Embed Size (px)
Citation preview

Configuring Cisco Unified
Communications Manager
with Comrex STAC-VIP
Vortex Communications Ltd, 75 The Grove, Ealing, London W5 5LL, UK
Tel: +44 (0)20-8579 2743 * Fax: +44 (0)20-8840 0018
Email: [email protected] * Web: www.vtx.co.uk
Copyright © Vortex Communications Ltd 2015

2
CONTENTS
Introduction ............................................................................................................................................ 3
Preliminary Steps .................................................................................................................................... 4
Enable All Services on CUCM .............................................................................................................. 4
Connecting STAC-VIP to CUCM ............................................................................................................... 6
Add a Phone Security Profile for STAC-VIP ......................................................................................... 6
Add an End User for STAC-VIP ............................................................................................................ 6
Add a Phone for STAC-VIP ................................................................................................................... 7
Add a Directory Number (DN) for STAC-VIP ..................................................................................... 10
Register STAC-VIP to CUCM .............................................................................................................. 11
Connecting a Softphone to CUCM ........................................................................................................ 14
Add a Phone Security Profile for the Softphone ............................................................................... 14
Add an End User for the Softphone .................................................................................................. 15
Add a Phone for the Softphone ........................................................................................................ 16
Add a Directory Number (DN) for the Softphone ............................................................................. 18
Register the Softphone to CUCM ...................................................................................................... 18
Notes ..................................................................................................................................................... 21
References ............................................................................................................................................ 23

3
INTRODUCTION This guide assumes you are starting with a clean install of Cisco UCM (refer to [1], [2] or [3] for
installation details) and a STAC-VIP in its factory-default state. STAC-VIP should be running firmware
version 1.1p4 or newer and both CUCM and STAC-VIP Mainframe should have static IP addresses
assigned. In this guide we set up a basic lab test scenario which allows calls to be made from
hardware IP phones or softphones to STAC-VIP via CUCM. CUCM is a very flexible and complex
product; you are encouraged to refer to [4], [5] or [6] and / or your Cisco support contact for
assistance in developing the configuration which best suits your requirements.
The officially-supported browsers and operating systems for the CUCM 10 web control panel are as
follows:
Internet Explorer 8, Internet Explorer 9 (Windows XP, Windows Vista, Windows 7)
Firefox 4.x, Firefox 10.x (Windows XP, Windows Vista, Windows 7, OSX)
Safari 5.x (OSX)

4
PRELIMINARY STEPS
Enable All Services on CUCM
a) Browse to the IP address of your CUCM installation and click on Cisco Unified Communications
Manager; ignore any errors caused by the server’s certificate not being trusted by your browser
(in Internet Explorer, click ‘Continue to this website (not recommended).’).
b) In the Navigation drop-down at the top-right of the screen, select Cisco Unified Serviceability
and click Go. Then enter the credentials set up when installing the server in the Username and
Password fields and click Login.
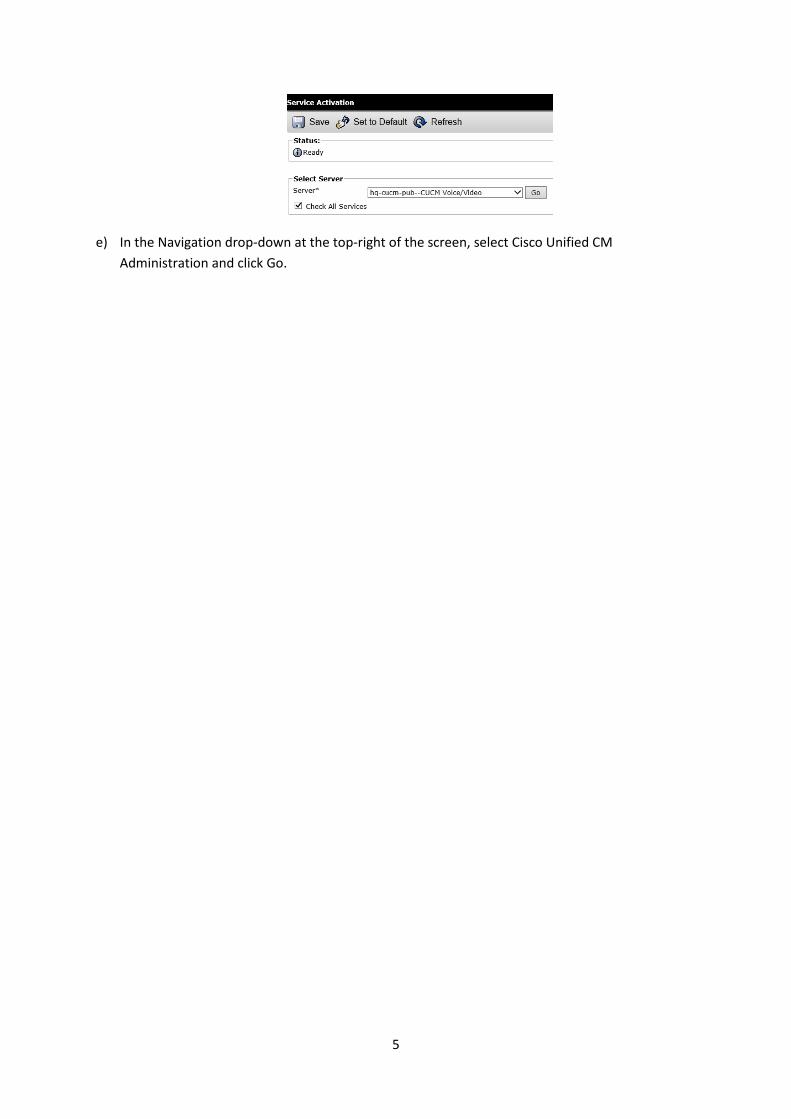
c) In the top menu, click Tools, Service Activation. If asked to select a server, choose the CUCM
server you wish to configure from the drop-down menu and click Go.
d) Check the Check All Services box, click Save and OK in the warning dialog. Wait a few minutes
for the ‘Loading, please wait.’ message to disappear and the page to refresh, at which point all
services should show an Activation Status of Activated.
5
e) In the Navigation drop-down at the top-right of the screen, select Cisco Unified CM
Administration and click Go.
6
CONNECTING STAC-VIP TO CUCM
Add a Phone Security Profile for STAC-VIP
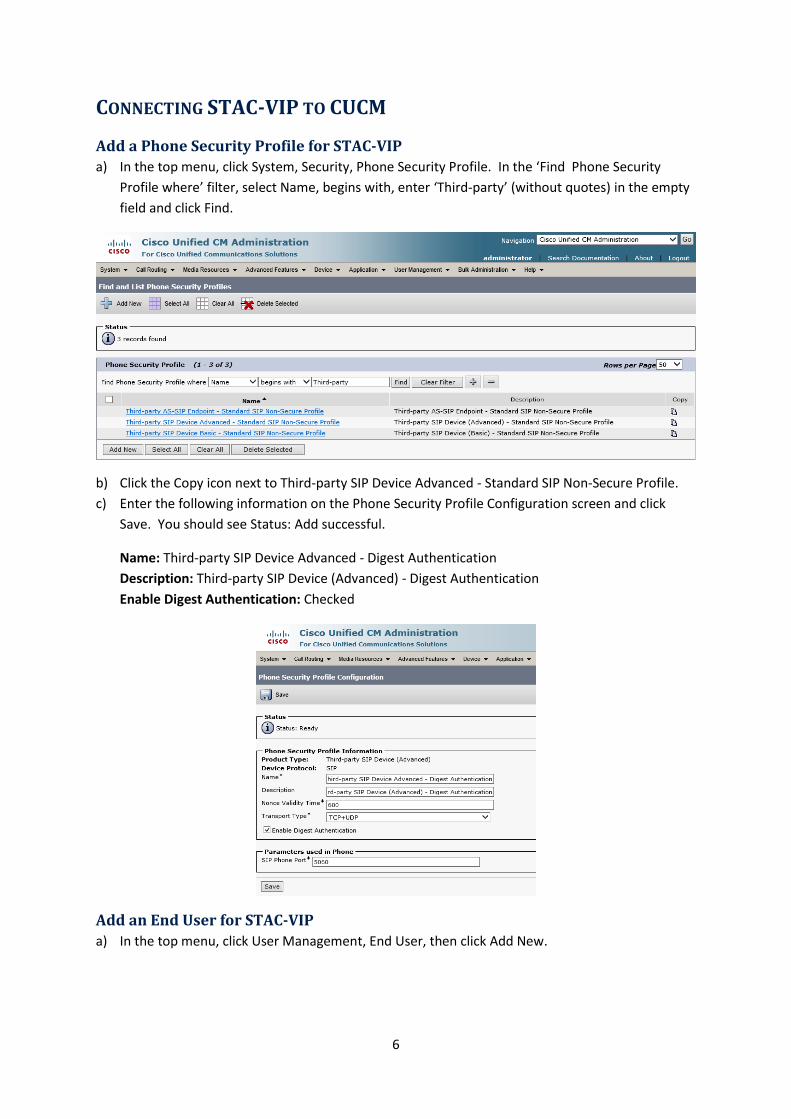
a) In the top menu, click System, Security, Phone Security Profile. In the ‘Find Phone Security
Profile where’ filter, select Name, begins with, enter ‘Third-party’ (without quotes) in the empty
field and click Find.
b) Click the Copy icon next to Third-party SIP Device Advanced - Standard SIP Non-Secure Profile.
c) Enter the following information on the Phone Security Profile Configuration screen and click
Save. You should see Status: Add successful.
Name: Third-party SIP Device Advanced - Digest Authentication
Description: Third-party SIP Device (Advanced) - Digest Authentication
Enable Digest Authentication: Checked
Add an End User for STAC-VIP
a) In the top menu, click User Management, End User, then click Add New.

7
b) Enter the following information on the End User Configuration screen and click Save. You should
see Status: Add successful.
User ID: stacvip
Password: P@ssw0rdOfYourChoice [or any other password of your choice]
Confirm Password: P@ssw0rdOfYourChoice [must match Password]
Last name: STAC-VIP
Digest Credentials: P@ssw0rdOfYourChoice [or any other password of your choice]
Confirm Digest Credentials: P@ssw0rdOfYourChoice [must match Digest Credentials]
Add a Phone for STAC-VIP
a) In the top menu, click Device, Phone, then click Add New.

8
b) In the Phone Type drop-down, select Third-party SIP Device (Advanced) and click Next.
c) Enter the following information on the Phone Configuration screen and click Save, then OK in the
dialog prompting you to apply the configuration. You should see Status: Add successful.
MAC Address: This field is actually ignored in our setup and can be any unique 12-digit hex
number (0-9, A-F) without punctuation; the actual MAC address of your STAC-VIP mainframe can
be determined by running the Comrex Device Manager application [7], clicking Scan for Devices
and noting the entry in the MAC Address column alongside STAC-VIP Mainframe
Description: STAC-VIP
Device Pool: Default
Phone Button Template: Third-party SIP Device (Advanced)
Owner User ID: stacvip [CUCM 9.1 and above only]
Device Security Profile: Third-party SIP Device Advanced - Digest Authentication
SIP Profile: Standard SIP Profile
Digest User: stacvip

9

10
Add a Directory Number (DN) for STAC-VIP
a) In the Association Information panel on the left of the screen, click Line [1] - Add a new DN.
b) Enter the following information on the Directory Number Configuration screen and click Save.
You should see a new Associated Devices list appear with a single entry representing the STAC-
VIP which you have just added.
Directory Number: 100 [or any other convenient unused extension number]
Description: STAC-VIP
Maximum Number of Calls: 16
Busy Trigger: 16

11
c) Finally, click Apply Config and OK in the popup window which appears.
Register STAC-VIP to CUCM
a) It should now be possible to register your STAC-VIP to CUCM. Browse to the IP address of your
STAC-VIP Mainframe, log in, click Configure and log in again. Click Line Configuration, VoIP
Providers, Add Provider, SIP Provider.
b) On the SIP Provider screen, click each of the following settings, enter the appropriate value and
click Save Setting each time.
Name: CUCM
Account username: 100 [must match Directory Number associated with STAC-VIP Phone on
CUCM above]
Account password: P@ssw0rdOfYourChoice [must match Digest Credentials associated with
STAC-VIP End User on CUCM above]
Server/Realm: <IP address of CUCM installation>
c) Click Show Advanced, click each of the following settings, enter the appropriate value and click
Save Setting each time. Note that the SIP Port setting is assigned automatically and should not
be changed from its default value.
Auth Username: stacvip
Codec Priority: No ISAC or Opus [G.722 > G.711 > G.729]
INVITE SDP Compatibility: On

12

13
d) Click Apply Changes then Back, or Back, then Restart (Apply Changes) and OK in the confirmation
dialog. You should see the status of the newly-added CUCM provider change to Registered.
e) Click Back, then Line Assignments. Click each line which you wish to be associated with the
CUCM Directory Number (100 in the example above), select CUCM from the Provider
assignment drop-down and click Save Setting.
f) The association of STAC-VIP to CUCM is now complete. If you already have software or
hardware phones registered to CUCM, you should be able to call into STAC-VIP by dialling the
Directory Number associated with it (100 in the example above). If not, continue with this guide
to add a softphone account for testing.

14
CONNECTING A SOFTPHONE TO CUCM
Add a Phone Security Profile for the Softphone
a) Return to the CUCM administration page by entering the IP address of the CUCM installation,
clicking Cisco Unified Communications Manager, ensuring Cisco Unified CM Administration is
selected in the Navigation drop-down at the top-right of the screen (if not, select it and click Go)
and logging if necessary.
b) In the top menu, click System, Security, Phone Security Profile. In the ‘Find Phone Security
Profile where’ filter, select Name, begins with, enter ‘Third-party’ (without quotes) in the empty
field and click Find.
c) Click the Copy icon next to Third-party SIP Device Basic - Standard SIP Non-Secure Profile.
d) Enter the following information on the Phone Security Profile Configuration screen and click
Save. You should see Status: Add successful.
Name: Third-party SIP Device Basic - Digest Authentication
Description: Third-party SIP Device (Basic) - Digest Authentication
Enable Digest Authentication: Checked

15
Add an End User for the Softphone
a) In the top menu, click User Management, End User, then click Add New.
b) Enter the following information on the End User Configuration screen and click Save. You should
see Status: Add successful.
User ID: softphone1
Password: S3cr3tW0rd [or any other password of your choice]
Confirm Password: S3cr3tW0rd [must match Password]
Last name: Softphone 1
Digest Credentials: S3cr3tW0rd [or any other password of your choice]
Confirm Digest Credentials: S3cr3tW0rd [must match Digest Credentials]

16
Add a Phone for the Softphone
a) In the top menu, click Device, Phone, then click Add New.
b) In the Phone Type drop-down, select Third-party SIP Device (Basic) and click Next.
c) Enter the following information on the Phone Configuration screen and click Save, then OK in the
dialog prompting you to apply the configuration. You should see Status: Add successful.
MAC Address: This field is actually ignored in our setup and can be any unique 12-digit hex
number (0-9, A-F) without punctuation; the actual MAC address of the computer on which you
will run the softphone can be determined by pressing Windows+R, typing cmd <enter>, then
typing ipconfig /all <enter> and noting the Physical Address for the network connection
currently in use
Description: Softphone 1
Device Pool: Default
Phone Button Template: Third-party SIP Device (Basic)
Owner User ID: softphone1 [CUCM 9.1 and above only]
Device Security Profile: Third-party SIP Device Basic - Digest Authentication
SIP Profile: Standard SIP Profile
Digest User: softphone1

17

18
Add a Directory Number (DN) for the Softphone
a) In the Association Information panel on the left of the screen, click Line [1] - Add a new DN.
b) Enter the following information on the Directory Number Configuration screen and click Save.
You should see a new Associated Devices list appear with a single entry representing the
softphone which you have just added.
Directory Number: 101 [or any other convenient unused extension number]
Description: Softphone 1
c) Finally, click Apply Config and OK in the popup window which appears.
Register the Softphone to CUCM
a) It should now be possible to register a softphone to CUCM. For this example we will use the free
PhonerLite application. Download the application from http://www.phoner.de/PhonerLite.zip,
extract the contents of the zip file and run PhonerLite.exe (no installation is required). A wizard
will appear prompting you to enter the details of your SIP server. Ensure manual configuration is
selected in the list on the left and enter the following information, clicking the green ‘next’
arrow to confirm each page and the green tick to finish. In the status bar at the bottom of the

19
PhonerLite window you should see a green light and a message that it has registered to the
CUCM server.
Proxy/Registrar: <IP address of CUCM installation>
User name: 101 [must match Directory Number associated with softphone Phone on CUCM
above]
Authentication name: softphone1
Password: S3cr3tW0rd [must match Digest Credentials associated with softphone End User on
CUCM above]
‘with the profile name’: CUCM

20
b) Click the Configuration tab, then the Codecs tab, scroll down in the list of codecs to find G.722
WB, select it and use the up arrow to move it to the top of the list. Then uncheck all codecs in
the list except G.722 WB, G.711 A-Law and G.711 u-Law. Click Save.
c) In the Destination number field, enter 100 (or whichever Directory Number you associated with
STAC-VIP on CUCM above) and press Enter. STAC-VIP should indicate an incoming call on the
first of the lines associated with CUCM. Answer the call by putting it on air to confirm that
everything is working as expected.
d) To test the conferencing of multiple calls on STAC-VIP via CUCM, repeat the following steps using
a different PC as the softphone client:
Add an End User for the Softphone (using a different User ID and Last name)
Add a Phone for the Softphone (using a different MAC Address, Description, Owner User ID
[CUCM 9.1 and above only] and Digest User)
Add a Directory Number (DN) for the Softphone (using a different Directory Number and
Description)
Register the Softphone to CUCM (using the different User name and Authentication name)

21
NOTES Each Third-party SIP Device configured in CUCM requires a different Digest User, so a different
End User must be set up for each, as we have done above.
The crucial difference between CUCM’s Basic and Advanced Third-party SIP Device is that the
former allows a maximum of two concurrent calls, while the latter allows up to 16. It is for this
reason that the Advanced version has to be used for STAC-VIP. Note that the Basic Device
consumes three Device Licence Units and the Advanced Device consumes six Device Licence
Units.
If you wish to register to the server a SIP device which does not provide support for separate
username and authentication user, the User ID of the End User (which is selected as the Digest
User in the Phone Configuration screen) can be made the same as the Directory Number
assigned to the device.
If you wish to associate a caller ID name with the STAC-VIP or a softphone to be displayed to the
callee, you should configure this on CUCM. In the top menu, click Device, Phone. In the ‘Find
Phone where’ filter, select Description, begins with, enter the description set on the STAC-VIP /
relevant softphone in the empty field and click Find. Click the link in the Device Name(Line)
column, then in the Association Information panel on the left of the screen, click Line [1] - ... .
Enter the name in the Display (Caller ID) [CUCM 10.5] or Display (Internal Caller ID) [CUCM 9.1
and below] field on the Directory Number Configuration screen in the ‘Line 1 on Device SEP...’
section. Click Save, then Apply Config and OK in the popup window which appears.
[CUCM 9.1 and below only]
If you wish to associate a caller ID number with the STAC-VIP to be displayed to the callee, you
should configure this on the STAC-VIP. Browse to the IP address of your STAC-VIP Mainframe,
log in, click Configure and log in again. Click Line Configuration, VoIP Providers, CUCM, Show
Advanced, Outgoing Caller ID Number, enter the number and click Save Setting. Note that the
Outgoing Caller ID Name setting does not apply for registrations to CUCM (it is overridden by the
Display (Internal Caller ID) setting in CUCM; see above). Click Back, then Restart (Apply Changes)
and OK in the confirmation dialog.
To associate different Directory Numbers with different lines on the STAC-VIP, repeat the
following sections:

22
Add an End User for STAC-VIP (using a different User ID and Last name)
Add a Phone for STAC-VIP (using a different MAC Address, Description, Owner User ID
[CUCM 9.1 and above only] and Digest User)
Add a Directory Number (DN) for STAC-VIP (using a different Directory Number and
Description)
Register STAC-VIP to CUCM (using a different Name, the different Account username and
Auth Username and different lines for the new Provider in Line Assignments)
We have configured CUCM to authenticate the SIP devices above (STAC-VIP and softphones)
using a username and password. CUCM’s default behaviour, however, is not to check the
password, since Cisco proprietary IP phones send their MAC address when registering and this is
validated by the server. If security is of no concern, when configuring STAC-VIP on CUCM, you
can omit the creation of a secure SIP profile (the entirety of the Add a Phone Security Profile for
STAC-VIP section), omit Digest Credentials and Confirm Digest Credentials in the Add an End
User for STAC-VIP section and use Device Security Profile: Third-party SIP Device Advanced -
Standard SIP Non-Secure Profile in the Add a Phone for STAC-VIP section. Any value can then be
used for the STAC-VIP Account password setting in the Register STAC-VIP to CUCM section (but
note that STAC-VIP will fail to register unless some value is entered).
Similarly, when configuring the softphone on CUCM, you can omit the creation of a secure SIP
profile (the entirety of the Add a Phone Security Profile for the Softphone section), omit Digest
Credentials and Confirm Digest Credentials in the Add an End User for the Softphone section and
use Device Security Profile: Third-party SIP Device Basic - Standard SIP Non-Secure Profile in the
Add a Phone for the Softphone section. Any value can then be used for the PhonerLite Password
setting in the Register the Softphone to CUCM section (but note that PhonerLite will fail to
register unless some value is entered).
Occasionally, after clicking Apply Config and OK on the Directory Number Configuration screen
for either STAC-VIP or a softphone, the device whose configuration has been changed will not be
able to make a call via CUCM - the call will proceed to the SIP ‘ringing’ stage and then be cleared
around half a second later by the server, which reports the problem as ‘Temporary failure’. The
solution is simply to wait a couple of minutes and retry.

23
REFERENCES
[1] Cisco Systems, Inc., “Installing Cisco Unified Communications Manager, Release 8.6(1),”
[Online]. Available:
http://www.cisco.com/c/en/us/td/docs/voice_ip_comm/cucm/install/8_6_1/install/cmins861.
pdf.
[2] Cisco Systems, Inc., “Installing Cisco Unified Communications Manager, Release 9.1(1),”
[Online]. Available:
http://www.cisco.com/c/en/us/td/docs/voice_ip_comm/cucm/install/9_1_1/CUCM_BK_I05CD
008_00_installing-cucm-91.pdf.
[3] Cisco Systems, Inc., “Installing Cisco Unified Communications Manager, Release 10.0(1),”
[Online]. Available:
http://www.cisco.com/c/en/us/td/docs/voice_ip_comm/cucm/install/10_0_1/CUCM_BK_I95A
D2FE_00_installing-cucm-100.pdf.
[4] Cisco Systems, Inc., “Cisco Unified Communications Manager Administration Guide, Release
8.6(1),” [Online]. Available:
http://www.cisco.com/c/en/us/td/docs/voice_ip_comm/cucm/admin/8_6_1/ccmcfg/bccm-
861-cm.pdf.
[5] Cisco Systems, Inc., “Cisco Unified Communications Manager Administration Guide, Release
9.1(1),” [Online]. Available:
http://www.cisco.com/c/en/us/td/docs/voice_ip_comm/cucm/admin/9_1_1/ccmcfg/CUCM_B
K_A34970C5_00_admin-guide-91.pdf.
[6] Cisco Systems, Inc., “Cisco Unified Communications Manager Administration Guide, Release
10.0(1),” [Online]. Available:
http://www.cisco.com/c/en/us/td/docs/voice_ip_comm/cucm/admin/10_0_1/ccmcfg/CUCM_
BK_C95ABA82_00_admin-guide-100.pdf.
[7] Comrex Corporation, “Comrex Device Manager,” [Online]. Available:
http://www.comrex.com/downloads/software/ComrexDeviceManagerInstall-2.0.121-2014-08-
27.exe.