Embed Size (px)
DESCRIPTION
swimmer harness
Citation preview
Blue = Pantone 2728C
Primary/Preferred Branding
Secondary Branding
Tertiary Branding
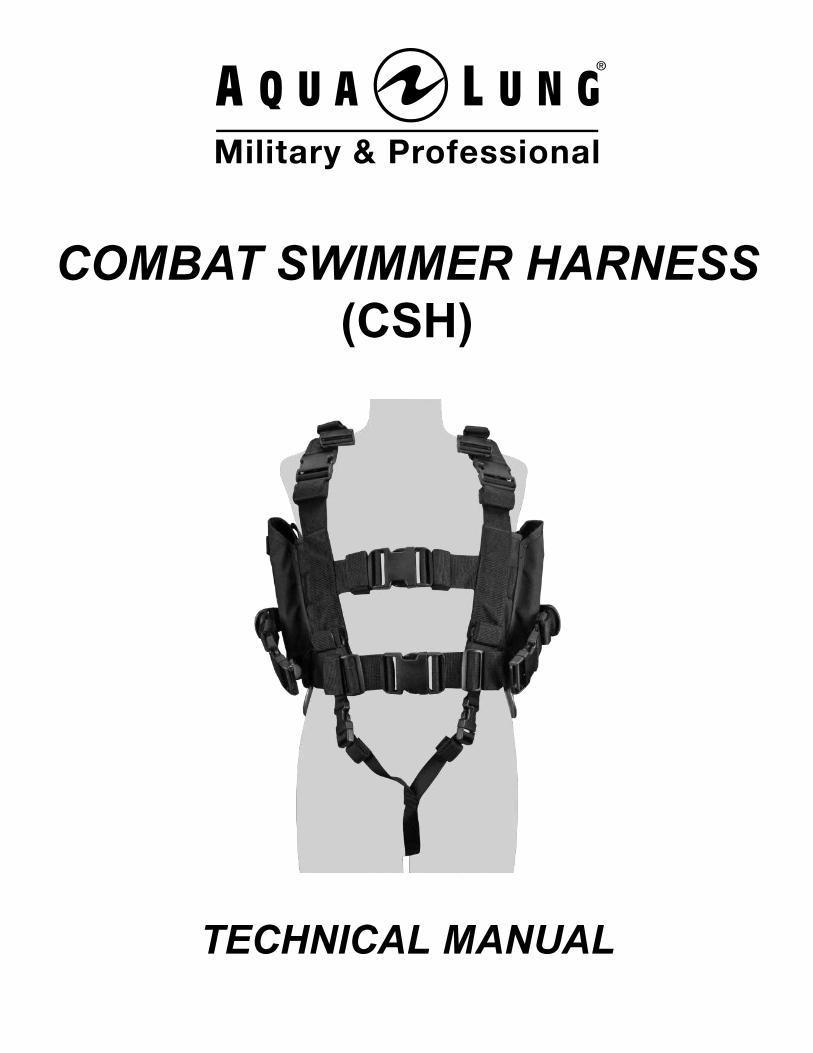
COMBAT SWIMMER HARNESS (CSH)
TECHNICAL MANUAL
2 Combat Swimmer Harness Technical Manual
COPYRIGHT NOTICEThis owner’s manual is copyrighted, all rights reserved. It may not, in whole or in part, be copied, photocopied, reproduced, translated or reduced to any electronic medium or machine readable form without prior consent in writing from Aqua Lung International, Inc.
©2014 AQUA LUNG AMERICACombat Swimmer Harness (CSH)
Technical Manual P/N 769133
Combat Swimmer Harness (CSH) P/N 495506
You can contact a Technical Advisor via e-mail at:[email protected]@aqualung.com
TRADEMARK NOTICEAqua Lung® is a registered trademark of Aqua Lung America, Inc.
WARNINGS, CAUTIONS AND NOTESPay special attention to information provided in warnings, cautions and notes which are accompanied by these symbols:
WARNINGS: Indicate a procedure or situation that may result in serious injury or death if instructions are not followed correctly.
NOTES: Are used to emphasize important points, tips and reminders.
CAUTIONS: Indicate any situation or technique that will result in potential damage to the product, or render the product unsafe if instructions are not followed correctly.
3
CONTENTS
CHANGE RECORD .................................................................................................... 4
SYSTEM OVERVIEW ................................................................................................. 5
Adjustable Harness ............................................................................................... 5
UBA Attachment Points ........................................................................................ 5
Equipment Attachment Points ............................................................................. 6
SureLock™ Weight System ................................................................................. 6
SURELOCK™ WEIGHT SYSTEM PROCEDURES ................................................... 7
DONNING AND ADJUSTMENT PROCEDURES ..................................................... 10
PRE-DIVE CHECKLIST ............................................................................................ 14
POST-DIVE CHECKLIST ......................................................................................... 15
MANUFACTURER’S RECOMMENDED MAINTENANCE CHECKS ....................... 16
TECHNICAL DATA ................................................................................................... 16
RECOMMENDED SPARE PARTS ........................................................................... 16
WARRANTY INFORMATION ................................................................................... 17
4 Combat Swimmer Harness Technical Manual
CHANGE RECORD
Change No. Date Title or Description Change Made By
001-14 21 Jan 14 Added SureLock™ Weight System Procedures Aqua Lung America
002-14 21 Jan 14 Revised Donning and Adjustment Procedures Aqua Lung America
003-14 21 Jan 14 Added Post-Dive Inspection Checklist Aqua Lung America
5
SYSTEM OVERVIEW
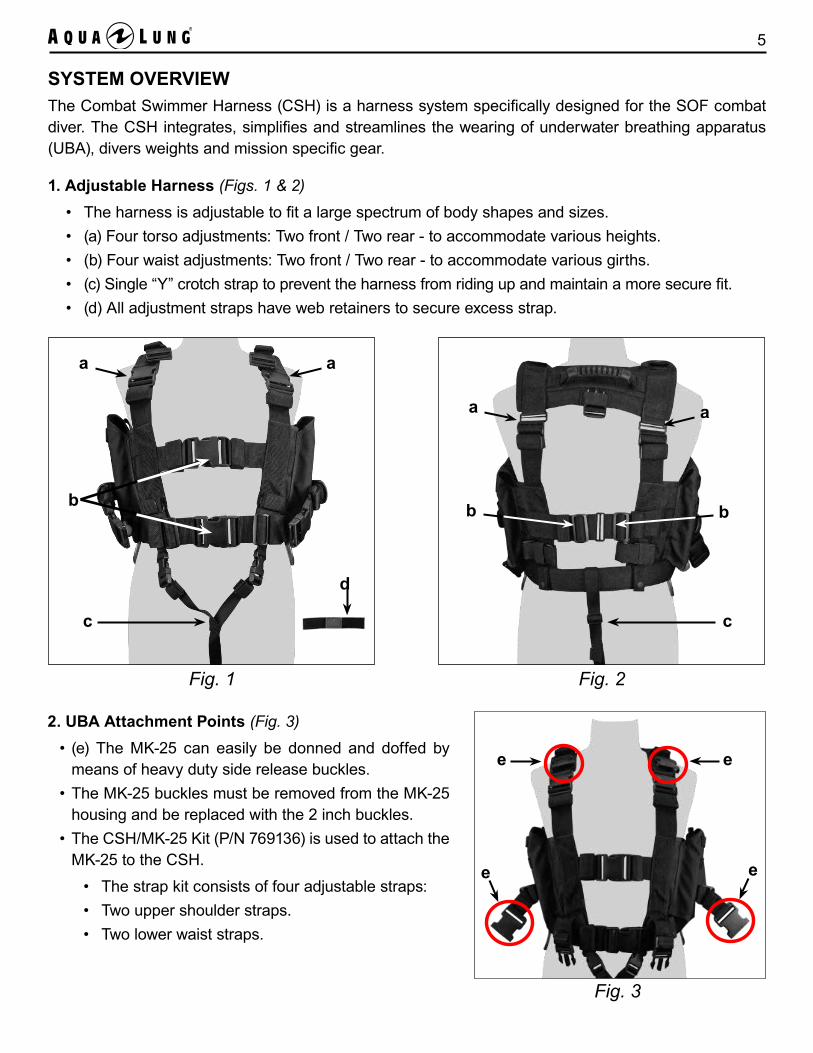
1. Adjustable Harness (Figs. 1 & 2)
• The harness is adjustable to fit a large spectrum of body shapes and sizes.• (a) Four torso adjustments: Two front / Two rear - to accommodate various heights.• (b) Four waist adjustments: Two front / Two rear - to accommodate various girths.• (c) Single “Y” crotch strap to prevent the harness from riding up and maintain a more secure fit.• (d) All adjustment straps have web retainers to secure excess strap.
The Combat Swimmer Harness (CSH) is a harness system specifically designed for the SOF combat diver. The CSH integrates, simplifies and streamlines the wearing of underwater breathing apparatus (UBA), divers weights and mission specific gear.
Fig. 1 Fig. 2
2. UBA Attachment Points (Fig. 3)
• (e) The MK-25 can easily be donned and doffed by means of heavy duty side release buckles.
• The MK-25 buckles must be removed from the MK-25 housing and be replaced with the 2 inch buckles.
• The CSH/MK-25 Kit (P/N 769136) is used to attach the MK-25 to the CSH.
• The strap kit consists of four adjustable straps:• Two upper shoulder straps.• Two lower waist straps.
Fig. 3
e e
e e
d
a a
c
b
a a
c
b b
6 Combat Swimmer Harness Technical Manual
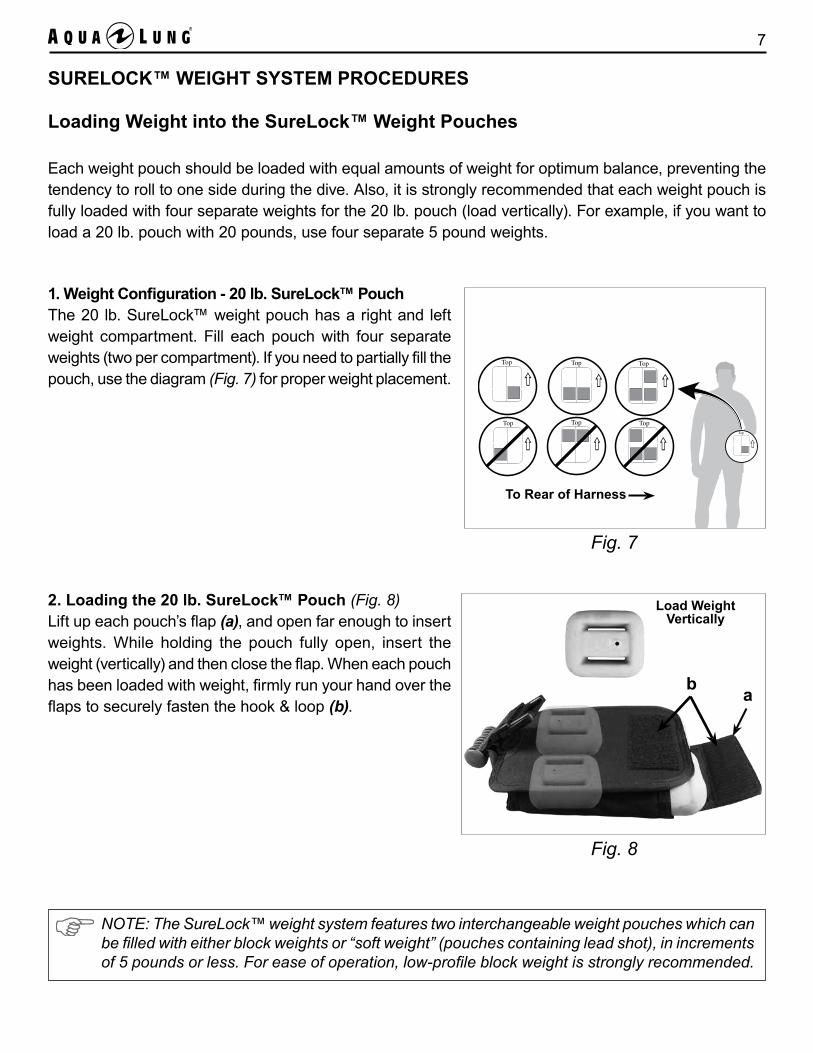
4. SureLock™ Weight System (Fig. 6)
• The CSH integrates the SureLock™ positive locking / quick release weight system on each side of the CSH.
• (j) Two SureLock™ weight pouches will each hold up to 20 lbs. of block or soft weight.
• (k) SureLock™ weight handle retainers to prevent accidental release of SureLock™ weight pouches.
WARNING: This harness is designed to simplify and streamline the integration of the UBA, weights and other mission specific gear. Care should be exercised not to overload the harness and not to exceed the lift capacity of the combat diver’s life vest.
Fig. 4 Fig. 5
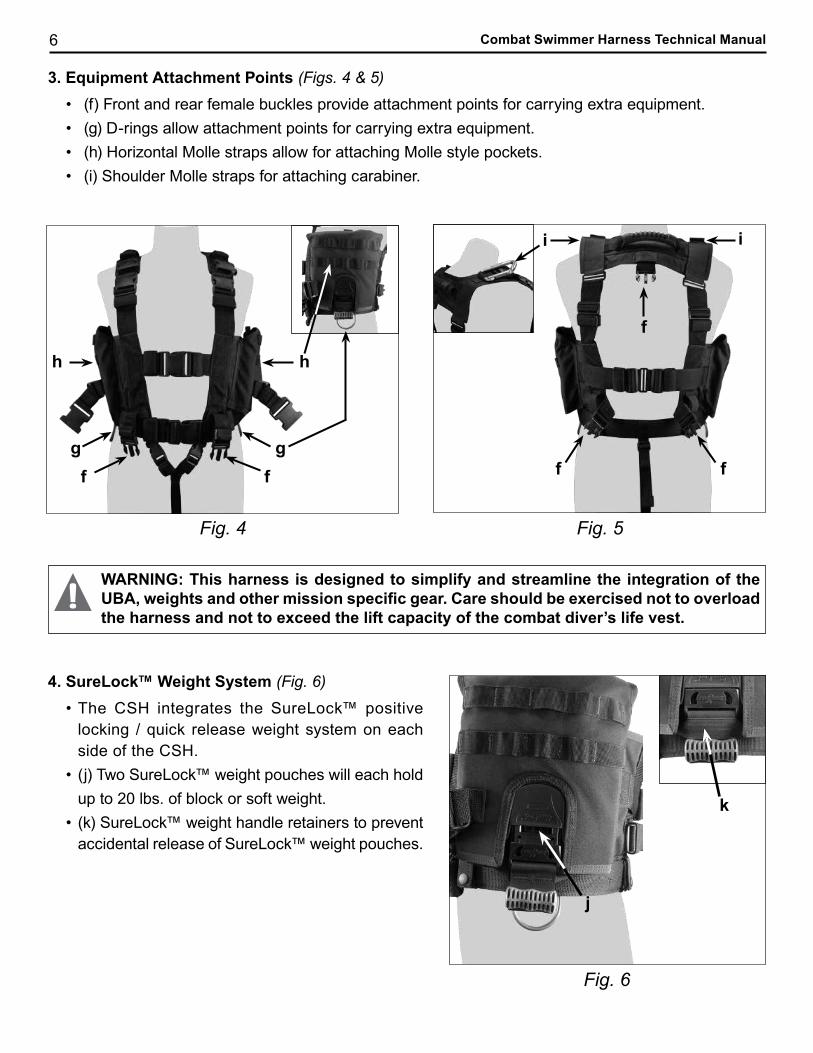
3. Equipment Attachment Points (Figs. 4 & 5)
• (f) Front and rear female buckles provide attachment points for carrying extra equipment.• (g) D-rings allow attachment points for carrying extra equipment.• (h) Horizontal Molle straps allow for attaching Molle style pockets.• (i) Shoulder Molle straps for attaching carabiner.
ff
f
ii
Fig. 6
ffgg
hh
j
k
7
Each weight pouch should be loaded with equal amounts of weight for optimum balance, preventing the tendency to roll to one side during the dive. Also, it is strongly recommended that each weight pouch is fully loaded with four separate weights for the 20 lb. pouch (load vertically). For example, if you want to load a 20 lb. pouch with 20 pounds, use four separate 5 pound weights.
SURELOCK™ WEIGHT SYSTEM PROCEDURES
Loading Weight into the SureLock™ Weight Pouches
Fig. 8
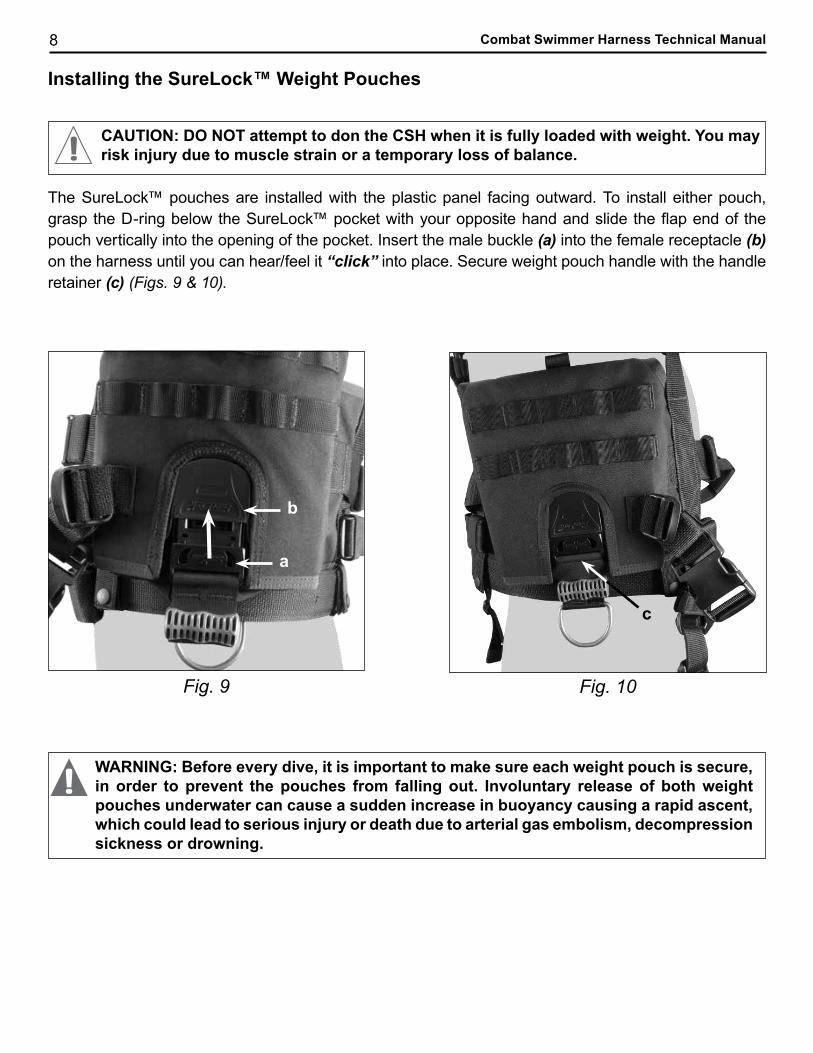
2. Loading the 20 lb. SureLock™ Pouch (Fig. 8)Lift up each pouch’s flap (a), and open far enough to insert weights. While holding the pouch fully open, insert the weight (vertically) and then close the flap. When each pouch has been loaded with weight, firmly run your hand over the flaps to securely fasten the hook & loop (b). ab
Load Weight Vertically
NOTE: The SureLock™ weight system features two interchangeable weight pouches which can be filled with either block weights or “soft weight” (pouches containing lead shot), in increments of 5 pounds or less. For ease of operation, low-profile block weight is strongly recommended.
Fig. 7
1. Weight Configuration - 20 lb. SureLock™ Pouch The 20 lb. SureLock™ weight pouch has a right and left weight compartment. Fill each pouch with four separate weights (two per compartment). If you need to partially fill the pouch, use the diagram (Fig. 7) for proper weight placement.
Top Top Top
Top
Top Top Top
To Rear of Harness
8 Combat Swimmer Harness Technical Manual
Installing the SureLock™ Weight Pouches
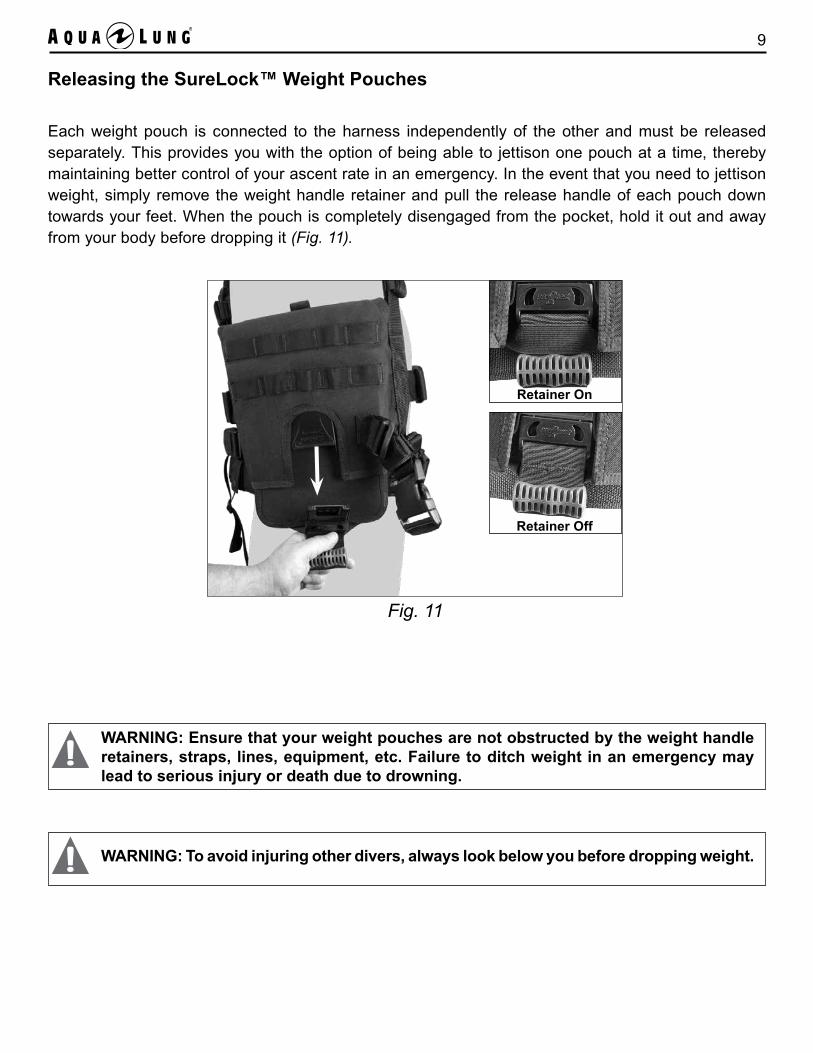
The SureLock™ pouches are installed with the plastic panel facing outward. To install either pouch, grasp the D-ring below the SureLock™ pocket with your opposite hand and slide the flap end of the pouch vertically into the opening of the pocket. Insert the male buckle (a) into the female receptacle (b) on the harness until you can hear/feel it “click” into place. Secure weight pouch handle with the handle retainer (c) (Figs. 9 & 10).
CAUTION: DO NOT attempt to don the CSH when it is fully loaded with weight. You may risk injury due to muscle strain or a temporary loss of balance.
Fig. 9
WARNING: Before every dive, it is important to make sure each weight pouch is secure, in order to prevent the pouches from falling out. Involuntary release of both weight pouches underwater can cause a sudden increase in buoyancy causing a rapid ascent, which could lead to serious injury or death due to arterial gas embolism, decompression sickness or drowning.
Fig. 10
a
b
c
9
Releasing the SureLock™ Weight Pouches
Each weight pouch is connected to the harness independently of the other and must be released separately. This provides you with the option of being able to jettison one pouch at a time, thereby maintaining better control of your ascent rate in an emergency. In the event that you need to jettison weight, simply remove the weight handle retainer and pull the release handle of each pouch down towards your feet. When the pouch is completely disengaged from the pocket, hold it out and away from your body before dropping it (Fig. 11).
WARNING: Ensure that your weight pouches are not obstructed by the weight handle retainers, straps, lines, equipment, etc. Failure to ditch weight in an emergency may lead to serious injury or death due to drowning.
WARNING: To avoid injuring other divers, always look below you before dropping weight.
Fig. 11
Retainer On
Retainer Off
10 Combat Swimmer Harness Technical Manual
DONNING AND ADJUSTMENT PROCEDURES
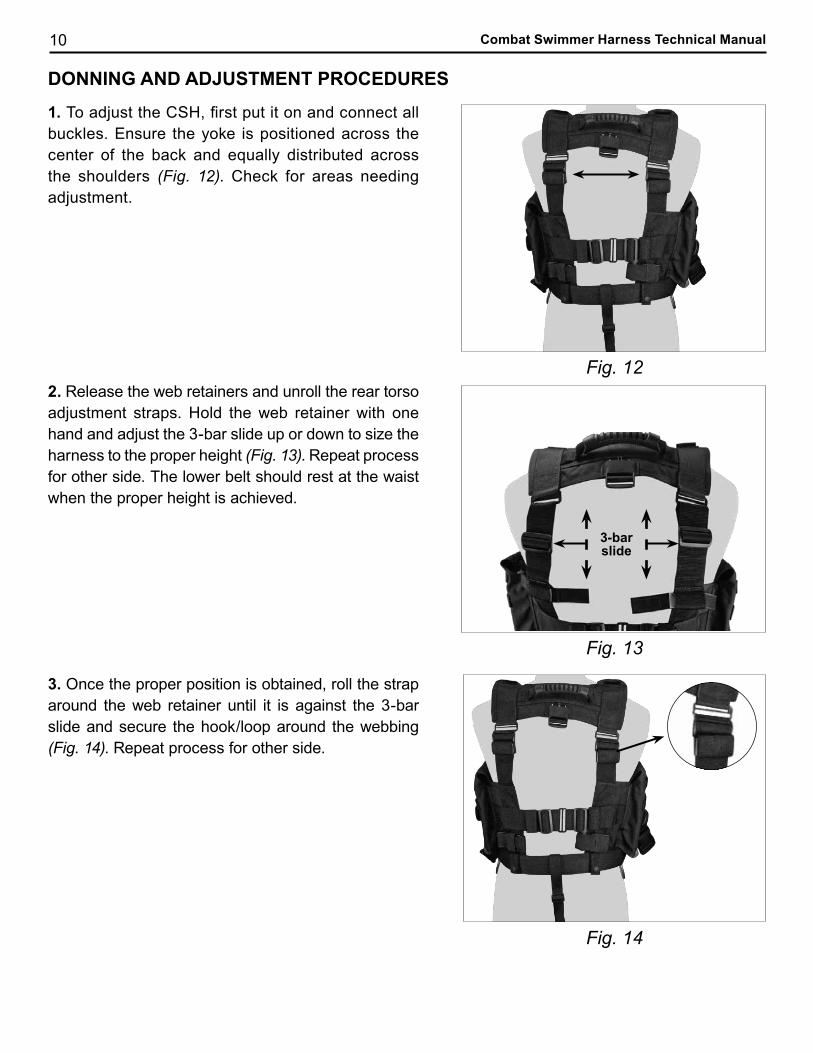
1. To adjust the CSH, first put it on and connect all buckles. Ensure the yoke is positioned across the center of the back and equally distributed across the shoulders (Fig. 12). Check for areas needing adjustment.
2. Release the web retainers and unroll the rear torso adjustment straps. Hold the web retainer with one hand and adjust the 3-bar slide up or down to size the harness to the proper height (Fig. 13). Repeat process for other side. The lower belt should rest at the waist when the proper height is achieved.
3. Once the proper position is obtained, roll the strap around the web retainer until it is against the 3-bar slide and secure the hook/loop around the webbing (Fig. 14). Repeat process for other side.
Fig. 12
Fig. 13
Fig. 14
3-bar slide
11
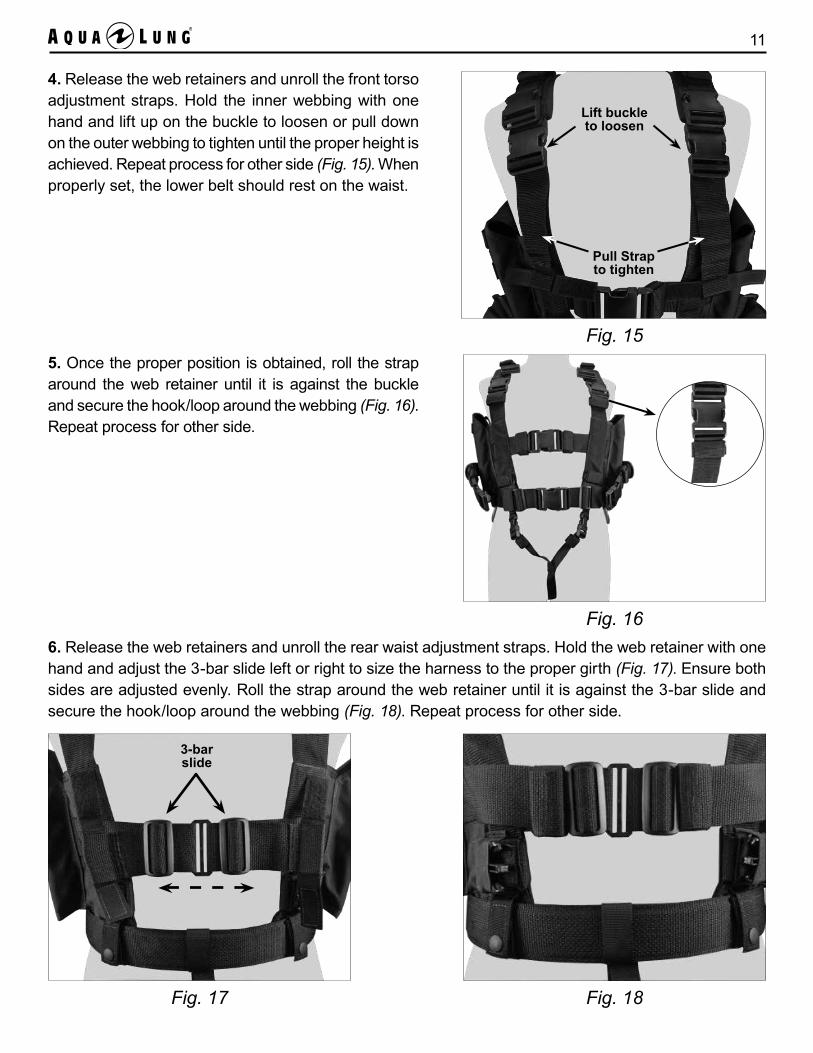
4. Release the web retainers and unroll the front torso adjustment straps. Hold the inner webbing with one hand and lift up on the buckle to loosen or pull down on the outer webbing to tighten until the proper height is achieved. Repeat process for other side (Fig. 15). When properly set, the lower belt should rest on the waist.
5. Once the proper position is obtained, roll the strap around the web retainer until it is against the buckle and secure the hook/loop around the webbing (Fig. 16). Repeat process for other side.
6. Release the web retainers and unroll the rear waist adjustment straps. Hold the web retainer with one hand and adjust the 3-bar slide left or right to size the harness to the proper girth (Fig. 17). Ensure both sides are adjusted evenly. Roll the strap around the web retainer until it is against the 3-bar slide and secure the hook/loop around the webbing (Fig. 18). Repeat process for other side.
Fig. 15
Fig. 16
Fig. 17
3-bar slide
Fig. 18
Lift buckle to loosen
Pull Strap to tighten
12 Combat Swimmer Harness Technical Manual
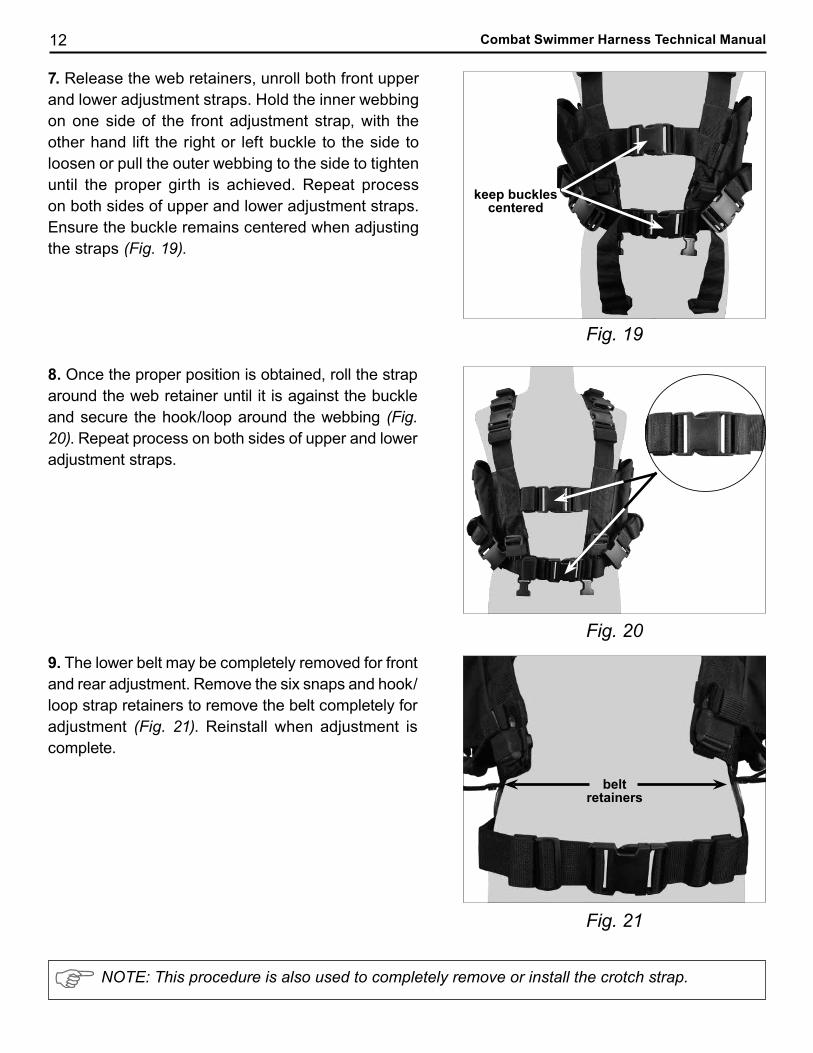
7. Release the web retainers, unroll both front upper and lower adjustment straps. Hold the inner webbing on one side of the front adjustment strap, with the other hand lift the right or left buckle to the side to loosen or pull the outer webbing to the side to tighten until the proper girth is achieved. Repeat process on both sides of upper and lower adjustment straps. Ensure the buckle remains centered when adjusting the straps (Fig. 19).
8. Once the proper position is obtained, roll the strap around the web retainer until it is against the buckle and secure the hook/loop around the webbing (Fig. 20). Repeat process on both sides of upper and lower adjustment straps.
9. The lower belt may be completely removed for front and rear adjustment. Remove the six snaps and hook/loop strap retainers to remove the belt completely for adjustment (Fig. 21). Reinstall when adjustment is complete.
belt retainers
NOTE: This procedure is also used to completely remove or install the crotch strap.
Fig. 19
Fig. 20
Fig. 21
keep buckles centered

13
10. The crotch strap has one adjustment at the rear and two adjustments in the front. The ends of the strap have attached web retainers to contain the excess strap after adjustments have been made (Figs. 22 & 23). The crotch strap adjustment will be the same procedure as the front and rear torso strap adjustments.
rear crotch strap adjustment
front crotch strap adjustment
11. If the crotch strap is not to be used, follow the procedure in step 9 to remove the crotch strap from the CSH. Stow the female buckles in the buckle retainers located on the inside of the vest just above the waistband (Fig. 24).
Fig. 22 Fig. 23
Fig. 24
12. Upon completion of all adjustments, ensure all buckles and straps have been secured. Don the CSH and check for proper fit.
14 Combat Swimmer Harness Technical Manual
Remarks:
Divers Signature Diving Supervisor Signature
WARNING: Before each use, the CSH must be given a thorough visual inspection and functional test. NEVER dive with a CSH that shows signs of damage until it has received a complete inspection and has been properly repaired.
1. Inspect all buckles and 3-bar slides for damage. Connect and disconnect each buckle to check for proper operation.
2. Inspect all stitching, webbing, hook/loop material, web retainers and elastic buckle retainers for damage or excessive wear.
3. Don harness and adjust webbing for proper fit.
4. Install weights into SureLock™ weight pouches as needed.
5. Install loaded SureLock™ weight pouches into harness pocket. SureLock™ pouches are installed properly when you hear it “click” into place. Secure each weight pouch with the handle retainers.
______
______
______
______
______
Initials
PRE-DIVE INSPECTION CHECKLISTDiver Name: Date:
CSH Number:

15
Divers Signature Diving Supervisor Signature
1. Remove all weights from SureLock™ pouches.
2. Thoroughly rinse harness and SureLock™ pouches, allow to dry overnight before stowing.
______
______
Initials
NOTE: Avoid prolonged exposure to sun, extreme heat and heavy pool chemicals to prevent deterioration. To prevent premature damage, thoroughly rinse the CSH with fresh water at the end of each diving day using the following procedure:
POST-DIVE INSPECTION CHECKLISTDiver Name: Date:
CSH Number:
Remarks:
16 Combat Swimmer Harness Technical Manual
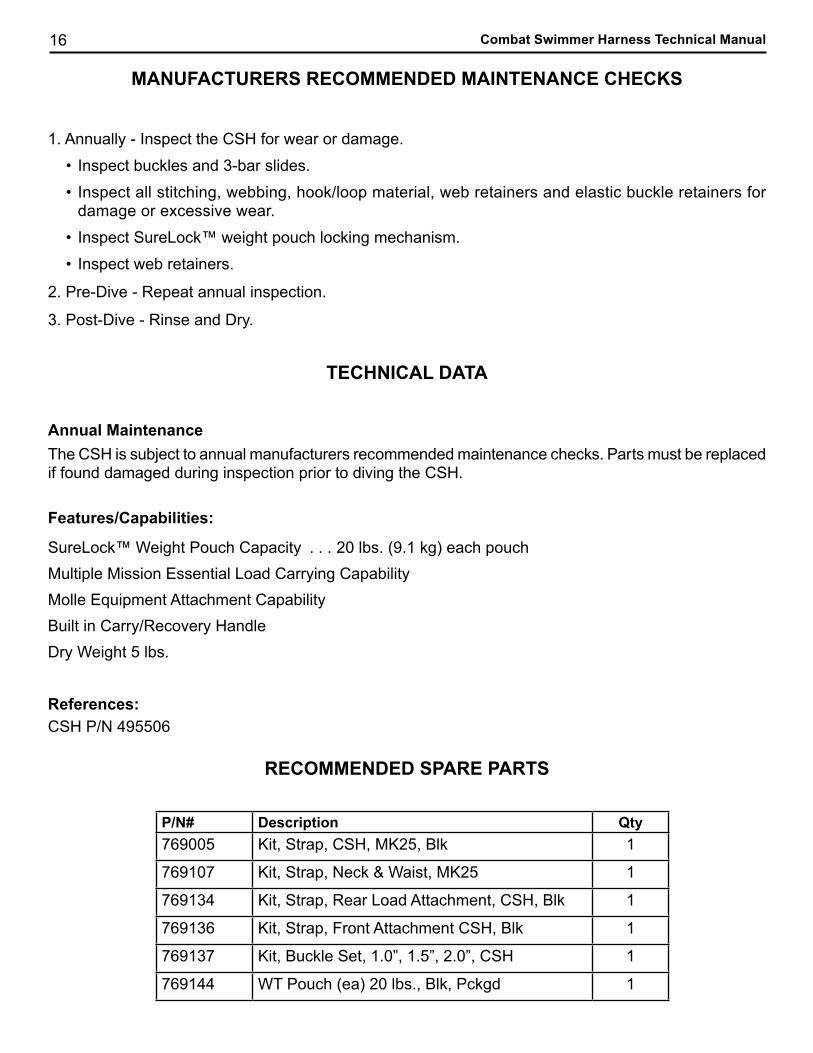
Annual MaintenanceThe CSH is subject to annual manufacturers recommended maintenance checks. Parts must be replaced if found damaged during inspection prior to diving the CSH.
Features/Capabilities:
SureLock™ Weight Pouch Capacity . . . 20 lbs. (9.1 kg) each pouchMultiple Mission Essential Load Carrying Capability Molle Equipment Attachment CapabilityBuilt in Carry/Recovery HandleDry Weight 5 lbs.
References:CSH P/N 495506
TECHNICAL DATA
P/N# Description Qty769005 Kit, Strap, CSH, MK25, Blk 1
769107 Kit, Strap, Neck & Waist, MK25 1
769134 Kit, Strap, Rear Load Attachment, CSH, Blk 1
769136 Kit, Strap, Front Attachment CSH, Blk 1
769137 Kit, Buckle Set, 1.0”, 1.5”, 2.0”, CSH 1
769144 WT Pouch (ea) 20 lbs., Blk, Pckgd 1
RECOMMENDED SPARE PARTS
MANUFACTURERS RECOMMENDED MAINTENANCE CHECKS
1. Annually - Inspect the CSH for wear or damage.
• Inspect buckles and 3-bar slides.
• Inspect all stitching, webbing, hook/loop material, web retainers and elastic buckle retainers for damage or excessive wear.
• Inspect SureLock™ weight pouch locking mechanism.
• Inspect web retainers.
2. Pre-Dive - Repeat annual inspection.
3. Post-Dive - Rinse and Dry.
17
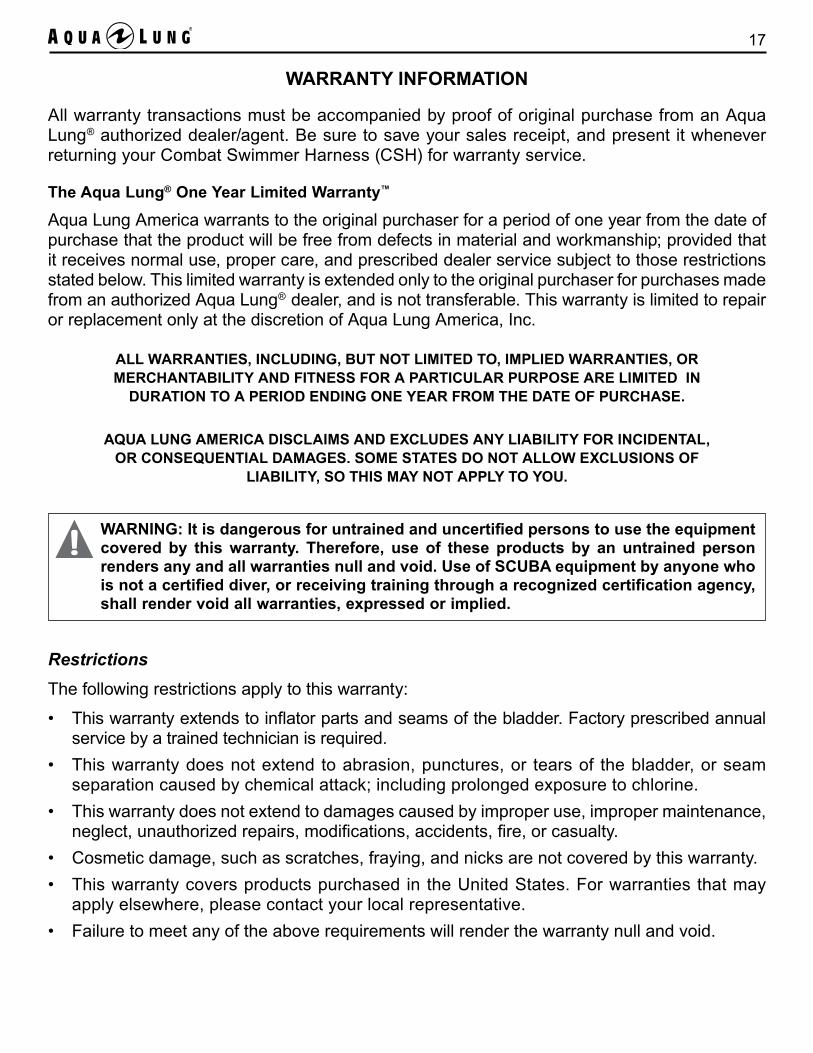
WARNING: It is dangerous for untrained and uncertified persons to use the equipment covered by this warranty. Therefore, use of these products by an untrained person renders any and all warranties null and void. Use of SCUBA equipment by anyone who is not a certified diver, or receiving training through a recognized certification agency, shall render void all warranties, expressed or implied.
RestrictionsThe following restrictions apply to this warranty:
• This warranty extends to inflator parts and seams of the bladder. Factory prescribed annual service by a trained technician is required.
• This warranty does not extend to abrasion, punctures, or tears of the bladder, or seam separation caused by chemical attack; including prolonged exposure to chlorine.
• This warranty does not extend to damages caused by improper use, improper maintenance, neglect, unauthorized repairs, modifications, accidents, fire, or casualty.
• Cosmetic damage, such as scratches, fraying, and nicks are not covered by this warranty.• This warranty covers products purchased in the United States. For warranties that may
apply elsewhere, please contact your local representative.• Failure to meet any of the above requirements will render the warranty null and void.
WARRANTY INFORMATION
All warranty transactions must be accompanied by proof of original purchase from an Aqua Lung® authorized dealer/agent. Be sure to save your sales receipt, and present it whenever returning your Combat Swimmer Harness (CSH) for warranty service.
The Aqua Lung® One Year Limited Warranty™
Aqua Lung America warrants to the original purchaser for a period of one year from the date of purchase that the product will be free from defects in material and workmanship; provided that it receives normal use, proper care, and prescribed dealer service subject to those restrictions stated below. This limited warranty is extended only to the original purchaser for purchases made from an authorized Aqua Lung® dealer, and is not transferable. This warranty is limited to repair or replacement only at the discretion of Aqua Lung America, Inc.
ALL WARRANTIES, INCLUDING, BUT NOT LIMITED TO, IMPLIED WARRANTIES, OR MERCHANTABILITY AND FITNESS FOR A PARTICULAR PURPOSE ARE LIMITED IN
DURATION TO A PERIOD ENDING ONE YEAR FROM THE DATE OF PURCHASE.
AQUA LUNG AMERICA DISCLAIMS AND EXCLUDES ANY LIABILITY FOR INCIDENTAL, OR CONSEQUENTIAL DAMAGES. SOME STATES DO NOT ALLOW EXCLUSIONS OF
LIABILITY, SO THIS MAY NOT APPLY TO YOU.
Blue = Pantone 2728C
Primary/Preferred Branding
Secondary Branding
Tertiary Branding
2340 Cousteau Court • Vista, CA 92081Phone (760) 597-5000 • Fax (760) 597-4900www.aqualung.com/militaryandprofessional
Combat Swimmer Harness(CSH)
©2014 Aqua Lung International Literature P/N 769133 Rev. 2/14