Embed Size (px)
Citation preview

Cloudera Security

Important Notice© 2010-2018 Cloudera, Inc. All rights reserved.
Cloudera, the Cloudera logo, and any other product or service names or slogans containedin this document are trademarks of Cloudera and its suppliers or licensors, and may notbe copied, imitated or used, in whole or in part, without the prior written permissionof Cloudera or the applicable trademark holder.
Hadoop and the Hadoop elephant logo are trademarks of the Apache SoftwareFoundation. All other trademarks, registered trademarks, product names and companynames or logosmentioned in this document are the property of their respective owners.Reference to any products, services, processes or other information, by trade name,trademark, manufacturer, supplier or otherwise does not constitute or implyendorsement, sponsorship or recommendation thereof by us.
Complying with all applicable copyright laws is the responsibility of the user. Withoutlimiting the rights under copyright, no part of this documentmay be reproduced, storedin or introduced into a retrieval system, or transmitted in any form or by any means(electronic, mechanical, photocopying, recording, or otherwise), or for any purpose,without the express written permission of Cloudera.
Cloudera may have patents, patent applications, trademarks, copyrights, or otherintellectual property rights covering subjectmatter in this document. Except as expresslyprovided in anywritten license agreement fromCloudera, the furnishing of this documentdoes not give you any license to these patents, trademarks copyrights, or otherintellectual property. For information about patents covering Cloudera products, seehttp://tiny.cloudera.com/patents.
The information in this document is subject to change without notice. Cloudera shallnot be liable for any damages resulting from technical errors or omissions which maybe present in this document, or from use of this document.
Cloudera, Inc.395 Page Mill RoadPalo Alto, CA [email protected]: 1-888-789-1488Intl: 1-650-362-0488www.cloudera.com
Release Information
Version: Cloudera Enterprise 5.4.xDate: February 6, 2018

Table of Contents
About this Guide......................................................................................................8
Authentication.........................................................................................................9Configuring Authentication in Cloudera Manager...............................................................................................9Cloudera Manager User Accounts.......................................................................................................................................10
Configuring External Authentication for Cloudera Manager...............................................................................................11
Kerberos Concepts - Principals, Keytabs and Delegation Tokens.........................................................................................17
Enabling Kerberos Authentication Using the Wizard...........................................................................................................19
Enabling Kerberos Authentication for Single User Mode or Non-Default Users..................................................................28
Configuring a Cluster with Custom Kerberos Principals.......................................................................................................29
Viewing and Regenerating Kerberos Principals...................................................................................................................31
Mapping Kerberos Principals to Short Names.....................................................................................................................32
Using Auth-to-Local Rules to Isolate Cluster Users..............................................................................................................32
Configuring Kerberos for Flume Thrift Source and Sink.......................................................................................................33
Configuring YARN for Long-running Applications................................................................................................................34
Enabling Kerberos Authentication Without the Wizard.......................................................................................................35
Configuring Authentication in the Cloudera Navigator Data Management Component...................................46Configuring External Authentication for the Cloudera Navigator Data Management Component.....................................46
Managing Users and Groups for the Cloudera Navigator Data Management Component.................................................51
Configuring Authentication in CDH Using the Command Line...........................................................................52Enabling Kerberos Authentication for Hadoop Using the Command Line...........................................................................53
Flume Authentication..........................................................................................................................................................75
HBase Authentication..........................................................................................................................................................78
HCatalog Authentication.....................................................................................................................................................85
Hive Authentication.............................................................................................................................................................86
HttpFS Authentication..........................................................................................................................................................93
Hue Authentication..............................................................................................................................................................95
Impala Authentication.......................................................................................................................................................106
Llama Authentication........................................................................................................................................................112
Oozie Authentication.........................................................................................................................................................113
Search Authentication........................................................................................................................................................115
Spark Authentication.........................................................................................................................................................118
Sqoop 2 Authentication.....................................................................................................................................................119
ZooKeeper Authentication.................................................................................................................................................119
FUSE Kerberos Configuration.............................................................................................................................................122
Using kadmin to Create Kerberos Keytab Files...................................................................................................................122
Configuring the Mapping from Kerberos Principals to Short Names.................................................................................123
Enabling Debugging Output for the Sun Kerberos Classes.................................................................................................126
Configuring a Cluster-dedicated MIT KDC with Cross-Realm Trust..................................................................126When to use kadmin.local and kadmin..............................................................................................................................126
Setting up a Cluster-Dedicated KDC and Default Realm for the Hadoop Cluster...............................................................127
Integrating Hadoop Security with Active Directory..........................................................................................131Configuring a Local MIT Kerberos Realm to Trust Active Directory....................................................................................132
Integrating Hadoop Security with Alternate Authentication............................................................................134Configuring the AuthenticationFilter to use Kerberos........................................................................................................134
Creating an AltKerberosAuthenticationHandler Subclass..................................................................................................134
Enabling Your AltKerberosAuthenticationHandler Subclass...............................................................................................134
Example Implementation for Oozie....................................................................................................................................136
Hadoop Users in Cloudera Manager and CDH.................................................................................................136
Authenticating Kerberos Principals in Java Code.............................................................................................141
Using a Web Browser to Access an URL Protected by Kerberos HTTP SPNEGO...............................................142
Troubleshooting Authentication Issues............................................................................................................145Sample Kerberos Configuration files: krb5.conf, kdc.conf, kadm5.acl................................................................................145
Potential Security Problems and Their Solutions................................................................................................................147
Encryption............................................................................................................156TLS/SSL Certificates Overview..........................................................................................................................156Creating Certificates..........................................................................................................................................................156
Creating Java Keystores and Truststores............................................................................................................................158
Private Key and Certificate Reuse Across Java Keystores and OpenSSL.............................................................................161
Configuring TLS Security for Cloudera Manager..............................................................................................162Configuring TLS Encryption Only for Cloudera Manager...................................................................................................163
Level 1: Configuring TLS Encryption for Cloudera Manager Agents...................................................................................167
Level 2: Configuring TLS Verification of Cloudera Manager Server by the Agents.............................................................168
Level 3: Configuring TLS Authentication of Agents to the Cloudera Manager Server........................................................170
HTTPS Communication in Cloudera Manager....................................................................................................................174
Troubleshooting SSL/TLS Connectivity...............................................................................................................................176
Deploying the Cloudera Manager Keystore for Level 1 TLS with Self-Signed Certificates..................................................177
Configuring SSL for the Cloudera Navigator Data Management Component..................................................178
Configuring SSL for Cloudera Management Service Roles...............................................................................179
Configuring SSL/TLS Encryption for CDH Services............................................................................................179Prerequisites......................................................................................................................................................................179
Hadoop Services as SSL Servers and Clients.......................................................................................................................179
Compatible Certificate Formats for Hadoop Components.................................................................................................179
Configuring SSL for HDFS, YARN and MapReduce..............................................................................................................180
Configuring SSL for HBase..................................................................................................................................................182
Configuring SSL for Flume Thrift Source and Sink..............................................................................................................184
Configuring Encrypted Communication Between Hive and Client Drivers.........................................................................185
Configuring SSL for Hue.....................................................................................................................................................187
Configuring SSL for Impala.................................................................................................................................................190
Configuring SSL for Oozie...................................................................................................................................................192
Configuring SSL for Solr......................................................................................................................................................193
Configuring HttpFS to use SSL............................................................................................................................................196
Encrypted Shuffle and Encrypted Web UIs.........................................................................................................................198
Deployment Planning for Data at Rest Encryption...........................................................................................204Data at Rest Encryption Reference Architecture................................................................................................................204
Data at Rest Encryption Requirements..............................................................................................................................205
Resource Planning for Data at Rest Encryption.................................................................................................................209
Cloudera Navigator Key Trustee Server............................................................................................................210Backing Up and Restoring Key Trustee Server....................................................................................................................210
Initializing Standalone Key Trustee Server.........................................................................................................................213
Configuring a Mail Transfer Agent for Key Trustee Server.................................................................................................214
Verifying Cloudera Navigator Key Trustee Server Operations............................................................................................215
Managing Key Trustee Server Organizations.....................................................................................................................215
Managing Key Trustee Server Certificates.........................................................................................................................218
Cloudera Navigator Key HSM...........................................................................................................................219Initializing Navigator Key HSM..........................................................................................................................................219
HSM-Specific Setup for Cloudera Navigator Key HSM.......................................................................................................220
Validating Key HSM Settings..............................................................................................................................................222
Creating a Key Store with CA-Signed Certificate................................................................................................................223
Managing the Navigator Key HSM Service........................................................................................................................223
Integrating Key HSM with Key Trustee Server....................................................................................................................224
Cloudera Navigator Encrypt.............................................................................................................................224Registering Navigator Encrypt with Key Trustee Server.....................................................................................................225
Preparing for Encryption Using Cloudera Navigator Encrypt.............................................................................................228
Encrypting and Decrypting Data Using Cloudera Navigator Encrypt.................................................................................232
Migrating eCryptfs-Encrypted Data to dm-crypt...............................................................................................................235
Navigator Encrypt Access Control List................................................................................................................................236
Maintaining Navigator Encrypt.........................................................................................................................................241
HDFS Data At Rest Encryption..........................................................................................................................244Use Cases...........................................................................................................................................................................244
Architecture.......................................................................................................................................................................244
crypto Command Line Interface......................................................................................................................................245
Enabling HDFS Encryption on a Cluster..............................................................................................................................246
DistCp Considerations........................................................................................................................................................250
Attack Vectors....................................................................................................................................................................251
Configuring the Key Management Server (KMS)...............................................................................................................252
Securing the Key Management Server (KMS)....................................................................................................................255
Integrating HDFS Encryption with Navigator Key Trustee Server.......................................................................................266
Configuring CDH Services for HDFS Encryption..................................................................................................................270
Troubleshooting HDFS Encryption .....................................................................................................................................274
Configuring Encrypted HDFS Data Transport....................................................................................................275Using Cloudera Manager...................................................................................................................................................275
Using the Command Line...................................................................................................................................................276

Configuring Encrypted HBase Data Transport..................................................................................................276Using Cloudera Manager...................................................................................................................................................276
Using the Command Line...................................................................................................................................................277
Authorization.......................................................................................................278Cloudera Manager User Roles..........................................................................................................................278User Roles..........................................................................................................................................................................278
Determining the Role of the Currently Logged in User......................................................................................................280
Removing the Full Administrator User Role.......................................................................................................................280
Cloudera Navigator Data Management Component User Roles......................................................................280User Roles..........................................................................................................................................................................280
Determining the Roles of the Currently Logged in User.....................................................................................................281
HDFS Extended ACLs........................................................................................................................................281Enabling ACLs.....................................................................................................................................................................281
Commands.........................................................................................................................................................................282
Configuring LDAP Group Mappings..................................................................................................................283Using Cloudera Manager...................................................................................................................................................285
Using the Command Line...................................................................................................................................................286
Authorization With Apache Sentry (Incubating)..............................................................................................286Architecture Overview.......................................................................................................................................................287
Sentry Integration with the Hadoop Ecosystem.................................................................................................................288
The Sentry Service..............................................................................................................................................................291
Sentry Policy File Authorization.........................................................................................................................................315
Enabling Sentry Authorization for Impala..........................................................................................................................333
Enabling Sentry Authorization for Search using the Command Line..................................................................................344
Configuring HBase Authorization.....................................................................................................................353Understanding HBase Access Levels..................................................................................................................................353
Enable HBase Authorization..............................................................................................................................................355
Configure Access Control Lists for Authorization...............................................................................................................356
Sensitive Data Redaction......................................................................................357Enabling Log and Query Redaction Using Cloudera Manager..........................................................................358
Configuring the Cloudera Navigator Data Management Component to Redact PII.........................................358
Overview of Impala Security................................................................................360Security Guidelines for Impala.........................................................................................................................360
Securing Impala Data and Log Files..................................................................................................................361
Installation Considerations for Impala Security...............................................................................................362
Securing the Hive Metastore Database............................................................................................................362
Securing the Impala Web User Interface..........................................................................................................362
Miscellaneous Topics............................................................................................363Jsvc, Task Controller and Container Executor Programs...................................................................................363MRv1 and YARN: The jsvc Program....................................................................................................................................363
MRv1 Only: The Linux TaskController Program..................................................................................................................363
YARN Only: The Linux Container Executor Program...........................................................................................................363
Task-controller and Container-executor Error Codes..........................................................................................................364
MRv1 ONLY: Task-controller Error Codes............................................................................................................................364
YARN ONLY: Container-executor Error Codes.....................................................................................................................366
Sqoop, Pig, and Whirr Security Support Status................................................................................................367
Setting Up a Gateway Node to Restrict Cluster Access....................................................................................367Installing and Configuring the Firewall and Gateway........................................................................................................368
Accessing HDFS..................................................................................................................................................................368
Submitting and Monitoring Jobs........................................................................................................................................368
Logging a Security Support Case......................................................................................................................369Kerberos Issues..................................................................................................................................................................369
SSL/TLS Issues....................................................................................................................................................................369
LDAP Issues........................................................................................................................................................................369
Using Antivirus Software on CDH Hosts...........................................................................................................369

About this Guide
This guide is intended for system administratorswhowant to secure a cluster using data encryption, user authentication,and authorization techniques. This topic also provides information about Hadoop security programs and shows youhow to set up a gateway to restrict access.
8 | Cloudera Security
About this Guide

Authentication
The purpose of authentication in Hadoop, as in other systems, is simply to prove that a user or service is who he orshe claims to be.
Typically, authentication in enterprises is managed through a single distributed system, such as a Lightweight DirectoryAccess Protocol (LDAP) directory. LDAP authentication consists of straightforward username/password services backedby a variety of storage systems, ranging from file to database.
A common enterprise-grade authentication system is Kerberos. Kerberos provides strong security benefits includingcapabilities that render intercepted authentication packets unusable by an attacker. It virtually eliminates the threatof impersonation by never sending a user's credentials in cleartext over the network.
Several components of theHadoop ecosystemare converging to use Kerberos authenticationwith the option tomanageand store credentials in LDAP or AD. For example, Microsoft's Active Directory (AD) is an LDAP directory that alsoprovides Kerberos authentication for added security.
Before you use this guide to configure Kerberos on your cluster, ensure you have a working KDC (MIT KDC or ActiveDirectory), set up. You can then use Cloudera Manager's Kerberos wizard to automate several aspects of Kerberosconfiguration on your cluster.
Important:
• You can use either Cloudera Manager or the following command-line instructions to completethis configuration.
• This information applies specifically to CDH 5.4.x. If you use an earlier version of CDH, see thedocumentation for that version located at Cloudera Documentation.
Configuring Authentication in Cloudera Manager
Why Use Cloudera Manager to Implement Kerberos Authentication?
If you do not use ClouderaManager to implement Hadoop security, youmustmanually create and deploy the Kerberosprincipals and keytabs on every host in your cluster. If you have a large number of hosts, this can be a time-consumingand error-prone process. After creating and deploying the keytabs, you must also manually configure properties in thecore-site.xml,hdfs-site.xml,mapred-site.xml, andtaskcontroller.cfg files on everyhost in the clusterto enable and configure Hadoop security in HDFS andMapReduce. You must also manually configure properties in theoozie-site.xml and hue.ini files on certain cluster hosts in order to enable and configure Hadoop security inOozie and Hue.
Cloudera Manager enables you to automate all of those manual tasks. Cloudera Manager can automatically createand deploy a keytab file for the hdfs user and a keytab file for the mapred user on every host in your cluster, as wellas keytab files for the oozie and hue users on select hosts. The hdfs keytab file contains entries for the hdfs principaland a host principal, and the mapred keytab file contains entries for the mapred principal and a host principal. Thehost principal will be the same in both keytab files. The oozie keytab file contains entries for the oozie principaland a HTTP principal. The hue keytab file contains an entry for the hue principal. Cloudera Manager can alsoautomatically configure the appropriate properties in the core-site.xml, hdfs-site.xml, mapred-site.xml,and taskcontroller.cfg files on every host in the cluster, and the appropriate properties in oozie-site.xmlandhue.ini for select hosts. Lastly, ClouderaManager can automatically start up theNameNode, DataNode, SecondaryNameNode, JobTracker, TaskTracker, Oozie Server, and Hue roles once all the appropriate configuration changes havebeen made.
Cloudera Security | 9
Authentication
Ways to Configure Kerberos Authentication Using Cloudera Manager
You can use one of the following ways to set up Kerberos authentication on your cluster using Cloudera Manager:
• Cloudera Manager 5.1 introduced a new wizard to automate the procedure to set up Kerberos on a cluster. Usingthe KDC information you enter, the wizard will create new principals and keytab files for your CDH services. Thewizard can be used to deploy the krb5.conf file cluster-wide, and automate othermanual tasks such as stoppingall services, deploying client configuration and restarting all services on the cluster.
If you want to use the Kerberos wizard, follow the instructions at Enabling Kerberos Authentication Using theWizard on page 19.
• If you do notwant to use the Kerberoswizard, follow the instructions at Enabling Kerberos AuthenticationWithoutthe Wizard on page 35.
Cloudera Manager User Accounts
Minimum Required Role: User Administrator (also provided by Full Administrator)
Access to ClouderaManager features is controlled by user accounts. A user account identifies howa user is authenticatedand determines what privileges are granted to the user.
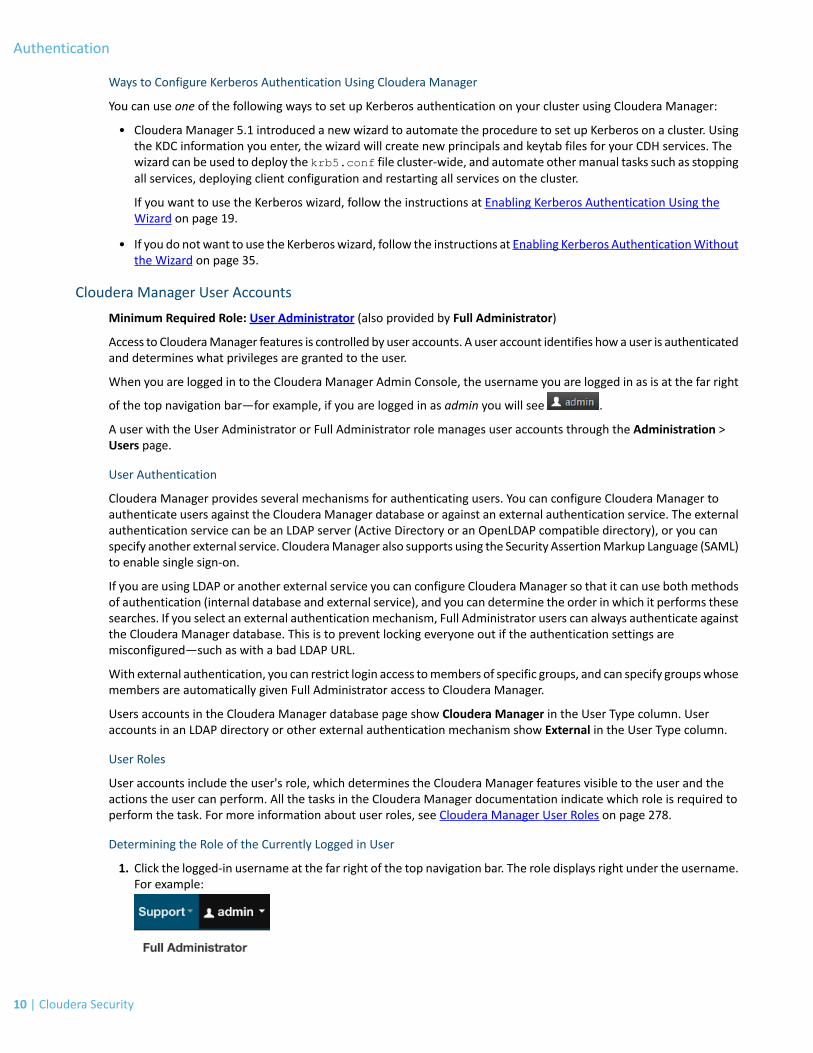
When you are logged in to the Cloudera Manager Admin Console, the username you are logged in as is at the far right
of the top navigation bar—for example, if you are logged in as admin you will see .
A user with the User Administrator or Full Administrator role manages user accounts through the Administration >Users page.
User Authentication
Cloudera Manager provides several mechanisms for authenticating users. You can configure Cloudera Manager toauthenticate users against the Cloudera Manager database or against an external authentication service. The externalauthentication service can be an LDAP server (Active Directory or an OpenLDAP compatible directory), or you canspecify another external service. ClouderaManager also supports using the Security AssertionMarkup Language (SAML)to enable single sign-on.
If you are using LDAP or another external service you can configure Cloudera Manager so that it can use both methodsof authentication (internal database and external service), and you can determine the order in which it performs thesesearches. If you select an external authenticationmechanism, Full Administrator users can always authenticate againstthe Cloudera Manager database. This is to prevent locking everyone out if the authentication settings aremisconfigured—such as with a bad LDAP URL.
With external authentication, you can restrict login access tomembers of specific groups, and can specify groupswhosemembers are automatically given Full Administrator access to Cloudera Manager.
Users accounts in the Cloudera Manager database page show Cloudera Manager in the User Type column. Useraccounts in an LDAP directory or other external authentication mechanism show External in the User Type column.
User Roles
User accounts include the user's role, which determines the Cloudera Manager features visible to the user and theactions the user can perform. All the tasks in the Cloudera Manager documentation indicate which role is required toperform the task. For more information about user roles, see Cloudera Manager User Roles on page 278.
Determining the Role of the Currently Logged in User
1. Click the logged-in username at the far right of the top navigation bar. The role displays right under the username.For example:
10 | Cloudera Security
Authentication

Changing the Logged-In Internal User Password
1. Right-click the logged-in username at the far right of the top navigation bar and select Change Password.2. Enter the current password and a new password twice, and then click Update.
Adding an Internal User Account
1. Select Administration > Users.2. Click the Add User button.3. Enter a username and password.4. In the Role drop-down, select a role for the new user.5. Click Add.
Assigning User Roles
1. Select Administration > Users.2. Check the checkbox next to one or more usernames.3. Select Actions for Selected > Assign User Roles.4. In the drop-down, select the role.5. Click the Assign Role button.
Changing an Internal User Account Password
1. Select Administration > Users.2. Click the Change Password button next to a username with User Type Cloudera Manager.3. Type the new password and repeat it to confirm.4. Click the Update button to make the change.
Deleting Internal User Accounts
1. Select Administration > Users.2. Check the checkbox next to one or more usernames with User Type Cloudera Manager.3. Select Actions for Selected > Delete.4. Click the OK button. (There is no confirmation of the action.)
Configuring External Authentication for Cloudera Manager
Minimum Required Role: User Administrator (also provided by Full Administrator)
Important: This feature is available only with a Cloudera Enterprise license; it is not available inCloudera Express. For information on Cloudera Enterprise licenses, see Managing Licenses.
Cloudera Manager supports user authentication against an internal database and against an external service. Thefollowing sections describe how to configure the supported external services.
Configuring Authentication Using Active Directory
1. Select Administration > Settings.2. In the left-hand column, select the External Authentication category.3. In the Authentication Backend Order field, select the order in which Cloudera Manager should attempt its
authentication. You can choose to authenticate users using just one of the methods (using Cloudera Manager'sown database is the default), or you can set it so that if the user cannot be authenticated by the first method, itwill attempt using the second method.
4. For External Authentication Type, select Active Directory.5. In the LDAP URL property, provide the URL of the Active Directory server.6. In the Active Directory NT Domain property, provide the NT domain to authenticate against.
Cloudera Security | 11
Authentication
LDAP URL and Active Directory NT Domain are the only settings required to allow anyone in AD to log in toCloudera Manager. For example, if you set LDAP URL to ldap://adserver.example.com and the ActiveDirectory NT Domain to ADREALM.EXAMPLE.COM, AD users should now be able to log into Cloudera Managerusing just their username, such as sampleuser. They no longer require the complete string:[email protected].
7. In the LDAPUser Groups property, optionally provide a comma-separated list of case-sensitive LDAP group names.If this list is provided, only users who are members of one or more of the groups in the list will be allowed to loginto Cloudera Manager. If this property is left empty, all authenticated LDAP users will be able to log into ClouderaManager. For example, if there is a group called CN=ClouderaManagerUsers,OU=Groups,DC=corp,DC=com,add the group name ClouderaManagerUsers to the LDAP User Groups list to allow members of that group tolog in to Cloudera Manager.
8. To automatically assign a role to users when they log in, provide a comma-separated list of LDAP group names inthe following properties:
• LDAP Full Administrator Groups• LDAP User Administrator Groups• LDAP Cluster Administrator Groups• LDAP BDR Administrator Groups• LDAP Configurator Groups• LDAP Navigator Administrator Groups• LDAP Operator Groups• LDAP Limited Operator Groups• LDAP Auditor Groups
If you specify groups in these properties, users must also be a member of at least one of the groups specified inthe LDAP User Groups property or they will not be allowed to log in. If these properties are left empty, users willbe assigned to the Read-Only role and any other role assignmentmust be performedmanually by an Administrator.
Note: Auser that is added to an LDAP groupwill not automatically be assigned the correspondingrole in the internal Cloudera Manager database. Hence, the Users page in Cloudera Manager willdisplay such users' roles as Read-Only, as this page only queries the Cloudera Manager database,and not LDAP.
Configuring Authentication Using an OpenLDAP-compatible Server
For an OpenLDAP-compatible directory, you have several options for searching for users and groups:
• You can specify a single base Distinguished Name (DN) and then provide a "Distinguished Name Pattern" to useto match a specific user in the LDAP directory.
• Search filter options let you search for a particular user based on somewhat broader search criteria – for exampleCloudera Manager users could be members of different groups or organizational units (OUs), so a single patternwon't find all those users. Search filter options also let you find all the groups to which a user belongs, to helpdetermine if that user should have login or admin access.
1. Select Administration > Settings.2. In the left-hand column, select the External Authentication category.3. In the Authentication Backend Order field, select the order in which Cloudera Manager should attempt its
authentication. You can choose to authenticate users using just one of the methods (using Cloudera Manager'sown database is the default), or you can set it so that if the user cannot be authenticated by the first method, itwill attempt using the second method.
4. For External Authentication Type, select LDAP.5. In the LDAP URL property, provide the URL of the LDAP server and (optionally) the base Distinguished Name (DN)
(the search base) as part of the URL — for example ldap://ldap-server.corp.com/dc=corp,dc=com.
12 | Cloudera Security
Authentication

6. If your server does not allow anonymous binding, provide the user DN and password to be used to bind to thedirectory. These are the LDAP Bind User Distinguished Name and LDAP Bind Password properties. By default,Cloudera Manager assumes anonymous binding.
7. Use one of the following methods to search for users and groups:
• You can search using User or Group search filters, using the LDAP User Search Base, LDAP User Search Filter,LDAP Group Search Base and LDAP Group Search Filter settings. These allow you to combine a base DN witha search filter to allow a greater range of search targets.
For example, if youwant to authenticate userswhomay be in one ofmultiple OUs, the search filtermechanismwill allow this. You can specify the User Search Base DN as dc=corp,dc=com and the user search filter asuid={0}. Then Cloudera Manager will search for the user anywhere in the tree starting from the Base DN.Suppose you have two OUs—ou=Engineering and ou=Operations—Cloudera Manager will find User"foo" if it exists in either of these OUs, that is, uid=foo,ou=Engineering,dc=corp,dc=com oruid=foo,ou=Operations,dc=corp,dc=com.
You can use a user search filter along with a DN pattern, so that the search filter provides a fallback if the DNpattern search fails.
The Groups filters let you search to determine if a DN or username is a member of a target group. In thiscase, the filter you provide can be something like member={0} where {0} will be replaced with the DN ofthe user you are authenticating. For a filter requiring the username, {1}may be used, as memberUid={1}.This will return a list of groups the user belongs to, which will be compared to the list in the group propertiesdiscussed in step 8 of Configuring Authentication Using Active Directory on page 11.
OR
• Alternatively, specify a single baseDistinguishedName (DN) and then provide a "DistinguishedNamePattern"in the LDAP Distinguished Name Pattern property.
Use {0} in the pattern to indicate where the username should go. For example, to search for a distinguishedname where the uid attribute is the username, you might provide a pattern similar touid={0},ou=People,dc=corp,dc=com. Cloudera Manager substitutes the name provided at login intothis pattern and performs a search for that specific user. So if a user provides the username "foo" at theCloudera Manager login page, Cloudera Manager will search for the DNuid=foo,ou=People,dc=corp,dc=com.
If you provided a base DN along with the URL, the pattern only needs to specify the rest of the DN pattern.For example, if the URL you provide is ldap://ldap-server.corp.com/dc=corp,dc=com, and thepattern is uid={0},ou=People, then the search DN will be uid=foo,ou=People,dc=corp,dc=com.
8. Restart the Cloudera Manager Server.
Configuring Cloudera Manager to Use LDAPS
If the LDAP server certificate has been signed by a trusted Certificate Authority (that is, VeriSign, GeoTrust, and so on),steps 1 and 2 below may not be necessary.
1. Copy the CA certificate file to the Cloudera Manager Server host.2. Import the CA certificate(s) from the CA certificate file to the local truststore. The default truststore is located in
the $JAVA_HOME/jre/lib/security/cacerts file. This contains the default CA information shipped with theJDK. Create an alternate default file called jssecacerts in the same location as the cacerts file. You can nowsafely append CA certificates for any private or public CAs not present in the default cacerts file, while keepingthe original file intact.
Cloudera Security | 13
Authentication

For our example, we will follow this recommendation by copying the default cacerts file into the newjssecacerts file, and then importing the CA certificate to this alternate truststore.
$ cp $JAVA_HOME/jre/lib/security/cacerts \ $JAVA_HOME/jre/lib/jssecacerts
$ /usr/java/latest/bin/keytool -import -alias nt_domain_name \-keystore /usr/java/latest/jre/lib/security/jssecacerts -file path_to_cert
Note:
• The default password for the cacerts store is changeit.• The alias can be any name (not just the domain name).
3. Configure the LDAP URL property to use ldaps://ldap_server instead of ldap://ldap_server.4. Restart the Cloudera Manager Server.
Configuring Authentication Using an External Program
You can configure Cloudera Manager to use an external authentication program of your own choosing. Typically, thismay be a custom script that interacts with a custom authentication service. Cloudera Manager will call the externalprogramwith the username as the first command line argument. The password is passed overstdin. ClouderaManagerassumes the program will return the following exit codes identifying the user role for a successful authentication:
• 0 - Read-Only• 1 - Full Administrator• 2 - Limited Operator• 3 - Operator• 4 - Configurator• 5 - Cluster Administrator• 6 - BDR Administrator• 7 - Navigator Administrator• 8 - User Administrator• 9 - Auditor
and a negative value is returned for a failure to authenticate.
To configure authentication using an external program:
1. Select Administration > Settings.2. In the left-hand column, select the External Authentication category.3. In the Authentication Backend Order field, select the order in which Cloudera Manager should attempt its
authentication. You can choose to authenticate users using just one of the methods (using Cloudera Manager'sown database is the default), or you can set it so that if the user cannot be authenticated by the first method, itwill attempt using the second method.
4. For External Authentication Type, select External Program.5. Provide a path to the external program in the External Authentication Program Path property.
Configuring Authentication Using SAML
ClouderaManager supports the Security AssertionMarkup Language (SAML), an XML-basedopen standard data formatfor exchanging authentication and authorization data between parties, in particular, between an identity provider(IDP) and a service provider (SP). The SAML specification defines three roles: the principal (typically a user), the IDP,and the SP. In the use case addressed by SAML, the principal (user agent) requests a service from the service provider.The service provider requests and obtains an identity assertion from the IDP. On the basis of this assertion, the SP canmake an access control decision—in other words it can decide whether to perform some service for the connectedprincipal.
14 | Cloudera Security
Authentication

The primary SAML use case is called web browser single sign-on (SSO). A user wielding a user agent (usually a webbrowser) requests a web resource protected by a SAML SP. The SP, wishing to know the identity of the requestinguser, issues an authentication request to a SAML IDP through the user agent. In the context of this terminology, ClouderaManager operates as a SP. This topic discusses the Cloudera Manager part of the configuration process; it assumesthat you are familiar with SAML and SAML configuration in a general sense, and that you have a functioning IDP alreadydeployed.
Note:
• Cloudera Manager supports both SP- and IDP-initiated SSO.• The logout action in Cloudera Manager will send a single-logout request to the IDP.• SAML authentication has been tested with specific configurations of SiteMinder and Shibboleth.
While SAML is a standard, there is a great deal of variability in configuration between differentIDP products, so it is possible that other IDP implementations, or other configurations of SiteMinderand Shibboleth, may not interoperate with Cloudera Manager.
• To bypass SSO if SAML configuration is incorrect or not working, you can login using a ClouderaManager local account using the URL: http://cm_host:7180/cmf/localLogin
Setting up Cloudera Manager to use SAML requires the following steps.
Preparing Files
You will need to prepare the following files and information, and provide these to Cloudera Manager:
• A Java keystore containing a private key for ClouderaManager to use to sign/encrypt SAMLmessages. For guidanceon creating Java keystores, see Creating Java Keystores and Truststores on page 158.
• The SAML metadata XML file from your IDP. This file must contain the public certificates needed to verify thesign/encrypt key used by your IDP per the SAML Metadata Interoperability Profile. For example, if you are usingthe Shibboleth IdP, the metadata file is available at: https://<IdPHOST>:8080/idp/shibboleth.
• The entity ID that should be used to identify the Cloudera Manager instance• How the user ID is passed in the SAML authentication response:
– As an attribute. If so, what identifier is used.– As the NameID.
• The method by which the Cloudera Manager role will be established:
– From an attribute in the authentication response:
– What identifier will be used for the attribute– What values will be passed to indicate each role
– From an external script that will be called for each use:
– The script takes user ID as $1– The script sets an exit code to reflect successful authentication of the assigned role:
– 0 - Full Administrator– 1 - Read-Only– 2 - Limited Operator– 3 - Operator– 4 - Configurator– 5 - Cluster Administrator– 6 - BDR Administrator– 7 - Navigator Administrator– 8 - User Administrator– 9 - Auditor
and a negative value is returned for a failure to authenticate.
Cloudera Security | 15
Authentication
Configuring Cloudera Manager
1. Select Administration > Settings.2. In the left-hand column, select the External Authentication category.3. Set the External Authentication Type property to SAML (the Authentication Backend Order property is ignored
for SAML).4. Set the Path to SAML IDP Metadata File property to point to the IDP metadata file.5. Set the Path to SAML Keystore File property to point to the Java keystore prepared earlier.6. In the SAML Keystore Password property, set the keystore password.7. In the Alias of SAML Sign/Encrypt Private Key property, set the alias used to identify the private key for Cloudera
Manager to use.8. In the SAML Sign/Encrypt Private Key Password property, set the private key password.9. Set the SAML Entity ID property if:
• There is more than one Cloudera Manager instance being used with the same IDP (each instance needs adifferent entity ID).
• Entity IDs are assigned by organizational policy.
10. In the Source of User ID in SAML Response property, set whether the user ID will be obtained from an attributeor the NameID.
If an attribute will be used, set the attribute name in the SAML attribute identifier for user ID property. Thedefault value is the normal OID used for user IDs and so may not need to be changed.
11. In the SAMLRole assignmentmechanism property, set whether the role assignmentwill be done from an attributeor an external script.
• If an attribute will be used:
– In the SAML attribute identifier for user role property, set the attribute name if necessary. The defaultvalue is the normal OID used for OrganizationalUnits and so may not need to be changed.
– In the SAML Attribute Values for Roles property, set which attribute values will be used to indicate theuser role.
• If an external script will be used, set the path to that script in the Path to SAML Role Assignment Scriptproperty. Make sure that the script is executable (an executable binary is fine - it doesn’t need to be a shellscript).
12. Save the changes. Cloudera Manager will run a set of validations that ensure it can find the metadata XML andthe keystore, and that the passwords are correct. If you see a validation error, correct the problem beforeproceeding.
13. Restart the Cloudera Manager Server.
Configuring the IDP
After the Cloudera Manager Server is restarted, it will attempt to redirect to the IDP login page instead of showing thenormal CM page. This may or may not succeed, depending on how the IDP is configured. In either case, the IDP willneed to be configured to recognize CM before authentication will actually succeed. The details of this process arespecific to each IDP implementation - refer to your IDP documentation for details. If you are using the Shibboleth IdP,information on configuring the IdP to communicate with a Service Provider is available here.
1. Download the Cloudera Manager’s SAML metadata XML file from http://hostname:7180/saml/metadata.2. Inspect the metadata file and ensure that any URLs contained in the file can be resolved by users’ web browsers.
The IDP will redirect web browsers to these URLs at various points in the process. If the browser cannot resolvethem, authentication will fail. If the URLs are incorrect, you can manually fix the XML file or set the Entity BaseURL in the CM configuration to the right value, and then re-download the file.
3. Provide this metadata file to your IDP using whatever mechanism your IDP provides.4. Ensure that the IDP has access to whatever public certificates are necessary to validate the private key that was
provided to Cloudera Manager earlier.
16 | Cloudera Security
Authentication
5. Ensure that the IDP is configured to provide the User ID and Role using the attribute names that ClouderaManagerwas configured to expect, if relevant.
6. Ensure the changes to the IDP configuration have taken effect (a restart may be necessary).
Verifying Authentication and Authorization
1. Return to the Cloudera Manager Admin Console and refresh the login page.2. Attempt to log in with credentials for a user that is entitled. The authentication should complete and you should
see the Home page.3. If authentication fails, you will see an IDP provided error message. Cloudera Manager is not involved in this part
of the process, and you must ensure the IDP is working correctly to complete the authentication.4. If authentication succeeds but the user is not authorized to use Cloudera Manager, they will be taken to an error
page by Cloudera Manager that explains the situation. If an user who should be authorized sees this error, thenyou will need to verify their role configuration, and ensure that it is being properly communicated to ClouderaManager, whether by attribute or external script. The Cloudera Manager log will provide details on failures toestablish a user’s role. If any errors occur during role mapping, Cloudera Manager will assume the user isunauthorized.
Kerberos Concepts - Principals, Keytabs and Delegation Tokens
This section describes howHadoop uses Kerberos principals and keytabs for user authentication. It also briefly describeshow Hadoop uses delegation tokens to authenticate jobs at execution time, to avoid overwhelming the KDC withauthentication requests for each job.
Kerberos Principals
A user in Kerberos is called a principal, which is made up of three distinct components: the primary, instance, andrealm. A Kerberos principal is used in a Kerberos-secured system to represent a unique identity. The first componentof the principal is called the primary, or sometimes the user component. The primary component is an arbitrary stringand may be the operating system username of the user or the name of a service. The primary component is followedby an optional section called the instance, which is used to create principals that are used by users in special roles orto define the host on which a service runs, for example. An instance, if it exists, is separated from the primary by aslash and then the content is used to disambiguate multiple principals for a single user or service. The final componentof the principal is the realm. The realm is similar to a domain in DNS in that it logically defines a related group of objects,although rather than hostnames as in DNS, the Kerberos realm defines a group of principals . Each realm can have itsown settings including the location of the KDC on the network and supported encryption algorithms. Large organizationscommonly create distinct realms to delegate administration of a realm to a group within the enterprise. Realms, byconvention, are written in uppercase characters.
Kerberos assigns tickets to Kerberos principals to enable them to access Kerberos-secured Hadoop services. For theHadoop daemon principals, the principal names should be of the formatusername/[email protected]. In this guide, username in theusername/[email protected] principal refers to the username of an existingUnix account that is used by Hadoop daemons, such as hdfs or mapred. Human users whowant to access the Hadoopcluster also need to have Kerberos principals; in this case, username refers to the username of the user's Unix account,such as joe or jane. Single-component principal names (such as [email protected]) are acceptable for clientuser accounts. Hadoop does not support more than two-component principal names.
Kerberos Keytabs
A keytab is a file containing pairs of Kerberos principals and an encrypted copy of that principal's key. A keytab file fora Hadoop daemon is unique to each host since the principal names include the hostname. This file is used to authenticatea principal on a host to Kerberos without human interaction or storing a password in a plain text file. Because havingaccess to the keytab file for a principal allows one to act as that principal, access to the keytab files should be tightlysecured. They should be readable by a minimal set of users, should be stored on local disk, and should not be includedin host backups, unless access to those backups is as secure as access to the local host.
Cloudera Security | 17
Authentication

Delegation Tokens
Users in a Hadoop cluster authenticate themselves to the NameNode using their Kerberos credentials. However, oncethe user is authenticated, each job subsequently submitted must also be checked to ensure it comes from anauthenticated user. Since there could be a time gap between a job being submitted and the job being executed, duringwhich the user could have logged off, user credentials are passed to the NameNode using delegation tokens that canbe used for authentication in the future.
Delegation tokens are a secret key shared with the NameNode, that can be used to impersonate a user to get a jobexecuted. While these tokens can be renewed, new tokens can only be obtained by clients authenticating to theNameNode using Kerberos credentials. By default, delegation tokens are only valid for a day. However, since jobs canlast longer than a day, each token specifies a JobTracker as a renewer which is allowed to renew the delegation tokenonce a day, until the job completes, or for a maximum period of 7 days. When the job is complete, the JobTrackerrequests the NameNode to cancel the delegation token.
Token Format
The NameNode uses a random masterKey to generate delegation tokens. All active tokens are stored in memory withtheir expiry date (maxDate). Delegation tokens can either expire when the current time exceeds the expiry date, or,they can be canceled by the owner of the token. Expired or canceled tokens are then deleted from memory. ThesequenceNumber serves as a unique ID for the tokens. The following section describes how the Delegation Token isused for authentication.
TokenID = {ownerID, renewerID, issueDate, maxDate, sequenceNumber}TokenAuthenticator = HMAC-SHA1(masterKey, TokenID) Delegation Token = {TokenID, TokenAuthenticator}
Authentication Process
To begin the authentication process, the client first sends the TokenID to the NameNode. The NameNode uses thisTokenID and the masterKey to once again generate the corresponding TokenAuthenticator, and consequently, theDelegation Token. If the NameNode finds that the token already exists in memory, and that the current time is lessthan the expiry date (maxDate) of the token, then the token is considered valid. If valid, the client and the NameNodewill then authenticate each other by using the TokenAuthenticator that they possess as the secret key, and MD5 asthe protocol. Since the client and NameNode do not actually exchange TokenAuthenticators during the process, evenif authentication fails, the tokens are not compromised.
Token Renewal
Delegation tokensmust be renewed periodically by the designated renewer (renewerID). For example, if a JobTrackeris the designated renewer, the JobTracker will first authenticate itself to the NameNode. It will then send the tokento be authenticated to the NameNode. The NameNode verifies the following information before renewing the token:
• The JobTracker requesting renewal is the same as the one identified in the token by renewerID.• The TokenAuthenticator generated by the NameNode using the TokenID and the masterKeymatches the one
previously stored by the NameNode.• The current time must be less than the time specified by maxDate.
If the token renewal request is successful, the NameNode sets the new expiry date to min(current time+renewperiod, maxDate). If the NameNode was restarted at any time, it will have lost all previous tokens from memory.In this case, the tokenwill be saved tomemory once again, this timewith a newexpiry date. Hence, designated renewersmust renew all tokens with the NameNode after a restart, and before relaunching any failed tasks.
A designated renewer can also revive an expired or canceled token as long as the current time does not exceedmaxDate.The NameNode cannot tell the difference between a token that was canceled, or has expired, and one that was erasedfrom memory due to a restart, since only the masterKey persists in memory. The masterKeymust be updatedregularly.
18 | Cloudera Security
Authentication

Enabling Kerberos Authentication Using the Wizard
Minimum Required Role: Cluster Administrator (also provided by Full Administrator)
Important: Ensure you have secured communication between the Cloudera Manager Server andAgents before you enable Kerberos on your cluster. Kerberos keytabs are sent from the ClouderaManager Server to the Agents, and must be encrypted to prevent potential misuse of leaked keytabs.For secure communication, you should have at least Level 1 TLS enabled as described in ConfiguringTLS Security for Cloudera Manager (Level 1).
This guide describes how to use Cloudera Manager and the Kerberos wizard (introduced in Cloudera Manager 5.1.0)to automate many of the manual tasks of implementing Kerberos security on your CDH cluster.
• Prerequisites - These instructions assume you know how to install and configure Kerberos, you already have aworking Kerberos key distribution center (KDC) and realm setup, and that you've installed the following Kerberosclient packages on all cluster hosts and hosts that will be used to access the cluster, depending on the OS in use.
Packages to be InstalledOS
RHEL/CentOS 5,RHEL/CentOS 6
• openldap-clients on the Cloudera Manager Server host• krb5-workstation, krb5-libs on ALL hosts
SLES • openldap2-client on the Cloudera Manager Server host• krb5-client on ALL hosts
Ubuntu or Debian • ldap-utils on the Cloudera Manager Server host• krb5-user on ALL hosts
Windows • krb5-workstation, krb5-libs on ALL hosts
Furthermore, Oozie andHue require that the realm support renewable tickets. ClouderaManager supports settingup kerberized clusters with MIT KDC and Active Directory.
Important: If you want to integrate Kerberos directly with Active Directory, ensure you havesupport from your AD administration team to do so. This includes any future support requiredto troubleshoot issues such as Kerberos TGT/TGS ticket renewal, access to KDC logs for debuggingand so on.
For more information about using Active Directory, refer the section below on Considerations when using anActive Directory KDC and the Microsoft AD documentation.
For more information about installing and configuring MIT KDC, see:
• MIT Kerberos Home• MIT Kerberos Documentation
• Support
– Kerberos security in Cloudera Manager has been tested on the following version of MIT Kerberos 5:
– krb5-1.6.1 on Red Hat Enterprise Linux 5 and CentOS 5
– Kerberos security in Cloudera Manager is supported on the following versions of MIT Kerberos 5:
– krb5-1.6.3 on SLES 11 Service Pack 1– krb5-1.8.1 on Ubuntu– krb5-1.8.2 on Red Hat Enterprise Linux 6 and CentOS 6– krb5-1.9 on Red Hat Enterprise Linux 6.1
Cloudera Security | 19
Authentication

Considerations when using an Active Directory KDCPerformance:
As your cluster grows, so will the volume of Authentication Service (AS) and Ticket Granting Service (TGS) interactionbetween the services on each cluster server. Consider evaluating the volume of this interaction against the ActiveDirectory domain controllers you have configured for the cluster before rolling this feature out to a productionenvironment. If cluster performance suffers, over time it might become necessary to dedicate a set of AD domaincontrollers to larger deployments.
Network Proximity:
By default, Kerberos uses UDP for client/server communication. Often, AD services are in a different network thanproject application services such as Hadoop. If the domain controllers supporting a cluster for Kerberos are not in thesame subnet, or they're separated by a firewall, consider using the udp_preference_limit = 1 setting in the[libdefaults] section of the krb5.conf used by cluster services. Cloudera strongly recommends against using ADdomain controller (KDC) servers that are separated from the cluster by a WAN connection, as latency in this servicewill significantly impact cluster performance.
Process:
Troubleshooting the cluster's operations, especially for Kerberos-enabled services, will need to includeAD administrationresources. Evaluate your organizational processes for engaging the AD administration team, and how to escalate incase a cluster outage occurs due to issues with Kerberos authentication against AD services. In some situations it mightbe necessary to enable Kerberos event logging to address desktop and KDC issues within windows environments.
Also note that if you decommission any Cloudera Manager roles or nodes, the related AD accounts will need to bedeleted manually. This is required because Cloudera Manager will not delete existing entries in Active Directory.
Step 1: Install Cloudera Manager and CDH
If you have not already done so, Cloudera strongly recommends that you install and configure the Cloudera ManagerServer and Cloudera Manager Agents and CDH to set up a fully-functional CDH cluster before you begin doing thefollowing steps to implement Hadoop security features.
Overview of the User Accounts and Groups in CDH and Cloudera Manager to Support Security
User Accounts and Groups in CDH and Cloudera Manager Required to Support Security:
When you install the CDH packages and the Cloudera Manager Agents on your cluster hosts, Cloudera Manager takessome steps to provide system security such as creating the following Unix accounts and setting directory permissionsas shown in the following table. TheseUnix accounts and directory permissionsworkwith the Hadoop Kerberos securityrequirements.
Note: Cloudera Manager 5.3 introduces a new single user mode. In single user mode, the ClouderaManager Agent and all the processes run by services managed by Cloudera Manager are started as asingle configured user and group. See Single User Mode Requirements for more information.
Runs These RolesThis User
NameNode, DataNodes, and Secondary Nodehdfs
JobTracker and TaskTrackers (MR1) and Job History Server (YARN)mapred
ResourceManager and NodeManagers (YARN)yarn
Oozie Serveroozie
Hue Server, Beeswax Server, Authorization Manager, and Job Designerhue
The hdfs user also acts as the HDFS superuser.
20 | Cloudera Security
Authentication

When you install the Cloudera Manager Server on the server host, a new Unix user account called cloudera-scm iscreated automatically to support security. The Cloudera Manager Server uses this account to create and deploy thehost principals and keytabs on your cluster.
Depending on whether you installed CDH and Cloudera Manager at the same time or not, use one of the followingsections for information on configuring directory ownerships on cluster hosts:
If you installed CDH and Cloudera Manager at the Same Time
If you have a new installation and you installed CDH and Cloudera Manager at the same time, when you started theCloudera Manager Agents on your cluster hosts, the Cloudera Manager Agent on each host automatically configuredthe directory owners shown in the following table to support security. Assuming the owners are configured as shown,the Hadoop daemons can then automatically set the permissions for each of the directories specified by the propertiesshown below to make sure they are properly restricted. It's critical that the owners are configured exactly as shownbelow, so do not change them:
OwnerDirectory Specified in this Property
hdfs:hadoopdfs.name.dir
hdfs:hadoopdfs.data.dir
mapred:hadoopmapred.local.dir
mapred:hadoopmapred.system.dir in HDFS
yarn:yarnyarn.nodemanager.local-dirs
yarn:yarnyarn.nodemanager.log-dirs
oozie:oozieoozie.service.StoreService.jdbc.url (if usingDerby)
hue:hue[[database]] name
hue:huejavax.jdo.option.ConnectionURL
If you Installed and Used CDH Before Installing Cloudera Manager
If you have been using HDFS and runningMapReduce jobs in an existing installation of CDHbefore you installed ClouderaManager, you must manually configure the owners of the directories shown in the table above. Doing so enables theHadoop daemons to automatically set the permissions for each of the directories. It's critical that youmanually configurethe owners exactly as shown above.
Step 2: If You are Using AES-256 Encryption, Install the JCE Policy File
If you are using CentOS or Red Hat Enterprise Linux 5.5 or later, which use AES-256 encryption by default for tickets,you must install the Java Cryptography Extension (JCE) Unlimited Strength Jurisdiction Policy File on all cluster andHadoop user hosts. There are 2 ways to do this:
• In the Cloudera Manager Admin Console, go to the Hosts page. Both, the Add New Hosts to Cluster wizard andthe Re-run Upgrade Wizard will give you the option to have Cloudera Manager install the JCE Policy file for you.
• You can follow the JCE Policy File installation instructions in the README.txt file included in thejce_policy-x.zip file.
Alternatively, you can configure Kerberos to not use AES-256 by removing aes256-cts:normal from thesupported_enctypes field of the kdc.conf or krb5.conf file. Note that after changing the kdc.conf file, you'llneed to restart both the KDC and the kadmin server for those changes to take affect. You may also need to recreateor change the password of the relevant principals, including potentially the Ticket Granting Ticket principal(krbtgt/REALM@REALM). If AES-256 is still used after all of those steps, it's because the aes256-cts:normal settingexisted when the Kerberos database was created. To fix this, create a new Kerberos database and then restart boththe KDC and the kadmin server.
Cloudera Security | 21
Authentication
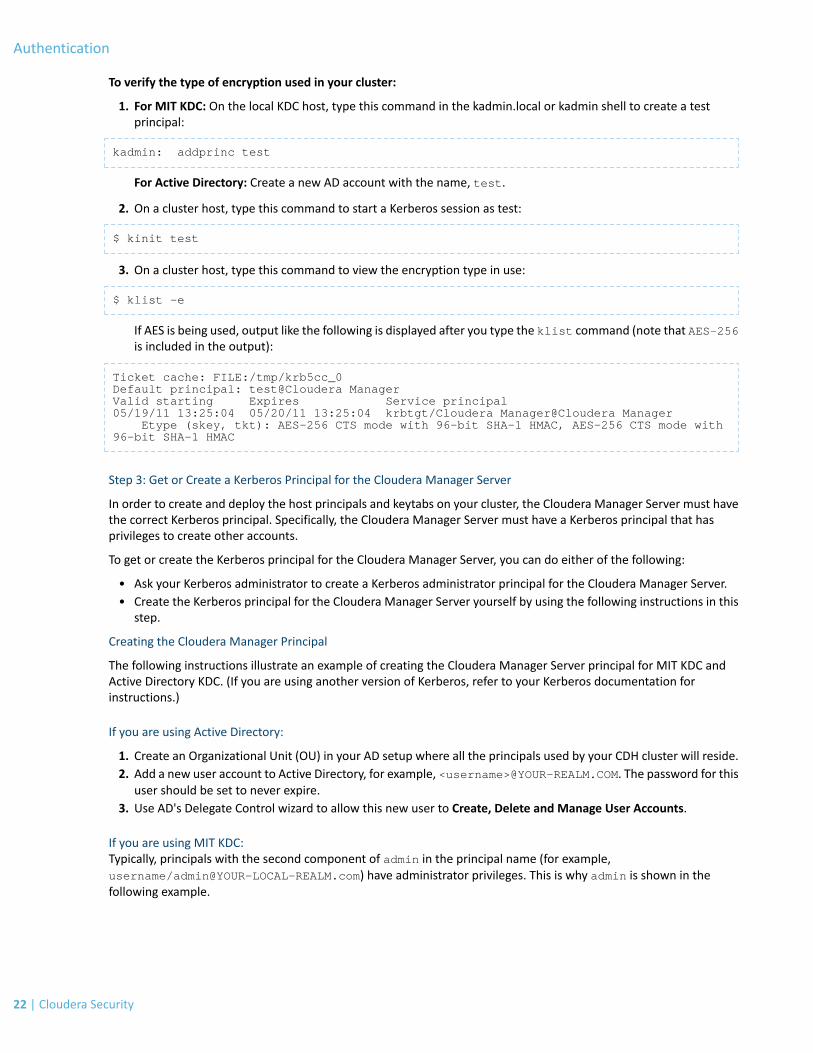
To verify the type of encryption used in your cluster:
1. For MIT KDC: On the local KDC host, type this command in the kadmin.local or kadmin shell to create a testprincipal:
kadmin: addprinc test
For Active Directory: Create a new AD account with the name, test.
2. On a cluster host, type this command to start a Kerberos session as test:
$ kinit test
3. On a cluster host, type this command to view the encryption type in use:
$ klist -e
If AES is being used, output like the following is displayed after you type the klist command (note that AES-256is included in the output):
Ticket cache: FILE:/tmp/krb5cc_0Default principal: test@Cloudera ManagerValid starting Expires Service principal05/19/11 13:25:04 05/20/11 13:25:04 krbtgt/Cloudera Manager@Cloudera Manager Etype (skey, tkt): AES-256 CTS mode with 96-bit SHA-1 HMAC, AES-256 CTS mode with 96-bit SHA-1 HMAC
Step 3: Get or Create a Kerberos Principal for the Cloudera Manager Server
In order to create and deploy the host principals and keytabs on your cluster, the Cloudera Manager Server must havethe correct Kerberos principal. Specifically, the Cloudera Manager Server must have a Kerberos principal that hasprivileges to create other accounts.
To get or create the Kerberos principal for the Cloudera Manager Server, you can do either of the following:
• Ask your Kerberos administrator to create a Kerberos administrator principal for the Cloudera Manager Server.• Create the Kerberos principal for the Cloudera Manager Server yourself by using the following instructions in this
step.
Creating the Cloudera Manager Principal
The following instructions illustrate an example of creating the Cloudera Manager Server principal for MIT KDC andActive Directory KDC. (If you are using another version of Kerberos, refer to your Kerberos documentation forinstructions.)
If you are using Active Directory:
1. Create an Organizational Unit (OU) in your AD setup where all the principals used by your CDH cluster will reside.2. Add a new user account to Active Directory, for example, <username>@YOUR-REALM.COM. The password for this
user should be set to never expire.3. Use AD's Delegate Control wizard to allow this new user to Create, Delete and Manage User Accounts.
If you are using MIT KDC:Typically, principals with the second component of admin in the principal name (for example,username/[email protected]) have administrator privileges. This is why admin is shown in thefollowing example.
22 | Cloudera Security
Authentication

Note: If you are running kadmin and the Kerberos Key Distribution Center (KDC) on the same host,use kadmin.local in the following steps. If the Kerberos KDC is running on a remote host, you mustuse kadmin instead of kadmin.local.
In the kadmin.local or kadmin shell, type the following command to create the Cloudera Manager Server principal,replacing YOUR-LOCAL-REALM.COM with the name of your realm:
kadmin: addprinc -pw <Password> cloudera-scm/[email protected]
Step 4: Enabling Kerberos Using the Wizard
Minimum Required Role: Full Administrator
To start the Kerberos wizard:
1.Go to the ClouderaManager Admin Console and click to the right of the cluster for which you want to enableKerberos authentication.
2. Select Enable Kerberos.
Before you Begin Using the Wizard
The Welcome page lists the following action items that you should complete before you begin to secure the clusterusing this wizard:
• Set up a working KDC. Cloudera Manager supports authentication with MIT KDC and Active Directory.• Configure the KDC to allow renewable tickets with non-zero ticket lifetimes.
Active Directory allows renewable tickets with non-zero lifetimes by default. You can verify this by checkingDomainSecurity Settings > Account Policies > Kerberos Policy in Active Directory.
For MIT KDC, make sure you have the following lines in the kdc.conf.
max_life = 1d max_renewable_life = 7dkdc_tcp_ports = 88
• If you are using Active Directory, make sure LDAP over SSL (LDAPS) is enabled for the Domain Controllers.• Install the following packages on your cluster depending on the OS in use.
Packages to be InstalledOS
RHEL/CentOS 5,RHEL/CentOS 6
• openldap-clients on the Cloudera Manager Server host• krb5-workstation, krb5-libs on ALL hosts
SLES • openldap2-client on the Cloudera Manager Server host• krb5-client on ALL hosts
Ubuntu or Debian • ldap-utils on the Cloudera Manager Server host• krb5-user on ALL hosts
Windows • krb5-workstation, krb5-libs on ALL hosts
• Create an account for ClouderaManager that has the permissions to create other accounts in the KDC. This shouldhave been completed as part of Step 3: Get or Create a Kerberos Principal for the Cloudera Manager Server onpage 22.
Cloudera Security | 23
Authentication

Important:
If you have enabled YARN Resource Manager HA in your non-secure cluster, you should clear theStateStore znode in ZooKeeper before enabling Kerberos. To do this:
1. Go to the Cloudera Manager Admin Console home page, click to the right of the YARN serviceand select Stop.
2. When you see a Finished status, the service has stopped.3. Go to the YARN service and select Actions > Format State Store.4. When the command completes, click Close.
Once you are able to check all the items on this list, click Continue.
KDC Information
On this page, select the KDC type you are using, MIT KDC or Active Directory, and complete the fields as applicable toenable Cloudera Manager to generate principals/accounts for the CDH services running on the cluster.
Note:
• If you are using AD and havemultiple Domain Controllers behind a Load Balancer, enter the nameof the Load Balancer in the KDC Server Host field and any one of the Domain Controllers inActiveDirectory Domain Controller Override. Hadoop daemons will use the Load Balancer forauthentication, but Cloudera Manager will use the override for creating accounts.
• If you have multiple Domain Controllers (in case of AD) or MIT KDC servers, only enter the nameof any one of them in the KDC Server Host field. Cloudera Manager will use that server only forcreating accounts. If you choose to use ClouderaManager tomanage krb5.conf, you can specifythe rest of the Domain Controllers using Safety Valve as explained below.
• Make sure the entries for the Kerberos Encryption Types field matches what your KDC supports.
Click Continue to proceed.
KRB5 Configuration
Manage krb5.conf through Cloudera Manager allows you to choose whether Cloudera Manager should deploy thekrb5.conf on your cluster or not. If left unchecked, you must ensure that the krb5.conf is deployed on all hosts inthe cluster, including the Cloudera Manager Server's host.
If you checkManage krb5.conf through Cloudera Manager, this page will let you configure the properties that will beemitted in it. In particular, the safety valves on this page can be used to configure cross-realm authentication. Moreinformation can be found at Configuring a Cluster-dedicated MIT KDC with Cross-Realm Trust on page 126.
Note: Cloudera Manager is unable to use a non-default realm. You must specify the default realm.
Click Continue to proceed.
Import KDC Account Manager Credentials
Enter the username and password for the user that can create principals for CDH cluster in the KDC. This is theuser/principal you created in Step 3: Get or Create a Kerberos Principal for the Cloudera Manager Server on page 22.Cloudera Manager encrypts the username and password into a keytab and uses it as needed to create new principals.
Note: The username entered should have the realm portion in upper-case only as shown in theexample in the UI.
Click Continue to proceed.
24 | Cloudera Security
Authentication
(Optional) Configuring Custom Kerberos Principals
Starting with Cloudera Manager 5.4, you can configure custom service principals for CDH services. Before you beginmaking configuration changes, see Configuring a Clusterwith CustomKerberos Principals on page 29 for some additionalconfiguration changes required and limitations.
Configure HDFS DataNode Ports
On this page, specify the privileged ports needed by the DataNode's Transceiver Protocol and the HTTP Web UI in asecure cluster.
Use the checkbox to confirm you are ready to restart the cluster. Click Continue.
Enabling Kerberos
This page lets you track the progress made by the wizard as it first stops all services on your cluster, deploys thekrb5.conf, generates keytabs for other CDH services, deploys client configuration and finally restarts all services.Click Continue.
Congratulations
The final page lists the cluster(s) for which Kerberos has been successfully enabled. Click Finish to return to the ClouderaManager Admin Console home page.
Step 5: Create the HDFS Superuser
To be able to create homedirectories for users, youwill need access to theHDFS superuser account. (CDH automaticallycreated the HDFS superuser account on each cluster host during CDH installation.) When you enabled Kerberos forthe HDFS service, you lost access to the HDFS superuser account using sudo -u hdfs commands. To enable youraccess to the HDFS superuser account now that Kerberos is enabled, you must create a Kerberos principal or an ADuser whose first component is hdfs:
If you are using Active DirectoryAdd a new user account to Active Directory, [email protected]. The password for this account should be set tonever expire.
If you are using MIT KDC
1. In the kadmin.local or kadmin shell, type the following command to create a Kerberos principal called hdfs:
kadmin: addprinc [email protected]
Note: This command prompts you to create a password for the hdfs principal. You should usea strong password because having access to this principal provides superuser access to all of thefiles in HDFS.
2. To run commands as the HDFS superuser, you must obtain Kerberos credentials for the hdfs principal. To do so,run the following command and provide the appropriate password when prompted.
$ kinit [email protected]
Step 6: Get or Create a Kerberos Principal for Each User Account
Now that Kerberos is configured and enabled on your cluster, you and every other Hadoop user must have a Kerberosprincipal or keytab to obtain Kerberos credentials to be allowed to access the cluster and use the Hadoop services. Inthe next step of this procedure, you will need to create your own Kerberos principals in order to verify that Kerberossecurity is working on your cluster. If you and the other Hadoop users already have a Kerberos principal or keytab, orif your Kerberos administrator can provide them, you can skip ahead to the next step.
The following instructions explain how to create a Kerberos principal for a user account.
Cloudera Security | 25
Authentication

If you are using Active Directory
Add a new AD user account for each new user that should have access to the cluster. You do not need to make anychanges to existing user accounts.
If you are using MIT KDC
1. In the kadmin.local or kadmin shell, use the following command to create user principals by replacingYOUR-LOCAL-REALM.COM with the name of your realm, and replacing USERNAME with a username:
kadmin: addprinc [email protected]
2. Enter and re-enter a password when prompted.
Step 7: Prepare the Cluster for Each User
Before you and other users can access the cluster, there are a few tasks you must do to prepare the hosts for eachuser.
1. Make sure all hosts in the cluster have a Linux user account with the same name as the first component of thatuser's principal name. For example, the Linux account joe should exist on every box if the user's principal nameis [email protected]. You can use LDAP for this step if it is available in your organization.
Note: Each account must have a user ID that is greater than or equal to 1000. In the/etc/hadoop/conf/taskcontroller.cfg file, the default setting for the banned.usersproperty is mapred, hdfs, and bin to prevent jobs from being submitted using those useraccounts. The default setting for the min.user.id property is 1000 to prevent jobs from beingsubmitted with a user ID less than 1000, which are conventionally Unix super users.
2. Create a subdirectory under /user on HDFS for each user account (for example, /user/joe). Change the ownerand group of that directory to be the user.
$ hadoop fs -mkdir /user/joe$ hadoop fs -chown joe /user/joe
Note: sudo -u hdfs is not included in the commands above. This is because it is not required ifKerberos is enabled on your cluster. You will, however, need to have Kerberos credentials for theHDFS super user in order to successfully run these commands. For information on gaining access tothe HDFS super user account, see Step 14: Create the HDFS Superuser Principal on page 43
Step 8: Verify that Kerberos Security is Working
After you have Kerberos credentials, you can verify that Kerberos security is working on your cluster by trying to runMapReduce jobs. To confirm, try launching a sleep or a pi job from the provided Hadoop examples(/usr/lib/hadoop/hadoop-examples.jar).
Note:
This section assumes you have a fully-functional CDH cluster and you have been able to access HDFSand run MapReduce jobs before you followed these instructions to configure and enable Kerberoson your cluster. If you have not already done so, you should at a minimum use the Cloudera ManagerAdmin Console to generate a client configuration file to enable you to access the cluster. Forinstructions, see Deploying Client Configuration Files.
To verify that Kerberos security is working:
26 | Cloudera Security
Authentication

1. Acquire Kerberos credentials for your user account.
$ kinit [email protected]
2. Enter a password when prompted.3. Submit a sample pi calculation as a test MapReduce job. Use the following command if you use a package-based
setup for Cloudera Manager:
$ hadoop jar /usr/lib/hadoop-0.20-mapreduce/hadoop-examples.jar pi 10 10000Number of Maps = 10Samples per Map = 10000...Job Finished in 38.572 secondsEstimated value of Pi is 3.14120000000000000000
If you have a parcel-based setup, use the following command instead:
$ hadoop jar /opt/cloudera/parcels/CDH/lib/hadoop-0.20-mapreduce/hadoop-examples.jar pi 10 10000Number of Maps = 10Samples per Map = 10000...Job Finished in 30.958 secondsEstimated value of Pi is 3.14120000000000000000
You have now verified that Kerberos security is working on your cluster.
Important:
Running a MapReduce job will fail if you do not have a valid Kerberos ticket in your credentials cache.You can examine the Kerberos tickets currently in your credentials cache by running the klistcommand. You can obtain a ticket by running the kinit command and either specifying a keytab filecontaining credentials, or entering the password for your principal. If you do not have a valid ticket,you will receive an error such as:
11/01/04 12:08:12 WARN ipc.Client:Exception encountered while connecting to the server :javax.security.sasl.SaslException:GSS initiate failed [Caused by GSSException: No valid credentials provided (Mechanism level: Failed to find anyKerberos tgt)]Bad connection to FS. command aborted. exception: Call to nn-host/10.0.0.2:8020 failed on local exception:java.io.IOException:javax.security.sasl.SaslException: GSS initiate failed[Caused by GSSException: No valid credentials provided(Mechanism level: Failed to find any Kerberos tgt)]
Step 9: (Optional) Enable Authentication for HTTP Web Consoles for Hadoop Roles
Minimum Required Role: Configurator (also provided by Cluster Administrator, Full Administrator)
Authentication for access to the HDFS,MapReduce, and YARN roles' web consoles can be enabled using a configurationoption for the appropriate service. To enable this authentication:
1. From the Clusters tab, select the service (HDFS,MapReduce, or YARN) forwhich youwant to enable authentication.2. Click the Configuration tab.3. Select Scope > service name Service-Wide.4. Select Category > Security.5. Type Enable Kerberos in the Search box.6. Select Enable Kerberos Authentication for HTTP Web-Consoles.
Cloudera Security | 27
Authentication

7. Click Save Changes to commit the changes.8. When the command finishes, restart all roles of that service.
Enabling SPNEGO as an Authentication Backend for Hue
To enable SPNEGO authentication:
1. In Cloudera Manager, set the authentication backend to SpnegoDjangoBackend.
a. Go to the Cloudera Manager Admin Console. From the Clusters tab, select the Hue service.b. Click the Configuration tab.c. Select Scope > Service-Wide.d. Select Category > Security.e. Locate theAuthenticationBackendproperty and selectdesktop.auth.backend.SpnegoDjangoBackend.f. Click Save Changes.
2. Restart the Hue service.3. On the host running the Hue Kerberos Ticket Renewer, switch to the KT_RENEWER process directory. For example:
cd /var/run/cloudera-scm-agent/process/`ls -lrt /var/run/cloudera-scm-agent/process/ \| awk '{print $9}' |grep KT_RENEWER| tail -1`/
4. Verify that the Hue keytab includes the HTTP principal.
klist -kte ./hue.keytab
Keytab name: FILE:./hue.keytabKVNO Timestamp Principal---- ----------------- --------------------------------------------------------1 03/09/15 20:20:35 hue/[email protected] (aes128-cts-hmac-sha1-96)1 03/09/15 20:20:36 HTTP/[email protected] (aes128-cts-hmac-sha1-96)
5. Copy the hue.keytab file to /var/lib/hue and change ownership to the hue user and group.
$ cp ./hue.keytab /var/lib/hue/$ chown hue:hue /var/lib/hue/hue.keytab
6. Go to the Cloudera Manager Admin Console. From the Clusters tab, select the Hue service.7. Click the Configuration tab.8. Select Scope > Service-Wide.9. Select Category > Advanced.10. Locate the Hue Service Environment Advanced Configuration Snippet (Safety Valve) property and add the
following line:
KRB5_KTNAME=/var/lib/hue/hue.keytab
11. Click Save Changes to commit the changes.12. Restart the Hue service.
Enabling Kerberos Authentication for Single User Mode or Non-Default Users
The steps described in this topic are only applicable in the following cases:
• You are running the Cloudera Manager in the single user mode. In this case, configure all the services describedin the table below.
OR
28 | Cloudera Security
Authentication

• You are running one or more CDH services with non-default users. This means if you have modified the defaultvalue for the System User property for any service in Cloudera Manager, you must only perform the command(as described below) corresponding to that service, to be able to successfully run jobs with the non-default user.
Configure the mapred.system.dir directory to be owned by the mapred user.
sudo -u hdfs hadoop fs -chown mapred:hadoop ${mapred.system.dir}
MapReduce
By default, mapred.system.dir is /tmp/mapred/system.
Give the hbase user ownership of the HBase root directory:
sudo -u hdfs hadoop fs -chown -R hbase ${hbase.rootdir}
HBase
By default, hbase.rootdir is /hbase.
Give the hive user ownership of the /user/hive directory.
sudo -u hdfs hadoop fs -chown hive /user/hive
Hive
For every NodeManager host, for each path in yarn.nodemanager.local-dirs, run:
rm -rf ${yarn.nodemanager.local-dirs}/usercache/*
YARN
This removes the /usercache directory that contains intermediate data stored forprevious jobs.
Configuring a Cluster with Custom Kerberos Principals
By default, ClouderaManager configures CDH services to use the same Kerberos principals as the default process users.For example, the hdfs principal for the HDFS service, hive principal for the Hive service, and so on. The advantageto this is that when Kerberos is enabled, no HDFS directory permissions need to be changed for the new principals.However, starting with Cloudera Manager 5.4, you can configure custom service principals for CDH services.
Important Considerations
• Using different Kerberos principals for different services will make it easier to track the HDFS directories beingaccessed by each service.
• If you are using ShellBasedUnixGroupsMapping to obtain user-group mappings, ensure you have the UNIXaccounts for the principals present on all hosts of the cluster.
Configuring Directory PermissionsConfigure the following HDFS directories to give their corresponding custom service principals read, write andexecute permissions.
HDFS DirectoryService
Accumulo • HDFS Directory• /user/principal
HBase Root DirectoryHBase
Hive • Hive Warehouse Directory• /user/principal
/user/principalImpala
/tmp/mapredMapReduce v1
Cloudera Security | 29
Authentication
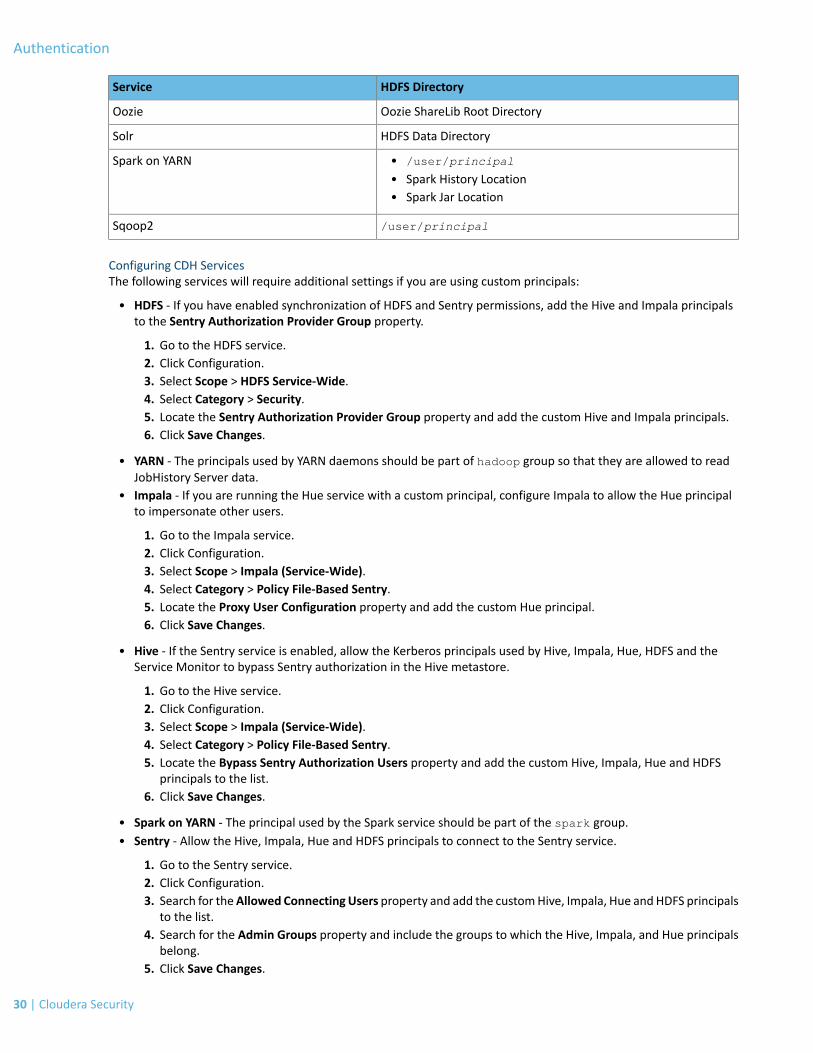
HDFS DirectoryService
Oozie ShareLib Root DirectoryOozie
HDFS Data DirectorySolr
Spark on YARN • /user/principal
• Spark History Location• Spark Jar Location
/user/principalSqoop2
Configuring CDH ServicesThe following services will require additional settings if you are using custom principals:
• HDFS - If you have enabled synchronization of HDFS and Sentry permissions, add the Hive and Impala principalsto the Sentry Authorization Provider Group property.
1. Go to the HDFS service.2. Click Configuration.3. Select Scope > HDFS Service-Wide.4. Select Category > Security.5. Locate the Sentry Authorization Provider Group property and add the custom Hive and Impala principals.6. Click Save Changes.
• YARN - The principals used by YARN daemons should be part of hadoop group so that they are allowed to readJobHistory Server data.
• Impala - If you are running the Hue service with a custom principal, configure Impala to allow the Hue principalto impersonate other users.
1. Go to the Impala service.2. Click Configuration.3. Select Scope > Impala (Service-Wide).4. Select Category > Policy File-Based Sentry.5. Locate the Proxy User Configuration property and add the custom Hue principal.6. Click Save Changes.
• Hive - If the Sentry service is enabled, allow the Kerberos principals used by Hive, Impala, Hue, HDFS and theService Monitor to bypass Sentry authorization in the Hive metastore.
1. Go to the Hive service.2. Click Configuration.3. Select Scope > Impala (Service-Wide).4. Select Category > Policy File-Based Sentry.5. Locate the Bypass Sentry Authorization Users property and add the custom Hive, Impala, Hue and HDFS
principals to the list.6. Click Save Changes.
• Spark on YARN - The principal used by the Spark service should be part of the spark group.• Sentry - Allow the Hive, Impala, Hue and HDFS principals to connect to the Sentry service.
1. Go to the Sentry service.2. Click Configuration.3. Search for theAllowed Connecting Users property and add the customHive, Impala, Hue andHDFS principals
to the list.4. Search for the Admin Groups property and include the groups to which the Hive, Impala, and Hue principals
belong.5. Click Save Changes.
30 | Cloudera Security
Authentication

• Cloudera Management Service - Configure the Reports Manager principal and the Navigator principal for HDFSas HDFS superusers.
1. Go to the Cloudera Management Service.2. Click Configuration.3. Search for kerberos.4. Locate the Reports Manager Kerberos Principal property and set it to a principal with administrative and
superuser privileges on all HDFS services.5. Locate the Navigator Kerberos Principal for HDFS property and set it to a principal with administrative and
superuser privileges on all HDFS services.6. Click Save Changes.
IncompatibilitiesThe following features do not work with custom principals:
• Llama must always use the default Kerberos principal llama.• If you are using MapReduce v1, the Activity Monitor and Cloudera Navigator should use the same principal as the
Hue service.• If you are using the Java KeyStore KMS or KeyTrustee KMS with a custom principal, you will need to add the proxy
user for the custom principal to the kms-site.xml safety valve.
For example, if you’ve replaced the default oozie principal with oozieprinc, add thehadoop.kms.proxyuser.oozieprinc.groupsandhadoop.kms.proxyuser.oozieprinc.hostspropertiesto the kms-site.xml safety valve.
Viewing and Regenerating Kerberos Principals
Minimum Required Role: Full Administrator
As soon as you enable Hadoop secure authentication for HDFS and MapReduce service instances, Cloudera Managerstarts creating the Kerberos principals for each of the role instances. The amount of time this process will take dependson the number of hosts and HDFS and MapReduce role instances on your cluster. The process can take from a fewseconds for a small cluster to several minutes for a larger cluster. After the process is completed, you can use theCloudera Manager Admin Console to view the list of Kerberos principals that Cloudera Manager has created for thecluster. Make sure there are principals for each of the hosts and HDFS and MapReduce role instances on your cluster.If there are no principals after 10 minutes, then there is most likely a problem with the principal creation. See theTroubleshooting Authentication Issues on page 145 section below for more information. If necessary, you can useCloudera Manager to regenerate the principals.
If you make a global configuration change in your cluster, such as changing the encryption type, you must use thefollowing instructions to regenerate the principals for your cluster.
Important:
• Regenerate principals using the following steps in the Cloudera Manager Admin Console and notdirectly using kadmin shell.
• Do not regenerate the principals for your cluster unless you have made a global configurationchange. Before regenerating, be sure to read Configuring a Cluster-dedicated MIT KDC withCross-Realm Trust on page 126 to avoid making your existing host keytabs invalid.
• If you are using Active Directory, delete the AD accounts with the userPrincipalName (or loginnames) that you want to manually regenerate before continuing with the steps below. This isrequired because Cloudera Manager will not delete existing entries in Active Directory.
To view and regenerate the Kerberos principals for your cluster:
1. Select Administration > Kerberos.
Cloudera Security | 31
Authentication

2. The currently configured Kerberos principals are displayed. If you are running HDFS, the hdfs/hostname andhost/hostnameprincipals are listed. If you are runningMapReduce, themapred/hostname andhost/hostnameprincipals are listed. The principals for other running services are also listed.
3. Only if necessary, select the principals you want to regenerate.4. Click Regenerate.
The Security Inspector
The Security Inspector uses the Host Inspector to run a security-related set of commands on the hosts in your cluster.It reports on things such as how Java is configured for encryption and on the default realms configured on each host:
1. Select Administration > Kerberos.2. Click Security Inspector. Cloudera Manager begins several tasks to inspect the managed hosts.3. After the inspection completes, click Download Result Data or Show Inspector Results to review the results.
Mapping Kerberos Principals to Short Names
Kerberos user principals typically have the format username@REALM, whereas Hadoop usernames are typically justusername. To translate Kerberos principals to Hadoop usernames, Hadoop uses rules defined in thehadoop.security.auth_to_local property. The default setting strips the @REALM portion from the Kerberosprincipal, where REALM is the Kerberos realm defined by the default_realm setting in the NameNode krb5.conffile.
If you configure your cluster's Kerberos realm to trust other realms, such as a trust between your cluster's realm anda central Active Directory or MIT Kerberos realm, you must identify the trusted realms in Cloudera Manager so it canautomatically generate the appropriate rules. If you do not do so, user accounts in those realms cannot access thecluster.
To specify trusted realms using Cloudera Manager:
1. Go to the HDFS Service > Configuration tab.2. Select Scope > HDFS (Service-Wide).3. Select Category > Security.4. In the Search field, type Kerberos Realms to find the Trusted Kerberos Realms and Additional Rules to Map
Kerberos Principals to Short Names settings.5. Add realms that are trusted by the cluster's Kerberos realm. Realm names, including Active Directory realms, must
be specified in uppercase letters (for example, CORP.EXAMPLE.COM). To add multiple realms, use the button.6. Click Save Changes.
The auto-generated mapping rules strip the Kerberos realm (for example, @CORP.EXAMPLE.COM) for each realmspecified in the Trusted Kerberos Realms setting. To customize the mapping rules, specify additional rules in theAdditional Rules to Map Kerberos Principals to Short Names setting, one rule per line. Only enter rules in this field;ClouderaManager automatically surrounds the ruleswith the appropriate XML tags for the generated core-site.xmlfile. For more information on creating custom rules, including how to translate mixed-case Kerberos principals tolowercase Hadoop usernames, see Mapping Rule Syntax on page 124.
If you specify custom mapping rules for a Kerberos realm using the Additional Rules to Map Kerberos Principals toShort Names setting, ensure that the same realm is not specified in the Trusted Kerberos Realms setting. If it is, theauto-generated rule (which only strips the realm from the principal and does no additional transformations) takesprecedent, and the custom rule is ignored.
For these changes to take effect, you must restart the cluster and re-deploy the client configuration. On the ClouderaManager Home page, click the cluster-wide button and select Deploy Client Configuration.
Using Auth-to-Local Rules to Isolate Cluster Users
By default, the Hadoop auth-to-local rules map a principal of the form <username>/<hostname>@<REALM> to<username>. This means if there are multiple clusters in the same realm, then principals associated with hosts of onecluster would map to the same user in all other clusters.
32 | Cloudera Security
Authentication
For example, if you have two clusters, cluster1-host-[1..4].example.com and cluster2-host-[1..4].example.com, that are part of the same Kerberos realm, EXAMPLE.COM, then the cluster2 principal,hdfs/[email protected], will map to the hdfs user even on cluster1 hosts.
To prevent this, use auth-to-local rules as follows to ensure only principals containing hostnames of cluster1 aremapped to legitimate users.
1. Go to the HDFS Service > Configuration tab.2. Select Scope > HDFS (Service-Wide).3. Select Category > Security.4. In the Search field, type Additional Rules to find the Additional Rules to Map Kerberos Principals to Short
Names settings.5. Additional mapping rules can be added to the Additional Rules to Map Kerberos Principals to Short Names
property. These rules will be inserted before the rules generated from the list of trusted realms (configured above)and before the default rule.
RULE:[2:$1/$2@$0](hdfs/[email protected])s/(.*)@EXAMPLE.COM/hdfs/RULE:[2:$1/$2@$0](hdfs/[email protected])s/(.*)@EXAMPLE.COM/hdfs/RULE:[2:$1/$2@$0](hdfs/[email protected])s/(.*)@EXAMPLE.COM/hdfs/RULE:[2:$1/$2@$0](hdfs/[email protected])s/(.*)@EXAMPLE.COM/hdfs/RULE:[2:$1/$2@$0](hdfs.*@EXAMPLE.COM)s/(.*)@EXAMPLE.COM/nobody/
In the example, the principal hdfs/<hostname>@REALM is mapped to the hdfs user if <hostname> is one ofthe cluster hosts. Otherwise it gets mapped to nobody, thus ensuring that principals from other clusters do nothave access to cluster1.
If the cluster hosts can be represented with a regular expression, that expression can be used to make theconfiguration easier and more conducive to scaling. For example:
RULE:[2:$1/$2@$0](hdfs/cluster1-host[1-4][email protected])s/(.*)@EXAMPLE.COM/hdfs/RULE:[2:$1/$2@$0](hdfs.*@EXAMPLE.COM)s/(.*)@EXAMPLE.COM/nobody/
6. Click Save Changes.7. Restart the HDFS service and any dependent services.
Configuring Kerberos for Flume Thrift Source and Sink
The Thrift source can be configured to start in secure mode by enabling Kerberos authentication. To communicatewith a secure Thrift source, the Thrift sink should also be operating in secure mode.
1. Open the Cloudera Manager Admin Console and go to the Flume service.2. Click the Configuration tab.3. Select Scope > Agent.4. Select Category >Main.5. Edit the Configuration File property and add the Thrift source and sink properties listed in the tables below to the
configuration file.
Table 1: Thrift Source Properties
DescriptionProperty
Set to true to enable Kerberos authentication. Theagent-principal and agent-keytab properties are required
kerberos
for successful authentication. The Thrift source in secure mode,will accept connections only from Thrift sinks that haveKerberos-enabled and are successfully authenticated to the KDC.
The Kerberos principal used by the Thrift Source to authenticateto the KDC.
agent-principal
Cloudera Security | 33
Authentication
DescriptionProperty
The path to the keytab file used by the Thrift Source in combinationwith the agent-principal to authenticate to the KDC.
agent-keytab
Table 2: Thrift Sink Properties
DescriptionProperty
Set to true to enable Kerberos authentication. In Kerberos mode,client-principal, client-keytab and server-principal are required for
kerberos
successful authentication and communication to a Kerberos enabledThrift Source.
The principal used by the Thrift Sink to authenticate to the KerberosKDC.
client-principal
The path to the keytab file used by the Thrift Sink in combinationwith the client-principal to authenticate to the KDC.
client-keytab
The principal of the Thrift Source to which this Thrift Sink connects.server-principal
Make sure you are configuring these properties for each Thrift source and sink instance. For example, for agenta1, source r1, and sink k1, you would add the following properties:
# Kerberos properties for Thrift source s1 a1.sources.r1.kerberos=truea1.sources.r1.agent-principal=<source_principal>a1.sources.r1.agent-keytab=<path/to/source/keytab>
# Kerberos properties for Thrift sink k1 a1.sinks.k1.kerberos=truea1.sinks.k1.client-principal=<sink_principal>a1.sinks.k1.client-keytab=<path/to/sink/keytab>a1.sinks.k1.server-principal=<path/to/source/keytab>
Configure these sets of properties for asmany instances of the Thrift source and sink as needed to enable Kerberos.
6. Click Save Changes to commit the changes.7. Restart the Flume service.
Configuring YARN for Long-running Applications
Long-running applications such as Spark Streaming jobs will need additional configuration since the default settingsonly allow the hdfs user's delegation tokens a maximum lifetime of 7 days which is not always sufficient.
You can work around this by configuring the ResourceManager as a proxy user for the corresponding HDFS NameNodeso that the ResourceManager can request new tokens when the existing ones are past their maximum lifetime. YARNwill then be able to continue performing localization and log-aggregation on behalf of the hdfs user.
Configure the proxy user in Cloudera Manager as follows:
1. Go to the Cloudera Manager Admin Console.2. Using the Clusters tab, go to the YARN service.3. Click the Configuration tab.4. Select Scope > Resource Manager.5. Select Category > Advanced.6. Check the Enable ResourceManager Proxy User Privileges property checkbox to give the ResourceManager proxy
user privileges.7. Click Save Changes.8. Using the Clusters tab, go to the HDFS service.
34 | Cloudera Security
Authentication

9. Click the Configuration tab.10. Select Scope > HDFS (Service-Wide).11. Select Category > Advanced.12. Add the following string to the Cluster-wide Advanced Configuration Snippet (Safety Valve) for core-site.xml
property.
<property><name>hadoop.proxyuser.yarn.hosts</name><value>*</value></property>
<property><name>hadoop.proxyuser.yarn.groups</name><value>*</value></property>
13. Click Save Changes.14. Restart the YARN and HDFS services.
Enabling Kerberos Authentication Without the Wizard
Minimum Required Role: Configurator (also provided by Cluster Administrator, Full Administrator)
Note that certain steps in the following procedure to configure Kerberos security may not be completed without FullAdministrator role privileges.
Important: Ensure you have secured communication between the Cloudera Manager Server andAgents before you enable Kerberos on your cluster. Kerberos keytabs are sent from the ClouderaManager Server to the Agents, and must be encrypted to prevent potential misuse of leaked keytabs.For secure communication, you should have at least Level 1 TLS enabled as described in ConfiguringTLS Security for Cloudera Manager (Level 1).
• Prerequisites - These instructions assume you know how to install and configure Kerberos, you already have aworking Kerberos key distribution center (KDC) and realm setup, and that you've installed the following Kerberosclient packages on all cluster hosts and hosts that will be used to access the cluster, depending on the OS in use.
Packages to be InstalledOS
RHEL/CentOS 5,RHEL/CentOS 6
• openldap-clients on the Cloudera Manager Server host• krb5-workstation, krb5-libs on ALL hosts
SLES • openldap2-client on the Cloudera Manager Server host• krb5-client on ALL hosts
Ubuntu or Debian • ldap-utils on the Cloudera Manager Server host• krb5-user on ALL hosts
Windows • krb5-workstation, krb5-libs on ALL hosts
Furthermore, Oozie andHue require that the realm support renewable tickets. ClouderaManager supports settingup kerberized clusters with MIT KDC and Active Directory.
Important: If you want to integrate Kerberos directly with Active Directory, ensure you havesupport from your AD administration team to do so. This includes any future support requiredto troubleshoot issues such as Kerberos TGT/TGS ticket renewal, access to KDC logs for debuggingand so on.
Cloudera Security | 35
Authentication

For more information about using Active Directory, refer the section below on Considerations when using anActive Directory KDC and the Microsoft AD documentation.
For more information about installing and configuring MIT KDC, see:
• MIT Kerberos Home• MIT Kerberos Documentation
• Support
– Kerberos security in Cloudera Manager has been tested on the following version of MIT Kerberos 5:
– krb5-1.6.1 on Red Hat Enterprise Linux 5 and CentOS 5
– Kerberos security in Cloudera Manager is supported on the following versions of MIT Kerberos 5:
– krb5-1.6.3 on SLES 11 Service Pack 1– krb5-1.8.1 on Ubuntu– krb5-1.8.2 on Red Hat Enterprise Linux 6 and CentOS 6– krb5-1.9 on Red Hat Enterprise Linux 6.1
Here are the general steps to using Cloudera Manager to configure Hadoop security on your cluster, each of which isdescribed in more detail in the following sections:
Step 1: Install Cloudera Manager and CDH
If you have not already done so, Cloudera strongly recommends that you install and configure the Cloudera ManagerServer and Cloudera Manager Agents and CDH to set up a fully-functional CDH cluster before you begin performingthe steps to implement Kerberos authentication.
User Accounts and Groups in CDH and Cloudera Manager Required to Support Security:
When you install the CDH packages and the Cloudera Manager Agents on your cluster hosts, Cloudera Manager takessome steps to provide system security such as creating the following Unix accounts and setting directory permissionsas shown in the following table. TheseUnix accounts and directory permissionsworkwith the Hadoop Kerberos securityrequirements.
Note: Cloudera Manager 5.3 introduces a new single user mode. In single user mode, the ClouderaManager Agent and all the processes run by services managed by Cloudera Manager are started as asingle configured user and group. See Single User Mode Requirements for more information.
Runs These RolesThis User
NameNode, DataNodes, and Secondary Nodehdfs
JobTracker and TaskTrackers (MR1) and Job History Server (YARN)mapred
ResourceManager and NodeManagers (YARN)yarn
Oozie Serveroozie
Hue Server, Beeswax Server, Authorization Manager, and Job Designerhue
The hdfs user also acts as the HDFS superuser.
When you install the Cloudera Manager Server on the server host, a new Unix user account called cloudera-scm iscreated automatically to support security. The Cloudera Manager Server uses this account to create and deploy thehost principals and keytabs on your cluster.
Depending on whether you installed CDH and Cloudera Manager at the same time or not, use one of the followingsections for information on configuring directory ownerships on cluster hosts:
36 | Cloudera Security
Authentication

If you installed CDH and Cloudera Manager at the Same Time
If you have a new installation and you installed CDH and Cloudera Manager at the same time, when you started theCloudera Manager Agents on your cluster hosts, the Cloudera Manager Agent on each host automatically configuredthe directory owners shown in the following table to support security. Assuming the owners are configured as shown,the Hadoop daemons can then automatically set the permissions for each of the directories specified by the propertiesshown below to make sure they are properly restricted. It's critical that the owners are configured exactly as shownbelow, so do not change them:
OwnerDirectory Specified in this Property
hdfs:hadoopdfs.name.dir
hdfs:hadoopdfs.data.dir
mapred:hadoopmapred.local.dir
mapred:hadoopmapred.system.dir in HDFS
yarn:yarnyarn.nodemanager.local-dirs
yarn:yarnyarn.nodemanager.log-dirs
oozie:oozieoozie.service.StoreService.jdbc.url (if usingDerby)
hue:hue[[database]] name
hue:huejavax.jdo.option.ConnectionURL
If you Installed and Used CDH Before Installing Cloudera Manager
If you have been using HDFS and runningMapReduce jobs in an existing installation of CDHbefore you installed ClouderaManager, you must manually configure the owners of the directories shown in the table above. Doing so enables theHadoop daemons to automatically set the permissions for each of the directories. It's critical that youmanually configurethe owners exactly as shown above.
Step 2: If You are Using AES-256 Encryption, Install the JCE Policy File
If you are using CentOS or RHEL 5.5 or later, which use AES-256 encryption by default for tickets, you must install theJava Cryptography Extension (JCE) Unlimited Strength Jurisdiction Policy File on all cluster and Hadoop user hosts.There are 2 ways to do this:
• In the Cloudera Manager Admin Console, go to the Hosts page. Both, the Add New Hosts to Cluster wizard andthe Re-run Upgrade Wizard will give you the option to have Cloudera Manager install the JCE Policy file for you.
• You can follow the JCE Policy File installation instructions in the README.txt file included in thejce_policy-x.zip file.
Alternatively, you can configure Kerberos to not use AES-256 by removing aes256-cts:normal from thesupported_enctypes field of the kdc.conf or krb5.conf file. Note that after changing the kdc.conf file, you'llneed to restart both the KDC and the kadmin server for those changes to take affect. You may also need to recreateor change the password of the relevant principals, including potentially the Ticket Granting Ticket principal (for example,krbtgt/[email protected]). If AES-256 is still used after all of those steps, it's because theaes256-cts:normal setting existed when the Kerberos database was created. To fix this, create a new Kerberosdatabase and then restart both the KDC and the kadmin server.
To verify the type of encryption used in your cluster:
1. On the local KDC host, type this command in the kadmin.local or kadmin shell to create a test principal:
kadmin: addprinc test
Cloudera Security | 37
Authentication

2. On a cluster host, type this command to start a Kerberos session as the test principal:
$ kinit test
3. After successfully running the previous command, type this command to view the encryption type in use:
$ klist -e
If AES is being used, output like the following is displayed after you type the klist command (note that AES-256is included in the output):
Ticket cache: FILE:/tmp/krb5cc_0Default principal: [email protected] starting Expires Service principal05/19/11 13:25:04 05/20/11 13:25:04 krbtgt/[email protected] Etype (skey, tkt): AES-256 CTS mode with 96-bit SHA-1 HMAC, AES-256 CTS mode with 96-bit SHA-1 HMAC
Step 3: Get or Create a Kerberos Principal for the Cloudera Manager Server
In order to create and deploy the host principals and keytabs on your cluster, the Cloudera Manager Server must havethe correct Kerberos principal. Specifically, the Cloudera Manager Server must have a Kerberos principal that hasadministrator privileges. Typically, principals with the second component of admin in the principal name (for example,username/[email protected]) have administrator privileges. This iswhyadmin is shown in the following instructionsand examples.
To get or create the Kerberos principal for the Cloudera Manager Server, you can do either of the following:
• Ask your Kerberos administrator to create a Kerberos administrator principal for the Cloudera Manager Server.• Create the Kerberos principal for the Cloudera Manager Server yourself by using the following instructions in this
step.
Creating the Cloudera Manager Principal
If you are using Active Directory
1. Create an Organizational Unit (OU) in your AD where all the principals used by your CDH cluster will reside.2. Add a new AD user, for example, <username>@EXAMPLE.COM. The password for this user should be set to never
expire.3. Use AD's Delegate Control wizard to allow this new user to Create, Delete and Manage User Accounts.
If you are using MIT KDC
The instructions in this section illustrate an example of creating the ClouderaManager Server principal forMIT Kerberos.(If you are using another version of Kerberos, refer to your Kerberos documentation for instructions.)
Note: If you are running kadmin and the Kerberos Key Distribution Center (KDC) on the same host,use kadmin.local in the following steps. If the Kerberos KDC is running on a remote host, you mustuse kadmin instead of kadmin.local.
In the kadmin.local or kadmin shell, type the following command to create the Cloudera Manager Server principal,replacing EXAMPLE.COM with the name of your realm:
kadmin: addprinc -pw <Password> cloudera-scm/[email protected]
Step 4: Import KDC Account Manager Credentials
1. In the Cloudera Manager Admin Console, select Administration > Kerberos.2. Go to the Credentials tab and click Import Kerberos Account Manager Credentials.
38 | Cloudera Security
Authentication
3. In the Import Kerberos Account Manager Credentials dialog box, enter the username and password for the userthat can create principals for CDH cluster in the KDC. This is the user/principal you created in Step 3: Get or Createa Kerberos Principal for the Cloudera Manager Server on page 38. Cloudera Manager encrypts the username andpassword into a keytab and uses it as needed to create new principals.
Note: The username entered should have the realm portion in upper-case only as shown in theexample in the UI.
Click Close when complete.
Step 5: Configure the Kerberos Default Realm in the Cloudera Manager Admin Console
Minimum Required Role: Full Administrator
Important: Hadoop is unable to use a non-default realm. The Kerberos default realm is configuredin the libdefaults property in the /etc/krb5.conf file on every host in the cluster:
[libdefaults] default_realm = EXAMPLE.COM
1. In the Cloudera Manager Admin Console, select Administration > Settings.2. Click the Security category, and enter the Kerberos realm for the cluster in the Kerberos Security Realm field (for
example, EXAMPLE.COM or HADOOP.EXAMPLE.COM) that you configured in the krb5.conf file.3. Click Save Changes.
Step 6: Stop All Services
Minimum Required Role: Operator (also provided by Configurator, Cluster Administrator, Full Administrator)
Before you enable security in CDH, you must stop all Hadoop daemons in your cluster and then change someconfiguration properties. You must stop all daemons in the cluster because after one Hadoop daemon has beenrestarted with the configuration properties set to enable security. Daemons running without security enabled will beunable to communicate with that daemon. This requirement to stop all daemons makes it impossible to do a rollingupgrade to enable security on a Hadoop cluster.
Stop all running services, and the Cloudera Management service, as follows:
Stopping All Services
1. On the Home page, click
to the right of the cluster name and select Stop.2. Click Stop in the confirmation screen. The Command Details window shows the progress of stopping services.
When All services successfully stopped appears, the task is complete and you can close the Command Detailswindow.
Stopping the Cloudera Management Service
1. On the Home page, click
to the right of Cloudera Management Service and select Stop.2. Click Stop to confirm. The Command Details window shows the progress of stopping the roles.3. When Command completed with n/n successful subcommands appears, the task is complete. Click Close.
Cloudera Security | 39
Authentication

Step 7: Enable Hadoop Security
Minimum Required Role: Configurator (also provided by Cluster Administrator, Full Administrator)
To enable Hadoop security for the cluster, you enable it on an HDFS service. After you do so, the Cloudera ManagerServer automatically enables Hadoop security on theMapReduce and YARN services associatedwith that HDFS service.
1. Go to the HDFS Service > Configuration tab.2. In the Search field, type Hadoop Secure to show the Hadoop security properties (found under the Service-Wide
> Security category).3. Click the value for theHadoop Secure Authentication property and select the kerberos option to enable Hadoop
security on the selected HDFS service.4. Click the value for the Hadoop Secure Authorization property and select the checkbox to enable service-level
authorization on the selected HDFS service. You can specify comma-separated lists of users and groups authorizedto use Hadoop services or perform admin operations using the following properties under the Service-Wide >Security section:
• Authorized Users: Comma-separated list of users authorized to use Hadoop services.• Authorized Groups: Comma-separated list of groups authorized to use Hadoop services.• AuthorizedAdminUsers: Comma-separated list of users authorized to performadmin operations onHadoop.• Authorized Admin Groups: Comma-separated list of groups authorized to perform admin operations on
Hadoop.
Important: For Cloudera Manager's Monitoring services to work, the hue user should always beadded as an authorized user.
5. In the Search field, type DataNode Transceiver to find the DataNode Transceiver Port property.6. Click the value for the DataNode Transceiver Port property and specify a privileged port number (below 1024).
Cloudera recommends 1004.
Note: If there is more than one DataNode Role Group, youmust specify a privileged port numberfor each DataNode Transceiver Port property.
7. In the Search field, typeDataNodeHTTP to find theDataNodeHTTPWebUI Port property and specify a privilegedport number (below 1024). Cloudera recommends 1006.
Note: These port numbers for the two DataNode properties must be below 1024 in order toprovide part of the security mechanism to make it impossible for a user to run aMapReduce taskthat impersonates a DataNode. The port numbers for the NameNode and Secondary NameNodecan be anything you want, but the default port numbers are good ones to use.
8. In the Search field type Data Directory Permissions to find the DataNode Data Directory Permissions property.9. Reset the value for the DataNode Data Directory Permissions property to the default value of 700 if not already
set to that.10. Make sure you have changed theDataNode Transceiver Port,DataNodeDataDirectory Permissions andDataNode
HTTP Web UI Port properties for every DataNode role group.11. Click Save Changes to save the configuration settings.
To enable ZooKeeper security:
1. Go to the ZooKeeper Service > Configuration tab and click View and Edit.2. Click the value for Enable Kerberos Authentication property.3. Click Save Changes to save the configuration settings.
To enable HBase security:
1. Go to the HBase Service > Configuration tab and click View and Edit.
40 | Cloudera Security
Authentication

2. In the Search field, type HBase Secure to show the Hadoop security properties (found under the Service-Wide >Security category).
3. Click the value for the HBase Secure Authorization property and select the checkbox to enable authorization onthe selected HBase service.
4. Click the value for the HBase Secure Authentication property and select kerberos to enable authorization onthe selected HBase service.
5. Click Save Changes to save the configuration settings.
(CDH 4.3 or later) To enable Solr security:
1. Go to the Solr Service > Configuration tab and click View and Edit.2. In the Search field, type Solr Secure to show the Solr security properties (found under the Service-Wide > Security
category).3. Click the value for the Solr Secure Authentication property and select kerberos to enable authorization on the
selected Solr service.4. Click Save Changes to save the configuration settings.
Note: If you use the Cloudera Manager Admin Console to generate a client configuration file afteryou enable Hadoop security on your cluster, the generated configuration file will not contain theKerberos principal and keytab file that end users need to authenticate. Users must obtain Kerberosprincipal and keytab file from your Kerberos administrator and then run the kinit commandthemselves.
Step 8: Wait for the Generate Credentials Command to Finish
Minimum Required Role: Configurator (also provided by Cluster Administrator, Full Administrator)
After you enable security for any of the services in Cloudera Manager, a command called Generate Credentials will betriggered automatically. You can watch the progress of the command on the top right corner of the screen that showsthe running commands. Wait for this command to finish (indicated by a grey box containing "0" in it).
Step 9: Enable Hue to Work with Hadoop Security using Cloudera Manager
Minimum Required Role: Cluster Administrator (also provided by Full Administrator)
If you are using a Hue service, you must add a role instance of Kerberos Ticket Renewer to the Hue service to enableHue to work properly with the secure Hadoop cluster using Cloudera Manager. The Kerberos Ticket Renewer role mustbe located on the same host as the Hue Server role. You add can the necessary Kerberos Ticket Renewer role instancesusing Cloudera Manager.
The Hue Kerberos Ticket Renewer service will only renew tickets for the Hue service, for the principalhue/<hostname>@<YOUR-REALM.COM>. The Hue principal is then used to impersonate other users for applicationswithin Hue such as the Job Browser, File Browser and so on.
Other services, such as HDFS and MapReduce, do not use the Hue Kerberos Ticket Renewer. They obtain tickets atstartup and use those tickets to obtain Delegation Tokens for various access privileges. Each service handles its ownticket renewal as needed.
To add a Kerberos Ticket Renewer role instance using Cloudera Manager:
1. Go to the Hue service.2. Click the Instances tab.3. Click the Add Role Instances button.4. Assign the Kerberos Ticket Renewer role instance to the same host as the Hue server.5. When the wizard is finished, the status will display Finished and the Kerberos Ticket Renewer role instance is
configured. The Hue service will now work with the secure Hadoop cluster.6. Repeat these steps for each Hue Server role.
Troubleshooting the Kerberos Ticket Renewer:
Cloudera Security | 41
Authentication
If the Hue Kerberos Ticket Renewer does not start, check your KDC configuration and the ticket renewal property,maxrenewlife, for the hue/<hostname> and krbtgt principals to ensure they are renewable. If not, running thefollowing commands on the KDC will enable renewable tickets for these principals.
kadmin.local: modprinc -maxrenewlife 90day krbtgt/YOUR_REALM.COMkadmin.local: modprinc -maxrenewlife 90day +allow_renewable hue/<hostname>@YOUR-REALM.COM
Step 10: (Flume Only) Use Substitution Variables for the Kerberos Principal and Keytab
Minimum Required Role: Configurator (also provided by Cluster Administrator, Full Administrator)
As described in Flume Security Configuration in the CDH 4 Security Guide, if you are using Flume on a secure clusteryou must configure the HDFS sink with the following configuration options in the flume.conf file:
• hdfs.kerberosPrincipal - fully-qualified principal.• hdfs.kerberosKeytab - location on the local host of the keytab containing the user and host keys for the above
principal
Here is an example of an HDFS sink configuration in the flume.conf file (the majority of the HDFS sink configurationoptions have been omitted):
agent.sinks.sink-1.type = HDFSagent.sinks.sink-1.hdfs.kerberosPrincipal = flume/[email protected] = /etc/flume-ng/conf/flume.keytabagent.sinks.sink-1.hdfs.proxyUser = weblogs
Since ClouderaManager generates the Flume keytab files for you, and the locations of the keytab files cannot be knownbeforehand, substitution variables are required for Flume. ClouderaManager provides two Flume substitution variablescalled $KERBEROS_PRINCIPAL and $KERBEROS_KEYTAB to configure the principal name and the keytab file pathrespectively on each host.
Here is an example of using the substitution variables to configure the options shown in the previous example:
agent.sinks.sink-1.type = hdfsagent.sinks.sink-1.hdfs.kerberosPrincipal = $KERBEROS_PRINCIPALagent.sinks.sink-1.hdfs.kerberosKeytab = $KERBEROS_KEYTABagent.sinks.sink-1.hdfs.proxyUser = weblogs
Use the following instructions to have Cloudera Manager add these variables to the flume.conf file on every hostthat Cloudera Manager manages.
To use the Flume substitution variables for the Kerberos principal and keytab:
1. Go to the Flume service > Configuration page in Cloudera Manager.2. Click Agent.3. In the Configuration File property, add the configuration options with the substitution variables. For example:
agent.sinks.sink-1.type = hdfsagent.sinks.sink-1.hdfs.kerberosPrincipal = $KERBEROS_PRINCIPALagent.sinks.sink-1.hdfs.kerberosKeytab = $KERBEROS_KEYTABagent.sinks.sink-1.hdfs.proxyUser = weblogs
4. Click Save.
Step 11: (CDH 4.0 and 4.1 only) Configure Hue to Use a Local Hive Metastore
If using Hue and the Bypass Hive Metastore Server option is not selected (metastore bypass is disabled by default),then Hue will not be able to communicate with Hive with CDH 4.0 or CDH 4.1. This is not a problem with CDH 4.2 orlater.
If you are using CDH 4.0 or 4.1, you can workaround this issue following the instructions in the Known Issues sectionof the Cloudera Manager 4 Release Notes.
42 | Cloudera Security
Authentication

Step 12: Start All Services
Minimum Required Role: Operator (also provided by Configurator, Cluster Administrator, Full Administrator)
Start all services on your cluster:
Starting All Services
1. On the Home page, click
to the right of the cluster name and select Start.2. Click Start that appears in the next screen to confirm. The CommandDetailswindow shows the progress of starting
services.
When All services successfully started appears, the task is complete and you can close the Command Detailswindow.
Starting the Cloudera Management Service
1. On the Home page, click
to the right of Cloudera Management Service and select Start.2. Click Start to confirm. The Command Details window shows the progress of starting the roles.3. When Command completed with n/n successful subcommands appears, the task is complete. Click Close.
Step 13: Deploy Client Configurations
Minimum Required Role: Configurator (also provided by Cluster Administrator, Full Administrator)
1. On the Home page, click
to the right of the cluster name and select Deploy Client Configuration.2. Click Deploy Client Configuration.
Step 14: Create the HDFS Superuser Principal
To create home directories for users you require access to a superuser account. In HDFS, the user account running theNameNode process (hdfs by default) is a superuser. CDH automatically creates the hdfs superuser account on eachcluster host during CDH installation. When you enable Kerberos for the HDFS service, you lose access to the hdfssuperuser account via sudo -u hdfs commands. To enable access to the hdfs superuser account when Kerberos isenabled, you must create a Kerberos principal or an AD user whose first or only component is hdfs. Alternatively, youcan designate a superuser group, whose members are superusers.
To create the hdfs superuser principal:
If you are using Active DirectoryAdd a new user account to Active Directory, [email protected]. The password for this account should be set tonever expire.
If you are using MIT KDC
In the kadmin.local or kadmin shell, type the following command to create a Kerberos principal named hdfs:
kadmin: addprinc [email protected]
This command prompts you to create a password for the hdfs principal. Use a strong password because this principalprovides superuser access to all of the files in HDFS.
Cloudera Security | 43
Authentication
To run commands as the hdfs superuser, you must obtain Kerberos credentials for the hdfs principal. To do so, runthe following command and provide the password:
$ kinit [email protected]
Designating a Superuser Group
To designate a group of superusers instead of using the default hdfs account, follow these steps:
1. Go to the HDFS Service > Configuration tab.2. In the Search field, type Superuser to display the Superuser Group property.3. Change the value from the default supergroup to the appropriate group name for your environment.4. Click Save Changes.
For this change to take effect, you must restart the cluster.
Step 15: Get or Create a Kerberos Principal for Each User Account
Now that Kerberos is configured and enabled on your cluster, you and every other Hadoop user must have a Kerberosprincipal or keytab to obtain Kerberos credentials to be allowed to access the cluster and use the Hadoop services. Inthe next step of this procedure, you will need to create your own Kerberos principals in order to verify that Kerberossecurity is working on your cluster. If you and the other Hadoop users already have a Kerberos principal or keytab, orif your Kerberos administrator can provide them, you can skip ahead to the next step.
The following instructions explain how to create a Kerberos principal for a user account.
If you are using Active Directory
Add a newAD user account, <username>@EXAMPLE.COM for each ClouderaManager service that should use Kerberosauthentication. The password for these service accounts should be set to never expire.
If you are using MIT KDC
1. In the kadmin.local or kadmin shell, use the following command to create a principal for your account by replacingEXAMPLE.COM with the name of your realm, and replacing username with a username:
kadmin: addprinc [email protected]
2. When prompted, enter the password twice.
Step 16: Prepare the Cluster for Each User
Before you and other users can access the cluster, there are a few tasks you must do to prepare the hosts for eachuser.
1. Make sure all hosts in the cluster have a Unix user account with the same name as the first component of thatuser's principal name. For example, the Unix account joe should exist on every box if the user's principal nameis [email protected]. You can use LDAP for this step if it is available in your organization.
Note: Each account must have a user ID that is greater than or equal to 1000. In the/etc/hadoop/conf/taskcontroller.cfg file, the default setting for the banned.usersproperty ismapred,hdfs, andbin to prevent jobs frombeing submitted from those user accounts.The default setting for the min.user.id property is 1000 to prevent jobs from being submittedwith a user ID less than 1000, which are conventionally Unix super users.
44 | Cloudera Security
Authentication

2. Create a subdirectory under /user on HDFS for each user account (for example, /user/joe). Change the ownerand group of that directory to be the user.
$ hadoop fs -mkdir /user/joe$ hadoop fs -chown joe /user/joe
Note: sudo -u hdfs is not included in the commands above. This is because it is not required ifKerberos is enabled on your cluster. You will, however, need to have Kerberos credentials for theHDFS super user in order to successfully run these commands. For information on gaining access tothe HDFS super user account, see Step 14: Create the HDFS Superuser Principal on page 43
Step 17: Verify that Kerberos Security is Working
After you have Kerberos credentials, you can verify that Kerberos security is working on your cluster by trying to runMapReduce jobs. To confirm, try launching a sleep or a pi job from the provided Hadoop examples(/usr/lib/hadoop/hadoop-examples.jar).
Note:
This section assumes you have a fully-functional CDH cluster and you have been able to access HDFSand run MapReduce jobs before you followed these instructions to configure and enable Kerberoson your cluster. If you have not already done so, you should at a minimum use the Cloudera ManagerAdmin Console to generate a client configuration file to enable you to access the cluster. Forinstructions, see Deploying Client Configuration Files.
To verify that Kerberos security is working:
1. Acquire Kerberos credentials for your user account.
$ kinit [email protected]
2. Enter a password when prompted.3. Submit a sample pi calculation as a test MapReduce job. Use the following command if you use a package-based
setup for Cloudera Manager:
$ hadoop jar /usr/lib/hadoop-0.20/hadoop-0.20.2*examples.jar pi 10 10000Number of Maps = 10Samples per Map = 10000...Job Finished in 38.572 secondsEstimated value of Pi is 3.14120000000000000000
If you have a parcel-based setup, use the following command instead:
$ hadoop jar /opt/cloudera/parcels/CDH/lib/hadoop-0.20-mapreduce/hadoop-examples.jar pi 10 10000Number of Maps = 10Samples per Map = 10000...Job Finished in 30.958 secondsEstimated value of Pi is 3.14120000000000000000
You have now verified that Kerberos security is working on your cluster.
Cloudera Security | 45
Authentication

Important:
Running a MapReduce job will fail if you do not have a valid Kerberos ticket in your credentials cache.You can examine the Kerberos tickets currently in your credentials cache by running the klistcommand. You can obtain a ticket by running the kinit command and either specifying a keytab filecontaining credentials, or entering the password for your principal. If you do not have a valid ticket,you will receive an error such as:
11/01/04 12:08:12 WARN ipc.Client:Exception encountered while connecting to the server :javax.security.sasl.SaslException:GSS initiate failed [Caused by GSSException: No valid credentials provided (Mechanism level: Failed to find anyKerberos tgt)]Bad connection to FS. command aborted. exception: Call to nn-host/10.0.0.2:8020 failed on local exception:java.io.IOException:javax.security.sasl.SaslException: GSS initiate failed[Caused by GSSException: No valid credentials provided(Mechanism level: Failed to find any Kerberos tgt)]
Step 18: (Optional) Enable Authentication for HTTP Web Consoles for Hadoop Roles
Minimum Required Role: Configurator (also provided by Cluster Administrator, Full Administrator)
Authentication for access to the HDFS,MapReduce, and YARN roles' web consoles can be enabled using a configurationoption for the appropriate service. To enable this authentication:
1. From the Clusters tab, select the service (HDFS,MapReduce, or YARN) forwhich youwant to enable authentication.2. Click the Configuration tab.3. Select Scope > serviceName Service-Wide.4. Select Category > Security.5. Select Enable Kerberos Authentication for HTTP Web-Consoles.6. Click Save Changes to commit the changes.7. Once the command finishes, restart all roles of that service.
Configuring Authentication in the Cloudera Navigator Data Management ComponentClouderaNavigator datamanagement component supports user authentication against ClouderaManager user accountsand against an external LDAP or Active Directory service. External authentication enables you to assign ClouderaNavigator user roles to LDAP or Active Directory groups containing the appropriate users for each user role.Authenticationwith a ClouderaManager user account requires either the Full Administrator or Navigator Administratoruser role, and enables the user to use Cloudera Navigator features or to configure the external authentication service.
Configuring External Authentication for the Cloudera Navigator Data Management Component
Minimum Required Role: Navigator Administrator (also provided by Full Administrator)
Important: This feature is available only with a Cloudera Enterprise license; it is not available inCloudera Express. For information on Cloudera Enterprise licenses, see Managing Licenses.
Cloudera Navigator supports user authentication against Cloudera Manager user accounts and against an externalservice. The external service can be either LDAP or Active Directory. User authentication against Cloudera Manageruser accounts requires users to have one of two Cloudera Manager user roles, either Full Administrator or NavigatorAdministrator. External authentication enables you to assign Cloudera Navigator user roles to LDAP or Active Directorygroups to which the appropriate users belong.
46 | Cloudera Security
Authentication
For more information about Cloudera Manager user accounts, see Cloudera Manager User Accounts on page 10. Formore information about Cloudera Navigator user roles, see Cloudera Navigator Data Management Component UserRoles on page 280.
The following sections describe how to configure the supported external directory services.
Configuring Cloudera Navigator Authentication Using Active Directory
Important:
Cloudera Navigator has its own role-based access control and user management scheme. If you wantto use LDAP/AD authentication, Cloudera Navigator roles must be explicitly assigned to AD users toallow them to log in to Navigator. To assign roles to AD users, log in to Cloudera Navigator for the firsttime using a ClouderaManager admin user. Any non-externally authenticated ClouderaManager userthat has Full Administrator or Navigator Administrator privileges will have admin access to ClouderaNavigator. You can use this account to set up user groups and assign Cloudera Navigator roles to ADusers.
Hence, Cloudera recommends that the Authentication Backend Order property be set initially toClouderaManager then External. Otherwise, the external authentication systemwill be checked first,and if the same user credentials also exist in the specified LDAP or Active Directory, the user will beauthenticated there, and will not be authenticated as a Cloudera Manager administrator. Since nouser roles will have been set up yet for the users in the external authentication system, the user'sattempt to log in will fail. Once the groups and user roles for Cloudera Navigator are set up, theAuthentication Backend Order can be changed to External then ClouderaManager or External Only,if desired.
To configure Cloudera Navigator to use AD authentication:
1. Select Clusters > Cloudera Management Service.2. Click the Configuration tab.3. Select Scope > Navigator Metadata Server.4. Select Category > External Authentication.5. In the Authentication Backend Order field, select the order in which Cloudera Navigator should attempt its
authentication. You can choose to authenticate users using just one of the methods (using Cloudera Manageruser accounts is the default), or you can set it so that if the user cannot be authenticated by the first method, itwill attempt using the second method.
6. In the External Authentication Type property, select Active Directory.7. In the LDAP URL property, provide the URL of the Active Directory server.8. In the Bind Distinguished Name, enter the distinguished name of the user to bind as. This is used to connect to
Active Directory for searching groups and to get other user information.9. In the LDAP Bind Password, enter the password for the bind user entered above.10. In the Active Directory NT Domain property, provide the NT domain to authenticate against.11. Click Save Changes to commit the changes.12. After changing the configuration settings, restart the Navigator Metadata Service: click the Instances tab on the
ClouderaManagement Service page, checkNavigatorMetadata Service, and clickActions for Selected > Restart.
Configuring Cloudera Navigator Authentication Using an OpenLDAP-compatible Server
For an OpenLDAP-compatible directory, you have several options for searching for users and groups:
• You can specify a single base Distinguished Name (DN) and then provide a "Distinguished Name Pattern" to useto match a specific user in the LDAP directory.
• Search filter options let you search for a particular user based on somewhat broader search criteria – for exampleCloudera Navigator users could be members of different groups or organizational units (OUs), so a single patternwon't find all those users. Search filter options also let you find all the groups to which a user belongs, to helpdetermine if that user should be allowed to log in.
Cloudera Security | 47
Authentication

1. Select Clusters > Cloudera Management Service.2. Click the Configuration tab.3. Select Scope > Navigator Metadata Server.4. Select Category > External Authentication.5. In the Authentication Backend Order field, select the order in which Cloudera Navigator should attempt its
authentication. You can choose to authenticate users using just one of the methods (using Cloudera Manageruser accounts is the default), or you can set it so that if the user cannot be authenticated by the first method, itwill attempt using the second method.
6. In the External Authentication Type, select LDAP.7. In the LDAP URL property, provide the URL of the LDAP server and (optionally) the base Distinguished Name (DN)
(the search base) as part of the URL — for example ldap://ldap-server.corp.com/dc=corp,dc=com.8. In the Bind Distinguished Name property, enter the distinguished name of the user to bind as. This is used to
connect to the LDAP server for searching groups and to get other user information.9. In the LDAP Bind Password property, enter the password for the bind user entered above.10. To use a single "DistinguishedNamePattern", provide a pattern in the LDAPDistinguishedNamePattern property.
Use {0} in the pattern to indicate where the username should go. For example, to search for a distinguished namewhere the uid attribute is the username, you might provide a pattern similar touid={0},ou=People,dc=corp,dc=com. Cloudera Navigator substitutes the name provided at login into thispattern and performs a search for that specific user. So if a user provides the username "foo" at the ClouderaNavigator login page, Cloudera Navigator will search for the DN uid=foo,ou=People,dc=corp,dc=com.
If you provided a base DN along with the URL, the pattern only needs to specify the rest of the DN pattern. Forexample, if the URL you provide is ldap://ldap-server.corp.com/dc=corp,dc=com, and the pattern isuid={0},ou=People, then the search DN will be uid=foo,ou=People,dc=corp,dc=com.
11. You can also search using User or Group search filters, using the LDAP User Search Base, LDAP User Search Filter,LDAP Group Search Base and LDAP Group Search Filter settings. These allow you to combine a base DN with asearch filter to allow a greater range of search targets.
For example, if you want to authenticate users who may be in one of multiple OUs, the search filter mechanismwill allow this. You can specify theUser Search Base DN as dc=corp,dc=com and the user search filter as uid={0}.Then Cloudera Navigator will search for the user anywhere in the tree starting from the Base DN. Suppose youhave two OUs—ou=Engineering and ou=Operations—Cloudera Navigator will find User "foo" if it exists ineither of these OUs, that is, uid=foo,ou=Engineering,dc=corp,dc=com oruid=foo,ou=Operations,dc=corp,dc=com.
You can use a user search filter along with a DN pattern, so that the search filter provides a fallback if the DNpattern search fails.
The Groups filters let you search to determine if a DN or username is a member of a target group. In this case,the filter you provide can be something like member={0}where {0}will be replaced with the DN of the user youare authenticating. For a filter requiring the username, {1}may be used, as memberUid={1}. This will return alist of groups to which the user belongs.
12. Click Save Changes to commit the changes.13. After changing the configuration settings, restart the Navigator Metadata Service: click the Instances tab on the
ClouderaManagement Service page, checkNavigatorMetadata Service, and clickActions for Selected > Restart.
Configuring Cloudera Navigator to Use LDAPS
If the LDAP server certificate has been signed by a trusted Certificate Authority (that is, VeriSign, GeoTrust, and so on),steps 1 and 2 below may not be necessary.
1. Copy the CA certificate file to the Cloudera Navigator Server host.2. Import the CA certificate(s) from the CA certificate file to the local truststore. The default truststore is located in
the $JAVA_HOME/jre/lib/security/cacerts file. This contains the default CA information shipped with theJDK. Create an alternate default file called jssecacerts in the same location as the cacerts file. You can now
48 | Cloudera Security
Authentication

safely append CA certificates for any private or public CAs not present in the default cacerts file, while keepingthe original file intact.
For our example, we will follow this recommendation by copying the default cacerts file into the newjssecacerts file, and then importing the CA certificate to this alternate truststore.
$ cp $JAVA_HOME/jre/lib/security/cacerts \ $JAVA_HOME/jre/lib/jssecacerts
$ /usr/java/latest/bin/keytool -import -alias nt_domain_name \-keystore /usr/java/latest/jre/lib/security/jssecacerts -file path_to_cert
Note:
• The default password for the cacerts store is changeit.• The alias can be any name (not just the domain name).
3. Configure the LDAP URL property to use ldaps://ldap_server instead of ldap://ldap_server.
Configuring Cloudera Navigator Authentication Using SAML
Cloudera Navigator supports the Security Assertion Markup Language (SAML), an XML-based open standard dataformat for exchanging authentication and authorization data between parties, in particular, between an identityprovider (IDP) and a service provider (SP). The SAML specification defines three roles: the principal (typically a user),the IDP, and the SP. In the use case addressed by SAML, the principal (user agent) requests a service from the serviceprovider. The service provider requests and obtains an identity assertion from the IDP. On the basis of this assertion,the SP can make an access control decision—in other words it can decide whether to perform some service for theconnected principal.
The primary SAML use case is called web browser single sign-on (SSO). A user wielding a user agent (usually a webbrowser) requests a web resource protected by a SAML SP. The SP, wishing to know the identity of the requestinguser, issues an authentication request to a SAML IDP through the user agent. In the context of this terminology, ClouderaNavigator operates as a SP. This topic discusses the Cloudera Navigator part of the configuration process; it assumesthat you are familiar with SAML and SAML configuration in a general sense, and that you have a functioning IDP alreadydeployed.
Setting up Cloudera Navigator to use SAML requires the following steps.
Preparing Files
You will need to prepare the following files and information, and provide these to Cloudera Navigator:
• A Java keystore containing a private key for Cloudera Navigator to use to sign/encrypt SAML messages.• The SAML metadata XML file from your IDP. This file must contain the public certificates needed to verify the
sign/encrypt key used by your IDP per the SAML Metadata Interoperability Profile.• The entity ID that should be used to identify the Navigator Metadata Server instance.• How the user ID is passed in the SAML authentication response:
– As an attribute. If so, what identifier is used.– As the NameID.
• The method by which the Cloudera Navigator role will be established:
– From an attribute in the authentication response:
– What identifier will be used for the attribute– What values will be passed to indicate each role
– From an external script that will be called for each use:
– The script takes user ID as $1
Cloudera Security | 49
Authentication
– The script must assign an exit code to reflect successful authentication of the assigned role:
– 0 - Full Administrator– 1 - User Administrator– 2 - Auditing Viewer– 4 - Lineage Viewer– 8 - Metadata Administrator– 16 - Policy Viewer– 32 - Policy Administrator– A negative value is returned for a failure to authenticate
To assign more than one role, add the numbers for the roles. For example, to assign the Policy Viewerand User Administrator roles, the exit code should be 17.
Configuring Cloudera Navigator
1. Select Clusters > Cloudera Management Service.2. Click the Configuration tab.3. Select Scope > Navigator Metadata Server.4. Select Category > External Authentication.5. Type SAML in the Search box.6. Set the External Authentication Type property to SAML (the Authentication Backend Order property is ignored
for SAML).7. Set the Path to SAML IDP Metadata File property to point to the IDP metadata file.8. Set the Path to SAML Keystore File property to point to the Java keystore file containing the Cloudera Navigator
private key (prepared above).9. In the SAML Keystore Password property, set the SAML keystore password.10. In the Alias of SAML Sign/Encrypt Private Key property, set the alias used to identify the private key for Cloudera
Navigator to use.11. In the SAML Sign/Encrypt Private Key Password property, set the password for the sign/encrypt private key.12. Set the SAML Entity ID property if:
• There is more than one Cloudera Navigator instance being used with the same IDP (each instance needs adifferent entity ID).
• Entity IDs are assigned by organizational policy.
The entity ID value should be unique to the current Navigator Metadata Server installation.13. In the Source of User ID in SAML Response property, set whether the user ID will be obtained from an attribute
or the NameID.
If an attribute will be used, set the attribute name in the SAML Attribute Identifier for User ID property. Thedefault value is the normal OID used for user IDs and so may not need to be changed.
14. In the SAMLRole AssignmentMechanism property, setwhether the role assignmentwill be done froman attributeor an external script.
• If an attribute will be used:
– In the SAML Attribute Identifier for User Role property, set the attribute name if necessary. The defaultvalue is the normal OID used for OrganizationalUnits and so may not need to be changed.
– In the SAML Attribute Values for Roles property, set which attribute values will be used to indicate theuser role.
• If an external script will be used, set the path to that script in the Path to SAML Role Assignment Scriptproperty. Make sure that the script is executable (an executable binary is fine - it doesn’t need to be a shellscript).
15. Click Save Changes to commit the changes.
50 | Cloudera Security
Authentication

16. Restart the Navigator Metadata Server role.
Configuring the IDP
After the Cloudera Navigator is restarted, it will attempt to redirect to the IDP login page instead of showing the normalCloudera Navigator login page. This may or may not succeed, depending on how the IDP is configured. In either case,the IDP will need to be configured to recognize Cloudera Navigator before authentication will actually succeed. Thedetails of this process are specific to each IDP implementation - refer to your IDP documentation for details.
1. Download Cloudera Navigator's SAML metadata XML file from http://hostname:7187/saml/metadata.2. Inspect the metadata file and ensure that any URLs contained in the file can be resolved by users’ web browsers.
The IDP will redirect web browsers to these URLs at various points in the process. If the browser cannot resolvethem, authentication will fail. If the URLs are incorrect, you can manually fix the XML file or set the SAML EntityBase URL property in the Navigator Metadata Server configuration to the right value, and then re-download thefile.
3. Provide this metadata file to your IDP using whatever mechanism your IDP provides.4. Ensure that the IDP has access to whatever public certificates are necessary to validate the private key that was
provided by Cloudera Navigator earlier.5. Ensure that the IDP is configured to provide the User ID and Role using the attribute names that Cloudera Navigator
was configured to expect, if relevant.6. Ensure the changes to the IDP configuration have taken effect (a restart may be necessary).
Verifying Authentication and Authorization
1. Return to the Cloudera Navigator home page at: http://hostname:7187/.2. Attempt to log in with credentials for a user that is entitled. The authentication should complete and you should
see the Home page.3. If authentication fails, you will see an IDP provided error message. Cloudera Navigator is not involved in this part
of the process, and you must ensure the IDP is working correctly to complete the authentication.4. If authentication succeeds but the user is not authorized to use Cloudera Navigator, they will be taken to an error
page that explains the situation. If a user who should be authorized sees this error, then you will need to verifytheir role configuration, and ensure that it is being properly communicated to the Navigator Metadata Server,whether by attribute or external script. The Cloudera Navigator log will provide details on failures to establish auser’s role. If any errors occur during role mapping, Cloudera Navigator will assume the user is unauthorized.
Bypassing SAML SSOYou can bypass SAML SSO by directly accessing the Cloudera Navigator login page athttp://hostname:7187/login.html. If the Cloudera Management Service property Authentication BackendOrder, is set to anything but External Only, a Cloudera Manager user will be able to log in to Cloudera Navigator.
Managing Users and Groups for the Cloudera Navigator Data Management Component
Required Role:
Note: The above are Cloudera Navigator user roles. Users with the Cloudera Manager user rolesNavigator Administrator or Full Administrator who log into the Cloudera Navigator Web UI with theirCloudera Manager credentials will be logged in with the Full Administrator Cloudera Navigator userrole.
Cloudera Navigator supports user authentication against Cloudera Manager user accounts and against an externalLDAP or Active Directory service. External authentication enables you to assign Cloudera Navigator user roles to LDAPor Active Directory groups containing the appropriate users for each user role.
Cloudera Security | 51
Authentication
Assigning Cloudera Navigator User Roles to LDAP or Active Directory Groups
This section assumes that values for your LDAP or Active Directory directory service have been configured in ClouderaManager as described in Configuring External Authentication for Cloudera Navigator. This section also assumes thatyour LDAP or Active Directory service contains user groups that correspond to Cloudera Navigator user roles havingthe permissions you want each group of users to have. If not, you should assign your users to such groups now. TheCloudera Navigator user roles are as follows:
• Full Administrator• User Administrator• Auditing Viewer• Lineage Viewer• Metadata Administrator• Policy Viewer• Policy Administrator
Each of these roles and the permissions associated with it are described in Cloudera Navigator User Roles.
To add or remove Cloudera Navigator user roles to LDAP or Active Directory user groups, you should know the namesof the directory groups you want to configure, and then perform the following steps:
1. Open the Cloudera Navigator Web UI in one of the following ways:
• On the Clustersmenu of Cloudera Manager, click Cloudera Navigator in the Cloudera Management Servicesection for the desired cluster.
• Click the Instances tab on the Cloudera Management Service page, and click Navigator Metadata Server. Inthe Summary section's Quick Links, click Cloudera Navigator.
2. Log in to Cloudera Navigator with the credentials of a user having one or more of the following user roles:
• Cloudera Manager Full Administrator• Cloudera Manager Navigator Administrator• Cloudera Navigator Full Administrator• Cloudera Navigator User Administrator
3. Click the Administration tab in the upper right.4. Search for an LDAP or Active Directory group by entering its name (or the first portion of the name) in the search
field.
• Select All Groups to search among all groups in the external directory.• SelectGroupswith Navigator Roles to display only external directory groups that have already been assigned
one or more Cloudera Navigator user roles.
5. From the LDAP or Active Directory groups displayed, select the group to which you want to assign a ClouderaNavigator user role or roles. If roles have already been assigned to the group, they are listed beneath the nameof the group in the main panel.
6. ClickManage Role Assignment in the upper right.7. Click the checkbox for each Cloudera Navigator user role youwant assigned to that Active Directory or LDAP group.
Uncheck any already-assigned roles that you want to remove from the group.8. Click Save.
If a user's role assignments are changed, the changes take effect with the user's next new session, that is, the nexttime the user logs in to Cloudera Navigator.
Configuring Authentication in CDH Using the Command LineThe security features in CDH 5 enable Hadoop to preventmalicious user impersonation. The Hadoop daemons leverageKerberos to perform user authentication on all remote procedure calls (RPCs). Group resolution is performed on theHadoop master nodes, NameNode, JobTracker and ResourceManager to guarantee that group membership cannot
52 | Cloudera Security
Authentication

be manipulated by users. Map tasks are run under the user account of the user who submitted the job, ensuringisolation there. In addition to these features, new authorization mechanisms have been introduced to HDFS andMapReduce to enable more control over user access to data.
The security features in CDH 5 meet the needs of most Hadoop customers because typically the cluster is accessibleonly to trusted personnel. In particular, Hadoop's current threat model assumes that users cannot:
1. Have root access to cluster machines.2. Have root access to shared client machines.3. Read or modify packets on the network of the cluster.
Note:
CDH 5 supports encryption of all user data sent over the network. For configuration instructions, seeConfiguring Encrypted Shuffle, Encrypted Web UIs, and Encrypted HDFS Transport.
Note also that there is no built-in support for on-disk encryption.
Enabling Kerberos Authentication for Hadoop Using the Command Line
Important:
These instructions assume you knowhow to install and configure Kerberos, you already have aworkingKerberos Key Distribution Center (KDC) and realm setup, and that you've installed the Kerberos userpackages on all cluster machines and machines which will be used to access the cluster. Furthermore,Oozie and Hue require that the realm support renewable tickets. Formore information about installingand configuring Kerberos, see:
• MIT Kerberos Home• MIT Kerberos Documentation• Kerberos Explained• Microsoft Kerberos Overview• Microsoft Kerberos in Windows Server 2008• Microsoft Kerberos in Windows Server 2003
Kerberos security in CDH 5 has been tested with the following version of MIT Kerberos 5:
• krb5-1.6.1 on Red Hat Enterprise Linux 5 and CentOS 5
Kerberos security in CDH 5 is supported with the following versions of MIT Kerberos 5:
• krb5-1.6.3 on SUSE Linux Enterprise Server (SLES) 11 Service Pack 1• krb5-1.8.1 on Ubuntu• krb5-1.8.2 on Red Hat Enterprise Linux 6 and CentOS 6• krb5-1.9 on Red Hat Enterprise Linux 6.1
Note: The krb5-server package includes a logrotate policy file to rotate log files monthly. Totake advantage of this, install the logrotate package. No additional configuration is necessary.
If you want to enable Kerberos SPNEGO-based authentication for the Hadoop web interfaces, see the Hadoop Auth,Java HTTP SPNEGO Documentation.
Here are the general steps to configuring secure Hadoop, each of which is described in more detail in the followingsections:
Cloudera Security | 53
Authentication

Step 1: Install CDH 5
Cloudera strongly recommends that you set up a fully-functional CDH 5 cluster before you begin configuring it to useHadoop's security features. When a secure Hadoop cluster is not configured correctly, the resulting error messagesare in a preliminary state, so it's best to start implementing security after you are sure your Hadoop cluster is workingproperly without security.
For information about installing and configuring Hadoop and CDH 5 components, and deploying them on a cluster, seeCloudera Installation and Upgrade.
Step 2: Verify User Accounts and Groups in CDH 5 Due to Security
Note: CDH 5 introduces a new version of MapReduce: MapReduce 2.0 (MRv2) built on the YARNframework. In this document, we refer to this new version as YARN. CDH 5 also provides animplementation of the previous version of MapReduce, referred to as MRv1 in this document.
• If you are using MRv1, see Step 2a (MRv1 only): Verify User Accounts and Groups in MRv1 on page 54 forconfiguration information.
• If you are using YARN, see Step 2b (YARN only): Verify User Accounts and Groups in YARN on page 56 forconfiguration information.
Step 2a (MRv1 only): Verify User Accounts and Groups in MRv1
Note: If you are using YARN, skip this step and proceed to Step 2b (YARN only): Verify User Accountsand Groups in YARN.
During CDH 5 package installation of MRv1, the following Unix user accounts are automatically created to supportsecurity:
Runs These Hadoop ProgramsThis User
HDFS: NameNode, DataNodes, Secondary NameNode (orStandby NameNode if you are using HA)
hdfs
MRv1: JobTracker and TaskTrackersmapred
The hdfs user also acts as the HDFS superuser.
The hadoop user no longer exists in CDH 5. If you currently use the hadoop user to run applications as an HDFSsuper-user, you should instead use the new hdfs user, or create a separate Unix account for your application such asmyhadoopapp.
MRv1: Directory Ownership in the Local File System
Because the HDFS and MapReduce services run as different users, you must be sure to configure the correct directoryownership of the following files on the local file system of each host:
PermissionsOwnerDirectoryFile System
drwx------hdfs:hdfsdfs.namenode.name.dir
(dfs.name.dir isLocal
deprecated but will alsowork)
drwx------hdfs:hdfsdfs.datanode.data.dir
(dfs.data.dir isLocal
1 In CDH 5, package installation and the Hadoop daemons will automatically configure the correct permissions foryou if you configure the directory ownership correctly as shown in the table above.
54 | Cloudera Security
Authentication

PermissionsOwnerDirectoryFile System
deprecated but will alsowork)
drwxr-xr-xmapred:mapredmapred.local.dirLocal
See also Deploying MapReduce v1 (MRv1) on a Cluster.
You must also configure the following permissions for the HDFS and MapReduce log directories (the default locationsin /var/log/hadoop-hdfs and /var/log/hadoop-0.20-mapreduce), and the $MAPRED_LOG_DIR/userlogs/directory:
PermissionsOwnerDirectoryFile System
drwxrwxr-xhdfs:hdfsHDFS_LOG_DIRLocal
drwxrwxr-xmapred:mapredMAPRED_LOG_DIRLocal
permissions will be setautomatically at daemonstart time
mapred:anygroupuserlogs directory inMAPRED_LOG_DIR
Local
MRv1: Directory Ownership on HDFS
The following directories on HDFS must also be configured as follows:
PermissionsOwnerDirectoryFile System
drwx------mapred:hadoopmapreduce.jobtracker.system.dir
(mapred.system.dir isHDFS
deprecated but will alsowork)
drwxr-xr-xhdfs:hadoop/ (root directory)HDFS
MRv1: Changing the Directory Ownership on HDFS
• If Hadoop security is enabled, use kinit hdfs to obtain Kerberos credentials for the hdfs user by running thefollowing commands before changing the directory ownership on HDFS:
$ sudo -u hdfs kinit -k -t hdfs.keytab hdfs/[email protected]
Ifkinit hdfs does notwork initially, runkinit -R after runningkinit to obtain credentials. (Formore information,see Troubleshooting Authentication Issues on page 145). To change the directory ownership on HDFS, run the followingcommands. Replace the example/mapred/system directory in the commands belowwith theHDFS directory specifiedby themapreduce.jobtracker.system.dir (ormapred.system.dir) property in theconf/mapred-site.xmlfile:
$ sudo -u hdfs hadoop fs -chown mapred:hadoop /mapred/system$ sudo -u hdfs hadoop fs -chown hdfs:hadoop /$ sudo -u hdfs hadoop fs -chmod -R 700 /mapred/system$ sudo -u hdfs hadoop fs -chmod 755 /
1 In CDH 5, package installation and the Hadoop daemons will automatically configure the correct permissions foryou if you configure the directory ownership correctly as shown in the table above.
2 When starting up, MapReduce sets the permissions for the mapreduce.jobtracker.system.dir (ormapred.system.dir) directory in HDFS, assuming the user mapred owns that directory.
Cloudera Security | 55
Authentication

• In addition (whether or not Hadoop security is enabled) create the /tmp directory. For instructions on creating/tmp and setting its permissions, see these instructions.
Step 2b (YARN only): Verify User Accounts and Groups in YARN
Note: If you are usingMRv1, skip this step and proceed to Step 3: If you are Using AES-256 Encryption,install the JCE Policy File on page 57.
During CDH 5 package installation ofMapReduce 2.0 (YARN), the following Unix user accounts are automatically createdto support security:
Runs These Hadoop ProgramsThis User
HDFS: NameNode, DataNodes, Standby NameNode (if you are using HA)hdfs
YARN: ResourceManager, NodeManageryarn
YARN: MapReduce Job History Servermapred
Important: The HDFS and YARN daemons must run as different Unix users; for example, hdfs andyarn. The MapReduce Job History server must run as user mapred. Having all of these users share acommon Unix group is recommended; for example, hadoop.
YARN: Directory Ownership in the Local File System
Because the HDFS and MapReduce services run as different users, you must be sure to configure the correct directoryownership of the following files on the local file system of each host:
Permissions (see 1)OwnerDirectoryFile System
drwx------hdfs:hdfsdfs.namenode.name.dir
(dfs.name.dir isLocal
deprecated but will alsowork)
drwx------hdfs:hdfsdfs.datanode.data.dir
(dfs.data.dir isLocal
deprecated but will alsowork)
drwxr-xr-xyarn:yarnyarn.nodemanager.local-dirsLocal
drwxr-xr-xyarn:yarnyarn.nodemanager.log-dirsLocal
--Sr-s---root:yarncontainer-executorLocal
r--------root:yarnconf/container-executor.cfgLocal
Important: Configuration changes to the Linux container executor could result in local NodeManagerdirectories (such as usercache) being left with incorrect permissions. To avoid this, when makingchanges using either Cloudera Manager or the command line, first manually remove the existingNodeManager local directories from all configured local directories(yarn.nodemanager.local-dirs), and let the NodeManager recreate the directory structure.
You must also configure the following permissions for the HDFS, YARN and MapReduce log directories (the defaultlocations in /var/log/hadoop-hdfs, /var/log/hadoop-yarn and /var/log/hadoop-mapreduce):
56 | Cloudera Security
Authentication

PermissionsOwnerDirectoryFile System
drwxrwxr-xhdfs:hdfsHDFS_LOG_DIRLocal
drwxrwxr-xyarn:yarn$YARN_LOG_DIRLocal
drwxrwxr-xmapred:mapredMAPRED_LOG_DIRLocal
YARN: Directory Ownership on HDFS
The following directories on HDFS must also be configured as follows:
PermissionsOwnerDirectoryFile System
drwxr-xr-xhdfs:hadoop/ (root directory)HDFS
drwxrwxrwxtyarn:hadoopyarn.nodemanager.remote-app-log-dirHDFS
drwxrwxrwxtmapred:hadoopmapreduce.jobhistory.intermediate-done-dirHDFS
drwxr-x---mapred:hadoopmapreduce.jobhistory.done-dirHDFS
YARN: Changing the Directory Ownership on HDFSIf Hadoop security is enabled, use kinit hdfs to obtain Kerberos credentials for the hdfs user by running thefollowing commands:
$ sudo -u hdfs kinit -k -t hdfs.keytab hdfs/[email protected]$ hadoop fs -chown hdfs:hadoop /$ hadoop fs -chmod 755 /
If kinit hdfs does not work initially, run kinit -R after running kinit to obtain credentials. See TroubleshootingAuthentication Issues on page 145. To change the directory ownership on HDFS, run the following commands:
$ sudo -u hdfs hadoop fs -chown hdfs:hadoop /$ sudo -u hdfs hadoop fs -chmod 755 /$ sudo -u hdfs hadoop fs -chown yarn:hadoop [yarn.nodemanager.remote-app-log-dir]$ sudo -u hdfs hadoop fs -chmod 1777 [yarn.nodemanager.remote-app-log-dir]$ sudo -u hdfs hadoop fs -chown mapred:hadoop [mapreduce.jobhistory.intermediate-done-dir]$ sudo -u hdfs hadoop fs -chmod 1777 [mapreduce.jobhistory.intermediate-done-dir]$ sudo -u hdfs hadoop fs -chown mapred:hadoop [mapreduce.jobhistory.done-dir]$ sudo -u hdfs hadoop fs -chmod 750 [mapreduce.jobhistory.done-dir]
• In addition (whether or not Hadoop security is enabled) create the /tmp directory. For instructions on creating/tmp and setting its permissions, see Step 7: If Necessary, Create the HDFS /tmp Directory.
• In addition (whether or not Hadoop security is enabled), change permissions on the /user/history Directory.See Step 8: Create the history Directory and Set Permissions and Owner.
Step 3: If you are Using AES-256 Encryption, install the JCE Policy File
If you are using CentOS/Red Hat Enterprise Linux 5.6 or later, or Ubuntu, which use AES-256 encryption by default fortickets, you must install the Java Cryptography Extension (JCE) Unlimited Strength Jurisdiction Policy File on all clusterand Hadoop user machines. For JCE Policy File installation instructions, see the README.txt file included in thejce_policy-x.zip file.
Alternatively, you can configure Kerberos to not use AES-256 by removing aes256-cts:normal from thesupported_enctypes field of the kdc.conf or krb5.conf file. After changing the kdc.conf file, you must restart
3 In CDH 5, package installation and the Hadoop daemons will automatically configure the correct permissions foryou if you configure the directory ownership correctly as shown in the two tables above. See also DeployingMapReduce v2 (YARN) on a Cluster.
Cloudera Security | 57
Authentication

both the KDC and the kadmin server for those changes to take affect. You may also need to re-create or change thepassword of the relevant principals, including potentially the Ticket Granting Ticket principal (krbtgt/REALM@REALM).If AES-256 is still used after completing steps, the aes256-cts:normal setting existed when the Kerberos databasewas created. To fix this, create a new Kerberos database and then restart both the KDC and the kadmin server.
To verify the type of encryption used in your cluster:
1. On the local KDC host, type this command to create a test principal:
$ kadmin -q "addprinc test"
2. On a cluster host, type this command to start a Kerberos session as test:
$ kinit test
3. On a cluster host, type this command to view the encryption type in use:
$ klist -e
If AES is being used, output like the following is displayed after you type the klist command; note that AES-256is included in the output:
Ticket cache: FILE:/tmp/krb5cc_0Default principal: test@SCMValid starting Expires Service principal05/19/11 13:25:04 05/20/11 13:25:04 krbtgt/SCM@SCM Etype (skey, tkt): AES-256 CTS mode with 96-bit SHA-1 HMAC, AES-256 CTS mode with 96-bit SHA-1 HMAC
Step 4: Create and Deploy the Kerberos Principals and Keytab Files
A Kerberos principal is used in a Kerberos-secured system to represent a unique identity. Kerberos assigns tickets toKerberos principals to enable them to access Kerberos-secured Hadoop services. For Hadoop, the principals should beof the format username/[email protected]. In this guide, the term username
in the username/[email protected] principal refers to the username of anexisting Unix account, such as hdfs or mapred.
A keytab is a file containing pairs of Kerberos principals and an encrypted copy of that principal's key. The keytab filesare unique to each host since their keys include the hostname. This file is used to authenticate a principal on a host toKerberos without human interaction or storing a password in a plain text file. Because having access to the keytab filefor a principal allows one to act as that principal, access to the keytab files should be tightly secured. They should bereadable by a minimal set of users, should be stored on local disk, and should not be included in machine backups,unless access to those backups is as secure as access to the local machine.
Important:
For both MRv1 and YARN deployments: On every machine in your cluster, there must be a keytabfile for the hdfs user and a keytab file for the mapred user. The hdfs keytab file must contain entriesfor the hdfs principal and a HTTP principal, and the mapred keytab file must contain entries for themapred principal and a HTTP principal. On each respective machine, the HTTP principal will be thesame in both keytab files.
In addition, for YARN deployments only: On every machine in your cluster, there must be a keytabfile for the yarn user. The yarn keytab file must contain entries for the yarn principal and a HTTPprincipal. On each respective machine, the HTTP principal in the yarn keytab file will be the same asthe HTTP principal in the hdfs and mapred keytab files.
58 | Cloudera Security
Authentication
Note:
The following instructions illustrate an example of creating keytab files for MIT Kerberos. If you areusing another version of Kerberos, refer to your Kerberos documentation for instructions. You mayuse either kadmin or kadmin.local to run these commands.
When to Use kadmin.local and kadmin
When creating the Kerberos principals and keytabs, you can use kadmin.local or kadmin depending on your accessand account:
• If you have root access to the KDC machine, but you do not have a Kerberos admin account, use kadmin.local.• If you do not have root access to the KDC machine, but you do have a Kerberos admin account, use kadmin.• If you have both root access to the KDC machine and a Kerberos admin account, you can use either one.
To start kadmin.local (on the KDC machine) or kadmin from any machine, run this command:
$ sudo kadmin.local
OR:
$ kadmin
Note:
In this guide, kadmin is shown as the prompt for commands in the kadmin shell, but you can type thesame commands at the kadmin.local prompt in the kadmin.local shell.
Note:
Running kadmin.local may prompt you for a password because it is being run via sudo. You shouldprovide your Unix password. Running kadmin may prompt you for a password because you needKerberos admin privileges. You should provide your Kerberos admin password.
To create the Kerberos principals
Important:
If you plan to useOozie, Impala, or the Hue Kerberos ticket renewer in your cluster, youmust configureyour KDC to allow tickets to be renewed, and you must configure krb5.conf to request renewabletickets. Typically, you can do this by adding the max_renewable_life setting to your realm inkdc.conf, and by adding the renew_lifetime parameter to the libdefaults section ofkrb5.conf. For more information about renewable tickets, see the Kerberos documentation.
Do the following steps for every host in your cluster. Run the commands in the kadmin.local or kadmin shell, replacingthe fully.qualified.domain.name in the commands with the fully qualified domain name of each host. ReplaceYOUR-REALM.COM with the name of the Kerberos realm your Hadoop cluster is in.
1. In the kadmin.local or kadmin shell, create the hdfs principal. This principal is used for the NameNode, SecondaryNameNode, and DataNodes.
kadmin: addprinc -randkey hdfs/[email protected]
Cloudera Security | 59
Authentication

Note:
If your Kerberos administrator or company has a policy about principal names that does not allowyou to use the format shown above, you canwork around that issue by configuring the<kerberosprincipal> to <short name>mapping that is built into Hadoop. For more information, seeAppendix C - Configuring the Mapping from Kerberos Principals to Short Names.
2. Create the mapred principal. If you are using MRv1, the mapred principal is used for the JobTracker andTaskTrackers. If you are using YARN, the mapred principal is used for the MapReduce Job History Server.
kadmin: addprinc -randkey mapred/[email protected]
3. YARN only: Create the yarn principal. This principal is used for the ResourceManager and NodeManager.
kadmin: addprinc -randkey yarn/[email protected]
4. Create the HTTP principal.
kadmin: addprinc -randkey HTTP/[email protected]
Important:
The HTTP principal must be in the formatHTTP/[email protected]. The first componentof theprincipalmust be the literal string "HTTP". This format is standard for HTTP principals in SPNEGO and ishard-coded in Hadoop. It cannot be deviated from.
To create the Kerberos keytab files
Important:
The instructions in this section for creating keytab files require using the Kerberos norandkey optionin the xst command. If your version of Kerberos does not support the norandkey option, or if youcannot use kadmin.local, then use these alternate instructions in Appendix F to create appropriateKerberos keytab files. After using those alternate instructions to create the keytab files, continue withthe next section To deploy the Kerberos keytab files.
Do the following steps for every host in your cluster. Run the commands in the kadmin.local or kadmin shell, replacingthe fully.qualified.domain.name in the commands with the fully qualified domain name of each host:
1. Create the hdfs keytab file that will contain the hdfs principal and HTTP principal. This keytab file is used for theNameNode, Secondary NameNode, and DataNodes.
kadmin: xst -norandkey -k hdfs.keytab hdfs/fully.qualified.domain.name HTTP/fully.qualified.domain.name
2. Create the mapred keytab file that will contain the mapred principal and HTTP principal. If you are using MRv1,the mapred keytab file is used for the JobTracker and TaskTrackers. If you are using YARN, the mapred keytab fileis used for the MapReduce Job History Server.
kadmin: xst -norandkey -k mapred.keytab mapred/fully.qualified.domain.name HTTP/fully.qualified.domain.name
60 | Cloudera Security
Authentication

3. YARN only: Create the yarn keytab file that will contain the yarn principal and HTTP principal. This keytab fileis used for the ResourceManager and NodeManager.
kadmin: xst -norandkey -k yarn.keytab yarn/fully.qualified.domain.name HTTP/fully.qualified.domain.name
4. Use klist to display the keytab file entries; a correctly-created hdfs keytab file should look something like this:
$ klist -e -k -t hdfs.keytabKeytab name: WRFILE:hdfs.keytabslot KVNO Principal---- ---- --------------------------------------------------------------------- 1 7 HTTP/[email protected] (DES cbc mode with CRC-32)
2 7 HTTP/[email protected] (Triple DES cbc mode with HMAC/sha1) 3 7 hdfs/[email protected] (DES cbc mode with CRC-32)
4 7 hdfs/[email protected] (Triple DES cbc mode with HMAC/sha1)
5. Continue with the next section To deploy the Kerberos keytab files.
To deploy the Kerberos keytab files
On every node in the cluster, repeat the following steps to deploy the hdfs.keytab and mapred.keytab files. If youare using YARN, you will also deploy the yarn.keytab file.
1. On the host machine, copy or move the keytab files to a directory that Hadoop can access, such as/etc/hadoop/conf.
a. If you are using MRv1:
$ sudo mv hdfs.keytab mapred.keytab /etc/hadoop/conf/
If you are using YARN:
$ sudo mv hdfs.keytab mapred.keytab yarn.keytab /etc/hadoop/conf/
b. Make sure that the hdfs.keytab file is only readable by the hdfs user, and that the mapred.keytab fileis only readable by the mapred user.
$ sudo chown hdfs:hadoop /etc/hadoop/conf/hdfs.keytab$ sudo chown mapred:hadoop /etc/hadoop/conf/mapred.keytab$ sudo chmod 400 /etc/hadoop/conf/*.keytab
Note:
To enable you to use the same configuration files on every host, Cloudera recommends thatyou use the same name for the keytab files on every host.
c. YARN only:Make sure that the yarn.keytab file is only readable by the yarn user.
$ sudo chown yarn:hadoop /etc/hadoop/conf/yarn.keytab$ sudo chmod 400 /etc/hadoop/conf/yarn.keytab
Cloudera Security | 61
Authentication

Important:
If the NameNode, Secondary NameNode, DataNode, JobTracker, TaskTrackers, HttpFS, orOozie services are configured to use Kerberos HTTP SPNEGO authentication, and two ormoreof these services are running on the same host, then all of the running services must use thesame HTTP principal and keytab file used for their HTTP endpoints.
Step 5: Shut Down the Cluster
To enable security in CDH, you must stop all Hadoop daemons in your cluster and then change some configurationproperties. You must stop all daemons in the cluster because after one Hadoop daemon has been restarted with theconfiguration properties set to enable security, daemons runningwithout security enabledwill be unable to communicatewith that daemon. This requirement to shut down all daemons makes it impossible to do a rolling upgrade to enablesecurity on a Hadoop cluster.
To shut down the cluster, run the following command on every node in your cluster (as root):
$ for x in `cd /etc/init.d ; ls hadoop-*` ; do sudo service $x stop ; done
Step 6: Enable Hadoop Security
Cloudera recommends that all of the Hadoop configuration files throughout the cluster have the same contents.
To enable Hadoop security, add the following properties to the core-site.xml file on every machine in the cluster:
<property> <name>hadoop.security.authentication</name> <value>kerberos</value> <!-- A value of "simple" would disable security. --></property>
<property> <name>hadoop.security.authorization</name> <value>true</value></property>
Enabling Service-Level Authorization for Hadoop Services
The hadoop-policy.xml file maintains access control lists (ACL) for Hadoop services. Each ACL consists ofcomma-separated lists of users and groups separated by a space. For example:
user_a,user_b group_a,group_b
If you only want to specify a set of users, add a comma-separated list of users followed by a blank space. Similarly, tospecify only authorized groups, use a blank space at the beginning. A * can be used to give access to all users.
For example, to give users, ann, bob, and groups, group_a, group_b access to Hadoop's DataNodeProtocol service,modify thesecurity.datanode.protocol.acl property inhadoop-policy.xml. Similarly, to give all users accessto the InterTrackerProtocol service, modify security.inter.tracker.protocol.acl as follows:
<property> <name>security.datanode.protocol.acl</name> <value>ann,bob group_a,group_b</value> <description>ACL for DatanodeProtocol, which is used by datanodes to communicate with the namenode.</description></property>
<property> <name>security.inter.tracker.protocol.acl</name> <value>*</value> <description>ACL for InterTrackerProtocol, which is used by tasktrackers to
62 | Cloudera Security
Authentication

communicate with the jobtracker.</description></property>
For more details, see Service-Level Authorization in Hadoop.
Step 7: Configure Secure HDFS
When following the instructions in this section to configure the properties in the hdfs-site.xml file, keep thefollowing important guidelines in mind:
• The properties for each daemon (NameNode, Secondary NameNode, and DataNode) must specify both the HDFSand HTTP principals, as well as the path to the HDFS keytab file.
• The Kerberos principals for the NameNode, Secondary NameNode, and DataNode are configured in thehdfs-site.xml file. The same hdfs-site.xml file with all three of these principals must be installed on everyhostmachine in the cluster. That is, it is not sufficient to have theNameNode principal configured on theNameNodehost machine only. This is because, for example, the DataNode must know the principal name of the NameNodein order to send heartbeats to it. Kerberos authentication is bi-directional.
• The special string _HOST in the properties is replaced at run-time by the fully-qualified domain name of the hostmachinewhere the daemon is running. This requires that reverseDNS is properlyworking on all the hosts configuredthis way. You may use _HOST only as the entirety of the second component of a principal name. For example,hdfs/[email protected] is valid, but [email protected] andhdfs/[email protected] are not.
• When performing the _HOST substitution for the Kerberos principal names, the NameNode determines its ownhostnamebasedon the configured valueoffs.default.name, whereas theDataNodesdetermine their hostnamesbased on the result of reverse DNS resolution on the DataNode hosts. Likewise, the JobTracker uses the configuredvalue of mapred.job.tracker to determine its hostname whereas the TaskTrackers, like the DataNodes, usereverse DNS.
• The dfs.datanode.address and dfs.datanode.http.address port numbers for the DataNodemust bebelow 1024, because this provides part of the security mechanism to make it impossible for a user to run a maptask which impersonates a DataNode. The port numbers for the NameNode and Secondary NameNode can beanything you want, but the default port numbers are good ones to use.
To configure secure HDFS
Add the following properties to the hdfs-site.xml file on everymachine in the cluster. Replace these example valuesshown belowwith the correct settings for your site: path to the HDFS keytab, YOUR-REALM.COM, fully qualified domainname of NN, and fully qualified domain name of 2NN
<!-- General HDFS security config --><property> <name>dfs.block.access.token.enable</name> <value>true</value></property>
<!-- NameNode security config --><property> <name>dfs.namenode.keytab.file</name> <value>/etc/hadoop/conf/hdfs.keytab</value> <!-- path to the HDFS keytab --></property><property> <name>dfs.namenode.kerberos.principal</name> <value>hdfs/[email protected]</value></property><property> <name>dfs.namenode.kerberos.internal.spnego.principal</name> <value>HTTP/[email protected]</value></property>
<!-- Secondary NameNode security config --><property> <name>dfs.secondary.namenode.keytab.file</name> <value>/etc/hadoop/conf/hdfs.keytab</value> <!-- path to the HDFS keytab --></property><property>
Cloudera Security | 63
Authentication
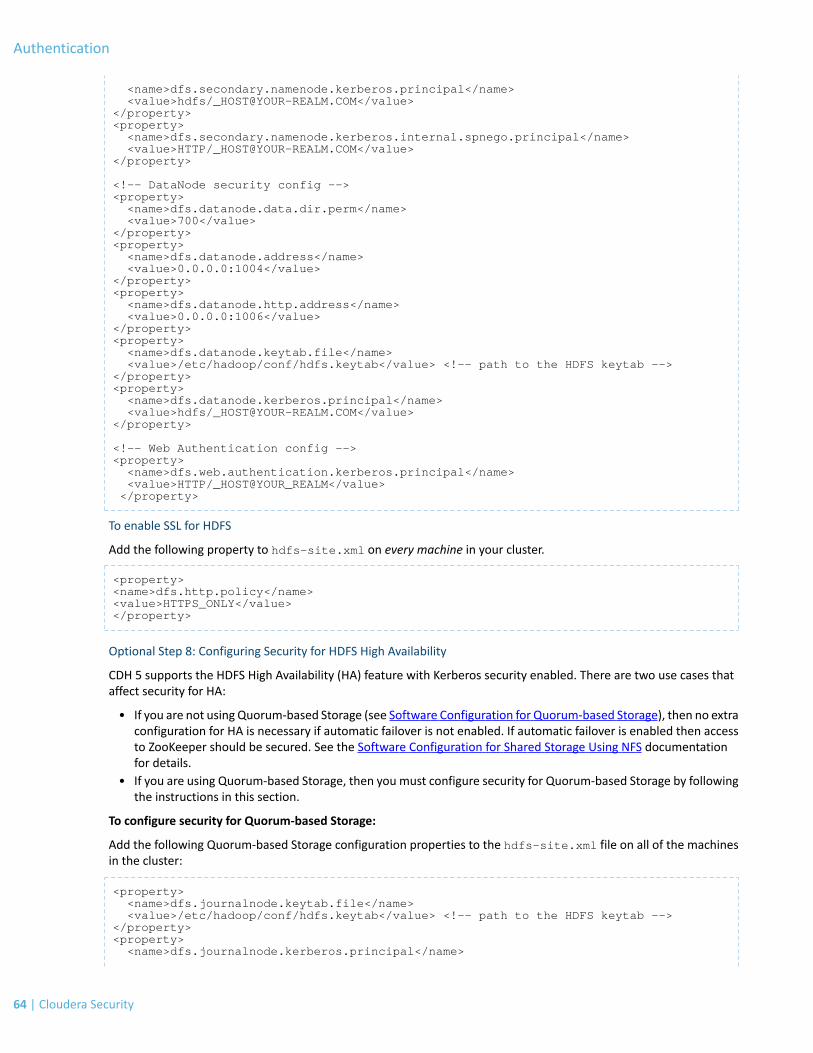
<name>dfs.secondary.namenode.kerberos.principal</name> <value>hdfs/[email protected]</value></property><property> <name>dfs.secondary.namenode.kerberos.internal.spnego.principal</name> <value>HTTP/[email protected]</value></property>
<!-- DataNode security config --><property> <name>dfs.datanode.data.dir.perm</name> <value>700</value> </property><property> <name>dfs.datanode.address</name> <value>0.0.0.0:1004</value></property><property> <name>dfs.datanode.http.address</name> <value>0.0.0.0:1006</value></property><property> <name>dfs.datanode.keytab.file</name> <value>/etc/hadoop/conf/hdfs.keytab</value> <!-- path to the HDFS keytab --></property><property> <name>dfs.datanode.kerberos.principal</name> <value>hdfs/[email protected]</value></property>
<!-- Web Authentication config --><property> <name>dfs.web.authentication.kerberos.principal</name> <value>HTTP/_HOST@YOUR_REALM</value> </property>
To enable SSL for HDFS
Add the following property to hdfs-site.xml on every machine in your cluster.
<property><name>dfs.http.policy</name><value>HTTPS_ONLY</value></property>
Optional Step 8: Configuring Security for HDFS High Availability
CDH 5 supports the HDFS High Availability (HA) feature with Kerberos security enabled. There are two use cases thataffect security for HA:
• If you are not using Quorum-based Storage (see Software Configuration for Quorum-based Storage), then no extraconfiguration for HA is necessary if automatic failover is not enabled. If automatic failover is enabled then accessto ZooKeeper should be secured. See the Software Configuration for Shared Storage Using NFS documentationfor details.
• If you are using Quorum-based Storage, then you must configure security for Quorum-based Storage by followingthe instructions in this section.
To configure security for Quorum-based Storage:
Add the following Quorum-based Storage configuration properties to the hdfs-site.xml file on all of the machinesin the cluster:
<property> <name>dfs.journalnode.keytab.file</name> <value>/etc/hadoop/conf/hdfs.keytab</value> <!-- path to the HDFS keytab --></property><property> <name>dfs.journalnode.kerberos.principal</name>
64 | Cloudera Security
Authentication
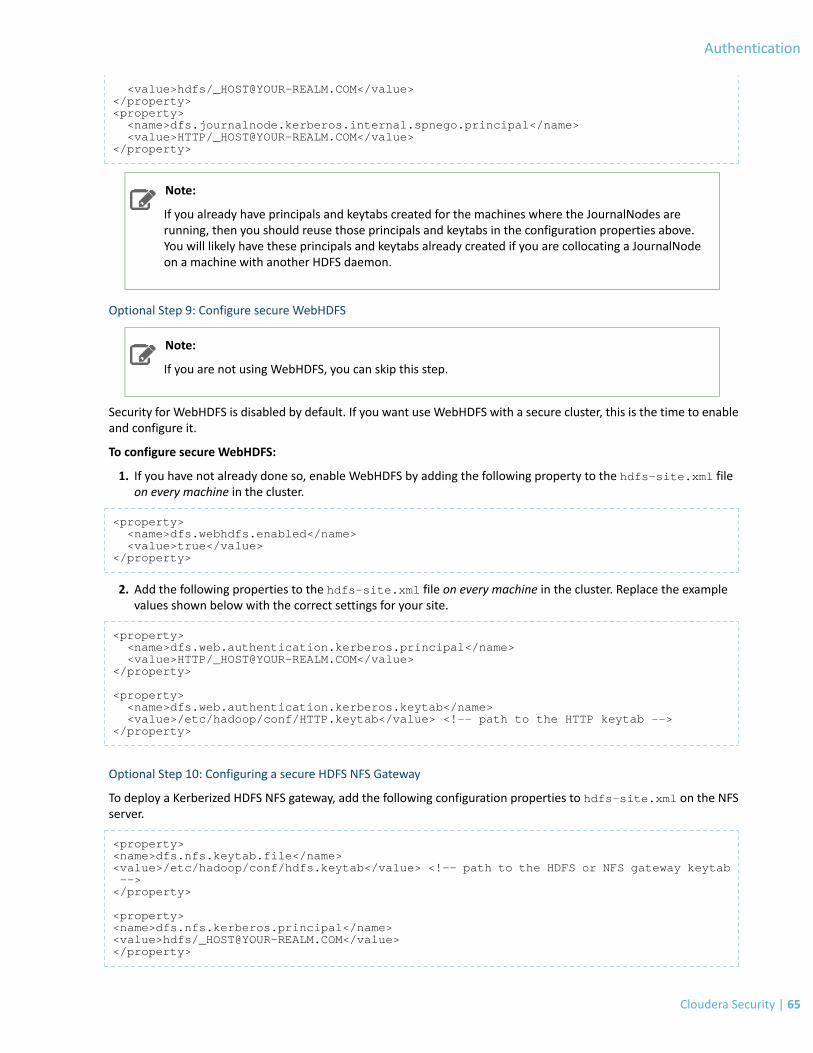
<value>hdfs/[email protected]</value></property><property> <name>dfs.journalnode.kerberos.internal.spnego.principal</name> <value>HTTP/[email protected]</value></property>
Note:
If you already have principals and keytabs created for the machines where the JournalNodes arerunning, then you should reuse those principals and keytabs in the configuration properties above.You will likely have these principals and keytabs already created if you are collocating a JournalNodeon a machine with another HDFS daemon.
Optional Step 9: Configure secure WebHDFS
Note:
If you are not using WebHDFS, you can skip this step.
Security for WebHDFS is disabled by default. If you want use WebHDFS with a secure cluster, this is the time to enableand configure it.
To configure secure WebHDFS:
1. If you have not already done so, enable WebHDFS by adding the following property to the hdfs-site.xml fileon every machine in the cluster.
<property> <name>dfs.webhdfs.enabled</name> <value>true</value></property>
2. Add the following properties to the hdfs-site.xml file on every machine in the cluster. Replace the examplevalues shown below with the correct settings for your site.
<property> <name>dfs.web.authentication.kerberos.principal</name> <value>HTTP/[email protected]</value></property>
<property> <name>dfs.web.authentication.kerberos.keytab</name> <value>/etc/hadoop/conf/HTTP.keytab</value> <!-- path to the HTTP keytab --></property>
Optional Step 10: Configuring a secure HDFS NFS Gateway
To deploy a Kerberized HDFS NFS gateway, add the following configuration properties to hdfs-site.xml on the NFSserver.
<property><name>dfs.nfs.keytab.file</name><value>/etc/hadoop/conf/hdfs.keytab</value> <!-- path to the HDFS or NFS gateway keytab --></property>
<property><name>dfs.nfs.kerberos.principal</name><value>hdfs/[email protected]</value></property>
Cloudera Security | 65
Authentication

Step 11: Set Variables for Secure DataNodes
In order to allow DataNodes to start on a secure Hadoop cluster, you must set the following variables on all DataNodesin /etc/default/hadoop-hdfs-datanode.
export HADOOP_SECURE_DN_USER=hdfsexport HADOOP_SECURE_DN_PID_DIR=/var/lib/hadoop-hdfsexport HADOOP_SECURE_DN_LOG_DIR=/var/log/hadoop-hdfsexport JSVC_HOME=/usr/lib/bigtop-utils/
Note:
Depending on the version of Linux you are using, you may not have the /usr/lib/bigtop-utilsdirectory on your system. If that is the case, set the JSVC_HOME variable to the/usr/libexec/bigtop-utils directory by using this command:
export JSVC_HOME=/usr/libexec/bigtop-utils
Step 12: Start up the NameNode
You are now ready to start the NameNode. Use the service command to run the /etc/init.d script.
$ sudo service hadoop-hdfs-namenode start
You'll see some extra information in the logs such as:
10/10/25 17:01:46 INFO security.UserGroupInformation: Login successful for user hdfs/[email protected] using keytab file /etc/hadoop/conf/hdfs.keytab
and:
12/05/23 18:18:31 INFO http.HttpServer: Adding Kerberos (SPNEGO) filter to getDelegationToken12/05/23 18:18:31 INFO http.HttpServer: Adding Kerberos (SPNEGO) filter to renewDelegationToken12/05/23 18:18:31 INFO http.HttpServer: Adding Kerberos (SPNEGO) filter to cancelDelegationToken12/05/23 18:18:31 INFO http.HttpServer: Adding Kerberos (SPNEGO) filter to fsck12/05/23 18:18:31 INFO http.HttpServer: Adding Kerberos (SPNEGO) filter to getimage12/05/23 18:18:31 INFO http.HttpServer: Jetty bound to port 5007012/05/23 18:18:31 INFO mortbay.log: jetty-6.1.2612/05/23 18:18:31 INFO server.KerberosAuthenticationHandler: Login using keytab /etc/hadoop/conf/hdfs.keytab, for principal HTTP/[email protected]/05/23 18:18:31 INFO server.KerberosAuthenticationHandler: Initialized, principal [HTTP/[email protected]] from keytab [/etc/hadoop/conf/hdfs.keytab]
You can verify that theNameNode is working properly by opening aweb browser to http://machine:50070/wheremachine is the name of the machine where the NameNode is running.
Cloudera also recommends testing that the NameNode is working properly by performing a metadata-only HDFSoperation, which will now require correct Kerberos credentials. For example:
$ hadoop fs -ls
66 | Cloudera Security
Authentication

Information about the kinit Command
Important:
Running the hadoop fs -ls command will fail if you do not have a valid Kerberos ticket in yourcredentials cache. You can examine the Kerberos tickets currently in your credentials cache by runningthe klist command. You can obtain a ticket by running the kinit command and either specifyinga keytab file containing credentials, or entering the password for your principal. If you do not have avalid ticket, you will receive an error such as:
11/01/04 12:08:12 WARN ipc.Client: Exception encountered while connecting to the server : javax.security.sasl.SaslException: GSS initiate failed [Caused by GSSException: No valid credentials provided (Mechanism level: Failed to find any Kerberos tgt)] Bad connection to FS. command aborted. exception: Call to nn-host/10.0.0.2:8020 failed on local exception: java.io.IOException: javax.security.sasl.SaslException: GSS initiate failed [Caused by GSSException: No valid credentials provided (Mechanism level: Failed to find any Kerberos tgt)]
Note:
The kinit commandmust either be on the path for user accounts running the Hadoop client, or elsethehadoop.kerberos.kinit.commandparameter incore-site.xmlmust bemanually configuredto the absolute path to the kinit command.
Note:
If you are running MIT Kerberos 1.8.1 or higher, a bug in versions of the Oracle JDK 6 Update 26 andhigher causes Java to be unable to read the Kerberos credentials cache even after you have successfullyobtained a Kerberos ticket using kinit. To workaround this bug, run kinit -R after running kinitinitially to obtain credentials. Doing so will cause the ticket to be renewed, and the credentials cacherewritten in a format which Java can read. For more information about this problem, seeTroubleshooting.
Step 12: Start up a DataNode
Begin by starting oneDataNodeonly tomake sure it can properly connect to theNameNode.Use theservice commandto run the /etc/init.d script.
$ sudo service hadoop-hdfs-datanode start
You'll see some extra information in the logs such as:
10/10/25 17:21:41 INFO security.UserGroupInformation: Login successful for user hdfs/[email protected] using keytab file /etc/hadoop/conf/hdfs.keytab
If you can get a single DataNode running and you can see it registering with the NameNode in the logs, then start upall the DataNodes. You should now be able to do all HDFS operations.
Step 14: Set the Sticky Bit on HDFS Directories
This step is optional but strongly recommended for security. In CDH 5, HDFS file permissions have support for the stickybit. The sticky bit can be set on directories, preventing anyone except the superuser, directory owner, or file ownerfrom deleting or moving the files within the directory. Setting the sticky bit for a file has no effect. This is useful for
Cloudera Security | 67
Authentication
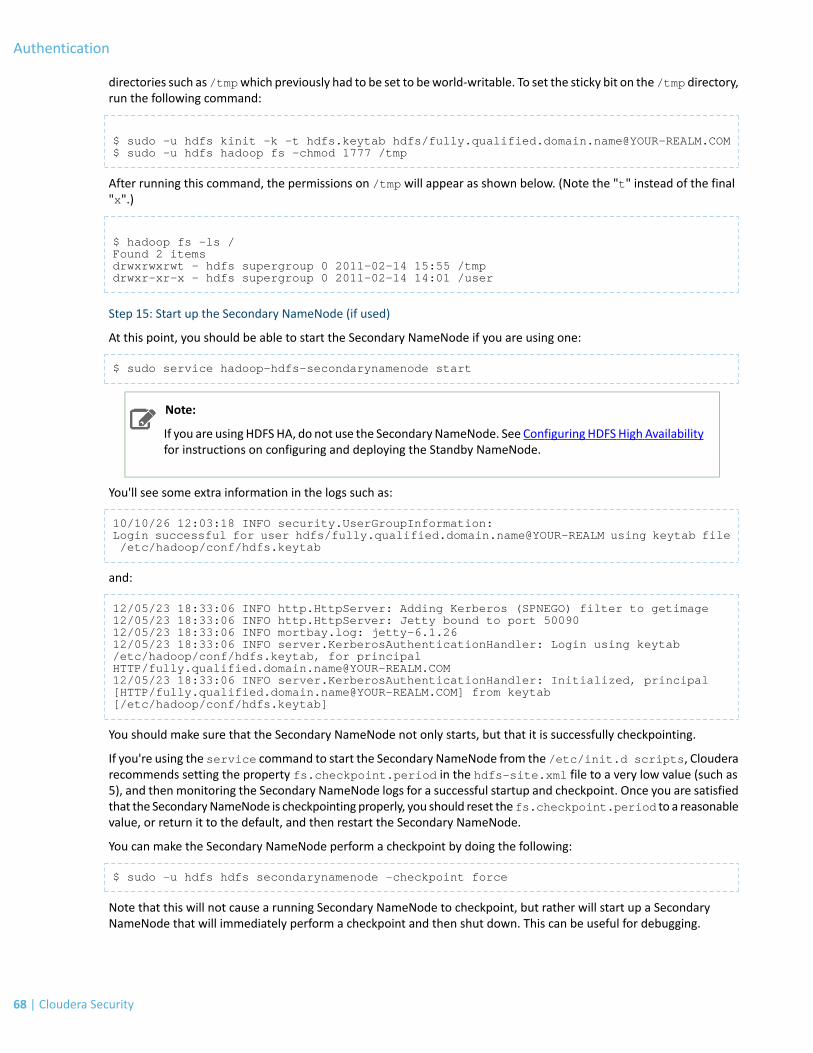
directories such as /tmpwhich previously had to be set to beworld-writable. To set the sticky bit on the /tmp directory,run the following command:
$ sudo -u hdfs kinit -k -t hdfs.keytab hdfs/[email protected]$ sudo -u hdfs hadoop fs -chmod 1777 /tmp
After running this command, the permissions on /tmp will appear as shown below. (Note the "t" instead of the final"x".)
$ hadoop fs -ls / Found 2 items drwxrwxrwt - hdfs supergroup 0 2011-02-14 15:55 /tmp drwxr-xr-x - hdfs supergroup 0 2011-02-14 14:01 /user
Step 15: Start up the Secondary NameNode (if used)
At this point, you should be able to start the Secondary NameNode if you are using one:
$ sudo service hadoop-hdfs-secondarynamenode start
Note:
If you are using HDFSHA, do not use the Secondary NameNode. See Configuring HDFSHigh Availabilityfor instructions on configuring and deploying the Standby NameNode.
You'll see some extra information in the logs such as:
10/10/26 12:03:18 INFO security.UserGroupInformation: Login successful for user hdfs/fully.qualified.domain.name@YOUR-REALM using keytab file /etc/hadoop/conf/hdfs.keytab
and:
12/05/23 18:33:06 INFO http.HttpServer: Adding Kerberos (SPNEGO) filter to getimage12/05/23 18:33:06 INFO http.HttpServer: Jetty bound to port 5009012/05/23 18:33:06 INFO mortbay.log: jetty-6.1.2612/05/23 18:33:06 INFO server.KerberosAuthenticationHandler: Login using keytab /etc/hadoop/conf/hdfs.keytab, for principal HTTP/[email protected]/05/23 18:33:06 INFO server.KerberosAuthenticationHandler: Initialized, principal [HTTP/[email protected]] from keytab [/etc/hadoop/conf/hdfs.keytab]
You should make sure that the Secondary NameNode not only starts, but that it is successfully checkpointing.
If you're using the service command to start the Secondary NameNode from the /etc/init.d scripts, Clouderarecommends setting the property fs.checkpoint.period in the hdfs-site.xml file to a very low value (such as5), and then monitoring the Secondary NameNode logs for a successful startup and checkpoint. Once you are satisfiedthat the SecondaryNameNode is checkpointing properly, you should reset thefs.checkpoint.period to a reasonablevalue, or return it to the default, and then restart the Secondary NameNode.
You can make the Secondary NameNode perform a checkpoint by doing the following:
$ sudo -u hdfs hdfs secondarynamenode -checkpoint force
Note that this will not cause a running Secondary NameNode to checkpoint, but rather will start up a SecondaryNameNode that will immediately perform a checkpoint and then shut down. This can be useful for debugging.
68 | Cloudera Security
Authentication

Note:
If you encounter errors during Secondary NameNode checkpointing, it may be helpful to enableKerberos debugging output. For instructions, see Appendix D - Enabling Debugging Output for the SunKerberos Classes.
Step 16: Configure Either MRv1 Security or YARN Security
At this point, you are ready to configure either MRv1 Security or YARN Security.
• If you are using MRv1, do the steps in Configuring MRv1 Security to configure, start, and test secure MRv1.
• If you are using YARN, do the steps in Configuring YARN Security to configure, start, and test secure YARN.
Configuring MRv1 Security
If you are using YARN, skip this section and see Configuring YARN Security.
If you are using MRv1, do the following steps to configure, start, and test secure MRv1.
1. Step 1: Configure Secure MRv1 on page 692. Step 2: Start up the JobTracker on page 703. Step 3: Start up a TaskTracker on page 714. Step 4: Try Running a Map/Reduce Job on page 71
Step 1: Configure Secure MRv1
Keep the following important information in mind when configuring secure MapReduce:
• The properties for Job Tracker and Task Tracker must specify the mapred principal, as well as the path to themapred keytab file.
• The Kerberos principals for the Job Tracker and Task Tracker are configured in the mapred-site.xml file. Thesame mapred-site.xml file with both of these principals must be installed on every host machine in the cluster.That is, it is not sufficient to have the Job Tracker principal configured on the Job Tracker host machine only. Thisis because, for example, the TaskTracker must know the principal name of the JobTracker in order to securelyregister with the JobTracker. Kerberos authentication is bi-directional.
• Do not use ${user.name} in the value of the mapred.local.dir or hadoop.log.dir properties inmapred-site.xml. Doing so can prevent tasks from launching on a secure cluster.
• Make sure that each user who will be running MRv1 jobs exists on all cluster nodes (that is, on every node thathosts any MRv1 daemon).
• Make sure the value specified for mapred.local.dir is identical in mapred-site.xml andtaskcontroller.cfg. If the values are different, this error message is returned.
• Make sure the value specified in taskcontroller.cfg for hadoop.log.dir is the same as what the Hadoopdaemons are using, which is /var/log/hadoop-0.20-mapreduce by default and can be configured inmapred-site.xml. If the values are different, this error message is returned.
To configure secure MapReduce:
1. Add the following properties to the mapred-site.xml file on every machine in the cluster:
<!-- JobTracker security configs --><property> <name>mapreduce.jobtracker.kerberos.principal</name> <value>mapred/[email protected]</value></property><property> <name>mapreduce.jobtracker.keytab.file</name> <value>/etc/hadoop/conf/mapred.keytab</value> <!-- path to the MapReduce keytab --></property>
<!-- TaskTracker security configs --><property> <name>mapreduce.tasktracker.kerberos.principal</name>
Cloudera Security | 69
Authentication

<value>mapred/[email protected]</value></property><property> <name>mapreduce.tasktracker.keytab.file</name> <value>/etc/hadoop/conf/mapred.keytab</value> <!-- path to the MapReduce keytab --></property>
<!-- TaskController settings --><property> <name>mapred.task.tracker.task-controller</name> <value>org.apache.hadoop.mapred.LinuxTaskController</value></property><property> <name>mapreduce.tasktracker.group</name> <value>mapred</value></property>
2. Create a file called taskcontroller.cfg that contains the following information:
hadoop.log.dir=<Path to Hadoop log directory. Should be same value used to start the TaskTracker. This is required to set proper permissions on the log files so that they can be written to by the user's tasks and read by the TaskTracker for serving on the web UI.>mapreduce.tasktracker.group=mapredbanned.users=mapred,hdfs,binmin.user.id=1000
Note:
In the taskcontroller.cfg file, the default setting for the banned.users property is mapred,hdfs, and bin to prevent jobs from being submitted using those user accounts. The defaultsetting for the min.user.id property is 1000 to prevent jobs from being submitted with a userID less than 1000, which are conventionally Unix super users. Note that some operating systemssuch as CentOS 5 use a default value of 500 and above for user IDs, not 1000. If this is the caseon your system, change the default setting for the min.user.id property to 500. If there areuser accounts on your cluster that have a user ID less than the value specified for themin.user.idproperty, the TaskTracker returns an error code of 255.
3. The path to the taskcontroller.cfg file is determined relative to the location of the task-controllerbinary. Specifically, the path is <path of task-controller binary>/../../conf/taskcontroller.cfg.If you installed the CDH 5 package, this path will always correspond to/etc/hadoop/conf/taskcontroller.cfg.
Note:
For more information about the task-controller program, see Information about Other HadoopSecurity Programs.
Important:
The same mapred-site.xml file and the same hdfs-site.xml file must both be installed on everyhost machine in the cluster so that the NameNode, Secondary NameNode, DataNode, Job Trackerand Task Tracker can all connect securely with each other.
Step 2: Start up the JobTracker
You are now ready to start the JobTracker.
70 | Cloudera Security
Authentication
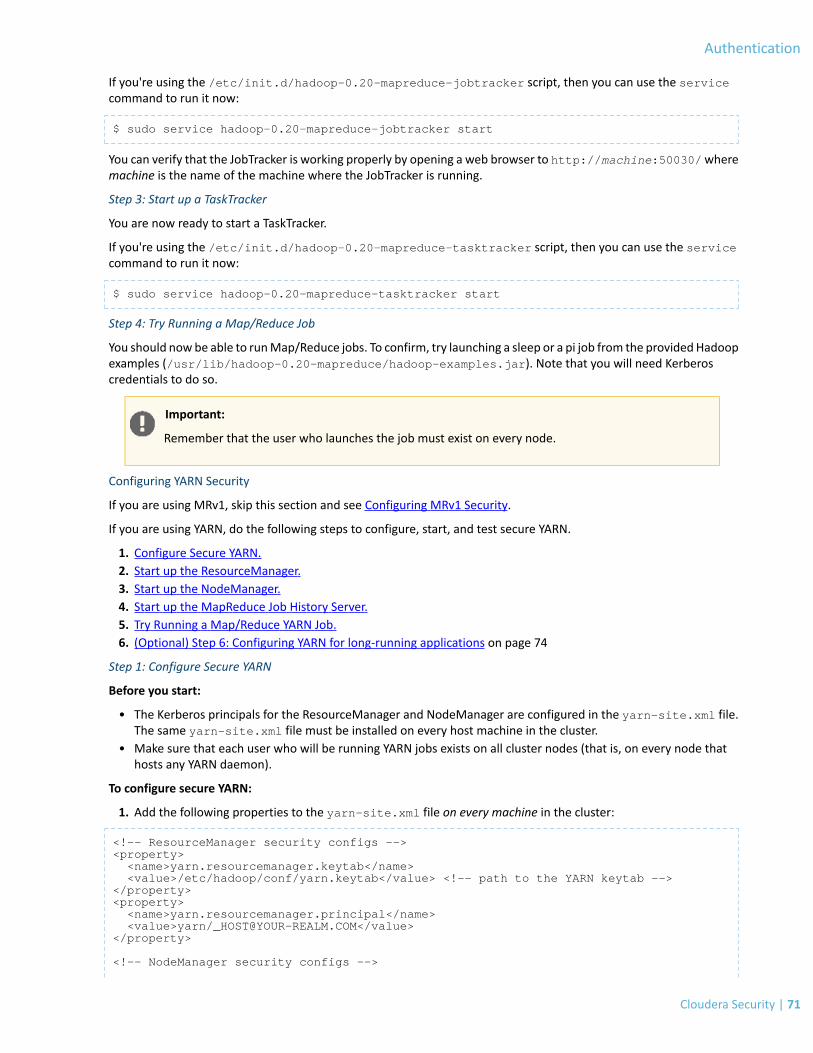
If you're using the /etc/init.d/hadoop-0.20-mapreduce-jobtracker script, then you can use the servicecommand to run it now:
$ sudo service hadoop-0.20-mapreduce-jobtracker start
You can verify that the JobTracker is working properly by opening a web browser to http://machine:50030/wheremachine is the name of the machine where the JobTracker is running.
Step 3: Start up a TaskTracker
You are now ready to start a TaskTracker.
If you're using the /etc/init.d/hadoop-0.20-mapreduce-tasktracker script, then you can use the servicecommand to run it now:
$ sudo service hadoop-0.20-mapreduce-tasktracker start
Step 4: Try Running a Map/Reduce Job
You should nowbe able to runMap/Reduce jobs. To confirm, try launching a sleep or a pi job from the providedHadoopexamples (/usr/lib/hadoop-0.20-mapreduce/hadoop-examples.jar). Note that you will need Kerberoscredentials to do so.
Important:
Remember that the user who launches the job must exist on every node.
Configuring YARN Security
If you are using MRv1, skip this section and see Configuring MRv1 Security.
If you are using YARN, do the following steps to configure, start, and test secure YARN.
1. Configure Secure YARN.2. Start up the ResourceManager.3. Start up the NodeManager.4. Start up the MapReduce Job History Server.5. Try Running a Map/Reduce YARN Job.6. (Optional) Step 6: Configuring YARN for long-running applications on page 74
Step 1: Configure Secure YARN
Before you start:
• The Kerberos principals for the ResourceManager and NodeManager are configured in the yarn-site.xml file.The same yarn-site.xml file must be installed on every host machine in the cluster.
• Make sure that each user who will be running YARN jobs exists on all cluster nodes (that is, on every node thathosts any YARN daemon).
To configure secure YARN:
1. Add the following properties to the yarn-site.xml file on every machine in the cluster:
<!-- ResourceManager security configs --><property> <name>yarn.resourcemanager.keytab</name> <value>/etc/hadoop/conf/yarn.keytab</value> <!-- path to the YARN keytab --></property><property> <name>yarn.resourcemanager.principal</name> <value>yarn/[email protected]</value></property>
<!-- NodeManager security configs -->
Cloudera Security | 71
Authentication

<property> <name>yarn.nodemanager.keytab</name> <value>/etc/hadoop/conf/yarn.keytab</value> <!-- path to the YARN keytab --></property><property> <name>yarn.nodemanager.principal</name> <value>yarn/[email protected]</value></property> <property> <name>yarn.nodemanager.container-executor.class</name> <value>org.apache.hadoop.yarn.server.nodemanager.LinuxContainerExecutor</value></property> <property> <name>yarn.nodemanager.linux-container-executor.group</name> <value>yarn</value></property>
<!-- To enable SSL --><property> <name>yarn.http.policy</name> <value>HTTPS_ONLY</value></property>
2. Add the following properties to the mapred-site.xml file on every machine in the cluster:
<!-- MapReduce Job History Server security configs --><property> <name>mapreduce.jobhistory.address</name> <value>host:port</value> <!-- Host and port of the MapReduce Job History Server; default port is 10020 --></property><property> <name>mapreduce.jobhistory.keytab</name> <value>/etc/hadoop/conf/mapred.keytab</value> <!-- path to the MAPRED keytab for the Job History Server --></property> <property> <name>mapreduce.jobhistory.principal</name> <value>mapred/[email protected]</value></property>
<!-- To enable SSL --> <property> <name>mapreduce.jobhistory.http.policy</name> <value>HTTPS_ONLY</value></property>
3. Create a file called container-executor.cfg for the Linux Container Executor program that contains thefollowing information:
yarn.nodemanager.local-dirs=<comma-separated list of paths to local NodeManager directories. Should be same values specified in yarn-site.xml. Required to validate paths passed to container-executor in order.>yarn.nodemanager.linux-container-executor.group=yarnyarn.nodemanager.log-dirs=<comma-separated list of paths to local NodeManager log directories. Should be same values specified in yarn-site.xml. Required to set proper permissions on the log files so that they can be written to by the user's containers and read by the NodeManager for log aggregation.banned.users=hdfs,yarn,mapred,bin min.user.id=1000
72 | Cloudera Security
Authentication

Note:
In the container-executor.cfg file, the default setting for the banned.users property ishdfs, yarn, mapred, and bin to prevent jobs from being submitted via those user accounts.The default setting for the min.user.id property is 1000 to prevent jobs from being submittedwith a user ID less than 1000,which are conventionally Unix super users. Note that someoperatingsystems such as CentOS 5 use a default value of 500 and above for user IDs, not 1000. If this isthe case on your system, change the default setting for the min.user.id property to 500. Ifthere are user accounts on your cluster that have a user ID less than the value specified for themin.user.id property, the NodeManager returns an error code of 255.
4. The path to the container-executor.cfg file is determined relative to the location of the container-executorbinary. Specifically, the path is <dirname of container-executorbinary>/../etc/hadoop/container-executor.cfg. If you installed the CDH5package, this pathwill alwayscorrespond to /etc/hadoop/conf/container-executor.cfg.
Note:
The container-executor program requires that the paths including and leading up to thedirectories specified inyarn.nodemanager.local-dirs andyarn.nodemanager.log-dirsto be set to 755 permissions as shown in this table on permissions on directories.
5. Verify that the ownership and permissions of the container-executor program corresponds to:
---Sr-s--- 1 root yarn 36264 May 20 15:30 container-executor
Note:
For more information about the Linux Container Executor program, see Appendix B - Informationabout Other Hadoop Security Programs.
Step 2: Start up the ResourceManager
You are now ready to start the ResourceManager.
Note:
Make sure you always start ResourceManager before starting NodeManager.
If you're using the/etc/init.d/hadoop-yarn-resourcemanager script, then you canuse theservice commandto run it now:
$ sudo service hadoop-yarn-resourcemanager start
You can verify that the ResourceManager is working properly by opening a web browser to http://host:8088/ wherehost is the name of the machine where the ResourceManager is running.
Step 3: Start up the NodeManager
You are now ready to start the NodeManager.
If you're using the /etc/init.d/hadoop-yarn-nodemanager script, then you can use the service command torun it now:
$ sudo service hadoop-yarn-nodemanager start
Cloudera Security | 73
Authentication

You can verify that the NodeManager is working properly by opening a web browser to http://host:8042/ where hostis the name of the machine where the NodeManager is running.
Step 4: Start up the MapReduce Job History Server
You are now ready to start the MapReduce Job History Server.
If you're using the /etc/init.d/hadoop-mapreduce-historyserver script, then you can use the servicecommand to run it now:
$ sudo service hadoop-mapreduce-historyserver start
You can verify that the MapReduce JobHistory Server is working properly by opening a web browser tohttp://host:19888/ where host is the name of the machine where the MapReduce JobHistory Server is running.
Step 5: Try Running a Map/Reduce YARN Job
You should nowbe able to runMap/Reduce jobs. To confirm, try launching a sleep or a pi job from the providedHadoopexamples (/usr/lib/hadoop-mapreduce/hadoop-mapreduce-examples.jar). Note that youwill need Kerberoscredentials to do so.
Important:
Remember that the user who launches the job must exist on every node.
To try running a MapReduce job using YARN, set the HADOOP_MAPRED_HOME environment variable and then submitthe job. For example:
$ export HADOOP_MAPRED_HOME=/usr/lib/hadoop-mapreduce$ /usr/bin/hadoop jar /usr/lib/hadoop-mapreduce/hadoop-mapreduce-examples.jar pi 10 10000
(Optional) Step 6: Configuring YARN for long-running applications
Long-running applications such as Spark Streaming jobs will need additional configuration since the default settingsonly allow the hdfs user's delegation tokens a maximum lifetime of 7 days which is not always sufficient.
You can work around this by configuring the ResourceManager as a proxy user for the corresponding HDFS NameNodeso that the ResourceManager can request new tokens when the existing ones are past their maximum lifetime. YARNwill then be able to continue performing localization and log-aggregation on behalf of the hdfs user.
Set the following property in yarn-site.xml to true:
<property> <name>yarn.resourcemanager.proxy-user-privileges.enabled</name><value>true</value></property>
Configure the following properties in core-site.xml on the HDFS NameNode. You can use a more restrictiveconfiguration by specifying hosts/groups instead of * as in the example below.
<property> <name>hadoop.proxyuser.yarn.hosts</name><value>*</value></property>
<property><name>hadoop.proxyuser.yarn.groups</name><value>*</value></property>
74 | Cloudera Security
Authentication
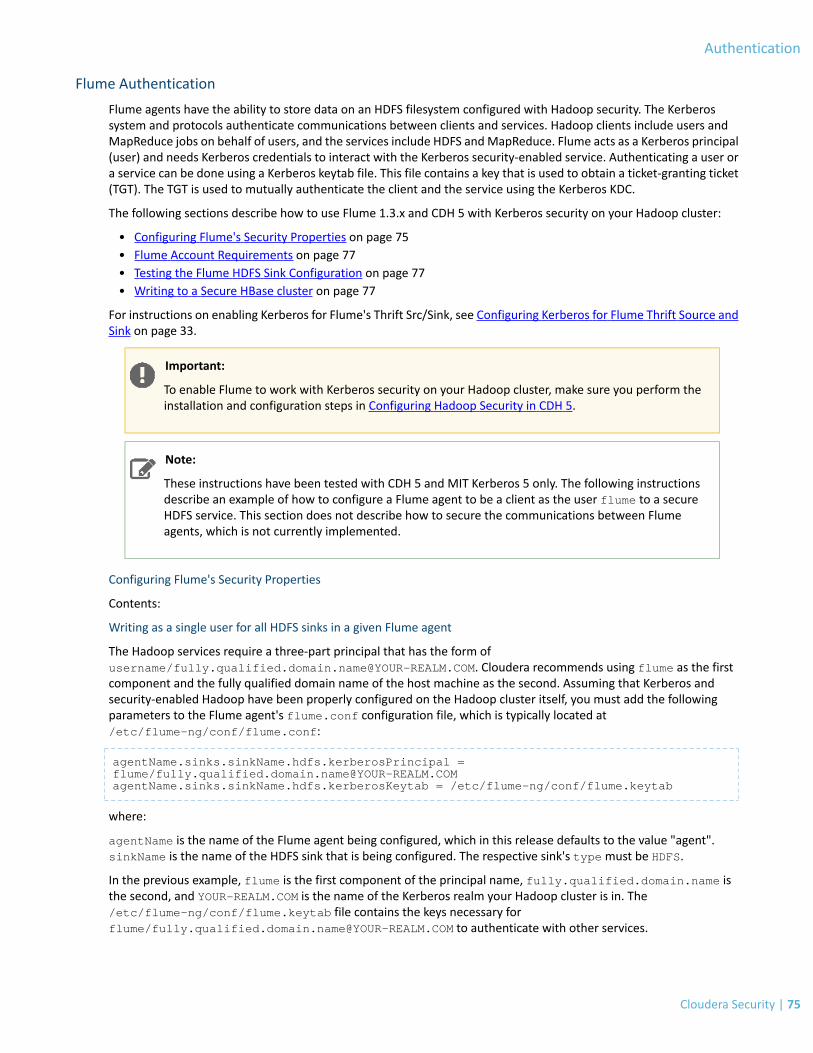
Flume Authentication
Flume agents have the ability to store data on an HDFS filesystem configured with Hadoop security. The Kerberossystem and protocols authenticate communications between clients and services. Hadoop clients include users andMapReduce jobs on behalf of users, and the services include HDFS andMapReduce. Flume acts as a Kerberos principal(user) and needs Kerberos credentials to interact with the Kerberos security-enabled service. Authenticating a user ora service can be done using a Kerberos keytab file. This file contains a key that is used to obtain a ticket-granting ticket(TGT). The TGT is used to mutually authenticate the client and the service using the Kerberos KDC.
The following sections describe how to use Flume 1.3.x and CDH 5 with Kerberos security on your Hadoop cluster:
• Configuring Flume's Security Properties on page 75• Flume Account Requirements on page 77• Testing the Flume HDFS Sink Configuration on page 77• Writing to a Secure HBase cluster on page 77
For instructions on enabling Kerberos for Flume's Thrift Src/Sink, see Configuring Kerberos for Flume Thrift Source andSink on page 33.
Important:
To enable Flume to work with Kerberos security on your Hadoop cluster, make sure you perform theinstallation and configuration steps in Configuring Hadoop Security in CDH 5.
Note:
These instructions have been tested with CDH 5 and MIT Kerberos 5 only. The following instructionsdescribe an example of how to configure a Flume agent to be a client as the user flume to a secureHDFS service. This section does not describe how to secure the communications between Flumeagents, which is not currently implemented.
Configuring Flume's Security Properties
Contents:
Writing as a single user for all HDFS sinks in a given Flume agent
The Hadoop services require a three-part principal that has the form ofusername/[email protected]. Cloudera recommends using flume as the firstcomponent and the fully qualified domain name of the host machine as the second. Assuming that Kerberos andsecurity-enabled Hadoop have been properly configured on the Hadoop cluster itself, you must add the followingparameters to the Flume agent's flume.conf configuration file, which is typically located at/etc/flume-ng/conf/flume.conf:
agentName.sinks.sinkName.hdfs.kerberosPrincipal = flume/fully.qualified.domain.name@YOUR-REALM.COMagentName.sinks.sinkName.hdfs.kerberosKeytab = /etc/flume-ng/conf/flume.keytab
where:
agentName is the name of the Flume agent being configured, which in this release defaults to the value "agent".sinkName is the name of the HDFS sink that is being configured. The respective sink's typemust be HDFS.
In the previous example, flume is the first component of the principal name, fully.qualified.domain.name isthe second, and YOUR-REALM.COM is the name of the Kerberos realm your Hadoop cluster is in. The/etc/flume-ng/conf/flume.keytab file contains the keys necessary forflume/[email protected] to authenticate with other services.
Cloudera Security | 75
Authentication

Flume and Hadoop also provide a simple keyword, _HOST, that gets expanded to be the fully qualified domain nameof the host machine where the service is running. This allows you to have one flume.conf file with the samehdfs.kerberosPrincipal value on all of your agent host machines.
agentName.sinks.sinkName.hdfs.kerberosPrincipal = flume/[email protected]
Writing as different users across multiple HDFS sinks in a single Flume agent
In this release, support has been added for secure impersonation of Hadoop users (similar to "sudo" in UNIX). This isimplemented in a way similar to how Oozie implements secure user impersonation.
The following steps to set up secure impersonation from Flume to HDFS assume your cluster is configured usingKerberos. (However, impersonation also works on non-Kerberos secured clusters, and Kerberos-specific aspects shouldbe omitted in that case.)
1. Configure Hadoop to allow impersonation. Add the following configuration properties to your core-site.xml.
<property> <name>hadoop.proxyuser.flume.groups</name> <value>group1,group2</value> <description>Allow the flume user to impersonate any members of group1 and group2</description></property><property> <name>hadoop.proxyuser.flume.hosts</name> <value>host1,host2</value> <description>Allow the flume user to connect only from host1 and host2 to impersonate a user</description></property>
You can use the wildcard character * to enable impersonation of any user from any host. For more information,see Secure Impersonation.
2. Set up a Kerberos keytab for the Kerberos principal and host Flume is connecting to HDFS from. This user mustmatch the Hadoop configuration in the preceding step. For instructions, see Configuring Hadoop Security in CDH5.
3. Configure the HDFS sink with the following configuration options:4. hdfs.kerberosPrincipal - fully-qualified principal. Note: _HOSTwill be replaced by the hostname of the local
machine (only in-between the / and @ characters)5. hdfs.kerberosKeytab - location on the local machine of the keytab containing the user and host keys for the
above principal6. hdfs.proxyUser - the proxy user to impersonate
Example snippet (the majority of the HDFS sink configuration options have been omitted):
agent.sinks.sink-1.type = HDFSagent.sinks.sink-1.hdfs.kerberosPrincipal = flume/[email protected] = /etc/flume-ng/conf/flume.keytabagent.sinks.sink-1.hdfs.proxyUser = weblogs
agent.sinks.sink-2.type = HDFSagent.sinks.sink-2.hdfs.kerberosPrincipal = flume/[email protected] = /etc/flume-ng/conf/flume.keytabagent.sinks.sink-2.hdfs.proxyUser = applogs
In the above example, the flume Kerberos principal impersonates the user weblogs in sink-1 and the user applogsin sink-2. This will only be allowed if the Kerberos KDC authenticates the specified principal (flume in this case), andthe if NameNode authorizes impersonation of the specified proxy user by the specified principal.
Limitations
At this time, Flume does not support using multiple Kerberos principals or keytabs in the same agent. Therefore, if youwant to create files as multiple users on HDFS, then impersonation must be configured, and exactly one principal mustbe configured in Hadoop to allow impersonation of all desired accounts. In addition, the same keytab path must be
76 | Cloudera Security
Authentication

used across all HDFS sinks in the same agent. If you attempt to configure multiple principals or keytabs in the sameagent, Flume will emit the following error message:
Cannot use multiple kerberos principals in the same agent. Must restart agent to use new principal or keytab.
Flume Account Requirements
This section provides an overview of the account and credential requirements for Flume to write to a Kerberized HDFS.Note the distinctions between the Flume agent machine, DataNode machine, and NameNode machine, as well as theflume Unix user account versus the flume Hadoop/Kerberos user account.
• Each Flume agent machine that writes to HDFS (using a configured HDFS sink) needs a Kerberos principal of theform:
flume/[email protected]
where fully.qualified.domain.name is the fully qualified domain name of the given Flume agent hostmachine, and YOUR-REALM.COM is the Kerberos realm.
• Each Flume agent machine that writes to HDFS does not need to have a flume Unix user account to write filesowned by the flume Hadoop/Kerberos user. Only the keytab for the flume Hadoop/Kerberos user is requiredon the Flume agent machine.
• DataNode machines do not need Flume Kerberos keytabs and also do not need the flume Unix user account.
• TaskTracker (MRv1) or NodeManager (YARN) machines need a flume Unix user account if and only ifMapReducejobs are being run as the flume Hadoop/Kerberos user.
• The NameNode machine needs to be able to resolve the groups of the flume user. The groups of the flume useron the NameNode machine are mapped to the Hadoop groups used for authorizing access.
• The NameNode machine does not need a Flume Kerberos keytab.
Testing the Flume HDFS Sink Configuration
To test whether your Flume HDFS sink is properly configured to connect to your secure HDFS cluster, you must rundata through Flume. An easy way to do this is to configure a Netcat source, a Memory channel, and an HDFS sink. StartFlume with that configuration, and use the nc command (available freely online and with many UNIX distributions) tosend events to the Netcat source port. The resulting events should appear on HDFS in the configured location. If theevents do not appear, check the Flume log at /var/log/flume-ng/flume.log for any error messages related toKerberos.
Writing to a Secure HBase cluster
If you want to write to a secure HBase cluster, be aware of the following:
• Flume must be configured to use Kerberos security as documented above, and HBase must be configured to useKerberos security as documented in HBase Security Configuration.
• The hbase-site.xml file, which must be configured to use Kerberos security, must be in Flume's classpath orHBASE_HOME/conf.
• HBaseSink org.apache.flume.sink.hbase.HBaseSink supports secure HBase, but AsyncHBaseSinkorg.apache.flume.sink.hbase.AsyncHBaseSink does not.
• The Flume HBase Sink takes these two parameters:• kerberosPrincipal – specifies the Kerberos principal to be used• kerberosKeytab – specifies the path to the Kerberos keytab These are defined as:
agent.sinks.hbaseSink.kerberosPrincipal = flume/fully.qualified.domain.name@YOUR-REALM.COMagent.sinks.hbaseSink.kerberosKeytab = /etc/flume-ng/conf/flume.keytab
Cloudera Security | 77
Authentication

• If HBase is running with the AccessController coprocessor, the flume user (or whichever user the agent is runningas) must have permissions to write to the same table and the column family that the sink is configured to writeto. You can grant permissions using the grant command from HBase shell as explained in HBase SecurityConfiguration.
• The Flume HBase Sink does not currently support impersonation; it will write to HBase as the user the agent isbeing run as.
• If you want to use HDFS Sink and HBase Sink to write to HDFS and HBase from the same agent respectively, bothsinks have to use the same principal and keytab. If you want to use different credentials, the sinks have to be ondifferent agents.
• Each Flume agent machine that writes to HBase (using a configured HBase sink) needs a Kerberos principal of theform:
flume/[email protected]
where fully.qualified.domain.name is the fully qualified domain name of the given Flume agent hostmachine, and YOUR-REALM.COM is the Kerberos realm.
HBase Authentication
There are two major parts in the process of configuring HBase security:
1. Configure HBaseAuthentication: Youmust establish amechanism for HBase servers and clients to securely identifythemselves with HDFS, ZooKeeper, and each other (called authentication). This ensures that, for example, a hostclaiming to be an HBase RegionServer or a particular HBase client are in fact who they claim to be.
2. Configure HBase Authorization: You must establish rules for the resources that clients are allowed to access(called authorization). For more information, see Configuring HBase Authorization on page 353.
For more background information, see this blog post.
The following sections describe how to use Apache HBase and CDH 5 with Kerberos security on your Hadoop cluster:
• Configuring Kerberos Authentication for HBase on page 78• Configuring Secure HBase Replication on page 84• Configuring the HBase Client TGT Renewal Period on page 85
Important:
To enable HBase to work with Kerberos security on your Hadoop cluster, make sure you perform theinstallation and configuration steps in Configuring Hadoop Security in CDH 5 and ZooKeeper SecurityConfiguration.
Note:
These instructions have been tested with CDH and MIT Kerberos 5 only.
Important:
Although an HBase Thrift server can connect to a secured Hadoop cluster, access is not secured fromclients to the HBase Thrift server.
Configuring Kerberos Authentication for HBase
Follow these steps to configure HBase authentication.
78 | Cloudera Security
Authentication

Configuring Kerberos Authentication for HBase Using Cloudera Manager
Cloudera Manager simplifies the task of configuring Kerberos authentication for HBase.
Configure HBase Servers to Authenticate with a Secure HDFS Cluster Using Cloudera Manager
Minimum Required Role: Security Administrator (also provided by Full Administrator)
1. Get or create a Kerberos principal for the Cloudera Manager server.2. Go to the HBase service.3. Click the Configuration tab.4. Select HBase Service-Wide.5. Select Category > Security.6. Locate the Kerberos Principal property and enter the name for the Kerberos principal from step 1.7. Locate the HBase Secure Authentication property or search for it by typing its name in the Search box.8. Select the kerberos option.9. Click Save Changes to commit the changes.10. Restart the role.11. Restart the service.
Configure HBase Servers and Clients to Authenticate with a Secure ZooKeeper
To run a secure HBase, you must also use a secure ZooKeeper. To use a secure ZooKeeper, each HBase host machine(Master, RegionServer, and client) must have a principal that allows it to authenticate with your secure ZooKeeperensemble.
Cloudera Manager automatically configures the following features when you enable Kerberos authentication, and noadditional configuration is required.
• Authentication between HBase and ZooKeeper• Authentication for the HBase REST and Thrift gateways• doAs Impersonation for the HBase Thrift gateway
Note:
Limitations with Thrift Framed Transport
If you use framed transport, you cannot doAs impersonation, because SASL does not work with Thriftframed transport.
Configuring Kerberos Authentication for HBase Using the Command Line
Important:
• If you use Cloudera Manager, do not use these command-line instructions.• This information applies specifically to CDH 5.4.x. If you use an earlier version of CDH, see the
documentation for that version located at Cloudera Documentation.
Configure HBase Servers to Authenticate with a Secure HDFS Cluster Using the Command Line
Important:
• If you use Cloudera Manager, do not use these command-line instructions.• This information applies specifically to CDH 5.4.x. If you use an earlier version of CDH, see the
documentation for that version located at Cloudera Documentation.
To configure HBase servers to authenticate with a secure HDFS cluster, you must do each of the following:
Cloudera Security | 79
Authentication
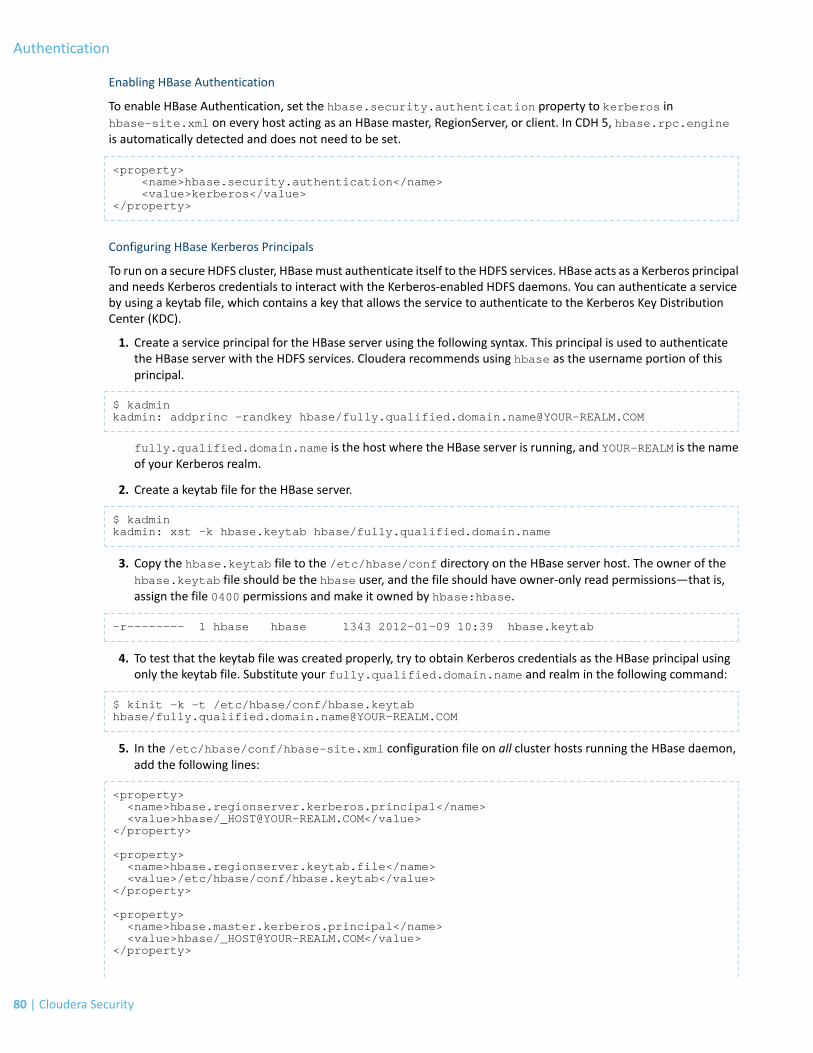
Enabling HBase Authentication
To enable HBase Authentication, set the hbase.security.authentication property to kerberos inhbase-site.xml on every host acting as an HBase master, RegionServer, or client. In CDH 5, hbase.rpc.engineis automatically detected and does not need to be set.
<property> <name>hbase.security.authentication</name> <value>kerberos</value> </property>
Configuring HBase Kerberos Principals
To run on a secure HDFS cluster, HBasemust authenticate itself to the HDFS services. HBase acts as a Kerberos principaland needs Kerberos credentials to interact with the Kerberos-enabled HDFS daemons. You can authenticate a serviceby using a keytab file, which contains a key that allows the service to authenticate to the Kerberos Key DistributionCenter (KDC).
1. Create a service principal for the HBase server using the following syntax. This principal is used to authenticatethe HBase server with the HDFS services. Cloudera recommends using hbase as the username portion of thisprincipal.
$ kadminkadmin: addprinc -randkey hbase/[email protected]
fully.qualified.domain.name is the host where the HBase server is running, and YOUR-REALM is the nameof your Kerberos realm.
2. Create a keytab file for the HBase server.
$ kadminkadmin: xst -k hbase.keytab hbase/fully.qualified.domain.name
3. Copy the hbase.keytab file to the /etc/hbase/conf directory on the HBase server host. The owner of thehbase.keytab file should be the hbase user, and the file should have owner-only read permissions—that is,assign the file 0400 permissions and make it owned by hbase:hbase.
-r-------- 1 hbase hbase 1343 2012-01-09 10:39 hbase.keytab
4. To test that the keytab file was created properly, try to obtain Kerberos credentials as the HBase principal usingonly the keytab file. Substitute your fully.qualified.domain.name and realm in the following command:
$ kinit -k -t /etc/hbase/conf/hbase.keytab hbase/[email protected]
5. In the /etc/hbase/conf/hbase-site.xml configuration file on all cluster hosts running the HBase daemon,add the following lines:
<property> <name>hbase.regionserver.kerberos.principal</name> <value>hbase/[email protected]</value> </property>
<property> <name>hbase.regionserver.keytab.file</name> <value>/etc/hbase/conf/hbase.keytab</value> </property>
<property> <name>hbase.master.kerberos.principal</name> <value>hbase/[email protected]</value> </property>
80 | Cloudera Security
Authentication

<property> <name>hbase.master.keytab.file</name> <value>/etc/hbase/conf/hbase.keytab</value> </property>
Configure HBase Servers and Clients to Authenticate with a Secure ZooKeeper
To run a secure HBase, you must also use a secure ZooKeeper. To use a secure ZooKeeper, each HBase host machine(Master, RegionServer, and client) must have a principal that allows it to authenticate with your secure ZooKeeperensemble.
Note: This section assumes the following:
• Your secure ZooKeeper is already configured according to the instructions in the ZooKeeperSecurity Configuration section and is notmanaged by HBase.
• You have successfully completed the previous steps and already have a principal and keytab filecreated and in place for every HBase server and client.
Configure HBase JVMs (all Masters, Region Servers, and clients) to use JAAS
1. On each host, set up a Java Authentication and Authorization Service (JAAS) by creating a/etc/hbase/conf/zk-jaas.conf file that contains the following:
Client { com.sun.security.auth.module.Krb5LoginModule required useKeyTab=true useTicketCache=false keyTab="/etc/hbase/conf/hbase.keytab" principal="hbase/fully.qualified.domain.name@<YOUR-REALM>"; };
2. Modify the hbase-env.sh file on HBase server and client hosts to include the following:
export HBASE_OPTS="$HBASE_OPTS -Djava.security.auth.login.config=/etc/hbase/conf/zk-jaas.conf" export HBASE_MANAGES_ZK=false
3. Restart the HBase cluster.
Configure the HBase Servers (Masters and Region Servers) to use Authentication to connect to ZooKeeper
Note: If you use Cloudera Manager, this configuration is done automatically and you do not need toperform these steps.
1. Update your hbase-site.xml on each HBase server host with the following properties:
<configuration> <property> <name>hbase.zookeeper.quorum</name> <value>$ZK_NODES</value> </property> <property> <name>hbase.cluster.distributed</name> <value>true</value> </property></configuration>
$ZK_NODES is the comma-separated list of hostnames of the ZooKeeper Quorum hosts that you configuredaccording to the instructions in ZooKeeper Security Configuration.
Cloudera Security | 81
Authentication
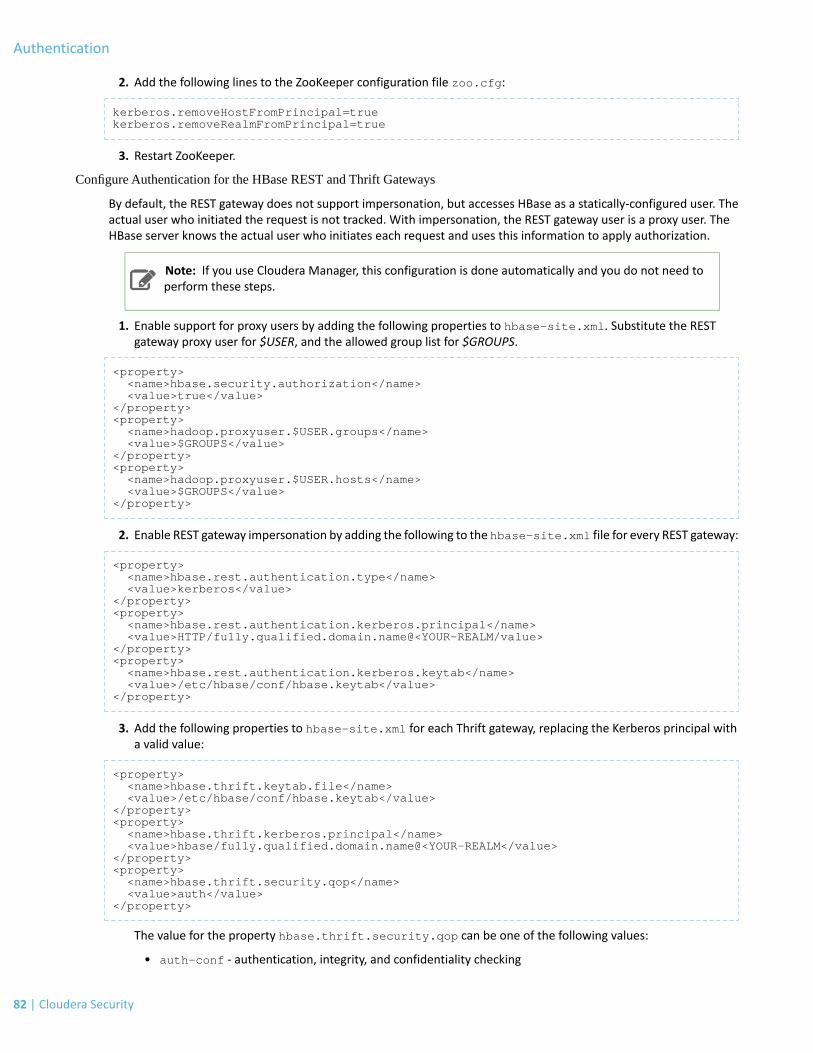
2. Add the following lines to the ZooKeeper configuration file zoo.cfg:
kerberos.removeHostFromPrincipal=truekerberos.removeRealmFromPrincipal=true
3. Restart ZooKeeper.
Configure Authentication for the HBase REST and Thrift Gateways
By default, the REST gateway does not support impersonation, but accesses HBase as a statically-configured user. Theactual user who initiated the request is not tracked. With impersonation, the REST gateway user is a proxy user. TheHBase server knows the actual user who initiates each request and uses this information to apply authorization.
Note: If you use Cloudera Manager, this configuration is done automatically and you do not need toperform these steps.
1. Enable support for proxy users by adding the following properties to hbase-site.xml. Substitute the RESTgateway proxy user for $USER, and the allowed group list for $GROUPS.
<property> <name>hbase.security.authorization</name> <value>true</value></property><property> <name>hadoop.proxyuser.$USER.groups</name> <value>$GROUPS</value></property><property> <name>hadoop.proxyuser.$USER.hosts</name> <value>$GROUPS</value></property>
2. Enable REST gateway impersonation by adding the following to the hbase-site.xml file for every REST gateway:
<property> <name>hbase.rest.authentication.type</name> <value>kerberos</value></property><property> <name>hbase.rest.authentication.kerberos.principal</name> <value>HTTP/fully.qualified.domain.name@<YOUR-REALM/value></property><property> <name>hbase.rest.authentication.kerberos.keytab</name> <value>/etc/hbase/conf/hbase.keytab</value></property>
3. Add the following properties to hbase-site.xml for each Thrift gateway, replacing the Kerberos principal witha valid value:
<property> <name>hbase.thrift.keytab.file</name> <value>/etc/hbase/conf/hbase.keytab</value></property><property> <name>hbase.thrift.kerberos.principal</name> <value>hbase/fully.qualified.domain.name@<YOUR-REALM</value></property><property> <name>hbase.thrift.security.qop</name> <value>auth</value></property>
The value for the property hbase.thrift.security.qop can be one of the following values:
• auth-conf - authentication, integrity, and confidentiality checking
82 | Cloudera Security
Authentication
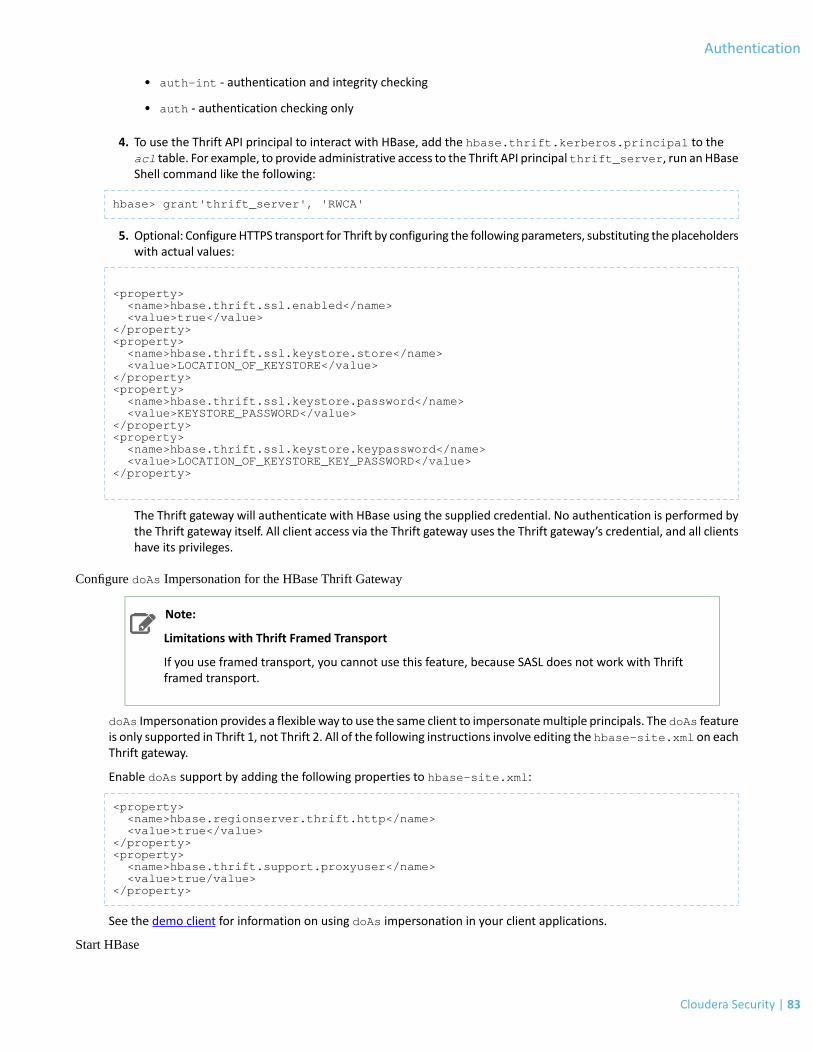
• auth-int - authentication and integrity checking
• auth - authentication checking only
4. To use the Thrift API principal to interact with HBase, add the hbase.thrift.kerberos.principal to theacl table. For example, to provide administrative access to the Thrift API principal thrift_server, run anHBaseShell command like the following:
hbase> grant'thrift_server', 'RWCA'
5. Optional: ConfigureHTTPS transport for Thrift by configuring the following parameters, substituting the placeholderswith actual values:
<property> <name>hbase.thrift.ssl.enabled</name> <value>true</value></property><property> <name>hbase.thrift.ssl.keystore.store</name> <value>LOCATION_OF_KEYSTORE</value></property><property> <name>hbase.thrift.ssl.keystore.password</name> <value>KEYSTORE_PASSWORD</value></property><property> <name>hbase.thrift.ssl.keystore.keypassword</name> <value>LOCATION_OF_KEYSTORE_KEY_PASSWORD</value></property>
The Thrift gateway will authenticate with HBase using the supplied credential. No authentication is performed bythe Thrift gateway itself. All client access via the Thrift gateway uses the Thrift gateway’s credential, and all clientshave its privileges.
Configure doAs Impersonation for the HBase Thrift Gateway
Note:
Limitations with Thrift Framed Transport
If you use framed transport, you cannot use this feature, because SASL does not work with Thriftframed transport.
doAs Impersonation provides a flexibleway to use the same client to impersonatemultiple principals. The doAs featureis only supported in Thrift 1, not Thrift 2. All of the following instructions involve editing the hbase-site.xml on eachThrift gateway.
Enable doAs support by adding the following properties to hbase-site.xml:
<property> <name>hbase.regionserver.thrift.http</name> <value>true</value></property><property> <name>hbase.thrift.support.proxyuser</name> <value>true/value></property>
See the demo client for information on using doAs impersonation in your client applications.
Start HBase
Cloudera Security | 83
Authentication

If the configuration worked, you see something similar to the following in the HBase Master and Region Server logswhen you start the cluster:
INFO zookeeper.ZooKeeper: Initiating client connection, connectString=ZK_QUORUM_SERVER:2181 sessionTimeout=180000 watcher=master:60000INFO zookeeper.ClientCnxn: Opening socket connection to server /ZK_QUORUM_SERVER:2181INFO zookeeper.RecoverableZooKeeper: The identifier of this process is PID@ZK_QUORUM_SERVERINFO zookeeper.Login: successfully logged in.INFO client.ZooKeeperSaslClient: Client will use GSSAPI as SASL mechanism.INFO zookeeper.Login: TGT refresh thread started.INFO zookeeper.ClientCnxn: Socket connection established to ZK_QUORUM_SERVER:2181, initiating sessionINFO zookeeper.Login: TGT valid starting at: Sun Apr 08 22:43:59 UTC 2012INFO zookeeper.Login: TGT expires: Mon Apr 09 22:43:59 UTC 2012INFO zookeeper.Login: TGT refresh sleeping until: Mon Apr 09 18:30:37 UTC 2012INFO zookeeper.ClientCnxn: Session establishment complete on server ZK_QUORUM_SERVER:2181, sessionid = 0x134106594320000, negotiated timeout = 180000
Configuring Secure HBase Replication
If you are using HBase Replication and youwant tomake it secure, read this section for instructions. Before proceeding,you should already have configured HBase Replication by following the instructions in the HBase Replication sectionof the CDH 5 Installation Guide.
To configure secure HBase replication, you must configure cross realm support for Kerberos, ZooKeeper, and Hadoop.
To configure secure HBase replication:
1. Create krbtgt principals for the two realms. For example, if you have two realms called ONE.COM and TWO.COM,you need to add the following principals: krbtgt/[email protected] and krbtgt/[email protected]. Addthese two principals at both realms. Note that there must be at least one common encryption mode betweenthese two realms.
kadmin: addprinc -e "<enc_type_list>" krbtgt/[email protected]: addprinc -e "<enc_type_list>" krbtgt/[email protected]
2. Add rules for creating short names in Zookeeper. To do this, add a system level property in java.env, definedin the conf directory. Here is an example rule that illustrates how to add support for the realm called ONE.COM,and have two members in the principal (such as service/[email protected]):
-Dzookeeper.security.auth_to_local=RULE:[2:\$1@\$0](.*@\\QONE.COM\\E$)s/@\\QONE.COM\\E$//DEFAULT
The above code example adds support for the ONE.COM realm in a different realm. So, in the case of replication,you must add a rule for the master cluster realm in the slave cluster realm. DEFAULT is for defining the defaultrule.
3. Add rules for creating short names in the Hadoop processes. To do this, add thehadoop.security.auth_to_local property in the core-site.xml file in the slave cluster. For example, toadd support for the ONE.COM realm:
<property> <name>hadoop.security.auth_to_local</name> <value> RULE:[2:$1@$0](.*@\QONE.COM\E$)s/@\QONE.COM\E$// DEFAULT </value></property>
For more information about adding rules, see Appendix C - Configuring the Mapping from Kerberos Principals toShort Names.
84 | Cloudera Security
Authentication
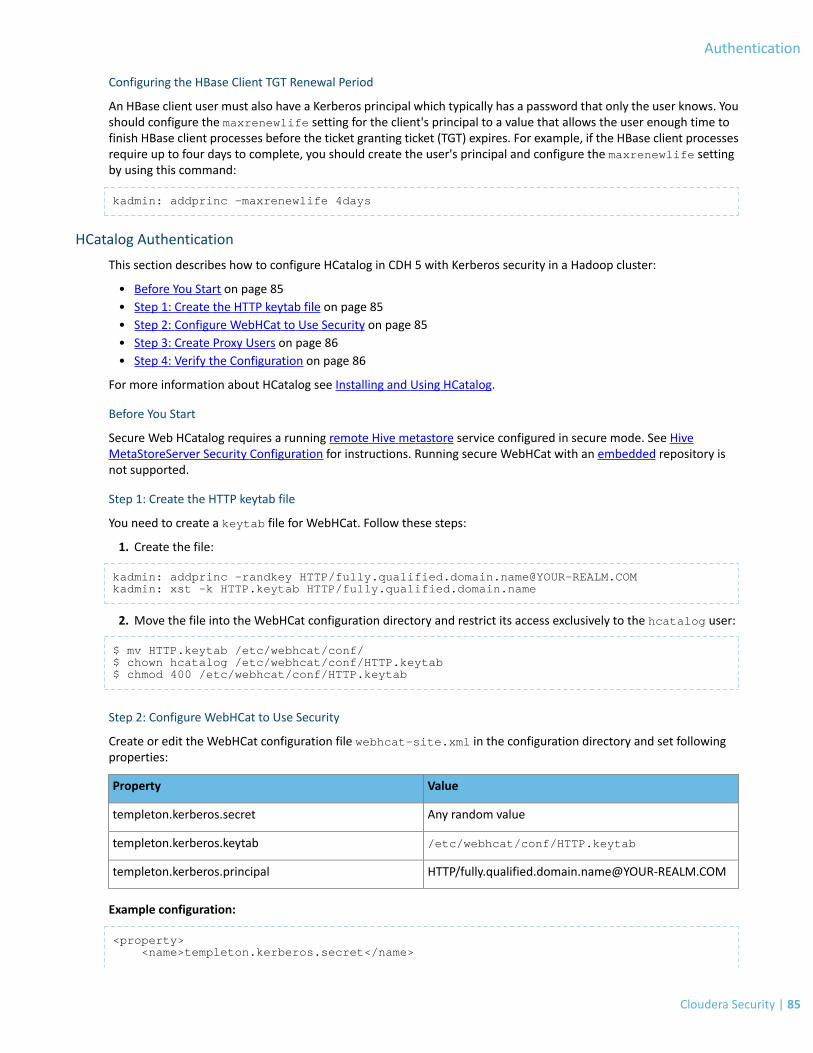
Configuring the HBase Client TGT Renewal Period
An HBase client user must also have a Kerberos principal which typically has a password that only the user knows. Youshould configure the maxrenewlife setting for the client's principal to a value that allows the user enough time tofinish HBase client processes before the ticket granting ticket (TGT) expires. For example, if the HBase client processesrequire up to four days to complete, you should create the user's principal and configure the maxrenewlife settingby using this command:
kadmin: addprinc -maxrenewlife 4days
HCatalog Authentication
This section describes how to configure HCatalog in CDH 5 with Kerberos security in a Hadoop cluster:
• Before You Start on page 85• Step 1: Create the HTTP keytab file on page 85• Step 2: Configure WebHCat to Use Security on page 85• Step 3: Create Proxy Users on page 86• Step 4: Verify the Configuration on page 86
For more information about HCatalog see Installing and Using HCatalog.
Before You Start
Secure Web HCatalog requires a running remote Hive metastore service configured in secure mode. See HiveMetaStoreServer Security Configuration for instructions. Running secure WebHCat with an embedded repository isnot supported.
Step 1: Create the HTTP keytab file
You need to create a keytab file for WebHCat. Follow these steps:
1. Create the file:
kadmin: addprinc -randkey HTTP/[email protected]: xst -k HTTP.keytab HTTP/fully.qualified.domain.name
2. Move the file into the WebHCat configuration directory and restrict its access exclusively to the hcatalog user:
$ mv HTTP.keytab /etc/webhcat/conf/$ chown hcatalog /etc/webhcat/conf/HTTP.keytab$ chmod 400 /etc/webhcat/conf/HTTP.keytab
Step 2: Configure WebHCat to Use Security
Create or edit the WebHCat configuration file webhcat-site.xml in the configuration directory and set followingproperties:
ValueProperty
Any random valuetempleton.kerberos.secret
/etc/webhcat/conf/HTTP.keytabtempleton.kerberos.keytab
HTTP/fully.qualified.domain.name@YOUR-REALM.COMtempleton.kerberos.principal
Example configuration:
<property> <name>templeton.kerberos.secret</name>
Cloudera Security | 85
Authentication
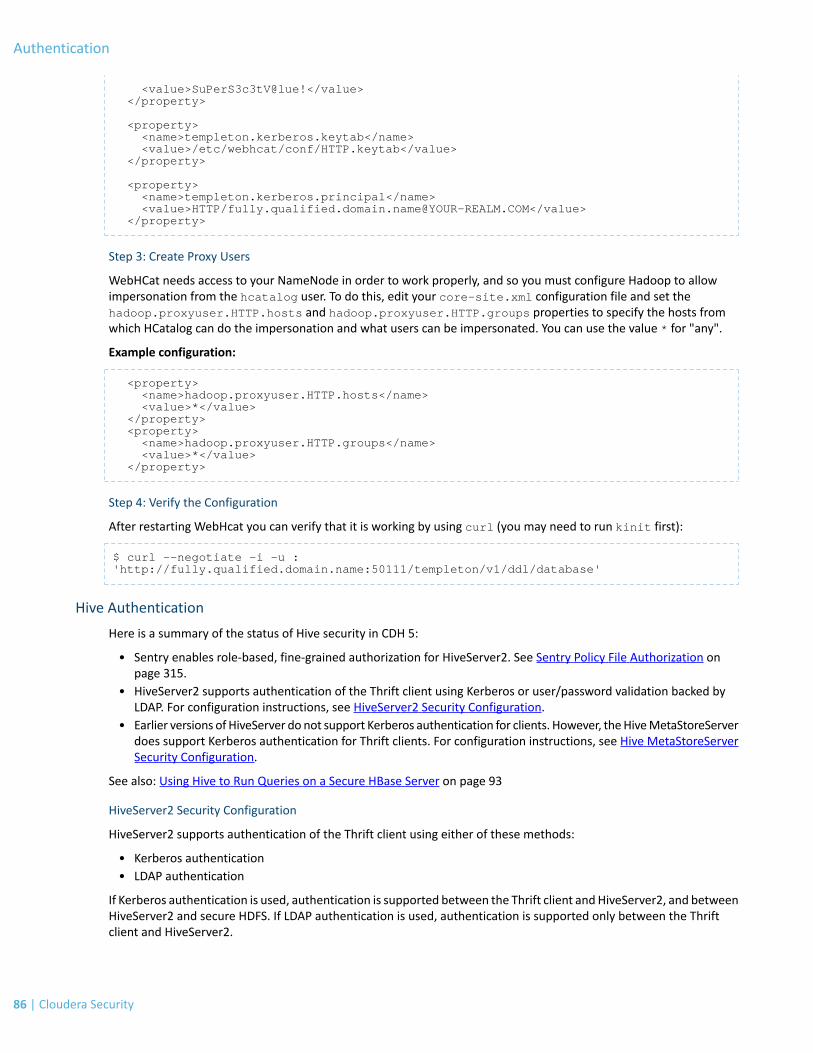
<value>SuPerS3c3tV@lue!</value> </property>
<property> <name>templeton.kerberos.keytab</name> <value>/etc/webhcat/conf/HTTP.keytab</value> </property>
<property> <name>templeton.kerberos.principal</name> <value>HTTP/[email protected]</value> </property>
Step 3: Create Proxy Users
WebHCat needs access to your NameNode in order to work properly, and so you must configure Hadoop to allowimpersonation from the hcatalog user. To do this, edit your core-site.xml configuration file and set thehadoop.proxyuser.HTTP.hosts and hadoop.proxyuser.HTTP.groups properties to specify the hosts fromwhich HCatalog can do the impersonation and what users can be impersonated. You can use the value * for "any".
Example configuration:
<property> <name>hadoop.proxyuser.HTTP.hosts</name> <value>*</value> </property> <property> <name>hadoop.proxyuser.HTTP.groups</name> <value>*</value> </property>
Step 4: Verify the Configuration
After restarting WebHcat you can verify that it is working by using curl (you may need to run kinit first):
$ curl --negotiate -i -u : 'http://fully.qualified.domain.name:50111/templeton/v1/ddl/database'
Hive Authentication
Here is a summary of the status of Hive security in CDH 5:
• Sentry enables role-based, fine-grained authorization for HiveServer2. See Sentry Policy File Authorization onpage 315.
• HiveServer2 supports authentication of the Thrift client using Kerberos or user/password validation backed byLDAP. For configuration instructions, see HiveServer2 Security Configuration.
• Earlier versions of HiveServer do not support Kerberos authentication for clients. However, theHiveMetaStoreServerdoes support Kerberos authentication for Thrift clients. For configuration instructions, see Hive MetaStoreServerSecurity Configuration.
See also: Using Hive to Run Queries on a Secure HBase Server on page 93
HiveServer2 Security Configuration
HiveServer2 supports authentication of the Thrift client using either of these methods:
• Kerberos authentication• LDAP authentication
If Kerberos authentication is used, authentication is supported between the Thrift client andHiveServer2, and betweenHiveServer2 and secure HDFS. If LDAP authentication is used, authentication is supported only between the Thriftclient and HiveServer2.
86 | Cloudera Security
Authentication
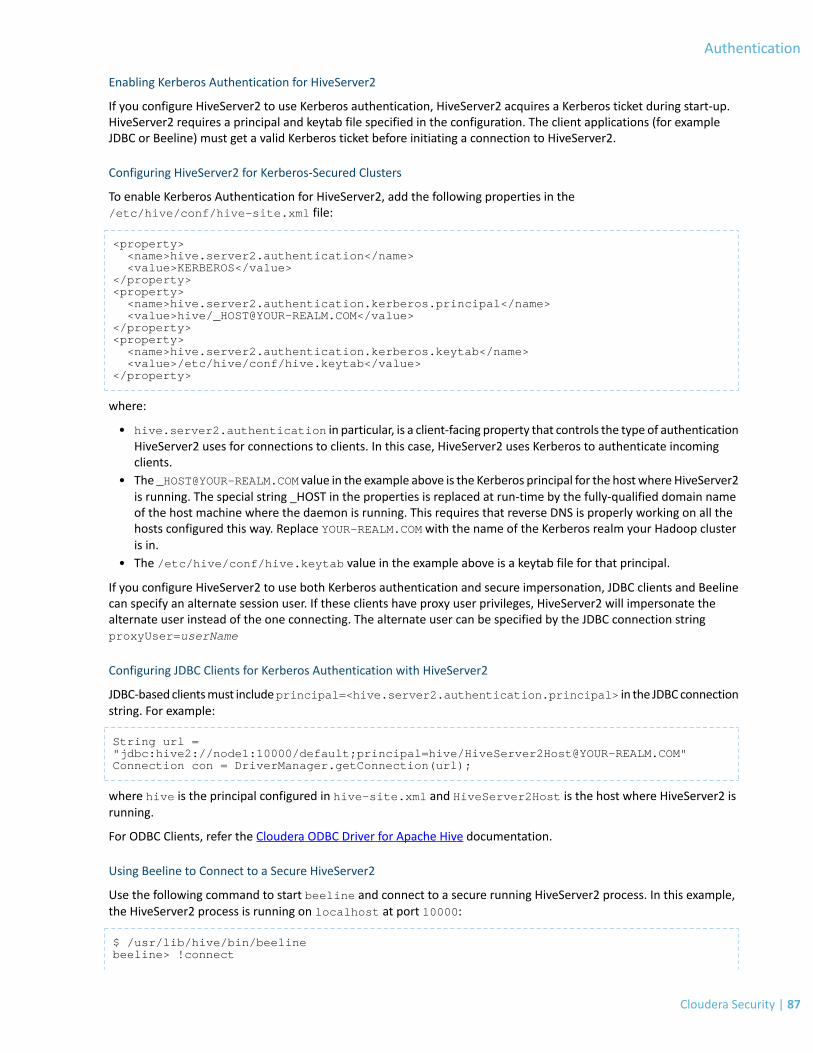
Enabling Kerberos Authentication for HiveServer2
If you configure HiveServer2 to use Kerberos authentication, HiveServer2 acquires a Kerberos ticket during start-up.HiveServer2 requires a principal and keytab file specified in the configuration. The client applications (for exampleJDBC or Beeline) must get a valid Kerberos ticket before initiating a connection to HiveServer2.
Configuring HiveServer2 for Kerberos-Secured Clusters
To enable Kerberos Authentication for HiveServer2, add the following properties in the/etc/hive/conf/hive-site.xml file:
<property> <name>hive.server2.authentication</name> <value>KERBEROS</value></property><property> <name>hive.server2.authentication.kerberos.principal</name> <value>hive/[email protected]</value></property><property> <name>hive.server2.authentication.kerberos.keytab</name> <value>/etc/hive/conf/hive.keytab</value></property>
where:
• hive.server2.authentication in particular, is a client-facing property that controls the type of authenticationHiveServer2 uses for connections to clients. In this case, HiveServer2 uses Kerberos to authenticate incomingclients.
• The [email protected] value in the example above is the Kerberos principal for the hostwhere HiveServer2is running. The special string _HOST in the properties is replaced at run-time by the fully-qualified domain nameof the host machine where the daemon is running. This requires that reverse DNS is properly working on all thehosts configured this way. Replace YOUR-REALM.COM with the name of the Kerberos realm your Hadoop clusteris in.
• The /etc/hive/conf/hive.keytab value in the example above is a keytab file for that principal.
If you configure HiveServer2 to use both Kerberos authentication and secure impersonation, JDBC clients and Beelinecan specify an alternate session user. If these clients have proxy user privileges, HiveServer2 will impersonate thealternate user instead of the one connecting. The alternate user can be specified by the JDBC connection stringproxyUser=userName
Configuring JDBC Clients for Kerberos Authentication with HiveServer2
JDBC-basedclientsmust includeprincipal=<hive.server2.authentication.principal> in the JDBCconnectionstring. For example:
String url = "jdbc:hive2://node1:10000/default;principal=hive/[email protected]"Connection con = DriverManager.getConnection(url);
where hive is the principal configured in hive-site.xml and HiveServer2Host is the host where HiveServer2 isrunning.
For ODBC Clients, refer the Cloudera ODBC Driver for Apache Hive documentation.
Using Beeline to Connect to a Secure HiveServer2
Use the following command to start beeline and connect to a secure running HiveServer2 process. In this example,the HiveServer2 process is running on localhost at port 10000:
$ /usr/lib/hive/bin/beelinebeeline> !connect
Cloudera Security | 87
Authentication

jdbc:hive2://localhost:10000/default;principal=hive/[email protected]: jdbc:hive2://localhost:10000/default>
For more information about the Beeline CLI, see Using the Beeline CLI.
Using LDAP Username/Password Authentication with HiveServer2
As an alternative to Kerberos authentication, you can configure HiveServer2 to use user and password validation backedby LDAP. In this case, the client sends a user name and password during the connection initiation. HiveServer2 validatesthese credentials using an external LDAP service.
You can enable LDAP Authentication with HiveServer2 using Active Directory or OpenLDAP.
Important: When using LDAP username/password authentication with HiveServer2, make sure youhave enabled encrypted communication between HiveServer2 and its client drivers to avoid sendingcleartext passwords. For instructions, see Configuring Encrypted Communication Between Hive andClient Drivers on page 185. Also see Configuring LDAPS Authentication with HiveServer2 on page 89.
Enabling LDAP Authentication with HiveServer2 using Active Directory
To enable the LDAP mode of authentication using Active Directory, include the following properties in thehive-site.xml file:
<property> <name>hive.server2.authentication</name> <value>LDAP</value></property><property> <name>hive.server2.authentication.ldap.url</name> <value>LDAP_URL</value></property><property> <name>hive.server2.authentication.ldap.Domain</name> <value>DOMAIN</value></property>
where:
• The LDAP_URL value is the access URL for your LDAP server. For example, ldap://[email protected].
Enabling LDAP Authentication with HiveServer2 using OpenLDAP
To enable the LDAP mode of authentication using OpenLDAP, include the following properties in the hive-site.xmlfile:
<property> <name>hive.server2.authentication</name> <value>LDAP</value></property><property> <name>hive.server2.authentication.ldap.url</name> <value>LDAP_URL</value></property><property> <name>hive.server2.authentication.ldap.baseDN</name> <value>LDAP_BaseDN</value></property>
where:
• The LDAP_URL value is the access URL for your LDAP server.• The LDAP_BaseDN value is the base LDAP DN for your LDAP server. For example,
ou=People,dc=example,dc=com.
88 | Cloudera Security
Authentication
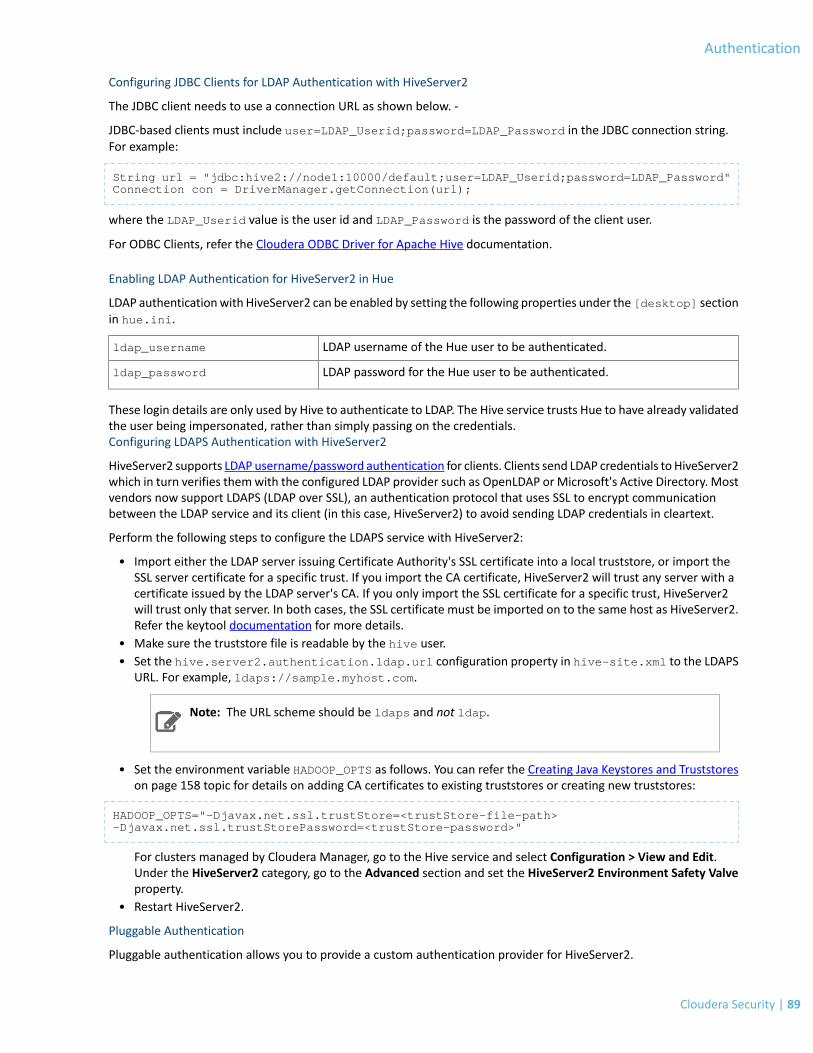
Configuring JDBC Clients for LDAP Authentication with HiveServer2
The JDBC client needs to use a connection URL as shown below. -
JDBC-based clients must include user=LDAP_Userid;password=LDAP_Password in the JDBC connection string.For example:
String url = "jdbc:hive2://node1:10000/default;user=LDAP_Userid;password=LDAP_Password"Connection con = DriverManager.getConnection(url);
where the LDAP_Userid value is the user id and LDAP_Password is the password of the client user.
For ODBC Clients, refer the Cloudera ODBC Driver for Apache Hive documentation.
Enabling LDAP Authentication for HiveServer2 in Hue
LDAP authenticationwith HiveServer2 can be enabled by setting the following properties under the [desktop] sectionin hue.ini.
LDAP username of the Hue user to be authenticated.ldap_username
LDAP password for the Hue user to be authenticated.ldap_password
These login details are only used by Hive to authenticate to LDAP. The Hive service trusts Hue to have already validatedthe user being impersonated, rather than simply passing on the credentials.Configuring LDAPS Authentication with HiveServer2
HiveServer2 supports LDAP username/password authentication for clients. Clients send LDAP credentials to HiveServer2which in turn verifies themwith the configured LDAP provider such as OpenLDAP or Microsoft's Active Directory. Mostvendors now support LDAPS (LDAP over SSL), an authentication protocol that uses SSL to encrypt communicationbetween the LDAP service and its client (in this case, HiveServer2) to avoid sending LDAP credentials in cleartext.
Perform the following steps to configure the LDAPS service with HiveServer2:
• Import either the LDAP server issuing Certificate Authority's SSL certificate into a local truststore, or import theSSL server certificate for a specific trust. If you import the CA certificate, HiveServer2 will trust any server with acertificate issued by the LDAP server's CA. If you only import the SSL certificate for a specific trust, HiveServer2will trust only that server. In both cases, the SSL certificate must be imported on to the same host as HiveServer2.Refer the keytool documentation for more details.
• Make sure the truststore file is readable by the hive user.• Set the hive.server2.authentication.ldap.url configuration property in hive-site.xml to the LDAPS
URL. For example, ldaps://sample.myhost.com.
Note: The URL scheme should be ldaps and not ldap.
• Set the environment variable HADOOP_OPTS as follows. You can refer the Creating Java Keystores and Truststoreson page 158 topic for details on adding CA certificates to existing truststores or creating new truststores:
HADOOP_OPTS="-Djavax.net.ssl.trustStore=<trustStore-file-path> -Djavax.net.ssl.trustStorePassword=<trustStore-password>"
For clusters managed by Cloudera Manager, go to the Hive service and select Configuration > View and Edit.Under the HiveServer2 category, go to the Advanced section and set the HiveServer2 Environment Safety Valveproperty.
• Restart HiveServer2.
Pluggable Authentication
Pluggable authentication allows you to provide a custom authentication provider for HiveServer2.
Cloudera Security | 89
Authentication
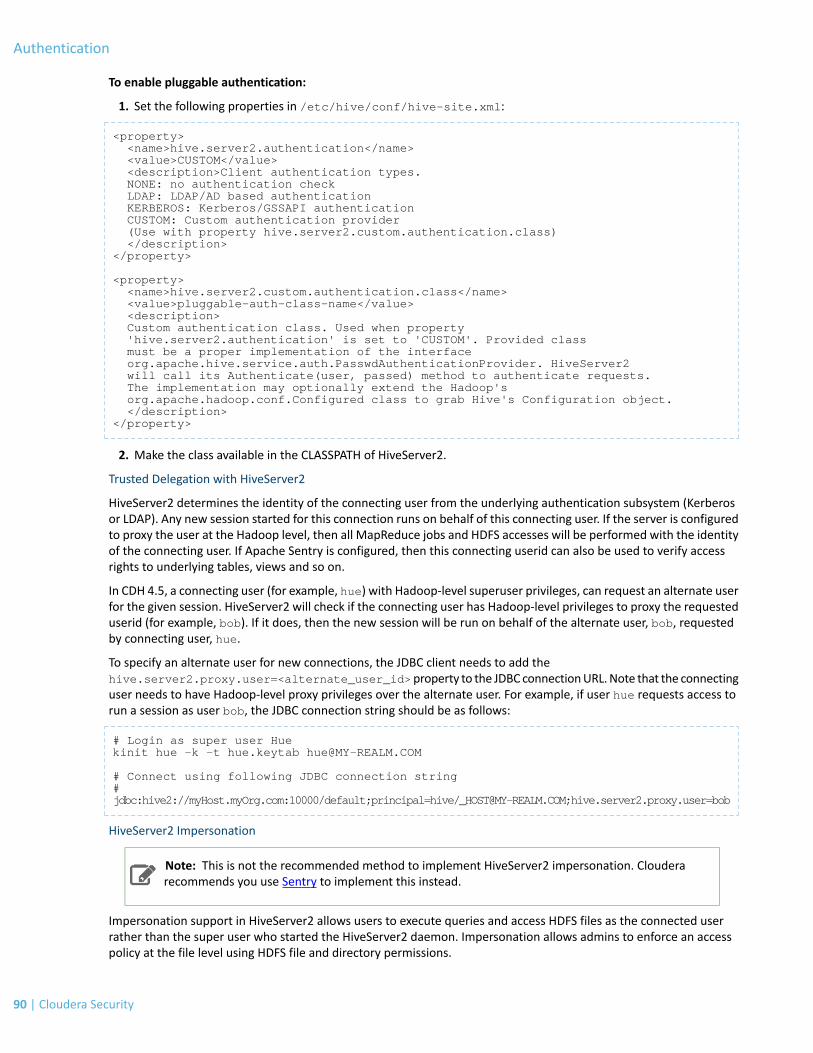
To enable pluggable authentication:
1. Set the following properties in /etc/hive/conf/hive-site.xml:
<property> <name>hive.server2.authentication</name> <value>CUSTOM</value> <description>Client authentication types. NONE: no authentication check LDAP: LDAP/AD based authentication KERBEROS: Kerberos/GSSAPI authentication CUSTOM: Custom authentication provider (Use with property hive.server2.custom.authentication.class) </description></property>
<property> <name>hive.server2.custom.authentication.class</name> <value>pluggable-auth-class-name</value> <description> Custom authentication class. Used when property 'hive.server2.authentication' is set to 'CUSTOM'. Provided class must be a proper implementation of the interface org.apache.hive.service.auth.PasswdAuthenticationProvider. HiveServer2 will call its Authenticate(user, passed) method to authenticate requests. The implementation may optionally extend the Hadoop's org.apache.hadoop.conf.Configured class to grab Hive's Configuration object. </description></property>
2. Make the class available in the CLASSPATH of HiveServer2.
Trusted Delegation with HiveServer2
HiveServer2 determines the identity of the connecting user from the underlying authentication subsystem (Kerberosor LDAP). Any new session started for this connection runs on behalf of this connecting user. If the server is configuredto proxy the user at the Hadoop level, then all MapReduce jobs and HDFS accesses will be performed with the identityof the connecting user. If Apache Sentry is configured, then this connecting userid can also be used to verify accessrights to underlying tables, views and so on.
In CDH 4.5, a connecting user (for example, hue) with Hadoop-level superuser privileges, can request an alternate userfor the given session. HiveServer2 will check if the connecting user has Hadoop-level privileges to proxy the requesteduserid (for example, bob). If it does, then the new session will be run on behalf of the alternate user, bob, requestedby connecting user, hue.
To specify an alternate user for new connections, the JDBC client needs to add thehive.server2.proxy.user=<alternate_user_id>property to the JDBC connectionURL.Note that the connectinguser needs to have Hadoop-level proxy privileges over the alternate user. For example, if user hue requests access torun a session as user bob, the JDBC connection string should be as follows:
# Login as super user Hue kinit hue -k -t hue.keytab [email protected]
# Connect using following JDBC connection string # jdbc:hive2://myHost.myOrg.com:10000/default;principal=hive/[email protected];hive.server2.proxy.user=bob
HiveServer2 Impersonation
Note: This is not the recommended method to implement HiveServer2 impersonation. Clouderarecommends you use Sentry to implement this instead.
Impersonation support in HiveServer2 allows users to execute queries and access HDFS files as the connected userrather than the super user who started the HiveServer2 daemon. Impersonation allows admins to enforce an accesspolicy at the file level using HDFS file and directory permissions.
90 | Cloudera Security
Authentication
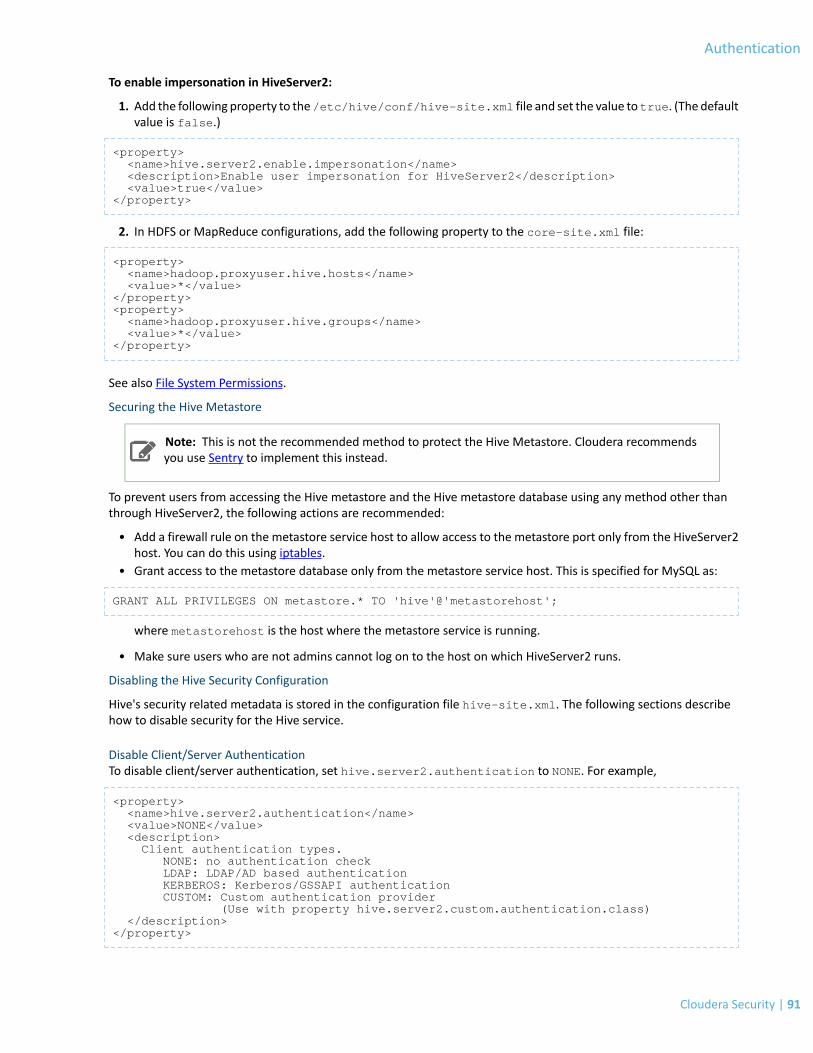
To enable impersonation in HiveServer2:
1. Add the following property to the/etc/hive/conf/hive-site.xml file and set the value totrue. (The defaultvalue is false.)
<property> <name>hive.server2.enable.impersonation</name> <description>Enable user impersonation for HiveServer2</description> <value>true</value></property>
2. In HDFS or MapReduce configurations, add the following property to the core-site.xml file:
<property> <name>hadoop.proxyuser.hive.hosts</name> <value>*</value></property><property> <name>hadoop.proxyuser.hive.groups</name> <value>*</value></property>
See also File System Permissions.
Securing the Hive Metastore
Note: This is not the recommended method to protect the Hive Metastore. Cloudera recommendsyou use Sentry to implement this instead.
To prevent users from accessing the Hive metastore and the Hive metastore database using any method other thanthrough HiveServer2, the following actions are recommended:
• Add a firewall rule on the metastore service host to allow access to the metastore port only from the HiveServer2host. You can do this using iptables.
• Grant access to the metastore database only from the metastore service host. This is specified for MySQL as:
GRANT ALL PRIVILEGES ON metastore.* TO 'hive'@'metastorehost';
where metastorehost is the host where the metastore service is running.
• Make sure users who are not admins cannot log on to the host on which HiveServer2 runs.
Disabling the Hive Security Configuration
Hive's security related metadata is stored in the configuration file hive-site.xml. The following sections describehow to disable security for the Hive service.
Disable Client/Server AuthenticationTo disable client/server authentication, set hive.server2.authentication to NONE. For example,
<property> <name>hive.server2.authentication</name> <value>NONE</value> <description> Client authentication types. NONE: no authentication check LDAP: LDAP/AD based authentication KERBEROS: Kerberos/GSSAPI authentication CUSTOM: Custom authentication provider (Use with property hive.server2.custom.authentication.class) </description></property>
Cloudera Security | 91
Authentication

Disable Hive Metastore securityTo disable Hive Metastore security, perform the following steps:
• Set the hive.metastore.sasl.enabled property to false in all configurations, the metastore service sideas well as for all clients of the metastore. For example, these might include HiveServer2, Impala, Pig and so on.
• Remove or comment the following parameters in hive-site.xml for the metastore service. Note that this is aserver-only change.
– hive.metastore.kerberos.keytab.file
– hive.metastore.kerberos.principal
Disable Underlying Hadoop Security
If you also want to disable the underlying Hadoop security, remove or comment out the following parameters inhive-site.xml.
• hive.server2.authentication.kerberos.keytab
• hive.server2.authentication.kerberos.principal
Hive Metastore Server Security Configuration
Important:
This section describes how to configure security for the Hive metastore server. If you are usingHiveServer2, see HiveServer2 Security Configuration.
Here is a summary of Hive metastore server security in CDH 5:
• No additional configuration is required to run Hive on top of a security-enabled Hadoop cluster in standalonemode using a local or embedded metastore.
• HiveServer does not support Kerberos authentication for clients. While it is possible to run HiveServer with asecured Hadoop cluster, doing so creates a security hole since HiveServer does not authenticate the Thrift clientsthat connect to it. Instead, you can use HiveServer2 HiveServer2 Security Configuration.
• The Hive metastore server supports Kerberos authentication for Thrift clients. For example, you can configure astandalone Hive metastore server instance to force clients to authenticate with Kerberos by setting the followingproperties in the hive-site.xml configuration file used by the metastore server:
<property> <name>hive.metastore.sasl.enabled</name> <value>true</value> <description>If true, the metastore thrift interface will be secured with SASL. Clients must authenticate with Kerberos.</description></property>
<property> <name>hive.metastore.kerberos.keytab.file</name> <value>/etc/hive/conf/hive.keytab</value> <description>The path to the Kerberos Keytab file containing the metastore thrift server's service principal.</description></property>
<property> <name>hive.metastore.kerberos.principal</name> <value>hive/[email protected]</value> <description>The service principal for the metastore thrift server. The special string _HOST will be replaced automatically with the correct host name.</description></property>
92 | Cloudera Security
Authentication

Note:
The values shown above for the hive.metastore.kerberos.keytab.file andhive.metastore.kerberos.principal properties are examples which you will need toreplace with the appropriate values for your cluster. Also note that the Hive keytab file shouldhave its access permissions set to 600 and be owned by the same account that is used to run theMetastore server, which is the hive user by default.
• Requests to access the metadata are fulfilled by the Hive metastore impersonating the requesting user. Thisincludes read access to the list of databases, tables, properties of each table such as their HDFS location, file typeand so on. You can restrict access to the Hive metastore service by allowing it to impersonate only a subset ofKerberos users. This can be done by setting the hadoop.proxyuser.hive.groups property in core-site.xmlon the Hive metastore host.
For example, if you want to give the hive user permission to impersonate members of groups hive and user1:
<property><name>hadoop.proxyuser.hive.groups</name><value>hive,user1</value></property>
In this example, the Hive metastore can impersonate users belonging to only the hive and user1 groups.Connection requests from users not belonging to these groups will be rejected.
Using Hive to Run Queries on a Secure HBase Server
To use Hive to run queries on a secure HBase Server, you must set the following HIVE_OPTS environment variable:
env HIVE_OPTS="-hiveconf hbase.security.authentication=kerberos -hiveconf hbase.master.kerberos.principal=hbase/[email protected] -hiveconf hbase.regionserver.kerberos.principal=hbase/[email protected] -hiveconf hbase.zookeeper.quorum=zookeeper1,zookeeper2,zookeeper3" hive
where:
• You replace YOUR-REALM with the name of your Kerberos realm• You replace zookeeper1,zookeeper2,zookeeper3 with the names of your ZooKeeper servers. The
hbase.zookeeper.quorum property is configured in the hbase-site.xml file.• The special string _HOST is replaced at run-time by the fully-qualified domain name of the host machine where
the HBase Master or RegionServer is running. This requires that reverse DNS is properly working on all the hostsconfigured this way.
In the following, _HOST is the name of the host where the HBase Master is running:
-hiveconf hbase.master.kerberos.principal=hbase/[email protected]
In the following, _HOST is the hostname of the HBase RegionServer that the application is connecting to:
-hiveconf hbase.regionserver.kerberos.principal=hbase/[email protected]
Note:
You can also set the HIVE_OPTS environment variable in your shell profile.
HttpFS Authentication
This section describes how to configure HttpFS CDH 5 with Kerberos security on a Hadoop cluster:
• Configuring the HttpFS Server to Support Kerberos Security on page 94
Cloudera Security | 93
Authentication
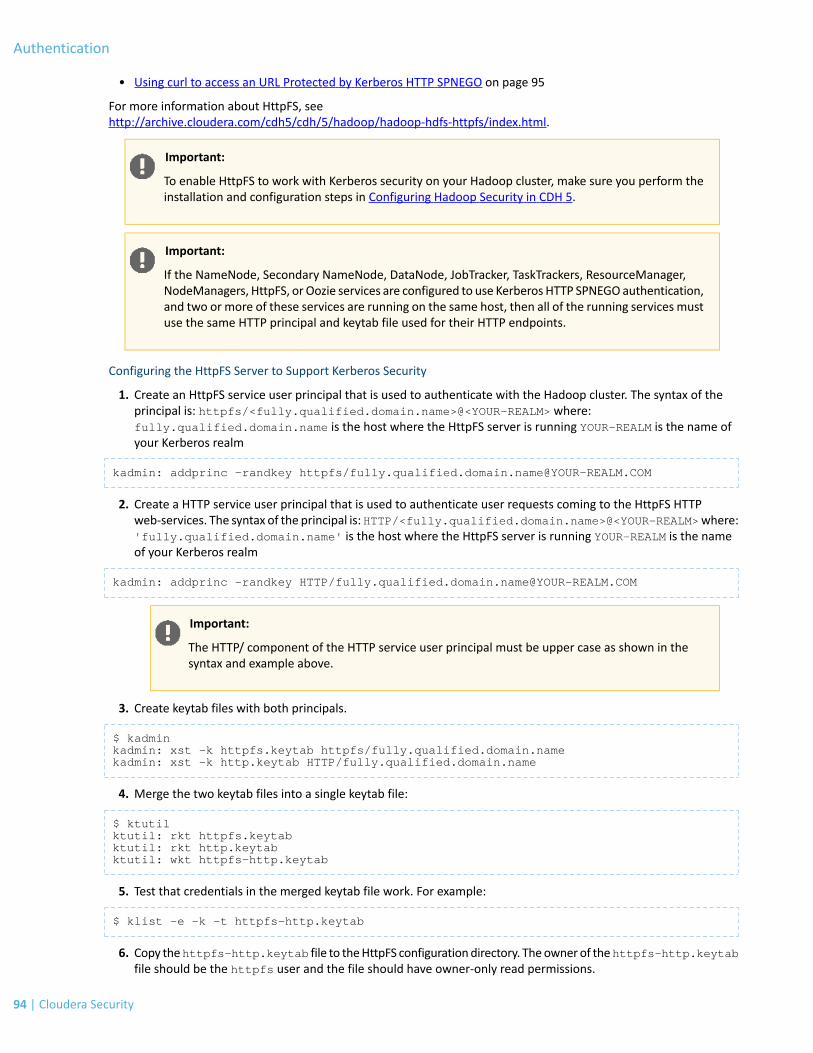
• Using curl to access an URL Protected by Kerberos HTTP SPNEGO on page 95
For more information about HttpFS, seehttp://archive.cloudera.com/cdh5/cdh/5/hadoop/hadoop-hdfs-httpfs/index.html.
Important:
To enable HttpFS to work with Kerberos security on your Hadoop cluster, make sure you perform theinstallation and configuration steps in Configuring Hadoop Security in CDH 5.
Important:
If the NameNode, Secondary NameNode, DataNode, JobTracker, TaskTrackers, ResourceManager,NodeManagers, HttpFS, or Oozie services are configured to use Kerberos HTTP SPNEGOauthentication,and two or more of these services are running on the same host, then all of the running services mustuse the same HTTP principal and keytab file used for their HTTP endpoints.
Configuring the HttpFS Server to Support Kerberos Security
1. Create an HttpFS service user principal that is used to authenticate with the Hadoop cluster. The syntax of theprincipal is: httpfs/<fully.qualified.domain.name>@<YOUR-REALM> where:fully.qualified.domain.name is the host where the HttpFS server is running YOUR-REALM is the name ofyour Kerberos realm
kadmin: addprinc -randkey httpfs/[email protected]
2. Create a HTTP service user principal that is used to authenticate user requests coming to the HttpFS HTTPweb-services. The syntax of the principal is:HTTP/<fully.qualified.domain.name>@<YOUR-REALM>where:'fully.qualified.domain.name' is the host where the HttpFS server is running YOUR-REALM is the nameof your Kerberos realm
kadmin: addprinc -randkey HTTP/[email protected]
Important:
The HTTP/ component of the HTTP service user principal must be upper case as shown in thesyntax and example above.
3. Create keytab files with both principals.
$ kadminkadmin: xst -k httpfs.keytab httpfs/fully.qualified.domain.namekadmin: xst -k http.keytab HTTP/fully.qualified.domain.name
4. Merge the two keytab files into a single keytab file:
$ ktutilktutil: rkt httpfs.keytabktutil: rkt http.keytabktutil: wkt httpfs-http.keytab
5. Test that credentials in the merged keytab file work. For example:
$ klist -e -k -t httpfs-http.keytab
6. Copy thehttpfs-http.keytab file to theHttpFS configurationdirectory. Theownerof thehttpfs-http.keytabfile should be the httpfs user and the file should have owner-only read permissions.
94 | Cloudera Security
Authentication
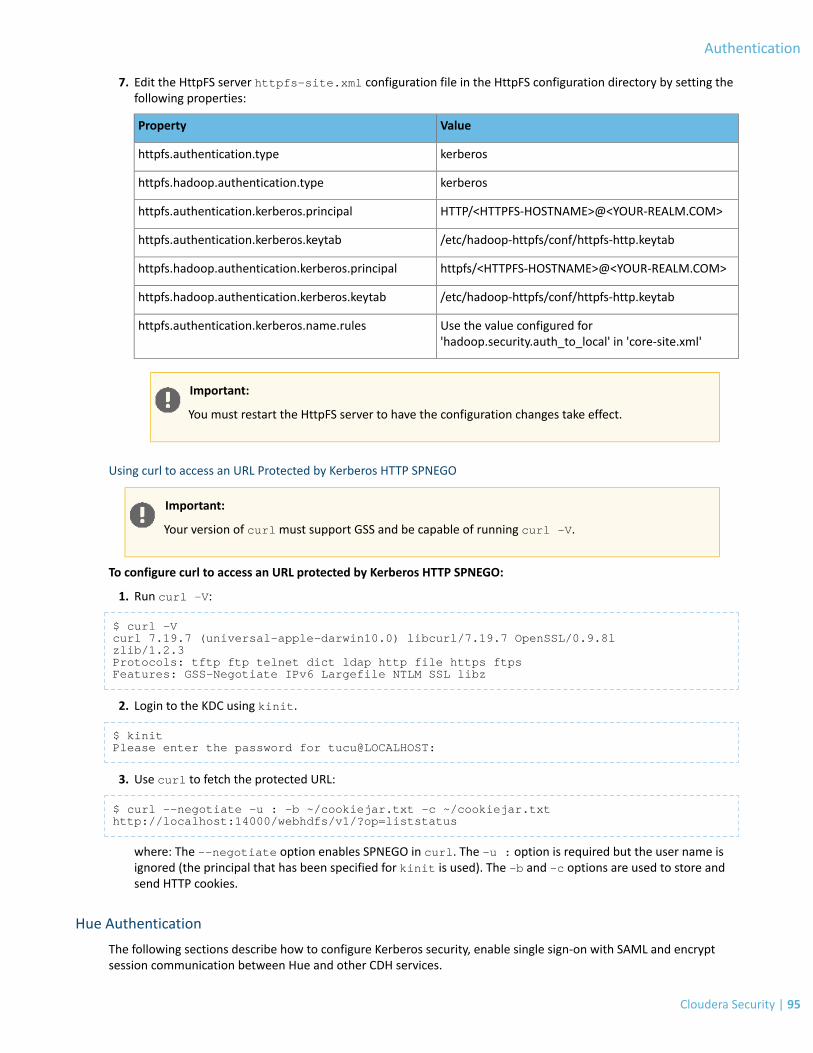
7. Edit the HttpFS server httpfs-site.xml configuration file in the HttpFS configuration directory by setting thefollowing properties:
ValueProperty
kerberoshttpfs.authentication.type
kerberoshttpfs.hadoop.authentication.type
HTTP/<HTTPFS-HOSTNAME>@<YOUR-REALM.COM>httpfs.authentication.kerberos.principal
/etc/hadoop-httpfs/conf/httpfs-http.keytabhttpfs.authentication.kerberos.keytab
httpfs/<HTTPFS-HOSTNAME>@<YOUR-REALM.COM>httpfs.hadoop.authentication.kerberos.principal
/etc/hadoop-httpfs/conf/httpfs-http.keytabhttpfs.hadoop.authentication.kerberos.keytab
Use the value configured for'hadoop.security.auth_to_local' in 'core-site.xml'
httpfs.authentication.kerberos.name.rules
Important:
You must restart the HttpFS server to have the configuration changes take effect.
Using curl to access an URL Protected by Kerberos HTTP SPNEGO
Important:
Your version of curlmust support GSS and be capable of running curl -V.
To configure curl to access an URL protected by Kerberos HTTP SPNEGO:
1. Run curl -V:
$ curl -Vcurl 7.19.7 (universal-apple-darwin10.0) libcurl/7.19.7 OpenSSL/0.9.8lzlib/1.2.3Protocols: tftp ftp telnet dict ldap http file https ftpsFeatures: GSS-Negotiate IPv6 Largefile NTLM SSL libz
2. Login to the KDC using kinit.
$ kinitPlease enter the password for tucu@LOCALHOST:
3. Use curl to fetch the protected URL:
$ curl --negotiate -u : -b ~/cookiejar.txt -c ~/cookiejar.txt http://localhost:14000/webhdfs/v1/?op=liststatus
where: The --negotiate option enables SPNEGO in curl. The -u : option is required but the user name isignored (the principal that has been specified for kinit is used). The -b and -c options are used to store andsend HTTP cookies.
Hue Authentication
The following sections describe how to configure Kerberos security, enable single sign-on with SAML and encryptsession communication between Hue and other CDH services.
Cloudera Security | 95
Authentication
• Configuring Kerberos Authentication for Hue on page 97• Integrating Hue with LDAP on page 99• Configuring Hue for SAML on page 103
Important:
To enable Hue to work with Kerberos security on your Hadoop cluster, make sure you perform theinstallation and configuration steps in Configuring Hadoop Security in CDH 5.
Hue Security Enhancements
Enabling LDAP Authentication with HiveServer2 and Impala
LDAP authentication with HiveServer2 and Impala can be enabled by setting the following properties under the[desktop] section in hue.ini.
LDAP username of the Hue user to be authenticated.ldap_username
LDAP password for the Hue user to be authenticated.ldap_password
These login details are only used by Impala and Hive to authenticate to LDAP. The Impala and Hive services trust Hueto have already validated the user being impersonated, rather than simply passing on the credentials.
Session Timeout
Session timeouts can be set by specifying the ttl configuration property under the [desktop]>[[session]] sectionin hue.ini.
The cookie containing the users' session ID will expire after this amount oftime in seconds.
ttl
Default: 60*60*24*14
Secure Cookies
Secure session cookies can be enable by specifying the secure configuration property under the[desktop]>[[session]] section in hue.ini. Additionally, you can set the http-only flag for cookies containingusers' session IDs.
The cookie containing the users' session ID will be secure. Should only beenabled with HTTPS.
secure
Default: false
The cookie containing the users' session ID will use the HTTP only flag.http-only
Default: false
Allowed HTTP Methods
You can specify the HTTP request methods that the server should respond to using the http_allowed_methodsproperty under the [desktop] section in hue.ini.
Default: options,get,head,post,put,delete,connecthttp_allowed_methods
96 | Cloudera Security
Authentication
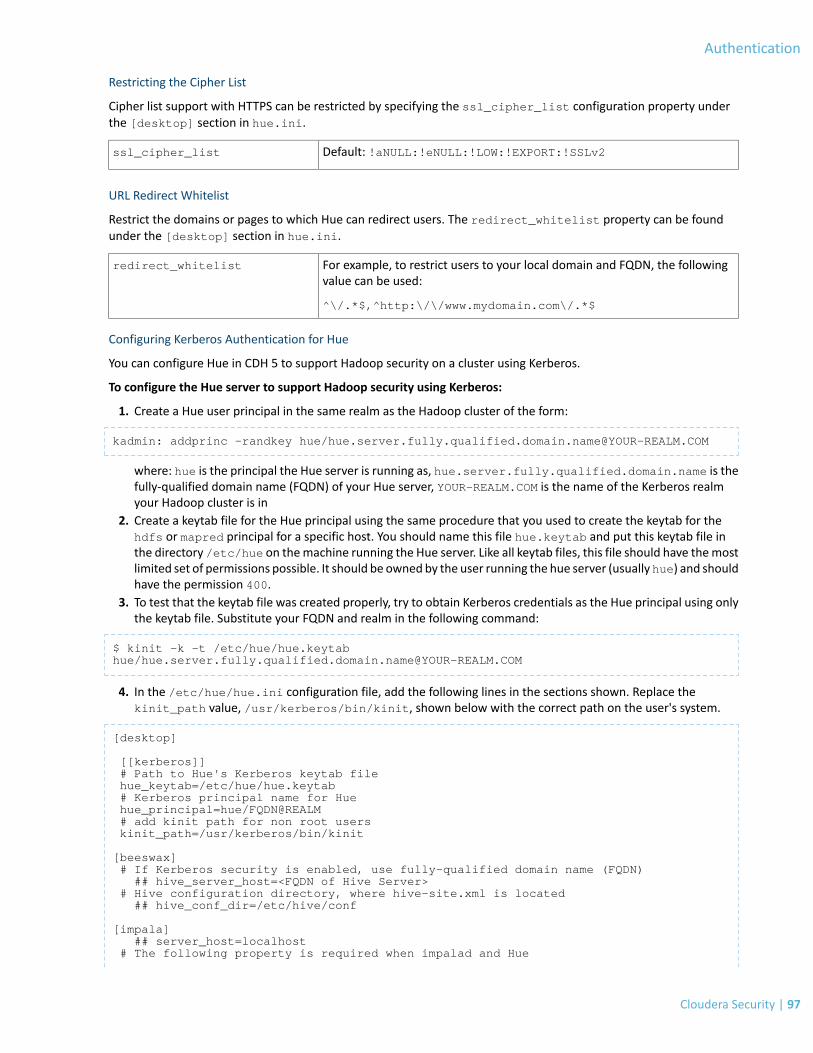
Restricting the Cipher List
Cipher list support with HTTPS can be restricted by specifying the ssl_cipher_list configuration property underthe [desktop] section in hue.ini.
Default: !aNULL:!eNULL:!LOW:!EXPORT:!SSLv2ssl_cipher_list
URL Redirect Whitelist
Restrict the domains or pages to which Hue can redirect users. The redirect_whitelist property can be foundunder the [desktop] section in hue.ini.
For example, to restrict users to your local domain and FQDN, the followingvalue can be used:
redirect_whitelist
^\/.*$,^http:\/\/www.mydomain.com\/.*$
Configuring Kerberos Authentication for Hue
You can configure Hue in CDH 5 to support Hadoop security on a cluster using Kerberos.
To configure the Hue server to support Hadoop security using Kerberos:
1. Create a Hue user principal in the same realm as the Hadoop cluster of the form:
kadmin: addprinc -randkey hue/[email protected]
where: hue is the principal the Hue server is running as, hue.server.fully.qualified.domain.name is thefully-qualified domain name (FQDN) of your Hue server, YOUR-REALM.COM is the name of the Kerberos realmyour Hadoop cluster is in
2. Create a keytab file for the Hue principal using the same procedure that you used to create the keytab for thehdfs or mapred principal for a specific host. You should name this file hue.keytab and put this keytab file inthe directory /etc/hue on themachine running the Hue server. Like all keytab files, this file should have themostlimited set of permissions possible. It should be owned by the user running the hue server (usuallyhue) and shouldhave the permission 400.
3. To test that the keytab file was created properly, try to obtain Kerberos credentials as the Hue principal using onlythe keytab file. Substitute your FQDN and realm in the following command:
$ kinit -k -t /etc/hue/hue.keytab hue/[email protected]
4. In the /etc/hue/hue.ini configuration file, add the following lines in the sections shown. Replace thekinit_path value, /usr/kerberos/bin/kinit, shown below with the correct path on the user's system.
[desktop]
[[kerberos]] # Path to Hue's Kerberos keytab file hue_keytab=/etc/hue/hue.keytab # Kerberos principal name for Hue hue_principal=hue/FQDN@REALM # add kinit path for non root users kinit_path=/usr/kerberos/bin/kinit
[beeswax] # If Kerberos security is enabled, use fully-qualified domain name (FQDN) ## hive_server_host=<FQDN of Hive Server> # Hive configuration directory, where hive-site.xml is located ## hive_conf_dir=/etc/hive/conf
[impala] ## server_host=localhost # The following property is required when impalad and Hue
Cloudera Security | 97
Authentication
# are not running on the same host ## impala_principal=impala/impalad.hostname.domainname.com
[search] # URL of the Solr Server ## solr_url=http://localhost:8983/solr/ # Requires FQDN in solr_url if enabled ## security_enabled=false
[hadoop]
[[hdfs_clusters]]
[[[default]]] # Enter the host and port on which you are running the Hadoop NameNode namenode_host=FQDN hdfs_port=8020 http_port=50070 security_enabled=true
# Thrift plugin port for the name node ## thrift_port=10090
# Configuration for YARN (MR2) # ------------------------------------------------------------------------ [[yarn_clusters]]
[[[default]]] # Enter the host on which you are running the ResourceManager ## resourcemanager_host=localhost # Change this if your YARN cluster is Kerberos-secured ## security_enabled=false
# Thrift plug-in port for the JobTracker ## thrift_port=9290
[liboozie] # The URL where the Oozie service runs on. This is required in order for users to submit jobs. ## oozie_url=http://localhost:11000/oozie # Requires FQDN in oozie_url if enabled ## security_enabled=false
Important:
In the /etc/hue/hue.ini file, verify the following:
— Make sure the jobtracker_host property is set to the fully-qualified domain name of thehost running the JobTracker. The JobTracker hostname must be fully-qualified in a securedenvironment.
— Make sure the fs.defaultfs property under each [[hdfs_clusters]] section contains thefully-qualified domain name of the file system access point, which is typically the NameNode.
—Make sure the hive_conf_dir property under the [beeswax] section points to a directorycontaining a valid hive-site.xml (either the original or a synced copy).
— Make sure the FQDN specified for HiveServer2 is the same as the FQDN specified for thehue_principal configuration property. Without this, HiveServer2 will not work with securityenabled.
5. In the /etc/hadoop/conf/core-site.xml configuration file on all of your cluster nodes, add the followinglines:
<!-- Hue security configuration --><property> <name>hue.kerberos.principal.shortname</name>
98 | Cloudera Security
Authentication
<value>hue</value></property><property> <name>hadoop.proxyuser.hue.groups</name> <value>*</value> <!-- A group which all users of Hue belong to, or the wildcard value "*" --></property><property> <name>hadoop.proxyuser.hue.hosts</name> <value>hue.server.fully.qualified.domain.name</value></property>
Important:
Make sure you change the /etc/hadoop/conf/core-site.xml configuration file on all ofyour cluster nodes.
6. If Hue is configured to communicate to Hadoop using HttpFS, then you must add the following properties tohttpfs-site.xml:
<property> <name>httpfs.proxyuser.hue.hosts</name> <value>fully.qualified.domain.name</value></property><property> <name>httpfs.proxyuser.hue.groups</name> <value>*</value></property>
7. Add the following properties to the Oozie server oozie-site.xml configuration file in the Oozie configurationdirectory:
<property> <name>oozie.service.ProxyUserService.proxyuser.hue.hosts</name> <value>*</value></property><property> <name>oozie.service.ProxyUserService.proxyuser.hue.groups</name> <value>*</value></property>
8. Restart the JobTracker to load the changes from the core-site.xml file.
$ sudo service hadoop-0.20-mapreduce-jobtracker restart
9. Restart Oozie to load the changes from the oozie-site.xml file.
$ sudo service oozie restart
10. Restart the NameNode, JobTracker, and all DataNodes to load the changes from the core-site.xml file.
$ sudo service hadoop-0.20-(namenode|jobtracker|datanode) restart
Integrating Hue with LDAP
When Hue is integrated with LDAP users can use their existing credentials to authenticate and inherit their existinggroups transparently. There is no need to save or duplicate any employee password in Hue. There are several otherways to authenticate with Hue such as PAM, SPNEGO, OpenID, OAuth, SAML2 and so on. This topic details how youcan configure Hue to authenticate against an LDAP directory server.
Cloudera Security | 99
Authentication

When authenticating using LDAP, Hue validates login credentials against an LDAP directory service if configured withthe LDAP authentication backend:
[desktop][[auth]] backend=desktop.auth.backend.LdapBackend
The LDAP authentication backendwill automatically create users that don’t exist in Hue by default. Hue needs to importusers in order to properly perform the authentication. Passwords are never imported when importing users. If youwant to disable automatic import set the create_users_on_login property under the [desktop] > [[ldap]]section of hue.ini to false.
[desktop] [[ldap]] create_users_on_login=false
The purpose of disabling the automatic import is to allow only a predefined list of manually imported users to login.
There are two ways to authenticate with a directory service through Hue:
• Search Bind• Direct Bind
You can specify the authentication mechanism using the search_bind_authentication property under the[desktop] > [[ldap]] section of hue.ini.
Uses search bind authentication by default. Set this property to false to usedirect bind authentication.
Default: true
search_bind_authentication
Search BindThe search bind mechanism for authenticating will perform an ldapsearch against the directory service and bindusing the found distinguished name (DN) and password provided. This is the default method of authentication usedby Hue with LDAP.
The following configuration properties under the [desktop] > [[ldap]] > [[[users]]] section in hue.inican be set to restrict the search process.
General LDAP filter to restrict the search.
Default: "objectclass=*"
user_filter
The attribute that will be considered the username to be searched against.Typical attributes to search for include: uid, sAMAccountName.
Default: sAMAccountName
user_name_attr
With the above configuration, the LDAP search filter will take on the form:
(&(objectClass=*)(sAMAccountName=<user entered username>))
Important: Setting search_bind_authentication=true in hue.ini tells Hue to perform anLDAP search using the bind credentials specified for the bind_dn and bind_password configurationproperties. Hue will start searching the subtree starting from the base DN specified for the base_dnproperty. It will then search the base DN for an entry whose attribute, specified in user_name_attr,has the same value as the short name provided on login. The search filter, defined in user_filterwill also be used to limit the search.
100 | Cloudera Security
Authentication

Direct Bind
The direct bind mechanism for authenticating will bind to the LDAP server using the username and password providedat login.
The following configuration properties can be used to determine how Hue binds to the LDAP server. These can be setunder the [desktop] > [[ldap]] section of hue.ini.
The NT domain to connect to (only for use with Active Directory). ThisAD-specific property allows Hue to authenticate with AD without having to
nt_domain
follow LDAP references to other partitions. This typically maps to the emailaddress of the user or the user's ID in conjunction with the domain.
If provided, Hue will use User Principal Names (UPNs) to bind to the LDAPservice.
Default: mycompany.com
Provides a template for the DN that will ultimately be sent to the directoryservice when authenticating. The <username> parameter will be replacedwith the username provided at login.
Default: "uid=<username>,ou=People,dc=mycompany,dc=com"
ldap_username_pattern
Important: Setting search_bind_authentication=false in hue.ini tells Hue to perform adirect bind to LDAP using the credentials provided (not bind_dn and bind_password specified inhue.ini). There are two ways direct bind works depending on whether the nt_domain property isspecified in hue.ini:
• nt_domain is specified: This is used to connect to an Active Directory service. In this case, theUser Principal Name (UPN) is used to perform a direct bind. Hue forms the UPN by concatenatingthe short name provided at login with the nt_domain. For example, <shortname>@<nt_domain>. The ldap_username_pattern property is ignored.
• nt_domain is not specified: This is used to connect to all other directory services (can handleActive Directory, but nt_domain is the preferred way for AD). In this case,ldap_username_pattern is used and it should take on the formcn=<username>,dc=example,dc=comwhere<username>will be replacedwith the usernameprovided at login.
Importing LDAP Users and Groups
If an LDAP user needs to be part of a certain group and be given a particular set of permissions, you can import thisuser with the User Admin interface in Hue.
Cloudera Security | 101
Authentication

Groups can also be imported using the User Admin interface, and users can be added to this group. As in the imagebelow, not only can groups be discovered using DN and rDN search, but users that are members of the group ormembers of its subordinate groups can be imported as well.
You have the following options available when importing a user/group:
• Distinguished name: If checked, the username provided must be a full distinguished name (for example,uid=hue,ou=People,dc=gethue,dc=com). Otherwise, the Username provided should be a fragment of aRelative Distinguished Name (rDN) (for example, the username huemaps to the rDN uid=hue). Hue will performan LDAP search using the samemethods and configurations as described above. That is, Huewill take the providedusername and create a search filter using the user_filter and user_name_attr configurations.
• Create home directory: If checked, when the user is imported, their home directory in HDFS will automaticallybe created if it doesn’t already exist.
Important: When managing LDAP entries, the User Admin app will always perform an LDAP searchand will always use bind_dn, bind_password, base_dn, as defined in hue.ini.
102 | Cloudera Security
Authentication
Synchronizing LDAP Users and Groups
Users and groups can be synchronized with the directory service using the User Admin interface or using a commandline utility. The image from the Importing LDAP Users and Groups section uses the words Add/Sync to indicate thatwhen a user or group that already exists in Hue is being added, it will in fact be synchronized instead. In the case ofimporting users for a particular group, new users will be imported and existing users will be synchronized.
Note: Users that have been deleted from the directory service will not be deleted from Hue. Thoseusers can be manually deactivated from Hue using the User Admin interface.
Attributes Synchronized
Currently, only the first name, last name, and email address are synchronized. Hue looks for the LDAP attributesgivenName, sn, and mailwhen synchronizing. The user_name_attr configuration property is used to appropriatelychoose the username in Hue. For instance, if user_name_attr’ is set to uid”, then the "uid" returned by the directoryservice will be used as the username of the user in Hue.
User Admin interface
The Sync LDAP users/groups button in the User Admin interface will automatically synchronize all users and groups.
Synchronize Using a Command-Line Interface
For example, to synchronize users and groups using a command-line interface:
<hue root>/build/env/bin/hue sync_ldap_users_and_groups
LDAPS/StartTLS support
Secure communication with LDAP is provided using the SSL/TLS and StartTLS protocols. They allow Hue to validate thedirectory service it is going to converse with. Hence, if a Certificate Authority certificate file is provided, Hue willcommunicate using LDAPS. You can specify the path to the CA certificate under :
[desktop] [[ldap]] ldap_cert=/etc/hue/ca.crt
The StartTLS protocol can be used as well:
[desktop] [[ldap]] use_start_tls=true
Configuring Hue for SAML
This section describes the configuration changes required to use Hue with SAML 2.0 (Security Assertion MarkupLanguage) to enable single sign-on (SSO) authentication.
The SAML 2.0WebBrowser SSO profile has three components: a Security Provider, aUser Agent and an Identity Provider.In this case, Hue is the Service Provider (SP), you can use an Identity Provider (IdP) of your choice, and you are the useracting through your browser (User Agent). When a user requests access to an application, Hue uses your browser tosend an authentication request to the Identity Provider which then authenticates the user and redirects them back toHue .
This blog post guides users through setting up SSO with Hue, using the SAML backend and Shibboleth as the IdentityProvider.
Note: The following instructions assume you already have an Identity Provider set up and running.
Cloudera Security | 103
Authentication

Step 1: Install swig and openssl packages
Install swig and openssl. For example, on RHEL systems, use the following commands:
yum install swig
yum install openssl
Step 2: Install libraries to support SAML in Hue
Important: CDH 5.4.x and higher include the djangosaml and pysaml2 libraries. Do not install.
Install the djangosaml2 and pysaml2 libraries to support SAML in Hue. These libraries are dependent on the xmlsec1package to be installed and available on the machine for Hue to use. Follow these instructions to install the xmlsec1package on your system.
RHEL, CentOS and SLES:
For RHEL, CentOS and SLES systems, the xmlsec1 package is available for download from the EPEL repository. Toinstall packages from the EPEL repository, first download the appropriate the RPMpackage to yourmachine, substitutingthe version in the package URL with the one required for your system. For example, use the following commands forCentOS 5 or RHEL 5:
rpm -Uvh http://download.fedoraproject.org/pub/epel/5/i386/epel-release-5-4.noarch.rpm
yum install xmlsec1yum install xmlsec1-openssl
Oracle Linux:
For Oracle Linux systems, download the xmlsec1 package from http://www.aleksey.com/xmlsec/ and execute thefollowing commands:
tar -xvzf xmlsec1-<version>.tar.gzcd xmlsec1-<version>./configure && makesudo make install
Important: The xmlsec1 package must be executable by the user running Hue.
You should now be able to install djangosaml and pysaml2 on your machines.
build/env/bin/pip install -e git+https://github.com/abec/pysaml2@HEAD#egg=pysaml2build/env/bin/pip install -e git+https://github.com/abec/djangosaml2@HEAD#egg=djangosaml2
Step 3: Update the Hue configuration file
Several configuration parameters need to be updated in Hue's configuration file, hue.ini to enable support for SAML.The table given below describes the available parameters for SAML in hue.ini under the [libsaml] section.
DescriptionParameter
This is a path to the xmlsec_binary, an executable used to sign, verify, encryptand decrypt SAML requests and assertions. This program should be executable bythe user running Hue.
xmlsec_binary
Create Hue users received in assertion response upon successful login. The valuefor this parameter can be either "true" or "false".
create_users_on_login
104 | Cloudera Security
Authentication

DescriptionParameter
Attributes Hue asks for from the IdP. This is a comma-separated list of attributes.For example, uid, email and so on.
required_attributes
Optional attributes Hue can ask for from the IdP. Also a comma-separated list ofattributes.
optional_attributes
This is a path to the IdPmetadata copied to a local file. This file should be readable.metadata_file
Path to the private key used to encrypt the metadata. File format .PEMkey_file
Path to the X.509 certificate to be sent along with the encrypted metadata. Fileformat .PEM
cert_file
Mapping from attributes received from the IdP to the Hue's django user attributes.For example, {'uid':'username', 'email':'email'}.
user_attribute_mapping
Have Hue initiated logout requests be signed and provide a certificate.logout_requests_signed
You must also add the fully-qualified domain name for the SAML server to the redirect_whitelist parameter toallow Hue to redirect to the SAML server for authentication. Note that this is not required if you are using a CDHparcel-based deployment managed by Cloudera Manager.
Value: "^\/.$,^https:\/\/<fqdn_of_SAML_server>\/.$"redirect_whitelist
Step 3a: Update the SAML metadata file
Update themetadata file pointed to by your Hue configuration file, hue.ini. Check your IdP documentation for detailson how to procure the XMLmetadata and paste it into the <metadata_file_name>.xml file at the location specifiedby the configuration parameter metadata_file.
For example, if you were using the Shibboleth IdP, you would visit https://<IdPHOST>:8443/idp/shibboleth,copy the metadata content available there and paste it into the Hue metadata file.
Note:
You may have to edit the content copied over from your IdP's metadata file in case of missing fieldssuch as port numbers (8443), from URLs that point to the IdP.
Step 3b: Private key and certificate files
To enable Hue to communicate with the IdP, you will need to specify the location of a private key, for the, key_fileproperty, that can be used to sign requests sent to the IdP. You will also need to specify the location of the certificatefile, for the cert_pem property, which you will use to verify and decrypt messages from the IdP.
Note: The key and certificate files specified by the key_file and cert_file parameters must be.PEM files.
Step 3c: Configure Hue to use SAML Backend
To enable SAML to allow user logins and create users, update the backend configuration property in hue.ini to usethe SAML authentication backend. Youwill find thebackendproperty in the[[auth]] sub-section under[desktop].
backend=libsaml.backend.SAML2Backend
Here is an example configuration of the [libsaml] section from hue.ini.
xmlsec_binary=/usr/local/bin/xmlsec1create_users_on_login=true
Cloudera Security | 105
Authentication
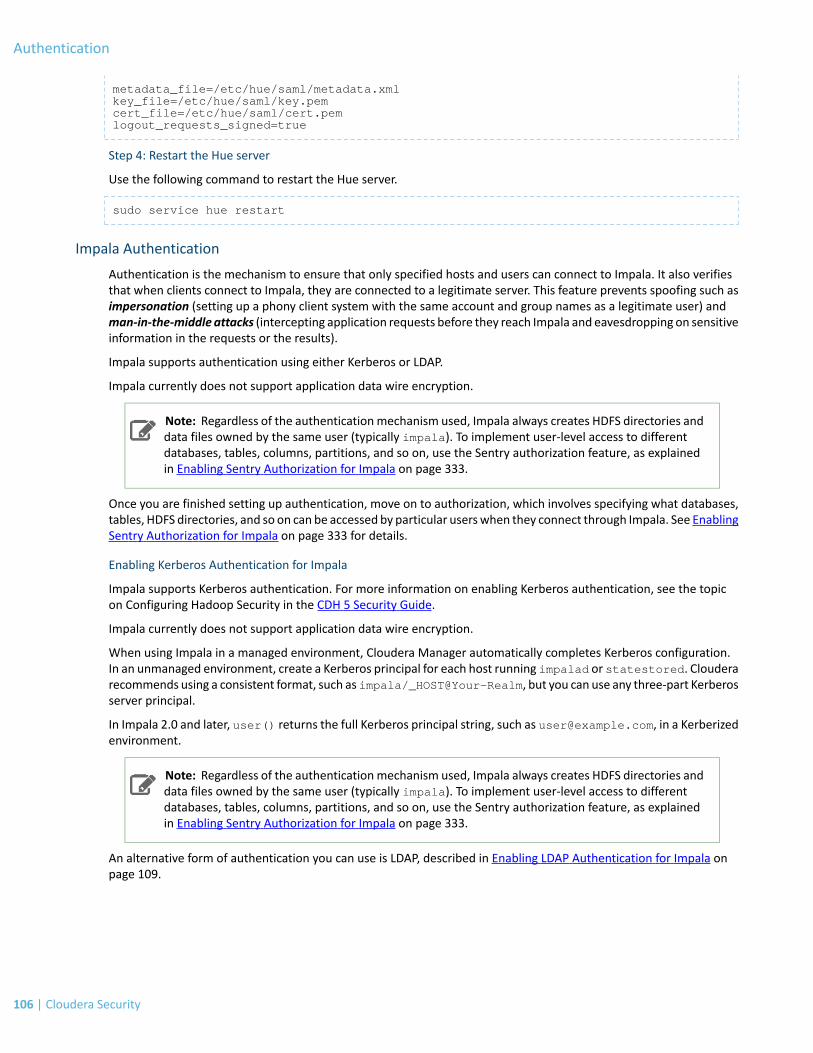
metadata_file=/etc/hue/saml/metadata.xmlkey_file=/etc/hue/saml/key.pemcert_file=/etc/hue/saml/cert.pemlogout_requests_signed=true
Step 4: Restart the Hue server
Use the following command to restart the Hue server.
sudo service hue restart
Impala Authentication
Authentication is the mechanism to ensure that only specified hosts and users can connect to Impala. It also verifiesthat when clients connect to Impala, they are connected to a legitimate server. This feature prevents spoofing such asimpersonation (setting up a phony client system with the same account and group names as a legitimate user) andman-in-the-middle attacks (intercepting application requests before they reach Impala and eavesdropping on sensitiveinformation in the requests or the results).
Impala supports authentication using either Kerberos or LDAP.
Impala currently does not support application data wire encryption.
Note: Regardless of the authenticationmechanism used, Impala always creates HDFS directories anddata files owned by the same user (typically impala). To implement user-level access to differentdatabases, tables, columns, partitions, and so on, use the Sentry authorization feature, as explainedin Enabling Sentry Authorization for Impala on page 333.
Once you are finished setting up authentication, move on to authorization, which involves specifying what databases,tables, HDFS directories, and so on can be accessed by particular userswhen they connect through Impala. See EnablingSentry Authorization for Impala on page 333 for details.
Enabling Kerberos Authentication for Impala
Impala supports Kerberos authentication. For more information on enabling Kerberos authentication, see the topicon Configuring Hadoop Security in the CDH 5 Security Guide.
Impala currently does not support application data wire encryption.
When using Impala in a managed environment, Cloudera Manager automatically completes Kerberos configuration.In an unmanaged environment, create a Kerberos principal for each host running impalad or statestored. Clouderarecommends using a consistent format, such as impala/_HOST@Your-Realm, but you can use any three-part Kerberosserver principal.
In Impala 2.0 and later, user() returns the full Kerberos principal string, such as [email protected], in a Kerberizedenvironment.
Note: Regardless of the authenticationmechanism used, Impala always creates HDFS directories anddata files owned by the same user (typically impala). To implement user-level access to differentdatabases, tables, columns, partitions, and so on, use the Sentry authorization feature, as explainedin Enabling Sentry Authorization for Impala on page 333.
An alternative form of authentication you can use is LDAP, described in Enabling LDAP Authentication for Impala onpage 109.
106 | Cloudera Security
Authentication

Requirements for Using Impala with Kerberos
On version 5 of Red Hat Enterprise Linux and comparable distributions, some additional setup is needed for theimpala-shell interpreter to connect to a Kerberos-enabled Impala cluster:
sudo yum install python-devel openssl-devel python-pipsudo pip-python install ssl
Important:
• If you plan to use Impala in your cluster, you must configure your KDC to allow tickets to berenewed, and you must configure krb5.conf to request renewable tickets. Typically, you cando this by adding the max_renewable_life setting to your realm in kdc.conf, and by addingthe renew_lifetime parameter to the libdefaults section of krb5.conf.
For more information about renewable tickets, see the Kerberos documentation.
• The Impala Web UI does not support Kerberos authentication.
• You cannot use the Impala resource management feature on a cluster that has Kerberosauthentication enabled.
Start all impalad and statestored daemons with the --principal and --keytab-file flags set to the principaland full path name of the keytab file containing the credentials for the principal.
Impala supports the Cloudera ODBC driver and the Kerberos interface provided. To use Kerberos through the ODBCdriver, the host type must be set depending on the level of the ODBD driver:
• SecImpala for the ODBC 1.0 driver.• SecBeeswax for the ODBC 1.2 driver.• Blank for the ODBC 2.0 driver or higher, when connecting to a secure cluster.• HS2NoSasl for the ODBC 2.0 driver or higher, when connecting to a non-secure cluster.
To enable Kerberos in the Impala shell, start the impala-shell command using the -k flag.
To enable Impala to work with Kerberos security on your Hadoop cluster, make sure you perform the installation andconfiguration steps in Authentication in the CDH 5 Security Guide.
Configuring Impala to Support Kerberos Security
Enabling Kerberos authentication for Impala involves steps that can be summarized as follows:
• Creating service principals for Impala and the HTTP service. Principal names take the form:serviceName/[email protected]
• Creating, merging, and distributing key tab files for these principals.• Editing /etc/default/impala (in cluster not managed by Cloudera Manager), or editing the Security settings
in the Cloudera Manager interface, to accommodate Kerberos authentication.
Enabling Kerberos for Impala
1. Create an Impala service principal, specifying the name of the OS user that the Impala daemons run under, thefully qualified domain name of each node running impalad, and the realm name. For example:
$ kadminkadmin: addprinc -requires_preauth -randkey impala/[email protected]
2. Create an HTTP service principal. For example:
kadmin: addprinc -randkey HTTP/[email protected]
Cloudera Security | 107
Authentication
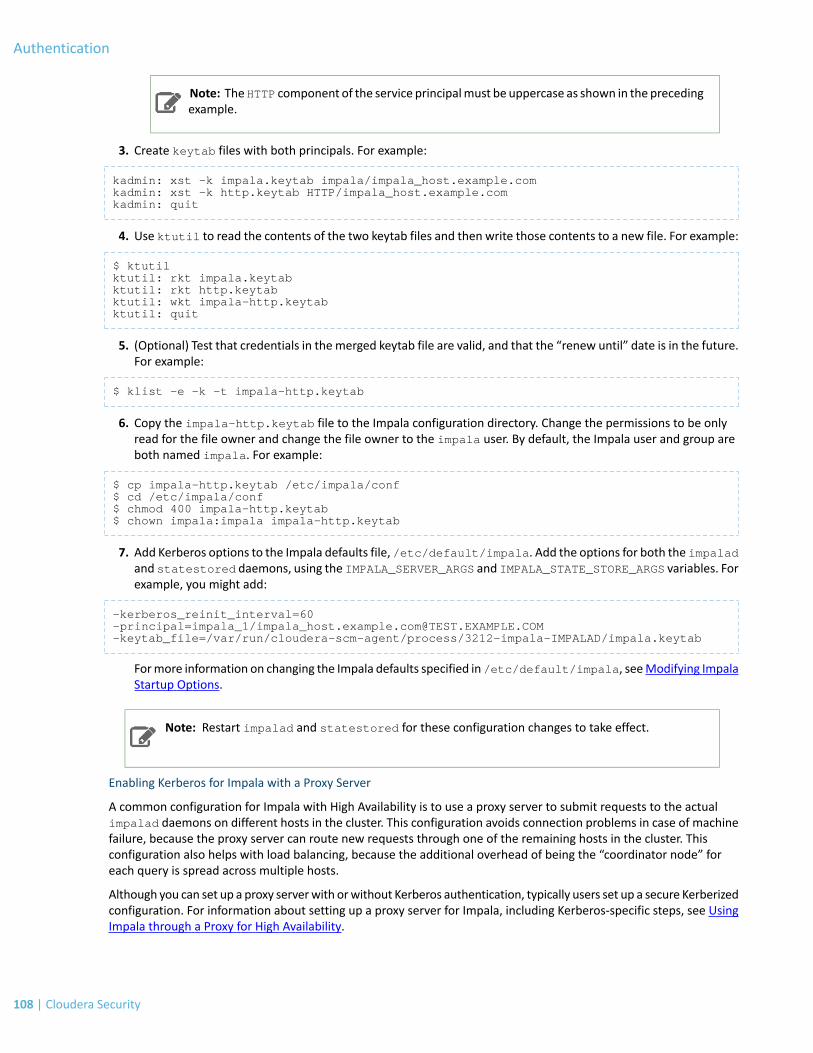
Note: TheHTTP component of the service principalmust be uppercase as shown in the precedingexample.
3. Create keytab files with both principals. For example:
kadmin: xst -k impala.keytab impala/impala_host.example.comkadmin: xst -k http.keytab HTTP/impala_host.example.comkadmin: quit
4. Use ktutil to read the contents of the two keytab files and then write those contents to a new file. For example:
$ ktutilktutil: rkt impala.keytabktutil: rkt http.keytabktutil: wkt impala-http.keytabktutil: quit
5. (Optional) Test that credentials in the merged keytab file are valid, and that the “renew until” date is in the future.For example:
$ klist -e -k -t impala-http.keytab
6. Copy the impala-http.keytab file to the Impala configuration directory. Change the permissions to be onlyread for the file owner and change the file owner to the impala user. By default, the Impala user and group areboth named impala. For example:
$ cp impala-http.keytab /etc/impala/conf$ cd /etc/impala/conf$ chmod 400 impala-http.keytab$ chown impala:impala impala-http.keytab
7. Add Kerberos options to the Impala defaults file, /etc/default/impala. Add the options for both the impaladand statestored daemons, using the IMPALA_SERVER_ARGS and IMPALA_STATE_STORE_ARGS variables. Forexample, you might add:
-kerberos_reinit_interval=60-principal=impala_1/[email protected]_file=/var/run/cloudera-scm-agent/process/3212-impala-IMPALAD/impala.keytab
Formore information on changing the Impala defaults specified in /etc/default/impala, seeModifying ImpalaStartup Options.
Note: Restart impalad and statestored for these configuration changes to take effect.
Enabling Kerberos for Impala with a Proxy Server
A common configuration for Impala with High Availability is to use a proxy server to submit requests to the actualimpalad daemons on different hosts in the cluster. This configuration avoids connection problems in case of machinefailure, because the proxy server can route new requests through one of the remaining hosts in the cluster. Thisconfiguration also helps with load balancing, because the additional overhead of being the “coordinator node” foreach query is spread across multiple hosts.
Although you can set up a proxy serverwith orwithout Kerberos authentication, typically users set up a secure Kerberizedconfiguration. For information about setting up a proxy server for Impala, including Kerberos-specific steps, see UsingImpala through a Proxy for High Availability.
108 | Cloudera Security
Authentication

Enabling Impala Delegation for Kerberos Users
See Configuring Impala Delegation for Hue and BI Tools on page 111 for details about the delegation feature that letscertain users submit queries using the credentials of other users.
Using TLS/SSL with Business Intelligence Tools
You can use Kerberos authentication, TLS/SSL encryption, or both to secure connections from JDBCandODBCapplicationsto Impala. See Configuring Impala to Work with JDBC and Configuring Impala to Work with ODBC for details.
Currently, the Hive JDBC driver does not support connections that use both Kerberos authentication and SSL encryption.To use both of these security features with Impala through a JDBC application, use the Cloudera JDBC Connector asthe JDBC driver.
Enabling LDAP Authentication for Impala
Authentication is the process of allowing only specified named users to access the server (in this case, the Impalaserver). This feature is crucial for any production deployment, to prevent misuse, tampering, or excessive load on theserver. Impala users LDAP for authentication, verifying the credentials of each user who connects throughimpala-shell, Hue, a Business Intelligence tool, JDBC or ODBC application, and so on.
Note: Regardless of the authenticationmechanism used, Impala always creates HDFS directories anddata files owned by the same user (typically impala). To implement user-level access to differentdatabases, tables, columns, partitions, and so on, use the Sentry authorization feature, as explainedin Enabling Sentry Authorization for Impala on page 333.
An alternative formof authentication you can use is Kerberos, described in Enabling Kerberos Authentication for Impalaon page 106.
Requirements for Using Impala with LDAP
Authentication against LDAP servers is available in Impala 1.2.2 and higher. Impala 1.4.0 adds support for secure LDAPauthentication through SSL and TLS.
The Impala LDAP support lets you use Impala with systems such as Active Directory that use LDAP behind the scenes.
Kerberos Authentication for Connections Between Impala Components
Only client->Impala connections can be authenticated by LDAP.
You must use the Kerberos authentication mechanism for connections between internal Impala components, such asbetween the impalad, statestored, and catalogd daemons. See Enabling Kerberos Authentication for Impala onpage 106 on how to set up Kerberos for Impala.
Server-Side LDAP Setup
These requirements apply on the server side when configuring and starting Impala:
To enable LDAP authentication, set the following startup options for impalad:
• --enable_ldap_auth enables LDAP-based authentication between the client and Impala.• --ldap_uri sets the URI of the LDAP server to use. Typically, the URI is prefixed with ldap://. In Impala 1.4.0
and higher, you can specify secure SSL-based LDAP transport by using the prefix ldaps://. The URI can optionallyspecify the port, for example: ldap://ldap_server.cloudera.com:389 orldaps://ldap_server.cloudera.com:636. (389 and 636 are the default ports for non-SSL and SSL LDAPconnections, respectively.)
• For ldaps:// connections secured by SSL, --ldap_ca_certificate="/path/to/certificate/pem"specifies the location of the certificate in standard .PEM format. Store this certificate on the local filesystem, in alocation that only the impala user and other trusted users can read.
Cloudera Security | 109
Authentication
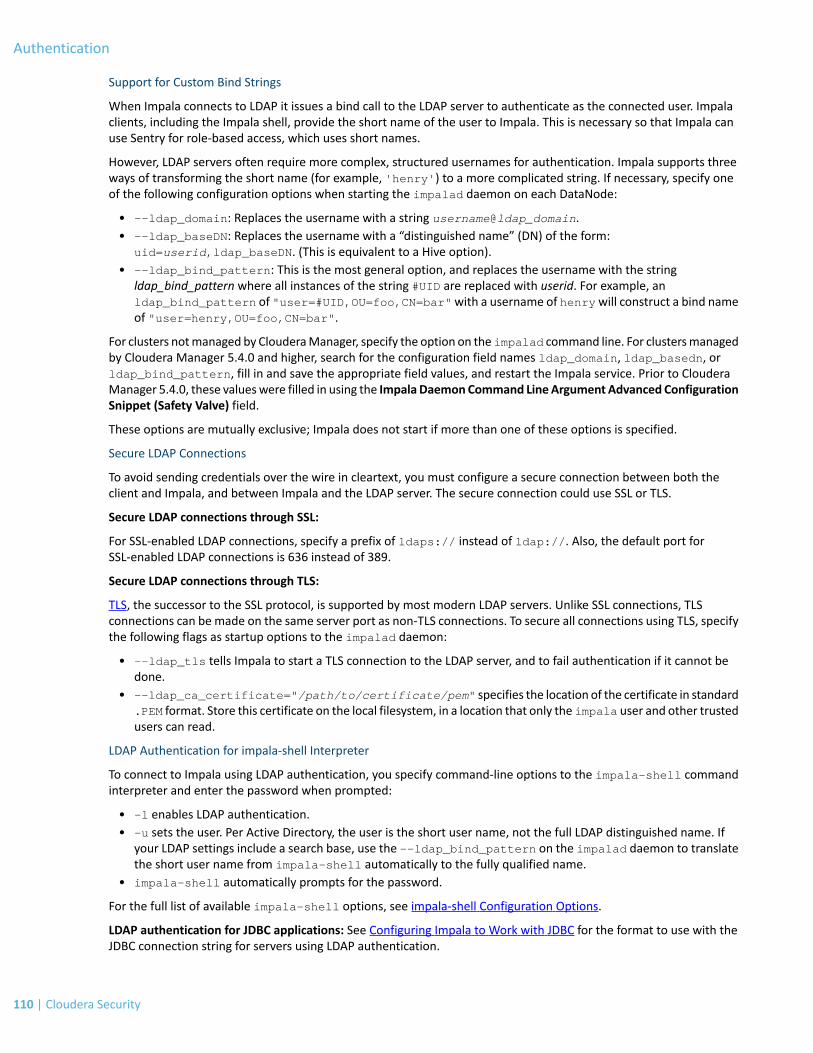
Support for Custom Bind Strings
When Impala connects to LDAP it issues a bind call to the LDAP server to authenticate as the connected user. Impalaclients, including the Impala shell, provide the short name of the user to Impala. This is necessary so that Impala canuse Sentry for role-based access, which uses short names.
However, LDAP servers often require more complex, structured usernames for authentication. Impala supports threeways of transforming the short name (for example, 'henry') to a more complicated string. If necessary, specify oneof the following configuration options when starting the impalad daemon on each DataNode:
• --ldap_domain: Replaces the username with a string username@ldap_domain.• --ldap_baseDN: Replaces the username with a “distinguished name” (DN) of the form:
uid=userid,ldap_baseDN. (This is equivalent to a Hive option).• --ldap_bind_pattern: This is the most general option, and replaces the username with the string
ldap_bind_pattern where all instances of the string #UID are replaced with userid. For example, anldap_bind_pattern of "user=#UID,OU=foo,CN=bar"with a username of henrywill construct a bind nameof "user=henry,OU=foo,CN=bar".
For clusters notmanaged by ClouderaManager, specify the option on theimpalad command line. For clustersmanagedby Cloudera Manager 5.4.0 and higher, search for the configuration field names ldap_domain, ldap_basedn, orldap_bind_pattern, fill in and save the appropriate field values, and restart the Impala service. Prior to ClouderaManager 5.4.0, these valueswere filled in using the Impala DaemonCommand LineArgument Advanced ConfigurationSnippet (Safety Valve) field.
These options are mutually exclusive; Impala does not start if more than one of these options is specified.
Secure LDAP Connections
To avoid sending credentials over the wire in cleartext, you must configure a secure connection between both theclient and Impala, and between Impala and the LDAP server. The secure connection could use SSL or TLS.
Secure LDAP connections through SSL:
For SSL-enabled LDAP connections, specify a prefix of ldaps:// instead of ldap://. Also, the default port forSSL-enabled LDAP connections is 636 instead of 389.
Secure LDAP connections through TLS:
TLS, the successor to the SSL protocol, is supported by most modern LDAP servers. Unlike SSL connections, TLSconnections can be made on the same server port as non-TLS connections. To secure all connections using TLS, specifythe following flags as startup options to the impalad daemon:
• --ldap_tls tells Impala to start a TLS connection to the LDAP server, and to fail authentication if it cannot bedone.
• --ldap_ca_certificate="/path/to/certificate/pem" specifies the location of the certificate in standard.PEM format. Store this certificate on the local filesystem, in a location that only the impala user and other trustedusers can read.
LDAP Authentication for impala-shell Interpreter
To connect to Impala using LDAP authentication, you specify command-line options to the impala-shell commandinterpreter and enter the password when prompted:
• -l enables LDAP authentication.• -u sets the user. Per Active Directory, the user is the short user name, not the full LDAP distinguished name. If
your LDAP settings include a search base, use the --ldap_bind_pattern on the impalad daemon to translatethe short user name from impala-shell automatically to the fully qualified name.
• impala-shell automatically prompts for the password.
For the full list of available impala-shell options, see impala-shell Configuration Options.
LDAP authentication for JDBC applications: See Configuring Impala to Work with JDBC for the format to use with theJDBC connection string for servers using LDAP authentication.
110 | Cloudera Security
Authentication
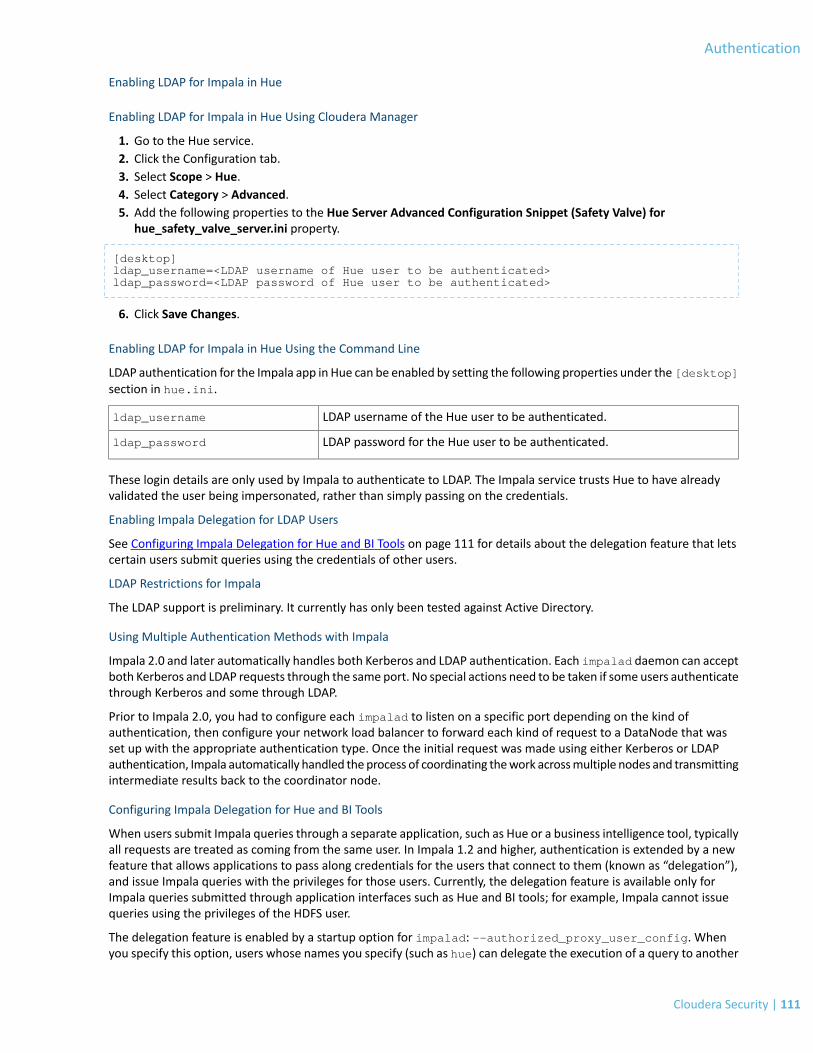
Enabling LDAP for Impala in Hue
Enabling LDAP for Impala in Hue Using Cloudera Manager
1. Go to the Hue service.2. Click the Configuration tab.3. Select Scope > Hue.4. Select Category > Advanced.5. Add the following properties to the Hue Server Advanced Configuration Snippet (Safety Valve) for
hue_safety_valve_server.ini property.
[desktop]ldap_username=<LDAP username of Hue user to be authenticated>ldap_password=<LDAP password of Hue user to be authenticated>
6. Click Save Changes.
Enabling LDAP for Impala in Hue Using the Command Line
LDAP authentication for the Impala app in Hue can be enabled by setting the following properties under the [desktop]section in hue.ini.
LDAP username of the Hue user to be authenticated.ldap_username
LDAP password for the Hue user to be authenticated.ldap_password
These login details are only used by Impala to authenticate to LDAP. The Impala service trusts Hue to have alreadyvalidated the user being impersonated, rather than simply passing on the credentials.
Enabling Impala Delegation for LDAP Users
See Configuring Impala Delegation for Hue and BI Tools on page 111 for details about the delegation feature that letscertain users submit queries using the credentials of other users.
LDAP Restrictions for Impala
The LDAP support is preliminary. It currently has only been tested against Active Directory.
Using Multiple Authentication Methods with Impala
Impala 2.0 and later automatically handles both Kerberos and LDAP authentication. Each impalad daemon can acceptboth Kerberos and LDAP requests through the same port. No special actions need to be taken if some users authenticatethrough Kerberos and some through LDAP.
Prior to Impala 2.0, you had to configure each impalad to listen on a specific port depending on the kind ofauthentication, then configure your network load balancer to forward each kind of request to a DataNode that wasset up with the appropriate authentication type. Once the initial request was made using either Kerberos or LDAPauthentication, Impala automatically handled theprocess of coordinating thework acrossmultiple nodes and transmittingintermediate results back to the coordinator node.
Configuring Impala Delegation for Hue and BI Tools
When users submit Impala queries through a separate application, such as Hue or a business intelligence tool, typicallyall requests are treated as coming from the same user. In Impala 1.2 and higher, authentication is extended by a newfeature that allows applications to pass along credentials for the users that connect to them (known as “delegation”),and issue Impala queries with the privileges for those users. Currently, the delegation feature is available only forImpala queries submitted through application interfaces such as Hue and BI tools; for example, Impala cannot issuequeries using the privileges of the HDFS user.
The delegation feature is enabled by a startup option for impalad: --authorized_proxy_user_config. Whenyou specify this option, users whose names you specify (such as hue) can delegate the execution of a query to another
Cloudera Security | 111
Authentication

user. The query runs with the privileges of the delegated user, not the original user such as hue. The name of thedelegated user is passed using the HiveServer2 configuration property impala.doas.user.
You can specify a list of users that the application user can delegate to, or * to allow a superuser to delegate to anyother user. For example:
impalad --authorized_proxy_user_config 'hue=user1,user2;admin=*' ...
Note: Make sure to use single quotes or escape characters to ensure that any * characters do notundergo wildcard expansion when specified in command-line arguments.
SeeModifying Impala StartupOptions for details about adding or changing impalad startup options. See this Clouderablog post for background information about the delegation capability in HiveServer2.
To set up authentication for the delegated users:
• On the server side, configure either user/password authentication through LDAP, or Kerberos authentication, forall the delegatedusers. See Enabling LDAPAuthentication for Impala onpage109or Enabling KerberosAuthenticationfor Impala on page 106 for details.
• On the client side, follow the instructions in the “Using User Name and Password” section in the ODBC driverinstallation guide. Then search for “delegation” in that same installation guide to learn about the Delegation UIDfield and DelegationUID configuration keyword to enable the delegation feature for ODBC-based BI tools.
Llama Authentication
This section describes how to configure Llama in CDH 5 with Kerberos security in a Hadoop cluster.
Note: Llama has been tested only in a Cloudera Manager deployment. For information on usingCloudera Manager to configure Llama and Impala, see Installing Impala.
Configuring Llama to Support Kerberos Security
1. Create a Llama service user principal using the syntax:llama/[email protected] principal is used to authenticate with the Hadoop cluster, where fully.qualified.domain.name is the hostwhere Llama is running and YOUR-REALM is the name of your Kerberos realm:
$ kadminkadmin: addprinc -randkey llama/fully.qualified.domain.name@YOUR-REALM
2. Create a keytab file with the Llama principal:
$ kadminkadmin: xst -k llama.keytab llama/fully.qualified.domain.name
3. Test that the credentials in the keytab file work. For example:
$ klist -e -k -t llama.keytab
4. Copy the llama.keytab file to the Llama configuration directory. The owner of the llama.keytab file shouldbe the llama user and the file should have owner-only read permissions.
5. Edit the Llama llama-site.xml configuration file in the Llama configuration directory by setting the followingproperties:
ValueProperty
truellama.am.server.thrift.security
112 | Cloudera Security
Authentication

ValueProperty
llama/conf.keytabllama.am.server.thrift.kerberos.keytab.file
llama/fully.qualified.domain.namellama.am.server.thrift.kerberos.server.principal.name
impalallama.am.server.thrift.kerberos.notification.principal.name
6. Restart Llama to make the configuration changes take effect.
Oozie Authentication
This section describes how to configure Oozie CDH 5 with Kerberos security on a Hadoop cluster:
• Configuring Kerberos Authentication for the Oozie Server on page 113• Configuring Oozie HA with Kerberos on page 114
Important:
To enable Oozie to work with Kerberos security on your Hadoop cluster, make sure you perform theinstallation and configuration steps in Configuring Hadoop Security in CDH 5. Also note that whenKerberos security is enabled in Oozie, a web browser that supports Kerberos HTTP SPNEGO is requiredto access the Oozie web-console (for example, Firefox, Internet Explorer or Chrome).
Important:
If the NameNode, Secondary NameNode, DataNode, JobTracker, TaskTrackers, ResourceManager,NodeManagers, HttpFS, or Oozie services are configured to use Kerberos HTTP SPNEGOauthentication,and two or more of these services are running on the same host, then all of the running services mustuse the same HTTP principal and keytab file used for their HTTP endpoints.
Configuring Kerberos Authentication for the Oozie Server
1. Create a Oozie service user principal using the syntax:oozie/<fully.qualified.domain.name>@<YOUR-REALM>. This principal is used to authenticate with theHadoop cluster. where: fully.qualified.domain.name is the host where the Oozie server is runningYOUR-REALM is the name of your Kerberos realm.
kadmin: addprinc -randkey oozie/[email protected]
2. Create aHTTP serviceuser principal using the syntax:HTTP/<fully.qualified.domain.name>@<YOUR-REALM>.This principal is used to authenticate user requests coming to the Oozie web-services. where:fully.qualified.domain.name is the host where the Oozie server is running YOUR-REALM is the name ofyour Kerberos realm.
kadmin: addprinc -randkey HTTP/[email protected]
Important:
The HTTP/ component of the HTTP service user principal must be upper case as shown in thesyntax and example above.
Cloudera Security | 113
Authentication

3. Create keytab files with both principals.
$ kadminkadmin: xst -k oozie.keytab oozie/fully.qualified.domain.namekadmin: xst -k http.keytab HTTP/fully.qualified.domain.name
4. Merge the two keytab files into a single keytab file:
$ ktutilktutil: rkt oozie.keytabktutil: rkt http.keytabktutil: wkt oozie-http.keytab
5. Test that credentials in the merged keytab file work. For example:
$ klist -e -k -t oozie-http.keytab
6. Copy the oozie-http.keytab file to the Oozie configuration directory. The owner of the oozie-http.keytabfile should be the oozie user and the file should have owner-only read permissions.
7. Edit the Oozie server oozie-site.xml configuration file in the Oozie configuration directory by setting thefollowing properties:
Important: You must restart the Oozie server to have the configuration changes take effect.
ValueProperty
trueoozie.service.HadoopAccessorService.kerberos.enabled
<REALM>local.realm
/etc/oozie/conf/oozie-http.keytab for apackage installation, or
oozie.service.HadoopAccessorService.keytab.file
<EXPANDED_DIR>/conf/oozie-http.keytab for atarball installation
oozie/<fully.qualified.domain.name>@<YOUR-REALM.COM>oozie.service.HadoopAccessorService.kerberos.principal
kerberosoozie.authentication.type
HTTP/<fully.qualified.domain.name>@<YOUR-REALM.COM>oozie.authentication.kerberos.principal
Use the value configured forhadoop.security.auth_to_local incore-site.xml
oozie.authentication.kerberos.name.rules
Configuring Oozie HA with Kerberos
In CDH 5, you can configure multiple active Oozie servers against the same database, providing high availability forOozie. For instructions on setting up Oozie HA, see Configuring Oozie for High Availability
Let's assume you have three hosts running Oozie servers, host1.example.com, host2.example.com,host3.example.com and the Load Balancer running on oozie.example.com. The Load Balancer directs traffic tothe Oozie servers: host1, host2 and host3. For such a configuration, assuming your Kerberos realm is EXAMPLE.COM,create the following Kerberos principals:
• oozie/[email protected]
• oozie/[email protected]
114 | Cloudera Security
Authentication

• oozie/[email protected]
• HTTP/[email protected]
• HTTP/[email protected]
• HTTP/[email protected]
• HTTP/[email protected]
On each of the hosts, host1, host2 and host3, create a keytab file with its corresponding oozie and HTTP principalsfrom the list above. All keytab files should also have the load balancer's HTTP principal. Hence, each keytab file shouldhave 3 principals in all.
Edit the following property in the Oozie server configuration file, oozie-site.xml:
<property><name>oozie.authentication.kerberos.principal</name><value>*</value></property>
Search Authentication
This section describes how to configure Search in CDH 5 to enable Kerberos security and Sentry.
Configuring Search to Use Kerberos
Cloudera Search supports Kerberos authentication. All necessary packages are installed when you install Search. Toenable Kerberos, create principals and keytabs and then modify default configurations.
The following instructions only apply to configuring Kerberos in an unmanaged environment. Kerberos configurationis automatically handled by Cloudera Manager if you are using Search in a Cloudera Manager environment.
To create principals and keytabs
Repeat this process on all Solr server hosts.
1. Create a Solr service user principal using the syntax:solr/<fully.qualified.domain.name>@<YOUR-REALM>.This principal is used to authenticate with the Hadoop cluster. where: fully.qualified.domain.name is thehost where the Solr server is running YOUR-REALM is the name of your Kerberos realm.
$ kadminkadmin: addprinc -randkey solr/[email protected]
2. Create aHTTP serviceuser principal using the syntax:HTTP/<fully.qualified.domain.name>@<YOUR-REALM>.This principal is used to authenticate user requests coming to the Solr web-services. where:fully.qualified.domain.name is the host where the Solr server is running YOUR-REALM is the name of yourKerberos realm.
kadmin: addprinc -randkey HTTP/[email protected]
Note:
The HTTP/ component of the HTTP service user principal must be upper case as shown in thesyntax and example above.
3. Create keytab files with both principals.
kadmin: xst -norandkey -k solr.keytab solr/fully.qualified.domain.name \HTTP/fully.qualified.domain.name
4. Test that credentials in the merged keytab file work. For example:
$ klist -e -k -t solr.keytab
5. Copy the solr.keytab file to the Solr configuration directory. The owner of the solr.keytab file should bethe solr user and the file should have owner-only read permissions.
To modify default configurations
Cloudera Security | 115
Authentication

Repeat this process on all Solr server hosts.
1. Ensure that the following properties appear in /etc/default/solr or/opt/cloudera/parcels/CDH-*/etc/default/solrand that theyareuncommented.Modify thesepropertiesto match your environment. The relevant properties to be uncommented and modified are:
SOLR_AUTHENTICATION_TYPE=kerberosSOLR_AUTHENTICATION_SIMPLE_ALLOW_ANON=trueSOLR_AUTHENTICATION_KERBEROS_KEYTAB=/etc/solr/conf/solr.keytabSOLR_AUTHENTICATION_KERBEROS_PRINCIPAL=HTTP/localhost@LOCALHOSTSOLR_AUTHENTICATION_KERBEROS_NAME_RULES=DEFAULTSOLR_AUTHENTICATION_JAAS_CONF=/etc/solr/conf/jaas.conf
Note: Modify the values for these properties to match your environment. For example, theSOLR_AUTHENTICATION_KERBEROS_PRINCIPAL=HTTP/localhost@LOCALHOSTmust includethe principal instance and Kerberos realm for your environment. That is often different fromlocalhost@LOCALHOST.
2. Set hadoop.security.auth_to_local to match the value specified bySOLR_AUTHENTICATION_KERBEROS_NAME_RULES in /etc/default/solr or/opt/cloudera/parcels/CDH-*/etc/default/solr.
Note: For information on how to configure the rules, see Configuring theMapping fromKerberosPrincipals to Short Names. For additional information on using Solr with HDFS, see ConfiguringSolr for Use with HDFS.
3. If using applications that use the solrj library, set up the Java Authentication and Authorization Service (JAAS).
a. Create a jaas.conf file in the Solr configuration directory containing the following settings. This file and itslocation must match the SOLR_AUTHENTICATION_JAAS_CONF value. Make sure that you substitute a valuefor principal that matches your particular environment.
Client { com.sun.security.auth.module.Krb5LoginModule required useKeyTab=true useTicketCache=false keyTab="/etc/solr/conf/solr.keytab" principal="solr/fully.qualified.domain.name@<YOUR-REALM>";};
Using Kerberos
The process of enabling Solr clients to authenticatewith a secure Solr is specific to the client. This section demonstrates:
• Using Kerberos and curl• Using solrctl• Configuring SolrJ Library Usage• This enables technologies including:
• Command line solutions• Java applications• The MapReduceIndexerTool
• Configuring Flume Morphline Solr Sink Usage
Secure Solr requires that the CDH components that it interacts with are also secure. Secure Solr interacts with HDFS,ZooKeeper and optionally HBase, MapReduce, and Flume.
116 | Cloudera Security
Authentication

Using Kerberos and curl
You can use Kerberos authenticationwith clients such ascurl. To usecurl, begin by acquiring valid Kerberos credentialsand then execute the desired command. For example, you might use commands similar to the following:
$ kinit -kt username.keytab username$ curl --negotiate -u foo:bar http://solrserver:8983/solr/
Note: Depending on the tool used to connect, additional arguments may be required. For example,with curl, --negotiate and -u are required. The username and password specified with -u is notactually checked because Kerberos is used. As a result, any value such as foo:bar or even just : isacceptable. While any value can be provided for -u, note that the option is required. Omitting -uresults in a 401 Unauthorized error, even though the -u value is not actually used.
Using solrctl
If you are using solrctl to manage your deployment in an environment that requires Kerberos authentication, youmust have valid Kerberos credentials, which you can get using kinit. For more information on solrctl, see SolrctlReference
Configuring SolrJ Library Usage
If using applications that use the solrj library, begin by establishing a Java Authentication and Authorization Service(JAAS) configuration file.
Create a JAAS file:
• If you have already used kinit to get credentials, you can have the client use those credentials. In such a case,modify your jaas-client.conf file to appear as follows:
Client { com.sun.security.auth.module.Krb5LoginModule required useKeyTab=false useTicketCache=true principal="user/fully.qualified.domain.name@<YOUR-REALM>"; };
where user/fully.qualified.domain.name@<YOUR-REALM> is replaced with your credentials.• You want the client application to authenticate using a keytab you specify:
Client { com.sun.security.auth.module.Krb5LoginModule required useKeyTab=true keyTab="/path/to/keytab/user.keytab" storeKey=true useTicketCache=false principal="user/fully.qualified.domain.name@<YOUR-REALM>"; };
where /path/to/keytab/user.keytab is the keytab file you wish to use anduser/fully.qualified.domain.name@<YOUR-REALM> is the principal in that keytab you wish to use.
Use the JAAS file to enable solutions:
• Command line solutions
Set the property when invoking the program. For example, if you were using a jar, you might use:
java -Djava.security.auth.login.config=/home/user/jaas-client.conf -jar app.jar
• Java applications
Cloudera Security | 117
Authentication
Set the Java system property java.security.auth.login.config. For example, if the JAAS configuration fileis located on the filesystem as /home/user/jaas-client.conf. The Java system propertyjava.security.auth.login.configmust be set to point to this file. Setting a Java system property can bedone programmatically, for example using a call such as:
System.setProperty("java.security.auth.login.config", "/home/user/jaas-client.conf");
• The MapReduceIndexerTool
The MapReduceIndexerTool uses SolrJ to pass the JAAS configuration file. Using the MapReduceIndexerTool in asecure environment requires the use of the HADOOP_OPTS variable to specify the JAAS configuration file. Forexample, you might issue a command such as the following:
HADOOP_OPTS="-Djava.security.auth.login.config=/home/user/jaas.conf" \hadoop jar MapReduceIndexerTool
• Configuring the hbase-indexer CLI
Certain hbase-indexer CLI commands such as replication-status attempt to read ZooKeeper hosts ownedby HBase. To successfully use these commands in Search for CDH 5 in a secure environment, specify a JAASconfiguration file with the HBase principal in the HBASE_INDEXER_OPTS environment variable. For example, youmight issue a command such as the following:
HBASE_INDEXER_OPTS="-Djava.security.auth.login.config=/home/user/hbase-jaas.conf" \hbase-indexer replication-status
Configuring Flume Morphline Solr Sink Usage
Repeat this process on all Flume hosts:
1. If you have not created a keytab file, do so now at /etc/flume-ng/conf/flume.keytab. This file shouldcontain the service principal flume/<fully.qualified.domain.name>@<YOUR-REALM>. See FlumeAuthentication on page 75 for more information.
2. Create a JAAS configuration file for flume at/etc/flume-ng/conf/jaas-client.conf. The file should appearas follows:
Client { com.sun.security.auth.module.Krb5LoginModule required useKeyTab=true useTicketCache=false keyTab="/etc/flume-ng/conf/flume.keytab" principal="flume/<fully.qualified.domain.name>@<YOUR-REALM>";};
3. Add the flume JAAS configuration to the JAVA_OPTS in /etc/flume-ng/conf/flume-env.sh. For example,you might change:
JAVA_OPTS="-Xmx500m"
to:
JAVA_OPTS="-Xmx500m -Djava.security.auth.login.config=/etc/flume-ng/conf/jaas-client.conf"
Spark Authentication
Spark Authentication can be configured using a shared secret configured by the spark.authenticate configurationparameter. The authentication process is essentially a handshake between Spark and the other party to ensure theyhave the same shared secret and can be allowed to communicate. If the shared secret does not match, they will notbe allowed to communicate.
118 | Cloudera Security
Authentication
If you are using Spark on YARN, setting spark.authenticate parameter to true will generate and distribute theshared secret to all applications communicating with Spark. For Cloudera Manager deployments, use the followinginstructions:
1. Go to the Spark Service > Configuration tab.2. In the Search field, type spark authenticate to find the Spark Authentication settings.3. Check the checkbox for the Spark Authentication property.4. Click Save Changes.
Sqoop 2 Authentication
This section describes how to configure Sqoop 2 with Kerberos security in a Hadoop cluster.
Note: Sqoop 2 is being deprecated. Cloudera recommends using Sqoop 1.
Create the Sqoop 2 Principal and Keytab File
You need to create a sqoop2.keytab file for Sqoop 2. Follow these steps:
1. Create the principal and keytab file:
kadmin: addprinc -randkey sqoop2/[email protected]: xst -k sqoop2.keytab sqoop2/fully.qualified.domain.name
2. Move the file into the Sqoop 2 configuration directory and restrict its access exclusively to the sqoop2 user:
$ mv sqoop2.keytab /etc/sqoop2/conf/$ chown sqoop2 /etc/sqoop2/conf/sqoop2.keytab$ chmod 400 /etc/sqoop2/conf/sqoop2.keytab
Formore details on creating Kerberos principals and keytabs, see Step 4: Create andDeploy the Kerberos Principalsand Keytab Files on page 58.
Configure Sqoop 2 to Use Kerberos
Edit the Sqoop 2 configuration file sqoop.properties file in the /etc/sqoop2/conf directory and add the followingproperties:
org.apache.sqoop.authentication.type=KERBEROSorg.apache.sqoop.authentication.handler=org.apache.sqoop.security.KerberosAuthenticationHandlerorg.apache.sqoop.authentication.kerberos.principal=sqoop2/fully.qualified.domain.name@YOUR-REALM.COMorg.apache.sqoop.authentication.kerberos.keytab=/etc/sqoop2/conf/sqoop2.keytab
ZooKeeper Authentication
This section describes how to configure ZooKeeper in CDH 5 to enable Kerberos security:
• Configuring the ZooKeeper Server to Support Kerberos Security on page 120• Configuring the ZooKeeper Client Shell to Support Kerberos Security on page 121• Verifying the Configuration on page 121
Important:
Prior to enabling ZooKeeper to work with Kerberos security on your cluster, make sure you first reviewthe requirements in Configuring Hadoop Security in CDH 5.
Cloudera Security | 119
Authentication
Configuring the ZooKeeper Server to Support Kerberos Security
Note:
It is strongly recommended that you ensure a properly functioning ZooKeeper ensemble prior toenabling security. See ZooKeeper Installation.
1. Create a service principal for the ZooKeeper server using the syntax:zookeeper/<fully.qualified.domain.name>@<YOUR-REALM>. This principal is used to authenticate theZooKeeper server with the Hadoop cluster. where: fully.qualified.domain.name is the host where theZooKeeper server is running YOUR-REALM is the name of your Kerberos realm.
kadmin: addprinc -randkey zookeeper/[email protected]
2. Create a keytab file for the ZooKeeper server.
$ kadminkadmin: xst -k zookeeper.keytab zookeeper/fully.qualified.domain.name
3. Copy the zookeeper.keytab file to the ZooKeeper configuration directory on the ZooKeeper server host. For apackage installation, the ZooKeeper configuration directory is /etc/zookeeper/conf/. For a tar ball installation,the ZooKeeper configuration directory is <EXPANDED_DIR>/conf. The owner of the zookeeper.keytab fileshould be the zookeeper user and the file should have owner-only read permissions.
4. Add the following lines to the ZooKeeper configuration file zoo.cfg:
authProvider.1=org.apache.zookeeper.server.auth.SASLAuthenticationProviderjaasLoginRenew=3600000
5. Set up the Java Authentication and Authorization Service (JAAS) by creating a jaas.conf file in the ZooKeeperconfiguration directory containing the following settings. Make sure that you substitutefully.qualified.domain.name as appropriate.
Server { com.sun.security.auth.module.Krb5LoginModule required useKeyTab=true keyTab="/etc/zookeeper/conf/zookeeper.keytab" storeKey=true useTicketCache=false principal="zookeeper/fully.qualified.domain.name@<YOUR-REALM>";};
6. Add the following setting to the java.env file located in the ZooKeeper configuration directory. (Create the fileif it does not already exist.)
export JVMFLAGS="-Djava.security.auth.login.config=/etc/zookeeper/conf/jaas.conf"
7. If you have multiple ZooKeeper servers in the ensemble, repeat steps 1 through 6 above for each ZooKeeperserver. When you create each new Zookeeper Server keytab file in step 2, you can overwrite the previous keytabfile and use the same name (zookeeper.keytab) to maintain consistency across the ZooKeeper servers in theensemble. The difference in the keytab files will be the hostname where each server is running.
8. Restart the ZooKeeper server to have the configuration changes take effect. For instructions, see ZooKeeperInstallation.
120 | Cloudera Security
Authentication

Configuring the ZooKeeper Client Shell to Support Kerberos Security
1. If youwant to use the ZooKeeper client shell zookeeper-clientwith Kerberos authentication, create a principalusing the syntax: zkcli@<YOUR-REALM>. This principal is used to authenticate the ZooKeeper client shell to theZooKeeper service. where: YOUR-REALM is the name of your Kerberos realm.
kadmin: addprinc -randkey [email protected]
2. Create a keytab file for the ZooKeeper client shell.
$ kadminkadmin: xst -norandkey -k zkcli.keytab [email protected]
Note:
Some versions of kadmin do not support the -norandkey option in the command above. If yourversion does not, you can omit it from the command. Note that doing so will result in a newpassword being generated every time you export a keytab, which will invalidatepreviously-exported keytabs.
3. Set up JAAS in the configuration directory on the host where the ZooKeeper client shell is running. For a packageinstallation, the configuration directory is /etc/zookeeper/conf/. For a tar ball installation, the configurationdirectory is <EXPANDED_DIR>/conf. Create a jaas.conf file containing the following settings:
Client { com.sun.security.auth.module.Krb5LoginModule required useKeyTab=true keyTab="/path/to/zkcli.keytab" storeKey=true useTicketCache=false principal="zkcli@<YOUR-REALM>";};
4. Add the following setting to the java.env file located in the configuration directory. (Create the file if it doesnot already exist.)
export JVMFLAGS="-Djava.security.auth.login.config=/etc/zookeeper/conf/jaas.conf"
Verifying the Configuration
1. Make sure that you have restarted the ZooKeeper cluster with Kerberos enabled, as described above.2. Start the client (where the hostname is the name of a ZooKeeper server):
zookeeper-client -server hostname:port
3. Create a protected znode fromwithin the ZooKeeper CLI.Make sure that you substituteYOUR-REALM as appropriate.
create /znode1 znode1data sasl:zkcli@{{YOUR-REALM}}:cdwra
4. Verify the znode is created and the ACL is set correctly:
getAcl /znode1
The results from getAcl should show that the proper scheme and permissions were applied to the znode.
Cloudera Security | 121
Authentication

FUSE Kerberos Configuration
This section describes how to use FUSE (Filesystem in Userspace) and CDH with Kerberos security on your Hadoopcluster. FUSE enables you to mount HDFS, which makes HDFS files accessible just as if they were UNIX files.
To use FUSE and CDH with Kerberos security, follow these guidelines:
• For each HDFS user, make sure that there is a UNIX user with the same name. If there isn't, some files in the FUSEmount point will appear to be owned by a non-existent user. Although this is harmless, it can cause confusion.
• When using Kerberos authentication, users must run kinit before accessing the FUSE mount point. Failure todo this will result in I/O errors when the user attempts to access the mount point. For security reasons, it is notpossible to list the files in the mount point without first running kinit.
• When a user runs kinit, all processes that run as that user can use the Kerberos credentials. It is not necessaryto run kinit in the same shell as the process accessing the FUSE mount point.
Using kadmin to Create Kerberos Keytab Files
If your version of Kerberos does not support the Kerberos -norandkey option in the xst command, or if you mustuse kadmin because you cannot use kadmin.local, then you can use the following procedure to create Kerberoskeytab files. Using the -norandkey option when creating keytabs is optional and a convenience, but it is not required.
Important:
For both MRv1 and YARN deployments: On every machine in your cluster, there must be a keytabfile for the hdfs user and a keytab file for the mapred user. The hdfs keytab file must contain entriesfor the hdfs principal and an HTTP principal, and the mapred keytab file must contain entries for themapred principal and an HTTP principal. On each respective machine, the HTTP principal will be thesame in both keytab files.
In addition, for YARN deployments only: On every machine in your cluster, there must be a keytabfile for the yarn user. The yarn keytab file must contain entries for the yarn principal and an HTTPprincipal. On each respective machine, the HTTP principal in the yarn keytab file will be the same asthe HTTP principal in the hdfs and mapred keytab files.
For instructions, see To create the Kerberos keytab files on page 122.
Note:
These instructions illustrate an example of creating keytab files for MIT Kerberos. If you are usinganother version of Kerberos, refer to your Kerberos documentation for instructions. You can use eitherkadmin or kadmin.local to run these commands.
To create the Kerberos keytab files
Do the following steps for every host in your cluster, replacing the fully.qualified.domain.name in the commandswith the fully qualified domain name of each host:
1. Create the hdfs keytab file, which contains an entry for the hdfs principal. This keytab file is used for theNameNode, Secondary NameNode, and DataNodes.
$ kadminkadmin: xst -k hdfs-unmerged.keytab hdfs/fully.qualified.domain.name
2. Create the mapred keytab file, which contains an entry for the mapred principal. If you are using MRv1, themapred keytab file is used for the JobTracker and TaskTrackers. If you are using YARN, the mapred keytab file isused for the MapReduce Job History Server.
kadmin: xst -k mapred-unmerged.keytab mapred/fully.qualified.domain.name
122 | Cloudera Security
Authentication
3. YARN only: Create the yarn keytab file, which contains an entry for the yarn principal. This keytab file is usedfor the ResourceManager and NodeManager.
kadmin: xst -k yarn-unmerged.keytab yarn/fully.qualified.domain.name
4. Create the http keytab file, which contains an entry for the HTTP principal.
kadmin: xst -k http.keytab HTTP/fully.qualified.domain.name
5. Use the ktutil command to merge the previously-created keytabs:
$ ktutilktutil: rkt hdfs-unmerged.keytabktutil: rkt http.keytabktutil: wkt hdfs.keytabktutil: clearktutil: rkt mapred-unmerged.keytabktutil: rkt http.keytabktutil: wkt mapred.keytabktutil: clearktutil: rkt yarn-unmerged.keytabktutil: rkt http.keytabktutil: wkt yarn.keytab
This procedure creates three new files: hdfs.keytab, mapred.keytab and yarn.keytab. These files containentries for the hdfs and HTTP principals, the mapred and HTTP principals, and the yarn and HTTP principalsrespectively.
6. Use klist to display the keytab file entries. For example, a correctly-created hdfs keytab file should looksomething like this:
$ klist -e -k -t hdfs.keytabKeytab name: WRFILE:hdfs.keytabslot KVNO Principal---- ---- --------------------------------------------------------------------- 1 7 HTTP/[email protected] (DES cbc mode with CRC-32)
2 7 HTTP/[email protected] (Triple DES cbc mode with HMAC/sha1) 3 7 hdfs/[email protected] (DES cbc mode with CRC-32)
4 7 hdfs/[email protected] (Triple DES cbc mode with HMAC/sha1)
7. To verify that you have performed the merge procedure correctly, make sure you can obtain credentials as boththe hdfs and HTTP principals using the single merged keytab:
$ kinit -k -t hdfs.keytab hdfs/[email protected]$ kinit -k -t hdfs.keytab HTTP/[email protected]
If either of these commands fails with an error message such as "kinit: Key table entry not foundwhile getting initial credentials", then something has gone wrong during the merge procedure. Goback to step 1 of this document and verify that you performed all the steps correctly.
8. To continue the procedure of configuring Hadoop security in CDH 5, follow the instructions in the section To deploythe Kerberos keytab files.
Configuring the Mapping from Kerberos Principals to Short Names
You configure the mapping from Kerberos principals to short names in the hadoop.security.auth_to_localproperty setting in the core-site.xml file. Kerberos has this support natively, and Hadoop's implementation reusesKerberos's configuration language to specify the mapping.
Cloudera Security | 123
Authentication

Amapping consists of a set of rules that are evaluated in the order listed in the hadoop.security.auth_to_localproperty. The first rule that matches a principal name is used to map that principal name to a short name. Any laterrules in the list that match the same principal name are ignored.
You specify the mapping rules on separate lines in the hadoop.security.auth_to_local property as follows:
<property> <name>hadoop.security.auth_to_local</name> <value> RULE:[<principal translation>](<acceptance filter>)<short name substitution> RULE:[<principal translation>](<acceptance filter>)<short name substitution> DEFAULT </value></property>
Mapping Rule Syntax
To specify a mapping rule, use the prefix string RULE: followed by three sections—principal translation, acceptancefilter, and short name substitution—described in more detail below. The syntax of a mapping rule is:
RULE:[<principal translation>](<acceptance filter>)<short name substitution>
Principal Translation
The first section of a rule, <principal translation>, performs the matching of the principal name to the rule. Ifthere is a match, the principal translation also does the initial translation of the principal name to a short name. In the<principal translation> section, you specify the number of components in the principal name and the patternyou want to use to translate those principal component(s) and realm into a short name. In Kerberos terminology, aprincipal name is a set of components separated by slash ("/") characters.
The principal translation is composed of two parts that are both specified within "[ ]" using the following syntax:
[<number of components in principal name>:<initial specification of short name>]
where:
<number of components in principal name> – This first part specifies the number of components in the principal name(not including the realm) and must be 1 or 2. A value of 1 specifies principal names that have a single component (forexample, hdfs), and 2 specifies principal names that have two components (for example,hdfs/fully.qualified.domain.name). A principal name that has only one component will only matchsingle-component rules, and a principal name that has two components will only match two-component rules.
<initial specification of short name> – This second part specifies a pattern for translating the principal component(s)and the realm into a short name. The variable $0 translates the realm, $1 translates the first component, and $2translates the second component.
Here are some examples of principal translation sections. These examples use [email protected] andatm/[email protected] as principal name inputs:
Translates atm/[email protected] this short name
[email protected] intothis short name
This PrincipalTranslation
Rule does not [email protected][1:$1@$0]
Rule does not match1atm[1:$1]
Rule does not match1atm.foo[1:$1.foo]
atm/[email protected] does not match2[2:$1/$2@$0]
atm/fully.qualified.domain.nameRule does not match2[2:$1/$2]
[email protected] does not match2[2:$1@$0]
124 | Cloudera Security
Authentication
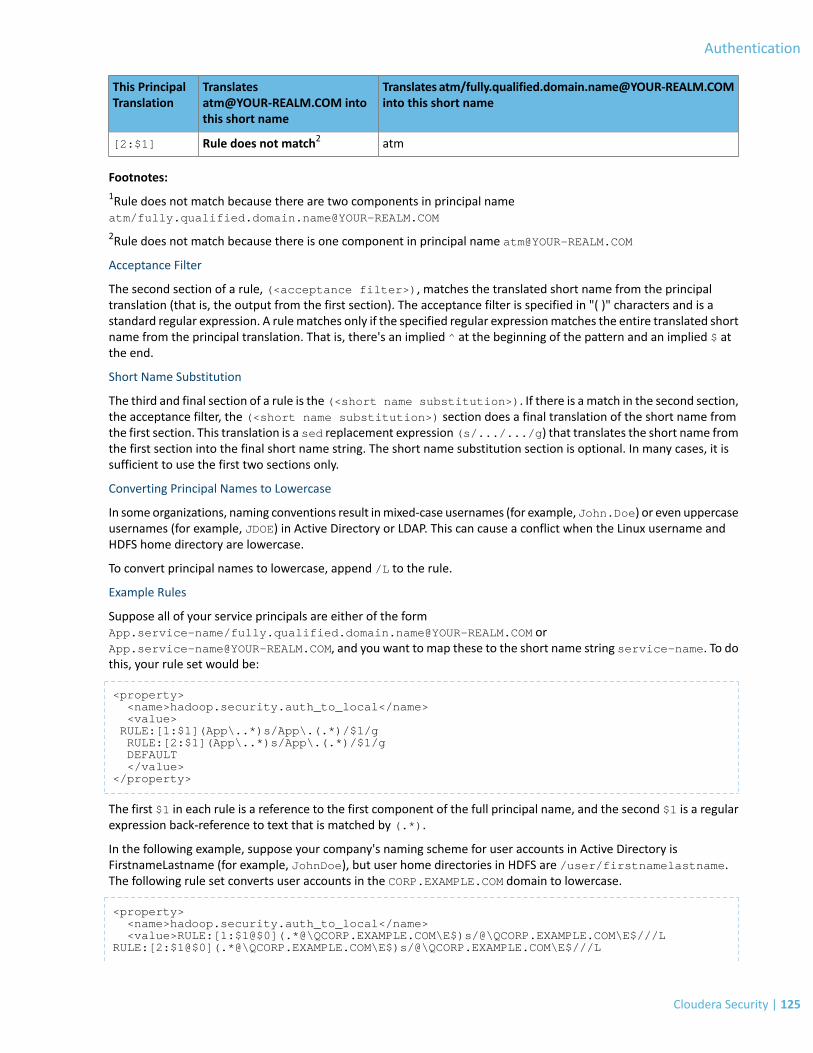
Translates atm/[email protected] this short name
[email protected] intothis short name
This PrincipalTranslation
atmRule does not match2[2:$1]
Footnotes:1Rule does not match because there are two components in principal nameatm/[email protected]
2Rule does not match because there is one component in principal name [email protected]
Acceptance Filter
The second section of a rule, (<acceptance filter>), matches the translated short name from the principaltranslation (that is, the output from the first section). The acceptance filter is specified in "( )" characters and is astandard regular expression. A rulematches only if the specified regular expressionmatches the entire translated shortname from the principal translation. That is, there's an implied ^ at the beginning of the pattern and an implied $ atthe end.
Short Name Substitution
The third and final section of a rule is the (<short name substitution>). If there is a match in the second section,the acceptance filter, the (<short name substitution>) section does a final translation of the short name fromthe first section. This translation is a sed replacement expression (s/.../.../g) that translates the short name fromthe first section into the final short name string. The short name substitution section is optional. In many cases, it issufficient to use the first two sections only.
Converting Principal Names to Lowercase
In someorganizations, naming conventions result inmixed-case usernames (for example, John.Doe) or even uppercaseusernames (for example, JDOE) in Active Directory or LDAP. This can cause a conflict when the Linux username andHDFS home directory are lowercase.
To convert principal names to lowercase, append /L to the rule.
Example Rules
Suppose all of your service principals are either of the formApp.service-name/[email protected] [email protected], and you want to map these to the short name string service-name. To dothis, your rule set would be:
<property> <name>hadoop.security.auth_to_local</name> <value> RULE:[1:$1](App\..*)s/App\.(.*)/$1/g RULE:[2:$1](App\..*)s/App\.(.*)/$1/g DEFAULT </value></property>
The first $1 in each rule is a reference to the first component of the full principal name, and the second $1 is a regularexpression back-reference to text that is matched by (.*).
In the following example, suppose your company's naming scheme for user accounts in Active Directory isFirstnameLastname (for example, JohnDoe), but user home directories in HDFS are /user/firstnamelastname.The following rule set converts user accounts in the CORP.EXAMPLE.COM domain to lowercase.
<property> <name>hadoop.security.auth_to_local</name> <value>RULE:[1:$1@$0](.*@\QCORP.EXAMPLE.COM\E$)s/@\QCORP.EXAMPLE.COM\E$///LRULE:[2:$1@$0](.*@\QCORP.EXAMPLE.COM\E$)s/@\QCORP.EXAMPLE.COM\E$///L
Cloudera Security | 125
Authentication

DEFAULT</value></property>
In this example, the [email protected] principal becomes the johndoe HDFS user.
Default Rule
You can specify an optional default rule called DEFAULT (see example above). The default rule reduces a principalnamedown to its first component only. For example, the default rule reduces the principal [email protected] atm/[email protected] down to atm, assuming that the default domain isYOUR-REALM.COM.
The default rule applies only if the principal is in the default realm.
If a principal name does not match any of the specified rules, the mapping for that principal name will fail.
Testing Mapping Rules
You can test mapping rules for a long principal name by running:
$ hadoop org.apache.hadoop.security.HadoopKerberosName name1 name2 name3
Enabling Debugging Output for the Sun Kerberos Classes
Initially getting a secure Hadoop cluster configured properly can be tricky, especially for those who are not yet familiarwith Kerberos. To help with this, it can be useful to enable debugging output for the Sun Kerberos classes. To do so,set the HADOOP_OPTS environment variable to the following:
HADOOP_OPTS="-Dsun.security.krb5.debug=true"
Configuring a Cluster-dedicated MIT KDC with Cross-Realm TrustIf you use Cloudera Manager to enable Hadoop security on your cluster, the Cloudera Manager Server will createseveral principals and then generate keytabs for those principals. Cloudera Manager will then deploy the keytab fileson every host in the cluster. See Hadoop Users in Cloudera Manager and CDH on page 136 for a complete listing of theprincipals created by Cloudera Manager.
Note: The following instructions illustrate an example of creating and deploying the principals andkeytab files for MIT Kerberos. (If you are using another version of Kerberos, refer to the Kerberosdocumentation for the version of the operating system you are using, for instructions.)
When to use kadmin.local and kadmin
When performing the Kerberos commands in this document, you can use kadmin.local or kadmin depending onyour access and account:
• If you can log on to the KDChost directly, and have root access or a Kerberos admin account, use thekadmin.localcommand.
• When accessing the KDC from a remote host, use the kadmin command.
To start kadmin.local on the KDC host:
$ sudo kadmin.local
To run kadmin from any host:
$ kadmin
126 | Cloudera Security
Authentication
Note:
• In this guide, kadmin is shown as the prompt for commands in the kadmin shell, but you cantype the same commands at the kadmin.local prompt in the kadmin.local shell.
• Running kadmin.localmay prompt you for a password because it is being run using sudo. Youshould provide your Unix password. Running kadminmay prompt you for a password becauseyou need Kerberos admin privileges. You should provide your Kerberos admin password.
Setting up a Cluster-Dedicated KDC and Default Realm for the Hadoop Cluster
Cloudera has tested the following configuration approaches to Kerberos security for clusters managed by ClouderaManager. For administration teams that are just getting started with Kerberos security, we recommend starting withthese approaches to the configuration of KDC services for a number of reasons.
The number of Service Principal Names (SPNs) that are created and managed by the Cloudera Manager server for aCDH cluster can be significant, so it is important to realize the potential impact on cluster uptime and overall operationsif you choose to manage keytabs manually instead. The Cloudera Manager server manages the creation of servicekeytabs on the proper hosts based on the current configuration of the database. Manual keytab management can beerror prone and introduce delays when deploying ormoving services within the cluster, especially under time-sensitiveconditions.
Cloudera Manager creates SPNs within a KDC that it can access with the kadmin command based on configuration ofthe /etc/krb5.conf file on the Cloudera Manager host. SPNs are created with the formatservice-name/[email protected] where service-name is the relevant CDH service name such ashue or hbase or hdfs.
If your site already has a working KDC, and any existing principals share the same name as any of the principals thatCloudera Manager creates, the Cloudera Manager Server generates a new randomized key for those principals, andconsequently causes existing keytabs to become invalid.
This is why Cloudera recommends using a dedicated local MIT Kerberos KDC and realm for the Hadoop cluster. Youcan set up a one-way cross-realm trust from the cluster-dedicated KDC and realm to your existing central MIT KerberosKDC, or to an existing Active Directory realm. Using this method, there is no need to create Hadoop service principalsin the centralMIT Kerberos KDC or in Active Directory, but principals (users) in the centralMIT KDC or in Active Directorycan be authenticated to Hadoop. The steps to implement this approach are as follows:
1. Install and configure a cluster-dedicatedMIT Kerberos KDC that will bemanaged by ClouderaManager for creatingand storing the service principals for your Hadoop cluster.
Note: The krb5-server package includes a logrotate policy file to rotate log files monthly.To take advantage of this, install the logrotate package. No additional configuration is necessary.
2. See the example kdc.conf and krb5.conf files in Sample Kerberos Configuration files: krb5.conf, kdc.conf,kadm5.acl on page 145 for configuration considerations for the KDC and Kerberos clients.
3. Configure a default Kerberos realm for the cluster you want Cloudera Manager to manage and set up one-waycross-realm trust between the cluster-dedicated KDC and either your central KDC or Active Directory. Follow theappropriate instructions below for your deployment: Using a Cluster-Dedicated KDC with a Central MIT KDC onpage 128 or Using a Cluster-Dedicated MIT KDC with Active Directory on page 129.
Cloudera strongly recommends the method above because:
• It requires minimal configuration in Active Directory.• It is comparatively easy to script the creation of many principals and keytabs. A principal and keytab must be
created for every daemon in the cluster, and in a large cluster this can be extremely onerous to do directly inActive Directory.
• There is no need to involve central Active Directory administrators in order to get service principals created.
Cloudera Security | 127
Authentication
• It allows for incremental configuration. The Hadoop administrator can completely configure and verify thefunctionality the cluster independently of integrating with Active Directory.
Using a Cluster-Dedicated KDC with a Central MIT KDC
Important: If you plan to use Oozie or the Hue Kerberos Ticket Renewer in your cluster, you mustconfigure your KDC to allow tickets to be renewed, and you must configure krb5.conf to requestrenewable tickets. Typically, you can do this by adding the max_renewable_life setting to yourrealm in kdc.conf, and by adding the renew_lifetime parameter to the libdefaults sectionof krb5.conf. For more information about renewable tickets, see the Kerberos documentation. Thisis demonstrated in the Sample Kerberos Configuration files: krb5.conf, kdc.conf, kadm5.acl on page145.
1. In the /var/kerberos/krb5kdc/kdc.conf file on the local dedicated KDC server host, configure the defaultrealm for the Hadoop cluster by substituting your Kerberos realm in the following realms property:
[realms] HADOOP.EXAMPLE.COM = {
2. In the /etc/krb5.conf file on all cluster hosts and all Hadoop client user hosts, configure the default realm forthe Hadoop cluster by substituting your Kerberos realm in the following realms property. Also specify the localdedicated KDC server hostname in the /etc/krb5.conf file (for example, kdc01.example.com).
[libdefaults] default_realm = HADOOP.EXAMPLE.COM[realms] HADOOP.EXAMPLE.COM = { kdc = kdc01.hadoop.example.com:88 admin_server = kdc01.hadoop.example.com:749 default_domain = hadoop.example.com } EXAMPLE.COM = { kdc = kdc01.example.com:88 admin_server = kdc01.example.com:749 default_domain = example.com }[domain_realm] .hadoop.example.com = HADOOP.EXAMPLE.COM hadoop.example.com = HADOOP.EXAMPLE.COM .example.com = EXAMPLE.COM example.com = EXAMPLE.COM
3. To set up the cross-realm trust in the cluster-dedicated KDC, type the following command in the kadmin.localor kadmin shell on the cluster-dedicated KDC host to create a krbtgt principal. Substitute your cluster-dedicatedKDC realm for HADOOP.EXAMPLE.COM, and substitute your central KDC realm for EXAMPLE.COM. Enter a trustpassword when prompted. Note the password because you will need to enter the exact same password in thecentral KDC in the next step.
kadmin: addprinc krbtgt/[email protected]
4. Each of your Hadoop client users must also place this information in their local core-site.xml file. The easiestway to do so is by using the Cloudera Manager Admin Console to generate a client configuration file.
5. To set up the cross-realm trust in the central KDC, type the same command in the kadmin.local or kadminshell on the central KDC host to create the exact same krbtgt principal and password.
kadmin: addprinc krbtgt/[email protected]
128 | Cloudera Security
Authentication

Important: In order for a cross-realm trust to operate properly, both KDCs must have the samekrbtgt principal and password, and both KDCs must be configured to use the same encryptiontype.
6. To properly translate principal names from the central KDC realm into the cluster-dedicated KDC realm for theHadoop cluster, configure the Trusted Kerberos Realms property of the HDFS service.
a. Open the Cloudera Manager Admin Console.b. Go to the HDFS service.c. Click the Configuration tab.d. Select Scope > HDFS (Service Wide)e. Select Category > Security.f. Type Kerberos in the Search box.g. Edit the Trusted Kerberos Realms property to add the name of your central KDC realm. If you need to use
more advanced mappings which do more than just allow principals from another domain, you may enterthem in the Additional Rules to Map Kerberos Principals to Short Names property. For more informationabout name mapping rules, see Configuring the Mapping from Kerberos Principals to Short Names on page123.
7. Each of your Hadoop client users must also place this information in their local core-site.xml file. The easiestway to do so is by using the Cloudera Manager Admin Console to generate a client configuration file.
8. Proceed to Step 2: If You are Using AES-256 Encryption, Install the JCE Policy File on page 37. Later in this procedure,you will restart the services to have the configuration changes in core-site.xml take effect.
Using a Cluster-Dedicated MIT KDC with Active Directory
Important: If you are using Cloudera Manager, ensure you have installed the openldap-clientspackage on the Cloudera Manager Server host before you begin configuring Kerberos authentication.
On the Active Directory Server
1. On the Active Directory server host, type the following command to add the local realm trust to Active Directory:
netdom trust HADOOP.EXAMPLE.COM /Domain:EXAMPLE.COM /add /realm /passwordt:TrustPassword
2. On the Active Directory server host, type the following command to set the proper encryption type:
Windows 2003 RC2
Windows 2003 server installations do not support AES encryption for Kerberos. Therefore RC4 should be used.Please see the Microsoft reference documentation for more information.
ktpass /MITRealmName HADOOP.EXAMPLE.COM /TrustEncryp RC4
Windows 2008
ksetup /SetEncTypeAttr HADOOP.EXAMPLE.COM <enc_type>
Where the <enc_type> parameter can be replacedwith parameter strings for AES, DES, or RC4 encryptionmodes.For example, for AES encryption, replace <enc_type> with AES256-CTS-HMAC-SHA1-96 orAES128-CTS-HMAC-SHA1-96 and for RC4 encryption, replace with RC4-HMAC-MD5. See theMicrosoft referencedocumentation for more information.
Important: Make sure that the encryption type you specify is supported on both your versionof Windows Active Directory and your version of MIT Kerberos.
Cloudera Security | 129
Authentication

On the MIT KDC Server
1. In the /var/kerberos/krb5kdc/kdc.conf file on the local dedicated KDC server host, configure the defaultrealm for the Hadoop cluster by substituting your Kerberos realm in the following realms property:
[realms] HADOOP.EXAMPLE.COM = {
2. Each of your Hadoop client users must also place this information in their local core-site.xml file. The easiestway to do so is by using the Cloudera Manager Admin Console to generate a client configuration file.
3. On the local MIT KDC server host, type the following command in the kadmin.local or kadmin shell to add thecross-realm krbtgt principal:
kadmin: addprinc -e "<enc_type_list>" krbtgt/[email protected]
where the <enc_type_list> parameter specifies the types of encryption this cross-realm krbtgt principal willsupport: either AES, DES, or RC4 encryption. You can specify multiple encryption types using the parameter in thecommand above. Make sure that at least one of the encryption types corresponds to the encryption types foundin the tickets granted by the KDC in the remote realm.
Examples by Active Directory Domain or Forest "Functional level"
Active Directory will, based on the Domain or Forest functional level, use encryption types supported by thatrelease of the Windows Server operating system. It is not possible to use AES encryption types with an AD 2003functional level. If you notice that DES encryption types are being used when authenticating or requesting servicetickets to Active Directory then it might be necessary to enable weak encryption types in the /etc/krb5.conf.See Sample Kerberos Configuration files: krb5.conf, kdc.conf, kadm5.acl on page 145 for an example.
• Windows 2003
kadmin: addprinc -e "rc4-hmac:normal" krbtgt/[email protected]
• Windows 2008
kadmin: addprinc -e "aes256-cts:normal aes128-cts:normal rc4-hmac:normal" krbtgt/[email protected]
Note: The cross-realm krbtgt principal that you add in this step must have at least one entrythat uses the same encryption type as the tickets that are issued by the remote KDC. If there areno matching encryption types, principals in the local realm can successfully access the Hadoopcluster, but principals in the remote realm are unable to.
On All Cluster Hosts
1. In the /etc/krb5.conf file on all cluster hosts and all Hadoop client user hosts, configure both Kerberos realms.Note that default_realm should be configured as the local MIT Kerberos realm for the cluster. Your krb5.confmay contain more configuration properties than those demonstrated below. This example is provided to clarifyconfiguration parameters. See Sample Kerberos Configuration files: krb5.conf, kdc.conf, kadm5.acl on page 145for more information.
[libdefaults] default_realm = HADOOP.EXAMPLE.COM[realms] EXAMPLE.COM = { kdc = dc01.example.com:88 admin_server = dc01.example.com:749 } HADOOP.EXAMPLE.COM = { kdc = kdc01.hadoop.example.com:88
130 | Cloudera Security
Authentication

admin_server = kdc01.hadoop.example.com:749 }[domain_realm] .hadoop.example.com = HADOOP.EXAMPLE.COM hadoop.example.com = HADOOP.EXAMPLE.COM .example.com = EXAMPLE.COM example.com = EXAMPLE.COM
2. Use one of the following methods to properly translate principal names from the Active Directory realm into thecluster-dedicated KDC realm for the Hadoop cluster.
• Using Cloudera Manager: Configure the Trusted Kerberos realms property of the HDFS service:
1. Open the Cloudera Manager Admin Console.2. Go to the HDFS service.3. Click the Configuration tab.4. Select Scope > HDFS (Service Wide)5. Select Category > Security.6. Type Kerberos in the Search box.7. Edit the Trusted Kerberos Realms property to add the name of your central KDC realm. If you need to
use more advanced mappings which do more than just allow principals from another domain, you mayenter them in the Additional Rules to Map Kerberos Principals to Short Names property. For moreinformation about name mapping rules, see Configuring the Mapping from Kerberos Principals to ShortNames on page 123.
• Using theCommandLine:Configure thehadoop.security.auth_to_local setting in thecore-site.xmlfile on all of the cluster hosts. The following example translates all principal names with the realmEXAMPLE.COM into the first component of the principal name only. It also preserves the standard translationfor the default realm (the cluster realm).
<property> <name>hadoop.security.auth_to_local</name> <value> RULE:[1:$1@$0](^.*@EXAMPLE\.COM$)s/^(.*)@EXAMPLE\.COM$/$1/g RULE:[2:$1@$0](^.*@EXAMPLE\.COM$)s/^(.*)@EXAMPLE\.COM$/$1/g DEFAULT </value></property>
Integrating Hadoop Security with Active Directory
Considerations when using an Active Directory KDCPerformance:
As your cluster grows, so will the volume of Authentication Service (AS) and Ticket Granting Service (TGS) interactionbetween the services on each cluster server. Consider evaluating the volume of this interaction against the ActiveDirectory domain controllers you have configured for the cluster before rolling this feature out to a productionenvironment. If cluster performance suffers, over time it might become necessary to dedicate a set of AD domaincontrollers to larger deployments.
Network Proximity:
By default, Kerberos uses UDP for client/server communication. Often, AD services are in a different network thanproject application services such as Hadoop. If the domain controllers supporting a cluster for Kerberos are not in thesame subnet, or they're separated by a firewall, consider using the udp_preference_limit = 1 setting in the[libdefaults] section of the krb5.conf used by cluster services. Cloudera strongly recommends against using ADdomain controller (KDC) servers that are separated from the cluster by a WAN connection, as latency in this servicewill significantly impact cluster performance.
Cloudera Security | 131
Authentication

Process:
Troubleshooting the cluster's operations, especially for Kerberos-enabled services, will need to includeAD administrationresources. Evaluate your organizational processes for engaging the AD administration team, and how to escalate incase a cluster outage occurs due to issues with Kerberos authentication against AD services. In some situations it mightbe necessary to enable Kerberos event logging to address desktop and KDC issues within windows environments.
Also note that if you decommission any Cloudera Manager roles or nodes, the related AD accounts will need to bedeleted manually. This is required because Cloudera Manager will not delete existing entries in Active Directory.
Important: With CDH 5.1 and higher, clusters managed by Cloudera Manager 5.1 (and higher) do notrequire a local MIT KDC and are able to integrate directly with an Active Directory KDC. Clouderarecommends you use a direct-to-AD setup. For instructions, see Enabling Kerberos AuthenticationUsing the Wizard on page 19.
If direct integration with AD is not currently possible, use the following instructions to configure a local MIT KDC totrust your AD server:
1. Run an MIT Kerberos KDC and realm local to the cluster and create all service principals in this realm.2. Set up one-way cross-realm trust from this realm to the Active Directory realm. Using this method, there is no
need to create service principals in Active Directory, but Active Directory principals (users) can be authenticatedto Hadoop. See Configuring a Local MIT Kerberos Realm to Trust Active Directory on page 132.
Configuring a Local MIT Kerberos Realm to Trust Active Directory
On the Active Directory Server
1. Add the local realm trust to Active Directory with this command:
netdom trust YOUR-LOCAL-REALM.COMPANY.COM /Domain:AD-REALM.COMPANY.COM /add /realm /passwordt:<TrustPassword>
2. Set the proper encryption type with this command:
OnWindows 2003 RC2:
ktpass /MITRealmName YOUR-LOCAL-REALM.COMPANY.COM /TrustEncryp <enc_type>
OnWindows 2008:
ksetup /SetEncTypeAttr YOUR-LOCAL-REALM.COMPANY.COM <enc_type>
The <enc_type> parameter specifies AES, DES, or RC4 encryption. Refer to the documentation for your version ofWindows Active Directory to find the <enc_type> parameter string to use.
3. Get and verify the list of encryption types set with this command:
OnWindows 2008:
ksetup /GetEncTypeAttr YOUR-LOCAL-REALM.COMPANY.COM
Important: Make sure the encryption type you specify is supported on both your version ofWindows Active Directory and your version of MIT Kerberos.
132 | Cloudera Security
Authentication

On the MIT KDC Server
Type the following command in the kadmin.local or kadmin shell to add the cross-realm krbtgt principal. Use the samepassword you used in the netdom command on the Active Directory Server.
kadmin: addprinc -e "<enc_type_list>" krbtgt/[email protected]
where the <enc_type_list> parameter specifies the types of encryption this cross-realm krbtgt principal will support:either AES, DES, or RC4 encryption. You can specify multiple encryption types using the parameter in the commandabove, what's important is that at least one of the encryption types corresponds to the encryption type found in thetickets granted by the KDC in the remote realm. For example:
kadmin: addprinc -e "rc4-hmac:normal des3-hmac-sha1:normal" krbtgt/[email protected]
Note: The cross-realm krbtgt principal that you add in this step must have at least one entry thatuses the same encryption type as the tickets that are issued by the remote KDC. If no entries have thesame encryption type, then the problem you will see is that authenticating as a principal in the localrealm will allow you to successfully run Hadoop commands, but authenticating as a principal in theremote realm will not allow you to run Hadoop commands.
On All of the Cluster Hosts
1. Verify that both Kerberos realms are configured on all of the cluster hosts. Note that the default realm and thedomain realm should remain set as the MIT Kerberos realm which is local to the cluster.
[realms] AD-REALM.CORP.FOO.COM = { kdc = ad.corp.foo.com:88 admin_server = ad.corp.foo.com:749 default_domain = foo.com } CLUSTER-REALM.CORP.FOO.COM = { kdc = cluster01.corp.foo.com:88 admin_server = cluster01.corp.foo.com:749 default_domain = foo.com }
2. To properly translate principal names from the Active Directory realm into local names within Hadoop, you mustconfigure the hadoop.security.auth_to_local setting in the core-site.xml file on all of the clustermachines. The following example translates all principal names with the realm AD-REALM.CORP.FOO.COM intothe first component of the principal name only. It also preserves the standard translation for the default realm(the cluster realm).
<property> <name>hadoop.security.auth_to_local</name> <value> RULE:[1:$1@$0](^.*@AD-REALM\.CORP\.FOO\.COM$)s/^(.*)@AD-REALM\.CORP\.FOO\.COM$/$1/g
RULE:[2:$1@$0](^.*@AD-REALM\.CORP\.FOO\.COM$)s/^(.*)@AD-REALM\.CORP\.FOO\.COM$/$1/g
DEFAULT </value></property>
For more information about name mapping rules, see Configuring the Mapping from Kerberos Principals to ShortNames on page 123.
Cloudera Security | 133
Authentication
Integrating Hadoop Security with Alternate AuthenticationOne of the ramifications of enabling security on a Hadoop cluster is that every user who interacts with the cluster musthave a Kerberos principal configured. For some of the services, specifically Oozie and Hadoop (for example, JobTrackerand TaskTracker), it can be convenient to run a mixed form of authentication where Kerberos authentication is usedfor API or command line access while some other form of authentication (for example, SSO and LDAP) is used foraccessing Web UIs. Using an alternate authentication deployment is considered an advanced topic because only apartial implementation is provided in this release: you will have to implement some of the code yourself.
Note: The following instructions assume you already have a Kerberos-enabled cluster.
Proceed as follows:
• Configuring the AuthenticationFilter to use Kerberos on page 134• Creating an AltKerberosAuthenticationHandler Subclass on page 134• Enabling Your AltKerberosAuthenticationHandler Subclass on page 134
See also the Example Implementation for Oozie on page 136.
Configuring the AuthenticationFilter to use Kerberos
First, you must do all of the steps in the Server Side Configuration section of the Hadoop Auth, Java HTTP SPNEGODocumentation to configureAuthenticationFilter to use Kerberos. Youmust configureAuthenticationFilterto use Kerberos before doing the steps below.
Creating an AltKerberosAuthenticationHandler Subclass
An AuthenticationHandler is installed on the server-side to handle authenticating clients and creating anAuthenticationToken.
1. Subclass theorg.apache.hadoop.security.authentication.server.AltKerberosAuthenticationHandler class(in the hadoop-auth package).
2. When a client sends a request, the authenticate method will be called. For browsers,AltKerberosAuthenticationHandler will call the alternateAuthenticatemethod, which is what youneed to implement to interact with the desired authentication mechanism. For non-browsers,AltKerberosAuthenticationHandler will follow the Kerberos SPNEGO sequence (this is provided for you).
3. The alternateAuthenticate(HttpServletRequest request, HttpServletResponse response)method in your subclass should following these rules:
4. Return null if the authentication is still in progress; the response object can be used to interact with the client.5. Throw an AuthenticationException if the authentication failed.6. Return an AuthenticationToken if the authentication completed successfully.
Enabling Your AltKerberosAuthenticationHandler Subclass
You can enable the alternate authentication on Hadoop Web UIs, Oozie Web UIs, or both. You will need to include aJAR containing your subclass on the classpath of Hadoop or Oozie. All Kerberos-related configuration properties willstill apply.
Enabling Your AltKerberosAuthenticationHandler Subclass on Hadoop Web UIs
1. Stop Hadoop by running the following command on every node in your cluster (as root):
$ for x in `cd /etc/init.d ; ls hadoop-*` ; do sudo service $x stop ; done
134 | Cloudera Security
Authentication

2. Set the following property in core-site.xml, whereorg.my.subclass.of.AltKerberosAuthenticationHandler is the classname of your subclass:
<property> <name>hadoop.http.authentication.type</name> <value>org.my.subclass.of.AltKerberosAuthenticationHandler</value></property>
3. (Optional) You can also specify which user-agents you do not want to be considered as browsers by setting thefollowing property as required (default value is shown). Note that all Java-based programs (such as Hadoop client)will use java as their user-agent.
<property> <name>hadoop.http.authentication.alt-kerberos.non-browser.user-agents</name> <value>java,curl,wget,perl</value></property>
4. Copy the JAR containing your subclass into /usr/lib/hadoop/lib/.5. Start Hadoop by running the following command:
$ for x in `cd /etc/init.d ; ls hadoop-*` ; do sudo service $x start ; done
Enabling Your AltKerberosAuthenticationHandler Subclass on Oozie Web UI
Note:
These instructions assume you have already performed the installation and configuration steps inOozie Security Configuration.
1. Stop the Oozie Server:
sudo /sbin/service oozie stop
2. Set the following property in oozie-site.xml, whereorg.my.subclass.of.AltKerberosAuthenticationHandler is the classname of your subclass:
<property> <name>oozie.authentication.type</name> <value>org.my.subclass.of.AltKerberosAuthenticationHandler</value></property>
3. (Optional) You can also specify which user-agents you do not want to be considered as browsers by setting thefollowing property as required (default value is shown). Note that all Java-based programs (such as Hadoop client)will use java as their user-agent.
<property> <name>oozie.authentication.alt-kerberos.non-browser.user-agents</name> <value>java,curl,wget,perl</value></property>
4. Copy the JAR containing your subclass into /var/lib/oozie.5. Start the Oozie Server:
sudo /sbin/service oozie start
Cloudera Security | 135
Authentication

Example Implementation for Oozie
Warning:
The example implementation isNOT SECURE. Its purpose is to be as simple as possible, as an exampleof how to write your own AltKerberosAuthenticationHandler subclass.
It should NOT be used in a production environment
An example implementation of AltKerberosAuthenticationHandler is included (though not built by default)with Oozie. Also included is a simple Login Server with two implementations. The first one will authenticate any userwho is using a username and password that are identical, such as foo:foo. The second one can be configured againstan LDAP server to use LDAP for authentication.
You can read comprehensive documentation on the example at Creating Custom Authentication.
Important:
If you installed Oozie from the CDH packages and are deploying oozie-login.war alongsideoozie.war, youwill also need to run the following commands after you copy the oozie-login.warfile to/usr/lib/oozie/oozie-server (if using YARNor/usr/lib/oozie/oozie-server-0.20if using MRv1) because it won't automatically be expanded:
jar xvf oozie-login.warmkdir oozie-loginmv META-INF oozie-login/mv WEB-INF oozie-login/
Hadoop Users in Cloudera Manager and CDHA number of special users are created by default when installing and using CDH and Cloudera Manager. Given belowis a list of users and groups as of the latest release. Also listed are the corresponding Kerberos principals and keytabfiles that should be created when you configure Kerberos security on your cluster.
Note: Cloudera Manager 5.3 introduces a new single user mode. In single user mode, the ClouderaManager Agent and all the processes run by services managed by Cloudera Manager are started as asingle configured user and group. See Single User Mode Requirements for more information.
Table 3: Users and Groups
NotesGroupsUnix User IDComponent(Version)
Cloudera Manager processes such as the ClouderaManager Server and the monitoring roles run as thisuser.
The Cloudera Manager keytab file must be namedcmf.keytab since that name is hard-coded inCloudera Manager.
Note: Applicable to clusters managedby Cloudera Manager only.
cloudera-scmcloudera-scmClouderaManager(all versions)
136 | Cloudera Security
Authentication

NotesGroupsUnix User IDComponent(Version)
Accumulo processes run as this user.accumuloaccumuloApache Accumulo(Accumulo 1.4.3and higher)
No special users.Apache Avro
The sink that writes to HDFS as this user must havewrite privileges.
flumeflumeApache Flume(CDH 4, CDH 5)
The Master and the RegionServer processes run asthis user.
hbasehbaseApache HBase(CDH 4, CDH 5)
The NameNode and DataNodes run as this user, andtheHDFS root directory aswell as the directories usedfor edit logs should be owned by it.
hdfs, hadoophdfsHDFS (CDH 4, CDH5)
The HiveServer2 process and the Hive Metastoreprocesses run as this user.
hivehiveApache Hive (CDH4, CDH 5)
A user must be defined for Hive access to itsMetastore DB (e.g. MySQL or Postgres) but it can beany identifier and does not correspond to a Unix uid.This isjavax.jdo.option.ConnectionUserNamein hive-site.xml.
The WebHCat service (for REST access to Hivefunctionality) runs as the hive user.
hivehiveApache HCatalog(CDH 4.2 andhigher, CDH 5)
The HttpFS service runs as this user. See HttpFSSecurity Configuration for instructions on how togenerate the merged httpfs-http.keytab file.
httpfshttpfsHttpFS (CDH 4,CDH 5)
Hue services run as this user.huehueHue (CDH 4, CDH5)
Impala services run as this user.impala, hadoop,
hdfs, hive
impalaCloudera Impala(CDH 4.1 andhigher, CDH 5)
Kafka services run as this user.kafkakafkaApache Kafka(ClouderaDistribution ofKafka 1.2.0)
The Java KeyStore KMS service runs as this user.kmskmsJava KeyStore KMS(CDH 5.2.1 andhigher)
The Key Trustee KMS service runs as this user.kmskmsKey Trustee KMS(CDH 5.3 andhigher)
The Key Trustee Server service runs as this user.keytrusteekeytrusteeKey Trustee Server(CDH 5.4 andhigher)
Llama runs as this user.llamallamaLlama (CDH 5)
No special users.Apache Mahout
Cloudera Security | 137
Authentication
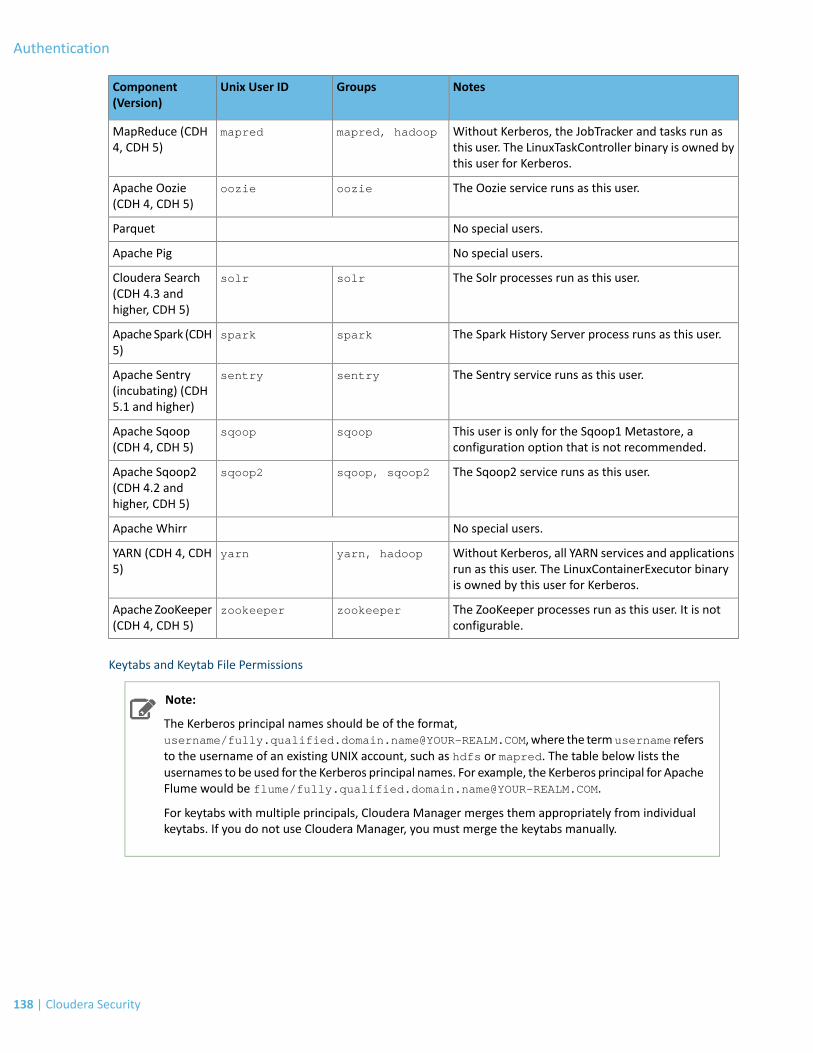
NotesGroupsUnix User IDComponent(Version)
Without Kerberos, the JobTracker and tasks run asthis user. The LinuxTaskController binary is owned bythis user for Kerberos.
mapred, hadoopmapredMapReduce (CDH4, CDH 5)
The Oozie service runs as this user.oozieoozieApache Oozie(CDH 4, CDH 5)
No special users.Parquet
No special users.Apache Pig
The Solr processes run as this user.solrsolrCloudera Search(CDH 4.3 andhigher, CDH 5)
The Spark History Server process runs as this user.sparksparkApacheSpark (CDH5)
The Sentry service runs as this user.sentrysentryApache Sentry(incubating) (CDH5.1 and higher)
This user is only for the Sqoop1 Metastore, aconfiguration option that is not recommended.
sqoopsqoopApache Sqoop(CDH 4, CDH 5)
The Sqoop2 service runs as this user.sqoop, sqoop2sqoop2Apache Sqoop2(CDH 4.2 andhigher, CDH 5)
No special users.Apache Whirr
Without Kerberos, all YARN services and applicationsrun as this user. The LinuxContainerExecutor binaryis owned by this user for Kerberos.
yarn, hadoopyarnYARN (CDH 4, CDH5)
The ZooKeeper processes run as this user. It is notconfigurable.
zookeeperzookeeperApache ZooKeeper(CDH 4, CDH 5)
Keytabs and Keytab File Permissions
Note:
The Kerberos principal names should be of the format,username/[email protected], where the termusername refersto the username of an existing UNIX account, such as hdfs or mapred. The table below lists theusernames to be used for the Kerberos principal names. For example, the Kerberos principal for ApacheFlume would be flume/[email protected].
For keytabs with multiple principals, Cloudera Manager merges them appropriately from individualkeytabs. If you do not use Cloudera Manager, you must merge the keytabs manually.
138 | Cloudera Security
Authentication

Table 4: Clusters Managed by Cloudera Manager
FilePermission(octal)
Keytab FileGroup
Keytab FileOwner
Filename(*.keytab)
KerberosPrincipals
ServiceComponent (UnixUser ID)
600cloudera-scmcloudera-scmcmfcloudera-scmNACloudera Manager(cloudera-scm)
600cloudera-scmcloudera-scmheadlamphdfscloudera-mgmt-REPORTSMANAGER
ClouderaManagementService(cloudera-scm)
600cloudera-scmcloudera-scmcmonhuecloudera-mgmt-SERVICEMONITOR,
ClouderaManagement
cloudera-mgmt-ACTIVITYMONITOR
Service(cloudera-scm)
N/AN/AN/AN/AN/Acloudera-mgmt-HOSTMONITOR
ClouderaManagementService(cloudera-scm)
600cloudera-scmcloudera-scmaccumulo16accumuloaccumulo16-ACCUMULO16_MASTERApache Accumulo(accumulo)
accumulo16-ACCUMULO16_TRACER
accumulo16-ACCUMULO16_MONITOR
accumulo16-ACCUMULO16_GC
accumulo16-ACCUMULO16_TSERVER
600cloudera-scmcloudera-scmflumeflumeflume-AGENTFlume (flume)
600cloudera-scmcloudera-scmHTTPHTTPhbase-HBASETHRIFTSERVERHBase (hbase)
hbasehbasehbase-REGIONSERVER
hbase-HBASERESTSERVER
hbase-MASTER
600cloudera-scmcloudera-scmhdfshdfs, HTTPhdfs-NAMENODEHDFS (hdfs)
hdfs-DATANODE
hdfs-SECONDARYNAMENODE
600cloudera-scmcloudera-scmhivehivehive-HIVESERVER2Hive (hive)
HTTPHTTPhive-WEBHCAT
hivehivehive-HIVEMETASTORE
600cloudera-scmcloudera-scmhttpfshttpfshdfs-HTTPFSHttpFS (httpfs)
600cloudera-scmcloudera-scmhuehuehue-KT_RENEWERHue (hue)
600cloudera-scmcloudera-scmimpalaimpalaimpala-STATESTOREImpala (impala)
impala-CATALOGSERVER
impala-IMPALAD
Cloudera Security | 139
Authentication
FilePermission(octal)
Keytab FileGroup
Keytab FileOwner
Filename(*.keytab)
KerberosPrincipals
ServiceComponent (UnixUser ID)
600cloudera-scmcloudera-scmkmsHTTPkms-KMSJava KeyStore KMS(kms)
600cloudera-scmcloudera-scmkeytrusteeHTTPkeytrustee-KMS_KEYTRUSTEEKey Trustee KMS(kms)
600cloudera-scmcloudera-scmllamallama, HTTPimpala-LLAMALlama (llama)
600cloudera-scmcloudera-scmmapredmapred,HTTP
mapreduce-JOBTRACKERMapReduce(mapred)
mapreduce- TASKTRACKER
600cloudera-scmcloudera-scmoozieoozie, HTTPoozie-OOZIE_SERVEROozie (oozie)
600cloudera-scmcloudera-scmsolrsolr, HTTPsolr-SOLR_SERVERSearch (solr)
600cloudera-scmcloudera-scmsentrysentrysentry-SENTRY_SERVERSentry (sentry)
600cloudera-scmcloudera-scmsparksparkspark_on_yarn-SPARK_YARN_HISTORY_SERVER
Spark (spark)
644cloudera-scmcloudera-scmyarnyarn, HTTPyarn-NODEMANAGERYARN (yarn)
600yarn- RESOURCEMANAGER
600yarn-JOBHISTORY
600cloudera-scmcloudera-scmzookeeperzookeeperzookeeper-serverZooKeeper(zookeeper)
Table 5: CDH Clusters Not Managed by Cloudera Manager
FilePermission(octal)
Keytab FileGroup
Keytab FileOwner
Filename(*.keytab)
KerberosPrincipals
ServiceComponent (UnixUser ID)
600accumuloaccumuloaccumulo16accumuloaccumulo16-ACCUMULO16_MASTERApacheAccumulo(accumulo)
accumulo16-ACCUMULO16_TRACER
accumulo16-ACCUMULO16_MONITOR
accumulo16-ACCUMULO16_GC
accumulo16-ACCUMULO16_TSERVER
600flumeflumeflumeflumeflume-AGENTFlume (flume)
600hbasehbaseHTTPHTTPhbase-HBASETHRIFTSERVERHBase (hbase)
hbasehbasehbase-REGIONSERVER
hbase-HBASERESTSERVER
hbase-MASTER
600hdfshdfshdfshdfs, HTTPhdfs-NAMENODEHDFS (hdfs)
hdfs-DATANODE
hdfs- SECONDARYNAMENODE
600hivehivehivehivehive-HIVESERVER2Hive (hive)
140 | Cloudera Security
Authentication

FilePermission(octal)
Keytab FileGroup
Keytab FileOwner
Filename(*.keytab)
KerberosPrincipals
ServiceComponent (UnixUser ID)
HTTPHTTPhive-WEBHCAT
hivehivehive-HIVEMETASTORE
600httpfshttpfshttpfshttpfshdfs-HTTPFSHttpFS (httpfs)
600huehuehuehuehue-KT_RENEWERHue (hue)
600impalaimpalaimpalaimpalaimpala-STATESTOREImpala (impala)
impala-CATALOGSERVER
impala-IMPALAD
600llamallamallamallama,HTTP
impala-LLAMALlama (llama)
600kmskmskmsHTTPkms-KMSJava KeyStoreKMS (kms)
600kmskmskmsHTTPkms-KEYTRUSTEEKey Trustee KMS(kms)
600hadoopmapredmapredmapred,HTTP
mapreduce-JOBTRACKERMapReduce(mapred)
mapreduce- TASKTRACKER
600oozieoozieoozieoozie,HTTP
oozie-OOZIE_SERVEROozie (oozie)
600solrsolrsolrsolr, HTTPsolr-SOLR_SERVERSearch (solr)
600sentrysentrysentrysentrysentry-SENTRY_SERVERSentry (sentry)
600sparksparksparksparkspark_on_yarn-SPARK_YARN_HISTORY_SERVER
Spark (spark)
644hadoopyarnyarnyarn, HTTPyarn-NODEMANAGERYARN (yarn)
600yarn- RESOURCEMANAGER
600yarn-JOBHISTORY
600zookeeperzookeeperzookeeperzookeeperzookeeper-serverZooKeeper(zookeeper)
Authenticating Kerberos Principals in Java CodeThis topic provides an example of how to authenticate a Kerberos principal in a Java application using theorg.apache.hadoop.security.UserGroupInformation class.
The following code snippet authenticates the cloudera principal using the cloudera.keytab file:
// Authenticating Kerberos principalSystem.out.println("Principal Authentication: ");final String user = "[email protected]";final String keyPath = "cloudera.keytab";UserGroupInformation.loginUserFromKeytab(user, keyPath);
Cloudera Security | 141
Authentication
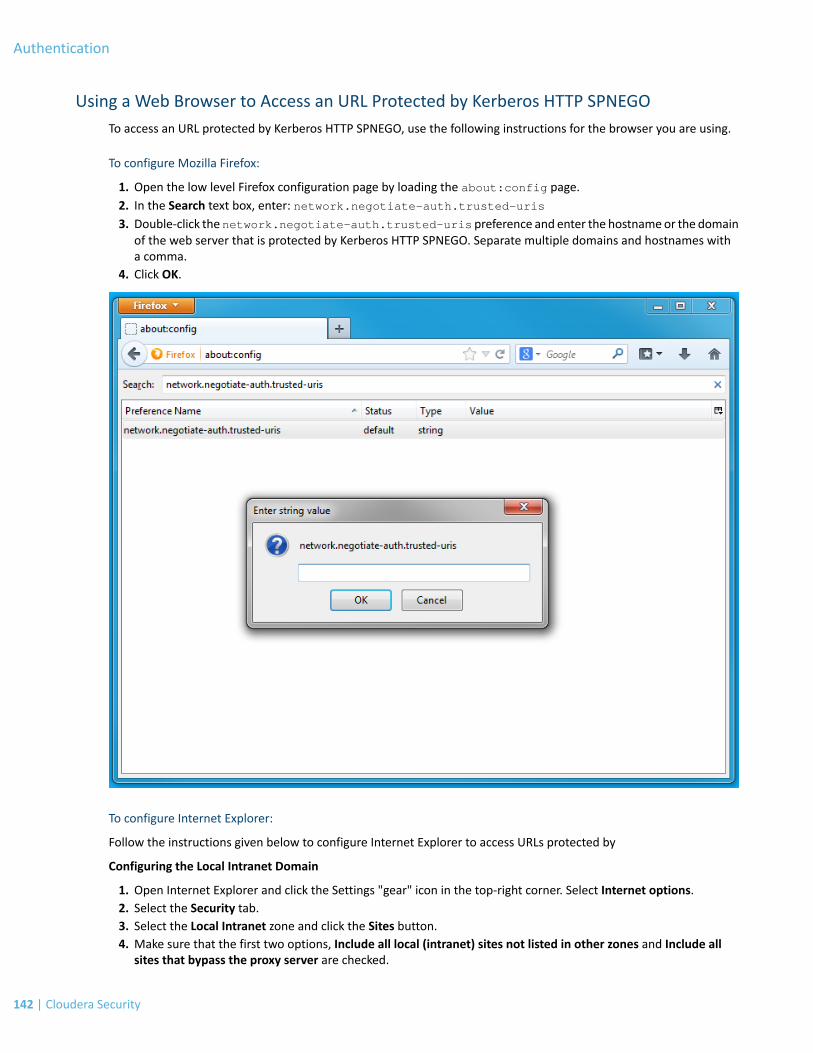
Using a Web Browser to Access an URL Protected by Kerberos HTTP SPNEGOTo access an URL protected by Kerberos HTTP SPNEGO, use the following instructions for the browser you are using.
To configure Mozilla Firefox:
1. Open the low level Firefox configuration page by loading the about:config page.2. In the Search text box, enter: network.negotiate-auth.trusted-uris3. Double-click thenetwork.negotiate-auth.trusted-uris preference and enter the hostnameor the domain
of the web server that is protected by Kerberos HTTP SPNEGO. Separate multiple domains and hostnames witha comma.
4. Click OK.
To configure Internet Explorer:
Follow the instructions given below to configure Internet Explorer to access URLs protected by
Configuring the Local Intranet Domain
1. Open Internet Explorer and click the Settings "gear" icon in the top-right corner. Select Internet options.2. Select the Security tab.3. Select the Local Intranet zone and click the Sites button.4. Make sure that the first two options, Include all local (intranet) sites not listed in other zones and Include all
sites that bypass the proxy server are checked.
142 | Cloudera Security
Authentication

5. Click Advanced and add the names of the domains that are protected by Kerberos HTTP SPNEGO, one at a time,to the list of websites. For example, myhost.example.com. Click Close.
6. Click OK to save your configuration changes.
Configuring Intranet Authentication
1. Click the Settings "gear" icon in the top-right corner. Select Internet options.2. Select the Security tab.3. Select the Local Intranet zone and click the Custom level... button to open the Security Settings - Local Intranet
Zone dialog box.4. Scroll down to the User Authentication options and select Automatic logon only in Intranet zone.5. Click OK to save these changes.
Cloudera Security | 143
Authentication

Verifying Proxy Settings
You need to perform the following steps only if you have a proxy server already enabled.
1. Click the Settings "gear" icon in the top-right corner. Select Internet options.2. Select the Connections tab and click LAN Settings.3. Verify that the proxy server Address and Port number settings are correct.4. Click Advanced to open the Proxy Settings dialog box.5. Add the Kerberos-protected domains to the Exceptions field.6. Click OK to save any changes.
144 | Cloudera Security
Authentication

To configure Google Chrome:
If you are using Windows, use the Control Panel to go to the Internet Options dialogue box. Configuration changesrequired are the same as those described above for Internet Explorer.
OnMacOS or Linux, add the--auth-server-whitelist parameter to thegoogle-chrome command. For example,to run Chrome from a Linux prompt, run the google-chrome command as follows,
> google-chrome --auth-server-whitelist = "hostname/domain"
Troubleshooting Authentication IssuesTypically, if there are problems with security, Hadoop will display generic messages about the cause of the problem.This topic contains some sample Kerberos configuration files for your reference. It also has solutions to potentialproblems you might face when configuring a secure cluster:
Sample Kerberos Configuration files: krb5.conf, kdc.conf, kadm5.acl
kdc.conf:
[kdcdefaults] kdc_ports = 88 kdc_tcp_ports = 88
[realms] EXAMPLE.COM = { #master_key_type = aes256-cts max_renewable_life = 7d 0h 0m 0s acl_file = /var/kerberos/krb5kdc/kadm5.acl dict_file = /usr/share/dict/words admin_keytab = /var/kerberos/krb5kdc/kadm5.keytab# note that aes256 is ONLY supported in Active Directory in a domain / forrest operating at a 2008 or greater functional level.# aes256 requires that you download and deploy the JCE Policy files for your JDK release level to provide
Cloudera Security | 145
Authentication

# strong java encryption extension levels like AES256. Make sure to match based on the encryption configured within AD for# cross realm auth, note that RC4 = arcfour when comparing windows and linux enctypes supported_enctypes = aes256-cts:normal aes128-cts:normal arcfour-hmac:normal default_principal_flags = +renewable, +forwardable }
krb5.conf:
[logging] default = FILE:/var/log/krb5libs.log kdc = FILE:/var/log/krb5kdc.log admin_server = FILE:/var/log/kadmind.log
[libdefaults] default_realm = EXAMPLE.COM dns_lookup_realm = false dns_lookup_kdc = false ticket_lifetime = 24h renew_lifetime = 7d forwardable = true# udp_preference_limit = 1
# set udp_preference_limit = 1 when TCP only should be# used. Consider using in complex network environments when# troubleshooting or when dealing with inconsistent# client behavior or GSS (63) messages.
# uncomment the following if AD cross realm auth is ONLY providing DES encrypted tickets# allow-weak-crypto = true
[realms] AD-REALM.EXAMPLE.COM = { kdc = AD1.ad-realm.example.com:88 kdc = AD2.ad-realm.example.com:88 admin_server = AD1.ad-realm.example.com:749 admin_server = AD2.ad-realm.example.com:749 default_domain = ad-realm.example.com } EXAMPLE.COM = { kdc = kdc1.example.com:88 admin_server = kdc1.example.com:749 default_domain = example.com }
# The domain_realm is critical for mapping your host domain names to the kerberos realms# that are servicing them. Make sure the lowercase left hand portion indicates any domains or subdomains# that will be related to the kerberos REALM on the right hand side of the expression. REALMs will # always be UPPERCASE. For example, if your actual DNS domain was test.com but your kerberos REALM is# EXAMPLE.COM then you would have,
[domain_realm]test.com = EXAMPLE.COM#AD domains and realms are usually the samead-domain.example.com = AD-REALM.EXAMPLE.COM ad-realm.example.com = AD-REALM.EXAMPLE.COM
kadm5.acl:
*/[email protected] *[email protected] * flume/*@[email protected] * hbase/*@[email protected] * hdfs/*@[email protected] * hive/*@[email protected] * httpfs/*@[email protected] * HTTP/*@[email protected] * hue/*@HADOOP.COM
146 | Cloudera Security
Authentication

[email protected] * impala/*@[email protected] * mapred/*@[email protected] * oozie/*@[email protected] * solr/*@[email protected] * sqoop/*@[email protected] * yarn/*@[email protected] * zookeeper/*@HADOOP.COM
Potential Security Problems and Their Solutions
This Troubleshooting appendix contains sample Kerberos configuration files, krb5.conf and kdc.conf for yourreference. It also has solutions to potential problems you might face when configuring a secure cluster:
Issues with Generate Credentials
Cloudera Manager uses a command called Generate Credentials to create the accounts needed by CDH for enablingauthentication using Kerberos. The command is triggered automatically when you are using the Kerberos Wizard ormaking changes to your cluster that will require new Kerberos principals.
When configuring Kerberos, if CDH services do not start, and on the ClouderaManager Home page you see a validationerror, Role is missing Kerberos keytab, it means theGenerate Credentials command failed. To see the outputof the command, go to the Home page and click the All Recent Commands tab.
Here are some common error messages:
SolutionsPossible CausesProblems
With Active Directory
Verify the KDC configuration by going to the ClouderaManager Admin Console and go to Administration>
TheDomainControllerspecified is incorrect
ldap_sasl_interactive_bind_s:
Can't contact LDAP server
(-1) Settings> Kerberos. Also check that LDAPS is enabledfor Active Directory.
or LDAPS has not beenenabled for it.
Use the Delegate Control wizard to grant permissionto the Cloudera Manager account to create other
The Active Directoryaccount you are using
ldap_add: Insufficient access
(50)
accounts. You can also login to Active Directory as thefor Cloudera ManagerCloudera Manager user to check that it can createother accounts in your Organizational Unit.
does not havepermissions to createother accounts.
With MIT KDC
Check the kdc field for your default realm inkrb5.conf and make sure the hostname is correct.
The hostname for theKDC server isincorrect.
kadmin: Cannot resolve
network address for admin
server in requested realm
while initializing kadmin
interface.
Running any Hadoop command fails after enabling security.
Description:
A user must have a valid Kerberos ticket in order to interact with a secure Hadoop cluster. Running any Hadoopcommand (such as hadoop fs -ls) will fail if you do not have a valid Kerberos ticket in your credentials cache. If youdo not have a valid ticket, you will receive an error such as:
11/01/04 12:08:12 WARN ipc.Client: Exception encountered while connecting to the server : javax.security.sasl.SaslException:GSS initiate failed [Caused by GSSException: No valid credentials provided (Mechanism level: Failed to find any Kerberos tgt)]
Cloudera Security | 147
Authentication

Bad connection to FS. command aborted. exception: Call to nn-host/10.0.0.2:8020 failed on local exception: java.io.IOException:javax.security.sasl.SaslException: GSS initiate failed [Caused by GSSException: No valid credentials provided (Mechanism level: Failed to find any Kerberos tgt)]
Solution:
You can examine the Kerberos tickets currently in your credentials cache by running the klist command. You canobtain a ticket by running the kinit command and either specifying a keytab file containing credentials, or enteringthe password for your principal.
Java is unable to read the Kerberos credentials cache created by versions of MIT Kerberos 1.8.1 or higher.
Description:
If you are running MIT Kerberos 1.8.1 or higher, the following error will occur when you attempt to interact with theHadoop cluster, even after successfully obtaining a Kerberos ticket using kinit:
11/01/04 12:08:12 WARN ipc.Client: Exception encountered while connecting to the server : javax.security.sasl.SaslException:GSS initiate failed [Caused by GSSException: No valid credentials provided (Mechanism level: Failed to find any Kerberos tgt)]Bad connection to FS. command aborted. exception: Call to nn-host/10.0.0.2:8020 failed on local exception: java.io.IOException:javax.security.sasl.SaslException: GSS initiate failed [Caused by GSSException: No valid credentials provided (Mechanism level: Failed to find any Kerberos tgt)]
Because of a change [1] in the format in which MIT Kerberos writes its credentials cache, there is a bug [2] in theOracle JDK 6 Update 26 and lower that causes Java to be unable to read the Kerberos credentials cache created byversions ofMIT Kerberos 1.8.1 and higher. Kerberos 1.8.1 is the default in Ubuntu Lucid and higher releases and DebianSqueeze and higher releases. (On RHEL and CentOS, a lower version of MIT Kerberos which does not have this issue,is the default.)
Footnotes:
[1]MIT Kerberos change: http://krbdev.mit.edu/rt/Ticket/Display.html?id=6206
[2] Report of bug in Oracle JDK 6 Update 26 and lower:http://bugs.sun.com/bugdatabase/view_bug.do?bug_id=6979329
Solution:
If you encounter this problem, you can work around it by running kinit -R after running kinit initially to obtaincredentials. Doing so will cause the ticket to be renewed, and the credentials cache rewritten in a format which Javacan read. To illustrate this:
$ klistklist: No credentials cache found (ticket cache FILE:/tmp/krb5cc_1000)$ hadoop fs -ls11/01/04 13:15:51 WARN ipc.Client: Exception encountered while connecting to the server : javax.security.sasl.SaslException:GSS initiate failed [Caused by GSSException: No valid credentials provided (Mechanism level: Failed to find any Kerberos tgt)]Bad connection to FS. command aborted. exception: Call to nn-host/10.0.0.2:8020 failed on local exception: java.io.IOException:javax.security.sasl.SaslException: GSS initiate failed [Caused by GSSException: No valid credentials provided (Mechanism level: Failed to find any Kerberos tgt)]$ kinitPassword for [email protected]: $ klistTicket cache: FILE:/tmp/krb5cc_1000Default principal: [email protected]
Valid starting Expires Service principal01/04/11 13:19:31 01/04/11 23:19:31 krbtgt/[email protected]
148 | Cloudera Security
Authentication
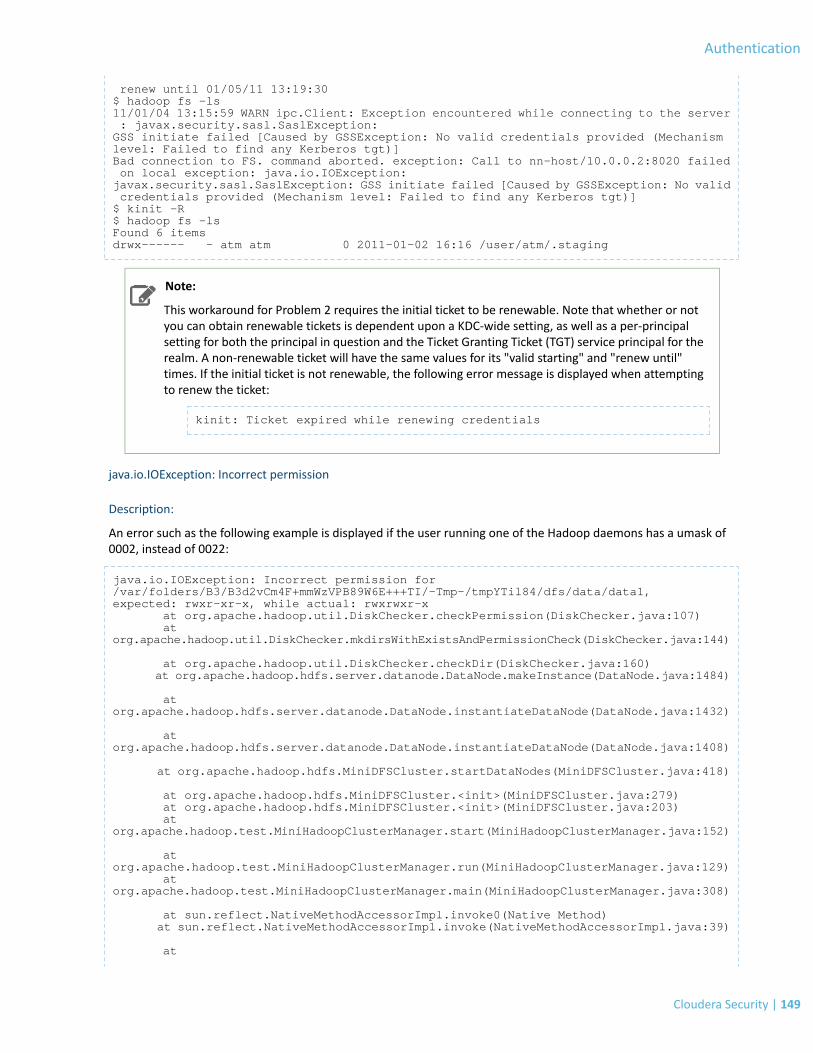
renew until 01/05/11 13:19:30$ hadoop fs -ls11/01/04 13:15:59 WARN ipc.Client: Exception encountered while connecting to the server : javax.security.sasl.SaslException:GSS initiate failed [Caused by GSSException: No valid credentials provided (Mechanism level: Failed to find any Kerberos tgt)]Bad connection to FS. command aborted. exception: Call to nn-host/10.0.0.2:8020 failed on local exception: java.io.IOException:javax.security.sasl.SaslException: GSS initiate failed [Caused by GSSException: No valid credentials provided (Mechanism level: Failed to find any Kerberos tgt)]$ kinit -R$ hadoop fs -lsFound 6 itemsdrwx------ - atm atm 0 2011-01-02 16:16 /user/atm/.staging
Note:
This workaround for Problem 2 requires the initial ticket to be renewable. Note that whether or notyou can obtain renewable tickets is dependent upon a KDC-wide setting, as well as a per-principalsetting for both the principal in question and the Ticket Granting Ticket (TGT) service principal for therealm. A non-renewable ticket will have the same values for its "valid starting" and "renew until"times. If the initial ticket is not renewable, the following error message is displayed when attemptingto renew the ticket:
kinit: Ticket expired while renewing credentials
java.io.IOException: Incorrect permission
Description:
An error such as the following example is displayed if the user running one of the Hadoop daemons has a umask of0002, instead of 0022:
java.io.IOException: Incorrect permission for/var/folders/B3/B3d2vCm4F+mmWzVPB89W6E+++TI/-Tmp-/tmpYTil84/dfs/data/data1,expected: rwxr-xr-x, while actual: rwxrwxr-x at org.apache.hadoop.util.DiskChecker.checkPermission(DiskChecker.java:107) at org.apache.hadoop.util.DiskChecker.mkdirsWithExistsAndPermissionCheck(DiskChecker.java:144)
at org.apache.hadoop.util.DiskChecker.checkDir(DiskChecker.java:160) at org.apache.hadoop.hdfs.server.datanode.DataNode.makeInstance(DataNode.java:1484)
at org.apache.hadoop.hdfs.server.datanode.DataNode.instantiateDataNode(DataNode.java:1432)
at org.apache.hadoop.hdfs.server.datanode.DataNode.instantiateDataNode(DataNode.java:1408)
at org.apache.hadoop.hdfs.MiniDFSCluster.startDataNodes(MiniDFSCluster.java:418)
at org.apache.hadoop.hdfs.MiniDFSCluster.<init>(MiniDFSCluster.java:279) at org.apache.hadoop.hdfs.MiniDFSCluster.<init>(MiniDFSCluster.java:203) at org.apache.hadoop.test.MiniHadoopClusterManager.start(MiniHadoopClusterManager.java:152)
at org.apache.hadoop.test.MiniHadoopClusterManager.run(MiniHadoopClusterManager.java:129) at org.apache.hadoop.test.MiniHadoopClusterManager.main(MiniHadoopClusterManager.java:308)
at sun.reflect.NativeMethodAccessorImpl.invoke0(Native Method) at sun.reflect.NativeMethodAccessorImpl.invoke(NativeMethodAccessorImpl.java:39)
at
Cloudera Security | 149
Authentication

sun.reflect.DelegatingMethodAccessorImpl.invoke(DelegatingMethodAccessorImpl.java:25) at java.lang.reflect.Method.invoke(Method.java:597) at org.apache.hadoop.util.ProgramDriver$ProgramDescription.invoke(ProgramDriver.java:68) at org.apache.hadoop.util.ProgramDriver.driver(ProgramDriver.java:139) at org.apache.hadoop.test.AllTestDriver.main(AllTestDriver.java:83) at sun.reflect.NativeMethodAccessorImpl.invoke0(Native Method) at sun.reflect.NativeMethodAccessorImpl.invoke(NativeMethodAccessorImpl.java:39)
at sun.reflect.DelegatingMethodAccessorImpl.invoke(DelegatingMethodAccessorImpl.java:25) at java.lang.reflect.Method.invoke(Method.java:597) at org.apache.hadoop.util.RunJar.main(RunJar.java:186)
Solution:
Make sure that the umask for hdfs and mapred is 0022.
A cluster fails to run jobs after security is enabled.
Description:
A cluster that was previously configured to not use securitymay fail to run jobs for certain users on certain TaskTrackers(MRv1) or NodeManagers (YARN) after security is enabled due to the following sequence of events:
1. A cluster is at some point in time configured without security enabled.2. A user X runs some jobs on the cluster, which creates a local user directory on each TaskTracker or NodeManager.3. Security is enabled on the cluster.4. User X tries to run jobs on the cluster, and the local user directory on (potentially a subset of) the TaskTrackers
or NodeManagers is owned by the wrong user or has overly-permissive permissions.
The bug is that after step 2, the local user directory on the TaskTracker or NodeManager should be cleaned up, butisn't.
If you're encountering this problem, youmay see errors in the TaskTracker or NodeManager logs. The following exampleis for a TaskTracker on MRv1:
10/11/03 01:29:55 INFO mapred.JobClient: Task Id : attempt_201011021321_0004_m_000011_0, Status : FAILEDError initializing attempt_201011021321_0004_m_000011_0: java.io.IOException: org.apache.hadoop.util.Shell$ExitCodeException: at org.apache.hadoop.mapred.LinuxTaskController.runCommand(LinuxTaskController.java:212)
at org.apache.hadoop.mapred.LinuxTaskController.initializeUser(LinuxTaskController.java:442)
at org.apache.hadoop.mapreduce.server.tasktracker.Localizer.initializeUserDirs(Localizer.java:272)
at org.apache.hadoop.mapred.TaskTracker.localizeJob(TaskTracker.java:963) at org.apache.hadoop.mapred.TaskTracker.startNewTask(TaskTracker.java:2209) at org.apache.hadoop.mapred.TaskTracker$TaskLauncher.run(TaskTracker.java:2174) Caused by: org.apache.hadoop.util.Shell$ExitCodeException: at org.apache.hadoop.util.Shell.runCommand(Shell.java:250) at org.apache.hadoop.util.Shell.run(Shell.java:177) at org.apache.hadoop.util.Shell$ShellCommandExecutor.execute(Shell.java:370) at org.apache.hadoop.mapred.LinuxTaskController.runCommand(LinuxTaskController.java:203)
... 5 more
Solution:
Delete the mapred.local.dir or yarn.nodemanager.local-dirs directories for that user across the cluster.
150 | Cloudera Security
Authentication

The NameNode does not start and KrbException Messages (906) and (31) are displayed.
Description:
When you attempt to start the NameNode, a login failure occurs. This failure prevents the NameNode from startingand the following KrbException messages are displayed:
Caused by: KrbException: Integrity check on decrypted field failed (31) - PREAUTH_FAILED}}
and
Caused by: KrbException: Identifier doesn't match expected value (906)
Note:
These KrbException error messages are displayed only if you enable debugging output. See AppendixD - Enabling Debugging Output for the Sun Kerberos Classes.
Solution:
Although there are several possible problems that can cause these two KrbException error messages to display, hereare some actions you can take to solve the most likely problems:
• If you are using CentOS/Red Hat Enterprise Linux 5.6 and higher, or Ubuntu, which use AES-256 encryption bydefault for tickets, you must install the Java Cryptography Extension (JCE) Unlimited Strength Jurisdiction PolicyFile on all cluster and Hadoop user machines. For information about how to verify the type of encryption used inyour cluster, see Step 3: If you are Using AES-256 Encryption, install the JCE Policy File on page 57. Alternatively,you can change your kdc.conf or krb5.conf to not use AES-256 by removing aes256-cts:normal from thesupported_enctypes field of the kdc.conf or krb5.conf file. Note that after changing the kdc.conf file,you'll need to restart both the KDC and the kadmin server for those changes to take affect. You may also need torecreate or change the password of the relevant principals, including potentially the TGT principal(krbtgt/REALM@REALM).
• In the [realms] section of your kdc.conf file, in the realm corresponding to HADOOP.LOCALDOMAIN, add (orreplace if it's already present) the following variable:
supported_enctypes = des3-hmac-sha1:normal arcfour-hmac:normal des-hmac-sha1:normal des-cbc-md5:normal des-cbc-crc:normal des-cbc-crc:v4 des-cbc-crc:afs3
• Recreate the hdfs keytab file and mapred keytab file using the -norandkey option in the xst command (fordetails, see Step 4: Create and Deploy the Kerberos Principals and Keytab Files on page 58).
kadmin.local: xst -norandkey -k hdfs.keytab hdfs/fully.qualified.domain.name HTTP/fully.qualified.domain.namekadmin.local: xst -norandkey -k mapred.keytab mapred/fully.qualified.domain.name HTTP/fully.qualified.domain.name
The NameNode starts but clients cannot connect to it and error message contains enctype code 18.
Description:
TheNameNode keytab file does not have an AES256 entry, but client tickets do contain an AES256 entry. TheNameNodestarts but clients cannot connect to it. The error message doesn't refer to "AES256", but does contain an enctype code"18".
Cloudera Security | 151
Authentication

Solution:
Make sure the "Java Cryptography Extension (JCE) Unlimited Strength Jurisdiction Policy File" is installed or removeaes256-cts:normal from thesupported_enctypes field of thekdc.conforkrb5.conf file. Formore information,see the first suggested solution above for Problem 5.
For more information about the Kerberos encryption types, seehttp://www.iana.org/assignments/kerberos-parameters/kerberos-parameters.xml.
(MRv1 Only) Jobs won't run and TaskTracker is unable to create a local mapred directory.
Description:
The TaskTracker log contains the following error message:
11/08/17 14:44:06 INFO mapred.TaskController: main : user is atm11/08/17 14:44:06 INFO mapred.TaskController: Failed to create directory /var/log/hadoop/cache/mapred/mapred/local1/taskTracker/atm - No such file or directory11/08/17 14:44:06 WARN mapred.TaskTracker: Exception while localization java.io.IOException: Job initialization failed (20) at org.apache.hadoop.mapred.LinuxTaskController.initializeJob(LinuxTaskController.java:191)
at org.apache.hadoop.mapred.TaskTracker$4.run(TaskTracker.java:1199) at java.security.AccessController.doPrivileged(Native Method) at javax.security.auth.Subject.doAs(Subject.java:396) at org.apache.hadoop.security.UserGroupInformation.doAs(UserGroupInformation.java:1127) at org.apache.hadoop.mapred.TaskTracker.initializeJob(TaskTracker.java:1174) at org.apache.hadoop.mapred.TaskTracker.localizeJob(TaskTracker.java:1089) at org.apache.hadoop.mapred.TaskTracker.startNewTask(TaskTracker.java:2257) at org.apache.hadoop.mapred.TaskTracker$TaskLauncher.run(TaskTracker.java:2221)Caused by: org.apache.hadoop.util.Shell$ExitCodeException: at org.apache.hadoop.util.Shell.runCommand(Shell.java:255) at org.apache.hadoop.util.Shell.run(Shell.java:182) at org.apache.hadoop.util.Shell$ShellCommandExecutor.execute(Shell.java:375) at org.apache.hadoop.mapred.LinuxTaskController.initializeJob(LinuxTaskController.java:184)
... 8 more
Solution:
Make sure the value specified for mapred.local.dir is identical in mapred-site.xml and taskcontroller.cfg.If the values are different, the error message above is returned.
(MRv1 Only) Jobs will not run and TaskTracker is unable to create a Hadoop logs directory.
Description:
The TaskTracker log contains an error message similar to the following :
11/08/17 14:48:23 INFO mapred.TaskController: Failed to create directory /home/atm/src/cloudera/hadoop/build/hadoop-0.23.2-cdh3u1-SNAPSHOT/logs1/userlogs/job_201108171441_0004 - No such file or directory11/08/17 14:48:23 WARN mapred.TaskTracker: Exception while localization java.io.IOException: Job initialization failed (255) at org.apache.hadoop.mapred.LinuxTaskController.initializeJob(LinuxTaskController.java:191)
at org.apache.hadoop.mapred.TaskTracker$4.run(TaskTracker.java:1199) at java.security.AccessController.doPrivileged(Native Method) at javax.security.auth.Subject.doAs(Subject.java:396) at org.apache.hadoop.security.UserGroupInformation.doAs(UserGroupInformation.java:1127) at org.apache.hadoop.mapred.TaskTracker.initializeJob(TaskTracker.java:1174) at org.apache.hadoop.mapred.TaskTracker.localizeJob(TaskTracker.java:1089)
152 | Cloudera Security
Authentication

at org.apache.hadoop.mapred.TaskTracker.startNewTask(TaskTracker.java:2257) at org.apache.hadoop.mapred.TaskTracker$TaskLauncher.run(TaskTracker.java:2221)Caused by: org.apache.hadoop.util.Shell$ExitCodeException: at org.apache.hadoop.util.Shell.runCommand(Shell.java:255) at org.apache.hadoop.util.Shell.run(Shell.java:182) at org.apache.hadoop.util.Shell$ShellCommandExecutor.execute(Shell.java:375) at org.apache.hadoop.mapred.LinuxTaskController.initializeJob(LinuxTaskController.java:184)
... 8 more
Solution:
In MRv1, the default value specified for hadoop.log.dir in mapred-site.xml is/var/log/hadoop-0.20-mapreduce. The path must be owned and be writable by the mapred user. If you changethe default value specified for hadoop.log.dir, make sure the value is identical in mapred-site.xml andtaskcontroller.cfg. If the values are different, the error message above is returned.
After you enable cross-realm trust, you can run Hadoop commands in the local realm but not in the remote realm.
Description:
After you enable cross-realm trust, authenticating as a principal in the local realm will allow you to successfully runHadoop commands, but authenticating as a principal in the remote realmwill not allow you to run Hadoop commands.Themost common cause of this problem is that the principals in the two realms either do not have the same encryptiontype, or the cross-realm principals in the two realms do not have the same password. This issuemanifests itself becauseyou are able to get Ticket Granting Tickets (TGTs) from both the local and remote realms, but you are unable to get aservice ticket to allow the principals in the local and remote realms to communicate with each other.
Solution:
On the localMIT KDC server host, type the following command in the kadmin.local or kadmin shell to add the cross-realmkrbtgt principal:
kadmin: addprinc -e "<enc_type_list>" krbtgt/[email protected]
where the <enc_type_list> parameter specifies the types of encryption this cross-realm krbtgt principal will support:AES, DES, or RC4 encryption. You can specify multiple encryption types using the parameter in the command above,what's important is that at least one of the encryption types parameters corresponds to the encryption type found inthe tickets granted by the KDC in the remote realm. For example:
kadmin: addprinc -e "aes256-cts:normal rc4-hmac:normal des3-hmac-sha1:normal" krbtgt/[email protected]
(MRv1 Only) Jobs won't run and cannot access files in mapred.local.dir
Description:
The TaskTracker log contains the following error message:
WARN org.apache.hadoop.mapred.TaskTracker: Exception while localization java.io.IOException: Job initialization failed (1)
Solution:
1. Add the mapred user to the mapred and hadoop groups on all hosts.2. Restart all TaskTrackers.
Cloudera Security | 153
Authentication

Users are unable to obtain credentials when running Hadoop jobs or commands.
Description:
This error occurs because the ticket message is too large for the default UDP protocol. An error message similar to thefollowing may be displayed:
13/01/15 17:44:48 DEBUG ipc.Client: Exception encountered while connecting to the server : javax.security.sasl.SaslException:GSS initiate failed [Caused by GSSException: No valid credentials provided (Mechanism level: Fail to create credential. (63) - No service creds)]
Solution:
Force Kerberos to use TCP instead of UDP by adding the following parameter to libdefaults in the krb5.conf fileon the client(s) where the problem is occurring.
[libdefaults]udp_preference_limit = 1
If you choose to manage krb5.conf through Cloudera Manager, this will automatically get added to krb5.conf.
Note:
When sending a message to the KDC, the library will try using TCP before UDP if the size of the ticketmessage is larger than the setting specified for the udp_preference_limit property. If the ticketmessage is smaller thanudp_preference_limit setting, thenUDPwill be tried before TCP. Regardlessof the size, both protocols will be tried if the first attempt fails.
Request is a replay exceptions in the logs.
Description:
The root cause of this exception is that Kerberos uses a second-resolution timestamp to protect against replay attacks(where an attacker can record network traffic, and play back recorded requests later to gain elevated privileges). Thatis, incoming requests are cached by Kerberos for a little while, and if there are similar requests within a few seconds,Kerberos will be able to detect them as replay attack attempts. However, if there are multiple valid Kerberos requestscoming in at the same time, these may also be misjudged as attacks for the following reasons:
• Multiple services in the cluster are using the same Kerberos principal. All secure clients that run on multiplemachines should use unique Kerberos principals for each machine. For example, rather than connecting as aservice principal [email protected], services should have per-host principals such asmyservice/[email protected].
• Clocks not in sync: All hosts should run NTP so that clocks are kept in sync between clients and servers.
While having different principals for each service, and clocks in sync helps mitigate the issue, there are, however, caseswhere even if all of the above are implemented, the problem still persists. In such a case, disabling the cache (and thereplay protection as a consequence), will allow parallel requests to succeed. This compromise between usability andsecurity can be applied by setting the KRB5RCACHETYPE environment variable to none.
Note that the KRB5RCACHETYPE is not automatically detected by Java applications. For Java-based components:
• Ensure that the cluster runs on JDK 8.• To disable the replay cache, add -Dsun.security.krb5.rcache=none to the Java Opts/Arguments of the
targeted JVM. For example, HiveServer2 or the Sentry service.
For more information, refer the MIT KDC documentation.
154 | Cloudera Security
Authentication
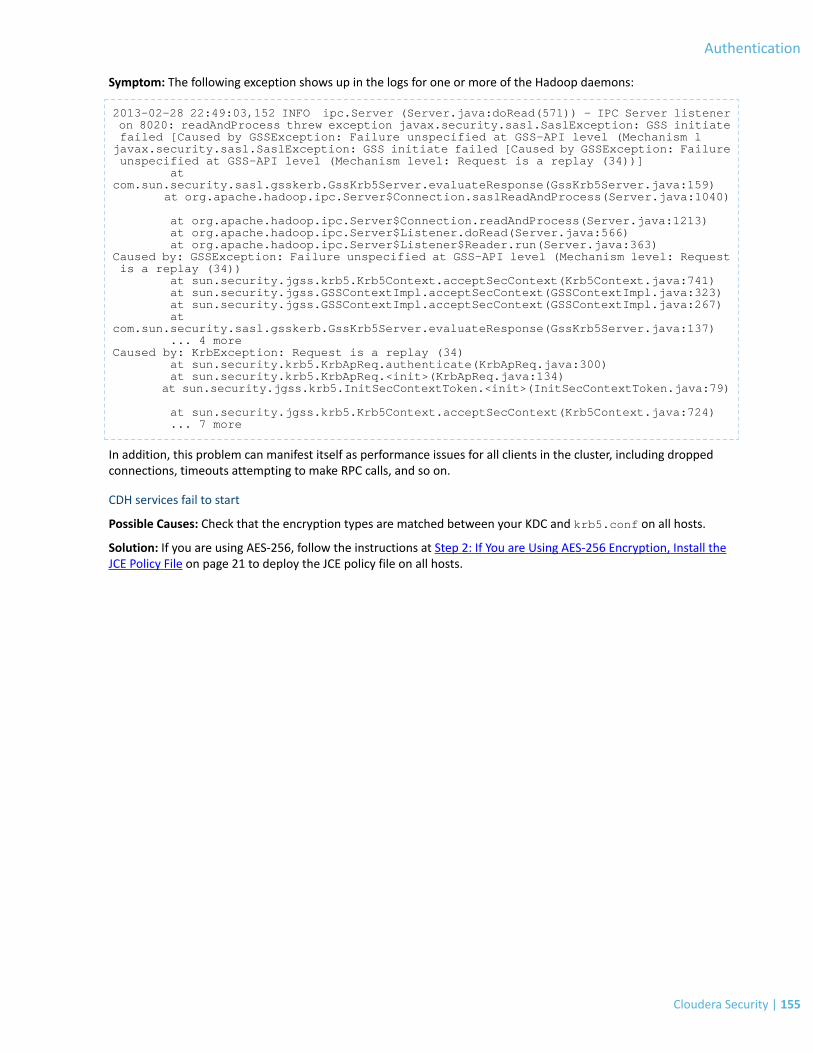
Symptom: The following exception shows up in the logs for one or more of the Hadoop daemons:
2013-02-28 22:49:03,152 INFO ipc.Server (Server.java:doRead(571)) - IPC Server listener on 8020: readAndProcess threw exception javax.security.sasl.SaslException: GSS initiate failed [Caused by GSSException: Failure unspecified at GSS-API level (Mechanism ljavax.security.sasl.SaslException: GSS initiate failed [Caused by GSSException: Failure unspecified at GSS-API level (Mechanism level: Request is a replay (34))] at com.sun.security.sasl.gsskerb.GssKrb5Server.evaluateResponse(GssKrb5Server.java:159) at org.apache.hadoop.ipc.Server$Connection.saslReadAndProcess(Server.java:1040)
at org.apache.hadoop.ipc.Server$Connection.readAndProcess(Server.java:1213) at org.apache.hadoop.ipc.Server$Listener.doRead(Server.java:566) at org.apache.hadoop.ipc.Server$Listener$Reader.run(Server.java:363)Caused by: GSSException: Failure unspecified at GSS-API level (Mechanism level: Request is a replay (34)) at sun.security.jgss.krb5.Krb5Context.acceptSecContext(Krb5Context.java:741) at sun.security.jgss.GSSContextImpl.acceptSecContext(GSSContextImpl.java:323) at sun.security.jgss.GSSContextImpl.acceptSecContext(GSSContextImpl.java:267) at com.sun.security.sasl.gsskerb.GssKrb5Server.evaluateResponse(GssKrb5Server.java:137) ... 4 moreCaused by: KrbException: Request is a replay (34) at sun.security.krb5.KrbApReq.authenticate(KrbApReq.java:300) at sun.security.krb5.KrbApReq.<init>(KrbApReq.java:134) at sun.security.jgss.krb5.InitSecContextToken.<init>(InitSecContextToken.java:79)
at sun.security.jgss.krb5.Krb5Context.acceptSecContext(Krb5Context.java:724) ... 7 more
In addition, this problem can manifest itself as performance issues for all clients in the cluster, including droppedconnections, timeouts attempting to make RPC calls, and so on.
CDH services fail to start
Possible Causes: Check that the encryption types are matched between your KDC and krb5.conf on all hosts.
Solution: If you are using AES-256, follow the instructions at Step 2: If You are Using AES-256 Encryption, Install theJCE Policy File on page 21 to deploy the JCE policy file on all hosts.
Cloudera Security | 155
Authentication
Encryption
The goal of encryption is to ensure that only authorized users can view, use, or contribute to a data set. These securitycontrols add another layer of protection against potential threats by end-users, administrators and other maliciousactors on the network. Data protection can be applied at a number of levels within Hadoop:
• OS Filesystem-level - Encryption can be applied at the Linux operating system file system level to cover all files ina volume. An example of this approach is Cloudera Navigator Encrypt on page 224 (formerly Gazzang zNcrypt)which is available for Cloudera customers licensed for Cloudera Navigator. Navigator Encrypt operates at the Linuxvolume level, so it can encrypt cluster data inside and outside HDFS, such as temp/spill files, configuration filesand metadata databases (to be used only for data related to a CDH cluster). Navigator Encrypt must be used withCloudera Navigator Key Trustee Server on page 210 (formerly Gazzang zTrustee).
• HDFS-level - Encryption applied by the HDFS client software. HDFS Data At Rest Encryption on page 244 operatesat the HDFS folder level, allowing you to encrypt some folders and leave others unencrypted. Cannot encrypt anydata outside HDFS. To ensure reliable key storage (so that data is not lost), Cloudera Navigator Key Trustee Servershould be used, while the default Java keystore can be used for test purposes. See Integrating HDFS Encryptionwith Navigator Key Trustee Server on page 266 for more information.
• Network-level - Encryption can be applied to encrypt data just before it gets sent across a network and to decryptit just after receipt. In Hadoop this means coverage for data sent from client user interfaces as well asservice-to-service communication like remote procedure calls (RPCs). This protection uses industry-standardprotocols such as TLS/SSL.
TLS/SSL Certificates OverviewThis topicwill guide you through the different certificate strategies that you can employ on your cluster to allow TLS/SSLclients to securely connect to servers using trusted certificates or certificates issued by trusted authorities. The set ofcertificates required depends upon the certificate provisioning strategy you implement. The following strategies arepossible:
• Public CA-signed certificates: Using certificates signed by a trusted public certificate authority (CA) simplifies theintegration procedure, because the default Java client already trusts the CA.
• Internal CA-signed certificates: Using certificates signed by an internal CA can also simplify integration if yourinfrastructure already trusts the internal CA. Otherwise, you must configure all hosts to trust your internal CA.
• Self-signed certificates: Using self-signed certificates complicates the deployment process because you mustconfigure all clients of a particular service to trust the specific certificate used by that service.
Note: Wildcard domain certificates and certificates using the SubjectAlternativeName extension arenot supported at this time.
When choosing an approach to certificate provisioning, keep in mind that TLS/SSL must be enabled for all core Hadoopservices (HDFS, MapReduce, and YARN) as a group. For example, if you are running HDFS and YARN on your cluster,you cannot choose to enable TLS/SSL for HDFS, but not for YARN. You must enable it for both services, which impliesthat you must make certificates available to all daemon roles of both services. You will need to obtain a certificate foreach host on which an HDFS or YARN daemon role is running.
Note: Cloudera Manager and CDH components support either TLS 1.0, TLS 1.1, or TLS 1.2, but notSSL 3.0. References to SSL continue only because of its widespread use in technical jargon.
Creating Certificates
The following sectionswill walk you through obtaining certificates from commercial Certificate Authorities and creatingself-signed test certificates.
156 | Cloudera Security
Encryption

Using Keytool
Keytool is a utility for creating and managing certificates and cryptographic keys, and is part of the standard JDKdistribution. The keytool executable usually resides in $JAVA_HOME/bin.
Keytool stores certificates and keys in a file known as a keystore .While several different keystore types are supported,by default keytool uses the Java KeyStore (JKS) format.
Java-based services such as HDFS, MapReduce, and YARN use the JKS format by default. For this reason it is particularlyconvenient to use keytool for managing keys and certificates for these services. In the following topics, we assumeyou are using keytool.
For additional information on keytool, refer the keytool documentation.
Using OpenSSL
Python-based services such as Hue expect certificates and keys to be stored in PEM format.Whenmanaging certificatesand keys for such services, you may find it convenient to use the openssl tool.
Refer the openssl documentation for more information.
Obtaining a Production Certificate from a Commercial CA
Once you have decided on a certificate-provisioning strategy, and have determined which hosts require certificates,you will typically purchase the necessary certificates from a commercial Certificate Authority (CA). The procedure forapplying for a certificate varies from one CA to another, but typically involves providing some form of proof that youare the legitimate owner of the domain name for which you are requesting a certificate, generating a key pair, andsubmitting a Certificate Signing Request (CSR) to the CA.
As noted above, you may find it convenient to use the Java keytool utility to generate your key pair and CSR, and tomanage your certificates. The CA you choosewill provide instructions for obtaining and installing a certificate; typically,there will be separate sets of instructions for different web and application servers. The instructions for Java-basedservers (Tomcat, for example), will usually describe the following process comprising three keytool commands toobtain a certificate:
1. keytool -genkeypair to generate a public/private key pair and create the keystore.2. keytool -certreq to create the CSR.3. keytool -importcert to import the signed certificate into the keystore.
For example, to generate a public/private key pair for the domain name node1.example.com, you would use acommand similar to the one shown below:
$ keytool -genkeypair -keystore node1.keystore -alias node1 \-dname "CN=node1.example.com,O=Hadoop" -keyalg RSA \-keysize 2048 -storepass changeme -keypass changeme
This command generates a pair of 2048-bit keys using the RSA key algorithm, one of several available. The keys arestored in a keystore file called node1.keystore, in a keystore entry identified by by the alias node1. The keystorepassword (which protects the keystore as a whole) and the key password (which protects the private key stored in thenode1 entry) are set using the -storepass and -keypass options (respectively). -keypassmust be set to the samepassword value as -storepass for Cloudera Manager to access the keystore.
To create a CSR, you would use a command similar to the following:
$ keytool -certreq -keystore node1.keystore -alias node1 \-storepass changeme -keypass changeme -file node1.csr
This command generates the CSR, and stores it in a file called node1.csr. Once you've submitted your CSR to the CA,and received the CA's reply (containing the signed certificate), you will use the following keytool -importcertcommand to import the reply into your keystore:
$ keytool -importcert -keystore node1.keystore -alias node1 \-storepass changeme -keypass changeme -trustcacerts -file node1.crt
Cloudera Security | 157
Encryption

Here we assume that the CA's reply is stored in the file node1.crt.
Important: This section describes a generic procedure using keytool to obtain a certificate from acommercial Certificate Authority. This procedure will differ from one CA to another and Clouderarecommends you consult your CA's documentation for more specifics.
Creating Self-Signed Test Certificates
Important: Cloudera strongly recommends against the use of self-signed certificates in productionclusters.
It is also possible to create your own test certificates. These certificates are typically self-signed; that is, they are signedby your own private key, rather than that of an external CA. Such test certificates are useful during testing and bringupof a cluster.
To generate a self-signed certificate, use keytool -genkeypair. (In addition to creating a public/private key pair,this command wraps the public key into a self-signed certificate.) For example, the following command creates aself-signed test certificate for the host node1.example.com, and stores it in a keystore named node1.keystore:
$ keytool -genkeypair -keystore node1.keystore -keyalg RSA \-alias node1 -dname "CN=node1.example.com,O=Hadoop" \-storepass changeme -keypass changeme -validity <val_days>
By default, self-signed certificates as created above are only valid for 90 days. To increase this period, use the -validity<val_days> parameter to specify the number of days for which the certificate should be considered valid.
Creating Java Keystores and Truststores
Typically, a keystore is used in one of two distinct ways:
• The keystore contains private keys and certificates used by SSL servers to authenticate themselves to SSL clients.By convention, such files are referred to as keystores.
• When used as a truststore, the file contains certificates of trusted SSL servers, or of Certificate Authorities trustedto identify servers. There are no private keys in the truststore.
Note: The foregoing assumes that certificate-based authentication is being used in one directiononly—that is, SSL servers are using certificates to authenticate themselves to clients. It is also possiblefor clients to authenticate themselves to servers using certificates. (This is known as mutualauthentication.) Throughout this document, we assume that client certificates are not in use.
While all SSL clients must have access to a truststore, it is not always necessary to create and deploy truststores acrossa cluster. The standard JDK distribution includes a default truststore which is pre-provisioned with the root certificatesof a number of well-known Certificate Authorities. If you do not provide a custom truststore, the Hadoop daemonsload this default truststore. Therefore, if you are using certificates issued by a CA in the default truststore, you do notneed to provide custom truststores. However, you must consider the following before you decide to use the defaulttruststore:
• If you choose to use the default truststore, it is your responsibility to maintain it. You may need to remove thecertificates of CAs you do not deem trustworthy, or add or update the certificates of CAs you trust. Use thekeytool utility to perform these actions.
Security Considerations for Keystores and Truststores
Note: While the strategy for certificate deployment you selectwill ultimately depend upon the securitypolicies you wish to implement, the following guidelines may prove useful.
158 | Cloudera Security
Encryption

Because keystores contain private keys, while truststores do not, the security requirements for keystores are morestringent. In particular:
• Hadoop SSL requires that truststores and the truststore password be stored, in plaintext, in a configuration filethat is readable by all.
• Keystore and key passwords are stored, in plaintext, in a file that is readable only by members of the appropriategroup.
These considerations should inform your choice of which keys and certificates to store in the keystores and truststoresyou will deploy across your cluster.
• Keystores should contain a minimal set of keys and certificates. A reasonable strategy would be to create a uniquekeystore for each host, which would contain only the keys and certificates needed by the Hadoop SSL servicesrunning on the host. In most cases, the keystore would contain a single key/certificate entry.
Modifying Keystores: CDH services and processes must be restarted in case changes are made to a keystore.However, this is relatively rare since keystores do not need to be updated when hosts are added or deleted froma cluster.
• On the other hand, because truststores do not contain sensitive information, it is reasonable to create a singletruststore for an entire cluster. On a production cluster, such a truststorewould often contain a single CA certificate(or certificate chain), since you would typically choose to have all certificates issued by a single CA.
•Important: Do not use the same password for truststores and keystores/keys.
Since truststore passwords are stored in the clear in files readable by all, doing so would compromise the securityof the private keys in the keystore.
Creating Keystores
Once you have settled on a storage plan for your keys and certificates, you can use keytool to create or update thenecessary keystores and truststores. To create a new keystore with a certificate see Creating Certificates on page 156.
In many cases, you will already have created the set of keystores that you need. If you have followed the approach ofcreating a separate keystore for each private key and certificate, andwish tomaintain this arrangementwhen deployingthe keystores, no additional steps are required to prepare the keystores for deployment. If you wish to reorganize yourkeys and certificates into a different set of keystores, you can use keytool -importkeystore to transfer entriesfrom one keystore to another.
Creating Truststores
The steps involved in preparing the truststores to be used in your deployment depend on whether you have decidedto use the default Java truststore, or to create custom truststores:
• If you are using the default truststore, you may need to add CA certificates (or certificate chains) to the truststore,or delete them from the truststore.
• If you are creating custom truststores, you will need to build the truststores by importing trusted certificates intonew truststores. The trusted certificates can be CA certificates (typically downloaded from the CA's website), orself-signed certificates that you have created. Note that Cloudera strongly recommends against using self-signedcertificates in production.
As shown in the examples below, when creating a truststore you must select a password. All truststore passwords fora given service must be the same. In practice, this restriction rarely comes into play, since it is only relevant when youwish to create distinct custom truststores for each host.
The following sections provide examples of the steps required for several common scenarios:
Cloudera Security | 159
Encryption
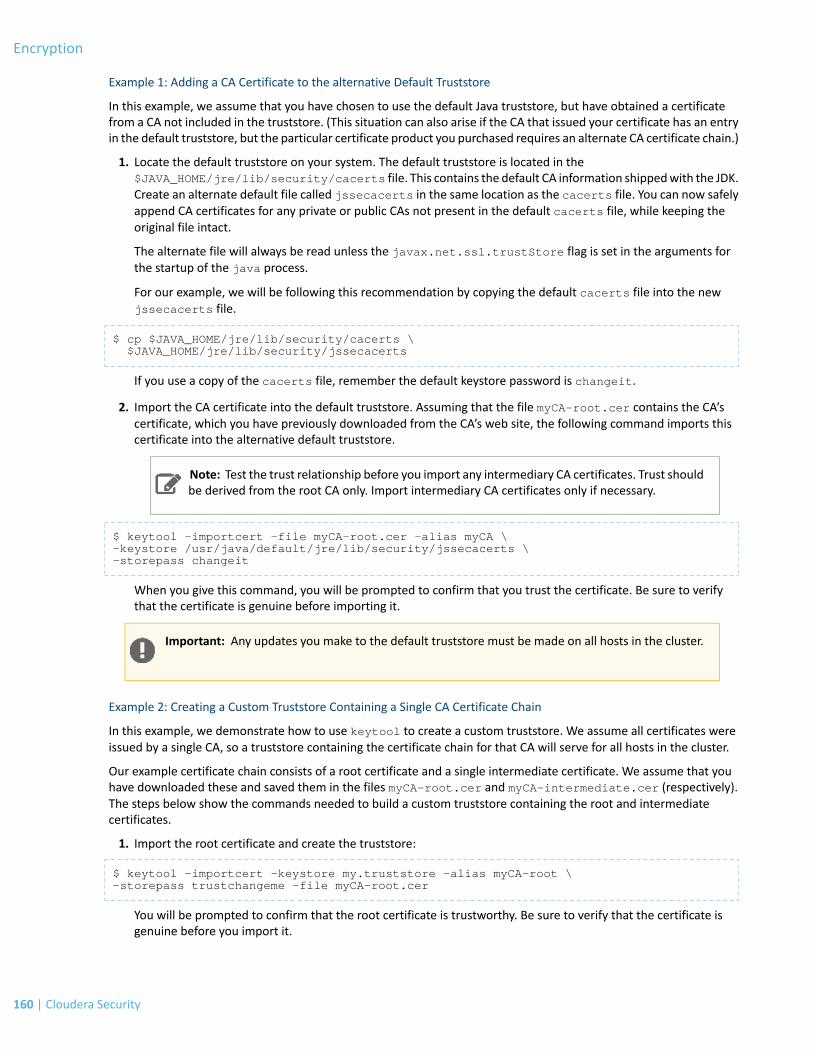
Example 1: Adding a CA Certificate to the alternative Default Truststore
In this example, we assume that you have chosen to use the default Java truststore, but have obtained a certificatefrom a CA not included in the truststore. (This situation can also arise if the CA that issued your certificate has an entryin the default truststore, but the particular certificate product you purchased requires an alternate CA certificate chain.)
1. Locate the default truststore on your system. The default truststore is located in the$JAVA_HOME/jre/lib/security/cacerts file. This contains the default CA information shippedwith the JDK.Create an alternate default file called jssecacerts in the same location as the cacerts file. You can now safelyappend CA certificates for any private or public CAs not present in the default cacerts file, while keeping theoriginal file intact.
The alternate file will always be read unless the javax.net.ssl.trustStore flag is set in the arguments forthe startup of the java process.
For our example, we will be following this recommendation by copying the default cacerts file into the newjssecacerts file.
$ cp $JAVA_HOME/jre/lib/security/cacerts \ $JAVA_HOME/jre/lib/security/jssecacerts
If you use a copy of the cacerts file, remember the default keystore password is changeit.
2. Import the CA certificate into the default truststore. Assuming that the file myCA-root.cer contains the CA’scertificate, which you have previously downloaded from the CA’s web site, the following command imports thiscertificate into the alternative default truststore.
Note: Test the trust relationship before you import any intermediary CA certificates. Trust shouldbe derived from the root CA only. Import intermediary CA certificates only if necessary.
$ keytool -importcert -file myCA-root.cer -alias myCA \-keystore /usr/java/default/jre/lib/security/jssecacerts \-storepass changeit
When you give this command, you will be prompted to confirm that you trust the certificate. Be sure to verifythat the certificate is genuine before importing it.
Important: Any updates you make to the default truststore must be made on all hosts in the cluster.
Example 2: Creating a Custom Truststore Containing a Single CA Certificate Chain
In this example, we demonstrate how to use keytool to create a custom truststore. We assume all certificates wereissued by a single CA, so a truststore containing the certificate chain for that CA will serve for all hosts in the cluster.
Our example certificate chain consists of a root certificate and a single intermediate certificate. We assume that youhave downloaded these and saved them in the files myCA-root.cer and myCA-intermediate.cer (respectively).The steps below show the commands needed to build a custom truststore containing the root and intermediatecertificates.
1. Import the root certificate and create the truststore:
$ keytool -importcert -keystore my.truststore -alias myCA-root \-storepass trustchangeme -file myCA-root.cer
You will be prompted to confirm that the root certificate is trustworthy. Be sure to verify that the certificate isgenuine before you import it.
160 | Cloudera Security
Encryption
2. Import the intermediate certificate into the truststore created in Step 1:
$ keytool -importcert -keystore my.truststore \-alias myCA-intermediate -storepass trustchangeme \-file myCA-intermediate.cer
Example 3: Creating a Custom Truststore Containing Self-Signed Test Certificates
Important: Cloudera strongly recommends against the use of self-signed certificates in productionclusters.
This example is particularly relevant when setting up a test cluster. We assume that you have generated a set ofself-signed test certificates for the hosts in the cluster, and wish to create a single truststore that can be deployed onall hosts. Because the certificates are self-signed, we cannot simply construct a truststore containing a single certificatechain, as in the previous example.When a client receives a self-signed certificate froma server during the SSL handshake,it must be able to find the server’s certificate in the truststore, since no other signing certificate exists to establishtrust. Therefore, the truststore must contain all the test certificates.
We assume that the test certificates reside in keystores named node1.keystore … node100.keystore, whichwere created following the steps described in Creating Self-Signed Test Certificates.
1. Export the test certificate for node1.example.com:
$ keytool -exportcert -keystore node1.keystore -alias node1 \-storepass changeme -file node1.cer
2. Import the test certificate into the truststore:
keytool -importcert -keystore my.truststore -alias node1 \-storepass trustchangeme -file node1.cer -noprompt
Here we specify the -noprompt option to suppress the prompt asking you to confirm that the certificate istrustworthy. Since you created the certificate yourself, this confirmation is unnecessary.
3. Repeat Steps 1 and 2 for node2.keystore … node100.keystore.
Private Key and Certificate Reuse Across Java Keystores and OpenSSL
This topic provides a quick tutorial on exporting/importing private keys for reuse from a Java keystore to OpenSSL andvice versa. Regardless of the procedure followed to create host private keys and certificates, sometimes it becomesnecessary to reuse those private keys and certificates by other services on the same host. For example, if you usedOpenSSL to create private keys and certificates for a service, you can reuse those keys for a Java-based service on thesame host by converting them to the Java keystore format.
The documentation for Configuring TLS Security for Cloudera Manager describes both approaches to creating privatekeys, using Java keystore, and OpenSSL.
Why Reuse a Private Key?
Certificate authorities generally revoke previous generations of certificates issued to a host. Hence, a host cannot have2 sets of CA-issued certificates and have both be valid. Once a certificate is issued to a host, it then becomes necessaryto reuse the private key that requested the certificate, and the CA-issued certificate across different services, Java-basedand otherwise.
Note: This following sections assume the default paths set up in Configuring TLS Encryption Only forCloudera Manager.
Cloudera Security | 161
Encryption

Conversion from Java Keystore to OpenSSL
First, use keytool to export the private key and certificate to a PKCS12 file as a transitional file format that can thenbe split up into individual key and certificate files by the openssl command line. Replace cmhost and hostname inthe commands below with the actual hostname of the server that is managing the certificate and keys.
$ keytool -importkeystore -srckeystore /opt/cloudera/security/jks/hostname-keystore.jks \ -srcstorepass password -srckeypass password -destkeystore /tmp/hostname-keystore.p12 \
-deststoretype PKCS12 -srcalias hostname -deststorepass password -destkeypass password
Now use openssl to split the PKCS12 file created above into first, the certificate file, and then the private key file.While the CA-issued certificate can be used as is, the command has been provided here for completeness.
$ openssl pkcs12 -in /tmp/hostname-keystore.p12 -passin pass:password -nokeys \-out /opt/cloudera/security/x509/hostname.pem
$ openssl pkcs12 -in /tmp/hostname-keystore.p12 -passin pass:password -nocerts \-out /opt/cloudera/security/x509/hostname.key -passout pass:password
Note that the method above generates a key with a password. For services such as Impala that require keys withoutpasswords, you can use the following command:
$ openssl rsa -in /opt/cloudera/security/x509/hostname.key \-passin pass:password -out /opt/cloudera/security/x509/hostname.pem
Conversion from OpenSSL to Java Keystore
First, convert the openssl private key and certificate files into a PKCS12 file. The PKCS12 file can then be importedinto a Java keystore file. Replace hostname in the commands below with the FQDN for the host whose certificate isbeing imported.
$ openssl pkcs12 -export -in /opt/cloudera/security/x509/hostname.pem \-inkey /opt/cloudera/security/x509/hostname.key -out /tmp/hostname.p12 \-name hostname -passin pass:password -passout pass:password
$ keytool -importkeystore -srckeystore /tmp/hostname.p12 -srcstoretype PKCS12 \ -srcstorepass password -alias hostname -deststorepass password -destkeypass password -destkeystore /opt/cloudera/security/jks/hostname-keystore.jks
Configuring TLS Security for Cloudera Manager
Important:
• Cloudera strongly recommends that you set up a fully functional CDH cluster and ClouderaManager before you configure the Cloudera Manager Server and Agents to use TLS.
• When TLS is enabled, ClouderaManager continues to accept HTTP requests on port 7180 (default)but immediately redirects clients to port 7183 for HTTPS connectivity.
• When Level 3 TLS is configured, to add new hosts running Agents, you must manually deploy theCloudera Manager agent and daemon packages for your platform, issue a new certificate for thehost, configure /etc/cloudera-scm-agent/config.ini to use SSL/TLS ,and then bring thehost online.
Or, you can disable TLS to add the host, configure the new host for TLS, and then re-enable withthe proper configuration in place. Either approach is valid, based on your needs.
• For all hosts running Agents, Cloudera recommends that you first create the keystore in Java,and then export the key and certificate using openSSLfor use by the Agent or Hue.
162 | Cloudera Security
Encryption

Transport Layer Security (TLS) provides encryption and authentication in communication between the ClouderaManagerServer and Agents. Encryption prevents snooping, and authentication helps prevent problems caused by maliciousservers or agents.
Cloudera Manager supports three levels of TLS security.
• Level 1 (Good) - This level encrypts communication between the browser and Cloudera Manager, and betweenAgents and the ClouderaManager Server. See Configuring TLS Encryption Only for ClouderaManager on page 163followed by Level 1: Configuring TLS Encryption for Cloudera Manager Agents on page 167 for instructions. Level1 encryption prevents snooping of commands and controls ongoing communication betweenAgents and ClouderaManager.
• Level 2 (Better) - This level encrypts communication between the Agents and the Server, and provides strongverification of the Cloudera Manager Server certificate by Agents. See Level 2: Configuring TLS Verification ofClouderaManager Server by the Agents on page 168. Level 2 provides Agents with additional security by verifyingtrust for the certificate presented by the Cloudera Manager Server.
• Level 3 (Best) - This includes encrypted communication between the Agents and the Server, strong verification ofthe Cloudera Manager Server certificate by the Agents, and authentication of Agents to the Cloudera ManagerServer using self-signed or CA-signed certs. See Level 3: Configuring TLS Authentication of Agents to the ClouderaManager Server on page 170. Level 3 TLS prevents cluster Servers frombeing spoofed by untrusted Agents runningon a host. Cloudera recommends that you configure Level 3 TLS encryption for untrusted network environmentsbefore enabling Kerberos authentication. This provides secure communication of keytabs between the ClouderaManager Server and verified Agents across the cluster.
Important: You must finish configuring Level 1 and Level 2 TLS to configure Level 3 encryption. Toenable TLS encryption for all connections between your Web browser running the Cloudera ManagerAdmin Console and the Cloudera Manager Server, see the first 2 steps of Level 1: Configuring TLSEncryption for Cloudera Manager Agents on page 167.
For details on how HTTPS communication is handled Cloudera Manager Agents and Cloudera Management Servicesdaemons, see HTTPS Communication in Cloudera Manager on page 174.
Configuring TLS Encryption Only for Cloudera Manager
Minimum Required Role: Cluster Administrator (also provided by Full Administrator)
Important: The sequence of steps described in the following topics to configure Level 1 through 3TLS will each build upon the steps of the previous level. The procedure and examples provided inthese topics, are based on this concept.
Before enabling TLS security for Cloudera Manager, you must create a keystore, submit a certificate-signing request,and install the issued certificate for the Server. You do this using the Oracle JDK keytool command-line tool. If youare using a Private CA, append its certificate (and any required intermediary certificates) to the alternate defaulttruststore provided with the JDK for inherent trust. This process is described in detail in Creating Truststores on page159.
The table below shows the paths for managing certificates in the following examples . These paths persist during anyupgrades and should be removedmanually if the host is removed fromaCDH cluster. Note that the folders and filepathslisted here can reside anywhere on the system and must be created on every host, especially as later sections moveon to creating certificates for each host.
Note: Set permissions on the paths such that scm-user, hue, Hadoop service users (or groups), androot users can read the private key, certificate, and keystore and truststore files.
DescriptionExample Property Values
FQDN for Cloudera Manager Server host.cmhost.sec.cloudera.com
Cloudera Security | 163
Encryption
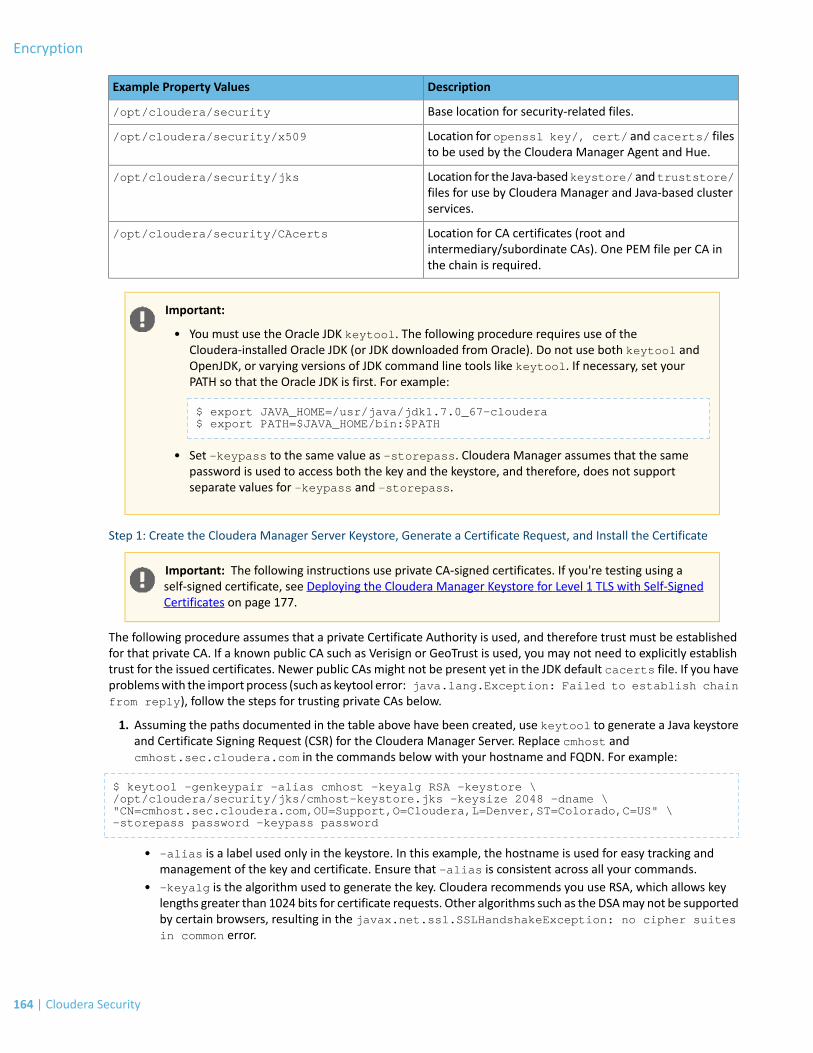
DescriptionExample Property Values
Base location for security-related files./opt/cloudera/security
Location for openssl key/, cert/ and cacerts/ filesto be used by the Cloudera Manager Agent and Hue.
/opt/cloudera/security/x509
Location for the Java-basedkeystore/ andtruststore/files for use by Cloudera Manager and Java-based clusterservices.
/opt/cloudera/security/jks
Location for CA certificates (root andintermediary/subordinate CAs). One PEM file per CA inthe chain is required.
/opt/cloudera/security/CAcerts
Important:
• You must use the Oracle JDK keytool. The following procedure requires use of theCloudera-installed Oracle JDK (or JDK downloaded from Oracle). Do not use both keytool andOpenJDK, or varying versions of JDK command line tools like keytool. If necessary, set yourPATH so that the Oracle JDK is first. For example:
$ export JAVA_HOME=/usr/java/jdk1.7.0_67-cloudera$ export PATH=$JAVA_HOME/bin:$PATH
• Set -keypass to the same value as -storepass. Cloudera Manager assumes that the samepassword is used to access both the key and the keystore, and therefore, does not supportseparate values for -keypass and -storepass.
Step 1: Create the Cloudera Manager Server Keystore, Generate a Certificate Request, and Install the Certificate
Important: The following instructions use private CA-signed certificates. If you're testing using aself-signed certificate, see Deploying the Cloudera Manager Keystore for Level 1 TLS with Self-SignedCertificates on page 177.
The following procedure assumes that a private Certificate Authority is used, and therefore trust must be establishedfor that private CA. If a known public CA such as Verisign or GeoTrust is used, you may not need to explicitly establishtrust for the issued certificates. Newer public CAs might not be present yet in the JDK default cacerts file. If you haveproblemswith the import process (such as keytool error: java.lang.Exception: Failed to establish chainfrom reply), follow the steps for trusting private CAs below.
1. Assuming the paths documented in the table above have been created, use keytool to generate a Java keystoreand Certificate Signing Request (CSR) for the Cloudera Manager Server. Replace cmhost andcmhost.sec.cloudera.com in the commands below with your hostname and FQDN. For example:
$ keytool -genkeypair -alias cmhost -keyalg RSA -keystore \/opt/cloudera/security/jks/cmhost-keystore.jks -keysize 2048 -dname \"CN=cmhost.sec.cloudera.com,OU=Support,O=Cloudera,L=Denver,ST=Colorado,C=US" \-storepass password -keypass password
• -alias is a label used only in the keystore. In this example, the hostname is used for easy tracking andmanagement of the key and certificate. Ensure that -alias is consistent across all your commands.
• -keyalg is the algorithm used to generate the key. Cloudera recommends you use RSA, which allows keylengths greater than 1024 bits for certificate requests. Other algorithms such as the DSAmay not be supportedby certain browsers, resulting in the javax.net.ssl.SSLHandshakeException: no cipher suitesin common error.
164 | Cloudera Security
Encryption
• -dname allows you to provide the certificate subject as a single line. If not specified, you will be promptedfor the values of the certificate subject information. In that case, use the host FQDN that agents and browserswill use to connect to in the subject First and Last name (CN) question prompt.
Note: The CN entry must match the hostname of the Cloudera Manager server, or you willget the java.io.IOException: HTTPS hostname wrong exception.
• /opt/cloudera/security/jks/cmhost-keystore.jks is an example path to the keystore where youstore the keystore file and where the Cloudera Manager Server host can access it.
• -keypassmust be set to the same password as -storepass to allow Cloudera Manager to access thekeystore. This is because Cloudera Manager assumes that the same password is used to access the key andthe keystore, and therefore, accepts only one password.
2. Generate a certificate signing request for the host (in this example, cmhost).
$ keytool -certreq -alias cmhost \-keystore /opt/cloudera/security/jks/cmhost-keystore.jks \-file /opt/cloudera/security/x509/cmhost.csr -storepass password \-keypass password
3. Submit the .csr file created by the -certreq command to your Certificate Authority to obtain a server certificate.When possible, work with certificates in the default Base64 (ASCII) format. You can easily modify Base64-encodedfiles from .CER or .CRT to .PEM. The file is in ASCII format if you see the opening and closing lines as follows:
-----BEGIN CERTIFICATE----- ( the encoded certificate is represented by multiple lines of exactly 64 characters, except for the last line which can contain 64 characters or less.) -----END CERTIFICATE-----
If your issued certificate is in binary (DER) format, adjust the commands according to the keytool documentation.
4. Copy the root CA certificate and any intermediary or subordinate CA certificates to/opt/cloudera/security/CAcerts/.
Important: For a private CA, you must import the private CA and intermediary or subordinateCA certificates into an alternative default JDK truststore jssecacerts, before importing themto your Java keystore.
a. Import the root CA certificate first, followed by any intermediary or subordinate CA certificates. Substitute$JAVA_HOME in the command below with the path for your Oracle JDK.
$ sudo cp $JAVA_HOME/jre/lib/security/cacerts $JAVA_HOME/jre/lib/security/jssecacerts
$ sudo keytool -importcert -alias RootCA -keystore $JAVA_HOME/jre/lib/security/jssecacerts \-file /opt/cloudera/security/CAcerts/RootCA.cer -storepass changeit
$ sudo keytool -importcert -alias SubordinateCA -keystore \$JAVA_HOME/jre/lib/security/jssecacerts \-file /opt/cloudera/security/CAcerts/SubordinateCA.cer -storepass changeit
Repeat for as many subordinate or intermediary CA certificates as needed. The default -storepass for thecacerts file is changeit. After completing this step, copy the jssecacerts file created to the same pathon all cluster hosts.
b. Import the Private CA certificates into your Java keystore file. Import the root CA certificate first.
$ keytool -importcert -trustcacerts -alias RootCA -keystore \/opt/cloudera/security/jks/<cmhost-keystore>.jks -file \/opt/cloudera/security/CAcerts/RootCA.cer -storepass password
Cloudera Security | 165
Encryption

$ keytool -importcert -trustcacerts -alias SubordinateCA -keystore \ /opt/cloudera/security/jks/<cmhost-keystore>.jks -file \ /opt/cloudera/security/CAcerts/SubordinateCA.cer -storepass password
Repeat for as many subordinate/intermediary CA certificates as needed.
5. Copy the signed certificate file provided to a location where it can be used by the Cloudera Manager Agents (andHue if necessary).
$ cp certificate-file.cer /opt/cloudera/security/x509/cmhost.pem
Install it with the following keytool command:
$ keytool -importcert -trustcacerts -alias cmhost \ -file /opt/cloudera/security/x509/cmhost.pem \ -keystore /opt/cloudera/security/jks/cmhost-keystore.jks -storepass password
Youmust see the following response verifying that the certificate has been properly imported against its privatekey.
Certificate reply was installed in keystore
Because the issued certificate has been imported by the Java keystore, the original certificate-signing request(.CSR) and certificate files are no longer needed by Java services on that host, and the certificate and private keyare now accessed through the keystore.
However, you still must export the private key from the Java keystore to make the certificate usable by Hue andthe ClouderaManager Agent. For instructions on reusing certificates, see Private Key and Certificate Reuse AcrossJava Keystores and OpenSSL on page 161.
Step 2: Enable HTTPS for the Cloudera Manager Admin Console and Specify Server Keystore Properties
1. Log into the Cloudera Manager Admin Console.2. Select Administration > Settings.3. Click the Security category.4. Configure the following TLS settings:
DescriptionProperty
The complete path to the keystore file. In the example, this path would be:
/opt/cloudera/security/jks/cmhost-keystore.jks
Path to TLS Keystore File
The password for keystore: passwordKeystore Password
Check this box to enable TLS encryption for Cloudera Manager.Use TLS Encryption forAdmin Console
5. Click Save Changes to save the settings.
Step 3: Specify SSL Truststore Properties for Cloudera Management Services
When enabling TLS for the ClouderaManager UI, youmust set the Java truststore location and password in the ClouderaManagement Services configuration. If this is not done, roles such as the Host Monitor and Service Monitor will beunable to connect to Cloudera Manager and will not start.
1. Open the Cloudera Manager Administration Console and go to the Cloudera Management Service.2. Click the Configuration tab.3. Select Scope > Cloudera Management Service (Service-Wide).4. Select Category > Security.
166 | Cloudera Security
Encryption

5. Edit the following SSL properties according to your cluster configuration.
DescriptionProperty
Path to the client truststore file used in HTTPS communication. The contents ofthis truststore can be modified without restarting the Cloudera ManagementService roles. By default, changes to its contents are picked upwithin ten seconds.
SSL Client Truststore FileLocation
Password for the client truststore file.SSL Client Truststore FilePassword
6. Click Save Changes to commit the changes.7. Restart the ClouderaManagement Service. Formore information, see HTTPS Communication in ClouderaManager
on page 174.
Step 4: Restart the Cloudera Manager Server
Restart the Cloudera Manager Server by running service cloudera-scm-server restart from the ClouderaManager host command prompt.
You should now be able to connect to the Cloudera Manager Admin Console using an HTTPS browser connection. If aprivate CA certificate or self-signed certificate is used, you must establish trust in the browser for your certificate. Thisshould be done for all browsers that will be used to access Cloudera Manager. By default, certificates issued by publiccommercial CAs should be trusted by the browsers accessing Cloudera Manager and other Java or OpenSSL-basedservices.
Formore information on establishing trust for certificates, see TLS/SSL Certificates Overview on page 156 or the relevantJDK documentation.
Level 1: Configuring TLS Encryption for Cloudera Manager Agents
Minimum Required Role: Cluster Administrator (also provided by Full Administrator)
Prerequisite:
You must have completed the steps described at Configuring TLS Encryption Only for Cloudera Manager.
Step 1: Enable Agent Connections to Cloudera Manager to use TLS
In this step, you enable TLS properties for Cloudera Manager Agents and their connections to the Cloudera ManagerServer. To configure agents to connect to Cloudera Manager over TLS, log into the Cloudera Manager Admin Console.
Note: If you are using a private certificate authority to sign certificate requests, see information onestablishing trust for this CA in Configuring TLS Encryption Only for Cloudera Manager on page 163.
1. Log into the Cloudera Manager Admin Console.2. Select Administration > Settings.3. Click the Security category.4. Configure the following TLS settings in the Cloudera Manager Server:
DescriptionProperty
Enable TLS encryption for Agents connecting to theServer. The Agents will still connect to the defined agent
Use TLS Encryption for Agents
listener port for ClouderaManager (default: 7182). Thisproperty negotiates TLS connections to the service atthis point.
5. Click Save Changes.
Cloudera Security | 167
Encryption

Step 2: Enable and Configure TLS on the Agent Hosts
To enable and configure TLS, you must specify values for the TLS properties in the/etc/cloudera-scm-agent/config.ini configuration file on all Agent hosts.
1. On theAgent host, open the/etc/cloudera-scm-agent/config.ini configuration file and edit the followingproperty:
DescriptionProperty
Specify 1 to enable TLS on the Agent, or 0 (zero) to disable TLS.use_tls
2. Repeat this step on every Agent host. You can copy the Agent’s config.ini file across all hosts since this file bydefault does not have host specific information within it. If youmodify properties such as listening_hostnameor listening_ip address in config.ini, you must configure the file individually for each host.
Step 3: Restart the Cloudera Manager Server
Restart the Cloudera Manager Server with the following command to activate the TLS configuration settings.
$ sudo service cloudera-scm-server restart
Step 4: Restart the Cloudera Manager Agents
On every Agent host, restart the Agent:
$ sudo service cloudera-scm-agent restart
Step 5: Verify that the Server and Agents are Communicating
In the Cloudera Manager Admin Console, open the Hosts page. If the Agents heartbeat successfully, TLS encryption isworking properly.
Level 2: Configuring TLS Verification of Cloudera Manager Server by the Agents
Minimum Required Role: Cluster Administrator (also provided by Full Administrator)
This level of TLS security requires that you provide a server certificate that is signed, either directly or through a chain,by a trusted root certificate authority (CA), to the Cloudera Manager Server. You must also provide the certificate ofthe CA that signed the Server certificate. For test environments, you can use a self-signed server certificate.
Note: If the ClouderaManager Server certificate or the associated CA certificate is missing or expired,Agents will not communicate with the Cloudera Manager Server.
Step 1: Configure TLS encryption
If you have not done so, configure TLS encryption to use this level of security. For instructions, see Configuring TLSEncryption Only for Cloudera Manager on page 163 and Level 1: Configuring TLS Encryption for Cloudera ManagerAgents on page 167.
Step 2: Copy the CA Certificate or Cloudera Manager Server's .pem file to the Agents
1. Agents can verify the Cloudera Manager Server using either the Server certificate or the associated root CAcertificate. Pick any one of the following approaches to proceed:
• Copy the Cloudera Manager Server .pem file to the Agent host
1. For verification by the Agent, copy the Server .pem file (for example, cmhost.pem ) to any directoryon the Agent host. In the examples, this path is /opt/cloudera/security/x509/cmhost.pem.
2. On the Agent host, open the /etc/cloudera-scm-agent/config.ini configuration file and editthe following properties.
168 | Cloudera Security
Encryption

DescriptionProperty
Point this property to the copied .pem file on the Agent host; in this example,/opt/cloudera/security/x509/cmhost-cert.pem.
verify_cert_file
Set this property to 1.use_tls
OR
• Copy the CA certificates to the Agent host
1. If you have a CA-signed certificate, copy the root CA or intermediate CA certificates in PEM format to theAgent host. In the example, the CA certificates are copied to /opt/cloudera/security/CAcerts/*.
2. On the Agent host, open the /etc/cloudera-scm-agent/config.ini configuration file and editthe following properties.
DescriptionProperty
Point this property to the directory on the Agent host with the copied CAcertificates; in the example, /opt/cloudera/security/CAcerts/.
verify_cert_dir
Set this property to 1.use_tls
Note: When configuring the verify_cert_dir property, the openss-perl packageis required to provide the c_rehash command that is necessary to generate the SubjectName hash values that need to be linked to the certificates to make them usable. Seethe comments in the config.ini file for more information.
The following example is for RHEL-compatible systems. The package name forDebian-based systems is the same. After the package is installed, go to the CA certificatepath and run the c_rehash command. This generates symbolic links to the certificatein that location, with "." being the current path, as follows:
$ yum -y install openssl-perl$ cd /opt/cloudera/security/CAcerts/ $ c_rehash . Doing . w2k8-1-root.pem => 4507f087.0 w2k8-2-intermediary.pem => 082ba6df.0 $ls -l total 8.0K lrwxrwxrwx 1 root root 23 Oct 6 22:44 082ba6df.0 -> w2k8-2-intermediary.pem lrwxrwxrwx 1 root root 15 Oct 6 22:44 4507f087.0 -> w2k8-1-root.pem -rw-r----- 1 root root 2.1K Oct 6 17:23 w2k8-1-root.pem -rw-r----- 1 root root 2.8K Oct 6 17:23 w2k8-2-intermediary.pem
2. Based on the approach you select in step 1, repeat the steps on every Agent host. You can copy the Agent’sconfig.ini file across all hosts. However, if you modify properties such as listening_hostname orlistening_ip address in config.ini, you must configure config.ini for each host individually.
Step 3: Restart the Cloudera Manager Agents
On every Agent host, restart the Agent:
$ sudo service cloudera-scm-agent restart
Cloudera Security | 169
Encryption

Step 4: Restart the Cloudera Management Services
To restart the Cloudera Management Service from the Cloudera Manager Admin Console:
1. On the Home page, click
to the right of the service name and select Restart.2. Click Start on the next screen to confirm. When you see a Finished status, the service has restarted.
Step 5: Verify that the Server and Agents are communicating
In the Cloudera Manager Admin Console, open the Hosts page. If the Agents heartbeat successfully, the Server andAgents are communicating. If not, check theAgent log/var/log/cloudera-scm-agent/cloudera-scm-agent.log,which shows errors if the connection fails.
Level 3: Configuring TLS Authentication of Agents to the Cloudera Manager Server
Minimum Required Role: Cluster Administrator (also provided by Full Administrator)
This is the highest level of TLS security supported for Cloudera Manager Server-Agent communications, and requiresyou to create private keys and Certificate Signing Requests (CSR) for each cluster node. A Certificate Authority (CA)can then sign the CSR, thus providing a server certificate for each host. Agentswill then need to authenticate themselvesto Cloudera Manager using this server certificate.
This can be completed one of two ways, depending on the approach you choose to configuring TLS on your cluster.
• Approach A - Use OpenSSL to create private keys and request CA-signed certificates for every Agent on yourcluster. Approach A is faster if you only need to enable TLS for Cloudera Manager Server-Agent communication.
• Approach B - Create a Java truststore file that contains the Agent and CA certificates, and authenticate Agentsagainst this truststore file. If you plan to enable TLS communication for all CDH services cluster-wide, includingJava-based components, consider using Approach B.
Steps for creating self-signed certificates are not included. Self-signed certificates are not recommended for productionenvironments.
Note: Wildcard domain certificates and certificates using the SubjectAlternativeName extension arenot supported at this time.
Step 1: Configure TLS encryption
If you have not already done so, you must configure TLS encryption to use this third level of security. For instructions,see Configuring TLS Encryption Only for Cloudera Manager on page 163 and Configuring TLS Encryption for ClouderaManager.
Step 2: Configure TLS Verification of Server Trust by Agents
If you have not already done so, you must configure TLS Verification of Server Trust by Agents. For instructions, seeConfiguring TLS Authentication of Server to Agents.
170 | Cloudera Security
Encryption

Important:
Steps 3, 4, and 5 can be completed one of two ways, depending on the approach you choose toconfiguring TLS on your cluster.
• Approach A - Use OpenSSL to create private keys and request CA-signed certificates for everyAgent on your cluster. Approach A is faster if you only need to enable TLS for Cloudera ManagerServer-Agent communication.
• Approach B - Create a Java truststore file that contains the Agent and CA certificates, andauthenticate Agents against this truststore file. If you plan to enable TLS communication for allCDH services cluster-wide, including Java-based components, consider using Approach B.
Irrespective of the path you select, it will still be possible to reuse OpenSSL private keys and certificatesby exporting to a Java keystore and vice versa. For instructions, see Private Key and Certificate ReuseAcross Java Keystores and OpenSSL on page 161.
After choosing an approach, follow steps 3-5 for all hosts in your cluster.
Approach A: Using OpenSSL to Create Private Keys and Request Agent Certificates
If the Cloudera Manager Server is running Management Services or CDH components (and therefore, has a ClouderaManager Agent installed), you do not need to re-create a private key for the Server host. Follow the steps in PrivateKey and Certificate Reuse Across Java Keystores and OpenSSL on page 161 to reuse the host certificate. Follow steps3-5 for all remaining cluster hosts.
Approach A Step 3: Generate the private key and certificate signing request for the Agent using OpenSSL.
Run the following command on the Agent, replacing hostnamewith your actual hostname. The -subj command lineoption allows you to provide the certificate subject as a single line. If you do not specify the certificate subject (-subj)as an argument, you will be prompted for the values of the certificate subject information. In that case, use the hostFQDN that Agents will use to connect from in the subject First and Last name (CN) question prompt. Country (C)requires a 2 letter country code. The "/" is replaced with "," in the actual CSR and private key file.
$ openssl req -subj '/CN=hostname.sec.cloudera.com/OU=Support/O=Cloudera/L=Denver/ST=Colorado/C=US' \-out /opt/cloudera/security/x509/hostname.csr -new -newkey rsa:2048 \ -keyout /opt/cloudera/security/x509/hostname.key -passout pass:password
password provides a password to protect the private key file. Keep the password in a safe place; you must provide akey password file to the Agent to complete configuration.
Approach A Step 4: Submit the certificate signing request to your CA and distribute the issued certificates.
The CSR file created (/opt/cloudera/security/x509/hostname.csr) is collected fromcluster hosts for submissionto the certificate authority (CA) for signing. In the example paths, you copy the issued CA-signed certificate file to/opt/cloudera/security/x509 on each cluster host. For easy management and tracking of files, name the filesin the hostname.pem format, replacing hostname with the actual hostname.
Note: Certificate file extensions of .cer, .crt, and .pem are interchangeable. Rename the files so theyhave a .pem extension, and can therefore be used by the Agent and Hue (or any other Python-basedcomponent).
The CSR can be examined with the following command:
$ openssl req -text -noout -verify -in /opt/cloudera/security/x509/hostname.csr
Cloudera Security | 171
Encryption

The issued certificate file can be examined with the following command:
$ openssl x509 -in /opt/cloudera/security/x509/hostname.pem -text -noout
Approach A Step 5 (Optional): Import the OpenSSL private key and certificate into the per-host Java keystore.
Follow the steps in Private Key and Certificate Reuse Across Java Keystores and OpenSSL on page 161 for this step.
Important: If you are using Approach A, skip to step 6 to continue.
Approach B: Creating a Java Keystore and Importing Signed Agent Certificates into it
If the Cloudera Manager Server is running Management Services or CDH components (and therefore, has a ClouderaManager Agent installed), you do not need to re-create a private key for the Server host. Follow the steps in PrivateKey and Certificate Reuse Across Java Keystores and OpenSSL on page 161 to reuse the host certificate. Follow steps3-5 for all remaining cluster hosts.
Approach B - Step 3: Create a Java Keystore and private key for a host
Create a Java Keystore and private key files for an Agent host as follows:
$ keytool -genkeypair -alias hostname -keyalg RSA -keystore \/opt/cloudera/security/jks/hostname-keystore.jks -keysize 2048 -dname \"CN=cmhost.sec.cloudera.com,OU=Support,O=Cloudera,L=Denver,ST=Colorado,C=US" \-storepass password -keypass password
password provides a password to protect the private key file. Note the password in a safe place; you must provide akey password file to the Agent to complete configuration.
Approach B - Step 4: Generate a certificate signing request and install the issued certificate into the Java Keystore
1. Generate a certificate signing request (CSR) and submit it to your CA for a signed certificate.
$ keytool -certreq -alias hostname \-keystore /opt/cloudera/security/jks/hostname-keystore.jks \ -file /opt/cloudera/security/x509/hostname.csr \-storepass password -keypass password
2. If you are using a Private CA, first import the root CA certificate followed by the intermediary/subordinate CAcertificates into the Java keystore created previously.
$ keytool -importcert -trustcacerts -alias RootCA -keystore \/opt/cloudera/security/jks/hostname-keystore.jks -file \ /opt/cloudera/security/CAcerts/RootCA.cer -storepass password
Repeat the following for all subordinate/intermediary CA certificates presented.
$ keytool -importcert -trustcacerts -alias SubordinateCA -keystore \/opt/cloudera/security/jks/hostname-keystore.jks -file \ /opt/cloudera/security/CAcerts/SubordinateCA.cer -storepass password
3. Copy the issued signed certificate file provided by your CA to the location from where it will be imported by theCloudera Manager Agent and possibly Hue.
$ cp certificate-file.cer /opt/cloudera/security/x509/hostname.pem
172 | Cloudera Security
Encryption
4. Import the issued certificate file into the previously created Java keystore (.jks) with the following command:
$ keytool -import -trustcacerts -alias <hostname> \-keystore /opt/cloudera/security/jks/<hostname>-keystore.jks \-file /opt/cloudera/security/x509/<hostname>.pem -storepass password
Approach B - Step 5: Export the private key from the Java keystore and convert it with OpenSSL for reuse by Agent
Follow the steps in Private Key and Certificate Reuse Across Java Keystores and OpenSSL on page 161.
Step 6: Create a File that Contains the Password for the Key
The Agent reads the password from a text file, not from the command line. The password file allows you to use filepermissions to protect the password. For our example the password file was created at,/etc/cloudera-scm-agent/agentkey.pw.
Step 7: Configure the Agent with its Private Key and Certificate
1. On theAgent host, open the/etc/cloudera-scm-agent/config.ini configuration file and edit the followingproperties:
DescriptionProperty
Name of the client key file.client_key_file
Name of the client key password file, agentkey.pw.client_keypw_file
Name of the client certificate file.client_cert_file
2. Repeat these steps on every Agent host.
Step 8: Verify that steps 3-7 Were Completed for every Agent Host in Your Cluster
Make sure each Agent's private key and certificate that you import into the Cloudera Manager Server's truststore isunique.
Step 9: Create a Truststore by Importing CA and Agent Certificates
Perform this step on the Cloudera Manager server, where the new truststore is used to authenticate Agents.
Create a new truststore file (/opt/cloudera/security/jks/truststore.jks) and import the CA root andintermediary/subordinate certificates to this truststore. The new truststore functions like a keystore, containing onlycertificates and no private key.
Note: Alternatively, you can use the existing Cloudera Manager keystore, containing the CAintermediate and root certificates, as the truststore. However, Cloudera recommends separating thetwo files, because the new truststore can be copied to and used by all hosts in the cluster whenenabling SSL/TLS for CDH services.
1. Create a trusted keystore using the keytool command and import the root CA certificate to this truststore.
$ keytool -importcert -noprompt -keystore /opt/cloudera/security/jks/truststore.jks \-alias root_CA -file root.crt -storepass password
2. Import any remaining intermediary/subordinate CA certificates into the truststore.
$ keytool -importcert -noprompt -keystore /opt/cloudera/security/jks/truststore.jks -alias int_CA -file intermediate-CA.pem -storepass password
Cloudera Security | 173
Encryption

3. Save the hostname.pem certificate files from all cluster hosts in a single location. The Cloudera Manager Servercan now import these host certificates (hostname.pem) into the new truststore.
$ keytool -keystore /opt/cloudera/security/jks/truststore.jks \-importcert -alias hostname -file hostname.pem -storepass password
Consider creating a for loop on a list of hostnames to speed up this process.
$ for HOST in 'cat hostlist.txt'; do keytool -keystore /opt/cloudera/security/jks/truststore.jks \-importcert -alias $HOST -file $HOST.pem -storepass password
Step 10: Enable Agent Authentication and Configure the Cloudera Manager Server to Use the New Truststore
1. Log into the Cloudera Manager Admin Console.2. Select Administration > Settings.3. Click the Security category.4. Configure the following TLS settings:
DescriptionSetting
Select this option to enable TLS authentication of Agents to the Server.UseTLSAuthenticationofAgentsto Server
Specify the full filesystem path to the truststore located on the ClouderaManager Server host; in the example,/opt/cloudera/security/jks/truststore.jks
Path to Truststore
Specify the password for the truststore.Truststore Password
5. Click Save Changes to save the settings.
Step 11: Restart the Cloudera Manager Server
$ sudo service cloudera-scm-server restart
Step 12: Restart the Cloudera Manager Agents
On every Agent host, restart the Agent:
$ sudo service cloudera-scm-agent restart
Step 13: Verify that the Server and Agents Are Communicating
In ClouderaManager Admin Console, open the Hosts page. If the Agents heartbeat successfully, the Server and Agentsare communicating. If they are not, you may see an error in the Server, such as a null CA chain error. This impliesthat either the truststore does not contain the Agent certificate, or the Agent is not presenting the certificate. Checkall of your settings, and check the Server log to verify that TLS and Agent validation have been enabled correctly.
HTTPS Communication in Cloudera Manager
Both the Cloudera Manager Agent and the roles that make up the Cloudera Management Service use HTTPS tocommunicate with Cloudera Manager and CDH services. This topic aims to explain how the various aspects of HTTPScommunication are handled by the Cloudera Manager Agents and the Cloudera Management Service roles.
Cloudera Manager Agents use HTTPS to communicate with HBase, HDFS, Impala, MapReduce, and YARN to collectmonitoring data.
174 | Cloudera Security
Encryption

Cloudera Manager Agent
Configuring TLS communication between the Cloudera Manager Server and Agents is outlined in Configuring TLSSecurity for ClouderaManager on page 162. You can configure the certificates available for server certificate verificationusing the verify_cert_dir parameter in the Agent config.ini file. See the comments in the config.ini filefor a detailed explanation of this property. You can also use the existing value for the verify_cert_file parameter.
When the Cloudera Manager Agent communicates with CDH services using HTTPS:
• If verify_cert_file or verify_cert_dir are configured in the Agent config.ini, the Agent uses thesesettings to verify the server certificates. If these settings are not configured, no certificate verification occurs. Ifcertificate verification is performed for the ClouderaManager Server, it must also be performed for CDH daemons.
• An Agent never participates in mutual TLS authentication with any CDH service. Instead, each service has its ownauthentication scheme. Most services use Kerberos authentication, but Impala uses HTTP digest.
User Impact
This depends on how you use certificates.
• If you do not need certificate verification, do not configure verify_cert_file or verify_cert_dir. However,this leaves you vulnerable to man-in-the-middle attacks.
• If you are using a CA-signed certificate, configure the Agent accordingly. Adding new services or enabling SSL/TLSon a service requires no changes to the Agent configuration because the CA verifies the certificates used by anynew servers brought online.
• If you are using self-signed certificates (recommended only on test clusters), the certificate for each new servicethat uses HTTPS must be available to the Agent. Modify the file pointed to by verify_cert_file (Agent restartrequired), or the directory pointed to by verify_cert_dir, to contain the new certificate.
Cloudera Management Services
Some Cloudera Management Service roles act as HTTPS clients when communicating with Cloudera Manager entitiesand CDH services.
You can verify server certificates in two ways:
• Configure a truststore through Cloudera Manager to perform certificate verification on the certificates of theservers with which it communicates. If this truststore is configured, it is used to verify server certificates.
OR
• If no truststore is configured through Cloudera Manager, the default Java truststore (cacerts) is used to verifycertificates.
The following table shows ClouderaManagement Service roles that act as HTTPS clients, and the corresponding ClouderaManager entities that communicate with them as HTTPS servers.This table does not depict the entirety of the roles'communication, only communications over HTTPS.
Table 6: HTTPS Communication Between Cloudera Management Service Roles and Cloudera Manager Entities
Communicating HTTPS ServersRoles as HTTPS Clients
Activity Monitor • Cloudera Manager Server• JobTracker Web Server• Oozie server (may involve the load balancer in an HA configuration)
Host Monitor • Cloudera Manager Server
Service Monitor • Cloudera Manager Server• NameNode(s) Web Server(s)• Impala StateStore Web Server• YARN ResourceManager(s) Web Server(s)
Cloudera Security | 175
Encryption

Communicating HTTPS ServersRoles as HTTPS Clients
• YARN JobHistory Web Server• Oozie server (directly, not through the load balancer)
Event Server • Cloudera Manager Server
Reports Manager • Cloudera Manager Server• NameNode(s) Web Servers
Note: The Cloudera Navigator roles also act as HTTPS clients, but are outside the scope of thisdocument.
The Cloudera Management Service roles communicate using HTTPS as follows:
• If the Cloudera Management Service SSL Client Truststore File Location parameter is configured, the roles usethis truststore to verify server certificates. If this parameter is not set, the default Java truststore is used to verifycertificates. Without using safety valves, you cannot verify certificates for some Cloudera Management Serviceroles but not for others. Nor can you verify certificates for only a subset of the HTTPS communication by a role.
• The Cloudera Management Service roles never participate in mutual TLS authentication with any CDH service orwith the Cloudera Manager Server. Instead, each service has its own authentication scheme: Kerberos for mostservices, HTTP digest for Impala. For the Cloudera Manager Server, this authentication is session-based.
User Impact
This depends on how you use certificates:
• If you use a CA-signed certificate, configure the Cloudera Management Service SSL Client Truststore File Locationparameter to point to a truststore that contains the CA certificate. Adding a new service or enabling TLS on anexisting service requires no changes to the ClouderaManagement Service configuration because the CA certificateverifies the certificates used by any new servers brought online. Alternatively, this CA-signed certificate can beadded to the default Java truststore.
• If you are using self-signed certificates, the certificate for each new service that uses HTTPS must be available tothe Agent.. You must modify the truststore pointed to by the Cloudera Management Service SSL Client TruststoreFile Location parameter. Truststore changes are required on each host on which a Cloudera Management Servicedaemon is running. Changes to the truststore do not require a role restart, and should be picked up within 10seconds by default.
If the Cloudera Management Service SSL Client Truststore File Location is not used, the certificate must be madeavailable in the default Java truststore. The Cloudera Management Service role must be restarted for this changeto take effect.
Troubleshooting SSL/TLS Connectivity
The openssl tool can be run from the host that is running the Cloudera Manager Agent or client service that shouldbe inspected for connectivity issues. You should also test whether the certificate in use by the host is recognized by atrusted CA during the TLS/SSL negotiation.
Use the following command to inspect the connection.
$ openssl s_client -connect [host.fqdn.name]:[port]
For example:
$ openssl s_client -connect test1.sec.cloudera.com:7183
A return code 0 means openssl was able to establish trust of the server through its library of trusted public CAs. Ifthe certificate was self-signed (recommended only on test clusters) or provided by a private CA it might be necessary
176 | Cloudera Security
Encryption

to add the private CA or self-signed certificate to the truststore using the openssl command. Adding the path to theroot CA, -CAfile </path/to/root-ca.pem>, should allow openssl to verify your self-signed or private CA-signedcertificate as follows:
$ openssl s_client -connect test1.sec.cloudera.com:7183 -CAfile \/opt/cloudera/security/CAcerts/RootCA.pem
Note that providing only the Root CA certificate is necessary to establish trust for this test. The result from the commandis successful when you see the return code 0 as follows:
... Verify return code: 0 (ok)---
By default, the Cloudera Manager Server writes logs to the/etc/cloudera-scm-server/cloudera-scm-server.log file on startup. Successful start of the server processwith the certificate will show logs similar to the following:
2014-10-06 21:33:47,515 INFO WebServerImpl:org.mortbay.log: jetty-6.1.26.cloudera.2 2014-10-06 21:33:47,572 INFO WebServerImpl:org.mortbay.log: Started [email protected]:7183 2014-10-06 21:33:47,573 INFO WebServerImpl:org.mortbay.log: Started [email protected]:7180 2014-10-06 21:33:47,573 INFO WebServerImpl:com.cloudera.server.cmf.WebServerImpl: Started Jetty server.
Deploying the Cloudera Manager Keystore for Level 1 TLS with Self-Signed Certificates
This topic describes how to perform Step 1: Create the Cloudera Manager Server Keystore, Generate a CertificateRequest, and Install the Certificate on page 164, but with self-signed certificates.
1. Create a directory to store the self-signed certificate-key pair that you will create.
$ mkdir -p /opt/cloudera/security/x509/ /opt/cloudera/security/jks/$ cd /opt/cloudera/security/jks
Use chmod/chown to change ownership of the /opt/cloudera/security/jks directory to give ClouderaManager access to the directory.
2. Generate a self-signed certificate-key pair and save it to a keystore, such as example.keystore.
Note: The CN entrymustmatch the fully-qualified domain name of the ClouderaManager server,or you will get the java.io.IOException: HTTPS hostname wrong exception.
$ keytool -genkeypair -keystore example.keystore -keyalg RSA -alias example \-dname "CN=example.cloudera" -storepass cloudera -keypass cloudera
3. Copy the default Java truststore, cacerts, to the alternate truststore at the same location, jssecacerts. Youcan append any self-signed certificates to this truststore without modifying the default cacerts file.
$ sudo cp $JAVA_HOME/jre/lib/security/cacerts $JAVA_HOME/jre/lib/security/jssecacerts
4. Export the certificate from example.keystore.
$ keytool -export -alias example -keystore example.keystore -rfc -file selfsigned.cer
5. Copy the self-signed certificate to the /opt/cloudera/security/x509/ directory (or any location where itcan be used by Cloudera Manager).
$ cp selfsigned.cer /opt/cloudera/security/x509/cmhost.pem
Cloudera Security | 177
Encryption

6. Import the public key into the alternate Java truststore, so that any process that runs with Java on this machinewill trust the key. Repeat this on all machines. The default password for the Java truststore is changeit. Do notuse the password created for the keystore in Step 2.
$ keytool -import -alias example -file /opt/cloudera/security/selfsigned.cer \-keystore $JAVA_HOME/jre/lib/security/jssecacerts -storepass changeit
7. Rename the keystore to cmhost-keystore.jks (this is to keep this example consistent with the documentationfor CA-signed certificates). You can delete the certificate since it has already been exported to the keystore at/opt/cloudera/security/x509/cmhost.pem in a previous step.
$ mv /opt/cloudera/security/jks/example.keystore /opt/cloudera/security/jks/cmhost-keystore.jks$ rm /opt/cloudera/security/selfsigned.cer
To continue setting up Level 1 TLS, go back to Step 2: Enable HTTPS for the Cloudera Manager Admin Console andSpecify Server Keystore Properties on page 166.
Configuring SSL for the Cloudera Navigator Data Management Component
Important: The following instructions assume you have a Java keystore set up on the NavigatorMetadata Server host.
To enable SSL communication between the Cloudera Navigator Metadata Server and its clients:
1. Open the Cloudera Manager Admin Console and go to the Cloudera Management Service.2. Click the Configuration tab.3. Select Scope > Navigator Metadata Server.4. Select Category > Security.5. Edit the following SSL properties according to your cluster configuration.
DescriptionProperty
Encrypt communication between clients and Navigator Metadata Server usingTransport Layer Security (TLS) (formerly known as Secure Socket Layer (SSL)).
Enable TLS/SSL for NavigatorMetadata Server
The path to the TLS/SSL keystore file containing the server certificate and privatekey used for TLS/SSL. UsedwhenNavigatorMetadata Server is acting as a TLS/SSLserver. The keystore must be in JKS format.
SSL Keystore File Location
The password for the Navigator Metadata Server JKS keystore file.SSL Keystore File Password
The password that protects the private key contained in the JKS keystore usedwhen Navigator Metadata Server is acting as a TLS/SSL server.
SSL Keystore Key Password
6. Click Save Changes to commit the changes.7. Restart the Navigator Metadata server.
Note: Once you have enabled SSL, the Quick Links in Cloudera Manager pointing to the ClouderaNavigator UI will not work as they use HTTP, not HTTPS.
178 | Cloudera Security
Encryption

Configuring SSL for Cloudera Management Service RolesTo enable SSL communication between Cloudera Management Service roles, and CDH services and the ClouderaManager Server:
1. Open the Cloudera Manager Administration Console and go to the Cloudera Management Service.2. Click the Configuration tab.3. Select Scope > Cloudera Management Service (Service-Wide).4. Select Category > Security.5. Edit the following SSL properties according to your cluster configuration.
DescriptionProperty
Path to the client truststore file used in HTTPS communication. The contents ofthis truststore can be modified without restarting the Cloudera ManagementService roles. By default, changes to its contents are picked upwithin ten seconds.
SSL Client Truststore FileLocation
Password for the client truststore file.SSL Client Truststore FilePassword
6. Click Save Changes to commit the changes.7. Restart the ClouderaManagement Service. Formore information, see HTTPS Communication in ClouderaManager
on page 174.
Configuring SSL/TLS Encryption for CDH ServicesThis section describes how to configure encryption for CDH services (HDFS, MapReduce, YARN, HBase, Hive, Impala,Hue and Oozie) focusing on SSL.
Prerequisites
• Cloudera recommends securing a cluster using Kerberos authentication before enabling encryption such as SSLon a cluster. If you enable SSL for a cluster that does not already have Kerberos authentication configured, awarning will be displayed.
• The following sections assume that you have created all the certificates required for SSL communication. If not,for information on how to do this, see Creating Certificates.
• The certificates and keys to be deployed in your cluster should be organized into the appropriate set of keystoresand truststores. For more information, see Creating Java Keystores and Truststores on page 158.
Hadoop Services as SSL Servers and Clients
Hadoop services differ in their use of SSL as follows:
• HDFS, MapReduce, and YARN daemons act as both SSL servers and clients.• HBase daemons act as SSL servers only.• Oozie daemons act as SSL servers only.• Hue acts as an SSL client to all of the above.
Daemons that act as SSL servers load the keystores when starting up. When a client connects to an SSL server daemon,the server transmits the certificate loaded at startup time to the client, which then uses its truststore to validate theserver’s certificate.
Compatible Certificate Formats for Hadoop Components
Compatible Certificate FormatComponent
Java KeystoreHDFS
Cloudera Security | 179
Encryption
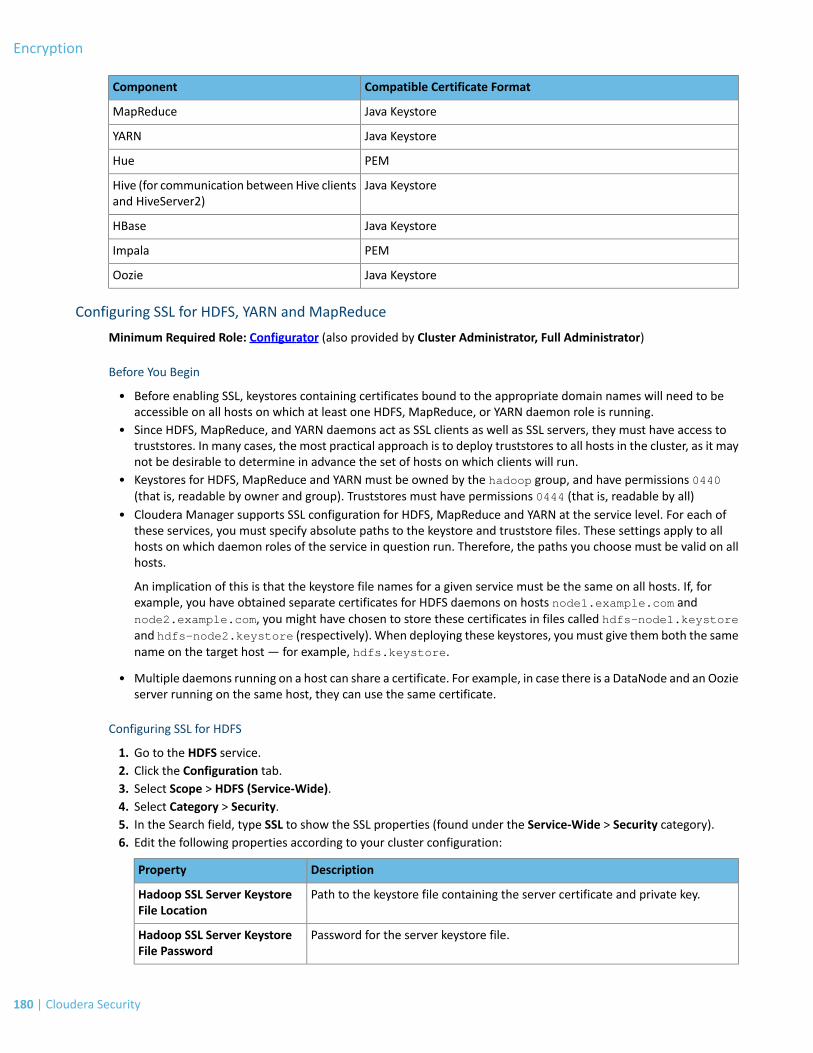
Compatible Certificate FormatComponent
Java KeystoreMapReduce
Java KeystoreYARN
PEMHue
Java KeystoreHive (for communication betweenHive clientsand HiveServer2)
Java KeystoreHBase
PEMImpala
Java KeystoreOozie
Configuring SSL for HDFS, YARN and MapReduce
Minimum Required Role: Configurator (also provided by Cluster Administrator, Full Administrator)
Before You Begin
• Before enabling SSL, keystores containing certificates bound to the appropriate domain names will need to beaccessible on all hosts on which at least one HDFS, MapReduce, or YARN daemon role is running.
• Since HDFS, MapReduce, and YARN daemons act as SSL clients as well as SSL servers, they must have access totruststores. In many cases, the most practical approach is to deploy truststores to all hosts in the cluster, as it maynot be desirable to determine in advance the set of hosts on which clients will run.
• Keystores for HDFS, MapReduce and YARN must be owned by the hadoop group, and have permissions 0440(that is, readable by owner and group). Truststores must have permissions 0444 (that is, readable by all)
• Cloudera Manager supports SSL configuration for HDFS, MapReduce and YARN at the service level. For each ofthese services, you must specify absolute paths to the keystore and truststore files. These settings apply to allhosts on which daemon roles of the service in question run. Therefore, the paths you choose must be valid on allhosts.
An implication of this is that the keystore file names for a given service must be the same on all hosts. If, forexample, you have obtained separate certificates for HDFS daemons on hosts node1.example.com andnode2.example.com, you might have chosen to store these certificates in files called hdfs-node1.keystoreand hdfs-node2.keystore (respectively). When deploying these keystores, youmust give them both the samename on the target host — for example, hdfs.keystore.
• Multiple daemons running on a host can share a certificate. For example, in case there is a DataNode and an Oozieserver running on the same host, they can use the same certificate.
Configuring SSL for HDFS
1. Go to the HDFS service.2. Click the Configuration tab.3. Select Scope > HDFS (Service-Wide).4. Select Category > Security.5. In the Search field, type SSL to show the SSL properties (found under the Service-Wide > Security category).6. Edit the following properties according to your cluster configuration:
DescriptionProperty
Path to the keystore file containing the server certificate and private key.Hadoop SSL Server KeystoreFile Location
Password for the server keystore file.Hadoop SSL Server KeystoreFile Password
180 | Cloudera Security
Encryption
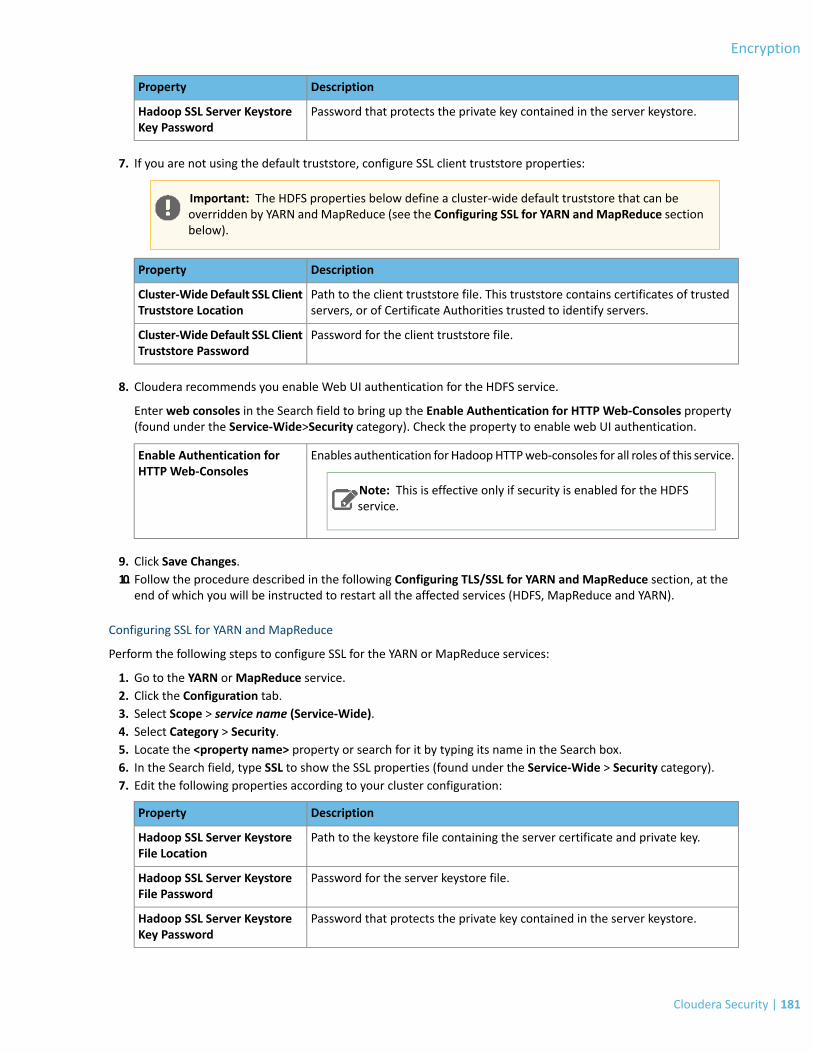
DescriptionProperty
Password that protects the private key contained in the server keystore.Hadoop SSL Server KeystoreKey Password
7. If you are not using the default truststore, configure SSL client truststore properties:
Important: The HDFS properties below define a cluster-wide default truststore that can beoverridden by YARN andMapReduce (see the Configuring SSL for YARN andMapReduce sectionbelow).
DescriptionProperty
Path to the client truststore file. This truststore contains certificates of trustedservers, or of Certificate Authorities trusted to identify servers.
Cluster-WideDefault SSL ClientTruststore Location
Password for the client truststore file.Cluster-WideDefault SSL ClientTruststore Password
8. Cloudera recommends you enable Web UI authentication for the HDFS service.
Enter web consoles in the Search field to bring up the Enable Authentication for HTTP Web-Consoles property(found under the Service-Wide>Security category). Check the property to enable web UI authentication.
Enables authentication for HadoopHTTPweb-consoles for all roles of this service.
Note: This is effective only if security is enabled for the HDFSservice.
Enable Authentication forHTTP Web-Consoles
9. Click Save Changes.10. Follow the procedure described in the following Configuring TLS/SSL for YARN and MapReduce section, at the
end of which you will be instructed to restart all the affected services (HDFS, MapReduce and YARN).
Configuring SSL for YARN and MapReduce
Perform the following steps to configure SSL for the YARN or MapReduce services:
1. Go to the YARN orMapReduce service.2. Click the Configuration tab.3. Select Scope > service name (Service-Wide).4. Select Category > Security.5. Locate the <property name> property or search for it by typing its name in the Search box.6. In the Search field, type SSL to show the SSL properties (found under the Service-Wide > Security category).7. Edit the following properties according to your cluster configuration:
DescriptionProperty
Path to the keystore file containing the server certificate and private key.Hadoop SSL Server KeystoreFile Location
Password for the server keystore file.Hadoop SSL Server KeystoreFile Password
Password that protects the private key contained in the server keystore.Hadoop SSL Server KeystoreKey Password
Cloudera Security | 181
Encryption

8. Configure the following SSL client truststore properties for MRv1 or YARN only if you want to override thecluster-wide defaults set by the HDFS properties configured above.
DescriptionProperty
Path to the client truststore file. This truststore contains certificates of trustedservers, or of Certificate Authorities trusted to identify servers.
SSL Client Truststore FileLocation
Password for the client truststore file.SSL Client Truststore FilePassword
9. Cloudera recommends you enable Web UI authentication for the service in question.
Enter web consoles in the Search field to bring up the Enable Authentication for HTTP Web-Consoles property(found under the Service-Wide>Security category). Check the property to enable web UI authentication.
Enables authentication for HadoopHTTPweb-consoles for all roles of this service.
Note: This is effective only if security is enabled for the HDFSservice.
Enable Authentication forHTTP Web-Consoles
10. Click Save Changes to commit the changes.11. Go to the HDFS service12. Click the Configuration tab.13. Type Hadoop SSL Enabled in the Search box.14. Select the Hadoop SSL Enabled property to enable SSL communication for HDFS, MapReduce, and YARN.
DescriptionProperty
Enable SSL encryption for HDFS, MapReduce, and YARN web UIs, as well asencrypted shuffle for MapReduce and YARN.
Hadoop SSL Enabled
15. Click Save Changes to commit the changes.16. Restart all affected services (HDFS, MapReduce and YARN), as well as their dependent services.
Configuring SSL for HBase
Minimum Required Role: Configurator (also provided by Cluster Administrator, Full Administrator)
Before You Begin
• Before enabling SSL, ensure that keystores containing certificates bound to the appropriate domain names willneed to be accessible on all hosts on which at least one HBase daemon role is running.
• Keystores for HBase must be owned by the hbase group, and have permissions 0440 (that is, readable by ownerand group).
• You must specify absolute paths to the keystore and truststore files. These settings apply to all hosts on whichdaemon roles of the HBase service run. Therefore, the paths you choose must be valid on all hosts.
• ClouderaManager supports the SSL configuration for HBase at the service level. Ensure you specify absolute pathsto the keystore and truststore files. These settings apply to all hosts on which daemon roles of the service inquestion run. Therefore, the paths you choose must be valid on all hosts.
An implication of this is that the keystore file names for a given service must be the same on all hosts. If, forexample, you have obtained separate certificates for HBase daemons on hosts node1.example.com andnode2.example.com, youmight have chosen to store these certificates in files called hbase-node1.keystoreand hbase-node2.keystore (respectively). When deploying these keystores, you must give them both thesame name on the target host — for example, hbase.keystore.
182 | Cloudera Security
Encryption

Configuring TLS/SSL for HBase Web UIs
The steps for configuring and enabling TLS/SSL for HBase are similar to those for HDFS, YARN and MapReduce:
1. Go to the HBase service2. Click the Configuration tab.3. Select Scope > HBASE (Service-Wide).4. Select Category > Security.5. In the Search field, type TLS/SSL to show the HBase TLS/SSL properties.6. Edit the following TLS/SSL properties according to your cluster configuration:
Table 7: HBase TLS/SSL Properties
DescriptionProperty
Path to the keystore file containing the server certificate and private key usedfor encrypted web UIs.
HBase TLS/SSL Server JKSKeystore File Location
Password for the server keystore file used for encrypted web UIs.HBase TLS/SSL Server JKSKeystore File Password
Password that protects the private key contained in the server keystore usedfor encrypted web UIs.
HBase TLS/SSL Server JKSKeystore Key Password
7. Check theWeb UI TLS/SSL Encryption Enabled property.
Enable TLS/SSL encryption for the HBase Master, RegionServer, Thrift Server,and REST Server web UIs.
Web UI TLS/SSL EncryptionEnabled
8. Click Save Changes to commit the changes.9. Restart the HBase service.
Configuring TLS/SSL for HBase REST Server
1. Go to the HBase service2. Click the Configuration tab.3. Select Scope > HBASE (Service-Wide).4. Select > Security.5. In the Search field, type SSL to show the HBase SSL properties.6. Edit the following SSL properties according to your cluster configuration:
Table 8: HBase SSL Properties
DescriptionProperty
Path to the keystore file containing the server certificate and private key.SSL Server Keystore FileLocation
Password for the server keystore file.SSL Server Keystore FilePassword
Password that protects the private key contained in the server keystore.SSL Server Keystore KeyPassword
7. Check theWeb UI SSL Encryption Enabled property.
Enable SSL encryption for the HBase Master, Region Server, Thrift Server, andREST Server web UIs.
WebUI SSL Encryption Enabled
Cloudera Security | 183
Encryption

8. Click Save Changes.9. Restart the HBase service.
Configuring SSL for Flume Thrift Source and Sink
This topic describes how to enable SSL communication between Flume's Thrift source and sink.
The following tables list the properties that must be configured to enable SSL communication between Flume's Thriftsource and sink instances.
Table 9: Thrift Source SSL Properties
DescriptionProperty
Set to true to enable SSL encryption.ssl
Path to a Java keystore file. Required for SSL.keystore
Password for the Java keystore. Required for SSL.keystore-password
The type of the Java keystore. This can be JKS or PKCS12.keystore-type
Table 10: Thrift Sink SSL Properties
DescriptionProperty
Set to true to enable SSL for this ThriftSink.
When configuring SSL, you can optionally set the following truststore,truststore-password and truststore-type properties. If a custom
ssl
truststore is not specified, Flume will use the default Java JSSE truststore(typically jssecacerts or cacerts in the Oracle JRE) to verify the remoteThrift Source's SSL credentials.
(Optional) The path to a custom Java truststore file.truststore
(Optional) The password for the specified truststore.truststore-password
(Optional) The type of the Java truststore. This can be JKS or any othersupported Java truststore type.
truststore-type
Make sure you are configuring SSL for each Thrift source and sink instance. For example, to the existing flume.conffile, for agent a1, source r1, and sink k1, you would add the following properties:
# SSL properties for Thrift source s1 a1.sources.r1.ssl=truea1.sources.r1.keystore=<path/to/keystore>a1.sources.r1.keystore-password=<keystore password>a1.sources.r1.keystore-type=<keystore type>
# SSL properties for Thrift sink k1 a1.sinks.k1.ssl=truea1.sinks.k1.truststore=<path/to/truststore>a1.sinks.k1.truststore-password=<truststore password>a1.sinks.k1.truststore-type=<truststore type>
Configure these sets of properties for more instances of the Thrift source and sink as required. You can use eitherCloudera Manager or the command line to edit the flume.conf file.
Using Cloudera Manager
1. Open the Cloudera Manager Admin Console and go to the Flume service.2. Click the Configuration tab.3. Select Scope > Agent.
184 | Cloudera Security
Encryption

4. Select Category >Main.5. Edit the Configuration File property and add the Thrift source and sink properties for each Thrift source and sink
instance as described above to the configuration file.6. Click Save Changes to commit the changes.7. Restart the Flume service.
Using the Command Line
Go to the /etc/flume-ng/conf/flume.conf file and add the Thrift source and sink properties for each Thrift sourceand sink instance as described above.
Configuring Encrypted Communication Between Hive and Client Drivers
This topic describes how to set up encrypted communication between HiveServer2 and its clients. Encrypting Hivecommunication depends on whether you are using Kerberos authentication for communications between HiveServer2and JDBC/ODBC client drivers.
With Kerberos Enabled
With Kerberos authentication enabled, traffic between theHive JDBC orODBC drivers andHiveServer2 can be encryptedusing SASL-QOP which allows you to preserve both data integrity (using checksums to validate message integrity) andconfidentiality (by encryptingmessages). For instructions, see Configuring Encrypted Client/Server Communication forKerberos-enabled HiveServer2 Connections on page 185.
Without Kerberos Enabled
If you are using any alternate means of authentication, such as LDAP, between HiveServer2 and its clients, you canconfigure Secure Socket Layer (SSL) communication between them. For instructions, see Configuring EncryptedClient/Server Communication for non-Kerberos HiveServer2 Connections on page 185. For more information onconfiguring SSL truststores and keystores, see TLS/SSL Certificates Overview on page 156.
Configuring Encrypted Client/Server Communication for Kerberos-enabled HiveServer2 Connections
With Kerberos authentication enabled, traffic between theHive JDBC orODBC drivers andHiveServer2 can be encryptedwhich allows you to preserve data integrity (using checksums to validate message integrity) and confidentiality (byencrypting messages). This can be enabled by setting the hive.server2.thrift.sasl.qop property inhive-site.xml. For example,
<property><name>hive.server2.thrift.sasl.qop</name><value>auth-conf</value><description>Sasl QOP value; one of 'auth', 'auth-int' and 'auth-conf'</description></property>
Valid settings for the value field are:
• auth: Authentication only (default)• auth-int: Authentication with integrity protection• auth-conf: Authentication with confidentiality protection
The parameter value that you specify above in the HiveServer2 configuration, shouldmatch that specified in the Beelineclient connection JDBC URL. For example:
!connect jdbc:hive2://ip-10-5-15-197.us-west-2.compute.internal:10000/default; \principal=hive/[email protected];sasl.qop=auth-conf
Configuring Encrypted Client/Server Communication for non-Kerberos HiveServer2 Connections
You can use either Cloudera Manager or the command-line to enable SSL encryption for non-Kerberized clientconnections to HiveServer2.
Cloudera Security | 185
Encryption

Using Cloudera Manager
The steps for configuring and enabling SSL for Hive are as follows:
1. Open the Cloudera Manager Admin Console and go to the Hive service.2. Click the Configuration tab.3. Select Scope > Hive (Service-Wide).4. Select Category > Security.5. In the Search field, type SSL to show the Hive SSL properties.6. Edit the following SSL properties according to your cluster configuration.
Table 11: Hive SSL Properties
DescriptionProperty
Enable support for encrypted client-server communication using Secure SocketLayer (SSL) for HiveServer2 connections. Not applicable for Kerberos-enabledconnections.
Enable TLS/SSL forHiveServer2
Path to the SSL keystore.HiveServer2 TLS/SSL ServerJKS Keystore File Location
Password for the keystore.HiveServer2 TLS/SSL ServerJKS Keystore File Password
7. Click Save Changes to commit the changes.8. Restart the Hive service.
Using the Command Line
• To enable SSL, add the following configuration parameters to hive-site.xml :
<property> <name>hive.server2.use.SSL</name> <value>true</value> <description>enable/disable SSL </description></property>
<property> <name>hive.server2.keystore.path</name> <value>keystore-file-path</value> <description>path to keystore file</description></property>
<property> <name>hive.server2.keystore.password</name> <value>keystore-file-password</value> <description>keystore password</description></property>
• The keystoremust contain the server's certificate.
• The JDBC client must add the following properties in the connection URL when connecting to a HiveServer2 usingSSL:
;ssl=true[;sslTrustStore=<Trust-Store-Path>;trustStorePassword=<Trust-Store-password>]
• Make sure one of the following is true:
• Either: sslTrustStore points to the trust store file containing the server's certificate; for example:
jdbc:hive2://localhost:10000/default;ssl=true;\sslTrustStore=/home/usr1/ssl/trust_store.jks;trustStorePassword=xyz
186 | Cloudera Security
Encryption

• or: the Trust Store arguments are set using the Java system properties javax.net.ssl.trustStore andjavax.net.ssl.trustStorePassword; for example:
java -Djavax.net.ssl.trustStore=/home/usr1/ssl/trust_store.jks -Djavax.net.ssl.trustStorePassword=xyz \ MyClass jdbc:hive2://localhost:10000/default;ssl=true
For more information on using self-signed certificates and the Trust Store, see the Oracle Java SE keytool page.
Configuring SSL for Hue
This topic describes how to enable SSL communication for Hue:
Hue as an SSL Client
Minimum Required Role: Configurator (also provided by Cluster Administrator, Full Administrator)
Hue acts as an SSL client when communicating with Oozie, HBase and core Hadoop services. This means Huemay haveto authenticate HDFS,MapReduce, and YARNdaemons, aswell as theHBase Thrift Server, andwill need their certificates(or the relevant CA certificate) in its truststore.
Deploying the Hue Truststore:
You can create the Hue truststore by consolidating certificates of all SSL-enabled servers (or a single CA certificatechain) that Hue communicates with into one file. This will generally include certificates of all the HDFS, MapReduceand YARN daemons, and other SSL-enabled services such as Oozie..
The Hue truststore must be in PEM format whereas other services use JKS format by default. Hence, to populate theHue truststore, you will need to extract the certificates from Hadoop's JKS keystores and convert them to PEM format.The following example assumes that hadoop-server.keystore contains the server certificate identified by aliasfoo-1.example.com and password example123.
$ keytool -exportcert -keystore hadoop-server.keystore -alias foo-1.example.com \ -storepass example123 -file foo-1.cert$ openssl x509 -inform der -in foo-1.cert > foo-1.pem
Once you've done this for each host in the cluster, you can concatenate the PEM files into one PEM file that can serveas the Hue truststore.
cat foo-1.pem foo-2.pem ... > huetrust.pem
Note: Ensure the final PEM truststore is deployed in a location that is accessible by the Hue service.
In Cloudera Manager, set REQUESTS_CA_BUNDLE to the path of the consolidated PEM file, huetrust.pem createdabove. To do this:
1. Open the Cloudera Manager Admin Console and go to the Hue service.2. Click Configuration.3. Select Scope > Hue-1 (Service-Wide) .4. Select Category > Advanced.5. Locate the field, Hue Service Environment Advanced Configuration Snippet (Safety Valve).6. Add the property, REQUESTS_CA_BUNDLE, set to the path of the Hue truststore in PEM format.
If more than one role group applies to this configuration, edit the value for the appropriate role group. SeeModifying Configuration Properties.
7. Click Save Changes.8. Restart the Hue service.
Cloudera Security | 187
Encryption

Hue as an SSL Server
Hue expects certificates and keys to be stored in PEM format. When managing certificates and keys for such services,using the openssl tool may be more convenient. To configure Hue to use HTTPS, you can generate a private key andcertificate as described in Creating Certificates on page 156.
Ensure secure session cookies for Hue have been enabled in hue.ini under [desktop]>[[session]].
[desktop] [[session]] secure=true
Enabling SSL for the Hue Server at the Command Line
If you are not using Cloudera Manager, update the following properties in hue.ini under [desktop].
[desktop] ssl_certificate=/path/to/server.cert ssl_private_key=/path/to/server.key ssl_password=<private_key_password>
You can also store ssl_passwordmore securely in a script and set this parameter instead:
ssl_password_script=<your_hue_passwords_script.sh>
For more, see Storing Hue Passwords in a Script on page 189.
Enabling SSL for the Hue Server in Cloudera Manager
Minimum Required Role: Configurator (also provided by Cluster Administrator, Full Administrator)
Perform the following steps in Cloudera Manager to enable SSL for the Hue web server.
1. Open the Cloudera Manager Admin Console and go to the Hue service.2. Click Configuration.3. Select Scope > Hue Server .4. Select Category >Main.5. Edit the following TLS/SSL properties according to your cluster configuration.
DescriptionProperty
Enable HTTPS for the Hue web server.Enable HTTPS
Path to the SSL certificate on the host running the Hue web server.Local Path to SSL Certificate
Path to the SSL private key on the host running the Hue web server.Local Path to SSL Private Key
If the private key has a password:
a. Select Scope > Hue-1 (Service-Wide) .b. Select Category > Advanced.c. Locate the field, Hue Service Advanced Configuration Snippet (Safety Valve) for hue_safety_valve.ini.d. Add the SSL password parameter in the [desktop] section as follows:
[desktop]ssl_password=<private_key_password>
You can also store ssl_passwordmore securely in a script and set this parameter instead:
ssl_password_script=<your_hue_passwords_script.sh>
For more, see Storing Hue Passwords in a Script on page 189.
188 | Cloudera Security
Encryption

If more than one role group applies to this configuration, edit the value for the appropriate role group. SeeModifying Configuration Properties.
6. Click Save Changes.7. Restart the Hue service.
For more details on configuring Hue with SSL, see this blog post.
Enabling Hue SSL Communication with HiveServer2
By providing a CA certificate, private key, and public certificate, Hue can communicate with HiveServer2 over TLS/SSL.You can now configure the following properties in the [beeswax] section under [[ssl]] in the Hue configurationfile, hue.ini.
Choose to enable/disable SSL communication for this server.enabled
Default: false
Path to Certificate Authority certificates.cacerts
Default: /etc/hue/cacerts.pem
Choose whether Hue should validate certificates received from the server.validate
Default: true
Enabling Hue SSL Communication with Impala
By providing a CA certificate, private key, and public certificate, Hue can communicate with Impala over TLS/SSL. Youcan configure the following properties in the[impala] section under[[ssl]] in theHue configuration file,hue.ini.
Choose to enable/disable TLS/SSL communication for this server.enabled
Default: false
Path to Certificate Authority certificates.cacerts
Default: /etc/hue/cacerts.pem
Choose whether Hue should validate certificates received from the server.validate
Default: true
Securing Database Connections using SSL
Connections vary depending on the database. Hue uses different clients to communicatewith each database internally.They all specify a common interface known as the DBAPI version 2 interface. Client specific options, such as secureconnectivity, can be passed through the interface. For example, for MySQL you can enable SSL communication byspecifying the options configuration property under the desktop>[[database]] section in hue.ini.
[desktop] [[databases]] … options={"ssl":{"ca":"/tmp/ca-cert.pem"}}
Storing Hue Passwords in a Script
In CDH 5.4, Hue added the ability to store passwords in a secure script and pull passwords from stdout. On startup,Hue runs one or more passwords scripts and grabs each password from stdout.
Cloudera Security | 189
Encryption

In hue_ini, add the suffix, _script, to any password property and set it equal to the script name. In ClouderaManager, set these properties in the configuration field, Hue Service Advanced Configuration Snippet (Safety Valve)for hue_safety_valve.ini. For example:
[desktop]ldap_username=hueserviceldap_password_script="/var/lib/hue/<your_hue_passwords_script.sh> ldap_password"ssl_password_script="/var/lib/hue/<your_hue_passwords_script.sh> ssl_password"
[[ldap]]bind_password_script="/var/lib/hue/<your_hue_passwords_script.sh> bind_password"
[[database]]password_script="/var/lib/hue/<your_hue_passwords_script.sh> database"
Store the script in a directory that only the hue user can read, write, and execute. You can have one script per passwordor one script with parameters for all passwords. Here is an example of a script with parameters for multiple passwords:
#!/bin/bash
SERVICE=$1
if [[ ${SERVICE} == "ldap_password" ]]then echo "password"fi
if [[ ${SERVICE} == "ssl_password" ]]then echo "password"fi
if [[ ${SERVICE} == "bind_password" ]]then echo "Password1"fi
if [[ ${SERVICE} == "database_password" ]]then echo "password"fi
Note: The bind password parameter was added in CDH 5.4.6.
Configuring SSL for Impala
Impala supports SSL network encryption, between Impala and client programs, and between the Impala-relateddaemons running on different nodes in the cluster. This feature is important when you also use other features suchas Kerberos authentication or Sentry authorization, where credentials are being transmitted back and forth.
Important:
• You can use either Cloudera Manager or the following command-line instructions to completethis configuration.
• This information applies specifically to CDH 5.4.x. If you use an earlier version of CDH, see thedocumentation for that version located at Cloudera Documentation.
Using Cloudera Manager
To configure Impala to listen for Beeswax and HiveServer2 requests on SSL-secured ports:
1. Open the Cloudera Manager Admin Console and go to the Impala service.
190 | Cloudera Security
Encryption

2. Click the Configuration tab.3. Select Scope > Impala (Service-Wide).4. Select Category > Security.5. Edit the following SSL properties:
Table 12: Impala SSL Properties
DescriptionProperty
Encrypt communication between clients (like ODBC, JDBC, and the Impala shell)and the Impala daemon using Transport Layer Security (TLS) (formerly knownas Secure Socket Layer (SSL)).
Enable TLS/SSL for ImpalaClient Services
Local path to the X509 certificate that will identify the Impala daemon to clientsduring SSL/TLS connections. This file must be in PEM format.
SSL/TLS Certificate for Clients
Local path to the private key that matches the certificate specified in theCertificate for Clients. This file must be in PEM format.
SSL/TLS Private Key for Clients
6. Click Save Changes to commit the changes.7. Restart the Impala service.
For information on configuring SSL communication with the impala-shell interpreter, see Configuring SSLCommunication for the Impala Shell on page 191.
Using the Command Line
To enable SSL for Impala network communication, add both of the following flags to the impalad startup options:
• --ssl_server_certificate: the full path to the server certificate, on the local filesystem.• --ssl_private_key: the full path to the server private key, on the local filesystem.
If either of these flags are set, both must be set. In that case, Impala starts listening for Beeswax and HiveServer2requests on SSL-secured ports only. (The port numbers stay the same; see Ports Used by Impala for details.)
Since Impala uses passphrase-less certificates in PEM format, you can reuse a host's existing Java keystore by convertingit to the PEM format. For instructions, see Conversion from Java Keystore to OpenSSL on page 162.
Configuring SSL Communication for the Impala Shell
Typically, a client programhas corresponding configuration properties in ClouderaManager to verify that it is connectingto the right server. For example, with SSL enabled for Impala, you use the following options when starting theimpala-shell interpreter:
• --ssl: enables SSL for impala-shell.• --ca_cert: the local pathname pointing to the third-party CA certificate, or to a copy of the server certificate
for self-signed server certificates.
If --ca_cert is not set, impala-shell enables SSL, but does not validate the server certificate. This is useful forconnecting to a known-good Impala that is only running over SSL, when a copy of the certificate is not available (suchas when debugging customer installations).
Using TLS/SSL with Business Intelligence Tools
You can use Kerberos authentication, TLS/SSL encryption, or both to secure connections from JDBCandODBCapplicationsto Impala. See Configuring Impala to Work with JDBC and Configuring Impala to Work with ODBC for details.
Currently, the Hive JDBC driver does not support connections that use both Kerberos authentication and SSL encryption.To use both of these security features with Impala through a JDBC application, use the Cloudera JDBC Connector asthe JDBC driver.
Cloudera Security | 191
Encryption

Configuring SSL for Oozie
Minimum Required Role: Configurator (also provided by Cluster Administrator, Full Administrator)
Before You Begin
• Keystores for Oozie must be readable by the oozie user. This could be a copy of the Hadoop services' keystorewith permissions 0440 and owned by the oozie group.
• Truststores must have permissions 0444 (that is, readable by all).• Specify absolute paths to the keystore and truststore files. These settings apply to all hosts on which daemon
roles of the Oozie service run. Therefore, the paths you choose must be valid on all hosts.• In case there is a DataNode and an Oozie server running on the same host, they can use the same certificate.
For more information on obtaining signed certificates and creating keystores, see TLS/SSL Certificates Overview onpage 156. You can also view the upstream documentation located here.
Important:
• You can use either Cloudera Manager or the following command-line instructions to completethis configuration.
• This information applies specifically to CDH 5.4.x. If you use an earlier version of CDH, see thedocumentation for that version located at Cloudera Documentation.
Using Cloudera Manager
The steps for configuring and enabling Hadoop SSL for Oozie are as follows:
1. Open the Cloudera Manager Admin Console and go to the Oozie service.2. Click the Configuration tab.3. Select Scope > All.4. Select Category > All.5. In the Search field, type SSL to show the Oozie SSL properties.6. Edit the following SSL properties according to your cluster configuration.
Table 13: Oozie SSL Properties
DescriptionProperty
Check this field to enable SSL for Oozie.Enable TLS/SSL for Oozie
Location of the keystore file on the local file system.Oozie TLS/SSL Server KeystoreFile Location
Password for the keystore.Oozie TLS/SSL Server JKSKeystore File Password
7. Click Save Changes.8. Restart the Oozie service.
Using the Command Line
To configure the Oozie server to use SSL:
1. Stop Oozie by running
sudo /sbin/service oozie stop
2. To enable SSL, set the MapReduce version that the Oozie server should work with using the alternativescommand.
192 | Cloudera Security
Encryption

Note: The alternatives command is only available on RHEL systems. For SLES, Ubuntu andDebian systems, the command is update-alternatives.
For RHEL systems, to use YARN with SSL:
alternatives --set oozie-tomcat-conf /etc/oozie/tomcat-conf.https
For RHEL systems, to use MapReduce (MRv1) with SSL:
alternatives --set oozie-tomcat-conf /etc/oozie/tomcat-conf.https.mr1
Important:
The OOZIE_HTTPS_KEYSTORE_PASS variable must be the same as the password used whencreating the keystore file. If you used a password other than password, you'll have to changethe value of the OOZIE_HTTPS_KEYSTORE_PASS variable in this file.
3. Start Oozie by running
sudo /sbin/service oozie start
Connect to the Oozie Web UI using SSL (HTTPS)
Use https://oozie.server.hostname:11443/oozie though most browsers should automatically redirect youif you use http://oozie.server.hostname:11000/oozie.
Additional Considerations when Configuring SSL for Oozie HA
To allow clients to talk to Oozie servers (the target servers) through the load balancer using SSL, configure the loadbalancer to perform SSL pass-through. This allows clients to use the SSL certificate provided by the target servers (sothe load balancer will not need one). Consult your load balancer's documentation on how to configure this. Make sureto point the load balancer at the https://HOST:HTTPS_PORT addresses for your target servers. Clients can thenconnect to the load balancer at https://LOAD_BALANCER_HOST:PORT.
Configuring SSL for Solr
Minimum Required Role: Configurator (also provided by Cluster Administrator, Full Administrator)
Before You Begin
• The Solr service must be running.• Keystores for Solr must be readable by the solr user. This could be a copy of the Hadoop services' keystore with
permissions 0440 and owned by the solr group.• Truststores must have permissions 0444 (that is, readable by all).• Specify absolute paths to the keystore and truststore files. These settings apply to all hosts on which daemon
roles of the Solr service run. Therefore, the paths you choose must be valid on all hosts.• In case there is a DataNode and a Solr server running on the same host, they can use the same certificate.
For more information on obtaining signed certificates and creating keystores, see TLS/SSL Certificates Overview onpage 156. You can also view the upstream documentation located here.
Cloudera Security | 193
Encryption
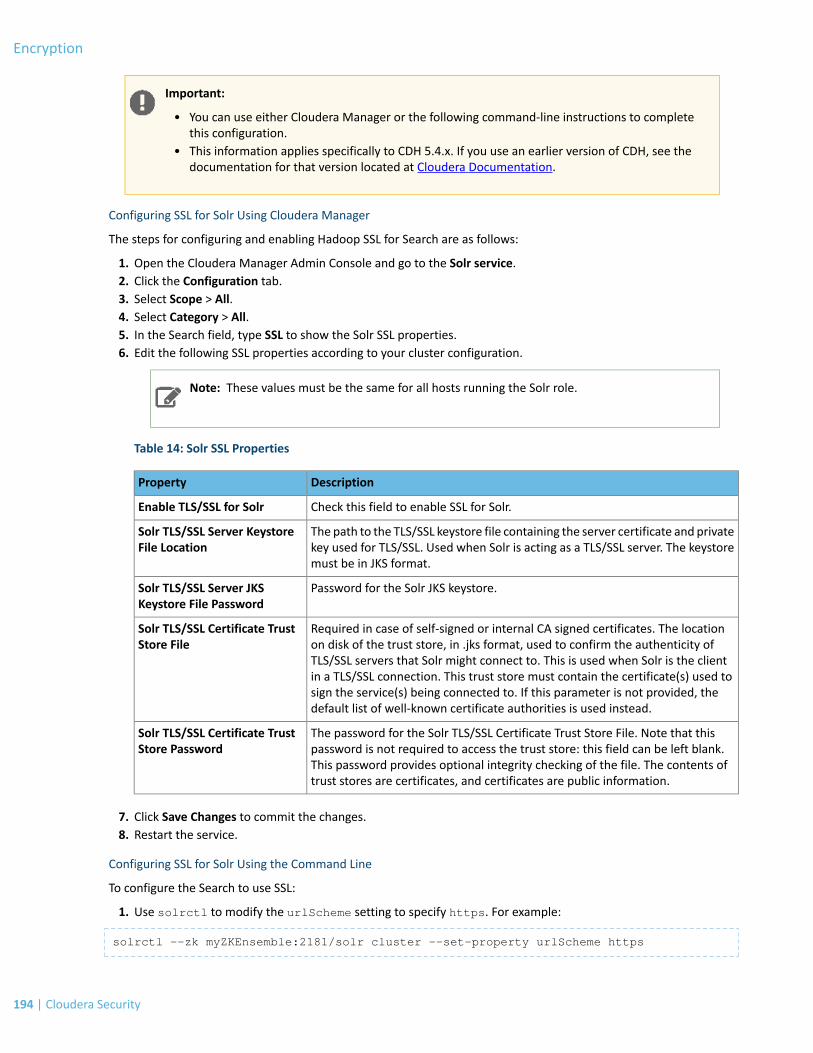
Important:
• You can use either Cloudera Manager or the following command-line instructions to completethis configuration.
• This information applies specifically to CDH 5.4.x. If you use an earlier version of CDH, see thedocumentation for that version located at Cloudera Documentation.
Configuring SSL for Solr Using Cloudera Manager
The steps for configuring and enabling Hadoop SSL for Search are as follows:
1. Open the Cloudera Manager Admin Console and go to the Solr service.2. Click the Configuration tab.3. Select Scope > All.4. Select Category > All.5. In the Search field, type SSL to show the Solr SSL properties.6. Edit the following SSL properties according to your cluster configuration.
Note: These values must be the same for all hosts running the Solr role.
Table 14: Solr SSL Properties
DescriptionProperty
Check this field to enable SSL for Solr.Enable TLS/SSL for Solr
The path to the TLS/SSL keystore file containing the server certificate and privatekey used for TLS/SSL. Used when Solr is acting as a TLS/SSL server. The keystoremust be in JKS format.
Solr TLS/SSL Server KeystoreFile Location
Password for the Solr JKS keystore.Solr TLS/SSL Server JKSKeystore File Password
Required in case of self-signed or internal CA signed certificates. The locationon disk of the trust store, in .jks format, used to confirm the authenticity of
Solr TLS/SSL Certificate TrustStore File
TLS/SSL servers that Solr might connect to. This is used when Solr is the clientin a TLS/SSL connection. This trust store must contain the certificate(s) used tosign the service(s) being connected to. If this parameter is not provided, thedefault list of well-known certificate authorities is used instead.
The password for the Solr TLS/SSL Certificate Trust Store File. Note that thispassword is not required to access the trust store: this field can be left blank.
Solr TLS/SSL Certificate TrustStore Password
This password provides optional integrity checking of the file. The contents oftrust stores are certificates, and certificates are public information.
7. Click Save Changes to commit the changes.8. Restart the service.
Configuring SSL for Solr Using the Command Line
To configure the Search to use SSL:
1. Use solrctl to modify the urlScheme setting to specify https. For example:
solrctl --zk myZKEnsemble:2181/solr cluster --set-property urlScheme https
194 | Cloudera Security
Encryption
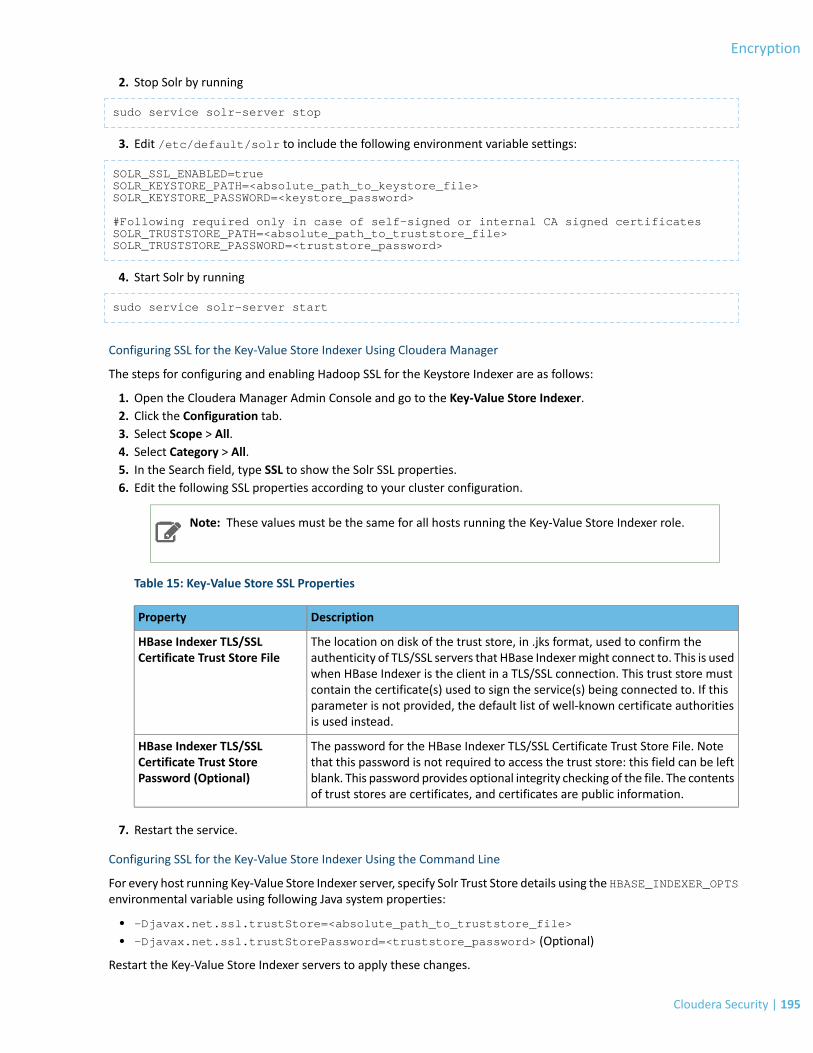
2. Stop Solr by running
sudo service solr-server stop
3. Edit /etc/default/solr to include the following environment variable settings:
SOLR_SSL_ENABLED=trueSOLR_KEYSTORE_PATH=<absolute_path_to_keystore_file>SOLR_KEYSTORE_PASSWORD=<keystore_password>
#Following required only in case of self-signed or internal CA signed certificatesSOLR_TRUSTSTORE_PATH=<absolute_path_to_truststore_file>SOLR_TRUSTSTORE_PASSWORD=<truststore_password>
4. Start Solr by running
sudo service solr-server start
Configuring SSL for the Key-Value Store Indexer Using Cloudera Manager
The steps for configuring and enabling Hadoop SSL for the Keystore Indexer are as follows:
1. Open the Cloudera Manager Admin Console and go to the Key-Value Store Indexer.2. Click the Configuration tab.3. Select Scope > All.4. Select Category > All.5. In the Search field, type SSL to show the Solr SSL properties.6. Edit the following SSL properties according to your cluster configuration.
Note: These values must be the same for all hosts running the Key-Value Store Indexer role.
Table 15: Key-Value Store SSL Properties
DescriptionProperty
The location on disk of the trust store, in .jks format, used to confirm theauthenticity of TLS/SSL servers that HBase Indexermight connect to. This is used
HBase Indexer TLS/SSLCertificate Trust Store File
when HBase Indexer is the client in a TLS/SSL connection. This trust store mustcontain the certificate(s) used to sign the service(s) being connected to. If thisparameter is not provided, the default list of well-known certificate authoritiesis used instead.
The password for the HBase Indexer TLS/SSL Certificate Trust Store File. Notethat this password is not required to access the trust store: this field can be left
HBase Indexer TLS/SSLCertificate Trust StorePassword (Optional) blank. This password provides optional integrity checking of the file. The contents
of trust stores are certificates, and certificates are public information.
7. Restart the service.
Configuring SSL for the Key-Value Store Indexer Using the Command Line
For every host running Key-Value Store Indexer server, specify Solr Trust Store details using the HBASE_INDEXER_OPTSenvironmental variable using following Java system properties:
• -Djavax.net.ssl.trustStore=<absolute_path_to_truststore_file>
• -Djavax.net.ssl.trustStorePassword=<truststore_password> (Optional)
Restart the Key-Value Store Indexer servers to apply these changes.
Cloudera Security | 195
Encryption
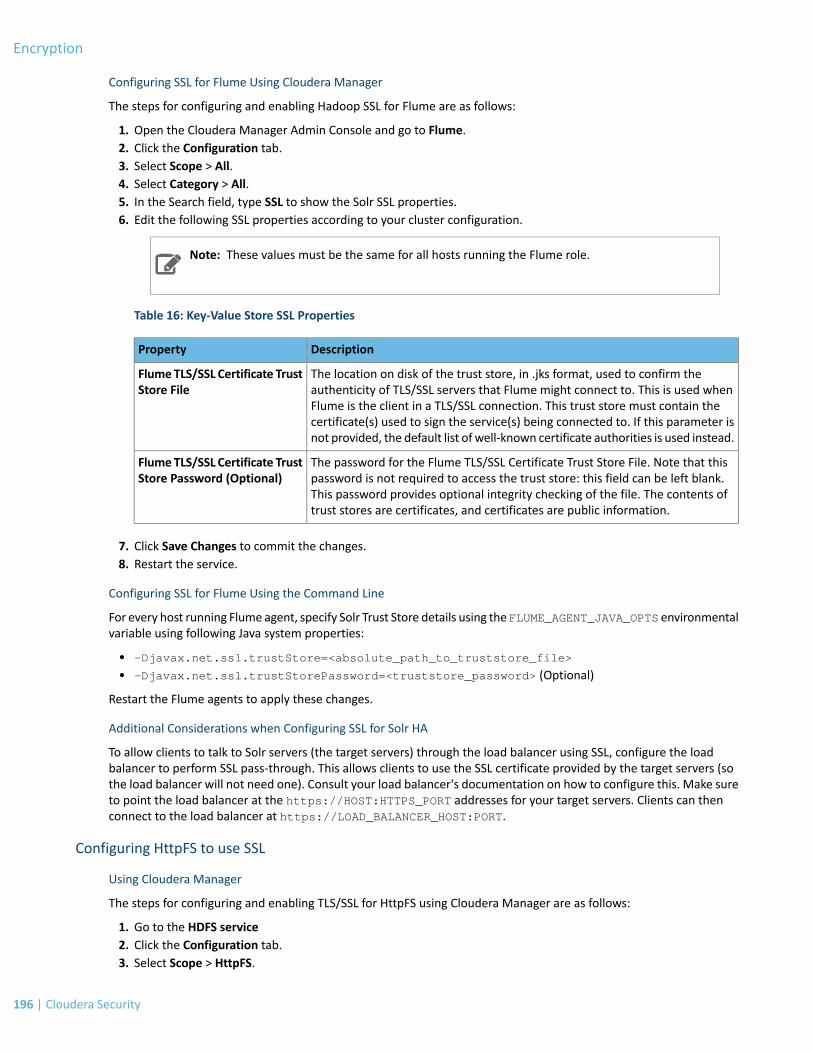
Configuring SSL for Flume Using Cloudera Manager
The steps for configuring and enabling Hadoop SSL for Flume are as follows:
1. Open the Cloudera Manager Admin Console and go to Flume.2. Click the Configuration tab.3. Select Scope > All.4. Select Category > All.5. In the Search field, type SSL to show the Solr SSL properties.6. Edit the following SSL properties according to your cluster configuration.
Note: These values must be the same for all hosts running the Flume role.
Table 16: Key-Value Store SSL Properties
DescriptionProperty
The location on disk of the trust store, in .jks format, used to confirm theauthenticity of TLS/SSL servers that Flume might connect to. This is used when
FlumeTLS/SSL Certificate TrustStore File
Flume is the client in a TLS/SSL connection. This trust store must contain thecertificate(s) used to sign the service(s) being connected to. If this parameter isnot provided, the default list of well-known certificate authorities is used instead.
The password for the Flume TLS/SSL Certificate Trust Store File. Note that thispassword is not required to access the trust store: this field can be left blank.
FlumeTLS/SSL Certificate TrustStore Password (Optional)
This password provides optional integrity checking of the file. The contents oftrust stores are certificates, and certificates are public information.
7. Click Save Changes to commit the changes.8. Restart the service.
Configuring SSL for Flume Using the Command Line
For every host running Flume agent, specify Solr Trust Store details using the FLUME_AGENT_JAVA_OPTS environmentalvariable using following Java system properties:
• -Djavax.net.ssl.trustStore=<absolute_path_to_truststore_file>
• -Djavax.net.ssl.trustStorePassword=<truststore_password> (Optional)
Restart the Flume agents to apply these changes.
Additional Considerations when Configuring SSL for Solr HA
To allow clients to talk to Solr servers (the target servers) through the load balancer using SSL, configure the loadbalancer to perform SSL pass-through. This allows clients to use the SSL certificate provided by the target servers (sothe load balancer will not need one). Consult your load balancer's documentation on how to configure this. Make sureto point the load balancer at the https://HOST:HTTPS_PORT addresses for your target servers. Clients can thenconnect to the load balancer at https://LOAD_BALANCER_HOST:PORT.
Configuring HttpFS to use SSL
Using Cloudera Manager
The steps for configuring and enabling TLS/SSL for HttpFS using Cloudera Manager are as follows:
1. Go to the HDFS service2. Click the Configuration tab.3. Select Scope > HttpFS.
196 | Cloudera Security
Encryption

4. Select > Security.5. Edit the following TLS/SSL properties according to your cluster configuration:
Table 17: HttpFS TLS/SSL Properties
DescriptionProperty
Use TLS/SSL for HttpFS.Use TLS/SSL
Location of the keystore file used by the HttpFS role for TLS/SSL.
Default: /var/run/hadoop-httpfs/.keystore. Note that the defaultlocation for the keystore file is on non-persistent disk.
HttpFS Keystore File
Password of the keystore used by the HttpFS role for TLS/SSL.
If the keystore password has a percent sign, it must be escaped. For example,for a password that is pass%word, use pass%%word.
HttpFS Keystore Password
The location on disk of the truststore, in .jks format, used to confirm theauthenticity of TLS/SSL servers that HttpFS might connect to. This is used whenHttpFS is the client in a TLS/SSL connection.
HttpFS TLS/SSL CertificateTrust Store File
The password for the HttpFS TLS/SSL Certificate Trust Store File. This passwordis not required to access the trust store; this field can be left blank.
If the truststore password has a percent sign, it must be escaped. For example,for a password that is pass%word, use pass%%word.
HttpFS TLS/SSL CertificateTrust Store Password
6. Click Save Changes.7. Restart the HDFS service.
Connect to the HttpFS Web UI using TLS/SSL (HTTPS)
Use https://<httpfs_server_hostname>:14000/webhdfs/v1/, though most browsers should automaticallyredirect you if you use http://<httpfs_server_hostname>:14000/webhdfs/v1/
Using the Command Line
Configure the HttpFS Server to use TLS/SSL (HTTPS)
1. Stop HttpFS by running
sudo /sbin/service hadoop-httpfs stop
2. To enable TLS/SSL, change which configuration the HttpFS server should work with using the alternativescommand.
Note: The alternatives command is only available on RHEL systems. For SLES, Ubuntu andDebian systems, the command is update-alternatives.
For RHEL systems, to use TLS/SSL:
alternatives --set hadoop-httpfs-tomcat-conf /etc/hadoop-httpfs/tomcat-conf.https
Cloudera Security | 197
Encryption
Important:
The HTTPFS_TLS/SSL_KEYSTORE_PASS variablemust be the same as the password usedwhencreating the keystore file. If you used a password other than password, you'll have to changethe value of the HTTPFS_TLS/SSL_KEYSTORE_PASS variable in/etc/hadoop-httpfs/conf/httpfs-env.sh.
3. Start HttpFS by running
sudo /sbin/service hadoop-httpfs start
Connect to the HttpFS Web UI using TLS/SSL (HTTPS)
Use https://<httpfs_server_hostname>:14000/webhdfs/v1/, though most browsers should automaticallyredirect you if you use http://<httpfs_server_hostname>:14000/webhdfs/v1/
Important:
If using a Self-Signed Certificate, your browser will warn you that it can't verify the certificate orsomething similar. You will probably have to add your certificate as an exception.
Encrypted Shuffle and Encrypted Web UIs
Once you've enabled Kerberos, which provides for strong authentication, you can optionally enable network encryptionif you so desire. CDH 5 supports the Encrypted Shuffle and Encrypted Web UIs feature that allows encryption of theMapReduce shuffle and web server ports using HTTPS with optional client authentication (also known as bi-directionalHTTPS, or HTTPS with client certificates). It includes:
• Hadoop configuration setting for toggling the shuffle between HTTP and HTTPS.• Hadoop configuration setting for toggling the Web UIs to use either HTTP or HTTPS.• Hadoop configuration settings for specifying the keystore and truststore properties (location, type, passwords)
that are used by the shuffle service, web server UIs and the reducers tasks that fetch shuffle data.• A way to re-read truststores across the cluster (when a node is added or removed).
CDH 5 supports Encrypted Shuffle for both MRv1 and MRv2 (YARN), with common configuration properties used forboth versions. The only configuration difference is in the parameters used to enable the features:
• ForMRv1, setting the hadoop.ssl.enabled parameter in the core-site.xml file enables both the EncryptedShuffle and the Encrypted Web UIs. In other words, the encryption toggling is coupled for the two features.
• ForMRv2, setting the hadoop.ssl.enabled parameter enables the Encrypted Web UI feature; setting themapreduce.shuffle.ssl.enabled parameter in the mapred-site.xml file enables the Encrypted Shufflefeature.
All other configuration properties apply to both the Encrypted Shuffle and Encrypted Web UI functionality.
When the Encrypted Web UI feature is enabled, all Web UIs for Hadoop components are served over HTTPS. If youconfigure the systems to require client certificates, browsersmust be configuredwith the appropriate client certificatesin order to access the Web UIs.
Important:
When the Web UIs are served over HTTPS, you must specify https:// as the protocol; there is noredirection from http://. If you attempt to access an HTTPS resource over HTTP, your browser willprobably show an empty screen with no warning.
Most components that run on top of MapReduce automatically use Encrypted Shuffle when it is configured.
198 | Cloudera Security
Encryption

Configuring Encrypted Shuffle and Encrypted Web UIs
To configure Encrypted Shuffle and Encrypted Web UIs, set the appropriate property/value pairs in the following:
• core-site.xml enables these features and defines the implementation• mapred-site.xml enables Encrypted Shuffle for MRv2• ssl-server.xml stores keystone and truststore settings for the server• ssl-client.xml stores keystone and truststore settings for the client
core-site.xml Properties
To configure encrypted shuffle, set the following properties in the core-site.xml files of all nodes in the cluster:
ExplanationDefault ValueProperty
For MRv1, setting this value to trueenables both the Encrypted Shuffle
falsehadoop.ssl.enabled
and the Encrypted Web UI features.For MRv2, this property only enablesthe Encrypted WebUI; EncryptedShuffle is enabled with a property inthe mapred-site.xml file asdescribed below.
When this property is set to true,client certificates are required for all
falsehadoop.ssl.require.client.cert
shuffle operations and all browsersused to access Web UIs.
Cloudera recommends that this be setto false. See Client Certificates onpage 203.
The hostname verifier to provide forHttpsURLConnections. Valid values
DEFAULThadoop.ssl.hostname.verifier
are: DEFAULT, STRICT, STRICT_I6,DEFAULT_AND_LOCALHOST andALLOW_ALL.
The KeyStoresFactoryimplementation to use.
org.apache.hadoop
.security.ssl.FileBasedKeyStoresFactory
hadoop.ssl.keystores.factory.class
Resource file from which ssl serverkeystore information is extracted. This
ssl-server.xmlhadoop.ssl.server.conf
file is looked up in the classpath;typically it should be in the/etc/hadoop/conf/ directory.
Resource file from which ssl serverkeystore information is extracted. This
ssl-client.xmlhadoop.ssl.client.conf
file is looked up in the classpath;typically it should be in the/etc/hadoop/conf/ directory.
Cloudera Security | 199
Encryption

Note:
All these properties should be marked as final in the cluster configuration files.
Example
<configuration> ... <property> <name>hadoop.ssl.require.client.cert</name> <value>false</value> <final>true</final> </property>
<property> <name>hadoop.ssl.hostname.verifier</name> <value>DEFAULT</value> <final>true</final> </property>
<property> <name>hadoop.ssl.keystores.factory.class</name> <value>org.apache.hadoop.security.ssl.FileBasedKeyStoresFactory</value> <final>true</final> </property>
<property> <name>hadoop.ssl.server.conf</name> <value>ssl-server.xml</value> <final>true</final> </property>
<property> <name>hadoop.ssl.client.conf</name> <value>ssl-client.xml</value> <final>true</final> </property>
<property> <name>hadoop.ssl.enabled</name> <value>true</value> </property> ...</configuration>
The cluster should be configured to use the Linux Task Controller in MRv1 and Linux container executor in MRv2 torun job tasks so that they are prevented from reading the server keystore information and gaining access to the shuffleserver certificates. Refer to Appendix B - Information about Other Hadoop Security Programs for more information.
mapred-site.xml Property (MRv2 only)
To enable Encrypted Shuffle for MRv2, set the following property in the mapred-site.xml file on every node in thecluster:
ExplanationDefault ValueProperty
If this property is set to true,encrypted shuffle is enabled. If this
falsemapreduce.shuffle.ssl.enabled
property is not specified, it defaults tothe value of hadoop.ssl.enabled.This value can be false whenhadoop.ssl.enabled is true butcannot be true whenhadoop.ssl.enabled is false
200 | Cloudera Security
Encryption

This property should be marked as final in the cluster configuration files.
Example:
<configuration> ... <property> <name>mapreduce.shuffle.ssl.enabled</name> <value>true</value> <final>true</final> </property> ...</configuration>
Keystore and Truststore Settings
FileBasedKeyStoresFactory is the only KeyStoresFactory that is currently implemented. It uses properties inthe ssl-server.xml and ssl-client.xml files to configure the keystores and truststores.
ssl-server.xml (Shuffle server and Web UI) Configuration
Use the following settings to configure the keystores and truststores in the ssl-server.xml file.
Note:
The ssl-server.xml should be owned by the hdfs or mapred Hadoop system user, belong to thehadoop group, and it should have 440 permissions. Regular users should not belong to the hadoopgroup.
DescriptionDefault ValueProperty
Keystore file typejksssl.server.keystore.type
Keystore file location. The mapred user should ownthis file and have exclusive read access to it.
NONEssl.server.keystore.location
Keystore file passwordNONEssl.server.keystore.password
Key passwordNONEssl.server.keystore.keypassword
Truststore file typejksssl.server.truststore.type
Truststore file location. The mapred user should ownthis file and have exclusive read access to it.
NONEssl.server.truststore.location
Truststore file passwordNONEssl.server.truststore.password
Truststore reload interval, in milliseconds10000ssl.server.truststore.reload.interval
Example
<configuration><!-- Server Certificate Store --><property> <name>ssl.server.keystore.type</name> <value>jks</value></property><property> <name>ssl.server.keystore.location</name> <value>${user.home}/keystores/server-keystore.jks</value></property><property>
Cloudera Security | 201
Encryption

<name>ssl.server.keystore.password</name> <value>serverfoo</value></property><property> <name>ssl.server.keystore.keypassword</name> <value>serverfoo</value></property>
<!-- Server Trust Store --><property> <name>ssl.server.truststore.type</name> <value>jks</value></property><property> <name>ssl.server.truststore.location</name> <value>${user.home}/keystores/truststore.jks</value></property><property> <name>ssl.server.truststore.password</name> <value>clientserverbar</value></property><property> <name>ssl.server.truststore.reload.interval</name> <value>10000</value></property></configuration>
ssl-client.xml (Reducer/Fetcher) Configuration
Use the following settings to configure the keystores and truststores in the ssl-client.xml file. This file should beowned by the mapred user for MRv1 and by the yarn user for MRv2; the file permissions should be 444 (read accessfor all users).
DescriptionDefault ValueProperty
Keystore file typejksssl.client.keystore.type
Keystore file location. The mapred user shouldown this file and it should have defaultpermissions.
NONEssl.client.keystore.location
Keystore file passwordNONEssl.client.keystore.password
Key passwordNONEssl.client.keystore.keypassword
Truststore file typejksssl.client.truststore.type
Truststore file location. Themapred user shouldown this file and it should have defaultpermissions.
NONEssl.client.truststore.location
Truststore file passwordNONEssl.client.truststore.password
Truststore reload interval, in milliseconds10000ssl.client.truststore.reload.interval
Example
<configuration>
<!-- Client certificate Store --> <property> <name>ssl.client.keystore.type</name> <value>jks</value> </property> <property>
202 | Cloudera Security
Encryption

<name>ssl.client.keystore.location</name> <value>${user.home}/keystores/client-keystore.jks</value> </property> <property> <name>ssl.client.keystore.password</name> <value>clientfoo</value> </property> <property> <name>ssl.client.keystore.keypassword</name> <value>clientfoo</value> </property>
<!-- Client Trust Store --> <property> <name>ssl.client.truststore.type</name> <value>jks</value> </property> <property> <name>ssl.client.truststore.location</name> <value>${user.home}/keystores/truststore.jks</value> </property> <property> <name>ssl.client.truststore.password</name> <value>clientserverbar</value> </property> <property> <name>ssl.client.truststore.reload.interval</name> <value>10000</value> </property></configuration>
Activating Encrypted Shuffle
When you have made the above configuration changes, activate Encrypted Shuffle by re-starting all TaskTrackers inMRv1 and all NodeManagers in YARN.
Important:
Encrypted shuffle has a significant performance impact. You should benchmark this before implementingit in production. In many cases, one or more additional cores are needed to maintain performance.
Client Certificates
Client Certificates are supported but they do not guarantee that the client is a reducer task for the job. The ClientCertificate keystore file that contains the private key must be readable by all users who submit jobs to the cluster,which means that a rogue job could read those keystore files and use the client certificates in them to establish asecure connection with a Shuffle server. The JobToken mechanism that the Hadoop environment provides is a betterprotector of the data; each job uses its own JobToken to retrieve only the shuffle data that belongs to it. Unless therogue job has a proper JobToken, it cannot retrieve Shuffle data from the Shuffle server.
Important:
If your certificates are signed by a certificate authority (CA), you must include the complete chain ofCA certificates in the keystore that has the server's key.
Reloading Truststores
By default, each truststore reloads its configuration every 10 seconds. If a new truststore file is copied over the oldone, it is re-read, and its certificates replace the old ones. This mechanism is useful for adding or removing nodes fromthe cluster, or for adding or removing trusted clients. In these cases, the client, TaskTracker or NodeManager certificateis added to (or removed from) all the truststore files in the system, and the new configuration is picked up withoutrequiring that the TaskTracker in MRv1 and NodeManager in YARN daemons are restarted.
Cloudera Security | 203
Encryption

Note:
The keystores are not automatically reloaded. To change a keystore for a TaskTracker in MRv1 or aNodeManager in YARN, you must restart the TaskTracker or NodeManager daemon.
The reload interval is controlled by the ssl.client.truststore.reload.interval andssl.server.truststore.reload.interval configuration properties in the ssl-client.xml andssl-server.xml files described above.
Debugging
Important:
Enable debugging only for troubleshooting, and then only for jobs running on small amounts of data.Debugging is very verbose and slows jobs down significantly.
To enable SSL debugging in the reducers, set -Djavax.net.debug=all in the mapred.reduce.child.java.optsproperty; for example:
<configuration> ... <property> <name>mapred.reduce.child.java.opts</name> <value>-Xmx200m -Djavax.net.debug=all</value> </property> ...</configuration>
You can do this on a per-job basis, or by means of a cluster-wide setting in mapred-site.xml.
To set this property in TaskTrackersfor MRv1, set it in hadoop-env.sh:
HADOOP_TASKTRACKER_OPTS="-Djavax.net.debug=all $HADOOP_TASKTRACKER_OPTS"
To set this property in NodeManagers for YARN, set it in hadoop-env.sh:
YARN_OPTS="-Djavax.net.debug=all $YARN_OPTS"
Deployment Planning for Data at Rest EncryptionBefore deploying encryption for data at rest, familiarize yourself with the components, concepts, and architecture forencrypting data. See Cloudera Navigator Data Encryption Overview for more information.
For information on planning your encryption deployment, continue reading:
Data at Rest Encryption Reference Architecture
The following diagram illustrates the recommended architecture for deploying Cloudera Navigator encryption for dataat rest:
204 | Cloudera Security
Encryption

To isolate Key Trustee Server from other enterprise data hub (EDH) services, deploy Key Trustee Server on dedicatedhosts in a separate cluster in Cloudera Manager. Deploy Key Trustee KMS on dedicated hosts in the same cluster asthe EDH services that require access to Key Trustee Server. This provides the following benefits:
• You can restart your EDH cluster without restarting Key Trustee Server, avoiding interruption to other clusters orclients that use the same Key Trustee Server instance.
• You can manage the Key Trustee Server upgrade cycle independently of other cluster components.• You can limit access to the Key Trustee Server hosts to authorized key administrators only, reducing the attack
surface of the system.• Resource contention is reduced. Running Key Trustee Server and Key Trustee KMS services on dedicated hosts
prevents other cluster services from reducing available resources (such as CPU and memory) and creatingbottlenecks.
If you are using virtualmachines for the Key Trustee Server or Key Trustee KMShosts, see VirtualMachine Considerationson page 210.
Data at Rest Encryption Requirements
Encryption comprises several components, each with its own requirements.
Data at rest encryption protection can be applied at a number of levels within Hadoop:
• OS filesystem-level• Network-level• HDFS-level (protects both data at rest and in transit)
For more information on the components, concepts, and architecture for encrypting data at rest, see DeploymentPlanning for Data at Rest Encryption on page 204.
Product Compatibility Matrix
See Product Compatibility Matrix for Cloudera Navigator Encryption for the individual compatibility matrices for eachCloudera Navigator encryption component.
Entropy Requirements
Cryptographic operations require entropy to ensure randomness.
Cloudera Security | 205
Encryption

You can check the available entropy on a Linux system by running the following command:
$ cat /proc/sys/kernel/random/entropy_avail
The output displays the entropy currently available. Check the entropy several times to determine the state of theentropy pool on the system. If the entropy is consistently low (500 or less), youmust increase the entropy in the systemby installing rng-tools and starting the rngd service. Run the following commands on RHEL 6-compatible systems:
$ sudo yum install rng-tools$ sudo echo 'EXTRAOPTIONS="-r /dev/urandom"' >> /etc/sysconfig/rngd$ sudo service rngd start$ sudo chkconfig rngd on
Make sure that the hosts running Key Trustee Server, Key Trustee KMS, and Navigator Encrypt have sufficient entropyto perform cryptographic operations.
Key Trustee Server Requirements
Recommended Hardware and Supported Distributions
Cloudera recommends that the Key Trustee Server be installed on a dedicated server or virtual machine (VM) that isnot used for any other purpose. The backing PostgreSQL databasemust be installed on the samehost as the Key TrusteeServer, and must not be shared with any other services. For high availability, the active and passive Key Trustee Serversmust not share physical resources. See Resource Planning for Data at Rest Encryption on page 209 formore information.
The recommended minimum hardware specifications are as follows:
• Processor: 1 GHz 64-bit quad core• Memory: 8 GB RAM• Storage: 20 GB on moderate- to high-performance disk drives
For information on the supported Linux distributions, see Table 2.
Cloudera Manager Requirements
Installing and managing Key Trustee Server using Cloudera Manager requires Cloudera Manager 5.4.0 and higher. KeyTrustee Server does not require Cloudera Navigator Audit Server or Metadata Server.
SELinux Requirements
SELinux must be disabled for Key Trustee installation and operation. Modify /etc/selinux/config to setSELINUX=disabled and reboot the system for the change to take effect.
umask Requirements
Key Trustee Server installation requires the default umask of 0022.
Network Requirements
For new Key Trustee Server installations (5.4.0 and higher) and migrated upgrades (see Migrate Apache Web Serverto CherryPy for more information), Key Trustee Server requires the following TCP ports to be opened for inboundtraffic:
• 11371
Clients connect to this port over HTTPS.
• 11381 (PostgreSQL)
The passive Key Trustee Server connects to this port for database replication.
For upgrades that are not migrated to the CherryPy web server, the pre-upgrade port settings are preserved:
206 | Cloudera Security
Encryption
• 80
Clients connect to this port over HTTP to obtain the Key Trustee Server public key.
• 443 (HTTPS)
Clients connect to this port over HTTPS.
• 5432 (PostgreSQL)
The passive Key Trustee Server connects to this port for database replication.
TLS Certificate Requirements
To ensure secure network traffic, Cloudera recommends obtaining Transport Layer Security (TLS) certificates specificto the hostname of your Key Trustee Server. To obtain the certificate, generate a Certificate Signing Request (CSR) forthe fully qualified domain name (FQDN) of the Key Trustee Server host. The CSRmust be signed by a trusted CertificateAuthority (CA). After the certificate has been verified and signed by the CA, the Key Trustee Server TLS configurationrequires:
• The CA-signed Certificate• The private key used to generate the original CSR• The Intermediate certificate/chain file (provided by the CA)
Cloudera recommends not using self-signed certificates. If you use self-signed certificates, you must use the--skip-ssl-checkparameterwhen registeringNavigator Encryptwith the Key Trustee Server. This skips TLS hostnamevalidation, which safeguards against certain network-level attacks. For more information regarding insecure mode,see Table 20: Registration Options on page 225.
Entropy Requirements
Cryptographic operations require entropy to ensure randomness.
You can check the available entropy on a Linux system by running the following command:
$ cat /proc/sys/kernel/random/entropy_avail
If the entropy is low (500 or less), you must increase the entropy in the system. A common way to accomplish this isto install rng-tools and start the rngd service:
$ sudo yum install rng-tools$ sudo echo 'EXTRAOPTIONS="-r /dev/urandom"' >> /etc/sysconfig/rngd$ sudo service rngd start$ sudo chkconfig rngd on
Key Trustee KMS Requirements
Recommended Hardware and Supported Distributions
The recommended minimum hardware specifications are as follows:
• Processor: 2 GHz 64-bit quad core• Memory: 16 GB RAM• Storage: 40 GB on moderate- to high-performance disk drives
For information on the supported Linux distributions, see Table 3.
The Key Trustee KMS workload is CPU-intensive. Cloudera recommends using machines with capabilities equivalentto your NameNode hosts, with Intel CPUs that support AES-NI for optimum performance.
Key HSM Requirements
The following are prerequisites for installing Navigator Key HSM:
Cloudera Security | 207
Encryption

• Oracle Java Runtime Environment (JRE) 7 or higher with Java Cryptography Extension (JCE) Unlimited StrengthJurisdiction Policy Files
• A supported Linux distribution. See Table 4.• A supported HSM device:
– SafeNet Luna
– HSM firmware version: 6.2.1– HSM software version: 5.2.3-1
– SafeNet KeySecure
– HSM firmware version: 6.2.1– HSM software version: 8.0.1
– Thales nSolo, nConnect
– HSM firmware version: 11.4.0– Client software version: 2.28.9cam136
• Key Trustee Server 3.7 or higher
Important: You must install Key HSM on the same host as Key Trustee Server.
Root access is required to install Navigator Key HSM.
Navigator Encrypt Requirements
Operating System Requirements
• Linux kernel 2.6.19 or higher (RHEL and CentOS can use 2.6.18-92 or higher)• For supported Linux distributions, see Table 5.
Important: With the exception of Cloudera Navigator Encrypt, Cloudera Enterprise is supported onplatforms with Security-Enhanced Linux (SELinux) enabled. However, policies need to be provided byother parties or created by the administrator of the cluster deployment. Cloudera is not responsiblefor policy support nor policy enforcement, nor for any issues with them. If you experience issues withSELinux, contact your OS support provider.
Supported command-line interpreters:
• sh (Bourne)• bash (Bash)• dash (Debian)
Note: Navigator Encrypt does not support installation or use in chroot environments.
SELinux Requirements
SELinux must be disabled for Key Trustee installation and operation. Modify /etc/selinux/config to setSELINUX=disabled and reboot the system for the change to take effect.
208 | Cloudera Security
Encryption

Network Requirements
For new Navigator Key Trustee Server (5.4.0 and higher) installations, Navigator Encrypt initiates TCP traffic over port11371 (HTTPS) to the Key Trustee Server.
For upgrades and Key Trustee Server versions lower than 5.4.0, Navigator Encrypt initiates TCP traffic over ports 80(HTTP) and 443 (HTTPS) to the Navigator Key Trustee Server.
Internet Access
Youmust have an active connection to the Internet to downloadmany package dependencies, unless you have internalrepositories or mirrors containing the dependent packages.
Maintenance Window
Data is not accessible during the encryption process. Plan for system downtime during installation and configuration.
Administrative Access
To enforce a high level of security, all Navigator Encrypt commands require administrative (root) access (includinginstallation and configuration). If you do not have administrative privileges on your server, contact your systemadministrator before proceeding.
Package Dependencies
These dependent packages are native to most Linux operating systems, and are resolved by your distribution packagemanager during installation.
• dkms
• kernel-devel
• keyutils
• ecryptfs-utils
• gettext
• gettext-libs
• libgomp
• libkeytrustee
• zncrypt-kernel-module
• binutils
• cloog-ppl
• cpp
• gcc
• glibc-devel
• glibc-headers
• kernel-headers
• libmpc
• mpfr
• ppl
• Updates to glibc and glibc-common
Installation works with gcc, gcc3, and gcc4.
Resource Planning for Data at Rest Encryption
For production environments, you must configure high availability for Key Trustee Server and Key Trustee KMS.
For high availability, you must provision two dedicated Key Trustee Server hosts and at least two dedicated Key TrusteeKMS hosts, for a minimum of four separate hosts. Do not run multiple Key Trustee Server or Key Trustee KMS services
Cloudera Security | 209
Encryption

on the same physical host, and do not run these services on hosts with other cluster services. Doing so causes resourcecontentionwith other important cluster services and defeats the purpose of high availability. See Data at Rest EncryptionReference Architecture on page 204 for more information.
The Key Trustee KMS workload is CPU-intensive. Cloudera recommends using machines with capabilities equivalentto your NameNode hosts, with Intel CPUs that support AES-NI for optimum performance.
Make sure that each host is secured and audited. Only authorized key administrators should have access to them. RedHat provides a security guide for RHEL:
• RHEL 6 Security Guide
For hardware sizing information, see Data at Rest Encryption Requirements on page 205 for recommendations for eachCloudera Navigator encryption component.
For Cloudera Manager deployments, deploy Key Trustee Server in its own dedicated cluster. Deploy Key Trustee KMSin each cluster that uses Key Trustee Server. See Data at Rest Encryption Reference Architecture on page 204 for moreinformation.
Virtual Machine Considerations
If you are using virtual machines, make sure that the resources (such as virtual disks, CPU, and memory) for each KeyTrustee Server and Key Trustee KMS host are allocated to separate physical hosts. Hosting multiple services on thesame physical host defeats the purpose of high availability, because a single machine failure can take down multipleservices.
To maintain the security of the cryptographic keys, make sure that all copies of the virtual disk (including any back-endstorage arrays, backups, snapshots, and so on) are secured and audited with the same standards you apply to the livedata.
Cloudera Navigator Key Trustee ServerCloudera Navigator Key Trustee Server is an enterprise-grade virtual safe-deposit box that stores and managescryptographic keys and other security artifacts. With Navigator Key Trustee Server, encryption keys are separated fromthe encrypted data, ensuring that sensitive data is still protected in the event that unauthorized users gain access tothe storage media.
Key Trustee Server protects these keys and other critical security objects from unauthorized access while enablingcompliance with strict data security regulations. For added security, Key Trustee Server can integrate with a hardwaresecurity module (HSM). See Cloudera Navigator Key HSM on page 219 for more information.
In conjunction with the Key Trustee KMS, Navigator Key Trustee Server can serve as a backing key store for HDFS DataAt Rest Encryption on page 244, providing enhanced security and scalability over the file-based Java KeyStore used bythe default Hadoop Key Management Server.
Cloudera Navigator Encrypt on page 224 also uses Key Trustee Server for key storage and management.
For instructions on installing Key Trustee Server, see Installing Cloudera Navigator Key Trustee Server.
For instructions on configuring Key Trustee Server, continue reading:
Backing Up and Restoring Key Trustee Server
Key Trustee Server high availability applies to read operations only. If either Key Trustee Server fails, the clientautomatically retries fetching keys from the functioning server. New write operations (for example, creating newencryption keys) are not allowed unless both Key Trustee Servers are operational.
If a Key Trustee Server fails catastrophically, you must restore it from backup to a new host with the same hostnameand IP address as the failed host. Cloudera does not support PostgreSQL promotion to convert a passive Key TrusteeServer to an active Key Trustee Server.
210 | Cloudera Security
Encryption

Cloudera strongly recommends regularly backing up Key Trustee Server databases and configuration files. Becausethese backups contain encryption keys and encrypted deposits, you must ensure that your backup repository is assecure as the Key Trustee Server itself.
You must also back up client configuration files and keys for Key Trustee Server clients such as the Key Trusteee KMSand Navigator Encrypt clients.
Backing Up Key Trustee Server
The procedure for backing up Key Trustee Server is the same for both parcel-based and package-based installations.
If you have deployed Cloudera Navigator Key Trustee Server High Availability, perform these steps on both the activeand passive Key Trustee Servers. The following procedure references the default database port and location; if youmodified these settings during installation, replace the database and port with your values.
1. Back up the Key Trustee Server database:
$ su - keytrustee$ pg_dump -c -p 11381 keytrustee | zip --encrypt keytrustee-db.zip -
The --encrypt option prompts you to create a password used to encrypt the zip file. This password is requiredto decrypt the file.
For parcel-based installations, you must set environment variables after switching to the keytrustee user:
$ su - keytrustee$ export PATH=$PATH:/opt/cloudera/parcels/KEYTRUSTEE_SERVER/PG_DB/opt/postgres/9.3/bin$ export LD_LIBRARY_PATH=/opt/cloudera/parcels/KEYTRUSTEE_SERVER/PG_DB/opt/postgres/9.3/lib$ pg_dump -c -p 11381 keytrustee | zip --encrypt keytrustee-db.zip -
2. Back up the Key Trustee Server configuration directory (/var/lib/keytrustee/.keytrustee):
$ zip -r --encrypt keytrustee-conf.zip /var/lib/keytrustee/.keytrustee
The --encrypt option prompts you to create a password used to encrypt the zip file. This password is requiredto decrypt the file.
3. Move the backup files (keytrustee-db.zip and keytrustee-conf.zip) to a secure location.
Backing Up Key Trustee Server Clients
Cryptographic keys stored in Key Trustee Server are encrypted by clients before they are sent to Key Trustee Server.The primary clients for Key Trustee Server are Key Trustee KMS and Navigator Encrypt. Cloudera strongly recommendsbacking up regularly the configuration files and GPG keys for Key Trustee Server clients.
Warning: Failure to back up these files can result in irretrievable data loss. For example, encryptionzone keys used for HDFS Data At Rest Encryption on page 244 are encrypted by the KMS before beingstored in Key Trustee Server. A catastrophic failure of the KMS with no backup causes all HDFS datastored in encryption zones to become permanently irretrievable.
To prevent permanent data loss, regularly back up the following directories on each client that stores objects in KeyTrustee Server:
Table 18: Key Trustee Server Client Configuration Directories
Directories to Back UpKey Trustee Server Client
/var/lib/kms-keytrusteeKey Trustee KMS
/etc/navencryptNavigator Encrypt
Cloudera Security | 211
Encryption
Restoring Key Trustee Server
When restoring the Key Trustee Server database from backup, any keys or deposits created after the backup are lost.
The procedure to restore Key Trustee Server is different for parcel-based and package-based installations. For moreinformation on parcels, see Parcels.
For Parcel-Based Installations
Note: These instructions apply to Key Trustee Servers deployed using parcels. For package-baseddeployments, skip to the For Package-Based Installations on page 213 section.
If you have deployed Cloudera Navigator Key Trustee Server High Availability, perform these steps on both the activeand passive Key Trustee Servers. The following procedures assume the default database port and location; if youmodified these settings during installation, replace the database and port with your custom values.
If the Key Trustee Server host has failed completely, remove the host from the cluster and add a newhost using ClouderaManager:
1. Remove the failed host from the cluster. See Deleting Hosts for instructions.2. Add a new host with the same hostname and IP address as the failed host to the cluster. See Adding a Host to the
Cluster for instructions.
Important: Make sure that the replacement host uses the same operating system version as thefailed host.
3. Install Key Trustee Server on the new host. See Installing Cloudera Navigator Key Trustee Server for instructions.Make sure to install the same Key Trustee Server version as the failed host.
After you have provisioned a new host and installed Key Trustee Server (or if you are restoring the database orconfiguration on the original host), restore the database and configuration directory:
1. Copy or move the backup files (keytrustee-db.zip and keytrustee-conf.zip) to the Key Trustee Server host.2. Start the PostgreSQL server:
$ sudo -u keytrustee ktadmin db --start --pg-rootdir /var/lib/keytrustee/db --background
3. Restore the Key Trustee Server database:
$ su - keytrustee$ export PATH=$PATH:/opt/cloudera/parcels/KEYTRUSTEE_SERVER/PG_DB/opt/postgres/9.3/bin$ export LD_LIBRARY_PATH=/opt/cloudera/parcels/KEYTRUSTEE_SERVER/PG_DB/opt/postgres/9.3/lib$ unzip -p /path/to/keytrustee-db.zip | psql -p 11381 -d keytrustee
If the zip file is encrypted, you are prompted for the password to decrypt the file.
4. Restore the Key Trustee Server configuration directory:
$ su - keytrustee$ cd /var/lib/keytrustee$ unzip /path/to/keytrustee-conf.zip
If the zip file is encrypted, you are prompted for the password to decrypt the file.
5. Stop the PostgreSQL server:
$ sudo -u keytrustee ktadmin db --stop --pg-rootdir /var/lib/keytrustee/db
6. Start the Key Trustee Server service in Cloudera Manager (Key Trustee Server service > Actions > Start).7. Remove the backup files (keytrustee-db.zip and keytrustee-conf.zip) from the Key Trustee Server host.
212 | Cloudera Security
Encryption

For Package-Based Installations
If you have deployed Cloudera Navigator Key Trustee Server High Availability, perform these steps on both the activeand passive Key Trustee Servers. The following procedures assume the default database port and location; if youmodified these settings during installation, replace the database and port with your custom values.
If the Key Trustee Server host has failed completely, provision a new host with the same hostname and IP address asthe failed host, and re-install Key Trustee Server. See Installing Cloudera Navigator Key Trustee Server for instructions.
Important: Make sure to install the same operating system and Key Trustee Server versions as thefailed host.
After you have provisioned a new host and installed Key Trustee Server (or if you are restoring the database orconfiguration on the original host), restore the database and configuration directory:
1. Copy or move the backup files (keytrustee-db.zip and keytrustee-conf.zip) to the Key Trustee Server host.2. Change the file ownership on the backup files to keytrustee:keytrustee:
$ sudo chown keytrustee:keytrustee /path/to/keytrustee*.zip
3. Restore the Key Trustee Server database:
$ su - keytrustee$ unzip -p /path/to/keytrustee-db.zip | psql -p 11381 -d keytrustee
If the zip file is encrypted, you are prompted for the password to decrypt the file.
4. Restore the Key Trustee Server configuration directory:
$ cd /var/lib/keytrustee$ unzip /path/to/keytrustee-conf.zip
If the zip file is encrypted, you are prompted for the password to decrypt the file.
5. Start the Key Trustee Server service:
$ sudo service keytrusteed start
6. Remove the backup files (keytrustee-db.zip and keytrustee-conf.zip) from the Key Trustee Server host.
Initializing Standalone Key Trustee Server
If you are configuring high availability Key Trustee Servers, skip this step and proceed to Cloudera Navigator Key TrusteeServer High Availability.
Using Cloudera Manager
Note: These instructions apply to using Cloudera Manager only. For package-based deployments,skip to the Using the Command Line on page 214 section.
Important: If you are using SSH software other than OpenSSH, pre-create the SSH key beforecontinuing:
$ sudo -u keytrustee ssh-keygen -t rsa -f /var/lib/keytrustee/.ssh/id_rsa
Add the Key Trustee Server service to your cluster, following the instructions in Adding a Service. When customizingrole assignments, assign only the Active Key Trustee Server and Active Database roles.
Cloudera Security | 213
Encryption

Important: Youmust assign the Key Trustee Server and Database roles to the same host.
Using the Command Line
To initialize a standalone Key Trustee Server, run the following commands on the Key Trustee Server:
Important: For Key Trustee Server 5.4.0 and higher, the ktadmin init-master command isdeprecated. Use the ktadmin init command instead. If you are using SSH software other thanOpenSSH, pre-create the SSH key before continuing:
$ sudo -u keytrustee ssh-keygen -t rsa /var/lib/keytrustee/.ssh/id_rsa
$ sudo -u keytrustee ktadmin init --logdir /var/log/keytrustee --external-address keytrustee.example.com$ sudo -u keytrustee ktadmin db --bootstrap --port 11381 --pg-rootdir /var/lib/keytrustee/db$ sudo /etc/init.d/keytrusteed start
Replace keytrustee.example.com with the fully-qualified domain name (FQDN) of the Key Trustee Server, and/var/lib/keytrustee/db with the path to the directory you want to use to store the PostgreSQL database.
The ktadmin init command initializes the Key Trustee configuration directory(/var/lib/keytrustee/.keytrustee by default) and generates a self-signed certificate that Key Trustee Serveruses for HTTPS communication.
The ktadmin db --bootstrap command initializes the database in the directory specified by the --pg-rootdirparameter.
The sudo /etc/init.d/keytrusteed start command starts Key Trustee Server.
Note: The/etc/init.d/postgresql script does notworkwhen the PostgreSQL database is startedby Key Trustee Server, and cannot be used to monitor the status of the database. Use ktadmin db[--start | --stop | --status] instead.
(Optional) Replace Self-Signed Certificate with CA-Signed Certificate
Important: Key Trustee Server certificates must be issued to the fully-qualified domain name (FQDN)of the Key Trustee Server host. If you are using CA-signed certificates, ensure that the generatedcertificates use the FQDN, and not the short name.
If you have a CA-signed certificate for Key Trustee Server, see Managing Key Trustee Server Certificates on page 218for instructions on how to replace the self-signed certificate.
Configuring a Mail Transfer Agent for Key Trustee Server
The Key Trustee Server requires a mail transfer agent (MTA) to send email. Cloudera recommends Postfix, but you canuse any MTA that meets your needs.
To configure Postfix for local delivery, run the following commands:
export KEYTRUSTEE_SERVER_PK="/var/lib/keytrustee/.keytrustee/.ssl/ssl-cert-keytrustee-pk.pem"export KEYTRUSTEE_SERVER_CERT="/var/lib/keytrustee/.keytrustee/.ssl/ssl-cert-keytrustee.pem"export KEYTRUSTEE_SERVER_CA="/var/lib/keytrustee/.keytrustee/.ssl/ssl-cert-keytrustee-ca.pem"
214 | Cloudera Security
Encryption

export KEYTRUSTEE_SERVER_HOSTNAME="$(hostname -f)" # or adjust as requiredpostconf -e 'mailbox_command ='postconf -e 'smtpd_sasl_local_domain ='postconf -e 'smtpd_sasl_auth_enable = yes'postconf -e 'smtpd_sasl_security_options = noanonymous'postconf -e 'broken_sasl_auth_clients = yes'postconf -e 'smtpd_recipient_restrictions = permit_sasl_authenticated,permit_mynetworks,reject_unauth_destination'postconf -e 'inet_interfaces = all'postconf -e 'smtp_tls_security_level = may'postconf -e 'smtpd_tls_security_level = may'
Start the Postfix service and ensure that it starts at boot:
$ service postfix restart$ sudo chkconfig --level 235 postfix on
For information on installing Postfix or configuring a relay host, see the Postfix documentation.
Verifying Cloudera Navigator Key Trustee Server Operations
Verify that the installation was successful by running the following command on all Key Trustee Servers. The outputshould be similar to the following. If high availability is enabled, the output should be identical on all Key TrusteeServers:
$ curl -k https://keytrustee.example.com:11371/?a=fingerprint4096R/4EDC46882386C827E20DEEA2D850ACA33BEDB0D1
Replace keytrustee.example.com with the fully-qualified domain name (FQDN) of each Key Trustee Server youare validating.
Managing Key Trustee Server Organizations
Organizations allow you to configure Key Trustee for use in amulti-tenant environment. Using thekeytrustee-orgtoolutility, you can create organizations and administrators for multiple organizations. Organization administrators canthen approve or deny the registration of clients, depending on the registration method.
The keytrustee-orgtool Utility
keytrustee-orgtool is a command-line utility for administering organizations. Thekeytrustee-orgtool commandmust be run as the root user.
The following table explains the variouskeytrustee-orgtool commands andparameters. Runkeytrustee-orgtool--help to view this information at the command line.
Table 19: Usage for keytrustee-orgtool
DescriptionUsageOperation
Initializes the license authority keyringand creates a signing key.
keytrustee-orgtool initInitialize
Adds a new organization andadministrators for the organization.
keytrustee-orgtool add [-h]
–n name –c contacts
Add
Lists current organizations, includingthe authorization secret, all
keytrustee-orgtool listList
administrators, the organizationcreation date, and the organizationexpiration date.
Cloudera Security | 215
Encryption
DescriptionUsageOperation
Approves clients.keytrustee-orgtool
activate-client [-h] –n name
–-fingerprint fingerprint
Activate client
Resets tokens. Key Trustee client andserver exchange sequenced tokens to
keytrustee-orgtool
reset-token [-h]
–-fingerprint fingerprint
Reset token
ensure communication is from thecorrect client (preventing, for example,attacks by a cloned client).
Disables a client that has already beenactivated by the organizationadministrator.
keytrustee-orgtool
disable-client [-h]
-–fingerprint fingerprint
Disable client
Enables a client that has requestedactivation but has not yet been
keytrustee-orgtool
enable-client [-h]
–-fingerprint fingerprint
Enable client
approved by the organizationadministrator.
Disables all unactivated clients anddeposits from unactivated clients.
keytrustee-orgtool
disable-unactivated [-h] –l
limit
Disable unactivated client
Sets the authorization code to a newstring, or to blank to allow automaticapprovals without the code.
keytrustee-orgtool set-auth
[-h] –n name –s secret
Set authorization Code
Create Organizations
Create new organizations using the keytrustee-orgtool add command. Create a new organization for each newKey Trustee tenant.
This example,creates a new organization for the Disaster Recovery group and adds two organization administrators,Finn and Jake:
$ sudo keytrustee-orgtool add -n disaster-recov -c [email protected],[email protected]
When adding organizations, consider the following:
• Avoid using spaces or special characters in the organization name. Use hyphens or underscores instead.• When adding more than one administrator, do not separate the entries with spaces. See the previous example
command containing the email addresses [email protected] and [email protected].• Each contact email address receives “Welcome to Key Trustee” email with the option to register a PGP public key.
The public key registry is time-sensitive and must be completed within 12 hours.• You can add additional administrators after creating an organization. Use the keytrustee-orgtool add
command with the existing organization name. For example, the command sudo keytrustee-orgtool add-n disaster-recov -c [email protected] adds an administrator to the disaster-recovorganization.
Note: You cannot remove contacts from an organization with the keytrustee-orgtool utility.
216 | Cloudera Security
Encryption
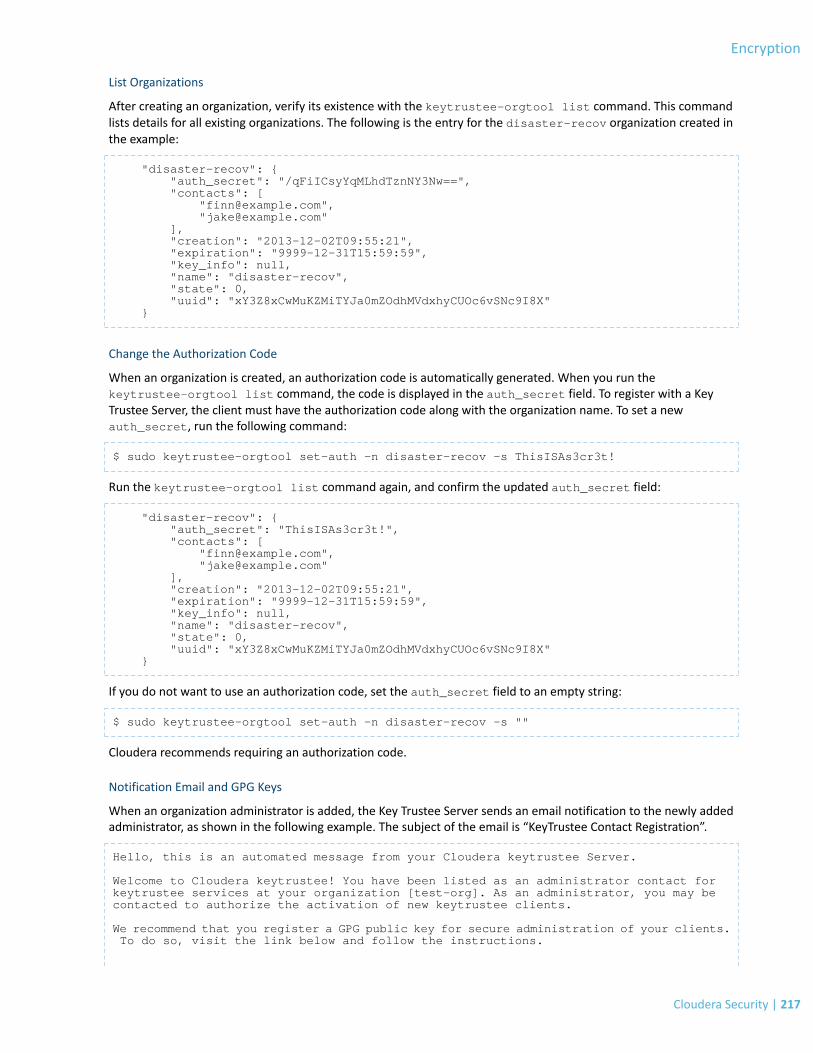
List Organizations
After creating an organization, verify its existence with the keytrustee-orgtool list command. This commandlists details for all existing organizations. The following is the entry for the disaster-recov organization created inthe example:
"disaster-recov": { "auth_secret": "/qFiICsyYqMLhdTznNY3Nw==", "contacts": [ "[email protected]", "[email protected]" ], "creation": "2013-12-02T09:55:21", "expiration": "9999-12-31T15:59:59", "key_info": null, "name": "disaster-recov", "state": 0, "uuid": "xY3Z8xCwMuKZMiTYJa0mZOdhMVdxhyCUOc6vSNc9I8X" }
Change the Authorization Code
When an organization is created, an authorization code is automatically generated. When you run thekeytrustee-orgtool list command, the code is displayed in the auth_secret field. To register with a KeyTrustee Server, the client must have the authorization code along with the organization name. To set a newauth_secret, run the following command:
$ sudo keytrustee-orgtool set-auth -n disaster-recov -s ThisISAs3cr3t!
Run the keytrustee-orgtool list command again, and confirm the updated auth_secret field:
"disaster-recov": { "auth_secret": "ThisISAs3cr3t!", "contacts": [ "[email protected]", "[email protected]" ], "creation": "2013-12-02T09:55:21", "expiration": "9999-12-31T15:59:59", "key_info": null, "name": "disaster-recov", "state": 0, "uuid": "xY3Z8xCwMuKZMiTYJa0mZOdhMVdxhyCUOc6vSNc9I8X" }
If you do not want to use an authorization code, set the auth_secret field to an empty string:
$ sudo keytrustee-orgtool set-auth -n disaster-recov -s ""
Cloudera recommends requiring an authorization code.
Notification Email and GPG Keys
When an organization administrator is added, the Key Trustee Server sends an email notification to the newly addedadministrator, as shown in the following example. The subject of the email is “KeyTrustee Contact Registration”.
Hello, this is an automated message from your Cloudera keytrustee Server.
Welcome to Cloudera keytrustee! You have been listed as an administrator contact for keytrustee services at your organization [test-org]. As an administrator, you may be contacted to authorize the activation of new keytrustee clients.
We recommend that you register a GPG public key for secure administration of your clients. To do so, visit the link below and follow the instructions.
Cloudera Security | 217
Encryption

https://keytrustee01.example.com:11371/?q=CnRV6u0nbm7zB07BQEpXCXsN0QJFBz684uC0lcHMoWL
This link will expire in 12 hours, at Thu Sep 3 00:08:25 2015 UTC.
Cloudera highly recommends that each organization administrator register a GPG public key for secure administrationof clients by following the link contained in the notification email. Cloudera also highly recommends that the organizationadministrators import the Key Trustee Server’s public GPG key to verify that the server is the sender.
Organization administrators are notified by email when new clients are registered to the Key Trustee Server.
When creating an organization, if you do not specify an outside organization administrator, or if the server does nothave access to send email, use a local system mail address; for example, username@hostname (where hostname isthe system hostname, and username is a valid user on the system).
If you use a local system mail address, ensure that the local mailbox is continuously monitored.
Managing Key Trustee Server Certificates
Transport Layer Security (TLS) certificates are used to secure communication with Key Trustee Server. By default, KeyTrustee Server generates self-signed certificates when it is first initialized. Cloudera strongly recommends usingcertificates signed by a trusted Certificate Authority (CA).
Generating a New Certificate
1. Generate a new certificate signing request (CSR):
$ openssl req -new -key keytrustee_private_key.pem -out new.csr
Replace keytrustee_private_key.pem with the filename of the private key. You can reuse the existing private keyor generate a new private key in accordance with your company policies. For existing auto-generated self-signedcertificates, the private key file is located at/var/lib/keytrustee/.keytrustee/.ssl/ssl-cert-keytrustee-pk.pem.
2. Generate a new certificate from the CSR:
• For a CA-signed certificate, submit the CSR to the CA, and they will provide a signed certificate.• To generate a new self-signed certificate, run the following command:
$ openssl x509 -req -days 365 -in new.csr -signkey keytrustee_private_key.pem \-out new_keytrustee_certificate.pem
Replacing Key Trustee Server Certificates
Use the following procedure if you need to replace an existing certificate for the Key Trustee Server. For example, youcan use this procedure to replace the auto-generated self-signed certificate with a CA-signed certificate, or to replacean expired certificate.
Note: Key Trustee Server does not support password-protected certificates.
1. After Generating a NewCertificate on page 218, replace the original certificate and key files with the new certificateand key.
a. Back up the original certificate and key files:
$ sudo cp -r /var/lib/keytrustee/.keytrustee/.ssl /var/lib/keytrustee/.keytrustee/.ssl.bak
218 | Cloudera Security
Encryption
b. Move the new certificate and key to the original location and filenames, overwriting the original files:
$ sudo mv /path/to/keytrustee_private_key.pem/var/lib/keytrustee/.keytrustee/.ssl/ssl-cert-keytrustee-pk.pem$ sudo mv /path/to/new_keytrustee_certificate.pem/var/lib/keytrustee/.keytrustee/.ssl/ssl-cert-keytrustee.pem
c. (CA-Signed Certificates Only) Remove the private CA key file and provide the root or intermediate CAcertificate. The private CA key is used by Key Trustee Server to self-sign certificates. If you are replacingself-signed certificates with CA-signed certificates, this key must be removed:
$ sudo rm /var/lib/keytrustee/.keytrustee/.ssl/ssl-cert-keytrustee-ca-pk.pem$ sudo mv /path/to/rootca.pem/var/lib/keytrustee/.keytrustee/.ssl/ssl-cert-keytrustee-ca.pem
2. Restart the Key Trustee Server daemon:
Using Cloudera Manager: Restart the Key Trustee Server service (Key Trustee Server service > Actions > Restart).
Using the Command Line: Restart the Key Trustee Server daemon:
$ sudo /etc/init.d/keytrusteed restart
3. If you are using the Key Trustee KMS service in Cloudera Manager for HDFS Data At Rest Encryption on page 244,update the Java KeyStore (JKS) used on the Key Trustee KMS host:
a. Download the new certificate to the Key Trustee KMS host:
$ echo -n | openssl s_client -connect keytrustee01.example.com:11371 \| sed -ne '/-BEGIN CERTIFICATE-/,/-END CERTIFICATE-/p' > /tmp/keytrustee_certificate.pem
b. Delete the existing keystore entry for keytrustee01.example.com:
$ keytool -delete -alias key_trustee_alias_name -keystore /path/to/truststore -v
c. Add the new keystore entry for keytrustee01.example.com:
$ keytool -import -trustcacerts -alias keytrustee01.example.com \-file /tmp/keytrustee_certificate.pem -keystore /path/to/truststore
d. Restart the Key Trustee KMS service in Cloudera Manager.
Cloudera Navigator Key HSMCloudera Navigator Key HSM allows Cloudera Navigator Key Trustee Server to seamlessly integrate with a hardwaresecurity module (HSM). Key HSM enables Key Trustee Server to use an HSM as a root of trust for cryptographic keys,taking advantage of Key Trustee Server’s policy-based key and security asset management capabilities while at thesame time satisfying existing, internal security requirements regarding treatment of cryptographic materials.
For instructions on installing Key HSM, see Installing Cloudera Navigator Key HSM.
For instructions on configuring Key HSM, continue reading:
Initializing Navigator Key HSM
Before initializing Navigator Key HSM, verify that the HSM is properly configured and accessible from the Key HSMhost, and that the HSM client libraries are installed on the Key HSM host:
• SafeNet Luna
Install the SafeNet Luna client. No additional configuration is needed.
Cloudera Security | 219
Encryption

• SafeNet KeySecure
Extract the KeySecure client tarball in the Key HSM library directory(/usr/share/keytrustee-server-keyhsm/).
• Thales
Install the Thales client service. CopynCipherKM.jar,jcetools.jar, andrsaprivenc.jar from the installationmedia (usually located in opt/nfast/java/classes relative to the installation media mount point) to the KeyHSM library directory (/usr/share/keytrustee-server-keyhsm/).
See your HSMproduct documentation formore information on installing and configuring your HSM and client libraries.
Note: When using an HSMwith Key Trustee Server and Navigator Encrypt, encrypting a large numberof directories may exceed the capacity of the HSM. For example, encrypting MapReduce spill filesrequires encrypting each HDFS data directory or disk on each node, each with its own encryption key.On a 10-node cluster with 12 disks per node, this requires 120 keys. Make sure that your HSM cansupport your encryption requirements.
To initialize Key HSM, use the service keyhsm setup command in conjunction with the name of the target HSMdistribution:
$ sudo service keyhsm setup [rsa|keysecure|thales|luna]
For all HSM distributions, this first prompts for the IP address and port number that Key HSM listens on.
Important: If you have implemented Key Trustee Server high availability, initialize Key HSM on eachKey Trustee Server.
Cloudera recommends using the loopback address (127.0.0.1) for the listener IP address and 9090 as the portnumber.
If the setup utility successfully validates the listener IP address and port, you are prompted for additional informationspecific to your HSM. For HSM-specific instructions, continue to the HSM-Specific Setup for Cloudera Navigator KeyHSM on page 220 section for your HSM.
After initial setup, configuration is stored in the/usr/share/keytrustee-server-keyhsm/application.properties file, which contains human-readableconfiguration information for the Navigator Key HSM server.
HSM-Specific Setup for Cloudera Navigator Key HSM
SafeNet KeySecure
Note: KeySecure was previously named DataSecure, but the Key HSM configuration process is thesame for both.
After entering the Key HSM listener IP address and port, the HSM setup for SafeNet KeySecure prompts for logincredentials, the IP address of the KeySecure HSM, and the port number:
-- Ingrian HSM Credential Configuration --Please enter HSM login USERNAME: keyhsmPlease enter HSM login PASSWORD: ******
Please enter HSM IP Address or Hostname: 172.19.1.135Please enter HSM Port number: 9020
220 | Cloudera Security
Encryption
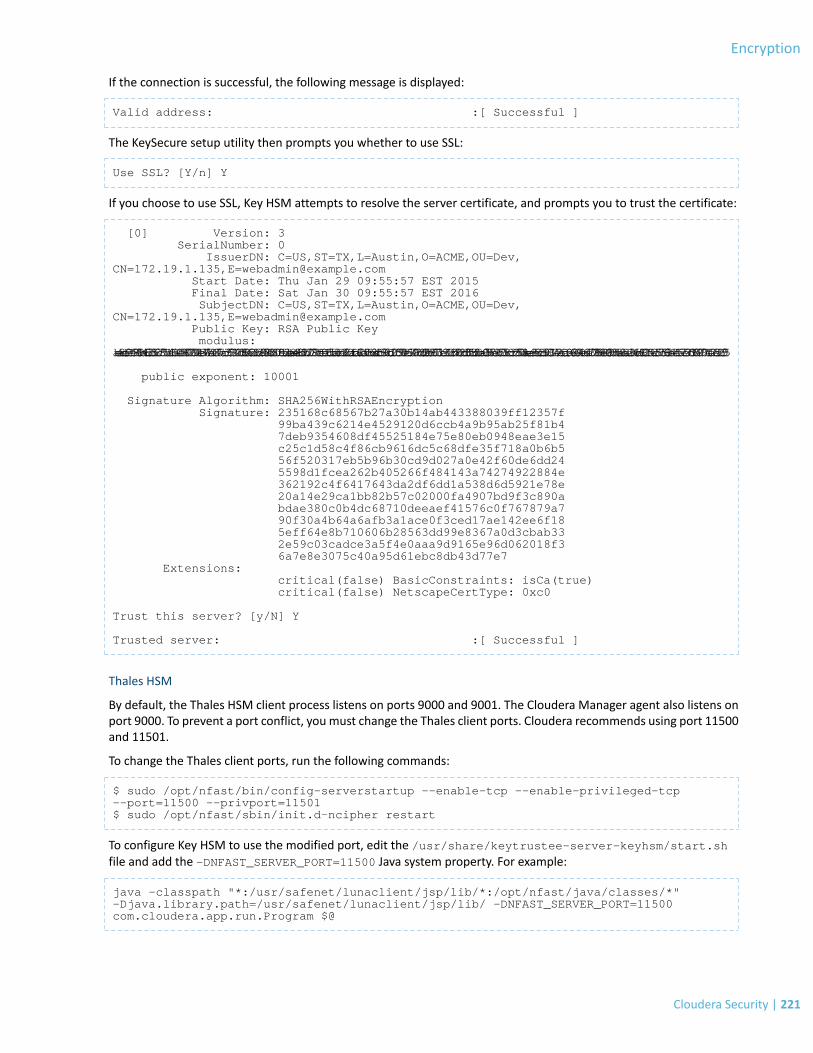
If the connection is successful, the following message is displayed:
Valid address: :[ Successful ]
The KeySecure setup utility then prompts you whether to use SSL:
Use SSL? [Y/n] Y
If you choose to use SSL, Key HSM attempts to resolve the server certificate, and prompts you to trust the certificate:
[0] Version: 3 SerialNumber: 0 IssuerDN: C=US,ST=TX,L=Austin,O=ACME,OU=Dev,CN=172.19.1.135,[email protected] Start Date: Thu Jan 29 09:55:57 EST 2015 Final Date: Sat Jan 30 09:55:57 EST 2016 SubjectDN: C=US,ST=TX,L=Austin,O=ACME,OU=Dev,CN=172.19.1.135,[email protected] Public Key: RSA Public Key modulus: abe4a8dcef92e145984309bd466b33b35562c7f8751d1c406b1140e0584890272090424eb347647ba04b34757cacc79652791427d0d8580a652c106bd26945384b30b8107f8e15d2deba8a4e868bf17bb02073837cffef0ef16d5b5da5cfb4d3625c0affbda6320daf7c6b6d8adfcb563960fcd1207c059300feb651340879dd2d929a5b986517531be93f113c8db780c92ddf30f5c8bf2b0bea60359b67be306c520358cc0c3fc365500d8abeeac99e53cc2b369b2031174e72e6fca1f9a4639e09240ed6d4a73073885868e814839b09d56aa98a5a1e230b46cdb4818321f546ac15567c596833be47ef156a73e537fd09605482790714f4a276e5f126f935
public exponent: 10001
Signature Algorithm: SHA256WithRSAEncryption Signature: 235168c68567b27a30b14ab443388039ff12357f 99ba439c6214e4529120d6ccb4a9b95ab25f81b4 7deb9354608df45525184e75e80eb0948eae3e15 c25c1d58c4f86cb9616dc5c68dfe35f718a0b6b5 56f520317eb5b96b30cd9d027a0e42f60de6dd24 5598d1fcea262b405266f484143a74274922884e 362192c4f6417643da2df6dd1a538d6d5921e78e 20a14e29ca1bb82b57c02000fa4907bd9f3c890a bdae380c0b4dc68710deeaef41576c0f767879a7 90f30a4b64a6afb3a1ace0f3ced17ae142ee6f18 5eff64e8b710606b28563dd99e8367a0d3cbab33 2e59c03cadce3a5f4e0aaa9d9165e96d062018f3 6a7e8e3075c40a95d61ebc8db43d77e7 Extensions: critical(false) BasicConstraints: isCa(true) critical(false) NetscapeCertType: 0xc0
Trust this server? [y/N] Y
Trusted server: :[ Successful ]
Thales HSM
By default, the Thales HSM client process listens on ports 9000 and 9001. The Cloudera Manager agent also listens onport 9000. To prevent a port conflict, youmust change the Thales client ports. Cloudera recommends using port 11500and 11501.
To change the Thales client ports, run the following commands:
$ sudo /opt/nfast/bin/config-serverstartup --enable-tcp --enable-privileged-tcp --port=11500 --privport=11501$ sudo /opt/nfast/sbin/init.d-ncipher restart
To configure Key HSM to use the modified port, edit the /usr/share/keytrustee-server-keyhsm/start.shfile and add the -DNFAST_SERVER_PORT=11500 Java system property. For example:
java -classpath "*:/usr/safenet/lunaclient/jsp/lib/*:/opt/nfast/java/classes/*" -Djava.library.path=/usr/safenet/lunaclient/jsp/lib/ -DNFAST_SERVER_PORT=11500 com.cloudera.app.run.Program $@
Cloudera Security | 221
Encryption
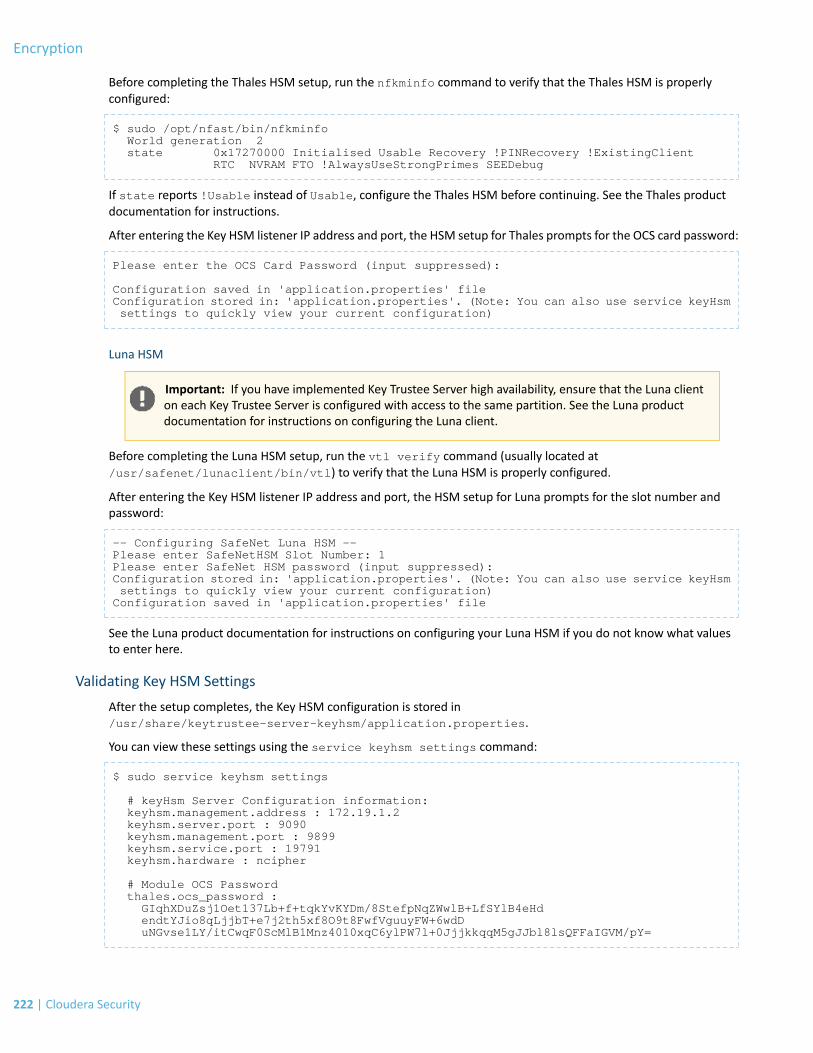
Before completing the Thales HSM setup, run the nfkminfo command to verify that the Thales HSM is properlyconfigured:
$ sudo /opt/nfast/bin/nfkminfo World generation 2 state 0x17270000 Initialised Usable Recovery !PINRecovery !ExistingClient RTC NVRAM FTO !AlwaysUseStrongPrimes SEEDebug
If state reports !Usable instead of Usable, configure the Thales HSM before continuing. See the Thales productdocumentation for instructions.
After entering the Key HSM listener IP address and port, the HSM setup for Thales prompts for the OCS card password:
Please enter the OCS Card Password (input suppressed):
Configuration saved in 'application.properties' fileConfiguration stored in: 'application.properties'. (Note: You can also use service keyHsm settings to quickly view your current configuration)
Luna HSM
Important: If you have implemented Key Trustee Server high availability, ensure that the Luna clienton each Key Trustee Server is configured with access to the same partition. See the Luna productdocumentation for instructions on configuring the Luna client.
Before completing the Luna HSM setup, run the vtl verify command (usually located at/usr/safenet/lunaclient/bin/vtl) to verify that the Luna HSM is properly configured.
After entering the Key HSM listener IP address and port, the HSM setup for Luna prompts for the slot number andpassword:
-- Configuring SafeNet Luna HSM --Please enter SafeNetHSM Slot Number: 1Please enter SafeNet HSM password (input suppressed):Configuration stored in: 'application.properties'. (Note: You can also use service keyHsm settings to quickly view your current configuration)Configuration saved in 'application.properties' file
See the Luna product documentation for instructions on configuring your Luna HSM if you do not know what valuesto enter here.
Validating Key HSM Settings
After the setup completes, the Key HSM configuration is stored in/usr/share/keytrustee-server-keyhsm/application.properties.
You can view these settings using the service keyhsm settings command:
$ sudo service keyhsm settings
# keyHsm Server Configuration information: keyhsm.management.address : 172.19.1.2 keyhsm.server.port : 9090 keyhsm.management.port : 9899 keyhsm.service.port : 19791 keyhsm.hardware : ncipher
# Module OCS Password thales.ocs_password : GIqhXDuZsj1Oet137Lb+f+tqkYvKYDm/8StefpNqZWwlB+LfSYlB4eHd endtYJio8qLjjbT+e7j2th5xf8O9t8FwfVguuyFW+6wdD uNGvse1LY/itCwqF0ScMlB1Mnz4010xqC6ylPW7l+0JjjkkqqM5gJJbl8lsQFFaIGVM/pY=
222 | Cloudera Security
Encryption
These settings can be manually configured by modifying the application.properties file, with the exception ofany passwords. These are encrypted by design, and can only be changed by re-running the setup utility.
Creating a Key Store with CA-Signed Certificate
Required Files
Before proceeding, ensure that you have the following three PEM files:
• Certificate Authority (CA) PEM file• Signed PEM certificate• Private key PEM file
The following example usesssl-cert-keyhsm-ca.pem,ssl-cert-keyhsm.pem, andssl-cert-keyhsm-pk.pem,respectively, to represent these files.
Create the Key Store
The following command accepts the ssl-cert-keyhsm.pem and ssl-cert-keyhsm-pk.pem files and convertsthem to a .p12 file:
$ openssl pkcs12 -export -in ssl-cert-keyhsm.pem -inkey ssl-cert-keyhsm-pk.pem -out mycert.p12 -name alias -CAfile ssl-cert-keyhsm-ca.pem -caname root -chain
Important: The certificate CNmust match the fully qualified domain name (FQDN) of the Key TrusteeServer.
Managing the Navigator Key HSM Service
Use the keyhsm service for all basic server operations:
$ sudo service keyhsmkeyHsm service usage: setup <hsm name> - setup a new connection to an HSM trust <path> - add a trusted client certificate validate - validate that keyHSM is properly configured settings - display the current server configuration start - start the keyHSM proxy server status - show the current keyHSM server status shutdown - force keyHSM server to shut down reload - reload the server (without shutdown)
The reload command causes the application to restart internal services without ending the process itself. If you wantto stop and start the process, use the restart command.
Logging and Audits
The Navigator Key HSM logs contain all log and audit information, and by default are stored in the /var/log/keyhsmdirectory.
Cloudera Security | 223
Encryption

Integrating Key HSM with Key Trustee Server
Warning:
When configuring Key Trustee Server to use Key HSM, if there are existing keys stored in Key TrusteeServer, you are prompted to migrate the keys to your HSM. Cloudera recommends scheduling amaintenance window for this operation, as the keys are unavailable until the migration is complete.
If any existing key names use special characters other than hyphen (-), period (.), or underscore (_),or begin with non-alphanumeric characters, the migration fails. To avoid this, decrypt any data usingthe affected key names, and re-encrypt it using a new key name without special characters.
After importing the certificate from Key Trustee Server, configure Key HSM to trust it. On the Key HSM server, run thefollowing command:
$ sudo keyhsm trust /path/to/key_trustee_server/cert
To configure Key Trustee Server to integrate with Key HSM:
1. Make sure that the Key HSM service is running. Run the following command on the Key HSM host:
$ sudo service keyhsm start
2. On the Key Trustee Server, run the following command:
$ sudo ktadmin keyhsm --server https://keyhsm01.example.com:<port> --trust
3. Restart the Key Trustee Server service:
• Using Cloudera Manager: Key Trustee Server service > Actions > Restart• Using the command line:
$ sudo service keytrusteed restart
Note: Connections using SSL versions 1 through 3 and connections from untrusted clients areimmediately terminated to prevent POODLE vulnerability exploits.
Cloudera Navigator EncryptClouderaNavigator Encrypt transparently encrypts and secures data at restwithout requiring changes to your applicationsand ensures there is minimal performance lag in the encryption or decryption process. Advanced key managementwith Cloudera Navigator Key Trustee Server on page 210 and process-based access controls in Navigator Encrypt enableorganizations to meet compliance regulations and ensure unauthorized parties or malicious actors never gain accessto encrypted data.
For instructions on installing Navigator Encrypt, see Installing Cloudera Navigator Encrypt.
For instructions on configuring Navigator Encrypt, continue reading:
224 | Cloudera Security
Encryption

Registering Navigator Encrypt with Key Trustee Server
Prerequisites
Functioning Navigator Key Trustee Server
After Installing Cloudera Navigator Encrypt on a host, you must register the host with Navigator Key Trustee Server. Ifyou have not yet installed Navigator Key Trustee Server, see Installing Cloudera Navigator Key Trustee Server forinstructions.
Key Trustee Server Organization
To register with Key Trustee Server, you must have an existing organization. See Managing Key Trustee ServerOrganizations on page 215 for information on creating and viewing organizations on a Key Trustee Server.
Master Password
TheMaster Key is the primary Navigator Encrypt administrator access code and is configured by the Navigator Encryptadministrator during installation. The Master Key can take any one of three different forms:
• If you choose a passphrase (single), it must be between 15 and 32 characters long.• If you choose passphrase (dual), both must be between 15 and 32 characters long.• If you choose the RSA option, enter a path to the RSA key file, and if it has RSA passphrase, enter it for this private
key.
Warning: It is extremely important that you keep your master password secret and safe. In the eventthat you lose your master password, you will never be able to recover it, leaving your encrypted datairretrievably locked away.
Registering with Key Trustee Server
After Installing Cloudera Navigator Encrypt on a host, you must register the host with Navigator Key Trustee Server tobe able to encrypt and decrypt data. The following section lists the command options for registering your NavigatorEncrypt client.
Note: Do not run Navigator Encrypt commands with the screen utility.
Example command:
$ sudo navencrypt register --server=https://keytrustee.example.com:11371--org=your_keytrustee_org --auth=org_auth_token
Table 20: Registration Options
ExplanationCommand Option
User-defined unique name for this client to be used foradministration and reports. You can verify your client name
--clientname=my_client_name
in the /etc/navencrypt/keytrustee/clientnamefile.
Target Navigator Key Trustee Server for key storage.Replace keytrustee.example.com:11371with thehostname
--server=https://keytrustee.example.com:11371
and port of the Key Trustee Server. The default port is11371.
Cloudera Security | 225
Encryption

ExplanationCommand Option
Key Trustee organization name configured by the KeyTrustee Server administrator
--org=your_keytrustee_org
Organization authorization token, a pre-shared secret bythe Navigator Key Trustee Server administrator
--auth=org_auth_token
Skip SSL certificate verification. Use with self-signedcertificates on the Navigator Key Trustee Server
--skip-ssl-check
Add trustees for retrieval of the master key--trustee
Configure voting policy for trustees--votes
Master Key will be uploaded without encrypting it withyour local GPG Navigator Key Trustee
--recoverable
Key Trustee Server scheme that Navigator Encrypt usesfor public key operations. Specify "http" or "https".
--scheme "<scheme>"
Key Trustee Server port that Navigator Encrypt uses forpublic key operations.
--port
Registering with Previous Versions of Key Trustee Server
By default, new installations of Navigator Key Trustee Server 5.4.0 use a single HTTPS port for key storage and publickey operations. Previous versions and upgrades use separate ports for key storage and public key operations. Forbackward compatibility, Navigator Encrypt 3.7.0 introduces the--scheme and--port parameters for thenavencryptregister command.
For example, to register a version 3.7.0 Navigator Encrypt client with a version 3.8.0 Key Trustee Server using HTTPSover port 443 for key storage and HTTP over port 80 for public key operations, run the following command:
$ sudo navencrypt register --server=https://keytrustee.example.com:443 --org=key_trustee_org --auth=auth_token --scheme "http" --port 80
Navigator Encrypt versions lower than 3.7.0 do not support the --scheme and --port parameters. For these versionsof Navigator Encrypt, youmust ensure that the Key Trustee Server is configured to use port 443 (HTTPS) for key storageand port 80 (HTTP) for public key operations.
Updating Key Trustee Server Ports
The navencrypt register command does not provide the ability to change the ports for existing registrations. Ifthe Key Trustee Server ports are changed, youmust update /etc/navencrypt/keytrustee/ztrustee.confwiththe new port and scheme parameters (HKP_PORT and HKP_SCHEME, respectively).
For example, see the following ztrustee.conf excerpt from a registered client that has been upgraded to NavigatorEncrypt 3.7.0:
{ "LOCAL_FINGERPRINT": "2048R/182AAA838DC300AC334258D8E7F299BFB68A6F6F", "REMOTES": { "keytrustee.example.com": { "REMOTE_FINGERPRINT": "4096R/AF6400E12DC149799CA8CE6BF1604C34D830DE20", "REMOTE_SERVER": "https://keytrustee.example.com", "DEFAULT": true, "SSL_INSECURE": false, "PROTOCOL": "json-encrypt" } }}
226 | Cloudera Security
Encryption
In this example, the Key Trustee Server (keytrustee.example.com) is using the default configuration of port 443(HTTPS) for key storage and port 80 (HTTP) for public key operations.
If the Key Trustee Server is then updated to use port 11371 (HTTPS) for both key storage and public key operations,you must update ztrustee.conf as follows (changes in bold):
{ "LOCAL_FINGERPRINT": "2048R/56D741F9581A421A7B73EFFA4A678555706073AC", "REMOTES": { "keytrustee.example.com": { "REMOTE_FINGERPRINT": "4096R/AF6400E12DC149799CA8CE6BF1604C34D830DE20", "REMOTE_SERVER": "https://keytrustee.example.com:11371",
"HKP_PORT": 11371,"HKP_SCHEME": "https",
"DEFAULT": true, "SSL_INSECURE": false, "PROTOCOL": "json-encrypt" } }}
Configuration Files
The installer creates the /etc/navencrypt directory. All configuration settings are saved in this directory. Do notdelete any file from /etc/navencrypt. These files provide the necessary information for the Navigator Encryptapplication to function properly.
Warning: Perform backups of encrypted data, mount-points, and Navigator Encrypt configurationdirectories on a regular basis. To do this, ensure you have a backup of /etc/navencrypt. Failure tobackup this directory will make your backed up encrypted data unrecoverable in the event of dataloss.
Change Master Key by UUID
It is possible to re-use a previously used Master Key by its UUID. For example, if you currently have a Master key witha single passphrase, you can see the corresponding Navigator Key Trustee UUID in the /etc/navencrypt/controlfile:
$ cat /etc/navencrypt/control{ "app": { "name": "navencrypt", "version": "3.5" }, "keys": { "master": { "type": "single-passphrase", "uuid": "qMAKRMdk4HVbhfzR79cp9w92YBmNHJ5nSLhfd8ZVo6L" }, "targets": [] }}
You can copy theUUID (qMAKRMdk4HVbhfzR79cp9w92YBmNHJ5nSLhfd8ZVo6L in this example) and runnavencryptkey --change with option --new-master-key-uuid to change a Master Key by using its UUID only:
$ sudo navencrypt key --change --new-master-key-uuid=qMAKRMdk4HVbhfzR79cp9w92YBmNHJ5nSLhfd8ZVo6L>> Type your OLD Master keyType MASTER passphrase 1:Type MASTER passphrase 2:Verifying Master Key against Navigator Key Trustee (wait a moment)...
Cloudera Security | 227
Encryption

OKChanging Master key (wait a moment)... * Setting up EXISTING MASTER key... * Uploading CONTROL content... * Re-encrypting local keys...Master key successfully changed.
Note: The navencrypt key command fails if no volumes are encrypted or the kernel module is notloaded.
Preparing for Encryption Using Cloudera Navigator Encrypt
Before you can encrypt data, you must prepare a storage repository to hold the encrypted data. Data stored andretrieved from the repository is encrypted and decrypted transparently.
Cloudera Navigator Encrypt does not support:
• Encrypting a directory that contains or is contained within a mount point for another service (such as NFS oranother Navigator Encrypt mount point). See Encrypting Data on page 233 for more information.
• Installation or use inchroot environments, including creatingchroot environmentswithin an encrypted directory.
Navigator Encrypt Commands
Note: Do not run Navigator Encrypt commands with the screen utility.
The following table lists the commands used to encrypt data:
Table 21: Navigator Encrypt Commands
DescriptionCommand
Manage, update, and verify your data.navencrypt
Prepare your system for encryption by creatingmount-points and specifying storage.
navencrypt-prepare
Remove a mountpoint that is no longer in use.navencrypt-prepare --undo
Encrypt/decrypt your data to/from the encryptedfilesystem.
navencrypt-move
Generate process profile information in JSON format.navencrypt-profile
Build or rebuild the Navigator Encrypt kernel module.navencrypt-module-setup
Preparing for Encryption
Note: When using an HSMwith Key Trustee Server and Navigator Encrypt, encrypting a large numberof directories may exceed the capacity of the HSM. For example, encrypting MapReduce spill filesrequires encrypting each HDFS data directory or disk on each node, each with its own encryption key.On a 10-node cluster with 12 disks per node, this requires 120 keys. Make sure that your HSM cansupport your encryption requirements.
To get an in-depth look at the details behind the navencrypt-prepare command, or to use a unique configuration,use the interactive prompt by executing navencrypt-preparewith no options. This launches an interactive consolethat guides you through the following operations:
• Creating internal encryption keys
228 | Cloudera Security
Encryption

• Registering internal keys in Navigator Key Trustee• Registering mount point in /etc/navencrypt/ztab• Mounting current mount point• Establishing encryption method (dm-crypt for devices, ecryptfs for directories)
Using the console, you can choose how youwant your data stored and accessed. Navigator Encrypt offers two differenttypes of encryption:
• Block-level encryption with dm-crypt: Protect your data by encrypting the entire device. This option enables fulldisk encryption and is optimized for some system configurations. Block-level encryption can be used with logicaldevices such as a loop device.
• File-level encryption with ecryptfs: Protect your data bymounting an encrypted filesystem on top of an existingone. Enables transparent access to encrypted data without modifying your storage.
Note: As of August 2015, Filesystem-level encryption using eCryptfs is deprecated. For newinstallations, use block-level encryption. For existing installations using eCryptfs, see MigratingeCryptfs-Encrypted Data to dm-crypt on page 235 for instructions on migrating data encryptedusing eCryptfs to use dm-crypt.
See Block-Level Encryption with dm-crypt on page 229 and Filesystem-Level Encryption with eCryptfs on page 231 formore information.
In order to prepare for encryption, you must set a location to store the encrypted data. In the following example wewill use the directory /navencrypt/encrypted-storage and /navencrypt/mount-point. If you have specificspace/partition requirements, you can select a different directory, though Cloudera highly recommends that you placethe encrypted directory on the same partition as the data you are planning to encrypt.
The syntax for the prepare command is as follows:
$ sudo navencrypt-prepare <data_storage_directory> <mount_point>
When specifying the storage path and themount point path, do not use a trailing / in the path names. Both directoriesmust exist prior to running the navencrypt-prepare command; they are not automatically created.
To create the encrypted partition, create the mount point and storage directories, and then use thenavencrypt-prepare utility:
$ sudo mkdir -p /navencrypt/encrypted-storage /navencrypt/mount-point$ sudo navencrypt-prepare /navencrypt/encrypted-storage /navencrypt/mount-point
To demonstrate the difference between the two directories, this example uses different directories for the encryptedstorage and the mount point. It is also possible to store and access the data using the same directory.
To see the effects of these commands, run df -h. This command displays the partition information about your system.You should see an ecryptfs partition located at /navencrypt/encrypted-storage, and mounted at/navencrypt/mount-point.
After you have successfully prepared a client for encryption, you can encrypt and decrypt data using the commandsdescribed in Encrypting and Decrypting Data Using Cloudera Navigator Encrypt on page 232.
Block-Level Encryption with dm-crypt
Note: For best performance, Cloudera strongly recommends using block encryption with dm-crypt.See Migrating eCryptfs-Encrypted Data to dm-crypt on page 235 for instructions on migrating dataencrypted using eCryptfs to use dm-crypt.
When choosing block-level encryption during the interactive console, you must specify two parameters:
Cloudera Security | 229
Encryption
1. The first parameter is the block device you want to store the encrypted file system in. Because this device storesall of the encrypted data, itmust be as large as or larger than the target data. The devicemust be empty. Supportedstorage devices are:
• Physical block devices (for example, a disk device)• Virtual block devices (for example, a block device created by LVM)• Loop devices
2. The second parameter is the mount point for the encrypted file system. This is the location where you can accessthe encrypted data stored in the first parameter.
The entire device in the first parameter will be used for encrypted data.
Note: Do not manually unmount the encryption mount point (for example, using umount). If you doso, you must manually close the dm-crypt device using the following procedure:
1. Run dmsetup table to list the dm-crypt devices.2. Run cryptsetup luksClose <device_name> to close the device for the unmounted mount
point.
After choosing these two parameters and following the interactive console (discussed further in Preparing for Encryptionon page 228), you are ready to encrypt your data. The following example shows successful output from anavencrypt-prepare command using dm-crypt for block-level encryption:
$ sudo /usr/sbin/navencrypt-prepare /dev/sda1 /mnt/dm_encryptedType MASTER passphrase:Encryption Type: dmCrypt (LUKS)Cipher: aesKey Size: 256Random Interface: /dev/urandomFilesystem: ext4Verifying MASTER key against Navigator Key Trustee (wait a moment) ... OKGeneration Encryption Keys with /dev/urandom ... OKPreparing dmCrypt device (--use-urandom) ... OKCreating ext4 filesystem ... OKRegistering Encryption Keys (wait a moment) ... OKMounting /dev/sda1 ... OK
Block-Level Encryption with a Loop Device
When encrypting a device with block encryption, the device does not have to be a physical device; it can be a storagespace treated as a device instead. See Migrating eCryptfs-Encrypted Data to dm-crypt on page 235 for instructions onmigrating data encrypted using eCryptfs to use dm-crypt with a loop device.
To configure a loop device, use the dd command to create a storage space:
Warning: The space for the loop device is pre-allocated. After the loop device is created, the sizecannot be changed. Make sure you are allocating enough storage for the current encrypted data aswell as any future data.
If your disks are mounted individually with a filesystem on each disk, and your storage needs exceedthe capacity of a single disk, you can create a loop device on each disk that you want to allocate spacefor encrypted data. If you have consolidated storage (for example, using LVM), you can create a singleloop device or multiple loop devices as needed.
$ sudo dd if=/dev/zero of=/dmcrypt/storage bs=1G count=500$ sudo losetup -f/dev/loop0 ## This output displays available loop devices.$ sudo losetup /dev/loop0 /dmcrypt/storage
230 | Cloudera Security
Encryption

The dd command used above creates a 500 GB file. The losetup -f command returns an unused loop device to beused as a device. The command losetup /dev/loop0 /dmcrypt/storage associates the 500 GB file with the loopdevice. Add the losetup /dev/loop0 /dmcrypt/storage command to /etc/rc.local to ensure that the loopdevice is available at boot.
Warning: Loop devices are not created by Navigator Encrypt. Instead, Navigator Encrypt assigns adatastore to a loop device when the navencrypt-prepare --datastore option is used. So, it isup to the system administrator to create persistent /dev/loopX devices, which are required to preparea virtual block device. If the loop device being prepared is not persistent, then Navigator Encrypt willnot mount the device upon a reboot.
The device /dev/loop0 is now ready to be used by navencrypt-prepare. For example:
$ sudo /usr/sbin/navencrypt-prepare /dev/loop0 /dmcrypt/mountpointThe following example shows the successful output from the command:Type MASTER passphrase:Encryption Type: dmCrypt (LUKS)Cipher: aesKey Size: 256Random Interface: /dev/urandomFilesystem: ext4Verifying MASTER key against Navigator Key Trustee (wait a moment) ... OKGeneration Encryption Keys with /dev/urandom ... OKPreparing dmCrypt device (--use-urandom) ... OKCreating ext4 filesystem ... OKRegistering Encryption Keys (wait a moment) ... OKMounting /dev/loop0 ... OK
Filesystem-Level Encryption with eCryptfs
Note: As of August 2015, Filesystem-level encryption using eCryptfs is deprecated. For bestperformance, Cloudera strongly recommends using Block-Level Encryptionwith dm-crypt on page 229where possible. See Migrating eCryptfs-Encrypted Data to dm-crypt on page 235 for instructions onmigrating data encrypted using eCryptfs to use dm-crypt.
When choosing file-level encryption during the interactive console, you must specify two parameters:
1. The first parameter is the storage directory you want to store the encrypted file system in. Because this directorywill hold all of the encrypted data, it must be as large as or larger than the target data.
2. The second parameter is the mount point for the encrypted file system. This is the location where you can accessthe encrypted data stored in the location identified by the first parameter.
While the data is technically stored at the location identified by the first parameter, you can only access the data fromthe mount point identified by the second parameter. Consider this when choosing where to mount your data.
After choosing these two parameters and following the interactive console (discussed further in Preparing for Encryptionon page 228), you are ready to encrypt your data.
Undo Operation
Navigator Encrypt 3.5 and higher supports a new command option, navencrypt-prepare --undo. This commandreverses the operations from the regular navencrypt-prepare command by removing the device from NavigatorEncrypt control and removing registered encryption keys.
The only parameter of the undo operation is the storage device used to store the encrypted file system (not the mountpoint). Here is an example showing navencrypt-prepare and navencrypt-prepare --undo operations:
$ sudo navencrypt-prepare /path/to/storage /path/to/mountpointType MASTER passphrase:
Encryption Type: eCryptfsCipher: aes
Cloudera Security | 231
Encryption

Key Size: 256Random Interface: OpenSSLFilesystem: ext4Options:
Verifying MASTER key against Navigator Key Trustee (wait a moment) ... OKGeneration Encryption Keys with OpenSSL ... OKRegistering Encryption Keys (wait a moment) ... OKMounting /path/to/mountpoint ... OK$ sudo navencrypt-prepare --undo /path/to/storageType MASTER passphrase:Verifying MASTER key against Navigator Key Trustee (wait a moment) ... OKUmounting /path/to/mountpoint ... OK
Pass-through Mount Options for navencrypt-prepare
Navigator Encrypt 3.5 and higher provides the ability to specify options to pass to the mount command that is executedduring /etc/init.d/navencrypt-mount start. These options are specified with the -o option when preparinga mountpoint with the navencrypt-prepare command.
The following shows an example navencrypt-prepare command output when passing mount options with the -ooption:
$ sudo navencrypt-prepare -o discard,resize /mnt/t2 /mnt/t2Type MASTER passphrase:
Encryption Type: eCryptfsCipher: aesKey Size: 256Random Interface: OpenSSLFilesystem: ext4Options: discard,resize
Verifying MASTER key against Navigator Key Trustee(wait a moment) ... OKGeneration Encryption Keys with OpenSSL ... OKRegistering Encryption Keys (wait a moment) ... OKMounting /mnt/t2 ... OK
You can verify the results by viewing the /etc/navencrypt/ztab file:
$ cat /etc/navencrypt/ztab/mnt/t2 /mnt/t2 ecryptfs key=keytrustee,cipher=aes,keysize=256,discard,resize
Options can be added or removed to existing mount points prepared with versions of Navigator Encrypt prior to 3.5by editing the /etc/navencrypt/ztab file and adding the comma-separated options to the end of each line as seenin the previous example above.
To see the mounted filesystems and options, run mount:
$ mount/mnt/t2 on /mnt/t2 type ecryptfs (rw,ecryptfs_sig=6de3db1e87077adb,ecryptfs_unlink_sigs,noauto,\ecryptfs_cipher=aes,ecryptfs_key_bytes=32,discard,resize)
Pass-through mount options work for both dm-crypt and eCryptfs. For a list of available mount options, see the manpages for cryptsetup and ecryptfs respectively.
Encrypting and Decrypting Data Using Cloudera Navigator Encrypt
Warning: Prior to encrypting or decrypting any data, ensure that all processes (for example, MySQL,MongoDB, PostgreSQL, etc.) that have access to the target data are stopped. Failure to do so couldlead to data corruption.
232 | Cloudera Security
Encryption
Once the encrypted file system is created and initialized, it is ready to hold data. All encryption and decryptionfunctionality is performed with a single command: navencrypt-move.
Encrypting Data
Warning: Do not attempt to encrypt a directory that contains or is contained within a mount pointfor another service (including Navigator Encrypt and NFS). For example:
• If your encryption mount point is /var/lib/navencrypt/mount, do not attempt to encrypt/var,/var/lib,/var/lib/navencrypt,/var/lib/navencrypt/mount, or anything under/var/lib/navencrypt/mount/.
• If you have mounted an NFS filesystem at /mnt/home, do not attempt to encrypt /mnt,/mnt/home, or anything under /mnt/home.
Do not use Navigator Encrypt within a chroot environment, or create a chroot environment withinan encrypted directory.
If your Key Trustee Server is managed by Cloudera Manager, do not encrypt the Cloudera Managerdatabase with Navigator Encrypt; doing so prevents Cloudera Manager from starting.
Here is an example command to encrypt data, with an explanation for each option:
$ sudo navencrypt-move encrypt @<category> <directory_to_encrypt> <encrypted_mount_point>
Important: Do not run navencrypt-move commands simultaneously in multiple terminals. Doingso results in failure to encrypt or decrypt all of the specified data. No data is lost, as the source datais not removed, but you must re-run the failed operations sequentially.
Table 22: navencrypt-move Command Options
ExplanationCommand Option
Main command interface for all actions that requiremoving data either to or from the encrypted file system.
navencrypt-move
For more information see the navencrypt-move manpage (man navencrypt-move).
Identifies the direction to move data. In this case, we aremoving data into the encrypted file system (encrypting it).
encrypt
The decrypt parameter is a valid option here as well,which produces the opposite effect.
Note: By default, all Navigator Encryptencryption commands require free spaceequal to twice the size of the encrypteddata. If your environment does not haveenough free space, add--per-file to theend of the command. This moves each fileindividually. Per-file encryption onlyrequires free space equal to twice the sizeof the largest individual file, but is a sloweroperation.
This is the access category that will be applied to the databeing encrypted. When moving data into the encrypted
@<category>
filesystem, you will be protecting it with process-based
Cloudera Security | 233
Encryption
ExplanationCommand Option
access controls that will restrict access to only theprocesses that you allow. The naming convention of thecategory is entirely up to you (the @ is required), but it istypically a good idea to keep it simple and memorable.Depending on what data you are encrypting, it is usuallybest to pick a name referencing the data encrypted. Forexample, a @mysql category would be fitting for aMySQLdeployment.
This is the data that you want to encrypt. This can be asingle file or an entire directory. The Navigator Encrypt
<directory to encrypt>
process starts after the system boots, so you should notencrypt system-required files and directories (for example,the root partition, the entire /var directory, etc.). Someexamples of recommendeddata directories to encrypt are/var/lib/mysql/data, /db/data, etc.
The last parameter is where you want the data to bestored. This is the path to themount-point specified during
<encrypted mount-point>
the navencrypt-prepare command. In the examplefrom the previous section above, this is/var/lib/navencrypt/mount.
When a file is encrypted, a symbolic link (symlink) is created which points to a mount-point @<category> directory.The navencrypt-move command actually moves all specified data to the encrypted filesystem and replaces it witha symlink to the mount-point for that encrypted filesystem.
Encrypting a directory is similar to encrypting a file. The following command encrypts a directory:
$ sudo /usr/sbin/navencrypt-move encrypt @mycategory /path/directory_to_encrypt/ /path/to/mount
In this command, a directory is specified instead of a filename, and a symlink is created for that particular directory.To see the effects of this command, run:
$ ls -l <directory_to_encrypt>$ du -h <encrypted_storage_directory>
The output demonstrates the new filesystem layout. Everything that was once in the target directory is now securelystored inside of the encrypted filesystem, fully encrypted and protected from outside access.
Decrypting Data
The decryption command works in a similar way to the encrypt command. The following example demonstrates howto decrypt a file using the navencrypt-move command:
$ sudo /usr/sbin/navencrypt-move decrypt /path/file_to_decrypt
Important: Do not run navencrypt-move commands simultaneously in multiple terminals. Doingso results in failure to encrypt or decrypt all of the specified data. No data is lost, as the source datais not removed, but you must re-run the failed operations sequentially.
As with encryption, you can specify a directory instead of a file:
$ sudo /usr/sbin/navencrypt-move decrypt /path/directory_to_decrypt
234 | Cloudera Security
Encryption
Migrating eCryptfs-Encrypted Data to dm-crypt
As of August 2015, Filesystem-level encryption using eCryptfs is deprecated. Use this procedure tomigrate to dm-crypt.
RHEL 7 does not support eCryptfs. For new installations on RHEL 7, youmust use Block-Level Encryption with dm-crypton page 229. If you are planning on upgrading to RHEL 7 and are currently using eCryptfs, migrate to dm-crypt beforeupgrading.
Warning: Prior to encrypting or decrypting any data, ensure that all processes (for example, MySQL,MongoDB, PostgreSQL, etc.) that have access to the target data are stopped. Failure to do so couldlead to data corruption.
1. Prepare an empty block device. This can be a physical block device (such as an unused disk) or a virtual blockdevice (for example, a logical block device created by LVM, or a loop device). For instructions on creating a loopdevice, see Block-Level Encryption with a Loop Device on page 230.
2. Stop any services which depend on the encrypted data to be moved.3. Prepare a block-level encrypted mount point. See Preparing for Encryption Using Cloudera Navigator Encrypt on
page 228 for details about the procedure. The following example uses a loop device, but the device can be anyunused block device:
$ sudo mkdir /dmcrypt/mountpoint$ sudo navencrypt-prepare /dev/loop0 /dmcrypt/mountpoint
4. Add ACL rules for the new encrypted mount point that match the ACL rules for the mount point you are migratingfrom. To view existing ACL rules, run sudo navencrypt acl --print.
5. Add an ACL rule for your preferred shell (for example, /bin/bash) to enable command-line utilities such as mvand cp:
$ sudo navencrypt acl --add --rule="ALLOW @category * /bin/bash"
6. Copy the encrypted data from the eCryptfs mount point to the dm-crypt mount point:
$ sudo cp -rp /ecryptfs/mountpoint/path/to/data /dmcrypt/mountpoint/path/to/data
7. Update any symbolic links referencing the encrypted data. The following example demonstrates updating asymbolic link for a PostgreSQL database that was originally encrypted using eCryptfs, but has been migrated todm-crypt:
$ sudo ls -l /var/lib/db/data/base/16385lrwxrwxrwx 1 root root 72 Jul 22 15:33 /var/lib/db/data/base/16385 -> /ecryptfs/mountpoint/postgres/var/lib/db/data/base/16385$ sudo ln -sif /dmcrypt/mountpoint/postgres/var/lib/db/data/base/16385 /var/lib/db/data/base/16385$ sudo ls -l /var/lib/db/data/base/16385lrwxrwxrwx 1 root root 72 Jul 22 15:33 /var/lib/db/data/base/16385 -> /dmcrypt/mountpoint/postgres/var/lib/db/data/base/16385
8. Remove the ACL rule enabling command-line utilities:
$ sudo navencrypt acl --del --rule="ALLOW @category * /bin/bash"
9. Restart any services which depend on the encrypted data.10. Verify that the data was successfully copied, then delete the original eCryptfs-encrypted data. Do not delete any
data until you are certain that you no longer need the original data.
a. Stop the navencrypt-mount service:
$ sudo service navencrypt-mount stop
Cloudera Security | 235
Encryption

b. Remove the original mountpoint directory and the storage directory with the original encrypted data.c. Edit /etc/navencrypt/ztab and remove entries for the original encrypted directory where eCryptfs is
listed as the <type>.d. Start the navencrypt-mount service:
$ sudo service navencrypt-mount start
Navigator Encrypt Access Control List
Managing the Access Control List
Cloudera Navigator Encrypt manages file system permissions with an access control list (ACL). This ACL is a securityaccess control created by Cloudera that enables a predefined Linux process to access a file or directory managed byNavigator Encrypt.
The ACL uses rules to control process access to files. The rules specify whether a Linux process has access permissionsto read from or write to a specific Navigator Encrypt path.
A rule is defined in the following order:
# TYPE @CATEGORY PATH PROCESS PARAMETERS
The following table defines the ACL rule components:
Table 23: ACL Rule Components
DescriptionComponent
Specifies whether to allow or deny a process. It can haveeither of the following values: ALLOW or DENY.
TYPE
This is a user-defined shorthand, or container, for theencrypted dataset that the process will have access to.
@CATEGORY
For example, if you are encrypting the directory/var/lib/mysql, you could use the category @mysqlto indicate that this rule is granting access to a process onthe MySQL data.
Specifies the rights permissions of a specific path. Forexample: *, www/*.htaccess. Omit the leading slash (/).
PATH
Specifies the process or command name for the rule.PROCESS
Tells the process the parent-child process to be executed:PARAMETERS
--shell defines the script for Navigator Encrypt to allowfor executable process. Supported shells are/usr/bin/bash, /bin/bash, /usr/bin/dash, and/bin/bash.
--children defines for Navigator Encrypt which childprocesses to allow that are executed by a process/script.
Example: --shell=/bin/bash,--children=/bin/df,/bin/ls
All rules are stored in an encrypted policy file together with a set of process signatures that are used by NavigatorEncrypt to authenticate each Linux process. This file is encrypted with the Navigator Encrypt key you defined duringinstallation.
236 | Cloudera Security
Encryption

Cloudera recommends using permissivemode to assist with the initial ACL rule creation for your environment. Inpermissivemode, Navigator Encrypt allows full access to the encrypted data by all processes, but logs them in dmesgas action="denied"messages. Consult these messages to identify required ACL rules. To set Navigator Encrypt topermissive mode, use the following command:
$ sudo /usr/sbin/navencrypt set --mode=permissive
To view the current mode, run navencrypt status -d. For more information on access modes, see Access Modes.
deny2allow
After you generate the action="denied"messages, use the navencrypt deny2allow command to show whichACL rules are required, based on the action="denied"messages in dmesg. To show which ACL rules are required,perform the following steps:
1. Save the dmesg content to a file:
$ sudo dmesg > /tmp/dmesg.txt
2. Use the dmesg.txt file content as input to the deny2allow command to analyze the action="denied"messages and display a list of required ACL rules based on the action="denied"messages. Here is an examplecommand and output:
$ sudo /usr/sbin/navencrypt deny2allow /tmp/dmesg.txtALLOW @mysql employees/* /usr/sbin/mysqldALLOW @mysql * /bin/bashALLOW @mysql * /bin/ls
If you need to clear the dmesg log and start fresh, run dmesg -c.
If a rule is displayed in the output from the command, it does not automatically mean the ACL rule must be added.You must determine which rules are actually needed. For example, the rule for ls would not typically be added as anACL rule.
After the initial ACL rules are created, disable permissivemode with the following command:
$ sudo /usr/sbin/navencrypt set --mode=enforcing
Adding ACL Rules
Rules can be added one at a time using the command line or by specifying a policy file containing multiple rules. Thefollowing example shows how to add a single rule using the navencrypt acl --add command:
$ sudo /usr/sbin/navencrypt acl --add --rule="ALLOW @mysql * /usr/sbin/mysqld"
The following example shows how to add multiple rules using a policy file:
$ sudo /usr/sbin/navencrypt acl --add --file=/mnt/private/acl_rules
The contents of the policy file should contain one rule per line. For example:
ALLOW @mysql * /usr/sbin/mysqldALLOW @log * /usr/sbin/mysqldALLOW @apache * /usr/lib/apache2/mpm-prefork/apache2
Using a policy file is the fastest way to add multiple rules because it only requires the security key one time.
It is also possible to overwrite the entire current rules set with the option --overwrite. When this command isexecuted, all current rules are replaced by the ones specified in the file that contains the new set of rules. It isrecommended to save a copy of your current set of rules by printing it with the option --print.
Cloudera Security | 237
Encryption

Here is an example command using the --overwrite option:
$ sudo /usr/sbin/navencrypt acl --overwrite --file=/mnt/private/acl_rules
Adding ACL Rules by Profile
If your environment requires more granular controls on the processes that can access the data, you can add extracontrols by using profiles. Profiles set requirements on a process other than just having the correct fingerprint. Theycan include such things as process owner and group, required open files, and the current working directory. To seemore about adding rules by profile, see ACL Profile Rules on page 239.
Deleting ACL Rules
Rules can be deleted in one of two ways:
1. Manually specifying the rule to delete using the command line.2. Specifying the line number of the rule to delete.
The following example shows how to delete a rule by passing it as a parameter:
$ sudo /usr/sbin/navencrypt acl --del --rule="ALLOW @mysql * /usr/sbin/mysqld "
If you remove a MySQL ALLOW rule, the MySQL cache must be cleaned by executing the FLUSH TABLES;MySQLstatement. Otherwise, it will still be possible to view data from encrypted table.
The following example shows how to delete a rule by specifying a line number:
$ sudo /usr/sbin/navencrypt acl --del --line 3
It is also possible to delete multiple ACL rules in a single command:
$ sudo /usr/sbin/navencrypt acl --del --line=1,3
See Printing ACL Rules on page 238 for information on determining line numbers.
Deleting ACL Rules by Profile
See ACL Profile Rules on page 239 for instructions on deleting rules by profile.
Printing ACL Rules
You can print the current Access Control List using the following command:
$ sudo /usr/sbin/navencrypt acl --print
Save the ACL to a file with the --file option:
$ sudo /usr/sbin/navencrypt acl --print --file=policy-backup
To display additional information about the organization of the policy file, use the --list option:
$ sudo /usr/sbin/navencrypt acl --list
Universal ACL Rules
Universal ACLs will allow or deny a process access to all files or directories encrypted with Navigator Encrypt.
The rule ALLOW @* * /process allows the designated process to access anything from all encrypted categories.
The rule ALLOW @data * * allows all processes access to any path under the @data category.
238 | Cloudera Security
Encryption
The rule ALLOW @* * * allows all processes access to all encrypted categories. Cloudera does not recommend usingthis rule; use it only in test environments.
Here is an example adding a universal ACL rule and then displaying it:
$ sudo /usr/sbin/navencrypt acl --add --rule="ALLOW @* * /usr/sbin/mysqld"Type MASTER passphrase:1 rule(s) were added# navencrypt acl --listType MASTER passphrase:# - Type Category Path Profile Process1 ALLOW @* * /usr/sbin/mysqld
Enabling Shell Scripts to Be Detected by ACL
All of the previous rules work for binary files. There may be times a script, such as a shell script, must be allowed toaccess the encrypted directory.
You can add the script as a rule by indicating the executable binary process of this script using the --shell option,for example:
ALLOW @scripts * /root/script.sh --shell=/bin/bash
The --shell option identifies which executable process is used to execute the script. Supported shells are/usr/bin/bash, /bin/bash, /usr/bin/dash, and /bin/bash
If the script is altered, it will no longer be trusted by the ACL because the fingerprint has changed. If you edit the scriptyou must invoke the update option to update the ACL with the new fingerprint.
In some cases, it may be necessary to grant permissions to sub-processes invoked by scripts. For example, it may benecessary to grant permissions to /bin/bash that also allow running the /bin/df command to allow the systemadministrator to check disk capacity through a script run using a crontab entry. By using the --children option,you can specify these permissions. For example:
ALLOW @scripts * /root/script.sh --shell=/bin/bash --children=/bin/df
The --children option tells Navigator Encrypt to allow the /bin/df binary process if it is executed by/root/script.sh.
To allow more than one sub-process, identify them with the --children option as comma-separated values. Forexample:
ALLOW @scripts * /root/script.sh --shell=/bin/bash --children=/bin/df,/bin/ls
To add shell-children sub-processes, execute the navencrypt acl --add command, for example:
$ sudo /usr/sbin/navencrypt acl --add --rule="ALLOW @mysql * /usr/bin/mysqld_safe \--shell=/bin/bash --children=/bin/df,/bin/ls"
ACL Profile Rules
If your environment requires more granular controls on the processes that can access the data, you can add extracontrols by using profiles. Profiles set requirements on a process other than just having the correct fingerprint. Theycan include such things as process owner and group, required open files, and the current working directory.
A profile is generated by using the following command:
$ usr/sbin/navencrypt-profile --pid=<pid>
The output, by default, will be displayed on the screen. You can redirect the output to a file using the > or >> redirectoperators; you can then edit the JSON output in the file to remove lines you do notwant. By default, the profile includesthe UID, the short name of the binary or script (identified as comm ), and the full command line of the running process(including any parameters passed). You can generate information by using one of these flags:
Cloudera Security | 239
Encryption

• -c, --with-cwd
Output the current working directory
• -e, --with-egid
Output the egid
• -g, --with-gid
Output the gid
• -u, --with-euid
Output the euid
Example output from the navencrypt-profile command:
{"uid":"0","comm":"NetworkManager","cmdline":"NetworkManager –pid-file=/var/run/NetwrkManager/NetworkManager.pid","gid":"0""cwd":"/","fd0":"/dev/null","fd1":"/dev/null","fd2":"/dev/null"}
Some distributions do not support euid and guid. Make sure that your profile file is correct by executing the followingcommand to verify the expected IDs:
$ ps -p <pid_of_process> -o euid,egid
If cmdline parameters are variable, such as appending a process start timestamp to a filename, then the processprofilewill notmatch on subsequent restarts of the process because the current profilewill have an updated timestampand access will be denied by the ACL. You can mark those parameters as variable inside the profile file. For example,if the cmdline of a process is something like this:
"cmdline":"NetworkManager –pid-file=/var/run/NetworkManager/NetworkManager.pid \-logfile=/var/log/NetworkManager/log-20130808152300.log"
Where log-20130505122300.log is a variable cmdline parameter, before adding the process profile to the ACL,edit the process profile file and use ## to specify that a particular parameter is variable:
"cmdline":"NetworkManager –pid-file=/var/run/NetworkManager/NetworkManager.pid -logfile=##"
With the above configuration, the ACL will allow any value for the -logfile cmdline parameter.
To enable a profile in the ACL, use the additional parameter --profile-file=<filename> when adding the ruleto the ACL:
$ sudo /usr/sbin/navencrypt acl --add --rule="ALLOW @mysql * /usr/sbin/mysqld" \–-profile-file=/path/to/profile/file
To display the profile portion of the rules, use the --all parameter with navencrypt acl --list:
$ sudo /usr/sbin/navencrypt acl --list --allType MASTER passphrase:# - Type Category Path Profile Process1 ALLOW @mysql * YES /usr/sbin/mysqldPROFILE:{"uid":"120","comm":"mysqld","cmdline":"mysqld"}
240 | Cloudera Security
Encryption

Maintaining Navigator Encrypt
Backing Up Navigator Encrypt
Perform backups of encrypted data, mount points, and the Navigator Encrypt configuration directory(/etc/navencrypt) on a regular basis.
Warning: Failure to back up the configuration directory makes your backed-up encrypted dataunrecoverable in the event of data loss.
Access Modes
Navigator Encrypt provides three different access modes:
• Enforcing is the default mode in which Navigator Encrypt validates access from all processes against the ACL. Toprotect your data, enforcing mode must be enabled.
• Permissivemode causes action="denied"messages to be logged in dmesg. It does not prevent access to theencrypted data. This mode is a dry-run feature to run and build ACL rules.
• Adminmode, as well as permissive mode, does not prevent access to the encrypted data. It allows any processto access the information because the ACL rules are not validated against the process. Admin mode does notcause action="denied"messages to be logged in dmesg.
To view the current access mode, run the following command:
# sudo /usr/sbin/navencrypt status -d
Note: The navencrypt status command reports that the navencryptmodule is not running ifno volumes are encrypted or the kernel module is not loaded.
To change the access mode, use the following command:
# sudo /usr/sbin/navencrypt set --mode={enforcing|permissive|admin}
You cannot change the Navigator Encrypt access mode unless the Navigator Encrypt module is running. To view thestatus of the Navigator Encrypt module, run navencrypt status --module.
To start the Navigator Encrypt module there must be at least one active mount-point. To verify the mount-pointsstatus, run the following command:
# sudo /etc/init.d/navencrypt-mount status
Changing and Verifying the Master Key
You can perform two operations with the navencrypt key command: change and verify.
You can verify a key against the Navigator Encrypt module, the Navigator Key Trustee server, or both. For example:
# sudo /usr/sbin/navencrypt key --verify# sudo /usr/sbin/navencrypt key --verify --only-module# sudo /usr/sbin/navencrypt key --verify --only-keytrustee
Note: The navencrypt key command fails if no volumes are encrypted or the kernel module is notloaded.
Cloudera Security | 241
Encryption

The master key can be changed in the event that another key-type authentication mechanism or a new master key isrequired. Valid master key types are single-passphrase, dual-passphrase, and RSA key files. To change the master keytype, issue the following command and follow the interactive console:
# sudo /usr/sbin/navencrypt key –-change
You can use the --trustees, --votes, and --recoverable options for the new key as described in Table 20:Registration Options on page 225.
Updating ACL Fingerprints
All rules reference a process fingerprint (a SHA256 digest) that is used to authenticate the process into the file system.If the filesystem detects a fingerprint that is different from the one stored in the ACL, the Linux process is denied accessand treated as an untrusted process.
Occasionally this process fingerprint must be updated, such as when software is upgraded. When the fingerprint mustbe updated, the Navigator Encrypt administrator re-authenticates the process on the ACL by executing the commandnavencrypt acl --update.
The following example demonstrates how to determine when a process fingerprint has been changed and must beupdated:
# sudo /usr/sbin/navencrypt acl --listType MASTER passphrase:# - Type Category Path Profile Process1 !! ALLOW @mysql * /usr/sbin/mysqld2 ALLOW @log * /usr/sbin/mysqld3 !! ALLOW @apache * /usr/lib/apache2/mpm-prefork/
In the example above, the double exclamation (!!) characters indicate that a process fingerprint has changed andmust be updated. Similarly, double E (EE) characters indicate a process read error. This error can be caused by a processthat does not exist or that has permission issues.
Note:
For RHEL-compatible OSes, the prelink applicationmay also be responsible for ACL fingerprint issues.Prelinking is intended to speed up a system by reducing the time a program needs to begin. Clouderahighly recommends disabling any automated prelink jobs, which are enabled by default in somesystems. As an alternative, it is recommended that you integrate a manual prelink run into yourexisting change control policies to ensure minimal downtime for applications accessing encrypteddata.
To disable prelinking, modify the /etc/sysconfig/prelink file and change PRELINKING=yes toPRELINKING=no. Then, run the/etc/cron.daily/prelink script as root. Once finished, automaticprelinking is disabled.
For more information about how prelinking affects your system, see prelink.
Managing Mount Points
The /etc/init.d/navencrypt-mount command mounts all mount points that were registered with thenavencrypt-prepare command and are listed in the /etc/navencrypt/ztab file. The possible operations are:
• start
• stop
• status
• restart
242 | Cloudera Security
Encryption

Note: Do not manually unmount the encryption mount point (for example, using umount). If you doso, you must manually close the dm-crypt device using the following procedure:
1. Run dmsetup table to list the dm-crypt devices.2. Run cryptsetup luksClose <device_name> to close the device for the unmounted mount
point.
When executing the stop operation, the encrypted mount point is unmounted, and your data becomes inaccessible.
The following example shows how to execute navencrypt-mount status with some inactive mount points:
# sudo /etc/init.d/navencrypt-mount status
The following example shows how to execute the navencrypt-mount stop command:
# sudo /etc/init.d/navencrypt-mount stop
The following example shows how to execute the navencrypt-mount start command:
# sudo /etc/init.d/navencrypt-mount start
Here is an example command used to manually mount a directory:
# sudo /usr/sbin/mount.navencrypt /path/to_encrypted_data/ /path/to/mountpoint
This command can be executed only if the navencrypt-prepare command was previously executed.
Allowing Access to a Single Operation
Sometimes running a single operation on encrypted data is required, such as listing the encrypted files or copying aparticular file. The navencrypt exec command provides an efficient method to accomplish this. In the followingcommand example, permission is denied when the command is run without navencrypt exec:
# ls /mnt/db_encrypted/mysql/ls: cannot open directory /mnt/db_encrypted/mysql/: Permission denied
If the ls command is executed with navencrypt exec, access is allowed one time only:
# sudo /usr/sbin/navencrypt exec "ls -l /mnt/db_encrypted/mysql/"
Navigator Encrypt Kernel Module Setup
If the kernel headers were not installed on your host, or if the wrong version of the kernel headers were installed, theNavigator Encrypt module was not built at installation time. To avoid reinstalling the system, install the correct headersand execute the navencrypt-module-setup command. This attempts to build the module and install it.
This method is also an efficient way to install any new Navigator Encrypt module feature or fix without otherwisemodifying your current Navigator Encrypt environment.
Navigator Encrypt Configuration Directory Structure
The file and directory structure of /etc/navencrypt is as follows:
# tree /etc/navencrypt//etc/navencrypt/ control -> /etc/navencrypt/jSpi9SM65xUIIhrau1Nn8ZXmQhrrQ9e363EUz8HKiRs jSpi9SM65xUIIhrau1Nn8ZXmQhrrQ9e363EUz8HKiRs rules ztab
Cloudera Security | 243
Encryption
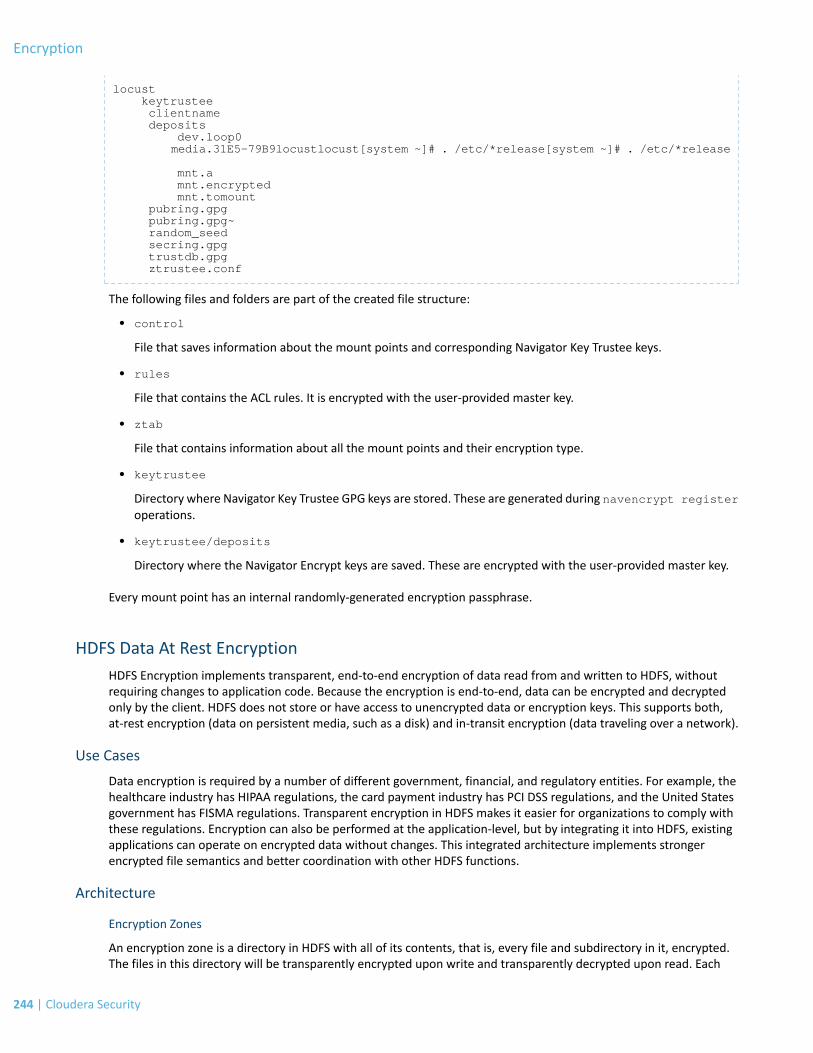
locust keytrustee clientname deposits dev.loop0 media.31E5-79B9locustlocust[system ~]# . /etc/*release[system ~]# . /etc/*release
mnt.a mnt.encrypted mnt.tomount pubring.gpg pubring.gpg~ random_seed secring.gpg trustdb.gpg ztrustee.conf
The following files and folders are part of the created file structure:
• control
File that saves information about the mount points and corresponding Navigator Key Trustee keys.
• rules
File that contains the ACL rules. It is encrypted with the user-provided master key.
• ztab
File that contains information about all the mount points and their encryption type.
• keytrustee
Directory where Navigator Key Trustee GPG keys are stored. These are generated during navencrypt registeroperations.
• keytrustee/deposits
Directory where the Navigator Encrypt keys are saved. These are encrypted with the user-provided master key.
Every mount point has an internal randomly-generated encryption passphrase.
HDFS Data At Rest EncryptionHDFS Encryption implements transparent, end-to-end encryption of data read from and written to HDFS, withoutrequiring changes to application code. Because the encryption is end-to-end, data can be encrypted and decryptedonly by the client. HDFS does not store or have access to unencrypted data or encryption keys. This supports both,at-rest encryption (data on persistent media, such as a disk) and in-transit encryption (data traveling over a network).
Use Cases
Data encryption is required by a number of different government, financial, and regulatory entities. For example, thehealthcare industry has HIPAA regulations, the card payment industry has PCI DSS regulations, and the United Statesgovernment has FISMA regulations. Transparent encryption in HDFS makes it easier for organizations to comply withthese regulations. Encryption can also be performed at the application-level, but by integrating it into HDFS, existingapplications can operate on encrypted data without changes. This integrated architecture implements strongerencrypted file semantics and better coordination with other HDFS functions.
Architecture
Encryption Zones
An encryption zone is a directory in HDFS with all of its contents, that is, every file and subdirectory in it, encrypted.The files in this directory will be transparently encrypted upon write and transparently decrypted upon read. Each
244 | Cloudera Security
Encryption
encryption zone is associated with a key which is specified when the zone is created. Each file within an encryptionzone also has its own encryption/decryption key, called the Data Encryption Key (DEK). These DEKs are never storedpersistently unless they are encrypted with the encryption zone's key. This encrypted DEK is known as the EDEK. TheEDEK is then stored persistently as part of the file's metadata on the NameNode.
A key can have multiple key versions, where each key version has its own distinct key material (that is, the portion ofthe key used during encryption and decryption). Key rotation is achieved by modifying the encryption zone's key, thatis, bumping up its version. Per-file key rotation is then achieved by re-encrypting the file's DEK with the new encryptionzone key to create new EDEKs. An encryption key can be fetched either by its key name, returning the latest versionof the key, or by a specific key version.
Note: An encryption zone cannot be created on top of an existing directory. Each encryption zonebegins as an empty directory and distcp can be used to add data to the zone.
Key Management Server
A new service needs to be added to your cluster to store, manage, and access encryption keys, called the Hadoop KeyManagement Server (KMS). The KMS service is a proxy that interfaces with a backing key store on behalf of HDFSdaemons and clients. Both the backing key store and the KMS implement the Hadoop KeyProvider client API.
Encryption and decryption of EDEKs happens entirely on the KMS. More importantly, the client requesting creation ordecryption of an EDEK never handles the EDEK's encryption key (that is, the encryption zone key). When a new file iscreated in an encryption zone, the NameNode asks the KMS to generate a new EDEK encrypted with the encryptionzone's key. When reading a file from an encryption zone, the NameNode provides the client with the file's EDEK andthe encryption zone key version that was used to encrypt the EDEK. The client then asks the KMS to decrypt the EDEK,which involves checking that the client has permission to access the encryption zone key version. Assuming that issuccessful, the client uses the DEK to decrypt the file's contents. All the steps for read andwrite take place automaticallythrough interactions between the DFSClient, the NameNode, and the KMS.
Access to encrypted file data and metadata is controlled by normal HDFS filesystem permissions. Typically, the backingkey store is configured to only allow end-user access to the encryption zone keys used to encrypt DEKs. This meansthat EDEKs can be safely stored and handled by HDFS, since the hdfs user will not have access to EDEK encryptionkeys. This means that if HDFS is compromised (for example, by gaining unauthorized access to a superuser account),a malicious user only gains access to the ciphertext and EDEKs. This does not pose a security threat since access toencryption zone keys is controlled by a separate set of permissions on the KMS and key store.
For more details on configuring the KMS, see Configuring the Key Management Server (KMS) on page 252.
Navigator Key Trustee
HDFS encryption can use a local Java KeyStore for key management. This is not sufficient for production environmentswhere a more robust and secure key management solution is required. Cloudera Navigator Key Trustee Server on page210 is a key store for managing encryption keys and other secure deposits.
In order to leverage themanageable, highly-available keymanagement capabilities of the Navigator Key Trustee Server,Cloudera provides a custom KMS service, the Key Trustee KMS.
Formore information on integratingNavigator Key Trustee ServerwithHDFS encryption, see IntegratingHDFS Encryptionwith Navigator Key Trustee Server on page 266.
crypto Command Line Interface
createZone
Use this command to create a new encryption zone.
-createZone -keyName <keyName> -path <path>
Where:
Cloudera Security | 245
Encryption

• path: The path of the encryption zone to be created. It must be an empty directory.• keyName: Name of the key to use for the encryption zone.
listZones
List all encryption zones. This command requires superuser permissions.
-listZones
Enabling HDFS Encryption on a Cluster
Minimum Required Role: Full Administrator
The following sections will guide you through enabling HDFS encryption on your cluster, using the default Java KeyStoreKMS. If you want to use Cloudera Navigator Key Trustee Server on page 210, and not the default JavaKeyStoreProvider,to store HDFS encryption keys, see Integrating HDFS Encryption with Navigator Key Trustee Server on page 266.
Optimizing for HDFS Data at Rest Encryption
Warning: To ensure that HDFS encryption functions as expected, the steps described in this sectionaremandatory for production use.
CDH implements theAdvanced Encryption StandardNew Instructions (AES-NI), which provide substantial performanceimprovements. To get these improvements, you need a recent version of libcrypto.so on HDFS and MapReduceclient hosts -- that is, any host fromwhich you originate HDFS orMapReduce requests. Many OS versions have an olderversion of the library that does not support AES-NI. The instructions that follow tell you what you need to do for eachOS version that CDH supports.
RHEL/CentOS 6.5 or later
The installed version of libcrypto.so supports AES-NI, but you need to install the openssl-devel package on allclients:
$ sudo yum install openssl-devel
RHEL/CentOS 6.4 or earlier 6.x versions, or SLES 11
Download and extract a newer version of libcrypto.so from a CentOS 6.5 repository and install it on all clients in/var/lib/hadoop/extra/native/:
1. Download the latest version of the openssl package. For example:
$ wget http://mirror.centos.org/centos/6/os/x86_64/Packages/openssl-1.0.1e-30.el6.x86_64.rpm
The libcrypto.so file in this package can be used on SLES 11 as well as RHEL/CentOS.2. Decompress the files in the package, but do not install it:
$ rpm2cpio openssl-1.0.1e-30.el6.x86_64.rpm | cpio -idmv
3. If you are using parcels, create the /var/lib/hadoop/extra/native/ directory:
$ sudo mkdir -p /var/lib/hadoop/extra/native
4. Copy the shared library into /var/lib/hadoop/extra/native/. Name the target file libcrypto.so, withno suffix at the end, exactly as in the command that follows.
$ sudo cp ./usr/lib64/libcrypto.so.1.0.1e /var/lib/hadoop/extra/native/libcrypto.so
246 | Cloudera Security
Encryption
RHEL/CentOS 5
In this case, you need to build libcrypto.so and copy it to all clients:
1. On one client, compile and install openssl from source:
$ wget http://www.openssl.org/source/openssl-1.0.1j.tar.gz$ cd openssl-1.0.1j $ ./config --shared --prefix=/opt/openssl-1.0.1j$ sudo make install
2. If you are using parcels, create the /var/lib/hadoop/extra/native/ directory:
$ sudo mkdir -p /var/lib/hadoop/extra/native
3. Copy the files into /var/lib/hadoop/extra/native/:
$ sudo cp /opt/openssl-1.0.1j/lib/libcrypto.so /var/lib/hadoop/extra/native
4. Copy the files to the remaining clients using a utility such as rsync
Debian Wheezy
The installed version of libcrypto.so supports AES-NI, but you need to install the libssl-devel package on allclients:
$ sudo apt-get install libssl-dev
Ubuntu Precise and Ubuntu Trusty
Install the libssl-devel package on all clients:
$ sudo apt-get install libssl-dev
Testing if encryption optimization works
To verify that a client host is ready to make use of the AES-NI instruction set optimization for HDFS encryption at rest,use the following command:
hadoop checknative
You should see a response such as the following:
14/12/12 13:48:39 INFO bzip2.Bzip2Factory: Successfully loaded & initialized native-bzip2library system-native14/12/12 13:48:39 INFO zlib.ZlibFactory: Successfully loaded & initialized native-zlib libraryNative library checking:hadoop: true /usr/lib/hadoop/lib/native/libhadoop.so.1.0.0zlib: true /lib64/libz.so.1snappy: true /usr/lib64/libsnappy.so.1lz4: true revision:99bzip2: true /lib64/libbz2.so.1openssl: true /usr/lib64/libcrypto.so
If you see true in the openssl row, Hadoop has detected the right version of libcrypto.so and optimization willwork. If you see false in this row, you do not have the right version.
Adding the KMS Service
1. Make sure you have performed the steps described in Optimizing for HDFS Data at Rest Encryption on page 246,depending on the operating system you are using.
2. On the Cloudera Manager Home page, click
Cloudera Security | 247
Encryption

to the right of the cluster name and select Add a Service. A list of service types display. You can add one type ofservice at a time.
3. Select the Java KeyStore KMS service and click Continue.4. Customize the assignment of role instances to hosts. You can click the View By Host button for an overview of
the role assignment by hostname ranges.
Click the field below the Key Management Server (KMS) role to display a dialog containing a list of hosts. Selectthe host for the new KMS role and click OK.
5. Review and modify the JavaKeyStoreProvider Directory configuration setting if required and click Continue. TheJava KeyStore KMS service is started.
6. Click Continue, then click Finish. You are returned to the Home page.7. Verify the new Java KeyStore KMS service has started properly by checking its health status. If the Health Status
is Good, then the service started properly.8. Follow the steps
Enabling Java KeyStore KMS for the HDFS Service
1. Go to the HDFS service.2. Click the Configuration tab.3. Select Scope > HDFS (Service-Wide).4. Select Category > All.5. Locate the KMS Service property or search for it by typing its name in the Search box.6. Select the Java KeyStore KMS radio button for the KMS Service property.7. Click Save Changes.8. Restart your cluster.
a. On the Home page, click
to the right of the cluster name and select Restart.b. Click Restart that appears in the next screen to confirm. The Command Details window shows the progress
of stopping services.
When All services successfully started appears, the task is complete and you can close the Command Detailswindow.
9. Deploy client configuration.
a. On the Home page, click
to the right of the cluster name and select Deploy Client Configuration.b. Click Deploy Client Configuration.
Configuring Encryption Properties for the HDFS and NameNode
Configure the following properties to select the encryption algorithmandKeyProvider thatwill be used during encryption.If you do not modify these properties, the default values will use AES-CTR to encrypt your data.
Note: You may notice many of the properties described in the table below are absent from yourkms-site.xml. In such a case, the default values listed here are being used.
For a managed cluster, since the properties listed below have not been exposed in ClouderaManager,use the corresponding safety valves if you want to specify a different value.
248 | Cloudera Security
Encryption

DescriptionProperty
Selecting an Encryption Algorithm: Set the following properties in the core-site.xml safety valve and redeployclient configuration.
The prefix for a given crypto codec, contains acomma-separated list of implementation classes for a
hadoop.security.crypto.codec.classes.EXAMPLECIPHERSUITE
given crypto codec (for example,EXAMPLECIPHERSUITE).The first implementation will be used if available, othersare fallbacks.
By default, the cipher suite used is AES/CTR/NoPaddingand its default classes areorg.apache.hadoop.crypto.OpensslAesCtrCryptoCodec
andorg.apache.hadoop.crypto.JceAesCtrCryptoCodec
as described in the following properties.
Cipher suite for crypto codec.hadoop.security.crypto.cipher.suite
Default: AES/CTR/NoPadding
Comma-separated list of crypto codec implementationsfor the default cipher suite: AES/CTR/NoPadding. The
hadoop.security.crypto.codec.classes.aes.ctr.nopadding
first implementation will be used if available, others arefallbacks.
Default:org.apache.hadoop.crypto.OpensslAesCtrCryptoCodec,
org.apache.hadoop.crypto.JceAesCtrCryptoCodec
The JCE provider name used in CryptoCodec.hadoop.security.crypto.jce.provider
Default: None
The buffer size used by CryptoInputStream andCryptoOutputStream.
hadoop.security.crypto.buffer.size
Default: 8192
KeyProvider Configuration: Set this property in the hdfs-site.xml safety valve and restart the NameNode.
The KeyProvider to be used when interacting withencryption keys that are used to read and write to anencryption zone.
dfs.encryption.key.provider.uri
If you have a managed cluster, Cloudera Manager willpoint to the KMS server you have enabled above.
NameNode Configuration: Set this property in the hdfs-site.xml safety valve and restart the NameNode.
When listing encryption zones, the maximum number ofzones that will be returned in a batch. Fetching the list
dfs.namenode.list.encryption.zones.num.responses
incrementally in batches improves NameNodeperformance.
Default: 100
Creating Encryption Zones
Once a KMS has been set up and the NameNode and HDFS clients have been correctly configured, use the hadoopkey and hdfs crypto command-line tools to create encryption keys and set up new encryption zones.
Cloudera Security | 249
Encryption

• Create an encryption key for your zone as the application user that will be using the key. For example, if you arecreating an encryption zone for HBase, create the key as the hbase user as follows:
$ sudo -u hbase hadoop key create <key_name>
• Create a new empty directory and make it an encryption zone using the key created above.
$ hadoop fs -mkdir /zone$ hdfs crypto -createZone -keyName <key_name> -path /zone
You can verify creation of the new encryption zone by running the -listZones command. You should see theencryption zone along with its key listed as follows:
$ sudo -u hdfs hdfs crypto -listZones /zone <key_name>
Warning: Do not delete an encryption key as long as it is still in use for an encryption zone. Thiswill result in loss of access to data in that zone.
For more information and recommendations on creating encryption zones for each CDH component, see ConfiguringCDH Services for HDFS Encryption on page 270.
Adding Files to an Encryption Zone
Existing data can be encrypted by coping it copied into the new encryption zones using tools like distcp. See the DistCpConsiderations section below for information on using DistCp with encrypted data files.
You can add files to an encryption zone by copying them over to the encryption zone. For example:
sudo -u hdfs hadoop distcp /user/dir /user/enczone
Additional Information:
• For more information on KMS setup and high availability configuration, see Configuring the Key ManagementServer (KMS) on page 252.
• For instructions on securing the KMS using Kerberos, SSL communication and ACLs, see Securing the KeyManagement Server (KMS) on page 255.
• If you want to use the KMS to encrypt data used by other CDH services, see Configuring CDH Services for HDFSEncryption on page 270 for information on recommended encryption zones for each service.
Backing Up Encryption Keys
It is critical that you regularly back up your encryption keys. Failure to do so can result in irretrievable loss of encrypteddata.
If you are using the Java KeyStore KMS, make sure you regularly back up the Java KeyStore that stores the encryptionkeys. If you are using the Key Trustee KMS and Key Trustee Server, see Backing Up and Restoring Key Trustee Serveron page 210 for instructions on backing up Key Trustee Server and Key Trustee KMS.
DistCp Considerations
A common usecase for DistCp is to replicate data between clusters for backup and disaster recovery purposes. This istypically performed by the cluster administrator, who is an HDFS superuser. To retain this workflow when using HDFSencryption, a new virtual path prefix has been introduced, /.reserved/raw/, that gives superusers direct access tothe underlying block data in the filesystem. This allows superusers todistcp datawithout requiring access to encryptionkeys, and avoids the overhead of decrypting and re-encrypting data. It also means the source and destination data willbe byte-for-byte identical, which would not have been true if the data was being re-encrypted with a new EDEK.
250 | Cloudera Security
Encryption

Warning:
Whenusing/.reserved/raw/ todistcpencrypteddata,make sure youpreserve extendedattributeswith the -px flag. This is because encrypted attributes such as the EDEK are exposed through extendedattributes andmust be preserved to be able to decrypt the file.
This means that if the distcp is initiated at or above the encryption zone root, it will automaticallycreate a new encryption zone at the destination if it does not already exist. Hence, Clouderarecommends you first create identical encryption zones on the destination cluster to avoid any potentialmishaps.
Copying between encrypted and unencrypted locations
By default, distcp compares checksums provided by the filesystem to verify that data was successfully copied to thedestination. When copying between an unencrypted and encrypted location, the filesystem checksums will not matchsince the underlying block data is different.
In this case, you can specify the -skipcrccheck and -update flags to avoid verifying checksums.
Attack Vectors
MitigationIssueType of Exploit
Hardware Access Exploit
It can be mitigated by disabling swap,using encrypted swap, or using mlock
Access to swap files of processescontaining DEKs. This exploit does not
These exploits assume the attacker hasgained physical access to hard drives
to prevent keys from being swappedout.
expose cleartext, as it also requiresaccess to encrypted block files.
from cluster machines, that is,DataNodes and NameNodes.
It can only be mitigated by restrictingphysical access to the clustermachines.
Access to encrypted block files. Thisexploit does not expose cleartext, asit also requires access to the DEKs.
Root Access Exploits
No mitigation required.Access to encrypted block files.
By itself, this does not exposecleartext, as it also requires access toencryption keys.
These exploits assume the attacker hasgained root shell access to clustermachines running datanodes andnamenodes. Many of these exploitscannot be addressed in HDFS, since amalicious root user has access to the No mitigation.Dump memory of client processes to
obtain DEKs, delegation tokens,cleartext.
in-memory state of processes holdingencryption keys and cleartext. Forthese exploits, the only mitigation
No mitigation required.Recording network traffic to sniffencryption keys and encrypted datain transit.
By itself, insufficient to read cleartextwithout the EDEK encryption key.
technique is carefully restricting andmonitoring root shell access.
No mitigation required.Dump memory of datanode processto obtain encrypted block data.
By itself, insufficient to read cleartextwithout the DEK.
Cloudera Security | 251
Encryption
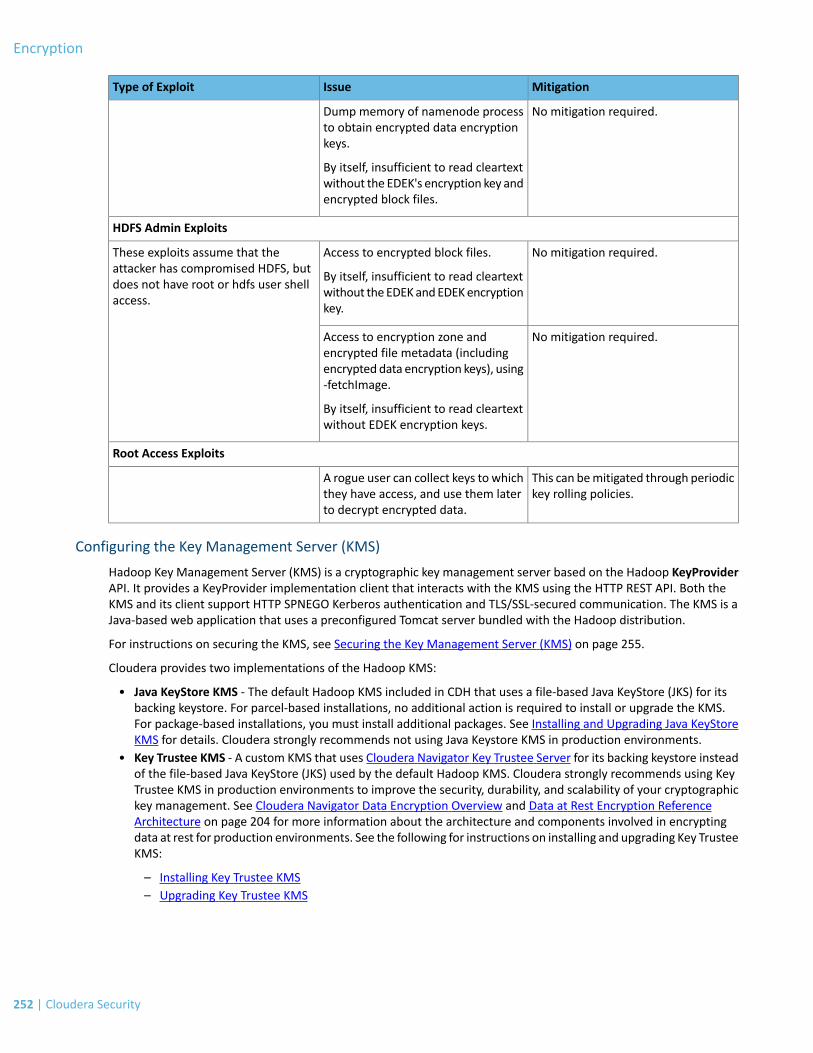
MitigationIssueType of Exploit
No mitigation required.Dump memory of namenode processto obtain encrypted data encryptionkeys.
By itself, insufficient to read cleartextwithout the EDEK's encryption key andencrypted block files.
HDFS Admin Exploits
No mitigation required.Access to encrypted block files.
By itself, insufficient to read cleartextwithout theEDEKandEDEKencryptionkey.
These exploits assume that theattacker has compromised HDFS, butdoes not have root or hdfs user shellaccess.
No mitigation required.Access to encryption zone andencrypted file metadata (includingencrypted data encryption keys), using-fetchImage.
By itself, insufficient to read cleartextwithout EDEK encryption keys.
Root Access Exploits
This can bemitigated through periodickey rolling policies.
A rogue user can collect keys to whichthey have access, and use them laterto decrypt encrypted data.
Configuring the Key Management Server (KMS)
Hadoop Key Management Server (KMS) is a cryptographic key management server based on the Hadoop KeyProviderAPI. It provides a KeyProvider implementation client that interacts with the KMS using the HTTP REST API. Both theKMS and its client support HTTP SPNEGO Kerberos authentication and TLS/SSL-secured communication. The KMS is aJava-based web application that uses a preconfigured Tomcat server bundled with the Hadoop distribution.
For instructions on securing the KMS, see Securing the Key Management Server (KMS) on page 255.
Cloudera provides two implementations of the Hadoop KMS:
• Java KeyStore KMS - The default Hadoop KMS included in CDH that uses a file-based Java KeyStore (JKS) for itsbacking keystore. For parcel-based installations, no additional action is required to install or upgrade the KMS.For package-based installations, you must install additional packages. See Installing and Upgrading Java KeyStoreKMS for details. Cloudera strongly recommends not using Java Keystore KMS in production environments.
• Key Trustee KMS - A custom KMS that uses Cloudera Navigator Key Trustee Server for its backing keystore insteadof the file-based Java KeyStore (JKS) used by the default Hadoop KMS. Cloudera strongly recommends using KeyTrustee KMS in production environments to improve the security, durability, and scalability of your cryptographickey management. See Cloudera Navigator Data Encryption Overview and Data at Rest Encryption ReferenceArchitecture on page 204 for more information about the architecture and components involved in encryptingdata at rest for production environments. See the following for instructions on installing and upgrading Key TrusteeKMS:
– Installing Key Trustee KMS– Upgrading Key Trustee KMS
252 | Cloudera Security
Encryption
Configuring KMS High Availability
For Key Trustee KMS high availability, see Key Trustee KMS High Availability. Java KeyStore KMS does not support highavailability.
KMS Configuration
If you are using Cloudera Manager, you can view and edit the KMS configuration by navigating to the following pages,depending on the KMS implementation you are using:
• Key Trustee KMS service > Configuration• Java KeyStore KMS service > Configuration
See Modifying Configuration Properties for more information on using Cloudera Manager to find and changeconfiguration parameters.
For instructions on configuring the KMS and its clients using the command line for package-based installations, continuereading:
Configuring the Java KeyStore KMS KeyProvider Using the Command Line
Important:
• If you use Cloudera Manager, do not use these command-line instructions.• This information applies specifically to CDH 5.4.x. If you use an earlier version of CDH, see the
documentation for that version located at Cloudera Documentation.
Configure the KMS backing KeyProvider properties in the /etc/hadoop-kms/conf/kms-site.xml configurationfile:
<property> <name>hadoop.kms.key.provider.uri</name> <value>jceks://file@/${user.home}/kms.keystore</value></property>
<property> <name>hadoop.security.keystore.java-keystore-provider.password-file</name> <value>keystore_password_file</value></property>
If you do not specify the absolute path to the password file, you must include it in the Hadoop CLASSPATH.
Restart the KMS for configuration changes to take effect. See Starting and Stopping the Java KeyStore KMS Using theCommand Line on page 254 for instructions.
Configuring the Java KeyStore KMS Cache Using the Command Line
Important:
• If you use Cloudera Manager, do not use these command-line instructions.• This information applies specifically to CDH 5.4.x. If you use an earlier version of CDH, see the
documentation for that version located at Cloudera Documentation.
The KMS caches keys for short periods of time to avoid excessive requests to the underlying key provider. The cacheis enabled by default and can be disabled by setting the hadoop.kms.cache.enable property to false.
The cache is used with the getCurrentKey(), getKeyVersion() and getMetadata()methods only.
For the getCurrentKey()method, cached entries are kept for a maximum of 30000milliseconds regardless of thenumber of times the key is accessed. This prevents stale keys from being considered current.
Cloudera Security | 253
Encryption
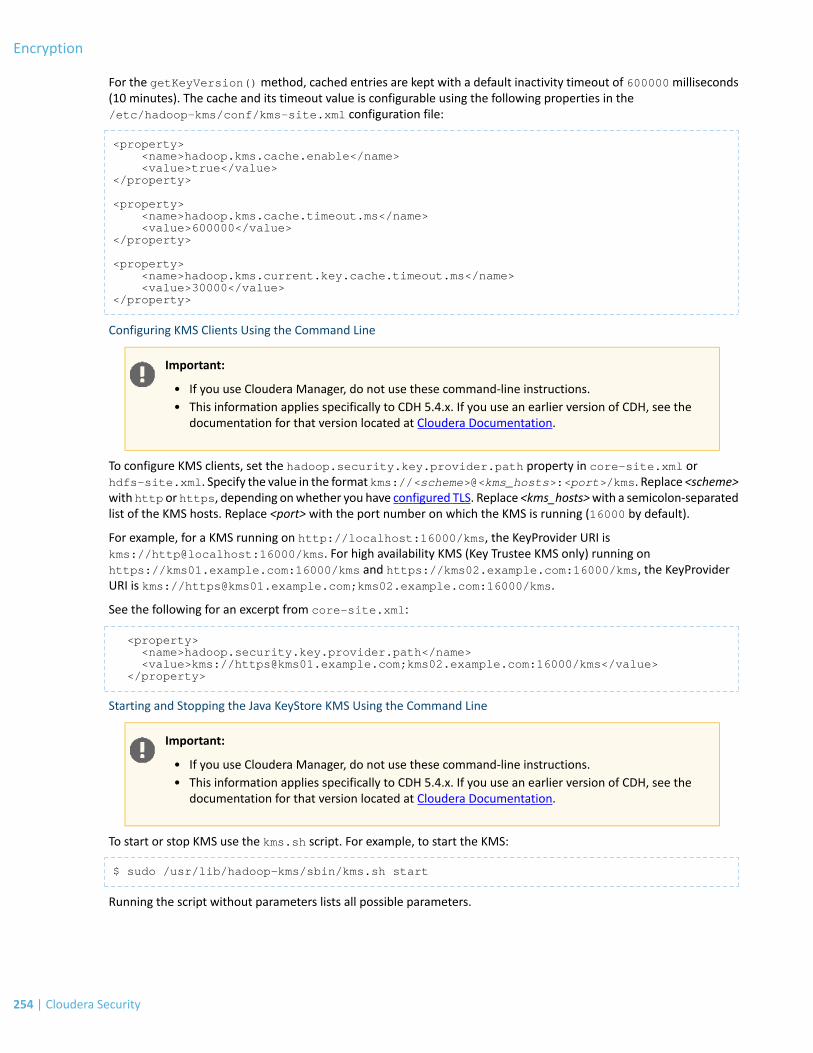
For the getKeyVersion()method, cached entries are kept with a default inactivity timeout of 600000milliseconds(10 minutes). The cache and its timeout value is configurable using the following properties in the/etc/hadoop-kms/conf/kms-site.xml configuration file:
<property> <name>hadoop.kms.cache.enable</name> <value>true</value></property>
<property> <name>hadoop.kms.cache.timeout.ms</name> <value>600000</value></property>
<property> <name>hadoop.kms.current.key.cache.timeout.ms</name> <value>30000</value></property>
Configuring KMS Clients Using the Command Line
Important:
• If you use Cloudera Manager, do not use these command-line instructions.• This information applies specifically to CDH 5.4.x. If you use an earlier version of CDH, see the
documentation for that version located at Cloudera Documentation.
To configure KMS clients, set the hadoop.security.key.provider.path property in core-site.xml orhdfs-site.xml. Specify the value in the format kms://<scheme>@<kms_hosts>:<port>/kms. Replace <scheme>with http or https, depending onwhether you have configured TLS. Replace <kms_hosts>with a semicolon-separatedlist of the KMS hosts. Replace <port> with the port number on which the KMS is running (16000 by default).
For example, for a KMS running on http://localhost:16000/kms, the KeyProvider URI iskms://http@localhost:16000/kms. For high availability KMS (Key Trustee KMS only) running onhttps://kms01.example.com:16000/kms and https://kms02.example.com:16000/kms, the KeyProviderURI is kms://[email protected];kms02.example.com:16000/kms.
See the following for an excerpt from core-site.xml:
<property> <name>hadoop.security.key.provider.path</name> <value>kms://[email protected];kms02.example.com:16000/kms</value> </property>
Starting and Stopping the Java KeyStore KMS Using the Command Line
Important:
• If you use Cloudera Manager, do not use these command-line instructions.• This information applies specifically to CDH 5.4.x. If you use an earlier version of CDH, see the
documentation for that version located at Cloudera Documentation.
To start or stop KMS use the kms.sh script. For example, to start the KMS:
$ sudo /usr/lib/hadoop-kms/sbin/kms.sh start
Running the script without parameters lists all possible parameters.
254 | Cloudera Security
Encryption
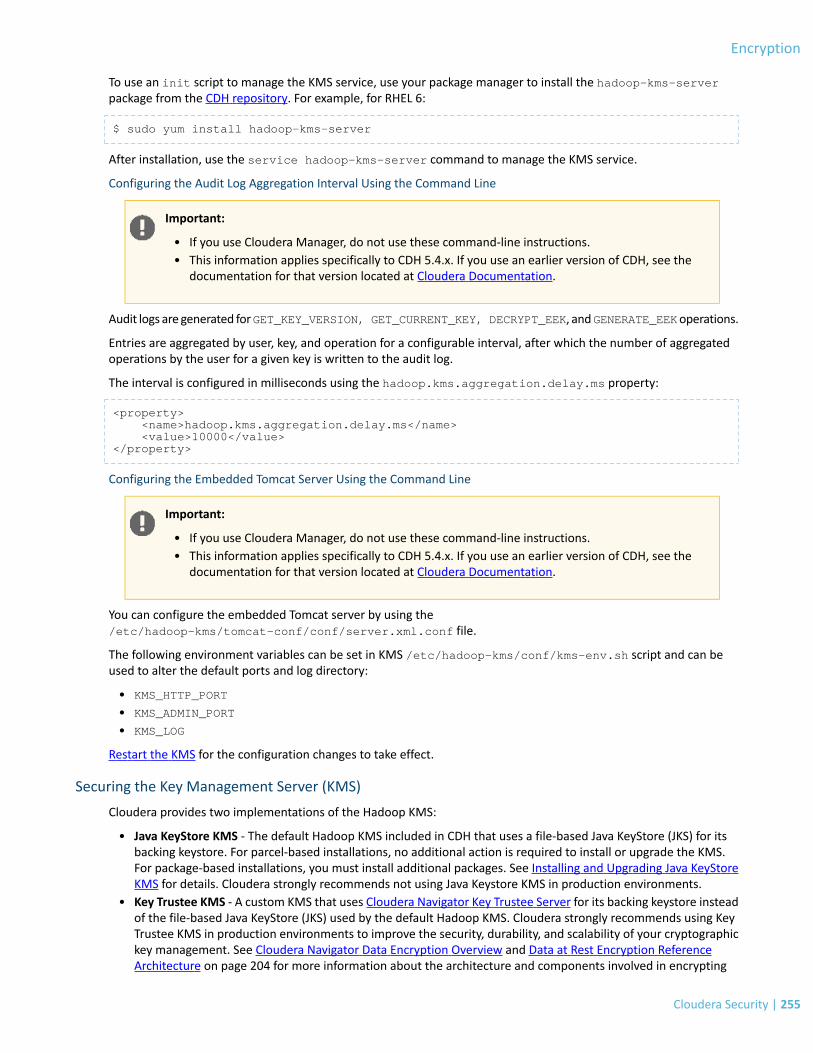
To use an init script to manage the KMS service, use your package manager to install the hadoop-kms-serverpackage from the CDH repository. For example, for RHEL 6:
$ sudo yum install hadoop-kms-server
After installation, use the service hadoop-kms-server command to manage the KMS service.
Configuring the Audit Log Aggregation Interval Using the Command Line
Important:
• If you use Cloudera Manager, do not use these command-line instructions.• This information applies specifically to CDH 5.4.x. If you use an earlier version of CDH, see the
documentation for that version located at Cloudera Documentation.
Audit logs are generated forGET_KEY_VERSION, GET_CURRENT_KEY, DECRYPT_EEK, andGENERATE_EEKoperations.
Entries are aggregated by user, key, and operation for a configurable interval, after which the number of aggregatedoperations by the user for a given key is written to the audit log.
The interval is configured in milliseconds using the hadoop.kms.aggregation.delay.ms property:
<property> <name>hadoop.kms.aggregation.delay.ms</name> <value>10000</value></property>
Configuring the Embedded Tomcat Server Using the Command Line
Important:
• If you use Cloudera Manager, do not use these command-line instructions.• This information applies specifically to CDH 5.4.x. If you use an earlier version of CDH, see the
documentation for that version located at Cloudera Documentation.
You can configure the embedded Tomcat server by using the/etc/hadoop-kms/tomcat-conf/conf/server.xml.conf file.
The following environment variables can be set in KMS /etc/hadoop-kms/conf/kms-env.sh script and can beused to alter the default ports and log directory:
• KMS_HTTP_PORT
• KMS_ADMIN_PORT
• KMS_LOG
Restart the KMS for the configuration changes to take effect.
Securing the Key Management Server (KMS)
Cloudera provides two implementations of the Hadoop KMS:
• Java KeyStore KMS - The default Hadoop KMS included in CDH that uses a file-based Java KeyStore (JKS) for itsbacking keystore. For parcel-based installations, no additional action is required to install or upgrade the KMS.For package-based installations, you must install additional packages. See Installing and Upgrading Java KeyStoreKMS for details. Cloudera strongly recommends not using Java Keystore KMS in production environments.
• Key Trustee KMS - A custom KMS that uses Cloudera Navigator Key Trustee Server for its backing keystore insteadof the file-based Java KeyStore (JKS) used by the default Hadoop KMS. Cloudera strongly recommends using KeyTrustee KMS in production environments to improve the security, durability, and scalability of your cryptographickey management. See Cloudera Navigator Data Encryption Overview and Data at Rest Encryption ReferenceArchitecture on page 204 for more information about the architecture and components involved in encrypting
Cloudera Security | 255
Encryption
data at rest for production environments. See the following for instructions on installing and upgrading Key TrusteeKMS:
– Installing Key Trustee KMS– Upgrading Key Trustee KMS
This topic contains information on securing the KMS using Kerberos, TLS/SSL communication, and access control lists(ACLs) for operations on encryption keys. Cloudera Manager instructions can be performed for both Key Trustee KMSand Java KeyStore KMS deployments. Command-line instructions apply only to Java KeyStore KMS deployments. KeyTrustee KMS is not supported outside of Cloudera Manager. See Installing Key Trustee KMS for more information.
Enabling Kerberos Authentication for the KMS
Enabling Kerberos Authentication for the KMS Using Cloudera Manager
Minimum Required Role: Full Administrator
To enable Kerberos for the KMS using Cloudera Manager:
1. Open the Cloudera Manager Admin Console and go to the KMS service.2. Click Configuration.3. Set the Authentication Type property to kerberos.4. Click Save Changes.5. Because Cloudera Manager does not automatically create the principal and keytab file for the KMS, you must run
the Generate Credentials command manually. On the top navigation bar, go to Administration > Kerberos >Credentials and click Generate Credentials.
Note: This does not create a new Kerberos principal if an existing HTTP principal exists for theKMS host.
6. Restart the KMS service.
Kerberos Mapping Rules:
The hadoop.kms.authentication.kerberos.name.rules property can only be changed using the KeyManagement Server Advanced Configuration Snippet (Safety Valve) for kms-site.xml property.
To modify, the value should be copied from the hadoop.security.auth_to_local configuration property, foundin the core-site.xml file of the service.
Enabling Kerberos Authentication for the Java KeyStore KMS Using the Command Line
Important:
• If you use Cloudera Manager, do not use these command-line instructions.• This information applies specifically to CDH 5.4.x. If you use an earlier version of CDH, see the
documentation for that version located at Cloudera Documentation.
Configure /etc/krb5.conf with information for your KDC server. Create an HTTP principal and keytab file for theKMS.
Configure /etc/hadoop-kms/conf/kms-site.xml with the following properties:
<property> <name>hadoop.kms.authentication.type</name> <value>kerberos</value></property>
<property> <name>hadoop.kms.authentication.kerberos.keytab</name>
256 | Cloudera Security
Encryption

<value>${user.home}/kms.keytab</value></property>
<property> <name>hadoop.kms.authentication.kerberos.principal</name> <value>HTTP/localhost</value></property>
<property> <name>hadoop.kms.authentication.kerberos.name.rules</name> <value>DEFAULT</value></property>
Restart the KMS service for the configuration changes to take effect.
Configuring the Java KeyStore KMS Proxyuser Using the Command Line
Important:
• If you use Cloudera Manager, do not use these command-line instructions.• This information applies specifically to CDH 5.4.x. If you use an earlier version of CDH, see the
documentation for that version located at Cloudera Documentation.
Each proxyuser must be configured in /etc/hadoop-kms/conf/kms-site.xml using the following properties:
<property> <name>hadoop.kms.proxyuser.#USER#.users</name> <value>*</value></property>
<property> <name>hadoop.kms.proxyuser.#USER#.groups</name> <value>*</value></property>
<property> <name>hadoop.kms.proxyuser.#USER#.hosts</name> <value>*</value></property>
where #USER# is the username of the proxyuser to be configured.
The hadoop.kms.proxyuser.#USER#.users property indicates the users that can be impersonated. Thehadoop.kms.proxyuser.#USER#.groups property indicates the groups to which the users being impersonatedmust belong. At least one of these properties must be defined. If both are defined, the configured proxyuser canimpersonate any user in the users list and any user belonging to a group listed in the groups list.
The hadoop.kms.proxyuser.#USER#.hosts property indicates the host from which the proxyuser can makeimpersonation requests. "*" means there are no restrictions for the #USER# regarding users, groups, or hosts.
Configuring TLS/SSL for the KMSConfiguring TLS/SSL for the KMS Using Cloudera Manager
Minimum Required Role: Configurator (also provided by Cluster Administrator, Full Administrator)
The steps for configuring and enabling Hadoop TLS/SSL for the KMS are as follows:
1. Go to the KMS service.2. Click Configuration.3. In the Search field, type SSL to show the KMS SSL properties (in the Key Management Server Default Group >
Security category).4. Edit the following SSL properties according to your cluster configuration.
Cloudera Security | 257
Encryption
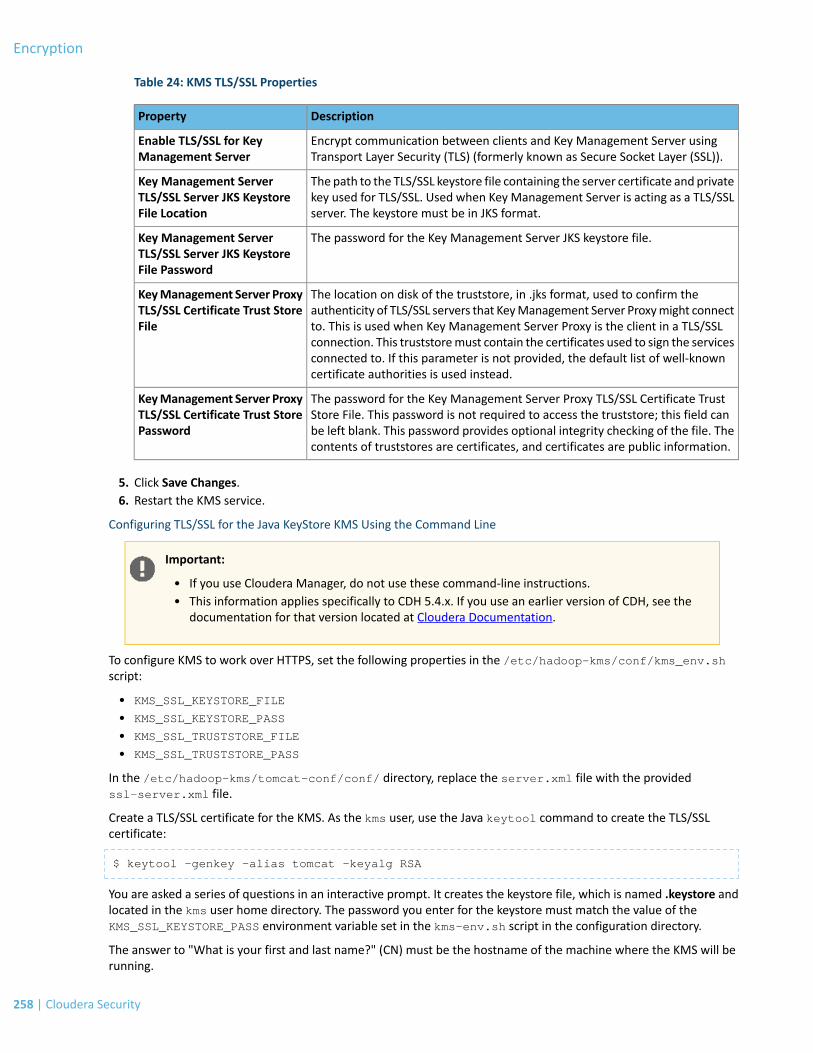
Table 24: KMS TLS/SSL Properties
DescriptionProperty
Encrypt communication between clients and Key Management Server usingTransport Layer Security (TLS) (formerly known as Secure Socket Layer (SSL)).
Enable TLS/SSL for KeyManagement Server
The path to the TLS/SSL keystore file containing the server certificate and privatekey used for TLS/SSL. Used when Key Management Server is acting as a TLS/SSLserver. The keystore must be in JKS format.
Key Management ServerTLS/SSL Server JKS KeystoreFile Location
The password for the Key Management Server JKS keystore file.Key Management ServerTLS/SSL Server JKS KeystoreFile Password
The location on disk of the truststore, in .jks format, used to confirm theauthenticity of TLS/SSL servers that KeyManagement Server Proxymight connect
KeyManagement Server ProxyTLS/SSL Certificate Trust StoreFile to. This is used when Key Management Server Proxy is the client in a TLS/SSL
connection. This truststoremust contain the certificates used to sign the servicesconnected to. If this parameter is not provided, the default list of well-knowncertificate authorities is used instead.
The password for the Key Management Server Proxy TLS/SSL Certificate TrustStore File. This password is not required to access the truststore; this field can
KeyManagement Server ProxyTLS/SSL Certificate Trust StorePassword be left blank. This password provides optional integrity checking of the file. The
contents of truststores are certificates, and certificates are public information.
5. Click Save Changes.6. Restart the KMS service.
Configuring TLS/SSL for the Java KeyStore KMS Using the Command Line
Important:
• If you use Cloudera Manager, do not use these command-line instructions.• This information applies specifically to CDH 5.4.x. If you use an earlier version of CDH, see the
documentation for that version located at Cloudera Documentation.
To configure KMS to work over HTTPS, set the following properties in the /etc/hadoop-kms/conf/kms_env.shscript:
• KMS_SSL_KEYSTORE_FILE
• KMS_SSL_KEYSTORE_PASS
• KMS_SSL_TRUSTSTORE_FILE
• KMS_SSL_TRUSTSTORE_PASS
In the /etc/hadoop-kms/tomcat-conf/conf/ directory, replace the server.xml file with the providedssl-server.xml file.
Create a TLS/SSL certificate for the KMS. As the kms user, use the Java keytool command to create the TLS/SSLcertificate:
$ keytool -genkey -alias tomcat -keyalg RSA
You are asked a series of questions in an interactive prompt. It creates the keystore file, which is named .keystore andlocated in the kms user home directory. The password you enter for the keystore must match the value of theKMS_SSL_KEYSTORE_PASS environment variable set in the kms-env.sh script in the configuration directory.
The answer to "What is your first and last name?" (CN) must be the hostname of the machine where the KMS will berunning.
258 | Cloudera Security
Encryption
Note: Restart the Java KeyStore KMS for the configuration changes to take effect.
Configuring KMS Access Control Lists
By default, the KMSAccess Control Lists (ACLs) are fully permissive; that is, everyone is allowed to perform all operations.However, restricting HDFS superusers from access to keymaterial is a key design requirement. This prevents amalicioussuperuser fromhaving access to all the keymaterial and all the encrypted data, and thus being able to decrypt everything.
The KMS supports bothwhitelist and blacklist ACLs; blacklist entries overridewhitelist entries. A user or group accessingKMS is first checked for inclusion in the ACL for the requested operation and then checked for exclusion in the blacklistfor the operation before access is granted. Add HDFS superusers to the blacklist, and allow everyone else.
The group membership used by ACL entries relies on the configured group mapping mechanism for HDFS. By default,group membership is determined on the local Linux system running the KMS service. If you have configured HDFS touse LDAP for group mapping, the group membership for the ACL entries is determined using the configured LDAPsettings. Formore information on LDAP-based groupmembership, see Configuring LDAPGroupMappings on page 283.
The ACL syntax for both blacklist and whitelist entries is as follows:
• Users only:
user1,user2,userN
Note: There are no spaces following the commas separating the users in the list.
• Groups only:
nobody group1,group2,groupN
Note: There is a space between nobody and the comma-separated group list. The nobody usershould not exist. If the nobody user exists in your system, specify a different nonexistent user inits place.
• Users and Groups:
user1,user2,userN group1,group2,groupN
Note: The comma-separated user list is separated from the comma-separated group list by aspace.
Configuring KMS Access Control Lists Using Cloudera Manager
Minimum Required Role: Configurator (also provided by Cluster Administrator, Full Administrator)
Important: See related Known Issue and listed workaround: KMS and Key Trustee ACLs do not workin Cloudera Manager 5.3.
1. Go to the KMS service.2. Click Configuration.3. In the Search field, type acl to show the KeyManagement Server Advanced Configuration Snippet (Safety Valve)
for kms-acls.xml (in the Key Management Server Default Group category).
Cloudera Security | 259
Encryption
4. Add or edit the ACL properties according to your cluster configuration. See Recommended KMS Access ControlList on page 260 for example ACL entries.
5. Click Save Changes.6. Restart the KMS service.
Configuring Java KeyStore KMS Access Control Lists Using the Command Line
Important:
• If you use Cloudera Manager, do not use these command-line instructions.• This information applies specifically to CDH 5.4.x. If you use an earlier version of CDH, see the
documentation for that version located at Cloudera Documentation.
KMS ACLs are defined in the /etc/hadoop-kms/conf/kms-acls.xml configuration file. This file is hot-reloadedwhen it changes. See Recommended KMS Access Control List on page 260 for example ACL entries.
Recommended KMS Access Control List
Cloudera recommends the following ACL definition for secure production settings. Replace keyadmin andkeyadmingroup with the user and group responsible for maintaining encryption keys.
Note: If you are entering the ACL using ClouderaManager, omit the surrounding <configuration>and </configuration> tags; Cloudera Manager adds this automatically.
<configuration>
<!-- This file is hot-reloaded when it changes -->
<!-- KMS ACLs control which users can perform various actions on the KMS.
This file has 5 sections: * Access to specific key operations * Blacklists ACLs * Default ACLs * Whitelist ACLs * Key-specific ACLs-->
<!-- KMS ACLs that govern access to specific key operations. If access is not granted for an operation here, then the operation is forbidden, even if a key ACL allows it.
The ACL value should be either a username or a username and group name separated by whitespace.
An empty value for an ACL indicates that no user is granted access to that operation. A value of "*" (for the username or groupname) indicates that all users are granted access to that operation. Any operation for which there is no ACL will be treated as having an ACL with a value of "*".-->
<property> <name>hadoop.kms.acl.CREATE</name> <value>keyadmin keyadmingroup</value> <description> ACL for create-key operations. If the user is not in the GET ACL, the key material is not returned as part of the response. </description></property>
<property> <name>hadoop.kms.acl.DELETE</name> <value>keyadmin keyadmingroup</value>
260 | Cloudera Security
Encryption
<description> ACL for delete-key operations. </description></property>
<property> <name>hadoop.kms.acl.ROLLOVER</name> <value>keyadmin keyadmingroup</value> <description> ACL for rollover-key operations. If the user does is not in the GET ACL, the key material is not returned as part of the response. </description></property>
<property> <name>hadoop.kms.acl.GET</name> <value></value> <description> ACL for get-key-version and get-current-key operations. </description></property>
<property> <name>hadoop.kms.acl.GET_KEYS</name> <value>keyadmin keyadmingroup</value> <description> ACL for get-keys operations. </description></property>
<property> <name>hadoop.kms.acl.GET_METADATA</name> <value>hdfs,keyadmin supergroup,keyadmingroup</value> <description> ACL for get-key-metadata and get-keys-metadata operations. </description></property>
<property> <name>hadoop.kms.acl.SET_KEY_MATERIAL</name> <value></value> <description> Complementary ACL for CREATE and ROLLOVER operations to allow the client to provide the key material when creating or rolling a key. </description></property>
<property> <name>hadoop.kms.acl.GENERATE_EEK</name> <value>hdfs supergroup</value> <description> ACL for generateEncryptedKey CryptoExtension operations. </description></property>
<property> <name>hadoop.kms.acl.DECRYPT_EEK</name> <value></value> <description> ACL for decryptEncryptedKey CryptoExtension operations. </description></property>
<!-- KMS blacklists to prevent access to operations. These settings override the permissions granted by the KMS ACLs above.
The blacklist value should be either a username or a username and group name separated by whitespace.
A blank value indicates that no user is blacklisted from the operation. A value of "*" (for either the username or groupname) indicates that all users
Cloudera Security | 261
Encryption

are blacklisted from the operation. Any operation for which there is no blacklist will be treated as having a blacklist with an empty value.-->
<!-- In this template the hdfs user is blacklisted for everything except GET_METADATA, GET_KEYS, and GENERATE_EEK. The GET and SET_KEY_MATERIAL operations are blacklisted for all users since Hadoop users should not need to perform those operations, and access to the key material should be as restricted as possible.-->
<property> <name>hadoop.kms.blacklist.CREATE</name> <value>hdfs supergroup</value></property>
<property> <name>hadoop.kms.blacklist.DELETE</name> <value>hdfs supergroup</value></property>
<property> <name>hadoop.kms.blacklist.ROLLOVER</name> <value>hdfs supergroup</value></property>
<property> <name>hadoop.kms.blacklist.GET</name> <value>*</value></property>
<property> <name>hadoop.kms.blacklist.GET_KEYS</name> <value></value></property>
<property> <name>hadoop.kms.blacklist.SET_KEY_MATERIAL</name> <value>*</value></property>
<property> <name>hadoop.kms.blacklist.DECRYPT_EEK</name> <value>hdfs supergroup</value></property>
<property> <name>keytrustee.kms.acl.UNDELETE</name> <value></value> <description> ACL that grants access to the UNDELETE operation on all keys. Only used by Key Trustee KMS. </description></property>
<property> <name>keytrustee.kms.acl.PURGE</name> <value></value> <description> ACL that grants access to the PURGE operation on all keys. Only used by Key Trustee KMS. </description></property>
<!-- Default key ACLs that govern access to key operations for key-operation pairs that do not have a specific key ACL already. Specific key ACLs will override the default key ACLs
The ACL value should be either a username or a username and group name separated by whitespace.
262 | Cloudera Security
Encryption
An empty value for an ACL indicates that no user is granted access to that operation. A value of "*" (for the username or groupname) indicates that all users are granted access to that operation. Any operation for which there is no ACL will be treated as having an ACL with an empty value.-->
<property> <name>default.key.acl.MANAGEMENT</name> <value></value> <description> Default ACL that grants access to the MANAGEMENT operation on all keys. </description></property>
<property> <name>default.key.acl.GENERATE_EEK</name> <value></value> <description> Default ACL that grants access to the GENERATE_EEK operation on all keys. </description></property>
<property> <name>default.key.acl.DECRYPT_EEK</name> <value></value> <description> Default ACL that grants access to the DECRYPT_EEK operation on all keys. </description></property>
<property> <name>default.key.acl.READ</name> <value></value> <description> Default ACL that grants access to the READ operation on all keys. </description></property>
<property> <name>default.key.acl.MIGRATE</name> <value></value> <description> Default ACL that grants access to the MIGRATE operation on all keys. </description></property>
<!-- Whitelist key ACLs that grant access to specific key operations. Any permissions granted here will be added to whatever permissions are granted by the specific key ACL or the default key ACL. Note that these whitelist ACLs grant access to operations on specific keys. If the operations themselves are not allowed because of the KMS ACLs/blacklists, then the operation will not be permitted, regardless of the whitelist settings.
The ACL value should be either a username or a username and group name separated by whitespace.
An empty value for an ACL indicates that no user is granted access to that operation. A value of "*" (for the username or groupname) indicates that all users are granted access to that operation. Any operation for which there is no ACL will be treated as having an ACL with an empty value.-->
<property> <name>whitelist.key.acl.MANAGEMENT</name> <value>keyadmin keyadmingroup</value> <description> Whitelist ACL for MANAGEMENT operations for all keys. </description></property>
<property> <name>whitelist.key.acl.READ</name>
Cloudera Security | 263
Encryption
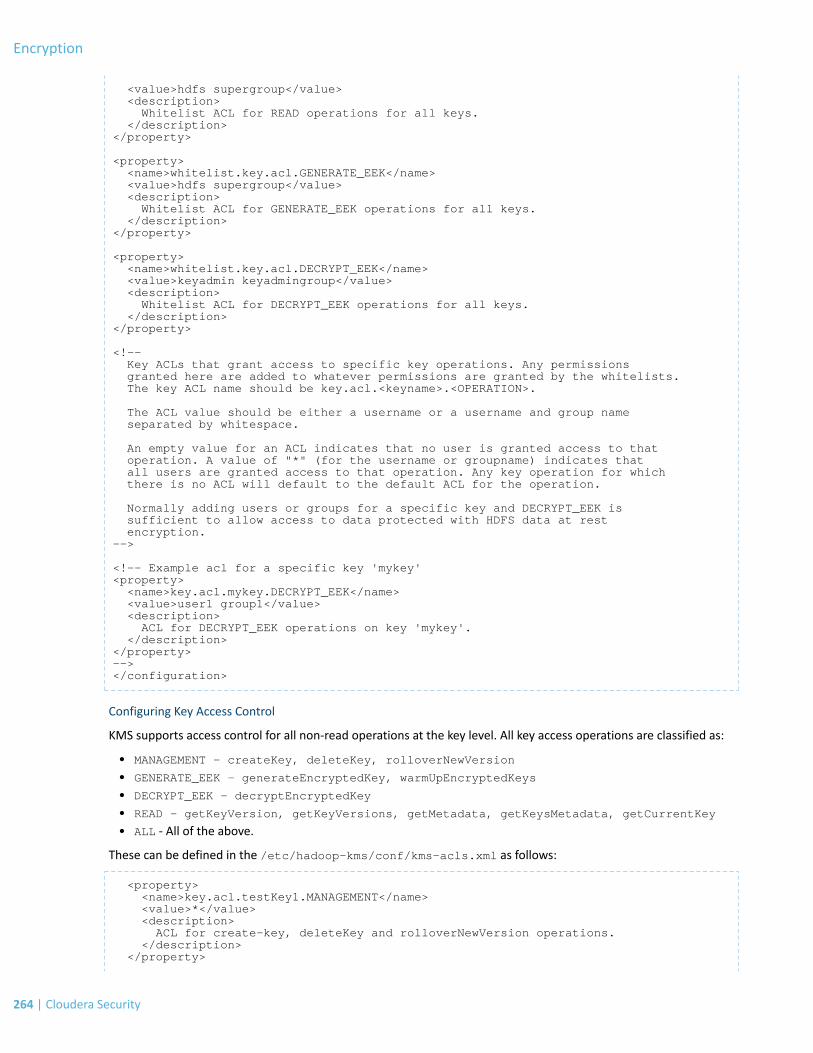
<value>hdfs supergroup</value> <description> Whitelist ACL for READ operations for all keys. </description></property>
<property> <name>whitelist.key.acl.GENERATE_EEK</name> <value>hdfs supergroup</value> <description> Whitelist ACL for GENERATE_EEK operations for all keys. </description></property>
<property> <name>whitelist.key.acl.DECRYPT_EEK</name> <value>keyadmin keyadmingroup</value> <description> Whitelist ACL for DECRYPT_EEK operations for all keys. </description></property>
<!-- Key ACLs that grant access to specific key operations. Any permissions granted here are added to whatever permissions are granted by the whitelists. The key ACL name should be key.acl.<keyname>.<OPERATION>.
The ACL value should be either a username or a username and group name separated by whitespace.
An empty value for an ACL indicates that no user is granted access to that operation. A value of "*" (for the username or groupname) indicates that all users are granted access to that operation. Any key operation for which there is no ACL will default to the default ACL for the operation.
Normally adding users or groups for a specific key and DECRYPT_EEK is sufficient to allow access to data protected with HDFS data at rest encryption.-->
<!-- Example acl for a specific key 'mykey'<property> <name>key.acl.mykey.DECRYPT_EEK</name> <value>user1 group1</value> <description> ACL for DECRYPT_EEK operations on key 'mykey'. </description></property>--></configuration>
Configuring Key Access Control
KMS supports access control for all non-read operations at the key level. All key access operations are classified as:
• MANAGEMENT - createKey, deleteKey, rolloverNewVersion
• GENERATE_EEK - generateEncryptedKey, warmUpEncryptedKeys
• DECRYPT_EEK - decryptEncryptedKey
• READ - getKeyVersion, getKeyVersions, getMetadata, getKeysMetadata, getCurrentKey
• ALL - All of the above.
These can be defined in the /etc/hadoop-kms/conf/kms-acls.xml as follows:
<property> <name>key.acl.testKey1.MANAGEMENT</name> <value>*</value> <description> ACL for create-key, deleteKey and rolloverNewVersion operations. </description> </property>
264 | Cloudera Security
Encryption

<property> <name>key.acl.testKey2.GENERATE_EEK</name> <value>*</value> <description> ACL for generateEncryptedKey operations. </description> </property>
<property> <name>key.acl.testKey3.DECRYPT_EEK</name> <value>*</value> <description> ACL for decryptEncryptedKey operations. </description> </property>
<property> <name>key.acl.testKey4.READ</name> <value>*</value> <description> ACL for getKeyVersion, getKeyVersions, getMetadata, getKeysMetadata, getCurrentKey operations </description> </property>
<property> <name>key.acl.testKey5.ALL</name> <value>*</value> <description> ACL for ALL operations. </description> </property>
<property> <name>default.key.acl.MANAGEMENT</name> <value>user1,user2</value> <description> default ACL for MANAGEMENT operations for all keys that are not explicitly defined. </description> </property>
<property> <name>default.key.acl.GENERATE_EEK</name> <value>user1,user2</value> <description> default ACL for GENERATE_EEK operations for all keys that are not explicitly defined. </description> </property>
<property> <name>default.key.acl.DECRYPT_EEK</name> <value>user1,user2</value> <description> default ACL for DECRYPT_EEK operations for all keys that are not explicitly defined. </description> </property>
<property> <name>default.key.acl.READ</name> <value>user1,user2</value> <description> default ACL for READ operations for all keys that are not explicitly defined. </description> </property>
For all keys for which an ACL has not been explicitly configured, you can configure a default key ACL for a subset of theoperation types.
Cloudera Security | 265
Encryption

If no ACL is configured for a specific key, and no default ACL is configured for the requested operation, access is denied.
Note: The default ACL does not support the ALL operation qualifier.
Configuring Java KeyStore KMS Delegation Tokens Using the Command Line
Important:
• If you use Cloudera Manager, do not use these command-line instructions.• This information applies specifically to CDH 5.4.x. If you use an earlier version of CDH, see the
documentation for that version located at Cloudera Documentation.
Configure KMS delegation token secret manager using the following properties:
<property> <name>hadoop.kms.authentication.delegation-token.update-interval.sec</name> <value>86400</value> <description> How often the master key is rotated, in seconds. Default value 1 day. </description> </property>
<property> <name>hadoop.kms.authentication.delegation-token.max-lifetime.sec</name> <value>604800</value> <description> Maximum lifetime of a delegation token, in seconds. Default value 7 days. </description> </property>
<property> <name>hadoop.kms.authentication.delegation-token.renew-interval.sec</name> <value>86400</value> <description> Renewal interval of a delegation token, in seconds. Default value 1 day. </description> </property>
<property> <name>hadoop.kms.authentication.delegation-token.removal-scan-interval.sec</name> <value>3600</value> <description> Scan interval to remove expired delegation tokens. </description> </property>
Integrating HDFS Encryption with Navigator Key Trustee Server
Important: The Key Trustee KMS service (parcel name: KEYTRUSTEE) in Cloudera Manager is not theCloudera Navigator Key Trustee Server (parcel name: KEYTRUSTEE_SERVER). It is a service thatfacilitates communication with an existing Key Trustee Server. See Installing Cloudera Navigator KeyTrustee Server for more information on installing Cloudera Navigator Key Trustee Server.
By default, HDFS Data At Rest Encryption on page 244 utilizes the Hadoop Key Management Server (KMS), which usesa file-based Java KeyStore.
For increased reliability, scalability, and simplicity, Cloudera recommends instead using Cloudera Navigator Key TrusteeServer (instead of the Hadoop KeyManagement Server) as the key store for HDFS Encryption. This topic describes howto integrate HDFS encryption on an existing CDH cluster managed by Cloudera Manager with Key Trustee Server.
If you have not installed and configured a Key Trustee Server, see Installing Cloudera Navigator Key Trustee Server.
266 | Cloudera Security
Encryption
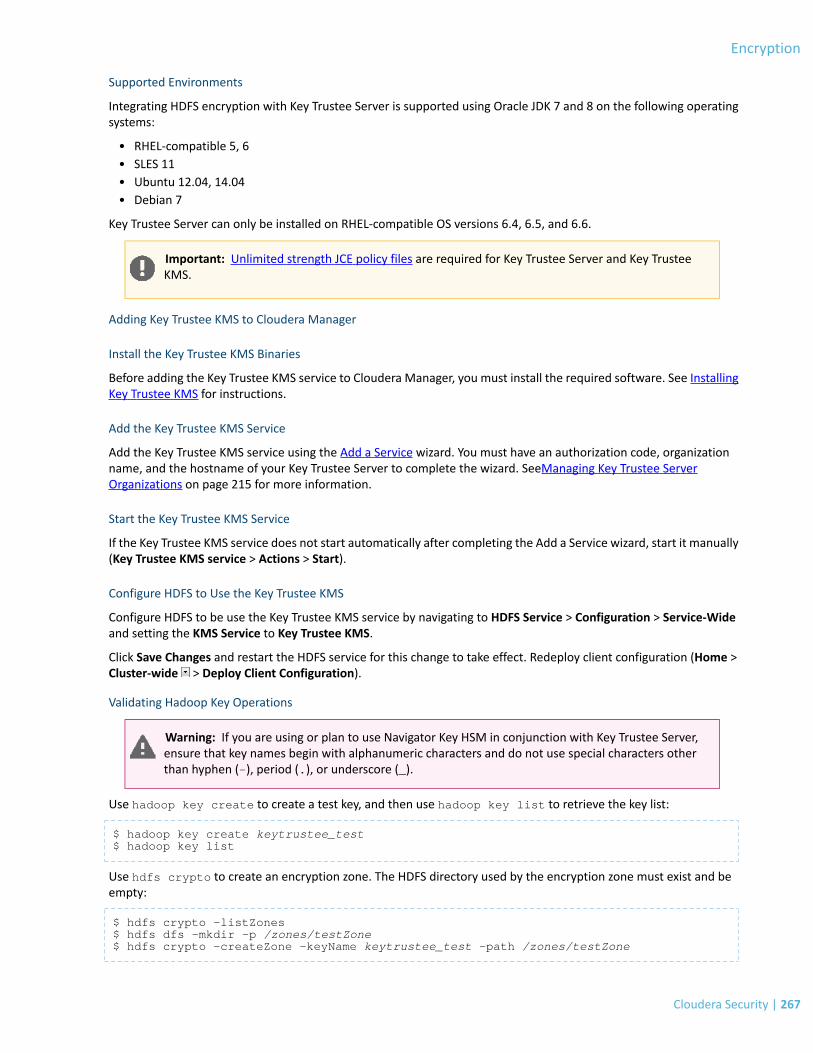
Supported Environments
Integrating HDFS encryption with Key Trustee Server is supported using Oracle JDK 7 and 8 on the following operatingsystems:
• RHEL-compatible 5, 6• SLES 11• Ubuntu 12.04, 14.04• Debian 7
Key Trustee Server can only be installed on RHEL-compatible OS versions 6.4, 6.5, and 6.6.
Important: Unlimited strength JCE policy files are required for Key Trustee Server and Key TrusteeKMS.
Adding Key Trustee KMS to Cloudera Manager
Install the Key Trustee KMS Binaries
Before adding the Key Trustee KMS service to Cloudera Manager, you must install the required software. See InstallingKey Trustee KMS for instructions.
Add the Key Trustee KMS Service
Add the Key Trustee KMS service using the Add a Service wizard. You must have an authorization code, organizationname, and the hostname of your Key Trustee Server to complete the wizard. SeeManaging Key Trustee ServerOrganizations on page 215 for more information.
Start the Key Trustee KMS Service
If the Key Trustee KMS service does not start automatically after completing the Add a Service wizard, start it manually(Key Trustee KMS service > Actions > Start).
Configure HDFS to Use the Key Trustee KMS
Configure HDFS to be use the Key Trustee KMS service by navigating to HDFS Service > Configuration > Service-Wideand setting the KMS Service to Key Trustee KMS.
Click Save Changes and restart the HDFS service for this change to take effect. Redeploy client configuration (Home >Cluster-wide > Deploy Client Configuration).
Validating Hadoop Key Operations
Warning: If you are using or plan to use Navigator Key HSM in conjunction with Key Trustee Server,ensure that key names begin with alphanumeric characters and do not use special characters otherthan hyphen (-), period (.), or underscore (_).
Use hadoop key create to create a test key, and then use hadoop key list to retrieve the key list:
$ hadoop key create keytrustee_test$ hadoop key list
Use hdfs crypto to create an encryption zone. The HDFS directory used by the encryption zone must exist and beempty:
$ hdfs crypto -listZones$ hdfs dfs -mkdir -p /zones/testZone$ hdfs crypto -createZone -keyName keytrustee_test -path /zones/testZone
Cloudera Security | 267
Encryption
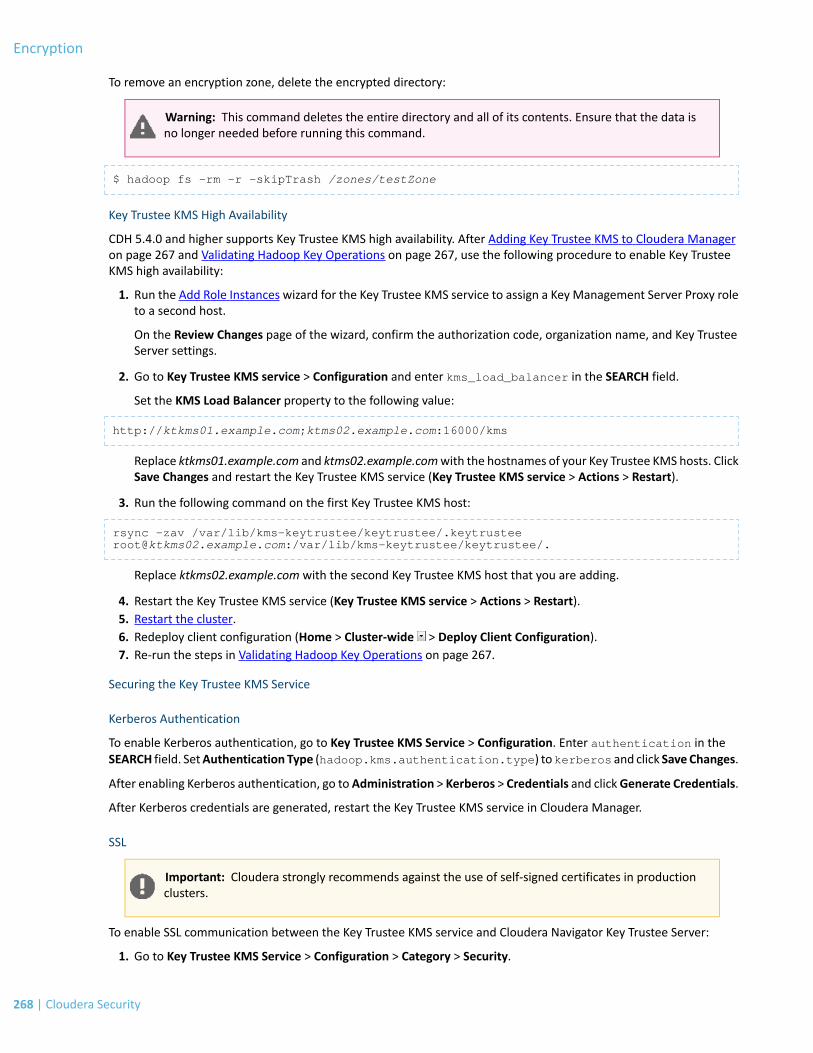
To remove an encryption zone, delete the encrypted directory:
Warning: This command deletes the entire directory and all of its contents. Ensure that the data isno longer needed before running this command.
$ hadoop fs -rm -r -skipTrash /zones/testZone
Key Trustee KMS High Availability
CDH 5.4.0 and higher supports Key Trustee KMS high availability. After Adding Key Trustee KMS to Cloudera Manageron page 267 and Validating Hadoop Key Operations on page 267, use the following procedure to enable Key TrusteeKMS high availability:
1. Run the Add Role Instances wizard for the Key Trustee KMS service to assign a Key Management Server Proxy roleto a second host.
On the Review Changes page of the wizard, confirm the authorization code, organization name, and Key TrusteeServer settings.
2. Go to Key Trustee KMS service > Configuration and enter kms_load_balancer in the SEARCH field.
Set the KMS Load Balancer property to the following value:
http://ktkms01.example.com;ktms02.example.com:16000/kms
Replace ktkms01.example.com and ktms02.example.comwith the hostnames of your Key Trustee KMS hosts. ClickSave Changes and restart the Key Trustee KMS service (Key Trustee KMS service > Actions > Restart).
3. Run the following command on the first Key Trustee KMS host:
rsync -zav /var/lib/kms-keytrustee/keytrustee/.keytrustee [email protected]:/var/lib/kms-keytrustee/keytrustee/.
Replace ktkms02.example.com with the second Key Trustee KMS host that you are adding.
4. Restart the Key Trustee KMS service (Key Trustee KMS service > Actions > Restart).5. Restart the cluster.6. Redeploy client configuration (Home > Cluster-wide > Deploy Client Configuration).7. Re-run the steps in Validating Hadoop Key Operations on page 267.
Securing the Key Trustee KMS Service
Kerberos Authentication
To enable Kerberos authentication, go to Key Trustee KMS Service > Configuration. Enter authentication in theSEARCH field. SetAuthentication Type (hadoop.kms.authentication.type) tokerberos and click Save Changes.
After enabling Kerberos authentication, go to Administration > Kerberos > Credentials and clickGenerate Credentials.
After Kerberos credentials are generated, restart the Key Trustee KMS service in Cloudera Manager.
SSL
Important: Cloudera strongly recommends against the use of self-signed certificates in productionclusters.
To enable SSL communication between the Key Trustee KMS service and Cloudera Navigator Key Trustee Server:
1. Go to Key Trustee KMS Service > Configuration > Category > Security.
268 | Cloudera Security
Encryption

2. Check the box labeled Enable TLS/SSL for Key Management Server Proxy.3. Complete the keystore and trust store configuration parameters with the location and password of the Java
keystore and trust store on each host running the Key Trustee KMS service.
The keystore must contain a valid certificate. See Creating Certificates on page 156 for more information. If youare using a self-signed certificate for the Key Trustee KMS service, you must also configure HDFS clients to trustthe self-signed certificate. See Configuring SSL for HDFS on page 180 for instructions on configuring the truststorefor HDFS clients.
The default location for the Java truststore is $JAVA_HOME/jre/lib/security/cacerts, and the defaultpassword is changeit. If the Key Trustee Server uses a self-signed certificate, Cloudera recommends creating anew truststore. See Creating Truststores on page 159 for more information.
4. Click Save Changes.5. (Self-signed certificates only)
a. SSH to each host running the Key Trustee KMS service and run the following command obtain the Key TrusteeServer certificate:
$ sudo echo -n | openssl s_client -connect keytrustee.example.com:11371 | sed -ne '/-BEGIN CERTIFICATE-/,/-END CERTIFICATE-/p' > /tmp/keytrustee.pem
b. Import the certificate into the truststore specified during step 3:
$ sudo keytool -importcert -trustcacerts -file /tmp/keytrustee.pem -keystore /path/to/truststore -alias keytrustee.example.com
c. Validate the import:
$ sudo keytool -list -v -keystore /path/to/truststore
You should see an entry with the Key Trustee Server name you imported.
If you have configured Key Trustee Server high availability, repeat this step for the Passive Key Trustee Serverto import its certificate.
6. (Key Trustee KMS high availability only) Go to Key Trustee KMS service > Configuration and enterkms_load_balancer in the SEARCH field.
Update the KMS Load Balancer property to specify https instead of http:
https://ktkms01.example.com;ktms02.example.com:16000/kms
Replace ktkms01.example.com and ktms02.example.comwith the hostnames of your Key Trustee KMS hosts. ClickSave Changes.
7. Restart the cluster and redeploy client configuration (Home > Cluster-wide > Deploy Client Configuration).8. Re-run the steps in Validating Hadoop Key Operations on page 267.
Migrating Keys from a Java KeyStore to Navigator Key Trustee Server
To migrate keys from an existing Java KeyStore (JKS) (for example, if you are currently using the Java KeyStore KMSservice for your key store), use the following procedure.
This procedure assumes a password-less Java KeyStore (JKS) on the same host as the new Key Trustee KMS service.
1. Stop the Java KeyStore KMS service.2. Add and configure the Key Trustee KMS service, and configure HDFS to use it for its KMS Service setting. Restart
the HDFS service and re-deploy client configuration (Home > Cluster-wide > Deploy Client Configuration) forthis to take effect.
Cloudera Security | 269
Encryption
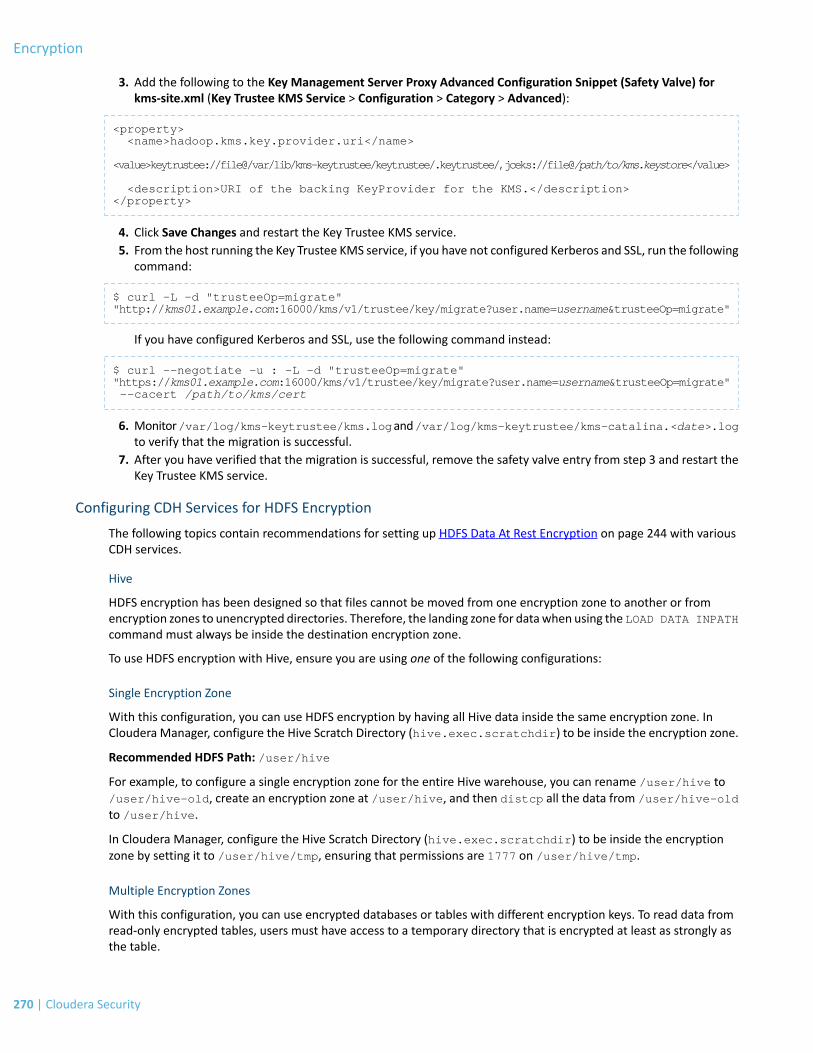
3. Add the following to the Key Management Server Proxy Advanced Configuration Snippet (Safety Valve) forkms-site.xml (Key Trustee KMS Service > Configuration > Category > Advanced):
<property> <name>hadoop.kms.key.provider.uri</name>
<value>keytrustee://file@/var/lib/kms-keytrustee/keytrustee/.keytrustee/,jceks://file@/path/to/kms.keystore</value>
<description>URI of the backing KeyProvider for the KMS.</description></property>
4. Click Save Changes and restart the Key Trustee KMS service.5. From the host running the Key Trustee KMS service, if you have not configured Kerberos and SSL, run the following
command:
$ curl -L -d "trusteeOp=migrate" "http://kms01.example.com:16000/kms/v1/trustee/key/migrate?user.name=username&trusteeOp=migrate"
If you have configured Kerberos and SSL, use the following command instead:
$ curl --negotiate -u : -L -d "trusteeOp=migrate" "https://kms01.example.com:16000/kms/v1/trustee/key/migrate?user.name=username&trusteeOp=migrate" --cacert /path/to/kms/cert
6. Monitor/var/log/kms-keytrustee/kms.logand/var/log/kms-keytrustee/kms-catalina.<date>.logto verify that the migration is successful.
7. After you have verified that the migration is successful, remove the safety valve entry from step 3 and restart theKey Trustee KMS service.
Configuring CDH Services for HDFS Encryption
The following topics contain recommendations for setting up HDFS Data At Rest Encryption on page 244 with variousCDH services.
Hive
HDFS encryption has been designed so that files cannot be moved from one encryption zone to another or fromencryption zones to unencrypted directories. Therefore, the landing zone for datawhen using the LOAD DATA INPATHcommand must always be inside the destination encryption zone.
To use HDFS encryption with Hive, ensure you are using one of the following configurations:
Single Encryption Zone
With this configuration, you can use HDFS encryption by having all Hive data inside the same encryption zone. InCloudera Manager, configure the Hive Scratch Directory (hive.exec.scratchdir) to be inside the encryption zone.
Recommended HDFS Path: /user/hive
For example, to configure a single encryption zone for the entire Hive warehouse, you can rename /user/hive to/user/hive-old, create an encryption zone at /user/hive, and then distcp all the data from /user/hive-old
to /user/hive.
In Cloudera Manager, configure the Hive Scratch Directory (hive.exec.scratchdir) to be inside the encryptionzone by setting it to /user/hive/tmp, ensuring that permissions are 1777 on /user/hive/tmp.
Multiple Encryption Zones
With this configuration, you can use encrypted databases or tables with different encryption keys. To read data fromread-only encrypted tables, users must have access to a temporary directory that is encrypted at least as strongly asthe table.
270 | Cloudera Security
Encryption

For example:
1. Configure two encrypted tables, ezTbl1 and ezTbl2.2. Create two new encryption zones, /data/ezTbl1 and /data/ezTbl2.3. Load data to the tables in Hive using LOAD statements.
For more information, see Changed Behavior after HDFS Encryption is Enabled on page 271.
Other Encrypted Directories
• LOCALSCRATCHDIR: The MapJoin optimization in Hive writes HDFS tables to a local directory and then uploadsthem to the distributed cache. To ensure these files are encrypted, either disable MapJoin by settinghive.auto.convert.join to false, or encrypt the local Hive Scratch directory(hive.exec.local.scratchdir) using Cloudera Navigator Encrypt.
• DOWNLOADED_RESOURCES_DIR: JARs that are added to a user session and stored in HDFS are downloaded tohive.downloaded.resources.dir on the HiveServer2 local filesystem. To encrypt these JAR files, configureCloudera Navigator Encrypt to encrypt the directory specified by hive.downloaded.resources.dir.
• NodeManager Local Directory List: Hive stores JARs and MapJoin files in the distributed cache. To use MapJoinor encrypt JARs and other resource files, the yarn.nodemanager.local-dirs YARN configuration propertymust be configured to a set of encrypted local directories on all nodes.
Changed Behavior after HDFS Encryption is Enabled
• Loading data from one encryption zone to another results in a copy of the data. Distcp is used to speed up theprocess if the size of the files being copied is higher than the value specified by HIVE_EXEC_COPYFILE_MAXSIZE.The minimum size limit for HIVE_EXEC_COPYFILE_MAXSIZE is 32 MB, which you can modify by changing thevalue for the hive.exec.copyfile.maxsize configuration property.
• When loading data to encrypted tables, Cloudera strongly recommends using a landing zone inside the sameencryption zone as the table.
– Example 1: Loading unencrypted data to an encrypted table - Use one of the following methods:
– If you are loading new unencrypted data to an encrypted table, use the LOAD DATA ... statement.Because the source data is not inside the encryption zone, the LOAD statement results in a copy. For thisreason, Cloudera recommends landing data that you need to encrypt inside the destination encryptionzone. You can use distcp to speed up the copying process if your data is inside HDFS.
– If the data to be loaded is already inside a Hive table, you can create a new table with a LOCATION insidean encryption zone as follows:
CREATE TABLE encrypted_table [STORED AS] LOCATION ... AS SELECT * FROM <unencrypted_table>
The location specified in the CREATE TABLE statement must be inside an encryption zone. Creating atable pointing LOCATION to an unencrypted directory does not encrypt your source data. Youmust copyyour data to an encryption zone, and then point LOCATION to that zone.
– Example 2: Loading encrypted data to an encrypted table - If the data is already encrypted, use the CREATETABLE statement pointingLOCATION to the encrypted source directory containing the data. This is the fastestway to create encrypted tables.
CREATE TABLE encrypted_table [STORED AS] LOCATION ... AS SELECT * FROM <encrypted_source_directory>
• Users reading data from encrypted tables that are read-only must have access to a temporary directory which isencrypted with at least as strong encryption as the table.
• Temporary data is now written to a directory named .hive-staging in each table or partition• Previously, an INSERT OVERWRITE on a partitioned table inherited permissions for new data from the existing
partition directory. With encryption enabled, permissions are inherited from the table.
Cloudera Security | 271
Encryption

Impala
Recommendations
• If HDFS encryption is enabled, configure Impala to encrypt data spilled to local disk.
• In releases lower than Impala 2.2.0 / CDH 5.4.0, Impala does not support the LOAD DATA statement when thesource and destination are in different encryption zones. If you are running an affected release and need to useLOAD DATA with HDFS encryption enabled, copy the data to the table's encryption zone prior to running thestatement.
• Use Cloudera Navigator to lock down the local directory where Impala UDFs are copied during execution. Bydefault, Impala copies UDFs into /tmp, and you can configure this location through the --local_library_dirstartup flag for the impalad daemon.
• Limit the rename operations for internal tables once encryption zones are set up. Impala cannot do an ALTERTABLE RENAME operation to move an internal table from one database to another, if the root directories forthose databases are in different encryption zones. If the encryption zone covers a table directory but not theparent directory associated with the database, Impala cannot do an ALTER TABLE RENAME operation to renamean internal table, even within the same database.
• Avoid structuring partitioned tables where different partitions reside in different encryption zones, or where anypartitions reside in an encryption zone that is different from the root directory for the table. Impala cannot do anINSERT operation into any partition that is not in the same encryption zone as the root directory of the overalltable.
Steps
Start every impalad process with the --disk_spill_encryption=true flag set. This encrypts all spilled data usingAES-256-CFB. Set this flag using the Impala service configuration property Impala Daemon Command Line ArgumentAdvanced Configuration Snippet (Safety Valve), under Impala Daemon Default Group > Advanced.
Important: Impala does not selectively encrypt data based on whether the source data is alreadyencrypted in HDFS. This results in at most 15 percent performance degradation when data is spilled.
HBase
Recommendations
Make /hbase an encryption zone. Do not create encryption zones as subdirectories under /hbase, because HBasemay need to rename files across those subdirectories.
Steps
On a cluster without HBase currently installed, create the /hbase directory and make that an encryption zone.
On a cluster with HBase already installed, perform the following steps:
1. Stop the HBase service.2. Move data from the /hbase directory to /hbase-tmp.3. Create an empty /hbase directory and make it an encryption zone.4. Distcp all data from /hbase-tmp to /hbase, preserving user-group permissions and extended attributes.5. Start the HBase service and verify that it is working as expected.6. Remove the /hbase-tmp directory.
272 | Cloudera Security
Encryption

Search
Recommendations
Make /solr an encryption zone.
Steps
On a cluster without Solr currently installed, create the /solr directory and make that an encryption zone.
On a cluster with Solr already installed:
1. Create an empty /solr-tmp directory.2. Make /solr-tmp an encryption zone.3. DistCp all data from /solr into /solr-tmp.4. Remove /solr, and rename /solr-tmp to /solr.
Sqoop
Recommendations
• For Hive support: Ensure that you are using Sqoop with the --target-dir parameter set to a directory that isinside the Hive encryption zone. For more details, see Hive on page 270.
• For append/incremental support:Make sure that the sqoop.test.import.rootDir property points to thesame encryption zone as the --target-dir argument.
• For HCatalog support: No special configuration is required.
Hue
Recommendations
Make /user/hue an encryption zone becauseOozieworkflows and other Hue-specific data are stored there by default.
Steps
On a cluster without Hue currently installed, create the /user/hue directory and make it an encryption zone.
On a cluster with Hue already installed:
1. Create an empty /user/hue-tmp directory.2. Make /user/hue-tmp an encryption zone.3. DistCp all data from /user/hue into /user/hue-tmp.4. Remove /user/hue and rename /user/hue-tmp to /user/hue.
Spark
Recommendations
• By default, application event logs are stored at /user/spark/applicationHistory, which can be made intoan encryption zone.
• Spark also optionally caches its JAR file at /user/spark/share/lib (by default), but encrypting this directoryis not required.
• Spark does not encrypt shuffle data. To do so, configure the Spark local directory,spark.local.dir (in Standalonemode), to reside on an encrypted disk. For YARN mode, make the corresponding YARN configuration changes.
Cloudera Security | 273
Encryption

MapReduce and YARNMapReduce v1
Recommendations
MRv1 stores both history and logs on local disks by default. Even if you do configure history to be stored on HDFS, thefiles are not renamed. Hence, no special configuration is required.
MapReduce v2 (YARN)
Recommendations
Make /user/history a single encryption zone, because history files are moved between the intermediate anddone directories, and HDFS encryption does not allow moving encrypted files across encryption zones.
Steps
On a cluster with MRv2 (YARN) installed, create the /user/history directory and make that an encryption zone.
If /user/history already exists and is not empty:
1. Create an empty /user/history-tmp directory.2. Make /user/history-tmp an encryption zone.3. DistCp all data from /user/history into /user/history-tmp.4. Remove /user/history and rename /user/history-tmp to /user/history.
Troubleshooting HDFS Encryption
This topic contains HDFS Encryption-specific troubleshooting information in the form of issues you might face whenencrypting HDFS files/directories and their workarounds.
Retrieval of encryption keys fails
DescriptionYou see the following error when trying to list encryption keys
user1@example-sles-4:~> hadoop key listCannot list keys for KeyProvider: KMSClientProvider[https: //example-sles-2.example.com:16000/kms/v1/]: Retrieval of all keys failed.
SolutionMake sure your truststore has been updated with the relevant certificate(s), such as the Key Trustee server certificate.
DistCp between unencrypted and encrypted locations fails
DescriptionBy default, DistCp compares checksums provided by the filesystem to verify that data was successfully copied to thedestination. However, when copying between unencrypted and encrypted locations, the filesystem checksums willnot match since the underlying block data is different.
SolutionSpecify the -skipcrccheck and -update distcp flags to avoid verifying checksums.
Cannot move encrypted files to trash
Description
With HDFS encryption enabled, you cannot move encrypted files or directories to the trash directory.
274 | Cloudera Security
Encryption

Solution
To remove encrypted files/directories, use the following commandwith the -skipTrash flag specified to bypass trash.
rm -r -skipTrash /testdir
NameNode - KMS communication fails after long periods of inactivity
Description
Encrypted files and encryption zones cannot be created if a long period of time (by default, 20 hours) has passed sincethe last time the KMS and NameNode communicated.
Solution
Important: Upgrading your cluster to the latest CDH 5 release will fix this problem. For instructions,see Upgrading from an Earlier CDH 5 Release to the Latest Release.
For earlier CDH 5 releases, there are two possible workarounds to this issue :
• You can increase the KMS authentication token validity period to a very high number. Since the default value is10 hours, this bug will only be encountered after 20 hours of no communication between the NameNode and theKMS. Add the following property to the kms-site.xmlSafety Valve:
<property><name>hadoop.kms.authentication.token.validity</name> <value>SOME VERY HIGH NUMBER</value> </property>
• You can switch the KMS signature secret provider to the string secret provider by adding the following propertyto the kms-site.xml Safety Valve:
<property><name>hadoop.kms.authentication.signature.secret</name> <value>SOME VERY SECRET STRING</value> </property>
Configuring Encrypted HDFS Data TransportThis topic describes how to configure encrypted HDFS data transport using both, ClouderaManager, and the commandline.
Using Cloudera Manager
Minimum Required Role: Full Administrator
To enable encryption of data transfered between DataNodes and clients, and among DataNodes, proceed as follows:
1. Enable Hadoop security using Kerberos.2. Select the HDFS service.3. Click the Configuration tab.4. Select Scope > HDFS (Service Wide)5. Select Category > Security.6. Configure the following properties: (You can type the property name in the Search box to locate the property.)
DescriptionProperty
Check this field to enable wire encryption.Enable Data TransferEncryption
Cloudera Security | 275
Encryption

DescriptionProperty
Optionally configure the algorithm used to encrypt data.Data Transfer EncryptionAlgorithm
Select privacy.Hadoop RPC Protection
7. Click Save Changes.8. Restart the HDFS service.
Using the Command Line
Important:
• You can use either Cloudera Manager or the following command-line instructions to completethis configuration.
• This information applies specifically to CDH 5.4.x. If you use an earlier version of CDH, see thedocumentation for that version located at Cloudera Documentation.
To enable encrypted data transport using the command line, proceed as follows:
1. Enable the Hadoop Security using Kerberos, following these instructions.2. Set the optional RPC encryption by setting hadoop.rpc.protection to "privacy" in the core-site.xml file
in both client and server configurations.
Note:
If RPC encryption is not enabled, transmission of other HDFS data is also insecure.
3. Set dfs.encrypt.data.transfer to true in the hdfs-site.xml file on all server systems.4. Restart all daemons.
Configuring Encrypted HBase Data TransportThis topic describes how to configure encrypted HBase data transport using both ClouderaManager and the commandline.
Using Cloudera Manager
Minimum Required Role: Full Administrator
To enable encryption of data transferred between HBase masters and RegionServers and between RegionServers andclients:
1. Enable Hadoop security using Kerberos.2. Configure Kerberos authentication for HBase.3. Select the HBase service.4. Click the Configuration tab.5. Select Scope > HBase (Service Wide)6. Select Category > Security.7. Search for the HBase Transport Security property. Select privacy to enable secure RPC transport. There are three
settings: authentication, integrity, and privacy. Each level includes the prior ones. Selecting privacyalso enables authentication and integrity.
8. Click Save Changes.9. Restart the HDFS service.
276 | Cloudera Security
Encryption

Using the Command Line
Important:
• You can use either Cloudera Manager or the following command-line instructions to completethis configuration.
• This information applies specifically to CDH 5.4.x. If you use an earlier version of CDH, see thedocumentation for that version located at Cloudera Documentation.
To enable encrypted data transport using the command line, proceed as follows:
1. Enable Hadoop Security using Kerberos.2. Enable HBase security using Kerberos.3. Enable RPC encryption by setting hbase.rpc.protection to "privacy" in the hbase-site.xml file.4. Restart all daemons.
Cloudera Security | 277
Encryption
Authorization
Authorization is concerned with who or what has access or control over a given resource or service. Since Hadoopmerges together the capabilities of multiple varied, and previously separate IT systems as an enterprise data hub thatstores andworks on all datawithin an organization, it requiresmultiple authorization controls with varying granularities.In such cases, Hadoop management tools simplify setup and maintenance by:
• Tying all users to groups, which can be specified in existing LDAP or AD directories.• Providing role-based access control for similar interaction methods, like batch and interactive SQL queries. For
example, Apache Sentry permissions apply to Hive (HiveServer2) and Impala.
CDH currently provides the following forms of access control:
• Traditional POSIX-style permissions for directories and files, where each directory and file is assigned a singleowner and group. Each assignment has a basic set of permissions available; file permissions are simply read, write,and execute, and directories have an additional permission to determine access to child directories.
• Extended Access Control Lists (ACLs) for HDFS that provide fine-grained control of permissions for HDFS files byallowing you to set different permissions for specific named users or named groups.
• Apache HBase uses ACLs to authorize various operations (READ, WRITE, CREATE, ADMIN) by column, columnfamily, and column family qualifier. HBase ACLs are granted and revoked to both users and groups.
• Role-based access control with Apache Sentry.As of ClouderaManager 5.1.x, Sentry permissions can be configuredusing either policy files or the database-backed Sentry service.
– The Sentry service is the preferred way to set up Sentry permissions. See The Sentry Service on page 291 formore information.
– For the policy file approach to configuring Sentry, see Sentry Policy File Authorization on page 315.
Cloudera Manager User RolesMinimum Required Role: User Administrator (also provided by Full Administrator)
Access to Cloudera Manager features is controlled by user accounts. For more information about user accounts, seeCloudera Manager User Accounts. Among the properties of a user account is the user role, which determines theCloudera Manager features visible to the user and the actions the user can perform. All the tasks in the ClouderaManager documentation indicate which role is required to perform the task.
Note: The full set of roles are available with Cloudera Enterprise; Cloudera Express supports only theRead-Only and Full Administrator roles. When a Cloudera Enterprise Data Hub Edition trial licenseexpires, only userswith Read-Only and Full Administrator roles are allowed to log in. A Full Administratormust change the role of any other user to Read-Only or Full Administrator before that user can login.
User Roles
A Cloudera Manager user account can be assigned one of the following roles with associated permissions:
• Auditor
– View data in Cloudera Manager.– View audit events.
• Read-Only - Allows the user to:
– View data in Cloudera Manager.– View service and monitoring information.
278 | Cloudera Security
Authorization

The Read-Only role does not allow the user to add services or take any actions that affect the state of the cluster.
• Limited Operator
– View data in Cloudera Manager.– View service and monitoring information.– Decommission hosts (except hosts running Cloudera Management Service roles).
The Limited Operator role does not allow the user to add services or take any other actions that affect the stateof the cluster.
• Operator
– View data in Cloudera Manager.– View service and monitoring information.– Stop, start, and restart clusters, services (except the Cloudera Management Service), and roles.– Decommission and recommission hosts (except hosts running Cloudera Management Service roles).– Decommission and recommission roles (except Cloudera Management Service roles).– Start, stop, and restart KMS.
The Operator role does not allow the user to add services, roles, or hosts, or take any other actions that affectthe state of the cluster.
• Configurator
– View data in Cloudera Manager.– Perform all Operator operations.– Configure services (except the Cloudera Management Service).– Enter and exit maintenance mode.– Manage dashboards (including Cloudera Management Service dashboards).
• Cluster Administrator - View all data and perform all actions except the following:
– Administer Cloudera Navigator.– View replication schedules and snapshot policies.– View audit events.– Manage user accounts and configuration of external authentication.
• BDR Administrator
– View data in Cloudera Manager.– View service and monitoring information.– Perform replication and define snapshot operations.
• Navigator Administrator
– View data in Cloudera Manager.– View service and monitoring information.– Administer Cloudera Navigator.– View audit events.
• User Administrator - Allows the user to:
– View data in Cloudera Manager.– View service and monitoring information.– Manage user accounts and configuration of external authentication.
• Key Administrator
– View data in Cloudera Manager.– Configure HDFS encryption, administer Key Trustee Server, and manage encryption keys.
Cloudera Security | 279
Authorization

– Start, stop, and restart KMS
• Full Administrator - Full Administrators have permissions to view all data and do all actions, including reconfiguringand restarting services, and administering other users.
Determining the Role of the Currently Logged in User
1. Click the logged-in username at the far right of the top navigation bar. The role displays right under the username.For example:
Removing the Full Administrator User Role
In some organizations, security policies may prohibit the use of the Full Administrator role. The Full Administrator roleis created during Cloudera Manager installation, but you can remove it as long as you have at least one remaining useraccount with User Administrator privileges.
To remove the Full Administrator user role, perform the following steps.
1. Add at least one user account with User Administrator privileges, or ensure that at least one such user accountalready exists.
2. Ensure that there is only a single user account with Full Administrator privileges.3. While logged in as the single remaining Full Administrator user, select your own user account and either delete
it or assign it a new user role.
Warning: After you delete the last Full Administrator account, you will be logged out immediatelyand will not be able to log in unless you have access to another user account. Also, it will no longerbe possible to create or assign Full Administrators.
A consequence of removing the Full Administrator role is that some tasks may require collaboration between two ormore users with different user roles. For example:
• If the machine that the Cloudera Navigator roles are running on needs to be replaced, the Cluster Administratorwill want to move all the roles running on that machine to a different machine. The Cluster Administrator canmove any non-Navigator roles by deleting and re-adding them, but would need a Navigator Administrator toperform the stop, delete, add, and start actions for the Cloudera Navigator roles.
• In order to take HDFS snapshots, snapshots must be enabled on the cluster by a Cluster Administrator, but thesnapshots themselves must be taken by a BDR Administrator.
Cloudera Navigator Data Management Component User RolesUser roles determine the Cloudera Navigator features visible to the user and the actions the user can perform.
User Roles
A Cloudera Navigator data management component user account can be assigned one of the following user roles:
• Lineage Viewer - Search for entities, view metadata, and view lineage.• Auditing Viewer - View audit events and create audit reports.• Policy Viewer - View metadata policies.• Metadata Administrator - Search for entities, view metadata, view lineage, and edit metadata.• Policy Administrator - View, create, update, and delete metadata and metadata policies.• User Administrator - Administer role assignments to groups.
280 | Cloudera Security
Authorization

• Full Administrator - Full access, including role assignments to groups.
The user roles and associated permissions are summarized as follows:
Table 25: Cloudera Navigator Data Management Component User Roles
AdministerRole GroupMapping
WritePolicies
ReadPolicies
WriteMetadata(Edit)
ReadMetadata(Search)
ReadLineage
ReadAudit
UserRole
FullAdministrator
UserAdministrator
AuditingViewer
LineageViewer
MetadataAdministrator
PolicyViewer
PolicyAdministrator
Determining the Roles of the Currently Logged in User
To display the Cloudera Navigator user roles for the currently logged-in user:
1. Click the username in the upper right.2. ClickMy roles.3. The Roles pop-upwindowwill appear, displaying all roles assigned to the LDAP or Active Directory groups to which
the current user belongs.
The selection of menus displayed in the upper right indicates the user's access to Cloudera Navigator features, asdetermined by the roles associated with the user's LDAP or Active Directory groups. For example, a Full Administratorwill see the Search, Audits, Policies, and Administrationmenus, while a user with the Policy Administrator role willonly see the Search and Policiesmenus.
HDFS Extended ACLsHDFS supports POSIX Access Control Lists (ACLs), as well as the traditional POSIX permissionsmodel already supported.ACLs control access of HDFS files by providing a way to set different permissions for specific named users or namedgroups.
Enabling ACLs
By default, ACLs are disabled on a cluster. To enable them, set the dfs.namenode.acls.enabled property to truein the NameNode's hdfs-site.xml.
Cloudera Security | 281
Authorization
Important: Ensure that all users and groups resolve on the NameNode for ACLs to work as expected.
<property><name>dfs.namenode.acls.enabled</name><value>true</value></property>
Commands
To set and get file access control lists (ACLs), use the file system shell commands, setfacl and getfacl.
getfacl
hdfs dfs -getfacl [-R] <path>
<!-- COMMAND OPTIONS<path>: Path to the file or directory for which ACLs should be listed.-R: Use this option to recursively list ACLs for all files and directories.-->
Examples:
<!-- To list all ACLs for the file located at /user/hdfs/file -->hdfs dfs -getfacl /user/hdfs/file
<!-- To recursively list ACLs for /user/hdfs/file -->hdfs dfs -getfacl -R /user/hdfs/file
setfacl
hdfs dfs -setfacl [-R] [-b|-k -m|-x <acl_spec> <path>]|[--set <acl_spec> <path>]
<!-- COMMAND OPTIONS<path>: Path to the file or directory for which ACLs should be set.-R: Use this option to recursively list ACLs for all files and directories.-b: Revoke all permissions except the base ACLs for user, groups and others.-k: Remove the default ACL.-m: Add new permissions to the ACL with this option. Does not affect existing permissions.-x: Remove only the ACL specified.<acl_spec>: Comma-separated list of ACL permissions.--set: Use this option to completely replace the existing ACL for the path specified. Previous ACL entries will no longer apply.-->
Examples:
<!-- To give user ben read & write permission over /user/hdfs/file -->hdfs dfs -setfacl -m user:ben:rw- /user/hdfs/file
<!-- To remove user alice's ACL entry for /user/hdfs/file -->hdfs dfs -setfacl -x user:alice /user/hdfs/file
<!-- To give user hadoop read & write access, and group or others read-only access -->hdfs dfs -setfacl --set user::rw-,user:hadoop:rw-,group::r--,other::r-- /user/hdfs/file
More details about using this feature can be found in the HDFS Permissions Guide on the Apache website.
282 | Cloudera Security
Authorization

Configuring LDAP Group Mappings
Important: Cloudera strongly recommends against using Hadoop's LdapGroupsMapping provider.LdapGroupsMapping should only be used in cases where OS-level integration is not possible.Production clusters require an identity provider that works well with all applications, not just Hadoop.Hence, often the preferred mechanism is to use tools such as SSSD, VAS or Centrify to replicate LDAPgroups.
Irrespective of the mechanism used, user/group mappings must be applied consistently across allcluster hosts for ease with maintenance.
When configuring LDAP for groupmappings in Hadoop, youmust create the users and groups for your Hadoop servicesin LDAP. When using the default shell-based group mapping provider(org.apache.hadoop.security.ShellBasedUnixGroupsMapping), the requisite user and group relationshipsalready exist because they are created during the installation procedure. When you switch to LDAP as the groupmapping provider, you must re-create these relationships within LDAP.
Note that if you have modified the System User or System Group setting within Cloudera Manager for any service,you must use those custom values to provision the users and groups in LDAP.
The table below lists users and their group members for CDH services:
Note: Cloudera Manager 5.3 introduces a new single user mode. In single user mode, the ClouderaManager Agent and all the processes run by services managed by Cloudera Manager are started as asingle configured user and group. See Single User Mode Requirements for more information.
Table 26: Users and Groups
NotesGroupsUnix User IDComponent(Version)
Cloudera Manager processes such as the ClouderaManager Server and the monitoring roles run as thisuser.
The Cloudera Manager keytab file must be namedcmf.keytab since that name is hard-coded inCloudera Manager.
Note: Applicable to clusters managedby Cloudera Manager only.
cloudera-scmcloudera-scmClouderaManager(all versions)
Accumulo processes run as this user.accumuloaccumuloApache Accumulo(Accumulo 1.4.3and higher)
No special users.Apache Avro
The sink that writes to HDFS as this user must havewrite privileges.
flumeflumeApache Flume(CDH 4, CDH 5)
The Master and the RegionServer processes run asthis user.
hbasehbaseApache HBase(CDH 4, CDH 5)
Cloudera Security | 283
Authorization

NotesGroupsUnix User IDComponent(Version)
The NameNode and DataNodes run as this user, andtheHDFS root directory aswell as the directories usedfor edit logs should be owned by it.
hdfs, hadoophdfsHDFS (CDH 4, CDH5)
The HiveServer2 process and the Hive Metastoreprocesses run as this user.
hivehiveApache Hive (CDH4, CDH 5)
A user must be defined for Hive access to itsMetastore DB (e.g. MySQL or Postgres) but it can beany identifier and does not correspond to a Unix uid.This isjavax.jdo.option.ConnectionUserNamein hive-site.xml.
The WebHCat service (for REST access to Hivefunctionality) runs as the hive user.
hivehiveApache HCatalog(CDH 4.2 andhigher, CDH 5)
The HttpFS service runs as this user. See HttpFSSecurity Configuration for instructions on how togenerate the merged httpfs-http.keytab file.
httpfshttpfsHttpFS (CDH 4,CDH 5)
Hue services run as this user.huehueHue (CDH 4, CDH5)
Impala services run as this user.impala, hadoop,
hdfs, hive
impalaCloudera Impala(CDH 4.1 andhigher, CDH 5)
Kafka services run as this user.kafkakafkaApache Kafka(ClouderaDistribution ofKafka 1.2.0)
The Java KeyStore KMS service runs as this user.kmskmsJava KeyStore KMS(CDH 5.2.1 andhigher)
The Key Trustee KMS service runs as this user.kmskmsKey Trustee KMS(CDH 5.3 andhigher)
The Key Trustee Server service runs as this user.keytrusteekeytrusteeKey Trustee Server(CDH 5.4 andhigher)
Llama runs as this user.llamallamaLlama (CDH 5)
No special users.Apache Mahout
Without Kerberos, the JobTracker and tasks run asthis user. The LinuxTaskController binary is owned bythis user for Kerberos.
mapred, hadoopmapredMapReduce (CDH4, CDH 5)
The Oozie service runs as this user.oozieoozieApache Oozie(CDH 4, CDH 5)
No special users.Parquet
No special users.Apache Pig
284 | Cloudera Security
Authorization

NotesGroupsUnix User IDComponent(Version)
The Solr processes run as this user.solrsolrCloudera Search(CDH 4.3 andhigher, CDH 5)
The Spark History Server process runs as this user.sparksparkApacheSpark (CDH5)
The Sentry service runs as this user.sentrysentryApache Sentry(incubating) (CDH5.1 and higher)
This user is only for the Sqoop1 Metastore, aconfiguration option that is not recommended.
sqoopsqoopApache Sqoop(CDH 4, CDH 5)
The Sqoop2 service runs as this user.sqoop, sqoop2sqoop2Apache Sqoop2(CDH 4.2 andhigher, CDH 5)
No special users.Apache Whirr
Without Kerberos, all YARN services and applicationsrun as this user. The LinuxContainerExecutor binaryis owned by this user for Kerberos.
yarn, hadoopyarnYARN (CDH 4, CDH5)
The ZooKeeper processes run as this user. It is notconfigurable.
zookeeperzookeeperApache ZooKeeper(CDH 4, CDH 5)
Important:
• You can use either Cloudera Manager or the following command-line instructions to completethis configuration.
• This information applies specifically to CDH 5.4.x. If you use an earlier version of CDH, see thedocumentation for that version located at Cloudera Documentation.
Using Cloudera Manager
Minimum Required Role: Configurator (also provided by Cluster Administrator, Full Administrator)
Make the following changes to the HDFS service's security configuration:
1. Open the Cloudera Manager Admin Console and go to the HDFS service.2. Click the Configuration tab.3. Select Scope > HDFS (Service Wide)4. Select Category > Security.5. Modify the following configuration properties using values from the table below:
ValueConfiguration Property
org.apache.hadoop.security.LdapGroupsMappingHadoop User Group Mapping Implementation
ldap://<server>Hadoop User Group Mapping LDAP URL
[email protected] User Group Mapping LDAP Bind User
***Hadoop User Group Mapping LDAP Bind UserPassword
dc=example,dc=comHadoop User Group Mapping Search Base
Cloudera Security | 285
Authorization

Although the above changes are sufficient to configure group mappings for Active Directory, some changes to theremaining default configurations might be required for OpenLDAP.
Using the Command Line
Add the following properties to the core-site.xml on the NameNode:
<property> <name>hadoop.security.group.mapping</name><value>org.apache.hadoop.security.LdapGroupsMapping</value> </property>
<property><name>hadoop.security.group.mapping.ldap.url</name><value>ldap://server</value> </property>
<property><name>hadoop.security.group.mapping.ldap.bind.user</name><value>[email protected]</value></property>
<property><name>hadoop.security.group.mapping.ldap.bind.password</name> <value>****</value></property>
<property><name>hadoop.security.group.mapping.ldap.base</name><value>dc=example,dc=com</value> </property>
<property><name>hadoop.security.group.mapping.ldap.search.filter.user</name><value>(&(objectClass=user)(sAMAccountName={0}))</value> </property>
<property><name>hadoop.security.group.mapping.ldap.search.filter.group</name> <value>(objectClass=group)</value> </property>
<property><name>hadoop.security.group.mapping.ldap.search.attr.member</name> <value>member</value></property>
<property><name>hadoop.security.group.mapping.ldap.search.attr.group.name</name> <value>cn</value></property>
Note: In addition:
• If you are using Sentry with Hive, you will also need to add these properties on the HiveServer2node.
• If you are using Sentry with Impala, add these properties on all hosts
See Users and Groups in Sentry for more information.
Authorization With Apache Sentry (Incubating)Apache Sentry (incubating) is a granular, role-based authorization module for Hadoop. Sentry provides the ability tocontrol and enforce precise levels of privileges on data for authenticated users and applications on a Hadoop cluster.Sentry currently works out of the box with Apache Hive, Hive Metastore/HCatalog, Apache Solr, Impala, and HDFS(limited to Hive table data).
286 | Cloudera Security
Authorization

Sentry is designed to be a pluggable authorization engine for Hadoop components. It allows you to define authorizationrules to validate a user or application’s access requests for Hadoop resources. Sentry is highly modular and can supportauthorization for a wide variety of data models in Hadoop.
Architecture Overview
Sentry Components
There are three components involved in the authorization process:
• Sentry Server
The Sentry RPC server manages the authorization metadata. It supports interfaces to securely retrieve andmanipulate the metadata.
• Data Engine
This is a data processing application such as Hive or Impala that needs to authorize access to data or metadataresources. The data engine loads the Sentry plugin and all client requests for accessing resources are interceptedand routed to the Sentry plugin for validation.
• Sentry Plugin
The Sentry plugin runs in the data engine. It offers interfaces to manipulate authorization metadata stored in theSentry server, and includes the authorization policy engine that evaluates access requests using the authorizationmetadata retrieved from the server.
Key Concepts
• Authentication - Verifying credentials to reliably identify a user• Authorization - Limiting the user’s access to a given resource• User - Individual identified by underlying authentication system• Group - A set of users, maintained by the authentication system• Privilege - An instruction or rule that allows access to an object• Role - A set of privileges; a template to combine multiple access rules• Authorization models - Defines the objects to be subject to authorization rules and the granularity of actions
allowed. For example, in the SQL model, the objects can be databases or tables, and the actions are SELECT,INSERT, CREATE and so on. For the Search model, the objects are indexes, collections and documents; theaccess modes are query, update and so on.
User Identity and Group Mapping
Sentry relies on underlying authentication systems such as Kerberos or LDAP to identify the user. It also uses the groupmapping mechanism configured in Hadoop to ensure that Sentry sees the same group mapping as other componentsof the Hadoop ecosystem.
Consider users Alice and Bob who belong to an Active Directory (AD) group called finance-department. Bob alsobelongs to a group called finance-managers. In Sentry, you first create roles and then grant privileges to these roles.For example, you can create a role called Analyst and grant SELECT on tables Customer and Sales to this role.
Cloudera Security | 287
Authorization

The next step is to join these authentication entities (users and groups) to authorization entities (roles). This can bedone by granting the Analyst role to the finance-department group. Now Bob and Alice who are members of thefinance-department group get SELECT privilege to the Customer and Sales tables.
Role-Based Access Control
Role-based access control (RBAC) is a powerful mechanism to manage authorization for a large set of users and dataobjects in a typical enterprise. New data objects get added or removed, users join, move, or leave organisations all thetime. RBAC makes managing this a lot easier. Hence, as an extension of the discussed previously, if Carol joins theFinance Department, all you need to do is add her to the finance-department group in AD. This will give Carolaccess to data from the Sales and Customer tables.
Unified Authorization
Another important aspect of Sentry is the unified authorization. The access control rules once defined, work acrossmultiple data access tools. For example, being granted the Analyst role in the previous example will allow Bob, Alice,and others in the finance-department group to access table data from SQL engines such as Hive and Impala, aswell as using MapReduce, Pig applications or metadata access using HCatalog.
Sentry Integration with the Hadoop Ecosystem
As illustrated above, Apache Sentry works with multiple Hadoop components. At the heart you have the Sentry Serverwhich stores authorization metadata and provides APIs for tools to retrieve and modify this metadata securely.
Note that the Sentry server only facilitates the metadata. The actual authorization decision is made by a policy enginewhich runs in data processing applications such as Hive or Impala. Each component loads the Sentry plugin whichincludes the service client for dealingwith the Sentry service and the policy engine to validate the authorization request.
288 | Cloudera Security
Authorization

Hive and Sentry
Consider an example where Hive gets a request to access an object in a certain mode by a client. If Bob submits thefollowing Hive query:
select * from production.sales
Hive will identify that user Bob is requesting SELECT access to the Sales table. At this point Hive will ask the Sentryplugin to validate Bob’s access request. The plugin will retrieve Bob’s privileges related to the Sales table and the policyengine will determine if the request is valid.
Hiveworkswith both, the Sentry service and policy files. Cloudera recommends you use the Sentry servicewhichmakesit easier to manage user privileges. For more details and instructions, see The Sentry Service on page 291 or SentryPolicy File Authorization on page 315.
Impala and Sentry
Authorization processing in Impala is similar to that in Hive. The main difference is caching of privileges. Impala’sCatalog server manages caching schema metadata and propagating it to all Impala server nodes. This Catalog servercaches Sentry metadata as well. As a result, authorization validation in Impala happens locally and much faster.
Cloudera Security | 289
Authorization

For detailed documentation, see Enabling Sentry Authorization for Impala on page 333.
Sentry-HDFS Synchronization
Sentry-HDFS authorization is focused on Hive warehouse data - that is, any data that is part of a table in Hive or Impala.The real objective of this integration is to expand the same authorization checks to Hivewarehouse data being accessedfrom any other components such as Pig, MapReduce or Spark. At this point, this feature does not replace HDFS ACLs.Tables that are not associated with Sentry will retain their old ACLs.
The mapping of Sentry privileges to HDFS ACL permissions is as follows:
• SELECT privilege -> Read access on the file.• INSERT privilege -> Write access on the file.• ALL privilege -> Read and Write access on the file.
The NameNode loads a Sentry plugin that caches Sentry privileges as well Hive metadata. This helps HDFS to keep filepermissions and Hive tables privileges in sync. The Sentry plugin periodically polls the Sentry and Metastore to keepthe metadata changes in sync.
For example, if Bob runs a Pig job that is reading from the Sales table data files, Pig will try to get the file handle fromHDFS. At that point the Sentry plugin on the NameNode will figure out that the file is part of Hive data and overlaySentry privileges on top of the file ACLs. As a result, HDFS will enforce the same privileges for this Pig client that Hivewould apply for a SQL query.
290 | Cloudera Security
Authorization

For HDFS-Sentry synchronization towork, youmust use the Sentry service, not policy file authorization. See SynchronizingHDFS ACLs and Sentry Permissions on page 310, for more details.
Search and Sentry
Sentry can apply a range of restrictions to various Search tasks, such accessing data or creating collections. Theserestrictions are consistently applied, regardless of the way users attempt to complete actions. For example, restrictingaccess to data in a collection restricts that access whether queries come from the command line, from a browser, orthrough the admin console.
With Search, Sentry stores its privilege policies in a policy file (for example, sentry-provider.ini) which is stored in anHDFS location such as hdfs://ha-nn-uri/user/solr/sentry/sentry-provider.ini.
Sentry with Search does not support multiple policy files for multiple databases. However, you must use a separatepolicy file for each Sentry-enabled service. For example, Hive and Search were using policy file authorization, using acombined Hive and Search policy file would result in an invalid configuration and failed authorization on both services.
Note: While Hive and Impala are compatible with the database-backed Sentry service, Search stilluses Sentry’s policy file authorization. Note that it is possible for a single cluster to use both, the Sentryservice (for Hive and Impala as described above) and Sentry policy files (for Solr).
For detailed documentation, see Enabling Sentry Authorization for Search using the Command Line on page 344.
Authorization Administration
The Sentry server supports APIs to securelymanipulate roles andprivileges. BothHive and Impala support SQL statementsto manage privileges natively. Sentry assumes that HiveServer2 and Impala run as superusers, usually called hive andimpala. To initiate top-level permissions for Sentry, an admin must login as a superuser.You can use either Beelineor the Impala shell to execute the following sample statement:
GRANT ROLE Analyst TO GROUP finance-managers
Disabling Hive CLI
To execute Hive queries, you must use Beeline. Hive CLI is not supported with Sentry and therefore its access to theHive Metastore must be disabled. This is especially necessary if the Hive metastore has sensistive metadata. To dothis, modify the hadoop.proxyuser.hive.groups in core-site.xml on the Hive metastore host. For example,to give the hive user permission to impersonate only members of the hive and hue groups, set the property to:
<property><name>hadoop.proxyuser.hive.groups</name><value>hive,hue</value></property>
More user groups that require access to the Hive Metastore can be added to the comma-separated list as needed.
Using Hue to Manage Sentry Permissions
Hue supports a Security app tomanage Sentry authorization. This allows users to explore and change table permissions.Here is a video blog that demonstrates its functionality.
The Sentry Service
Important: This is the documentation for the Sentry service introduced in CDH 5.1. If you want touse Sentry's previous policy file approach to secure your data, see Sentry Policy File Authorization onpage 315.
The Sentry service is a RPC server that stores the authorization metadata in an underlying relational database andprovides RPC interfaces to retrieve and manipulate privileges. It supports secure access to services using Kerberos.
Cloudera Security | 291
Authorization

The service serves authorization metadata from the database backed storage; it does not handle actual privilegevalidation. The Hive and Impala services are clients of this service and will enforce Sentry privileges when configuredto use Sentry.
The motivation behind introducing a new Sentry service is to make it easier to handle user privileges than the existingpolicy file approach. Providing a database instead, allows you to use the more traditional GRANT/REVOKE statementsto modify privileges.
For more information on installing, upgrading and configuring the Sentry service, see:
Prerequisites
• CDH 5.1.x (or later) managed by Cloudera Manager 5.1.x (or later). See the Cloudera Manager AdministrationGuide and Cloudera Installation and Upgrade for instructions.
• HiveServer2 and the Hive Metastore running with strong authentication. For HiveServer2, strong authenticationis either Kerberos or LDAP. For the HiveMetastore, only Kerberos is considered strong authentication (to override,see Securing the Hive Metastore on page 306).
• Impala 1.4.0 (or later) runningwith strong authentication.With Impala, either Kerberos or LDAP can be configuredto achieve strong authentication.
• Implement Kerberos authentication on your cluster. For instructions, see Enabling Kerberos Authentication Usingthe Wizard on page 19.
Terminologies
• An object is an entity protected by Sentry's authorization rules. The objects supported in the current release areserver, database, table, and URI.
• A role is a collection of rules for accessing a given Hive object.• A privilege is granted to a role to govern access to an object. Supported privileges are:
Table 27: Valid privilege types and the objects they apply to
ObjectPrivilege
DB, TABLEINSERT
DB, TABLESELECT
SERVER, TABLE, DB, URIALL
• A user is an entity that is permitted by the authentication subsystem to access the Hive service. This entity canbe a Kerberos principal, an LDAP userid, or an artifact of some other pluggable authentication system supportedby HiveServer2.
• A group connects the authentication system with the authorization system. It is a collection of one or more userswho have been granted one or more authorization roles. Sentry allows a set of roles to be configured for a group.
• A configured group provider determines a user’s affiliationwith a group. The current release supports HDFS-backedgroups and locally configured groups.
Privilege Model
Sentry uses a role-based privilege model with the following characteristics.
• Allows any user to execute show function, desc function, and show locks.• Allows the user to see only those tables and databases for which this user has privileges.• Requires a user to have the necessary privileges on the URI to execute HiveQL operations that take in a location.
Examples of such operations include LOAD, IMPORT, and EXPORT.• Privileges granted on URIs are recursively applied to all subdirectories. That is, privileges only need to be granted
on the parent directory.
292 | Cloudera Security
Authorization

Important:
• When Sentry is enabled, you must use Beeline to execute Hive queries. Hive CLI is not supportedwith Sentry and must be disabled as described here.
• When Sentry is enabled, a user with no privileges on a database will not be allowed to connectto HiveServer2. This is because the use <database> command is now executed as part of theconnection to HiveServer2, which is why the connection fails. See HIVE-4256.
For more information, see Appendix: Authorization Privilege Model for Hive and Impala on page 295.
User to Group Mapping
Minimum Required Role: Configurator (also provided by Cluster Administrator, Full Administrator)
Group mappings in Sentry can be summarized as in the figure below.
Cloudera Security | 293
Authorization
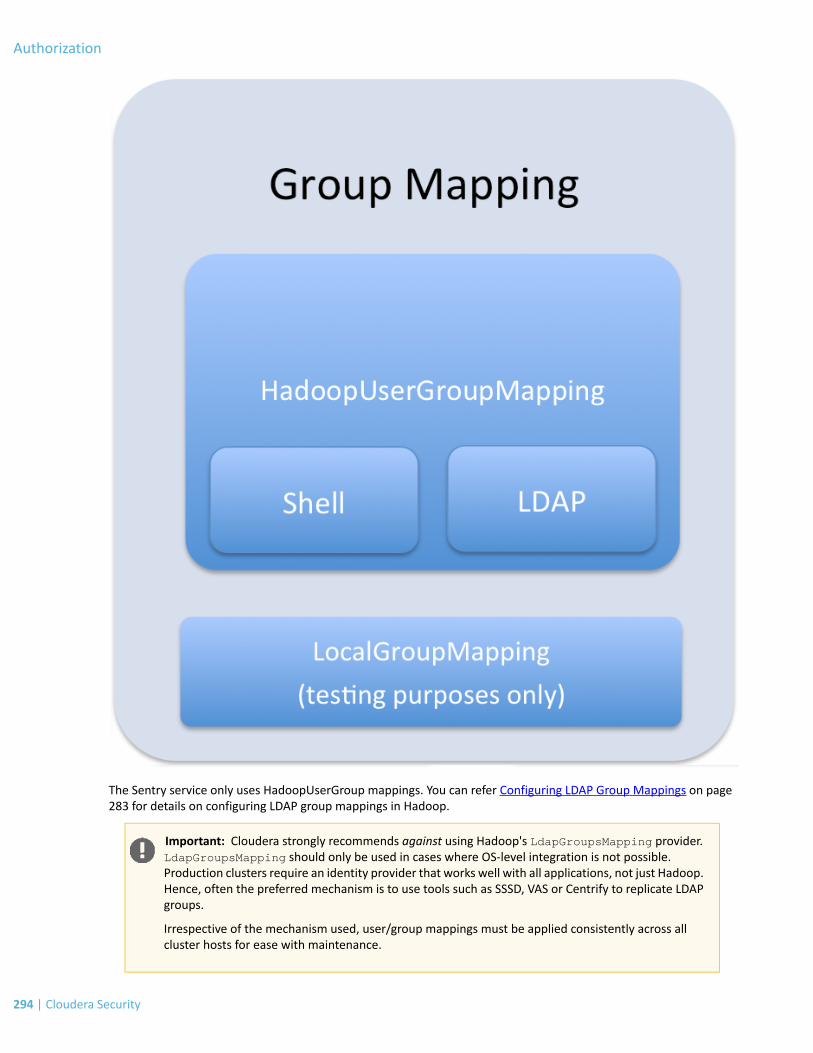
The Sentry service only uses HadoopUserGroup mappings. You can refer Configuring LDAP Group Mappings on page283 for details on configuring LDAP group mappings in Hadoop.
Important: Cloudera strongly recommends against using Hadoop's LdapGroupsMapping provider.LdapGroupsMapping should only be used in cases where OS-level integration is not possible.Production clusters require an identity provider that works well with all applications, not just Hadoop.Hence, often the preferred mechanism is to use tools such as SSSD, VAS or Centrify to replicate LDAPgroups.
Irrespective of the mechanism used, user/group mappings must be applied consistently across allcluster hosts for ease with maintenance.
294 | Cloudera Security
Authorization

Appendix: Authorization Privilege Model for Hive and Impala
Privileges can be granted on different objects in the Hive warehouse. Any privilege that can be granted is associatedwith a level in the object hierarchy. If a privilege is granted on a container object in the hierarchy, the base objectautomatically inherits it. For instance, if a user has ALL privileges on the database scope, then (s)he has ALL privilegeson all of the base objects contained within that scope.
Object Hierarchy in Hive
Server URI Database Table Partition Columns View Index Function/Routine Lock
Table 28: Valid privilege types and objects they apply to
ObjectPrivilege
DB, TABLEINSERT
DB, TABLESELECT
SERVER, TABLE, DB, URIALL
Table 29: Privilege hierarchy
Privileges on containerobject that impliesprivileges on the baseobject
Container object thatcontains the base object
Granular privileges onobject
Base Object
ALLSERVERALLDATABASE
ALLDATABASEINSERTTABLE
ALLDATABASESELECTTABLE
ALLDATABASESELECTVIEW
Table 30: Privilege table for Hive & Impala operations
OthersURIPrivilegesScopeOperation
ALLSERVERCREATE DATABASE
ALLDATABASEDROP DATABASE
ALLDATABASECREATE TABLE
ALLTABLEDROP TABLE
SELECT on TABLEALLDATABASE; SELECT onTABLE
CREATE VIEW
ALLVIEW/TABLEDROP VIEW
ALLTABLEALTER TABLE .. ADDCOLUMNS
Cloudera Security | 295
Authorization

OthersURIPrivilegesScopeOperation
ALLTABLEALTER TABLE .. REPLACECOLUMNS
ALLTABLEALTER TABLE .. CHANGEcolumn
ALLTABLEALTER TABLE .. RENAME
ALLTABLEALTER TABLE .. SETTBLPROPERTIES
ALLTABLEALTER TABLE .. SETFILEFORMAT
URIALLTABLEALTER TABLE .. SETLOCATION
ALLTABLEALTER TABLE .. ADDPARTITION
URIALLTABLEALTER TABLE .. ADDPARTITION location
ALLTABLEALTER TABLE .. DROPPARTITION
ALLTABLEALTER TABLE .. PARTITIONSET FILEFORMAT
SELECT/INSERTTABLESHOW CREATE TABLE
SELECT/INSERTTABLESHOW PARTITIONs
SELECT/INSERTTABLEDESCRIBE TABLE
URIINSERTTABLELOAD DATA
SELECTTABLESELECT
INSERTTABLEINSERT OVERWRITE TABLE
SELECT on TABLEALLDATABASE; SELECT onTABLE
CREATE TABLE .. AS SELECT
AnyUSE <dbName>
ALLSERVERCREATE FUNCTION
ALLTABLEALTER TABLE .. SETSERDEPROPERTIES
ALLTABLEALTER TABLE .. PARTITIONSET SERDEPROPERTIES
Hive-Only Operations
URIINSERTTABLEINSERT OVERWRITEDIRECTORY
SELECT + INSERTTABLEAnalyze TABLE
URIALLDATABASEIMPORT TABLE
URISELECTTABLEEXPORT TABLE
ALLTABLEALTER TABLE TOUCH
296 | Cloudera Security
Authorization

OthersURIPrivilegesScopeOperation
ALLTABLEALTER TABLE TOUCHPARTITION
ALLTABLEALTER TABLE .. CLUSTEREDBY SORTED BY
ALLTABLEALTER TABLE ..ENABLE/DISABLE
ALLTABLEALTER TABLE .. PARTITIONENABLE/DISABLE
ALLTABLEALTER TABLE .. PARTITION..RENAME TO PARTITION
ALLTABLEMSCK REPAIR TABLE
ALLDATABASEALTER DATABASE
SELECT/INSERTDATABASEDESCRIBE DATABASE
SELECT/INSERTTABLESHOW COLUMNS
ALLTABLECREATE INDEX
ALLTABLEDROP INDEX
SELECT/INSERTTABLESHOW INDEXES
Allowed only for Sentryadmin users
GRANT PRIVILEGE
Allowed only for Sentryadmin users
REVOKE PRIVILEGE
Allowed only for Sentryadmin users
SHOW GRANT
SELECT/INSERTTABLESHOW TBLPROPERTIES
SELECT/INSERTTABLEDESCRIBE TABLE ..PARTITION
Not AllowedADD JAR
Not AllowedADD FILE
Not AllowedDFS
Impala-Only Operations
SELECTTABLEEXPLAIN
ALLSERVERINVALIDATE METADATA
SELECT/INSERTTABLEINVALIDATE METADATA<table name>
SELECT/INSERTTABLEREFRESH <table name>
ALLSERVERDROP FUNCTION
ALLTABLECOMPUTE STATS
Cloudera Security | 297
Authorization

Installing and Upgrading the Sentry Service
This topic describes how to install and upgrade the Sentry service. If you are migrating from Sentry policy files to thedatabase-backed Sentry service, see Migrating from Sentry Policy Files to the Sentry Service on page 300.
Adding the Sentry Service
Use one of the following sections to add/install the Sentry service:
Adding the Sentry Service Using Cloudera Manager
Minimum Required Role: Cluster Administrator (also provided by Full Administrator)
1. On the Home page, click
to the right of the cluster name and select Add a Service. A list of service types display. You can add one type ofservice at a time.
2. Select the Sentry service and click Continue.3. Customize role assignments for Sentry. The wizard evaluates the hardware configurations of the available hosts
and selects the best hosts for each role. If you are happy with the preselected hosts, click Continue and move tothe next step. Otherwise, you can change the hosts that are assigned to the roles. The View By Host button allowsyou to view a list of hosts.
To change the host for a role, click the hostname under the role. A window appears with a list of hosts to choosefrom. Note that you can only select one host for the Sentry Server. You can search for a host in the Search fieldor you can filter the list by entering a range of hosts in the Search field. You can search for hosts in the followingways:
• Range of hostnames (without the domain portion)
Matching HostsRange Definition
10.1.1.1, 10.1.1.2, 10.1.1.3, 10.1.1.410.1.1.[1-4]
host1.company.com, host2.company.com, host3.company.comhost[1-3].company.com
host07.company.com, host08.company.com, host09.company.com,host10.company.com
host[07-10].company.com
• IP addresses• Rack name
Click Search to filter the list and click a hostname to select the host. Click OK to close the window. The hostnamethat you selected appears under the role.
Click Continue to move to the next page in the wizard.
4. Configure database settings. You can use either an embedded or a custom database.
a. Choose the database type:
• Leave the default setting of Use Embedded Database to have Cloudera Manager create and configurerequired databases. Make a note of the auto-generated passwords.
• Select Use Custom Databases to specify external databases.
1. Enter the database host, database type, database name, username, and password for the databasethat you created when you set up the database. See the Creating Databases documentation forSentry Server database requirements.
b. Click Test Connection to confirm that Cloudera Manager can communicate with the database using theinformation you have supplied. If the test succeeds in all cases, click Continue; otherwise check and correctthe information you have provided for the database and then try the test again. (For some servers, if you are
298 | Cloudera Security
Authorization

using the embedded database, you will see a message saying the database will be created at a later step inthe installation process.) The Review Changes page displays.
5. Click Continue then click Finish. You are returned to the Home page.6. Verify the new service is started properly by checking the health status for the new service. If the Health Status
is Good, then the service started properly.7. To use the Sentry service, begin by enabling Hive and Impala for the service.
Installing Sentry Using the Command Line
Use the following the instructions, depending on your operating system, to install the latest version of Sentry.
Important: Configuration files
• If you install a newer version of a package that is already on the system, configuration files thatyou have modified will remain intact.
• If you uninstall a package, the packagemanager renames any configuration files you havemodifiedfrom <file> to <file>.rpmsave. If you then re-install the package (probably to install a newversion) the packagemanager creates a new <file>with applicable defaults. You are responsiblefor applying any changes captured in the original configuration file to the new configuration file.In the case of Ubuntu and Debian upgrades, you will be prompted if you have made changes toa file for which there is a new version; for details, see Automatic handling of configuration filesby dpkg.
CommandOS
$ sudo yum install sentryRHEL
$ sudo zypper install sentrySLES
$ sudo apt-get update; $ sudo apt-get install sentry
Ubuntu or Debian
Starting the Sentry Service
Perform the following steps to start the Sentry service on your cluster.
1. Set the SENTRY_HOME and HADOOP_HOME parameters.2. Create the Sentry database schema using the Sentry schematool. Sentry, by default, does not initialize the schema.
The schematool is a built-inway for you to deploy the backend schema required by the Sentry service. For example,the following command uses the schematool to initialize the schema for a MySQL database.
bin/sentry --command schema-tool --conffile <sentry-site.xml> --dbType mysql --initSchema
Alternatively, you can set the sentry.verify.schema.version configuration property to false. However,this is not recommended.
3. Start the Sentry service.
bin/sentry --command service --conffile <sentry-site.xml>
Upgrading the Sentry Service
Use one of the following sections to upgrade the Sentry service:
Upgrading the Sentry Service Using Cloudera Manager
If you have a cluster managed by Cloudera Manager, go to Upgrading CDH and Managed Services Using ClouderaManager and follow the instructions depending on the version of CDH you are upgrading to. If you are upgrading fromCDH 5.1, you will notice an extra step in the procedure to upgrade the Sentry database schema.
Cloudera Security | 299
Authorization
For command-line instructions, continue reading.
Upgrading the Sentry Service Using the Command Line
1. Stop the Sentry service by identifying the PID of the Sentry Service and use the kill command to end the process:
ps -ef | grep sentrykill -9 <PID>
Replace <PID> with the PID of the Sentry Service.2. Remove the previous version of Sentry.
CommandOS
$ sudo yum remove sentryRHEL
$ sudo zypper remove sentrySLES
$ sudo apt-get remove sentryUbuntu or Debian
3. Install the new version of Sentry.
CommandOS
$ sudo yum install sentryRHEL
$ sudo zypper install sentrySLES
$ sudo apt-get update; $ sudo apt-get install sentry
Ubuntu or Debian
4. (From CDH 5.1 to CDH 5.x) Upgrade Sentry Database Schema
Use the Sentry schematool to upgrade the database schema as follows:
bin/sentry --command schema-tool --conffile <sentry-site.xml> --dbType <db-type> --upgradeSchema
Where <db-type> should be either mysql, postgres or oracle.
5. Start the Sentry Service
a. Set the SENTRY_HOME and HADOOP_HOME parameters.b. Run the following command:
bin/sentry --command service --conffile <sentry-site.xml>
Migrating from Sentry Policy Files to the Sentry Service
Minimum Required Role: Cluster Administrator (also provided by Full Administrator)
The following steps describe how you can upgrade from Sentry's policy file-based approach to the newdatabase-backedSentry service.
1. If you haven't already done so, upgrade your cluster to the latest version of CDH and Cloudera Manager. Referthe Cloudera Manager Administration Guide for instructions.
2. Disable the existing Sentry policy file for any Hive or Impala services on the cluster. To do this:
a. Go to the Hive or Impala service.b. Click the Configuration tab.c. Select Scope > Service Name (Service-Wide).d. Select Category > Policy File Based Sentry.
300 | Cloudera Security
Authorization
e. Deselect Enable Sentry Authorization using Policy Files. Cloudera Manager will throw a validation error ifyou attempt to configure the Sentry service while this property is checked.
f. Repeat for any remaining Hive or Impala services.
3. Add the new Sentry service to your cluster. For instructions, see Adding the Sentry Service on page 298.4. To begin using the Sentry service, see Enabling the Sentry Service Using Cloudera Manager on page 301 and
Configuring Impala as a Client for the Sentry Service on page 304.5. Use the command-line interface Beeline to issue grants to the Sentry service to match the contents of your old
policy file(s). For more details on the Sentry service and examples on using Grant/Revoke statements to matchyour policy file, see Hive SQL Syntax for Use with Sentry on page 307.
Configuring the Sentry Service
This topic describes how to enable the Sentry service for Hive and Impala, and configuring the Hive metastore tocommunicate with the service.
Enabling the Sentry Service Using Cloudera Manager
Minimum Required Role: Configurator (also provided by Cluster Administrator, Full Administrator)
Before Enabling the Sentry Service
• Ensure you satisfy all the Prerequisites on page 292 for the Sentry service.• The Hive warehouse directory (/user/hive/warehouse or any path you specify ashive.metastore.warehouse.dir in your hive-site.xml) must be owned by the Hive user and group.
– Permissions on the warehouse directory must be set as follows (see following Note for caveats):
– 771 on the directory itself (for example, /user/hive/warehouse)– 771 on all subdirectories (for example, /user/hive/warehouse/mysubdir)– All files and subdirectories should be owned by hive:hive
For example:
$ sudo -u hdfs hdfs dfs -chmod -R 771 /user/hive/warehouse$ sudo -u hdfs hdfs dfs -chown -R hive:hive /user/hive/warehouse
Note:
• If you set hive.warehouse.subdir.inherit.perms to true in hive-site.xml,the permissions on the subdirectories will be set when you set permissions on thewarehouse directory itself.
• If a user has access to any object in the warehouse, that user will be able to executeuse default. This ensures thatuse default commands issued by legacy applicationswork when Sentry is enabled.
Important: These instructions override the recommendations in the Hive section of the CDH5 Installation Guide.
• Disable impersonation for HiveServer2 in the Cloudera Manager Admin Console:
1. Go to the Hive service.2. Click the Configuration tab.3. Select Scope > HiveServer2.4. Select Category >Main.5. Uncheck the HiveServer2 Enable Impersonation checkbox.6. Click Save Changes to commit the changes.
Cloudera Security | 301
Authorization
• If you are using MapReduce, enable the Hive user to submit MapReduce jobs.
1. Open the Cloudera Manager Admin Console and go to the MapReduce service.2. Click the Configuration tab.3. Select Scope > TaskTracker.4. Select Category > Security.5. Set theMinimum User ID for Job Submission property to zero (the default is 1000).6. Click Save Changes to commit the changes.7. Repeat steps 1-6 for every TaskTracker role group for the MapReduce service that is associated with Hive, if
more than one exists.8. Restart the MapReduce service.
• If you are using YARN, enable the Hive user to submit YARN jobs.
1. Open the Cloudera Manager Admin Console and go to the YARN service.2. Click the Configuration tab.3. Select Scope > NodeManager.4. Select Category > Security.5. Ensure the Allowed System Users property includes the hive user. If not, add hive.6. Click Save Changes to commit the changes.7. Repeat steps 1-6 for every NodeManager role group for the YARN service that is associated with Hive, if more
than one exists.8. Restart the YARN service.
Important: Ensure you have unchecked the Enable Sentry Authorization using Policy Filesconfiguration property for both Hive and Impala under the Policy File Based Sentry category beforeyou proceed.
Enabling the Sentry Service for Hive
1. Go to the Hive service.2. Click the Configuration tab.3. Select Scope > Hive (Service-Wide).4. Select Category >Main.5. Locate the Sentry Service property and select Sentry.6. Click Save Changes to commit the changes.7. Restart the Hive service.
Enabling Sentry on Hive service places several HiveServer2 properties on a restricted list properties that cannot bemodified at runtime by clients. See HiveServer2 Restricted Properties on page 305.
Enabling the Sentry Service for Impala
1. Enable the Sentry service for Hive (as instructed above).2. Go to the Impala service.3. Click the Configuration tab.4. Select Scope > Impala (Service-Wide).5. Select Category >Main.6. Locate the Sentry Service property and select Sentry.7. Click Save Changes to commit the changes.8. Restart Impala.
Enabling the Sentry Service for HueTo interact with Sentry using Hue, enable the Sentry service as follows:
302 | Cloudera Security
Authorization
1. Enable the Sentry service for Hive and Impala (as instructed above).2. Go to the Hue service.3. Click the Configuration tab.4. Select Scope > Hue (Service-Wide).5. Select Category >Main.6. Locate the Sentry Service property and select Sentry.7. Click Save Changes to commit the changes.8. Restart Hue.
Enabling the Sentry Service Using the Command Line
Important:
• If you use Cloudera Manager, do not use these command-line instructions.• This information applies specifically to CDH 5.4.x. If you use an earlier version of CDH, see the
documentation for that version located at Cloudera Documentation.
Before Enabling the Sentry Service
• The Hive warehouse directory (/user/hive/warehouse or any path you specify ashive.metastore.warehouse.dir in your hive-site.xml) must be owned by the Hive user and group.
– Permissions on the warehouse directory must be set as follows (see following Note for caveats):
– 771 on the directory itself (for example, /user/hive/warehouse)– 771 on all subdirectories (for example, /user/hive/warehouse/mysubdir)– All files and subdirectories should be owned by hive:hive
For example:
$ sudo -u hdfs hdfs dfs -chmod -R 771 /user/hive/warehouse$ sudo -u hdfs hdfs dfs -chown -R hive:hive /user/hive/warehouse
Note:
• If you set hive.warehouse.subdir.inherit.perms to true in hive-site.xml,the permissions on the subdirectories will be set when you set permissions on thewarehouse directory itself.
• If a user has access to any object in the warehouse, that user will be able to executeuse default. This ensures thatuse default commands issued by legacy applicationswork when Sentry is enabled.
Important: These instructions override the recommendations in the Hive section of the CDH5 Installation Guide.
• HiveServer2 impersonation must be turned off.• If you are using MapReduce, you must enable the Hive user to submit MapReduce jobs. You can ensure that this
is true by setting the minimum user ID for job submission to 0. Edit the taskcontroller.cfg file and setmin.user.id=0.
If you are using YARN, you must enable the Hive user to submit YARN jobs, add the user hive to theallowed.system.users configuration property. Edit the container-executor.cfg file and add hive to theallowed.system.users property. For example,
allowed.system.users = nobody,impala,hive
Cloudera Security | 303
Authorization

Important: You must restart the cluster and HiveServer2 after changing these values.
Configuring HiveServer2 for the Sentry Service
Add the following properties to hive-site.xml to allow the Hive service to communicate with the Sentry service.
<property> <name>hive.security.authorization.task.factory</name> <value>org.apache.sentry.binding.hive.SentryHiveAuthorizationTaskFactoryImpl</value></property><property> <name>hive.server2.session.hook</name> <value>org.apache.sentry.binding.hive.HiveAuthzBindingSessionHook</value></property><property> <name>hive.sentry.conf.url</name> <value>file:///{{PATH/TO/DIR}}/sentry-site.xml</value></property><property> <name>hive.security.authorization.task.factory</name> <value>org.apache.sentry.binding.hive.SentryHiveAuthorizationTaskFactoryImpl</value></property>
Enabling Sentry on Hive service places several HiveServer2 properties on a restricted list properties that cannot bemodified at runtime by clients. See HiveServer2 Restricted Properties on page 305.
Configuring the Hive Metastore for the Sentry Service
Add the following properties to hive-site.xml to allow the Hivemetastore to communicate with the Sentry service.
<property><name>hive.metastore.filter.hook</name><value>org.apache.sentry.binding.metastore.SentryMetaStoreFilterHook</value></property>
<property> <name>hive.metastore.pre.event.listeners</name> <value>org.apache.sentry.binding.metastore.MetastoreAuthzBinding</value> <description>list of comma separated listeners for metastore events.</description></property>
<property> <name>hive.metastore.event.listeners</name> <value>org.apache.sentry.binding.metastore.SentryMetastorePostEventListener</value>
<description>list of comma separated listeners for metastore, post events.</description></property>
Configuring Impala as a Client for the Sentry Service
Set the following configuration properties in sentry-site.xml.
<property> <name>sentry.service.client.server.rpc-port</name> <value>3893</value></property><property> <name>sentry.service.client.server.rpc-address</name> <value>hostname</value></property><property> <name>sentry.service.client.server.rpc-connection-timeout</name> <value>200000</value></property><property> <name>sentry.service.security.mode</name>
304 | Cloudera Security
Authorization

<value>none</value></property>
Youmust also add the following configuration properties to Impala's/etc/default/impala file. Formore information, see Configuring Impala Startup Options through the Command Line.
• On the catalogd and the impalad.
--sentry_config=<absolute path to sentry service configuration file>
• On the impalad.
--server_name=<server name>
If the --authorization_policy_file flag is set, Impala will use the policy file-based approach. Otherwise,the database-backed approach will be used to implement authorization.
HiveServer2 Restricted Properties
Enabling Sentry on Hive service places several HiveServer2 properties on a restricted list properties that cannot bemodified at runtimeby clients. This list is denoted by thehive.conf.restricted.listproperty and these propertiesare only configurable on the server side. The list includes:
hive.enable.spark.execution.enginehive.semantic.analyzer.hookhive.exec.pre.hookshive.exec.scratchdirhive.exec.local.scratchdirhive.metastore.uris,javax.jdo.option.ConnectionURLhadoop.bin.pathhive.session.idhive.aux.jars.pathhive.stats.dbconnectionstringhive.scratch.dir.permissionhive.security.command.whitelisthive.security.authorization.task.factoryhive.entity.capture.transformhive.access.conf.urlhive.sentry.conf.urlhive.access.subject.namehive.sentry.subject.namehive.sentry.active.role.set
Configuring Pig and HCatalog for the Sentry Service
Once you have the Sentry service up and running, and Hive has been configured to use the Sentry service, there aresome configuration changes you must make to your cluster to allow Pig, MapReduce (using HCatLoader, HCatStorer)and WebHCat queries to access Sentry-secured data stored in Hive.
Since the Hive warehouse directory is owned by hive:hive, with its permissions set to 771, with these settings, otheruser requests such as commands coming through Pig jobs, WebHCat queries, and MapReduce jobs, may fail. To givethese users access, perform the following configuration changes:
• Use HDFS ACLs to define permissions on a specific directory or file of HDFS. This directory/file is generally mappedto a database, table, partition, or a data file.
• Users running these jobs should have the required permissions in Sentry to add new metadata or read metadatafrom the Hive Metastore Server. For instructions on how to set up the required permissions, see Hive SQL Syntaxfor Use with Sentry on page 307. You can use HiveServer2's command line interface, Beeline to update the Sentrydatabase with the user privileges.
Examples:
• A user who is using Pig HCatLoader will require read permissions on a specific table or partition. In such a case,you can GRANT read access to the user in Sentry and set the ACL to read and execute, on the file being accessed.
Cloudera Security | 305
Authorization
• A user who is using Pig HCatStorer will require ALL permissions on a specific table. In this case, you GRANT ALLaccess to the user in Sentry and set the ACL to write and execute, on the table being used.
Securing the Hive Metastore
It's important that the Hive metastore be secured. If you want to override the Kerberos prerequisite for the Hivemetastore, set thesentry.hive.testing.mode property totrue to allow Sentry toworkwithweaker authenticationmechanisms. Add the following property to the HiveServer2 and Hive metastore's sentry-site.xml:
<property> <name>sentry.hive.testing.mode</name> <value>true</value></property>
Impala does not require this flag to be set.
Warning: Cloudera strongly recommends against enabling this property in production. Use Sentry'stesting mode only in test environments.
You canturn on Hive metastore security using the instructions in Cloudera Security. To secure the Hive metastore; seeHive Metastore Server Security Configuration on page 92.
Using User-Defined Functions with HiveServer2
The ADD JAR command does notwork with HiveServer2 and the Beeline client when Beeline runs on a different host.As an alternative to ADD JAR, Hive's auxiliary paths functionality should be used. There are some differences in theprocedures for creating permanent functions and temporary functionswhen Sentry is enabled. For detailed instructions,see:
• User-Defined Functions (UDFs) with HiveServer2 Using Cloudera Manager
OR
• User-Defined Functions (UDFs) with HiveServer2 Using the Command Line
.
Sentry Debugging and Failure Scenarios
This topic describes how Sentry deals with conflicting policies, how to debug Sentry authorization request failures andhow different CDH components respond when the Sentry service fails.
Resolving Policy Conflicts
Sentry treats all policies independently. Hence, for any operation, if Sentry can find a policy that allows it, that operationwill be allowed. Consider an example with a table, test_db.test_tbl, whose HDFS directory is located athdfs://user/hive/warehouse/test_db.db/test_tbl, and grant the following conflicting privileges to a userwith the role, test_role. That is, you are granting ALL privilege to the role test_role on the URI, but only theSELECT privilege on the table itself.
GRANT ALL ON URI 'hdfs:///user/hive/warehouse/test_db.db/test_tbl' to role test_role; USE test_db; GRANT SELECT ON TABLE test_tbl to role test_role;
With these privileges, all users with the role test_role will be able to carry out the EXPORT TABLE operation eventhough they should only have SELECT privileges on test_db.test_tbl:
EXPORT TABLE <another-table-user-can-read> TO 'hdfs:///user/hive/warehouse/test_db.db/test_tbl'
Debugging Failed Sentry Authorization Requests
Sentry logs all facts that lead up to authorization decisions at the debug level. If you do not understand why Sentry isdenying access, the best way to debug is to temporarily turn on debug logging:
306 | Cloudera Security
Authorization

• In ClouderaManager, add log4j.logger.org.apache.sentry=DEBUG to the logging settings for your servicethrough the corresponding Logging Safety Valve field for Impala or HiveServer2.
• On systems not managed by Cloudera Manager, add log4j.logger.org.apache.sentry=DEBUG to thelog4j.properties file on each host in the cluster, in the appropriate configuration directory for each service.
Specifically, look for exceptions and messages such as:
FilePermission server..., RequestPermission server...., result [true|false]
which indicate each evaluation Sentrymakes. TheFilePermission is from the policy file, whileRequestPermissionis the privilege required for the query. A RequestPermission will iterate over all appropriate FilePermissionsettings until a match is found. If no matching privilege is found, Sentry returns false indicating “Access Denied” .
Sentry Service Failure Scenarios
If the Sentry service fails and you attempt to access the Hive warehouse, Hive, Impala and HDFS will behave as follows:
• Hive: Queries to the Hive warehouse will fail with an authentication error.• Impala: The Impala Catalog server caches Sentry privileges. If Sentry goes down, Impala queries will continue to
work and will be authorized against this cached copy of the metadata. However, authorization DDLs such asCREATE ROLE or GRANT ROLE will fail.
• HDFS/Sentry Synchronized Permissions:Affected HDFS files will continue to use a cached copy of the synchronizedACLs for a configurable period of time, after which they will fall back to NameNode ACLs. The timeout value canbe modified by adding the sentry.authorization-provider.cache-stale-threshold.ms parameter tothe hdfs-site.xml Safety Valve in Cloudera Manager.
While the default timeout value is very conservative (60 seconds), if you're working with a large cluster, thesetimeouts can be increased to a much longer period, anywhere between a fewminutes to a few hours, as requiredby the cluster in the event that Sentry fails.
• Solr: Solr does not use the Sentry service, hence there will be no impact.
Hive SQL Syntax for Use with Sentry
Sentry permissions can be configured through Grant and Revoke statements issued either interactively orprogrammatically through the HiveServer2 SQL command line interface, Beeline (documentation available here). Thesyntax described below is very similar to theGRANT/REVOKE commands available inwell-established relational databasesystems.
Important:
• When Sentry is enabled, you must use Beeline to execute Hive queries. Hive CLI is not supportedwith Sentry and must be disabled as described here.
• There are somedifferences in syntax betweenHive and the corresponding Impala SQL statements.For the Impala syntax, see SQL Statements.
CREATE ROLE StatementThe CREATE ROLE statement creates a role to which privileges can be granted. Privileges can be granted to roles,which can then be assigned to users. A user that has been assigned a role will only be able to exercise the privilegesof that role.
Only users that have administrative privileges can create/drop roles. By default, the hive, impala and hue users haveadmin privileges in Sentry.
CREATE ROLE [role_name];
Cloudera Security | 307
Authorization

DROP ROLE StatementThe DROP ROLE statement can be used to remove a role from the database. Once dropped, the role will be revokedfor all users to whom it was previously assigned. Queries that are already executing will not be affected. However,since Hive checks user privileges before executing each query, active user sessions in which the role has already beenenabled will be affected.
DROP ROLE [role_name];
GRANT ROLE StatementThe GRANT ROLE statement can be used to grant roles to groups. Only Sentry admin users can grant roles to a group.
GRANT ROLE role_name [, role_name] TO GROUP <groupName> [,GROUP <groupName>]
REVOKE ROLE StatementThe REVOKE ROLE statement can be used to revoke roles from groups. Only Sentry admin users can revoke the rolefrom a group.
REVOKE ROLE role_name [, role_name] FROM GROUP <groupName> [,GROUP <groupName>]
GRANT <PRIVILEGE> StatementIn order to grant privileges on an object to a role, the user must be a Sentry admin user.
GRANT <PRIVILEGE> [, <PRIVILEGE> ] ON <OBJECT> <object_name> TO ROLE <roleName> [,ROLE <roleName>]
REVOKE <PRIVILEGE> StatementSince only authorized admin users can create roles, consequently only Sentry admin users can revoke privileges froma group.
REVOKE <PRIVILEGE> [, <PRIVILEGE> ] ON <OBJECT> <object_name> FROM ROLE <roleName> [,ROLE <roleName>]
GRANT <PRIVILEGE> ... WITH GRANT OPTION
With CDH 5.2, you can delegate granting and revoking privileges to other roles. For example, a role that is granted aprivilege WITH GRANT OPTION can GRANT/REVOKE the same privilege to/from other roles. Hence, if a role has theALL privilege on a database and the WITH GRANT OPTION set, users granted that role can execute GRANT/REVOKEstatements only for that database or child tables of the database.
GRANT <PRIVILEGE> ON <OBJECT> <object_name> TO ROLE <roleName> WITH GRANT OPTION
Only a role with GRANT option on a specific privilege or its parent privilege can revoke that privilege from other roles.Once the following statement is executed, all privileges with and without grant option are revoked.
REVOKE <PRIVILEGE> ON <OBJECT> <object_name> FROM ROLE <roleName>
308 | Cloudera Security
Authorization

Hive does not currently support revoking only the WITH GRANT OPTION from a privilege previously granted to a role.To remove the WITH GRANT OPTION, revoke the privilege and grant it again without the WITH GRANT OPTION flag.
SET ROLE StatementThe SET ROLE statement can be used to specify a role to be enabled for the current session. A user can only enablea role that has been granted to them. Any roles not listed and not already enabled are disabled for the current session.If no roles are enabled, the user will have the privileges granted by any of the roles that (s)he belongs to.
To enable a specific role:
SET ROLE <roleName>;
To enable all roles:
SET ROLE ALL;
No roles enabled:
SET ROLE NONE;
SHOW Statement
To list all the roles in the system (only for sentry admin users):
SHOW ROLES;
To list all the roles in effect for the current user session:
SHOW CURRENT ROLES;
To list all the roles assigned to the given <groupName> (only allowed for Sentry admin users and others users that arepart of the group specified by <groupName>):
SHOW ROLE GRANT GROUP <groupName>;
The SHOW statement can also be used to list the privileges that have been granted to a role or all the grants given to arole for a particular object.
To list all the grants for the given <roleName> (only allowed for Sentry admin users and other users that have beengranted the role specified by <roleName>):
SHOW GRANT ROLE <roleName>;
To list all the grants for a role on the given <objectName> (only allowed for Sentry admin users and other users thathave been granted the role specified by <roleName>):
SHOW GRANT ROLE <roleName> on OBJECT <objectName>;
Example: Using Grant/Revoke Statements to Match an Existing Policy File
Here is a sample policy file:
[groups] # Assigns each Hadoop group to its set of roles manager = analyst_role, junior_analyst_role analyst = analyst_role jranalyst = junior_analyst_role customers_admin = customers_admin_role admin = admin_role
Cloudera Security | 309
Authorization
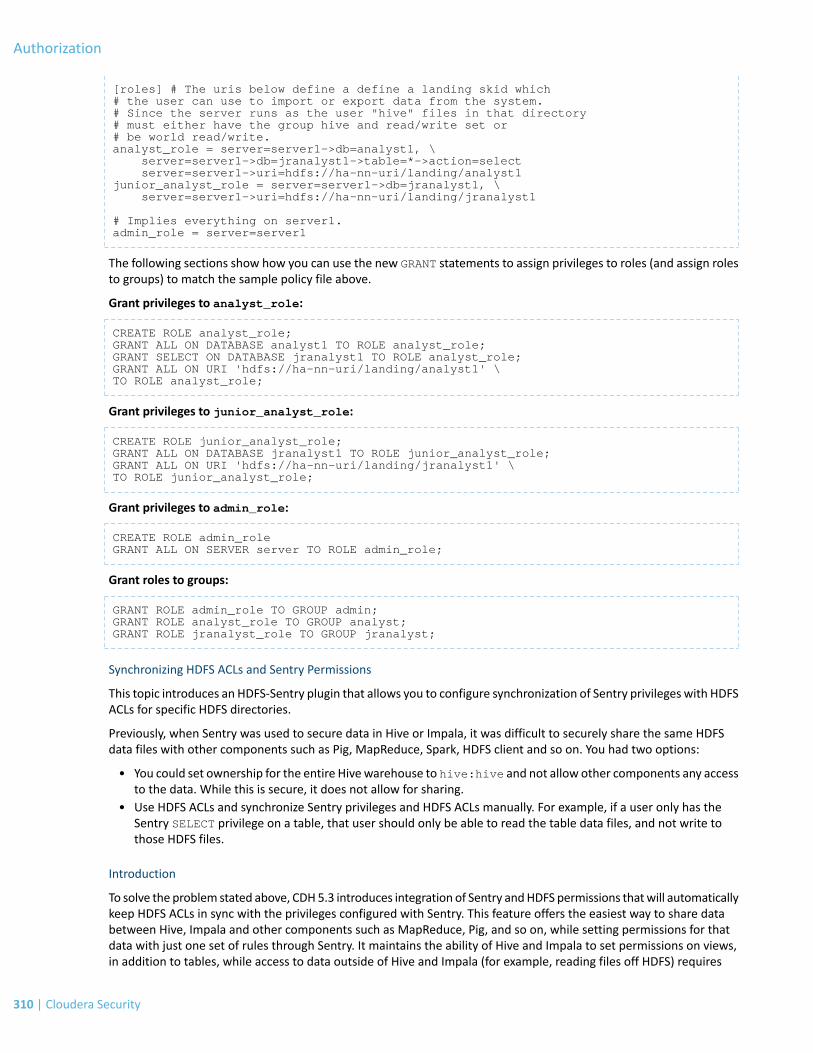
[roles] # The uris below define a define a landing skid which # the user can use to import or export data from the system. # Since the server runs as the user "hive" files in that directory # must either have the group hive and read/write set or # be world read/write. analyst_role = server=server1->db=analyst1, \ server=server1->db=jranalyst1->table=*->action=select server=server1->uri=hdfs://ha-nn-uri/landing/analyst1 junior_analyst_role = server=server1->db=jranalyst1, \ server=server1->uri=hdfs://ha-nn-uri/landing/jranalyst1
# Implies everything on server1. admin_role = server=server1
The following sections show how you can use the new GRANT statements to assign privileges to roles (and assign rolesto groups) to match the sample policy file above.
Grant privileges to analyst_role:
CREATE ROLE analyst_role;GRANT ALL ON DATABASE analyst1 TO ROLE analyst_role;GRANT SELECT ON DATABASE jranalyst1 TO ROLE analyst_role;GRANT ALL ON URI 'hdfs://ha-nn-uri/landing/analyst1' \TO ROLE analyst_role;
Grant privileges to junior_analyst_role:
CREATE ROLE junior_analyst_role;GRANT ALL ON DATABASE jranalyst1 TO ROLE junior_analyst_role;GRANT ALL ON URI 'hdfs://ha-nn-uri/landing/jranalyst1' \TO ROLE junior_analyst_role;
Grant privileges to admin_role:
CREATE ROLE admin_roleGRANT ALL ON SERVER server TO ROLE admin_role;
Grant roles to groups:
GRANT ROLE admin_role TO GROUP admin;GRANT ROLE analyst_role TO GROUP analyst;GRANT ROLE jranalyst_role TO GROUP jranalyst;
Synchronizing HDFS ACLs and Sentry Permissions
This topic introduces an HDFS-Sentry plugin that allows you to configure synchronization of Sentry privileges with HDFSACLs for specific HDFS directories.
Previously, when Sentry was used to secure data in Hive or Impala, it was difficult to securely share the same HDFSdata files with other components such as Pig, MapReduce, Spark, HDFS client and so on. You had two options:
• You could set ownership for the entire Hivewarehouse to hive:hive and not allow other components any accessto the data. While this is secure, it does not allow for sharing.
• Use HDFS ACLs and synchronize Sentry privileges and HDFS ACLs manually. For example, if a user only has theSentry SELECT privilege on a table, that user should only be able to read the table data files, and not write tothose HDFS files.
Introduction
To solve the problem stated above, CDH5.3 introduces integration of Sentry andHDFS permissions thatwill automaticallykeep HDFS ACLs in sync with the privileges configured with Sentry. This feature offers the easiest way to share databetween Hive, Impala and other components such as MapReduce, Pig, and so on, while setting permissions for thatdata with just one set of rules through Sentry. It maintains the ability of Hive and Impala to set permissions on views,in addition to tables, while access to data outside of Hive and Impala (for example, reading files off HDFS) requires
310 | Cloudera Security
Authorization

table permissions. HDFS permissions for some or all of the files that are part of tables defined in the Hive Metastorewill now be controlled by Sentry.
This change consists of three components:
• An HDFS NameNode plugin• A Sentry-Hive Metastore plugin• A Sentry Service plugin
With synchronization enabled, Sentry will translate permissions on tables to the appropriate corresponding HDFS ACLon the underlying table files in HDFS. For example, if a user group is assigned to a Sentry role that has SELECT permissionon a particular table, then that user group will also have read access to the HDFS files that are part of that table. Whenyou list those files in HDFS, this permission will be listed as an HDFS ACL.
Note that when Sentry was enabled, the hive user/group was given ownership of all files/directories in the Hivewarehouse (/user/hive/warehouse). Hence, the resulting synchronized Sentry permissions will reflect this fact.
The mapping of Sentry privileges to HDFS ACLs is as follows:
• SELECT privilege -> Read access on the file.• INSERT privilege -> Write access on the file.• ALL privilege -> Read and Write access on the file.
Important:
• With synchronization enabled, your ability to set HDFS permissions for those files is disabled.Permissions for those particular files can be set only through Sentry, andwhen examined throughHDFS these permissions appear as HDFS ACLs. A configurable set of users, such as hive andimpala, will have full access to the files automatically. This ensures that a key requirement ofusing Sentry with Hive and Impala — giving these processes full access to regulate permissionson underlying data files — is met automatically.
• Tables that are not associated with Sentry, that is, have no user with Sentry privileges to accessthem, will retain their old ACLs.
• With HDFS-Sentry sync enabled, if the NameNode plugin is unable to communicate with theSentry Service for a particular period of time (configurable by thesentry.authorization-provider.cache-stale-threshold.ms property), permissionsfor all directories under Sentry-managed path prefixes, irrespective of whether those file pathscorrespond to Hive warehouse objects, will be set to hive:hive.
• Sentry HDFS synchronization does not support Hive metastore HA.
Prerequisites
• CDH 5.3.0 (or higher)• (Strongly Recommended) Implement Kerberos authentication on your cluster.
The following conditions must be also be true when enabling Sentry-HDFS synchronization. Failure to comply with anyof these will result in validation errors.
• You must use the Sentry service, not policy file-based authorization.• Enabling HDFS Extended Access Control Lists (ACLs) is required.• There must be exactly one Sentry service dependent on HDFS.• The Sentry service must have exactly one Sentry Server role.• The Sentry service must have exactly one dependent Hive service.• The Hive service must have exactly one Hive Metastore role (that is, High Availability should not be enabled).
Enabling the HDFS-Sentry Plugin Using Cloudera Manager
1. Go to the HDFS service.
Cloudera Security | 311
Authorization
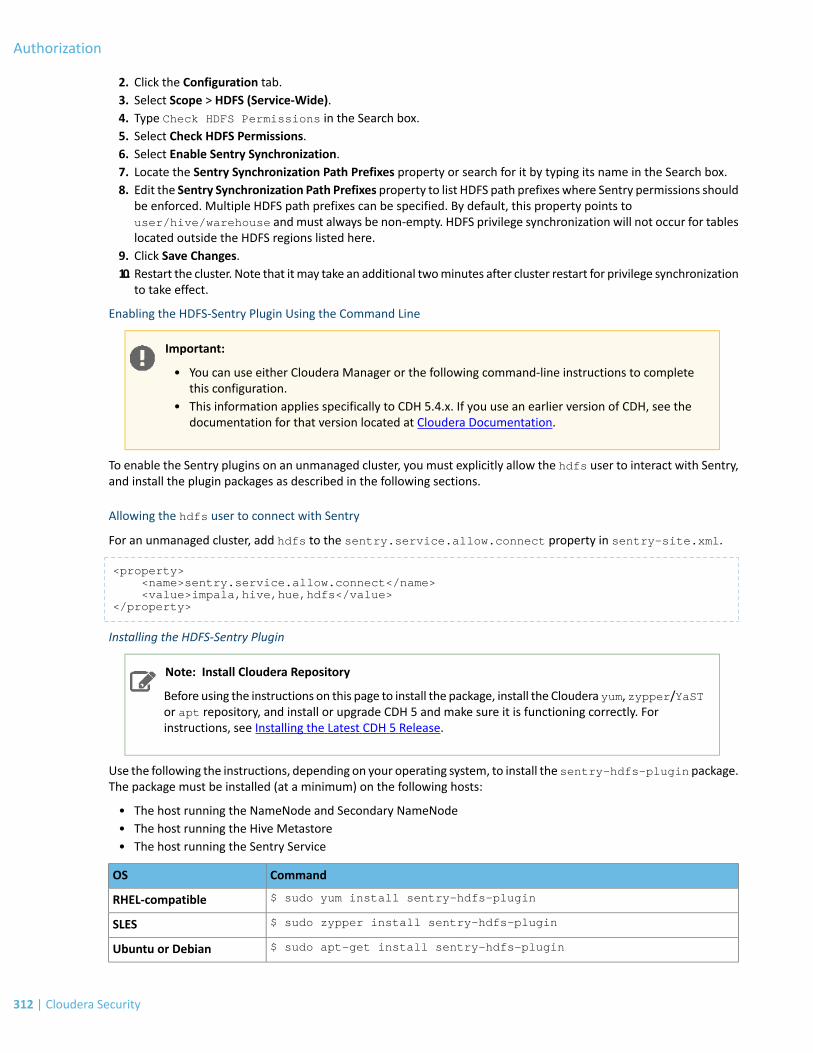
2. Click the Configuration tab.3. Select Scope > HDFS (Service-Wide).4. Type Check HDFS Permissions in the Search box.5. Select Check HDFS Permissions.6. Select Enable Sentry Synchronization.7. Locate the Sentry Synchronization Path Prefixes property or search for it by typing its name in the Search box.8. Edit the Sentry Synchronization Path Prefixes property to list HDFS path prefixes where Sentry permissions should
be enforced. Multiple HDFS path prefixes can be specified. By default, this property points touser/hive/warehouse and must always be non-empty. HDFS privilege synchronization will not occur for tableslocated outside the HDFS regions listed here.
9. Click Save Changes.10. Restart the cluster. Note that itmay take an additional twominutes after cluster restart for privilege synchronization
to take effect.
Enabling the HDFS-Sentry Plugin Using the Command Line
Important:
• You can use either Cloudera Manager or the following command-line instructions to completethis configuration.
• This information applies specifically to CDH 5.4.x. If you use an earlier version of CDH, see thedocumentation for that version located at Cloudera Documentation.
To enable the Sentry plugins on an unmanaged cluster, you must explicitly allow the hdfs user to interact with Sentry,and install the plugin packages as described in the following sections.
Allowing the hdfs user to connect with Sentry
For an unmanaged cluster, add hdfs to the sentry.service.allow.connect property in sentry-site.xml.
<property> <name>sentry.service.allow.connect</name> <value>impala,hive,hue,hdfs</value></property>
Installing the HDFS-Sentry Plugin
Note: Install Cloudera Repository
Before using the instructions on this page to install the package, install the Cloudera yum, zypper/YaSTor apt repository, and install or upgrade CDH 5 and make sure it is functioning correctly. Forinstructions, see Installing the Latest CDH 5 Release.
Use the following the instructions, depending on your operating system, to install the sentry-hdfs-plugin package.The package must be installed (at a minimum) on the following hosts:
• The host running the NameNode and Secondary NameNode• The host running the Hive Metastore• The host running the Sentry Service
CommandOS
$ sudo yum install sentry-hdfs-pluginRHEL-compatible
$ sudo zypper install sentry-hdfs-pluginSLES
$ sudo apt-get install sentry-hdfs-pluginUbuntu or Debian
312 | Cloudera Security
Authorization

Configuring the HDFS NameNode Plugin
Add the following properties to the hdfs-site.xml file on the NameNode host.
<property><name>dfs.namenode.acls.enabled</name><value>true</value></property>
<property><name>dfs.namenode.authorization.provider.class</name><value>org.apache.sentry.hdfs.SentryAuthorizationProvider</value></property>
<property><name>dfs.permissions</name><value>true</value></property>
<!-- Comma-separated list of HDFS path prefixes where Sentry permissions should be enforced. --><!-- Privilege synchronization will occur only for tables located in HDFS regions specified here. --><property><name>sentry.authorization-provider.hdfs-path-prefixes</name><value>/user/hive/warehouse</value> </property>
<property><name>sentry.hdfs.service.security.mode</name><value>kerberos</value> </property>
<property><name>sentry.hdfs.service.server.principal</name><value> SENTRY_SERVER_PRINCIPAL (for eg : sentry/[email protected] )</value></property>
<property><name>sentry.hdfs.service.client.server.rpc-port</name><value>SENTRY_SERVER_PORT</value></property>
<property><name>sentry.hdfs.service.client.server.rpc-address</name><value>SENTRY_SERVER_HOST</value> </property>
Configuring the Hive Metastore Plugin
Add the following properties to hive-site.xml on the Hive Metastore Server host.
<property><name>sentry.metastore.plugins</name><value>org.apache.sentry.hdfs.MetastorePlugin</value></property>
<property><name>sentry.hdfs.service.client.server.rpc-port</name><value> SENTRY_SERVER_PORT </value></property>
<property><name>sentry.hdfs.service.client.server.rpc-address</name><value> SENTRY_SERVER_HOSTNAME </value></property>
<property><name>sentry.hdfs.service.client.server.rpc-connection-timeout</name><value>200000</value></property>
Cloudera Security | 313
Authorization

<property><name>sentry.hdfs.service.security.mode</name><value>kerberos</value></property>
<property><name>sentry.hdfs.service.server.principal</name><value> SENTRY_SERVER_PRINCIPAL (for eg : sentry/[email protected] )</value></property>
Configuring the Sentry Service Plugin
Add the following properties to the sentry-site.xml file on the NameNode host.
<property><name>sentry.service.processor.factories</name><value>org.apache.sentry.provider.db.service.thrift.SentryPolicyStoreProcessorFactory,org.apache.sentry.hdfs.SentryHDFSServiceProcessorFactory</value></property>
<property><name>sentry.policy.store.plugins</name><value>org.apache.sentry.hdfs.SentryPlugin</value></property>
Important: Once all the configuration changes are complete, restart your cluster. Note that it maytake an additional two minutes after cluster restart for privilege synchronization to take effect.
Testing the Sentry Synchronization Plugins
The following tasks should help you make sure that Sentry-HDFS synchronization has been enabled and configuredcorrectly:
For a folder that has been enabled for the plugin, such as the Hive warehouse, try accessing the files in that folderoutside Hive and Impala. For this, you should know what tables those HDFS files belong to and the Sentry permissionson those tables. Attempt to view ormodify the Sentry permissions settings over those tables using one of the followingtools:
• (Recommended) Hue's Security application• HiveServer2 CLI• Impala CLI• Access the table files directly in HDFS. For example:
– List files inside the folder and verify that the file permissions shown in HDFS (including ACLs) match what wasconfigured in Sentry.
– Run a MapReduce, Pig or Spark job that accesses those files. Pick any tool besides HiveServer2 and Impala
Reporting Metrics for the Sentry Service
Metrics for the Sentry service can now be reported using either JMX or console. To obtain the metrics in JSON format,you can use the Sentry Web Server which by default, listens on port 51000. Use the following properties to enable andconfigure metric reports.
Specify the tool being used to report metrics.sentry.service.reporter
Value: jmx or console
Set this property to true to enable reporting of metrics by the Sentry WebServer.
sentry.service.web.enable
Default: false
Configure the port on which the Sentry Web Server listens for metrics.sentry.service.web.port
314 | Cloudera Security
Authorization

Default: 51000
Sentry Policy File Authorization
Important: This is the documentation for configuring Sentry using the policy file approach. Clouderarecommends you use the database-backed Sentry service introduced in CDH 5.1 to secure your data.See The Sentry Service on page 291 for more information.
Sentry enables role-based, fine-grained authorization for HiveServer2, Cloudera Impala and Cloudera Search.
For more information on installing, upgrading and configuring policy file authorization, see:
Prerequisites
Sentry depends on an underlying authentication framework to reliably identify the requesting user. It requires:
• CDH 4.3.0 or later.• HiveServer2 and the Hive Metastore running with strong authentication. For HiveServer2, strong authentication
is either Kerberos or LDAP. For the HiveMetastore, only Kerberos is considered strong authentication (to override,see Securing the Hive Metastore on page 332).
• Impala 1.2.1 (or later) runningwith strong authentication.With Impala, either Kerberos or LDAP can be configuredto achieve strong authentication. Auditing of authentication failures is supported only with CDH 4.4.0 and Impala1.2.1 or later.
• Implement Kerberos authentication on your cluster. This is to prevent a user bypassing the authorization andgaining direct access to the underlying data.
Terminologies
• An object is an entity protected by Sentry's authorization rules. The objects supported in the current release areserver, database, table, and URI.
• A role is a collection of rules for accessing a given Hive object.• A privilege is granted to a role to govern access to an object. Supported privileges are:
Table 31: Valid privilege types and the objects they apply to
ObjectPrivilege
DB, TABLEINSERT
DB, TABLESELECT
SERVER, TABLE, DB, URIALL
• A user is an entity that is permitted by the authentication subsystem to access the Hive service. This entity canbe a Kerberos principal, an LDAP userid, or an artifact of some other pluggable authentication system supportedby HiveServer2.
• A group connects the authentication system with the authorization system. It is a collection of one or more userswho have been granted one or more authorization roles. Sentry allows a set of roles to be configured for a group.
• A configured group provider determines a user’s affiliationwith a group. The current release supports HDFS-backedgroups and locally configured groups.
Privilege Model
Sentry uses a role-based privilege model with the following characteristics.
• Allows any user to execute show function, desc function, and show locks.• Allows the user to see only those tables and databases for which this user has privileges.• Requires a user to have the necessary privileges on the URI to execute HiveQL operations that take in a location.
Examples of such operations include LOAD, IMPORT, and EXPORT.
Cloudera Security | 315
Authorization

• Privileges granted on URIs are recursively applied to all subdirectories. That is, privileges only need to be grantedon the parent directory.
Important:
• When Sentry is enabled, you must use Beeline to execute Hive queries. Hive CLI is not supportedwith Sentry and must be disabled as described here.
• When Sentry is enabled, a user with no privileges on a database will not be allowed to connectto HiveServer2. This is because the use <database> command is now executed as part of theconnection to HiveServer2, which is why the connection fails. See HIVE-4256.
For more information, see Authorization Privilege Model for Hive and Impala on page 322.
Granting Privileges
For example, a rule for the Select privilege on table customers from database sales would be formulated asfollows:
server=server1->db=sales->table=customer->action=Select
Each object must be specified as a hierarchy of the containing objects, from server to table, followed by the privilegegranted for that object. A role can containmultiple such rules, separated by commas. For example, a rolemight containthe Select privilege for the customer and items tables in the sales database, and the Insert privilege for thesales_insights table in the reports database. You would specify this as follows:
sales_reporting =\server=server1->db=sales->table=customer->action=Select, \server=server1->db=sales->table=items>action=Select, \server=server1->db=reports->table=sales_insights>action=Insert
User to Group Mapping
You can configure Sentry to use either Hadoop groups or groups defined in the policy file. By default, Sentry looks upgroups locally, but it can be configured to look up Hadoop groups using LDAP (for Active Directory). Local groups willbe looked up on the host Sentry runs on. For Hive, this will be the host running HiveServer2. Group mappings in Sentrycan be summarized as in the figure below:
316 | Cloudera Security
Authorization

Important: You can use either Hadoop groups or local groups, but not both at the same time. Localgroups are traditionally used for a quick proof-of-concept, while Hadoop groups are more commonlyused in production. Refer Configuring LDAP Group Mappings on page 283 for details on configuringLDAP group mappings in Hadoop.
Policy File
The sections that follow contain notes on creating and maintaining the policy file, and using URIs to load external dataand JARs.
Cloudera Security | 317
Authorization
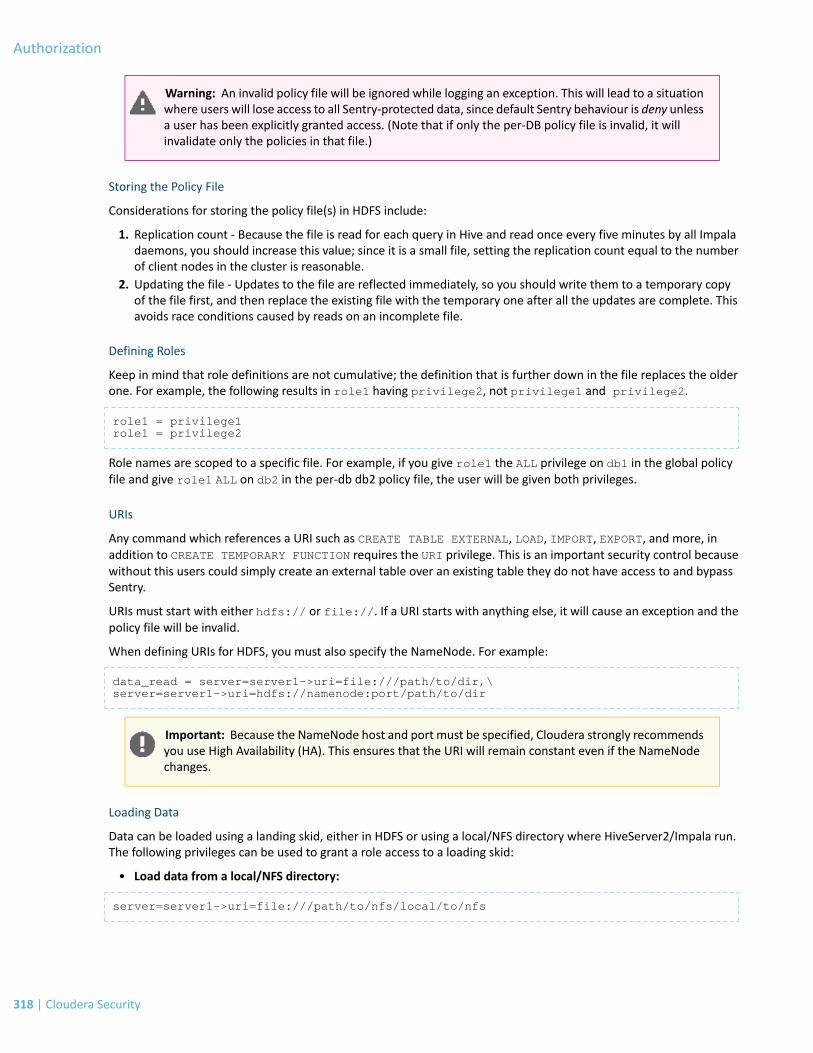
Warning: An invalid policy file will be ignored while logging an exception. This will lead to a situationwhere users will lose access to all Sentry-protected data, since default Sentry behaviour is deny unlessa user has been explicitly granted access. (Note that if only the per-DB policy file is invalid, it willinvalidate only the policies in that file.)
Storing the Policy File
Considerations for storing the policy file(s) in HDFS include:
1. Replication count - Because the file is read for each query in Hive and read once every five minutes by all Impaladaemons, you should increase this value; since it is a small file, setting the replication count equal to the numberof client nodes in the cluster is reasonable.
2. Updating the file - Updates to the file are reflected immediately, so you should write them to a temporary copyof the file first, and then replace the existing file with the temporary one after all the updates are complete. Thisavoids race conditions caused by reads on an incomplete file.
Defining Roles
Keep in mind that role definitions are not cumulative; the definition that is further down in the file replaces the olderone. For example, the following results in role1 having privilege2, not privilege1 and privilege2.
role1 = privilege1role1 = privilege2
Role names are scoped to a specific file. For example, if you give role1 the ALL privilege on db1 in the global policyfile and give role1 ALL on db2 in the per-db db2 policy file, the user will be given both privileges.
URIs
Any command which references a URI such as CREATE TABLE EXTERNAL, LOAD, IMPORT, EXPORT, and more, inaddition to CREATE TEMPORARY FUNCTION requires the URI privilege. This is an important security control becausewithout this users could simply create an external table over an existing table they do not have access to and bypassSentry.
URIs must start with either hdfs:// or file://. If a URI starts with anything else, it will cause an exception and thepolicy file will be invalid.
When defining URIs for HDFS, you must also specify the NameNode. For example:
data_read = server=server1->uri=file:///path/to/dir,\server=server1->uri=hdfs://namenode:port/path/to/dir
Important: Because the NameNode host and port must be specified, Cloudera strongly recommendsyou use High Availability (HA). This ensures that the URI will remain constant even if the NameNodechanges.
Loading Data
Data can be loaded using a landing skid, either in HDFS or using a local/NFS directory where HiveServer2/Impala run.The following privileges can be used to grant a role access to a loading skid:
• Load data from a local/NFS directory:
server=server1->uri=file:///path/to/nfs/local/to/nfs
318 | Cloudera Security
Authorization

• Load data from HDFS (MapReduce, Pig, and so on):
server=server1->uri=hdfs://ha-nn-uri/data/landing-skid
In addition to the privilege in Sentry, the hive or impala user will require the appropriate file permissions to accessthe data being loaded. Groups can be used for this purpose. For example, create a group hive-users, and add thehive and impala users along with the users who will be loading data, to this group.
The exampleusermod andgroupadd commands below are only applicable to locally defined groups on theNameNode,JobTracker, and ResourceManager. If you use another system for group management, equivalent changes should bemade in your group management system.
$ groupadd hive-users$ usermod -G someuser,hive-users someuser$ usermod -G hive,hive-users hive
External Tables
External tables require the ALL@database privilege in addition to the URI privilege. When data is being insertedthrough the EXTERNAL TABLE statement, or is referenced from an HDFS location outside the normal Hive databasedirectories, the user needs appropriate permissions on the URIs corresponding to those HDFS locations. This meansthat the URI location must either be owned by the hive:hive user OR the hive/impala users must be members ofthe group that owns the directory.
You can configure access to the directory using a URI as follows:
[roles]someuser_home_dir_role = server=server1->uri=hdfs://ha-nn-uri/user/someuser
You should now be able to create an external table:
CREATE EXTERNAL TABLE ... LOCATION 'hdfs://ha-nn-uri/user/someuser/mytable';
Sample Sentry Configuration Files
This section provides a sample configuration.
Policy Files
The following is an example of a policy file with a per-DB policy file. In this example, the first policy file,sentry-provider.ini would exist in HDFS; hdfs://ha-nn-uri/etc/sentry/sentry-provider.inimightbe an appropriate location. The per-DB policy file is for the customer's database. It is located athdfs://ha-nn-uri/etc/sentry/customers.ini.
sentry-provider.ini
[databases]# Defines the location of the per DB policy file for the customers DB/schema customers = hdfs://ha-nn-uri/etc/sentry/customers.ini
[groups]# Assigns each Hadoop group to its set of roles manager = analyst_role, junior_analyst_roleanalyst = analyst_rolejranalyst = junior_analyst_rolecustomers_admin = customers_admin_roleadmin = admin_role
[roles]# The uris below define a define a landing skid which# the user can use to import or export data from the system.# Since the server runs as the user "hive" files in that directory
Cloudera Security | 319
Authorization
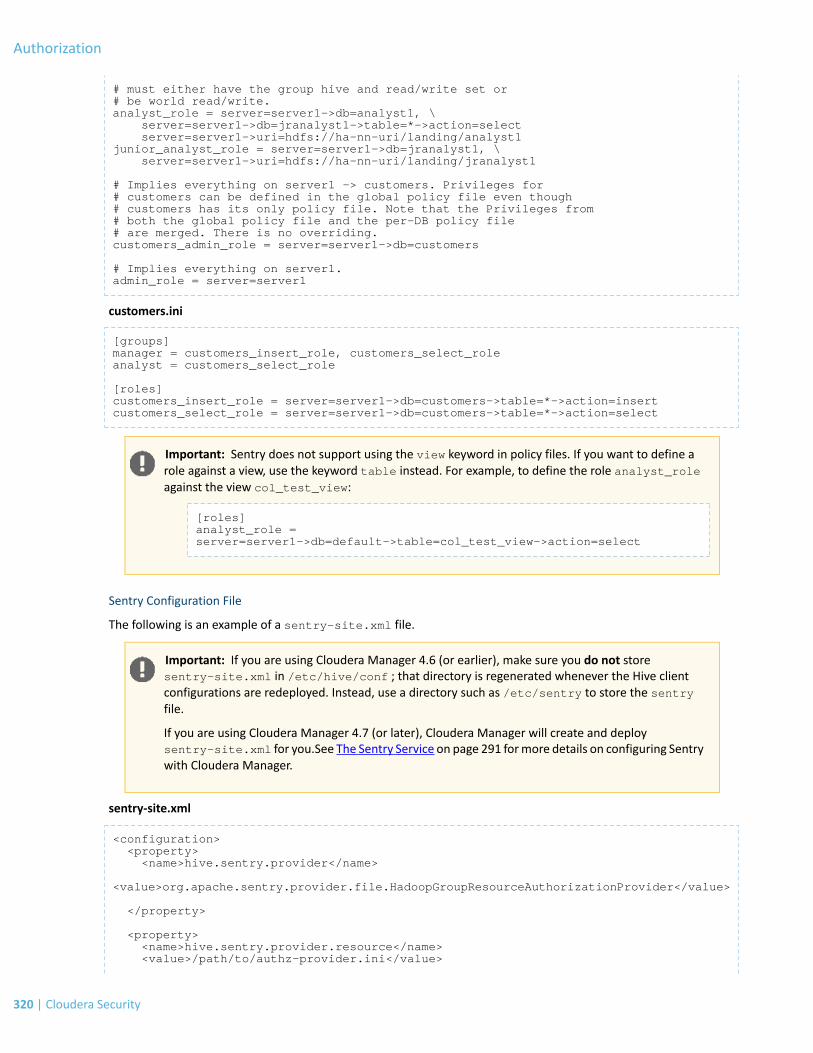
# must either have the group hive and read/write set or# be world read/write.analyst_role = server=server1->db=analyst1, \ server=server1->db=jranalyst1->table=*->action=select server=server1->uri=hdfs://ha-nn-uri/landing/analyst1junior_analyst_role = server=server1->db=jranalyst1, \ server=server1->uri=hdfs://ha-nn-uri/landing/jranalyst1
# Implies everything on server1 -> customers. Privileges for# customers can be defined in the global policy file even though # customers has its only policy file. Note that the Privileges from# both the global policy file and the per-DB policy file# are merged. There is no overriding.customers_admin_role = server=server1->db=customers
# Implies everything on server1.admin_role = server=server1
customers.ini
[groups]manager = customers_insert_role, customers_select_roleanalyst = customers_select_role
[roles]customers_insert_role = server=server1->db=customers->table=*->action=insertcustomers_select_role = server=server1->db=customers->table=*->action=select
Important: Sentry does not support using the view keyword in policy files. If you want to define arole against a view, use the keyword table instead. For example, to define the role analyst_roleagainst the view col_test_view:
[roles]analyst_role = server=server1->db=default->table=col_test_view->action=select
Sentry Configuration File
The following is an example of a sentry-site.xml file.
Important: If you are using Cloudera Manager 4.6 (or earlier), make sure you do not storesentry-site.xml in /etc/hive/conf ; that directory is regenerated whenever the Hive clientconfigurations are redeployed. Instead, use a directory such as /etc/sentry to store the sentryfile.
If you are using Cloudera Manager 4.7 (or later), Cloudera Manager will create and deploysentry-site.xml for you.See The Sentry Service on page 291 formore details on configuring Sentrywith Cloudera Manager.
sentry-site.xml
<configuration> <property> <name>hive.sentry.provider</name>
<value>org.apache.sentry.provider.file.HadoopGroupResourceAuthorizationProvider</value>
</property>
<property> <name>hive.sentry.provider.resource</name> <value>/path/to/authz-provider.ini</value>
320 | Cloudera Security
Authorization
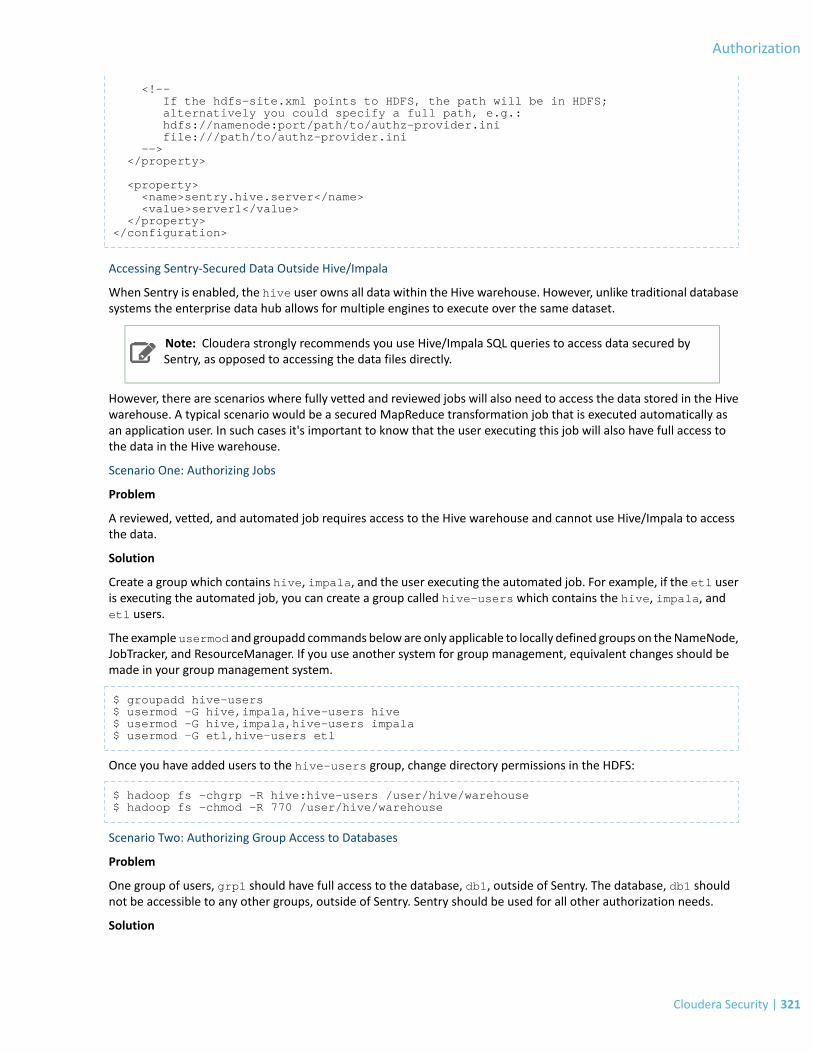
<!-- If the hdfs-site.xml points to HDFS, the path will be in HDFS; alternatively you could specify a full path, e.g.: hdfs://namenode:port/path/to/authz-provider.ini file:///path/to/authz-provider.ini --> </property>
<property> <name>sentry.hive.server</name> <value>server1</value> </property></configuration>
Accessing Sentry-Secured Data Outside Hive/Impala
When Sentry is enabled, the hive user owns all data within the Hive warehouse. However, unlike traditional databasesystems the enterprise data hub allows for multiple engines to execute over the same dataset.
Note: Cloudera strongly recommends you use Hive/Impala SQL queries to access data secured bySentry, as opposed to accessing the data files directly.
However, there are scenarios where fully vetted and reviewed jobs will also need to access the data stored in the Hivewarehouse. A typical scenario would be a secured MapReduce transformation job that is executed automatically asan application user. In such cases it's important to know that the user executing this job will also have full access tothe data in the Hive warehouse.
Scenario One: Authorizing Jobs
Problem
A reviewed, vetted, and automated job requires access to the Hive warehouse and cannot use Hive/Impala to accessthe data.
Solution
Create a group which contains hive, impala, and the user executing the automated job. For example, if the etl useris executing the automated job, you can create a group called hive-users which contains the hive, impala, andetl users.
The exampleusermod and groupadd commands beloware only applicable to locally defined groups on theNameNode,JobTracker, and ResourceManager. If you use another system for group management, equivalent changes should bemade in your group management system.
$ groupadd hive-users$ usermod -G hive,impala,hive-users hive$ usermod -G hive,impala,hive-users impala$ usermod -G etl,hive-users etl
Once you have added users to the hive-users group, change directory permissions in the HDFS:
$ hadoop fs -chgrp -R hive:hive-users /user/hive/warehouse$ hadoop fs -chmod -R 770 /user/hive/warehouse
Scenario Two: Authorizing Group Access to Databases
Problem
One group of users, grp1 should have full access to the database, db1, outside of Sentry. The database, db1 shouldnot be accessible to any other groups, outside of Sentry. Sentry should be used for all other authorization needs.
Solution
Cloudera Security | 321
Authorization

Place the hive and impala users in grp1.
$ usermod -G hive,impala,grp1 hive$ usermod -G hive,impala,grp1 impala
Then change group ownerships of all directories and files in db1 to grp1, and modify directory permissions in theHDFS. This example is only applicable to local groups on a single host.
$ hadoop fs -chgrp -R hive:grp1 /user/hive/warehouse/db1.db $ hadoop fs -chmod -R 770 /user/hive/warehouse/db1.db
Debugging Failed Sentry Authorization Requests
Sentry logs all facts that lead up to authorization decisions at the debug level. If you do not understand why Sentry isdenying access, the best way to debug is to temporarily turn on debug logging:
• In ClouderaManager, add log4j.logger.org.apache.sentry=DEBUG to the logging settings for your servicethrough the corresponding Logging Safety Valve field for the Impala, Hive Server 2, or Solr Server services.
• On systems not managed by Cloudera Manager, add log4j.logger.org.apache.sentry=DEBUG to thelog4j.properties file on each host in the cluster, in the appropriate configuration directory for each service.
Specifically, look for exceptions and messages such as:
FilePermission server..., RequestPermission server...., result [true|false]
which indicate each evaluation Sentrymakes. TheFilePermission is from the policy file, whileRequestPermissionis the privilege required for the query. A RequestPermission will iterate over all appropriate FilePermissionsettings until a match is found. If no matching privilege is found, Sentry returns false indicating “Access Denied” .
Authorization Privilege Model for Hive and Impala
Privileges can be granted on different objects in the Hive warehouse. Any privilege that can be granted is associatedwith a level in the object hierarchy. If a privilege is granted on a container object in the hierarchy, the base objectautomatically inherits it. For instance, if a user has ALL privileges on the database scope, then (s)he has ALL privilegeson all of the base objects contained within that scope.
Object Hierarchy in Hive
Server URI Database Table Partition Columns View Index Function/Routine Lock
Table 32: Valid privilege types and objects they apply to
ObjectPrivilege
DB, TABLEINSERT
DB, TABLESELECT
SERVER, TABLE, DB, URIALL
322 | Cloudera Security
Authorization

Table 33: Privilege hierarchy
Privileges on containerobject that impliesprivileges on the baseobject
Container object thatcontains the base object
Granular privileges onobject
Base Object
ALLSERVERALLDATABASE
ALLDATABASEINSERTTABLE
ALLDATABASESELECTTABLE
ALLDATABASESELECTVIEW
Table 34: Privilege table for Hive & Impala operations
OthersURIPrivilegesScopeOperation
ALLSERVERCREATE DATABASE
ALLDATABASEDROP DATABASE
ALLDATABASECREATE TABLE
ALLTABLEDROP TABLE
SELECT on TABLEALLDATABASE; SELECT onTABLE
CREATE VIEW
ALLVIEW/TABLEDROP VIEW
ALLTABLEALTER TABLE .. ADDCOLUMNS
ALLTABLEALTER TABLE .. REPLACECOLUMNS
ALLTABLEALTER TABLE .. CHANGEcolumn
ALLTABLEALTER TABLE .. RENAME
ALLTABLEALTER TABLE .. SETTBLPROPERTIES
ALLTABLEALTER TABLE .. SETFILEFORMAT
URIALLTABLEALTER TABLE .. SETLOCATION
ALLTABLEALTER TABLE .. ADDPARTITION
URIALLTABLEALTER TABLE .. ADDPARTITION location
ALLTABLEALTER TABLE .. DROPPARTITION
ALLTABLEALTER TABLE .. PARTITIONSET FILEFORMAT
SELECT/INSERTTABLESHOW CREATE TABLE
Cloudera Security | 323
Authorization
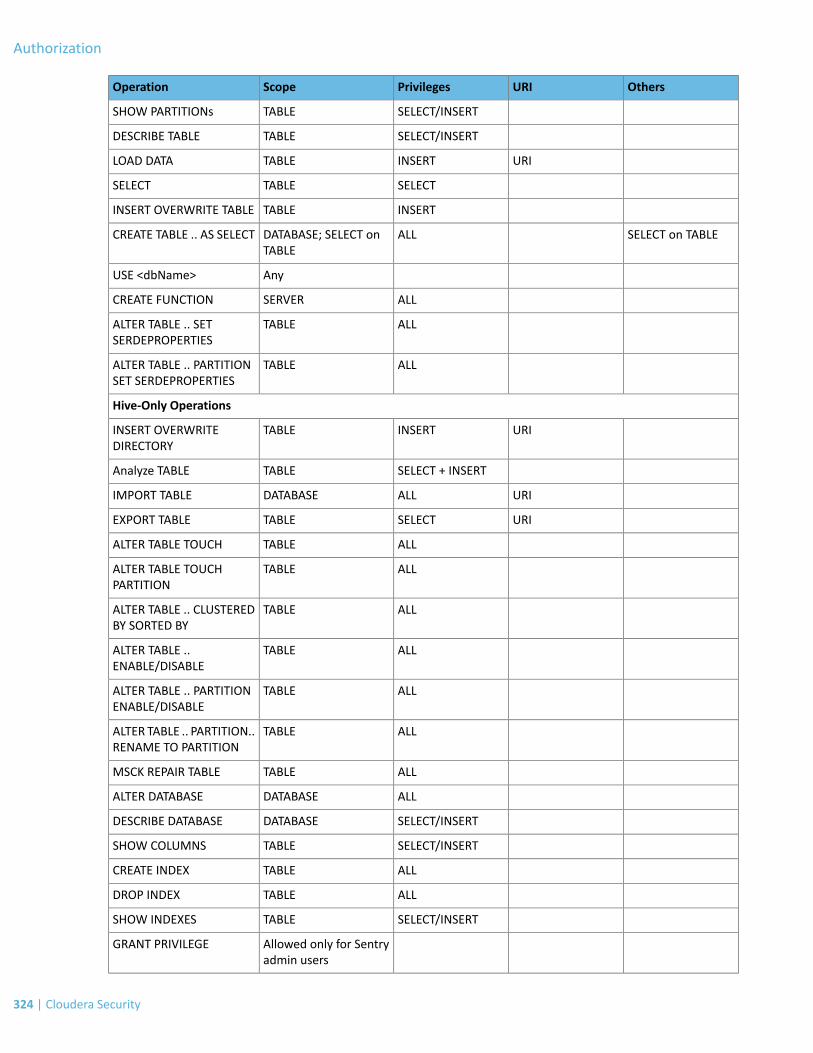
OthersURIPrivilegesScopeOperation
SELECT/INSERTTABLESHOW PARTITIONs
SELECT/INSERTTABLEDESCRIBE TABLE
URIINSERTTABLELOAD DATA
SELECTTABLESELECT
INSERTTABLEINSERT OVERWRITE TABLE
SELECT on TABLEALLDATABASE; SELECT onTABLE
CREATE TABLE .. AS SELECT
AnyUSE <dbName>
ALLSERVERCREATE FUNCTION
ALLTABLEALTER TABLE .. SETSERDEPROPERTIES
ALLTABLEALTER TABLE .. PARTITIONSET SERDEPROPERTIES
Hive-Only Operations
URIINSERTTABLEINSERT OVERWRITEDIRECTORY
SELECT + INSERTTABLEAnalyze TABLE
URIALLDATABASEIMPORT TABLE
URISELECTTABLEEXPORT TABLE
ALLTABLEALTER TABLE TOUCH
ALLTABLEALTER TABLE TOUCHPARTITION
ALLTABLEALTER TABLE .. CLUSTEREDBY SORTED BY
ALLTABLEALTER TABLE ..ENABLE/DISABLE
ALLTABLEALTER TABLE .. PARTITIONENABLE/DISABLE
ALLTABLEALTER TABLE .. PARTITION..RENAME TO PARTITION
ALLTABLEMSCK REPAIR TABLE
ALLDATABASEALTER DATABASE
SELECT/INSERTDATABASEDESCRIBE DATABASE
SELECT/INSERTTABLESHOW COLUMNS
ALLTABLECREATE INDEX
ALLTABLEDROP INDEX
SELECT/INSERTTABLESHOW INDEXES
Allowed only for Sentryadmin users
GRANT PRIVILEGE
324 | Cloudera Security
Authorization

OthersURIPrivilegesScopeOperation
Allowed only for Sentryadmin users
REVOKE PRIVILEGE
Allowed only for Sentryadmin users
SHOW GRANT
SELECT/INSERTTABLESHOW TBLPROPERTIES
SELECT/INSERTTABLEDESCRIBE TABLE ..PARTITION
Not AllowedADD JAR
Not AllowedADD FILE
Not AllowedDFS
Impala-Only Operations
SELECTTABLEEXPLAIN
ALLSERVERINVALIDATE METADATA
SELECT/INSERTTABLEINVALIDATE METADATA<table name>
SELECT/INSERTTABLEREFRESH <table name>
ALLSERVERDROP FUNCTION
ALLTABLECOMPUTE STATS
Installing and Upgrading Sentry for Policy File Authorization
Sentry stores the configuration as well as privilege policies in files. The sentry-site.xml file contains configurationoptions such as group association provider, privilege policy file location, and so on. The policy filecontains the privileges and groups. It has a .ini file format and can be stored on a local file system or HDFS.
Sentry is plugged into Hive as session hooks which you configure in hive-site.xml. The vsentry package must beinstalled; it contains the required JAR files. You must also configure properties in the Sentry Configuration File on page320.
Important:
If you have not already done so, install the Cloudera yum, zypper/YaST or apt repository beforeusing the following commands. For instructions, see Installing the Latest CDH 5 Release.
Installing Sentry
Use the following the instructions, depending on your operating system, to install the latest version of Sentry.
Cloudera Security | 325
Authorization

Important: Configuration files
• If you install a newer version of a package that is already on the system, configuration files thatyou have modified will remain intact.
• If you uninstall a package, the packagemanager renames any configuration files you havemodifiedfrom <file> to <file>.rpmsave. If you then re-install the package (probably to install a newversion) the packagemanager creates a new <file>with applicable defaults. You are responsiblefor applying any changes captured in the original configuration file to the new configuration file.In the case of Ubuntu and Debian upgrades, you will be prompted if you have made changes toa file for which there is a new version; for details, see Automatic handling of configuration filesby dpkg.
CommandOS
$ sudo yum install sentryRHEL
$ sudo zypper install sentrySLES
$ sudo apt-get update; $ sudo apt-get install sentry
Ubuntu or Debian
Upgrading Sentry
If you are upgrading fromCDH 5.x to the latest CDH release, see Installing Sentry on page 325 to install the latest version.
Configuring Sentry Policy File Authorization Using Cloudera Manager
This topic describes how to configure Sentry policy files and enable policy file authorization for CDH services usingCloudera Manager.
Configuring User to Group Mappings
Minimum Required Role: Configurator (also provided by Cluster Administrator, Full Administrator)
Hadoop Groups
1. Go to the Hive service.2. Click the Configuration tab.3. Select Scope > Hive (Service-Wide).4. Select Category > Policy File Based Sentry.5. Locate the Sentry User to Group Mapping Class property or search for it by typing its name in the Search box.6. Set the Sentry User to Group Mapping Class property to
org.apache.sentry.provider.file.HadoopGroupResourceAuthorizationProvider.7. Click Save Changes.8. Restart the Hive service.
Local Groups
Note: You can use either Hadoop groups or local groups, but not both at the same time. Use localgroups if you want to do a quick proof-of-concept. For production, use Hadoop groups.
1. Define local groups in the [users] section of the Policy File on page 317. For example:
[users]user1 = group1, group2, group3user2 = group2, group3
2. Modify Sentry configuration as follows:
326 | Cloudera Security
Authorization

Go to the Hive service.a.b. Click the Configuration tab.c. Select Scope > Hive (Service-Wide).d. Select Category > Policy File Based Sentry.e. Locate the Sentry User to Group Mapping Class property or search for it by typing its name in the Search
box.f. Set the Sentry User to Group Mapping Class property to
org.apache.sentry.provider.file.LocalGroupResourceAuthorizationProvider.g. Click Save Changes.h. Restart the Hive service.
Enabling URIs for Per-DB Policy Files
The ADD JAR command does notwork with HiveServer2 and the Beeline client when Beeline runs on a different host.As an alternative to ADD JAR, Hive's auxiliary paths functionality should be used as described in the following steps.
Important: Enabling URIs in per-DB policy files introduces a security risk by allowing the owner ofthe db-level policy file to grant himself/herself load privileges to anything the hive user has readpermissions for in HDFS (including data in other databases controlled by different db-level policy files).
Add the following string to the Java configuration options for HiveServer2 during startup.
-Dsentry.allow.uri.db.policyfile=true
Using User-Defined Functions with HiveServer2
Minimum Required Role: Configurator (also provided by Cluster Administrator, Full Administrator)
The ADD JAR command does notwork with HiveServer2 and the Beeline client when Beeline runs on a different host.As an alternative to ADD JAR, Hive's auxiliary paths functionality should be used. There are some differences in theprocedures for creating permanent functions and temporary functions. For detailed instructions, see User-DefinedFunctions (UDFs) with HiveServer2 Using Cloudera Manager.
Enabling Policy File Authorization for Hive
Minimum Required Role: Configurator (also provided by Cluster Administrator, Full Administrator)
1. Ensure the Prerequisites on page 315 have been satisfied.2. The Hive warehouse directory (/user/hive/warehouse or any path you specify ashive.metastore.warehouse.dir in your hive-site.xml) must be owned by the Hive user and group.
• Permissions on the warehouse directory must be set as follows (see following Note for caveats):
– 771 on the directory itself (for example, /user/hive/warehouse)– 771 on all subdirectories (for example, /user/hive/warehouse/mysubdir)– All files and subdirectories should be owned by hive:hive
For example:
$ sudo -u hdfs hdfs dfs -chmod -R 771 /user/hive/warehouse$ sudo -u hdfs hdfs dfs -chown -R hive:hive /user/hive/warehouse
Cloudera Security | 327
Authorization
Note:
• If you set hive.warehouse.subdir.inherit.perms to true in hive-site.xml,the permissions on the subdirectories will be set when you set permissions on thewarehouse directory itself.
• If a user has access to any object in the warehouse, that user will be able to executeuse default. This ensures thatuse default commands issued by legacy applicationswork when Sentry is enabled. Note that you can protect objects in the default database(or any other database) by means of a policy file.
Important: These instructions override the recommendations in the Hive section of the CDH5 Installation Guide.
3. Disable impersonation for HiveServer2:
a. Go to the Hive service.b. Click the Configuration tab.c. Select Scope > HiveServer2.d. Select Category > All.e. Locate the HiveServer2 Enable Impersonation property or search for it by typing its name in the Search box.f. Under the HiveServer2 role group, deselect the HiveServer2 Enable Impersonation property.g. Click Save Changes to commit the changes.
4. Create the Sentry policy file, sentry-provider.ini, as an HDFS file.5. Enable the Hive user to submit MapReduce jobs.
a. Go to the MapReduce service.b. Click the Configuration tab.c. Select Scope > TaskTracker.d. Select Category > Security.e. Locate theMinimum User ID for Job Submission property or search for it by typing its name in the Search
box.f. Set theMinimum User ID for Job Submission property to 0 (the default is 1000).g. Click Save Changes to commit the changes.h. Repeat steps 5.a-5.d for every TaskTracker role group for theMapReduce service that is associated with Hive,
if more than one exists.i. Restart the MapReduce service.
6. Enable the Hive user to submit YARN jobs.
a. Go to the YARN service.b. Click the Configuration tab.c. Select Scope > NodeManager.d. Select Category > Security.e. Ensure the Allowed System Users property includes the hive user. If not, add hive.f. Click Save Changes to commit the changes.g. Repeat steps 6.a-6.d for every NodeManager role group for the YARN service that is associated with Hive, if
more than one exists.h. Restart the YARN service.
7. Go to the Hive service.8. Click the Configuration tab.9. Select Scope > Hive (Service-Wide).
328 | Cloudera Security
Authorization

10. Select Category > Policy File Based Sentry.11. Select Enable Sentry Authorization Using Policy Files.12. Click Save Changes to commit the changes.13. Restart the cluster and HiveServer2 after changing these values, whether you use Cloudera Manager or not.
Configuring Group Access to the Hive Metastore
Minimum Required Role: Configurator (also provided by Cluster Administrator, Full Administrator)
You can configure the Hive Metastore to reject connections from users not listed in the Hive group proxy list (in HDFS).If you do not configure this override, the Hive Metastore will use the value in the core-site HDFS configuration. Toconfigure the Hive group proxy list:
1. Go to the Hive service.2. Click the Configuration tab.3. Select Scope > Hive (Service-Wide).4. Select Category > Proxy.5. In the Hive Metastore Access Control and Proxy User Groups Override property, specify a list of groups whose
users are allowed to access the Hive Metastore. If you do not specify "*" (wildcard), you will be warned if thegroups do not include hive and impala (if the Impala service is configured) in the list of groups.
6. Click Save Changes.7. Restart the Hive service.
Enabling Policy File Authorization for Impala
For a cluster managed by ClouderaManager, perform the following steps to enable policy file authorization for Impala.
1. Enable Sentry's policy file based authorization for Hive. For details, see Enabling Policy File Authorization for Hiveon page 327.
2. Go to the Cloudera Manager Admin Console and go to the Impala service.3. Click the Configuration tab.4. Select Scope > Impala (Service-Wide).5. Select Category > Policy File-Based Sentry.6. Select Enable Sentry Authorization Using Policy Files.7. Click Save Changes to commit the changes.8. Restart the Impala service.
For more details, see Starting the impalad Daemon with Sentry Authorization Enabled on page 334.
Enabling Sentry Authorization for Solr
Minimum Required Role: Full Administrator
1. Ensure the following requirements are satisfied:
• Cloudera Search 1.1.1 or later or CDH 5 or later.• A secure Hadoop cluster.
2. Create the policy file sentry-provider.ini as an HDFS file. When you create the policy filesentry-provider.ini follow the instructions in the Policy File section in Configuring Sentry for Search (CDH4) orSearch Authentication on page 115. The file must be owned by owned by the solr user in the solr group,with perms=600. By default ClouderaManager assumes the policy file is in theHDFS location/user/solr/sentry.To configure the location:
a. Go to the Solr service.b. Click the Configuration tab.c. Select Scope > SOLR (Service-Wide).d. Select Category > Policy File Based Sentry.e. Locate the Sentry Global Policy File property.f. Modify the path in the Sentry Global Policy File property.
Cloudera Security | 329
Authorization
g. Select Enable Sentry Authorization.h. Click Save Changes.
3. Restart the Solr service.
For more details, see Enabling Sentry Authorization for Search using the Command Line on page 344.
Configuring Sentry to Enable BDR Replication
Cloudera recommends the following steps when configuring Sentry and data replication is enabled.
• Group membership should be managed outside of Sentry (as typically OS groups, LDAP groups, and so on aremanaged) and replication for them also should be handled outside of Cloudera Manager.
• In Cloudera Manager, set up HDFS replication for the Sentry files of the databases that are being replicated(separately using Hive replication).
• On the source cluster:
– Use a separate Sentry policy file for every database– Avoid placing any group or role info (except for server admin info) in the global Sentry policy file (to avoid
manual replication/merging with the global file on the target cluster)– To avoid manual fix up of URI privileges, ensure that the URIs for the data are the same on both the source
and target cluster
• On the target cluster:
– In the global Sentry policy file, manually add the DB name - DB filemapping entries for the databases beingreplicated
– Manually copy the server admin info from the global Sentry policy file on the source to the policy on thetarget cluster
– For the databases being replicated, avoid adding more privileges (adding tables specific to target cluster maysometimes require adding extra privileges to allow access to those tables). If any target cluster specificprivileges absolutely need to be added for a database, add them to the global Sentry policy file on the targetcluster since the per database files would be overwritten periodically with source versions during scheduledreplication.
Configuring Sentry Policy File Authorization Using the Command Line
This topic describes how to configure Sentry policy files and enable policy file authorization for unmanaged CDH servicesusing the command line.
Configuring User to Group Mappings
Hadoop Groups
Set the hive.sentry.provider property in sentry-site.xml.
<property><name>hive.sentry.provider</name><value>org.apache.sentry.provider.file.HadoopGroupResourceAuthorizationProvider</value></property>
Local Groups
1. Define local groups in the [users] section of the Policy File on page 317. For example:
[users]user1 = group1, group2, group3user2 = group2, group3
2. Modify Sentry configuration as follows:
330 | Cloudera Security
Authorization

In sentry-site.xml, set hive.sentry.provider as follows:
<property><name>hive.sentry.provider</name><value>org.apache.sentry.provider.file.LocalGroupResourceAuthorizationProvider</value></property>
Enabling URIs for Per-DB Policy Files
The ADD JAR command does notwork with HiveServer2 and the Beeline client when Beeline runs on a different host.As an alternative to ADD JAR, Hive's auxiliary paths functionality should be used as described in the following steps.
Important: Enabling URIs in per-DB policy files introduces a security risk by allowing the owner ofthe db-level policy file to grant himself/herself load privileges to anything the hive user has readpermissions for in HDFS (including data in other databases controlled by different db-level policy files).
Add the following string to the Java configuration options for HiveServer2 during startup.
-Dsentry.allow.uri.db.policyfile=true
Using User-Defined Functions with HiveServer2
The ADD JAR command does notwork with HiveServer2 and the Beeline client when Beeline runs on a different host.As an alternative to ADD JAR, Hive's auxiliary paths functionality should be used as described in the following steps.There are some differences in the procedures for creating permanent functions and temporary functions. For detailedinstructions, see User-Defined Functions (UDFs) with HiveServer2 Using the Command Line.
Enabling Policy File Authorization for Hive
PrerequisitesIn addition to the Prerequisites on page 315 above, make sure that the following are true:
• The Hive warehouse directory (/user/hive/warehouse or any path you specify ashive.metastore.warehouse.dir in your hive-site.xml) must be owned by the Hive user and group.
– Permissions on the warehouse directory must be set as follows (see following Note for caveats):
– 771 on the directory itself (for example, /user/hive/warehouse)– 771 on all subdirectories (for example, /user/hive/warehouse/mysubdir)– All files and subdirectories should be owned by hive:hive
For example:
$ sudo -u hdfs hdfs dfs -chmod -R 771 /user/hive/warehouse$ sudo -u hdfs hdfs dfs -chown -R hive:hive /user/hive/warehouse
Note:
• If you set hive.warehouse.subdir.inherit.perms to true in hive-site.xml,the permissions on the subdirectories will be set when you set permissions on thewarehouse directory itself.
• If a user has access to any object in the warehouse, that user will be able to executeuse default. This ensures thatuse default commands issued by legacy applicationswork when Sentry is enabled. Note that you can protect objects in the default database(or any other database) by means of a policy file.
Cloudera Security | 331
Authorization

Important: These instructions override the recommendations in the Hive section of the CDH5 Installation Guide.
• HiveServer2 impersonation must be turned off.• The Hive user must be able to submit MapReduce jobs. You can ensure that this is true by setting the minimum
user ID for job submission to 0. Edit the taskcontroller.cfg file and set min.user.id=0.
To enable the Hive user to submit YARN jobs, add the user hive to the allowed.system.users configurationproperty. Edit the container-executor.cfg file and add hive to the allowed.system.users property. Forexample,
allowed.system.users = nobody,impala,hive
Important:
• You must restart the cluster and HiveServer2 after changing this value, whether you useCloudera Manager or not.
• These instructions override the instructions under Configuring MRv1 Security on page 69• These instructions override the instructions under Configuring YARN Security on page 71
Configuration Changes Required
To enable Sentry, add the following properties to hive-site.xml:
<property><name>hive.server2.session.hook</name><value>org.apache.sentry.binding.hive.HiveAuthzBindingSessionHook</value></property>
<property><name>hive.sentry.conf.url</name><value></value><description>sentry-site.xml file location</description></property>
<property><name>hive.metastore.client.impl</name><value>org.apache.sentry.binding.metastore.SentryHiveMetaStoreClient</value><description>Sets custom Hive Metastore client which Sentry uses to filter out metadata.</description></property>
Securing the Hive Metastore
It's important that the Hive metastore be secured. If you want to override the Kerberos prerequisite for the Hivemetastore, set thesentry.hive.testing.mode property totrue to allow Sentry toworkwithweaker authenticationmechanisms. Add the following property to the HiveServer2 and Hive metastore's sentry-site.xml:
<property> <name>sentry.hive.testing.mode</name> <value>true</value></property>
Impala does not require this flag to be set.
Warning: Cloudera strongly recommends against enabling this property in production. Use Sentry'stesting mode only in test environments.
332 | Cloudera Security
Authorization

You canturn on Hive metastore security using the instructions in Cloudera Security. To secure the Hive metastore; seeHive Metastore Server Security Configuration on page 92.
Enabling Policy File Authorization for Impala
First, enable Sentry's policy file based authorization for Hive. For details, see Enabling Policy File Authorization for Hiveon page 331.
See Enabling Sentry Authorization for Impala on page 333 for details on configuring Impala to work with Sentry policyfiles.
Enabling Sentry in Cloudera Search
See Enabling Sentry in Cloudera Search for CDH 5 on page 347 for details on securing Cloudera Search with Sentry.
Enabling Sentry Authorization for Impala
Authorization determines which users are allowed to access which resources, and what operations they are allowedto perform. In Impala 1.1 and higher, you use the Sentry open source project for authorization. Sentry adds a fine-grainedauthorization framework for Hadoop. By default (when authorization is not enabled), Impala does all read and writeoperations with the privileges of the impala user, which is suitable for a development/test environment but not fora secure production environment. When authorization is enabled, Impala uses the OS user ID of the user who runsimpala-shell or other client program, and associates various privileges with each user.
Note: Sentry is typically used in conjunction with Kerberos authentication, which defines which hostsare allowed to connect to each server. Using the combination of Sentry and Kerberos preventsmalicioususers from being able to connect by creating a named account on an untrustedmachine. See EnablingKerberos Authentication for Impala on page 106 for details about Kerberos authentication.
The Sentry Privilege Model
Privileges can be granted on different objects in the schema. Any privilege that can be granted is associated with alevel in the object hierarchy. If a privilege is granted on a container object in the hierarchy, the child object automaticallyinherits it. This is the same privilege model as Hive and other database systems such as MySQL.
The object hierarchy covers Server, URI, Database, and Table. (The Table privileges apply to views as well; anywhereyou specify a table name, you can specify a view name instead.) Currently, you cannot assign privileges at the partitionor column level. The way you implement column-level or partition-level privileges is to create a view that queries justthe relevant columns or partitions, and assign privileges to the view rather than the underlying table or tables.
A restricted set of privileges determines what you can do with each object:
SELECT privilege
Lets you read data from a table or view, for example with the SELECT statement, the INSERT...SELECT syntax,or CREATE TABLE...LIKE. Also required to issue the DESCRIBE statement or the EXPLAIN statement for a queryagainst a particular table. Only objects for which a user has this privilege are shown in the output for SHOWDATABASES and SHOW TABLES statements. The REFRESH statement and INVALIDATE METADATA statementsonly access metadata for tables for which the user has this privilege.
INSERT privilege
Lets you write data to a table. Applies to the INSERT and LOAD DATA statements.
ALL privilege
Lets you create or modify the object. Required to run DDL statements such as CREATE TABLE, ALTER TABLE, orDROP TABLE for a table, CREATE DATABASE or DROP DATABASE for a database, or CREATE VIEW, ALTER VIEW,or DROP VIEW for a view. Also required for the URI of the “location” parameter for the CREATE EXTERNAL TABLEand LOAD DATA statements.
Privileges can be specified for a table or view before that object actually exists. If you do not have sufficient privilegeto perform an operation, the error message does not disclose if the object exists or not.
Cloudera Security | 333
Authorization

Originally, privileges were encoded in a policy file, stored in HDFS. This mode of operation is still an option, but theemphasis of privilege management is moving towards being SQL-based. Although currently Impala does not haveGRANT or REVOKE statements, Impala can make use of privileges assigned through GRANT and REVOKE statementsdone through Hive. The mode of operation with GRANT and REVOKE statements instead of the policy file requires thata special Sentry service be enabled; this service stores, retrieves, and manipulates privilege information stored insidethe metastore database.
Starting the impalad Daemon with Sentry Authorization Enabled
To run the impalad daemon with authorization enabled, you add one or more options to the IMPALA_SERVER_ARGSdeclaration in the /etc/default/impala configuration file:
• The -server_name option turns on Sentry authorization for Impala. The authorization rules refer to a symbolicserver name, and you specify the name to use as the argument to the -server_name option.
• If you specify just -server_name, Impala uses the Sentry service for authorization, relying on the results of GRANTand REVOKE statements issued through Hive. (This mode of operation is available in Impala 1.4.0 and higher.)Prior to Impala 1.4.0, or if you want to continue storing privilege rules in the policy file, also specify the-authorization_policy_file option as in the following item.
• Specifying the-authorization_policy_fileoption in addition to-server_namemakes Impala read privilegeinformation from a policy file, rather than from the metastore database. The argument to the-authorization_policy_file option specifies the HDFS path to the policy file that defines the privileges ondifferent schema objects.
For example, you might adapt your /etc/default/impala configuration to contain lines like the following. To usethe Sentry service rather than the policy file:
IMPALA_SERVER_ARGS=" \-server_name=server1 \...
Or to use the policy file, as in releases prior to Impala 1.4:
IMPALA_SERVER_ARGS=" \-authorization_policy_file=/user/hive/warehouse/auth-policy.ini \-server_name=server1 \...
The preceding examples set up a symbolic name of server1 to refer to the current instance of Impala. This symbolicname is used in the following ways:
• In an environment managed by Cloudera Manager, the server name is specified through Impala (Service-Wide) >Category > Advanced > Sentry Service and Hive > Service-Wide > Advanced > Sentry Service. The values mustbe the same for both, so that Impala and Hive can share the privilege rules. Restart the Impala and Hive servicesafter setting or changing this value.
• In an environment not managed by Cloudera Manager, you specify this value for the sentry.hive.serverproperty in thesentry-site.xml configuration file for Hive, aswell as in the-server_name option forimpalad.
If the impalad daemon is not already running, start it as described in Starting Impala. If it is already running,restart it with the command sudo /etc/init.d/impala-server restart. Run the appropriate commandson all the nodes where impalad normally runs.
• If you use the mode of operation using the policy file, the rules in the [roles] section of the policy file refer tothis same server1 name. For example, the following rule sets up a role report_generator that lets users withthat role query any table in a database named reporting_db on a nodewhere the impalad daemonwas startedup with the -server_name=server1 option:
[roles]report_generator = server=server1->db=reporting_db->table=*->action=SELECT
334 | Cloudera Security
Authorization

When impalad is started with one or both of the -server_name=server1 and -authorization_policy_fileoptions, Impala authorization is enabled. If Impala detects any errors or inconsistencies in the authorization settingsor the policy file, the daemon refuses to start.
Using Impala with the Sentry Service (CDH 5.1 or higher only)
When you use the Sentry service rather than the policy file, you set up privileges through GRANT and REVOKE statementin either Impala or Hive, then both components use those same privileges automatically. (Impala added the GRANTand REVOKE statements in Impala 2.0.0 / CDH 5.2.0.)
Hive already had GRANT and REVOKE statements prior to CDH 5.1, but those statements were not production-ready.CDH 5.1 is the first release where those statements use the Sentry framework and are considered GA level. If you usedthe Hive GRANT and REVOKE statements prior to CDH 5.1, you must set up these privileges with the CDH 5.1 versionsof GRANT and REVOKE to take advantage of Sentry authorization.
For information about using the updated Hive GRANT and REVOKE statements, see Sentry service topic in the CDH 5Security Guide.
Using Impala with the Sentry Policy File
The policy file is a file that you put in a designated location in HDFS, and is read during the startup of the impaladdaemonwhen you specify both the -server_name and -authorization_policy_file startup options. It controlswhich objects (databases, tables, and HDFS directory paths) can be accessed by the user who connects to impalad,and what operations that user can perform on the objects.
Note:
In CDH5 and higher, Cloudera recommendsmanaging privileges through SQL statements, as describedin Using Impalawith the Sentry Service (CDH 5.1 or higher only) on page 335. If you are still using policyfiles, plan to migrate to the new approach some time in the future.
The location of the policy file is listed in the auth-site.xml configuration file. To minimize overhead, the securityinformation from this file is cached by each impalad daemon and refreshed automatically, with a default interval of5 minutes. After making a substantial change to security policies, restart all Impala daemons to pick up the changesimmediately.
Policy File Location and Format
The policy file uses the familiar .ini format, divided into the major sections [groups] and [roles]. There is alsoan optional[databases] section,which allows you to specify a specific policy file for a particular database, as explainedin Using Multiple Policy Files for Different Databases on page 340. Another optional section, [users], allows you tooverride the OS-level mapping of users to groups; that is an advanced technique primarily for testing and debugging,and is beyond the scope of this document.
In the [groups] section, you define various categories of users and select which roles are associated with eachcategory. The group and user names correspond to Linux groups and users on the server where the impalad daemonruns.
The group and user names in the [groups] section correspond to Linux groups and users on the server where theimpalad daemon runs. When you access Impala through the impalad interpreter, for purposes of authorization, theuser is the logged-in Linux user and the groups are the Linux groups that user is a member of. When you access Impalathrough the ODBC or JDBC interfaces, the user and password specified through the connection string are used as logincredentials for the Linux server, and authorization is based on that user name and the associated Linux groupmembership.
In the [roles] section, you a set of roles. For each role, you specify precisely the set of privileges is available. Thatis, which objects users with that role can access, and what operations they can perform on those objects. This is thelowest-level category of security information; the other sections in the policy file map the privileges to higher-leveldivisions of groups and users. In the [groups] section, you specify which roles are associated with which groups. The
Cloudera Security | 335
Authorization

group and user names correspond to Linux groups and users on the server where the impalad daemon runs. Theprivileges are specified using patterns like:
server=server_name->db=database_name->table=table_name->action=SELECTserver=server_name->db=database_name->table=table_name->action=CREATEserver=server_name->db=database_name->table=table_name->action=ALL
For the server_name value, substitute the same symbolic name you specify with the impalad -server_name option.You can use * wildcard characters at each level of the privilege specification to allow access to all such objects. Forexample:
server=impala-host.example.com->db=default->table=t1->action=SELECTserver=impala-host.example.com->db=*->table=*->action=CREATEserver=impala-host.example.com->db=*->table=audit_log->action=SELECTserver=impala-host.example.com->db=default->table=t1->action=*
When authorization is enabled, Impala uses the policy file as a whitelist, representing every privilege available to anyuser on any object. That is, only operations specified for the appropriate combination of object, role, group, and userare allowed; all other operations are not allowed. If a group or role is defined multiple times in the policy file, the lastdefinition takes precedence.
To understand the notion of whitelisting, set up aminimal policy file that does not provide any privileges for any object.When you connect to an Impala node where this policy file is in effect, you get no results for SHOW DATABASES, andan error when you issue any SHOW TABLES, USE database_name, DESCRIBE table_name, SELECT, and or otherstatements that expect to access databases or tables, even if the corresponding databases and tables exist.
The contents of the policy file are cached, to avoid a performance penalty for each query. The policy file is re-checkedby each impalad node every 5 minutes. When you make a non-time-sensitive change such as adding new privilegesor new users, you can let the change take effect automatically a few minutes later. If you remove or reduce privileges,and want the change to take effect immediately, restart the impalad daemon on all nodes, again specifying the-server_name and -authorization_policy_file options so that the rules from the updated policy file areapplied.
Examples of Policy File Rules for Security Scenarios
The following examples show rules that might go in the policy file to deal with various authorization-related scenarios.For illustration purposes, this section shows several very small policy fileswith only a few rules each. In your environment,typically you would definemany roles to cover all the scenarios involving your own databases, tables, and applications,and a smaller number of groups, whose members are given the privileges from one or more roles.
A User with No Privileges
If a user has no privileges at all, that user cannot access any schema objects in the system. The error messages do notdisclose the names or existence of objects that the user is not authorized to read.
This is the experience you want a user to have if they somehow log into a system where they are not an authorizedImpala user. In a real deployment with a filled-in policy file, a user might have no privileges because they are not amember of any of the relevant groups mentioned in the policy file.
Examples of Privileges for Administrative Users
When an administrative user has broad access to tables or databases, the associated rules in the [roles] sectiontypically use wildcards and/or inheritance. For example, in the following sample policy file, db=* refers to all databasesand db=*->table=* refers to all tables in all databases.
Omitting the rightmost portion of a rule means that the privileges apply to all the objects that could be specified there.For example, in the following sample policy file, the all_databases role has all privileges for all tables in all databases,while the one_database role has all privileges for all tables in one specific database. The all_databases role does
336 | Cloudera Security
Authorization

not grant privileges on URIs, so a group with that role could not issue a CREATE TABLE statement with a LOCATIONclause. The entire_server role has all privileges on both databases and URIs within the server.
[groups]supergroup = all_databases
[roles]read_all_tables = server=server1->db=*->table=*->action=SELECTall_tables = server=server1->db=*->table=*all_databases = server=server1->db=*one_database = server=server1->db=test_dbentire_server = server=server1
A User with Privileges for Specific Databases and Tables
If a user has privileges for specific tables in specific databases, the user can access those things but nothing else. Theycan see the tables and their parent databases in the output ofSHOW TABLES andSHOW DATABASES,USE the appropriatedatabases, and perform the relevant actions (SELECT and/or INSERT) based on the table privileges. To actually createa table requires the ALL privilege at the database level, so you might define separate roles for the user that sets up aschema and other users or applications that perform day-to-day operations on the tables.
The following sample policy file shows some of the syntax that is appropriate as the policy file grows, such as the #comment syntax, \ continuation syntax, and comma separation for roles assigned to groups or privileges assigned toroles.
[groups]cloudera = training_sysadmin, instructorvisitor = student
[roles]training_sysadmin = server=server1->db=training, \server=server1->db=instructor_private, \server=server1->db=lesson_developmentinstructor = server=server1->db=training->table=*->action=*, \server=server1->db=instructor_private->table=*->action=*, \server=server1->db=lesson_development->table=lesson*# This particular course is all about queries, so the students can SELECT but not INSERT or CREATE/DROP.student = server=server1->db=training->table=lesson_*->action=SELECT
Privileges for Working with External Data Files
When data is being inserted through the LOAD DATA statement, or is referenced from an HDFS location outside thenormal Impala database directories, the user also needs appropriate permissions on the URIs corresponding to thoseHDFS locations.
In this sample policy file:
• The external_table role lets us insert into and query the Impala table, external_table.sample.• The staging_dir role lets us specify the HDFS path /user/cloudera/external_data with the LOAD DATA
statement. Remember, when Impala queries or loads data files, it operates on all the files in that directory, notjust a single file, so any Impala LOCATION parameters refer to a directory rather than an individual file.
• We included the IP address and port of the Hadoop name node in the HDFS URI of the staging_dir rule. Wefound those details in /etc/hadoop/conf/core-site.xml, under the fs.default.name element. That iswhat we use in any roles that specify URIs (that is, the locations of directories in HDFS).
• We start this example after the table external_table.sample is already created. In the policy file for theexample,we have already taken away theexternal_table_admin role from thecloudera group, and replacedit with the lesser-privileged external_table role.
• We assign privileges to a subdirectory underneath /user/cloudera in HDFS, because such privileges also applyto any subdirectories underneath. If we had assigned privileges to the parent directory /user/cloudera, it wouldbe too likely to mess up other files by specifying a wrong location by mistake.
• The cloudera under the [groups] section refers to the cloudera group. (In the demoVMused for this example,there is a cloudera user that is a member of a cloudera group.)
Cloudera Security | 337
Authorization

Policy file:
[groups]cloudera = external_table, staging_dir
[roles]external_table_admin = server=server1->db=external_tableexternal_table = server=server1->db=external_table->table=sample->action=*staging_dir = server=server1->uri=hdfs://127.0.0.1:8020/user/cloudera/external_data->action=*
impala-shell session:
[localhost:21000] > use external_table;Query: use external_table[localhost:21000] > show tables;Query: show tablesQuery finished, fetching results ...+--------+| name |+--------+| sample |+--------+Returned 1 row(s) in 0.02s
[localhost:21000] > select * from sample;Query: select * from sampleQuery finished, fetching results ...+-----+| x |+-----+| 1 || 5 || 150 |+-----+Returned 3 row(s) in 1.04s
[localhost:21000] > load data inpath '/user/cloudera/external_data' into table sample;Query: load data inpath '/user/cloudera/external_data' into table sampleQuery finished, fetching results ...+----------------------------------------------------------+| summary |+----------------------------------------------------------+| Loaded 1 file(s). Total files in destination location: 2 |+----------------------------------------------------------+Returned 1 row(s) in 0.26s[localhost:21000] > select * from sample;Query: select * from sampleQuery finished, fetching results ...+-------+| x |+-------+| 2 || 4 || 6 || 8 || 64738 || 49152 || 1 || 5 || 150 |+-------+Returned 9 row(s) in 0.22s
[localhost:21000] > load data inpath '/user/cloudera/unauthorized_data' into table sample;Query: load data inpath '/user/cloudera/unauthorized_data' into table sampleERROR: AuthorizationException: User 'cloudera' does not have privileges to access: hdfs://127.0.0.1:8020/user/cloudera/unauthorized_data
338 | Cloudera Security
Authorization

Controlling Access at the Column Level through Views
If a user has SELECT privilege for a view, they can query the view, even if they do not have any privileges on theunderlying table. To see the details about the underlying table throughEXPLAINorDESCRIBE FORMATTED statementson the view, the user must also have SELECT privilege for the underlying table.
Important:
The types of data that are considered sensitive and confidential differ depending on the jurisdictionthe type of industry, or both. For fine-grained access controls, set up appropriate privileges based onall applicable laws and regulations.
Be careful using the ALTER VIEW statement to point an existing view at a different base table or anew set of columns that includes sensitive or restricted data. Make sure that any users who haveSELECT privilege on the view do not gain access to any additional information they are not authorizedto see.
The following example shows how a system administrator could set up a table containing some columns with sensitiveinformation, then create a view that only exposes the non-confidential columns.
[localhost:21000] > create table sensitive_info > ( > name string, > address string, > credit_card string, > taxpayer_id string > );[localhost:21000] > create view name_address_view as select name, address from sensitive_info;
Then the following policy file specifies read-only privilege for that view, without authorizing access to the underlyingtable:
[groups]cloudera = view_only_privs
[roles]view_only_privs = server=server1->db=reports->table=name_address_view->action=SELECT
Thus, a user with the view_only_privs role could access through Impala queries the basic information but not thesensitive information, even if both kinds of information were part of the same data file.
You might define other views to allow users from different groups to query different sets of columns.
Separating Administrator Responsibility from Read and Write Privileges
Remember that to create a database requires full privilege on that database, while day-to-day operations on tableswithin that database can be performed with lower levels of privilege on specific table. Thus, you might set up separateroles for each database or application: an administrative one that could create or drop the database, and a user-levelone that can access only the relevant tables.
For example, this policy file divides responsibilities between users in 3 different groups:
• Members of the supergroup group have the training_sysadmin role and so can set up a database namedtraining.
• Members of the cloudera group have the instructor role and so can create, insert into, and query any tablesin the training database, but cannot create or drop the database itself.
• Members of the visitor group have the student role and so can query those tables in the training database.
[groups]supergroup = training_sysadmincloudera = instructor
Cloudera Security | 339
Authorization
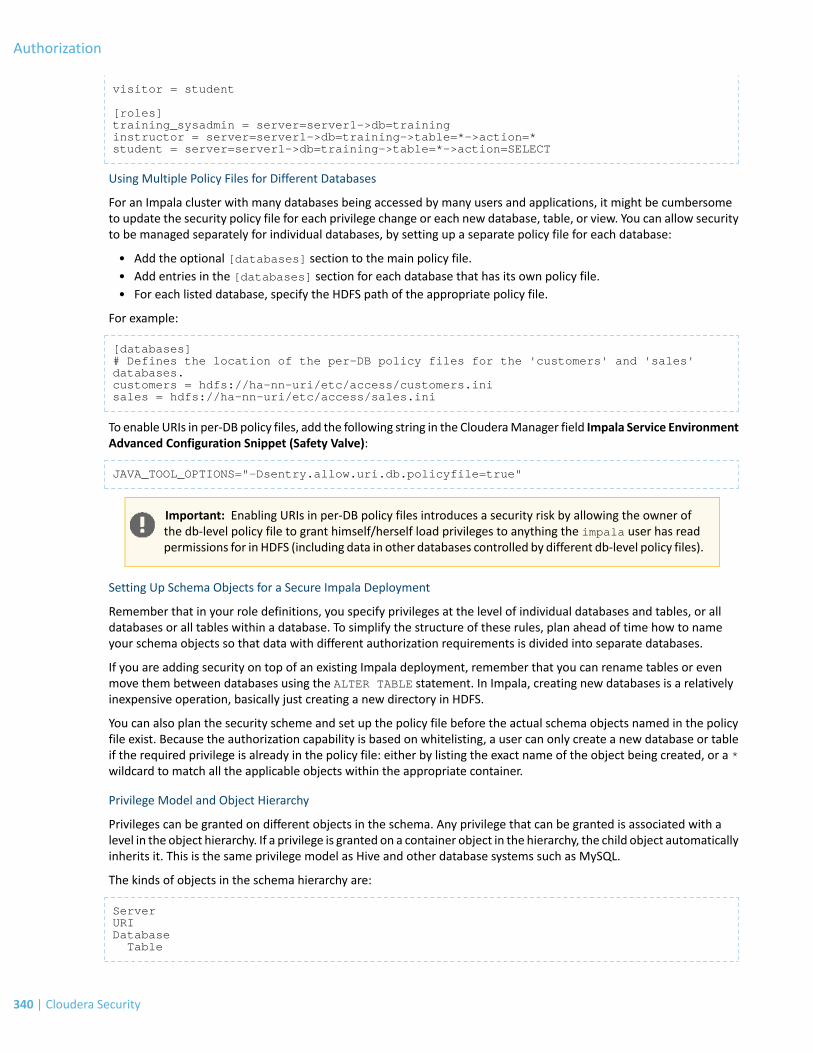
visitor = student
[roles]training_sysadmin = server=server1->db=traininginstructor = server=server1->db=training->table=*->action=*student = server=server1->db=training->table=*->action=SELECT
Using Multiple Policy Files for Different Databases
For an Impala cluster with many databases being accessed by many users and applications, it might be cumbersometo update the security policy file for each privilege change or each new database, table, or view. You can allow securityto be managed separately for individual databases, by setting up a separate policy file for each database:
• Add the optional [databases] section to the main policy file.• Add entries in the [databases] section for each database that has its own policy file.• For each listed database, specify the HDFS path of the appropriate policy file.
For example:
[databases]# Defines the location of the per-DB policy files for the 'customers' and 'sales' databases.customers = hdfs://ha-nn-uri/etc/access/customers.inisales = hdfs://ha-nn-uri/etc/access/sales.ini
To enable URIs in per-DB policy files, add the following string in the ClouderaManager field Impala Service EnvironmentAdvanced Configuration Snippet (Safety Valve):
JAVA_TOOL_OPTIONS="-Dsentry.allow.uri.db.policyfile=true"
Important: Enabling URIs in per-DB policy files introduces a security risk by allowing the owner ofthe db-level policy file to grant himself/herself load privileges to anything the impala user has readpermissions for in HDFS (including data in other databases controlled by different db-level policy files).
Setting Up Schema Objects for a Secure Impala Deployment
Remember that in your role definitions, you specify privileges at the level of individual databases and tables, or alldatabases or all tables within a database. To simplify the structure of these rules, plan ahead of time how to nameyour schema objects so that data with different authorization requirements is divided into separate databases.
If you are adding security on top of an existing Impala deployment, remember that you can rename tables or evenmove them between databases using the ALTER TABLE statement. In Impala, creating new databases is a relativelyinexpensive operation, basically just creating a new directory in HDFS.
You can also plan the security scheme and set up the policy file before the actual schema objects named in the policyfile exist. Because the authorization capability is based on whitelisting, a user can only create a new database or tableif the required privilege is already in the policy file: either by listing the exact name of the object being created, or a *wildcard to match all the applicable objects within the appropriate container.
Privilege Model and Object Hierarchy
Privileges can be granted on different objects in the schema. Any privilege that can be granted is associated with alevel in the object hierarchy. If a privilege is granted on a container object in the hierarchy, the child object automaticallyinherits it. This is the same privilege model as Hive and other database systems such as MySQL.
The kinds of objects in the schema hierarchy are:
ServerURIDatabase Table
340 | Cloudera Security
Authorization

The server name is specified by the -server_name option when impalad starts. Specify the same name for allimpalad nodes in the cluster.
URIs represent the HDFS paths you specify as part of statements such as CREATE EXTERNAL TABLE and LOAD DATA.Typically, you specify what look like UNIX paths, but these locations can also be prefixed with hdfs:// to make clearthat they are really URIs. To set privileges for a URI, specify the name of a directory, and the privilege applies to all thefiles in that directory and any directories underneath it.
There are not separate privileges for individual table partitions or columns. To specify read privileges at this level, youcreate a view that queries specific columns and/or partitions from a base table, and give SELECT privilege on the viewbut not the underlying table. See Overview of Impala Views for details about views in Impala.
URIs must start with either hdfs:// or file://. If a URI starts with anything else, it will cause an exception and thepolicy file will be invalid. When defining URIs for HDFS, you must also specify the NameNode. For example:
data_read = server=server1->uri=file:///path/to/dir, \server=server1->uri=hdfs://namenode:port/path/to/dir
Warning:
Because theNameNode host and portmust be specified, Cloudera strongly recommends you use HighAvailability (HA). This ensures that the URI will remain constant even if the NameNode changes.
data_read = server=server1->uri=file:///path/to/dir,\ server=server1->uri=hdfs://ha-nn-uri/path/to/dir
Table 35: Valid privilege types and objects they apply to
ObjectPrivilege
DB, TABLEINSERT
DB, TABLESELECT
SERVER, TABLE, DB, URIALL
Note:
Although this document refers to the ALL privilege, currently if you use the policy file mode, you donot use the actual keyword ALL in the policy file. When you code role entries in the policy file:
• To specify the ALL privilege for a server, use a role like server=server_name.• To specify the ALL privilege for a database, use a role like
server=server_name->db=database_name.• To specify the ALL privilege for a table, use a role like
server=server_name->db=database_name->table=table_name->action=*.
OthersURIPrivilegesScopeOperation
SELECTTABLEEXPLAIN
URIINSERTTABLELOAD DATA
ALLSERVERCREATE DATABASE
ALLDATABASEDROP DATABASE
ALLDATABASECREATE TABLE
ALLTABLEDROP TABLE
Cloudera Security | 341
Authorization

OthersURIPrivilegesScopeOperation
SELECT/INSERTTABLEDESCRIBE TABLE
ALLTABLEALTER TABLE .. ADDCOLUMNS
ALLTABLEALTER TABLE .. REPLACECOLUMNS
ALLTABLEALTER TABLE .. CHANGEcolumn
ALLTABLEALTER TABLE .. RENAME
ALLTABLEALTER TABLE .. SETTBLPROPERTIES
ALLTABLEALTER TABLE .. SETFILEFORMAT
URIALLTABLEALTER TABLE .. SETLOCATION
ALLTABLEALTER TABLE .. ADDPARTITION
URIALLTABLEALTER TABLE .. ADDPARTITION location
ALLTABLEALTER TABLE .. DROPPARTITION
ALLTABLEALTER TABLE .. PARTITIONSET FILEFORMAT
ALLTABLEALTER TABLE .. SETSERDEPROPERTIES
SELECT on TABLEALLDATABASE; SELECT onTABLE
CREATE VIEW
ALLVIEW/TABLEDROP VIEW
ALL, SELECTYou need ALL privilegeon the named view and
ALTER VIEW
the parent database,plus SELECT privilegefor any tables or viewsreferenced by the viewquery. Once the view iscreated or altered by ahigh-privileged systemadministrator, it can bequeried by alower-privileged userwho does not have fullquery privileges for thebase tables. (This is howyou implementcolumn-level security.)
URIALLTABLEALTER TABLE .. SETLOCATION
342 | Cloudera Security
Authorization

OthersURIPrivilegesScopeOperation
ALL, SELECTDatabase (ALL), URI(SELECT)
CREATE EXTERNAL TABLE
SELECTTABLESELECT
AnyUSE <dbName>
ALLSERVERCREATE FUNCTION
ALLSERVERDROP FUNCTION
SELECT/INSERTTABLEREFRESH <table name>
ALLSERVERINVALIDATE METADATA
SELECT/INSERTTABLEINVALIDATE METADATA<table name>
ALLTABLECOMPUTE STATS
SELECT/INSERTTABLESHOWTABLE STATS, SHOWPARTITIONS
SELECT/INSERTTABLESHOW COLUMN STATS
SELECTDATABASESHOW FUNCTIONS
No special privilegesneeded to issue the
SHOW TABLES
statement, but onlyshows objects youare authorized for
No special privilegesneeded to issue the
SHOW DATABASES, SHOWSCHEMAS
statement, but onlyshows objects youare authorized for
Debugging Failed Sentry Authorization Requests
Sentry logs all facts that lead up to authorization decisions at the debug level. If you do not understand why Sentry isdenying access, the best way to debug is to temporarily turn on debug logging:
• In ClouderaManager, add log4j.logger.org.apache.sentry=DEBUG to the logging settings for your servicethrough the corresponding Logging Safety Valve field for the Impala, Hive Server 2, or Solr Server services.
• On systems not managed by Cloudera Manager, add log4j.logger.org.apache.sentry=DEBUG to thelog4j.properties file on each host in the cluster, in the appropriate configuration directory for each service.
Specifically, look for exceptions and messages such as:
FilePermission server..., RequestPermission server...., result [true|false]
which indicate each evaluation Sentrymakes. TheFilePermission is from the policy file, whileRequestPermissionis the privilege required for the query. A RequestPermission will iterate over all appropriate FilePermissionsettings until a match is found. If no matching privilege is found, Sentry returns false indicating “Access Denied” .
Managing Sentry for Impala through Cloudera Manager
To enable the Sentry service for Impala and Hive, set Hive/Impala > Service-Wide > Sentry Service parameter to theSentry service. Then restart Impala and Hive. Simply adding Sentry service as a dependency and restarting enablesImpala and Hive to use the Sentry service.
Cloudera Security | 343
Authorization

To set the server name to use when granting server level privileges, set the Hive > Service-Wide > Advanced > ServerName for Sentry Authorization parameter. When using Sentry with the Hive Metastore, you can specify the list ofusers that are allowed to bypass Sentry Authorization in HiveMetastore usingHive > Service-Wide > Security > BypassSentry Authorization Users. These are usually service users that already ensure all activity has been authorized.
Note: The Hive/Impala > Service-Wide > Policy File Based Sentry tab contains parameters onlyrelevant to configuring Sentry using policy files. In particular, make sure that Enable SentryAuthorization using Policy Files parameter is unchecked when using the Sentry service. ClouderaManager throws a validation error if you attempt to configure the Sentry service and policy file at thesame time.
The DEFAULT Database in a Secure Deployment
Because of the extra emphasis on granular access controls in a secure deployment, you should move any importantor sensitive information out of the DEFAULT database into a named database whose privileges are specified in thepolicy file. Sometimes you might need to give privileges on the DEFAULT database for administrative reasons; forexample, as a place you can reliably specify with a USE statement when preparing to drop a database.
Enabling Sentry Authorization for Search using the Command Line
Sentry enables role-based, fine-grained authorization for Cloudera Search. Sentry can apply a range of restrictions tovarious tasks, such as accessing data or creating collections. These restrictions are consistently applied, regardless ofthe way users attempt to complete actions. For example, restricting access to data in a collection restricts that accesswhether queries come from the command line, from a browser, Hue, or through the admin console.
• You can use either Cloudera Manager or the following command-line instructions to complete this configuration.• This information applies specifically to CDH 5.4.x. If you use an earlier version of CDH, see the documentation for
that version located at Cloudera Documentation.
For information on enabling Sentry authorization using ClouderaManager, see Configuring Sentry Policy File AuthorizationUsing Cloudera Manager on page 326.
Follow the instructions below to configure Sentry under CDH 4.5 or later or CDH 5. Sentry is included in the Searchinstallation.
Note: Sentry for Search depends on Kerberos authentication. For additional information on usingKerberos with Search, see Search Authentication on page 115.
This document describes configuring Sentry for Cloudera Search. For information about alternate ways to configureSentry or for information about installing Sentry for other services, see:
• Enabling Sentry Authorization for Solr for instructions for using ClouderaManager to configure Search Authorizationwith Sentry.
• Overview of Impala Security for instructions on using Impala with Sentry.• Sentry Installation for additional information on Sentry installation.
Roles and Collection-Level Privileges
Sentry uses a role-based privilege model. A role is a set of rules for accessing a given Solr collection. Access to eachcollection is governed by privileges: Query, Update, or All (*).
For example, a rule for the Query privilege on collection logs would be formulated as follows:
collection=logs->action=Query
344 | Cloudera Security
Authorization

A role can contain multiple such rules, separated by commas. For example the engineer_rolemight contain theQuery privilege for hive_logs and hbase_logs collections, and the Update privilege for the current_bugscollection. You would specify this as follows:
engineer_role = collection=hive_logs->action=Query, collection=hbase_logs->action=Query, collection=current_bugs->action=Update
Users and Groups
• A user is an entity that is permitted by the Kerberos authentication system to access the Search service.• A group connects the authentication system with the authorization system. It is a set of one or more users who
have been granted one or more authorization roles. Sentry allows a set of roles to be configured for a group.• A configured group provider determines a user’s affiliationwith a group. The current release supports HDFS-backed
groups and locally configured groups. For example,
dev_ops = dev_role, ops_role
Here the group dev_ops is granted the roles dev_role and ops_role. The members of this group can completesearches that are allowed by these roles.
User to Group Mapping
You can configure Sentry to use either Hadoop groups or groups defined in the policy file.
Important: You can use either Hadoop groups or local groups, but not both at the same time. Uselocal groups if you want to do a quick proof-of-concept. For production, use Hadoop groups.
To configure Hadoop groups:
Set the sentry.provider property in sentry-site.xml toorg.apache.sentry.provider.file.HadoopGroupResourceAuthorizationProvider.
By default, this uses local shell groups. See the Group Mapping section of the HDFS Permissions Guide for moreinformation.
In this case, Sentry uses theHadoop configuration described in Configuring LDAPGroupMappings on page 283. ClouderaManager automatically uses this configuration. In a deployment not managed by Cloudera Manager, manually setthese configuration parameters parameters in the hadoop-conf file that is passed to Solr.
OR
To configure local groups:
1. Define local groups in a [users] section of the Sentry Policy file. For example:
[users]user1 = group1, group2, group3user2 = group2, group3
2. In sentry-site.xml, set search.sentry.provider as follows:
<property> <name>sentry.provider</name> <value>org.apache.sentry.provider.file.LocalGroupResourceAuthorizationProvider</value>
</property>
Cloudera Security | 345
Authorization

Setup and Configuration
This release of Sentry stores the configuration as well as privilege policies in files. The sentry-site.xml file containsconfiguration options such as privilege policy file location. The Policy File on page 346 contains the privileges and groups.It has a .ini file format and should be stored on HDFS.
Sentry is automatically installed when you install Cloudera Search for CDH or Cloudera Search 1.1.0 or later.
Policy File
The sections that follow contain notes on creating and maintaining the policy file.
Warning: An invalid configuration disables all authorization while logging an exception.
Storing the Policy File
Considerations for storing the policy file(s) include:
1. Replication count - Because the file is read for each query, you should increase this; 10 is a reasonable value.2. Updating the file - Updates to the file are only reflected when the Solr process is restarted.
Defining Roles
Keep in mind that role definitions are not cumulative; the newer definition replaces the older one. For example, thefollowing results in role1 having privilege2, not privilege1 and privilege2.
role1 = privilege1role1 = privilege2
Sample Configuration
This section provides a sample configuration.
Note: Sentrywith CDH Search does not supportmultiple policy files. Other implementations of Sentrysuch as Sentry for Hive do support different policy files for different databases, but Sentry for CDHSearch has no such support for multiple policies.
Policy File
The following is an example of a CDH Search policy file. The sentry-provider.ini would exist in an HDFS locationsuch as hdfs://ha-nn-uri/user/solr/sentry/sentry-provider.ini. This locationmust be readable by Solr.
Note: Use separate policy files for each Sentry-enabled service. Using one file for multiple servicesresults in each service failing on the other services' entries. For example, with a combined Hive andSearch file, Search would fail on Hive entries and Hive would fail on Search entries.
sentry-provider.ini
[groups]# Assigns each Hadoop group to its set of rolesengineer = engineer_roleops = ops_roledev_ops = engineer_role, ops_rolehbase_admin = hbase_admin_role
[roles]# The following grants all access to source_code.# "collection = source_code" can also be used as syntactic# sugar for "collection = source_code->action=*"engineer_role = collection = source_code->action=*
346 | Cloudera Security
Authorization

# The following imply more restricted access.ops_role = collection = hive_logs->action=Querydev_ops_role = collection = hbase_logs->action=Query
#give hbase_admin_role the ability to create/delete/modify the hbase_logs collectionhbase_admin_role = collection=admin->action=*, collection=hbase_logs->action=*
Sentry Configuration File
The following is an example of a sentry-site.xml file.
sentry-site.xml
<configuration> <property> <name>hive.sentry.provider</name>
<value>org.apache.sentry.provider.file.HadoopGroupResourceAuthorizationProvider</value>
</property>
<property> <name>sentry.solr.provider.resource</name> <value>/path/to/authz-provider.ini</value> <!-- If the HDFS configuration files (core-site.xml, hdfs-site.xml) pointed to by SOLR_HDFS_CONFIG in /etc/default/solr point to HDFS, the path will be in HDFS; alternatively you could specify a full path, e.g.:hdfs://namenode:port/path/to/authz-provider.ini --> </property>
Enabling Sentry in Cloudera Search for CDH 5
You can enable Sentry using ClouderaManager or bymanuallymodifying files. Formore information on enabling Sentryusing Cloudera Manager, see Configuring Sentry Policy File Authorization Using Cloudera Manager on page 326 andEnabling Sentry Authorization for Solr on page 329.
Sentry is enabled with addition of two properties to /etc/default/solr or/opt/cloudera/parcels/CDH-*/etc/default/solr.
• In a Cloudera Manager deployment, these properties are added automatically when you click Enable SentryAuthorization in the Solr configuration page in Cloudera Manager.
• In a deployment not managed by Cloudera Manager, you must make these changes yourself. The variableSOLR_AUTHORIZATION_SENTRY_SITE specifies the path to sentry-site.xml. The variableSOLR_AUTHORIZATION_SUPERUSER specifies the first part of SOLR_KERBEROS_PRINCIPAL. This is solr forthe majority of users, as solr is the default. Settings are of the form:
SOLR_AUTHORIZATION_SENTRY_SITE=/location/to/sentry-site.xmlSOLR_AUTHORIZATION_SUPERUSER=solr
To enable sentry collection-level authorization checking on a new collection, the instancedir for the collection mustuse amodified version of solrconfig.xmlwith Sentry integration. Each collection has a separate solrconfig.xmlfile,meaning you candefine different behavior for each collection. The commandsolrctl instancedir --generategenerates two versions of solrconfig.xml: the standard solrconfig.xml without sentry integration, and thesentry-integrated version called solrconfig.xml.secure. To use the sentry-integrated version, replacesolrconfig.xml with solrconfig.xml.secure before creating the instancedir.
You can enable Sentry on an existing collection bymodifying the settings that are stored in instancedir. For example,you might have an existing collection named foo and a standard solrconfig.xml. By default, collections are stored
Cloudera Security | 347
Authorization
in instancedirs that use the collection's name, which is foo in this case. In such a situation, you could enable Sentryfrom the command line by executing the following commands:
# generate a fresh instancedirsolrctl instancedir --generate foosecure# download the existing instancedir from ZK into subdirectory foosolrctl instancedir --get foo foo# replace the existing solrconfig.xml with the sentry-enabled onecp foosecure/conf/solrconfig.xml.secure foo/conf/solrconfig.xml# update the instancedir in ZKsolrctl instancedir --update foo foo# reload the collectionsolrctl collection --reload foo
If you have an existing collection using a version of solrconfig.xml that you have modified, contact Support forassistance.
Providing Document-Level Security Using Sentry
For role-based access control of a collection, an administrator modifies a Sentry role so it has query, update, oradministrative access, as described above.
Collection-level authorization is useful when the access control requirements for the documents in the collection arethe same, but users may want to restrict access to a subset of documents in a collection. This finer-grained restrictioncould be achieved by defining separate collections for each subset, but this is difficult to manage, requires duplicatedocuments for each collection, and requires that these documents be kept synchronized.
Document-level access control solves this issue by associating authorization tokenswith each document in the collection.This enables granting Sentry roles access to sets of documents in a collection.
Document-Level Security Model
Document-level security depends on a chain of relationships between users, groups, roles, and documents.
• Users are assigned to groups.• Groups are assigned to roles.• Roles are stored as "authorization tokens" in a specified field in the documents.
Document-level security supports restricting which documents can be viewed by which users. Access is provided byadding roles as "authorization tokens" to a specified document field. Conversely, access is implicitly denied by omittingroles from the specified field. In other words, in a document-level security enabled environment, a user might submita query that matches a document; if the user is not part of a group that has a role has been granted access to thedocument, the result is not returned.
For example, Alice might belong to the administrators group. The administrators group may belong to the doc-mgmtrole. A document could be ingested and the doc-mgmt role could be added at ingest time. In such a case, if Alicesubmitted a query that matched the document, Search would return the document, since Alice is then allowed to seeany document with the "doc-mgmt" authorization token.
Similarly, Bob might belong to the guests group. The guests group may belong to the public-browser role. If Bob triedthe same query as Alice, but the document did not have the public-browser role, Search would not return the resultbecause Bob does not belong to a group that is associated with a role that has access.
Note that collection-level authorization rules still apply, if enabled. Even if Alice is able to view a document givendocument-level authorization rules, if she is not allowed to query the collection, the query will fail.
Roles are typically added to documents when those documents are ingested, either via the standard Solr APIs or, ifusing morphlines, the setValuesmorphline command.
Enabling Document-Level Security
Cloudera Search supports document-level security in Search for CDH 5.1 and later. Document-level security requirescollection-level security. Configuring collection-level security is described earlier in this topic.
348 | Cloudera Security
Authorization
Document-level security is disabled by default, so the first step in using document-level security is to enable the featurebymodifying thesolrconfig.xml.secure file. Remember to replace thesolrconfig.xmlwith this file, as describedin Enabling Sentry in Cloudera Search for CDH 5 on page 347.
To enable document-level security, change solrconfig.xml.secure. The default file contents are as follows:
<searchComponent name="queryDocAuthorization"> <!-- Set to true to enabled document-level authorization -->
<bool name="enabled">false</bool>
<!-- Field where the auth tokens are stored in the document --> <str name="sentryAuthField">sentry_auth</str>
<!-- Auth token defined to allow any role to access the document. Uncomment to enable. -->
<!--<str name="allRolesToken">*</str>-->
</searchComponent>
• The enabled Boolean determines whether document-level authorization is enabled. To enable document levelsecurity, change this setting to true.
• The sentryAuthField string specifies the name of the field that is used for storing authorization information.You can use the default setting of sentry_auth or you can specify some other string to be used for assigningvalues during ingest.
Note: This field must exist as an explicit or dynamic field in the schema for the collection youare creating with document-level security. sentry_auth exists in the default schema.xml,which is automatically generated and can be found in the same directory as solrconfig.xml.
for the collection you are creating with document-level security. Schema.xml is in the generatedconfiguration in the same directory as the solrconfig.xml
• The allRolesToken string represents a special token defined to allow any role access to the document. Bydefault, this feature is disabled. To enable this feature, uncomment the specification and specify the token. Thistoken should be different from the name of any sentry role to avoid collision. By default it is "*". This feature isuseful when first configuring document level security or it can be useful in granting all roles access to a documentwhen the set of roles may change. See Best Practices for additional information.
Best Practices
Using allRolesToken
You may want to grant every user that belongs to a role access to certain documents. One way to accomplish this isto specify all known roles in the document, but this requires updating or re-indexing the document if you add a newrole. Alternatively, an allUser role, specified in the Sentry .ini file, could contain all valid groups, but this role wouldneed to be updated every time a new group was added to the system. Instead, specifying allRolesToken allows anyuser that belongs to a valid role to access the document. This access requires no updating as the system evolves.
In addition, allRolesTokenmay be useful for transitioning a deployment to use document-level security. Instead ofhaving to define all the roles upfront, all the documents can be specified with allRolesToken and later modified asthe roles are defined.
Consequences of Document-Level Authorization Only Affecting Queries
Document-level security does not prevent users from modifying documents or performing other update operationson the collection. Update operations are only governed by collection-level authorization.
Cloudera Security | 349
Authorization

Document-level security can be used to prevent documents being returned in query results. If users are not grantedaccess to a document, those documents are not returned even if that user submits a query that matches thosedocuments. This does not have affect attempted updates.
Consequently, it is possible for a user to not have access to a set of documents based on document-level security, butto still be able to modify the documents via their collection-level authorization update rights. This means that a usercan delete all documents in the collection. Similarly, a user might modify all documents, adding their authorizationtoken to each one. After such a modification, the user could access any document via querying. Therefore, if you arerestricting access using document-level security, consider granting collection-level update rights only to those usersyou trust and assume they will be able to access every document in the collection.
Limitations on Query Size
By default queries support up to 1024 Boolean clauses. As a result, queries containing more that 1024 clauses maycause errors. Because authorization information is added by Sentry as part of a query, using document-level securitycan increase the number of clauses. In the case where users belong to many roles, even simple queries can becomequite large. If a query is too large, an error of the following form occurs:
org.apache.lucene.search.BooleanQuery$TooManyClauses: maxClauseCount is set to 1024
To change the supported number of clauses, edit the maxBooleanClauses setting in solrconfig.xml. For example,to allow 2048 clauses, you would edit the setting so it appears as follows:
<maxBooleanClauses>2048</maxBooleanClauses>
For maxBooleanClauses to be applied as expected, make any change to this value to all collections and then restartthe service. Youmustmake this change to all collections because this optionmodifies a global Lucene property, affectingall Solr cores. If different solrconfig.xml files have different values for this property, the effective value is determinedper host, based on the first Solr core to be initialized.
Enabling Secure Impersonation
Secure Impersonation is a feature that allows a user to make requests as another user in a secure way. For example,to allow the following impersonations:
• User hue can make requests as any user from any host.• User foo can make requests as any member of group bar, from host1 or host2.
Configure the following properties in /etc/default/solr or/opt/cloudera/parcels/CDH-*/etc/default/solr:
SOLR_SECURITY_ALLOWED_PROXYUSERS=hue,fooSOLR_SECURITY_PROXYUSER_hue_HOSTS=*SOLR_SECURITY_PROXYUSER_hue_GROUPS=*SOLR_SECURITY_PROXYUSER_foo_HOSTS=host1,host2SOLR_SECURITY_PROXYUSER_foo_GROUPS=bar
SOLR_SECURITY_ALLOWED_PROXYUSERS lists all of the users allowed to impersonate. For a user x inSOLR_SECURITY_ALLOWED_PROXYUSERS, SOLR_SECURITY_PROXYUSER_x_HOSTS list the hosts x is allowed toconnect from in order to impersonate, and SOLR_SECURITY_PROXYUSERS_x_GROUPS lists the groups that the usersis allowed to impersonate members of. Both GROUPS and HOSTS support the wildcard * and both GROUPS and HOSTSmust be defined for a specific user.
Note: ClouderaManager has its ownmanagement of secure impersonation for Hue. To add additionalusers for Secure Impersonation, use the environment variable safety value for Solr to set theenvironment variables as above. Be sure to include hue in SOLR_SECURITY_ALLOWED_PROXYUSERSif you want to use secure impersonation for hue.
350 | Cloudera Security
Authorization

Debugging Failed Sentry Authorization Requests
Sentry logs all facts that lead up to authorization decisions at the debug level. If you do not understand why Sentry isdenying access, the best way to debug is to temporarily turn on debug logging:
• In ClouderaManager, add log4j.logger.org.apache.sentry=DEBUG to the logging settings for your servicethrough the corresponding Logging Safety Valve field for the Impala, Hive Server 2, or Solr Server services.
• On systems not managed by Cloudera Manager, add log4j.logger.org.apache.sentry=DEBUG to thelog4j.properties file on each host in the cluster, in the appropriate configuration directory for each service.
Specifically, look for exceptions and messages such as:
FilePermission server..., RequestPermission server...., result [true|false]
which indicate each evaluation Sentrymakes. TheFilePermission is from the policy file, whileRequestPermissionis the privilege required for the query. A RequestPermission will iterate over all appropriate FilePermissionsettings until a match is found. If no matching privilege is found, Sentry returns false indicating “Access Denied” .
Appendix: Authorization Privilege Model for Search
The tables below refer to the request handlers defined in the generated solrconfig.xml.secure. If you are notusing this configuration file, the below may not apply.
admin is a special collection in sentry used to represent administrative actions. A non-administrative request may onlyrequire privileges on the collection on which the request is being performed. This is called collection1 in thisappendix. An administrative request may require privileges on both the admin collection and collection1. This isdenoted as admincollection1 in the tables below.
Table 36: Privilege table for non-administrative request handlers
Collections that Require PrivilegeRequired PrivilegeRequest Handler
collection1QUERYselect
collection1QUERYquery
collection1QUERYget
collection1QUERYbrowse
collection1QUERYtvrh
collection1QUERYclustering
collection1QUERYterms
collection1QUERYelevate
collection1QUERYanalysis/field
collection1QUERYanalysis/document
collection1UPDATEupdate
collection1UPDATEupdate/json
collection1UPDATEupdate/csv
Table 37: Privilege table for collections admin actions
Collections that Require PrivilegeRequired PrivilegeCollection Action
admin, collection1UPDATEcreate
admin, collection1UPDATEdelete
Cloudera Security | 351
Authorization

Collections that Require PrivilegeRequired PrivilegeCollection Action
admin, collection1UPDATEreload
admin, collection1
Note: collection1here refers to the nameof the alias, not theunderlying collection(s).For example,http://YOUR-HOST:8983/
solr/admin/collections?action=
CREATEALIAS&name=collection1
&collections=underlyingCollection
UPDATEcreateAlias
admin, collection1
Note: collection1here refers to the nameof the alias, not theunderlying collection(s).For example,http://YOUR-HOST:8983/
solr/admin/collections?action=
DELETEALIAS&name=collection1
UPDATEdeleteAlias
admin, collection1UPDATEsyncShard
admin, collection1UPDATEsplitShard
admin, collection1UPDATEdeleteShard
Table 38: Privilege table for core admin actions
Collections that Require PrivilegeRequired PrivilegeCollection Action
admin, collection1UPDATEcreate
admin, collection1UPDATErename
admin, collection1UPDATEload
admin, collection1UPDATEunload
admin, collection1UPDATEstatus
adminUPDATEpersist
admin, collection1UPDATEreload
admin, collection1UPDATEswap
admin, collection1UPDATEmergeIndexes
admin, collection1UPDATEsplit
admin, collection1UPDATEprepRecover
admin, collection1UPDATErequestRecover
admin, collection1UPDATErequestSyncShard
352 | Cloudera Security
Authorization
Collections that Require PrivilegeRequired PrivilegeCollection Action
admin, collection1UPDATErequestApplyUpdates
Table 39: Privilege table for Info and AdminHandlers
Collections that Require PrivilegeRequired PrivilegeRequest Handler
adminQUERYLukeRequestHandler
adminQUERYSystemInfoHandler
adminQUERYSolrInfoMBeanHandler
adminQUERYPluginInfoHandler
adminQUERYThreadDumpHandler
adminQUERYPropertiesRequestHandler
adminQUERY, UPDATE (or *)LogginHandler
adminQUERYShowFileRequestHandler
Configuring HBase AuthorizationAfter you have configured HBase authentication as described in the previous section, you must establish authorizationrules for the resources that a client is allowed to access. HBase currently allows you to establish authorization rules atthe table, column and cell-level. for Cell-level authorization was added as an experimental feature in CDH 5.2 and isstill considered experimental.
Understanding HBase Access Levels
HBase access levels are granted independently of each other and allow for different types of operations at a givenscope.
• Read (R) - can read data at the given scope• Write (W) - can write data at the given scope• Execute (X) - can execute coprocessor endpoints at the given scope• Create (C) - can create tables or drop tables (even those they did not create) at the given scope• Admin (A) - can perform cluster operations such as balancing the cluster or assigning regions at the given scope
The possible scopes are:
• Superuser - superusers can perform any operation available in HBase, to any resource. The user who runs HBaseon your cluster is a superuser, as are any principals assigned to the configuration property hbase.superuser inhbase-site.xml on the HMaster.
• Global - permissions granted at global scope allow the admin to operate on all tables of the cluster.• Namespace - permissions granted at namespace scope apply to all tables within a given namespace.• Table - permissions granted at table scope apply to data or metadata within a given table.• ColumnFamily - permissions granted at ColumnFamily scope apply to cells within that ColumnFamily.• Cell - permissions granted at Cell scope apply to that exact cell coordinate. This allows for policy evolution along
with data. To change an ACL on a specific cell, write an updated cell with new ACL to the precise coordinates ofthe original. If you have a multi-versioned schema and want to update ACLs on all visible versions, you'll need towrite new cells for all visible versions. The application has complete control over policy evolution. The exceptionis append and increment processing. Appends and increments can carry an ACL in the operation. If one isincluded in the operation, then it will be applied to the result of the append or increment. Otherwise, the ACLof the existing cell being appended to or incremented is preserved.
Cloudera Security | 353
Authorization

The combination of access levels and scopes creates a matrix of possible access levels that can be granted to a user.In a production environment, it is useful to think of access levels in terms of what is needed to do a specific job. Thefollowing list describes appropriate access levels for some common types of HBase users. It is important not to grantmore access than is required for a given user to perform their required tasks.
• Superusers - In a production system, only the HBase user should have superuser access. In a developmentenvironment, an administrator may need superuser access in order to quickly control and manage the cluster.However, this type of administrator should usually be a Global Admin rather than a superuser.
• Global Admins - A global admin can perform tasks and access every table in HBase. In a typical productionenvironment, an admin should not have Read or Write permissions to data within tables.
– A global adminwith Admin permissions can perform cluster-wide operations on the cluster, such as balancing,assigning or unassigning regions, or calling an explicit major compaction. This is an operations role.
– A global adminwith Create permissions can create or drop any tablewithin HBase. This ismore of a DBA-typerole.
In a production environment, it is likely that different users will have only one of Admin and Create permissions.
Warning:
In the current implementation, a Global Adminwith Admin permission can grant himself Readand Write permissions on a table and gain access to that table's data. For this reason, only grantGlobal Admin permissions to trusted user who actually need them.
Also be aware that a Global Admin with Create permission can perform a Put operation onthe ACL table, simulating a grant or revoke and circumventing the authorization check forGlobal Admin permissions. This issue (but not the first one) is fixed in CDH 5.3 and higher, aswell as CDH 5.2.1. It is not fixed in CDH 4.x or CDH 5.1.x.
Due to these issues, be cautious with granting Global Admin privileges.
• Table Admins - A table admin can perform administrative operations only on that table. A table adminwith Createpermissions can create snapshots from that table or restore that table from a snapshot. A table admin with Adminpermissions can perform operations such as splits or major compactions on that table.
• Users - Users can read or write data, or both. Users can also execute coprocessor endpoints, if given Executablepermissions.
Important:
If you are using Kerberos principal names when setting ACLs for users, note that Hadoop uses onlythe first part (short) of the Kerberos principal when converting it to the user name. Hence, for theprincipal ann/[email protected], HBase ACLs should only beset for user ann.
Table 40: Real-World Example of Access Levels
This table shows some typical job descriptions at a hypothetical company and the permissions they might require inorder to get their jobs done using HBase.
DescriptionPermissionsScopeJob Title
Manages the cluster andgives access to JuniorAdministrators.
Admin, CreateGlobalSenior Administrator
354 | Cloudera Security
Authorization

DescriptionPermissionsScopeJob Title
Creates tables and givesaccess to TableAdministrators.
CreateGlobalJunior Administrator
Maintains a table from anoperations point of view.
AdminTableTable Administrator
Creates reports from HBasedata.
ReadTableData Analyst
Puts data into HBase anduses HBase data to performoperations.
Read, WriteTableWeb Application
Further Reading
• Access Control Matrix• Security - Apache HBase Reference Guide
Enable HBase Authorization
HBase authorization is built on top of the Coprocessors framework, specifically AccessController Coprocessor.
Note: Once the Access Controller coprocessor is enabled, any user who uses the HBase shell will besubject to access control. Access control will also be in effect for native (Java API) client access toHBase.
Enable HBase Authorization Using Cloudera Manager
1. Go to Clusters and select the HBase cluster.2. Select Configuration.3. Search for HBase Secure Authorization and select it.4. Search forHBase Service Advanced Configuration Snippet (Safety Valve) for hbase-site.xml and enter the following
into it to enable hbase.security.exec.permission.checks. Without this option, all users will continue tohave access to execute endpoint coprocessors. This option is not enabled when you enable HBase SecureAuthorization for backward compatibility.
<property> <name>hbase.security.exec.permission.checks</name> <value>true</value></property>
5. Optionally, search for and configure HBase Coprocessor Master Classes and HBase Coprocessor Region Classes.
Enable HBase Authorization Using the Command Line
Important:
• If you use Cloudera Manager, do not use these command-line instructions.• This information applies specifically to CDH 5.4.x. If you use an earlier version of CDH, see the
documentation for that version located at Cloudera Documentation.
Cloudera Security | 355
Authorization
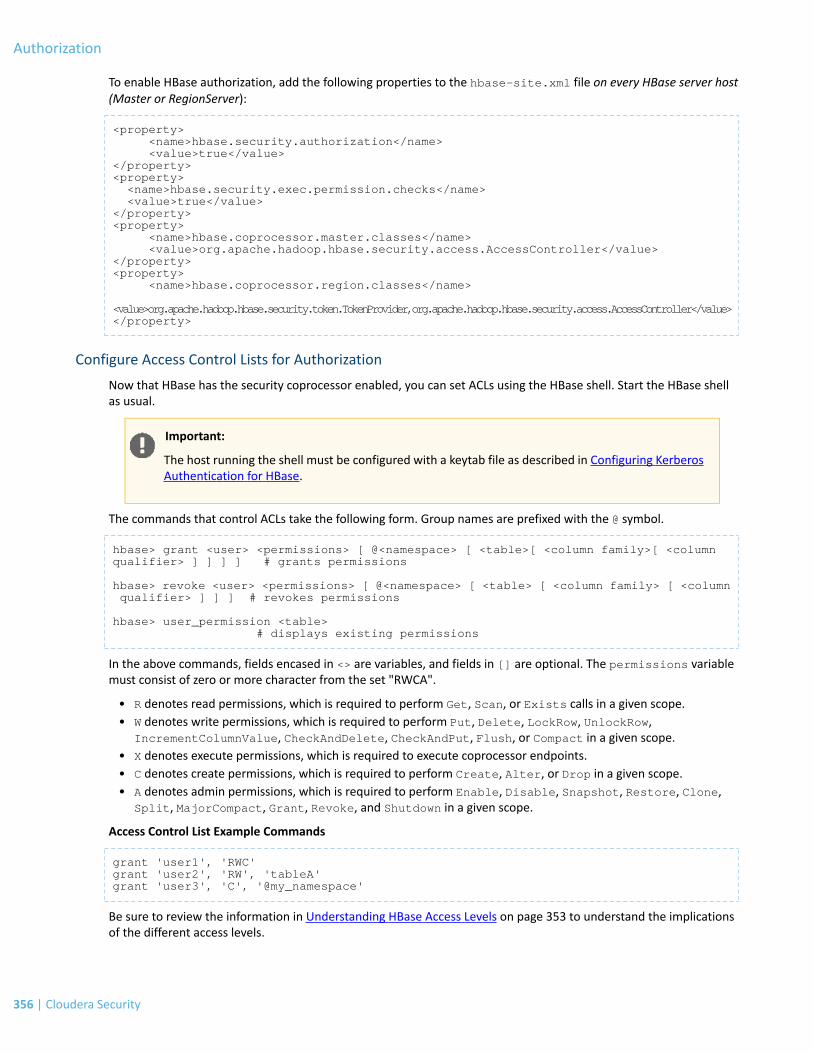
To enable HBase authorization, add the following properties to the hbase-site.xml file on every HBase server host(Master or RegionServer):
<property> <name>hbase.security.authorization</name> <value>true</value></property><property> <name>hbase.security.exec.permission.checks</name> <value>true</value></property><property> <name>hbase.coprocessor.master.classes</name> <value>org.apache.hadoop.hbase.security.access.AccessController</value></property><property> <name>hbase.coprocessor.region.classes</name>
<value>org.apache.hadoop.hbase.security.token.TokenProvider,org.apache.hadoop.hbase.security.access.AccessController</value></property>
Configure Access Control Lists for Authorization
Now that HBase has the security coprocessor enabled, you can set ACLs using the HBase shell. Start the HBase shellas usual.
Important:
The host running the shell must be configured with a keytab file as described in Configuring KerberosAuthentication for HBase.
The commands that control ACLs take the following form. Group names are prefixed with the @ symbol.
hbase> grant <user> <permissions> [ @<namespace> [ <table>[ <column family>[ <column qualifier> ] ] ] ] # grants permissions
hbase> revoke <user> <permissions> [ @<namespace> [ <table> [ <column family> [ <column qualifier> ] ] ] # revokes permissions
hbase> user_permission <table> # displays existing permissions
In the above commands, fields encased in <> are variables, and fields in [] are optional. The permissions variablemust consist of zero or more character from the set "RWCA".
• R denotes read permissions, which is required to perform Get, Scan, or Exists calls in a given scope.• W denotes write permissions, which is required to perform Put, Delete, LockRow, UnlockRow,
IncrementColumnValue, CheckAndDelete, CheckAndPut, Flush, or Compact in a given scope.• X denotes execute permissions, which is required to execute coprocessor endpoints.• C denotes create permissions, which is required to perform Create, Alter, or Drop in a given scope.• A denotes admin permissions, which is required to perform Enable, Disable, Snapshot, Restore, Clone,
Split, MajorCompact, Grant, Revoke, and Shutdown in a given scope.
Access Control List Example Commands
grant 'user1', 'RWC'grant 'user2', 'RW', 'tableA'grant 'user3', 'C', '@my_namespace'
Be sure to review the information in Understanding HBase Access Levels on page 353 to understand the implicationsof the different access levels.
356 | Cloudera Security
Authorization

Sensitive Data Redaction
Data redaction is the suppression of sensitive data, such as any personally identifiable information (PII). PII can be usedon its own orwith other information to identify or locate a single person, or to identify an individual in context. Enablingredaction allow you to transform PII to a pattern that does not contain any identifiable information. For example, youcould replace all Social Security numbers (SSN) like 123-45-6789 with an unintelligible pattern like XXX-XX-XXXX,or replace only part of the SSN (XXX-XX-6789).
Although encryption techniques are available to protect Hadoop data, the underlying problem with using encryptionis that an admin who has complete access to the cluster also access to unencrypted sensitive user data. Even userswith appropriate ACLs on the data could have access to logs and queries where sensitive data might have leaked.
Data redaction provides compliance with industry regulations such as PCI and HIPAA, which require that access to PIIbe restricted to only those users whose jobs require such access. PII or other sensitive data must not be availablethrough any other channels to users like cluster administrators or data analysts. However, if you already have permissionsto access PII through queries, the query results will not be redacted. Redaction only applies to any incidental leak ofdata. Queries and query results must not show up in cleartext in logs, configuration files, UIs, or other unprotectedareas.
Scope
Data redaction in CDH targets sensitive SQL data and log files. Currently, you can enable or disable redaction for thewhole cluster with a simple HDFS service-wide configuration change. Redaction is implemented with the assumptionthat sensitive information resides in the data itself, not the metadata. If you enable redaction for a file, only sensitivedata inside the file is redacted. Metadata such as the name of the file or file owner is not redacted.
When data redaction is enabled, the following data is redacted:
• Logs in HDFS and any dependent cluster services. Log redaction is not available in Isilon-based clusters.• Audit data sent to Cloudera Navigator• SQL query strings displayed by Hue, Hive, and Impala.
Redaction RulesRedaction is based on pattern matching. Use regular expressions to define redaction rules that search for patterns ofsensitive information such as Social Security numbers, credit card numbers, and dates.
Use Cloudera Manager to create redaction rules that have the following components:
• Search - A regular expression matched against the data. If the expression matches any part of the data, the matchis replaced by the contents of the replace string. For example, to redact credit card numbers, your regular expressionis \d{4}[^\w]\d{4}[^\w]\d{4}[^\w]\d{4}.
• Replace - The string used to replace the redacted data. For example, to replace any matched credit card digitswith Xs, the Replace string value would be XXXX-XXXX-XXXX-XXXX.
• Trigger - An optional field that specifies a simple string to be searched for in the data. The redactor searches formatches to the search regular expression only if the string is found,. If no trigger is specified, redaction occurswhen the Search regular expression is matched. Using the Trigger field improves performance: simple stringmatching is faster than regular expression matching.
The following redaction rules are preconfigured (not enabled) in Cloudera Manager. The order in which the rules arespecified is relevant. For example, in the list of rules below, credit card numbers are redacted first, followed by SSNs,email addresses, and finally, hostnames.
Replace ExpressionSearch ExpressionRedaction Rule
XXXX-XXXX-XXXX-XXXX\d{4}[^\w]\d{4}[^\w]\d{4}[^\w]\d{4}Credit Card numbers (withseparator)
Cloudera Security | 357
Sensitive Data Redaction
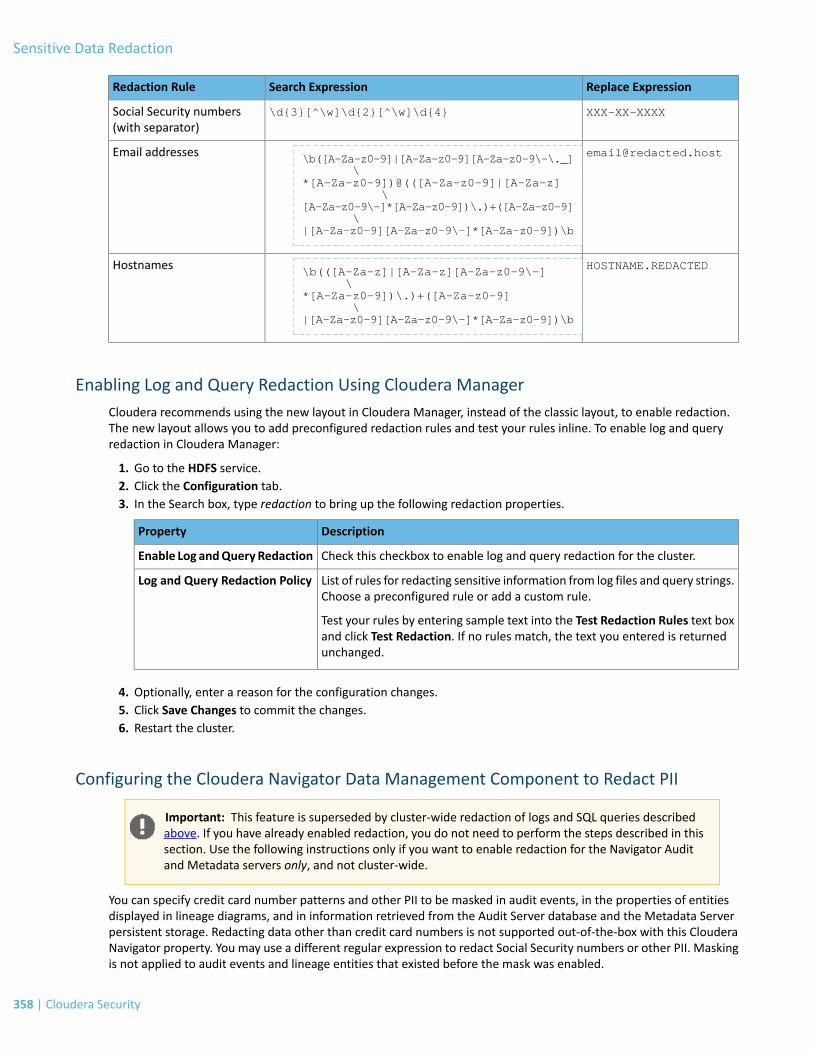
Replace ExpressionSearch ExpressionRedaction Rule
XXX-XX-XXXX\d{3}[^\w]\d{2}[^\w]\d{4}Social Security numbers(with separator)
[email protected]\b([A-Za-z0-9]|[A-Za-z0-9][A-Za-z0-9\-\._] \
Email addresses
*[A-Za-z0-9])@(([A-Za-z0-9]|[A-Za-z] \[A-Za-z0-9\-]*[A-Za-z0-9])\.)+([A-Za-z0-9] \|[A-Za-z0-9][A-Za-z0-9\-]*[A-Za-z0-9])\b
HOSTNAME.REDACTED\b(([A-Za-z]|[A-Za-z][A-Za-z0-9\-] \
Hostnames
*[A-Za-z0-9])\.)+([A-Za-z0-9] \|[A-Za-z0-9][A-Za-z0-9\-]*[A-Za-z0-9])\b
Enabling Log and Query Redaction Using Cloudera ManagerCloudera recommends using the new layout in Cloudera Manager, instead of the classic layout, to enable redaction.The new layout allows you to add preconfigured redaction rules and test your rules inline. To enable log and queryredaction in Cloudera Manager:
1. Go to the HDFS service.2. Click the Configuration tab.3. In the Search box, type redaction to bring up the following redaction properties.
DescriptionProperty
Check this checkbox to enable log and query redaction for the cluster.Enable Log andQuery Redaction
List of rules for redacting sensitive information from log files and query strings.Choose a preconfigured rule or add a custom rule.
Test your rules by entering sample text into the Test Redaction Rules text boxand click Test Redaction. If no rules match, the text you entered is returnedunchanged.
Log and Query Redaction Policy
4. Optionally, enter a reason for the configuration changes.5. Click Save Changes to commit the changes.6. Restart the cluster.
Configuring the Cloudera Navigator Data Management Component to Redact PII
Important: This feature is superseded by cluster-wide redaction of logs and SQL queries describedabove. If you have already enabled redaction, you do not need to perform the steps described in thissection. Use the following instructions only if you want to enable redaction for the Navigator Auditand Metadata servers only, and not cluster-wide.
You can specify credit card number patterns and other PII to be masked in audit events, in the properties of entitiesdisplayed in lineage diagrams, and in information retrieved from the Audit Server database and the Metadata Serverpersistent storage. Redacting data other than credit card numbers is not supported out-of-the-box with this ClouderaNavigator property. You may use a different regular expression to redact Social Security numbers or other PII. Maskingis not applied to audit events and lineage entities that existed before the mask was enabled.
358 | Cloudera Security
Sensitive Data Redaction

Minimum Required Role: Navigator Administrator (also provided by Full Administrator)
1. Do one of the following:
• Select Clusters > Cloudera Management Service > Cloudera Management Service.• On the Status tab of theHomepage, in ClouderaManagement Service table, click the ClouderaManagement
Service link.
2. Click the Configuration tab.3. Expand the Navigator Audit Server Default Group category.4. Click the Advanced category.5. Configure the PII Masking Regular Expression property with a regular expression that matches the credit card
number formats to be masked. The default expression is:
(4[0-9]{12}(?:[0-9]{3})?)|(5[1-5][0-9]{14})|(3[47][0-9]{13})|(3(?:0[0-5]|[68][0-9])[0-9]{11})|(6(?:011|5[0-9]{2})[0-9]{12})|((?:2131|1800|35\\d{3})\\d{11})
which is constructed from the following subexpressions:
• Visa - (4[0-9]{12}(?:[0-9]{3})?)• MasterCard - (5[1-5][0-9]{14})• American Express - (3[47][0-9]{13})• Diners Club - (3(?:0[0-5]|[68][0-9])[0-9]{11})• Discover - (6(?:011|5[0-9]{2})[0-9]{12})• JCB - ((?:2131|1800|35\\d{3})\\d{11})
If the property is left blank, PII information is not masked.6. Click Save Changes to commit the changes.
Cloudera Security | 359
Sensitive Data Redaction

Overview of Impala Security
Impala includes a fine-grained authorization framework for Hadoop, based on the Sentry open source project. Sentryauthorization was added in Impala 1.1.0. Together with the Kerberos authentication framework, Sentry takes Hadoopsecurity to a new level needed for the requirements of highly regulated industries such as healthcare, financial services,and government. Impala also includes an auditing capability; Impala generates the audit data, the Cloudera Navigatorproduct consolidates the audit data from all nodes in the cluster, and Cloudera Manager lets you filter, visualize, andproduce reports. The auditing feature was added in Impala 1.1.1.
The Impala security features have several objectives. At the most basic level, security prevents accidents or mistakesthat could disrupt application processing, delete or corrupt data, or reveal data to unauthorized users. More advancedsecurity features and practices can harden the system against malicious users trying to gain unauthorized access orperform other disallowed operations. The auditing feature provides a way to confirm that no unauthorized accessoccurred, and detect whether any such attemptsweremade. This is a critical set of features for production deploymentsin large organizations that handle important or sensitive data. It sets the stage for multi-tenancy, where multipleapplications run concurrently and are prevented from interfering with each other.
The material in this section presumes that you are already familiar with administering secure Linux systems. That is,you should know the general security practices for Linux andHadoop, and their associated commands and configurationfiles. For example, you should know how to create Linux users and groups, manage Linux group membership, set Linuxand HDFS file permissions and ownership, and designate the default permissions and ownership for new files. Youshould be familiar with the configuration of the nodes in your Hadoop cluster, and know how to apply configurationchanges or run a set of commands across all the nodes.
The security features are divided into these broad categories:
authorization
Which users are allowed to access which resources, andwhat operations are they allowed to perform? Impala relieson the open source Sentry project for authorization. By default (when authorization is not enabled), Impala doesall read and write operations with the privileges of the impala user, which is suitable for a development/testenvironment but not for a secure production environment. When authorization is enabled, Impala uses the OS userID of the user who runs impala-shell or other client program, and associates various privileges with each user.See Enabling Sentry Authorization for Impala on page 333 for details about setting up and managing authorization.
authentication
How does Impala verify the identity of the user to confirm that they really are allowed to exercise the privilegesassigned to that user? Impala relies on the Kerberos subsystem for authentication. See Enabling KerberosAuthentication for Impala on page 106 for details about setting up and managing authentication.
auditing
What operations were attempted, and did they succeed or not? This feature provides a way to look back anddiagnose whether attempts were made to perform unauthorized operations. You use this information to trackdown suspicious activity, and to see where changes are needed in authorization policies. The audit data producedby this feature is collected by the Cloudera Manager product and then presented in a user-friendly form by theCloudera Manager product. See Auditing Impala Operations for details about setting up and managing auditing.
These other topics in the Security Guide cover how Impala integrates with security frameworks such as Kerberos, LDAP,and Sentry:
• Impala Authentication on page 106• Enabling Sentry Authorization for Impala on page 333
Security Guidelines for ImpalaThe following are the major steps to harden a cluster running Impala against accidents and mistakes, or maliciousattackers trying to access sensitive data:
360 | Cloudera Security
Overview of Impala Security

• Secure the root account. The root user can tamper with the impalad daemon, read and write the data files inHDFS, log into other user accounts, and access other system services that are beyond the control of Impala.
• Restrict membership in the sudoers list (in the /etc/sudoers file). The users who can run the sudo commandcan do many of the same things as the root user.
• Ensure the Hadoop ownership and permissions for Impala data files are restricted.
• Ensure the Hadoop ownership and permissions for Impala log files are restricted.
• Ensure that the Impala web UI (available by default on port 25000 on each Impala node) is password-protected.See Impala Web User Interface for Debugging for details.
• Create a policy file that specifies which Impala privileges are available to users in particular Hadoop groups (whichby defaultmap to LinuxOS groups). Create the associated Linux groups using the groupadd command if necessary.
• The Impala authorization featuremakes use of theHDFS file ownership and permissionsmechanism; for backgroundinformation, see the CDH HDFS Permissions Guide. Set up users and assign them to groups at the OS level,corresponding to the different categories of users with different access levels for various databases, tables, andHDFS locations (URIs). Create the associated Linux users using the useradd command if necessary, and add themto the appropriate groups with the usermod command.
• Design your databases, tables, and views with database and table structure to allow policy rules to specify simple,consistent rules. For example, if all tables related to an application are inside a single database, you can assignprivileges for that database and use the * wildcard for the table name. If you are creating views with differentprivileges than the underlying base tables, you might put the views in a separate database so that you can usethe * wildcard for the database containing the base tables, while specifying the precise names of the individualviews. (For specifying table or database names, you either specify the exact name or * to mean all the databaseson a server, or all the tables and views in a database.)
• Enable authorization by running the impalad daemons with the -server_name and-authorization_policy_file options on all nodes. (The authorization feature does not apply to thestatestored daemon, which has no access to schema objects or data files.)
• Set up authentication using Kerberos, to make sure users really are who they say they are.
Securing Impala Data and Log FilesOne aspect of security is to protect files from unauthorized access at the filesystem level. For example, if you storesensitive data in HDFS, you specify permissions on the associated files and directories in HDFS to restrict read andwritepermissions to the appropriate users and groups.
If you issue queries containing sensitive values in the WHERE clause, such as financial account numbers, those valuesare stored in Impala log files in the Linux filesystem and you must secure those files also. For the locations of Impalalog files, see Using Impala Logging.
All Impala read and write operations are performed under the filesystem privileges of the impala user. The impalauser must be able to read all directories and data files that you query, and write into all the directories and data filesfor INSERT and LOAD DATA statements. At a minimum, make sure the impala user is in the hive group so that itcan access files and directories shared between Impala and Hive. See User Account Requirements for more details.
Setting file permissions is necessary for Impala to function correctly, but is not an effective security practice by itself:
• The way to ensure that only authorized users can submit requests for databases and tables they are allowed toaccess is to set up Sentry authorization, as explained in Enabling Sentry Authorization for Impala on page 333.Withauthorization enabled, the checking of the user ID and group is done by Impala, and unauthorized access is blockedby Impala itself. The actual low-level read and write requests are still done by the impala user, so you must haveappropriate file and directory permissions for that user ID.
Cloudera Security | 361
Overview of Impala Security
• You must also set up Kerberos authentication, as described in Enabling Kerberos Authentication for Impala onpage 106, so that users can only connect from trusted hosts. With Kerberos enabled, if someone connects a newhost to the network and creates user IDs that match your privileged IDs, they will be blocked from connecting toImpala at all from that host.
Installation Considerations for Impala SecurityImpala 1.1 comes set up with all the software and settings needed to enable security when you run the impaladdaemon with the new security-related options (-server_name and -authorization_policy_file). You do notneed to change any environment variables or install any additional JAR files. In a clustermanaged by ClouderaManager,you do not need to change any settings in Cloudera Manager.
Securing the Hive Metastore DatabaseIt is important to secure theHivemetastore, so that users cannot access the names or other information about databasesand tables the through the Hive client or by querying the metastore database. Do this by turning on Hive metastoresecurity, using the instructions in the CDH 5 Security Guide for securing different Hive components:
• Secure the Hive Metastore.• In addition, allow access to the metastore only from the HiveServer2 server, and then disable local access to the
HiveServer2 server.
Securing the Impala Web User InterfaceThe instructions in this section presume you are familiar with the .htpasswdmechanism commonly used topassword-protect pages on web servers.
Password-protect the ImpalawebUI that listens on port 25000 by default. Set up a.htpasswd file in the$IMPALA_HOMEdirectory, or start both the impalad and statestored daemons with the --webserver_password_file optionto specify a different location (including the filename).
This file should only be readable by the Impala process and machine administrators, because it contains (hashed)versions of passwords. The username / password pairs are not derived from Unix usernames, Kerberos users, or anyother system. Thedomain field in the password filemustmatch the domain supplied to Impala by the new command-lineoption --webserver_authentication_domain. The default is mydomain.com.
Impala also supports using HTTPS for secure web traffic. To do so, set --webserver_certificate_file to referto a valid .pem SSL certificate file. Impala will automatically start using HTTPS once the SSL certificate has been readand validated. A .pem file is basically a private key, followed by a signed SSL certificate; make sure to concatenate bothparts when constructing the .pem file.
If Impala cannot find or parse the .pem file, it prints an error message and quits.
Note:
If the private key is encrypted using a passphrase, Impalawill ask for that passphrase on startup, whichis not useful for a large cluster. In that case, remove the passphrase and make the .pem file readableonly by Impala and administrators.
When you turn on SSL for the Impala web UI, the associated URLs change from http:// prefixes tohttps://. Adjust any bookmarks or application code that refers to those URLs.
362 | Cloudera Security
Overview of Impala Security

Miscellaneous Topics
This section comprisesmiscellaneous security guide topics that youmay find useful once you have secured your clusterwith authentication, encryption and authorization techniques.
Jsvc, Task Controller and Container Executor ProgramsThis section contains information about the following Hadoop security programs:
MRv1 and YARN: The jsvc Program
The jsvc program is part of the bigtop-jsvc package and installed in either /usr/lib/bigtop-utils/jsvc or/usr/libexec/bigtop-utils/jsvc depending on the particular Linux flavor.
jsvc (more info) is used to start the DataNode listening on low port numbers. Its entry point is theSecureDataNodeStarter class, which implements the Daemon interface that jsvc expects. jsvc is run as root,and calls the SecureDataNodeStarter.init(...)method while running as root. Once theSecureDataNodeStarter class has finished initializing, jsvc sets the effective UID to be the hdfs user, and thencalls SecureDataNodeStarter.start(...). SecureDataNodeStarter then calls the regular DataNode entrypoint, passing in a reference to the privileged resources it previously obtained.
MRv1 Only: The Linux TaskController Program
A setuid binary called task-controller is part of the hadoop-0.20-mapreduce package and is installed in either/usr/lib/hadoop-0.20-mapreduce/sbin/Linux-amd64-64/task-controller or/usr/lib/hadoop-0.20-mapreduce/sbin/Linux-i386-32/task-controller.
This task-controller program, which is used on MRv1 only, allows the TaskTracker to run tasks under the Unixaccount of the user who submitted the job in the first place. It is a setuid binary that must have a very specific set ofpermissions and ownership in order to function correctly. In particular, it must:
1. Be owned by root2. Be owned by a group that contains only the user running the MapReduce daemons3. Be setuid4. Be group readable and executable
This corresponds to the ownership root:mapred and the permissions 4754.
Here is the output of ls on a correctly-configured Task-controller:
-rwsr-xr-- 1 root mapred 30888 Mar 18 13:03 task-controller
The TaskTracker will check for this configuration on start up, and fail to start if the Task-controller is not configuredcorrectly.
YARN Only: The Linux Container Executor Program
A setuid binary called container-executor is part of the hadoop-yarn package and is installed in/usr/lib/hadoop-yarn/bin/container-executor.
Thiscontainer-executorprogram,which is used on YARNonly and supported onGNU/Linux only, runs the containersas the user who submitted the application. It requires all user accounts to be created on the cluster nodes where thecontainers are launched. It uses a setuid executable that is included in the Hadoop distribution. The NodeManageruses this executable to launch and kill containers. The setuid executable switches to the user who has submitted theapplication and launches or kills the containers. For maximum security, this executor sets up restricted permissionsand user/group ownership of local files and directories used by the containers such as the shared objects, jars,
Cloudera Security | 363
Miscellaneous Topics

intermediate files, log files, and so on. As a result, only the application owner and NodeManager can access any of thelocal files/directories including those localized as part of the distributed cache.
The container-executor program must have a very specific set of permissions and ownership in order to functioncorrectly. In particular, it must:
1. Be owned by root2. Be owned by a group that contains only the user running the YARN daemons3. Be setuid4. Be group readable and executable
This corresponds to the ownership root:yarn and the permissions 6050.
---Sr-s--- 1 root yarn 91886 2012-04-01 19:54 container-executor
Important: Configuration changes to the Linux container executor could result in local NodeManagerdirectories (such as usercache) being left with incorrect permissions. To avoid this, when makingchanges using either Cloudera Manager or the command line, first manually remove the existingNodeManager local directories from all configured local directories(yarn.nodemanager.local-dirs), and let the NodeManager recreate the directory structure.
Task-controller and Container-executor Error Codes
When you set up a secure cluster for the first time and debug problems with it, the task-controller orcontainer-executormay encounter errors. These programs communicate these errors to the TaskTracker orNodeManager daemon via numeric error codes whichwill appear in the TaskTracker or NodeManager logs respectively(/var/log/hadoop-mapreduce or /var/log/hadoop-yarn). The following sections list the possible numericerror codes with descriptions of what they mean:
• MRv1 ONLY: Task-controller Error Codes on page 364• YARN ONLY: Container-executor Error Codes on page 366
MRv1 ONLY: Task-controller Error Codes
The following table applies to the task-controller in MRv1.
DescriptionNameNumericCode
INVALID_ARGUMENT_NUMBER1 • Incorrect number of arguments provided forthe given task-controller command
• Failure to initialize the job localizer
The user passed to the task-controller does notexist.
INVALID_USER_NAME2
The task-controller does not recognize thecommand it was asked to execute.
INVALID_COMMAND_PROVIDED3
The user passed to the task-controllerwas the superuser.
SUPER_USER_NOT_ALLOWED_TO_RUN_TASKS4
The passed TaskTracker root does not match theconfigured TaskTracker root (mapred.local.dir),or does not exist.
INVALID_TT_ROOT5
Either could not read the local groups database, orcould not set UID or GID
SETUID_OPER_FAILED6
364 | Cloudera Security
Miscellaneous Topics
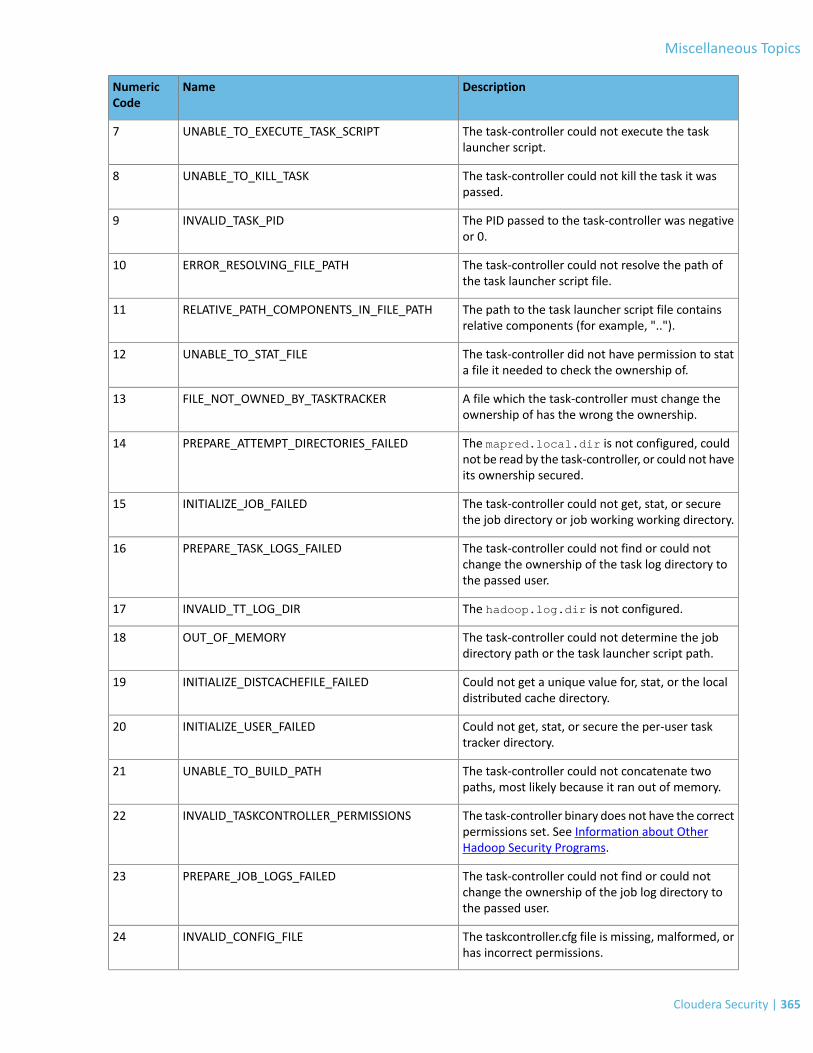
DescriptionNameNumericCode
The task-controller could not execute the tasklauncher script.
UNABLE_TO_EXECUTE_TASK_SCRIPT7
The task-controller could not kill the task it waspassed.
UNABLE_TO_KILL_TASK8
The PID passed to the task-controller was negativeor 0.
INVALID_TASK_PID9
The task-controller could not resolve the path ofthe task launcher script file.
ERROR_RESOLVING_FILE_PATH10
The path to the task launcher script file containsrelative components (for example, "..").
RELATIVE_PATH_COMPONENTS_IN_FILE_PATH11
The task-controller did not have permission to stata file it needed to check the ownership of.
UNABLE_TO_STAT_FILE12
A file which the task-controller must change theownership of has the wrong the ownership.
FILE_NOT_OWNED_BY_TASKTRACKER13
The mapred.local.dir is not configured, couldnot be read by the task-controller, or could not haveits ownership secured.
PREPARE_ATTEMPT_DIRECTORIES_FAILED14
The task-controller could not get, stat, or securethe job directory or job working working directory.
INITIALIZE_JOB_FAILED15
The task-controller could not find or could notchange the ownership of the task log directory tothe passed user.
PREPARE_TASK_LOGS_FAILED16
The hadoop.log.dir is not configured.INVALID_TT_LOG_DIR17
The task-controller could not determine the jobdirectory path or the task launcher script path.
OUT_OF_MEMORY18
Could not get a unique value for, stat, or the localdistributed cache directory.
INITIALIZE_DISTCACHEFILE_FAILED19
Could not get, stat, or secure the per-user tasktracker directory.
INITIALIZE_USER_FAILED20
The task-controller could not concatenate twopaths, most likely because it ran out of memory.
UNABLE_TO_BUILD_PATH21
The task-controller binary does not have the correctpermissions set. See Information about OtherHadoop Security Programs.
INVALID_TASKCONTROLLER_PERMISSIONS22
The task-controller could not find or could notchange the ownership of the job log directory tothe passed user.
PREPARE_JOB_LOGS_FAILED23
The taskcontroller.cfg file is missing, malformed, orhas incorrect permissions.
INVALID_CONFIG_FILE24
Cloudera Security | 365
Miscellaneous Topics

DescriptionNameNumericCode
There are several causes for this error. Somecommon causes are:
Unknown Error255
• There are user accounts on your cluster thathave a user ID less than the value specified forthe min.user.id property in thetaskcontroller.cfg file. The default valueis 1000 which is appropriate on Ubuntusystems, but may not be valid for youroperating system. For information aboutsetting min.user.id in thetaskcontroller.cfg file, see this step.
• Jobs won't run and the TaskTracker is unableto create a Hadoop logs directory. For moreinformation, see (MRv1 Only) Jobs will not runand TaskTracker is unable to create a Hadooplogs directory. on page 152.
• This error is often caused by previous errors;look earlier in the log file for possible causes.
YARN ONLY: Container-executor Error Codes
The codes in the table apply to the container-executor in YARN, but are used by the LinuxContainerExecutor only.
DescriptionNameNumericCode
INVALID_ARGUMENT_NUMBER1 • Incorrect number of arguments provided forthe given task-controller command
• Failure to initialize the container localizer
The user passed to the task-controller does notexist.
INVALID_USER_NAME2
The container-executor does not recognize thecommand it was asked to run.
INVALID_COMMAND_PROVIDED3
The passed NodeManager root does not match theconfigured NodeManager root
INVALID_NM_ROOT5
(yarn.nodemanager.local-dirs), or does notexist.
Either could not read the local groups database, orcould not set UID or GID
SETUID_OPER_FAILED6
The container-executor could not run the containerlauncher script.
UNABLE_TO_EXECUTE_CONTAINER_SCRIPT7
The container-executor could not signal thecontainer it was passed.
UNABLE_TO_SIGNAL_CONTAINER8
The PID passed to the container-executor wasnegative or 0.
INVALID_CONTAINER_PID9
366 | Cloudera Security
Miscellaneous Topics

DescriptionNameNumericCode
The container-executor couldn't allocate enoughmemory while reading the container-executor.cfg
OUT_OF_MEMORY18
file, or while getting the paths for the containerlauncher script or credentials files.
Couldn't get, stat, or secure the per-userNodeManager directory.
INITIALIZE_USER_FAILED20
The container-executor couldn't concatenate twopaths, most likely because it ran out of memory.
UNABLE_TO_BUILD_PATH21
The container-executor binary does not have thecorrect permissions set. See Information aboutOther Hadoop Security Programs.
INVALID_CONTAINER_EXEC_PERMISSIONS22
The container-executor.cfg file is missing,malformed, or has incorrect permissions.
INVALID_CONFIG_FILE24
Could not set the session ID of the forked container.SETSID_OPER_FAILED25
Failed to write the value of the PID of the launchedcontainer to the PID file of the container.
WRITE_PIDFILE_FAILED26
This error has several possible causes. Somecommon causes are:
Unknown Error255
• User accounts on your cluster have a user IDless than the value specified for themin.user.id property in thecontainer-executor.cfg file. The defaultvalue is 1000 which is appropriate on Ubuntusystems, but may not be valid for youroperating system. For information aboutsetting min.user.id in thecontainer-executor.cfg file, see this step.
• This error is often caused by previous errors;look earlier in the log file for possible causes.
Sqoop, Pig, and Whirr Security Support StatusHere is a summary of the status of security in the other CDH 5 components:
• Sqoop 1 and Pig support security with no configuration required.• Whirr does not support security in CDH 5.
Setting Up a Gateway Node to Restrict Cluster AccessUse the instructions that follow to set up and use a Hadoop cluster that is entirely firewalled off from outside access;the only exception will be one node which will act as a gateway. Client machines can access the cluster through thegateway using the REST API.
HttpFS will be used to allow REST access to HDFS, and Oozie will allow REST access for submitting and monitoring jobs.
Cloudera Security | 367
Miscellaneous Topics

Installing and Configuring the Firewall and Gateway
Follow these steps:
1. Choose a cluster node to be the gateway machine.2. Install and configure the Oozie server by following the standard directions starting here: Installing Oozie.3. Install HttpFS.4. Start the Oozie server:
$ sudo service oozie start
5. Start the HttpFS server:
$ sudo service hadoop-httpfs start
6. Configure firewalls.
Block all access from outside the cluster.
• The gateway node should have ports 11000 (oozie) and 14000 (hadoop-httpfs) open.• Optionally, to maintain access to the Web UIs for the cluster's JobTrackers, NameNodes, etc., open their
HTTP ports: see Ports Used by Components of CDH 5.
7. Optionally configure authentication in simple mode (default) or using Kerberos. See HttpFS Authentication onpage 93 to configure Kerberos for HttpFS and Oozie Authentication on page 113 to configure Kerberos for Oozie.
8. Optionally encrypt communication using HTTPS for Oozie by following these directions.
Accessing HDFS
With the Hadoop client:
All of the standard hadoop fs commands will work; just make sure to specify -fs webhdfs://HOSTNAME:14000.For example (where GATEWAYHOST is the hostname of the gateway machine):
$ hadoop fs -fs webhdfs://GATEWAYHOST:14000 -cat /user/me/myfile.txtHello World!
Without the Hadoop client:
You can run all of the standard hadoop fs commands by using the WebHDFS REST API and any program that cando GET , PUT, POST, and DELETE requests; for example:
$ curl "http://GATEWAYHOST:14000/webhdfs/v1/user/me/myfile.txt?op=OPEN&user.name=me"Hello World!
Important: The user.name parameter is valid only if security is disabled. In a secure cluster, you musta initiate a valid Kerberos session.
In general, the command will look like this:
$ curl "http://GATEWAYHOST/webhdfs/v1/PATH?[user.name=USER&]op=…"
You can find a full explanation of the commands in the WebHDFS REST API documentation.
Submitting and Monitoring Jobs
The Oozie REST API currently supports direct submission of MapReduce, Pig, and Hive jobs; Oozie will automaticallycreate a workflow with a single action. For any other action types, or to execute anything more complicated than asingle job, you will need to create an actual workflow. Any required files (e.g. JAR files, input data, etc.) must alreadyexist on HDFS; if they do not, you can use HttpFS to upload the files.
368 | Cloudera Security
Miscellaneous Topics

With the Oozie client:
All of the standard Oozie commands will work. You can find a full explanation of the commands in the documentationfor the command-line utilities.
Without the Oozie client:
You can run all of the standard Oozie commands by using the REST API and any program that can do GET, PUT, andPOST requests. You can find a full explanation of the commands in the Oozie Web Services API documentation.
Logging a Security Support CaseBefore you log a support case, ensure you have either part or all of the following information to help Support investigateyour case:
Kerberos Issues
• For Kerberos issues, your krb5.conf and kdc.conf files are valuable for support to be able to understand yourconfiguration.
• If you are having trouble with client access to the cluster, provide the output for klist -ef after kiniting as theuser account on the client host in question. Additionally, confirm that your ticket is renewable by running kinit-R after successfully kiniting.
• Specify if you are authenticating (kiniting) with a user outside of the Hadoop cluster's realm (such as ActiveDirectory, or another MIT Kerberos realm).
• If using AES-256 encryption, ensure you have the Unlimited Strength JCE Policy Files deployed on all cluster andclient nodes.
SSL/TLS Issues
• Specify whether you are using a private/commercial CA for your certificates, or if they are self-signed. Note thatCloudera strongly recommends against using self-signed certificates in production clusters.
• Clarify what services you are attempting to setup SSL/TLS for in your description.• When troubleshooting SSL/TLS trust issues, provide the output of the following openssl command:
openssl s_client -connect host.fqdn.name:port
LDAP Issues
• Specify the LDAP service in use (Active Directory, OpenLDAP, one of Oracle Directory Server offerings, OpenDJ,etc)
• Provide a screenshot of the LDAP configuration screen you are working with if you are troubleshooting setupissues.
• Be prepared to troubleshoot using the ldapsearch command (requires the openldap-clients package) onthe host where LDAP authentication or authorization issues are being seen.
Using Antivirus Software on CDH HostsIf you use antivirus software on your servers, consider configuring it to skip scans on certain types of Hadoop-specificresources. It can take a long time to scan large files or directories with a large number of files. In addition, if yourantivirus software locks files or directories as it scans them, those resourceswill be unavailable to your Hadoop processesduring the scan, and can cause latency or unavailability of resources in your cluster. Consider skipping scans on thefollowing types of resources:
• Scratch directories used by services such as Impala• Log directories used by various Hadoop services• Data directories which can grow to petabytes in size
Cloudera Security | 369
Miscellaneous Topics

The specific directory names and locations depend on the services your cluster uses and your configuration. In general,avoid scanning very large directories and filesystems. Instead, limit write access to these locations using securitymechanisms such as access controls at the level of the operating system, HDFS, or at the service level.
370 | Cloudera Security
Miscellaneous Topics


![CENTERITY SERVICE PACK FOR CLOUDERA€¦ · OOZIE [roles status] • CLOUDERA ROLES SOLR [roles status] • CLOUDERA ROLES SPARK [roles status] • CLOUDERA ROLES SQOOP [roles status]](https://img.dokumen.tips/doc/110x75/5fc0df6d43307a59a12ae0a7/centerity-service-pack-for-cloudera-oozie-roles-status-a-cloudera-roles-solr.jpg)


