Embed Size (px)
Citation preview

B1WD-3387-01ENZ0(00)July 2015
Windows(R)
FUJITSU SoftwareSystemwalker Live Help
Client's Guide
Preface
Purpose of this guide
This document provides an overview of the functions and reference information on the remote operation functions of SystemwalkerDesktop Patrol.
Systemwalker is a generic name for the distributed system operation management products provided by Fujitsu Limited.
Intended readers
This document is aimed at persons who will use the remote operation functions of Systemwalker Desktop Patrol.
To understand the contents of this guide, the following knowledge is essential.
- General knowledge regarding personnel computers
- General knowledge regarding Windows
- General knowledge regarding the Internet
Structure of this guide
The structure of this guide is as follows:
Chapter 1 Installing and Uninstalling the Software
Describes how to install and uninstall Live Help Client software, and system requirements of it.
Chapter 2 Live Help Support Session
Walks you through from launching to exiting of Live Help Client program.
Chapter 3 User Interaction with Live Help Client
Describes about screens and messages displayed on Live Help Client program and how to deal them.
Chapter 4 Changing your Configuration
Explains how to change your Live Help Client program settings.
Appendix A Release Notes
This appendix describes the release information about this version/level.
Appendix B Information Collection Using FJQSS
This appendix explains how to access the reference material for FJQSS (Information Collection Tool).
Location of this guide
In Systemwalker Desktop Patrol manual, location of this guide is shown as follows.
Manual Name Contents
Systemwalker Desktop Patrol Release Information Functions modified and added to Systemwalker Desktop Patrol, anditems that become incompatible after a version upgrade.
Systemwalker Desktop Patrol User's Guide (ThisGuide)
Basic knowledge of Systemwalker Desktop Patrol, such as overview,features, functions, etc.
Systemwalker Desktop Patrol Installation Guide How to install Systemwalker Desktop Patrol, change the operationenvironment, and perform maintenance.
Systemwalker Desktop Patrol Operation Guide: forAdministrators
How to collect PC information, install security patches, distributesoftware, license management, management ledger, and environmentsetup of Systemwalker Desktop Keeper.
- i -

Manual Name Contents
Systemwalker Desktop Patrol Operation Guide: forClients
How to install, operate and change the settings of the client side. Inaddition, it explains how to handle error messages output from clientside.
Systemwalker Desktop Patrol Reference Manual Commands, files and port numbers used in Systemwalker DesktopPatrol. In addition, it explains how to handle error message output fromSystemwalker Desktop Patrol.
Also, the following manuals are enclosed as Systemwalker Live Help manuals. Please refer to them when you use the remote operationfunction (Systemwalker Live Help Function).
Manual Name Contents
Systemwalker Live Help User's Guide It explains how to install Systemwalker Live Help, how to use thehardware and software and set the support center. In addition, it alsoexplains how to manage by Live Help Connection Manager.
Systemwalker Live Help Client Guide It explains how to install, use and set Systemwalker Live Help Client.
Symbols used in this guide
This guide uses the following names, symbols and abbreviations for explications.
Symbols used in commands
This subsection describes the symbols used in the examples of commands.
Meaning of symbols
Symbol Meaning
[ ] Indicates that the items enclosed in these brackets can be omitted.
l Indicates that one of the items separated by this symbol should be specified.
{ } Indicates that one of the items enclosed in these symbols should be specified.
Symbols used in this guide
The following symbols are used in this guide.
Meaning of symbols
Symbol Meaning
n Indicates variable value.
Note
Indicates an item requires special attention.
Point
Indicates useful information.
Abbreviations
In this guide, the operating system names are abbreviated as follows.
- ii -
Abbreviation Full Name
Windows Server 2012 R2 Microsoft(R) Windows Server(R) 2012 R2 StandardMicrosoft(R) Windows Server(R) 2012 R2 EssentialsMicrosoft(R) Windows Server(R) 2012 R2 FoundationMicrosoft(R) Windows Server(R) 2012 R2 Datacenter
Windows Server 2012 Microsoft(R) Windows Server(R) 2012 StandardMicrosoft(R) Windows Server(R) 2012 EssentialsMicrosoft(R) Windows Server(R) 2012 FoundationMicrosoft(R) Windows Server(R) 2012 Datacenter
Windows Server 2008 R2 Microsoft(R) Windows Server(R) 2008 R2 FoundationMicrosoft(R) Windows Server(R) 2008 R2 StandardMicrosoft(R) Windows Server(R) 2008 R2 Enterprise
Windows Server 2008STD
Microsoft(R) Windows Server(R) 2008 StandardMicrosoft(R) Windows Server(R) 2008 Standard without Hyper-V™
Windows Server 2008 EE Microsoft(R) Windows Server(R) 2008 EnterpriseMicrosoft(R) Windows Server(R) 2008 Enterprise without Hyper-V™
Windows Server 2008Foundation
Microsoft(R) Windows Server(R) 2008 FoundationMicrosoft(R) Windows Server(R) 2008 R2 Foundation
Windows Server 2003STD
Microsoft(R) Windows Server(R) 2003, Standard EditionMicrosoft(R) Windows Server(R) 2003, Standard x64 EditionMicrosoft(R) Windows Server(R) 2003 R2, Standard EditionMicrosoft(R) Windows Server(R) 2003 R2, Standard x64 Edition
Windows Server 2003 EE Microsoft(R) Windows Server(R) 2003, Enterprise EditionMicrosoft(R) Windows Server(R) 2003, Enterprise x64 EditionMicrosoft(R) Windows Server(R) 2003 R2, Enterprise EditionMicrosoft(R) Windows Server(R) 2003 R2, Enterprise x64 Edition
Windows Server 2003STD(x64)
Microsoft(R) Windows Server(R) 2003, Standard x64 EditionMicrosoft(R) Windows Server(R) 2003 R2, Standard x64 Edition
Windows Server 2003EE(x64)
Microsoft(R) Windows Server(R) 2003, Enterprise x64 EditionMicrosoft(R) Windows Server(R) 2003 R2, Enterprise x64 Edition
Windows 8.1 Windows(R) 8.1Windows(R) 8.1 ProWindows(R) 8.1 Enterprise
Windows 8 Windows(R) 8Windows(R) 8 ProWindows(R) 8 Enterprise
Windows 7 Windows(R) 7 EnterpriseWindows(R) 7 UltimateWindows(R) 7 ProfessionalWindows(R) 7 Home Premium
Windows Vista Microsoft(R) Windows Vista(R) UltimateMicrosoft(R) Windows Vista(R) EnterpriseMicrosoft(R) Windows Vista(R) BusinessMicrosoft(R) Windows Vista(R) Home PremiumMicrosoft(R) Windows Vista(R) Home BasicMicrosoft(R) Windows Vista(R) Ultimate 64-bit EditionMicrosoft(R) Windows Vista(R) Enterprise 64-bit EditionMicrosoft(R) Windows Vista(R) Business 64-bit EditionMicrosoft(R) Windows Vista(R) Home Premium 64-bit EditionMicrosoft(R) Windows Vista(R) Home Basic 64-bit Edition
- iii -

Abbreviation Full Name
Windows Microsoft(R) Windows Server(R) 2012 R2 StandardMicrosoft(R) Windows Server(R) 2012 R2 EssentialsMicrosoft(R) Windows Server(R) 2012 R2 FoundationMicrosoft(R) Windows Server(R) 2012 R2 DatacenterMicrosoft(R) Windows Server(R) 2012 StandardMicrosoft(R) Windows Server(R) 2012 EssentialsMicrosoft(R) Windows Server(R) 2012 FoundationMicrosoft(R) Windows Server(R) 2012 DatacenterMicrosoft(R) Windows Server(R) 2008 FoundationMicrosoft(R) Windows Server(R) 2008 StandardMicrosoft(R) Windows Server(R) 2008 EnterpriseMicrosoft(R) Windows Server(R) 2008 Standard without Hyper-V™
Microsoft(R) Windows Server(R) 2008 Enterprise without Hyper-V™
Microsoft(R) Windows Server(R) 2008 R2 FoundationMicrosoft(R) Windows Server(R) 2008 R2 StandardMicrosoft(R) Windows Server(R) 2008 R2 EnterpriseMicrosoft(R) Windows Server(R) 2003, Standard EditionMicrosoft(R) Windows Server(R) 2003, Enterprise EditionMicrosoft(R) Windows Server(R) 2003, Standard x64 EditionMicrosoft(R) Windows Server(R) 2003, Enterprise x64 EditionMicrosoft(R) Windows Server(R) 2003 R2, Standard EditionMicrosoft(R) Windows Server(R) 2003 R2, Enterprise EditionMicrosoft(R) Windows Server(R) 2003 R2, Standard x64 EditionMicrosoft(R) Windows Server(R) 2003 R2, Enterprise x64 EditionWindows(R) 8.1Windows(R) 8.1 ProWindows(R) 8.1 EnterpriseWindows(R) 8Windows(R) 8 ProWindows(R) 8 EnterpriseWindows(R) 7 EnterpriseWindows(R) 7 UltimateWindows(R) 7 ProfessionalWindows(R) 7 Home PremiumMicrosoft(R) Windows Vista(R) UltimateMicrosoft(R) Windows Vista(R) EnterpriseMicrosoft(R) Windows Vista(R) BusinessMicrosoft(R) Windows Vista(R) Home PremiumMicrosoft(R) Windows Vista(R) Home BasicMicrosoft(R) Windows Vista(R) Ultimate 64-bit EditionMicrosoft(R) Windows Vista(R) Enterprise 64-bit EditionMicrosoft(R) Windows Vista(R) Business 64-bit EditionMicrosoft(R) Windows Vista(R) Home Premium 64-bit EditionMicrosoft(R) Windows Vista(R) Home Basic 64-bit Edition
IIS Internet Information Services 6.0Internet Information Services 7.0Internet Information Services 7.5Internet Information Services 8.0Internet Information Services 8.5
IE Microsoft(R) Internet Explorer(R) 6.0Windows(R) Internet Explorer(R) 7Windows(R) Internet Explorer(R) 8Windows(R) Internet Explorer(R) 9 Windows(R) Internet Explorer(R) 10Windows(R) Internet Explorer(R) 11
- iv -

Abbreviation Full Name
Android Android(TM) 3.0 - Android(TM) 5.0
iOS iOS 5.0 - iOS 8.1
Shortcuts in the Start window of Windows(R) 8 and Windows Server(R) 2012
To check which product a shortcut in the Start window is for, right-click the shortcut and click Open File Location from the menuat the bottom of the screen. This will open the file location in Windows Explorer, where the product name can be checked.
Halfwidth characters
In this guide, the "halfwidth characters to be handled" refer to the following ASCII characters, except in places where limitations forthe halfwidth characters that can be used are described.
- Halfwidth spaces
- Halfwidth symbols
! " # $ % & ' ( ) * + , - . / : ; < = > ? @ [ \ ] ^ _ ` { | } ~
- Halfwidth numbers
0 1 ... 9
- Halfwidth alphabetic characters
A B ... Z
a b ... z
Characters other than the above are treated as fullwidth characters.
Version notation
The following versions of this product do not have an English version - please ignore references to them.
- Systemwalker Desktop Patrol V12.0L10
- Systemwalker Desktop Patrol V13.3.0
- Systemwalker Desktop Patrol V14.0.0
- Systemwalker Desktop Patrol V14.0.1
- Systemwalker Desktop Patrol V14.1.0
- Systemwalker Desktop Patrol V14.3.0
- Systemwalker Desktop Patrol V14.3.1
- Systemwalker Desktop Patrol V15.0.0
- Systemwalker Desktop Patrol V15.0.1
For example, read "V15.0.1 or later" as "V14.2.0 or later", because V15.0.1 does not have an English version.
Likewise, read "V14.0.0 or earlier" as "V13.2.0 or earlier", because V14.3.1 does not have an English version.
The table below shows the available versions:
Japanese version English version
V11.0L10 V11.0L10
V12.0L10 V11.0L10
V13.0.0 V13.0.0
V13.2.0/V13.2.1 V13.2.0
V13.3.0 V13.2.0
V14.0.0/V14.0.1 V13.2.0
- v -

Japanese version English version
V14.1.0 V13.2.0
V14.2.0 V14.2.0
V14.3.0 V14.2.0
V14.3.1 V14.2.0
V15.0.0 V14.2.0
V15.0.1 V14.2.0
V15.1.0 V15.1.0
Export management regulations
Exportation/release of this document may require necessary procedures in accordance with the regulations of your resident countryand/or US export control laws.
Trademark
Intel, Intel vPro and Centrino are trademarks or registered trademarks of Intel Corporation or its subsidiaries in the United States and othercountries.
Microsoft, Windows, Windows NT, Windows Vista, Windows Server, Active Directory and names or product names of other Microsoft'sproducts are registered trademarks of Microsoft Corporation in the United States and other countries
Oracle is the registered trademark of Oracle Corporation.
Symantec, the Symantec logo, and Norton AntiVirus are registered trademarks of Symantec Corporation in the United States.
VirusBuster is registered trademark of Trendmicro Ltd.
VirusScan and NetShield are trademarks or registered trademarks of Network Associate, Inc. or its affiliates.
Google, the Google logo, Android, the Android logo, Google Play, the Google Play logo, Gmail, and the Gmail logo are trademarks orregistered trademarks of Google Inc.
Wi-Fi is a registered trademark of Wi-Fi Alliance.
IOS is a trademark or registered trademark of Cisco in the U.S. and other countries and is used under license.
Apple, the Apple logo, and Mac OS are trademarks of Apple Inc., registered in the United States and other countries.
All other trademarks are the property of their respective owners.
Screen shots are used in accordance with Microsoft Corporation's guidelines.
July 2015
First edition, July 2015
Copyright 1993 - 2015 FUJITSU LIMITED
- vi -
ContentsChapter 1 Installing and Uninstalling the Software...................................................................................................................1
1.1 System Requirements.......................................................................................................................................................................... 11.1.1 Hardware Requirements............................................................................................................................................................... 11.1.2 Software Requirements.................................................................................................................................................................3
1.2 Precautions...........................................................................................................................................................................................41.3 Installing Live Help Client Using the Product CD-ROM....................................................................................................................5
1.3.1 Installing Live Help Client........................................................................................................................................................... 51.4 Installing Live Help Client Using the Live Help Installer Customize Wizard..................................................................................12
1.4.1 Flow of the installation using Live Help Installer Customize Wizard....................................................................................... 131.4.2 Start the Live Help Installer Customize Wizard.........................................................................................................................13
1.4.2.1 Select Install Package ......................................................................................................................................................... 151.4.2.2 Specify Settings to Customize............................................................................................................................................. 171.4.2.3 Live Help Client Settings.....................................................................................................................................................231.4.2.4 Save Install Package............................................................................................................................................................ 24
1.5 Uninstalling Live Help Client............................................................................................................................................................25
Chapter 2 Live Help Support Session.................................................................................................................................... 272.1 Starting Live Help..............................................................................................................................................................................272.2 Client Startup Screen......................................................................................................................................................................... 272.3 Client Dial Dialog Box...................................................................................................................................................................... 28
2.3.1 Client Settings Screen.................................................................................................................................................................282.3.1.1 Adding and Editing Phone Book Entries.............................................................................................................................29
2.3.2 Dialing Rules.............................................................................................................................................................................. 292.4 Closing Live Help Client................................................................................................................................................................... 29
Chapter 3 User Interaction with Live Help Client....................................................................................................................313.1 Sending a File.................................................................................................................................................................................... 31
3.1.1 File Transfer Progress.................................................................................................................................................................313.2 Sending a Reply to a Message........................................................................................................................................................... 313.3 Sending Clipboard Information......................................................................................................................................................... 32
3.3.1 Clipboard Transfer Progress....................................................................................................................................................... 323.4 Remote Control..................................................................................................................................................................................323.5 Connection Notice Feature................................................................................................................................................................ 323.6 Instruction Mode................................................................................................................................................................................32
Chapter 4 Changing your Configuration.................................................................................................................................344.1 Changing your Live Help settings by using the Client Setup program ............................................................................................ 34
4.1.1 User Name.................................................................................................................................................................................. 354.1.2 Security Options......................................................................................................................................................................... 35
4.1.2.1 Live Help Password Authentication.................................................................................................................................... 354.1.2.2 Windows group based authentication.................................................................................................................................. 364.1.2.3 Approve Connections ......................................................................................................................................................... 394.1.2.4 Remote Control Options...................................................................................................................................................... 39
4.1.3 Communications Options........................................................................................................................................................... 394.1.3.1 Network Setup - TCP/IP...................................................................................................................................................... 404.1.3.2 TCP/IP Setup....................................................................................................................................................................... 404.1.3.3 Modifying Entries in the Restricted Connections List.........................................................................................................424.1.3.4 Modem Setup.......................................................................................................................................................................43
4.1.4 Running Client as a Windows Service....................................................................................................................................... 444.1.5 Setting of the Connection Notice Feature...................................................................................................................................454.1.6 Other Startup Options................................................................................................................................................................. 46
4.2 Changing your Live Help settings by using Live Help Client Configuration Feature...................................................................... 46
Appendix A Release Notes.....................................................................................................................................................47A.1 Overview of new functions...............................................................................................................................................................47
- vii -

A.2 Compatibility information................................................................................................................................................................ 47
Appendix B Information Collection Using FJQSS...................................................................................................................48
Index.......................................................................................................................................................................................49
- viii -

Chapter 1 Installing and Uninstalling the Software
This section describes install and uninstall procedure of Live Help Client, Live Help Expert and Live Help Connection Manager. Theflows of the installation and uninstallation tasks are as follows.
To install Live Help Client
1. Make sure the computer meets all of the requirements listed in the section "System Requirements".
2. Read the section "Precautions" and make sure your computer has no problem.
3. Choose one of the following methods:
- Installing Live Help Client Using the Product CD-ROM.
The most ordinary installation method that requires you to specify each setting during the installation.
- Installing Live Help Client Using the Live Help Installer Customize Wizard.
The Live Help Installer Customize Wizard allows you to create a customized install package that some or all installation optionsare pre-configured. By presetting the all install options, you can even perform a silent install.
To uninstall Live Help Client
Refer to the section "Uninstalling Live Help Client".
Note
Refer to the Live Help User's Guide or Live Help Connect Administrator's Guide on how to install Live Help Expert, Live Help ConnectionManager, or Live Help Connect.
1.1 System RequirementsThis section describes the hardware and software requirements to run Live Help Client software.
1.1.1 Hardware RequirementsLive Help software works on the PC-AT compatible computer that meets the following requirements.
Note
There are some exceptions on the cases below:
- Cluster environment
You can use Live Help on a cluster environment, but the cluster failover is not supported. In this case, the remote control functionguarantee is limited to proper work on a normal Windows Server 2008 STD / Windows Server 2008 EE / Windows Server 2008 R2 /Windows Server 2008 Foundation / Windows Server 2012 / Windows Server 2012 R2.
- PRIMERGY FT models
You can use Live Help on PRIMERGY FT models, but only Live Help Client supports CoServer OS. Besides that, there are somemore limitations. Refer to "Appendix H - Support for PRIMERGY FT models" in the "Live Help User's Guide" for further information.
- 1 -
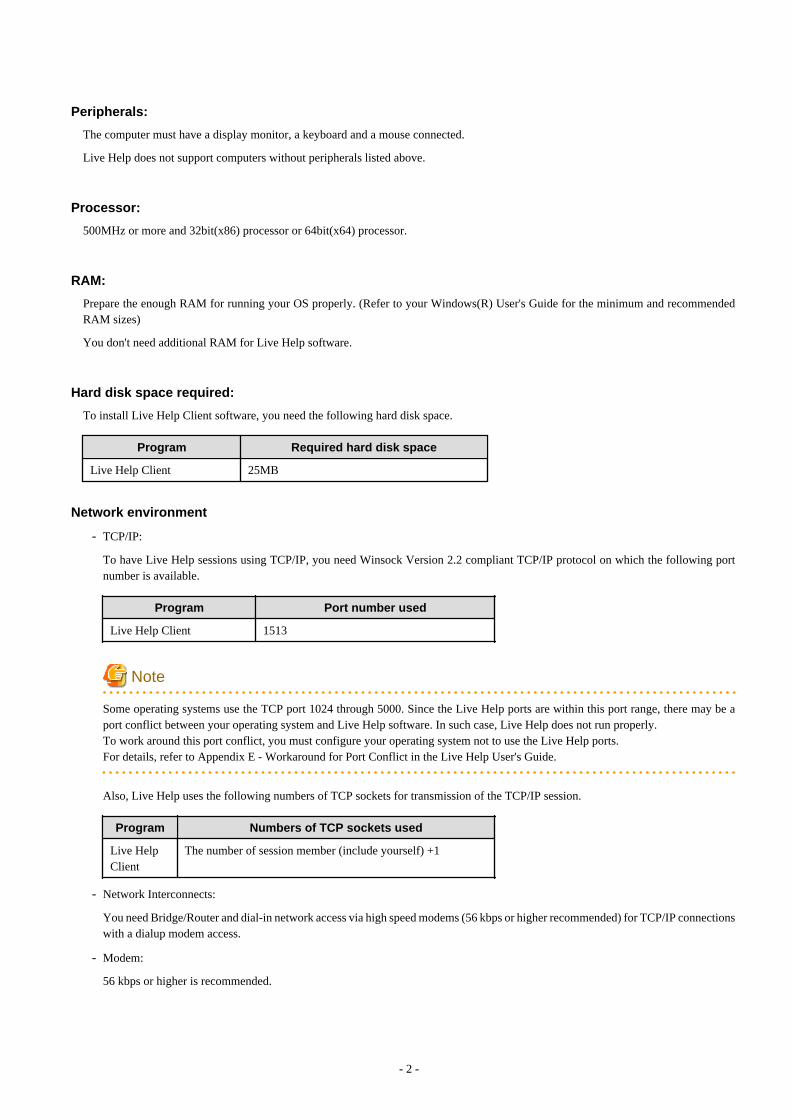
Peripherals:
The computer must have a display monitor, a keyboard and a mouse connected.
Live Help does not support computers without peripherals listed above.
Processor:
500MHz or more and 32bit(x86) processor or 64bit(x64) processor.
RAM:
Prepare the enough RAM for running your OS properly. (Refer to your Windows(R) User's Guide for the minimum and recommendedRAM sizes)
You don't need additional RAM for Live Help software.
Hard disk space required:
To install Live Help Client software, you need the following hard disk space.
Program Required hard disk space
Live Help Client 25MB
Network environment
- TCP/IP:
To have Live Help sessions using TCP/IP, you need Winsock Version 2.2 compliant TCP/IP protocol on which the following portnumber is available.
Program Port number used
Live Help Client 1513
Note
Some operating systems use the TCP port 1024 through 5000. Since the Live Help ports are within this port range, there may be aport conflict between your operating system and Live Help software. In such case, Live Help does not run properly.To work around this port conflict, you must configure your operating system not to use the Live Help ports.For details, refer to Appendix E - Workaround for Port Conflict in the Live Help User's Guide.
Also, Live Help uses the following numbers of TCP sockets for transmission of the TCP/IP session.
Program Numbers of TCP sockets used
Live HelpClient
The number of session member (include yourself) +1
- Network Interconnects:
You need Bridge/Router and dial-in network access via high speed modems (56 kbps or higher recommended) for TCP/IP connectionswith a dialup modem access.
- Modem:
56 kbps or higher is recommended.
- 2 -

1.1.2 Software Requirements
Platforms
Live Help Client works on the following operation systems.
OS Note
Windows Vista
Windows 7
Windows Server 2008 STDWindows Server 2008 EE
Live Help software doesn't run on aServer Core installation. Only Full installation is supported.
Windows Server 2008 Foundation
Windows Server 2008 R2
Windows 8
Windows Server 2012
Windows 8.1
Windows Server 2012 R2
Shell
The Windows(R)' shell is the application that is presented when Windows(R) starts. By default, this application is always Explorer. LiveHelp is designed to work properly only when Windows(R) is using the standard shell.
Programs that cannot coexist with Live Help
Live Help cannot coexist with the following programs.
- Other companies' remote control products
If Live Help is installed on a computer on which one of other companies' remote control products (for example, the remote controlfunctionality of pcAnywhere, LapLink, ReachOut, CoSession, VNC, WinShare, JP1, LANDeskServerManager, SMS, and so on) isinstalled, the Windows(R) system may become unable to start up due to inconsistency. Before installing Live Help, make sure thatother companies' remote control products are not installed. If such products are installed, uninstall them before installing Live Help.
- MetaFrame
We do not guarantee that Live Help will work properly when it is installed together with MetaFrame, which is the add-on softwareof the Terminal Services.
Programs that can coexist with Live Help but require special attention
- The Remote Desktop feature and Terminal Services
Live Help can coexist with the Remote Desktop feature and Terminal Services. However, the use of Live Help on a server where theTerminal Services is running is limited to specific conditions. Refer to the section "Session Condition Requirements" in "Appendix I- Support for Terminal Services" in the "Live Help User's Guide" for further details.
- The Remote Assistance feature
Live Help can coexist with the Remote Assistance (Windows Messenger) feature. However, you must quit the Remote Assistancefeature before using Live Help. In the same manner, you must quit Live Help before using the Remote Assistance feature. We do notguarantee that Live Help will work properly when you use the Remote Assistance feature and Live Help at the same time.
- 3 -
- VM software
You can use Live Help on a VM environment, but there are some limitations as follows;
- Limitations on the network configurationWhen NAT is used on a guest network configuration, the limitations same as on the NAT environment are applied.
- Only a point to point static NAT connection is supported.
- You can have just one NAT device on the communication route between the Live Help Expert and the Live Help Clientcomputers. NAT with multiple layers are not supported.
- Limitations on a guest OS
- To operate a guest OS remotely, you must connect your Live Help Expert to the Live Help Client installed on the guest OS.In this case, you cannot remotely operate the management OS.
- When you see a remotely operated guest OS from the management OS, the mouse on the guest OS may seem not remotecontrolled because the mouse cursor of the guest OS may not move.
1.2 Precautions
General Precautions on Installation of Live Help
- On the installation of [Live Help Client] program , the error report "Could not load driver software" issued by the Fujitsu Live Helpgraphics driver may appear in 'Problem Reports and Solutions' or 'Reliability Monitor' of the operating system. However, you canignore the error report as it does not affect the Live Help functions. Make sure to restart the operating system after installing theseproducts.
- When you install the Live Help Expert and Live Help Client programs on the same computer, they should be the same versions/levels.If the versions/levels are different, the computer will not work properly.
- You cannot remotely install Live Help applications by using one of other companies' remote control products, such as pcAnywhere,LapLink, ReachOut, CoSession, VNC, WinShare, JP1, LANDeskServerManager, SMS, and so on.
- You cannot install Live Help applications when you are working on a user other than the first logged in user by using Fast UserSwitching feature.
- You cannot upgrade the Live Help Client while you are remotely operating it using the Live Help Expert.
- Normally, when an application is installed on an NTFS partition, Windows(R) will provide the "Everyone" group with full accesspermissions to the installation folder. This is considered a security risk. Consequently, when Live Help is installed on an NTFSpartition, the "Everyone" group is removed from the permissions list. This also applies to Live Help's Registration Database entriesregardless of the file system. This is done to prevent unwanted access to Live Help's files and configuration. Interactive Users (thosephysically logged in to the computer) and Administrators will still have full access permissions to the installation folder andRegistration Database entries. Refer to the documentation describing access permissions accompanying your copy of Windows(R) if you find it necessary to restorethese permissions.
- When you use different versions of the Live Help products together on the network, the version of Live Help Expert and Live HelpMonitor must be the same as or later than that of the Live Help Client program.
- You cannot perform remote operation using the touch screen feature.
Precautions on Version Upgrade
This section describes precautions you need to consider when you upgrade your Live Help application from an old version to a newversion.
- User Data Compatibility
There is no data incompatibility.
- 4 -
- Migration of Configuration
Some versions of Live Help do not support migration of some settings. The table below summarizes migration of configuration amongversions.
Upgraded Version
5.0 5.2 10.0 11.0 12.0 13.x
Old V
ersion
5.0 P/C P/C P/C P/C
5.2
10.0
11.0
12.0
13.x
Compatible All settings will be migrated.
However, if you upgrade version 13.1.0 or 13.2.0 of LiveHelp Client, option switches for Live Help Security Setupcommand will become different from the old version.Refer to the section "Version Upgrade" in "Appendix G- Live Help Security Setup Command" in the "Live HelpUser's Guide" for further details.
P/C Partially compatible Some settings will be migrated. Refer to Settings not migrated on partially compatiblecases for more details.
Blank Incompatible No setting will be migrated. (Migration of configuration is not supported.)
Settings not migrated on partially compatible cases
Upgrade installation resets the following settings. Run Client Setup and configure them again after upgrade.
- Approve Connections
- TCP/IP Setup - Local Interface
1.3 Installing Live Help Client Using the Product CD-ROM
1.3.1 Installing Live Help ClientTo install Live Help Client software using the product CD-ROM, follow the steps below:
Note
- You need an administrator's permission to install Live Help software. Therefore, you must logon to the Windows(R) system as anadministrator (a user who belongs to the Administrator group) to install the Live Help products.
- During installation of Live Help, the screen may blackout a few seconds. This is a proper behavior that occurs when Live Help installerregisters drivers for controlling screen information.
- 5 -

- After installing Live Help Client, you must restart the computer to run it.
- For the following operating systems, enable Secure Attention Sequence for the software.
- Windows Vista or later
- Windows Server 2008 or later
Settings
1. From the Start menu or Apps screen, select Run, then execute "gpedit.msc".
2. In the Local Group Policy Editor window, select Computer Configuration >> Administrative Templates >> WindowsComponents >> Windows Logon Options. Then, on the right hand side of the window, double-clickDisable or enable software Secure Attention Sequence.
3. In the Disable or enable software Secure Attention Sequence window, select Enabled, then select Services or Services and Easeof Access applications from the drop-down menu in the bottom left hand side of the window,and then click OK.
4. In the Local Group Policy Editor window, select File >> Exit.
1. Insert the CD containing the Live Help Client software in the CD drive.
The Systemwalker Live Help installation program should automatically start showing the dialog box below. If not, runSWSETUP.EXE stored in the root of the CD.
- 6 -
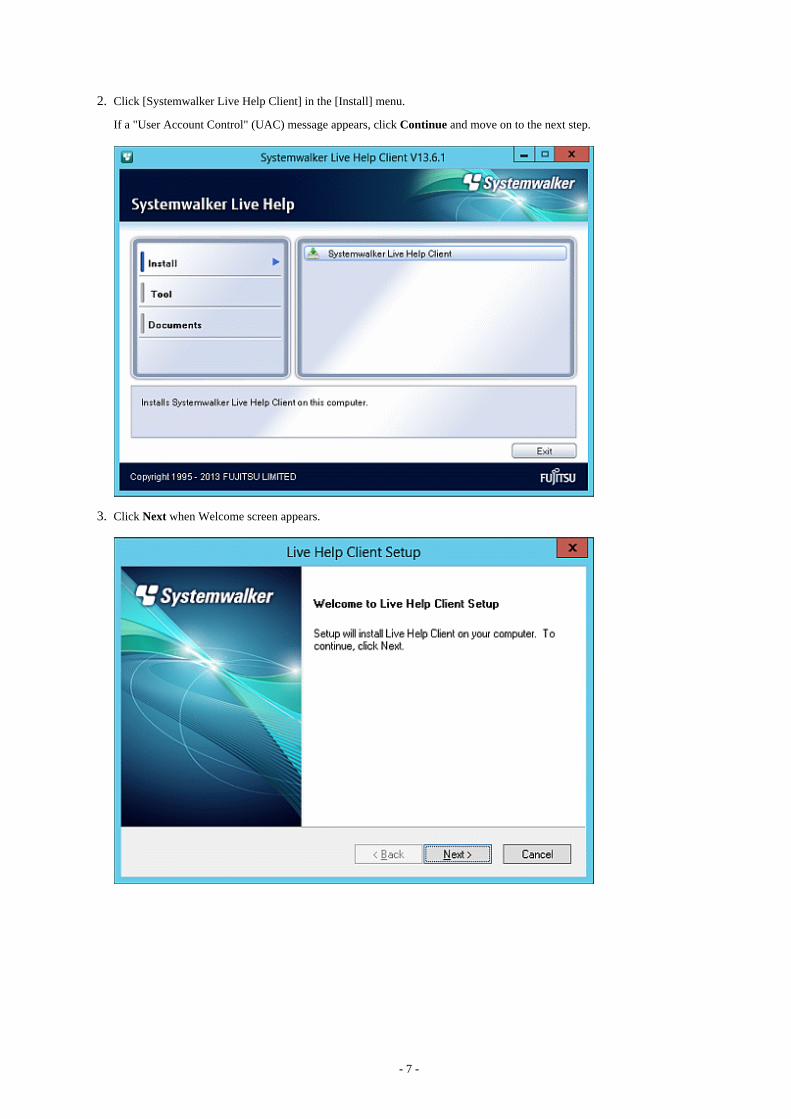
2. Click [Systemwalker Live Help Client] in the [Install] menu.
If a "User Account Control" (UAC) message appears, click Continue and move on to the next step.
3. Click Next when Welcome screen appears.
- 7 -

4. Caution screen will be displayed.
Read the contents carefully and click Next if your system has no problem.
5. Specify a directory where the software will be stored.
The default install directory is as follows. Change if necessary.
- On 32bit OS:%ProgramFiles%\Fujitsu\Live Help\Client
- 8 -
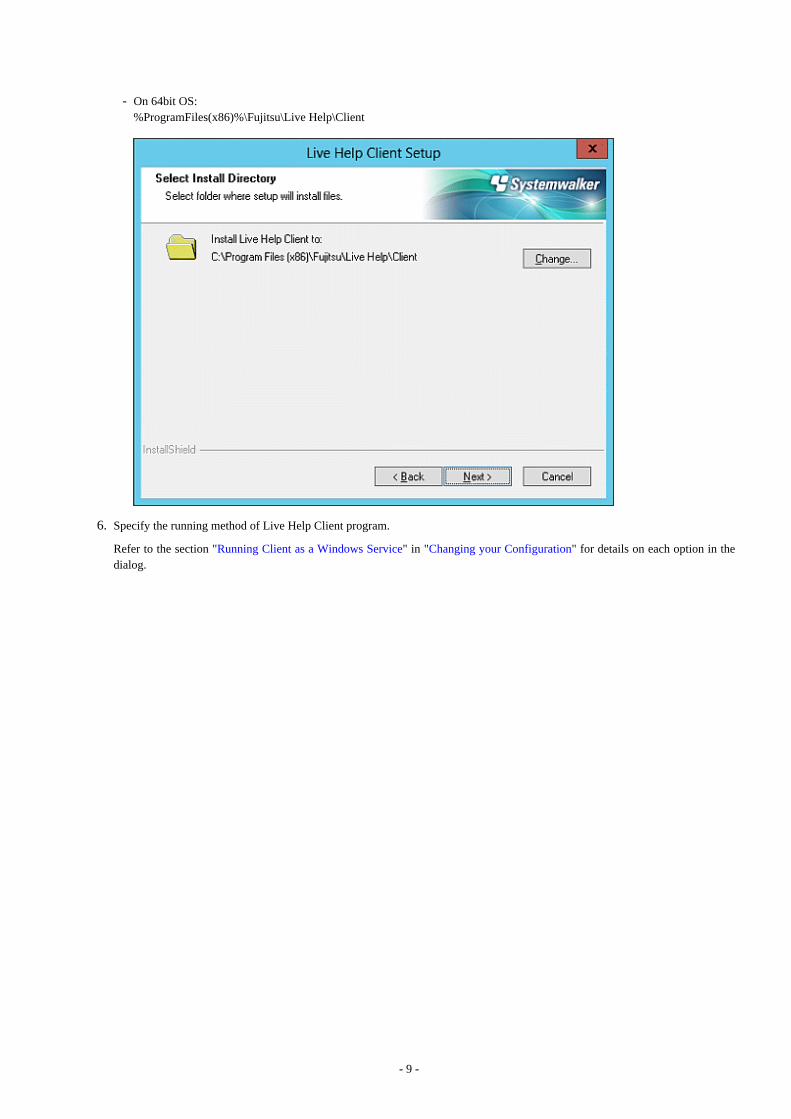
- On 64bit OS:%ProgramFiles(x86)%\Fujitsu\Live Help\Client
6. Specify the running method of Live Help Client program.
Refer to the section "Running Client as a Windows Service" in "Changing your Configuration" for details on each option in thedialog.
- 9 -

Information
You can also change this option after the installation is completed, by using the Client Setup program.
7. Select your preferences of communications.
- When selecting a modem, choose the name of the modem and its connection method ("Wait for Call," or "Dial calling") fromthe pull-down box.
- Refer to the section "Communications Options" in "Changing your Configuration" for details on each option in the dialog.
Note
You cannot use a Modem for communication when you run the Live Help Client program as a service.
- 10 -

Information
You can also change this option after the installation is completed, by using the Client Setup program.
8. Confirm installation options.
If you are satisfied with the settings, click Install to begin copying files.
At the end of the installation process, the system files (the Windows(R) registry) will be modified and shortcuts for Live Help Clientand Client Setup will be added to the Live Help folder in the Start menu.
- 11 -

9. Select a preferred option and click Finish to exit the Setup program when [Finish] screen appears.
1.4 Installing Live Help Client Using the Live Help InstallerCustomize Wizard
This chapter describes custom installation of the Live Help software, using the Live Help Installer Customize Wizard.
The Live Help Installer Customize Wizard walks you through to configure your Live Help software during its installation. Once theinstallation is complete, the Live Help Client program or the Live Help Expert program does not need to be configured.
It will save the customized settings in a text file that allows you to verify configuration of the customized package.
Note
- The Live Help Installer Customize Wizard does not support Live Help Connection Manager and Live Help Connect programs.
- Refer to the "Live Help User's Guide" for how to install Live Help Expert program using the Live Help Installer Customize Wizard.
- To receive Ctrl+Alt+Del using the Sending Special Windows(R) Keys feature on the following operating systems, enable SecureAttention Sequence for the software.
- Windows Vista or later
- Windows Server 2008 or later
Settings
1. From the Start menu or Apps screen, select Run, then execute "gpedit.msc".
2. In the Local Group Policy Editor window, select Computer Configuration >> Administrative Templates >> WindowsComponents >> Windows Logon Options. Then, on the right hand side of the window, double-clickDisable or enable software Secure Attention Sequence.
3. In the Disable or enable software Secure Attention Sequence window, select Enabled, then select Services or Services and Easeof Access applications from the drop-down menu in the bottom left hand side of the window,and then click OK.
- 12 -
4. In the Local Group Policy Editor window, select File >> Exit.
1.4.1 Flow of the installation using Live Help Installer Customize WizardTo install Live Help Client program using the Live Help Installer Customize Wizard, follow the steps below.
1. Start the Live Help Installer Customize Wizard.
2. Select Install Package.
3. Specify Settings to Customize.
4. Save Install Package.
5. Copy or distribute the customized package to the computer on which you wish to install the Live Help product.
6. Run the executable file "SETUP.EXE" stored in the distributed package folder.
7. After the installation process is complete, restart the computer.
Refer to the subsequent sections for describe details on each step.
Note
The computer will be restarted automatically at the end of the installation, if you uncheck the checkbox "Ask user to reboot the computerat the end of the Live Help installation" and select the radio button "Reboot the computer automatically."
1.4.2 Start the Live Help Installer Customize WizardTo run the Live Help Installer Customize Wizard, follow the steps below.
- 13 -

1. Insert the CD containing the Live Help Client software in the CD drive.
The Systemwalker Live Help installation program should automatically start showing the dialog box below. If not, runSWSETUP.EXE stored in the root of the CD.
2. Click [Live Help Installer Customize Wizard] in the [Tool] menu.
- 14 -
3. The following Installer Customize Wizard dialog will appear.
The Live Help Installer Customize Wizard has the following fields.
- Left paneLocated at left of the window. Lists various settings available to configure using the Wizard.
- Right paneLocated at right of the window. Allows you to configure the selected setting (shown in blue) from the list on the left pane.
- BackDisplays the previous Wizard dialog.
- NextDisplays the next Wizard dialog.
- CancelQuits the Installer Customize Wizard without saving the settings.
- HelpDisplays help for the Wizard dialogs.
1.4.2.1 Select Install PackageChoose a package to customize in the first dialog of the Installer Customize Wizard, Install Package Settings.
You may also specify the installation type, advanced options for Live Help Client, and installation view options.
- 15 -

- Refer to the following install package as the base image
Specify the directory that stores the installation package to customize. The term "installation package" refers to the following folders.
- The following folder in the product CD of Live Help V12.0 or later:CD drive:\Client
- A copy of any of the above folders.
- A customized folder of any of the above folders.
- Setup Type:
Install a new copy of Live Help application:
- Select this option when you install the Live Help application for the first time.
- If you use the customized install package selecting this option to upgrade an existing Live Help application, the following settingswill be overwritten with the values specified in the customized install package:
- Running Method
- Communication Type
- User Name
The install directory and other settings will not be changed.
Update an existing Live Help application:
- Select this option when you want to upgrade the previous version of Live Help application installed on your computer. The settingsto be migrated differ depends on the version of the Live Help application installed on the computer. For details, refer to the section"Precautions on Version Upgrade" in "Precautions".
- If you use the customized install package selecting this option on the computer on which the Live Help application is not installed,an error message will appear and the installation will be aborted.
- 16 -

- When you install the Live Help application using the customized install package with this option selected, the computer will notbe restarted automatically at the end of installation.
- If you select this option, following detailed setting screens in the Live Help Installer Customize Wizard program, such as theInstall Settings and the Live Help Client Settings screens, are not displayed.
- Specify detailed options for Live Help Client
Check this checkbox to specify advanced options of for the Live Help Client application. For details on available options, refer to thesection "Live Help Client Settings."You must select "Install a new copy of Live Help application" for the Setup Type first to enable this checkbox.
- Specify detailed options for Live Help Expert
Check this checkbox to specify advanced options of for the Live Help Expert application. This option will be grayed out and becomeunavailable when you specify a Live Help Client package in the [Refer to the following install package as the base image] field.
- Do not show the background bitmap image during Live Help installation
Check this checkbox to hide the background screen of Live Help Installer during installation.
- Do not show the progress bar while copying files
Check this checkbox to hide the copy progress during the installation.
After specifying settings, click the Next button. The Installer Customize Wizard will verify the settings and displays the next Wizarddialog.
If the install package is invalid, In that case, re-specify an appropriate install package.
1.4.2.2 Specify Settings to CustomizeAfter choosing a package to customize, specify each setting that you would like to customize.
The subsequent sections describe details on available settings on Wizard dialogs.
For details on each setting, refer to "Changing your Configuration".
Select Install Directory
Select Install Directory allows you to specify the directory to install the Live Help application.
- 17 -

- Ask user to specify a destination folder during the Live Help installation
Check this checkbox to ask the user to specify the install directory of the Live Help application during the installation. If this optionis unchecked, the Installer will install the Live Help application to the directory specified in the [Install Live Help application to:]field.
- Install Live Help application to:
Specify the directory to install the Live Help application. If you specify a network drive or a drive that does not exist on the targetcomputer, the installation will fail. Decide the drive carefully and make sure that the drive you specified is appropriate for the computeron which the Live Help application will actually be installed.
If this field left empty, Live Help Installer will install the application to one of the following directories on the target computer.
- On 32bit OS:%ProgramFiles%\Fujitsu\Live Help\Client
- On 64bit OS:%ProgramFiles(x86)%\Fujitsu\Live Help\Client
Note
A directory name cannot contain any of the following characters:
- Slash ( / )
- More than one Colons ( : )
- Asterisk ( * )
- Question Mark ( ? )
- Double quotation ( " )
- Less-Than Sign ( < )
- 18 -

- Grater-Than Sign ( > )
- Vertical Line ( | )
Select Running Method
Select Running Method allows you to specify the running method for Live Help Client. This setting is available only when customizingthe Live Help Client installation package.
- Ask user to choose a running method during the Live Help installation
Check this checkbox to ask the user to select the running method of the Live Help Client application during the installation. If thisoption is unchecked, the Installer will install the Live Help Client application applying the running method specified in the customizedinstall package.
- Do not run as a service
Select this option to run the Live Help Client as an application.
- Run as a service
Select this option to run the Live Help Client as a Windows(R) service. The following two choices are available:
- Start Client at Windows boot:
Select this option to run Live Help Client as a service and start it when the Windows(R) system starts.
- Start Client manually:
Select this option to run Live Help Client as a service, but start it manually.
- 19 -

Select Communication Type
Select Communication Type allows you to specify the communication type for Live Help Client and Live Help Expert.
- Ask user to choose a communication method during the Live Help installation
Check this checkbox to ask the user to select the communication method during the installation. If this option is unchecked, the Installerwill install the Live Help application applying the communication method specified in the customized install package.
- Support Centers
Select this option to use a Support Center for communication.For Live Help Client, the Installer Customize Wizard provides fields for specifying the name and the IP address of a Support Center.
- Support center name:
Specify the Support Center name in up to 40 characters.
- IP address for the support center:
Specify the IP address of the Support Center in up to 49 characters.
Note
- The Support Center name cannot contain a comma ( , ).
- The IP address cannot contain a comma ( , ) and a space.
- TCP/IP Direct Connect
Select this option to connect to a specific computer by using TCP/IP direct connection.
- Modem
Select this option to use a modem for communication. After installation, you must choose a modem installed on the target computer.
- 20 -

Note
You cannot use a Modem for communication when you run the Live Help Client program as a service.
Specify the User Name
Specify the User Name allows you to specify the user name to use for Live Help connections.
Note
Every Live Help connection must have a unique user name. Make sure that the specified user name is unique among Live Help users.
- Ask user to type a user name during the Live Help installation
Check this checkbox to ask the user to specify the user name during the installation. If this option is unchecked, the Installer willinstall the application applying the user name specified in the customized install package.
- User name
Specify the user name in up to 16 characters.
If unspecified, the Installer will use the name of the target computer as the user name.
Note
- A user name cannot contain double quotation ( " ).
- 21 -

- If the specified user name begins with or ends with a space, Live Help Installer Customize Wizard will delete the space characterautomatically.
Select Rebooting Method
Select Rebooting Method allows you to specify the Installer action after completing the installation.
Note
After installing Live Help Client, you must restart the computer to run it.
- Ask user to reboot the computer at the end of the Live Help installation
Check this checkbox to prompt the user to restart the computer at the end of the installation process. If this option is unchecked, theInstaller will end the installation with the action specified in the customized install package.
- Reboot the computer automatically
Select this option to automatically restart the computer at the end of the installation.
- Return to Windows without rebooting the computer
Select this option to return to Windows(R) without restarting the computer.
Note
The computer will be restarted automatically at the end of the installation, if you uncheck the checkbox "Ask user to reboot thecomputer at the end of the Live Help installation" and select the radio button "Reboot the computer automatically."
- 22 -

1.4.2.3 Live Help Client SettingsLive Help Client Options - I and II allow you to change the configuration of Live Help Client.
- Run minimized
Check this checkbox to run the Live Help Client program minimized and displayed in the taskbar.
- Store in task tray
Check this checkbox to display the Live Help Client icon not in the taskbar, but in the task tray.
- Approve connections
Check this checkbox to display a dialog box notifying Client when someone tries to connect to Client computer using the Live HelpExpert program.
- Display messages for (sec)
Check this checkbox to specify the duration of time to display messages (connection approval and remote control, etc.) when the LiveHelp Client program is running as a service. The default value is 5 seconds, and the maximum value is 120 seconds. You can makethe message box not to disappear automatically by specifying the value "0."
- Remote control
Select an action from the dropdown list to control remote operations initiated by the Expert.
- Allow: Choose this option to always allow the Support Specialist to take remote control.
- Prohibit: Choose this option to prohibit the Support Specialist from taking remote control.
- 23 -

- Ask user: Choose this option to displays a dialog box that allows Client to accept or deny the request when the Support Specialistattempts to take remote control.
- Do not display the message after closing the Client
If the Live Help Client program is configured to manually run as a service or not run as a service, it will exit when the Support Specialistselects the "Close Client" menu or button on the Live Help Expert program. In this case, the Live Help Client program will displaythe following message before it exits: "This support session has ended. Thank you for using Fujitsu's products."Check this checkbox to hide this message.
- Make NumLock, ScrollLock, and CapsLock keys state on the Client computer same as those of the Expert computer when asession is started
Select this checkbox to synchronize the state of NumLock, ScrollLock and CapsLock keys on Live Help Client computer with thoseof Live Help Expert computer when a Live Help session is started.
Note
By default, Live Help Client does not synchronize the state of NumLock, ScrollLock and CapsLock keys on Live Help Client computerwith those of Live Help Expert computer.
1.4.2.4 Save Install PackageSave the customized install package in the Save Install Package dialog.
- 24 -

- Save the customized install package to:
Specify the directory to store the install package. The directory must have enough space to store all files necessary to install the productas well as the file that contains the customization information.
After specifying a folder, click the Next button to save the customized install package.
The customization information is stored in the file "custom.txt" in the specified folder.
1.5 Uninstalling Live Help ClientTo uninstall the Live Help Client software, follow the steps below.
On Windows Vista;
1. In the Control Panel, under Programs, select Uninstall a program.
2. Click to select Live Help Client in the list.
3. Click Uninstall button.
4. When a UAC message appears, click Continue.
On Windows 7 / Windows Server 2008 STD / Windows Server 2008 EE / Windows Server 2008 R2 / WindowsServer 2008 Foundation;
1. Open the Control Panel and double-click the Programs and Features icon.
2. Click to select Live Help Client in the list.
3. Click Uninstall button.
- 25 -

On Windows 8 / Windows 8.1 / Windows Server 2012 / Windows Server 2012 R2;
1. In the Control Panel, under Programs, select Programs and Features icon.
2. Click to select Live Help Client in the list.
3. Click Uninstall button.
Note
- You must logon to the Windows(R) system as an administrator (a user who belongs to the Administrator group) to uninstall the LiveHelp products.
- After uninstalling Live Help Client, you must restart the computer.
- 26 -
Chapter 2 Live Help Support Session
2.1 Starting Live HelpLive Help is very easy to use. When you encounter a problem or need training, start the Live Help Client application.
To start Live Help Client, select the Live Help Client shortcut from Fujitsu Live Help folder on the Start Menu. This will allow the SupportSpecialist to connect to your computer.
When Live Help Client starts, the opening screen shows your Live Help user name or your TCP/IP address at the top. Depending on yourconnection method, you will either see the Client Startup Screen or the Client Dial dialog box.
Note
Do not include or create shortcuts to the Live Help applications in the Startup folder to start them automatically at Windows(R) boot. TheLive Help applications may not work properly, because the Windows(R) system may launch them before completing initialization of thecommunication environment.
Starting the Live Help Client program remotely, using a remote command or other methods, is not supported.
2.2 Client Startup ScreenWhile you are waiting for a connection from the Help Desk Specialist, this startup screen shows your Live Help user name or TCP/IPaddress.
If you have set a password for Live Help password authentication, the "Password protected" reminder appears in the lower right cornerof the dialog box.If you have configured Live Help Client to authenticate using Windows(R) groups, "Windows Group Based Authentication Enabled"reminder is posted.
Note
The contents of your startup screen may differ slightly from the screenshot shown.
Two buttons are available:
- Click the Cancel button to close Live Help. The Specialist will no longer be able to connect to your computer.
- Click the Change Settings button to change your name, or set security, service or communications options before the Specialist connectsto your computer.
- 27 -

Once a Help Desk Specialist connects to your computer, the Client startup screen closes and the on-line support session begins. TheSpecialist uses Live Help features to resolve your problems and questions. It is not necessary for you to operate Live Help during thesession.
While the session is in progress, you can terminate the connection and end the session at any time. Normally this is not necessary becausethe Specialist will end the session once the problem is resolved. However, this capability gives you control over the session.
To end the session:
1. Click the minimized Client program icon.
2. Click the End Session button.
2.3 Client Dial Dialog BoxThis opening screen appears if you are configured for the Dial Out connection method. In this case, you will use your modem to place adata call to the Help Desk, make the connection, and begin the support session.
The Client Dial dialog allows you to enter the telephone number you want to dial, any required password, and your dialing location.
- Phone Number
Type the telephone number of the Support Specialist's modem. If you are not using Dialing Rules be sure to include any required pre-dial numbers (for example, a "1" for long distance, or a "9" for an outside line).
If you have added a Phone Book entry for the Help Desk, you can click on the entry in the Phone Book list. The telephone numberfor that entry appears in the Phone Number field.
- Password
If the Support Specialist has set a password, you must type the password in this field. As you type your password, the '*' Characterwill be echoed in the field to prevent unwanted observation of your password.
- Dialing From
This field allows you to select a pre-configured Windows(R) dialing location.
- Change Settings
To change your Live Help user name or make changes to your Phone Book, click the Change Settings button. The Client Settingsdialog box appears.
- Dial Rules
Once you have entered the phone number and optional password (if necessary), click the Dial button to place the call to the Help Desk.Click the Cancel button to close the Live Help Client application without placing the call.
2.3.1 Client Settings ScreenWhen you click the Change Settings button in the Client Dial dialog box, the Client Settings dialog box appears. You can change yourLive Help user name and make changes to the Phone Book.
- Name
You can edit your Live Help user name in this field. The name can be up to 16 characters.
- Phone Book
This area lists your Phone Book entries. Below the list is a Note field for the selected entry. You can add, edit, or delete entries.
With edit and delete, you must first click on an entry to select it then click the appropriate button.
More information on adding entries and making changes to your Phone Book is given in the following section "Adding and Editing PhoneBook Entries".
- 28 -

Once you have made all the desired changes, click the OK button. Click Cancel to close the dialog box without saving any changes youmade to the Name field. If you made any Phone Book changes, they are already saved.
2.3.1.1 Adding and Editing Phone Book EntriesWhen you use Client Dial to participate in support sessions, you can add someone to your Live Help Phone Book or edit an existing entry.
In the Phone Book Entry dialog box, three fields appear:
- Name
Enter the person's name as you want it to appear in your Phone Book list.
- Phone #
Enter the telephone number. If you are not using Dialing Rules, include any pre-dial numbers (for example a "1" for long distance, ora "9" for an outside line). To improve readability, you can include spaces and dashes to separate the digits of the telephone number,for example: 555-1234.
- Note
You can type a note for the entry, such as "New York office". In the Client Dial dialog, the note displays below the Phone Book listfor the entry you have selected.
When you have finished entering the information, click the OK button to write the entry into your Phone Book. Click Cancel to close thedialog box without saving any changes.
2.3.2 Dialing RulesThe Dial Rules dialog box allows you to save dialing information that is used repeatedly.
To display the standard Windows(R) Dialing Rules dialog box, click the Dial Rules button in the Client Dial dialog box.
Use the dialog box to:
- Automatically add any needed prefix numbers or to suppress the dialing of your local area code, and to enter calling card information.
- Add or remove a Dialing From location.
2.4 Closing Live Help ClientDuring the support session, the Support Specialist can close your Live Help Client application for you once your problem or question isresolved. However, at any time during the session you can end the Specialist's connection to your computer and close Live Help.
To close (exit) Live Help during a session:
1. Click the minimized Live Help Client program icon. The following dialog appears.
2. Click the End Session button.
- 29 -

The Client application closes, and the session ends. The Specialist can no longer connect to your computer.
- 30 -

Chapter 3 User Interaction with Live Help ClientThe Client is not generally required to interact with the Live Help Client software during a support session. There are, however, a fewsituations that may require input from the user running the Client application. During file transfers a Client may be required to approve atransfer or may choose to cancel an ongoing transfer. Clients can also respond to messages transmitted by their Support Specialist or cancelongoing Clipboard transfers.
Additionally, the user may choose to approve requests to take remote control of his/her machine. Refer to the topics below for moreinformation on these features.
3.1 Sending a FileThe Support Specialist may want to take files from your computer for off-line investigation. The Specialist will start Client File Exchangeto transfer files to or from your machine. Client File Exchange may be configured so that the Client is required to approve various ClientFile Exchange functions. When configured in this way, the Client must approve all file and folder operations that affect the Client'scomputer. This option covers creating a folder, deleting a file or folder, renaming a file or folder, sending files to the Client's computer,and taking a copy of files from the Client's computer. The Client may optionally need to confirm any file transfer that will overwrite apre-existing file on the Client's computer.
It is important to note that, with the exception of the above confirmations, the Support Specialist completely controls the file transferprocess. As a Client, the only indication that files are being transferred is a file transfer progress box.
3.1.1 File Transfer ProgressWhile file transfers are in progress, both the sender and the recipient see a status box reporting the progress.
Either the sender or the recipient can click Cancel to stop the transfer before it finishes.
3.2 Sending a Reply to a MessageThe Support Specialist may send you a text message during a support session. A dialog box displays the message at the top, and a replyarea appears at the bottom.
To respond to a message:
1. Type the text in the Reply field. When you reach the end of a line, the words wrap to the next line. Press CTRL+ENTER to forcea new line. Pressing the ENTER key sends the reply, so be careful not to press it until you have finished typing and have selectedthe recipients.
2. Choose the recipient(s) of your reply. If there is only one other member in the session, that person's name appears in the "Send To"field. If there are more members, the "Send To" field shows several choices: Recipients, Sender, Everyone, Select, and the name ofeach member.
3. Choose Recipients to send the reply to the recipients of the original message, Everyone if you want the reply sent to all members,Select to specify several members, or choose a specific name to send to one individual.
4. Click Reply to send the reply, or Cancel for no reply.
5. If you chose Select in the "Send To" field, the Select dialog box displays a list of all members before the message is sent. You canselect one person or several. When you select a member, their name highlights. To select multiple members, press and hold downCTRL then click each name. To cancel a selection, hold down CTRL then click the name again.
6. Click Send to send the reply to the selected member(s), or Cancel to close without sending the reply.
- 31 -

3.3 Sending Clipboard InformationThe Support Specialist may want to take a copy of the information in your Windows(R) Clipboard during the support session. The Specialistwill start the Receive Clipboard feature, and the contents of your Clipboard will be transferred to the Specialist.
3.3.1 Clipboard Transfer ProgressWhile the Clipboard transfer is in progress, members involved in the transfer see a status box. It reports the progress of the transfer, showinghow much of the Clipboard has been sent.
Either the sender or recipients can click Cancel to stop the transfer before it finishes. If a recipient clicks Cancel, the transfer continuesto any other members. If the sender clicks Cancel, the transfer is stopped to all members.
The transferred Clipboard data is stored in the recipient's Clipboard.
3.4 Remote ControlDuring Remote Control, the Support Specialist can operate your computer remotely. When Support Specialists move their mouse or typeon their keyboard, the mouse movements and keystrokes are executed on your computer.
The Support Specialist is also given the option to "lock out" your keyboard and mouse while in Remote Control. If the Specialist has donethis, you will not be able to use your keyboard and mouse while the Support Specialist is in control. If you wish to control your mouseand keyboard, request that the Support Specialist disable this feature.
You can also configure the Live Help Client software to allow or deny the Remote Control of your computer by Support Specialist. Referto the section "Changing your Live Help settings by using the Client Setup program" in "Changing your Configuration" for moreinformation.
3.5 Connection Notice FeatureYou may not notice activities run by the Remote Control when the Support Specialist initiate the remote jobs. You can use ConnectionNotice feature to enter any arbitrary text on your computer screen. Using the Connection Notice feature, you can confirm that the SupportSpecialist is connecting to your terminal by looking at the pre-input text on the screen. Refer to the section "Setting of the ConnectionNotice Feature" in "Changing your Configuration" for more information.
3.6 Instruction ModeThe Support Specialist can give you operational instructions from a remote location. When a Support Specialist connects in "InstructionMode", a pointer will appear in the screen so that you will be able to follow its procedures and learn the Support Specialist's instructionvery easily.
The Support Specialist may use options to prohibit users from using the mouse and the keyboards during the remote operations. If theSupport Specialist selects this option during the remote operation, you will not be able to operate by the mouse or the keyboards. If youintend to use mouse or keyboards during the sessions, we recommend that you ask the Support Specialist not use this option in advance.
- 32 -

- 33 -

Chapter 4 Changing your ConfigurationYou can change your Live Help Client configuration with the following methods:
- Change each setting manually by using the Client Setup program (CSETUP). OR...
- Change the settings in a quick operation by using the Live Help Client Configuration Feature.
4.1 Changing your Live Help settings by using the Client Setupprogram
The simplest way to change the configuration of the Live Help Client is using the Client Setup program.
To run Client Setup:
- Choose Live Help Client Setup from the Fujitsu Live Help program group on the Start menu or the Apps screen. OR...
- Run the Live Help Client program and choose the Change Settings button in the Client startup dialog box.
The Client Setup dialog box will be displayed.
Note
- Only users with administrative privileges can change Client's configuration when the access control is enabled on the Live Help Clientprogram using Live Help Security Setup command. If a user without administrative privileges starts the Client Setup program in suchsituation, all menu items will be grayed out and he/she can only see the settings of Live Help Client. Refer to the "Appendix G - LiveHelp Security Setup command" in the "Live Help User's Guide" for more information.
- Do not start Client Setup program or change the Live Help Client settings during a session. If you change the settings during a session,the session may close unexpectedly or Live Help Client program may quit unexpectedly.
- 34 -

- If you launch the Client Setup program by pressing the Change Settings button in the Client Startup Screen, exiting the Client Setupprogram will cause the Live Help Client application to restart.
Refer to following sections for details on items that can be changed in Client Setup.
4.1.1 User NameTo change your Live Help user name as it appears in the Client startup screen, edit the Name field. The name can be up to 16 characters.
Note
- A user name cannot contain double quotation ( " ).
- If the specified user name begins with or ends with a space, Live Help Client will delete the space character automatically.
- When the Live Help Client program is running as a service, you cannot change the user name of it. If you click the Change Settingsbutton on the Client startup dialog box, the Name field will be grayed out and become unavailable. In such case, follow the stepsbelow to change the user name:
1. Click the Change Settings button to start Client Setup.
2. Change the running method of the Live Help Client to "Do Not Run as a Service," and exit Client Setup.
3. Again, click the Change Settings button to start Client Setup.
4. Change the user name.
5. Back the running method to one of "Run as a Service" options, and exit Client Setup.
4.1.2 Security OptionsLive Help Client provides the user with several security options to protect your computer from unauthorized access while the Clientapplication is running. Refer to following sections for details on each feature.
4.1.2.1 Live Help Password AuthenticationThis authentication method allows you to authenticate Live Help connections using the password registered on the Live Help Clientapplication.
- 35 -

- Password
In this field, you can set a password that Live Help Client program will use to authenticate Live Help connections. Passwords are casesensitive and can include spaces and special characters except double quotation ( " ). The '*' character will be echoed in the field asyou type to prevent unwanted observation of your password. If you set a password, a Help Desk Specialist must type the password tomake a connection to your computer. Tell the Specialist the password at the time he or she needs to make the connection. The Clientapplication remembers the password for future sessions, and reports that a password is set, by showing "Password Protected" in thelower right corner of the startup screen.
- Confirm Password
If you set a password for your Client, Live Help requires that you verify it by re-typing it exactly in the Confirm Password field.
Note
The Password and Confirm Password fields will be grayed out when the "Authenticate using Windows groups" check box is selected.
4.1.2.2 Windows group based authenticationThis authentication method allows you to authenticate Live Help connections using the Windows(R) Groups registered on your system.You can grant the permission to connect to your computer to up to 10 groups. A Support Specialist will be allowed to connect to yourcomputer only when he/she joins your support session using a user who belongs to the permitted groups.
- 36 -

To enable Windows group based authentication, specify the following items:
- Authenticate using Windows groups
Select this check box to use Windows group based authentication.
- Permitted Groups
This button is available only when the "Authenticate using Windows groups" check box is selected. Click the button to grant thepermission to connect to the Client computer, to Windows(R) groups.
Note
The "Authenticate using Windows groups" check box will be grayed out when:
- "Do Not Run as a Service" option is selected as the running method.
- Modem option is selected as the communication type.
Specify permitted groups
In this dialog box, you can grant the permission to connect to your computer to up to 10 groups. A Support Specialist will be allowed toconnect to your computer only when he/she joins your support session using a user who belongs to the permitted groups.
- 37 -

- Available Groups
Windows(R) groups available on your computer will be displayed.
Groups
TypeDisplayed As Example Explanation
Built-ingroups
BUILTIN\Group name BUILTIN\AdministratorsBUILTIN\Users
Windows(R) groups thatare contained in the local(your) computer bydefault.
Local groups Computer name\Groupname
SERVER001\HelpServicesGroup Windows(R) groups thathave been added to thelocal computer.
Domainglobalgroups
Domain name\Groupname
DOMAIN\Users Global groups that areregistered on the domainwhere your computer is amember of.
Groups displayed in the "Available Groups" field differ depends on the condition of the logged on user.
Login Using: Displayed Groups
A domain user Built-in groupsLocal groupsDomain global groups
A local user (A domain user having the same user nameand the same password exists)
A local userBuilt-in groupsLocal groups
- Permitted Groups
Windows(R) groups specified in this field will be allowed to connect to your Live Help Client application when it is configured toauthenticate connections based on Windows(R) groups.
In the example above, users that belong to Administrators group, LiveHelpUsers group, and Remote Desktop Users group can connectto your computer.
To grant the permission to a Windows(R) group, or remove the granted permission from a Windows(R) group, follow the steps below.
- 38 -

- To grant the permission to a Windows group:
Select the group in the "Available Groups" field and click the Add button. The selected group will move to the "Permitted Groups"field. You can grant the permission to up to 10 groups.
- To remove the granted permission from a Windows group:
Select the group in the "Permitted Groups" field and click the Delete button. The selected group will move to the "Available Groups"field.
- To reset the permitted group settings to the default:
Click the Reset button. The permitted group settings will be reset to the default, such as only the Administrator group (or the groupthat is equivalent to the Administrator group for the languages other than Japanese and English) is displayed in the "Permitted Groups"field and the rest of groups are displayed in the "Available Groups" field. This setting is the same as the setting at right after installationof Live Help Client.
4.1.2.3 Approve ConnectionsWhen this option is set, you are notified when someone tries to connect to your computer using Live Help. The person's name displays,and you can accept or deny the connection.
Note
- If you do not approve the request within 5 seconds when the Live Help Client is configured to "run as a service, start Client at Windowsboot," the Live Help Client application decides that you are away and automatically denies the Support Specialist.
- In case the Live Help Client is configured to "run as a service" or "do not run as a service," the Live Help Client application waits 30seconds before it decides that you are away and automatically denies the Support Specialist.
4.1.2.4 Remote Control OptionsChoose an option to determine how the Support Specialist can take Remote Control of your computer:
- Allow
Allows the Specialist to take remote control.
- Prohibit
Prohibits the Specialist from taking remote control.
- Ask User
When the Specialist attempts to take control, displays a dialog box that allows you to accept or deny the request.
4.1.3 Communications OptionsThe entry selected in the Client Setup dialog box is the connection method in use. The connection methods supported are:
- Network using a Support Center
- TCP/IP Direct
- Modem
Only one connection method can be active at a time.
To change the communications options:
- Select the radio button for the communications method that you wish to use to change the communications method.
- 39 -

- Click the TCP/IP Setup button to choose the TCP/IP address to use for Live Help sessions or to restrict access to Live Help sessionsby IP address or host name.
Note
The "Authenticate using Windows groups" check box in the "Security" field will be grayed out when Modem option is selected as thecommunication type.
4.1.3.1 Network Setup - TCP/IPChoose one of the network related choices to enable Local Area Network (LAN) and Wide Area Network (WAN) support. The networkchoices are:
- Support Centers
If the Support Center option is selected, a drop-down list box will be available that will allow you to select which Support Center touse for the next session.
Note
To use this option, Live Help CM application is required. Refer to the "Live Help User's Guide" for information about configuring aLive Help CM application.If you need to establish Live Help sessions over the Internet through firewalls, you need a computer on which Live Help Connectapplication is installed instead of Live Help CM application. Refer to the "Live Help Connect Administrator's Guide" for informationabout configuring a Live Help Connect computer.
- TCP/IP Direct Connect
The Support Specialist must type your TCP/IP address to make a connection to you. (Neither a Live Help CM application nor a LiveHelp Connect computer is required)
When you have selected the appropriate network choice, choose OK.
Live Help Client will take advantage of the Windows(R) dial-up networking (DUN) feature to hold TCP/IP sessions over a network. Theuse of DUN requires no changes to your Client configuration. If DUN is configured properly, and Windows(R) is set to use dial-upnetworking when a TCP/IP connection is required, Live Help Client will automatically activate it when creating a session.
Note
The dialup connection to an IPv6 network cannot be performed.
4.1.3.2 TCP/IP SetupClicking the TCP/IP Setup button in Client Setup displays the TCP/IP Setup dialog box.
- 40 -

This allows you to configure two settings. These are:
- Local Interface
- If your system has multiple network cards with TCP/IP support installed (known as a multi-homed host), Live Help detects thecards and allows you to select the TCP/IP address to use for Live Help session communications. Choose a TCP/IP address youwould like to use during Live Help sessions, or choose Windows Default if you would like the Windows(R) operating system todecide for you.
- When an IPv6 address is displayed, the global unicast address is displayed if it has been assigned. A unique local unicast addressis displayed if a global unicast address has not been assigned.
- The following three types of settings are possible in an IPv4/IPv6 dual stack environment:
- If waiting for only IPv4 connections, select the IPv4 address that waits for connections.
- If waiting for only IPv6 connections, select the IPv6 address that waits for connections.
- If waiting for both IPv4 and IPv6 connections, select the IPv4 and IPv6 address pair that waits for connections.
Note
If “Windows default” is selected, Live Help will wait for connection requests for all network adapters.Note that the IP address displayed in the Live Help Client window that waits for connection will be one of the IP addresses set for theterminals on which Live Help Client is installed.
- Restricted Connections List
This security feature allows the Client to restrict access to sessions based on the IP address or host name of the computer running theLive Help Expert software. By default, the Client software is configured to allow all connections. To restrict access to your Live Helpsession, select the Restrict Connections radio button. You will then need to configure which IP addresses or host names can haveaccess to your machine.
Note
The Restricted Connections List is valid only for TCP/IP Direct and Connection Manager sessions. Incoming connections throughmodems or a Live Help Connect Server will not be restricted by IP address or host name.
The Restricted Connections List contains IP addresses and host names of computers that are allowed to connect to your Client session.The list contains two columns. The first column can contain an IP address, a range of IP addresses or a host name. The second columncontains an optional comment for each entry in the list. To help differentiate items in the list, a '#' icon is placed next to IP addresses orranges of IP addresses. A icon is placed next to host names in the list.
- 41 -

The list is sorted alphanumerically, first by IP address then by host name. The columns of the list box can be resized as necessary andscroll bars will display should the contents of an entry not fit in the list.
4.1.3.3 Modifying Entries in the Restricted Connections ListTo modify entries in the Restricted Connections List, click the Add, Edit or Delete buttons on the TCP/IP Setup dialog box.
Adding Entries
To add entries to the Restricted Connections List, click the Add button. The Add dialog box will display. This dialog box contains threeradio buttons that allow you to select the type of entry to add to the list.
- IPv4 Address
Selecting this radio button permits you to enter the IPv4 address of a single workstation that can join the Client session. The addressis entered in the format ###.###.###.### and is validated for correctness when the OK button is pressed.
- IPv4 Address Range
Selecting this radio button permits you to enter a range of IPv4 addresses that can join the Client session. This option is particularlyuseful when, for example, all the Expert machines are located on a single subnet of the network. The addresses are entered in theformat ###.###.###.### and are validated for correctness when the OK button is pressed.
- IPv6 Address
Selecting this radio button permits you to enter the IPv6 address of a single workstation that can join the Client session. The addressis entered in the RFC5952 format and is validated for correctness when the OK button is pressed.
- IPv6 Address Range
Selecting this radio button permits you to enter a range of IPv6 addresses that can join the Client session. This option is particularlyuseful when, for example, all the Expert machines are located on a single subnet of the network. The addresses are entered in theRFC5952 format and are validated for correctness when the OK button is pressed.
- 42 -

- Host Name
Selecting this radio button permits you to enter the host name of a computer that can join the Client session. This name must be anyof the followings:
1. The host name written in the hosts file if there is the entry for the computer in the hosts file.
2. The host name of the computer registered on a DNS name server if there is no entry for the computer in the hosts file. (You cancheck the host name registered on a DNS name server by using NSLOOKUP command of Windows(R))
3. NetBIOS name (the name displayed as "Unique[00]" when you run NBTSTAT command) of the computer if the computer isnot registered on either hosts file or a DNS name server.
Note
- You must specify exactly the same name as the name written in the hosts file or displayed by NSLOOKUP/NBTSTAT command inthe Restricted Connections List. A computer with a fully qualified host name (e.g. jsmith.fujitsu.com) cannot connect to your supportsession if you specify a simple host name (e.g. jsmith) in the Restricted Connections List.
- When the IP address of Live Help Expert is changed in the NAT environment, the IP address to specify should specify the physicalIP address of Live Help Expert.
Wildcards are also allowed. So, for example, if you wish to allow all workstations located on the Fujitsu domain to join the session, youcould add *.fujitsu.com as the host name.
The Optional Comment text box can be used to enter a descriptive comment for that particular entry.
After you have supplied an IP address, range of addresses or host name, you can add the entry to your list by pressing the OK button.Pressing the Cancel button would cancel the dialog box without adding anything to your list.
Editing Entries
To edit entries in the Restricted Connections List, select the entry and press the Edit button. You can also edit an entry by double clickingon it in the Address column. The Edit dialog box will display. This dialog box is identical to the Add dialog box with the exception thatthe IP address, range of addresses or host name fields are filled in with the information from the selected entry.
Make any desired changes to the entry and press the OK button to save the changes. Press the Cancel button to discard any changes thatwere made.
Deleting Entries
To delete entries in the Restricted Connections List, select the entry that you wish to remove and press the Delete button. A message boxwill display requesting confirmation of the delete action.
4.1.3.4 Modem SetupWhen you select the Modem choice, the Live Help Client application will use your modem to make the connection to the Support Specialistcomputer.
There are two choices available when using your modem for the support session connection: Wait for Call, and Dial Out.
- Wait for Call
Choose this option to wait for a data call from the Specialist. In this case, when you start the Client application your modem is placedin "auto answer" mode and the application waits for the incoming data call.
- Dial Out
Choose Dial Out to call the Specialist and make a connection using your modem. Using Dial Out, the Client application asks you toenter the telephone number of the Specialist modem, and then dials the data call.
- 43 -
Additionally, there is a modem drop-down list available. If your machine is configured with more than one modem, this drop-down willallow you to choose which modem to use for sessions.
Note
The "Authenticate using Windows groups" check box in the "Security" field will be grayed out when Modem option is selected.
4.1.4 Running Client as a Windows ServiceThe Client application can be configured to run as a Windows(R) Service. Running the Live Help Client as a service allows a SupportSpecialist to administer unattended servers or workstations by remotely logging in and logging out with administrative privileges. Forexample, some configuration changes to a Windows(R) system require administrative privileges that may be unavailable to the logged inuser.
The Client application can only survive the log off if running as a Service. Otherwise, the Client application stops running.
There are two ways to run the Client application as a service:
- Run as a Service when the user starts the Client application. OR...
- Automatically start the Client application as a Service when Windows starts.This option is recommended for unattended servers or workstations, so they can be remotely monitored or administered.
To run the Client application as a Windows(R) service, follow the steps below.
1. Click the Advanced button in Client Setup. The Client Service Options screen displays, showing three options:
- Run as a Service
- Run as a Service, start Client at Windows boot
- Do not run as a Service
2. Select either of the two service options.
3. Click OK to save the setting.
- 44 -
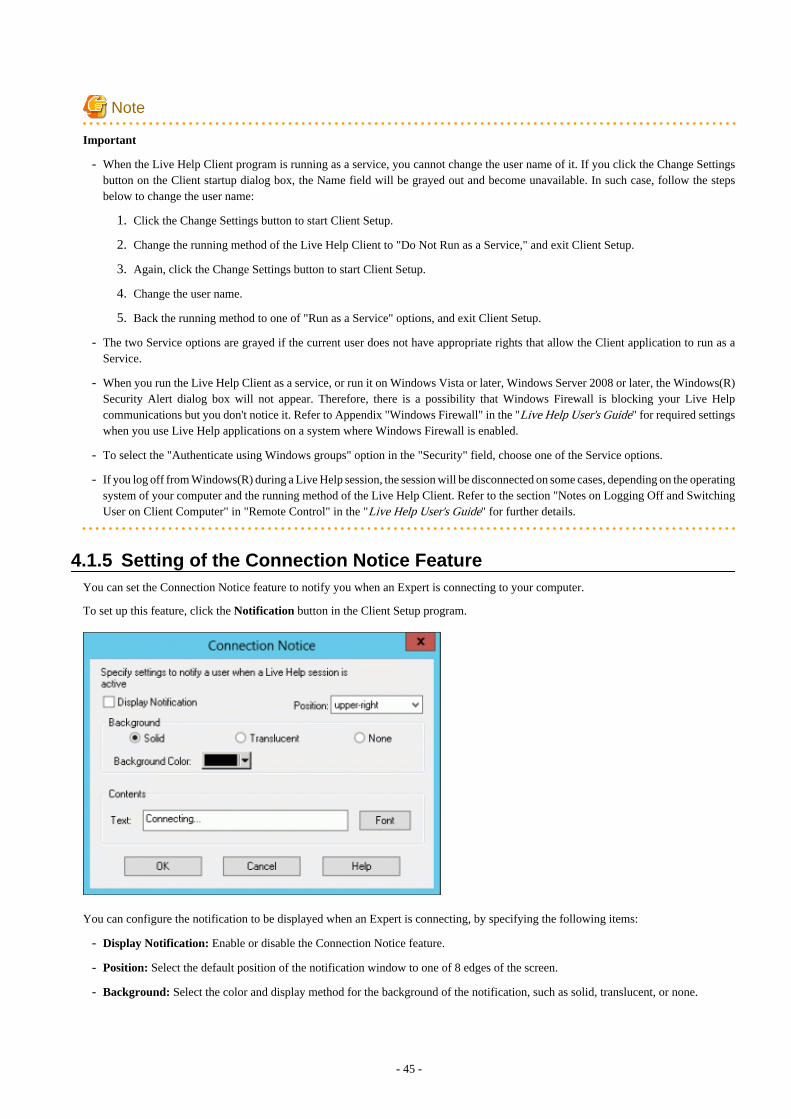
Note
Important
- When the Live Help Client program is running as a service, you cannot change the user name of it. If you click the Change Settingsbutton on the Client startup dialog box, the Name field will be grayed out and become unavailable. In such case, follow the stepsbelow to change the user name:
1. Click the Change Settings button to start Client Setup.
2. Change the running method of the Live Help Client to "Do Not Run as a Service," and exit Client Setup.
3. Again, click the Change Settings button to start Client Setup.
4. Change the user name.
5. Back the running method to one of "Run as a Service" options, and exit Client Setup.
- The two Service options are grayed if the current user does not have appropriate rights that allow the Client application to run as aService.
- When you run the Live Help Client as a service, or run it on Windows Vista or later, Windows Server 2008 or later, the Windows(R)Security Alert dialog box will not appear. Therefore, there is a possibility that Windows Firewall is blocking your Live Helpcommunications but you don't notice it. Refer to Appendix "Windows Firewall" in the "Live Help User's Guide" for required settingswhen you use Live Help applications on a system where Windows Firewall is enabled.
- To select the "Authenticate using Windows groups" option in the "Security" field, choose one of the Service options.
- If you log off from Windows(R) during a Live Help session, the session will be disconnected on some cases, depending on the operatingsystem of your computer and the running method of the Live Help Client. Refer to the section "Notes on Logging Off and SwitchingUser on Client Computer" in "Remote Control" in the "Live Help User's Guide" for further details.
4.1.5 Setting of the Connection Notice FeatureYou can set the Connection Notice feature to notify you when an Expert is connecting to your computer.
To set up this feature, click the Notification button in the Client Setup program.
You can configure the notification to be displayed when an Expert is connecting, by specifying the following items:
- Display Notification: Enable or disable the Connection Notice feature.
- Position: Select the default position of the notification window to one of 8 edges of the screen.
- Background: Select the color and display method for the background of the notification, such as solid, translucent, or none.
- 45 -

- Contents: Type a text (up to 128 single-byte characters) to be displayed and select the font style and size for the text.
Note
- In case the display color is 256 colors or lower, the background color will become solid even if you have chosen the "Translucent"option.
- Although you can register up to 128 characters in the Text field in the Contents, some characters may not be displayed dependingon the font size and screen size.
If the text displayed by the Connection Notice feature is in your way, click it to move to one of the eight positions at the edge of the screen.As you click continuously, the text moves around clockwise.
4.1.6 Other Startup OptionsYou can also specify other startup options:
- Run Minimized
Choose this option to start Live Help Client in a minimized state. The Client application will appear minimized in the taskbar and canbe restored by clicking on its taskbar button.
- Store in Task Tray
When Live Help Client is started with this option selected, a Live Help icon will appear in the Windows(R) task tray. Client will notappear in the taskbar. You can restore Client by double-clicking on the task tray icon.
4.2 Changing your Live Help settings by using Live Help ClientConfiguration Feature
The Live Help Client Configuration Feature allows you to change the settings of Live Help Client in a quick operation.
You can create a Client configuration file using Live Help Client Configuration Wizard and use Configuration File Apply Tool to applythe created Client configuration file to a Live Help Client application.
For details on the Client Configuration Feature, refer to the "Live Help Client Configuration Feature" in the "Live Help User's Guide".
- 46 -

Appendix A Release NotesThis appendix describes the release information about this version/level.
The following table describes general troubles may happen while using the Live Help products and how to solve them.
A.1 Overview of new functions- Support for IPv6 network
This version of Live Help supports IPv6 network.
- Support for Windows 8 / Windows 8.1 / Windows Server 2012 / Windows Server 2012 R2
This version of Live Help supports Windows 8, Windows 8.1, Windows Server 2012 and Windows Server 2012 R2 operating systems.
A.2 Compatibility information- Change of Icon Name
The Client Setup icon that is to be registered in Start or Apps > Live Help has been changed to the Live Help Client Setup icon.
- 47 -

Appendix B Information Collection Using FJQSSYou can collect the information necessary for the trouble investigation with FJQSS (Information Collection Tool).
See the manual according to the following procedures shown below.
You can collect information using FJQSS only if Live Help was installed with standard settings.
- Windows Server 2012 or later OS, Windows 8 and later OS
Click [All Apps] menu, and select [FJQSS (Information Collection Tool)]>[FJQSS User's Guide].
- Windows Server 2008 R2 or former OS, Windows 7 or former OS.
Click [Start] menu, and select [FJQSS (Information Collection Tool)]>[ FJQSS User's Guide].
Collecting Information by FJQSS (Information Collection Tool)
- Click [Start] or [All Apps] menu, and select [FJQSS (Information Collection Tool)]>[Information Collection( Live Help Client )].This operation opens a command prompt.
- After the command prompt opens, input "Y[Enter]" according to the instruction in the prompt.
- After the FJQSS has completed the collection, the name of the output folder of the collected information appears in the prompt.Verify that the information have been collected in the folder whose name is indicated in the prompt.
- Input "[Enter]" to end the command prompt.
- The following file is created in the output folder of the collected information. Please send it to the Fujitsu support engineer.resultYYYYMMDDHHMMSS_1_1.cab(YYYYMMDDHHMMSS: time (year, month, day, hours, minutes and seconds) that the collection started)
- 48 -
Index[A]
Adding Entries..........................................................................42Adding Phone Book Entries..................................................... 29Allow........................................................................................ 39Approve Connections............................................................... 39Ask User................................................................................... 39
[B]Bridge......................................................................................... 2
[C]Change Settings Button............................................................ 27Changing your Configuration...................................................34Changing your Live Help Settings........................................... 34Changing your User Name....................................................... 35Client Configuration Feature.................................................... 46Client Dial Dialog Box............................................................. 28Client Service Options screen...................................................44Client Settings Screen...............................................................28Client Startup Screen................................................................ 27Clipboard Transfer Progress.....................................................32Close a Support Session........................................................... 28Closing Live Help Client..........................................................29Communications Options......................................................... 39Confirm Password.................................................................... 36Connection Notice Feature.................................................. 32,45CSETUP................................................................................... 34
[D]Deleting Entries........................................................................ 43Dialing From.............................................................................28Dialing Rules............................................................................ 29Dial Out.................................................................................... 43
[E]Editing Entries.......................................................................... 43Editing Phone Book Entries..................................................... 29End a Support Session.............................................................. 28
[F]File Transfer Progress...............................................................31
[G]General Precautions on Installation............................................4
[H]Host Name................................................................................ 43
[I]Instruction Mode.......................................................................32IP Address.................................................................................42IP Address Range..................................................................... 42
[L]Live Help Client Settings......................................................... 23Local Interface..........................................................................41
[M]Modem Setup............................................................................43Modifying Entries in the Restricted Connections List............. 42multi-homed host......................................................................41multiple network cards............................................................. 41
[N]Name.........................................................................................29Network Setup.......................................................................... 40Note.......................................................................................... 29
[O]Optional Comment................................................................... 43Other Startup Options...............................................................46
[P]Password..............................................................................28,36Phone #..................................................................................... 29Phone Book...............................................................................28Phone Number.......................................................................... 28Precautions on Version Upgrade................................................ 4Prohibit..................................................................................... 39
[R]Remote Control.........................................................................32Remote Control Options...........................................................39Restricted Connections List......................................................41Router......................................................................................... 2Run Minimized......................................................................... 46Running Client as a Windows Service..................................... 44
[S]Security Options....................................................................... 35Select Communication Type.................................................... 20Select Install Directory............................................................. 17Select Rebooting Method......................................................... 22Select Running Method............................................................ 19Sending a File........................................................................... 31Sending a Reply to a Message..................................................31Sending Clipboard Information................................................ 32Specify permitted groups..........................................................37Specify the User Name............................................................. 21Starting Live Help.................................................................... 27Store in Task Tray.................................................................... 46Support Centers........................................................................ 40System Requirements................................................................. 1
[T]TCP/IP Direct Connect.............................................................40TCP/IP Setup............................................................................ 40
[W]Wait for Call............................................................................. 43Winsock...................................................................................... 2
[Y]Your Name............................................................................... 28
- 49 -