Embed Size (px)
Citation preview

Cisco Nexus 1000V for Microsoft Hyper-V Installation and Upgrade GuideRelease 5.2(1)SM1(5.2)
December 2013
Americas HeadquartersCisco Systems, Inc.170 West Tasman DriveSan Jose, CA 95134-1706 USAhttp://www.cisco.comTel: 408 526-4000
800 553-NETS (6387)Fax: 408 527-0883
Text Part Number: OL-28335-01

THE SPECIFICATIONS AND INFORMATION REGARDING THE PRODUCTS IN THIS MANUAL ARE SUBJECT TO CHANGE WITHOUT NOTICE. ALL STATEMENTS, INFORMATION, AND RECOMMENDATIONS IN THIS MANUAL ARE BELIEVED TO BE ACCURATE BUT ARE PRESENTED WITHOUT WARRANTY OF ANY KIND, EXPRESS OR IMPLIED. USERS MUST TAKE FULL RESPONSIBILITY FOR THEIR APPLICATION OF ANY PRODUCTS.
THE SOFTWARE LICENSE AND LIMITED WARRANTY FOR THE ACCOMPANYING PRODUCT ARE SET FORTH IN THE INFORMATION PACKET THAT SHIPPED WITH THE PRODUCT AND ARE INCORPORATED HEREIN BY THIS REFERENCE. IF YOU ARE UNABLE TO LOCATE THE SOFTWARE LICENSE OR LIMITED WARRANTY, CONTACT YOUR CISCO REPRESENTATIVE FOR A COPY.
The Cisco implementation of TCP header compression is an adaptation of a program developed by the University of California, Berkeley (UCB) as part of UCB’s public domain version of the UNIX operating system. All rights reserved. Copyright © 1981, Regents of the University of California.
NOTWITHSTANDING ANY OTHER WARRANTY HEREIN, ALL DOCUMENT FILES AND SOFTWARE OF THESE SUPPLIERS ARE PROVIDED “AS IS” WITH ALL FAULTS. CISCO AND THE ABOVE-NAMED SUPPLIERS DISCLAIM ALL WARRANTIES, EXPRESSED OR IMPLIED, INCLUDING, WITHOUT LIMITATION, THOSE OF MERCHANTABILITY, FITNESS FOR A PARTICULAR PURPOSE AND NONINFRINGEMENT OR ARISING FROM A COURSE OF DEALING, USAGE, OR TRADE PRACTICE.
IN NO EVENT SHALL CISCO OR ITS SUPPLIERS BE LIABLE FOR ANY INDIRECT, SPECIAL, CONSEQUENTIAL, OR INCIDENTAL DAMAGES, INCLUDING, WITHOUT LIMITATION, LOST PROFITS OR LOSS OR DAMAGE TO DATA ARISING OUT OF THE USE OR INABILITY TO USE THIS MANUAL, EVEN IF CISCO OR ITS SUPPLIERS HAVE BEEN ADVISED OF THE POSSIBILITY OF SUCH DAMAGES.
Cisco and the Cisco logo are trademarks or registered trademarks of Cisco and/or its affiliates in the U.S. and other countries. To view a list of Cisco trademarks, go to this URL: www.cisco.com/go/trademarks. Third-party trademarks mentioned are the property of their respective owners. The use of the word partner does not imply a partnership relationship between Cisco and any other company. (1110R)
Any Internet Protocol (IP) addresses and phone numbers used in this document are not intended to be actual addresses and phone numbers. Any examples, command display output, network topology diagrams, and other figures included in the document are shown for illustrative purposes only. Any use of actual IP addresses or phone numbers in illustrative content is unintentional and coincidental.
Cisco Nexus 1000V for Microsoft Hyper-V Installation and Upgrade Guide © 2013 Cisco Systems, Inc. All rights reserved.

Cisco Nexus 1000OL-28335-01
C O N T E N T S
Preface vAudience v
Document Conventions v
Available Documents vi
Related Documentation vi
viii
Documentation Feedback viii
Obtaining Documentation and Submitting a Service Request viii
viii
C H A P T E R 1 Installing the Cisco Nexus 1000V for Microsoft Hyper-V 1-1
Prerequisites for Installing the VSM Software 1-1
Before You Begin 1-1
Guidelines and Limitations 1-2
System Requirements 1-2
Hardware Requirements 1-2
Software Requirements 1-2
VSM NIC Ordering 1-3
Basic Topology 1-4
Installation Workflow 1-6
Installing the VSM Software 1-7
Downloading the Cisco Nexus 1000V Package 1-7
Configuring SCVMM and VSM 1-7
Installing SCVMM Components 1-8
Installing and Configuring the VSM Workflow 1-9
Configuring the SCVMM Fabric Workflow 1-13
Installing the VSM Certificate 1-18
Installing the VSM Certificate Manually 1-18
Installing the VSM Certificate Using a Script 1-19
PowerShell Scripts for Configuring the SCVMM Fabric Workflow 1-19
Preparing the Microsoft Hyper-V Hosts (Optional) 1-22
Configuring the MTU with the Cisco Nexus 1000V 1-22
VMQ Processor Configuration with the Cisco Nexus 1000V 1-23
Changing the RSS Registry 1-23
iiiV for Microsoft Hyper-V Installation and Upgrade Guide, Release 5.2(1)SM1(5.2)

Contents
Adding Hosts to a Logical Switch 1-24
Connecting the VM Network Adapter to the Logical Switch 1-24
C H A P T E R 2 Upgrading the Cisco Nexus 1000V for Microsoft Hyper-V 2-1
Prerequisites for Upgrading the VSM Software 2-1
Before You Begin 2-1
Prerequisites 2-1
Licensing 2-2
Prerequisites for Upgrading the VEM Software 2-3
Upgrade Procedures 2-4
Upgrading the VSM 2-4
Software Images 2-4
In-Service Software Upgrades on Systems with Dual VSMs 2-5
ISSU Process for the Cisco Nexus 1000V 2-6
ISSU VSM Switchover 2-6
ISSU Command Attributes 2-7
Upgrading VSMs from Releases 5.2(1)SM1(5.1) to Release 5.2(1)SM1(5.2) Using Kickstart and System Images 2-7
Upgrading VSMs in a High Availability (HA) pair 2-8
Upgrading a standalone VSM 2-9
Performing an ISSU Upgrade using an ISO Image File 2-11
Upgrading the Cisco VSEM 2-12
Upgrading the VEM Software 2-13
Upgrade Workflow 2-14
Upgrading the VEM Software Manually 2-15
Download Cisco Nexus 1000v package 2-15
Prepare the Windows Server Update Services (WSUS) Server 2-15
Prepare the Active Directory (AD) 2-17
Configure SCVMM 2-18
Check Compliance and Perform VEM upgrade 2-19
Upgrading the VEM Software Using a Script 2-19
Prerequisites 2-20
Runnning VEM upgrade script 2-20
Upgrade SCVMM 2012 SP1 to SCVMM 2012 R2 2-21
Preparing Cisco Nexus 1000V 2-21
Upgrade Windows Server 2012 Hosts to 2012R2 2-22
C H A P T E R 3 Installing a VSM on Cisco Cloud Services Platform 3-23
Installing a VSM on Cisco Cloud Services Platform 3-23
ivCisco Nexus 1000V for Microsoft Hyper-V Installation and Upgrade Guide, Release 5.2(1)SM1(5.2)
OL-28335-01

Contents
Before You Begin 3-23
Procedure 3-23
vCisco Nexus 1000V for Microsoft Hyper-V Installation and Upgrade Guide, Release 5.2(1)SM1(5.2)
OL-28335-01

Contents
viCisco Nexus 1000V for Microsoft Hyper-V Installation and Upgrade Guide, Release 5.2(1)SM1(5.2)
OL-28335-01
Preface
This preface describes the audience, organization, and conventions of the Cisco Nexus 1000V for Microsoft Hyper-V Installation and Upgrade Guide, Release 5.2(1)SM1(5.2). It also provides information on how to obtain related documentation.
This preface includes the following sections:
• Audience, page v
• Document Conventions, page v
• Available Documents, page vi
• Related Documentation, page vi
• Documentation Feedback, page viii
• Obtaining Documentation and Submitting a Service Request, page viii
Audience This guide is for network administrators and server administrators with the following experience and knowledge:
• An understanding of virtualization
• Ability to set up and configure Microsoft Windows Virtual Machine Manager
• Using Microsoft Windows Virtual Machine Manager (SCVMM) software to create a virtual machine and configure a virtual switch
Document ConventionsCommand descriptions use these conventions:
boldface font Commands and keywords are in boldface.
italic font Arguments for which you supply values are in italics.
{ } Elements in braces are required choices.
[ ] Elements in square brackets are optional.
vCisco Nexus 1000V for Microsoft Hyper-V Installation and Upgrade Guide, Release 5.2(1)SM1(5.2)
OL-30997-01

Chapter
Screen examples use these conventions:
screen font Terminal sessions and information the device displays are in screen font.
boldface screen font
Information you must enter is in boldface screen font.
italic screen font Arguments for which you supply values are in italic screen font.
< > Nonprinting characters, such as passwords, are in angle brackets.
[ ] Default responses to system prompts are in square brackets.
!, # An exclamation point (!) or a pound sign (#) at the beginning of a line of code indicates a comment line.
This document uses the following conventions for notes and cautions:
Note Means reader take note. Notes contain helpful suggestions or references to material not covered in the manual.
Caution Means reader be careful. In this situation, you might do something that could result in equipment damage or loss of data.
Available DocumentsYou can view and download documentation for the current version of Cisco Nexus 1000V for Microsoft Hyper-V at the location: http://www.cisco.com/en/US/products/ps13056/tsd_products_support_series_home.html
Related Documentation This section lists the documents used with the Cisco Nexus 1000V for Microsoft Hyper-V.
General Information
Cisco Nexus 1000V for Microsoft Hyper-V Release Notes
Install and Upgrade
Cisco Nexus 1000V for Microsoft Hyper-V Installation and Upgrade Guide
Configuration Guides
Cisco Nexus 1000V for Microsoft Hyper-V High Availability and Redundancy Configuration Guide
x | y | z Alternative, mutually exclusive elements are separated by vertical bars.
string A nonquoted set of characters. Do not use quotation marks around the string or the string will include the quotation marks.
viCisco Nexus 1000V for Microsoft Hyper-V Installation and Upgrade Guide, Release 5.2(1)SM1(5.2)
OL-30997-01

Chapter
Cisco Nexus 1000V for Microsoft Hyper-V Interface Configuration Guide
Cisco Nexus 1000V for Microsoft Hyper-V Layer 2 Switching Configuration Guide
Cisco Nexus 1000V for Microsoft Hyper-V License Configuration Guide
Cisco Nexus 1000V for Microsoft Hyper-V Network Segmentation Manager Configuration Guide
Cisco Nexus 1000V for Microsoft Hyper-V Port Profile Configuration Guide
Cisco Nexus 1000V for Microsoft Hyper-V Quality of Service Configuration Guide
Cisco Nexus 1000V for Microsoft Hyper-V Security Configuration Guide
Cisco Nexus 1000V for Microsoft Hyper-V System Management Configuration Guide
Programming Guide
Cisco Nexus 1000V for Microsoft Hyper-V REST API Guide
Reference and Troubleshooting Guides
Cisco Nexus 1000V for Microsoft Hyper-V Command Reference
Cisco Nexus 1000V for Microsoft Hyper-V Troubleshooting Guide
Virtual Services Appliance Documentation
The Cisco Nexus Virtual Services Appliance (VSA) documentation is available at
http://www.cisco.com/en/US/products/ps9902/tsd_products_support_series_home.html
Virtual Security Gateway Documentation
The Cisco Virtual Security Gateway documentation is available at http://www.cisco.com/en/US/products/ps13095/tsd_products_support_series_home.html
Prime Network Services Controller
The Cisco Prime Network Services Controller documentation is available at http://www.cisco.com/en/US/partner/products/ps13213/tsd_products_support_series_home.html
Virtual Wide Area Application Services (vWAAS)
The Virtual Wide Area Application Services documentation is available at
http://www.cisco.com/en/US/products/ps6870/tsd_products_support_series_home.html
ASA 1000V Cloud Firewall
The ASA 1000V Cloud Firewall documentation is available at
http://www.cisco.com/en/US/products/ps12233/tsd_products_support_series_home.html
viiCisco Nexus 1000V for Microsoft Hyper-V Installation and Upgrade Guide, Release 5.2(1)SM1(5.2)
OL-30997-01

Chapter
Documentation Feedback To provide technical feedback on this document, or to report an error or omission, please send your comments to [email protected]. We appreciate your feedback.
Obtaining Documentation and Submitting a Service RequestFor information on obtaining documentation, submitting a service request, and gathering additional information, see the monthly What’s New in Cisco Product Documentation, which also lists all new and revised Cisco technical documentation, at:
http://www.cisco.com/en/US/docs/general/whatsnew/whatsnew.html
Subscribe to the What’s New in Cisco Product Documentation as a Really Simple Syndication (RSS) feed and set content to be delivered directly to your desktop using a reader application. The RSS feeds are a free service and Cisco currently supports RSS Version 2.0.
viiiCisco Nexus 1000V for Microsoft Hyper-V Installation and Upgrade Guide, Release 5.2(1)SM1(5.2)
OL-30997-01

Cisco Nexus 1000V for MicrosoftOL-30997-01
C H A P T E R 1
Installing the Cisco Nexus 1000V for Microsoft Hyper-VThis chapter includes the following sections:
• Prerequisites for Installing the VSM Software, page 1-1
• VSM NIC Ordering, page 1-3
• Basic Topology, page 1-4
• Installation Workflow, page 1-6
• Installing the VSM Software, page 1-7
Prerequisites for Installing the VSM SoftwareThis section includes the following sections:
• Before You Begin, page 1-1
• Guidelines and Limitations, page 1-2
• System Requirements, page 1-2
Note For information about your software and platform compatibility, see the Cisco Nexus 1000V and Microsoft Hyper-V Compatibility Information, Release 5.2(1) SM1(5.2) document.
Before You BeginEnsure that you have installed and configured the following components on the target setup:
• Windows Active Directory service
• Microsoft System Center Virtual Machine Manager (SCVMM) 2012 SP1 UR3 (build version 3.1.6027.0) or Microsoft System Center Virtual Machine Manager (SCVMM) WS2012-R2 (build version 3.2.7510)
• Windows Server 2012 Hosts
• Windows Server 2012 R2 Hosts
• For the hosts that are running the Virtual Ethernet Module (VEM), you should enable the Hyper-V module for Windows PowerShell.
1-1 Hyper-V Installation Guide, Release 5.2(1)SM1(5.2)

Chapter 1 Installing the Cisco Nexus 1000V for Microsoft Hyper-V Prerequisites for Installing the VSM Software
Guidelines and LimitationsIt is your responsibility to monitor and install all the relevant patches from Microsoft on the Windows hosts.
System RequirementsThis section describes the hardware and software requirements.
• Hardware Requirements, page 1-2
• Software Requirements, page 1-2
Hardware Requirements
The hardware must meet the requirements set by Microsoft to run the Hyper-V role. The Cisco Nexus 1000V for Microsoft Hyper-V Virtual Supervisor Module (VSM) requires VMs with the following configuration:
• 4 GB minimum of hard disk space
• 4 GB minimum of RAM
• As a best practice, we recommend that you have four network adapters (network interface cards—NICs) on the host where Microsoft Hyper-V is installed. You can have various combinations depending on the hardware that you have. For example, you can have one NIC with four ports or four NICs with one port each.
Software Requirements
To install and bring up a Cisco Nexus 1000V for Microsoft Hyper-V, you need the following server setup:
• Microsoft System Center Virtual Machine Manager (SCVMM) 2012 SP1 UR3 (build version 3.1.6027.0) or Microsoft System Center Virtual Machine Manager (SCVMM) WS2012-R2 (build version 3.2.7510)
• Windows 2012 hosts
• Windows 2012 R2 hosts
• Active Directory server
To configure the VSM, you need the following information:
• VSM IP address
• VSM domain ID (1—1023)—This ID is used for high availability (HA)
• Layer 3 connectivity between a VSM and the hosts that run a VEM is required.
– Layer2 mode is not supported.
– Layer3 UDP port number 4785
– Communication between the VSM and VEM occurs over UDP port number 4785 that uses the Cisco Nexus Control Protocol (CNCP)
• TCP Port 80 is open on the network for communication from the SCVMM to VSM. In case of https, the TCP Port is 443.
1-2Cisco Nexus 1000V for Microsoft Hyper-V Installation Guide, Release 5.2(1)SM1(5.2)
OL-30997-01

Chapter 1 Installing the Cisco Nexus 1000V for Microsoft Hyper-V VSM NIC Ordering
VSM NIC Ordering The VSM creates interfaces in an ascending MAC address order of the virtual NIC offered by Microsoft Hyper-V. Currently, Microsoft Hyper V provides no guarantees that this order is the same as displayed at the VSM VM Settings panel. The VSM always uses its first interface as control0 and its second interface as mgmt0. The network profiles for these two interfaces might need different VLANs. Therefore, you should verify that the interfaces are selected by the VSM in the same order that are displayed in the Settings panel.
Execute the following CLI on the VSM to verify the order of the management and control mac addresses.
Nexus1000V# show interface mac-address
--------------------------------------------------------------------------------Interface Mac-Address Burn-in Mac-Address--------------------------------------------------------------------------------mgmt0 001d.d8b7.1e61 001d.d8b7.1e61control0 001d.d8b7.1e60 001d.d8b7.1e60
If the order is not the same, you can use the following commands to specify the preferred MAC to control0/mgmt0 interface mappings:
• system internal control-mac XXXX.XXXX.XXXX
• system internal mgmt-mac XXXX.XXXX.XXXX
These commands require that you entere the copy running-config startup-config command afterwards to make the change persistent and effective after the next VSM reload.
switch# show system internal interface mac-addressSample output:Interface Preferred MACsh interface mac-address--------- --------------mgmt0 cccc.bbbb.aaaacontrol0 aaaa.bbbb.cccc
If any of the preferred MAC for control0/mgmt0 selected by users is not available at VSM boot up, the driver ignores it and it picks another interface instead (following MAC ascending order). In that case, the system logs an error with a syslog as follows:
%KERN-3-SYSTEM_MSG: Preferred MAC (aaaa.bbbb.cccc) for control0 not found – kernel
1-3Cisco Nexus 1000V for Microsoft Hyper-V Installation Guide, Release 5.2(1)SM1(5.2)
OL-30997-01

Chapter 1 Installing the Cisco Nexus 1000V for Microsoft Hyper-V Basic Topology
Basic TopologyFigure 1-1 displays the basic Hyper-V topology on a Cisco Nexus 1000V for Microsoft Hyper-V VEM.
Figure 1-1 Basic Topology for the Cisco Nexus 1000V for Microsoft Hyper-V
Secondary VSM Host
Infra VM Host
Management VM Cluster
HYPER-VNative Switch
ADServer
SQLVM
SCVMMVM
3040
68
NIC
Man
agem
ent
NICNIC
Live
Mig
ratio
n
NIC
Clu
ster
Primary VSM Host
HYPER-VNative Switch
Nexus 1000V VSM
NIC
Man
agem
ent
NICNIC
Live
Mig
ratio
n
NIC
Clu
ster
... Host 64
Data VM Cluster
Host 1
VM1 ...
...
VMN
Team
NIC
Man
agem
ent
NIC
Live
Mig
ratio
n
NIC
Clu
ster
NICNICNIC
Nexus 1000V Switch
Note The Management NIC is actually on the Microsoft switch.
The Management VM cluster is for Infra VMs.
The Data VM Cluster is for Workload VMs
The Minimum topology is three servers with four NICs each.
Figure 1-1 displays the Cisco Nexus 1000V for Microsoft Hyper-V deployment on two servers with the following network configuration:
• Management NIC—This network adapter is connected to an external network for the host OS connectivity.
• Microsoft Virtual Switch—The Microsoft virtual switch has one physical network adapter for the VSM connectivity.
1-4Cisco Nexus 1000V for Microsoft Hyper-V Installation Guide, Release 5.2(1)SM1(5.2)
OL-30997-01

Chapter 1 Installing the Cisco Nexus 1000V for Microsoft Hyper-V Basic Topology
• Two Physical Network adapters—These adapters are connected to the Cisco Nexus 1000V logical switch instance of the Hyper-V host.
1-5Cisco Nexus 1000V for Microsoft Hyper-V Installation Guide, Release 5.2(1)SM1(5.2)
OL-30997-01
Chapter 1 Installing the Cisco Nexus 1000V for Microsoft Hyper-V Installation Workflow
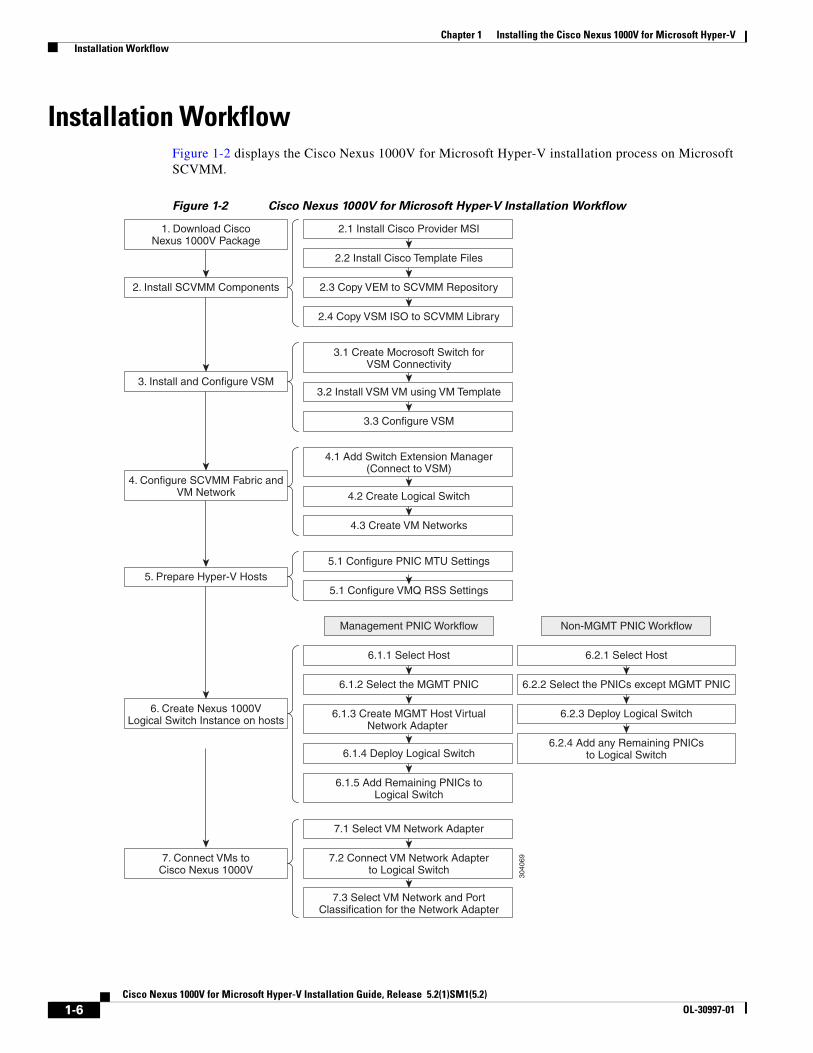
Installation WorkflowFigure 1-2 displays the Cisco Nexus 1000V for Microsoft Hyper-V installation process on Microsoft SCVMM.
Figure 1-2 Cisco Nexus 1000V for Microsoft Hyper-V Installation Workflow
1. Download CiscoNexus 1000V Package
2.1 Install Cisco Provider MSI
2.2 Install Cisco Template Files
2.3 Copy VEM to SCVMM Repository
2.4 Copy VSM ISO to SCVMM Library
2. Install SCVMM Components
3. Install and Configure VSM
4. Configure SCVMM Fabric andVM Network
5. Prepare Hyper-V Hosts
7. Connect VMs toCisco Nexus 1000V
6. Create Nexus 1000VLogical Switch Instance on hosts
3040
69
Non-MGMT PNIC WorkflowManagement PNIC Workflow
6.2.1 Select Host
6.2.2 Select the PNICs except MGMT PNIC
6.2.3 Deploy Logical Switch
6.2.4 Add any Remaining PNICsto Logical Switch
6.1.1 Select Host
6.1.2 Select the MGMT PNIC
6.1.4 Deploy Logical Switch
6.1.5 Add Remaining PNICs toLogical Switch
3.1 Create Mocrosoft Switch forVSM Connectivity
3.2 Install VSM VM using VM Template
3.3 Configure VSM
4.1 Add Switch Extension Manager(Connect to VSM)
4.2 Create Logical Switch
4.3 Create VM Networks
7.1 Select VM Network Adapter
7.2 Connect VM Network Adapterto Logical Switch
7.3 Select VM Network and PortClassification for the Network Adapter
6.1.3 Create MGMT Host VirtualNetwork Adapter
5.1 Configure PNIC MTU Settings
5.1 Configure VMQ RSS Settings
1-6Cisco Nexus 1000V for Microsoft Hyper-V Installation Guide, Release 5.2(1)SM1(5.2)
OL-30997-01

Chapter 1 Installing the Cisco Nexus 1000V for Microsoft Hyper-V Installing the VSM Software
Installing the VSM SoftwareTo install the VSM software, perform the following steps:
1. Downloading the Cisco Nexus 1000V Package, page 1-7
2. Configuring SCVMM and VSM, page 1-7
3. Installing the VSM Certificate, page 1-18
4. Preparing the Microsoft Hyper-V Hosts (Optional), page 1-22
5. Adding Hosts to a Logical Switch, page 1-24
6. Connecting the VM Network Adapter to the Logical Switch, page 1-24
Downloading the Cisco Nexus 1000V PackageThe Cisco Nexus 1000V for Microsoft Hyper-V package (a zip file) is available at the download URL location provided with the software.
To download the Cisco Nexus 1000V for Microsoft Hyper-V package, download the Cisco Nexus 1000V for Microsoft Hyper-V package for Microsoft System Center Virtual Machine Manager (SCVMM) 2012 SP1. This package contains the following files:
• Virtual Supervisor Module (VSM) ISO (Nexus1000V.5.2.1.SM1.5.2\VSM\install\Nexus-1000V.5.2.1.SM1.5.2.iso)
• Virtual Ethernet Module (VEM) MSI package (Nexus1000V.5.2.1.SM1.5.2\VEM\Nexus1000V-VEM-5.2.1.SM1.5.2.0.msi)
• Cisco VSEM Provider MSI package (Nexus1000V.5.2.1.SM1.5.2\VMM\Nexus1000V-VSEMProvider-5.2.1.SM1.5.2.0.msi)
• Kickstart file (Nexus1000V.5.2.1.SM1.5.2\VSM\Upgrade\Nexus-1000V-kickstart.5.2.1.SM1.5.2.bin )
• System file (Nexus1000V.5.2.1.SM1.5.2\VSM\Upgrade\Nexus-1000V.5.2.1.SM1.5.2.bin)
• WSUS scripts (Nexus1000V.5.2.1.SM1.5.2\WSUS\)
– Publish-CiscoUpdate.ps1
– Remove-CiscoUpdates.ps1
– Get-CiscoUpdates.ps1
– Get-MSIDetails.ps1
Configuring SCVMM and VSMThis section describes how to install the Cisco Nexus 1000V for Microsoft Hyper-V VSM software and includes the following topics:
• Installing SCVMM Components, page 1-8
• Installing and Configuring the VSM Workflow, page 1-9
• Configuring the SCVMM Fabric Workflow, page 1-13
1-7Cisco Nexus 1000V for Microsoft Hyper-V Installation Guide, Release 5.2(1)SM1(5.2)
OL-30997-01

Chapter 1 Installing the Cisco Nexus 1000V for Microsoft Hyper-V Installing the VSM Software
Installing SCVMM Components
To install the SCVMM components, perform the following steps:
Step 1 Install the Cisco Provider MSI.
a. Install the Nexus1000V-VSEMProvider-5.2.1.SM1.5.2.0.msi from the Cisco Nexus1000V zip location on the SCVMM server in order to establish communication between SCVMM and the Cisco Nexus1000V VSM.
Note The MSI installation restarts the SCVMM service.
b. Verify that the Cisco Provider is installed properly as follows:
• Open the SCVMM console.
• Navigate to the Settings Pane.
• Click on Configuration Providers.
c. Verify the Cisco Systems Nexus 1000V extension is displayed.
Step 2 Install Cisco VSM template files as follows:
After downloading the Cisco Nexus 1000V for Microsoft Hyper-V package, complete the following steps to install the VSM template:
• On the SCVMM server, open the PowerShell console from the SCVMM console.
• Run the script Register-Nexus1000VVSMTemplate.ps1 from the following location C:\Program Files\Cisco\Nexus1000V\Nexus1000V-VSMTemplate.
This script imports the Cisco VSM Template in the SCVMM Library
• To verify the template, do the following:
– Navigate to the Templates tab.
– Choose Templates. On the right pane, the Nexus 1000V-VSM-Template is listed.
Step 3 Copy the VEM to the SCVMM repository.
The VEM is an MSI file that needs to be placed in the following location on SCVMM server: ALLUSERSPROFILE%\Switch Extension Drivers. For example, C:\ProgramData\Switch Extension Drivers. SCVMM uses the MSI file during Add host operation.
Caution Do not install the VEM on the SCVMM server. Only copy the file to the location specified.
Step 4 Copy the VSM ISO file. For example, copy N1000vh-dk9.5.2.1.SM1.5.0.339 to the SCVMM library in the following location on SCVMM server: \\VMName\MSSCVMMLibrary. After copying the ISO file, make sure to refresh the SCVMM library so that SCVMM detects the copied ISO.
1-8Cisco Nexus 1000V for Microsoft Hyper-V Installation Guide, Release 5.2(1)SM1(5.2)
OL-30997-01

Chapter 1 Installing the Cisco Nexus 1000V for Microsoft Hyper-V Installing the VSM Software
Installing and Configuring the VSM Workflow
To install and configure the VSM workflow, use an existing Microsoft Switch with external connectivity or create a new one, for the VSM connectivity.
1. Installing the VSM using a VM Template, page 1-9
2. Configuring the VSM, page 1-10
3. Deploying the VSM, page 1-11
4. Configuring the VSM, page 1-12
Installing the VSM using a VM Template
To install the VSM using a VM template, perform the following steps:
Step 1 From the left navigation pane in the SCVMM user interface, click the VMs and Services icon and from the top menu bar, choose Create Virtual Machine. The Create Virtual Machine Wizard window opens.
Step 2 In the Select Source panel, choose the Use an existing virtual machine, VM template, or virtual hard disk option and click Browse.
Step 3 Choose the Nexus1000V_VSM_Template file listed under the Type: VM Template header.
Step 4 Click OK and click Next.
Step 5 In the Specify Virtual Machine Identity panel, enter the name of the virtual machine and click Next.
Step 6 In the Configure Hardware panel, configure the hardware settings for the virtual machine. If you are using a template, most of the settings have already been configured (For example, the hard drive is set to 4 GB and there are three network adapters). The only item that you have to manually configure is the ISO image.
Step 7 Click Virtual DVD drive below the Bus Configuration header in the center pane.
Step 8 Click Existing ISO image file and click Browse.
Step 9 Choose the ISO image from the SCVMM library, click OK, and click Next.
Step 10 In the Select Destination panel, keep the default settings of Place the virtual machine on a host; Destination: All Hosts and click Next.
Step 11 After the host is displayed in the Select Host panel, chose it, and click Next.
Step 12 In the Configure Settings panel, review the settings and click Next.
Step 13 In the Select Networks panel, choose the virtual switches that are used for the virtual machine. For each network adapter, select the type of the virtual switch, for example, choose Standard Switch or Logical Switch and click Next.
Step 14 In the Add Properties panel, keep the default settings of the Automatic Actions and click Next.
Step 15 In the Confirm the Settings panel in the final Summary window, review and confirm the settings.
Step 16 Click Create to begin the virtual machine creation. A progress bar is displayed in the Job Status column in the VM window.
Step 17 After the virtual machine creation is complete, right-click the Name of the virtual machine in the SCVMM user interface and choose Power On.
Step 18 Right-click the Name of the virtual machine again, click Connect or View, and choose Connect via Console.
1-9Cisco Nexus 1000V for Microsoft Hyper-V Installation Guide, Release 5.2(1)SM1(5.2)
OL-30997-01

Chapter 1 Installing the Cisco Nexus 1000V for Microsoft Hyper-V Installing the VSM Software
See Table 1-1 for more information about the Cisco Nexus 1000V ISO boot options.
Table 1-1 Cisco Nexus 1000V ISO Boot Options
No Boot Option If the disk is unformatted If disk is formatted
1 Install the Cisco Nexus 1000V and bring up the new image
• Boot the kickstart image from ISO
• Format the disk and copy the images from ISO to bootflash:
• Load the system image
• Boot the kickstart image from ISO
• Copy the images from ISO to bootflash:
• Load the system image
2 Install the Cisco Nexus 1000V and go to the VSH shell
• Boot the kickstart image from ISO
• Format the disk and copy the images from ISO to bootflash:
• Start the VSH shell
• Boot the kickstart image from ISO
• Copy the images from ISO to bootflash:
• Start the VSH shell
3 Install the Cisco Nexus 1000V only if the disk is unformatted, and bring up the new image
• Boot the kickstart image from ISO
• Format the disk and copy the images from ISO to bootflash:
• Load the system image
• Boot the kickstart image from ISO
• Try to load the system image from the disk with the same name as that in ISO
• If the image is not found, start the VSH shell
4 Install Cisco Nexus 1000V only if the disk is unformatted and go to the VSH shell
• Boot the kickstart image from ISO
• Format the disk and copy the images from ISO to bootflash:
• Load the system image
• Boot the kickstart image from ISO
• Start the VSH shell
Configuring the VSM
After installing VSM using a VM template, connect to a VM console and configure the VSM. We recommend that the VSM is deployed using the template provided by Cisco. After the deployment is complete, power on the VSM. The following basic inputs are required for the VSM configuration:
1. Switch name
2. Domain ID
3. Management address
4. Subnet mask
5. Gateway address
1-10Cisco Nexus 1000V for Microsoft Hyper-V Installation Guide, Release 5.2(1)SM1(5.2)
OL-30997-01

Chapter 1 Installing the Cisco Nexus 1000V for Microsoft Hyper-V Installing the VSM Software
Note Make sure that you eject the virtual ISO image from the CD ROM.
Deploying the VSM
To deploy the VSM, perform the following steps:
Step 1 When the Virtual Machine Viewer window opens, the message “Do you want to format it? (y/n)” apperas. enter Y for yes at the prompt.
Step 2 At the command prompt, when the message “Perform r/w tests (takes very long time) on target disks? (y/n)” appears, enter Y for yes at the prompt.
Note The default action is taken if you do not immediately respond to the message prompts.
Step 3 After the software is copied and the CD-ROM drive is mounted, you are prompted to enter the System Administrator Account Setup. At the Enter the password for “admin”: prompt, enter the password. At the Confirm the password for “admin”: prompt, reenter the password.
Step 4 Enter the high availability (HA) role at the prompt Enter HA role [standalone/primary/secondary].
Note We recommend that you create a VSM high availability pair. Configure the first VM as the primary VSM and install the second VM as the secondary VSM.
If you set the HA role as secondary, the following question is displayed at the prompt: Setting HA role to secondary will cause a system reboot. Are you sure (yes/no)?: Enter Yes if you want to set the HA role to Secondary.
Step 5 At the prompt, enter the domain ID: Enter the domain ID[1-1023], for example, 199. A domain ID is required for the VSMs to communicate with each other. While installing the secondary VSM, enter the same domain ID that was specified for the primary VSM.
Step 6 After step 5 for secondary VSM, the message is displayed: saving boot configuration and the system reloads.
Step 7 At the prompt, the Basic System Configuration Dialog is displayed. Enter Yes at the prompt.
Step 8 At the command prompt, the following message is displayed: Create another login account? [yes/no] (n). Select No to skip creating another login account.
Note The defaults are used if you do not change the values.
Step 9 Enter the switch name, for example, Nexus1000V-Eng.
Step 10 Press Y for yes when prompted to continue with the out-of-band management configuration.
Step 11 Enter the Mgmt0 IPv4 address for the VSM, for example, 10.10.10.4.
Step 12 Enter the Mgmt0 IPv4 netmask, for example, 255.255.255.0.
Step 13 At the command prompt, the following message is displayed: Configure the default gateway? Enter Y for yes.
Step 14 Enter the IPv4 address of the default gateway, for example, 10.10.10.5.
1-11Cisco Nexus 1000V for Microsoft Hyper-V Installation Guide, Release 5.2(1)SM1(5.2)
OL-30997-01

Chapter 1 Installing the Cisco Nexus 1000V for Microsoft Hyper-V Installing the VSM Software
Step 15 At the command prompt, the following message is displayed: Vem feature level will be set to 5.2(1)SM1(5.2). Do you want to reconfigure? (yes/no) [n]: Press Enter at the prompt to enter the default value.
Step 16 Enter n when the following command prompt message is displayed: Configure Advanced Options? (yes/no)[n]:.
Step 17 The following message is displayed: Would you like to edit the configuration? (yes/no) [n]: Press Enter at the prompt to enter the default value.
Step 18 Enter y when the following command prompt message is displayed: Use this configuration and save it ? (yes/no) [y]:.
Step 19 Complete steps 1 to 5 to configure the secondary VSM with an HA role.
Step 20 Verify the HA role using the command show system redundancy status on primary and secondary VSMs.
Configuring the VSM
After completing these steps, you are prompted to log into the VSM. Access the VSM via SSH using the IP address configured in the VSM installation section. The following minimal objects need to be created on the VSM:
• Logical Network
• Network Segment Pool
• IP Pool Template
• Network Segment
• Virtual Ethernet Port Profile
• Ethernet Port Profile
• Network Uplink
To configure the VSM, perform the following steps:
Step 1 Enter the configuration mode using the command config t.
Step 2 Create a Logical Network using the command nsm logical network <name> at the prompt to configure the SCVMM networking fabric, for example, nsm logical network Intranet. Type exit. You can enter any name for the Logical Network.
Step 3 Create a Network Segment Pool using the command nsm network segment pool <name>, for example, nsm network segment pool IntranetSJ.
Step 4 Associate the Network Segment Pool to the Logical Network using the command: member-of logical-network <name>, for example, member-of logical-network Intranet. Type exit.
Step 5 Create an IP pool template using the command nsm ip pool template <name>, for example, nsm ip pool template pool10.
Step 6 Configure the IP address range, for example, ip address <30.0.0.2> <30.0.0.100>.
Step 7 Configure the network, for example, network <30.0.0.2> <255.255.255.0>. Type exit.
Step 8 Create a Network Segment using the command, nsm network segment <name>, for example, nsm network segment VMNetworkA.
1-12Cisco Nexus 1000V for Microsoft Hyper-V Installation Guide, Release 5.2(1)SM1(5.2)
OL-30997-01

Chapter 1 Installing the Cisco Nexus 1000V for Microsoft Hyper-V Installing the VSM Software
Step 9 Create a VLAN inside the Network Segment using the command switchport access vlan <number>, for example, switchport access vlan 100.
Step 10 Associate the Network Segment Pool to the Network Segment using the command member-of network segment pool <name>, for example, member-of network segment pool IntranetSJ.
Step 11 Import the IP pool template to the Network Segment using the command ip pool import template <name>, for example, ip pool import template pool10.
Step 12 Publish the Network Segment using the command publish network segment <name>, for example, publish network segment VMNetworkA. Type exit.
Step 13 Create a virtual Ethernet port profile of type vethernet using the command port-profile type vethernet <name>, for example, port-profile type vethernet Veth-policy.
Step 14 Enter the no shutdown command to keep the system in a power-on state. Enter state enabled at the prompt.
Step 15 Publish the port profile using the command publish port-profile and type exit. The port profile is imported for publishing the Network uplink.
Step 16 Create a virtual Ethernet port profile of type ethernet using the command port-profile type ethernet <name>, for example, port-profile type ethernet UplinkNoPortChannel.
Step 17 Enter the no shutdown command to keep the system in a power-on state. Enter state enabled at the prompt.
Step 18 Create a Network Uplink using the command nsm network uplink NexusUplink.
Step 19 Associate the Network Segment Pool using the command allow network segment pool IntranetSJ, for example, allow network segment pool IntranetSJ.
Step 20 Import the port profile that was created earlier using the command import port-profile <name>, for example, import port-profile eth-pp-policy.
Step 21 Publish the Network Uplink using the command publish network uplink <name>, for example, publish network uplink NexusUplink. Type exit.
Step 22 Copy the running configuration to the start-up configuration using the copy running-config startup-config command. The following message is displayed in the window: Copy complete, now saving to disk (please wait)
Step 23 Enter the show running-config command to verify the configuration.
Note The setup script configures the VSM to function in L3 control mode. L2 control mode is not supported with Cisco Nexus 1000V for Microsoft Hyper-V. When configuring L3 control with Microsoft Hyper-V, you do not need to create a port profile with capability L3control. The VSM communicates with the Microsoft Server 2012 management interface directly. There is no need to create a special vEthernet port profile to be assigned to the Windows 2012 host.
Configuring the SCVMM Fabric Workflow
Note The entire workflow to configure the SCVMM Fabric Workflow can also be performed using scripts. For more information, see the “PowerShell Scripts for Configuring the SCVMM Fabric Workflow” section on page 1-19.
1-13Cisco Nexus 1000V for Microsoft Hyper-V Installation Guide, Release 5.2(1)SM1(5.2)
OL-30997-01

Chapter 1 Installing the Cisco Nexus 1000V for Microsoft Hyper-V Installing the VSM Software
To install and configure the VSM workflow, create a Microsoft switch for VSM connectivity and then perform the following steps:
1. Connecting SCVMM to VSM, page 1-14
2. Creating a Logical Switch in SCVMM, page 1-16
3. Configuring the VM Network, page 1-17
Connecting SCVMM to VSM
Once the VSM is up, configure the SCVMM networking fabric for the Nexus 1000V.
Note Check and turn off the proxy server settings for your LAN in the Internet Options settings window of Internet Explorer before proceeding to the next steps.
This section includes the following:
• Connecting SCVMM 2012 SP1 to VSM, page 1-14
• Connecting SCVMM 2012-R2 to VSM, page 1-15
Connecting SCVMM 2012 SP1 to VSM
To retrieve the objects from the VSM to SCVMM, perform the following steps:
Step 1 When the VSM is up, log in to the VSM using SSH and the IP address configured in the previous section.
Step 2 From the SCVMM administrator console, navigate to the Fabric pane.
Step 3 On Fabric Pane under Networking, select Switch Extension Manager.
Step 4 Right click to add a New Extension Manager. The Add Virtual Switch Extension Manager Wizard window is displayed.
Step 5 In the General panel of the Add Virtual Switch Extension Manager Wizard window, enter the connection settings for the extension manager as outlined in the following steps:
a. Select a manufacturer, for example, Cisco Systems.
b. Select the model type, for example, Nexus 1000V.
c. Select the configuration provider for the extension manager, for example, Cisco Systems Nexus 1000V.
d. Enter the IP address of the VSM in the connection string, for example, http://10.10.10.4.
e. Create a run as account for the VSM. In the Run As account field, click Browse... The Select a Run As Account window opens up.
f. In the Select a Run As Account window, select an account from the available options or click Create Run As account tab to create an account for the VSM. A Create Run As account window opens up.
g. In the Create Run As account window, enter the following VSM credentials:
– Enter the name of the account in the Name field as VSM_admin.
– Enter the description of the account in the Description field.
– Enter the user name in the User Name field and the password in the Password field.
– Confirm the password in the Confirm password field.
1-14Cisco Nexus 1000V for Microsoft Hyper-V Installation Guide, Release 5.2(1)SM1(5.2)
OL-30997-01

Chapter 1 Installing the Cisco Nexus 1000V for Microsoft Hyper-V Installing the VSM Software
– Uncheck the Validate Domain Credentials box as the Active Directory cannot be validated with the credentials.
– Click OK.
– The new account, for example, VSM_admin is displayed in the Select a Run As Account window. This is a one-time procedure for the VSM.
h. Select the new account and click OK in the Select a Run As Account window.
Step 6 Click Next.
Step 7 In the Host Groups panel, select a few or all the host groups that can use the virtual switch extension manager and click Next.
Step 8 In the Summary panel, confirm the settings and click Finish.
Once the Virtual Switch Extension Manager has been successfully added, it is listed in the main window in the SCVMM user interface at the path: Fabric -> Switch Extension Managers.
Connecting SCVMM 2012-R2 to VSM
To retrieve the objects from the VSM to SCVMM 2012 R2, perform the following steps:.
Step 1 When the VSM is up, log in to the VSM using SSH and the IP address configured in the previous section.
Step 2 From the SCVMM administrator console, navigate to the Fabric pane.
Step 3 On Fabric Pane under Networking, select Network Service.
Step 4 Right click to add a Add Network Service. The Add Network Service Wizard window is displayed.
Step 5 Enter a name for the Network Service and click Next. In the descricption , mention that it is a virtual switch extension.
Step 6 Step 6: In the Manufacturer and Model window, select the settings as outlined in the following steps:
a. a.Select a manufacturer, for example, Cisco Systems.
b. Select the model type, for example, Nexus 1000V.
Step 7 Step 7: In the next window, select Run As Account.
Step 8 In the Run As account field, click Browse... The Select a Run As Account window opens up.
a. In the Select a Run As Account window, select an account from the available options or click Create Run As account tab to create an account for the VSM. A Create Run As account window opens up.
b. In the Create Run As account window, enter the following VSM credentials:
– Enter the name of the account in the Name field as VSM_admin.
– Enter the description of the account in the Description field.
– Enter the user name in the User Name field and the password in the Password field.
– Confirm the password in the Confirm password field.
– Uncheck the Validate Domain Credentials box as the Active Directory cannot be validated with the credentials.
– Click OK.
– The new account, for example, VSM_admin is displayed in the Select a Run As Account window. This is a one-time procedure for the VSM.
1-15Cisco Nexus 1000V for Microsoft Hyper-V Installation Guide, Release 5.2(1)SM1(5.2)
OL-30997-01
Chapter 1 Installing the Cisco Nexus 1000V for Microsoft Hyper-V Installing the VSM Software
c. Select the new account and click OK in the Select a Run As Account window.
Step 9 Enter the IP address of the VSM in the connection string, for example, http://10.10.10.4. To use https, see the “Installing the VSM Certificate” section on page 1-18
Step 10 In the Providers window, choose the provider as Cisco Systems Nexus 1000V and click Test. This verifies the communication between the Cisco VSM and the SCVMM.
Step 11 In the Host Groups panel, select a few or all the host groups that can use the virtual switch extension manager and click Next.
Step 12 In the Summary panel, confirm the settings and click Finish.
Once the Virtual Network Service has been successfully added, it is listed in the main window in the SCVMM user interface at the path: Fabric>Networking> Network Service.
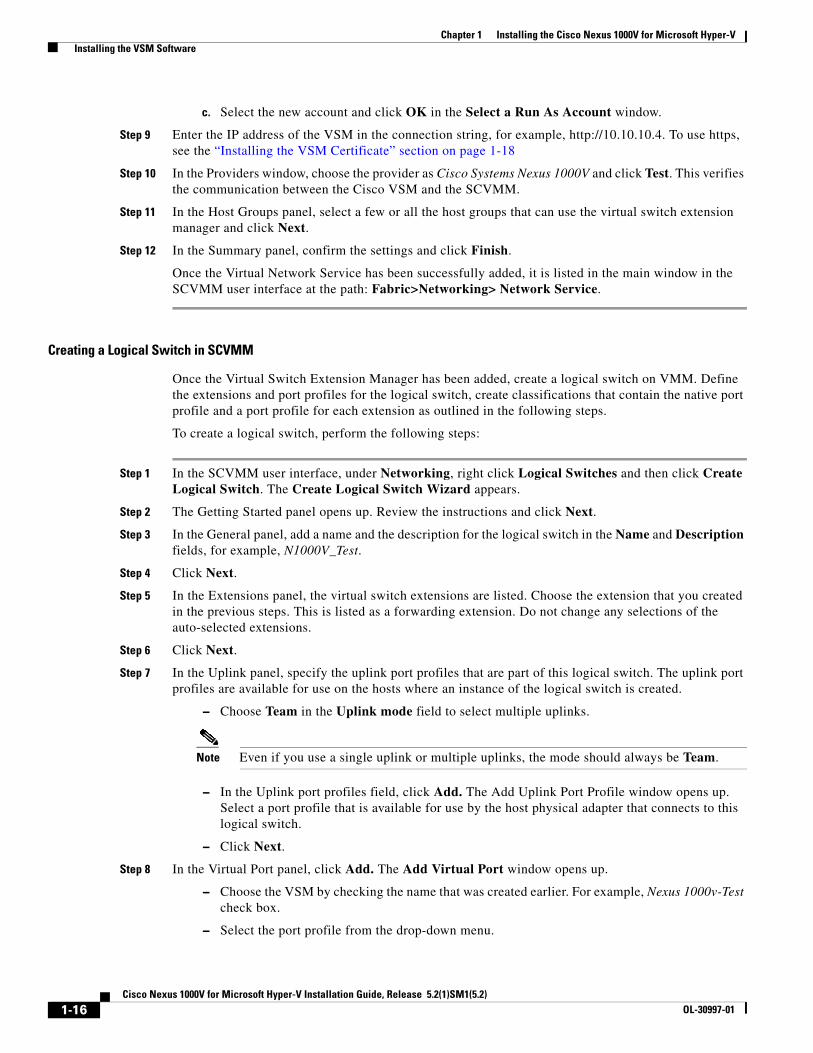
Creating a Logical Switch in SCVMM
Once the Virtual Switch Extension Manager has been added, create a logical switch on VMM. Define the extensions and port profiles for the logical switch, create classifications that contain the native port profile and a port profile for each extension as outlined in the following steps.
To create a logical switch, perform the following steps:
Step 1 In the SCVMM user interface, under Networking, right click Logical Switches and then click Create Logical Switch. The Create Logical Switch Wizard appears.
Step 2 The Getting Started panel opens up. Review the instructions and click Next.
Step 3 In the General panel, add a name and the description for the logical switch in the Name and Description fields, for example, N1000V_Test.
Step 4 Click Next.
Step 5 In the Extensions panel, the virtual switch extensions are listed. Choose the extension that you created in the previous steps. This is listed as a forwarding extension. Do not change any selections of the auto-selected extensions.
Step 6 Click Next.
Step 7 In the Uplink panel, specify the uplink port profiles that are part of this logical switch. The uplink port profiles are available for use on the hosts where an instance of the logical switch is created.
– Choose Team in the Uplink mode field to select multiple uplinks.
Note Even if you use a single uplink or multiple uplinks, the mode should always be Team.
– In the Uplink port profiles field, click Add. The Add Uplink Port Profile window opens up. Select a port profile that is available for use by the host physical adapter that connects to this logical switch.
– Click Next.
Step 8 In the Virtual Port panel, click Add. The Add Virtual Port window opens up.
– Choose the VSM by checking the name that was created earlier. For example, Nexus 1000v-Test check box.
– Select the port profile from the drop-down menu.
1-16Cisco Nexus 1000V for Microsoft Hyper-V Installation Guide, Release 5.2(1)SM1(5.2)
OL-30997-01

Chapter 1 Installing the Cisco Nexus 1000V for Microsoft Hyper-V Installing the VSM Software
– Click Browse.. in the Port Classification field.
– Click Create Port Classification... The Create Port Classification Wizard window opens up. Enter the name for the port profile classification in the Name field, for example, AllAccess1. Enter the description for the port profile classification in the Description field.
– Assign the selected port profile to a port classification created in the earlier step, that is the All Access1 in the Select a Port Profile Classification window.
– Click OK. Now the selected port classification, AllAccess1 is displayed in the Select a Port Profile Classification window.
– Click OK.
Step 9 Click OK to finish adding the Virtual Port.
Step 10 Click Next to close the Create Logical Switch Wizard window.
Step 11 In the Summary panel, confirm the settings and click Finish. Now the logical switch is created.
The defined configuration is available on every host that uses the logical switch and the hosts, virtual switches, and virtual machines remain in compliance with their associated logical switch
Note If you want to add more port profiles to the VSM, you have configure the properties again. All the hosts should be configured for multiple uplinks. To update the properties and add more uplink port profiles, right-click the logical switch in the SCVMM user interface and click Properties.
Configuring the VM Network
Once the logical switch and the hosts are configured, complete the following steps to configure the VMs and associate the network segments to the VMs.
Step 1 Click VMs and Services in the left navigation panel of the SCVMM user interface.
Step 2 Click VM Networks. Right-click and select the Create VM Network option. The Create VM Network Wizard window opens up.
Step 3 In the Name panel, specify the name for the VM network in the Name field. Enter the description for the VM network in the Description field. For example, add a name for the VM network as VM_network. If the name is same as the network-segment name, it is easy for the customers to do the mapping.
Step 4 Select the LogicaL Network which is created on the VSM.
Step 5 Click Next.
Step 6 To configure VM network in SCVMM 2012 SP1, do the following:
a. In the Isolation panel, select Specify an externally supplied VM network to configure the isolation externally. Confirm the External VM Network that was previously created, for example, VM_Network.
Step 7 To configure VM network in SCVMM 2012 R2, do the following:
a. In the Isolation panel, select the Network manager in which is the logical switch was created.
b. Click Next.
1-17Cisco Nexus 1000V for Microsoft Hyper-V Installation Guide, Release 5.2(1)SM1(5.2)
OL-30997-01

Chapter 1 Installing the Cisco Nexus 1000V for Microsoft Hyper-V Installing the VSM Software
c. In the Isolation options panel, select Specify an externally supplied VM network to configure the isolation externally. Confirm the External VM Network that was previously created, for example, VM_Network.
Step 8 Click Next.
Step 9 In the Summary panel, confirm the settings, and click Finish.
The new VM network is displayed in the VM Networks and IP Pools panel in the SCVMM user interface.
Installing the VSM CertificateTo enable HTTPS communication between the Cisco Nexus 1000V for Microsoft Hyper-V VSM software and the SCVMM server, you must first install the Cisco Nexus 1000V for Microsoft Hyper-V VSM certificate. You can install this certificate either manually or nu using a script.
This section includes the following topics:
• Installing the VSM Certificate Manually, page 1-18
• Installing the VSM Certificate Using a Script, page 1-19
Installing the VSM Certificate Manually
To install the Cisco Nexus 1000V for Microsoft Hyper-V VSM software certificate, perform the following steps:
Step 1 From the SCVMM Server, open Internet Explorer, and connect to the VSM using https://vsm-ip.
The Certificate Error window opens.
Step 2 Choose the Continue to this website option.
The Cisco Nexus 1000V window opens.
Step 3 Select the Certificate Error link that is available on the address bar of the same window.
Step 4 From the Unstrusted Certificate dialog box click View Certificates.
The Nexus1000V VSM certificate appears.
Step 5 Click the Install Certificate button.
The Certificate Import Wizard window opens.
Step 6 Choose Local Machine as the installation location and click Next.
Step 7 Based on the VM settings, a pop up window for the User Account Control (UAC) may open.
Step 8 On the next window, select the Place all certificates in the following store option and click Browse.
Step 9 Choose the Trusted Root Certification Authorities option available on the certificate store and click OK.
Step 10 Click Next on the Certificate Import Wizard.
Step 11 Review the summary on the final window and Select Finish. This completes the importing of the certificate.
Step 12 Press OK on the Certificate Import Wizard.
1-18Cisco Nexus 1000V for Microsoft Hyper-V Installation Guide, Release 5.2(1)SM1(5.2)
OL-30997-01

Chapter 1 Installing the Cisco Nexus 1000V for Microsoft Hyper-V Installing the VSM Software
Step 13 Press OK on the Certificate window.
Installing the VSM Certificate Using a Script
Use the following PowerShell script to install the VSM certificate:
Install-Nexus1000V-VSMCertificate.ps1
This script is available at the following location on the SCVMM server:
%ProgramFiles%\Cisco\Nexus1000V\Scripts\VMMConfig" , example "C:\Program Files\Cisco\Nexus1000V\Scripts\VMMConfig
PowerShell Scripts for Configuring the SCVMM Fabric WorkflowAfter the Cisco VSM Provider (Nexus1000V-VSEMProvider-5.2.1.SM1.5.2.0.msi) is installed from the download package on the SCVMM Server, the following scripts are available in the location "%ProgramFiles%\Cisco\Nexus1000V\Scripts\VMMConfig" example C:\Program Files\Cisco\Nexus1000V\Scripts\VMMConfig.
• Deploy-Nexus1000V-VSEM.ps1
• Refresh-Nexus1000V-VSEM.ps1
• Install-Nexus1000V-VSMCertificate.ps1
• Cleanup-Nexus1000V-VSEM.ps1
Deploy-Nexus1000V-VSEM.ps1
The usage, purpose, and the sample run of the scripts are explained in this script.
This script takes care of the following operations that you would need to do on the SCVMM server.
a. Add Extension Manager / Network Service.
b. Create a Logical Switch.
c. Associate Cisco Uplink Port Profiles with Logical Switch (created in step b)
d. Associate Virtual Port Profiles with Logical Switch (created in step b)
e. Create VM Networks from Cisco published Network Segments.
Below is a sample run :-
PS C:\Program Files\Cisco\Nexus1000V\Scripts\VMMConfig> .\Deploy-Nexus1000V-VSEM.ps1################################################################################# SCRIPT NAME: Deploy-Nexus1000V-VSEM.ps1 #### VERSION: 1.1 #### DESCRIPTION: This script will add a new Cisco Nexus1000V Extension to #### SCVMM and create the following SCVMM objects: #### 1. Extension Manager / Network Service. #### 2: Logical Switch. #### 3: Associate Uplink Port Profiles with Logical Switch. #### 4: Associate Virtual Port Profile with Logical Switch. #### 5: Create VMNetworks from Cisco published Network Segments. #### #################################################################################Enter IP Address for the Nexus1000V VSM: 10.105.234.211
1-19Cisco Nexus 1000V for Microsoft Hyper-V Installation Guide, Release 5.2(1)SM1(5.2)
OL-30997-01

Chapter 1 Installing the Cisco Nexus 1000V for Microsoft Hyper-V Installing the VSM Software
Enter Username for the Nexus1000V VSM: adminEnter Password for the Nexus1000V VSM: ********Enter Name of Logical Switch to be Created on SCVMM: Nexus-Logical-SwitchImporting Virtual Machine Manager Libraries ..
------------------------------------------------- Deploying Cisco Nexus1000V Logical Switch:-------------------------------------------------
VSM IP : 10.105.234.211 RUN-AS-ACCOUNT: CiscoVSM-10.105.234.211-1-23-14_12-44 HOSTGROUP: All Hosts NAME: Cisco Systems Nexus 1000V LOGICAL SWITCH NAME: Nexus-Logical-Switch SCVMM VERSION: 3.2.7510.0
----------------------------------------------------------Adding Cisco Extension over 'https' with IP = 10.105.234.211----------------------------------------------------------This may take a while depending on VSM configuration Size...Cisco Switch Extension Manager Added Successfully to VMM-Server.
--------------------------------------------------------------------------------------Creating Logical Switch 'Nexus-Logical-Switch'.--------------------------------------------------------------------------------------Logical Switch 'Nexus-Logical-Switch' Created Successfully
--------------------------------------------------------------------------------------Populating Uplink Port Profile Sets for Logical Switch 'Nexus-Logical-Switch'.--------------------------------------------------------------------------------------1 : Uplink Port Profile Set ==> 'NexusUplink'
--------------------------------------------------------------------------------------Populating Virtual Port Profile Sets and Classifications for Logical Switch 'Nexus-Logical-Switch'.
-------------------------------------------------------------------------------------------------------------------
1 : Port Classification ==> 'Veth-policy'
--------------------------------------------------------------------------------------Populating VM Networks for Logical Switch 'Nexus-Logical-Switch'.--------------------------------------------------------------------------------------INFO : List of VMnetworks Created (1): 1 : 'VMNetworkA'
---------------------Execution Complete!---------------------
Transcript stopped, output file is C:\Program Files\Cisco\Nexus1000V\Scripts\VMMConfig\Deploy-Nexus1000V-VSEM-logs\Deploy-Nexus1000V-VSEM-1-23-14_12-44.logPS C:\Program Files\Cisco\Nexus1000V\Scripts\VMMConfig>
Refresh-Nexus1000V-VSEM.ps1
In a situation where the Cisco VSEM is already added to the SCVMM server and you need to configure new objects such as port-profiles, network segments, uplink networks on the VSM. You may also need to refresh the Cisco VSEM inorder to associate the Nexus 1000v Objects on the SCVMM and make them available for usage.
1-20Cisco Nexus 1000V for Microsoft Hyper-V Installation Guide, Release 5.2(1)SM1(5.2)
OL-30997-01
Chapter 1 Installing the Cisco Nexus 1000V for Microsoft Hyper-V Installing the VSM Software
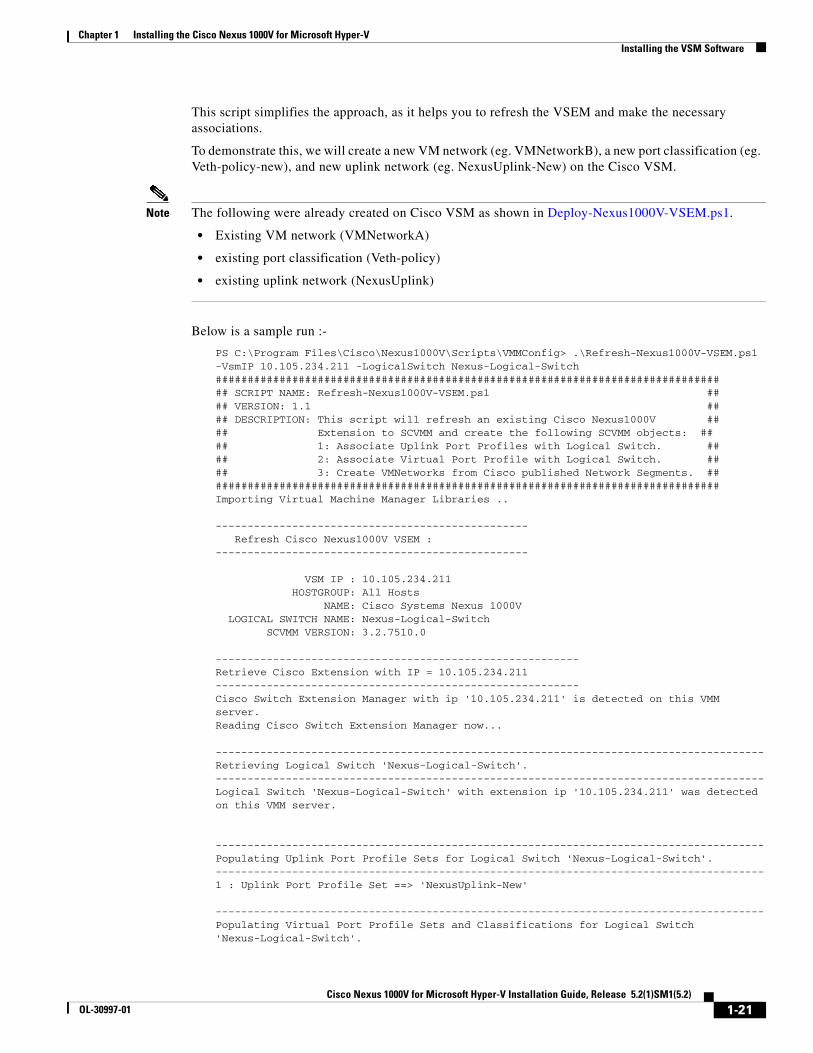
This script simplifies the approach, as it helps you to refresh the VSEM and make the necessary associations.
To demonstrate this, we will create a new VM network (eg. VMNetworkB), a new port classification (eg. Veth-policy-new), and new uplink network (eg. NexusUplink-New) on the Cisco VSM.
Note The following were already created on Cisco VSM as shown in Deploy-Nexus1000V-VSEM.ps1.
• Existing VM network (VMNetworkA)
• existing port classification (Veth-policy)
• existing uplink network (NexusUplink)
Below is a sample run :-
PS C:\Program Files\Cisco\Nexus1000V\Scripts\VMMConfig> .\Refresh-Nexus1000V-VSEM.ps1 -VsmIP 10.105.234.211 -LogicalSwitch Nexus-Logical-Switch################################################################################# SCRIPT NAME: Refresh-Nexus1000V-VSEM.ps1 #### VERSION: 1.1 #### DESCRIPTION: This script will refresh an existing Cisco Nexus1000V #### Extension to SCVMM and create the following SCVMM objects: #### 1: Associate Uplink Port Profiles with Logical Switch. #### 2: Associate Virtual Port Profile with Logical Switch. #### 3: Create VMNetworks from Cisco published Network Segments. #################################################################################Importing Virtual Machine Manager Libraries ..
------------------------------------------------- Refresh Cisco Nexus1000V VSEM :-------------------------------------------------
VSM IP : 10.105.234.211 HOSTGROUP: All Hosts NAME: Cisco Systems Nexus 1000V LOGICAL SWITCH NAME: Nexus-Logical-Switch SCVMM VERSION: 3.2.7510.0
---------------------------------------------------------Retrieve Cisco Extension with IP = 10.105.234.211---------------------------------------------------------Cisco Switch Extension Manager with ip '10.105.234.211' is detected on this VMM server.Reading Cisco Switch Extension Manager now...
--------------------------------------------------------------------------------------Retrieving Logical Switch 'Nexus-Logical-Switch'.--------------------------------------------------------------------------------------Logical Switch 'Nexus-Logical-Switch' with extension ip '10.105.234.211' was detected on this VMM server.
--------------------------------------------------------------------------------------Populating Uplink Port Profile Sets for Logical Switch 'Nexus-Logical-Switch'.--------------------------------------------------------------------------------------1 : Uplink Port Profile Set ==> 'NexusUplink-New'
--------------------------------------------------------------------------------------Populating Virtual Port Profile Sets and Classifications for Logical Switch 'Nexus-Logical-Switch'.
1-21Cisco Nexus 1000V for Microsoft Hyper-V Installation Guide, Release 5.2(1)SM1(5.2)
OL-30997-01

Chapter 1 Installing the Cisco Nexus 1000V for Microsoft Hyper-V Installing the VSM Software
--------------------------------------------------------------------------------------1 : Port Classification ==> 'Veth-policy-new'
--------------------------------------------------------------------------------------Populating VM Networks for Logical Switch 'Nexus-Logical-Switch'.--------------------------------------------------------------------------------------INFO : List of VMnetworks Created (1): 1 : 'VMNetworkB'
---------------------Execution Complete!---------------------Transcript stopped, output file is C:\Program Files\Cisco\Nexus1000V\Scripts\VMMConfig\Refresh-Nexus1000V-VSEM-logs\Refresh-Nexus1000V-VSEM-1-23-14_12-54.logPS C:\Program Files\Cisco\Nexus1000V\Scripts\VMMConfig>
Install-Nexus1000V-VSMCertificate.ps1
This script is used to install the Cisco Nexus1000V VSM certificate on the SCVMM server. This certificate is required to establish an HTTPS connection between the SCVMM Server and the VSM.
Below is a sample run :-
PS C:\Program Files\Cisco\Nexus1000V\Scripts\VMMConfig> .\Install-Nexus1000V-VSMCertificate.ps1 -ip 10.105.234.211True
The script returns "True" for a successful install.
Cleanup-Nexus1000V-VSEM.ps1
This script is used to perform a cleanup of the Nexus1000V components available on the SCVMM server.
Note This script will exit if it encounters any Nexus1000V objects being used.
Preparing the Microsoft Hyper-V Hosts (Optional)Before you add the hosts to the logical switch, you can prepare the Microsoft Hyper-V hosts. This step is optional.
This section includes the following topics:
• Configuring the MTU with the Cisco Nexus 1000V, page 1-22
• VMQ Processor Configuration with the Cisco Nexus 1000V, page 1-23
• Changing the RSS Registry, page 1-23
Configuring the MTU with the Cisco Nexus 1000V
In Microsoft Hyper-V, the VSM does not manage the Maximum Transmission Unit (MTU) setting of VM NIC or physical adapters. All physical adapters added to the Cisco Nexus 1000V switch should have the same MTU configured and the PNIC MTU should not be changed after it is added to the switch.
To configure the MTU, perform the following steps:
1-22Cisco Nexus 1000V for Microsoft Hyper-V Installation Guide, Release 5.2(1)SM1(5.2)
OL-30997-01

Chapter 1 Installing the Cisco Nexus 1000V for Microsoft Hyper-V Installing the VSM Software
Step 1 Open View Network Connections from the Server Manager or Control Panel or by typing ncpa.cpl from a command line.
Step 2 Right click the adapter and choose Properties.
Step 3 Click Configure under the adapter properties window.
Step 4 Click the Advanced tab.
Step 5 Under Property, click on Jumbo Packet.
Step 6 Set the desired value of the Jumbo Packet property.
Repeat this procedure for all the adapters that are added to Cisco Nexus 1000V logical switch.
Note Certain adapters allow the MTU change only through their own adapter manager. For example, the MTU of the Cisco VIC cards can be changed thorugh the UCSM or ILO.
VMQ Processor Configuration with the Cisco Nexus 1000V
VMQ allows the network traffic received on an adapter to be spread over multiple CPU cores which provides better performance. The following two factors are important in determining if the VMQ operates correctly:
• The receive side scaling (RSS) CPU number determines the lowest CPU core that can be used by RSS.
• The maximum number of RSS CPU determines how many CPU cores can be used by RSS.
The above two factors can be configured so that the same CPU core is not used by multiple NICs.
Note Changing the RSS registry is a disruptive operation and causes the Ethernet adapter to flap.
The Cisco Nexus 1000V supports the following port-channel operational modes: Link Aggregation Control Protocol (LACP) and vPC.
The LACP utilizes the same Subgroup id for all the members of a port-channel. The RSS Base CPU and Max RSS Processors should be configured with same value for all member ports.
MAC pinning / manual pinning port-channel use multiple subgroup ids within the members of the port-channel. Therefore, the RSS Base CPU and Max RSS processors should be configured so that the same CPU core is not used by multiple NICs.
Changing the RSS Registry
To change the RSS registry, perform the following steps:
Step 1 Open View Network Connections from the Server Manager or Control Panel or by typing ncpa.cpl from a command line.
Step 2 Right-click the adapter and choose properties.
Step 3 Under the Adapter Properties window, click Configure.
1-23Cisco Nexus 1000V for Microsoft Hyper-V Installation Guide, Release 5.2(1)SM1(5.2)
OL-30997-01

Chapter 1 Installing the Cisco Nexus 1000V for Microsoft Hyper-V Installing the VSM Software
Step 4 Click the Advanced tab.
Step 5 Click Maximum Number of RSS Processor and enter a value.
Step 6 Click Starting RSS CPU and enter a value.
Repeat this procedure for all the adapters that you want VMQ to be enabled on.
The RSS setting cannot be modified through the network connections for certain adapters. For those adapters, you must set the registry keys directly using the registry editor. Check the Microsoft documentation for information about changing the registry.
Adding Hosts to a Logical SwitchAfter a logical switch is created, you can update the properties of the logical switch.
Step 1 In the left navigation pane, choose the server, under Fabric > Servers > All Hosts, right-click, and choose Properties. The Properties window opens.
Step 2 In the left navigation pane of the Properties window, click Virtual Switches.
Step 3 In the Virtual Switches pane, in the New Virtual Switches field, click New Logical Switch. Choose the correct logical switch and physical adapters to assign to the logical switch. The module is added to Cisco Nexus1000V VSM.
Note The MGMT PNIC can be added to the logical switch only when the switch is created. Adding it later results in a loss of host connectivity.
Step 4 Under the Physical Adapter header, choose a network adapter from the drop-down list in the Adapter field. In the Uplink Port Profile field, confirm the uplink port profile for the adapter.
Step 5 For port-channeling, click Add to add a second network adapter. Choose a different network adapter, confirm the uplink port profile, and click OK.
Note Do not use the same port profile for both adapters. If you have configured the port channels, then you can use the same port-profile on both the adapters. Refer the NSM Configuration Guide for more details.
Now, the Cisco Nexus 1000V package that was copied on the SCVMM is installed on the host.
Note We recommend that one logical switch is created per VSM.
Connecting the VM Network Adapter to the Logical SwitchTo connect the VM network adapter to the Logical Switch, perform the following steps:
Step 1 Choose the VM network adapter.
1-24Cisco Nexus 1000V for Microsoft Hyper-V Installation Guide, Release 5.2(1)SM1(5.2)
OL-30997-01

Chapter 1 Installing the Cisco Nexus 1000V for Microsoft Hyper-V Installing the VSM Software
Step 2 Choose the server on which the VM is installed in the SCVMM user interface. In the left navigation pane under VMs and Services > All Hosts, click the Hyper-V server. In the main window, right-click the virtual machine that you have created, and choose Properties.
Step 3 In the properties file, click Hardware Configuration in the left navigation pane.
Step 4 In the Hardware Configuration panel, choose NetWork Adapter.
Step 5 In the Network Adapter 1 pane on the right, choose Connected to a VM Network.
Step 6 Browse to find the VM network created in an earlier section.
Step 7 Click OK.
Step 8 In the Hardware Configuration pane, under Virtual Switch, choose the logical switch in the Logical Switch field. For the classification, choose the previously created port profile in the Classification field.
Note If you set the default port profile earlier as outlined in step 8 of the “Creating a Logical Switch in SCVMM” section on page 1-16 and if you do not select a port classification for the logical switch in this window, the default port classification is applied to the logical switch.
Step 9 Click OK.
The Cisco Nexus 1000V for Microsoft Hyper-V installation is now complete.
1-25Cisco Nexus 1000V for Microsoft Hyper-V Installation Guide, Release 5.2(1)SM1(5.2)
OL-30997-01

Chapter 1 Installing the Cisco Nexus 1000V for Microsoft Hyper-V Installing the VSM Software
1-26Cisco Nexus 1000V for Microsoft Hyper-V Installation Guide, Release 5.2(1)SM1(5.2)
OL-30997-01

Cisco Nexus 1000V for MicrosoftOL-30997-01
C H A P T E R 2
Upgrading the Cisco Nexus 1000V for Microsoft Hyper-VThis chapter includes the following sections:
• Prerequisites for Upgrading the VSM Software, page 2-1
• Upgrade Procedures, page 2-4
• Upgrading the VSM, page 2-4
• Upgrading the Cisco VSEM, page 2-12
• Upgrading the VEM Software, page 2-13
• Upgrade SCVMM 2012 SP1 to SCVMM 2012 R2, page 2-21
• Upgrade Windows Server 2012 Hosts to 2012R2, page 2-22
Prerequisites for Upgrading the VSM SoftwareThis section includes the following sections:
• Before You Begin, page 2-1
• Prerequisites, page 2-1
Before You Begin • A pair of VSMs in a high availability (HA) pair is required in order to support a nondisruptive
upgrade.
• A system with a single VSM can only be upgraded in a disruptive manner.
The upgrade process is irrevocable. After the software is upgraded, you can downgrade by removing the current installation and reinstalling the software.
PrerequisitesUpgrading VSMs has the following prerequisites:
• Close any active configuration sessions before upgrading the Cisco Nexus 1000V software.
• Save all changes in the running configuration to the startup configuration.
2-1 Hyper-V Installation Guide, Release 5.2(1)SM1(5.2)

Chapter 2 Upgrading the Cisco Nexus 1000V for Microsoft Hyper-V Prerequisites for Upgrading the VSM Software
• Save a backup copy of the running configuration in external storage.
• Perform a VSM backup. For more information, see the Configuring VSM Backup and Recovery chapter in the Cisco Nexus 1000V System Management Configuration Guide, Release 5.2(1)SM1(5.2).
Licensing
Determine the edition of the Cisco Nexus 1000V by using the show switch edition command. Based on the edition, see the following sections:
• Advanced Edition, page 2-2
• Essential Edition, page 2-2
• Licensing and Upgrade, page 2-3
Advanced Edition
• Install the Nexus1000V Multi-Hypervisor based licenses (evaluation or permanent) before you upgrade to the current release.
• If an upgrade is performed with a default license, the upgrade will fail.
• Platform-specific licenses are checked in and the Nexus1000V Multi-Hypervisor Licenses are checked out after a VSM upgrade.
• After a successful upgrade, the License Socket count is changed to 1024 with the evaluation period changed to 60 days.
Essential Edition
• The upgrade to a current release is supported in the Essential edition with a default license.
• After a successful upgrade, the license socket count is changed to 1024 and the evaluation period is changed to 60 days.
For more information, see the Cisco Nexus 1000V for Microsoft Hyper-V License Configuration Guide.
2-2Cisco Nexus 1000V for Microsoft Hyper-V Installation Guide, Release 5.2(1)SM1(5.2)
OL-30997-01

Chapter 2 Upgrading the Cisco Nexus 1000V for Microsoft Hyper-V Prerequisites for Upgrading the VEM Software
Licensing and Upgrade
If you are upgrading the software from Release 5.2(1)SM1(5.1), and the switch edition is advanced, then you need to follow the Figure 2-1 to check on the license details after the upgrade.
Note For information on availing a replacement for the Nexus 1000V Multi-Hypervisor licenses, see the Rehosting a License on a Different VSM section in the Cisco Nexus 1000V for Microsoft Hyper-V License Configuration Guide, Release 5.2(1)SM1(5.2).
Note The License count is counted as one for each of the CPU socket.
Figure 2-1 Licensing and Upgrade
Prerequisites for Upgrading the VEM SoftwareUpgrading the VEM software has the following prerequisites:
1. The VSM and virtual switch extension manager (VSEM) need to be upgraded to the current release before you upgrade the VEM software.
2-3Cisco Nexus 1000V for Microsoft Hyper-V Installation Guide, Release 5.2(1)SM1(5.2)
OL-30997-01

Chapter 2 Upgrading the Cisco Nexus 1000V for Microsoft Hyper-V Upgrade Procedures
– To upgrade the VSM, see the “Upgrading the VSM” section on page 2-4.
– To upgrade the VSEM, see the “Upgrading the Cisco VSEM” section on page 2-12.
2. You have already obtained a copy of the VEM software file.
Upgrade ProceduresTable 2-1 lists the upgrade paths from the Cisco Nexus 1000v software releases.
Note For the SCVMM upgrade from SP1 to R2, see the “Upgrade SCVMM 2012 SP1 to SCVMM 2012 R2” section on page 2-21. For the host upgrade to Windows Server 2012 R2, see the “Upgrade Windows Server 2012 Hosts to 2012R2” section on page 2-22.
Table 2-1 Upgrade Paths from Cisco Nexus 1000V Releases
If you are running this configuration Follow these steps
Release 5.2(1)SM1(5.1) with the following:
• SCVMM 2012 (SP1) UR2 build version 3.1.6020.0 and later)
• Windows Server 2012 Hosts
• Upgrade Cisco Nexus 1000V to the current release
– Upgrade the VSM to current release.
– Upgrade the VSEM to current release.
– Upgrade the VEM to current release.
Upgrading the VSM This section includes the following topics:
• Software Images, page 2-4
• In-Service Software Upgrades on Systems with Dual VSMs, page 2-5
• ISSU Process for the Cisco Nexus 1000V, page 2-6
• ISSU VSM Switchover, page 2-6
• ISSU Command Attributes, page 2-7
• Upgrading VSMs from Releases 5.2(1)SM1(5.1) to Release 5.2(1)SM1(5.2) Using Kickstart and System Images, page 2-7
• Performing an ISSU Upgrade using an ISO Image File, page 2-11
Software ImagesThe software image install procedure is dependent on the following factors:
• Software images—The kickstart and system image files reside in directories or folders that you can access from the Cisco Nexus 1000V software prompt.
• Image version—Each image file has a version.
2-4Cisco Nexus 1000V for Microsoft Hyper-V Installation Guide, Release 5.2(1)SM1(5.2)
OL-30997-01

Chapter 2 Upgrading the Cisco Nexus 1000V for Microsoft Hyper-V Upgrading the VSM
• Disk—The bootflash: resides on the VSM.
In-Service Software Upgrades on Systems with Dual VSMs
Note Performing an In-Service Software Upgrade (ISSU) from Cisco Nexus 1000V Release 5.2(1)SM1(5.1) to the current release of Cisco Nexus 1000V using ISO files is not supported. You must use the kickstart and system files to perform an ISSU upgrade to the current release of Cisco Nexus 1000V.
The Cisco Nexus 1000V software supports in-service software upgrades (ISSUs) for systems with dual VSMs. An ISSU can update the software images on your switch without disrupting data traffic. Only control traffic is disrupted. If an ISSU causes a disruption of data traffic, the Cisco Nexus 1000V software warns you before proceeding so that you can stop the upgrade and reschedule it to a time that minimizes the impact on your network.
Note On systems with dual VSMs, you should have access to the console of both VSMs to maintain connectivity when the switchover occurs during upgrades. If you are performing the upgrade over Secure Shell (SSH) or Telnet, the connection will drop when the system switchover occurs, and you must reestablish the connection.
An ISSU updates the following images:
• Kickstart image
• System image
2-5Cisco Nexus 1000V for Microsoft Hyper-V Installation Guide, Release 5.2(1)SM1(5.2)
OL-30997-01

Chapter 2 Upgrading the Cisco Nexus 1000V for Microsoft Hyper-V Upgrading the VSM
ISSU Process for the Cisco Nexus 1000VFigure 2-2 displays the ISSU process.
Figure 2-2 ISSU Process
ISSU VSM SwitchoverFigure 2-3 provides an example of the VSM status before and after an ISSU switchover.
Figure 2-3 Example of an ISSU VSM Switchover
Active
VSM VSM
Primary Secondary Primary Secondary
Your pre-upgraderelease version
Your pre-upgraderelease version
Standby
Your upgraderelease version
Your upgraderelease version
ISSU
Before the ISSU After the ISSU
Nexus 1000V33
6026
Active
VSM VSM
Standby
2-6Cisco Nexus 1000V for Microsoft Hyper-V Installation Guide, Release 5.2(1)SM1(5.2)
OL-30997-01

Chapter 2 Upgrading the Cisco Nexus 1000V for Microsoft Hyper-V Upgrading the VSM
ISSU Command Attributes
Support
The install all command supports an in-service software upgrade (ISSU) on dual VSMs in an HA environment and performs the following actions:
• Determines whether the upgrade is disruptive and asks if you want to continue.
• Copies the kickstart and system images to the standby VSM.
• Sets the kickstart and system boot variables.
• Reloads the standby VSM with the new Cisco Nexus 1000V software.
• Causes the active VSM to reload when the switchover occurs.
Benefits
The install all command provides the following benefits:
• You can upgrade the VSM by using the install all command.
• You can receive descriptive information on the intended changes to your system before you continue with the installation.
• You have the option to cancel the command. Once the effects of the command are presented, you can continue or cancel when you see this question (the default is no):
Do you want to continue (y/n) [n]: y
• You can upgrade the VSM using the least disruptive procedure.
• You can see the progress of this command on the console, Telnet, and SSH screens:
– After a switchover process, you can see the progress from both the VSMs.
– Before a switchover process, you can see the progress only from the active VSM.
• The install all command automatically checks the image integrity, which includes the running kickstart and system images.
• The install all command performs a platform validity check to verify that a wrong image is not used.
• The Ctrl-C escape sequence gracefully ends the install all command. The command sequence completes the update step in progress and returns to the switch prompt. (Other upgrade steps cannot be ended by using Ctrl-C.)
After running the install all command, if any step in the sequence fails, the command completes the step in progress and ends.
Upgrading VSMs from Releases 5.2(1)SM1(5.1) to Release 5.2(1)SM1(5.2) Using Kickstart and System Images
Depending on the redundancy status of the VSM, the upgrade procedure differs. The redundancy status of VSM can be determined by the show system redundancy status command.
This section includes the following topics:
• Upgrading VSMs in a High Availability (HA) pair, page 2-8
• Upgrading a standalone VSM, page 2-9
2-7Cisco Nexus 1000V for Microsoft Hyper-V Installation Guide, Release 5.2(1)SM1(5.2)
OL-30997-01

Chapter 2 Upgrading the Cisco Nexus 1000V for Microsoft Hyper-V Upgrading the VSM
Upgrading VSMs in a High Availability (HA) pair
To upgrade the VSMs in a HA pair using the ISSU process, perform the following steps:
Step 1 Choose and download the Cisco Nexus 1000V zip file and extract the kickstart and system software files to a server. For more information, see the “Downloading the Cisco Nexus 1000V Package” section on page 1-7.
Step 2 Log in to the active VSM.
Step 3 Ensure that the required space is available for the image file(s) to be copied.
switch# dir bootflash:...Usage for bootflash://485830656 bytes used1109045248 bytes free1594875904 bytes total
Tip We recommend that you have the kickstart and system image files for at least one previous release of the Cisco Nexus 1000V software on the system to use if the new image files do not load successfully.
Step 4 Verify that there is space available on the standby VSM by entering the dir bootflash://sup-standby/ command
Step 5 Verify that there is space available on the standby VSM.
switch# dir bootflash://sup-standby/...Usage for bootflash://485830656 bytes used1109045248 bytes free1594875904 bytes total
Step 6 Delete any unnecessary files to make space available if you need more space on the standby VSM.
Step 7 If you plan to install the images from the bootflash:, copy the Cisco Nexus 1000V kickstart and system images to the active VSM by using a transfer protocol. You can use ftp:, tftp:, scp:, or sftp:. The examples in this procedure copies a kickstart and system image using tftp:.
switch# copy tftp://10.106.196.163/n1000vh-dk9.5.2.1.SM1.5.2.bin bootflash: n1000vh-dk9.5.2.1.SM1.5.2.binswitch# copy tftp://10.106.196.163/n1000vh-dk9-kickstart.5.2.1.SM1.5.2.bin bootflash:n1000vh-dk9-kickstart.5.2.1.SM1.5.2.bin
Step 8 Verify the ISSU upgrade for the kickstart and system images
switch# show install all impact kickstart bootflash: n1000vh-dk9-kickstart.5.2.1.SM1.5.2.bin system bootflash: n1000vh-dk9.5.2.1.SM1.5.2.bin
Step 9 Save the running configuration to startup configuration, bootflash:, and to an external location.
Note You can also run a VSM backup. See the Configuring VSM Backup and Recovery chapter of the Cisco Nexus 1000V System Management Configuration Guide, Release 5.2(1) SM1 (5.2).
a. Save the running configuration to a startup configuration using copy running-config startup-config command.
2-8Cisco Nexus 1000V for Microsoft Hyper-V Installation Guide, Release 5.2(1)SM1(5.2)
OL-30997-01

Chapter 2 Upgrading the Cisco Nexus 1000V for Microsoft Hyper-V Upgrading the VSM
b. Save the running configuration to bootflash: using the copy running-config bootflash:run-cfg-backup command
c. Save the running configuration to external location using the copy running-config tftp://external_backup_location command.
Step 10 Perform the upgrade on the active VSM by using the following command:
install all kickstart bootflash: n1000vh-dk9-kickstart.5.2.1.SM1.5.2.bin system bootflash: n1000vh-dk9.5.2.1.SM1.5.2.bin
Step 11 Continue with the installation by pressing Y.
Note If you press N, the installation exits gracefully.
Note As a part of the upgrade process, the standby VSM is reloaded with new images. After it becomes the HA standby again, the upgrade process initiates a switchover. The upgrade then continues from the new active VSM.
Step 12 After the installation operation completes, log in and verify that the switch is running the required software version by using the show version command.
Step 13 Copy the running configuration to the startup configuration by using the copy running-config startup-config command.
Step 14 Display the log for the last installation by entering the following commands.
switch# show install all statusswitch# attach module <module_number>switch# show install all status
Note In case the command show install all status does not exit automatically while the installation is in progress, use Ctrl+C to exit from the command.
Step 15 Perform the Refresh operation of the Cisco Nexus 1000V Virtual Switch Extension Manager, if you have added the Cisco Nexus 1000V as the Virtual Switch Extension Magager in SCVMM. To perform the refresh operation, do the following:
a. Open the SCVMM console.
b. Navigate to the Fabric workspace, on the Fabric pane, expand Networking, and click Switch Extension Manager. If the SCVMM version is 2012 R2, then click Network Service.
c. In results pane, right-click Cisco Systems Nexus 1000V extension and select Refresh.
Upgrading a standalone VSM
The system with a single/standalone VSM can only be upgraded in a disruptive manner using the install all command.
To upgrade the standalone VSM, perform the following steps:
2-9Cisco Nexus 1000V for Microsoft Hyper-V Installation Guide, Release 5.2(1)SM1(5.2)
OL-30997-01
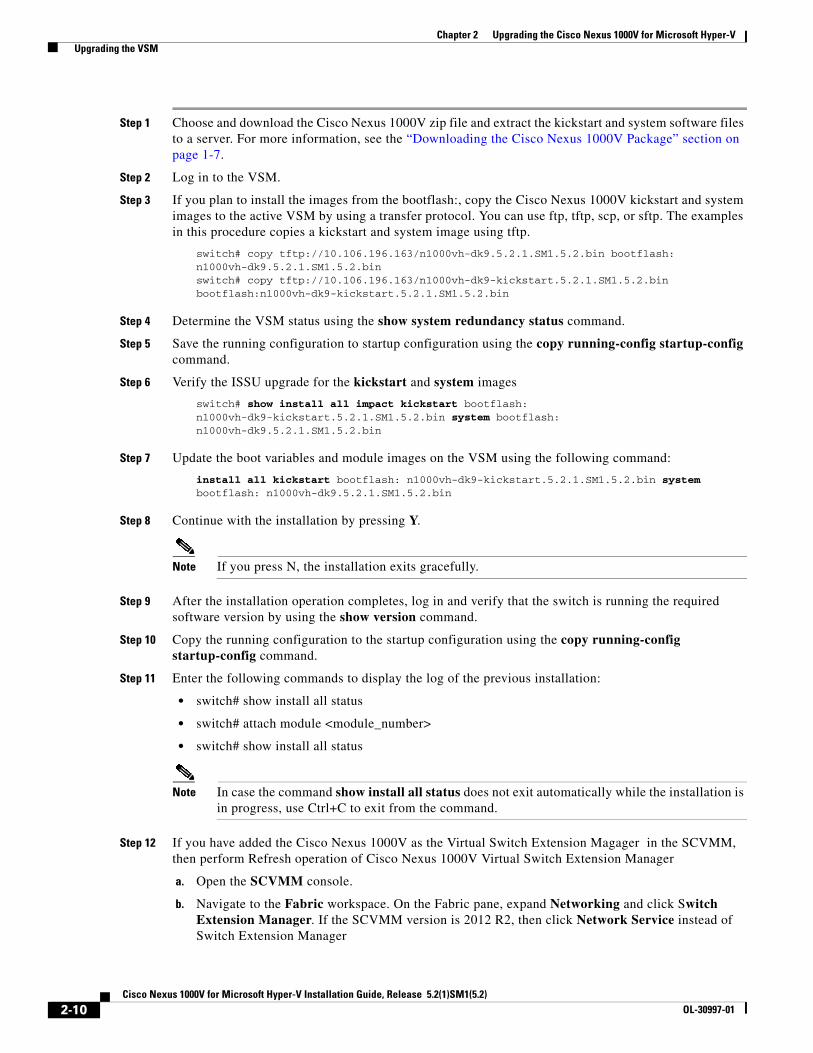
Chapter 2 Upgrading the Cisco Nexus 1000V for Microsoft Hyper-V Upgrading the VSM
Step 1 Choose and download the Cisco Nexus 1000V zip file and extract the kickstart and system software files to a server. For more information, see the “Downloading the Cisco Nexus 1000V Package” section on page 1-7.
Step 2 Log in to the VSM.
Step 3 If you plan to install the images from the bootflash:, copy the Cisco Nexus 1000V kickstart and system images to the active VSM by using a transfer protocol. You can use ftp, tftp, scp, or sftp. The examples in this procedure copies a kickstart and system image using tftp.
switch# copy tftp://10.106.196.163/n1000vh-dk9.5.2.1.SM1.5.2.bin bootflash: n1000vh-dk9.5.2.1.SM1.5.2.binswitch# copy tftp://10.106.196.163/n1000vh-dk9-kickstart.5.2.1.SM1.5.2.bin bootflash:n1000vh-dk9-kickstart.5.2.1.SM1.5.2.bin
Step 4 Determine the VSM status using the show system redundancy status command.
Step 5 Save the running configuration to startup configuration using the copy running-config startup-config command.
Step 6 Verify the ISSU upgrade for the kickstart and system images
switch# show install all impact kickstart bootflash: n1000vh-dk9-kickstart.5.2.1.SM1.5.2.bin system bootflash: n1000vh-dk9.5.2.1.SM1.5.2.bin
Step 7 Update the boot variables and module images on the VSM using the following command:
install all kickstart bootflash: n1000vh-dk9-kickstart.5.2.1.SM1.5.2.bin system bootflash: n1000vh-dk9.5.2.1.SM1.5.2.bin
Step 8 Continue with the installation by pressing Y.
Note If you press N, the installation exits gracefully.
Step 9 After the installation operation completes, log in and verify that the switch is running the required software version by using the show version command.
Step 10 Copy the running configuration to the startup configuration using the copy running-config startup-config command.
Step 11 Enter the following commands to display the log of the previous installation:
• switch# show install all status
• switch# attach module <module_number>
• switch# show install all status
Note In case the command show install all status does not exit automatically while the installation is in progress, use Ctrl+C to exit from the command.
Step 12 If you have added the Cisco Nexus 1000V as the Virtual Switch Extension Magager in the SCVMM, then perform Refresh operation of Cisco Nexus 1000V Virtual Switch Extension Manager
a. Open the SCVMM console.
b. Navigate to the Fabric workspace. On the Fabric pane, expand Networking and click Switch Extension Manager. If the SCVMM version is 2012 R2, then click Network Service instead of Switch Extension Manager
2-10Cisco Nexus 1000V for Microsoft Hyper-V Installation Guide, Release 5.2(1)SM1(5.2)
OL-30997-01

Chapter 2 Upgrading the Cisco Nexus 1000V for Microsoft Hyper-V Upgrading the VSM
c. In results pane, right-click Cisco Systems Nexus 1000V extension and select Refresh.
Performing an ISSU Upgrade using an ISO Image FileTo do an ISSU upgrade using an ISO image file, perform the following steps:
Step 1 Log in to Cisco.com to access the Software Download Center. To log in to Cisco.com, go to http://www.cisco.com/ and click Log In at the top of the page. Enter your Cisco username and password.
You see links to the download images for the switch.
Step 2 Select and download the ISO file to bootflash:.
Step 3 Verify that the required space is available in the bootflash: directory for the image file(s) to be copied.
Step 4 Copy the ISO to the bootflash using a transfer protocol such as ftp:, tftp:, scp:, or sftp:. The examples in this procedure use scp:.
Step 5 Enter the install all iso bootflash:<iso_filename> command.
switch# install all iso bootflash:n1000vh-dk9.5.2.1.SM1.5.2.iso
Verifying image bootflash:/n1000vh-dk9-kickstart.5.2.1.SM1.5.2.gbin for boot variable "kickstart".[####################] 100% -- SUCCESS
Verifying image bootflash:/n1000vh-dk9.5.2.1.SM1.5.2.bin for boot variable "system".[####################] 100% -- SUCCESS
Verifying image type.[####################] 100% -- SUCCESS
Extracting "system" version from image bootflash:/n1000vh-dk9.5.2.1.SM1.5.2.bin.[####################] 100% -- SUCCESS
Extracting "kickstart" version from image bootflash:/n1000vh-dk9-kickstart.5.2.1.SM1.5.2.gbin.[####################] 100% -- SUCCESS
Performing module support checks.[####################] 100% -- SUCCESS
Notifying services about system upgrade.[####################] 100% -- SUCCESS
Compatibility check is done:Module bootable Impact Install-type Reason------ -------- -------------- ------------ ------ 1 yes non-disruptive reset 2 yes non-disruptive reset
Images will be upgraded according to following table:Module Image Running-Version New-Version Upg-Required------ ---------- ---------------------- ---------------------- ------------ 1 system 5.2(1)SM1(5.1) 5.2(1)SM1(5.2) yes 1 kickstart 5.2(1)SM1(5.1) 5.2(1)SM1(5.2) yes 2 system 5.2(1)SM1(5.1) 5.2(1)SM1(5.2) yes 2 kickstart 5.2(1)SM1(5.1) 5.2(1)SM1(5.2) yes
2-11Cisco Nexus 1000V for Microsoft Hyper-V Installation Guide, Release 5.2(1)SM1(5.2)
OL-30997-01
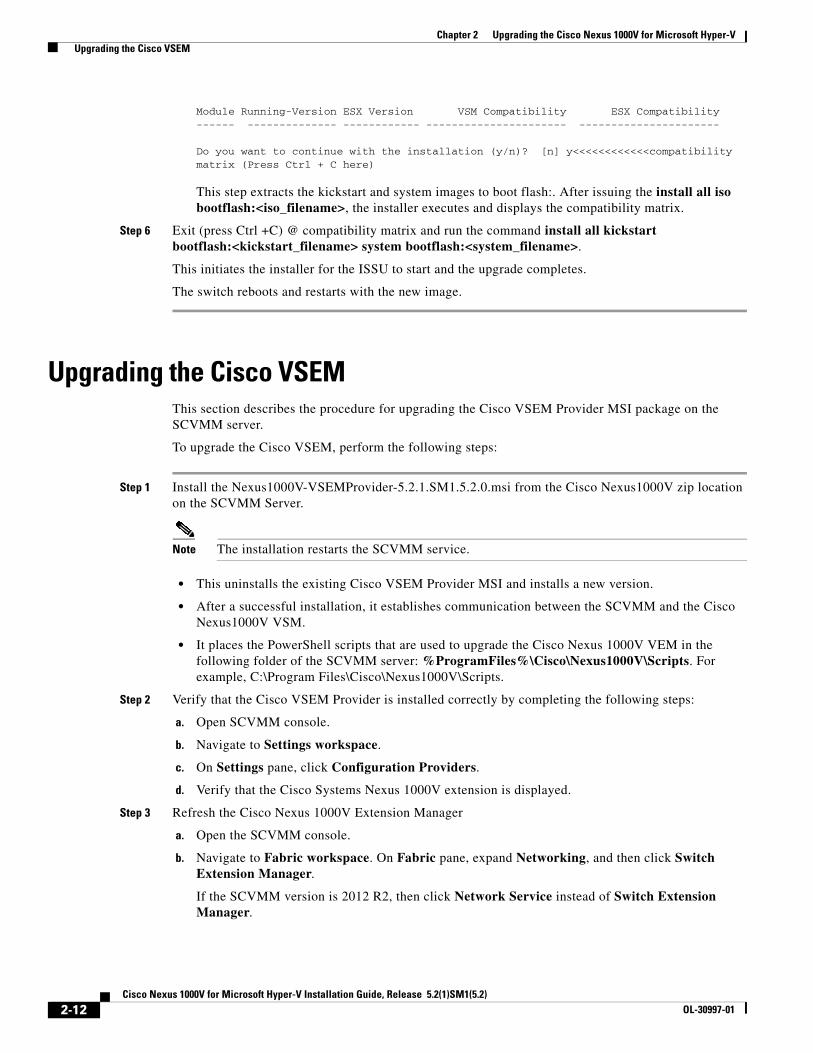
Chapter 2 Upgrading the Cisco Nexus 1000V for Microsoft Hyper-V Upgrading the Cisco VSEM
Module Running-Version ESX Version VSM Compatibility ESX Compatibility------ -------------- ------------ ---------------------- ----------------------
Do you want to continue with the installation (y/n)? [n] y<<<<<<<<<<<<compatibility matrix (Press Ctrl + C here)
This step extracts the kickstart and system images to boot flash:. After issuing the install all iso bootflash:<iso_filename>, the installer executes and displays the compatibility matrix.
Step 6 Exit (press Ctrl +C) @ compatibility matrix and run the command install all kickstart bootflash:<kickstart_filename> system bootflash:<system_filename>.
This initiates the installer for the ISSU to start and the upgrade completes.
The switch reboots and restarts with the new image.
Upgrading the Cisco VSEM This section describes the procedure for upgrading the Cisco VSEM Provider MSI package on the SCVMM server.
To upgrade the Cisco VSEM, perform the following steps:
Step 1 Install the Nexus1000V-VSEMProvider-5.2.1.SM1.5.2.0.msi from the Cisco Nexus1000V zip location on the SCVMM Server.
Note The installation restarts the SCVMM service.
• This uninstalls the existing Cisco VSEM Provider MSI and installs a new version.
• After a successful installation, it establishes communication between the SCVMM and the Cisco Nexus1000V VSM.
• It places the PowerShell scripts that are used to upgrade the Cisco Nexus 1000V VEM in the following folder of the SCVMM server: %ProgramFiles%\Cisco\Nexus1000V\Scripts. For example, C:\Program Files\Cisco\Nexus1000V\Scripts.
Step 2 Verify that the Cisco VSEM Provider is installed correctly by completing the following steps:
a. Open SCVMM console.
b. Navigate to Settings workspace.
c. On Settings pane, click Configuration Providers.
d. Verify that the Cisco Systems Nexus 1000V extension is displayed.
Step 3 Refresh the Cisco Nexus 1000V Extension Manager
a. Open the SCVMM console.
b. Navigate to Fabric workspace. On Fabric pane, expand Networking, and then click Switch Extension Manager.
If the SCVMM version is 2012 R2, then click Network Service instead of Switch Extension Manager.
2-12Cisco Nexus 1000V for Microsoft Hyper-V Installation Guide, Release 5.2(1)SM1(5.2)
OL-30997-01

Chapter 2 Upgrading the Cisco Nexus 1000V for Microsoft Hyper-V Upgrading the VEM Software
c. In results pane, right-click Cisco Systems Nexus 1000V extension, and then select Refresh.
Upgrading the VEM SoftwareYou must complete the following procedures before upgrading the VEM software.
• Upgrade the VSM. For information, see the “Upgrading the VSM” section on page 2-4.
• Upgrade the VSEM. For information, see the “Upgrading the Cisco VSEM” section on page 2-12.
This section includes the following:
• Upgrade Workflow, page 2-14
• Upgrading the VEM Software Manually, page 2-15
• Upgrading the VEM Software Using a Script, page 2-19
2-13Cisco Nexus 1000V for Microsoft Hyper-V Installation Guide, Release 5.2(1)SM1(5.2)
OL-30997-01

Chapter 2 Upgrading the Cisco Nexus 1000V for Microsoft Hyper-V Upgrading the VEM Software
Upgrade WorkflowFigure 2-4 displays the Cisco Nexus 1000V VEM upgrade workflow.
Figure 2-4 Cisco Nexus 1000V VEM upgrade Workflow
1. Download Cisco Nexus1000V Package
2. Prepare Windows Server Update Services Server (WSUS)
2.1 Enable and configure Windows Server Update Services Role on a Windows 2012 machine
2.2 Install System Center Update Publisher 2012 (SCUP)
2.3 Generate a Self Signed WSUS Certificate using SCUP
2.4 Copy Cisco VEM MSI on WSUS Server
3.1 Import the WSUS Certificate in Active Directory
4.1 Add WSUS Server to SCVMM
4.2 Create baseline and Include the Cisco MSI Published
4.3 Apply baseline on the Cluster/Hosts to be Upgraded
5. Check Compliance and Perform VEM Upgrade
3.2 Make necessary Group policy changes to include WSUS Certificate.
3.3 Point to Local Windows Update Server and accept signed certificates.
2.5 Publish the MSI to WSUS Server using PowerShell Scripts part of Cisco Nexus1000V Package
3. Prepare Active Directory
4. Configure SCVMM
5.1 Perform Compliance Check on the Hosts from SCVMM.
5.2 Put Hosts in Maintenance Mode.
5.4 Bring the Host out of Maintenance Mode.
5.5 Perform a second remediate to enable Cisco Extension on the Hosts after upgrade.
5.3 Remediate from SCVMM and make the Hosts Complaint.
352171
2-14Cisco Nexus 1000V for Microsoft Hyper-V Installation Guide, Release 5.2(1)SM1(5.2)
OL-30997-01

Chapter 2 Upgrading the Cisco Nexus 1000V for Microsoft Hyper-V Upgrading the VEM Software
Upgrading the VEM Software Manually
Summary Steps
1. Download Cisco Nexus 1000v package, page 2-15
2. Prepare the Windows Server Update Services (WSUS) Server, page 2-15
3. Prepare the Active Directory (AD), page 2-17
4. Configure SCVMM, page 2-18
5. Check Compliance and Perform VEM upgrade, page 2-19
Download Cisco Nexus 1000v packageFor information to download the Cisco Nexus 1000v package, see the “Downloading the Cisco Nexus 1000V Package” section on page 1-7.
Prepare the Windows Server Update Services (WSUS) Server To prepare the WSUS, perform the following steps:
Step 1 Enable and configure the WSUS role on a Windows Server 2012 machine.
For more information, see http://technet.microsoft.com/en-us/library/hh852340.aspx.
Step 2 Install the System Center Update Publisher 2011 (SCUP) on the WSUS server.
For more information, see http://technet.microsoft.com/en-us/library/hh134775.aspx.
Step 3 Generate a self-signed WSUS certificate via the SCUP using the following steps:.
a. Run the SCUP 2011 as a network administrator.
b. Click the Options icon in the upper left corner and then click Options.
c. Select the Enable publishing to an update server check box for Updates Publisher 2011 to publish all software updates.
d. Select the Connect to a local update server radio button as the SCUP was installed locally on the WSUS Server.
e. Click Test Connection to validate that the WSUS server name and the port settings are valid.
f. If the connection is successful, click Create. This creates a new certificate.
g. In the Test Connection dialog box, click OK.
h. In the System Center Updates Publisher Options dialog box, click OK.
Step 4 Configure the Certificate Store on the WSUS Server using the following steps:
For more information, see http://technet.microsoft.com/en-us/library/hh134732.aspx
a. On the WSUS server, click Start, click Run, and then enter MMC in the available text box.
b. Click OK to open the Microsoft Management Console (MMC).
c. Click File and then click Add/Remove Snap-in.
d. In the Add or Remove Snap-ins dialog box that appears, select Certificates and then click Add.
2-15Cisco Nexus 1000V for Microsoft Hyper-V Installation Guide, Release 5.2(1)SM1(5.2)
OL-30997-01

Chapter 2 Upgrading the Cisco Nexus 1000V for Microsoft Hyper-V Upgrading the VEM Software
e. In the Certificates snap-in dialog box, select Computer account, and then click Next.
f. Select the Local computer radio button and click Finish to close the Certificates snap-in dialog box.
g. Click OK on the Add or Remove Snap-ins dialog box.
h. On MMC, expand Certificates (Local Computer), expand WSUS, and then click Certificates.
i. In the results pane, right-click the desired certificate, click All Tasks, and then click Export.
j. In the Certificate Export Wizard, use the default settings to create an export file with the name and location specified in the wizard.
k. Right-click Trusted Publishers, click All Tasks, and then click Import. Complete the Certificate Import Wizard using the exported file from step j.
l. Right-click Trusted Root Certification Authorities, click All Tasks, and then click Import. Complete the Certificate Import Wizard using the exported file from step j.
Step 5 Copy the VEM MSI file to local directory on the WSUS server.
Step 6 Publish the VEM MSI file to the WSUS server using the provided PowerShell script .
PS C: Publish-CiscoUpdate.ps1 <location of VEM MSI file on Update Server>
PS C: > .\Publish-CiscoUpdate.ps1 .\Nexus1000V-VEM-5.2.1.SM1.5.1.73.msiStarting Publish-CiscoUpdate...------------------ MSI File Info -----------------------Pkg File Name : Nexus1000V-VEM-5.2.1.SM1.5.1.73.msiPkg Full Path : C:\Nexus1000V-VEM-5.2.1.SM1.5.1.73.msiPkg Dir : C:Pkg Name : Nexus1000V-VEM-5.2.1.SM1.5.1.73--------------------------------------------------------Reading MSI Properties...------------------ MSI Details -----------------------MSI : C:\Nexus1000V-VEM-5.2.1.SM1.5.1.73.msiProductName : Cisco Nexus 1000V Series SwitchDescription : Cisco Nexus 1000V Series SwitchManufacturer : Cisco Systems, Inc.ProductVersion : 1.01.000ProductCode : {7D54B9CA-9DDA-4E67-94B4-695679F48539}UpgradeCode : {D1099B98-17BE-40F2-A10E-29D48B9A5829}DriverID : {9C8ED422-F33A-4F34-B771-E8B8D0539FD3}DriverVersion : 105.200.0.73ExtensionType : Forwarding------------------------------------------------------Connecting to WSUS Server ...------------- Update Server Details ------------------Name : WSUSVersion : 6.2.9200.16384------------------------------------------------------Loading MSI in Software Distribution package...Loaded MSI installer in SDP.Configuring Software Distribution Package...Configuration Complete.Preparing Update Catalog XML...Update Catalog Creation complete.Publishing package to WSUS Server...Published .\Nexus1000V-VEM-5.2.1.SM1.5.1.73.msi to WSUS Server.
Step 7 Verify if the msi was published correctly using the script.
PS C: Get-CiscoUpdate.ps1
PS C: >Nexus1000v.5.2.1.SM1.5.2\WSUS\Get-CiscoUpdates.ps1
2-16Cisco Nexus 1000V for Microsoft Hyper-V Installation Guide, Release 5.2(1)SM1(5.2)
OL-30997-01

Chapter 2 Upgrading the Cisco Nexus 1000V for Microsoft Hyper-V Upgrading the VEM Software
Script to retrive Cisco Products installed in WSUS Server.1 packages found in WSUS Server.------------------------------------------------------Company : Cisco Systems, Inc.Product : Cisco-Nexus1000VTitle : Cisco Nexus 1000V Series Switch [MSI: 1.01.000] [Driver: 105.200.0.73]GUID : add6924f-2989-4143-bd46-bd16e919f32aDescription : [PC: {7D54B9CA-9DDA-4E67-94B4-695679F48539}] [UC: {D1099B98-17BE-40F2-A10E-29D48B9A5829}] \nCreation Date : 12/12/2013 7:07:24 PMArrival Date : 12/12/2013 7:07:42 PM------------------------------------------------------
Prepare the Active Directory (AD)To prepare the AD, perform the following steps:
Step 1 Copy the previously exported certificate that was exported earlier( see step 4j) to the local directory of the AD server.
Step 2 On the AD server, click the Tools tab of the Server Manager, and then select Group Policy Management.
Step 3 Do the following to create a new Group Policy Object:
a. In the console tree, navigate to <Forest name>/Domains/<Domain name>/Group Policy Objects and then right-click to select New.
b. In the New GPO dialog box that appears, enter a name for the new GPO, and then click OK.
c. To link the newly created GPO, navigate to <Forest name>/Domains/<Domain name> and select Link and Existing GPO.
d. From the results pane of the Group Policy Objects in the Select GPO dialog box, select the GPO, and the click OK.
Step 4 Navigate to the newly created GPO in <Forest name>/Domains/<Domain name> and right-click to select Edit to open policy in Group Policy Management Editor. Modify the following settings:
a. Windows Update Group Policy settings
Navigate to Computer Configuration\Policies\Administrative Templates\Windows Components\Windows Update location and modify the following settings for:
1. Specify intranet Microsoft update service location
– Select Specify intranet Microsoft update service location and right-click to select Edit. Check the Enabled radio button. Navigate to Options>Set the intranet update service for detecting updates and Options>Set the intranet statistics server and enter the location of local update server. For example, http://wsus-2012. Click Apply and click OK.
2. Allow signed updates from an intranet Microsoft update service location
– Select Allow signed updates from an intranet Microsoft update service location and right-click to select Edit. Check the Enabled radio button. Click Apply and then click OK.
2-17Cisco Nexus 1000V for Microsoft Hyper-V Installation Guide, Release 5.2(1)SM1(5.2)
OL-30997-01

Chapter 2 Upgrading the Cisco Nexus 1000V for Microsoft Hyper-V Upgrading the VEM Software
b. Public Key Policies Group Policy settings
Deploy the WSUS Publishers Self-signed certificate to Trusted Publishers and Trusted Root Certification Authorities certificate stores of Public Key Policies of newly created GPO.
1. On AD server, using the Group Policy Managament Editor, navigate to Computer Configuration\Policies\Windows Settings\Security Settings\Public Key policies of the newly created GPO.
2. Right-click Trusted Publishers, click All Tasks, and then click Import. Complete the Certificate Import Wizard using the file from Step 1.
3. Right-click Trusted Root Certification Authorities, click All Tasks, and then click Import. Complete the Certificate Import Wizard using the file from Step 1.
Step 5 Identify the hosts on which the VEM upgrade is needed and enter the gpupdate command using elevated command prompt, to enforce the group policy settings to be applied to the hosts immediately.
Configure SCVMMTo configure the SCVMM, perform the following steps:
Step 1 Add the WSUS server to the VMM using the following steps:
a. On the VMM console, in the Fabric workspace, choose the Home tab. Click Add Resources and then click Update Server.
b. In the Add Windows Server Update Services Server dialog box, enter the name of the Update server in Computer name field and specify the WSUS TCP/IP port in the TCP/IP port field. The default value is 8530.
c. Use or create a Run As account that has administrative rights on the WSUS server.
d. In the Add Windows Server Update Services Server dialog wizard, Select Add.
Step 2 Create a new baseline for the Cisco Nexus 1000v Series Switch, using the following steps:
a. In the Library workspace, on the Library pane, expand Update Catalog and Baselines and right-click Update Baselines to select Create Baseline.
b. In Update Baseline Wizard, select the General tab to enter a name and description for the baseline.
c. Click Next to move to the Updates tab. Click Add, and search for string "Cisco" to select an update for the Cisco Nexus 1000V.
d. Click Next to move to the Assignment Scope tab and then select infrastructure servers that need to be added to the baseline.
e. Click Next and then click Finish.
2-18Cisco Nexus 1000V for Microsoft Hyper-V Installation Guide, Release 5.2(1)SM1(5.2)
OL-30997-01

Chapter 2 Upgrading the Cisco Nexus 1000V for Microsoft Hyper-V Upgrading the VEM Software
Check Compliance and Perform VEM upgradeTo check compliance and perform a VEM upgrade, perform the following steps:
Step 1 Scan servers to check compliance with respect to previously created baseline for Cisco Nexus 1000v Series Switch
a. In the Fabric workspace, on the Fabric pane, expand Servers.
b. Select the Home tab, and click Compliance on ribbon.
c. From the Compliance view, select the host to scan.
d. Right-click on the host and select Scan.
Once the scan is completed, identify the hosts that are non-compliant.
Step 2 Put the non-compliant host to maintenance mode and perform Remediation.
a. Put the Non-compliant host in maintanence mode by refering to below link:
For more information, see http://technet.microsoft.com/en-us/library/hh882398.aspx
b. In the Fabric workspace, on the Fabric pane, expand Servers .
c. Select Home tab, and click Compliance on ribbon.
d. From the Compliance view, select host to remediate.
e. Right-click the host and select Remediate.
f. In the Update remediation wizard, select the Do not restart servers after remediation checkbox.
g. Click Remediate to start update remediation.
Step 3 Bring the host out of Maintenance Mode.
For more information, see http://technet.microsoft.com/en-us/library/hh882398.aspx
Step 4 Perform another remediation, to bring the Host online in VSM
a. Navigate to the Fabric workspace, on the Fabric pane, expand Networking to select Logical Switches.
b. In the Home tab, select Hosts in ribbon.
c. Select the corresponding host and then select the Cisco Nexus 1000V Virtual Switch on the same host.
d. Right-click on the switch to select Remediate.
Step 5 Verify whether the VEM modules got upgraded using the show module command in VSM. After upgrade, the software version in the show module output should reflect as 5.2(1)SM1(5.2).
This completes the upgrade process for the Cisco Nexus 1000V virtual switch.
Upgrading the VEM Software Using a ScriptStep 5 of the “Upgrade Workflow” section on page 2-14 are performed by this script.
Note Steps 1 to 4 of “Upgrade Workflow” section on page 2-14 needs to be done manually.
2-19Cisco Nexus 1000V for Microsoft Hyper-V Installation Guide, Release 5.2(1)SM1(5.2)
OL-30997-01

Chapter 2 Upgrading the Cisco Nexus 1000V for Microsoft Hyper-V Upgrading the VEM Software
Prerequisites
The script needs to be executed from the PowerShell console of the SCVMM server. Additionally, ensure that the following prerequisites with respect to configuration are followed before running the script:
• Windows Update server should already be added to SCVMM.
• Upgrade baselines should be pre-created.
• Nexus1000v baseline should have only one upgrade.
Runnning VEM upgrade script
On SCVMM server, the script is located at %ProgramFiles%\Cisco\Nexus1000V\Scripts\VEMUpgrade. For example, :\Program Files\Cisco\Nexus1000V\Scripts\VEMUpgrade.
It requires the following three inputs as parameters:
• BaseLine name
• Cluster name
• Logical Switch name.
Below is the sample snapshot of VEM upgrade script:
PS C:\Program Files\Cisco\Nexus1000V\Scripts\VEMUpgrade> .\Upgrade-Nexus1000V-VEM.ps1 -BaseLineName build_73 -ClusterName infraset4 -LogicalSwitchName nexus1000v
################################################################################# COMPANY NAME: Cisco Systems Inc #### Copyright © 2013 Cisco Systems, Inc. All rights Reserved. #### #### SCRIPT NAME: Upgrade-Nexus1000V-VEM.ps1 #### VERSION: 1.1 #### DESCRIPTION: This script is applicable to all releases . #### #### =============== #### PREREQUISITES: #### =============== #### 1: WINDOWS UPDATE SERVER SHOULD ALREADY BE ADDED to SCVMM. #### 2: UPGRADE BASELINES SHOULD BE PRE-CREATED. #### 3: NEXUS1000V BASELINE SHOULD HAVE ONLY ONE UPGRADE. #################################################################################
Importing Virtual Machine Manager Libraries ..-------------------------------------------------------Fetching Baseline Info for Baseline - 'build_73'-------------------------------------------------------Update 1 => Cisco Nexus 1000V Series Switch [MSI: 1.01.000] [Driver: 105.200.0.73]
--------------------------------------------------------------------------------------Starting Compliance Scan on Cluster before Upgrade 'infraset4' with baseline 'build_73'--------------------------------------------------------------------------------------HOSTNAME = hyperv01 : STATUS = NonCompliant : Nexus1000V Version = 1.00.000HOSTNAME = hyperv06 : STATUS = NonCompliant : Nexus1000V Version = 1.00.000
--------------------------------------------------------------------------------STARTING UPGRADE ON HOST: hyperv01--------------------------------------------------------------------------------STEP 1.1 : Enabling Maintenance Mode and migrating VM's to suitable host in ClusterNOTE: This may take a while, '9' VM's are being migrated, and 0 VM's are being saved!!
2-20Cisco Nexus 1000V for Microsoft Hyper-V Installation Guide, Release 5.2(1)SM1(5.2)
OL-30997-01

Chapter 2 Upgrading the Cisco Nexus 1000V for Microsoft Hyper-V Upgrade SCVMM 2012 SP1 to SCVMM 2012 R2
STEP 1.2 : Starting Update Remediation
STEP 1.3 : Stopping Maintenance Mode
--------------------------------------------------------------------------------STARTING UPGRADE ON HOST: hyperv06--------------------------------------------------------------------------------STEP 2.1 : Enabling Maintenance Mode and migrating VM's to suitable host in ClusterNOTE: This may take a while, '9' VM's are being migrated, and 0 VM's are being saved!!
STEP 2.2 : Starting Update Remediation
STEP 2.3 : Stopping Maintenance Mode
--------------------------------------------------------------------------------------Starting Compliance Scan on Cluster after Upgrade 'infraset4' with baseline 'build_73'--------------------------------------------------------------------------------------HOSTNAME = hyperv01 : STATUS = Compliant : Nexus1000V Version = 1.01.000HOSTNAME = hyperv06 : STATUS = Compliant : Nexus1000V Version = 1.01.000-------------------------------Nexus1000V VEM Upgrade Complete-------------------------------Transcript stopped, output file is C:\Program Files\Cisco\Nexus1000V\Scripts\VEMUpgrade\Upgrade-Nexus1000V-VEM-logs\Upgrade-Nexus1000V-VEM-12-14-13_5-40.log
Verify whether VEM modules got upgraded using the show module command in VSM. After the upgrade, the software version in the show module output should reflect as 5.2(1)SM1(5.2).
Upgrade SCVMM 2012 SP1 to SCVMM 2012 R2 Upgrade SCVMM 2012 SP1 to SCVMM 2012 R2 by retaining the VMM database from the System Center 2012 SP1 deployment.
Refer to http://technet.microsoft.com/en-us/library/dn469609.aspx for additional details.
Preparing Cisco Nexus 1000VAfter upgrading SCVMM to 2012 R2, install the Cisco Provider MSI using the following steps:
Step 1 Uninstall existing Cisco Nexus 1000V VSEM Provider.
Step 2 Install the Nexus1000V-VSEMProvider-5.2.1.SM1.5.2.0.msi from the Cisco Nexus1000V zip location on SCVMM Server.
Note The installation restarts the SCVMM service.
Step 3 Verify that the Cisco Provider is installed corectly by completing the following steps:
a. Open the SCVMM console.
b. Navigate to Settings workspace.
c. On Settings pane, click Configuration Providers.
2-21Cisco Nexus 1000V for Microsoft Hyper-V Installation Guide, Release 5.2(1)SM1(5.2)
OL-30997-01

Chapter 2 Upgrading the Cisco Nexus 1000V for Microsoft Hyper-V Upgrade Windows Server 2012 Hosts to 2012R2
d. Verify that the Cisco Systems Nexus 1000V extension is displayed.
Step 4 Do the following to refresh the Cisco Nexus 1000V Extension Manager:
a. Open the SCVMM console.
b. Navigate to Fabric workspace. On Fabric pane, expand Networking, and then click Switch Extension Manager. If the SCVMM version is 2012 R2, then click Network Service instead of Switch Extension Manager.
c. In results pane, right-click Cisco Systems Nexus 1000V extension, and then select Refresh.
Upgrade Windows Server 2012 Hosts to 2012R2Microsoft does not support an upgrade of the third party extension, for example, Cisco Nexus 1000V VEM, while upgrade of Windows Server 2012 to Windows Server 2012 R2. Therefore, you must uninstall Cisco Nexus 1000V VEM before the host upgrade, and re-install it after the upgrade.
2-22Cisco Nexus 1000V for Microsoft Hyper-V Installation Guide, Release 5.2(1)SM1(5.2)
OL-30997-01

Cisco Nexus 1000V for MicrosofOL-30997-01
C H A P T E R 3
Installing a VSM on Cisco Cloud Services PlatformThis document includes the following sections:
• Installing a VSM on Cisco Cloud Services Platform, page 3-23
Installing a VSM on Cisco Cloud Services Platform You can install the Cisco Nexus 1000V VSM on Cisco Cloud Services Platform. For information, refer to the documentation available at http://www.cisco.com/en/US/products/ps12752/index.html.
Note Layer 3 mode is supported for the Cisco Nexus 1000V for Hyper-V.
Before You BeginCopy the ISO file to the boot flash:repository/ of the virtual service blade as displayed in the following example:
switch(config)# dir boot flash:repository16384 Feb 21 11:31:10 2013 lost+found/169932800 May 08 20:20:09 2013 n1000vh-dk9.5.2.1.SM1.5.0.345.iso653 May 08 20:28:24 2013 vmpresults.txt
Usage for bootflash://sup-local326832128 bytes used3664547840 bytes free3991379968 bytes totalswitch(config)#
ProcedureComplete the following steps to install the VSM on the Cloud Services Platform:
Step 1 Create a virtual service blade by entering the following commands.
switch(config)# show virtual-service-blade summary ---------------------------------------------------------------------------------
3-23t Hyper-V Installation Guide, Release 5.2(1)SM1(5.2)

Chapter 3 Installing a VSM on Cisco Cloud Services Platform Installing a VSM on Cisco Cloud Services Platform
Name HA-Role HA-Status Status Location---------------------------------------------------------------------------------switch(config)# virtual-service-blade vsm-1 switch(config-vsb-config)# virtual-service-blade-type new 1000vh-dk9.5.2.1.SM1.5.0.345.iso switch(config-vsb-config)# show virtual-service-blade summary --------------------------------------------------------------------------------------Name HA-Role HA-Status Status Location--------------------------------------------------------------------------------------vsm-1 PRIMARY NONE VSB NOT PRESENT PRIMARYvsm-1 SECONDARY NONE VSB NOT PRESENT SECONDARYswitch(config-vsb-config)#
Step 2 Configure the control and packet VLANs for static and flexible topologies. Note that no provisioning is allowed for a Management VLAN because the Management class interface uses the Management VLAN of Cisco Cloud Services Platform (CSP).
switch(config-vsb-config)# interface control vlan 391switch(config-vsb-config)# interface packet vlan 392
Step 3 Configure the Cisco Nexus 1000V on Cisco Cloud Services Platform.
switch(config-vsb-config)# enable Enter vsb image: [n1000vh-dk9.5.2.1.SM1.5.0.345.iso]Enter domain id[1-1023]: 391 Management IP version [V4/V6]: [V4] Enter Management IP address: 172.16.5.5 Enter Management subnet mask: 255.255.255.0 IPv4 address of the default gateway: 172.16.5.1 Enter HostName: vsm-1 Enter the password for ‘admin’: ********Note: VSB installation is in progress, please use show virtual-service-blade commands to check the installation status.switch(config-vsb-config)#
Step 4 Display the primary and secondary VSM status.
switch(config-vsb-config)#show virtual-service-blade summary -------------------------------------------------------------------------------Name HA-Role HA-Status Status Location-------------------------------------------------------------------------------VSM-1 PRIMARY NONE VSB DEPLOY IN PROGRESS PRIMARYVSM-1 SECONDARY NONE VSB NOT PRESENT SECONDARYswitch(config-vsb-config)#
Step 5 Log in to the VSM.
switch(config)# virtual-service-blade vsm-1 switch(config-vsb-config)# login virtual-service-blade vsm-1Telnet escape character is ‘^\’.Trying 172.1.0.18...Connected to 172.1.0.18.Escape character is ‘^\’.
Nexus 1000v Switchvsm-1 login: adminPassword:Cisco Nexus operating System (NX-OS) Software TAC support: http://www/cisco.com/tac Copyright (c) 2002-2013, Cisco Systems, Inc. All rights reserved. The copyrights to certain works contained in this software are owned by other third parties and used and distributed under license. Certain components of this software are licensed under the GNU General Public License (GPL) version 2.0 or the GNU Lesser General Public License (LGPL) Version 2.1. A copy of each
3-24Cisco Nexus 1000V for Microsoft Hyper-V Installation Guide, Release 5.2(1)SM1(5.2)
OL-30997-01
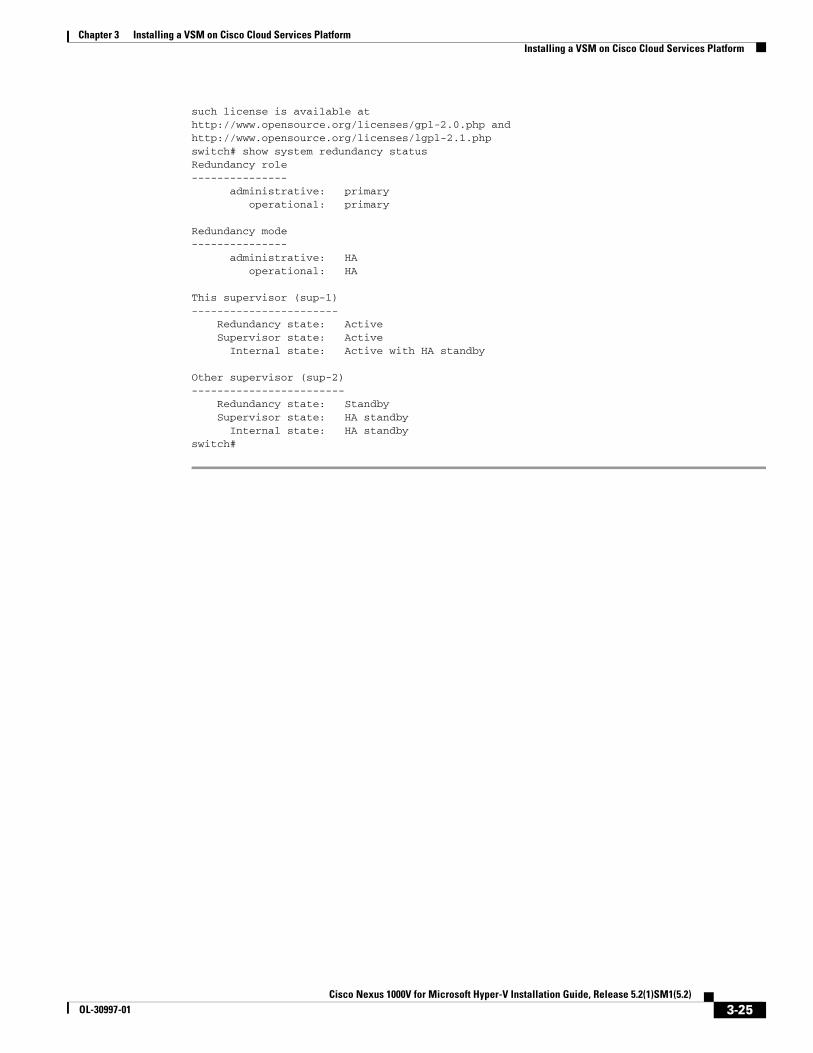
Chapter 3 Installing a VSM on Cisco Cloud Services Platform Installing a VSM on Cisco Cloud Services Platform
such license is available at http://www.opensource.org/licenses/gpl-2.0.php and http://www.opensource.org/licenses/lgpl-2.1.php switch# show system redundancy status Redundancy role--------------- administrative: primary operational: primary
Redundancy mode--------------- administrative: HA operational: HA
This supervisor (sup-1)----------------------- Redundancy state: Active Supervisor state: Active Internal state: Active with HA standby
Other supervisor (sup-2)------------------------ Redundancy state: Standby Supervisor state: HA standby Internal state: HA standby switch#
3-25Cisco Nexus 1000V for Microsoft Hyper-V Installation Guide, Release 5.2(1)SM1(5.2)
OL-30997-01

Chapter 3 Installing a VSM on Cisco Cloud Services Platform Installing a VSM on Cisco Cloud Services Platform
3-26Cisco Nexus 1000V for Microsoft Hyper-V Installation Guide, Release 5.2(1)SM1(5.2)
OL-30997-01