Embed Size (px)
Citation preview
ePM Quick Reference Guide #129
QRG.129_CILP Document Management ePM 6.0
February 2016 Page 1
CILP Document Management
The Capital Investment and Leasing Program (CILP) submission typically supports a funding request for site and design services. This submission may also support site, design and construction funding requests for 1-year funding cycle projects by including a Feasibility Study (FS) and Program Development Study (PDS). The Project Manager (PM) should obtain Regional approvals, coordinate preparation and collection of the required documentation, and submit the CILP submission to the PBS Central Office via the 2.1 CILP catalog card in ePM.
Who Will Use This?
√ GSA Executive
√ GSA Portfolio
√ GSA Project Manager
Manually Creating CILP Catalog Card Documents
1. Once logged into your project in ePM, expand the File Management menu, expand the Catalog Cards menu, and select 2.1 CILP.
ePM Quick Reference Guide #129
QRG.129_CILP Document Management ePM 6.0
February 2016 Page 2
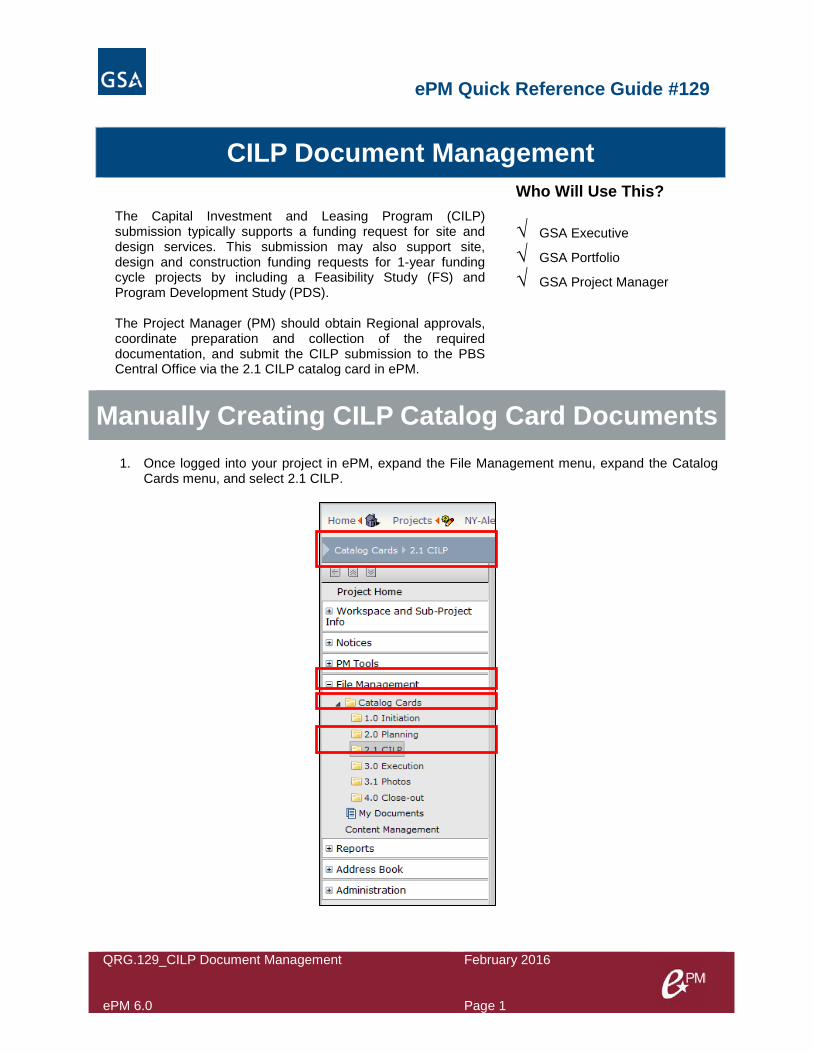
2. Click the arrow to the right of New and then choose the 2.1 CILP sub-type.
This will open the Catalog Card window.
ePM Quick Reference Guide #129
QRG.129_CILP Document Management ePM 6.0
February 2016 Page 3
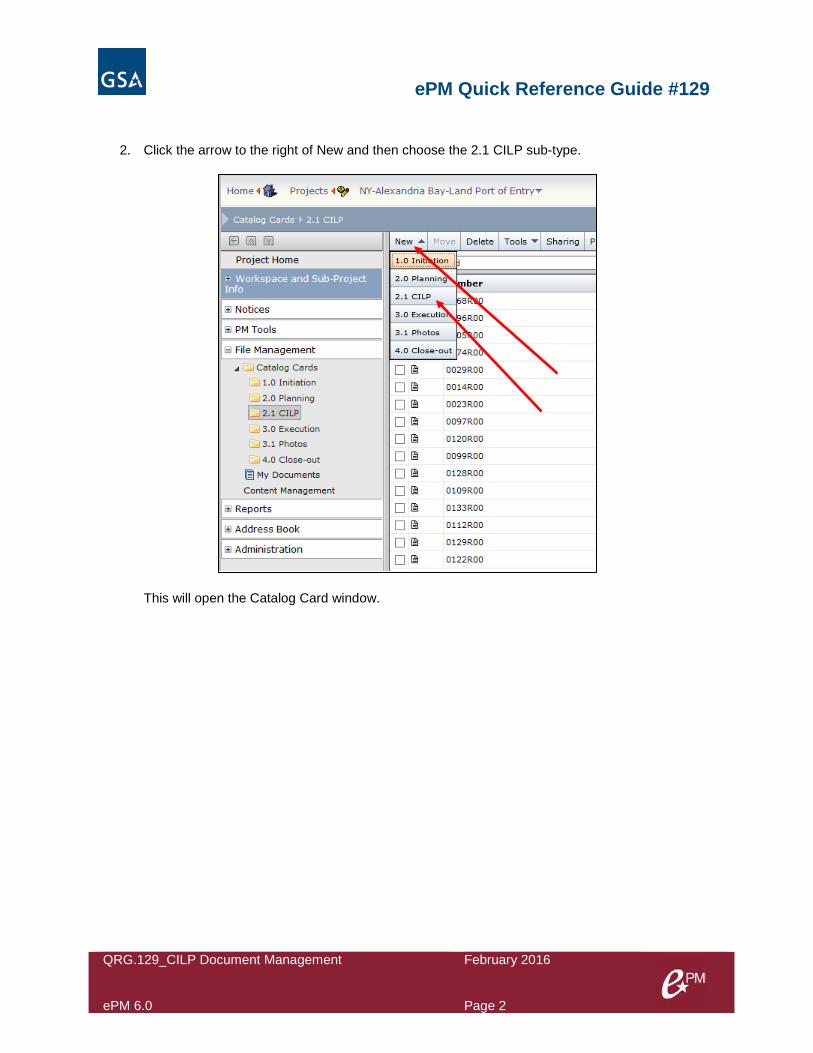
3. Maintain the name of the file by unchecking the “Rename File” box. 4. In the File/URL Information section, click the arrow button to upload the Source File/URL. 5. Enter a Name for the document.
ePM Quick Reference Guide #129
QRG.129_CILP Document Management ePM 6.0
February 2016 Page 4
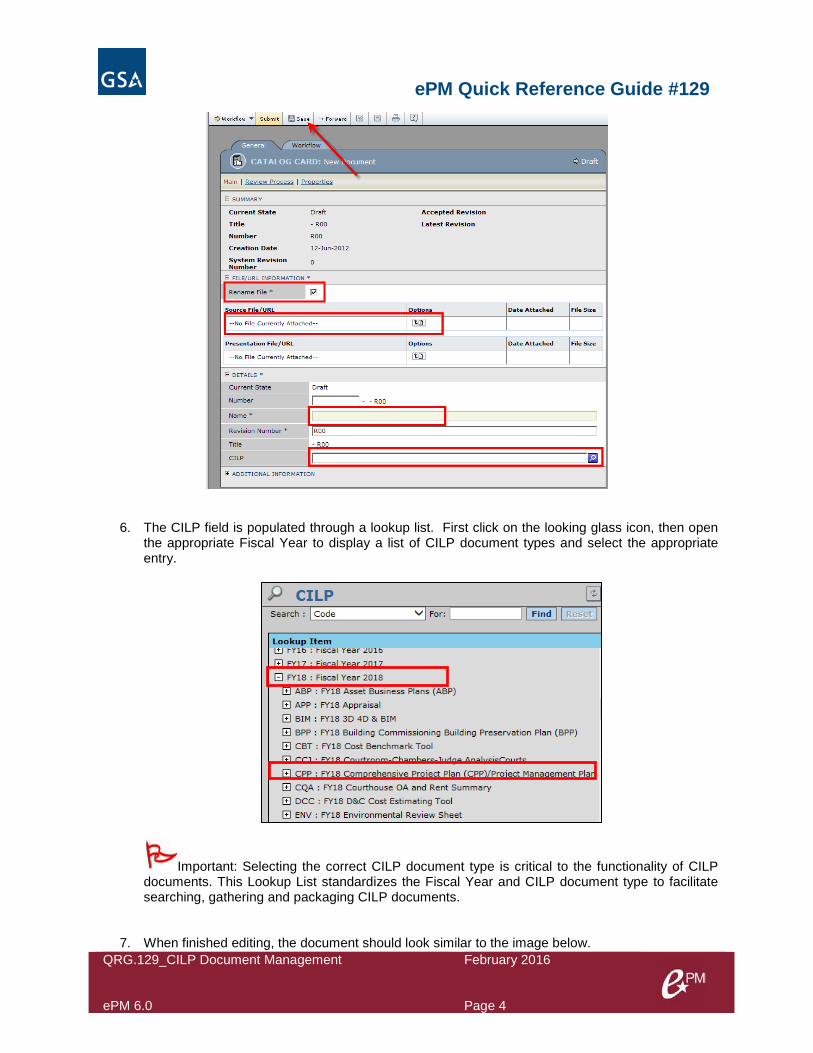
6. The CILP field is populated through a lookup list. First click on the looking glass icon, then open
the appropriate Fiscal Year to display a list of CILP document types and select the appropriate entry.
Important: Selecting the correct CILP document type is critical to the functionality of CILP documents. This Lookup List standardizes the Fiscal Year and CILP document type to facilitate searching, gathering and packaging CILP documents.
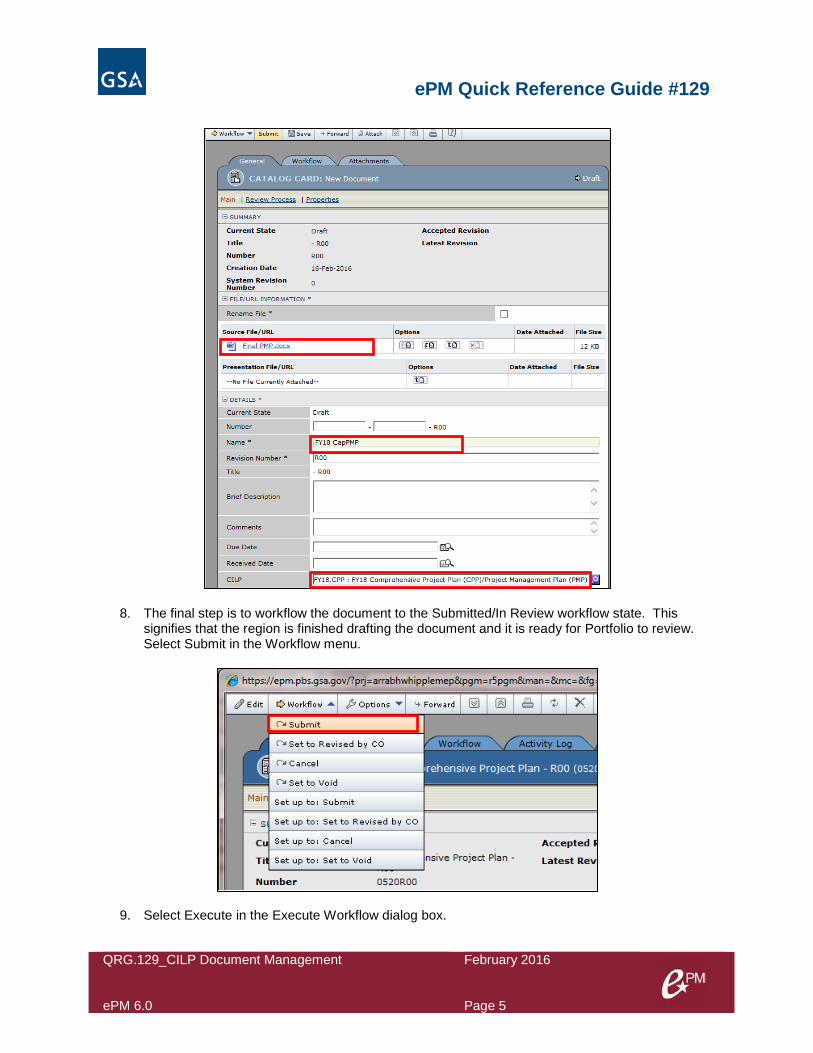
7. When finished editing, the document should look similar to the image below.
ePM Quick Reference Guide #129
QRG.129_CILP Document Management ePM 6.0
February 2016 Page 5
8. The final step is to workflow the document to the Submitted/In Review workflow state. This signifies that the region is finished drafting the document and it is ready for Portfolio to review. Select Submit in the Workflow menu.
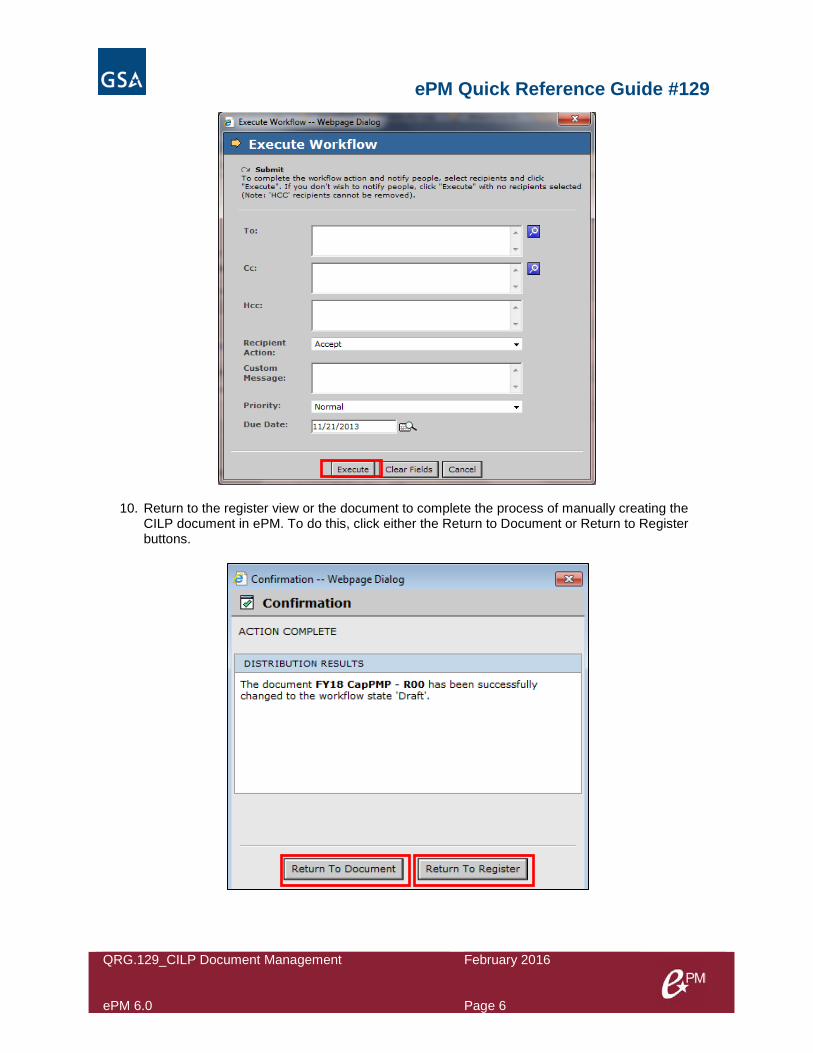
9. Select Execute in the Execute Workflow dialog box.
ePM Quick Reference Guide #129
QRG.129_CILP Document Management ePM 6.0
February 2016 Page 6
10. Return to the register view or the document to complete the process of manually creating the CILP document in ePM. To do this, click either the Return to Document or Return to Register buttons.
ePM Quick Reference Guide #129
QRG.129_CILP Document Management ePM 6.0
February 2016 Page 7
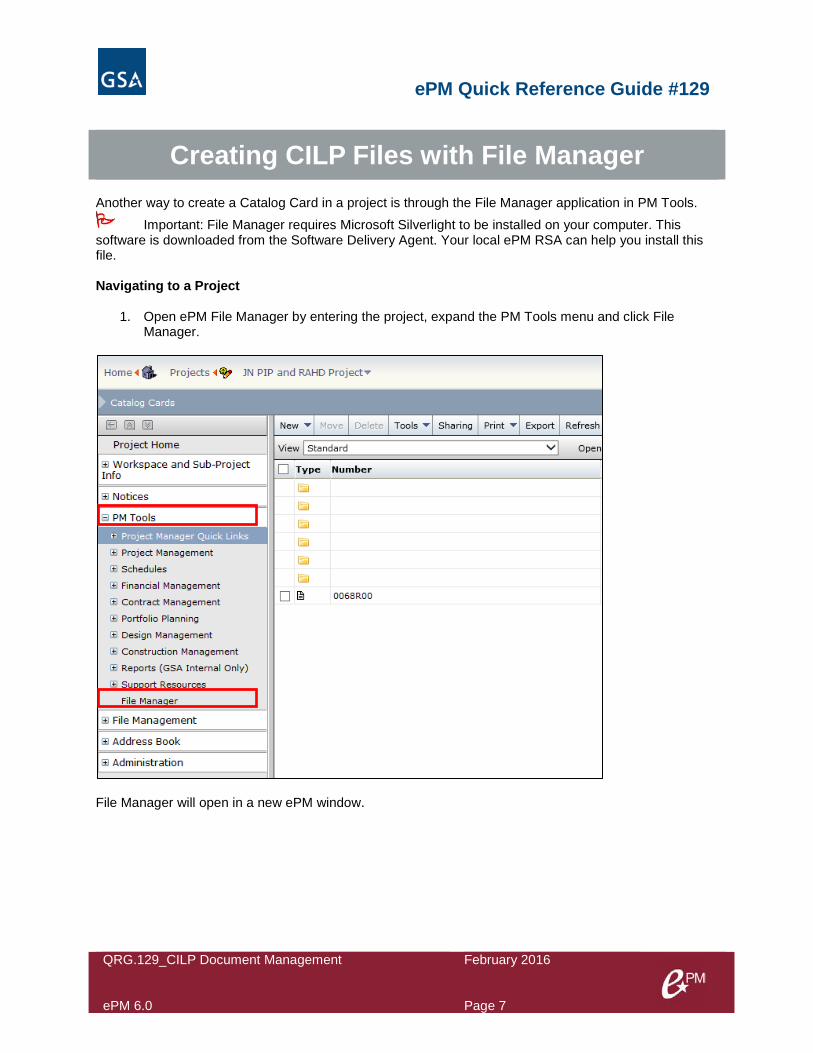
Another way to create a Catalog Card in a project is through the File Manager application in PM Tools.
Important: File Manager requires Microsoft Silverlight to be installed on your computer. This software is downloaded from the Software Delivery Agent. Your local ePM RSA can help you install this file. Navigating to a Project
1. Open ePM File Manager by entering the project, expand the PM Tools menu and click File Manager.
File Manager will open in a new ePM window.
Creating CILP Files with File Manager
ePM Quick Reference Guide #129
QRG.129_CILP Document Management ePM 6.0
February 2016 Page 8
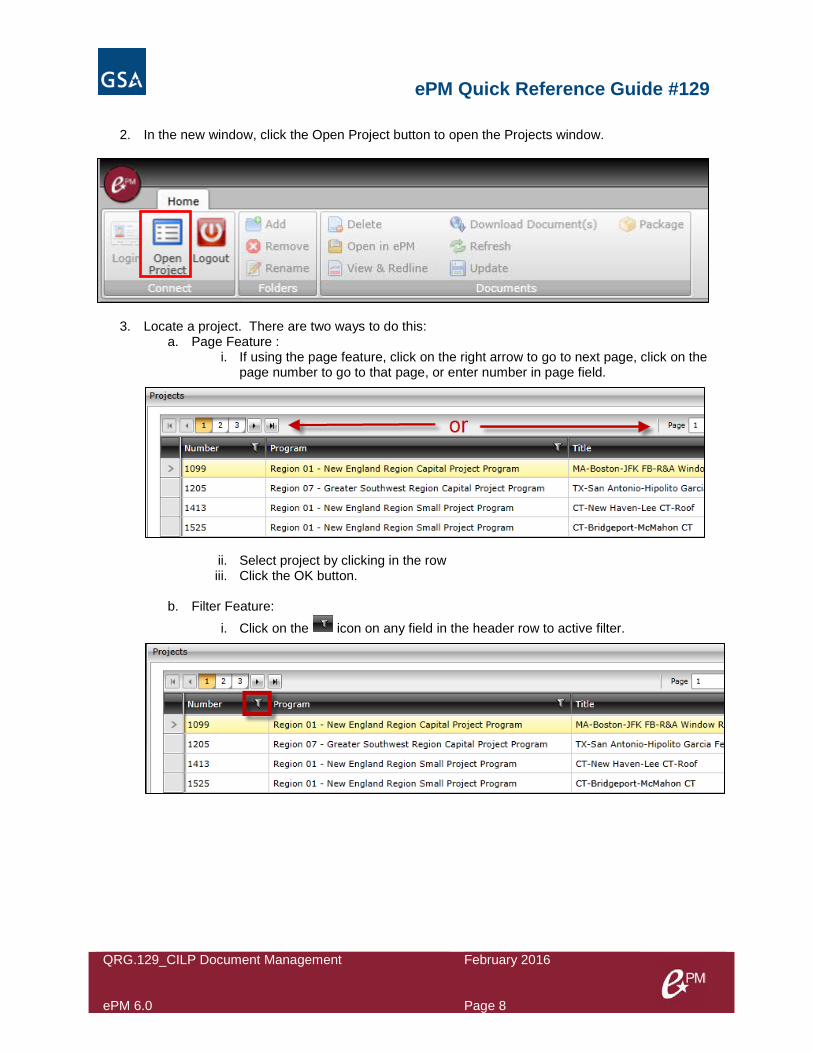
2. In the new window, click the Open Project button to open the Projects window.
3. Locate a project. There are two ways to do this: a. Page Feature :
i. If using the page feature, click on the right arrow to go to next page, click on the page number to go to that page, or enter number in page field.
ii. Select project by clicking in the row iii. Click the OK button.
b. Filter Feature:
i. Click on the icon on any field in the header row to active filter.
ePM Quick Reference Guide #129
QRG.129_CILP Document Management ePM 6.0
February 2016 Page 9
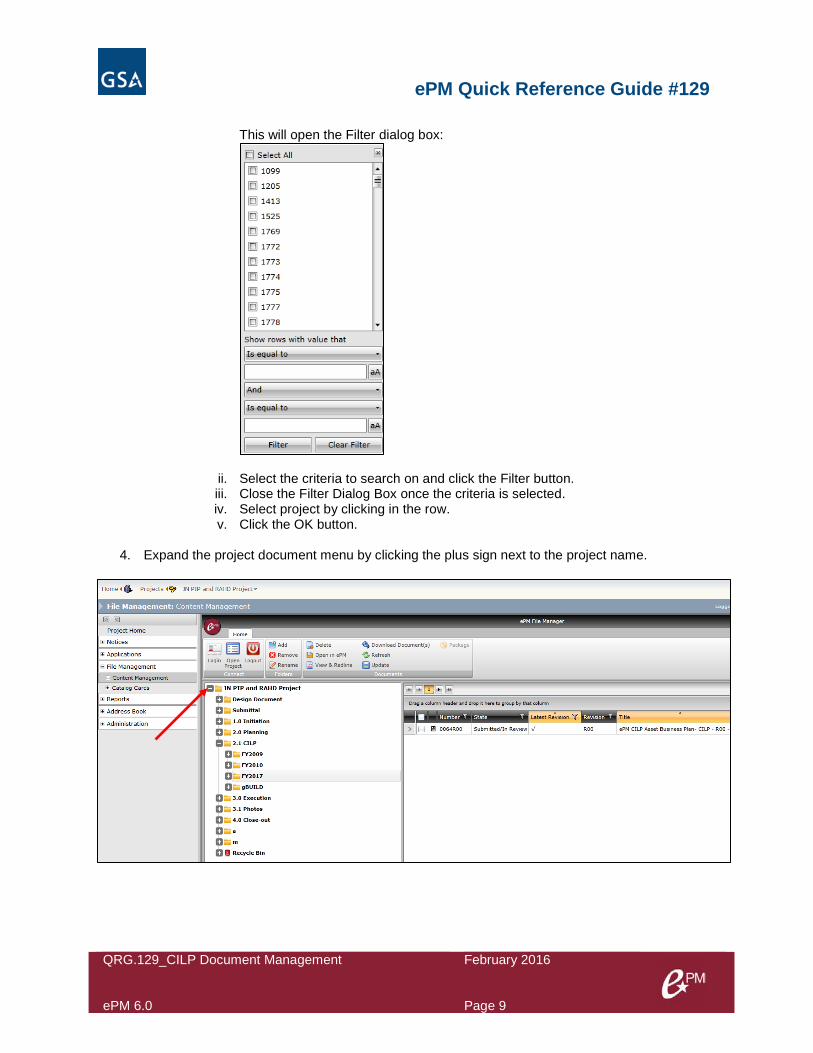
This will open the Filter dialog box:
ii. Select the criteria to search on and click the Filter button. iii. Close the Filter Dialog Box once the criteria is selected. iv. Select project by clicking in the row. v. Click the OK button.
4. Expand the project document menu by clicking the plus sign next to the project name.
ePM Quick Reference Guide #129
QRG.129_CILP Document Management ePM 6.0
February 2016 Page 10
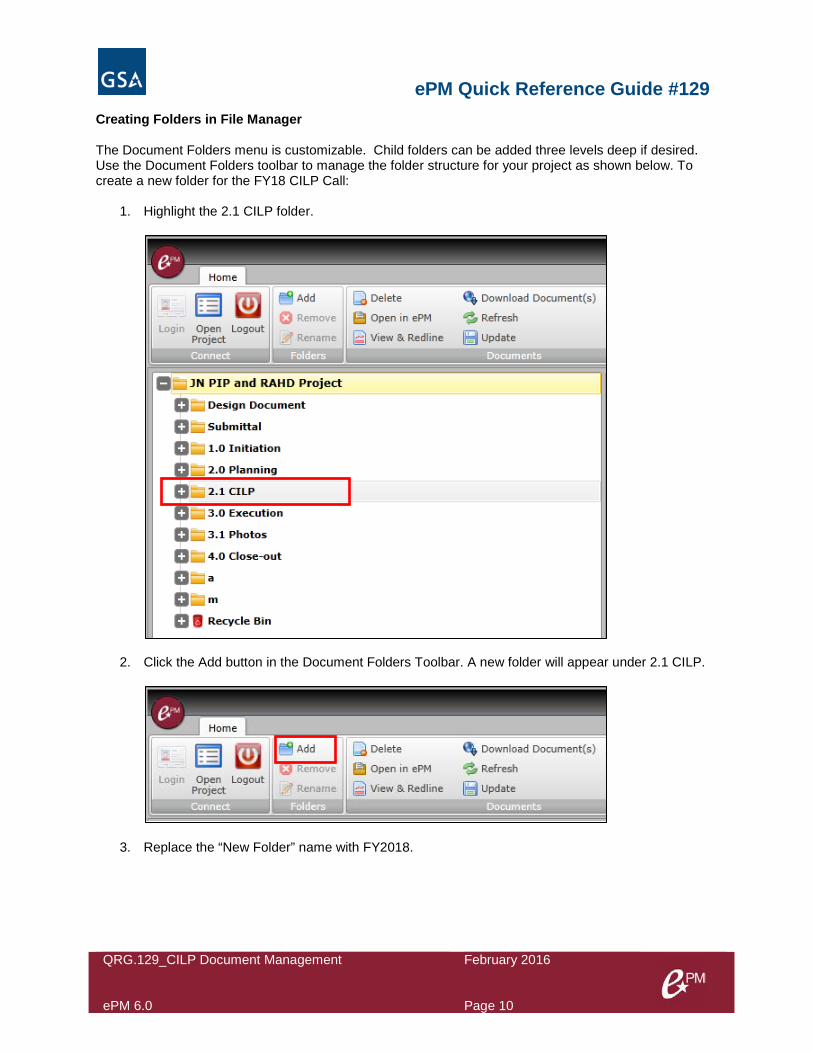
Creating Folders in File Manager The Document Folders menu is customizable. Child folders can be added three levels deep if desired. Use the Document Folders toolbar to manage the folder structure for your project as shown below. To create a new folder for the FY18 CILP Call:
1. Highlight the 2.1 CILP folder.
2. Click the Add button in the Document Folders Toolbar. A new folder will appear under 2.1 CILP.
3. Replace the “New Folder” name with FY2018.
ePM Quick Reference Guide #129
QRG.129_CILP Document Management ePM 6.0
February 2016 Page 11
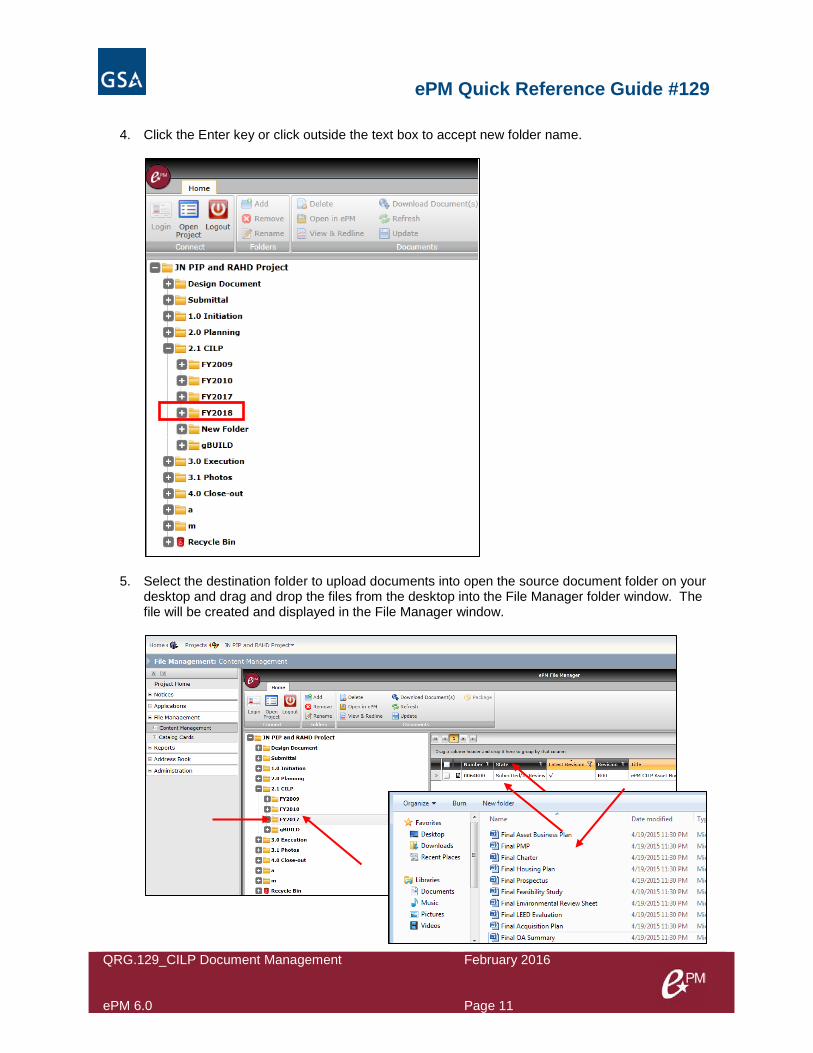
4. Click the Enter key or click outside the text box to accept new folder name.
5. Select the destination folder to upload documents into open the source document folder on your desktop and drag and drop the files from the desktop into the File Manager folder window. The file will be created and displayed in the File Manager window.
ePM Quick Reference Guide #129
QRG.129_CILP Document Management ePM 6.0
February 2016 Page 12
Note: The workflowing of CILP documents must be done in ePM, this functionality is not included with File Manager. To workflow the document or assign the appropriate CILP document type, click the Open in ePM button, which will open the Catalog Card.
ePM Quick Reference Guide #129
QRG.129_CILP Document Management ePM 6.0
February 2016 Page 13
Viewing CILP Files in the Program Workspace
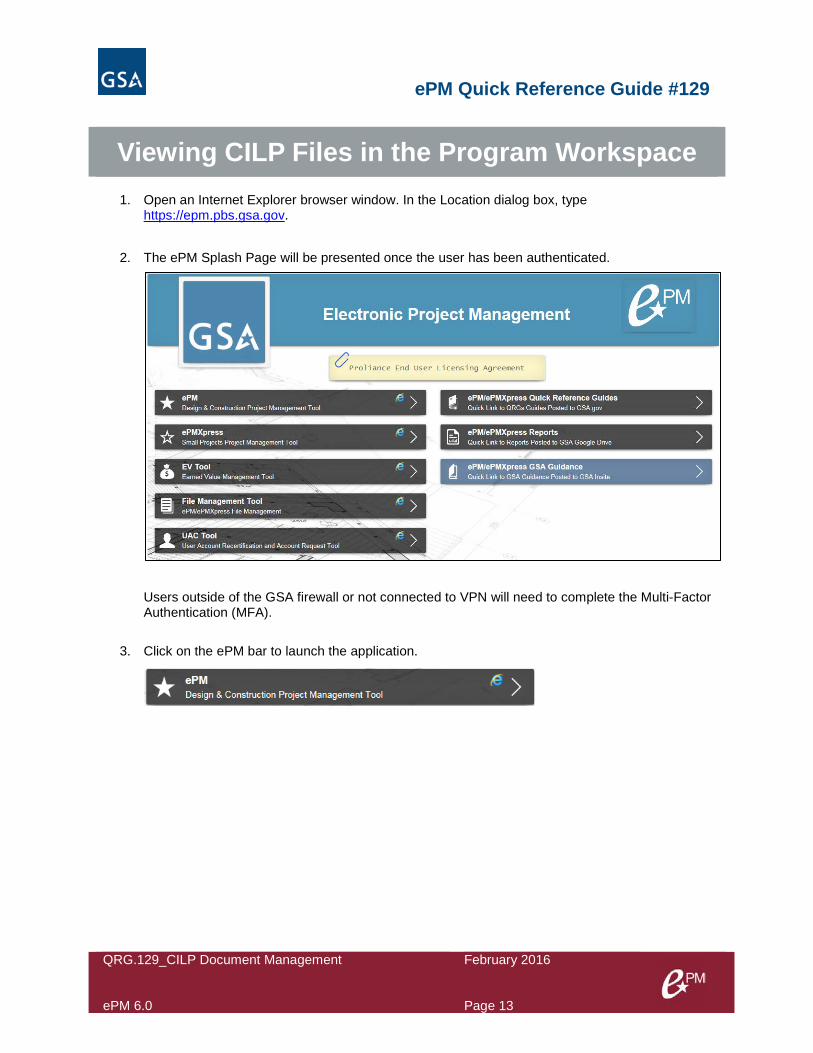
1. Open an Internet Explorer browser window. In the Location dialog box, type https://epm.pbs.gsa.gov.
2. The ePM Splash Page will be presented once the user has been authenticated.
Users outside of the GSA firewall or not connected to VPN will need to complete the Multi-Factor Authentication (MFA).
3. Click on the ePM bar to launch the application.
ePM Quick Reference Guide #129
QRG.129_CILP Document Management ePM 6.0
February 2016 Page 14
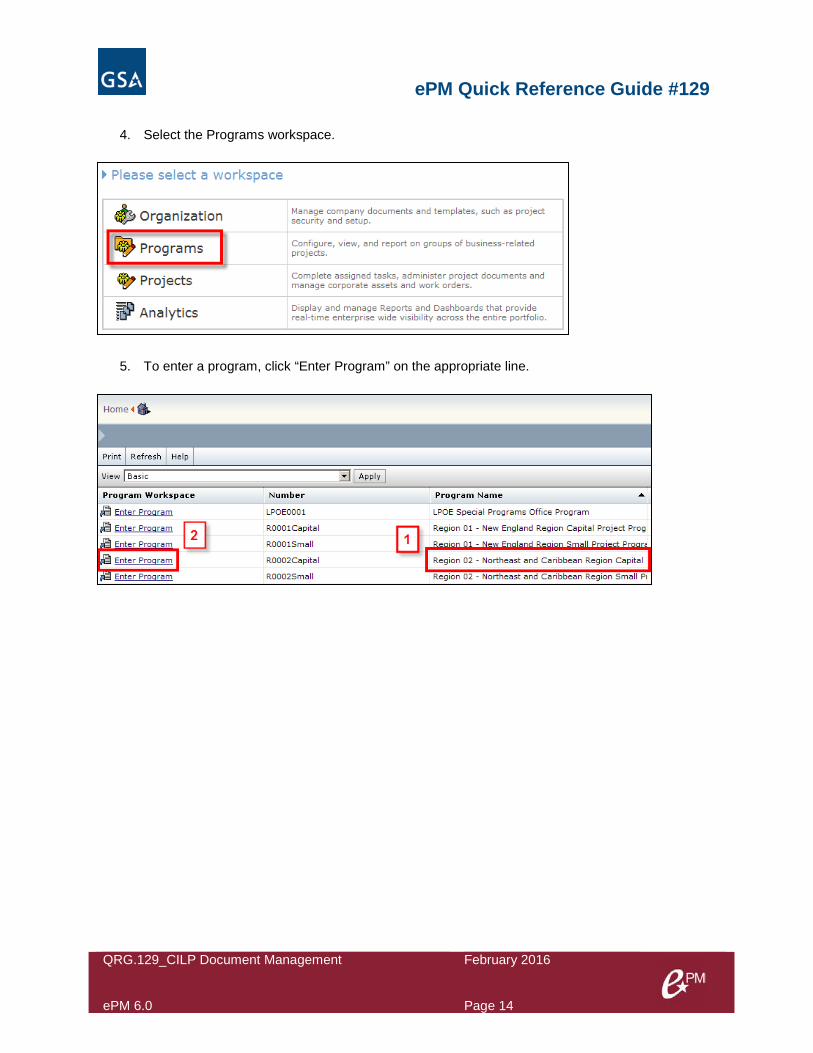
4. Select the Programs workspace.
5. To enter a program, click “Enter Program” on the appropriate line.
ePM Quick Reference Guide #129
QRG.129_CILP Document Management ePM 6.0
February 2016 Page 15
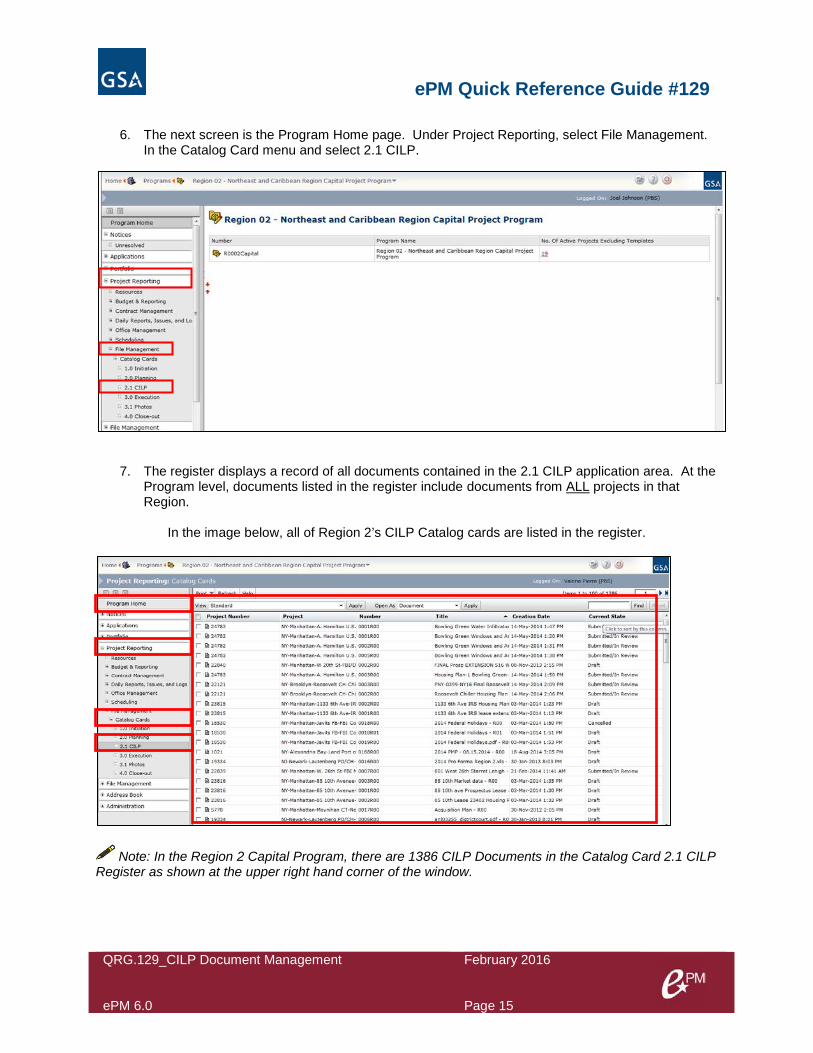
6. The next screen is the Program Home page. Under Project Reporting, select File Management.
In the Catalog Card menu and select 2.1 CILP.
7. The register displays a record of all documents contained in the 2.1 CILP application area. At the Program level, documents listed in the register include documents from ALL projects in that Region.
In the image below, all of Region 2’s CILP Catalog cards are listed in the register.
Note: In the Region 2 Capital Program, there are 1386 CILP Documents in the Catalog Card 2.1 CILP Register as shown at the upper right hand corner of the window.
ePM Quick Reference Guide #129
QRG.129_CILP Document Management ePM 6.0
February 2016 Page 16
8. In the register, the following can be done: a. View a summary list of all documents in that application area b. Open existing documents c. Customize views of data to meet user and reporting needs d. Perform actions such as exporting data to pdf or MS Excel. e. Perform a keyword search for documents within the register
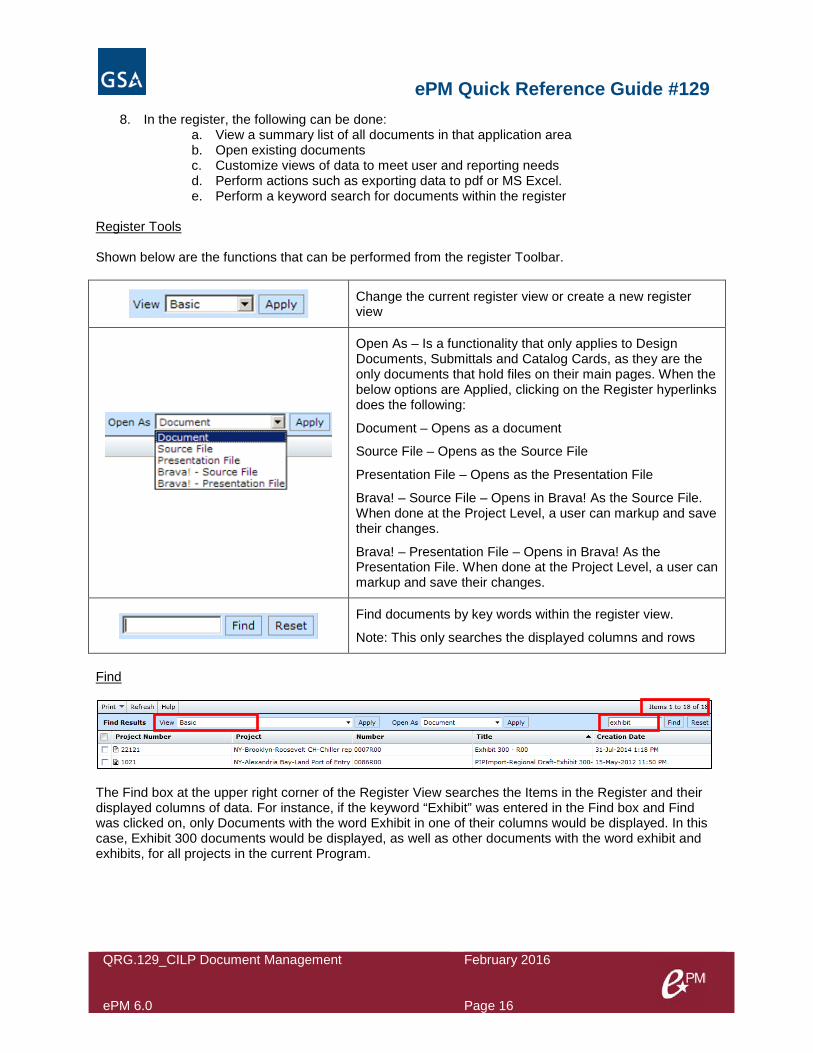
Register Tools Shown below are the functions that can be performed from the register Toolbar.
Change the current register view or create a new register view
Open As – Is a functionality that only applies to Design Documents, Submittals and Catalog Cards, as they are the only documents that hold files on their main pages. When the below options are Applied, clicking on the Register hyperlinks does the following:
Document – Opens as a document
Source File – Opens as the Source File
Presentation File – Opens as the Presentation File
Brava! – Source File – Opens in Brava! As the Source File. When done at the Project Level, a user can markup and save their changes.
Brava! – Presentation File – Opens in Brava! As the Presentation File. When done at the Project Level, a user can markup and save their changes.
Find documents by key words within the register view.
Note: This only searches the displayed columns and rows
Find
The Find box at the upper right corner of the Register View searches the Items in the Register and their displayed columns of data. For instance, if the keyword “Exhibit” was entered in the Find box and Find was clicked on, only Documents with the word Exhibit in one of their columns would be displayed. In this case, Exhibit 300 documents would be displayed, as well as other documents with the word exhibit and exhibits, for all projects in the current Program.
ePM Quick Reference Guide #129
QRG.129_CILP Document Management ePM 6.0
February 2016 Page 17
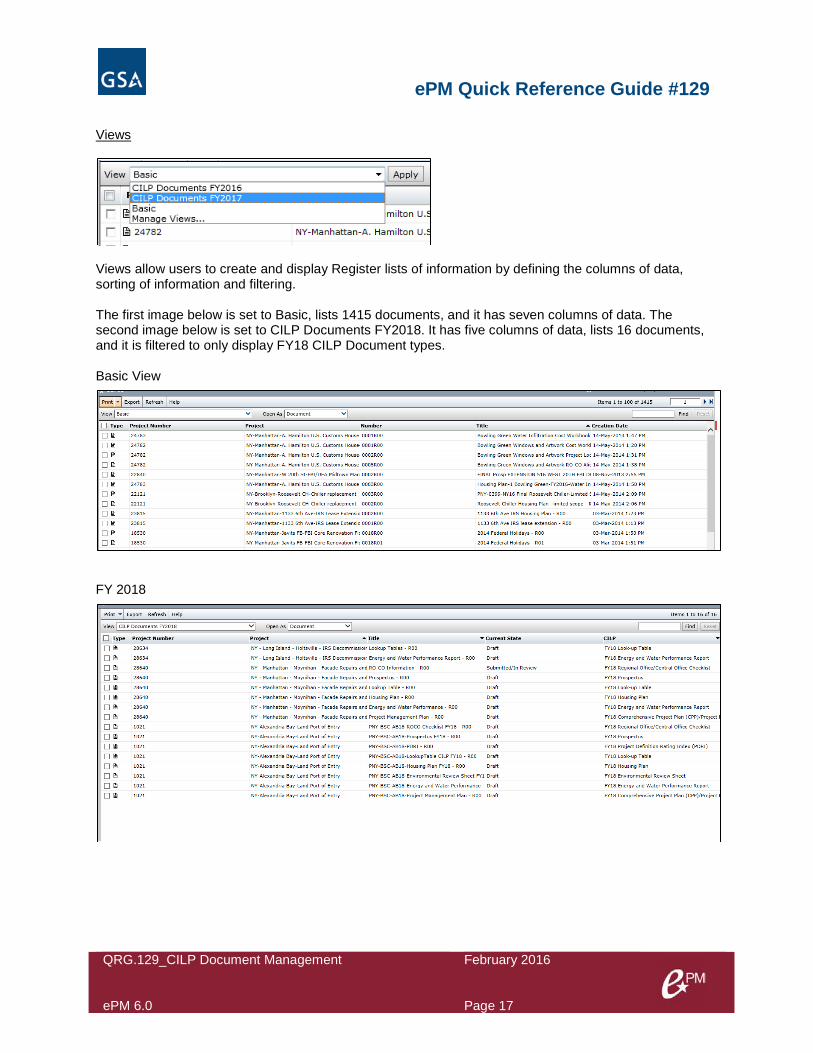
Views
Views allow users to create and display Register lists of information by defining the columns of data, sorting of information and filtering. The first image below is set to Basic, lists 1415 documents, and it has seven columns of data. The second image below is set to CILP Documents FY2018. It has five columns of data, lists 16 documents, and it is filtered to only display FY18 CILP Document types. Basic View
FY 2018
ePM Quick Reference Guide #129
QRG.129_CILP Document Management ePM 6.0
February 2016 Page 18
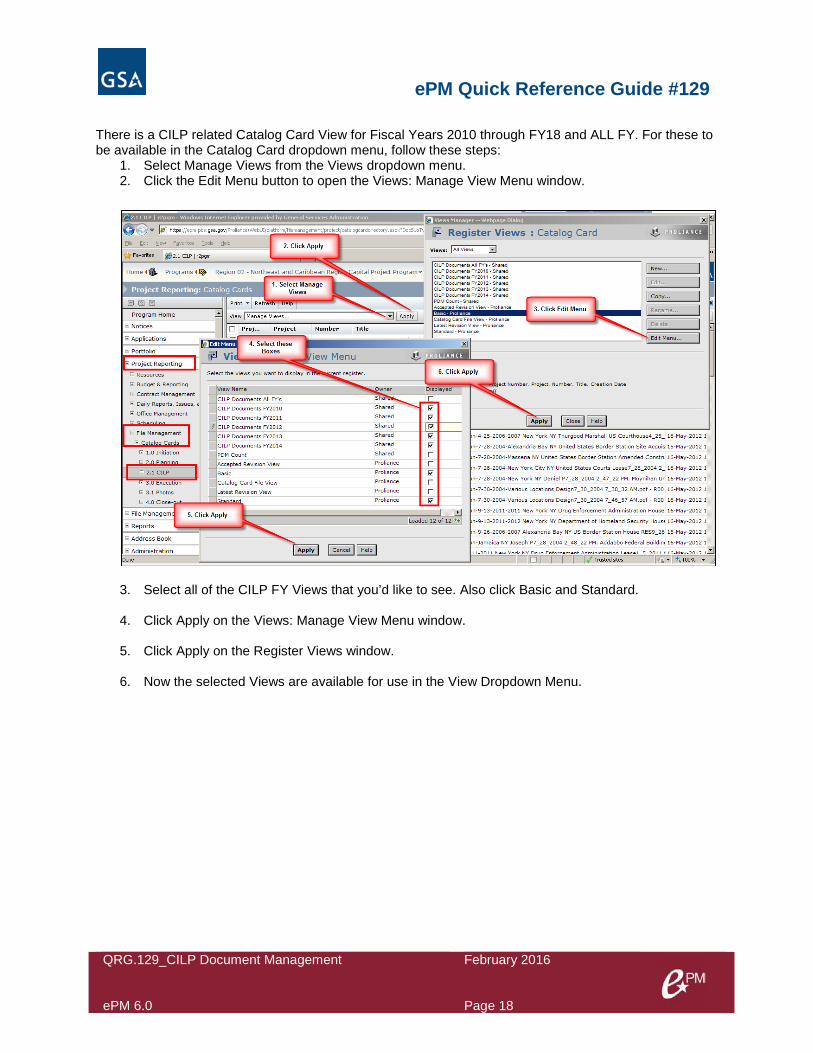
There is a CILP related Catalog Card View for Fiscal Years 2010 through FY18 and ALL FY. For these to be available in the Catalog Card dropdown menu, follow these steps:
1. Select Manage Views from the Views dropdown menu. 2. Click the Edit Menu button to open the Views: Manage View Menu window.
3. Select all of the CILP FY Views that you’d like to see. Also click Basic and Standard.
4. Click Apply on the Views: Manage View Menu window.
5. Click Apply on the Register Views window.
6. Now the selected Views are available for use in the View Dropdown Menu.
ePM Quick Reference Guide #129
QRG.129_CILP Document Management ePM 6.0
February 2016 Page 19
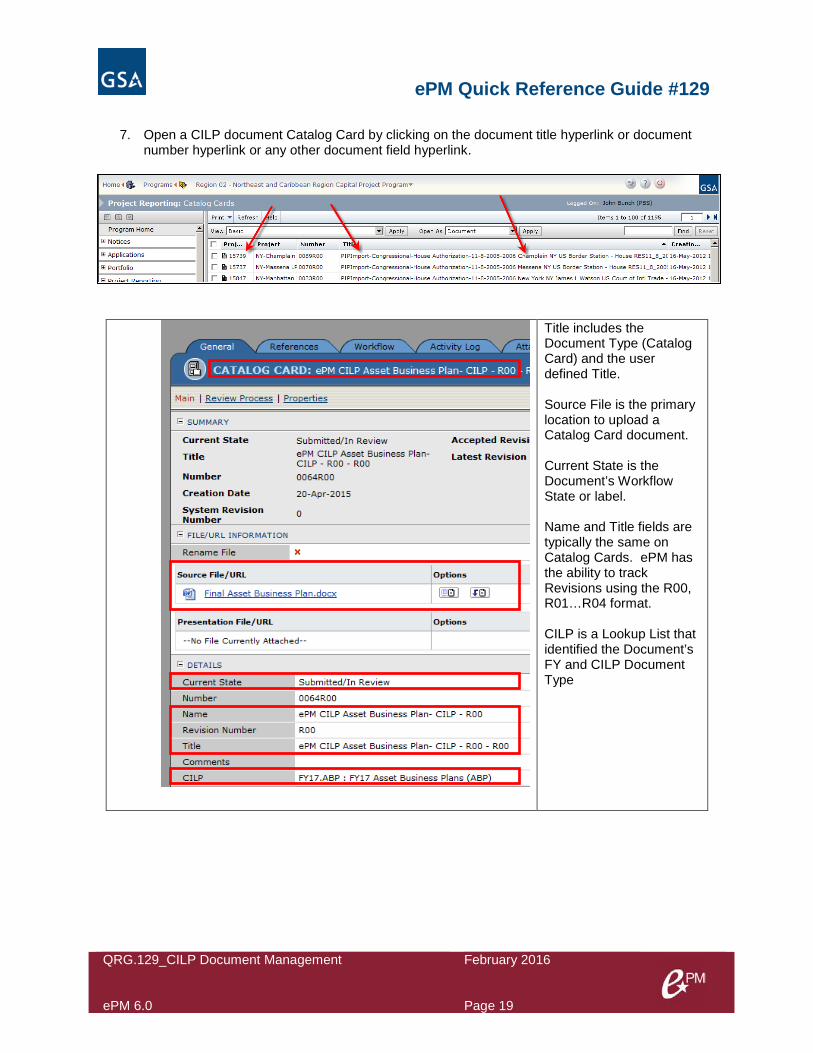
7. Open a CILP document Catalog Card by clicking on the document title hyperlink or document
number hyperlink or any other document field hyperlink.
Title includes the Document Type (Catalog Card) and the user defined Title. Source File is the primary location to upload a Catalog Card document. Current State is the Document’s Workflow State or label. Name and Title fields are typically the same on Catalog Cards. ePM has the ability to track Revisions using the R00, R01…R04 format. CILP is a Lookup List that identified the Document’s FY and CILP Document Type
ePM Quick Reference Guide #129
QRG.129_CILP Document Management ePM 6.0
February 2016 Page 20
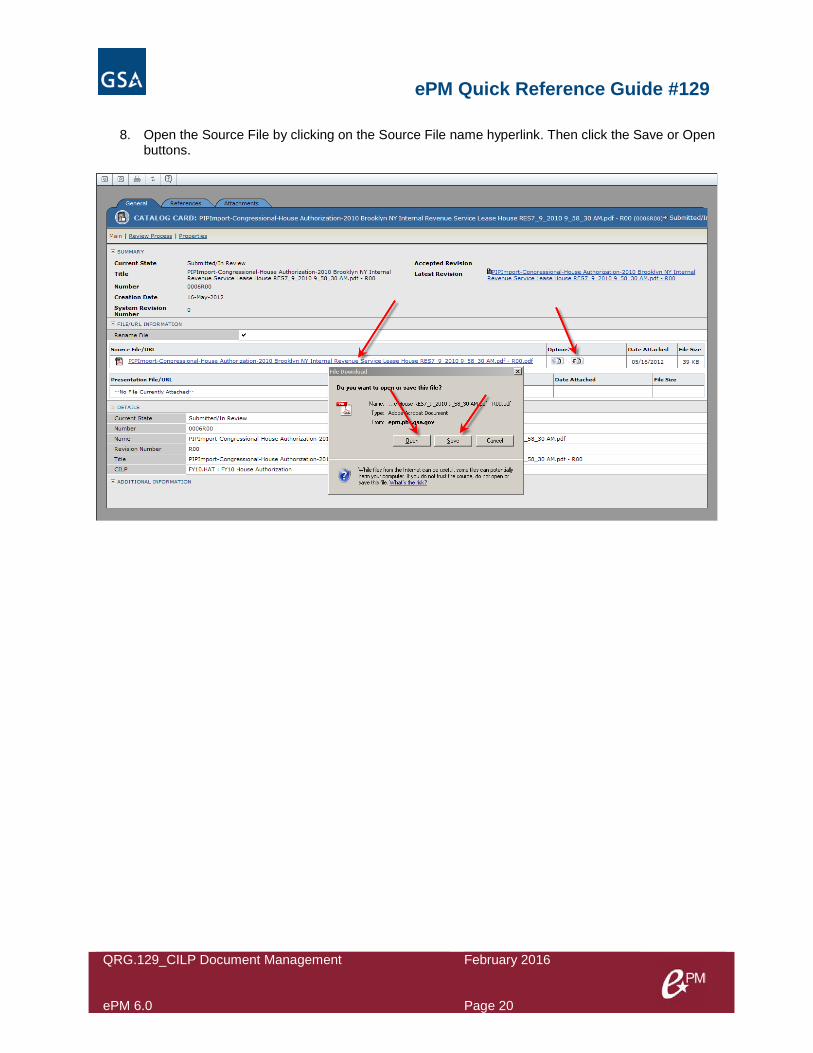
8. Open the Source File by clicking on the Source File name hyperlink. Then click the Save or Open
buttons.
ePM Quick Reference Guide #129
QRG.129_CILP Document Management ePM 6.0
February 2016 Page 21
Reviewing and Finalizing CILP Files in ePM for Central Office Portfolio
To edit and workflow CILP documents to the ‘Final’ state in ePM, a user must have project-level access. To request project level access to a list of CILP projects, find and coordinate with the appropriate ePM Regional System Administrator by visiting https://insite.gsa.gov/portal/category/517890.
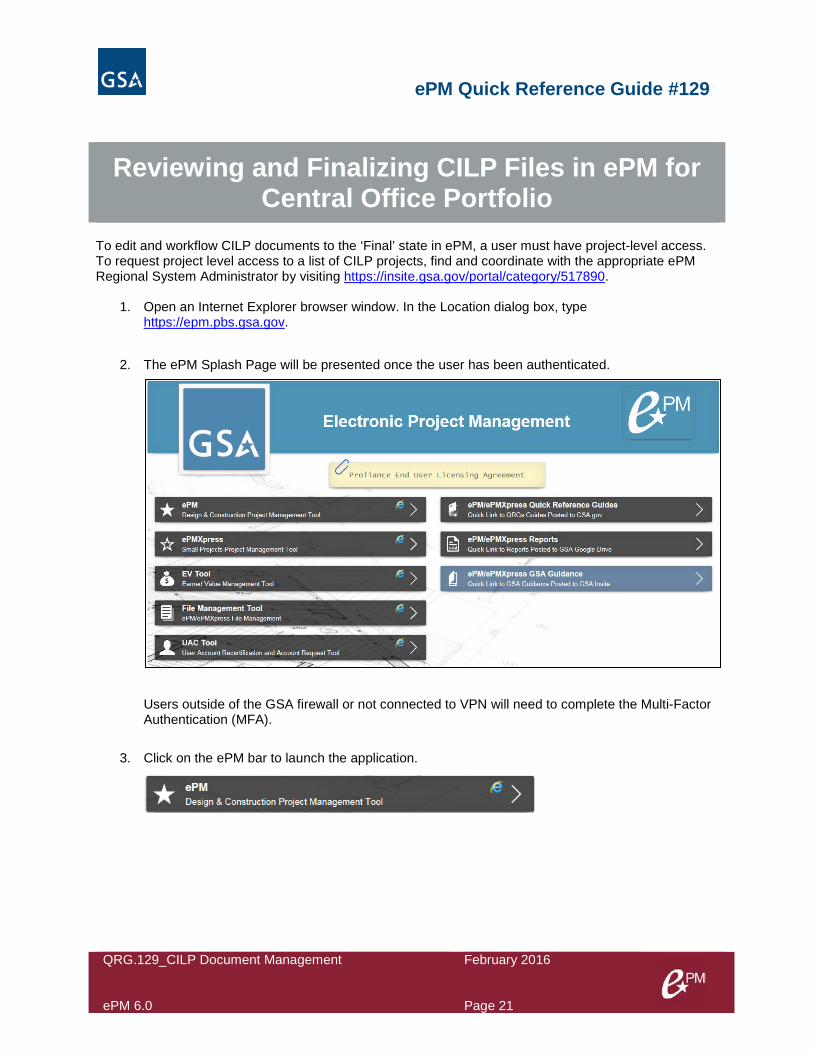
1. Open an Internet Explorer browser window. In the Location dialog box, type https://epm.pbs.gsa.gov.
2. The ePM Splash Page will be presented once the user has been authenticated.
Users outside of the GSA firewall or not connected to VPN will need to complete the Multi-Factor Authentication (MFA).
3. Click on the ePM bar to launch the application.

ePM Quick Reference Guide #129
QRG.129_CILP Document Management ePM 6.0
February 2016 Page 22
4. Select the Projects workspace.
5. Choose a project from the list.
6. Using the left menu navigate to the 2.1 CILP folder.
ePM Quick Reference Guide #129
QRG.129_CILP Document Management ePM 6.0
February 2016 Page 23
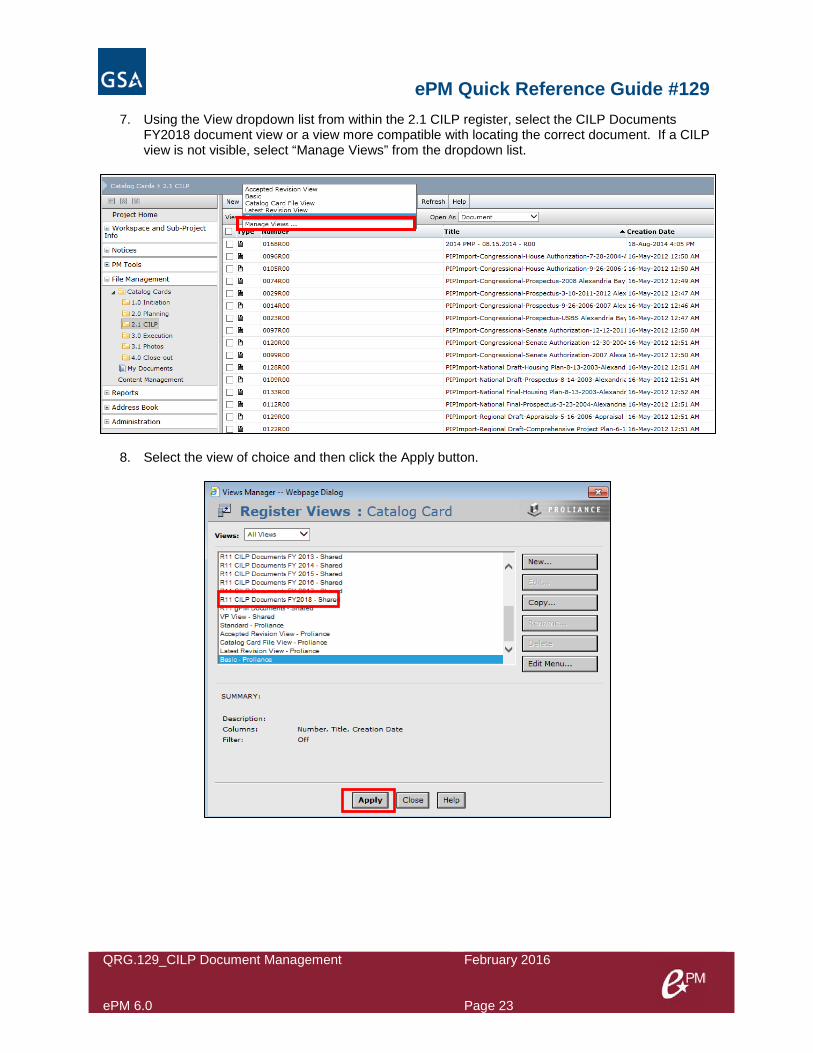
7. Using the View dropdown list from within the 2.1 CILP register, select the CILP Documents FY2018 document view or a view more compatible with locating the correct document. If a CILP view is not visible, select “Manage Views” from the dropdown list.
8. Select the view of choice and then click the Apply button.
ePM Quick Reference Guide #129
QRG.129_CILP Document Management ePM 6.0
February 2016 Page 24
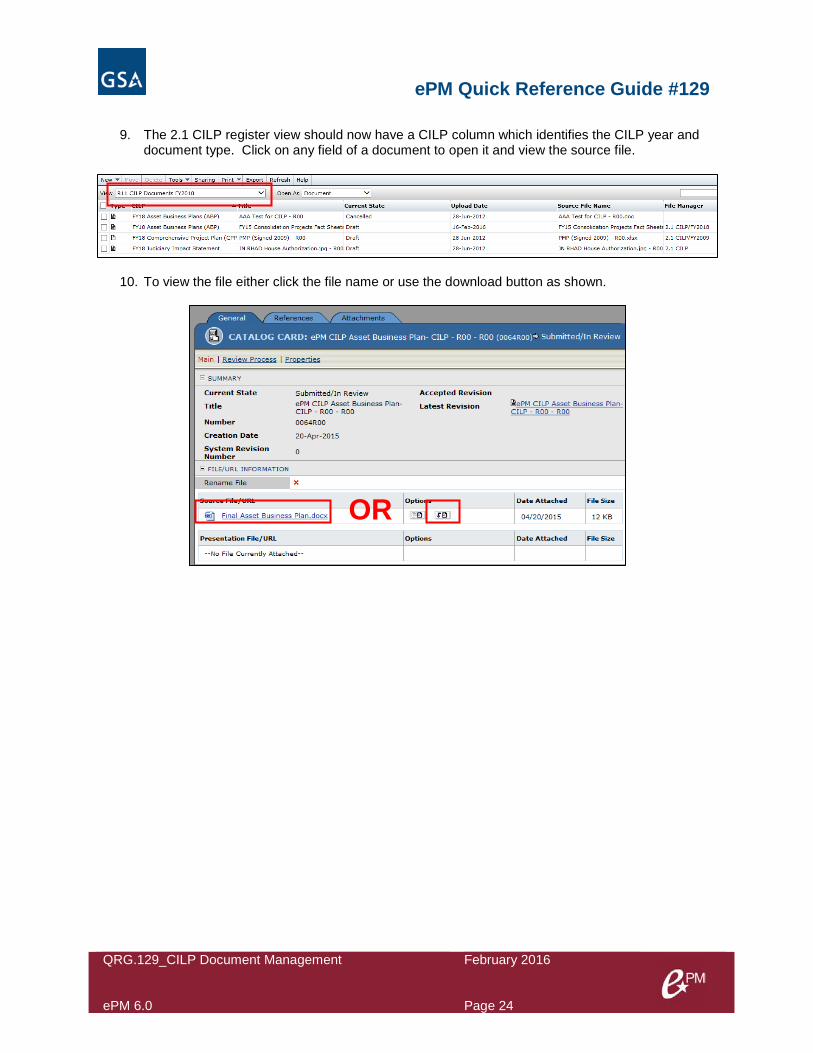
9. The 2.1 CILP register view should now have a CILP column which identifies the CILP year and
document type. Click on any field of a document to open it and view the source file.
10. To view the file either click the file name or use the download button as shown.
OR
ePM Quick Reference Guide #129
QRG.129_CILP Document Management ePM 6.0
February 2016 Page 25
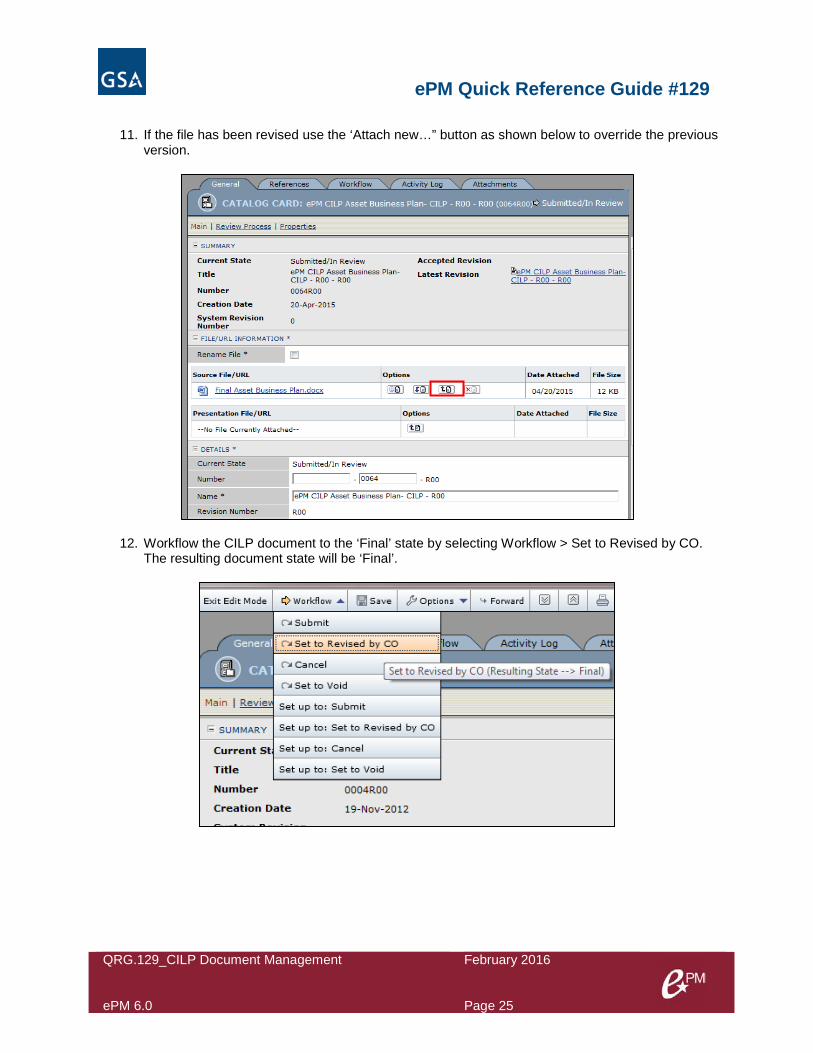
11. If the file has been revised use the ‘Attach new…” button as shown below to override the previous
version.
12. Workflow the CILP document to the ‘Final’ state by selecting Workflow > Set to Revised by CO. The resulting document state will be ‘Final’.