Embed Size (px)
DESCRIPTION
component based technologyfinal year cse lab manual
Citation preview

SASTRA UNIVERSITY
THANJAVUR
SCHOOL OF COMPUTING
COMPONENT BASED DEVELOPMENT LAB
BCSCCS706R01 / BICCIC706R01 / BITCIT705R01
2013 - 2014
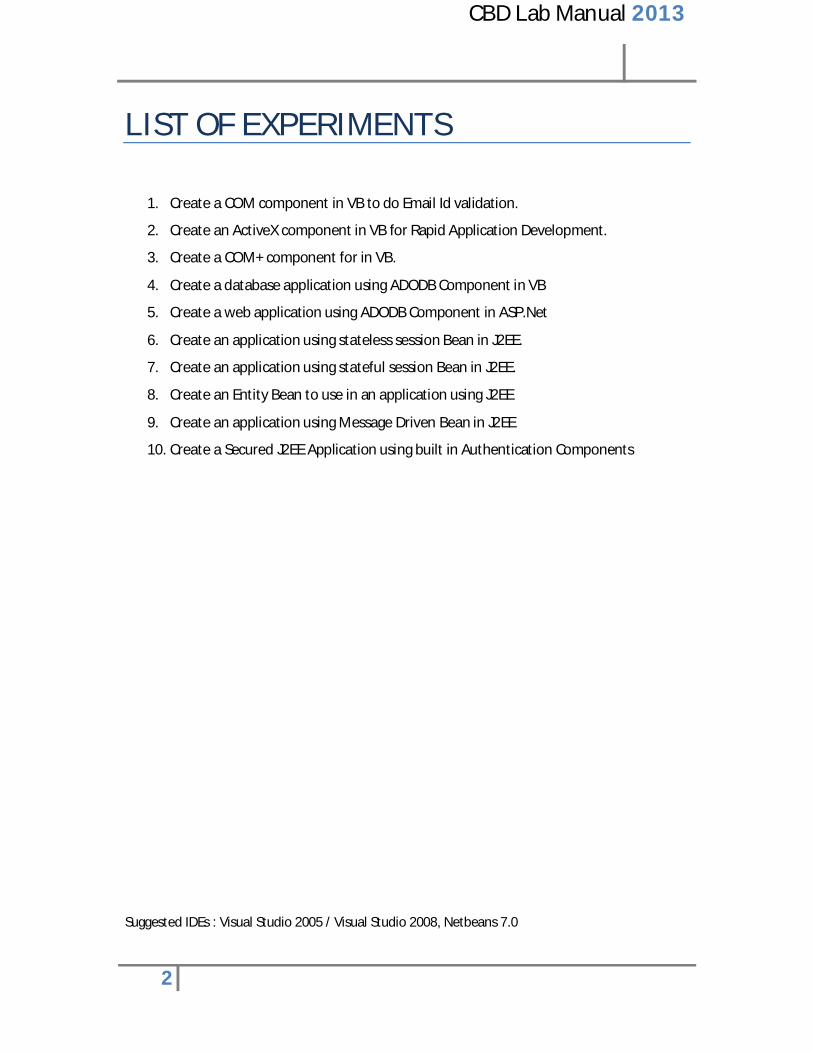
CBD Lab Manual 2013
LIST OF EXPERIMENTS
1. Create a COM component in VB to do Email Id validation.
2. Create an ActiveX component in VB for Rapid Application Development.
3. Create a COM+ component for in VB.
4. Create a database application using ADODB Component in VB
5. Create a web application using ADODB Component in ASP.Net
6. Create an application using stateless session Bean in J2EE.
7. Create an application using stateful session Bean in J2EE.
8. Create an Entity Bean to use in an application using J2EE
9. Create an application using Message Driven Bean in J2EE
10. Create a Secured J2EE Application using built in Authentication Components Suggested IDEs : Visual Studio 2005 / Visual Studio 2008, Netbeans 7.0
2
CBD Lab Manual 2013
Ex. 1 - Create a COM component in VB Objectives:
To create a COM component in VB, for Email Id validation. Procedure:
Create a Class Library project.
Write a function which accepts Email Id as parameter.
Check whether the Email Id is valid or not, if valid return true else return false.
Build the project to create component (.dll file).
Create a Windows application to test the component.
Windows application should have one text box to get the Email Id and one command button.
Prerequisite:
Basic Programming Knowledge in VB, Class libraries.
Example:
The following example will explain how to create a component to display greeting message.
Creating COM Component:
1. Open Visual Studio 2005. 2. Go to File Menu -> New -> Project. 3. Select Project Type “Visual Basic” and Template “Class Library”. 4. Give project name as “GreetingCOM” and click OK. 5. In solution explorer right click on “class1.vb”, select rename, give “MyGreeting.vb” as
new name. 6. In the coding window type the following code
Public Sub welcome()
MsgBox("Welcome to SASTRA") End Sub
7. Select Build -> Build Solution or press ctrl+shift+B. Now a dll file will be created with the name “GreetingCOM.dll”.
8. In output window the location of the dll file will be displayed. Remember the path. 9. Now we have successfully created a component with the name “GreetingCOM.dll”. 10. Goto File Menu -> close solution.
Creating client application to use the component:
1. Goto File Menu -> New -> Project. 2. Select Project type “Visual Basic” and Template “Windows Application”.
3
CBD Lab Manual 2013
3. Give project name as “GreetingCOMClient” and click OK. 4. In the solution explorer right click project name “GreetingCOMClient” and select
“Add Reference”. 5. In “Add Reference” window, select the “Browse” tab and choose the dll file created
above. 6. In the design form, drag and drop one button control. 7. Double click the button. In the coding window type the following code
Dim a As New GreetingCOM.MyGreeting a.welcome()
8. Press F5 to execute the program. Click the button, “Welcome to SASTRA” message will be displayed.
9. Based on this example develop the exercise. Result:
COM Component and a client application to test the component are developed and executed. Prelab :
Data Manipulation programs in VB Greeting Message Generation in VB
4
CBD Lab Manual 2013 Ex. 2 - Create an ActiveX component in VB for Rapid Application Development Objectives:
To Create an ActiveX component in VB to perform EMI calculation for Rapid Application Development Procedure:
Create a Windows Control Library project.
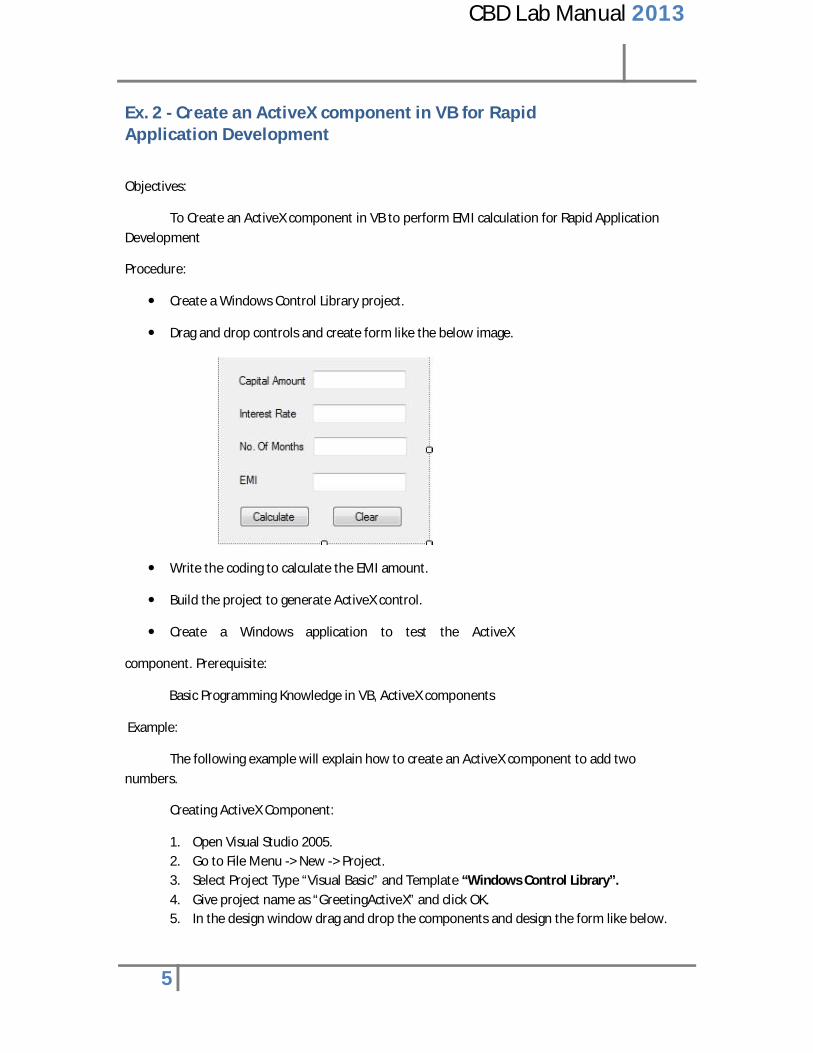
Drag and drop controls and create form like the below image.
Write the coding to calculate the EMI amount.
Build the project to generate ActiveX control.
Create a Windows application to test the ActiveX
component. Prerequisite:
Basic Programming Knowledge in VB, ActiveX components
Example:
The following example will explain how to create an ActiveX component to add two numbers.
Creating ActiveX Component:
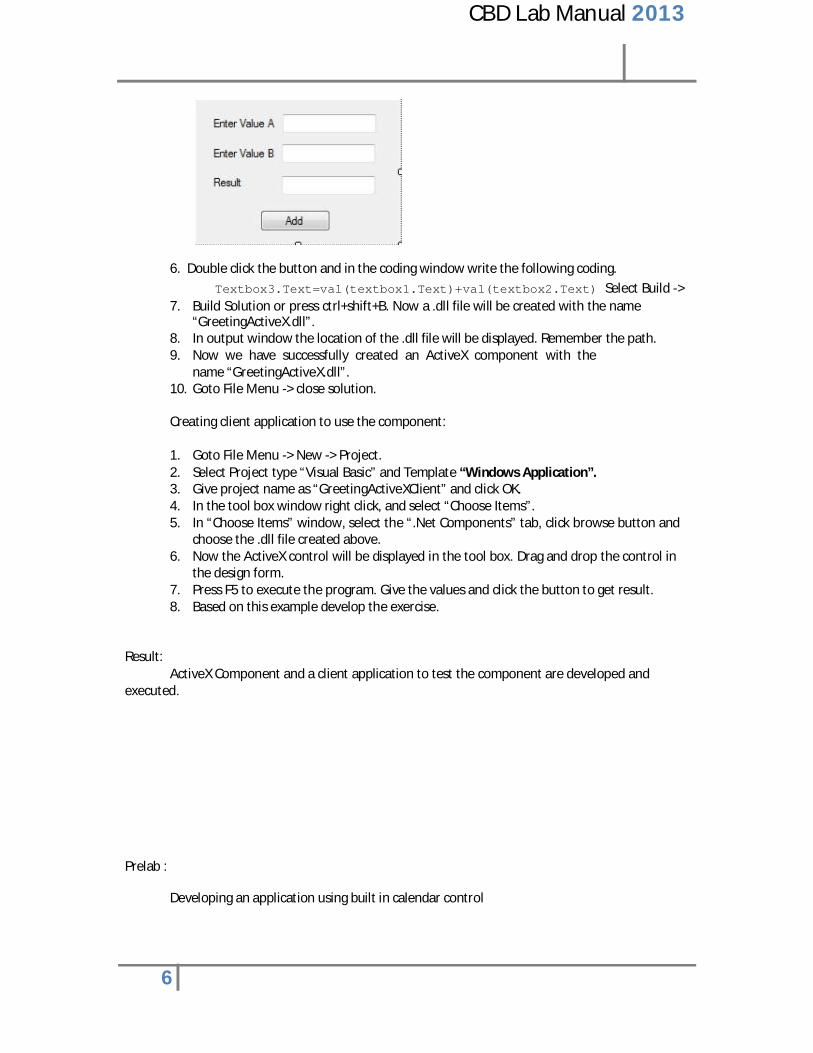
1. Open Visual Studio 2005. 2. Go to File Menu -> New -> Project. 3. Select Project Type “Visual Basic” and Template “Windows Control Library”. 4. Give project name as “GreetingActiveX” and click OK. 5. In the design window drag and drop the components and design the form like below.
5
CBD Lab Manual 2013
6. Double click the button and in the coding window write the following coding. Textbox3.Text=val(textbox1.Text)+val(textbox2.Text) Select Build ->
7. Build Solution or press ctrl+shift+B. Now a .dll file will be created with the name “GreetingActiveX.dll”.
8. In output window the location of the .dll file will be displayed. Remember the path. 9. Now we have successfully created an ActiveX component with the
name “GreetingActiveX.dll”. 10. Goto File Menu -> close solution.
Creating client application to use the component:
1. Goto File Menu -> New -> Project. 2. Select Project type “Visual Basic” and Template “Windows Application”. 3. Give project name as “GreetingActiveXClient” and click OK. 4. In the tool box window right click, and select “Choose Items”. 5. In “Choose Items” window, select the “.Net Components” tab, click browse button and
choose the .dll file created above. 6. Now the ActiveX control will be displayed in the tool box. Drag and drop the control in
the design form. 7. Press F5 to execute the program. Give the values and click the button to get result. 8. Based on this example develop the exercise.
Result:
ActiveX Component and a client application to test the component are developed and executed. Prelab :
Developing an application using built in calendar control
6
CBD Lab Manual 2013 Ex. 3 - Create a COM+ Component in VB Objectives:
To create a COM+ Component for Distance Conversion in VB. Procedure:
Create a Class Library project.
Write functions to convert M to KM, KM to M, KM to Miles, and Miles to KM which accepts corresponding value as parameter and returns the converted value.
Build the project to create component (.dll file).
Goto Control Panel -> Component Services, deploy the .dll file.
Start the service.
Create a Windows application to test the component.
Windows application should have one text box to get input, and one text box to display
the output. Create button to invoke the distance conversion functions. Prerequisite:
Knowledge about windows component service, COM and COM+. Result:
COM+ Component and a client application to test the component are developed and executed. Prelab:
Create a Temperature component in COM+ component
7
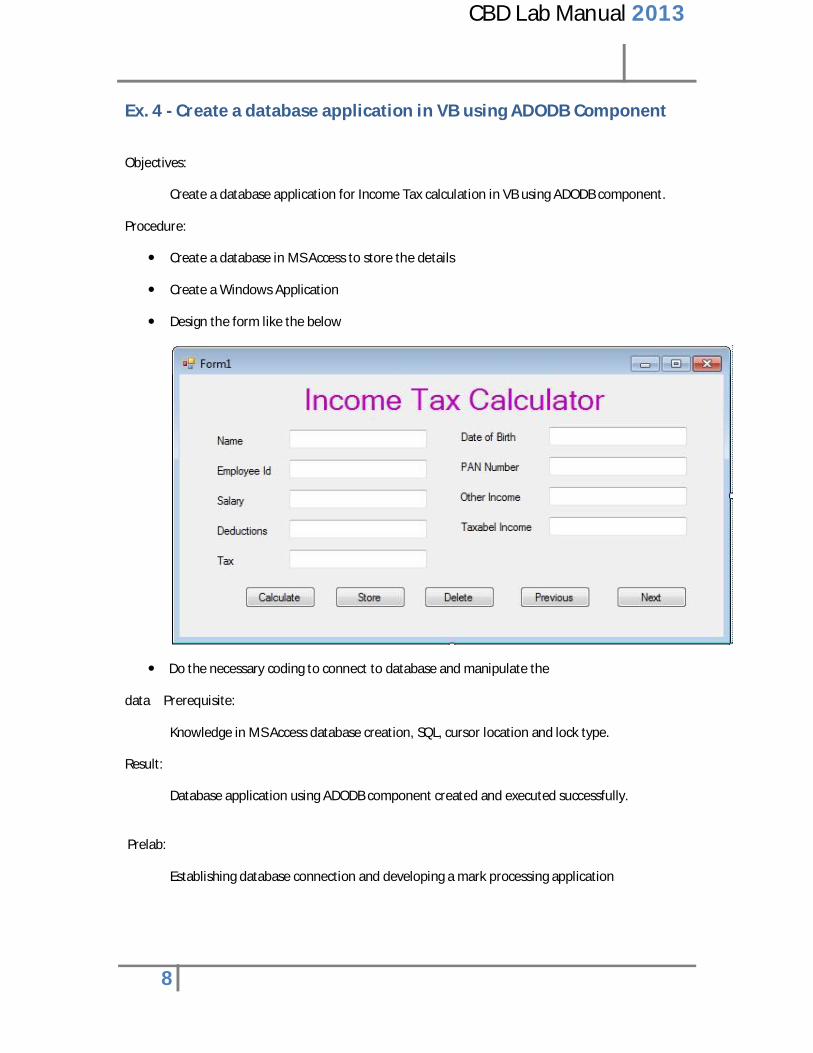
CBD Lab Manual 2013 Ex. 4 - Create a database application in VB using ADODB Component Objectives:
Create a database application for Income Tax calculation in VB using ADODB component.
Procedure:
Create a database in MS Access to store the details
Create a Windows Application
Design the form like the below
Do the necessary coding to connect to database and manipulate the
dataPrerequisite:
Knowledge in MS Access database creation, SQL, cursor location and lock type. Result:
Database application using ADODB component created and executed successfully. Prelab:
Establishing database connection and developing a mark processing application
8
CBD Lab Manual 2013
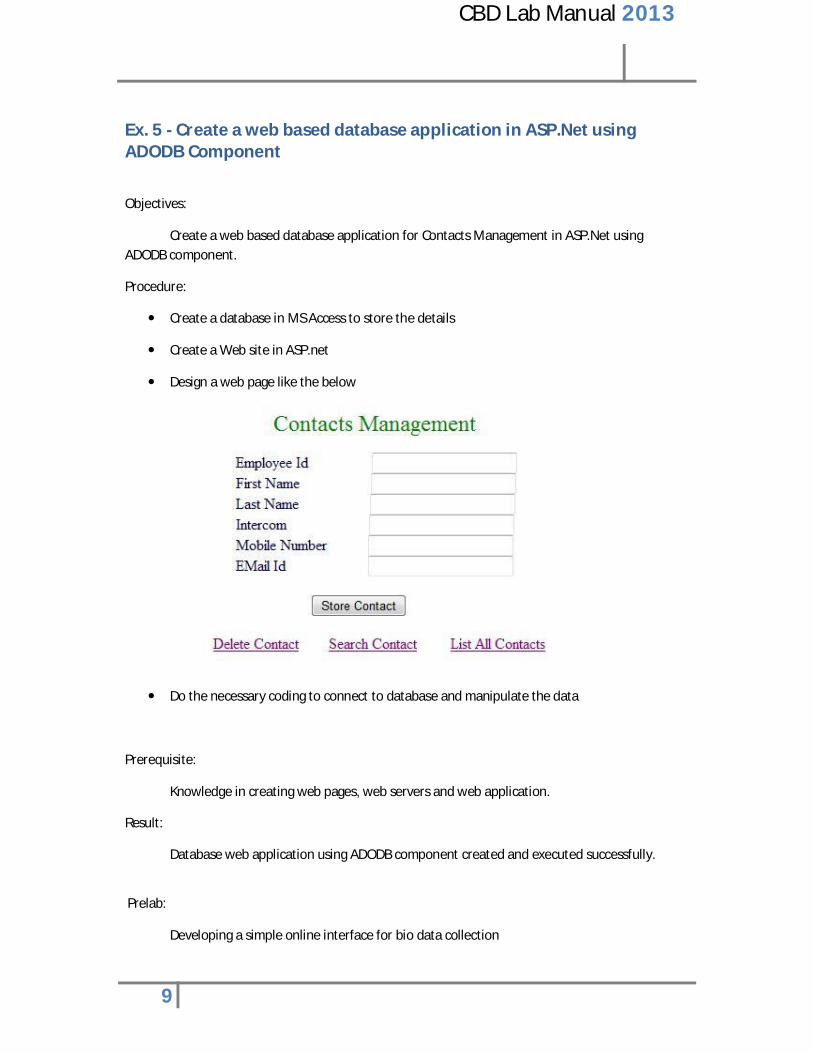
Ex. 5 - Create a web based database application in ASP.Net using ADODB Component Objectives:
Create a web based database application for Contacts Management in ASP.Net using ADODB component. Procedure:
Create a database in MS Access to store the details
Create a Web site in ASP.net
Design a web page like the below
Do the necessary coding to connect to database and manipulate the data Prerequisite:
Knowledge in creating web pages, web servers and web application. Result:
Database web application using ADODB component created and executed successfully. Prelab:
Developing a simple online interface for bio data collection
9
CBD Lab Manual 2013 Ex. 6 – Stateless Session bean in J2EE Objectives:
Create a stateless session bean to check the validity of the credit card in J2EE. Procedure:
Create a Stateless session bean in J2EE application to check the validity of credit card.
Create a web application to use the session bean. Example:
The following example will explain how to create a simple stateless session bean.
Creating Remote Interface:
1. File -> New Project -> Categories = “Java” -> Projects = “Java Class Library”, Click Next 2. Give Project Name as “Ex6RemoteInterface”, Click Finish 3. Save the project.
Creating Statess Session Bean:
1. File -> New Project -> Categories = “JavaEE” -> Projects = “Enterprise Application” 2. Give Project Name as “Ex6”, Click Next. 3. Uncheck “Create Web Application Module” check box, click Finish. 4. Right click EJB Module (Ex6-ejb) -> New -> Session Bean 5. Give EJB Name as “MySession6”, package name as “ejb” 6. Select session type as “Stateless”, select “Remote” check box. 7. In the drop down list select the Remote interface name(Ex6RemoteInterface) that
we created as first step of this Ex. 8. Click “Finish” 9. In the coding window declare one String variable
String message; 10. Right click in the coding window select “insert code”, select “Add Business Method” 11. Give Method name as “getMessage”, return type as “String”, click ok. 12. Replace “return null” by “return message” 13. Again Right click in the coding window select “insert code”, select “Add Business Method” 14. Give Method name as “setMessage”. 15. Click Add button and give Parameter Name as “message” click ok. 16. Add the following line in the setMessage method body.
this.message=message; 17. Save the project.
Creating Client 1:
1. File -> New Project -> Categories = “JavaEE” -> Projects = “Enterprise Application Client”
10

CBD Lab Manual 2013
2. Click Next. Give project name as “Ex6Client1”, Click Next, Click Finish. 3. Right click in the main method, select “insert code”, select “Call Enterprise Bean”,
Expand the ejb module (Ex6-ejb), select session bean(MySession6), click ok. 4. Add the following code in main method.
mySession6.setMessage("This is Session Bean..."); System.out.println("Client1 Message : "+mySession6.getMessage());
5. Save the project. Creating Client 2:
1. File -> New Project -> Categories = “JavaEE” -> Projects = “Enterprise Application Client” 2. Click Next. Give project name as “Ex6Client2”, Click Next, Click Finish. 3. Right click in the main method, select “insert code”, select “Call Enterprise Bean”,
Expand the ejb module (Ex6-ejb), select session bean(MySession6), click ok. 4. Add the following code in main method.
System.out.println("Client2 Message : "+mySession6.getMessage()); 5. Save the project.
Running the project:
1. Right click Enterprise Application Project and select deploy. 2. Right click client 1 project and select Run
a. Output : “Client1 Message : This is Session Bean...” 3. Right click client 2 project and select Run
a. Output : “Client2 Message : This is Session Bean...” Prerequisite:
Knowledge in Java, Java Beans and web. Result:
Stateless Session bean and client applications to test the bean are developed and executed. Prelab:
Create a web application using JSP.
11
CBD Lab Manual 2013 Ex. 7 – Stateful Session bean in J2EE Objetives:
Create a stateful session bean for shopping cart application in J2EE. Procedure:
Create a Stateful session bean in J2EE application for shopping cart application
Create a web application to use the session bean. Example:
The following example will explain how to create a simple stateful session bean.
Creating Remote Interface:
1. File -> New Project -> Categories = “Java” -> Projects = “Java Class Library”, Click Next 2. Give Project Name as “Ex7RemoteInterface”, Click Finish 3. Save the project.
Creating Statess Session Bean:
1. File -> New Project -> Categories = “JavaEE” -> Projects = “Enterprise Application” 2. Give Project Name as “Ex7”, Click Next. 3. Uncheck “Create Web Application Module” check box, click Finish. 4. Right click EJB Module (Ex7-ejb) -> New -> Session Bean 5. Give EJB Name as “MySession7”, package name as “ejb” 6. Select session type as “Stateful”, select “Remote” check box. 7. In the drop down list select the Remote interface name(Ex7RemoteInterface) that we
created as first step of this Ex. 8. Click “Finish” 9. In the coding window declare one String variable
String message; 10. Right click in the coding window select “insert code”, select “Add Business Method” 11. Give Method name as “getMessage”, return type as “String”, click ok. 12. Replace “return null” by “return message” 13. Again Right click in the coding window select “insert code”, select “Add Business Method” 14. Give Method name as “setMessage”. 15. Click Add button and give Parameter Name as “message” click ok. 16. Add the following line in the setMessage method body.
this.message=message; 17. Save the project.
Creating Client 1:
1. File -> New Project -> Categories = “JavaEE” -> Projects = “Enterprise Application Client”
12
CBD Lab Manual 2013
2. Click Next. Give project name as “Ex7Client1”, Click Next, Click Finish. 3. Right click in the main method, select “insert code”, select “Call Enterprise Bean”,
Expand the ejb module (Ex7-ejb), select session bean(MySession7), click ok. 4. Add the following code in main method.
mySession6.setMessage("This is Session Bean..."); System.out.println("Client1 Message : "+mySession7.getMessage());
5. Save the project. Creating Client 2:
1. File -> New Project -> Categories = “JavaEE” -> Projects = “Enterprise Application Client” 2. Click Next. Give project name as “Ex7Client2”, Click Next, Click Finish. 3. Right click in the main method, select “insert code”, select “Call Enterprise Bean”,
Expand the ejb module (Ex7-ejb), select session bean(MySession7), click ok. 4. Add the following code in main method.
System.out.println("Client2 Message : "+mySession7.getMessage()); 5. Save the project.
Running the project:
1. Right click Enterprise Application Project and select deploy. 2. Right click client 1 project and select Run
Output : “Client1 Message : This is Session Bean...” 3. Right click client 2 project and select Run
Output : “Client2 Message : null” Prerequisite:
Knowledge about Java, Java Beans, web Result:
Statelful Session bean and client applications to test the bean are developed and executed. Prelab:
Create a web application using JSP and Servlet.
13
CBD Lab Manual 2013 Ex. 8 – Entity bean in J2EE Objectives :
Create an Employee entity bean in J2EE. Procedure:
Create a Employee entity bean in J2EE application.
Create a web application to use the entity bean.
Example:
The following example will explain how to create a simple entity bean.
1. Create the Datastore
1. Goto Services Tab -> Expand Databases -> right click on 'Java DB' -> select 'Create Database' Database Name : BooksDemoDB username and password set to books
2. The creation will also start the database, if you go back to the services tab, you will be able to open and view the database.
14
CBD Lab Manual 2013
Project creation
1. Goto File Menu -> New Project -> Java EE -> Enterprise Application Project Name : BooksDemo
2. No need to change any-thing else. Click next and finish. This will create three projects - BooksDemo 'containing' BooksDemo-ejb and BooksDemo-war
Persistence Unit creation
1. Right click 'BooksDemo-ejb' -> new -> other -> category ‘Persistance’ -> File Type
‘Persistence Unit’ -> Next 2. Don’t change default name (BooksDemo-ejbPU) 3. Datasource -> select 'New Data Source' at the bottom of the dropdown. Then
select the BooksDemoDB database you created earlier and make the JNDI name 'jdbc/booksDemo', leave the rest as default and finish.
Create the Entity Bean
1. Right click 'BooksDemo-ejb', -> new -> other -> Persistance -> Entity Class -
> Next Classname : 'Book', package 'com.book.model'
2. Don’t change any-thing else, click finish. 3. In the Book class, in member variable declaration section, right click and select
insert code -> select Add Property -> Give property name as ‘title’ and click ok. 4. The same way add one more property called ‘author’
Create the SessionBean
1. Right click 'BooksDemo-ejb', -> new -> other ->Java EE -> Session Bean -> Next
Name: 'BookService', Package: 'com.example.book.service',
2. No need to change any-thing else, click finish. 3. Now we are going to create two 'business' methods:
getAll - > retrieving all books from database addBook -> add a book to the database.
4. <ALT>INSERT -> Add Business Method with name 'getAll' with return type 'List<Book>'
5. <ALT>INSERT -> Add Business Method with name 'addBook' and add a parameters called 'book' of type 'Book'.
6. Add the following import statements in the import section of the class. 15
CBD Lab Manual 2013
import java.util.List; import com.book.model.Book;
7. Next we need a handle on the persistance unit: Right click in the coding window -> select ‘Use Entity Manager’ then the following code will be added automatically. @PersistenceContext(unitName = "BooksDemo-ejbPU") private EntityManager em;
8. Now we need to use the EntityManager to store and retrieve the books: Modify the return statement in getAll method by the following line. return em.createQuery("select b from Book b").getResultList();
9. Add the following line in addBook method. em.persist(book);
The Web Tier 1. First we need to create a servlet to receive the values from the index.jsp file and
pass the values to the session bean to store it in the database. 2. Right click 'BooksDemo-war' (note its 'war' not ejb) -> new -> other -> Web ->
Servlet -> Next
Class Name: 'BookAdd' package: 'com.book.web.action'
the rest is default, click 'next' and 'finish'
3. Add the SessionBean by Right click in the coding window ->Insert Code -> select Call Enterprise Bean and select the BookService bean under 'BooksDemo-ejb'and OK.
4. Edit the 'processRequest' method, replace the try block code with the following code.
Book book = new Book(); book.setTitle(request.getParameter("title")); book.setAuthor(request.getParameter("author")); bookService.addBook(book); List<Book> listOfBooks=bookService.getAll(); out.println("<html>"); out.println("<head>"); out.println("<title>Servlet BookAdd</title>"); out.println("</head>"); out.println("<body>");
out.println("<h1>List of Books</h1>"); out.println("<table border=1>"); out.println("<tr><th>Title of the Book</th><th>Author</th></tr>");
16
CBD Lab Manual 2013
for(Book b:listOfBooks){ out.println("<tr><td>"+b.getTitle()+"</td>"); out.println("<td>"+b.getAuthor()+"</td></tr>");
} out.println("</table>"); out.println("</body>"); out.println("</html>");
5. The index.jsp
We are going to edit the index.jsp.
Under 'Web Pages' in the 'BooksDemo-war' project you will find the index.jsp page, open it. Replace '<h1>Hello World!</h1>': by the following code.
<h1>Book Store</h1> Add Book Details<br/> <form method="post" action="BookAdd">
Title : <input type="text" name="title"></input></br> Author : <input type="text" name="author"></input></br> <button type="submit">add</button>
</form>
Save it.
Right click BooksDemo Project and select Run. Give input values and click the add button. Input values will be added to the database and displayed in the next page.
You can see the inserted values in your database also(Service -> Data Store
- > Java DB -> BookDemoDB->Tables right click and select view Data) Prerequisite:
Knowledge about Java, Java Beans, web Result:
Entity bean and client applications to test the bean are developed and executed. Prelab:
Create a web application using JSP and Servlet.
17

CBD Lab Manual 2013 Ex. 9 – Message Driven bean in J2EE Objectives :
Create a message driven bean to store the feedback details in J2EE. Procedure:
Create a message driven bean in J2EE application to store feedback and grievances.
Create a web application to use the Message Driven Bean. Example:
The following example will explain how to create a simple message driven bean.
Creating Message Driven Bean:
1. File -> New Project -> select Category = “JavaEE” and Project = “EJB Module” 2. Click Next 3. Enter the Project Name as “Ex9MDB” -> Click Next -> Click Finish 4. In Projects window right click on your project 5. Choose New -> Message Driven Bean 6. Enter EJB Name “HelloBean” and package “hello” 7. Click the “Add” button to add project destination 8. In the window give destination name “hello” and select destination type “Queue”, click ok. 9. Click Finish. 10. In the coding window add the following code in “onMessage” method.
try { System.out.println(message.getStringProperty("msg"));
} catch (JMSException ex) { Logger.getLogger(MessageBean.class.getName()).log(Level.SEVERE, null, ex);
} 11. Save the project.
Creating Client Application to Access the Message Driven Bean: 1. File -> New Project -> Category = “JavaEE” and Project = “Enterprise Application Client” 2. Click Next 3. Enter the Project Name as “Ex9MEBClient” -> Click Next -> Click Finish 4. In the coding window before main method copy paste the following code
@Resource(mappedName="jms/helloFactory") private static ConnectionFactory connectionFactory; @Resource(mappedName="jms/hello") private static Queue queue;
5. Add the following code to the Main method Connection connection = connectionFactory.createConnection(); Session session = connection.createSession(false, Session.AUTO_ACKNOWLEDGE);
18

CBD Lab Manual 2013
MessageProducer producer = session.createProducer(queue); Message message = session.createTextMessage(); message.setStringProperty("msg", "Hello World!"); System.out.println("Message Sent is : " + message.getStringProperty("msg")); producer.send(message); System.exit(0);
6. Add the following header files import javax.annotation.Resource; import javax.jms.Connection; import javax.jms.ConnectionFactory; import javax.jms.JMSException; import javax.jms.Message; import javax.jms.MessageProducer; import javax.jms.Queue; import javax.jms.Session;
7. Save the project 8. Deploy EJB Module project 9. Run the Client project
Output :
In Run window message sent will be displayed In GlassFish server log message received will be displayed
Prerequisite:
Knowledge about Java, Java Beans, web Result:
Message Driven Bean and client applications to test the bean are developed and executed. Prelab:
Create a web application using JSP and Servlet.
19
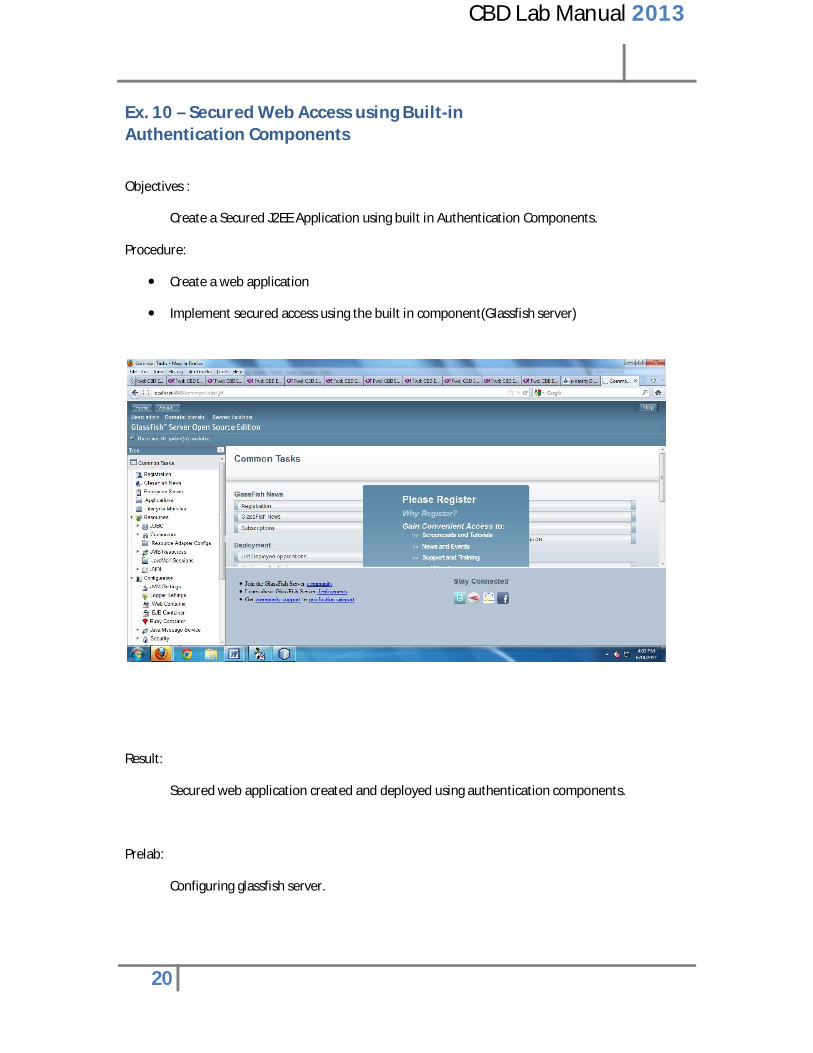
CBD Lab Manual 2013 Ex. 10 – Secured Web Access using Built-in Authentication Components Objectives :
Create a Secured J2EE Application using built in Authentication Components. Procedure:
Create a web application
Implement secured access using the built in component(Glassfish server) Result:
Secured web application created and deployed using authentication components. Prelab:
Configuring glassfish server.
20

CBD Lab Manual 2013
ADDITIONAL EXERCISES
1. Create a web application and make use of a JavaBeans to check the validity of user’s credit card number.
2. Develop a E-commerce application using j2ee under net beans 3. Create a java web service to validate the identity of a customer 4. Develop Lists-Based Application for a Music Store
http://www.functionx.com/vbnet/xml/musicstore.htm 5. Create a web application using asp.net to update and view the results of college
students
21