Embed Size (px)
Citation preview

Cashiering in PeopleSoft:
Tellers
Rev. 0
March 23, 2007

TABLE OF CONTENTS PeopleSoft Cashiering Training .............................................................................................................................................. 3 Agenda.................................................................................................................................................................................... 3 Navigating to the Cashiering Functions .................................................................................................................................. 5 Enter Departmental Receipts Using SpeedType Keys ........................................................................................................... 9
Job Aid – Enter Dept Receipt with SpeedType Key.......................................................................................................... 17 Enter a Departmental Receipt without SpeedType............................................................................................................... 19
Job Aid – Enter Dept Receipt without a SpeedType Key.................................................................................................. 23 Post a Student’s Payment..................................................................................................................................................... 25
Job Aid – Post a Student’s Payment ................................................................................................................................. 37 Cash a Check........................................................................................................................................................................ 39
Job Aid – Cash a Check .................................................................................................................................................... 43 End-of-Day Preliminary Balance ........................................................................................................................................... 45
Job Aid: End-of-day Preliminary Balancing ....................................................................................................................... 55 End-of-Day Final Balancing .................................................................................................................................................. 57
Job Aid: End-of-day Final Balancing ................................................................................................................................. 65 Look up a Student Receipt.................................................................................................................................................... 67
Job Aid – Look Up Student’s Receipt................................................................................................................................ 73 FERPA .................................................................................................................................................................................. 75 TERMINOLOGY AND SHORTCUTS ................................................................................................................................... 77
SIS to PeopleSoft .............................................................................................................................................................. 77 Common Values ................................................................................................................................................................ 77
Key board Shortcuts ...................................................................................................................................................... 79 Glossary......................................................................................................................................................................... 80
Next steps ............................................................................................................................................................................. 83

PeopleSoft Cashiering Training Overview
PeopleSoft Cashiering Training Today we are going to cover the Teller functionalities in the new PS Cashiering System. Some of the items we will cover briefly because we are assuming you have taken the following online training classes (if not please take in the next day or two):
OASIS: FERPA Refresher OASIS: General Navigation in PeopleSoft OASIS: Advisors: Intro to PeopleSoft – View Student Data*
To enroll, log into the Blackboard system and click on the “Courses” tab. Next, type OASIS in the Course Search box and click the “GO!” button. Finally, locate the courses listed above and begin your journey through the OASIS system.
Agenda
• Navigating to the Cashiering functionalities
• Entering Departmental Receipts using SpeedTypes (SpeedTypes are replacing ShortCodes)
• Entering Departmental Receipts using accounting information
• Entering Student Payment Receipts
• Cashing a Check
• End of Day Preliminary Balancing
• Interim Deposit
• Final End of Day Balancing
• Looking up a Student Receipt for research/reprinting
• Questions
Page 3 of 85
Last Revised 3/26/2007
Copyright 2007 – Arizona State University

PeopleSoft Cashiering Training Overview
Notes
Page 4 of 85
Last Revised 3/26/2007
Copyright 2007 – Arizona State University

PeopleSoft Cashiering Training Enter Dept Receipts using SpeedType Keys
Navigating to the Cashiering Functions Before you can begin any work, you must login to the system. The link to do so is https://hrsa.oasis.asu.edu/You should see a login screen similar to the one below:
Page 5 of 85
Last Revised 3/26/2007
Copyright 2007 – Arizona State University
PeopleSoft Cashiering Training Enter Dept Receipts using SpeedType Keys
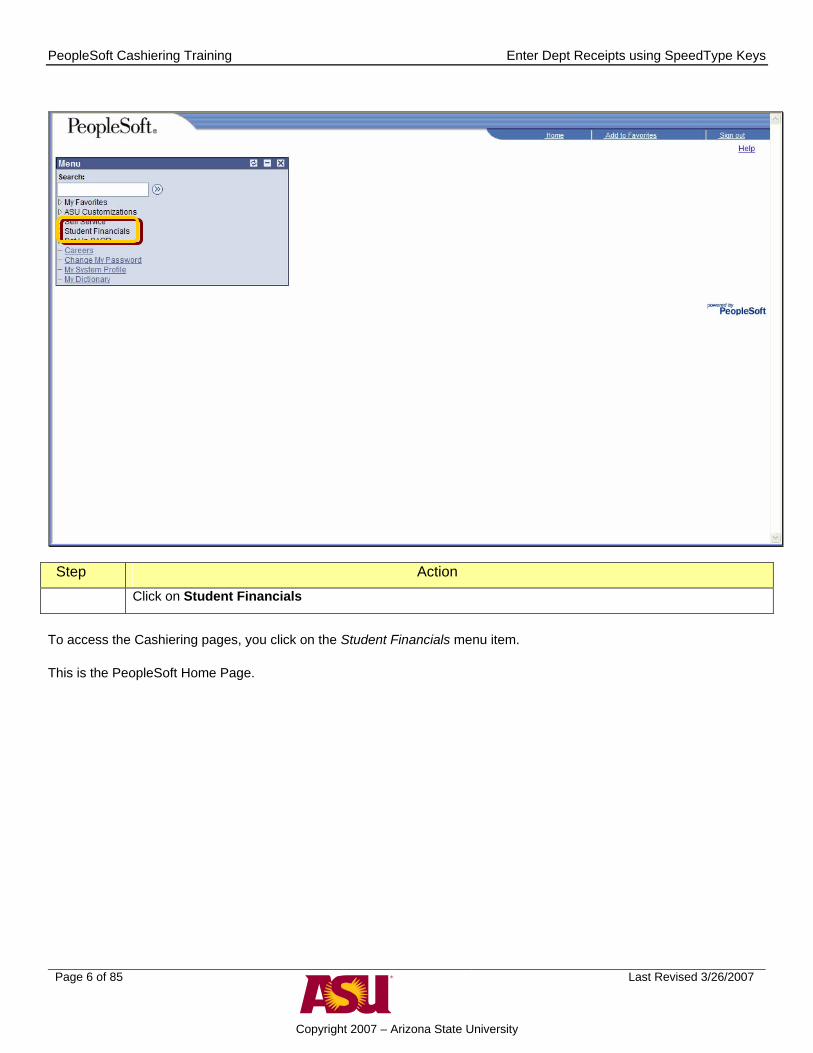
Step Action
Click on Student Financials
To access the Cashiering pages, you click on the Student Financials menu item. This is the PeopleSoft Home Page.
Page 6 of 85
Last Revised 3/26/2007
Copyright 2007 – Arizona State University
PeopleSoft Cashiering Training Enter Dept Receipts using SpeedType Keys
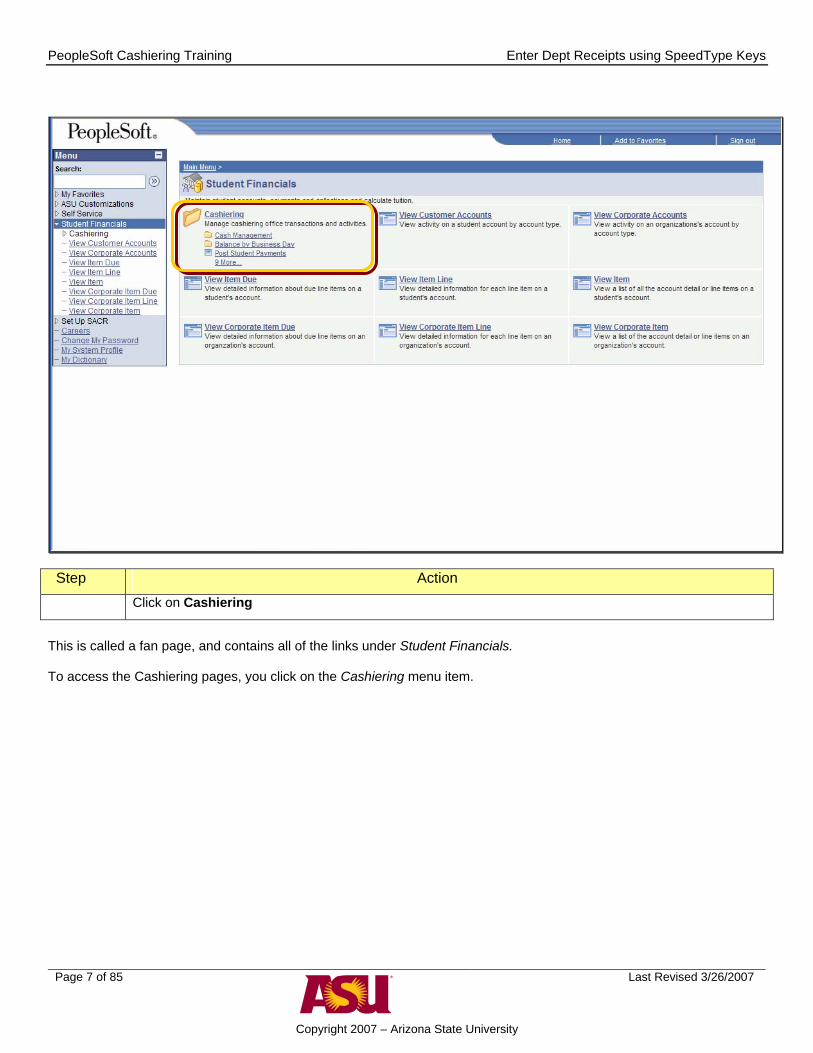
Step Action
Click on Cashiering
This is called a fan page, and contains all of the links under Student Financials. To access the Cashiering pages, you click on the Cashiering menu item.
Page 7 of 85
Last Revised 3/26/2007
Copyright 2007 – Arizona State University
PeopleSoft Cashiering Training Enter Dept Receipts using SpeedType Keys
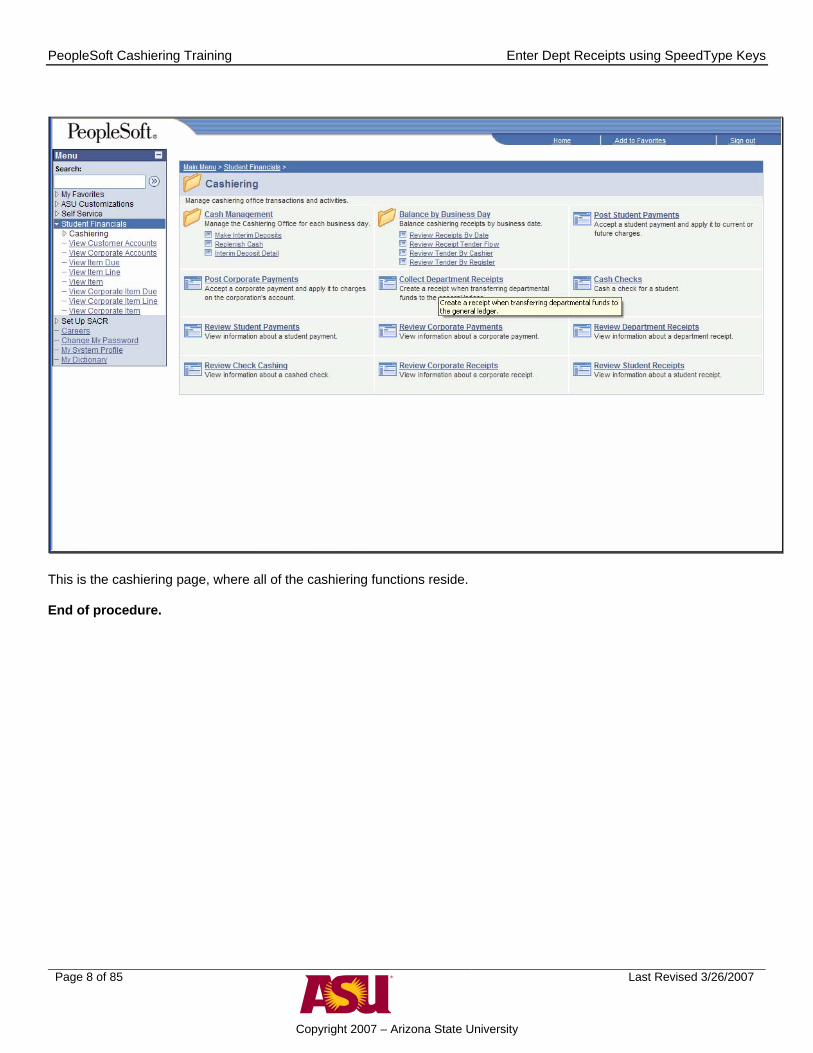
This is the cashiering page, where all of the cashiering functions reside.
End of procedure.
Page 8 of 85
Last Revised 3/26/2007
Copyright 2007 – Arizona State University
PeopleSoft Cashiering Training Enter Dept Receipts Using a SpeedType Key
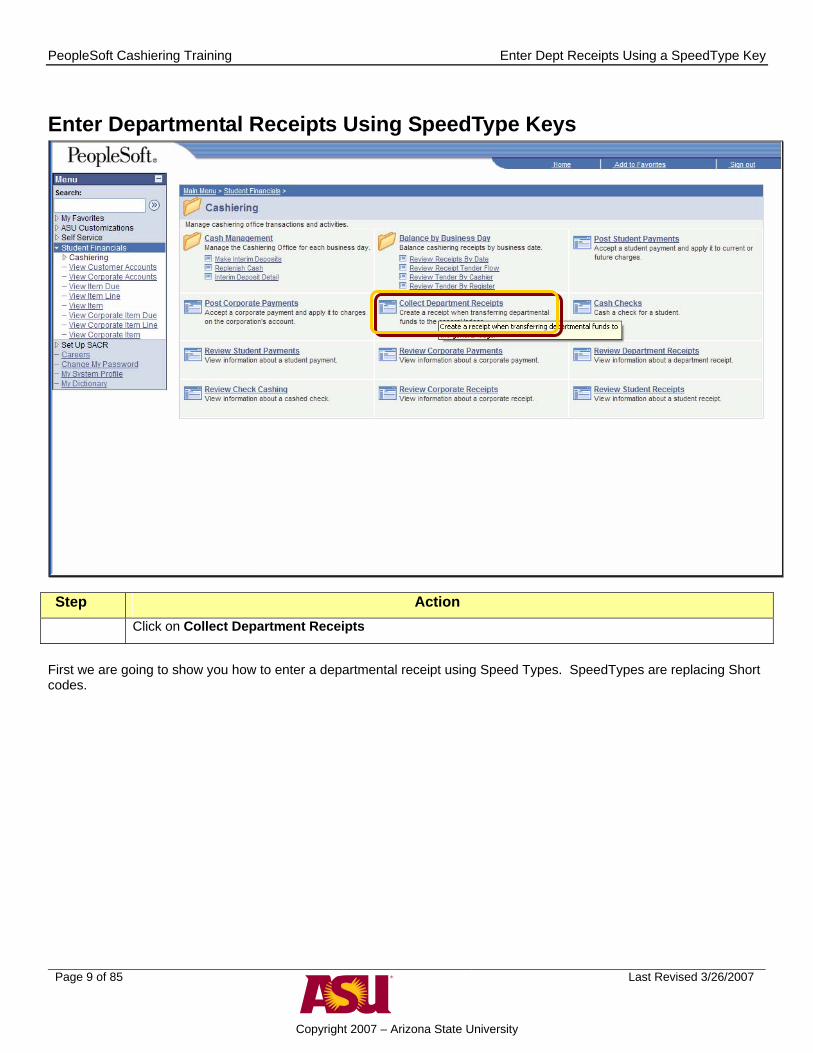
Enter Departmental Receipts Using SpeedType Keys
Step Action
Click on Collect Department Receipts
First we are going to show you how to enter a departmental receipt using Speed Types. SpeedTypes are replacing Short codes.
Page 9 of 85
Last Revised 3/26/2007
Copyright 2007 – Arizona State University

PeopleSoft Cashiering Training Enter Dept Receipts Using a SpeedType Key
Step Action
Type in the correct Cashier’s Office, or click on the magnifying glass and select from the resulting list.
Click on the Add button.
The Collect Department Receipts page appears Select the Cashier's Office link or type in the Cashier’s Office name • Downtown • Polytech • Tempe • West
Page 10 of 85
Last Revised 3/26/2007
Copyright 2007 – Arizona State University

PeopleSoft Cashiering Training Enter Dept Receipts Using a SpeedType Key
Step Action
Type the amount of the receipt into the Amount field.
In the Target Detail area, enter the Amount being paid and the Accounting Information of where the deposit is being made If multiple Accounting Information is needed select the button to add a new row. In our example, we will put in a $1.00 transaction for the Tempe bookstore.
Page 11 of 85
Last Revised 3/26/2007
Copyright 2007 – Arizona State University
PeopleSoft Cashiering Training Enter Dept Receipts Using a SpeedType Key
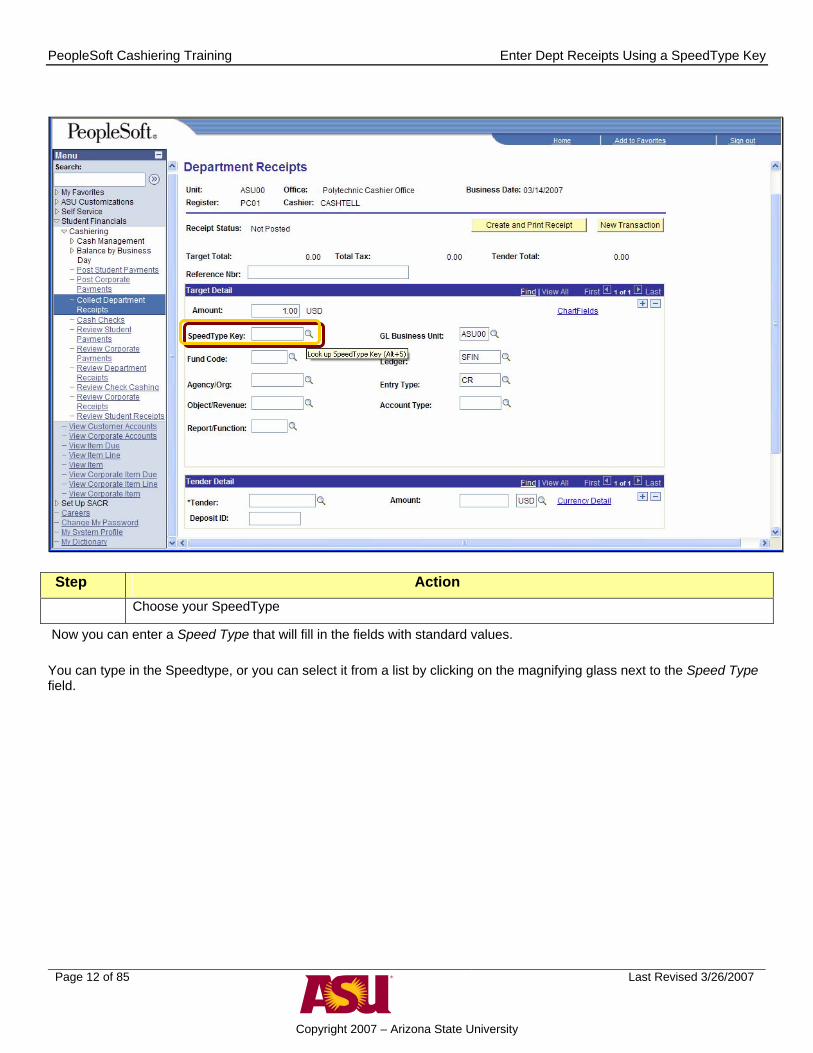
Step Action
Choose your SpeedType
Now you can enter a Speed Type that will fill in the fields with standard values. You can type in the Speedtype, or you can select it from a list by clicking on the magnifying glass next to the Speed Type field.
Page 12 of 85
Last Revised 3/26/2007
Copyright 2007 – Arizona State University
PeopleSoft Cashiering Training Enter Dept Receipts Using a SpeedType Key
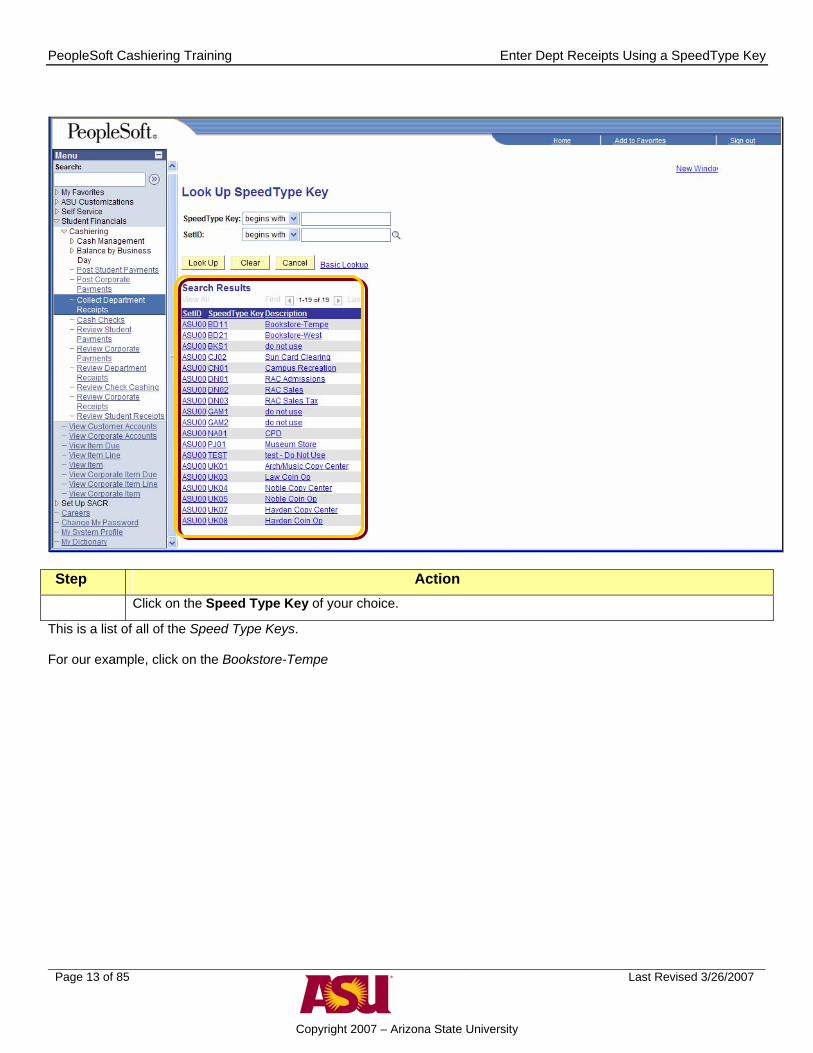
This is a list of all of the Speed Type Keys.
Step Action
Click on the Speed Type Key of your choice.
For our example, click on the Bookstore-Tempe
Page 13 of 85
Last Revised 3/26/2007
Copyright 2007 – Arizona State University
PeopleSoft Cashiering Training Enter Dept Receipts Using a SpeedType Key
Step Action
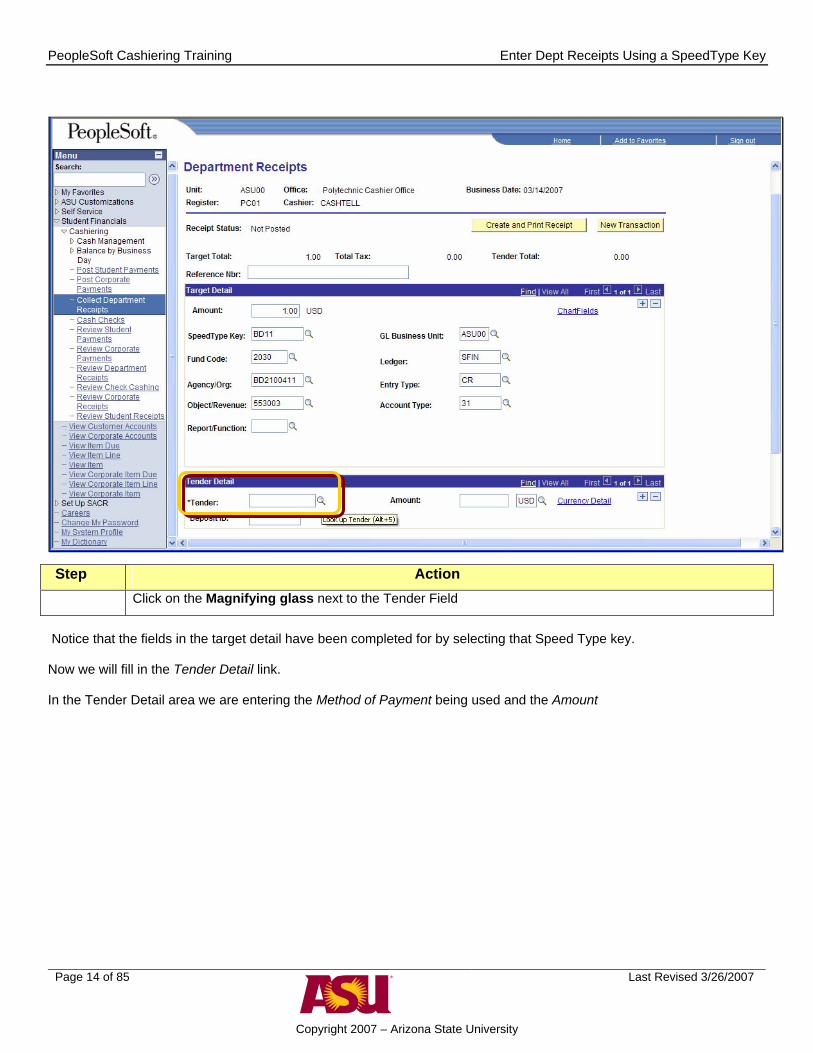
Click on the Magnifying glass next to the Tender Field
Notice that the fields in the target detail have been completed for by selecting that Speed Type key. Now we will fill in the Tender Detail link. In the Tender Detail area we are entering the Method of Payment being used and the Amount
Page 14 of 85
Last Revised 3/26/2007
Copyright 2007 – Arizona State University

PeopleSoft Cashiering Training Enter Dept Receipts Using a SpeedType Key
Step Action
Click on Tender type of your choice.
These are all of the Tender types. Each office will preset which ones are available at their office.
• CASH Cash • CASH - DD Cash - Direct Deposit • CHECK Check Payment • CHECK - DD Check Payment - Direct Deposit • CRCD - DD Credit Card - Direct Deposit • CREDITCARD Credit Card • ELECTRONIC Electronic Payments • INTLCHECK Check - International
Page 15 of 85
Last Revised 3/26/2007
Copyright 2007 – Arizona State University
PeopleSoft Cashiering Training Enter Dept Receipts Using a SpeedType Key
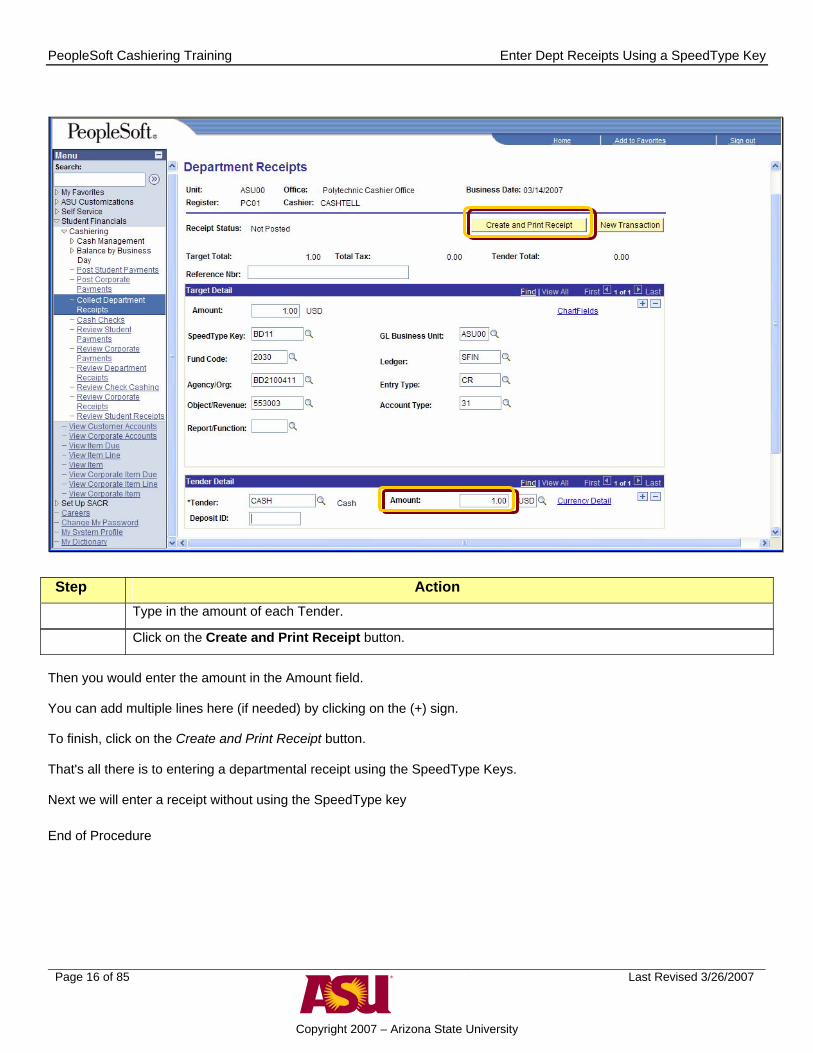
Click on the Create and Print Receipt button.
Step Action
Type in the amount of each Tender.
Then you would enter the amount in the Amount field. You can add multiple lines here (if needed) by clicking on the (+) sign. To finish, click on the Create and Print Receipt button. That's all there is to entering a departmental receipt using the SpeedType Keys. Next we will enter a receipt without using the SpeedType key End of Procedure
Page 16 of 85
Last Revised 3/26/2007
Copyright 2007 – Arizona State University

PeopleSoft Cashiering Training Enter Dept Receipts Using a SpeedType Key
Job Aid – Enter Dept Receipt with SpeedType Key Step Action
1. From the Home page, click on Cashiering
2. Click on Collect Department Receipts
3. Select your Cashier’s Office.
4. Click on the Add button.
5. Type the amount of the receipt into the Amount field.
6. Choose your SpeedType key
7. Select the Tender type
8. Type in the amount of the Tender.
9. Click on the Create and Print Receipt button.
10. End of procedure
Page 17 of 85
Last Revised 3/26/2007
Copyright 2007 – Arizona State University

PeopleSoft Cashiering Training Enter Dept Receipts Using a SpeedType Key
Notes
Page 18 of 85
Last Revised 3/26/2007
Copyright 2007 – Arizona State University

PeopleSoft Cashiering Training Enter Dept Receipts without a SpeedType Key
Enter a Departmental Receipt without SpeedType
Step Action
Click the New Transaction button
Now we will enter a different Receipt, but not use the SpeedType keys. To start a new transaction from here, you click on the New Transaction button.
Page 19 of 85
Last Revised 3/26/2007
Copyright 2007 – Arizona State University

PeopleSoft Cashiering Training Enter Dept Receipts without a SpeedType Key
Step Action
Enter the Amount of the receipt in the Amount field
Enter the Fund code
Enter the Agency/Org
Enter the Object
Enter the Report Function
Without the SpeedType Key, you can enter the values yourself. If the field has a magnifying glass, you can click on it to see a list of acceptable values for that field.
Page 20 of 85
Last Revised 3/26/2007
Copyright 2007 – Arizona State University

PeopleSoft Cashiering Training Enter Dept Receipts without a SpeedType Key
Step Action
Enter the type of Tender Received in the Tender field.
Type the amount for the Tender in the Amount Field.
Click on the Create and Print Receipt button to generate a receipt for the person.
If you have multiple different tender types, you can click on the + sign to add more rows.
End of Procedure
Page 21 of 85
Last Revised 3/26/2007
Copyright 2007 – Arizona State University

PeopleSoft Cashiering Training Enter Dept Receipts without a SpeedType Key
Page 22 of 85
Last Revised 3/26/2007
Copyright 2007 – Arizona State University

PeopleSoft Cashiering Training Enter Dept Receipts without a SpeedType Key
Job Aid – Enter Dept Receipt without a SpeedType Key Step Action
1. From the Home page, click on Cashiering
2. Click on Collect Department Receipts
3. Select your Cashier’s Office.
4. Click on the Add button.
5. Click the New Transaction button
6. Enter the Amount of the receipt in the Amount field
7. Enter the Fund code
8. Enter the Agency/Org
9. Enter the Object
10. Enter the Report Function
11. Enter the type of Tender Received in the Tender field.
12. Type the amount for the Tender in the Amount Field.
13. Click on the Create and Print Receipt button to generate a receipt for the person.
Page 23 of 85
Last Revised 3/26/2007
Copyright 2007 – Arizona State University

PeopleSoft Cashiering Training Enter Dept Receipts without a SpeedType Key
Page 24 of 85
Last Revised 3/26/2007
Copyright 2007 – Arizona State University

PeopleSoft Cashiering Training Post a Student’s Payment
Post a Student’s Payment
v Action
Click on Post Student Payments
Next we will enter Student Payment Receipts
Page 25 of 85
Last Revised 3/26/2007
Copyright 2007 – Arizona State University

PeopleSoft Cashiering Training Post a Student’s Payment
Step Action
Select your Cashiering office (or type it into) the Cashier’s office field.
Type in the Affiliate ID (the one that starts 100...) of the student.
Click on Add
Page 26 of 85
Last Revised 3/26/2007
Copyright 2007 – Arizona State University

PeopleSoft Cashiering Training Post a Student’s Payment
Step Action
(optional) Click on the Select Charges to Pay link
You can see what charges are currently in a student's account by clicking on Select Charges to Pay.
Page 27 of 85
Last Revised 3/26/2007
Copyright 2007 – Arizona State University

PeopleSoft Cashiering Training Post a Student’s Payment
Step Action
(optional) Click the OK button
These are the student's current charges. Everything is grayed out because we haven't selected a type of payment yet. Click OK to return to the previous screen.
Page 28 of 85
Last Revised 3/26/2007
Copyright 2007 – Arizona State University
PeopleSoft Cashiering Training Post a Student’s Payment
Step Action
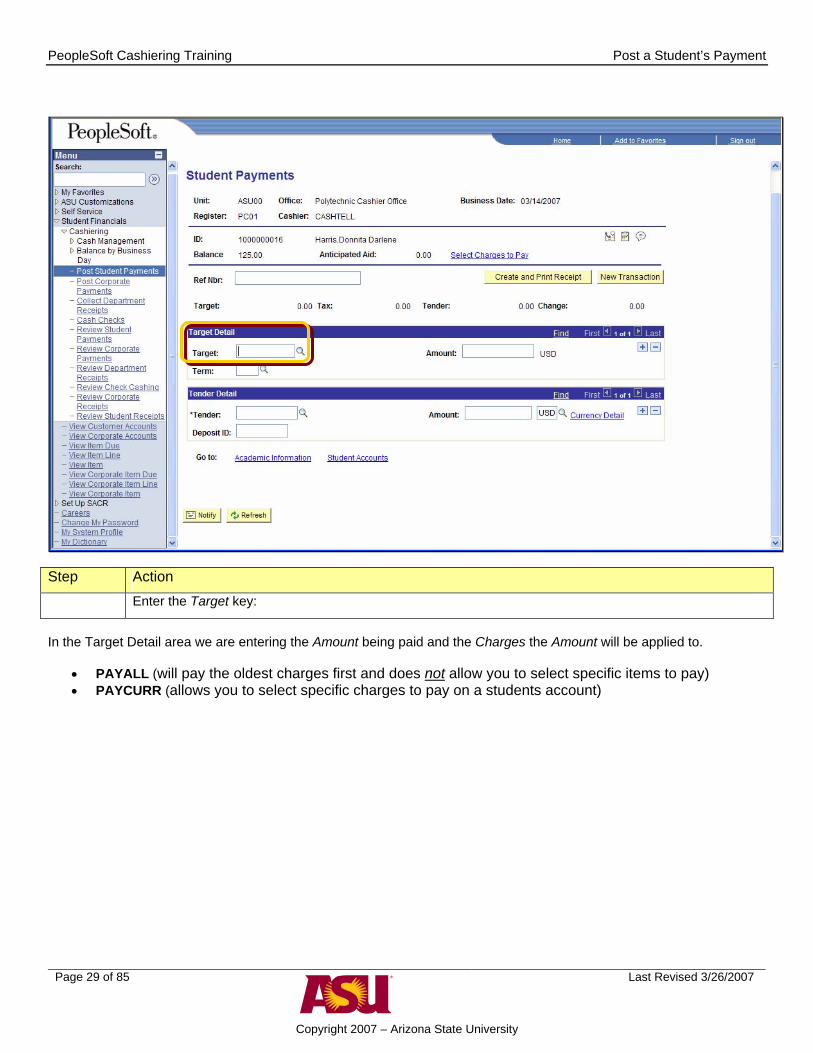
Enter the Target key:
In the Target Detail area we are entering the Amount being paid and the Charges the Amount will be applied to.
• PAYALL (will pay the oldest charges first and does not allow you to select specific items to pay) • PAYCURR (allows you to select specific charges to pay on a students account)
Page 29 of 85
Last Revised 3/26/2007
Copyright 2007 – Arizona State University
PeopleSoft Cashiering Training Post a Student’s Payment
Step Action
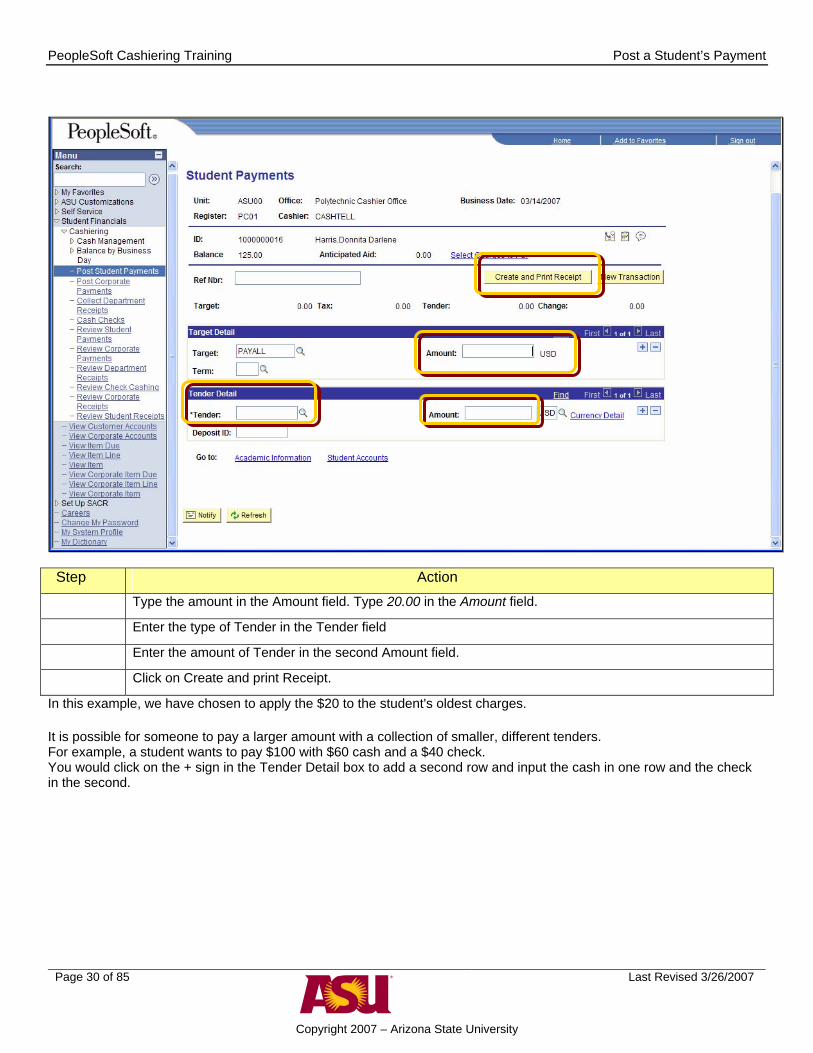
Type the amount in the Amount field. Type 20.00 in the Amount field.
Enter the type of Tender in the Tender field
Enter the amount of Tender in the second Amount field.
Click on Create and print Receipt.
In this example, we have chosen to apply the $20 to the student's oldest charges. It is possible for someone to pay a larger amount with a collection of smaller, different tenders. For example, a student wants to pay $100 with $60 cash and a $40 check. You would click on the + sign in the Tender Detail box to add a second row and input the cash in one row and the check in the second.
Page 30 of 85
Last Revised 3/26/2007
Copyright 2007 – Arizona State University

PeopleSoft Cashiering Training Post a Student’s Payment
Step Action
Click the New Transaction button
Now let's try a student payment where the student wants to apply the payment to a specific charge. In this example, the student wants to pay $15.00 of one of his library fines using a credit card. The first part is the same. Start a new transaction by clicking on the New Transaction button.
Page 31 of 85
Last Revised 3/26/2007
Copyright 2007 – Arizona State University

PeopleSoft Cashiering Training Post a Student’s Payment
Step Action
Select your Cashiering office (or type it into) the Cashier’s office field.
Type in the Affiliate ID (the one that starts 100...) of the student.
Click on Add
This part is the same as before, where you enter your cashiering office and the student IDs in the field. For our example, we've done that for you, and you are now ready to click on the Add button.
Page 32 of 85
Last Revised 3/26/2007
Copyright 2007 – Arizona State University

PeopleSoft Cashiering Training Post a Student’s Payment
We’re going to choose the PAYCURR target, so that we can apply the student’s payment to a specific charge. Step Action
Select PAYCURR as the Target
Click on the Select Charges to Pay Link.
Page 33 of 85
Last Revised 3/26/2007
Copyright 2007 – Arizona State University

PeopleSoft Cashiering Training Post a Student’s Payment
Step Action
Type in the amount of the payment against the specific charges on the student’s bill
Click OK
Notice how now all of the fields are active. You can enter amounts in any or all of the fields. In our example, the student wants to pay $15.00 of the top fee on the list.
Page 34 of 85
Last Revised 3/26/2007
Copyright 2007 – Arizona State University

PeopleSoft Cashiering Training Post a Student’s Payment
Step Action
Enter the type of Tender in the Tender field
Enter the amount of Tender in the second Amount field.
Click on Create and print Receipt.
Now you must select the type of Tender. Click on the magnifying glass End of procedure
Page 35 of 85
Last Revised 3/26/2007
Copyright 2007 – Arizona State University

PeopleSoft Cashiering Training Post a Student’s Payment
Page 36 of 85
Last Revised 3/26/2007
Copyright 2007 – Arizona State University

PeopleSoft Cashiering Training Post a Student’s Payment
Job Aid – Post a Student’s Payment Step Action
1. Select the Post Student Payments link
2. Select your Cashiering office (or type it into) the Cashier’s office field.
3. Type in the Affiliate ID (the one that starts 100...) of the student.
4. Click on Add
5. Enter the Target key: If Payall – skip next 3 steps, if PayCurr, continue to next step
6. Click on the Select Charges to Pay Link.
7. Type in the amount of the payment against the specific charges on the student’s bill
8. Click OK
9. Enter the type of Tender in the Tender field
10. Enter the amount of Tender in the second Amount field.
11. Click on Create and print Receipt.
Page 37 of 85
Last Revised 3/26/2007
Copyright 2007 – Arizona State University

PeopleSoft Cashiering Training Post a Student’s Payment
Page 38 of 85
Last Revised 3/26/2007
Copyright 2007 – Arizona State University

PeopleSoft Cashiering Training Cash a Check
Cash a Check
Step Action
Select the Cash Checks link
Now let's Cash a check.
Page 39 of 85
Last Revised 3/26/2007
Copyright 2007 – Arizona State University

PeopleSoft Cashiering Training Cash a Check
Step Action
Select your Cashiering office (or type it into) the Cashier’s office field.
Type in the Affiliate ID (the one that starts 100...) of the student.
Click on Add
Page 40 of 85
Last Revised 3/26/2007
Copyright 2007 – Arizona State University

PeopleSoft Cashiering Training Cash a Check
Step Action
Enter the type of Tender in the Tender field
Enter the amount of Tender in the second Amount field.
Click on Create and print Receipt.
IMPORTANT NOTE: Do NOT put an amount in the Target Detail Amount Field! End of procedure.
Page 41 of 85
Last Revised 3/26/2007
Copyright 2007 – Arizona State University

PeopleSoft Cashiering Training Cash a Check
Page 42 of 85
Last Revised 3/26/2007
Copyright 2007 – Arizona State University

PeopleSoft Cashiering Training Cash a Check
Job Aid – Cash a Check Step Action
1. Select the Cash Checks link
2. Select your Cashiering office (or type it into) the Cashier’s office field.
3. Type in the Affiliate ID (the one that starts 100...) of the student.
4. Click on Add
5. Enter the type of Tender in the Tender field
6. Enter the amount of Tender in the second Amount field.
7. Click on Create and print Receipt.
Page 43 of 85
Last Revised 3/26/2007
Copyright 2007 – Arizona State University

PeopleSoft Cashiering Training Cash a Check
Page 44 of 85
Last Revised 3/26/2007
Copyright 2007 – Arizona State University

PeopleSoft Cashiering Training End-of-day Preliminary Balancing
End-of-Day Preliminary Balance
Now we are going to show you how to do a preliminary End of Day Balance.
Page 45 of 85
Last Revised 3/26/2007
Copyright 2007 – Arizona State University

PeopleSoft Cashiering Training End-of-day Preliminary Balancing
Step Action
Select Cash Management
Select the Review Tender By Cashier link
Page 46 of 85
Last Revised 3/26/2007
Copyright 2007 – Arizona State University

PeopleSoft Cashiering Training End-of-day Preliminary Balancing
Step Action
Type in the first few characters of your office’s name
Click on Search.
Page 47 of 85
Last Revised 3/26/2007
Copyright 2007 – Arizona State University
PeopleSoft Cashiering Training End-of-day Preliminary Balancing
Step Action
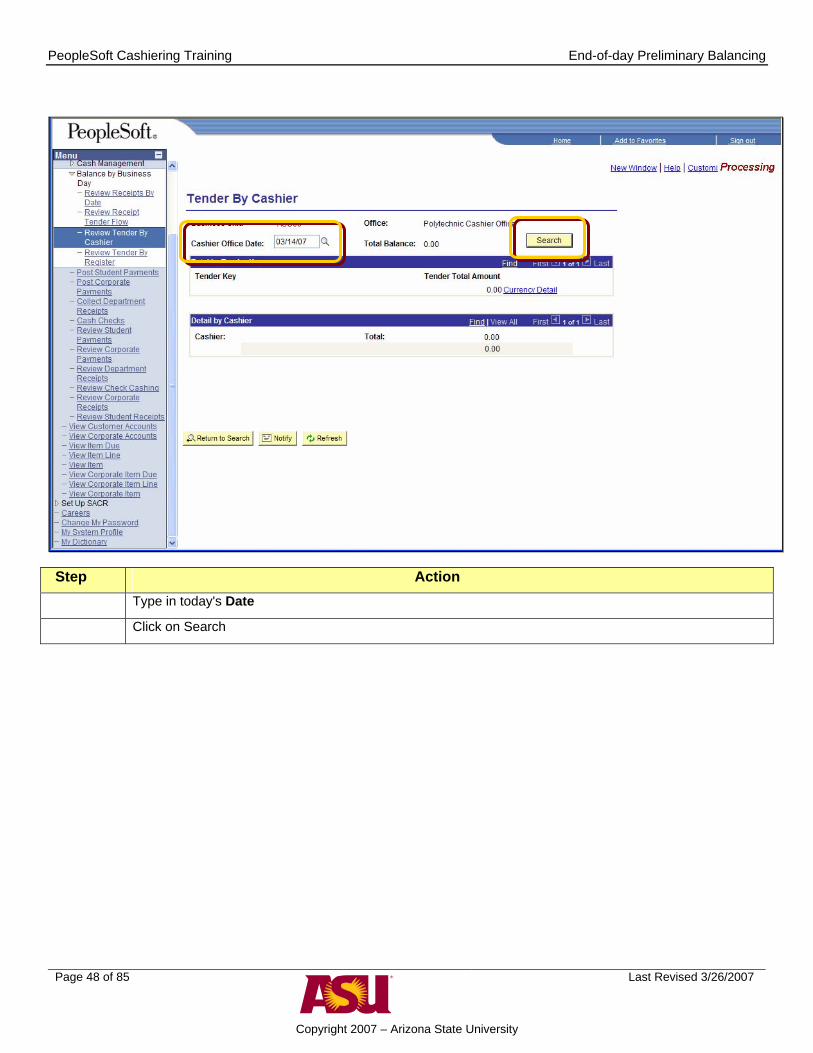
Type in today's Date
Click on Search
Page 48 of 85
Last Revised 3/26/2007
Copyright 2007 – Arizona State University

PeopleSoft Cashiering Training End-of-day Preliminary Balancing
Step Action
Select the Cash Management link
Because we took in cash for the day we need to make an Interim Deposit to balance back to our Opening Cash
Page 49 of 85
Last Revised 3/26/2007
Copyright 2007 – Arizona State University

PeopleSoft Cashiering Training End-of-day Preliminary Balancing
Step Action
Select the Make Interim Deposits link
Page 50 of 85
Last Revised 3/26/2007
Copyright 2007 – Arizona State University

PeopleSoft Cashiering Training End-of-day Preliminary Balancing
Step Action
Enter your cashier’s office
Click on Add
Page 51 of 85
Last Revised 3/26/2007
Copyright 2007 – Arizona State University

PeopleSoft Cashiering Training End-of-day Preliminary Balancing
Step Action
Enter Cash in the Tender Field
Enter the amount of cash you took in with a minus (-) sign in front
Press Enter
Click on the Create Receipt Button
Here you will put in a negative amount of cash equal to the amount of cash you received today.
Page 52 of 85
Last Revised 3/26/2007
Copyright 2007 – Arizona State University

PeopleSoft Cashiering Training End-of-day Preliminary Balancing
Step Action
Click on the Print Receipt Button
Page 53 of 85
Last Revised 3/26/2007
Copyright 2007 – Arizona State University

PeopleSoft Cashiering Training End-of-day Preliminary Balancing
Page 54 of 85
Last Revised 3/26/2007
Copyright 2007 – Arizona State University
PeopleSoft Cashiering Training End-of-day Preliminary Balancing
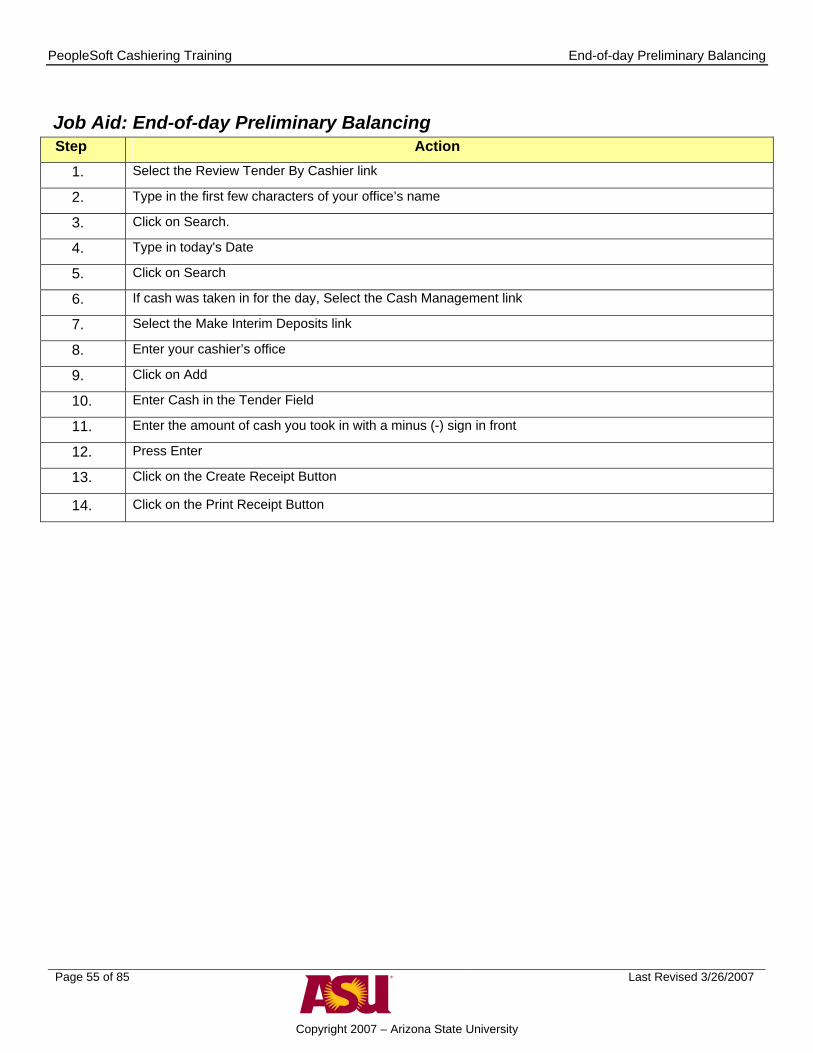
Job Aid: End-of-day Preliminary Balancing Step Action
1. Select the Review Tender By Cashier link
2. Type in the first few characters of your office’s name
3. Click on Search.
4. Type in today's Date
5. Click on Search
6. If cash was taken in for the day, Select the Cash Management link
7. Select the Make Interim Deposits link
8. Enter your cashier’s office
9. Click on Add
10. Enter Cash in the Tender Field
11. Enter the amount of cash you took in with a minus (-) sign in front
12. Press Enter
13. Click on the Create Receipt Button
14. Click on the Print Receipt Button
Page 55 of 85
Last Revised 3/26/2007
Copyright 2007 – Arizona State University

PeopleSoft Cashiering Training End-of-day Final Balancing
Page 56 of 85
Last Revised 3/26/2007
Copyright 2007 – Arizona State University

PeopleSoft Cashiering Training End-of-day Final Balancing
End-of-Day Final Balancing
Step Action
Select the Balance by Business Day link
Select the Review Tender By Cashier link
Now we are ready to do the final Balance for the business day.
Page 57 of 85
Last Revised 3/26/2007
Copyright 2007 – Arizona State University
PeopleSoft Cashiering Training End-of-day Final Balancing
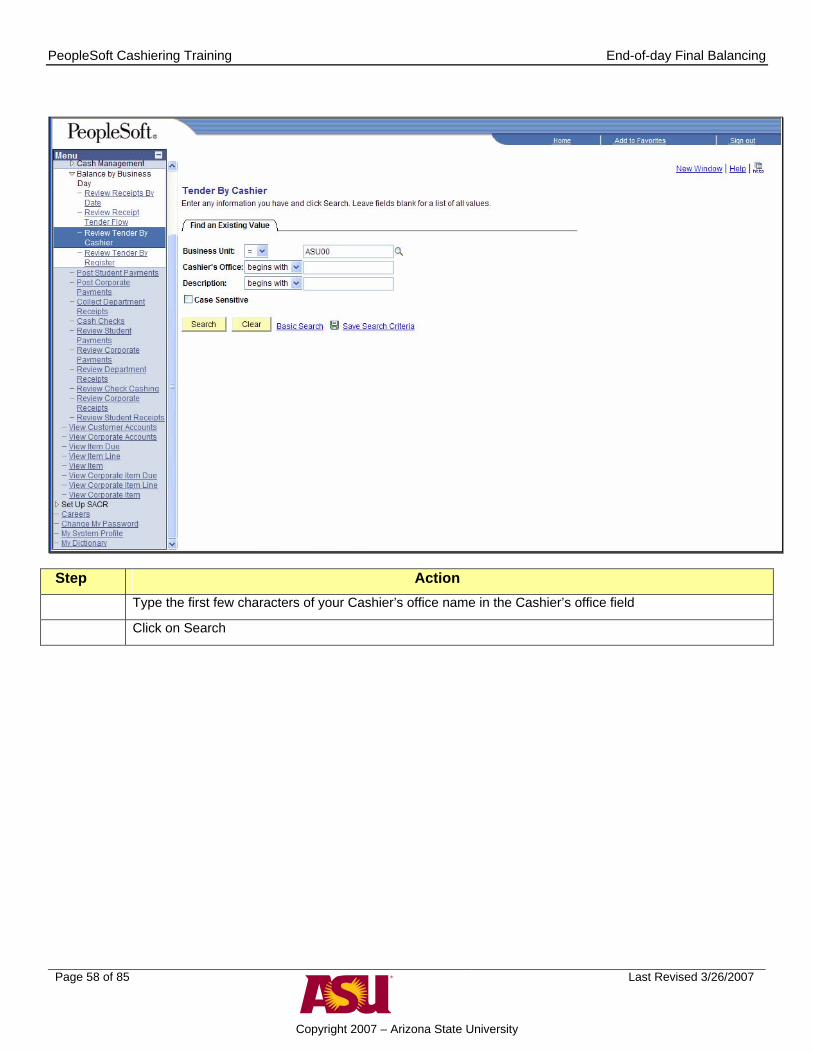
Step Action
Type the first few characters of your Cashier’s office name in the Cashier’s office field
Click on Search
Page 58 of 85
Last Revised 3/26/2007
Copyright 2007 – Arizona State University

PeopleSoft Cashiering Training End-of-day Final Balancing
Step Action
Enter today’s date
Click on the Search button
Page 59 of 85
Last Revised 3/26/2007
Copyright 2007 – Arizona State University

PeopleSoft Cashiering Training End-of-day Final Balancing
Step Action
Print this page through the internet browser (we are reviewing other options)
Select the Review Receipt Tender Flow link
The Review Receipt Tender Flow link (this will show the cashier over/short activity)
Page 60 of 85
Last Revised 3/26/2007
Copyright 2007 – Arizona State University
PeopleSoft Cashiering Training End-of-day Final Balancing
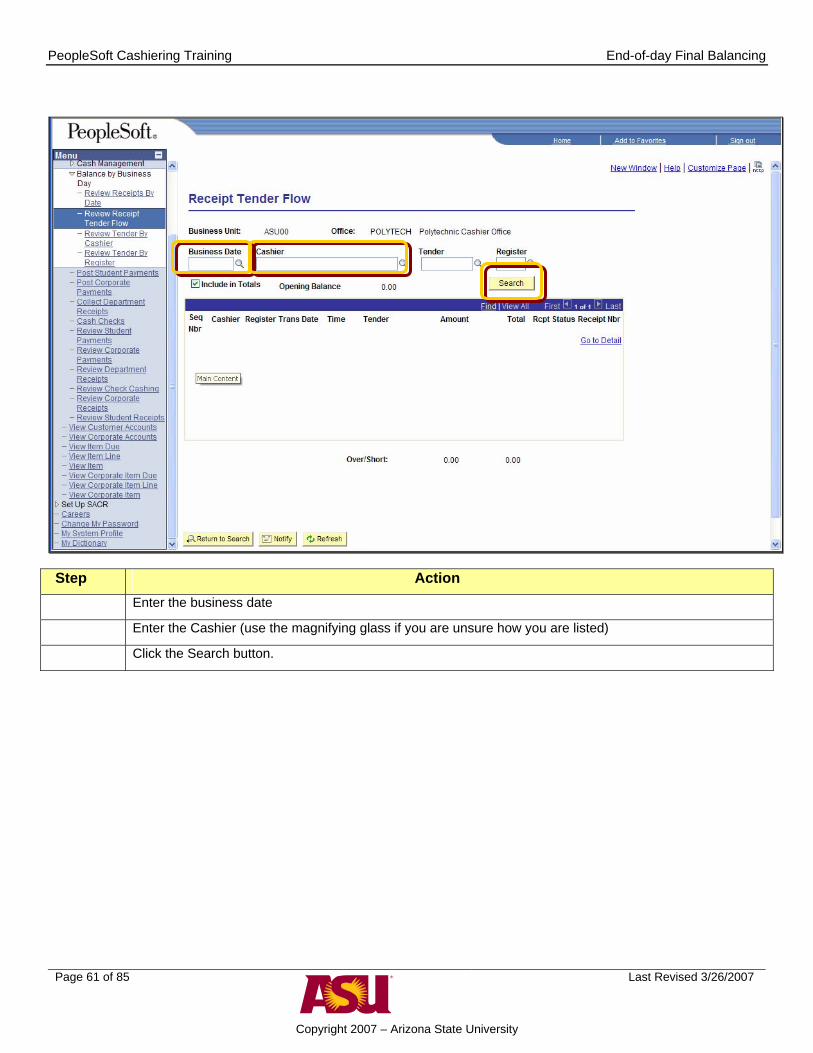
Step Action
Enter the business date
Enter the Cashier (use the magnifying glass if you are unsure how you are listed)
Click the Search button.
Page 61 of 85
Last Revised 3/26/2007
Copyright 2007 – Arizona State University

PeopleSoft Cashiering Training End-of-day Final Balancing
Step Action
Select the View All link
Page 62 of 85
Last Revised 3/26/2007
Copyright 2007 – Arizona State University

PeopleSoft Cashiering Training End-of-day Final Balancing
Step Action
Print this page through the internet Browser.
End of procedure.
Page 63 of 85
Last Revised 3/26/2007
Copyright 2007 – Arizona State University

PeopleSoft Cashiering Training End-of-day Final Balancing
Page 64 of 85
Last Revised 3/26/2007
Copyright 2007 – Arizona State University

PeopleSoft Cashiering Training End-of-day Final Balancing
Job Aid: End-of-day Final Balancing Step Action
1. Select the Balance by Business Day link
2. Select the Review Tender By Cashier link
3. Type the first few characters of your Cashier’s office name in the Cashier’s office field
4. Click on Search
5. Enter today’s date
6. Click on the Search button
7. Print this page through the internet browser (we are reviewing other options)
8. Select the Review Receipt Tender Flow link
9. Enter the business date
10. Enter the Cashier (use the magnifying glass if you are unsure how you are listed)
11. Click the Search button.
12. Select the View All link
13. Print this page through the internet Browser.
Page 65 of 85
Last Revised 3/26/2007
Copyright 2007 – Arizona State University

PeopleSoft Cashiering Training End-of-day Final Balancing
Page 66 of 85
Last Revised 3/26/2007
Copyright 2007 – Arizona State University
PeopleSoft Cashiering Training Look up a Student Receipt
Look up a Student Receipt
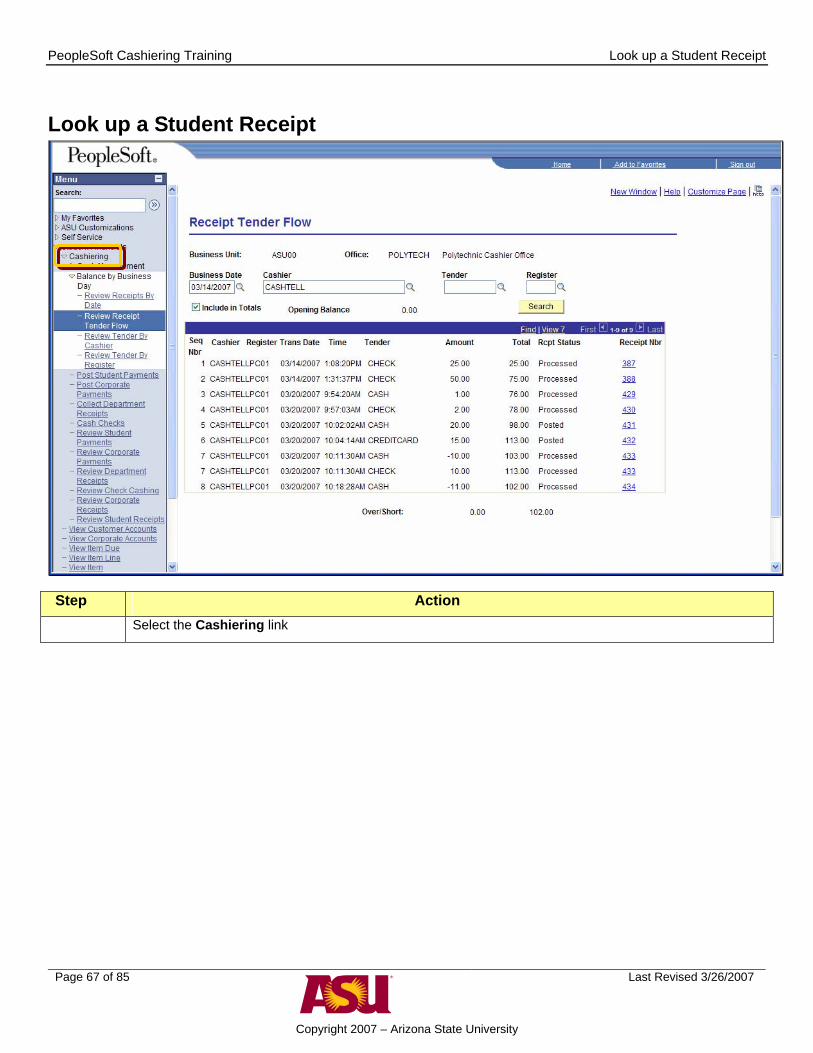
Step Action
Select the Cashiering link
Page 67 of 85
Last Revised 3/26/2007
Copyright 2007 – Arizona State University
PeopleSoft Cashiering Training Look up a Student Receipt
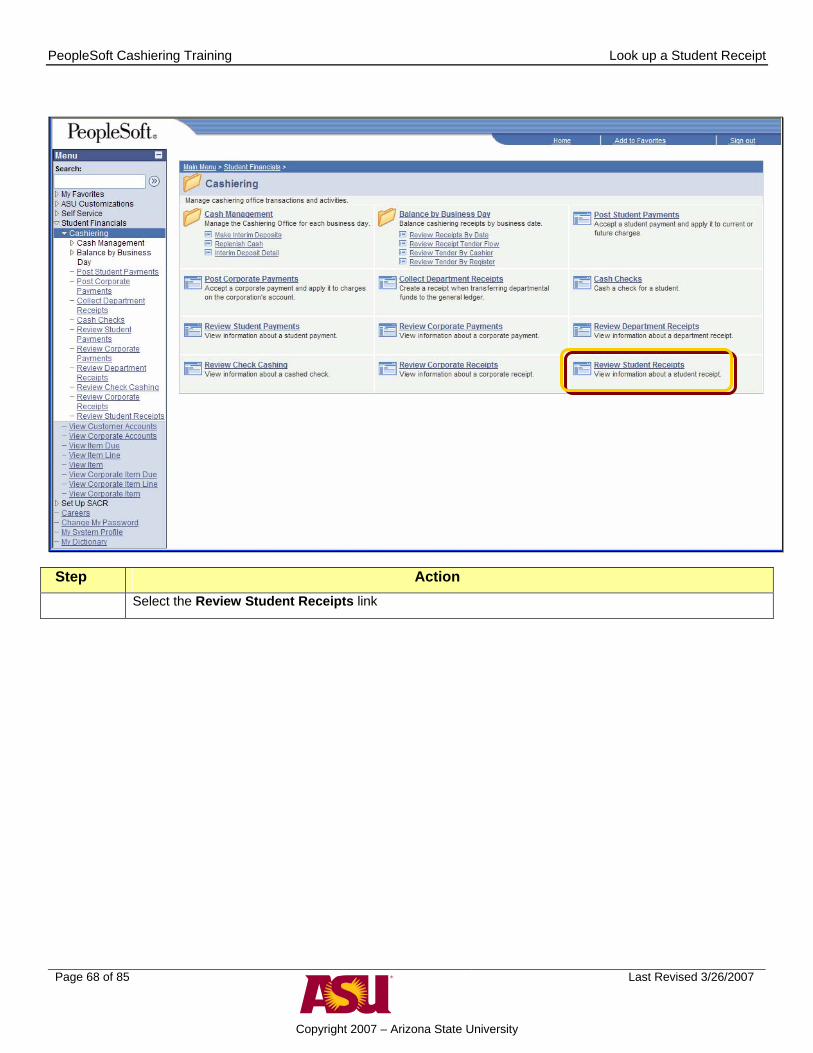
Step Action
Select the Review Student Receipts link
Page 68 of 85
Last Revised 3/26/2007
Copyright 2007 – Arizona State University
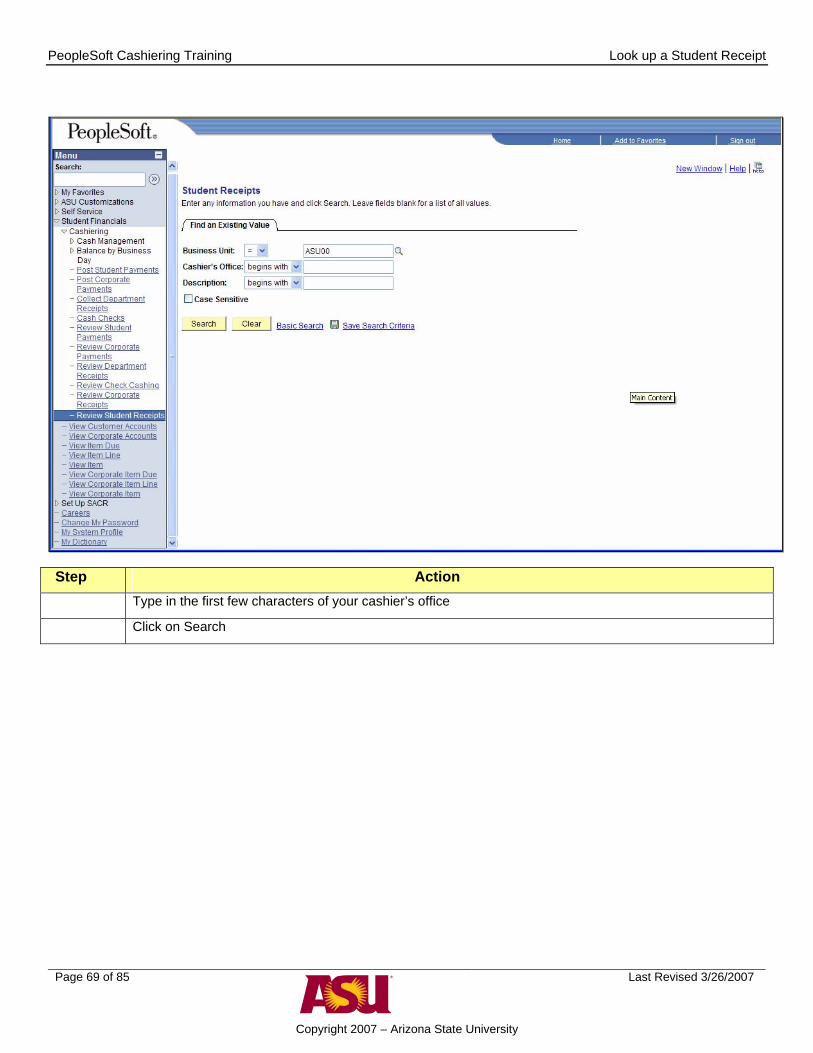
PeopleSoft Cashiering Training Look up a Student Receipt
Step Action
Type in the first few characters of your cashier’s office
Click on Search
Page 69 of 85
Last Revised 3/26/2007
Copyright 2007 – Arizona State University

PeopleSoft Cashiering Training Look up a Student Receipt
Step Action
Type in the 10 digit affiliate ID of the student
Click on Search
Page 70 of 85
Last Revised 3/26/2007
Copyright 2007 – Arizona State University

PeopleSoft Cashiering Training Look up a Student Receipt
Step Action
Click on the link of the receipt you are interested in
Page 71 of 85
Last Revised 3/26/2007
Copyright 2007 – Arizona State University

PeopleSoft Cashiering Training Look up a Student Receipt
Step Action
Click the Print Receipt button
End of procedure
Page 72 of 85
Last Revised 3/26/2007
Copyright 2007 – Arizona State University

PeopleSoft Cashiering Training Look up a Student Receipt
Job Aid – Look Up Student’s Receipt Step Action
1. Select the Cashiering link
2. Select the Review Student Receipts link
3. Type in the first few characters of your cashier’s office
4. Click on Search
5. Type in the 10 digit affiliate ID of the student
6. Click on Search
7. Click on the link of the receipt you are interested in
8. Click the Print Receipt button
Page 73 of 85
Last Revised 3/26/2007
Copyright 2007 – Arizona State University

PeopleSoft Cashiering Training Look up a Student Receipt
Page 74 of 85
Last Revised 3/26/2007
Copyright 2007 – Arizona State University

PeopleSoft Cashiering Training FERPA
FERPA The purpose of this lesson is to provide introduction to FERPA and the disclosure of student information. Much of this information has been excerpted from the Office of the Registrar website (http://www.asu.edu/registrar). GENERAL INFORMATION The federal Family Educational Rights and Privacy Act (also known as FERPA, and/or the Buckley Amendment) afford students certain rights with respect to their education records. They are: 1. The right to inspect and review the student’s education records within 45 days of the day the university receives a request for access. Students should submit to the registrar, dean, head of the academic department, or other appropriate official, written requests that identify the record(s) they wish to inspect. The university official will make arrangements for access and notify the student of the time and place where the records may be inspected. If the records are not maintained by the university official to whom the request was submitted, that official shall advise the student of the correct official to whom the request should be addressed. Note: Students must provide photo identification in order to access their education records. 2. The right to request the amendment of the student’s education records that the student believes is inaccurate or misleading. Students who believe their record is inaccurate or misleading should write to the university official responsible for the record. Clearly identify the part of the record they want changed, and specify why it is inaccurate or misleading. If the university decides not to amend the record as requested by the student, the university will notify the student of the decision and advise the student of his or her right to a hearing about the request for amendment. Additional information about the hearing procedures will be provided to the student when notified of the right to a hearing. Note: FERPA does not address grade disputes or grievances, which are pursued through other university and/or college procedures. 3. The right to consent to disclosures of personally identifiable information contained in the student’s education records, except to the extent that FERPA authorizes disclosure without consent. One exception which permits disclosure without consent is disclosure to school officials with legitimate educational interests. A school official is a person employed by the university in an administrative, professional, supervisory, academic, research, or support position; staff in the Alumni Association and ASU Foundation offices; a person or company with whom the university has contracted (such as an attorney, auditor or collection agency); a person serving on the Board of Regents; or a student serving on an official committee, such as a disciplinary or grievance committee, or assisting another school official in performing his or her tasks. A school official has a legitimate educational interest if the official needs to review an education record in order to fulfill his or her professional responsibility. Note: A parent of a dependent student may challenge denial of access to the dependent student’s record by producing the most current copy of Internal Revenue Form 1040. (Dependency is defined in Section 152 of the Internal Revenue Code.) If that form lists the student in question as a dependent, the parent will be required to sign an Affidavit of Dependency which affirms that the student is his/her tax dependent. The affidavit will be retained by the University Registrar’s Office, and must be renewed each tax year. Upon receipt of these documents, the dependent student records will be made available to the parent as specified under FERPA. 4. The right to file a complaint with the U.S. Department of Education concerning alleged failures by Arizona State University to comply with the requirements of FERPA. Students are encouraged to first contact the University Registrar’s Administrative Office at (480) 965-7302. A complaint may be filed with the Department of Education at the following address: Family Policy Compliance Office U.S. Department of Education 400 Maryland Avenue, SW Washington, DC, 20202-4605 NOTE: While FERPA applies only to students (as opposed to applicants), ASU employees are urged to err on the side of caution whenever disclosing information. When in doubt, do not disclose the information and refer to your supervisor or the Office of the Registrar as appropriate. Now that you know what FERPA is, how can you tell if the student has elected to place a FERPA hold on their record? The answer lies on the page displayed below:
Page 75 of 85 Last Revised 3/26/2007
Copyright 2007 – Arizona State University

PeopleSoft Cashiering Training FERPA
(FERPA privacy shade) When you apply FERPA control to restrict data for a student, the system attaches a FERPA window shade privacy button to that individual's records in your database. This icon indicates the student has a FERPA hold on their record. You can click the icon to see the specific information about the hold.
Page 76 of 85 Last Revised 3/26/2007
Copyright 2007 – Arizona State University
PeopleSoft Cashiering Training TERMINOLGY
TERMINOLOGY AND SHORTCUTS
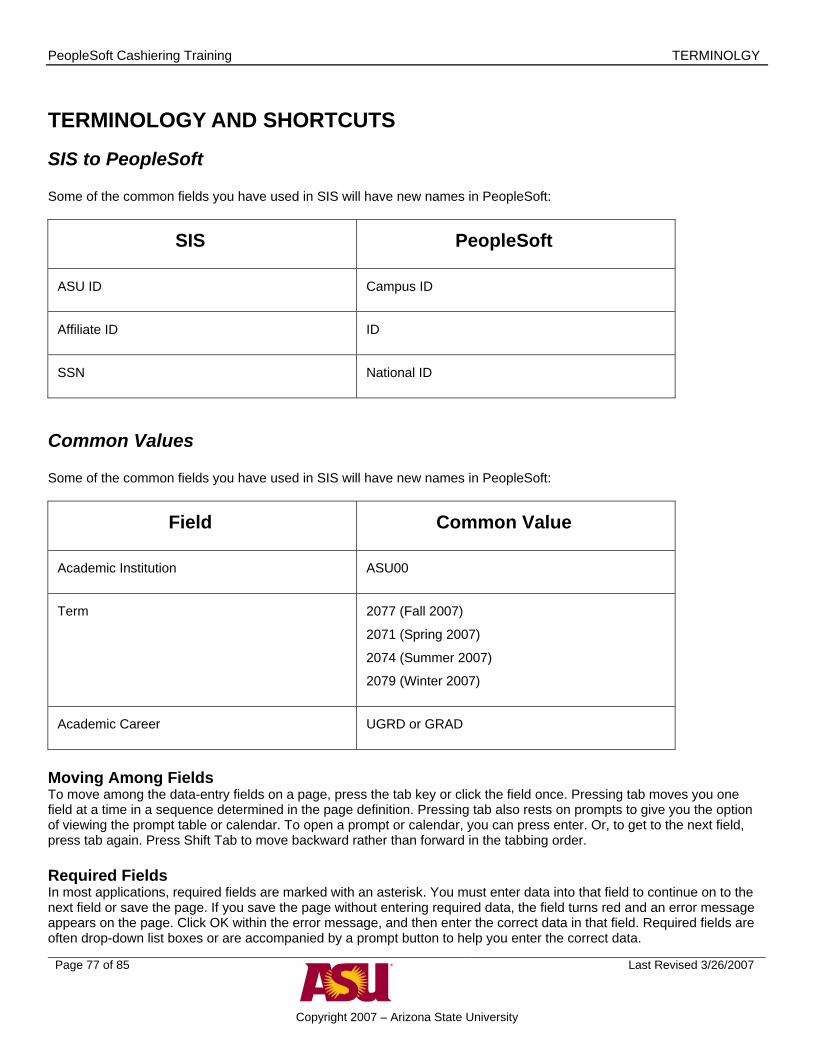
SIS to PeopleSoft Some of the common fields you have used in SIS will have new names in PeopleSoft:
SIS PeopleSoft
ASU ID Campus ID
Affiliate ID ID
SSN National ID
Common Values Some of the common fields you have used in SIS will have new names in PeopleSoft:
Field Common Value
Academic Institution ASU00
Term 2077 (Fall 2007)
2071 (Spring 2007)
2074 (Summer 2007)
2079 (Winter 2007)
Academic Career UGRD or GRAD
Moving Among Fields To move among the data-entry fields on a page, press the tab key or click the field once. Pressing tab moves you one field at a time in a sequence determined in the page definition. Pressing tab also rests on prompts to give you the option of viewing the prompt table or calendar. To open a prompt or calendar, you can press enter. Or, to get to the next field, press tab again. Press Shift Tab to move backward rather than forward in the tabbing order. Required Fields In most applications, required fields are marked with an asterisk. You must enter data into that field to continue on to the next field or save the page. If you save the page without entering required data, the field turns red and an error message appears on the page. Click OK within the error message, and then enter the correct data in that field. Required fields are often drop-down list boxes or are accompanied by a prompt button to help you enter the correct data.
Page 77 of 85 Last Revised 3/26/2007
Copyright 2007 – Arizona State University
PeopleSoft Cashiering Training TERMINOLGY
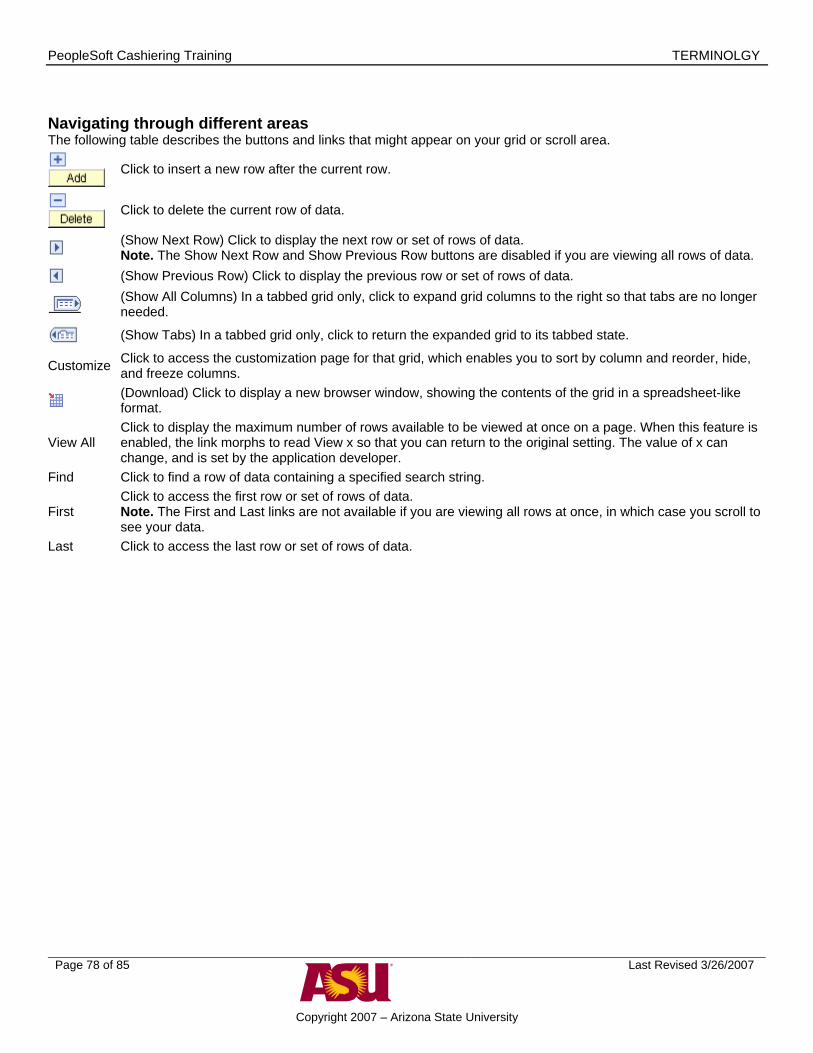
Navigating through different areas The following table describes the buttons and links that might appear on your grid or scroll area.
Click to insert a new row after the current row.
Click to delete the current row of data.
(Show Next Row) Click to display the next row or set of rows of data. Note. The Show Next Row and Show Previous Row buttons are disabled if you are viewing all rows of data.
(Show Previous Row) Click to display the previous row or set of rows of data.
(Show All Columns) In a tabbed grid only, click to expand grid columns to the right so that tabs are no longer needed.
(Show Tabs) In a tabbed grid only, click to return the expanded grid to its tabbed state.
Customize Click to access the customization page for that grid, which enables you to sort by column and reorder, hide, and freeze columns.
(Download) Click to display a new browser window, showing the contents of the grid in a spreadsheet-like format.
View All Click to display the maximum number of rows available to be viewed at once on a page. When this feature is enabled, the link morphs to read View x so that you can return to the original setting. The value of x can change, and is set by the application developer.
Find Click to find a row of data containing a specified search string.
First Click to access the first row or set of rows of data. Note. The First and Last links are not available if you are viewing all rows at once, in which case you scroll to see your data.
Last Click to access the last row or set of rows of data.
Page 78 of 85 Last Revised 3/26/2007
Copyright 2007 – Arizona State University

PeopleSoft Cashiering Training TERMINOLGY
Key board Shortcuts There are also keyboard shortcuts for all of the above buttons and links listed below: (Hot keys perform immediate actions. When you press one, the designated action occurs. Note that several hot keys perform different functions depending on the page that you are on, such as a transaction page or a search page.)
ALT+1 Saves a page in a transaction. Moves to the Search or Add button on a search or look up page. Moves to the OK button on a secondary page.
ALT+2 Returns to the search page from the transaction page. ALT+3 View the next row in the list when the button is active. ALT+4 View the previous row the in list when the button is active.
ALT+5 Accesses the Look Up page. Opens the calendar prompt.
ALT+6 Opens the pop-up window on a page. ALT+7 Inserts a row in a grid or scroll area. ALT+8 Deletes a row in a grid or scroll area. ALT+0 When in Expert Entry mode, activates the Refresh button, which validates the data entered on the page. ALT+ . View the next set of rows in a grid or scroll area. ALT+ , View a previous set of rows in a grid or scroll area. ALT+ / Finds data in a grid or scroll area. ALT+ ‘ View all rows of data in a grid, scroll area, or search page results list. ALT+ \ Toggles between Add a New Value and Find an Existing Value on a search page. CTRL+ J Displays the system information page.
CTRL+ K When on a search or transaction page, accesses a page with a list of keyboard navigation shortcuts using hot keys and access keys.
CTRL+ Y Toggles the menu pagelet between collapse and expand. CTRL+TAB Toggles the focus through the frame set.
ENTER Activates the OK button, where appropriate. On a search page, activates the Search button. On a look up page, activates the lookup button.
ESC Activates the Cancel button, where appropriate. One last important item to know is the online Help. There is a link in the upper right hand corner that says “Help” and this link will take you to the help topic related to the page you are currently working with. You must be in the element for the help topic to be connected.
Page 79 of 85 Last Revised 3/26/2007
Copyright 2007 – Arizona State University

PeopleSoft Cashiering Training TERMINOLGY
Glossary academic career - In PeopleSoft Enterprise Campus Solutions, all course work that a student undertakes at an academic institution and that is grouped in a single student record. For example, a university that has an undergraduate school, a graduate school, and various professional schools might define several academic careers—an undergraduate career, a graduate career, and separate careers for each professional school (law school, medical school, dental school, and so on). academic institution - In PeopleSoft Enterprise Campus Solutions, an entity (such as a university or college) that is independent of other similar entities and that has its own set of rules and business processes. academic organization - In PeopleSoft Enterprise Campus Solutions, an entity that is part of the administrative structure within an academic institution. At the lowest level, an academic organization might be an academic department. At the highest level, an academic organization can represent a division. academic plan - In PeopleSoft Enterprise Campus Solutions, an area of study—such as a major, minor, or specialization—that exists within an academic program or academic career. academic program - In PeopleSoft Enterprise Campus Solutions, the entity to which a student applies and is admitted and from which the student graduates. administrative function - In PeopleSoft Enterprise Campus Solutions, a particular functional area that processes checklists, communication, and comments. The administrative function identifies which variable data is added to a person's checklist or communication record when a specific checklist code, communication category, or comment is assigned to the student. This key data enables you to trace that checklist, communication, or comment back to a specific processing event in a functional area. admit type - In PeopleSoft Enterprise Campus Solutions, a designation used to distinguish different types of applications such as first-year applications, transfer applications and readmitted applications. campus - In PeopleSoft Enterprise Campus Solutions, an entity that is usually associated with a distinct physical administrative unit that belongs to a single academic institution that uses a unique course catalog and that produces a common transcript for students within the same academic career. category -In PeopleSoft Enterprise Campus Solutions, a broad grouping to which specific comments or communications (contexts) are assigned. Category codes are also linked to 3C access groups so that you can assign data-entry or view-only privileges across functions. checklist code - In PeopleSoft Enterprise Campus Solutions, a code that represents a list of planned or completed action items that can be assigned to a staff member, volunteer, or unit. Checklists enable you to view all action assignments on one page. course - In PeopleSoft Enterprise Campus Solutions, a course that is offered by a school and that is typically described in a course catalog. A course has a standard syllabus and credit level; however, these may be modified at the class level. Courses can contain multiple components such as lecture, discussion, and lab. effective date - A method of dating information in PeopleSoft applications. You can predate information to add historical data to your system, or postdate information in order to enter it before it actually goes into effect. By using effective dates, you don't delete values; you enter a new value with a current effective date. inquiry access - In PeopleSoft Enterprise Campus Solutions, a type of security access that permits the user only to view data. institution - In PeopleSoft Enterprise Campus Solutions, an entity (such as a university or college) that is independent of other similar entities and that has its own set of rules and business processes.
Page 80 of 85 Last Revised 3/26/2007
Copyright 2007 – Arizona State University

PeopleSoft Cashiering Training TERMINOLGY
personal portfolio - In PeopleSoft Enterprise Campus Solutions, the user-accessible menu item that contains an individual's name, address, telephone number, and other personal information. primary name type - In PeopleSoft Enterprise Campus Solutions, the name type that is used to link the name stored at the highest level within the system to the lower-level set of names that an individual provides. prospects - In PeopleSoft Enterprise Campus Solutions, students who are interested in applying to the institution. QBU (Query Based Update) a process in PeopleSoft that runs overnight which identifies a select population of applicants and performs predefined actions on the population. There are many different QBU processes running every night. search/match - In PeopleSoft Enterprise Campus Solutions and PeopleSoft Enterprise Human Resources Management Solutions, a feature that enables you to search for and identify duplicate records in the database. service impact - In PeopleSoft Enterprise Campus Solutions, the resulting action triggered by a service indicator. For example, a service indicator that reflects nonpayment of account balances by a student might result in a service impact that prohibits registration for classes. service indicator - In PeopleSoft Enterprise Campus Solutions, indicates services that may be either withheld or provided to an individual. Negative service indicators indicate holds that prevent the individual from receiving specified services, such as check-cashing privileges or registration for classes. Positive service indicators designate special services that are provided to the individual, such as front-of-line service or special services for disabled students. update access - In PeopleSoft Enterprise Campus Solutions, a type of security access that permits the user to edit and update data.
Page 81 of 85 Last Revised 3/26/2007
Copyright 2007 – Arizona State University

PeopleSoft Cashiering Training TERMINOLGY
Page 82 of 85 Last Revised 3/26/2007
Copyright 2007 – Arizona State University

PeopleSoft Cashiering Training Next Steps
Next steps In order to get access to PeopleSoft, you must complete these steps:
1. Complete the on-line FERPA training a. Log into Blackboard from the ASU homepage. Click on “ASU Interactive”, then the “MyASU Courses”
link. The blackboard login screen will appear. Log in with your ASURITE ID and password. b. Click on the Courses tab in the upper left corner of the screen. c. In the search field, type in OASIS, and click search d. Available courses will be listed, click on the enroll button on the far right side of the page for the OASIS:
FERPA refresher course. e. Click Submit. f. Click OK. g. This will put you into the FERPA class. h. You must score at least 140 points on the test to get credit for the class. You can take the test multiple
times.
2. Set your user profile in the PeopleSoft System
a. Log in to the PeopleSoft system i. https://hrsa.oasis.asu.edu/ ii. Log in with your ASU RITE ID and network password. iii. The system will create your user profile
b. Click the “Sign out” link to log out.
3. Apply for access to Peoplesoft;
This class makes you eligible for these roles:
Cashier Teller Be sure to include specific information about your job responsibilities so the data trustee will have the necessary information to approve your request. Here is the link to apply for access: https://ep.oasis.asu.edu/ Here are step by step instructions for how to apply: http://www.asu.edu/oasis/support/documents/RequestAccessForYourself.pdf Here is a link to all of the different instructions related to this process. http://www.asu.edu/oasis/support/Access.html 1
Page 83 of 85 Last Revised 3/26/2007
Copyright 2007 – Arizona State University
PeopleSoft Cashiering Training Next Steps
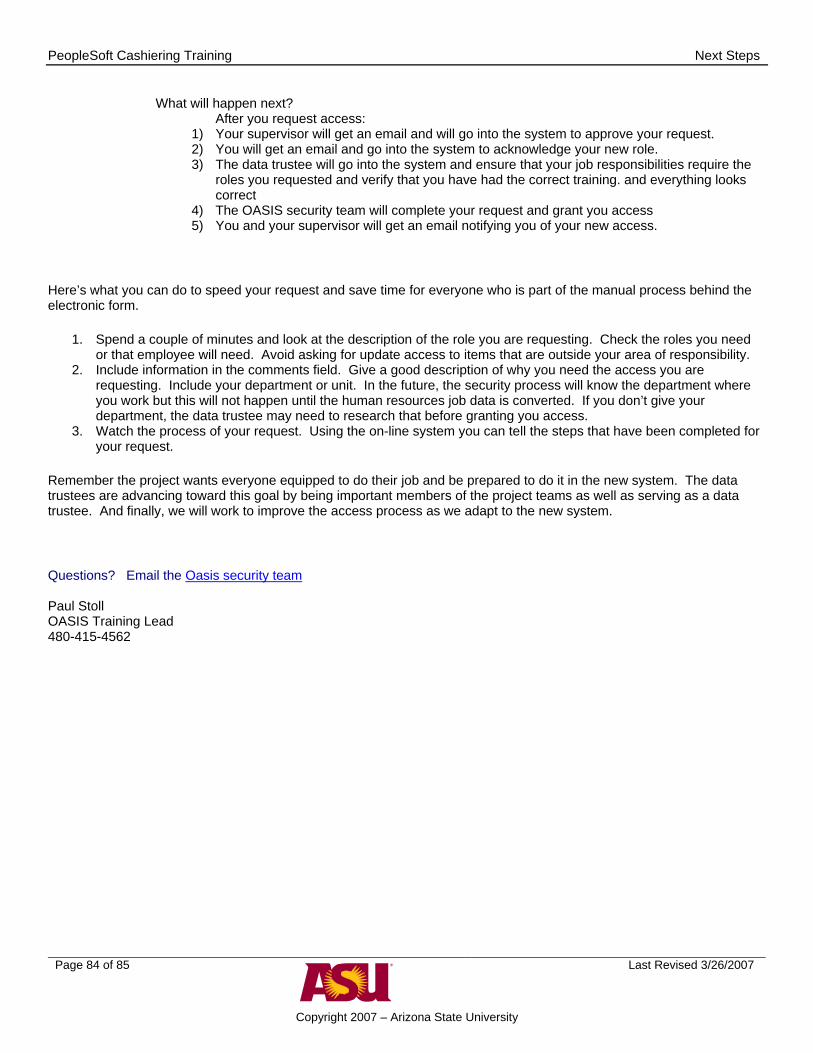
What will happen next? After you request access:
1) Your supervisor will get an email and will go into the system to approve your request. 2) You will get an email and go into the system to acknowledge your new role. 3) The data trustee will go into the system and ensure that your job responsibilities require the
roles you requested and verify that you have had the correct training. and everything looks correct
4) The OASIS security team will complete your request and grant you access 5) You and your supervisor will get an email notifying you of your new access.
Here’s what you can do to speed your request and save time for everyone who is part of the manual process behind the electronic form.
1. Spend a couple of minutes and look at the description of the role you are requesting. Check the roles you need or that employee will need. Avoid asking for update access to items that are outside your area of responsibility.
2. Include information in the comments field. Give a good description of why you need the access you are requesting. Include your department or unit. In the future, the security process will know the department where you work but this will not happen until the human resources job data is converted. If you don’t give your department, the data trustee may need to research that before granting you access.
3. Watch the process of your request. Using the on-line system you can tell the steps that have been completed for your request.
Remember the project wants everyone equipped to do their job and be prepared to do it in the new system. The data trustees are advancing toward this goal by being important members of the project teams as well as serving as a data trustee. And finally, we will work to improve the access process as we adapt to the new system.
Questions? Email the Oasis security team Paul Stoll OASIS Training Lead 480-415-4562
Page 84 of 85 Last Revised 3/26/2007
Copyright 2007 – Arizona State University

PeopleSoft Cashiering Training Next Steps
Page 85 of 85 Last Revised 3/26/2007
Copyright 2007 – Arizona State University