Embed Size (px)
Citation preview
Campus Cruiser and Moodle
Student Guide
©2016 Pamlico Community College Instructional Services Division
August 2016
This guide was created by the Coordinator of Distance Learning at Pamlico Community College to assist faculty, staff, and students with navigating the Moodle Learning Management System and the Campus Cruiser web portal. The guide is intended for internal training purposes, pursuant to any licensing or copyright issues.
Portions of this document were taken verbatim from http://docs.moodle.org. Moodle documentation is Copyright @2005 onwards by the individual authors as noted. It is provided to all under the terms of the GNU Public License.

P a g e | 5
TABLE OF CONTENTS
INTRODUCTION .................................................................................................................................7
WHAT IS CAMPUS CRUISER? ...............................................................................................................7
HOW DO I LOGIN TO CAMPUS CRUISER?.............................................................................................8
EMAILING YOUR INSTRUCTOR ............................................................................................................9
WHAT IS MOODLE? .......................................................................................................................... 14
HOW DO I LOGIN TO MOODLE? ........................................................................................................ 14
BROWSER RECOMMENDATIONS ...................................................................................................... 16
BROWSER SETTINGS ......................................................................................................................... 17
BROWSER ADD-ONS ......................................................................................................................... 17
BROWSER TROUBLESHOOTING ........................................................................................................ 18
ENABLE POP-UPS ............................................................................................................................. 20
GETTING STARTED WITH MOODLE AT PCC ........................................................................................ 23
EDIT YOUR PROFILE .......................................................................................................................... 23
NAVIGATE THE SITE AND YOUR COURSES ......................................................................................... 25
USING BREADCRUMBS TO NAVIGATE IN MOODLE ............................................................................ 26
VIEW YOUR GRADES ........................................................................................................................ 27
ENABLE POP-UPS ............................................................................................................................. 27
MESSAGES ....................................................................................................................................... 30
FORUMS .......................................................................................................................................... 32
SUBMIT ASSIGNMENTS .................................................................................................................... 34

P a g e | 6
TAKE A QUIZ .................................................................................................................................... 40
CREATING AND SAVING A WORD DOCUMENT .................................................................................. 43
P a g e | 7
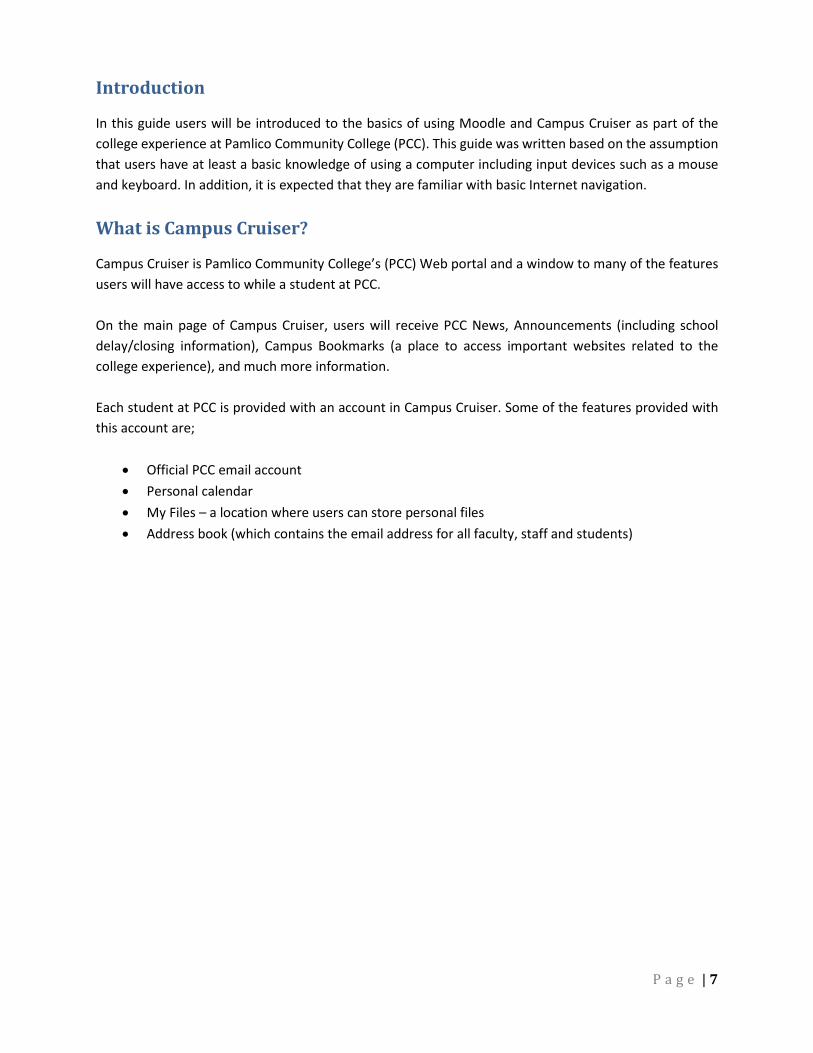
Introduction
In this guide users will be introduced to the basics of using Moodle and Campus Cruiser as part of the college experience at Pamlico Community College (PCC). This guide was written based on the assumption that users have at least a basic knowledge of using a computer including input devices such as a mouse and keyboard. In addition, it is expected that they are familiar with basic Internet navigation.
What is Campus Cruiser?
Campus Cruiser is Pamlico Community College’s (PCC) Web portal and a window to many of the features users will have access to while a student at PCC. On the main page of Campus Cruiser, users will receive PCC News, Announcements (including school delay/closing information), Campus Bookmarks (a place to access important websites related to the college experience), and much more information. Each student at PCC is provided with an account in Campus Cruiser. Some of the features provided with this account are;
• Official PCC email account • Personal calendar • My Files – a location where users can store personal files • Address book (which contains the email address for all faculty, staff and students)
P a g e | 8
How Do I Login to Campus Cruiser?
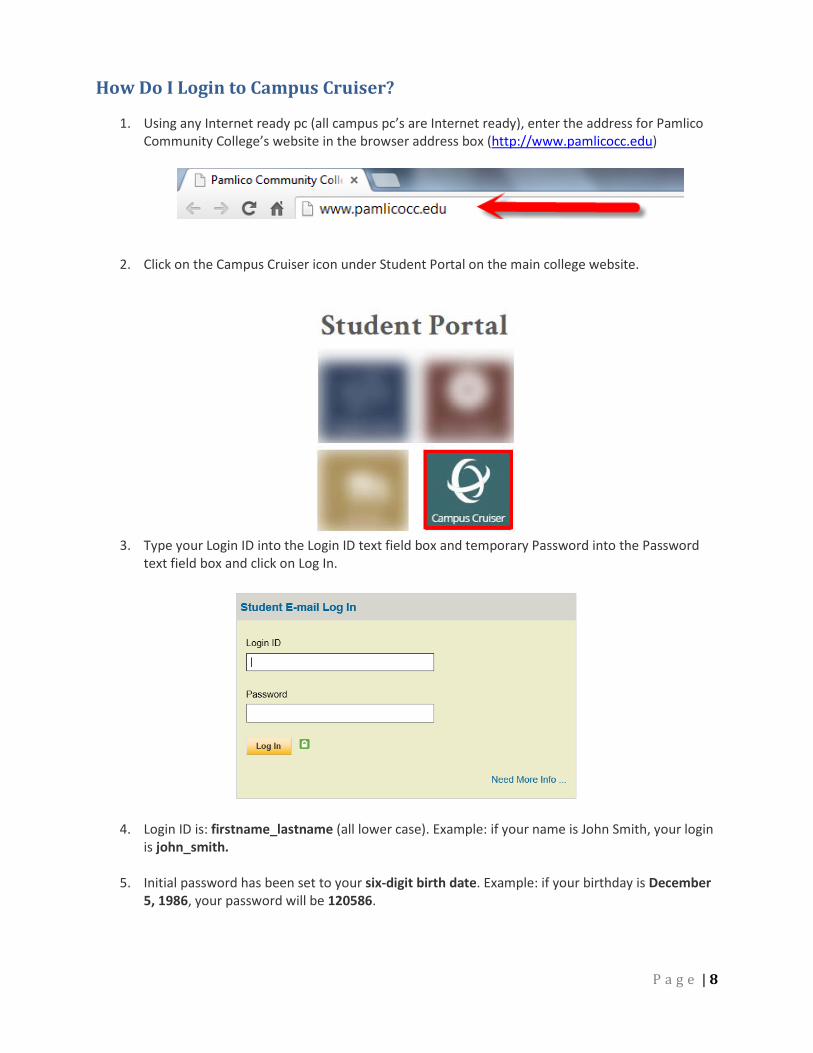
1. Using any Internet ready pc (all campus pc’s are Internet ready), enter the address for Pamlico Community College’s website in the browser address box (http://www.pamlicocc.edu)
2. Click on the Campus Cruiser icon under Student Portal on the main college website.
3. Type your Login ID into the Login ID text field box and temporary Password into the Password
text field box and click on Log In.
4. Login ID is: firstname_lastname (all lower case). Example: if your name is John Smith, your login is john_smith.
5. Initial password has been set to your six-digit birth date. Example: if your birthday is December 5, 1986, your password will be 120586.
P a g e | 9
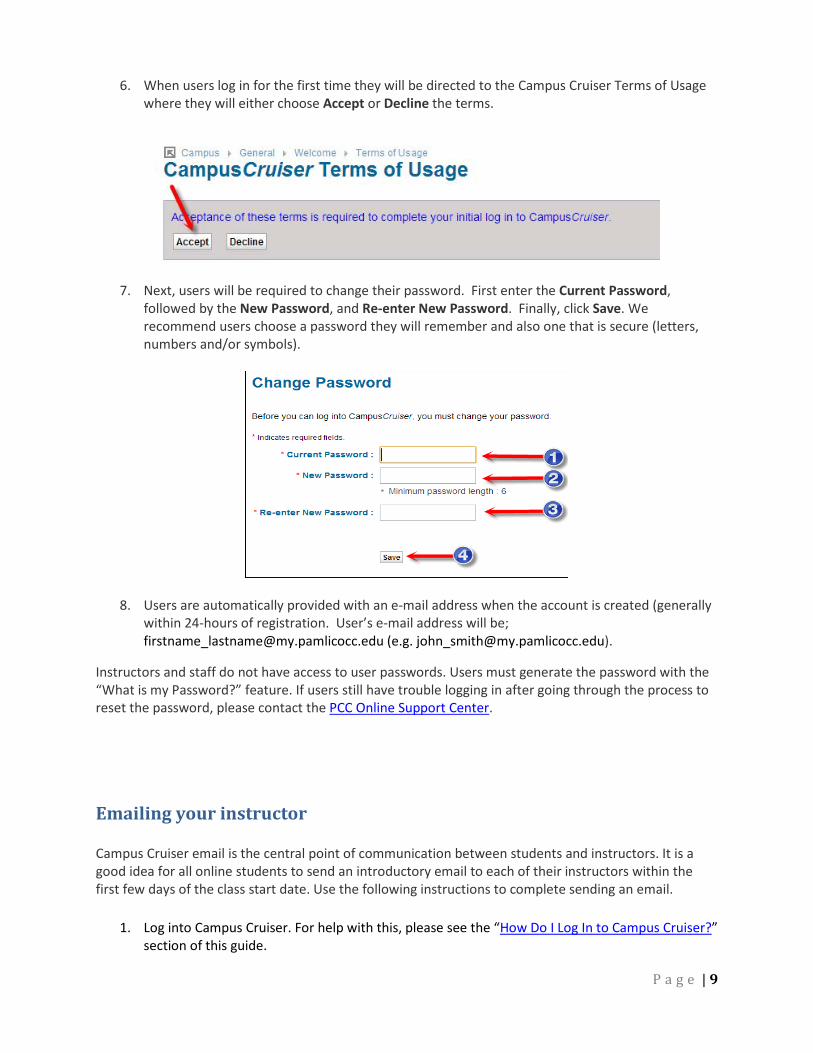
6. When users log in for the first time they will be directed to the Campus Cruiser Terms of Usage where they will either choose Accept or Decline the terms.
7. Next, users will be required to change their password. First enter the Current Password, followed by the New Password, and Re-enter New Password. Finally, click Save. We recommend users choose a password they will remember and also one that is secure (letters, numbers and/or symbols).
8. Users are automatically provided with an e-mail address when the account is created (generally within 24-hours of registration. User’s e-mail address will be; [email protected] (e.g. [email protected]).
Instructors and staff do not have access to user passwords. Users must generate the password with the “What is my Password?” feature. If users still have trouble logging in after going through the process to reset the password, please contact the PCC Online Support Center.
Emailing your instructor Campus Cruiser email is the central point of communication between students and instructors. It is a good idea for all online students to send an introductory email to each of their instructors within the first few days of the class start date. Use the following instructions to complete sending an email.
1. Log into Campus Cruiser. For help with this, please see the “How Do I Log In to Campus Cruiser?” section of this guide.
P a g e | 10
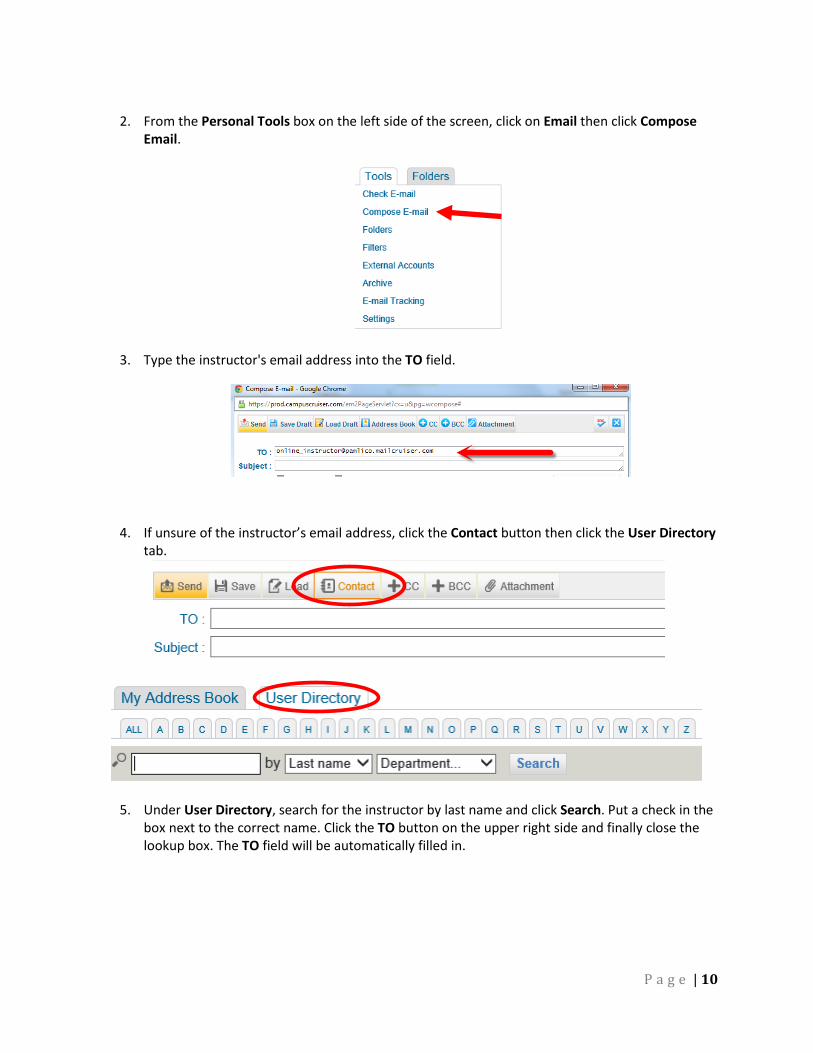
2. From the Personal Tools box on the left side of the screen, click on Email then click Compose Email.
3. Type the instructor's email address into the TO field.
4. If unsure of the instructor’s email address, click the Contact button then click the User Directory tab.
5. Under User Directory, search for the instructor by last name and click Search. Put a check in the box next to the correct name. Click the TO button on the upper right side and finally close the lookup box. The TO field will be automatically filled in.
P a g e | 11
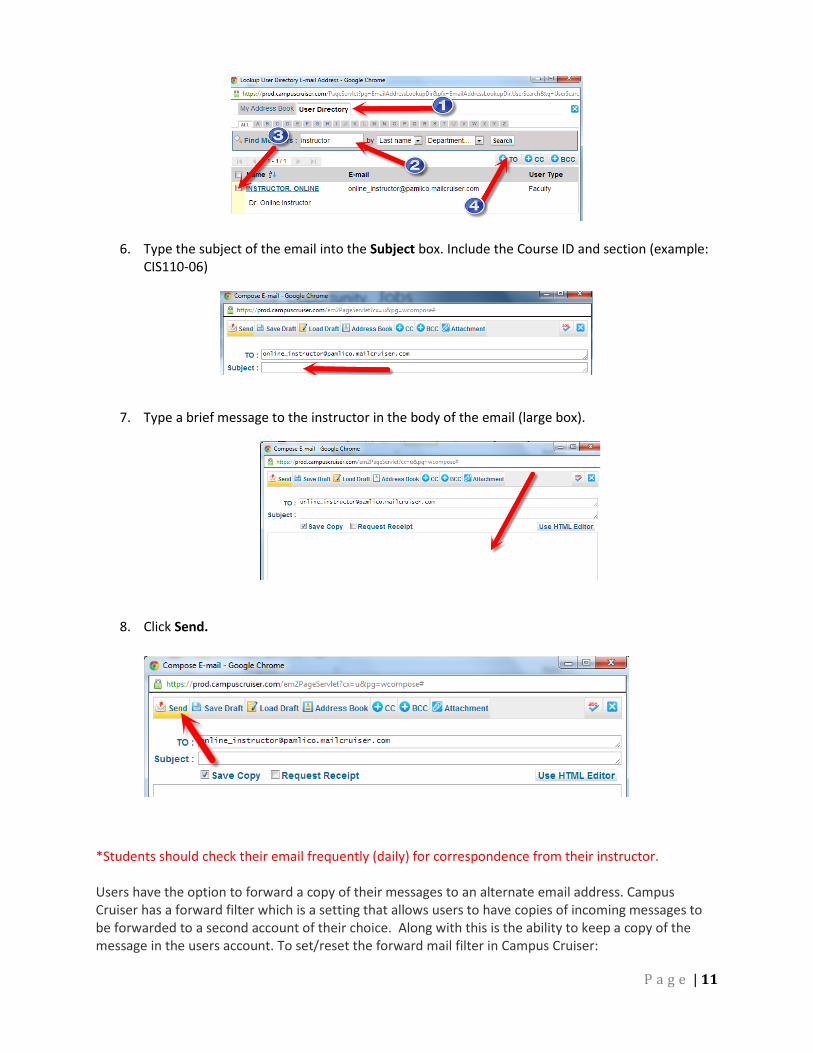
6. Type the subject of the email into the Subject box. Include the Course ID and section (example: CIS110-06)
7. Type a brief message to the instructor in the body of the email (large box).
8. Click Send.
*Students should check their email frequently (daily) for correspondence from their instructor. Users have the option to forward a copy of their messages to an alternate email address. Campus Cruiser has a forward filter which is a setting that allows users to have copies of incoming messages to be forwarded to a second account of their choice. Along with this is the ability to keep a copy of the message in the users account. To set/reset the forward mail filter in Campus Cruiser:

P a g e | 12
1. Click the "Tools" tab from the side panel of the E-mail feature. • Click the "Filters" option from the "Tools" tab. The E-mail Filters page is displayed with the
Incoming Mail Filters tab active.
2. Click on the Forwarding Filter onscreen tab.
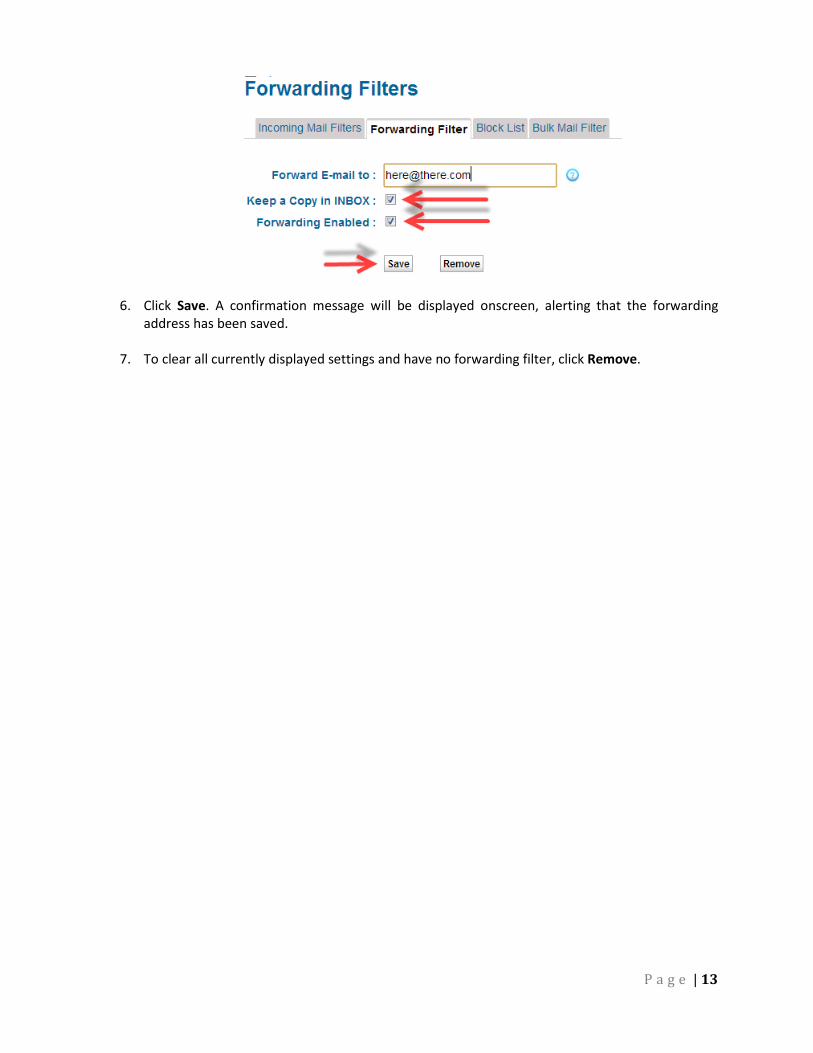
• If any forwarding filter has been applied, then the E-mail address to which the messages are forwarded will be displayed in the Forward Email to text box.
• If no forwarding filter has been applied, then all fields in this tab will be blank.
3. To set a new forwarding address that will receive forwarded messages, enter ONLY ONE E-mail address in the Forward Email to text box. (More than one E-mail address is not permitted.)
-OR-
Click Remove to remove the existing address, and then enter the new E-mail address.
4. Place a check in the Forwarding Enabled checkbox.
5. If you wish to keep a copy of each forwarded message available in the INBOX of your Email Personal Tool, then place a check in the Keep copy in INBOX checkbox.
P a g e | 13
6. Click Save. A confirmation message will be displayed onscreen, alerting that the forwarding address has been saved.
7. To clear all currently displayed settings and have no forwarding filter, click Remove.
P a g e | 14
What is Moodle?
Moodle is one of many Learning Management Systems (LMS). An LMS is software that is designed to add to traditional learning methods in order to enhance the learning experience with a variety of non-traditional features. Moodle runs as an interactive website with a number of features and activities designed to engage learners and promote collaborative, student-centered learning. In a nutshell, Moodle is where students will access and work through their class information online. Moodle is used at PCC to enhance traditional classes as well as teach partial Internet and online classes.
How do I Login to Moodle?
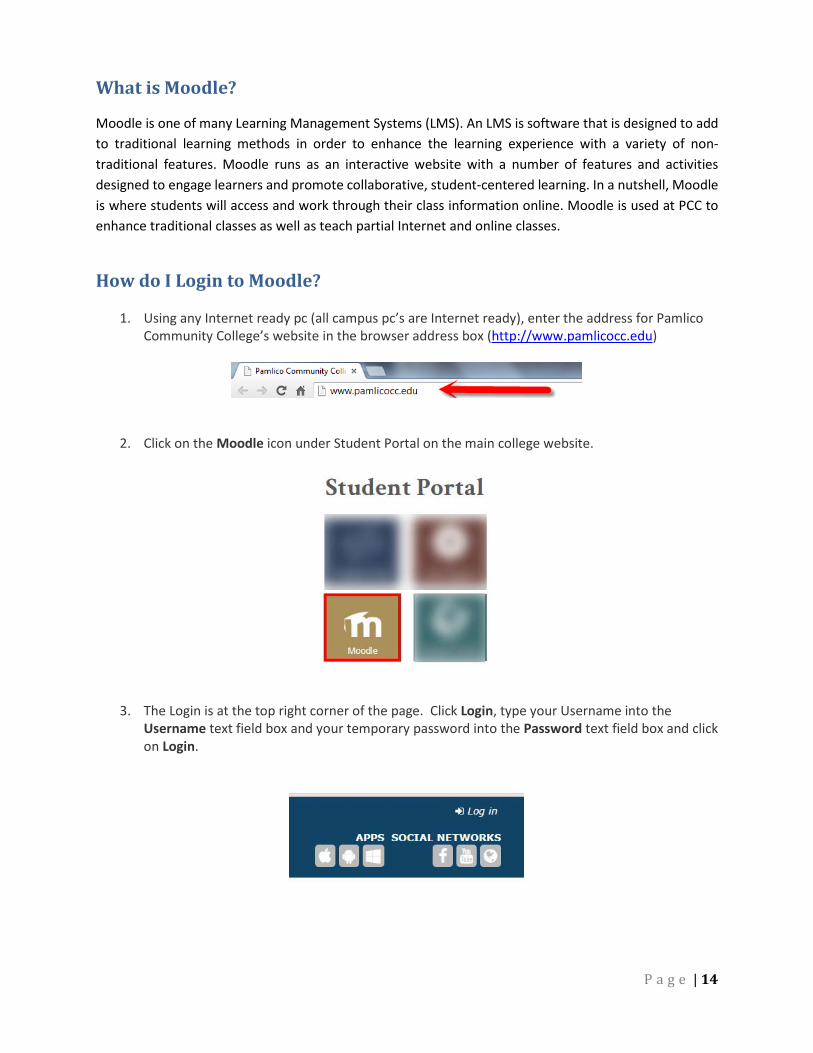
1. Using any Internet ready pc (all campus pc’s are Internet ready), enter the address for Pamlico Community College’s website in the browser address box (http://www.pamlicocc.edu)
2. Click on the Moodle icon under Student Portal on the main college website.
3. The Login is at the top right corner of the page. Click Login, type your Username into the
Username text field box and your temporary password into the Password text field box and click on Login.

P a g e | 15
4. Username is: firstname_lastname (all lower case). Example: if your name is Jane Doe, your username is jane_doe.
5. Initial password has been set to your six-digit birth date. Example: if your birthday is December
5, 1986, your password will be 120586.
6. After users login for the first time, we encourage them to change their password.
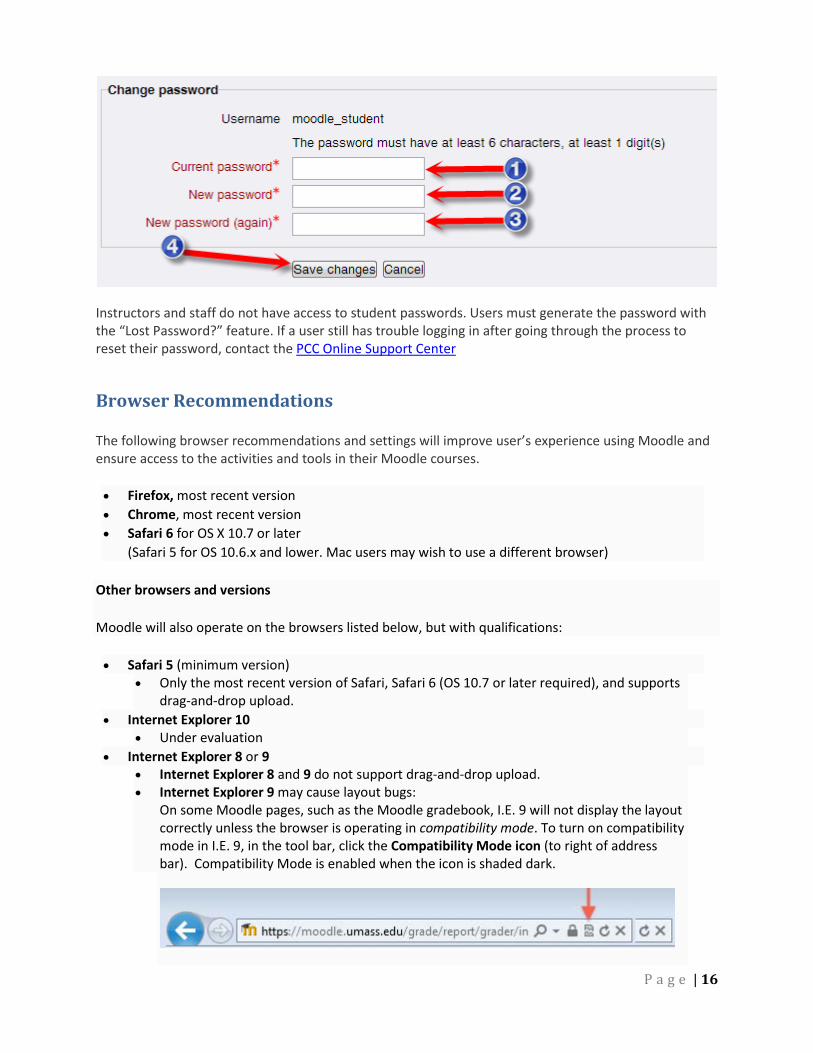
To change your password, click on your name in the upper right corner of the page. Choose Preferences > Change password.
We recommend users choose a password they will remember and also one that is secure (letters, numbers and/or symbols). The new password must be at least 6 characters and contain 1 number.
1. Type your current password (six-digit birth date) 2. Type your new password 3. Re-type your new password 4. Click Save Changes
P a g e | 16
Instructors and staff do not have access to student passwords. Users must generate the password with the “Lost Password?” feature. If a user still has trouble logging in after going through the process to reset their password, contact the PCC Online Support Center
Browser Recommendations The following browser recommendations and settings will improve user’s experience using Moodle and ensure access to the activities and tools in their Moodle courses. • Firefox, most recent version • Chrome, most recent version • Safari 6 for OS X 10.7 or later
(Safari 5 for OS 10.6.x and lower. Mac users may wish to use a different browser)
Other browsers and versions
Moodle will also operate on the browsers listed below, but with qualifications:
• Safari 5 (minimum version) • Only the most recent version of Safari, Safari 6 (OS 10.7 or later required), and supports
drag-and-drop upload. • Internet Explorer 10
• Under evaluation • Internet Explorer 8 or 9
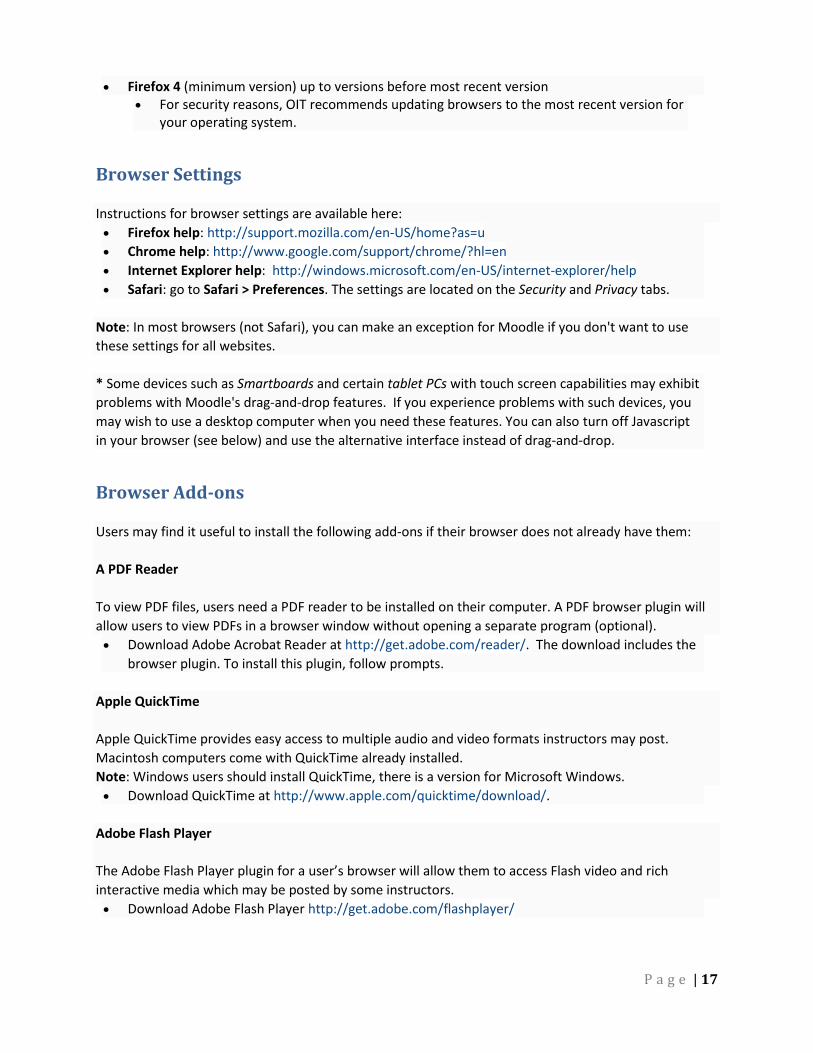
• Internet Explorer 8 and 9 do not support drag-and-drop upload. • Internet Explorer 9 may cause layout bugs:
On some Moodle pages, such as the Moodle gradebook, I.E. 9 will not display the layout correctly unless the browser is operating in compatibility mode. To turn on compatibility mode in I.E. 9, in the tool bar, click the Compatibility Mode icon (to right of address bar). Compatibility Mode is enabled when the icon is shaded dark.
P a g e | 17
• Firefox 4 (minimum version) up to versions before most recent version • For security reasons, OIT recommends updating browsers to the most recent version for
your operating system.
Browser Settings
Instructions for browser settings are available here: • Firefox help: http://support.mozilla.com/en-US/home?as=u • Chrome help: http://www.google.com/support/chrome/?hl=en • Internet Explorer help: http://windows.microsoft.com/en-US/internet-explorer/help • Safari: go to Safari > Preferences. The settings are located on the Security and Privacy tabs.
Note: In most browsers (not Safari), you can make an exception for Moodle if you don't want to use these settings for all websites.
* Some devices such as Smartboards and certain tablet PCs with touch screen capabilities may exhibit problems with Moodle's drag-and-drop features. If you experience problems with such devices, you may wish to use a desktop computer when you need these features. You can also turn off Javascript in your browser (see below) and use the alternative interface instead of drag-and-drop.
Browser Add-ons
Users may find it useful to install the following add-ons if their browser does not already have them:
A PDF Reader
To view PDF files, users need a PDF reader to be installed on their computer. A PDF browser plugin will allow users to view PDFs in a browser window without opening a separate program (optional). • Download Adobe Acrobat Reader at http://get.adobe.com/reader/. The download includes the
browser plugin. To install this plugin, follow prompts.
Apple QuickTime
Apple QuickTime provides easy access to multiple audio and video formats instructors may post. Macintosh computers come with QuickTime already installed. Note: Windows users should install QuickTime, there is a version for Microsoft Windows. • Download QuickTime at http://www.apple.com/quicktime/download/.
Adobe Flash Player
The Adobe Flash Player plugin for a user’s browser will allow them to access Flash video and rich interactive media which may be posted by some instructors. • Download Adobe Flash Player http://get.adobe.com/flashplayer/
P a g e | 18
Browser Troubleshooting
1. Check supported browser versions.
Check to see if the problem is related to known issues with the browser recommendations, above.
2. Clear browser cache.
Clearing the browser's cache may help to resolve problems such as trouble using drag-and-drop features or trouble viewing the gradebook.
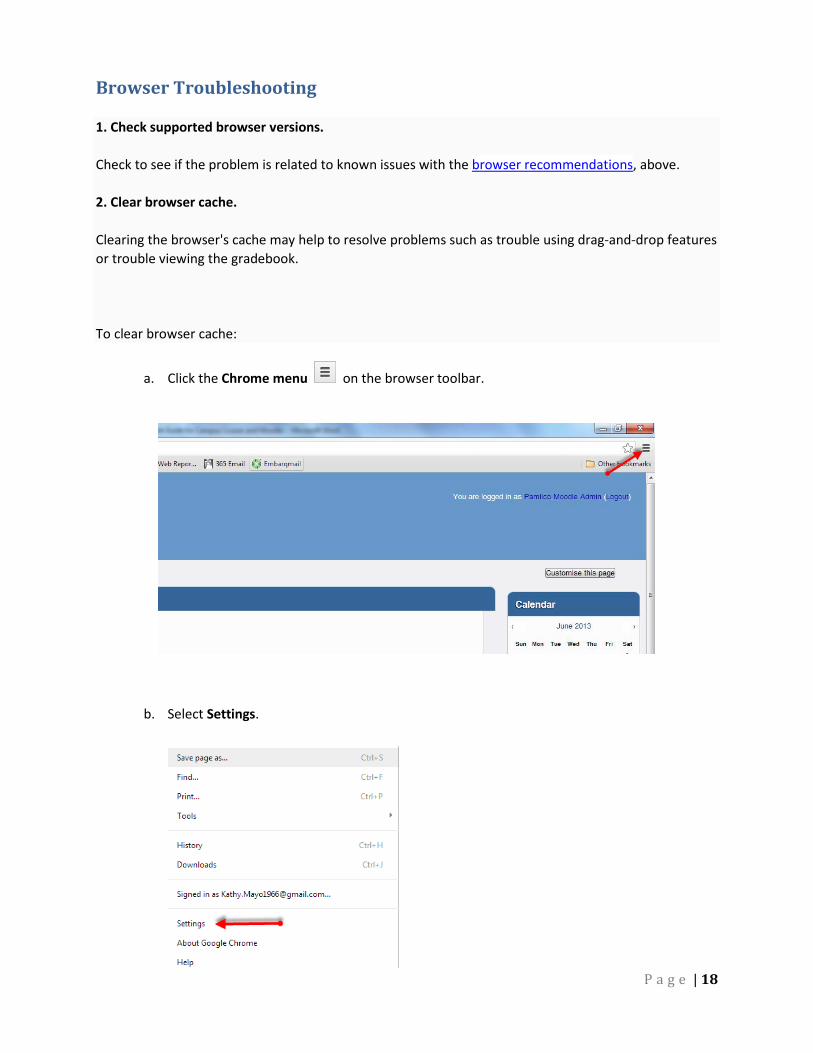
To clear browser cache:
a. Click the Chrome menu on the browser toolbar.
b. Select Settings.
P a g e | 19
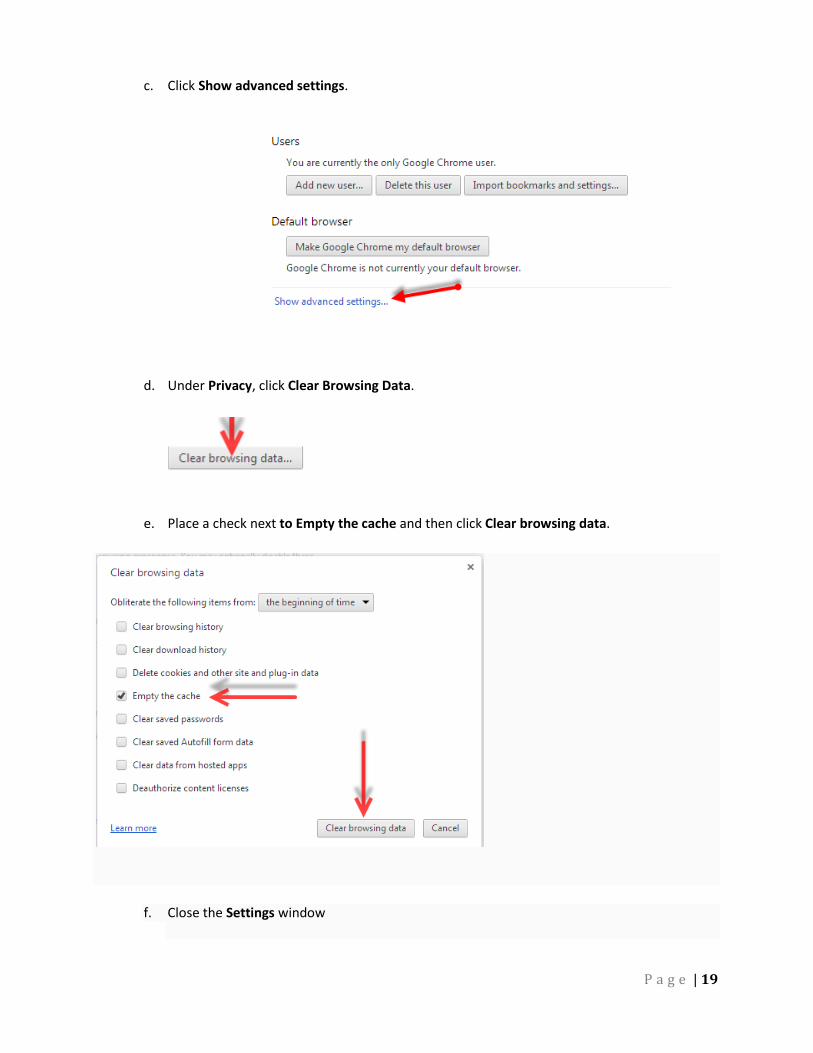
c. Click Show advanced settings.
d. Under Privacy, click Clear Browsing Data.
e. Place a check next to Empty the cache and then click Clear browsing data.
f. Close the Settings window
P a g e | 20
3. Try a different browser, and/or move to a different computer.
Users may find it helpful to have more than one browser installed on their computer. If you run into problems using Moodle, moving to another browser may resolve the issues. Users can also try moving to a different computer to see if the problem persists. This may help to discern whether the issue was a problem with the browser on the computer where you experienced the issue, or with Moodle.
Enable Pop-ups
In order to take some tests and to make full use of the Moodle Messaging system, users should enable popups for the Pamlico Moodle site. Most browsers will have an automatic popup blocker, and there may be additional ones built into add-ons like Google or Yahoo toolbars. Users may need to enable popups in more than one place to ensure they receive their messages instantly. Instructions are given below for Google Chrome. Users may need to look around to locate the popup controls for other browsers or add-ins, though the process should be similar.
Allow pop-ups in Google Chrome
To manually allow pop-ups from a site, follow the steps below:
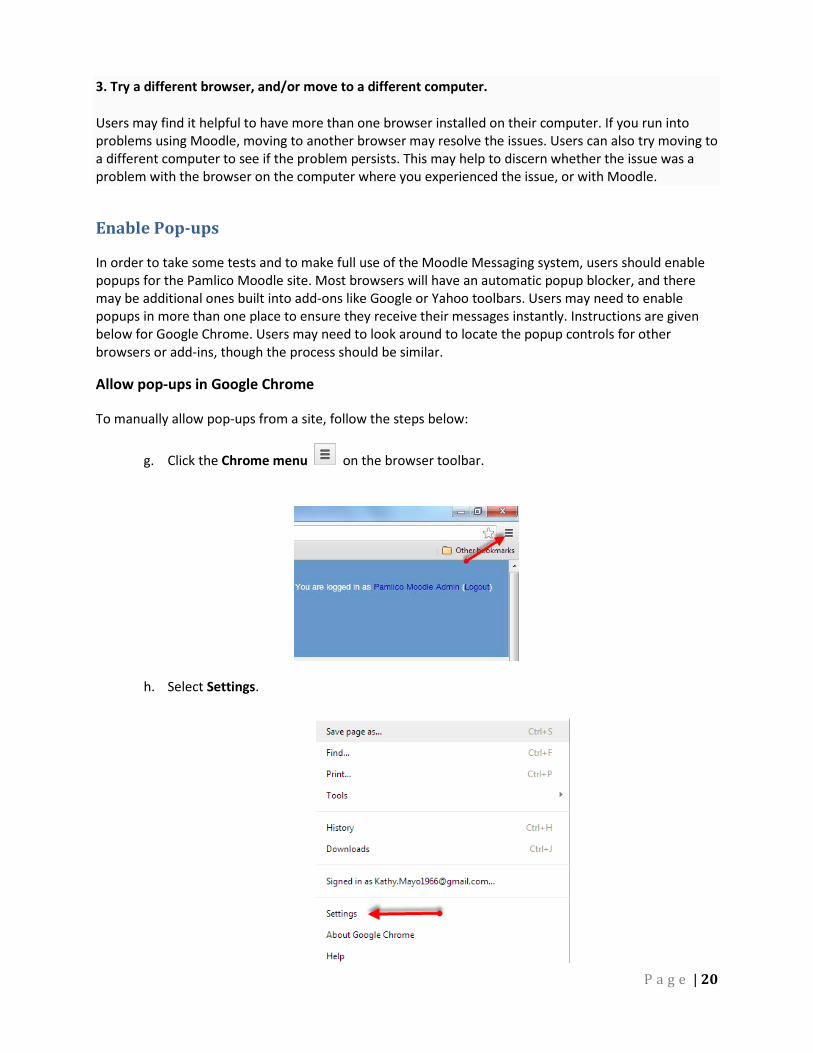
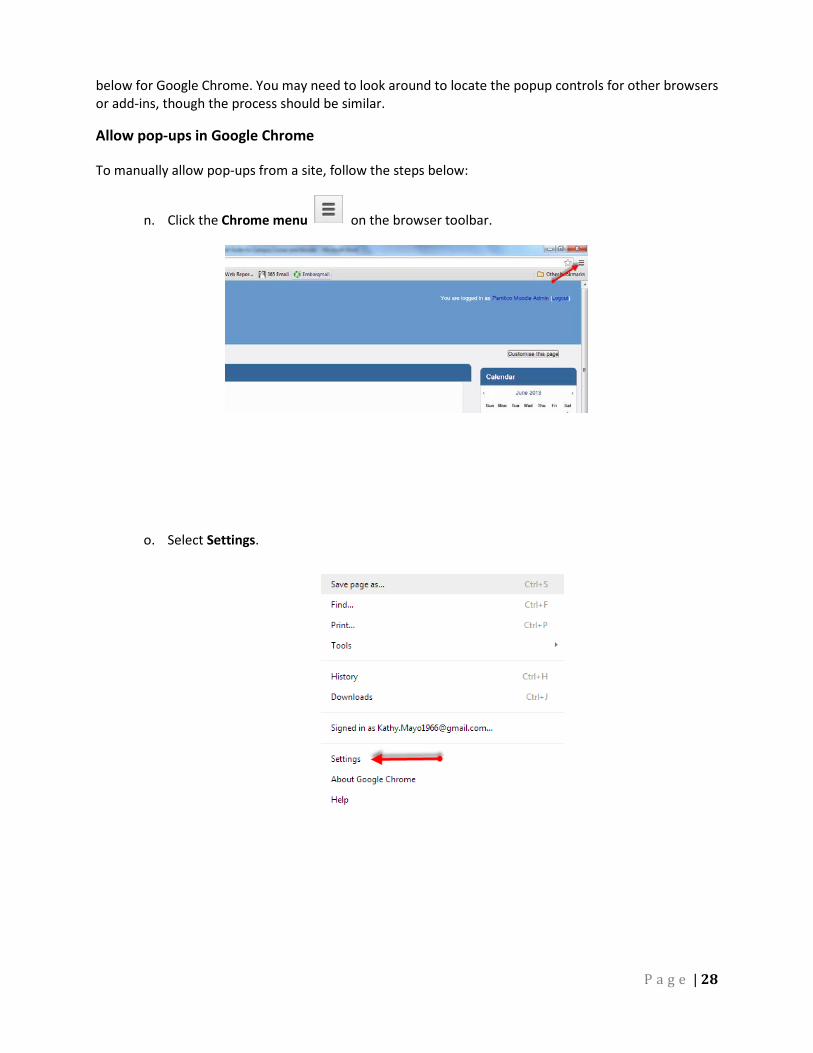
g. Click the Chrome menu on the browser toolbar.
h. Select Settings.
P a g e | 21
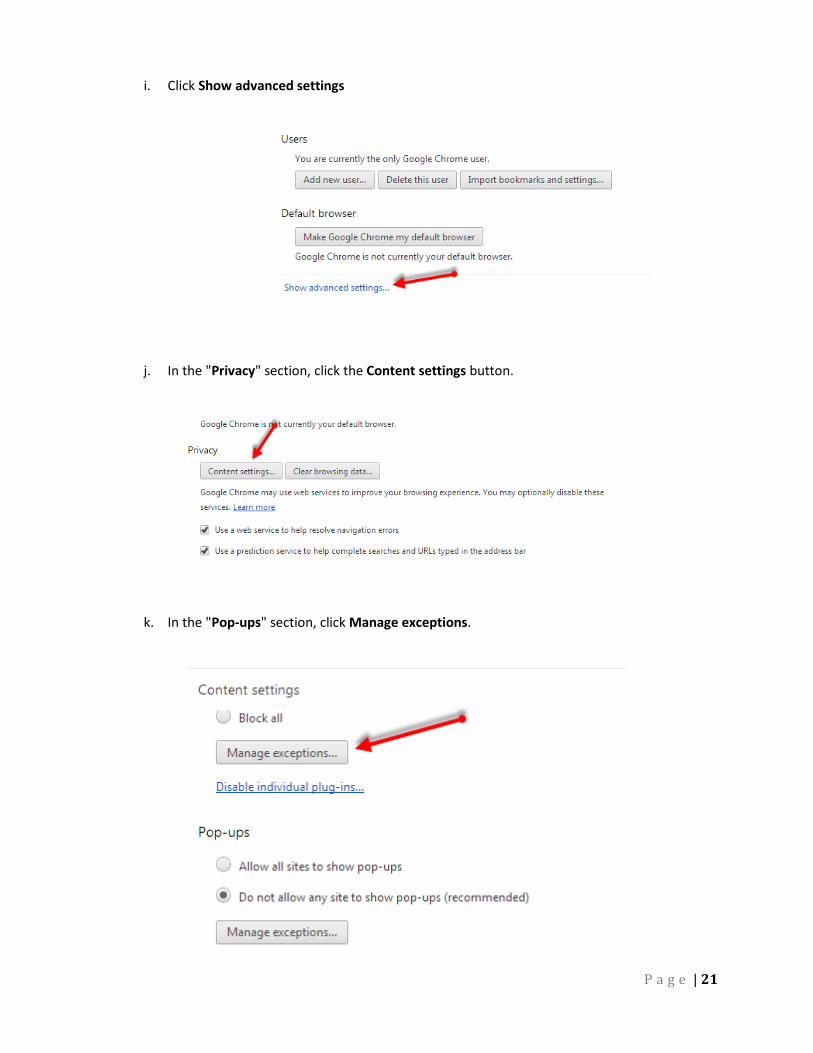
i. Click Show advanced settings
j. In the "Privacy" section, click the Content settings button.
k. In the "Pop-ups" section, click Manage exceptions.

P a g e | 22
l. In the “Add a New Hostname” box, type https://moodle.pamlicocc.edu
m. Click Done
P a g e | 23
Getting Started with Moodle at PCC In this section you will learn how to:
- Edit your Profile - Navigate the Site and Your Courses - Use Breadcrumbs to Navigate in Moodle - View Your Grades - Enable Pop-ups in Moodle - Use Messages - Use Forums - Submit Assignments - Take a Quiz
Edit Your Profile Now that you are logged on to Moodle we would advise that you edit your profile. Editing your profile will allow you to become familiar with the options available to you in order to personalize your environment.
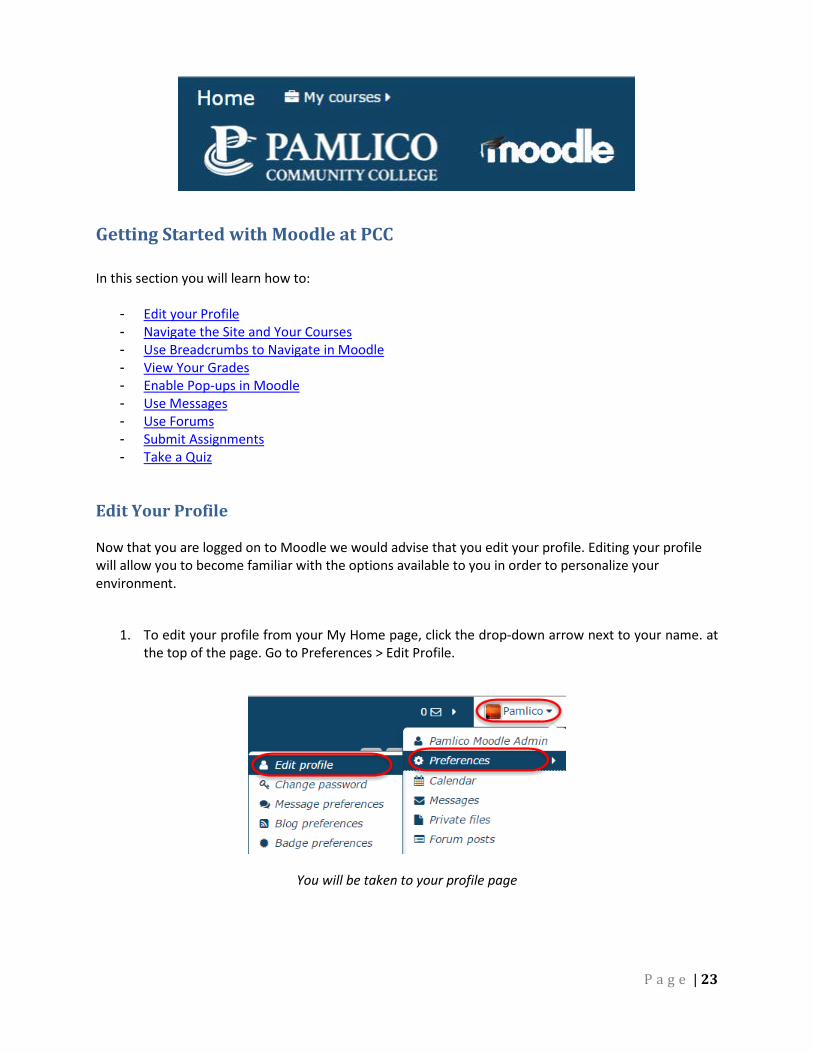
1. To edit your profile from your My Home page, click the drop-down arrow next to your name. at
the top of the page. Go to Preferences > Edit Profile.
You will be taken to your profile page
P a g e | 24
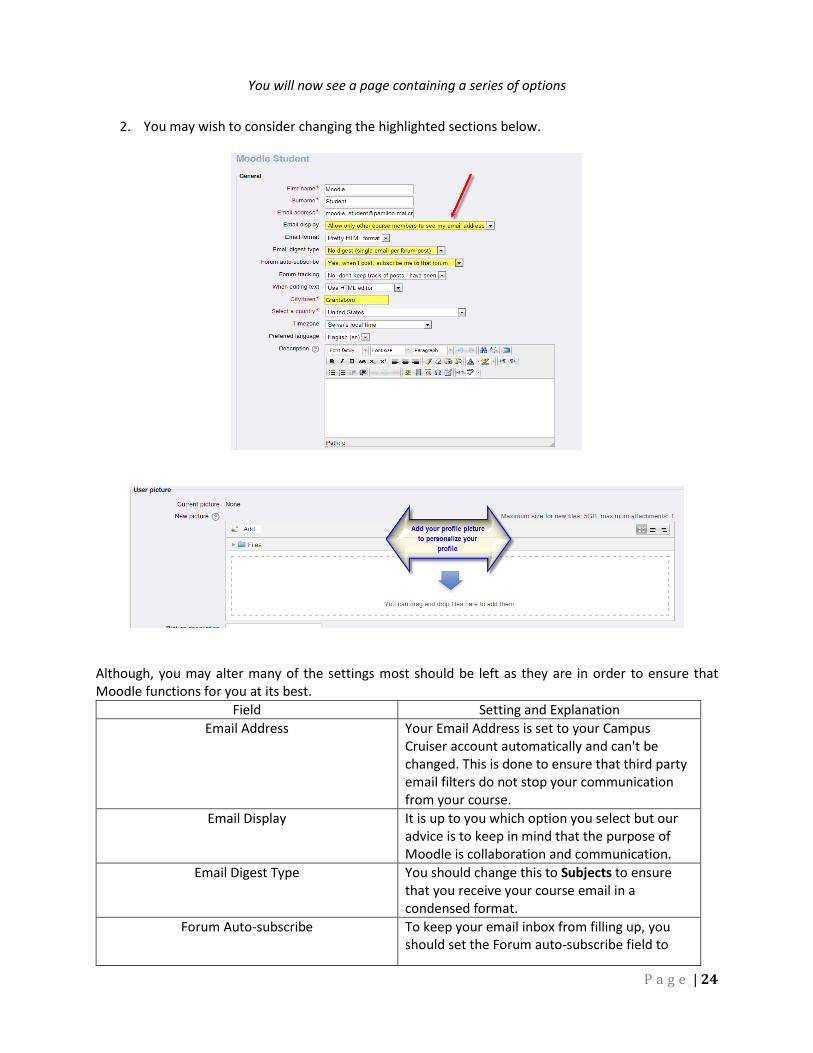
You will now see a page containing a series of options
2. You may wish to consider changing the highlighted sections below.
Although, you may alter many of the settings most should be left as they are in order to ensure that Moodle functions for you at its best.
Field Setting and Explanation Email Address Your Email Address is set to your Campus
Cruiser account automatically and can't be changed. This is done to ensure that third party email filters do not stop your communication from your course.
Email Display It is up to you which option you select but our advice is to keep in mind that the purpose of Moodle is collaboration and communication.
Email Digest Type You should change this to Subjects to ensure that you receive your course email in a condensed format.
Forum Auto-subscribe To keep your email inbox from filling up, you should set the Forum auto-subscribe field to
P a g e | 25
No: don't automatically subscribe me to forums.
New Picture When inserting a picture it is your responsibility to ensure that you have the picture is appropriate and you have copyright clearance. To insert a picture click the browse button and search your computer for a picture. Make sure that the file is not larger than the maximum size listed. The image file will be dropped to a square and resized down to 100 x 100 pixels.
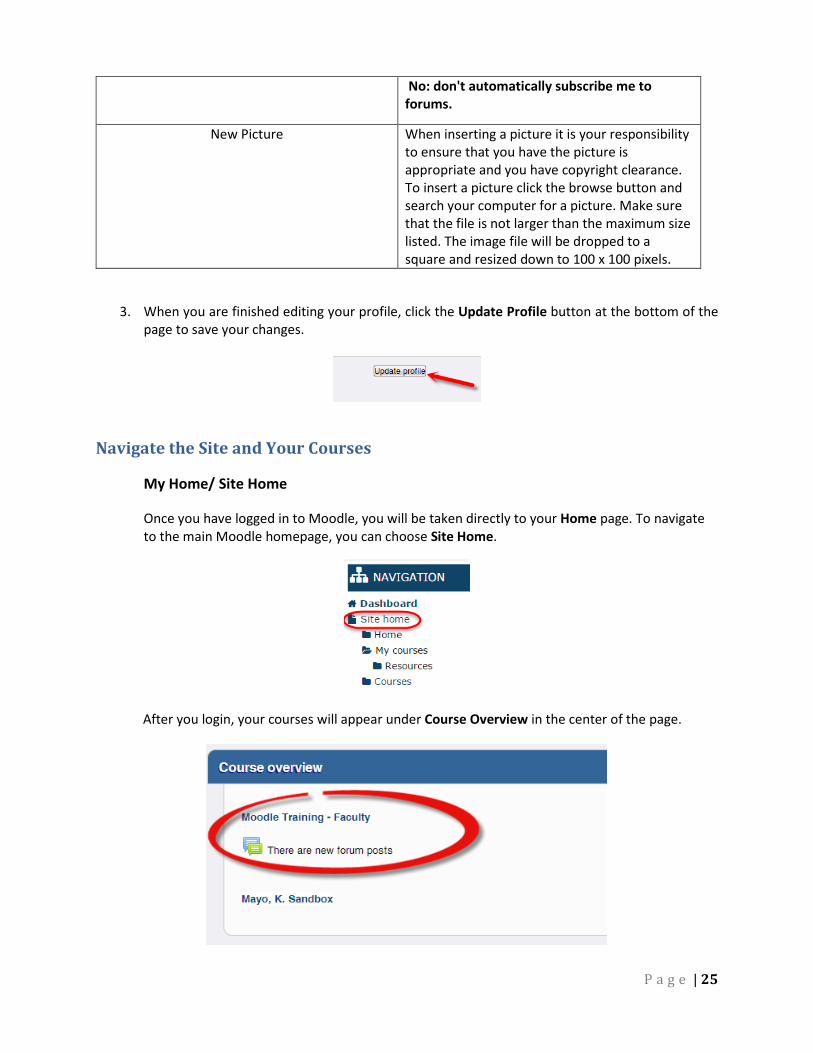
3. When you are finished editing your profile, click the Update Profile button at the bottom of the page to save your changes.
Navigate the Site and Your Courses
My Home/ Site Home
Once you have logged in to Moodle, you will be taken directly to your Home page. To navigate to the main Moodle homepage, you can choose Site Home.
After you login, your courses will appear under Course Overview in the center of the page.
P a g e | 26
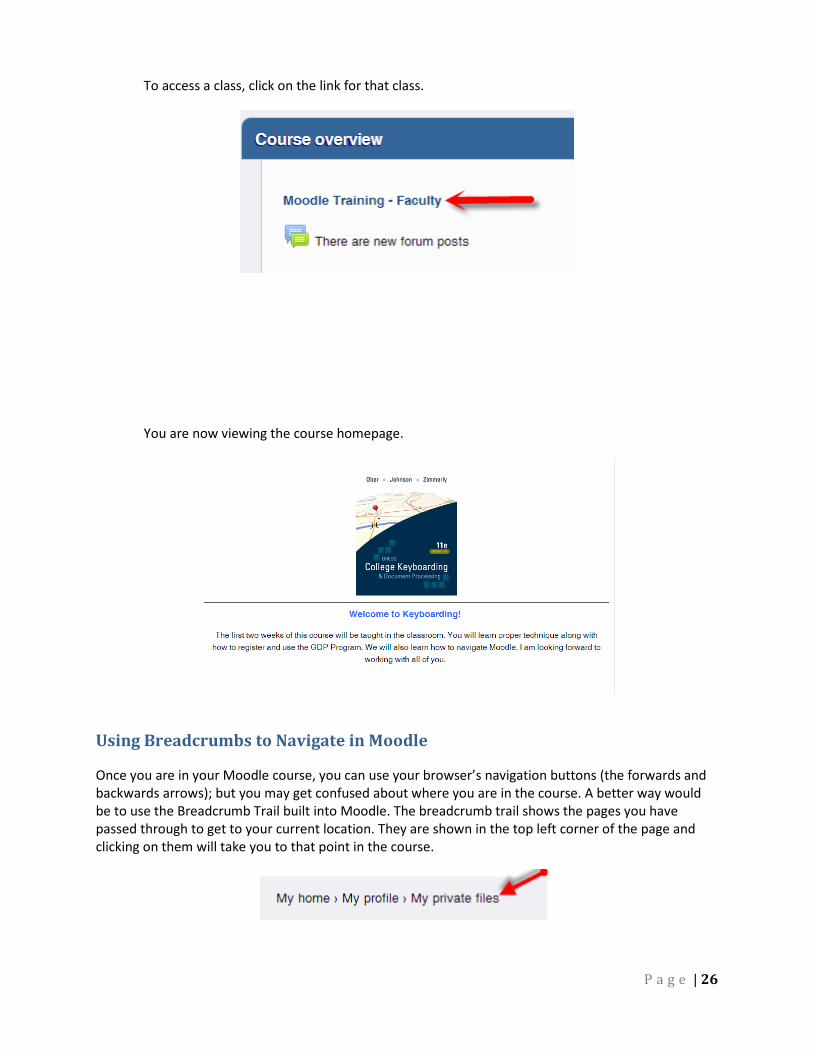
To access a class, click on the link for that class.
You are now viewing the course homepage.
Using Breadcrumbs to Navigate in Moodle
Once you are in your Moodle course, you can use your browser’s navigation buttons (the forwards and backwards arrows); but you may get confused about where you are in the course. A better way would be to use the Breadcrumb Trail built into Moodle. The breadcrumb trail shows the pages you have passed through to get to your current location. They are shown in the top left corner of the page and clicking on them will take you to that point in the course.

P a g e | 27
The image above shows that the page you are on at the moment is My Private Files. Clicking on My Home would take you to your My Home page. The same principle applies with each of the activity types, so if you were in a quiz you would have a link to a list of all quizzes in your course.
View Your Grades
In Moodle, students can view their grades at any time. Click on your name in the upper right corner of the page. Click on My grades.
Your Gradebook will look similar to the following. You can click on the item to be taken back to the original assignment. You will find feedback from your instructor in the Feedback column.
Enable Pop-ups
In order to take some tests and to make full use of the Moodle Messaging system, you should enable popups for the Pamlico Moodle site. Most browsers will have an automatic popup blocker, and there may be additional ones built into add-ons like Google or Yahoo toolbars. You may need to enable popups in more than one place to ensure you receive your messages instantly. Instructions are given
P a g e | 28
below for Google Chrome. You may need to look around to locate the popup controls for other browsers or add-ins, though the process should be similar.
Allow pop-ups in Google Chrome
To manually allow pop-ups from a site, follow the steps below:
n. Click the Chrome menu on the browser toolbar.
o. Select Settings.
P a g e | 29
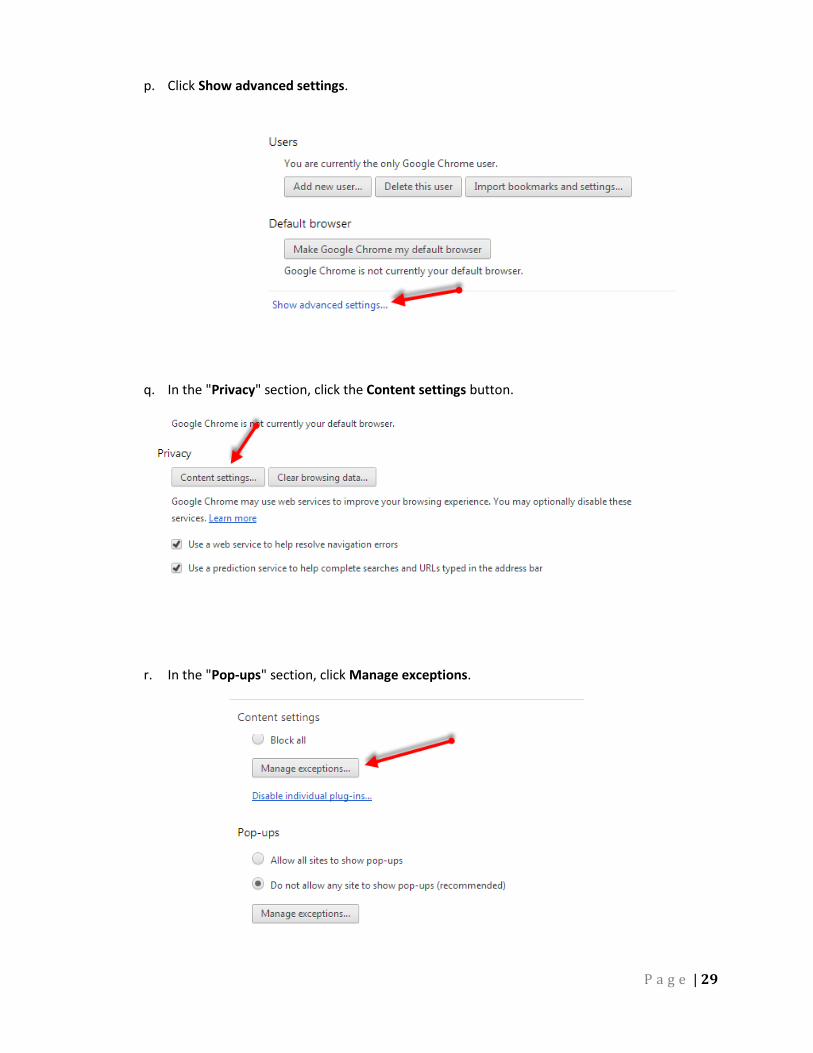
p. Click Show advanced settings.
q. In the "Privacy" section, click the Content settings button.
r. In the "Pop-ups" section, click Manage exceptions.
P a g e | 30
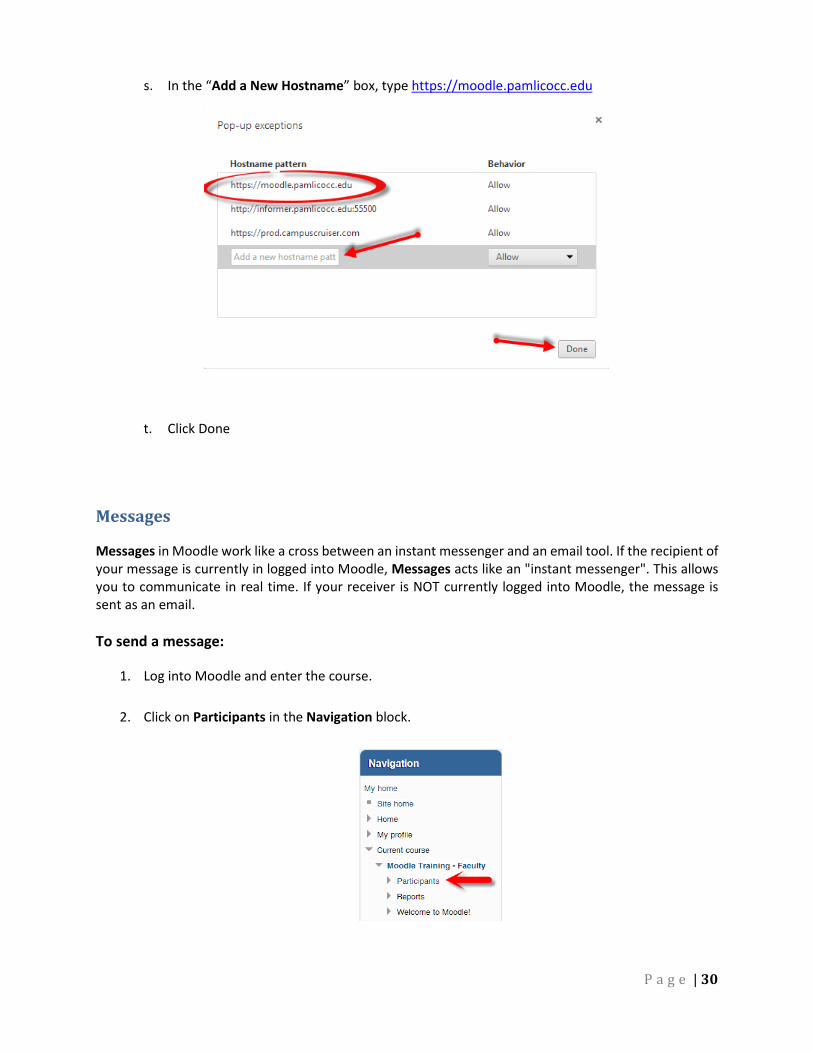
s. In the “Add a New Hostname” box, type https://moodle.pamlicocc.edu
t. Click Done
Messages
Messages in Moodle work like a cross between an instant messenger and an email tool. If the recipient of your message is currently in logged into Moodle, Messages acts like an "instant messenger". This allows you to communicate in real time. If your receiver is NOT currently logged into Moodle, the message is sent as an email. To send a message:
1. Log into Moodle and enter the course.
2. Click on Participants in the Navigation block.
P a g e | 31
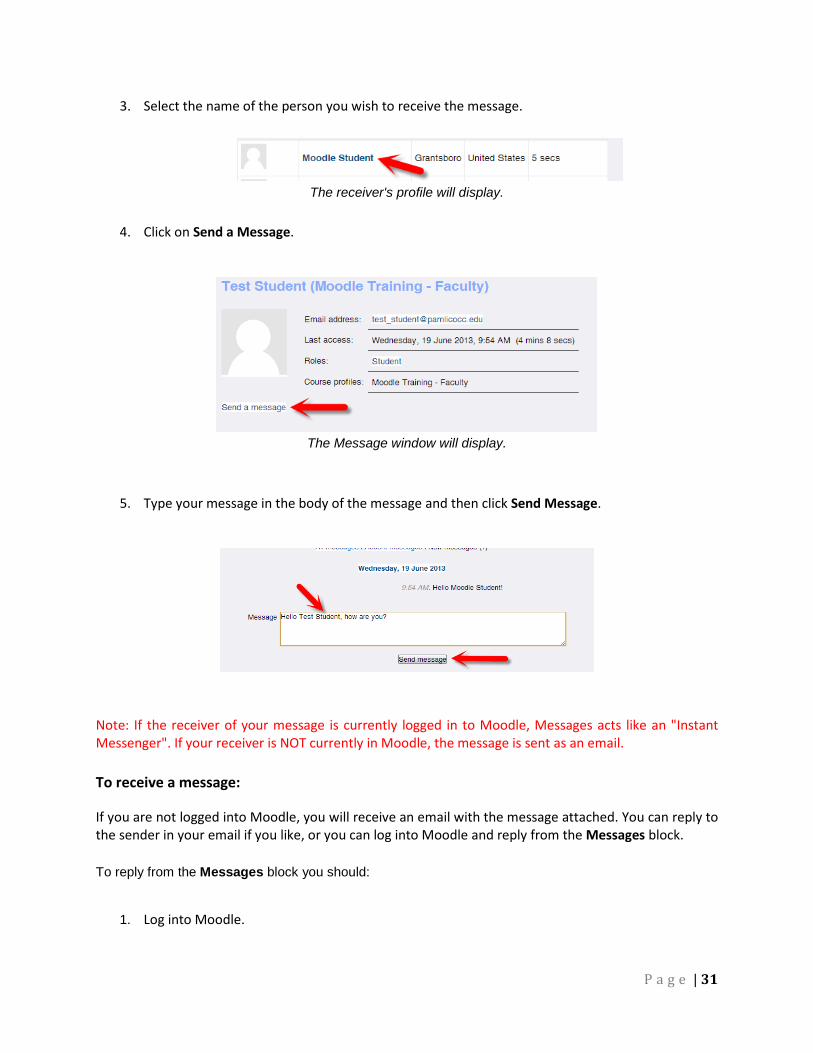
3. Select the name of the person you wish to receive the message.
The receiver's profile will display.
4. Click on Send a Message.
The Message window will display.
5. Type your message in the body of the message and then click Send Message.
Note: If the receiver of your message is currently logged in to Moodle, Messages acts like an "Instant Messenger". If your receiver is NOT currently in Moodle, the message is sent as an email. To receive a message:
If you are not logged into Moodle, you will receive an email with the message attached. You can reply to the sender in your email if you like, or you can log into Moodle and reply from the Messages block. To reply from the Messages block you should:
1. Log into Moodle.
P a g e | 32
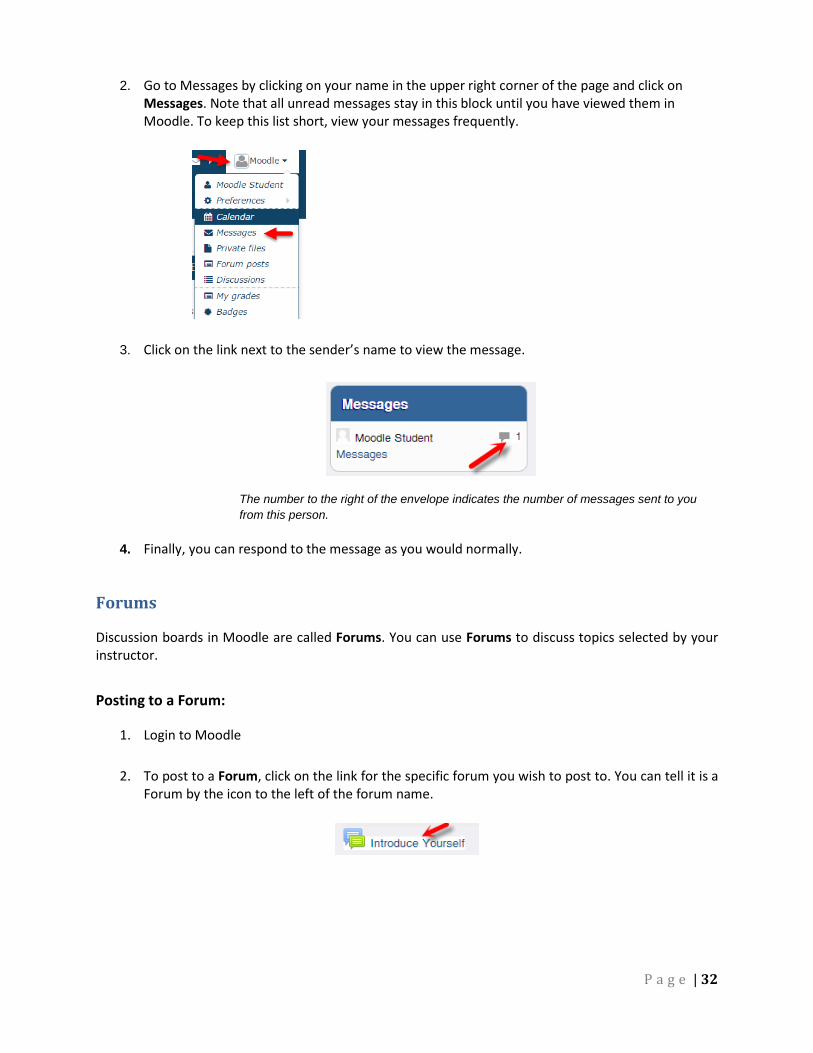
2. Go to Messages by clicking on your name in the upper right corner of the page and click on Messages. Note that all unread messages stay in this block until you have viewed them in Moodle. To keep this list short, view your messages frequently.
3. Click on the link next to the sender’s name to view the message.
The number to the right of the envelope indicates the number of messages sent to you from this person.
4. Finally, you can respond to the message as you would normally.
Forums
Discussion boards in Moodle are called Forums. You can use Forums to discuss topics selected by your instructor. Posting to a Forum:
1. Login to Moodle
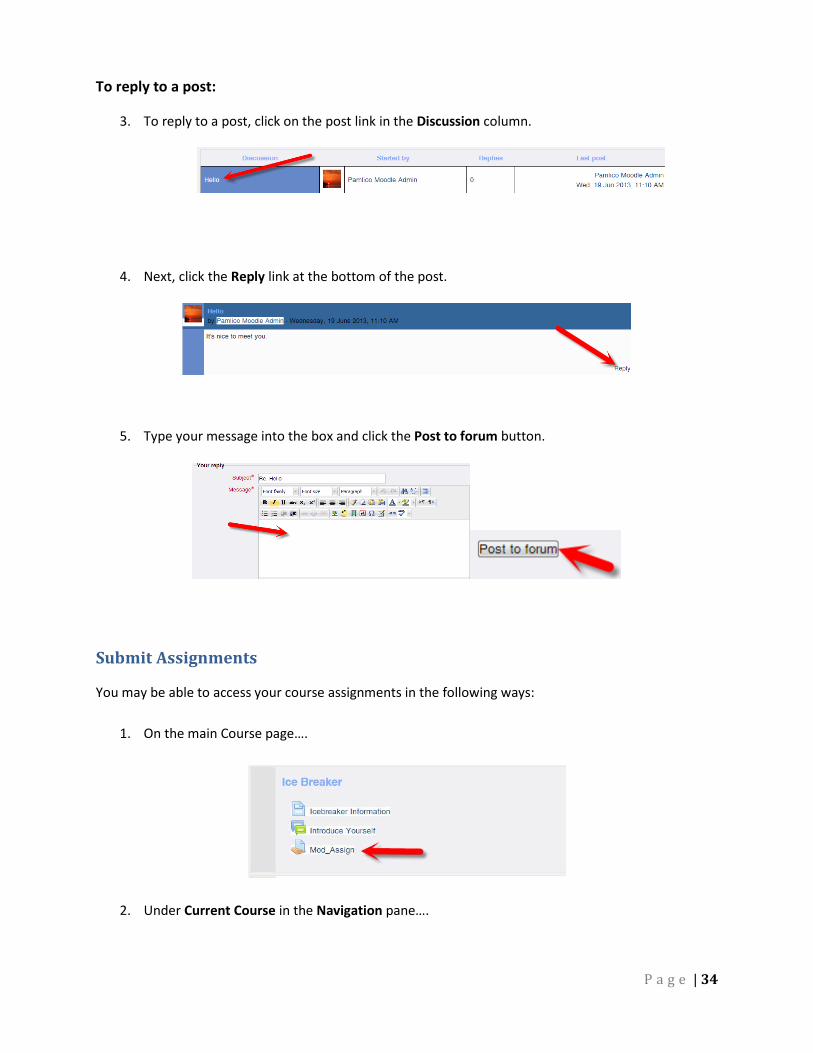
2. To post to a Forum, click on the link for the specific forum you wish to post to. You can tell it is a Forum by the icon to the left of the forum name.

P a g e | 33
3. Read the instructions and/or topic of the discussion.
4. Click on the Add a new discussion topic button.
5. On the Add a new discussion topic page, type a subject for your topic in the subject line.
6. Type a reply to the forum in the Message field.
IMPORTANT NOTE: You should leave the Subscription field set to “I don't want emails..." because the replies to the post may fill up your email.
7. Lastly, click the Post to forum button.
To edit a post:
1. To edit your post, click on your post link in the Discussion column.
2. Next, click the Edit link next to the post you wish to edit and make your changes.
P a g e | 34
To reply to a post:
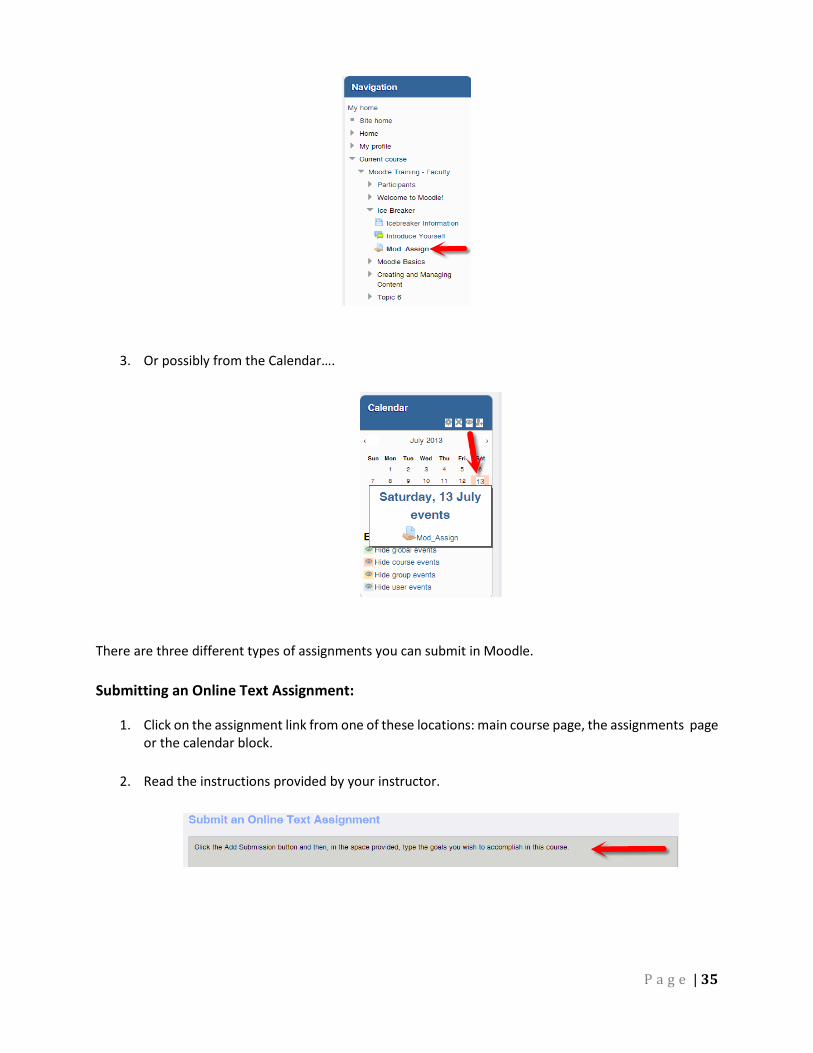
3. To reply to a post, click on the post link in the Discussion column.
4. Next, click the Reply link at the bottom of the post.
5. Type your message into the box and click the Post to forum button.
Submit Assignments
You may be able to access your course assignments in the following ways:
1. On the main Course page….
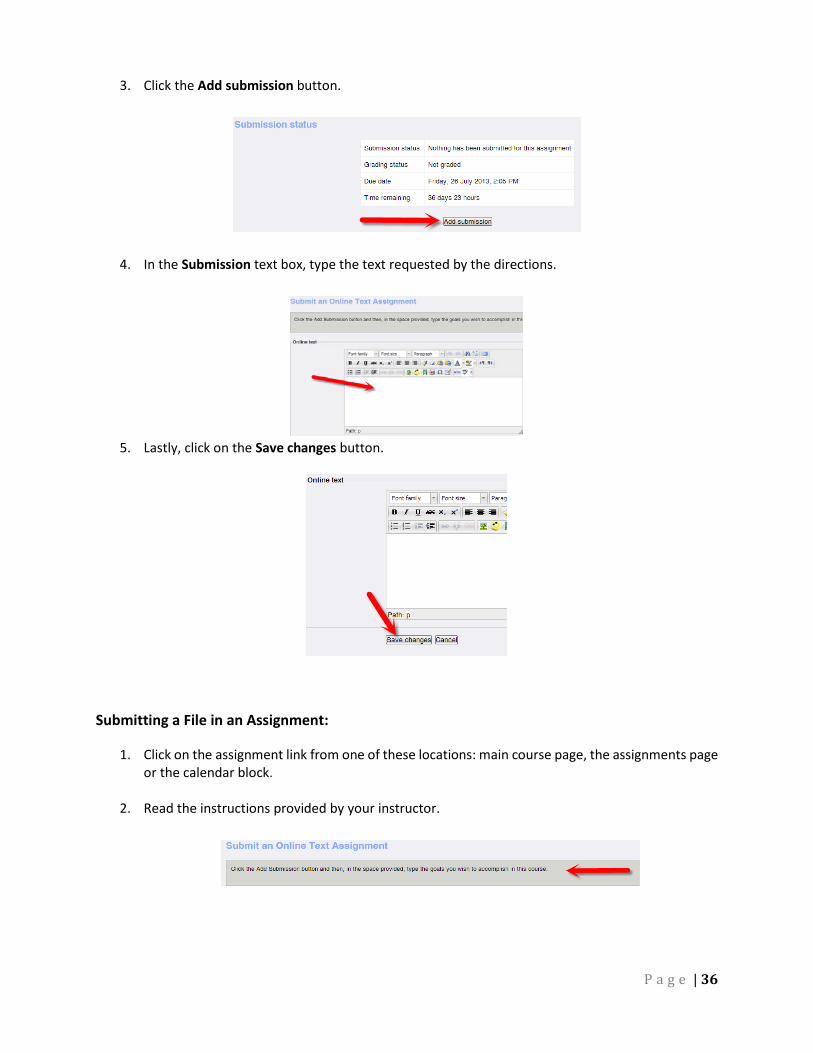
2. Under Current Course in the Navigation pane….
P a g e | 35
3. Or possibly from the Calendar….
There are three different types of assignments you can submit in Moodle. Submitting an Online Text Assignment:
1. Click on the assignment link from one of these locations: main course page, the assignments page or the calendar block.
2. Read the instructions provided by your instructor.
P a g e | 36
3. Click the Add submission button.
4. In the Submission text box, type the text requested by the directions.
5. Lastly, click on the Save changes button.
Submitting a File in an Assignment:
1. Click on the assignment link from one of these locations: main course page, the assignments page or the calendar block.
2. Read the instructions provided by your instructor.
P a g e | 37
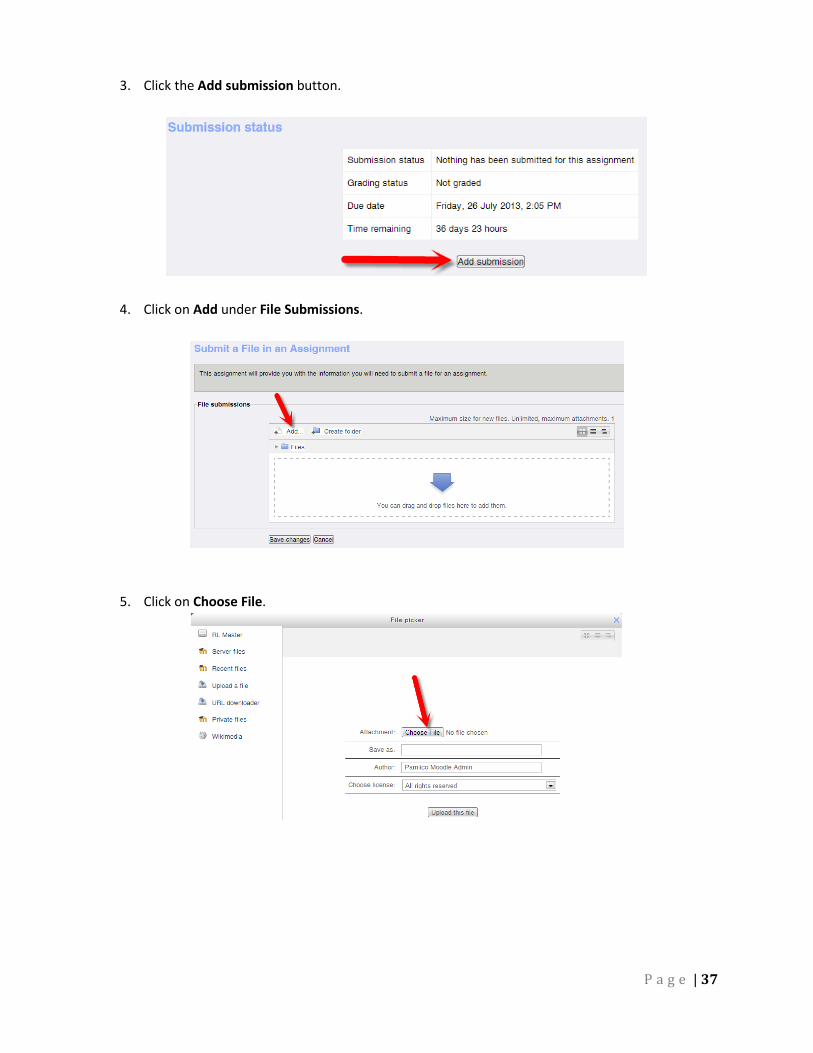
3. Click the Add submission button.
4. Click on Add under File Submissions.
5. Click on Choose File.

P a g e | 38
6. Locate and select the file you want to attach. Click Open.
7. Click Upload this file.
8. Click Save changes.
P a g e | 39
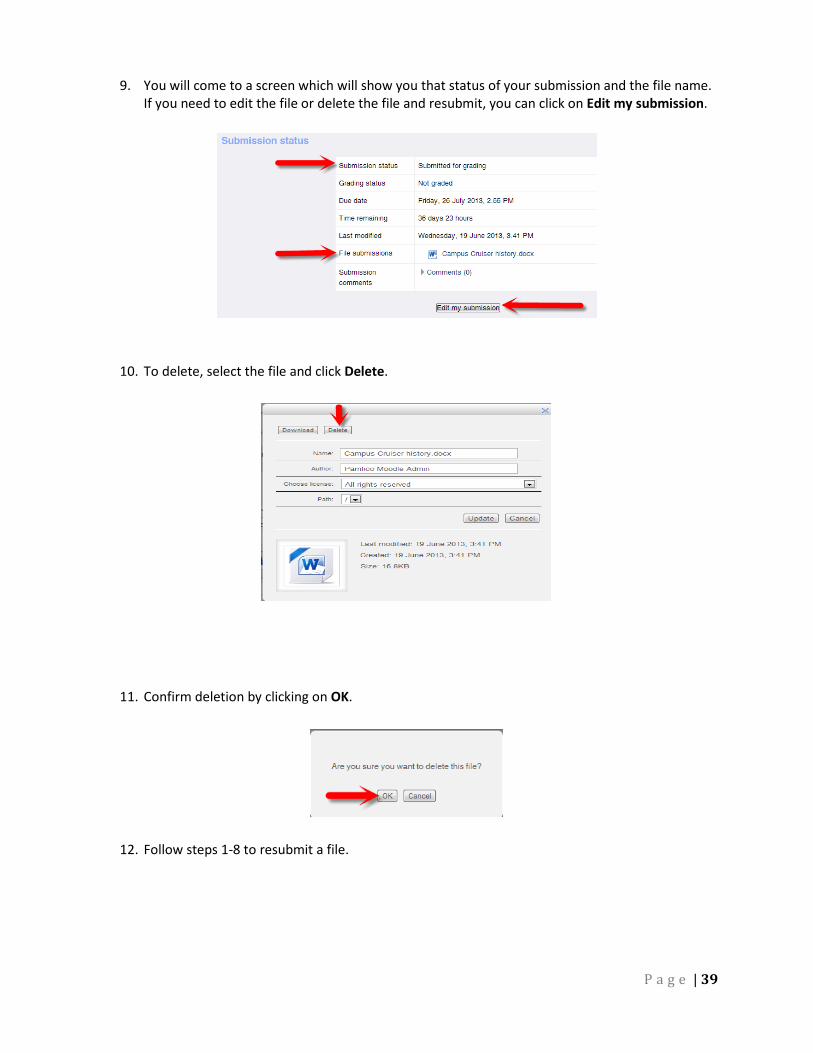
9. You will come to a screen which will show you that status of your submission and the file name. If you need to edit the file or delete the file and resubmit, you can click on Edit my submission.
10. To delete, select the file and click Delete.
11. Confirm deletion by clicking on OK.
12. Follow steps 1-8 to resubmit a file.
P a g e | 40
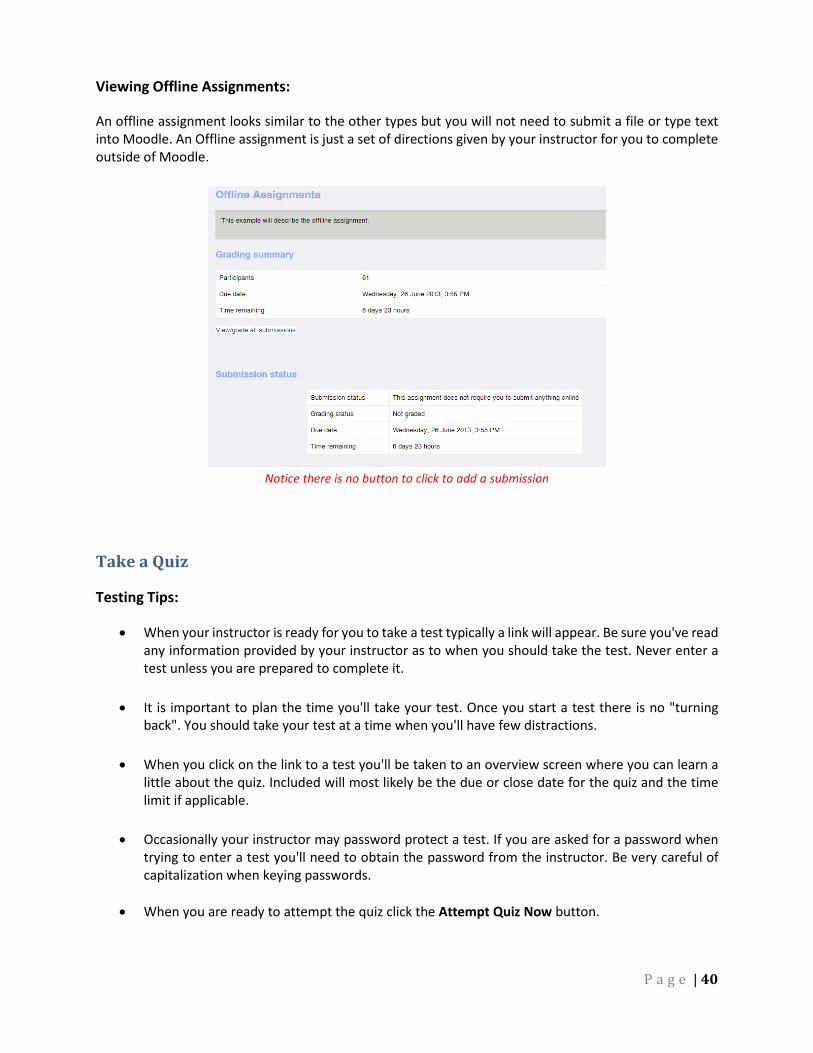
Viewing Offline Assignments:
An offline assignment looks similar to the other types but you will not need to submit a file or type text into Moodle. An Offline assignment is just a set of directions given by your instructor for you to complete outside of Moodle.
Notice there is no button to click to add a submission
Take a Quiz
Testing Tips:
• When your instructor is ready for you to take a test typically a link will appear. Be sure you've read any information provided by your instructor as to when you should take the test. Never enter a test unless you are prepared to complete it.
• It is important to plan the time you'll take your test. Once you start a test there is no "turning
back". You should take your test at a time when you'll have few distractions.
• When you click on the link to a test you'll be taken to an overview screen where you can learn a little about the quiz. Included will most likely be the due or close date for the quiz and the time limit if applicable.
• Occasionally your instructor may password protect a test. If you are asked for a password when trying to enter a test you'll need to obtain the password from the instructor. Be very careful of capitalization when keying passwords.
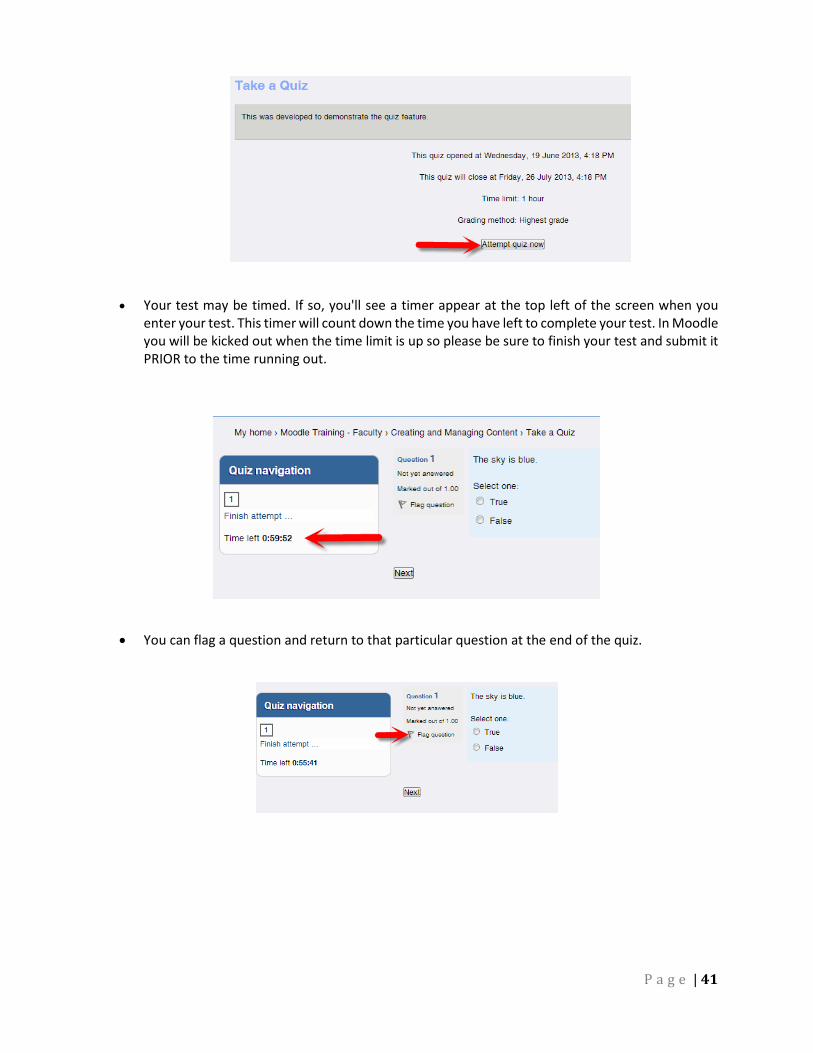
• When you are ready to attempt the quiz click the Attempt Quiz Now button.
P a g e | 41
• Your test may be timed. If so, you'll see a timer appear at the top left of the screen when you enter your test. This timer will count down the time you have left to complete your test. In Moodle you will be kicked out when the time limit is up so please be sure to finish your test and submit it PRIOR to the time running out.
• You can flag a question and return to that particular question at the end of the quiz.
P a g e | 42
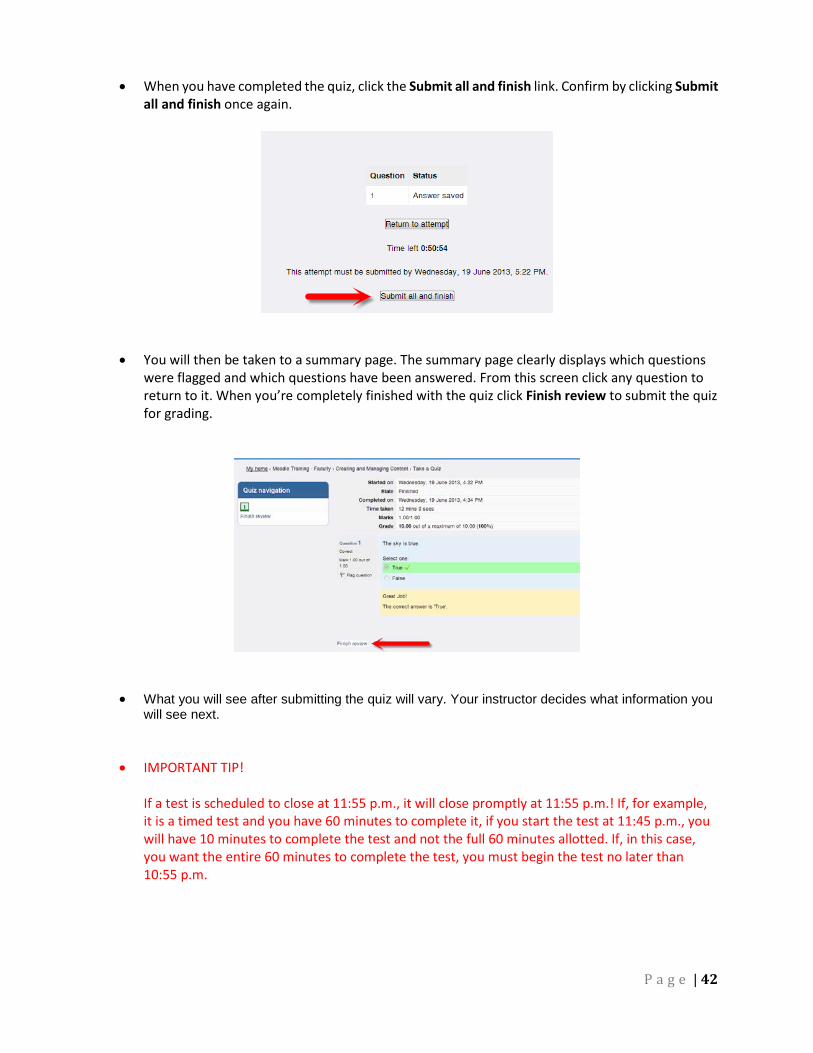
• When you have completed the quiz, click the Submit all and finish link. Confirm by clicking Submit all and finish once again.
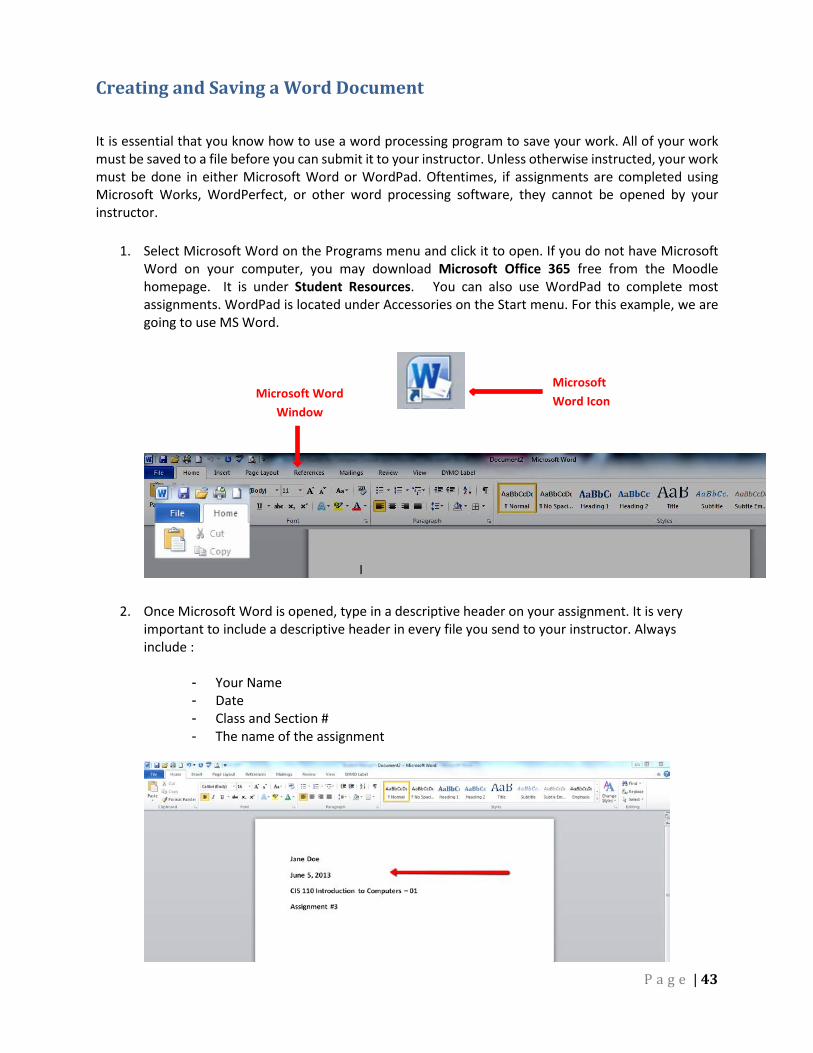
• You will then be taken to a summary page. The summary page clearly displays which questions were flagged and which questions have been answered. From this screen click any question to return to it. When you’re completely finished with the quiz click Finish review to submit the quiz for grading.
• What you will see after submitting the quiz will vary. Your instructor decides what information you will see next.
• IMPORTANT TIP! If a test is scheduled to close at 11:55 p.m., it will close promptly at 11:55 p.m.! If, for example, it is a timed test and you have 60 minutes to complete it, if you start the test at 11:45 p.m., you will have 10 minutes to complete the test and not the full 60 minutes allotted. If, in this case, you want the entire 60 minutes to complete the test, you must begin the test no later than 10:55 p.m.
P a g e | 43
Creating and Saving a Word Document
It is essential that you know how to use a word processing program to save your work. All of your work must be saved to a file before you can submit it to your instructor. Unless otherwise instructed, your work must be done in either Microsoft Word or WordPad. Oftentimes, if assignments are completed using Microsoft Works, WordPerfect, or other word processing software, they cannot be opened by your instructor.
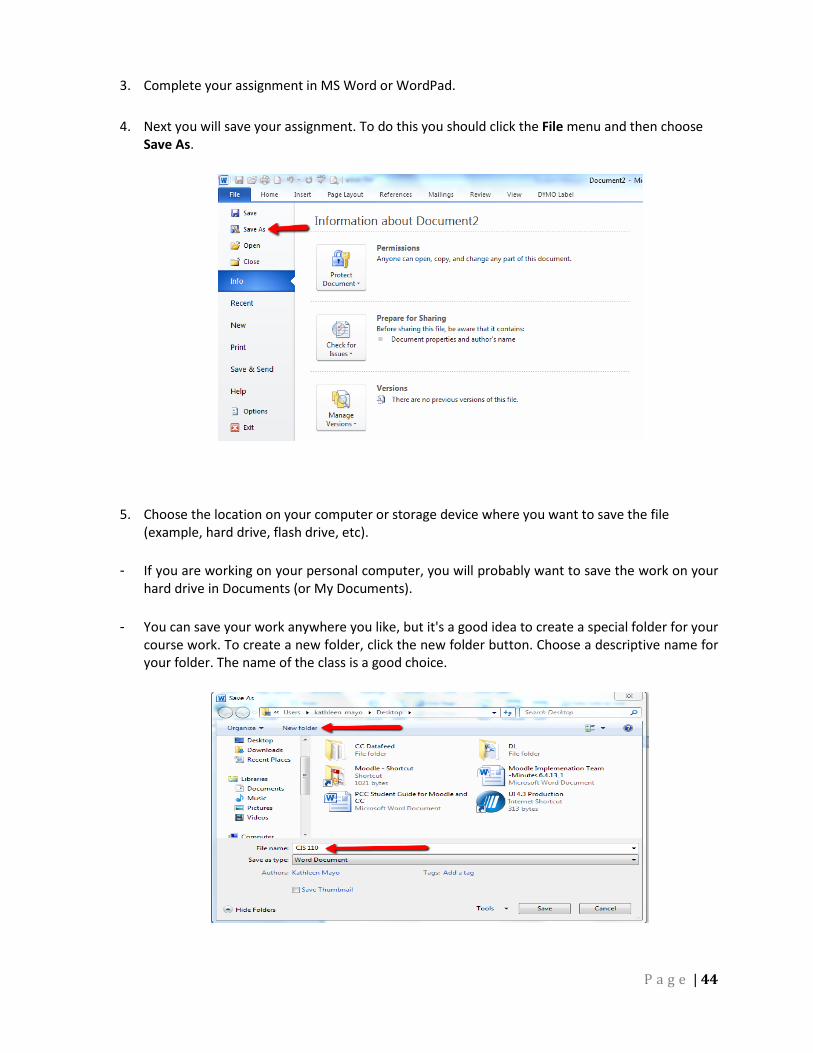
1. Select Microsoft Word on the Programs menu and click it to open. If you do not have Microsoft Word on your computer, you may download Microsoft Office 365 free from the Moodle homepage. It is under Student Resources. You can also use WordPad to complete most assignments. WordPad is located under Accessories on the Start menu. For this example, we are going to use MS Word.
2. Once Microsoft Word is opened, type in a descriptive header on your assignment. It is very important to include a descriptive header in every file you send to your instructor. Always include :
- Your Name - Date - Class and Section # - The name of the assignment
Microsoft Word Icon Microsoft Word
Window
P a g e | 44
3. Complete your assignment in MS Word or WordPad.
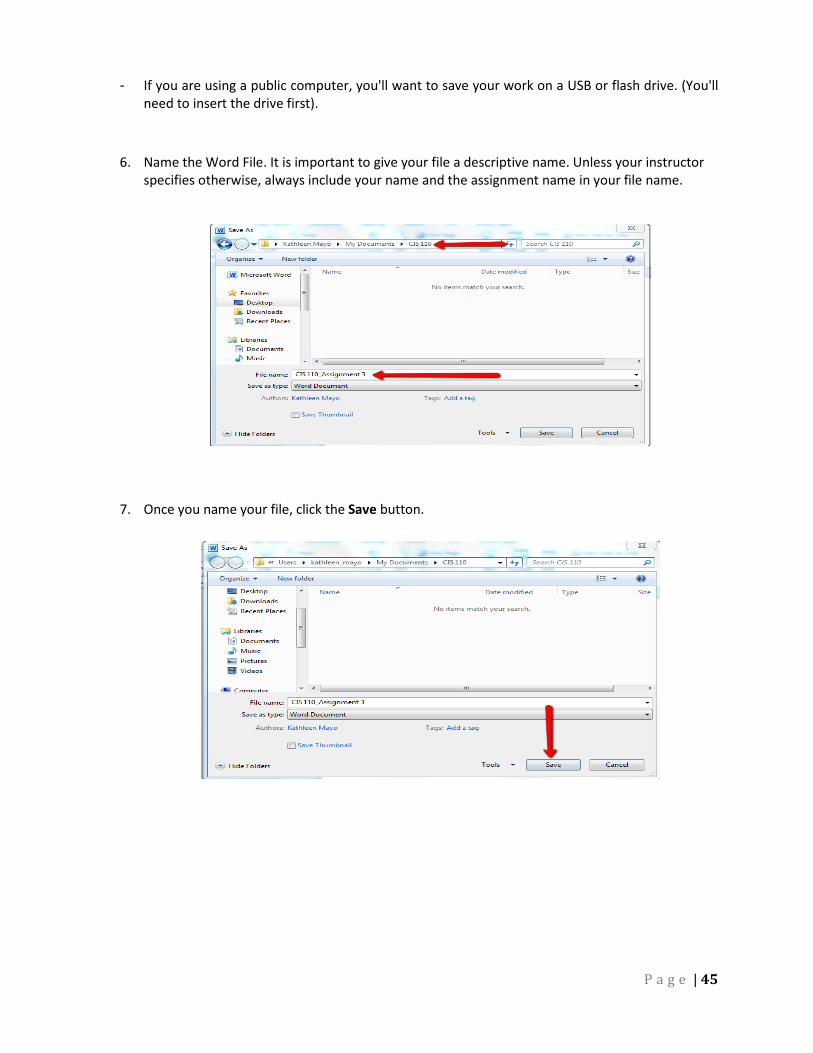
4. Next you will save your assignment. To do this you should click the File menu and then choose Save As.
5. Choose the location on your computer or storage device where you want to save the file
(example, hard drive, flash drive, etc).
- If you are working on your personal computer, you will probably want to save the work on your hard drive in Documents (or My Documents).
- You can save your work anywhere you like, but it's a good idea to create a special folder for your course work. To create a new folder, click the new folder button. Choose a descriptive name for your folder. The name of the class is a good choice.
P a g e | 45
- If you are using a public computer, you'll want to save your work on a USB or flash drive. (You'll need to insert the drive first).
6. Name the Word File. It is important to give your file a descriptive name. Unless your instructor specifies otherwise, always include your name and the assignment name in your file name.
7. Once you name your file, click the Save button.