Embed Size (px)
Citation preview
CALISTHENIC TECHNICAL GUIDE
FOREWORD
This manual has been written to describe correct technique of Calisthenic positions. It should be noted that this is not a rule book, but a guideline for Accredited Coaches, Assistant Coaches and Cadets.
THANKSAre extended to:-
Contributing members of theAustralian Calisthenic Federation,
Australian Calisthenic Federation Coaching CommitteeAustralian Calisthenic Federation Adjudicators ̓Advisory Board Australian Calisthenic Federation Examiners ̓Advisory Board
And to all others who assisted in the preparation and update of this manual.Photography by Barbara Stavaruk.Layout assistance by Colin Beaton
Revised Edition 2004
© ACF 2004

2
Table of Contents
3
Table of Contents
DEPORTMENT .......................................................6BANNED AND DANGEROUS MOVEMENTS .........7BANNED AND DANGEROUS MOVEMENTS .........8MOVEMENTS ALLOWABLE WITH CARE ..............8AREAS CAUSING CONCERN................................9FREE EXERCISES ................................................10ARM POSITIONS..................................................10FORWARD RAISE ................................................10SIDE RAISE ..........................................................11ARMS OBLIQUE...................................................11UPWARD STRETCH.............................................11CLASP OVERHEAD..............................................12HIPS FIRM............................................................12WRIST CROSS.....................................................12NECK REST..........................................................13ARMS FOLDED IN FRONT...................................13ARMS FOLDED AT BACK ....................................13FINGERS TO SHOULDERS..................................13LEG AND FEET POSITIONS.................................14ATTENTION ........................................................14STEP—SIDE .........................................................14FORWARD or BACKWARD ..................................14CURVE OVERHEAD .............................................14TOE POINT—SIDE, .............................................15FORWARD or BACKWARD .................................15LUNGE—SIDE, FORWARD OR BACKWARD ......15TOE POINT WITH FONDU —...............................15SIDE, FORWARD or BACKWARD ........................15TURNING LUNGE OR STEP ................................16SQUAT..................................................................16DOUBLE LEG KNEEL...........................................16SINGLE LEG KNEEL ............................................16PRONE KNEEL.....................................................17KNEELING ARABESQUE .....................................17SIDE LEG EXTENSION WHEN KNEELING OR SQUATTING .........................................................17LEG RAISE—SIDE, FORWARD OR BACKWARD 18KNEE RAISE.........................................................18LEG MOUNT ........................................................19CIRCULAR LEG MOUNT ....................................19SUPPORTED (HELD) ATTITUDE ..........................20ARABESQUE........................................................20SUPPORTED ARABESQUE ................................20BENDS .................................................................21FULL FORWARD TRUNK BEND ..........................21BACK TRUNK BEND............................................21HALF FORWARD TRUNK BEND..........................21CIRCULAR HALF TRUNK BEND..........................22CIRCULAR FULL TRUNK BEND..........................22SIDE BEND...........................................................23HEAD TO LEGS ..............................................23SIDE BEND—WITH ARMS AT SIDE RAISE AND LEGS IN LUNGE POSITION ................................23BRIDGE ................................................................24
BACKBEND..........................................................24LONG SIT .............................................................25SITTING POSITIONS............................................25CROSS LEG SIT ..................................................25LONG SIT SINGLE LEG RAISE FORWARD ........25STRADDLE/LEGS ASTRIDE SlT...........................26BODY RAISE (LONG OR SQUARE) .....................26LONG SIT/FORWARD TRUNK BEND .................26TUCK SIT..............................................................27LEGS ASTRIDE SIT - FORWARD BEND OVER EACH LEG ...........................................................27CHEST TO FLOOR...............................................27SIDE LYING WITH RAISED LEG...........................28PRONE LIE ...........................................................28PRONE LIE SINGLE LEG RAISE .........................28SIDE LYING ..........................................................28FLOOR EXERCISES .............................................28PRONE LEG RAISE .............................................29SUPINE LIE ..........................................................29LEG RAISE FROM SUPINE LIE............................29CRADLE ...............................................................30SPLIT....................................................................30SWALLOW............................................................30ADVANCED FLEX/STRENGTH MOVEMENTS .....31SPOTTING/PADDING ..........................................31HEADSTAND ........................................................31CARTWHEELS .....................................................31PRE EXERCISES FOR WALKOVERS...................32BACKWARD WALKOVER.....................................32FORWARD WALKOVER .......................................32EXTENDED BACKBEND ......................................32ROD SECTION .....................................................33MEASURING THE ROD........................................33GRIP OF THE ROD ..............................................33ATTENTION .........................................................33PLACEMENTS OF THE ROD ...............................33ROD ACROSS SHOULDERS—............................34UNDER/BOTTOM OR TOP GRIP.........................34UPWARD STRETCH.............................................34ARMS FOLDED ..................................................35STRIKES...............................................................35FORWARD STRIKE ..............................................35SINGLE HAND STRIKE .......................................35NECK STRIKE ......................................................36TWISTS OF THE ROD .........................................36SINGLE HAND STRIKE ........................................36FOREHEAD STRIKE .............................................36SIDE RAISE TWIST - TOP GRIP...........................37SIDE OBLIQUE UP—SIDE OBLIQUE DOWN ......37BACK TWIST .......................................................37FORWARD OBLIQUE UP/FORWARD OBLIQUE DOWN TWIST.......................................................38FORWARD RAISE TWIST ....................................38BACK OBLIQUE DOWN TWIST ..........................39
2
Table of Contents
3
Table of Contents
VERTICAL TWIST— TOP GRIP............................39VERTICAL TWIST—UNDER/BOTTOM GRIP ......39LEG TWIST...........................................................40CURVE OVERHEAD .............................................40SIDE RAISE WITH NECK REST ...........................40FLASHING OF THE ROD—SINGLE/MULTIPLE ...41ROD ACROSS BACK ...........................................41SINGLE FLASH ....................................................41FLASH BEHIND BACK ......................................42COMBINING MOVEMENTS ................................42TOP GRIP FLASH.................................................42MULTIPLE FLASH ................................................42COMBINATION MOVEMENTS - IDEAS FOR CHOREOGRAPHY ...............................................43BATON FLASH ....................................................43CLUB SWINGING.................................................44LENGTH OF THE CLUB.......................................44PLANEING............................................................44CIRCLES ..............................................................46DIRECTIONS ........................................................46DETAILS OF FOOTWORK ....................................46GRIPS FOR SWINGING .......................................47SWINGS ..............................................................47HEAD SWINGS.....................................................47BACKSWINGS ....................................................47BACKSWINGS—PARALLEL ................................48SIDE RAISE SWINGS...........................................48BACKSWINGS - INWARD....................................48LEG SWINGS .......................................................49FORWARD RAISE SWINGS .................................49CHEST SWINGS & CROSSES .............................50HIPSWINGS .........................................................52SINGLE HIPSWINGS ...........................................52DUAL/DOUBLE HIPSWINGS ..............................52MULTIPLE HIPSWINGS ......................................53HIP CROSS ..........................................................53HIP WRIST SWINGS ............................................53BODY SWINGS ...................................................54BODY SWINGS ...................................................54BODY CROSS......................................................54BODY SWINGS ...................................................54WRIST SWINGS AND CROSSES.........................55WRIST SWINGS ...................................................55OVERHEAD WRIST SWING ................................55BACK WRIST SWING...........................................55SINGLE WRIST CROSS .......................................56SINGLE WRIST CROSS .......................................56DOUBLE WRIST CROSS .....................................56SINGLE WRIST CROSS .......................................56OVERHEAD WRIST CROSS (double)...................57OVERHEAD WRIST CROSS (single) ....................57NECK SWING.......................................................58NECK SWINGS & CROSSES ...............................58NECK CROSS ......................................................58
NECK CROSS ......................................................59NECK CROSS ......................................................59FOLDS..................................................................60DOUBLE FOLD.....................................................60DOUBLE FOLD ....................................................61MIXED FOLDS......................................................61BIG WHEEL TURNS ............................................62FRONT TO BACK TURNING ................................63BODY SWING.......................................................63OVERHEAD WRIST CROSS.................................63WINDMILL ............................................................63BODY SWING.......................................................63DOUBLE NECK SWING .......................................64NECK CROSS ......................................................64HIP SWING...........................................................64HIP WRIST SWING...............................................65HIP CROSS ..........................................................65FIGURE MARCHING ............................................66TEMPO .................................................................66HANDS AND ARMS .............................................66LEG AND FOOT WORK........................................66SLOW MARCH.....................................................67TURNING CORNERS ...........................................67STEPPING—SIDE AND BOX STEPPING .............67MARKING TIME....................................................67TURNS .................................................................68ABOUT TURN.......................................................68MARK TIME TURN ..............................................68WITH FOOT ACROSS BEHIND............................68HEAD TURNS.......................................................68TURNING THROUGH ATTENTION ......................68OPEN TURN.........................................................68AESTHETIC ..........................................................69PORT-DE-BRAS—CARRIAGE OF THE ARMS.....69ARM POSITIONS..................................................69HEAD POSITIONS................................................69LOW SECOND POSITION....................................70PREPARATION POSITION....................................70FIRST POSITION..................................................70SECOND POSITION.............................................70HIGH SECOND POSITION ...................................70FOURTH POSITION CROSSED ...........................71THIRD POSITION .................................................71DEMI BRAS ..........................................................71FIFTH POSITION ..................................................71FOURTH POSITION .............................................71LEGS AND FEET ..................................................72POSITIONS OF THE FEET ...................................72FIRST POSITION..................................................72FOURTH POSITION OPEN...................................72SECOND POSITION.............................................72FOURTH POSITION CROSSED ...........................72THIRD POSITION .................................................72FIFTH POSITION ..................................................72
4
Table of Contents
FIFTH ON DEMI-POINTE .....................................73POSITIONS OF THE FEET ...................................73PLIÉ ......................................................................73DEVELOPPÉ ........................................................73FONDU.................................................................74DEMI-PLIÉ ...........................................................74POSÉ ...................................................................74RETIRÉ ................................................................75RETIRÉ DEVANT ..................................................75CHASSÉ ..............................................................75RETIRÉ DERRIÈRE...............................................75RONDE DE JAMBE .............................................76BALANCE POSITIONS.........................................76ARABESQUE........................................................76ARABESQUE ALIGNMENT POSITIONS ..............77FIRST ARABESQUE ............................................77ARABESQUE FONDU ..........................................77ARABESQUE PENCHÉE ......................................77SECOND ARABESQUE........................................77THIRD ARABESQUE ............................................77ATTITUDE .............................................................78ATTITUDE DEVANT ..............................................78STANDING SPLIT .................................................78ATTITUDE DERRIÉRE...........................................78ATTITUDE PENCHÉE ...........................................78SPOTTING............................................................79PIROUETTE..........................................................79TURNING AND TRAVELLING ..............................79BACK LAYOUT.....................................................79BOURRÉE ............................................................80PAS DE BOURRÉE COURU.................................80ILLUSION TURN...................................................80SOUTENU TURN..................................................80DANCE .................................................................81ASSEMBLÉ...........................................................81CABRIOLE............................................................81BALANCÉ ............................................................81CHAINES .............................................................82CHASSÉ .............................................................82CURTSEY.............................................................83GALLOP OR SLIP STEP.......................................83GLISSADE ...........................................................83GRAPE VINE STEP ..............................................84HOP......................................................................84JETÉ ....................................................................84PETIT JETÉ ..........................................................84GRAND JETÉ .......................................................85LEAP.....................................................................85GRAND JETÉ EN TOURNANT ............................85PAS DE CHAT ......................................................86PAS DE BASQUE ................................................86MAZURKA ...........................................................86PIVOT ...................................................................87360 DEGREE TURN ............................................87
POSÉ TURNS.......................................................87RELEVÉ ................................................................87RISES ...................................................................87SAUTÉ .................................................................87SAUTÉ DE BASQUE.............................................87RUN......................................................................87SISSONNE ORDINAIRE .......................................88SISSONNE OUVERTE .........................................88SISSONNE FERMÉE ...........................................88POLKA WITH DEVELOPPÉ ..................................88POLKA..................................................................88WALK....................................................................89WALK WITH STRETCHED FEET ..........................89SKIP......................................................................89SLIDE....................................................................89TEMPS LEVÉ ......................................................89WALK ON DEMI-POINTE .....................................89WALTZ ..................................................................90FOLK DANCE .......................................................91RHYTHMIC INTERPRETATIONS ..........................92THEME .................................................................92EXPRESSION AND STYLE...................................92MUSICAL INTERPRETATION ...............................92DANCE VARIETY AND TECHNIQUE....................92SONG AND DANCE .............................................93SONGS OR SONGS WITH MOVEMENTS ...........94SINGING ..............................................................94PHRASING/BREATHING ....................................94ENUNCIATION/DICTION ......................................94CALISTHENIC SPECTACULAR............................95STAGE PRESENTATION.......................................95STAGE MEDLEY...................................................96GRACEFUL CALISTHENIC SOLO........................97CALISTHENIC SOLO............................................98CALISTHENIC DUO .............................................99
5
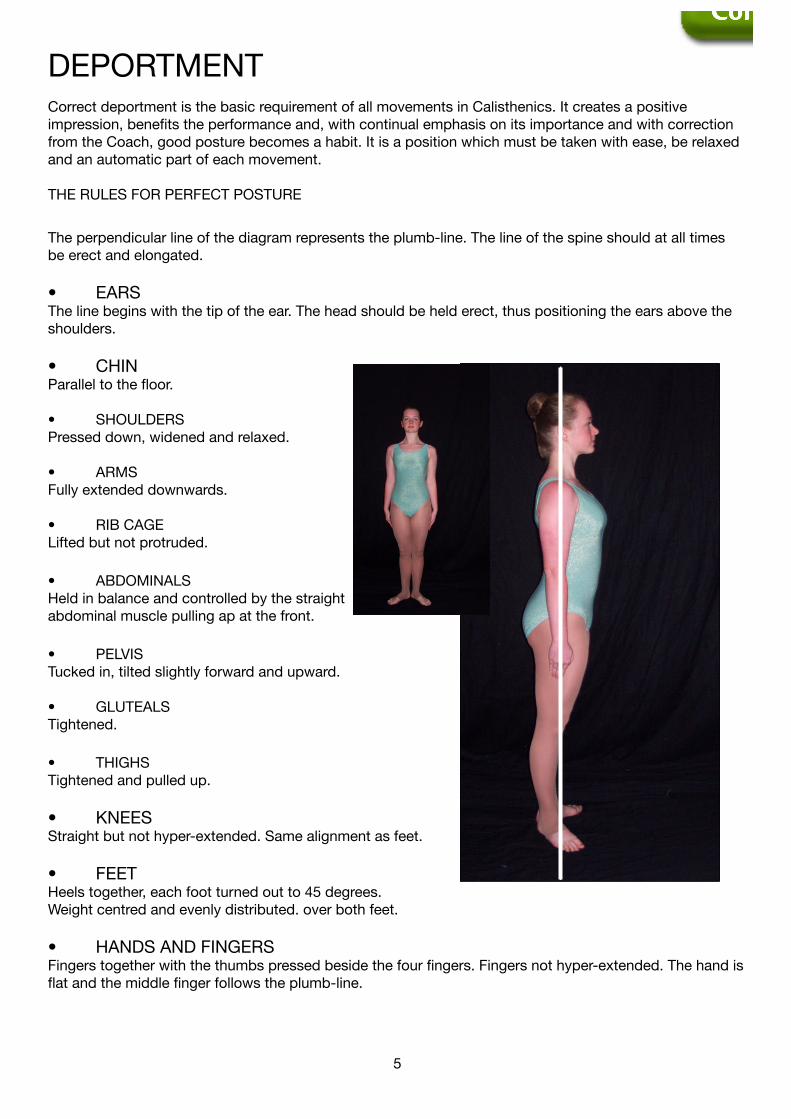
DEPORTMENTCorrect deportment is the basic requirement of all movements in Calisthenics. It creates a positive impression, benefits the performance and, with continual emphasis on its importance and with correction from the Coach, good posture becomes a habit. It is a position which must be taken with ease, be relaxed and an automatic part of each movement.
THE RULES FOR PERFECT POSTURE
The perpendicular line of the diagram represents the plumb-line. The line of the spine should at all times be erect and elongated.
• EARSThe line begins with the tip of the ear. The head should be held erect, thus positioning the ears above the shoulders.
• CHIN Parallel to the floor.
• SHOULDERS Pressed down, widened and relaxed.
• ARMS Fully extended downwards.
• RIB CAGE Lifted but not protruded.
• ABDOMINALS Held in balance and controlled by the straight abdominal muscle pulling ap at the front. • PELVISTucked in, tilted slightly forward and upward.
• GLUTEALS Tightened.
• THIGHS Tightened and pulled up.
• KNEESStraight but not hyper-extended. Same alignment as feet.
• FEETHeels together, each foot turned out to 45 degrees. Weight centred and evenly distributed. over both feet.
• HANDS AND FINGERSFingers together with the thumbs pressed beside the four fingers. Fingers not hyper-extended. The hand is flat and the middle finger follows the plumb-line.
6 7
THIS LIST MUST ACCOMPANY THE ACF VIDEO ON BANNED AND DANGEROUS MOVEMENTS IN CALISTHENICS. THE VIDEO MUST BE VIEWED ANNUALLY BY ALL COACHES.
The following movements apply to all sections of Calisthenics and take effect in 1998.
Movements are banned or regarded as dangerous because of the unsuitability of hard floors and lack of necessary strength in participants.
The speed of some movements makes them dangerous especially on hard floors.
Because of these things, there may be a lack of control or there may be jarring, so that injuries may occur.
Risk is added when eight participants attempt to do the same difficult movement simultaneously.
Risk is also added at the time of competition when the competitors are likely to be more tense.
BANNED AND DANGEROUS MOVEMENTS
BANNED MOVEMENTS.
• Handstand Chest Drop• Handstand to Forward Roll• Fish Flop• ANY GYMNASTIC MOVEMENT ORIGINATING FROM A RUN UP AND/OR SPRING -Dive Roll Spring into Forward Roll -Run Up into Cartwheel -Spring into Handstand with straight legs -Spring into Walkover -Round Off -Hand Springs
-Head Springs• Bridge holding feet with both hands balancing on head• Squat to Straddle Leap• Revolving Headstand• Chest Rolls – Forward, Backward and all variations of the movement• Supported Chest Balance (from any position)• Hook• Prone Hook• Rotation from Straddle into Standing Lunge• Shoulder Stand• Rods in Mouth• Rod Over Shoulder in Close Formation
6 7
PAIR WORKExamples of Banned Pair work should be viewed on the video.
No participant should take the full body weight of another in a static standing position. For example:-
1. Back to back linking arms, one performer lying on top of partner’s back.
2. Handstand against partner’s shoulders, front person bends forward and takes body weight of partner on the back.
STRENGTH MOVEMENTS which are given to men in gymnastics, ballet and folk dance are not recommended for Calisthenic participants. These movements require specialist teaching and training.
The following are examples of strength movements:-
1. Press to handstand2. Walkover with recovery of two legs together3. Backward roll to handstand (caught by partner)4. Headstand to handstand (held by partner)
BANNED AND DANGEROUS MOVEMENTS
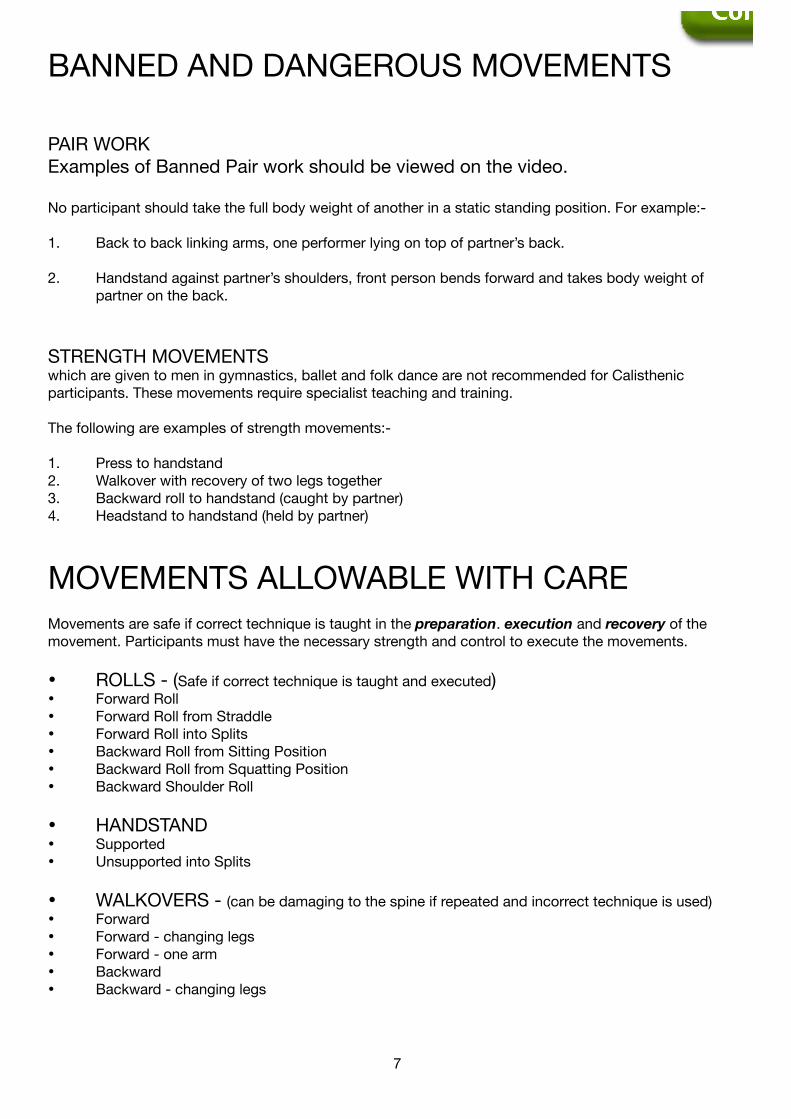
MOVEMENTS ALLOWABLE WITH CAREMovements are safe if correct technique is taught in the preparation. execution and recovery of the movement. Participants must have the necessary strength and control to execute the movements.
• ROLLS - (Safe if correct technique is taught and executed)• Forward Roll• Forward Roll from Straddle• Forward Roll into Splits• Backward Roll from Sitting Position• Backward Roll from Squatting Position• Backward Shoulder Roll
• HANDSTAND• Supported• Unsupported into Splits
• WALKOVERS - (can be damaging to the spine if repeated and incorrect technique is used)• Forward• Forward - changing legs• Forward - one arm• Backward• Backward - changing legs
8
FREE EXERCISES
9
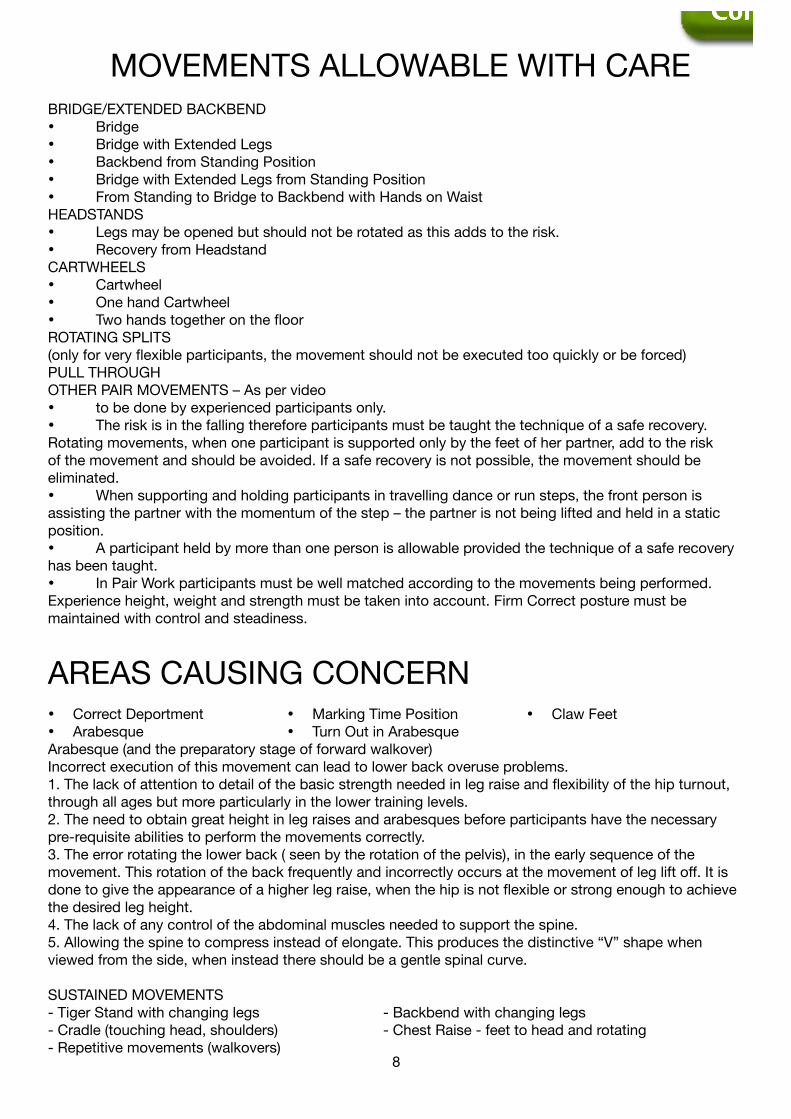
BRIDGE/EXTENDED BACKBEND• Bridge• Bridge with Extended Legs• Backbend from Standing Position• Bridge with Extended Legs from Standing Position• From Standing to Bridge to Backbend with Hands on WaistHEADSTANDS • Legs may be opened but should not be rotated as this adds to the risk.• Recovery from HeadstandCARTWHEELS• Cartwheel• One hand Cartwheel• Two hands together on the floorROTATING SPLITS (only for very flexible participants, the movement should not be executed too quickly or be forced)PULL THROUGHOTHER PAIR MOVEMENTS – As per video• to be done by experienced participants only.• The risk is in the falling therefore participants must be taught the technique of a safe recovery. Rotating movements, when one participant is supported only by the feet of her partner, add to the risk of the movement and should be avoided. If a safe recovery is not possible, the movement should be eliminated.• When supporting and holding participants in travelling dance or run steps, the front person is assisting the partner with the momentum of the step – the partner is not being lifted and held in a static position.• A participant held by more than one person is allowable provided the technique of a safe recovery has been taught.• In Pair Work participants must be well matched according to the movements being performed. Experience height, weight and strength must be taken into account. Firm Correct posture must be maintained with control and steadiness.
AREAS CAUSING CONCERN• Correct Deportment • Marking Time Position • Claw Feet • Arabesque • Turn Out in ArabesqueArabesque (and the preparatory stage of forward walkover)Incorrect execution of this movement can lead to lower back overuse problems.1. The lack of attention to detail of the basic strength needed in leg raise and flexibility of the hip turnout, through all ages but more particularly in the lower training levels.2. The need to obtain great height in leg raises and arabesques before participants have the necessary pre-requisite abilities to perform the movements correctly.3. The error rotating the lower back ( seen by the rotation of the pelvis), in the early sequence of the movement. This rotation of the back frequently and incorrectly occurs at the movement of leg lift off. It is done to give the appearance of a higher leg raise, when the hip is not flexible or strong enough to achieve the desired leg height.4. The lack of any control of the abdominal muscles needed to support the spine.5. Allowing the spine to compress instead of elongate. This produces the distinctive “V” shape when viewed from the side, when instead there should be a gentle spinal curve.
SUSTAINED MOVEMENTS- Tiger Stand with changing legs - Backbend with changing legs- Cradle (touching head, shoulders) - Chest Raise - feet to head and rotating- Repetitive movements (walkovers)
MOVEMENTS ALLOWABLE WITH CARE

8
FREE EXERCISES
9
The flexibility and agility the pupils achieve in Free Exercises gives the imaginative choreographer the opportunity to create an interesting routine, demonstrating the physical capabilities of the performers.
The routine is complemented by a musical accompaniment, which is unrestricted in choice, giving an individual quality to each performance.
Free Exercises, whilst allowing a wide scope of variety, is built on a series of basic movements, all of which must be correct in detail, thus ensuring each movement is physically beneficial and aesthetically pleasing. Routines should be choreographed with an equal balance of movements in all directions and should not include repetitive use of any one part of the body.
Refer to Banned Movements Video, the list of Banned Movements Section (page 7 ) and Movements Allowable only with Control and Correct Technique.
ATTENTION
Arms fully extended downwards with the fingers together.
The thumbs should be pressed beside the four fingers with the fingers not hyper-extended.
The hand is flat and the middle finger follows the plumb-line.
In the following arm movements, the elbows, wrists and fingers are held straight and firm, the fingers are together but not hyper-extended .
FORWARD RAISE
The arms are fully extended forward at shoulder level, parallel to the floor, shoulder width apart, palms facing each other.
ARM POSITIONS
FREE EXERCISES
FREE EXERCISES
10
FREE EXERCISES
11
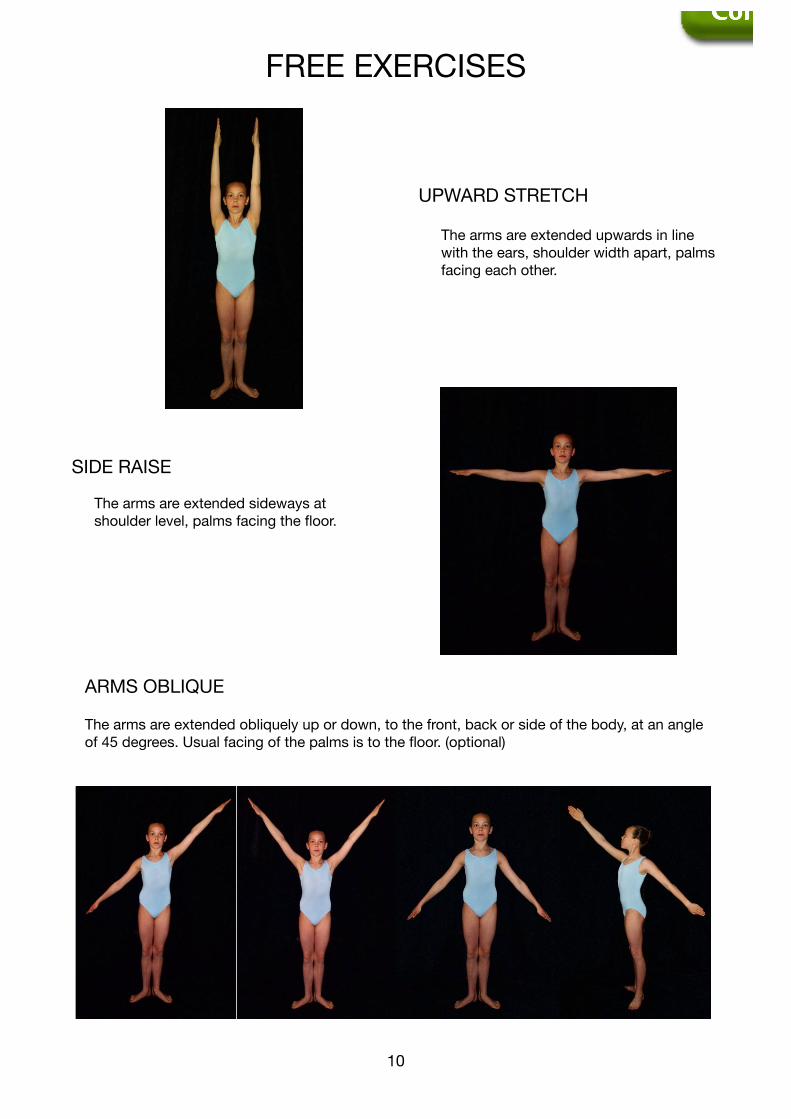
UPWARD STRETCH
The arms are extended upwards in line with the ears, shoulder width apart, palms facing each other.
SIDE RAISE
The arms are extended sideways at shoulder level, palms facing the floor.
ARMS OBLIQUE
The arms are extended obliquely up or down, to the front, back or side of the body, at an angle of 45 degrees. Usual facing of the palms is to the floor. (optional)

FREE EXERCISES
10
FREE EXERCISES
11
In the following arm movements, the elbows, wrists and fingers can be bent as required.
WRIST CROSS
Cross wrists either overhead, in front or behind the body
CLASP OVERHEAD
Thumb tips towards each other, with one hand overlapping the other. Hands are flat across the top at right angles to the arms.
HIPS FIRM
The hands are placed just below the waist with the thumb at the back and the four fingers together at the front. The middle finger continues the line of the forearm and the elbow should be in line with the shoulders.
FREE EXERCISES
12
FREE EXERCISES
13
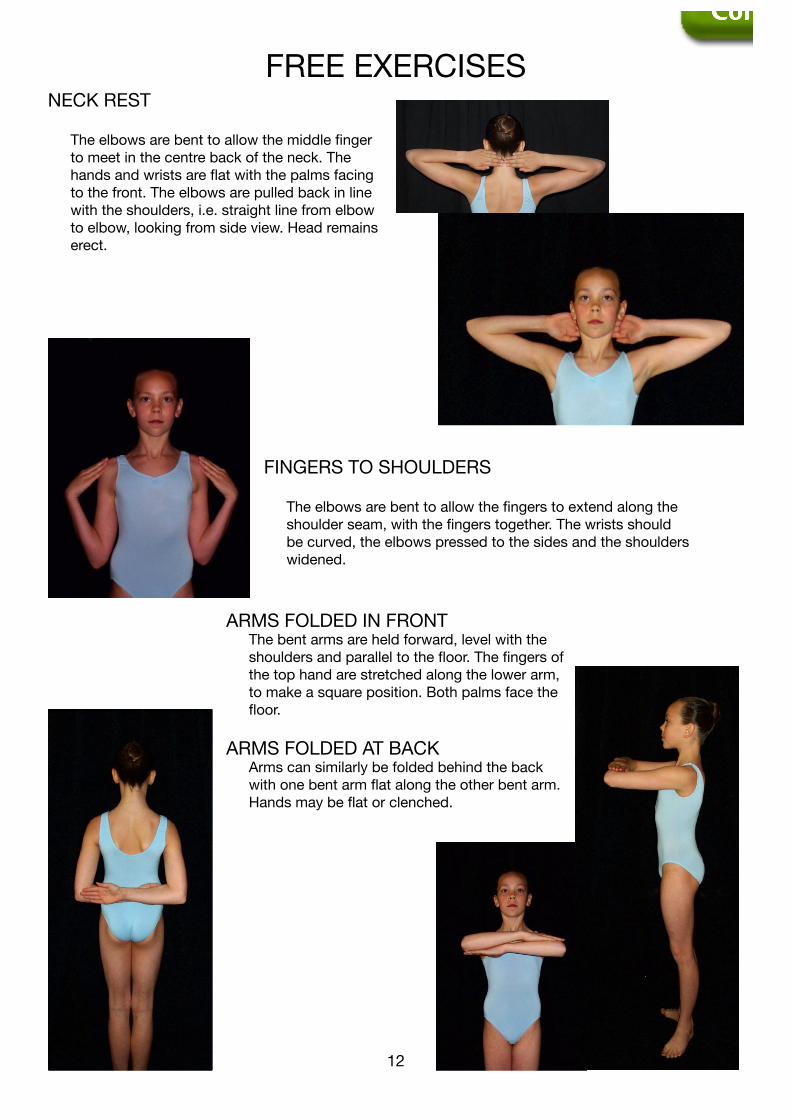
NECK REST
The elbows are bent to allow the middle finger to meet in the centre back of the neck. The hands and wrists are flat with the palms facing to the front. The elbows are pulled back in line with the shoulders, i.e. straight line from elbow to elbow, looking from side view. Head remains erect.
FINGERS TO SHOULDERS
The elbows are bent to allow the fingers to extend along the shoulder seam, with the fingers together. The wrists should be curved, the elbows pressed to the sides and the shoulders widened.
ARMS FOLDED IN FRONT The bent arms are held forward, level with the
shoulders and parallel to the floor. The fingers of the top hand are stretched along the lower arm, to make a square position. Both palms face the floor.
ARMS FOLDED AT BACK Arms can similarly be folded behind the back
with one bent arm flat along the other bent arm. Hands may be flat or clenched.
FREE EXERCISES
12
FREE EXERCISES
13
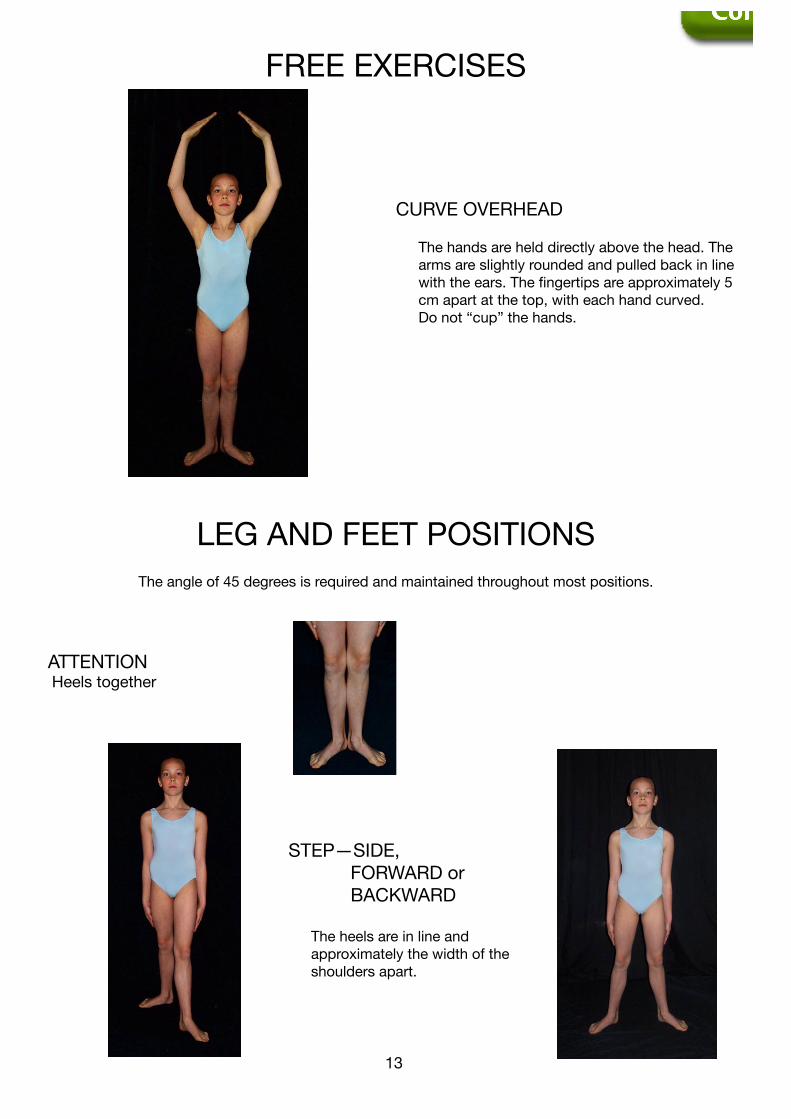
CURVE OVERHEAD
The hands are held directly above the head. The arms are slightly rounded and pulled back in line with the ears. The fingertips are approximately 5 cm apart at the top, with each hand curved.Do not “cup” the hands.
LEG AND FEET POSITIONSThe angle of 45 degrees is required and maintained throughout most positions.
ATTENTION Heels together
STEP—SIDE, FORWARD or BACKWARD
The heels are in line and approximately the width of the shoulders apart.
FREE EXERCISES
14
FREE EXERCISES
15
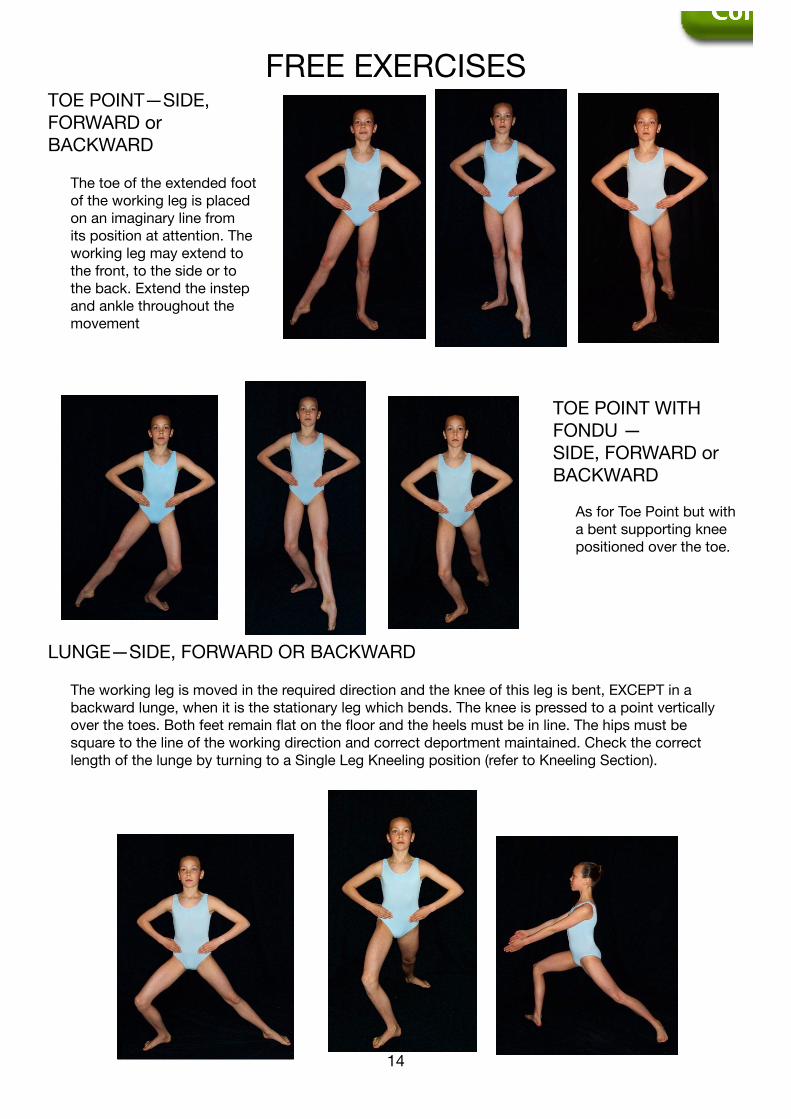
TOE POINT—SIDE, FORWARD or BACKWARD
The toe of the extended foot of the working leg is placed on an imaginary line from its position at attention. The working leg may extend to the front, to the side or to the back. Extend the instep and ankle throughout the movement
TOE POINT WITH FONDU —SIDE, FORWARD or BACKWARD
As for Toe Point but with a bent supporting knee positioned over the toe.
LUNGE—SIDE, FORWARD OR BACKWARD
The working leg is moved in the required direction and the knee of this leg is bent, EXCEPT in a backward lunge, when it is the stationary leg which bends. The knee is pressed to a point vertically over the toes. Both feet remain flat on the floor and the heels must be in line. The hips must be square to the line of the working direction and correct deportment maintained. Check the correct length of the lunge by turning to a Single Leg Kneeling position (refer to Kneeling Section).
FREE EXERCISES
14
FREE EXERCISES
15
TURNING LUNGE OR STEPQUARTER/HALF TURNS
Lift the toes and pivot on the heels. Pass through a 90 degree or 180 degree angle. Hips and shoulders finish square to the line of the new working direction.
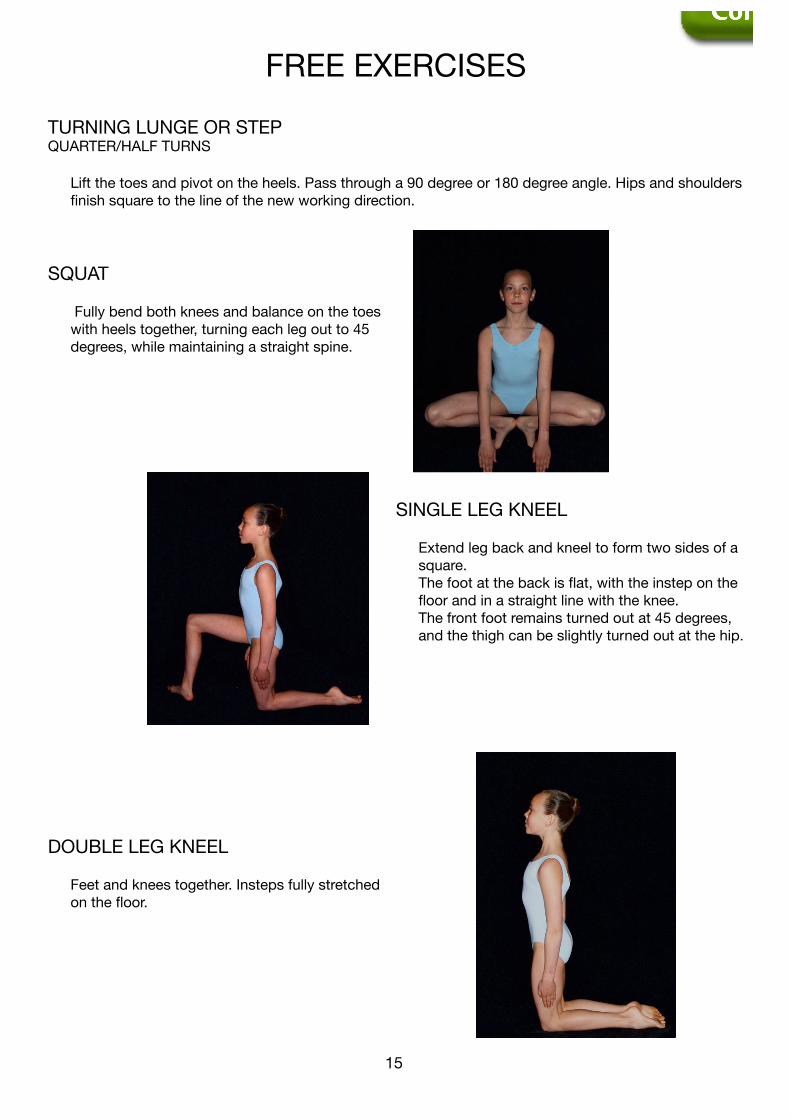
SQUAT
Fully bend both knees and balance on the toes with heels together, turning each leg out to 45 degrees, while maintaining a straight spine.
SINGLE LEG KNEEL
Extend leg back and kneel to form two sides of a square.
The foot at the back is flat, with the instep on the floor and in a straight line with the knee.
The front foot remains turned out at 45 degrees, and the thigh can be slightly turned out at the hip.
DOUBLE LEG KNEEL
Feet and knees together. Insteps fully stretched on the floor.
FREE EXERCISES
16
FREE EXERCISES
17
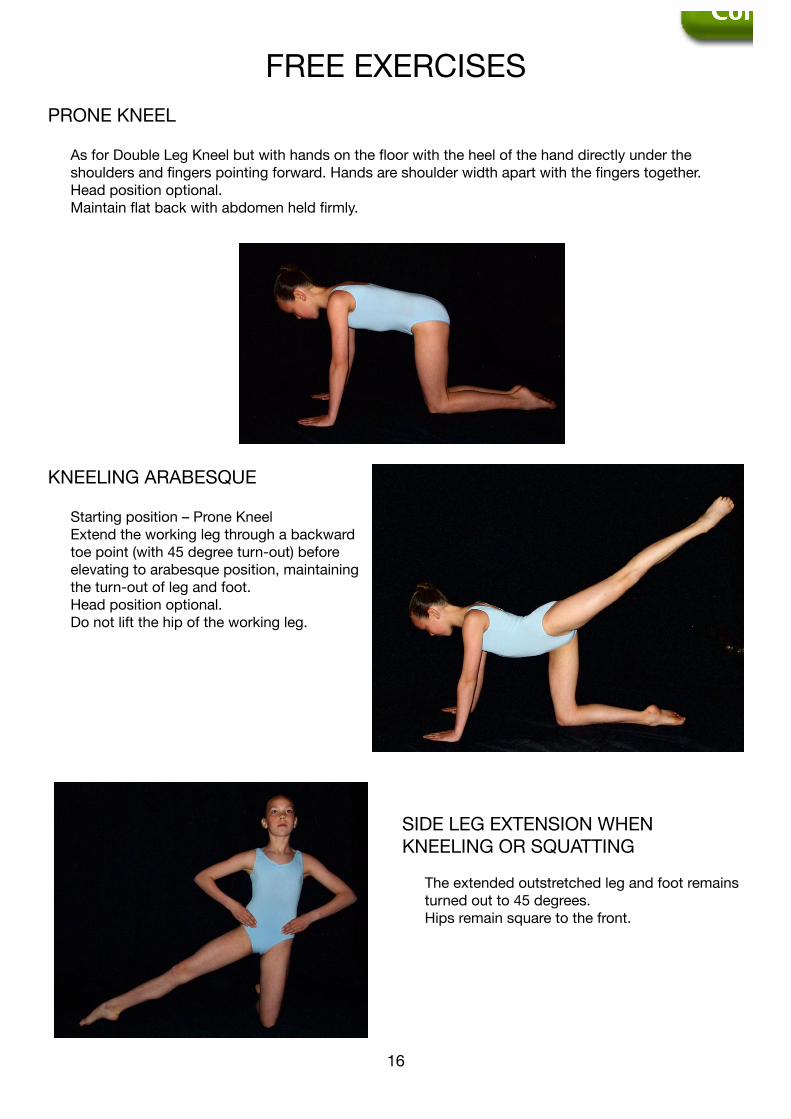
PRONE KNEEL
As for Double Leg Kneel but with hands on the floor with the heel of the hand directly under the shoulders and fingers pointing forward. Hands are shoulder width apart with the fingers together.
Head position optional. Maintain flat back with abdomen held firmly.
KNEELING ARABESQUE
Starting position – Prone Kneel Extend the working leg through a backward
toe point (with 45 degree turn-out) before elevating to arabesque position, maintaining the turn-out of leg and foot.
Head position optional. Do not lift the hip of the working leg.
SIDE LEG EXTENSION WHEN KNEELING OR SQUATTING
The extended outstretched leg and foot remains turned out to 45 degrees.
Hips remain square to the front.
FREE EXERCISES
16
FREE EXERCISES
17
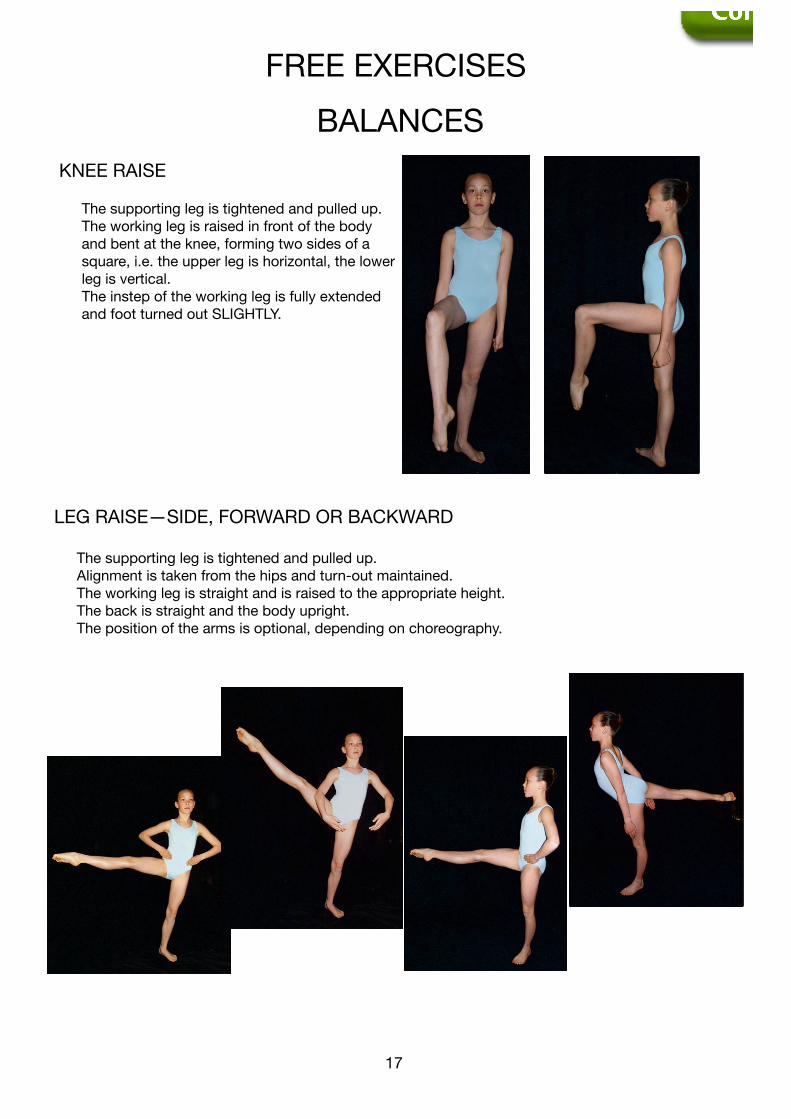
BALANCESKNEE RAISE
The supporting leg is tightened and pulled up. The working leg is raised in front of the body
and bent at the knee, forming two sides of a square, i.e. the upper leg is horizontal, the lower leg is vertical.
The instep of the working leg is fully extended and foot turned out SLIGHTLY.
LEG RAISE—SIDE, FORWARD OR BACKWARD
The supporting leg is tightened and pulled up. Alignment is taken from the hips and turn-out maintained. The working leg is straight and is raised to the appropriate height. The back is straight and the body upright. The position of the arms is optional, depending on choreography.
FREE EXERCISES
18
FREE EXERCISES
19
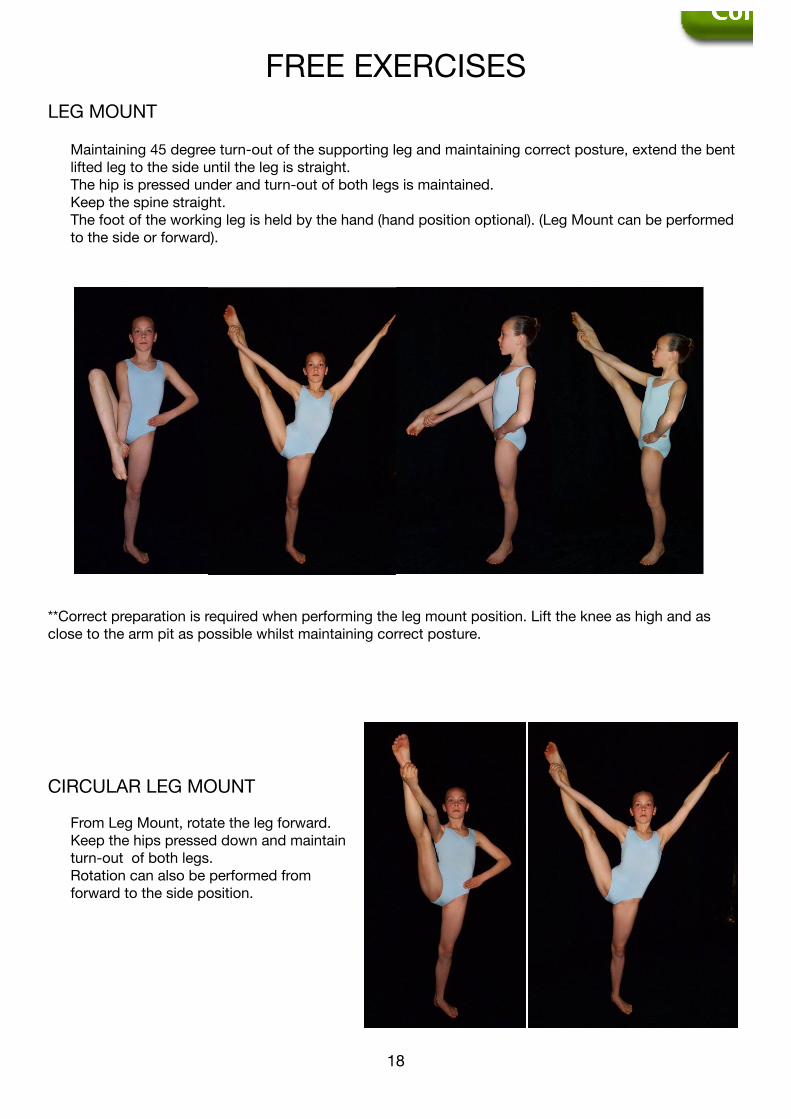
LEG MOUNT
Maintaining 45 degree turn-out of the supporting leg and maintaining correct posture, extend the bent lifted leg to the side until the leg is straight.
The hip is pressed under and turn-out of both legs is maintained. Keep the spine straight. The foot of the working leg is held by the hand (hand position optional). (Leg Mount can be performed
to the side or forward).
**Correct preparation is required when performing the leg mount position. Lift the knee as high and as close to the arm pit as possible whilst maintaining correct posture.
CIRCULAR LEG MOUNT
From Leg Mount, rotate the leg forward. Keep the hips pressed down and maintain
turn-out of both legs. Rotation can also be performed from
forward to the side position.
FREE EXERCISES
18
FREE EXERCISES
19
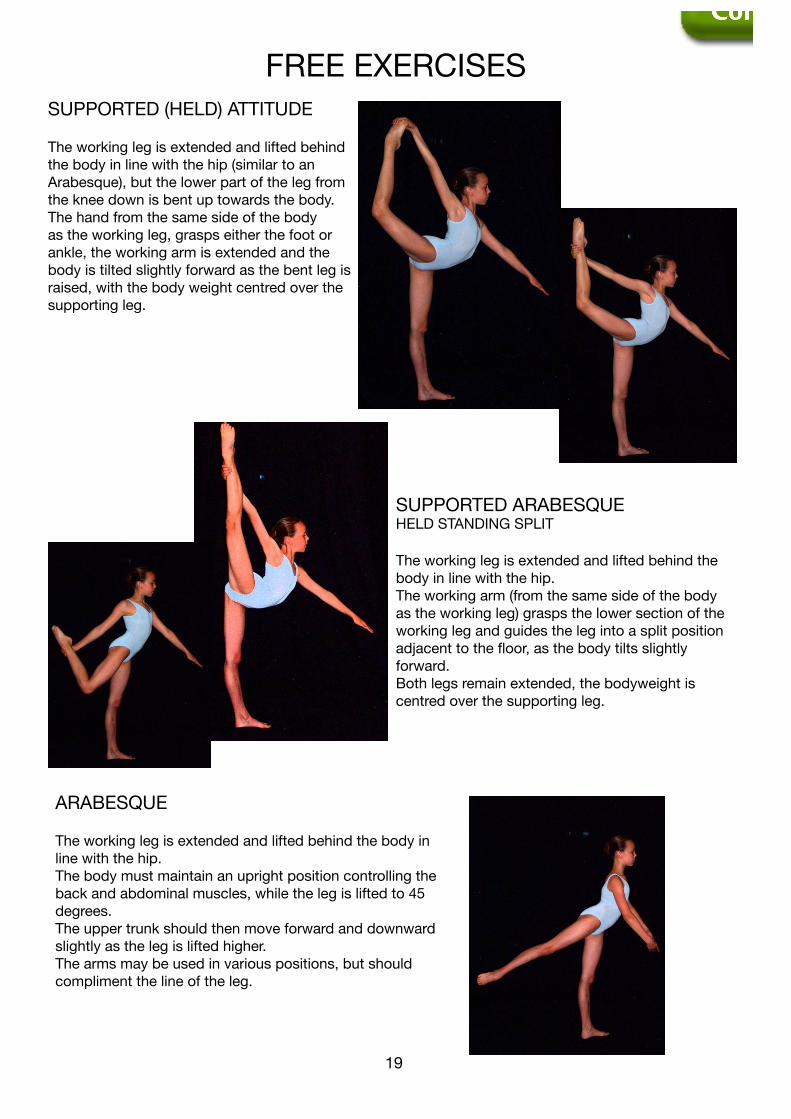
SUPPORTED (HELD) ATTITUDE
The working leg is extended and lifted behind the body in line with the hip (similar to an Arabesque), but the lower part of the leg from the knee down is bent up towards the body. The hand from the same side of the body as the working leg, grasps either the foot or ankle, the working arm is extended and the body is tilted slightly forward as the bent leg is raised, with the body weight centred over the supporting leg.
SUPPORTED ARABESQUE HELD STANDING SPLIT
The working leg is extended and lifted behind the body in line with the hip. The working arm (from the same side of the body as the working leg) grasps the lower section of the working leg and guides the leg into a split position adjacent to the floor, as the body tilts slightly forward. Both legs remain extended, the bodyweight is centred over the supporting leg.
ARABESQUE
The working leg is extended and lifted behind the body in line with the hip. The body must maintain an upright position controlling the back and abdominal muscles, while the leg is lifted to 45 degrees. The upper trunk should then move forward and downward slightly as the leg is lifted higher. The arms may be used in various positions, but should compliment the line of the leg.
FREE EXERCISES
20
FREE EXERCISES
21
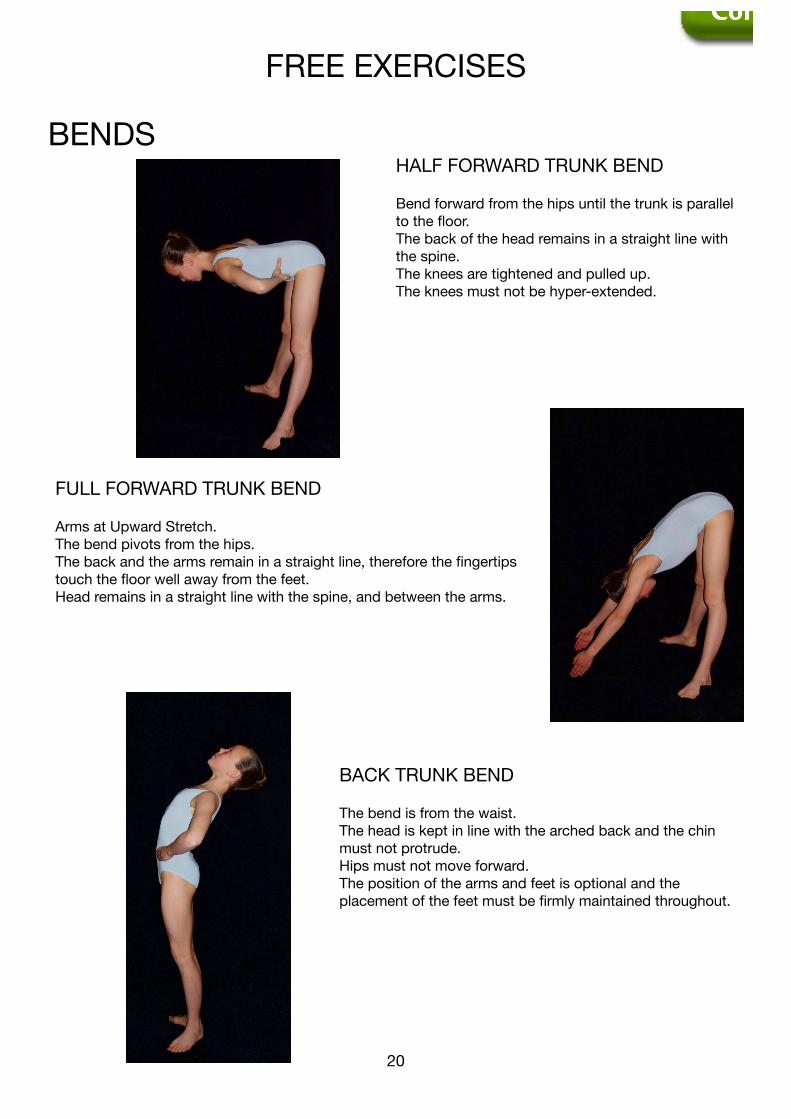
BENDSHALF FORWARD TRUNK BEND
Bend forward from the hips until the trunk is parallel to the floor. The back of the head remains in a straight line with the spine. The knees are tightened and pulled up. The knees must not be hyper-extended.
FULL FORWARD TRUNK BEND
Arms at Upward Stretch. The bend pivots from the hips. The back and the arms remain in a straight line, therefore the fingertips touch the floor well away from the feet. Head remains in a straight line with the spine, and between the arms.
BACK TRUNK BEND
The bend is from the waist. The head is kept in line with the arched back and the chin must not protrude.Hips must not move forward. The position of the arms and feet is optional and the placement of the feet must be firmly maintained throughout.
FREE EXERCISES
20
FREE EXERCISES
21
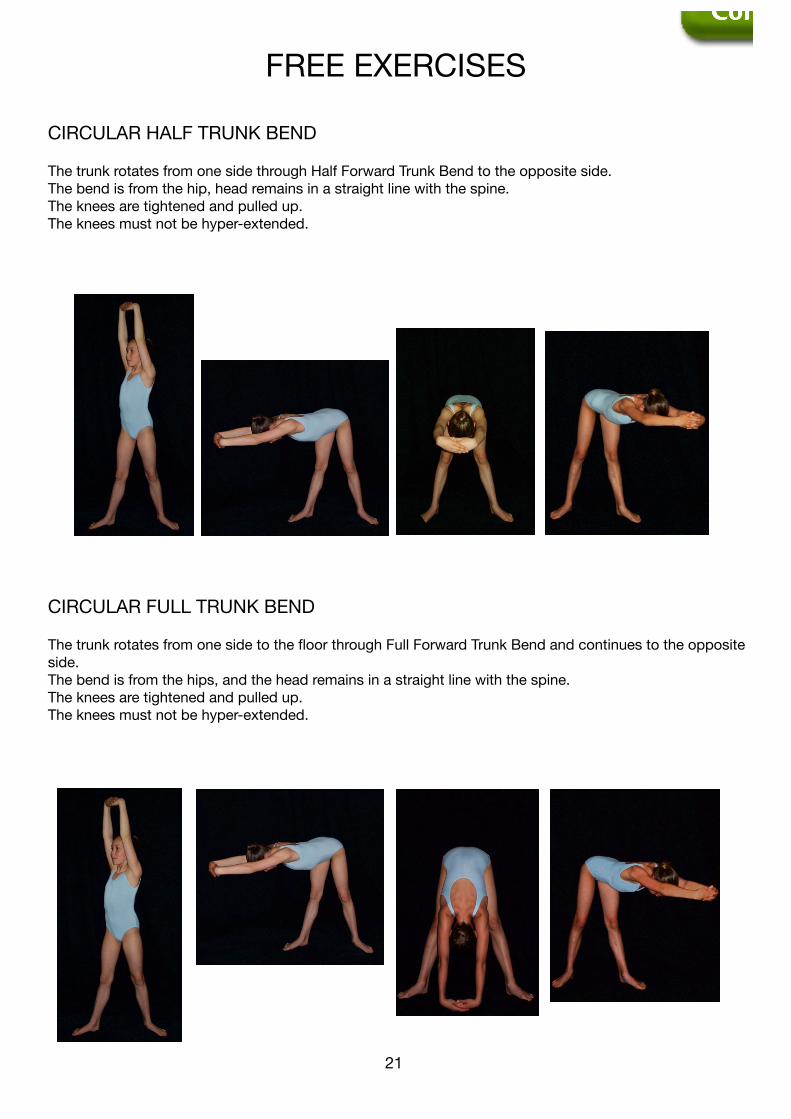
CIRCULAR HALF TRUNK BEND
The trunk rotates from one side through Half Forward Trunk Bend to the opposite side. The bend is from the hip, head remains in a straight line with the spine.The knees are tightened and pulled up. The knees must not be hyper-extended.
CIRCULAR FULL TRUNK BEND
The trunk rotates from one side to the floor through Full Forward Trunk Bend and continues to the opposite side. The bend is from the hips, and the head remains in a straight line with the spine. The knees are tightened and pulled up. The knees must not be hyper-extended.
FREE EXERCISES
22
FREE EXERCISES
23
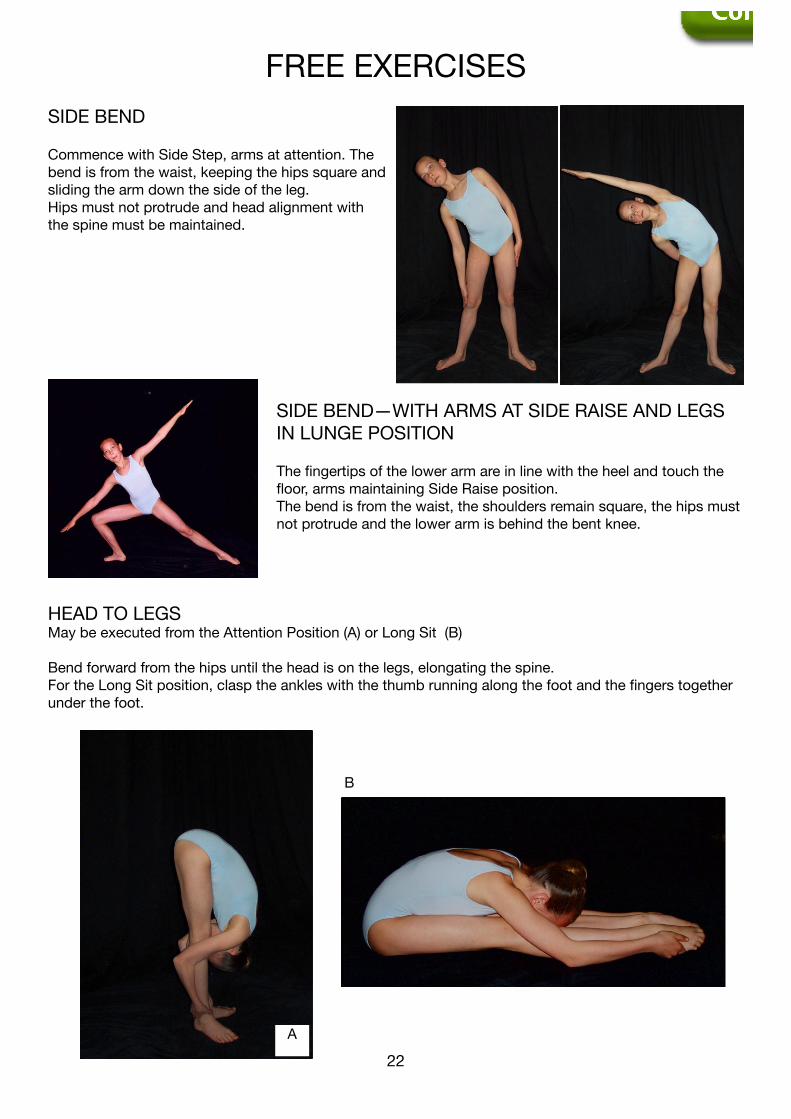
SIDE BEND
Commence with Side Step, arms at attention. The bend is from the waist, keeping the hips square and sliding the arm down the side of the leg. Hips must not protrude and head alignment with the spine must be maintained.
SIDE BEND—WITH ARMS AT SIDE RAISE AND LEGS IN LUNGE POSITION
The fingertips of the lower arm are in line with the heel and touch the floor, arms maintaining Side Raise position. The bend is from the waist, the shoulders remain square, the hips must not protrude and the lower arm is behind the bent knee.
HEAD TO LEGS May be executed from the Attention Position (A) or Long Sit (B)
Bend forward from the hips until the head is on the legs, elongating the spine. For the Long Sit position, clasp the ankles with the thumb running along the foot and the fingers together under the foot.
A
B
FREE EXERCISES
22
FREE EXERCISES
23
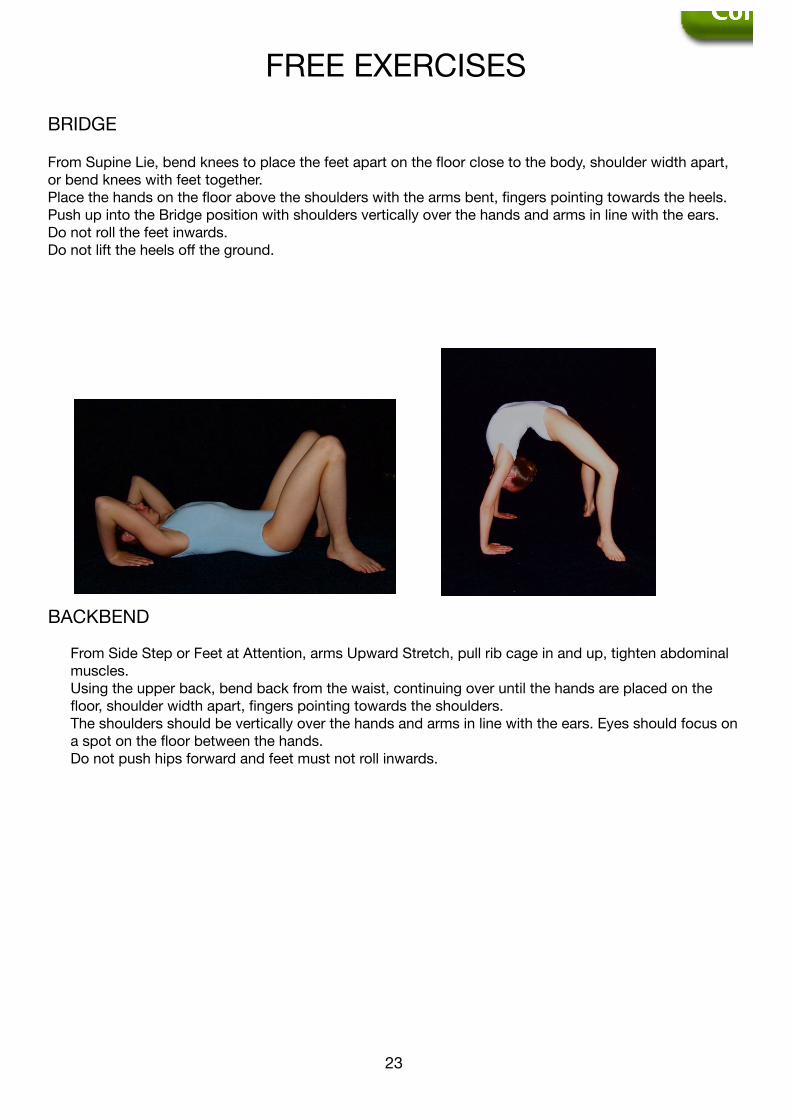
BRIDGE
From Supine Lie, bend knees to place the feet apart on the floor close to the body, shoulder width apart, or bend knees with feet together. Place the hands on the floor above the shoulders with the arms bent, fingers pointing towards the heels. Push up into the Bridge position with shoulders vertically over the hands and arms in line with the ears. Do not roll the feet inwards. Do not lift the heels off the ground.
BACKBEND
From Side Step or Feet at Attention, arms Upward Stretch, pull rib cage in and up, tighten abdominal muscles.
Using the upper back, bend back from the waist, continuing over until the hands are placed on the floor, shoulder width apart, fingers pointing towards the shoulders.
The shoulders should be vertically over the hands and arms in line with the ears. Eyes should focus on a spot on the floor between the hands.
Do not push hips forward and feet must not roll inwards.
FREE EXERCISES
24
FREE EXERCISES
25
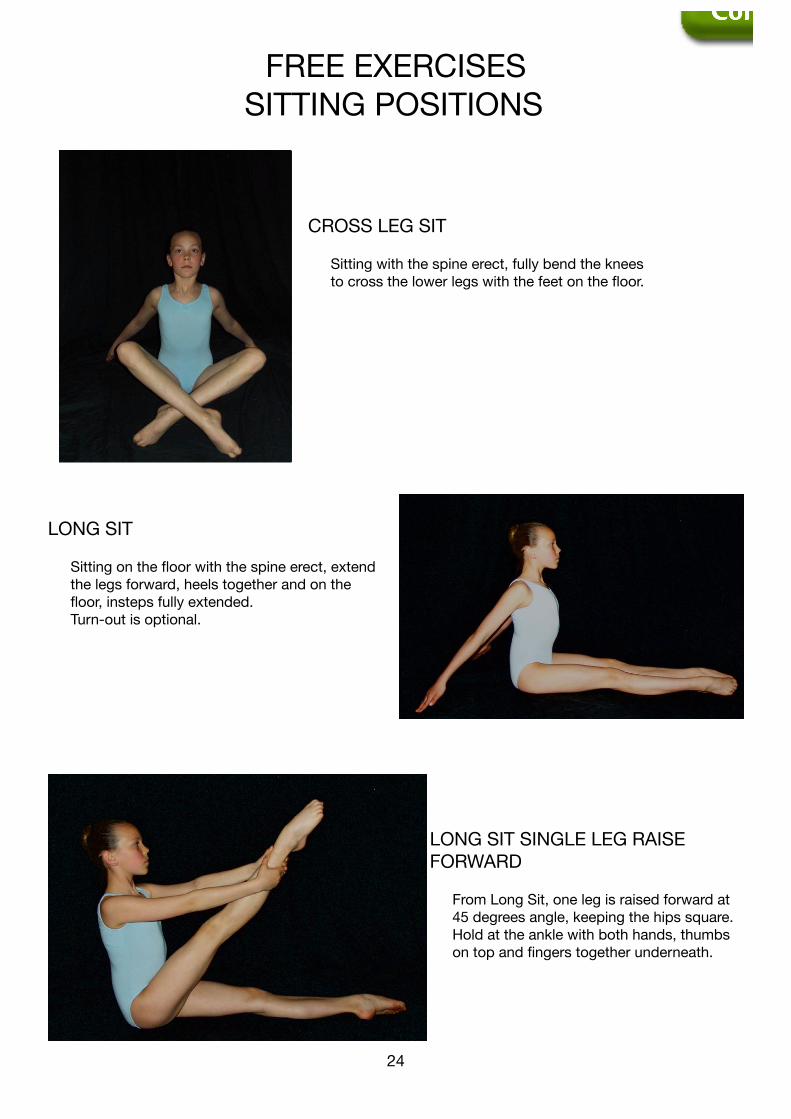
LONG SIT SINGLE LEG RAISE FORWARD
From Long Sit, one leg is raised forward at 45 degrees angle, keeping the hips square.
Hold at the ankle with both hands, thumbs on top and fingers together underneath.
CROSS LEG SIT
Sitting with the spine erect, fully bend the knees to cross the lower legs with the feet on the floor.
SITTING POSITIONS
LONG SIT
Sitting on the floor with the spine erect, extend the legs forward, heels together and on the floor, insteps fully extended.
Turn-out is optional.
FREE EXERCISES
24
FREE EXERCISES
25
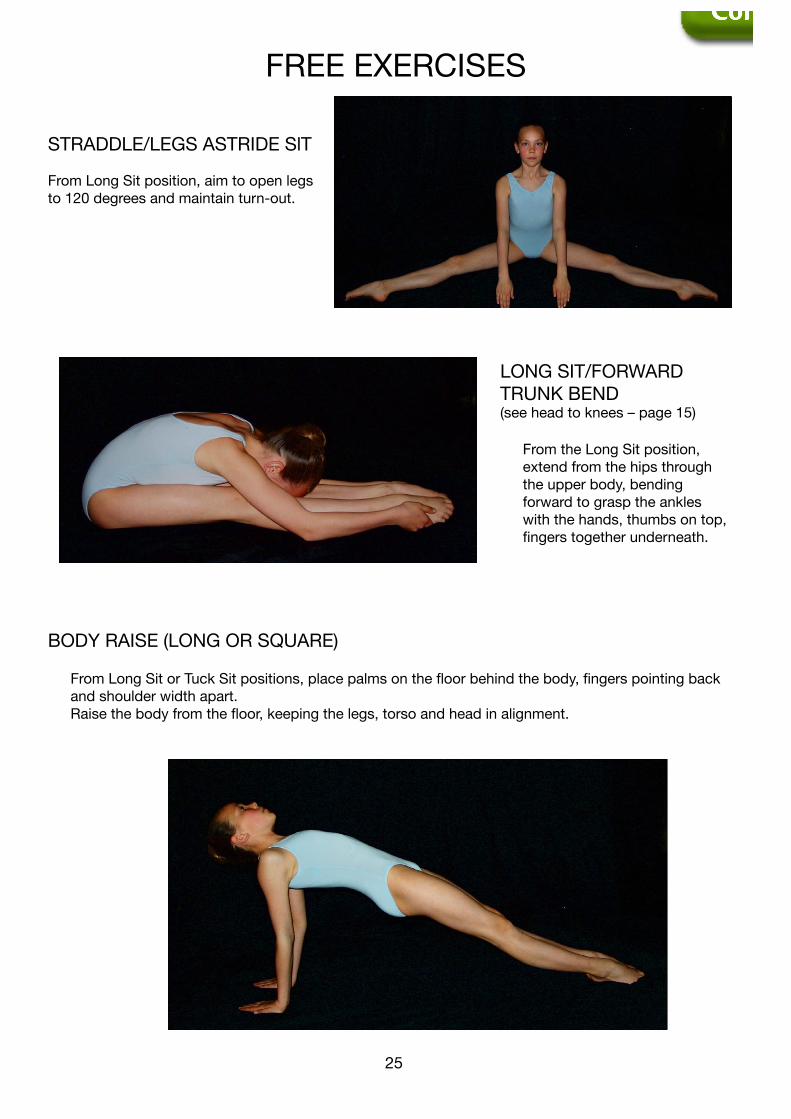
STRADDLE/LEGS ASTRIDE SlT
From Long Sit position, aim to open legs to 120 degrees and maintain turn-out.
LONG SIT/FORWARD TRUNK BEND (see head to knees – page 15)
From the Long Sit position, extend from the hips through the upper body, bending forward to grasp the ankles with the hands, thumbs on top, fingers together underneath.
BODY RAISE (LONG OR SQUARE)
From Long Sit or Tuck Sit positions, place palms on the floor behind the body, fingers pointing back and shoulder width apart.
Raise the body from the floor, keeping the legs, torso and head in alignment.
FREE EXERCISES
26
FREE EXERCISES
27
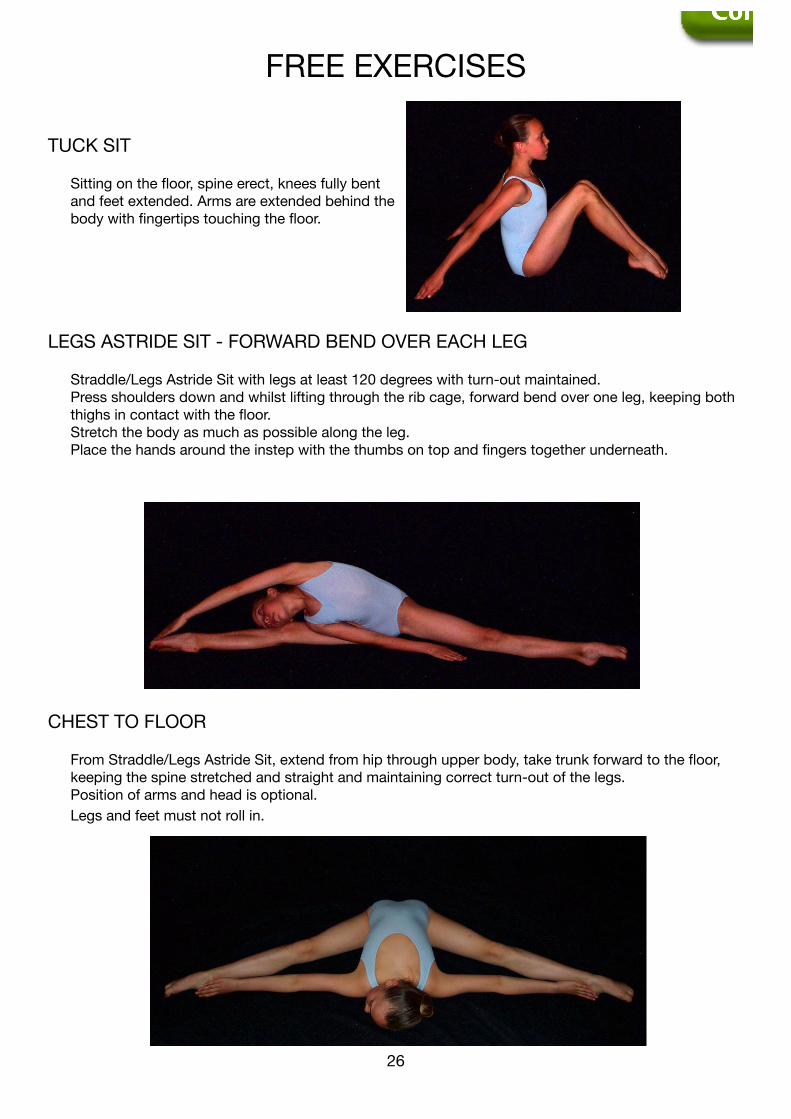
LEGS ASTRIDE SIT - FORWARD BEND OVER EACH LEG
Straddle/Legs Astride Sit with legs at least 120 degrees with turn-out maintained. Press shoulders down and whilst lifting through the rib cage, forward bend over one leg, keeping both
thighs in contact with the floor. Stretch the body as much as possible along the leg. Place the hands around the instep with the thumbs on top and fingers together underneath.
TUCK SIT Sitting on the floor, spine erect, knees fully bent
and feet extended. Arms are extended behind the body with fingertips touching the floor.
CHEST TO FLOOR
From Straddle/Legs Astride Sit, extend from hip through upper body, take trunk forward to the floor, keeping the spine stretched and straight and maintaining correct turn-out of the legs.
Position of arms and head is optional. Legs and feet must not roll in.
FREE EXERCISES
26
FREE EXERCISES
27
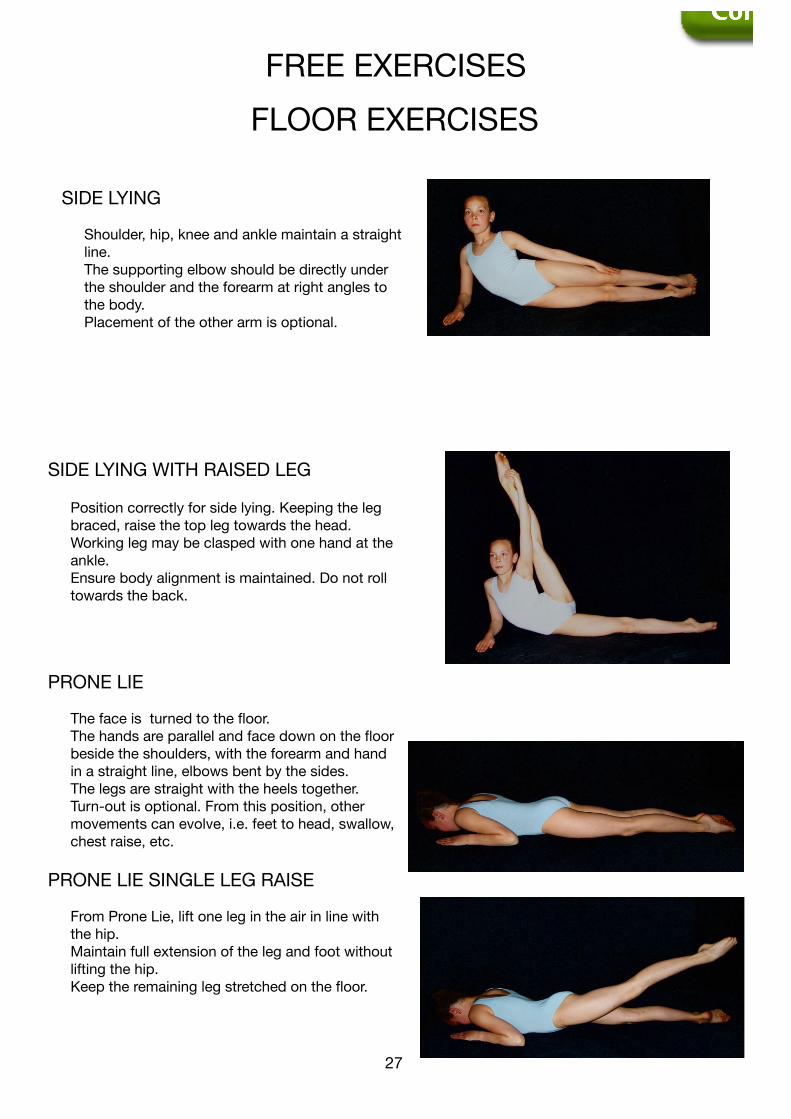
SIDE LYING
Shoulder, hip, knee and ankle maintain a straight line.
The supporting elbow should be directly under the shoulder and the forearm at right angles to the body.
Placement of the other arm is optional.
SIDE LYING WITH RAISED LEG
Position correctly for side lying. Keeping the leg braced, raise the top leg towards the head.
Working leg may be clasped with one hand at the ankle.
Ensure body alignment is maintained. Do not roll towards the back.
PRONE LIE
The face is turned to the floor. The hands are parallel and face down on the floor
beside the shoulders, with the forearm and hand in a straight line, elbows bent by the sides.
The legs are straight with the heels together. Turn-out is optional. From this position, other
movements can evolve, i.e. feet to head, swallow, chest raise, etc.
PRONE LIE SINGLE LEG RAISE
From Prone Lie, lift one leg in the air in line with the hip.
Maintain full extension of the leg and foot without lifting the hip.
Keep the remaining leg stretched on the floor.
FLOOR EXERCISES
FREE EXERCISES
28
FREE EXERCISES
29
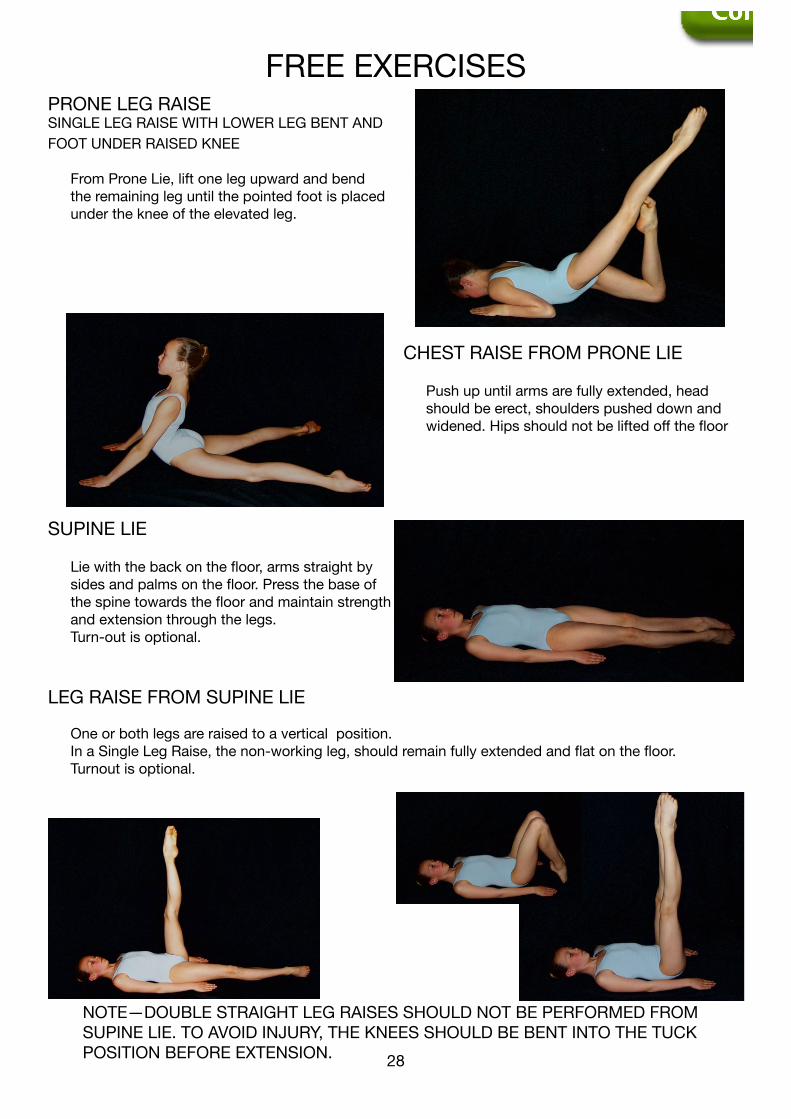
PRONE LEG RAISE SINGLE LEG RAISE WITH LOWER LEG BENT AND FOOT UNDER RAISED KNEE
From Prone Lie, lift one leg upward and bend the remaining leg until the pointed foot is placed under the knee of the elevated leg.
CHEST RAISE FROM PRONE LIE
Push up until arms are fully extended, head should be erect, shoulders pushed down and widened. Hips should not be lifted off the floor
SUPINE LIE
Lie with the back on the floor, arms straight by sides and palms on the floor. Press the base of the spine towards the floor and maintain strength and extension through the legs.
Turn-out is optional.
LEG RAISE FROM SUPINE LIE
One or both legs are raised to a vertical position. In a Single Leg Raise, the non-working leg, should remain fully extended and flat on the floor. Turnout is optional.
NOTE—DOUBLE STRAIGHT LEG RAISES SHOULD NOT BE PERFORMED FROM SUPINE LIE. TO AVOID INJURY, THE KNEES SHOULD BE BENT INTO THE TUCK POSITION BEFORE EXTENSION.
FREE EXERCISES
28
FREE EXERCISES
29
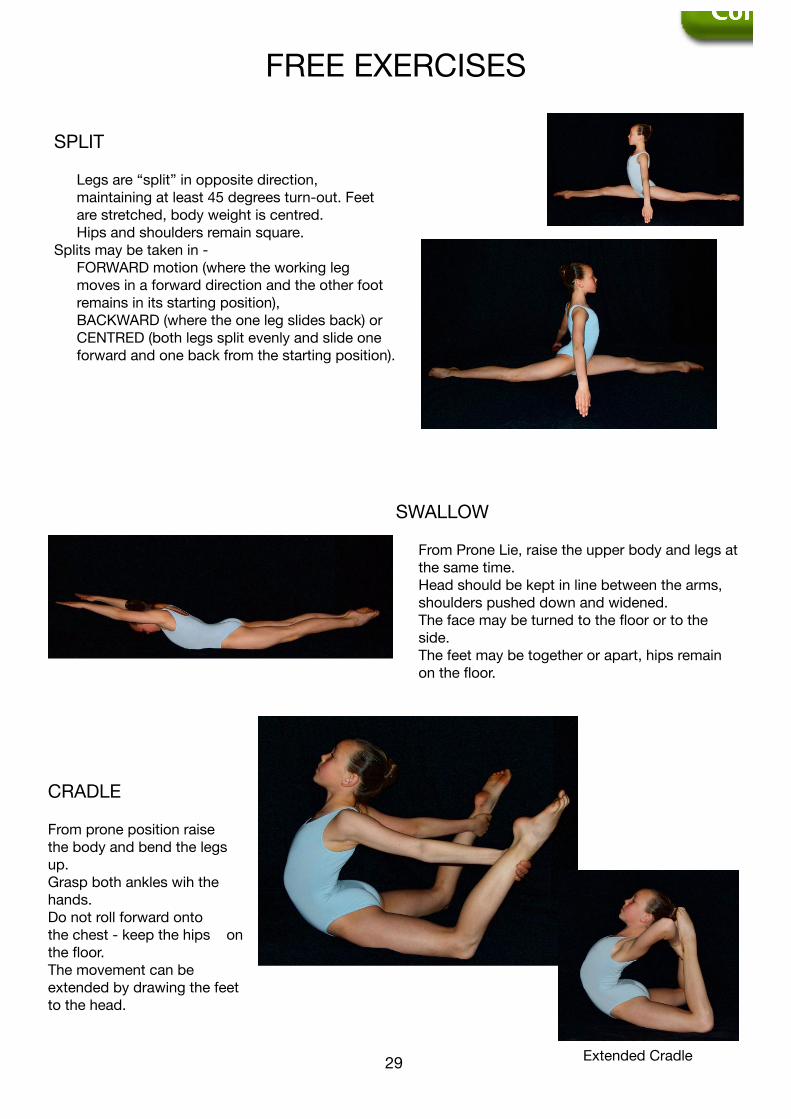
SPLIT
Legs are “split” in opposite direction, maintaining at least 45 degrees turn-out. Feet are stretched, body weight is centred.
Hips and shoulders remain square. Splits may be taken in - FORWARD motion (where the working leg
moves in a forward direction and the other foot remains in its starting position),
BACKWARD (where the one leg slides back) or CENTRED (both legs split evenly and slide one
forward and one back from the starting position).
SWALLOW
From Prone Lie, raise the upper body and legs at the same time.
Head should be kept in line between the arms, shoulders pushed down and widened.
The face may be turned to the floor or to the side.
The feet may be together or apart, hips remain on the floor.
CRADLE
From prone position raisethe body and bend the legsup.Grasp both ankles wih the hands.Do not roll forward onto the chest - keep the hips on the floor.The movement can be extended by drawing the feet to the head.
Extended Cradle
FREE EXERCISES
30
FREE EXERCISES
31
ADVANCED FLEX/STRENGTH MOVEMENTS
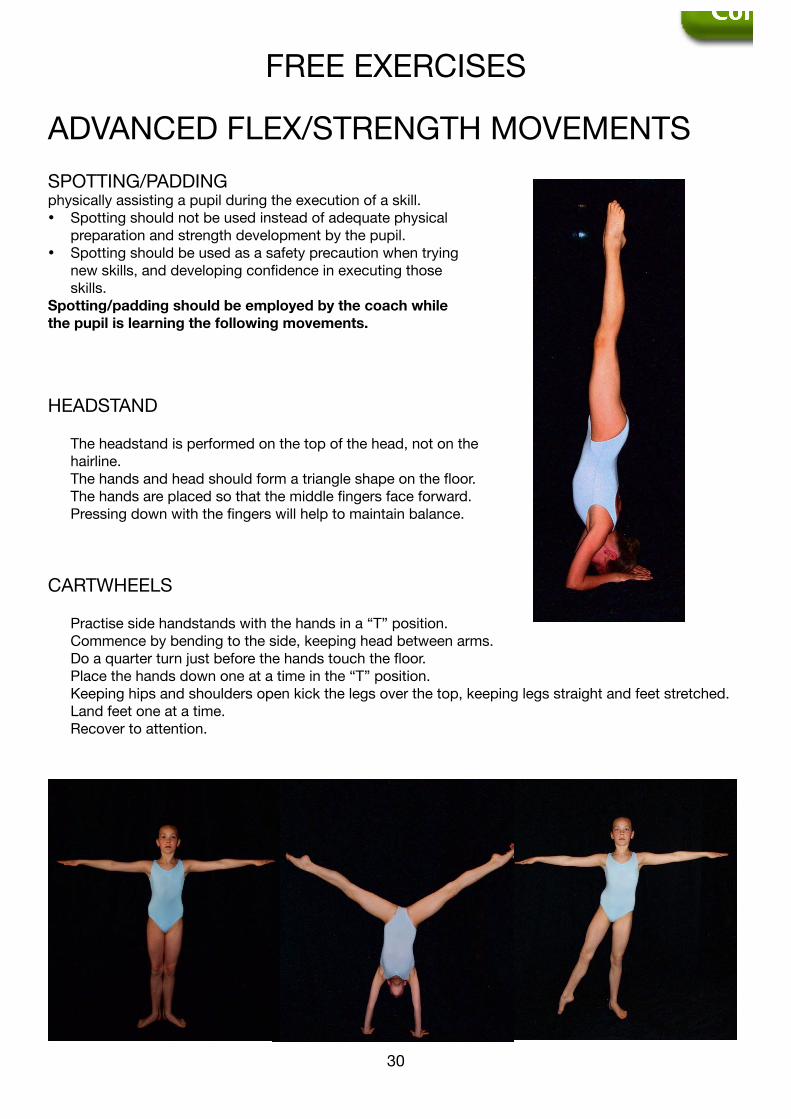
HEADSTAND
The headstand is performed on the top of the head, not on the hairline.
The hands and head should form a triangle shape on the floor. The hands are placed so that the middle fingers face forward. Pressing down with the fingers will help to maintain balance.
SPOTTING/PADDING physically assisting a pupil during the execution of a skill.• Spotting should not be used instead of adequate physical
preparation and strength development by the pupil.• Spotting should be used as a safety precaution when trying
new skills, and developing confidence in executing those skills.
Spotting/padding should be employed by the coach while the pupil is learning the following movements.
CARTWHEELS
Practise side handstands with the hands in a “T” position. Commence by bending to the side, keeping head between arms. Do a quarter turn just before the hands touch the floor. Place the hands down one at a time in the “T” position. Keeping hips and shoulders open kick the legs over the top, keeping legs straight and feet stretched. Land feet one at a time. Recover to attention.
FREE EXERCISES
30
FREE EXERCISES
31
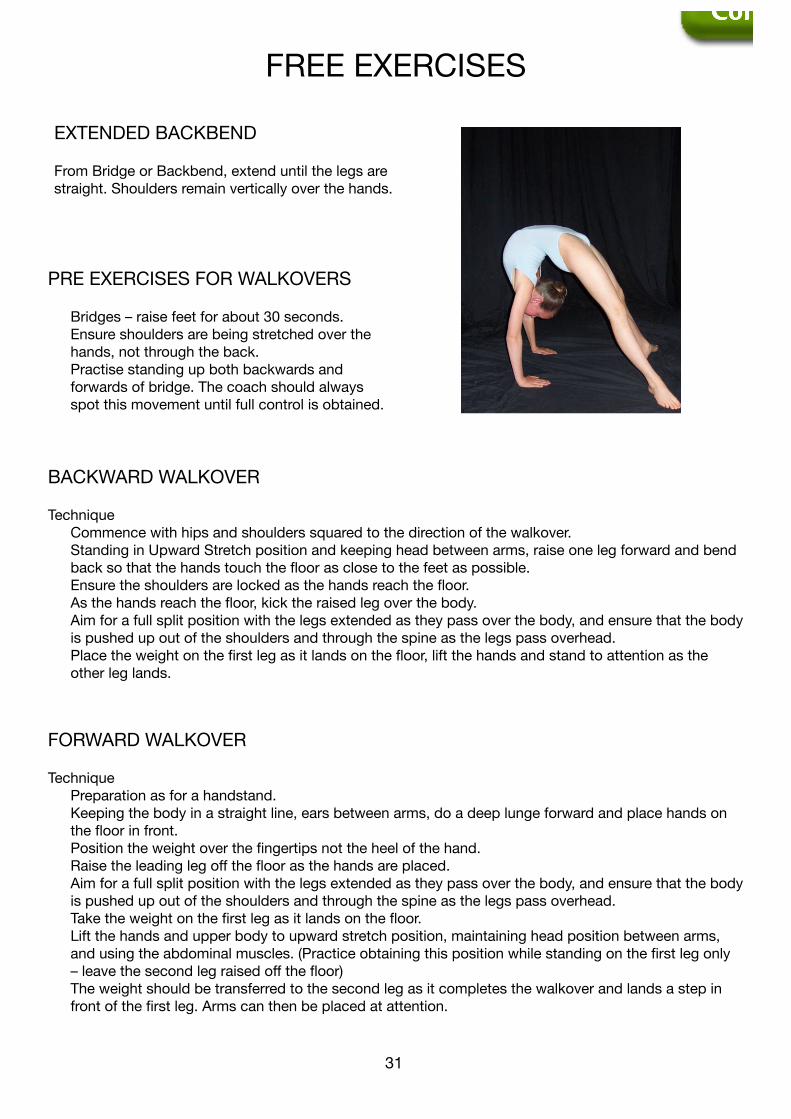
EXTENDED BACKBEND
From Bridge or Backbend, extend until the legs are straight. Shoulders remain vertically over the hands.
PRE EXERCISES FOR WALKOVERS
Bridges – raise feet for about 30 seconds. Ensure shoulders are being stretched over the
hands, not through the back. Practise standing up both backwards and
forwards of bridge. The coach should always spot this movement until full control is obtained.
BACKWARD WALKOVER
Technique Commence with hips and shoulders squared to the direction of the walkover. Standing in Upward Stretch position and keeping head between arms, raise one leg forward and bend
back so that the hands touch the floor as close to the feet as possible. Ensure the shoulders are locked as the hands reach the floor. As the hands reach the floor, kick the raised leg over the body. Aim for a full split position with the legs extended as they pass over the body, and ensure that the body
is pushed up out of the shoulders and through the spine as the legs pass overhead. Place the weight on the first leg as it lands on the floor, lift the hands and stand to attention as the
other leg lands.
FORWARD WALKOVER
Technique Preparation as for a handstand. Keeping the body in a straight line, ears between arms, do a deep lunge forward and place hands on
the floor in front. Position the weight over the fingertips not the heel of the hand. Raise the leading leg off the floor as the hands are placed. Aim for a full split position with the legs extended as they pass over the body, and ensure that the body
is pushed up out of the shoulders and through the spine as the legs pass overhead. Take the weight on the first leg as it lands on the floor. Lift the hands and upper body to upward stretch position, maintaining head position between arms,
and using the abdominal muscles. (Practice obtaining this position while standing on the first leg only – leave the second leg raised off the floor)
The weight should be transferred to the second leg as it completes the walkover and lands a step in front of the first leg. Arms can then be placed at attention.
ROD SECTION
32
ROD SECTION
33
Rod Exercises are a challenge in the use of apparatus. The manipulation of this simple piece of equipment demonstrates the co-ordination that can be achieved. Whilst the rod itself is the focal point, the use of the body and legs is incorporated into the sets of exercises. In Rod Exercises, the basic detail for leg, foot and body work is as for Free Exercises. The movements described can be combined to create more complex movements, thus allowing creative and entertaining routines to be choreographed.
MEASURING THE RODThe rod is made of metal, approximately 5-10 mm diameter. Each participant should have a rod cut for their own specific measurement. The length is taken from the centre of the chest to the end of the middle finger when the arm is in the Side Raise position, plus 30-50mm.
GRIP OF THE ROD
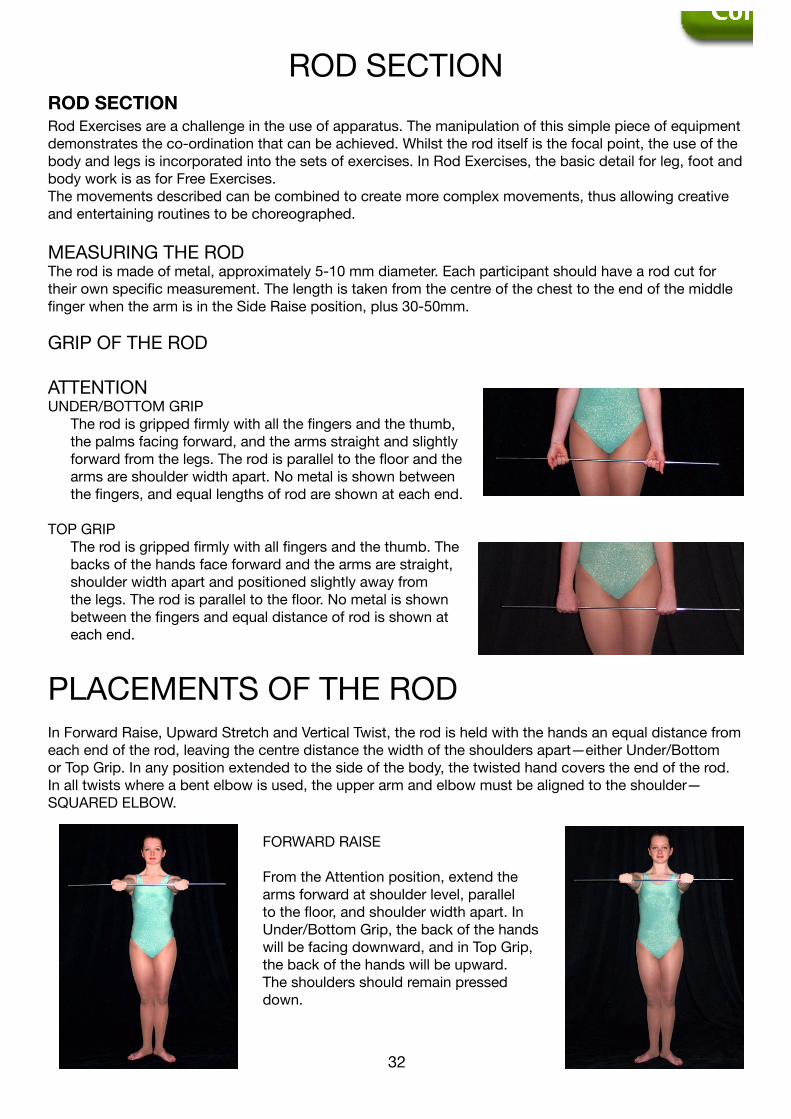
ATTENTION UNDER/BOTTOM GRIP
The rod is gripped firmly with all the fingers and the thumb, the palms facing forward, and the arms straight and slightly forward from the legs. The rod is parallel to the floor and the arms are shoulder width apart. No metal is shown between the fingers, and equal lengths of rod are shown at each end.
TOP GRIPThe rod is gripped firmly with all fingers and the thumb. The backs of the hands face forward and the arms are straight, shoulder width apart and positioned slightly away from the legs. The rod is parallel to the floor. No metal is shown between the fingers and equal distance of rod is shown at each end.
PLACEMENTS OF THE RODIn Forward Raise, Upward Stretch and Vertical Twist, the rod is held with the hands an equal distance from each end of the rod, leaving the centre distance the width of the shoulders apart—either Under/Bottom or Top Grip. In any position extended to the side of the body, the twisted hand covers the end of the rod. In all twists where a bent elbow is used, the upper arm and elbow must be aligned to the shoulder—SQUARED ELBOW.
FORWARD RAISE
From the Attention position, extend the arms forward at shoulder level, parallel to the floor, and shoulder width apart. In Under/Bottom Grip, the back of the hands will be facing downward, and in Top Grip, the back of the hands will be upward. The shoulders should remain pressed down.
ROD SECTION
ROD SECTION
32
ROD SECTION
33
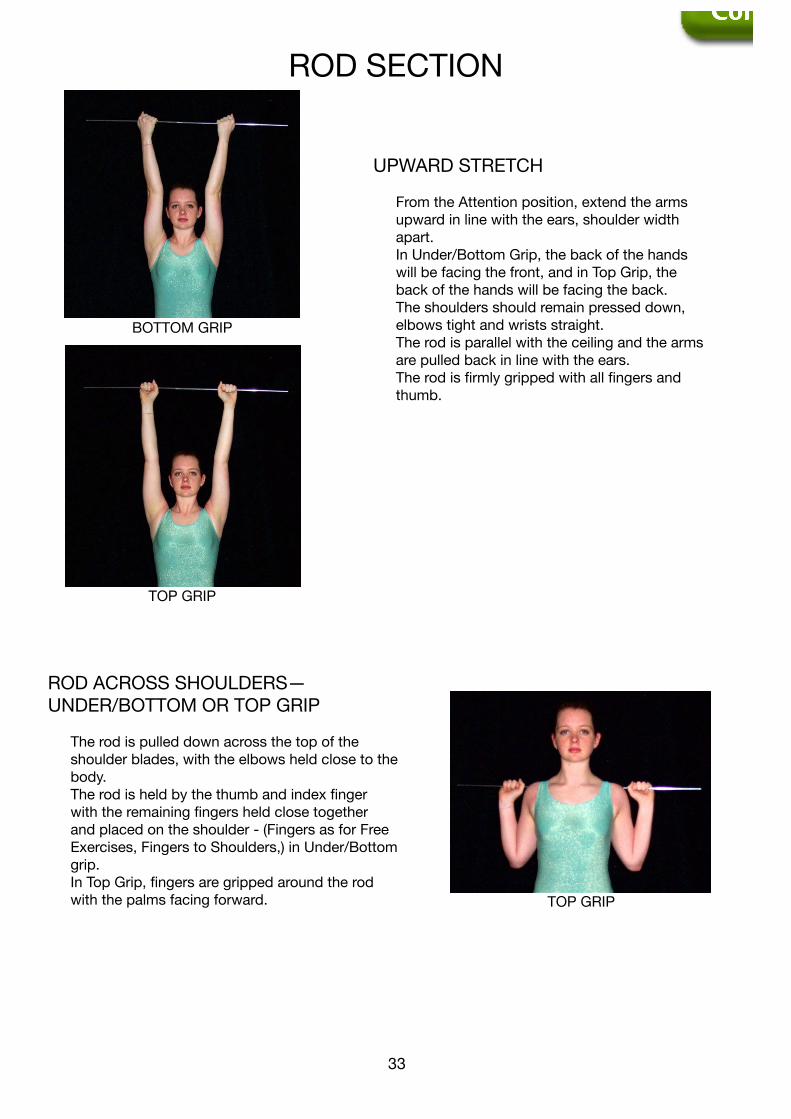
UPWARD STRETCH
From the Attention position, extend the arms upward in line with the ears, shoulder width apart.
In Under/Bottom Grip, the back of the hands will be facing the front, and in Top Grip, the back of the hands will be facing the back.
The shoulders should remain pressed down, elbows tight and wrists straight.
The rod is parallel with the ceiling and the arms are pulled back in line with the ears.
The rod is firmly gripped with all fingers and thumb.
ROD ACROSS SHOULDERS—UNDER/BOTTOM OR TOP GRIP
The rod is pulled down across the top of the shoulder blades, with the elbows held close to the body.
The rod is held by the thumb and index finger with the remaining fingers held close together and placed on the shoulder - (Fingers as for Free Exercises, Fingers to Shoulders,) in Under/Bottom grip.
In Top Grip, fingers are gripped around the rod with the palms facing forward.
BOTTOM GRIP
TOP GRIP
TOP GRIP
ROD SECTION
34
ROD SECTION
35
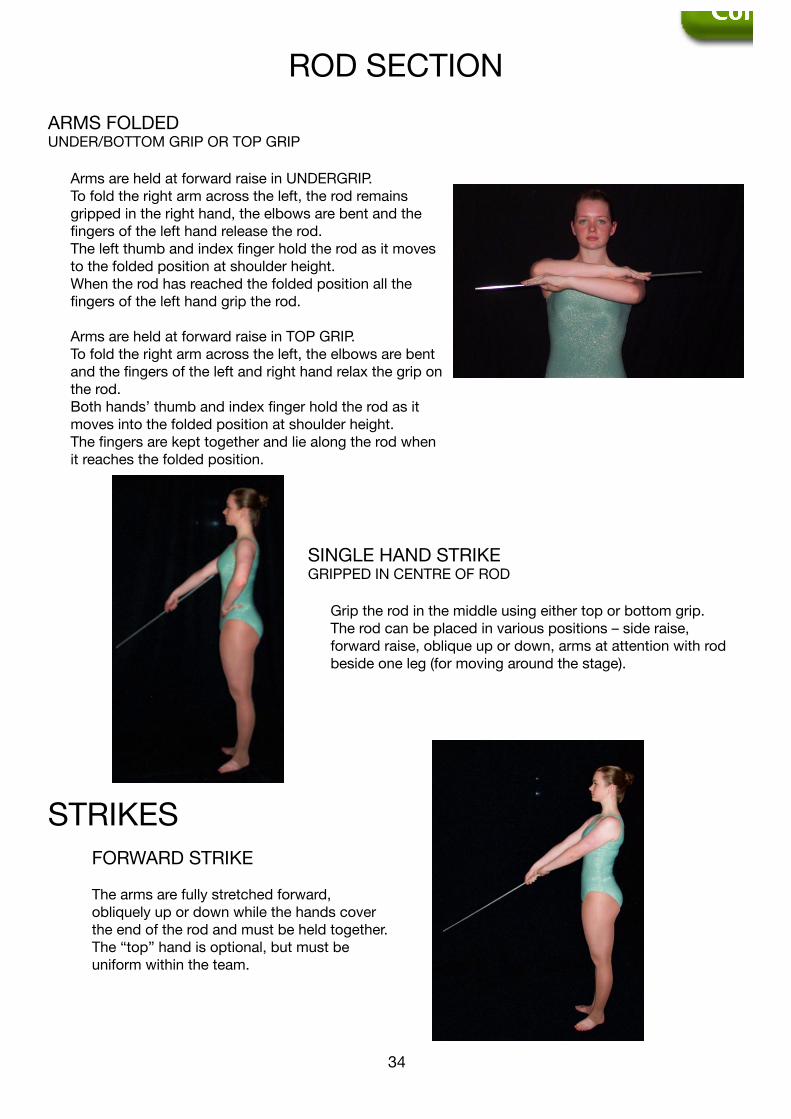
ARMS FOLDED UNDER/BOTTOM GRIP OR TOP GRIP
Arms are held at forward raise in UNDERGRIP. To fold the right arm across the left, the rod remains
gripped in the right hand, the elbows are bent and the fingers of the left hand release the rod.
The left thumb and index finger hold the rod as it moves to the folded position at shoulder height.
When the rod has reached the folded position all the fingers of the left hand grip the rod.
Arms are held at forward raise in TOP GRIP. To fold the right arm across the left, the elbows are bent
and the fingers of the left and right hand relax the grip on the rod.
Both hands’ thumb and index finger hold the rod as it moves into the folded position at shoulder height.
The fingers are kept together and lie along the rod when it reaches the folded position.
SINGLE HAND STRIKE GRIPPED IN CENTRE OF ROD
Grip the rod in the middle using either top or bottom grip. The rod can be placed in various positions – side raise, forward raise, oblique up or down, arms at attention with rod beside one leg (for moving around the stage).
STRIKESFORWARD STRIKE
The arms are fully stretched forward, obliquely up or down while the hands cover the end of the rod and must be held together. The “top” hand is optional, but must be uniform within the team.
ROD SECTION
34
ROD SECTION
35
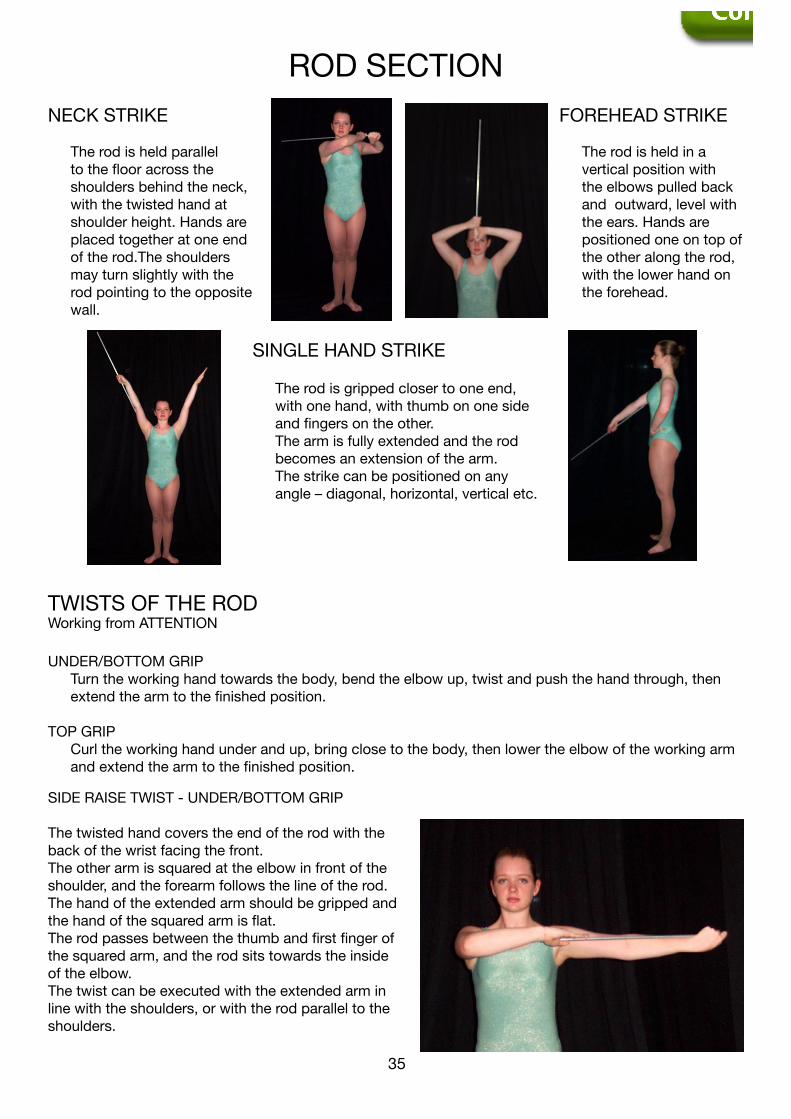
NECK STRIKE
The rod is held parallel to the floor across the shoulders behind the neck, with the twisted hand at shoulder height. Hands are placed together at one end of the rod.The shoulders may turn slightly with the rod pointing to the opposite wall.
FOREHEAD STRIKE
The rod is held in a vertical position with the elbows pulled back and outward, level with the ears. Hands are positioned one on top of the other along the rod, with the lower hand on the forehead.
SINGLE HAND STRIKE
The rod is gripped closer to one end, with one hand, with thumb on one side and fingers on the other.
The arm is fully extended and the rod becomes an extension of the arm.
The strike can be positioned on any angle – diagonal, horizontal, vertical etc.
TWISTS OF THE ROD Working from ATTENTION
UNDER/BOTTOM GRIP Turn the working hand towards the body, bend the elbow up, twist and push the hand through, then
extend the arm to the finished position.
TOP GRIP Curl the working hand under and up, bring close to the body, then lower the elbow of the working arm
and extend the arm to the finished position.
SIDE RAISE TWIST - UNDER/BOTTOM GRIP
The twisted hand covers the end of the rod with the back of the wrist facing the front. The other arm is squared at the elbow in front of the shoulder, and the forearm follows the line of the rod. The hand of the extended arm should be gripped and the hand of the squared arm is flat. The rod passes between the thumb and first finger of the squared arm, and the rod sits towards the inside of the elbow. The twist can be executed with the extended arm in line with the shoulders, or with the rod parallel to the shoulders.

ROD SECTION
36
ROD SECTION
37
SIDE RAISE TWIST - TOP GRIP
The hand of the extended arm is flat, fingers flat and facing upward, and the hand of the squared arm is gripped, without dropping the elbow.
The twist can be executed with the extended arm in line with the shoulders, or with the rod parallel to the shoulders.
SIDE OBLIQUE UP—SIDE OBLIQUE DOWN
From the Side Raise Twist position, raise or lower the extended arm to an angle of 45 degrees upward or downward. The elbow is squared and the forearm of the bent arm should follow the line of the rod. The placement can be executed with the extended arm in line with the shoulders, or with the rod parallel to the shoulders.
BACK TWIST UNDER/BOTTOM GRIP ONLY
The twisted hand is in the centre of the back, with the fingers extended along the rod or gripping the rod. The untwisted arm is straight to the side at shoulder level, holding the rod between the thumb and the first finger, keeping the fingers and wrist straight.This position is usually attained through Curve Overhead.
UNDERGRIP
TOPGRIP
ROD SECTION
36
ROD SECTION
37
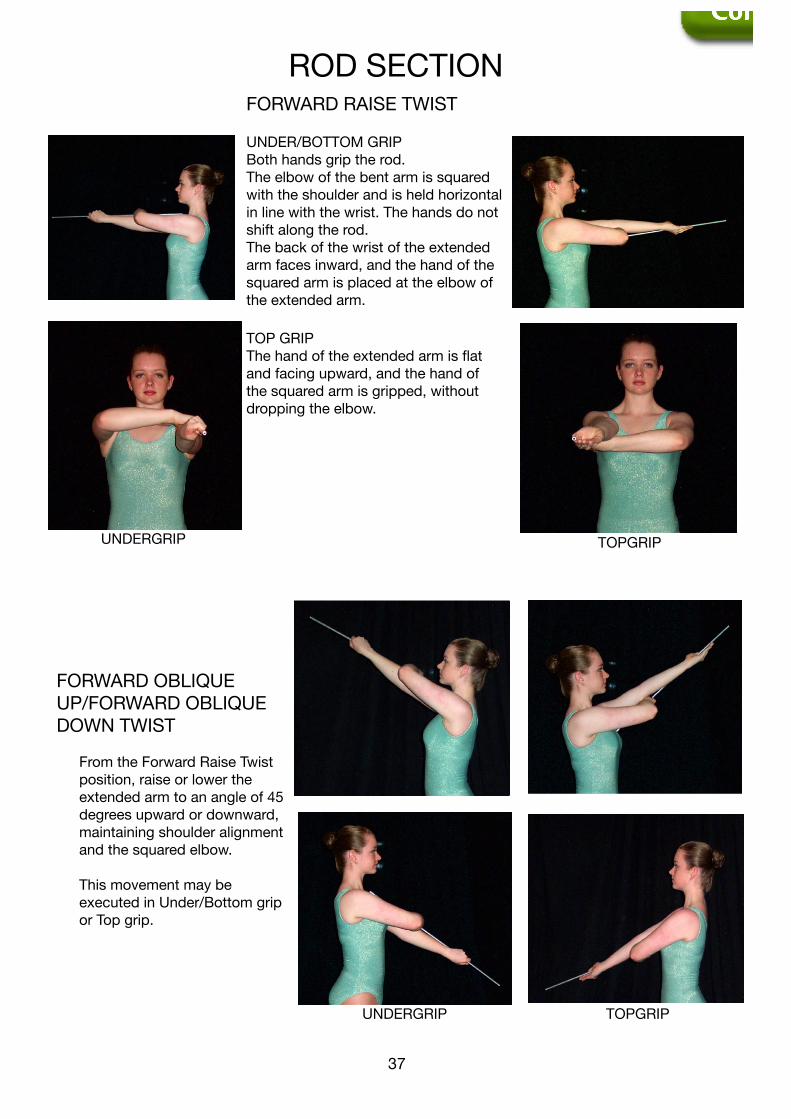
FORWARD RAISE TWIST
UNDER/BOTTOM GRIPBoth hands grip the rod. The elbow of the bent arm is squared with the shoulder and is held horizontal in line with the wrist. The hands do not shift along the rod. The back of the wrist of the extended arm faces inward, and the hand of the squared arm is placed at the elbow of the extended arm.
TOP GRIPThe hand of the extended arm is flat and facing upward, and the hand of the squared arm is gripped, without dropping the elbow.
UNDERGRIP TOPGRIP
FORWARD OBLIQUE UP/FORWARD OBLIQUE DOWN TWIST
From the Forward Raise Twist position, raise or lower the extended arm to an angle of 45 degrees upward or downward, maintaining shoulder alignment and the squared elbow.
This movement may be executed in Under/Bottom grip or Top grip.
UNDERGRIP TOPGRIP
ROD SECTION
38
ROD SECTION
39
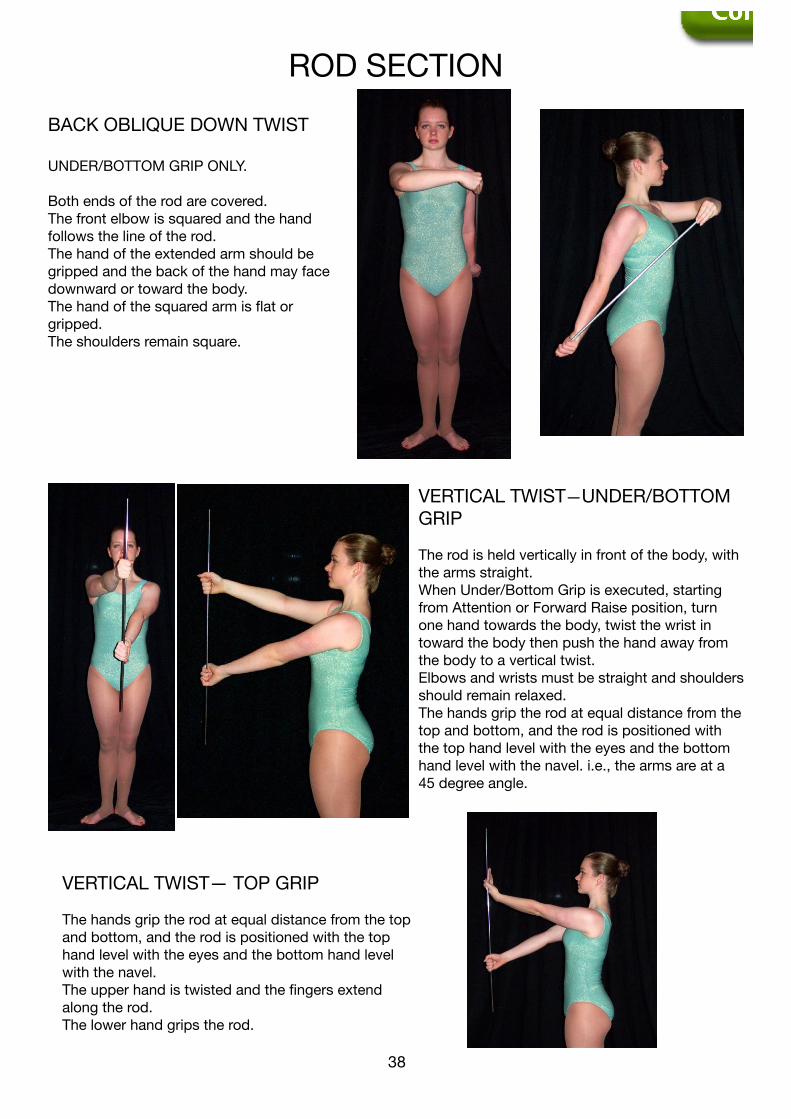
BACK OBLIQUE DOWN TWIST
UNDER/BOTTOM GRIP ONLY.
Both ends of the rod are covered. The front elbow is squared and the hand follows the line of the rod. The hand of the extended arm should be gripped and the back of the hand may face downward or toward the body. The hand of the squared arm is flat or gripped. The shoulders remain square.
VERTICAL TWIST—UNDER/BOTTOM GRIP
The rod is held vertically in front of the body, with the arms straight. When Under/Bottom Grip is executed, starting from Attention or Forward Raise position, turn one hand towards the body, twist the wrist in toward the body then push the hand away from the body to a vertical twist. Elbows and wrists must be straight and shoulders should remain relaxed. The hands grip the rod at equal distance from the top and bottom, and the rod is positioned with the top hand level with the eyes and the bottom hand level with the navel. i.e., the arms are at a 45 degree angle.
VERTICAL TWIST— TOP GRIP
The hands grip the rod at equal distance from the top and bottom, and the rod is positioned with the top hand level with the eyes and the bottom hand level with the navel.The upper hand is twisted and the fingers extend along the rod. The lower hand grips the rod.
ROD SECTION
38
ROD SECTION
39
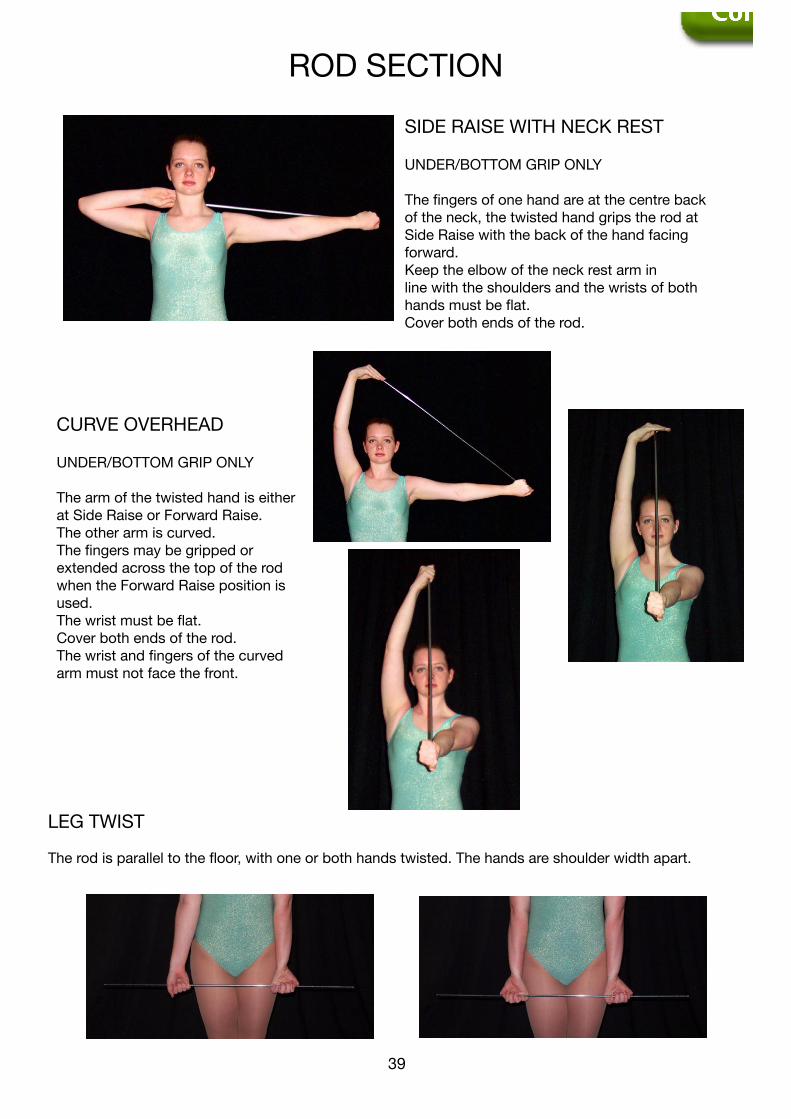
SIDE RAISE WITH NECK REST
UNDER/BOTTOM GRIP ONLY
The fingers of one hand are at the centre backof the neck, the twisted hand grips the rod atSide Raise with the back of the hand facingforward. Keep the elbow of the neck rest arm inline with the shoulders and the wrists of bothhands must be flat. Cover both ends of the rod.
CURVE OVERHEAD
UNDER/BOTTOM GRIP ONLY
The arm of the twisted hand is either at Side Raise or Forward Raise. The other arm is curved. The fingers may be gripped or extended across the top of the rod when the Forward Raise position is used. The wrist must be flat. Cover both ends of the rod. The wrist and fingers of the curved arm must not face the front.
LEG TWIST
The rod is parallel to the floor, with one or both hands twisted. The hands are shoulder width apart.
ROD SECTION
40
ROD SECTION
41
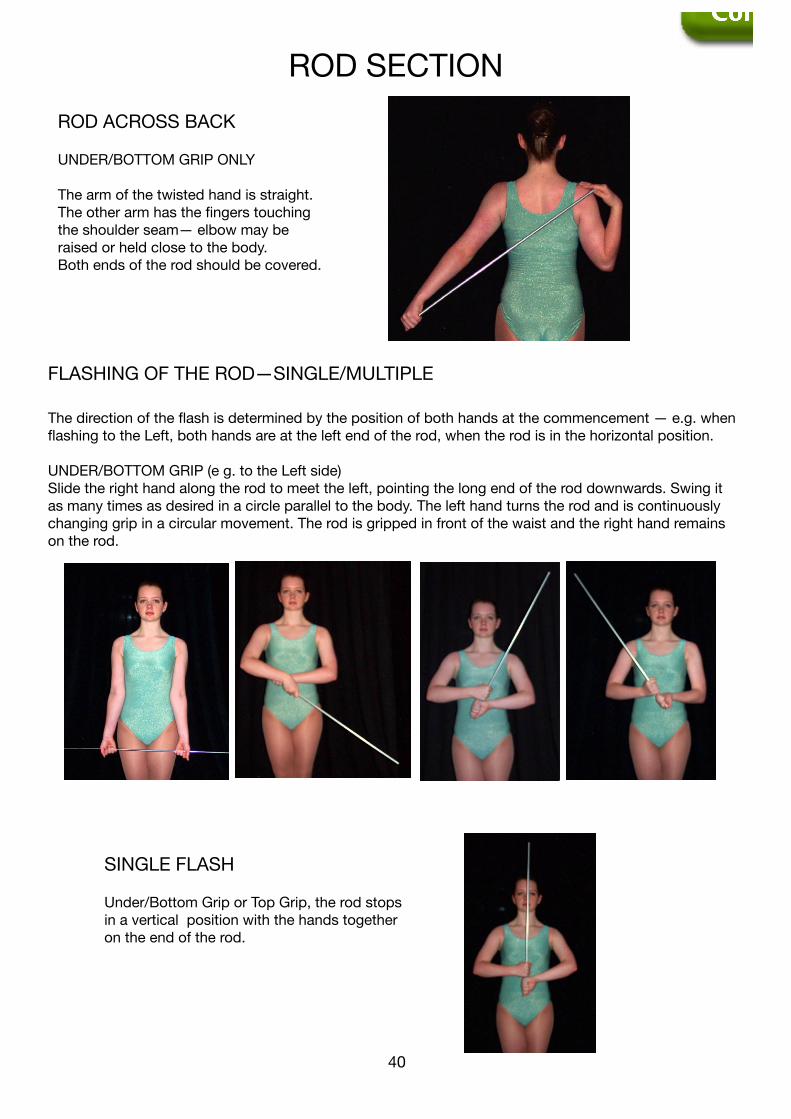
ROD ACROSS BACK
UNDER/BOTTOM GRIP ONLY
The arm of the twisted hand is straight. The other arm has the fingers touching the shoulder seam— elbow may be raised or held close to the body. Both ends of the rod should be covered.
FLASHING OF THE ROD—SINGLE/MULTIPLE
The direction of the flash is determined by the position of both hands at the commencement — e.g. when flashing to the Left, both hands are at the left end of the rod, when the rod is in the horizontal position.
UNDER/BOTTOM GRIP (e g. to the Left side)Slide the right hand along the rod to meet the left, pointing the long end of the rod downwards. Swing it as many times as desired in a circle parallel to the body. The left hand turns the rod and is continuously changing grip in a circular movement. The rod is gripped in front of the waist and the right hand remains on the rod.
SINGLE FLASH
Under/Bottom Grip or Top Grip, the rod stops in a vertical position with the hands together on the end of the rod.
ROD SECTION
40
ROD SECTION
41
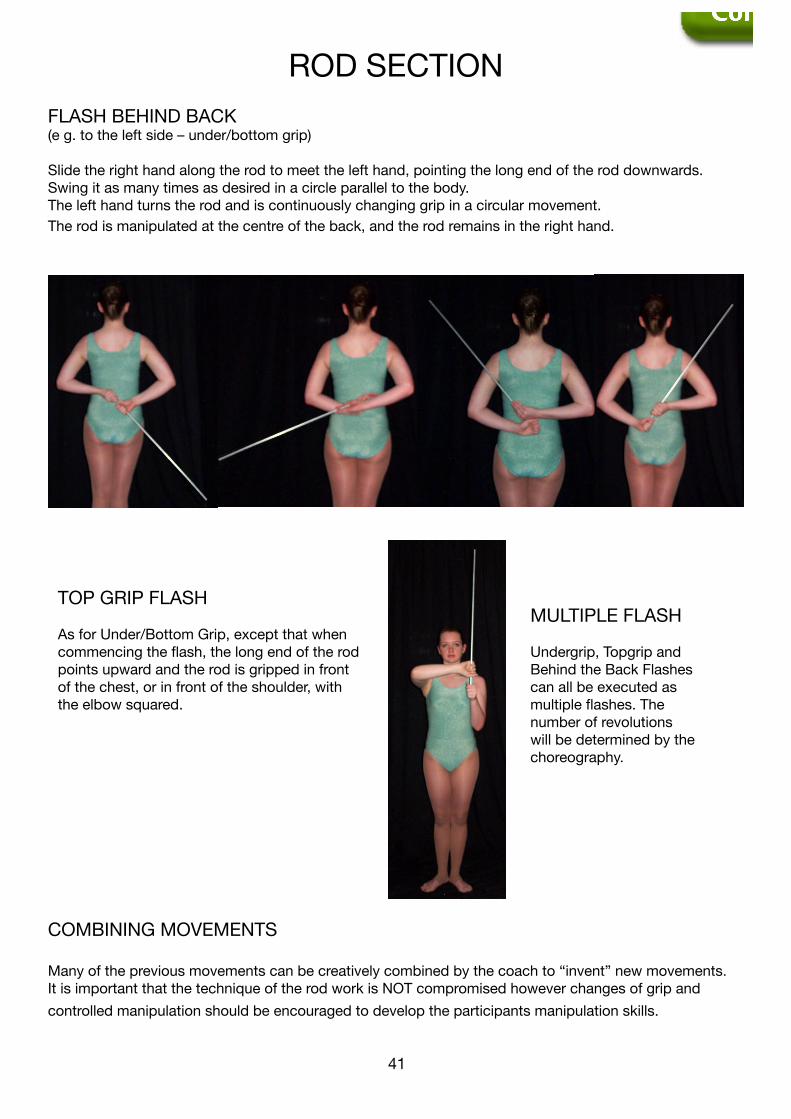
TOP GRIP FLASH
As for Under/Bottom Grip, except that when commencing the flash, the long end of the rod points upward and the rod is gripped in front of the chest, or in front of the shoulder, with the elbow squared.
FLASH BEHIND BACK (e g. to the left side – under/bottom grip)
Slide the right hand along the rod to meet the left hand, pointing the long end of the rod downwards. Swing it as many times as desired in a circle parallel to the body. The left hand turns the rod and is continuously changing grip in a circular movement. The rod is manipulated at the centre of the back, and the rod remains in the right hand.
COMBINING MOVEMENTS
Many of the previous movements can be creatively combined by the coach to “invent” new movements. It is important that the technique of the rod work is NOT compromised however changes of grip and
controlled manipulation should be encouraged to develop the participants manipulation skills.
MULTIPLE FLASH
Undergrip, Topgrip and Behind the Back Flashes can all be executed as multiple flashes. The number of revolutions will be determined by the choreography.
ROD SECTION
42
COMBINATION MOVEMENTS - IDEAS FOR CHOREOGRAPHY
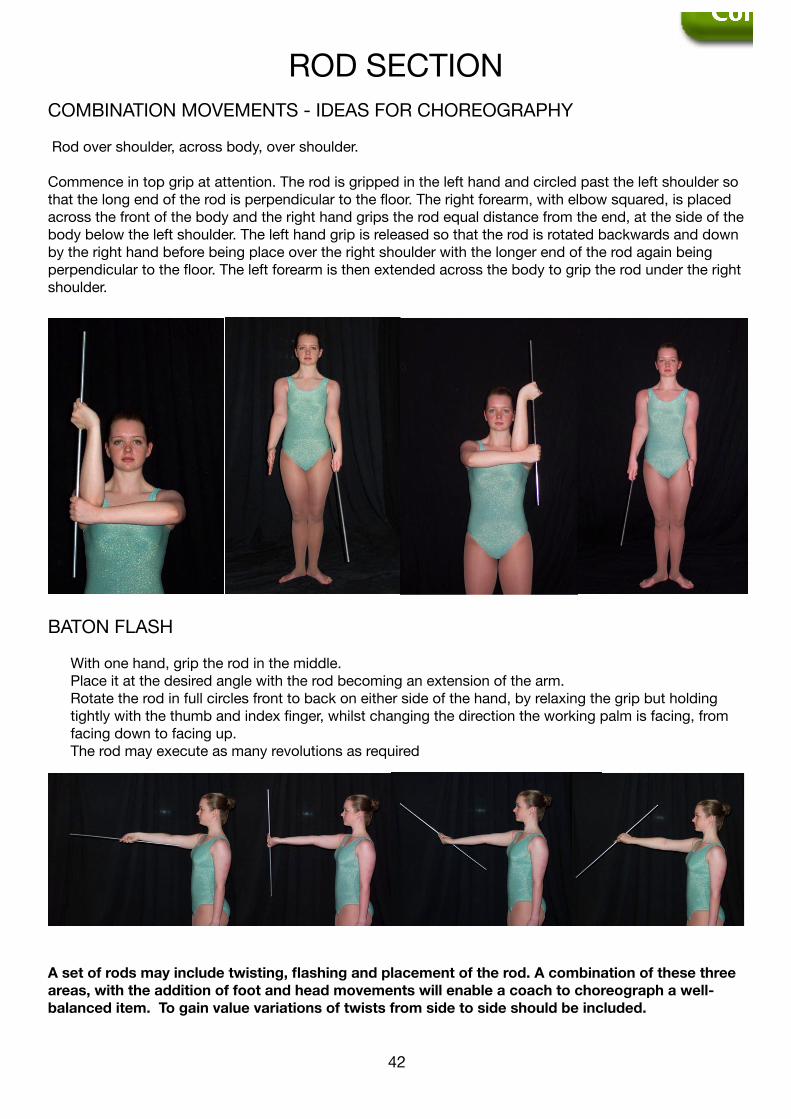
Rod over shoulder, across body, over shoulder.
Commence in top grip at attention. The rod is gripped in the left hand and circled past the left shoulder so that the long end of the rod is perpendicular to the floor. The right forearm, with elbow squared, is placed across the front of the body and the right hand grips the rod equal distance from the end, at the side of the body below the left shoulder. The left hand grip is released so that the rod is rotated backwards and down by the right hand before being place over the right shoulder with the longer end of the rod again being perpendicular to the floor. The left forearm is then extended across the body to grip the rod under the right shoulder.
A set of rods may include twisting, flashing and placement of the rod. A combination of these three areas, with the addition of foot and head movements will enable a coach to choreograph a well-balanced item. To gain value variations of twists from side to side should be included.
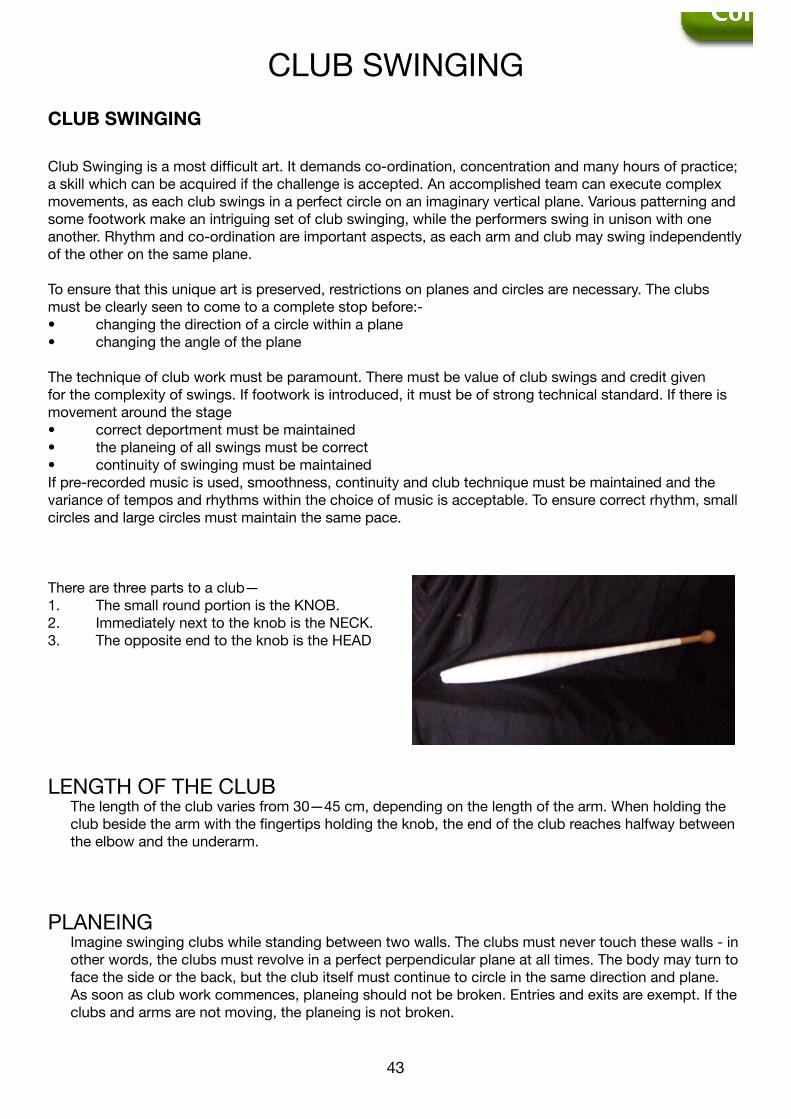
BATON FLASH
With one hand, grip the rod in the middle. Place it at the desired angle with the rod becoming an extension of the arm. Rotate the rod in full circles front to back on either side of the hand, by relaxing the grip but holding
tightly with the thumb and index finger, whilst changing the direction the working palm is facing, from facing down to facing up.
The rod may execute as many revolutions as required
CLUB SWINGING
43
CLUB SWINGING
44
CLUB SWINGING
Club Swinging is a most difficult art. It demands co-ordination, concentration and many hours of practice; a skill which can be acquired if the challenge is accepted. An accomplished team can execute complex movements, as each club swings in a perfect circle on an imaginary vertical plane. Various patterning and some footwork make an intriguing set of club swinging, while the performers swing in unison with one another. Rhythm and co-ordination are important aspects, as each arm and club may swing independently of the other on the same plane.
To ensure that this unique art is preserved, restrictions on planes and circles are necessary. The clubs must be clearly seen to come to a complete stop before:- • changing the direction of a circle within a plane• changing the angle of the plane
The technique of club work must be paramount. There must be value of club swings and credit given for the complexity of swings. If footwork is introduced, it must be of strong technical standard. If there is movement around the stage • correct deportment must be maintained • the planeing of all swings must be correct • continuity of swinging must be maintained If pre-recorded music is used, smoothness, continuity and club technique must be maintained and the variance of tempos and rhythms within the choice of music is acceptable. To ensure correct rhythm, small circles and large circles must maintain the same pace.
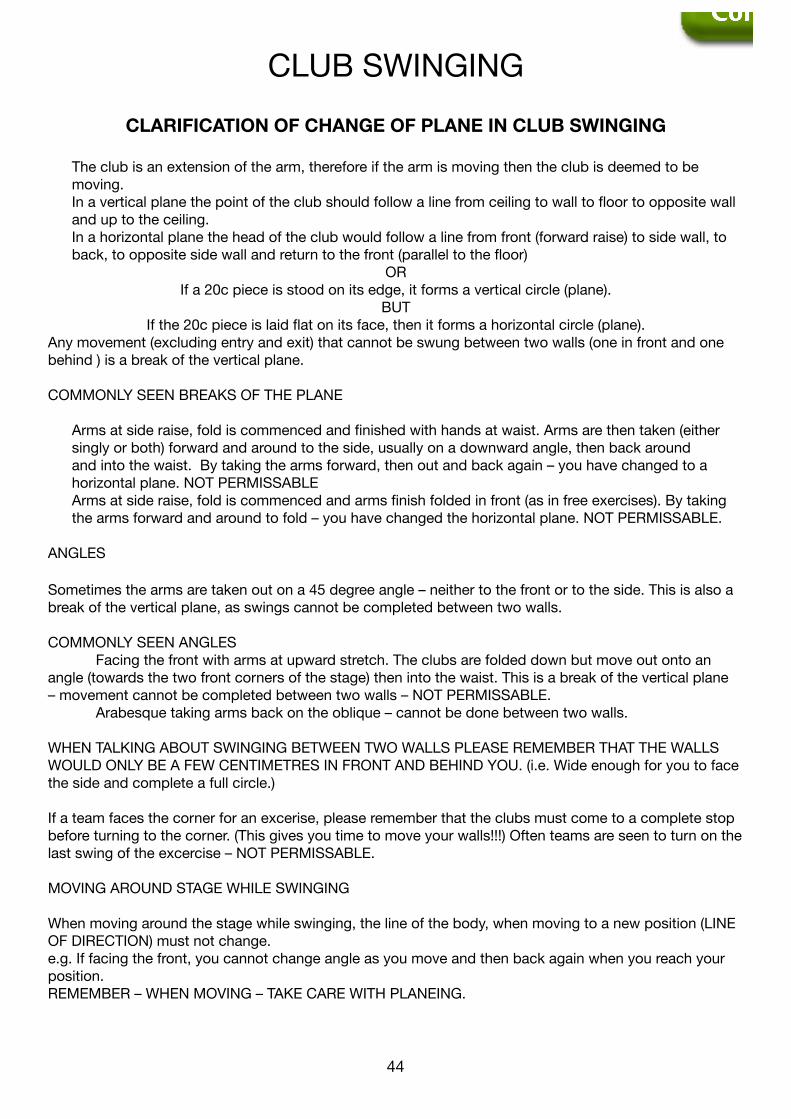
There are three parts to a club—1. The small round portion is the KNOB.2. Immediately next to the knob is the NECK.3. The opposite end to the knob is the HEAD
LENGTH OF THE CLUB The length of the club varies from 30—45 cm, depending on the length of the arm. When holding the
club beside the arm with the fingertips holding the knob, the end of the club reaches halfway between the elbow and the underarm.
PLANEING Imagine swinging clubs while standing between two walls. The clubs must never touch these walls - in
other words, the clubs must revolve in a perfect perpendicular plane at all times. The body may turn to face the side or the back, but the club itself must continue to circle in the same direction and plane.
As soon as club work commences, planeing should not be broken. Entries and exits are exempt. If the clubs and arms are not moving, the planeing is not broken.
CLUB SWINGING
43
CLUB SWINGING
44
CLARIFICATION OF CHANGE OF PLANE IN CLUB SWINGING
The club is an extension of the arm, therefore if the arm is moving then the club is deemed to be moving.
In a vertical plane the point of the club should follow a line from ceiling to wall to floor to opposite wall and up to the ceiling.
In a horizontal plane the head of the club would follow a line from front (forward raise) to side wall, to back, to opposite side wall and return to the front (parallel to the floor)
ORIf a 20c piece is stood on its edge, it forms a vertical circle (plane).
BUTIf the 20c piece is laid flat on its face, then it forms a horizontal circle (plane).
Any movement (excluding entry and exit) that cannot be swung between two walls (one in front and one behind ) is a break of the vertical plane.
COMMONLY SEEN BREAKS OF THE PLANE
Arms at side raise, fold is commenced and finished with hands at waist. Arms are then taken (either singly or both) forward and around to the side, usually on a downward angle, then back around and into the waist. By taking the arms forward, then out and back again – you have changed to a horizontal plane. NOT PERMISSABLE
Arms at side raise, fold is commenced and arms finish folded in front (as in free exercises). By taking the arms forward and around to fold – you have changed the horizontal plane. NOT PERMISSABLE.
ANGLES
Sometimes the arms are taken out on a 45 degree angle – neither to the front or to the side. This is also a break of the vertical plane, as swings cannot be completed between two walls.
COMMONLY SEEN ANGLES Facing the front with arms at upward stretch. The clubs are folded down but move out onto an angle (towards the two front corners of the stage) then into the waist. This is a break of the vertical plane – movement cannot be completed between two walls – NOT PERMISSABLE. Arabesque taking arms back on the oblique – cannot be done between two walls.
WHEN TALKING ABOUT SWINGING BETWEEN TWO WALLS PLEASE REMEMBER THAT THE WALLS WOULD ONLY BE A FEW CENTIMETRES IN FRONT AND BEHIND YOU. (i.e. Wide enough for you to face the side and complete a full circle.)
If a team faces the corner for an excerise, please remember that the clubs must come to a complete stop before turning to the corner. (This gives you time to move your walls!!!) Often teams are seen to turn on the last swing of the excercise – NOT PERMISSABLE.
MOVING AROUND STAGE WHILE SWINGING
When moving around the stage while swinging, the line of the body, when moving to a new position (LINE OF DIRECTION) must not change.e.g. If facing the front, you cannot change angle as you move and then back again when you reach your position.REMEMBER – WHEN MOVING – TAKE CARE WITH PLANEING.
CLUB SWINGING
45
CLUB SWINGING
46
CIRCLES The end of the club draws perfect circles, small circles use the wrist/hand as the pivot point and
the club as the radius, large circles use the shoulder as the pivot point, and the arm and club as the radius.
DIRECTIONS
INWARDFrom Upward Stretch, arms circle inward across the face and down the body, then circle outward to Upward Stretch. This is considered a Full Circle.
OUTWARD From Upward Stretch, arms circle outward away from the body then up across the body to Upward
Stretch. This is considered a Full Circle.
PARALLEL - to the Left or Right. From Upward Stretch, both arms move through the forward side with the arm crossing the body
bending slightly. Continue up the backward side, reversing the position of the arms to Upward Stretch. This is considered a Full Circle.
WINDMILL - Side, Inward, Outward. One club remains exactly half a circle behind the other.
FORWARD SIDE (Parallel exercise)—if the clubs are circling to the left, the forward side is the left.
BACKWARD SIDE (Parallel exercise)—if the clubs are circling to the left, the backward side is the right.
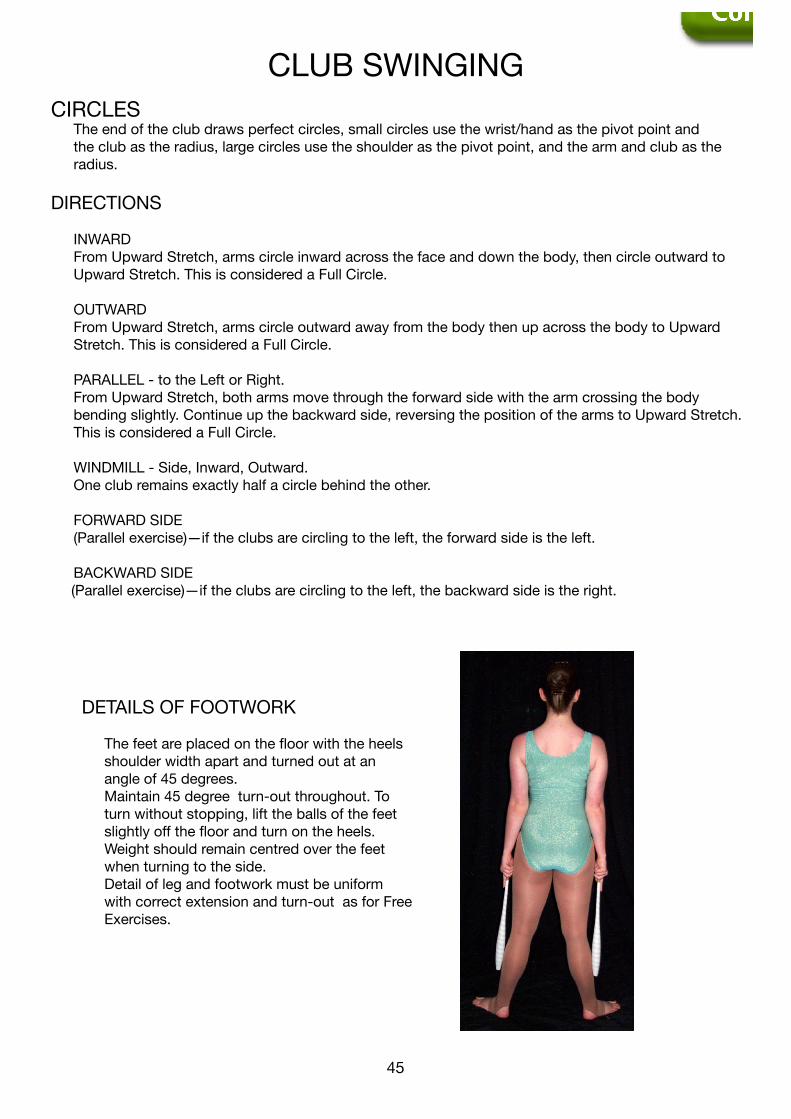
DETAILS OF FOOTWORK
The feet are placed on the floor with the heels shoulder width apart and turned out at an angle of 45 degrees.
Maintain 45 degree turn-out throughout. To turn without stopping, lift the balls of the feet slightly off the floor and turn on the heels.
Weight should remain centred over the feet when turning to the side.
Detail of leg and footwork must be uniform with correct extension and turn-out as for Free Exercises.

CLUB SWINGING
45
CLUB SWINGING
46
GRIPS FOR SWINGING
The Knob of the club is in the centre of the palm and the fingers are held loosely around the Knob. The exceptions are—
UPWARD STRETCH Palms of the hands face each other as for Free Exercises with the first finger extended along the Neck
of the club.
WRIST SWINGS, BACK SWINGS, FULL CIRCLES The first finger is placed along the Neck of the club. FOLDS The first finger is placed on the top of the Knob, the other fingers gripping the Neck below the Knob.
SWINGS
HEAD SWINGS
Bend the elbows keeping them level with the ears and pulled back in line with the shoulders.
Hands vertical in line with the shoulders.
Swing the club behind the head, completing a full circle with each club in the appropriate direction—outward, inward or parallel.
Arms should pass through Upward Stretch before and after Head Swings.
BACKSWINGS OUTWARD Commence by taking the arms outward in half a full circle, cross clubs behind the back, bending the
elbows. Continue the circle up and out around the hip line, bringing the clubs to the side of the body, then straighten arms down beside the legs.
OUTWARD HEAD SWING
CLUB SWINGING
47
CLUB SWINGING
48
BACKSWINGS - INWARD
Commence with half a full circle, bend arms rotating the wrists, pointing the clubs to the side horizontally.
Lift the arms to hip line, rotate the wrists to cross the clubs behind the back. Continue the circle, lower the arms down behind the back and lift the arms to the original starting
positions.
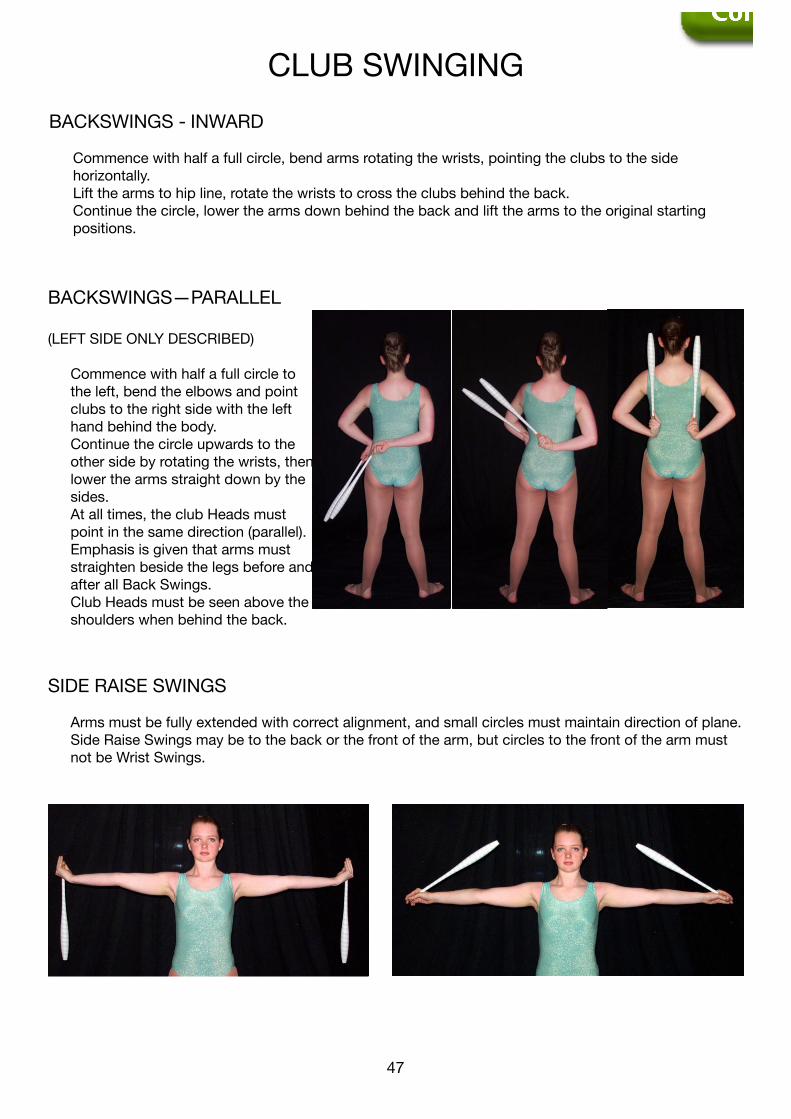
BACKSWINGS—PARALLEL
(LEFT SIDE ONLY DESCRIBED)
Commence with half a full circle to the left, bend the elbows and point clubs to the right side with the left hand behind the body.
Continue the circle upwards to the other side by rotating the wrists, then lower the arms straight down by the sides.
At all times, the club Heads must point in the same direction (parallel).
Emphasis is given that arms must straighten beside the legs before and after all Back Swings.
Club Heads must be seen above the shoulders when behind the back.
SIDE RAISE SWINGS
Arms must be fully extended with correct alignment, and small circles must maintain direction of plane. Side Raise Swings may be to the back or the front of the arm, but circles to the front of the arm must not be Wrist Swings.
CLUB SWINGING
47
CLUB SWINGING
48
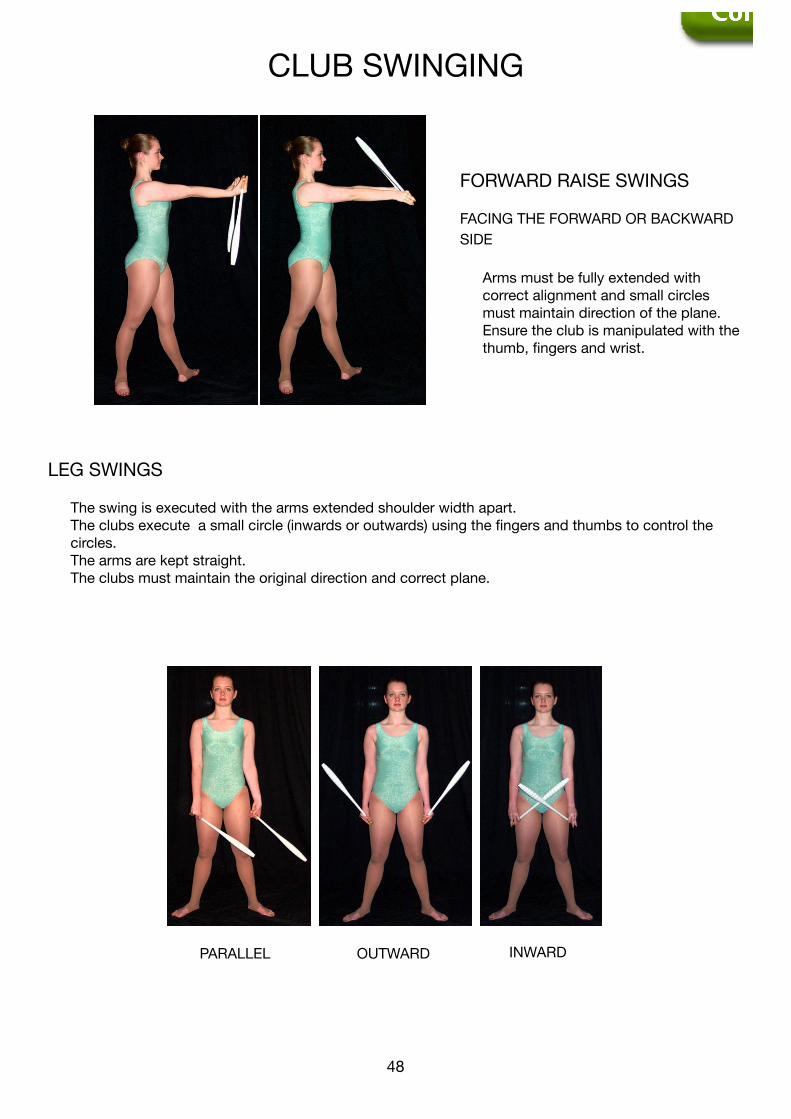
LEG SWINGS
The swing is executed with the arms extended shoulder width apart. The clubs execute a small circle (inwards or outwards) using the fingers and thumbs to control the
circles. The arms are kept straight. The clubs must maintain the original direction and correct plane.
FORWARD RAISE SWINGS
FACING THE FORWARD OR BACKWARD SIDE
Arms must be fully extended with correct alignment and small circles must maintain direction of the plane. Ensure the club is manipulated with the thumb, fingers and wrist.
PARALLEL OUTWARD INWARD
CLUB SWINGING
49
CLUB SWINGING
50
CHEST SWINGS & CROSSES
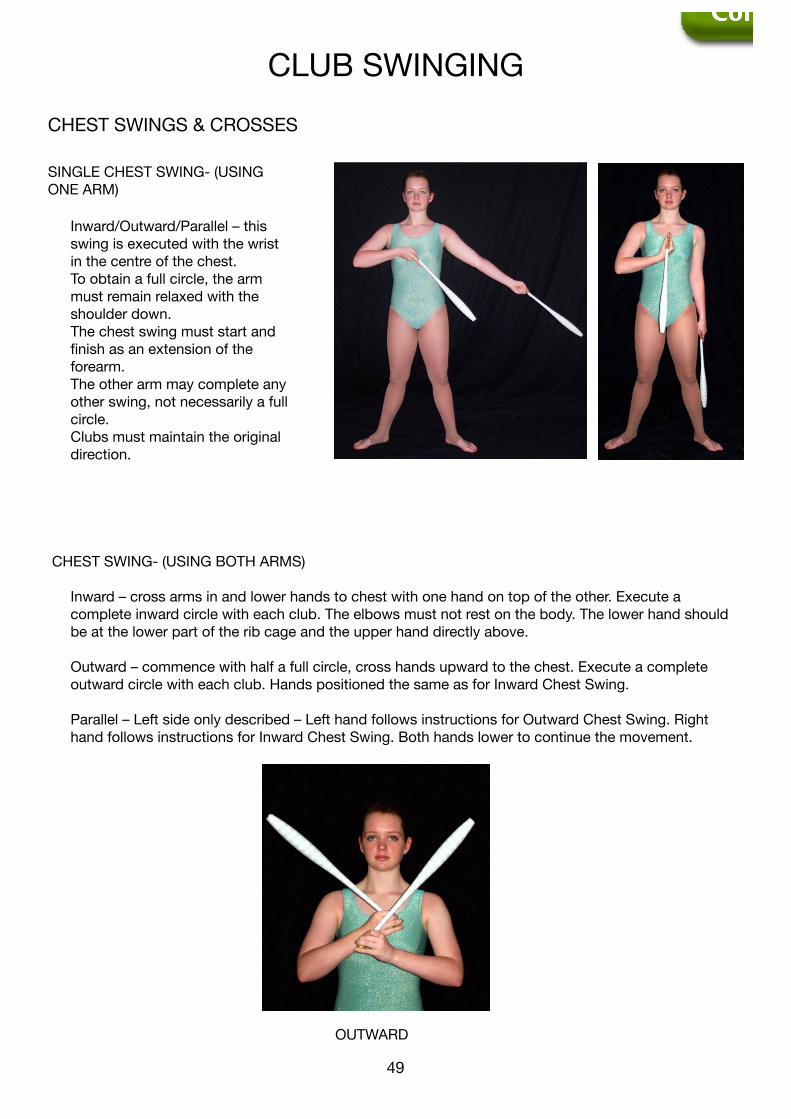
SINGLE CHEST SWING- (USING ONE ARM)
Inward/Outward/Parallel – this swing is executed with the wrist in the centre of the chest.
To obtain a full circle, the arm must remain relaxed with the shoulder down.
The chest swing must start and finish as an extension of the forearm.
The other arm may complete any other swing, not necessarily a full circle.
Clubs must maintain the original direction.
CHEST SWING- (USING BOTH ARMS) Inward – cross arms in and lower hands to chest with one hand on top of the other. Execute a
complete inward circle with each club. The elbows must not rest on the body. The lower hand should be at the lower part of the rib cage and the upper hand directly above.
Outward – commence with half a full circle, cross hands upward to the chest. Execute a complete outward circle with each club. Hands positioned the same as for Inward Chest Swing.
Parallel – Left side only described – Left hand follows instructions for Outward Chest Swing. Right hand follows instructions for Inward Chest Swing. Both hands lower to continue the movement.
OUTWARD
CLUB SWINGING
49
CLUB SWINGING
50
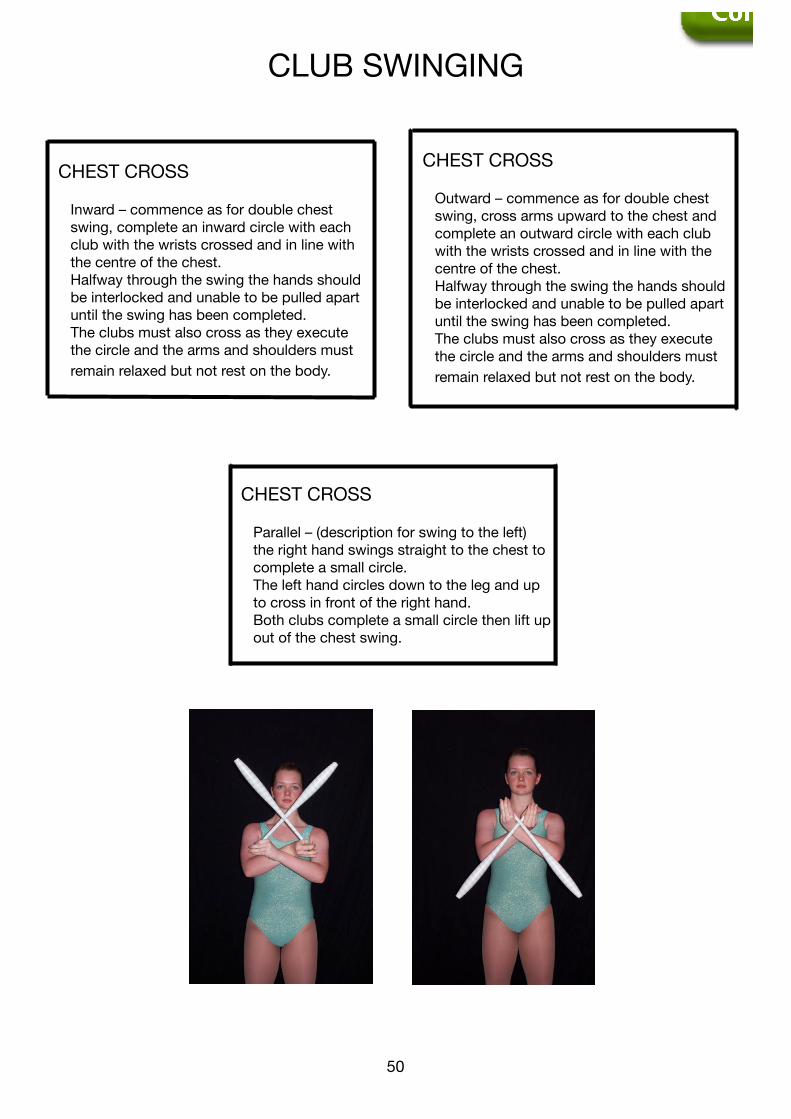
CHEST CROSS
Inward – commence as for double chest swing, complete an inward circle with each club with the wrists crossed and in line with the centre of the chest.
Halfway through the swing the hands should be interlocked and unable to be pulled apart until the swing has been completed.
The clubs must also cross as they execute the circle and the arms and shoulders must remain relaxed but not rest on the body.
CHEST CROSS
Outward – commence as for double chest swing, cross arms upward to the chest and complete an outward circle with each club with the wrists crossed and in line with the centre of the chest.
Halfway through the swing the hands should be interlocked and unable to be pulled apart until the swing has been completed.
The clubs must also cross as they execute the circle and the arms and shoulders must remain relaxed but not rest on the body.
CHEST CROSS
Parallel – (description for swing to the left) the right hand swings straight to the chest to complete a small circle.
The left hand circles down to the leg and up to cross in front of the right hand.
Both clubs complete a small circle then lift up out of the chest swing.
CLUB SWINGING
51
CLUB SWINGING
52
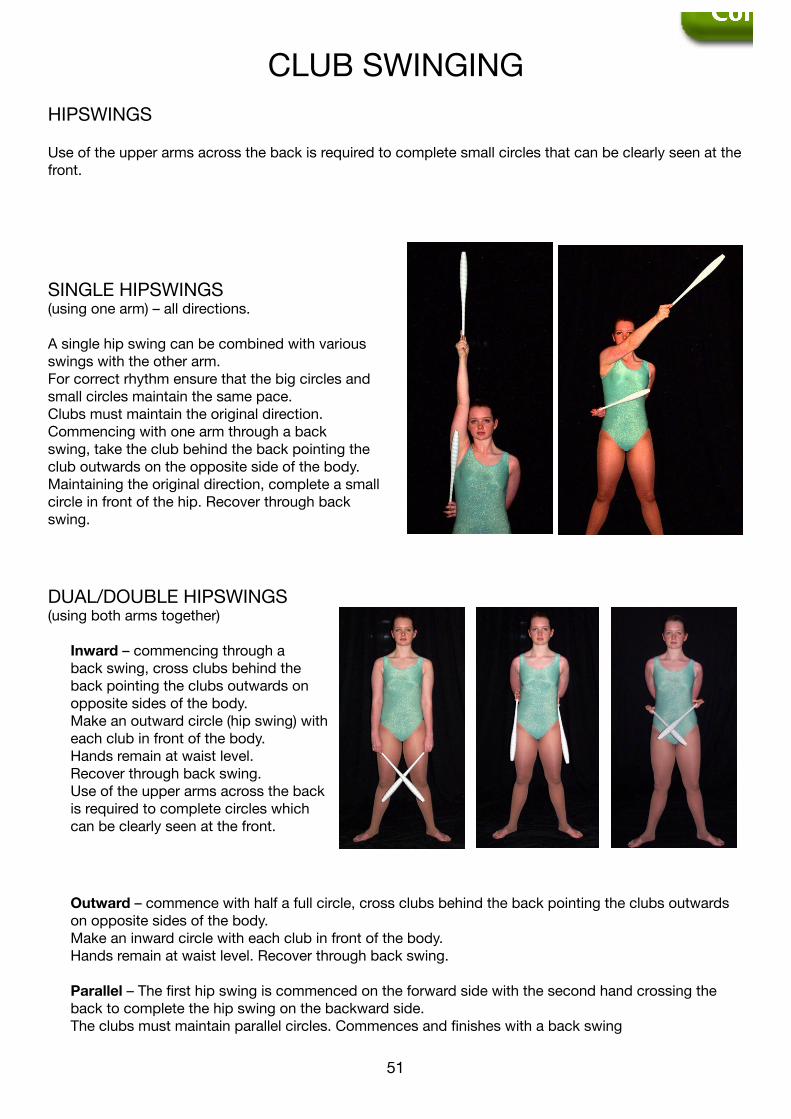
HIPSWINGS
Use of the upper arms across the back is required to complete small circles that can be clearly seen at the front.
DUAL/DOUBLE HIPSWINGS (using both arms together)
Inward – commencing through a back swing, cross clubs behind the back pointing the clubs outwards on opposite sides of the body.
Make an outward circle (hip swing) with each club in front of the body.
Hands remain at waist level. Recover through back swing. Use of the upper arms across the back
is required to complete circles which can be clearly seen at the front.
Outward – commence with half a full circle, cross clubs behind the back pointing the clubs outwards on opposite sides of the body.
Make an inward circle with each club in front of the body. Hands remain at waist level. Recover through back swing.
Parallel – The first hip swing is commenced on the forward side with the second hand crossing the back to complete the hip swing on the backward side.
The clubs must maintain parallel circles. Commences and finishes with a back swing
SINGLE HIPSWINGS (using one arm) – all directions.
A single hip swing can be combined with various swings with the other arm. For correct rhythm ensure that the big circles and small circles maintain the same pace. Clubs must maintain the original direction.Commencing with one arm through a back swing, take the club behind the back pointing the club outwards on the opposite side of the body. Maintaining the original direction, complete a small circle in front of the hip. Recover through back swing.
CLUB SWINGING
51
CLUB SWINGING
52
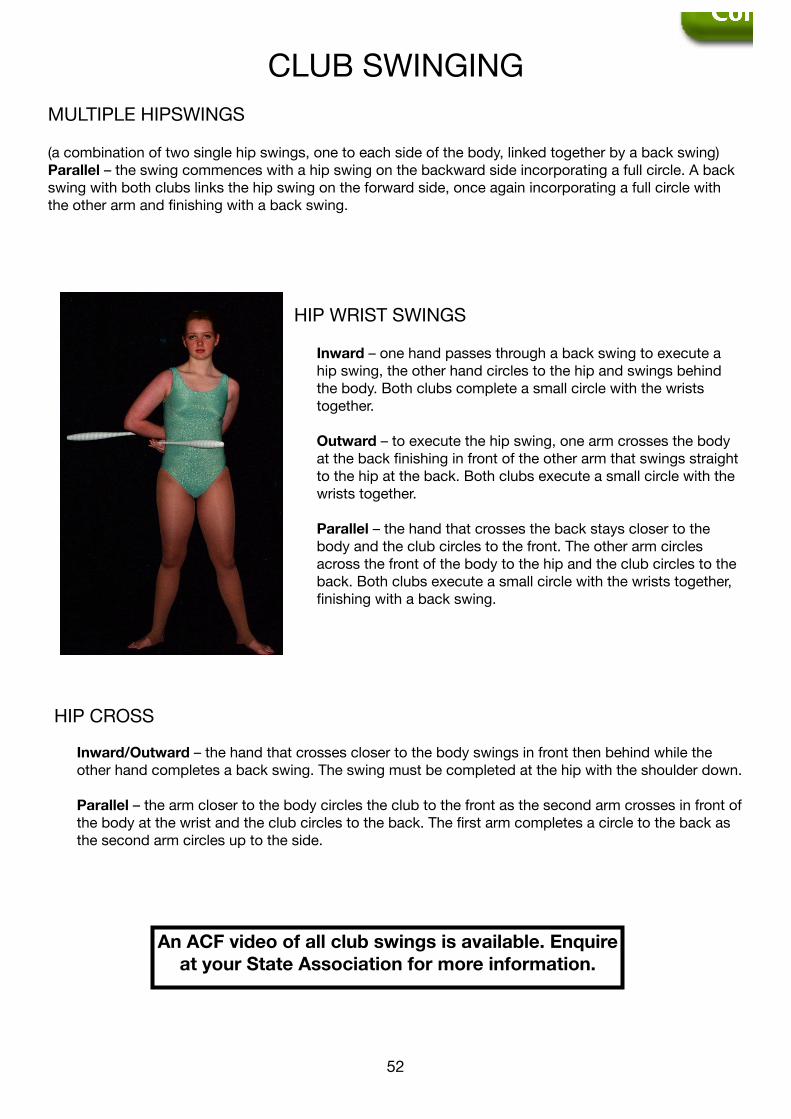
HIP WRIST SWINGS
Inward – one hand passes through a back swing to execute a hip swing, the other hand circles to the hip and swings behind the body. Both clubs complete a small circle with the wrists together.
Outward – to execute the hip swing, one arm crosses the body at the back finishing in front of the other arm that swings straight to the hip at the back. Both clubs execute a small circle with the wrists together.
Parallel – the hand that crosses the back stays closer to the body and the club circles to the front. The other arm circles across the front of the body to the hip and the club circles to the back. Both clubs execute a small circle with the wrists together, finishing with a back swing.
MULTIPLE HIPSWINGS
(a combination of two single hip swings, one to each side of the body, linked together by a back swing)Parallel – the swing commences with a hip swing on the backward side incorporating a full circle. A back swing with both clubs links the hip swing on the forward side, once again incorporating a full circle with the other arm and finishing with a back swing.
HIP CROSS
Inward/Outward – the hand that crosses closer to the body swings in front then behind while the other hand completes a back swing. The swing must be completed at the hip with the shoulder down.
Parallel – the arm closer to the body circles the club to the front as the second arm crosses in front of the body at the wrist and the club circles to the back. The first arm completes a circle to the back as the second arm circles up to the side.
An ACF video of all club swings is available. Enquire at your State Association for more information.
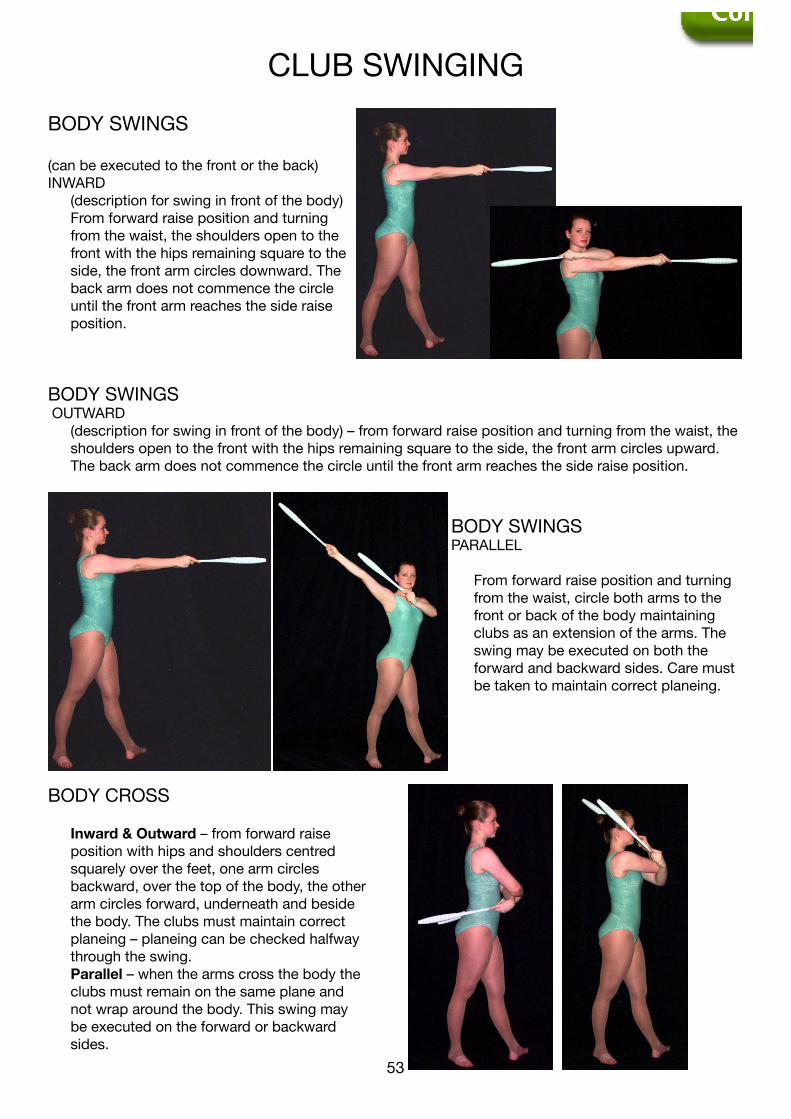
CLUB SWINGING
53
CLUB SWINGING
54
BODY SWINGS
(can be executed to the front or the back)INWARD (description for swing in front of the body) From forward raise position and turning
from the waist, the shoulders open to the front with the hips remaining square to the side, the front arm circles downward. The back arm does not commence the circle until the front arm reaches the side raise position.
BODY SWINGS OUTWARD (description for swing in front of the body) – from forward raise position and turning from the waist, the
shoulders open to the front with the hips remaining square to the side, the front arm circles upward. The back arm does not commence the circle until the front arm reaches the side raise position.
BODY SWINGS PARALLEL
From forward raise position and turning from the waist, circle both arms to the front or back of the body maintaining clubs as an extension of the arms. The swing may be executed on both the forward and backward sides. Care must be taken to maintain correct planeing.
BODY CROSS
Inward & Outward – from forward raise position with hips and shoulders centred squarely over the feet, one arm circles backward, over the top of the body, the other arm circles forward, underneath and beside the body. The clubs must maintain correct planeing – planeing can be checked halfway through the swing.
Parallel – when the arms cross the body the clubs must remain on the same plane and not wrap around the body. This swing may be executed on the forward or backward sides.
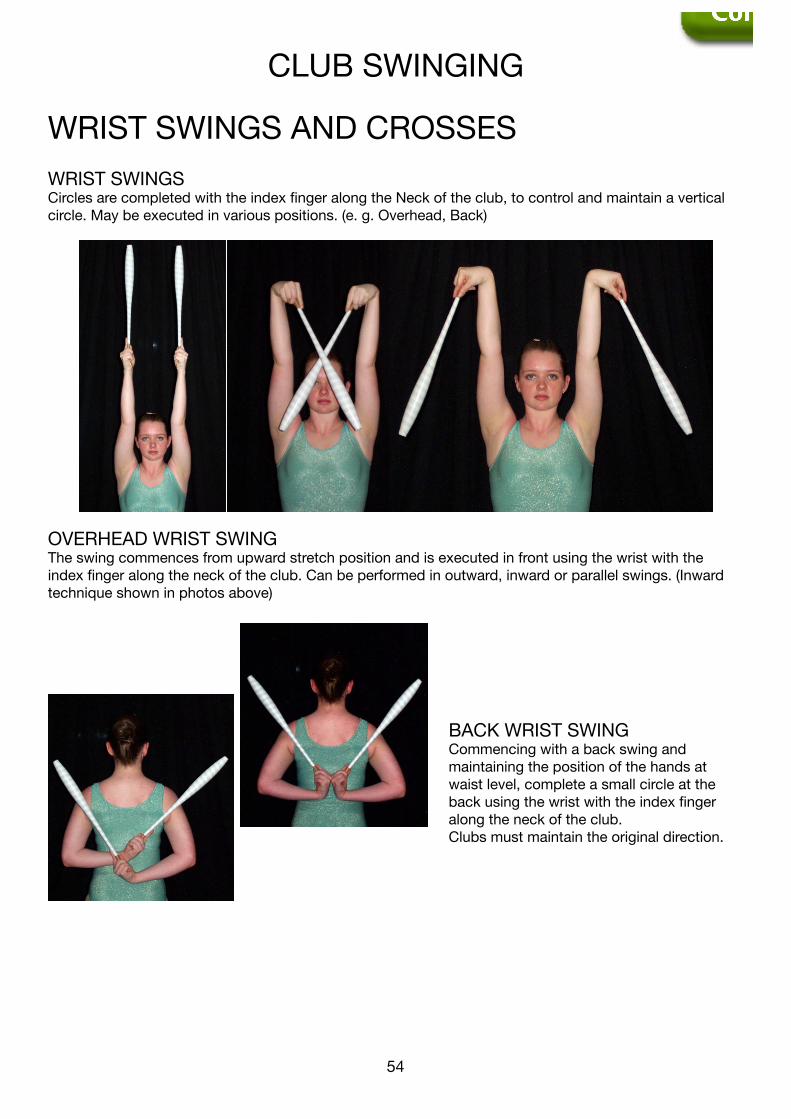
CLUB SWINGING
53
CLUB SWINGING
54
WRIST SWINGS AND CROSSESWRIST SWINGSCircles are completed with the index finger along the Neck of the club, to control and maintain a vertical circle. May be executed in various positions. (e. g. Overhead, Back)
OVERHEAD WRIST SWING The swing commences from upward stretch position and is executed in front using the wrist with the index finger along the neck of the club. Can be performed in outward, inward or parallel swings. (Inward technique shown in photos above)
BACK WRIST SWINGCommencing with a back swing and maintaining the position of the hands at waist level, complete a small circle at the back using the wrist with the index finger along the neck of the club. Clubs must maintain the original direction.
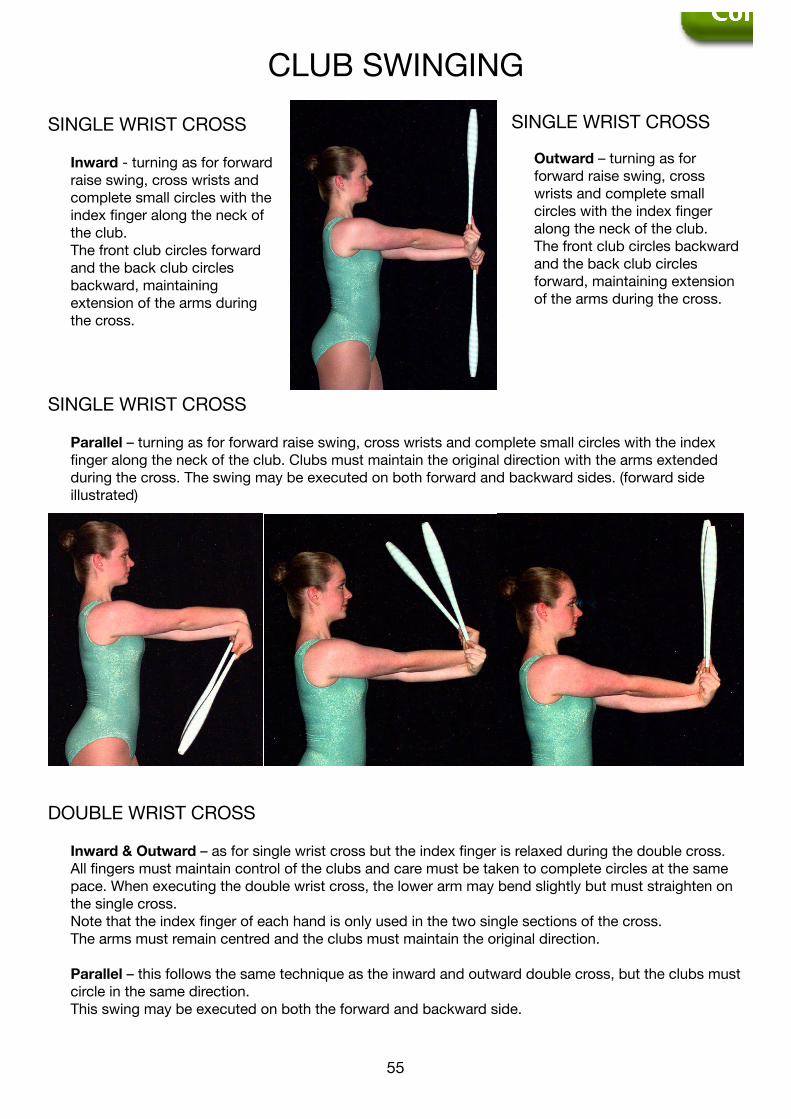
CLUB SWINGING
55
CLUB SWINGING
56
SINGLE WRIST CROSS
Inward - turning as for forward raise swing, cross wrists and complete small circles with the index finger along the neck of the club.
The front club circles forward and the back club circles backward, maintaining extension of the arms during the cross.
SINGLE WRIST CROSS Outward – turning as for
forward raise swing, cross wrists and complete small circles with the index finger along the neck of the club.
The front club circles backward and the back club circles forward, maintaining extension of the arms during the cross.
SINGLE WRIST CROSS
Parallel – turning as for forward raise swing, cross wrists and complete small circles with the index finger along the neck of the club. Clubs must maintain the original direction with the arms extended during the cross. The swing may be executed on both forward and backward sides. (forward side illustrated)
DOUBLE WRIST CROSS
Inward & Outward – as for single wrist cross but the index finger is relaxed during the double cross. All fingers must maintain control of the clubs and care must be taken to complete circles at the same pace. When executing the double wrist cross, the lower arm may bend slightly but must straighten on the single cross.
Note that the index finger of each hand is only used in the two single sections of the cross. The arms must remain centred and the clubs must maintain the original direction.
Parallel – this follows the same technique as the inward and outward double cross, but the clubs must circle in the same direction.
This swing may be executed on both the forward and backward side.
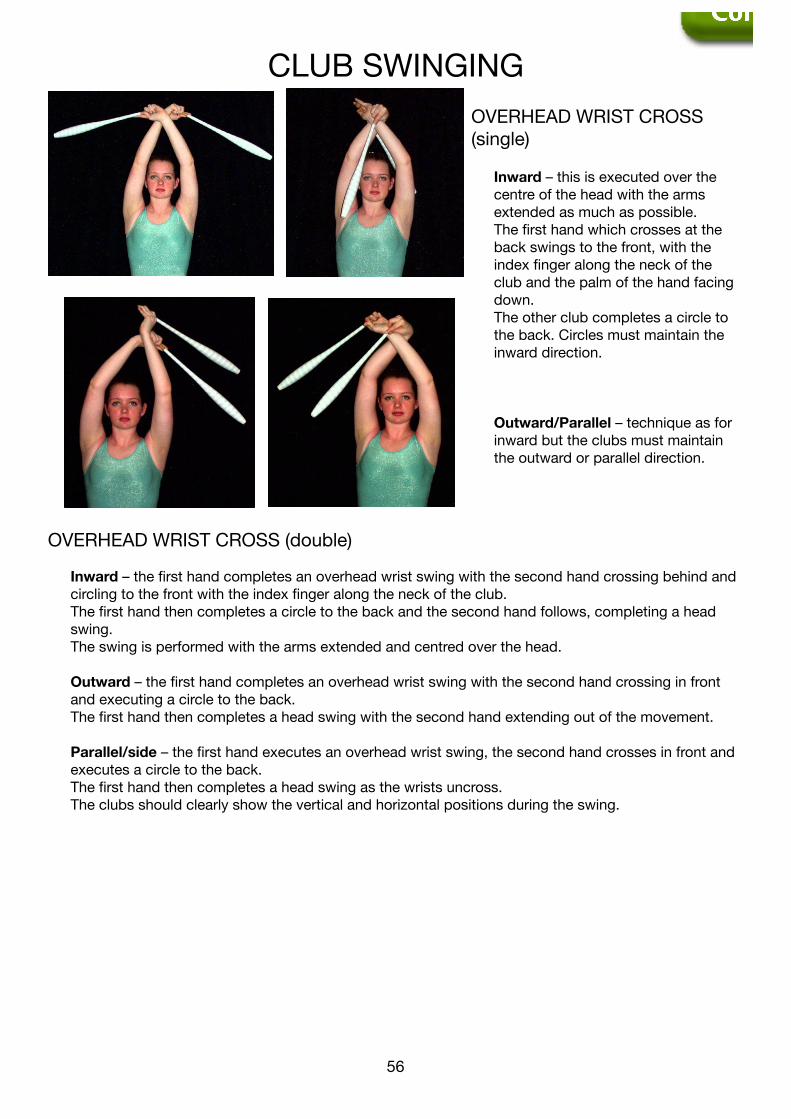
CLUB SWINGING
55
CLUB SWINGING
56
OVERHEAD WRIST CROSS (single)
Inward – this is executed over the centre of the head with the arms extended as much as possible.
The first hand which crosses at the back swings to the front, with the index finger along the neck of the club and the palm of the hand facing down.
The other club completes a circle to the back. Circles must maintain the inward direction.
Outward/Parallel – technique as for inward but the clubs must maintain the outward or parallel direction.
OVERHEAD WRIST CROSS (double)
Inward – the first hand completes an overhead wrist swing with the second hand crossing behind and circling to the front with the index finger along the neck of the club.
The first hand then completes a circle to the back and the second hand follows, completing a head swing.
The swing is performed with the arms extended and centred over the head.
Outward – the first hand completes an overhead wrist swing with the second hand crossing in front and executing a circle to the back.
The first hand then completes a head swing with the second hand extending out of the movement.
Parallel/side – the first hand executes an overhead wrist swing, the second hand crosses in front and executes a circle to the back.
The first hand then completes a head swing as the wrists uncross. The clubs should clearly show the vertical and horizontal positions during the swing.
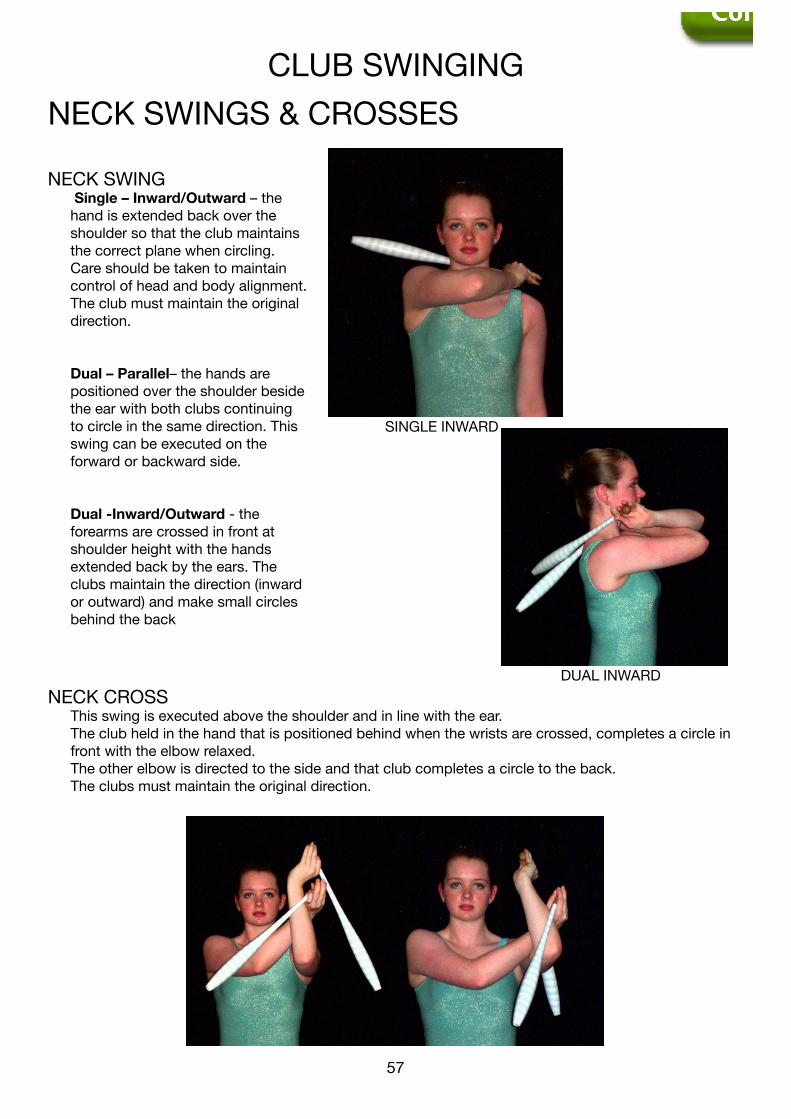
CLUB SWINGING
57
CLUB SWINGING
58
NECK SWING Single – Inward/Outward – the
hand is extended back over the shoulder so that the club maintains the correct plane when circling. Care should be taken to maintain control of head and body alignment. The club must maintain the original direction.
Dual – Parallel– the hands are positioned over the shoulder beside the ear with both clubs continuing to circle in the same direction. This swing can be executed on the forward or backward side.
Dual -Inward/Outward - the forearms are crossed in front at shoulder height with the hands extended back by the ears. The clubs maintain the direction (inward or outward) and make small circles behind the back
NECK CROSS This swing is executed above the shoulder and in line with the ear. The club held in the hand that is positioned behind when the wrists are crossed, completes a circle in
front with the elbow relaxed. The other elbow is directed to the side and that club completes a circle to the back. The clubs must maintain the original direction.
SINGLE INWARD
DUAL INWARD
NECK SWINGS & CROSSES
CLUB SWINGING
57
CLUB SWINGING
58
NECK CROSS
Inward – description for over left shoulder – The right arm crosses the body and passes behind the left arm, and its club swings in front. At the same time the left arm, which passes in front, holds the club that swings to the back. The right arm completes a neck swing while the left arm continues in a big circle.
Outward – description for over left shoulder – The right arm circles and passes behind the left arm, and its club swings in front. At the same time the left arm, which passes in front, holds the club that swings to the back. The right arm completes a neck swing while the left arm continues in a big circle.
NECK CROSS
Parallel – (description for swinging to the Left side) Forward side – the right hand crosses the body and circles to the front. At the same time the left hand crosses in front and circles to the back with the wrists locked together. This is followed by another circle to the back by both clubs together.
Backward side – the clubs swing together to the back, then one to the front and one to the back on the reverse of the forward side.
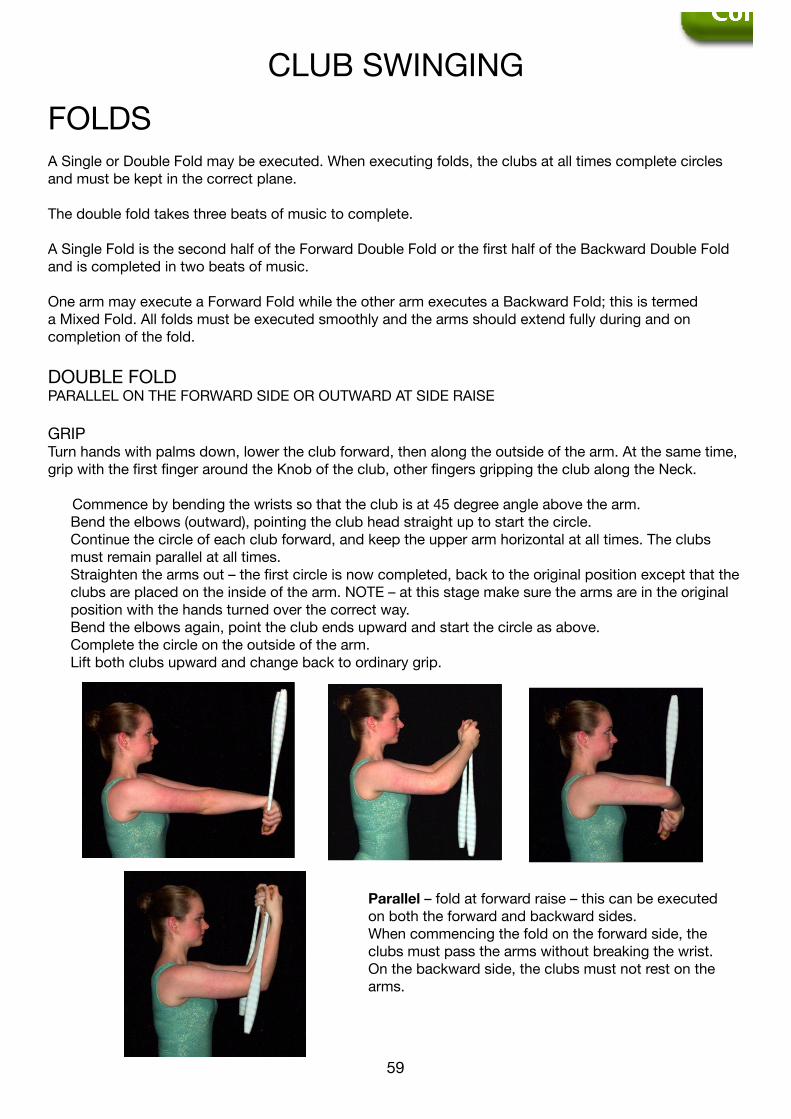
CLUB SWINGING
59
CLUB SWINGING
60
FOLDSA Single or Double Fold may be executed. When executing folds, the clubs at all times complete circles and must be kept in the correct plane.
The double fold takes three beats of music to complete. A Single Fold is the second half of the Forward Double Fold or the first half of the Backward Double Fold and is completed in two beats of music.
One arm may execute a Forward Fold while the other arm executes a Backward Fold; this is termed a Mixed Fold. All folds must be executed smoothly and the arms should extend fully during and on completion of the fold.
DOUBLE FOLDPARALLEL ON THE FORWARD SIDE OR OUTWARD AT SIDE RAISE
GRIPTurn hands with palms down, lower the club forward, then along the outside of the arm. At the same time, grip with the first finger around the Knob of the club, other fingers gripping the club along the Neck.
Commence by bending the wrists so that the club is at 45 degree angle above the arm. Bend the elbows (outward), pointing the club head straight up to start the circle. Continue the circle of each club forward, and keep the upper arm horizontal at all times. The clubs
must remain parallel at all times. Straighten the arms out – the first circle is now completed, back to the original position except that the
clubs are placed on the inside of the arm. NOTE – at this stage make sure the arms are in the original position with the hands turned over the correct way.
Bend the elbows again, point the club ends upward and start the circle as above. Complete the circle on the outside of the arm. Lift both clubs upward and change back to ordinary grip.
Parallel – fold at forward raise – this can be executed on both the forward and backward sides.
When commencing the fold on the forward side, the clubs must pass the arms without breaking the wrist. On the backward side, the clubs must not rest on the arms.
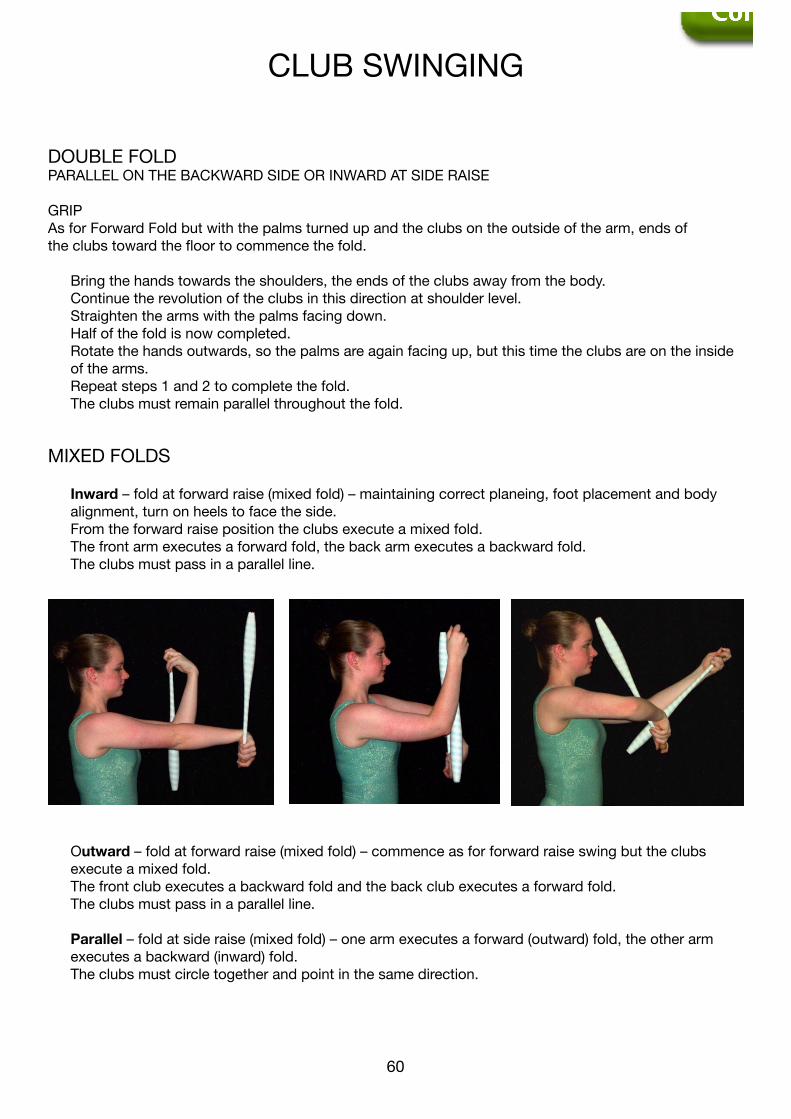
CLUB SWINGING
59
CLUB SWINGING
60
DOUBLE FOLD PARALLEL ON THE BACKWARD SIDE OR INWARD AT SIDE RAISE
GRIPAs for Forward Fold but with the palms turned up and the clubs on the outside of the arm, ends of the clubs toward the floor to commence the fold.
Bring the hands towards the shoulders, the ends of the clubs away from the body. Continue the revolution of the clubs in this direction at shoulder level. Straighten the arms with the palms facing down. Half of the fold is now completed. Rotate the hands outwards, so the palms are again facing up, but this time the clubs are on the inside
of the arms. Repeat steps 1 and 2 to complete the fold. The clubs must remain parallel throughout the fold.
MIXED FOLDS
Inward – fold at forward raise (mixed fold) – maintaining correct planeing, foot placement and body alignment, turn on heels to face the side.
From the forward raise position the clubs execute a mixed fold. The front arm executes a forward fold, the back arm executes a backward fold. The clubs must pass in a parallel line.
Outward – fold at forward raise (mixed fold) – commence as for forward raise swing but the clubs
execute a mixed fold. The front club executes a backward fold and the back club executes a forward fold. The clubs must pass in a parallel line.
Parallel – fold at side raise (mixed fold) – one arm executes a forward (outward) fold, the other arm executes a backward (inward) fold.
The clubs must circle together and point in the same direction.
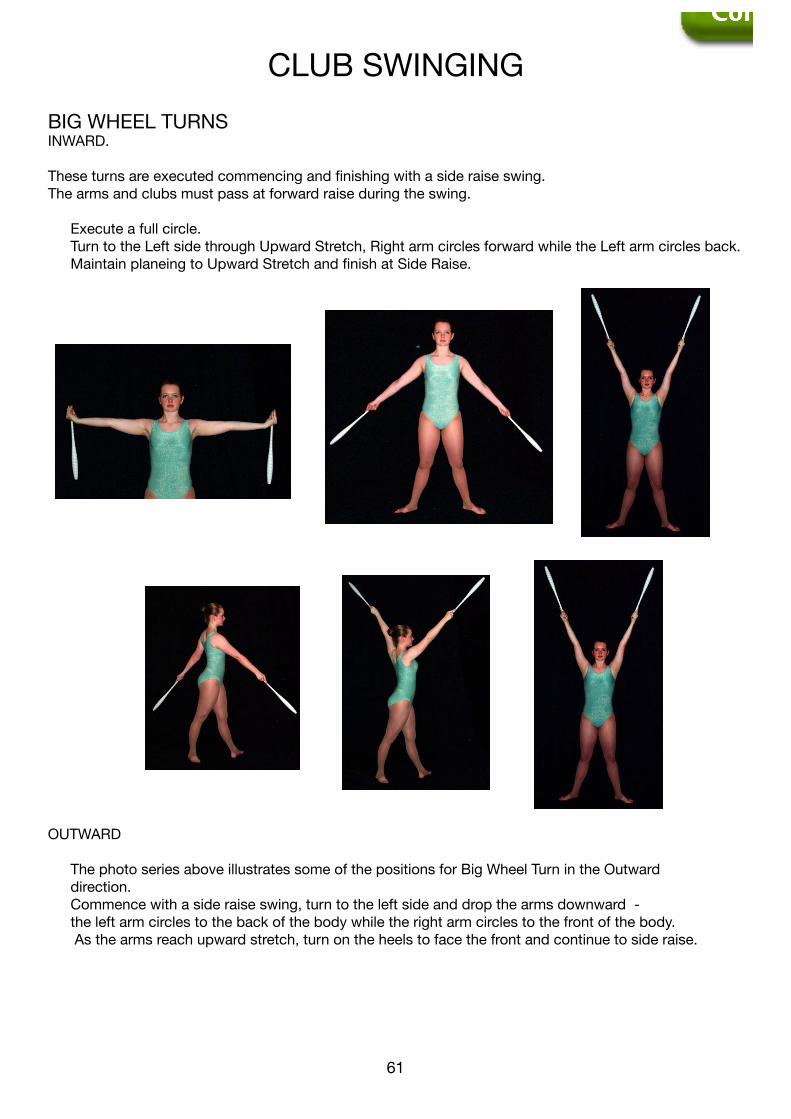
CLUB SWINGING
61
CLUB SWINGING
62
BIG WHEEL TURNS INWARD.
These turns are executed commencing and finishing with a side raise swing.The arms and clubs must pass at forward raise during the swing.
Execute a full circle. Turn to the Left side through Upward Stretch, Right arm circles forward while the Left arm circles back.
Maintain planeing to Upward Stretch and finish at Side Raise.
OUTWARD
The photo series above illustrates some of the positions for Big Wheel Turn in the Outward direction. Commence with a side raise swing, turn to the left side and drop the arms downward - the left arm circles to the back of the body while the right arm circles to the front of the body. As the arms reach upward stretch, turn on the heels to face the front and continue to side raise.
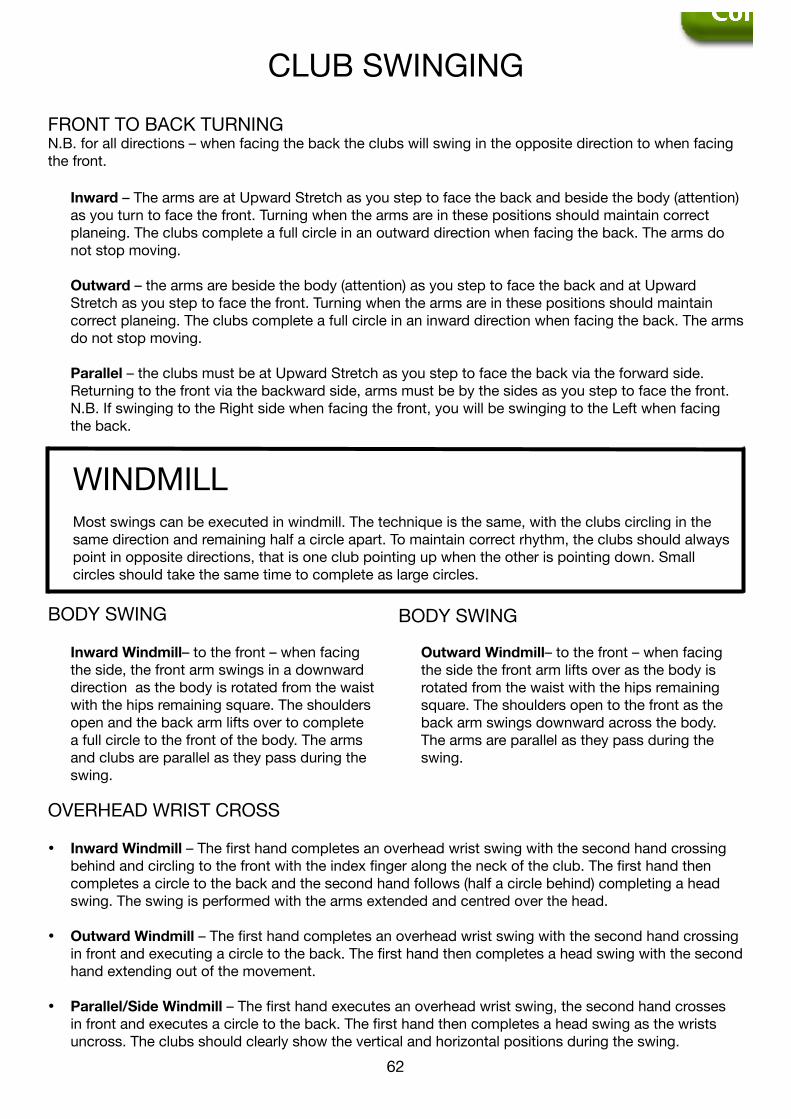
CLUB SWINGING
61
CLUB SWINGING
62
FRONT TO BACK TURNINGN.B. for all directions – when facing the back the clubs will swing in the opposite direction to when facing the front.
Inward – The arms are at Upward Stretch as you step to face the back and beside the body (attention) as you turn to face the front. Turning when the arms are in these positions should maintain correct planeing. The clubs complete a full circle in an outward direction when facing the back. The arms do not stop moving.
Outward – the arms are beside the body (attention) as you step to face the back and at Upward Stretch as you step to face the front. Turning when the arms are in these positions should maintain correct planeing. The clubs complete a full circle in an inward direction when facing the back. The arms do not stop moving.
Parallel – the clubs must be at Upward Stretch as you step to face the back via the forward side. Returning to the front via the backward side, arms must be by the sides as you step to face the front. N.B. If swinging to the Right side when facing the front, you will be swinging to the Left when facing the back.
WINDMILLMost swings can be executed in windmill. The technique is the same, with the clubs circling in the same direction and remaining half a circle apart. To maintain correct rhythm, the clubs should always point in opposite directions, that is one club pointing up when the other is pointing down. Small circles should take the same time to complete as large circles.
BODY SWING
Inward Windmill– to the front – when facing the side, the front arm swings in a downward direction as the body is rotated from the waist with the hips remaining square. The shoulders open and the back arm lifts over to complete a full circle to the front of the body. The arms and clubs are parallel as they pass during the swing.
OVERHEAD WRIST CROSS
• Inward Windmill – The first hand completes an overhead wrist swing with the second hand crossing behind and circling to the front with the index finger along the neck of the club. The first hand then completes a circle to the back and the second hand follows (half a circle behind) completing a head swing. The swing is performed with the arms extended and centred over the head.
• Outward Windmill – The first hand completes an overhead wrist swing with the second hand crossing in front and executing a circle to the back. The first hand then completes a head swing with the second hand extending out of the movement.
• Parallel/Side Windmill – The first hand executes an overhead wrist swing, the second hand crosses in front and executes a circle to the back. The first hand then completes a head swing as the wrists uncross. The clubs should clearly show the vertical and horizontal positions during the swing.
BODY SWING
Outward Windmill– to the front – when facing the side the front arm lifts over as the body is rotated from the waist with the hips remaining square. The shoulders open to the front as the back arm swings downward across the body. The arms are parallel as they pass during the swing.
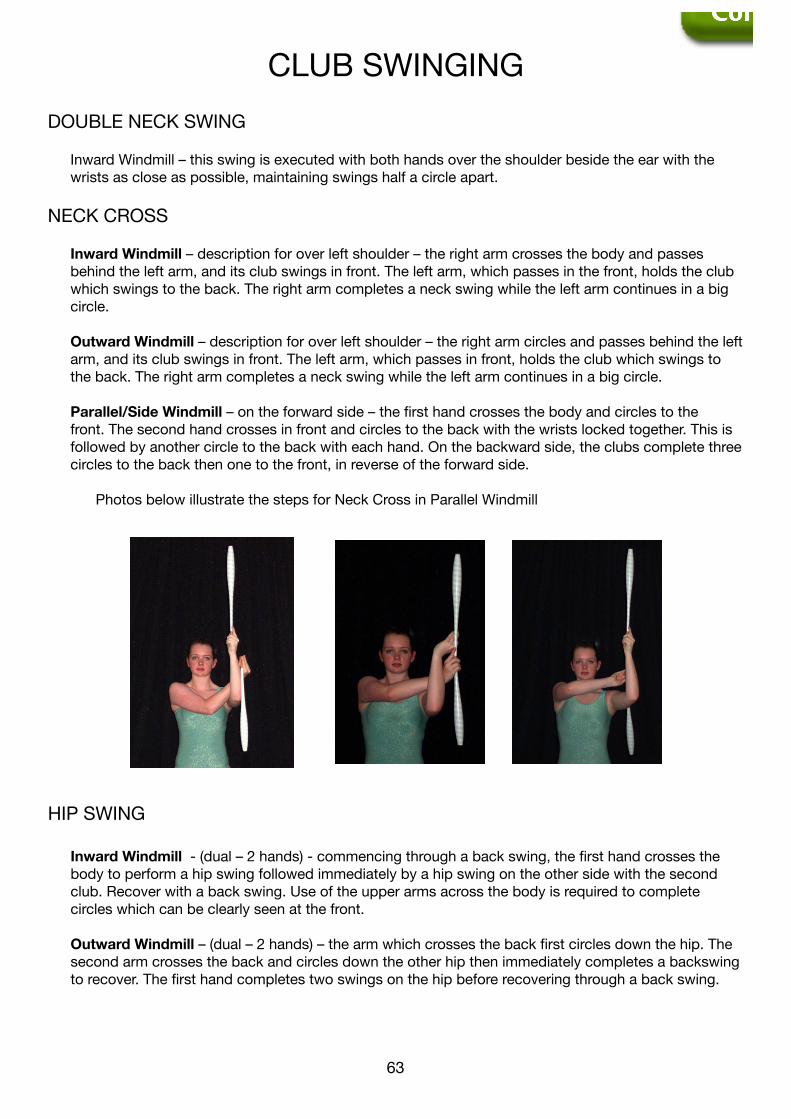
CLUB SWINGING
63
CLUB SWINGING
64
DOUBLE NECK SWING
Inward Windmill – this swing is executed with both hands over the shoulder beside the ear with the wrists as close as possible, maintaining swings half a circle apart.
NECK CROSS Inward Windmill – description for over left shoulder – the right arm crosses the body and passes
behind the left arm, and its club swings in front. The left arm, which passes in the front, holds the club which swings to the back. The right arm completes a neck swing while the left arm continues in a big circle.
Outward Windmill – description for over left shoulder – the right arm circles and passes behind the left arm, and its club swings in front. The left arm, which passes in front, holds the club which swings to the back. The right arm completes a neck swing while the left arm continues in a big circle.
Parallel/Side Windmill – on the forward side – the first hand crosses the body and circles to the front. The second hand crosses in front and circles to the back with the wrists locked together. This is followed by another circle to the back with each hand. On the backward side, the clubs complete three circles to the back then one to the front, in reverse of the forward side.
Photos below illustrate the steps for Neck Cross in Parallel Windmill
HIP SWING
Inward Windmill - (dual – 2 hands) - commencing through a back swing, the first hand crosses the body to perform a hip swing followed immediately by a hip swing on the other side with the second club. Recover with a back swing. Use of the upper arms across the body is required to complete circles which can be clearly seen at the front.
Outward Windmill – (dual – 2 hands) – the arm which crosses the back first circles down the hip. The second arm crosses the back and circles down the other hip then immediately completes a backswing to recover. The first hand completes two swings on the hip before recovering through a back swing.
CLUB SWINGING
63
CLUB SWINGING
64
HIP WRIST SWING
Inward Windmill - the first hand passes through a back swing to execute the hip swing. The second hand circles to the hip and circles to the back. Both clubs complete a small circle with the wrists together at the hip.
Outward Windmill – the hand which crosses the back completes the hip swing and the other hand circles straight to the hip and circles at the back. Both clubs complete a small circle with wrists together at he hip.
Parallel/Side Windmill – the hand which commences the back swing performs the hip swing on the backward side while the other hand performs a small circle at the back with the wrists together at the hip. The swing is completed with a back swing.
HIP CROSS
Inward Windmill – the hand that stays close to the body circles to the front and then behind the back while the other hand completes a back swing. The swing must be executed at the hip, keeping the shoulders down.
Parallel/Side Windmill – the first arm completes a full circle as the second arm travels to the opposite hip and executes a small circle at the front. The first arm then crosses over the wrist and completes a back swing. The second hand follows to complete a circle at the back. The swing may be completed with a side raise swing or turn to the side.
THE ACF CLUB SWINGING VIDEO IS RECOMMENDED FOR VIEWING ADVANCED CLUB SWINGS AND COMBINATIONS.
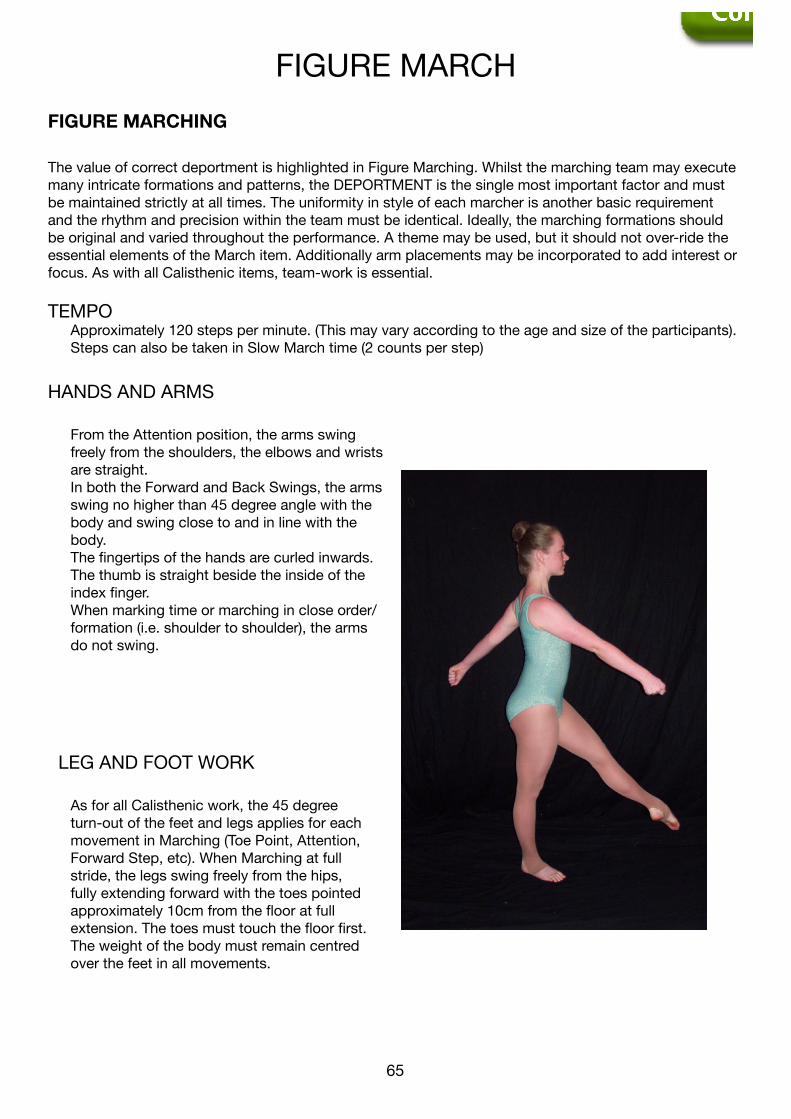
FIGURE MARCH
65
FIGURE MARCH
66
FIGURE MARCHING
The value of correct deportment is highlighted in Figure Marching. Whilst the marching team may execute many intricate formations and patterns, the DEPORTMENT is the single most important factor and must be maintained strictly at all times. The uniformity in style of each marcher is another basic requirement and the rhythm and precision within the team must be identical. Ideally, the marching formations should be original and varied throughout the performance. A theme may be used, but it should not over-ride the essential elements of the March item. Additionally arm placements may be incorporated to add interest or focus. As with all Calisthenic items, team-work is essential.
TEMPO Approximately 120 steps per minute. (This may vary according to the age and size of the participants).
Steps can also be taken in Slow March time (2 counts per step)
HANDS AND ARMS
From the Attention position, the arms swing freely from the shoulders, the elbows and wrists are straight.
In both the Forward and Back Swings, the arms swing no higher than 45 degree angle with the body and swing close to and in line with the body.
The fingertips of the hands are curled inwards. The thumb is straight beside the inside of the index finger.
When marking time or marching in close order/formation (i.e. shoulder to shoulder), the arms do not swing.
LEG AND FOOT WORK
As for all Calisthenic work, the 45 degree turn-out of the feet and legs applies for each movement in Marching (Toe Point, Attention, Forward Step, etc). When Marching at full stride, the legs swing freely from the hips, fully extending forward with the toes pointed approximately 10cm from the floor at full extension. The toes must touch the floor first. The weight of the body must remain centred over the feet in all movements.
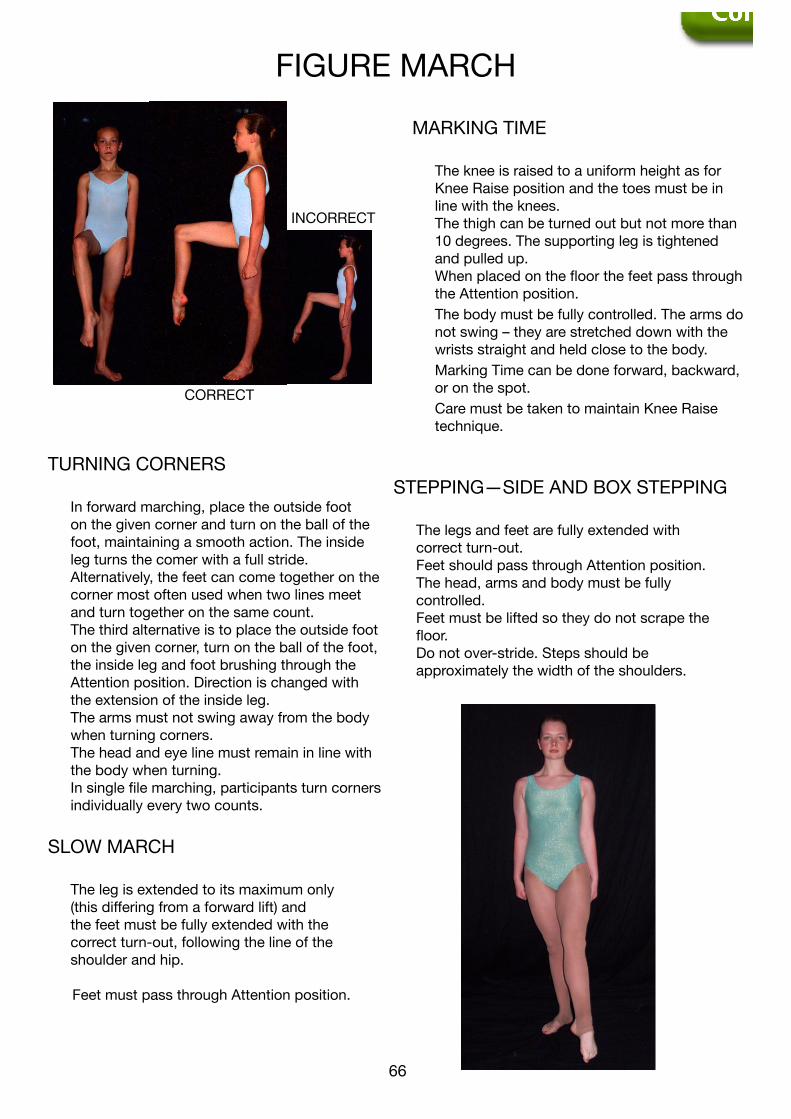
FIGURE MARCH
65
FIGURE MARCH
66
TURNING CORNERS
In forward marching, place the outside foot on the given corner and turn on the ball of the foot, maintaining a smooth action. The inside leg turns the comer with a full stride.
Alternatively, the feet can come together on the corner most often used when two lines meet and turn together on the same count.
The third alternative is to place the outside foot on the given corner, turn on the ball of the foot, the inside leg and foot brushing through the Attention position. Direction is changed with the extension of the inside leg.
The arms must not swing away from the body when turning corners.
The head and eye line must remain in line with the body when turning.
In single file marching, participants turn corners individually every two counts.
MARKING TIME
The knee is raised to a uniform height as for Knee Raise position and the toes must be in line with the knees.
The thigh can be turned out but not more than 10 degrees. The supporting leg is tightened and pulled up.
When placed on the floor the feet pass through the Attention position.
The body must be fully controlled. The arms do not swing – they are stretched down with the wrists straight and held close to the body.
Marking Time can be done forward, backward, or on the spot.
Care must be taken to maintain Knee Raise technique.
CORRECT
INCORRECT
STEPPING—SIDE AND BOX STEPPING
The legs and feet are fully extended with correct turn-out.
Feet should pass through Attention position. The head, arms and body must be fully
controlled. Feet must be lifted so they do not scrape the
floor. Do not over-stride. Steps should be
approximately the width of the shoulders.
SLOW MARCH
The leg is extended to its maximum only (this differing from a forward lift) and the feet must be fully extended with the correct turn-out, following the line of the shoulder and hip.
Feet must pass through Attention position.
FIGURE MARCH
67
TURNS
ABOUT TURN There are varying ways of performing this movement but in all cases, the body must be fully balanced
and controlled. Uniformity, rhythm, correct extension and technique of basic footwork must be maintained without
excessive bending of the knees. Varieties of turning include mark-time turn, open turn, with feet across front or behind, or through
Attention position.
MARK TIME TURN (e.g. Turning by the R Shoulder)
The L leg is lifted to Knee Raise and returns to the Attention position but with the weight on the ball of the foot. Immediately turn by the R shoulder and raise the R leg to Knee Raise in the opposite direction.
OPEN TURN(e.g. Turning by the R Shoulder)
The L foot is placed in Step Forward position, placing the weight on the ball of the foot. Immediately turn by R shoulder and step the R leg forward in the opposite direction.
WITH FOOT ACROSS IN FRONT (e.g. Turning by the R Shoulder)
Place the ball of the L foot on the outside of, and close to the R foot. Place the weight on the ball of the L and immediately turn by the R shoulder and step forward in the opposite direction with the R leg.
WITH FOOT ACROSS BEHIND (e.g. Turning by the L Shoulder)
Place the ball of the L foot behind and close to the R heel. Place the weight on the ball of the L foot and immediately turn by the L shoulder. Step forward in the opposite direction with the R leg.
TURNING THROUGH ATTENTION (e.g. Turning by the R Shoulder)
From Attention position, keep the weight on the ball of the L foot. Immediately turn by the R shoulder and step forward in the opposite direction with the R leg.
HEAD TURNS
These are optional. If turned to the side the head must remain erect. Do not lower the chin to the shoulder or tilt the head forward or back. Check alignment of shoulders when using Head Turns in wheels.
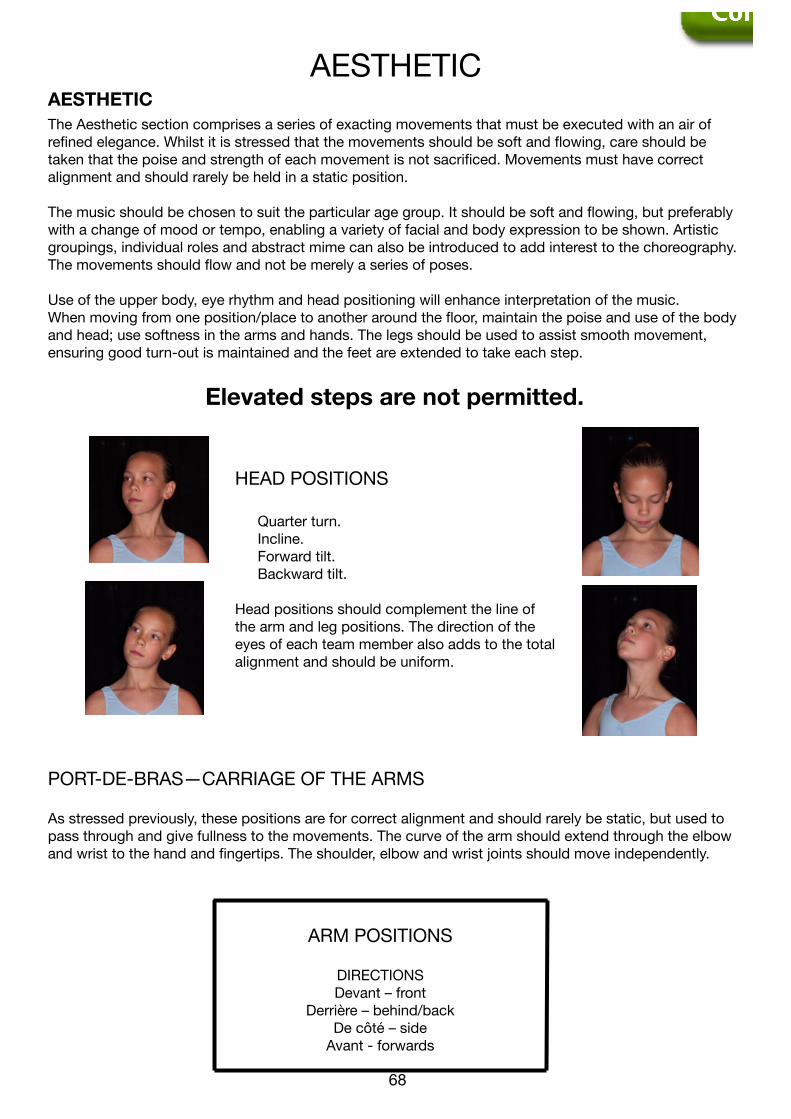
AESTHETIC
68
AESTHETIC
69
The Aesthetic section comprises a series of exacting movements that must be executed with an air of refined elegance. Whilst it is stressed that the movements should be soft and flowing, care should be taken that the poise and strength of each movement is not sacrificed. Movements must have correct alignment and should rarely be held in a static position.
The music should be chosen to suit the particular age group. It should be soft and flowing, but preferably with a change of mood or tempo, enabling a variety of facial and body expression to be shown. Artistic groupings, individual roles and abstract mime can also be introduced to add interest to the choreography. The movements should flow and not be merely a series of poses.
Use of the upper body, eye rhythm and head positioning will enhance interpretation of the music.When moving from one position/place to another around the floor, maintain the poise and use of the body and head; use softness in the arms and hands. The legs should be used to assist smooth movement, ensuring good turn-out is maintained and the feet are extended to take each step.
Elevated steps are not permitted.
HEAD POSITIONS
Quarter turn. Incline. Forward tilt. Backward tilt.
Head positions should complement the line of the arm and leg positions. The direction of the eyes of each team member also adds to the total alignment and should be uniform.
PORT-DE-BRAS—CARRIAGE OF THE ARMS
As stressed previously, these positions are for correct alignment and should rarely be static, but used to pass through and give fullness to the movements. The curve of the arm should extend through the elbow and wrist to the hand and fingertips. The shoulder, elbow and wrist joints should move independently.
ARM POSITIONS
DIRECTIONSDevant – front
Derrière – behind/backDe côté – side
Avant - forwards
AESTHETIC
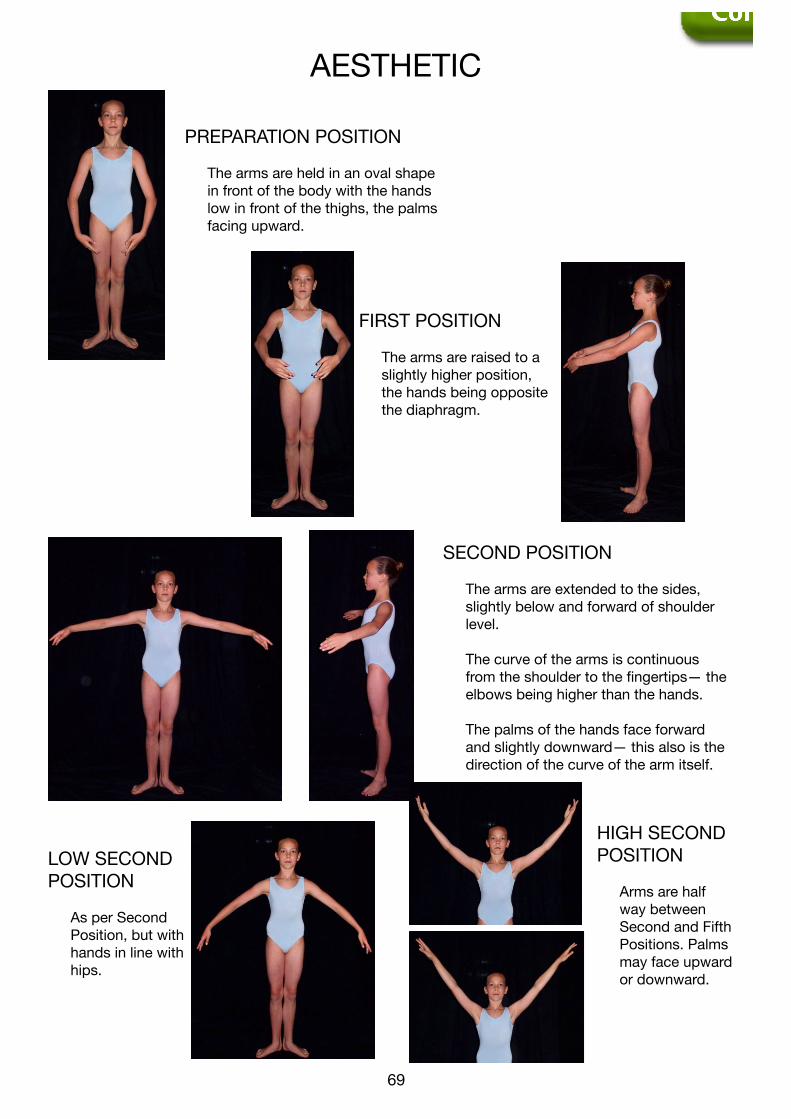
AESTHETIC
68
AESTHETIC
69
PREPARATION POSITION
The arms are held in an oval shape in front of the body with the hands low in front of the thighs, the palms facing upward.
FIRST POSITION
The arms are raised to a slightly higher position, the hands being opposite the diaphragm.
SECOND POSITION
The arms are extended to the sides, slightly below and forward of shoulder level.
The curve of the arms is continuous
from the shoulder to the fingertips— the elbows being higher than the hands.
The palms of the hands face forward and slightly downward— this also is the direction of the curve of the arm itself.
LOW SECOND POSITION
As per Second Position, but with hands in line with hips.
HIGH SECOND POSITION
Arms are half way between Second and Fifth Positions. Palms may face upward or downward.
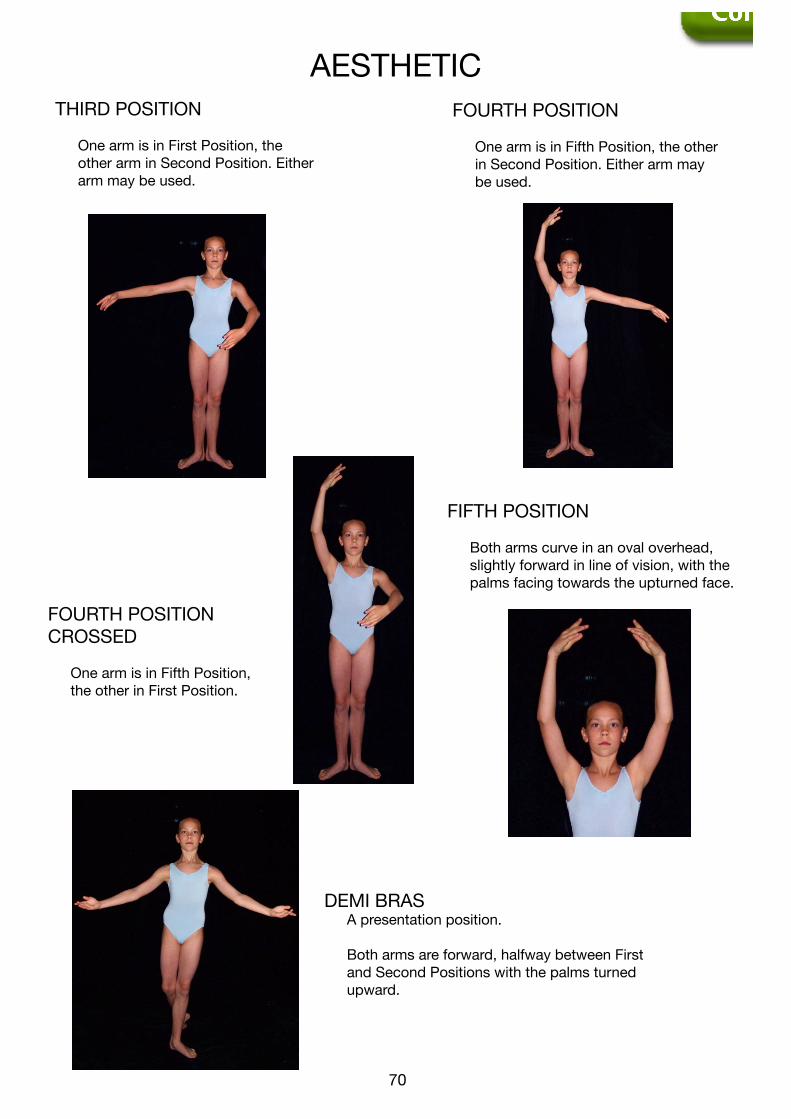
AESTHETIC
70
AESTHETIC
71
THIRD POSITION
One arm is in First Position, the other arm in Second Position. Either arm may be used.
FOURTH POSITION
One arm is in Fifth Position, the other in Second Position. Either arm may be used.
FOURTH POSITION CROSSED
One arm is in Fifth Position, the other in First Position.
FIFTH POSITION
Both arms curve in an oval overhead, slightly forward in line of vision, with the palms facing towards the upturned face.
DEMI BRAS A presentation position.
Both arms are forward, halfway between First and Second Positions with the palms turned upward.
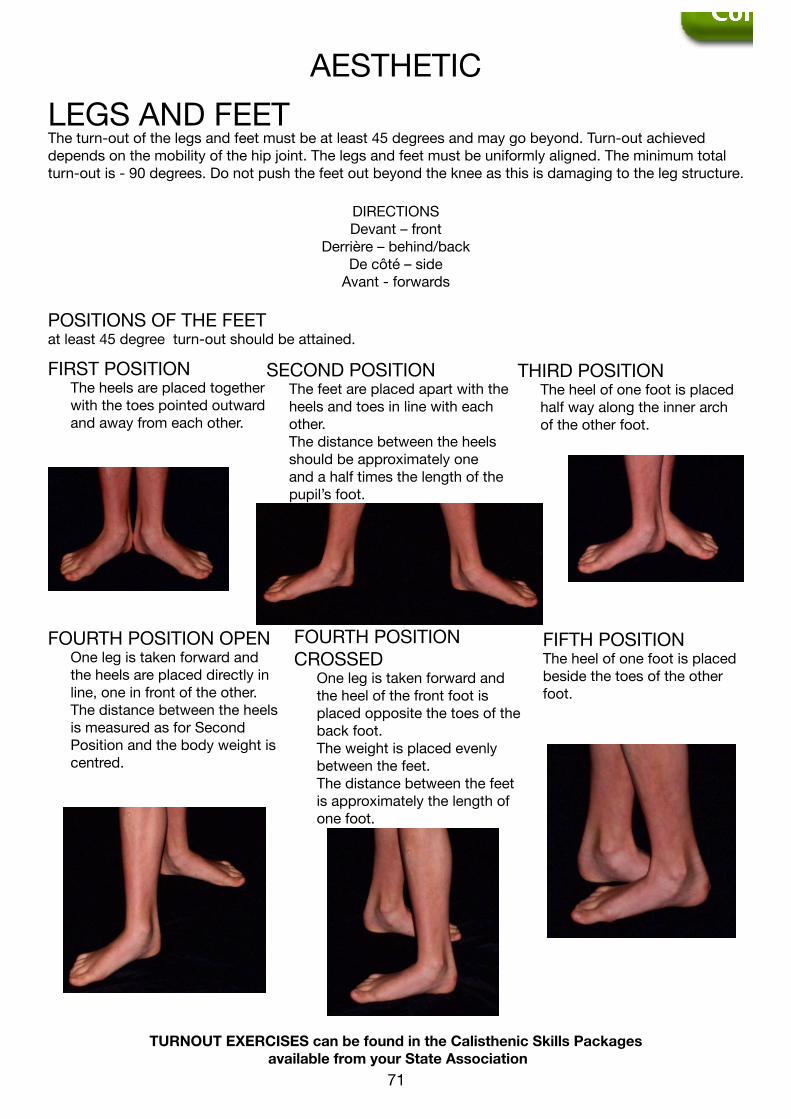
AESTHETIC
70
AESTHETIC
71
LEGS AND FEETThe turn-out of the legs and feet must be at least 45 degrees and may go beyond. Turn-out achieved depends on the mobility of the hip joint. The legs and feet must be uniformly aligned. The minimum total turn-out is - 90 degrees. Do not push the feet out beyond the knee as this is damaging to the leg structure.
DIRECTIONSDevant – front
Derrière – behind/backDe côté – side
Avant - forwards
POSITIONS OF THE FEETat least 45 degree turn-out should be attained.
FIRST POSITION The heels are placed together
with the toes pointed outward and away from each other.
SECOND POSITION The feet are placed apart with the
heels and toes in line with each other.
The distance between the heels should be approximately one and a half times the length of the pupil’s foot.
THIRD POSITION The heel of one foot is placed
half way along the inner arch of the other foot.
FOURTH POSITION OPEN One leg is taken forward and
the heels are placed directly in line, one in front of the other.
The distance between the heels is measured as for Second Position and the body weight is centred.
FOURTH POSITION CROSSED One leg is taken forward and
the heel of the front foot is placed opposite the toes of the back foot.
The weight is placed evenly between the feet.
The distance between the feet is approximately the length of one foot.
FIFTH POSITIONThe heel of one foot is placed beside the toes of the other foot.
TURNOUT EXERCISES can be found in the Calisthenic Skills Packages available from your State Association
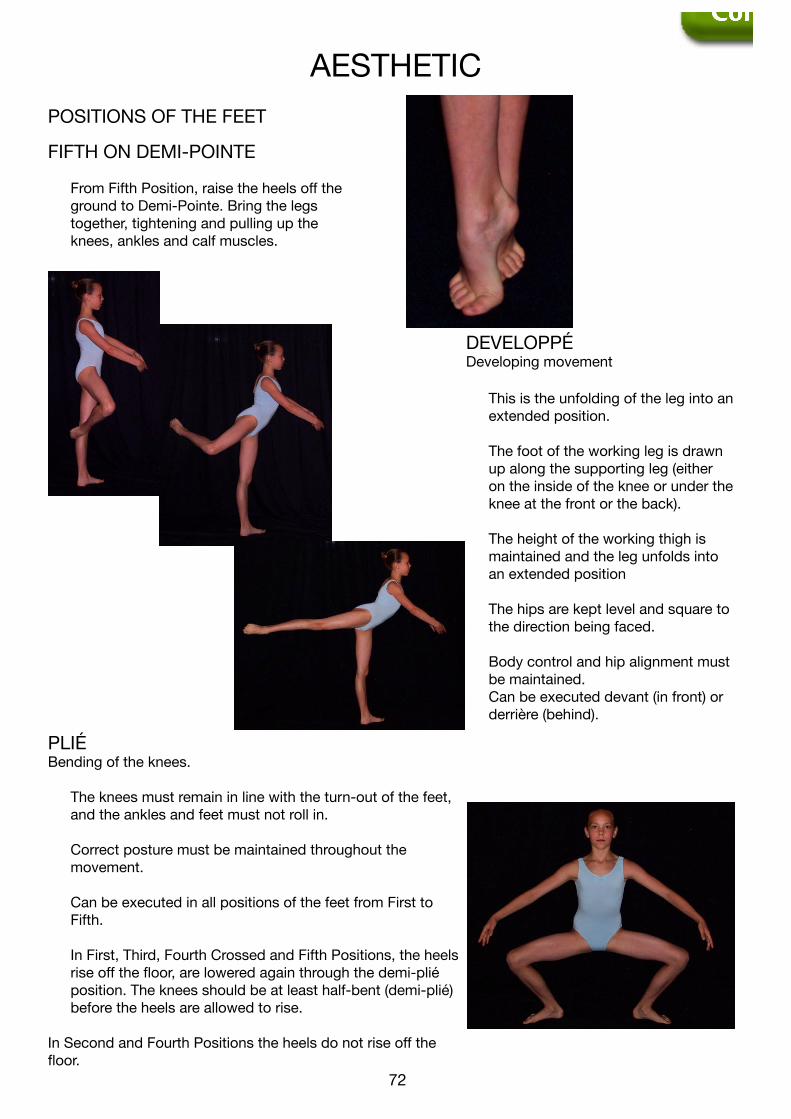
AESTHETIC
72
AESTHETIC
73
FIFTH ON DEMI-POINTE
From Fifth Position, raise the heels off the ground to Demi-Pointe. Bring the legs together, tightening and pulling up the knees, ankles and calf muscles.
POSITIONS OF THE FEET
DEVELOPPÉ Developing movement
This is the unfolding of the leg into an extended position.
The foot of the working leg is drawn up along the supporting leg (either on the inside of the knee or under the knee at the front or the back).
The height of the working thigh is maintained and the leg unfolds into an extended position
The hips are kept level and square to the direction being faced.
Body control and hip alignment must be maintained.
Can be executed devant (in front) or derrière (behind).
PLIÉBending of the knees.
The knees must remain in line with the turn-out of the feet, and the ankles and feet must not roll in.
Correct posture must be maintained throughout the movement.
Can be executed in all positions of the feet from First to Fifth.
In First, Third, Fourth Crossed and Fifth Positions, the heels rise off the floor, are lowered again through the demi-plié position. The knees should be at least half-bent (demi-plié) before the heels are allowed to rise.
In Second and Fourth Positions the heels do not rise off the floor.
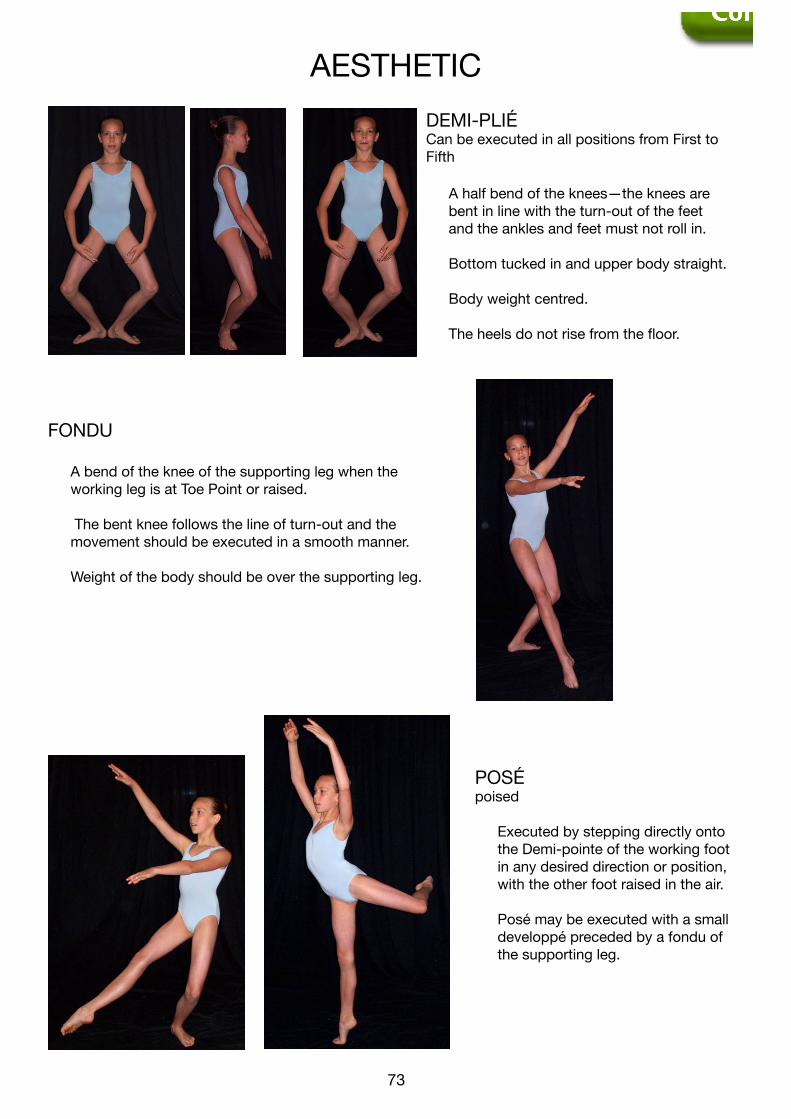
AESTHETIC
72
AESTHETIC
73
DEMI-PLIÉ Can be executed in all positions from First to Fifth
A half bend of the knees—the knees are bent in line with the turn-out of the feet and the ankles and feet must not roll in.
Bottom tucked in and upper body straight.
Body weight centred.
The heels do not rise from the floor.
FONDU
A bend of the knee of the supporting leg when the working leg is at Toe Point or raised.
The bent knee follows the line of turn-out and the movement should be executed in a smooth manner.
Weight of the body should be over the supporting leg.
POSÉ poised
Executed by stepping directly onto the Demi-pointe of the working foot in any desired direction or position, with the other foot raised in the air.
Posé may be executed with a small developpé preceded by a fondu of the supporting leg.
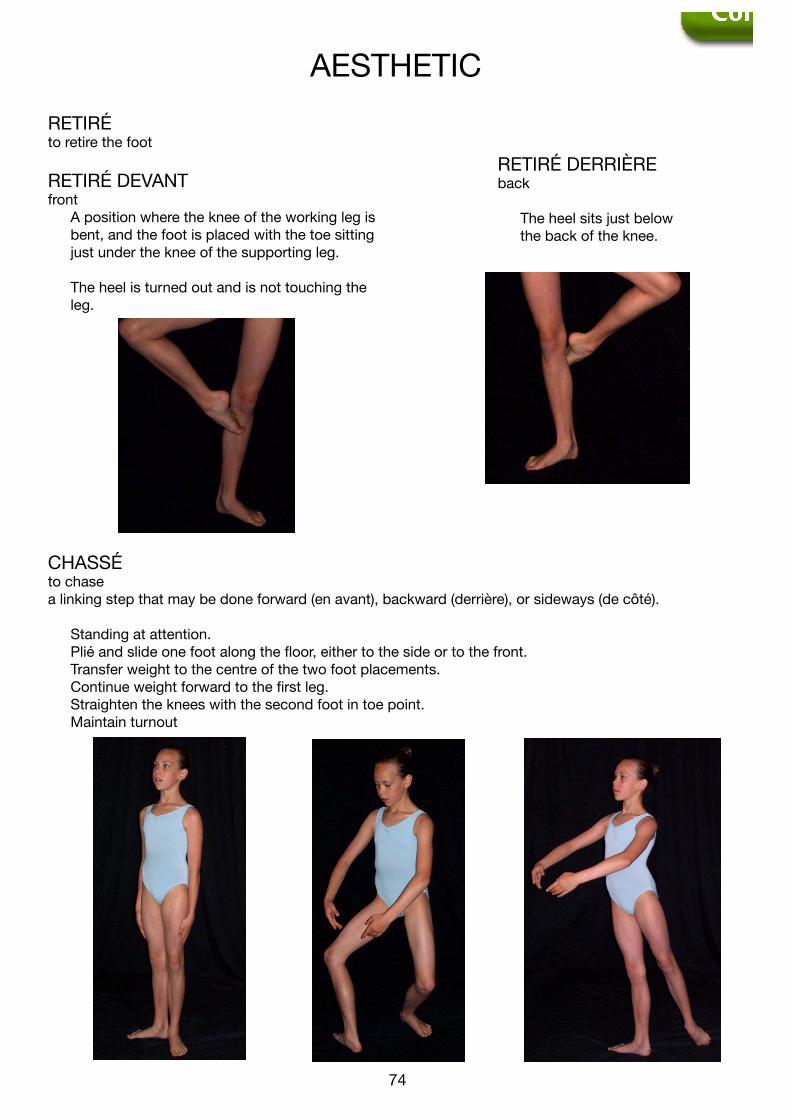
AESTHETIC
74
AESTHETIC
75
RETIRÉ to retire the foot
RETIRÉ DEVANTfront A position where the knee of the working leg is
bent, and the foot is placed with the toe sitting just under the knee of the supporting leg.
The heel is turned out and is not touching the leg.
CHASSÉ to chasea linking step that may be done forward (en avant), backward (derrière), or sideways (de côté).
Standing at attention. Plié and slide one foot along the floor, either to the side or to the front. Transfer weight to the centre of the two foot placements. Continue weight forward to the first leg. Straighten the knees with the second foot in toe point. Maintain turnout
RETIRÉ DERRIÈREback
The heel sits just below the back of the knee.
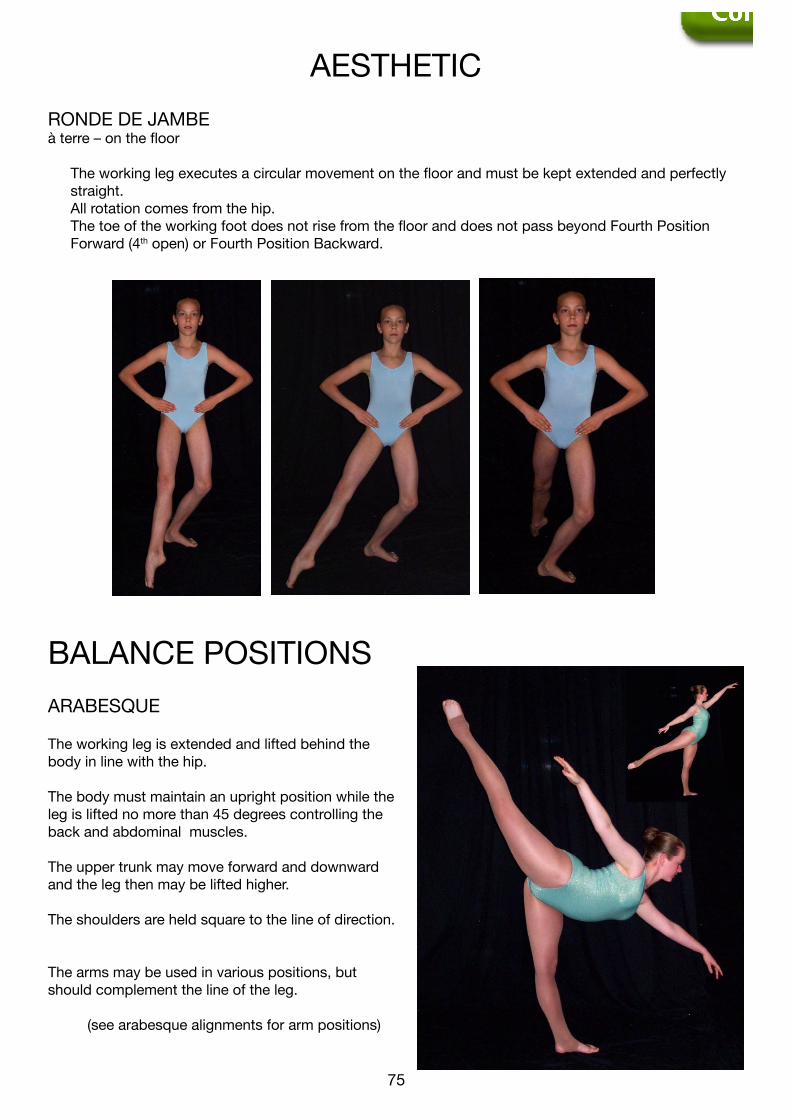
AESTHETIC
74
AESTHETIC
75
RONDE DE JAMBE à terre – on the floor
The working leg executes a circular movement on the floor and must be kept extended and perfectly straight.
All rotation comes from the hip. The toe of the working foot does not rise from the floor and does not pass beyond Fourth Position
Forward (4th open) or Fourth Position Backward.
ARABESQUE
The working leg is extended and lifted behind the body in line with the hip. The body must maintain an upright position while the leg is lifted no more than 45 degrees controlling the back and abdominal muscles.
The upper trunk may move forward and downward and the leg then may be lifted higher.
The shoulders are held square to the line of direction.
The arms may be used in various positions, but should complement the line of the leg.
(see arabesque alignments for arm positions)
BALANCE POSITIONS
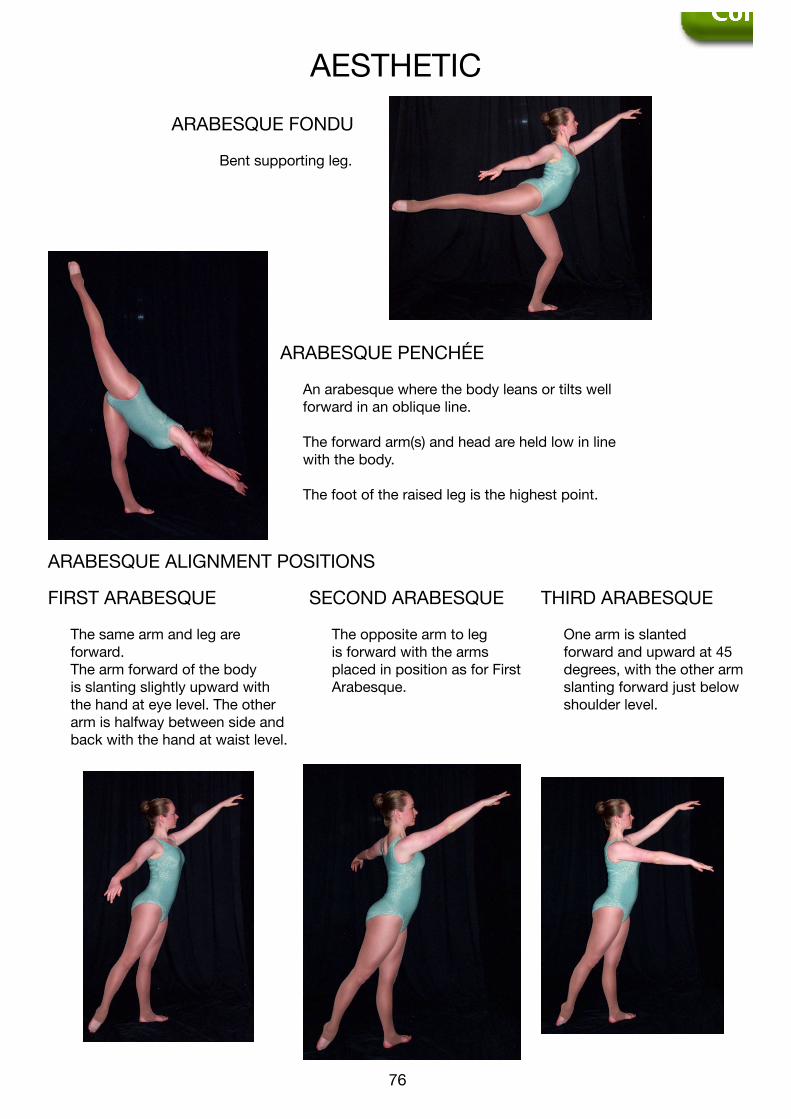
AESTHETIC
76
AESTHETIC
77
ARABESQUE FONDU
Bent supporting leg.
ARABESQUE PENCHÉE
An arabesque where the body leans or tilts well forward in an oblique line.
The forward arm(s) and head are held low in line with the body.
The foot of the raised leg is the highest point.
ARABESQUE ALIGNMENT POSITIONS
FIRST ARABESQUE
The same arm and leg are forward.
The arm forward of the body is slanting slightly upward with the hand at eye level. The other arm is halfway between side and back with the hand at waist level.
SECOND ARABESQUE
The opposite arm to leg is forward with the arms placed in position as for First Arabesque.
THIRD ARABESQUE
One arm is slanted forward and upward at 45 degrees, with the other arm slanting forward just below shoulder level.
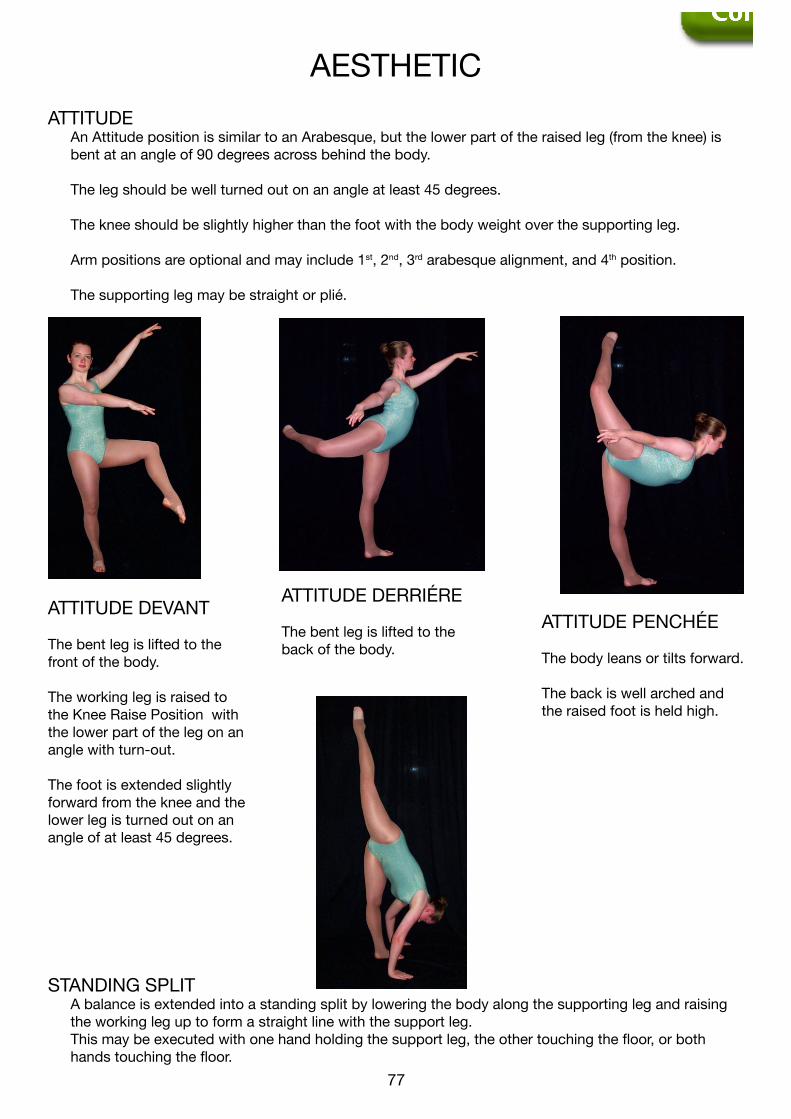
AESTHETIC
76
AESTHETIC
77
ATTITUDE An Attitude position is similar to an Arabesque, but the lower part of the raised leg (from the knee) is
bent at an angle of 90 degrees across behind the body. The leg should be well turned out on an angle at least 45 degrees.
The knee should be slightly higher than the foot with the body weight over the supporting leg.
Arm positions are optional and may include 1st, 2nd, 3rd arabesque alignment, and 4th position.
The supporting leg may be straight or plié.
ATTITUDE DEVANT
The bent leg is lifted to the front of the body.
The working leg is raised to the Knee Raise Position with the lower part of the leg on an angle with turn-out.
The foot is extended slightly forward from the knee and the lower leg is turned out on an angle of at least 45 degrees.
ATTITUDE DERRIÉRE
The bent leg is lifted to theback of the body.
ATTITUDE PENCHÉE
The body leans or tilts forward.
The back is well arched and the raised foot is held high.
STANDING SPLIT A balance is extended into a standing split by lowering the body along the supporting leg and raising
the working leg up to form a straight line with the support leg. This may be executed with one hand holding the support leg, the other touching the floor, or both
hands touching the floor.
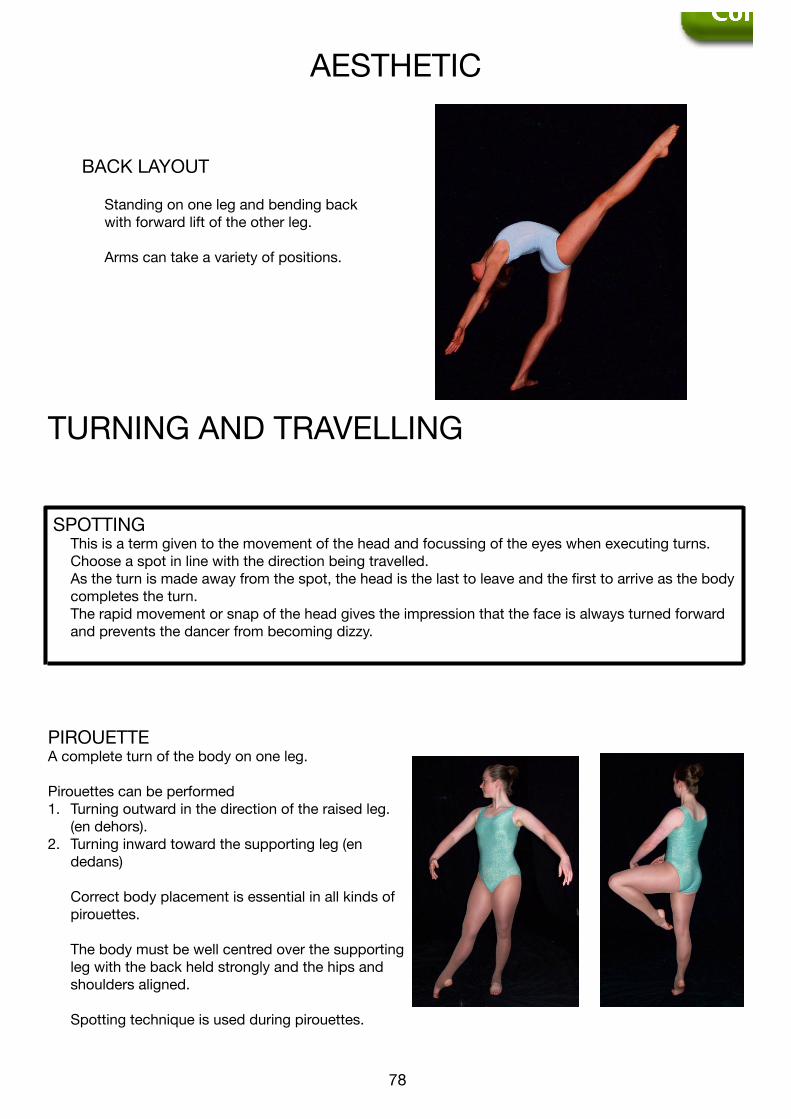
AESTHETIC
78
AESTHETIC
79
BACK LAYOUT
Standing on one leg and bending back with forward lift of the other leg.
Arms can take a variety of positions.
SPOTTING This is a term given to the movement of the head and focussing of the eyes when executing turns. Choose a spot in line with the direction being travelled. As the turn is made away from the spot, the head is the last to leave and the first to arrive as the body
completes the turn. The rapid movement or snap of the head gives the impression that the face is always turned forward
and prevents the dancer from becoming dizzy.
TURNING AND TRAVELLING
PIROUETTEA complete turn of the body on one leg.
Pirouettes can be performed 1. Turning outward in the direction of the raised leg.
(en dehors).2. Turning inward toward the supporting leg (en
dedans)
Correct body placement is essential in all kinds of pirouettes.
The body must be well centred over the supporting leg with the back held strongly and the hips and
shoulders aligned. Spotting technique is used during pirouettes.
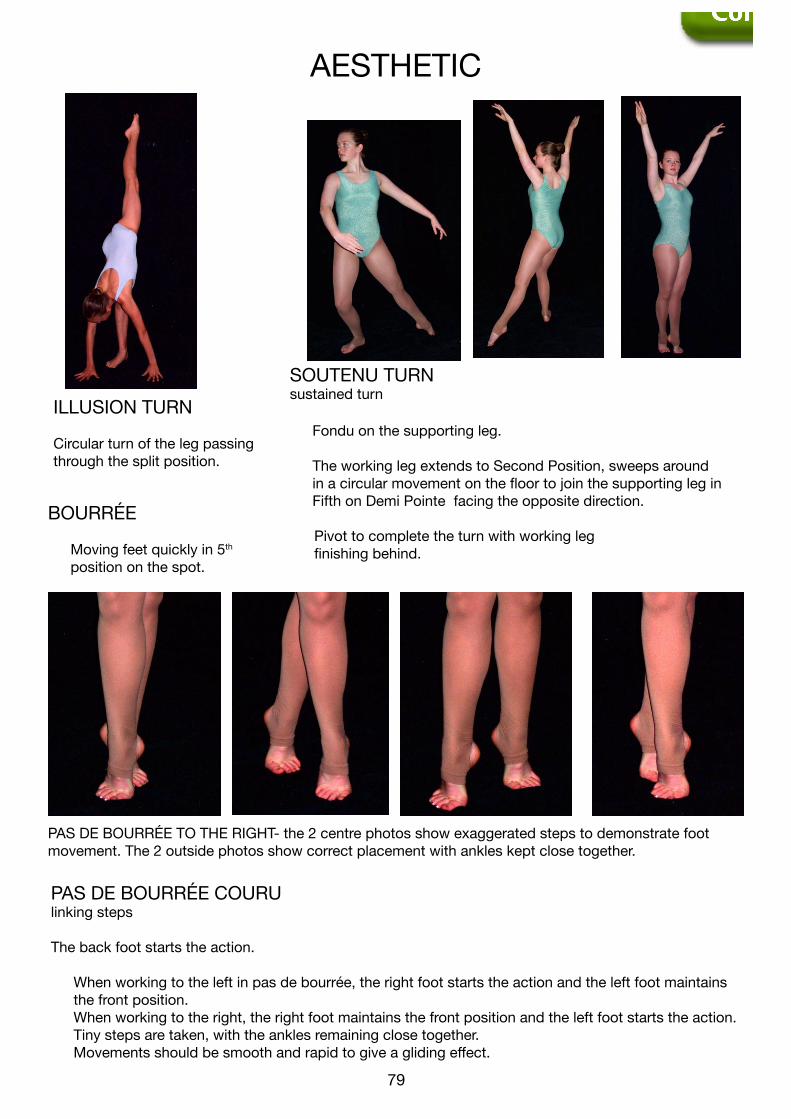
AESTHETIC
78
AESTHETIC
79
ILLUSION TURN
Circular turn of the leg passingthrough the split position.
SOUTENU TURNsustained turn
Fondu on the supporting leg.
The working leg extends to Second Position, sweeps around in a circular movement on the floor to join the supporting leg in Fifth on Demi Pointe facing the opposite direction.
Pivot to complete the turn with working leg finishing behind.
BOURRÉE
Moving feet quickly in 5th position on the spot.
PAS DE BOURRÉE COURUlinking steps
The back foot starts the action.
When working to the left in pas de bourrée, the right foot starts the action and the left foot maintains the front position.
When working to the right, the right foot maintains the front position and the left foot starts the action. Tiny steps are taken, with the ankles remaining close together. Movements should be smooth and rapid to give a gliding effect.
PAS DE BOURRÉE TO THE RIGHT- the 2 centre photos show exaggerated steps to demonstrate foot movement. The 2 outside photos show correct placement with ankles kept close together.

DANCE
80
DANCE
81
DANCE
Calisthenics includes many aspects of Dance. Rhythmic Interpretation requires natural dance. Folk Dance involves the adaptation and presentation of characteristic National dances. Song and Dance requires a dance presentation and Calisthenic Spectacular includes 50% dance of any style with the other 50% containing physical movements pertaining to the theme. Many dance steps are adapted from the ballet. In such cases, the equivalent balletic term is listed and in general coaching, it is recommended that the use of balletic terms occur so pupils become familiar with this terminology.
ASSEMBLÉassembled or joined together
Commence with Demi-Plié. The working foot slides well along the floor before sweeping into the air. As the foot moves into the air, the dancer pushes off the floor with the supporting leg, extending the foot. Both feet land on the floor simultaneously in Demi-Plié in 5th or 3rd position. May be Petit (small) or Grand (large), according to the height “throw” of the working leg, and is executed devant (front), derrière (behind), dessus (over), dessous (under), en avant (forward), en arrière (backward) and en tournant (turning)
BALANCÉ rocking step, waltz
This step is an alteration of balance, shifting the weight from one foot to the other. Balancé may be done crossing the foot either front or back. It can be executed from side to side, travelling forwards or turning.
CABRIOLE
A lively step where the legs are beaten together in the air. The working leg is thrust into the air, the underneath leg follows and beats against the first leg sending it higher. The landing is then made on the underneath leg. Petit Cabriole is executed at 45 degrees and Grande Cabriole is executed at 90 degrees. The Cabriole can be done forward, backward or to the side.
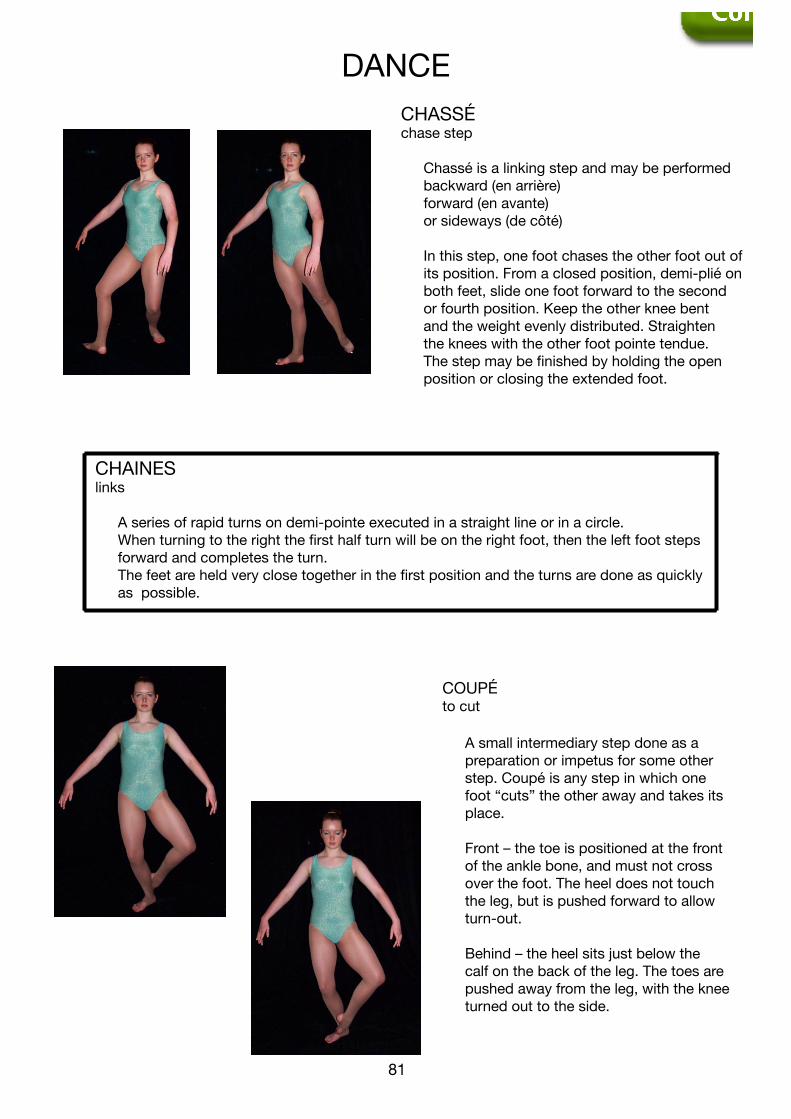
DANCE
80
DANCE
81
CHASSÉ chase step
Chassé is a linking step and may be performed backward (en arrière) forward (en avante) or sideways (de côté)
In this step, one foot chases the other foot out of its position. From a closed position, demi-plié on both feet, slide one foot forward to the second or fourth position. Keep the other knee bent and the weight evenly distributed. Straighten the knees with the other foot pointe tendue. The step may be finished by holding the open position or closing the extended foot.
CHAINES links
A series of rapid turns on demi-pointe executed in a straight line or in a circle. When turning to the right the first half turn will be on the right foot, then the left foot steps
forward and completes the turn. The feet are held very close together in the first position and the turns are done as quickly
as possible.
COUPÉ to cut
A small intermediary step done as a preparation or impetus for some other step. Coupé is any step in which one foot “cuts” the other away and takes its place.
Front – the toe is positioned at the front of the ankle bone, and must not cross over the foot. The heel does not touch the leg, but is pushed forward to allow turn-out.
Behind – the heel sits just below the calf on the back of the leg. The toes are pushed away from the leg, with the knee turned out to the side.
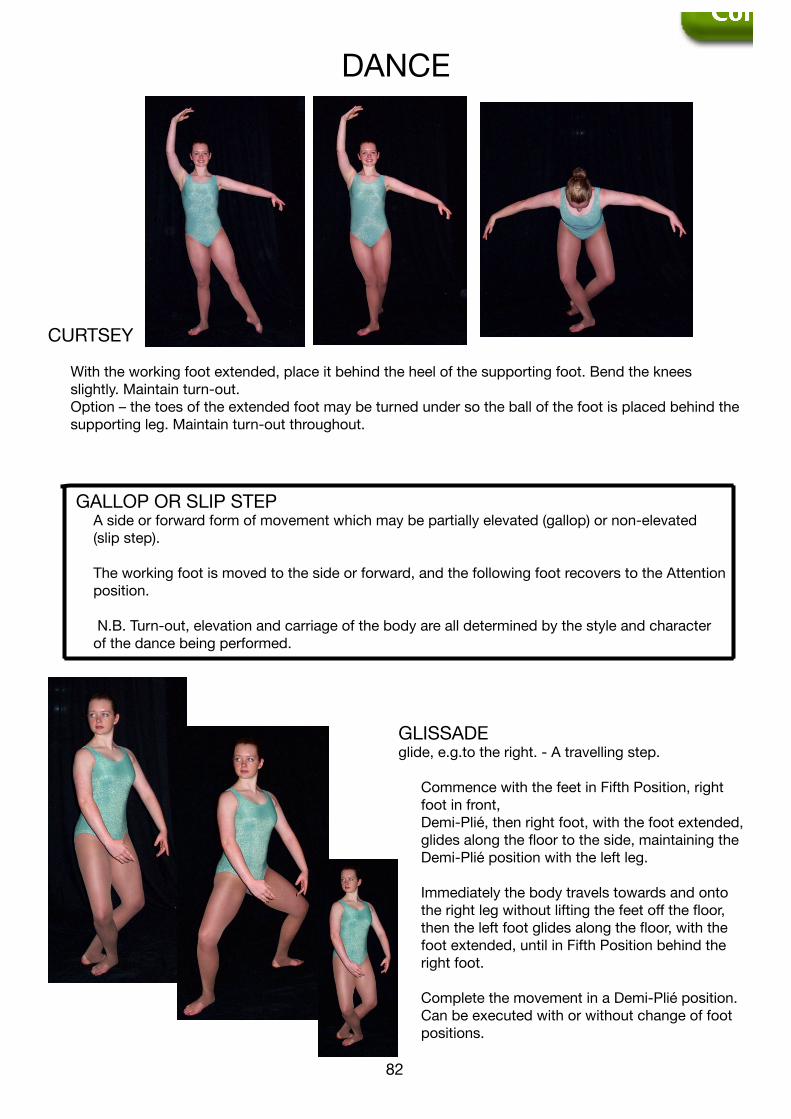
DANCE
82
DANCE
83
CURTSEY
With the working foot extended, place it behind the heel of the supporting foot. Bend the knees slightly. Maintain turn-out.Option – the toes of the extended foot may be turned under so the ball of the foot is placed behind the supporting leg. Maintain turn-out throughout.
GALLOP OR SLIP STEP A side or forward form of movement which may be partially elevated (gallop) or non-elevated
(slip step).
The working foot is moved to the side or forward, and the following foot recovers to the Attention position.
N.B. Turn-out, elevation and carriage of the body are all determined by the style and character of the dance being performed.
GLISSADE glide, e.g.to the right. - A travelling step.
Commence with the feet in Fifth Position, right foot in front,
Demi-Plié, then right foot, with the foot extended, glides along the floor to the side, maintaining the Demi-Plié position with the left leg.
Immediately the body travels towards and onto the right leg without lifting the feet off the floor, then the left foot glides along the floor, with the foot extended, until in Fifth Position behind the right foot.
Complete the movement in a Demi-Plié position. Can be executed with or without change of foot positions.
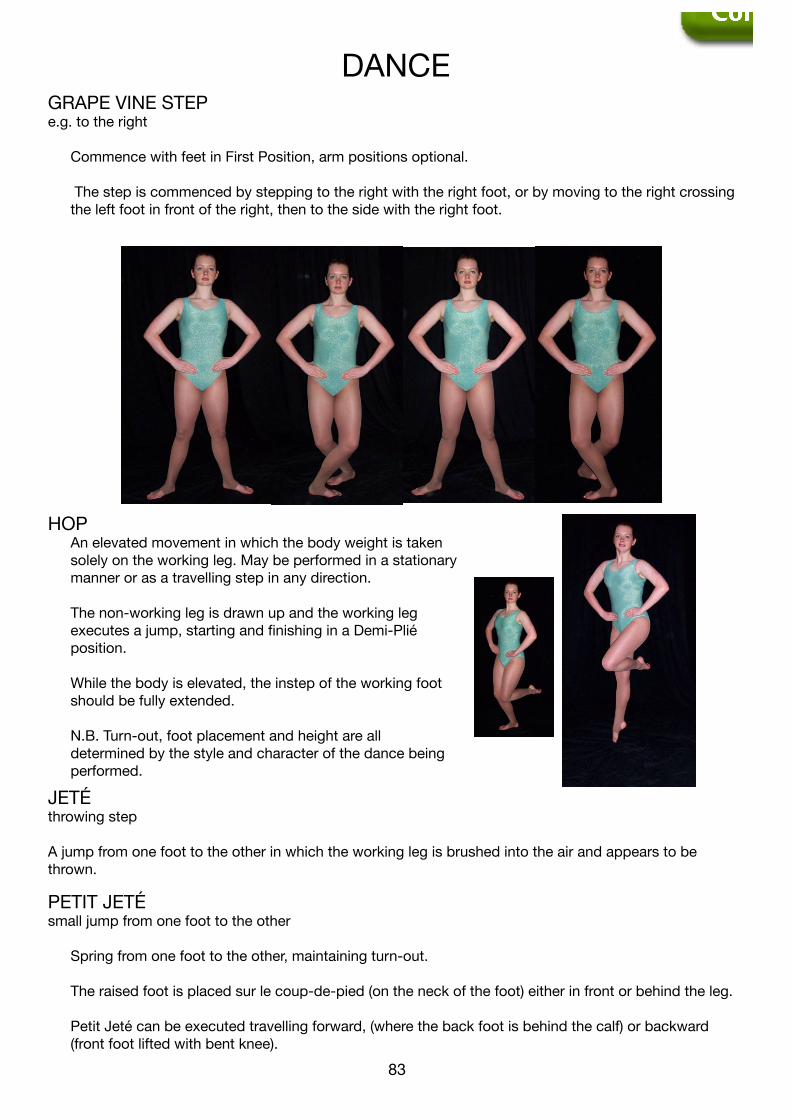
DANCE
82
DANCE
83
GRAPE VINE STEP e.g. to the right
Commence with feet in First Position, arm positions optional.
The step is commenced by stepping to the right with the right foot, or by moving to the right crossing the left foot in front of the right, then to the side with the right foot.
HOP An elevated movement in which the body weight is taken
solely on the working leg. May be performed in a stationary manner or as a travelling step in any direction.
The non-working leg is drawn up and the working leg executes a jump, starting and finishing in a Demi-Plié position.
While the body is elevated, the instep of the working foot should be fully extended.
N.B. Turn-out, foot placement and height are all determined by the style and character of the dance being performed.
JETÉ throwing step A jump from one foot to the other in which the working leg is brushed into the air and appears to be thrown.
PETIT JETÉ small jump from one foot to the other Spring from one foot to the other, maintaining turn-out.
The raised foot is placed sur le coup-de-pied (on the neck of the foot) either in front or behind the leg.
Petit Jeté can be executed travelling forward, (where the back foot is behind the calf) or backward (front foot lifted with bent knee).
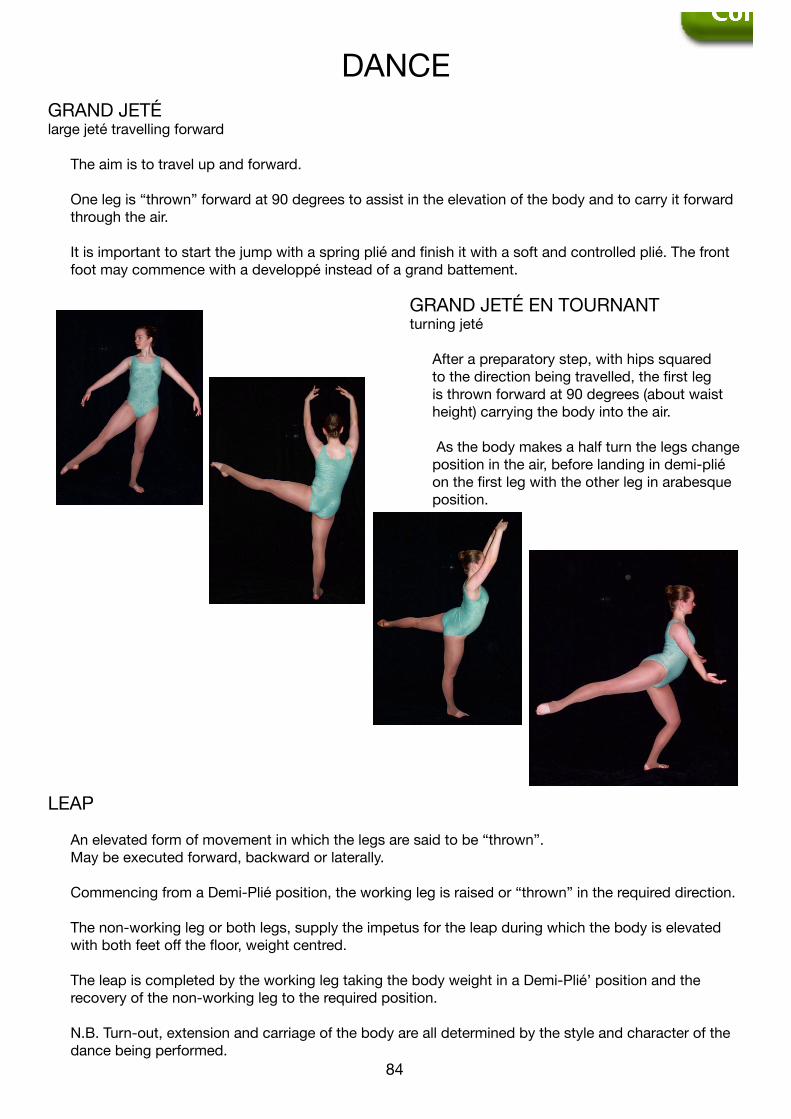
DANCE
84
DANCE
85
GRAND JETÉ large jeté travelling forward
The aim is to travel up and forward.
One leg is “thrown” forward at 90 degrees to assist in the elevation of the body and to carry it forward through the air.
It is important to start the jump with a spring plié and finish it with a soft and controlled plié. The front foot may commence with a developpé instead of a grand battement.
GRAND JETÉ EN TOURNANT turning jeté
After a preparatory step, with hips squared to the direction being travelled, the first leg is thrown forward at 90 degrees (about waist height) carrying the body into the air.
As the body makes a half turn the legs change position in the air, before landing in demi-plié on the first leg with the other leg in arabesque position.
LEAP
An elevated form of movement in which the legs are said to be “thrown”. May be executed forward, backward or laterally.
Commencing from a Demi-Plié position, the working leg is raised or “thrown” in the required direction.
The non-working leg or both legs, supply the impetus for the leap during which the body is elevated with both feet off the floor, weight centred.
The leap is completed by the working leg taking the body weight in a Demi-Plié’ position and the recovery of the non-working leg to the required position.
N.B. Turn-out, extension and carriage of the body are all determined by the style and character of the dance being performed.
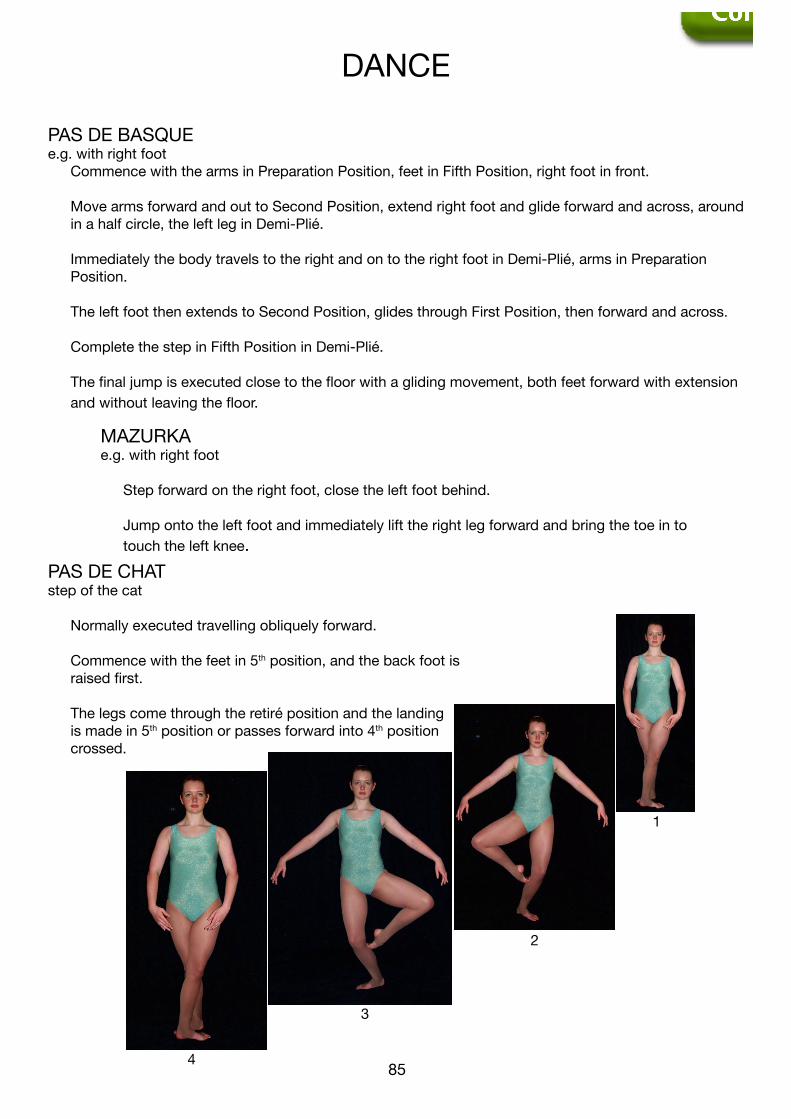
DANCE
84
DANCE
85
PAS DE BASQUE e.g. with right foot Commence with the arms in Preparation Position, feet in Fifth Position, right foot in front.
Move arms forward and out to Second Position, extend right foot and glide forward and across, around in a half circle, the left leg in Demi-Plié.
Immediately the body travels to the right and on to the right foot in Demi-Plié, arms in Preparation Position.
The left foot then extends to Second Position, glides through First Position, then forward and across.
Complete the step in Fifth Position in Demi-Plié.
The final jump is executed close to the floor with a gliding movement, both feet forward with extension and without leaving the floor.
PAS DE CHAT step of the cat
Normally executed travelling obliquely forward.
Commence with the feet in 5th position, and the back foot is raised first.
The legs come through the retiré position and the landing is made in 5th position or passes forward into 4th position crossed.
MAZURKA e.g. with right foot
Step forward on the right foot, close the left foot behind.
Jump onto the left foot and immediately lift the right leg forward and bring the toe in to touch the left knee.
1
2
3
4

DANCE
86
DANCE
87
POSÉ TURNS
This is a pirouette in which the dancer steps directly onto the demi-pointe with one foot while the other leg is raised in a given position.
The positions may be sur le coup-de-pied (on the neck of the foot) or retiré devant or derrière. The turn may be executed turning inward or outward.
The turn may be single or double and may be executed travelling diagonally or in a circle.
SAUTÉ Jump
When this term is added to the name of a step, the movement is performed while jumping.
In all jumping movements, the tips of the toes should be the first to reach the floor after the jump, then the sole of the foot, followed by the heel.
In rising from the floor, the foot moves in reverse order.
SAUTÉ DE BASQUE
A travelling step in which the dancer turns in the air with one foot drawn up to the knee of the other leg.
Both legs should be fully turned out during the jump.
RISES
A movement which involves rising on one or both feet to Demi-Pointe.
Rise well onto the balls of the feet, maintaining at least 45 degree turn-out, keeping heels well pressed forward.
RUN
An elevated form of movement. May be executed in any direction. Following the line of turn-out, the knee
and foot of the working leg are fully extended.
Body weight is transferred to the ball of the foot of the working leg which is in Demi-Plié.
The non-working leg is raised with the knee bent to the required degree, maintaining turn-out.
N.B. Turn-out, extension, degree of bend of the non-working leg, carriage of the body and elevation are all determined by the style and character of the dance being performed.
RELEVÉ
Commence with demi-plié, then swiftly straighten the knees, drawing the feet firmly to Demi-Pointe and bringing the feet a little closer together.
Lift the body. Lower both heels at the same time with a slight spring
to commencement position in Demi-Plié. Maintain a straight and well-supported spine
throughout the movement.
360 DEGREE TURN eg turning to the right. Commence with arms in first position, feet in first position. Open arms to Second Position, step right foot to Second Position. Circling, rotate forward on the right leg 180 degrees to Second Position, arms to First Position. Rotate backward on the left leg to Second Position, open arms to Second Position. Complete the turn by bringing the left foot to First Position and the arms to First Position. The head will have completed a 360 degree turn and the “Spotting” should be used.
PIVOT Full circular rotation. Can be executed in many positions either on the spot or travelling.
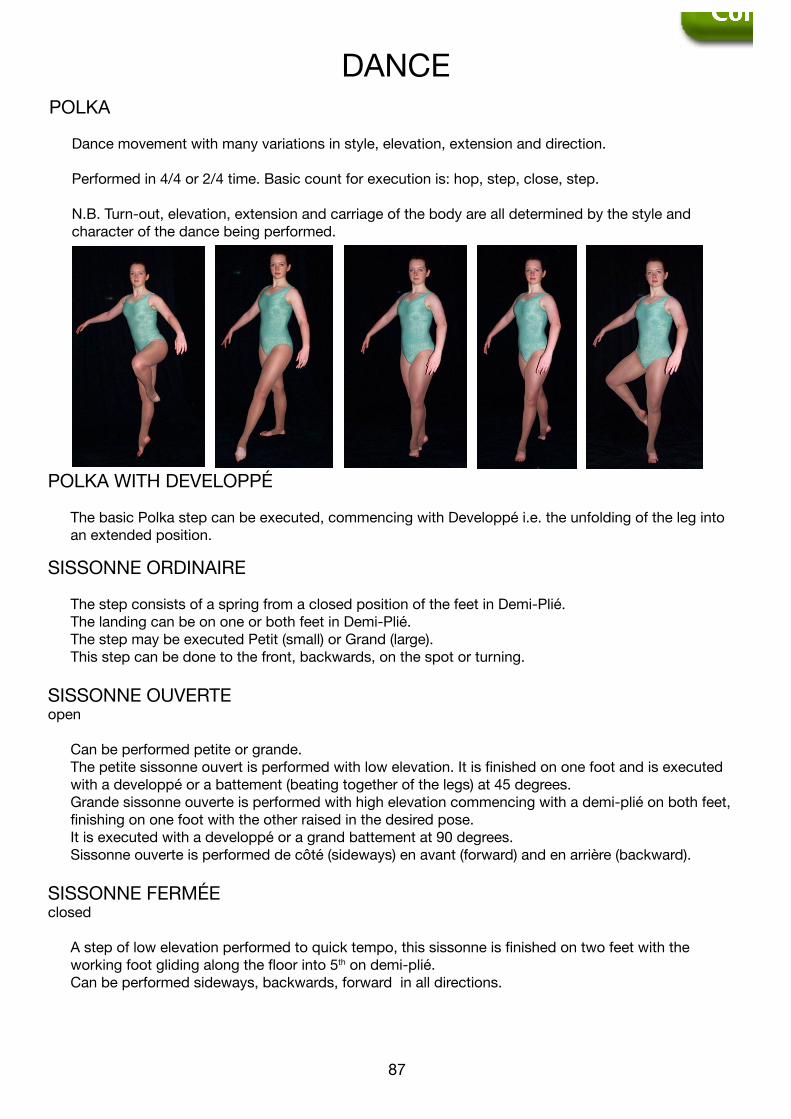
DANCE
86
DANCE
87
POLKA
Dance movement with many variations in style, elevation, extension and direction.
Performed in 4/4 or 2/4 time. Basic count for execution is: hop, step, close, step.
N.B. Turn-out, elevation, extension and carriage of the body are all determined by the style and character of the dance being performed.
POLKA WITH DEVELOPPÉ
The basic Polka step can be executed, commencing with Developpé i.e. the unfolding of the leg into an extended position.
SISSONNE ORDINAIRE
The step consists of a spring from a closed position of the feet in Demi-Plié. The landing can be on one or both feet in Demi-Plié. The step may be executed Petit (small) or Grand (large). This step can be done to the front, backwards, on the spot or turning.
SISSONNE OUVERTE open
Can be performed petite or grande. The petite sissonne ouvert is performed with low elevation. It is finished on one foot and is executed
with a developpé or a battement (beating together of the legs) at 45 degrees. Grande sissonne ouverte is performed with high elevation commencing with a demi-plié on both feet,
finishing on one foot with the other raised in the desired pose. It is executed with a developpé or a grand battement at 90 degrees. Sissonne ouverte is performed de côté (sideways) en avant (forward) and en arrière (backward).
SISSONNE FERMÉE closed
A step of low elevation performed to quick tempo, this sissonne is finished on two feet with the working foot gliding along the floor into 5th on demi-plié.
Can be performed sideways, backwards, forward in all directions.
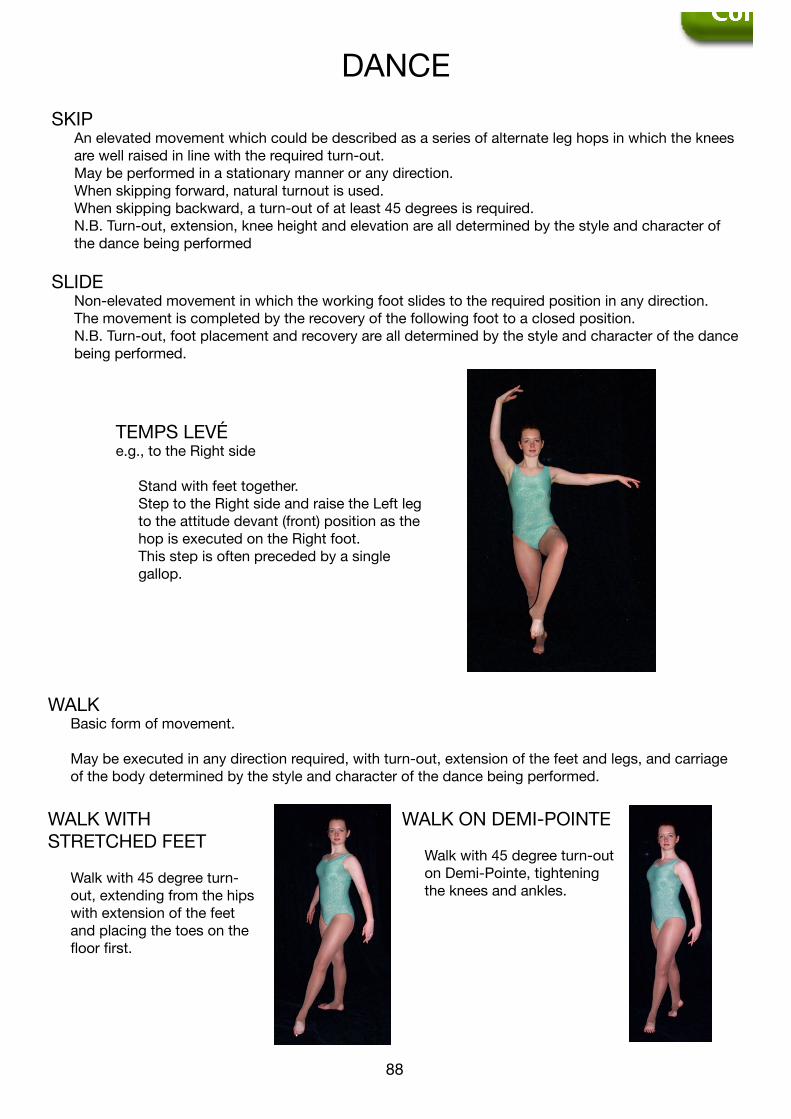
DANCE
88
DANCE
89
SKIP An elevated movement which could be described as a series of alternate leg hops in which the knees
are well raised in line with the required turn-out. May be performed in a stationary manner or any direction. When skipping forward, natural turnout is used. When skipping backward, a turn-out of at least 45 degrees is required. N.B. Turn-out, extension, knee height and elevation are all determined by the style and character of
the dance being performed
SLIDE Non-elevated movement in which the working foot slides to the required position in any direction. The movement is completed by the recovery of the following foot to a closed position. N.B. Turn-out, foot placement and recovery are all determined by the style and character of the dance
being performed.
TEMPS LEVÉ e.g., to the Right side
Stand with feet together. Step to the Right side and raise the Left leg
to the attitude devant (front) position as the hop is executed on the Right foot.
This step is often preceded by a single gallop.
WALK Basic form of movement.
May be executed in any direction required, with turn-out, extension of the feet and legs, and carriage of the body determined by the style and character of the dance being performed.
WALK WITH STRETCHED FEET Walk with 45 degree turn-
out, extending from the hips with extension of the feet and placing the toes on the floor first.
WALK ON DEMI-POINTE Walk with 45 degree turn-out
on Demi-Pointe, tightening the knees and ankles.

DANCE
88
DANCE
89
WALTZ
Dance movement with many variations in style, elevation, extension and direction. Performed in 3/4 or 6/8 time. Consists of an extended first step, followed by two ball changes (transfer of weight). The following step commences on the alternate foot. N.B. Turn-out, elevation, extension and carriage of the body are all determined by the style and
character of the dance being performed.
DANCE
90
DANCE
91
FOLK DANCE
Folk Dance means the “dance of the people” and most of these dances in their pure form are not generally suitable for presentation on stage for competitive or entertainment value. With slight alteration in choreography and embellishment of costumes, many Folk Dances can be used. In making these variations, the choreographer must not go against the traditional colouring or designs in costumes, dance steps or music. In the choreography, consider stage presentation, and arrange with changing patterns to enhance visual appeal, enjoyment and interest of the performers and the audience. The further research of festivals and legends of the countries may inspire more originality in the choreography.
Many basic steps are used in most Folk Dances, but there is a variance of rhythm, elevation and style from country to country.
The fundamental movements are:
walk, run, leap, hop, skip, slide, gallop or slip step, waltz, polka, petit jeté, jeté, retiré.
A turn-out of at least 45 degrees is required unless otherwise specified. It should be noted that turn-out is inappropriate in the execution of some Folk Dances. Coaches should be aware of such differences in style.There are many steps that may be used to combine movements specific to particular dances in certain step patterns. It is recommended that coaches research steps that are characteristic for the country they are portraying.
Information may be sought from libraries, embassies, the internet or International folk dance groups.
DANCE
90
DANCE
91
RHYTHMIC INTERPRETATIONS
THEME
The interpretation of a theme is portrayed throughout the dance by the choice of music and costuming. The use of mime and the inclusion of solo dancers may enhance the theme. The theme must be maintained, and be suited to the age and capabilities of the competitors. However, when using characters, care must be taken to keep the dance within the context of a Rhythmic Dance, not a character dance. All participants in the team should be actively involved. The choreography must allow the performers to express the theme and be in harmony with it. Emphasis should be given to the artistic arrangement and variety of dance movements which create a flow to the performance which in turn creates and sustains interest. A sustained pose may be included in accordance with the theme and the music.If a modern interpretation is chosen, it must be adapted to include all the components of this item.
EXPRESSION AND STYLE
The movement and expression should translate the sentiments of the theme. When considering expression, there must be an in depth feeling portrayed through the body and the face. To present a modern theme all participants must have the correct style and control.
MUSICAL INTERPRETATION
The music and movements give inspiration for the participants to interpret the atmosphere pertaining to the mood. The dance can be set to a variety of rhythms but the choice of music must be suited to the capabilities of the participants.
DANCE VARIETY AND TECHNIQUE
Within Rhythmic Interpretations, turn-out, arm, foot and head positions are as for Aesthetic. Many of the steps listed in the Dance section of the CD are used in rhythmic interpretations. ELEVATION is an essential component of this section. The coach should aim for a team performance demonstrating a variety of steps unlaboured and performed with good body control. There should be freedom of movement which makes dance natural, and not the stiffness of ballet positions. The combination of steps should be fluent, and allow the participants to develop ease and grace of movements which are essential qualities of this item. Body lines should flow with the steps and gestures maintaining a uniformity and precision of movement. Technique should be executed with correct body control, alignment and placement.
The use of curtains, (front, mid, scrim) and white cyclorama or black back curtains, together with fancy lighting (see competition rule booklet) enables the coach to create an atmosphere for this item.
DANCE
92
SONG AND DANCE
The type of dance performed is optional, but coaches should always be aware of the technique required for differing styles, e.g. modern, jazz, Latin American, neo-classical, etc.
Throughout the presentation, singing and dancing must be evenly balanced.
The theme of the song should carry through and influence the dance (Refer to Song or Songs With Movements Section for guidelines on singing).
Songs and dance should be suitable to the age group.
Songs must be sung by all members of the team on stage, however, limited solo singing may be used in this item.
The steps and movements available to a coach are many. Some of those most commonly used are:
kicks (spring kicks, round kicks, high kicks), body movements (retraction, contraction, isolations), foot movements (ball change, tap springs, tap steps, brushes, pick-ups, shuffles, heel
beats) and many variations of the basic movements of dance.
The performance can be enhanced by creative use of lighting, stage dressing and costuming.
93 94
SONGS OR SONGS WITH MOVEMENTS
The basic techniques of Calisthenics should be carried through into this section. Placement of the feet, use of the arms and movement about the stage must be compatible with accepted technique, variation being used primarily to project the characters of the presentation. Dance steps can be used, but limited use pertaining to the lyrics and theme is advised. The arrangement should incorporate a song or a selection of songs, varying in tune and tempo, and movements pertaining to the style and character of the presentation. Selections should be suitable to the age groups and capabilities of the pupils. Arrangements should be animated and should maintain interest for the performers and the audience. The combination of grouping and patterns, costumes and stage properties should enhance the presentation as a whole.
SINGING Singing requires the following technique
PHRASING/BREATHING music and Iyrics require analysis to allow the sense and length of phrases to be determined and
to decide the breathing pattern required.
ENUNCIATION/DICTION correct and clear pronunciation of individual words. Great care must be taken and sufficient practice allowed to ensure that opening and closing words or
phrases are not swallowed, consonants are produced crisply and vowel sounds are not allowed to become flat.
93 94
CALISTHENIC SPECTACULAR
The basis of this item consists of a routine of equal balance—50% physical exercises and 50% dance, keeping in mind that all movements as well as the musical accompaniment, must relate to the chosen theme. Physical movements must retain the technique, precision and uniformity of Free Exercise. Steps and
movements used in the dance section must similarly comply with requirements of dance technique. The components do not need to be separated. Their integration throughout the routine should compliment and enhance the performers’ capability and
the flow of the performance. The arrangement, use of pattern, colour, costume change or comedy should be imaginative and allow
the performers to express their theme to the highest standard, creating a spectacular item.
STAGE PRESENTATION
This item enables Calisthenic coaches and pupils/competitors to show their truly unique and versatile talents.Stage Presentations may include any or all of the facets of calisthenics, plus all aspects of theatre, such as mime, dialogue, solo and group singing, dance of any style except tap and pointe, gymnastics, lighting effects and stage dressing.All of these above components are acceptable, but none of them are compulsory. The theme should guide the coach in the selection of various performance skills best suited to the choice of item. Unlike Calisthenic Spectacular there is no requirement to include dance or calisthenic skills.
CHOREOGRAPHY Must follow a chosen theme or storyline. Must have suitable musical accompaniment. Movement must be varied and not repetitive. Continued interest and impact should be maintained. Full use of stage area is required, with smooth and effective use of stage properties, lighting and
smoke machines.
COSTUMING Should compliment the item. Costume changes may occur during the item. Many changing effects can be created with appropriate choice and blending of colours, enhanced
by skilful use of lighting.
EXECUTION Is of utmost importance. Pupils/competitors must maintain strong technique, musicality and characterization throughout this
item. Good stage presence and projection to the audience will maintain interest. Choreography, music, costuming and performance must blend together as one.
RULES competition rules will give information on use of stage properties, curtains etc.
95 96
STAGE MEDLEY
This item must include equal balance of singing, calisthenic physical work and dance (not tap or pointe).
Dialogue is acceptable but should not be excessive. Singing and speaking on recorded music is permitted as long as it does not accompany live vocal. Competitors may enter and exit the stage at any time during the item, but the minimum number should
be visible at all times excluding entry/opening. All members of the team must be actively involved for the majority of the item. Uniformity of movement and presentation in execution should be achieved.
THEME, CHOREOGRAPHY, PRESENTATION
The theme should be maintained throughout by the skilful use of music and choreography. The choice of theme should be suitable to the age and capability of the competitors and all members should be actively involved. The arrangement should flow, create and sustain interest. There should be good use of the stage and a variety of formations. The whole presentation should be alive, entertaining and well presented. If comedy is included timing must be skilful and flow. The presentation should be visually effective, and the portrayed theme should evolve with clarity.
SINGING
Song/s should be in a key suited to the age and capabilities of the team. Singing should be tuneful and in unison. Volume and tone should not be forced. Enunciation and diction should be clear with correct breathing and phrasing. Movement should not be excessive when singing. Dialogue should be clear and not excessive.
VARIETY OF DANCE
The variety of steps included should be according to the theme with all of the team participating. Correct interpretation of movements should be evident with strength and uniformity displayed throughout the team. Correct rhythm should be maintained by all team members.
PHYSICAL CONTENT
The item should comprise a variety of free exercise movements including floor and standing work, and not over-emphasise a particular type of movement. Extension of movements, control and correct alignment, deportment and technique should be evident throughout. Movements should suit the age and capabilities of the performers, and should demonstrate control and use of the whole body.
95 96
GRACEFUL CALISTHENIC SOLO
In this solo performance, the music, choreography and the performer must combine to give a high standard in Aesthetic Dance Technique and Natural Dancing. A high standard of personal presentation, including grooming, natural make-up, good deportment and the ability to project personality is sought. Sincerity of expression is conveyed through use of the face and body. Facial expression should not be artificial, and the use of eye rhythm and eye contact should create a rapport with the audience and adjudicator.
COMPONENTS OF CHOREOGRAPHY
MUSIC
Choice of music must suit the age group of the performer. The music must not over-ride the performance. The selections of music should complement each other and must not be discordant. All movements should portray the mood of the music and interpret the musical structure
—the accents, rhythms, mood and phrases.
ARRANGEMENT
Aesthetic movements with a softness and flow of arm and leg work. Choreography should be well balanced, have light and shade and a variety of movements linked with
fluency. Hand and body movements should be as important as the facial expression. Flexibility—body bends and leg balances performed with grace and control on both sides of the body. If a character or theme is portrayed, this should be done within the context of a Graceful Solo and
should not become a character dance. Technique should be based on the basic technique of Calisthenics. Strict ballet technique is not a necessity, however, if a ballet step is executed, it should be executed
with correct technique. As with a character or theme, a modern interpretation could be acceptable, so long as it remains within
the context of a Graceful Solo and not a modern dance. Elevation is an essential component.
97 98
CALISTHENIC SOLO
The Calisthenic Solo should comprise a combination of physical and dance sections. The routine can evolve into a flowing arrangement and need not be divided into sections. The music, choreography and performer must combine together to give a harmonious presentation. Expression should not be artificial and should suit the choice and style of music. It must be stressed that the physical quality and extension of movement should be paramount in the performance.
COMPONENTS OF CHOREOGRAPHY
MUSIC
The choice of music must suit the age group of the performer and blend with the theme or the arrangement.
The music must not over-ride the performance. The selections of music should complement each other and must not be discordant. All movements should portray the mood of the music and interpret its musical structure – the accents,
rhythm and the phrases.
ARRANGEMENT
The choreography must contain equal balance of physical and dance sections. The content should be varied and suit the capabilities, personality and physical type of the performer
and make full use of the stage. A story or mime may be introduced. All movements must retain the technique, precision, uniformity, etc. required in the basic technique of
Calisthenics.
PHYSICAL QUALITY
The ability to perform a variety of Free Exercise movements including floor, standing and balance work should be demonstrated.
Extension of movement, control and correct alignment should be evident. Correct deportment should be evident throughout the item. The demonstration of suppleness and extension throughout the body. Use and control of the whole body, demonstrating use of both sides of the body.
DANCE QUALITY
Use a variety of steps which must include elevation. Dance technique must be executed with reasonable turn-out, body control, correct alignment and
placement. Softness and flow of movement through arm and leg work.
All movements should portray the mood of the music and interpret its musical structure – the accents, rhythm and the phrases.
97 98
CALISTHENIC DUO
The Calisthenic Duo allows much scope in choreographic creativity. Two performers are selected to compliment each other with an equal standard of physical ability. The performers must maintain excellent extension and correct execution of movement throughout the item. The performers personalities should compliment each other and allow interpretation and projection of the chosen theme.
MUSIC
The choice of music must suit the age group of the performer and blend with the theme or the arrangement.
The music must not over-ride the performance. The selections of music should complement each other and must not be discordant. All movements should portray the mood of the music and interpret its musical structure – the accents,
rhythm and the phrases.
ARRANGEMENT
The choreography must contain an equal balance of Physical and Dance sections. The style of dance must compliment the theme of the item, and can include modern, jazz, aesthetic
etc., but not tap or pointe. Choreography should make full use of the stage, with a variety of “pair” and individual movements
being included. Performers movements should compliment each other without necessarily performing the same
actions. The content should suit the capabilities, personalities and physical types of the performers. A story or mime may be introduced.