Embed Size (px)
DESCRIPTION
wargaming rules set in japanese fantasy style
Citation preview

1
New Dawn By
GCT Studios

2 3
Bushido: New Dawn - Game Rules Bushido: New Dawn - Game Rules
Getting ready for BushidoFor a game of Bushido, each player will need;
•A copy of these rules.
•A set of Bushido miniatures to represent their Warband.
•A tape measure.
•A bunch of six-sided dice (D6) in two different colours, about six of one colour, six of another. The examples in these rules use white dice to signify Attack dice and black dice to signify Defence dice.
•A number of coins, chips, counters or dice to track a model’s Ki Tokens.
•Plastic card sleeves and a dry wipe marker.
For the game, you will also need:
•The play area is a 2 foot by 2 foot area. Though commonly you need a bit more space than this to accommodate dice, cards, snacks, drinks, etc.
•Six pieces of terrain, these can be varied in size but should not be larger than 6” x 6” and the total amount of space the terrain pieces take up shouldn’t exceed half the board.
Bushido Game terms and Concepts •Active Model: The current model that is resolving its action.
•Active Player: The player who is controlling the Active model.
•Base to Base: A model is in Base to Base (abbreviated to BtB) with another model if; its base is touching the base of that model.
•Cover: A model is considered in Cover if the Active model cannot draw LoS to the entire model’s Volume.
•Damage Roll: Is a roll on the Wound Chart.
•Dice; Rolls in Bushido use Six sided dice (referred to as a D6), a D3 (D6 with the results 1-2 = 1, 3-4 = 2, 5-6= 3) or a D2 (D6 with the results 1-3 = 1, 4-6 = 2). When halving a result, always round down.
•Enemy; Models in an opponent’s Warband.
•Facing: The Facing of a model is determined by the direction the model is facing. Players should clearly mark Facing on the model’s base, using a dot or arrow.
•Friendly: Models in a player’s Warband.
•Initiative: The model with the Initiative checks its Attack dice first in Melee Exchanges and declares the use of Ki Boosts/Feats and Special Attacks or Defences second. The Active model usually has the Initiative.
•Line of Sight: A model can draw Line of Sight (abbreviated to LoS) up to 90 degrees either side of its Facing point (see Facing). LoS is determined by drawing an imaginary line from the centre of a models base to any point or Volume another model occupies (See Volume).
•Measuring Distances:
oDistances in Bushido are measured in inches. oDistances can only be measured after an action or game effect is declared. If a model is unable to complete the declared action due to having insufficient movement or range then the action is still considered spent and any costs paid. oDistance is measured from the edge of a model’s base.
•Size: Unless a model’s Size is stated as a trait it is calculated based on its base size; o30mm = Medium o40mm = Medium o50mm = Large
•Target: A model must be able to draw LoS to another model to Target it. A model may always Target itself.
•Volume: Models occupy a Volume covering their base size and extending to a height dependant on its Size;
oTiny = 1cm oSmall = 2 cm oMedium = 3.5 cm oLarge = 5 cm oHuge = 7.5 cm
For example see the Temple of Ro-Kan models below; Hotaru and Riku have differeng heights but for game purposes drawing LoS etc. they would have the same volume as they are both Medium sized models.
•Warband: A player’s Warband consists of owned and controlled models.
•Zone of Control: In Bushido, every model has a Zone of Control (abbreviated to ZoC) extending 1” to any point within its LoS. Models ignore Friendly model’s ZoC when moving but once a model enters an Enemy model’s ZoC it may only move directly towards that model, or directly away, until it leaves the ZoC. Models in BtB with Enemy models have no ZoC.
RikuTemple of
Ro-Kan
HotaruTemple of
Ro-Kan

4 5
Bushido: New Dawn - Game Rules Bushido: New Dawn - Game Rules
9.Unique effect: Any special rules that apply to this model.
10.Rice Cost: The cost in rice to recruit this model into your Warband. Models with Su are Summoned models that enter play during the game through a Ki Feat or Effect and cannot be purchased when creating your Warband. Models with Sp are models with a special rule which will be explained on its Profile card and cannot be purchased when creating your Warband.
The Profile CardsModels in Bushido are represented by a profile card. The profile cards contain all the information that will be used in a game specific to that model(s). You also use the profile card to keep track of the wounds sustained by your model(s), Ki Tokens and game effects.
Below, you will see a sample profile card followed by a list of what the terms and the symbols on the card mean;
1. Name: The name of the individual that the model represents.
2. Type: The Type affects some game effects.
3. Statistics: The number is the model’s base Statistic value. Some models also have a number of Ki icons above the base value. This is the statistics Ki Boost cost; this is the cost in Ki Tokens to increase the base Statistic by one for the duration of a single Target or Opposed Test. A player may increase a statistic multiple times, as long as there are Ki Tokens available to do so (See Ki Feats). a.MS: Melee Skill.
This is the number of dice the model uses when resolving an Opposed Melee Test.
b.RAS: Ranged Attack Skill.
This is the number of dice the model uses when resolving a Ranged Attack Action.
c. Move:
The distance the model can move in inches.
d. Ki:
The first number tells you the amount of Ki Tokens this model generates during the Starting Phase and the number of dice it uses for Opposed and Target Ki Tests. The second
smaller number is the maximum number of Ki Tokens it can have on its Profile card at any one time.
4. Wounds Track: The amount of wounds a model can sustain before it is removed from the table.
5. Traits: Each model has a number of traits that describe how it behaves in the game and whether it has any special advantages or disadvantages
6. Ki Feats: Ki Feat available to the model including its name and cost full description of the Ki Feats’ effects are on the reverse.
7. Weapons grid: Most models in Bushido are armed in some way. There are two categories of weapons: Melee and Ranged Attack.
a. Designates the weapon as either Melee or Ranged Attack. i. For Ranged Weapons includes the weapons Range bands. The first number is short range, the second medium range and the last number Long range.
b. Strength: The weapons strength modifier to any Damage Rolls made by this weapon (Sp) indicates a special effect and consults the models Unique Effects for further instructions. A – indicates no modifier to the Damage Roll.
c. Any Special Attacks/Defences available to the model.
8. Faction symbol: This symbol tells you what Bushido game faction the model belongs to. Your force can only consist of models that belong to the same faction.
WraithCult of Yurei

6 7
Bushido: New Dawn - Game Rules Bushido: New Dawn - Game Rules
Taking Actions and ConditionModels in Bushido perform actions to affect the game. The actions a model can take depend on its Condition and whether it’s in BtB with an Enemy model, models in BtB with an Enemy model may only declare; Melee, Disengage or Ki Feats useable in BtB.
The Active Player chooses which model they are activating (the Active Model) and what action the model will take, the model must declare a Simple or Complex action if able.
ConditionThroughout a game of Bushido all models will be in one of these three Conditions. A model’s condition affects the type of Actions it can declare and may incur penalties to actions it takes. The three conditions are;
Rested: The model may be activated and declare either a Simple or Complex action.(All models start each turn Rested)
Tired: The model may be activated and declare a Simple action.
Exhausted: The model may not be chosen to activate by the Active player and suffers -1 MS.
The actions a model is eligible to declare depend on its Condition.
•Rested; the model may declare either a Simple or Complex action.
•Tired; the model may declare a Simple action.
•Exhausted; the model may not declare actions whilst exhausted.
Once a model’s action has been resolved then the controlling player places a Condition marker next to the model depending on the action performed.
Simple action = Tired marker.
Complex action or Simple action (whilst in the tired condition) = Exhausted marker.
During the End Phase remove all Condition markers.
Simple Actions •Disengage: The model resolves a Melee exchange. It must however roll more dice in Defence than in Attack. If the model successfully defends then after the Melee is resolved it may then Walk its Move statistic, it may not enter into BtB with an Enemy model with this move.
•Ki Feat: The model may attempt to perform a Simple Ki Feat listed on its Profile card. Some Ki Feats can be combined with a Walk action (see Ki Feats)
• Melee: The model must Target an Enemy model, LoS is not required. It must then attempt to enter BtB with that model by moving up to its Move Statistic, during this move it may only enter into the ZoC of the Targeted Enemy model, however if whilst in the Target model’s ZoC you would enter another Enemy model’s ZoC then you may ignore that model’s ZoC if moving directly towards the Targeted model. If at the end of movement it is in BtB with the Targeted Enemy model it must resolve a Melee exchange. Model’s starting their activation in BtB with a single Enemy model may move around that Enemy model’s base before a Melee exchange is resolved. If a model which started its activation in BtB with an Enemy model and Targeted another Enemy model with a Melee action cannot reach the Targeted model through its move around the Enemies’ base then it must resolve a Melee exchange against the model it started in BtB with.
•Ranged Attack: The model may make a Ranged Attack (see Ranged Attack) and move up to its Move Statistic either before or after the Ranged Attack is resolved, changing Facing is considered a move.
•Reload: The model may remove a Reload Counter from its Profile Card (See Traits). It may neither move nor change facing during this action.
•Run: A model may turn to face a point within its LoS. The model may then move up to its Move statistic X 1.5 in a straight line, directly towards that point. A model may not Run into an Enemy model’s ZoC, into BtB with an Enemy model, or
change its facing after the movement.
•Simple Scenario Action: A model may not be in BtB with an Enemy model, or in an Enemies ZoC. See the specific Scenario for the effect. It may neither move nor change facing during this action.
•Stand up: The model removes its Prone marker and may freely change its Facing. If Standing Up brings the model into BtB with an Enemy model resolve a Melee exchange after removing the Prone State.
•Wait: The model does nothing. •Walk: The model may move up to its Move statistic in any direction and change it’s Facing at the end of the move. Changing Facing is considered a move, even if the model remains in the space place. A model performing a Walk action may not move into an Enemy’s ZoC or move into BtB with an Enemy model.
Complex Actions •Charge: The model Targets an Enemy model within LoS and may move up to its Move x 2 in a straight line, during this move it may only enter into the ZoC of
the Targeted Enemy model, if it would pass through another Enemy model’s ZoC its move stops at the ZoC, however if whilst in the Target model’s ZoC you would enter another Enemy model’s ZoC then you may ignore that model’s ZoC if moving directly towards the Targeted model. If it does not have enough move to bring the model in BtB with its Target its action ends. If however this move brings the model into BtB contact with the Target Enemy model a Melee exchange is resolved, for this Melee exchange the model gains a +2 to the first Damage roll of the Melee exchange.
•Ki feat: The model may attempt to perform a Complex Ki feat listed on its profile card. Some Ki Feats can be combined with a Walk action (see Ki Feats)
•Focus: The model gains a number of Ki tokens equal to its Ki Statistic. It may neither move nor change facing during this action.
•Complex Scenario Action: A model may not be in BtB with an Enemy model, or in an Enemies ZoC. See the specific Scenario for the effect. It may neither move nor change facing during this action.

8 9
Bushido: New Dawn - Game Rules Bushido: New Dawn - Game Rules
Types of Test in BushidoTo see if a model’s action is successful often requires a test.
There are two primary types of tests in Bushido, Opposed and Target. Both tests involve rolling d6’s, if the roll on a dice is a natural 1 then it cannot be used to resolve the test. If all dice rolled result in 1’s then the final result is considered 0 as if no dice were rolled, and do not count for tie breakers when calculating number of dice rolled. Additional 6’s after the first add a +1 to the final result of Tests.
If naturally or because of negative modifiers a model would have 0 or less dice to roll in a Target or Opposed Test then that player still rolls a single dice for the Test. In an Opposed Test the Enemy model’s statistic is increased by 1 for each value less than 1.
When declaring the use of Ki Boosts, Ki Feats, Special Attacks or Defences during any Test the Active model or the Model with the Initiative chooses and declares second.
In the event of rerolling dice then players must stick to the same combination of dice and whether or not they used Ki Feats, Ki Boosts or other abilities.
Target Tests These require rolling a number of dice equal to the named statistic/type i.e. Ki/Target test (5), Move/Target test (6). The bracketed number is the number that must be equalled or exceeded by the highest dice rolled and is called the Target Number. If no statistic is specified then the Target Test is made using a single d6.
Yumi must make a Move Target test (5), she has a Move Statistic of 4 and so rolls 4 dice for the test. She rolls a 3,3,5,6 meaning that she has passed the test.
A Bakemono must make a Ki target test (4), the Bakemono has a Ki Statistic of 1 and so only rolls 1 die. It rolls a 2 meaning that it has failed the test.
Ranged Attacks are Target tests that are resolved slightly differently.
Ranged Attack
The steps to resolving Ranged Attack actions are 1.Check if the model can make a Ranged Attack Action. a.The Active model is not in BtB with an Enemy model, or an Enemy model’s ZoC. 2.Declare a Ranged Attack action. a.The model may move up to its Move statistic in any direction or change facing.
3.Declare a Target Enemy model for the Ranged Attack action. a.Measure the range from the Active model’s base to any volume of the Target. Check the range measured against your weapon’s Range Band. If the range is equal to or less than the first number then you are at Short Range. Equal to, or less than the middle number is Medium Range and equal to or less than the last number is Long Range. If the model is further than the Long range of the weapon the action fails and move to step 10.
Range Bands Base Target Number
Short (First number) 3Medium (Second Number)
5
Long (Third number) 7 b.The models declare the use of any Ki Feats. c.Target number of the Ranged Attack test is calculated based on the Range Band calculated in Step 3a, with any modifiers added/subtracted.
Effect Modifier to Target Number
Target is Tiny +2Target is Small +1Target is Large -1Target is Prone -1Target is Exhausted -1Target is Surprised -1Target in Cover +2Active model ran this turn
+1
Active model moved/ or will move this action
+1
4.The Active model then calculates its dice pool using its Ranged Attack Skill Statistic as the starting number of dice used, then decides if they will use any of that its abilities, use a Ki feat or increase its Ranged Attack Skill Statistic through a Ki Boost. a.The Active player then rolls their dice. b.The Active model conducts any rerolls of dice. c.The Active model applies any modifiers to the dice. d.The Active player can then choose up to an additional two dice rolled which were not 1’s. The result of a 2-5 on a dice adds +1 to the highest dice, 6’s adding +2 to the highest dice. 5.The Active model compares its final Attack result against the Target number. If the result is higher or equal then it has successfully hit, if the result is lower the attack has failed and now move to step 10. a.The difference in the result and the target number is the Success level. 6.The player controlling the Targeted model may nominate a different Friendly model as the new Target if; a.LoS of the Active model crosses through the nominated model’s ZoC before contacting the original Target’s Volume. b.The nominated model is able to draw LoS to the Active model. c.The nominated model is not exhausted. 7.If Step 6 steps are met then the nominated model becomes the Target model.
8.The models declare the use of any Ki Feats 9.The Active Player then makes a Damage Roll: rolling 2d6 and applying any negative or positive modifiers, consulting the Wound Table in the column equal to the Success level of the test to see the number of wounds suffered by the Target. Mark off the wounds on the Target model’s Profile card. If this reduces it to 0 or less then remove the model from the table. 10.Place any Reload counters and remove any Ammo markers from the model’s profile card. 11.The Ranged Attack action is now resolved and the Active model’s condition will worsen one step (Rest – Tired – Exhausted).
Targeting a model in BtB
If the Targeted model is in BtB with a Friendly model then after step 4 Make a Target Test (3) using a single dice, with the following modifiers to the Target Number.
Condition Modifier to the Target Number
Target is Tiny -2Target is Small -1Target is Large +1
If the test is successful proceed as normal, if however the test is a failure then the Target of the Attack is changed to the nearest Friendly model in BtB and LoS. The Ranged Attacked continues from Step 6 with the new Target.
The Active player chooses and activates a Bakemono Archer and declares a Ranged Attack Action. It is not in BtB with or in the ZoC of an Enemy model and so is free to do so. The player decides to move the Bakemono incurring a +1 to the Target Number of the test. He moves him a little closer and declares a monkey as the Target of the action, neither player wishes to use any Ki Feats. He measures the range and it comes to 7”. The Ranged brackets for the Bakemono’s Ranged Weapon are 4/8/12 meaning it is the Medium ranged bracket with a base Target number of 5. He then checks the modifiers table and adds 1 for the Bakemono having moved and 1 for the Monkey being small, making the final target number 7. Next he calculates his dice pool for the test, his Ranged Attack statistic is 2 and he
10 11
Bushido: New Dawn - Game Rules Bushido: New Dawn - Game Rules
chooses not to use a Ki Boost to increase it. He rolls the 2 dice and gets a 4 and 5 meaning the final result is a 6. The highest dice was a 5 and the 4 adds +1. He checks this against the Target number 7 and realises the shot has failed, he places a Reload marker on the Bakemono and its condition worsens one degree. The action is resolved and so his opponent now becomes the Active player.
Opposed TestsThese require the Active model and its Target to roll a number of dice equal to the Statistic being used or the X value of a Ki Feat. They are resolved in the following order; 1.The models calculate their dice pools, deciding if they will use any abilities, Ki feats or increase the statistic being used through a Ki Boost. 2.Both players then roll their dice. 3.Conduct any rerolls of dice. a.The Active model then requests any rerolls of the Targets model’s dice. b.The Target model conducts any rerolls of its dice. c.The Target model then requests any rerolls of the Active model’s dice. d.The Active model then conducts any rerolls of its dice. 4.The models apply any modifiers to the highest dice result. 5.The final results are then compared, the winner being the model with the highest result; the difference is the Success Level.
Tie Breakers are resolved through the following steps. If the step doesn’t provide a winner move to the next step.
1.Player who rolled the highest number of dice, excluding 1’s wins. 2.Active player’s model wins. 3.Reroll dice.
If naturally or because of negative modifiers a model would have 0 or less dice to roll in a Target or Opposed Test then that player still rolls a single dice for the Test. In an Opposed Test the Enemy model’s statistic is increased by 1 for each value less than 1.
An Exhausted and Surprised Matsu is targeted in a Melee Exchange by a Kairai Villager. Matsu’s base Melee Skill is 2 but since she is Exhausted -1 and Surprised -1 this drops to 0. Since models always roll one dice the Kairai she is in the Melee with will gain +1 to its Melee Skill for the Melee
Exchange.
Enemy Statistic Bonus to Model’s Statistic
0 +1-1 +2
The Active player chooses Ikiryo to activate and declares a Simple Ki Feat “Look into the Void” targeting an Ashigaru. This requires an Opposed Ki Test, Ikiryo has a Ki Statistic of 3 and the Ashigaru 1. Ikiryo rolls 4,6,6 and the Ashigaru rolls 2. Ikiryo’s highest dice is a 6 and the Ashigaru’s a 2 so Ikiryo wins.
A Turn later the Active player chooses Ikiryo to activate again and declares a Simple Ki Feat “Look into the Void” targeting Hiro. This requires an Opposed Ki Test, Ikiryo has a Ki Statistic of 3 and Hiro 2. Both players will roll 3 dice as Hiro has the Strong Mind trait. Ikiryo rolls 1,1 and a5 and Hiro rolls 2,3 and a 5. Now in this case Hiro wins as they both rolled a 5 as their highest result but Ikiryo is considered to have only rolled 1 dice as she rolled two 1’s.
Melee Exchanges are Opposed Tests that are resolved slightly differently (See Melee Exchanges)
Melee Exchanges
When a Melee exchange occurs first determine which model has the Initiative; the model with the Initiative checks its Attack dice first in Melee Exchanges and declares the use of Ki Boosts/Feats and Special Attacks or Defences second. The Active model has the Initiative but some traits and States affect this. If a model has a trait that causes two opposing effects on its Initiative then both traits cancel each other. Then use the following steps to resolve the Melee Exchange; 1.Turn both models so their Facings are contacting. 2.The models then calculate their dice pools using its Melee Skill Statistic as the starting number of dice used then decide if they will use any abilities, Ki feats or increase its Melee Skill Statistic through a Ki Boost. 3.Once the players have calculated the number of dice they will roll in their Melee exchange they must both secretly decide how to allocate the dice between Attack and Defence. If players are using a Special Attack or Special Defence then they must secretly remove a number of dice from their pool equal to its cost. This is why you
need different- coloured dice; one colour represents Attack and one colour represents Defence. For example, a model with a Melee Skill of 3 may roll either 3 Attack dice; 2 Attack dice and 1 Defence die; 1 Attack die and 2 Defence dice; or 3 Defence dice. a.Once both players have allocated then they announce if they are using a Special Attack or Defence. 4.Both players then roll all of their dice simultaneously. a.The model with the Initiative then requests any rerolls of the Targets model’s dice. b.The other model conducts any rerolls of its dice. c.The other model then requests any rerolls of the model with the Initiative’s dice. d.The model with the Initiative then conducts any rerolls of its dice. 5.Both players then calculate their final Attack and Defence results by selecting the highest dice of each type (Defence and Attack); each player must then choose up to an additional two dice of the same type rolled which were not 1’s. The result of a 2-5 on a dice adds +1 to the highest dice, 6’s adding +2 to the highest dice. 6.The models apply any modifiers to the highest dice rolled. 7.The model with the Initiative compares its final Attack result against the other model’s final Defence result. If the result is higher or equal then it has successfully hit move to the next Step, If not then the model has successfully Defended move to Step 9 and apply any Special Defence effects if used by the Target. 8.The difference in the results is the Success level. a.The model with the Initiative applies any Special Attack effects used, and then proceed to the appropriate step. b.The models declare the use of any Ki feats. 9.Damage Roll; The player rolls 2d6 adding the results together and applies any negative or positive modifiers, consulting the Wound Table in the column equal to the Success level of the test to see the number of wounds inflicted. a.Mark off the wounds on the other model’s Profile card and apply any effects. Go to step 11 if; i.If this reduces it to 0 or less wounds then remove the model from the table. ii.If it is moved out of BtB or became Prone. 10.Now run through steps 12 -17,
with the other model becoming the model with the Initiative, unless it has already done so and if it placed dice in Attack. 11.The Melee is now resolved and BOTH model’s condition will worsen one step; (Rest – Tired – Exhausted).
Modifier to Melee exchange pool
Explanation
Model is Exhausted
-1 Model is in the Exhausted condition
Model is Frightened
-1 Model is in the Frightened state.
Model is Out numbered
-1 per model Out numbering
Each Enemy model, after the first, in BtB and not in BtB with a Friendly model
Model is Prone
-1 Model is in the Prone state
Model ran this turn
-1 Model performed a Run action this turn.
Model is Surprised
-1 Model is Surprised
All these modifiers are cumulative. If the modifier brings a model’s Melee dice pool below 1, then the player will still roll 1 die. However, the opponent gets a number of extra dice to their MS equal to the number the other player’s MA drops below 1.
Enemy MS Statistic Bonus to Model’s Statistic
0 +1-1 +2
A player chooses and Activates Kenko to perform a Melee action. Kenko chooses a Ashigaru model and measures his Move distance. He’s in range and so moves Kenko into BtB. Both models turn so that their Facing markings are touching. Both players calculate their dice pools, first the player controlling the Ashigaru; he has a base pool of 3 dice equal to his Melee Skill, he chooses not to Ki Boost so has 3 dice to split between Attack and Defence. Next Kenko calculates his dice, his starting pool is 4 equal to his Melee Skill and decides to spend 2 Ki to Boost to 5 dice.
Next both players secretly assign their dice. Kenko’s controller decides to use his Combo

12 13
Bushido: New Dawn - Game Rules Bushido: New Dawn - Game Rules
Attack which costs 1 dice and so leaves him with a pool of 4, he assigns 3 to attack and 1 to defence. The Ashigaru’s controller needs the Ashigaru to tie up Kenko and so goes 2 in defence and 1 in attack. Both players announce the use of Special Attacks/Defences. First to announce is the Ashigaru’s controller as Kenko has the initiative, he reveals that he has not chosen to use a Special Attack or Defence. Next Kenko reveals that he is using the Combo Special Attack which cost him 1 so he’s rolling 4 not 5 dice. Both players roll. Kenko gets 6,5,1 in Attack and a 4 in Defence. The Ashigaru rolls 4,4 for his Defence and 5 in Attack.
As Kenko has the Initiative from being the model activated he checks his Attack dice first. His final total is 7 ( 6 being his highest dice and +1 from the 5) he cannot use the 1 as it is a failure. The Ashigaru’s Defence result being a 5 (4 being his highest dice and +1 from the other 4) mean that Kenko Successfully hit with a Success Level of 2.
Now before he makes his Damage Roll he decides to use his Ki Feat “Fists of Iron” for 2, meaning that he will +3 (+1 Melee Strength base, +2 from the Ki Feat) on the Wound Table. He rolls 2,2, adds the +3 for a result of 7, unfortunately the Ashigaru has Armour (2) and so this is reduce from the score leaving a Final result of 5. He checks the Wound Table and sees he has caused 1 wound.
As he used Combo Attack he reduces the success level by 2 meaning he rolls again immediately in the Success Level 0 Column (2 being the original Success Level, -2 for the Combo Attack). This time he rolls better and gets a 6,5 plus +3, -2 giving him a final result of 12 meaning that the Ashigaru suffers another 3 wounds. Now, as the Ashigaru is still on the Table, not
Prone, in BtB, placed dice in Attack, and has not already checked its Attack dice this Melee Exchange he checks his final Attack Result against Kenko’s final Defence result.
The Ashigaru rolled a 5 and so this is the final result, Kenko’s final result is a 4. The Ashigaru’s Attack is a success in the 1 Column and so the player makes his Damage roll and gets a 4,5 giving a final result of 9 meaning that Kenko suffers 2 wounds.
As both players have checked their Attack dice the Melee Exchange is over and so both model’s condition worsens by one degree.
Wound Table• The Success Level indicates which column
of the Wound table the player should consult. The player then rolls 2D6, adds the results together, adds any positive or negative modifiers, this final number is the row to cross reference to find the number of wounds inflicted by the attack.
• The Success level of an attack cannot go above 10.
• The modified result of the Damage Roll cannot be lower than 2 or higher than 12.
• 1’s are not failures when making a Damage Roll.
• Models without a Melee Combat Grid on their Profile cards halve the final number of wounds inflicted by successful Attacks.
A Kairai villager, successfully Attacks Zuba with a final Success Level of 5. The player rolls a 1 and 3 for his Damage roll and so the Final result is 4, Zuba has the Toughness (1) trait and so suffers 3 wounds.
Special Attacks/DefencesThese are special abilities that allow a model in a Melee Exchange to inflict an effect on its opponent instead of a standard wound if it successfully Attacks/Defends.
If a model is able to attempt one of these Special Attacks/Defences it will appear on the model’s Profile Card. All Special Attacks/Defences have an X cost after the text, this is the number of dice to remove from the model’s Melee dice pool (See Step 4 above) if it chooses to use a Special Attack/Defence, this modifier only effects the current Melee exchange being resolved. A model may only perform one Special Attack OR Defence per Melee exchange.
If through a movement from a Special Attack or Defence a model moves into BtB with another model then:
• If that model is of a larger Size, the model stops at the point at which it entered BtB.
• If that model is of an equal Size, the model stops at the point at which it entered BtB and the model it contacted is placed prone.
• If that model is of a smaller Size, the model continues its movement and pushes the model it contacted directly away from the point of contact and equal to a distance that would enable the model to continue its movement without contacting the model. The model it contacted is placed prone at the end of the movement.
If an Impassable Terrain element would prevent this movement then the model must stop at the point of contact.
Special AttacksSlam Attack; If the Attack is successful the Enemy model is moved d3” directly away and becomes prone. It suffers half the wounds when rolling on the Wound table.Throw Attack: If the Attack is successful the Enemy model is placed anywhere within d2” in LoS, and becomes Prone. It suffers
half the wounds when rolling on the Wound table.Sweep Attack: If the Attack is successful then the Enemy model becomes Prone. It suffers half the wounds when rolling on the Wound table.Powerful Attack: If the Attack is successful then the model gains an additional +2 Strength for the Damage Roll. Combo Attack: If the Attack is successful then after the wounds from the attack have been applied make another Damage Roll on the Wound table at the original Success Level – 2. Continue this until the Success Level is reduced below 0.
For example, Hiro successfully attacks a Kairai with a Success Level of 3. The player makes a Damage roll using the Success Level 3 column, then after that is resolved they will make another Damage roll in the Success Level 1 (3 -2 = 1 column). After this they will stop as the next -2 would reduce the Success level below 0.
Critical Strike Attack: If the Attack is successful, when making the Damage Roll any doubles rolled instantly remove the Enemy model from the game.Push Attack: If the Attack is successful, move the Enemy model 1” directly away from this model if able. It does not suffer a Damage Roll.Force Back Attack: If the Attack is successful, move the Enemy model 1” directly away and then move directly towards it into BtB. It does not suffer a Damage Roll.
Special Defences Counter Attack Defence: If this Defence is successful then deduct 2 from the Success Level of the defence. If this is 0 or greater then make a Damage Roll on Wound Chart in the column equal to that number. Throw Defence: If the Defence is successful the Enemy model is placed within d2” in LoS, and becomes Prone. Sweep Defence: If the Defence is successful then the Enemy model becomes Prone. Side Step Defence: If the Defence is successful move this model 1” away from the Enemy model. Push Defence: If the Defence is successful move the Enemy model 1” directly away from this model.Drag Defence: If the Defence is successful move this model 1” directly away from the Enemy model, then move the Enemy model directly into BtB.
Success Level0 1 2 3 4 5 6 7 8 9 10
Fina
l mod
ified
Res
ult O
f Th
e Da
mag
e Ro
ll
2 0 0 0 0 1 2 3 4 5 6 73 0 0 0 1 2 3 4 5 6 7 84 0 0 1 2 3 4 5 6 7 8 95 0 0 1 2 3 4 5 6 7 8 96 0 1 2 3 4 5 6 7 8 9 107 0 1 2 3 4 5 6 7 8 9 108 0 1 2 3 4 5 6 7 8 9 109 1 2 3 4 5 6 7 8 9 10 11
10 1 2 3 4 5 6 7 8 9 10 1111 2 3 4 5 6 7 8 9 10 11 1212 3 4 5 6 7 8 9 10 11 12 13
14 15
Bushido: New Dawn - Game Rules Bushido: New Dawn - Game Rules
Model StatesA model may, through game effects, enter into a number of different states.
Berserk: The model gains the traits Aggressive and Impetuous until the End Phase. Blind: Models with Blind Markers on its Profile card cannot draw LoS outside of BtB, must be the second model to
have the Initiative in Melee Exchanges and suffer a -1 MS. During the End Phase remove one Blind Marker from each model with a Blind Marker on its Profile card.
Controlled: Controlled models are Enemy models that become Friendly for a number of actions equal to the
number of Control tokens on the model’s Profile card. Whilst Controlled the Active player may declare any action the model would normally be able to perform but may not spend its Ki tokens, the model does however generate Ki. Simple actions will remove one Control token and Complex remove two Control tokens once the action is resolved. As soon as all the Control tokens are removed the model returns to the original player and is considered an Enemy model.
Frightened: This model gains the Defensive trait and suffers a -1 MS. It may not declare actions that would
move it into BtB with Enemy models with the Fear trait. During the end phase the model must make another Fear test with the target of the test equal to the highest Fear value of Enemy model’s in BtB. If there are no Enemy model’s in BtB the target of the test is equal to the original failed test. Frightened model’s automatically fail Fear tests against model’s with a higher Fear value than the original failed test.
On Fire: If a model has Fire markers on its Profile card it is considered On Fire. During the End Phase remove the
highest value Fire marker, the model suffers a number of wounds equal to the removed Fire marker’s value, these wounds ignore the Armour and Toughness traits, after removing the highest value marker, if that model still has three or more of the same value markers replace two of those markers with one of the same type (Ie Fire marker) but of one value higher. A model with Fire markers on its Profile card, or a Friendly model in BtB which is unengaged and not in an Enemy model’s ZoC, may spend a Simple
action to remove two Fire markers from a model’s Profile card.
During the End Phase an Ashigaru has 3 x Fire markers (1) and 1 x Fire Marker (2) counters. He removes the Fire (2) marker and suffers two wounds, his opponent then chooses to replace 2 x Fire (1) markers with a Fire (2) marker leaving him with 1 x Fire (1) marker and 1 x Fire (2) marker.
Poisoned: If a model has Poison markers on its Profile card it is considered Poisoned. During the End
phase, remove the highest value Poison marker, the model suffers wounds equal to the removed marker’s value, after removing the highest value marker, if that model still has three or more of the same value markers replace two of those markers with one of the same type but one value higher. These wounds ignore Armour.
Prone: Models that are in the Prone state; have no ZoC, do not block LoS, Enemy models may choose not to be
considered in BtB with them when declaring actions and must be the second model to have the Initiative in Melee Exchanges. The only action a Prone model may declare is Stand Up. When a Prone model is the Target of a Melee Exchange or through initiating a Melee Exchange from Standing Up it suffers -1 MS.
Spirit Block: Models with Spirit Block Markers on their Profile Cards do not generate Ki during the Ki Generation
step. At the end of the Ki Generation Step remove one Spirit Block Marker from each model with a Spirit Block Marker on its Profile card.
Stunned: Models with any Stunned Markers on their Profile card suffer a -1MS. During the End Phase remove
one Stunned Marker from each model with a Stunned Marker on its Profile card.
Surprised: A model is Surprised if it is the Target of an Enemy model’s action and that Enemy model started its activation not in BtB with it and outside of its LoS. Surprised models may not declare Ki Feats or Ki Boosts, are always the second model to have the Initiative in Melee Exchanges, and may not benefit from traits or effects that would change this. They also suffer a -1 MS. and suffer a -1 MS. Models are only Surprised until the action in which they were Surprised is resolved.
Ki FeatsEach model may perform the Ki Feats on its Profile Card.
Ki Feats are categorised in a number of ways. Before the Feat’s name the following icons may be present. These can restrict the feat’s use; when it can be used or how.
Not in Melee; All Ki Feats may be used whilst the model is in Melee unless it has this Icon.
No Move; Models performing Simple and Complex Ki Feats can combine the action with a Walk either before
or after it is resolved, unless it has this icon. All Feats have a cost in Ki Tokens; this cost must be spent for the effects of the Feat to be applied. If a model does not have enough Ki Tokens then it may not declare the use of the Feat.
When a feat can be used depends on its complexity. Instant and Active Ki Feats are not considered actions.
Instant: • Can be used any time except in Melee exchanges and Ranged Attacks when the timing is dictated by the
steps detailed. • Because this is not an action it can be combined with a Simple or Complex Action if the model is the Active model.
Active Player: • Can only be used when this model’s controller is the Active Player, even if
it is not the Active Model. •Because this is not an action it can be combined with a Simple or Complex Action if the model is the Active model.
It is important to remember that Instant and Active Ki Feats/Boosts cannot be used to affect dice already rolled, and any traits or effects that would affect a roll or test must be declared and paid for before dice are rolled.
Simple: •A Simple Feat requires a Simple action.
•Can only be used when the model is the Active model.
Complex: •A Complex feat requires a Complex action. •Can only be used when the model is
the Active model.
Ki Feats are classified further by whom they affect:
Personal: This Feat affects the user only.
Target (X): This Feat affects a specific Target. The Target must be within X” otherwise the Feat fails, but the Ki
Tokens must still be removed.
Aura: This Feat affects an area that may be either set or variable. The area is expressed as a 360 degree radius
measured from the edge of the model’s base, the model from which it originated is always considered within the Aura. Unless stated Auras ignore LoS rules, obstacles; all models even partially within the Aura’s area of effect are affected. Auras last until the End phase or the originating model is removed from play.
Pulse; This Feat affects an area that may be either set or variable. The area is expressed as a 360 degree
radius measured from the edge of the model’s base. Unless stated Pulse’s ignore LoS rules and obstacles; all models even partially within the Pulse’s area of effect are affected. The effects of Pulses last until the Ki Feat is resolved.
Special: The effect of the Feat is unique in some way and is further described on the model’s Profile card.
Ki Boosts to Statistics
Some models are able to increase a statistic through the spending of Ki Tokens (See Profile Cards). These increases are Ki Feats that are - X - Instant - Personal. The increase lasts until the currently Active model’s activation is resolved.
A player is activating Yumi, they are unsure whether they are within 4” of a Bakemono they want to declare a Melee action against. Luckily Yumi can boost her Move Statistic by 1 for every two Ki spent. The player declares that they are Ki Boosting her Move Statistic once, spent the two Ki and then declare the Melee action.

16 17
Bushido: New Dawn - Game Rules Bushido: New Dawn - Game Rules
A player has a model with 6 Ki, Outnumbered in a Melee exchange, the model can Ki Boost its Melee Skill by 1 for every three Ki spent. When calculating that model’s dice pool for that exchange they decide to Ki Boost by 2 by spending all six Ki.
Character TraitsModels in Bushido commonly have one or more Traits.
Some traits have X, Y or Type values in brackets after the traits name. This is either a positive or a negative modifier, a range or the Type of model the trait affects.
Players cannot choose whether they use Traits, but can choose in which order their own model’s traits trigger. Unless stated they are considered in effect.
Some traits on a model’s Profile card may have either Melee or Ranged after the trait in brackets, in this case the trait only applies to the model’s weapons of that type. If neither Melee or Ranged is stated it applies to all Weapon Types
Example; A model with the trait Sharp (Ranged), would only benefit from Sharp when making Ranged Attack actions with its Ranged weapon.
A player controlling a Kairai with Rise (4) and Last Stand can choose to attempt his Rise test first, then if successful the Rise trait would cause the model to recover all its wounds. If it failed then the Last Stand trait would trigger.
Example; Players cannot choose not to use the Armour trait.
Traits A-B
Aggressive: This model may not choose more Defence dice than Attack Dice during Melee exchanges.Ammo (X): This model starts the game with X Ammo counters. When this model resolves a Ranged attack remove an Ammo Counter. If this model has no Ammo counters it may not declare Ranged Attacks.Armour (X): Reduce the result of Damage Rolls against this model by X.
Hanso is successfully Attacked in a Melee exchange with a Success Level of 4, his opponent
rolls a 4 and 3 for a result of 7 on their Damage Roll, Hanso has the Armour (2) trait and so the final result is a 5 in the Success Level 4 meaning Hanso suffers 3 wounds.
Armour Piercing (Weapon Type): Damage rolls made by this model ignore the Target Enemy model’s Armour trait. Assault Fire: This model may make a Ranged Attack against the Target of a Melee or Charge action if it was not in BtB at the start of its action. After moving but before the Melee is resolved if the model entered BtB with the Target resolve a Ranged Attack. The Ranged Attack is considered to be at Short Range. If the model is removed from play by the Ranged Attack the model’s activation ends. The Active model suffers a -1 to MS and RAS until the end of its current activation.Assassin: If this model makes a successful Attack against a Surprised model, it may roll three dice for the Damage roll and choose the highest two.Automatic Disengage: When this model activates it may ignore Enemy models in BtB when declaring its action and freely move out of BtB with Enemy models without declaring a Disengage action. Aware: This model can choose to draw LoS 360 degrees around its base.Believer: (X/Type/Y): Friendly models within X” of the Type reduce the cost of Ki feats by Y. Blood of Orochi: During Ki Generation this model’s controller adds together all the Blood of Orcochi values of models in their warband currently on the table. The player can then spend these points to grant a model the Poison trait until the End Phase. The Poison traits X and Y values are dependant on the number of points spent on that model, and are as follows;
1 = Poison (1/1)2 = Poison (1/2)3 = Poison (2/1)4 = Poison (2/2)
If a model already has the Poison trait, the player may choose which to use for the turn. Any points unspent are lost.
Bodyguard (X/Type): This model may switch positions with another model of Type if; •Within X” and has LoS to Type, •Type is not in BtB with an Enemy model. •This model is not in BtB with an
Enemy model. •This model has actions remaining, and Type is the target of a Melee, Charge or Ranged Attack action.
This model then becomes the target of the action, and the action is resolved normally.Bravery: This model may reroll a failed Fear test. The second result must be kept. Brutal (X): This model adds X to the highest Attack Dice when calculating the final result. Traits C-E
Camouflage (X): This model cannot be Targeted by Enemy models when in Obscuring Terrain or when it would benefit from Cover, unless the Active model starts its activation within X” of the model Targeted.Channel (X): During this model’s activation it may remove Ki Tokens from its own profile card and place in on a Friendly model(s) profile card as long as the model(s) is within X”. If the model is outside of this range then the Ki Tokens are lost. Charging Bonus (Bonus): When this model Charges an Enemy model it gains the bracketed Bonus for that Melee exchange.Command (X/Type): This model may declare a Simple action Command; it then activates up to X number of non-exhausted models of the Type to perform a Simple action. The order the models activate in is chosen by the controlling player, after each action is resolved that model’s condition worsens as normal.Conspiracy of the Cult (X): When this model activates it may inflict up to X wounds on any Friendly model(s) with this trait, up to its own X value. This model gains Ki Tokens equal to the number of wounds suffered. A model cannot suffer more wounds than the X value of its own Conspiracy of the Cult trait. These wounds ignore Amour and Toughness.Co-ordinated Attack (Type): If this model is in a Melee exchange in which a Friendly model of Type is Outnumbering then this model gains +1 MS. A model can only benefit from this trait once per Melee Exchange.Cowardly: This model must reroll successful Fear tests. The second result must be kept.Cumbersome: If this model is not the Active model then it suffers a -1 to its Melee Skill.Defensive: This model may not choose more Attack dice than Defence Dice during Melee exchanges.Disturb Flow (X/Y): All Enemy models must spend an additional X Ki tokens when performing Ki Feats within Y”.
Dodge (X): During a Melee exchange the model may force its opponent to reroll up to X Attack Dice once, the second result must be kept.Durable: When this model would suffer multiple wounds it only suffers one wound. If this model would recover wounds only recover one wound.Elusive: This model ignores Enemy model’s ZoC when moving.
Traits F-J
Fear (X): When models make Target Fear tests against this model X is the target number of the tests. Models with equal Fear X traits ignore Fear tests, but must still test against models with higher Fear X traits.
Fear Tests; Fear tests are Target tests using the model’s Ki statistic to resolve. Resolve a Fear test when;
1.An Active model declares an action that would bring it into BtB with a model with the Fear Trait. If the Active model fails the Fear test. Its action is spent and its condition worsens by one degree (see Model States and Conditions) and its activation ends.
2.Or, an Active model with the Fear trait declares an action that would bring it into BtB with an Enemy model. If the Enemy model fails its Fear test then it enters the Frightened state (See Model States and Conditions).
Note; Models only enter the Frightened state in Step 2.
Fearless: This model automatically passes Fear tests.Feint (X): During a Melee exchange the model may force its opponent to reroll up to X Defence Dice once, the second result must be keptFire (X/Y): When this model inflicts wounds through an Attack on an Enemy model, that model gains Y Fire markers of value X. First Strike: This model gains the Initiative for the first Melee exchange with an Enemy model if it started the current activation unengaged. Flank: During this model’s controlling player’s Deployment they may choose whether this model will use Flank or not, if the player chooses not to use Flank, this model is deployed as normal. If the player declares the model is using Flank then do

18 19
Bushido: New Dawn - Game Rules Bushido: New Dawn - Game Rules
not deploy it and instead choose a table edge. Then starting in the second turn of the game, at the beginning of the Starting Step, and before Ki Generation roll a d6. Add the game turn number to the result rolled, if the total is equal to or greater than five then immediately deploy the model anywhere along the chosen edge but not in the opponents Deployment zone, ones are not considered failures for this roll. Fly: When a model with this trait declares a Walk, Run, Melee or Charge action it ignores; Terrain elements, other models and ZoC for the duration of the action. Force of Will (X): A model with this trait may add X to its highest dice when making opposed Ki tests and is the Active model.Forward Deployment: This model may be deployed 4” outside the deployment area when the player’s Warband is deployed. Group Activation: All models on this Profile card must perform the same action when declared the Active model; each model on this card resolves any moves before any Melee exchanges are resolved. Melee exchanges are then resolved in the order the controlling player chooses. Heal (X): If unengaged this model may declare a simple action and remove X Wounds from its profile card or that of a Friendly model in BtB.Heavy: This model may not move as part of a Ranged Attack action. Immovable: This model may not be moved by an Enemy attack, Ki Feat or effect, and can never become Prone. Immunity (Type): This model may not have Markers of Type placed on its Profile card. Impenetrable Defence: In Melee exchanges with this model Enemy models must always discard the highest resulting Attack dice before the final results are calculated.Impetuous: This model must always be the first activated by the Active player. This model may only declare Melee, Charge and Ranged Attack actions and needs to target the nearest Enemy model it is able to. If a player controls several impetuous models then that player chooses the order in which they activate them. Indomitable (X): This model ignores X additional Enemy models when checking for Out Numbering in Melee exchanges. Insignificant: This model;• Has no ZoC.• Does not inflict opponents with a -1 MS
penalty due to Out Numbering.• May not perform Simple or Complex
Scenario actions. • Does not count towards the number of
models in the Warband when calculating Pass tokens.
Intangible: This model ignores ZoC, other models, terrain and being in BtB when declaring actions. It may not end its move occupying the same volume as a terrain feature or another model.Iron Mind (X): This model adds X to its highest dice when it is the Target of an opposed Ki Test.Jump Up: At the start of this model’s activation but before its action is declared it may remove the Prone state from itself. Kami: When this model suffers wounds instead remove an equal number of Ki Tokens from its profile card. If this model has no Ki Tokens on its Profile card it is removed from play. This model may not be Channelled to or Leeched from and cannot be Healed.
Traits L-R
Large: Model’s Targeting this model with a Ranged Attack subtract 1 from the Target number of the test.Last Stand: If this model is reduced to 0 wounds, it may still be activated until the end of the turn, this model cannot recover wounds through any game effect or trait once its wounds have been reduced to 0. During the End Phase, the model is removed from playLeadership (X): Friendly model’s within X” may use this model’s Ki Statistic when resolving Fear tests.Leap: When this model declares a Melee, Charge, Walk or Run action, and is not in BtB with an Enemy model. It may, before movement reduce the distance this model would move in inches by X. If so then place this model anywhere within X, the model may not be placed in BtB with an Enemy model or in an Enemy models ZoC. The model then completes its move and action. Leech (X): Once during this model’s activation it may remove Ki tokens from any Friendly model(s) as long as the model(s) is within X”. If a model is outside of this range then its Ki tokens are lost. Light Weight: This model does not suffer penalties to the Target number of a Ranged Attack action for moving as part of a Ranged Attack action.Light Footed: This model moves through Difficult Terrain as if it were Clear. Lightning Reflexes: This model always has
the Initiative in Melee Exchanges. Model’s with this trait gain the initiative against model’s with First Strike.Martial Prowess (X): During a Melee exchange the model may reroll up to X Attack or Defence Dice once, the second result must be kept.Medium: This model is a medium size. Oni Rage: During Ki Generation this model may gain an additional number of Ki Tokens equal to D2. If it does it enters the Berserk State until the End Phase.Order (X/Type/Y): The model may declare a complex action and may then immediately improve the conditions of X models of Type that are within Y“ (Exhausted – Tired – Rested) Parry (X): This model adds X to the highest Defence Dice when calculating the final Defence result in Melee Exchanges.Poison (X/Y): When this model inflicts wounds through an Attack on an Enemy model, that model gains Y Poison markers of value X. Ranged Defence (X): A model making a Ranged Attack against this model adds +X to the Target number of the test. Rapid Fire (X): When this model declares a Ranged Attack Action it may resolve up to X Ranged Attacks during the activation. These Ranged Attacked may Target different models and are resolved in the order this model’s control chooses. This model’s condition still only worsens one degree regardless of the number of Ranged Attacks made by Rapid Fire. Regenerate (X): This Model recovers X wounds during the End phase. Reload (X): After resolving a Ranged Attack action place X Reload counters on this model’s Profile Card. The model cannot declare a Ranged Attack action as long as it has Reload counters on its card.Retreat: This model must always declare a Disengage action if it starts its activation in BtB with an Enemy model.Rise(X): At the end of an action where this model is reduced to 0 wounds, make a Target test with one D6 with a target of X. If successful the model becomes Prone and recovers all Wounds. If it fails remove the model from play as normal.
Traits S-Z
Scout: This model may deploy after both player’s normal deployment and may deploy anywhere within 4” of the controlling player’s normal deployment zone. Also the model’s
controller adds +1 to the result of the Tactical roll during the Deployment Phase. Self-Sacrifice (X/Type): If this model is within X” of Type, unengaged and not Exhausted. Then if Type would receive a wound roll, before that roll is made the player may remove this model from play and the Wound roll is cancelled. Sharp: This model ignores Enemy model’s Armour and Toughness traits when rolling on the Wound table.Sixth Sense: This model is never considered Surprised. This trait ignores the effects of the Camouflage Trait.Slow: This model must be the second model to have the Initiative in Melee Exchanges, and may not declare Run or Charge actions.Small: Model’s Targeting this model with a Ranged Attack action add 1 to the Target number of the test.Split Attack: When this model declares a Melee or Charge Action, after its movement if it is in BtB with two or more Enemy models the player may resolve a Melee exchange with two or more of those models. The player splits this model’s Melee Skill between the Melee Exchanges with a minimum of 1 MS for each exchange before resolving the Melee Exchanges, then resolves them in the order they chose. This only worsens the Active model’s condition by one degree (Rested – Tired – Exhausted).
Kenko activates and is in BtB with two Bakemono. He decides to split his Melee Skill of 4, to 3 and 1. He resolves the first Melee Exchange with Melee Skill 3, after which the first Bakemono’s condition worsens one degree, he then resolves the second and final Melee Exchange with Melee Skill 1 after which both the second Bakemono’s and Kenko’s condition worsens one degree.
Note: Kenko’s state only worsens when the final melee exchange is resolved. Soulless: This model automatically succeeds all opposed Ki rolls, and Fear tests.Spirit Block: When this model inflicts Wounds through an Attack on an Enemy model, that model gains one Spirit Block marker.Steadfast: This model may freely choose how to place MS dice when frightened.Steady: The model can never become Prone.Strong: When this model makes a Damage Roll with the Type stated, roll 3d6 and choose the two highest dice.Strong Mind (X): This model gains an additional X dice when resolving Opposed Ki tests.

20 21
Bushido: New Dawn - Game Rules Bushido: New Dawn - Game Rules
Stubborn: This model cannot voluntarily leave BtB with an Enemy model.Stupid (X): When this model is the Active model and declares an action, make a Target test with one D6 with a target of X, if it fails this test the model forfeits its action, but its condition still worsens one degree.Tactician (X): This model adds X dice to the players Tactical rolls. The player may only benefit from one model’s Tactician at a time. Terror: If a model should make a Fear test against this model it must reroll the test if it succeeds it, the second result must be kept.Tiny: Model’s Targeting this model with a Ranged Attack action add 2 to the Target number of the test.Tireless: This model does not tire or exhaust as a result of Melee exchanges initiated by Enemy models. Toughness (X): Reduce the final number of wounds inflicted by successful attacks by X after consulting the Wound Chart.
Zuba is successfully Attacked in a Melee Exchange with a Success Level of 2. His opponent rolls a 9 on his Damage Roll and so would suffer 3 wounds but Zuba has the Toughness (1) trait and so only suffers 2 wounds.
Unblockable Strike: Model’s with this trait ignore their opponent’s highest Defence dice in Melee Exchanges.Unstable (X): This model suffers a penalty of X” to its Move statistic when move through Difficult terrain.Weak: When this model makes a Damage Roll with the Type stated, roll 3d6 and chooses the two lowest dice.Weak Mind (X): This model loses a number of dice equal to X when making opposed Ki tests.
Game TurnsGames of Bushido are broken down into Turns. How many turns the game lasts is dictated by the Scenario being played.
Each game Turn is divided into three phases. The three phases are the Starting phase, the Main phase and the End phase.
1.Starting phase •Roll for Variable Turns (See Scenarios)
•Ki Generation - All models receive a number of Ki Tokens equal to the first number of their Ki statistic.
•Resolution of Unique Effects.
•Players calculate the number of Passes for the turn. Each player totals the number of Friendly non-Insignificant models. The player with the least gains the difference in Pass tokens. •Tactical Roll; both players roll a D6; the winner decides which player will start the main phase as the Active Player.
2. Main phase •Starting with the Active player.
•The Active player chooses a model and declares a Simple or Complex action for it to perform, or uses a Pass token.
•The model’s action is resolved.
•The opponent then becomes the Active player, unless; the player is unable to activate a model then their opponent continues to be the Active Player, and activates models until they are unable to activate a model.
•Once neither player is able to activate a model, move to the End Phase.
3. End phase •Resolve any effects that occur or end in the End phase. Always resolve the negative effects first.
•Refer to the Scenario being played and check for the scoring of Victory Points. If this is the final turn of the scenario the game finishes. If one player has no models left on the table, the game ends, and Victory Points are calculated immediately.
•Remove Exhausted condition markers.
•Discard any unspent Pass tokens. Note; games can only finish in the End Phase.
Token Key:
Blind Prone
Ki Stunned
Spirit Block Ran
Tired Controlled
Exhausted Frightened
Reload Posion
Beserk Fire
W a r b a n d C o m p o s i t i o nA player’s Warband in Bushido is made up of a number of models from the same faction, the Rice cost of your Warband must come to the same total as your opponent. Players can only recruit one card of each fighter and cannot duplicate them; this does not prohibit the opponent recruiting the model for their force. Sometimes two or more models are represented by the same Profile card. A player can choose to recruit up to the number of models as there are Wound tracks on the card.
Pass Tokens
A player may spend a Pass token instead of taking an action with one of their models, if they do then their opponent becomes the Active player.

22 23
Bushido: New Dawn - Game Rules Bushido: New Dawn - Game Rules
Games of Bushido represent the struggles of each faction to meet its objectives in
battle. Scenarios allow players to attempt to meet their objectives while trying to stop the opponent meeting theirs. Scenarios greatly improve a game of Bushido and once you are comfortable with the rules it is highly recommended you compete using them.
In every Bushido scenario there are three victory points (VP) available, in total, to both players. The score a player earns during a scenario depends upon how many VP’s they and their opponent gain (See table right).
Bushido’s scenarios are intended to create the strategical difficulties and challenges any commander (you) will face on the battlefield. To this end if you or your opponent should lose all of their Warband in a turn then during the End phase the game ends and VP’s earned are calculated (Remember a game can only finish during the End phase).
BUSHIDO SCENARIOS
VP Score
3-0 9
2-0 8
2-1 7
1-0 6
1-1 5
0-1 4
1-2 3
0-2 2
0-3 1
Scenario RulesBushido is best enjoyed by playing a scenario to decide the victor. Scenarios are broken down into the following sections.
TerrainPlayers should decide before a game on which elements to use, and how the terrain elements will affect the game. The terrain should fill roughly between a quarter and half of the play area. Terrain elements are categorised by two traits; Visibility and Difficultly.
Unless stated Idol Markers are 30mm Bases, these are Difficulty; Clear and Visibility; Clear although a model may not end its action occupying the same area as the Idol Marker’s base.
Visibility
Can the terrain be seen through when drawing LoS?
•Blocking: No LoS can be drawn through any part of this the terrain that is considered Solid.
•Obscuring: Model’s draw LoS 3” extending from where the terrain that is Obscuring starts. No matter where the model is in relation to the terrain. •Un-Obscuring: LoS can be drawn through the terrain.
Difficulty
How easy is it for a model to move through?
•Impassable: Cannot be moved through. •Difficult: Can be moved through but at ½ Movement rate for any movement whilst in the terrain element. •Normal: No affect to movement
Some terrain elements like a building might have different types of Visibility and/or Difficulty and so the players should decide
before the game starts which areas are different.
Deployment Deployment can be either Baseline or Corner Square deployment.
•Baseline Deployment: models are set up with the base of the model touching the edge of the board.
•Corner Square Deployment: Players set up their model’s in a 6” square in opposite corners of the board.
Setup Unless otherwise stated in the Scenario description the players should setup the terrain and deploy following these steps.
1.One player sets up the terrain (Randomly decide which player) 2.The other player then chooses a Deployment area (As detailed by the scenario) 3.Players make a Tactical roll. 4.The winner decides which player deploys first. That player then deploys their entire force. Then the second player deploys their force (Deploy as detailed by the scenario)
Game Length Games of Bushido can be Fixed or Variable
•5 Turns Variable: During the Starting Phase of Turn 5 one of the players rolls a single D6. If the result is 4 or more the game will end at the end of the turn. If the result is not then the game continues to the next turn and this roll will be made again. The game will always end on the seventh turn.
•Fixed (X): The game ends after the End Phase of the designated turn.
Victory Conditions All scenarios in Bushido have three Victory Points. The game cannot have more than three Victory Points.
24 25
Bushido: New Dawn - Game Rules Bushido: New Dawn - Game Rules
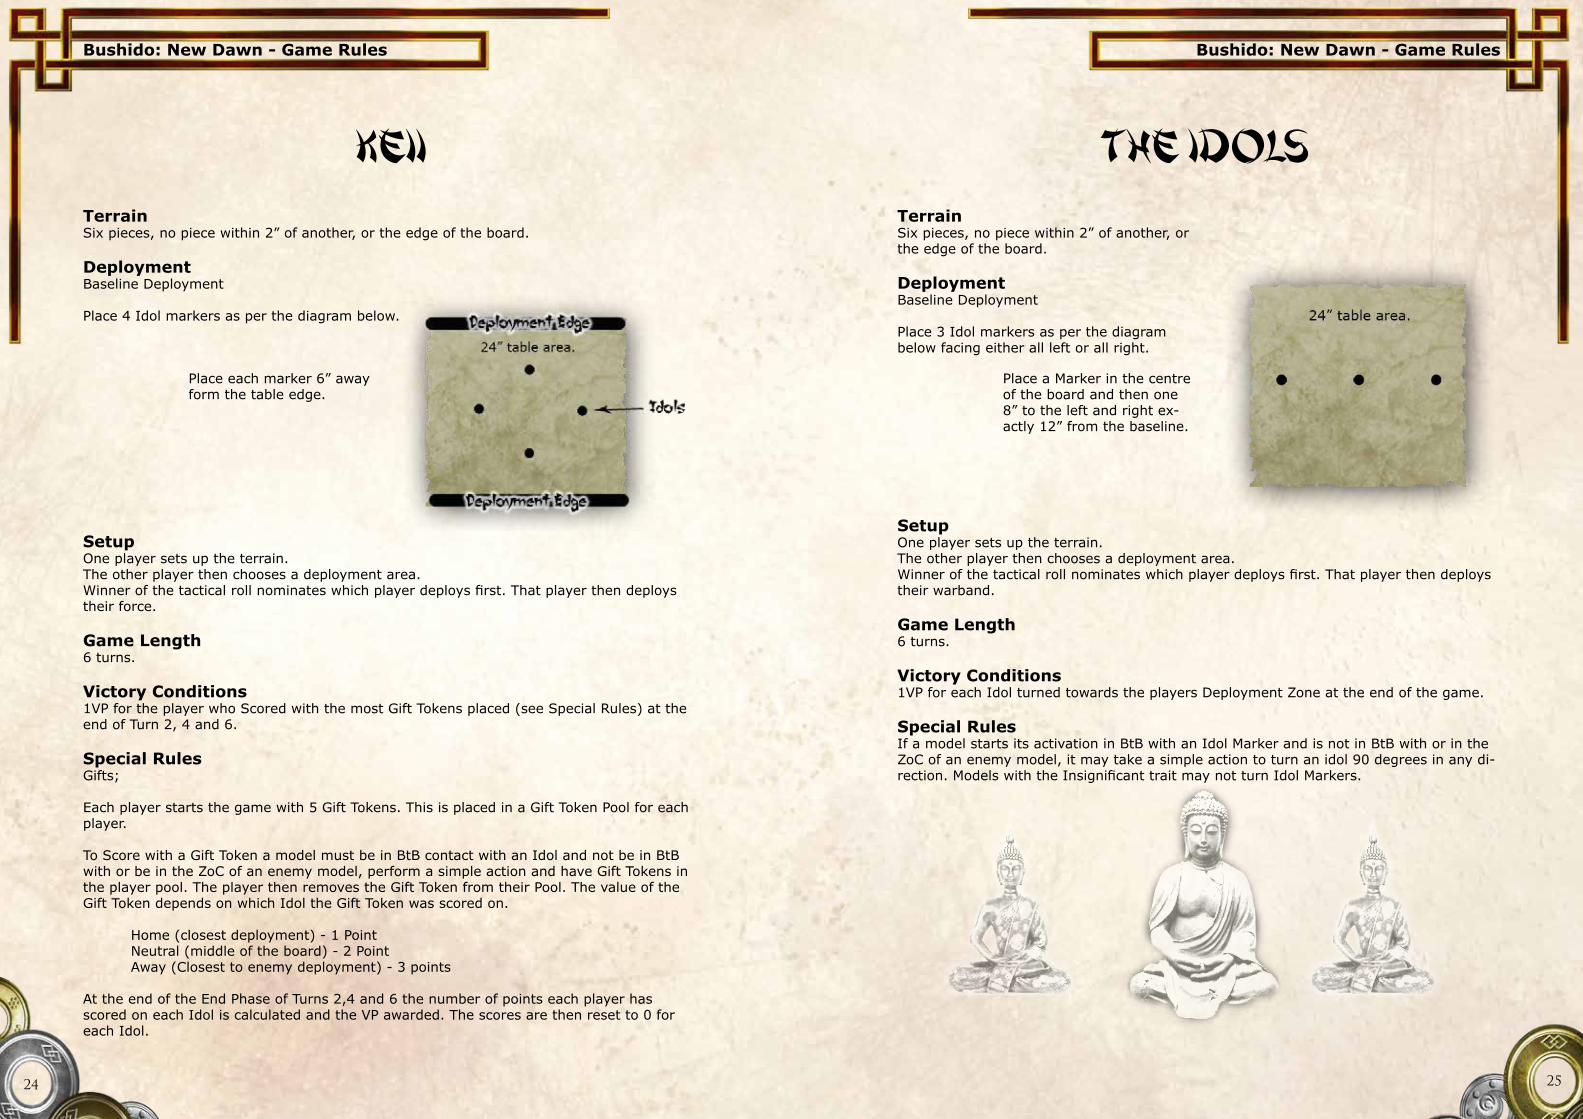
TerrainSix pieces, no piece within 2” of another, or the edge of the board.
Deployment Baseline Deployment
Place 3 Idol markers as per the diagram below facing either all left or all right.
Setup One player sets up the terrain.The other player then chooses a deployment area.Winner of the tactical roll nominates which player deploys first. That player then deploys their warband.
Game Length6 turns.
Victory Conditions1VP for each Idol turned towards the players Deployment Zone at the end of the game. Special RulesIf a model starts its activation in BtB with an Idol Marker and is not in BtB with or in the ZoC of an enemy model, it may take a simple action to turn an idol 90 degrees in any di-rection. Models with the Insignificant trait may not turn Idol Markers.
Place a Marker in the centre of the board and then one 8” to the left and right ex-actly 12” from the baseline.
The IdolsTerrainSix pieces, no piece within 2” of another, or the edge of the board.
Deployment Baseline Deployment
Place 4 Idol markers as per the diagram below.
Setup One player sets up the terrain.The other player then chooses a deployment area.Winner of the tactical roll nominates which player deploys first. That player then deploys their force.
Game Length6 turns.
Victory Conditions1VP for the player who Scored with the most Gift Tokens placed (see Special Rules) at the end of Turn 2, 4 and 6. Special RulesGifts;
Each player starts the game with 5 Gift Tokens. This is placed in a Gift Token Pool for each player.
To Score with a Gift Token a model must be in BtB contact with an Idol and not be in BtB with or be in the ZoC of an enemy model, perform a simple action and have Gift Tokens in the player pool. The player then removes the Gift Token from their Pool. The value of the Gift Token depends on which Idol the Gift Token was scored on.
Home (closest deployment) - 1 Point Neutral (middle of the board) - 2 Point Away (Closest to enemy deployment) - 3 points
At the end of the End Phase of Turns 2,4 and 6 the number of points each player has scored on each Idol is calculated and the VP awarded. The scores are then reset to 0 for each Idol.
Place each marker 6” away form the table edge.
Keii

26 27
Bushido: New Dawn - Game Rules Bushido: New Dawn - Game Rules
The ChallengeDeployment:Baseline or Corner
Setup:No special rules Game Length:5 turns Variable Victory Conditions:Both players are attempting to kill the model they selected to “Challenge” whilst keeping theirs alive and moving it across
the table. 1VP - If the model your opponent “Chal-lenged” is alive at the end of the Game.1VP - If the model you “Challenged” is not alive at the end of the game. 1VP - For the player whose own “Chal-lenged” model is closest to the opponents Deployment area at the end of the game. Special Rules:Before deployment both players nominate a model in their opponents Warband, this model is the “Challenged”.
The OfferingDeployment:Corner Deployment or Base Line Setup:Each player places a Shrine in their half of the table not within 2” of a piece of Terrain. Place one Object in the centre of the table then place two more Objects either side of the centre one every 4”. Game Length:6 turns Victory Conditions:To have more Objects on the Shrine in your half of the table at the end of Turns 2,4,6 one VP is scored at the end of each of those turns.
• 1VP for most Object at the end of turn 2 • 1VP for most Object at the end of turn 4 • 1VP for most Object at the end of turn 6 Special Rules: Shrines; are 50mm, Terrain elements that are Blocking and Impassable
Objects; 30mm base, does not affect movement or LoS but models may not end their movement occupying the same space. “Pick Up”; if a model is not in BtB or, in the ZoC of an enemy model it may “Pick Up” the object before that start of its action for free.•A model may only carry one Object at a time.•If at the start of a model’s action the model is in BtB with an enemy they may Place the Object anywhere in BtB.•If the model starts in BtB with a Friendly model and is not in BtB with an Enemy they may “Take” the Object from that model be-fore its action is resolved.•Insignificant models may not “Pick Up” or “Take” objects.•Models carrying an Object suffer -1 MS, -1RAS and enemies targeting them with Ranged Attack Actions -1 to the Target num-ber.•If a model starts its action in BtB with a Shrine, is not in BtB with, or in the ZoC of an Enemy model it may “Pick Up” or “Place” an Object it is carrying on the Shrine.
TerrainSix pieces, no piece within 2” of another or the edge of the board.
Deployment6“ Corner Square Deployment.
Setup One player sets up the terrain.The other player then chooses a deployment area. Their opponent then places their shrine, they then do the same. Winner of the tactical roll nominates which player deploys first. That player then deploys their warband.
Game Length6 turns.
Victory Conditions1 VP - First player to “Appease” their own shrine, in a turn the opponent did not.
1 VP - Player with more ‘Offering’ counters on their shrine at the end of the game.
1 VP - First player to ‘Despoil’ an opponents Shrine. Special Rules5 Models that are NOT insignificant start the game with a single offering marker.
The Shrines
If a model starts any activation in BtB with a Shrine and not in an enemies ZoC they may use a simple action to ‘Appease’ the ancestor within (if it is your shrine) or attempt to ‘de-spoil’ the sacred ground (if it is your opponents).To ‘Appease’ a Shrine the model places its offering marker on the Shrine.To ‘Despoil’ a Shrine the model removes an opponents offering marker from the opponents Shrine.
Each player places a Shrine Marker within the opponents half of the table outside of their deployment zone.
The Shrines

28
Bushido: New Dawn - Game Rules
The Six HakaDeployment:Baseline Deployment Setup:Place 6 Idol markers as per the diagram below.
O O - 6” in from deployment, 8” from the table edge O O - Centre line, 4” from the table edge O O - 6” in from the deployment, 8” from the table edge Game Length:6 turns Victory Conditions:1VP - for the player who Scored the highest total with Prayer Tokens at the end of Turn 2, 4 and 6. Special Rules: Prayers; each player starts the game with 5 Prayers Tokens. These are placed in a Prayer Pool for each player. Simple Scenario Action; the model must be in BtB with an Idol. The player then removes one Prayer Token from their Pool. The value of the Prayer Token depends on which Idol the model was in Base to Base with. Home (closest deployment) = 1 Point Neutral (middle of the board) = 2 Point Away (Closest to Enemy deployment) = 3 points At the End of Turns 2 and 4 the two Idols on which most Prayer Tokens were scored are removed from the table and can no longer be scored on. During the Starting Phase of Turns 3 and 5 reset each player’s Score to 0.