Embed Size (px)
Citation preview

December 2008
Building CUDA Photoshop Filters for the GPU
James Fung and Tim Murray {jfung,tmurray}@nvidia.com

December 2008
Document Change History
Version Date Responsible Reason for Change
1.0 3/6/2008 jfung,tmurray First draft of GPU Photoshop filters with CUDA whitepaper
1.1 12/22/2008 jfung Build instructions synchronized to CUDA.rules v2.1.1

NVIDIA Corporation 2701 San Tomas Expressway
Santa Clara, CA 95050 www.nvidia.com
Abstract
This document describes how to develop GPU accelerated image processing filters as plug-ins to the widely used application, Adobe Photoshop. Modern GPUs are highly parallel architectures that are well suited for accelerating many operations used in image processing. With GPU acceleration, computationally intensive filters can be run interactively within the Photoshop environment, and operations on batches of images can be accelerated.
This sample includes skeleton filters that use the GPU and can be dropped into the Adobe Photoshop SDK as a starting point for development. This document is intended to help developers set up the basic build environment, and introduce basic image processing operations on the GPU using CUDA.

December 2008
Introduction
This sample introduces how to develop GPU accelerated image filters for Adobe Photoshop.
Included in this sample is the source code to three example filters:
1. InvertFilter: A basic filter that inverts color channels, used as a simple example of CUDA image processing
2. AutoLevelsFilter: A Histogram Equalization filter, demonstrating how to use more advanced techniques with CUDA (such as creating histograms)
3. knnFilter: A k nearest neighbor (KNN) denoising algorithm.
4. LRDeconvFilter: A GPU implementation of a Lucy-Richardson Deconvolution that demonstrates frequency domain processing on the GPU using the CUDA FFT libraries in the filter.
This document is structured as follows:
1. Installation instructions for setting up the build environment for the filter are presented.
2. The filter’s communication with the Adobe Photoshop API and the GPU is presented.
3. Source walkthroughs of some of the key parts of the GPU filters.
Getting Started
Configuring the Build
Environment
The SDK sample includes a Microsoft Visual Studio Visual C++ Project (.vcproj) project file that can be used as a starting point for developing CUDA-enabled filters. This section outlines how to use CUDA within the Photoshop plug-in framework.
What you need You’ll need to install the following to develop Photoshop plug-ins using CUDA:
- NVIDIA CUDA Toolkit and SDK
The CUDA Toolkit and SDK are available from http://www.nvidia.com/object/cuda_home.html

December 2008
After installation, the following environment variables should be set (in Settings→Control Panel→System→Advanced→Environment Variables)
NVSDK_ROOT should point to the root directory of the CUDA SDK installation.
CUDA_LIB_PATH should point to the lib subdirectory of the CUDA toolkit installation.
- Microsoft Visual Studio 2005
The samples provided in this package include Microsoft Visual Studio project files.
A custom build rule to handle compilation of .cu files is included with this SDK sample. To active the rule, highlight the project in the Solution Explorer panel, and, from the menu bar select “Project → Custom Build Rules → Find Existing” and select and activate the Cuda.rules file included in this sample.
- Adobe Photoshop CS3
The samples were developed to run with Adobe Photoshop CS3.
- Adobe Photoshop CS3 SDK
The Photoshop CS3 SDK is required and it can be obtained from Adobe by registering as a developer.
Build and Test the Filter
To build the GPU filter samples, do the following:
1. Copy the sample’s \cudaFilters directory into the Photoshop CS3 SDK
\samplecode\ directory
2. In the each filter’s source tree, open the \win directory, and open the .vcproj file with Microsoft Visual Studio to open the project
3. Build the project. Upon a successful build, the project should produce an .8BF file. The project is configured to place this file in the default Adobe Photoshop installation path, C:\Program Files\Adobe\Adobe Photoshop CS3\Plug-Ins\Filters.
Open an image in Adobe Photoshop and in the filters menu, there will be an entry for the NVIDIA CUDA filter you have just compiled. You can test to ensure the filter is working with the GPU by running the filter, or by clicking “Help→About Plugin” and finding the GPU filter name in the menu. This will cause the filter to query the graphics hardware for some basic information.

December 2008
Writing GPU Photoshop Filters
Retrieving Image Data from
Photoshop
Photoshop defines a FilterRecord structure that is used for communication between the plug-in and the host application (Photoshop). We briefly discuss basic concepts in transferring image data from Photoshop to the GPU. Full documentation for the FilterRecord structure and plug-in development is provided with the Photoshop CS3 SDK.
The Photoshop API supports tiling, making it possible to read and write tiles for cache efficiency, low memory footprint, and for processing of regions of interest. The tiles are delivered in colour planes, meaning that for a given tile area of an RGB image, there are three tiles corresponding to the three colour channels.
Leaving aside the color planes for the moment (see the code sample for details), the basic operations of requesting pointer to the input image and output image areas can be achieved with the Adobe Photoshop SDK as follows:
Figure 1. Retrieving Image Data
doStart() {
…
// Get the filter area rectangle.
// This is set before the call into doStart()
fRect.right = gFilterRecord->filterRect.right;
fRect.top = gFilterRecord->filterRect.top;
…
// Set the input rectangle area to request
gFilterRecord->inRect.right = (int16)fRect.right;
gFilterRecord->inRect.top = (int16)fRect.top;
…
// Set the output rectangle area to request
gFilterRecord->outRect.right = (int16)fRect.right;
gFilterRecord->outRect.top = (int16)fRect.top;
…
// perform the actual request: update the gFilterRecord with
our latest request
*gResult = gFilterRecord->advanceState();
// now gFilterRecord->outData and gFilterRecord->inData point
// to the input and output memory areas
}

December 2008
In figure 1, it is assumed the whole image can fit in the available GPU memory and so the whole image is retrieved. It may be desirable to break up the image into multiple tiles when the image is large.
These pointers to the image (outData and inData) can then be used to send the image to the GPU for processing, and have the processed image returned to Photoshop as follows:
Figure 2. Transfer and Process the Image on the GPU
A basic CUDA filter will use most of the following fields and methods from FilterRecord:
- planes
This field contains the total number of active channels in the image, including alpha channels. To determine the number of color channels in the image, use the CSPlanesFromMode function.
- inLoPlane and inHiPlane
These fields control which planes are placed in the inData field after the next call to advanceState(). To process a single plane at a time, inLoPlane should equal inHiPlane.
- outLoPlane and outHiPlane
These are the output equivalents to inLoPlane and inHiPlane.
- imageMode
This field contains the current mode of the image being processed. Using CSPlanesFromMode (imageMode, currentPlanes) will return the number of color channels for the current image mode.
- inData
This field contains a pointer to the image data that has been requested by inLoPlane and inHiPlane. If more than one plane has been requested, the planes will be interleaved. A CUDA kernel will copy the requested portion of the image from inData to the GPU for processing.
- outData
This field is the pointer to the destination memory for the image after it has been processed by the CUDA kernel. It is controlled by outLoPlane and outHiPlane.
- advanceState()
advanceState() updates the FilterRecord by loading inData and outData with the currently requested planes. advanceState() does not need to be called in order to update the image after memory has been copied from the GPU to outData.
// allocate some GPU memory
cudaMalloc( (void **)cudaptr, sz );
// copy the image data to the GPU, process, and retrieve
cudaMemcpy( cudaPtr, gFilterRecord->inData, sz,
cudaMemcpyHostToDevice);
cudaKernel<<<dimBlock, dimGrid>>>(…, cudaPtr );
cudaMemcpy( gFilterRecord->outData, cudaPtr,
cudaMemcpyHostToDevice );

December 2008
- inRowBytes
This field contains the total width of a row in memory. Photoshop may add padding to the image’s width for improved efficiency. CUDA kernels must be able to handle this padding correctly. For more information, see below.
- depth
This field contains the color depth in bits of a channel in the current image mode.
Row Width vs. Image Width
For computational efficiency, Photoshop may add additional padding bytes to each row of the image. As a result, the width in memory of each row may be greater than the image width. The additional padding bytes do not contain data. Care should be taken to ensure that the correct region of the image is processed.
More specifically, the FilterRecord parameter inRowBytes holds the offset in bytes between rows (i.e. the row stride) and the parameter inRect holds the four corners of the image area being processed. In the simple case where the whole image is being processed these are the image dimensions. Typically, the offset between rows will be a convenient multiple of two for the purposes of creating thread blocks, and the grid can be sized to accommodate the full row. Inside the CUDA kernel, the padding bytes can be excluded from processing as follows:
Figure 3. Excluding Image Padding Areas
Execution Runtime
Requirements
If the CUDA device is being used as a display adapter, the execution time of a single kernel must be less than five seconds. If the execution time exceeds five seconds, the Windows “watchdog timer” will be triggered and cause the CUDA runtime to return an error. While this may not be encountered on high-end desktop platforms, testing on lower-end and laptop GPUs as well as testing with very large images should be performed to ensure that such chips do not trigger the watchdog timer.
If kernel execution times will exceed five seconds, executing the kernel on a CUDA device that is not being used as a display adapter will not trigger the watchdog timer. However, an NVIDIA GPU must still be the primary display adapter.
int ix = blockIdx.x*blockDim.x+threadIdx.x;
int iy = blockIdx.y*blockDim.y+threadIdx.y;
int idx = iy*width+ix;
if( ix >= width || ix >= height ) return;

December 2008
Source Walkthroughs
All demos should be placed inside the \samplecode subdirectory of the Adobe Photoshop CS3 SDK.
Invert Filter
The first sample replicates Photoshop’s Invert command across all channels (including alpha channels). It does not support inverting sections of an image. It is provided both as an introduction to using CUDA within Photoshop and as a basis for developing more complex filters.
CUDA-specific actions are performed in the DoFilter() function in invertFilter.cpp:
Figure 4: DoFilter() in invertFilter.cpp
Figure 4 shows the calls in the plug-in to call CUDA. We first check how many channels are in the current image. If there are more channels in the image than in the currently selected layer, we iterate over the layer’s channels to avoid breaking layer transparency; otherwise, we iterate over the number of channels in the full image. By setting outLoPlane, outHiPlane, inLoPlane, and inHiPlane equal to plane, we read and write only a single color channel on each iteration. advanceState() is then called to set inData and outData to the channels requested. We then call cudaInvert, found in invert.cu, which actually copies memory to and from the GPU and calls the CUDA kernel:
void DoFilter(void)
{
// Prepare the image as seen in the Photoshop Dissolve sample
...
// Begin CUDA: Run the kernel on a single channel at a time
// Less likely to run out of memory, but still less overhead
// than tiling the image
int planesToProcess = gFilterRecord->planes;
if (gFilterRecord->inLayerPlanes)
planesToProcess = gFilterRecord->inLayerPlanes;
for (int16 plane = 0; plane < gFilterRecord->planes; plane++)
{
// Overwrite the current color channel
gFilterRecord->outLoPlane = gFilterRecord->inLoPlane = plane;
gFilterRecord->outHiPlane = gFilterRecord->inHiPlane = plane;
// Load the data we have requested into inData and outData
*gResult = gFilterRecord->advanceState();
// Call the invert kernel
cudaInvert(gFilterRecord->inData, gFilterRecord->outData,
rectWidth, rectHeight, gFilterRecord->inRowBytes,
gFilterRecord->depth);
}
December 2008
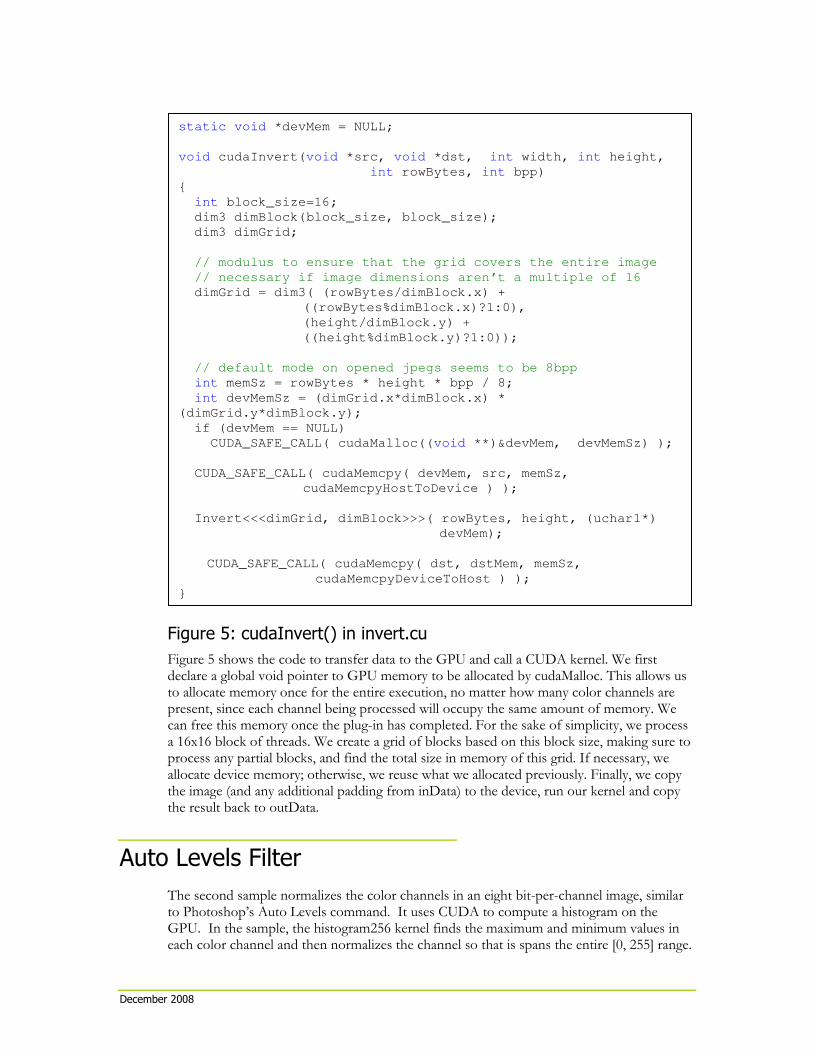
Figure 5: cudaInvert() in invert.cu
Figure 5 shows the code to transfer data to the GPU and call a CUDA kernel. We first declare a global void pointer to GPU memory to be allocated by cudaMalloc. This allows us to allocate memory once for the entire execution, no matter how many color channels are present, since each channel being processed will occupy the same amount of memory. We can free this memory once the plug-in has completed. For the sake of simplicity, we process a 16x16 block of threads. We create a grid of blocks based on this block size, making sure to process any partial blocks, and find the total size in memory of this grid. If necessary, we allocate device memory; otherwise, we reuse what we allocated previously. Finally, we copy the image (and any additional padding from inData) to the device, run our kernel and copy the result back to outData.
Auto Levels Filter
The second sample normalizes the color channels in an eight bit-per-channel image, similar to Photoshop’s Auto Levels command. It uses CUDA to compute a histogram on the GPU. In the sample, the histogram256 kernel finds the maximum and minimum values in each color channel and then normalizes the channel so that is spans the entire [0, 255] range.
static void *devMem = NULL;
void cudaInvert(void *src, void *dst, int width, int height,
int rowBytes, int bpp)
{
int block_size=16;
dim3 dimBlock(block_size, block_size);
dim3 dimGrid;
// modulus to ensure that the grid covers the entire image
// necessary if image dimensions aren’t a multiple of 16
dimGrid = dim3( (rowBytes/dimBlock.x) +
((rowBytes%dimBlock.x)?1:0),
(height/dimBlock.y) +
((height%dimBlock.y)?1:0));
// default mode on opened jpegs seems to be 8bpp
int memSz = rowBytes * height * bpp / 8;
int devMemSz = (dimGrid.x*dimBlock.x) *
(dimGrid.y*dimBlock.y);
if (devMem == NULL)
CUDA_SAFE_CALL( cudaMalloc((void **)&devMem, devMemSz) );
CUDA_SAFE_CALL( cudaMemcpy( devMem, src, memSz,
cudaMemcpyHostToDevice ) );
Invert<<<dimGrid, dimBlock>>>( rowBytes, height, (uchar1*)
devMem);
CUDA_SAFE_CALL( cudaMemcpy( dst, dstMem, memSz,
cudaMemcpyDeviceToHost ) );
}

December 2008
Setting up the CUDA function call from DoFilter() is identical to the Invert filter example. The main CUDA function is located in HistogramCUDA.cu:
Figure 6: cudaAutoLevels() in HistogramCUDA.cu, part I
The cudaAutoLevels function begins similarly to cudaInvert by setting up block and grid sizes for the kernel invocation. However, it diverges when setting up memSz. In cudaInvert, memSz was based on the row width; in cudaAutoLevels, memSz is based on the actual size of the image, not the size of the image in memory. After allocating device memory, we initialize the allocated region to zero. This ensures that any empty regions in device memory can be ignored when computing the histogram. Because there are no guarantees for the values in the padding bytes of each row, we must copy only the image and not any padding that Photoshop adds to each row. As a result, we use cudaMemcpy2D if the width of the image and the width of a row are not equal.
void cudaAutoLevels(void *src, void *dst, int width, int
height, int rowBytes, int bpp)
{
int block_size = 16;
dim3 dimBlock(block_size, block_size);
dim3 dimGrid;
dimGrid = dim3((width/dimBlock.x) + ((width%dimBlock.x)?1:0),
(height/dimBlock.y) +
((height%dimBlock.y)?1:0));
int memSz = width * height * bpp / 8;
int devMemSz = (dimGrid.x * dimBlock.x) * (dimGrid.y *
dimBlock.y);
if (devMem == NULL || dstMem == NULL)
makeMem(devMemSz);
//histogram256 is dependent upon multiples of 4.
CUDA_SAFE_CALL(cudaMemset(devMem, 0, devMemSz));
//use memcpy2D if row width does not equal image width
if (width != rowBytes)
CUDA_SAFE_CALL(cudaMemcpy2D(devMem, width, src, rowBytes,
width, height,
cudaMemcpyHostToDevice));
else
CUDA_SAFE_CALL(cudaMemcpy(devMem, src, memSz, cudaMemcpyHostToDevice));

December 2008
Figure 7: cudaAutoLevels() in HistogramCUDA.cu, part II
histogram256 computes a histogram for an array whose length is a multiple of 4. Since we have no such guarantees for our image, we must add our own padding. We round paddedMemSz up to the nearest multiple of 4 and use that as the length of the array passed to histogram256GPU(). histogram256GPU(), as documented in the histogram256 SDK sample and white paper, computes a 256-bin histogram and copies that to the array given by the first argument. Once we have computed the histogram, we subtract however much padding we added (which we guaranteed to be 0 by clearing device memory) from the 0th bin.
After we compute the maximum and minimum levels of the image using the histogram, we can call the CUDA kernel that will normalize the color levels and then copy the image back to the CPU:
Figure 8: cudaAutoLevels() in HistogramCUDA.cu, part III
After the kernel is called, we call either cudaMemcpy2D or cudaMemcpy to copy only the image back to the CPU.
float m = 255.0f/(max-min);
float b = m*min;
//run adjustment kernel
adjustLevels<<<dimGrid, dimBlock>>>(width, height,
(uchar1*)devMem,
(uchar1*)dstMem, m, b);
//same assumptions as above
if (width != rowBytes)
CUDA_SAFE_CALL(cudaMemcpy2D(dst, rowBytes, dstMem, width,
width, height,
cudaMemcpyDeviceToHost));
else
//for histogram256
unsigned int padding = 0;
int paddedMemSz = memSz;
if (memSz % 4)
{
padding = (4 - memSz % 4);
paddedMemSz += padding;
}
//run histogram256
initHistogram256();
unsigned int histogram[256];
histogram256GPU(histogram, (unsigned int*) devMem,
paddedMemSz); histogram[0] -= padding;

December 2008
KNN-Denoising
A KNN-denoising filter is included in the sample in the knnFilter directory. It is based off the standalone NVIDIA SDK imageDenoising sample. Its implementation is similar to the InvertFilter demo with a different CUDA kernel (KNN-denoising in this case). A test image is included in /cudaFilters/knnFilter/images.
Lucy-Richardson Deconvolution
The sample includes an implementation of a Lucy-Richardson Deconvolution, in the LRdeconvFilter directory.
• The LR deconvolution only works on images of size 256x256 or 1024x1024.
• The PSF is hardcoded to deal with a Gaussian blur of size 13x11 pixels.
• The sample links to the NVIDIA CUDA FFT library, cuFFT for frequency space processing. The sample shows how to use the cuFFT API within a GPU Photoshop Filter.
Additional Notes
• This sample includes a Mac OS X example. See the README in the sample code for more information on building on Mac OS.
• A custom build rule file, cuda.rules, is included in the sample. It allows Microsoft Visual Studio to use nvcc to compile .cu files. See the installation section for installation details.
Bibliography
1. Wolfram Mathworld. “Histogram” http://mathworld.wolfram.com/Histogram.html 2. Adobe Photoshop CS3 SDK, http://www.adobe.com/devnet/photoshop/sdk/

December 2008
Notice
ALL NVIDIA DESIGN SPECIFICATIONS, REFERENCE BOARDS, FILES, DRAWINGS, DIAGNOSTICS, LISTS, AND OTHER DOCUMENTS (TOGETHER AND SEPARATELY, “MATERIALS”) ARE BEING PROVIDED “AS IS.” NVIDIA MAKES NO WARRANTIES, EXPRESSED, IMPLIED, STATUTORY, OR OTHERWISE WITH RESPECT TO THE MATERIALS, AND EXPRESSLY DISCLAIMS ALL IMPLIED WARRANTIES OF NONINFRINGEMENT, MERCHANTABILITY, AND FITNESS FOR A PARTICULAR PURPOSE.
Information furnished is believed to be accurate and reliable. However, NVIDIA Corporation assumes no responsibility for the consequences of use of such information or for any infringement of patents or other rights of third parties that may result from its use. No license is granted by implication or otherwise under any patent or patent rights of NVIDIA Corporation. Specifications mentioned in this publication are subject to change without notice. This publication supersedes and replaces all information previously supplied. NVIDIA Corporation products are not authorized for use as critical components in life support devices or systems without express written approval of NVIDIA Corporation.
Trademarks
NVIDIA, the NVIDIA logo, GeForce, NVIDIA Quadro, and NVIDIA CUDA are trademarks or registered trademarks of NVIDIA Corporation in the United States and other countries. Other company and product names may be trademarks of the respective companies with which they are associated.
Copyright
© 2007 NVIDIA Corporation. All rights reserved.