Embed Size (px)
Citation preview

MO-480/481
BROADCAST GRADE SFN/MFN DVB-T/T2 MODULATOR
- 0 MI1970 -

SAFETY NOTES Read the user’s manual before using the equipment, mainly "SAFETY RULES" paragraph.
The symbol on the equipment means "SEE USER’S MANUAL". In this manual may also appear as a Caution or Warning symbol. WARNING AND CAUTION statements may appear in this manual to avoid injury hazard or damage to this product or other property.
USER’S MANUAL VERSION
Version Date Software Version
2.0 September 2016 v1.02

SAFETY RULES ∗ The safety could not be assured if the instructions for use are not closely
followed.
∗ Use this equipment connected only to systems with their negative of measurement connected to ground potential.
∗ The mains adaptor is a Class I equipment. For safety reasons it must be plugged to supply power lines with their ground.
∗ This equipment can be used in Overvoltage Category II installations and Pollution Degree 1 environments.
∗ When using some of the following accessories use only the specified ones to ensure safety:
Power cord CA005.
∗ Observe all specified ratings both of supply and measurement.
∗ Remember that voltages higher than 70 V DC or 33 V AC rms are dangerous.
∗ Use this instrument under the specified environmental conditions.
∗ The user is only authorized to carry out the following maintenance operations:
Replace the fuses of the specified type and value.
On the Maintenance paragraph the proper instructions are given.
Any other change on the equipment should be carried out by qualified personnel.
∗ The negative of measurement is at ground potential.
∗ Do not obstruct the ventilation system of the equipment.
∗ Use appropriate low-level radiation cables for input/output signals, especially on high level signals.
∗ Follow the cleaning instructions described in the Maintenance paragraph.

∗ Symbols related with safety:
Descriptive Examples of Over-Voltage Categories Cat I Low voltage installations isolated from the mains. Cat II Portable domestic installations. Cat III Fixed domestic installations. Cat IV Industrial installations.

TABLE OF CONTENTS
1 GENERAL ..................................................................................................1-1 1.1 Introduction .......................................................................................1-1
2 INSTALATION............................................................................................2-3 2.1 Power Supply .....................................................................................2-3
2.1.1 Operation using the Mains Adapter .................................................2-3 2.1.2 Operation using the AC Adapter .....................................................2-3
2.2 Installation and Start-up ......................................................................2-3 3 OPERATING INSTRUCTIONS ........................................................................3-4
3.1 MO-480.............................................................................................3-4 3.1.1 Front panel description .................................................................3-4 3.1.2 Rear panel description ..................................................................3-5
3.2 MO-481.............................................................................................3-6 3.2.1 Front panel description .................................................................3-6 3.2.2 Rear panel description ..................................................................3-6
4 WEB CONTROL MANUAL..............................................................................4-8 4.1 Introduction .......................................................................................4-8 4.2 Installation ........................................................................................4-8
4.2.1 Installation Requirements .............................................................4-8 4.2.1.1 System Requirements .............................................................4-8 4.2.1.2 Software Requirements ...........................................................4-8
5 MO-480/481 CONFIGURATION.....................................................................5-9 5.1 Login ................................................................................................5-9 5.2 Menu Options ................................................................................... 5-10
5.2.1 Monitoring ................................................................................ 5-11 5.2.2 Configuration ............................................................................ 5-13
5.2.2.1 Input ..................................................................................5-13 5.2.2.2 Modulation...........................................................................5-16 5.2.2.3 Network Parameters .............................................................5-18 5.2.2.4 PLP Parameters (only for DVB-T2)...........................................5-19 4.2.2.5 Output ................................................................................5-20
5.2.3 System .................................................................................... 5-22 5.2.4 Log.......................................................................................... 5-23 5.2.5 Admin ...................................................................................... 5-24 5.2.6 Testing..................................................................................... 5-25 5.2.7 About....................................................................................... 5-26
6 SPECIFICATIONS ............................................................................... 6-27
7 MAINTENANCE .................................................................................. 7-31 7.1 Cleaning Recommendations................................................................ 7-31 7.2 Fuses .............................................................................................. 7-31

September 2016 1-1
BROADCAST GRADE SFN/MFN DVB-T/T2 MODULATOR
MO-480/481
1
1 GENERAL
1.1 Introduction
The MO-480/481 is a broadcast grade DVB-T/T2 modulator available in a standard 1U high 19" rack case (MO-480) and also in an open frame chassis (MO-481) that can be used for MFN as well as SFN applications.
The modulator has several Transport Stream and T2-MI inputs in ASI and IP formats so that it can be easily interfaced with other existing transmission equipments such as gateways. The modulator can be configured to generate any of the transmission modes listed in the corresponding DVB-T2 standard including single and multiple PLP, MISO or SISO. It can also be used for DVB-T applications.
The modulator inputs consist of an MPEG-2 transport stream (TS) in TS over IP or DVB-ASI format, a 10 MHz GPS reference and a 1pps GPS reference. The GPS inputs are for SFN synchronisation purposes. The outputs are DVB-T/T2 signals COFDM-modulated and up-converted to RF.
The interest in DVB-T2 is now increasing with the growing demand for bandwidth mostly to deliver high definition television programmes. Several countries already have T2 commercial services, some others are running test trials and many more are on the planning stage.
Highlights of this product are:
DVB-T and DVB-T2 modulation
MFN and SFN
Single output 30 to 900 MHz
Affordable yet broadcast grade design
High output quality
1 Trademark of the DVB - Digital Video Broadcasting Project

1-2 September 2016
Low power consumption
Easy OEM integration
Multi-PLP
SISO/MISO
Digital Pre-correction
Webserver for programming and control
10 MHz / 1PPS internal and external references
Installation and maintenance tests modes
Configurable latence
IP FEC correction
IP UDP, RTP & IGMP compatibility

September 2016 2-3
2 INSTALATION
2.1 Power Supply
The MO-480 is an equipment powered through the mains for its operation.
The MO-481 is powered through an AC Adapter.
2.1.1 Operation using the Mains Adapter
Connect the MO-480 to the mains through the AC voltage connector located on the rear panel.
Check if the mains voltage is according to the equipment specifications.
2.1.2 Operation using the AC Adapter
Connect the AC power adapter to the module MO-481 through the power connector on the rear panel.
Then connect the AC power adapter to the mains via the mains cord. Ensure that your mains voltage is compatible with the adapter voltage.
2.2 Installation and Start-up
The MO-480 modulator is designed for use as a rack-mounted 19 inches device (1U chassis). The MO-481 modulator it is in an open frame chassis and can be used anywhere.
To start-up the MO-480, switch the main switch located in the rear panel to position I (power on). To start-up the MO-481, just connect the AC adapter to the mains. After a successfully start up, all LEDs of the MO-480 blink (except power). When the equipment is connected to the mains, the POWER LED remains lit.

3-4 September 2016
3 OPERATING INSTRUCTIONS
3.1 MO-480
3.1.1 Front panel description
Figure 1. Front panel.
Power LED.
When is in green means the power supply is ON.
Status LEDs
Ready: When it is in green means it is working properly.
Alarm: When it is in red means some kind of error.
GPS inputs LEDs
10 MHz: 10 MHz GPS input.
1 pps: One pulse per second GPS input.
TS inputs LEDs
Primary: It shows the status of the primary TS input.
Secondary: It shows the status of the secondary TS input.

September 2016 3-5
3.1.2 Rear panel description
Figure 2. Rear panel.
RF output, 50 Ω, female N-type connector.
10 MHz reference output, female SMA.
ASI Sample output, female SMA.
ASI A input, 75 Ω, female BNC.
DVB-ASI input number 1.
ASI B input, 75 Ω, female BNC.
DVB-ASI input number 2.
1PPS GPS input, 50 Ω or high impedance, female SMA.
10 MHz GPS input, 50 Ω or high impedance, female SMA.
IP DATA, input for MPEG2 TS over IP, 1 Gigabit ethernet RJ45 connector.
IP CONTROL, input for web control software, 100 Mbps ethernet, RJ45 connector.
Reset IP button.
If keeping pressed for 10 or more seconds it changes the current IP address to the default IP address: 192.168.42.30.
AC voltage connector.
Supplies power to the equipment.
Mains switch.
Switch on or off the power supply.

3-6 September 2016
3.2 MO-481
3.2.1 Front panel description
Figure 3. Front panel.
RF output, 50 Ω, female N-type connector.
3.2.2 Rear panel description
Figure 4. Front panel.
10 MHz reference output, female SMA.
ASI Sample output, female SMA.
Reset IP button.
If keeping pressed for 10 or more seconds it changes the current IP address to the default IP address: 192.168.42.30.
IP CONTROL, input for web control software, 100 Mbps ethernet, RJ45 connector.
IP DATA, input for MPEG2 TS over IP, 1 Gigabit ethernet RJ45 connector.
AC voltage connector.

September 2016 3-7
10 MHz GPS input, 50 Ω or high impedance, female SMA.
1PPS GPS input, 50 Ω or high impedance, female SMA.
ASI B input, 75 Ω, female BNC.
DVB-ASI input number 2.
ASI A input, 75 Ω, female BNC.
DVB-ASI input number 1.

4-8 September 2016
4 WEB CONTROL MANUAL
4.1 Introduction
This WEB application provides access to the MO480/481 modulator from a computer, via Ethernet. This way you can configure and control remotely the modulator.
This web application to control does not need a previous installation. Using a web browser (Mozilla Firefox highly recommended) is enough to work with the web control application.
The remote control allows you to work with the modulator from a computer in a more comfortable way, whether to check the status of signal output, to change the selected services or for general maintenance.
This manual is for version 1.02. You can download the latest version of the program from PROMAX website.
4.2 Installation
4.2.1 Installation Requirements
4.2.1.1 System Requirements
Pentium compatible or higher.
1 Ethernet Port.
Local network connection.
4.2.1.2 Software Requirements
Windows XP S.O. or higher.
Web browser (Firefox 3 or higher).
Java software. You can download the last version from http://www.java.com.

September 2016 5-9
5 MO-480/481 CONFIGURATION
The MO-480/481 module is controlled and configured by means of a computer directly connected to the IP CONTROL port or through an Ethernet network.
5.1 Login
The default IP of this device is 192.168.42.30.
To recover this IP default address, just keep pressed the reset IP button for 10 or more seconds.
To connect to the modulator, the IP address of the computer has to be changed in order to have the same IP range of the modulator.
If, as an example, the PC IP address is 192.168.99.252, it would be changed to 192.168.42.xxx (xxx can be 0 to 255 except 30 to avoid conflict with modulator IP address), then we need to use a web browser to connect the device with our PC.
When communication is established, the user can change the IP address of the modulator to suit the range of the Ethernet network or PC. Write down the new IP address if you change the default IP address of the modulator, as it is required each time you want to communicate. If after changing, you do not know the IP of the modulator, the module has a reset button to recover the default IP (see figure 2).
Check the computer IP is not the same that the modulator IP to avoid conflicts between IPs.
Then connect the PC and the device with a net cable, and use a ping command to confirm they are on the same network segment and communication between them can be established.
Once the communication is checked, open a web browser on the PC, enter the modulator IP and press ENTER.

5-10 September 2016
5.2 Menu Options
The menu bar appears at the top of the screen with all the available options. This menu bar stays in all the screens, so it is always possible to access it.
Figure 5. Top screen.
Options are:
5.2.1 Monitoring 5.2.2 Configuration
5.2.2.1 Input 5.2.2.2 Modulation 5.2.2.3 Network parameters 5.2.2.4 PLP parameters 5.2.2.5 Output
5.2.4 System 5.2.5 Log 5.2.6 Admin 5.2.7 Testing 5.2.8 About
At the bottom of all screens there is some information about the status of the equipment.
Figure 6.
Information shown is:
Input
Primary: It shows the type of signal at the primary.
Secondary: It shows the type of signal at the secondary.
Frequency Network
If shows if it is SFN (single-frequency network) or MFN (multiple-frequency network).

September 2016 5-11
Output
It shows the frequency of the signal at the output
Log
It shows information about the log register.
Next to each parameter there is a point in a colour, which refers to the physical LED.
If this point is in RED, it means that some error has ocurred and is working badly.
If this point is in GREEN, it means it is working properly.
If this point is in GRAY, it means that is not working or there is no signal.
The following sections describe in detail each one of the screens.
5.2.1 Monitoring
Figure 7. Monitoring screen for DVB-T

5-12 September 2016
Figure 8. Monitoring screen for DVB-T2
It shows some parameters in order to monitor the modulator and the signals working on it. These parameters cannot be changed on this page. Just watched.
They are:
Primary Input [Type of input]
Secondary Input [Type of input]
Clock References
SFN Monitoring (only for DVB-T2)
Parameters shown are according to the type of signal.
It shows data status for each input: primary and secondary.

September 2016 5-13
5.2.2 Configuration
5.2.2.1 Input
Figure 9. Input configuration screen for DVB-T

5-14 September 2016
Figure 10. Input configuration screen for DVB-T2
► Input Mode:
In this option, user can select what type of transport stream is at the input:
Mode a, TS: Select when using generic transport streams.
Mode a/b, T2-MI over TS: Select when using T2-MI.
► Primary Input Selection/Secondary Input Selection:
The modulator has two inputs to work: primary and secondary. The modulator only modulates one of this inputs. User should select which is the primary and the secondary from:
ASI A: When working with ASI A input.
ASI B: When working with ASI B input.
IP: When working with IP input.
► TS Switching (only for DVB-T)
You can select TS switching between these options:
No switching.
Automatic temporary.
Automatic permanent.
Switch now.

September 2016 5-15
► Clock reference (only for DVB-T)
You can select between the internal 10 MHz synchronism or one external.
► Input modification:
It allows the user to change some parameters from the transport stream coming from the input:
Null packet deletion: It deletes null packets.
PCR Restamping.
Internal 10 MHz: It uses the internal synchronism.
T2-MI Data Piping PID.
To edit these parameters, user should tick on the checkbox “enable”.
► IP input parameters:
It allows the user to change some parameters from the IP data coming from the input:
IP Multicast: IP used if working in Multicast mode.
UDP Port: Destination port used by the UDP protocol to send IP.
UDP UDP/RTP: It allows the user to choose between UDP or UDP/RTP protocol communication or Auto (it detects it automatically).
IGMP: Enables/Disables the IGMP protocol version 2 for the IP input.
Host IP: It is the IP address for the modulator, which works as a host and where is send the IP data.
Host IP Mask: Mask for the modulator.
Host Gateway IP: Gateway for the modulator.
MAC Address: MAC address of the modulator.

5-16 September 2016
5.2.2.2 Modulation
It shows the modulation parameters.
Figure 11. Modulation configuration screen for DVB-T
Figure 12. Modulation configuration screen for DVB-T2
► DVB-T Processing Parameters:
Configure from MIP
Bandwidth
FFT size
Guard Interval
Constellation
Convolutional Rate

September 2016 5-17
► DVB-T2 Processing Parameters:
Bandwidth
FFT size
Extended carrier mode
Guard Interval
L1 Constellation
Pilot Pattern
Output mode
MISO Group
In the case of "Mode a/b T2-MI input", these parameters are detected by the modulator and they cannot be changed.
In the case of "Mode a TS", if user changes parameters, he has to be careful to select the parameters according to the standard.

5-18 September 2016
5.2.2.3 Network Parameters
Figure 13. Network configuration screen for DVB-T
Figure 14. Network configuration screen for DVB-T2
In DVB-T2, this information is only for use of T2-MI transport streams.
In DVB-T2, these parameters are detected by the modulator in the case of "Mode a/b T2-MI input" and they cannot be changed.
In the case of "Mode a TS", if user changes parameters, he has to be careful to select the parameters according to the standard.
It is used to work in a network with other modulators.
These data is detected automatically through the T2-MI.
User can change the detected value by clicking on "use local value".

September 2016 5-19
5.2.2.4 PLP Parameters (only for DVB-T2)
Figure 15.
It shows the parameters for each Physical Pipe Layers.
In case of mode a / b T2-MI, selecting the desired PLP with PLP select it shows the parameters for that PLP.
In case of mode a, TS, then there will be only one PLP and parameters must be set by the user.
User can select the layer to watch on PLP select menu. It will show the parameters associated with the layer selected.

5-20 September 2016
5.2.2.5 Output
Figure 16. Output configuration screen for DVB-T
Figure 17. Output configuration screen for DVB-T2
► Output configuration:
Signal Configuration
Rf frequency: It shows the frequency at the output. This value can be changed by the user by ticking on "Use local value".
RF attenuation: It is the attenuation at the output.
Spectral inversion: Tick to enable it.

September 2016 5-21
Mute Conditions: With the mute conditions, the signal at the output can be stopped.
Mute RF (now): It immediately stops the signal at the output
when enabled by ticking in the box.
Mute RF when 10 MHz reference loss after delay (s): It is a conditional mute. It stops the signal at the
output when the synchronism signal is lost during a lapse of time in DVB-T2 (this time has to be defined at the in seconds.
Mute IF when errors at delay (s): It is a conditional mute. It stops the signal at the
output when there are some errors during a lapse of time (in DVB-T2 this time has to be defined at the "at delay" box in seconds).

5-22 September 2016
5.2.3 System
Figure 18.
► Load/Save system configuration:
User can save and load the current configuration in a file on a PC.
► Load default configuration:
It loads the default configuration.
► Check for updates:
It check the PROMAX server to update the current version.
► System selection:
User has to select if the modulator is going to work as a DVB-T o DVB-T2 modulator and then press "Change System".

September 2016 5-23
5.2.4 Log
It shows all the modulator inside work. Each status line has time, date and a little description.
Figure 19.

5-24 September 2016
5.2.5 Admin
Figure 20.
► Network parameters:
User has to enter all network parameters of the PC where he connects.
► Date & Time Configuration:
You can select between time synchronized by server or set manually.
September 2016 5-25
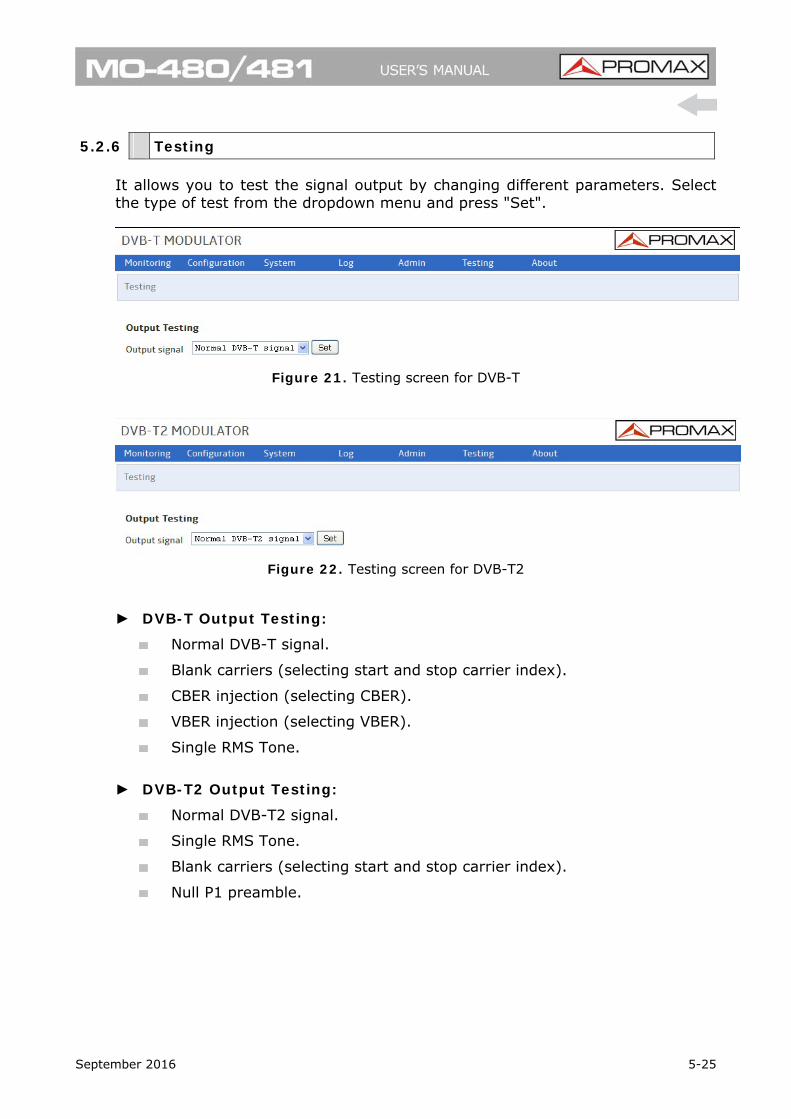
5.2.6 Testing
It allows you to test the signal output by changing different parameters. Select the type of test from the dropdown menu and press "Set".
Figure 21. Testing screen for DVB-T
Figure 22. Testing screen for DVB-T2
► DVB-T Output Testing:
Normal DVB-T signal.
Blank carriers (selecting start and stop carrier index).
CBER injection (selecting CBER).
VBER injection (selecting VBER).
Single RMS Tone.
► DVB-T2 Output Testing:
Normal DVB-T2 signal.
Single RMS Tone.
Blank carriers (selecting start and stop carrier index).
Null P1 preamble.

5-26 September 2016
5.2.7 About
Contact data to order or ask any question.
Figure 20.

September 2016 6-27
6 SPECIFICATIONS
INPUT STREAMS
Interface 2 x ASI (EN 102 773) 1 x IP (SMPTE-2022-1,2 – UDP, RTP and FEC)
Mode A with TS input TS input (one PLP, HEM mode, no NULL packet deletion, no ISSY, no in-band signalling)
Modes A&B with T2-MI input T2-MI over TS input with automatic search for the T2-MI data piping PID
T2-MI encapsulation MPEG-2 TS (ASI) and MPEG-2 TS over IP (IP) Switching Automatic and seamless between any two T2-MI inputs in SFN mode.
Automatic in MFN mode In both modes, the switchover may be permanent or temporary
REFERENCE INPUTS
1pps Reference Input High impedance/50 Ω (Configurable)
Active Edge Rising/Falling (Configurable)
Level Min. 2 V, max. 5 V
Pulse width 100 µs minimum
10 MHz Reference Input High impedance/50 Ω (Configurable)
Input Level Min. 50 mV, max. +3.3 V
RF OUTPUT
Output level -20 dBm to -40 dBm
Frequency Range 30 to 900 MHz
Return loss > 20dB
Spectrum polarity Inverted/Normal
Ripple < ± 0.2 dB (without linear predistortion)
Group delay ripple < ± 10 ns (without linear predistortion)
Harmonics and spurious < 60 dB relative to the total output power
MER > 42 dB
SYNCHRONISATION
MFN External: 10 MHz with T2-MI input. Internal: 10 MHz TCXO with TS input
SFN 10 MHz external reference

6-28 September 2016
TRANSMISSION MODES
Standard DVB-T2 version 1.1.1
IFFT lengths 1K, 2K, 4K, 8K, 8K ext, 16K, 16K ext, 32K, 32K ext
Guard interval 1/4, 19/128, 1/8, 19/256, 1/16, 1/32, 1/128
Code Rate 1/2, 3/5, 2/3, 3/4, 4/5, 5/6, 7/8 for short and normal LDPCs
Constellation QPSK, 16QAM, 64QAM, 256QAM (Normal or Rotated)
L1 constellation BPSK, QPSK, 16QAM and 64QAM
Rotated constellation 29°, 16.8°, 8.6°, Atan (1/16)
Pilot pattern PP1 – PP8
PAPR Tone Reservation
Network type MFN or SFN
Bandwidth 5, 6, 7, 8 MHz
Diversity SISO, MISO groups 1 and 2
Time interleaving Bypass, options 1 and 3 (no multi-frame interleaving)
Number of PLP 1 (System A). From 1 to 8 (System B) with optional sub-slicing
Configuration parameters From the L1 and Individual Addressing T2-MI packets or local programming via register map
Local parameter insertion Cell ID, Network ID, T2 system ID, RF frequency
Others TS and BBFRAME input bit rate measurement Estimates of the primary and secondary TS network delay margins Modulator latency available for any T2 configuration
SFN DELAY INSERTION
Dynamic Delay Automatically calculated from the 1pps signal and the T2-MI timestamp
Local delay Adjustable between -500,000.0 µs and +500,000.0 µs with 100-ns resolution

September 2016 6-29
TEST MODES
PRBS Modulates 23-bit PRBS-filled BBFRAMEs
Blank Carrier Carriers are blanked between two configurable values
Null P1 preamble First P1 preamble of every superframe is zeroed
Single RMS tone Tone at central frequency with the same RMS power as the T2 signal
SIGNAL PREDISTORTION
Crest Factor Reduction Enable/Disable
Range 8 to 11 dB
Resolution 0.1 dB
Non linear predistortion Enable/Disable
Number of points From 2 to 16. Linear interpolation
Table AM-AM Input Amplitude: -12 dB to +12 dB/Output Amplitude: -6 dB to +6 dB
Table AM-PM Input Amplitude: -12 dB to +12 dB/Output Phase: -30° to +30°
AM Resolution 0.1 dB
PM Resolution 0.1°
Linear predistortion Enable/Disable
Number of points 72. Linear interpolation
Amplitude Correction From -6 dB to +6 dB
Group Delay Correction From -1500 to +1500 ns
Amplitude Resolution 0.01 dB
Group Delay Resolution 1 ns
OPERATING ENVIRONMENTAL CONDITIONS
Indoor use
Altitude Up to 2000° m
Temperature range From 5 °C to 40 °C
Max. relative humidity 80 % (up to 31 °C), decreasing lineally up to 50% at 40 °C
POWER SUPPLY MO-480 90 - 250 V AC @ 50 - 60 Hz Consumption 15 W
POWER SUPPLY MO-481 12 V DC 1.8 A

6-30 September 2016
MECHANICAL FEATURES MO-480
Dimensions 482.6 (W.) x 44.4 (H.) x 381 (D.) mm
Weight 5.1 kg MECHANICAL FEATURES MO-481
Dimensions 116 (W.) x 61 (H.) x 258 (D.) mm
Weight 1.57 kg
RECOMMENDATIONS ABOUT THE PACKING It is recommended to keep all the packing material in order to return the equipment, if necessary, to the Technical Service.

September 2016 7-31
7 MAINTENANCE
7.1 Instructions for returning by mail
Instruments returned for repair or calibration, either within or out of the warranty period, should be sent with the following information: Name of the Company, name of the contact person, address, telephone number, receipt (in the case of coverage under warranty) and a description of the problem or the service required.
7.2 Cleaning Recommendations
CAUTION
To clean the cover, take care the instrument is disconnected.
CAUTION
Do not use scented hydrocarbons or chlorized solvents. Such products may attack the plastics used in the construction of the cover.
The cover should be cleaned by means of a light solution of detergent and water applied with a soft cloth. Dry thoroughly before using the equipment again.
CAUTION
Do not use alcohol or its derivates for the cleaning of the front panel and particularly the viewfinders. These products can attack the mechanical properties of the materials and diminish their useful time of life.
7.3 Fuses
Fuses not replaceable by the user.
F001: FUS SMD 2,5 A T 125 V.

PROMAX ELECTRONICA, S. L. Francesc Moragas, 71-75 08907 L’HOSPITALET DE LLOBREGAT (Barcelona) SPAIN Tel. : 93 184 77 00 * Tel. Intl. : (+34) 93 184 77 02 Fax : 93 338 11 26 * Fax Intl. : (+34) 93 338 11 26 http://www.promaxelectronics.com e-mail: [email protected]


