Embed Size (px)
Citation preview
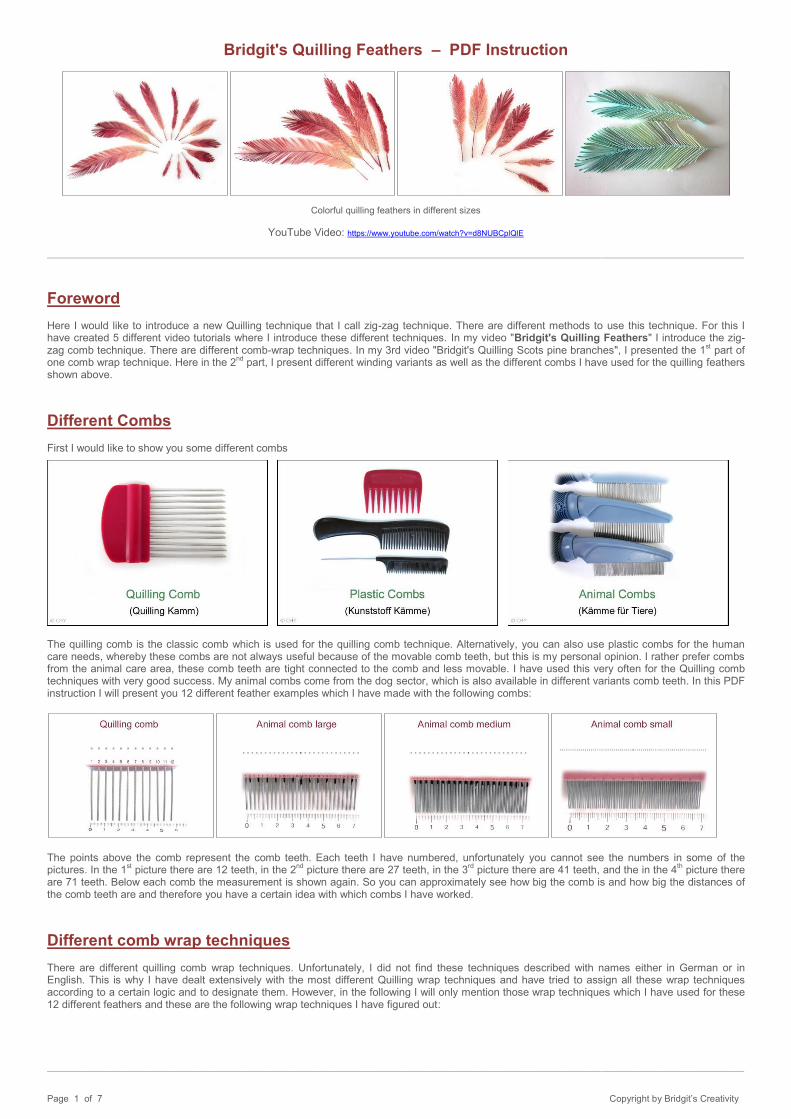
Bridgit's Quilling Feathers – PDF Instruction
Colorful quilling feathers in different sizes
YouTube Video: https://www.youtube.com/watch?v=d8NUBCplQlE
__________________________________________________________________________________________________________________________________________________________________________________________________________________________________________________________________________________________________________________________
Foreword Here I would like to introduce a new Quilling technique that I call zig-zag technique. There are different methods to use this technique. For this I have created 5 different video tutorials where I introduce these different techniques. In my video "Bridgit's Quilling Feathers" I introduce the zig-zag comb technique. There are different comb-wrap techniques. In my 3rd video "Bridgit's Quilling Scots pine branches", I presented the 1
st part of
one comb wrap technique. Here in the 2nd
part, I present different winding variants as well as the different combs I have used for the quilling feathers shown above.
Different Combs First I would like to show you some different combs
The quilling comb is the classic comb which is used for the quilling comb technique. Alternatively, you can also use plastic combs for the human care needs, whereby these combs are not always useful because of the movable comb teeth, but this is my personal opinion. I rather prefer combs from the animal care area, these comb teeth are tight connected to the comb and less movable. I have used this very often for the Quilling comb techniques with very good success. My animal combs come from the dog sector, which is also available in different variants comb teeth. In this PDF instruction I will present you 12 different feather examples which I have made with the following combs:
The points above the comb represent the comb teeth. Each teeth I have numbered, unfortunately you cannot see the numbers in some of the pictures. In the 1
st picture there are 12 teeth, in the 2
nd picture there are 27 teeth, in the 3
rd picture there are 41 teeth, and the in the 4
th picture there
are 71 teeth. Below each comb the measurement is shown again. So you can approximately see how big the comb is and how big the distances of the comb teeth are and therefore you have a certain idea with which combs I have worked.
Different comb wrap techniques There are different quilling comb wrap techniques. Unfortunately, I did not find these techniques described with names either in German or in English. This is why I have dealt extensively with the most different Quilling wrap techniques and have tried to assign all these wrap techniques according to a certain logic and to designate them. However, in the following I will only mention those wrap techniques which I have used for these 12 different feathers and these are the following wrap techniques I have figured out:
__________________________________________________________________________________________________________________________________________________________________________________________________________________________________________________________________________________________________________________________
Page 1 of 7 Copyright by Bridgit’s Creativity
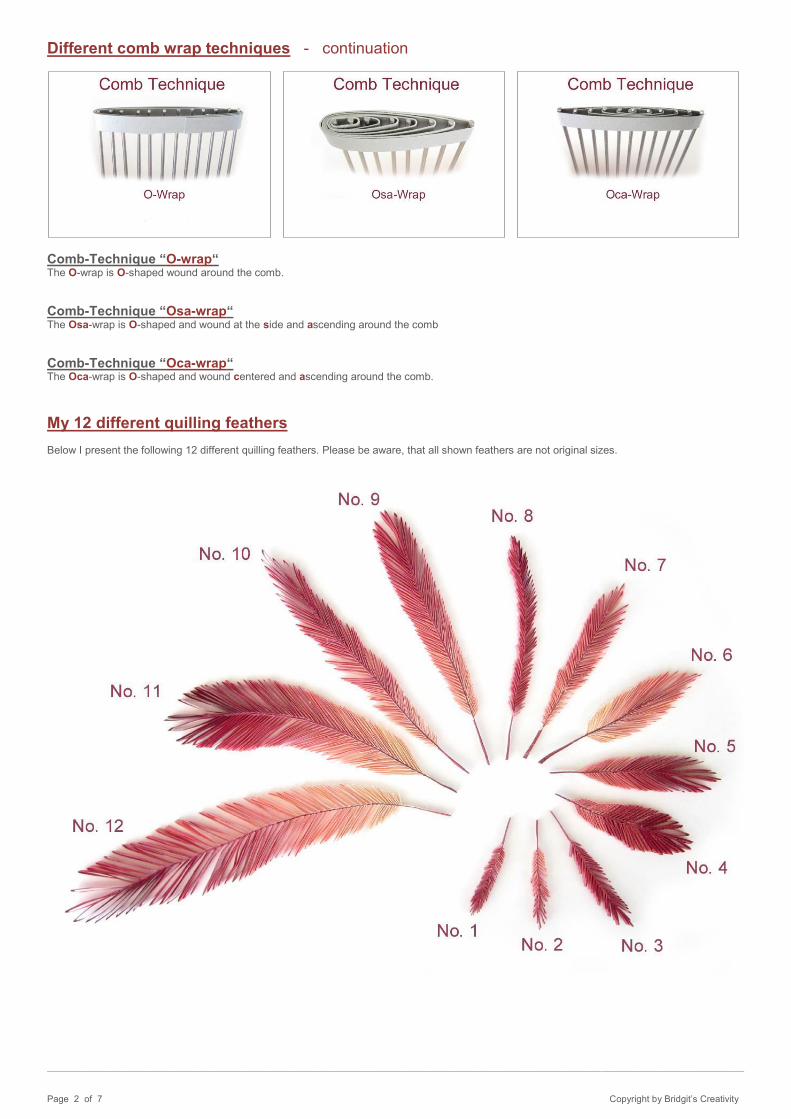
Different comb wrap techniques - continuation
Comb-Technique “O-wrap“ The O-wrap is O-shaped wound around the comb.
Comb-Technique “Osa-wrap“ The Osa-wrap is O-shaped and wound at the side and ascending around the comb
Comb-Technique “Oca-wrap“ The Oca-wrap is O-shaped and wound centered and ascending around the comb.
My 12 different quilling feathers Below I present the following 12 different quilling feathers. Please be aware, that all shown feathers are not original sizes.
__________________________________________________________________________________________________________________________________________________________________________________________________________________________________________________________________________________________________________________________
Page 2 of 7 Copyright by Bridgit’s Creativity
My 12 different quilling feathers - continuation
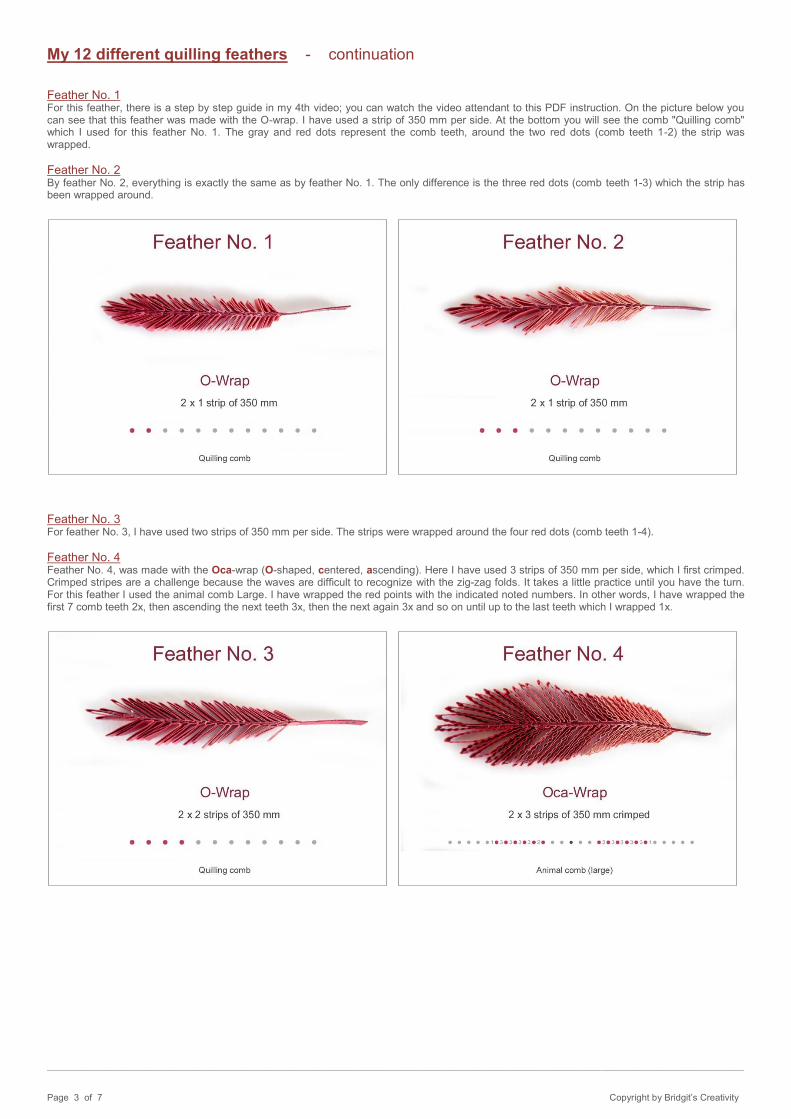
Feather No. 1 For this feather, there is a step by step guide in my 4th video; you can watch the video attendant to this PDF instruction. On the picture below you can see that this feather was made with the O-wrap. I have used a strip of 350 mm per side. At the bottom you will see the comb "Quilling comb" which I used for this feather No. 1. The gray and red dots represent the comb teeth, around the two red dots (comb teeth 1-2) the strip was wrapped.
Feather No. 2 By feather No. 2, everything is exactly the same as by feather No. 1. The only difference is the three red dots (comb teeth 1-3) which the strip has been wrapped around.
Feather No. 3 For feather No. 3, I have used two strips of 350 mm per side. The strips were wrapped around the four red dots (comb teeth 1-4).
Feather No. 4 Feather No. 4, was made with the Oca-wrap (O-shaped, centered, ascending). Here I have used 3 strips of 350 mm per side, which I first crimped. Crimped stripes are a challenge because the waves are difficult to recognize with the zig-zag folds. It takes a little practice until you have the turn. For this feather I used the animal comb Large. I have wrapped the red points with the indicated noted numbers. In other words, I have wrapped the first 7 comb teeth 2x, then ascending the next teeth 3x, then the next again 3x and so on until up to the last teeth which I wrapped 1x.
__________________________________________________________________________________________________________________________________________________________________________________________________________________________________________________________________________________________________________________________
Page 3 of 7 Copyright by Bridgit’s Creativity
My 12 different quilling feathers - continuation
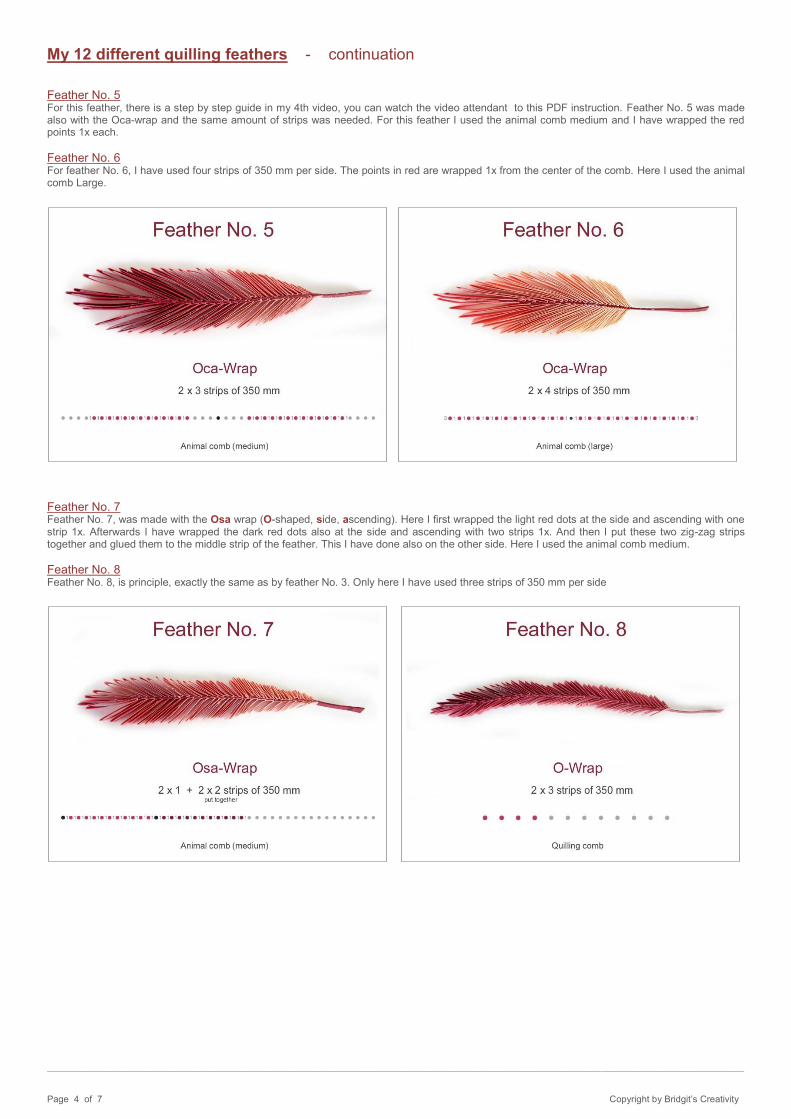
Feather No. 5 For this feather, there is a step by step guide in my 4th video, you can watch the video attendant to this PDF instruction. Feather No. 5 was made also with the Oca-wrap and the same amount of strips was needed. For this feather I used the animal comb medium and I have wrapped the red points 1x each.
Feather No. 6 For feather No. 6, I have used four strips of 350 mm per side. The points in red are wrapped 1x from the center of the comb. Here I used the animal comb Large.
Feather No. 7 Feather No. 7, was made with the Osa wrap (O-shaped, side, ascending). Here I first wrapped the light red dots at the side and ascending with one strip 1x. Afterwards I have wrapped the dark red dots also at the side and ascending with two strips 1x. And then I put these two zig-zag strips together and glued them to the middle strip of the feather. This I have done also on the other side. Here I used the animal comb medium.
Feather No. 8 Feather No. 8, is principle, exactly the same as by feather No. 3. Only here I have used three strips of 350 mm per side
__________________________________________________________________________________________________________________________________________________________________________________________________________________________________________________________________________________________________________________________
Page 4 of 7 Copyright by Bridgit’s Creativity

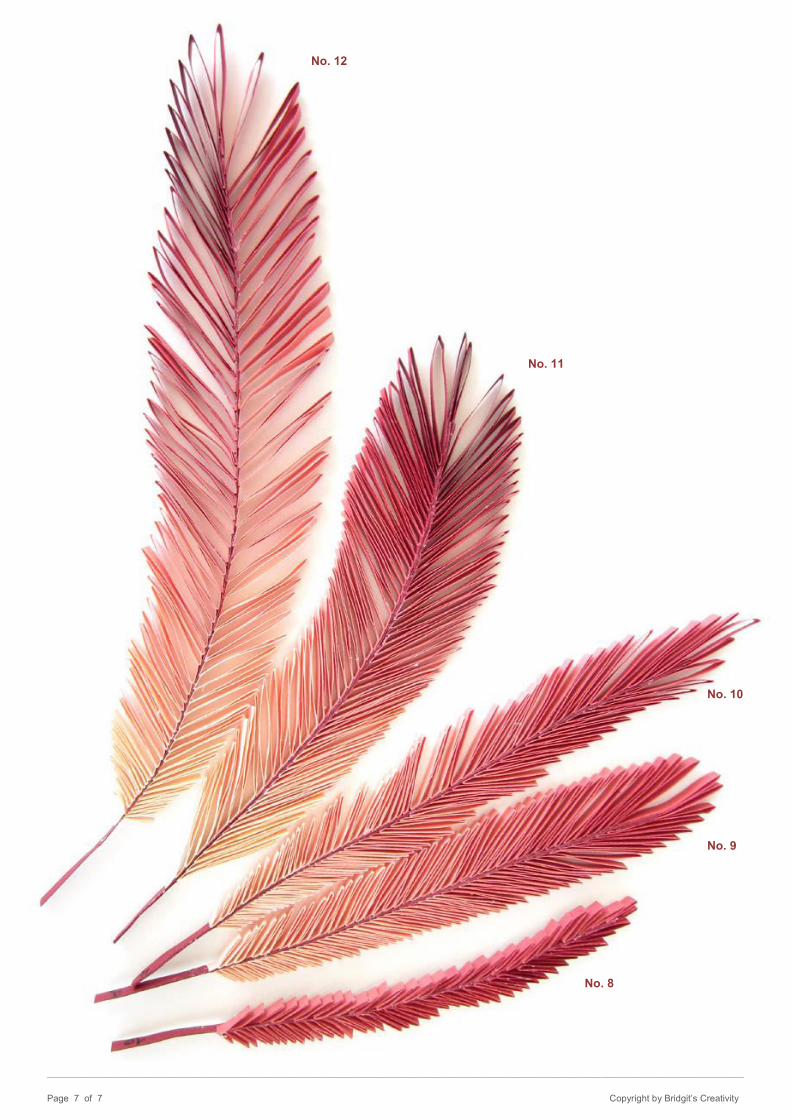
My 12 different quilling feathers - continuation Feather No. 9 and 10 Feather No. 9 and No. 10 are nearly equal. For both, the same amount of strip was needed and was also made with the Oza wrap. Feather No. 9 looks slightly more smooth. Here I used the animal comb medium and the strips were wrapped twice around the comb teeth. Feather No. 10 looks somehow ragged. Here I used the animal comb small and the strips were wrapped once around the comb teeth. Otherwise, both are equal in length and width.
Feather No. 11 This feather was made with the O-wrap. With a total of 9 strips, I wrapped the whole quilling comb (1-12 comb teeth). The challenge with this feather lies in the 2
nd fold, because of the thickness of the 9 strips. Before reopening the wrap it is recommended to press each fold again tight.
Feather No. 12 This feather is the largest of all my 12 presented feathers here I have used 10 strips of 350 mm per side and made it with the Osa-wrap In the beginning, I wrapped the strips around the animal comb Large 1x, then 2x, with the second last comb teeth even 4x and with the last teeth the rest of the stripe.
Strip colors
By all presented feathers the color are into each other in harmony. Here I have only used one original color, all other 8 colors I have used, are bleached. This method is excellent for feathers because you can be creative and create beautiful new Quilling Artworks. In my video Quilling stripes coloring/bleaching which I have linked below you can see how I bleach or color quilling strips. Here are the colors I used for the above feathers:
__________________________________________________________________________________________________________________________________________________________________________________________________________________________________________________________________________________________________________________________
Page 5 of 7 Copyright by Bridgit’s Creativity

Closing words In my 4thrd video "Quilling feathers" you can follow step by step how I make two of these 12 feathers. You will find useful tips and tricks in my video. Of course, I have presented you here 12 different feathers as example. Other sizes as well as shapes remain open to your own imagination. Experiment yourself and see what comes out of it. Below you will find my other 5 video tutorials to know more about other zig-zag techniques:
1. Video - Quilling Autumn Flower Bouquet (Introduction to zigzag spiral technique) https://www.youtube.com/watch?v=EOJPBrgKR7c
2. Video - Quilling Fir branches (zigzag spiral "square" technique) https://www.youtube.com/watch?v=ZTb3Og7I7fU
3. Video - Quilling Scots pine branches (zigzag comb technique - Part 1) https://www.youtube.com/watch?v=5moE2_Wv814
4. Video - Quilling Feathers (zigzag comb technique - Part 2) https://www.youtube.com/watch?v=d8NUBCplQlE
5. Video - Quilling Thuja branches (zigzag spiral "square" technique crimped stripes) https://www.youtube.com/watch?v=tySvGnAi6s8
If you want to know more about the coloring or bleaching of quilling stripes, check out my 3 part video tutorial. 1st Video: Quilling strips coloring (part 1): https://www.youtube.com/watch?v=jy7bHJZUrYg
2nd Video: Quilling strips coloring (part 2): https://www.youtube.com/watch?v=v-q7gsUo5Ro 3rd Video: Quilling strips beatching (part 3): https://www.youtube.com/watch?v=UW8dDe9YZfk
Check my other zigzag technique videos to, it is determined worthwhile. Now I wish you much fun and good success doing some new Quillings. If you find incorrect information’s in this PDF Introduction or other ambiguities, I am very grateful for your feedback. And if you have any questions, please feel free to write me a comment below my video by YouTube: https://www.youtube.com/watch?v=d8NUBCplQlE
Youtube channel: Bridgit’s Creativity Facebook: Bridgit’s Creativity - Quilling
First Version dated: October 7, 2016
__________________________________________________________________________________________________________________________________________________________________________________________________________________________________________________________________________________________________________________________
Quilling feathers in original sizes No. 2 No. 1 No. 3 No. 4 No. 5 No. 6 No. 7
__________________________________________________________________________________________________________________________________________________________________________________________________________________________________________________________________________________________________________________________ Page 6 of 7 Copyright by Bridgit’s Creativity
No. 12 No. 11
No. 10
No. 9
No. 8
__________________________________________________________________________________________________________________________________________________________________________________________________________________________________________________________________________________________________________________________ Page 7 of 7 Copyright by Bridgit’s Creativity