Embed Size (px)
Citation preview
Aw
ard
Win
ning
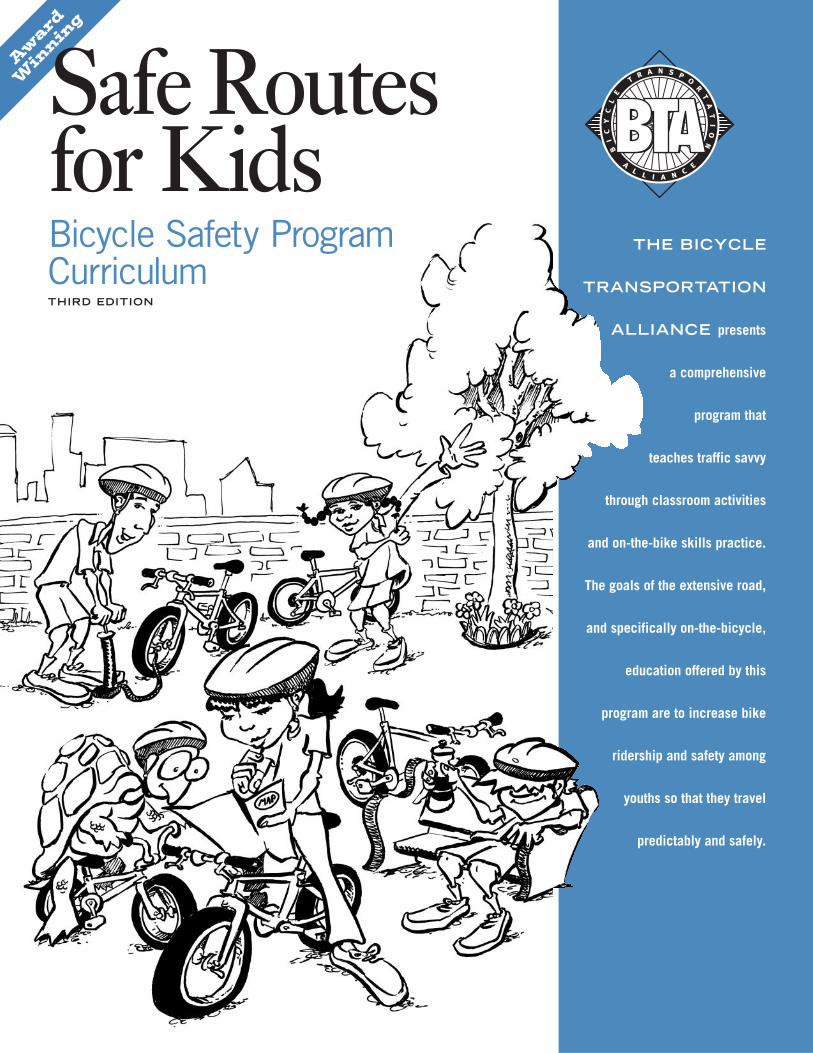
THE BICYCLE
TRANSPORTATION
ALLIANCE presents
a comprehensive
program that
teaches traffic savvy
through classroom activities
and on-the-bike skills practice.
The goals of the extensive road,
and specifically on-the-bicycle,
education offered by this
program are to increase bike
ridership and safety among
youths so that they travel
predictably and safely.
Safe Routesfor KidsBicycle Safety ProgramCurriculumTHIRD EDITION
CURRICULUM DEVELOPMENT TEAM
Scott BrickerBicycle Transportation AllianceProgram Director, author
Serra SermetBicycle Transportation AllianceProgram Manager, curriculum development, field testing, editing
Karen FrostBicycle Transportation Alliance
Catherine CiarloBicycle Transportation AllianceEditing
Corinna WilbornGrapheon DesignDesign, layout
Lizzy CastonReview, evaluation
ART
Justin ShortIllustration
Tom FrischComputer illustration
CURRICULUM COMMITTEE (REVIEW AND CONSULTATION – 1999)
David MesirowPrincipal (retired)
Kathy SmithTeacher – Health MS
Jessica LawrenceTeacher – Health MS
Greg WilsonPlanner, City of Corvallis
Ira GrishaverCommunity Cycling Center, Director
Jo Ann FairchildTrauma Nurses Talk Tough
Sky BrignerPlanner, Metro
Barbara PlummerPlanner, City of Portland
Other special thanks in getting the program going to ODOT, Mike Morrison at Trauma NursesTalk Tough, Deb Hogan, and the teachers including Nancy Phillips, Julie Ponder, Nancy Meitle,Kathy Smith, Jessica Lawrence, Cara Ungar and Jim O’Horo.
Acknowledgements
The Bicycle Safety Program wasdeveloped by the BicycleTransportation Alliance througha grant provided by the OregonDepartment of Transportation.This safety curriculum wasmodeled using the followingprograms and educationalmaterials:
Traffic Safety Education Guide.University of Florida, Gainsville(1998)
Effective Cycling: Kids II. League ofAmerican Bicyclists
Basics of Bicycling: Version 1.1.Bicycle Federation of America
Kids on Bikes In Chicago(Pamphlet). City of Chicago
The Alaska Bicycle Driver’s Guide(Booklet); State of Alaska,Department of Public Safety
Training Programs for Bicycle Safety.Harborview Injury Prevention andResearch Center (1998)
Effective Cycling. John Forester, MIT Press (1984)
PROGRAM SPONSORS
The following sponsors gaveessential financial and materi-als support that made our firstyear a success.
B A C K G R O U N D
©2003 Bicycle Transportation Alliance
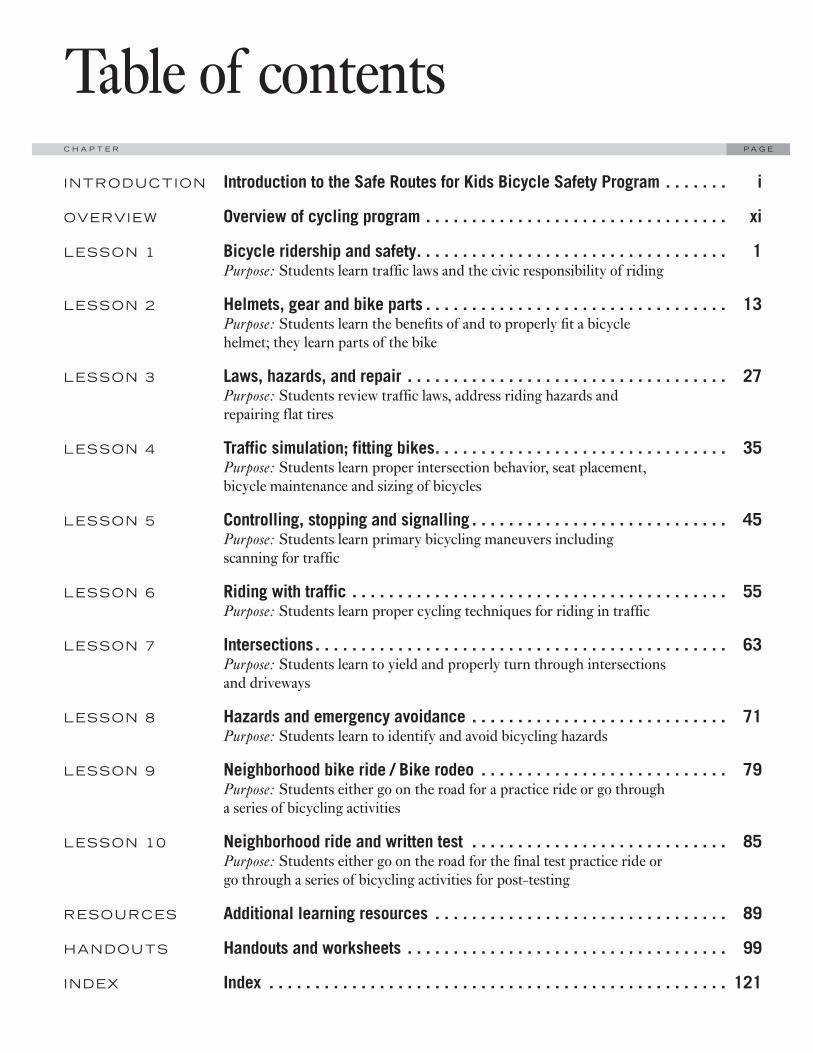
INTRODUCTION Introduction to the Safe Routes for Kids Bicycle Safety Program . . . . . . . i
OVERVIEW Overview of cycling program . . . . . . . . . . . . . . . . . . . . . . . . . . . . . . . . . xi
LESSON 1 Bicycle ridership and safety. . . . . . . . . . . . . . . . . . . . . . . . . . . . . . . . . . 1Purpose: Students learn traffic laws and the civic responsibility of riding
LESSON 2 Helmets, gear and bike parts . . . . . . . . . . . . . . . . . . . . . . . . . . . . . . . . . 13Purpose: Students learn the benefits of and to properly fit a bicyclehelmet; they learn parts of the bike
LESSON 3 Laws, hazards, and repair . . . . . . . . . . . . . . . . . . . . . . . . . . . . . . . . . . . 27Purpose: Students review traffic laws, address riding hazards andrepairing flat tires
LESSON 4 Traffic simulation; fitting bikes. . . . . . . . . . . . . . . . . . . . . . . . . . . . . . . . 35Purpose: Students learn proper intersection behavior, seat placement,bicycle maintenance and sizing of bicycles
LESSON 5 Controlling, stopping and signalling . . . . . . . . . . . . . . . . . . . . . . . . . . . . 45Purpose: Students learn primary bicycling maneuvers includingscanning for traffic
LESSON 6 Riding with traffic . . . . . . . . . . . . . . . . . . . . . . . . . . . . . . . . . . . . . . . . . 55Purpose: Students learn proper cycling techniques for riding in traffic
LESSON 7 Intersections. . . . . . . . . . . . . . . . . . . . . . . . . . . . . . . . . . . . . . . . . . . . . 63Purpose: Students learn to yield and properly turn through intersections and driveways
LESSON 8 Hazards and emergency avoidance . . . . . . . . . . . . . . . . . . . . . . . . . . . . 71Purpose: Students learn to identify and avoid bicycling hazards
LESSON 9 Neighborhood bike ride / Bike rodeo . . . . . . . . . . . . . . . . . . . . . . . . . . . 79Purpose: Students either go on the road for a practice ride or go througha series of bicycling activities
LESSON 10 Neighborhood ride and written test . . . . . . . . . . . . . . . . . . . . . . . . . . . . 85Purpose: Students either go on the road for the final test practice ride orgo through a series of bicycling activities for post-testing
RESOURCES Additional learning resources . . . . . . . . . . . . . . . . . . . . . . . . . . . . . . . . 89
HANDOUTS Handouts and worksheets . . . . . . . . . . . . . . . . . . . . . . . . . . . . . . . . . . . 99
INDEX Index . . . . . . . . . . . . . . . . . . . . . . . . . . . . . . . . . . . . . . . . . . . . . . . . . . 121
Table of contentsP A G EC H A P T E R
Welcome ii
What students learn iii
Background of cycling education iv
Overview of lesson plans v
Starting and implementing vi
Getting help vii
Statewide Education Goals viii
Teachers, you are about to offer your students the national award-winning SafeRoutes For Kids education program, a comprehensive two-part program thatteaches bicycle safety education and transportation alternatives and solutions.The Bicycle Safety Program curriculum teaches traffic savvy through classroomactivities and on-the-bike skills practice. Working with the Bicycle Transporta-tion Alliance (BTA), a statewide non-profit organization, will make it easy. BTA instructors are working with classes throughout Oregon and SouthwestWashington, bringing bikes, helmets and other program materials to make yourprogram a success.
Why is the BTA offering all of these resources? Because children face a greaterlikelihood of death or disability through traffic related crashes than any othercause. Children between the ages of 10 and 14 have the highest rate of bicyclecrashes for all age groups and since youths are usually at fault, a majority ofcrashes can be avoided through education. The BSP is also a great way foryouth to stay active and healthy. At a time when obesity amongst children andadults has reached epidemic proportions, bicycling is an excellent and efficientmeans to meeting daily physical activity needs.
Youth use the roads for bicycling everyday. Yet roads can be hazardous and chil-dren are not formally educated to skillfully maneuver on the streets. As our-children get older, they also increase the distance they travel and are thusexposed to higher traffic streets. Studies show that parents grant their children agreater degree of freedom to travel from home (called home range) between theages of 10-12. These freedoms typically coincide with the move fromelementary to middle school. Parents are justified to grant preadolescents morefreedom because their mental, physical, perceptual, and coordination abilitiesare rapidly increasing to adult capacity. The extensive road, and specifically on-the-bicycle, lessons offered by this program are designed to increase bikeridership, physical activity and safe and predictable riding amongst youth.
Safe Routes for KidsBicycle Safety Program
The BICYCLE TRANSPORTATIONALLIANCE (BTA), a 501 (c)(3) a non-profit organization, works to promote bicycle use and to improve bicycling con-ditions throughout the State of Oregon.Active since 1990 in the Portland metroregion, BTA members work in partnershipwith citizens, businesses, communityorganizations and government agencies tomake our communities in Oregon safer,more pleasant and more livable.
In the Fall of 1998, the BTA beganimplementing its new Bicycle SafetyProgram. The Bicycle Safety Programbegan with seed money provided by theOregon Department of Transportation,Transportation Safety Division. The BTAimplements the Bicycle Safety Program in schools throughout Oregon and SWWashington, provides support, trainings,equipment, and implementation services.The BTA has taught this program to over14,000 children in Oregon and SWWashington. In June of 2003, the BTAreceived the National Bicycle EducationLeadership by the League of AmericanBicyclists at their National BicycleEducation Leaders Conference. The BTAhas extensive experience with teachingbicycle safety, this third edition includesrefinements as a result of field experienceand evaluation.
INTRO
i
B A C K G R O U N DO V E R V I E W
B I C Y C L E T R A N S P O R T A T I O N A L L I A N C E ’ S
Welcome to the Safe Routes forKids Bicycle Safety ProgramThe Bicycle Safety Program (BSP) is a comprehensive curriculum, funded bythe Oregon Department of Transportation, with a goal to teach 4th-7th gradestudents to travel safely on a bicycle. Students learn the traffic rules andregulations, the potential hazards to travelling and handling skills needed tocycle effectively, appropriately and safely through their community. The BSPpromotes safe youth cycling and offers on-the-bicycle training; the BSP alsouses hands-on in-class lessons to teach safety concepts and laws. Thecurriculum is geared to meet Oregon’s statewide health and physical educationBenchmarks. A series of corresponding optional activities are offered that meetreading, math, science, social science, and civics Benchmarks. Many of theseoptional activities are also found in the Safe Routes for Kids – TransportationAlternatives and Solutions curriculum.
Ten cycle safety lessons, lasting 55 to 60 minutes each, are provided in thisbook. Of the ten lessons, four are in-class and six are on-the-bicycle. Thelessons are developed to be taught on consecutive days but can be taught overthe course of multiple weeks. (Note: A variety of lesson plans from 7 to 10 hoursare provided in the next section, Overview of Cycling Program [p. xi]).
The Safe Routes for Kids learning package includes the BSP and the Transpor-tation Alternatives and Solutions curricula that are designed to coincide withother school-based bicycle advocacy and education programs. Expanded SafeRoutes for Kids lesson plans may include graphing bicycle ridership to school,survey of students’ transportation behavior, mapping safe bicycle routes, andlearning the principles of physics that apply to a bicycle. In-school promotions,such as the Bike to School Challenge and Walk to School Day, can be organizedand students can learn to organize an event and record the effects of theirpromotional efforts.
The Safe Routes for Kids curriculum packages is a perfect school-basedlearning model that is part of the international Safe Routes to Schools model.The Safe Routes to School model starts with an adult driven task-force thathelps determine needs and solutions to schools traffic safety. In Oregon, theDepartment of Human Services developed an Oregon Safe Routes to SchoolSupplement, see www.dhs.state.or.us/publichealth/hpcdp/index.cfm or call(503) 731-4025 for references. The National Highway Transportation SafetyAdministration (NHTSA) also developed a toolkit that guides communitymembers and school administration to run Safe Routes to Schools programsand helps connect the classroom and children to the adult-led process.
Safe Routes for Kids Bicycle Safety Program
Goals for Bicycle SafetyProgram
• Increase safety of youth bicyclists
• Increase the number and frequency of children ridingtheir bicycles
• Improve the lives of children by improving health, learningcapacity, independence, andcommunity conditions for bicycling.
B A C K G R O U N D L E S S O N
ii

What students learnThe curriculum teaches children to ride bicycles properly and safely. Because ofhigh crash rates and riding activity, the BSP is geared for 4th-7th graders. TheBSP emphasizes educating students to cycle by the traffic laws in order to makethem safe and predictable cyclists. The BSP also promotes cycling as a way toincrease independence and physical activity for an increasingly overweightyouth population.
During the Bicycle Safety Program, students learn:
• Communication skills
• Writing skills
• Team building skills
• Using a bicycle for an active and healthy lifestyle
• Rules of road and riding predictably — including intersections, traffic signs,riding position, looking back for traffic
• Riding skills to avoid hazards
• Properly fitting a helmet
• Bicycle laws
• Benefits of cycling
• Basic mechanics
By the conclusion of the program, students should be able to:
• Explain traffic rules and regulations that pertain to cyclists. Students shouldbe able to demonstrate this behavior on a bicycle including traveling in theproper direction and location, turning and yielding through intersections.
• Demonstrate the ability to work in a team setting, communicating with theteam’s members, self-esteem building, and general assertiveness.
• Discuss the most common cause for crashes, identify riding hazards anddemonstrate an understanding of hazards avoidance maneuvers on a bicycle.
• Properly fit a bicycle helmet on their head and recognize the symptoms ofimproper fit.
I N T R O D U C T I O N
Statewide Common CurriculumGoalsA primary objective is to have studentsachieve the Statewide Education Goalsfor health and physical education. Byimplementing the journal assignmentsand the Investigation Activities, thecurriculum can meet writing, math,science, civics, and social scienceBenchmarks. Elements of the BSP andother bicycle curriculum may be usedto further investigate any of the aboveeducation areas (a) see page viii for listof Curriculum Goals; b) see page 89 forcurriculum resources.
iii
B A C K G R O U N DL E S S O N
Background of cycling educationThis curriculum is a product of extensive research and application. It is basedon similar successful programs implemented in Florida, Montana, Minnesota,and by national cycling organizations such as the League of American Bicyclistsand the National Center for Bicycling and Walking. The above programs havebeen documented as effective in reducing bicycling related crashes causinginjury and fatalities among youths (see Training Programs for Bicycle Safety.Harborview Injury Prevention and Research Center, 1998). In addition toresearch, this curriculum has been taught to over 14,000 children in Oregon and SW Washington.
On-the-bicycle training done in a comprehensive manner are the two elementsthat make the BSP effective in teaching youth. Bicycle programs that are com-prehensive and that put kids on bicycles have been show to be effective in teach-ing riding skills and decreasing the rates of bicycle-automobile crashes. In con-trast, the Harborview Injury Prevention report states that short-term programs,such as a two-hour program implemented in Canada, are inadequate: it “wasnot effective in improving safe cycling behavior, knowledge, or attitudes amongfourth grade children due to its inadequate time frame” (page 3).
The BSP also serves as an early segment in a continuum in traffic safety educa-tion. Young drivers, often lacking extensive drivers education, impose thehighest risk to the safety of other vehicle operators and pedestrians. Yet childrenthat were “previously trained in bicycle safety transfer their knowledge andskills to motor vehicle driving skills and safety” (Stutts and Hunter, 1990 andMcArthur, 1998 as in Harborview). Therefore, the BSP not only benefitschildren, but benefits the entire community by providing more education andby potentially decreasing deadly motor vehicle crashes.
Safe Routes for Kids Bicycle Safety Program
The Bicycle Safety Program is:
• a successful program that hasreached over 14,000 students.
• geared for Oregonians and Oregon’sdriving regulations.
• researched and developed by avidcyclists.
• reviewed by teachers, principals,health officials, bicycle planners, andother cycling service providers.
• focused on providing on-the-bicycletraining.
• teaching children at the time they areventuring into high traffic streets andare most susceptible to bicycle crashes.
Theories that the BSP are based on:• proper training will decrease crashestoday as cyclists and tomorrow as bothcyclists and automobile drivers.
• decreases in crashes will bring abouta healthier population.
• bicycle riding is an excellent source ofexercise for an increasingly unhealthy,inactive and overweight youth popula-tion. Promoting cycling as a means oftransportation will develop a populationof more active and healthy youth andlater adults.
• youth over the age of 10 are travellingfurther, have increased mental andphysical abilities and are generallyallowed greater freedoms and an ex-tended “home range”. Children shouldreceive bicycle safety education duringor soon after their 10th year.
B A C K G R O U N D L E S S O N
iv
Overview of the lesson plans
CURRICULUM LENGTH AND STRATEGY
The curriculum provides four in-class lessons that will stimulate students byshowing interesting videos and conducting hands-on exercises such as bicyclehelmet fit and flat tire repair. Six on-the-bicycle lessons are fun for students andprogressively build riding skills so students are able to safely ride on the street.
The lesson plan as laid out in this curriculum is divided into two sections:
• Lessons 1-4: In-class activities
• Lessons 5-10: On-bike activities
A program overview of each lesson and their activities are provided starting onpage xi. In this section we provide a variety of lesson plan formats rangingbetween 7-10 instructional hours. The curriculum in this book is laid out in 10one-hour lessons, see page xii. A newer strategy that the BTA uses for this thirdedition is to integrate in-class and on-bike activities, getting students biking byDay 3 to pique their interest. See page xiii for this format. Other lesson planformats include:
• Eight 50-minute classes that introduce bikes early
• Ten 45-minute classes
• Seven 1:20-minute classes
The flexibility of the BSP allows teachers to shift the order, amount of timespent and delete activities from the base 10-hour lesson plan.
The ten lesson, lesson plan is designed to teach and reinforce the essentialsafety components to students. The seven lesson format will teach students allelements of the course but will not provide essential reinforcement. Alternativelesson plans shorter than seven instructional hours will fail to provide theminimum exposure to all of the essential bicycling safety activities.
Each individual lesson plan is formatted like a chapter. The lesson plan providesan overview of the lesson, the health and physical education goals achieved bythe lesson, description of the activities, details of and how to administer theactivities, required materials, and copies of handouts for each activity. Startingon page 89 is information to assist teachers, such as a complete list of requiredprogram materials, ways to find additional resources, guides, curriculum,samples of letters to parents, and additional readings.
I N T R O D U C T I O N
Throughout this curriculum, youwill see the following guideposts toquickly and easily guide you to theinformation you are looking for:
Discussion
Indicates that thematerial is for generalclass discussion, andcan be read aloud.
The estimated completion time isindicated at bottom. At the begin-ning of each chapter, this iconappears as .
In the “Lesson” column (at left),material to be read aloud is indicatedby this style and indented:
Here is a sample of textintended as interactiveclass material.
Activity
This icon indicates that the material is anactivity to be carriedout by the entire class.
The estimated completion time isindicated at bottom. At the begin-ning of each lesson, the simplifiedversion appears as .
In the “Lesson” column (at left),
activity information is set in this
type style:
Here is a sample of directionalinformation, meant to be readahead of time.
Homework
Indicates a homeworkassignment or journalentry to be made indi-
vidually by the students. At thebeginning of each lesson, this iconappears as .
homework
5MINUTES
discussion
5MINUTES
v
B A C K G R O U N DL E S S O N
Starting and implementing The Bicycle Safety Program runs like a well-oiled chain once your equipment isready, the school administration is on board and community involvement is inplace. Read through the curriculum before implementation. It is helpful toreview the Materials Checklist, on page 90, to get a complete list of the itemsyou will need. As you consider all of the program logistics that should be inplace prior to running the BSP, you may decide to contact other communitygroups to provide supporting materials and volunteers. Please use the list belowfor ideas on where to find help with certain aspects of the program.
Bicycle Transportation Alliance: Teacher trainings, program materials assistance,program set-up, program implementation.
School Administration: Field trip or off-campus approval for community rides,insurance and liability issues, parent volunteer recruitment, storage of programbicycles, storage of students’ bicycles.
Parent Teacher Organizations: Parent volunteers for on-street lessons, funding.
Other school support possibilities: School Police officer, safety administrator,Americorps member.
Police Bureau Traffic Safety Section: Escort for on-street practice and community rides.
Trauma Nurses Talk Tough: School-wide safety presentations, possible helmet sales.
Hospital: Helmet donations, caps to prevent transmission of lice.
Community Members: Volunteers for on-street lessons and community ride days.
Bike Shops: Mechanical support before and during program, equipmentpurchasing assistance, volunteers for community ride days.
Bike Clubs: Volunteers for on-street lessons and community ride days, funding.
Businesses: Volunteers for on-street lessons and community ride days, financial support.
Safe Routes for Kids Bicycle Safety ProgramB A C K G R O U N D L E S S O N
vi
Getting help with implementing the curriculumThrough a start-up grant from the Oregon Department of Transportation,Traffic Safety Division, and additional funding from many organizations, theBTA is training teachers and community members to implement the program.The Teacher Training is offered as a graduate or undergraduate credit coursethrough Portland State University; the training can also be taken for no credit.
The BTA will administer resources to assist with the implementation of theBSP. Support includes: acquisition of bicycles; coordination with communitymembers and services; training; curriculum development; and in-class support.The BTA will work to make each school it visits a “bike-friendly school”through an assessment of the bicycle parking facilities, promotion of bicyclingthrough safety activities and working with school staff and administration tosupport increase cycling.
Also see pages 92 and 95 for a list of organizations and materials that may beuseful in implementing the program.
I N T R O D U C T I O N
For more information, please contact:
Scott Bricker
Bicycle Transportation Alliance
P.O. Box 9072
Portland, Oregon 97207-9072
(503) 226-0676
www.bta4bikes.org
vii
B A C K G R O U N DL E S S O N
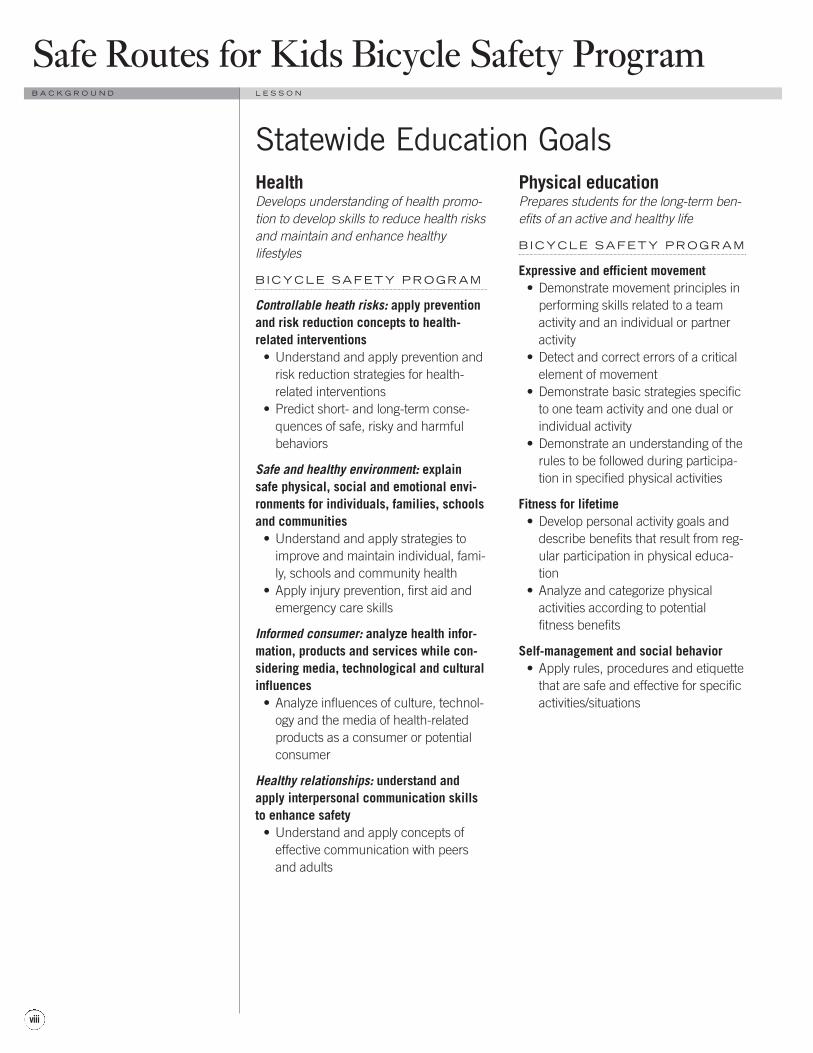
Statewide Education GoalsHealthDevelops understanding of health promo-tion to develop skills to reduce health risksand maintain and enhance healthylifestyles
B ICYCLE SAFETY PROGRAM
Controllable heath risks: apply preventionand risk reduction concepts to health-related interventions
• Understand and apply prevention andrisk reduction strategies for health-related interventions
• Predict short- and long-term conse-quences of safe, risky and harmfulbehaviors
Safe and healthy environment: explainsafe physical, social and emotional envi-ronments for individuals, families, schoolsand communities
• Understand and apply strategies toimprove and maintain individual, fami-ly, schools and community health
• Apply injury prevention, first aid andemergency care skills
Informed consumer: analyze health infor-mation, products and services while con-sidering media, technological and culturalinfluences
• Analyze influences of culture, technol-ogy and the media of health-relatedproducts as a consumer or potentialconsumer
Healthy relationships: understand andapply interpersonal communication skillsto enhance safety
• Understand and apply concepts ofeffective communication with peersand adults
Physical educationPrepares students for the long-term ben-efits of an active and healthy life
B ICYCLE SAFETY PROGRAM
Expressive and efficient movement• Demonstrate movement principles in
performing skills related to a teamactivity and an individual or partneractivity
• Detect and correct errors of a criticalelement of movement
• Demonstrate basic strategies specificto one team activity and one dual orindividual activity
• Demonstrate an understanding of therules to be followed during participa-tion in specified physical activities
Fitness for lifetime• Develop personal activity goals and
describe benefits that result from reg-ular participation in physical educa-tion
• Analyze and categorize physical activities according to potential fitness benefits
Self-management and social behavior• Apply rules, procedures and etiquette
that are safe and effective for specificactivities/situations
Safe Routes for Kids Bicycle Safety ProgramB A C K G R O U N D L E S S O N
viii
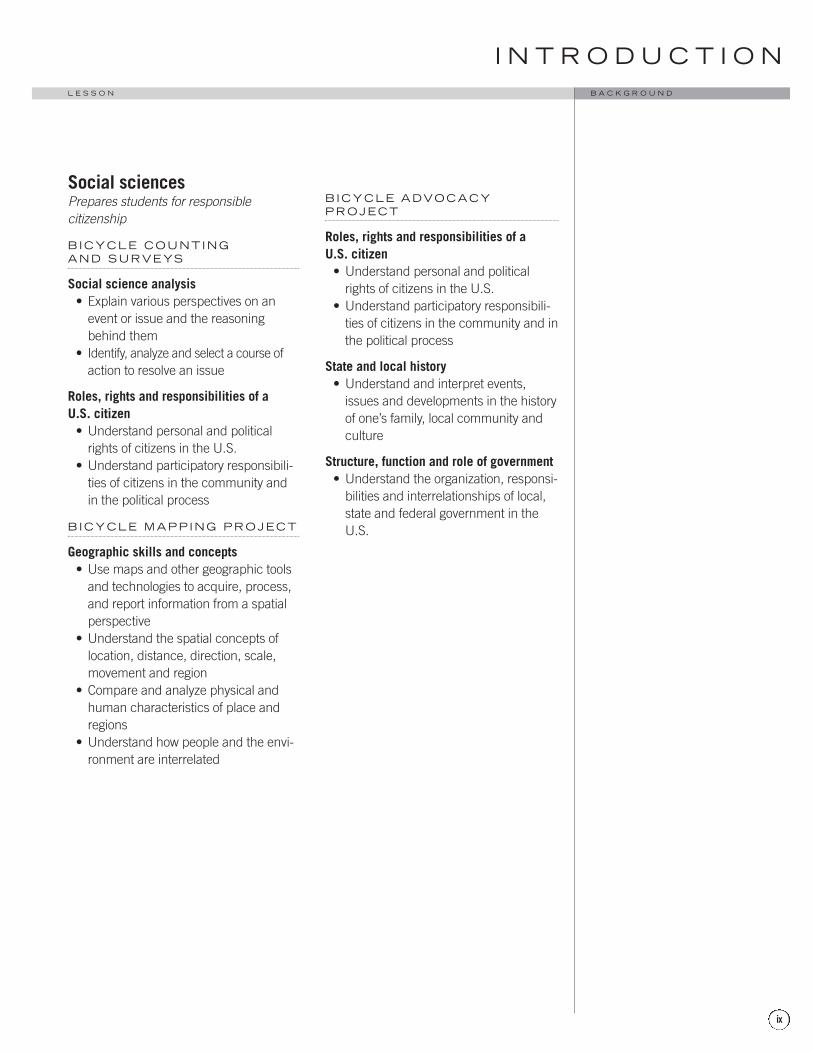
Social sciencesPrepares students for responsible citizenship
B ICYCLE COUNT ING AND SURVEYS
Social science analysis• Explain various perspectives on an
event or issue and the reasoningbehind them
• Identify, analyze and select a course ofaction to resolve an issue
Roles, rights and responsibilities of a U.S. citizen
• Understand personal and politicalrights of citizens in the U.S.
• Understand participatory responsibili-ties of citizens in the community andin the political process
B ICYCLE MAPP ING PROJECT
Geographic skills and concepts• Use maps and other geographic tools
and technologies to acquire, process,and report information from a spatialperspective
• Understand the spatial concepts oflocation, distance, direction, scale,movement and region
• Compare and analyze physical andhuman characteristics of place andregions
• Understand how people and the envi-ronment are interrelated
B ICYCLE ADVOCACYPROJECT
Roles, rights and responsibilities of a U.S. citizen
• Understand personal and politicalrights of citizens in the U.S.
• Understand participatory responsibili-ties of citizens in the community and inthe political process
State and local history• Understand and interpret events,
issues and developments in the historyof one’s family, local community andculture
Structure, function and role of government• Understand the organization, responsi-
bilities and interrelationships of local,state and federal government in theU.S.
I N T R O D U C T I O N
ix
B A C K G R O U N DL E S S O N
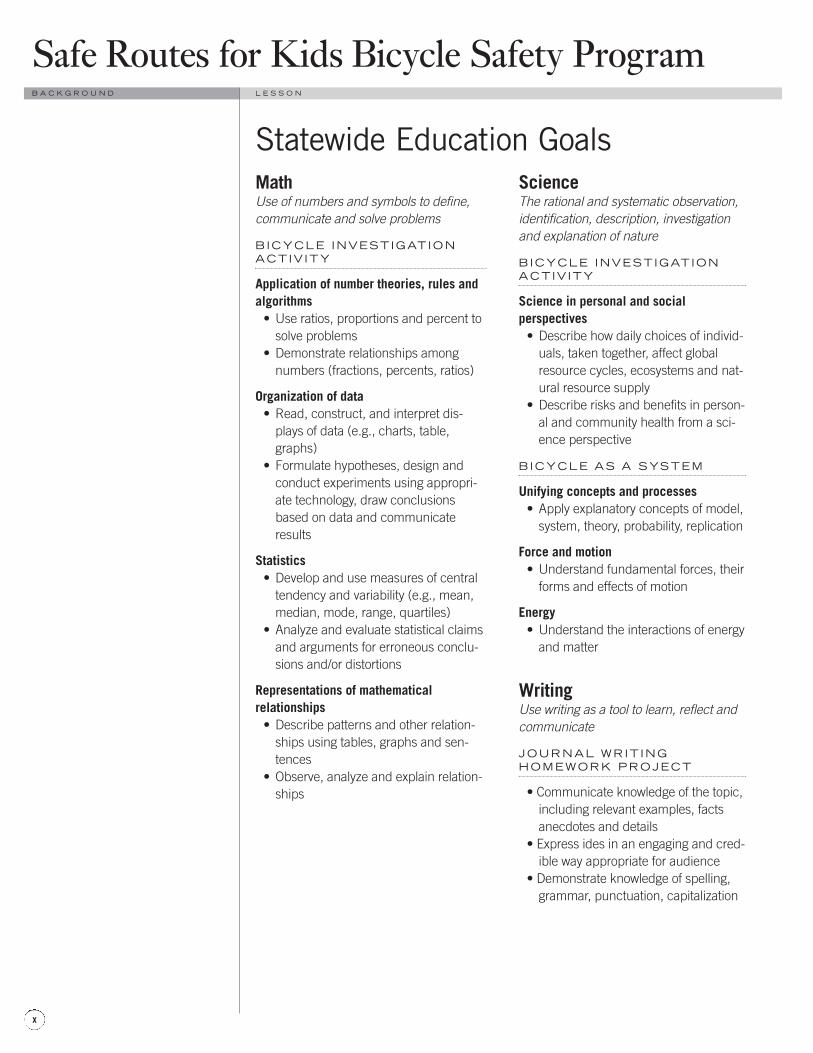
MathUse of numbers and symbols to define,communicate and solve problems
B ICYCLE INVEST IGAT IONACT IV ITY
Application of number theories, rules andalgorithms
• Use ratios, proportions and percent tosolve problems
• Demonstrate relationships amongnumbers (fractions, percents, ratios)
Organization of data• Read, construct, and interpret dis-
plays of data (e.g., charts, table,graphs)
• Formulate hypotheses, design andconduct experiments using appropri-ate technology, draw conclusionsbased on data and communicateresults
Statistics• Develop and use measures of central
tendency and variability (e.g., mean,median, mode, range, quartiles)
• Analyze and evaluate statistical claimsand arguments for erroneous conclu-sions and/or distortions
Representations of mathematicalrelationships
• Describe patterns and other relation-ships using tables, graphs and sen-tences
• Observe, analyze and explain relation-ships
ScienceThe rational and systematic observation,identification, description, investigationand explanation of nature
B ICYCLE INVEST IGAT IONACT IV ITY
Science in personal and socialperspectives
• Describe how daily choices of individ-uals, taken together, affect globalresource cycles, ecosystems and nat-ural resource supply
• Describe risks and benefits in person-al and community health from a sci-ence perspective
B ICYCLE AS A SYSTEM
Unifying concepts and processes• Apply explanatory concepts of model,
system, theory, probability, replication
Force and motion• Understand fundamental forces, their
forms and effects of motion
Energy• Understand the interactions of energy
and matter
WritingUse writing as a tool to learn, reflect andcommunicate
JOURNAL WR IT INGHOMEWORK PROJECT
• Communicate knowledge of the topic,including relevant examples, factsanecdotes and details
• Express ides in an engaging and cred-ible way appropriate for audience
• Demonstrate knowledge of spelling,grammar, punctuation, capitalization
Safe Routes for Kids Bicycle Safety ProgramB A C K G R O U N D L E S S O N
x
Statewide Education Goals
Overview of entire ten lesson cycling program(60-minute classes) xii
Ten lesson overview — introducing bikes early (for 50 minute classes) xiii
Eight lesson overview —introducing bikes early (50-minute classes) xiv
Ten lesson overview (45-minute classes) xv
Seven lesson overview (1:20-minute classes) xvi
In this section we provide a variety of lesson plan formats ranging between 7-10instructional hours. The curriculum in this book is laid out in 10 one-hourlessons, see page xii. A newer strategy that the BTA uses for this third edition isto get children on the bicycles, and out of the classroom, quickly to pique theirinterest. For a 10-hour lesson plan we start bike riding in Lesson 3, not Lesson5 as done in the past, see page xiii for the new format. Other lesson planformats include:
• Eight 50-minute classes that introduce bikes early
• Ten 45-minute classes
• Seven 1:20-minute classes
The flexibility of the BSP allows teachers to shift the order, amount of timespent and delete activities from the base 10 hour lesson plan.
Bicycle helmets and bicycle laws are of utmost importance and should not onlybe formally taught but also stressed each day in class. This can often be donewith warm-up questions and activities.
For support to use this curriculum, see the introduction section of this book. For resources, please see the final section of the curriculum.
Overview of cyclingprogram
OVERV IEW
xi
S T A T E W I D E E D U C A T I O N G O A L SO V E R V I E W
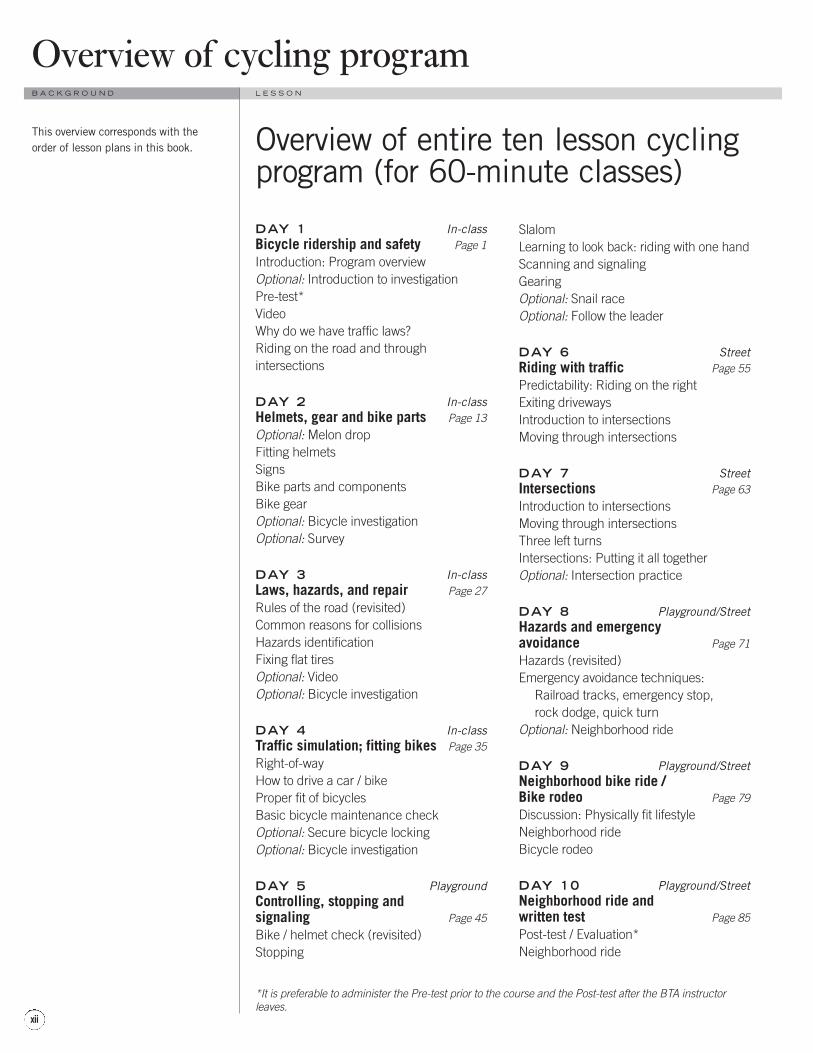
DAY 1 In-classBicycle ridership and safety Page 1
Introduction: Program overviewOptional: Introduction to investigationPre-test*VideoWhy do we have traffic laws?Riding on the road and through intersections
DAY 2 In-classHelmets, gear and bike parts Page 13
Optional: Melon dropFitting helmetsSignsBike parts and componentsBike gearOptional: Bicycle investigationOptional: Survey
DAY 3 In-classLaws, hazards, and repair Page 27
Rules of the road (revisited)Common reasons for collisionsHazards identificationFixing flat tiresOptional: VideoOptional: Bicycle investigation
DAY 4 In-classTraffic simulation; fitting bikes Page 35
Right-of-wayHow to drive a car / bikeProper fit of bicyclesBasic bicycle maintenance checkOptional: Secure bicycle lockingOptional: Bicycle investigation
DAY 5 PlaygroundControlling, stopping and signaling Page 45
Bike / helmet check (revisited)Stopping
SlalomLearning to look back: riding with one handScanning and signalingGearingOptional: Snail raceOptional: Follow the leader
DAY 6 StreetRiding with traffic Page 55
Predictability: Riding on the rightExiting drivewaysIntroduction to intersectionsMoving through intersections
DAY 7 StreetIntersections Page 63
Introduction to intersectionsMoving through intersectionsThree left turnsIntersections: Putting it all togetherOptional: Intersection practice
DAY 8 Playground/StreetHazards and emergency avoidance Page 71
Hazards (revisited)Emergency avoidance techniques:
Railroad tracks, emergency stop, rock dodge, quick turn
Optional: Neighborhood ride
DAY 9 Playground/StreetNeighborhood bike ride / Bike rodeo Page 79
Discussion: Physically fit lifestyleNeighborhood rideBicycle rodeo
DAY 10 Playground/StreetNeighborhood ride and written test Page 85
Post-test / Evaluation*Neighborhood ride
Overview of cycling program
This overview corresponds with theorder of lesson plans in this book.
B A C K G R O U N D L E S S O N
xii
Overview of entire ten lesson cyclingprogram (for 60-minute classes)
*It is preferable to administer the Pre-test prior to the course and the Post-test after the BTA instructorleaves.
DAY 1 In-class
Bicycle ridership and safety Page 1
Introduction: Program overviewVideoOptional: Survey (see page 25)
DAY 2 In-class
Helmets, gear and bike parts Page 13
Optional: Melon dropFitting helmetsBike parts and componentsIntroduction to basic bicycle maintenancecheck
DAY 3 Playground
Fitting bikes; Controlling, stopping andsignaling Page 40, 45
Helmet check (revisited)Proper fit of bicyclesStoppingSlalomLearning to look back: riding with onehandOptional: GearingOptional: Slow race
DAY 4 In-class
Laws Page 27, 36
LawsStreet signsRules of the roadRight-of-wayRoad positioning
DAY 5 Street
Riding with traffic Page 55
Bike/helmet check (revisited)Predictability: Riding on the rightExiting drivewaysIntroduction to intersections
DAY 6 In-class
Laws, hazards and repair Page 27
Common reasons for collisionsHazard identification Fixing flat tiresRules of the road (revisited)
DAY 7 Street
Intersections Page 63
Bike/helmet check (revisited)Moving through intersection: Left handturnsThree left turns
DAY 8 Street
Intersections Page 68 (63)
Bike/helmet check (revisited)Intersections: Putting it all togetherIntersection practice
DAY 9 Street
Neighborhood ride Page 79
Bike/helmet check (revisited)Neighborhood ride
DAY 10 Street
Neighborhood ride Page 85
Bike/helmet check (revisited)Neighborhood ride
O V E R V I E W
Note: Because this lesson has studentsgetting on-bike quickly, it is suggestedthat teachers hold at least a 5-minutetalk prior to doing cycling activities.
xiii
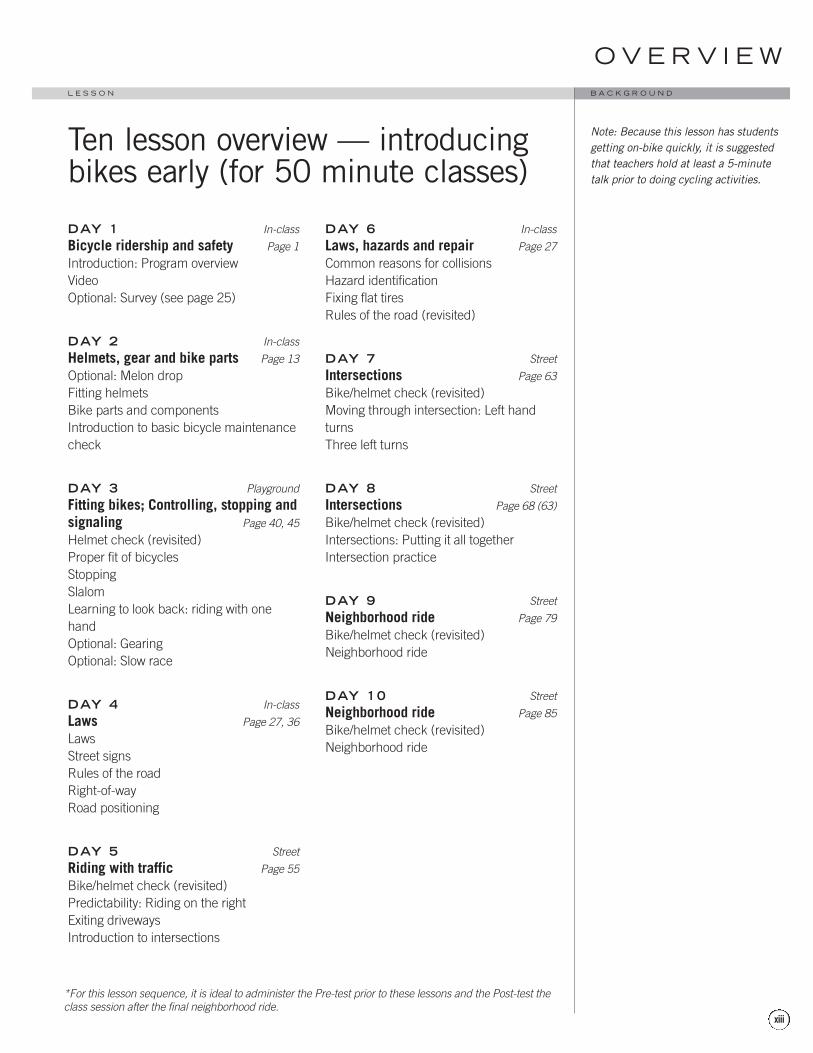
B A C K G R O U N DL E S S O N
Ten lesson overview — introducingbikes early (for 50 minute classes)
*For this lesson sequence, it is ideal to administer the Pre-test prior to these lessons and the Post-test theclass session after the final neighborhood ride.
DAY 1 In-class
Bicycle ridership and safety Page 1
Introduction: Program overviewVideoIntroduction to laws
DAY 2 In-class
Helmets, gear and bike parts Page 13
Optional: Melon dropFitting helmetsBike parts and componentsIntroduction to basic bicycle maintenancecheck
DAY 3 Playground
Fitting bikes; Controlling, stopping andsignaling Page 40, 45
Helmet check (revisited)Proper fit of bicyclesStoppingSlalomLearning to look back: riding with onehandOptional: GearingOptional: Slow race
DAY 4 In-class
Laws and hazards Page 27, 36
LawsStreet signsRules of the roadRight-of-wayHazard identificationRoad positioning
DAY 5 Street
Riding with traffic Page 55
Bike/helmet check (revisited)Predictability: Riding on the rightExiting drivewaysMoving through intersection: Goingstraight
DAY 6 Street
Intersections Page 63
Bike/helmet check (revisited)Moving through intersection: Right handturnsMoving through intersection: Left handturns
DAY 7 Street
Intersections Page 68 (63)
Bike/helmet check (revisited)Intersections: Putting it all togetherIntersection practice
DAY 8 Street
Neighborhood ride Page 79, 85
Bike/helmet check (revisited)Neighborhood ride
Overview of cycling programB A C K G R O U N D L E S S O N
xiv
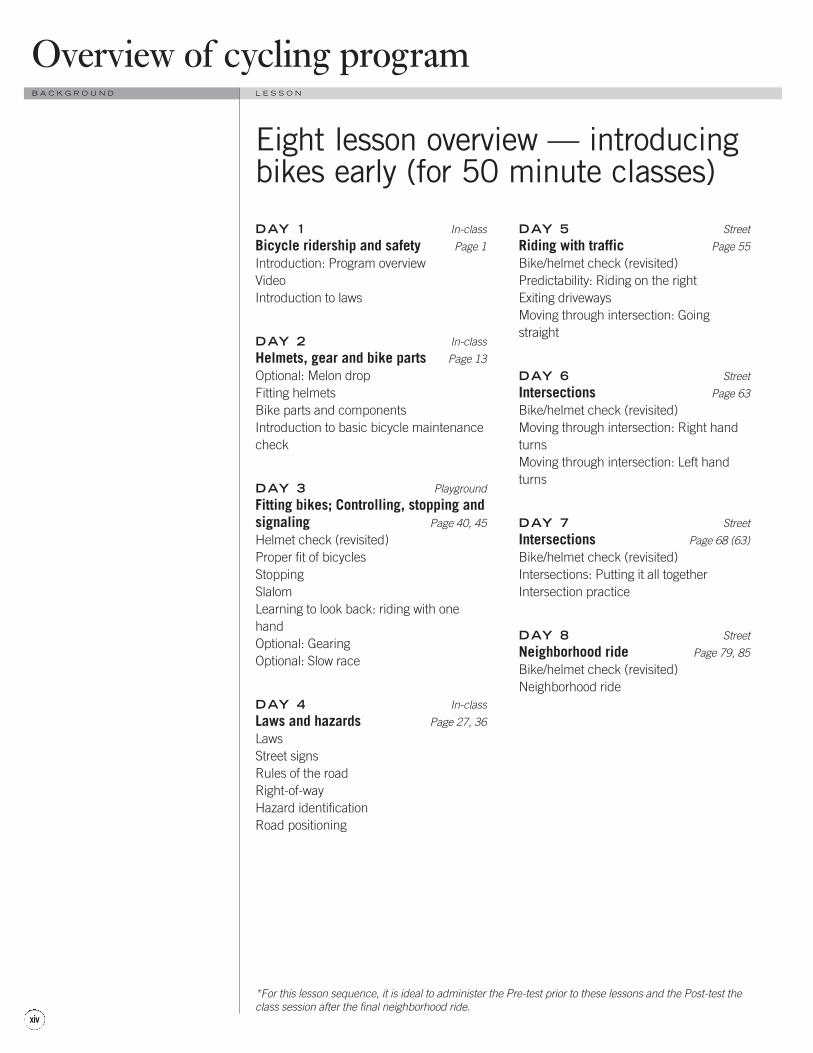
Eight lesson overview — introducingbikes early (for 50 minute classes)
*For this lesson sequence, it is ideal to administer the Pre-test prior to these lessons and the Post-test theclass session after the final neighborhood ride.
DAY 1 In-classBicycle ridership and safety Page 1
Introduction: Program overviewPre-test*Optional: Introduction to investigationVideoLaws (introduction)
DAY 2 In-classBicycle laws and gear Page 6, 13
Laws / traffic signs / Right-of-way / Ridingon the road and through intersectionsBike parts and componentsBike gearOptional: Bicycle investigationOptional: Survey
DAY 3 In-classHelmets Page 13
Fitting helmetsSecure bicycle parking
DAY 4 PlaygroundTraffic simulation; fitting bikes Page 35
How to drive a car / bike (modified to fit 20 minutes)
Basic bicycle maintenance checkProper fit of bicycles
DAY 5 PlaygroundControlling, stopping and signaling Page 45
Bike / helmet check (revisited)StoppingSlalomLearning to look back: Riding with onehand
Scanning and signalingOptional: GearingOptional: Snail raceOptional: Follow the leader
DAY 6 StreetRiding with traffic Page 55
Quick stopPredictability: Riding on the rightExiting drivewaysIntroduction to intersections
DAY 7 StreetIntersections Page 63, 71
Moving through intersectionsThree left turnsIntersections: Putting it all together
DAY 8 Playground/StreetNeighborhood ride / Bike rodeo Page 79
Neighborhood rideRodeo
DAY 9 StreetNeighborhood ride Page 85
Neighborhood ride
DAY 10 In-classWritten test / Conclusion Page 80, 86
Post-testDiscussion: Physically fit lifestyleOptional: Review curriculumOptional: Crash stories
O V E R V I E W
xv
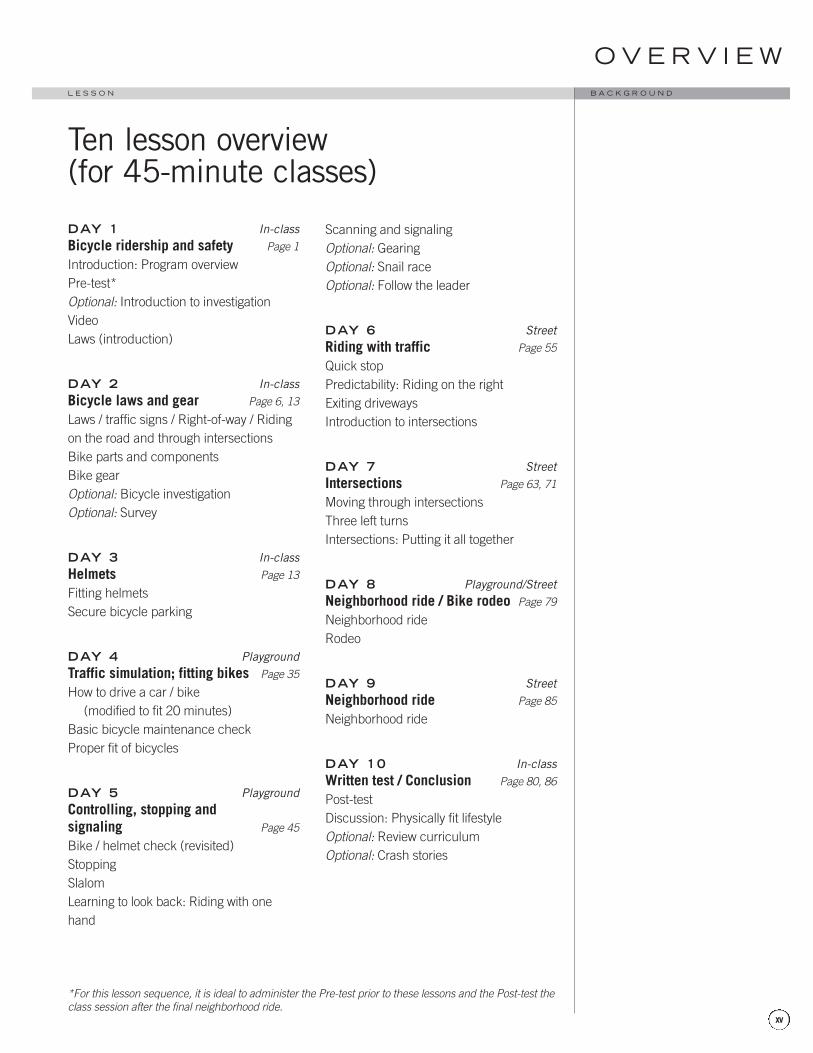
B A C K G R O U N DL E S S O N
Ten lesson overview(for 45-minute classes)
*For this lesson sequence, it is ideal to administer the Pre-test prior to these lessons and the Post-test theclass session after the final neighborhood ride.
LESSON 1 In-classBicycle ridership and safety Page 1, 29
Introduction: Program overviewPre-testOptional: Introduction to investigationVideoLaws / traffic signs / Right-of-way / Ridingon the road and through intersectionsCommon reasons for collisions
LESSON 2 In-classHelmets, gear and bike parts Page 13
Optional: Melon dropSurveyFitting helmetsBike parts and componentsBike gearOptional: Bicycle investigation
LESSON 3 In-classTraffic simulation, laws and repair Page 27, 38
Fixing flat tiresHazard identificationLaws revisitedHow to drive a car / bikeOptional: Video
LESSON 4 In-class/PlaygroundFitting bikes, controlling, stopping and signaling Page 35, 45
Proper fit of bicyclesBasic bicycle maintenance checkHelmets (revisited)StoppingSlalomLearning to look back: Riding with one handScanning and signalingOptional: GearingOptional: Snail raceOptional: Follow the leader
LESSON 5 StreetRiding with traffic Page 55, 63
Predictability: Riding on the rightExiting drivewaysIntroduction to intersectionsMoving through intersectionsThree left turnsIntersections: Putting it all together
LESSON 6 Playground/StreetNeighborhood bike ride / Bike rodeo Page 79
Discussion: Physically fit lifestyleNeighborhood rideBicycle rodeo
LESSON 7 Playground/StreetPost-test / Neighborhood ride Page 85
Post-test / EvaluationNeighborhood ride
Overview of cycling programB A C K G R O U N D L E S S O N
xvi
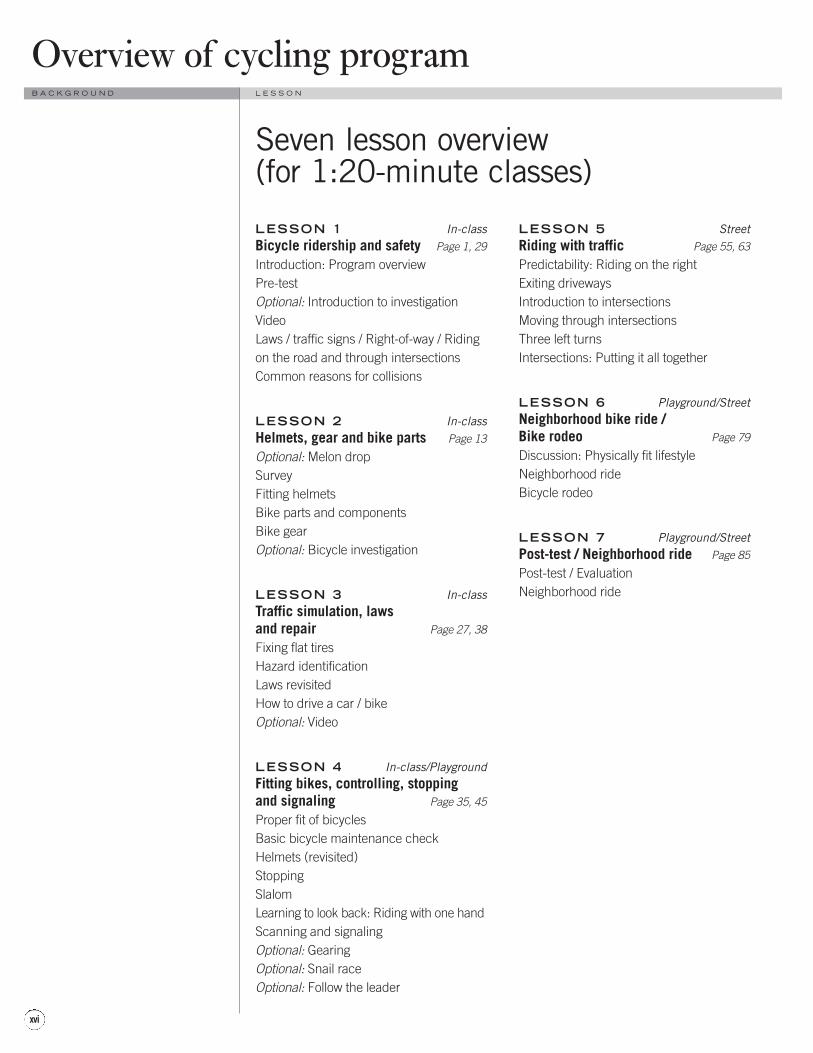
Seven lesson overview (for 1:20-minute classes)
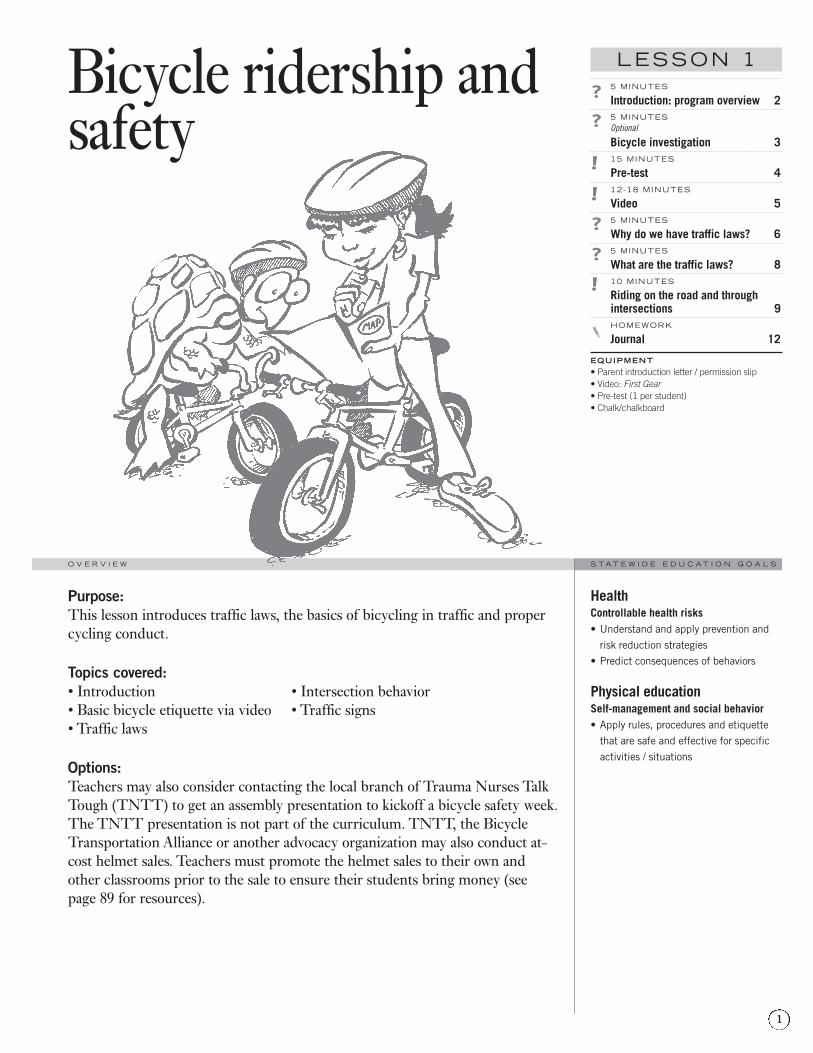
5 MINUTES
Introduction: program overview 25 MINUTESOptional
Bicycle investigation 315 MINUTES
Pre-test 412-18 MINUTES
Video 55 MINUTES
Why do we have traffic laws? 65 MINUTES
What are the traffic laws? 810 MINUTES
Riding on the road and throughintersections 9HOMEWORK
Journal 12
EQUIPMENT• Parent introduction letter / permission slip• Video: First Gear• Pre-test (1 per student)• Chalk/chalkboard
Purpose:This lesson introduces traffic laws, the basics of bicycling in traffic and propercycling conduct.
Topics covered: • Introduction • Intersection behavior• Basic bicycle etiquette via video • Traffic signs• Traffic laws
Options:Teachers may also consider contacting the local branch of Trauma Nurses TalkTough (TNTT) to get an assembly presentation to kickoff a bicycle safety week.The TNTT presentation is not part of the curriculum. TNTT, the BicycleTransportation Alliance or another advocacy organization may also conduct at-cost helmet sales. Teachers must promote the helmet sales to their own andother classrooms prior to the sale to ensure their students bring money (seepage 89 for resources).
Bicycle ridership andsafety
HealthControllable health risks• Understand and apply prevention and
risk reduction strategies• Predict consequences of behaviors
Physical educationSelf-management and social behavior• Apply rules, procedures and etiquette
that are safe and effective for specificactivities / situations
LESSON 1
1
S T A T E W I D E E D U C A T I O N G O A L SO V E R V I E W
PROGRAM OVERVIEW AND INTRODUCTION TO INVESTIGATION
Introduce the Bicycle Safety Program (BSP) to the students. Thefollowing paragraphs will provide ideas for introducing the BSP:
The BSP is a hands-on curriculum with in-class lessons and on-the-bicycle training that will be done outside. We will have vari-ous speakers and people helping out including: police officers, aperson (name) from an organization that advocates for bicycles— the Bicycle Transportation Alliance (BTA) — and other peopleto help us learn about cycling. Helmets will be for sale for $5-8.We will have a bike to school day, an assembly, and after schoolrides (announce only if these will actually happen).
Distribute permission slip to all students. They are required to get the slipssigned by a parent or guardian and returned. See sample in Handouts, page 99.
The first four lessons (in-class lessons) will teach us how to“drive a bike”. We will learn some basic laws and skills thatteach us how to drive. Yes, the same rules apply for driving a carand riding a bike. Safety rules include: stopping at stop signs,riding on the right side of the road and using hand signals. In thelast six lessons, we will go outside and ride bicycles. We willlearn basic riding skills, including: riding with one hand, quickstops and quick turns, and how to properly ride in traffic, again— how to drive a bike!
If the class performs well we will go on rides through the community.
discussion
5MINUTES
Bicycle ridership and safety
WHAT: A brief description of the tenday program and an optional investiga-tive theme that may accompany theprogram.
PURPOSE : To briefly introduce thestudents to the Bicycle Safety Program.
B A C K G R O U N D L E S S O N
2

BICYCLE INVESTIGATION Optional theme
In addition to learning how to ride bikes we are going to launchan investigation to study our school’s travel and bicycle behavior.Do our schoolmates ride bikes to school? We will go and measurethe daily bicycle ridership to school (activities that involve chartsand graphs, see Handouts chapter) and then promote cycling; wewill observe changes in travel behavior. We will also investigateother facilities that influence bicycling, e.g. does our school havea safe place to park our bikes? Is it easy to bike to school or isthere too much traffic? We will figure out ways to make ourschool a better place to bike. We will try to implement some ofthese solutions during our bike-to-school day promotion and bytalking with the principal about the need for such changes.
discussion
5MINUTES
L E S S O N 1
For additional information on promotingbicycling to schools, contact the BTA at(503) 226-0676.
3
B A C K G R O U N DL E S S O N
PRE-TEST
! Introduce the pre-test. Ask students if the know what a pre-testsis; what is a post-test? Tell students they have 15 minutes to com-
plete the pre-test which will be graded but just for informational purposes, itwill not reflect on their grade. At the end of the curriculum, we will then takethe EXACT SAME TEST and compare their grades to that of the pre-test.This process will allow us to evaluate the effectiveness of the curriculum. Inother words, we are testing you on your knowledge and testing ourselves on howwell we are teaching you.
" Administer the pre-test. Give them 15 minutes. Many students will notfinish, advise them to skip questions that they do not know at all and go back ifthey have time. This is good test-taking practice.
Note: Consider administering the Pre-test prior to the arrival of the BTA instructorto save time.
15MINUTES
Bicycle ridership and safety
WHAT: A written test to test the knowl-edge of the students prior to the imple-mentation of the curriculum.
PURPOSE : The pre-test is strictly forinformational purposes. It will be grad-ed and evaluated in comparison withthe post-test.
B A C K G R O U N D L E S S O N
4

BICYCLE VIDEO
M A T E R I A L S
• First Gear (21 minutes)
! First Gear is a 21 minute bicycle safety video designed for 10 year olds andup. The video moves sequentially, starting with bicycle safety checks, equipmentand gear before discussing traffic safety. The video focuses on traffic laws toteach cyclists how to be safe and predictable cyclists. The video introducesterminology that will be used throughout this curriculum in order to conveybasic traffic concepts.
" Discuss the video for a few minutes afterwards. Include the importance ofriding by the laws: riding by the laws makes you safe and predictable so you donot get into crashes with cars. The helmet aspect of safety is taught in Lesson 2.
Ask the students to tell you a new concept they learned from the video. It is alsoa good idea to review hand signals with the class.
OTHER VIDEOS (SEE RESOURCES, PAGE 96, FOR ORDERING INFORMATION):
The Bicycle Zone (3 - 5th grade)Pedal Smarts (5 - 7th grade)
12-18MINUTES
L E S S O N 1
WHAT: Show the class a bicycle safetyvideo and discuss.
PURPOSE : To introduce new bicyclesafety and helmet safety issues to stu-dents. Concepts will be applied later incurriculum in order to properly learn toride bicycles on the road.
First Gear can be obtained through the Bicycle Transportation Alliance,(503) 226-0676, or www.bta4bikes.org
5
B A C K G R O U N DL E S S O N
Traffic lawsWHY DO WE HAVE LAWS?
Question: What is a law?
“A rule or regulation set up by a government to be followed by allof the people…”
There are many different types of laws. Some laws are made toprevent people from stealing and for punishing them if theydo…Some laws are made to help keep people safe andhealthy….
The logic behind a law is to set rules that we are supposed to follow. The rules are generally set up so people can remain safeand healthy.
Example: One example is the requirement that people must havea driver’s license before driving a car.
This law ensures that people understand the rules of driving andthat they should drive safely so they do not crash and kill some-one. Another example is a law that prohibits drunk driving. Adrunk driver is a person who has consumed alcohol and then dri-ves a car. Alcohol decreases people’s reaction speeds and abilityto make decisions, increasing the chance for a crash and thusmaking it very dangerous to drive.
Of course there are certain consequences to breaking laws.Because it is very dangerous to drive while under the influence ofalcohol, when drunk drivers are caught they are usually arrested,go to court and often go to prison and lose their drivers license. If they crash and hurt or kill a person they may go to prison formany years.
There is also a law REQUIRING people under that age of 16 towear a bicycle helmet whenever riding a bike. The penalty for thisoffense is a $50 fine. That is a lot of money to pay for not wear-ing a helmet. But how often do the police enforce this law?(explain enforcement; use their bed times or eating their vegeta-bles as an example). So enforcement and severity of punishmentare two major considerations when thinking about our laws.
Let’s look more closely at these laws so we can all get a betterunderstanding of laws:
discussion
5MINUTES
Bicycle ridership and safety
WHAT: A discussion about laws, en-forcement and punishment. A seconddiscussion explains the traffic laws thatbicyclists must follow.
PURPOSE : Teach students aboutlaws so they will understand the conse-quences of violation and abide by themgenerally. Teach students traffic lawsand regulations so they will be safer rid-ers and avoid potential crashes.
Users of the road must be aware ofthe traffic that is around them. Ashas been discussed in the video,bicyclists generally ride on the rightside of the road. When changinglanes or preparing for a left handturn bicyclists look back into thelane to see if any other traffic isthere.
Looking back: explain the scenarioswhere you use looking back bydrawing a two-lane, two-way streetwith intersection on the board.Demonstrate that the cyclist isriding in the right lane in position 3for a left hand turn and wants tomove into position 1 for a left turn.The cyclist must:
• First look for traffic by lookingbehind.
• If no traffic, the bicyclist signalsleft and looks back again.
• Then moves through position 2into position 1.
• Stop at the stop sign and followright-of-way rules.
• Finally, the cyclist signals left andturns from position 1 into position 3on the adjacent street.
B A C K G R O U N D L E S S O N
6
Law: Must wear a bike helmet.Reason: To protect our heads.If violated: $50 fine
Law: Must stop at a red light.Reason: There are certain traffic rules that everyone follows
and if you violate them you put yourself and other people in danger.
If violated: $150 fine; if you cause a crash you might have to pay for the other person’s property. If you kill another person, motorist, bicyclist or pedestrian, you may have to go to prison even if you didn’t mean it.
Law: No drinking and driving.Reason: To prevent crashes due to drivers who are
intoxicated and operate a vehicle.If violated: Possibility of paying a $1,000 fine, losing driver’s
license, and going to prison.
Why do different laws have different punishments? If a law has alesser punishment than another, are they both important?
Being responsible for your actions is called liability. You areresponsible (liable) for the way you behave and if you break a ruleyou may go to the principal’s office, get detention, etc. Liability isimportant because if you injure someone or their property andbreak the law, you are liable for the damages.
Example: you don’t stop at a stop sign, and get into a crash.
This means that you may have to replace their property, pay for adoctor, pay a fine, or go to jail.
SO, laws are put in place to create order, to keep us safe and pro-tect our stuff. In traffic, laws are essential so others can predictwhat we are going to do. Bicycles must ride like all other vehiclesto remain Predictable and Safe!
L E S S O N 1
Vocabulary for bike lawsLaw: a rule or regulation set up by agovernment to be followed by all of thepeople.
Enforcement: the actions taken by policeofficers or other persons instructed tomake sure people do not break rules orlaws. For example, a referee enforcesthe rules in a basketball game and callsa foul if rules are broken.
Severity of punishment: the degree ofpunishment one may receive when vio-lating a rule or law. In a basketballgame the team often gets foul shotswhen a rule is broken. A $50 fine is thepunishment for not wearing a bicyclehelmet.
Liability: to be responsible for an action.You are responsible (liable) for the wayyou behave and if you break a rule youmay go to the principal’s office for apunishment.
Be predictable: to act so other peoplewill know what you are going to do.“You are so predictable, you alwayswant pizza for dinner.” Bicyclist musttravel in a predictable manner so othermotorists and cyclists know what theywill do. Predictability prevents crashes.
7
B A C K G R O U N DL E S S O N
WHAT ARE THE TRAFFIC LAWS?
Bikes generally must follow the same rules of the road as auto-mobiles. Therefore when we teach you the rules of the road forbicycling, you are also learning how to drive a car. Riding on thesidewalk is dangerous and is only recommended for children ages9 and under.
A “bicycle” means a vehicle. ORS 801.150.
Helmets always first. The Helmet Law: “A person commits anoffense… if the person is under 16 years of age…operates orrides a bicycle…on premises open to the public and is not wear-ing protective headgear.” ORS 814.408, Section 2.
Bicycles must act like cars. “Every person riding a bicycle upon apublic way is subject to the provisions applicable to and has thesame rights and duties as the driver of any other vehicle.” ORS814.400.
There are some valid reasons for riding with traffic/like anautomobile:
• The law requires cyclists to ride with traffic (in the same direc-tion as cars).
• Motorists do not expect to see traffic coming in the oppositedirection. In order to be seen bicyclists must ride wheremotorists expect to see traffic, on the right.
• Wrong-way riding results in nearly one fourth of all car/bikecrashes.
• Traffic control devices (i.e. stop signs and traffic lights) facethe normal flow of traffic.
• Cyclists who ride with the traffic, on the right, face the dangerof a head-on crash with a wrong-way rider.
Bike lanes. In Oregon bicyclists are supposed to ride in bikelanes when they are provided unless when turning or if the bicy-clist doesn’t feel that it is safe. While in the bike lane, bicyclistspossess additional right-of-way privileges. In fact, bicyclists canlegally pass on the right side of cars and cars are not allowed toturn in front of bicyclists in bike lanes. Bicyclists should stillremain cautious of cars when in bike lanes.
discussion
5MINUTES
Bicycle ridership and safety
The five key rules for bikes! Ride in the Same Direction as Traffic
" Obey All Traffic Signs
# Ride on the Road
$ Use Hand Signals
% Stay to the Right
ORS means Oregon Revised Statute.
Skateboards, rollerblades and scootersin some areas have the same responsi-bilities as bicycles, which means thatthey have to follow the rules of theroad, not act like a walker. This meansthat they have to give audible callswhen passing walkers on the sidewalkand have to be especially careful whentraveling across intersections becausecars do not expect people in the cross-walk to be moving quickly through theintersection.
B A C K G R O U N D L E S S O N
8
L E S S O N 1
9
B A C K G R O U N DL E S S O N
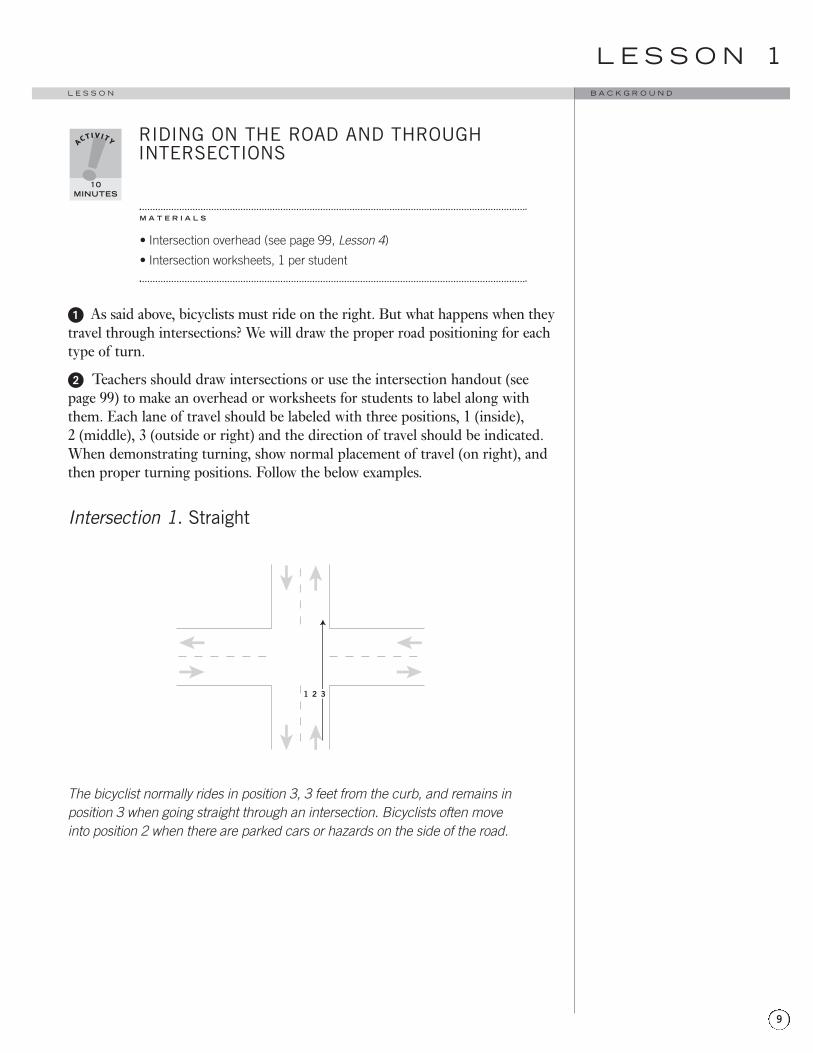
RIDING ON THE ROAD AND THROUGHINTERSECTIONS
M A T E R I A L S
• Intersection overhead (see page 99, Lesson 4)
• Intersection worksheets, 1 per student
! As said above, bicyclists must ride on the right. But what happens when theytravel through intersections? We will draw the proper road positioning for eachtype of turn.
" Teachers should draw intersections or use the intersection handout (seepage 99) to make an overhead or worksheets for students to label along withthem. Each lane of travel should be labeled with three positions, 1 (inside), 2 (middle), 3 (outside or right) and the direction of travel should be indicated.When demonstrating turning, show normal placement of travel (on right), andthen proper turning positions. Follow the below examples.
Intersection 1. Straight
The bicyclist normally rides in position 3, 3 feet from the curb, and remains inposition 3 when going straight through an intersection. Bicyclists often moveinto position 2 when there are parked cars or hazards on the side of the road.
1 2 3
10MINUTES
Intersection 2. Right
The bicyclist normally rides in position 3 and remains in position 3 when turningright through an intersection.
Intersection 3. Left
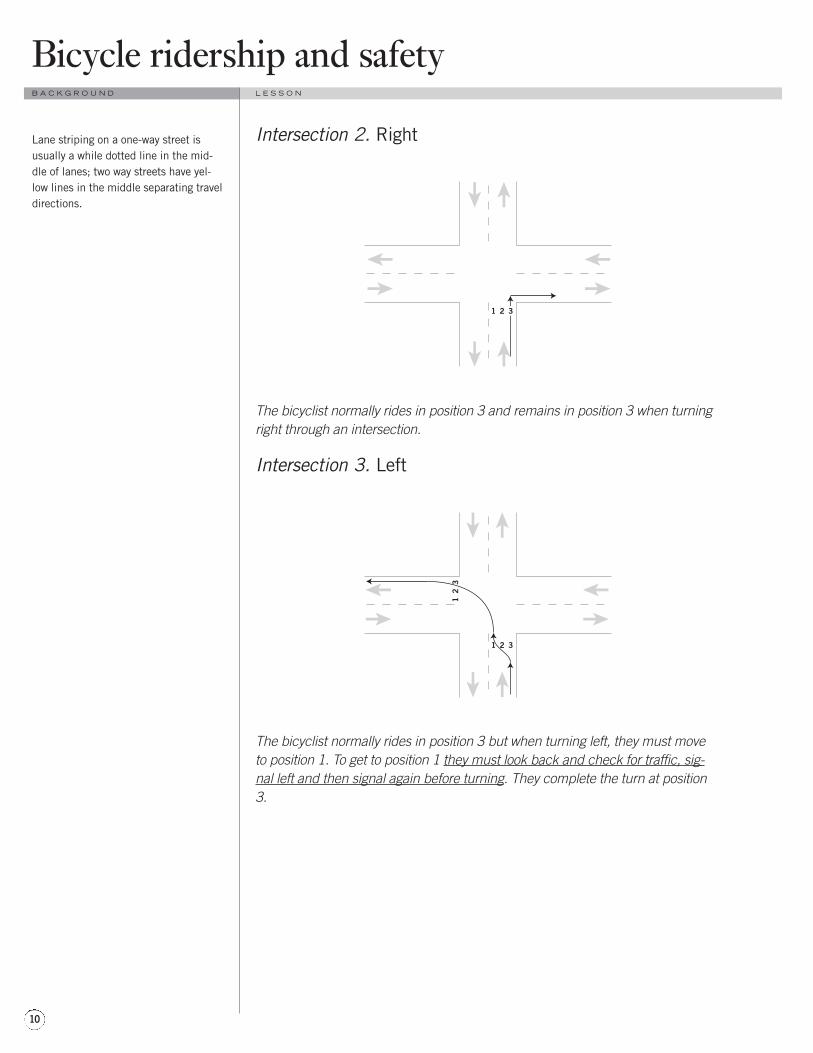
The bicyclist normally rides in position 3 but when turning left, they must moveto position 1. To get to position 1 they must look back and check for traffic, sig-nal left and then signal again before turning. They complete the turn at position3.
1 2 3
12
3
1 2 3
Bicycle ridership and safety
Lane striping on a one-way street isusually a while dotted line in the mid-dle of lanes; two way streets have yel-low lines in the middle separating traveldirections.
B A C K G R O U N D L E S S O N
10
Intersection 4. Positioning and left turns on a 2-lane, one-way street
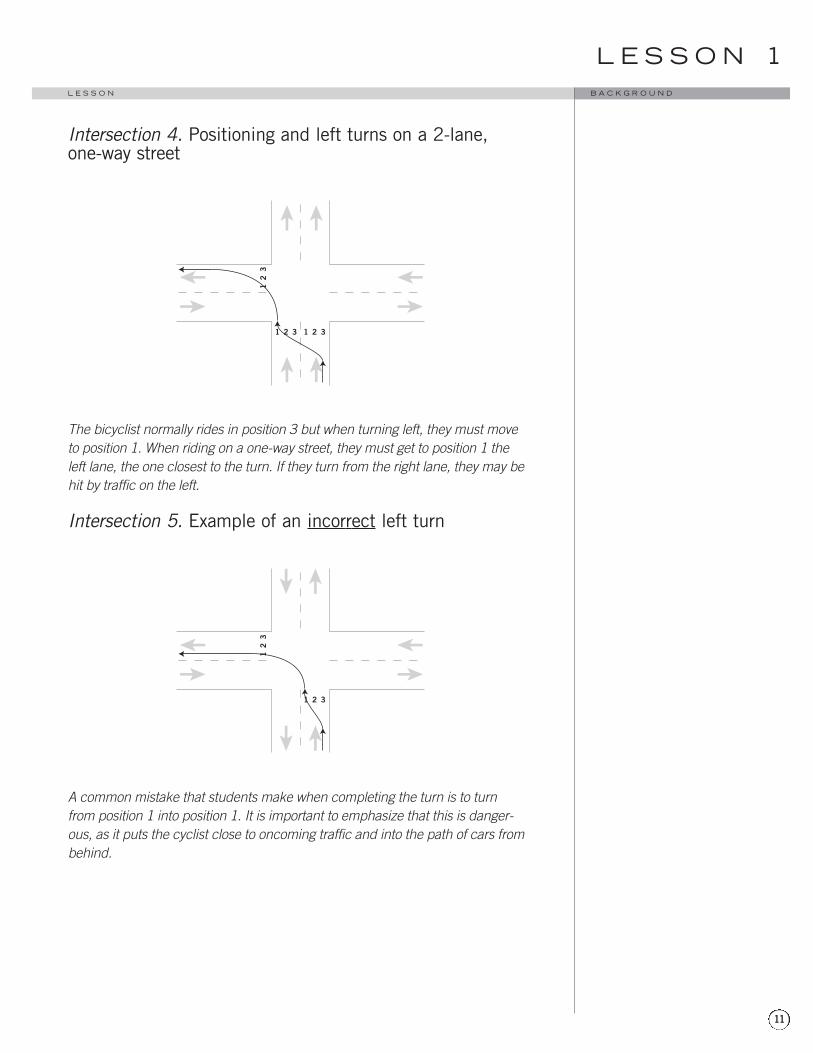
The bicyclist normally rides in position 3 but when turning left, they must moveto position 1. When riding on a one-way street, they must get to position 1 theleft lane, the one closest to the turn. If they turn from the right lane, they may behit by traffic on the left.
Intersection 5. Example of an incorrect left turn
A common mistake that students make when completing the turn is to turnfrom position 1 into position 1. It is important to emphasize that this is danger-ous, as it puts the cyclist close to oncoming traffic and into the path of cars frombehind.
1 2 3
12
3
1 2 31 2 3
12
3
L E S S O N 1
11
B A C K G R O U N DL E S S O N
NARRATIVE WRITING
We are going to create a journal or add to existing journals for the BSP.
Journal TopicDescribe how I normally get around. How do I go to school? My friend’s house? To the park? By bus, bike, walking, car. Which way do I like best? Why? Why don’t I like some ways?
homework
Bicycle ridership and safetyB A C K G R O U N D L E S S O N
12
5 MINUTES
Importance of the brain 145 MINUTESOptional
Melon drop 1630 MINUTES
Helmet fitting 175-10 MINUTES
Signs 1910 MINUTESOptional
Bike parts and components 2010 MINUTES
Bike gear 21HOMEWORK
Journal 2220 MINUTESOptional
Bicycle investigation 2215 MINUTESOptional
Survey overview; survey 24
EQUIPMENT
Helmet Drop• Melon• Bicycle helmet
(can be fairly old)• Small tarp / trash bag• Rags for cleaningHelmet Fit• Bicycle helmets
(30-40, various sizes)• Helmet fitting
brochure (15)
• Tape measures (15)• Pre-test score sheet
to grade classOther Gear• Bike parts worksheet• Night and rain gear• Bicycle• Pannier• Bike stand (optional)• Sample of bicycle
system
Purpose: Students learn the importance and proper fit of bicycle helmets in order toreduce fatal crashes. Familiarize students with bicycle parts and gear for properuse and safety.
Topics covered: • Helmet use and fit• Bike parts• Other gear• Survey
Helmets, bike gearand parts
HealthControllable health risks• Understand and apply prevention and
risk reduction strategiesSafe and healthy environment• Understand and apply strategies to
improve and maintain health• Apply injury preventionInformed consumer• Analyze influences of culture on health
related products as a consumer
Physical educationSelf-management and social behavior• Apply rules, procedures anad etiquette
that are safe and effective for specificactivities / solutions.
LESSON 2
13
S T A T E W I D E E D U C A T I O N G O A L SO V E R V I E W
Helmets
IMPORTANCE OF THE BRAIN
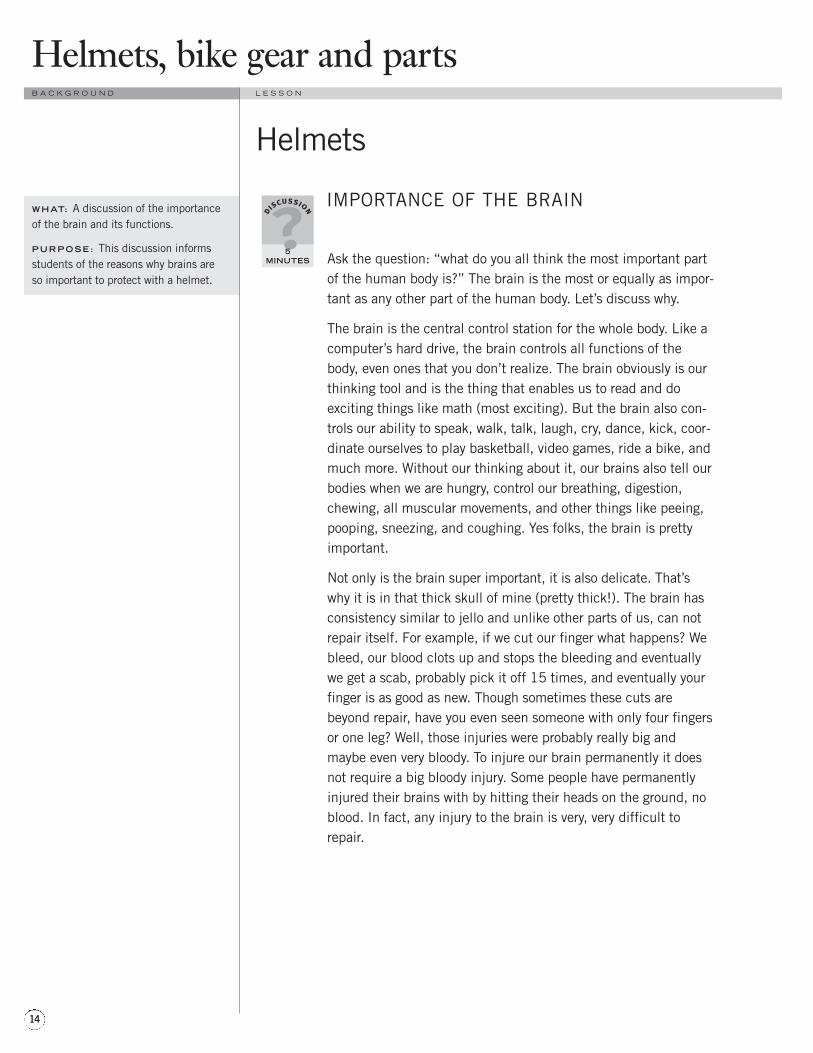
Ask the question: “what do you all think the most important partof the human body is?” The brain is the most or equally as impor-tant as any other part of the human body. Let’s discuss why.
The brain is the central control station for the whole body. Like acomputer’s hard drive, the brain controls all functions of thebody, even ones that you don’t realize. The brain obviously is ourthinking tool and is the thing that enables us to read and doexciting things like math (most exciting). But the brain also con-trols our ability to speak, walk, talk, laugh, cry, dance, kick, coor-dinate ourselves to play basketball, video games, ride a bike, andmuch more. Without our thinking about it, our brains also tell ourbodies when we are hungry, control our breathing, digestion,chewing, all muscular movements, and other things like peeing,pooping, sneezing, and coughing. Yes folks, the brain is prettyimportant.
Not only is the brain super important, it is also delicate. That’swhy it is in that thick skull of mine (pretty thick!). The brain hasconsistency similar to jello and unlike other parts of us, can notrepair itself. For example, if we cut our finger what happens? Webleed, our blood clots up and stops the bleeding and eventuallywe get a scab, probably pick it off 15 times, and eventually yourfinger is as good as new. Though sometimes these cuts arebeyond repair, have you even seen someone with only four fingersor one leg? Well, those injuries were probably really big andmaybe even very bloody. To injure our brain permanently it doesnot require a big bloody injury. Some people have permanentlyinjured their brains with by hitting their heads on the ground, noblood. In fact, any injury to the brain is very, very difficult torepair.
discussion
5MINUTES
Helmets, bike gear and parts
WHAT: A discussion of the importanceof the brain and its functions.
PURPOSE : This discussion informsstudents of the reasons why brains areso important to protect with a helmet.
B A C K G R O U N D L E S S O N
14

What does brain injury mean? It could mean a lot of thingsbecause your brain controls so much. It could mean you looseyour memory. Maybe you lose your ability to speak or walk. Howwould you feel if you couldn’t play basketball anymore, notbecause your body wasn’t good but because your brain couldn’tfigure out how to walk?
This is why people wear helmets. As you know, not only bicyclistswear helmets but many sports and professions require helmets.Can anyone name some? Sports include: biking, boarding, blad-ing, football, baseball, hockey, rock climbing, bungie jumping,skiing, luging, motor cycle and car racing, and some boxing.Professions that use helmets include: construction, jet pilot,astronaut, motorcycle police officers, and firefighters.
Helmets are a commonly used by many people for good reason. In Oregon, it is the law for people under 16 to wear a helmetwhen they ride a bike. In this course everyone will wear a helmet.
L E S S O N 2
15
B A C K G R O U N DL E S S O N
Research shows that up to 90 percent
of deaths from bicycle crashes are
the result of head trauma. A prop-
erly worn and certified bicycle
helmet cushions and protects the
head from damaging impacts with
hard surfaces such as asphalt and
concrete. Scientists measure how
hard something hits something else
with “g forces”. Things that hit hard
have a high g force and high
potential for damage. 300 g’s is
enough to cause permanent brain
damage. 500 g’s can fracture the
skull and cause death. The head of
someone who falls from bicycle
height to a concrete surface can
receive a force of more than 1800 g’s.
CPSC approved helmets can reduce
the 1800 g’s of bicycle falls to less
than 200 g’s, which is not enough to
fracture a skull. Many doctors agree
that if all bicyclists wore helmets, 75
percent or more of bicycle-related
deaths would be eliminated.
(Florida, Traffic Safety Curriculum)

MELON DROPOptional
M A T E R I A L S
• Waterproof barrier (plastic bag) and napkins for cleaning up
• One head-sized honeydew melon (ripe)
• Chair to stand on
• ASTM, ANSI and/or SNELL approved bicycle helmet
The first drop is with a helmet (and the melon shouldn’t break) and the secondwithout the helmet, when the melon should break.
! Teacher gathers materials.
" Explain that the melon simulates the human head, the fruit and seeds insideare the brain. Yes, heads are fragile. If they hit a hard surface they could crackand your brain could get injured. Discuss the concept of force, that your headreceives force upon impact and how a helmet can reduce that force.
# Cover the hard floor surface with the cut trash bag. The teacher (or studentstanding on a chair) will strap the melon in a helmet and drop it six feet onto ahard surface. The class will observe the results. The melon should not break,and this will demonstrate the fact that the head was saved because the helmetabsorbed the force of the fall. If the melon gets injured, the teacher should notethat even with a helmet, heads can get injured — but watch to see what happenswhen we drop it without any helmet.
$ The melon is then dropped six feet without a helmet. It should break andthis is because it received the full amount of force from the fall. Heads arefragile: they may crack and you may get permanent brain damage because ofhigh-impact falls. If the melon does not break, it will bruise and that will showup in a few days. Look for a soft spot. That type of damage may still causepermanent brain damage.
5MINUTES
Helmets, bike gear and parts
WHAT: An activity where the teacherdrops a melon to simulate impacts ofbicycle crashes on the head and brain.
PURPOSE : This activity demonstratesthe importance of wearing a bicycle hel-met to reduce the severity of headinjuries.
B A C K G R O U N D L E S S O N
16
VocabularyG-forces: a measurement scientists useto indicate how hard one object hitsanother.
Bicycle helmet: equipment used to pro-tect a person’s head. Reliable helmetsshould have the CPSC sticker of certifi-cation inside. Properly fitting helmetsshould be snug and cannot slide about.
Crushable liner: the inner portion of ahelmet that absorbs and reduces gforce to the head.
WHAT: Read the essential componentsof helmet fit and have the studentsproperly adjust their helmets.
PURPOSE : Students will learn to fit ahelmet properly.
HELMET FIT
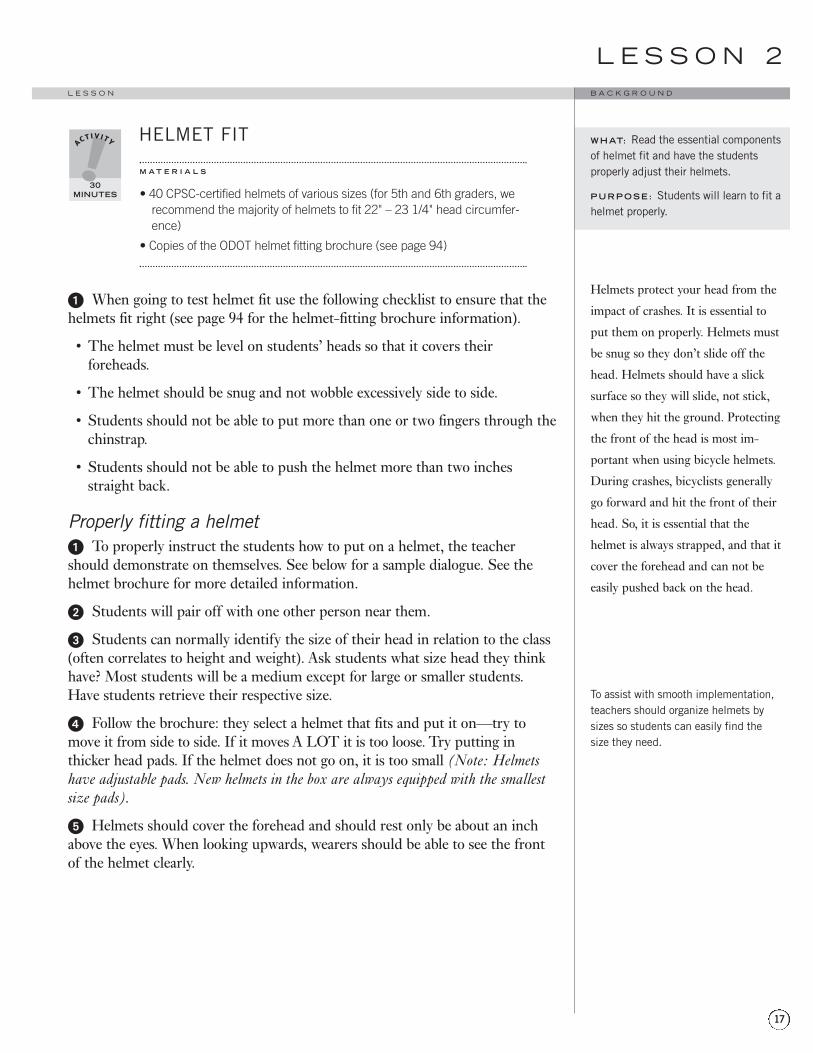
M A T E R I A L S
• 40 CPSC-certified helmets of various sizes (for 5th and 6th graders, werecommend the majority of helmets to fit 22" – 23 1/4" head circumfer-ence)
• Copies of the ODOT helmet fitting brochure (see page 94)
! When going to test helmet fit use the following checklist to ensure that thehelmets fit right (see page 94 for the helmet-fitting brochure information).
• The helmet must be level on students’ heads so that it covers theirforeheads.
• The helmet should be snug and not wobble excessively side to side.
• Students should not be able to put more than one or two fingers through thechinstrap.
• Students should not be able to push the helmet more than two inchesstraight back.
Properly fitting a helmet! To properly instruct the students how to put on a helmet, the teachershould demonstrate on themselves. See below for a sample dialogue. See thehelmet brochure for more detailed information.
" Students will pair off with one other person near them.
# Students can normally identify the size of their head in relation to the class(often correlates to height and weight). Ask students what size head they thinkhave? Most students will be a medium except for large or smaller students.Have students retrieve their respective size.
$ Follow the brochure: they select a helmet that fits and put it on—try tomove it from side to side. If it moves A LOT it is too loose. Try putting inthicker head pads. If the helmet does not go on, it is too small (Note: Helmetshave adjustable pads. New helmets in the box are always equipped with the smallestsize pads).
% Helmets should cover the forehead and should rest only be about an inchabove the eyes. When looking upwards, wearers should be able to see the front of the helmet clearly.
30MINUTES
L E S S O N 2
17
B A C K G R O U N DL E S S O N
Helmets protect your head from the
impact of crashes. It is essential to
put them on properly. Helmets must
be snug so they don’t slide off the
head. Helmets should have a slick
surface so they will slide, not stick,
when they hit the ground. Protecting
the front of the head is most im-
portant when using bicycle helmets.
During crashes, bicyclists generally
go forward and hit the front of their
head. So, it is essential that the
helmet is always strapped, and that it
cover the forehead and can not be
easily pushed back on the head.
To assist with smooth implementation,teachers should organize helmets bysizes so students can easily find thesize they need.
& Start with the hollow buckle, put the buckle under the chin and adjust theslide adjuster buckle so the ear is between the two straps and slide adjuster isnear the point of the cheek bone (will vary among students).
' Do the same with the pronged buckle.
( The chin strap should be snug, you should only be able to put one or twofingers between strap and chin. Tighten the chin strap.
) You should not be able to move the helmet more than an inch back on yourhead. If you can, the buckles of the helmet strap should be moved forward onthe face.
Have each student put their name on tape and place it on borrowed helmets soit can be used in future lessons. Place helmets in a class bag or some other easilyretrievable location.
Helmets, bike gear and partsB A C K G R O U N D L E S S O N
18
Transmission of lice from helmets canbe a concern. Since helmets are gener-ally stored in large bags between classperiods, teachers might require eachstudent to have a separate bag that they store their helmet in and tie or rubber band it shut. In this case stu-dents should write their name on mask-ing tape and attach it to the bag. Afterthe bike safety class is complete, hel-mets should be stored in an air-tightbag for two weeks in a dark location.This will kill all lice and their eggs. Lice spray that can be purchased atmost drug stores can also be used todisinfect helmets.
For helmet statistics, see Backgroundto “Melon Drop”.
WHAT: A brief activity to introduce avariety of traffic signs.
PURPOSE : Understanding streetsigns is essential to following trafficrules.
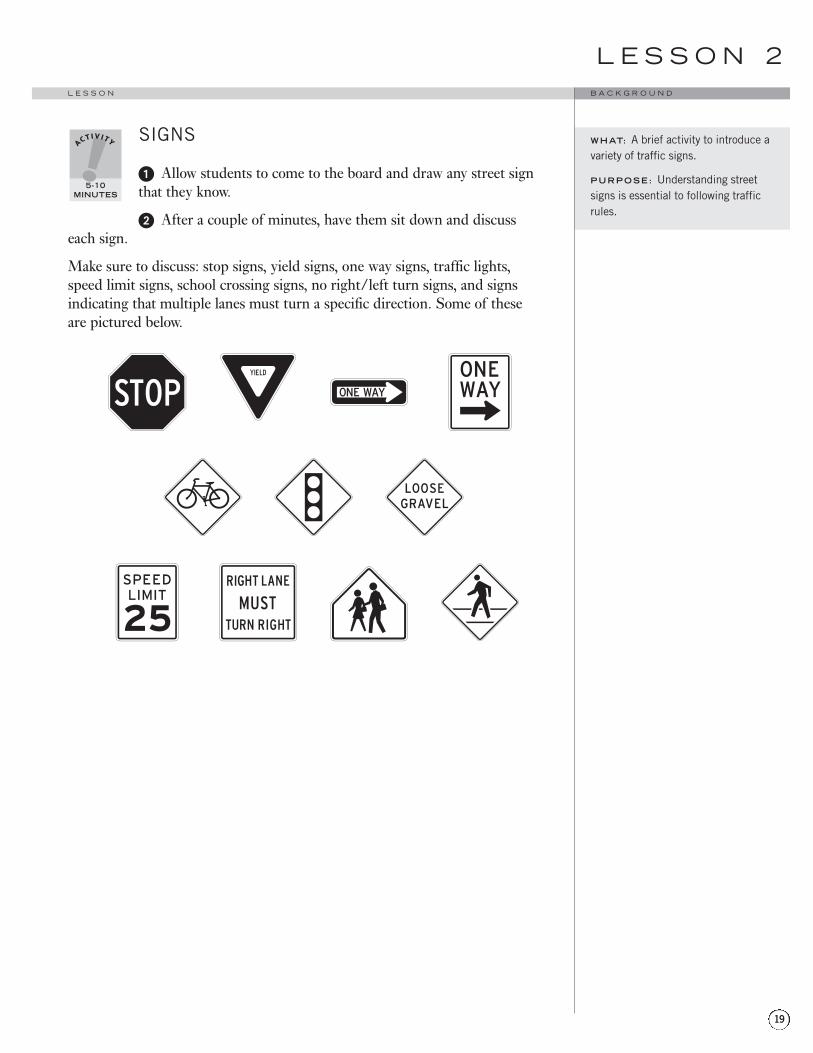
SIGNS
! Allow students to come to the board and draw any street sign that they know.
" After a couple of minutes, have them sit down and discuss each sign.
Make sure to discuss: stop signs, yield signs, one way signs, traffic lights, speed limit signs, school crossing signs, no right/left turn signs, and signsindicating that multiple lanes must turn a specific direction. Some of these are pictured below.
l z n b
y s K
@ " n s
5-10MINUTES
L E S S O N 2
19
B A C K G R O U N DL E S S O N
BIKE PARTS AND COMPONENTS
M A T E R I A L S :
• Handout: Bike Parts (see page 99)
• Pencils
• A bicycle: to show what you are talking about for this lesson
• A frame without parts and wheels; the separated components (example: the braking system — a connected brake lever, wire/housing,and brake shoes) (Optional)
! Discuss the following topics: What is the Frame? What areParts/Components?
The bike frame is the section of your bike that is completely fused together, thebody of the bike. Bike parts and components include all other pieces that holdthe bike together (example — forks, tires, pedals, crank arms) and thoseadjustable parts (example — brake levers, shifters, derailleurs).
" Distribute the handout to students. Instruct students to identify 20 bicycleparts and put each corresponding letter next to the part. If need be they candraw a line to the part and write the corresponding letter next to the line.
# Students should be told to work on the sheet by themselves at first. Allowstudents to look at and touch the real bikes and bike parts. After a few minutes,allow students to work together.
$ Present the list. After about five minutes (or when students are done), haveabout five kids, or one per table, go to the bike and point out each part/componentof the bike.
% Teacher reiterates the parts.
& Have a short break to allow kids to hand in their lists of parts.
' Quickly, the teacher should then reiterate the bicycle parts, having studentscall out the correct answer for each part.
10MINUTES
Helmets, bike gear and parts
WHAT: A discussion and worksheetactivity to teach bicycle parts.
PURPOSE : Understanding the partsof the bicycle will allow you to maintainyour bicycle in order to keep it safe andhelp you know what to get it fixed.
B A C K G R O U N D L E S S O N
20
WHAT: A brief discussion about thegear used by bicyclists including tools,rain gear and nighttime gear.
PURPOSE : Students become familiarwith the gear that is important for ridingat night and in rain, and gear thatimproves safety.
BIKE GEAR
M A T E R I A L S :
• Lighting — headlight, taillight, reflectors, reflective vests and pant straps
• Commuting — bike rack, panniers, back pack, horn
• Rain — fenders, rain pants, jacket, gloves
• Repair — patch kit, tire levers, pump (see Lesson 3, Repair)
• 1 bicycle — should be equipped with many of the above items
Nighttime Wear and LightingStudents should avoid riding at nighttime because it can be dangerous. If they do need to ride at night, it is very important tohave equipment that will help make them visible to other cars, etc.
Demonstrate nighttime equipment. Nightwear must include lighting and reflec-tion, and riders should wear retro-reflective clothing. It is the law to use lightingat night including: a front white headlight that is visible from 500 feet and a rearred taillight or reflector that is visible from 600 feet when shone upon from anautomobile’s low beams. Generally, lights are better, and reflectors should beused in addition to lights.
Riding in the RainIn many areas of Oregon, it rains all winter so we should be pre-pared so our clothing is not wet all day.
A good jacket and fenders are probably the most important wayto stay dry. Rubber jackets are on sale for about $25 in manysporting goods stores. Other equipment includes rain pants,boots and gloves to protect from the rain. Parking your bikeunderneath a covered area is always helpful.
Commuting — Riding to SchoolRiding to school is definitely fun and a really good way to get aworkout. (Teachers, do you ride to work? Tell the story). It is goodto get proper gear for carrying your lunch, gym clothes, etc.
You can buy a bike rack and special bags that clip on called pan-niers. They can be normal or waterproof and often very expensive.A book bag also works really well, either a back pack or shoulderbriefcase style, as long as you have both hands free to ride thebike. Don’t forget your jacket and helmet.
Repair ToolsYou should carry repair tools, especially if travelling long dis-tances. We will go over this when fixing a flat.
Quickly show repair tools — pump, repair kit, tire levers.
discussion
10MINUTES
L E S S O N 2
21
B A C K G R O U N DL E S S O N
SMALL TOOL BAG:• patch kit (patches, glue and sandpaper)
• y-wrench
• rag
• tire irons
• small flat-head screw driver
• Band-aids
• duct tape
• important hex-keys
• pump (normally on bike)
JOURNAL ASSIGNMENT
Have students write about a bicycle crash they had. Include how andwhen it happened, whether they got hurt, whether they wearing a helmet, andwhat parts got messed up. Ask them how it made them feel. Were they afraid toride a bike afterwards? Etc.
BICYCLE INVESTIGATIONOptional discussion
Advertisers believe that promotion will influence the behaviors ofindividuals. If we promote bicycling, more students might ride toschool. Of course there are other factors. These might includepermission from our parents, the quality of the bicycle lockers,weather, and the bicycle friendliness our streets. For the next twoweeks (or longer), we will keep track of bicycle ridership andobserve changes because of promotion or other reasons (i.e.,weather, secure bicycle parking, contest).
Measuring Our Class’ Ridership! Ask the class: who biked yesterday?
" Who biked today? (use the results from the above survey or ask class)
# The class should keep a daily count of bicycle ridership among the class andby counting the number of bikes parked at the bike racks, chart and graph theinformation (see Handouts, page 99).
$ The teacher should actively promote cycling to school and the class shouldkeep track of their ridership. Teachers can run a contest to see who rides themost or if the class can reach a certain percentage of students riding to school.
20MINUTES
homework
Helmets, bike gear and partsB A C K G R O U N D L E S S O N
22
Promoting and Measuring School RidershipOur next step is to promote bicycling throughout the entireschool. There are many things we can do, some are simple andsome are time intensive. During any of these activities, the classshould count the bicycles parked at the school each day.
! Promote bicycling via flyers around school and student-made posters thatdiscuss bicycle laws and safety rules (minimal amount of work). Talk with theprincipal and other teachers about promoting cycling and increasing studentridership. Set up a Trauma Nurses Talk Tough assembly (the teacher may havealready done this).
" Have a Bike to School Day (medium amount of work). First discuss theconcept with the school administration and let them know your class wantsmore students to ride because it is healthy and environmentally friendly. Postflyers around the school promoting a one-time event which students are invitedto bike to school a half hour early (helmets required). Offering bagels or othertreats, raffles (water bottles, helmets, patch kits, etc.) and a speaker who talksabout cycling can be effective promotion. If parking security is a problem, offera secure parking alternative. Get other teachers promoting the event to theirstudents. A student announcing the event to each classroom helps too. Lastly,consider putting on a bike rodeo after school with the help of teachers, the localbike shop and community volunteers.
# Conduct a survey (a lot of work) of schoolmates. Ask why they do or don’tride to school. Analyze the information with charts and graphs. Make recom-mendations and write a letter and make presentations to school administration,city officers, city planner, or a local safety police officers. See page 92 andHandouts, page 99, for more information on developing a survey. Consider thenconducting a school-wide promotion campaign (see numbers ! and " above).
L E S S O N 2
23
B A C K G R O U N DL E S S O N
SURVEY OVERVIEWOptional
Surveys are a tool used to study and gather information aboutpeople, their behaviors, animals, materials, etc. When conduct-ing personal surveys you use your survey questions and ask peo-ple for information about themselves. Our class will read surveyquestions and the students will respond. We will then learn infor-mation about our bicycles and our riding habits.
What will we do with the information? Results of surveys canhave many uses for many people. If we find that many studentswould ride bikes if we had better parking we might give the resultsto the principal and ask for good bike racks. If we find that it istoo dangerous to ride, we might contact city planners and discussmaking the streets safer.
discussion
5MINUTES
Helmets, bike gear and parts
WHAT: Conduct a survey about bicycleridership and discuss bicycle behavioramong students. Discuss surveys, dis-cuss problems with surveys.
PURPOSE : This activity increases theawareness of bicycle behavior for stu-dents and teachers alike. The questionshere will be used to generate discussionaround bicycle use throughout the cur-riculum. The lesson also teaches aboutthe uses and weaknesses of surveys.
B A C K G R O U N D L E S S O N
24
This background information can be
used in a discussion period after the
surveys are conducted.
Surveys have strong and weak
points. Below are listed the strengths
and weaknesses.
STRENGTHS: the benefits of sur-
veys as opposed to other methods of
collecting information.
Ease of implementation: It is easy to
administer surveys and they do not
cost a lot of money; therefore we can
ask a lot of people a lot of questions.
Other methods of collecting informa-
tion are not so easy. Interviews take a
long time so you can’t ask as many
people the for the same information.
An interview is another way to get
information, but you ask one person
questions and they can respond in
depth.
Analysis: It is usually easy to inter-
pret the information. So, if we ask,
“who biked today,” it is easy to
count the responses and develop
conclusions.
(continued next page)
(continued from previous page)
WEAKNESSES: problems, includ-
ing things that lead to inaccurate
data collection
Participation: did everyone answer
the questions? Did anyone answer
twice? It is important that everyone
answers or we may have inaccurate
information. Example: If people who
don’t own bikes are afraid to answer,
we will think everyone owns a bike
Accuracy: was everyone honest?
Sometimes people don’t really mean
to, but answer inaccurately. Example:
How often do you eat french fries?
Because we know fries are unhealthy
we might answer twice per month
when it is really twice per week.
Inaccuracy can also occur because
we don’t remember, or because we
answer based on our ideals instead
of our actions and influences
(see below).
Influence: another aspect of accuracy
– did you answer improperly because
you didn’t want others to know that
you eat fries for every meal?
SURVEYOptional
M A T E R I A L S :
• Survey questions (page 26) cut into eight rectangles
! Select a student who will record the results of the survey (provide themwith a scoring sheet to save a minute or two, page 99). That student must makethree columns: a) “question numbers,” b) “yes,” and c) “no” column. Next toeach question number they should record the number of “yes” and “no”answers.
" Count the number of students in the class. Tell the number it to the classand have them remember it.
# Distribute the survey questions to the class. Try to give one per table.Students should not look at the questions until their number has been called.
$ In numerical order, a student from each table will read a question out loudto the class. Students answer by raising their hands for either “yes” or “no”(students should not answer both yes and no).
% As you are going through the survey, tally to make sure the “yes” and “no”add up to the total number of students in the class.
& Briefly discuss the intricacies and inaccuracies of administering a survey(example: students want to look cool and don’t answer truthfully). SeeBackground column for details.
' Discuss results. Who rides to school and who would like to ride if theycould? If any students have crashed their bikes, how did this make them feel?What would have to change for them to ride to school?
10MINUTES
L E S S O N 2
25
B A C K G R O U N DL E S S O N
STUDENT SURVEY QUESTIONS
M A T E R I A L S
• Scissors
! Photocopy this set of questions.
" Cut them apart.
# Place the appropriate number on the front of each piece of paper.
$ Have one student read out each question and the class will respond to eachquestion by raising their hands for either “yes” or “no”.
% The teacher should select a student to record the class’ answers on aseparate sheet of paper.
SURVEY QUESTIONS
1) Who owns a working bike that they can ride?
2) Who rode their bike or someone else’s bike during the summer?
3) Who has ever crashed on their bike?
4) Who has ridden their bike to school this year?
5) Who rode their bike today?
6) Who wears a bike helmet?
7) Who would ride to school if they could?
8) Who would like to ride bikes as an after school activity?
5-10MINUTES
Helmets, bike gear and partsB A C K G R O U N D L E S S O N
26
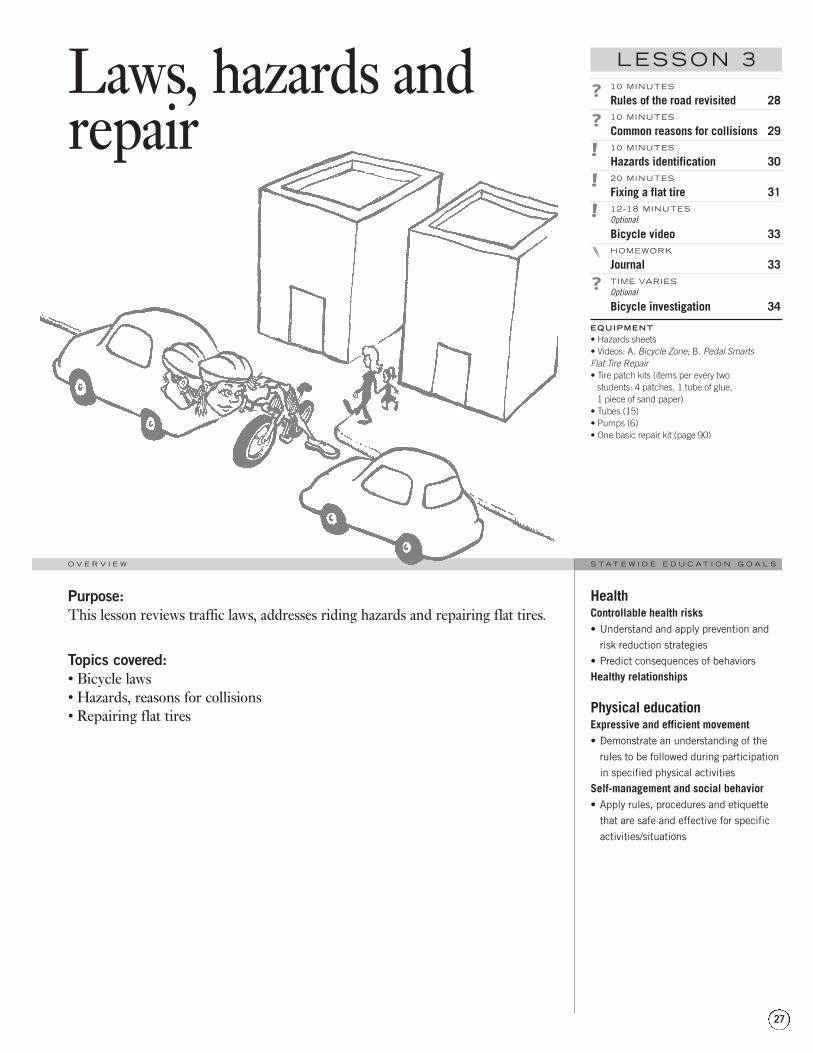
10 MINUTES
Rules of the road revisited 2810 MINUTES
Common reasons for collisions 2910 MINUTES
Hazards identification 3020 MINUTES
Fixing a flat tire 3112-18 MINUTESOptional
Bicycle video 33HOMEWORK
Journal 33TIME VARIESOptional
Bicycle investigation 34
EQUIPMENT• Hazards sheets• Videos: A. Bicycle Zone; B. Pedal SmartsFlat Tire Repair• Tire patch kits (items per every two
students: 4 patches, 1 tube of glue, 1 piece of sand paper)
• Tubes (15)• Pumps (6)• One basic repair kit (page 90)
Purpose:This lesson reviews traffic laws, addresses riding hazards and repairing flat tires.
Topics covered:• Bicycle laws• Hazards, reasons for collisions• Repairing flat tires
Laws, hazards andrepair
HealthControllable health risks• Understand and apply prevention and
risk reduction strategies• Predict consequences of behaviorsHealthy relationships
Physical educationExpressive and efficient movement• Demonstrate an understanding of the
rules to be followed during participationin specified physical activities
Self-management and social behavior• Apply rules, procedures and etiquette
that are safe and effective for specificactivities/situations
LESSON 3
27
S T A T E W I D E E D U C A T I O N G O A L SO V E R V I E W
RULES OF THE ROAD REVISITED
Review the discussion about laws in Lesson 1. Topics include:
• riding on the right,
• identifying and abiding by all traffic signs,
• signaling before turning,
• riding single file,
• helmet law,
• right-of-way rules through intersections,
• predictable riding.
Move on once students have a basic understanding of riding like a vehicle.
discussion
10MINUTES
Laws, hazards and repair
WHAT: Re-discuss the rules of theroad (see Lesson 1).
PURPOSE : It is essential that stu-dents have a long-term, basic under-standing of the rules of the road.
B A C K G R O U N D L E S S O N
28
WHAT: A discussion about the com-mon reasons for collisions
PURPOSE : Because the majority ofyouth bicyclists who crash with cars areat fault, the information in this lessonwill work to decrease these crashes.
COMMON REASONS FOR COLLISIONS
Interestingly enough, about 85% of all bicycle crashes do notinvolve a motor vehicle. Is this what our bicycle crash journal sto-ries told us?
(TEACHERS, you may want to re-discuss the crash stories here).
But, the worst bicycle accidents occur when crashing with a car.Youths are at fault almost all of the time when they do crash withcars. Therefore, most really bad accidents can be avoided bysmart cycling.
What are the frequent causes of major bicycle crashes foryouths?
THE two top reasons are:
• cyclists come out of a driveway, don’t stop and crash with a car
• cyclists fails to comply with the right-of-way rules at intersec-tions, such as running stop sign
Brainstorm other ideas about why bikes crash, why bikes crash into cars:
• failure to yield when changing lanes, or swerving into traffic.• bicyclists ride the wrong way on a street and crash with a car• when a motorist turns left• sidewalk cycling• when motorists turn right• when motorists restart from stop sign.
Generally, riding like a car (i.e. following the laws and drivingrules) will prevent crashes with cars. Other crashes can only beprevented with increased cycling skills (example: avoiding glassand hazards). We will teach some of those things next in the les-son and later during this curriculum.
discussion
10MINUTES
L E S S O N 3
29
B A C K G R O U N DL E S S O N
For more detailed crash data, seeHandouts, page 99.
HAZARDS IDENTIFICATION
M A T E R I A L S :
• “Find 10 Hazards” worksheet, p. 99
! Discuss the types of hazards with the class. Explain the problems and threatthat these hazards pose.
" Distribute the hazards handout sheet, have each student circle the hazardsand list them on side of the sheet.
# Review the sheet. Discusses avoidance of the hazards with the class. We willpractice avoidance on the bicycle at a later time.
10MINUTES
Laws, hazards and repair
WHAT: A discussion about and activityidentifying riding hazards. Avoidancetechniques are taught during Lesson 8.
PURPOSE : To increase knowledge ofhazards so they can be identified andavoided while riding the bicycle. Thisexercise will increase safety whilecycling.
B A C K G R O U N D L E S S O N
30
There are three main types of hazards:surface, collision and visual. TheHazards Handout depicts many ofthese.
Surface hazards: include glass, stormgrates, potholes, railroad tracks, rain,ice, or leaves.
Collision hazards: include turning cars,other bikers, pedestrians, dogs, andtrains. Also included are parked carswith opening doors.
Visual hazards: block a bicyclists view.They include bushes, fences, other cars,buildings, and too little light at night.

WHAT: An activity where studentspatch a flat tire
PURPOSE : Flat tires occur relativelyfrequently when bicycle riding. Cyclistsneed to be able to fix flat tires in orderto continue their ride when they getflats, otherwise have a good walk!
FIXING A FLAT TIRE
M A T E R I A L S
REPAIR TOOLS: SMALL TOOL BAG:
• 3 tubes of glue/ • Patch kit10 students (patches, glue and sandpa-per)
• 1 patch per 2 students • Y-wrench
• 2 tire irons per/rim with tire • Rag
• 1 pump/5 students • Tire irons
• Sandpaper • Small flat-head screwdriver
• Innertubes (at least 1 per 2 students) • Band-Aids
• Rims/tires (optional) • Water resistant electrical tape
• Chalk or light colored marker • Important hex keys
• Pump (normally on bike)
Note: The inner tubes and rims used for this lesson should not be theones used on the fleet of bicycles but instead old, used equipment.
! Introduce the lesson: this lesson teaches how to fix a flat. Of course, youcan’t fix the flat if you don’t carry the tools with you, so I always carry somebasic tools in case of emergency (show them small tool bag).
" Discuss potential road hazards that cause flats. Glass and nails are verycommon.
# Demonstrate or have student demonstrate repairing a flat. (If a studentdemonstrates, stress that they talk loudly).
$ How to: Assuming we have rims, tires and tubes, the tube must be taken outfrom between the tire and rim, patched or replaced and put it back in.
How to fix a flat:• Take one side of the tire off of the rim with the tire irons (not the whole
tire off),
• Take the tube from between the tire and rim and pull the tube out startingwith the side opposite the air valve.
• Pull tube out.
• Check the tube to find the hole. Usually this is easily done by pumping up the tire and feeling for the air coming out. Mark the hole with a marker or chalk.
20MINUTES
L E S S O N 3
31
B A C K G R O U N DL E S S O N
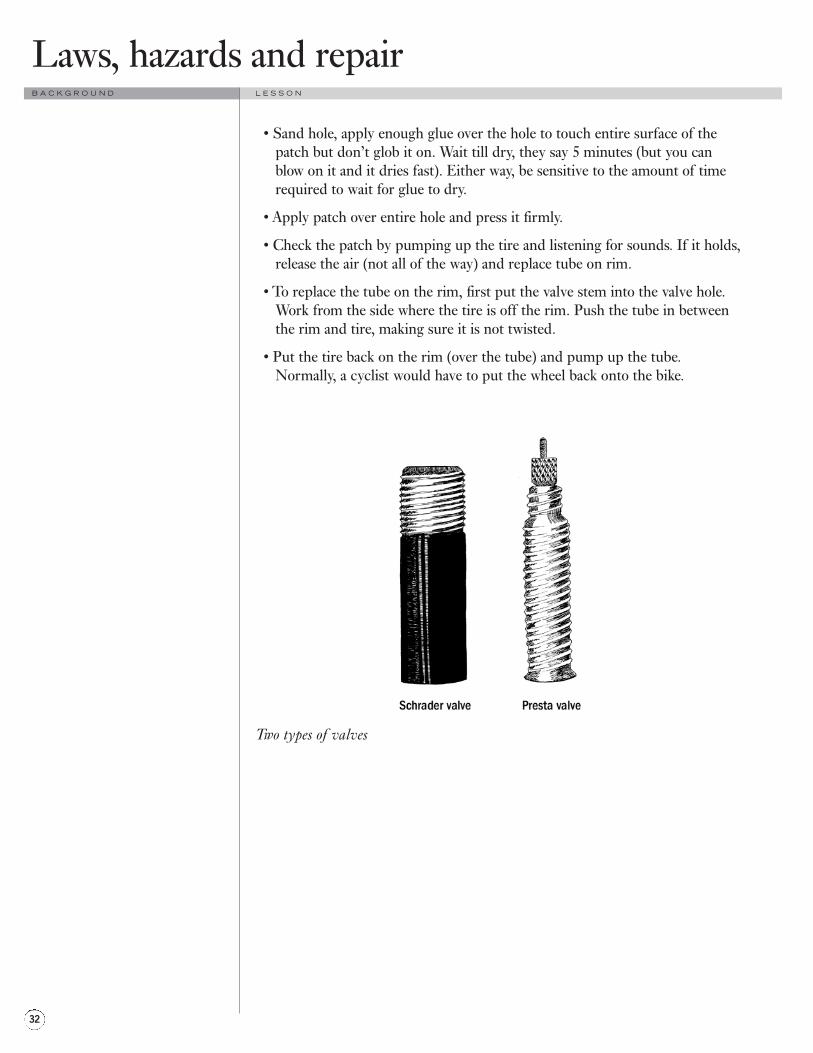
• Sand hole, apply enough glue over the hole to touch entire surface of thepatch but don’t glob it on. Wait till dry, they say 5 minutes (but you can blow on it and it dries fast). Either way, be sensitive to the amount of timerequired to wait for glue to dry.
• Apply patch over entire hole and press it firmly.
• Check the patch by pumping up the tire and listening for sounds. If it holds,release the air (not all of the way) and replace tube on rim.
• To replace the tube on the rim, first put the valve stem into the valve hole.Work from the side where the tire is off the rim. Push the tube in betweenthe rim and tire, making sure it is not twisted.
• Put the tire back on the rim (over the tube) and pump up the tube. Normally, a cyclist would have to put the wheel back onto the bike.
Two types of valves
Laws, hazards and repairB A C K G R O U N D L E S S O N
32

BICYCLE VIDEOOptional
M A T E R I A L S
• First Gear (21 minutes)
• The Bicycle Zone (12 minutes)
• Pedal Smarts (18 minutes)
Show a video to reinforce skills, concepts and rules before the students ridetheir bicycles. Discuss main elements of the video.
JOURNAL ASSIGNMENT
What have you learned about bike safety? Describe how you aresupposed to ride your bike around the community. On what sideof the street? How do you interact with traffic signs and signals.What types of things have you or do you normally see peopledoing wrong when cycling?
Read JournalsAs a wrap-up, find out what students learned during this week. You can ask someof the original survey questions again to see if you get a change in response.How did students like these lessons. If time permits, allow students to read theirjournal essays.
homework
12-18MINUTES
L E S S O N 3
33
B A C K G R O U N DL E S S O N
BICYCLE INVESTIGATIONOptional
Continue the work plan as set out in Lesson 2. Count the bicyclesparked at the bicycle racks.
Consider having a speaker come in and discuss bicycle ridership, the bicyclefacilities that are in place, and the City’s support for education of cyclists. Askwhat they are doing to make the city safer for kids to cycle. See Resources forpotential speakers including City planner, police officer, bicycle club member,bicycle shop employee.
Other Optional Activities
Route SelectionFactors in considering route selection: Where are you? Where do you want togo? What is a safe route?
Traffic: Lower traffic streets may be better to bike on. We should all beconcerned with crossing major streets.
Stop signs and stop lights: It is better to have these controls at intersections withhigh traffic roads.
Others: Street conditions (especially avoid train tracks); the scenery; time.
Consider discussing this topic before and after riding around in traffic. In addi-tion, consider the mapping activity in the BTA’s Safe Routes for Kids –Transportation Alternatives and Solutions curriculum.
Community Service Project: PostersMake bicycle safety posters that can be hung around the school and around thecommunity. Bring large pieces of paper and get proper art supplies. Give thestudents the laws and information to give them ideas for the poster. Bringpictures of bikes so they can draw them. (The BTA also has promotionalposters available.)
discussion
TIME VARIES
Laws, hazards and repairB A C K G R O U N D L E S S O N
34
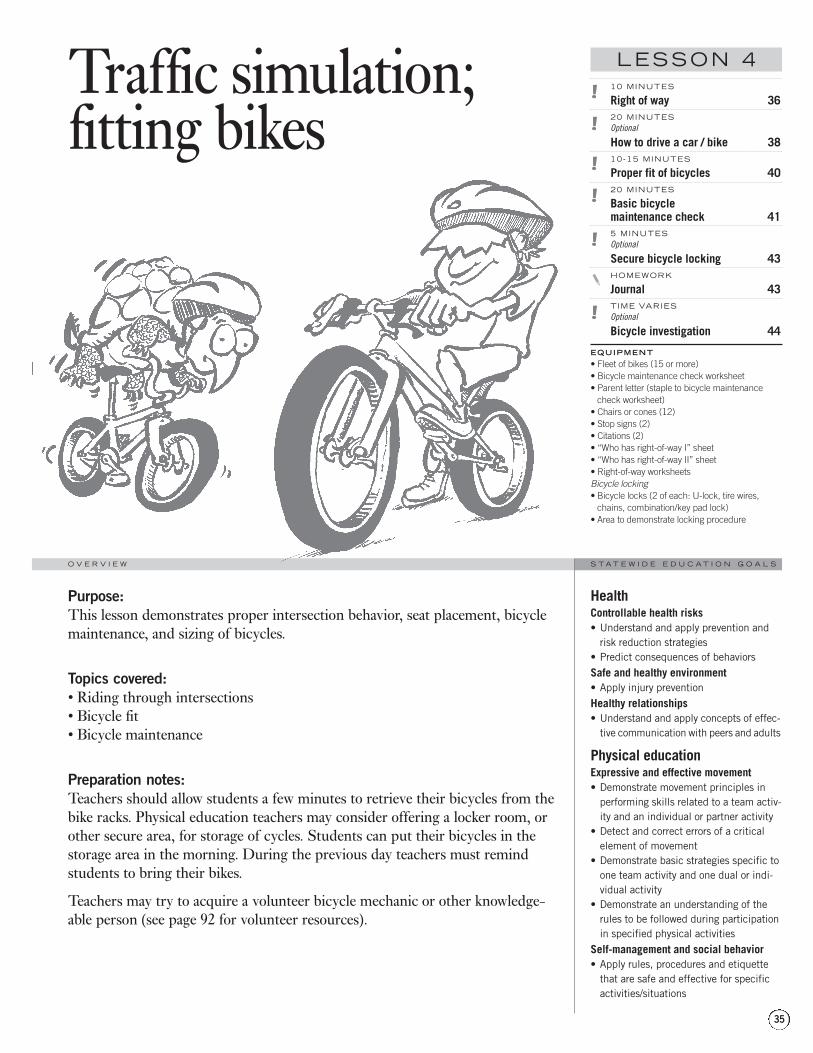
10 MINUTES
Right of way 3620 MINUTESOptional
How to drive a car / bike 3810-15 MINUTES
Proper fit of bicycles 4020 MINUTES
Basic bicycle maintenance check 415 MINUTESOptional
Secure bicycle locking 43HOMEWORK
Journal 43TIME VARIESOptional
Bicycle investigation 44
EQUIPMENT• Fleet of bikes (15 or more)• Bicycle maintenance check worksheet• Parent letter (staple to bicycle maintenance
check worksheet)• Chairs or cones (12)• Stop signs (2)• Citations (2)• “Who has right-of-way I” sheet• “Who has right-of-way II” sheet• Right-of-way worksheetsBicycle locking• Bicycle locks (2 of each: U-lock, tire wires,
chains, combination/key pad lock)• Area to demonstrate locking procedure
Purpose:This lesson demonstrates proper intersection behavior, seat placement, bicyclemaintenance, and sizing of bicycles.
Topics covered:• Riding through intersections• Bicycle fit• Bicycle maintenance
Preparation notes:Teachers should allow students a few minutes to retrieve their bicycles from thebike racks. Physical education teachers may consider offering a locker room, orother secure area, for storage of cycles. Students can put their bicycles in thestorage area in the morning. During the previous day teachers must remindstudents to bring their bikes.
Teachers may try to acquire a volunteer bicycle mechanic or other knowledge-able person (see page 92 for volunteer resources).
Traffic simulation;fitting bikes
HealthControllable health risks• Understand and apply prevention and
risk reduction strategies• Predict consequences of behaviorsSafe and healthy environment• Apply injury preventionHealthy relationships• Understand and apply concepts of effec-
tive communication with peers and adults
Physical educationExpressive and effective movement• Demonstrate movement principles in
performing skills related to a team activ-ity and an individual or partner activity
• Detect and correct errors of a criticalelement of movement
• Demonstrate basic strategies specific toone team activity and one dual or indi-vidual activity
• Demonstrate an understanding of therules to be followed during participationin specified physical activities
Self-management and social behavior• Apply rules, procedures and etiquette
that are safe and effective for specificactivities/situations
LESSON 4
35
S T A T E W I D E E D U C A T I O N G O A L SO V E R V I E W
RIGHT-OF-WAY
M A T E R I A L S
Worksheet: Who has the right-of–way?
Overhead: Right-of-way rules (p. 99)
Overhead: Intersection (p. 99)
Overhead: Intersection vehicles (cut-out individual bicycles, cars, pick-uptruck for activity) (p. 99)
Overhead projector
! Introduce the concept of right-of-way. Ask, “Who can tell me what theyknow about right-of-way?” Tell them that right-of-way is a set of traffic lawsthat vehicles must follow and that helps us know who’s turn it is to go at anintersection. Ask students if they have heard the expression, “The pedestrianhas the right-of-way”. Ask them if they know what this means. You may alsowant to mention that in skiing and boating similar right-of-way rules exist tokeep people safe.
" Demonstrate the three right-of-way rules using the intersection overheadand intersection (bicycle, car and pick-up truck) pieces. Show differentscenarios and have the students identify who has the right-of-way. Show howright-of-way works at a 4-way and 2-way intersection. Briefly mention whatwould happen at an uncontrolled intersection. Optional: Elementary agedstudents may benefit from using a paper copy of the intersection and paper cut-outs of the vehicles to simulate what you are demonstrating on the overhead.
The three right-of-way rules are:
• The first person at the intersection goes through the intersection first
• When two cars get to the intersection at the same time, the person on theright side goes first
• When two people are directly across from each other, and one is goingstraight and the other is turning left, the one that is going straight goes first.
Distribute the Right-of-way worksheet for the students to complete. Place theOverhead: Right-of-way rules on the projector so students can have clearexamples of the three rules while they work. Give the students 5-7 minutes tofinish and turn in the worksheets.
10MINUTES
Traffic simulation; fitting bikes
WHAT: A discussion and worksheetactivity to teach right-of-way.
PURPOSE : Understanding right-of-way rules will improve the student’sability to safely navigate and proceedthrough intersections
B A C K G R O U N D L E S S O N
36
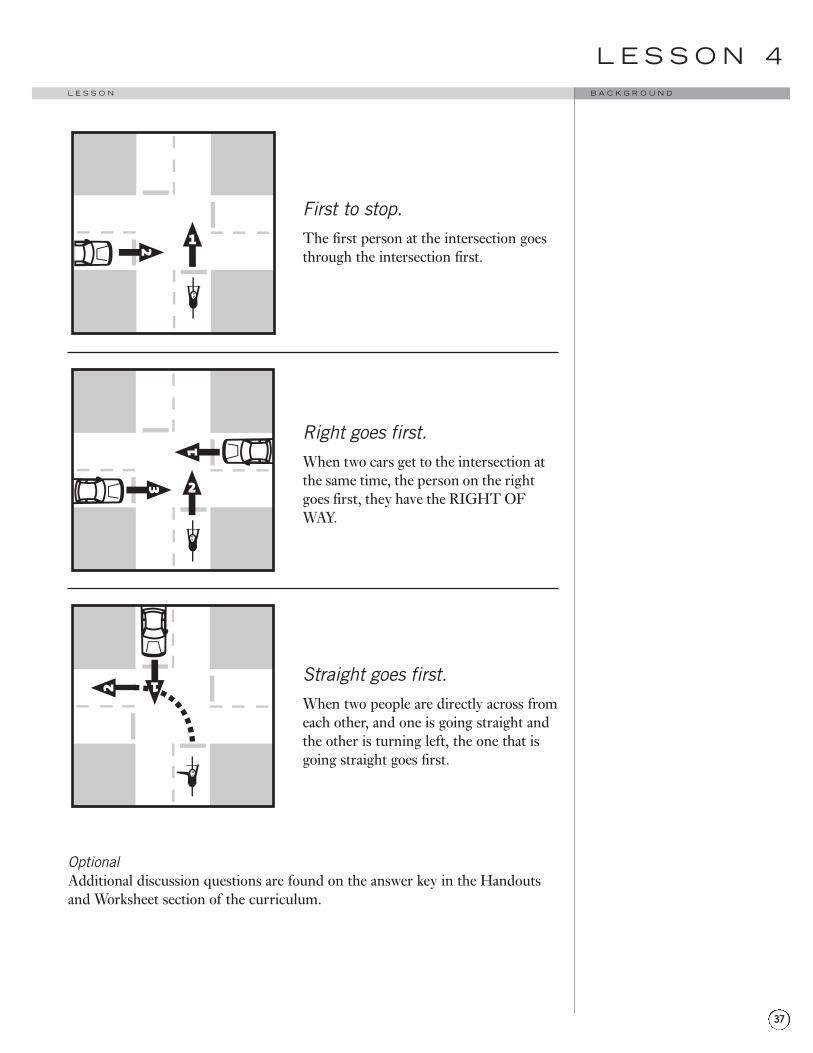
First to stop.The first person at the intersection goesthrough the intersection first.
Right goes first.When two cars get to the intersection atthe same time, the person on the rightgoes first, they have the RIGHT OFWAY.
Straight goes first.When two people are directly across fromeach other, and one is going straight andthe other is turning left, the one that isgoing straight goes first.
OptionalAdditional discussion questions are found on the answer key in the Handoutsand Worksheet section of the curriculum.
L E S S O N 4
37
B A C K G R O U N DL E S S O N

HOW TO DRIVE A CAR / BIKEOptional
M A T E R I A L S
• Chairs or cones (16) • Yield signs (2)
• Gym, large classroom or auditorium • Stop signs (4)
• Sidewalk chalk (See Handouts, p.99, for traffic signs)
! Set up a simulated intersection beforehand.
Sample course of simulated intersection
Use sidewalk chalk and traffic signs to set up a simulated intersection on theplayground. Masking tape can be used in place of the chalk for a classroomcourse. Change signs to challenge students with other intersection configur-ations. Have students who are not participating carefully watch those who areand hand out citations to students who break rules.
" Use the intersection to present the intersection maneuvers. Talk about theconcept of ‘right-of-way’ and practice hand signals. The rules of a 4-wayintersection with stop signs are:
• The right of way is given to the first person to stop.
• All drivers must then yield to the driver on the right.
• The driver going straight goes first.
1 2 3
12
3
123
12
3
20MINUTES
Traffic simulation; fitting bikes
WHAT: Students navigate through asimulated intersection. The activity isconducted inside a classroom and students walk, or done outside on footor bike, through the intersection. Have fun!!
PURPOSE : The point of this exerciseis to familiarize students with the rulesof the road and intersections. Studentswill learn the basics of right-of-way,turning position and hand-signaling.Moving correctly through intersectionsis essential to avoid bicycle or carcrashes.
This lesson can be run in a classroom,gymnasium, outside on a blacktop,field, or in a low-traffic intersection.Teachers should configure an intersec-tion using cones, chairs or chalkedlines prior to the class. If on blacktop orpavement, teachers should use chalkand write the lane position numbers onthe ground so students can recognizewhere they should be in different trafficsituations.
Most instructors prefer to use a low-traffic intersection in order to get stu-dents riding on bikes as soon aspossible. If this is what you plan to do,it is recommended that you first runLesson V, Controlling, stopping and sig-naling. Regardless which lesson you runfirst, teachers must conduct properbicycle fit and bike safety check (seepages 40-42, later in this lesson)before allowing students to ride bikes.
B A C K G R O U N D L E S S O N
38
Of course this varies when only one car has a stop sign. This also varies whenone car has a yield sign. (Introduce the yield sign and talk about this).
# Demonstrate the proper lane positioning for each type of turn.
$ Have a couple of adults demonstrate maneuvering through the intersection.Teachers should show the right-of-way concepts by yielding to right or whentaking a left turn.
% Start with a small group of students going only two at a time. They willenter the intersection, read the traffic signs, look for other traffic, obey the rules,use turn signals, and make their turn. The teachers should take liberty to intro-duce signs at will. A good progression is to begin with four stop signs, decreaseit to two signs opposite each and finally no signs. Add Yield signs after stopsigns are mastered.
& To allow students to run or ride fast, spread the course out and let studentsrun or ride through the course but require that students go around an end conethat is far away from the intersection.
' Introduce the yield sign to the exercise.
( Begin to enforce traffic laws and hand out citations if the traffic is too fast orif people violate laws. Some instructors eliminate students who break traffic lawsuntil one student is remaining. Briefly discuss traffic court.
) Discuss this exercise. Finally, convey the concept of congestion. Have just afew students go through the intersection. Add more and more and watch thesystem get too crowded and break down. This is why people should ride theirbikes — because with a lot of cars on the road we get congestion. Congestionapplies to many other things when too may people use them at once (like the in-ternet and classrooms). When we overuse things such as gasoline for auto-mobiles we also tend to deplete our resources (this is discussed in Safe Routesfor Kids Transportation Alternatives and Solutions).
L E S S O N 4
39
B A C K G R O U N DL E S S O N
PROPER FIT OF BICYCLES
M A T E R I A L S :
• Fleet of bikes
• Children’s own bikes
• Wrench, for seat adjustments (crescent and allen wrenches)
• Bicycle maintenance checklist to record whether bikes properly fit stu-dents (optional)
! If teachers have encouraged students to bring bikes to school, they shouldallow their students to quickly retrieve their bikes. For students without bikes,match them with a bike from the fleet.
Note: The fleet of bikes may be numbered or labeled with names. Once fitted,encourage or assign students to the same bike for each future lesson.
" Explain that the class will check to see if bikes fit properly. Proper fit is veryimportant for safe handling, ease in pedaling and especially to prevent hittingthe top tube when dismounting quickly. Bicycles that are too big should not beridden, even if the student might eventually “grow into it.” Riders should alsoavoid using bikes that are too small.
There are a couple of basic checks to demonstrate proper fit:
# Stand over the bike: the top tube of the bicycle should not touch thestudent yet it should only be about two inches away. (This can depend on thetype of bicycle.) For bikes with downward slanting toptubes, measure tube height as if it were straight.
$ Sit on the bike: Students should place the ball of theirfoot on the pedal when the pedal is closest to the ground.The student’s leg should be almost totally extended; it isgood to have a slight bend at the knee. If the bike frame fitsbut the pedals are too close, raise the seat post. If the pedalsare too far, lower the seat post. A safety precaution would be to make sure thatstudents can put their toes on the ground.
% Adjust the seat height:
A. Quick release seats: pull the quick release up, loosen itby turning counterclockwise (lefty loosey, rightytighty), and slide the seat up or down, make sure it isstraight to the frame. Retighten the quick release byturning it clockwise and pushing it down.
B. Nut and bolt seats: loosen the nut with a wrench(counter-clockwise) and adjust the seat. Retighten the nut.
10-15MINUTES
Traffic simulation; fitting bikes
WHAT: Students analyze and adjustbikes to ensure that they properly fit.
PURPOSE : Proper fit is essential forsafety and efficient riding.
B A C K G R O U N D L E S S O N
40
WHAT: Students conduct a basic bicy-cle maintenance check, an inspectionof their bicycles to ensure they are safefor riding.
PURPOSE : Checking bicyclesensures that they are safe to ride. Thislesson teaches students to check theirbikes to ensure safety.
BASIC BICYCLE MAINTENANCE CHECK
M A T E R I A L S :
• Bicycle maintenance checksheets
• Bicycles
• Tool kit
Discussion topic: What and why of a bicycle checkWHAT: A basic bicycle check is a quick procedure that we can doto see if the bicycle is in good operating condition. As part of thebicycle check, we will look over all basic parts of the bike. A reg-ular tune-up, a bigger job, will keep a bike in good condition. Atune-up includes cleaning the bike, readjusting (fixing) thebrakes, tightening the pedals, “truing” the wheels (making themround), readjusting the derailleurs, and sometimes taking apartand cleaning the hubs and headset. Tune-ups usually mean tak-ing the bike to a shop and having them work on it. Bicyclists whoride a lot will do a big tune-up about twice a year. We might needit less often, probably once a year.
Why: Keeping your bike in good working condition is really impor-tant. If your bike is unsafe to ride you could get into a bad crash(like if your wheel falls off). If your bike is safe but is not workingwell, it will be difficult to ride and you won’t be able to go as fastor pedal as easily, and it may lead to more serious damage thatcosts a lot to fix.
How: For our bicycle check, we will determine if our bikes are ingood operating condition, or if they need to be taken to the shopfor fixing or to be cleaned and have minor repairs. We will gothrough a standard bicycle maintenance check list to see if thebike is safe to ride.
20MINUTES
L E S S O N 4
41
B A C K G R O U N DL E S S O N
Conducting the maintenance check! Teachers should have students get into a straight line standing next to theirbikes. If there are not enough bikes pair students together. There are five majorsteps to the bicycle safety check that can be run in any order. We will check thechain, tires, seat, handlebars, and brakes. It is also a good idea to check thequick releases and pedals. Below is a suggested order.
" Have students stand to the left of their bicycle. Pick up the rear wheel andspin the pedals. Students should look at the chain to make sure it is movingsmoothly and is not too rusty. While doing this, students should pull on thepedals and make sure they are not loose.
# Students should then check the air pressure of their front and rear tires.Squeeze the sides to get a more accurate measure of air pressure. Studentsshould not be able to squeeze tire in much, if at all. Students should look at thequick releases of the wheels to make sure they are locked down tight.
$ After setting the seat height, students should check the tightness of theirseat by trying to move the seat from side to side and by tapping on the nose ofthe saddle. If the seat wiggles, tighten the seat bolts and/or quick release lever.
% Check handlebar tightness by having students stand in front of the bike andsqueeze the front tire with their knees. Try to turn the handlebars while holdingthe tire still. If the handle bars are tight, students will feel the pressure of thetire on their legs and the handlebars will not turn. If handlebars turn and thewheel stays straight, tighten the stem-bolt.
& Students should now stand over their bikes and squeeze the brakes with two fingers and leave the other two fingers on the handle bars. When squeezingbrakes, the brake levers should not touch students’ fingers that are on thehandlebars. Next, sit on the bike seat. Push the bike forward and apply bothbrakes. Make sure that the brakes stop the wheels from turning. Finally, get offthe bike and look closely at the brake pads. While braking the brake pads shouldbe aligned with the rim and only be in contact with the rim. Also check the padfor wear. Most brake pads have a wear line. Make sure the pads have not wornbelow this limit.
' If students have any problems — poor chain, loose seat, tires or pedals, flattire, or poor brakes — these problems must be solved before using the bike. Ifthere are problems, students should go to repair stations that teachers have setup. E.g., pumping station in the corner, brake adjustment in another corner.
Note: If the mechanical problems are too severe to correct in school the bicycle shouldnot be used until repaired. Encourage the student to take the bike in for repairs orarrange for a volunteer to help you.
Traffic simulation; fitting bikes
About bicycle maintenanceThere is potential to conduct someminor repair of students’ bikes.Teachers should get a volunteer bicycleshop mechanic to help out the classand either arrive with tools and a bikestand (or the teacher may have previ-ously purchased tools. This can also bedone after school with a volunteer.
Bicycles with problems such as a rustychain or wobbly rims are not very dan-gerous and can be ridden, but shouldeventually be fixed by a bike mechanic.Things that teachers should not let theirstudents ride with include:
bulgy tires (need new tire)
loose pedals (tighten or take to bikeshop)
flat tires (patch hole, reinflate)
loose handle bars (tighten bolt at top ofhandle bars)
wheels that are not tight on the bicycledropouts (tighten quick release or nut)
poor brakes (take to bike shop)
wheels that are placed improperly on the bicycle dropouts (reset wheel indropouts)
loose seat (tighten quick release/nut)
B A C K G R O U N D L E S S O N
42
Coaster brakesStand alongside the left side of thebike. Position the left pedal so that it istowards the rear of the bike, about 45degrees below the horizontal position.With the left foot step hard on the leftpedal and push the bike forward. If thewheel skids the brake is okay; if thewheel turns the brake is no good. Next,check that the brake arm is firmly bolt-ed to the left chainstay.
WHAT: Learning to properly lock bicycles
PURPOSE : To ensure that bicycles donot get stolen.
SECURE BICYCLE LOCKINGOptional
M A T E R I A L S
• U-lock • Wire lock
• Padlock • Bicycle
Conduct this section if time permits. It is often easily done at the end of the class whenstudents are putting their bikes back on the bike racks.
! Discuss activity: bikes must be parked and locked properly to minimizetheft and vandalism. Locks can vary in type but should be sturdy. U-locks areone of the most secure. Chain or reinforced cable, combination locks and keylocks are also usable.
" Take bicycle to a locking facility (this can be done at the end of class whenother students are planning to lock their bicycles at the racks) and demonstrate.
JOURNAL ASSIGNMENT
Describe your furthest bike ride or your most fun riding experi-ence. If you don’t ride, talk about your furthest or most adventur-ous walk. Where did you go? How long did it take you and was itreally hard? Was it dangerous? Were you scared? Did you crash?Did you get lost? Tell about it!
homework
5MINUTES
L E S S O N 4
43
B A C K G R O U N DL E S S O N
How to “U Lock” your bikeLock your frame and front or back tireto a regulation rack or sign, pole, etc.Do not simply lock the front tire or seatbecause the rest of the bicycle can eas-ily be stolen. As for deciding whichwheel to lock, front wheels are usuallyeasier to steal but rear wheels are moreexpensive.
Front tire• Place the U-lock through the spokesof the front tire (with the ends of the Ufacing the rear);
• Place the U-lock so the ends are pastthe down tube and straddle the pole;
• Lock the U-lock.
Back tire• Place the U-lock around the seat tubeand inner rim of the wheel or seat-stayand wheel;
• Place the U-lock so the ends arethrough the bike and past the pole orrack;
• Lock the U-lock.
*U-lock manufacturers say that mini-mizing excess room in the lock and fac-ing the keyhole downward are ways todecrease breakability of a U-lock.
BICYCLE INVESTIGATIONOptional
Continue the work plan as set out in Lesson 2. Count the bicyclesparked at the bicycle racks.
Consider having a speaker come in and discuss bicycle ridership, the bicyclefacilities that are in place, the City’s support for education of cyclists, and askwhat they are doing to make the city safer for kids to cycle. See Resources, page92, for potential speakers including City planner, police officer, bicycle clubmember, bicycle shop employee.
Other Optional Activities
Route SelectionFactors in considering route selection: Where are you? Where do you want togo? What is a safe route?
Consider discussing this topic before and after riding around in traffic. In addi-tion, consider the mapping activity in the Safe Routes For Kids – TransportationAlternatives and Solutions curriculum.
Community Service Project: PostersMake bicycle safety posters that can be hung around the school and around thecommunity. Bring large pieces of paper and get proper art supplies. Give thestudents the laws and information to give them ideas for the poster. Bringpictures of bikes so they can draw them.
discussion
TIME VARIES
Traffic simulation; fitting bikes
Traffic: lower traffic streets can be better to bike on. We should all be con-cerned with crossing major streets.
Stop signs and stop lights: It is better tohave these controls at intersectionswith high traffic roads.
Others: Street conditions (especiallyavoid train tracks); the scenery; time.
B A C K G R O U N D L E S S O N
44
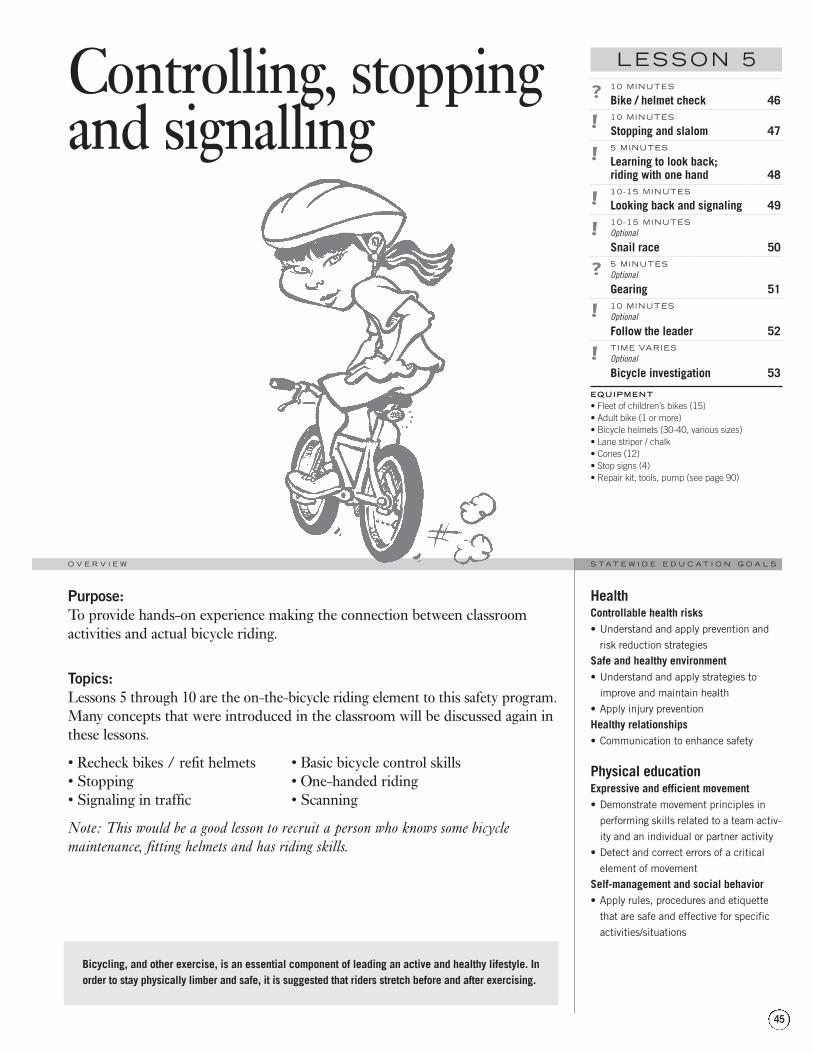
10 MINUTES
Bike / helmet check 4610 MINUTES
Stopping and slalom 475 MINUTES
Learning to look back; riding with one hand 4810-15 MINUTES
Looking back and signaling 4910-15 MINUTESOptional
Snail race 505 MINUTESOptional
Gearing 5110 MINUTESOptional
Follow the leader 52TIME VARIESOptional
Bicycle investigation 53
EQUIPMENT• Fleet of children’s bikes (15)• Adult bike (1 or more)• Bicycle helmets (30-40, various sizes)• Lane striper / chalk• Cones (12)• Stop signs (4)• Repair kit, tools, pump (see page 90)
Purpose:To provide hands-on experience making the connection between classroomactivities and actual bicycle riding.
Topics:Lessons 5 through 10 are the on-the-bicycle riding element to this safety program.Many concepts that were introduced in the classroom will be discussed again inthese lessons.
• Recheck bikes / refit helmets • Basic bicycle control skills• Stopping • One-handed riding• Signaling in traffic • Scanning
Note: This would be a good lesson to recruit a person who knows some bicyclemaintenance, fitting helmets and has riding skills.
Controlling, stoppingand signalling
HealthControllable health risks• Understand and apply prevention and
risk reduction strategiesSafe and healthy environment• Understand and apply strategies to
improve and maintain health• Apply injury preventionHealthy relationships• Communication to enhance safety
Physical educationExpressive and efficient movement• Demonstrate movement principles in
performing skills related to a team activ-ity and an individual or partner activity
• Detect and correct errors of a criticalelement of movement
Self-management and social behavior• Apply rules, procedures and etiquette
that are safe and effective for specificactivities/situations
LESSON 5
45
S T A T E W I D E E D U C A T I O N G O A L SO V E R V I E W
Bicycling, and other exercise, is an essential component of leading an active and healthy lifestyle. Inorder to stay physically limber and safe, it is suggested that riders stretch before and after exercising.
BIKE / HELMET CHECK
M A T E R I A L S :
• Fleet of bicycles • Helmets for each student
• Wrench for adjusting seat • Maintenance checksheets
• Students’ own bicycles if they passed the maintenance check
Fitting bikes ! Teachers should have helmets and the fleet of bicycles. Each helmet shouldbe labeled with a student’s name.
" Distribute helmets that are marked with student’s names and matchstudents with the bikes they were using.
# Briefly review the elements of properly fitting helmets. Have students helpeach other to ensure they have properly fitting helmets. Do this prior to eachon-bike lesson.
$ Students with problems should raise their hands for assistance.
% Teachers should also discuss shoelaces and pant legs with students beforeriding. All shoe laces must be tied and long ones tucked into the side of shoes sothey don’t get caught in the chain. Pant legs should be rolled up, tucked intosocks or restrained with a rubber band. This will prevent the pant legs fromtouching the chain, which will make it dirty, or getting caught in the chain. Iflaces or pants get caught in the chain, stop pedaling, brake and stop. Untanglethe problem.
& Teachers should line students up and have them stand next to the personthey were working with during the bike-fitting exercise (see Lesson 4).
' Have students make sure that the bike is properly sized. Remember, twoinches above the top tube and when seated, leg should be almost totallyextended when foot is on pedal. If there is a problem, they should raise theirhand and you will come around to help them find a new bike or adjust the seat.
( Once properly fitted, students should be encouraged to use the same bikefor the rest of the program.
Bike maintenance check) Students should do a quick maintenance check on the bike. For moreinformation see page 41 and Handouts, page 99. The basic activities are:
1. chain check 4. seat height and tightness2. pedal check 5. handlebar tightness3. tire check 6. brake check
* Students with problems should raise their hands for assistance.
Note: In general, if any students have major problems, a bicycle mechanic or othervolunteer should take those students aside and the teacher should continue with thenext activity.
10MINUTES
Controlling, stopping and signalling
WHAT: A quick bike check and helmetcheck.
PURPOSE : To review and make surethat bikes are in good maintenance andthat helmets fit the students properly.
B A C K G R O U N D L E S S O N
46
Students must have a well-
maintained bike to ride (see Lesson 4,
page 41, for maintenance check).
With the fleet of bikes and children’s
own bikes, most of the class will have
a bike to use for the entire session.
Sharing bicycles should not be
problematic because most of the
activities are efficiently performed
with only a portion of the students
riding at once. Today is a good day
to get a volunteer bike mechanic to
assist the students with problems
with their bikes.
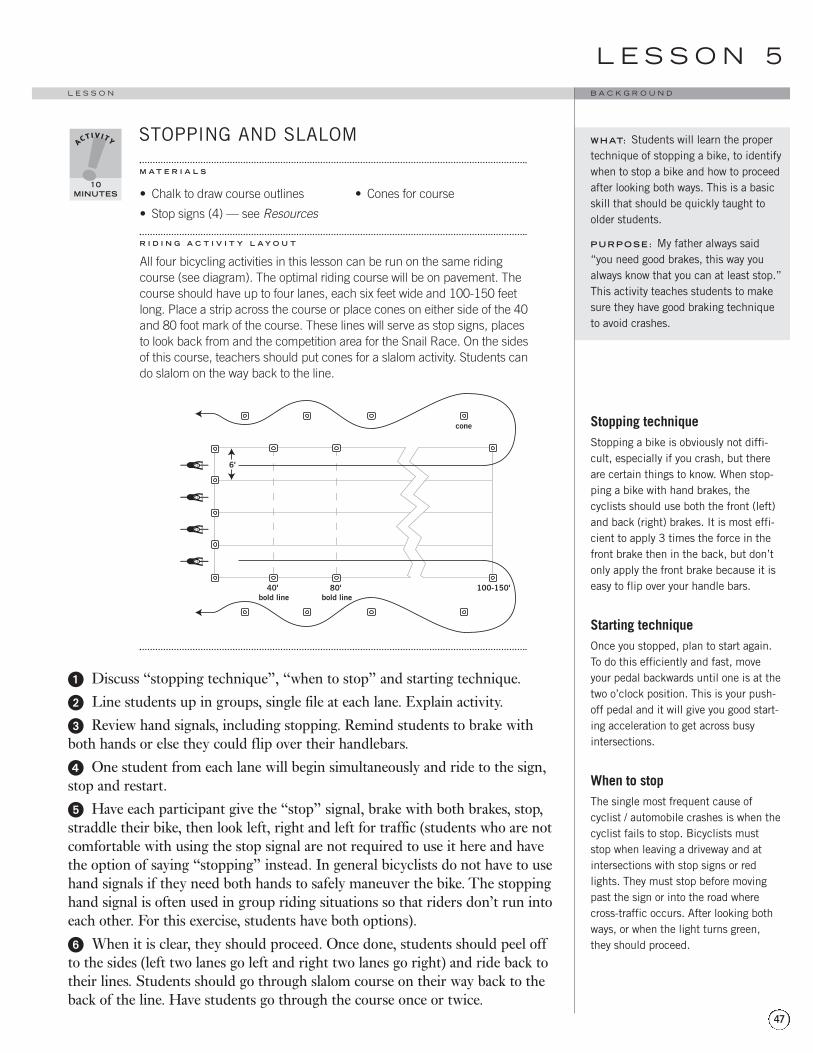
WHAT: Students will learn the propertechnique of stopping a bike, to identifywhen to stop a bike and how to proceedafter looking both ways. This is a basicskill that should be quickly taught toolder students.
PURPOSE : My father always said“you need good brakes, this way youalways know that you can at least stop.”This activity teaches students to makesure they have good braking techniqueto avoid crashes.
STOPPING AND SLALOM
M A T E R I A L S
• Chalk to draw course outlines • Cones for course
• Stop signs (4) — see Resources
R I D I N G A C T I V I T Y L A Y O U T
All four bicycling activities in this lesson can be run on the same ridingcourse (see diagram). The optimal riding course will be on pavement. Thecourse should have up to four lanes, each six feet wide and 100-150 feetlong. Place a strip across the course or place cones on either side of the 40and 80 foot mark of the course. These lines will serve as stop signs, placesto look back from and the competition area for the Snail Race. On the sidesof this course, teachers should put cones for a slalom activity. Students cando slalom on the way back to the line.
! Discuss “stopping technique”, “when to stop” and starting technique." Line students up in groups, single file at each lane. Explain activity.# Review hand signals, including stopping. Remind students to brake withboth hands or else they could flip over their handlebars.$ One student from each lane will begin simultaneously and ride to the sign,stop and restart. % Have each participant give the “stop” signal, brake with both brakes, stop,straddle their bike, then look left, right and left for traffic (students who are notcomfortable with using the stop signal are not required to use it here and havethe option of saying “stopping” instead. In general bicyclists do not have to usehand signals if they need both hands to safely maneuver the bike. The stoppinghand signal is often used in group riding situations so that riders don’t run intoeach other. For this exercise, students have both options).& When it is clear, they should proceed. Once done, students should peel offto the sides (left two lanes go left and right two lanes go right) and ride back totheir lines. Students should go through slalom course on their way back to theback of the line. Have students go through the course once or twice.
6'
40' bold line
80' bold line
cone
100-150'
10MINUTES
L E S S O N 5
47
B A C K G R O U N DL E S S O N
Stopping techniqueStopping a bike is obviously not diffi-cult, especially if you crash, but thereare certain things to know. When stop-ping a bike with hand brakes, thecyclists should use both the front (left)and back (right) brakes. It is most effi-cient to apply 3 times the force in thefront brake then in the back, but don’tonly apply the front brake because it iseasy to flip over your handle bars.
Starting techniqueOnce you stopped, plan to start again.To do this efficiently and fast, moveyour pedal backwards until one is at thetwo o’clock position. This is your push-off pedal and it will give you good start-ing acceleration to get across busyintersections.
When to stopThe single most frequent cause ofcyclist / automobile crashes is when thecyclist fails to stop. Bicyclists muststop when leaving a driveway and atintersections with stop signs or redlights. They must stop before movingpast the sign or into the road wherecross-traffic occurs. After looking bothways, or when the light turns green,they should proceed.
LEARNING TO LOOK BACK: RIDING WITH ONE HAND
M A T E R I A L S
• Use above course; remove stop signs
Riding with one hand is an important skill for cyclists. The primary time thatone-handed cycling is used is when looking back for traffic behind you. Rightnow we will do a stationary demonstration.
Stationary looking back! What is looking back? Well, bicycles ride on the right side of the street.When we need to take a left turn, we must look back over our left shoulder toscan for traffic. When it is clear we then move left.
" Everyone should stand over their top tube. Hold onto your handle bars withboth hands.
# Keep your hands on the handle bars and try looking over your left shoulderby just turning your neck. How far can you see?
$ Next bend your elbows and pivot to look over your left shoulder. Now howfar can you see? Farther but also look at your handlebars and front wheel. Oftenthey will get turned and you will swerve into traffic.
% Lastly, put your left hand on your hip and look over your shoulder, you canstill see a lot and your handlebars will usually stay straighter. So first we willpractice riding a straight line with one hand.
Riding with one hand! Students can stay in their lines as in stopping exercise. One student fromeach even or odd line should go at a time (thus two students simultaneously).
" Students ride a line for 50-60 feet with one hand without stopping orweaving our of their lane. Teachers should stress the need for students tomaintain control and not bicycle too fast.
# Once one group of students has completed half of the course, the nextgroup should go.
$ Once done, students should signal, peel off and ride back through theslalom course to their lines. They can turn with both hands.
% Repeat a few times.
Note: If students do not successfully complete the exercise have them do it over or talk with them aside since this is a basic maneuver and may indicate an inability toride safely.
5MINUTES
Controlling, stopping and signalling
WHAT: Students ride a straight line to display skills and gain an under-standing for the importance of handlingand control.
PURPOSE : This exercise will test and improve the student’s ability to balance and ride a straight line withone hand. It is practice for looking backwhile riding.
B A C K G R O U N D L E S S O N
48
Looking back technique requires the
ability to ride in a straight line, then
do it while not looking. While riding,
students will have to look back and
keep their bicycle going forward.
This is difficult to do because when
you look back your hands tend to
turn. When demonstrating this
maneuver, show the difference
between:
a) bending your elbows and looking
back while keeping both hands on
the handlebars, or b) taking one
hand off of your bike and placing it
on your hip before looking back.
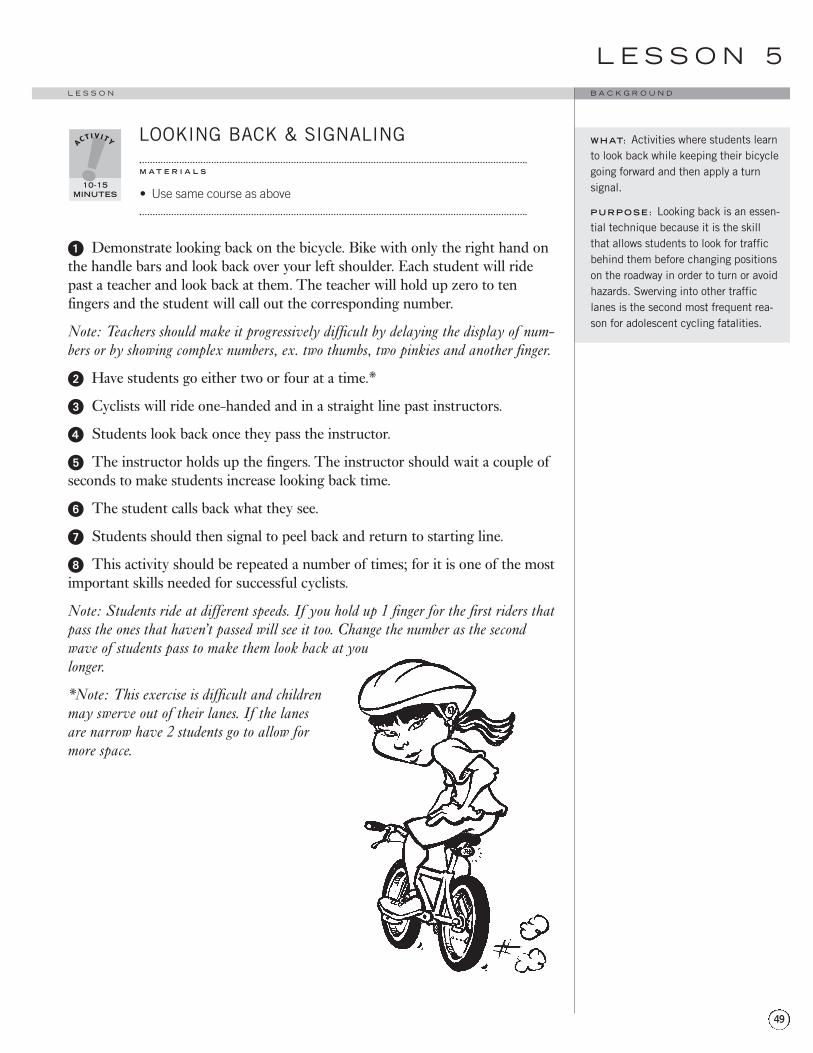
WHAT: Activities where students learnto look back while keeping their bicyclegoing forward and then apply a turn signal.
PURPOSE : Looking back is an essen-tial technique because it is the skillthat allows students to look for trafficbehind them before changing positionson the roadway in order to turn or avoidhazards. Swerving into other trafficlanes is the second most frequent rea-son for adolescent cycling fatalities.
LOOKING BACK & SIGNALING
M A T E R I A L S
• Use same course as above
! Demonstrate looking back on the bicycle. Bike with only the right hand onthe handle bars and look back over your left shoulder. Each student will ridepast a teacher and look back at them. The teacher will hold up zero to tenfingers and the student will call out the corresponding number.
Note: Teachers should make it progressively difficult by delaying the display of num-bers or by showing complex numbers, ex. two thumbs, two pinkies and another finger.
" Have students go either two or four at a time.*
# Cyclists will ride one-handed and in a straight line past instructors.
$ Students look back once they pass the instructor.
% The instructor holds up the fingers. The instructor should wait a couple ofseconds to make students increase looking back time.
& The student calls back what they see.
' Students should then signal to peel back and return to starting line.
( This activity should be repeated a number of times; for it is one of the mostimportant skills needed for successful cyclists.
Note: Students ride at different speeds. If you hold up 1 finger for the first riders thatpass the ones that haven’t passed will see it too. Change the number as the secondwave of students pass to make them look back at youlonger.
*Note: This exercise is difficult and childrenmay swerve out of their lanes. If the lanesare narrow have 2 students go to allow formore space.
10-15MINUTES
L E S S O N 5
49
B A C K G R O U N DL E S S O N
SNAIL RACEOptional
M A T E R I A L S ( O P T I O N A L )
• Stopwatch
• Paper
• Pencil
• Prizes for winners — water bottles, rear blinking lights, stickers
R I D I N G A C T I V I T Y L A Y O U T
Use above course without stop signs.
This is a continuation of Riding a Straight Line with an added slow-ridingelement.
Note: It is recommended that teachers discuss gearing prior to this exercise. See theoptional activity below (add an extra 5 minutes). Introducing gearing now will givestudents the ability to practice during future lessons.
! Students should remain in their four lines, one for each lane, and will ridein groups or “heats”.
" The last person to cross the finish line in their heat wins the heat and goesonto the “winner’s bracket” in the next round.
# Students will ride within their lanes. Riders are not allowed to place theirfeet on the ground or cross over their lanes. If they do so they are eliminatedfrom that round.
$ The race begins by having students ride up to the 40 foot line together. They should all cross it together and the race lasts until the 80 foot line.
% Teachers can record the winner of each heat and note the lowest times.
& Have playoffs for the two top winners of each heat to see who is the slowest, the first playoff should be groups 1-4 and second groups 5-8. Recordthe lowest times.
' The two top winners of each heat go to a final race and the first and secondplace winners are crowned the slow champions. The overall slowest time (thusthe best time) should also be recognized.
10-15MINUTES
Controlling, stopping and signalling
WHAT: A slow-speed race where thelast cyclist to cross the line wins.
PURPOSE : This activity improveslow-speed balance and control skills.
B A C K G R O U N D L E S S O N
50

WHAT: Discussion about using thegears on a bicycle.
PURPOSE : Gearing makes for effi-cient cycling. Gears are important tounderstand, especially when climbingor descending hills.
GEARINGOptional
How many people live on a hill, like to go fast, or have to go uphills to get to school or other places? When riding a bike, shiftinggears allows you to adjust the difficulty of pedaling so you canclimb hills and go fast down them.
Most of our bicycles have more than one gear. Gears affect ourability to turn the pedals.
Low gear (like 1st gear) is the easiest to pedal and is used whengoing slow or when going up hills. The chain is closer to the bikein lower gears. It is always good to get into lower gears when youare stopping the bike so you can quickly and easily start.
High gear is harder to pedal and gives the ability to go fast, espe-cially when coming down hills. The chain is farther away from thebike in higher gears. (Note that the distance that the chain isfrom the bike does not determine gearing, it’s just coincidenceand an easy check.)
You can change gears by using the gear shifters. The right shifterchanges the back gears (smaller increments, first to second) andthe left shifter changes the front gears (larger increments, e.g.from range of 1-7 to range 8-14). Usually, if you move the rightshifter away from you or the left shifter towards you, it becomeseasier to ride.
Try shifting the right shifter and look at the rear derailleurs as itmoves closer to the bike and it would be easier to pedal. Yet itwill not move the chain unless you are pedaling. Have one stu-dent lift the back tire and one pedal. In general, only shift whilepedaling!
The only way to learn is experiment. Just remember....
Low Gear (1st gear) High Gear (21st Gear)
Easy to pedal Hard to pedalSlow FastUphill Downhill
discussion
5MINUTES
L E S S O N 5
51
B A C K G R O U N DL E S S O N
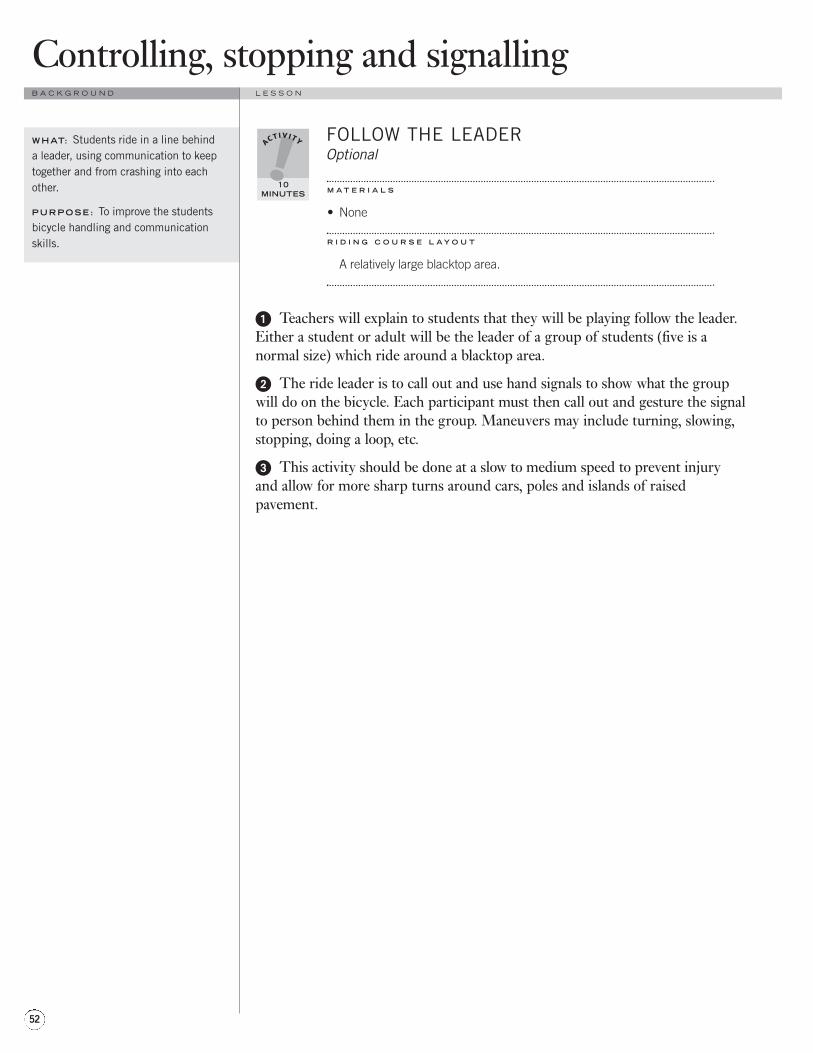
FOLLOW THE LEADEROptional
M A T E R I A L S
• None
R I D I N G C O U R S E L A Y O U T
A relatively large blacktop area.
! Teachers will explain to students that they will be playing follow the leader.Either a student or adult will be the leader of a group of students (five is anormal size) which ride around a blacktop area.
" The ride leader is to call out and use hand signals to show what the groupwill do on the bicycle. Each participant must then call out and gesture the signalto person behind them in the group. Maneuvers may include turning, slowing,stopping, doing a loop, etc.
# This activity should be done at a slow to medium speed to prevent injuryand allow for more sharp turns around cars, poles and islands of raisedpavement.
10MINUTES
Controlling, stopping and signalling
WHAT: Students ride in a line behinda leader, using communication to keeptogether and from crashing into eachother.
PURPOSE : To improve the studentsbicycle handling and communicationskills.
B A C K G R O U N D L E S S O N
52
BICYCLE INVESTIGATIONOptional
Continue the work plan as set out in Lesson 2. Assess yourprogress. When will the Bike to School Day be? Count the bicy-cles parked at the bicycle racks and add to the charting andgraphing exercise.
Discuss ridership for the class today. Now that we are doing on-the-bicycle activities, are we riding more or less? Do you thinkthat learning about bikes in school gets more students to ride toschool? If we did science or math classes using the bikes, wouldyou ride your bike in for that too?
discussion
TIME VARIES
L E S S O N 5
53
B A C K G R O U N DL E S S O N
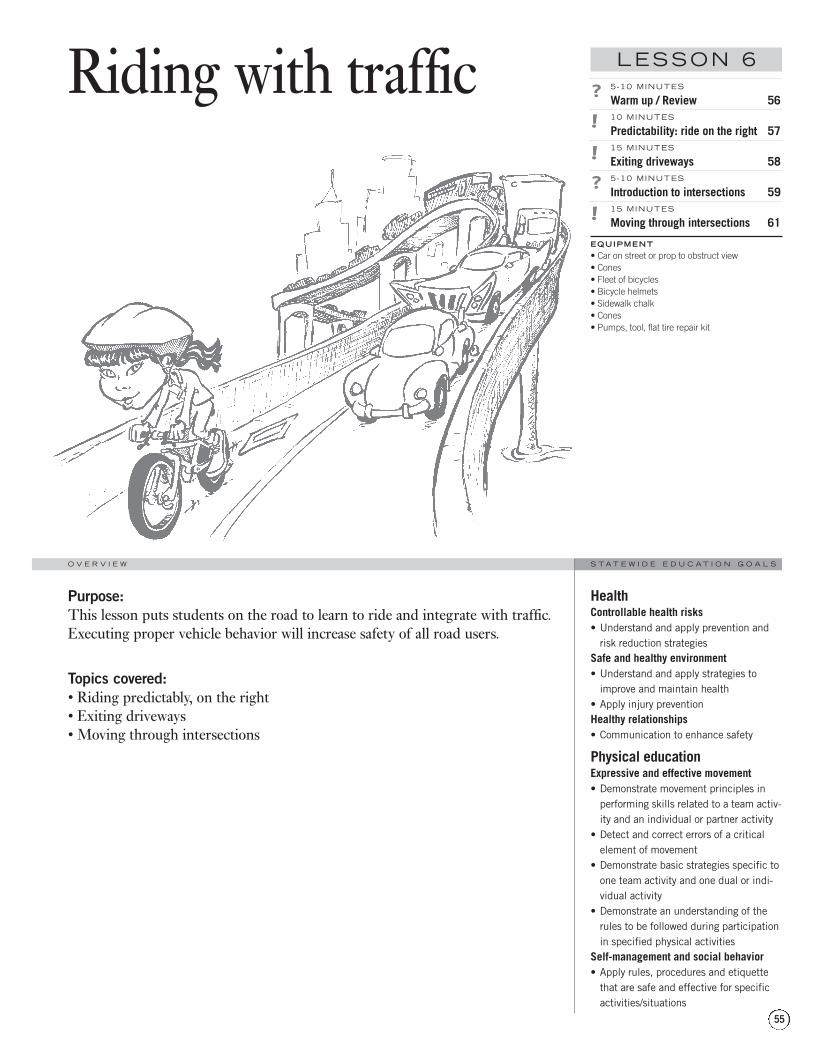
5-10 MINUTES
Warm up / Review 5610 MINUTES
Predictability: ride on the right 5715 MINUTES
Exiting driveways 585-10 MINUTES
Introduction to intersections 5915 MINUTES
Moving through intersections 61
EQUIPMENT• Car on street or prop to obstruct view• Cones• Fleet of bicycles• Bicycle helmets• Sidewalk chalk• Cones• Pumps, tool, flat tire repair kit
Purpose:This lesson puts students on the road to learn to ride and integrate with traffic.Executing proper vehicle behavior will increase safety of all road users.
Topics covered: • Riding predictably, on the right• Exiting driveways• Moving through intersections
Riding with traffic
HealthControllable health risks• Understand and apply prevention and
risk reduction strategiesSafe and healthy environment• Understand and apply strategies to
improve and maintain health• Apply injury preventionHealthy relationships• Communication to enhance safety
Physical educationExpressive and effective movement• Demonstrate movement principles in
performing skills related to a team activ-ity and an individual or partner activity
• Detect and correct errors of a criticalelement of movement
• Demonstrate basic strategies specific toone team activity and one dual or indi-vidual activity
• Demonstrate an understanding of therules to be followed during participationin specified physical activities
Self-management and social behavior• Apply rules, procedures and etiquette
that are safe and effective for specificactivities/situations
LESSON 6
55
S T A T E W I D E E D U C A T I O N G O A L SO V E R V I E W
WARM UP / REVIEW
Get warmed up, we will be riding on the road today. Who rodetheir bikes? Review hand signals. What side of the road are wesupposed to ride on?
Have students find their partners, quickly put on helmets and get bikes.
Have students check their helmets for proper fit and their bikes for propermaintenance, shoelaces tucked in and pants rolled up or tucked into socks.
It is also recommended to have students wear bright-colored pinnies or retro-reflective vests when riding on the street.
discussion
5-10MINUTES
Riding with traffic
This lesson is best taught on a low-traffic street. The street can be blockedoff by police markers or cones can beplaced for increased visibility.
The length of roadway should be atleast 150 feet and the width should beat least 25 feet. To plan ahead for thefollowing activities in this lesson, use astreet that has a four-way intersectionthat can be used for riding exercises.The roadway would ideally have twodriveways, one on each side of the road.The roadway should be relatively freeof parked cars (ensure that at least oneside of the street has no parked cars)and traveling automobiles except fortwo cars that are used for props. Thesecars should be placed immediatelybefore each driveway as the bicyclistapproaches the driveway. This will putthe cars in position to act as visualbarriers for bicyclists emerging fromthe driveway. Use cones to representthe cars if cars are not available.
Block off only the street for the first 40minutes and block off the intersectionand road for the last 20 minutes.
Blocking off an intersection can causetrouble for travelling automobiles, sochoose a lightly traveled neighborhoodstreet. The intersection should be on atleast 25 foot streets and 50 feet on eachstreet leading into the intersection isneeded for the intersection activities.Depending on the street, teachersmight have to contact residentialhomeowners to see if using theirdriveways is ok. If there is a schooldriveway, there should be no problem.
Note: If the driveways are privatelyowned, contact owners to get permissionfor use of the driveway. A liabilityrelease form to release the landownerfrom any liability should be signed by the teacher/school.
B A C K G R O U N D L E S S O N
56
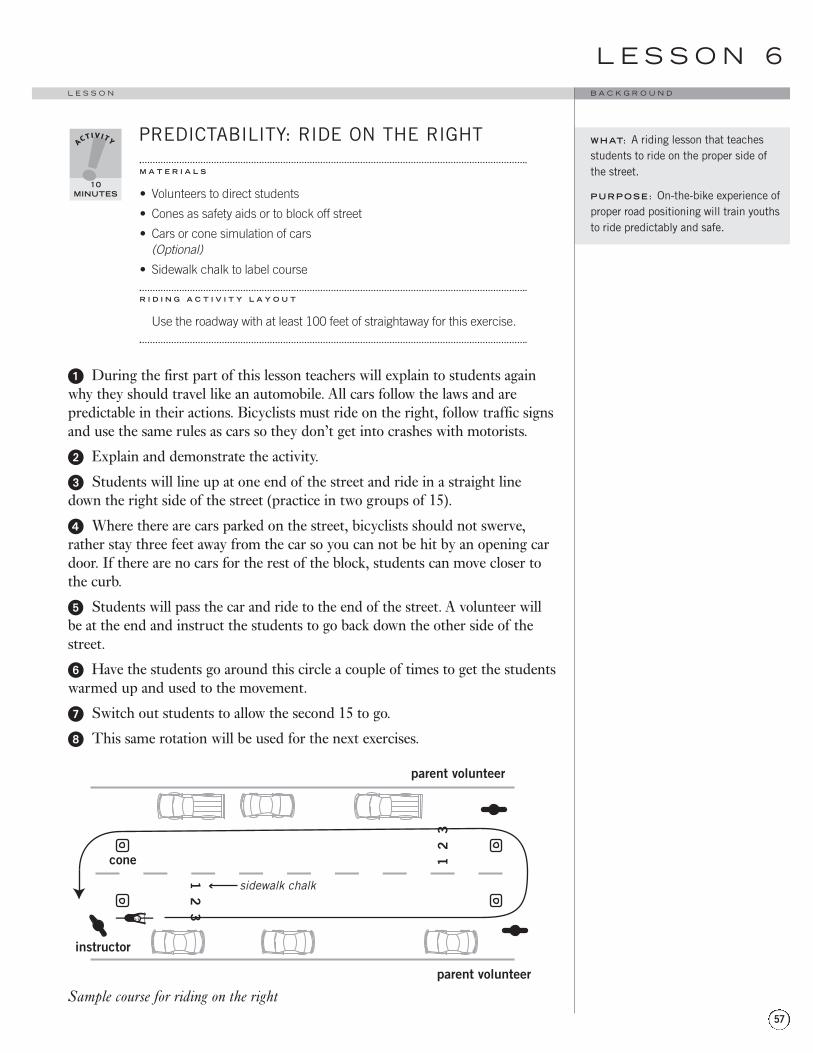
WHAT: A riding lesson that teachesstudents to ride on the proper side ofthe street.
PURPOSE : On-the-bike experience ofproper road positioning will train youthsto ride predictably and safe.
PREDICTABILITY: RIDE ON THE RIGHT
M A T E R I A L S
• Volunteers to direct students
• Cones as safety aids or to block off street
• Cars or cone simulation of cars (Optional)
• Sidewalk chalk to label course
R I D I N G A C T I V I T Y L A Y O U T
Use the roadway with at least 100 feet of straightaway for this exercise.
! During the first part of this lesson teachers will explain to students againwhy they should travel like an automobile. All cars follow the laws and arepredictable in their actions. Bicyclists must ride on the right, follow traffic signsand use the same rules as cars so they don’t get into crashes with motorists.
" Explain and demonstrate the activity.
# Students will line up at one end of the street and ride in a straight linedown the right side of the street (practice in two groups of 15).
$ Where there are cars parked on the street, bicyclists should not swerve,rather stay three feet away from the car so you can not be hit by an opening cardoor. If there are no cars for the rest of the block, students can move closer tothe curb.
% Students will pass the car and ride to the end of the street. A volunteer willbe at the end and instruct the students to go back down the other side of thestreet.
& Have the students go around this circle a couple of times to get the studentswarmed up and used to the movement.
' Switch out students to allow the second 15 to go.
( This same rotation will be used for the next exercises.
Sample course for riding on the right
12
3
12
3
parent volunteer
parent volunteer
cone
sidewalk chalk
instructor
10MINUTES
L E S S O N 6
57
B A C K G R O U N DL E S S O N
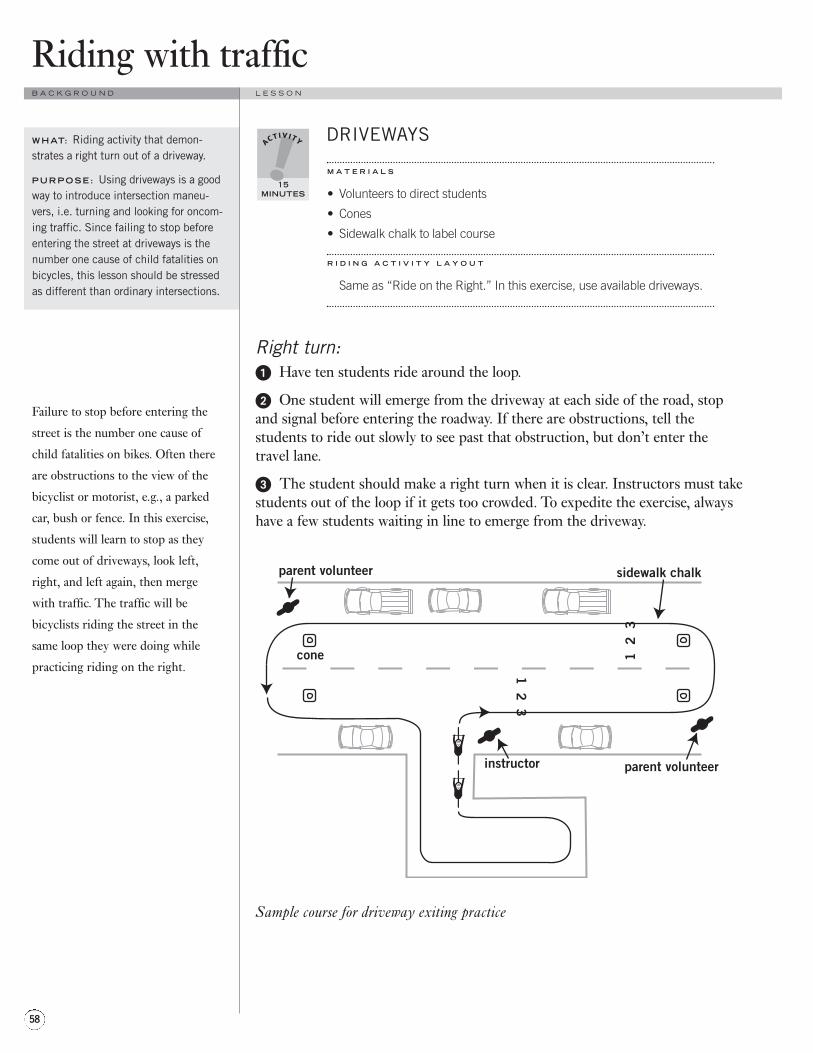
DRIVEWAYS
M A T E R I A L S
• Volunteers to direct students
• Cones
• Sidewalk chalk to label course
R I D I N G A C T I V I T Y L A Y O U T
Same as “Ride on the Right.” In this exercise, use available driveways.
Right turn:! Have ten students ride around the loop.
" One student will emerge from the driveway at each side of the road, stopand signal before entering the roadway. If there are obstructions, tell thestudents to ride out slowly to see past that obstruction, but don’t enter the travel lane.
# The student should make a right turn when it is clear. Instructors must takestudents out of the loop if it gets too crowded. To expedite the exercise, alwayshave a few students waiting in line to emerge from the driveway.
Sample course for driveway exiting practice
12
3
12
3
parent volunteer
parent volunteer
cone
instructor
sidewalk chalk
15MINUTES
Riding with traffic
WHAT: Riding activity that demon-strates a right turn out of a driveway.
PURPOSE : Using driveways is a goodway to introduce intersection maneu-vers, i.e. turning and looking for oncom-ing traffic. Since failing to stop beforeentering the street at driveways is thenumber one cause of child fatalities onbicycles, this lesson should be stressedas different than ordinary intersections.
B A C K G R O U N D L E S S O N
58
Failure to stop before entering the
street is the number one cause of
child fatalities on bikes. Often there
are obstructions to the view of the
bicyclist or motorist, e.g., a parked
car, bush or fence. In this exercise,
students will learn to stop as they
come out of driveways, look left,
right, and left again, then merge
with traffic. The traffic will be
bicyclists riding the street in the
same loop they were doing while
practicing riding on the right.
WHAT: A discussion to introduce inter-sections.
PURPOSE : This introduction to inter-sections is the first element in a seriesof discussions and activities to trainstudents the proper method of movingthrough an intersection. Movingthrough an intersection is complex andessential for safe riding.
INTRODUCTION TO INTERSECTIONS
M A T E R I A L S
• Volunteers to direct students
• Cones
• Sidewalk chalk to label course
• Teachers should block off or put out cones at the intersection(Contact a police officer)
• 4 stop sign props
R I D I N G A C T I V I T Y L A Y O U T
The same street can be used as in “Ride on the Right”. The intersectionmust be added to this exercise. Because of adding the intersection, atleast 25 feet of the intersecting streets will be used for the activity. Placea stop sign at each street that is coming into the intersection.
! Introduce students to the intersection and demonstrate turning procedure.There are many types of intersections but the activity is always the same. Riderscan go straight, left, or right. It is important for the cyclist to be in the properposition when approaching and maneuvering through intersections. Theturning movement is the same as when leaving a driveway.
" To start with, we know the cyclist rides on the right side of the road. Cyclistsmust vary their positions on the road when they want to make different turns.
Turn right: cyclist will remain in the same position (on the right side of theroad) and signal right. They must watch for pedestrians crossing in front ofthem and give them the right of way.
Go straight: cyclist will look back and move a little bit more into the auto-mobile travel lane and go straight through the intersection. Once crossed,bicyclist will edge back right.
Turn left: cyclist will need to get to the left side of the far left lane. This isdone by looking back, signaling, looking back again and moving fromPosition 3 through Position 2 and into Position 1. Left-turning cyclists mustthen scan for and yield to oncoming traffic.
# Types of intersections include: uncontrolled, stop sign, and stop light.Instructors should review the right-of-way rules for these types of intersectionsand the difference between stop and yield (see Lesson 7 for more information).
discussion
5-10MINUTES
L E S S O N 6
59
B A C K G R O U N DL E S S O N
See Lesson 7 for detailed description of intersection types. These will be covered in Lesson 7.
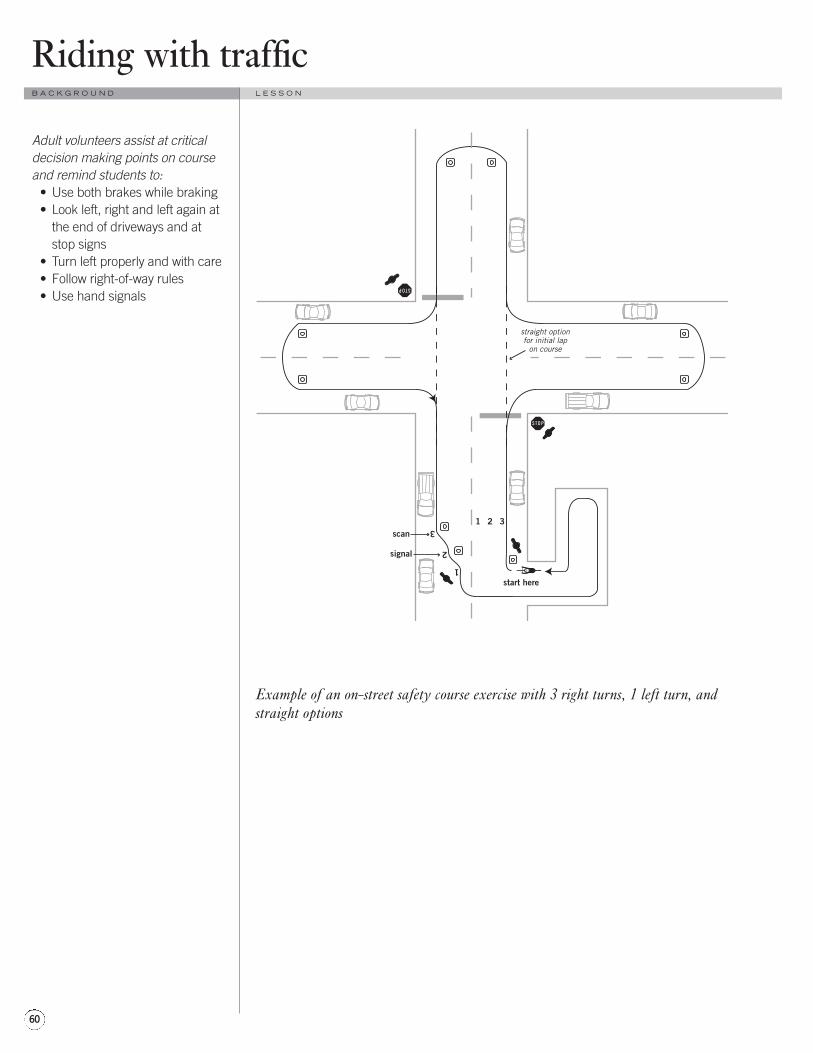
Example of an on-street safety course exercise with 3 right turns, 1 left turn, andstraight options
1
2
31 2 3
start here
scan
signal
straight optionfor initial lap
on course
Riding with traffic
Adult volunteers assist at criticaldecision making points on courseand remind students to:
• Use both brakes while braking• Look left, right and left again at
the end of driveways and atstop signs
• Turn left properly and with care• Follow right-of-way rules• Use hand signals
B A C K G R O U N D L E S S O N
60
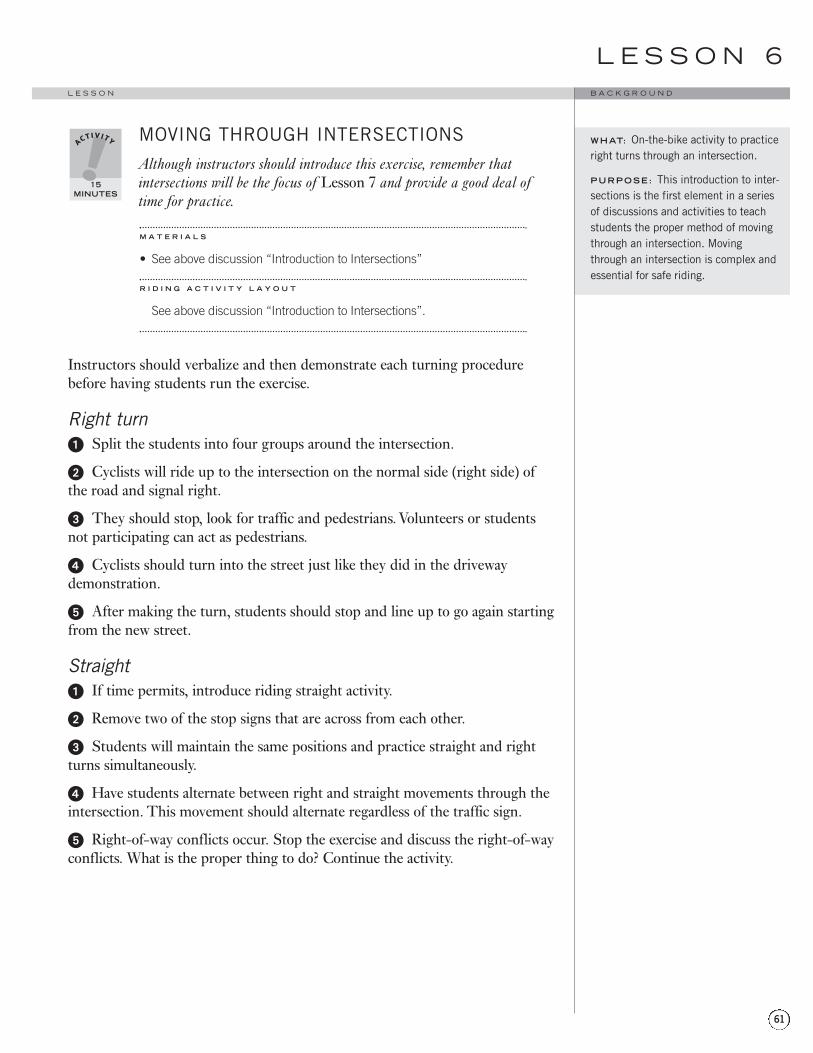
WHAT: On-the-bike activity to practiceright turns through an intersection.
PURPOSE : This introduction to inter-sections is the first element in a seriesof discussions and activities to teachstudents the proper method of movingthrough an intersection. Movingthrough an intersection is complex andessential for safe riding.
MOVING THROUGH INTERSECTIONSAlthough instructors should introduce this exercise, remember thatintersections will be the focus of Lesson 7 and provide a good deal oftime for practice.
M A T E R I A L S
• See above discussion “Introduction to Intersections”
R I D I N G A C T I V I T Y L A Y O U T
See above discussion “Introduction to Intersections”.
Instructors should verbalize and then demonstrate each turning procedurebefore having students run the exercise.
Right turn! Split the students into four groups around the intersection.
" Cyclists will ride up to the intersection on the normal side (right side) ofthe road and signal right.
# They should stop, look for traffic and pedestrians. Volunteers or studentsnot participating can act as pedestrians.
$ Cyclists should turn into the street just like they did in the drivewaydemonstration.
% After making the turn, students should stop and line up to go again startingfrom the new street.
Straight! If time permits, introduce riding straight activity.
" Remove two of the stop signs that are across from each other.
# Students will maintain the same positions and practice straight and rightturns simultaneously.
$ Have students alternate between right and straight movements through theintersection. This movement should alternate regardless of the traffic sign.
% Right-of-way conflicts occur. Stop the exercise and discuss the right-of-wayconflicts. What is the proper thing to do? Continue the activity.
15MINUTES
L E S S O N 6
61
B A C K G R O U N DL E S S O N
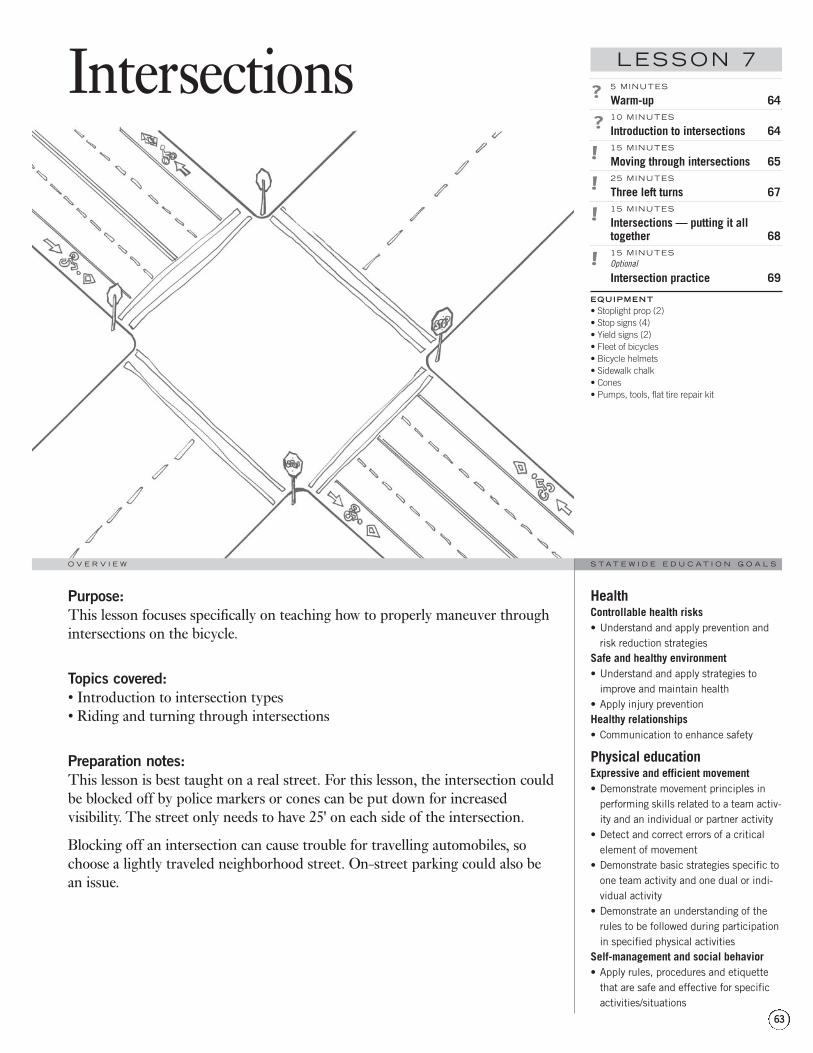
5 MINUTES
Warm-up 6410 MINUTES
Introduction to intersections 6415 MINUTES
Moving through intersections 6525 MINUTES
Three left turns 6715 MINUTES
Intersections — putting it alltogether 6815 MINUTESOptional
Intersection practice 69
EQUIPMENT• Stoplight prop (2)• Stop signs (4)• Yield signs (2)• Fleet of bicycles• Bicycle helmets• Sidewalk chalk• Cones• Pumps, tools, flat tire repair kit
Purpose:This lesson focuses specifically on teaching how to properly maneuver throughintersections on the bicycle.
Topics covered:• Introduction to intersection types• Riding and turning through intersections
Preparation notes:This lesson is best taught on a real street. For this lesson, the intersection couldbe blocked off by police markers or cones can be put down for increasedvisibility. The street only needs to have 25' on each side of the intersection.
Blocking off an intersection can cause trouble for travelling automobiles, sochoose a lightly traveled neighborhood street. On-street parking could also be an issue.
Intersections
HealthControllable health risks• Understand and apply prevention and
risk reduction strategiesSafe and healthy environment• Understand and apply strategies to
improve and maintain health• Apply injury preventionHealthy relationships• Communication to enhance safety
Physical educationExpressive and efficient movement• Demonstrate movement principles in
performing skills related to a team activ-ity and an individual or partner activity
• Detect and correct errors of a criticalelement of movement
• Demonstrate basic strategies specific toone team activity and one dual or indi-vidual activity
• Demonstrate an understanding of therules to be followed during participationin specified physical activities
Self-management and social behavior• Apply rules, procedures and etiquette
that are safe and effective for specificactivities/situations
LESSON 7
63
S T A T E W I D E E D U C A T I O N G O A L SO V E R V I E W
WARM UP
Who rode a bike to school today?
Review traffic signs. Do a bike, helmet and clothing check.
INTRODUCTION TO INTERSECTIONS(continued from Lesson 6)
Types of IntersectionsUNCONTROLLED: an uncontrolled intersection does not have signsor a stop light. Riders must slow down at these intersections (asif everyone has a yield sign) and decide if they have the Right ofWay to go through. Remember the ROW rules (see Lesson 4).Regardless of the intersection type, walkers always have ROW.
SIGNED: signed intersections will generally have two or four signs.Many intersections will only have two stop signs. The people withno signs go through the intersection slowly (as if they had a yieldsign) but the cyclists who have the stop signs must wait until allcars and pedestrians in the non-signed lanes have passed. Ifthere are four stops signs, all cyclists have to stop and the normalright of way rules apply. Remember a stop sign has to stop for ayield sign.
LIGHTED: you know this? Red means stop. Green means go.Yellow means slow and stop. So, if you are approaching an inter-section and the light turns yellow — STOP. But never stop in themiddle of the intersection, even if the light turns yellow. Cyclistscan usually take a right turn on red; the only time they are pro-hibited is when a sign says so. (They can also take a left on redas long as they are going onto a one-way street).
discussion
10MINUTES
discussion
5MINUTES
Intersections
WHAT: A discussion to fully explainthe types of intersections.
PURPOSE : Have students under-stand the types of intersections so theycan properly maneuver through them.
B A C K G R O U N D L E S S O N
64
Right of way rulesFirst to stop: First person at the intersec-tion goes through the intersection first.
Right goes first: When two cars get tothe intersection at the same time, theperson on the right goes first.
Straight goes first: When two people aredirectly across from each other, the onethat is going straight goes first.

WHAT: This lesson will again addressright turns and straight maneuversthrough intersections. The activities willpick up where they left off on Lesson 6.This activity will review driveway andintersection etiquette, hand signals,and where to ride on the street.
PURPOSE : to train students theproper method of moving through anintersection.
MOVING THROUGH INTERSECTIONS(continued from Lesson 6)
M A T E R I A L S
• Volunteers to direct students • Stop signs
• Citations • Street lights
• Bikes • Yield sign
• Helmets • Sidewalk chalk
R I D I N G A C T I V I T Y L A Y O U T
A similar layout is needed to the one used in Lesson 6. An intersection isneeded, along with the use of at least 25 feet of the adjacent four streets(Note: In Lesson 6, a 75-foot street was required). It is best to have onestreet or the intersection completely blocked off so the class can con-vene and discuss ideas in this area.
Begin this activity with the right turn. Next, proceeding straight through anintersection; and lastly the left turn. During this exercise, instructors shouldalso incorporate the three types of intersections: uncontrolled, signed andlighted intersections. Instructors should verbalize and then demonstrate eachturning procedure before having students attempt the activity.
Right turnNote: This exercise will be the same set-up as in Lesson 6 except that each travellane should have a stop sign.
! Review driveway and intersection etiquette, hand signals, and where to rideon the street.
" Split the students into four groups around the intersection and place a stopsign at each corner.
# Cyclists will begin 25 feet away and bike up to the intersection on thenormal side (right side) of the road, stop and signal right.
$ Before progressing, cyclists should stop, look for traffic and pedestrians.
% They should turn out just like they did in the intersection demonstration.
& After making the turn, students should line up to go again.
' Volunteers and extra students can act as pedestrians walking across theexercise.
15MINUTES
L E S S O N 7
65
B A C K G R O U N DL E S S O N
See the above discussion for intersec-tion types.
Straight! Remove two of the stop signs that are across from each other.
" Students will maintain the same positions and practice straight and rightturns simultaneously.
# Have students alternate between right and straight movements through theintersection.
$ Right-of-way conflicts occur. Stop the exercise and discuss the right-of-wayconflicts and the solutions. Remember the rules from Lesson 4 — whenconflicts of right-of-way occur, such as two vehicles approaching a four-waystop, the first to intersection goes first, then vehicle to the right goes first, andthen straight goes first. Continue the activity.
Left turnsSee next activity.
IntersectionsB A C K G R O U N D L E S S O N
66
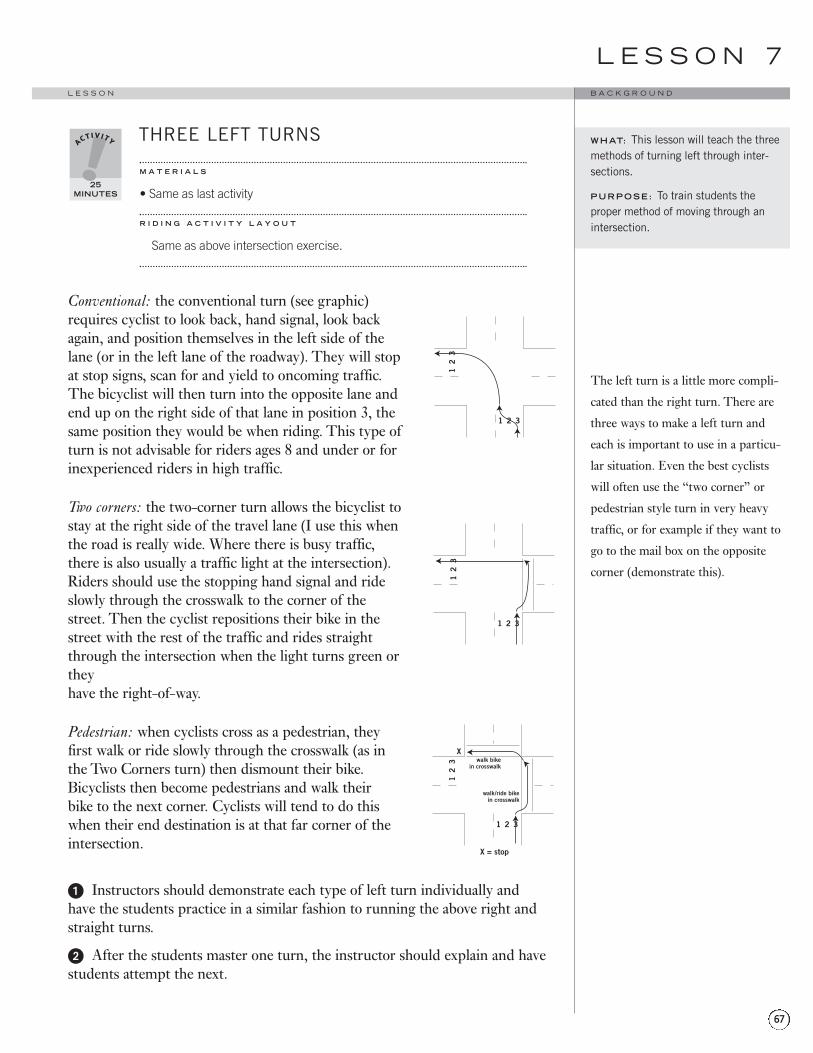
WHAT: This lesson will teach the threemethods of turning left through inter-sections.
PURPOSE : To train students theproper method of moving through anintersection.
THREE LEFT TURNS
M A T E R I A L S
• Same as last activity
R I D I N G A C T I V I T Y L A Y O U T
Same as above intersection exercise.
Conventional: the conventional turn (see graphic)requires cyclist to look back, hand signal, look backagain, and position themselves in the left side of thelane (or in the left lane of the roadway). They will stopat stop signs, scan for and yield to oncoming traffic.The bicyclist will then turn into the opposite lane andend up on the right side of that lane in position 3, thesame position they would be when riding. This type ofturn is not advisable for riders ages 8 and under or for inexperienced riders in high traffic.
Two corners: the two-corner turn allows the bicyclist tostay at the right side of the travel lane (I use this whenthe road is really wide. Where there is busy traffic,there is also usually a traffic light at the intersection).Riders should use the stopping hand signal and rideslowly through the crosswalk to the corner of thestreet. Then the cyclist repositions their bike in thestreet with the rest of the traffic and rides straightthrough the intersection when the light turns green orthey have the right-of-way.
Pedestrian: when cyclists cross as a pedestrian, theyfirst walk or ride slowly through the crosswalk (as inthe Two Corners turn) then dismount their bike.Bicyclists then become pedestrians and walk theirbike to the next corner. Cyclists will tend to do thiswhen their end destination is at that far corner of theintersection.
! Instructors should demonstrate each type of left turn individually and have the students practice in a similar fashion to running the above right andstraight turns.
" After the students master one turn, the instructor should explain and havestudents attempt the next.
1 2
walk bikein crosswalk
walk/ride bikein crosswalk
3
12
3
X
X = stop
1 2 3
12
3
1 2 3
12
3
25MINUTES
L E S S O N 7
67
B A C K G R O U N DL E S S O N
The left turn is a little more compli-
cated than the right turn. There are
three ways to make a left turn and
each is important to use in a particu-
lar situation. Even the best cyclists
will often use the “two corner” or
pedestrian style turn in very heavy
traffic, or for example if they want to
go to the mail box on the opposite
corner (demonstrate this).
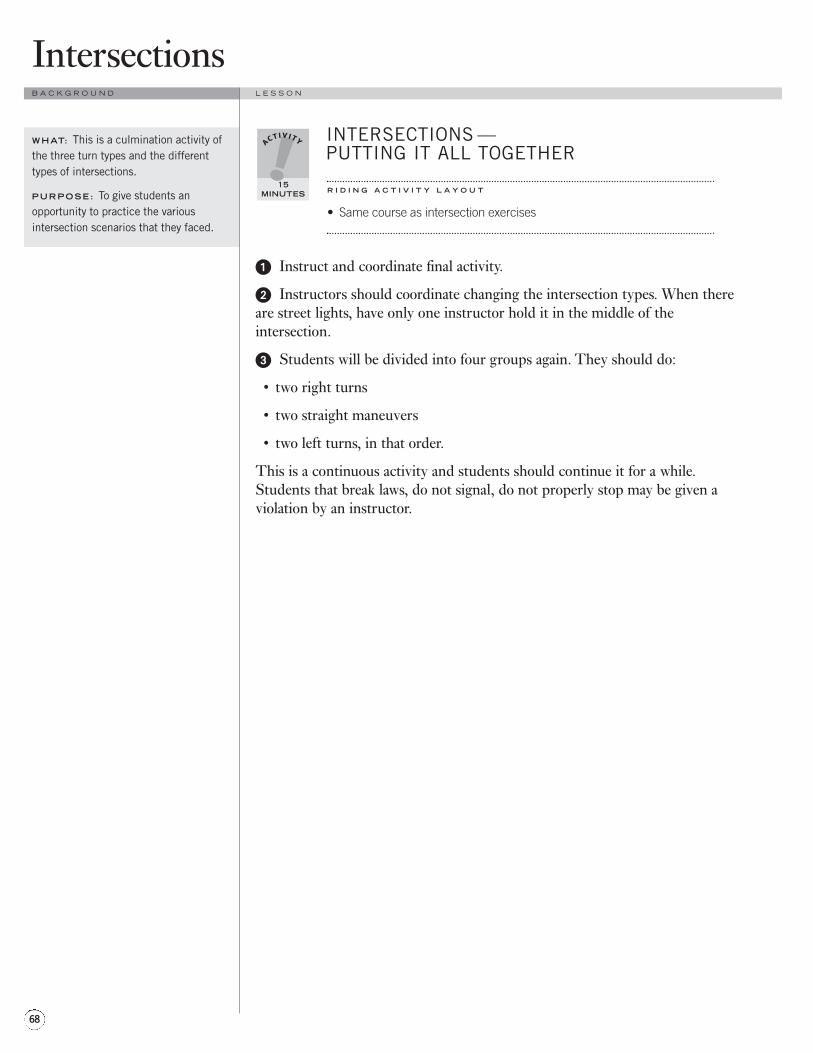
INTERSECTIONS — PUTTING IT ALL TOGETHER
R I D I N G A C T I V I T Y L A Y O U T
• Same course as intersection exercises
! Instruct and coordinate final activity.
" Instructors should coordinate changing the intersection types. When thereare street lights, have only one instructor hold it in the middle of theintersection.
# Students will be divided into four groups again. They should do:
• two right turns
• two straight maneuvers
• two left turns, in that order.
This is a continuous activity and students should continue it for a while.Students that break laws, do not signal, do not properly stop may be given aviolation by an instructor.
15MINUTES
Intersections
WHAT: This is a culmination activity ofthe three turn types and the differenttypes of intersections.
PURPOSE : To give students anopportunity to practice the variousintersection scenarios that they faced.
B A C K G R O U N D L E S S O N
68
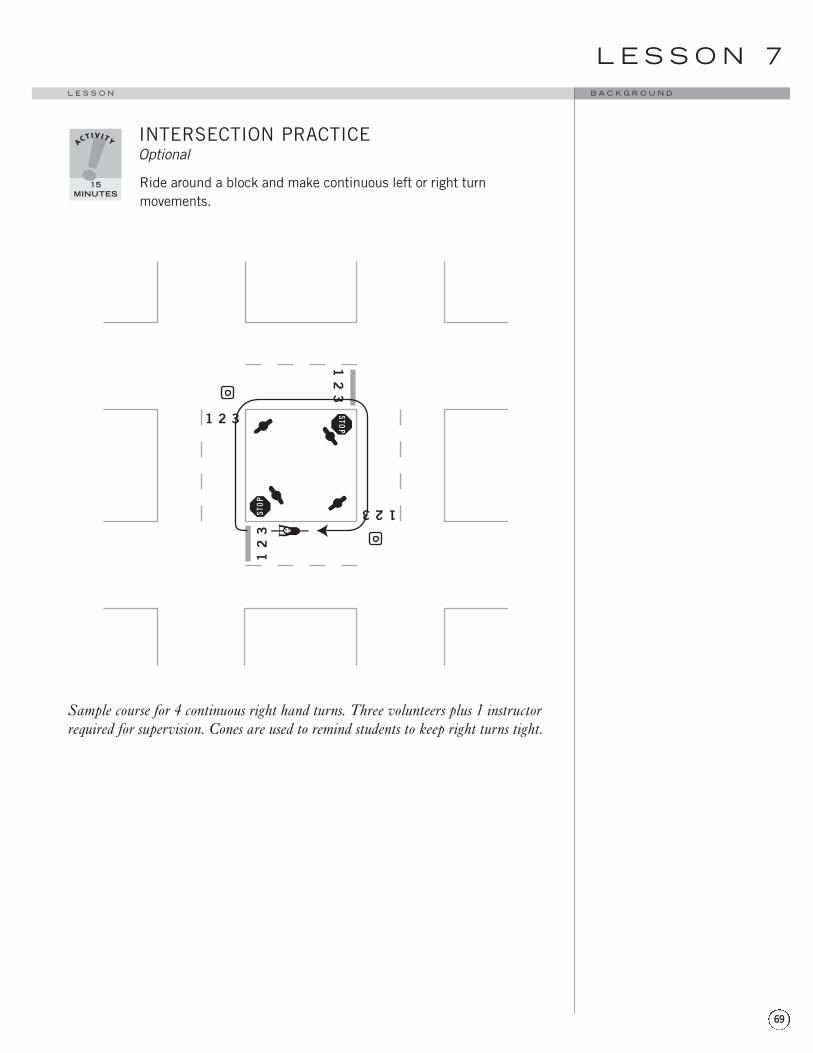
INTERSECTION PRACTICEOptional
Ride around a block and make continuous left or right turn movements.
Sample course for 4 continuous right hand turns. Three volunteers plus 1 instructorrequired for supervision. Cones are used to remind students to keep right turns tight.
12
3
123
1 2 3
12
3
15MINUTES
L E S S O N 7
69
B A C K G R O U N DL E S S O N
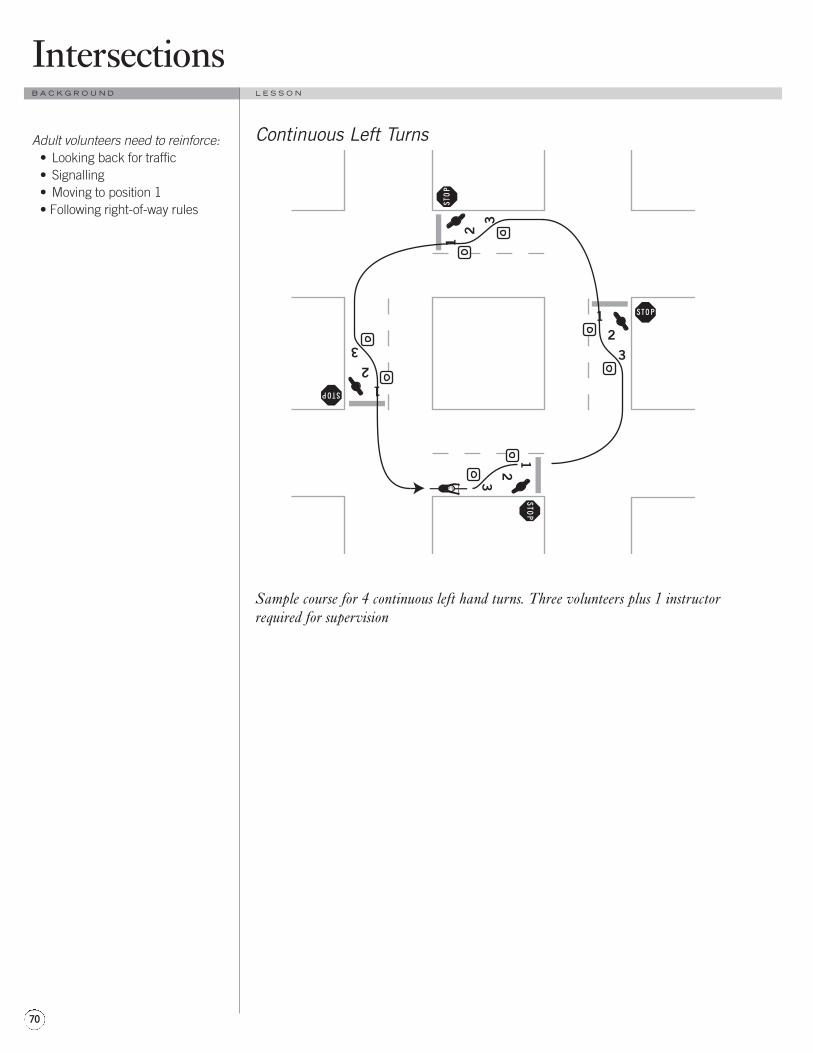
Continuous Left Turns
Sample course for 4 continuous left hand turns. Three volunteers plus 1 instructorrequired for supervision
12
31
23
12
3
12
3
Intersections
Adult volunteers need to reinforce:• Looking back for traffic• Signalling• Moving to position 1• Following right-of-way rules
B A C K G R O U N D L E S S O N
70
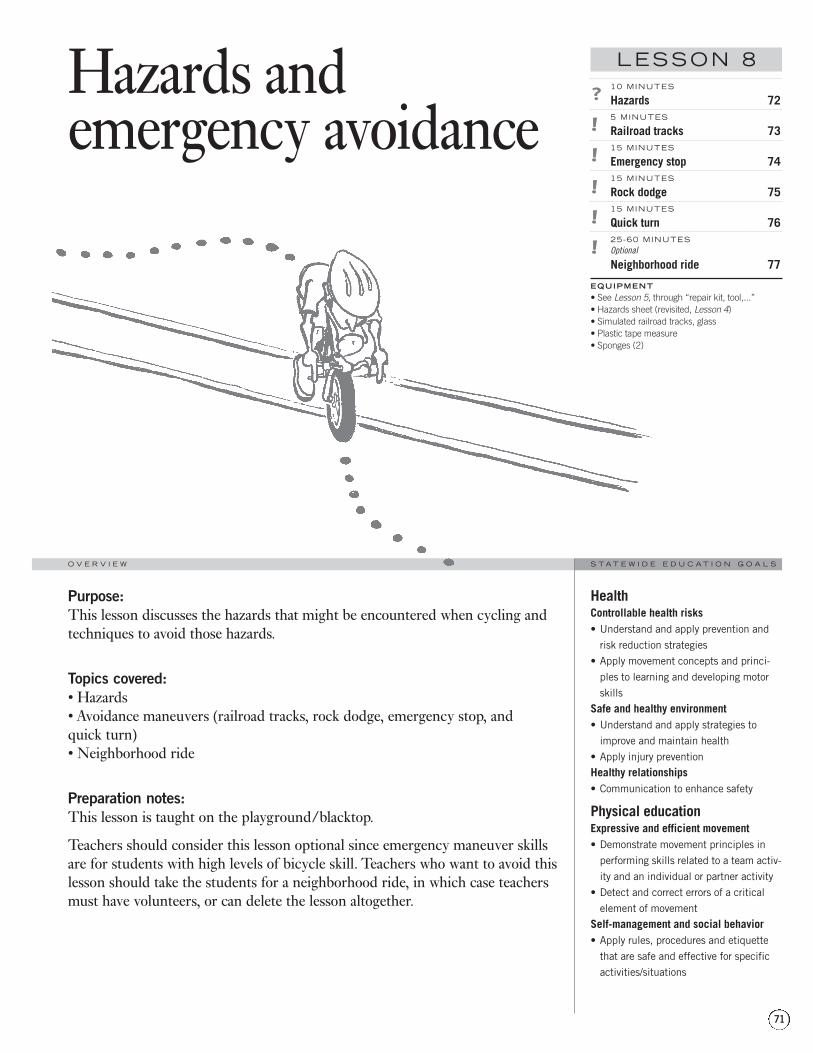
10 MINUTES
Hazards 725 MINUTES
Railroad tracks 7315 MINUTES
Emergency stop 7415 MINUTES
Rock dodge 7515 MINUTES
Quick turn 7625-60 MINUTESOptional
Neighborhood ride 77
EQUIPMENT• See Lesson 5, through “repair kit, tool,...”• Hazards sheet (revisited, Lesson 4)• Simulated railroad tracks, glass• Plastic tape measure• Sponges (2)
Purpose:This lesson discusses the hazards that might be encountered when cycling andtechniques to avoid those hazards.
Topics covered:• Hazards• Avoidance maneuvers (railroad tracks, rock dodge, emergency stop, and quick turn) • Neighborhood ride
Preparation notes:This lesson is taught on the playground/blacktop.
Teachers should consider this lesson optional since emergency maneuver skillsare for students with high levels of bicycle skill. Teachers who want to avoid thislesson should take the students for a neighborhood ride, in which case teachersmust have volunteers, or can delete the lesson altogether.
Hazards andemergency avoidance
HealthControllable health risks• Understand and apply prevention and
risk reduction strategies• Apply movement concepts and princi-
ples to learning and developing motorskills
Safe and healthy environment• Understand and apply strategies to
improve and maintain health• Apply injury preventionHealthy relationships• Communication to enhance safety
Physical educationExpressive and efficient movement• Demonstrate movement principles in
performing skills related to a team activ-ity and an individual or partner activity
• Detect and correct errors of a criticalelement of movement
Self-management and social behavior• Apply rules, procedures and etiquette
that are safe and effective for specificactivities/situations
LESSON 8
71
S T A T E W I D E E D U C A T I O N G O A L SO V E R V I E W
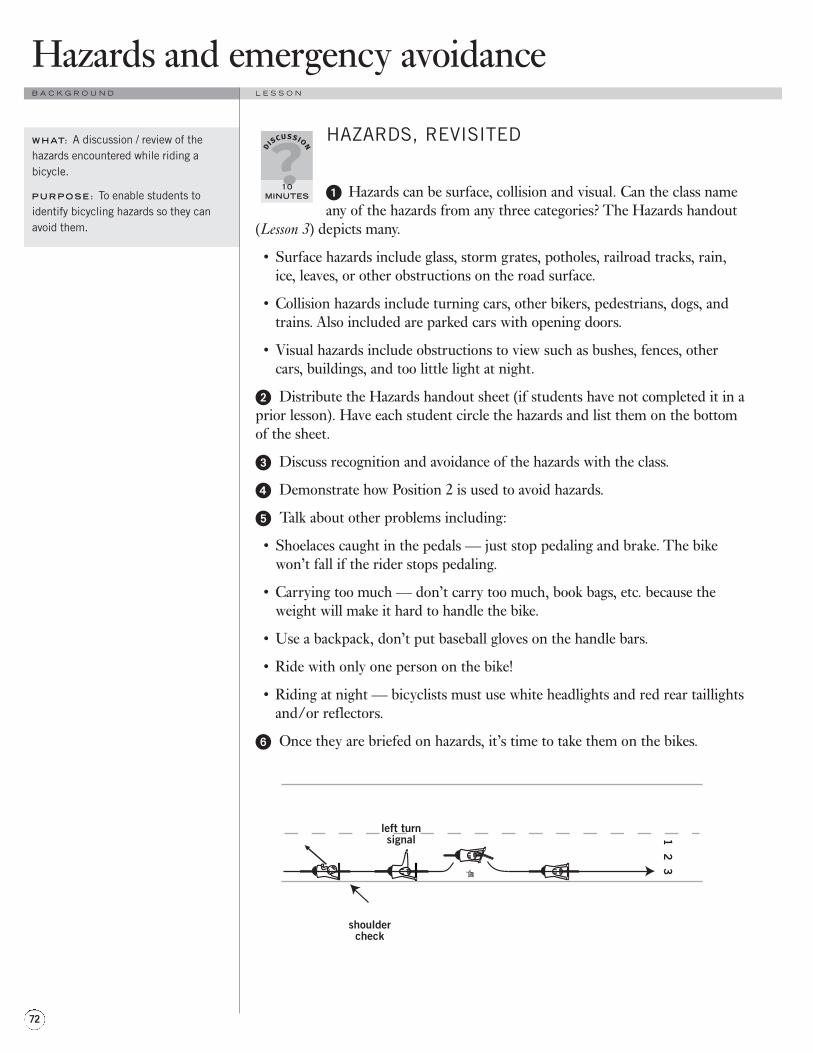
WHAT: A discussion / review of thehazards encountered while riding abicycle.
PURPOSE : To enable students toidentify bicycling hazards so they canavoid them.
HAZARDS, REVISITED
! Hazards can be surface, collision and visual. Can the class nameany of the hazards from any three categories? The Hazards handout
(Lesson 3) depicts many.
• Surface hazards include glass, storm grates, potholes, railroad tracks, rain,ice, leaves, or other obstructions on the road surface.
• Collision hazards include turning cars, other bikers, pedestrians, dogs, andtrains. Also included are parked cars with opening doors.
• Visual hazards include obstructions to view such as bushes, fences, othercars, buildings, and too little light at night.
" Distribute the Hazards handout sheet (if students have not completed it in aprior lesson). Have each student circle the hazards and list them on the bottomof the sheet.
# Discuss recognition and avoidance of the hazards with the class.
$ Demonstrate how Position 2 is used to avoid hazards.
% Talk about other problems including:
• Shoelaces caught in the pedals — just stop pedaling and brake. The bikewon’t fall if the rider stops pedaling.
• Carrying too much — don’t carry too much, book bags, etc. because theweight will make it hard to handle the bike.
• Use a backpack, don’t put baseball gloves on the handle bars.
• Ride with only one person on the bike!
• Riding at night — bicyclists must use white headlights and red rear taillightsand/or reflectors.
& Once they are briefed on hazards, it’s time to take them on the bikes.
12
3
shouldercheck
left turnsignal
discussion
10MINUTES
Hazards and emergency avoidanceB A C K G R O U N D L E S S O N
72
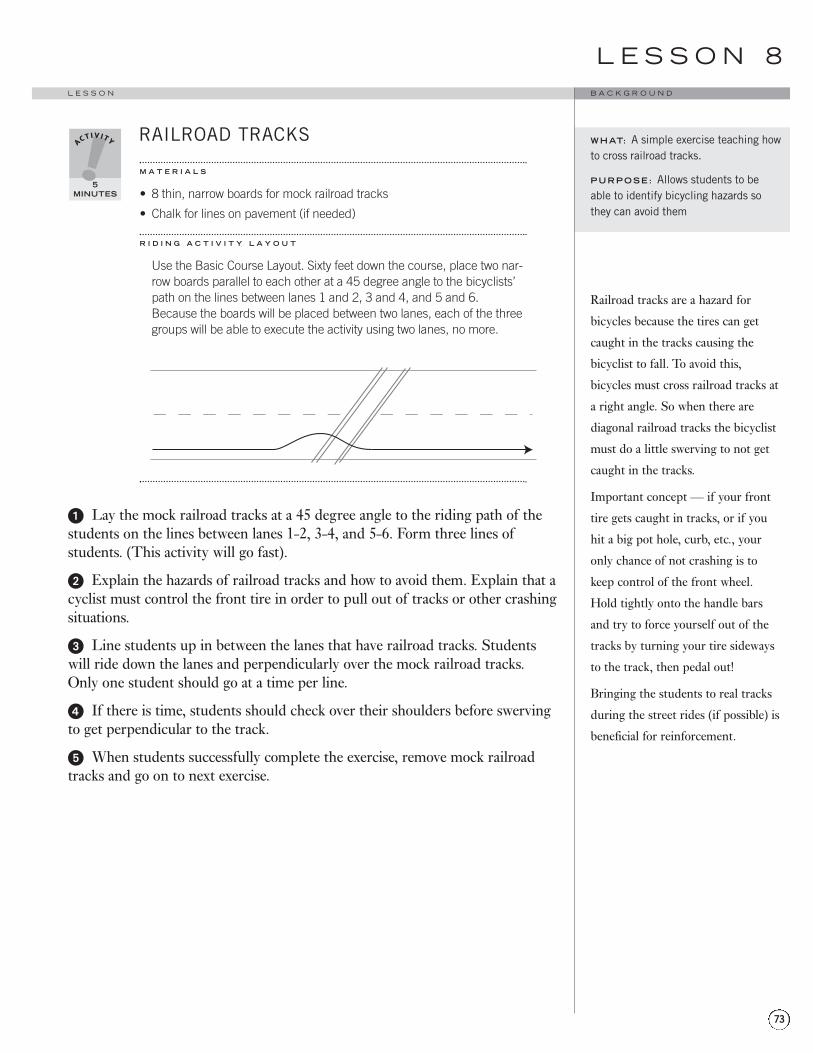
WHAT: A simple exercise teaching howto cross railroad tracks.
PURPOSE : Allows students to beable to identify bicycling hazards sothey can avoid them
RAILROAD TRACKS
M A T E R I A L S
• 8 thin, narrow boards for mock railroad tracks
• Chalk for lines on pavement (if needed)
R I D I N G A C T I V I T Y L A Y O U T
Use the Basic Course Layout. Sixty feet down the course, place two nar-row boards parallel to each other at a 45 degree angle to the bicyclists’path on the lines between lanes 1 and 2, 3 and 4, and 5 and 6.Because the boards will be placed between two lanes, each of the threegroups will be able to execute the activity using two lanes, no more.
! Lay the mock railroad tracks at a 45 degree angle to the riding path of thestudents on the lines between lanes 1-2, 3-4, and 5-6. Form three lines ofstudents. (This activity will go fast).
" Explain the hazards of railroad tracks and how to avoid them. Explain that acyclist must control the front tire in order to pull out of tracks or other crashingsituations.
# Line students up in between the lanes that have railroad tracks. Studentswill ride down the lanes and perpendicularly over the mock railroad tracks.Only one student should go at a time per line.
$ If there is time, students should check over their shoulders before swervingto get perpendicular to the track.
% When students successfully complete the exercise, remove mock railroadtracks and go on to next exercise.
5MINUTES
L E S S O N 8
73
B A C K G R O U N DL E S S O N
Railroad tracks are a hazard for
bicycles because the tires can get
caught in the tracks causing the
bicyclist to fall. To avoid this,
bicycles must cross railroad tracks at
a right angle. So when there are
diagonal railroad tracks the bicyclist
must do a little swerving to not get
caught in the tracks.
Important concept — if your front
tire gets caught in tracks, or if you
hit a big pot hole, curb, etc., your
only chance of not crashing is to
keep control of the front wheel.
Hold tightly onto the handle bars
and try to force yourself out of the
tracks by turning your tire sideways
to the track, then pedal out!
Bringing the students to real tracks
during the street rides (if possible) is
beneficial for reinforcement.
Many hazards can be avoided by
good planning. Usually you avoid a
crash at an intersection by following
the laws and going through it slowly.
But other times the hazards are very
sudden, and to avoid them you must
apply an emergency maneuver.
These include the emergency stop,
rock dodge and quick turn.
The emergency stop is often useful
when a car unexpectedly pulls out
of a driveway and can not be avoided
via swerving. The emergency stop
is not the end-all maneuver to
avoid accidents. We will cover
other important maneuver in the
following exercises.
WHAT: An activity to teach students tostop quickly in order to avoid a crash.
PURPOSE : Emergency stopping isused in situations when you need tostop fast. This activity will introduceyouths to emergency stopping so theymay avoid a car, people or hazards.
EMERGENCY STOP
M A T E R I A L S ( O P T I O N A L )
• Tape measure • Chalk
• Stopping distance sheet • Pencil
R I D I N G A C T I V I T Y L A Y O U T
Use the same lane setup as for the railroad tracks exercise, except haveonly two groups go at a time. Place a perpendicular line halfway downthe cycle lane as an indicator to where students should start their stop.The stopping line should be placed between 80 and 150 feet from thestart depending on the size of the blacktop area. There should be atleast 20 feet after stop line.
Teacher instructions! Discuss stopping, emergency stopping and basic hazard avoidance.
" Demonstrate stopping distance using three types of stops:
Normal stop — when we stop our bikes, we should apply 3 timesgreater force to the front brake than the back (pull brake lever 3times harder). Why? Because the front slows us down the fastest!
Hard stop with skidding — if we stop by using only the back brake,we tend to skid. Why do you think it is so easy to skid on a bikewith coaster brakes? (Because they only have back brakes.)
Emergency stop — to stop faster you have to apply more frontbrake. The best emergency stop will use a lot of front brake pres-sure and little back brake pressure. If we skid with our backbrake we are pressing too much on our back brake. BUT, DON’TAPPLY ONLY FRONT BRAKE OR YOU WILL FLIP OVER YOURHANDLE BARS! So be careful. Also, to stop well you must dropyour body and shift your weight to the back over the rear wheel.
# Have a student with a tape measure to measure how many feet it takes tostop for each different type of stop, and record it on a record sheet. Theemergency stop should be the fastest. (Optional)
Student instructions! Line two groups on lines in between lanes 1-2 and 5-6. Have two groupsstart and pedal to gain some speed.
" At the stopping line have the students apply the brakes to try to stop quickly.
# Don’t allow students to intentionally skid their back tires.
$ Have the left lane of students return to their lines to the left and right lanereturn to the right.
Note: Students with coaster brakes on their bikes should not use them for this exercise.Have them share bikes with another group.
15MINUTES
Hazards and emergency avoidanceB A C K G R O U N D L E S S O N
74
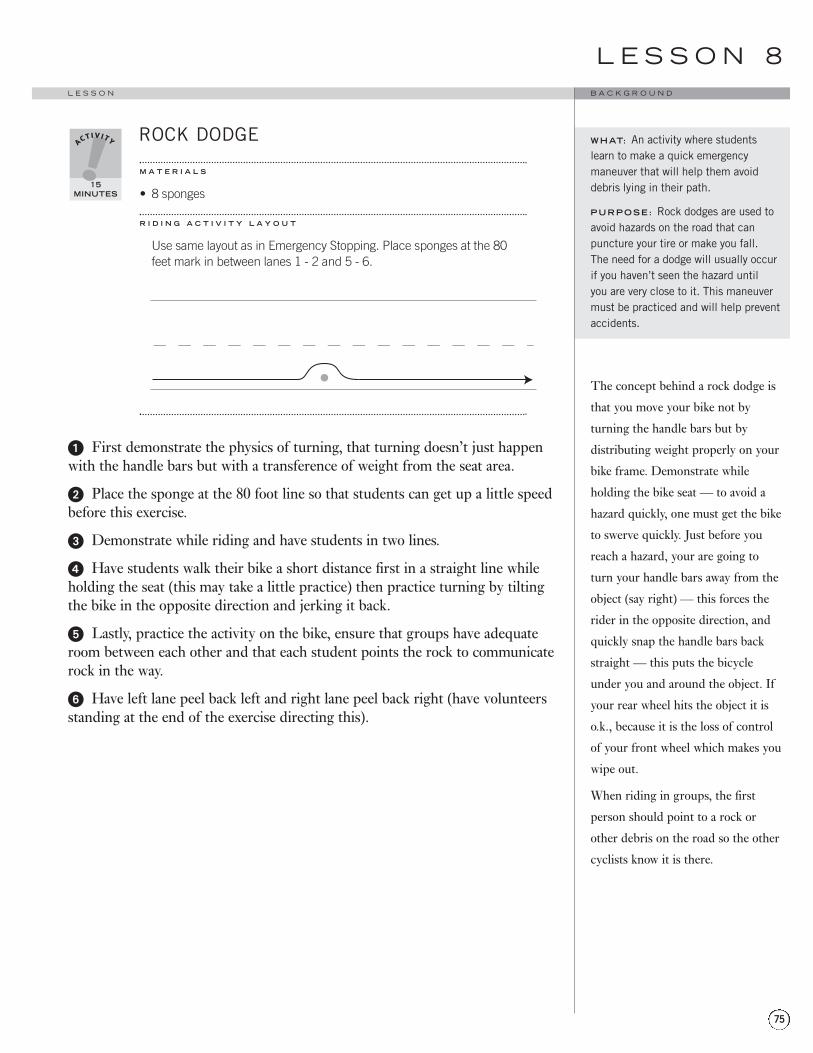
WHAT: An activity where studentslearn to make a quick emergencymaneuver that will help them avoiddebris lying in their path.
PURPOSE : Rock dodges are used toavoid hazards on the road that canpuncture your tire or make you fall. The need for a dodge will usually occurif you haven’t seen the hazard until you are very close to it. This maneuvermust be practiced and will help preventaccidents.
ROCK DODGE
M A T E R I A L S
• 8 sponges
R I D I N G A C T I V I T Y L A Y O U T
Use same layout as in Emergency Stopping. Place sponges at the 80feet mark in between lanes 1 - 2 and 5 - 6.
! First demonstrate the physics of turning, that turning doesn’t just happenwith the handle bars but with a transference of weight from the seat area.
" Place the sponge at the 80 foot line so that students can get up a little speedbefore this exercise.
# Demonstrate while riding and have students in two lines.
$ Have students walk their bike a short distance first in a straight line whileholding the seat (this may take a little practice) then practice turning by tiltingthe bike in the opposite direction and jerking it back.
% Lastly, practice the activity on the bike, ensure that groups have adequateroom between each other and that each student points the rock to communicaterock in the way.
& Have left lane peel back left and right lane peel back right (have volunteersstanding at the end of the exercise directing this).
15MINUTES
L E S S O N 8
75
B A C K G R O U N DL E S S O N
The concept behind a rock dodge is
that you move your bike not by
turning the handle bars but by
distributing weight properly on your
bike frame. Demonstrate while
holding the bike seat — to avoid a
hazard quickly, one must get the bike
to swerve quickly. Just before you
reach a hazard, your are going to
turn your handle bars away from the
object (say right) — this forces the
rider in the opposite direction, and
quickly snap the handle bars back
straight — this puts the bicycle
under you and around the object. If
your rear wheel hits the object it is
o.k., because it is the loss of control
of your front wheel which makes you
wipe out.
When riding in groups, the first
person should point to a rock or
other debris on the road so the other
cyclists know it is there.
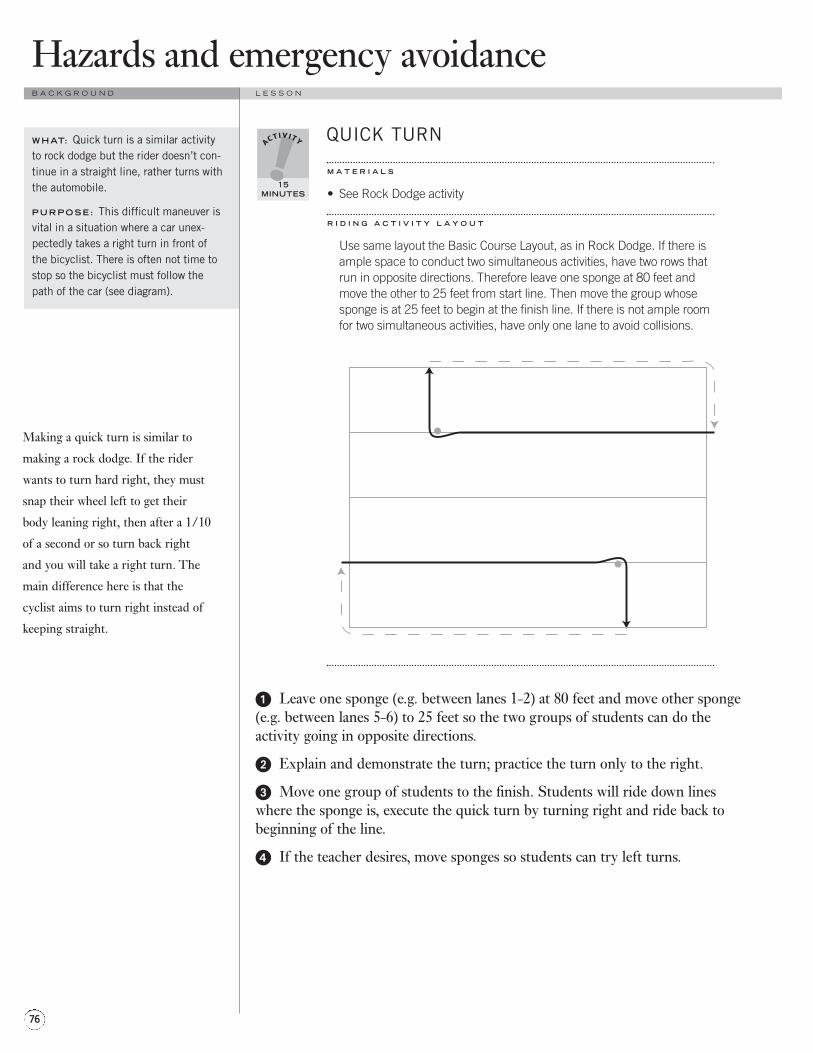
WHAT: Quick turn is a similar activityto rock dodge but the rider doesn’t con-tinue in a straight line, rather turns withthe automobile.
PURPOSE : This difficult maneuver isvital in a situation where a car unex-pectedly takes a right turn in front ofthe bicyclist. There is often not time tostop so the bicyclist must follow thepath of the car (see diagram).
QUICK TURN
M A T E R I A L S
• See Rock Dodge activity
R I D I N G A C T I V I T Y L A Y O U T
Use same layout the Basic Course Layout, as in Rock Dodge. If there isample space to conduct two simultaneous activities, have two rows thatrun in opposite directions. Therefore leave one sponge at 80 feet andmove the other to 25 feet from start line. Then move the group whosesponge is at 25 feet to begin at the finish line. If there is not ample roomfor two simultaneous activities, have only one lane to avoid collisions.
! Leave one sponge (e.g. between lanes 1-2) at 80 feet and move other sponge(e.g. between lanes 5-6) to 25 feet so the two groups of students can do theactivity going in opposite directions.
" Explain and demonstrate the turn; practice the turn only to the right.
# Move one group of students to the finish. Students will ride down lineswhere the sponge is, execute the quick turn by turning right and ride back tobeginning of the line.
$ If the teacher desires, move sponges so students can try left turns.
15MINUTES
Hazards and emergency avoidanceB A C K G R O U N D L E S S O N
76
Making a quick turn is similar to
making a rock dodge. If the rider
wants to turn hard right, they must
snap their wheel left to get their
body leaning right, then after a 1/10
of a second or so turn back right
and you will take a right turn. The
main difference here is that the
cyclist aims to turn right instead of
keeping straight.
WHAT: This activity combines all theskills of safe bicycling and puts theminto practical application in a neighbor-hood setting.
PURPOSE : To give the students expo-sure to cycling in traffic and enforcesproper cycling technique.
On-street rideThe on-street ride is preferred to a bicy-cle rodeo because students practiceskills while gaining confidence of prop-er on-road cycling. To coordinate rides,teachers must obtain prior approval byadministration and parents using nor-mal field trip procedures. Teachersshould also recruit volunteers ride lead-ers. A ratio of one adult to five studentsis ideal, but adults can usually handleseven student cyclists.
When planning group rides, one of twobasic riding strategies should be taken:
Small groups – each adult leads as smalla group as possible. The adult eitherrides in front or back of the group, com-municating with students to keep right,hand signal and facilitating communi-cation among each other. In smallgroups, adults should allow each stu-dent to negotiate intersection move-ments independently. At stop signs,adults can stand to the left of students,coaching them through intersections.Students should be told to wait a cou-ple of hundred feet up the road for therest of the group. The advantage ofsmall groups is that students learn amore realistic sense of cycling in traffic.
Large groups – classes are broken intogroups of 10-15 children and two orthree adults per group. Students negoti-ate intersections as individuals butoften are waived on by automobiles, orfail to properly stop at stop signsbecause the cyclist before them justwent through. Adults should be spreadout among the group.
(continued next page)
NEIGHBORHOOD RIDEOptional
Run a neighborhood ride if time permits or if students do not have thecycling skill level to perform emergency maneuvers.
M A T E R I A L S
• Bright safety vests for leaders • Repair tools (1 per group)and sweeps
• Bicycles • Helmets
• Watch for each group ride leader • Patch kits (1 per group)
• Pump (1 per group) • Safety kit (1 per group)
• Cell phone/walkie talkies
! Have students organized in groups for riding. Each must have a helmet anda bike. Ride leaders must have safety vests and one adult per group wears a packwith tools and a safety kit.
" Communicate to the class the riding activity and the riding rules (seeBackground column).
# Assign groups of students to adults (see Background column for strategies).
$ Allow each group to go for at least 20-minute ride. If there is plenty of staff,the rides can be longer (or to a destination where we stop and play, get icecream, etc).
% Upon returning, debrief.
WHAT TO BRING ON A RIDE
• Cell phone / walkie-talkies
• First aid kit
• Water
25- 60MINUTES
L E S S O N 8
77
B A C K G R O U N DL E S S O N
(continued from previous page)
Combo groups – A good method is tocombine the two styles. Small groups ofstudents, each supervised by one adult,ride the same routes but are separatedby a few moments and remain in eye-sight of each other. This will give teach-ers more ability to supervise their entireclass while allowing youth the ability tonegotiate intersections in small groups.The drawback is that front groups oftenhave to wait for rear groups.
Ride leaders and sweepsEach ride should have a leader whoknows the route and is an expert at bicy-cling and managing the large group ofstudents. The ride leader’s responsibilityis to ensure that the groups of riders donot get lost behind. The rider leadermust wait when later groups are not insight. A general rule is that the rideleader should be able to see at least halfthe class.
Ride sweeps should carry a cell phone,emergency equipment and repair tools.The ride sweep is often the lead teacheror responsible bicycle advocate. The ridesweep is responsible for managing anyproblem that arises including injuriesand mechanical failures. Having walkie-talkie communication for sweeps and theride leader is useful to avoid separation.
Routes and logisticsRides should begin on low to mediumtraffic streets around the community,distance depending on time. Rides canbe led on higher traffic streets as stu-dents improve in skill. Teachers willwant to consider routing and meet withvolunteers at least 15 minutes beforeclass to discuss routes (maps are help-ful) and group riding strategy. Teachersshould also have reflective vests, patchkits and medical kits for adults to carry.
Teachers may have pre-marked the rid-ing course with signs such as “BicycleEvent” placed around the course.Another idea on long rides is to recruitparents to stand at important intersec-tions and guide groups, ensuring thatthey keep on the designated course andacting a check-in posts. If you do this,make sure to tell the volunteers howmany groups they should expect to seepassing.
NEIGHBORHOOD RIDE GUIDELINES
Laws
• All riders must wear an approved helmet, fitted properly.
• Bicycles are vehicles and must follow same laws that apply tomotor vehicles.
• When riding on the roadway, ride as far to the right as is safe.
Group Riding Techniques
• Take responsibility for yourself. Don’t just follow the leader,especially when crossing streets, driveways or intersections. If atraffic light turns yellow and half of the group rides through, youshould stop and they will wait.
• Ride single file and ride on the right, pass on the left. (Limitpassing on group ride).
• Communicate with other riders verbally and with hand signals(left and right turns, stops, hazards, slowing, passing).
• Ride as a group, but leave at least one bike length between youand the next rider. When passing another rider, give verbal warn-ing “PASSING” or “ON YOUR LEFT”.
• For left turns, consider traffic volume and skill levels to decidethe best technique.
• The first and last rider (leader and sweep) wears retro-reflectivematerial.
• Everyone pulls off to the right side of the roadway for discus-sions and rest stops.
Hazards and emergency avoidanceB A C K G R O U N D L E S S O N
78
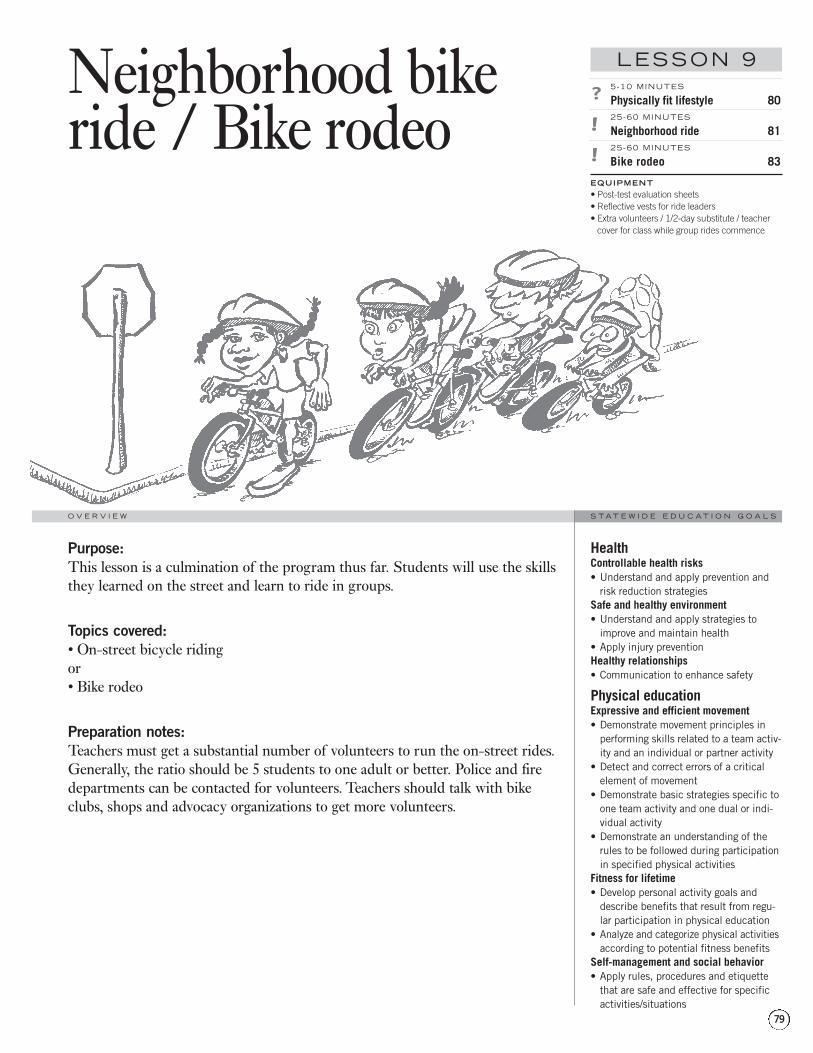
5-10 MINUTES
Physically fit lifestyle 8025-60 MINUTES
Neighborhood ride 8125-60 MINUTES
Bike rodeo 83
EQUIPMENT• Post-test evaluation sheets• Reflective vests for ride leaders• Extra volunteers / 1/2-day substitute / teacher
cover for class while group rides commence
Purpose:This lesson is a culmination of the program thus far. Students will use the skillsthey learned on the street and learn to ride in groups.
Topics covered:• On-street bicycle riding or• Bike rodeo
Preparation notes:Teachers must get a substantial number of volunteers to run the on-street rides.Generally, the ratio should be 5 students to one adult or better. Police and firedepartments can be contacted for volunteers. Teachers should talk with bikeclubs, shops and advocacy organizations to get more volunteers.
Neighborhood bikeride / Bike rodeo
HealthControllable health risks• Understand and apply prevention and
risk reduction strategiesSafe and healthy environment• Understand and apply strategies to
improve and maintain health• Apply injury preventionHealthy relationships• Communication to enhance safety
Physical educationExpressive and efficient movement• Demonstrate movement principles in
performing skills related to a team activ-ity and an individual or partner activity
• Detect and correct errors of a criticalelement of movement
• Demonstrate basic strategies specific toone team activity and one dual or indi-vidual activity
• Demonstrate an understanding of therules to be followed during participationin specified physical activities
Fitness for lifetime• Develop personal activity goals and
describe benefits that result from regu-lar participation in physical education
• Analyze and categorize physical activitiesaccording to potential fitness benefits
Self-management and social behavior• Apply rules, procedures and etiquette
that are safe and effective for specificactivities/situations
LESSON 9
79
S T A T E W I D E E D U C A T I O N G O A L SO V E R V I E W
PHYSICALLY FIT LIFESTYLE
Riding a bike, walking, skating, scooting, and blading are all excellentways to maintain an active and healthy lifestyle. In fact, national
organizations, such as the National Centers for Disease Control, are working toincrease bicycling and walking to school and work as a means of gettingexercise. The Bike Safety Program and other programs nationwide arepromoting and doing similar work with the same goals.
This curriculum works to empower students to ride safely so that they can startbiking and walking to school on a daily basis. Hopefully the teachers can workinternally to ensure that there is adequate bicycle parking and work withstudents to plan safe travel routes to school. Students and teachers shoulddiscuss their plans to bike and walk to school and the benefits of a daily exerciseroutine. Students should also have dialogues with their parents, and evenrequest that their parents accompany them the first few times so that parentsand children feel that the commute is safe.
Riding a bike and promoting cycling to students may be the most effective wayto increase youth cycling to school. For more assistance on route planning andother safety considerations (in addition to this curriculum), call your localbicycle advocacy organization, most likely the BTA, the organization thatbrought this very curriculum to your classroom. These bicycling organizationsmay have programs, such as Safe Routes to Schools, which work with teachers,administration, students, and parents to getting children to school safely ontheir own two wheels (or feet).
discussion
5-10MINUTES
Neighborhood bike ride / Bike rodeoB A C K G R O U N D L E S S O N
80
On-street rideThe on-street ride is preferred to a bicy-cle rodeo because students practiceskills while gaining confidence of prop-er on-road cycling. To coordinate rides,teachers must obtain prior approval byadministration and parents using nor-mal field trip procedures. Teachersshould also recruit volunteers ride lead-ers. A ratio of one adult to five studentsis ideal, but adults can usually handleseven student cyclists.
When planning group rides, one of twobasic riding strategies should be taken:
Small groups – each adult leads as smalla group as possible. The adult eitherrides in front or back of the group, com-municating with students to keep right,hand signal and facilitating communi-cation among each other. In smallgroups, adults should allow each stu-dent to negotiate intersection move-ments independently. At stop signs,adults can stand to the left of students,coaching them through intersections.Students should be told to wait a cou-ple of hundred feet up the road for therest of the group. The advantage ofsmall groups is that students learn amore realistic sense of cycling in traffic.
Large groups – classes are broken intogroups of 10-15 children and two orthree adults per group. Students negoti-ate intersections as individuals butoften are waived on by automobiles, orfail to properly stop at stop signsbecause the cyclist before them justwent through. Adults should be spreadout among the group.
(continued next page)
NEIGHBORHOOD RIDESee Lesson 10 for post-testing during neighborhood rides
M A T E R I A L S
• Bright safety vests for leaders • Repair tools (1 per group)and sweeps
• Bicycles • Helmets
• Watch for each group ride leader • Patch kits (1 per group)
• Pump (1 per group) • Safety kit (1 per group)
• Route directions • Cell phone / walkie-talkies
! Have students organized in groups for riding. Each must have a helmet anda bike. Ride leaders must have vests and one adult per group wears a pack withtools and a safety kit.
" Communicate to the class the riding activity and the riding rules (seeBackground column).
# Assign groups of students to adults (see Background column for strategies).
$ Allow each group to go for at least 20-minute ride. If there is plenty of staff,the rides can be longer (or to a destination where we stop and play, get icecream, etc).
% Upon returning, debrief.
25- 60MINUTES
L E S S O N 9
81
B A C K G R O U N DL E S S O N
WHAT: This activity combines all theskills of safe bicycling and puts theminto practical application in a neighbor-hood setting.
PURPOSE : To give the students expo-sure to cycling in traffic and enforceproper cycling technique.

(continued from previous page)
Combo groups – A good method is tocombine the two styles. Small groups ofstudents, each supervised by one adult,ride the same routes but are separatedby a few moments and remain in eye-sight of each other. This will give teach-ers more ability to supervise their entireclass while allowing youth the ability tonegotiate intersections in small groups.The drawback is that front groups oftenhave to wait for rear groups.
Ride leaders and sweepsEach ride should have a leader whoknows the route and is an expert atbicycling and managing the large groupof students. The ride leader’s responsi-bility is to ensure that the groups of rid-ers do not get lost behind. The riderleader must wait when later groups arenot in sight. A general rule is that theride leader should be able to see atleast half the class.
Ride sweeps should carry a cell phone,emergency equipment and repair tools.The ride sweep is often the lead teacheror responsible bicycle advocate. Theride sweep is responsible for managingany problem that arises includinginjuries and mechanical failures.
Routes and logisticsRides should begin on low to mediumtraffic streets around the community,distance depending on time. Rides canbe led on higher traffic streets as stu-dents improve in skill. Teachers willwant to consider routing and meet withvolunteers at least 15 minutes beforeclass to discuss routes (maps are help-ful) and group riding strategy. Teachersshould also have reflective vests, patchkits and medical kits for adults to carry.
Teachers may have pre-marked the rid-ing course with signs such as “BicycleEvent” placed around the course. Anoth-er idea on long rides is to recruit parentsto stand at important intersections andguide groups, ensuring that they keepon the designated course and acting acheck-in posts. If you do this, make sureto tell the volunteers how many groupsthey should expect to see passing.
NEIGHBORHOOD RIDE GUIDELINES
Laws
• All riders must wear an approved helmet, fitted properly.
• Bicycles are vehicles and must follow same laws that apply tomotor vehicles.
• When riding on the roadway, ride as far to the right as is safe.
Group Riding Techniques
• Take responsibility for yourself. Don’t just follow the leader,especially when crossing streets, driveways or intersections. If atraffic light turns yellow and half of the group rides through, youshould stop and they will wait.
• Ride single file and ride on the right, pass on the left. (Limitpassing on group ride).
• Communicate with other riders verbally and with hand signals(left and right turns, stops, hazards, slowing, passing).
• Ride as a group, but leave at least one bike length between youand the next rider. When passing another rider, give verbal warn-ing “PASSING”.
• For left turns, consider traffic volume and skill levels to decidethe best technique.
• The first and last rider (leader and sweep) wears retro-reflectivematerial.
• Everyone pulls off to the right side of the roadway for discus-sions and rest stops.
Neighborhood bike ride / Bike rodeoB A C K G R O U N D L E S S O N
82

WHAT: Bicycle rodeos are organizedevents with a series of stations that thestudents bicycle through to help re-enforce the skills that were taught during the previous lessons. This rodeo consists mostly of the same exercises that were executed during the curriculum.
PURPOSE : To reinforce and testskills of students.
BICYCLE RODEO / POST-TEST
M A T E R I A L S
• Refer to prior lessons and activities
A good method for testing students’ skills is to run a bike rodeo. At each station,an adult could have a score card with the students’ names and a list of events inwhich they will be graded. Teachers should grade students “1” for excellent,“2” for satisfactory, and “3” for unsatisfactory. For more information, see AGuide to Bicycle Rodeos.
Order of events! Helmet fit
" Bicycle check
# Snail race
$ One-handed riding
% Bicycle slalom
& Scanning
' Railroad tracks obstacle course
( Intersections and turns
) Emergency stop
* Rock dodge
+ Quick turn
25- 60MINUTES
L E S S O N 9
83
B A C K G R O U N DL E S S O N
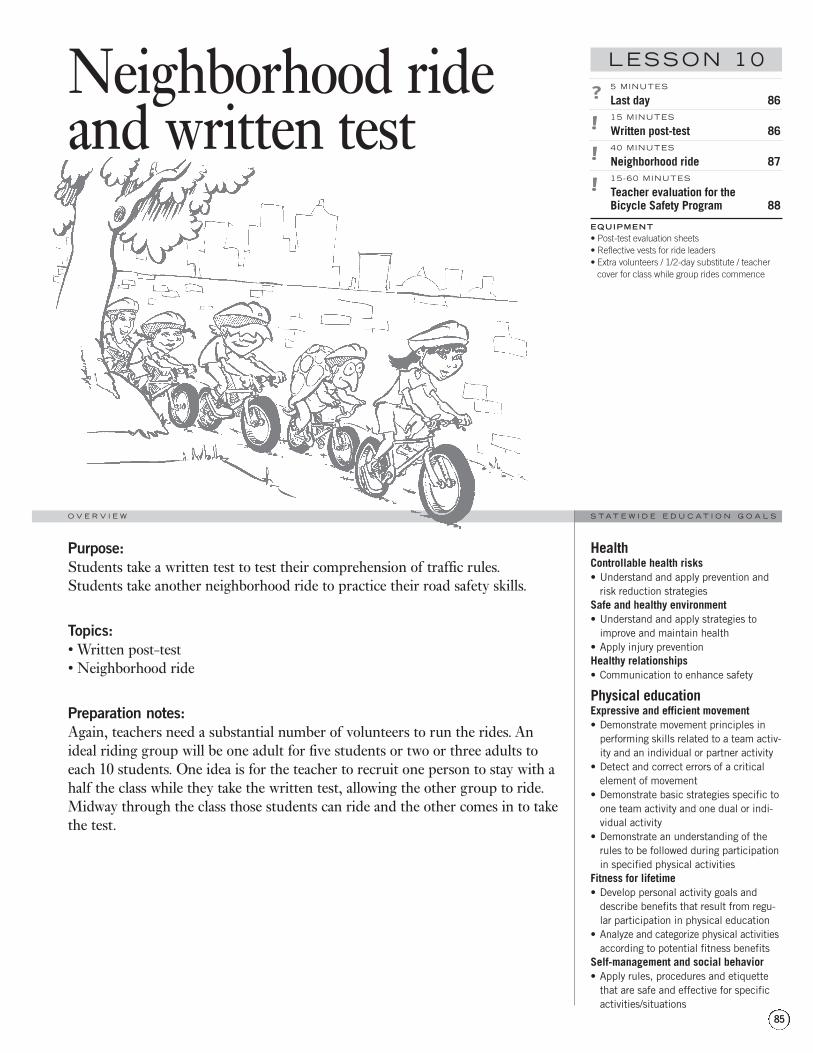
5 MINUTES
Last day 8615 MINUTES
Written post-test 8640 MINUTES
Neighborhood ride 8715-60 MINUTES
Teacher evaluation for theBicycle Safety Program 88
EQUIPMENT• Post-test evaluation sheets• Reflective vests for ride leaders• Extra volunteers / 1/2-day substitute / teacher
cover for class while group rides commence
Purpose:Students take a written test to test their comprehension of traffic rules.Students take another neighborhood ride to practice their road safety skills.
Topics: • Written post-test• Neighborhood ride
Preparation notes:Again, teachers need a substantial number of volunteers to run the rides. Anideal riding group will be one adult for five students or two or three adults toeach 10 students. One idea is for the teacher to recruit one person to stay with ahalf the class while they take the written test, allowing the other group to ride.Midway through the class those students can ride and the other comes in to takethe test.
Neighborhood rideand written test
HealthControllable health risks• Understand and apply prevention and
risk reduction strategiesSafe and healthy environment• Understand and apply strategies to
improve and maintain health• Apply injury preventionHealthy relationships• Communication to enhance safety
Physical educationExpressive and efficient movement• Demonstrate movement principles in
performing skills related to a team activ-ity and an individual or partner activity
• Detect and correct errors of a criticalelement of movement
• Demonstrate basic strategies specific toone team activity and one dual or indi-vidual activity
• Demonstrate an understanding of therules to be followed during participationin specified physical activities
Fitness for lifetime• Develop personal activity goals and
describe benefits that result from regu-lar participation in physical education
• Analyze and categorize physical activitiesaccording to potential fitness benefits
Self-management and social behavior• Apply rules, procedures and etiquette
that are safe and effective for specificactivities/situations
LESSON 10
85
S T A T E W I D E E D U C A T I O N G O A L SO V E R V I E W
OUR LAST DAY
Let students know that this is the last day of the riding lesson.Hopefully it was fun and maybe now more people in the class will
continue to ride their bikes to school and do it safely. The teacher should takefinal questions, comments, concerns, etc.
WRITTEN POST-TEST
Administer the written post-test and collect journals. The post-tests, journals, and general behavior should be part of the grade for
this program.
Use the pre and post-tests as an evaluation tool to measure the students’ im-provement and as one element for the teacher evaluation of this curriculum.Please see the next page for the full instructions for the teacher evaluation for the curriculum.
*In order to maximize riding time, teachers can administer the post-test in the classsession following the ride.
15MINUTES
discussion
5MINUTES
Neighborhood ride / Written testB A C K G R O U N D L E S S O N
86
NEIGHBORHOOD RIDE
M A T E R I A L S
• Bright safety vests for leaders • Repair tools (1 per group)and sweeps
• Bicycles • Helmets
• Watch for each group ride leader • Patch kits (1 per group)
• Pump (1 per group) • Safety kit (1 per group)
! Have students organized in groups for riding. Each must have a helmet anda bike. Ride leaders must have vests and one adult per group wears a pack withtools and a safety kit.
" Communicate to the class the riding activity and the riding rules (see Lesson 9).
# Assign a group of 10 students to two adults (or one adult per five youths).
$ Allow each group to go for a 20-minute ride. If there is plenty of staff, therides can be longer (or to a destination where we stop and play, get ice cream,etc).
% Upon returning, debrief.
25- 60MINUTES
L E S S O N 1 0
87
B A C K G R O U N DL E S S O N
TEACHER EVALUATION FOR THE BICYCLE SAFETY PROGRAM
Please complete a evaluation of the Bicycle Safety Program. Thisevaluation will serve to make the program better and assist the Bicycle Trans-portation Alliance meet teachers’ and students’ needs.
In the Handouts chapter you will find an evaluation sheet that should take nomore than 15 minutes to complete. Please fill this out and return to:
Bicycle Transportation AllianceP.O. Box 9072Portland, Oregon 97207Attn: Bicycle Safety
The BTA also requests that teachers who enjoyed this curriculum and felt it was valuable for their students write a letter in support of the program. Theletter should be no more than two pages, written on school letterhead and co-signed by the school principal if possible. Letters of support could include thefollowing topics:
1.Course Content — is the content appropriate, exciting and educational foryour class?
2.Experiences for Your Class — did your students enjoy the class? Did theythink it was an appropriate topic and experience for school.
3.Potential for the Course — would you run the course again? Is this somethingthat more teachers should do? Might you recommend that bicycle safety is anecessary component of curriculum for 5th and 6th graders? Other agegroups?
4.Length of Course — consider the appropriateness of a comprehensive coursewith on-bike training versus a one or two hour program with discussions ofbike safety.
5.Training — were trainings helpful and necessary, or not?
15- 60MINUTES
Neighborhood ride / Written testB A C K G R O U N D L E S S O N
88
Materials checksheet 90
How to acquire equipment 91
Contacts 92
Helmets resource list 94
Educational resources 95
Grant resources 97
This section provides information for the educator to help get the BicycleSafety Program started. Information includes:
• A list of program materials• How to acquire equipment• Contacts• Helmets resource list• Educational resources• Grant resources
Additional learningresources
RESOURCES
89
S T A T E W I D E E D U C A T I O N G O A L SO V E R V I E W
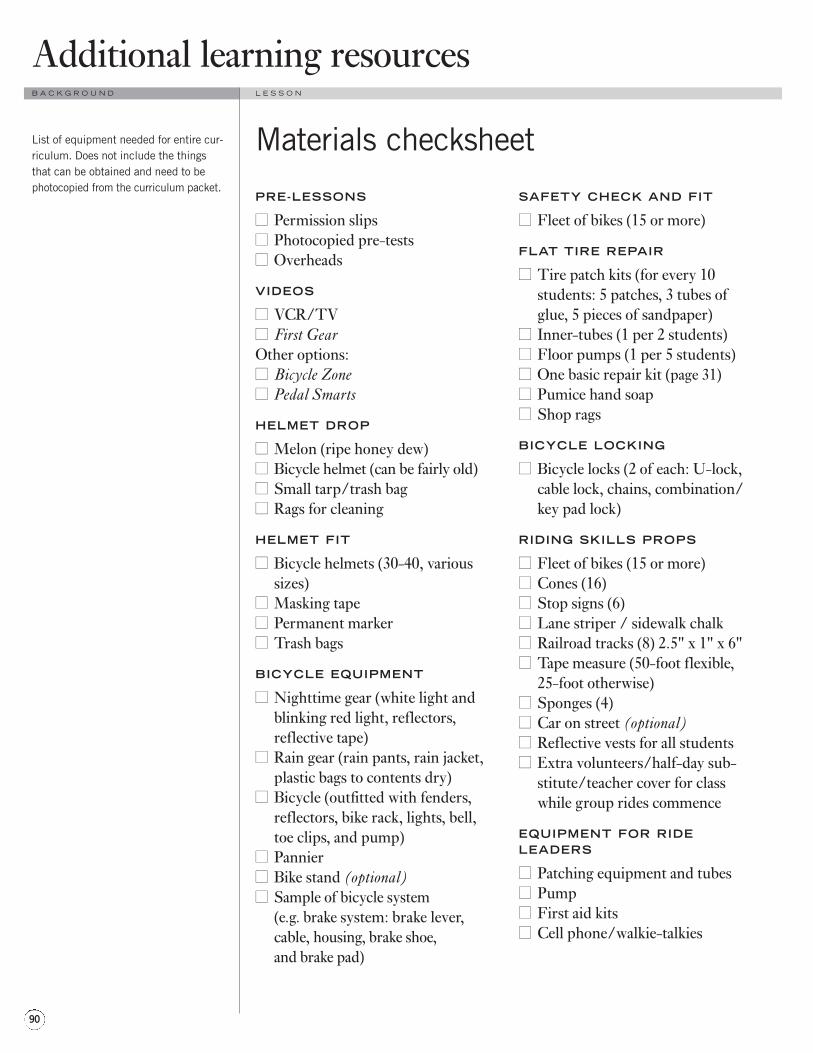
List of equipment needed for entire cur-riculum. Does not include the thingsthat can be obtained and need to bephotocopied from the curriculum packet.
PRE-LESSONS
■■ Permission slips■■ Photocopied pre-tests■■ Overheads
VIDEOS
■■ VCR/TV■■ First GearOther options:■■ Bicycle Zone■■ Pedal Smarts
HELMET DROP
■■ Melon (ripe honey dew)■■ Bicycle helmet (can be fairly old)■■ Small tarp/trash bag■■ Rags for cleaning
HELMET FIT
■■ Bicycle helmets (30-40, varioussizes)
■■ Masking tape■■ Permanent marker■■ Trash bags
BICYCLE EQUIPMENT
■■ Nighttime gear (white light andblinking red light, reflectors,reflective tape)
■■ Rain gear (rain pants, rain jacket,plastic bags to contents dry)
■■ Bicycle (outfitted with fenders,reflectors, bike rack, lights, bell,toe clips, and pump)
■■ Pannier■■ Bike stand (optional)■■ Sample of bicycle system
(e.g. brake system: brake lever,cable, housing, brake shoe, and brake pad)
SAFETY CHECK AND FIT
■■ Fleet of bikes (15 or more)
FLAT TIRE REPAIR
■■ Tire patch kits (for every 10students: 5 patches, 3 tubes ofglue, 5 pieces of sandpaper)
■■ Inner-tubes (1 per 2 students)■■ Floor pumps (1 per 5 students)■■ One basic repair kit (page 31)■■ Pumice hand soap■■ Shop rags
BICYCLE LOCKING
■■ Bicycle locks (2 of each: U-lock,cable lock, chains, combination/key pad lock)
RIDING SKILLS PROPS
■■ Fleet of bikes (15 or more)■■ Cones (16)■■ Stop signs (6) ■■ Lane striper / sidewalk chalk■■ Railroad tracks (8) 2.5" x 1" x 6"■■ Tape measure (50-foot flexible,
25-foot otherwise)■■ Sponges (4) ■■ Car on street (optional)■■ Reflective vests for all students■■ Extra volunteers/half-day sub-
stitute/teacher cover for classwhile group rides commence
EQUIPMENT FOR RIDELEADERS
■■ Patching equipment and tubes■■ Pump■■ First aid kits■■ Cell phone/walkie-talkies
Additional learning resourcesB A C K G R O U N D L E S S O N
90
Materials checksheet
For more information, please contact:
Scott Bricker
Bicycle Transportation Alliance
P.O. Box 9072
Portland, Oregon 97207-9072
(503) 226-0676
www.bta4bikes.org
The Bicycle Transportation Allianceis working with school districts toprovide all or the bulk of the abovematerials. The total cost of the pro-gram, including 25 bikes, helmets,and other materials is approximately$5,000.
R E S O U R C E S
91
B A C K G R O U N DL E S S O N
Grants can be written to obtain bicy-cles and helmets for this program.Grant writing resources are availableon page 97 of this resource chapter.
How to acquire equipment

Bicycle Transportation Alliance: Astatewide bicycle advocacy organiza-tion, has regional branches. The BTAruns the Bicycle Safety Program anddeveloped this curriculum. Contact: Scott Bricker, EducationDirector (503) 226-0676 x14
Oregon Department of Transportation(ODOT) Transportation Safety Division(TSD): ODOT TSD has a Bicycle andPedestrian Safety Program Coordina-tor. The Coordinator has materials andvideos for distribution. Contact: Rick Waring, Program Coordinator(503)986-4196
Safe Communities programs: SafeCommunities programs are work toimprove traffic safety in local areas andcities. They often have staff and grantmonies to help run safety programs.Contact the Oregon Department ofTransportation for local branches.Contact: Walt McCallister (503) 986-4187
City of Portland, Safe CommunitiesProgram: The City of Portland isorganizing a Safe CommunitiesProgram to bring together traffic safetyprofessional in Portland. They arecollecting data and helping run SafeRoutes to Schools programs throughmapping and engineering services.Contact Dakota Inyoswan (503) 823-5552
Oregon Safe Kids Coalition: Statebranch of national organizationpromoting child safety. Brochures andother material available; has regionalbranches. Contact: Adrienne Greene,Department of Health Services - Human Services (503) 731-4025
Additional learning resourcesB A C K G R O U N D L E S S O N
92
Trauma Nurses Talk Tough: Offers in-school assemblies and presentationson helmet and other safety in manycommunities around Oregon. Sellslow-cost helmets. Contact: Simone(503) 413-4960
Think First Program: Offers K-12injury prevention programs focusingon neurological injuries. Contact: Rae Rosenburg (503) 494-7801
Alliance for Community Traffic Safety(ACTS Oregon): ACTS works toincrease traffic safety in Oregon. Forbicycling programs, the offer mini-grant programs that can be applied forto purchase equipment or hireinstructors to run bike safetycurriculum. Contact: Lynn Mutrie(503) 656-7207
Police Bureau and County Sheriff,traffic safety sections: Each com-munity will have officers that focus ontraffic safety. Contact local bureau andask for class presentations, bicyclerodeos, low-cost helmets, and expla-nation about enforcement techniques.
Parks and Recreation Bureaus: Parksand recreation bureaus or districtsusually have education programs.They may have money to supportafter-school or summer safety, ridingor repair programs. Contact: Your citygovernment Parks Bureau or local parksand recreation district
Universities: University health educa-tion students can offer assistance aspracticum credit. Contact: Localuniversity’s education or health/physicaleducation department
Contacts
School Resources: Consider yourschool’s staff for presentations: nurses,community police officers, avidcyclists, and others.
Physical Education Director: Canprovide general support for cyclingeducation programs includingmonetary resources and coordinationfor the transport of bikes.
AmeriCorps: The NW Service Acad-emy or other national AmeriCorpsorganizations places young adult mem-bers in schools as resource persons.Contact: Portland based NW ServiceAcademy (503) 736-9814 and ask about other AmeriCorps organizationsthroughout the state
Bicycle Shops: Local bike shops oftenhave written materials and informationabout local bicycle organizations andevents. Employees may volunteer todiscuss mechanics and lead rides.Shops might donate some materials.Contact: Local bike shop managers
Bicycle Clubs/advocacy coalitions:Many communities have local bicycleclubs with active volunteer membersthat will assist with your curriculum orprovide a presentation on cycling.
Bicycle Helmet Safety Institute:National organization providing up-to-date information on helmetsincluding statistics, guides to helmetpromotions and fitting tips. Contact:(703) 486-0100
Hospitals/Insurance Companies: Mayhave money for helmets or safetyliterature.
R E S O U R C E S
93
B A C K G R O U N DL E S S O N
City Planning Bureau: Often inter-ested in youth travel safety and mayhave ideas on getting volunteers orother local support. Often have freebike maps. Ask if they have Bicycle and Pedestrian advisory committees.Contact: City government-planningdepartment
Community Cycling Center (Portland):A non-profit organization that hassafety, riding and repair educationprograms. They run after-school andsummer programs, some in-schoolactivity. Offers low-cost bicycles andbicycle services. Contact: Tom Knipe,Program Manager (503) 288-8864
Center for Appropriate Transport(Eugene): a non-profit organizationthat has riding, repair, bike building,journalism and other education pro-grams. They have school presentations,day-time educational services and alibrary. Offers low-cost bicycles andbicycle services. Contact: JanVanderTuin, Executive Director (541)343-5568
OTHER• Bicycling, environmental and safety
related nonprofit organizations
• Community-based companies and businesses
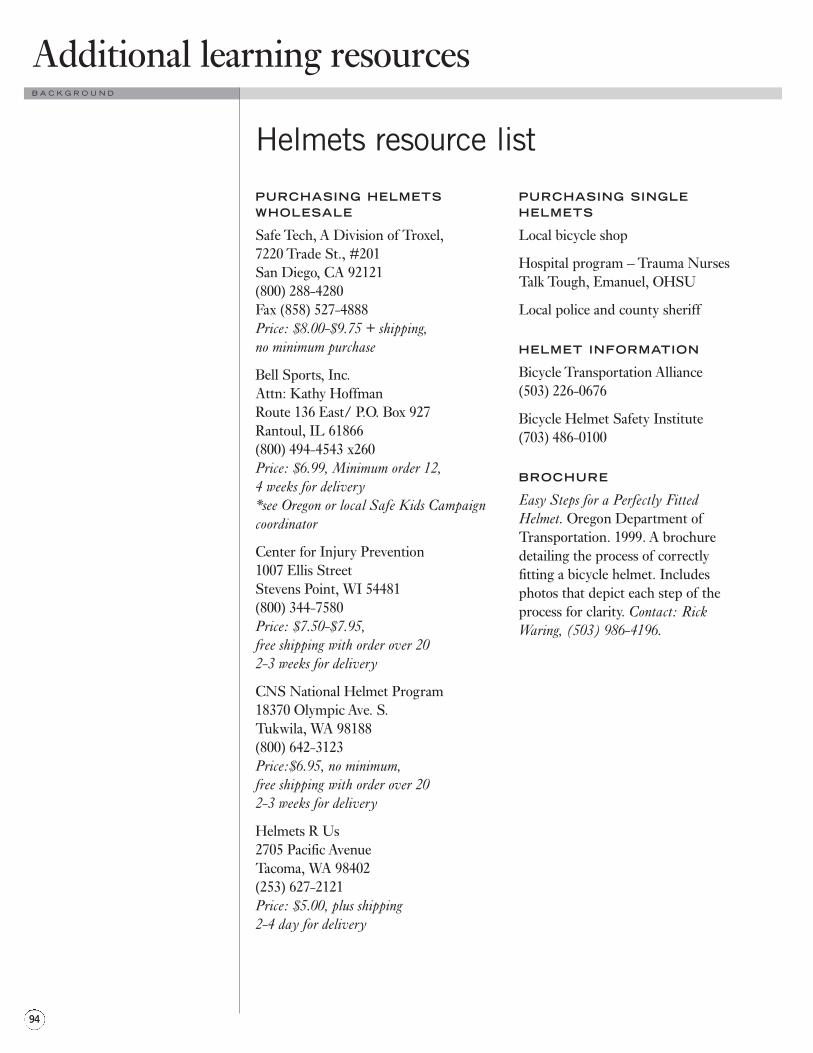
PURCHASING HELMETSWHOLESALE
Safe Tech, A Division of Troxel,7220 Trade St., #201San Diego, CA 92121(800) 288-4280Fax (858) 527-4888Price: $8.00-$9.75 + shipping, no minimum purchase
Bell Sports, Inc.Attn: Kathy HoffmanRoute 136 East/ P.O. Box 927Rantoul, IL 61866(800) 494-4543 x260Price: $6.99, Minimum order 12,4 weeks for delivery*see Oregon or local Safe Kids Campaigncoordinator
Center for Injury Prevention1007 Ellis StreetStevens Point, WI 54481(800) 344-7580Price: $7.50-$7.95,free shipping with order over 202-3 weeks for delivery
CNS National Helmet Program18370 Olympic Ave. S.Tukwila, WA 98188(800) 642-3123Price:$6.95, no minimum,free shipping with order over 202-3 weeks for delivery
Helmets R Us2705 Pacific AvenueTacoma, WA 98402(253) 627-2121Price: $5.00, plus shipping2-4 day for delivery
Additional learning resourcesB A C K G R O U N D
94
PURCHASING SINGLEHELMETS
Local bicycle shop
Hospital program – Trauma NursesTalk Tough, Emanuel, OHSU
Local police and county sheriff
HELMET INFORMATION
Bicycle Transportation Alliance (503) 226-0676
Bicycle Helmet Safety Institute (703) 486-0100
BROCHURE
Easy Steps for a Perfectly FittedHelmet. Oregon Department ofTransportation. 1999. A brochuredetailing the process of correctlyfitting a bicycle helmet. Includesphotos that depict each step of theprocess for clarity. Contact: RickWaring, (503) 986-4196.
Helmets resource list
CURRICULUM
Transportation Alternatives and Solutions.Bicycle Transportation Alliance. This isan 10-hour in-class science and socialscience based curriculum that discussesthe history and different modes oftransportation. The practicality andenvironmental impacts of the differentforms of transportation are alsodiscussed. Contact: (503) 226-0676
Safe Routes to School 2002. Providesoverview of a national Safe Routes toSchool model. U.S. DOT. ContactBTA (503) 226-0676
Basics of Bicycling. National Center forBicycling and Walking. A curriculumfor elementary level bicyclists training,offers on-bicycle training. 1506 21 St.NW, Suite 2000, Washington D.C.20036. (202) 463-6622
Bike Smarts: A handbook. InsuranceCorporation of B.C. 1998. The cur-riculum is a on bicycle educationprogram for 7-13 year olds. Contact:Bike Smarts Team, #228 - 1367 W.Broadway, Vancouver, B.C. V6H 4A9.(800) 565-7727
Creating Livable Communities. Fall 1998.This curriculum contains lesson plansfor grades 6-8 about land use and trans-portation planning, the environment,and population/housing. Contact:Metro, 600 NE Grand Avenue, Portland,Oregon 97232. (503) 797-1700
Traffic Safety Education Guide. FloridaTraffic and Bicycle Safety EducationProgram. 1998. This curriculum is acomprehensive education programproviding on-bicycle training, one ofthe curriculum used to structure thelesson plans included in this book.Contact: Liza Lemaster (352) 392-8192
R E S O U R C E S
95
B A C K G R O U N D
Effective Cycling: Kids I and II. Leagueof American Bicyclists. 1996. Kids Iteaches adults to train their childrenand Kids II is a comprehensive educa-tion program offering on-bicycletraining. Contact: Sami Founder (202)822-1333.
Smart Cycling. Oregon Department ofTransportation. 1992. A seven lessonon-the-bicycle curriculum. Contact:(503) 986-4196.
Get Out Spoken. This curriculummobilizes school youths to advocate forbicycle transportation. Contact: EarthForce, 1908 Mount Vernon Ave., 2ndFloor, Alexandria, Virginia 22301.(703) 299-9400
PAMPHLETS / BROCHURES
Safe Routes for Kids City Biking Hand-book. Bicycle Transportation Alliance.2001. A 12-page booklet that illustratesthe essential aspects of bicycling safety.It is full of graphics and easy to under-stand. Geared for ages 10 and up. Contact: (503) 226-0676
Safe Routes for Kids Guide to Biking in the City. Bicycle TransportationAlliance. 2001. A four-panel brochurethat summarizes the informationprovided in the City Biking Handbook.Geared for ages 10 and up. Available inSpanish. Contact: (503) 226-0676
Alaska Bicycle Driver’s Guide. AlaskaDepartment of Public Safety. 1996. A48-page, 8 1/2 x 11" booklet that iscumbersome but has good graphics explaining bicycle safety. Age groupunspecified, probably 6th grade and up.
Educational resources
Smart Cycling in Chicago. ChicagolandBicycle Federation by Dave Glowacz.1994. A 32-page free brochure discus-sing basics of cycling, for 4th gradeand up. Contact: (312) 427-3325
Kids on Bikes in Chicago. ChicagolandBicycle Federation by Dave Glowacz.1998. A 10-page booklet providing theessential basic cycling tips. Full ofgraphics and easy to understand.Geared for 2nd grade and up. Contact:(312) 427-3325
Teacher’s Guide to Bicycle Safety.American Academy of Pediatrics. 1992-3. A booklet with pullout sheets andposters. For grades 1-3. Contact: AAPPublications, PO Box 927, Elk GroveVillage, IL 60009.
Washington Bicyclist’s Guide.Washington Traffic Safety Commis-sion. 1996. A 32-page booklet that issimilar in scope to Alaska’s booklet.Provides information for novice andexperts ages 12 and up. Contact: (206)624-3845
Easy Steps for a Perfectly Fitted Helmet.Oregon Department of Transportation.1999. A brochure detailing the processof correctly fitting a bicycle helmet.Includes photos that depict each stepof the process for clarity. Contact: RickWaring (503) 986-4196
Bicycle Skills Course (Rodeo)Instructor’s Guide. Cascade BicycleClub, King County EmergencyMedical Services. Contact: CascadeBicycle Club or BTA (503) 226-0676(the BTA has a bike rodeo packet).
BOOKS AND PUBLICATIONS
Effective Cycling, John Forester. MIT Press.
Oregon Bicyclist Manual. OregonDepartment of Transportation. Contact: ODOT, Michael Ronkin, (503)
Additional learning resourcesB A C K G R O U N D L E S S O N
96
986-3555
Oregon Driver Manual. OregonDepartment of Transportation. Contact: DMV or ODOT
Training programs for Bicycle Safety.Harborview Injury Prevention andResearch Center. September 1998.Contact: Jane Metrik (206) 521-1570,[email protected]
Urban Biker’s Tricks and Tips. DaveGlowacz. Available at bookstores, bikeshops and BTA. Contact: (800) 888-4741
Mick Harte was here. Barbara Park.Scholastic Inc. 1995.
Bikecentennial’s Guide to Bicycle Rodeo.A comprehensive book detailingbicycle rodeo activities. Contact:Outdoor Publishing, 511 Eastlake Ave.E. Seattle, Washington. 98109
Bike Ed. Contact the League ofAmerican Bicyclists. Bike Ed. is themanual that accompanies the League’sbicycle safety education program. Theprogram trains adults nationwide tobe certified instructors and teach all orpieces of the entire curriculum.Contact: Sami Founder (202) 822-1333.
VIDEOS
First Gear. Bicycle TransportationAlliance. New and comprehensivecurriculum for ages 10 and up.Contact: (503) 226-0676
The Bicycle Zone. Transit Media Com-munication. Contact: (800) 343-5540
Pedal Smarts. Transit MediaCommunication. Contact: (800) 343-5540
Ride Smart. NHSTA Helmet video.www.nhsta.dot.gov
BOOKS
Oregon Foundation Datebook, by CraigMcPherson. This book gives detailedinformation about foundations inOregon.
An Information Clearinghouse for Teachersand Educators. Environmental Educa-tion Clearinghouse. U.S. EPA, Region10. 1200 6th Ave. So-143, Seattle, WA98101-9797; (800) 424-4372
Grantseeking Made Easier. City ofPortland, Bureau of Housing andCommunity Development
The Guide to Oregon Foundation, byUnited Way. This book outlinesfoundations that have a history ofgiving in Oregon.
Guide to Business Giving in Oregon.This book profiles major corporategiving programs in Oregon.
National guide to Funding for Children,Youth and Families, by the FoundationCenter.
Foundation 1000, by the FoundationCenter. This book lists the top 1000foundations in the nation.
Getting Funded: A complete guide to pro-posal writing, by Mary Hall. This bookgoes through a step by step process ofdeveloping ideas, selecting fundingsources and writing the proposal.
Program Planning and Proposal Writing,by The Grantsmanship Center. A guideto proposal writing with a focus on howto write the elements of a complete andcompetitive grant application.
Check University and public libraries(particularly Multnomah County’sCentral Library) for grant centers.
R E S O U R C E S
97
B A C K G R O U N DL E S S O N
INTERNET RESOURCES
The Foundation Center (www.fndcenter.org)
Foundations on Line (www.foundations.org)
CharityNet (www.charitynet.org)
The Grant Doctors (www.thegrantdoctors.com)
The Grantsmanship Center (www.tgci.com)
(Mostly taken from Bureau ofHousing and Community Development,Grantseeking Made Easier, by LeahHalstead.)
OREGON DEPARTMENT OFTRANSPORTATION MINIGRANTS
Bicycle and Pedestrian Mini Grants:Annual mini grants available to avariety of organizations that are dealingwith bicycle and pedestrian safety.Contact Rick Waring, (503) 986-4196
ACTS Oregon Mini Grants: ACTSOregon administers a mini grantprogram for building safe communitiesand for DUII programs. Generallyonly city agencies can apply for grants.Contact Lynn Mutrie, (503) 656-7207
ODOT Region Representatives: ODOThas five regions and each has a safetyrepresentative that possesses a smallamount of money to allocate each yearto safety programs. Contact RickWaring, (503) 986-4196
Grant resources
LESSON 1:BICYCLE RIDERSHIP AND SAFETY
Release and consent formBicycle pre-testLESSON 2:HELMETS, GEAR AND BIKE PARTS
Bicycle parts worksheetTravel to school survey formBike ridership graphLESSON 3:LAWS, HAZARDS AND REPAIR
Crashing: Very much a young person’sproblemBicycle riding dangersLESSON 4:TRAFFIC SIMULATION; FITTINGBIKES
Overhead: Right-of-way rulesWorksheet: Who has the right-of-way?Right-of-way overhead: Intersectionvehicles Overhead: IntersectionTraffic SignsBicycle maintenance checksheetLESSON 9:NEIGHBORHOOD BIKE RIDE / B IKE RODEO
Bicycle post-test (see Lesson 1)
Answer Keys
Teacher Evaluation
This section contains handouts correlated to individual lesson activities anddiscussions for the educator to copy and distribute to students. Informationincludes:
• Release and consent form• Worksheets for students to complete and turn in• Answer keys• Informational handouts• Evaluations
Handouts andworksheets
HANDOUTS
99
S T A T E W I D E E D U C A T I O N G O A L SO V E R V I E W
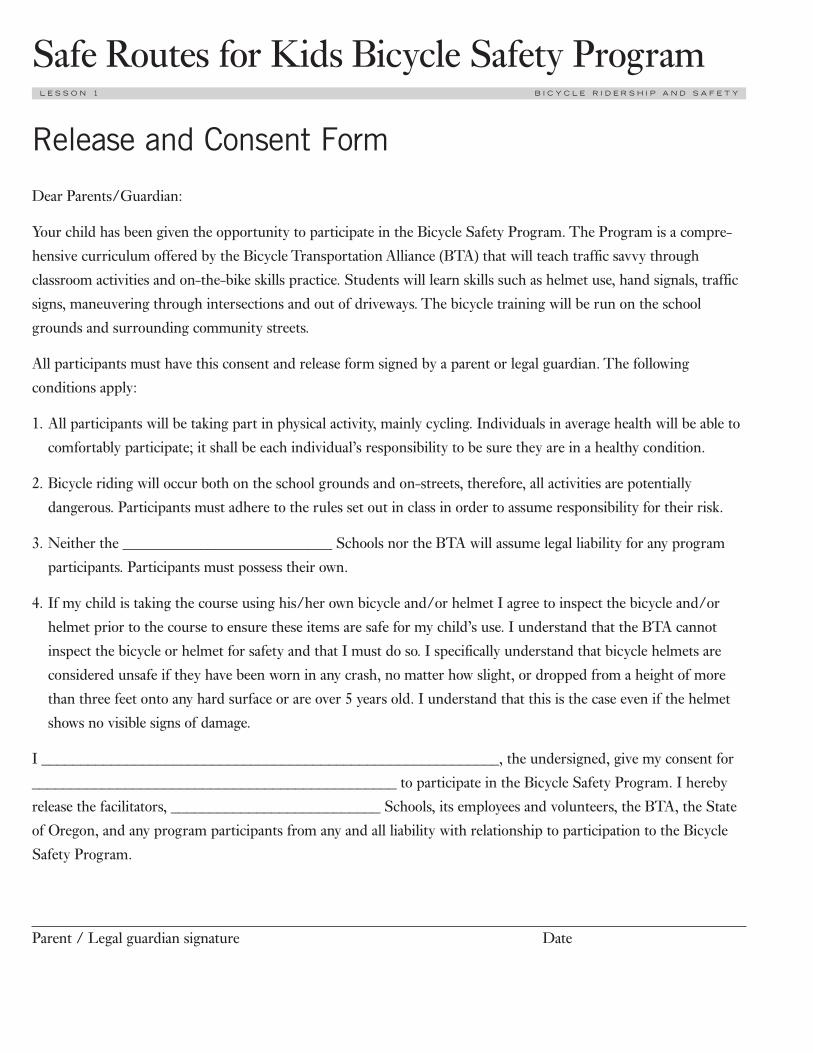
Release and Consent Form
Dear Parents/Guardian:
Your child has been given the opportunity to participate in the Bicycle Safety Program. The Program is a compre-hensive curriculum offered by the Bicycle Transportation Alliance (BTA) that will teach traffic savvy throughclassroom activities and on-the-bike skills practice. Students will learn skills such as helmet use, hand signals, trafficsigns, maneuvering through intersections and out of driveways. The bicycle training will be run on the schoolgrounds and surrounding community streets.
All participants must have this consent and release form signed by a parent or legal guardian. The followingconditions apply:
1. All participants will be taking part in physical activity, mainly cycling. Individuals in average health will be able tocomfortably participate; it shall be each individual’s responsibility to be sure they are in a healthy condition.
2. Bicycle riding will occur both on the school grounds and on-streets, therefore, all activities are potentiallydangerous. Participants must adhere to the rules set out in class in order to assume responsibility for their risk.
3. Neither the ___________________________ Schools nor the BTA will assume legal liability for any programparticipants. Participants must possess their own.
4. If my child is taking the course using his/her own bicycle and/or helmet I agree to inspect the bicycle and/orhelmet prior to the course to ensure these items are safe for my child’s use. I understand that the BTA cannotinspect the bicycle or helmet for safety and that I must do so. I specifically understand that bicycle helmets areconsidered unsafe if they have been worn in any crash, no matter how slight, or dropped from a height of morethan three feet onto any hard surface or are over 5 years old. I understand that this is the case even if the helmetshows no visible signs of damage.
I ___________________________________________________________, the undersigned, give my consent for_______________________________________________ to participate in the Bicycle Safety Program. I herebyrelease the facilitators, ___________________________ Schools, its employees and volunteers, the BTA, the Stateof Oregon, and any program participants from any and all liability with relationship to participation to the BicycleSafety Program.
Parent / Legal guardian signature Date
Safe Routes for Kids Bicycle Safety Program
100
L E S S O N 1 B I C Y C L E R I D E R S H I P A N D S A F E T Y
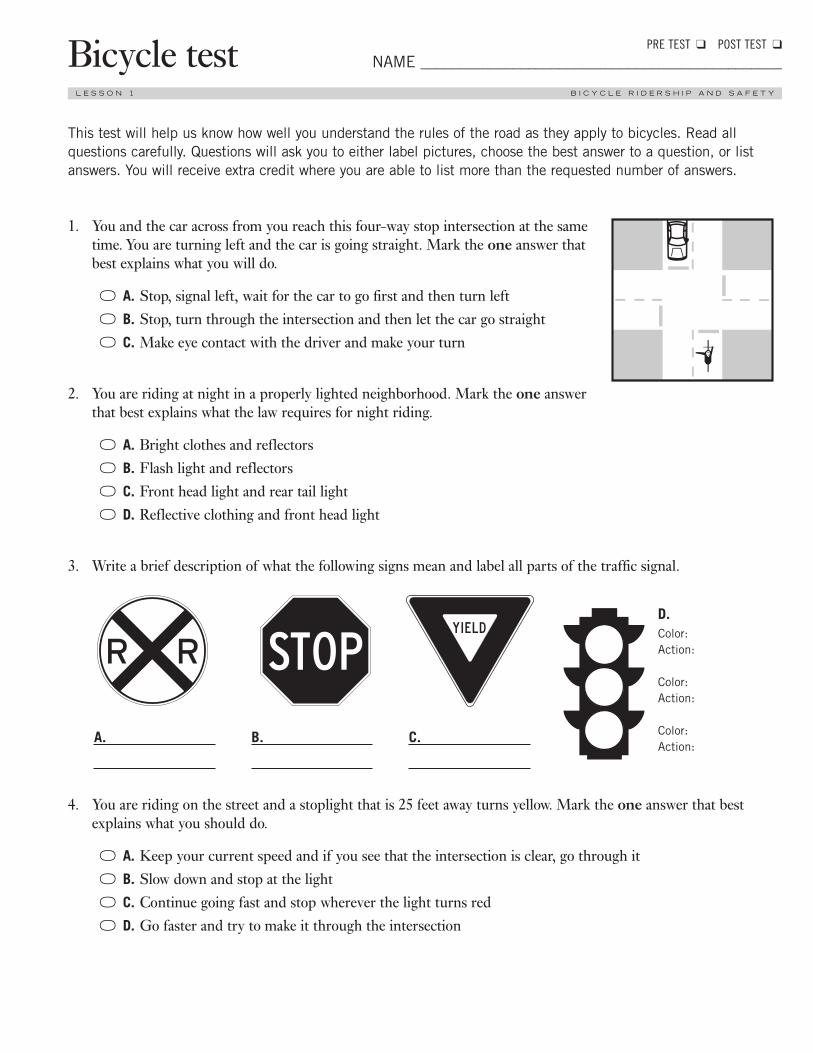
This test will help us know how well you understand the rules of the road as they apply to bicycles. Read allquestions carefully. Questions will ask you to either label pictures, choose the best answer to a question, or listanswers. You will receive extra credit where you are able to list more than the requested number of answers.
1. You and the car across from you reach this four-way stop intersection at the sametime. You are turning left and the car is going straight. Mark the one answer that best explains what you will do.
! A. Stop, signal left, wait for the car to go first and then turn left! B. Stop, turn through the intersection and then let the car go straight! C. Make eye contact with the driver and make your turn
2. You are riding at night in a properly lighted neighborhood. Mark the one answerthat best explains what the law requires for night riding.
! A. Bright clothes and reflectors! B. Flash light and reflectors! C. Front head light and rear tail light! D. Reflective clothing and front head light
3. Write a brief description of what the following signs mean and label all parts of the traffic signal.
4. You are riding on the street and a stoplight that is 25 feet away turns yellow. Mark the one answer that bestexplains what you should do.
! A. Keep your current speed and if you see that the intersection is clear, go through it! B. Slow down and stop at the light! C. Continue going fast and stop wherever the light turns red! D. Go faster and try to make it through the intersection
Color:Action:
Color:Action:
Color:Action:
A. B. C.
D.
Bicycle test
101
L E S S O N 1 B I C Y C L E R I D E R S H I P A N D S A F E T Y
PRE TEST ❑ POST TEST ❑
NAME _______________________________________________
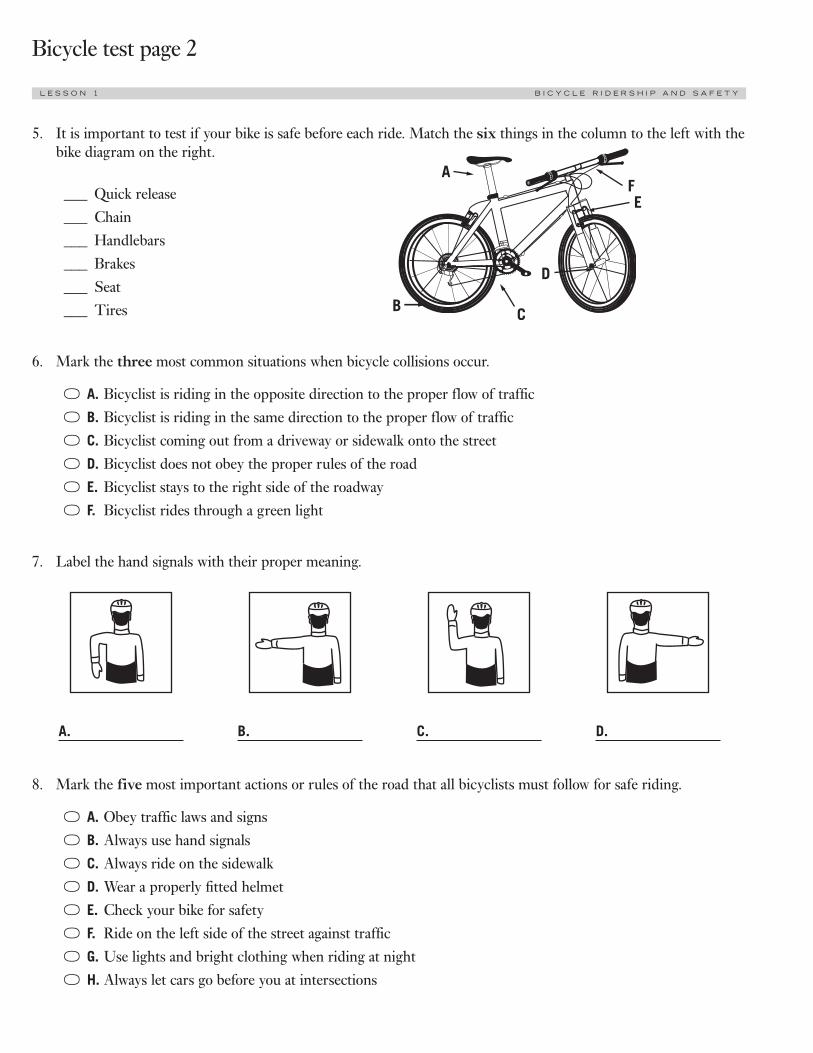
A
B C
D
EF
5. It is important to test if your bike is safe before each ride. Match the six things in the column to the left with thebike diagram on the right.
___ Quick release___ Chain___ Handlebars___ Brakes___ Seat___ Tires
6. Mark the three most common situations when bicycle collisions occur.
! A. Bicyclist is riding in the opposite direction to the proper flow of traffic! B. Bicyclist is riding in the same direction to the proper flow of traffic! C. Bicyclist coming out from a driveway or sidewalk onto the street! D. Bicyclist does not obey the proper rules of the road! E. Bicyclist stays to the right side of the roadway! F. Bicyclist rides through a green light
7. Label the hand signals with their proper meaning.
8. Mark the five most important actions or rules of the road that all bicyclists must follow for safe riding.
! A. Obey traffic laws and signs! B. Always use hand signals! C. Always ride on the sidewalk! D. Wear a properly fitted helmet! E. Check your bike for safety! F. Ride on the left side of the street against traffic! G. Use lights and bright clothing when riding at night! H. Always let cars go before you at intersections
A. B. C. D.
Bicycle test page 2
102
L E S S O N 1 B I C Y C L E R I D E R S H I P A N D S A F E T Y
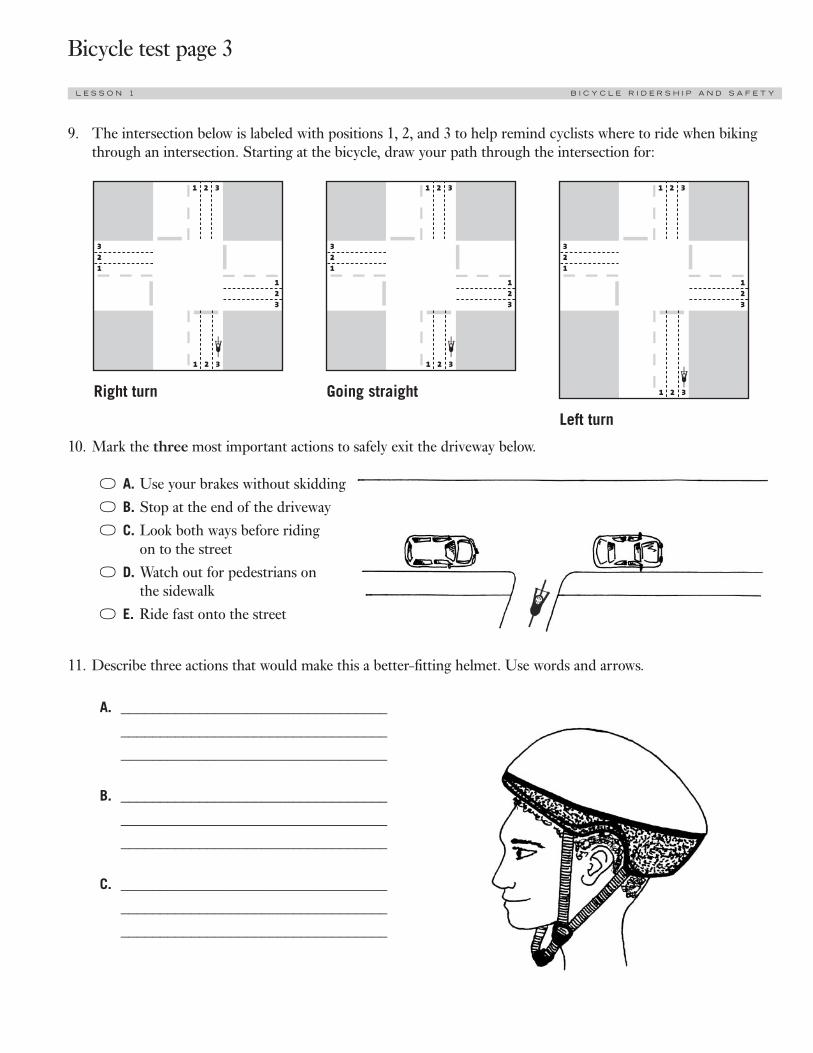
9. The intersection below is labeled with positions 1, 2, and 3 to help remind cyclists where to ride when bikingthrough an intersection. Starting at the bicycle, draw your path through the intersection for:
10. Mark the three most important actions to safely exit the driveway below.
! A. Use your brakes without skidding! B. Stop at the end of the driveway! C. Look both ways before riding
on to the street ! D. Watch out for pedestrians on
the sidewalk ! E. Ride fast onto the street
11. Describe three actions that would make this a better-fitting helmet. Use words and arrows.
A. ______________________________________________________________________________________________________
B. ______________________________________________________________________________________________________
C. ______________________________________________________________________________________________________
1
321
123
2 3
1 2 3
Right turn Going straight
Left turn
1
321
123
2 3
1 2 3
1
321
123
2 3
1 2 3
Bicycle test page 3
103
L E S S O N 1 B I C Y C L E R I D E R S H I P A N D S A F E T Y

Bicycle parts worksheet
104
L E S S O N 2
Place a line pointing to a part of the bike listed below. Letter the line with the correct bicycle part.
Frame Drive Train Other ComponentsA top tube I pedal O tireB down tube J cranks P spokesC head tube K chainwheel Q rimD seat tube L chain R seatE front fork M rear derailleur S seat postF seat stays N freewheel/cassette T handle barsG chain stays U brake cablesH wheel dropouts V brake levers
W shift levers
NAME __________________________________________________________________
H E L M E T S , G E A R A N D B I K E P A R T S

Your class can have a lot of fun going around to other classes and asking them these questions. When you go toanother class, ask the students to raise their hands if they would answer yes to the question. Take turns reading thequestions, have one person count the hands up and one person writing the numbers in the blank space.
How many students are in the class? ____________________________________________
YES NO
Do you own a working bike that you can ride?
Did you ride your, or someone else’s bike this summer?
Have you ever crashed a bike?
Did you ride your bike to school this year?
Did you ride your bike today?
Did you walk to school today?
Did you take the bus today?
Were you driven in by car today?
If you came to school some other way, raise your hand, how?
If you didn’t ride your bike, would ride to school if you could?
Would you like to ride bikes as an after school activity?
WHAT TEACHER’S CLASS IS THIS? ________________________________________
GRADE _______________________TODAY’S DATE ____________________________
WEATHER (circle ones that describe today)
SUNNY RAINY COLD WARM HOT OTHER _____________
WHEN YOU ARE DONE, RETURN THIS TO YOUR TEACHER. YES NOW!
Travel to school survey form
105
L E S S O N 2 H E L M E T S , G E A R A N D B I K E P A R T S
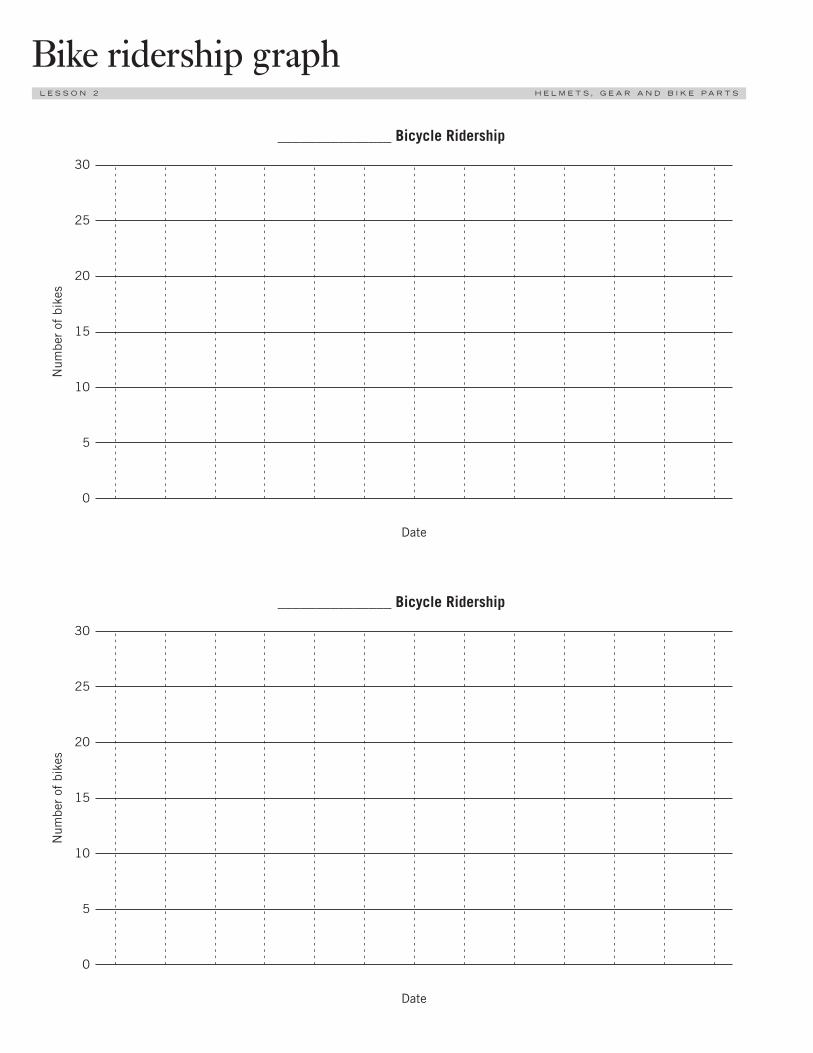
Bike ridership graph
106
L E S S O N 2
Num
ber
of b
ikes
Date
30
25
20
15
10
5
0
_______________ Bicycle Ridership
Num
ber
of b
ikes
Date
30
25
20
15
10
5
0
_______________ Bicycle Ridership
H E L M E T S , G E A R A N D B I K E P A R T S
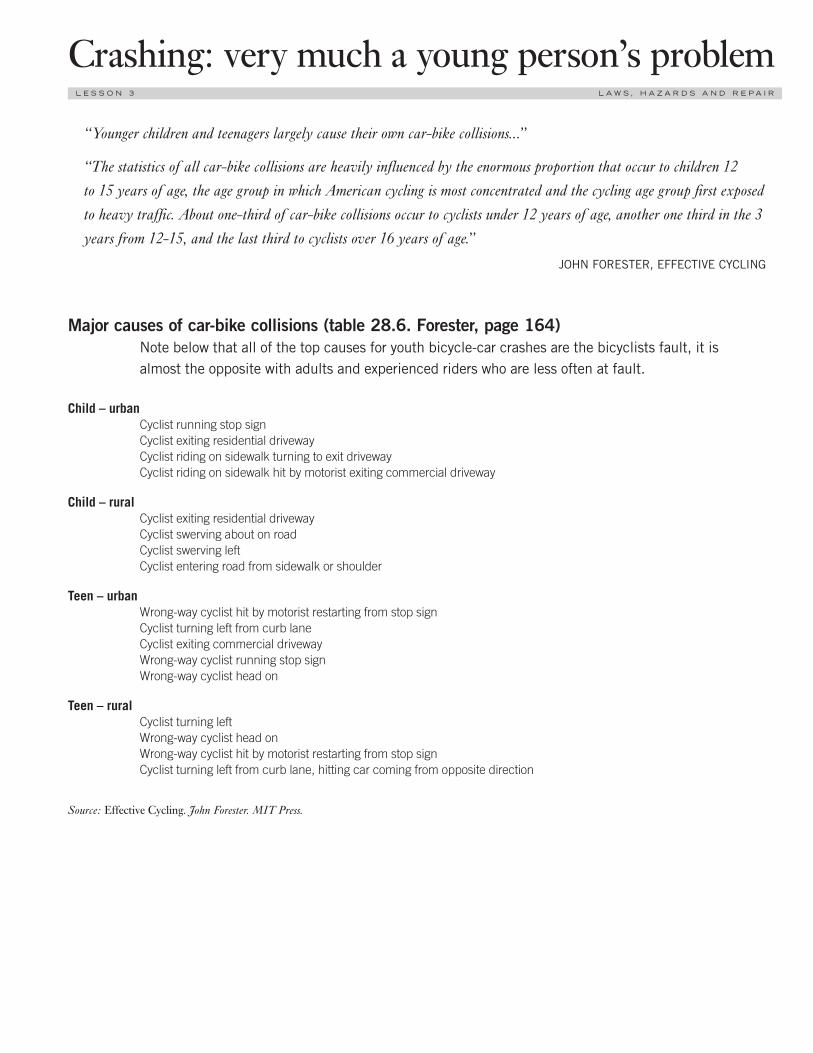
L E S S O N 3 L A W S , H A Z A R D S A N D R E P A I R
Crashing: very much a young person’s problem
107
“Younger children and teenagers largely cause their own car-bike collisions...”
“The statistics of all car-bike collisions are heavily influenced by the enormous proportion that occur to children 12 to 15 years of age, the age group in which American cycling is most concentrated and the cycling age group first exposedto heavy traffic. About one-third of car-bike collisions occur to cyclists under 12 years of age, another one third in the 3years from 12-15, and the last third to cyclists over 16 years of age.”
JOHN FORESTER, EFFECTIVE CYCLING
Major causes of car-bike collisions (table 28.6. Forester, page 164)Note below that all of the top causes for youth bicycle-car crashes are the bicyclists fault, it isalmost the opposite with adults and experienced riders who are less often at fault.
Child – urbanCyclist running stop signCyclist exiting residential drivewayCyclist riding on sidewalk turning to exit drivewayCyclist riding on sidewalk hit by motorist exiting commercial driveway
Child – ruralCyclist exiting residential drivewayCyclist swerving about on roadCyclist swerving leftCyclist entering road from sidewalk or shoulder
Teen – urbanWrong-way cyclist hit by motorist restarting from stop signCyclist turning left from curb laneCyclist exiting commercial drivewayWrong-way cyclist running stop signWrong-way cyclist head on
Teen – ruralCyclist turning leftWrong-way cyclist head onWrong-way cyclist hit by motorist restarting from stop signCyclist turning left from curb lane, hitting car coming from opposite direction
Source: Effective Cycling. John Forester. MIT Press.

Bike riding dangersL E S S O N 3 L A W S , H A Z A R D S A N D R E P A I R
Pretend you are the person riding the bicycle at the bottom of the picture. Can you see all the things that couldcause you to have an accident? There are 13 hazards in this drawing. See if you can find them all!
This picture shows 13 bike riding dangers. Can you find them all?
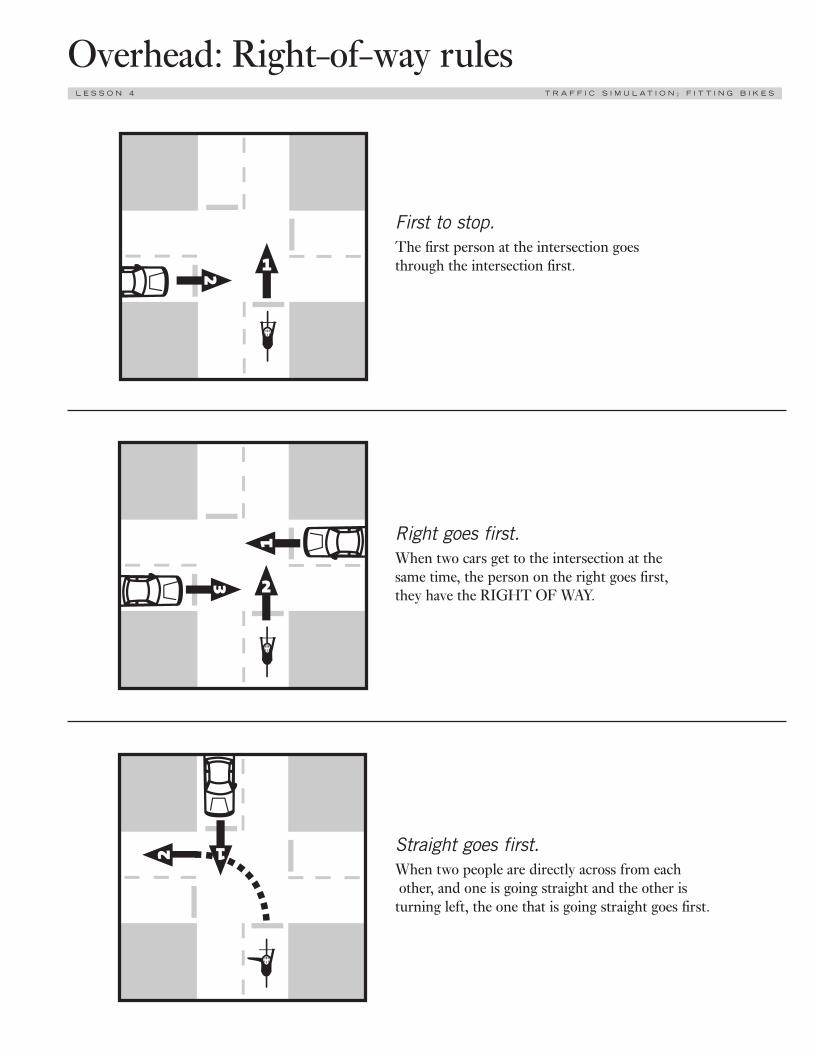
Overhead: Right-of-way rulesL E S S O N 4 T R A F F I C S I M U L A T I O N ; F I T T I N G B I K E S
First to stop.The first person at the intersection goes through the intersection first.
Right goes first.When two cars get to the intersection at the same time, the person on the right goes first, they have the RIGHT OF WAY.
Straight goes first.When two people are directly across from eachother, and one is going straight and the other is
turning left, the one that is going straight goes first.
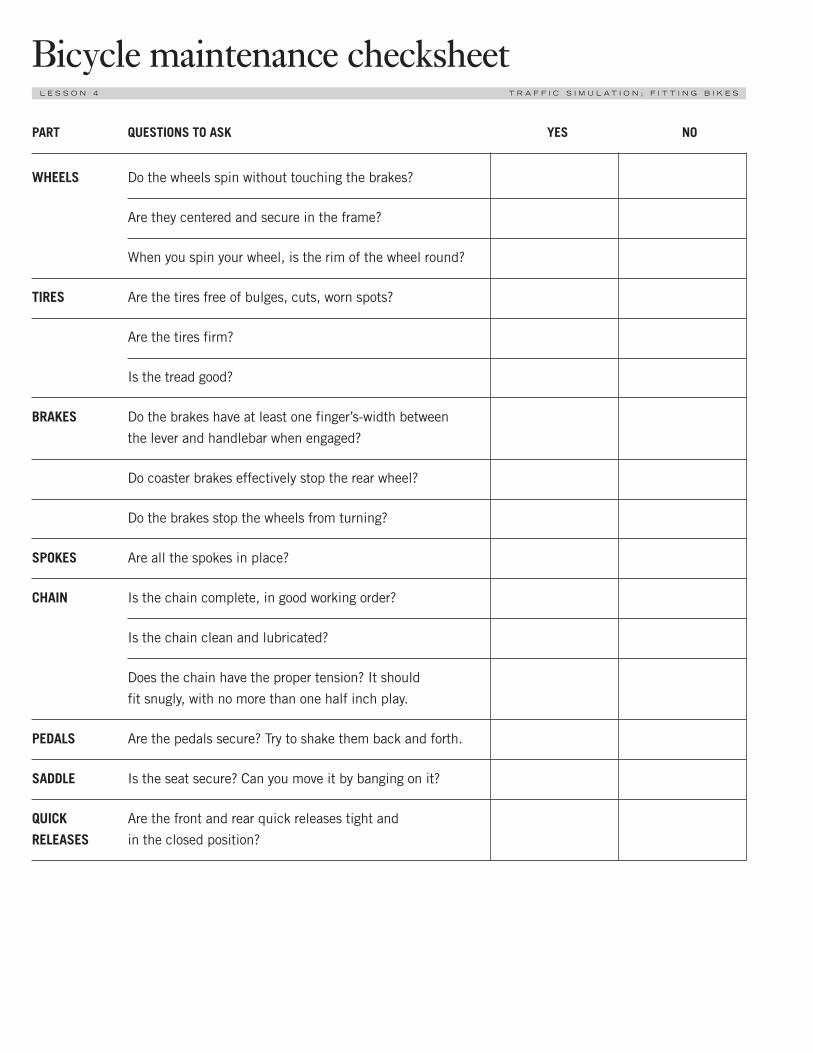
Bicycle maintenance checksheetL E S S O N 4 T R A F F I C S I M U L A T I O N ; F I T T I N G B I K E S
PART QUESTIONS TO ASK YES NO
WHEELS Do the wheels spin without touching the brakes?
Are they centered and secure in the frame?
When you spin your wheel, is the rim of the wheel round?
TIRES Are the tires free of bulges, cuts, worn spots?
Are the tires firm?
Is the tread good?
BRAKES Do the brakes have at least one finger’s-width betweenthe lever and handlebar when engaged?
Do coaster brakes effectively stop the rear wheel?
Do the brakes stop the wheels from turning?
SPOKES Are all the spokes in place?
CHAIN Is the chain complete, in good working order?
Is the chain clean and lubricated?
Does the chain have the proper tension? It should fit snugly, with no more than one half inch play.
PEDALS Are the pedals secure? Try to shake them back and forth.
SADDLE Is the seat secure? Can you move it by banging on it?
QUICK Are the front and rear quick releases tight and RELEASES in the closed position?
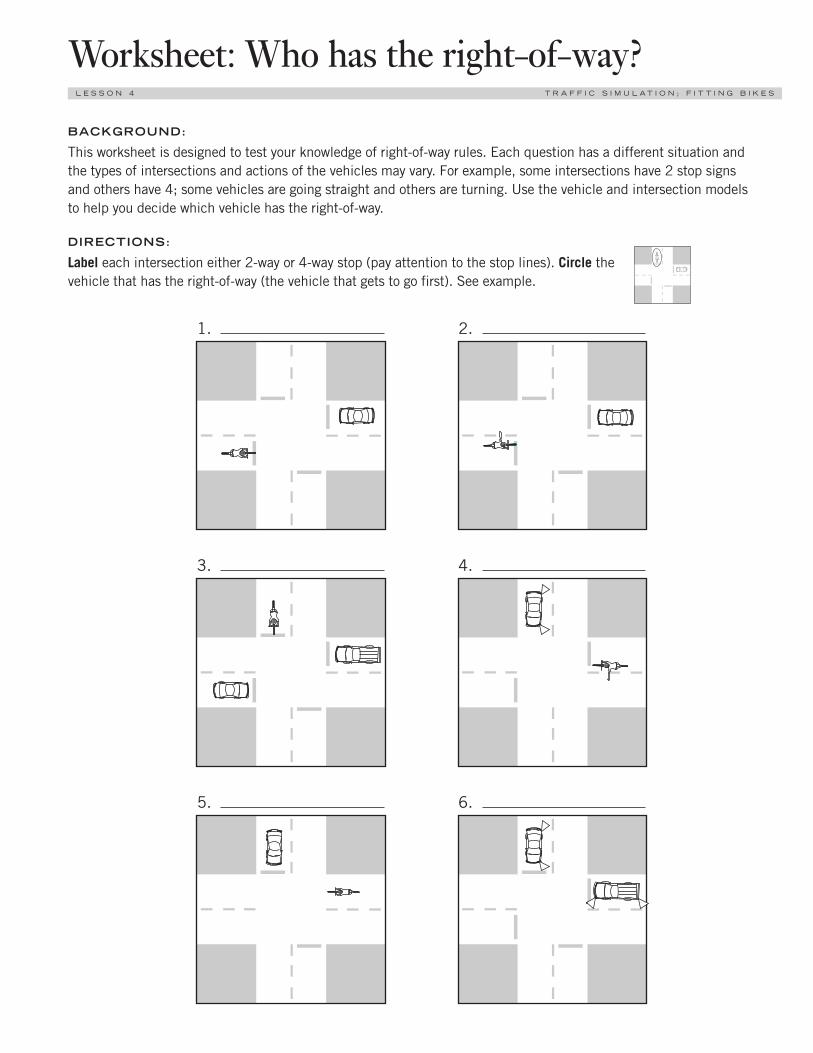
BACKGROUND:
This worksheet is designed to test your knowledge of right-of-way rules. Each question has a different situation andthe types of intersections and actions of the vehicles may vary. For example, some intersections have 2 stop signsand others have 4; some vehicles are going straight and others are turning. Use the vehicle and intersection modelsto help you decide which vehicle has the right-of-way.
DIRECTIONS:
Label each intersection either 2-way or 4-way stop (pay attention to the stop lines). Circle thevehicle that has the right-of-way (the vehicle that gets to go first). See example.
Worksheet: Who has the right-of-way?
111
L E S S O N 4 T R A F F I C S I M U L A T I O N ; F I T T I N G B I K E S
1. 2.
3. 4.
5. 6.
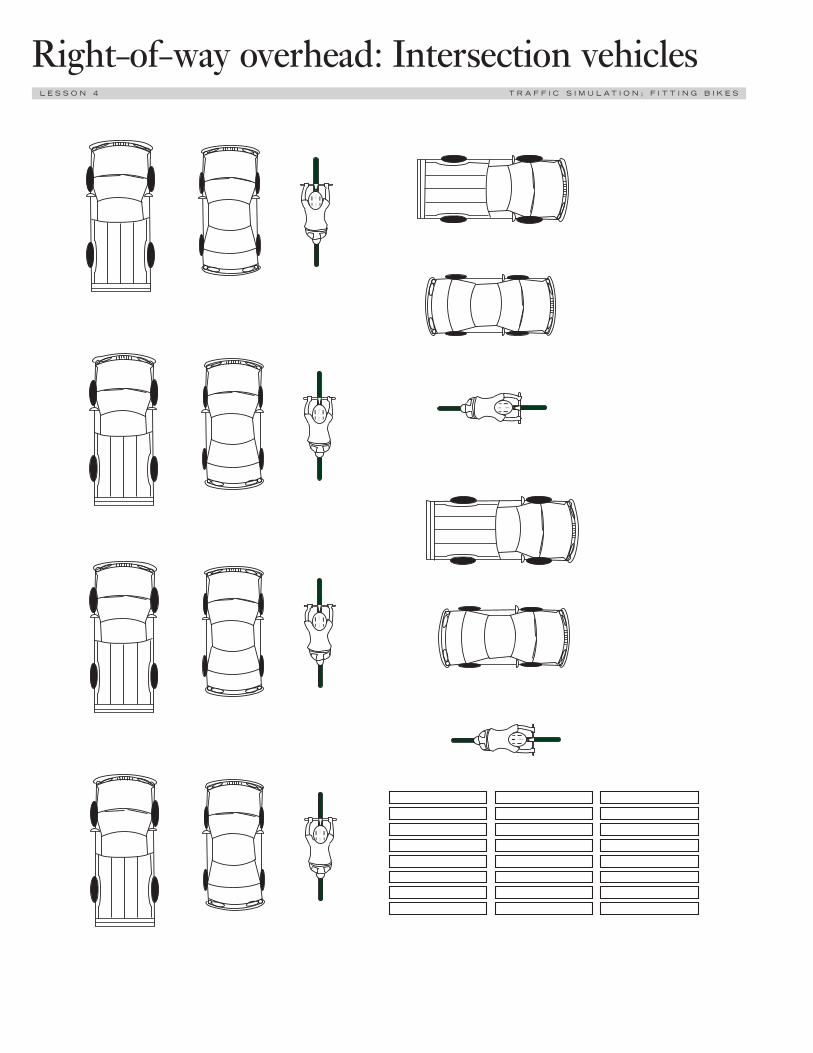
Right-of-way overhead: Intersection vehicles
112
L E S S O N 4 T R A F F I C S I M U L A T I O N ; F I T T I N G B I K E S
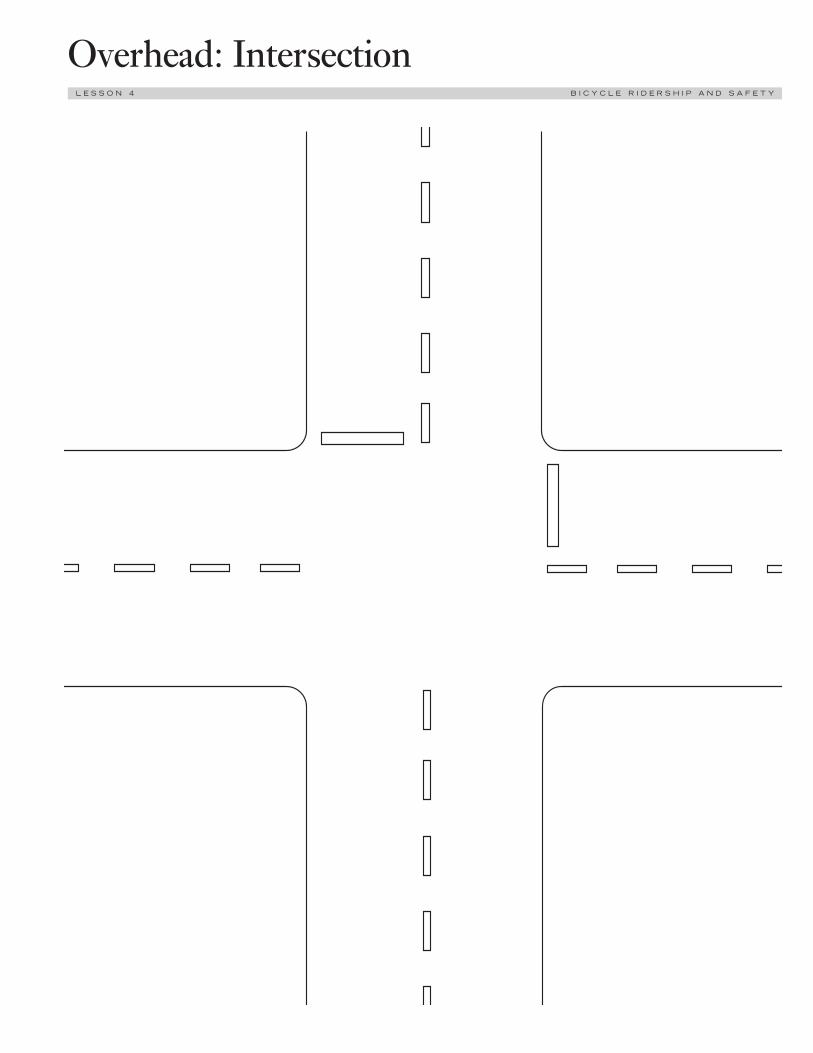
Overhead: Intersection
113
L E S S O N 4 B I C Y C L E R I D E R S H I P A N D S A F E T Y
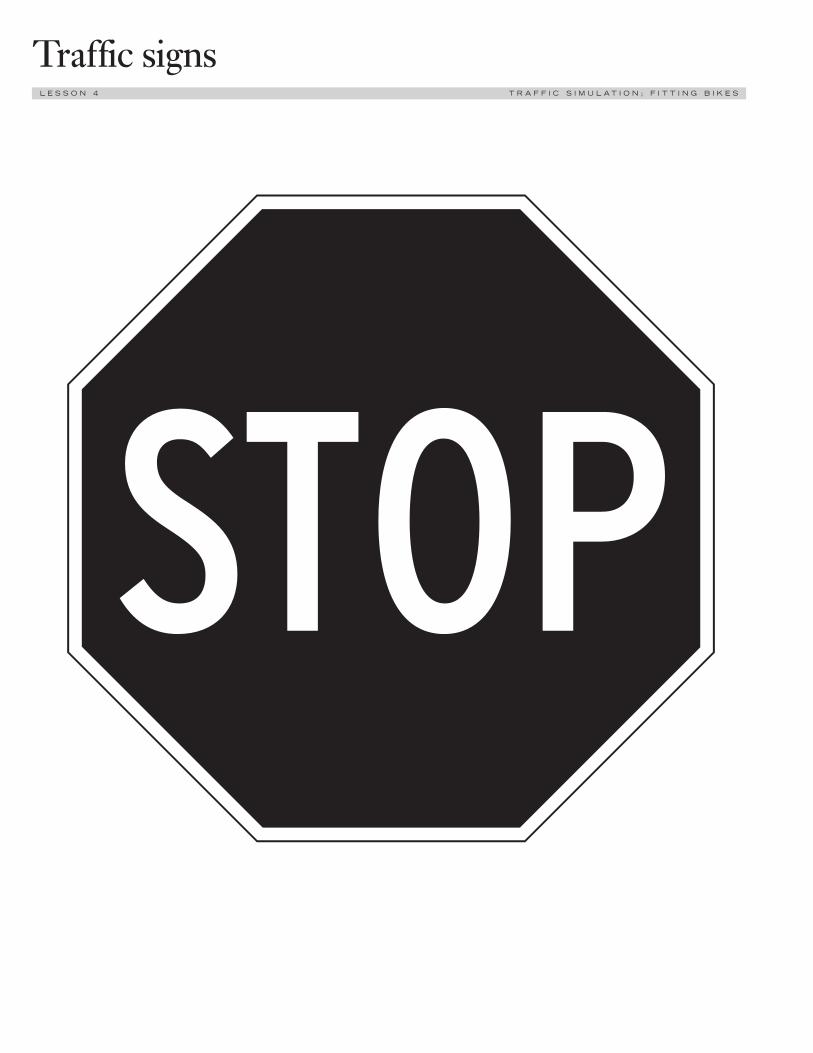
Traffic signs
114
L E S S O N 4 T R A F F I C S I M U L A T I O N ; F I T T I N G B I K E S
l

Traffic signs
115
L E S S O N 4 T R A F F I C S I M U L A T I O N ; F I T T I N G B I K E S
z

Traffic signs
116
L E S S O N 4 T R A F F I C S I M U L A T I O N ; F I T T I N G B I K E S
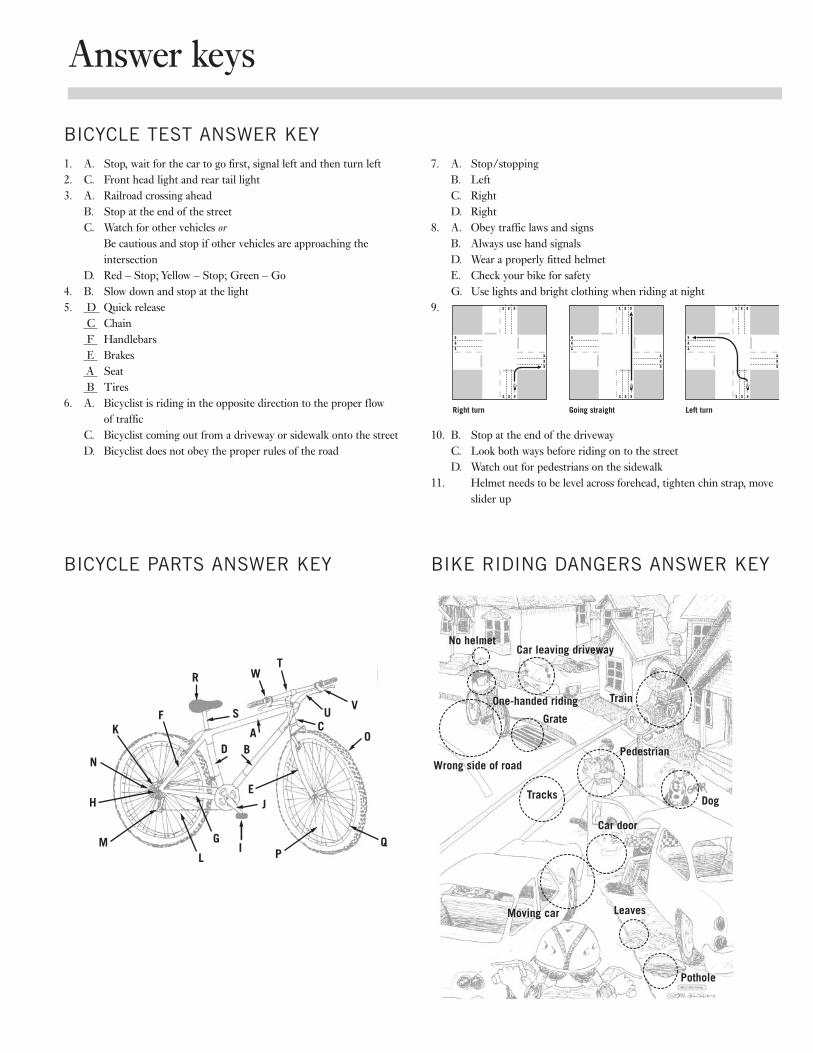
Answer keys
117
BICYCLE TEST ANSWER KEY1. A. Stop, wait for the car to go first, signal left and then turn left2. C. Front head light and rear tail light3. A. Railroad crossing ahead
B. Stop at the end of the streetC. Watch for other vehicles or
Be cautious and stop if other vehicles are approaching theintersection
D. Red – Stop; Yellow – Stop; Green – Go4. B. Slow down and stop at the light5. D Quick release
C Chain F Handlebars E BrakesA Seat B Tires
6. A. Bicyclist is riding in the opposite direction to the proper flow of traffic
C. Bicyclist coming out from a driveway or sidewalk onto the streetD. Bicyclist does not obey the proper rules of the road
7. A. Stop/stoppingB. LeftC. RightD. Right
8. A. Obey traffic laws and signsB. Always use hand signalsD. Wear a properly fitted helmetE. Check your bike for safetyG. Use lights and bright clothing when riding at night
9.
10. B. Stop at the end of the drivewayC. Look both ways before riding on to the street D. Watch out for pedestrians on the sidewalk
11. Helmet needs to be level across forehead, tighten chin strap, moveslider up
1
321
123
2 3
1 2 3
Right turn Going straight Left turn
1
321
123
2 3
1 2 3
1
321
123
2 3
1 2 3
BICYCLE PARTS ANSWER KEY BIKE RIDING DANGERS ANSWER KEY
Tracks
Pedestrian
Dog
Wrong side of road
One-handed riding
No helmetCar leaving driveway
Train
Car door
Moving car Leaves
Pothole
Grate
R
FK
H
M
N
L
GI
JE
PQ
OCU V
TW
ABD
S

RIGHT OF WAY ANSWER KEYAdditional class discussion questions for each intersection or add your own:
1. Q: What would happen if the car and bicycle arrived at the intersection at the same time?A: Both vehicles would stop, look for traffic and continue through intersection at the same time.
2. Q: What would happen if the car was also taking a left turn? Can both vehicles go at the sametime?
A: Both vehicles could go at the same time after stopping and checking for traffic.
3. Q: What would happen if the vehicle at the 9:00 position were turning left instead of goingstraight?
A: The vehicle turning left has the right-of-way because it is still the vehicle that is the furthest“right” of the other vehicles. Next the vehicle in the 12:00 position would go, followed bythe vehicle in the 3:00 position.
4. Q: What would happen if an additional car heading straight (from the 6:00 position), oppositethe car turning left, was included?
A: The car coming straight would go first, then the turning car would turn left, finally thebicycle would turn left.
5. Q: Who would have the right-of-way if this was a 4-way instead of a 2-way intersection?A: The car would have the right-of-way because it is on the "right" of the bike.
6. Q: Who would have the right-of-way if both vehicles arrived at the intersection at the sametime?
A: The car because it is on the "right" of the pick-up.
Answer keys
118
1. 4-way 2. 4-way
3. 4-way 4. 2-way
5. 2-way 6. 4-way
Teacher evaluation of Safe Routes for Kids Bicycle Safety Program
119
Feel free to attach additional sheets of paper to include more detailed answers. If it applies, please write the correspondingnumber to the question you might be answering.
School Name _______________________________________________________City __________________________________
Teacher Name __________________________________________Dates of Program __________________________________
BTA staff who taught in your school __________________________________________________________________________
Grades which participated in Bicycle Safety Program ___________________________________________________________
1. How do you rate the curriculum that was most recently run in your school? 1 2 3 4 5 6 7
Very Poor Average Outstanding
2. Did you feel that the program content was age appropriate? 1 2 3 4 5 6 7Not Appropriate Average Very Appropriate
3. What do you think would be the ideal grade level for this material? ____________________________________
4. Did you feel that the program content was valuable to the students? 1 2 3 4 5 6 7
Not Valuable Average Very Valuable
5. What level of knowledge do you think the students had of bicycle safety / traffic safety concepts prior to this training? 1 2 3 4 5 6 7
No Knowledge Average Full Knowledge
6. What level of knowledge do you think the students had of bicycle safety / traffic safety concepts after the training? 1 2 3 4 5 6 7
No Knowledge Average Full Knowledge
7. Do you think that the information will be applicable in the students’daily lives? 1 2 3 4 5 6 7
Not Applicable Average Very Applicable
8. Do you think that this program will help children be safer automobile drivers in the future? 1 2 3 4 5 6 7
Not At All Average Much Safer
9. What particular strengths do you feel the curriculum had? ___________________________________________________
_____________________________________________________________________________________________________
_____________________________________________________________________________________________________
_____________________________________________________________________________________________________
Teacher evaluation of Safe Routes for Kids Bicycle Safety Program (continued)
120
10. Weaknesses of the curriculum? __________________________________________________________________________
_____________________________________________________________________________________________________
_____________________________________________________________________________________________________
_____________________________________________________________________________________________________
11. If a BTA instructor assisted, please evaluate their strengths. _________________________________________________
_____________________________________________________________________________________________________
_____________________________________________________________________________________________________
_____________________________________________________________________________________________________
12. The BTA instructor’s traits to be improved upon? ___________________________________________________________
_____________________________________________________________________________________________________
_____________________________________________________________________________________________________
_____________________________________________________________________________________________________
13. Do you think that this program added value to the community? _______________________________________________
_____________________________________________________________________________________________________
_____________________________________________________________________________________________________
_____________________________________________________________________________________________________
14. How did you feel about the level of supervision on the rides? _________________________________________________
_____________________________________________________________________________________________________
_____________________________________________________________________________________________________
_____________________________________________________________________________________________________
15. Do you think that the students benefited from having adult volunteers in the school? ____________________________
_____________________________________________________________________________________________________
_____________________________________________________________________________________________________
16. Would you like to receive this program again? _______ When? _______________________________________________
_____________________________________________________________________________________________________
_____________________________________________________________________________________________________
17. Could you envision leading any of these aspects of the program on your own?_____ Some in-class lessons _____ All in-class lessons_____ Some on-bike lessons _____ All on-bike lessons_____ On-street bike rides

BicycleFitting 40, 46, 115Locking 43Safety check 41-42, 99
Bike exercisesDriveways 29, 58, 60, 78, 99Exiting a driveway 58Follow the leader 52Gearing 51Going straight 9, 36-8, 99Predictability 7-8, 57Riding on the right 8-11, 28, 57-58Riding with one hand 48-49Signaling 28, 38, 49, 59Slalom 47-48, 83Snail race 50, 83Starting 47, 49, 61Stopping 38, 47-48, 67, 74
Bike Gear 14, 16, 18, 20-22, 90Commuting 21, 90Riding at night 21, 30, 72, 90Riding in the rain 21, 30, 72, 90
Bike rodeo 79, 83, 96
Crashes i, iii, iv, 5-8, 13, 15-17, 29-30, 38, 47, 57, 99
CurriculumBackground ivOverview iiLesson plans xi - xviResources (See resources)
Driving iv, 2, 6, 7, 29
Educational goals ii, viii-x
Flat tire repair 31
Hazards 28-30, 34, 49, 72-76, 78, 82, 99Collisions 29, 76, 99Emergency stop 74Identification 30, 72Quick turn 76Railroad tracks 73Rock dodge 75
Helmets 14-18, 20, 22, 46, 56, 83, 90, 94Importance of the brain 14-15Melon drop 16
Intersections 8-11, 28-29, 36-38, 44, 58-61, 63-70, 77-78, 81-83, 99
Laws ii, 5-8, 28-29, 36, 39, 78, 82, 99
Left turns 67-68, 70, 78, 82
Looking back 6, 48-48, 59, 70
Neighborhood ride 77-78, 81-82, 87-88
Physically fit lifestyle viii, 80
Resources vi, vii, 89-98Administration vii, 23Equipment vi, vii, 91, 94, 99Organizations vi, vii, 92-93, 95-96
Ridership ii, 3, 22-26, 34, 44, 53, 99Measuring 22-26, 99Promoting iv, 3, 23, 80, 92
Right turns 9-10, 28, 38-39, 59-61, 65-66, 68-69, 78, 82
Rules of the Road 8-11, 28, 38-39, 99
Surveys 24-25, 99
Testing 4, 86, 99
Traffic signs 8, 19, 57, 64, 99
Traffic simulation 38-39, 99
Video 5, 33, 96
Worksheets 99
Index
121
Bicycle Transportation AllianceP.O. Box 9072Portland, OR 97207-9072
PHONE 503-226-0676FAX 503-226-0498EMAIL [email protected] ADDRESS www.bta4bikes.org SRV3 09/03