Embed Size (px)
DESCRIPTION
BeoSound 3000 easy guideand instruction manual
Citation preview
Reference book
BeoSound 3000

Legal Notice:
CAUTION: To reduce the risk ofelectric shock, do not removecover (or back).No User-serviceable partsinside. Refer servicing toqualified service personnel.
WARNING: To prevent fire or electricshock, do not expose this applianceto rain or moisture.
This symbol indicates that adangerous voltage constitut-ing a risk of electric shock ispresent within this unit.
This symbol indicates thatthere are important operat-ing and maintenance instruc-tions in the literatureaccompanying this unit.
For the Canadian market only!CAUTION: To prevent electric shock do not usethe polarized plug, attached to this apparatus,with an extension cord, receptacle or otheroutlet unless the blades can be fully insertedto prevent blade exposure.

BeoSound 3000 – the fully integrated music system
Whenever you reach out to operate the
BeoSound 3000, the glass doors slide
open as if by magic, inviting you in to
the music.
The BeoSound 3000 is a fully integrated
music system with both radio and CD
player. Its compactness facilitates
placement next to your favourite
listening position.
All the operating buttons are located in
one place. They are conveniently
grouped according to type of function,
so you can easily find your way around
the close-up operation panel and
operate the system.

To get to know your Bang & Olufsen product
two guides are at your disposal.
The Guide provides information on daily use.
The Reference book gives a thorough overview
of all aspects, installation and in-depth
explanation.
To the right, you find the contents of the
Reference book, all the chapters of the Guide
are listed below:
• Your key to BeoSound 3000, 4• Operation panel, 5• Displays, 5• CD player, 6• Different ways of playing a CD, 6• Favourite CD tracks only, 7• Make series of CD tracks, 7• Delete series of CD tracks, 7• Radio, 8• Volume, 8
The
Guide
The
Reference
book
Guide
BeoSound 3000
Reference book
BeoSound 3000
Contents of the Reference Book
How to set up BeoSound 3000
6 Placing your BeoSound 3000
Connect the cables
7 Aerial7 Loudspeakers7 Auxiliary equipment7 BeoLink7 To the mains
How to assemble BeoSound 3000
8 Mount the glass doors8 Mount the cables8 Mount the cable cover
BeoSound 3000 in an audio/videosetup
9 BeoSound 3000 – without speakers – witha video system
9 BeoSound 3000 – with speakers – with avideo system
9 BeoSound 3000 in another room
Adjust and set Sound
10 Sound adjustments10 Survey of sound displays
Set the right time
11 Set the built-in clock
Tune in radio stations
12 Tune in stations13 Move radio stations13 Delete radio stations13 Name radio stations
Make BeoSound 3000 start or stopat a specific time
14 Make a Timer to start or stop automatically
15 Check the Timers15 Delete a Timer
Daily use of radio and CD player
16 Switch on the radio16 Adjust volume16 Switch on the CD player16 Find tracks on a CD
BeoSound 3000 display indications
17 Understand and change the displays
Play CDs in different ways
18 Play tracks in random order18 Repeat a CD19 Repeat a track on a CD19 Repeat a passage on a CD19 Scan a CD
Play favourite CD tracks only
20 Delete a series of tracks20 Select and store a series of tracks
Name your CDs
21 Name your individual CDs21 See list of CD names21 Delete CD names and series of tracks
Looking after BeoSound 3000
22 Cleaning BeoSound 300022 Handling your CDs
Beo4 remote control operation
23 Use the Beo4 remote control
Use with a video system – transfersound from system to system
24 A fully integrated Audio/Video setup24 An Audio/Video integrated setup

Set and enter a PIN code
26 Enter a PIN code26 Switch on the PIN code27 Change the PIN code27 Switch off the PIN code27 Using a Master code
Key to using this guide
Use this Key to identify what a button,source or status display looks like in aninstruction sequence.
Buttons on theBeoSound 3000close-up operationpanel or on theBeo4 remote control
Lower display onBeoSound 3000
Displays on Beo4
RADIOCD
PLAYA >>> B
CD
EDIT?
RANDOM
REPEAT

6
We recommend that you follow this
procedure when you set up your
BeoSound 3000:
1 Place the BeoSound 3000 where
you want to use it.
2 Set up your speakers and any
auxiliary equipment.
3 Connect all cables to their sockets
on the rear panel of the BeoSound
3000 – remember not to connect
it to the mains yet!
4 Arrange the cables in the cable
cover grooves and attach the
cover to the rear of the BeoSound.
5 Mount the glass doors.
6 Connect the products to the
mains.
If no permanent FM aerial connection is available,
an indoor aerial may be hooked onto the clamp
on the back of the BeoSound 3000.
How to set up BeoSound 3000
Placing your BeoSound 3000…
• Make sure that the BeoSound 3000 is set up,
placed and connected, in accordance with the
instructions in this guide.
• Place your BeoSound 3000 on a firm
surface, preferably on the table, sideboard or
stand where you want it placed permanently.
• The BeoSound 3000 is designed for indoor use
in dry, domestic environments only, and for use
within a temperature range of 10–40º C
(50–105º F).
• Avoid placing the system in direct sunlight, near
radiators or other sources of heat.
• Allow a space of at least 5cm above and to
each side of the BeoSound 3000 for adequate
ventilation. Remember to leave enough space at
the sides for the glass doors to open.
• If you want to hang the BeoSound 3000 on a
wall, make sure that you use the correct size and
type of screws and wall plugs for mounting the
wall bracket (optional accessory) and the
BeoSound. The type of screws and wall plugs will
depend on the material and construction of the
wall.
• Do not switch on the mains for any products in
your system, until after you have connected all the
cables (see opposite page, p. 7).
The program list for TV is now called up. It
provides you with an overview of all your available
TV programs.

7
You can use your BeoSound 3000 in
a stand-alone setup or connected to
a Bang & Olufsen video system using
the Master Link cable. The Master
Link socket on the back of BeoSound
3000 can also be used for BeoLink
distribution. The BeoLink system
allows you to listen to the BeoSound
3000 in any room you like, via extra
speakers*.
Use the diagram and the graphics
imprinted on the socket panel for
reference, when locating the sockets.
Please do not connect the BeoSound
to the mains until you have finished
the setting-up procedure.
Connect the cables
*NOTE! Please contact a Bang & Olufsen retailer
for further information on the BeoLink system
and information on auxiliary equipment.
AM aerial FM aerial
Mains supply
Aerial
Connect your FM aerial to the socket markedFM and your AM aerial, if any, to the socketmarked AM.
When using an AM loop aerial, tune in to theradio station you want, then turn the aerialhorisontally until you receive the best possiblesignal.
Loudspeakers
Connect your active speakers to the socketsmarked POWER LINK.
You may choose to loop the signals throughfrom speaker to speaker, please refer to theUser’s guide for your BeoLab loudspeakers, oryou may connect one speaker to each of thetwo sockets.
Remember to set the L • R • LINE switch onthe BeoLab speakers to L and R (left andright), respectively.
Note: If you wish to connect the BeoLab 2500
loudspeakers, please refer to the guide supplied
with the speakers.
Auxiliary equipment
Connect your auxiliary equipment to the socket marked AUX. This socket enables youto use compatible Bang & Olufsen equipment,e.g. an audio tape recorder or a record player.The socket may also accommodate equipmentof other makes.
BeoLink connection
The socket marked MASTER LINK should beused when you connect your BeoSound 3000and a compatible Bang & Olufsen video system.
Mains supply
Plug the mains lead into the socket marked ~,but do not switch on at the mains yet.
Loudspeakers
BeoLink Connection
Auxiliaryequipment

8
When you have finished the setting
up procedure, described on the
previous page, you must mount the
glass doors and the cable cover.
NOTE! Treat the glass doors with great care. If
they are cracked or chipped, or damaged in any
other way, they should be replaced immediately
as they could otherwise cause bodily harm.
You can order replacement doors through a
Bang & Olufsen retailer.
How to assemble BeoSound 3000
Mount the glass doors
The labels on the back of the glass doors indicate which end should be pointingupwards, and which side of the glass doorshould point towards the middle of theBeoSound 3000.• Fasten the two glass doors, one at a time, to
the front of the BeoSound 3000 by pressing
their fastening points into the corresponding
fastening sockets on the BeoSound.
• Press gently on each of the fastening points
until you hear a click. The click indicates that
the glass doors are mounted properly.
Arrange the cables
Arrange the connector cables in the cablecover as shown to the right. You can fastenthe cables with tape to keep them in placebefore you mount the cable cover to the rearof BeoSound 3000.
Mount the cable cover
Fasten the cover – with the cables attached –to the grill on the BeoSound rear panel:a Insert the bottom row of pegs into the grill.
b Push the top row of pegs into the grill.
c Pull the cable cover upwards until the pegs fit
properly with the grill.
Note: Do not plug in the cables before the cable
cover is mounted.c
b
a
9
When you have connected your
BeoSound 3000 to the mains, you
must make sure that it is set up to
function with the other products you
have connected, if any. This means
that you must programme the
BeoSound 3000 option. If you have
only connected speakers to the
BeoSound, you do not have to make
this programming.
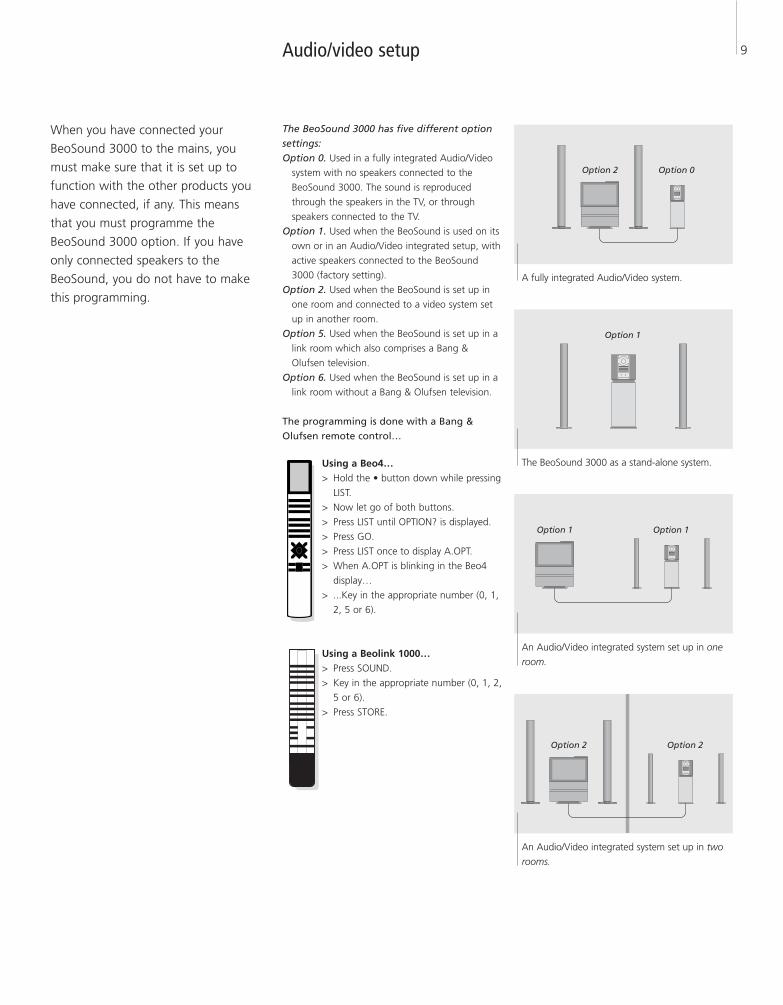
The BeoSound 3000 has five different optionsettings:Option 0. Used in a fully integrated Audio/Video
system with no speakers connected to the
BeoSound 3000. The sound is reproduced
through the speakers in the TV, or through
speakers connected to the TV.
Option 1. Used when the BeoSound is used on its
own or in an Audio/Video integrated setup, with
active speakers connected to the BeoSound
3000 (factory setting).
Option 2. Used when the BeoSound is set up in
one room and connected to a video system set
up in another room.
Option 5. Used when the BeoSound is set up in a
link room which also comprises a Bang &
Olufsen television.
Option 6. Used when the BeoSound is set up in a
link room without a Bang & Olufsen television.
The programming is done with a Bang &Olufsen remote control…
Audio/video setup
Option 2 Option 0
Using a Beo4…> Hold the • button down while pressing
LIST.
> Now let go of both buttons.
> Press LIST until OPTION? is displayed.
> Press GO.
> Press LIST once to display A.OPT.
> When A.OPT is blinking in the Beo4
display…
> ...Key in the appropriate number (0, 1,
2, 5 or 6).
Using a Beolink 1000…> Press SOUND.
> Key in the appropriate number (0, 1, 2,
5 or 6).
> Press STORE.
A fully integrated Audio/Video system.
Option 1
The BeoSound 3000 as a stand-alone system.
Option 1 Option 1
An Audio/Video integrated system set up in one
room.
Option 2 Option 2
An Audio/Video integrated system set up in two
rooms.
10
All sound levels are set to neutral
values from the factory, but you can
make your own sound adjustments
and store them.
If you store a volume level,
BeoSound 3000 will start playing at
this level each time you switch it on.
The BeoSound 3000 also features a
loudness function which you can
activate or deactivate as you like.
The loudness function makes the
music more dynamic. It compensates
for the human ear’s lack of sensitivity
to high and low frequencies when
listening to low music.
If you do not store the sound
adjustments you make, BeoSound
3000 will return to the preset sound
levels once you switch it off.
If you only want to adjust volume,
simply press the buttons ∧ or ∨
directly to turn the volume up or
down.
NOTE! When BeoSound 3000 is used in a fully
integrated Bang & Olufsen Audio/Video system,
sound must be adjusted as described in the guide
for the video system. When you press the
SOUND button, the display will read USE TV.
Adjust and store sound
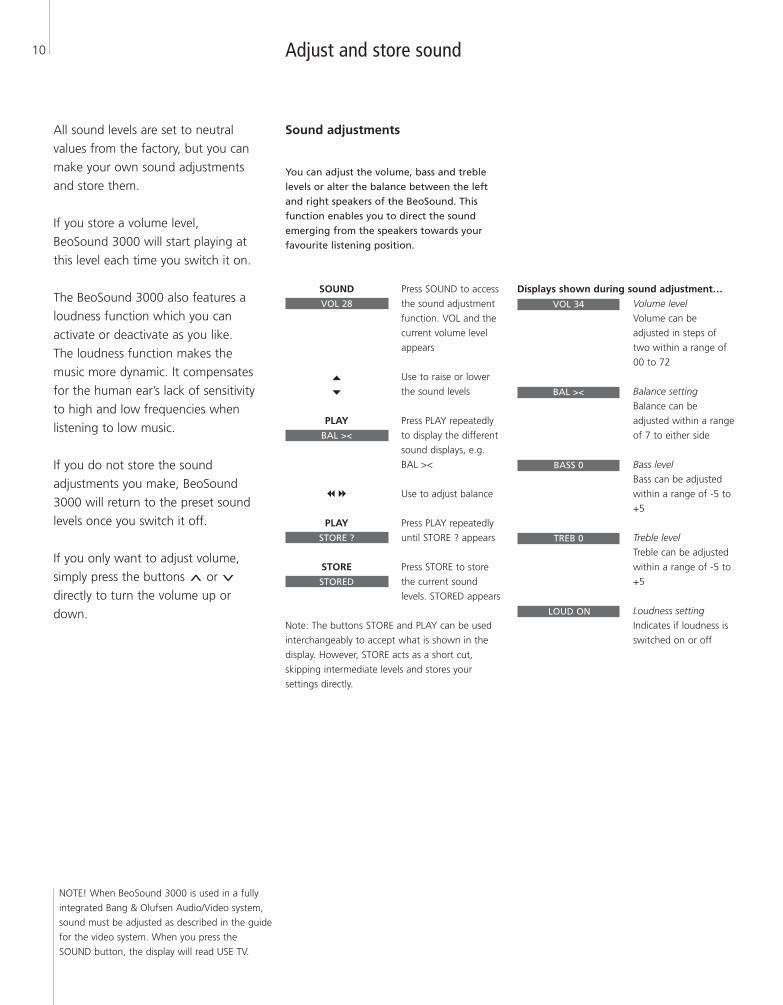
Sound adjustments
You can adjust the volume, bass and treblelevels or alter the balance between the leftand right speakers of the BeoSound. Thisfunction enables you to direct the soundemerging from the speakers towards yourfavourite listening position.
Press SOUND to access
the sound adjustment
function. VOL and the
current volume level
appears
Use to raise or lower
the sound levels
Press PLAY repeatedly
to display the different
sound displays, e.g.
BAL ><
Use to adjust balance
Press PLAY repeatedly
until STORE ? appears
Press STORE to store
the current sound
levels. STORED appears
Note: The buttons STORE and PLAY can be used
interchangeably to accept what is shown in the
display. However, STORE acts as a short cut,
skipping intermediate levels and stores your
settings directly.
SOUNDVOL 28
�
�
PLAYBAL ><
ss tt
PLAYSTORE ?
STORESTORED
Displays shown during sound adjustment…Volume level
Volume can be
adjusted in steps of
two within a range of
00 to 72
Balance setting
Balance can be
adjusted within a range
of 7 to either side
Bass level
Bass can be adjusted
within a range of -5 to
+5
Treble level
Treble can be adjusted
within a range of -5 to
+5
Loudness setting
Indicates if loudness is
switched on or off
VOL 34
BAL ><
BASS 0
TREB 0
LOUD ON
11
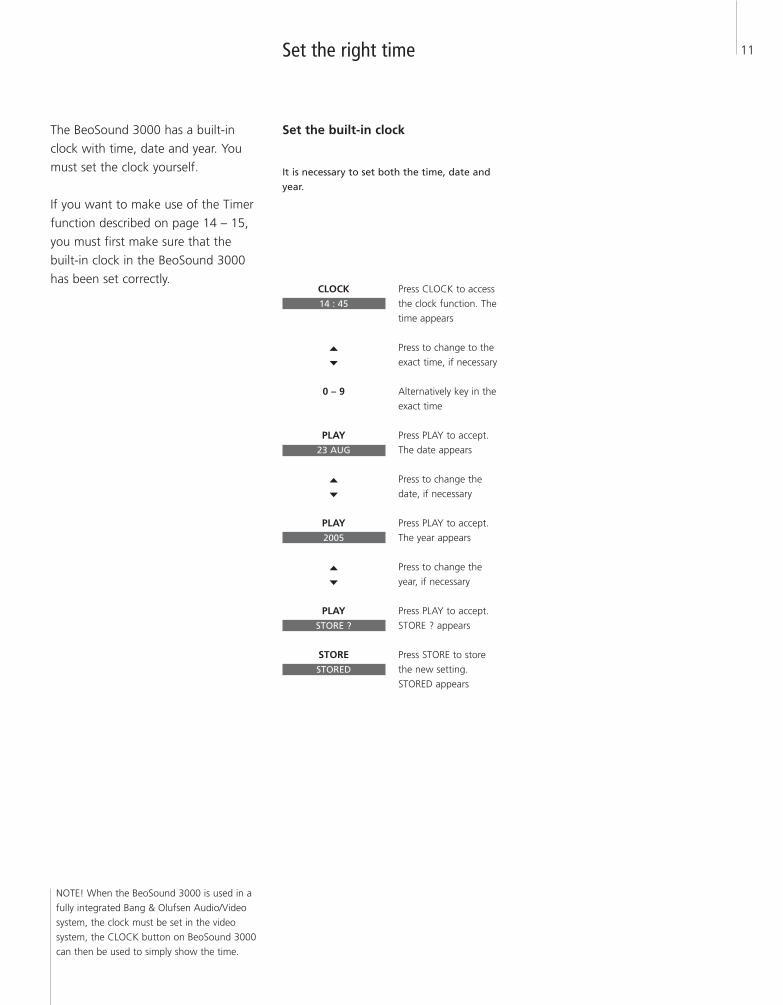
The BeoSound 3000 has a built-in
clock with time, date and year. You
must set the clock yourself.
If you want to make use of the Timer
function described on page 14 – 15,
you must first make sure that the
built-in clock in the BeoSound 3000
has been set correctly.
Set the right time
Set the built-in clock
It is necessary to set both the time, date andyear.
NOTE! When the BeoSound 3000 is used in a
fully integrated Bang & Olufsen Audio/Video
system, the clock must be set in the video
system, the CLOCK button on BeoSound 3000
can then be used to simply show the time.
Press CLOCK to access
the clock function. The
time appears
Press to change to the
exact time, if necessary
Alternatively key in the
exact time
Press PLAY to accept.
The date appears
Press to change the
date, if necessary
Press PLAY to accept.
The year appears
Press to change the
year, if necessary
Press PLAY to accept.
STORE ? appears
Press STORE to store
the new setting.
STORED appears
CLOCK14 : 45
�
�
0 – 9
PLAY23 AUG
�
�
PLAY2005
�
�
PLAYSTORE ?
STORESTORED
12
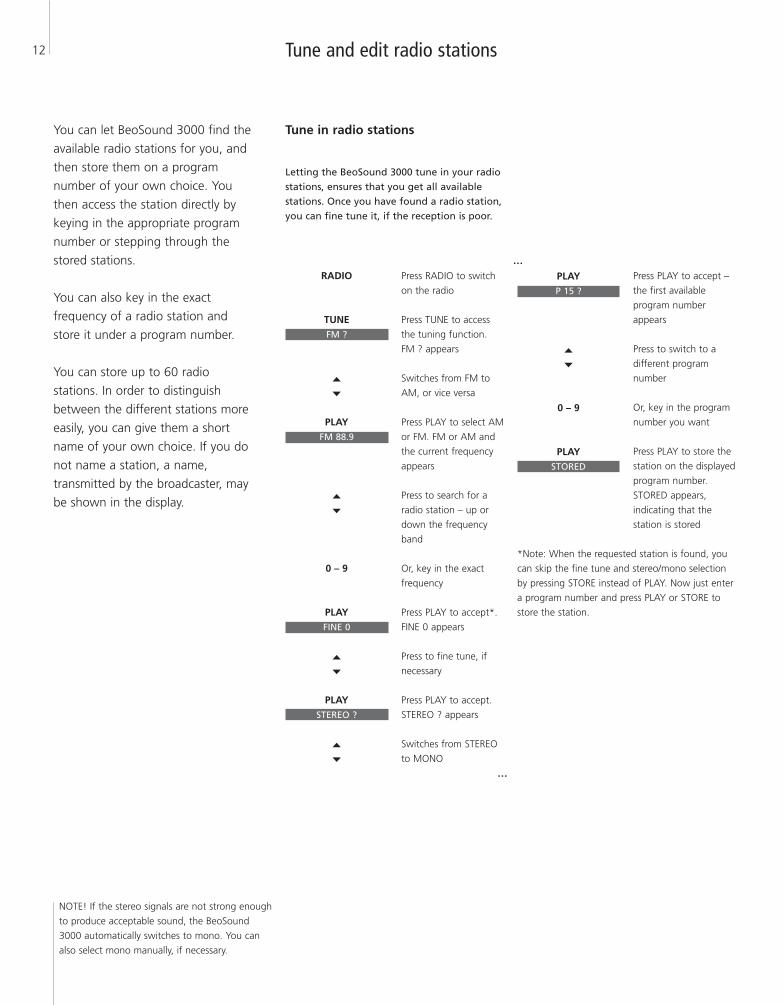
You can let BeoSound 3000 find the
available radio stations for you, and
then store them on a program
number of your own choice. You
then access the station directly by
keying in the appropriate program
number or stepping through the
stored stations.
You can also key in the exact
frequency of a radio station and
store it under a program number.
You can store up to 60 radio
stations. In order to distinguish
between the different stations more
easily, you can give them a short
name of your own choice. If you do
not name a station, a name,
transmitted by the broadcaster, may
be shown in the display.
NOTE! If the stereo signals are not strong enough
to produce acceptable sound, the BeoSound
3000 automatically switches to mono. You can
also select mono manually, if necessary.
Tune and edit radio stations
Tune in radio stations
Letting the BeoSound 3000 tune in your radiostations, ensures that you get all available stations. Once you have found a radio station,you can fine tune it, if the reception is poor.
Press RADIO to switch
on the radio
Press TUNE to access
the tuning function.
FM ? appears
Switches from FM to
AM, or vice versa
Press PLAY to select AM
or FM. FM or AM and
the current frequency
appears
Press to search for a
radio station – up or
down the frequency
band
Or, key in the exact
frequency
Press PLAY to accept*.
FINE 0 appears
Press to fine tune, if
necessary
Press PLAY to accept.
STEREO ? appears
Switches from STEREO
to MONO
RADIO
TUNEFM ?
�
�
PLAYFM 88.9
�
�
0 – 9
PLAYFINE 0
�
�
PLAYSTEREO ?
�
�
Press PLAY to accept –
the first available
program number
appears
Press to switch to a
different program
number
Or, key in the program
number you want
Press PLAY to store the
station on the displayed
program number.
STORED appears,
indicating that the
station is stored
*Note: When the requested station is found, you
can skip the fine tune and stereo/mono selection
by pressing STORE instead of PLAY. Now just enter
a program number and press PLAY or STORE to
store the station.
PLAYP 15 ?
�
�
0 – 9
PLAYSTORED
…
…
13
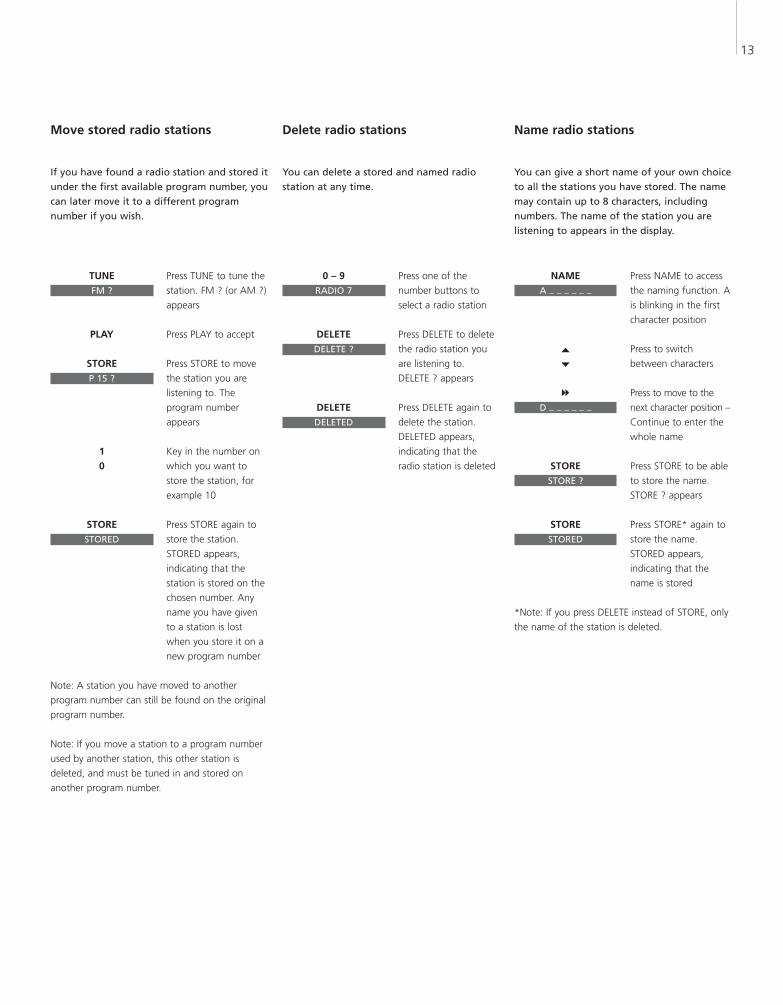
Move stored radio stations
If you have found a radio station and stored itunder the first available program number, youcan later move it to a different program number if you wish.
Delete radio stations
You can delete a stored and named radio station at any time.
Name radio stations
You can give a short name of your own choiceto all the stations you have stored. The namemay contain up to 8 characters, includingnumbers. The name of the station you are listening to appears in the display.
Press TUNE to tune the
station. FM ? (or AM ?)
appears
Press PLAY to accept
Press STORE to move
the station you are
listening to. The
program number
appears
Key in the number on
which you want to
store the station, for
example 10
Press STORE again to
store the station.
STORED appears,
indicating that the
station is stored on the
chosen number. Any
name you have given
to a station is lost
when you store it on a
new program number
Note: A station you have moved to another
program number can still be found on the original
program number.
Note: If you move a station to a program number
used by another station, this other station is
deleted, and must be tuned in and stored on
another program number.
TUNEFM ?
PLAY
STOREP 15 ?
10
STORESTORED
Press one of the
number buttons to
select a radio station
Press DELETE to delete
the radio station you
are listening to.
DELETE ? appears
Press DELETE again to
delete the station.
DELETED appears,
indicating that the
radio station is deleted
0 – 9RADIO 7
DELETEDELETE ?
DELETEDELETED
Press NAME to access
the naming function. A
is blinking in the first
character position
Press to switch
between characters
Press to move to the
next character position –
Continue to enter the
whole name
Press STORE to be able
to store the name.
STORE ? appears
Press STORE* again to
store the name.
STORED appears,
indicating that the
name is stored
*Note: If you press DELETE instead of STORE, only
the name of the station is deleted.
NAMEA _ _ _ _ _ _
�
�
tt
D _ _ _ _ _ _
STORESTORE ?
STORESTORED

14
NOTE! The list of sources shown in the display
contains N.MUSIC (for music tracks stored on
your PC) and N.RADIO (for radio sites on the
Internet). These sources are available if you have
connected your BeoSound 3000 to BeoLink PC 2
and have access to the Internet.
You can make BeoSound 3000 start
or stop playing at designated times
throughout the day and week.
The BeoSound 3000 memorises up
to 15 such Timer programmings and
you can use it to e.g. wake you up in
the morning to the sound from
either your favourite CD or radio
program. If, for example, you want
the BeoSound 3000 to stop playing
at a specific time in the evening, you
just make a Timer with STANDBY as
the source.
If you set a Timer for Monday,
Tuesday and Thursday, the Timer will
be repeated on these days only, every
week.
Your Timers can be changed or
cancelled, at any time.
Please note that when BeoSound
3000 is used in a fully integrated
Bang & Olufsen Audio/Video system,
the system Timer must be set as
described in the guide for the video
system. When you press the TIMER
button, the display will read USE TV.
Start or stop at a specific time
Set a Timer
Once you have pressed the TIMER button toget started, programming a new Timer is justlike having a dialogue with the display. If youpress any other button or switch to CD beforethe Timer has been stored in BeoSound 3000,the Timer is cancelled.
Press TIMER to access
the Timer function.
NEW ? appears
Press PLAY to make a
new Timer. RADIO ?
appears
Press to switch
between the available
sources
Press PLAY to select a
source when it is
displayed – If you have
selected radio, the
program number
appears
Press to step between
program numbers
Press PLAY to accept.
A start time appears
Key in the start time
you want
Press PLAY to accept.
A stop time appears
Key in the stop time
you want
Press PLAY to accept.
MTWTFSS appears.
The letters represent
the 7 days of the week,
starting with M for
Monday
TIMERNEW ?
PLAYRADIO ?
�
�
PLAYP. NO 12 ?
�
�
PLAYON 20:00
0 – 9
PLAYOFF 20:00
0 – 9
PLAYMTWTFSS
Press to move between
the days
Press to include a day
Press to exclude a day
The selected days are
displayed
Press PLAY to accept the
days shown in the
display. STORE ? appears
Press PLAY to store the
Timer. STORED appears,
indicating that your
Timer is stored
Press to activate the
Timer and cut the
loudspeakers connected
to BeoSound 3000 in or
out
A green indicator light
will show when the
Timer setting is ON
Note: If you have made a mistake and do not wish
to store your Timer, pressing � when STORE ? is
displayed, will change the display to EXIT ?. Press
PLAY to exit the Timer function without storing
the Timer.
If you make a STANDBY Timer, then all you need
to store is a stop time.
ss tt
�
�
MT T SS
PLAYSTORE ?
PLAYSTORED
ON/OFF
…
…

15
Check the Timers
You can check your Timers, the check functioncan also be used to correct Timers.
Delete a Timer
When you call up a list of your Timers, youcan delete any Timer you want.
Press TIMER to access
the function. NEW ?
appears
Press to switch the
display to CHECK ?
Press PLAY to see the
Timers
Press to leaf through
the programmed
Timers
If you wish to make
corrections, press PLAY
when the Timer is
displayed
Press to change source,
if required
Press PLAY to accept, if
you have changed the
source
Key in your corrections
Press PLAY to accept.
OK ? appears
Press PLAY to store.
STORED appears,
indicating that your
corrected Timer is
stored
TIMERNEW ?
�
CHECK ?
PLAY
�
�
RADIO 12
PLAY
�
�
PLAY
0 – 9
PLAYOK ?
PLAYSTORED
Press TIMER to access
the function. NEW ?
appears
Press to switch the
display to CHECK ?
Press PLAY to see the
Timers
Press to leaf through
the programmed
Timers
When the Timer is
displayed
Press DELETE to delete
it. DELETED appears,
indicating that the
Timer is deleted
TIMERNEW ?
�
CHECK ?
PLAY
�
�
RADIO 12
DELETEDELETED

16
To be able to use the radio, you must
first tune in the radio stations you
want, and store them on program
numbers of their own, see page 12.
Once you have loaded a CD, press
CD to listen to it. Playing will
continue until the CD has reached
the end, then BeoSound 3000 will
switch to standby after 30 minutes if
you do not operate it.
While listening to either radio or CD,
you can adjust the volume up or
down at all times by means of the
∧ and ∨ buttons on the close-up
operation panel.
Daily use of radio and CD player
Switch on the radio
When you switch on the radio, it automaticallyselects the station you listened to last.
Press RADIO to switch
on the radio
Use the number keys to
select a stored station
Step through all stored
stations
Switch to standby
Adjust the volume up
or down
Silences the speakers
immediately. Press
again to recall the
sound
Note: Pressing 0 will swap between present and
previous radio station.
RADIO
0 – 9
�
�
•
∧
∨
MUTE
Plays the CD in the
compartment
Plays specific track
numbers
Plays the next track
Plays the previous track
Pauses playing
Resumes playing
Searches forwards on
the CD
Searches backwards on
the CD
Keep the button
pressed down until you
have reached the point
you want
CD
0 – 9
�
�
STOP
PLAY
tt
ss
Play a CD
When you play a CD, you can stop it at anytime. If you select another source, the CDstops automatically. You can select specifictracks or step through the tracks on the CD.When you search through a CD, searching willcontinue for as long as you keep your fingeron the button. When you lift your finger offthe button, the CD resumes playing.

17
The displays on BeoSound 3000 give
you various types of information.
The upper display gives you specific
information on the CD player only.
Track numbers are always shown and
the number of the playing track is
blinking. As the tracks are played,
the numbers disappear. The lower
display informs you of the source you
have chosen and guides you through
setting up and programming
sequences.
You can switch between different types ofinformation by pressing DISPLAY repeatedlywhen the radio or CD player is switched on.
Three different display settings are availablefor the radio:1 Program name2 Program number3 Radio frequency
Also three display settings are available forthe CD player:1 Name of CD2 Track number3 Elapsed time of current track
Understand and change the displays
The radio station named CLASSIC is playing.
Radio program 3 is playing.
The current radio station is transmitting on FM
frequency 94.6.
TRACK 1 2 3 4 5 6 7 8 9 10 RANDOM
The ten tracks on this CD will be played in
random order.
The name of the CD is MOZART*.
TRACK 1 2 3 4 5 6 7 8 9 10SCAN
The CD is being scanned.
The current track number is 5.
TRACK 1 2 3 4 5 6 7 8 9 10 REPEATCD ED
This edited CD is being repeated.
The current track has been playing for 2 minutes
and 15 seconds.
*NOTE! In order to display CD names, you must
name the CD, see page 21 for further
instructions.

18
Apart from just playing a CD, you
can play tracks on a CD in random
order and also repeat the CD for up
to 12 hours on end. It is also possible
to make the CD player repeat either
a track or just a specific passage on a
CD for up to 12 hours.
You can use the repeat function in
conjunction with the random play
function, which means that the
tracks will be played in a different
order, each time the CD is repeated.
If you use the scan function, the first
15 seconds of each track on the CD
is played.
Playing CDs in different ways
Play tracks in random order
The random play function plays all the trackson the CD in random order.
Repeat a CD
You can play the whole CD over and over forup to 12 hours.
Press RANDOM while
the CD is playing. ON
appears – and
RANDOM is shown in
the upper display
Press RANDOM twice to
cancel the random play
function. OFF appears
Note: If you cancel the random play function while
the CD is playing, all tracks beyond the current
track number will be played in chronological order,
even if they have already been played while the
random play function was activated. The random
function is not cancelled when you switch off
BeoSound 3000.
RANDOMON
RANDOMOFF
Press REPEAT while the
CD is playing. ON
appears – and
REPEAT is shown in the
upper display
Press REPEAT twice to
cancel the repeat
function. OFF appears
Note: If you switch off the BeoSound 3000, or if
you select another source, the repeat function will
also be cancelled.
REPEATON
REPEATOFF
19
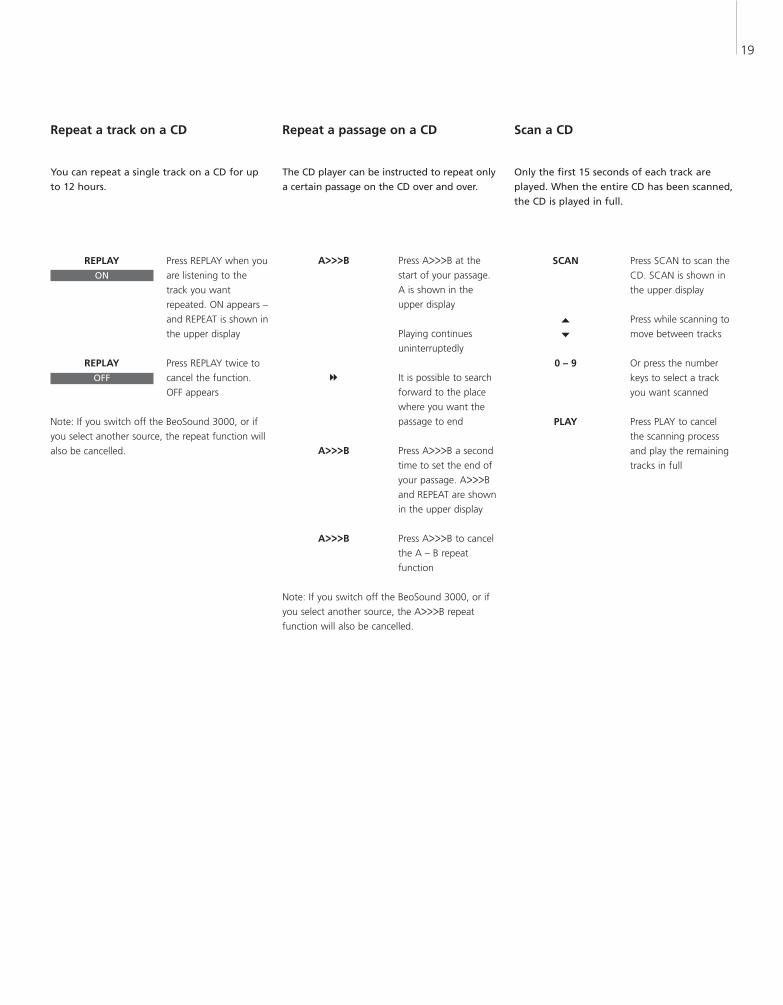
Repeat a track on a CD
You can repeat a single track on a CD for upto 12 hours.
Press REPLAY when you
are listening to the
track you want
repeated. ON appears –
and REPEAT is shown in
the upper display
Press REPLAY twice to
cancel the function.
OFF appears
Note: If you switch off the BeoSound 3000, or if
you select another source, the repeat function will
also be cancelled.
REPLAYON
REPLAY OFF
Repeat a passage on a CD
The CD player can be instructed to repeat onlya certain passage on the CD over and over.
Press A>>>B at the
start of your passage.
A is shown in the
upper display
Playing continues
uninterruptedly
It is possible to search
forward to the place
where you want the
passage to end
Press A>>>B a second
time to set the end of
your passage. A>>>B
and REPEAT are shown
in the upper display
Press A>>>B to cancel
the A – B repeat
function
Note: If you switch off the BeoSound 3000, or if
you select another source, the A>>>B repeat
function will also be cancelled.
A>>>B
tt
A>>>B
A>>>B
Press SCAN to scan the
CD. SCAN is shown in
the upper display
Press while scanning to
move between tracks
Or press the number
keys to select a track
you want scanned
Press PLAY to cancel
the scanning process
and play the remaining
tracks in full
SCAN
�
�
0 – 9
PLAY
Scan a CD
Only the first 15 seconds of each track are played. When the entire CD has been scanned,the CD is played in full.

20
The edit function enables you to
program series of tracks for your
individual CDs and memorise them
permanently. Editing a CD means
that you include or exclude each
track on the CD while scanning it as
described on the previous page. So,
whenever you load such an edited
CD, only the selected tracks will be
played. The selected tracks are
played in numerical order. When you
play an edited CD, only the selected
CD tracks are played, and CD ED
appears in the display. However, you
can still choose to play all the tracks
on the CD.
Play favourite CD tracks only
Play or delete a series of tracks
Once you have edited a CD and selected yourown series of tracks, then every time you playthe CD it starts playing the series of tracks youhave chosen. But you can choose to listen tothe entire CD. You can also delete the seriesof tracks you have made, to always play theCD in full.
Select and store a series of tracks
Before making your own series of tracks youmust start playing the CD. If you do not makea selection of whether to include or excludethe track being played, the track is auto-matically included. If you choose to leave thefunction before you have included or excluded all the tracks on the CD, the remaining tracks will be regarded as excluded.
Press CD to play your
edited series of tracks.
CD ED is shown in the
upper display
To play the entireCD…Press CD-ALL
To delete a series…While the edited CD is
playing, press EDIT to
delete the series. EDIT ?
appears
Press DELETE to delete
the series altogether.
DELETED appears
CD
CD-ALL
EDITEDIT ?
DELETEDELETED
Press EDIT while the CD
is playing. EDIT ?
appears
Press PLAY to start
scanning the CD.
EDITING appears – and
SCAN is shown in the
upper display
Press � to include a
track number in the
series
Press � to exclude a
track number from the
series
EDIT OK ? appears
when the last track has
been included or
excluded
Press PLAY to store the
series. STORED appears,
indicating that your
series is stored
Or, press STORE before
all tracks have been
scanned. EDIT OK ?
appears
Press STORE to store
the series. STORED
appears, indicating that
your series is stored
EDITEDIT ?
PLAYEDITING
�
�
EDIT OK ?
PLAYSTORED
STOREEDIT OK ?
STORESTORED
NOTE! You can make series of tracks for up to
200 different CDs. If you exceed this limit, the
display will read FULL, and you will have to delete
a series of tracks before you can make another.

21
To distinguish between your individual
CDs, you can name them. The name
will then be shown in the display
when you load the CD. You can store
a total of 200 names in your
BeoSound 3000. Each name may
contain up to 8 characters, including
numbers.
Name your CDs
Name a CD
The CD you are naming must be playing in theBeoSound 3000. If the CD has already beennamed, you can change the name or delete it,or you can just leave the function by pressingCD.
Press NAME to access
the naming function.
A is blinking in the first
character position
Press to switch
between characters
Press to move to the
next character
Press STORE to
complete the naming
process. STORE ?
appears
Press STORE* again to
store the name.
STORED appears,
indicating that the
name is stored
*Note: If you press DELETE instead of STORE, only
the name of the CD is deleted.
NAMEA _ _ _ _ _ _
�
�
tt
M _ _ _ _ _ _
STORESTORE ?
STORESTORED
See the list of names
You can call up a list of CD names in thedisplay. When the list is displayed, you candelete the names and any stored series oftracks at the same time.
While any CD is playing
press NAME twice to
access the memory
function. MEMORY
appears briefly, then
the name of the
current CD blinks. If it
has no name, the disc
number, e.g. DISC 1,
appears
Press to list the names
or numbers one by one
Press DELETE to delete
a name and series of
tracks while the
appropriate name is
displayed. DELETE ?
appears
Press DELETE again to
delete the name and
series of tracks.
DELETED appears,
indicating that the
name and series of
tracks are deleted
Press CD to exit the
memory function
Note: The display indicates whether BeoSound
3000 memory is empty, EMPTY, or full, FULL.
NAMENAME
MEMORY
DISC 1
�
�
DELETEDELETE ?
DELETEDELETED
CD

22
Normal maintenance, such as
cleaning the BeoSound 3000, is the
responsibility of the user. To achieve
the best result, please follow the
instructions.
Please make sure to treat the glass
doors with great care. If they crack
or chip, or if they are damaged in
any other way, they should be
replaced immediately as they could
otherwise cause bodily harm. You
can order replacement doors through
a Bang & Olufsen retailer.
Looking after BeoSound 3000
Handling your CDsCleaning BeoSound 3000
Before you clean the BeoSound 3000, werecommend that you disconnect it from themains to prevent the glass doors fromopening and closing. While the BeoSound3000 is disconnected, you can open or closethe glass doors manually. It requires only alittle, gentle force to do so.
Use a soft, dry cloth to wipe dust off theBeoSound 3000.
The glass doors can be removed and cleanedon the inside, if required. To remove the glassdoors, simply grip them tightly, one at a time,while they are open and gently but firmlyunhook them from their four fasteningpoints, pulling outwards. To clean the glassdoors, we recommend that you use a mildwindow cleaner.
Fasten the doors again as described earlier inthis guide. Leave the doors half-way openbefore reconnecting the BeoSound 3000 tothe mains.
Note: Handle CDs with care, if the CD isalways held by its edges and placed in itsoriginal cassette when out of the BeoSound3000, no cleaning will be required.
Should the CD become soiled by fingerprints,dust or dirt, it can be wiped clean with a lint-free, soft, dry cloth. Avoid extreme heat andhumidity, and never write on your CDs.
No solvents or abrasive cleaners should ever be
used on the CD and always wipe the CD in a
straight line from centre to edge.
The program list for TV is now called up. It
provides you with an overview of all your available
TV programs.
NOTE! Do not use alcohol or other solvents to
clean any part of the BeoSound 3000. We do not
recommend using special cleaning CDs in the
BeoSound 3000.

23
Although designed primarily for
close-up operation, the BeoSound
3000 can also be operated from a
distance. The Beo4 remote control
operates all the primary functions in
your BeoSound 3000.
With Beo4, you can switch on or off,
select radio stations or CD tracks. It
is also possible to switch on the
special random and repeated
playback functions in the CD player
as well as adjust the sound.
If your BeoSound 3000 is used
together with other Bang & Olufsen
products, please turn to the User’s
guides delivered with these products
for further explanation.
Using the Beo4 remote control
*NOTE! In order to display the relevant extra
buttons on the Beo4, you must add them to the
Beo4 list of functions:
Add RANDOM and REPEAT to Beo4 to use the
random and repeated play function.
Add A.AUX to be able to switch on any other
source connected to the BeoSound 3000
AUX-socket.
Please refer to Beo4’s own User’s Guide for
information about how to add extra buttons to
the Beo4.
BANG & OLUFSEN
TV LIGHT RADIO
SAT DVD CD
V TAPE RECORD A TAPE
7 8 9
4 5 6
TEXT 0 MENU
1 2 3
LIST EXIT
STOP
GO
Press to switch on the radio
Press to switch on the CD player
Step through your radio programs, or tracks on a
CD. Press � when RANDOM or REPEAT is shown
in the display, to activate the function, and press
� to switch it off when the function is displayed
Use the number buttons to key in the exact radio
program number or CD track number
Search through a CD
Press to pause playback any time
Press to resume playback – the GO button equals
PLAY on the BeoSound 3000 operation panel
Press to display extra buttons or functions*, e.g.
RANDOM or REPEAT*
Press to activate the source or function in the
Beo4 display
To turn the volume up or down, press in the
middle to mute speakers, press again to recall
sound
Switch the BeoSound 3000 to standby
RADIO
CD
�
�
0 – 9
ss tt
STOP
GO
LISTRANDOM
REPEAT
GO
∧
∨
•
24
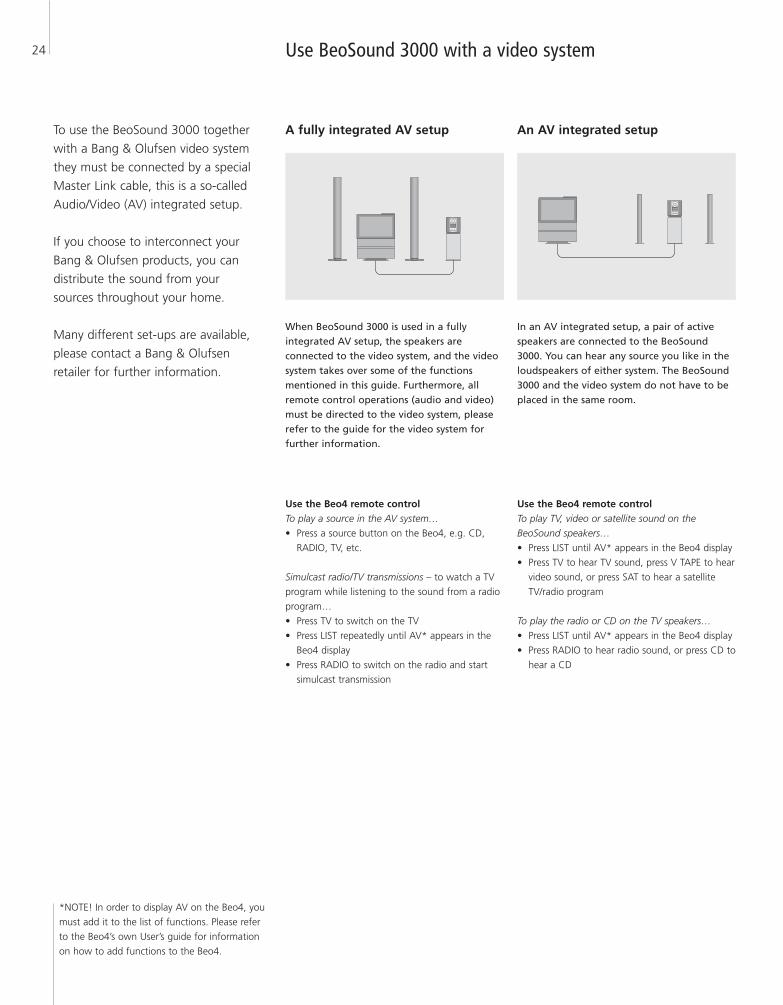
To use the BeoSound 3000 together
with a Bang & Olufsen video system
they must be connected by a special
Master Link cable, this is a so-called
Audio/Video (AV) integrated setup.
If you choose to interconnect your
Bang & Olufsen products, you can
distribute the sound from your
sources throughout your home.
Many different set-ups are available,
please contact a Bang & Olufsen
retailer for further information.
*NOTE! In order to display AV on the Beo4, you
must add it to the list of functions. Please refer
to the Beo4’s own User’s guide for information
on how to add functions to the Beo4.
Use BeoSound 3000 with a video system
A fully integrated AV setup
When BeoSound 3000 is used in a fully integrated AV setup, the speakers are connected to the video system, and the videosystem takes over some of the functions mentioned in this guide. Furthermore, allremote control operations (audio and video)must be directed to the video system, pleaserefer to the guide for the video system forfurther information.
Use the Beo4 remote controlTo play a source in the AV system…
• Press a source button on the Beo4, e.g. CD,
RADIO, TV, etc.
Simulcast radio/TV transmissions – to watch a TV
program while listening to the sound from a radio
program…
• Press TV to switch on the TV
• Press LIST repeatedly until AV* appears in the
Beo4 display
• Press RADIO to switch on the radio and start
simulcast transmission
An AV integrated setup
In an AV integrated setup, a pair of activespeakers are connected to the BeoSound3000. You can hear any source you like in theloudspeakers of either system. The BeoSound3000 and the video system do not have to beplaced in the same room.
Use the Beo4 remote controlTo play TV, video or satellite sound on the
BeoSound speakers…
• Press LIST until AV* appears in the Beo4 display
• Press TV to hear TV sound, press V TAPE to hear
video sound, or press SAT to hear a satellite
TV/radio program
To play the radio or CD on the TV speakers…
• Press LIST until AV* appears in the Beo4 display
• Press RADIO to hear radio sound, or press CD to
hear a CD

25
26
It is your own choice whether or not
to activate the PIN code system.
However, if you choose to activate
the system, your BeoSound 3000 is
protected against theft with a four-
digit PIN code.
The use of a PIN code means that if
your BeoSound 3000 has been
disconnected from the mains for
more than approximately 30 minutes,
the indicator light will flash to show
that the PIN code system is active.
The BeoSound 3000 can only be
activated again by switching it on
and keying in your own personal PIN
code via the close-up operation panel.
If the PIN code is not entered, the
BeoSound 3000 automatically
switches to standby after 3 minutes.
If a wrong PIN code is entered, you
get five attempts to key in the code,
after which the system is switched
off and cannot be switched on for 3
hours.
Should you forget your PIN code,
please contact a retailer who can
assist you in receiving a Master code
from Bang & Olufsen. You need the
Master code to reactivate your
BeoSound 3000.
Set and enter a PIN code
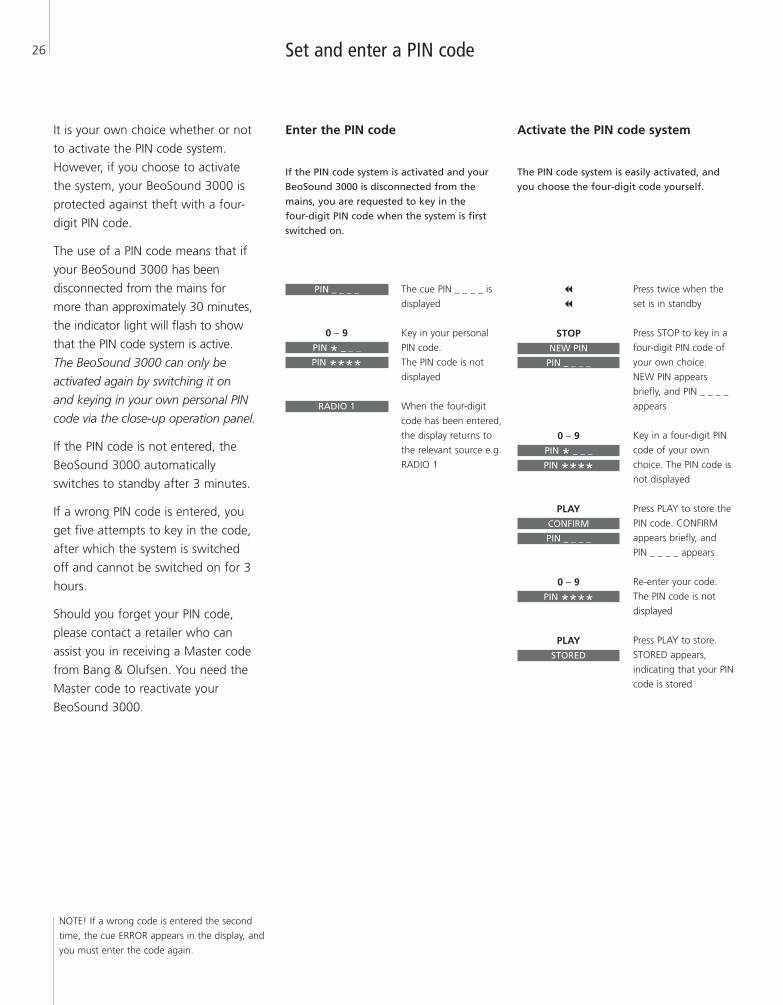
Enter the PIN code
If the PIN code system is activated and yourBeoSound 3000 is disconnected from themains, you are requested to key in the four-digit PIN code when the system is firstswitched on.
Activate the PIN code system
The PIN code system is easily activated, andyou choose the four-digit code yourself.
The cue PIN _ _ _ _ is
displayed
Key in your personal
PIN code.
The PIN code is not
displayed
When the four-digit
code has been entered,
the display returns to
the relevant source e.g.
RADIO 1
PIN _ _ _ _
0 – 9PIN * _ _ _
PIN ****
RADIO 1
Press twice when the
set is in standby
Press STOP to key in a
four-digit PIN code of
your own choice.
NEW PIN appears
briefly, and PIN _ _ _ _
appears
Key in a four-digit PIN
code of your own
choice. The PIN code is
not displayed
Press PLAY to store the
PIN code. CONFIRM
appears briefly, and
PIN _ _ _ _ appears
Re-enter your code.
The PIN code is not
displayed
Press PLAY to store.
STORED appears,
indicating that your PIN
code is stored
ss
ss
STOPNEW PIN
PIN _ _ _ _
0 – 9PIN * _ _ _
PIN ****
PLAYCONFIRM
PIN _ _ _ _
0 – 9PIN ****
PLAYSTORED
NOTE! If a wrong code is entered the second
time, the cue ERROR appears in the display, and
you must enter the code again.

27
Deactivate the PIN code system
You can deactivate the PIN code system at anytime. All you need to do is enter your PINcode first and then you can deactivate thesystem.
If you have forgotten your PIN code
If you have forgotten your PIN code, you mustcontact a retailer who then requests a five-digit Master code from Bang & Olufsen.Once you have keyed in this code, yourBeoSound 3000 is operational again and thePIN code system is deactivated.
Press twice when the
set is in standby
Press STOP to key in
the four-digit PIN code.
PIN _ _ _ _ appears
Key in your personal
PIN code. The PIN code
is not displayed.
NEW PIN ? appears
Press to switch the
display.
PIN OFF appears
Press PLAY to deactivate
the PIN code system.
DELETED appears,
indicating that the PIN
code system is
deactivated
ss
ss
STOPPIN _ _ _ _
0 – 9PIN ****NEW PIN ?
�
�
PIN OFF
PLAYDELETED
Change your PIN code
You can change your PIN code at any time.However, for security reasons it is onlypossible to change the PIN code five timeswithin a period of 3 hours.
Press twice when the
set is in standby
Press STOP to key in
the four-digit PIN code.
PIN _ _ _ _ appears
Key in your personal
PIN code. The PIN code
is not displayed.
NEW PIN ? appears
Press PLAY to enter a
new PIN code.
PIN _ _ _ _ appears
Key in your new PIN
code. The PIN code is
not displayed
Press PLAY to store.
CONFIRM appears
briefly, and PIN _ _ _ _
appears
Re-enter your code.
The PIN code is not
displayed
Press PLAY to store.
STORED appears,
indicating that your
changed PIN code is
stored
ss
ss
STOPPIN _ _ _ _
0 – 9PIN ****NEW PIN ?
PLAYPIN _ _ _ _
0 – 9PIN ****
PLAYCONFIRM
PIN _ _ _ _
0 – 9PIN ****
PLAYSTORED
The cue PIN _ _ _ _ is
displayed
Keep pressed down for
3 seconds to open for
master code input
Key in the five-digit
Master code. DELETED
appears, indicating that
the PIN code system is
deactivated and the set
is ready for use
PIN _ _ _ _
ss
0 – 9DELETED

28

29

30
For your information…
Your needs as a user are given careful consideration during the design and development process of a Bang & Olufsen product and we strive to make our productseasy and comfortable to operate.
Therefore, we hope that you will take thetime to tell us about your experiences withyour Bang & Olufsen product. Anything whichyou consider important – positive or negative– may help us in our efforts to refine our products.
Thank you!
Write to: Bang & Olufsen a/sConsumer Service dept. 7210Peter Bangs Vej 15DK–7600 Struer
or fax: Bang & OlufsenConsumer Service+45 97 85 39 11 (fax.)
or e-mail: [email protected]
Visit our Web-site on…www.bang-olufsen.com
3505767 0501 Printed in Denmark by Bogtrykkergården a-s, Struer
This product fulfils the conditions stated in the
EEU directives 89/336 and 73/23.
The black and yellow label on the compact disc
player serves as a warning that the apparatus
contains a laser system and is classified as a class 1
laser product. In case any difficulties arise with the
compact disc player, please contact a Bang &
Olufsen retailer. The apparatus must be opened by
qualified service personnel only.
CAUTION: The use of any controls, adjustments or
procedures other than those specified herein may
result in hazardous radiation exposure.
NOTE: This equipment has been tested and found
to comply with the limits for a class B digital
device, pursuant to part 15 of the FCC Rules.
These limits are designed to provide reasonable
protection against harmful interference in a
residential installation.
This equipment generates, uses and can radiate
radio frequency energy and, if not installed and
used in accordance with the instructions, may
cause harmful interference to radio commu-
nications. However, there is no guarantee that
interference will not occur in a particular
installation. If this equipment does cause harmful
interference to radio or television reception, which
can be determined by turning the equipment off
and on, the user is encouraged to try to correct
the interference by one or more of the following
measures:
– Reorient or relocate the receiving antenna.
– Increase the separation between the equipment
and receiver.
– Connect the equipment into an outlet on a
circuit different from that to which the receiver
is connected.
– Consult the retailer or an experienced radio/TV
technician for help.
This class B digital apparatus meets all
requirements of the Canadian Interference-
Causing Equipment Regulations.
CLASS 1LASER PRODUCT

www.bang-olufsen.com