Embed Size (px)
Citation preview

BEA
WebLogic Integration™Learning to Use BPM with WebLogic Integration
Release 2.1 Service Pack 1Document Date: January 2002
Copyright
Copyright © 2002 BEA Systems, Inc. All Rights Reserved.
Restricted Rights Legend
This software and documentation is subject to and made available only pursuant to the terms of the BEA Systems License Agreement and may be used or copied only in accordance with the terms of that agreement. It is against the law to copy the software except as specifically allowed in the agreement. This document may not, in whole or in part, be copied photocopied, reproduced, translated, or reduced to any electronic medium or machine readable form without prior consent, in writing, from BEA Systems, Inc.
Use, duplication or disclosure by the U.S. Government is subject to restrictions set forth in the BEA Systems License Agreement and in subparagraph (c)(1) of the Commercial Computer Software-Restricted Rights Clause at FAR 52.227-19; subparagraph (c)(1)(ii) of the Rights in Technical Data and Computer Software clause at DFARS 252.227-7013, subparagraph (d) of the Commercial Computer Software--Licensing clause at NASA FAR supplement 16-52.227-86; or their equivalent.
Information in this document is subject to change without notice and does not represent a commitment on the part of BEA Systems. THE SOFTWARE AND DOCUMENTATION ARE PROVIDED “AS IS” WITHOUT WARRANTY OF ANY KIND INCLUDING WITHOUT LIMITATION, ANY WARRANTY OF MERCHANTABILITY OR FITNESS FOR A PARTICULAR PURPOSE. FURTHER, BEA Systems DOES NOT WARRANT, GUARANTEE, OR MAKE ANY REPRESENTATIONS REGARDING THE USE, OR THE RESULTS OF THE USE, OF THE SOFTWARE OR WRITTEN MATERIAL IN TERMS OF CORRECTNESS, ACCURACY, RELIABILITY, OR OTHERWISE.
Trademarks or Service Marks
BEA, Jolt, Tuxedo, and WebLogic are registered trademarks of BEA Systems, Inc. BEA Builder, BEA Campaign Manager for WebLogic, BEA eLink, BEA Manager, BEA WebLogic Commerce Server, BEA WebLogic E-Business Platform, BEA WebLogic Enterprise, BEA WebLogic Express, BEA WebLogic Integration, BEA WebLogic Personalization Server, BEA WebLogic Portal, BEA WebLogic Server and How Business Becomes E-Business are trademarks of BEA Systems, Inc.
All other trademarks are the property of their respective companies.
Learning to Use BPM with WebLogic Integration
Part Number Date Software Version
N/A January 2002 2.1 Service Pack 1

Contents
About This DocumentPurpose ................................................................................................................ ix
Audience.............................................................................................................. ix
Structure ................................................................................................................x
e-docs Web Site ................................................................................................... xi
How to Print the Document................................................................................. xi
Related Information............................................................................................. xi
Contact Us! ......................................................................................................... xii
Documentation Conventions .............................................................................. xii
1. Introduction to Business Process Management and the Sample Workflows
Overview of the Scenario .................................................................................. 1-2
Overview of the BPM Environment.................................................................. 1-5
Modeling the Scenario in WebLogic Integration .............................................. 1-8
Defining Application Users........................................................................ 1-8
Organizations ...................................................................................... 1-8
Users.................................................................................................... 1-9
Roles.................................................................................................... 1-9
Identifying External Components ............................................................ 1-10
Defining Workflow Objects ..................................................................... 1-12
Nodes and Connections..................................................................... 1-13
Actions .............................................................................................. 1-17
Variables ........................................................................................... 1-17
Exception Handlers ........................................................................... 1-18
Defining Workflow Interfaces ................................................................. 1-18
Business Operations.......................................................................... 1-19
Learning to Use BPM with WebLogic Integration iii

XML Documents............................................................................... 1-20
Event Keys ........................................................................................ 1-21
Working with the Sample Workflows ............................................................. 1-22
Using the Tutorial ............................................................................................ 1-24
2. Getting Started with the WebLogic Integration StudioStarting the WebLogic Integration Studio ......................................................... 2-2
Understanding Workflow Object Relationships................................................ 2-5
Global Objects ............................................................................................ 2-5
Templates and Template Definitions.......................................................... 2-6
Organizations.............................................................................................. 2-6
Importing Workflow Objects: Importing the Tutorial Package File ................. 2-7
Importing the Tutorial.jar Workflow Objects ............................................ 2-8
Using the Folder Tree: Viewing the Order Processing Trigger Template Contents .................................................................................................... 2-13
Viewing a Workflow: Opening the Order Processing Trigger Template Definition.................................................................................................. 2-14
Using the Interface View ................................................................................. 2-15
3. Understanding Workflow Objects and PropertiesAbout the Order Processing Trigger Workflow ................................................ 3-2
Understanding Template Definition Properties ................................................. 3-4
Understanding Variable Properties: Viewing the OrderID Variable................. 3-5
Understanding Start Node Properties ................................................................ 3-7
Understanding Task Node Properties: Viewing the Start Order Processing Task Node................................................................................................... 3-9
About Task States and Actions................................................................. 3-10
About Task Permissions ........................................................................... 3-11
Understanding Workflow Expressions: Viewing the Set Workflow Variable and Assign Task to User Actions ............................................................. 3-12
Posting an Internal XML Event: Editing the Neworder XML Document....... 3-14
Editing the XML Document Structure ..................................................... 3-16
Using the XML Repository: Exporting the Neworder XML Document ......... 3-19
Saving a Template Definition .......................................................................... 3-24
iv Learning to Use BPM with WebLogic Integration

4. Creating a WorkflowOverview of the Order Processing Workflow Design....................................... 4-1
Creating a Template .......................................................................................... 4-4
Creating a Template Definition ......................................................................... 4-5
Drawing the Flow .............................................................................................. 4-6
Placing Shapes............................................................................................ 4-6
Renaming Nodes ........................................................................................ 4-7
Arranging Shapes and Connecting Nodes.................................................. 4-8
Adding a Workflow Label............................................................................... 4-10
Creating an Expression with the Expression Builder............................... 4-11
Activating the Workflow................................................................................. 4-15
Saving the Workflow....................................................................................... 4-16
5. Defining Workflow NodesOverview of the Order Processing Workflow Nodes........................................ 5-2
Creating an Event-Triggered Start..................................................................... 5-5
Creating Variables...................................................................................... 5-6
Defining the Start Node Event ................................................................... 5-9
Defining XPath Statements ...................................................................... 5-10
Sending an XML Message to a Worklist User: Defining the Check Customer Credit Task............................................................................... 5-19
Assigning a Task to a User....................................................................... 5-19
Sending an XML Message to a Client ..................................................... 5-21
Adding the Send XML to Client Action ........................................... 5-24
Defining the XML Document Structure ........................................... 5-25
Assigning the Callback Variable....................................................... 5-27
Marking the Task Done..................................................................... 5-27
Testing for Equality: Defining the Check Credit Decision ............................. 5-29
Adding a Task and Workflow Comment: Defining the Contact Customer Task .......................................................................................................... 5-30
Setting a Workflow Variable.................................................................... 5-30
Setting a Workflow Comment.................................................................. 5-31
Setting a Task Comment .......................................................................... 5-32
Assigning a Task to a Role....................................................................... 5-34
Marking the Task Done............................................................................ 5-35
Learning to Use BPM with WebLogic Integration v

Creating and Performing a Business Operation: Defining the Check Inventory Task.......................................................................................... 5-36
Creating a Business Operation ................................................................. 5-37
Viewing the Create OrderBean Business Operation ......................... 5-38
Creating the Check Inventory Business Operation ........................... 5-39
Performing a Business Operation............................................................. 5-41
Performing the Create OrderBean Business Operation..................... 5-42
Performing the Check Inventory Business Operation....................... 5-44
Marking the Task Done............................................................................ 5-45
Testing for Inequality: Defining the Check Inventory Decision ..................... 5-46
Creating an Event: Defining the Wait for New Inventory Event .................... 5-48
Configuring an Event Key........................................................................ 5-50
Defining an Event..................................................................................... 5-52
Calling a Sub-Workflow: Defining the Start Order Fulfillment Task ............. 5-54
Creating the OrderTotalPrice Variable..................................................... 5-55
Starting a Called Workflow...................................................................... 5-55
Defining Input Parameters........................................................................ 5-56
Defining Result Variables ........................................................................ 5-58
Marking the Task Done..................................................................... 5-60
Sending an E-mail Message: Defining the Confirm Order Fulfillment Task.. 5-60
Cancelling an Event.................................................................................. 5-61
Setting the Workflow Variable................................................................. 5-62
Setting the Workflow Comment............................................................... 5-62
Sending an E-mail Message ..................................................................... 5-63
Marking the Task Done ............................................................................ 5-66
Creating an Event: Defining the Watch for Cancellation Event...................... 5-67
Defining the Event.................................................................................... 5-69
6. Using a Custom Exception HandlerOverview of the Order Fulfillment Workflow................................................... 6-1
About the Exception Handlers........................................................................... 6-3
Viewing the Generate Invoice Task .................................................................. 6-5
Viewing the Calculate Total Price Business Operation..................................... 6-6
Defining a Custom Exception Handler: Viewing the Bad Data to OrderBean Exception Handler ................................................................... 6-9
vi Learning to Use BPM with WebLogic Integration

About Exception Handler Actions ........................................................... 6-10
Viewing the Evaluate Condition Action.......................................................... 6-12
Viewing the Send XML to Client Action........................................................ 6-13
7. Executing and Monitoring the Example WorkflowsExecuting the Workflows in the Worklist Application ..................................... 7-2
Logging On to the Worklist Application.................................................... 7-2
Starting the Sample Workflows ................................................................. 7-5
Executing the Order Processing Workflow Tasks ..................................... 7-8
Executing the Order Fulfillment Workflow Tasks..................................... 7-9
Monitoring the Running Workflows in the Studio.......................................... 7-11
Learning to Use BPM with WebLogic Integration vii

viii Learning to Use BPM with WebLogic Integration

About This Document
Purpose
This document serves as a tutorial for working with business process management (BPM) in WebLogic Integration. It steps you through the WebLogic Integration Studio and Worklist applications, using three workflow examples to describe the process of defining and executing workflows based on a simple sales order scenario. The three workflows, Order Processing Trigger, Order Processing, and Order Fulfillment, are contained in the Tutorial.jar package file provided in the bea/wlintegration2.1/samples/bpm_tutorial folder of your installation.
We hope that by following the procedures provided in this tutorial, you will learn many of the basic concepts of the business process management component of WebLogic Integration and will be able to use most of the Studio’s functions. However, the document is not a reference or a user guide and therefore does not describe all the features of the Studio or Worklist. For more information on any particular subject addressed in this document, see Using the WebLogic Integration Studio and Using the WebLogic Integration Worklist.
Audience
This document is for users such as business analysts and workflow designers, who use the WebLogic Integration Studio to define and administer workflows. It is addressed to both technical and nontechnical users alike.
Learning to Use BPM with WebLogic Integration ix

This document assumes some familiarity with the Java 2 Enterprise Edition (J2EE) platform, Enterprise JavaBeans, BEA WebLogic Server, eXtensible Markup Language (XML), and XPath language.
Structure
This document is organized as follows:
Chapter 1, “Introduction to Business Process Management and the Sample Workflows,” provides an overview of the tutorial scenario and example workflows, as well as an introduction to business process management and workflow concepts.
Chapter 2, “Getting Started with the WebLogic Integration Studio,” provides an introduction to the Studio user interface and gives procedures for importing the tutorial package file.
Chapter 3, “Understanding Workflow Objects and Properties,” uses the Order Processing Trigger workflow to demonstrate the use of WebLogic Integration workflow objects and provides some hands-on experience with editing a previously-defined workflow.
Chapter 4, “Creating a Workflow,” takes you through procedures for creating and setting up the Order Processing workflow.
Chapter 5, “Defining Workflow Nodes,” provides step-by-step procedures for defining all the objects contained in the Order Processing workflow, from start to finish.
Chapter 6, “Using a Custom Exception Handler,” uses the Order Fulfillment workflow to introduce one of the Studio’s advanced features.
Chapter 7, “Executing and Monitoring the Example Workflows,” provides procedures for running the example workflows in the Worklist application and simultaneously monitoring the progress of those workflows in the Studio.
x Learning to Use BPM with WebLogic Integration

e-docs Web Site
BEA product documentation is available on the BEA corporate Web site. From the BEA Home page, click on Product Documentation or go directly to the “e-docs” Product Documentation page at http://e-docs.beasys.com.
How to Print the Document
You can print a copy of this document from a Web browser, one file at a time, by using the File—>Print option on your Web browser.
A PDF version of this document is available on the WebLogic Integration documentation Home page on the e-docs Web site (and also on the documentation CD). You can open the PDF in Adobe Acrobat Reader and print the entire document (or a portion of it) in book format. To access the PDFs, open the WebLogic Integration documentation Home page, click the PDF files button, and select the document you want to print.
If you do not have the Adobe Acrobat Reader, you can get it for free from the Adobe Web site at http://www.adobe.com/.
Related Information
The following WebLogic Integration documents contain more information on the BPM component of WebLogic Integration:
n Using the WebLogic Integration Studio
n Using the WebLogic Integration Worklist
n Programming BPM Client Applications
n Programming BPM Plug-Ins for WebLogic Integration
Learning to Use BPM with WebLogic Integration xi

Contact Us!
Your feedback on the WebLogic Integration documentation is important to us. Send us e-mail at [email protected] if you have questions or comments. Your comments will be reviewed directly by the BEA professionals who create and update the WebLogic Integration documentation.
In your e-mail message, please indicate which release of the WebLogic Integration documentation you are using.
If you have any questions about this version of WebLogic Integration worklist, or if you have problems installing and running the worklist, contact BEA Customer Support through BEA WebSupport at www.beasys.com. You can also contact Customer Support by using the contact information provided on the Customer Support Card, which is included in the product package.
When contacting Customer Support, be prepared to provide the following information:
n Your name, e-mail address, phone number, and fax number
n Your company name and company address
n Your machine type and authorization codes
n The name and version of the product you are using
n A description of the problem and the content of pertinent error messages
Documentation Conventions
The following documentation conventions are used throughout this document.
Convention Item
Ctrl+Tab Indicates that you must press two or more keys simultaneously.
italics Indicates emphasis or book titles.
xii Learning to Use BPM with WebLogic Integration

monospace text
Indicates code samples, commands and their options, data structures and their members, data types, directories, and filenames and their extensions. Monospace text also indicates text that you must enter from the keyboard.
Examples:
#include <iostream.h> void main ( ) the pointer psz
chmod u+w *
\tux\data\ap
.doc
tux.doc
BITMAP
float
monospace italic text
Identifies variables in code.
Example:
String expr
UPPERCASE TEXT
Indicates device names, environment variables, and logical operators.
Examples:
LPT1
SIGNON
OR
{ } Indicates a set of choices in a syntax line. The braces themselves should never be typed.
[ ] Indicates optional items in a syntax line. The brackets themselves should never be typed.
Example:
buildobjclient [-v] [-o name ] [-f file-list]... [-l file-list]...
| Separates mutually exclusive choices in a syntax line. The symbol itself should never be typed.
Convention Item
Learning to Use BPM with WebLogic Integration xiii

... Indicates one of the following in a command line:
n That an argument can be repeated several times in a command line.
n That the statement omits additional optional arguments.
n That you can enter additional parameters, values, or other information.
The ellipsis itself should never be typed.
Example:
buildobjclient [-v] [-o name ] [-f file-list]... [-l file-list]...
.
.
.
Indicates the omission of items from a code example or from a syntax line. The vertical ellipsis itself should never be typed.
Convention Item
xiv Learning to Use BPM with WebLogic Integration

CHAPTER
1 Introduction to Business Process Management and the Sample Workflows
The example workflows documented in this tutorial, which are contained in the Tutorial.jar file provided in the bea/wlintegration2.1/samples/bpm_tutorial folder, illustrate many of the most commonly-used business process management (BPM) features of WebLogic Integration. They do not represent a real-world implementation, but present a highly simplified scenario that allows you to gain experience running the two client applications provided for business process management: the Studio (design environment) and the Worklist (run-time environment).
This overview provides the context for the example workflows so that you can gain a picture of the entire puzzle before you begin to piece it together in the remaining sections of the tutorial. Specifically, this section includes the following:
n “Overview of the Scenario” provides the functional requirements of the workflows by describing the underlying business logic. A flowchart is used to illustrate the processes involved.
n “Overview of the BPM Environment” describes the application context of the business management component so that you can more clearly situate the role of a workflow among the many application components that it serves to integrate.
Learning to Use BPM with WebLogic Integration 1-1

1 Introduction to Business Process Management and the Sample Workflows
n “Modeling the Scenario in WebLogic Integration” provides an introduction to the external components, internal objects, and interfaces that you will work with in the sample workflows. We discuss both the components that might be used in a real-world implementation and how these components are actually implemented or simulated in the examples.
n Finally, “Working with the Sample Workflows” and “Using the Tutorial” provide practical information for working with the installed example files and the tutorial itself.
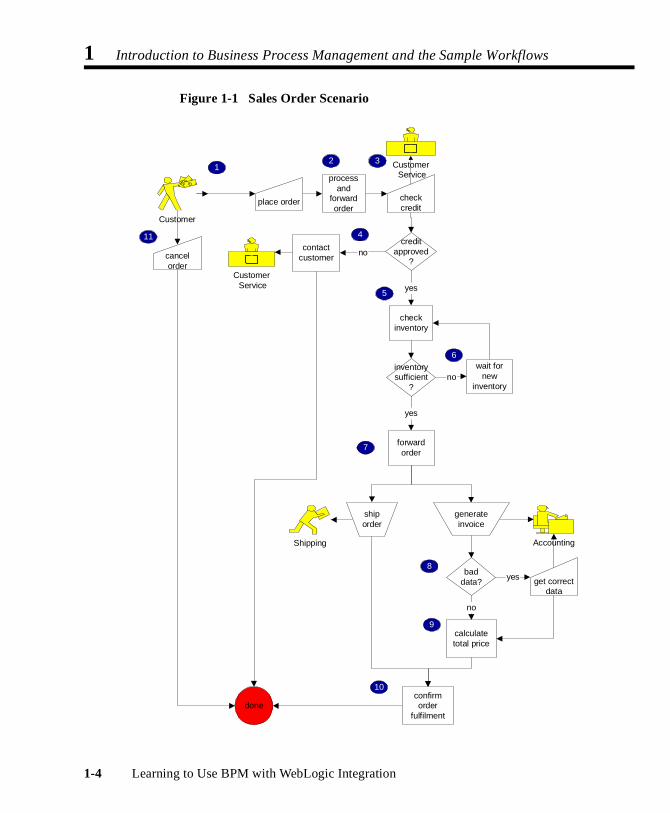
Overview of the Scenario
Our example workflows are loosely based on a generic Web-based sales order scenario. Once the order has been received, the workflows control the processing and fulfillment of the order, as it passes through the stages of approval, inventory checking, shipping, and invoicing. The following narrative describes the processes and data that make up the scenario:
1. A customer submits an order for goods to CDExpress, a music retailer, through an online mechanism such as a browser-based order form. The customer supplies his or her name, the appropriate e-mail address, the state to which the order will be shipped, the desired items (IDs and names), and the requested quantities.
2. The order is received by a processing system, which reads the data and appends an ID number to the order.
3. The order is forwarded to a customer service representative, who checks the customer’s credit information.
4. If the credit check fails, the customer service representative is assigned the task of notifying the customer to obtain correct credit information, and the process becomes manual from this point on.
5. If the credit check passes, the system checks a database for the current inventory of the ordered item, according to the item ID, and it compares the quantity of items available with the quantity requested.
1-2 Learning to Use BPM with WebLogic Integration

Overview of the Scenario
6. If the amount of stock is not sufficient to accommodate the order, the order is placed on hold until new inventory arrives. When the system receives notice of new incoming inventory, it repeats step 5 until it can verify that the inventory is sufficient to process the order.
7. If the inventory is sufficient, the order is forwarded simultaneously to a shipping agent who arranges shipment, and an accounting agent who instructs the system to generate an invoice for the order.
8. If the system encounters an error in processing the input necessary to calculate the total price for the invoice, including state sales tax, the accounting agent who initiated the billing process is notified and prompted to provide the correct information.
9. The system calculates the total price of the order.
10. The system confirms that the order has been shipped and notifies the customer via e-mail.
11. At any point in the transaction before shipping, the order can be cancelled by notification from the customer.
To get an idea of what our workflow will look like, we can sketch out a preliminary flowchart, as shown in the following figure. The numbered sections correspond to the steps in the preceding procedure.
Learning to Use BPM with WebLogic Integration 1-3
1 Introduction to Business Process Management and the Sample Workflows
Figure 1-1 Sales Order Scenario
place order
cancelorder
$ $$
Customer
1process
andforwardorder
2 3
done
checkcredit
Customer Service
creditapproved
?
contactcustomer
no
yes
4
5
Customer Service
checkinventory
nowait for
newinventory
inventorysufficient
?
yes
8
forwardorder
shiporder
Shipping Accounting
get correctdata
calculatetotal price
confirmorder
fulfilment
generateinvoice
baddata?
no
yes
6
7
9
10
11
1-4 Learning to Use BPM with WebLogic Integration

Overview of the BPM Environment
Overview of the BPM Environment
Although you can use a Studio workflow to perform certain business processes directly—such as sending e-mail to a client, or assigning a manual task to a Worklist user—mostly you design workflows to integrate external software components, while the workflow definition serves to control the sequence in which these external program modules are invoked. Thus, before you can begin to draw a workflow, you should identify the external components, such as Enterprise JavaBeans, Java classes, or other applications with which you will need to interface.
To help identify the external components that we will need for our scenario, let us first review the role of WebLogic Integration in relation to WebLogic Server and the middle tier of a Java 2 Enterprise Edition (J2EE) model-view-controller multitier application. The following figure locates the WebLogic Integration server in relation to the other components needed to implement our scenario in a distributed J2EE/WebLogic Server application.
Figure 1-2 WebLogic Integration BPM Environment
DBMS
Client Tier Back-end Tier
EnterpriseJavaBean
JavaServlet
JSP
Middle Tier: WebLogic Server
Web Layer
WebLogicIntegration BPM
Business Logic Layer
JavaClass
JMSTopic/Queue
JMSTopic/Queue
Workflow
Applet
XML XML
Otherapplications
HTML
Learning to Use BPM with WebLogic Integration 1-5

1 Introduction to Business Process Management and the Sample Workflows
As the figure shows, BPM operates at the business-logic layer of the J2EE framework. This means that a workflow directly integrates business objects, such as Java classes and Enterprise JavaBeans (EJBs), while for communication with other components or applications, it exchanges eXtensible Markup Language (XML) messages via the intermediary of the Java Message Service (JMS).
In fact, the entire front-end application, which receives and formats input from an external client, is not represented in a BPM workflow. Rather, it is at the point where the Web components need to interact with the EJB layer that the workflow takes control of processing. Thus, a common way for a workflow to be started is to be triggered by an external event, namely the arrival of the appropriate XML document on a JMS topic, as pictured in the figure.
According to this framework, the order-placement process of our scenario is not normally captured in a BPM workflow. It is, however, simulated for the purposes of this tutorial. (See “Working with the Sample Workflows” for more information.) Rather, the start of the workflow would be the point at which the order is passed on for processing, as depicted in the following figure.
Figure 1-3 Sales Order Scenario: Start Mechanism
Let us redraw our scenario flowchart, then, so it shows, more accurately, the starting point of the workflow and the extra step that is needed to intercept a cancellation notice.
Client Tier
JSP
Web Tier
Applet Servlet
Order Placement (and Cancellation)
start workflow
Order Processing and Fulfillment
EJB Tier
JMSQueue XML
WebLogicIntegration
HTML
1-6 Learning to Use BPM with WebLogic Integration

Overview of the BPM Environment
Figure 1-4 Sales Order Scenario: Start and Finish
start
done
watch forcancellation
place order
cancelorder
$ $$
Customer
processand
forwardorder
checkcredit
Customer Service
creditapproved
?
contactcustomer No
yes
Customer Service
checkinventory
Nowait for
newinventory
inventorysufficient
?
Yes
forwardorder
shiporder
confirmorder
fulfillment
Shipping Accounting
get correctdata
calculatetotal price
generateinvoice
baddata?
no
yes
Learning to Use BPM with WebLogic Integration 1-7

1 Introduction to Business Process Management and the Sample Workflows
Modeling the Scenario in WebLogic Integration
Having defined the scenario and reviewed the WebLogic Integration BPM environment, we now need to determine how we will map the real-world processes and entities in the scenario to the workflow modeling constructs provided by the WebLogic Integration Studio. To do so, we must identify:
n The users of the application
n External components we need to invoke from our workflow to perform the application’s work
n Various workflow objects we need to implement our scenario
n Interfaces required for the workflow to interact with external applications
Each of these modeling tasks is discussed in the following sections.
Defining Application Users
Before we actually model the workflows, we first need to define the system in terms of the real-world agents who will interact with it. The Studio provides three constructs to define context of use: organizations, users, and roles. The following sections describe these constructs and explain how they are used in the tutorial scenario.
Organizations
An organization represents a company or site location. Organizations are business process management-specific constructs which you create in the Studio, and do not correspond to any users or groups defined in WebLogic Server. However, users can be associated with an organization, and roles (see “Roles”) are defined within one. Workflows may be associated with a single, or with multiple organizations.
The organization for our scenario is CDExpress, which has been predefined for you.
1-8 Learning to Use BPM with WebLogic Integration

Modeling the Scenario in WebLogic Integration
Users
These are users of the Studio and Worklist client applications, and are defined in a WebLogic Server security realm. Users may be created in the Studio, and should be associated with at least one default organization. Although users can access workflows associated with any organizations, they can only execute workflows within the organization(s) to which they have been assigned. Users may also be associated with roles (see “Roles”).
Our organization, CDExpress, includes three of the default users that are shipped with the Studio: joe, mary, and admin.
For complete information about users and permissions, see “Maintaining Users” in “Administering Data” in Using the WebLogic Integration Studio.
Roles
A role represents the generic business function that a user may perform, independent of his or her individual user account. For example, a role may be a department, or a job description or title. In our scenario, roles correspond to the customer service representative, accounting, and shipping roles.
Roles are contained within an organization, so that each organization has a unique set. Roles must be mapped to groups that have been configured on WebLogic Server, although you can automatically create a WebLogic Server group when you create a role in the Studio.
Finally, roles can have one-to-one, one-to-many, or many-to-one associations with users. That is, one user might take on several roles, while one role may be filled by several users.
The CDExpress organization contains the following roles, mappings, and member users, all of which have been predefined for you.
Learning to Use BPM with WebLogic Integration 1-9

1 Introduction to Business Process Management and the Sample Workflows
For complete information about roles and permissions, see “Maintaining Roles” in “Administering Data” in Using the WebLogic Integration Studio.
Identifying External Components
In the case of our scenario, we can identify the following Web and back-end components which we need to integrate in our workflow to accomplish the work we want to perform:
n A servlet that would process the order or cancellation request from the front-end application used by the customer
n A session EJB that would provide the method for calculating the total price of the order, and for checking inventory in a database
n An enterprise application that would report the arrival of new inventory for the ordered item
Without explaining the details of how a workflow interfaces with external components for now (which is discussed in “Defining Workflow Interfaces”), the following figure locates the points in our preliminary workflow at which external components are required.
Table 1-1 Default CDExpress Roles, Groups, and Member Users
Role Maps to WebLogic Server Group Member Users
CustomerService CustomerServiceCDE admin
Accounting AccountingCDE admin
joe
Shipping ShippingCDE admin
mary
1-10 Learning to Use BPM with WebLogic Integration

Modeling the Scenario in WebLogic Integration
Figure 1-5 Sales Order Scenario: External Components
EJB
EJB
Application
5
3
done
DBMS
DBMS
4
process andforward order
check credit
Customer Service
creditapproved?
contactcustomer
No
yesCustomer Service
checkinventory
Nowait for new
inventoryinventorysufficient?
Yes
forwardorder
shiporder
confirm orderfulfillment
Shipping Accounting
get correctdata
calculatetotal price
generateinvoice
baddata?
no
yes
Servlet
Servlet1
2
start
watch forcancellation
placeorder
cancelorder
$$$
Customer
Learning to Use BPM with WebLogic Integration 1-11
1 Introduction to Business Process Management and the Sample Workflows
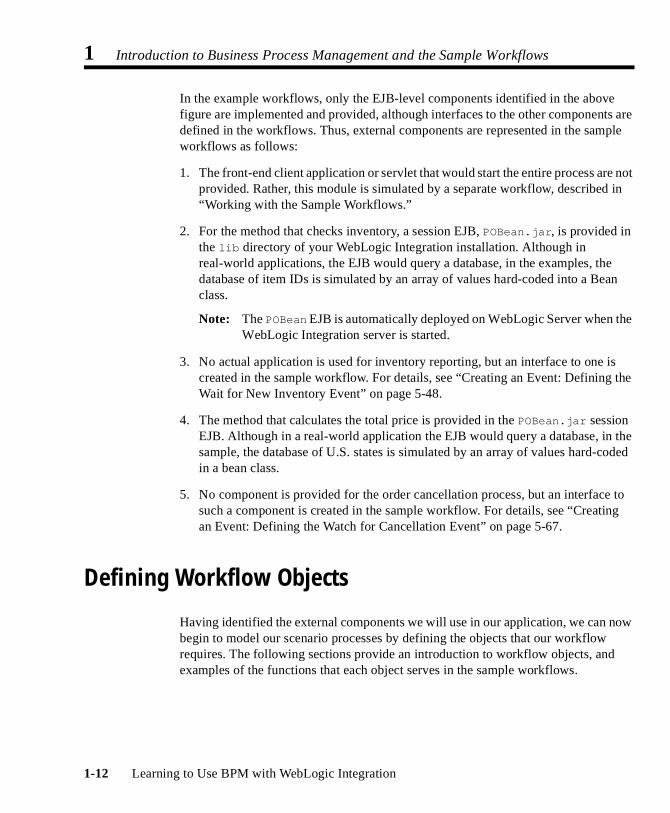
In the example workflows, only the EJB-level components identified in the above figure are implemented and provided, although interfaces to the other components are defined in the workflows. Thus, external components are represented in the sample workflows as follows:
1. The front-end client application or servlet that would start the entire process are not provided. Rather, this module is simulated by a separate workflow, described in “Working with the Sample Workflows.”
2. For the method that checks inventory, a session EJB, POBean.jar, is provided in the lib directory of your WebLogic Integration installation. Although in real-world applications, the EJB would query a database, in the examples, the database of item IDs is simulated by an array of values hard-coded into a Bean class.
Note: The POBean EJB is automatically deployed on WebLogic Server when the WebLogic Integration server is started.
3. No actual application is used for inventory reporting, but an interface to one is created in the sample workflow. For details, see “Creating an Event: Defining the Wait for New Inventory Event” on page 5-48.
4. The method that calculates the total price is provided in the POBean.jar session EJB. Although in a real-world application the EJB would query a database, in the sample, the database of U.S. states is simulated by an array of values hard-coded in a bean class.
5. No component is provided for the order cancellation process, but an interface to such a component is created in the sample workflow. For details, see “Creating an Event: Defining the Watch for Cancellation Event” on page 5-67.
Defining Workflow Objects
Having identified the external components we will use in our application, we can now begin to model our scenario processes by defining the objects that our workflow requires. The following sections provide an introduction to workflow objects, and examples of the functions that each object serves in the sample workflows.
1-12 Learning to Use BPM with WebLogic Integration

Modeling the Scenario in WebLogic Integration
Nodes and Connections
Nodes are the major building blocks with which you construct your workflow and demarcate business processes. Connections form the transitions between nodes. Seven types of nodes can be used to capture the different requirements of a business scenario, as described in the following table.
Table 1-2 WebLogic Integration Studio Nodes
Functional Requirement Typically Modeled by
Studio Shape
Specify work to be performed by humans or software.
Task node
Delimit the boundaries of a process. Start node
Done node
Specify the order in which work is to be performed: in sequence or parallel.
Connections
AND node
OR node
Specify a repeated course of action or a backtrack to a previous step (looping).
Connections
Learning to Use BPM with WebLogic Integration 1-13

1 Introduction to Business Process Management and the Sample Workflows
Normally the completion of one node causes the successor nodes to be activated in a sequential manner, unless the flow is overridden by a particular action (see “Actions” for a description).
Events represent a special type of node in that they function as wait states within a workflow. Although an event is activated by the completion of a predecessor node, it is triggered asynchronously by the arrival of an XML document for which the event has been configured to listen. XML messages may be received from external applications via an external JMS queue, or from other workflows via an internal JMS queue.
Note: Event nodes can also be triggered by plug-in-defined events, which can use a mechanism other than XML on JMS. For more information about programming plug-ins, see Programming BPM Plug-Ins for WebLogic Integration.
In our sample workflows, in addition to the required start, task, and done nodes, we also use:
n Decision nodes to specify alternative courses of action, depending on whether the credit check passes, and whether the inventory is sufficient
n Event nodes to wait for new inventory and watch out for a cancellation from the customer
n An AND node to ensure that both shipping and invoicing tasks are completed before the order completion notice is sent out
Specify an alternative course of action as the result of a decision.
Decision node
Specify an alternative course of action as the result of an external or ad hoc event.
Event node
Table 1-2 WebLogic Integration Studio Nodes
Functional Requirement Typically Modeled by
Studio Shape
1-14 Learning to Use BPM with WebLogic Integration
Modeling the Scenario in WebLogic Integration
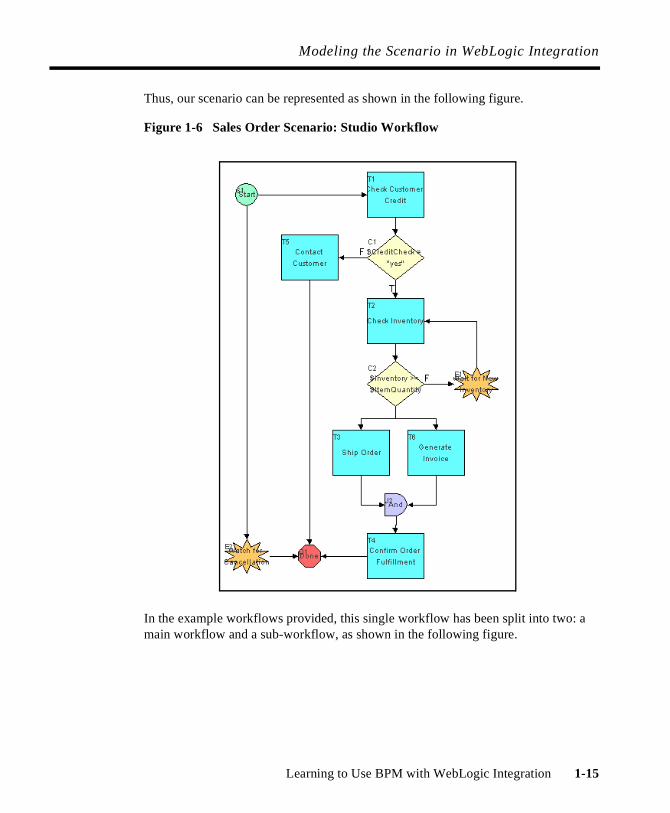
Thus, our scenario can be represented as shown in the following figure.
Figure 1-6 Sales Order Scenario: Studio Workflow
In the example workflows provided, this single workflow has been split into two: a main workflow and a sub-workflow, as shown in the following figure.
Learning to Use BPM with WebLogic Integration 1-15

1 Introduction to Business Process Management and the Sample Workflows
Figure 1-7 Sales Order Scenario: Main Workflow and Sub-Workflow
As the figure shows, an additional node is used in the main workflow to call the sub-workflow.
We draw nodes in Chapter 4, “Creating a Workflow,” and define them in Chapter 5, “Defining Workflow Nodes.”
task node calls sub-workflow
Main Workflow: Order Processing
Sub-workflow: Order Fulfillment
1-16 Learning to Use BPM with WebLogic Integration

Modeling the Scenario in WebLogic Integration
Actions
An action is the basic unit of work that you use to construct a workflow. The Studio provides 28 types of actions which perform different operations, ranging from assigning manual tasks to Worklist users, to controlling the overall program flow, and integrating and communicating with external components.
Note: The default catalog of actions can be extended through the use of a plug-in. For more information about programming plug-ins, see Programming BPM Plug-Ins for WebLogic Integration.
Actions are not represented visually within the workflow, but are specified within a node—usually a task node, although actions can be specified in starts, decisions, events, exception handlers (see “Exception Handlers”), and even other actions.
Some of the actions used in the sample workflows include:
n Assigning the credit approval and shipping tasks to Worklist users
n Calling the POBean EJB to check inventory and calculate the total price of the order
n Sending e-mail to the customer
We work extensively with actions throughout this tutorial.
Variables
A variable is a container in which a workflow can store a value, whether it is text, numbers, dates, or even references to Java objects and EJBs. When you define a workflow template, you can create any number of variables. Over a workflow’s lifetime, the value of any variable can change.
Typically, variables represent real-world data items that are gathered by the workflow at run time. They are populated by values that can be returned by business operations (see “Defining Workflow Interfaces”), extracted from XML documents, or explicitly set by workflow actions. Variables can also be used for several purposes by a workflow, such as evaluating a condition in a decision node, or storing the result of a Worklist user response to an XML message.
In the sample workflows we use variables for various functions, including the following:
Learning to Use BPM with WebLogic Integration 1-17

1 Introduction to Business Process Management and the Sample Workflows
n To represent the customer name, ID, e-mail, address, phone number, and state, and the item ID, name, and quantity
n To store the result of the Worklist user’s response to the credit approval request
n To store the result of the inventory-checking procedure
We create variables throughout Chapter 4, “Creating a Workflow.”
Exception Handlers
WebLogic Integration provides a system exception handler that it uses by default for all workflow instances, or running workflows. In cases where an exception occurs at run time, the system exception handler rolls back the active transaction and rethrows the exception.
You can also set up custom exception handlers for a workflow, in which you define specific actions for the exception handler to perform upon rolling back or committing the transaction.
We define and invoke an exception handler that can handle the possibility of invalid data being passed to the calculate() method of the POBean in Chapter 6, “Using a Custom Exception Handler.”
Defining Workflow Interfaces
Our scenario and workflow design call for our workflow to interface with the following hypothetical and actual components and applications:
n The Worklist client used by the customer service, accounting, and shipping agents
n The EJB that provides inventory-checking and price-calculation methods
n Server-side components, such as servlets, in the front-end Web application with which the customer interacts
n A back-end inventory-reporting application
n An e-mail client to which a confirmation message may be sent
1-18 Learning to Use BPM with WebLogic Integration

Modeling the Scenario in WebLogic Integration
The following figure shows the various means by which a workflow interfaces with external components.
Figure 1-8 Interfacing with External Components and Applications
The following sections describe these interfaces in more detail.
Business Operations
To call a Java class or Enterprise JavaBean method from a workflow, you create a business operation. When you perform a business operation, you can pass workflow variable values as input parameters to EJB or Java object methods, which can then return values back to the workflow variables.
EnterpriseJavaBean
JavaServlet
WebLogic Integration Server
Java Class
ExternalJMSQueue
WorkflowXML Other
applications
WebLogicIntegration
Client
Email Client
InternalJMSQueue
XML
Workflow
XML
BusinessOperations
Eventkey
ExternalJMSTopicXML
Learning to Use BPM with WebLogic Integration 1-19

1 Introduction to Business Process Management and the Sample Workflows
In the sample workflows we use business operations to:
n Call the checkInventory() method of the POBean to perform the inventory-checking task
n Call the calculate() method of the POBean to perform the total-price calculation task
n Call the create() method of the POBean to create an instance of the bean on the WebLogic Integration server at run time
We will define and perform a business operation in Chapter 4, “Creating a Workflow.”
XML Documents
To interact, in an asynchronous fashion, with other types of server-side components such as servlets or back-end applications, a WebLogic Integration workflow shares data via XML documents that are published to JMS topics or queues and received from JMS queues.
In fact, even to exchange information between multiple workflows in an asynchronous fashion, the WebLogic Integration server uses XML documents posted to an internal topic. And although communication between the workflow and the Worklist client is accomplished via the WebLogic Integration Application Programming Interface (API), in many cases requests and responses take the form of an XML document.
Note: For information about the WebLogic Integration API, see Programming BPM Client Applications and the BEA WebLogic Integration Javadoc.
Thus, to communicate with many of the external and even internal components in our workflows, we will need to compose and send XML messages to either a Worklist client user, or an external or internal topic or queue. XML elements and attributes correspond to workflow variables for which values are provided at run time. We use outgoing XML documents in the sample workflows for the following purposes:
n To substitute for the XML document which would be sent by a front-end Web application to trigger the order-processing application
n To prompt a Worklist user to provide the result of the credit check
n To prompt a Worklist user to provide correct data for the state to which the order is to be shipped
1-20 Learning to Use BPM with WebLogic Integration

Modeling the Scenario in WebLogic Integration
XML documents may be embedded within specific workflows, depending on the action that you use to reference them. However, you can also export and import them to and from the XML repository, which stores XML documents, document type definitions (DTDs), and other XML entities outside of a workflow definition, so that you can access documents created in one workflow for reuse by another. We will compose, export, and import XML documents to and from the repository in “Using the XML Repository: Exporting the Neworder XML Document” on page 3-19 and “Defining XPath Statements” on page 5-10.
Event Keys
When you define a workflow event to listen for incoming XML documents, you specify the document type or root element of the document that the event is expecting. To filter incoming XML documents so that only those containing particular element or attribute values can trigger the event, you can specify an event key. The event key identifies the document type and element value that is to be extracted from the XML document via an XPath expression. The event key is stored in a table so that at run time, the server’s event processor compares the value returned from the XML document with the value of a key specified by the event node; if a match is found, the event is triggered. The mechanism is explained in more detail in “Creating an Event: Defining the Wait for New Inventory Event” on page 5-48.
Examples of event keys used in our workflows include event keys for recognizing an XML message sent to:
n Notify that the customer has cancelled the order
n Report the arrival of new inventory
We define event keys and XPath expressions throughout Chapter 4, “Creating a Workflow.”
Learning to Use BPM with WebLogic Integration 1-21

1 Introduction to Business Process Management and the Sample Workflows
Working with the Sample Workflows
In the sample workflows provided for business process management, our scenario is implemented as three workflows: a main workflow, a sub-workflow, and a trigger workflow that is included for use with the tutorial. While the same scenario may be implemented, just as easily, as a single workflow, the division of the processes into two separate workflows illustrates a strategy you may want to use for structuring long and complex workflows.
The following figure shows the relationship among the three sample workflows.
Figure 1-9 Relationship Among Three Sample Workflows
Order Fulfillment
Order ProcessingTrigger
Order Processingtriggers
calls
returns to
Main Workflow Sub-workflowTrigger Workflow
XML
<neworder>
1-22 Learning to Use BPM with WebLogic Integration

Working with the Sample Workflows
Each of the workflows is described in more detail in a separate section of the tutorial; however, a high-level overview of each workflow is provided here:
n Main Workflow: Order Processing
Order Processing is the main workflow. It defines the tasks that range from processing the initial customer request up to and including checking the inventory, at which point it passes control to the sub-workflow. When Order Processing regains program control, it sends out the confirmation notice and the entire process is complete.
n Sub-Workflow: Order Fulfillment
Order Fulfilment is the sub-workflow that is called from the Order Processing workflow after the inventory is checked. This sub-workflow defines the shipping and invoicing tasks. When these tasks are complete, program control is returned to the main workflow.
n Trigger Workflow: Order Processing Trigger
Order Processing Trigger is included to simulate the Web-presentation application that accepts the order from the customer, so that you can run the workflow from the Worklist.
Complete, ready-to-use versions of the three workflows described in this tutorial are available in the Tutorial.jar package in the bea/wlintegration2.1/samples/bpm_tutorial folder of your installation. This package includes the templates, template definitions, business operations, and event keys required to run the workflows.
While we encourage you to follow the procedures in this tutorial, if you simply want to run the workflows as a demonstration without following the tutorial, you will need to do the following:
1. Log on to the Studio by following the procedure in “Starting the WebLogic Integration Studio” on page 2-2.
2. Import the complete Tutorial.jar workflow package, and activate the workflows. Choose option 1 of step 5 in the procedure given in “Importing Workflow Objects: Importing the Tutorial Package File” on page 2-7.
3. Follow the procedures for logging on to the Worklist and running the workflows in Chapter 7, “Executing and Monitoring the Example Workflows.”
Learning to Use BPM with WebLogic Integration 1-23

1 Introduction to Business Process Management and the Sample Workflows
Using the Tutorial
This tutorial is organized to help you learn to use many of the common features of the Studio and Worklist applications. Each of the first four sections uses one example workflow to highlight different aspects of the Studio and workflow design, while the final section shows the completed workflows in action.
In Chapter 2, “Getting Started with the WebLogic Integration Studio,” you log on to the Studio and import the Order Processing Trigger and Order Fulfillment workflows to explore various aspects of the Studio interface. Topics covered in this section include:
n Starting and logging on to the Studio
n Understanding the workflow object hierarchy
n Importing a workflow package
n Using the folder tree
n Using the Interface View
In Chapter 3, “Understanding Workflow Objects and Properties,” you use the Order Processing Trigger workflow to explore the properties of a workflow, and to edit an XML message embedded in a workflow. Topics covered in this section are:
n Understanding workflow object properties
n Understanding workflow expressions
n Viewing and editing an XML message to be posted
n Exporting a document to the XML repository
n Saving a workflow
In Chapter 4, “Creating a Workflow,” you create the Order Processing workflow from scratch by doing the following:
n Creating a workflow template
n Creating a template definition
n Creating a variable
1-24 Learning to Use BPM with WebLogic Integration
Using the Tutorial
n Adding a workflow label
n Activating a template definition
In Chapter 5, “Defining Workflow Nodes,” you define the nodes of the Order Processing workflow by adding and defining variables, actions and other workflow objects. Topics covered in this section are:
n Creating an event-triggered start node
n Creating workflow expressions
n Interacting with a Worklist user
n Evaluating a condition with a decision node
n Creating and performing a business operation
n Creating events and event keys
n Calling a sub-workflow
n Sending e-mail to a client
Chapter 6, “Using a Custom Exception Handler,” uses the Order Fulfillment workflow to look at the WebLogic Integration exception-handling facility and an additional Worklist user interaction.
Finally, in Chapter 7, “Executing and Monitoring the Example Workflows,” you log on to the Worklist application and run the example workflows, while simultaneously monitoring them in the Studio.
Studio functions that are not demonstrated in this tutorial include:
n Triggering timed starts
n Using timed events
n Using calendars
n Setting permissions for users and roles
n Using business operations to call Entity Beans and Java objects
n Calling executable programs
n Using JMS messaging for posting XML events
Learning to Use BPM with WebLogic Integration 1-25
1 Introduction to Business Process Management and the Sample Workflows
n Using auditing
n Monitoring workflows with workload and statistical reporting
n Using plug-ins
For information about these functions, see Using the WebLogic Integration Studio.
1-26 Learning to Use BPM with WebLogic Integration

CHAPTER
2 Getting Started with the WebLogic Integration Studio
In this section you will become familiar with the Studio client application, which you use to design workflows. The following tasks are described:
n Starting and logging on to the Studio
n Understanding the workflow object hierarchy
n Importing workflows
n Opening a template definition
n Using Interface View
n Using the folder tree
n Viewing object properties
Learning to Use BPM with WebLogic Integration 2-1

2 Getting Started with the WebLogic Integration Studio
Starting the WebLogic Integration Studio
To start the WebLogic Integration Studio:
1. Do one of the following:
l On a Windows system, choose Start→Programs→BEA WebLogic E-Business Platform→WebLogic Integration 2.1→Studio.
l On a UNIX system, go to /bea/wlintegration2.1/bin directory, and run the Studio start-up script, by entering the following at the command prompt:
sh studio.sh
The Logon to WebLogic Integration dialog box appears in front of the business process management Studio application window.
Figure 2-1 Logon to WebLogic Integration Dialog Box
2. Enter a user name and a password in the appropriate fields. If you are set up as an authorized user, you can enter your user name and password. Otherwise, use one of the user names that is configured by default for the CDExpress organization when the server is installed, as listed in the following table.
2-2 Learning to Use BPM with WebLogic Integration

Starting the WebLogic Integration Studio
Note: User names and passwords are case-sensitive. Be sure to enter the user names and passwords shown in the table in lower case.
3. In the Server [:port] field, specify the system that is running the WebLogic Integration server as follows:
t3://host:7001
Here host is the computer name or IP address of the system that is running the WebLogic Integration server. Specify localhost if the server is running on the same computer as the Studio application.
4. Click OK. The Studio main window opens. It consists of two vertical panes. The right pane provides a blank workspace. The left pane contains a folder tree headed by the name of an organization with which your user name is associated.
5. From the Organization drop-down list, select CDExpress.
Table 2-1 Default CDExpress Users and Passwords
User Name Password
joe password
mary password
admin security
Learning to Use BPM with WebLogic Integration 2-3

2 Getting Started with the WebLogic Integration Studio
Figure 2-2 WebLogic Integration Studio Application Window
Folder tree
2-4 Learning to Use BPM with WebLogic Integration

Understanding Workflow Object Relationships
Understanding Workflow Object Relationships
In the Studio, data and process objects are represented at different hierarchical levels, which you can think of as containers for other objects that you create:
n Global objects
n Templates and template definitions
n Organizations
This section describes these three levels.
Global Objects
These exist at the highest level of the hierarchy, and are available for use by all workflows and organizations. Configuration objects may be displayed in the folder tree, or accessed through the Configuration menu. They include calendars, users, workflow templates (see below) interfaces such as business operations and event keys, and permissions for users.
Figure 2-3 Configuration Menu
Learning to Use BPM with WebLogic Integration 2-5

2 Getting Started with the WebLogic Integration Studio
Templates and Template Definitions
Templates are folders that can contain multiple workflow definitions. A single template can be shared by multiple organizations. You can name a template however you want, but the name must be unique.
Within a template folder, you create template definitions, which are the actual workflows containing objects such as nodes, actions, variables, and exception handlers. Template definitions are automatically assigned a label according to their effective and expiry dates and times, and multiple template definitions serve as different versions of a workflow.
Organizations
Organizations represent another level of structure. Organizations contain objects that can be accessed by any workflow created in that organization, such as users, roles, and other workflows. In the Studio interface, the folder tree in the left pane shows the objects contained within the currently selected organization.
Figure 2-4 Organization Folder Tree
Folders are displayed according to the currently selected organization.
Users associated with the organization are also displayed in the folder tree.
Roles are defined within an organization.
2-6 Learning to Use BPM with WebLogic Integration

Importing Workflow Objects: Importing the Tutorial Package File
Although users and templates can be associated with multiple organizations, the ones that are associated with the current organization are listed in the Users and Template folders, respectively.
By contrast, other objects, such as roles, routings, and reports, are actually defined from within organizations.
For information about calendars and routings, see “Administering Data” in Using the WebLogic Integration Studio. For information about reports, see “Monitoring Workflows” in Using the WebLogic Integration Studio.)
We will now import templates and template definitions so that you can view other workflow objects.
Importing Workflow Objects: Importing the Tutorial Package File
You can import or export complete workflow packages, including all dependencies, from or to a Java archive (JAR) package file, which stores workflow objects as binary files. The Import/Export Package feature allows you to import the following workflow objects:
n Templates
n Template definitions
n Event keys
n Business operations
n XML repository contents
n Calendars
Note: Template definitions can also be imported and exported from and to an XML file.
For complete information on Import/Export, see “Importing and Exporting Workflow Packages” in Using the WebLogic Integration Studio.
Learning to Use BPM with WebLogic Integration 2-7
2 Getting Started with the WebLogic Integration Studio
Importing the Tutorial.jar Workflow Objects
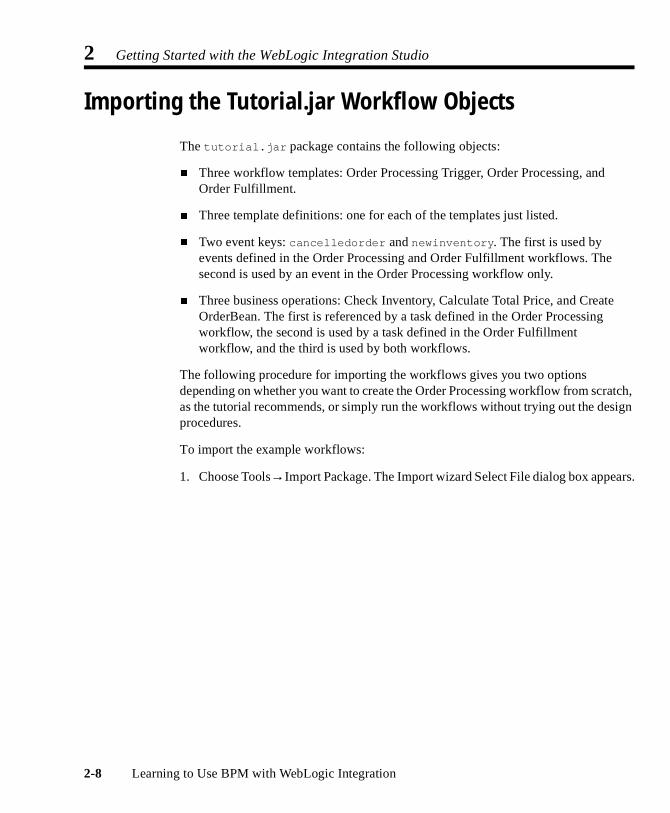
The tutorial.jar package contains the following objects:
n Three workflow templates: Order Processing Trigger, Order Processing, and Order Fulfillment.
n Three template definitions: one for each of the templates just listed.
n Two event keys: cancelledorder and newinventory. The first is used by events defined in the Order Processing and Order Fulfillment workflows. The second is used by an event in the Order Processing workflow only.
n Three business operations: Check Inventory, Calculate Total Price, and Create OrderBean. The first is referenced by a task defined in the Order Processing workflow, the second is used by a task defined in the Order Fulfillment workflow, and the third is used by both workflows.
The following procedure for importing the workflows gives you two options depending on whether you want to create the Order Processing workflow from scratch, as the tutorial recommends, or simply run the workflows without trying out the design procedures.
To import the example workflows:
1. Choose Tools→Import Package. The Import wizard Select File dialog box appears.
2-8 Learning to Use BPM with WebLogic Integration

Importing Workflow Objects: Importing the Tutorial Package File
Figure 2-5 Select File Dialog Box
2. Click Browse to navigate to the /bea/wlintegration2.1/samples/bpm_tutorial directory and open the file Tutorial.jar.
3. Click Next. The Select Components to Import dialog box appears, with the target organization already set to CDExpress, and all workflow objects in the import file selected by default.
Learning to Use BPM with WebLogic Integration 2-9

2 Getting Started with the WebLogic Integration Studio
Figure 2-6 Select Components to Import Dialog Box
4. Select the Activate workflows after import check box.
Note: You must activate a workflow before you can run it.
5. Choose from the following options:
Option 1: If you are not going to follow the tutorial, import the entire package, consisting of templates, template definitions, business operations, and event keys, by proceeding to step 9.
Option 2: If you are going to follow the tutorial, import only the following by proceeding to step 6:
l Order Processing Trigger template and template definition
l Order Processing Fulfillment template and template definition
2-10 Learning to Use BPM with WebLogic Integration

Importing Workflow Objects: Importing the Tutorial Package File
l Calculate Total Price business operation
l Create OrderBean business operation
l cancelledorder event key
6. Expand the Templates check box, and deselect the Order Processing check box.
7. Expand the Business Operations check box and deselect the Check Inventory check box.
8. Expand the Event Keys check box and deselect the newinventory event key.
The dialog box should now appear as follows.
9. Click Import. The Review Import Summary dialog box appears with a summary of the objects imported. If you followed Option 2, it should appear as in the following figure.
Learning to Use BPM with WebLogic Integration 2-11

2 Getting Started with the WebLogic Integration Studio
Figure 2-7 Review Import Summary Dialog Box
10. Click Close.
The imported templates and template definitions now appear in the folder tree.
2-12 Learning to Use BPM with WebLogic Integration

Using the Folder Tree: Viewing the Order Processing Trigger Template Contents
Using the Folder Tree: Viewing the Order Processing Trigger Template Contents
You can view the folder tree for any template definition without actually opening it. Simply expand all the folders for that template definition folder. The following figure shows the folder tree structure for the Order Processing Trigger template definition.
Figure 2-8 Order Processing Trigger Workflow: Folder Tree
From the folder tree, you can view an object’s properties by right-clicking the object and choosing Properties from the pop-up menu. If the template definition is closed, the properties dialog boxes are read-only; to edit them, you must first open the template definition.
Note: Variable and exception handler properties are accessible only from the folder tree.
Template
Template definition
Learning to Use BPM with WebLogic Integration 2-13

2 Getting Started with the WebLogic Integration Studio
Now we will view the imported workflow in the workflow design window and in Interface View. Before we can see the latter two views, we have to open the template definition.
Viewing a Workflow: Opening the Order Processing Trigger Template Definition
To see the graphical view of a workflow, you have to open its template definition.
To open the Order Processing Trigger template definition:
1. In the folder tree, expand the Order Processing Trigger template.
2. Right-click the template definition, and choose Open from the pop-up menu. The workflow appears in the workflow design window in the right pane.
Figure 2-9 Order Processing Trigger Template Definition: Workflow Design Window
You can view and edit properties for any object in the workflow design window by double-clicking the appropriate object.
2-14 Learning to Use BPM with WebLogic Integration

Using the Interface View
Using the Interface View
The Interface View gives additional information about a workflow by showing a graphical representation of inbound and outbound XML documents, business operations, sub-workflows and plug-ins that are associated with each node. The following table lists the Interface View icons and the objects they represent.
To use the Interface View for a workflow, you first set your preferences and then use the toolbar toggle button to switch Interface View on and off.
To set Interface View preferences:
1. Choose View→Interface View. The Interface View Preferences dialog box appears.
Table 2-2 Interface View Icons
Icon Object
Business operation
Plug-in
Sub-workflow
Inbound XML document
Outbound XML document
Learning to Use BPM with WebLogic Integration 2-15

2 Getting Started with the WebLogic Integration Studio
Figure 2-10 Interface View Preferences Dialog Box
2. Select all the check boxes and click OK.
3. In the workflow design window, scroll to the far right-hand side of the toolbar,
and click the Show/Hide Interfaces button .
Tip: You can relocate the toolbar by clicking in any inactive area of the toolbar and drag it to any part of your desktop. Alternatively, choose View→Look and Feel→Metal to display the toolbar entirely contained within the drawing area.
The workflow now appears as follows.
2-16 Learning to Use BPM with WebLogic Integration

Using the Interface View
Figure 2-11 Order Processing Trigger Workflow: Interface View
In Interface View you can also access read-only Properties dialog boxes for interface objects such as business operations and outbound XML documents. To view properties dialog boxes for interface objects, double-click the interface icon in the workflow design window.
Note: Because inbound XML documents are not workflow objects, double-clicking on their interface icon does not produce any effect; for basic information on their relevant properties, double-click on the appropriate event or start node to which they point.
In the next section of the tutorial, we will look at the different types of workflow objects and their properties.
Learning to Use BPM with WebLogic Integration 2-17

2 Getting Started with the WebLogic Integration Studio
2-18 Learning to Use BPM with WebLogic Integration

CHAPTER
3 Understanding Workflow Objects and Properties
In this section, we continue our tutorial by exploring the Order Processing Trigger workflow. After an overview that describes the workflow, we take a close look at the workflow’s objects to help you gain a better understanding of:
n Template definition properties
n Variable properties
n Start node properties
n Task node properties
n Workflow expressions
Finally, to gain practice with using some of the Studio features, we will:
n Edit the XML document to be posted
n Export the XML document to the repository
n Save the template definition
Learning to Use BPM with WebLogic Integration 3-1

3 Understanding Workflow Objects and Properties
This section of the tutorial assumes that you have done the following:
n Logged on to the Studio, as described in “Starting the WebLogic Integration Studio” on page 2-2.
n Imported and opened the Order Processing Trigger template definition as described in “Importing Workflow Objects: Importing the Tutorial Package File” on page 2-7 and “Viewing a Workflow: Opening the Order Processing Trigger Template Definition” on page 2-14.
About the Order Processing Trigger Workflow
The Order Processing Trigger workflow simulates the process by which the Order Processing workflow would normally be triggered. In a real-world application, this would most likely be accomplished by a servlet that sends an XML document to a JMS queue. The arrival of the XML message on the queue would trigger the start of the Order Processing workflow, as depicted in the following figure.
Figure 3-1 Simulated Order Processing Start
JSP
Applet Servlet
Order Placement (and Cancellation)
start workflow
Order Processing and Fulfilment
JMSQueue XML
WebLogic Integration
HTML
Variables
3-2 Learning to Use BPM with WebLogic Integration

About the Order Processing Trigger Workflow
For the purposes of this tutorial, we will simulate this process by having a Worklist user start the process of posting the XML document. A detailed view of the Order Processing Trigger workflow is shown in the following figure. The numbered steps in the figure are described in a table after the figure, which maps the real-world process and implementation to the actual implementation in the sample workflow.
Figure 3-2 Order Processing Trigger Workflow: Detailed View
Note: This workflow does not contain a done node, which means that it loops interminably. As you will see later in the tutorial, when you run the workflows, this mechanism allows the workflow to be started from within the task list window in the Worklist application.
XMLWorklist
InternalJMSQueue
12
OrderProcessingWorkflow
<neworder>
Table 3-1 Order Processing Trigger Workflow Summary
Process Implementation
A customer submits an order for goods to CDExpress, a music retailer, through an online mechanism such as a browser-based order form. The customer supplies his or her name, the appropriate e-mail address, the state to which the order will be shipped, the desired items (IDs and names), and the requested quantities.
In a real-world application, the order would be processed by a servlet which forwards an XML document to an external JMS queue for receipt by the workflow.
1. The Start node is defined as manual, so that the workflow is started by a Worklist user.
2. The first task is assigned to the same Worklist user who starts the workflow. When the task is executed, the <neworder> XML document is posted to an internal JMS queue. The XML document contains the order status and ID, the customer ID, name, e-mail, address, phone number, and state, and the item name, ID, and quantity.
Learning to Use BPM with WebLogic Integration 3-3
3 Understanding Workflow Objects and Properties
Understanding Template Definition Properties
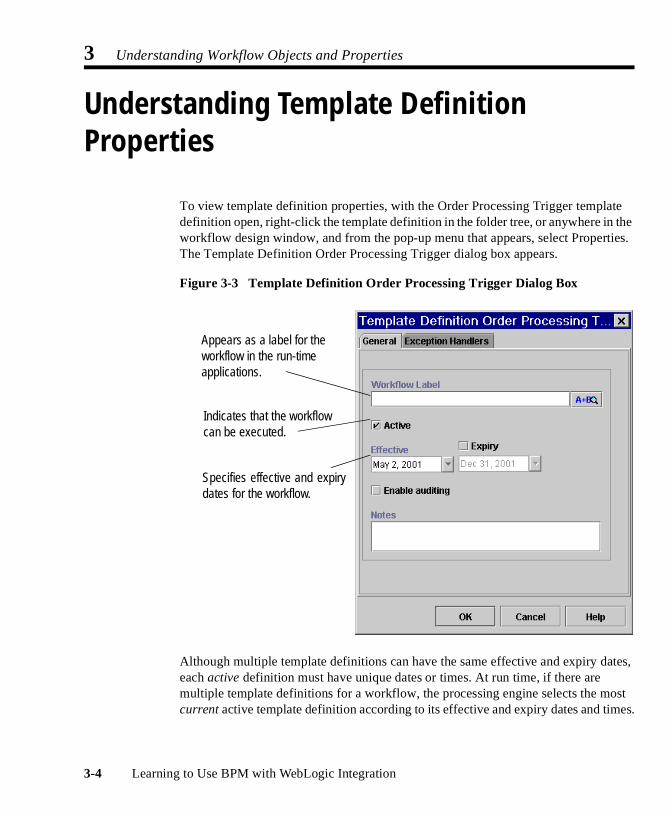
To view template definition properties, with the Order Processing Trigger template definition open, right-click the template definition in the folder tree, or anywhere in the workflow design window, and from the pop-up menu that appears, select Properties. The Template Definition Order Processing Trigger dialog box appears.
Figure 3-3 Template Definition Order Processing Trigger Dialog Box
Although multiple template definitions can have the same effective and expiry dates, each active definition must have unique dates or times. At run time, if there are multiple template definitions for a workflow, the processing engine selects the most current active template definition according to its effective and expiry dates and times.
Appears as a label for the workflow in the run-time applications.
Indicates that the workflow can be executed.
Specifies effective and expirydates for the workflow.
3-4 Learning to Use BPM with WebLogic Integration

Understanding Variable Properties: Viewing the OrderID Variable
Because we activated the Order Processing Trigger template definition during the import process, the dialog box shows it as already active. This template definition workflow has been effective since May 2, 2001, and it never expires.
We have not used a label for this workflow.
Understanding Variable Properties: Viewing the OrderID Variable
To view variable properties, go to the folder tree, and under the Variables folder, double-click the variable OrderID. The Variable Properties dialog box appears.
Figure 3-4 OrderID Variable: Variable Properties Dialog Box
Data type for the variable
Indicates whether the variable is passed as a parameter from or to another workflow
Learning to Use BPM with WebLogic Integration 3-5

3 Understanding Workflow Objects and Properties
Variables can be passed as parameters to other template definitions, XML documents, and EJB and Java class methods. An input parameter indicates that the variable is to receive its value from the calling, or parent, workflow. An output parameter indicates that the variable contains a value that will be passed back to the calling workflow.
Deselect the Input parameter value within the Variable Properties dialog box. Within the Order Processing Trigger template, the OrderID variable will serve as neither an input parameter nor an output parameter.
Note: There is no harm in leaving the Input parameter value selected, even if the variable will not be used as an input parameter. For example, if you elected to import the Order Processing Trigger template and run the tutorial sample without deselecting this value, the sample would execute without error.
As you will see later, within the Order Processing and Order Fulfillment workflow templates, the variable is marked as an input parameter, meaning that it is passed from another workflow. Because the OrderID variable is used to track the number of the order for each instance of the workflow, it is passed to both the Order Processing and Order Fulfilment workflows.
Variables are global in scope, meaning that they apply to an entire workflow. You can view a summary of the nodes and actions in which variables are used for the current workflow.
To view the usage for the OrderID variable, go to the folder tree, and under the Variables folder, right-click the variable OrderID, and from the pop-up menu that appears, select Usage. The Variable Usage window appears.
3-6 Learning to Use BPM with WebLogic Integration

Understanding Start Node Properties
Figure 3-5 OrderID Variable: Variable Usage Window
As you can see, the OrderID variable is used in the Set Workflow Variable action of the Start Order Processing task. This action is described in more detail in “Understanding Workflow Expressions: Viewing the Set Workflow Variable and Assign Task to User Actions.”
You will create a variable in “Adding a Workflow Label” on page 4-10 and throughout Chapter 5, “Defining Workflow Nodes.”
Understanding Start Node Properties
Because the Order Processing Trigger contains a single start node, the start node is not named. However, you can also define workflows that contain multiple start nodes, to specify multiple processing paths that run in parallel. You can also use start nodes to initialize any workflow variables.
Folder tree shows all objects in which the variable is used in the current workflow.
Learning to Use BPM with WebLogic Integration 3-7

3 Understanding Workflow Objects and Properties
To view start node properties, go to the workflow design window and double-click the Start node. The Start Properties dialog box appears.
Figure 3-6 Start Properties Dialog Box
As you see in the dialog box, there are four ways to start a workflow:
n Timed—The workflow starts automatically according to an exact date and time that you specify. We do not use any timed starts in this tutorial.
n Manual—The workflow is started by a Worklist user. The Order Processing Trigger workflow is defined as a manual start, which allows us to start the entire tutorial sample.
n Called—The workflow is called by another workflow. The Order Fulfillment workflow, for example, uses a called start.
n Event—The workflow is triggered by the arrival on a JMS queue of an XML document. We create an event-triggered start for the Order Processing workflow in Chapter 5, “Defining Workflow Nodes,” and later in this section we work with the XML document that acts as the trigger for that workflow.
3-8 Learning to Use BPM with WebLogic Integration

Understanding Task Node Properties: Viewing the Start Order Processing Task Node
Also, in this start node, the OrderID variable, which will be incremented each time the workflow is run, is initialized to 0. For more information on this variable, see “Understanding Variable Properties: Viewing the OrderID Variable” on page 3-5.
Understanding Task Node Properties: Viewing the Start Order Processing Task Node
To view task node properties, go to the workflow design window, and double-click on the Start Order Processing task node. The Task Properties dialog box appears.
Figure 3-7 Start Order Processing Task: Task Properties Dialog Box
Marks the task as low, medium, or high for Worklist users at run time. Medium is the default setting.
Sets run-time workflow options for Worklist users. No permissions is the default setting.
Indicates the next node in the workflow.
Tabs indicate states under which actions are listed.
Learning to Use BPM with WebLogic Integration 3-9

3 Understanding Workflow Objects and Properties
Note that under the Next tab the successor to this task is itself (indicated in the workflow design window by the looping arrow), and that there is no Done node in the list. This means that the workflow never actually terminates; every time the Start Order Processing task is executed, it creates another instance of itself. You will see this process in action when we run the workflows in Chapter 7, “Executing and Monitoring the Example Workflows.”
About Task States and Actions
The tabs on the left side of the dialog box indicate four different run-time states. Actions placed on each state-specific tab for a given task are performed when the designated state is reached. The four states are:
n Created—Any actions listed in this tab are executed as soon as the workflow is started.
n Activated—The flow reaches this particular task and the actions listed here executed. You typically specify all automated actions under this tab.
n Executed—These actions are only performed after an action has been executed manually in the worklist, programatically by the execute task API, or by the use of the Execute Task action. If none of these occurs, any actions specified in the Executed tab will never be performed.
n Marked Done—A task is marked done by the Mark Task as Done action or the corresponding API. This tab is normally used in the case that the Mark Task as Done action is not specified within itself but by some other node in the flow. It is typically used to specify clean-up actions such as writing audit information to a log.
See “Defining Task Properties” in “Defining Workflow Templates” in Using the WebLogic Integration Studio for a more thorough discussion of task states.
Actions are grouped into the following categories:
n Task actions—specify operations for a particular task
n Workflow actions—specify operations for an entire workflow
n Integration actions—invoke interfaces to external components
n Exception Handling actions—invoke a custom exception handler
3-10 Learning to Use BPM with WebLogic Integration

Understanding Task Node Properties: Viewing the Start Order Processing Task Node
n Miscellaneous actions—perform other operations such as sending e-mail or making an audit entry.
As you can see in the Task Properties dialog box (or in the folder tree), the Start Order Processing task contains the following actions:
n Activated
l Set workflow variable—a workflow action that sets the OrderID variable for the workflow. See “Understanding Workflow Expressions: Viewing the Set Workflow Variable and Assign Task to User Actions” for more information.
l Assign task to user —a task action that assigns a manual task to a workflow user. See “Understanding Workflow Expressions: Viewing the Set Workflow Variable and Assign Task to User Actions” for more information.
n Executed
l Post internal XML event —an integration action that publishes an XML message to be used by the Order Processing workflow. See “Posting an Internal XML Event: Editing the Neworder XML Document” for more information.
l Mark task as done—a task action that allows the flow to proceed to the next node. All task nodes require that you specify this action to instruct the flow to move on.
We look more closely at how to define actions in Chapter 5, “Defining Workflow Nodes.”
About Task Permissions
Finally, the Permissions tab lets you set the types of actions a Worklist user can perform for this task. The default setting is none. For this scenario, we have left the default setting, as shown in the following figure.
Learning to Use BPM with WebLogic Integration 3-11
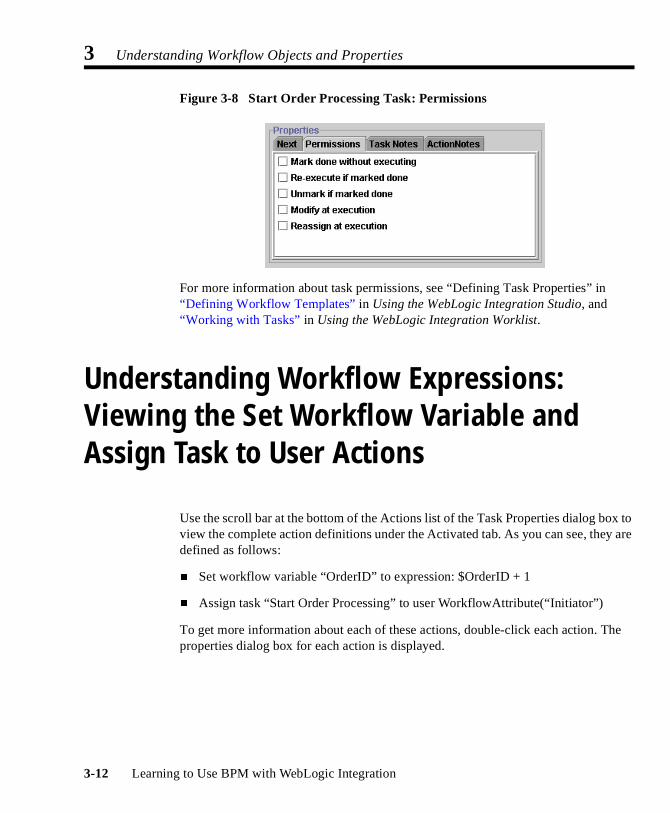
3 Understanding Workflow Objects and Properties
Figure 3-8 Start Order Processing Task: Permissions
For more information about task permissions, see “Defining Task Properties” in “Defining Workflow Templates” in Using the WebLogic Integration Studio, and “Working with Tasks” in Using the WebLogic Integration Worklist.
Understanding Workflow Expressions: Viewing the Set Workflow Variable and Assign Task to User Actions
Use the scroll bar at the bottom of the Actions list of the Task Properties dialog box to view the complete action definitions under the Activated tab. As you can see, they are defined as follows:
n Set workflow variable “OrderID” to expression: $OrderID + 1
n Assign task “Start Order Processing” to user WorkflowAttribute(“Initiator”)
To get more information about each of these actions, double-click each action. The properties dialog box for each action is displayed.
3-12 Learning to Use BPM with WebLogic Integration

Understanding Workflow Expressions: Viewing the Set Workflow Variable and Assign
Figure 3-9 Set Workflow Variable Dialog Box
Figure 3-10 Assign Task to User Dialog Box
As you can see, both of these actions are defined by expressions. If you think of nodes as the building blocks of workflows, and actions as the building blocks of nodes, then you can think of expressions as the building blocks of actions. Expressions are statements that are evaluated at run time to calculate and supply a value. They can
This button indicates that the field requires a workflow expression. You can also use this button to invoke the Expression Builder. You will use the Expression Builder in “Adding a Task and Workflow Comment: Defining the Contact Customer Task” on page 5-30.
Learning to Use BPM with WebLogic Integration 3-13

3 Understanding Workflow Objects and Properties
combine variables, constants, literals, operators, and predefined functions. One of the most common types of expressions you will define uses the XPath function to extract values from XML documents.
Some basic rules of the workflow expression language that you should know are:
n String literals must be surrounded by quotation marks (“ ”).
n Variable names must be preceded by a dollar sign ($) or a colon (:).
n Different element types can be concatenated with the plus sign (+) operator.
Thus, the expression for the first action specifies that the value for the OrderID variable should be incremented by 1 every time the workflow runs. You will see this in action when we run the workflows in Chapter 7, “Executing and Monitoring the Example Workflows.”
The expression for the second action uses a built-in function to specify that the Start Order Processing task should be assigned to the same Worklist user who initiates the workflow.
We create expressions using the Expression Builder and the XPath Wizard in Chapter 5, “Defining Workflow Nodes.”
For detailed information about the workflow expression language and functions, see “Using Workflow Expressions” in Using the WebLogic Integration Studio.
Posting an Internal XML Event: Editing the Neworder XML Document
To view the Post XML Event action:
1. In the Start Order Processing Task Properties dialog box, select the Executed tab.
2. Select the Post XML Event action, and click Update. The Post XML Event dialog box appears, with an XML document already defined.
3-14 Learning to Use BPM with WebLogic Integration

Posting an Internal XML Event: Editing the Neworder XML Document
Figure 3-11 Post XML Event Dialog Box
When you post an XML event, you can specify various options, including the following:
n Destination—Internal JMS queue or external JMS topic or queue. The default destination is internal.
n Transaction mode—Send message when transaction commits or immediately. The default transaction mode is when transaction commits.
n XML message—A document that has been stored in an XML variable, or one that you create by composing it within the XML editor in the action’s dialog box. The default setting is to compose a new document.
Learning to Use BPM with WebLogic Integration 3-15

3 Understanding Workflow Objects and Properties
In our example, we use the default settings. In a production environment, you will probably also want to take advantage of the various JMS messaging and addressing options offered for posting XML events. For more information on all Post XML Event action options, see “Posting an XML Message to a JMS Topic or Queue” in “Defining Actions” in Using the WebLogic Integration Studio.
Editing the XML Document Structure
The XML document that is posted by this action simulates an XML document that would be sent by a servlet to the workflow. It contains information about the order and has the structure shown below.
Listing 3-1 Neworder XML Document
<neworder> <id>$OrderID</id> <shiptostate>KK</shiptostate> <status>new</status> <customer> <id>6831</id> <name>John Doe</name> <address>3126 Blue Street Anytown CA 96822</address> <phone>408 534 9567</phone> <email>[email protected]</email> </customer> <item> <id>236</id> <name>CD storage rack</name>
<quantity>2</quantity> </item></neworder>
The element values in this XML document will be extracted and stored in workflow variables by the Start node of the Order Processing workflow. Values will then be used throughout the Order Processing and Order Fulfillment workflows as indicated in the following table, which lists the variables, their uses in the workflow, and the XML elements to which they correspond.
3-16 Learning to Use BPM with WebLogic Integration

Posting an Internal XML Event: Editing the Neworder XML Document
Table 3-2 Neworder XML Elements
XML Element Corresponding Workflow Variable
Use in Workflows
<status> OrderStatus Can change at various points of the workflow
<id> OrderID Value is provided by the workflow itself; appears as the workflow label in the Worklist and increments each time the workflow is run
<shiptostate> ShipToState Passed to the calculate() method of the POBean; the initial value will be caught by the exception handler
<customer>
<id>
CustomerID Used for the credit check task
<customer>
<name>
CustomerName Used for the customer notification task and is passed to the Order Fulfillment workflow for the shipping task
<customer>
<address>
CustomerAddress Passed to the Order Fulfillment workflow for the shipping task
<customer>
<phone>
CustomerPhone Used in the customer notification task
<customer>
<email>
CustomerEmail May be used in the order confirmation task
<item>
<id>
ItemID Passed to the checkInventory() and calculate() methods
<item>
<name>
ItemName Not used
<item>
<quantity>
ItemQuantity Passed to the checkInventory() and calculate() methods
Learning to Use BPM with WebLogic Integration 3-17

3 Understanding Workflow Objects and Properties
Default values have been entered for each element. Note that the <shiptostate> element contains incorrect data, with the state abbreviation KK. This is used to simulate the possibility of invalid data being passed to the POBean EJB in the Order Fulfillment workflow, so that a custom exception handler can be triggered. (For more information, see Chapter 6, “Using a Custom Exception Handler.”)
In “Sending an E-mail Message: Defining the Confirm Order Fulfillment Task” on page 5-60, you can define an action to send an e-mail. In the action definition, the e-mail address will be taken from the value provided in the XML document sent out by this Post XML Event action. If you would like to receive the e-mail sent to confirm the order at the end of the process when you run the workflows in Chapter 7, “Executing and Monitoring the Example Workflows,” you can edit the XML document to specify your own real-world information.
Note: For this procedure to work at run time, your e-mail server must be appropriately configured in your server domain. For more information, see Installing BEA WebLogic Integration.
To specify your own data, edit the XML document as follows:
1. In the XML Document Structure portion of the Post XML Event dialog box, expand the element nodes to view their values. Use the scroll bar to view additional fields.
Figure 3-12 Neworder XML Document Structure
Element value fields require workflow expression syntax.String literals are surrounded by quotation marks.
XML elements and attributes appear in a tree structure.
Double-click a field to edit it.
3-18 Learning to Use BPM with WebLogic Integration

Using the XML Repository: Exporting the Neworder XML Document
2. In the customer e-mail element value field, type in your own e-mail address, surrounded by quotation marks. Press Enter to enter the value.
Note: Be sure to enter a valid e-mail address if you intend to specify the Send E-mail action in “Sending an E-mail Message: Defining the Confirm Order Fulfillment Task” on page 5-60.
3. If you like, edit values for the other customer and item attribute values to put in your own preferred information.
Note: Do not edit the erroneous data in the shiptostate element value field. This value will be used at run time to invoke the exception handler in the Order Fulfillment workflow.
4. When done, click OK to save your changes and exit the Post XML Event dialog box.
Using the XML Repository: Exporting the Neworder XML Document
When you create or edit an XML document in the Studio, you can save it to a file on disk, or export it to the XML repository. The repository stores XML documents, DTDs, schemas, style sheets, and other entities for later access, and offers you a convenient way to export and import previously-defined XML documents for reuse by other nodes, workflows or even organizations.
Because the Order Processing workflow will reference the data stored in the XML document of our Start Order Processing task, storing the XML document in the repository will greatly simplify our task of defining XPath expressions to extract the data from the document in “Defining XPath Statements” on page 5-10.
Learning to Use BPM with WebLogic Integration 3-19

3 Understanding Workflow Objects and Properties
To save the document to the repository:
1. In the Task Properties dialog box, under the Executed tab, double-click the Post internal XML Event action to display the Post XML Event dialog box.
2. In the toolbar, click the Export button . The XML Finder dialog box appears.
3. Select the Repository tab.
Click to export a document you compose here to the repository or to a file on disk.
Click to import an XML document from the repository or disk into the XML editor.
3-20 Learning to Use BPM with WebLogic Integration

Using the XML Repository: Exporting the Neworder XML Document
Figure 3-13 XML Finder Dialog Box
4. To create a new folder in which to store the XML document, right-click the XML Repository folder, and from the pop-up menu, select Add Folder. The Add Folder dialog box appears.
Learning to Use BPM with WebLogic Integration 3-21

3 Understanding Workflow Objects and Properties
Figure 3-14 XML Finder: Add Folder Dialog Box
5. In the Name field, enter a name for the new folder, such as Tutorial, and click OK. The new folder now appears in the Repository window.
6. In the Repository window, right-click the new folder and from the pop-up menu, select Add Entity. The Add Entity dialog box appears.
3-22 Learning to Use BPM with WebLogic Integration

Using the XML Repository: Exporting the Neworder XML Document
Figure 3-15 XML Finder: Add Entity Dialog Box
7. From the Type drop-down list, select XML Document.
8. In the Name field, enter a name for the document, such as Neworder, and click OK. This creates an empty container for the new document, which appears in the list of entities for the folder.
Figure 3-16 XML Finder Dialog Box
9. Select the new document, and click OK to exit the XML Finder dialog box. The container is populated with the contents of the XML document you defined in the XML editor.
10. Click OK to exit the Post XML Event dialog box.
11. Click OK to exit the Task Properties dialog box.
This icon indicates that the entity is an XML document.
Learning to Use BPM with WebLogic Integration 3-23

3 Understanding Workflow Objects and Properties
Saving a Template Definition
You may notice that when you make changes to a template definition, its label in the folder tree and in the title bar of the workflow design window is preceded by an asterisk. This means that the template definition contains unsaved changes.
To save the workflow:
1. In the folder tree, expand the Order Processing Trigger template, and right-click the workflow template definition.
2. From the pop-up menu, select Save.
You are now ready to create and define the Order Processing workflow, as described in the following sections of the tutorial.
3-24 Learning to Use BPM with WebLogic Integration

CHAPTER
4 Creating a Workflow
This section of the tutorial shows you how to create the Order Processing workflow. After a high-level overview of the workflow, we do the following:
n Create a template
n Create a template definition
n Draw the flow by placing, renaming, and connecting node shapes
n Add a workflow label
n Create an expression with the Expression Builder
n Activate the template definition
n Save the template definition
Overview of the Order Processing Workflow Design
The Order Processing workflow handles the processes from receiving the order to checking customer credit and checking inventory. It then passes control to the Order Fulfillment workflow, which handles shipping and invoicing. When the Order Fulfillment process is complete, control is returned to the Order Processing workflow, which confirms the order completion.
The following figure provides a high-level depiction of the workflow in Interface View. The numbered steps in the figure are described in the table that follows the figure, which maps the real-world processes to the workflow model.
Learning to Use BPM with WebLogic Integration 4-1

4 Creating a Workflow
Figure 4-1 Order Processing Workflow: Interface View
2
4
7
5
1
3
9
6
8
1011
Table 4-1 Order Processing Workflow Summary
Process Implementation
The order is received by a processing system, which reads the data and appends an ID number to the order.
1. The workflow is started by an incoming XML document.
The order is forwarded to a customer service representative, who checks the customer’s credit information.
2. An XML message is sent to a Worklist user to confirm the credit check.
3. A decision evaluates whether the response from the Worklist user is yes or no.
4-2 Learning to Use BPM with WebLogic Integration

Overview of the Order Processing Workflow Design
If the credit check fails, the customer service representative is assigned the task of contacting the customer to obtain correct credit information, and the process becomes manual from this point on.
4. The task of contacting the customer is assigned to a Worklist role, and the workflow terminates.
If the credit check passes, the system checks a database for the current inventory of the ordered item, according to the item ID, and it compares the quantity of items available with the quantity requested.
5. An EJB is called to check the inventory.
6. A decision evaluates whether the inventory is sufficient.
If the amount of stock is not sufficient to accommodate the order, the order is placed on hold until new inventory arrives. When the system receives notice of new incoming inventory, it repeats step 5 until it can verify that the inventory is sufficient to process the order.
7. An event node waits for an incoming XML document. When the event is triggered, the flow loops back to the inventory-checking task node.
If the inventory is sufficient, the order is forwarded to two human agents simultaneously: one agent arranges shipment; the other instructs the system to generate an invoice for the order.
8. The Order Fulfillment sub-workflow is called.
The system confirms that the order has been shipped and notifies the customer via e-mail.
9. An e-mail may be sent to the customer.
10. The workflow terminates.
At any point in the transaction before shipping, the order can be cancelled by notification from the customer.
11. An event node waits for an incoming XML message.
Table 4-1 Order Processing Workflow Summary (Continued)
Process Implementation
Learning to Use BPM with WebLogic Integration 4-3

4 Creating a Workflow
Creating a Template
When you create a workflow template, you specify the organizations with which you would like to associate it.
Note: If you associate a template with multiple organizations, any changes you make to the template are automatically reflected when viewing the template from different organizations.
To create the Order Processing template:
1. In the Studio folder tree, right-click the Templates folder and select Create Template from the pop-up menu. The Template Properties dialog box appears.
Figure 4-2 Template Properties Dialog Box
2. In the Name field, enter Order Processing, and from the Organizations list, select the CDExpress check box.
3. Click OK. The Order Processing template is added under the Templates folder in the folder tree.
4-4 Learning to Use BPM with WebLogic Integration

Creating a Template Definition
Creating a Template Definition
When you create a template definition, you specify effective and expiry dates. By default, the effective date is the current date and there is no expiry date.
To create the template definition for the new workflow template:
1. Under the Templates folder, right-click the Order Processing template and select Create Template Definition from the pop-up menu. The Template Definition Order Processing dialog box appears.
Figure 4-3 Template Definition Order Processing Dialog Box
2. Optionally, enter an effective date and expiry date (be sure that your dates will allow you to run the workflows), and click OK.
Learning to Use BPM with WebLogic Integration 4-5

4 Creating a Workflow
The workflow design window opens, with a simple default workflow containing a start node, a task node, and a done node, and two actions within the task node: Assign Task to User WorkflowAttribute(“Initiator”) and Mark Task as Done. These are the minimum workflow objects that are required to define an executable workflow.
Figure 4-4 Workflow Design Window
Drawing the Flow
You use the toolbar icons in the workflow design window to draw your flow. In this section we draw the Order Processing workflow by placing node shapes in the workflow design area, and then connecting and renaming them.
Placing Shapes
Our workflow design requires the following shapes:
n Four tasks (in addition to the one provided by default)
n Two events
n Two decisions
4-6 Learning to Use BPM with WebLogic Integration

Drawing the Flow
To add a shape, do the following:
1. Click the icon for the shape on the toolbar.
2. Click anywhere in the workflow design area.
3. Release the mouse button to drop the shape.
Note: Shapes are initially assigned a number when you place them. However, the final order of the shapes within the flow does not matter.
n To move a shape, drag and drop it anywhere within the workflow design area.
n To delete a shape, right-click it and select Delete from the pop-up menu. When prompted, select Yes to confirm deletion.
Renaming Nodes
Before we connect the nodes, let us rename them, to make it easier to identify them.
Note: Decision nodes must be named with expressions, usually containing variables. Because you must first create the variables to be used in conditional expressions, you will name the decision nodes in Chapter 5, “Defining Workflow Nodes.”
To rename task and event nodes:
1. In the workflow design area, double-click a node to invoke its Properties dialog box.
2. In the Name field for a task node, or the Description field for an event node, enter the name for the node, as listed in the following table.
Table 4-2 Order Processing Workflow: Task and Event Nodes
Node Name
T1 Check Customer Credit
T2 Confirm Order Fulfillment
T3 Check Inventory
Learning to Use BPM with WebLogic Integration 4-7

4 Creating a Workflow
3. Click OK to exit the dialog box. The name now appears on the node in the workflow design area.
4. Repeat steps 1 to 3 for all the nodes listed in the table.
Note: Do not worry if your names do not correspond exactly to the node numbers in the table. The final order of the shapes within the flow does not matter.
Arranging Shapes and Connecting Nodes
We now move the shapes around and connect the nodes so that the final flow appears as in the following figure.
T4 Start Order Fulfillment
T5 Contact Customer
E1 Wait for New Inventory
E2 Watch for Cancellation
Table 4-2 Order Processing Workflow: Task and Event Nodes
Node Name
4-8 Learning to Use BPM with WebLogic Integration

Drawing the Flow
Figure 4-5 Order Processing Workflow: Final Design
To move a shape, drag and drop it anywhere within the workflow design area.
To make a connection, you can use one of two approaches: from the toolbar or from a Properties dialog box for the node.
To make a connection from the toolbar:
1. Click the Connection button on the toolbar.
Learning to Use BPM with WebLogic Integration 4-9

4 Creating a Workflow
2. Click the node from which you want to begin the connection and drag to the node at which you want to end the connection, and then release the mouse button to make the connection. For Decision nodes, you are prompted to select a True or False connection.
To make a connection from a node’s Properties dialog box:
1. Double-click the source node from which you want to draw the connection. Its Properties dialog box appears.
2. On the Next tab, select the target node to which you want to connect. For Decision nodes, select the node from the Next True and Next False tabs.
To delete a connection, you can use one of two approaches: from within the drawing area or from the Properties dialog box for a node.
To delete a connection from within the drawing area:
1. Right-click on the desired connection, and from the pop-up menu that appears, select Delete Connection.
2. When prompted, confirm deletion by selecting Yes.
To delete a connection from a node’s Properties dialog box:
1. Double-click the source node from which the connection is made to invoke its Properties dialog box.
2. On the Next tab, deselect the target node to which the source node is connected. For Decision nodes, deselect the node from Next True and Next False tabs.
Adding a Workflow Label
In “Understanding Workflow Expressions: Viewing the Set Workflow Variable and Assign Task to User Actions” on page 3-12, you saw that in the Order Processing Trigger workflow, the variable OrderID was set to be incremented by 1. Now we will create a label which displays that information in the run-time applications, so that each instance of the workflow will have a unique label.
To create a workflow label, you specify a workflow expression. To display the label Order number, we use the following expression.
4-10 Learning to Use BPM with WebLogic Integration

Adding a Workflow Label
Listing 4-1 Workflow Label
“Order ” + $OrderID
To add our label, we must also create the variable OrderID that corresponds to the variable that already exists in the Order Processing Trigger workflow. Since we can create a variable from within the Expression Builder, the following procedure combines creating a variable with defining an expression.
Creating an Expression with the Expression Builder
To create the OrderID variable and define the workflow label:
1. With the Order Processing template definition open, right-click its folder in the folder tree, or anywhere in the workflow design window, and from the pop-up menu, select Properties. The Template Definition Order Processing dialog box appears, now with the Workflow Label field displayed.
Note: This field is not available when you first create the template definition, but only after you have opened it.
Figure 4-6 Order Processing Template Definition Dialog Box: Workflow Label Field
2. Click the button next to the Workflow Label field. The Expression Builder appears.
Learning to Use BPM with WebLogic Integration 4-11

4 Creating a Workflow
Figure 4-7 Creating a Variable from the Expression Builder
3. Select the Variables option and, in the list of variables in the right pane, double-click NEW. The Variable Properties dialog box appears.
Figure 4-8 Variable Properties Dialog Box
4-12 Learning to Use BPM with WebLogic Integration

Adding a Workflow Label
4. Enter the relevant information for the OrderID variable, as listed in the table below.
The new variable now appears under the Variables folder in the folder tree.
5. Click OK to close the Variable Properties Dialog Box. The variable now appears in the Expression field of the Expression Builder dialog box.
Figure 4-9 Using the Expression Builder
Table 4-3 Template Definition ID Variable
Variable Name
Data Type
Parameter Type
Use in Workflow
OrderID Integer Input Appears as the workflow label in the Worklist and increments each time the workflow is run.
Is passed to the Order Fulfillment workflow.
1. Select an element type from the menu.
2. Scroll to the desired item and double-click it.
3. The expression element appears in the Expression window.
Learning to Use BPM with WebLogic Integration 4-13

4 Creating a Workflow
6. Continue to build the expression shown in Listing 4-1 by doing any of the following:
l Type directly into the Expression window.
l To enter quotation marks, select the Literals option, and then select double quote.
l To enter a plus sign, select the Operators option, and then select plus sign.
l To enter a variable, select the Variables option, and then select the appropriate variable name from the list.
When done, your Expression window should look like the following window.
7. Click OK to exit the Expression Builder dialog box. Your expression now appears in the Workflow Label field of the Template Definition properties dialog box.
8. Click OK to exit the Template Definition Order Processing dialog box.
4-14 Learning to Use BPM with WebLogic Integration

Activating the Workflow
Activating the Workflow
To make the workflow available to be run, you must activate it.
To activate the Order Processing workflow:
1. With the Order Processing template definition open, right-click its folder in the folder tree, or anywhere in the workflow design window, and from the pop-up menu, select Properties. The Template Definition Order Processing dialog box appears, now with the Active check-box displayed.
Note: This check box is not available when you first create the template definition, but only after you have opened it.
Figure 4-10 Order Processing Template Definition Dialog Box: Active Check Box
2. Select the Active check box.
3. Click OK to exit the dialog box.
Learning to Use BPM with WebLogic Integration 4-15

4 Creating a Workflow
Saving the Workflow
A workflow cannot be run if it has not been saved at least once.
To save the Order Processing workflow, with the template definition open, right-click its folder in the folder tree, and from the pop-up menu, select Save.
In the next section, you will add and define all the variables and actions required by the workflow. Remember to save your workflow periodically as you proceed through the remainder of the tutorial.
4-16 Learning to Use BPM with WebLogic Integration

CHAPTER
5 Defining Workflow Nodes
In this section, after a detailed overview of the workflow nodes, we provide procedures for defining every workflow object of the Order Processing workflow, node by node. By following the procedures in this section, you will learn how to:
n Create an event-triggered start node
n Create XPath expressions with the XPath Wizard
n Compose and send an XML document to a Worklist client and process the response with the Worklist DTDs
n Add comments to tasks and workflows
n Define events and event keys
n Create and define decisions
n Configure and perform business operations to call EJB methods
n Use a plug-in action
n Call a sub-workflow
n Send an e-mail message
You are ready to do the procedures provided in this section of the tutorial if you have done the following:
n Imported the Create OrderBean business operation, as described in “Importing the Tutorial.jar Workflow Objects” on page 2-8.
Learning to Use BPM with WebLogic Integration 5-1

5 Defining Workflow Nodes
n Created, designed, and activated the Order Processing workflow template and template definition, as described in Chapter 4, “Creating a Workflow.”
n Optionally, specified a valid e-mail address in the Post XML Event action in the Order Processing Trigger workflow, as described in “Posting an Internal XML Event: Editing the Neworder XML Document” on page 3-14.
Overview of the Order Processing Workflow Nodes
The following figure provides a detailed view of the workflow. The numbered steps in the figure are described in the table that follows the figure, which maps the real-world processes to the workflow implementation.
5-2 Learning to Use BPM with WebLogic Integration

Overview of the Order Processing Workflow Nodes
Figure 5-1 Order Processing Nodes: Detailed View
Order FulfilmentWorkflowVariables
2
4
7
8
5
6
Order ProcessingTrigger Workflow
Variables
InternalJMSQueue
XML
1
3
Worklist XML VariablesXML XPath
EJBVariables
Application
ExternalJMS
Queue
XML
XPath
Worklist
Email ClientEmail
Servlet
ExternalJMSQueue
XML
9
10
<cancelledorder>
<neworder>
<newinventory>
11
Learning to Use BPM with WebLogic Integration 5-3

5 Defining Workflow Nodes
Table 5-1 Order Processing Workflow Summary
Process Implementation
The order is received by a processing system, which reads the data and appends an ID number to the order.
In a real-world implementation, an event-type start node would be set up to react to an XML message posted to an external JMS queue by a servlet.
1. An event-triggered start node is set up to listen for the <neworder> XML message sent to the internal JMS queue by the Order Processing Trigger workflow. XPath statements extract data from the XML document to populate the workflow variables.
The order is forwarded to a customer service representative, who checks the customer’s credit information.
2. An XML message is sent to the admin user, prompting him/her with a yes/no response to confirm whether the credit check passes. The response is sent back in an XML message, and read into a workflow variable by an XPath statement.
3. A decision evaluates whether the response is yes or no.
If the credit check fails, the customer service representative is assigned the task of contacting the customer to obtain correct credit information, and the process becomes manual from this point on.
4. The task of contacting the customer is assigned to the CustomerService role, and the workflow proceeds to the Done node.
If the credit check passes, the system checks a database for the current inventory of the ordered item, according to the item ID, and it compares the quantity of items available with the quantity requested.
5. The item ID is passed to a method in an EJB that checks a database and returns the current inventory for the item to a variable.
6. A decision evaluates whether the returned inventory value is greater than or equal to the quantity of items ordered. If it is not, the order status is set to waiting.
If the amount of stock is not sufficient to accommodate the order, the order is placed on hold until new inventory arrives. When the system receives notice of new incoming inventory, it repeats step 5 until it can verify that the inventory is sufficient to process the order.
In a real-world implementation, an event would be set up to react to an XML message posted to an external JMS queue by an inventory-reporting application.
7. An event and event key are set up to react to a hypothetical XML <checkinventory> message including the relevant item ID. When the event is triggered, the flow loops back to the inventory-checking task node.
5-4 Learning to Use BPM with WebLogic Integration

Creating an Event-Triggered Start
Creating an Event-Triggered Start
The Order Processing workflow is triggered by the XML event that is posted by the Order Processing Trigger workflow. When the workflow is started, its first operation is to initialize workflow variables to the values provided by the XML document posted by the Order Processing Trigger workflow.
Thus, to create our node, we need to do the following:
n Create variables to correspond to the data in the XML document
n Set up the event that triggers the workflow
n Define XPath expressions to extract the data from the XML document and assign it to variables
If the inventory is sufficient, the order is forwarded to two human agents simultaneously: one agent arranges shipment; the other instructs the system to generate an invoice for the order.
8. The Order Fulfillment workflow is called, variables are passed to it, the results of the operations performed within it are returned.
The system confirms that the order has been shipped and notifies the customer via e-mail.
9. When the Order Fulfillment workflow terminates, and the Watch for Cancellation event is cancelled, the order status is set to complete, and an e-mail may be sent to the customer.
10. The workflow terminates.
At any point in the transaction before shipping, the order can be cancelled by notification from the customer.
In a real-world implementation, an event would be set up to react to an XML message posted to an external JMS queue by a servlet.
11. An event and event key are set up to react to a hypothetical <cancelledorder> XML message including the relevant order ID. If the event is triggered, the workflow proceeds to the done node and is terminated.
Table 5-1 Order Processing Workflow Summary (Continued)
Process Implementation
Learning to Use BPM with WebLogic Integration 5-5

5 Defining Workflow Nodes
Creating Variables
Because our start node will extract values from an XML document, we need to set up corresponding variables in which we can store the values we have extracted. The following table lists the variables, their use in the workflow, and the XML elements to which they correspond. Remember that an input parameter is used when the value of a variable is to be passed to another workflow. An output parameter, on the other hand, is used when the value of a variable is to be passed to the current workflow from another workflow.
Table 5-2 Start Node Variables
Variable Data Type
Parameter Type
Use in Workflow Corresponding XML Element
OrderStatus String Input Can change at various points of the workflow
<status>
OrderID Integer Input Appears as the workflow label in the Worklist and increments each time the workflow is run
<id>
ShipToState String Input, Output Is passed to the calculate() method of the POBean by the Order Fulfillment workflow; the initial value will be caught by the exception handler and passed to a Worklist user for correction
The corrected value obtained from the user is returned to the Order Processing workflow
<shiptostate>
CustomerID String n/a Is used for the credit check task to identify the customer to the Worklist user
<customer>
<id>
CustomerName String Input Is used for the customer notification task to identify the customer to the Worklist user
Is passed to the Order Fulfillment workflow for the shipping task
<customer>
<name>
CustomerAddress String Input Is passed to the Order Fulfillment workflow for the shipping task
<customer>
<address>
5-6 Learning to Use BPM with WebLogic Integration

Creating an Event-Triggered Start
To create the variables:
1. Expand the Order Processing template definition folder, right-click Variable, and select Create Variable from the pop-up menu. The Variable Properties dialog box appears.
CustomerPhone String n/a Is used in the customer notification task to provide the customer’s contact information to the Worklist user
<customer>
<phone>
CustomerEmail String n/a Is used in the order confirmation task <customer>
<email>
ItemID Integer Input Is passed to the checkInventory() and calculate() methods
<item>
<id>
ItemName String n/a Not used <item>
<name>
ItemQuantity Integer Input Is used by a decision node for comparison with the result of the checkInventory() method, and is passed to the calculate() method by the Order Fulfillment workflow
<item>
<quantity>
Table 5-2 Start Node Variables (Continued)
Variable Data Type
Parameter Type
Use in Workflow Corresponding XML Element
Learning to Use BPM with WebLogic Integration 5-7

5 Defining Workflow Nodes
Figure 5-2 Variable Properties Dialog Box
2. In the Name field, enter a name for the variable, according to Table 5-2.
Note: Variable names cannot contain spaces.
3. From the Type drop-down list, select the appropriate data type for the variable, according to Table 5-2.
4. Select any Parameter check boxes that are necessary, according to Table 5-2.
5. Click OK. The new variable appears in the Variables folder in the folder tree.
6. Repeat steps 1 to 5 to create all the variables listed in Table 5-2.
Note: You do not need to create the OrderID variable, because you already created it in “Adding a Workflow Label” on page 4-10.
5-8 Learning to Use BPM with WebLogic Integration

Creating an Event-Triggered Start
When you are done, the Variables folder tree should appear as follows.
Defining the Start Node Event
To ensure that the workflow is triggered by the correct XML document, we specify a root element for the Start node that corresponds to the root element of the XML document posted in the Order Processing Trigger, namely <neworder>.
Because the Start node is not tied to a particular instance of the XML document, but should be triggered by all incoming XML documents containing the root element <neworder>, we do not need to set up an event key, as we do for the events we define within the workflow. (For an example, see “Creating an Event: Defining the Watch for Cancellation Event.”)
To set up the event:
1. In the Order Processing workflow diagram, double-click the Start node to display the Start Properties dialog box.
2. Select the Event option, and in the drop-down list, select XML Event.
Learning to Use BPM with WebLogic Integration 5-9

5 Defining Workflow Nodes
Figure 5-3 Start Properties Dialog Box: Event
3. In the Document Type/Root Element field, enter neworder.
4. From the Start Organization drop-down list, select “CDExpress”.
Defining XPath Statements
To extract values from an XML document and place them into workflow variables, you use XPath language statements, which function in a similar fashion to query language statements on a database. Although XPath is a powerful language with numerous functions, the function you will most commonly use is text(), which returns the value of an element or attribute. The generic form of the XPath text() function statements that we will use is as follows:
n For an element value:
XPath(“/root element/child element/text()”)
5-10 Learning to Use BPM with WebLogic Integration

Creating an Event-Triggered Start
n For an attribute value:
XPath(“/root element/@attribute/text()”)
To extract the values from our XML document, then, you will need to set up XPath statements like those shown in the following table.
Table 5-3 Start Node: XPath Expressions
Variable Corresponding XML Element
Required XPath Expression to Extract Value
OrderStatus <status> XPath(“/neworder/status/text()”)
OrderID <id> XPath(“/neworder/id/text()”)
ShipToState <shiptostate> XPath(“/neworder/shiptostate/text()”)
CustomerID <customer>
<id>
XPath(“/neworder/customer/id/text()”)
CustomerName <customer>
<name>
XPath(“/neworder/customer/name/text()”)
CustomerAddress <customer>
<address>
XPath(“/neworder/customer/address/text()”)
CustomerPhone <customer>
<phone>
XPath(“/neworder/customer/phone/text()”)
CustomerEmail <customer>
<email>
XPath(“/neworder/customer/email/text()”)
ItemID <item>
<id>
XPath(“/neworder/item/id/text()”)
ItemName <item>
<name>
XPath(“/neworder/item/name/text()”)
ItemQuantity <item>
<quantity>
XPath(“/neworder/item/quantity/text()”)
Learning to Use BPM with WebLogic Integration 5-11

5 Defining Workflow Nodes
You can create XPath statements in the Studio through any of the following three methods, which are listed in increasing order of validity checking:
n Typing the expressions manually—This method provides no validity checking; if your XPath statement is invalid, it will not be rejected, and you will have to find the error manually.
n Using the Expression Builder to construct parts of the expressions—This method still requires that you type most of the expression manually, but it prompts you with error messages if you try to add an invalid statement.
n Using the XPath Wizard to generate the expressions automatically from a stored XML entity—This method allows you to select sections of actual XML entities and to test expressions against them. This method provides the highest level of assistance and validity checking of the three methods listed here.
In the following procedure, we use the XPath Wizard to load the Neworder document you exported in “Using the XML Repository: Exporting the Neworder XML Document” on page 3-19.
To use the XPath Wizard to define XPath expressions:
1. At the bottom of the Start Properties dialog box, select the Variables tab and click Add. The Workflow Variable Assignment dialog box appears.
2. Click the button next to the Event Expression field. The Expression
Builder dialog box appears.
3. Click XPath Wizard. The XPath Wizard appears.
4. Select the Sample tab.
5. Click the Open Document button . The XML Finder dialog box appears.
6. Select the Repository tab.
7. Double-click the folder in which you saved the XML entity in “Using the XML Repository: Exporting the Neworder XML Document” on page 3-19 (for example, Tutorial).
5-12 Learning to Use BPM with WebLogic Integration

Creating an Event-Triggered Start
Figure 5-4 XML Finder Dialog Box: Repository Tab
8. Select the Neworder document and click Preview to preview the document. The Preview Document window appears, showing the actual text version of the XML document you saved in “Using the XML Repository: Exporting the Neworder XML Document” on page 3-19.
Learning to Use BPM with WebLogic Integration 5-13

5 Defining Workflow Nodes
Figure 5-5 Preview Document Window
9. Click OK to close the Preview window.
10. Click OK to exit the XML Finder. The XML document appears in the Sample window of the XPath Wizard.
5-14 Learning to Use BPM with WebLogic Integration

Creating an Event-Triggered Start
Figure 5-6 XPath Wizard: Sample Tab
1. Highlight a value here...
2. ...to generate the XPath expression for it here.
Learning to Use BPM with WebLogic Integration 5-15

5 Defining Workflow Nodes
11. Do either of the following:
l Highlight the first element value by clicking it. Its XPath statement is automatically generated in the XPath Expression field.
l Select the Test tab, type the XPath statement in the XPath Expression field, and validate your expression by clicking the Test XPath Expression button
and checking to see whether the value selected in the document by the Wizard is the value you want to capture.
12. Click the Pin Expression to Workspace button . The expression appears in the Workspace (select the Workspace tab to view).
Figure 5-7 XPath Wizard: Workspace Tab
13. Repeat steps 10 and 11 for all the XML elements in Table 5-3. When you are done, the Workspace should look like this:
14. Click OK to exit the XPath Wizard for now, click OK to exit the Expression Builder and Cancel to exit the Workflow Variable Assignment dialog boxes.
5-16 Learning to Use BPM with WebLogic Integration

Creating an Event-Triggered Start
To add the XPath expressions to the Variables list of the Start Properties dialog box:
1. At the bottom of the Start Properties dialog box, select the Variables tab and click Add. The Workflow Variable Assignment dialog box appears.
Figure 5-8 Workflow Variable Assignment Dialog Box
2. From the Variable drop-down list, select a variable.
3. Click the button to invoke the Expression Builder dialog box.
4. Click XPath Wizard.
5. In the XPath Wizard dialog box, select the Workspace tab.
6. Select the appropriate XPath expression for your variable, according to the list in Table 5-3, and click OK. The expression appears in the Expression window of the Expression Builder dialog box.
Learning to Use BPM with WebLogic Integration 5-17

5 Defining Workflow Nodes
Figure 5-9 Expression Builder Dialog Box
7. Click OK. The expression appears in the Expression field of the Workflow Variable Assignment dialog box.
8. Click OK. The new XPath expression appears on the Variables tab of the Start Node Properties dialog box.
5-18 Learning to Use BPM with WebLogic Integration

Sending an XML Message to a Worklist User: Defining the Check Customer Credit Task
Figure 5-10 Start Node Properties Dialog Box: Variables Tab
9. Repeat steps 1 to 8 for all the variables and expressions listed in Table 5-3.
10. When you are done, click OK to exit the Start Node Properties dialog box.
Sending an XML Message to a Worklist User: Defining the Check Customer Credit Task
This task assigns the work of checking the customer’s credit to the user admin in the Worklist, and then sends an XML message to that user, requesting confirmation of the credit approval.
To define the task, we need to:
n Add and define the Assign Task to User action
n Add and define the Send XML to Client Action
Assigning a Task to a User
This procedure explains how to assign the Check Customer Credit task to the user admin.
Learning to Use BPM with WebLogic Integration 5-19

5 Defining Workflow Nodes
Before we can add the actions we want for this node, we need to clear the default actions and permissions that were predefined for all T1 task nodes when you created the template definition.
To clear default actions:
1. In the workflow design area, double-click the Check Customer Credit task node to display the Task Properties dialog box.
2. Select the Activated tab, select the default Assign Task to WorkflowAttribute(“Initiator”) action, and click Delete. When prompted for confirmation, click Yes.
3. Select the Executed tab, select the default Mark Task Done action, and click Delete. When prompted for confirmation, click Yes.
To add and define the Assign Task to User action:
1. In the Task Properties dialog box, select the Activated tab, and click Add to invoke the Add Action dialog box.
2. Expand the Task Actions folder, select Assign Task to User, and click OK. The Assign Task to User dialog box appears.
5-20 Learning to Use BPM with WebLogic Integration

Sending an XML Message to a Worklist User: Defining the Check Customer Credit Task
Figure 5-11 Assign Task to User Dialog Box
3. In the Task to assign list of the dialog box, select the task Check Customer Credit.
4. From the User drop-down list, select admin, and click OK. The Assign Task to User now appears on the Activated tab in the Task Properties dialog box.
Sending an XML Message to a Client
One way of interacting with a client application user is to define an XML document that you send to the client application. The application should be programmed to identify this XML document, respond to it appropriately, and send an XML document to the server with information that can be used to populate workflow variables.
Learning to Use BPM with WebLogic Integration 5-21

5 Defining Workflow Nodes
By default, the Worklist application recognizes a default set of Document Type Definitions (DTDs), consisting of eight request and response DTDs, which you can view in the /docs/apidocs/com/bea/wlpi/common/doc-files directory of your WebLogic Integration installation. They are described in the following table.
Note: You can also develop custom code to extend the types of XML documents a client application can recognize, or to communicate with a client application via the API. For more information, see Programming BPM Client Applications.
For our Check Customer Credit task, we will use the ClientMsgBoxReq.dtd to send a message box with yes/no buttons. The DTD has the following structure:
Listing 5-1 ClientMsgBoxReq XML Document Structure
<message-box title=“text” style=“{plain|information|question|warning|error}” options=“{ok|ok_cancel|yes_no|yes_no_cancel}”>text <actionid>provided by default</actionid></message-box>
Table 5-4 Worklist DTDs
Request DTD Description Corresponding Response DTD
ClientMsgBoxReq.dtd Displays a message box with buttons to the user.
ClientMsgBoxResp.dtd
ClientSetVarsReq.dtd Displays a message box with data entry fields to the user.
ClientSetVarsResp.dtd
ClientCallPgmReq.dtd Calls a program on the client machine. ClientCallPgmResp.dtd
ClientCallAddInReq.dtd Invokes a custom extension to the Worklist application.
ClientCallAddInResp.dtd
5-22 Learning to Use BPM with WebLogic Integration

Sending an XML Message to a Worklist User: Defining the Check Customer Credit Task
Note: The action ID element and value are provided by the system when you create a Send XML to client action.
The following figure shows the tags and values that correspond to the message box we will send.
Figure 5-12 Credit Check Message Box
Because we want to use the customer ID in the text of the message we send, we will use the CustomerID variable to supply the appropriate value at run time.
To capture the result of the user’s selection of buttons, we need to extract data from the ClientMsgBoxResp.dtd, specifically from the <message-box option> attribute, as shown in Listing 5-2.
Listing 5-2 ClientMsgBoxResp XML Document Structure
<message-box option=”{ok|yes|no|cancel}” />
Thus, to define the complete action, we need to:
n Add the Send XML to Client action and create a variable in which to store the user’s response to the XML message
n Create the XML document structure
Title bar: <message-box title=“Credit Check”>
Message format: <message-box style=“question”>
Buttons: <message-box options=“yes_no”>
Learning to Use BPM with WebLogic Integration 5-23
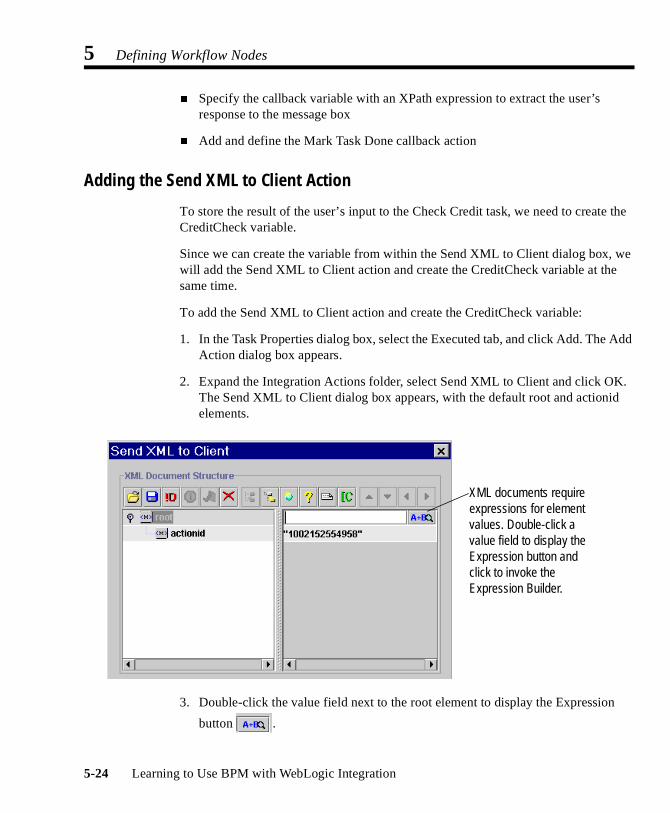
5 Defining Workflow Nodes
n Specify the callback variable with an XPath expression to extract the user’s response to the message box
n Add and define the Mark Task Done callback action
Adding the Send XML to Client Action
To store the result of the user’s input to the Check Credit task, we need to create the CreditCheck variable.
Since we can create the variable from within the Send XML to Client dialog box, we will add the Send XML to Client action and create the CreditCheck variable at the same time.
To add the Send XML to Client action and create the CreditCheck variable:
1. In the Task Properties dialog box, select the Executed tab, and click Add. The Add Action dialog box appears.
2. Expand the Integration Actions folder, select Send XML to Client and click OK. The Send XML to Client dialog box appears, with the default root and actionid elements.
3. Double-click the value field next to the root element to display the Expression
button .
XML documents require expressions for element values. Double-click a value field to display the Expression button and click to invoke the Expression Builder.
5-24 Learning to Use BPM with WebLogic Integration

Sending an XML Message to a Worklist User: Defining the Check Customer Credit Task
4. Click the Expression button to invoke the Expression Builder.
5. In the Expression Builder, select the Variables option.
6. From the variables list, scroll to NEW, and double-click NEW to invoke the Variable Properties dialog box.
7. Create the variable as described in the following table. Click OK to exit the Variable Properties dialog box.
8. Click OK to exit the Expression Builder.
Defining the XML Document Structure
To define the message-box XML document structure:
1. In the Send XML to Client dialog box, expand the root element.
Warning: Do not edit, delete or move the actionid element, its name or, its value. The action ID is used to identify the action instance at run time.
2. To begin composing the XML document, double-click the root element and type over the existing text to enter message-box. Press Enter.
Note: If you see the icon, this means that the field does not yet include a valid expression. When you enter a value in the field, the icon disappears.
3. Double-click the value field next to the message-box element and, by typing or using the Expression Builder, enter the following:
“Does customer ” + $CustomerID + “ pass credit check?”
Remember to include spaces inside the quotation marks to separate string literals from variables.
Table 5-5 Check Customer Credit Task Variable
Variable Data Type
Parameter Type
Use in Workflow Corresponding XML Element or Attribute
CreditCheck String n/a To store the result of the Worklist user’s response
<message-box option>
Learning to Use BPM with WebLogic Integration 5-25

5 Defining Workflow Nodes
4. Select the message-box element, and click the Add Attribute button to add
the first attribute.
5. In the Attribute field, double-click and type over the existing text to add the attribute name options.
6. In the value field next to the options attribute, double-click type over the existing text to enter “yes_no”.
7. Select the message-box element, and click the Add Attribute button to add the second attribute.
8. In the Attribute field, double-click and type over the text to add the attribute name style.
9. In the value field next to the options attribute, double-click and type over the text to enter “question”.
10. Select the message-box element, and click the Add Attribute button to add the third attribute.
11. In the Attribute field, double-click and type over the text to add the attribute name title. Press Enter.
12. In the value field next to the style attribute, double-click and type over the text to enter “Credit Check”, and press Enter.
The completed XML document structure should now look like the following.
5-26 Learning to Use BPM with WebLogic Integration

Sending an XML Message to a Worklist User: Defining the Check Customer Credit Task
Assigning the Callback Variable
To extract the result of the user’s response to the message box from the XML document returned by the Worklist application, we need to set up an XPath expression to populate the CreditCheck variable.
To assign the callback variable:
1. At the bottom of the Send XML to Client dialog box, select the Callback Variables tab.
2. Click Add. The Workflow Variable Assignment dialog box appears.
3. From the Variable drop-down list, select CreditCheck.
4. In the Event Expression field, enter the XPath statement listed in the following table.
5. Click OK to exit. The new variable assignment statement appears on the Callback Variables tab.
Tip: You can also load the ClientMsgBoxResp.dtd file into the XPath Wizard to automatically generate an XML document from which you can build the XPath expression. For procedures on using the XPath Wizard, see “Defining XPath Statements” on page 5-10.
Marking the Task Done
Because we want to ensure that the task node waits for the user’s response to the message box before moving to the next node, we specify the Mark Task Done action as a callback action in the Send XML to Client dialog box, rather than adding it to the Task Properties dialog box. Placing the Mark Task Done action here causes the workflow to wait for the response from the Worklist client before proceeding to the next node.
Table 5-6 Check Customer Credit Task Node XPath Expression
Variable Corresponding XML Element
Required XPath Expression to Extract Value
CreditCheck <message-box option>
XPath(“/message-box/@option/text()”)
Learning to Use BPM with WebLogic Integration 5-27

5 Defining Workflow Nodes
To add the Mark Task Done callback action:
1. At the bottom of the Send XML to Client dialog box, select the Callback Actions tab.
2. Click Add to invoke the Add Action dialog box.
3. Expand the Task Actions folder, select Mark Task as Done, and click OK. The Mark Task as Done dialog box appears.
Figure 5-13 Mark Task as Done Dialog Box
4. From the Task to mark as done list, select Check Customer Credit, and click OK. The Mark Task Done action appears on the Callback Actions tab.
5. Click OK to exit the Send XML to Client dialog box. The Send XML to Client action appears on the Executed tab of the Task Properties dialog box.
6. Click OK to exit the Task Properties dialog box.
5-28 Learning to Use BPM with WebLogic Integration

Testing for Equality: Defining the Check Credit Decision
Testing for Equality: Defining the Check Credit Decision
The first decision in our workflow checks whether the customer has passed the credit check, according to the Worklist user’s response in the Check Credit task—yes or no.
The decision node is named with the condition that you are evaluating, and this condition must be specified as an expression. Typically the condition compares the value of a variable with another element, such as a constant, or another variable. By default a decision is assigned the condition 1=1 (which always evaluates to true).
To check the Worklist user’s response to the credit check question, we will create a test for equality with a constant. That is, we will test whether the response from the user, stored in the variable CreditCheck, equals “yes”. If the condition evaluates to true, the flow proceeds to the Check Inventory task; if the condition evaluates to false, the flow proceeds to the Contact Customer task.
To define the C1 decision node:
1. In the workflow design window, double-click the C1 decision shape to display the Decision Properties dialog box.
2. In the Condition field, enter $CreditCheck=“yes”.
3. Click OK to close the dialog box.
Learning to Use BPM with WebLogic Integration 5-29

5 Defining Workflow Nodes
Adding a Task and Workflow Comment: Defining the Contact Customer Task
If the credit check decision evaluates to false, the flow proceeds to the Contact Customer task, and then terminates. This node sets the variable OrderStatus to cancelled and adds a workflow comment to that effect. The comment will appear in the run-time applications when the workflow is executed.
The task of contacting the customer is then assigned to the role CustomerService, rather than to a particular user. This means that any user associated with the role can execute the task. Also, rather than communicating with the Worklist user via an XML message, we set a task comment that appears along with the task in the Worklist window at run time.
Note: Workflow and task comments are limited to a maximum of 254 characters. Comments exceeding this limit are truncated and no exception is thrown.
To define the Contact Customer task node, we will:
n Add and define the Set Workflow Variable action
n Add and define the Set Workflow Comment action
n Add and define the Set Task Comment action
n Add and define the Assign Task to Role action
n Add and define the Mark Task as Done Action
Setting a Workflow Variable
To add and define the Set Workflow Variable action:
1. Double-click the Contact Customer task node to open the Task Properties dialog box.
2. Select the Activated tab and click Add to open the Add Action dialog box.
5-30 Learning to Use BPM with WebLogic Integration

Adding a Task and Workflow Comment: Defining the Contact Customer Task
3. Expand the Workflow Actions folder, select Set Workflow Variable, and click OK. The Set Workflow Variable dialog box appears.
Figure 5-14 Set Workflow Variable Dialog Box
4. From the Variable to be set drop-down list, select OrderStatus.
5. Select the From Expression option, and in the field, enter “cancelled”.
6. Click OK. The Set Workflow Variable action appears on the Activated tab in the Task Properties dialog box.
Setting a Workflow Comment
Once we have set the OrderStatus variable, we can use this variable in the expression we build to specify a workflow comment. This comment will appear in the run-time applications as Order cancelled.
To add and define the Set Workflow Comment action:
1. In the Contact Customer Task Properties dialog box, select the Activated tab and click Add to open the Add Action dialog box.
2. Expand the Workflow Actions folder, select Set Workflow Comment and click OK. The Set Workflow Comment dialog box appears.
Learning to Use BPM with WebLogic Integration 5-31

5 Defining Workflow Nodes
Figure 5-15 Set Workflow Comment Dialog Box
3. In the Comment field, type or use the Expression Builder to enter the expression “Order ” + $OrderStatus.
4. Click OK to exit the dialog box. The Set Workflow Comment action now appears on the Activated tab in the Task Properties dialog box.
Setting a Task Comment
The comment we are going to display to the Worklist user is:
Please contact John Doe at 408 534 9567
So that the workflow supplies the variable values at run time, we use the CustomerName and CustomerPhone variables in the expression. Our expression should resemble the following:
Listing 5-3 Contact Customer Task: Task Comment
“Please contact ” + $CustomerName + “ at” + $CustomerPhone
Note the use of plus signs to concatenate string literals and variables, and the use of spaces to ensure that spaces appear in the final message between variable values and literal text.
5-32 Learning to Use BPM with WebLogic Integration

Adding a Task and Workflow Comment: Defining the Contact Customer Task
To add and define the Set Task Comment action:
1. In the Contact Customer Task Properties dialog box, select the Activated tab, and click Add to invoke the Add Action dialog box.
2. Expand the Task Actions folder, select Set Task Comment, and click OK. The Set Task Comment dialog box appears.
Figure 5-16 Set Task Comment Dialog Box
3. From the Task for which to set comment list, select Contact Customer.
4. In the Comment field, type or click the Expression button to invoke the Expression Builder to enter the text in Listing 5-3.
5. Click OK to exit the Set Task Comment dialog box. The Set Task Comment action now appears on the Activated tab of the Task Properties dialog box.
Learning to Use BPM with WebLogic Integration 5-33

5 Defining Workflow Nodes
Assigning a Task to a Role
In addition to assigning a task to a user, identified by user name, you can also assign a task to a role, which can be executed by any user associated with that role.
You have a third option, which is to assign a task to a user in a role. This action assigns the task to the user associated with the role name who has the fewest number of tasks assigned to him or her at run time. However, because we are working with only a limited number of users and tasks in our examples, we will assign the task to the role name directly.
This procedure assigns the task to the role CustomerService. The user who is assigned the task (in this case, only the user admin) will see the task comment and should respond to it accordingly before executing the task.
To add and define the Assign Task to Role action:
1. In the Contact Customer Task Properties dialog box, select the Activated tab, and click Add to invoke the Add Action dialog box.
2. Expand the Task Actions folder, select Assign Task to Role, and click OK. The Assign Task to Role dialog box appears.
5-34 Learning to Use BPM with WebLogic Integration

Adding a Task and Workflow Comment: Defining the Contact Customer Task
Figure 5-17 Assign Task to Role Dialog Box
3. From the Task to assign list, select Contact Customer.
4. From the Role drop-down list, select CustomerService.
5. Click OK to exit the dialog box. The Assign Task to Role action now appears on the Activated tab in the Task Properties dialog box.
Marking the Task Done
Because this is task is assigned to an end user, we add the Mark Task Done action to the Executed tab in the Task Properties dialog box. Remember, without the Mark Task as Done action, the flow will not move forward from this node.
Learning to Use BPM with WebLogic Integration 5-35

5 Defining Workflow Nodes
To add and define the Mark Task Done action:
1. In the Contact Customer Task Properties dialog box, select the Executed tab, and click Add to invoke the Add Action dialog box.
2. Expand the Task Actions folder, select Mark Task as Done, and click OK to invoke the Mark Task as Done dialog box.
3. From the Task to mark as done list, select Contact Customer, and click OK. The Mark Task Done action appears on the Executed tab in the Task Properties dialog box.
4. Click OK to exit the Task Properties dialog box.
Creating and Performing a Business Operation: Defining the Check Inventory Task
If the credit check decision evaluates to true, the flow proceeds to the Inventory Check task. This task calls the checkInventory() method on the POBean EJB, which checks the inventory for the item ordered and returns the results to the workflow. The checkInventory() method takes a single parameter, the item ID, and returns the quantity in stock.
Note: For more information on the POBean.jar EJB, see the BEA WebLogic Integration Javadoc.
To call an EJB method, you need to do two things:
n Create a business operation for it
n Add and define the Perform Business Operation action to the node that calls the business operation
Because the checkInventory() method returns a value, namely the inventory quantity for the relevant item, we also need to create a workflow variable in which to store the result.
5-36 Learning to Use BPM with WebLogic Integration

Creating and Performing a Business Operation: Defining the Check Inventory Task
However, before calling any method on an EJB, you must first call the bean’s create() method, which creates an instance of the EJB on the WebLogic Integration server. The create()method also returns a reference to the EJB instance. This reference needs to be stored in a workflow variable known as an instance variable, so that you can invoke multiple methods on the EJB.
Thus, in order to define our Check Inventory task, we need to:
n Create the business operation for the create() method
n Create the business operation for the checkInventory() method
n Add and define the Perform Business Operation Create OrderBean action, and create a variable in which to store the result
n Add and define the Perform Business Operation Check Inventory action, and create a variable in which to store the result
n Add and define the Mark Task Done action
Note: The sample plug-ins that ship with WebLogic Integration include a plug-in action, Check Inventory, that allows you to perform the first four steps listed above in a single, predefined action. This action provides custom code that calls the appropriate POBean methods and passes parameters from and to the workflow, while you only need to specify the workflow variables that should act as the input and output parameters. To view the dialog box for this action, in the Actions dialog box, expand the Sample Actions folder and double-click Check inventory for an available item. For more information on this action and the other sample plug-ins, see Programming BPM Plug-Ins for WebLogic Integration.
Creating a Business Operation
When you create a business operation, you are configuring it globally, which means that it can then be used by any workflow in any organization. The business operation is essentially a user-friendly alias for a method call on a Java class or EJB. You can also add descriptive names for any parameters the method takes, so that other users who want to call the same business operation can know immediately what parameters, and in which order, they need to provide for it.
Learning to Use BPM with WebLogic Integration 5-37

5 Defining Workflow Nodes
We do not need to create the Create OrderBean business operation, because we imported it during the import procedure in “Importing Workflow Objects: Importing the Tutorial Package File.” (The Order Fulfillment workflow also uses this business operation, and we did not want to cause an unresolved reference in that workflow at import time.) Instead, we will simply view it.
However, we will create the Check Inventory business operation that calls the checkInventory() method on the POBean EJB, so that we can then invoke it in our Check Inventory task.
Viewing the Create OrderBean Business Operation
To view the Create OrderBean Business Operation definition:
1. Choose Configuration→Business Operations. The Business Operations dialog box appears, with the two business operations you imported in “Importing Workflow Objects: Importing the Tutorial Package File” on page 2-7: Create OrderBean and Calculate Total Price.
Figure 5-18 Business Operations Dialog Box
5-38 Learning to Use BPM with WebLogic Integration

Creating and Performing a Business Operation: Defining the Check Inventory Task
2. In the list of business operations, double-click the Create OrderBean description. The Define Business Operation dialog box appears.
Figure 5-19 Create OrderBean: Define Business Operation Dialog Box
The dialog box shows that the create() method contains no parameters, and its return type is a reference to the remote interface of the POBean EJB.
3. Click Cancel to close the Define Business Operation dialog box.
Creating the Check Inventory Business Operation
To create the Check Inventory Business Operation:
1. In the Business Operations dialog box, click Add. The Define Business Operation dialog box appears.
2. Select the Session EJB option. All the currently deployed Session EJBs become available for selection in the JNDI Name for Session EJB drop-down list.
The method’s return value type appears here. A workflow variable must exist or be created to store this value.
List of the method’s parameters (if any) appears here.
Learning to Use BPM with WebLogic Integration 5-39

5 Defining Workflow Nodes
3. From the JNDI Name for Session EJB drop-down list, select wlpi.tour.POBean. The methods for this EJB become available for selection in the Method to Call drop-down list.
4. From the Method to Call drop-down list, select int checkInventory(int p0). Its parameters and return type are displayed in the dialog box.
Figure 5-20 Check Inventory: Define Business Operation Dialog Box
5. In the Business Operation Name field, enter Check Inventory.
6. Optionally, rename the single parameter by double-clicking on it in the Parameters list. The Parameter dialog box appears.
The method’s return value type is an integer, to be stored in a variable we will create.
The method contains a single parameter, an integer.
5-40 Learning to Use BPM with WebLogic Integration

Creating and Performing a Business Operation: Defining the Check Inventory Task
Figure 5-21 Parameter Dialog Box
7. Because this method takes the item ID as its parameter, in the Name field, enter ItemID.
Note: Business operation parameter names cannot contain spaces.
8. Click OK. The new parameter name appears in the Parameters list in the Define Business Operation dialog box.
9. Click OK to exit the Define Business Operation dialog box. The new business operation now appears in the Business Operations dialog box.
10. Click Close to exit the Business Operations dialog box.
Performing a Business Operation
Now that we have created the business operations necessary to call the methods we need from the OrderBean, we need to define the action that invokes them from within the task.
When you define an action that invokes a business operation, you need to specify the following variables/parameters:
n Any workflow variables you are passing as input parameters to the method
n The workflow variable in which you want to store the result returned by the method
n The instance variable, which is the reference to the EJB returned by the create() method
The following table summarizes the relationship between the parameters required by the two business operations.
Learning to Use BPM with WebLogic Integration 5-41

5 Defining Workflow Nodes
Note that we need to create the OrderBeanReference and Inventory variables before we can use them in our business operations. Because variables used in business operations can be created from within the Perform Business Operation action dialog box, we will combine the procedure for creating the variables with the procedure for adding and defining the actions in the following sections.
Performing the Create OrderBean Business Operation
When we add and define the action, we will also create the variable listed in the following table.
To add and define the Perform Business Operation action for Create OrderBean:
1. In the workflow design window, double-click the Check Inventory task to invoke the Task Properties dialog box.
2. Select the Activated tab and click Add to display the Add Action dialog box.
3. Expand the Integration Actions folders, select the Perform Business Operation action, and click OK. The Perform Business Operation dialog box appears.
4. From the Operation drop-down list, select Create OrderBean.
5. Next to the Assign Result to field, click Add. The Variable Properties dialog box appears.
Table 5-7 Create OrderBean and Check Inventory Business Operations: Parameters
Business Operation Instance Variable Input Parameter(s) Result Variable
Create OrderBean none none OrderBeanReference
Check Inventory OrderBeanReference ItemID Inventory
Table 5-8 Create OrderBean Business Operation: Result Variable
Variable Data Type Parameter Type
Use in Workflow
OrderBeanReference Session EJB n/a To store a reference to the instance of the POBean session EJB
5-42 Learning to Use BPM with WebLogic Integration

Creating and Performing a Business Operation: Defining the Check Inventory Task
6. In the Name field, enter OrderBeanReference.
7. From the Type drop-down list, select Session EJB.
8. Select the Input check box. (This variable is also used by the Order Fulfillment workflow.)
9. Click OK. The variable name and type now appear in the Assign Results to field.
Figure 5-22 Create OrderBean: Perform Business Operation Dialog Box
10. Click OK to exit the dialog box. The Perform Business Operation Create OrderBean action now appears on the Activated tab in the Task Properties dialog box.
Learning to Use BPM with WebLogic Integration 5-43
5 Defining Workflow Nodes
Performing the Check Inventory Business Operation
When we add and define the action, we will also create the variable listed in the following table.
To add and define the Perform Business Operation action for Check Inventory:
1. In the Check Inventory Task Properties dialog box, select the Activated tab, and click Add to display the Add Action dialog box.
2. Expand the Integration Actions folders, select the Perform Business Operation action, and click OK. The Perform Business Operation dialog box appears.
3. From the Operation drop-down list, select Check Inventory. The Instance Variable field is automatically populated with the OrderBeanReference variable.
4. In the Parameters list, double-click the ItemID parameter. The Expression Builder appears.
5. Select the Variables option, find ItemID in the list, and double-click it to place it in the Expression field.
6. Click OK. The ItemID variable now appears in the Value section of the Parameters list.
7. Next to the Assign result to field, click Add. The Variable Properties dialog box appears.
8. In the Name field, enter Inventory.
9. From the Type drop-down list, select Integer.
10. Click OK. The variable name and type now appear in the Assign result to field.
Table 5-9 Check Inventory Business Operation: Result Variable
Variable Data Type Parameter Type
Use in Workflow
Inventory Integer n/a To store the result of the inventory check
5-44 Learning to Use BPM with WebLogic Integration

Creating and Performing a Business Operation: Defining the Check Inventory Task
Figure 5-23 Check Inventory: Perform Business Operation Dialog Box
11. Click OK to exit the dialog box. The Perform Business Operation Check Inventory action now appears on the Activated tab in the Task Properties dialog box.
Marking the Task Done
Because this task contains no actions that execute the task (for example, assigning the task to a Worklist user who executes it), we need to add the Mark Task Done action to the Activated, rather than the Executed, tab of the Task Properties dialog box.
To add and define the Mark Task Done action:
1. In the Task Properties dialog box, select the Activated tab, and click Add to invoke the Add Action dialog box.
Learning to Use BPM with WebLogic Integration 5-45

5 Defining Workflow Nodes
2. Expand the Task Actions folder, select Mark Task as Done, and click OK to invoke the Mark Task as Done dialog box.
3. From the Task to mark as done list, select Check Inventory, and click OK. The Mark Task Done action appears on the Activated tab in the Task Properties dialog box.
4. Click OK to exit the Task Properties dialog box.
Testing for Inequality: Defining the Check Inventory Decision
The second decision in our workflow checks whether the inventory is sufficient, by comparing the inventory value returned by the Check Inventory business operation with the quantity of items ordered by the customer (that is, the quantity originally specified in the Neworder XML document and stored in the ItemQuantity variable when the workflow is started).
To test whether the inventory is sufficient, we will create a test for inequality between two variables. That is, we will test whether the value of the variable Inventory is greater than or equal to that of the variable ItemQuantity. If the condition evaluates to true, the flow proceeds to the Start Order Fulfillment task; if the condition evaluates to false, the order status is set to “waiting” and the flow proceeds to the Wait for Inventory task.
To define the C2 decision node:
1. In the workflow design window, double-click the C2 decision shape to display the Decision Properties dialog box.
5-46 Learning to Use BPM with WebLogic Integration

Testing for Inequality: Defining the Check Inventory Decision
Figure 5-24 Check Inventory Decision
2. In the Condition field, enter $Inventory>=$ItemQuantity.
3. Select the False tab, and click Add to invoke the Add Action dialog box.
4. Expand the Workflow Actions folder, select Set Workflow Variable, and click OK to display the Set Workflow Variable dialog box.
5. From the Variable drop-down list, select OrderStatus.
6. Select the From Expression option, and in the field, enter “waiting”.
7. Click OK to close the Set Workflow Variable. The Set Workflow variable action appears on the False tab.
8. Click Add to invoke the Add Action dialog box.
9. Expand the Workflow Actions folder, select Set Workflow Comment, and click OK to invoke the Set Workflow Comment dialog box.
10. In the Comment field, enter the expression “Order ” + $OrderStatus.
11. Click OK to exit the Set Workflow Comment dialog box. The Set Workflow Comment action appears on the false tab.
12. Click OK to exit the Decision Properties dialog box.
Learning to Use BPM with WebLogic Integration 5-47

5 Defining Workflow Nodes
Creating an Event: Defining the Wait for New Inventory Event
If the inventory check decision evaluates to false, the flow proceeds to the Wait for Inventory event, which would be triggered—hypothetically—by the arrival of the relevant XML message on a JMS queue from an inventory-reporting application. Because the node is embedded within the main flow, the flow does not proceed, but remains in a wait state, until the node is triggered. When the node is triggered, the flow loops back to the Inventory Check task to see whether the current inventory is now sufficient to process the order.
Although this event is never actually triggered in the sample workflow because we are not using a real XML document, we can imagine a hypothetical XML document that looks something like the following document.
Listing 5-4 Newinventory XML Document
<newinventory> <date> June 18 2001 </date> . . . <item> <id>236</id> <name>CD storage rack</name> <item></newinventory>
To ensure that the event is triggered at run time only by instances of <newinventory> documents that contain information about the relevant item in stock (in our original XML document, it was a CD storage rack), you define an event key that specifies the relevant element within the message document that the event processor should watch out for—in this case, the item ID. The event key expression is specified as an XPath statement that extracts the value from the relevant element in an XML document.
5-48 Learning to Use BPM with WebLogic Integration

Creating an Event: Defining the Wait for New Inventory Event
Then, to save the event processor from searching through every workflow instance containing an event with a reference to a <newinventory> document, the event node itself defines a key value expression to match the value extracted by the event key. If the two values match, the event is triggered. The following figure shows how the mechanism works.
Figure 5-25 Relationship Between Incoming XML Document, Event Key Expression, and Key Value Expression
In the example given in Listing 5-4, the event would be triggered, since our original item ID was 236.
The way in which the incoming XML document element value, event key configuration expression, and event node key value expression correspond to each other for the Wait for Inventory node is represented in the following table.
<newinventory> <date> June 18 2001 </date> . . .<item> <id>236</id> <name>CD storage rack</name> <item></newinventory>
newinventory
ToInteger(ToString(XPath("/newinventory/item/id/text()")))
newinventory
$ItemID
Incoming XMLDocument
Event Key ConfigurationExpression
Event Node Key ValueExpressionRun-Time Value
newinventory
236
newinventory
236
MATCH?
Yes
MATCH?
Yes
Run-Time Value
Learning to Use BPM with WebLogic Integration 5-49

5 Defining Workflow Nodes
Note that an event key configuration expression must evaluate to the same data type as that by the key value expression in a Start or Event node. Since XPath expressions return a node list type, you will usually need to use a typecasting function provided in the workflow expression language to return the correct data type. In our example, since our variable was stored as an integer, we needed to first convert the node list to a string, and then convert the string to an integer. For more information on typecasting and other workflow functions, see “Using Functions” in “Using Workflow Expressions” in Using the WebLogic Integration Studio.
To create our event, then, we must do the following:
n Configure the event key
n Define the event
Configuring an Event Key
When you configure an event key, you specify the document type or root element of an XML document and an expression that parses the document for the particular element value you want to extract. Once the event key is configured, it is globally available to all workflow templates.
Table 5-10 Wait for Inventory Event: Relationship Between Event Key and Event Node Expressions
Element XML Document Event Key Configuration Event Node
Root element/Document Type
<newinventory> newinventory newinventory
Event Key Expression/Key Value Expression
<item>
<id>
ToInteger(ToString(XPath(“/newinventory/item/id/text()”)))
$ItemID
5-50 Learning to Use BPM with WebLogic Integration

Creating an Event: Defining the Wait for New Inventory Event
To define the newinventory event key:
1. Choose Configuration→Events. The Event Key Expressions dialog box appears, showing the cancelledorder event key you imported in Chapter 2, “Getting Started with the WebLogic Integration Studio.”
Figure 5-26 Event Key Expressions Dialog Box
2. Click Add. The Define Event Key Expression dialog box appears.
Figure 5-27 Define Event Key Expression Dialog Box
3. In the Event Descriptor field, enter newinventory.
4. In the Expression field, enter the XPath expression listed in Table 5-10, by typing it or clicking the Expression button to invoke the Expression Builder.
Learning to Use BPM with WebLogic Integration 5-51

5 Defining Workflow Nodes
5. Click OK. The new event key appears in the Event Key Expressions dialog box.
6. Click Close to close the Event Key Expressions dialog box.
Defining an Event
In the event node, you specify the root element of the incoming XML document, and the key value expression that you wish to match the value provided by the XML document. The key value expression you use in each event node should be unique. You can filter incoming documents further by adding a condition, but we do not use one in this example.
Note: Because the event key facility provides better performance, you should always use it in preference over an event condition. Only use a condition in addition to an event key when you wish to further restrict the XML document instance that should trigger the event.
To define the Wait for Inventory event:
1. In the workflow design window, double-click the Wait for Inventory event node. The Event Properties dialog box appears.
5-52 Learning to Use BPM with WebLogic Integration

Creating an Event: Defining the Wait for New Inventory Event
Figure 5-28 Wait for Inventory Event: Event Properties Dialog Box
2. From the Type drop-down list, select XML Event.
3. In the Document Type/Root Element field, enter newinventory.
4. In the Key Value Expression field, enter $ItemID by typing it or clicking the Expression button to invoke the Expression Builder.
5. Click OK to exit the Event Properties dialog box.
Learning to Use BPM with WebLogic Integration 5-53

5 Defining Workflow Nodes
Calling a Sub-Workflow: Defining the Start Order Fulfillment Task
If the inventory check decision evaluates to true, the workflow proceeds to the Start Order Fulfillment task, which calls the Order Fulfillment workflow. When the sub-workflow is finished executing, control returns to the Start Order Fulfillment task, and when the task is marked done, the flow proceeds to the next node in the main workflow, namely the Confirm Order Fulfillment task.
When you call a sub-workflow, you need to pass any values that have been collected or set during the execution of the main workflow to the sub-workflow’s input variables. These include, for example, the customer address information needed for the shipping task, and the parameters required by the POBean calculate() method invoked by the invoice generation task. (You can view the list of variables defined in the imported Order Fulfillment workflow by opening its template definition and expanding its Variables folder in the folder tree. To see whether a variable has been defined as input or output, right-click it, and select Properties from the pop-up menu to invoke the variable’s Properties dialog box.)
Similarly, you also need to create and specify variables in which you want to store values that are returned by the sub-workflow, such as the total price order to be provided by the calculate() method.
To define the Start Order Fulfillment task, we need to do the following:
n Create the OrderTotalPrice variable
n Add and define the Start Workflow action
n Define the input parameters
n Define the result variables
n Add and define the Mark Task as Done callback action
5-54 Learning to Use BPM with WebLogic Integration

Calling a Sub-Workflow: Defining the Start Order Fulfillment Task
Creating the OrderTotalPrice Variable
To store the result returned from the calculate() method (which is invoked by the Order Fulfillment workflow), we need to create the OrderTotalPrice variable as described in the following table. If necessary, refer to the procedure given in “Creating Variables” on page 5-6, substituting the values from the following table.
Starting a Called Workflow
To start a sub-workflow, you must be sure that the sub-workflow’s start node is defined as Called, and that the workflow is active. In this case, we activated the Order Fulfillment workflow when we imported it in “Importing Workflow Objects: Importing the Tutorial Package File” on page 2-7.
To add and define the Start Workflow action:
1. In the workflow design window, double-click the Start Order Fulfillment task node to invoke the Task Properties dialog box.
2. Select the Activated tab, and click Add to invoke the Add Action dialog box.
3. Expand the Workflow Actions folder, select Start Workflow, and click OK. The Start Workflow dialog box appears.
4. In the Workflow to Start window, select Order Fulfillment
Table 5-11 Start Order Fulfillment Task Variable
Variable Data Type
Parameter Type
Use in Workflow
OrderTotalPrice Double Input To store the result of the calculate() method invoked in the Order Fulfillment workflow
Learning to Use BPM with WebLogic Integration 5-55

5 Defining Workflow Nodes
Figure 5-29 Start Workflow Dialog Box
5. Under Start in Organization, select Current Organization.
Defining Input Parameters
When you select a sub-workflow to call in the Start Workflow dialog box, any variables defined as input in the sub-workflow are displayed in the Parameters tab at the bottom of the dialog box.
5-56 Learning to Use BPM with WebLogic Integration

Calling a Sub-Workflow: Defining the Start Order Fulfillment Task
Figure 5-30 Start Order Fulfillment Workflow: Input Parameters
You must now set the values for those parameters. You can use an expression to define a value or, in this case, because we simply want to pass the current variable values, you can specify variable names as the parameter expressions.
To define the input parameters for the Start Order Fulfillment workflow:
1. At the bottom of the Start Workflow dialog box, select the Parameters tab.
2. Double-click a parameter in the list. The Set Parameter dialog box appears.
Figure 5-31 Set Parameter Dialog Box
3. In the Expression field, enter the variable name, preceded by the dollar sign, that corresponds to the parameter, and click OK.
Variables that have been defined in the called workflow as input parameters are listed here.
You define an expression to set the value to be passed to the called workflow.
Learning to Use BPM with WebLogic Integration 5-57

5 Defining Workflow Nodes
4. Repeat steps 1 to 3 for all the variables in the list.
5. When you are done, the list should be complete, as follows.
Defining Result Variables
When you select a workflow to call in the Start Workflow dialog box, any variables that have been defined as output parameters by the sub-workflow are displayed on the Results tab at the bottom of the dialog box.
Figure 5-32 Start Order Fulfillment Workflow: Results
Variables which have been defined in the called workflow as output parameters are listed here.
You specify the variables in which you want to store the returned values.
5-58 Learning to Use BPM with WebLogic Integration

Calling a Sub-Workflow: Defining the Start Order Fulfillment Task
We now want to ensure that the results returned from the sub-workflow are stored in the appropriate variables. In this case, because all variable names are the same, we need to specify only the equivalent variable name for each result parameter.
To define the result parameters for the Start Order Fulfillment workflow:
1. At the bottom of the Start Workflow dialog box, select the Results tab.
2. Double-click an item in the Result list. The Set Variable from Result dialog box appears.
Figure 5-33 Set Variable from Result Dialog Box
3. From the variable drop-down list, select the appropriate variable to which to assign the result, and click OK.
4. Repeat steps 1 to 3 for both results.
5. When you are done, the list should be complete, as follows.
Learning to Use BPM with WebLogic Integration 5-59

5 Defining Workflow Nodes
Marking the Task Done
To ensure that the main workflow waits for the sub-workflow to complete before it continues, we add the Mark Task Done as a sub-action within the Start Workflow action.
To add and define the Mark Task Done action:
1. At the bottom of the Start Workflow dialog box, select the Actions tab, and click Add to invoke the Add Action dialog box.
2. Expand the Task Actions folder, select Mark Task as Done, and click OK to invoke the Mark Task as Done dialog box.
3. From the Task to mark as done list, select Start Order Fulfillment, and click OK. The Mark Task Done action appears on the Actions tab of the Start Workflow dialog box.
Sending an E-mail Message: Defining the Confirm Order Fulfillment Task
Once the Order Fulfillment has been executed, we want to ensure that the Watch for Cancellation event can no longer be triggered, and the workflow can no longer be terminated. The Confirm Order Fulfillment task cancels the Watch for Cancellation event, sets the order status to complete, adds a workflow comment to this effect, and, optionally, sends an e-mail to the customer, confirming the completion of the order.
To set up this task, you may:
n Add and define the Cancel Event action
n Add and define the Set Workflow Variable action
n Add and define the Set Workflow Comment action
n Add and define the Send E-mail action
n Add and define the Mark Task as Done action
5-60 Learning to Use BPM with WebLogic Integration

Sending an E-mail Message: Defining the Confirm Order Fulfillment Task
Cancelling an Event
Once the Order Fulfillment workflow has executed, and the order has been shipped, the order should not be cancelled. To stop the Watch for Cancellation event from listening for incoming messages, we add a Cancel Event action to the Confirm Order Fulfillment task.
To add the Cancel Event action:
1. In the workflow design window, double-click the Confirm Order Fulfillment task to invoke the Task Properties dialog box.
2. Select the Activated tab, click Add to invoke the Add Action dialog box, expand the Miscellaneous Actions folder, select Cancel Workflow Event, and click OK. The Cancel Workflow Event dialog box appears.
Figure 5-34 Cancel Workflow Event Dialog Box
3. From the Event to cancel list, select Watch for Cancellation and click OK. The Cancel Workflow Event action appears on the Activated tab of the Task Properties dialog box.
Learning to Use BPM with WebLogic Integration 5-61
5 Defining Workflow Nodes
Setting the Workflow Variable
The following procedure explains how to set the workflow variable OrderStatus with the value complete.
To add the Set Workflow Variable action:
1. Select the Activated tab, click Add to invoke the Add Action dialog box, expand the Workflow actions folder, select Set Workflow Variable, and click OK to invoke the Set Workflow Variable dialog box.
2. From the Variable to be set drop-down list, select OrderStatus.
3. Select the From Expression option, and in the field, enter “complete”.
4. Click OK. The Set Workflow Variable action appears on the Activated tab in the Task Properties dialog box.
Setting the Workflow Comment
Once the OrderStatus variable is set to complete, you can use this variable in a workflow comment expression. The following procedure explains how to set the workflow comment to Order complete.
To add and define the Set Workflow Comment action:
1. In the Task Properties dialog box, select the Activated tab and click Add to invoke the Add Action dialog box.
2. Expand the Workflow Actions folder, select Set Workflow Comment, and click OK to invoke the Set Workflow Comment dialog box.
3. In the Comment field, type or use the Expression Builder to enter the following expression:
“Order ” + $OrderStatus.
4. Click OK to exit the dialog box. The Set Workflow Comment action now appears on the Activated tab in the Task Properties dialog box.
5-62 Learning to Use BPM with WebLogic Integration

Sending an E-mail Message: Defining the Confirm Order Fulfillment Task
Sending an E-mail Message
To complete the order, you can have the workflow send an e-mail message to the customer who placed it, confirming the fulfillment of the order.
If you entered your own e-mail address and other data in “Posting an Internal XML Event: Editing the Neworder XML Document” on page 3-14, you will receive the e-mail when you execute the workflow in Chapter 7, “Executing and Monitoring the Example Workflows.”
Note: The Order Processing template definition provided in the tutorial.jar file does not contain this action because the action requires correct server configuration, as described in the following text.
Attempting to send an e-mail at run time requires the following prerequisites:
n Your e-mail server must be appropriately configured during or after the WebLogic Integration installation. For more information on setting up e-mail server properties after installation, see “Customizing Mail Session Properties” in “Customizing WebLogic Integration” in Starting, Stopping, and Customizing BEA WebLogic Integration.
n You must edit the default e-mail address provided in the Order Processing Trigger workflow, to provide a valid e-mail address. Follow the procedure given in “Posting an Internal XML Event: Editing the Neworder XML Document” on page 3-14.
If both of these conditions are not met, do not follow this procedure to add the Send E-mail Message action.
If you do opt to add the Send E-mail action, consider using the message shown below as the content for your message.
Subject: Your order #order number
Your order for item (quantity) has been shipped. The total price for your order is amount. Thank you for your business.
To add and define the Send E-mail Message action:
1. In the Task Properties dialog box, select the Activated tab and click Add to invoke the Add Action dialog box.
Learning to Use BPM with WebLogic Integration 5-63

5 Defining Workflow Nodes
2. Expand the Miscellaneous Actions folder, select Send E-mail Message, and click OK. The Send E-Mail Message dialog box appears.
Figure 5-35 Send E-Mail Message Dialog Box
3. In the subject field, enter “Your order #” + $OrderID or any message you like.
4. Select the To tab and click Add. The Mail Recipient dialog box appears.
5-64 Learning to Use BPM with WebLogic Integration

Sending an E-mail Message: Defining the Confirm Order Fulfillment Task
Figure 5-36 Mail Recipient Dialog Box
5. Select the Address option.
6. Select the Expression check box and in the field, enter $CustomerEmail.
7. Click OK. The CustomerEmail variable appears in the Addressee list.
8. Select the Message tab, and enter any text you like. If you enter the expression shown in the following figure, your text will resemble the message shown earlier.
Learning to Use BPM with WebLogic Integration 5-65

5 Defining Workflow Nodes
Figure 5-37 Send E-mail Message Dialog Box: Order Confirmation Message
9. When done, click OK.
10. The Send E-mail action appears on the Activated tab in the Task Properties dialog box.
Marking the Task Done
Because this task contains no actions that execute it, we must add the Mark Task Done action to the Activated tab of the Task Properties dialog box.
To add and define the Mark Task Done action:
1. In the Task Properties dialog box, select the Activated tab, and click Add to invoke the Add Action dialog box.
2. Expand the Task Actions folder, select Mark Task as Done, and click OK to invoke the Mark Task as Done dialog box.
5-66 Learning to Use BPM with WebLogic Integration

Creating an Event: Defining the Watch for Cancellation Event
3. From the Task to mark as done list, select Confirm Order Fulfillment, and click OK. The Mark Task Done action appears on the Activated tab in the Task Properties dialog box.
4. Click OK to exit the Task Properties dialog box.
Creating an Event: Defining the Watch for Cancellation Event
At any point during the entire process until the Ship Order task of the Order Fulfillment sub-workflow is executed, the Watch for Cancellation event could be triggered—hypothetically—by the arrival of a relevant XML message on a JMS queue from a Web-tier application. Because the node stands outside of the flow, attached directly to the start and done nodes, the flow can be interrupted regardless of the node which it is currently executing. If the node is triggered before the shipping task of the Order Fulfillment workflow is executed, the Order Processing workflow proceeds to the Done node and terminates.
Although this event is never actually triggered in the sample workflow because we are not using a real XML document, we can imagine a hypothetical XML document that looks like the following document.
Learning to Use BPM with WebLogic Integration 5-67

5 Defining Workflow Nodes
Listing 5-5 Cancelledorder XML Document
<cancelledorder> <date>June 18 2001</date> <order> <id>9654</id> </order> <customer> <id>232</id> <name>Harold Jones</name> </customer>
.
.
.</cancelledorder>
The way in which the incoming XML document, event key configuration expression, and event node key value expression correspond to each other for this node is represented in following table.
Because you already imported the cancelledorder event key, which is also used by the Order Fulfillment workflow (for information, see “Overview of the Order Fulfillment Workflow” on page 6-1), you do not need to create the event key. You simply need to define the event.
Table 5-12 Watch for Cancellation Event: Relationship Between Event Key and Event Node Expressions
Element XML Document Event Key Configuration Event Node
Root element/Document Type
<cancelledorder> cancelledorder cancelledorder
Event Key Expression/Key Value Expression
<order>
<id>
ToInteger(ToString(XPath
(“/cancelledorder/
order/id/text()”)))
$OrderID
5-68 Learning to Use BPM with WebLogic Integration

Creating an Event: Defining the Watch for Cancellation Event
Defining the Event
To define the Watch for Cancellation event:
1. In the workflow design window, double-click the Watch for Cancellation event node. The Event Properties dialog box appears.
Figure 5-38 Watch for Cancellation Event: Event Properties Dialog Box
2. From the Type drop-down list, select XML Event.
3. In the Document Type/Root Element field, enter cancelledorder.
4. In the Key Value Expression field, enter $OrderID, by typing it or clicking the Expression button to invoke the Expression Builder.
Learning to Use BPM with WebLogic Integration 5-69

5 Defining Workflow Nodes
5. Optionally, set the OrderStatus variable to cancelled by doing the following:
a. Select the Variables tab, and click Add to invoke the Workflow Variable Assignment dialog box.
b. From the Variable drop-down list, select OrderStatus.
c. In the Expression field, enter “cancelled”.
d. Click OK to close the Workflow Variable Assignment dialog box. The variable and expression appear on the Variables tab.
6. Optionally, set the workflow comment to Order cancelled by doing the following:
a. Select the Actions tab, and click Add to invoke the Add Action dialog box.
b. Expand the Workflow Actions folder, select Set Workflow Comment, and click OK to invoke the Set Workflow Comment dialog box.
c. In the Comment field, enter the expression “Order ” + $OrderStatus.
d. Click OK to exit the Set Workflow Comment dialog box. The Set Workflow Comment action appears on the Actions tab.
7. Click OK to exit the Event Properties dialog box.
Save the template definition and it is now ready to be run. The next section describes the Order Fulfillment workflow, which you imported predefined.
5-70 Learning to Use BPM with WebLogic Integration

CHAPTER
6 Using a Custom Exception Handler
In this section we focus on the Studio’s exception handling facility, by showing an example of a user-defined exception handler used by the Order Fulfillment workflow. After an overview that describes all the nodes in the workflow, this section describes how to:
n Define a custom exception handler and its actions
n Invoke a custom exception handler
n Evaluate a condition to catch a specific exception
n Send an XML message to a client to correct run-time errors
In this section of the tutorial, it is assumed that you have imported the Order Fulfillment workflow, the Create OrderBean and Calculate Total Price business operations, and the cancelledorder event key, as described in “Importing Workflow Objects: Importing the Tutorial Package File” on page 2-7.
Overview of the Order Fulfillment Workflow
The Order Fulfillment workflow, called by the Order Processing workflow, contains tasks to handle the shipping and invoicing of the ordered item. Because both tasks in the workflow are to be executed in parallel, both are connected directly to the start node. To ensure that both tasks are executed before the workflow terminates, an AND node joins them together.
Learning to Use BPM with WebLogic Integration 6-1

6 Using a Custom Exception Handler
The workflow also defines and invokes a custom exception handler to prompt a Worklist user to correct the invalid state abbreviation that was provided in the original XML document in the Order Processing Trigger workflow.
A detailed view of the Order Fulfillment workflow is shown in the following figure. The numbered steps in the figure are described in a table following the figure. The table maps the real-world processes to the actual implementation in the sample workflow.
Figure 6-1 Order Fulfillment Workflow: Detailed View
1Order Processing
Workflow
EJB
XML Worklist XML VariablesXPathWorklist
3
4
5
2
6
Servlet
ExternalJMSQueue
XML
<cancelledorder>
6-2 Learning to Use BPM with WebLogic Integration

About the Exception Handlers
About the Exception Handlers
All WebLogic Integration workflow template definitions contain a default exception handler: the system exception handler. The system exception handler responds to exceptions that occur at run time by marking the active transaction for rollback only and rethrowing the exception to the client.
You can also define custom exception handlers to perform workflow actions upon the occurrence of an exception. You can configure the custom exception handler to catch any exceptions that occur at run time, or to handle specific exceptions that have been defined in called EJBs. To define your custom exception handler, you specify commit and rollback actions to be performed for the active transaction. (See “About Exception Handler Actions.”)
An exception handler exists at the workflow level, so that it can be called from within any node. After you have defined an exception handler, you use one of two actions to invoke it from within a node:
n Set Workflow Exception Handler—This deactivates the system exception handler and sets the exception handler to the one you specify for the duration of the workflow. The exception handler actions will only be invoked if an exception is actually thrown. If desired, you can use this action to reset the exception handler to the system exception handler.
n Invoke Exception Handler—This invokes the actions defined in the exception handler that you specify, at that point in the workflow, regardless of whether an exception actually occurs. The system exception handler is reset when control returns to the main workflow.
You can create and view existing exception handlers from both the folder tree and on the Exception Handlers tab of the template definition’s Properties dialog box.
To view the exception handler defined for the Order Fulfillment workflow in the folder tree:
1. In the folder tree, expand the Order Fulfillment template, right-click the template definition, and from the pop-up menu, select Open to open the workflow.
2. In the folder tree, expand the Exception Handlers folder. It appears as shown in the following figure.
Learning to Use BPM with WebLogic Integration 6-3

6 Using a Custom Exception Handler
Figure 6-2 Order Fulfillment Workflow: Exception Handlers
This workflow contains one user-defined exception handler: Bad Data to OrderBean.
3. To identify the location from which the Bad Data to OrderBean exception handler is invoked, right-click its folder in the folder tree, and from the pop-up menu, select Usage. The Exception Handler Usage dialog box appears.
Figure 6-3 Exception Handler Usage Dialog Box
As the window shows, the custom exception handler is invoked from the Generate Invoice node. We will now examine this node more closely before viewing the Bad Data to OrderBean exception handler’s properties in detail.
You can create and define exception handlers and their actions from the folder tree.
6-4 Learning to Use BPM with WebLogic Integration

Viewing the Generate Invoice Task
4. Click OK to close the Exception Handler Usage dialog box.
Viewing the Generate Invoice Task
Let us first view the actions that make up the Generate Invoice task, including the calls to business operations and to the Bad Data to OrderBean custom exception handler.
To view the Generate Invoice task properties:
1. In the workflow design window, double-click the Generate Invoice task to open the Task Properties dialog box. The Activated tab contains an action that assigns the task to the role Accounting.
2. Select the Executed tab.
Figure 6-4 Generate Invoice Task Properties Dialog Box: Executed Tab
The Executed tab contains the following actions:
n Set exception handler to “Bad Data to OrderBean”—This is an exception handling action that sets the user-defined exception handler for the duration of the workflow from this point on, until another exception handler is set by the workflow. The exception handler definition itself is described in detail in “Defining a Custom Exception Handler: Viewing the Bad Data to OrderBean Exception Handler.”
n Perform business operation “Create OrderBean”—This is the same integration action we used in “Performing the Create OrderBean Business Operation” on
Learning to Use BPM with WebLogic Integration 6-5

6 Using a Custom Exception Handler
page 5-42 before calling the checkInventory() method on the POBean. It creates an instance of the EJB on the server at run time.
n Perform Business Operation “Calculate Total Price”—This is an integration action that calls the calculate() method on the POBean and is described in more detail in “Viewing the Calculate Total Price Business Operation.”
n Set exception handler to “(system exception handler)”—This is an exception handling action that resets the workflow exception handler back to the system exception handler which is in effect, by default, for all workflows at execution time.
n Mark task “Generate Invoice” done—This is the task action that completes the Generate Invoice task. When the Shipping task is also marked done, the workflow proceeds to the done node and the workflow terminates.
Viewing the Calculate Total Price Business Operation
Double-click the Perform Business Operation “Calculate Total Price” action to display its properties.
6-6 Learning to Use BPM with WebLogic Integration

Viewing the Calculate Total Price Business Operation
Figure 6-5 Calculate Total Price: Perform Business Operation Dialog Box
The calculate() method returns the total price, including state sales tax, to the variable OrderTotalPrice.
To get more information about the calculate() method, let us look at the business operation configuration.
To view the Calculate Total Price business operation configuration:
1. Click Cancel to close the Perform Business Operation dialog box.
2. Click Cancel to close the Task Properties dialog box.
3. Choose Configuration→Business Operations. The Business Operations dialog box appears.
4. In the list of business operations, double-click the Calculate Total Price business operation. The Define Business Operation dialog box appears.
These variables are passed to the calculate() method as input parameters.
The output of the method is stored in the OrderTotalPrice variable, whose value is returned to the Order Processing workflow.
Learning to Use BPM with WebLogic Integration 6-7

6 Using a Custom Exception Handler
Figure 6-6 Calculate Total Price: Define Business Operation Dialog Box
You can see that in the Method to Call field, the calculate() method throws an exception, BadStateException. In the EJB class file, this exception is defined to occur if invalid state data is passed to the method. In the source code, invalid state data is any text that does not match a valid two-letter abbreviation for a U.S. state name.
To handle the possibility of this exception being thrown, the Bad Data to OrderBean exception handler is set up in the workflow to correct the error at run time. We look at this exception handler in more detail in the following sections.
Note: For more information on the POBean.jar EJB, see the BEA WebLogic Integration Javadoc.
5. Click Cancel to close the Define Business Operation dialog box.
6. Click Close to close the Business Operations dialog box.
Exceptions thrown by the method called by the business operation are visible here.
6-8 Learning to Use BPM with WebLogic Integration

Defining a Custom Exception Handler: Viewing the Bad Data to OrderBean Exception
Defining a Custom Exception Handler: Viewing the Bad Data to OrderBean Exception Handler
As you may recall from Chapter 3, “Understanding Workflow Objects and Properties,” we simulated the occurrence of invalid data being passed to the POBean in the <shiptostate> value in the Neworder XML document that triggered the Order Processing workflow. That workflow set the ShipToState variable to an incorrect value, KK, which was passed by the Start Order Fulfillment task node to the Order Fulfillment workflow.
When the Generate Invoice task is executed, the Perform Business Operation action attempts to call the calculate() method with the wrong ShipToState variable value as input. Because the calculate() method of the POBean throws the BadStateException when the invalid state data is passed to it, the server invokes the custom-defined exception handler, Bad Data to OrderBean.
Let us now view the Bad Data to OrderBean exception handler and the actions defined within it.
To view the Bad Data to Order Bean exception handler:
1. In the folder tree, expand the Exception Handlers folder, right-click the Bad Data to Order Bean exception handler, and from the pop-up menu, select Properties. The Exception Handler Properties dialog box appears.
Learning to Use BPM with WebLogic Integration 6-9

6 Using a Custom Exception Handler
Figure 6-7 Exception Handler Properties Dialog Box
About Exception Handler Actions
The Actions on Commit and Actions on Rollback tabs allow you to specify workflow actions to be executed on the transaction’s commit and rollback paths. In most cases, the transaction is committed unless it has been specifically marked for rollback only; in this case, the exception handler executes the actions specified on the rollback tab. Although the called EJB method may mark transactions for rollback only, it is a good idea to specify both types of actions.
Select to set the current custom exception handler to be the active one upon workflow instantiation. Otherwise, the system exception handler is the initial exception handler by default.
Specify workflow actions to be performed on the active transaction’s commit path.
Specify workflow actions to be performed on the active transaction’s rollback path.
6-10 Learning to Use BPM with WebLogic Integration

Defining a Custom Exception Handler: Viewing the Bad Data to OrderBean Exception
n Actions on Commit—You can specify any workflow action you like on this tab, including the Exit Exception Handler action, with the following options:
l Exit and rollback
l Exit and stop (do not process remaining operations)
l Exit and retry (retry the failed operation)
l Exit and continue (resume at the next operation)
n Actions on Rollback—The only available actions are Set Workflow Variable, Integration actions, Exit Exception Handler and Rollback, Send E-mail, No Operation, Evaluate Condition, or Make Audit Entry.
As you can see in the Exception Handler Properties dialog box, the Bad Data to OrderBean exception handler defines the following actions:
n Commit
l Evaluate Condition—A miscellaneous action that tests for a particular condition in which to apply the exception handling actions, and that specifies true or false actions depending on the test results. It is described in more detail in “Viewing the Evaluate Condition Action.”
l Exit Exception Handler and Continue—An exception handling action that stops the exception handler and attempts to continue the execution of the workflow at the next operation (in this case, the action following the business operation that caused the exception).
n Rollback
Exit Exception Handler and Rollback—An exception handling action that stops the exception handler, rolls back the active transaction to its state before the exception was thrown, and rethrows the exception to the client.
Learning to Use BPM with WebLogic Integration 6-11

6 Using a Custom Exception Handler
Viewing the Evaluate Condition Action
To view the Evaluate Condition action, in the Exception Handler Properties dialog box, double-click the Evaluate Condition action. The Evaluate Condition dialog box appears.
Figure 6-8 Evaluate Condition Dialog Box
The condition is defined with the following expression:
WorkflowAttribute(“ExceptionType”) = “com.bea.wlpi.tour.po.BadStateException”
In this case, this expression uses the workflow attribute ExceptionType to test whether the exception thrown equals the BadStateException specified by the POBean. Using a condition like this is a common way to set up an exception handler to catch specific exceptions. You can use the WorkflowAttribute function to identify the target exception, with a number of different exception attributes, including:
6-12 Learning to Use BPM with WebLogic Integration

Viewing the Send XML to Client Action
n “ExceptionType” (String)—The fully qualified Java class name of the exception
n “ExceptionText” (String)—The exception message text
n “ExceptionObject” (Exception)—The exception object itself
For a complete list of workflow functions and attributes, see “Using Workflow Expressions” in Using the WebLogic Integration Studio.
The Evaluate Condition action specifies actions to execute according to the test result, that is, whether the expression evaluates to true or false. In this example the action specifies the following actions:
n True
Send XML to Client—An integration action that sends an XML message to a Worklist user to prompt him or her to correct the invalid data that was passed to the calculate() method, and re-executes the Generate Invoice task. This action is described in detail in “Viewing the Send XML to Client Action.”
n False
No actions are specified here; if the condition evaluates to false, the exception handler executes the Rollback actions specified in the Exception Handler Properties dialog box.
Viewing the Send XML to Client Action
The Send XML to Client action sends a message to a Worklist user, requesting correction of the bad data that has been passed to the POBean and caused the BadStateException to occur. Then it re-executes the actions specified on the Executed tab of the Generate Invoice Task Properties dialog box so that the task can now complete successfully.
To view the Send XML to Client action, in the Evaluate Condition dialog box, select the True tab, and double-click the Send XML to Client action. The Send XML to Client dialog box appears.
Learning to Use BPM with WebLogic Integration 6-13

6 Using a Custom Exception Handler
Figure 6-9 Bad Data to OrderBean Exception Handler: Send XML to Client Dialog Box
This Send XML to Client action sends an XML document, based on the ClientSetVarsReq DTD, to the Worklist client, causing the Worklist to display a message box with a field in which the Worklist user types information. The XML document has the following structure.
Listing 6-1 ClientSetVarsReq XML Document Structure
<set-variables title=“text”>text <actionid>provided by default</actionid> <variable name=“variable name” prompt=“text” /> [<variable name=“variable name” prompt=“text” />]</set-variables>
6-14 Learning to Use BPM with WebLogic Integration

Viewing the Send XML to Client Action
The following figure shows the tags and values in the XML document that correspond to the message box displayed by the Worklist client.
Figure 6-10 Error Warning Message Box
To capture the response from the Worklist user, data is extracted from the XML document returned by the Worklist client, based on the ClientSetVarsResp.dtd, specifically from the <variable name> attribute, as shown in Listing 6-2.
Listing 6-2 ClientMsgBoxResp XML Document Structure
<set-variables> <variable name=“variable name” /> [<variable name=“variable name” />] </set-variables>
To extract the desired information, the following XPath expression is defined:
XPath("/set-variables/variable[@name=\"ShipToState\"]/text()")
Title bar: <set-variables title=“Error Warning”>
Message prompt: <variable prompt=“text”>
Value field: <variable name=“ShipToState”>
Message: <set-variables>“text”</set-variables>>
Learning to Use BPM with WebLogic Integration 6-15

6 Using a Custom Exception Handler
Then the result is assigned to the ShipToState variable in the Callback Variables tab of the Send XML to Client dialog box.
Finally, a callback action is specified.
This action re-executes all the actions listed on the Executed tab of the Generate Invoice Task Properties dialog box (see “Viewing the Generate Invoice Task” on page 6-5) after the Worklist user has entered valid data. Note that if the user enters invalid data, he or she is repeatedly prompted with the message box until acceptable data is provided.
When the task is marked done by the final action of the Generate Invoice task, the workflow proceeds to the AND node. When the Ship Order task is marked done, the workflow terminates. At this point variable values that have been collected during the workflow execution are passed back to the Order Processing workflow.
6-16 Learning to Use BPM with WebLogic Integration

CHAPTER
7 Executing and Monitoring the Example Workflows
In this section we execute the example workflows from the WebLogic Integration Worklist. We then monitor the running instances of the workflows from the Studio.
Before you can do the procedures given in this section, it is assumed that you have done the following:
n Logged on to the Studio, as described in “Starting the WebLogic Integration Studio” on page 2-2.
n Imported and activated the Order Processing Trigger and Order Fulfillment template definitions and their dependencies, as described in “Importing Workflow Objects: Importing the Tutorial Package File” on page 2-7.
n Either imported the Order Processing template definition and its dependencies, as described in “Importing Workflow Objects: Importing the Tutorial Package File” on page 2-7, or created and defined it from scratch, as described in Chapter 4, “Creating a Workflow,” and Chapter 5, “Defining Workflow Nodes.”
Note: Although the Worklist and the monitoring functions of the Studio are described in this section, the section is not intended to serve as a tutorial for them. For more information about these topics, see Using the WebLogic Integration Worklist and “Monitoring Workflows” in Using the WebLogic Integration Studio.
Learning to Use BPM with WebLogic Integration 7-1

7 Executing and Monitoring the Example Workflows
Executing the Workflows in the Worklist Application
Because the Order Processing Trigger workflow contains a manual start, we can execute it from the Worklist application. This workflow then launches all the tasks of the Order Processing and Order Fulfillment workflow. In this section, we do the following:
n Log on to the Worklist
n Start the Order Processing Trigger workflow
n Execute the tasks in the Order Processing workflow
n Execute the tasks in the Order Fulfillment workflow
Logging On to the Worklist Application
Because we have defined the user admin as a member of all the roles used in the sample workflows, we will log on as admin.
To start the WebLogic Integration Worklist:
1. Do one of the following:
l On a Windows system, choose Start→Programs→BEA WebLogic E-Business Platform→WebLogic Integration 2.1→Worklist.
l On a UNIX system, go to the bea/wlintegration2.1/bin directory, and run the Worklist start-up script by entering the following at the command prompt:
sh worklist.sh
The Logon to WebLogic Integration dialog box appears in front of the WebLogic Integration Worklist application window.
7-2 Learning to Use BPM with WebLogic Integration

Executing the Workflows in the Worklist Application
Figure 7-1 Logon to WebLogic Integration Dialog Box
2. In the User Name field, enter admin.
3. In the Password field, enter security.
Note: User names and passwords are case-sensitive. Be sure to enter user names and passwords in lower case.
4. In the Server [:port] field, specify the system that is running the WebLogic Integration server application as follows:
t3://host:7001
Here host is the computer name or IP address of the system that is running the WebLogic Integration server. Specify localhost if the server is running on the same computer as the Worklist application.
5. Click OK. The WebLogic Integration Worklist dialog box appears.
Learning to Use BPM with WebLogic Integration 7-3

7 Executing and Monitoring the Example Workflows
Figure 7-2 WebLogic Integration Worklist Dialog Box
6. Click OK. The Worklist main window appears.
Figure 7-3 Worklist Application Main Window
Select the CDExpress organization.
Drag the window and column names to view all columns.
The user name appears on this tab. Select this tab to view tasks assigned to a user.
The task list shows no pending tasks for this user.
Role names appear on these tabs. Select these tabs to view tasks assigned to roles.
7-4 Learning to Use BPM with WebLogic Integration

Executing the Workflows in the Worklist Application
7. From the drop-down list at the top of the window, select CDExpress. The roles associated with the user for that organization appear as tabs next to the user name tab. In this case, the roles are Accounting, CustomerService, and Shipping.
8. From the View menu, select the Done check box. This allows you to view both Pending and Done tasks in the worklist window.
Starting the Sample Workflows
We start the sample workflows by starting the Order Processing Trigger workflow, which was designed to be started manually. It sets off the main workflow of the sample, Order Processing.
Any Worklist user can start the workflow.
To start the Order Processing Trigger workflow:
1. Choose Workflow→Start a Workflow. The Start Workflow dialog box is displayed.
Figure 7-4 Start Workflow Dialog Box
2. In the Select the organization drop-down list, select CDExpress.
Learning to Use BPM with WebLogic Integration 7-5

7 Executing and Monitoring the Example Workflows
3. From the Select a workflow to start window, select Order Processing Trigger and click OK. An instance of the workflow is created, and a message confirming the successful start of the workflow appears.
Because the first task in this workflow is assigned to the initiator of the workflow (for more information, see “Understanding Task Node Properties: Viewing the Start Order Processing Task Node” on page 3-9), the following message also appears.
4. Click OK to close both message boxes. The Start Order Processing task appears in the worklist under the same user name.
7-6 Learning to Use BPM with WebLogic Integration

Executing the Workflows in the Worklist Application
Figure 7-5 Worklist Application: Task List
5. To execute the task, double-click it in the task list. The execution of the task creates the XML document that triggers the Order Processing workflow, and the first task is assigned to admin.
Notice that the status of the Start Order Processing task does not change to Done. This is because this task is assigned interminably, as specified by the looping mechanism and the lack of a Done node in the workflow design (see “Understanding Task Node Properties: Viewing the Start Order Processing Task Node” on page 3-9).
Each time you execute this task, another instance of it appears in admin’s tasklist. Thus, every time you want to start the Order Processing workflow, you do not need to start the Order Processing Trigger workflow from the Workflow menu; you simply double-click the Start Order Processing task in the worklist.
Indicates date and time that the task first appears in the task list.
Empty box indicates that the status of the task is pending.
Learning to Use BPM with WebLogic Integration 7-7

7 Executing and Monitoring the Example Workflows
Executing the Order Processing Workflow Tasks
The first task in the Order Processing workflow is the credit check, which was assigned to the user admin. In this section, we will execute all the tasks specified in the workflow path that follows a Yes response to the Check Customer Credit task.
To execute the Order Processing workflow tasks:
1. In the message box that informs you of the new task, click OK.
2. Under the admin user tab, double-click the Check Customer Credit task to execute it. The Credit Check message box appears. (We set up this message box in “Defining the XML Document Structure” on page 5-25.)
Figure 7-6 Credit Check Message Box
3. In the message box, click Yes for now. This marks the task done, as indicated by the checkmark in the Status column.
Figure 7-7 Task Marked Done
At this point, let us view the status of the Order Processing workflow to which the Check Customer Credit task belongs. Select the Check Customer Credit task, and choose Workflow→Workflow Status. The Workflow Status dialog box appears.
The workflow label is defined by the Order Processing template definition.
The task is marked done.
7-8 Learning to Use BPM with WebLogic Integration
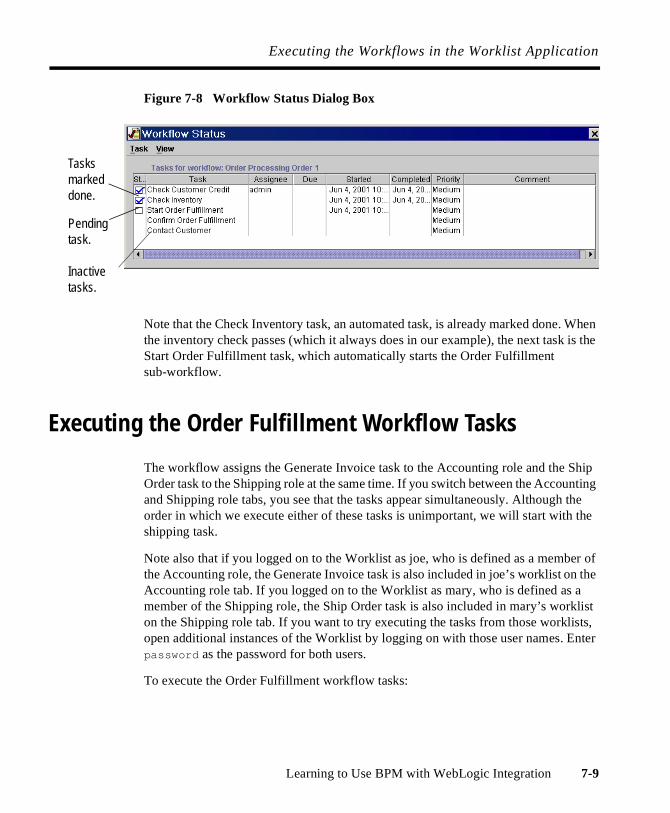
Executing the Workflows in the Worklist Application
Figure 7-8 Workflow Status Dialog Box
Note that the Check Inventory task, an automated task, is already marked done. When the inventory check passes (which it always does in our example), the next task is the Start Order Fulfillment task, which automatically starts the Order Fulfillment sub-workflow.
Executing the Order Fulfillment Workflow Tasks
The workflow assigns the Generate Invoice task to the Accounting role and the Ship Order task to the Shipping role at the same time. If you switch between the Accounting and Shipping role tabs, you see that the tasks appear simultaneously. Although the order in which we execute either of these tasks is unimportant, we will start with the shipping task.
Note also that if you logged on to the Worklist as joe, who is defined as a member of the Accounting role, the Generate Invoice task is also included in joe’s worklist on the Accounting role tab. If you logged on to the Worklist as mary, who is defined as a member of the Shipping role, the Ship Order task is also included in mary’s worklist on the Shipping role tab. If you want to try executing the tasks from those worklists, open additional instances of the Worklist by logging on with those user names. Enter password as the password for both users.
To execute the Order Fulfillment workflow tasks:
Tasks marked done.
Pending task.
Inactive tasks.
Learning to Use BPM with WebLogic Integration 7-9

7 Executing and Monitoring the Example Workflows
1. Select the Shipping tab. Notice that the Ship Order task contains a comment with instructions for shipping. This comment was specified in the workflow template definition.
2. Double-click the Ship Order task to execute it.
3. Select the Accounting tab.
4. Double-click the Generate Invoice task to execute it.
As you may recall from “Defining a Custom Exception Handler: Viewing the Bad Data to OrderBean Exception Handler” on page 6-9, executing this task causes the Calculate Total Price business operation to be performed. This operation, in turn, causes the invalid KK state data provided in the Order Processing Trigger workflow XML event to be passed to the calculate() method on the POBean EJB. The calculate() method then causes the server to throw the BadStateException exception.
Because the Order Fulfillment workflow defines an exception handler to catch the exception, you do not see any evidence of the exception in the Worklist client. Instead, you simply receive the message box specified by the Send XML to Client action defined in the Bad Data to OrderBean exception handler. (For more information, see “Viewing the Send XML to Client Action” on page 6-13.)
Figure 7-9 Error Warning Dialog Box
Let us see what happens if we again enter invalid state data.
5. In the message box field, enter invalid data, such as XYZ. Notice that you are reprompted with the same message.
6. Now enter a valid two-letter state abbreviation, such as CA.
7-10 Learning to Use BPM with WebLogic Integration

Monitoring the Running Workflows in the Studio
The Generate Invoice task is now executed and marked as done. The Calculate Total Price business operation calculates the total price of the order, and returns the value to the Order Processing workflow. The Confirm Order Fulfillment task is automatically executed and the entire process is complete.
If you included the Send E-mail action when defining the Order Processing workflow (see “Sending an E-mail Message: Defining the Confirm Order Fulfillment Task” on page 5-60), you will receive the e-mail with the text you composed.
Otherwise, you can view the results of the complete workflow operation by following the procedures in the next section.
Monitoring the Running Workflows in the Studio
In this section we will rerun the workflows twice, following the two paths specified in the Order Processing workflow: the first time we will reply No to the Check Customer Credit task and execute the Contact Customer task, which terminates the Order Processing workflow; the second time we will reply Yes and execute the remaining tasks of both the Order Processing and Order Fulfillment workflows.
At the same time that we run the workflows in the Worklist, we monitor the running workflow instances in the Studio. You should have both the Worklist and an instance of the Studio open, in the organization CDExpress.
Learning to Use BPM with WebLogic Integration 7-11

7 Executing and Monitoring the Example Workflows
To run and monitor the Order Processing workflow instances:
1. In the Worklist, select the admin tab, and double-click the Start Order Processing task. The Order Processing workflow is triggered.
2. In the Studio, right-click the Order Processing template in the folder tree, and from the pop-up menu, select Instances. The Workflow Instances dialog box appears.
Note that two instances are displayed: the first is the workflow we executed in the previous section; the second, the instance we have just begun. Note that the Order ID has incremented; now it is 2.
Figure 7-10 Workflow Instances Order Processing Dialog Box
The workflow comment was specified in the Confirm Order Fulfillment task of the Order Processing workflow definition.
7-12 Learning to Use BPM with WebLogic Integration

Monitoring the Running Workflows in the Studio
3. Double-click Order 2 in the list of instances. The Workflow Status window appears.
Figure 7-11 Workflow Status Order Processing Window
Green indicates that the task is pending.
Learning to Use BPM with WebLogic Integration 7-13

7 Executing and Monitoring the Example Workflows
4. Click the Vars button to view the current setting of variables in the workflow. The Workflow Variables window appears.
Figure 7-12 Workflow Variables Window
5. Click Close to close the Workflow Variables window.
6. Close the Workflow Status window.
7. Switch back to the Worklist.
8. On the admin user tab, double-click the Check Customer Credit task to execute it.
9. When the message box appears, click No. Now the flow proceeds to the Contact Customer task, which was assigned to the role CustomerService (to which admin belongs).
10. Click the CustomerService tab. In the Comment column is the expression we defined in “Adding a Task and Workflow Comment: Defining the Contact Customer Task” on page 5-30. The comment provides instructions that the user should follow before executing the task.
The value of the CreditCheck variable will be determined by your response to the Credit Check
Other variables have been set by the incoming XML document from the Order Processing
The OrderTotalPrice variable will be provided when the Order Fulfillment workflow has executed.
7-14 Learning to Use BPM with WebLogic Integration

Monitoring the Running Workflows in the Studio
Figure 7-13 Task Comment
11. Double-click the task to execute it. Now the flow terminates. Let us return to the Studio to see the results displayed in the workflow instances.
12. In the Workflow Instances dialog box in the Studio, click Refresh. The workflow now appears complete; it includes the workflow comment Order cancelled that you defined in “Setting the Workflow Comment” on page 5-62.
Instructions for the user appear in the Comment column.
Learning to Use BPM with WebLogic Integration 7-15

7 Executing and Monitoring the Example Workflows
13. Double-click the Order 2 instance to display the Workflow Status window. Now the Contact Customer task appears in grey.
Gray indicates that the task has been marked done.
7-16 Learning to Use BPM with WebLogic Integration

Monitoring the Running Workflows in the Studio
Learning to Use BPM with WebLogic Integration 7-17
14. Click Vars to display the Workflow Variables dialog box.
15. Click Close to close the Workflow Variables window.
16. Close the Workflow Status window.
Now we will rerun the workflow for a third time to monitor the instance of the completed workflow after a Yes response to the credit check task.
To rerun and monitor the Order Processing and Order Fulfillment workflows:
1. In the Worklist, select the admin user tab, and double-click the Start Order Processing task. The Order Processing workflow is triggered. It now appears with the label Order 3.
2. Select the admin tab, and double-click the Check Customer Credit task to execute it. The Credit Check message box appears again.
3. This time, click Yes. The workflow proceeds to the Check Inventory task.
4. Now switch back to the Studio.
5. In the Workflow Instances dialog box, click Refresh. The new instance appears, this time identified as Order 3.
Now the response to the Credit Check
The Inventory variable remains undefined, because the workflow terminates before reaching the
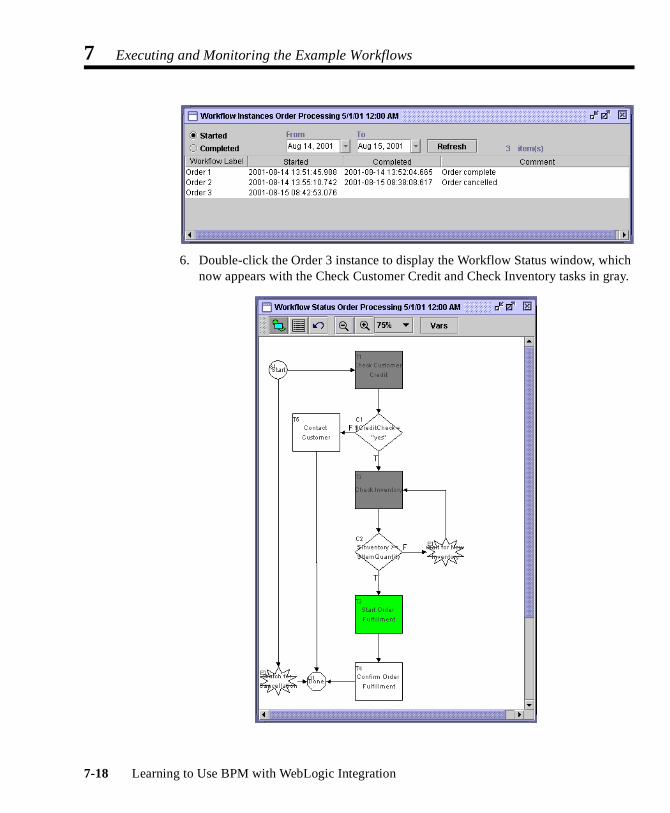
7 Executing and Monitoring the Example Workflows
6. Double-click the Order 3 instance to display the Workflow Status window, which now appears with the Check Customer Credit and Check Inventory tasks in gray.
7-18 Learning to Use BPM with WebLogic Integration

Monitoring the Running Workflows in the Studio
7. Now click Vars to display the Workflow Variables window.
8. Click Close to close the Workflow Variables window.
Because the value in the Inventory variable (536) is greater than the value in the ItemQuantity variable (2), the Order Fulfillment workflow is now launched and you can monitor its instances.
The CreditCheck and Inventory variables have now been set.
Learning to Use BPM with WebLogic Integration 7-19
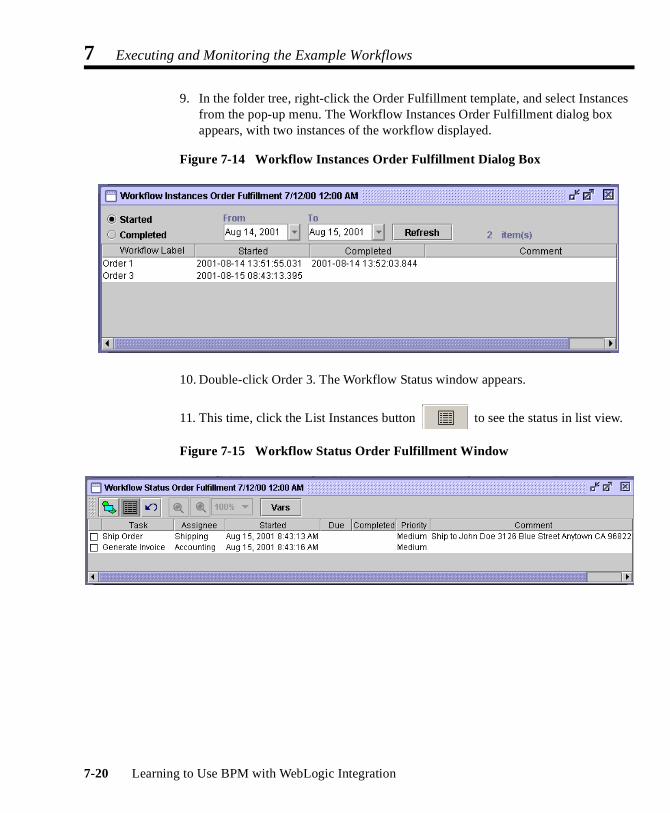
7 Executing and Monitoring the Example Workflows
9. In the folder tree, right-click the Order Fulfillment template, and select Instances from the pop-up menu. The Workflow Instances Order Fulfillment dialog box appears, with two instances of the workflow displayed.
Figure 7-14 Workflow Instances Order Fulfillment Dialog Box
10. Double-click Order 3. The Workflow Status window appears.
11. This time, click the List Instances button to see the status in list view.
Figure 7-15 Workflow Status Order Fulfillment Window
7-20 Learning to Use BPM with WebLogic Integration

Monitoring the Running Workflows in the Studio
12. Click Vars to display the Workflow Variables window.
13. Click Close to close the Workflow Variables window.
14. Return to the Worklist window.
15. Select the Shipping role tab, and double-click the Ship Order task to execute it.
16. Select the Accounting tab, and double-click the Generate Invoice task. In the Error Warning message box, enter a valid state abbreviation, such as CA.
17. Return to the Studio.
18. In the Workflow Status Order Fulfillment window, click the Instance Refresh
button .
These values have been passed from the Order Processing workflow.
These values have yet to be provided.
Both tasks are marked done.
Learning to Use BPM with WebLogic Integration 7-21

7 Executing and Monitoring the Example Workflows
19. Now click Vars to display the Workflow Variables window.
20. Click Close to close the window.
21. Close the Workflow Status Order Fulfillment window.
22. In the Workflow Instances Order Processing dialog box, click Refresh. The window shows that the workflow is complete.
The OrderTotalPrice and ShipToState variables are now set.
7-22 Learning to Use BPM with WebLogic Integration

Monitoring the Running Workflows in the Studio
23. Double-click Order 3 to see the Workflow Status window. The window shows that the workflow is complete.
Learning to Use BPM with WebLogic Integration 7-23
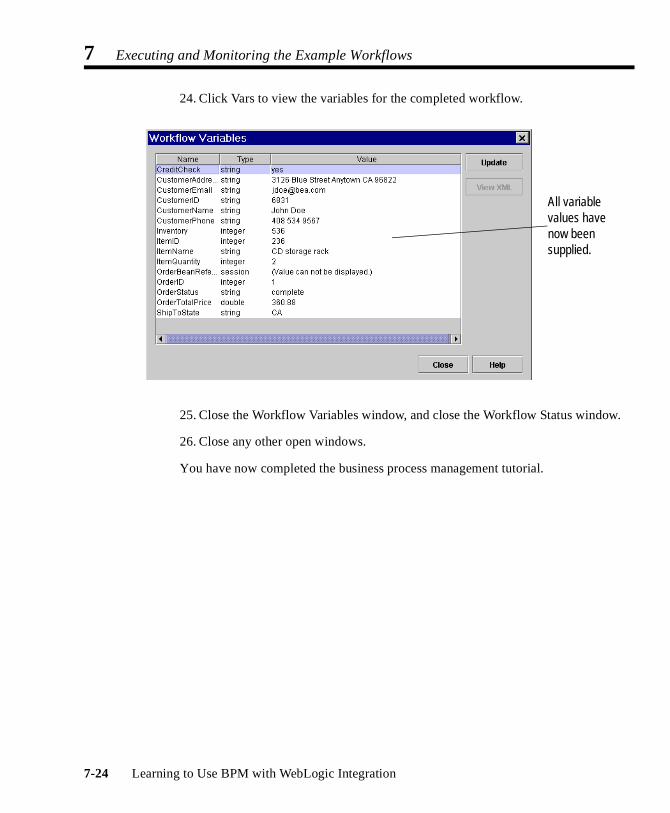
7 Executing and Monitoring the Example Workflows
24. Click Vars to view the variables for the completed workflow.
25. Close the Workflow Variables window, and close the Workflow Status window.
26. Close any other open windows.
You have now completed the business process management tutorial.
All variable values have now been supplied.
7-24 Learning to Use BPM with WebLogic Integration