Embed Size (px)
Citation preview

Bagger GUI User Guide: How to Create and Validate Bags with Bagger
[January 2015]
August 2021 Bagger version 2.8.1

Bagger User Guide | 1 1
Contents
Overview ...................................................................................................................................................................2
Special Note on Non-Windows Operating Systems ............................................................................................................ 2
1. Downloading and Installing Bagger .........................................................................................................................3
1.1 Download Files from GitHub ......................................................................................................................................... 3
1.2 Extract Zipped Files ....................................................................................................................................................... 4
1.3 Resolve Java Error ......................................................................................................................................................... 5 Open Bagger .................................................................................................................................................................... 5 Confirm that JRE is installed ............................................................................................................................................ 5 Download and Install JRE if it is not already installed. .................................................................................................... 7 Configure JRE environmental variable ............................................................................................................................ 7
2. Creating a Bag ...................................................................................................................................................... 10
2.1 Open Bagger ............................................................................................................................................................... 10
2.2 Create a Bag ................................................................................................................................................................ 10 Creating a New Bag ....................................................................................................................................................... 10 Adding payload to bag .................................................................................................................................................. 14 Saving the Bag ............................................................................................................................................................... 15 Record the Size of the Saved Bag .................................................................................................................................. 17
3. Validating a Bag ................................................................................................................................................... 19
3.1 Open Existing Bag ....................................................................................................................................................... 19
3.2 Validate Bag ................................................................................................................................................................ 20
3.3 Check results ............................................................................................................................................................... 20
3.4 Close Bagger ................................................................................................................................................................ 21
Bagger User Guide | 2 2
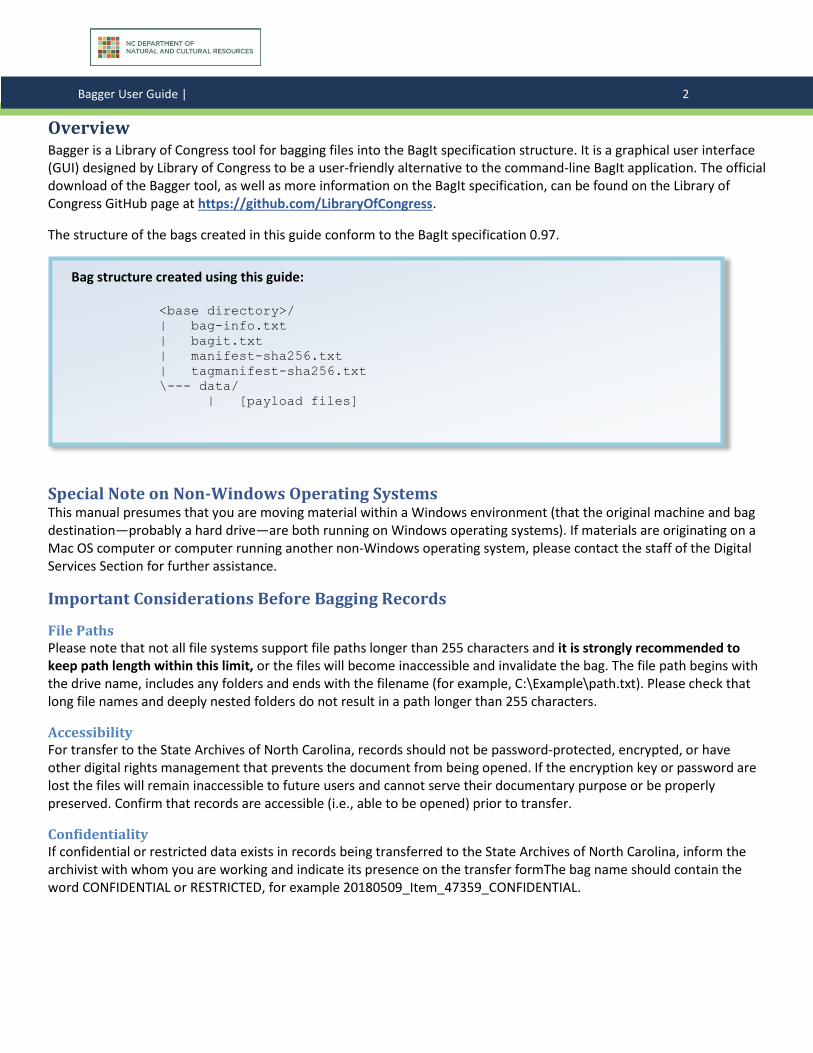
Overview Bagger is a Library of Congress tool for bagging files into the BagIt specification structure. It is a graphical user interface (GUI) designed by Library of Congress to be a user-friendly alternative to the command-line BagIt application. The official download of the Bagger tool, as well as more information on the BagIt specification, can be found on the Library of Congress GitHub page at https://github.com/LibraryOfCongress.
The structure of the bags created in this guide conform to the BagIt specification 0.97.
Special Note on Non-Windows Operating Systems This manual presumes that you are moving material within a Windows environment (that the original machine and bag destination—probably a hard drive—are both running on Windows operating systems). If materials are originating on a Mac OS computer or computer running another non-Windows operating system, please contact the staff of the Digital Services Section for further assistance.
Important Considerations Before Bagging Records
File Paths Please note that not all file systems support file paths longer than 255 characters and it is strongly recommended to keep path length within this limit, or the files will become inaccessible and invalidate the bag. The file path begins with the drive name, includes any folders and ends with the filename (for example, C:\Example\path.txt). Please check that long file names and deeply nested folders do not result in a path longer than 255 characters.
Accessibility For transfer to the State Archives of North Carolina, records should not be password-protected, encrypted, or have other digital rights management that prevents the document from being opened. If the encryption key or password are lost the files will remain inaccessible to future users and cannot serve their documentary purpose or be properly preserved. Confirm that records are accessible (i.e., able to be opened) prior to transfer.
Confidentiality If confidential or restricted data exists in records being transferred to the State Archives of North Carolina, inform the archivist with whom you are working and indicate its presence on the transfer formThe bag name should contain the word CONFIDENTIAL or RESTRICTED, for example 20180509_Item_47359_CONFIDENTIAL.
Bag structure created using this guide: <base directory>/
| bag-info.txt
| bagit.txt
| manifest-sha256.txt
| tagmanifest-sha256.txt
\--- data/
| [payload files]
Bagger User Guide | 3 3
1. Downloading and Installing Bagger
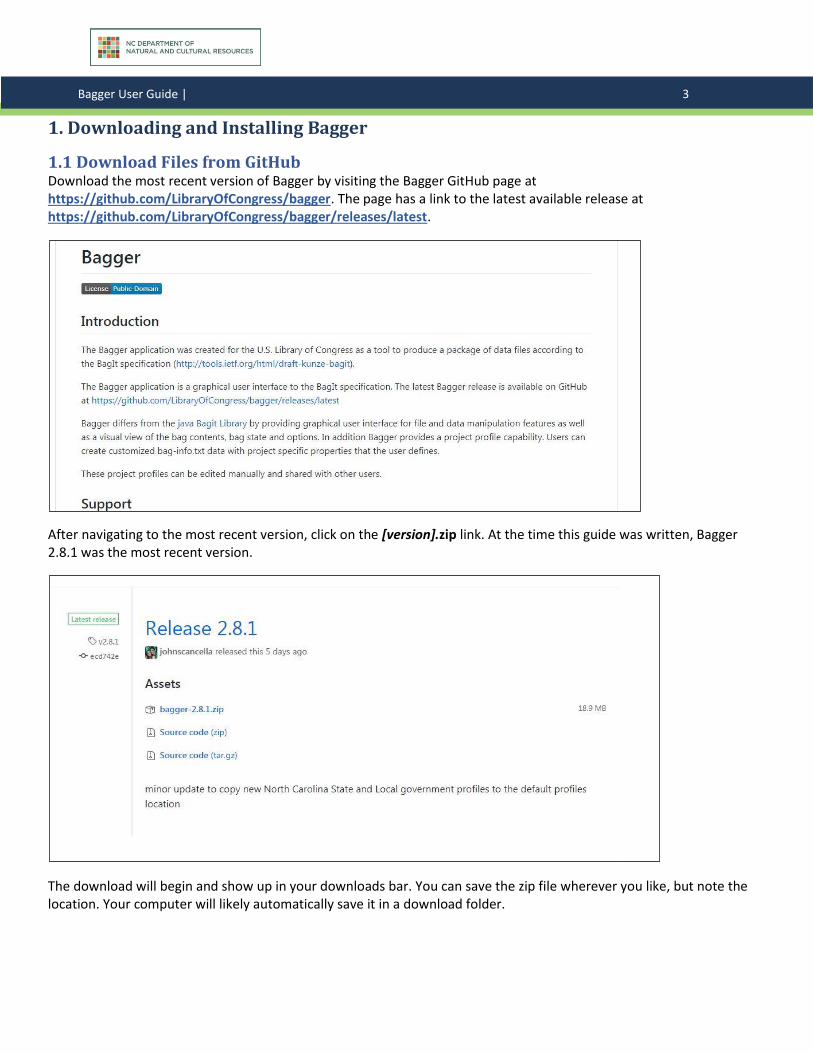
1.1 Download Files from GitHub Download the most recent version of Bagger by visiting the Bagger GitHub page at https://github.com/LibraryOfCongress/bagger. The page has a link to the latest available release at https://github.com/LibraryOfCongress/bagger/releases/latest.
After navigating to the most recent version, click on the [version].zip link. At the time this guide was written, Bagger 2.8.1 was the most recent version.
The download will begin and show up in your downloads bar. You can save the zip file wherever you like, but note the location. Your computer will likely automatically save it in a download folder.
Bagger User Guide | 4 4
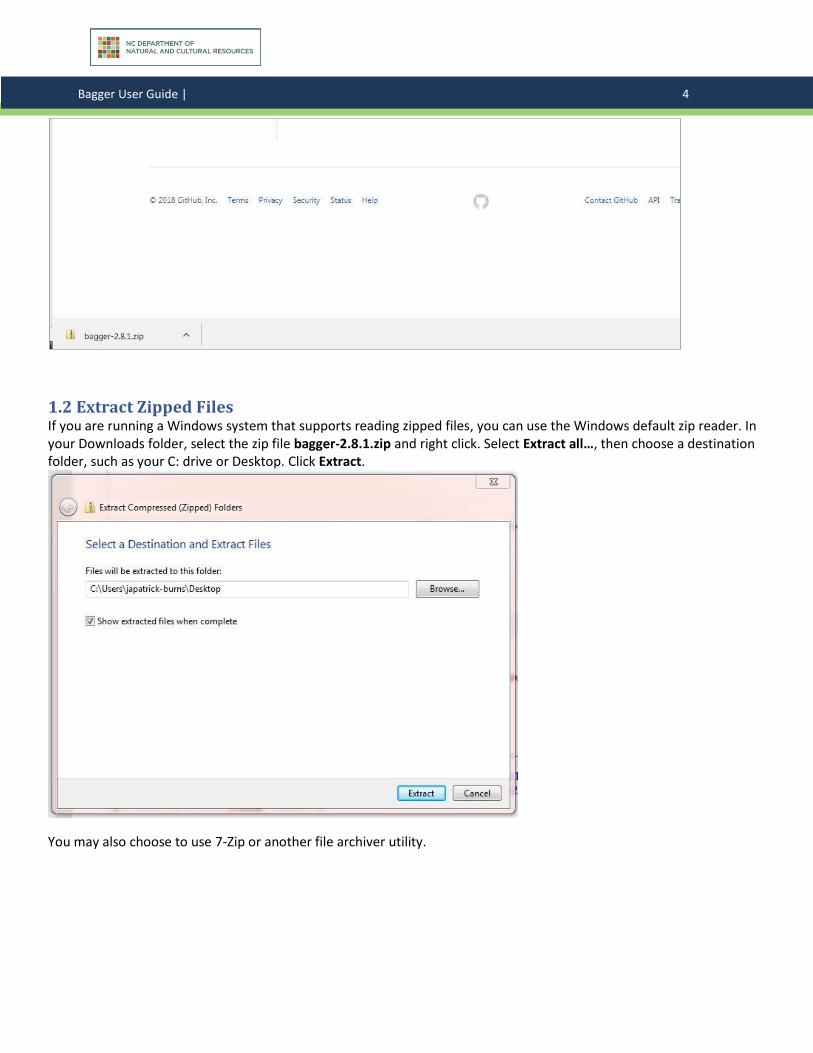
1.2 Extract Zipped Files If you are running a Windows system that supports reading zipped files, you can use the Windows default zip reader. In your Downloads folder, select the zip file bagger-2.8.1.zip and right click. Select Extract all…, then choose a destination folder, such as your C: drive or Desktop. Click Extract.
You may also choose to use 7-Zip or another file archiver utility.
Bagger User Guide | 5 5
1.3 Resolve Java Error Bagger requires Java Runtime Environment (JRE) be installed and accessible by Bagger. JRE is widely used, and most computers will already have a copy. If the computer you are working with (a) does not have a copy or (b) the computer cannot correctly locate its copy, you will receive an error when you attempt to open Bagger.
Open Bagger Double-click C:\ bagger-2.8.1\bin\bagger.bat, and the Bagger application will start.
(Note: if you have installed Bagger in another location, navigate to bagger.bat and double-click).
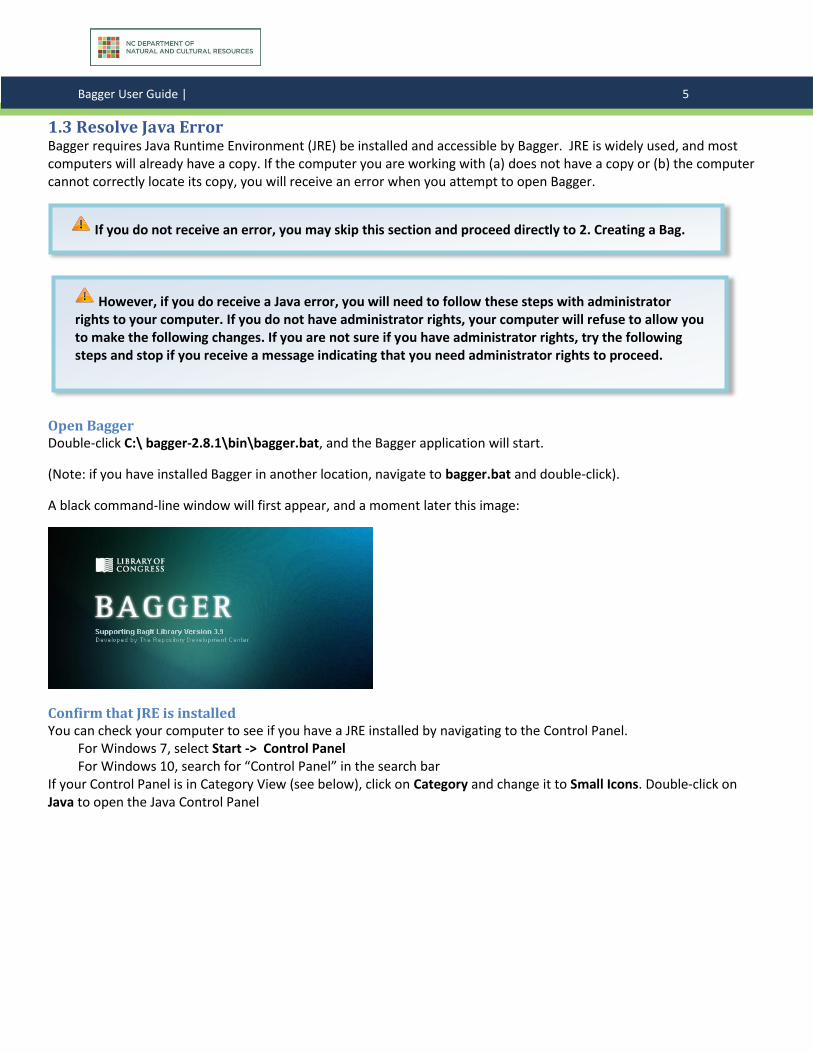
A black command-line window will first appear, and a moment later this image:
Confirm that JRE is installed You can check your computer to see if you have a JRE installed by navigating to the Control Panel.
For Windows 7, select Start -> Control Panel For Windows 10, search for “Control Panel” in the search bar
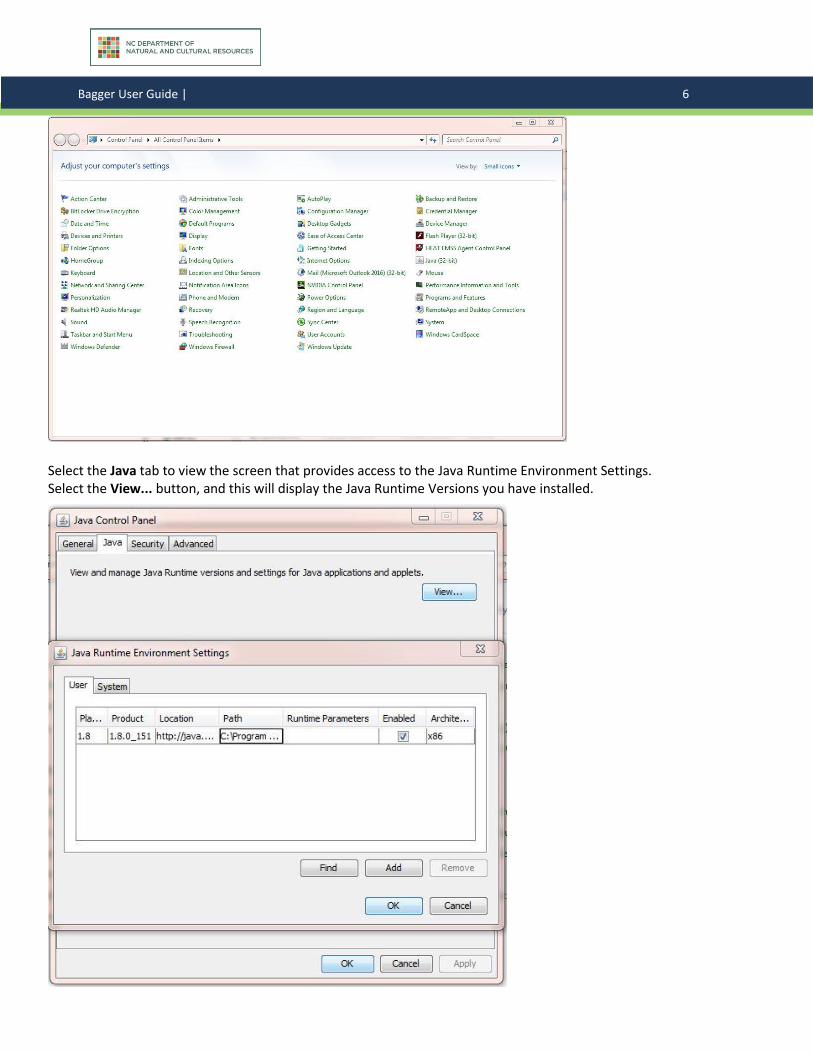
If your Control Panel is in Category View (see below), click on Category and change it to Small Icons. Double-click on Java to open the Java Control Panel
If you do not receive an error, you may skip this section and proceed directly to 2. Creating a Bag.
However, if you do receive a Java error, you will need to follow these steps with administrator rights to your computer. If you do not have administrator rights, your computer will refuse to allow you to make the following changes. If you are not sure if you have administrator rights, try the following steps and stop if you receive a message indicating that you need administrator rights to proceed.
Bagger User Guide | 6 6
Select the Java tab to view the screen that provides access to the Java Runtime Environment Settings. Select the View... button, and this will display the Java Runtime Versions you have installed.
Bagger User Guide | 7 7
This displays the version and the installation location. If it appears that you have a JRE installed, skip down to step 1.2 to confirm that the JRE environmental variable is defined.
Download and Install JRE if it is not already installed. 1. Oracle: http://www.oracle.com/technetwork/java/javase/downloads/index.html 2. CNET: http://download.cnet.com/Java-Runtime-Environment-JRE/3000-2356_4-10009607.html
Note the JRE is generally installed to the C:\Program Files or C:\Program Files (x86) folder.
Configure JRE environmental variable Navigate to the Advanced system settings.
• For Windows 7: From the Start menu, right click on the Computer button. From right-click menu, select the Properties option. Select the Advanced system settings link on the left.
• For Windows 10: navigate to the Control Panel by searching “control panel” in the search bar. Click on System, then Advanced system settings.
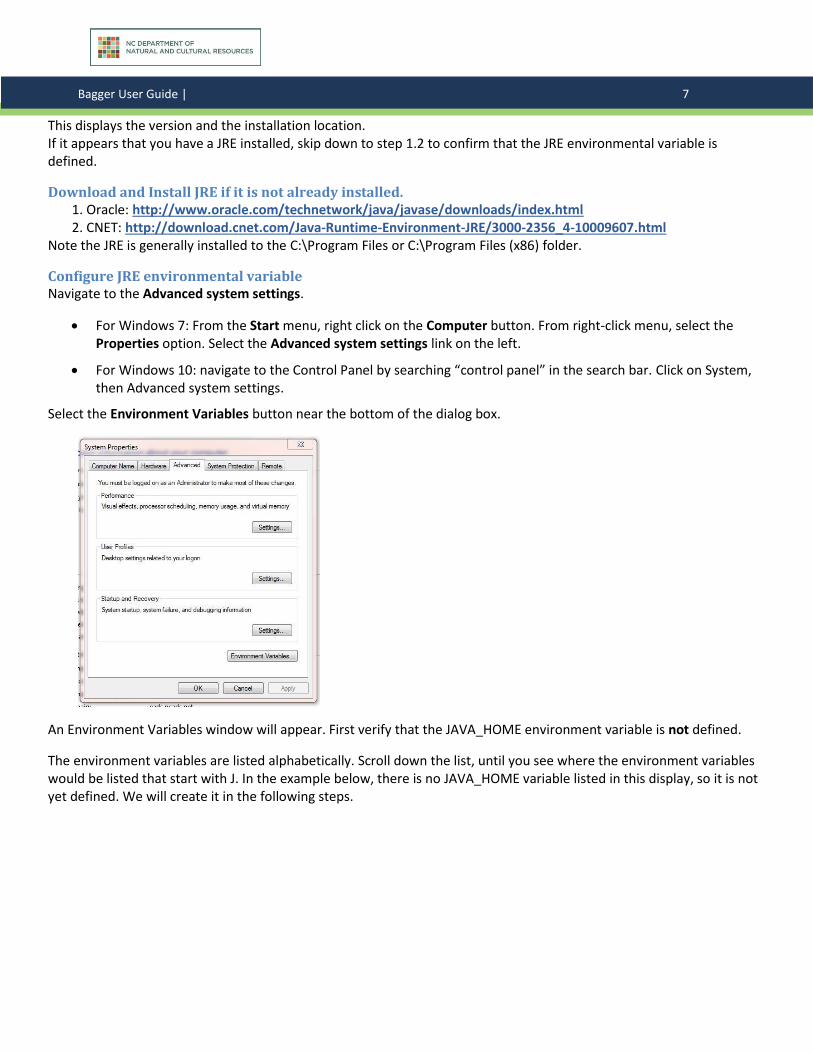
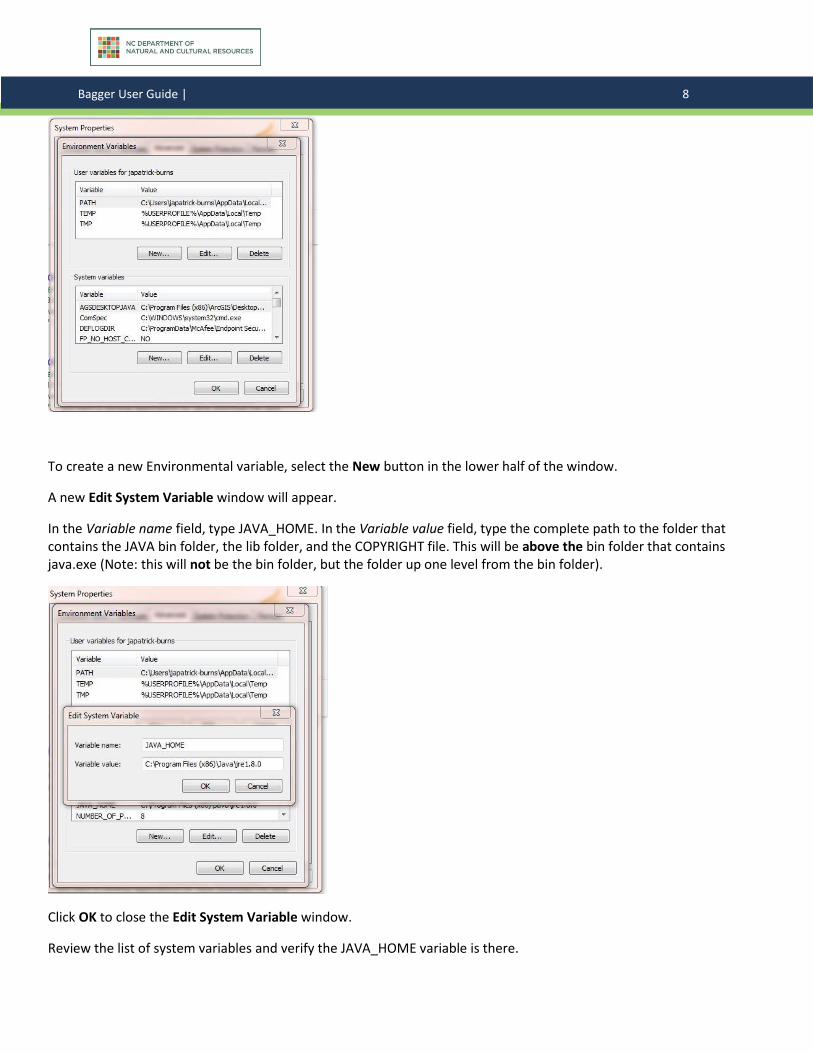
Select the Environment Variables button near the bottom of the dialog box.
An Environment Variables window will appear. First verify that the JAVA_HOME environment variable is not defined.
The environment variables are listed alphabetically. Scroll down the list, until you see where the environment variables would be listed that start with J. In the example below, there is no JAVA_HOME variable listed in this display, so it is not yet defined. We will create it in the following steps.
Bagger User Guide | 8 8
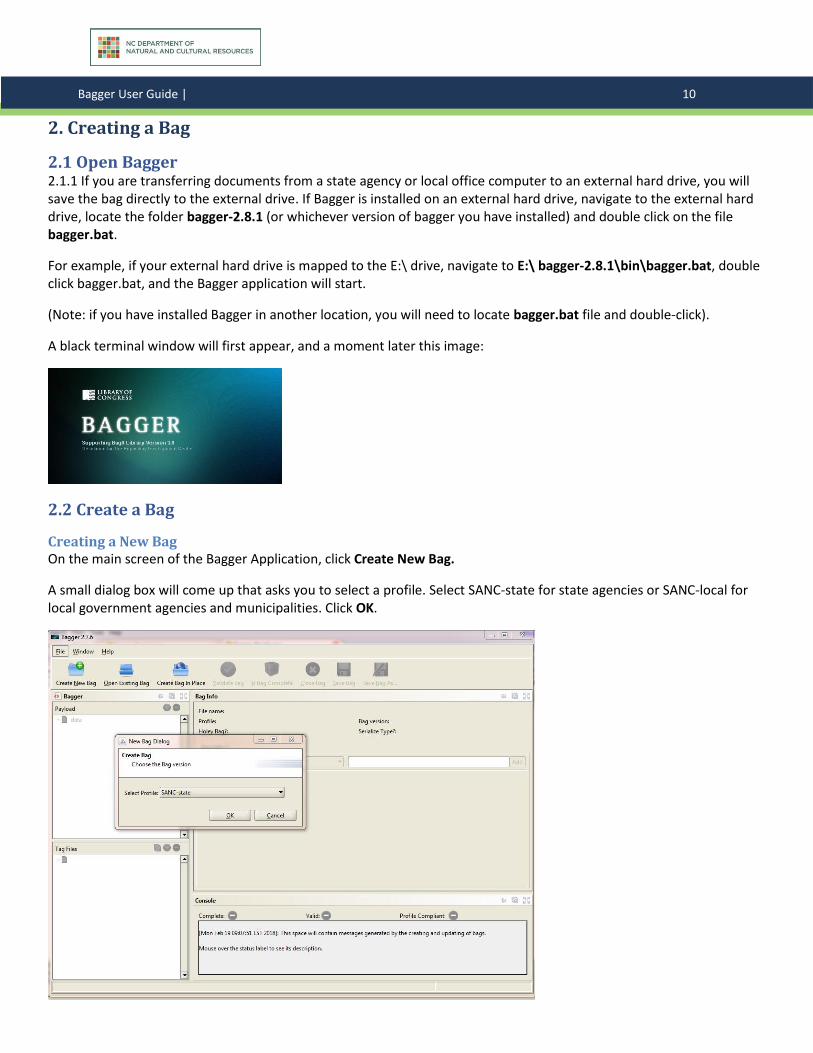
To create a new Environmental variable, select the New button in the lower half of the window.
A new Edit System Variable window will appear.
In the Variable name field, type JAVA_HOME. In the Variable value field, type the complete path to the folder that contains the JAVA bin folder, the lib folder, and the COPYRIGHT file. This will be above the bin folder that contains java.exe (Note: this will not be the bin folder, but the folder up one level from the bin folder).
Click OK to close the Edit System Variable window.
Review the list of system variables and verify the JAVA_HOME variable is there.

Bagger User Guide | 9 9
The system variables are listed alphabetically in the lower window. Scroll down through your list of system variables to confirm the JAVA_HOME variable was properly assigned.
Click OK to close the Environment Variables window.
Click OK to close the System Properties window.
Bagger User Guide | 10 10
2. Creating a Bag
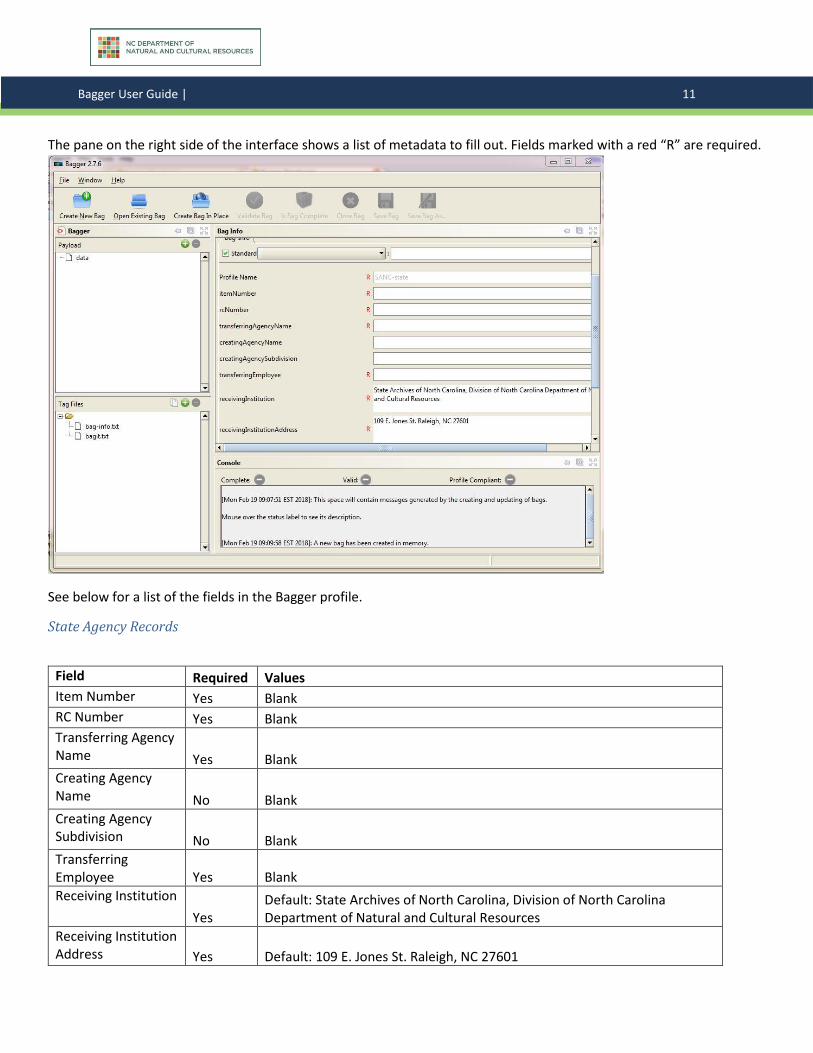
2.1 Open Bagger 2.1.1 If you are transferring documents from a state agency or local office computer to an external hard drive, you will save the bag directly to the external drive. If Bagger is installed on an external hard drive, navigate to the external hard drive, locate the folder bagger-2.8.1 (or whichever version of bagger you have installed) and double click on the file bagger.bat.
For example, if your external hard drive is mapped to the E:\ drive, navigate to E:\ bagger-2.8.1\bin\bagger.bat, double click bagger.bat, and the Bagger application will start.
(Note: if you have installed Bagger in another location, you will need to locate bagger.bat file and double-click).
A black terminal window will first appear, and a moment later this image:
2.2 Create a Bag
Creating a New Bag On the main screen of the Bagger Application, click Create New Bag.
A small dialog box will come up that asks you to select a profile. Select SANC-state for state agencies or SANC-local for local government agencies and municipalities. Click OK.
Bagger User Guide | 11 11
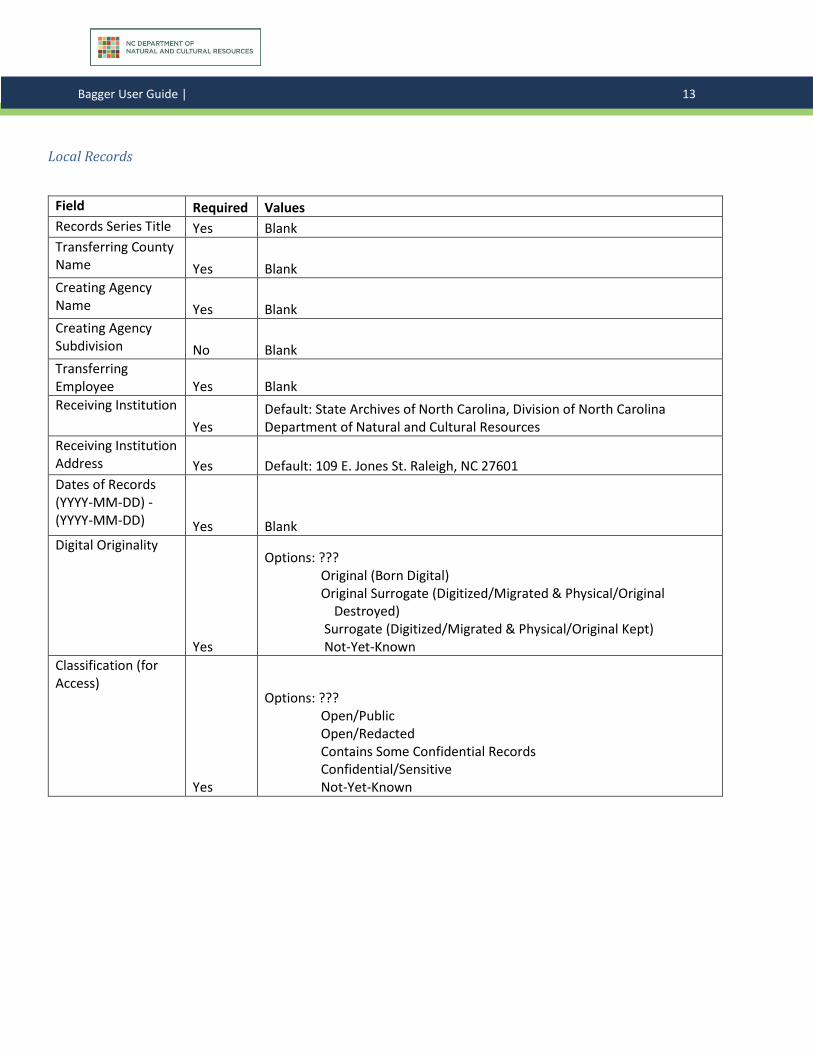
The pane on the right side of the interface shows a list of metadata to fill out. Fields marked with a red “R” are required.
See below for a list of the fields in the Bagger profile.
State Agency Records
Field Required Values
Item Number Yes Blank
RC Number Yes Blank
Transferring Agency Name Yes Blank
Creating Agency Name No Blank
Creating Agency Subdivision No Blank
Transferring Employee Yes Blank
Receiving Institution
Yes Default: State Archives of North Carolina, Division of North Carolina Department of Natural and Cultural Resources
Receiving Institution Address Yes Default: 109 E. Jones St. Raleigh, NC 27601

Bagger User Guide | 12 12
Field Required Values
Dates of Records (YYYY-MM-DD) - (YYYY-MM-DD) Yes Blank
Digital Originality
Yes
Options: ??? Original (Born Digital) Original Surrogate (Digitized/Migrated & Physical/Original Destroyed) Surrogate (Digitized/Migrated & Physical/Original Kept) Not-Yet-Known
Classification (for Access)
Yes
Options: ??? Open/Public Open/Redacted Contains Some Confidential Records Confidential/Sensitive Not-Yet-Known
Digital Content Structure
Yes
Options: ??? Compound (Multiple Types) Word Processing Plain Text Text With Markup Spreadsheet Presentation Database AUDIO Audio: Mono Audio: Stereo VIDEO Video: High Quality/Professional Video: Medium Quality/Amateur Video: Animation/Interactive IMAGE Image: Raster (for Tiff,PNG,Jpeg,jpeg2000,etc.) Image: Vector/CAD Image: Raw/Native Image: Geospatial Raster Image: Geospatial Vector Email Web Content: Site/Page/SocialMedia/Blog/etc. Software: Game/Application/Virtual Machine/Code/etc. Disk Image/Forensic Image Archive: Zip/Tar/Arc/Warc/SIRF/VEO/etc. Encrypted (Key-Available/Accessible-Content) Encrypted (No-Key/Inaccessible-Content)) Not-Yet-Known
Notes No Blank
Bagger User Guide | 13 13
Local Records
Field Required Values
Records Series Title Yes Blank
Transferring County Name Yes Blank
Creating Agency Name Yes Blank
Creating Agency Subdivision No Blank
Transferring Employee Yes Blank
Receiving Institution
Yes Default: State Archives of North Carolina, Division of North Carolina Department of Natural and Cultural Resources
Receiving Institution Address Yes Default: 109 E. Jones St. Raleigh, NC 27601
Dates of Records (YYYY-MM-DD) - (YYYY-MM-DD) Yes Blank
Digital Originality
Yes
Options: ??? Original (Born Digital) Original Surrogate (Digitized/Migrated & Physical/Original Destroyed) Surrogate (Digitized/Migrated & Physical/Original Kept) Not-Yet-Known
Classification (for Access)
Yes
Options: ??? Open/Public Open/Redacted Contains Some Confidential Records Confidential/Sensitive Not-Yet-Known
Bagger User Guide | 14 14
Field Required Values
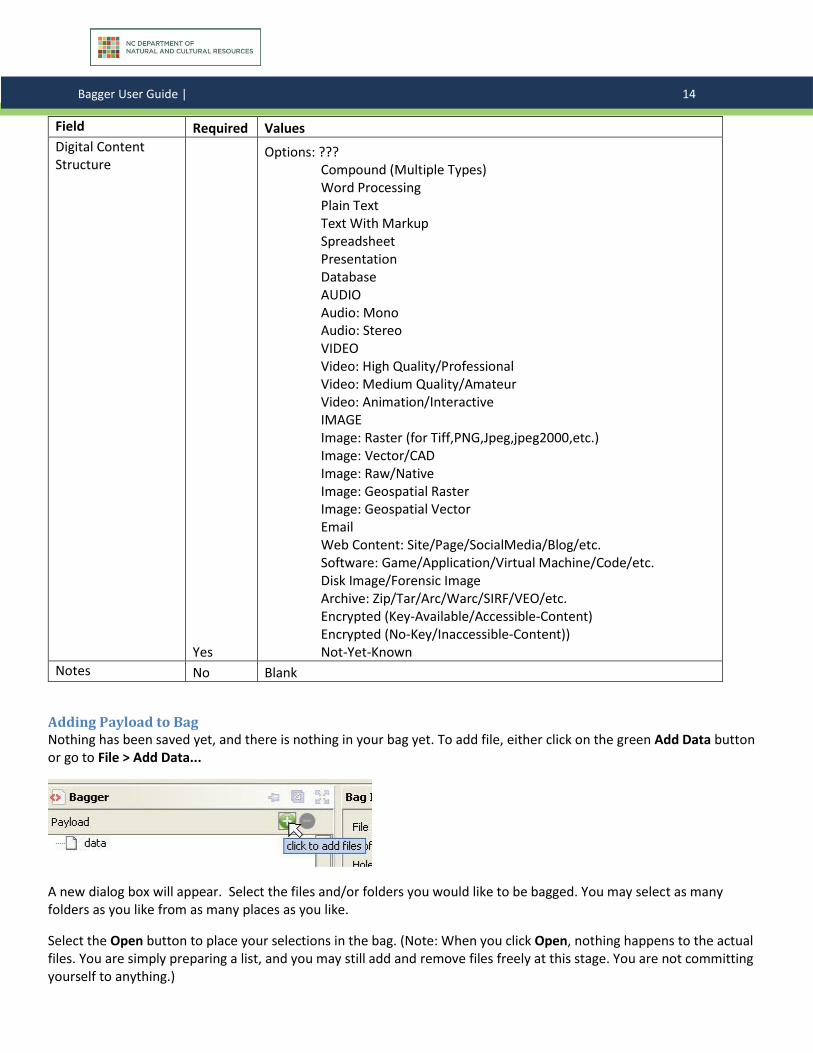
Digital Content Structure
Yes
Options: ??? Compound (Multiple Types) Word Processing Plain Text Text With Markup Spreadsheet Presentation Database AUDIO Audio: Mono Audio: Stereo VIDEO Video: High Quality/Professional Video: Medium Quality/Amateur Video: Animation/Interactive IMAGE Image: Raster (for Tiff,PNG,Jpeg,jpeg2000,etc.) Image: Vector/CAD Image: Raw/Native Image: Geospatial Raster Image: Geospatial Vector Email Web Content: Site/Page/SocialMedia/Blog/etc. Software: Game/Application/Virtual Machine/Code/etc. Disk Image/Forensic Image Archive: Zip/Tar/Arc/Warc/SIRF/VEO/etc. Encrypted (Key-Available/Accessible-Content) Encrypted (No-Key/Inaccessible-Content)) Not-Yet-Known
Notes No Blank
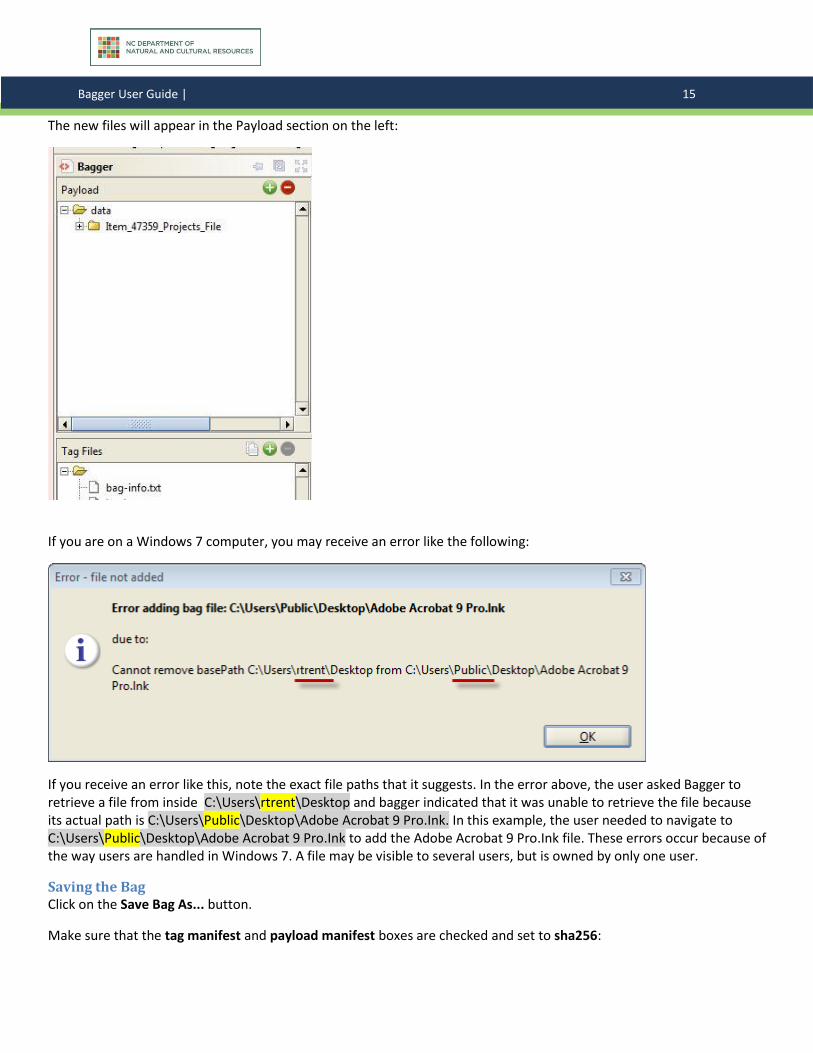
Adding Payload to Bag Nothing has been saved yet, and there is nothing in your bag yet. To add file, either click on the green Add Data button or go to File > Add Data...
A new dialog box will appear. Select the files and/or folders you would like to be bagged. You may select as many folders as you like from as many places as you like.
Select the Open button to place your selections in the bag. (Note: When you click Open, nothing happens to the actual files. You are simply preparing a list, and you may still add and remove files freely at this stage. You are not committing yourself to anything.)
Bagger User Guide | 15 15
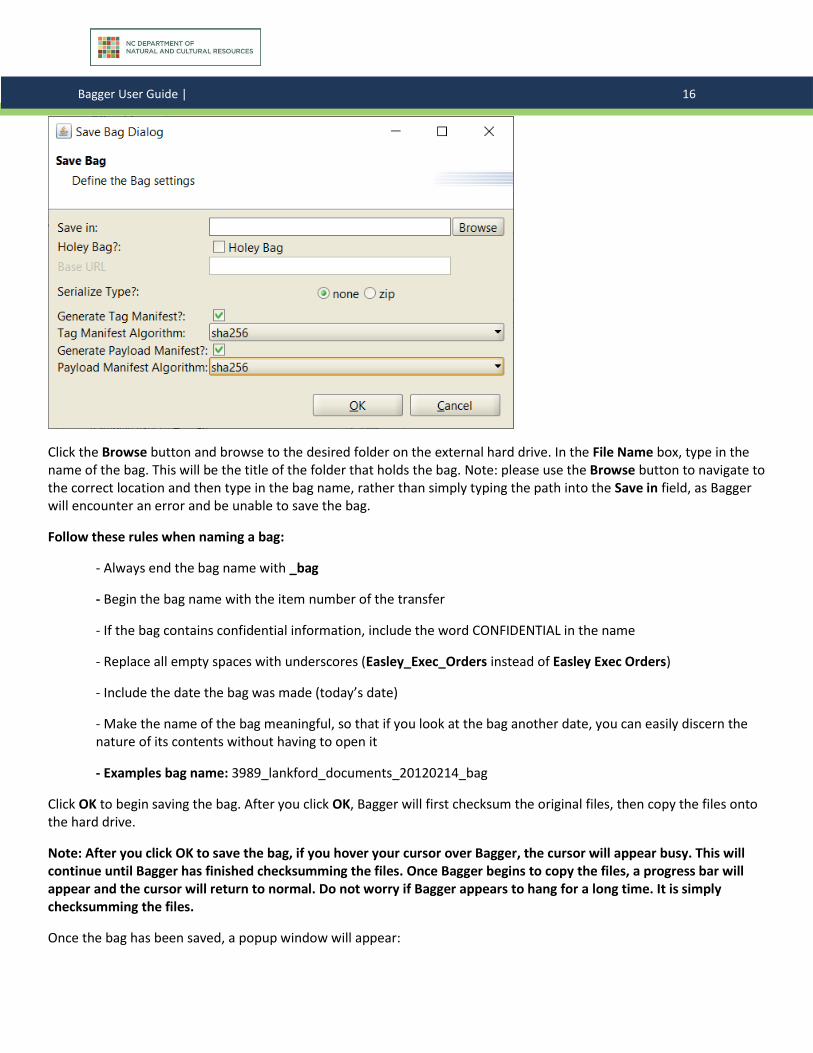
The new files will appear in the Payload section on the left:
If you are on a Windows 7 computer, you may receive an error like the following:
If you receive an error like this, note the exact file paths that it suggests. In the error above, the user asked Bagger to retrieve a file from inside C:\Users\rtrent\Desktop and bagger indicated that it was unable to retrieve the file because its actual path is C:\Users\Public\Desktop\Adobe Acrobat 9 Pro.Ink. In this example, the user needed to navigate to C:\Users\Public\Desktop\Adobe Acrobat 9 Pro.Ink to add the Adobe Acrobat 9 Pro.Ink file. These errors occur because of the way users are handled in Windows 7. A file may be visible to several users, but is owned by only one user.
Saving the Bag Click on the Save Bag As... button.
Make sure that the tag manifest and payload manifest boxes are checked and set to sha256:
Bagger User Guide | 16 16
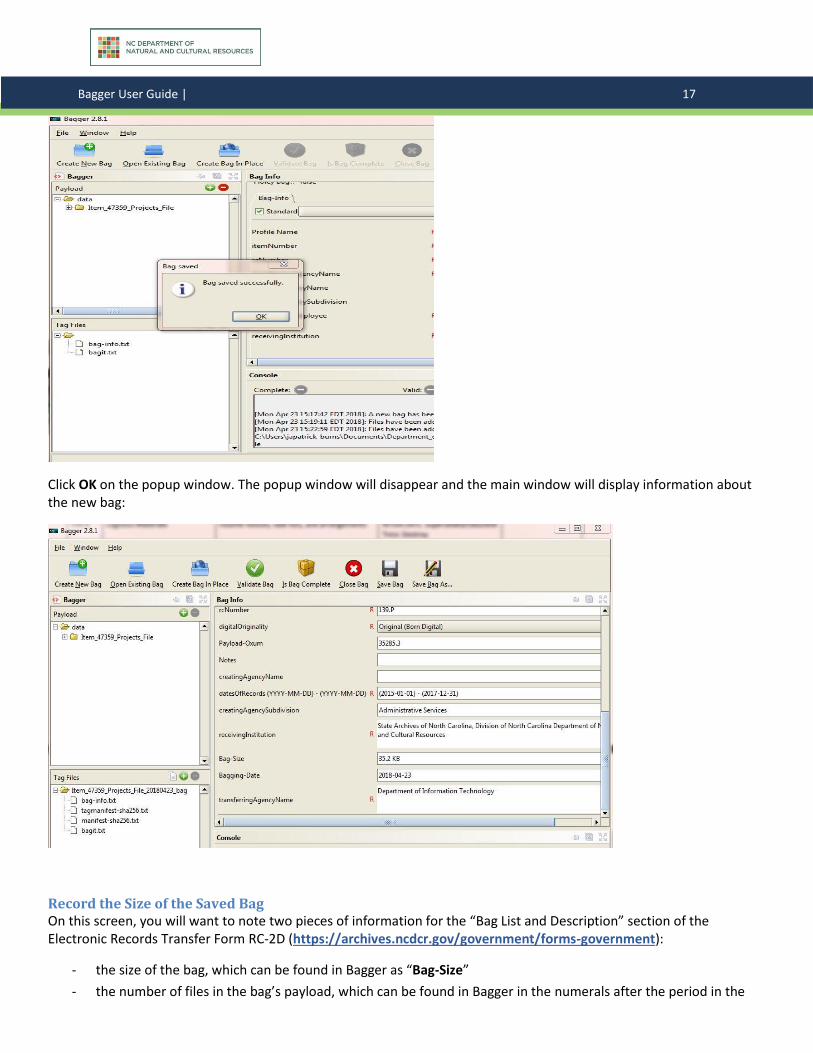
Click the Browse button and browse to the desired folder on the external hard drive. In the File Name box, type in the name of the bag. This will be the title of the folder that holds the bag. Note: please use the Browse button to navigate to the correct location and then type in the bag name, rather than simply typing the path into the Save in field, as Bagger will encounter an error and be unable to save the bag.
Follow these rules when naming a bag:
- Always end the bag name with _bag
- Begin the bag name with the item number of the transfer
- If the bag contains confidential information, include the word CONFIDENTIAL in the name
- Replace all empty spaces with underscores (Easley_Exec_Orders instead of Easley Exec Orders)
- Include the date the bag was made (today’s date)
- Make the name of the bag meaningful, so that if you look at the bag another date, you can easily discern the nature of its contents without having to open it
- Examples bag name: 3989_lankford_documents_20120214_bag
Click OK to begin saving the bag. After you click OK, Bagger will first checksum the original files, then copy the files onto the hard drive.
Note: After you click OK to save the bag, if you hover your cursor over Bagger, the cursor will appear busy. This will continue until Bagger has finished checksumming the files. Once Bagger begins to copy the files, a progress bar will appear and the cursor will return to normal. Do not worry if Bagger appears to hang for a long time. It is simply checksumming the files.
Once the bag has been saved, a popup window will appear:
Bagger User Guide | 17 17
Click OK on the popup window. The popup window will disappear and the main window will display information about the new bag:
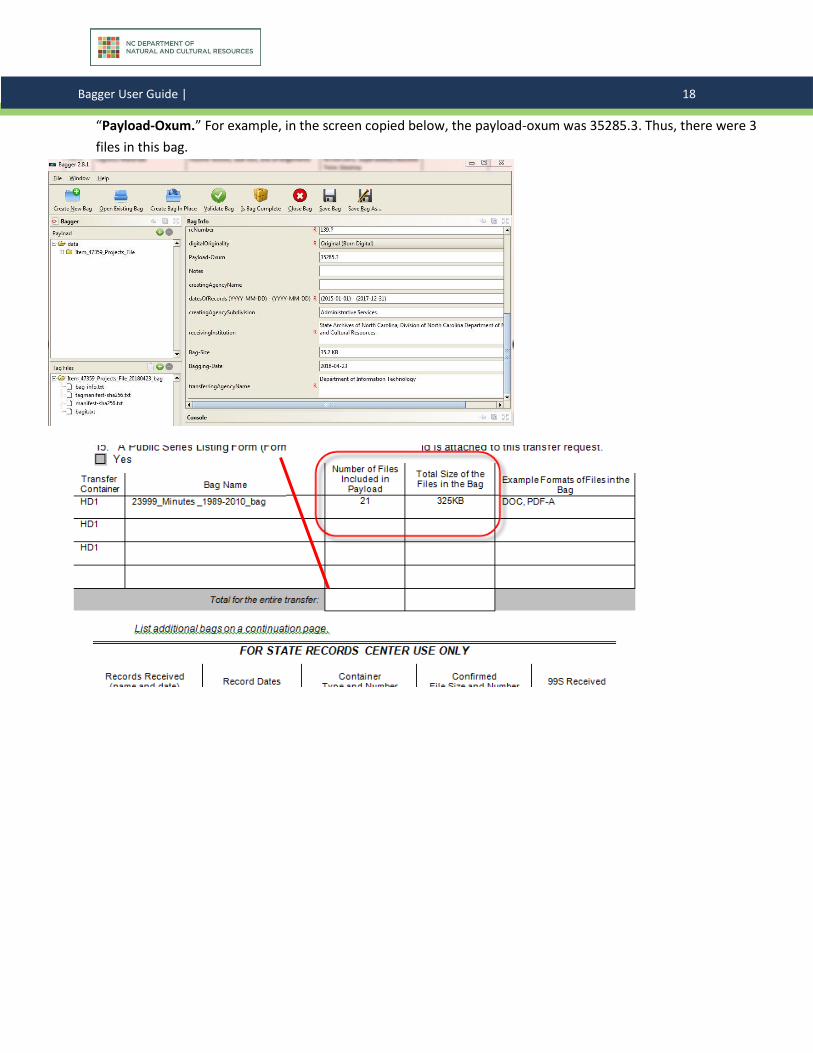
Record the Size of the Saved Bag On this screen, you will want to note two pieces of information for the “Bag List and Description” section of the Electronic Records Transfer Form RC-2D (https://archives.ncdcr.gov/government/forms-government):
- the size of the bag, which can be found in Bagger as “Bag-Size”
- the number of files in the bag’s payload, which can be found in Bagger in the numerals after the period in the
Bagger User Guide | 18 18
“Payload-Oxum.” For example, in the screen copied below, the payload-oxum was 35285.3. Thus, there were 3
files in this bag.
Bagger User Guide | 19 19
3. Validating a Bag Immediately after creating a bag, it is a good idea to validate it to authenticate that the bag was successfully created.
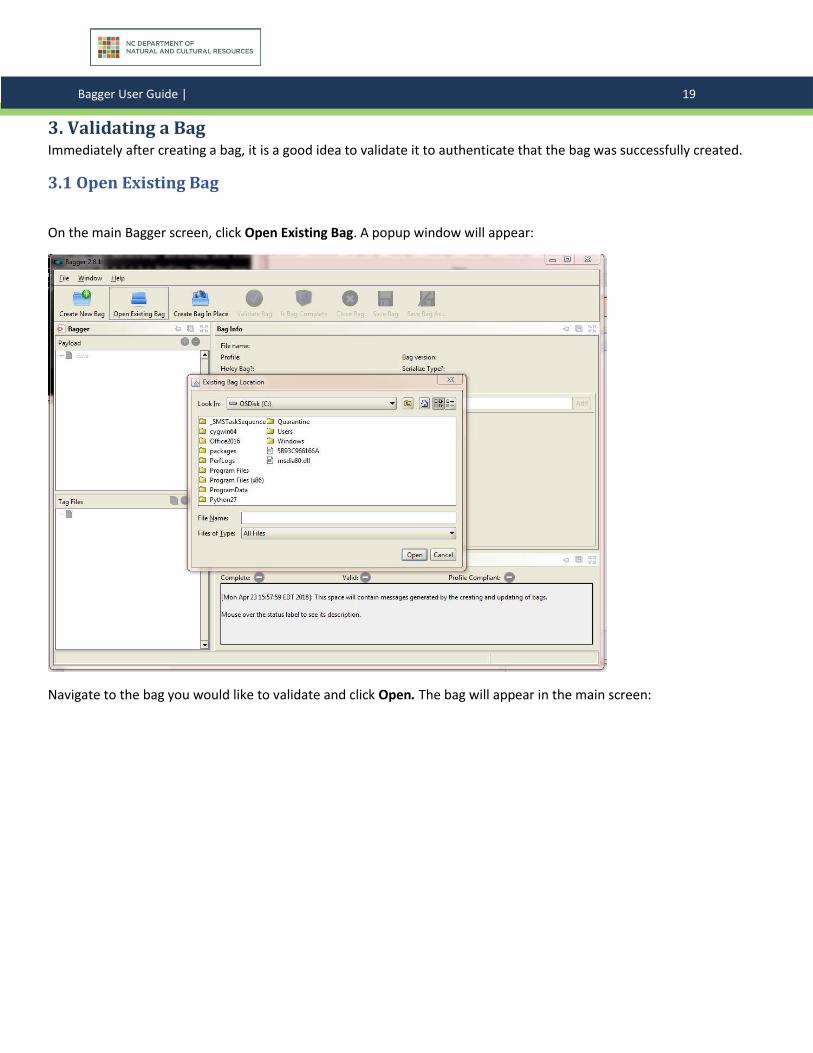
3.1 Open Existing Bag
On the main Bagger screen, click Open Existing Bag. A popup window will appear:
Navigate to the bag you would like to validate and click Open. The bag will appear in the main screen:
Bagger User Guide | 20 20
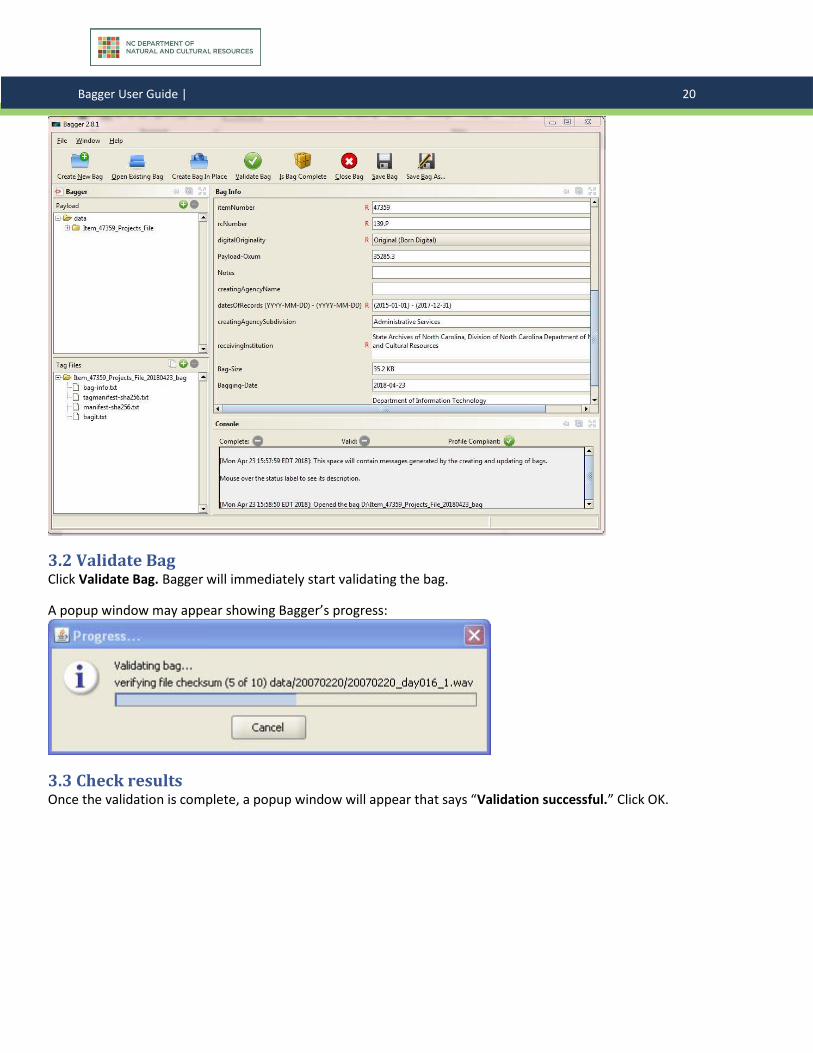
3.2 Validate Bag Click Validate Bag. Bagger will immediately start validating the bag.
A popup window may appear showing Bagger’s progress:
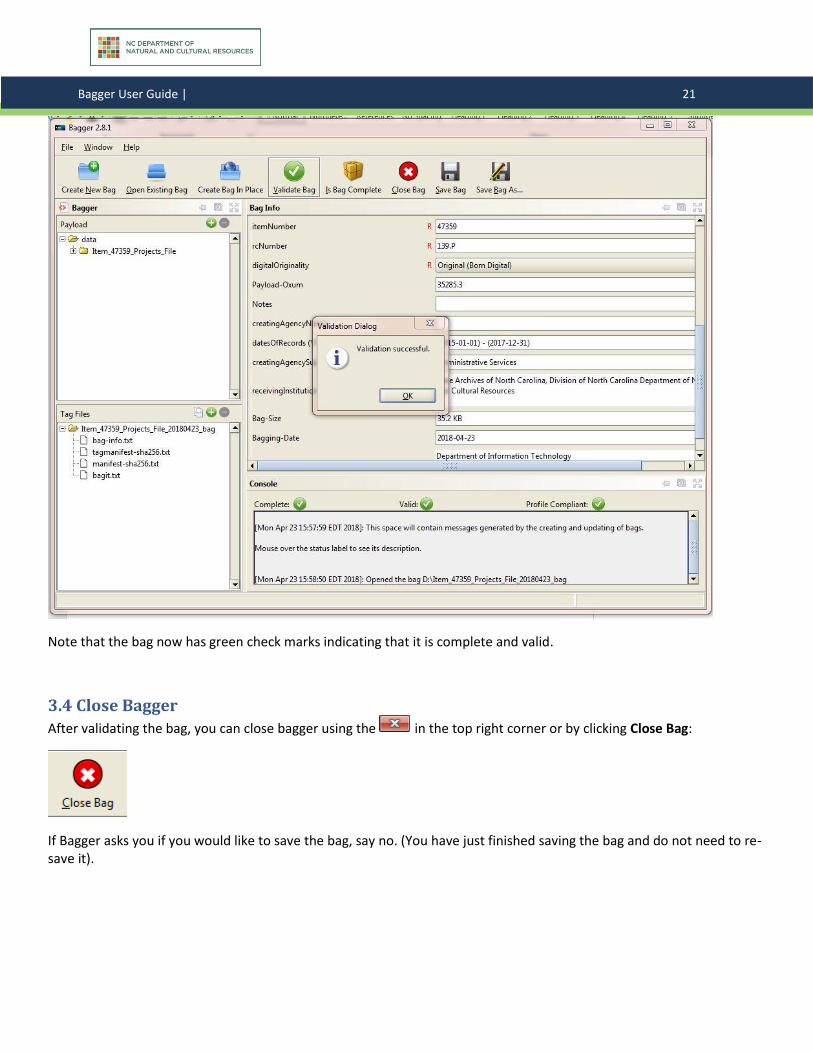
3.3 Check results Once the validation is complete, a popup window will appear that says “Validation successful.” Click OK.
Bagger User Guide | 21 21
Note that the bag now has green check marks indicating that it is complete and valid.
3.4 Close Bagger
After validating the bag, you can close bagger using the in the top right corner or by clicking Close Bag:
If Bagger asks you if you would like to save the bag, say no. (You have just finished saving the bag and do not need to re-save it).