Embed Size (px)
Citation preview

AWS Mobile HubDeveloper Guide
Developer Guide
AWS Mobile Hub Developer Guide: Developer GuideCopyright © 2020 Amazon Web Services, Inc. and/or its affiliates. All rights reserved.

AWS Mobile Hub Developer Guide Developer Guide
Amazon's trademarks and trade dress may not be used in connection with any product or service that is notAmazon's, in any manner that is likely to cause confusion among customers, or in any manner that disparages ordiscredits Amazon. All other trademarks not owned by Amazon are the property of their respective owners, who mayor may not be affiliated with, connected to, or sponsored by Amazon.

AWS Mobile Hub Developer Guide Developer Guide
Table of ContentsMobile and Web App Development .... . . . . . . . . . . . . . . . . . . . . . . . . . . . . . . . . . . . . . . . . . . . . . . . . . . . . . . . . . . . . . . . . . . . . . . . . . . . . . . . . . . . . . . . . . . . . . . . . . . 1Reference .... . . . . . . . . . . . . . . . . . . . . . . . . . . . . . . . . . . . . . . . . . . . . . . . . . . . . . . . . . . . . . . . . . . . . . . . . . . . . . . . . . . . . . . . . . . . . . . . . . . . . . . . . . . . . . . . . . . . . . . . . . . . . . . . . . . . . . . 2
SDK API References .... . . . . . . . . . . . . . . . . . . . . . . . . . . . . . . . . . . . . . . . . . . . . . . . . . . . . . . . . . . . . . . . . . . . . . . . . . . . . . . . . . . . . . . . . . . . . . . . . . . . . . . . . . . . . . . . . 2AWS Mobile Hub Reference .... . . . . . . . . . . . . . . . . . . . . . . . . . . . . . . . . . . . . . . . . . . . . . . . . . . . . . . . . . . . . . . . . . . . . . . . . . . . . . . . . . . . . . . . . . . . . . . . . . . . . 2
Android and iOS .... . . . . . . . . . . . . . . . . . . . . . . . . . . . . . . . . . . . . . . . . . . . . . . . . . . . . . . . . . . . . . . . . . . . . . . . . . . . . . . . . . . . . . . . . . . . . . . . . . . . . . . . . . . . . 2Web .... . . . . . . . . . . . . . . . . . . . . . . . . . . . . . . . . . . . . . . . . . . . . . . . . . . . . . . . . . . . . . . . . . . . . . . . . . . . . . . . . . . . . . . . . . . . . . . . . . . . . . . . . . . . . . . . . . . . . . . . . . . 141React Native .... . . . . . . . . . . . . . . . . . . . . . . . . . . . . . . . . . . . . . . . . . . . . . . . . . . . . . . . . . . . . . . . . . . . . . . . . . . . . . . . . . . . . . . . . . . . . . . . . . . . . . . . . . . . . . . 176Mobile Hub Features .... . . . . . . . . . . . . . . . . . . . . . . . . . . . . . . . . . . . . . . . . . . . . . . . . . . . . . . . . . . . . . . . . . . . . . . . . . . . . . . . . . . . . . . . . . . . . . . . . . . . 190IAM Usage .... . . . . . . . . . . . . . . . . . . . . . . . . . . . . . . . . . . . . . . . . . . . . . . . . . . . . . . . . . . . . . . . . . . . . . . . . . . . . . . . . . . . . . . . . . . . . . . . . . . . . . . . . . . . . . . . . . 214Project Service Region Hosting .... . . . . . . . . . . . . . . . . . . . . . . . . . . . . . . . . . . . . . . . . . . . . . . . . . . . . . . . . . . . . . . . . . . . . . . . . . . . . . . . . . . . . . 224Troubleshooting Projects ... . . . . . . . . . . . . . . . . . . . . . . . . . . . . . . . . . . . . . . . . . . . . . . . . . . . . . . . . . . . . . . . . . . . . . . . . . . . . . . . . . . . . . . . . . . . . . . 229Exporting and Importing Projects ... . . . . . . . . . . . . . . . . . . . . . . . . . . . . . . . . . . . . . . . . . . . . . . . . . . . . . . . . . . . . . . . . . . . . . . . . . . . . . . . . . . 233Amazon CloudFront Security ... . . . . . . . . . . . . . . . . . . . . . . . . . . . . . . . . . . . . . . . . . . . . . . . . . . . . . . . . . . . . . . . . . . . . . . . . . . . . . . . . . . . . . . . . . 245Amazon S3 Security ... . . . . . . . . . . . . . . . . . . . . . . . . . . . . . . . . . . . . . . . . . . . . . . . . . . . . . . . . . . . . . . . . . . . . . . . . . . . . . . . . . . . . . . . . . . . . . . . . . . . . . 246
iii

AWS Mobile Hub Developer Guide Developer Guide
Mobile and Web App DevelopmentThe Amplify Framework enables developers to build cloud-powered mobile and web apps. It includes acomprehensive set of SDKs, libraries, tools, and documentation for client app development. Learn moreor get started with the Amplify Framework now.
1

AWS Mobile Hub Developer Guide Developer GuideSDK API References
AWS Mobile ReferenceTopics
• Android and iOS API References (p. 2)
• AWS Mobile Hub Reference (p. 2)
Android and iOS API ReferencesAndroid
• AWS Mobile SDK for Android API Reference
• AWS Mobile SDK for Android on GitHub
• AWS Mobile SDK for Android Samples
iOS
• AWS Mobile SDK for iOS API Reference
• AWS Mobile SDK for iOS on GitHub
• AWS Mobile SDK for iOS Samples
AWS Mobile Hub ReferenceTopics
• AWS Mobile for Android and iOS (p. 2)
• AWS Amplify Library for Web (p. 141)
• AWS Amplify Library for React Native (p. 176)
• AWS Mobile Hub Features (p. 190)
• AWS Identity and Access Management Usage in AWS Mobile Hub (p. 214)
• Mobile Hub Project Service Region Hosting (p. 224)
• Mobile Hub Project Troubleshooting (p. 229)
• Exporting and Importing AWS Mobile Hub Projects (p. 233)
• Amazon CloudFront Security Considerations for Mobile Hub Users (p. 245)
• Amazon S3 Security Considerations for Mobile Hub Users (p. 246)
AWS Mobile for Android and iOS
The following reference content only applies to existing apps that were built using the AWS MobileSDKs for iOS and Android. If you’re building a new mobile or web app, or you’re adding cloud
2
AWS Mobile Hub Developer Guide Developer GuideAndroid and iOS
capabilities to an existing app, visit the Amplify Framework website instead. Documentation for theAWS Mobile SDKs for iOS and Android is now part of the Amplify Framework.
The AWS Mobile SDKs for Android and iOS enable you to quickly and easily integrate robust cloudbackends into your existing mobile apps.
Topics• Get Started (p. 3)• AWS Mobile Android and iOS How To (p. 92)
Get Started
The following reference content only applies to existing apps that were built using the AWS MobileSDKs for iOS and Android. If you’re building a new mobile or web app, or you’re adding cloudcapabilities to an existing app, visit the Amplify Framework website instead. Documentation for theAWS Mobile SDKs for iOS and Android is now part of the Amplify Framework.
Overview
The AWS Mobile Android and iOS SDKs help you build high quality mobile apps quickly and easily. Theyprovide easy access to a range of AWS services, including Amazon Cognito, AWS Lambda, Amazon S3,Amazon Kinesis, Amazon DynamoDB, Amazon Pinpoint and many more.
Set Up Your Backend
1. Sign up for the AWS Free Tier.2. Create a Mobile Hub project by signing into the console. The Mobile Hub console provides a single
location for managing and monitoring your app’s cloud resources.3. Name your project, check the box to allow Mobile Hub to administer resources for you and then
choose Add.
Android - Java
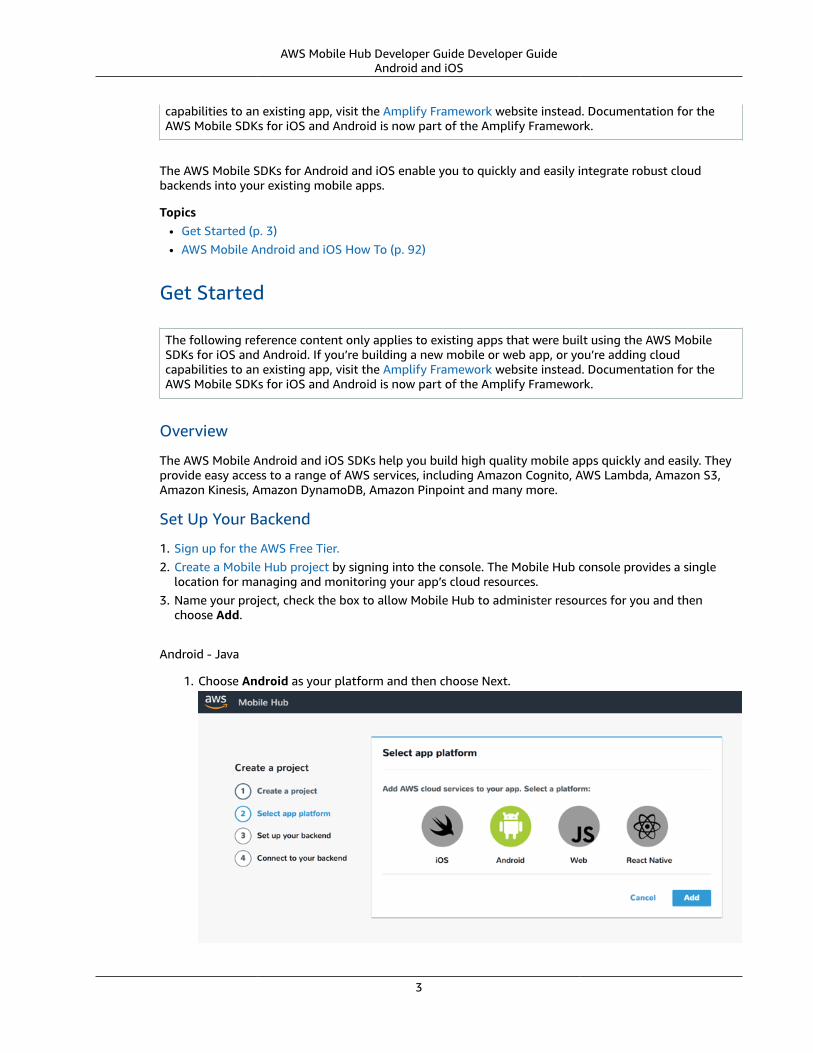
1. Choose Android as your platform and then choose Next.
3
AWS Mobile Hub Developer Guide Developer GuideAndroid and iOS
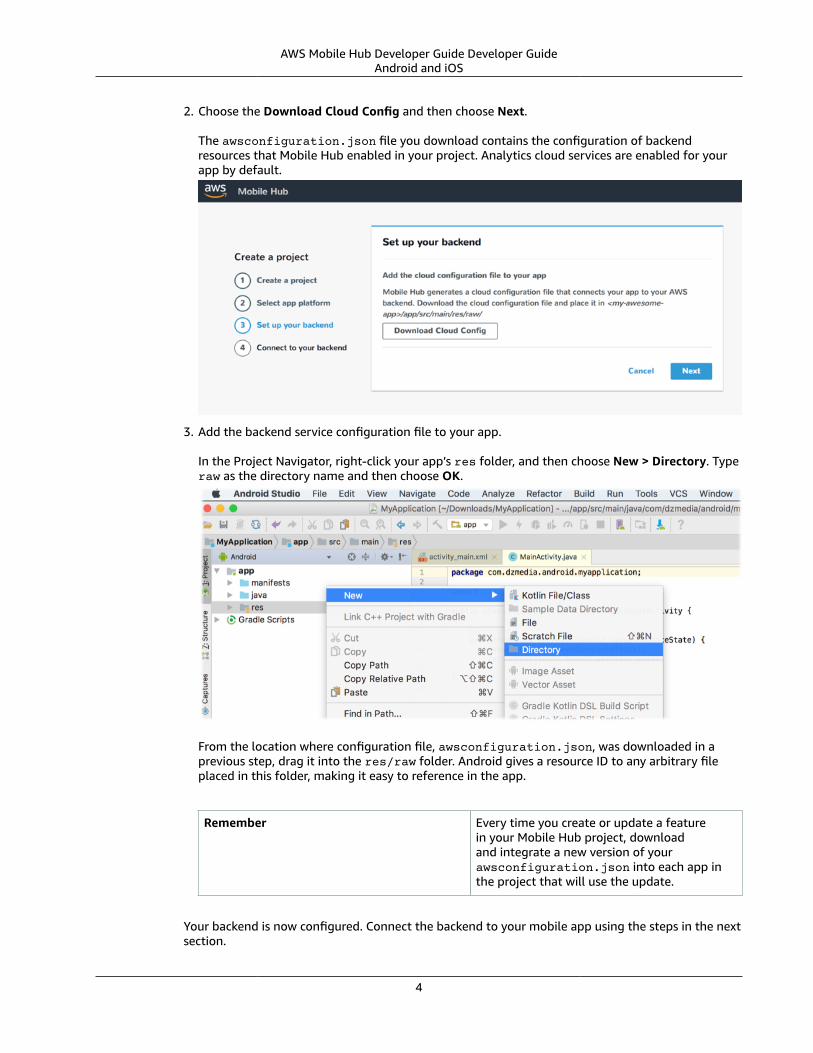
2. Choose the Download Cloud Config and then choose Next.
The awsconfiguration.json file you download contains the configuration of backendresources that Mobile Hub enabled in your project. Analytics cloud services are enabled for yourapp by default.
3. Add the backend service configuration file to your app.
In the Project Navigator, right-click your app’s res folder, and then choose New > Directory. Typeraw as the directory name and then choose OK.
From the location where configuration file, awsconfiguration.json, was downloaded in aprevious step, drag it into the res/raw folder. Android gives a resource ID to any arbitrary fileplaced in this folder, making it easy to reference in the app.
Remember Every time you create or update a featurein your Mobile Hub project, downloadand integrate a new version of yourawsconfiguration.json into each app inthe project that will use the update.
Your backend is now configured. Connect the backend to your mobile app using the steps in the nextsection.
4

AWS Mobile Hub Developer Guide Developer GuideAndroid and iOS
Android - Kotlin
1. Choose Android as your platform and then choose Next.
2. Choose the Download Cloud Config and then choose Next.
The awsconfiguration.json file you download contains the configuration of backendresources that Mobile Hub enabled in your project. Analytics cloud services are enabled for yourapp by default.
3. Add the backend service configuration file to your app.
In the Project Navigator, right-click your app’s res folder, and then choose New > Directory. Typeraw as the directory name and then choose OK.
5

AWS Mobile Hub Developer Guide Developer GuideAndroid and iOS
From the location where configuration file, awsconfiguration.json, was downloaded in aprevious step, drag it into the res/raw folder. Android gives a resource ID to any arbitrary fileplaced in this folder, making it easy to reference in the app.
Remember Every time you create or update a featurein your Mobile Hub project, downloadand integrate a new version of yourawsconfiguration.json into each app inthe project that will use the update.
Your backend is now configured. Connect the backend to your mobile app using the steps in the nextsection.
iOS - Swift
1. Pick iOS as your platform and choose Next.
2. Choose the Download Cloud Config and then choose Next.
The awsconfiguration.json file you download contains the configuration of backendresources that Mobile Hub enabled in your project. Analytics cloud services are enabled for yourapp by default.
6

AWS Mobile Hub Developer Guide Developer GuideAndroid and iOS
3. Add the backend service configuration file to your app.
From your download location, place awsconfiguration.json into the folder containing yourinfo.plist file in your Xcode project. Select Copy items if needed and Create groups in theoptions dialog. Choose Next.
Remember Every time you create or update a featurein your Mobile Hub project, downloadand integrate a new version of yourawsconfiguration.json into each app inthe project that will use the update.
Your backend is now configured. Connect the backend to your mobile app using the steps in the nextsection.
Connect to Your Backend
Android - Java
1. Prerequisites
• Install Android Studio version 2.33 or higher.
• Install Android SDK v7.11 (Nougat), API level 25.
2. Your AndroidManifest.xml must contain:
<uses-permission android:name="android.permission.INTERNET"/><uses-permission android:name="android.permission.ACCESS_NETWORK_STATE"/>
3. Add dependencies to your app/build.gradle, then choose Sync Now in the upper right ofAndroid Studio. This libraries enable basic AWS functions, like credentials, and analytics.
dependencies { implementation ('com.amazonaws:aws-android-sdk-mobile-client:2.7.+@aar') { transitive = true }}
7

AWS Mobile Hub Developer Guide Developer GuideAndroid and iOS
4. Add the following code to the onCreate method of your main or startup activity.AWSMobileClient is a singleton that establishes your connection to AWS and acts as aninterface for your services.
import com.amazonaws.mobile.client.AWSMobileClient;
public class YourMainActivity extends Activity { @Override protected void onCreate(Bundle savedInstanceState) { super.onCreate(savedInstanceState);
AWSMobileClient.getInstance().initialize(this, new AWSStartupHandler() { @Override public void onComplete(AWSStartupResult awsStartupResult) { Log.d("YourMainActivity", "AWSMobileClient is instantiated and you are connected to AWS!"); } }).execute();
// More onCreate code ... } }
What does this do? When AWSMobileClient is initialized, itconstructs the AWSCredentialsProviderand AWSConfiguration objects which,in turn, are used when creating other SDKclients. The client then makes a Sigv4 signednetwork call to Amazon Cognito FederatedIdentities to retrieve AWS credentials thatprovide the user access to your backendresources. When the network interactionsucceeds, the onComplete method of theAWSStartUpHandler is called.
Your app is now set up to interact with the AWS services you configured in your Mobile Hub project!
Choose the run icon (▶) in Android Studio to build your app and run it on your device/emulator. Lookfor Welcome to AWS! in your Android Logcat output (choose View > Tool Windows > Logcat).
Optional: The following example shows how to retrieve the reference toAWSCredentialsProvider and AWSConfiguration objects which can be used to instantiateother SDK clients. You can use the IdentityManager to fetch the user’s AWS identity id eitherdirectly from Amazon Cognito or from the locally cached identity id value.
import com.amazonaws.auth.AWSCredentialsProvider;import com.amazonaws.mobile.auth.core.IdentityHandler;import com.amazonaws.mobile.auth.core.IdentityManager;import com.amazonaws.mobile.client.AWSMobileClient;import com.amazonaws.mobile.client.AWSStartupHandler;import com.amazonaws.mobile.client.AWSStartupResult;import com.amazonaws.mobile.config.AWSConfiguration;
public class YourMainActivity extends Activity {
private AWSCredentialsProvider credentialsProvider; private AWSConfiguration configuration;
8

AWS Mobile Hub Developer Guide Developer GuideAndroid and iOS
@Override protected void onCreate(Bundle savedInstanceState) { super.onCreate(savedInstanceState);
AWSMobileClient.getInstance().initialize(this, new AWSStartupHandler() { @Override public void onComplete(AWSStartupResult awsStartupResult) {
// Obtain the reference to the AWSCredentialsProvider and AWSConfiguration objects credentialsProvider = AWSMobileClient.getInstance().getCredentialsProvider(); configuration = AWSMobileClient.getInstance().getConfiguration();
// Use IdentityManager#getUserID to fetch the identity id. IdentityManager.getDefaultIdentityManager().getUserID(new IdentityHandler() { @Override public void onIdentityId(String identityId) { Log.d("YourMainActivity", "Identity ID = " + identityId);
// Use IdentityManager#getCachedUserID to // fetch the locally cached identity id. final String cachedIdentityId = IdentityManager.getDefaultIdentityManager().getCachedUserID(); }
@Override public void handleError(Exception exception) { Log.d("YourMainActivity", "Error in retrieving the identity" + exception); } }); } }).execute();
// .. more code }}
Android - Kotlin
1. Prerequisites
• Install Android Studio version 2.33 or higher.
• Install Android SDK v7.11 (Nougat), API level 25.
2. Your AndroidManifest.xml must contain:
<uses-permission android:name="android.permission.INTERNET"/><uses-permission android:name="android.permission.ACCESS_NETWORK_STATE"/>
3. Add dependencies to your app/build.gradle, then choose Sync Now in the upper right ofAndroid Studio. This libraries enable basic AWS functions, like credentials, and analytics.
dependencies { implementation ('com.amazonaws:aws-android-sdk-mobile-client:2.7.+@aar') { transitive = true }}
9

AWS Mobile Hub Developer Guide Developer GuideAndroid and iOS
4. Add the following code to the onCreate method of your main or startup activity.AWSMobileClient is a singleton that establishes your connection to AWS and acts as aninterface for your services.
import com.amazonaws.mobile.client.AWSMobileClient;
class YourMainActivity : Activity() { companion object { private val TAG: String = this::class.java.simpleName }
override fun onCreate(savedInstanceState: Bundle?) { super.onCreate(savedInstanceState);
AWSMobileClient.getInstance().initialize(this) { Log.d(TAG, "AWSMobileClient is initialized") }.execute()
// More onCreate code... }}
What does this do? When AWSMobileClient is initialized, itconstructs the AWSCredentialsProviderand AWSConfiguration objects which, inturn, are used when creating other SDK clients.The client then makes a Sigv4 signed networkcall to Amazon Cognito Federated Identitiesto retrieve AWS credentials that provide theuser access to your backend resources. Whenthe network interaction succeeds, the callback(which is technically the onComplete methodof the AWSStartUpHandler) is called.
Your app is now set up to interact with the AWS services you configured in your Mobile Hub project!
Choose the run icon (▶) in Android Studio to build your app and run it on your device/emulator. Lookfor Welcome to AWS! in your Android Logcat output (choose View > Tool Windows > Logcat).
Optional: The following example shows how to retrieve the reference toAWSCredentialsProvider and AWSConfiguration objects which can be used to instantiateother SDK clients. You can use the IdentityManager to fetch the user’s AWS identity id eitherdirectly from Amazon Cognito or from the locally cached identity id value.
import com.amazonaws.auth.AWSCredentialsProviderimport com.amazonaws.mobile.auth.core.IdentityHandlerimport com.amazonaws.mobile.auth.core.IdentityManagerimport com.amazonaws.mobile.client.AWSMobileClientimport com.amazonaws.mobile.config.AWSConfiguration
class YourMainActivity : Activity() { companion object { private val TAG: String = this::class.java.simpleName }
private var credentialsProvider: AWSCredentialsProvider? = null private var awsConfiguration: AWSConfiguration? = null
10
AWS Mobile Hub Developer Guide Developer GuideAndroid and iOS
override fun onCreate(savedInstanceState: Bundle?) { super.onCreate(savedInstanceState);
AWSMobileClient.getInstance().initialize(this) { credentialsProvider = AWSMobileClient.getInstance().credentialsProvider awsConfiguration = AWSMobileClient.getInstance().configuration
IdentityManager.getDefaultIdentityManager().getUserID(object : IdentityHandler { override fun handleError(exception: Exception?) { Log.e(TAG, "Retrieving identity: ${exception.message}") }
override fun onIdentityId(identityId: String?) { Log.d(TAG, "Identity = $identityId") val cachedIdentityId = IdentityManager.getDefaultIdentityManager().cachedUserID // Do something with the identity here } }) }.execute()
// More onCreate code... }}
iOS - Swift
1. Prerequisites
• Install Xcode version 8.0 or later.
2. Install Cocoapods. From a terminal window run:
sudo gem install cocoapods
3. Create Podfile. From a terminal window, navigate to the directory that contains your project’s.xcodeproj file and run:
pod init
4. Add core AWS Mobile SDK components to your build.
platform :ios, '9.0'target :'YOUR-APP-NAME' do use_frameworks! pod 'AWSMobileClient', '~> 2.6.13' # other podsend
5. Install dependencies by runnng:
pod install --repo-update
If you encounter an error message that begins “[!] Failed to connect to GitHub toupdate the CocoaPods/Specs . . .”, and your internet connectivity is working, you mayneed to update openssl and Ruby.
6. The command pod install creates a new workspace file. Close your Xcode project and reopen itusing ./YOUR-PROJECT-NAME.xcworkspace.
11

AWS Mobile Hub Developer Guide Developer GuideAndroid and iOS
Use ONLY your .xcworkspace Remember to always use ./YOUR-PROJECT-NAME.xcworkspace to open your Xcodeproject from now on.
7. Rebuild your app after reopening it in the workspace to resolve APIs from new libraries called inyour code. This is a good practice any time you add import statements.
8. Replace the return true statement in didFinishLaunching with the following code in yourAppDelegate to establish a run-time connection with AWS Mobile.
import UIKitimport AWSMobileClient
@UIApplicationMainclass AppDelegate: UIResponder, UIApplicationDelegate {
func application(_ application: UIApplication, didFinishLaunchingWithOptions launchOptions: [UIApplicationLaunchOptionsKey: Any]?) -> Bool { // Override point for customization after application launch.
// Create AWSMobileClient to connect with AWS return AWSMobileClient.sharedInstance().interceptApplication( application, didFinishLaunchingWithOptions: launchOptions)
}
What does this do? When AWSMobileClient is initialized, itmakes a Sigv4 signed network call to AmazonCognito Federated Identities to retrieve AWScredentials that provide the user access toyour backend resources. When the networkinteraction succeeds, the onComplete methodof the AWSStartUpHandler is called.
Your app is now set up to interact with the AWS services you configured in your Mobile Hub project!
Choose the run icon (▶) in the top left of the Xcode window or type ⌘-R to build and run your app.Look for Welcome to AWS! in the log output.
Optional: If you want to make sure you’re connected to AWS, import AWSCore and add thefollowing code to didFinishLaunchingWithOptions before you return AWSMobileClient.
import AWSCore
//. . .
AWSDDLog.add(AWSDDTTYLogger.sharedInstance)AWSDDLog.sharedInstance.logLevel = .info
Optional: The following example shows how to retrieve the reference toAWSCredentialsProvider object which can be used to instantiate other SDK clients. You canuse the AWSIdentityManager to fetch the AWS identity id of the user from Amazon Cognito.
12
AWS Mobile Hub Developer Guide Developer GuideAndroid and iOS
import UIKitimport AWSMobileClientimport AWSAuthCore
class ViewController: UIViewController {
@IBOutlet weak var textfield: UITextField! override func viewDidLoad() { super.viewDidLoad() textfield.text = "View Controller Loaded"
// Get the AWSCredentialsProvider from the AWSMobileClient let credentialsProvider = AWSMobileClient.sharedInstance().getCredentialsProvider()
// Get the identity Id from the AWSIdentityManager let identityId = AWSIdentityManager.default().identityId }}
Next Steps
• Add Analytics (p. 14)
• Add User Sign-in (p. 20)
• Add Push Notification (p. 44)
• Add NoSQL Database (p. 54)
• Add User File Storage (p. 66)
• Add Cloud Logic (p. 76)
• Add Messaging (p. 85)
• Add Conversational Bots (p. 86)
Add Analytics to your Mobile App with Amazon Pinpoint
The following reference content only applies to existing apps that were built using the AWS MobileSDKs for iOS and Android. If you’re building a new mobile or web app, or you’re adding cloudcapabilities to an existing app, visit the Amplify Framework website instead. Documentation for theAWS Mobile SDKs for iOS and Android is now part of the Amplify Framework.
Overview
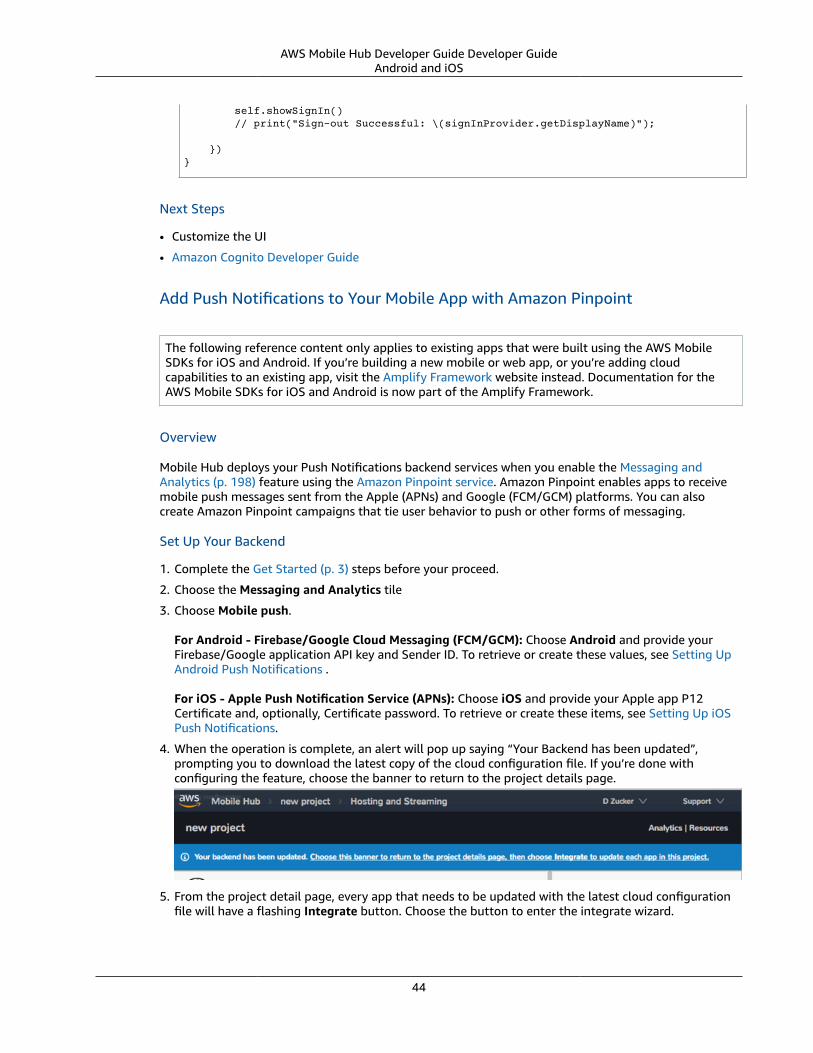
Gather the data that helps improve your app’s usability, monetization, and engagement with your users.Mobile Hub deploys your analytics backend when you enable the Messaging and Analytics (p. 198)feature, which uses the Amazon Pinpoint service.
Set up your Backend
1. Complete the Get Started (p. 3) steps before your proceed.
2. When you create a project, we enable analytics by default in your backend. You should see a greencheck mark present on the Analytics tile in your backend, indicating that the feature is enabled. If thecheck mark is absent, choose Analytics, and then choose Enable.
13

AWS Mobile Hub Developer Guide Developer GuideAndroid and iOS
Connect to your Backend
Use the following steps to add analytics to your mobile app and monitor the results through AmazonPinpoint.
Add Analytics
Android - Java
1. Set up AWS Mobile SDK components as follows.a. Include the following libraries in your app/build.gradle dependencies list.
dependencies{ implementation 'com.amazonaws:aws-android-sdk-pinpoint:2.7.+' implementation ('com.amazonaws:aws-android-sdk-mobile-client:2.7.+@aar') { transitive = true } // other dependencies . . .}
• aws-android-sdk-pinpoint library enables sending analytics to Amazon Pinpoint.• aws-android-sdk-mobile-client library gives access to the AWS credentials provider
and configurations.b. Add required permissions to your app manifest.
The AWS Mobile SDK required the INTERNET and ACCESS_NETWORK_STATE permissions.These are defined in the AndroidManifest.xml file.
<uses-permission android:name="android.permission.INTERNET"/><uses-permission android:name="android.permission.ACCESS_NETWORK_STATE"/>
2. Add calls to capture session starts and stops.
Three typical places to instrument your app session start and stop are:• Start a session in the Application.onCreate() method.• Start a session in the onCreate() method of the app’s first activity.• Start and/or stop a session in the ActivityLifecycleCallbacks class.
The following example shows starting a session in the OnCreate event of MainActivity.
import android.support.v7.app.AppCompatActivity;import android.os.Bundle;
import com.amazonaws.mobileconnectors.pinpoint.PinpointManager;import com.amazonaws.mobileconnectors.pinpoint.PinpointConfiguration;
14

AWS Mobile Hub Developer Guide Developer GuideAndroid and iOS
import com.amazonaws.mobile.client.AWSMobileClient;
public class MainActivity extends AppCompatActivity {
public static PinpointManager pinpointManager;
@Override protected void onCreate(Bundle savedInstanceState) { super.onCreate(savedInstanceState); setContentView(R.layout.activity_main);
// Initialize the AWS Mobile Client AWSMobileClient.getInstance().initialize(this).execute();
PinpointConfiguration config = new PinpointConfiguration( MainActivity.this, AWSMobileClient.getInstance().getCredentialsProvider(), AWSMobileClient.getInstance().getConfiguration() ); pinpointManager = new PinpointManager(config); pinpointManager.getSessionClient().startSession(); pinpointManager.getAnalyticsClient().submitEvents(); }}
To stop the session, use stopSession() and submitEvents() at the last point in the sessionyou want to capture.
// . . .
pinpointManager.getSessionClient().stopSession();pinpointManager.getAnalyticsClient().submitEvents();
// . . .
Android - Kotlin
1. Set up AWS Mobile SDK components as follows.
a. Include the following libraries in your app/build.gradle dependencies list.
dependencies { implementation 'com.amazonaws:aws-android-sdk-pinpoint:2.7.+' implementation ('com.amazonaws:aws-android-sdk-mobile-client:2.7.+@aar') { transitive = true } // other dependencies . . .}
• aws-android-sdk-pinpoint library enables sending analytics to Amazon Pinpoint.
• aws-android-sdk-mobile-client library gives access to the AWS credentials providerand configurations.
b. Add required permissions to your app manifest.
The AWS Mobile SDK required the INTERNET and ACCESS_NETWORK_STATE permissions.These are defined in the AndroidManifest.xml file.
<uses-permission android:name="android.permission.INTERNET"/><uses-permission android:name="android.permission.ACCESS_NETWORK_STATE"/>
2. Add calls to capture session starts and stops.
15

AWS Mobile Hub Developer Guide Developer GuideAndroid and iOS
Three typical places to instrument your app session start and stop are:
• Start a session in the Application.onCreate() method.
• Start a session in the onCreate() method of the app’s first activity.
• Start and/or stop a session in the ActivityLifecycleCallbacks class.
The following example shows starting a session in the OnCreate event of MainActivity.
import android.support.v7.app.AppCompatActivity;import android.os.Bundle;import com.amazonaws.mobileconnectors.pinpoint.PinpointManager;import com.amazonaws.mobileconnectors.pinpoint.PinpointConfiguration;import com.amazonaws.mobile.client.AWSMobileClient;
class MainActivity : AppCompatActivity() { companion object { var pinpointManager: PinpointManager? = null }
override fun onCreate(savedInstanceState: Bundle?) { super.onCreate(savedInstanceState) setContentView(R.layout.activity_main)
// Initialize the AWS Mobile client AWSMobileClient.getInstance().initialize(this).execute()
with (AWSMobileClient.getInstance()) { val config = PinpointConfiguration(this, credentialsProvider, configuration) pinpointManager = PinpointManager(config) }
pinpointManager?.sessionClient?.startSession() pinpointManager?.analyticsClient?.submitEvents() }}
To stop the session, use stopSession() and submitEvents() at the last point in the sessionyou want to capture.
// . . .
pinpointManager?.sessionClient?.stopSession();pinpointManager?.analyticsClient?.submitEvents();
// . . .
iOS - Swift
1. Set up AWS Mobile SDK components as follows.
2. The Podfile that you configure to install the AWS Mobile SDK must contain:
platform :ios, '9.0'target :'YourAppName' do use_frameworks!
pod 'AWSPinpoint', '~> 2.6.13'
# other pods
16

AWS Mobile Hub Developer Guide Developer GuideAndroid and iOS
end
Run pod install --repo-update before you continue.
If you encounter an error message that begins “[!] Failed to connect to GitHub toupdate the CocoaPods/Specs . . .”, and your internet connectivity is working, you mayneed to update openssl and Ruby.
3. Classes that call Amazon Pinpoint APIs must use the following import statements:
import AWSCoreimport AWSPinpoint
4. Insert the following code into the application(_:didFinishLaunchingWithOptions:)method of your app’s AppDelegate.swift.
class AppDelegate: UIResponder, UIApplicationDelegate {
var pinpoint: AWSPinpoint?
func application(_ application: UIApplication, didFinishLaunchingWithOptions launchOptions: [UIApplicationLaunchOptionsKey: Any]?) -> Bool {
//. . .
// Initialize Pinpoint pinpoint = AWSPinpoint(configuration: AWSPinpointConfiguration.defaultPinpointConfiguration(launchOptions: launchOptions))
//. . . }}
Monitor Analytics
Build and run your app to see usage metrics in Amazon Pinpoint.
1. To see visualizations of the analytics coming from your app, open your project in the Mobile Hubconsole.
2. Choose Analytics on the upper right to open the Amazon Pinpoint console.
17

AWS Mobile Hub Developer Guide Developer GuideAndroid and iOS
1. Choose Analytics from the icons on the left of the console, and view the graphs of your app’s usage. Itmay take up to 15 minutes for metrics to become visible.
Learn more about Amazon Pinpoint.
Enable Custom App Analytics
Instrument your code to capture app usage event information, including attributes you define. Usegraphs of your custom usage event data in the Amazon Pinpoint console. Visualize how your users’behavior aligns with a model you design using Amazon Pinpoint Funnel Analytics, or use stream the datafor deeper analysis.
Use the following steps to implement Amazon Pinpoint custom analytics for your app.
Android - Java
import com.amazonaws.mobileconnectors.pinpoint.analytics.AnalyticsEvent;
public void logEvent() { final AnalyticsEvent event = pinpointManager.getAnalyticsClient().createEvent("EventName") .withAttribute("DemoAttribute1", "DemoAttributeValue1") .withAttribute("DemoAttribute2", "DemoAttributeValue2") .withMetric("DemoMetric1", Math.random());
pinpointManager.getAnalyticsClient().recordEvent(event); pinpointManager.getAnalyticsClient().submitEvents();}
Android - Kotlin
import com.amazonaws.mobileconnectors.pinpoint.analytics.AnalyticsEvent;
fun logEvent() { pintpointManager?.analyticsClient?.let { val event = it.createEvent("EventName")
18
AWS Mobile Hub Developer Guide Developer GuideAndroid and iOS
.withAttribute("DemoAttribute1", "DemoAttributeValue1") .withAttribute("DemoAttribute2", "DemoAttributeValue2") .withMetric("DemoMetric1", Math.random()); it.recordEvent(event) it.submitEvents()}
iOS - Swift
func logEvent() {
let pinpointAnalyticsClient = AWSPinpoint(configuration: AWSPinpointConfiguration.defaultPinpointConfiguration(launchOptions: nil)).analyticsClient
let event = pinpointAnalyticsClient.createEvent(withEventType: "EventName") event.addAttribute("DemoAttributeValue1", forKey: "DemoAttribute1") event.addAttribute("DemoAttributeValue2", forKey: "DemoAttribute2") event.addMetric(NSNumber.init(value: arc4random() % 65535), forKey: "EventName") pinpointAnalyticsClient.record(event) pinpointAnalyticsClient.submitEvents()
}
Build, run, and try your app, and then view your custom events in the Events tab of the Amazon Pinpointconsole (use your Mobile Hub project / Analytics > Amazon Pinpoint console / Analytics > Events). Lookfor the name of your event in the Events dropdown menu.
Enable Revenue Analytics
Amazon Pinpoint supports the collection of monetization event data. Use the following steps to placeand design analytics related to purchases through your app.
Android - Java
import com.amazonaws.mobileconnectors.pinpoint.analytics.monetization.AmazonMonetizationEventBuilder;
public void logMonetizationEvent() { final AnalyticsEvent event = AmazonMonetizationEventBuilder.create(pinpointManager.getAnalyticsClient()) .withFormattedItemPrice("$10.00") .withProductId("DEMO_PRODUCT_ID") .withQuantity(1.0) .withProductId("DEMO_TRANSACTION_ID").build();
pinpointManager.getAnalyticsClient().recordEvent(event); pinpointManager.getAnalyticsClient().submitEvents();}
Android - Kotlin
import com.amazonaws.mobileconnectors.pinpoint.analytics.monetization.AmazonMonetizationEventBuilder;
public void logMonetizationEvent() { pinpointManager?.analyticsClient?.let { val event = AmazonMonetizationEventBuilder.create(it) .withFormattedItemPrice("$10.00")
19

AWS Mobile Hub Developer Guide Developer GuideAndroid and iOS
.withProductId("DEMO_PRODUCT_ID") .withQuantity(1.0) .withProductId("DEMO_TRANSACTION_ID").build(); it.recordEvent(event) it.submitEvents() }}
iOS - Swift
func sendMonetizationEvent() { let pinpointClient = AWSPinpoint(configuration: AWSPinpointConfiguration.defaultPinpointConfiguration(launchOptions: nil))
let pinpointAnalyticsClient = pinpointClient.analyticsClient
let event = pinpointAnalyticsClient.createVirtualMonetizationEvent(withProductId: "DEMO_PRODUCT_ID", withItemPrice: 1.00, withQuantity: 1, withCurrency: "USD") pinpointAnalyticsClient.record(event) pinpointAnalyticsClient.submitEvents() }
Add User Sign-in to Your Mobile App with Amazon Cognito
The following reference content only applies to existing apps that were built using the AWS MobileSDKs for iOS and Android. If you’re building a new mobile or web app, or you’re adding cloudcapabilities to an existing app, visit the Amplify Framework website instead. Documentation for theAWS Mobile SDKs for iOS and Android is now part of the Amplify Framework.
Enable your users to sign-in using credentials from Facebook, Google, or your own custom user directory.The AWS Mobile Hub User Sign-in (p. 206) feature is powered by Amazon Cognito, and the SDKprovides a pre-built, configurable Sign-in UI based on the identity provider(s) you configure.
Set Up Your Backend
Prerequisite Complete the Get Started (p. 3) steps before your proceed.
Email & Password
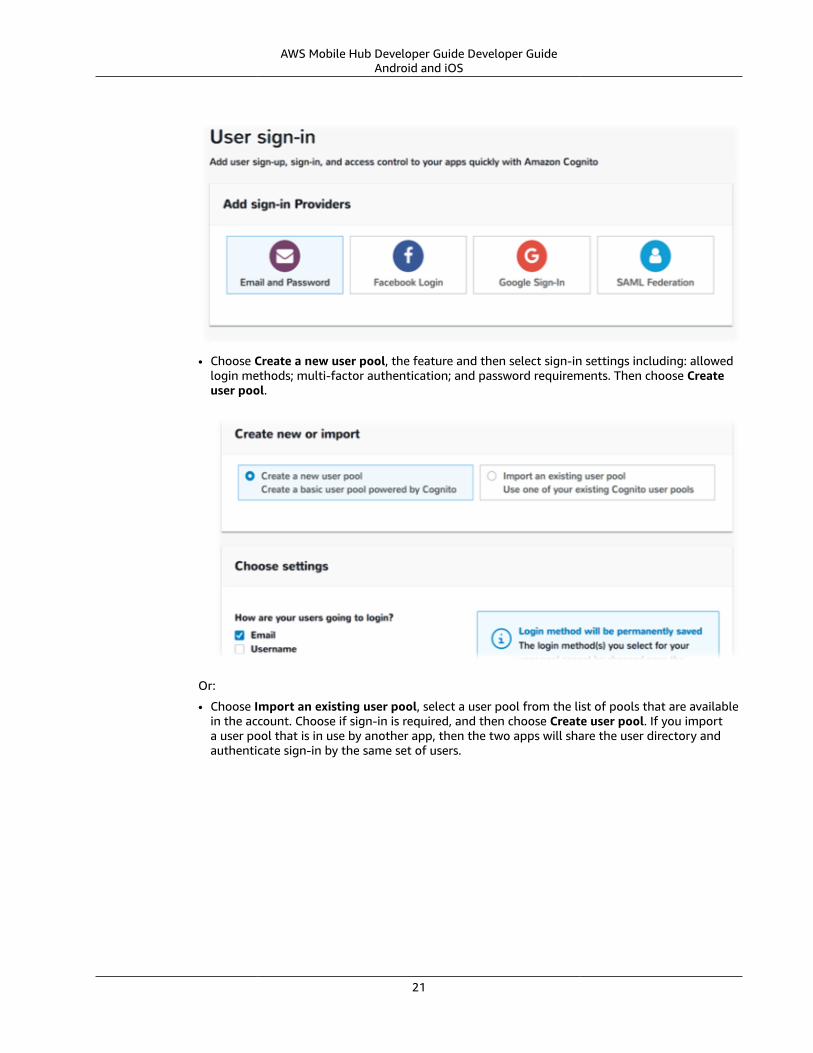
1. Enable User Sign-in: Open your project in Mobile Hub console and choose the User Sign-in tile.
2. Choose Email and Password sign-in
20
AWS Mobile Hub Developer Guide Developer GuideAndroid and iOS
• Choose Create a new user pool, the feature and then select sign-in settings including: allowedlogin methods; multi-factor authentication; and password requirements. Then choose Createuser pool.
Or:
• Choose Import an existing user pool, select a user pool from the list of pools that are availablein the account. Choose if sign-in is required, and then choose Create user pool. If you importa user pool that is in use by another app, then the two apps will share the user directory andauthenticate sign-in by the same set of users.
21

AWS Mobile Hub Developer Guide Developer GuideAndroid and iOS
3. When you are done configuring providers, choose Click here to return to project details page inthe blue banner at the top.
4. On the project detail page, choose the flashing Integrate button, and then complete the stepsthat guide you to connect your backend.
If your project contains apps for more than one platform, any that need to complete those stepswill also display a flashing Integrate button. The reminder banner will remain in place until youhave taken steps to update the configuration of each app in the project.
5. Follow the Set up Email & Password Login (p. 24) steps to connect to your backend from yourapp.
1. Enable User Sign-in: Open your project in Mobile Hub console and choose the User Sign-in tile.
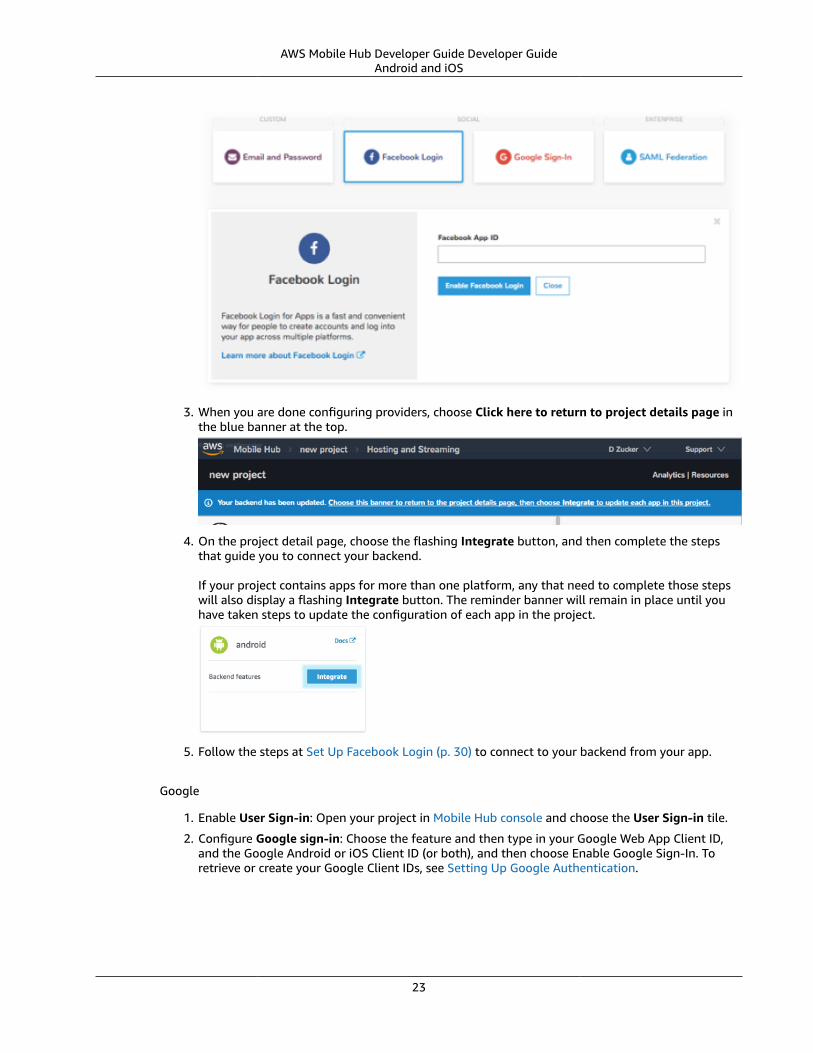
2. Configure Facebook sign-in: Choose the feature and then type your Facebook App ID and thenchoose Enable Facebook login. To retrieve or create your Facebook App ID, see Setting UpFacebook Authentication..
22
AWS Mobile Hub Developer Guide Developer GuideAndroid and iOS
3. When you are done configuring providers, choose Click here to return to project details page inthe blue banner at the top.
4. On the project detail page, choose the flashing Integrate button, and then complete the stepsthat guide you to connect your backend.
If your project contains apps for more than one platform, any that need to complete those stepswill also display a flashing Integrate button. The reminder banner will remain in place until youhave taken steps to update the configuration of each app in the project.
5. Follow the steps at Set Up Facebook Login (p. 30) to connect to your backend from your app.
1. Enable User Sign-in: Open your project in Mobile Hub console and choose the User Sign-in tile.
2. Configure Google sign-in: Choose the feature and then type in your Google Web App Client ID,and the Google Android or iOS Client ID (or both), and then choose Enable Google Sign-In. Toretrieve or create your Google Client IDs, see Setting Up Google Authentication.
23

AWS Mobile Hub Developer Guide Developer GuideAndroid and iOS
3. When you are done configuring providers, choose Click here to return to project details page inthe blue banner at the top.
4. On the project detail page, choose the flashing Integrate button, and then complete the stepsthat guide you to connect your backend.
If your project contains apps for more than one platform, any that need to complete those stepswill also display a flashing Integrate button. The reminder banner will remain in place until youhave taken steps to update the configuration of each app in the project.
5. Follow the steps at Set Up Google Login (p. 37) to connect to your backend from your app.
Setup Email & Password Login in your Mobile App
Choose your platform:
Android - Java
Use Android API level 23 or higher The AWS Mobile SDK library for Android sign-in (aws-android-sdk-auth-ui) provides theactivity and view for presenting a SignInUI forthe sign-in providers you configure. This librarydepends on the Android SDK API Level 23 orhigher.
1. Add or update your AWS backend configuration file to incorporate your new sign-in. For details,see the last steps in the Get Started: Set Up Your Backend (p. 3) section.
2. Add these permissions to the AndroidManifest.xml file:
24

AWS Mobile Hub Developer Guide Developer GuideAndroid and iOS
<uses-permission android:name="android.permission.INTERNET"/><uses-permission android:name="android.permission.ACCESS_NETWORK_STATE"/>
3. Add these dependencies to the app/build.gradle file:
dependencies { // Mobile Client for initializing the SDK implementation ('com.amazonaws:aws-android-sdk-mobile-client:2.7.+@aar') { transitive = true }
// Cognito UserPools for SignIn implementation 'com.android.support:support-v4:24.+' implementation ('com.amazonaws:aws-android-sdk-auth-userpools:2.7.+@aar') { transitive = true }
// Sign in UI Library implementation 'com.android.support:appcompat-v7:24.+' implementation ('com.amazonaws:aws-android-sdk-auth-ui:2.7.+@aar') { transitive = true }}
4. Create an activity that will present your sign-in screen.
In Android Studio, choose File > New > Activity > Basic Activity and type an activity name,such as AuthenticatorActivity. If you want to make this your starting activity, move theintent filter block containing .LAUNCHER to the AuthenticatorActivity in your app’sAndroidManifest.xml.
<activity android:name=".AuthenticatorActivity"> <intent-filter> <action android:name="android.intent.action.MAIN" /> <category android:name="android.intent.category.LAUNCHER" /> </intent-filter></activity>
5. Update the onCreate function of your AuthenticatorActivity to call AWSMobileClient.This component provides the functionality to resume a signed-in authentication session. It makesa network call to retrieve the AWS credentials that allow users to access your AWS resources andregisters a callback for when that transaction completes.
If the user is signed in, the app goes to the NextActivity, otherwise it presents the user withthe AWS Mobile ready made, configurable sign-in UI. NextActivity Activity class a user seesafter a successful sign-in.
import android.app.Activity;import android.os.Bundle;
import com.amazonaws.mobile.auth.ui.SignInUI;import com.amazonaws.mobile.client.AWSMobileClient;import com.amazonaws.mobile.client.AWSStartupHandler;import com.amazonaws.mobile.client.AWSStartupResult;
public class AuthenticatorActivity extends Activity { @Override protected void onCreate(Bundle savedInstanceState) { super.onCreate(savedInstanceState); setContentView(R.layout.activity_authenticator);
// Add a call to initialize AWSMobileClient AWSMobileClient.getInstance().initialize(this, new AWSStartupHandler() { @Override
25
AWS Mobile Hub Developer Guide Developer GuideAndroid and iOS
public void onComplete(AWSStartupResult awsStartupResult) { SignInUI signin = (SignInUI) AWSMobileClient.getInstance().getClient( AuthenticatorActivity.this, SignInUI.class); signin.login( AuthenticatorActivity.this, NextActivity.class).execute(); } }).execute(); }}
Choose the run icon (▶) in Android Studio to build your app and run it on your device/emulator. Youshould see our ready made sign-in UI for your app. To learn how to customize your UI.
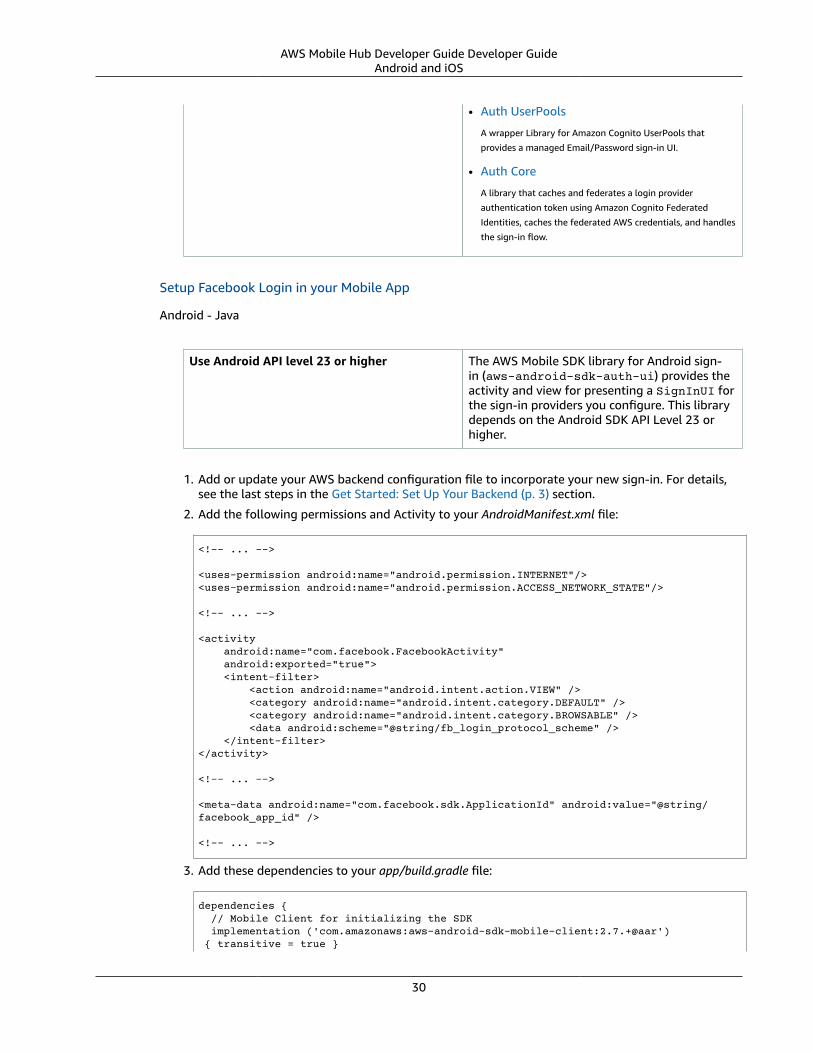
API References • AWSMobileClient
A library that initializes the SDK, constructs
CredentialsProvider and AWSConfiguration objects, fetches
the AWS credentials, and creates a SDK SignInUI client
instance.
• Auth UserPools
A wrapper Library for Amazon Cognito UserPools that
provides a managed Email/Password sign-in UI.
• Auth Core
A library that caches and federates a login provider
authentication token using Amazon Cognito Federated
Identities, caches the federated AWS credentials, and handles
the sign-in flow.
Android - Kotlin
Use Android API level 23 or higher The AWS Mobile SDK library for Android sign-in (aws-android-sdk-auth-ui) provides theactivity and view for presenting a SignInUI forthe sign-in providers you configure. This librarydepends on the Android SDK API Level 23 orhigher.
1. Add or update your AWS backend configuration file to incorporate your new sign-in. For details,see the last steps in the Get Started: Set Up Your Backend (p. 3) section.
2. Add these permissions to the AndroidManifest.xml file:
<uses-permission android:name="android.permission.INTERNET"/><uses-permission android:name="android.permission.ACCESS_NETWORK_STATE"/>
3. Add these dependencies to the app/build.gradle file:
dependencies { // Mobile Client for initializing the SDK implementation ('com.amazonaws:aws-android-sdk-mobile-client:2.7.+@aar') { transitive = true }
26

AWS Mobile Hub Developer Guide Developer GuideAndroid and iOS
// Cognito UserPools for SignIn implementation 'com.android.support:support-v4:24.+' implementation ('com.amazonaws:aws-android-sdk-auth-userpools:2.7.+@aar') { transitive = true }
// Sign in UI Library implementation 'com.android.support:appcompat-v7:24.+' implementation ('com.amazonaws:aws-android-sdk-auth-ui:2.7.+@aar') { transitive = true }}
4. Create an activity that will present your sign-in screen.
In Android Studio, choose File > New > Activity > Basic Activity and type an activity name,such as AuthenticatorActivity. If you want to make this your starting activity, move theintent filter block containing .LAUNCHER to the AuthenticatorActivity in your app’sAndroidManifest.xml.
<activity android:name=".AuthenticatorActivity"> <intent-filter> <action android:name="android.intent.action.MAIN" /> <category android:name="android.intent.category.LAUNCHER" /> </intent-filter></activity>
5. Update the onCreate function of your AuthenticatorActivity to call AWSMobileClient.This component provides the functionality to resume a signed-in authentication session. It makesa network call to retrieve the AWS credentials that allow users to access your AWS resources andregisters a callback for when that transaction completes.
If the user is signed in, the app goes to the NextActivity, otherwise it presents the user withthe AWS Mobile ready made, configurable sign-in UI. NextActivity Activity class a user seesafter a successful sign-in.
import android.app.Activity;import android.os.Bundle;
import com.amazonaws.mobile.auth.ui.SignInUI;import com.amazonaws.mobile.client.AWSMobileClient;import com.amazonaws.mobile.client.AWSStartupHandler;import com.amazonaws.mobile.client.AWSStartupResult;
class AuthenticatorActivity : Activity() { override fun onCreate(savedInstanceState: Bundle?) { super.onCreate(savedInstanceState)
AWSMobileClient.getInstance().initialize(this) { val ui = AWSMobileClient.getInstance().getClient( this@AuthenticatorActivity, SignInUI::class.java) as SignInUI? ui?.login( this@AuthenticatorActivity, MainActivity::class.java)?.execute() }.execute()}
Choose the run icon (▶) in Android Studio to build your app and run it on your device/emulator.You should see our ready made sign-in UI for your app. Checkout the next steps to learn how tocustomize your UI.
27

AWS Mobile Hub Developer Guide Developer GuideAndroid and iOS
API References • AWSMobileClient
A library that initializes the SDK, constructs
CredentialsProvider and AWSConfiguration objects, fetches
the AWS credentials, and creates a SDK SignInUI client
instance.
• Auth UserPools
A wrapper Library for Amazon Cognito UserPools that
provides a managed Email/Password sign-in UI.
• Auth Core
A library that caches and federates a login provider
authentication token using Amazon Cognito Federated
Identities, caches the federated AWS credentials, and handles
the sign-in flow.
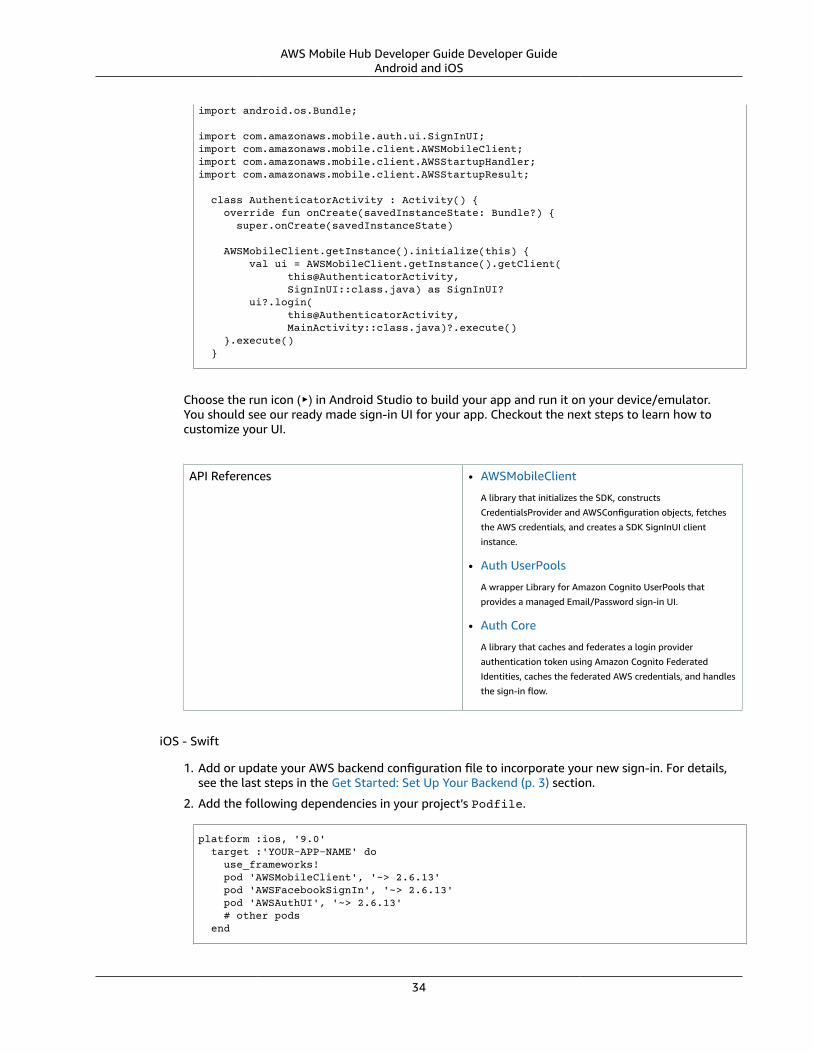
iOS - Swift
1. Add or update your AWS backend configuration file to incorporate your new sign-in. For details,see the last steps in the Get Started: Set Up Your Backend (p. 3) section.
2. Add the following dependencies in your project’s Podfile.
platform :ios, '9.0'target :'YOUR-APP-NAME' do use_frameworks! pod 'AWSUserPoolsSignIn', '~> 2.6.13' pod 'AWSAuthUI', '~> 2.6.13' pod 'AWSMobileClient', '~> 2.6.13' # other podsend
3. Pull the SDK libraries into your local repo.
$ pod install --repo-update
If you encounter an error message that begins “[!] Failed to connect to GitHub toupdate the CocoaPods/Specs . . .”, and your internet connectivity is working, you mayneed to update openssl and Ruby.
4. Create a AWSMobileClient and initialize the SDK.
Add code to create an instance of AWSMobileClient in the application:open url functionof your AppDelegate.swift, to resume a previously signed-in authenticated session.
Then add another instance of AWSMobileClient in the didFinishLaunching function toregister the sign in providers, and to fetch an Amazon Cognito credentials that AWS will use toauthorize access once the user signs in.
import UIKit
import AWSMobileClient
@UIApplicationMain
class AppDelegate: UIResponder, UIApplicationDelegate {
28

AWS Mobile Hub Developer Guide Developer GuideAndroid and iOS
// Add a AWSMobileClient call in application:open url func application(_ application: UIApplication, open url: URL, sourceApplication: String?, annotation: Any) -> Bool {
return AWSMobileClient.sharedInstance().interceptApplication( application, open: url, sourceApplication: sourceApplication, annotation: annotation)
}
// Add a AWSMobileClient call in application:didFinishLaunching func application( _ application: UIApplication, didFinishLaunchingWithOptions launchOptions: [UIApplicationLaunchOptionsKey: Any]?) -> Bool {
return AWSMobileClient.sharedInstance().interceptApplication( application, didFinishLaunchingWithOptions: launchOptions) }
// Other functions in AppDelegate . . .
}
5. Implement your sign-in UI by calling the library provided in the SDK.
import UIKitimport AWSAuthCoreimport AWSAuthUI
class SampleViewController: UIViewController {
override func viewDidLoad() {
super.viewDidLoad()
if !AWSSignInManager.sharedInstance().isLoggedIn { AWSAuthUIViewController .presentViewController(with: self.navigationController!, configuration: nil, completionHandler: { (provider: AWSSignInProvider, error: Error?) in if error != nil { print("Error occurred: \(String(describing: error))") } else { // Sign in successful. } }) } }}
Choose the run icon (▶) in the top left of the Xcode window or type ⌘-R to build and run yourapp. You should see our pre-built sign-in UI for your app. Checkout the next steps to learn how tocustomize your UI.
API References • AWSMobileClient
A library that initializes the SDK, fetches the AWS credentials,
and creates a SDK SignInUI client instance.
29
AWS Mobile Hub Developer Guide Developer GuideAndroid and iOS
• Auth UserPools
A wrapper Library for Amazon Cognito UserPools that
provides a managed Email/Password sign-in UI.
• Auth Core
A library that caches and federates a login provider
authentication token using Amazon Cognito Federated
Identities, caches the federated AWS credentials, and handles
the sign-in flow.
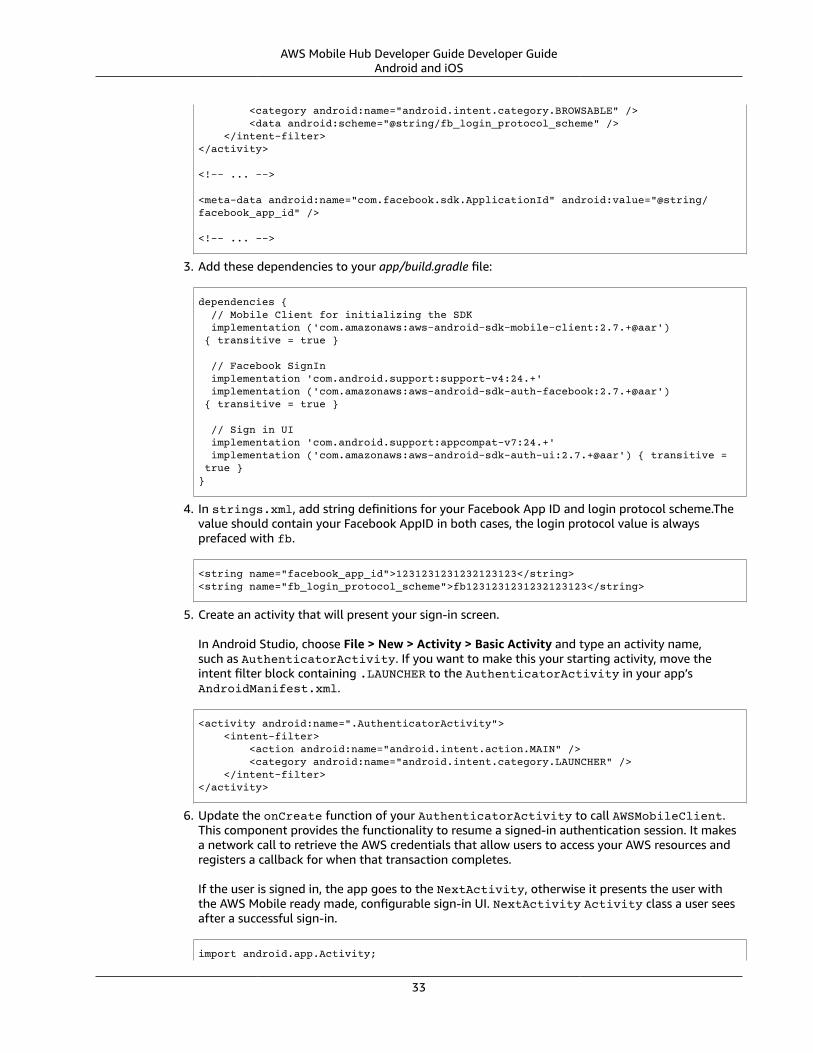
Setup Facebook Login in your Mobile App
Android - Java
Use Android API level 23 or higher The AWS Mobile SDK library for Android sign-in (aws-android-sdk-auth-ui) provides theactivity and view for presenting a SignInUI forthe sign-in providers you configure. This librarydepends on the Android SDK API Level 23 orhigher.
1. Add or update your AWS backend configuration file to incorporate your new sign-in. For details,see the last steps in the Get Started: Set Up Your Backend (p. 3) section.
2. Add the following permissions and Activity to your AndroidManifest.xml file:
<!-- ... -->
<uses-permission android:name="android.permission.INTERNET"/><uses-permission android:name="android.permission.ACCESS_NETWORK_STATE"/>
<!-- ... -->
<activity android:name="com.facebook.FacebookActivity" android:exported="true"> <intent-filter> <action android:name="android.intent.action.VIEW" /> <category android:name="android.intent.category.DEFAULT" /> <category android:name="android.intent.category.BROWSABLE" /> <data android:scheme="@string/fb_login_protocol_scheme" /> </intent-filter></activity>
<!-- ... -->
<meta-data android:name="com.facebook.sdk.ApplicationId" android:value="@string/facebook_app_id" />
<!-- ... -->
3. Add these dependencies to your app/build.gradle file:
dependencies { // Mobile Client for initializing the SDK implementation ('com.amazonaws:aws-android-sdk-mobile-client:2.7.+@aar') { transitive = true }
30

AWS Mobile Hub Developer Guide Developer GuideAndroid and iOS
// Facebook SignIn implementation 'com.android.support:support-v4:24.+' implementation ('com.amazonaws:aws-android-sdk-auth-facebook:2.7.+@aar') { transitive = true }
// Sign in UI implementation 'com.android.support:appcompat-v7:24.+' implementation ('com.amazonaws:aws-android-sdk-auth-ui:2.7.+@aar') { transitive = true }}
4. In strings.xml, add string definitions for your Facebook App ID and login protocol scheme.Thevalue should contain your Facebook AppID in both cases, the login protocol value is alwaysprefaced with fb.
<string name="facebook_app_id">1231231231232123123</string><string name="fb_login_protocol_scheme">fb1231231231232123123</string>
5. Create an activity that will present your sign-in screen.
In Android Studio, choose File > New > Activity > Basic Activity and type an activity name,such as AuthenticatorActivity. If you want to make this your starting activity, move theintent filter block containing .LAUNCHER to the AuthenticatorActivity in your app’sAndroidManifest.xml.
<activity android:name=".AuthenticatorActivity"> <intent-filter> <action android:name="android.intent.action.MAIN" /> <category android:name="android.intent.category.LAUNCHER" /> </intent-filter></activity>
6. Update the onCreate function of your AuthenticatorActivity to call AWSMobileClient.This component provides the functionality to resume a signed-in authentication session. It makesa network call to retrieve the AWS credentials that allow users to access your AWS resources andregisters a callback for when that transaction completes.
If the user is signed in, the app goes to the NextActivity, otherwise it presents the user withthe AWS Mobile ready made, configurable sign-in UI. NextActivity Activity class a user seesafter a successful sign-in.
import android.app.Activity;import android.os.Bundle;
import com.amazonaws.mobile.auth.ui.SignInUI;import com.amazonaws.mobile.client.AWSMobileClient;import com.amazonaws.mobile.client.AWSStartupHandler;import com.amazonaws.mobile.client.AWSStartupResult;
public class AuthenticatorActivity extends Activity { @Override protected void onCreate(Bundle savedInstanceState) { super.onCreate(savedInstanceState); setContentView(R.layout.activity_authenticator);
// Add a call to initialize AWSMobileClient AWSMobileClient.getInstance().initialize(this, new AWSStartupHandler() { @Override public void onComplete(AWSStartupResult awsStartupResult) { SignInUI signin = (SignInUI) AWSMobileClient.getInstance().getClient(AuthenticatorActivity.this, SignInUI.class);
31

AWS Mobile Hub Developer Guide Developer GuideAndroid and iOS
signin.login(AuthenticatorActivity.this, NextActivity.class).execute(); } }).execute(); }}
Choose the run icon (▶) in Android Studio to build your app and run it on your device/emulator.You should see our ready made sign-in UI for your app. Checkout the next steps to learn how tocustomize your UI.
API References • AWSMobileClient
A library that initializes the SDK, constructs
CredentialsProvider and AWSConfiguration objects, fetches
the AWS credentials, and creates a SDK SignInUI client
instance.
• Auth UserPools
A wrapper Library for Amazon Cognito UserPools that
provides a managed Email/Password sign-in UI.
• Auth Core
A library that caches and federates a login provider
authentication token using Amazon Cognito Federated
Identities, caches the federated AWS credentials, and handles
the sign-in flow.
Android - Kotlin
Use Android API level 23 or higher The AWS Mobile SDK library for Android sign-in (aws-android-sdk-auth-ui) provides theactivity and view for presenting a SignInUI forthe sign-in providers you configure. This librarydepends on the Android SDK API Level 23 orhigher.
1. Add or update your AWS backend configuration file to incorporate your new sign-in. For details,see the last steps in the Get Started: Set Up Your Backend (p. 3) section.
2. Add the following permissions and Activity to your AndroidManifest.xml file:
<!-- ... -->
<uses-permission android:name="android.permission.INTERNET"/><uses-permission android:name="android.permission.ACCESS_NETWORK_STATE"/>
<!-- ... -->
<activity android:name="com.facebook.FacebookActivity" android:exported="true"> <intent-filter> <action android:name="android.intent.action.VIEW" /> <category android:name="android.intent.category.DEFAULT" />
32
AWS Mobile Hub Developer Guide Developer GuideAndroid and iOS
<category android:name="android.intent.category.BROWSABLE" /> <data android:scheme="@string/fb_login_protocol_scheme" /> </intent-filter></activity>
<!-- ... -->
<meta-data android:name="com.facebook.sdk.ApplicationId" android:value="@string/facebook_app_id" />
<!-- ... -->
3. Add these dependencies to your app/build.gradle file:
dependencies { // Mobile Client for initializing the SDK implementation ('com.amazonaws:aws-android-sdk-mobile-client:2.7.+@aar') { transitive = true }
// Facebook SignIn implementation 'com.android.support:support-v4:24.+' implementation ('com.amazonaws:aws-android-sdk-auth-facebook:2.7.+@aar') { transitive = true }
// Sign in UI implementation 'com.android.support:appcompat-v7:24.+' implementation ('com.amazonaws:aws-android-sdk-auth-ui:2.7.+@aar') { transitive = true }}
4. In strings.xml, add string definitions for your Facebook App ID and login protocol scheme.Thevalue should contain your Facebook AppID in both cases, the login protocol value is alwaysprefaced with fb.
<string name="facebook_app_id">1231231231232123123</string><string name="fb_login_protocol_scheme">fb1231231231232123123</string>
5. Create an activity that will present your sign-in screen.
In Android Studio, choose File > New > Activity > Basic Activity and type an activity name,such as AuthenticatorActivity. If you want to make this your starting activity, move theintent filter block containing .LAUNCHER to the AuthenticatorActivity in your app’sAndroidManifest.xml.
<activity android:name=".AuthenticatorActivity"> <intent-filter> <action android:name="android.intent.action.MAIN" /> <category android:name="android.intent.category.LAUNCHER" /> </intent-filter></activity>
6. Update the onCreate function of your AuthenticatorActivity to call AWSMobileClient.This component provides the functionality to resume a signed-in authentication session. It makesa network call to retrieve the AWS credentials that allow users to access your AWS resources andregisters a callback for when that transaction completes.
If the user is signed in, the app goes to the NextActivity, otherwise it presents the user withthe AWS Mobile ready made, configurable sign-in UI. NextActivity Activity class a user seesafter a successful sign-in.
import android.app.Activity;
33
AWS Mobile Hub Developer Guide Developer GuideAndroid and iOS
import android.os.Bundle;
import com.amazonaws.mobile.auth.ui.SignInUI;import com.amazonaws.mobile.client.AWSMobileClient;import com.amazonaws.mobile.client.AWSStartupHandler;import com.amazonaws.mobile.client.AWSStartupResult;
class AuthenticatorActivity : Activity() { override fun onCreate(savedInstanceState: Bundle?) { super.onCreate(savedInstanceState)
AWSMobileClient.getInstance().initialize(this) { val ui = AWSMobileClient.getInstance().getClient( this@AuthenticatorActivity, SignInUI::class.java) as SignInUI? ui?.login( this@AuthenticatorActivity, MainActivity::class.java)?.execute() }.execute() }
Choose the run icon (▶) in Android Studio to build your app and run it on your device/emulator.You should see our ready made sign-in UI for your app. Checkout the next steps to learn how tocustomize your UI.
API References • AWSMobileClient
A library that initializes the SDK, constructs
CredentialsProvider and AWSConfiguration objects, fetches
the AWS credentials, and creates a SDK SignInUI client
instance.
• Auth UserPools
A wrapper Library for Amazon Cognito UserPools that
provides a managed Email/Password sign-in UI.
• Auth Core
A library that caches and federates a login provider
authentication token using Amazon Cognito Federated
Identities, caches the federated AWS credentials, and handles
the sign-in flow.
iOS - Swift
1. Add or update your AWS backend configuration file to incorporate your new sign-in. For details,see the last steps in the Get Started: Set Up Your Backend (p. 3) section.
2. Add the following dependencies in your project’s Podfile.
platform :ios, '9.0' target :'YOUR-APP-NAME' do use_frameworks! pod 'AWSMobileClient', '~> 2.6.13' pod 'AWSFacebookSignIn', '~> 2.6.13' pod 'AWSAuthUI', '~> 2.6.13' # other pods end
34

AWS Mobile Hub Developer Guide Developer GuideAndroid and iOS
Run pod install --repo-update.
If you encounter an error message that begins “[!] Failed to connect to GitHub toupdate the CocoaPods/Specs . . .”, and your internet connectivity is working, you mayneed to update openssl and Ruby.
3. Add Facebook meta data to Info.plist.
To configure your Xcode project to use Facebook Login, right-choose Info.plist and thenchoose Open As > Source Code.
Add the following entry, using your project name, Facebook ID and login scheme ID.
<plist version="1.0"><!-- ... --><dict><key>FacebookAppID</key><string>0123456789012345</string><key>FacebookDisplayName</key><string>YOUR-PROJECT-NAME</string><key>LSApplicationQueriesSchemes</key><array> <string>fbapi</string> <string>fb-messenger-api</string> <string>fbauth2</string> <string>fbshareextension</string></array><key>CFBundleURLTypes</key><array> <dict> <key>CFBundleURLSchemes</key> <array> <string>fb0123456789012345</string> </array> </dict></array></dict><!-- ... -->
4. Create a AWSMobileClient and initialize the SDK.
Add code to create an instance of AWSMobileClient in the application:open url functionof your AppDelegate.swift, to resume a previously signed-in authenticated session.
Then add another instance of AWSMobileClient in the didFinishLaunching function toregister the sign in providers, and to fetch an Amazon Cognito credentials that AWS will use toauthorize access once the user signs in.
import UIKit
//import AWSMobileClientimport AWSMobileClient
@UIApplicationMain
class AppDelegate: UIResponder, UIApplicationDelegate {
// Add a AWSMobileClient call in application:open url func application(_ application: UIApplication, open url: URL, sourceApplication: String?, annotation: Any) -> Bool {
return AWSMobileClient.sharedInstance().interceptApplication(
35

AWS Mobile Hub Developer Guide Developer GuideAndroid and iOS
application, open: url, sourceApplication: sourceApplication, annotation: annotation)
}
// Add a AWSMobileClient call in application:didFinishLaunching func application( _ application: UIApplication, didFinishLaunchingWithOptions launchOptions: [UIApplicationLaunchOptionsKey: Any]?) -> Bool {
return AWSMobileClient.sharedInstance().interceptApplication( application, didFinishLaunchingWithOptions: launchOptions) }
// Other functions in AppDelegate . . .
}
5. Implement your sign-in UI by calling the library provided by the SDK.
import UIKitimport AWSAuthCoreimport AWSAuthUI
class SampleViewController: UIViewController {
override func viewDidLoad() {
super.viewDidLoad()
if !AWSSignInManager.sharedInstance().isLoggedIn { AWSAuthUIViewController .presentViewController(with: self.navigationController!, configuration: nil, completionHandler: { (provider: AWSSignInProvider, error: Error?) in if error != nil { print("Error occurred: \(String(describing: error))") } else { // sign in successful. } }) } }}
Choose the run icon (▶) in the top left of the Xcode window or type ⌘-R to build and run yourapp. You should see our pre-built sign-in UI for your app. Checkout the next steps to learn how tocustomize your UI.
API References • AWSMobileClient
A library that initializes the SDK, fetches the AWS credentials,
and creates a SDK SignInUI client instance.
• Auth UserPools
A wrapper Library for Amazon Cognito UserPools that
provides a managed Email/Password sign-in UI.
36

AWS Mobile Hub Developer Guide Developer GuideAndroid and iOS
• Auth Core
A library that caches and federates a login provider
authentication token using Amazon Cognito Federated
Identities, caches the federated AWS credentials, and handles
the sign-in flow.
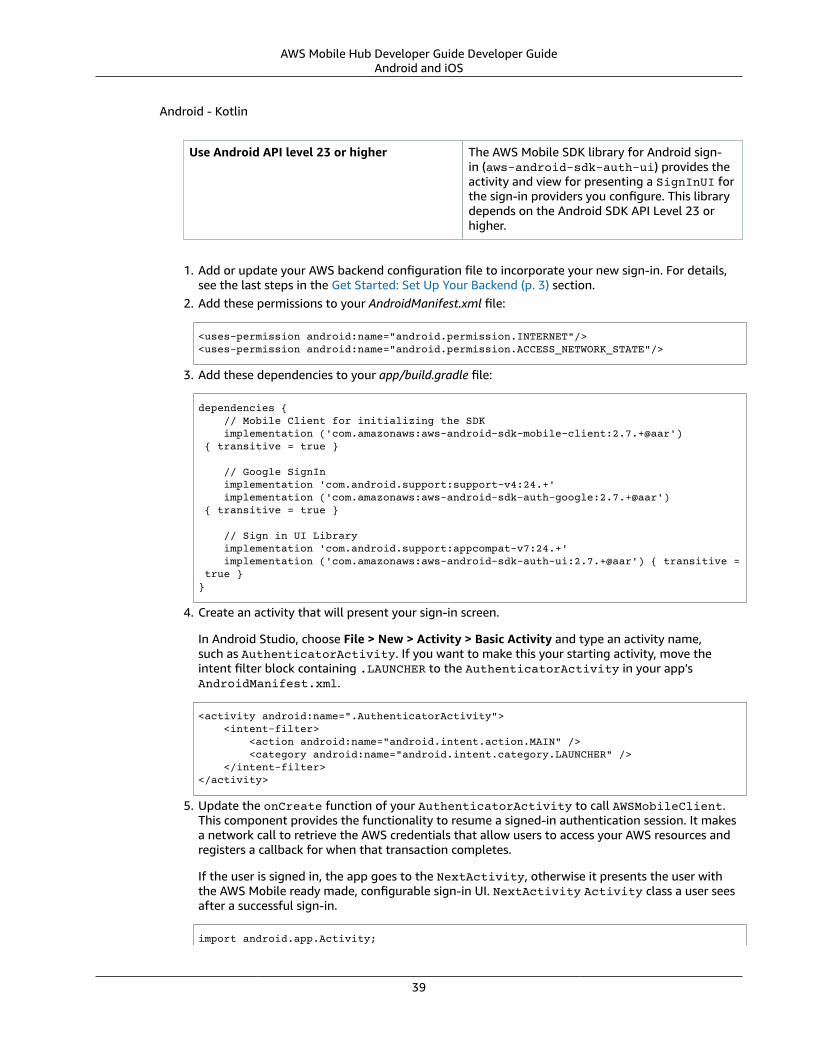
Setup Google Login in your Mobile App
Android - Java
Use Android API level 23 or higher The AWS Mobile SDK library for Android sign-in (aws-android-sdk-auth-ui) provides theactivity and view for presenting a SignInUI forthe sign-in providers you configure. This librarydepends on the Android SDK API Level 23 orhigher.
1. Add or update your AWS backend configuration file to incorporate your new sign-in. For details,see the last steps in the Get Started: Set Up Your Backend (p. 3) section.
2. Add these permissions to your AndroidManifest.xml file:
<uses-permission android:name="android.permission.INTERNET"/><uses-permission android:name="android.permission.ACCESS_NETWORK_STATE"/>
3. Add these dependencies to your app/build.gradle file:
dependencies { // Mobile Client for initializing the SDK implementation ('com.amazonaws:aws-android-sdk-mobile-client:2.7.+@aar') { transitive = true }
// Google SignIn implementation 'com.android.support:support-v4:24.+' implementation ('com.amazonaws:aws-android-sdk-auth-google:2.7.+@aar') { transitive = true }
// Sign in UI Library implementation 'com.android.support:appcompat-v7:24.+' implementation ('com.amazonaws:aws-android-sdk-auth-ui:2.7.+@aar') { transitive = true }}
4. Create an activity that will present your sign-in screen.
In Android Studio, choose File > New > Activity > Basic Activity and type an activity name,such as AuthenticatorActivity. If you want to make this your starting activity, move theintent filter block containing .LAUNCHER to the AuthenticatorActivity in your app’sAndroidManifest.xml.
<activity android:name=".AuthenticatorActivity"> <intent-filter> <action android:name="android.intent.action.MAIN" /> <category android:name="android.intent.category.LAUNCHER" /> </intent-filter></activity>
37

AWS Mobile Hub Developer Guide Developer GuideAndroid and iOS
5. Update the onCreate function of your AuthenticatorActivity to call AWSMobileClient.This component provides the functionality to resume a signed-in authentication session. It makesa network call to retrieve the AWS credentials that allow users to access your AWS resources andregisters a callback for when that transaction completes.
If the user is signed in, the app goes to the NextActivity, otherwise it presents the user withthe AWS Mobile ready made, configurable sign-in UI. NextActivity Activity class a user seesafter a successful sign-in.
import android.app.Activity;import android.os.Bundle;
import com.amazonaws.mobile.auth.ui.SignInUI;import com.amazonaws.mobile.client.AWSMobileClient;import com.amazonaws.mobile.client.AWSStartupHandler;import com.amazonaws.mobile.client.AWSStartupResult;
public class AuthenticatorActivity extends Activity { @Override protected void onCreate(Bundle savedInstanceState) { super.onCreate(savedInstanceState); setContentView(R.layout.activity_authenticator);
// Add a call to initialize AWSMobileClient AWSMobileClient.getInstance().initialize(this, new AWSStartupHandler() { @Override public void onComplete(AWSStartupResult awsStartupResult) { SignInUI signin = (SignInUI) AWSMobileClient.getInstance().getClient(AuthenticatorActivity.this, SignInUI.class); signin.login(AuthenticatorActivity.this, MainActivity.class).execute(); } }).execute(); }}
Choose the run icon (▶) in Android Studio to build your app and run it on your device/emulator.You should see our ready made sign-in UI for your app. Checkout the next steps to learn how tocustomize your UI.
API References • AWSMobileClient
A library that initializes the SDK, constructs
CredentialsProvider and AWSConfiguration objects, fetches
the AWS credentials, and creates a SDK SignInUI client
instance.
• Auth UserPools
A wrapper Library for Amazon Cognito UserPools that
provides a managed Email/Password sign-in UI.
• Auth Core
A library that caches and federates a login provider
authentication token using Amazon Cognito Federated
Identities, caches the federated AWS credentials, and handles
the sign-in flow.
38
AWS Mobile Hub Developer Guide Developer GuideAndroid and iOS
Android - Kotlin
Use Android API level 23 or higher The AWS Mobile SDK library for Android sign-in (aws-android-sdk-auth-ui) provides theactivity and view for presenting a SignInUI forthe sign-in providers you configure. This librarydepends on the Android SDK API Level 23 orhigher.
1. Add or update your AWS backend configuration file to incorporate your new sign-in. For details,see the last steps in the Get Started: Set Up Your Backend (p. 3) section.
2. Add these permissions to your AndroidManifest.xml file:
<uses-permission android:name="android.permission.INTERNET"/><uses-permission android:name="android.permission.ACCESS_NETWORK_STATE"/>
3. Add these dependencies to your app/build.gradle file:
dependencies { // Mobile Client for initializing the SDK implementation ('com.amazonaws:aws-android-sdk-mobile-client:2.7.+@aar') { transitive = true }
// Google SignIn implementation 'com.android.support:support-v4:24.+' implementation ('com.amazonaws:aws-android-sdk-auth-google:2.7.+@aar') { transitive = true }
// Sign in UI Library implementation 'com.android.support:appcompat-v7:24.+' implementation ('com.amazonaws:aws-android-sdk-auth-ui:2.7.+@aar') { transitive = true }}
4. Create an activity that will present your sign-in screen.
In Android Studio, choose File > New > Activity > Basic Activity and type an activity name,such as AuthenticatorActivity. If you want to make this your starting activity, move theintent filter block containing .LAUNCHER to the AuthenticatorActivity in your app’sAndroidManifest.xml.
<activity android:name=".AuthenticatorActivity"> <intent-filter> <action android:name="android.intent.action.MAIN" /> <category android:name="android.intent.category.LAUNCHER" /> </intent-filter></activity>
5. Update the onCreate function of your AuthenticatorActivity to call AWSMobileClient.This component provides the functionality to resume a signed-in authentication session. It makesa network call to retrieve the AWS credentials that allow users to access your AWS resources andregisters a callback for when that transaction completes.
If the user is signed in, the app goes to the NextActivity, otherwise it presents the user withthe AWS Mobile ready made, configurable sign-in UI. NextActivity Activity class a user seesafter a successful sign-in.
import android.app.Activity;
39

AWS Mobile Hub Developer Guide Developer GuideAndroid and iOS
import android.os.Bundle;
import com.amazonaws.mobile.auth.ui.SignInUI;import com.amazonaws.mobile.client.AWSMobileClient;import com.amazonaws.mobile.client.AWSStartupHandler;import com.amazonaws.mobile.client.AWSStartupResult;
class AuthenticatorActivity : Activity() { override fun onCreate(savedInstanceState: Bundle?) { super.onCreate(savedInstanceState)
AWSMobileClient.getInstance().initialize(this) { val ui = AWSMobileClient.getInstance().getClient( this@AuthenticatorActivity, SignInUI::class.java) as SignInUI? ui?.login( this@AuthenticatorActivity, MainActivity::class.java)?.execute() }.execute()}
Choose the run icon (▶) in Android Studio to build your app and run it on your device/emulator.You should see our ready made sign-in UI for your app. Checkout the next steps to learn how tocustomize your UI.
API References • AWSMobileClient
A library that initializes the SDK, constructs
CredentialsProvider and AWSConfiguration objects, fetches
the AWS credentials, and creates a SDK SignInUI client
instance.
• Auth UserPools
A wrapper Library for Amazon Cognito UserPools that
provides a managed Email/Password sign-in UI.
• Auth Core
A library that caches and federates a login provider
authentication token using Amazon Cognito Federated
Identities, caches the federated AWS credentials, and handles
the sign-in flow.
iOS - Swift
1. Add or update your AWS backend configuration file to incorporate your new sign-in. For details,see the last steps in the Get Started: Set Up Your Backend (p. 3) section.
2. Add the following dependencies in the Podfile.
platform :ios, '9.0' target :'YOUR-APP-NAME' do use_frameworks! pod 'AWSMobileClient', '~> 2.6.13' pod 'AWSGoogleSignIn', '~> 2.6.13' pod 'AWSAuthUI', '~> 2.6.13' pod 'GoogleSignIn', '~> 4.0' # other pods end
40

AWS Mobile Hub Developer Guide Developer GuideAndroid and iOS
Run pod install --repo-update before you continue.
If you encounter an error message that begins “[!] Failed to connect to GitHub toupdate the CocoaPods/Specs . . .”, and your internet connectivity is working, you mayneed to update openssl and Ruby.
3. Add Google metadata to info.plist
To configure your Xcode project to use Google Login, open its Info.plist file using Right-click> Open As > Source Code. Add the following entry. Substitute your project name for theplaceholder string.
<plist version="1.0"><!-- ... --><key>CFBundleURLTypes</key><array> <dict> <key>CFBundleURLSchemes</key> <array> <string>com.googleusercontent.apps.xxxxxxxxxxxx-xxxxxxxxxxxxxxxxxxxxxxxxxxxxxxxx</string> </array> </dict></array><!-- ... -->
4. Create a AWSMobileClient and initialize the SDK.
Add code to create an instance of AWSMobileClient in the application:open url functionof your AppDelegate.swift, to resume a previously signed-in authenticated session.
Then add another instance of AWSMobileClient in the didFinishLaunching function toregister the sign in providers, and to fetch an Amazon Cognito credentials that AWS will use toauthorize access once the user signs in.
import UIKit
//import AWSMobileClientimport AWSMobileClient
@UIApplicationMain
class AppDelegate: UIResponder, UIApplicationDelegate {
// Add a AWSMobileClient call in application:open url func application(_ application: UIApplication, open url: URL, sourceApplication: String?, annotation: Any) -> Bool {
return AWSMobileClient.sharedInstance().interceptApplication( application, open: url, sourceApplication: sourceApplication, annotation: annotation)
}
// Add a AWSMobileClient call in application:didFinishLaunching func application( _ application: UIApplication, didFinishLaunchingWithOptions launchOptions: [UIApplicationLaunchOptionsKey: Any]?) -> Bool {
return AWSMobileClient.sharedInstance().interceptApplication(
41

AWS Mobile Hub Developer Guide Developer GuideAndroid and iOS
application, didFinishLaunchingWithOptions: launchOptions) }
// Other functions in AppDelegate . . .
}
5. Implement your sign-in UI by calling the library provided by the SDK.
import UIKitimport AWSAuthCoreimport AWSAuthUI
class SampleViewController: UIViewController {
override func viewDidLoad() {
super.viewDidLoad()
if !AWSSignInManager.sharedInstance().isLoggedIn { AWSAuthUIViewController .presentViewController(with: self.navigationController!, configuration: nil, completionHandler: { (provider: AWSSignInProvider, error: Error?) in if error != nil { print("Error occurred: \(String(describing: error))") } else { // Sign in successful. } }) } }}
Choose the run icon (▶) in the top left of the Xcode window or type ⌘-R to build and run yourapp. You should see our pre-built sign-in UI for your app. Checkout the next steps to learn how tocustomize your UI.
API References • AWSMobileClient
A library that initializes the SDK, fetches the AWS credentials,
and creates a SDK SignInUI client instance.
• Auth UserPools
A wrapper Library for Amazon Cognito UserPools that
provides a managed Email/Password sign-in UI.
• Auth Core
A library that caches and federates a login provider
authentication token using Amazon Cognito Federated
Identities, caches the federated AWS credentials, and handles
the sign-in flow.
42
AWS Mobile Hub Developer Guide Developer GuideAndroid and iOS
Enable Sign-out
Android - Java
To enable a user to sign-out of your app, register a callback for sign-in events by addinga SignInStateChangeListener to IdentityManager. The listener captures bothonUserSignedIn and onUserSignedOut events.
IdentityManager.getDefaultIdentityManager().addSignInStateChangeListener(new SignInStateChangeListener() { @Override // Sign-in listener public void onUserSignedIn() { Log.d(LOG_TAG, "User Signed In"); }
// Sign-out listener @Override public void onUserSignedOut() {
// return to the sign-in screen upon sign-out showSignIn(); }});
To initiate a sign-out, call the signOut method of IdentityManager.
IdentityManager.getDefaultIdentityManager().signOut();
Android - Kotlin
To enable a user to sign-out of your app, register a callback for sign-in events by addinga SignInStateChangeListener to IdentityManager. The listener captures bothonUserSignedIn and onUserSignedOut events.
IdentityManager.getDefaultIdentityManager().addSignInStateChangeListener( object : SignInStateChangeListener() { override fun onUserSignedIn() { Log.d(TAG, "User signed in"); }
override fun onUserSignedOut() { Log.d(TAG, "User signed out"); } });
To initiate a sign-out, call the signOut method of IdentityManager.
IdentityManager.getDefaultIdentityManager().signOut();
iOS - Swift
To initiate a sign-out, add a call to AWSSignInManager.sharedInstance().logout.
@IBAction func signOutButtonPress(_ sender: Any) {
AWSSignInManager.sharedInstance().logout(completionHandler: {(result: Any?, error: Error?) in
43
AWS Mobile Hub Developer Guide Developer GuideAndroid and iOS
self.showSignIn() // print("Sign-out Successful: \(signInProvider.getDisplayName)");
})}
Next Steps
• Customize the UI
• Amazon Cognito Developer Guide
Add Push Notifications to Your Mobile App with Amazon Pinpoint
The following reference content only applies to existing apps that were built using the AWS MobileSDKs for iOS and Android. If you’re building a new mobile or web app, or you’re adding cloudcapabilities to an existing app, visit the Amplify Framework website instead. Documentation for theAWS Mobile SDKs for iOS and Android is now part of the Amplify Framework.
Overview
Mobile Hub deploys your Push Notifications backend services when you enable the Messaging andAnalytics (p. 198) feature using the Amazon Pinpoint service. Amazon Pinpoint enables apps to receivemobile push messages sent from the Apple (APNs) and Google (FCM/GCM) platforms. You can alsocreate Amazon Pinpoint campaigns that tie user behavior to push or other forms of messaging.
Set Up Your Backend
1. Complete the Get Started (p. 3) steps before your proceed.
2. Choose the Messaging and Analytics tile
3. Choose Mobile push.
For Android - Firebase/Google Cloud Messaging (FCM/GCM): Choose Android and provide yourFirebase/Google application API key and Sender ID. To retrieve or create these values, see Setting UpAndroid Push Notifications .
For iOS - Apple Push Notification Service (APNs): Choose iOS and provide your Apple app P12Certificate and, optionally, Certificate password. To retrieve or create these items, see Setting Up iOSPush Notifications.
4. When the operation is complete, an alert will pop up saying “Your Backend has been updated”,prompting you to download the latest copy of the cloud configuration file. If you’re done withconfiguring the feature, choose the banner to return to the project details page.
5. From the project detail page, every app that needs to be updated with the latest cloud configurationfile will have a flashing Integrate button. Choose the button to enter the integrate wizard.
44
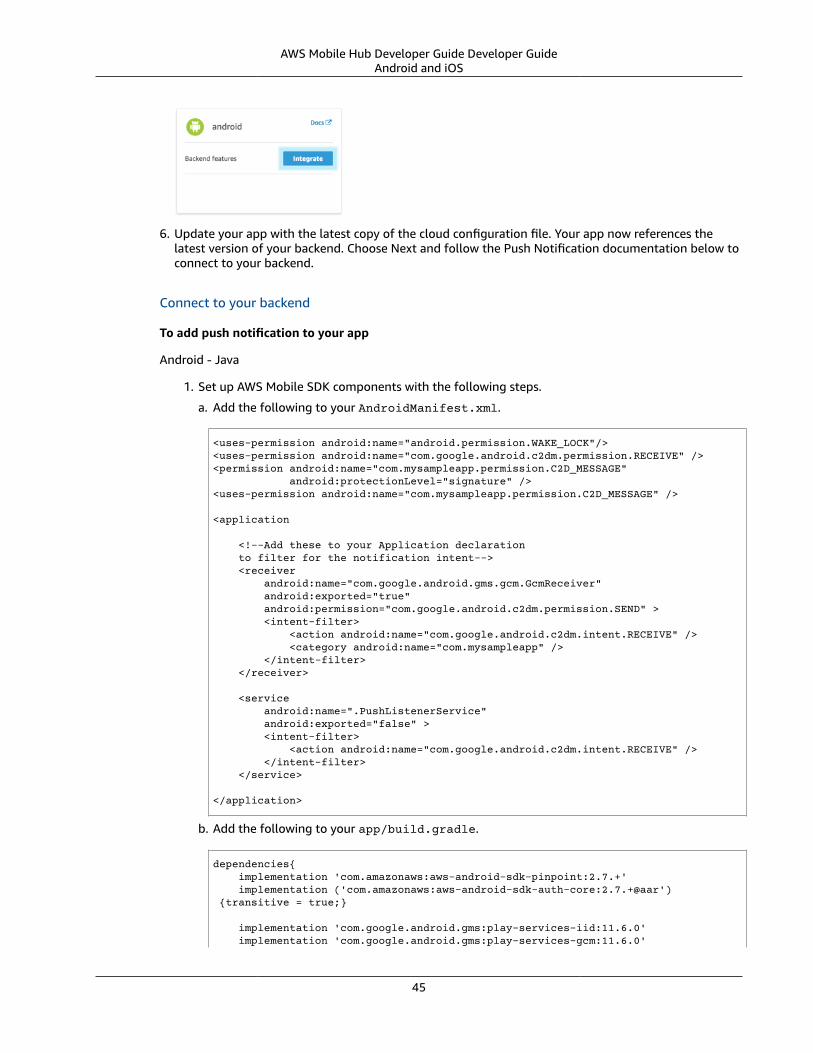
AWS Mobile Hub Developer Guide Developer GuideAndroid and iOS
6. Update your app with the latest copy of the cloud configuration file. Your app now references thelatest version of your backend. Choose Next and follow the Push Notification documentation below toconnect to your backend.
Connect to your backend
To add push notification to your app
Android - Java
1. Set up AWS Mobile SDK components with the following steps.
a. Add the following to your AndroidManifest.xml.
<uses-permission android:name="android.permission.WAKE_LOCK"/><uses-permission android:name="com.google.android.c2dm.permission.RECEIVE" /><permission android:name="com.mysampleapp.permission.C2D_MESSAGE" android:protectionLevel="signature" /><uses-permission android:name="com.mysampleapp.permission.C2D_MESSAGE" />
<application
<!--Add these to your Application declaration to filter for the notification intent--> <receiver android:name="com.google.android.gms.gcm.GcmReceiver" android:exported="true" android:permission="com.google.android.c2dm.permission.SEND" > <intent-filter> <action android:name="com.google.android.c2dm.intent.RECEIVE" /> <category android:name="com.mysampleapp" /> </intent-filter> </receiver>
<service android:name=".PushListenerService" android:exported="false" > <intent-filter> <action android:name="com.google.android.c2dm.intent.RECEIVE" /> </intent-filter> </service>
</application>
b. Add the following to your app/build.gradle.
dependencies{ implementation 'com.amazonaws:aws-android-sdk-pinpoint:2.7.+' implementation ('com.amazonaws:aws-android-sdk-auth-core:2.7.+@aar') {transitive = true;}
implementation 'com.google.android.gms:play-services-iid:11.6.0' implementation 'com.google.android.gms:play-services-gcm:11.6.0'
45
AWS Mobile Hub Developer Guide Developer GuideAndroid and iOS
}
c. Add the following to the project level build.gradle in the folder containing your project.
buildscript { dependencies { classpath 'com.google.gms:google-services:3.1.1' }}
allprojects { repositories { maven { url "https://maven.google.com" } }}
2. Create an Amazon Pinpoint client in the location of your push notification code.
import com.amazonaws.mobileconnectors.pinpoint.PinpointConfiguration;import com.amazonaws.mobileconnectors.pinpoint.PinpointManager;import com.google.android.gms.gcm.GoogleCloudMessaging;import com.google.android.gms.iid.InstanceID;
public class MainActivity extends AppCompatActivity { public static final String LOG_TAG = MainActivity.class.getSimpleName();
public static PinpointManager pinpointManager;
@Override protected void onCreate(Bundle savedInstanceState) { super.onCreate(savedInstanceState); setContentView(R.layout.activity_main);
if (pinpointManager == null) { PinpointConfiguration pinpointConfig = new PinpointConfiguration( getApplicationContext(), AWSMobileClient.getInstance().getCredentialsProvider(), AWSMobileClient.getInstance().getConfiguration());
pinpointManager = new PinpointManager(pinpointConfig);
new Thread(new Runnable() { @Override public void run() { try { String deviceToken = InstanceID.getInstance(MainActivity.this).getToken( "123456789Your_GCM_Sender_Id", GoogleCloudMessaging.INSTANCE_ID_SCOPE); Log.e("NotError", deviceToken); pinpointManager.getNotificationClient() .registerGCMDeviceToken(deviceToken); } catch (Exception e) { e.printStackTrace(); } } }).start(); } } }
46
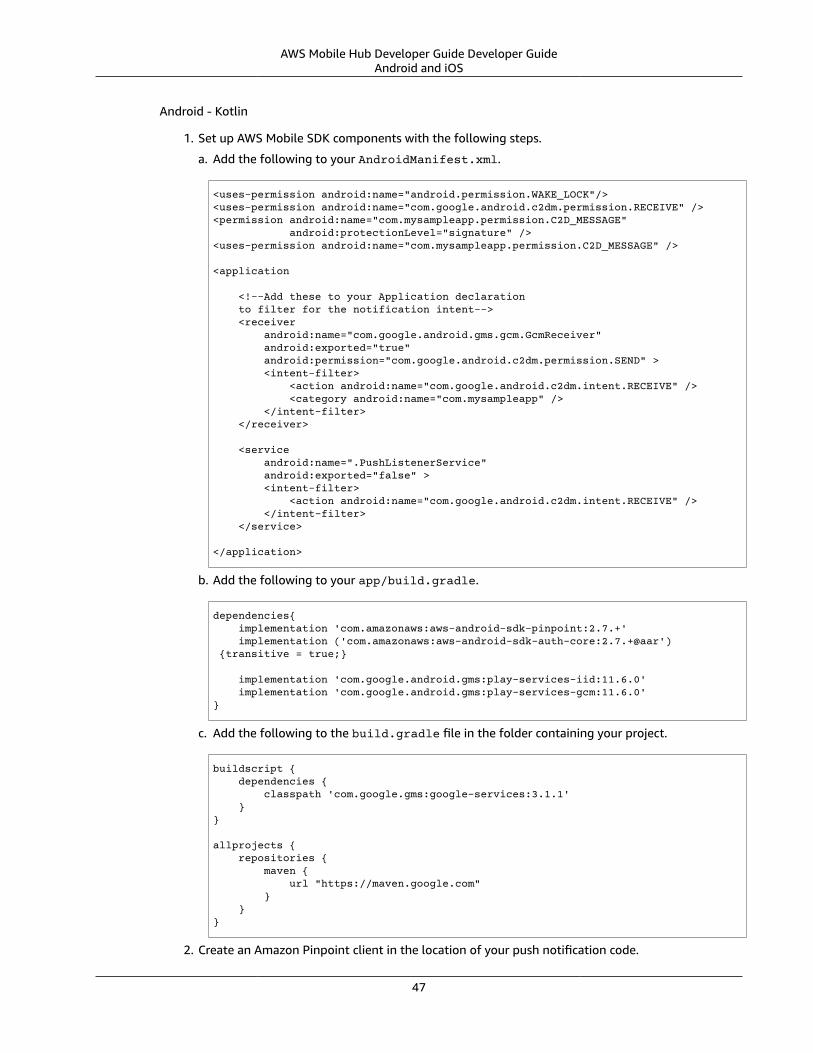
AWS Mobile Hub Developer Guide Developer GuideAndroid and iOS
Android - Kotlin
1. Set up AWS Mobile SDK components with the following steps.
a. Add the following to your AndroidManifest.xml.
<uses-permission android:name="android.permission.WAKE_LOCK"/><uses-permission android:name="com.google.android.c2dm.permission.RECEIVE" /><permission android:name="com.mysampleapp.permission.C2D_MESSAGE" android:protectionLevel="signature" /><uses-permission android:name="com.mysampleapp.permission.C2D_MESSAGE" />
<application
<!--Add these to your Application declaration to filter for the notification intent--> <receiver android:name="com.google.android.gms.gcm.GcmReceiver" android:exported="true" android:permission="com.google.android.c2dm.permission.SEND" > <intent-filter> <action android:name="com.google.android.c2dm.intent.RECEIVE" /> <category android:name="com.mysampleapp" /> </intent-filter> </receiver>
<service android:name=".PushListenerService" android:exported="false" > <intent-filter> <action android:name="com.google.android.c2dm.intent.RECEIVE" /> </intent-filter> </service>
</application>
b. Add the following to your app/build.gradle.
dependencies{ implementation 'com.amazonaws:aws-android-sdk-pinpoint:2.7.+' implementation ('com.amazonaws:aws-android-sdk-auth-core:2.7.+@aar') {transitive = true;}
implementation 'com.google.android.gms:play-services-iid:11.6.0' implementation 'com.google.android.gms:play-services-gcm:11.6.0'}
c. Add the following to the build.gradle file in the folder containing your project.
buildscript { dependencies { classpath 'com.google.gms:google-services:3.1.1' }}
allprojects { repositories { maven { url "https://maven.google.com" } }}
2. Create an Amazon Pinpoint client in the location of your push notification code.
47

AWS Mobile Hub Developer Guide Developer GuideAndroid and iOS
import com.amazonaws.mobileconnectors.pinpoint.PinpointConfiguration;import com.amazonaws.mobileconnectors.pinpoint.PinpointManager;import com.google.android.gms.gcm.GoogleCloudMessaging;import com.google.android.gms.iid.InstanceID;
class MainActivity : AppCompatActivity() { companion object { private val LOG_TAG = this::class.java.getSimpleName var pinpointManager: PinpointManager? = null }
override fun onCreate(savedInstanceState: Bundle?) { super.onCreate(savedInstanceState) setContentView(R.layout.activity_main)
AWSMobileClient.getInstance().initialize(this).execute() with (AWSMobileClient.getInstance()) { if (pinpointManager == null) { val config = PinpointConfiguration(applicationContext, credentialsProvider, configuration) pinpointManager = PinpointManager(config) } }
thread(start = true) { try { val deviceToken = InstanceID.getInstance(this@MainActivity) .getToken("YOUR-GCM-SENDER-ID", GoogleCloudMessaging.INSTANCE_ID_SCOPE) Log.i(LOG_TAG, "GCM DeviceToken = $deviceToken") pinpointManager?.notificationClient?.registerGCMDeviceToken(deviceToken) } catch (e: Exception) { e.printStackTrace() } } }}
iOS - Swift
1. Set up AWS Mobile SDK components with the following steps.
a. The Podfile that you configure to install the AWS Mobile SDK must contain:
platform :ios, '9.0'
target :'YOUR-APP-NAME' do use_frameworks!
pod 'AWSPinpoint', '~> 2.6.13' # other pods
end
Run pod install --repo-update before you continue.
If you encounter an error message that begins “[!] Failed to connect to GitHub toupdate the CocoaPods/Specs . . .”, and your internet connectivity is working, you mayneed to update openssl and Ruby.
b. Classes that call Amazon Pinpoint APIs must use the following import statements:
48
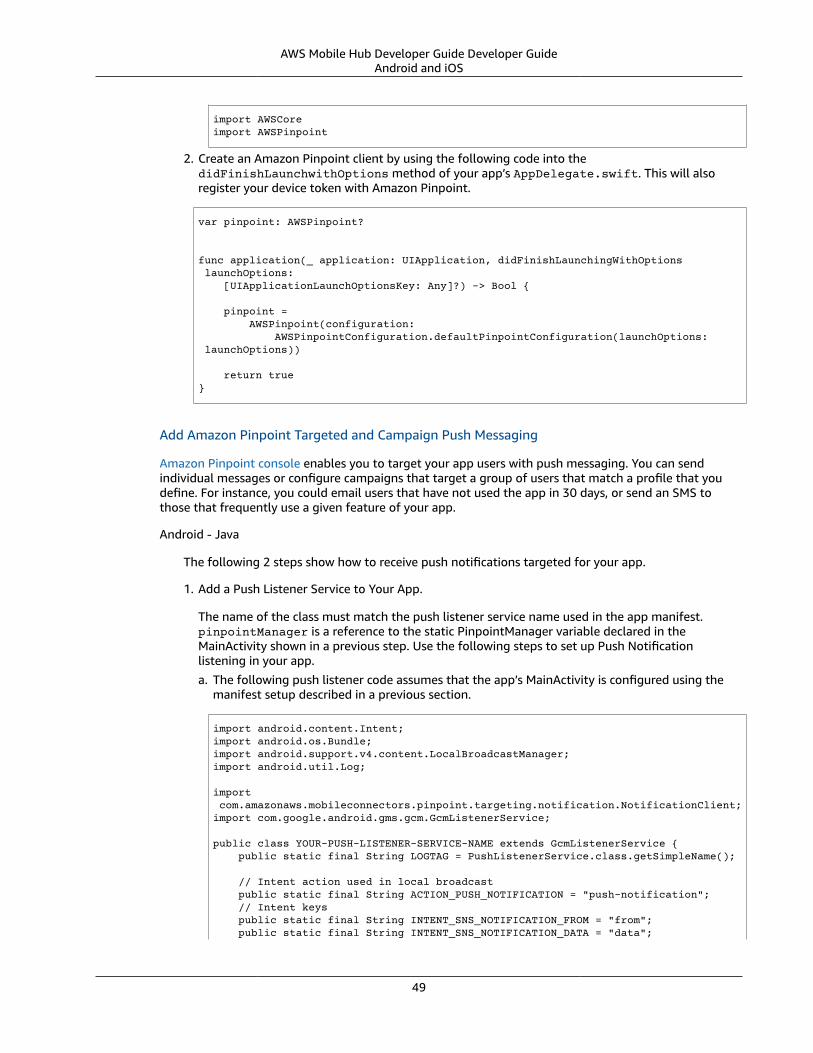
AWS Mobile Hub Developer Guide Developer GuideAndroid and iOS
import AWSCoreimport AWSPinpoint
2. Create an Amazon Pinpoint client by using the following code into thedidFinishLaunchwithOptions method of your app’s AppDelegate.swift. This will alsoregister your device token with Amazon Pinpoint.
var pinpoint: AWSPinpoint?
func application(_ application: UIApplication, didFinishLaunchingWithOptions launchOptions: [UIApplicationLaunchOptionsKey: Any]?) -> Bool {
pinpoint = AWSPinpoint(configuration: AWSPinpointConfiguration.defaultPinpointConfiguration(launchOptions: launchOptions))
return true}
Add Amazon Pinpoint Targeted and Campaign Push Messaging
Amazon Pinpoint console enables you to target your app users with push messaging. You can sendindividual messages or configure campaigns that target a group of users that match a profile that youdefine. For instance, you could email users that have not used the app in 30 days, or send an SMS tothose that frequently use a given feature of your app.
Android - Java
The following 2 steps show how to receive push notifications targeted for your app.
1. Add a Push Listener Service to Your App.
The name of the class must match the push listener service name used in the app manifest.pinpointManager is a reference to the static PinpointManager variable declared in theMainActivity shown in a previous step. Use the following steps to set up Push Notificationlistening in your app.a. The following push listener code assumes that the app’s MainActivity is configured using the
manifest setup described in a previous section.
import android.content.Intent;import android.os.Bundle;import android.support.v4.content.LocalBroadcastManager;import android.util.Log;
import com.amazonaws.mobileconnectors.pinpoint.targeting.notification.NotificationClient;import com.google.android.gms.gcm.GcmListenerService;
public class YOUR-PUSH-LISTENER-SERVICE-NAME extends GcmListenerService { public static final String LOGTAG = PushListenerService.class.getSimpleName();
// Intent action used in local broadcast public static final String ACTION_PUSH_NOTIFICATION = "push-notification"; // Intent keys public static final String INTENT_SNS_NOTIFICATION_FROM = "from"; public static final String INTENT_SNS_NOTIFICATION_DATA = "data";
49

AWS Mobile Hub Developer Guide Developer GuideAndroid and iOS
/** * Helper method to extract push message from bundle. * * @param data bundle * @return message string from push notification */ public static String getMessage(Bundle data) { // If a push notification is sent as plain // text, then the message appears in "default". // Otherwise it's in the "message" for JSON format. return data.containsKey("default") ? data.getString("default") : data.getString( "message", ""); }
private void broadcast(final String from, final Bundle data) { Intent intent = new Intent(ACTION_PUSH_NOTIFICATION); intent.putExtra(INTENT_SNS_NOTIFICATION_FROM, from); intent.putExtra(INTENT_SNS_NOTIFICATION_DATA, data); LocalBroadcastManager.getInstance(this).sendBroadcast(intent); }
@Override public void onMessageReceived(final String from, final Bundle data) { Log.d(LOGTAG, "From:" + from); Log.d(LOGTAG, "Data:" + data.toString());
final NotificationClient notificationClient = MainActivity.pinpointManager.getNotificationClient();
NotificationClient.CampaignPushResult pushResult = notificationClient.handleGCMCampaignPush(from, data, this.getClass());
if (!NotificationClient.CampaignPushResult.NOT_HANDLED.equals(pushResult)) { // The push message was due to a Pinpoint campaign. // If the app was in the background, a local notification was added // in the notification center. If the app was in the foreground, an // event was recorded indicating the app was in the foreground, // for the demo, we will broadcast the notification to let the main // activity display it in a dialog. if ( NotificationClient.CampaignPushResult.APP_IN_FOREGROUND.equals(pushResult)) { // Create a message that will display the raw //data of the campaign push in a dialog. data.putString(" message", String.format("Received Campaign Push:\n%s", data.toString())); broadcast(from, data); } return; } }}
b. Add code to react to your push listener service.
The following code can be placed where your app will react to incoming notifications.
import android.app.Activity;import android.app.AlertDialog;
50
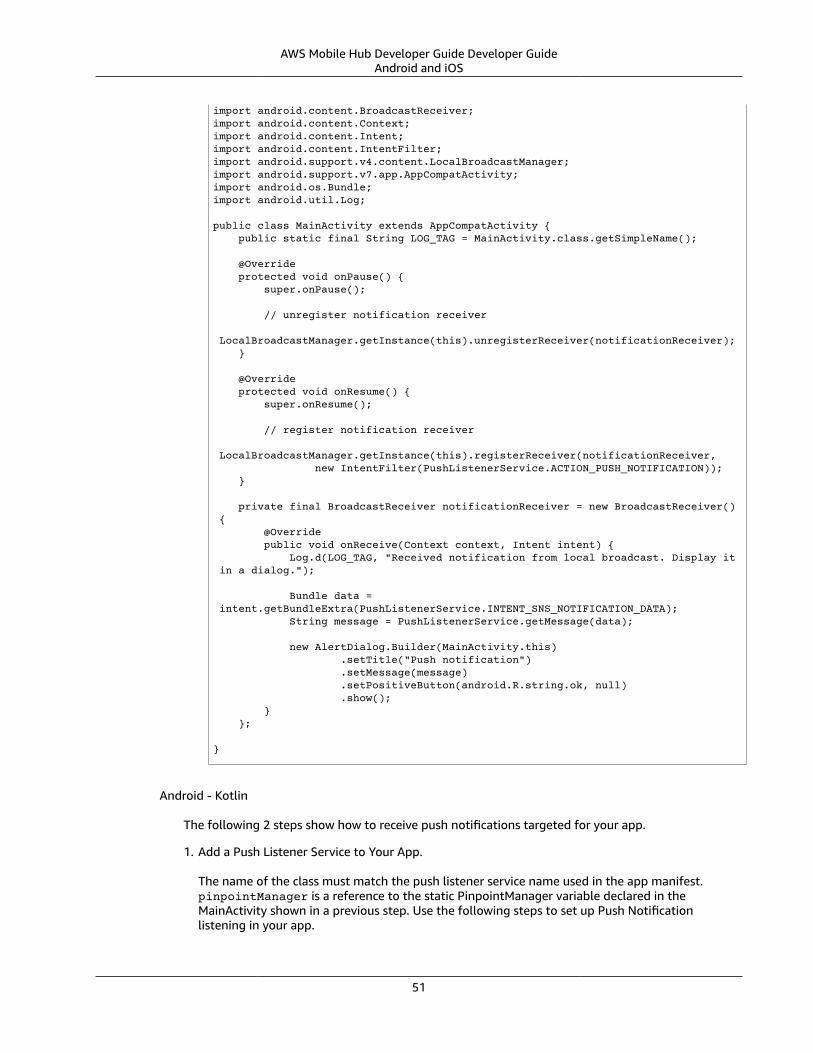
AWS Mobile Hub Developer Guide Developer GuideAndroid and iOS
import android.content.BroadcastReceiver;import android.content.Context;import android.content.Intent;import android.content.IntentFilter;import android.support.v4.content.LocalBroadcastManager;import android.support.v7.app.AppCompatActivity;import android.os.Bundle;import android.util.Log;
public class MainActivity extends AppCompatActivity { public static final String LOG_TAG = MainActivity.class.getSimpleName();
@Override protected void onPause() { super.onPause();
// unregister notification receiver LocalBroadcastManager.getInstance(this).unregisterReceiver(notificationReceiver); }
@Override protected void onResume() { super.onResume();
// register notification receiver LocalBroadcastManager.getInstance(this).registerReceiver(notificationReceiver, new IntentFilter(PushListenerService.ACTION_PUSH_NOTIFICATION)); }
private final BroadcastReceiver notificationReceiver = new BroadcastReceiver() { @Override public void onReceive(Context context, Intent intent) { Log.d(LOG_TAG, "Received notification from local broadcast. Display it in a dialog.");
Bundle data = intent.getBundleExtra(PushListenerService.INTENT_SNS_NOTIFICATION_DATA); String message = PushListenerService.getMessage(data);
new AlertDialog.Builder(MainActivity.this) .setTitle("Push notification") .setMessage(message) .setPositiveButton(android.R.string.ok, null) .show(); } };
}
Android - Kotlin
The following 2 steps show how to receive push notifications targeted for your app.
1. Add a Push Listener Service to Your App.
The name of the class must match the push listener service name used in the app manifest.pinpointManager is a reference to the static PinpointManager variable declared in theMainActivity shown in a previous step. Use the following steps to set up Push Notificationlistening in your app.
51
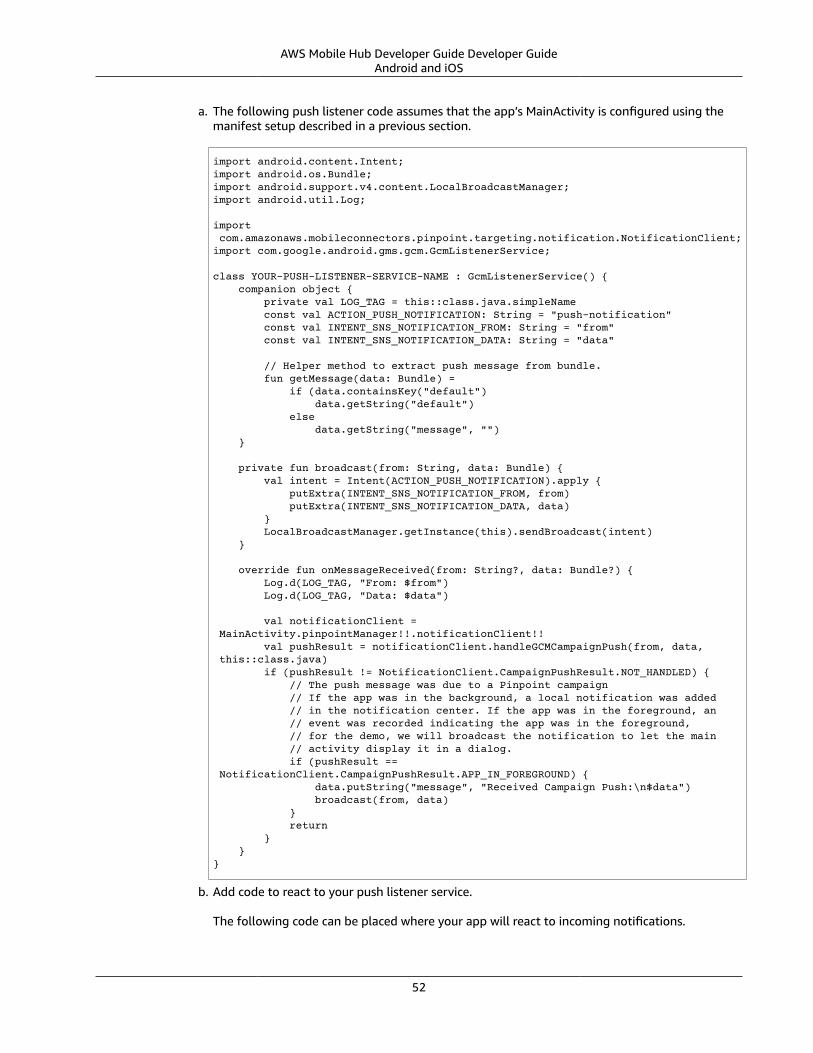
AWS Mobile Hub Developer Guide Developer GuideAndroid and iOS
a. The following push listener code assumes that the app’s MainActivity is configured using themanifest setup described in a previous section.
import android.content.Intent;import android.os.Bundle;import android.support.v4.content.LocalBroadcastManager;import android.util.Log;
import com.amazonaws.mobileconnectors.pinpoint.targeting.notification.NotificationClient;import com.google.android.gms.gcm.GcmListenerService;
class YOUR-PUSH-LISTENER-SERVICE-NAME : GcmListenerService() { companion object { private val LOG_TAG = this::class.java.simpleName const val ACTION_PUSH_NOTIFICATION: String = "push-notification" const val INTENT_SNS_NOTIFICATION_FROM: String = "from" const val INTENT_SNS_NOTIFICATION_DATA: String = "data"
// Helper method to extract push message from bundle. fun getMessage(data: Bundle) = if (data.containsKey("default") data.getString("default") else data.getString("message", "") }
private fun broadcast(from: String, data: Bundle) { val intent = Intent(ACTION_PUSH_NOTIFICATION).apply { putExtra(INTENT_SNS_NOTIFICATION_FROM, from) putExtra(INTENT_SNS_NOTIFICATION_DATA, data) } LocalBroadcastManager.getInstance(this).sendBroadcast(intent) }
override fun onMessageReceived(from: String?, data: Bundle?) { Log.d(LOG_TAG, "From: $from") Log.d(LOG_TAG, "Data: $data")
val notificationClient = MainActivity.pinpointManager!!.notificationClient!! val pushResult = notificationClient.handleGCMCampaignPush(from, data, this::class.java) if (pushResult != NotificationClient.CampaignPushResult.NOT_HANDLED) { // The push message was due to a Pinpoint campaign // If the app was in the background, a local notification was added // in the notification center. If the app was in the foreground, an // event was recorded indicating the app was in the foreground, // for the demo, we will broadcast the notification to let the main // activity display it in a dialog. if (pushResult == NotificationClient.CampaignPushResult.APP_IN_FOREGROUND) { data.putString("message", "Received Campaign Push:\n$data") broadcast(from, data) } return } }}
b. Add code to react to your push listener service.
The following code can be placed where your app will react to incoming notifications.
52

AWS Mobile Hub Developer Guide Developer GuideAndroid and iOS
import android.app.Activity;import android.app.AlertDialog;import android.content.BroadcastReceiver;import android.content.Context;import android.content.Intent;import android.content.IntentFilter;import android.support.v4.content.LocalBroadcastManager;import android.support.v7.app.AppCompatActivity;import android.os.Bundle;import android.util.Log;
class MainActivity : AppCompatActivity() { companion object { // ...
val notificationReceiver = object : BroadcastReceiver() { override fun onReceive(context: Context, intent: Intent) { Log.d(LOG_TAG, "Received notification from local broadcast.")
val data = intent.getBundleExtra(PushListenerService.INTENT_SNS_NOTIFICATION_DATA) val message = PushListenerService.getMessage(data)
// Uses anko library to display an alert dialog alert(message) { title = "Push notification" positiveButton("OK") { /* Do nothing */ } }.show() } } }
override fun onPause() { super.onPause() LocalBroadcastManager.getInstance(this).unregisterReceiver(notificationReceiver) }
override fun onResume() { super.onResume() LoadBroadcastManager.getInstance(this).registerReceiver(notificationReceiver, IntentFilter(PushListenerService.ACTION_PUSH_NOTIFICATION)) }
// ...}
iOS - Swift
1. In your AppDelegate with PinpointManager instantiated, make sure the push listening codeexists in the following functions.
// . . .
func application( _ application: UIApplication, didRegisterForRemoteNotificationsWithDeviceToken deviceToken: Data) {
pinpoint!.notificationManager.interceptDidRegisterForRemoteNotifications(
53

AWS Mobile Hub Developer Guide Developer GuideAndroid and iOS
withDeviceToken: deviceToken) }
func application( _ application: UIApplication, didReceiveRemoteNotification userInfo: [AnyHashable: Any], fetchCompletionHandler completionHandler: @escaping (UIBackgroundFetchResult) -> Void) {
pinpoint!.notificationManager.interceptDidReceiveRemoteNotification( userInfo, fetchCompletionHandler: completionHandler)
if (application.applicationState == .active) { let alert = UIAlertController(title: "Notification Received", message: userInfo.description, preferredStyle: .alert) alert.addAction(UIAlertAction(title: "Ok", style: .default, handler: nil))
UIApplication.shared.keyWindow?.rootViewController?.present( alert, animated: true, completion:nil) } }// . . .}
2. Add the following code in the ViewController where you request notification permissions.
var userNotificationTypes : UIUserNotificationTypeuserNotificationTypes = [.alert , .badge , .sound]let notificationSettings = UIUserNotificationSettings.init(types: userNotificationTypes, categories: nil)UIApplication.shared.registerUserNotificationSettings(notificationSettings)UIApplication.shared.registerForRemoteNotifications()
3. In Xcode, choose your app target in the Project Navigator, choose Capabilities, turn on PushNotifications.
4. Build and run your app using information at Building the Sample iOS App From AWS Mobile Hub.
Add NoSQL Database to Your Mobile App with Amazon DynamoDB
The following reference content only applies to existing apps that were built using the AWS MobileSDKs for iOS and Android. If you’re building a new mobile or web app, or you’re adding cloudcapabilities to an existing app, visit the Amplify Framework website instead. Documentation for theAWS Mobile SDKs for iOS and Android is now part of the Amplify Framework.
54

AWS Mobile Hub Developer Guide Developer GuideAndroid and iOS
Overview
The AWS Mobile Hub nosqldb feature uses Amazon DynamoDB to enable you to create database tablesthat can store and retrieve data for use by your apps.
Set Up Your Backend
1. Complete the Get Started (p. 3) steps before you proceed. If you already have an AmazonDynamoDB table, see How to integrate Integrate Your Existing NoSQL Table (p. 96).
2. Enable NoSQL Database: Open your project in Mobile Hub and choose the NoSQL Database tile toenable the feature.
3. Follow the console work flow to define the tables you need. See Configuring the NoSQL DatabaseFeature (p. 194) for details.
4. When the operation is complete, an alert will pop up saying “Your Backend has been updated”,prompting you to download the latest copy of the cloud configuration file. If you’re done configuringthe feature, choose the banner to return to the project details page.
5. From the project detail page, every app that needs to be updated with the latest cloud configurationfile will have a flashing Integrate button. Choose the button to enter the integrate wizard.
6. Update your app with the latest copy of the cloud configuration file. Your app now references thelatest version of your backend. Choose Next and follow the NoSQL Database documentation below toconnect to your backend.
7. Download the models required for your app. The data models provide set and get methods for eachattribute of a DynamoDB table.
Connect to your backend
To add AWS Mobile NoSQL Database to your app
Android - Java
1. Set up AWS Mobile SDK components with the following steps.a. Add the following to your app/build.gradle.
dependencies{ implementation 'com.amazonaws:aws-android-sdk-ddb-mapper:2.7.+'}
b. For each Activity where you make calls to perform database operations, import the followingAPIs.
import com.amazonaws.mobileconnectors.dynamodbv2.dynamodbmapper.DynamoDBMapper;
55

AWS Mobile Hub Developer Guide Developer GuideAndroid and iOS
2. Create a DynamoDBMapper client for your app as in the following example.
import com.amazonaws.auth.AWSCredentialsProvider;import com.amazonaws.mobile.client.AWSMobileClient;import com.amazonaws.mobile.config.AWSConfiguration;
import com.amazonaws.mobileconnectors.dynamodbv2.dynamodbmapper.DynamoDBMapper;import com.amazonaws.services.dynamodbv2.AmazonDynamoDBClient;
import java.util.Random;
public class MainActivity extends AppCompatActivity {
// Declare a DynamoDBMapper object DynamoDBMapper dynamoDBMapper;
@Override protected void onCreate(Bundle savedInstanceState) { super.onCreate(savedInstanceState); setContentView(R.layout.activity_main);
// AWSMobileClient enables AWS user credentials to access your table AWSMobileClient.getInstance().initialize(this).execute();
AWSCredentialsProvider credentialsProvider = AWSMobileClient.getInstance().getCredentialsProvider(); AWSConfiguration configuration = AWSMobileClient.getInstance().getConfiguration();
// Add code to instantiate a AmazonDynamoDBClient AmazonDynamoDBClient dynamoDBClient = new AmazonDynamoDBClient(credentialsProvider);
this.dynamoDBMapper = DynamoDBMapper.builder() .dynamoDBClient(dynamoDBClient) .awsConfiguration(configuration) .build();
// other activity code ... }}
3. Add the project data model files you downloaded from the Mobile Hub console. The data modelsprovide set and get methods for each attribute of a DynamoDB table they model.a. Copy the data model file(s) you downloaded, ./YOUR-PROJECT-NAME-integration-lib-
aws-my-sample-app-android/src/main/java/com/amazonaws/models/nosqlYOUR-TABLE-NAMEDO.java into the Android Studio folder that contains your main activity.
NoteUse Asynchronous Calls to DynamoDBSince calls to DynamoDB are synchronous, they don’t belong on your UI thread. Use anasynchronous method like the Runnable wrapper to call DynamoDBObjectMapper in aseparate thread.
Runnable runnable = new Runnable() { public void run() { //DynamoDB calls go here }};Thread mythread = new Thread(runnable);
56
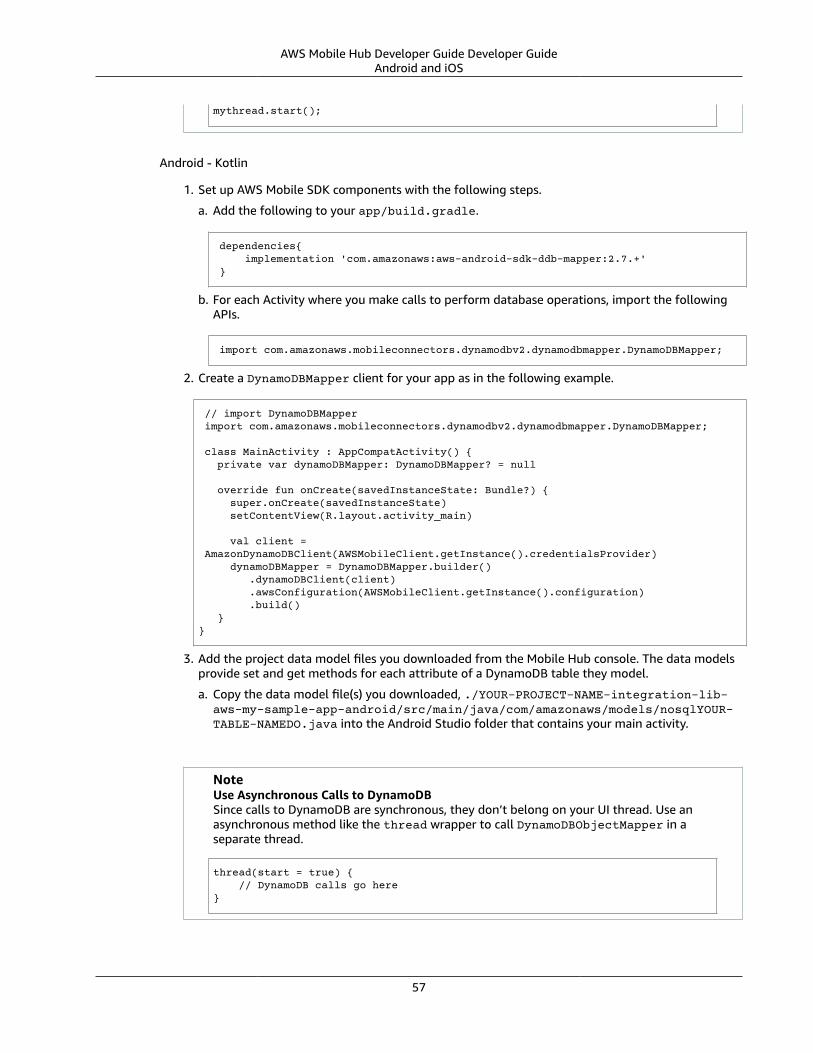
AWS Mobile Hub Developer Guide Developer GuideAndroid and iOS
mythread.start();
Android - Kotlin
1. Set up AWS Mobile SDK components with the following steps.
a. Add the following to your app/build.gradle.
dependencies{ implementation 'com.amazonaws:aws-android-sdk-ddb-mapper:2.7.+' }
b. For each Activity where you make calls to perform database operations, import the followingAPIs.
import com.amazonaws.mobileconnectors.dynamodbv2.dynamodbmapper.DynamoDBMapper;
2. Create a DynamoDBMapper client for your app as in the following example.
// import DynamoDBMapper import com.amazonaws.mobileconnectors.dynamodbv2.dynamodbmapper.DynamoDBMapper;
class MainActivity : AppCompatActivity() { private var dynamoDBMapper: DynamoDBMapper? = null
override fun onCreate(savedInstanceState: Bundle?) { super.onCreate(savedInstanceState) setContentView(R.layout.activity_main)
val client = AmazonDynamoDBClient(AWSMobileClient.getInstance().credentialsProvider) dynamoDBMapper = DynamoDBMapper.builder() .dynamoDBClient(client) .awsConfiguration(AWSMobileClient.getInstance().configuration) .build() }}
3. Add the project data model files you downloaded from the Mobile Hub console. The data modelsprovide set and get methods for each attribute of a DynamoDB table they model.
a. Copy the data model file(s) you downloaded, ./YOUR-PROJECT-NAME-integration-lib-aws-my-sample-app-android/src/main/java/com/amazonaws/models/nosqlYOUR-TABLE-NAMEDO.java into the Android Studio folder that contains your main activity.
NoteUse Asynchronous Calls to DynamoDBSince calls to DynamoDB are synchronous, they don’t belong on your UI thread. Use anasynchronous method like the thread wrapper to call DynamoDBObjectMapper in aseparate thread.
thread(start = true) { // DynamoDB calls go here}
57
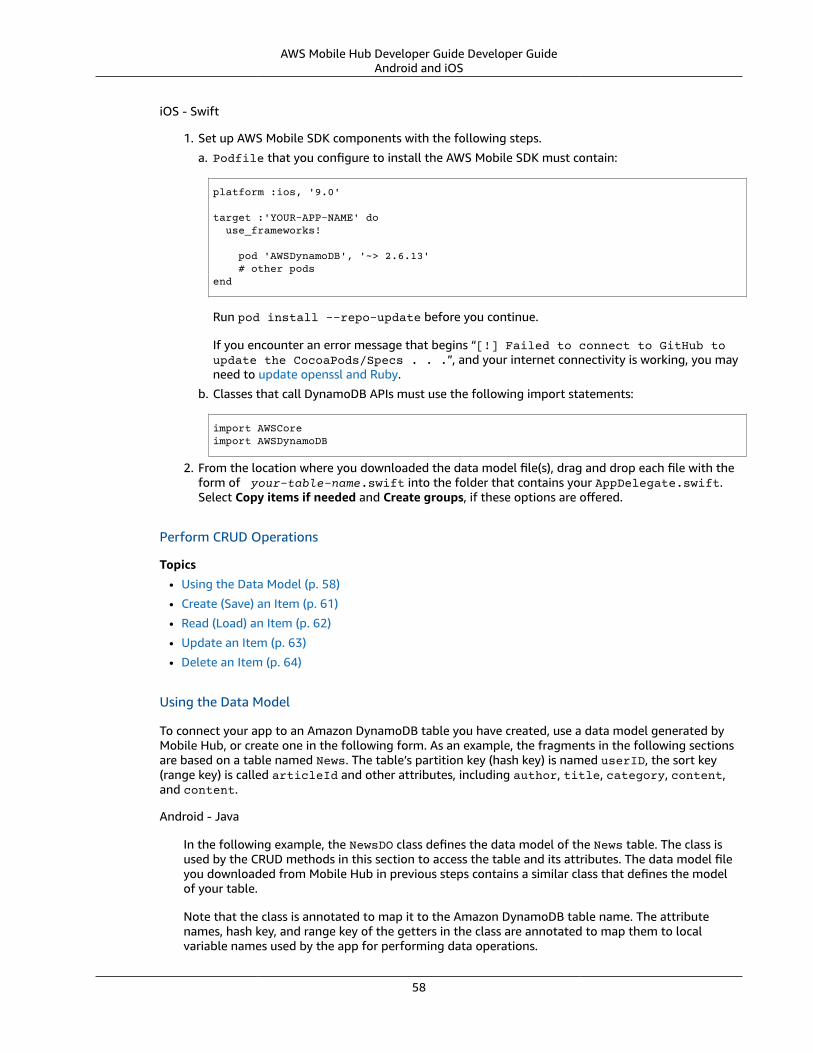
AWS Mobile Hub Developer Guide Developer GuideAndroid and iOS
iOS - Swift
1. Set up AWS Mobile SDK components with the following steps.
a. Podfile that you configure to install the AWS Mobile SDK must contain:
platform :ios, '9.0'
target :'YOUR-APP-NAME' do use_frameworks!
pod 'AWSDynamoDB', '~> 2.6.13' # other podsend
Run pod install --repo-update before you continue.
If you encounter an error message that begins “[!] Failed to connect to GitHub toupdate the CocoaPods/Specs . . .”, and your internet connectivity is working, you mayneed to update openssl and Ruby.
b. Classes that call DynamoDB APIs must use the following import statements:
import AWSCoreimport AWSDynamoDB
2. From the location where you downloaded the data model file(s), drag and drop each file with theform of your-table-name.swift into the folder that contains your AppDelegate.swift.Select Copy items if needed and Create groups, if these options are offered.
Perform CRUD Operations
Topics
• Using the Data Model (p. 58)
• Create (Save) an Item (p. 61)
• Read (Load) an Item (p. 62)
• Update an Item (p. 63)
• Delete an Item (p. 64)
Using the Data Model
To connect your app to an Amazon DynamoDB table you have created, use a data model generated byMobile Hub, or create one in the following form. As an example, the fragments in the following sectionsare based on a table named News. The table’s partition key (hash key) is named userID, the sort key(range key) is called articleId and other attributes, including author, title, category, content,and content.
Android - Java
In the following example, the NewsDO class defines the data model of the News table. The class isused by the CRUD methods in this section to access the table and its attributes. The data model fileyou downloaded from Mobile Hub in previous steps contains a similar class that defines the modelof your table.
Note that the class is annotated to map it to the Amazon DynamoDB table name. The attributenames, hash key, and range key of the getters in the class are annotated to map them to localvariable names used by the app for performing data operations.
58

AWS Mobile Hub Developer Guide Developer GuideAndroid and iOS
package com.amazonaws.models.nosql;
import com.amazonaws.mobileconnectors.dynamodbv2.dynamodbmapper.DynamoDBAttribute;import com.amazonaws.mobileconnectors.dynamodbv2.dynamodbmapper.DynamoDBHashKey;import com.amazonaws.mobileconnectors.dynamodbv2.dynamodbmapper.DynamoDBIndexHashKey;import com.amazonaws.mobileconnectors.dynamodbv2.dynamodbmapper.DynamoDBIndexRangeKey;import com.amazonaws.mobileconnectors.dynamodbv2.dynamodbmapper.DynamoDBRangeKey;import com.amazonaws.mobileconnectors.dynamodbv2.dynamodbmapper.DynamoDBTable;
import java.util.List;import java.util.Map;import java.util.Set;
@DynamoDBTable(tableName = "nosqlnews-mobilehub-1234567890-News")
public class NewsDO { private String _userId; private String _articleId; private String _author; private String _category; private String _content; private Double _creationDate; private String _title;
@DynamoDBHashKey(attributeName = "userId") @DynamoDBAttribute(attributeName = "userId") public String getUserId() { return _userId; }
public void setUserId(final String _userId) { this._userId = _userId; } @DynamoDBRangeKey(attributeName = "articleId") @DynamoDBAttribute(attributeName = "articleId") public String getArticleId() { return _articleId; }
public void setArticleId(final String _articleId) { this._articleId = _articleId; } @DynamoDBAttribute(attributeName = "author") public String getAuthor() { return _author; }
public void setAuthor(final String _author) { this._author = _author; }
// setters and getters for other attributes ...
}
Android - Kotlin
In the following example, the NewsDO class defines the data model of the News table. The class isused by the CRUD methods in this section to access the table and its attributes. The data model fileyou downloaded from Mobile Hub in previous steps contains a similar class that defines the modelof your table.
59
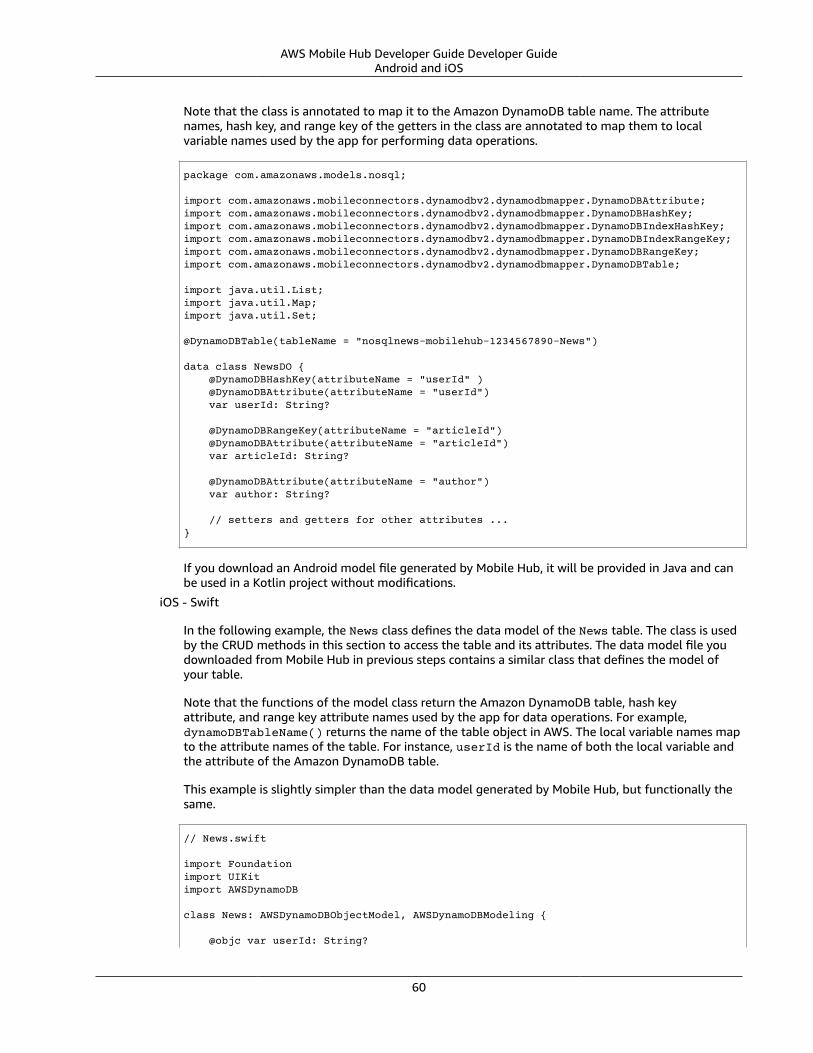
AWS Mobile Hub Developer Guide Developer GuideAndroid and iOS
Note that the class is annotated to map it to the Amazon DynamoDB table name. The attributenames, hash key, and range key of the getters in the class are annotated to map them to localvariable names used by the app for performing data operations.
package com.amazonaws.models.nosql;
import com.amazonaws.mobileconnectors.dynamodbv2.dynamodbmapper.DynamoDBAttribute;import com.amazonaws.mobileconnectors.dynamodbv2.dynamodbmapper.DynamoDBHashKey;import com.amazonaws.mobileconnectors.dynamodbv2.dynamodbmapper.DynamoDBIndexHashKey;import com.amazonaws.mobileconnectors.dynamodbv2.dynamodbmapper.DynamoDBIndexRangeKey;import com.amazonaws.mobileconnectors.dynamodbv2.dynamodbmapper.DynamoDBRangeKey;import com.amazonaws.mobileconnectors.dynamodbv2.dynamodbmapper.DynamoDBTable;
import java.util.List;import java.util.Map;import java.util.Set;
@DynamoDBTable(tableName = "nosqlnews-mobilehub-1234567890-News")
data class NewsDO { @DynamoDBHashKey(attributeName = "userId" ) @DynamoDBAttribute(attributeName = "userId") var userId: String?
@DynamoDBRangeKey(attributeName = "articleId") @DynamoDBAttribute(attributeName = "articleId") var articleId: String?
@DynamoDBAttribute(attributeName = "author") var author: String?
// setters and getters for other attributes ...}
If you download an Android model file generated by Mobile Hub, it will be provided in Java and canbe used in a Kotlin project without modifications.
iOS - Swift
In the following example, the News class defines the data model of the News table. The class is usedby the CRUD methods in this section to access the table and its attributes. The data model file youdownloaded from Mobile Hub in previous steps contains a similar class that defines the model ofyour table.
Note that the functions of the model class return the Amazon DynamoDB table, hash keyattribute, and range key attribute names used by the app for data operations. For example,dynamoDBTableName() returns the name of the table object in AWS. The local variable names mapto the attribute names of the table. For instance, userId is the name of both the local variable andthe attribute of the Amazon DynamoDB table.
This example is slightly simpler than the data model generated by Mobile Hub, but functionally thesame.
// News.swift
import Foundationimport UIKitimport AWSDynamoDB
class News: AWSDynamoDBObjectModel, AWSDynamoDBModeling {
@objc var userId: String?
60

AWS Mobile Hub Developer Guide Developer GuideAndroid and iOS
@objc var articleId: String? @objc var author: String? @objc var category: String? @objc var content: String? @objc var creationDate: NSNumber? @objc var title: String?
class func dynamoDBTableName() -> String {
return "nosqlnews-mobilehub-1200412570-News" }
class func hashKeyAttribute() -> String {
return "userId" }
class func rangeKeyAttribute() -> String {
return "articleId" }
}
Create (Save) an Item
Use the following code to create an item in your NoSQL Database table.
Android - Java
public void createNews() { final NewsDO newsItem = new NewsDO();
newsItem.setUserId(unique-user-id);
newsItem.setArticleId("Article1"); newsItem.setContent("This is the article content");
new Thread(new Runnable() { @Override public void run() { dynamoDBMapper.save(newsItem); // Item saved } }).start();}
Android - Kotlin
fun createNews() { val NewsDO newsItem = NewsDO() newsItem.userId = "unique-user-id" newsItem.articleId = UUID.randomUUID().toString() newsItem.author = "Your Name" newsItem.content = "This is the article content"
thread(start = true) { dynamoDBMapper.save(newsItem) } }
61

AWS Mobile Hub Developer Guide Developer GuideAndroid and iOS
iOS - Swift
func createNews() { let dynamoDbObjectMapper = AWSDynamoDBObjectMapper.default()
// Create data object using data models you downloaded from Mobile Hub let newsItem: News = News()
newsItem.userId = AWSIdentityManager.default().identityId
newsItem.articleId = "YourArticleId" newsItem.title = "YourTitlestring" newsItem.author = "YourAuthor" newsItem.creationDate = NSDate().timeIntervalSince1970 as NSNumber
//Save a new item dynamoDbObjectMapper.save(newsItem, completionHandler: { (error: Error?) -> Void in
if let error = error { print("Amazon DynamoDB Save Error: \(error)") return } print("An item was saved.") })}
Read (Load) an Item
Use the following code to read an item in your NoSQL Database table.
Android - Java
public void readNews() { new Thread(new Runnable() { @Override public void run() {
NewsDO newsItem = dynamoDBMapper.load( NewsDO.class, unique-user-id, "Article1");
// Item read // Log.d("News Item:", newsItem.toString()); } }).start();}
Android - Kotlin
fun readNews(userId: String, articleId: String, callback: (NewsDO?) -> Unit) { thread(start = true) { var newsItem = dynamoDBMapper.load(NewsDO::class.java, userId, articleId) runOnUiThread { callback(newsItem) } } }
62

AWS Mobile Hub Developer Guide Developer GuideAndroid and iOS
iOS - Swift
func readNews() { let dynamoDbObjectMapper = AWSDynamoDBObjectMapper.default()
// Create data object using data models you downloaded from Mobile Hub let newsItem: News = News(); newsItem.userId = AWSIdentityManager.default().identityId
dynamoDbObjectMapper.load( News.self, hashKey: newsItem.userId, rangeKey: "YourArticleId", completionHandler: { (objectModel: AWSDynamoDBObjectModel?, error: Error?) -> Void in if let error = error { print("Amazon DynamoDB Read Error: \(error)") return } print("An item was read.") }) }
Update an Item
Use the following code to update an item in your NoSQL Database table.
Android - Java
public void updateNews() { final NewsDO newsItem = new NewsDO();
newsItem.setUserId(unique-user-id);
newsItem.setArticleId("Article1"); newsItem.setContent("This is the updated content.");
new Thread(new Runnable() { @Override public void run() {
dynamoDBMapper.save(newsItem);
// Item updated } }).start();}
Android - Kotlin
fun updateNews(updatedNews: NewsDO) { thread(start = true) { dynamoDBMapper.save(updatedNews) } }
iOS - Swift
func updateNews() { let dynamoDbObjectMapper = AWSDynamoDBObjectMapper.default()
63

AWS Mobile Hub Developer Guide Developer GuideAndroid and iOS
let newsItem: News = News();
newsItem.userId = "unique-user-id"
newsItem.articleId = "YourArticleId" newsItem.title = "This is the Title" newsItem.author = "B Smith" newsItem.creationDate = NSDate().timeIntervalSince1970 as NSNumber newsItem.category = "Local News"
dynamoDbObjectMapper.save(newsItem, completionHandler: {(error: Error?) -> Void in if let error = error { print(" Amazon DynamoDB Save Error: \(error)") return } print("An item was updated.") })}
Delete an Item
Use the following code to delete an item in your NoSQL Database table.
Android - Java
public void deleteNews() { new Thread(new Runnable() { @Override public void run() {
NewsDO newsItem = new NewsDO();
newsItem.setUserId(unique-user-id); //partition key
newsItem.setArticleId("Article1"); //range (sort) key
dynamoDBMapper.delete(newsItem);
// Item deleted } }).start();}
Android - Kotlin
public void deleteNews(userId: String, articleId: String) { thread(start = true) { val item = NewsDO() item.userId = userId item.articleId = articleId
dynamoDBMapper.delete(item) } }
iOS - Swift
func deleteNews() { let dynamoDbObjectMapper = AWSDynamoDBObjectMapper.default()
let itemToDelete = News() itemToDelete?.userId = "unique-user-id"
64

AWS Mobile Hub Developer Guide Developer GuideAndroid and iOS
itemToDelete?.articleId = "YourArticleId"
dynamoDbObjectMapper.remove(itemToDelete!, completionHandler: {(error: Error?) -> Void in if let error = error { print(" Amazon DynamoDB Save Error: \(error)") return } print("An item was deleted.") })}
Perform a Query
A query operation enables you to find items in a table. You must define a query using both the hash key(partition key) and range key (sort key) attributes of a table. You can filter the results by specifying theattributes you are looking for.
The following example code shows querying for news submitted with userId (hash key) and article IDbeginning with Trial (range key).
Android - Java
public void queryNews() {
new Thread(new Runnable() { @Override public void run() { NewsDO news = new NewsDO(); news.setUserId(unique-user-id); news.setArticleId("Article1");
Condition rangeKeyCondition = new Condition() .withComparisonOperator(ComparisonOperator.BEGINS_WITH) .withAttributeValueList(new AttributeValue().withS("Trial"));
DynamoDBQueryExpression queryExpression = new DynamoDBQueryExpression() .withHashKeyValues(note) .withRangeKeyCondition("articleId", rangeKeyCondition) .withConsistentRead(false);
PaginatedList<NewsDO> result = dynamoDBMapper.query(NewsDO.class, queryExpression);
Gson gson = new Gson(); StringBuilder stringBuilder = new StringBuilder();
// Loop through query results for (int i = 0; i < result.size(); i++) { String jsonFormOfItem = gson.toJson(result.get(i)); stringBuilder.append(jsonFormOfItem + "\n\n"); }
// Add your code here to deal with the data result Log.d("Query result: ", stringBuilder.toString());
if (result.isEmpty()) { // There were no items matching your query. } } }).start();}
65

AWS Mobile Hub Developer Guide Developer GuideAndroid and iOS
Android - Kotlin
public void queryNews(userId: String, articleId: String, callback: (List<NewsDO>?) -> Unit) { thread(start = true) { val item = NewsDO() item.userId = userId item.articleId = articleId
val rangeKeyCondition = Condition() .withComparisonOperator(ComparisonOperator.BEGINS_WITH) .withAttributeValueList(AttributeValue().withS("Trial")) val queryExpression = DynamoDBQueryExpression() .withHashKeyValues(item) .withRangeKeyCondition("articleId", rangeKeyCondition) .withConsistentRead(false); val result = dynamoDBMapper.query(NewsDO::class.java, queryExpression) runOnUiThread { callback(result) } }}
iOS - Swift
func queryNote() { // 1) Configure the query let queryExpression = AWSDynamoDBQueryExpression() queryExpression.keyConditionExpression = "#articleId >= :articleId AND #userId = :userId"
queryExpression.expressionAttributeNames = [ "#userId": "userId", "#articleId": "articleId" ] queryExpression.expressionAttributeValues = [ ":articleId": "SomeArticleId", ":userId": "unique-user-id" ]
// 2) Make the query
let dynamoDbObjectMapper = AWSDynamoDBObjectMapper.default()
dynamoDbObjectMapper.query(News.self, expression: queryExpression) { (output: AWSDynamoDBPaginatedOutput?, error: Error?) in if error != nil { print("The request failed. Error: \(String(describing: error))") } if output != nil { for news in output!.items { let newsItem = news as? News print("\(newsItem!.title!)") } } }}
Add User File Storage to Your Mobile App with Amazon S3
The following reference content only applies to existing apps that were built using the AWS MobileSDKs for iOS and Android. If you’re building a new mobile or web app, or you’re adding cloud
66

AWS Mobile Hub Developer Guide Developer GuideAndroid and iOS
capabilities to an existing app, visit the Amplify Framework website instead. Documentation for theAWS Mobile SDKs for iOS and Android is now part of the Amplify Framework.
Overview
Enable your app to store and retrieve user files from cloud storage with the permissions model that suitsyour purpose. Mobile Hub User File Storage (p. 211) deploys and configures cloud storage bucketsusing Amazon Simple Storage Service (Amazon S3).
Set Up Your Backend
1. Complete the Get Started (p. 3) steps before your proceed.
2. Enable User File Storage: Open your project in Mobile Hub and choose the User File Storage tile toenable the feature.
3. When the operation is complete, an alert will pop up saying “Your Backend has been updated”,prompting you to download the latest copy of the cloud configuration file. If you’re done configuringthe feature, choose the banner to return to the project details page.
4. From the project detail page, every app that needs to be updated with the latest cloud configurationfile will have a flashing Integrate button. Choose the button to enter the integrate wizard.
5. Update your app with the latest copy of the cloud configuration file. Your app now references thelatest version of your backend. Choose Next and follow the User File Storage documentation below toconnect to your backend.
Connect to Your Backend
Make sure to complete the add-aws-mobile-user-sign-in-backend-setup steps before using theintegration steps on this page.
To add User File Storage to your app
Android - Java
Set up AWS Mobile SDK components as follows:
1. Add the following to app/build.gradle (Module:app):
dependencies { implementation 'com.amazonaws:aws-android-sdk-s3:2.7.+' implementation 'com.amazonaws:aws-android-sdk-cognito:2.7.+'}
67
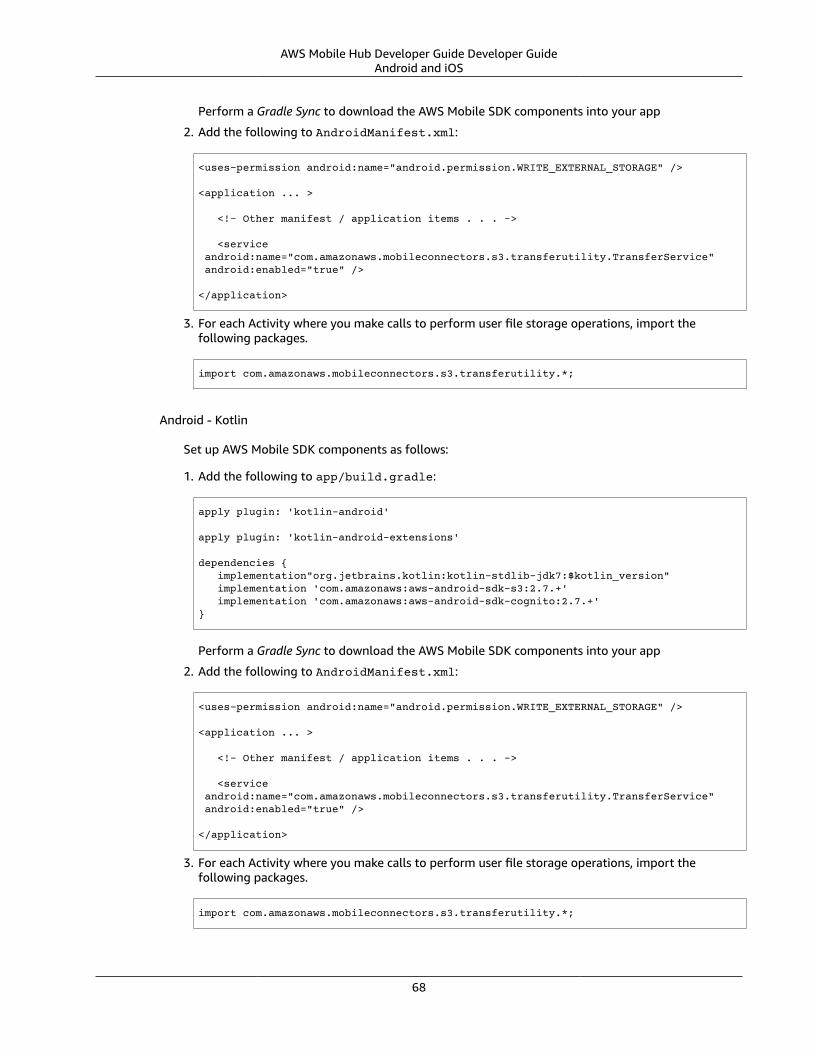
AWS Mobile Hub Developer Guide Developer GuideAndroid and iOS
Perform a Gradle Sync to download the AWS Mobile SDK components into your app
2. Add the following to AndroidManifest.xml:
<uses-permission android:name="android.permission.WRITE_EXTERNAL_STORAGE" />
<application ... >
<!- Other manifest / application items . . . ->
<service android:name="com.amazonaws.mobileconnectors.s3.transferutility.TransferService" android:enabled="true" />
</application>
3. For each Activity where you make calls to perform user file storage operations, import thefollowing packages.
import com.amazonaws.mobileconnectors.s3.transferutility.*;
Android - Kotlin
Set up AWS Mobile SDK components as follows:
1. Add the following to app/build.gradle:
apply plugin: 'kotlin-android'
apply plugin: 'kotlin-android-extensions'
dependencies { implementation"org.jetbrains.kotlin:kotlin-stdlib-jdk7:$kotlin_version" implementation 'com.amazonaws:aws-android-sdk-s3:2.7.+' implementation 'com.amazonaws:aws-android-sdk-cognito:2.7.+'}
Perform a Gradle Sync to download the AWS Mobile SDK components into your app
2. Add the following to AndroidManifest.xml:
<uses-permission android:name="android.permission.WRITE_EXTERNAL_STORAGE" />
<application ... >
<!- Other manifest / application items . . . ->
<service android:name="com.amazonaws.mobileconnectors.s3.transferutility.TransferService" android:enabled="true" />
</application>
3. For each Activity where you make calls to perform user file storage operations, import thefollowing packages.
import com.amazonaws.mobileconnectors.s3.transferutility.*;
68

AWS Mobile Hub Developer Guide Developer GuideAndroid and iOS
iOS - Swift
Set up AWS Mobile SDK components as follows:
1. Add the following to Podfile that you configure to install the AWS Mobile SDK:
platform :ios, '9.0'
target :'YOUR-APP-NAME' do use_frameworks!
pod 'AWSS3', '~> 2.6.13' # For file transfers pod 'AWSCognito', '~> 2.6.13' #For data sync
# other pods . . .
end
Run pod install --repo-update before you continue.
If you encounter an error message that begins “[!] Failed to connect to GitHub toupdate the CocoaPods/Specs . . .”, and your internet connectivity is working, you mayneed to update openssl and Ruby.
2. Add the following imports to the classes that perform user file storage operations:
import AWSCoreimport AWSS3
3. Add the following code to your AppDelegate to establish a run-time connection with AWS Mobile.
import UIKitimport AWSMobileClient
@UIApplicationMainclass AppDelegate: UIResponder, UIApplicationDelegate {
func application(_ application: UIApplication, didFinishLaunchingWithOptions launchOptions: [UIApplicationLaunchOptionsKey: Any]?) -> Bool { return AWSMobileClient.sharedInstance().interceptApplication(application, didFinishLaunchingWithOptions: launchOptions) }}
Upload a File
Android - Java
To upload a file to an Amazon S3 bucket, use AWSMobileClient to get the AWSConfigurationand AWSCredentialsProvider, then create the TransferUtility object. AWSMobileClientexpects an activity context for resuming an authenticated session and creating the credentialsprovider.
The following example shows using the TransferUtility in the context of an Activity.If you are creating TransferUtility from an application context, you can construct theAWSCredentialsProvider and pass it into TransferUtility to use in forming theAWSConfiguration object. TransferUtility will check the size of file being uploaded and willautomatically switch over to using multi-part uploads if the file size exceeds 5 MB.
69

AWS Mobile Hub Developer Guide Developer GuideAndroid and iOS
import android.app.Activity; import android.util.Log;
import com.amazonaws.mobile.client.AWSMobileClient; import com.amazonaws.mobileconnectors.s3.transferutility.TransferUtility; import com.amazonaws.mobileconnectors.s3.transferutility.TransferState; import com.amazonaws.mobileconnectors.s3.transferutility.TransferObserver; import com.amazonaws.mobileconnectors.s3.transferutility.TransferListener; import com.amazonaws.services.s3.AmazonS3Client;
import java.io.File;
public class YourActivity extends Activity {
@Override protected void onCreate(Bundle savedInstanceState) { AWSMobileClient.getInstance().initialize(this).execute(); uploadWithTransferUtility(); }
public void uploadWithTransferUtility() {
TransferUtility transferUtility = TransferUtility.builder() .context(getApplicationContext()) .awsConfiguration(AWSMobileClient.getInstance().getConfiguration()) .s3Client(new AmazonS3Client(AWSMobileClient.getInstance().getCredentialsProvider())) .build();
TransferObserver uploadObserver = transferUtility.upload( "s3Folder/s3Key.txt", new File("/path/to/file/localFile.txt"));
// Attach a listener to the observer to get state update and progress notifications uploadObserver.setTransferListener(new TransferListener() {
@Override public void onStateChanged(int id, TransferState state) { if (TransferState.COMPLETED == state) { // Handle a completed upload. } }
@Override public void onProgressChanged(int id, long bytesCurrent, long bytesTotal) { float percentDonef = ((float) bytesCurrent / (float) bytesTotal) * 100; int percentDone = (int)percentDonef;
Log.d("YourActivity", "ID:" + id + " bytesCurrent: " + bytesCurrent + " bytesTotal: " + bytesTotal + " " + percentDone + "%"); }
@Override public void onError(int id, Exception ex) { // Handle errors }
});
// If you prefer to poll for the data, instead of attaching a
70

AWS Mobile Hub Developer Guide Developer GuideAndroid and iOS
// listener, check for the state and progress in the observer. if (TransferState.COMPLETED == uploadObserver.getState()) { // Handle a completed upload. }
Log.d("YourActivity", "Bytes Transferrred: " + uploadObserver.getBytesTransferred()); Log.d("YourActivity", "Bytes Total: " + uploadObserver.getBytesTotal()); }}
Android - Kotlin
To upload a file to an Amazon S3 bucket, use AWSMobileClient to get the AWSConfigurationand AWSCredentialsProvider, then create the TransferUtility object. AWSMobileClientexpects an activity context for resuming an authenticated session and creating the credentialsprovider.
The following example shows using the TransferUtility in the context of an Activity.
If you are creating TransferUtility from an application context, you can construct theAWSCredentialsProvider and pass it into TransferUtility to use in forming theAWSConfiguration object. TransferUtility will check the size of file being uploaded and willautomatically switch over to using multi-part uploads if the file size exceeds 5 MB.
import android.os.Bundleimport android.support.v7.app.AppCompatActivityimport android.util.Logimport com.amazonaws.AmazonServiceExceptionimport com.amazonaws.mobile.client.AWSMobileClientimport com.amazonaws.mobileconnectors.s3.transferutility.TransferListenerimport com.amazonaws.mobileconnectors.s3.transferutility.TransferStateimport com.amazonaws.mobileconnectors.s3.transferutility.TransferUtilityimport com.amazonaws.services.s3.AmazonS3Clientimport kotlinx.android.synthetic.main.activity_main.*import java.io.File;
class YourActivity : Activity() { override fun onCreate(savedInstanceState: Bundle?) { super.onCreate(savedInstanceState)
AWSMobileClient.getInstance().initialize(this).execute() uploadWithTransferUtility() }
fun uploadWithTransferUtility() { val transferUtility = TransferUtility.builder() .context(this.applicationContext) .awsConfiguration(AWSMobileClient.getInstance().configuration) .s3Client(AmazonS3Client(AWSMobileClient.getInstance().credentialsProvider)) .build()
val uploadObserver = transferUtility.upload("s3folder/s3key.txt", File("/path/to/localfile.txt"))
// Attach a listener to the observer uploadObserver.setTransferListener(object : TransferListener { override fun onStateChanged(id: Int, state: TransferState) { if (state == TransferState.COMPLETED) { // Handle a completed upload } }
71
AWS Mobile Hub Developer Guide Developer GuideAndroid and iOS
override fun onProgressChanged(id: Int, current: Long, total: Long) { val done = (((current.toDouble() / total) * 100.0).toInt()) Log.d(LOG_TAG, "UPLOAD - - ID: $id, percent done = $done") }
override fun onError(id: Int, ex: Exception) { Log.d(LOG_TAG, "UPLOAD ERROR - - ID: $id - - EX: ${ex.message.toString()}") } })
// If you prefer to long-poll for updates if (uploadObserver.state == TransferState.COMPLETED) { /* Handle completion */ }
val bytesTransferred = uploadObserver.bytesTransferred }}
iOS - Swift
The following example shows how to upload a file to an Amazon S3 bucket.
func uploadData() {
let data: Data = Data() // Data to be uploaded
let expression = AWSS3TransferUtilityUploadExpression() expression.progressBlock = {(task, progress) in DispatchQueue.main.async(execute: { // Do something e.g. Update a progress bar. }) }
var completionHandler: AWSS3TransferUtilityUploadCompletionHandlerBlock? completionHandler = { (task, error) -> Void in DispatchQueue.main.async(execute: { // Do something e.g. Alert a user for transfer completion. // On failed uploads, `error` contains the error object. }) }
let transferUtility = AWSS3TransferUtility.default()
transferUtility.uploadData(data, bucket: "YourBucket", key: "YourFileName", contentType: "text/plain", expression: expression, completionHandler: completionHandler).continueWith { (task) -> AnyObject! in if let error = task.error { print("Error: \(error.localizedDescription)") }
if let _ = task.result { // Do something with uploadTask. } return nil; }}
72

AWS Mobile Hub Developer Guide Developer GuideAndroid and iOS
Download a File
Android - Java
To download a file from an Amazon S3 bucket, use AWSMobileClient to get theAWSConfiguration and AWSCredentialsProvider to create the TransferUtility object.AWSMobileClient expects an activity context for resuming an authenticated session and creatingthe AWSCredentialsProvider.
The following example shows using the TransferUtility in the context of an Activity.If you are creating TransferUtility from an application context, you can construct theAWSCredentialsProvider and pass it into TransferUtility to use in forming theAWSConfiguration object.
import android.app.Activity;import android.util.Log;
import com.amazonaws.mobile.client.AWSMobileClient;import com.amazonaws.mobileconnectors.s3.transferutility.TransferUtility;import com.amazonaws.mobileconnectors.s3.transferutility.TransferState;import com.amazonaws.mobileconnectors.s3.transferutility.TransferObserver;import com.amazonaws.mobileconnectors.s3.transferutility.TransferListener;import com.amazonaws.services.s3.AmazonS3Client;
import java.io.File;
public class YourActivity extends Activity {
@Override protected void onCreate(Bundle savedInstanceState) { AWSMobileClient.getInstance().initialize(this).execute(); downloadWithTransferUtility(); }
private void downloadWithTransferUtility() {
TransferUtility transferUtility = TransferUtility.builder() .context(getApplicationContext()) .awsConfiguration(AWSMobileClient.getInstance().getConfiguration()) .s3Client(new AmazonS3Client(AWSMobileClient.getInstance().getCredentialsProvider())) .build();
TransferObserver downloadObserver = transferUtility.download( "s3Folder/s3Key.txt", new File("/path/to/file/localFile.txt"));
// Attach a listener to the observer to get state update and progress notifications downloadObserver.setTransferListener(new TransferListener() {
@Override public void onStateChanged(int id, TransferState state) { if (TransferState.COMPLETED == state) { // Handle a completed upload. } }
@Override public void onProgressChanged(int id, long bytesCurrent, long bytesTotal) { float percentDonef = ((float)bytesCurrent/(float)bytesTotal) * 100; int percentDone = (int)percentDonef;
73

AWS Mobile Hub Developer Guide Developer GuideAndroid and iOS
Log.d(LOG_TAG, " ID:" + id + " bytesCurrent: " + bytesCurrent + " bytesTotal: " + bytesTotal + " " + percentDone + "%"); }
@Override public void onError(int id, Exception ex) { // Handle errors }
});
// If you prefer to poll for the data, instead of attaching a // listener, check for the state and progress in the observer. if (TransferState.COMPLETED == downloadObserver.getState()) { // Handle a completed upload. }
Log.d(LOG_TAG, "Bytes Transferrred: " + downloadObserver.getBytesTransferred()); Log.d(LOG_TAG, "Bytes Total: " + downloadObserver.getBytesTotal()); }}
Android - Kotlin
To download a file from an Amazon S3 bucket, use AWSMobileClient to get theAWSConfiguration and AWSCredentialsProvider to create the TransferUtility object.AWSMobileClient expects an activity context for resuming an authenticated session and creatingthe AWSCredentialsProvider.
The following example shows using the TransferUtility in the context of an Activity.If you are creating TransferUtility from an application context, you can construct theAWSCredentialsProvider and pass it into TransferUtility to use in forming theAWSConfiguration object.
import android.app.Activity;import android.util.Log;
import com.amazonaws.mobile.client.AWSMobileClient;import com.amazonaws.mobileconnectors.s3.transferutility.TransferUtility;import com.amazonaws.mobileconnectors.s3.transferutility.TransferState;import com.amazonaws.mobileconnectors.s3.transferutility.TransferObserver;import com.amazonaws.mobileconnectors.s3.transferutility.TransferListener;import com.amazonaws.services.s3.AmazonS3Client;
import java.io.File;
class YourActivity : Activity() { override fun onCreate(savedInstanceState: Bundle?) { super.onCreate(savedInstanceState) setContentView(R.layout.activity_your)
AWSMobileClient.getInstance().initialize(this).execute() donwloadWithTransferUtility() }
private fun downloadWithTransferUtility() { val transferUtility = TransferUtility.builder() .context(applicationContext) .awsConfiguration(AWSMobileClient.getInstance().configuration) .s3Client(AmazonS3Client(AWSMobileClient.getInstance().credentialsProvider)) .build()
74
AWS Mobile Hub Developer Guide Developer GuideAndroid and iOS
val downloadObserver = transferUtility.download( "s3folder/s3key.txt", File("/path/to/file/localfile.txt"))
// Attach a listener to get state updates downloadObserver.setTransferListener(object : TransferListener { override fun onStateChanged(id: Int, state: TransferState) { if (state == TransferState.COMPLETED) { // Handle a completed upload. } }
override fun onProgressChanged(id: Int, current: Long, total: Long) { try { val done = (((current.toDouble() / total) * 100.0).toInt()) //as Int Log.d(LOG_TAG, "DOWNLOAD - - ID: $id, percent done = $done") } catch (e: Exception) { Log.e(LOG_TAG, "Trouble calculating progress percent", e) } }
override fun onError(id: Int, ex: Exception) { Log.d(LOG_TAG, "DOWNLOAD ERROR - - ID: $id - - EX: ${ex.message.toString()}") } })
// If you prefer to poll for the data, instead of attaching a // listener, check for the state and progress in the observer. if (downloadObserver.state == TransferState.COMPLETED) { // Handle a completed upload. }
Log.d(LOG_TAG, "Bytes Transferrred: ${downloadObserver.bytesTransferred}"); }}
iOS - Swift
The following example shows how to download a file from an Amazon S3 bucket.
func downloadData() { let expression = AWSS3TransferUtilityDownloadExpression() expression.progressBlock = {(task, progress) in DispatchQueue.main.async(execute: { // Do something e.g. Update a progress bar. }) }
var completionHandler: AWSS3TransferUtilityDownloadCompletionHandlerBlock? completionHandler = { (task, URL, data, error) -> Void in DispatchQueue.main.async(execute: { // Do something e.g. Alert a user for transfer completion. // On failed downloads, `error` contains the error object. }) }
let transferUtility = AWSS3TransferUtility.default() transferUtility.downloadData( fromBucket: "YourBucket", key: "YourFileName", expression: expression, completionHandler: completionHandler
75
AWS Mobile Hub Developer Guide Developer GuideAndroid and iOS
).continueWith { (task) -> AnyObject! in if let error = task.error { print("Error: \(error.localizedDescription)") }
if let _ = task.result { // Do something with downloadTask.
} return nil; }}
Next Steps
• For sample apps that demonstrate TransferUtility capabilities, see Android S3 TransferUtility Sampleand iOS S3 TransferUtility Sample.
• Looking for Amazon Cognito Sync? If you are a new user, use AWS AppSync instead. AppSync is anew service for synchronizing application data across devices. Like Cognito Sync, AppSync enablessynchronization of a user’s own data, such as game state or app preferences. AppSync extends thesecapabilities by allowing multiple users to synchronize and collaborate in real-time on shared data, suchas a virtual meeting space or chatroom. Start building with AWS AppSync now
Add Cloud APIs to Your Mobile App with Amazon API GateWay and AWS Lambda
The following reference content only applies to existing apps that were built using the AWS MobileSDKs for iOS and Android. If you’re building a new mobile or web app, or you’re adding cloudcapabilities to an existing app, visit the Amplify Framework website instead. Documentation for theAWS Mobile SDKs for iOS and Android is now part of the Amplify Framework.
Cloud Logic Overview
Add RESTful APIs handled by your serverless Lambda functions to extend your mobile app to the rangeof AWS services and beyond. In Mobile Hub, enabling the Cloud Logic (p. 190) feature uses Amazon APIGateway and AWS Lambda services to provide these capabilities.
Set Up Your Backend
1. Complete the Get Started (p. 3) steps before your proceed.2. Enable Cloud Logic: Open your project in Mobile Hub and choose the Cloud Logic tile to enable the
feature.3. Create a new API or import one that you created in the API Gateway console.
a. To create a new API choose Create an API.b. Type an API Name and Description.c. Configure your Paths. Paths are locations to the serverless AWS Lambda functions that handle
requests to your API.
Choose Create API to deploy a default API and its associated handler function. The default handleris a Node.js function that echoes JSON input that it receives. For more information, see Using AWSLambda with Amazon API Gateway.
The definition of APIs and paths configured in a Mobile Hub project are captured in an AWSCloudFormation template. The body of a request containing a template is limited to 51,200 bytes,see AWS CloudFormation Limits for details. If your API definition is too large to fit this size, you
76
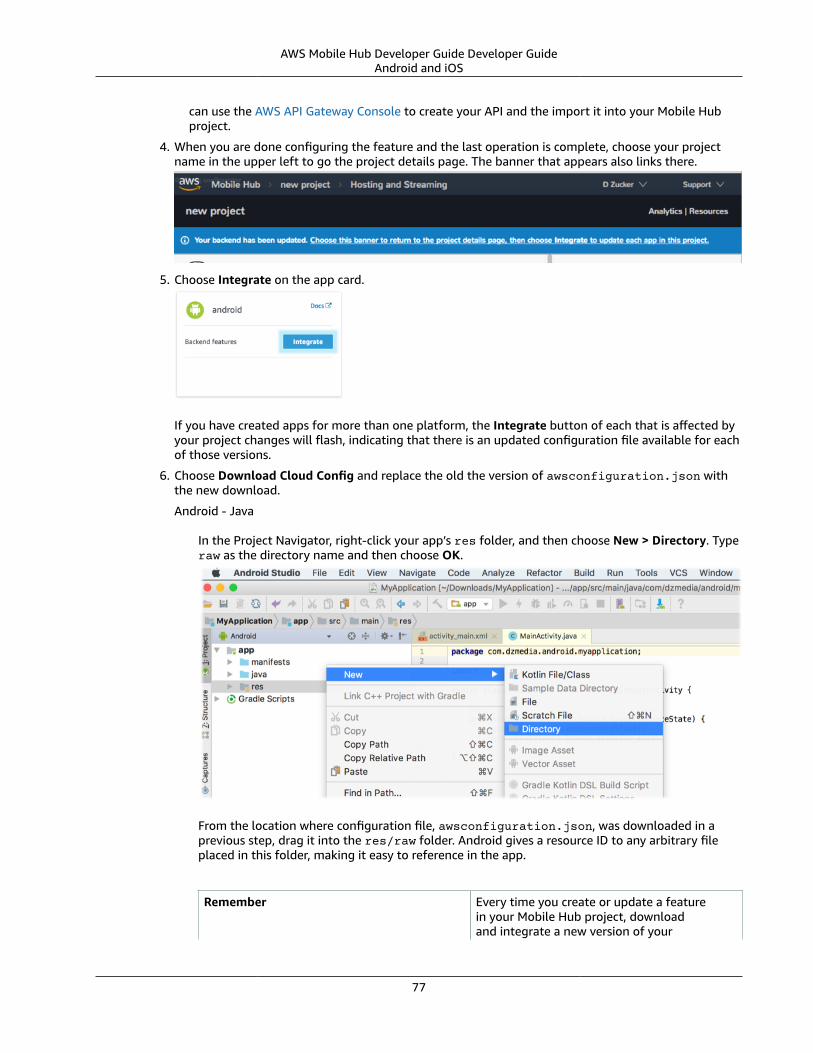
AWS Mobile Hub Developer Guide Developer GuideAndroid and iOS
can use the AWS API Gateway Console to create your API and the import it into your Mobile Hubproject.
4. When you are done configuring the feature and the last operation is complete, choose your projectname in the upper left to go the project details page. The banner that appears also links there.
5. Choose Integrate on the app card.
If you have created apps for more than one platform, the Integrate button of each that is affected byyour project changes will flash, indicating that there is an updated configuration file available for eachof those versions.
6. Choose Download Cloud Config and replace the old the version of awsconfiguration.json withthe new download.
Android - Java
In the Project Navigator, right-click your app’s res folder, and then choose New > Directory. Typeraw as the directory name and then choose OK.
From the location where configuration file, awsconfiguration.json, was downloaded in aprevious step, drag it into the res/raw folder. Android gives a resource ID to any arbitrary fileplaced in this folder, making it easy to reference in the app.
Remember Every time you create or update a featurein your Mobile Hub project, downloadand integrate a new version of your
77
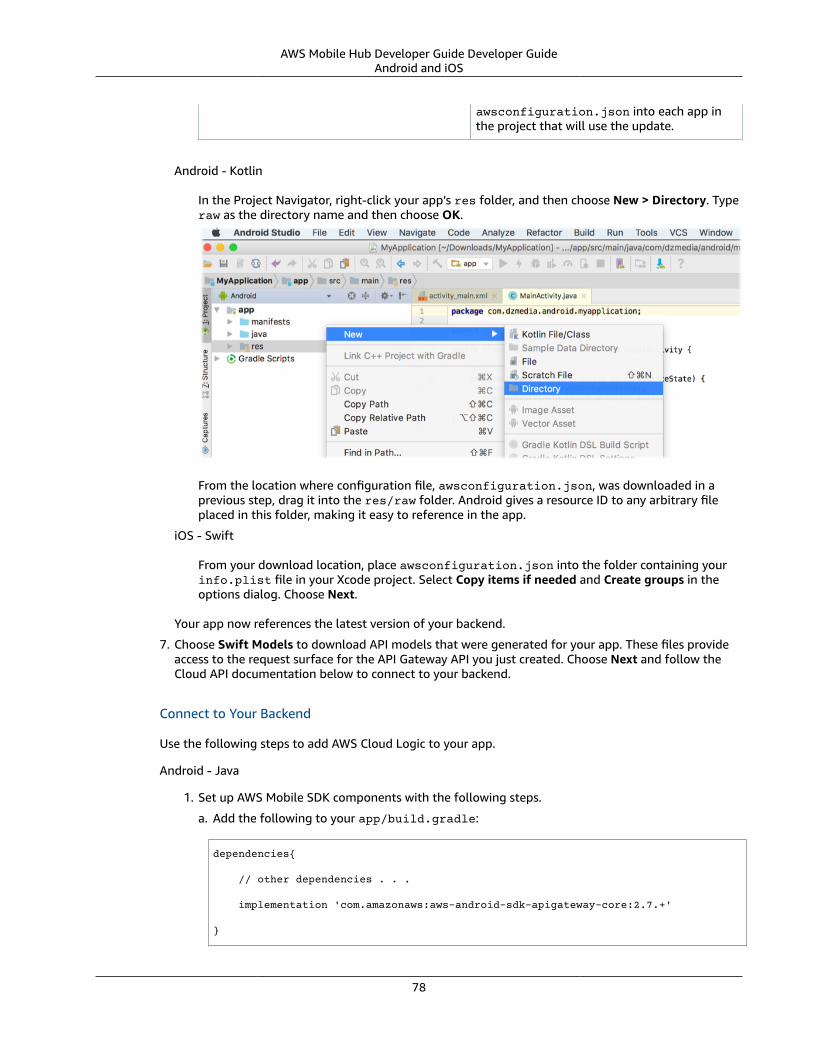
AWS Mobile Hub Developer Guide Developer GuideAndroid and iOS
awsconfiguration.json into each app inthe project that will use the update.
Android - Kotlin
In the Project Navigator, right-click your app’s res folder, and then choose New > Directory. Typeraw as the directory name and then choose OK.
From the location where configuration file, awsconfiguration.json, was downloaded in aprevious step, drag it into the res/raw folder. Android gives a resource ID to any arbitrary fileplaced in this folder, making it easy to reference in the app.
iOS - Swift
From your download location, place awsconfiguration.json into the folder containing yourinfo.plist file in your Xcode project. Select Copy items if needed and Create groups in theoptions dialog. Choose Next.
Your app now references the latest version of your backend.
7. Choose Swift Models to download API models that were generated for your app. These files provideaccess to the request surface for the API Gateway API you just created. Choose Next and follow theCloud API documentation below to connect to your backend.
Connect to Your Backend
Use the following steps to add AWS Cloud Logic to your app.
Android - Java
1. Set up AWS Mobile SDK components with the following steps.
a. Add the following to your app/build.gradle:
dependencies{
// other dependencies . . .
implementation 'com.amazonaws:aws-android-sdk-apigateway-core:2.7.+'
}
78

AWS Mobile Hub Developer Guide Developer GuideAndroid and iOS
b. For each Activity where you make calls to API Gateway, declare the following imports. Replacethe portion of the first declaration, denoted here as idABCD012345.NAME-OF-YOUR-API-MODEL-CLASS, with class id and name of the API model that you downloaded from yourMobile Hub project.
You can find these values at the top of the ./src/main/java/com/amazonaws/mobile/api/API-CLASS-ID/TestMobileHubClient.java file of the download.
// This statement imports the model class you download from |AMH|.import com.amazonaws.mobile.api.idABCD012345.NAME-OF-YOUR-API-MODEL-CLASSMobileHubClient;
import com.amazonaws.mobile.auth.core.IdentityManager;import com.amazonaws.mobile.config.AWSConfiguration;import com.amazonaws.mobileconnectors.apigateway.ApiClientFactory;import com.amazonaws.mobileconnectors.apigateway.ApiRequest;import com.amazonaws.mobileconnectors.apigateway.ApiResponse;import com.amazonaws.util.IOUtils;import com.amazonaws.util.StringUtils;import java.io.InputStream;
c. The location where you downloaded the API model file(s) contains a folder for each Cloud LogicAPI you created in your Mobile Hub project. The folders are named for the class ID assigned tothe API by API Gateway. For each folder:
i. In a text editor, open ./src/main/java/com/amazonaws/mobile/api/YOUR-API-CLASS-ID/YOUR-API-CLASS-NAMEMobileHubClient.java.
ii. Copy the package name at the top of the file with the form:com.amazonaws.mobile.api.{api-class-id}.
iii. In Android Studio, right-choose app/java, and then choose New > Package.
iv. Paste the package name you copied in a previous step and choose OK.
v. Drag and drop the contents of the API class folder into the newly created package. Thecontents include YOUR-API-CLASS-NAMEMobileHubClient.java and the model folder.
2. Invoke a Cloud Logic API.
The following code shows how to invoke a Cloud Logic API using your API’s client class, model,and resource paths.
import android.support.v7.app.AppCompatActivity;import android.os.Bundle;import android.util.Log;import com.amazonaws.http.HttpMethodName;import java.io.InputStream;import java.util.HashMap;
import com.amazonaws.mobile.client.AWSMobileClient;import com.amazonaws.mobileconnectors.api.YOUR-API-CLASS-ID.YOUR-API-CLASS-NAMEMobilehubClient;import com.amazonaws.mobileconnectors.apigateway.ApiClientFactory;import com.amazonaws.mobileconnectors.apigateway.ApiRequest;import com.amazonaws.mobileconnectors.apigateway.ApiResponse;import com.amazonaws.util.StringUtils;
public class MainActivity extends AppCompatActivity { private static final String LOG_TAG = MainActivity.class.getSimpleName();
private YOUR-API-CLASS-NAMEMobileHubClient apiClient;
@Override protected void onCreate(Bundle savedInstanceState) {
79

AWS Mobile Hub Developer Guide Developer GuideAndroid and iOS
super.onCreate(savedInstanceState); setContentView(R.layout.activity_main);
// Create the client apiClient = new ApiClientFactory() .credentialsProvider(AWSMobileClient.getInstance().getCredentialsProvider()) .build(YOUR-API-CLASS-NAMEMobileHubClient.class); }
public callCloudLogic() { // Create components of api request final String method = "GET";
final String path = "/items";
final String body = ""; final byte[] content = body.getBytes(StringUtils.UTF8);
final Map parameters = new HashMap<>(); parameters.put("lang", "en_US");
final Map headers = new HashMap<>();
// Use components to create the api request ApiRequest localRequest = new ApiRequest(apiClient.getClass().getSimpleName()) .withPath(path) .withHttpMethod(HttpMethodName.valueOf(method)) .withHeaders(headers) .addHeader("Content-Type", "application/json") .withParameters(parameters);
// Only set body if it has content. if (body.length() > 0) { localRequest = localRequest .addHeader("Content-Length", String.valueOf(content.length)) .withBody(content); }
final ApiRequest request = localRequest;
// Make network call on background thread new Thread(new Runnable() { @Override public void run() { try { Log.d(LOG_TAG, "Invoking API w/ Request : " + request.getHttpMethod() + ":" + request.getPath());
final ApiResponse response = apiClient.execute(request);
final InputStream responseContentStream = response.getContent();
if (responseContentStream != null) { final String responseData = IOUtils.toString(responseContentStream); Log.d(LOG_TAG, "Response : " + responseData); }
Log.d(LOG_TAG, response.getStatusCode() + " " + response.getStatusText());
80

AWS Mobile Hub Developer Guide Developer GuideAndroid and iOS
} catch (final Exception exception) { Log.e(LOG_TAG, exception.getMessage(), exception); exception.printStackTrace(); } } }).start(); }}
Android - Kotlin
1. Set up AWS Mobile SDK components with the following steps.
a. Add the following to your app/build.gradle:
dependencies{
// other dependencies . . .
implementation 'com.amazonaws:aws-android-sdk-apigateway-core:2.7.+'
}
b. For each Activity where you make calls to API Gateway, declare the following imports. Replacethe portion of the first declaration, denoted here as idABCD012345.NAME-OF-YOUR-API-MODEL-CLASS, with class id and name of the API model that you downloaded from yourMobile Hub project.
You can find these values at the top of the ./src/main/java/com/amazonaws/mobile/api/API-CLASS-ID/TestMobileHubClient.java file of the download.
// This statement imports the model class you download from |AMH|.import com.amazonaws.mobile.api.idABCD012345.NAME-OF-YOUR-API-MODEL-CLASSMobileHubClient;
import com.amazonaws.mobile.auth.core.IdentityManager;import com.amazonaws.mobile.config.AWSConfiguration;import com.amazonaws.mobileconnectors.apigateway.ApiClientFactory;import com.amazonaws.mobileconnectors.apigateway.ApiRequest;import com.amazonaws.mobileconnectors.apigateway.ApiResponse;import com.amazonaws.util.IOUtils;import com.amazonaws.util.StringUtils;import java.io.InputStream;
c. The location where you downloaded the API model file(s) contains a folder for each Cloud LogicAPI you created in your Mobile Hub project. The folders are named for the class ID assigned tothe API by API Gateway. For each folder:
i. In a text editor, open ./src/main/java/com/amazonaws/mobile/api/YOUR-API-CLASS-ID/YOUR-API-CLASS-NAMEMobileHubClient.java.
ii. Copy the package name at the top of the file with the form:com.amazonaws.mobile.api.{api-class-id}.
iii. In Android Studio, right-choose app/java, and then choose New > Package.
iv. Paste the package name you copied in a previous step and choose OK.
v. Drag and drop the contents of the API class folder into the newly created package. Thecontents include YOUR-API-CLASS-NAMEMobileHubClient.java and the model folder.
2. Invoke a Cloud Logic API.
The following code shows how to invoke a Cloud Logic API using your API’s client class, model,and resource paths.
81

AWS Mobile Hub Developer Guide Developer GuideAndroid and iOS
import android.support.v7.app.AppCompatActivity;import android.os.Bundle;import android.util.Log;import com.amazonaws.http.HttpMethodName;import java.io.InputStream;import java.util.HashMap;
import com.amazonaws.mobile.client.AWSMobileClient;import com.amazonaws.mobileconnectors.api.YOUR-API-CLASS-ID.YOUR-API-CLASS-NAMEMobilehubClient;import com.amazonaws.mobileconnectors.apigateway.ApiClientFactory;import com.amazonaws.mobileconnectors.apigateway.ApiRequest;import com.amazonaws.mobileconnectors.apigateway.ApiResponse;import com.amazonaws.util.StringUtils;
class MainActivity : AppCompatActivity() { companion object { private val TAG = this::class.java.simpleName }
private var apiClient: YOUR-API-CLASS-NAMEMobileHubClient? = null
override fun onCreate(savedInstanceState: Bundle?) { super.onCreate(savedInstanceState) setContentView(R.layout.activity_main)
apiClient = ApiClientFactory() .credentialsProvider(AWSMobileClient.getInstance().credentialsProvider) .build(YOUR-API-CLASS-NAMEMobileHubClinet::class.java) }
fun callCloudLogic(body: String) { val parameters = mapOf("lang" to "en_US") val headers = mapOf("Content-Type" to "application/json")
val request = ApiRequest(apiClient::class.java.simpleName) .withPath("/items") .withHttpMethod(HttpMethod.GET) .withHeaders(headers) .withParameters(parameters) if (body.isNotEmpty()) { val content = body.getBytes(StringUtils.UTF8) request .addHeader("Content-Length", String.valueOf(content.length)) .withBody(content) }
thread(start = true) { try { Log.d(TAG, "Invoking API") val response = apiClient.execute(request) val responseContentStream = response.getContent() if (responseContentStream != null) { val responseData = IOUtils.toString(responseContentStream) // Do something with the response data here } } catch (ex: Exception) { Log.e(TAG, "Error invoking API") } } }}
82

AWS Mobile Hub Developer Guide Developer GuideAndroid and iOS
iOS - Swift
1. Set up AWS Mobile SDK components with the following steps.
a. Podfile that you configure to install the AWS Mobile SDK must contain:
platform :ios, '9.0'
target :'YOUR-APP-NAME' do use_frameworks!
pod 'AWSAuthCore', '~> 2.6.13' pod 'AWSAPIGateway', '~> 2.6.13' # other pods
end
Run pod install --repo-update before you continue.
If you encounter an error message that begins “[!] Failed to connect to GitHub toupdate the CocoaPods/Specs . . .”, and your internet connectivity is working, you mayneed to update openssl and Ruby.
b. Classes that call API Gateway APIs must use the following import statements:
import AWSAuthCoreimport AWSCoreimport AWSAPIGateway
c. Add the backend service configuration and API model files that you downloaded from theMobile Hub console, The API model files provide an API calling surface for each API GatewayAPI they model.
i. From the location where you downloaded the data model file(s), drag and drop the ./AmazonAws/API folder into the Xcode project folder that contains AppDelegate.swift.
Select Copy items if needed and Create groups, if these options are offered.
If your Xcode project already contains a Bridging_Header.h file then open ./AmazonAws/Bridging_Header.h, copy the import statement it contains, and paste it intoyour version of the file.
If your Xcode project does not contain a Bridging_Header.h file then:
A. Drag and drop ./AmazonAws/Bridging_Header.h into the Xcode project folder thatcontains AppDelegate.swift.
B. Choose your project root in Xcode, then choose Build Settings, and search for “bridgingheaders”
C. Choose Objective-C Bridging Header, press your return key, and type the path withinyour Xcode project:
your-project-name/…/Bridging_Header.h
2. Invoke a Cloud Logic API.
To invoke a Cloud Logic API, create code in the following form and substitute your API’s clientclass, model, and resource paths.
import UIKitimport AWSAuthCoreimport AWSCoreimport AWSAPIGateway
83
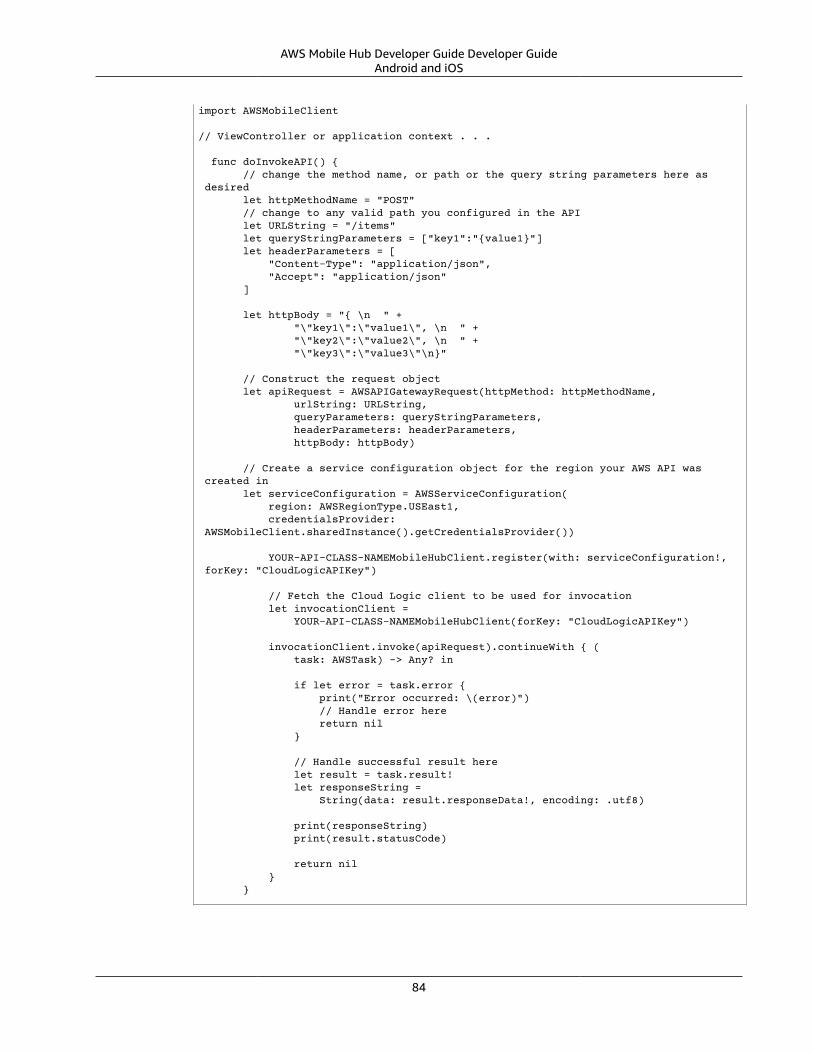
AWS Mobile Hub Developer Guide Developer GuideAndroid and iOS
import AWSMobileClient
// ViewController or application context . . .
func doInvokeAPI() { // change the method name, or path or the query string parameters here as desired let httpMethodName = "POST" // change to any valid path you configured in the API let URLString = "/items" let queryStringParameters = ["key1":"{value1}"] let headerParameters = [ "Content-Type": "application/json", "Accept": "application/json" ]
let httpBody = "{ \n " + "\"key1\":\"value1\", \n " + "\"key2\":\"value2\", \n " + "\"key3\":\"value3\"\n}"
// Construct the request object let apiRequest = AWSAPIGatewayRequest(httpMethod: httpMethodName, urlString: URLString, queryParameters: queryStringParameters, headerParameters: headerParameters, httpBody: httpBody)
// Create a service configuration object for the region your AWS API was created in let serviceConfiguration = AWSServiceConfiguration( region: AWSRegionType.USEast1, credentialsProvider: AWSMobileClient.sharedInstance().getCredentialsProvider())
YOUR-API-CLASS-NAMEMobileHubClient.register(with: serviceConfiguration!, forKey: "CloudLogicAPIKey")
// Fetch the Cloud Logic client to be used for invocation let invocationClient = YOUR-API-CLASS-NAMEMobileHubClient(forKey: "CloudLogicAPIKey")
invocationClient.invoke(apiRequest).continueWith { ( task: AWSTask) -> Any? in
if let error = task.error { print("Error occurred: \(error)") // Handle error here return nil }
// Handle successful result here let result = task.result! let responseString = String(data: result.responseData!, encoding: .utf8)
print(responseString) print(result.statusCode)
return nil } }
84

AWS Mobile Hub Developer Guide Developer GuideAndroid and iOS
Add Messaging to Your Mobile App with Amazon Pinpoint
The following reference content only applies to existing apps that were built using the AWS MobileSDKs for iOS and Android. If you’re building a new mobile or web app, or you’re adding cloudcapabilities to an existing app, visit the Amplify Framework website instead. Documentation for theAWS Mobile SDKs for iOS and Android is now part of the Amplify Framework.
Overview
Engage your users more deeply by tying their app usage behavior to messaging campaigns.
When you enable the AWS Mobile Hub Messaging and Analytics (p. 198) feature, your app is registeredwith the Amazon Pinpoint service. You can define User Segments and send E-mail, SMS, and PushNotification (p. 44) messages to those recipients through the Amazon Pinpoint console.
Amazon Pinpoint also enables you to gather and visualize your app’s Analytics (p. 13). The metrics yougather can be as simple as session start and stop data, or you can customize them to show things likehow closely actual behavior matches your predicted model.
You can then algorithmically tie messaging campaigns to user behavior. For instance, send a discountmail to frequent users, or send a push notification that initiates a data sync for users that have selected acertain category in a feature of your app.
Set Up Your Backend
To set up email or SMS as part of a Amazon Pinpoint campaign take the following steps.
To setup your app to receive Push Notifications from Amazon Pinpoint, see Add Push Notifications toYour Mobile App with Amazon Pinpoint (p. 44)
1. Complete the Get Started (p. 3) steps before your proceed.2. For Email: Choose the Messaging and Analytics tile to enable the
feature.a. Choose Email, and then choose Enable.b. Choose the Amazon Pinpoint console link at the bottom of the descriptive text on the left.c. Choose Email in the Amazon Pinpoint console Channels tab.d. Choose Email address, type the address your messages should come from, and then choose
verify at the end of the entry field.
The email account you enter will receive an email requesting your approval for AmazonPinpoint to use that account as the sender address for emails sent by the system. The statusof Pending Verification is displayed in the console entry field until Amazon Pinpoint hasprocessed your approval.
e. Choose Email domain, type the domain your messages should come from, and then chooseverify at the end of the entry field.
A dialog is displayed providing the name and value of the TXT record you must add to thedomain’s settings. The status of Pending Verification is displayed in the entry field untilthe console processes your approval.
Add a default user name to Default from address.f. Choose Save.g. For information about sending mail from Amazon Pinpoint, see Sending an Email Message.
a. For SMS: Choose the Messaging and Analytics tile to enable the feature.
85

AWS Mobile Hub Developer Guide Developer GuideAndroid and iOS
i. Choose SMS, and then choose Enable.ii. Choose the Amazon Pinpoint console link at the bottom of the descriptive text on the left.iii. Choose SMS in the Amazon Pinpoint console Channels tab.iv. Adjust the options for Default message type, Account spend limit, and Default sender ID. For
more information on these options, see Updating SMS Settings.v. For information about sending SMS messages from Amazon Pinpoint, see Sending an SMS
Message.
Connect to your backend
The AWS Mobile SDK is not required to receive Email or SMS messages from Amazon Pinpoint.
Add Conversational Bots to Your Mobile App with Amazon Lex
The following reference content only applies to existing apps that were built using the AWS MobileSDKs for iOS and Android. If you’re building a new mobile or web app, or you’re adding cloudcapabilities to an existing app, visit the Amplify Framework website instead. Documentation for theAWS Mobile SDKs for iOS and Android is now part of the Amplify Framework.
Overview
Add the natural language understanding that powers Amazon Alexa to your mobile app. The AWS mobileHub Conversational Bots (p. 205) feature provides ready-made bot templates using the Amazon Lexservice.
Set Up Your Backend
1. Complete the Get Started (p. 3) steps before your proceed.2. Enable Conversational Bots: Open your project in Mobile Hub and choose the Conversational Bots
tile to enable the feature.a. Choose one of the sample Bots or import one that you have created in the Amazon Lex console.
3. When the operation is complete, an alert will pop up saying “Your Backend has been updated”,prompting you to download the latest copy of the cloud configuration file. If you’re done configuringthe feature, choose the banner to return to the project details page.
4. From the project detail page, every app that needs to be updated with the latest cloud configurationfile will have a flashing Integrate button. Choose the button to enter the integrate wizard.
5. Update your app with the latest copy of the cloud configuration file. Your app now references thelatest version of your backend. Choose Next and follow the Cloud API documentation below toconnect to your backend.
86

AWS Mobile Hub Developer Guide Developer GuideAndroid and iOS
Connect to your backend
To add AWS Mobile Conversational Bots to your app
Android - Java
Set Up Your Backend (p. 3) steps.
1. Add the following permissions to your AndroidManifest.xml:
<uses-permission android:name="android.permission.RECORD_AUDIO" /><uses-permission android:name="android.permission.WRITE_EXTERNAL_STORAGE" />
2. Add the following to your app/build.gradle:
dependencies{ implementation ('com.amazonaws:aws-android-sdk-lex:2.7.+@aar') {transitive = true;}}
3. For each Activity where you make calls to Amazon Lex, import the following APIs.
import com.amazonaws.mobileconnectors.lex.interactionkit.Response;import com.amazonaws.mobileconnectors.lex.interactionkit.config.InteractionConfig;import com.amazonaws.mobileconnectors.lex.interactionkit.ui.InteractiveVoiceView;
1. Add a voice button to an activity or fragment layouta. Add a voice_component to your layout file.
<com.amazonaws.mobileconnectors.lex.interactionkit.ui.InteractiveVoiceViewandroid:id="@+id/voiceInterface"layout="@layout/voice_component"android:layout_width="200dp"android:layout_height="200dp"/>
b. In your strings.xml file add the region for your bot. Note: Currently bots are only supportedin US Virginia East (us-east-1).
<string name="aws_region">us-east-1</string>
c. Initialize the voice button
Add the following init() function to the onCreate() of the activity where your Bot will beused.
Initialize AWSMobileClient before the call to init(), as the InteractiveVoiceViewin the function connects to Amazon Lex using the credentials provider object created byAWSMobileClient .
import com.amazonaws.mobile.client.AWSMobileClient;import com.amazonaws.mobile.client.AWSStartupHandler;import com.amazonaws.mobile.client.AWSStartupResult;import com.amazonaws.mobileconnectors.lex.interactionkit.Response;import com.amazonaws.mobileconnectors.lex.interactionkit.config.InteractionConfig;import com.amazonaws.mobileconnectors.lex.interactionkit.ui.InteractiveVoiceView;
public class MainActivity extends AppCompatActivity {
@Override
87

AWS Mobile Hub Developer Guide Developer GuideAndroid and iOS
protected void onCreate(Bundle savedInstanceState) { super.onCreate(savedInstanceState); setContentView(R.layout.activity_main);
AWSMobileClient.getInstance().initialize(this, new AWSStartupHandler() { @Override public void onComplete(AWSStartupResult awsStartupResult) { Log.d("YourMainActivity", "AWSMobileClient is instantiated and you are connected to AWS!"); } }).execute();
init();
}
public void init(){ InteractiveVoiceView voiceView = (InteractiveVoiceView) findViewById(R.id.voiceInterface);
voiceView.setInteractiveVoiceListener( new InteractiveVoiceView.InteractiveVoiceListener() {
@Override public void dialogReadyForFulfillment(Map slots, String intent) { Log.d(LOG_TAG, String.format( Locale.US, "Dialog ready for fulfillment:\n\tIntent: %s\n\tSlots: %s", intent, slots.toString())); }
@Override public void onResponse(Response response) { Log.d(LOG_TAG, "Bot response: " + response.getTextResponse()); }
@Override public void onError(String responseText, Exception e) { Log.e(LOG_TAG, "Error: " + responseText, e); } });
voiceView.getViewAdapter().setCredentialProvider(AWSMobileClient.getInstance().getCredentialsProvider());
//replace parameters with your botname, bot-alias voiceView.getViewAdapter() .setInteractionConfig( new InteractionConfig("YOUR-BOT-NAME","$LATEST"));
voiceView.getViewAdapter() .setAwsRegion(getApplicationContext() .getString(R.string.aws_region)); }}
Android - Kotlin
1. Set up AWS Mobile SDK components with the following steps.
88

AWS Mobile Hub Developer Guide Developer GuideAndroid and iOS
a. Add the following permissions to your AndroidManifest.xml:
<uses-permission android:name="android.permission.RECORD_AUDIO" /> <uses-permission android:name="android.permission.WRITE_EXTERNAL_STORAGE" />
b. Add the following to your app/build.gradle:
dependencies{ implementation ('com.amazonaws:aws-android-sdk-lex:2.7.+@aar') {transitive = true;} }
c. For each Activity where you make calls to Amazon Lex, import the following APIs.
import com.amazonaws.mobileconnectors.lex.interactionkit.Response; import com.amazonaws.mobileconnectors.lex.interactionkit.config.InteractionConfig; import com.amazonaws.mobileconnectors.lex.interactionkit.ui.InteractiveVoiceView;
2. Add a voice button to an activity or fragment layout
a. Add a voice_component to your layout file.
<com.amazonaws.mobileconnectors.lex.interactionkit.ui.InteractiveVoiceView android:id="@+id/voiceInterface" layout="@layout/voice_component" android:layout_width="200dp" android:layout_height="200dp"/>
b. In your strings.xml file add the region for your bot. Note: Currently bots are only supportedin US Virginia East (us-east-1).
<string name="aws_region">us-east-1</string>
c. Initialize the voice button
In the onCreate() of the activity where your Bot will be used, call init().
fun init() { voiceInterface.interactiveVoiceListener = object : InteractiveVoiceView.InteractiveVoiceListener() { override fun dialogReadyFOrFulfillment(slots: Map, intent: String) { Log.d(TAG, "Dialog ready for fulfillment:\n\tIntent: $intent") }
override fun onResponse(response: Response) { Log.d(TAG, "Bot response: ${response.textResponse}") }
override fun onError(responseText: String, e: Exception) { Log.e(TAG, "Error: ${e.message}") } }
with (voiceInterface.viewAdapter) { credentialsProvider = AWSMobileClient.getInstance().credentialsProvider interactionConfig = InteractionConfig("YOUR-BOT-NAME","$LATEST") awsRegion = applicationContext.getString(R.string.aws_region) } }
89
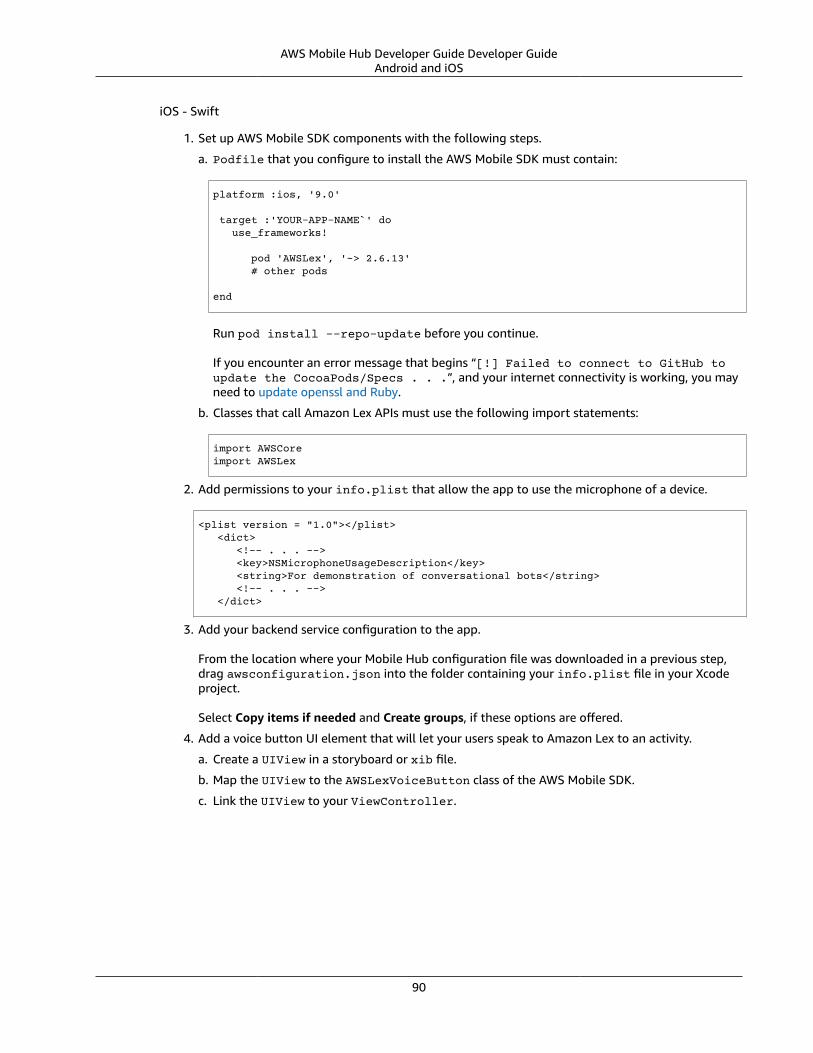
AWS Mobile Hub Developer Guide Developer GuideAndroid and iOS
iOS - Swift
1. Set up AWS Mobile SDK components with the following steps.
a. Podfile that you configure to install the AWS Mobile SDK must contain:
platform :ios, '9.0'
target :'YOUR-APP-NAME`' do use_frameworks!
pod 'AWSLex', '~> 2.6.13' # other pods
end
Run pod install --repo-update before you continue.
If you encounter an error message that begins “[!] Failed to connect to GitHub toupdate the CocoaPods/Specs . . .”, and your internet connectivity is working, you mayneed to update openssl and Ruby.
b. Classes that call Amazon Lex APIs must use the following import statements:
import AWSCoreimport AWSLex
2. Add permissions to your info.plist that allow the app to use the microphone of a device.
<plist version = "1.0"></plist> <dict> <!-- . . . --> <key>NSMicrophoneUsageDescription</key> <string>For demonstration of conversational bots</string> <!-- . . . --> </dict>
3. Add your backend service configuration to the app.
From the location where your Mobile Hub configuration file was downloaded in a previous step,drag awsconfiguration.json into the folder containing your info.plist file in your Xcodeproject.
Select Copy items if needed and Create groups, if these options are offered.
4. Add a voice button UI element that will let your users speak to Amazon Lex to an activity.
a. Create a UIView in a storyboard or xib file.
b. Map the UIView to the AWSLexVoiceButton class of the AWS Mobile SDK.
c. Link the UIView to your ViewController.
90

AWS Mobile Hub Developer Guide Developer GuideAndroid and iOS
5. Register the voice button.
The following code shows how use the viewDidLoad method of your View Controller to enableyour voice button to respond to Amazon Lex success and error messages The code conforms theclass to AWSLexVoiceButtonDelegate. It initializes the button by binding it to the bot youconfigured in your Mobile Hub project, and registers the button as the AWSLexVoiceButtonKeyof your Amazon Lex voice interaction client.
import UIKitimport AWSLeximport AWSAuthCore
class VoiceChatViewController: UIViewController, AWSLexVoiceButtonDelegate { override func viewDidLoad() {
// Set the bot configuration details // You can use the configuration constants defined in AWSConfiguration.swift file let botName = "YOUR-BOT-NAME" let botRegion: AWSRegionType = "YOUR-BOT-REGION" let botAlias = "$LATEST"
// set up the configuration for AWS Voice Button let configuration = AWSServiceConfiguration(region: botRegion, credentialsProvider: AWSMobileClient.sharedInstance().getCredentialsProvider()) let botConfig = AWSLexInteractionKitConfig.defaultInteractionKitConfig(withBotName: YOUR-BOT-NAME, botAlias: :YOUR-BOT-ALIAS)
// register the interaction kit client for the voice button using the AWSLexVoiceButtonKey constant defined in SDK AWSLexInteractionKit.register(with: configuration!, interactionKitConfiguration: botConfig, forKey: AWSLexVoiceButtonKey) super.viewDidLoad() (self.voiceButton as AWSLexVoiceButton).delegate = self }}
6. Handle Amazon Lex success and error messages by adding the following delegate methods forthe Voice Button in your View Controller.
91
AWS Mobile Hub Developer Guide Developer GuideAndroid and iOS
func voiceButton(_ button: AWSLexVoiceButton, on response: AWSLexVoiceButtonResponse) { // handle response from the voice button here print("on text output \(response.outputText)")}
func voiceButton(_ button: AWSLexVoiceButton, onError error: Error) { // handle error response from the voice button here print("error \(error)")}
AWS Mobile Android and iOS How To
The following reference content only applies to existing apps that were built using the AWS MobileSDKs for iOS and Android. If you’re building a new mobile or web app, or you’re adding cloudcapabilities to an existing app, visit the Amplify Framework website instead. Documentation for theAWS Mobile SDKs for iOS and Android is now part of the Amplify Framework.
This section provides information on the steps for achieving specific tasks for integrating your AWSMobile features into your Android and iOS apps.
Topics
• How To: User Sign-in with Amazon Cognito (p. 92)
• How To: NoSQL Database with Amazon DynamoDB (p. 95)
• How To: Serverless Code with AWS Lambda (p. 125)
• How To Add Machine Learning with Amazon Machine Learning (p. 136)
How To: User Sign-in with Amazon Cognito
The following reference content only applies to existing apps that were built using the AWS MobileSDKs for iOS and Android. If you’re building a new mobile or web app, or you’re adding cloudcapabilities to an existing app, visit the Amplify Framework website instead. Documentation for theAWS Mobile SDKs for iOS and Android is now part of the Amplify Framework.
This section provides procedures for integrating user sign-in features into your Android and iOS apps.
Topics
• Customize the SDK Sign-In UI (p. 92)
Customize the SDK Sign-In UI
The following reference content only applies to existing apps that were built using the AWS MobileSDKs for iOS and Android. If you’re building a new mobile or web app, or you’re adding cloudcapabilities to an existing app, visit the Amplify Framework website instead. Documentation for theAWS Mobile SDKs for iOS and Android is now part of the Amplify Framework.
92

AWS Mobile Hub Developer Guide Developer GuideAndroid and iOS
By default, the SDK presents sign-in UI for each sign in provider you enable in your Mobile Hub project(Email and Password, Facebook, Google) with a default look and feel. It knows which provider(s) youchose by reading the awsconfiguration.json file you integrated with your app.
To override the defaults, and modify the behavior, look, and feel of the sign-in UI, create anAuthUIConfiguration object and set the appropriate properties.
Android - Java
Create and configure an AuthUIConfiguration object and set its properties.
• To present the Email and Password user SignInUI, set userPools to true.• To present Facebook or Google user SignInUI, add signInButton(FacebookButton.class)
or signInButton(GoogleButton.class).• To change the logo, use the logoResId.• To change the background color, use backgroundColor.• To cancel the sign-in flow, set .canCancel(true).• To change the font in the sign-in views, use the fontFamily method and pass in the string that
represents a font family.• To draw the backgroundColor full screen, use fullScreenBackgroundColor.
import android.app.Activity;import android.graphics.Color;import android.os.Bundle;
import com.amazonaws.mobile.auth.facebook.FacebookButton;import com.amazonaws.mobile.auth.google.GoogleButton;import com.amazonaws.mobile.auth.ui.AuthUIConfiguration;import com.amazonaws.mobile.auth.ui.SignInUI;
import com.amazonaws.mobile.client.AWSMobileClient;import com.amazonaws.mobile.client.AWSStartupHandler;import com.amazonaws.mobile.client.AWSStartupResult;
public class YourMainActivity extends Activity { @Override protected void onCreate(Bundle savedInstanceState) { super.onCreate(savedInstanceState);
AWSMobileClient.getInstance().initialize(this, new AWSStartupHandler() { @Override public void onComplete(final AWSStartupResult awsStartupResult) { AuthUIConfiguration config = new AuthUIConfiguration.Builder() .userPools(true) // true? show the Email and Password UI .signInButton(FacebookButton.class) // Show Facebook button .signInButton(GoogleButton.class) // Show Google button .logoResId(R.drawable.mylogo) // Change the logo .backgroundColor(Color.BLUE) // Change the backgroundColor .isBackgroundColorFullScreen(true) // Full screen backgroundColor the backgroundColor full screenff .fontFamily("sans-serif-light") // Apply sans-serif-light as the global font .canCancel(true) .build(); SignInUI signinUI = (SignInUI) AWSMobileClient.getInstance().getClient(YourMainActivity.this, SignInUI.class); signinUI.login(YourMainActivity.this, YourNextActivity.class).authUIConfiguration(config).execute(); }
93
AWS Mobile Hub Developer Guide Developer GuideAndroid and iOS
}).execute(); }}
Android - Kotlin
Create and configure an AuthUIConfiguration object and set its properties.
• To present the Email and Password user SignInUI, set userPools to true.
• To present Facebook or Google user SignInUI, add signInButton(FacebookButton.class)or signInButton(GoogleButton.class).
• To change the logo, use the logoResId.
• To change the background color, use backgroundColor.
• To cancel the sign-in flow, set .canCancel(true).
• To change the font in the sign-in views, use the fontFamily method and pass in the string thatrepresents a font family.
• To draw the backgroundColor full screen, use fullScreenBackgroundColor.
import android.app.Activity;import android.graphics.Color;import android.os.Bundle;
import com.amazonaws.mobile.auth.facebook.FacebookButton;import com.amazonaws.mobile.auth.google.GoogleButton;import com.amazonaws.mobile.auth.ui.AuthUIConfiguration;import com.amazonaws.mobile.auth.ui.SignInUI;
import com.amazonaws.mobile.client.AWSMobileClient;import com.amazonaws.mobile.client.AWSStartupHandler;import com.amazonaws.mobile.client.AWSStartupResult;
class MainActivity : AppCompatActivity() { override fun onCreate(savedInstanceState : Bundle?) { super.onCreate() AWSMobileClient.getInstance().initialize(this) { val config = AuthUIConfiguration.Builder() .userPools(true) // show the Email and Password UI .signInButton(FacebookButton.class) // Show Facebook .signInButton(GoogleButton.class) // Show Google .logoResId(R.drawable.mylogo) // Change the logo .backgroundColor(Color.BLUE) // Change the background color .isBackgroundColorFullScreen(true) // Full screen background color .fontFamily("sans-serif-light") // font .canCancel(true) // Add a cancel/back button .build() val signInUI = AWSMobileClient.getInstance().getClient(this@MainActivity, SignInUI::class.java) as SignInUI signInUI.login(this@MainActivity, NextActivity::class.java).authUIConfiguration(config).execute() }.execute() }}
iOS - Swift
Create and configure an AWSAuthUIConfiguration object and set its properties.
Create and configure an AuthUIConfiguration object.
94

AWS Mobile Hub Developer Guide Developer GuideAndroid and iOS
• To present the Email and Password user SignInUI, set enableUserPoolsUI to true.
• To present Facebook or Google user SignInUI, add .addSignInButtonView(class:AWSFacebookSignInButton.self) or .addSignInButtonView(class:AWSFacebookSignInButton.self).
• To change the logo, use logoImage.
• To change the background color, use backgroundColor.
• To cancel the sign-in flow, use canCancel.
• To change the font in the sign-in views, use the font property and pass in the UIFont object thatrepresents a font family.
• To draw the backgroundColor full screen, use fullScreenBackgroundColor.
import UIKitimport AWSAuthUIimport AWSMobileClientimport AWSUserPoolsSignInimport AWSFacebookSignInimport AWSGoogleSignIn
class SampleViewController: UIViewController { override func viewDidLoad() { super.viewDidLoad() if !AWSSignInManager.sharedInstance().isLoggedIn { presentAuthUIViewController() } }
func presentAuthUIViewController() { let config = AWSAuthUIConfiguration() config.enableUserPoolsUI = true config.addSignInButtonView(class: AWSFacebookSignInButton.self) config.addSignInButtonView(class: AWSGoogleSignInButton.self) config.backgroundColor = UIColor.blue config.font = UIFont (name: "Helvetica Neue", size: 20) config.isBackgroundColorFullScreen = true config.canCancel = true
AWSAuthUIViewController.presentViewController( with: self.navigationController!, configuration: config, completionHandler: { (provider: AWSSignInProvider, error: Error?) in if error == nil { // SignIn succeeded. } else { // end user faced error while loggin in, take any required action here. } }) }}
How To: NoSQL Database with Amazon DynamoDB
The following reference content only applies to existing apps that were built using the AWS MobileSDKs for iOS and Android. If you’re building a new mobile or web app, or you’re adding cloudcapabilities to an existing app, visit the Amplify Framework website instead. Documentation for theAWS Mobile SDKs for iOS and Android is now part of the Amplify Framework.
95

AWS Mobile Hub Developer Guide Developer GuideAndroid and iOS
This section provides procedures for integrating Amazon DynamoDB into your Android and iOS apps.
Topics
• Integrate Your Existing NoSQL Table (p. 96)
• iOS: Amazon DynamoDB Object Mapper API (p. 112)
• iOS: Amazon DynamoDB Low-Level Client (p. 121)
Integrate Your Existing NoSQL Table
The following reference content only applies to existing apps that were built using the AWS MobileSDKs for iOS and Android. If you’re building a new mobile or web app, or you’re adding cloudcapabilities to an existing app, visit the Amplify Framework website instead. Documentation for theAWS Mobile SDKs for iOS and Android is now part of the Amplify Framework.
The following steps and examples are based on a simple bookstore app. The app tracks the books thatare available in the bookstore using an Amazon DynamoDB table.
Set Up Your Backend
To manually configure an Amazon DynamoDB table that you can integrate into your mobile app, use thefollowing steps.
Topics
• Create an New Table and Index (p. 96)
• Set Up an Identity Pool (p. 97)
• Set Permissions (p. 97)
• Apply Permissions (p. 97)
Create an New Table and Index
• If you already have an Amazon DynamoDB table and know its region, you can skip to Set Up anIdentity Pool (p. 97).
To create the Books table:
1. Sign in to the Amazon DynamoDB Console.
2. Choose Create Table.
3. Type Books as the name of the table.
4. Enter ISBN in the Partition key field of the Primary key with String as their type.
5. Check the Add sort key box , then type Category in the provided field and select String as the type.
6. Clear the Use default settings check box and choose + Add Index.
7. In the Add Index dialog type Author with String as the type.
8. Check the Add sort key check box and enter Title as the sort key value, with String as its type.
9. Leave the other values at their defaults. Choose Add index to add the Author-Title-index index.
10.Set the Minimum provisioned capacity for read to 10, and for write to 5.
11.Choose Create.Amazon DynamoDB will create your database.
12.Refresh the console and choose your Books table from the list of tables.
96
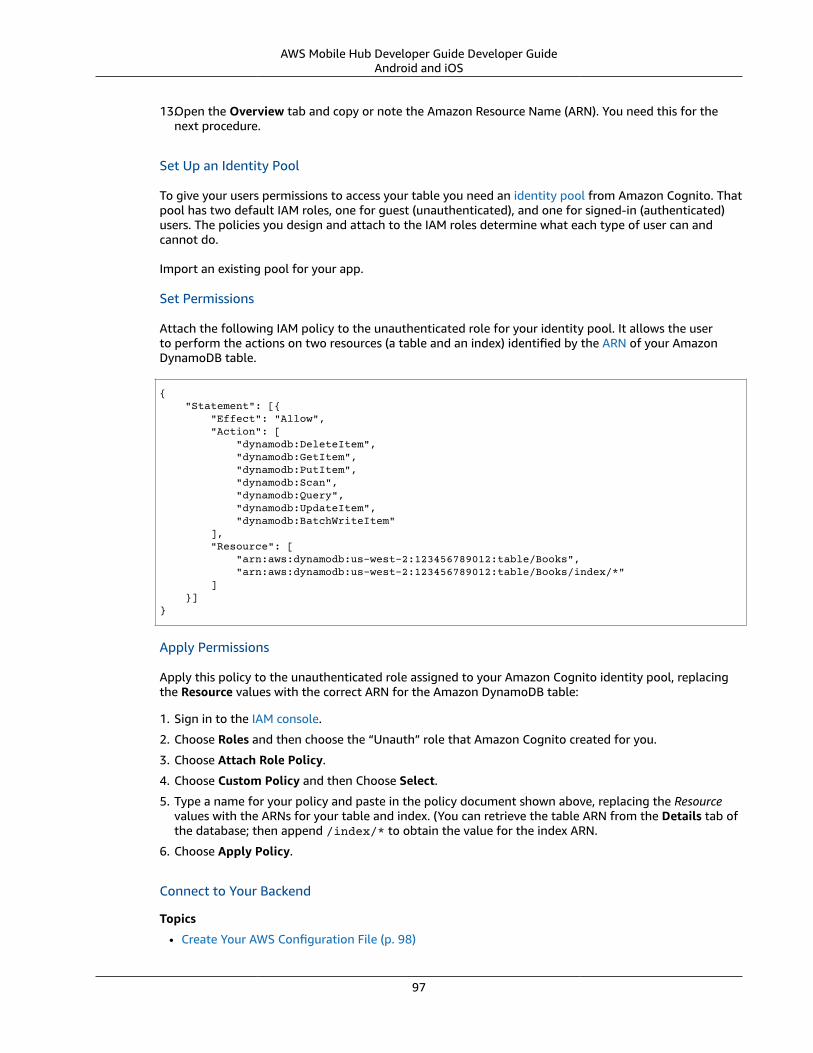
AWS Mobile Hub Developer Guide Developer GuideAndroid and iOS
13.Open the Overview tab and copy or note the Amazon Resource Name (ARN). You need this for thenext procedure.
Set Up an Identity Pool
To give your users permissions to access your table you need an identity pool from Amazon Cognito. Thatpool has two default IAM roles, one for guest (unauthenticated), and one for signed-in (authenticated)users. The policies you design and attach to the IAM roles determine what each type of user can andcannot do.
Import an existing pool for your app.
Set Permissions
Attach the following IAM policy to the unauthenticated role for your identity pool. It allows the userto perform the actions on two resources (a table and an index) identified by the ARN of your AmazonDynamoDB table.
{ "Statement": [{ "Effect": "Allow", "Action": [ "dynamodb:DeleteItem", "dynamodb:GetItem", "dynamodb:PutItem", "dynamodb:Scan", "dynamodb:Query", "dynamodb:UpdateItem", "dynamodb:BatchWriteItem" ], "Resource": [ "arn:aws:dynamodb:us-west-2:123456789012:table/Books", "arn:aws:dynamodb:us-west-2:123456789012:table/Books/index/*" ] }]}
Apply Permissions
Apply this policy to the unauthenticated role assigned to your Amazon Cognito identity pool, replacingthe Resource values with the correct ARN for the Amazon DynamoDB table:
1. Sign in to the IAM console.
2. Choose Roles and then choose the “Unauth” role that Amazon Cognito created for you.
3. Choose Attach Role Policy.
4. Choose Custom Policy and then Choose Select.
5. Type a name for your policy and paste in the policy document shown above, replacing the Resourcevalues with the ARNs for your table and index. (You can retrieve the table ARN from the Details tab ofthe database; then append /index/* to obtain the value for the index ARN.
6. Choose Apply Policy.
Connect to Your Backend
Topics
• Create Your AWS Configuration File (p. 98)
97

AWS Mobile Hub Developer Guide Developer GuideAndroid and iOS
• Add the AWS Config File (p. 99)
• Add the SDK to Your App (p. 100)
• Add Data Models to Your App (p. 103)
Create Your AWS Configuration File
Your app is connected to your AWS resources using an awsconfiguration.json file which containsthe endpoints for the services you use.
1. Create a file with name awsconfiguration.json with the following contents:
{ "Version": "1.0", "CredentialsProvider": { "CognitoIdentity": { "Default": { "PoolId": "COGNITO-IDENTITY-POOL-ID", "Region": "COGNITO-IDENTITY-POOL-REGION" } } }, "IdentityManager": { "Default": {} }, "DynamoDBObjectMapper": { "Default": { "Region": "DYNAMODB-REGION" } }}
2. Make the following changes to the configuration file.
• Replace the DYNAMODB-REGION with the region the table was created in.
Need to find your table’s region? Go to Amazon DynamoDB Console. and choosethe Overview tab for your table. The AmazonResource Name (ARN) item shows the table’sID, which contains its region.
For example, if your pool IDis arn:aws:dynamodb:us-east-1:012345678901:table/nosqltest-mobilehub-012345678-Books, then your thetable’s region value would be us-east-1.
The configuration file value you want is inthe form of: "Region": "REGION-OF-YOU-DYNAMODB-ARN". For this example:
"Region": "us-east-1"
• Replace the COGNITO-IDENTITY-POOL-ID with the identity pool ID.
• Replace the COGNITO-IDENTITY-POOL-REGION with the region the identity pool was created in.
Need to find your pool’s ID and region? Go to Amazon Cognito Console and chooseManage Federated Identities, then choose your
98

AWS Mobile Hub Developer Guide Developer GuideAndroid and iOS
pool and choose Edit identity pool. Copy thevalue of Identity pool ID.
Insert this region value into the followingform to create the value you need for thisintegration.
"Region": "REGION-PREFIX-OF-YOUR-POOL-ID".
For example, if your pool ID is us-east-1:01234567-yyyy-0123-xxxx-012345678901, then your integrationregion value would be:
"Region": "us-east-1"
Add the AWS Config File
To make the connection between your app and your backend services, add the configuration file.
Android - Java
In the Android Studio Project Navigator, right-click your app’s res folder, and then choose New >Directory. Type raw as the directory name and then choose OK.
Drag the awsconfiguration.json you created into the res/raw folder. Android gives a resourceID to any arbitrary file placed in this folder, making it easy to reference in the app.
Android - Kotlin
In the Android Studio Project Navigator, right-click your app’s res folder, and then choose New >Directory. Type raw as the directory name and then choose OK.
99
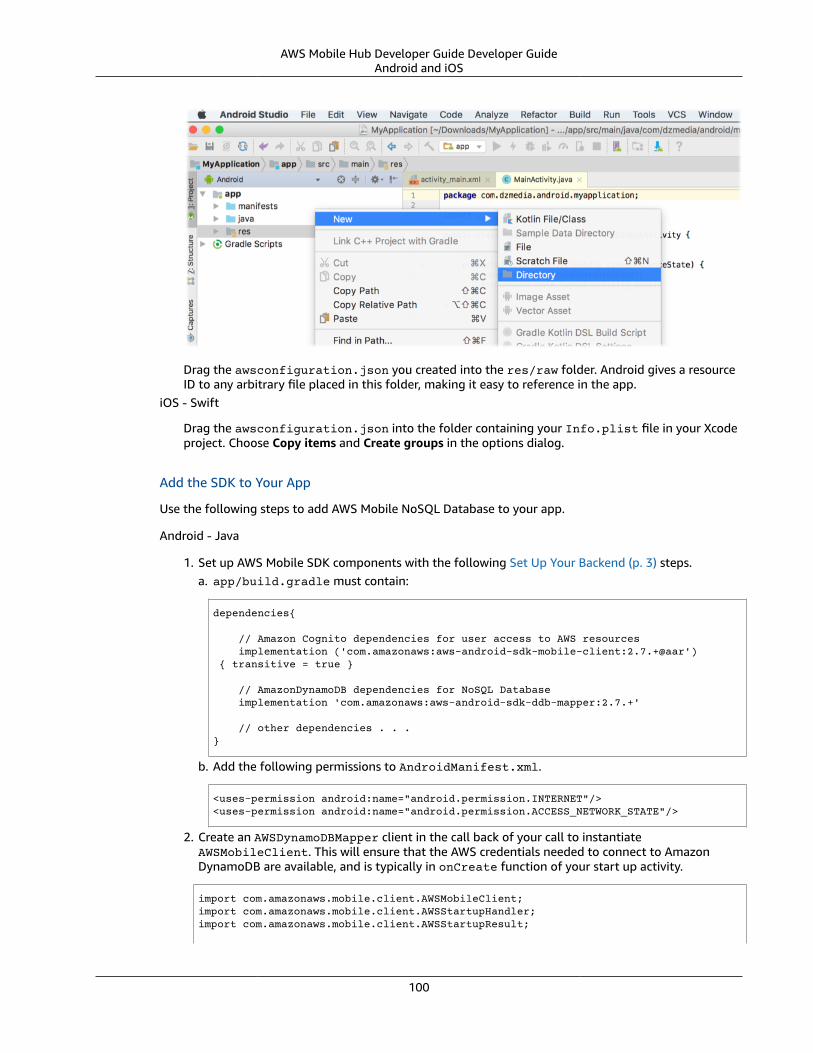
AWS Mobile Hub Developer Guide Developer GuideAndroid and iOS
Drag the awsconfiguration.json you created into the res/raw folder. Android gives a resourceID to any arbitrary file placed in this folder, making it easy to reference in the app.
iOS - Swift
Drag the awsconfiguration.json into the folder containing your Info.plist file in your Xcodeproject. Choose Copy items and Create groups in the options dialog.
Add the SDK to Your App
Use the following steps to add AWS Mobile NoSQL Database to your app.
Android - Java
1. Set up AWS Mobile SDK components with the following Set Up Your Backend (p. 3) steps.a. app/build.gradle must contain:
dependencies{
// Amazon Cognito dependencies for user access to AWS resources implementation ('com.amazonaws:aws-android-sdk-mobile-client:2.7.+@aar') { transitive = true }
// AmazonDynamoDB dependencies for NoSQL Database implementation 'com.amazonaws:aws-android-sdk-ddb-mapper:2.7.+'
// other dependencies . . .}
b. Add the following permissions to AndroidManifest.xml.
<uses-permission android:name="android.permission.INTERNET"/><uses-permission android:name="android.permission.ACCESS_NETWORK_STATE"/>
2. Create an AWSDynamoDBMapper client in the call back of your call to instantiateAWSMobileClient. This will ensure that the AWS credentials needed to connect to AmazonDynamoDB are available, and is typically in onCreate function of your start up activity.
import com.amazonaws.mobile.client.AWSMobileClient;import com.amazonaws.mobile.client.AWSStartupHandler;import com.amazonaws.mobile.client.AWSStartupResult;
100

AWS Mobile Hub Developer Guide Developer GuideAndroid and iOS
import com.amazonaws.mobileconnectors.dynamodbv2.dynamodbmapper.DynamoDBMapper;import com.amazonaws.services.dynamodbv2.AmazonDynamoDBClient;
public class MainActivity extends AppCompatActivity {
// Declare a DynamoDBMapper object DynamoDBMapper dynamoDBMapper;
@Override protected void onCreate(Bundle savedInstanceState) { super.onCreate(savedInstanceState); setContentView(R.layout.activity_main);
// AWSMobileClient enables AWS user credentials to access your table AWSMobileClient.getInstance().initialize(this, new AWSStartupHandler() {
@Override public void onComplete(AWSStartupResult awsStartupResult) {
// Add code to instantiate a AmazonDynamoDBClient AmazonDynamoDBClient dynamoDBClient = new AmazonDynamoDBClient(AWSMobileClient.getInstance().getCredentialsProvider()); this.dynamoDBMapper = DynamoDBMapper.builder() .dynamoDBClient(dynamoDBClient) .awsConfiguration( AWSMobileClient.getInstance().getConfiguration()) .build();
} }).execute();
// Other functions in onCreate . . . }}
Important Use Asynchronous Calls to DynamoDB
Since calls to DynamoDB are synchronous,they don’t belong on your UI thread. Use anasynchronous method like the Runnablewrapper to call DynamoDBObjectMapper in aseparate thread.
Runnable runnable = new Runnable() { public void run() { //DynamoDB calls go here }};Thread mythread = new Thread(runnable);mythread.start();
Android - Kotlin
1. Set up AWS Mobile SDK components with the following Set Up Your Backend (p. 3) steps.
a. app/build.gradle must contain:
dependencies{
101

AWS Mobile Hub Developer Guide Developer GuideAndroid and iOS
// Amazon Cognito dependencies for user access to AWS resources implementation ('com.amazonaws:aws-android-sdk-mobile-client:2.7.+@aar') { transitive = true }
// AmazonDynamoDB dependencies for NoSQL Database implementation 'com.amazonaws:aws-android-sdk-ddb-mapper:2.7.+'
// other dependencies . . .}
b. Add the following permissions to AndroidManifest.xml.
<uses-permission android:name="android.permission.INTERNET"/><uses-permission android:name="android.permission.ACCESS_NETWORK_STATE"/>
2. Create an AWSDynamoDBMapper client in the call back of your call to instantiateAWSMobileClient. This will ensure that the AWS credentials needed to connect to AmazonDynamoDB are available, and is typically in onCreate function of your start up activity.
import com.amazonaws.mobile.client.AWSMobileClient;import com.amazonaws.mobile.client.AWSStartupHandler;import com.amazonaws.mobile.client.AWSStartupResult;
import com.amazonaws.mobileconnectors.dynamodbv2.dynamodbmapper.DynamoDBMapper;import com.amazonaws.services.dynamodbv2.AmazonDynamoDBClient;
class MainActivity : AppCompatActivity() { var ddbMapper: DynamoDBMapper? = null
override fun onCreate(savedInstanceState: Bundle?) { super.onCreate(savedInstanceState) setContentView(R.layout.activity_main)
AWSMobileClient.getInstance().initialize(this, object : AWSStartupHandler() { override fun onComplete(awsStartupResult: AWSStartupResult) { val ddbClient = AmazonDynamoDBClient(AWSMobileClient.getInstance().credentialsProvider) ddbMapper = DynamoDBMapper.builder() .dynamoDBClient(ddbClient) .awsConfiguration(AWSMobileClient.getInstance().configuration) .build() } }).execute()
// other setup within onCreate() ... }}
Important Use Asynchronous Calls to DynamoDB
Since calls to DynamoDB are synchronous,they don’t belong on your UI thread. Use anasynchronous method like the thread wrapperto call DynamoDBObjectMapper in a separatethread.
thread(start = true ) { // DynamoDB calls go here}
102

AWS Mobile Hub Developer Guide Developer GuideAndroid and iOS
iOS - Swift
1. Set up AWS Mobile SDK components with the following Set Up Your Backend (p. 3) steps.
a. Add the AWSDynamoDB pod to your Podfile to install the AWS Mobile SDK.
platform :ios, '9.0'
target :'YOUR-APP-NAME' do use_frameworks!
# Enable AWS user credentials pod 'AWSMobileClient', '~> 2.6.13'
# Connect to NoSQL database tables pod 'AWSDynamoDB', '~> 2.6.13'
# other pods . . .end
Run pod install --repo-update before you continue.
If you encounter an error message that begins “[!] Failed to connect to GitHub toupdate the CocoaPods/Specs . . .”, and your internet connectivity is working, you mayneed to update openssl and Ruby.
b. Classes that call DynamoDB APIs must use the following import statements:
import AWSCoreimport AWSDynamoDB
Add Data Models to Your App
To connect your app to your table create a data model object in the following form. In this example, themodel is based on the Books table you created in a previous step. The partition key (hash key) is calledISBN and the sort key (rangekey) is called Category.
Android - Java
In the Android Studio project explorer right-click the folder containing your main activity, andchoose New > Java Class. Type the Name you will use to refer to your data model. In this examplethe name would be BooksDO. Add code in the following form.
package com.amazonaws.models.nosql;
import com.amazonaws.mobileconnectors.dynamodbv2.dynamodbmapper.DynamoDBAttribute;import com.amazonaws.mobileconnectors.dynamodbv2.dynamodbmapper.DynamoDBHashKey;import com.amazonaws.mobileconnectors.dynamodbv2.dynamodbmapper.DynamoDBIndexHashKey;import com.amazonaws.mobileconnectors.dynamodbv2.dynamodbmapper.DynamoDBIndexRangeKey;import com.amazonaws.mobileconnectors.dynamodbv2.dynamodbmapper.DynamoDBRangeKey;import com.amazonaws.mobileconnectors.dynamodbv2.dynamodbmapper.DynamoDBTable;
import java.util.List;import java.util.Map;import java.util.Set;
@DynamoDBTable(tableName = "Books")
public class BooksDO { private String _isbn; private String _category;
103

AWS Mobile Hub Developer Guide Developer GuideAndroid and iOS
private String _title; private String _author;
@DynamoDBHashKey(attributeName = "ISBN") @DynamoDBAttribute(attributeName = "ISBN") public String getIsbn() { return _isbn; }
public void setIsbn(final String _isbn) { this._isbn = _isbn; }
@DynamoDBRangeKey (attributeName = "Category") @DynamoDBAttribute(attributeName = "Category") public String getCategory() { return _category; }
public void setCategory(final String _category) { this._category= _category; }
@DynamoDBIndexHashKey(attributeName = "Author", globalSecondaryIndexName = "Author") public String getAuthor() { return _author; }
public void setAuthor(final String _author) { this._author = _author; }
@DynamoDBIndexRangeKey(attributeName = "Title", globalSecondaryIndexName = "Title") public String getTitle() { return _title; }
public void setTitle(final String _title) { this._title = _title; }
}
Android - Kotlin
In the Android Studio project explorer right-click the folder containing your main activity, andchoose New > Java Class. Type the Name you will use to refer to your data model. In this examplethe name would be BooksDO. Add code in the following form. You can also use a data model in theJava form in a Kotlin project.
package com.amazonaws.models.nosql;
import com.amazonaws.mobileconnectors.dynamodbv2.dynamodbmapper.DynamoDBAttribute;import com.amazonaws.mobileconnectors.dynamodbv2.dynamodbmapper.DynamoDBHashKey;import com.amazonaws.mobileconnectors.dynamodbv2.dynamodbmapper.DynamoDBIndexHashKey;import com.amazonaws.mobileconnectors.dynamodbv2.dynamodbmapper.DynamoDBIndexRangeKey;import com.amazonaws.mobileconnectors.dynamodbv2.dynamodbmapper.DynamoDBRangeKey;import com.amazonaws.mobileconnectors.dynamodbv2.dynamodbmapper.DynamoDBTable;
import java.util.List;import java.util.Map;import java.util.Set;
104

AWS Mobile Hub Developer Guide Developer GuideAndroid and iOS
@DynamoDBTable(tableName = "Books")class BooksDO { @DynamoDBHashKey(attributeName = "ISBN") @DynamoDBAttribute(attributeName = "ISBN") var isbn: String? = null
@DynamoDBRangeKey (attributeName = "Category") @DynamoDBAttribute(attributeName = "Category") var category: String? = null
@DynamoDBIndexHashKey(attributeName = "Author", globalSecondaryIndexName = "Author") var author: String? = null
@DynamoDBIndexRangeKey(attributeName = "Title", globalSecondaryIndexName = "Title") var title: String? = null}
iOS - Swift
In the Xcode project explorer, right-click the folder containing your app delegate, and choose NewFile > Swift File > Next. Type the name you will use to refer to your data model as the filename. Inthis example the name would be Books. Add code in the following form.
import Foundation import UIKit import AWSDynamoDB
class Books: AWSDynamoDBObjectModel, AWSDynamoDBModeling {
@objc var _isbn: String? @objc var _category: String? @objc var _author: String? @objc var _title: String?
class func dynamoDBTableName() -> String { return "Books" }
class func hashKeyAttribute() -> String { return "_isbn" }
class func rangeKeyAttribute() -> String { return "_category" }
override class func jsonKeyPathsByPropertyKey() -> [AnyHashable: Any] { return [ "_isbn" : "ISBN", "_category" : "Category", "_author" : "Author", "_title" : "Title", ] }}
Perform CRUD Operations
The fragments below consume the BooksDO data model class created in a previous step.
Topics
105

AWS Mobile Hub Developer Guide Developer GuideAndroid and iOS
• Create (Save) an Item (p. 106)• Read (Load) an Item (p. 107)• Update an Item (p. 108)• Delete an Item (p. 109)
Create (Save) an Item
Use the following code to create an item in your NoSQL Database table.
Android - Java
public void createBooks() { final com.amazonaws.models.nosql.BooksDO booksItem = new com.amazonaws.models.nosql.BooksDO();
booksItem.setIsbn("ISBN1"); booksItem.setAuthor("Frederick Douglas"); booksItem.setTitle("Escape from Slavery"); booksItem.setCategory("History");
new Thread(new Runnable() { @Override public void run() { dynamoDBMapper.save(booksItem); // Item saved } }).start();}
Android - Kotlin
fun createBooks() { val booksItem = BooksDO().apply { isbn = "ISBN1" author = "Frederick Douglas" title = "Escape from Slavery" category = "History" }
thread(start = true) { ddbMapper.save(booksItem) }}
iOS - Swift
func createBooks() { let dynamoDbObjectMapper = AWSDynamoDBObjectMapper.default()
let booksItem: Books = Books()
booksItem._isbn = "1234" booksItem._category = "History" booksItem._author = "Harriet Tubman" booksItem._title = "My Life"
//Save a new item dynamoDbObjectMapper.save(booksItem, completionHandler: { (error: Error?) -> Void in
106
AWS Mobile Hub Developer Guide Developer GuideAndroid and iOS
if let error = error { print("Amazon DynamoDB Save Error: \(error)") return } print("An item was saved.") })}
Read (Load) an Item
Use the following code to read an item in your NoSQL Database table.
Android - Java
public void readBooks() { new Thread(new Runnable() { @Override public void run() {
com.amazonaws.models.nosql.BooksDO booksItem = dynamoDBMapper.load( com.amazonaws.models.nosql.BooksDO.class, "ISBN1", // Partition key (hash key) "History"); // Sort key (range key)
// Item read Log.d(LOG_TAG, String.format("Books Item: %s", booksItem.toString())); } }).start();}
Android - Kotlin
fun readBooks() { thread(start = true) { val booksItem = ddbMapper.load(BooksDO::class.java, "ISBN1", // Partition Key (hash key) "History") // Sort key (range key)
Log.d(LOG_TAG, "Books Item: $booksItem") }}
iOS - Swift
func readBooks() { let dynamoDbObjectMapper = AWSDynamoDBObjectMapper.default()
// Create data object using data model you created let booksItem: Books = Books();
dynamoDbObjectMapper.load( Books.self, hashKey: "1234", rangeKey: "Harriet Tubman", completionHandler: { (objectModel: AWSDynamoDBObjectModel?, error: Error?) -> Void in if let error = error { print("Amazon DynamoDB Read Error: \(error)") return } print("An item was read.")
107
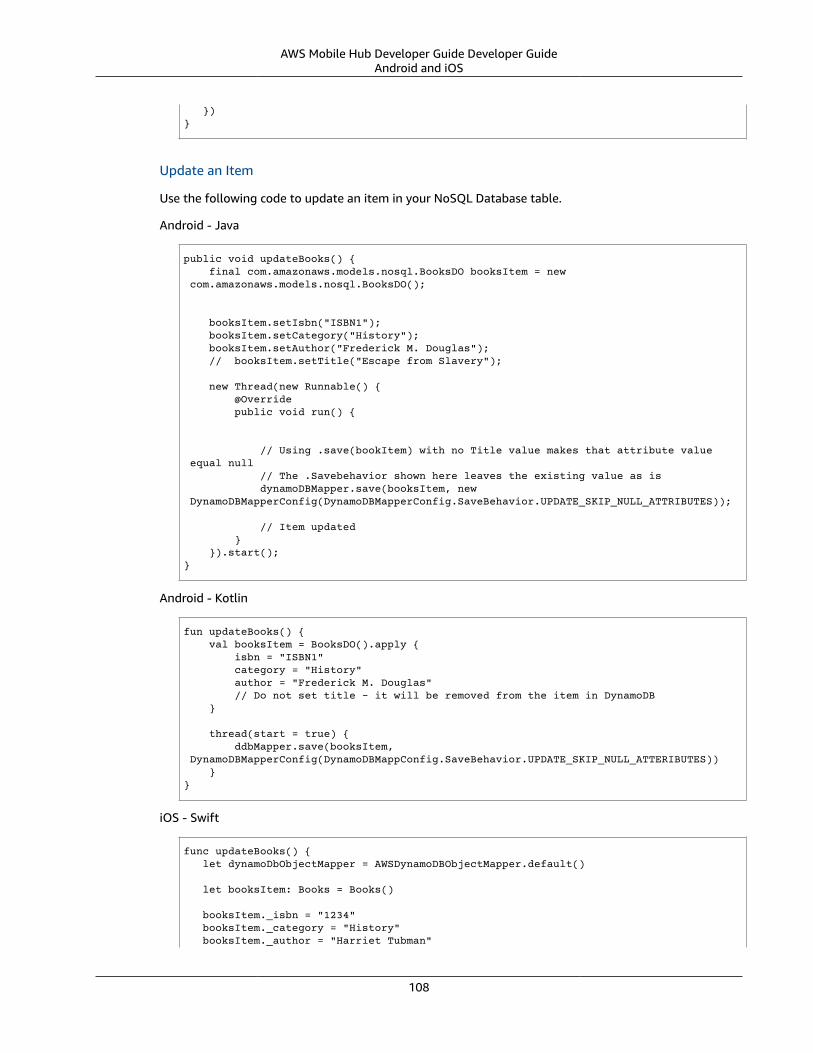
AWS Mobile Hub Developer Guide Developer GuideAndroid and iOS
})}
Update an Item
Use the following code to update an item in your NoSQL Database table.
Android - Java
public void updateBooks() { final com.amazonaws.models.nosql.BooksDO booksItem = new com.amazonaws.models.nosql.BooksDO();
booksItem.setIsbn("ISBN1"); booksItem.setCategory("History"); booksItem.setAuthor("Frederick M. Douglas"); // booksItem.setTitle("Escape from Slavery");
new Thread(new Runnable() { @Override public void run() {
// Using .save(bookItem) with no Title value makes that attribute value equal null // The .Savebehavior shown here leaves the existing value as is dynamoDBMapper.save(booksItem, new DynamoDBMapperConfig(DynamoDBMapperConfig.SaveBehavior.UPDATE_SKIP_NULL_ATTRIBUTES));
// Item updated } }).start();}
Android - Kotlin
fun updateBooks() { val booksItem = BooksDO().apply { isbn = "ISBN1" category = "History" author = "Frederick M. Douglas" // Do not set title - it will be removed from the item in DynamoDB }
thread(start = true) { ddbMapper.save(booksItem, DynamoDBMapperConfig(DynamoDBMappConfig.SaveBehavior.UPDATE_SKIP_NULL_ATTERIBUTES)) }}
iOS - Swift
func updateBooks() { let dynamoDbObjectMapper = AWSDynamoDBObjectMapper.default()
let booksItem: Books = Books()
booksItem._isbn = "1234" booksItem._category = "History" booksItem._author = "Harriet Tubman"
108
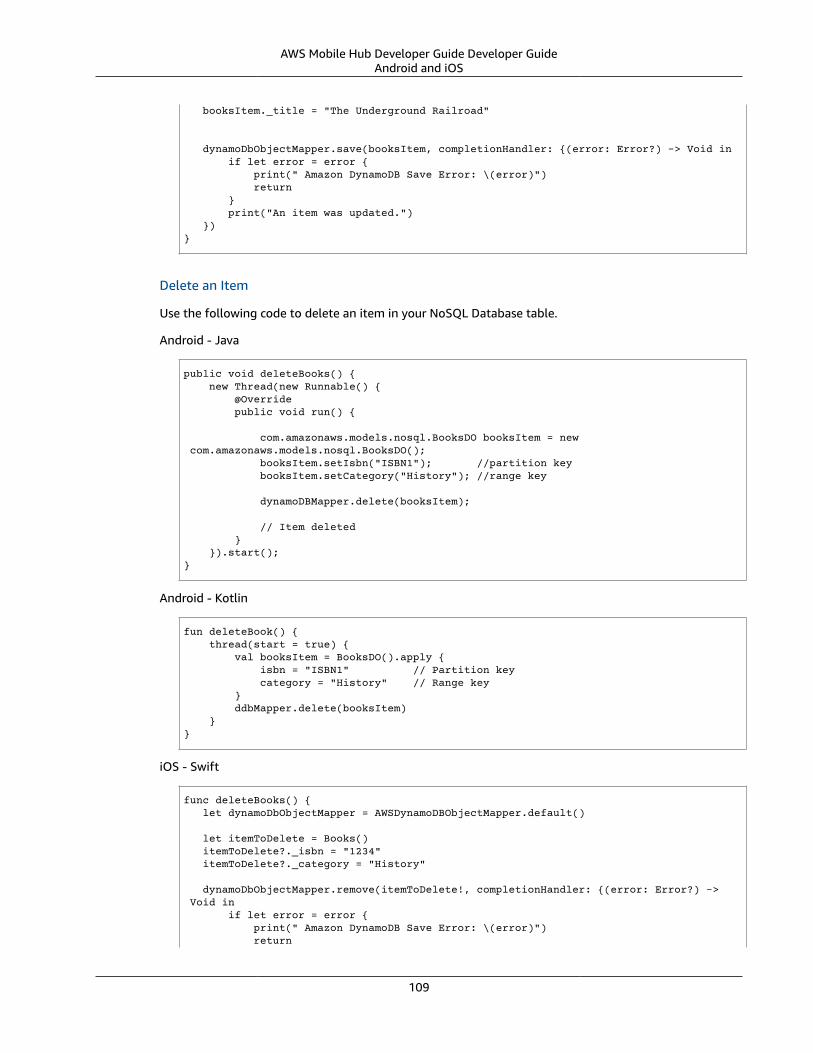
AWS Mobile Hub Developer Guide Developer GuideAndroid and iOS
booksItem._title = "The Underground Railroad"
dynamoDbObjectMapper.save(booksItem, completionHandler: {(error: Error?) -> Void in if let error = error { print(" Amazon DynamoDB Save Error: \(error)") return } print("An item was updated.") })}
Delete an Item
Use the following code to delete an item in your NoSQL Database table.
Android - Java
public void deleteBooks() { new Thread(new Runnable() { @Override public void run() {
com.amazonaws.models.nosql.BooksDO booksItem = new com.amazonaws.models.nosql.BooksDO(); booksItem.setIsbn("ISBN1"); //partition key booksItem.setCategory("History"); //range key
dynamoDBMapper.delete(booksItem);
// Item deleted } }).start();}
Android - Kotlin
fun deleteBook() { thread(start = true) { val booksItem = BooksDO().apply { isbn = "ISBN1" // Partition key category = "History" // Range key } ddbMapper.delete(booksItem) }}
iOS - Swift
func deleteBooks() { let dynamoDbObjectMapper = AWSDynamoDBObjectMapper.default()
let itemToDelete = Books() itemToDelete?._isbn = "1234" itemToDelete?._category = "History"
dynamoDbObjectMapper.remove(itemToDelete!, completionHandler: {(error: Error?) -> Void in if let error = error { print(" Amazon DynamoDB Save Error: \(error)") return
109
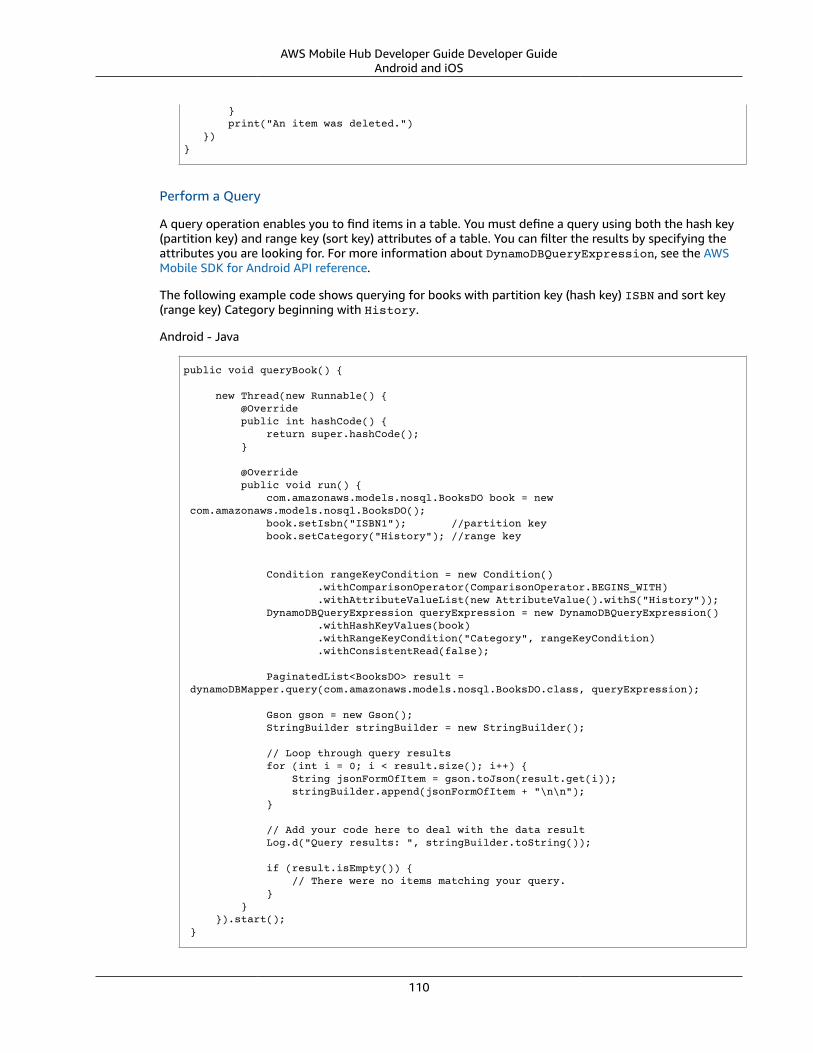
AWS Mobile Hub Developer Guide Developer GuideAndroid and iOS
} print("An item was deleted.") })}
Perform a Query
A query operation enables you to find items in a table. You must define a query using both the hash key(partition key) and range key (sort key) attributes of a table. You can filter the results by specifying theattributes you are looking for. For more information about DynamoDBQueryExpression, see the AWSMobile SDK for Android API reference.
The following example code shows querying for books with partition key (hash key) ISBN and sort key(range key) Category beginning with History.
Android - Java
public void queryBook() {
new Thread(new Runnable() { @Override public int hashCode() { return super.hashCode(); }
@Override public void run() { com.amazonaws.models.nosql.BooksDO book = new com.amazonaws.models.nosql.BooksDO(); book.setIsbn("ISBN1"); //partition key book.setCategory("History"); //range key
Condition rangeKeyCondition = new Condition() .withComparisonOperator(ComparisonOperator.BEGINS_WITH) .withAttributeValueList(new AttributeValue().withS("History")); DynamoDBQueryExpression queryExpression = new DynamoDBQueryExpression() .withHashKeyValues(book) .withRangeKeyCondition("Category", rangeKeyCondition) .withConsistentRead(false);
PaginatedList<BooksDO> result = dynamoDBMapper.query(com.amazonaws.models.nosql.BooksDO.class, queryExpression);
Gson gson = new Gson(); StringBuilder stringBuilder = new StringBuilder();
// Loop through query results for (int i = 0; i < result.size(); i++) { String jsonFormOfItem = gson.toJson(result.get(i)); stringBuilder.append(jsonFormOfItem + "\n\n"); }
// Add your code here to deal with the data result Log.d("Query results: ", stringBuilder.toString());
if (result.isEmpty()) { // There were no items matching your query. } } }).start(); }
110

AWS Mobile Hub Developer Guide Developer GuideAndroid and iOS
Android - Kotlin
fun queryBooks() { thread(start = true) { val book = BooksDO().apply { isbn = "ISBN1" // Partition key category = "History" // Range key }
val rangeKeyCondition = Condition() .withComparisonOperator(ComparisionOperator.BEGINS_WITH) .withAttrbiuteValueList(AttributeValue().withS("History")) val queryExpression = DynamoDBQUeryExpression() .withHashKeyValues(book) .withRangeKeyCondition("Category", rangeKeyCondition) .withConsistentRead(false)
val result = ddbMapper.query(BooksDO::class.java, queryExpression) as PaginatedList<BooksDO> if (result.isEmpty()) { // There were no items matching your query } else { // loop through the result list and process the response } }}
iOS - Swift
func queryBooks() {
// 1) Configure the query let queryExpression = AWSDynamoDBQueryExpression() queryExpression.keyConditionExpression = "#isbn = :ISBN AND #category = :Category"
queryExpression.expressionAttributeNames = [ "#isbn": "ISBN", "#category": "Category" ]
queryExpression.expressionAttributeValues = [ ":ISBN" : "1234", ":Category" : "History" ]
// 2) Make the query let dynamoDbObjectMapper = AWSDynamoDBObjectMapper.default()
dynamoDbObjectMapper.query(Books.self, expression: queryExpression) { (output: AWSDynamoDBPaginatedOutput?, error: Error?) in if error != nil { print("The request failed. Error: \(String(describing: error))") } if output != nil { for books in output!.items { let booksItem = books as? Books print("\(booksItem!._title!)") } } }}
111

AWS Mobile Hub Developer Guide Developer GuideAndroid and iOS
Next Steps
• To learn more about IAM policies, see Using IAM.• To learn more about creating fine-grained access policies for Amazon DynamoDB, see DynamoDB on
Mobile – Part 5: Fine-Grained Access Control.
iOS: Amazon DynamoDB Object Mapper API
The following reference content only applies to existing apps that were built using the AWS MobileSDKs for iOS and Android. If you’re building a new mobile or web app, or you’re adding cloudcapabilities to an existing app, visit the Amplify Framework website instead. Documentation for theAWS Mobile SDKs for iOS and Android is now part of the Amplify Framework.
Topics• Overview (p. 13)• Setup (p. 112)• Instantiate the Object Mapper API (p. 112)• CRUD Operations (p. 114)• Perform a Scan (p. 117)• Perform a Query (p. 119)• Additional Resources (p. 120)
Overview
Amazon DynamoDB is a fast, highly scalable, highly available, cost-effective, non-relational databaseservice. Amazon DynamoDB removes traditional scalability limitations on data storage while maintaininglow latency and predictable performance.
The AWS Mobile SDK for iOS provides both low-level and high-level libraries for working with AmazonDynamoDB.
The high-level library described in this section provides Amazon DynamoDB object mapper which letsyou map client-side classes to tables. Working within the data model defined on your client you can writesimple, readable code that stores and retrieves objects in the cloud.
The dynamodb-low-level-client provides useful ways to perform operations like conditional writes andbatch operations.
Setup
To set your project up to use the AWS SDK for iOS dynamoDBObjectMapper, take the following steps.
Set Up the SDK, Credentials, and Services
To integrate dynamoDBObjectMapper into a new app, follow the steps described in Get Started toinstall the AWS Mobile SDK for iOS.
Instantiate the Object Mapper API
In this section:
Topics• Import the AWSDynamoDB APIs (p. 113)
112

AWS Mobile Hub Developer Guide Developer GuideAndroid and iOS
• Create Amazon DynamoDB Object Mapper Client (p. 113)• Define a Mapping Class (p. 113)
Import the AWSDynamoDB APIs
Add the following import statement to your project.
iOS - Swift
import AWSDynamoDB
iOS - Objective-C
#import <AWSDynamoDB/AWSDynamoDB.h>
Create Amazon DynamoDB Object Mapper Client
Use the AWSDynamoDBObjectMapper to map a client-side class to your database. The object mappersupports high-level operations like creating, getting, querying, updating, and deleting records. Create anobject mapper as follows.
iOS - Swift
dynamoDBObjectMapper = AWSDynamoDBObjectMapper.default()
iOS - Objective-C
AWSDynamoDBObjectMapper *dynamoDBObjectMapper = [AWSDynamoDBObjectMapper defaultDynamoDBObjectMapper];
Object mapper methods return an AWSTask object. for more information, see Working withAsynchronous Tasks.
Define a Mapping Class
An Amazon DynamoDB database is a collection of tables, and a table can be described as follows:
• A table is a collection of items.• Each item is a collection of attributes.• Each attribute has a name and a value.
For the bookstore app, each item in the table represents a book, and each item has four attributes: Title,Author, Price, and ISBN.
Each item (Book) in the table has a Primary key, in this case, the primary key is ISBN.
To directly manipulate database items through their object representation, map each item in the Booktable to a Book object in the client-side code, as shown in the following code. Attribute names are casesensitive.
iOS - Swift
import AWSDynamoDB
113
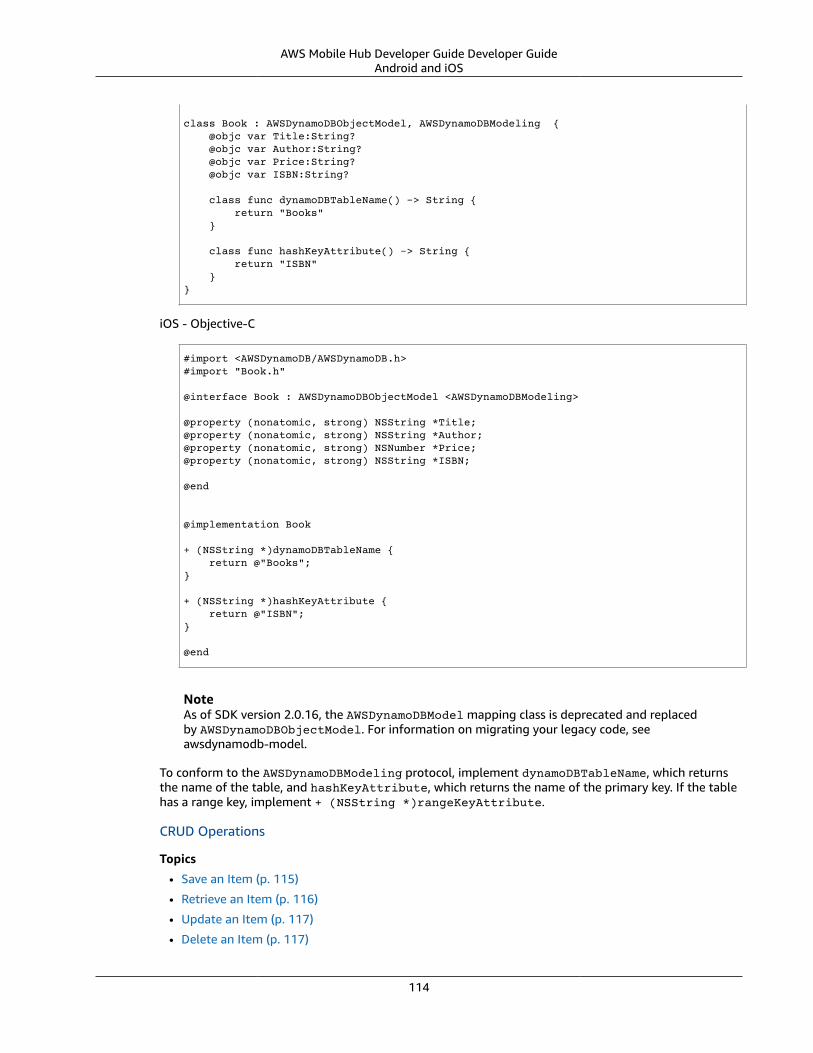
AWS Mobile Hub Developer Guide Developer GuideAndroid and iOS
class Book : AWSDynamoDBObjectModel, AWSDynamoDBModeling { @objc var Title:String? @objc var Author:String? @objc var Price:String? @objc var ISBN:String?
class func dynamoDBTableName() -> String { return "Books" }
class func hashKeyAttribute() -> String { return "ISBN" }}
iOS - Objective-C
#import <AWSDynamoDB/AWSDynamoDB.h>#import "Book.h"
@interface Book : AWSDynamoDBObjectModel <AWSDynamoDBModeling>
@property (nonatomic, strong) NSString *Title;@property (nonatomic, strong) NSString *Author;@property (nonatomic, strong) NSNumber *Price;@property (nonatomic, strong) NSString *ISBN;
@end
@implementation Book
+ (NSString *)dynamoDBTableName { return @"Books";}
+ (NSString *)hashKeyAttribute { return @"ISBN";}
@end
NoteAs of SDK version 2.0.16, the AWSDynamoDBModel mapping class is deprecated and replacedby AWSDynamoDBObjectModel. For information on migrating your legacy code, seeawsdynamodb-model.
To conform to the AWSDynamoDBModeling protocol, implement dynamoDBTableName, which returnsthe name of the table, and hashKeyAttribute, which returns the name of the primary key. If the tablehas a range key, implement + (NSString *)rangeKeyAttribute.
CRUD Operations
Topics
• Save an Item (p. 115)
• Retrieve an Item (p. 116)
• Update an Item (p. 117)
• Delete an Item (p. 117)
114
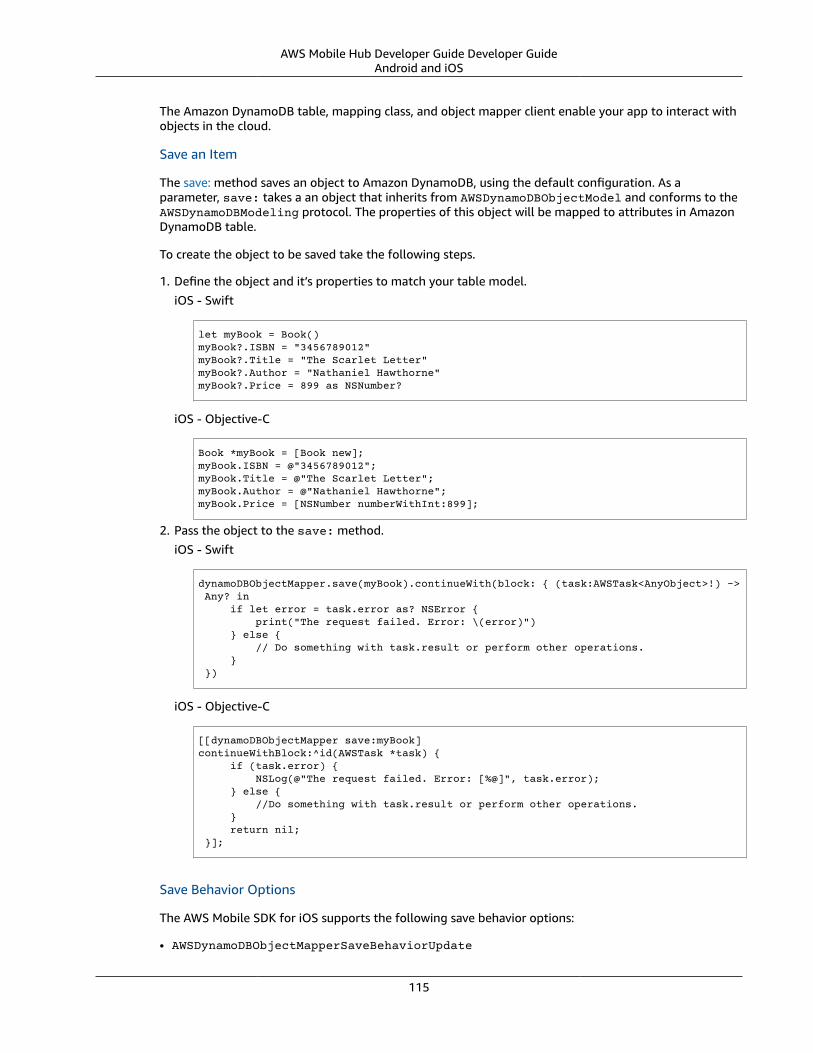
AWS Mobile Hub Developer Guide Developer GuideAndroid and iOS
The Amazon DynamoDB table, mapping class, and object mapper client enable your app to interact withobjects in the cloud.
Save an Item
The save: method saves an object to Amazon DynamoDB, using the default configuration. As aparameter, save: takes a an object that inherits from AWSDynamoDBObjectModel and conforms to theAWSDynamoDBModeling protocol. The properties of this object will be mapped to attributes in AmazonDynamoDB table.
To create the object to be saved take the following steps.
1. Define the object and it’s properties to match your table model.iOS - Swift
let myBook = Book()myBook?.ISBN = "3456789012"myBook?.Title = "The Scarlet Letter"myBook?.Author = "Nathaniel Hawthorne"myBook?.Price = 899 as NSNumber?
iOS - Objective-C
Book *myBook = [Book new];myBook.ISBN = @"3456789012";myBook.Title = @"The Scarlet Letter";myBook.Author = @"Nathaniel Hawthorne";myBook.Price = [NSNumber numberWithInt:899];
2. Pass the object to the save: method.iOS - Swift
dynamoDBObjectMapper.save(myBook).continueWith(block: { (task:AWSTask<AnyObject>!) -> Any? in if let error = task.error as? NSError { print("The request failed. Error: \(error)") } else { // Do something with task.result or perform other operations. } })
iOS - Objective-C
[[dynamoDBObjectMapper save:myBook]continueWithBlock:^id(AWSTask *task) { if (task.error) { NSLog(@"The request failed. Error: [%@]", task.error); } else { //Do something with task.result or perform other operations. } return nil; }];
Save Behavior Options
The AWS Mobile SDK for iOS supports the following save behavior options:
• AWSDynamoDBObjectMapperSaveBehaviorUpdate
115
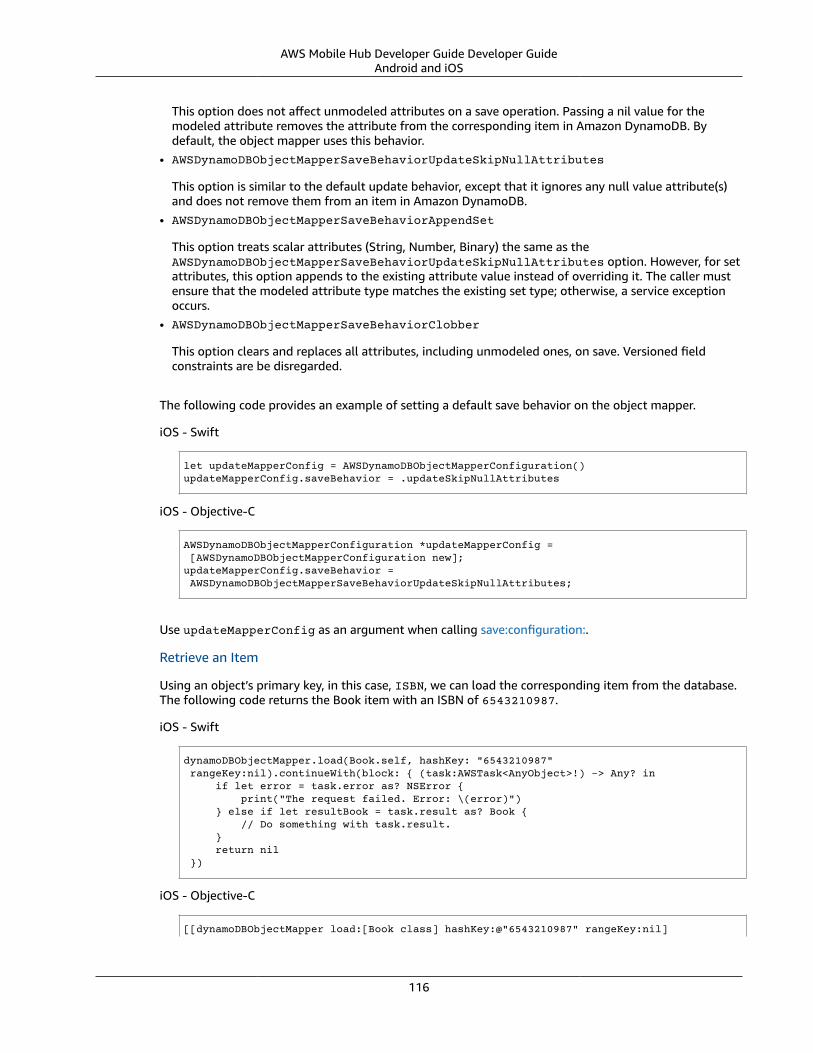
AWS Mobile Hub Developer Guide Developer GuideAndroid and iOS
This option does not affect unmodeled attributes on a save operation. Passing a nil value for themodeled attribute removes the attribute from the corresponding item in Amazon DynamoDB. Bydefault, the object mapper uses this behavior.
• AWSDynamoDBObjectMapperSaveBehaviorUpdateSkipNullAttributes
This option is similar to the default update behavior, except that it ignores any null value attribute(s)and does not remove them from an item in Amazon DynamoDB.
• AWSDynamoDBObjectMapperSaveBehaviorAppendSet
This option treats scalar attributes (String, Number, Binary) the same as theAWSDynamoDBObjectMapperSaveBehaviorUpdateSkipNullAttributes option. However, for setattributes, this option appends to the existing attribute value instead of overriding it. The caller mustensure that the modeled attribute type matches the existing set type; otherwise, a service exceptionoccurs.
• AWSDynamoDBObjectMapperSaveBehaviorClobber
This option clears and replaces all attributes, including unmodeled ones, on save. Versioned fieldconstraints are be disregarded.
The following code provides an example of setting a default save behavior on the object mapper.
iOS - Swift
let updateMapperConfig = AWSDynamoDBObjectMapperConfiguration()updateMapperConfig.saveBehavior = .updateSkipNullAttributes
iOS - Objective-C
AWSDynamoDBObjectMapperConfiguration *updateMapperConfig = [AWSDynamoDBObjectMapperConfiguration new];updateMapperConfig.saveBehavior = AWSDynamoDBObjectMapperSaveBehaviorUpdateSkipNullAttributes;
Use updateMapperConfig as an argument when calling save:configuration:.
Retrieve an Item
Using an object’s primary key, in this case, ISBN, we can load the corresponding item from the database.The following code returns the Book item with an ISBN of 6543210987.
iOS - Swift
dynamoDBObjectMapper.load(Book.self, hashKey: "6543210987" rangeKey:nil).continueWith(block: { (task:AWSTask<AnyObject>!) -> Any? in if let error = task.error as? NSError { print("The request failed. Error: \(error)") } else if let resultBook = task.result as? Book { // Do something with task.result. } return nil })
iOS - Objective-C
[[dynamoDBObjectMapper load:[Book class] hashKey:@"6543210987" rangeKey:nil]
116

AWS Mobile Hub Developer Guide Developer GuideAndroid and iOS
continueWithBlock:^id(AWSTask *task) { if (task.error) { NSLog(@"The request failed. Error: [%@]", task.error); } else { //Do something with task.result. } return nil;}];
The object mapper creates a mapping between the Book item returned from the database and the Bookobject on the client (here, resultBook). Access the title at resultBook.Title.
Since the Books database does not have a range key, nil was passed to the rangeKey parameter.
Update an Item
To update an item in the database, just set new attributes and save the objects. The primary key of anexisting item, myBook.ISBN in the Book object mapper example, cannot be changed. If you save anexisting object with a new primary key, a new item with the same attributes and the new primary key arecreated.
Delete an Item
To delete a table row, use the remove: method.
iOS - Swift
let bookToDelete = Book() bookToDelete?.ISBN = "4456789012";
dynamoDBObjectMapper.remove(bookToDelete).continueWith(block: { (task:AWSTask<AnyObject>!) -> Any? in if let error = task.error as? NSError { print("The request failed. Error: \(error)") } else { // Item deleted. } })
iOS - Objective-C
Book *bookToDelete = [Book new];bookToDelete.ISBN = @"4456789012";
[[dynamoDBObjectMapper remove:bookToDelete] continueWithBlock:^id(AWSTask *task) {
if (task.error) { NSLog(@"The request failed. Error: [%@]", task.error); } else { //Item deleted. } return nil; }];
Perform a Scan
A scan operation retrieves in an undetermined order.
117

AWS Mobile Hub Developer Guide Developer GuideAndroid and iOS
The scan:expression: method takes two parameters: the class of the resulting object and an instanceof AWSDynamoDBScanExpression, which provides options for filtering results.
The following example shows how to create an AWSDynamoDBScanExpression object, set its limitproperty, and then pass the Book class and the expression object to scan:expression:.
iOS - Swift
let scanExpression = AWSDynamoDBScanExpression() scanExpression.limit = 20
dynamoDBObjectMapper.scan(Book.self, expression: scanExpression).continueWith(block: { (task:AWSTask<AnyObject>!) -> Any? in if let error = task.error as? NSError { print("The request failed. Error: \(error)") } else if let paginatedOutput = task.result { for book in paginatedOutput.items as! Book { // Do something with book. } } })
iOS - Objective-C
AWSDynamoDBScanExpression *scanExpression = [AWSDynamoDBScanExpression new];scanExpression.limit = @10;
[[dynamoDBObjectMapper scan:[Book class] expression:scanExpression]continueWithBlock:^id(AWSTask *task) { if (task.error) { NSLog(@"The request failed. Error: [%@]", task.error); } else { AWSDynamoDBPaginatedOutput *paginatedOutput = task.result; for (Book *book in paginatedOutput.items) { //Do something with book. } } return nil;}];
Filter a Scan
The output of a scan is returned as an AWSDynamoDBPaginatedOutput object. The array of returneditems is in the items property.
The scanExpression method provides several optional parameters. Use filterExpression andexpressionAttributeValues to specify a scan result for the attribute names and conditions youdefine. For more information about the parameters and the API, see AWSDynamoDBScanExpression.
The following code scans the Books table to find books with a price less than 50.
iOS - Swift
let scanExpression = AWSDynamoDBScanExpression() scanExpression.limit = 10 scanExpression.filterExpression = "Price < :val" scanExpression.expressionAttributeValues = [":val": 50]
118
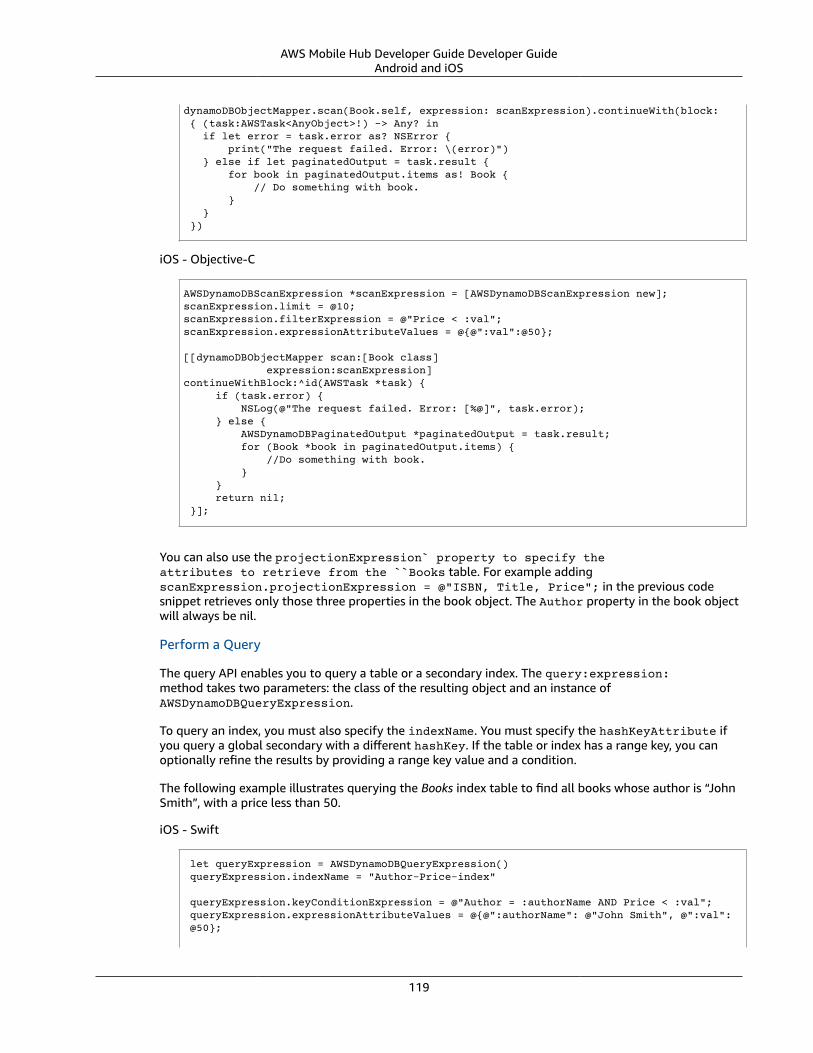
AWS Mobile Hub Developer Guide Developer GuideAndroid and iOS
dynamoDBObjectMapper.scan(Book.self, expression: scanExpression).continueWith(block: { (task:AWSTask<AnyObject>!) -> Any? in if let error = task.error as? NSError { print("The request failed. Error: \(error)") } else if let paginatedOutput = task.result { for book in paginatedOutput.items as! Book { // Do something with book. } } })
iOS - Objective-C
AWSDynamoDBScanExpression *scanExpression = [AWSDynamoDBScanExpression new];scanExpression.limit = @10;scanExpression.filterExpression = @"Price < :val";scanExpression.expressionAttributeValues = @{@":val":@50};
[[dynamoDBObjectMapper scan:[Book class] expression:scanExpression]continueWithBlock:^id(AWSTask *task) { if (task.error) { NSLog(@"The request failed. Error: [%@]", task.error); } else { AWSDynamoDBPaginatedOutput *paginatedOutput = task.result; for (Book *book in paginatedOutput.items) { //Do something with book. } } return nil; }];
You can also use the projectionExpression` property to specify theattributes to retrieve from the ``Books table. For example addingscanExpression.projectionExpression = @"ISBN, Title, Price"; in the previous codesnippet retrieves only those three properties in the book object. The Author property in the book objectwill always be nil.
Perform a Query
The query API enables you to query a table or a secondary index. The query:expression:method takes two parameters: the class of the resulting object and an instance ofAWSDynamoDBQueryExpression.
To query an index, you must also specify the indexName. You must specify the hashKeyAttribute ifyou query a global secondary with a different hashKey. If the table or index has a range key, you canoptionally refine the results by providing a range key value and a condition.
The following example illustrates querying the Books index table to find all books whose author is “JohnSmith”, with a price less than 50.
iOS - Swift
let queryExpression = AWSDynamoDBQueryExpression() queryExpression.indexName = "Author-Price-index"
queryExpression.keyConditionExpression = @"Author = :authorName AND Price < :val"; queryExpression.expressionAttributeValues = @{@":authorName": @"John Smith", @":val": @50};
119

AWS Mobile Hub Developer Guide Developer GuideAndroid and iOS
dynamoDBObjectMapper.query(Book.self, expression: queryExpression).continueWith(block: { (task:AWSTask<AnyObject>!) -> Any? in if let error = task.error as? NSError { print("The request failed. Error: \(error)") } else if let paginatedOutput = task.result { for book in paginateOutput.items as! Book { // Do something with book. } } return nil })
iOS - Objective-C
AWSDynamoDBQueryExpression *queryExpression = [AWSDynamoDBQueryExpression new];
queryExpression.indexName = @"Author-Price-index";
queryExpression.keyConditionExpression = @"Author = :authorName AND Price < :val";
queryExpression.expressionAttributeValues = @{@":authorName": @"John Smith", @":val":@50};
[[dynamoDBObjectMapper query:[Book class] expression:queryExpression]continueWithBlock:^id(AWSTask *task) { if (task.error) { NSLog(@"The request failed. Error: [%@]", task.error); } else { AWSDynamoDBPaginatedOutput *paginatedOutput = task.result; for (Book *book in paginatedOutput.items) { //Do something with book. } } return nil; }];
In the preceding example, indexName is specified to demonstrate querying an index. The queryexpression is specified using keyConditionExpression and the values used in the expression usingexpressionAttributeValues.
You can also provide filterExpression and projectionExpression inAWSDynamoDBQueryExpression. The syntax is the same as that used in a scan operation.
For more information, see AWSDynamoDBQueryExpression.
Migrating AWSDynamoDBModel to AWSDynamoDBObjectModel
As of SDK version 2.0.16, the AWSDynamoDBModel mapping class is deprecated and replaced byAWSDynamoDBObjectModel.The deprecated AWSDynamoDBModel used NSArray to representmulti-valued types (String Set, Number Set, and Binary Set); it did not support Boolean,Map, or List types. The new AWSDynamoDBObjectModel uses NSSet for multi-valued types andsupports Boolean, Map, and List. For the Boolean type, you create an NSNumber using [NSNumbernumberWithBool:YES] or using the shortcuts @YES and @NO. For the Map type, create usingNSDictionary. For the List type, create using NSArray.
Additional Resources
• Amazon DynamoDB Developer Guide
• Amazon DynamoDB API Reference
120

AWS Mobile Hub Developer Guide Developer GuideAndroid and iOS
iOS: Amazon DynamoDB Low-Level Client
The following reference content only applies to existing apps that were built using the AWS MobileSDKs for iOS and Android. If you’re building a new mobile or web app, or you’re adding cloudcapabilities to an existing app, visit the Amplify Framework website instead. Documentation for theAWS Mobile SDKs for iOS and Android is now part of the Amplify Framework.
Topics• Overview (p. 13)• Setup (p. 112)• Conditional Writes Using the Low-Level Client (p. 122)• Batch Operations Using the Low-Level Client (p. 123)• Additional Resources (p. 120)
Overview
Amazon DynamoDB is a fast, highly scalable, highly available, cost-effective, nonrelational databaseservice. Amazon DynamoDB removes traditional scalability limitations on data storage while maintaininglow latency and predictable performance.
The AWS Mobile SDK for iOS provides both low-level and high-level libraries for working AmazonDynamoDB.
The low-level client described in this section allows the kind of direct access to Amazon DynamoDBtables useful for NoSQL and other non-relational data designs. The low-level client also supportsconditional data writes to mitigate simultaneous write conflicts and batch data writes.
The high-level library includes dynamodb-object-mapper, which lets you map client-side classes toaccess and manipulate Amazon Dynamo tables.
Setup
To set up your project to use the AWS SDK for iOS TransferUtility, perform the following steps.
1. Set Up the SDK, Credentials, and Services
To use the low-level DynamoDB mobile client in a new app, follow the steps described in GetStarted (p. 3) to install the AWS Mobile SDK for iOS.
2. Create or Use an Existing Amazon DynamoDB Table
Follow the steps on <dynamodb-setup-for-ios-legacy> to create a table.
3. Import the AWSDynamoDB APIs
Add the following import statement to your project.
iOS - Swift
import AWSDynamoDB
iOS - Objective-C
#import <AWSDynamoDB/AWSDynamoDB.h>
121

AWS Mobile Hub Developer Guide Developer GuideAndroid and iOS
Conditional Writes Using the Low-Level Client
In a multi-user environment, multiple clients can access the same item and attempt to modifyits attribute values at the same time. To help clients coordinate writes to data items, the AmazonDynamoDB low-level client supports conditional writes for PutItem, DeleteItem, and UpdateItemoperations. With a conditional write, an operation succeeds only if the item attributes meet one or moreexpected conditions; otherwise, it returns an error.
In the following example, we update the price of an item in the Books table if the Price attribute of theitem has a value of 999.
iOS - Swift
Amazon DynamoDB = AWSDynamoDB.default() let updateInput = AWSDynamoDBUpdateItemInput()
let hashKeyValue = AWSDynamoDBAttributeValue() hashKeyValue?.s = "4567890123"
updateInput?.tableName = "Books" updateInput?.key = ["ISBN": hashKeyValue!]
let oldPrice = AWSDynamoDBAttributeValue() oldPrice?.n = "999"
let expectedValue = AWSDynamoDBExpectedAttributeValue() expectedValue?.value = oldPrice
let newPrice = AWSDynamoDBAttributeValue() newPrice?.n = "1199"
let valueUpdate = AWSDynamoDBAttributeValueUpdate() valueUpdate?.value = newPrice valueUpdate?.action = .put
updateInput?.attributeUpdates = ["Price": valueUpdate!] updateInput?.expected = ["Price": expectedValue!] updateInput?.returnValues = .updatedNew
Amazon DynamoDB.updateItem(updateInput!).continueWith { (task:AWSTask<AWSDynamoDBUpdateItemOutput>) -> Any? in if let error = task.error as? NSError { print("The request failed. Error: \(error)") return nil }
// Do something with task.result
return nil }
iOS - Objective-C
AWSDynamoDB *dynamoDB = [AWSDynamoDB defaultDynamoDB];AWSDynamoDBUpdateItemInput *updateInput = [AWSDynamoDBUpdateItemInput new];
AWSDynamoDBAttributeValue *hashKeyValue = [AWSDynamoDBAttributeValue new];hashKeyValue.S = @"4567890123";
updateInput.tableName = @"Books";updateInput.key = @{ @"ISBN" : hashKeyValue };
AWSDynamoDBAttributeValue *oldPrice = [AWSDynamoDBAttributeValue new];
122

AWS Mobile Hub Developer Guide Developer GuideAndroid and iOS
oldPrice.N = @"999";
AWSDynamoDBExpectedAttributeValue *expectedValue = [AWSDynamoDBExpectedAttributeValue new];expectedValue.value = oldPrice;
AWSDynamoDBAttributeValue *newPrice = [AWSDynamoDBAttributeValue new];newPrice.N = @"1199";
AWSDynamoDBAttributeValueUpdate *valueUpdate = [AWSDynamoDBAttributeValueUpdate new];valueUpdate.value = newPrice;valueUpdate.action = AWSDynamoDBAttributeActionPut;
updateInput.attributeUpdates = @{@"Price": valueUpdate};updateInput.expected = @{@"Price": expectedValue};updateInput.returnValues = AWSDynamoDBReturnValueUpdatedNew;
[[dynamoDB updateItem:updateInput] continueWithBlock:^id(AWSTask *task) { if (task.error) { NSLog(@"The request failed. Error: [%@]", task.error); } else { //Do something with task.result. } return nil; }];
Conditional writes are idempotent. In other words, if a conditional write request is made multiple times,the update will be performed only in the first instance unless the content of the request changes. In thepreceding example, sending the same request a second time results in a ConditionalCheckFailedException,because the expected condition is not met after the first update.
Batch Operations Using the Low-Level Client
The Amazon DynamoDB low-level client provides batch write operations to put items in the databaseand delete items from the database. You can also use batch get operations to return the attributes ofone or more items from one or more tables.
The following example shows a batch write operation.
iOS - Swift
Amazon DynamoDB = AWSDynamoDB.default()
//Write Request 1 let hashValue1 = AWSDynamoDBAttributeValue() hashValue1?.s = "3210987654" let otherValue1 = AWSDynamoDBAttributeValue() otherValue1?.s = "Some Title"
let writeRequest = AWSDynamoDBWriteRequest() writeRequest?.putRequest = AWSDynamoDBPutRequest() writeRequest?.putRequest?.item = ["ISBN": hashValue1!, "Title": otherValue1!]
//Write Request 2 let hashValue2 = AWSDynamoDBAttributeValue() hashValue2?.s = "8901234567" let otherValue2 = AWSDynamoDBAttributeValue() otherValue2?.s = "Another Title"
let writeRequest2 = AWSDynamoDBWriteRequest() writeRequest2?.putRequest = AWSDynamoDBPutRequest() writeRequest2?.putRequest?.item = ["ISBN": hashValue2!, "Title": otherValue2!]
123

AWS Mobile Hub Developer Guide Developer GuideAndroid and iOS
let batchWriteItemInput = AWSDynamoDBBatchWriteItemInput() batchWriteItemInput?.requestItems = ["Books": [writeRequest!, writeRequest2!]]
Amazon DynamoDB.batchWriteItem(batchWriteItemInput!).continueWith { (task:AWSTask<AWSDynamoDBBatchWriteItemOutput>) -> Any? in if let error = task.error as? NSError { print("The request failed. Error: \(error)") return nil }
// Do something with task.result
return nil }
iOS - Objective-C
AWSDynamoDB *dynamoDB = [AWSDynamoDB defaultDynamoDB];
//Write Request 1AWSDynamoDBAttributeValue *hashValue1 = [AWSDynamoDBAttributeValue new];hashValue1.S = @"3210987654";AWSDynamoDBAttributeValue *otherValue1 = [AWSDynamoDBAttributeValue new];otherValue1.S = @"Some Title";
AWSDynamoDBWriteRequest *writeRequest = [AWSDynamoDBWriteRequest new];writeRequest.putRequest = [AWSDynamoDBPutRequest new];writeRequest.putRequest.item = @{ @"ISBN" : hashValue1, @"Title" : otherValue1 };
//Write Request 2AWSDynamoDBAttributeValue *hashValue2 = [AWSDynamoDBAttributeValue new];hashValue2.S = @"8901234567";AWSDynamoDBAttributeValue *otherValue2 = [AWSDynamoDBAttributeValue new];otherValue2.S = @"Another Title";
AWSDynamoDBWriteRequest *writeRequest2 = [AWSDynamoDBWriteRequest new];writeRequest2.putRequest = [AWSDynamoDBPutRequest new];writeRequest2.putRequest.item = @{ @"ISBN" : hashValue2, @"Title" : otherValue2 };
AWSDynamoDBBatchWriteItemInput *batchWriteItemInput = [AWSDynamoDBBatchWriteItemInput new];batchWriteItemInput.requestItems = @{@"Books": @[writeRequest,writeRequest2]};
[[dynamoDB batchWriteItem:batchWriteItemInput] continueWithBlock:^id(AWSTask *task) { if (task.error) { NSLog(@"The request failed. Error: [%@]", task.error); } else { //Do something with task.result. } return nil;}];
Additional Resources
• Amazon DynamoDB Developer Guide
124

AWS Mobile Hub Developer Guide Developer GuideAndroid and iOS
• Amazon DynamoDB API Reference
How To: Serverless Code with AWS Lambda
The following reference content only applies to existing apps that were built using the AWS MobileSDKs for iOS and Android. If you’re building a new mobile or web app, or you’re adding cloudcapabilities to an existing app, visit the Amplify Framework website instead. Documentation for theAWS Mobile SDKs for iOS and Android is now part of the Amplify Framework.
This section provides procedures for integrating your AWS Lambda functions into your Android and iOSapps.
Topics• Android: Execute Code On Demand with AWS Lambda (p. 125)• iOS: Execute Code On Demand with AWS Lambda (p. 130)
Android: Execute Code On Demand with AWS Lambda
The following reference content only applies to existing apps that were built using the AWS MobileSDKs for iOS and Android. If you’re building a new mobile or web app, or you’re adding cloudcapabilities to an existing app, visit the Amplify Framework website instead. Documentation for theAWS Mobile SDKs for iOS and Android is now part of the Amplify Framework.
Overview
AWS Lambda is a compute service that runs your code in response to events and automatically managesthe compute resources for you, making it easy to build applications that respond quickly to newinformation. The AWS Mobile SDK for Android enables you to call Lambda functions from your Androidmobile apps.
The tutorial below explains how to integrate AWS Lambda with your app.
Setup
Prerequisites
Add the AWS Mobile SDK for Android to your app before beginning this tutorial.
Create a Lambda Function in the AWS Console
For this tutorial, let’s use a simple “echo” function that returns the input. Follow the steps described atAWS Lambda Getting Started, replacing the function code with the code below:
exports.handler = function(event, context) { console.log("Received event"); context.succeed("Hello "+ event.firstName + "using " + context.clientContext.deviceManufacturer); }
Set IAM Permissions
The default IAM role policy grants your users access to Amazon Mobile Analytics and Amazon CognitoSync. To use AWS Lambda in your application, you must configure the IAM role policy so that it allowsyour application and your users access to AWS Lambda. The IAM policy in the following steps allows
125

AWS Mobile Hub Developer Guide Developer GuideAndroid and iOS
the user to perform the actions shown in this tutorial on a given AWS Lambda function identified by itsAmazon Resource Name (ARN). To find the ARN go to the Lambda Console and click the Function name.
To set IAM Permissions for AWS Lambda:
1. Navigate to the IAM Console and click Roles in the left-hand pane.2. Type your identity pool name into the search box. Two roles will be listed: one for unauthenticated
users and one for authenticated users.3. Click the role for unauthenticated users (it will have unauth appended to your Identity Pool name).4. Click the Create Role Policy button, select Custom Policy, and then click the Select button.5. Enter a name for your policy and paste in the following policy document, replacing the function’s
Resource value with the ARN for your function (click your function’s Function name in the AWSLambda console to view its ARN).
{ "Statement": [{ "Effect": "Allow", "Action": [ "lambda:invokefunction" ], "Resource": [ ”arn:aws:lambda:us-west-2:012345678901:function:yourFunctionName” ] }]}
1. Click the Add Statement button, and then click the Next Step button. The wizard will show you theconfiguration that you generated.
2. Click the Apply Policy button.
To learn more about IAM policies, see IAM documentation.
Set Permissions in Your Android Manifest
In your AndroidManifest.xml, add the following permission
<uses-permission android:name="android.permission.ACCESS_NETWORK_STATE" />
Initialize LambdaInvokerFactory
Android - Java
Pass your initialized Amazon Cognito credentials provider to the LambdaInvokerFactoryconstructor:
LambdaInvokerFactory factory = new LambdaInvokerFactory( myActivity.getApplicationContext(), REGION, credentialsProvider);
Android - Kotlin
Pass your initialized Amazon Cognito credentials provider to the LambdaInvokerFactoryconstructor:
val factory = LambdaInvokerFactory(applicationContext,
126

AWS Mobile Hub Developer Guide Developer GuideAndroid and iOS
REGION, credentialsProvider)
Declare Data Types
Android - Java
Declare the Java classes to hold the data you pass to the Lambda function. The following classdefines a NameInfo class that contains a person’s first and last name:
package com.amazonaws.demo.lambdainvoker;
/** * A simple POJO */public class NameInfo { private String firstName; private String lastName;
public NameInfo() {}
public NameInfo(String firstName, String lastName) { this.firstName = firstName; this.lastName = lastName; }
public String getFirstName() { return firstName; }
public void setFirstName(String firstName) { this.firstName = firstName; }
public String getLastName() { return lastName; }
public void setLastName(String lastName) { this.lastName = lastName; }}
Android - Kotlin
Declare the Kotlin data classes to hold the data you pass to the Lambda function. The following classdefines a NameInfo class that contains a person’s first and last name:
package com.amazonaws.demo.lambdainvoker;
data class NameInfo(var firstName: String, var lastName: String)
Create a Lambda proxy
Declare an interface containing one method for each Lambda function call. Each method in the interfacemust be decorated with the “@LambdaFunction” annotation. The LambdaFunction attribute can take 3optional parameters:
• functionName allows you to specify the name of the Lambda function to call when the method isexecuted, by default the name of the method is used.
127

AWS Mobile Hub Developer Guide Developer GuideAndroid and iOS
• logType is valid only when invocationType is set to “Event”. If set, AWS Lambda will return the last4KB of log data produced by your Lambda Function in the x-amz-log-results header.
• invocationType specifies how the Lambda function will be invoked. Can be one of the followingvalues:
• Event: calls the Lambda Function asynchronously
• RequestResponse: calls the Lambda Function synchronously
• DryRun: allows you to validate access to a Lambda Function without executing it
The following code shows how to create a Lambda proxy:
Android - Java
package com.amazonaws.demo.lambdainvoker;
import com.amazonaws.mobileconnectors.lambdainvoker.LambdaFunction;
public interface MyInterface { /** * Invoke lambda function "echo". The function name is the method name */ @LambdaFunction String echo(NameInfo nameInfo)
/** * Invoke lambda function "echo". The functionName in the annotation * overrides the default which is the method name */ @LambdaFunction(functionName = "echo") void noEcho(NameInfo nameInfo)}
Android - Kotlin
package com.amazonaws.demo.lambdainvoker;
import com.amazonaws.mobileconnectors.lambdainvoker.LambdaFunction;
interface MyInterface { /** * Invoke lambda function "echo". The function name is the method name */ @LambdaFunction fun echo(nameInfo: NameInfo): String
/** * Invoke lambda function "echo". The functionName in the annotation * overrides the default which is the method name */ @LambdaFunction(functionName = "echo") fun noEcho(nameInfo: NameInfo): Unit}
Invoke the Lambda Function
NoteDo not invoke the Lambda function from the main thread as it results in a network call.
128

AWS Mobile Hub Developer Guide Developer GuideAndroid and iOS
The following code shows how to initialize the Cognito Caching Credentials Provider and invoke aLambda function. The value for IDENTITY_POOL_ID will be specific to your account. Ensure the regionis the same as the Lambda function you are trying to invoke.
Android - Java
// Create an instance of CognitoCachingCredentialsProviderCognitoCachingCredentialsProvider credentialsProvider = new CognitoCachingCredentialsProvider( myActivity.getApplicationContext(), IDENTITY_POOL_ID, Regions.YOUR_REGION);
// Create a LambdaInvokerFactory, to be used to instantiate the Lambda proxyLambdaInvokerFactory factory = new LambdaInvokerFactory( myActivity.getApplicationContext(), REGION, credentialsProvider);
// Create the Lambda proxy object with default Json data binder.// You can provide your own data binder by implementing// LambdaDataBinderMyInterface myInterface = factory.build(MyInterface.class);
// Create an instance of the POJO to transfer dataNameInfo nameInfo = new NameInfo("John", "Doe");
// The Lambda function invocation results in a network call// Make sure it is not called from the main threadnew AsyncTask<NameInfo, Void, String>() { @Override protected String doInBackground(NameInfo... params) { // invoke "echo" method. In case it fails, it will throw a // LambdaFunctionException. try { return myInterface.echo(params[0]); } catch (LambdaFunctionException lfe) { Log.e(TAG, "Failed to invoke echo", lfe); return null; } }
@Override protected void onPostExecute(String result) { if (result == null) { return; }
// Do a toast Toast.makeText(MainActivity.this, result, Toast.LENGTH_LONG).show(); }}.execute(nameInfo);
Android - Kotlin
// Create an instance of CognitoCachingCredentialsProviderval credentialsProvider = CognitoCachingCredentialsProvider( [email protected], IDENTITY_POOL_ID, Regions.IDENTITY_POOL_REGION)
// Create a LambdaInvokerFactory, to be used to instantiate the Lambda proxyval factory = LambdaInvokerFactory( [email protected],
129
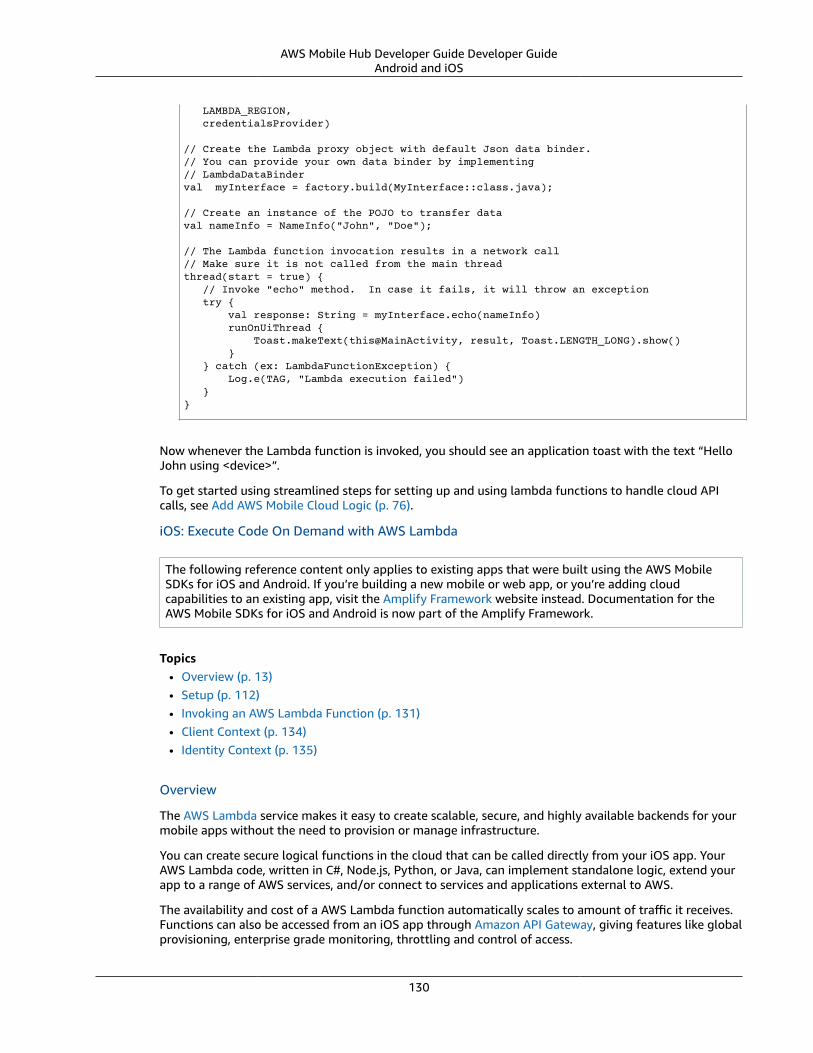
AWS Mobile Hub Developer Guide Developer GuideAndroid and iOS
LAMBDA_REGION, credentialsProvider)
// Create the Lambda proxy object with default Json data binder.// You can provide your own data binder by implementing// LambdaDataBinderval myInterface = factory.build(MyInterface::class.java);
// Create an instance of the POJO to transfer dataval nameInfo = NameInfo("John", "Doe");
// The Lambda function invocation results in a network call// Make sure it is not called from the main threadthread(start = true) { // Invoke "echo" method. In case it fails, it will throw an exception try { val response: String = myInterface.echo(nameInfo) runOnUiThread { Toast.makeText(this@MainActivity, result, Toast.LENGTH_LONG).show() } } catch (ex: LambdaFunctionException) { Log.e(TAG, "Lambda execution failed") }}
Now whenever the Lambda function is invoked, you should see an application toast with the text “HelloJohn using <device>”.
To get started using streamlined steps for setting up and using lambda functions to handle cloud APIcalls, see Add AWS Mobile Cloud Logic (p. 76).
iOS: Execute Code On Demand with AWS Lambda
The following reference content only applies to existing apps that were built using the AWS MobileSDKs for iOS and Android. If you’re building a new mobile or web app, or you’re adding cloudcapabilities to an existing app, visit the Amplify Framework website instead. Documentation for theAWS Mobile SDKs for iOS and Android is now part of the Amplify Framework.
Topics• Overview (p. 13)• Setup (p. 112)• Invoking an AWS Lambda Function (p. 131)• Client Context (p. 134)• Identity Context (p. 135)
Overview
The AWS Lambda service makes it easy to create scalable, secure, and highly available backends for yourmobile apps without the need to provision or manage infrastructure.
You can create secure logical functions in the cloud that can be called directly from your iOS app. YourAWS Lambda code, written in C#, Node.js, Python, or Java, can implement standalone logic, extend yourapp to a range of AWS services, and/or connect to services and applications external to AWS.
The availability and cost of a AWS Lambda function automatically scales to amount of traffic it receives.Functions can also be accessed from an iOS app through Amazon API Gateway, giving features like globalprovisioning, enterprise grade monitoring, throttling and control of access.
130

AWS Mobile Hub Developer Guide Developer GuideAndroid and iOS
Setup
This section provides a step-by-step guide for getting started with AWS Lambda using the AWS MobileSDK for iOS.
1. Install the SDK
Add the AWS SDK for iOS to your project and import the APIs you need.2. Configure Credentials
To use Amazon Cognito to create AWS identities and credentials that give your users access to yourapp’s AWS resources, follow the steps described in Add User Sign-in (p. 92).
3. Create and Configure a Lambda Functiona. Sign in to the AWS Lambda console.b. Choose Create a Lambda function.c. Choose the Blank Function template.
Note that dozens of function templates that connect to other AWS services are available.d. Choose Next.
Note that the console allows you to configure triggers for a function from other AWS services, thesewon’t be used in this walkthrough.
e. Type a Name and select Node.js as the Runtime language.f. Under Lambda function handler and role, select Create new role from template(s). Type a Role
name. Select the Policy template named Simple Microservice permissions.g. Choose Next.h. Choose Create function.
Invoking an AWS Lambda Function
The SDK enables you to call AWS Lambda functions from your iOS mobile apps, using theAWSLambdaInvoker class. When invoked from this SDK, AWS Lambda functions receive data about thedevice and the end user identity through client and identity context objects. To learn more about usingthese contexts to create rich, and personalized app experiences, see Client Context (p. 134) and IdentityContext (p. 135).
Import AWS Lambda API
To use the lambdainvoker API, use the following import statement:
iOS - Swift
import AWSLambda
Objective C
#import <AWSLambda/AWSLambda.h>
Call lambdaInvoker
AWSLambdaInvoker provides a high-level abstraction for AWS Lambda. When invokeFunctionJSONObject is invoked, the JSON object is serialized into JSON data and sent to the AWS Lambdaservice. AWS Lambda returns a JSON encoded response that is deserialized into a JSON object.
A valid JSON object must have the following properties:
131

AWS Mobile Hub Developer Guide Developer GuideAndroid and iOS
• All objects are instances of string, number, array, dictionary or null objects.• All dictionary keys are instances of string objects.• Numbers are not NaN or infinity.
The following is an example of valid request.
iOS - Swift
let lambdaInvoker = AWSLambdaInvoker.default()let jsonObject: [String: Any] = ["key1" : "value1", "key2" : 2 , "key3" : [1, 2], "isError" : false]
lambdaInvoker.invokeFunction("myFunction", jsonObject: jsonObject) .continueWith(block: {(task:AWSTask<AnyObject>) -> Any? in if( task.error != nil) { print("Error: \(task.error!)") return nil }
// Handle response in task.result return nil})
Objective C
AWSLambdaInvoker *lambdaInvoker = [AWSLambdaInvoker defaultLambdaInvoker];
[[lambdaInvoker invokeFunction:@"myFunction" JSONObject:@{@"key1" : @"value1", @"key2" : @2, @"key3" : [NSNull null], @"key4" : @[@1, @"2"], @"isError" : @NO}] continueWithBlock:^id(AWSTask *task) { // Handle response return nil;}];
Using function returns
On successful execution, task.result contains a JSON object. For instance, if myFunctions returns adictionary, you can cast the result to a dictionary object as follows.
iOS - Swift
if let JSONDictionary = task.result as? NSDictionary { print("Result: \(JSONDictionary)") print("resultKey: \(JSONDictionary["resultKey"])")}
Objective C
if (task.result) { NSLog(@"Result: %@", task.result); NSDictionary *JSONObject = task.result; NSLog(@"result: %@", JSONObject[@"resultKey"]);}
132

AWS Mobile Hub Developer Guide Developer GuideAndroid and iOS
Handling service execution errors
On failed AWS Lambda service execution, task.error may contain a NSError with AWSLambdaErrorDomaindomain and the following error code.
• AWSLambdaErrorUnknown• AWSLambdaErrorService• AWSLambdaErrorResourceNotFound• AWSLambdaErrorInvalidParameterValue
On failed function execution, task.error may contain a NSError with AWSLambdaInvokerErrorDomaindomain and the following error code:
• AWSLambdaInvokerErrorTypeUnknown• AWSLambdaInvokerErrorTypeFunctionError
When AWSLambdaInvokerErrorTypeFunctionError error code is returned, error.userInfo may contain afunction error from your AWS Lambda function with AWSLambdaInvokerFunctionErrorKey key.
The following code shows error handling.
iOS - Swift
if let error = task.error as? NSError { if (error.domain == AWSLambdaInvokerErrorDomain) && (AWSLambdaInvokerErrorType.functionError == AWSLambdaInvokerErrorType(rawValue: error.code)) { print("Function error: \(error.userInfo[AWSLambdaInvokerFunctionErrorKey])") } else { print("Error: \(error)") } return nil}
Objective C
if (task.error) { NSLog(@"Error: %@", task.error); if ([task.error.domain isEqualToString:AWSLambdaInvokerErrorDomain] && task.error.code == AWSLambdaInvokerErrorTypeFunctionError) { NSLog(@"Function error: %@", task.error.userInfo[AWSLambdaInvokerFunctionErrorKey]); }}
Comprehensive example
The following code shows invoking an AWS Lambda call and handling returns and errors all together.
iOS - Swift
let lambdaInvoker = AWSLambdaInvoker.default()
let jsonObject: [String: Any] = ["key1" : "value1", "key2" : 2, "key3" : [1, 2],
133

AWS Mobile Hub Developer Guide Developer GuideAndroid and iOS
"isError" : false]
lambdaInvoker.invokeFunction("myFunction", jsonObject: jsonObject).continueWith(block: {(task:AWSTask<AnyObject>) -> Any? in if let error = task.error as? NSError { if (error.domain == AWSLambdaInvokerErrorDomain) && (AWSLambdaInvokerErrorType.functionError == AWSLambdaInvokerErrorType(rawValue: error.code) { print("Function error: \(error.userInfo[AWSLambdaInvokerFunctionErrorKey])") } else { print("Error: \(error)") } return nil }
// Handle response in task.result if let JSONDictionary = task.result as? NSDictionary { print("Result: \(JSONDictionary)") print("resultKey: \(JSONDictionary["resultKey"])") } return nil})
Objective C
AWSLambdaInvoker *lambdaInvoker = [AWSLambdaInvoker defaultLambdaInvoker];
[[lambdaInvoker invokeFunction:@"myFunction" JSONObject:@{@"key1" : @"value1", @"key2" : @2, @"key3" : [NSNull null], @"key4" : @[@1, @"2"], @"isError" : @NO}] continueWithBlock:^id(AWSTask *task) { if (task.error) { NSLog(@"Error: %@", task.error); if ([task.error.domain isEqualToString:AWSLambdaInvokerErrorDomain] && task.error.code == AWSLambdaInvokerErrorTypeFunctionError) { NSLog(@"Function error: %@", task.error.userInfo[AWSLambdaInvokerFunctionErrorKey]); } } if (task.result) { NSLog(@"Result: %@", task.result); NSDictionary *JSONObject = task.result; NSLog(@"result: %@", JSONObject[@"resultKey"]); } return nil;}];
Client Context
Calls to AWS Lambda using this SDK provide your functions with data about the calling device and appusing the ClientContext class.
You can access the client context in your lambda function as follows.
JavaScript
exports.handler = function(event, context) { console.log("installation_id = " + context.clientContext.client.installation_id); console.log("app_version_code = " + context.clientContext.client.app_version_code);
134

AWS Mobile Hub Developer Guide Developer GuideAndroid and iOS
console.log("app_version_name = " + context.clientContext.client.app_version_name); console.log("app_package_name = " + context.clientContext.client.app_package_name); console.log("app_title = " + context.clientContext.client.app_title); console.log("platform_version = " + context.clientContext.env.platform_version); console.log("platform = " + context.clientContext.env.platform); console.log("make = " + context.clientContext.env.make); console.log("model = " + context.clientContext.env.model); console.log("locale = " + context.clientContext.env.locale);
context.succeed("Your platform is " + context.clientContext.env.platform;}
ClientContext has the following fields:
client.installation_id
Auto-generated UUID that is created the first time the app is launched. This is stored in the keychainon the device. In case the keychain is wiped a new installation ID will be generated.
client.app_version_code
CFBundleShortVersionStringclient.app_version_name
CFBundleVersionclient.app_package_name
CFBundleIdentifierclient.app_title
CFBundleDisplayNameenv.platform_version
systemVersionenv.platform
systemNameenv.make
Hardcoded as “apple”env.model
Model of the deviceenv.locale
localeIdentifier from autoupdatingCurrentLocale
Identity Context
The IdentityContext class of the SDK passes Amazon Cognito credentials making the AWS identity of theend user available to your function. You can access the Identity ID as follows.
JavaScript
exports.handler = function(event, context) { console.log("clientID = " + context.identity);
135
AWS Mobile Hub Developer Guide Developer GuideAndroid and iOS
context.succeed("Your client ID is " + context.identity);}
How To Add Machine Learning with Amazon Machine Learning
The following reference content only applies to existing apps that were built using the AWS MobileSDKs for iOS and Android. If you’re building a new mobile or web app, or you’re adding cloudcapabilities to an existing app, visit the Amplify Framework website instead. Documentation for theAWS Mobile SDKs for iOS and Android is now part of the Amplify Framework.
This section provides procedures for integrating Amazon Machine Learning into your Android and iOSapps.
Topics• Android: Amazon Machine Learning (p. 136)• iOS: Amazon Machine Learning (p. 139)
Android: Amazon Machine Learning
The following reference content only applies to existing apps that were built using the AWS MobileSDKs for iOS and Android. If you’re building a new mobile or web app, or you’re adding cloudcapabilities to an existing app, visit the Amplify Framework website instead. Documentation for theAWS Mobile SDKs for iOS and Android is now part of the Amplify Framework.
Amazon Machine Learning (ML) is a service that makes it easy for developers of all skill levels to usemachine learning technology. The SDK for Android provides a simple, high-level client designed to helpyou interface with Amazon Machine Learning service. The client enables you to call Amazon ML’s real-time API to retrieve predictions from your models and enables you to build mobile applications thatrequest and take actions on predictions. The client also enables you to retrieve the real-time predictionendpoint URLs for your ML models.
Setup
Prerequisites
You must complete all of the instructions on the Set Up the SDK for Android page before beginning thistutorial.
Granting Access to Amazon Machine Learning Resources
To use Amazon Machine Learning in an application, you must set the proper permissions. The followingIAM policy allows the user to perform the actions shown in this tutorial on two actions identified by ARN.
{ "Statement": [{ "Effect": "Allow", "Action": [ "machinelearning:GetMLModel", "machinelearning:Predict" ], "Resource": "arn:aws:machinelearning:use-east-1:11122233444:mlmodel/example-model-id" }]
136
AWS Mobile Hub Developer Guide Developer GuideAndroid and iOS
}
This policy should be applied to roles assigned to the Amazon Cognito identity pool, but you will needto replace the Resource value with the correct account ID and ML Model ID. You can apply policies at theIAM console. To learn more about IAM policies, see Introduction to IAM.
Add Import Statements
Add the following imports to the main activity of your app:
import com.amazonaws.services.machinelearning.*;
Initialize AmazonMachineLearningClient
Pass your initialized Amazon Cognito credentials provider to the AmazonMachineLearningClientconstructor:
Android - Java
AmazonMachineLearningClient client = new AmazonMachineLearningClient(credentialsProvider);
Android - Kotlin
val client = AmazonMachineLearningClient(credentialsProvider)
Create an Amazon Machine Learning Client
Making a Predict Request
Prior to calling Predict, make sure you have not only a completed ML Model ID but also a created real-time endpoint for that ML Model ID. This cannot be done through the mobile SDK; you will have to usethe Machine Learning Console or an alternate SDK. To validate that this ML can be used for real-timepredictions:
Android - Java
// Use a created model that has a created real-time endpoint String mlModelId = "example-model-id";
// Call GetMLModel to get the realtime endpoint URL GetMLModelRequest getMLModelRequest = new GetMLModelRequest(); getMLModelRequest.setMLModelId(mlModelId); GetMLModelResult mlModelResult = client.getMLModel(getMLModelRequest);
// Validate that the ML model is completed if (!mlModelResult.getStatus().equals(EntityStatus.COMPLETED.toString())) { System.out.println("ML Model is not completed: " + mlModelResult.getStatus()"); return; }
// Validate that the realtime endpoint is ready if (!mlModelResult.getEndpointInfo().getEndpointStatus().equals(RealtimeEndpointStatus.READY.toString())){ System.out.println("Realtime endpoint is not ready: " + mlModelResult.getEndpointInfo().getEndpointStatus());
137

AWS Mobile Hub Developer Guide Developer GuideAndroid and iOS
return; }
Android - Kotlin
// Call GetMLModel to get the realtime endpoint URLval modelRequest = new GetMLModelRequest()modelRequest.mLModelID = "example-model-id"val modelResult = client.getMLModel(modelRequest);
// Validate that the ML model is completedif (modelResult.status != EntityStatus.COMPLETED.toString()) { Log.d(TAG, "ML Model is not completed: ${modelResult.status}"); return;}
// Validate that the realtime endpoint is readyif (modelResult.endpointInfo.endpointStatus != RealtimeEndpointStatus.READY.toString()) { Log.d(TAG, "Realtime endpoint is not ready: ${modelResult.endpointInfo.endpointStatus}"); return;}
Once the real-time endpoint is ready, we can begin calling Predict. Note that you must pass the real-timeendpoint through the PredictRequest.
Android - Java
// Create a Predict request with your ML model ID and the appropriate Record mappingPredictRequest predictRequest predictRequest = new PredictRequest();predictRequest.setMLModelId(mlModelId);
HashMap<String, String> record = new HashMap<String, String>();record.put("example attribute", "example value");
predictRequest.setRecord(record);predictRequest.setPredictEndpoint(mlModelResult.getEndpointInfo().getEndpointUrl());
// Call Predict and print out your predictionPredictResult predictResult = client.predict(predictRequest);Log.d(LOG_TAG. predictResult.getPrediction());
// Do something with the prediction// ...
Android - Kotlin
// Create a Predict request with your ML model ID and the appropriate Record mappingval predictRequest predictRequest = PredictRequest().apply { mLModelID = "example-model-id" record = mapOf("example attribute" to "example value") predictEndpoint = modelResult.endpointInfo.getEndpointUrl }
val predictResult = client.predict(predictRequest) Log.d(LOG_TAG, predictResult.prediction)
// Do something with the prediction // ...
138

AWS Mobile Hub Developer Guide Developer GuideAndroid and iOS
Additional Resources
• Developer Guide• Service API Reference
iOS: Amazon Machine Learning
The following reference content only applies to existing apps that were built using the AWS MobileSDKs for iOS and Android. If you’re building a new mobile or web app, or you’re adding cloudcapabilities to an existing app, visit the Amplify Framework website instead. Documentation for theAWS Mobile SDKs for iOS and Android is now part of the Amplify Framework.
Amazon Machine Learning (ML) is a service that makes it easy for developers of all skill levels to usemachine learning technology. The SDK for iOS provides a simple, high-level client designed to help youinterface with Amazon Machine Learning service. The client enables you to call Amazon ML’s real-timeAPI to retrieve predictions from your models and enables you to build mobile applications that requestand take actions on predictions. The client also enables you to retrieve the real-time prediction endpointURLs for your ML models.
Integrate Amazon Machine Learning
To use the Amazon Machine Learning mobile client, you’ll need to integrate the SDK for iOS into yourapp and import the necessary libraries. To do so, follow these steps:
1. Download the SDK and unzip it as described in Setup the SDK for iOS.2. The instructions direct you to import the headers for the services you’ll be using. For Amazon Machine
Learning, you need the following import.
iOS - Swift
import AWSMachineLearning
iOS - Objective C
#import <AWSMachineLearning/AWSMachineLearning.h>
Configure Credentials
You can use Amazon Cognito to provide temporary AWS credentials to your application. Thesecredentials let the app access your AWS resources. To create a credentials provider, follow theinstructions at Providing AWS Credentials.
To use Amazon Machine Learning in an application, you must set the proper permissions. The followingIAM policy allows the user to perform the actions shown in this tutorial on two actions identified by ARN.
{ "Statement": [{ "Effect": "Allow", "Action": [ "machinelearning:GetMLModel", "machinelearning:Predict" ], "Resource": "arn:aws:machinelearning:use-east-1:11122233444:mlmodel/example-model-id" }]
139

AWS Mobile Hub Developer Guide Developer GuideAndroid and iOS
}
This policy should be applied to roles assigned to the Amazon Cognito identity pool, but you need toreplace the Resource value with the correct account ID and ML Model ID. You can apply policies at theIAM console. To learn more about IAM policies, see Introduction to IAM.
Create an Amazon Machine Learning Client
Once you’ve imported the necessary libraries and have your credentials object, you can instantiateAWSMachineLearningGetMLModelInput.
iOS - Swift
let getMlModelInput = AWSMachineLearningGetMLModelInput()
Objective C
AWSMachineLearningGetMLModelInput *getMLModelInput = [AWSMachineLearningGetMLModelInput new];
Making a Predict Request
Prior to calling Predict, make sure you have not only a completed ML Model ID but also a created real-time endpoint for that ML Model ID. This cannot be done through the mobile SDK; you have to usethe Machine Learning Console or an alternate SDK. To validate that this ML can be used for real-timepredictions.
iOS - Swift
// Use a created model that has a created real-time endpointlet mlModelId = "example-model-id";// Call GetMLModel to get the realtime endpoint URLlet getMlModelInput = AWSMachineLearningGetMLModelInput()getMlModelInput!.mlModelId = mlModelId;
machineLearning.getMLModel(getMlModelInput!).continueOnSuccessWith { (task) -> Any? in if let getMLModelOutput = task.result {
if (getMLModelOutput.status != AWSMachineLearningEntityStatus.completed) { print("ML Model is not completed"); return nil; }
// Validate that the realtime endpoint is ready if (getMLModelOutput.endpointInfo!.endpointStatus != AWSMachineLearningRealtimeEndpointStatus.ready) { print("Realtime endpoint is not ready"); return nil; } }
return nil}
Objective C
AWSMachineLearning *MachineLearning = [AWSMachineLearning defaultMachineLearning];
// Use a created model that has a created real-time endpointNSString *MLModelId = @"example-model-id";
140

AWS Mobile Hub Developer Guide Developer GuideWeb
// Call GetMLModel to get the realtime endpoint URLAWSMachineLearningGetMLModelInput *getMLModelInput = [AWSMachineLearningGetMLModelInput new];getMLModelInput.MLModelId = MLModelId;
[[[MachineLearning getMLModel:getMLModelInput] continueWithSuccessBlock:^id(AWSTask *task) { AWSMachineLearningGetMLModelOutput *getMLModelOutput = task.result;
// Validate that the ML model is completed if (getMLModelOutput.status != AWSMachineLearningEntityStatusCompleted) { NSLog(@"ML Model is not completed"); return nil; }
// Validate that the realtime endpoint is ready if (getMLModelOutput.endpointInfo.endpointStatus != AWSMachineLearningRealtimeEndpointStatusReady) { NSLog(@"Realtime endpoint is not ready"); return nil; }}
Once the real-time endpoint is ready, we can begin calling Predict. Note that you must pass the real-timeendpoint through the PredictRequest.
iOS - Swift
// Create a Predict request with your ML Model id and the appropriatelet predictInput = AWSMachineLearningPredictInput()predictInput!.predictEndpoint = getMLModelOutput.endpointInfo!.endpointUrl;predictInput!.mlModelId = mlModelId;predictInput!.record = record
return machineLearning.predict(predictInput!)
Objective C
// Create a Predict request with your ML Model id and the appropriate Record mapping.AWSMachineLearningPredictInput *predictInput = [AWSMachineLearningPredictInput new];predictInput.predictEndpoint = getMLModelOutput.endpointInfo.endpointUrl;predictInput.MLModelId = MLModelId;predictInput.record = @{};
// Call and return predictionreturn [MachineLearning predict:predictInput];
Additional Resources
• Developer Guide• API Reference
AWS Amplify Library for WebImportantThe following content applies if you are already using the AWS Mobile CLI to configure yourbackend. If you are building a new mobile or web app, or you’re adding cloud capabilities to
141

AWS Mobile Hub Developer Guide Developer GuideWeb
your existing app, use the new AWS Amplify CLI instead. With the new Amplify CLI, you canuse all of the features described in Announcing the AWS Amplify CLI toolchain, including AWSCloudFormation functionality that provides additional workflows.
AWS Amplify is an open source JavaScript library for frontend and mobile developers building cloud-enabled applications. The library is a declarative interface across different categories of operations inorder to make common tasks easier to add into your application. The default implementation works withAmazon Web Services (AWS) resources but is designed to be open and pluggable for usage with othercloud services that wish to provide an implementation or custom backends.
The AWS Mobile CLI, built on AWS Mobile Hub, provides a command line interface for frontendJavaScript developers to seamlessly enable and configure AWS services into their apps. With minimalconfiguration, you can start using all of the functionality provided by the AWS Mobile Hub from yourfavorite terminal application.
Topics• Get Started (p. 142)• AWS Mobile Hub Features (p. 163)
Get StartedImportantThe following content applies if you are already using the AWS Mobile CLI to configure yourbackend. If you are building a new mobile or web app, or you’re adding cloud capabilities toyour existing app, use the new AWS Amplify CLI instead. With the new Amplify CLI, you canuse all of the features described in Announcing the AWS Amplify CLI toolchain, including AWSCloudFormation functionality that provides additional workflows.
Overview
The AWS Mobile CLI provides a command line experience that allows front end JavaScript developers toquickly create and integrate AWS backend resources into their mobile apps.
Prerequisites
1. Sign up for the AWS Free Tier.2. Install Node.js with NPM.3. Install AWS Mobile CLI
npm install -g awsmobile-cli
4. Configure the CLI with your AWS credentials
To setup permissions for the toolchain used by the CLI, run:
awsmobile configure
If prompted for credentials, follow the steps provided by the CLI. For more information, see provideIAM credentials to AWS Mobile CLI (p. 172).
Set Up Your Backend
Need to create a quick sample React app? See Create a React App.
142
AWS Mobile Hub Developer Guide Developer GuideWeb
To configure backend features for your app
1. In the root folder of your app, run:
awsmobile init
The init command creates a backend project for your app. By default, analytics and web hostingare enabled in your backend and this configuration is automatically pulled into your app when youinitialize.
2. When prompted, provide the source directory for your project. The CLI will generate aws-exports.js in this location. This file contains the configuration and endpoint metadata used to linkyour front end to your backend services.
? Where is your project's source directory: src
3. Respond to further prompts with the following values.
? Where is your project's distribution directory to store build artifacts: build? What is your project's build command: npm run-script build? What is your project's start command for local test run: npm run-script start? What awsmobile project name would you like to use: YOUR-APP-NAME-2017-11-10-15-17-48
After the project is created you will get a success message which also includes details on the path wherethe aws-exports.js is copied.
awsmobile project's details logged at: awsmobilejs/#current-backend-info/backend-details.jsonawsmobile project's access information logged at: awsmobilejs/#current-backend-info/aws-exports.jsawsmobile project's access information copied to: src/aws-exports.jsawsmobile project's specifications logged at: awsmobilejs/#current-backend-info/mobile-hub-project.ymlcontents in #current-backend-info/ is synchronized with the latest information in the aws cloud
Your project is now initialized.
NoteYou can add the AWS backend resources you create for this project to another exisiting appusing awsmobile init YOUR_MOBILE_HUB_PROJECT_ID. To find the project ID, open yourMobile Hub project in the Mobile Hub console by running awsmobile console. The projectID is the GUID portion of the console address, in the form of XXXXXXXXX-XXXX-XXXX-XXXX-XXXXXXXXXXXX.
Connect to Your Backend
AWS Mobile uses the open source AWS Amplify library to link your code to the AWS features configuredfor your app.
This section of the guide shows examples using a React application of the kind output by create-react-app or a similar tool.
To connect the app to your configured AWS features
In index.js (or in other code that runs at launch-time), add the following imports.
import Amplify from 'aws-amplify';
143
AWS Mobile Hub Developer Guide Developer GuideWeb
import awsmobile from './YOUR-PATH-TO/aws-exports';
Then add the following code.
Amplify.configure(awsmobile);
Run Your App Locally
Your app is now ready to launch and use the default features configured by AWS Mobile.
To launch your app locally in a browser
In the root folder of your app, run:
awsmobile run
Behind the scenes, this command runs npm install to install the Amplify library and also pushes anybackend configuration changes to AWS Mobile. To run your app locally without pushing backend changesyou can choose to run npm install and then run npm start.
Anytime you launch your app, app analytics are gathered and can be visualized (p. 147) in an AWSconsole.
AWS Free Tier Initializing your app or adding features throughthe CLI will cause AWS services to be configuredon your behalf. The pricing for AWS Mobileservices enables you to learn and prototype atlittle or no cost using the AWS Free Tier.
Next Steps
Topics
• Deploy your app to the cloud (p. 144)
• Test Your App on Our Mobile Devices (p. 145)
• Add Features (p. 146)
• Learn more (p. 147)
Deploy your app to the cloud
Using a simple command, you can publish your app’s front end to hosting on a robust contentdistribution network (CDN) and view it in a browser.
To deploy your app to the cloud and launch it in a browser
In the root folder of your app, run:
awsmobile publish
To push any backend configuration changes to AWS and view content locally, run awsmobile run. Inboth cases, any pending changes you made to your backend configuration are made to your backendresources.
144

AWS Mobile Hub Developer Guide Developer GuideWeb
By default, the CLI configures AWS Mobile Hosting and Streaming (p. 200) feature, that hosts your appon Amazon CloudFront CDN endpoints. These locations make your app highly available to the public onthe Internet and support media file streaming
You can also use a custom domain (p. 161) for your hosting location.
Test Your App on Our Mobile Devices
Invoke a free remote test of your app on a variety of real devices and see results, including screen shots.
To invoke a remote test of your app
In the root folder of your app, run:
awsmobile publish --test
The CLI will open the reporting page for your app in the Mobile Hub console to show the metricsgathered from the test devices. The device that runs the remote test you invoke resides in AWS DeviceFarm which provides flexible configuration of tests and reporting.
145
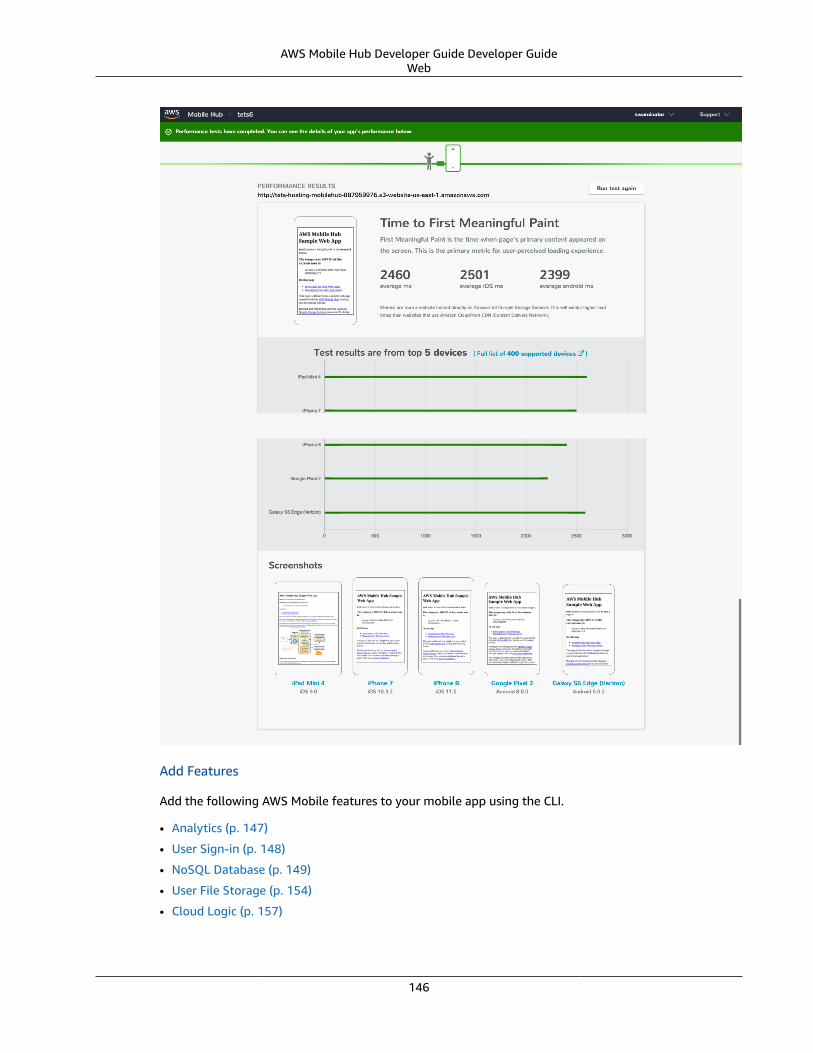
AWS Mobile Hub Developer Guide Developer GuideWeb
Add Features
Add the following AWS Mobile features to your mobile app using the CLI.
• Analytics (p. 147)
• User Sign-in (p. 148)
• NoSQL Database (p. 149)
• User File Storage (p. 154)
• Cloud Logic (p. 157)
146

AWS Mobile Hub Developer Guide Developer GuideWeb
Learn more
To learn more about the commands and usage of the AWS Mobile CLI, see the AWS Mobile CLIreference (p. 163).
Learn about AWS Mobile Amplify.
Add AnalyticsImportantThe following content applies if you are already using the AWS Mobile CLI to configure yourbackend. If you are building a new mobile or web app, or you’re adding cloud capabilities toyour existing app, use the new AWS Amplify CLI instead. With the new Amplify CLI, you canuse all of the features described in Announcing the AWS Amplify CLI toolchain, including AWSCloudFormation functionality that provides additional workflows.
Basic Analytics Backend is Enabled for Your App
BEFORE YOU BEGIN The steps on this page assume you have alreadycompleted the steps on Get Started (p. 142).
When you complete the AWS Mobile CLI setup and launch your app, anonymized session and devicedemographics data flows to the AWS analytics backend.
To send basic app usage analytics to AWS
Launch your app locally by running:
npm start
When you use your app the Amazon Pinpoint service gathers and visualizes analytics data.
To view the analytics using the Amazon Pinpoint console
1. Run npm start, awsmobile run, or awsmobile publish --test at least once.2. Open your project in the AWS Mobile Hub console.
awsmobile console
3. Choose the Analytics icon on the left, to navigate to your project in the Amazon Pinpoint console.4. Choose Analytics on the left.
You should see an up-tick in several graphs.
Add Custom Analytics to Your App
You can configure your app so that Amazon Pinpoint gathers data for custom events that you registerwithin the flow of your code.
To instrument custom analytics in your app
In the file containing the event you want to track, add the following import:
import { Analytics } from 'aws-amplify';
147
AWS Mobile Hub Developer Guide Developer GuideWeb
Add the a call like the following to the spot in your JavaScript where the tracked event should be fired:
componentDidMount() { Analytics.record('FIRST-EVENT-NAME');}
Or to relevant page elements:
handleClick = () => { Analytics.record('SECOND-EVENT-NAME');}
<button onClick={this.handleClick}>Call request</button>
To test:
1. Save the changes and run npm start, awsmobile run, or awsmobile publish --test to launchyour app. Use your app so that tracked events are triggered.
2. In the Amazon Pinpoint console, choose Events near the top.
3. Select an event in the Event dropdown menu on the left.
Custom event data may take a few minutes to become visible in the console.
Next Steps
Learn more about the analytics in AWS Mobile which are part of the Messaging and Analytics (p. 198)feature. This feature uses Amazon Pinpoint.
Learn about AWS Mobile CLI (p. 163).
Learn about AWS Mobile Amplify.
Add Auth / User Sign-inImportantThe following content applies if you are already using the AWS Mobile CLI to configure yourbackend. If you are building a new mobile or web app, or you’re adding cloud capabilities toyour existing app, use the new AWS Amplify CLI instead. With the new Amplify CLI, you canuse all of the features described in Announcing the AWS Amplify CLI toolchain, including AWSCloudFormation functionality that provides additional workflows.
Set Up Your Backend
BEFORE YOU BEGIN The steps on this page assume you have alreadycompleted the steps on Get Started (p. 142).
The AWS Mobile CLI components for user authentication include a rich, configurable UI for sign-up andsign-in.
To enable the Auth features
In the root folder of your app, run:
awsmobile user-signin enable
148

AWS Mobile Hub Developer Guide Developer GuideWeb
awsmobile push
Connect to Your Backend
The AWS Mobile CLI enables you to integrate ready-made sign-up/sign-in/sign-out UI from thecommand line.
To add user auth UI to your app
1. Install AWS Amplify for React library.
npm install --save aws-amplify-react
2. Add the following import in App.js (or other file that runs upon app startup):
import { withAuthenticator } from 'aws-amplify-react';
3. Then change export default App; to the following.
export default withAuthenticator(App);
To test, run npm start, awsmobile run, or awsmobile publish --test.
Next Steps
Learn more about the AWS Mobile User Sign-in (p. 206) feature, which uses Amazon Cognito.
Learn about AWS Mobile CLI (p. 163).
Learn about AWS Mobile Amplify.
Access Your DatabaseImportantThe following content applies if you are already using the AWS Mobile CLI to configure yourbackend. If you are building a new mobile or web app, or you’re adding cloud capabilities toyour existing app, use the new AWS Amplify CLI instead. With the new Amplify CLI, you canuse all of the features described in Announcing the AWS Amplify CLI toolchain, including AWSCloudFormation functionality that provides additional workflows.
Set Up Your Backend
The AWS Mobile CLI and Amplify library make it easy to perform create, read, update, and delete(“CRUD”) actions against data stored in the cloud through simple API calls in your JavaScript app.
BEFORE YOU BEGIN The steps on this page assume you have alreadycompleted the steps on Get Started (p. 142).
To create a database
1. Enable the NoSQL database feature and configure your table.
In the root folder of your app, run:
149

AWS Mobile Hub Developer Guide Developer GuideWeb
awsmobile database enable --prompt
2. Choose Open to make the data in this table viewable by all users of your application.
? Should the data of this table be open or restricted by user?# Open Restricted
3. For this example type in todos as your Table name.
? Table name: todos
Add columns and queries
You are creating a table in a NoSQL database and adding an initial set of columns, each of which hasa name and a data type. NoSQL lets you add a column any time you store data that contains a newcolumn. NoSQL tables must have one column defined as the Primary Key, which is a unique identifier foreach row.
1. For this example, follow the prompts to add three columns: team (string), todoId (number), andtext (string).
? What would you like to name this column: team? Choose the data type: string
2. When prompted to ? Add another column, type Y and then choose enter. Repeat the steps tocreate todoId and text columns.
3. Select team as the primary key.
? Select primary key# team todoId text
4. Choose (todoId) as the sort key and then no to adding any more indexes, to keep the examplesimple.
Sort Keys and Indexes To optimize performance, you can define acolumn as a Sort Key. Choose a column tobe a Sort Key if it will be frequently used incombination with the Primary key to query yourtable. You can also create Secondary Indexes tomake additional columns sort keys.
? Select sort key# todoId text (No Sort Key)
? Add index (Y/n): nTable todos saved.
The todos table is now created.
150

AWS Mobile Hub Developer Guide Developer GuideWeb
Use a cloud API to do CRUD operations
To access your NoSQL database, you will create an API that can be called from your app to performCRUD operations.
Why an API? Using an API to access your database providesa simple coding interface on the front end androbust flexibility on the backend. Behind thescenes, a call to an Amazon API Gateway APIend point in the cloud is handled by a serverlessLambda function.
To create a CRUD API
1. Enable and configure the Cloud Logic feature**
awsmobile cloud-api enable --prompt
2. Choose Create CRUD API for an existing Amazon DynamoDB table API for an existingAmazon DynamoDB table” and then choose enter.
? Select from one of the choices below. (Use arrow keys) Create a new API# Create CRUD API for an existing Amazon DynamoDB table
3. Select the todos table created in the previous steps, and choose enter.
? Select Amazon DynamoDB table to connect to a CRUD API# todos
4. Push your configuration to the cloud. Without this step, the configuration for your database and API isnow in place only on your local machine.
awsmobile push
The required DynamoDB tables, API Gateway endpoints, and Lambda functions will now be created.
Create your first Todo
The AWS Mobile CLI enables you to test your API from the command line.
Run the following command to create your first todo.
awsmobile cloud-api invoke todosCRUD POST /todos '{"body": {"team": "React", "todoId": 1, "text": "Learn more Amplify"}}'
Connect to Your Backend
The examples in this section show how you would integrate AWS Amplify library calls using React (seethe AWS Amplify documentation to use other flavors of Javascript).
The following component is a simple Todo list that you might add to a create-react-app project. TheTodos component currently adds and displays todos to and from an in memory array.
151

AWS Mobile Hub Developer Guide Developer GuideWeb
// To Do app example
import React from 'react';
class Todos extends React.Component { state = { team: "React", todos: [] };
render() { let todoItems = this.state.todos.map(({todoId, text}) => { return <li key={todoId}>{text}</li>; });
return ( <div style={styles}> <h1>{this.state.team} Todos</h1> <ul> {todoItems} </ul>
<form> <input ref="newTodo" type="text" placeholder="What do you want to do?" /> <input type="submit" value="Save" /> </form> </div> ); }}
let styles = { margin: "0 auto", width: "25%"};
export default Todos;
Displaying todos from the cloud
The API module from AWS Amplify allows you connect to DynamoDB through API Gateway endpoints.
To retrieve and display items in a database
1. Import the API module from aws-amplify at the top of the Todos component file.
import { API } from 'aws-amplify';
2. Add the following componentDidMount to the Todos component to fetch all of the todos.
async componentDidMount() { let todos = await API.get('todosCRUD', `/todos/${this.state.team}`); this.setState({ todos });}
When the Todos component mounts it will fetch all of the todos stored in your database and displaythem.
Saving todos to the cloud
The following fragment shows the saveTodo function for the Todo app.
152

AWS Mobile Hub Developer Guide Developer GuideWeb
async saveTodo(event) { event.preventDefault();
const { team, todos } = this.state; const todoId = todos.length + 1; const text = this.refs.newTodo.value;
const newTodo = {team, todoId, text}; await API.post('todosCRUD', '/todos', { body: newTodo }); todos.push(newTodo); this.refs.newTodo.value = ''; this.setState({ todos, team });}
Update the form element in the component’s render function to invoke the saveTodo function whenthe form is submitted.
<form onSubmit={this.saveTodo.bind(this)}>
Your entire component should look like the following:
// To Do app example
import React from 'react';import { API } from 'aws-amplify';
class Todos extends React.Component { state = { team: "React", todos: [] };
async componentDidMount() { const todos = await API.get('todosCRUD', `/todos/${this.state.team}`) this.setState({ todos }); }
async saveTodo(event) { event.preventDefault();
const { team, todos } = this.state; const todoId = todos.length + 1; const text = this.refs.newTodo.value;
const newTodo = {team, todoId, text}; await API.post('todosCRUD', '/todos', { body: newTodo }); todos.push(newTodo); this.refs.newTodo.value = ''; this.setState({ todos, team }); }
render() { let todoItems = this.state.todos.map(({todoId, text}) => { return <li key={todoId}>{text}</li>; });
return ( <div style={styles}> <h1>{this.state.team} Todos</h1> <ul> {todoItems} </ul>
<form onSubmit={this.saveTodo.bind(this)}>
153

AWS Mobile Hub Developer Guide Developer GuideWeb
<input ref="newTodo" type="text" placeholder="What do you want to do?" /> <input type="submit" value="Save" /> </form> </div> ); }}
let styles = { margin: "0 auto", width: "25%"}
export default Todos;
Next Steps
• Learn how to retrieve specific items and more with the API module in AWS Amplify.
• Learn how to enable more features for your app with the AWS Mobile CLI.
Add Storage
ImportantThe following content applies if you are already using the AWS Mobile CLI to configure yourbackend. If you are building a new mobile or web app, or you’re adding cloud capabilities toyour existing app, use the new AWS Amplify CLI instead. With the new Amplify CLI, you canuse all of the features described in Announcing the AWS Amplify CLI toolchain, including AWSCloudFormation functionality that provides additional workflows.
Set Up the Backend
The AWS Mobile CLI and AWS Amplify library make it easy to store and manage files in the cloud fromyour JavaScript app.
BEFORE YOU BEGIN The steps on this page assume you have alreadycompleted the steps on Get Started (p. 142).
Enable the User File Storage feature by running the following commands in the root folder of your app.
awsmobile user-files enable
awsmobile push
Connect to the Backend
The examples in this section show how you would integrate AWS Amplify library calls using React (seethe AWS Amplify documentation to use other flavors of Javascript).
The following simple component could be added to a create-react-app project to present aninterface that uploads images and download them for display.
// Image upload and download for display example component
154
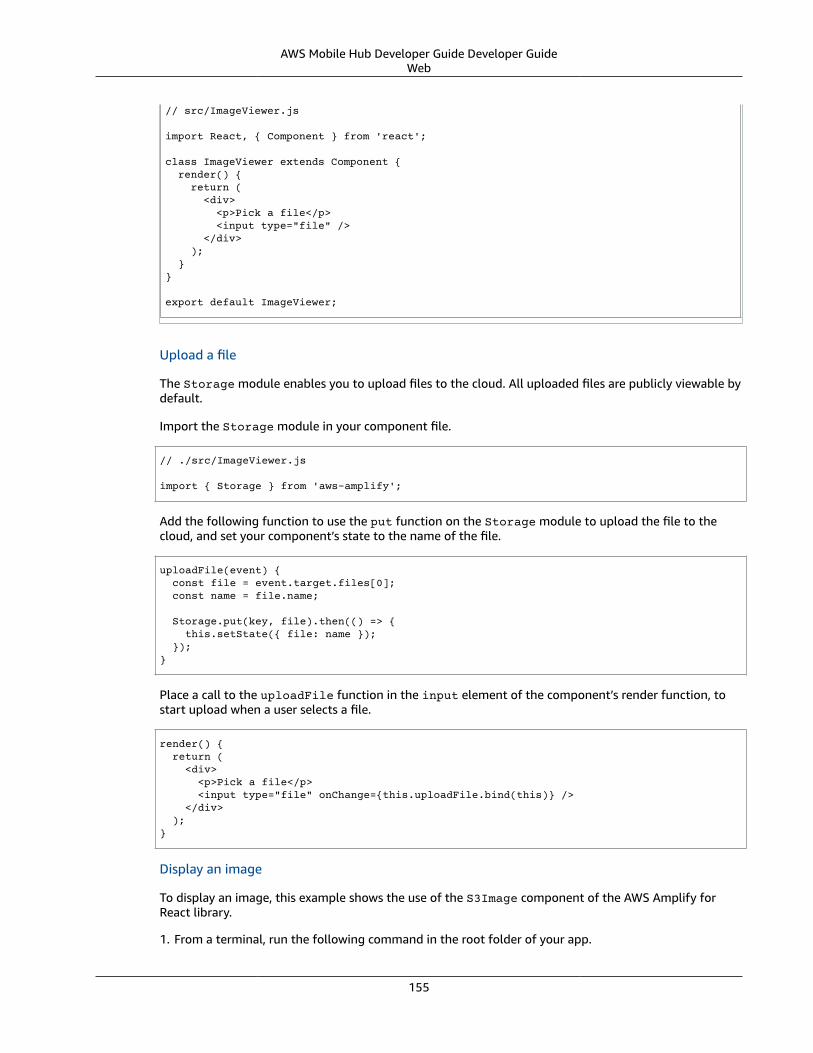
AWS Mobile Hub Developer Guide Developer GuideWeb
// src/ImageViewer.js
import React, { Component } from 'react';
class ImageViewer extends Component { render() { return ( <div> <p>Pick a file</p> <input type="file" /> </div> ); }}
export default ImageViewer;
Upload a file
The Storage module enables you to upload files to the cloud. All uploaded files are publicly viewable bydefault.
Import the Storage module in your component file.
// ./src/ImageViewer.js
import { Storage } from 'aws-amplify';
Add the following function to use the put function on the Storage module to upload the file to thecloud, and set your component’s state to the name of the file.
uploadFile(event) { const file = event.target.files[0]; const name = file.name;
Storage.put(key, file).then(() => { this.setState({ file: name }); });}
Place a call to the uploadFile function in the input element of the component’s render function, tostart upload when a user selects a file.
render() { return ( <div> <p>Pick a file</p> <input type="file" onChange={this.uploadFile.bind(this)} /> </div> );}
Display an image
To display an image, this example shows the use of the S3Image component of the AWS Amplify forReact library.
1. From a terminal, run the following command in the root folder of your app.
155

AWS Mobile Hub Developer Guide Developer GuideWeb
npm install --save aws-amplify-react
2. Import the S3Image module in your component.
import { S3Image } from 'aws-amplify-react';
Use the S3Image component in the render function. Update your render function to look like thefollowing:
render() { return ( <div> <p>Pick a file</p> <input type="file" onChange={this.handleUpload.bind(this)} /> { this.state && <S3Image path={this.state.path} /> } </div> );}
Put together, the entire component should look like this:
// Image upload and download for display example component
import React, { Component } from 'react';import { Storage } from 'aws-amplify';import { S3Image } from 'aws-amplify-react';
class ImageViewer extends Component {
handleUpload(event) { const file = event.target.files[0]; const path = file.name; Storage.put(path, file).then(() => this.setState({ path }) ); }
render() { return ( <div> <p>Pick a file</p> <input type="file" onChange={this.handleUpload.bind(this)} /> { this.state && <S3Image path={this.state.path} /> } </div> ); }}
export default ImageViewer;
Next Steps
• Learn how to do private file storage and more with the Storage module in AWS Amplify.
• Learn how to enable more features for your app with the AWS Mobile CLI.
• Learn how to use those features in your app with the AWS Amplify library.
• Learn more about the analytics for the User File Storage feature.
156

AWS Mobile Hub Developer Guide Developer GuideWeb
• Learn more about how your files are stored on Amazon Simple Storage Service.
Access Your APIsImportantThe following content applies if you are already using the AWS Mobile CLI to configure yourbackend. If you are building a new mobile or web app, or you’re adding cloud capabilities toyour existing app, use the new AWS Amplify CLI instead. With the new Amplify CLI, you canuse all of the features described in Announcing the AWS Amplify CLI toolchain, including AWSCloudFormation functionality that provides additional workflows.
Set Up Your Backend
The AWS Mobile CLI and Amplify library make it easy to create and call cloud APIs and their handler logicfrom your JavaScript.
BEFORE YOU BEGIN The steps on this page assume you have alreadycompleted the steps on Get Started (p. 142).
Create Your API
In the following examples you will create an API that is part of a cloud-enabled number guessing app.The CLI will create a serverless handler for the API behind the scenes.
To enable and configure an API
1. In the root folder of your app, run:
awsmobile cloud-api enable --prompt
2. When prompted, name the API Guesses.
? API name: Guesses
3. Name a HTTP path /number. This maps to a method call in the API handler.
? HTTP path name (/items): /number
4. Name your Lambda API handler function guesses.
? Lambda function name (This will be created if it does not already exists): guesses
5. When prompted to add another HTTP path, type N.
? Add another HTTP path (y/N): N
6. The configuration for your Guesses API is now saved locally. Push your configuration to the cloud.
awsmobile push
To test your API and handler
From the command line, run:
157
AWS Mobile Hub Developer Guide Developer GuideWeb
awsmobile cloud-api invoke Guesses GET /number
The Cloud Logic API endpoint for the Guesses API is now created.
Customize Your API Handler Logic
The AWS Mobile CLI has generated a Lambda function to handle calls to the Guesses API. It is savedlocally in YOUR-APP-ROOT-FOLDER/awsmobilejs/backend/cloud-api/guesses. The app.js filein that directory contains the definitions and functional code for all of the paths that are handled foryour API.
To customize your API handler
1. Find the handler for POST requests on the /number path. That line starts withapp.post('number',. Replace the callback function’s body with the following:
# awsmobilejs/backend/cloud-api/guesses/app.jsapp.post('/number', function(req, res) { const correct = 12; let guess = req.body.guess let result = ""
if (guess === correct) { result = "correct"; } else if (guess > correct) { result = "high"; } else if (guess < correct) { result = "low"; }
res.json({ result })});
2. Push your changes to the cloud.
awsmobile push
The Guesses API handler logic that implements your new number guessing functionality is nowdeployed to the cloud.
Connect to Your Backend
The examples in this section show how you would integrate AWS Amplify library calls using React (seethe AWS Amplify documentation to use other flavors of Javascript).
The following simple component could be added to a create-react-app project to present thenumber guessing game.
// Number guessing game app example
# src/GuessNumber.js
class GuessNumber extends React.Component { state = { answer: null };
render() { let prompt = ""
158
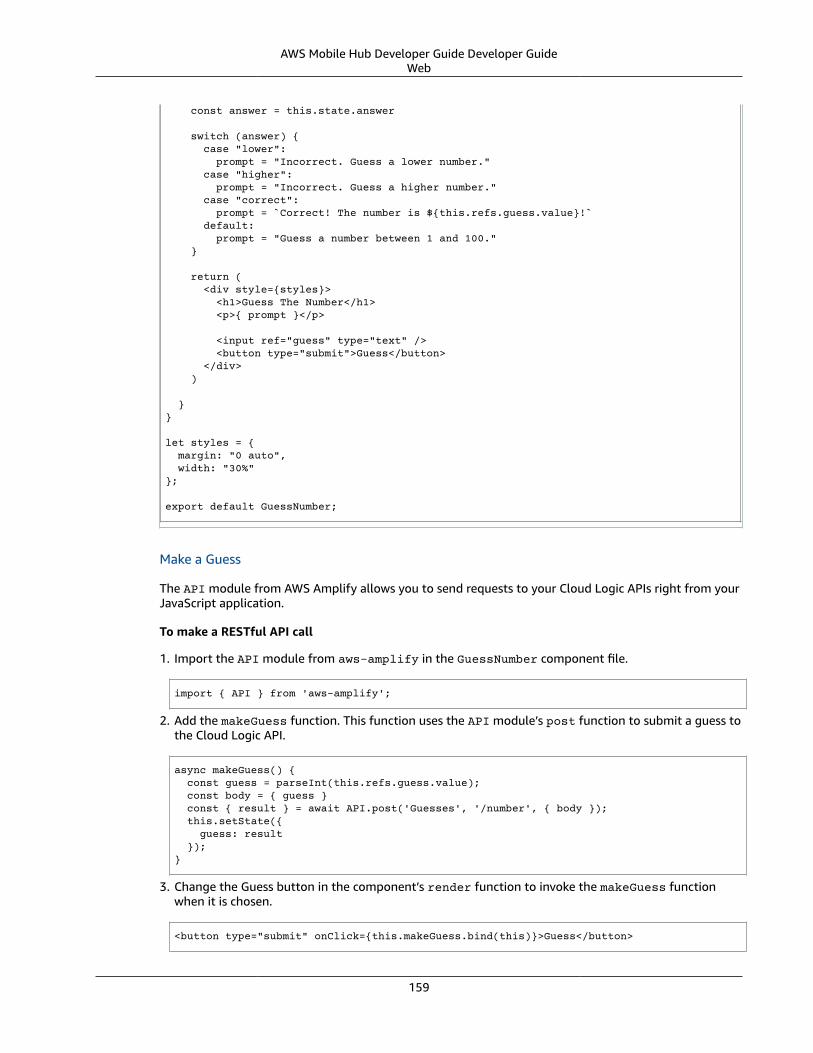
AWS Mobile Hub Developer Guide Developer GuideWeb
const answer = this.state.answer
switch (answer) { case "lower": prompt = "Incorrect. Guess a lower number." case "higher": prompt = "Incorrect. Guess a higher number." case "correct": prompt = `Correct! The number is ${this.refs.guess.value}!` default: prompt = "Guess a number between 1 and 100." }
return ( <div style={styles}> <h1>Guess The Number</h1> <p>{ prompt }</p>
<input ref="guess" type="text" /> <button type="submit">Guess</button> </div> )
}}
let styles = { margin: "0 auto", width: "30%"};
export default GuessNumber;
Make a Guess
The API module from AWS Amplify allows you to send requests to your Cloud Logic APIs right from yourJavaScript application.
To make a RESTful API call
1. Import the API module from aws-amplify in the GuessNumber component file.
import { API } from 'aws-amplify';
2. Add the makeGuess function. This function uses the API module’s post function to submit a guess tothe Cloud Logic API.
async makeGuess() { const guess = parseInt(this.refs.guess.value); const body = { guess } const { result } = await API.post('Guesses', '/number', { body }); this.setState({ guess: result });}
3. Change the Guess button in the component’s render function to invoke the makeGuess functionwhen it is chosen.
<button type="submit" onClick={this.makeGuess.bind(this)}>Guess</button>
159
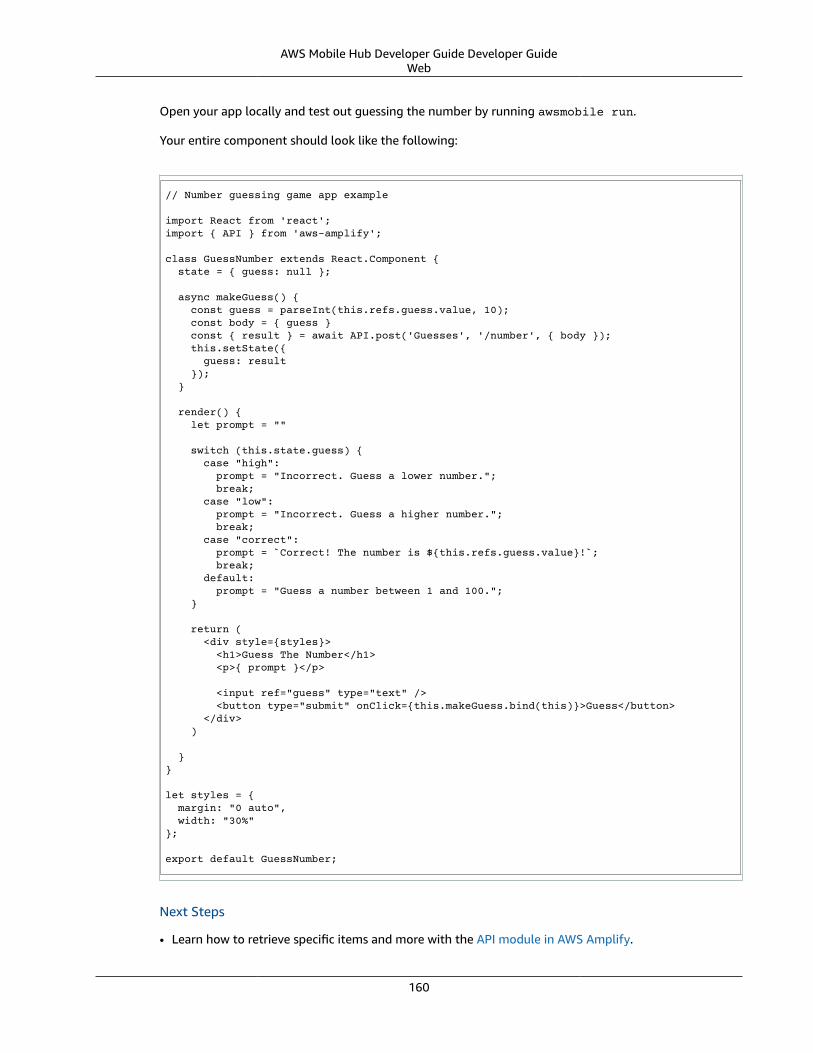
AWS Mobile Hub Developer Guide Developer GuideWeb
Open your app locally and test out guessing the number by running awsmobile run.
Your entire component should look like the following:
// Number guessing game app example
import React from 'react';import { API } from 'aws-amplify';
class GuessNumber extends React.Component { state = { guess: null };
async makeGuess() { const guess = parseInt(this.refs.guess.value, 10); const body = { guess } const { result } = await API.post('Guesses', '/number', { body }); this.setState({ guess: result }); }
render() { let prompt = ""
switch (this.state.guess) { case "high": prompt = "Incorrect. Guess a lower number."; break; case "low": prompt = "Incorrect. Guess a higher number."; break; case "correct": prompt = `Correct! The number is ${this.refs.guess.value}!`; break; default: prompt = "Guess a number between 1 and 100."; }
return ( <div style={styles}> <h1>Guess The Number</h1> <p>{ prompt }</p>
<input ref="guess" type="text" /> <button type="submit" onClick={this.makeGuess.bind(this)}>Guess</button> </div> )
}}
let styles = { margin: "0 auto", width: "30%"};
export default GuessNumber;
Next Steps
• Learn how to retrieve specific items and more with the API module in AWS Amplify.
160
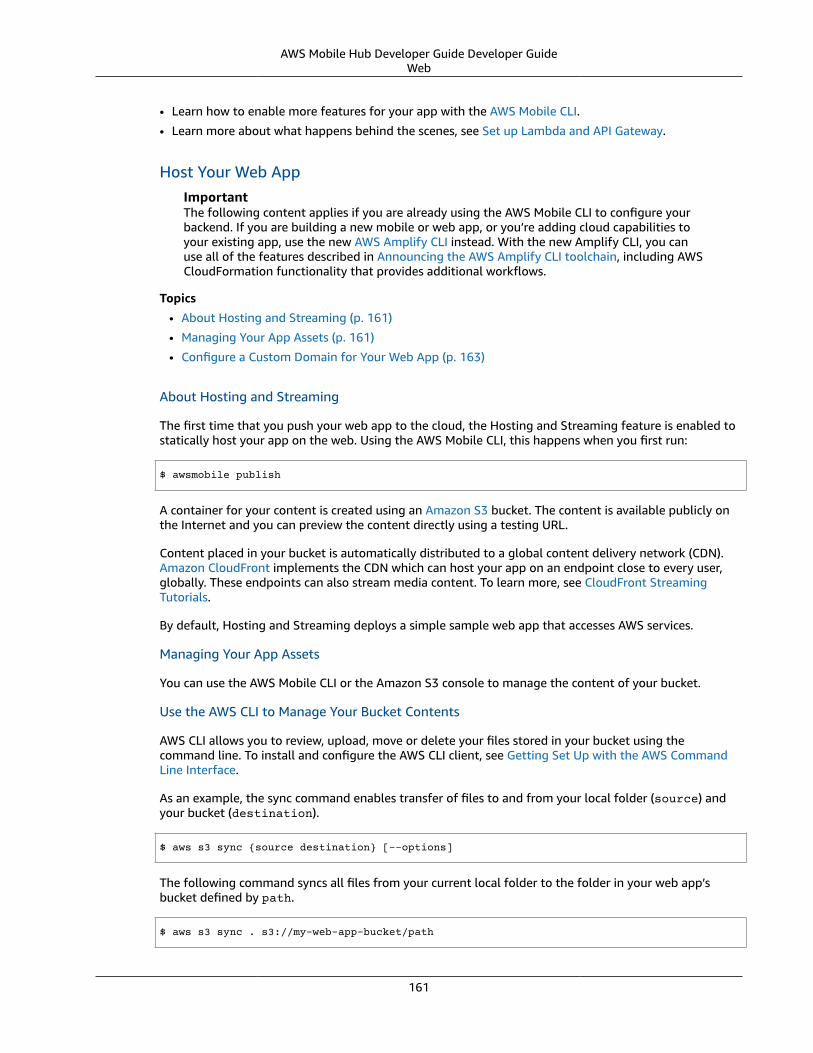
AWS Mobile Hub Developer Guide Developer GuideWeb
• Learn how to enable more features for your app with the AWS Mobile CLI.
• Learn more about what happens behind the scenes, see Set up Lambda and API Gateway.
Host Your Web AppImportantThe following content applies if you are already using the AWS Mobile CLI to configure yourbackend. If you are building a new mobile or web app, or you’re adding cloud capabilities toyour existing app, use the new AWS Amplify CLI instead. With the new Amplify CLI, you canuse all of the features described in Announcing the AWS Amplify CLI toolchain, including AWSCloudFormation functionality that provides additional workflows.
Topics
• About Hosting and Streaming (p. 161)
• Managing Your App Assets (p. 161)
• Configure a Custom Domain for Your Web App (p. 163)
About Hosting and Streaming
The first time that you push your web app to the cloud, the Hosting and Streaming feature is enabled tostatically host your app on the web. Using the AWS Mobile CLI, this happens when you first run:
$ awsmobile publish
A container for your content is created using an Amazon S3 bucket. The content is available publicly onthe Internet and you can preview the content directly using a testing URL.
Content placed in your bucket is automatically distributed to a global content delivery network (CDN).Amazon CloudFront implements the CDN which can host your app on an endpoint close to every user,globally. These endpoints can also stream media content. To learn more, see CloudFront StreamingTutorials.
By default, Hosting and Streaming deploys a simple sample web app that accesses AWS services.
Managing Your App Assets
You can use the AWS Mobile CLI or the Amazon S3 console to manage the content of your bucket.
Use the AWS CLI to Manage Your Bucket Contents
AWS CLI allows you to review, upload, move or delete your files stored in your bucket using thecommand line. To install and configure the AWS CLI client, see Getting Set Up with the AWS CommandLine Interface.
As an example, the sync command enables transfer of files to and from your local folder (source) andyour bucket (destination).
$ aws s3 sync {source destination} [--options]
The following command syncs all files from your current local folder to the folder in your web app’sbucket defined by path.
$ aws s3 sync . s3://my-web-app-bucket/path
161

AWS Mobile Hub Developer Guide Developer GuideWeb
To learn more about using AWS CLI to manage Amazon S3, see Using Amazon S3 with the AWSCommand Line Interface
Use the Amazon S3 Console to Manage Your Bucket
To use the Amazon S3 console to review, upload, move or delete your files stored in your bucket, use thefollowing steps.
1. From the root of your project, run:
awsmobile console
2. Choose the tile with the name of your project, then choose the Hosting and Streaming tile.3. Choose the link labelled Manage files to display the contents of your bucket in the Amazon S3
console.
Other Useful Functions in the AWS Mobile Hub Console
The Mobile Hub console also provides convenient ways to browse to your web content, return to the AWSCLI content on this page, and other relevant tasks. These include:
• The View from S3 link browses to the web contents of your bucket. When Hosting and Streaming isenabled, the bucket is populated with the files for a default web app files that is viewable immediately.
• The View from CloudFront browses to the web contents that have propagated from your bucket toCDN. The endpoint propagation is dependent on network conditions. You can expect your content tobe distributed and viewable within one hour.
162

AWS Mobile Hub Developer Guide Developer GuideWeb
• The Sync files with the command line link takes you to content on this page that describes how to usethe command line to manage the web app and streaming media files in your bucket.
Configure a Custom Domain for Your Web App
To use your custom domain for linking to your Web app, use the Route 53 service to configure DNSrouting.
For a web app hosted in a single location, see Routing Traffic to a Website that Is Hosted in an AmazonS3 Bucket.
For a web app distributed through a global CDN, see Routing Traffic to an Amazon CloudFront WebDistribution by Using Your Domain Name
AWS Mobile Hub FeaturesImportantThe following content applies if you are already using the AWS Mobile CLI to configure yourbackend. If you are building a new mobile or web app, or you’re adding cloud capabilities toyour existing app, use the new AWS Amplify CLI instead. With the new Amplify CLI, you canuse all of the features described in Announcing the AWS Amplify CLI toolchain, including AWSCloudFormation functionality that provides additional workflows.
The following pages contain reference material for the AWS Mobile CLI for Web (JavaScript).
Topics• AWS Mobile CLI Reference (p. 163)• AWS Mobile CLI User Credentials (p. 172)• Logging AWS Mobile CLI API Calls with AWS CloudTrail (p. 174)
AWS Mobile CLI ReferenceImportantThe following content applies if you are already using the AWS Mobile CLI to configure yourbackend. If you are building a new mobile or web app, or you’re adding cloud capabilities toyour existing app, use the new AWS Amplify CLI instead. With the new Amplify CLI, you canuse all of the features described in Announcing the AWS Amplify CLI toolchain, including AWSCloudFormation functionality that provides additional workflows.
The AWS Mobile CLI provides a command line interface for front end JavaScript developers to seamlesslyenable AWS services and configure into their apps. With minimal configuration, you can start using all ofthe functionality provided by the AWS Mobile Hub from your favorite terminal program.
Installation and Usage
This section details the usage and the core commands of the awsmobile CLI for JavaScript.
Install AWS Mobile CLI
1. Sign up for the AWS Free Tier.2. Install Node.js with NPM.3. Install AWS Mobile CLI
163

AWS Mobile Hub Developer Guide Developer GuideWeb
npm install -g awsmobile-cli
4. Configure the CLI with your AWS credentials
To setup permissions for the toolchain used by the CLI, run:
awsmobile configure
If prompted for credentials, follow the steps provided by the CLI. For more information, see provideIAM credentials to AWS Mobile CLI (p. 172).
Usage
The AWS Mobile CLI usage is designed to resemble other industry standard command line interfaces.
awsmobile <command> [options]
The help and version options are universal to all the commands. Additional special options for somecommands are detailed in the relevant sections.
-V, --version output the version number-h, --help output usage information
For example:
awsmobile -helporawsmobile init --help
Summary of CLI Commands
The current set of commands supported by the awsmobile CLI are listed below.
awsmobile init (p. 165) Initializes a new Mobile Hub project, checks forIAM keys, and pulls the aws-exports.js file
awsmobile configure (p. 166) Shows existing keys and allows them to bechanged if already set. If keys aren’t set, deeplinks the user to the IAM console to create keysand then prompts for the access key and secretkey. This command helps edit configurationsettings for the AWS account or the project.
awsmobile pull (p. 167) Downloads the latest aws-exports.js, YAML or anyother relevant project details from the Mobile Hubproject
awsmobile push (p. 167) Uploads local metadata, Lambda code,DynamoDB definitions or any other relevantproject details to Mobile Hub
awsmobile publish (p. 167) Executes awsmobile push, then builds andpublishes client-side application to S3 and CloudFront
164

AWS Mobile Hub Developer Guide Developer GuideWeb
awsmobile run (p. 168) Executes awsmobile push, then executes theproject’s start command to test run the client-sideapplication
awsmobile console (p. 168) Open the web console of the awsmobile MobileHub project in the default browser
awsmobile features (p. 168) Shows available and enabled features. Toggle toselect or de-select features.
awsmobile <feature-name> enable [–prompt] (p. 168)
Enables the feature with the defaults (and promptfor changes)
awsmobile <feature-name> disable (p. 170) Disables the feature
awsmobile <feature-name> configure (p. 170) Contains feature-specific sub commands like add-table, add-api, etc.
awsmobile cloud-api invoke <apiname><method> <path> [init] (p. 171)
Invokes the API for testing locally. This helpsquickly test unsigned APIs in your localenvironment.
awsmobile delete (p. 172) Deletes the Mobile hub project.
awsmobile help [cmd] (p. 172) Displays help for [cmd].
init
The awsmobile init command initializes a new Mobile Hub project, checks for IAM keys, and pulls theaws-exports.js file.
There are two usages of the awsmobile init command
1. Initialize the current project with awsmobilejs features
awsmobile init
When prompted, set these project configs:
Please tell us about your project:? Where is your project's source directory: src? Where is your project's distribution directory that stores build artifacts: build? What is your project's build command: npm run-script build? What is your project's start command for local test run: npm run-script start
? What awsmobile project name would you like to use: my-mobile-project
The source directory is where the AWS Mobile CLI copies the latest aws-exports.js to be easilyavailable for your front-end code. This file is automatically updated every time features are added orremoved. Specifying a wrong / unavailable folder will not copy the file over.
The Distribution directly is essentially the build directory for your project. This is used during theawsmobile publish process.
The project’s build and start values are used during the awsmobile publish and awsmobile runcommands respectively.
The awsmobile project name is the name of the backend project created in the Mobile hub.
165

AWS Mobile Hub Developer Guide Developer GuideWeb
You can alter the settings about your project by using the awsmobile configure project (p. 166)command.
2. Initialize and link to an existing awsmobile project as backend
awsmobile init <awsmobile-project-id>
The awsmobile-project-id is the id of the existing backend project in the Mobile Hub. This commandhelps attach an existing backend project to your app.
3. Remove the attached awsmobile project from the backend.
awsmobile init --remove
This command removes the attached backend project associated with your app and cleans theassociated files. This will not alter your app in any way, other than removing the backend project itself.
configure
The awsmobile configure shows existing keys and allows them to be changed if already set. If keysaren’t set, deep links the user to the IAM console to create keys and then prompts for the access keyand secret key. There are two possible usages of this command. Based on the argument selected, thiscommand can be used to set or change the AWS account settings OR the project settings.
awsmobile configure [aws|project]
1. Configuring the AWS account settings using the aws argument. This is the default argument for thiscommand
awsmobile configureorawsmobile configure aws
You will be prompted with questions to set the AWS account credentials as below
configure aws? accessKeyId: <ACCESS-KEY-ID>? secretAccessKey: <SECRET-ACCESS-KEY>? region: <SELECT-REGION-FROM-THE-LIST>
2. Configuring the project settings using the project argument
awsmobile configure project
You will be prompted with questions to configure project as detailed below
? Where is your project's source directory: src? Where is your project's distribution directory to store build artifacts: dist? What is your project's build command: npm run-script build? What is your project's start command for local test run: npm run-script start
3. Retrieve and display the AWS credentials using the --list option
awsmobile configure --list
166
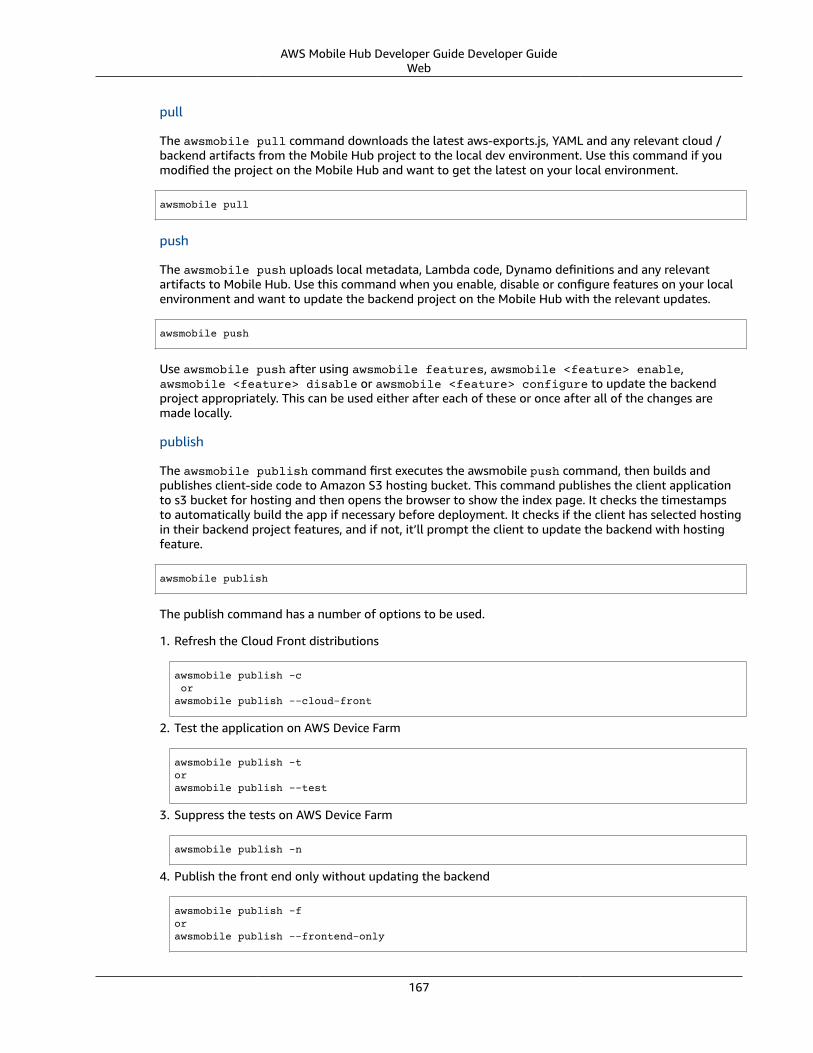
AWS Mobile Hub Developer Guide Developer GuideWeb
pull
The awsmobile pull command downloads the latest aws-exports.js, YAML and any relevant cloud /backend artifacts from the Mobile Hub project to the local dev environment. Use this command if youmodified the project on the Mobile Hub and want to get the latest on your local environment.
awsmobile pull
push
The awsmobile push uploads local metadata, Lambda code, Dynamo definitions and any relevantartifacts to Mobile Hub. Use this command when you enable, disable or configure features on your localenvironment and want to update the backend project on the Mobile Hub with the relevant updates.
awsmobile push
Use awsmobile push after using awsmobile features, awsmobile <feature> enable,awsmobile <feature> disable or awsmobile <feature> configure to update the backendproject appropriately. This can be used either after each of these or once after all of the changes aremade locally.
publish
The awsmobile publish command first executes the awsmobile push command, then builds andpublishes client-side code to Amazon S3 hosting bucket. This command publishes the client applicationto s3 bucket for hosting and then opens the browser to show the index page. It checks the timestampsto automatically build the app if necessary before deployment. It checks if the client has selected hostingin their backend project features, and if not, it’ll prompt the client to update the backend with hostingfeature.
awsmobile publish
The publish command has a number of options to be used.
1. Refresh the Cloud Front distributions
awsmobile publish -c orawsmobile publish --cloud-front
2. Test the application on AWS Device Farm
awsmobile publish -torawsmobile publish --test
3. Suppress the tests on AWS Device Farm
awsmobile publish -n
4. Publish the front end only without updating the backend
awsmobile publish -forawsmobile publish --frontend-only
167

AWS Mobile Hub Developer Guide Developer GuideWeb
run
The awsmobile run command first executes the awsmobile push command, then executes the startcommand you set in the project configuration, such as npm run start or npm run ios. This can beused to conveniently test run your application locally with the latest backend development pushed tothe cloud.
awsmobile run
console
The awsmobile console command opens the web console of the awsmobile Mobile Hub project in thedefault browser
awsmobile console
features
The awsmobile features command displays all the available awsmobile features, and allows you toindividually enable/disable them locally. Use the arrow key to scroll up and down, and use the space keyto enable/disable each feature. Please note that the changes are only made locally, execute awsmobilepush to update the awsmobile project in the cloud.
awsmobile features
The features supported by the AWS Mobile CLI are:
• user-signin (Amazon Cognito)• user-files (Amazon S3)• cloud-api (Lambda / API Gateway)• database (DynamoDB)• analytics (Amazon Pinpoint)• hosting (Amazon S3 and CloudFront)
? select features: (Press <space> to select, <a> to toggle all, <i> to inverse selection)## user-signin # user-files # cloud-api # database # analytics # hosting
Use caution when disabling a feature. Disabling the feature will delete all the related objects (APIs,Lambda functions, tables etc). These artifacts can not be recovered locally, even if you re-enable thefeature.
Use awsmobile push after using awsmobile <feature> disable to update the backend project onthe AWS Mobile Hub project with the selected features.
enable
The awsmobile <feature> enable enables the specified feature with the default settings. Pleasenote that the changes are only made locally, execute awsmobile push to update the AWS Mobile projectin the cloud.
168
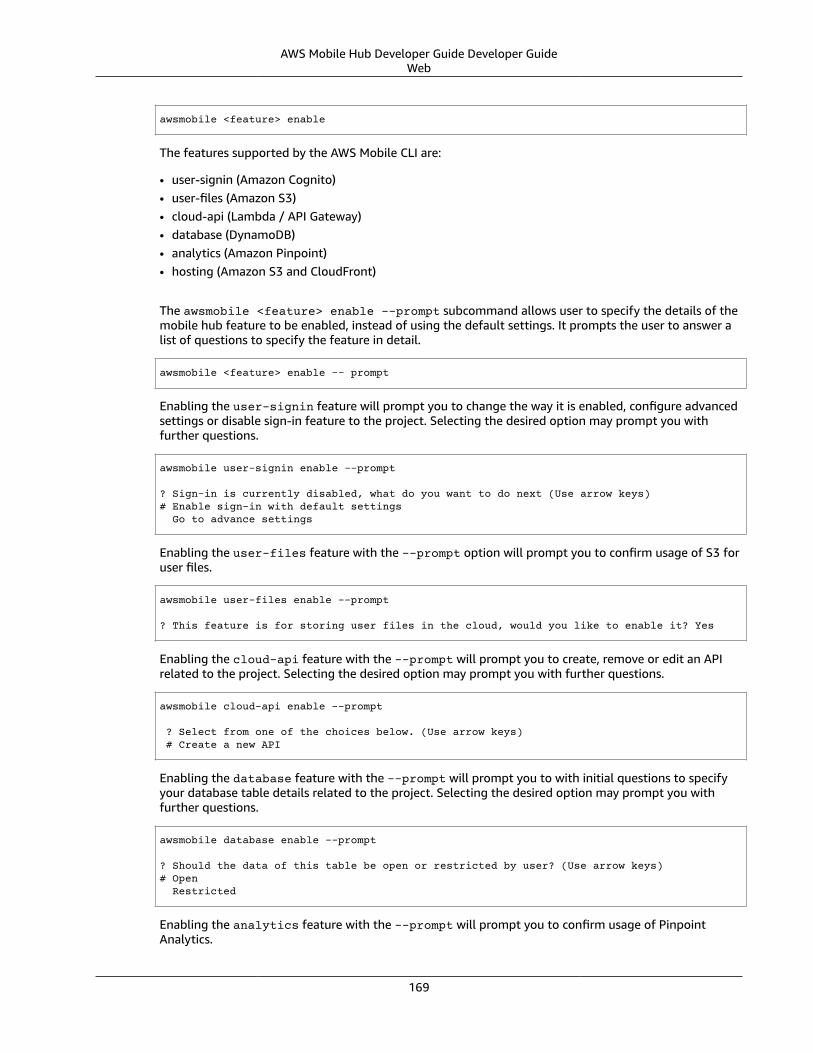
AWS Mobile Hub Developer Guide Developer GuideWeb
awsmobile <feature> enable
The features supported by the AWS Mobile CLI are:
• user-signin (Amazon Cognito)• user-files (Amazon S3)• cloud-api (Lambda / API Gateway)• database (DynamoDB)• analytics (Amazon Pinpoint)• hosting (Amazon S3 and CloudFront)
The awsmobile <feature> enable --prompt subcommand allows user to specify the details of themobile hub feature to be enabled, instead of using the default settings. It prompts the user to answer alist of questions to specify the feature in detail.
awsmobile <feature> enable -- prompt
Enabling the user-signin feature will prompt you to change the way it is enabled, configure advancedsettings or disable sign-in feature to the project. Selecting the desired option may prompt you withfurther questions.
awsmobile user-signin enable --prompt
? Sign-in is currently disabled, what do you want to do next (Use arrow keys)# Enable sign-in with default settings Go to advance settings
Enabling the user-files feature with the --prompt option will prompt you to confirm usage of S3 foruser files.
awsmobile user-files enable --prompt
? This feature is for storing user files in the cloud, would you like to enable it? Yes
Enabling the cloud-api feature with the --prompt will prompt you to create, remove or edit an APIrelated to the project. Selecting the desired option may prompt you with further questions.
awsmobile cloud-api enable --prompt
? Select from one of the choices below. (Use arrow keys) # Create a new API
Enabling the database feature with the --prompt will prompt you to with initial questions to specifyyour database table details related to the project. Selecting the desired option may prompt you withfurther questions.
awsmobile database enable --prompt
? Should the data of this table be open or restricted by user? (Use arrow keys)# Open Restricted
Enabling the analytics feature with the --prompt will prompt you to confirm usage of PinpointAnalytics.
169

AWS Mobile Hub Developer Guide Developer GuideWeb
awsmobile analytics enable --prompt
? Do you want to enable Amazon Pinpoint analytics? (y/N)
Enabling the hosting feature with the --prompt will prompt you to confirm hosting and streaming onCloudFront distribution.
awsmobile hosting enable --prompt
? Do you want to host your web app including a global CDN? (y/N)
Execute awsmobile push after using awsmobile <feature> enable to update the awsmobileproject in the cloud.
disable
The awsmobile <feature> disable disables the feature in their backend project. Use caution whendisabling a feature. Disabling the feature will delete all the related objects (APIs, Lambda functions,tables etc). These artifacts can not be recovered locally, even if you re-enable the feature.
awsmobile <feature> disable
The features supported by the AWS Mobile CLI are:
• user-signin (Amazon Cognito)
• user-files (Amazon S3)
• cloud-api (Lambda / API Gateway)
• database (DynamoDB)
• analytics (Amazon Pinpoint)
• hosting `
Use awsmobile push after using awsmobile <feature> disable to update the backend project onthe AWS Mobile Hub project with the disabled features.
configure
The awsmobile <feature> configure configures the objects in the selected feature. Theconfiguration could mean adding, deleting or updating a particular artifact. This command can be usedonly if the specific feature is already enabled.
awsmobile <feature> configure
The features supported by the AWS Mobile CLI are:
• user-signin (Amazon Cognito)
• user-files (Amazon S3)
• cloud-api (Lambda / API Gateway)
• database (DynamoDB)
• analytics (Amazon Pinpoint)
• hosting (Amazon S3 and CloudFront)
170

AWS Mobile Hub Developer Guide Developer GuideWeb
Configuring the user-signin feature will prompt you to change the way it is enabled, configureadvanced settings or disable sign-in feature to the project. Selecting the desired option may prompt youwith further questions.
awsmobile user-signin configure
? Sign-in is currently enabled, what do you want to do next (Use arrow keys)# Configure Sign-in to be required (Currently set to optional) Go to advance settings Disable sign-in
Configuring the user-files feature will prompt you to confirm usage of S3 for user files.
awsmobile user-files configure
? This feature is for storing user files in the cloud, would you like to enable it? (Y/n)
Configuring the cloud-api feature will prompt you to create, remove or edit an API related to theproject. Selecting the desired option may prompt you with further questions.
awsmobile cloud-api configure
? Select from one of the choices below. (Use arrow keys)# Create a new API Remove an API from the project Edit an API from the project
Configuring the database feature will prompt you to create, remove or edit a table related to theproject. Selecting the desired option may prompt you with further questions.
awsmobile database configure
? Select from one of the choices below. (Use arrow keys) # Create a new table Remove table from the project Edit table from the project
Configuring the analytics feature will prompt you to confirm usage of Pinpoint Analytics.
awsmobile analytics configure
? Do you want to enable Amazon Pinpoint analytics? Yes
Configuring the hosting feature will prompt you to confirm hosting and streaming on CloudFrontdistribution.
awsmobile hosting configure
? Do you want to host your web app including a global CDN? Yes
Use awsmobile push after using awsmobile <feature> configure to update the backend projecton the AWS Mobile Hub project with the configured features.
invoke
The awsmobile cloud-api invoke invokes the API for testing locally. This helps quickly testthe unsigned API locally by passing the appropriate arguments. This is intended to be used for thedevelopment environment or debugging of your API / Lambda function.
171

AWS Mobile Hub Developer Guide Developer GuideWeb
awsmobile cloud-api invoke <apiname> <method> <path> [init]
For example you could invoke the sampleCloudApi post method as shown below
awsmobile cloud-api invoke sampleCloudApi post /items '{"body":{"test-key":"test-value"}}'
The above test will return a value that looks like
{ success: 'post call succeed!', url: '/items', body: { 'test-key': 'test-value' } }
Similarly, you could invoke the sampleCloudApi get method as shown below
awsmobile cloud-api invoke sampleCloudApi get /items
The above test will return a value that looks like
{ success: 'get call succeed!', url: '/items' }
delete
The awsmobile delete command deletes the Mobile hub project in the cloud. Use extra cautionwhen you decide to execute this command, as it can irrevocably affect your team’s work, the mobile hubproject will be delete and cannot be recovered once this command is executed.
awsmobile delete
help
The awsmobile help command can be used as a standalone command or the command name thatyou need help in can be passed as an argument. This gives the usage information for that commandincluding any options that can be used with it.
For Example:
awsmobile helporawsmobile help init
The --help option detailing at the beginning of this page and the awsmobile help command providethe same level of detail. The difference is in the usage.
AWS Mobile CLI User CredentialsImportantThe following content applies if you are already using the AWS Mobile CLI to configure yourbackend. If you are building a new mobile or web app, or you’re adding cloud capabilities toyour existing app, use the new AWS Amplify CLI instead. With the new Amplify CLI, you canuse all of the features described in Announcing the AWS Amplify CLI toolchain, including AWSCloudFormation functionality that provides additional workflows.
Overview
The first time you set up the CLI you will be prompted to provide AWS user credentials. The credentialsestablish permissions for the CLI to manage AWS services on your behalf. They must belong to an AWSIAM user with administrator permissions in the account where the CLI is being used.
172
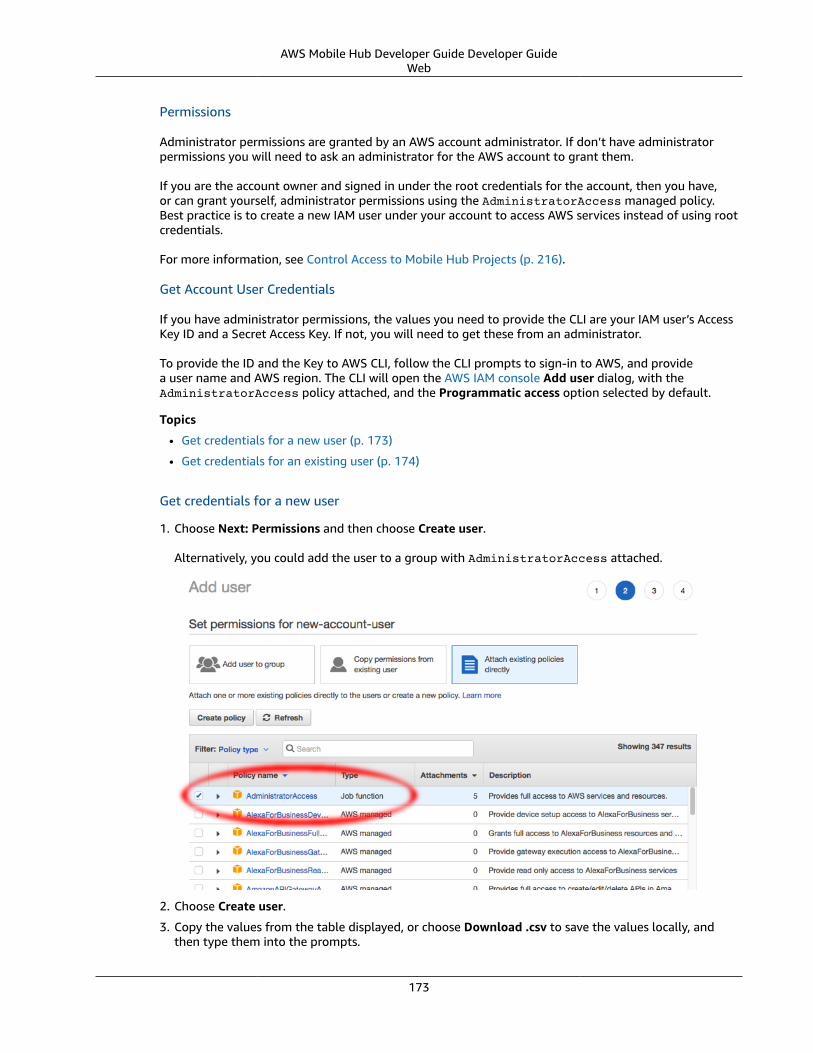
AWS Mobile Hub Developer Guide Developer GuideWeb
Permissions
Administrator permissions are granted by an AWS account administrator. If don’t have administratorpermissions you will need to ask an administrator for the AWS account to grant them.
If you are the account owner and signed in under the root credentials for the account, then you have,or can grant yourself, administrator permissions using the AdministratorAccess managed policy.Best practice is to create a new IAM user under your account to access AWS services instead of using rootcredentials.
For more information, see Control Access to Mobile Hub Projects (p. 216).
Get Account User Credentials
If you have administrator permissions, the values you need to provide the CLI are your IAM user’s AccessKey ID and a Secret Access Key. If not, you will need to get these from an administrator.
To provide the ID and the Key to AWS CLI, follow the CLI prompts to sign-in to AWS, and providea user name and AWS region. The CLI will open the AWS IAM console Add user dialog, with theAdministratorAccess policy attached, and the Programmatic access option selected by default.
Topics
• Get credentials for a new user (p. 173)
• Get credentials for an existing user (p. 174)
Get credentials for a new user
1. Choose Next: Permissions and then choose Create user.
Alternatively, you could add the user to a group with AdministratorAccess attached.
2. Choose Create user.
3. Copy the values from the table displayed, or choose Download .csv to save the values locally, andthen type them into the prompts.
173
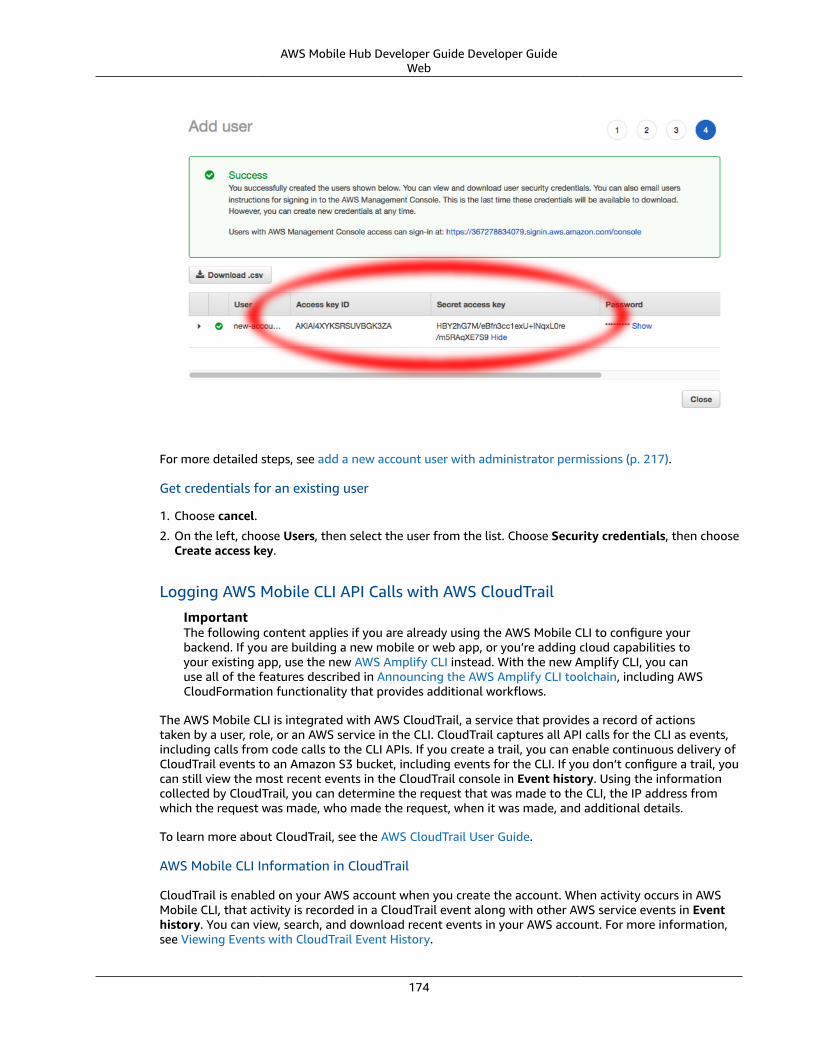
AWS Mobile Hub Developer Guide Developer GuideWeb
For more detailed steps, see add a new account user with administrator permissions (p. 217).
Get credentials for an existing user
1. Choose cancel.
2. On the left, choose Users, then select the user from the list. Choose Security credentials, then chooseCreate access key.
Logging AWS Mobile CLI API Calls with AWS CloudTrailImportantThe following content applies if you are already using the AWS Mobile CLI to configure yourbackend. If you are building a new mobile or web app, or you’re adding cloud capabilities toyour existing app, use the new AWS Amplify CLI instead. With the new Amplify CLI, you canuse all of the features described in Announcing the AWS Amplify CLI toolchain, including AWSCloudFormation functionality that provides additional workflows.
The AWS Mobile CLI is integrated with AWS CloudTrail, a service that provides a record of actionstaken by a user, role, or an AWS service in the CLI. CloudTrail captures all API calls for the CLI as events,including calls from code calls to the CLI APIs. If you create a trail, you can enable continuous delivery ofCloudTrail events to an Amazon S3 bucket, including events for the CLI. If you don’t configure a trail, youcan still view the most recent events in the CloudTrail console in Event history. Using the informationcollected by CloudTrail, you can determine the request that was made to the CLI, the IP address fromwhich the request was made, who made the request, when it was made, and additional details.
To learn more about CloudTrail, see the AWS CloudTrail User Guide.
AWS Mobile CLI Information in CloudTrail
CloudTrail is enabled on your AWS account when you create the account. When activity occurs in AWSMobile CLI, that activity is recorded in a CloudTrail event along with other AWS service events in Eventhistory. You can view, search, and download recent events in your AWS account. For more information,see Viewing Events with CloudTrail Event History.
174
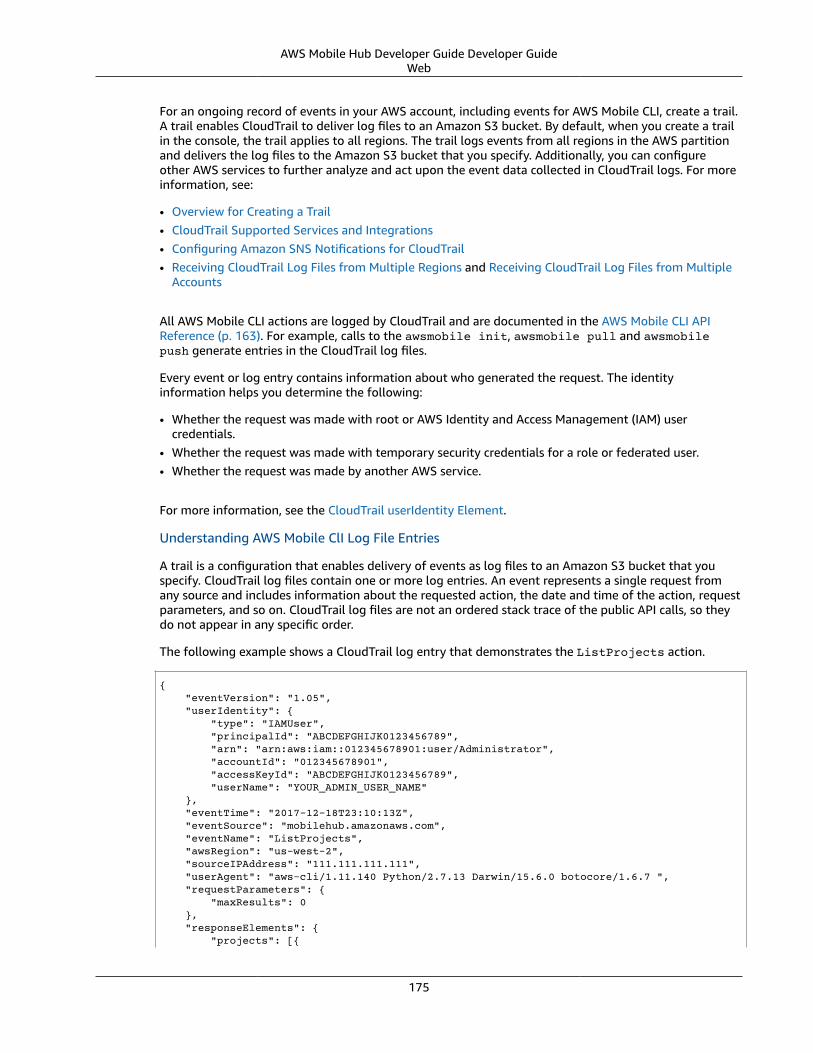
AWS Mobile Hub Developer Guide Developer GuideWeb
For an ongoing record of events in your AWS account, including events for AWS Mobile CLI, create a trail.A trail enables CloudTrail to deliver log files to an Amazon S3 bucket. By default, when you create a trailin the console, the trail applies to all regions. The trail logs events from all regions in the AWS partitionand delivers the log files to the Amazon S3 bucket that you specify. Additionally, you can configureother AWS services to further analyze and act upon the event data collected in CloudTrail logs. For moreinformation, see:
• Overview for Creating a Trail• CloudTrail Supported Services and Integrations• Configuring Amazon SNS Notifications for CloudTrail• Receiving CloudTrail Log Files from Multiple Regions and Receiving CloudTrail Log Files from Multiple
Accounts
All AWS Mobile CLI actions are logged by CloudTrail and are documented in the AWS Mobile CLI APIReference (p. 163). For example, calls to the awsmobile init, awsmobile pull and awsmobilepush generate entries in the CloudTrail log files.
Every event or log entry contains information about who generated the request. The identityinformation helps you determine the following:
• Whether the request was made with root or AWS Identity and Access Management (IAM) usercredentials.
• Whether the request was made with temporary security credentials for a role or federated user.• Whether the request was made by another AWS service.
For more information, see the CloudTrail userIdentity Element.
Understanding AWS Mobile ClI Log File Entries
A trail is a configuration that enables delivery of events as log files to an Amazon S3 bucket that youspecify. CloudTrail log files contain one or more log entries. An event represents a single request fromany source and includes information about the requested action, the date and time of the action, requestparameters, and so on. CloudTrail log files are not an ordered stack trace of the public API calls, so theydo not appear in any specific order.
The following example shows a CloudTrail log entry that demonstrates the ListProjects action.
{ "eventVersion": "1.05", "userIdentity": { "type": "IAMUser", "principalId": "ABCDEFGHIJK0123456789", "arn": "arn:aws:iam::012345678901:user/Administrator", "accountId": "012345678901", "accessKeyId": "ABCDEFGHIJK0123456789", "userName": "YOUR_ADMIN_USER_NAME" }, "eventTime": "2017-12-18T23:10:13Z", "eventSource": "mobilehub.amazonaws.com", "eventName": "ListProjects", "awsRegion": "us-west-2", "sourceIPAddress": "111.111.111.111", "userAgent": "aws-cli/1.11.140 Python/2.7.13 Darwin/15.6.0 botocore/1.6.7 ", "requestParameters": { "maxResults": 0 }, "responseElements": { "projects": [{
175
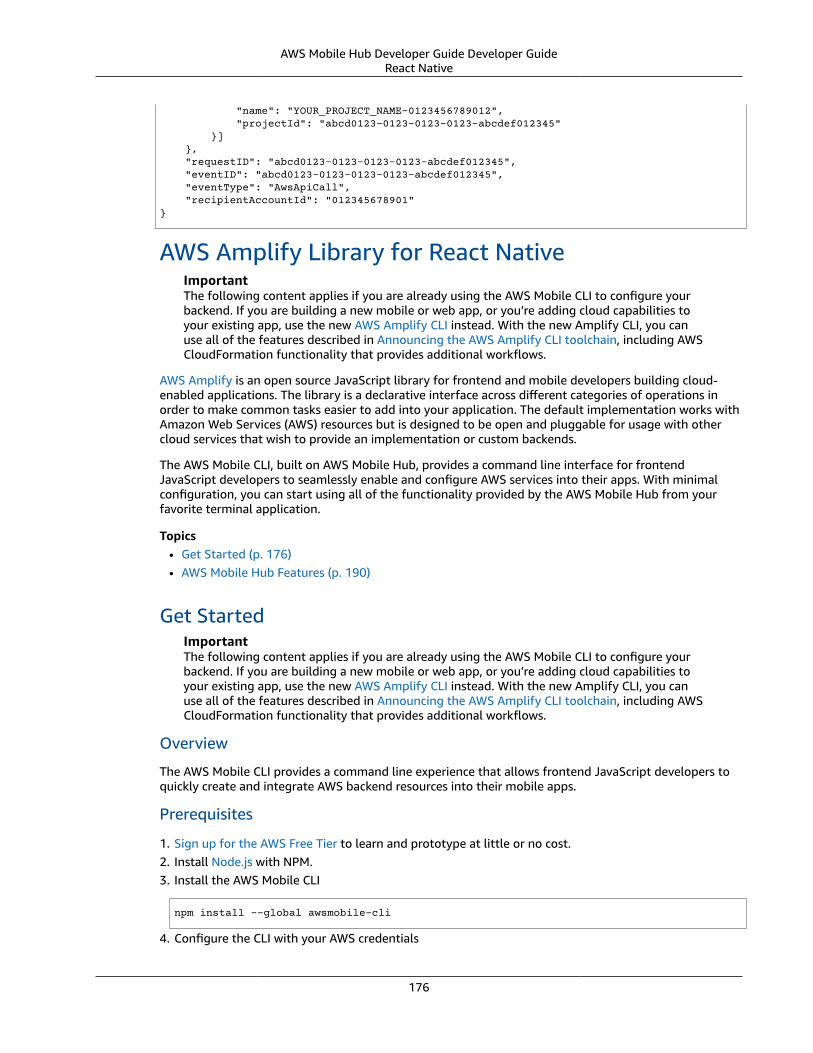
AWS Mobile Hub Developer Guide Developer GuideReact Native
"name": "YOUR_PROJECT_NAME-0123456789012", "projectId": "abcd0123-0123-0123-0123-abcdef012345" }] }, "requestID": "abcd0123-0123-0123-0123-abcdef012345", "eventID": "abcd0123-0123-0123-0123-abcdef012345", "eventType": "AwsApiCall", "recipientAccountId": "012345678901"}
AWS Amplify Library for React NativeImportantThe following content applies if you are already using the AWS Mobile CLI to configure yourbackend. If you are building a new mobile or web app, or you’re adding cloud capabilities toyour existing app, use the new AWS Amplify CLI instead. With the new Amplify CLI, you canuse all of the features described in Announcing the AWS Amplify CLI toolchain, including AWSCloudFormation functionality that provides additional workflows.
AWS Amplify is an open source JavaScript library for frontend and mobile developers building cloud-enabled applications. The library is a declarative interface across different categories of operations inorder to make common tasks easier to add into your application. The default implementation works withAmazon Web Services (AWS) resources but is designed to be open and pluggable for usage with othercloud services that wish to provide an implementation or custom backends.
The AWS Mobile CLI, built on AWS Mobile Hub, provides a command line interface for frontendJavaScript developers to seamlessly enable and configure AWS services into their apps. With minimalconfiguration, you can start using all of the functionality provided by the AWS Mobile Hub from yourfavorite terminal application.
Topics• Get Started (p. 176)• AWS Mobile Hub Features (p. 190)
Get StartedImportantThe following content applies if you are already using the AWS Mobile CLI to configure yourbackend. If you are building a new mobile or web app, or you’re adding cloud capabilities toyour existing app, use the new AWS Amplify CLI instead. With the new Amplify CLI, you canuse all of the features described in Announcing the AWS Amplify CLI toolchain, including AWSCloudFormation functionality that provides additional workflows.
Overview
The AWS Mobile CLI provides a command line experience that allows frontend JavaScript developers toquickly create and integrate AWS backend resources into their mobile apps.
Prerequisites
1. Sign up for the AWS Free Tier to learn and prototype at little or no cost.2. Install Node.js with NPM.3. Install the AWS Mobile CLI
npm install --global awsmobile-cli
4. Configure the CLI with your AWS credentials
176
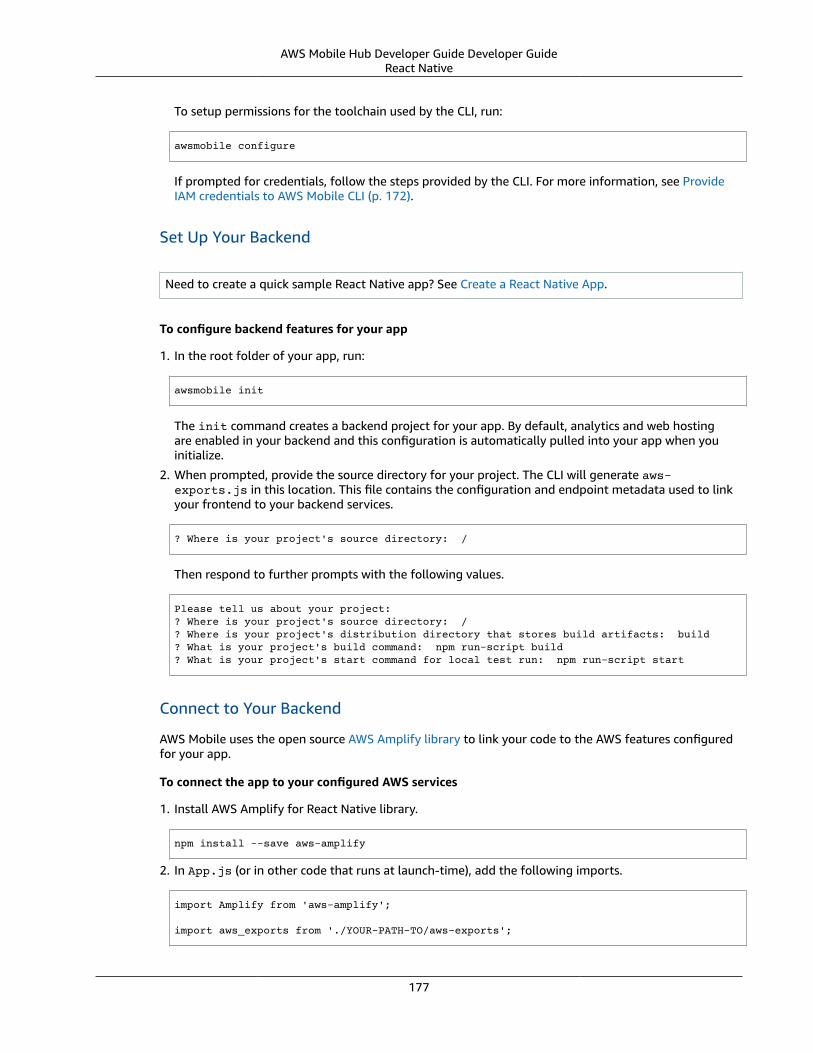
AWS Mobile Hub Developer Guide Developer GuideReact Native
To setup permissions for the toolchain used by the CLI, run:
awsmobile configure
If prompted for credentials, follow the steps provided by the CLI. For more information, see ProvideIAM credentials to AWS Mobile CLI (p. 172).
Set Up Your Backend
Need to create a quick sample React Native app? See Create a React Native App.
To configure backend features for your app
1. In the root folder of your app, run:
awsmobile init
The init command creates a backend project for your app. By default, analytics and web hostingare enabled in your backend and this configuration is automatically pulled into your app when youinitialize.
2. When prompted, provide the source directory for your project. The CLI will generate aws-exports.js in this location. This file contains the configuration and endpoint metadata used to linkyour frontend to your backend services.
? Where is your project's source directory: /
Then respond to further prompts with the following values.
Please tell us about your project:? Where is your project's source directory: /? Where is your project's distribution directory that stores build artifacts: build? What is your project's build command: npm run-script build? What is your project's start command for local test run: npm run-script start
Connect to Your Backend
AWS Mobile uses the open source AWS Amplify library to link your code to the AWS features configuredfor your app.
To connect the app to your configured AWS services
1. Install AWS Amplify for React Native library.
npm install --save aws-amplify
2. In App.js (or in other code that runs at launch-time), add the following imports.
import Amplify from 'aws-amplify';
import aws_exports from './YOUR-PATH-TO/aws-exports';
177

AWS Mobile Hub Developer Guide Developer GuideReact Native
3. Then add the following code.
Amplify.configure(aws_exports);
Run Your App Locally
Your app is now ready to launch and use the default services configured by AWS Mobile.
To launch your app locally
Use the command native to the React Native tooling you are using. For example, if you made your appusing create-react-native-app then run:
npm run android
# OR
npm run ios
Anytime you launch your app, app usage analytics are gathered and can be visualized (p. 178) in anAWS console.
AWS Free Tier Initializing your app or adding features throughthe CLI will cause AWS services to be configuredon your behalf. The pricing for AWS Mobileservices enables you to learn and prototype atlittle or no cost using the AWS Free Tier.
Next Steps
Add Features
Add the following AWS Mobile features to your mobile app using the CLI.
• Analytics (p. 178)
• User Sign-in (p. 180)
• NoSQL Database (p. 181)
• User File Storage (p. 186)
• Cloud Logic (p. 187)
Learn more
To learn more about the commands and usage of the AWS Mobile CLI, see the AWS Mobile CLIreference (p. 163).
Learn about AWS Mobile Amplify.
Add AnalyticsImportantThe following content applies if you are already using the AWS Mobile CLI to configure yourbackend. If you are building a new mobile or web app, or you’re adding cloud capabilities to
178

AWS Mobile Hub Developer Guide Developer GuideReact Native
your existing app, use the new AWS Amplify CLI instead. With the new Amplify CLI, you canuse all of the features described in Announcing the AWS Amplify CLI toolchain, including AWSCloudFormation functionality that provides additional workflows.
Basic Analytics Backend is Enabled for Your App
BEFORE YOU BEGIN The steps on this page assume you have alreadycompleted the steps on Get Started (p. 176).
When you complete the AWS Mobile CLI setup and launch your app, anonymized session and devicedemographics data flows to the AWS analytics backend.
To send basic app usage analytics to AWS
Launch your app locally, for instance, if you created your app using create-react-native-app, byrunning:
npm run android
# Or
npm run ios
When you use your app the Amazon Pinpoint service gathers and visualizes analytics data.
To view the analytics using the Amazon Pinpoint console
1. Launch your app at least once.
2. Open your project in the AWS Mobile Hub console.
awsmobile console
3. Choose the Analytics icon on the left, to navigate to your project in the Amazon Pinpoint console.
4. Choose Analytics on the left.
You should see an up-tick in several graphs.
Add Custom Analytics to Your App
You can configure your app so that Amazon Pinpoint gathers data for custom events that you registerwithin the flow of your code.
To instrument custom analytics in your app
In the file containing the event you want to track, add the following import:
import { Analytics } from 'aws-amplify';
Add the a call like the following to the spot in your JavaScript where the tracked event should be fired:
componentDidMount() { Analytics.record('FIRST-EVENT-NAME');}
179

AWS Mobile Hub Developer Guide Developer GuideReact Native
Or to relevant page elements:
handleClick = () => { Analytics.record('SECOND-EVENT-NAME');}
<Button title="Record event" onPress={this.handleClick}/>
To test:
1. Save the changes and launch your app. Use your app so that tracked events are triggered.
2. In the Amazon Pinpoint console, choose Events near the top.
3. Select an event in the Event dropdown menu on the left.
Custom event data may take a few minutes to become visible in the console.
Next Steps
Learn more about the analytics in AWS Mobile which are part of the Messaging and Analytics (p. 198)feature. This feature uses Amazon Pinpoint.
Learn about AWS Mobile CLI (p. 163).
Learn about the AWS Amplify for React Native library.
Add Auth / User Sign-inImportantThe following content applies if you are already using the AWS Mobile CLI to configure yourbackend. If you are building a new mobile or web app, or you’re adding cloud capabilities toyour existing app, use the new AWS Amplify CLI instead. With the new Amplify CLI, you canuse all of the features described in Announcing the AWS Amplify CLI toolchain, including AWSCloudFormation functionality that provides additional workflows.
Set Up Your Backend
BEFORE YOU BEGIN The steps on this page assume you have alreadycompleted the steps on Get Started (p. 176).
The AWS Mobile CLI components for user authentication include a rich, configurable UI for sign-up andsign-in.
To enable the Auth features
In the root folder of your app, run:
awsmobile user-signin enable
awsmobile push
Connect to Your Backend
The AWS Mobile CLI enables you to integrate ready-made sign-up/sign-in/sign-out UI from thecommand line.
180
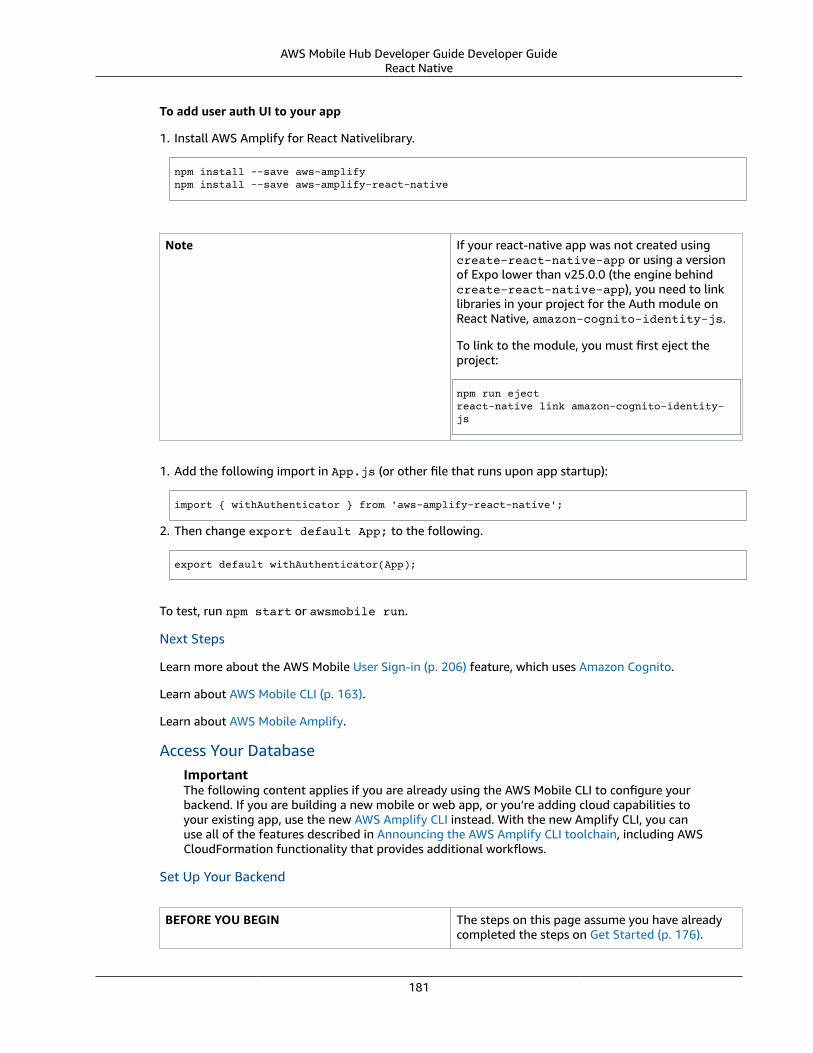
AWS Mobile Hub Developer Guide Developer GuideReact Native
To add user auth UI to your app
1. Install AWS Amplify for React Nativelibrary.
npm install --save aws-amplifynpm install --save aws-amplify-react-native
Note If your react-native app was not created usingcreate-react-native-app or using a versionof Expo lower than v25.0.0 (the engine behindcreate-react-native-app), you need to linklibraries in your project for the Auth module onReact Native, amazon-cognito-identity-js.
To link to the module, you must first eject theproject:
npm run ejectreact-native link amazon-cognito-identity-js
1. Add the following import in App.js (or other file that runs upon app startup):
import { withAuthenticator } from 'aws-amplify-react-native';
2. Then change export default App; to the following.
export default withAuthenticator(App);
To test, run npm start or awsmobile run.
Next Steps
Learn more about the AWS Mobile User Sign-in (p. 206) feature, which uses Amazon Cognito.
Learn about AWS Mobile CLI (p. 163).
Learn about AWS Mobile Amplify.
Access Your DatabaseImportantThe following content applies if you are already using the AWS Mobile CLI to configure yourbackend. If you are building a new mobile or web app, or you’re adding cloud capabilities toyour existing app, use the new AWS Amplify CLI instead. With the new Amplify CLI, you canuse all of the features described in Announcing the AWS Amplify CLI toolchain, including AWSCloudFormation functionality that provides additional workflows.
Set Up Your Backend
BEFORE YOU BEGIN The steps on this page assume you have alreadycompleted the steps on Get Started (p. 176).
181
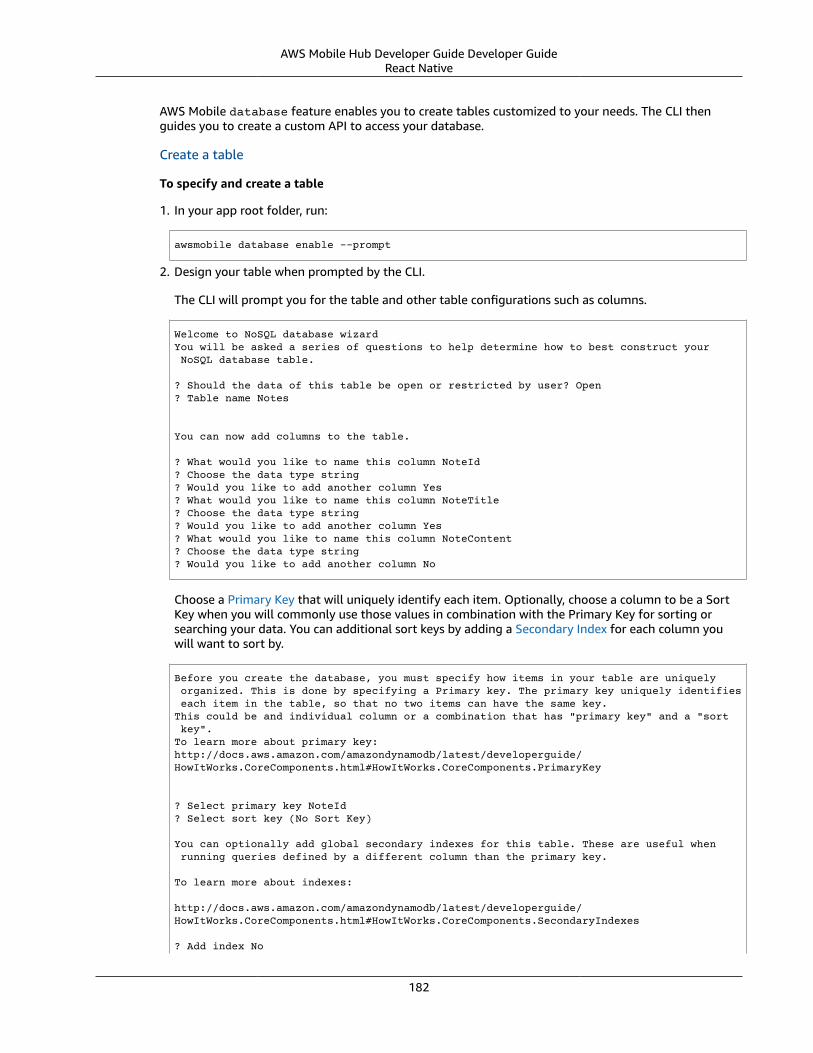
AWS Mobile Hub Developer Guide Developer GuideReact Native
AWS Mobile database feature enables you to create tables customized to your needs. The CLI thenguides you to create a custom API to access your database.
Create a table
To specify and create a table
1. In your app root folder, run:
awsmobile database enable --prompt
2. Design your table when prompted by the CLI.
The CLI will prompt you for the table and other table configurations such as columns.
Welcome to NoSQL database wizardYou will be asked a series of questions to help determine how to best construct your NoSQL database table.
? Should the data of this table be open or restricted by user? Open? Table name Notes
You can now add columns to the table.
? What would you like to name this column NoteId? Choose the data type string? Would you like to add another column Yes? What would you like to name this column NoteTitle? Choose the data type string? Would you like to add another column Yes? What would you like to name this column NoteContent? Choose the data type string? Would you like to add another column No
Choose a Primary Key that will uniquely identify each item. Optionally, choose a column to be a SortKey when you will commonly use those values in combination with the Primary Key for sorting orsearching your data. You can additional sort keys by adding a Secondary Index for each column youwill want to sort by.
Before you create the database, you must specify how items in your table are uniquely organized. This is done by specifying a Primary key. The primary key uniquely identifies each item in the table, so that no two items can have the same key.This could be and individual column or a combination that has "primary key" and a "sort key".To learn more about primary key:http://docs.aws.amazon.com/amazondynamodb/latest/developerguide/HowItWorks.CoreComponents.html#HowItWorks.CoreComponents.PrimaryKey
? Select primary key NoteId? Select sort key (No Sort Key)
You can optionally add global secondary indexes for this table. These are useful when running queries defined by a different column than the primary key.
To learn more about indexes:
http://docs.aws.amazon.com/amazondynamodb/latest/developerguide/HowItWorks.CoreComponents.html#HowItWorks.CoreComponents.SecondaryIndexes
? Add index No
182
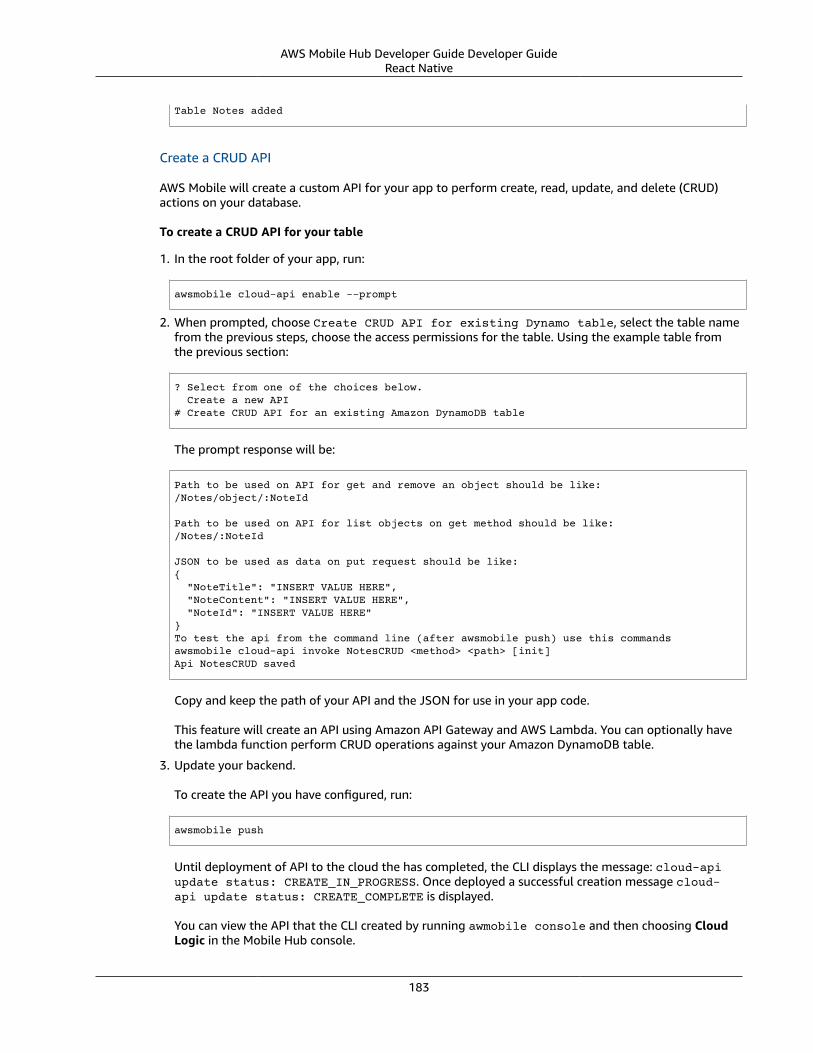
AWS Mobile Hub Developer Guide Developer GuideReact Native
Table Notes added
Create a CRUD API
AWS Mobile will create a custom API for your app to perform create, read, update, and delete (CRUD)actions on your database.
To create a CRUD API for your table
1. In the root folder of your app, run:
awsmobile cloud-api enable --prompt
2. When prompted, choose Create CRUD API for existing Dynamo table, select the table namefrom the previous steps, choose the access permissions for the table. Using the example table fromthe previous section:
? Select from one of the choices below. Create a new API# Create CRUD API for an existing Amazon DynamoDB table
The prompt response will be:
Path to be used on API for get and remove an object should be like:/Notes/object/:NoteId
Path to be used on API for list objects on get method should be like:/Notes/:NoteId
JSON to be used as data on put request should be like:{ "NoteTitle": "INSERT VALUE HERE", "NoteContent": "INSERT VALUE HERE", "NoteId": "INSERT VALUE HERE"}To test the api from the command line (after awsmobile push) use this commandsawsmobile cloud-api invoke NotesCRUD <method> <path> [init]Api NotesCRUD saved
Copy and keep the path of your API and the JSON for use in your app code.
This feature will create an API using Amazon API Gateway and AWS Lambda. You can optionally havethe lambda function perform CRUD operations against your Amazon DynamoDB table.
3. Update your backend.
To create the API you have configured, run:
awsmobile push
Until deployment of API to the cloud the has completed, the CLI displays the message: cloud-apiupdate status: CREATE_IN_PROGRESS. Once deployed a successful creation message cloud-api update status: CREATE_COMPLETE is displayed.
You can view the API that the CLI created by running awmobile console and then choosing CloudLogic in the Mobile Hub console.
183
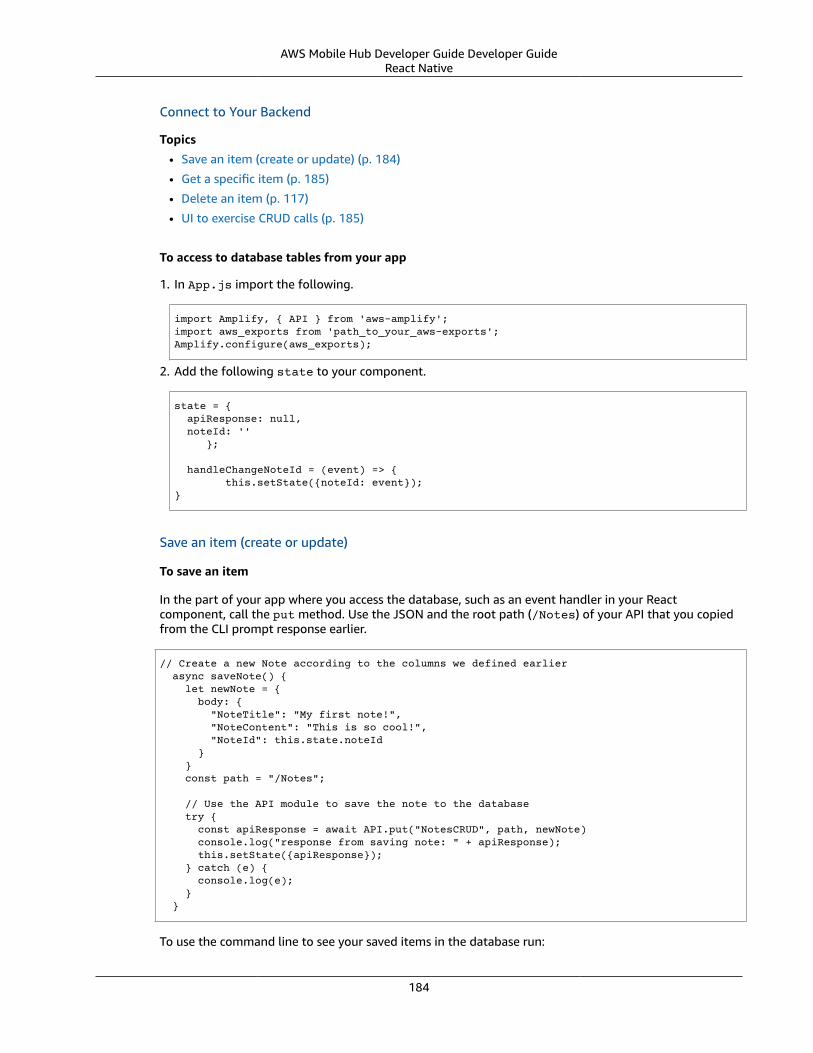
AWS Mobile Hub Developer Guide Developer GuideReact Native
Connect to Your Backend
Topics
• Save an item (create or update) (p. 184)
• Get a specific item (p. 185)
• Delete an item (p. 117)
• UI to exercise CRUD calls (p. 185)
To access to database tables from your app
1. In App.js import the following.
import Amplify, { API } from 'aws-amplify';import aws_exports from 'path_to_your_aws-exports';Amplify.configure(aws_exports);
2. Add the following state to your component.
state = { apiResponse: null, noteId: '' };
handleChangeNoteId = (event) => { this.setState({noteId: event});}
Save an item (create or update)
To save an item
In the part of your app where you access the database, such as an event handler in your Reactcomponent, call the put method. Use the JSON and the root path (/Notes) of your API that you copiedfrom the CLI prompt response earlier.
// Create a new Note according to the columns we defined earlier async saveNote() { let newNote = { body: { "NoteTitle": "My first note!", "NoteContent": "This is so cool!", "NoteId": this.state.noteId } } const path = "/Notes";
// Use the API module to save the note to the database try { const apiResponse = await API.put("NotesCRUD", path, newNote) console.log("response from saving note: " + apiResponse); this.setState({apiResponse}); } catch (e) { console.log(e); } }
To use the command line to see your saved items in the database run:
184
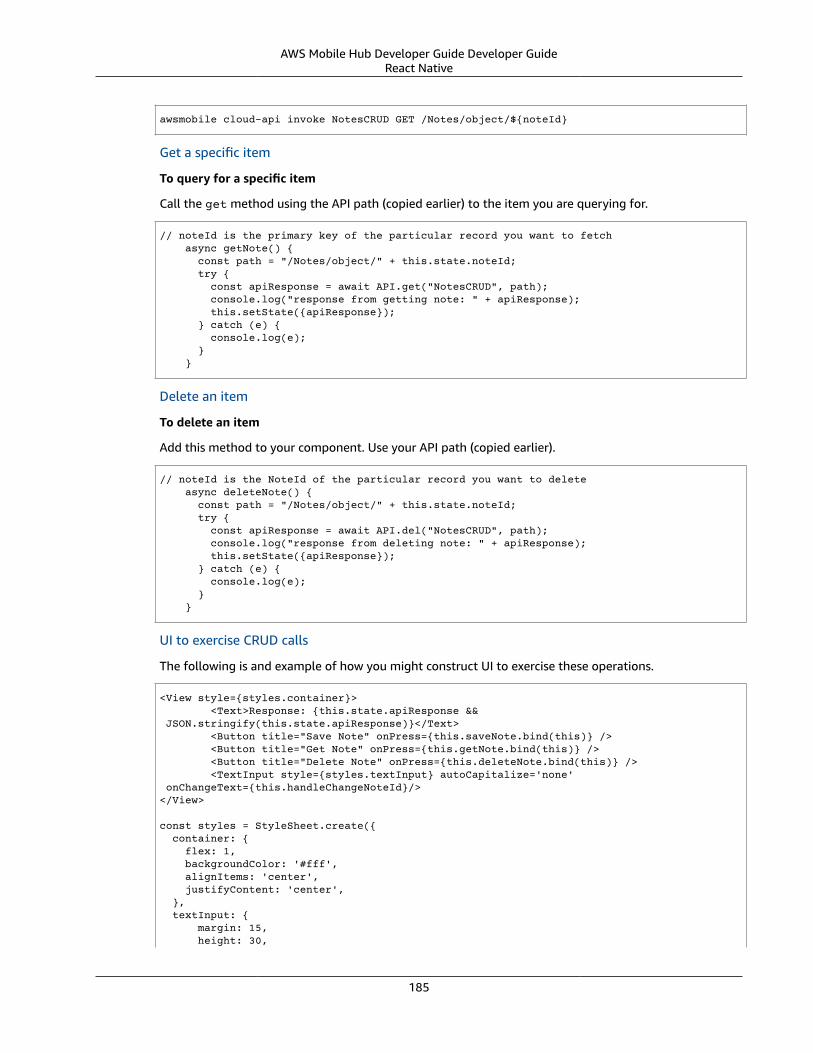
AWS Mobile Hub Developer Guide Developer GuideReact Native
awsmobile cloud-api invoke NotesCRUD GET /Notes/object/${noteId}
Get a specific item
To query for a specific item
Call the get method using the API path (copied earlier) to the item you are querying for.
// noteId is the primary key of the particular record you want to fetch async getNote() { const path = "/Notes/object/" + this.state.noteId; try { const apiResponse = await API.get("NotesCRUD", path); console.log("response from getting note: " + apiResponse); this.setState({apiResponse}); } catch (e) { console.log(e); } }
Delete an item
To delete an item
Add this method to your component. Use your API path (copied earlier).
// noteId is the NoteId of the particular record you want to delete async deleteNote() { const path = "/Notes/object/" + this.state.noteId; try { const apiResponse = await API.del("NotesCRUD", path); console.log("response from deleting note: " + apiResponse); this.setState({apiResponse}); } catch (e) { console.log(e); } }
UI to exercise CRUD calls
The following is and example of how you might construct UI to exercise these operations.
<View style={styles.container}> <Text>Response: {this.state.apiResponse && JSON.stringify(this.state.apiResponse)}</Text> <Button title="Save Note" onPress={this.saveNote.bind(this)} /> <Button title="Get Note" onPress={this.getNote.bind(this)} /> <Button title="Delete Note" onPress={this.deleteNote.bind(this)} /> <TextInput style={styles.textInput} autoCapitalize='none' onChangeText={this.handleChangeNoteId}/></View>
const styles = StyleSheet.create({ container: { flex: 1, backgroundColor: '#fff', alignItems: 'center', justifyContent: 'center', }, textInput: { margin: 15, height: 30,
185

AWS Mobile Hub Developer Guide Developer GuideReact Native
width: 200, borderWidth: 1, color: 'green', fontSize: 20, backgroundColor: 'black' }});
Next Steps
Learn more about the AWS Mobile NoSQL Database (p. 193) feature, which uses Amazon DynamoDB.
Learn about AWS Mobile CLI (p. 163).
Learn about AWS Mobile Amplify.
Add StorageImportantThe following content applies if you are already using the AWS Mobile CLI to configure yourbackend. If you are building a new mobile or web app, or you’re adding cloud capabilities toyour existing app, use the new AWS Amplify CLI instead. With the new Amplify CLI, you canuse all of the features described in Announcing the AWS Amplify CLI toolchain, including AWSCloudFormation functionality that provides additional workflows.
Set Up Your Backend
The AWS Mobile CLI User File Storage (p. 211) feature enables apps to store user files in the cloud.
BEFORE YOU BEGIN The steps on this page assume you have alreadycompleted the steps on Get Started (p. 176).
To configure your app’s cloud storage location
In your app root folder, run:
awsmobile user-files enable
awsmobile push
Connect to Your Backend
To add User File Storage to your app
In your component where you want to transfer files:
Import the Storage module from aws-amplify and configure it to communicate with your backend.
import { Storage } from 'aws-amplify';
Now that the Storage module is imported and ready to communicate with your backend, implementcommon file transfer actions using the code below.
Upload a file
To upload a file to storage
Add the following methods to the component where you handle file uploads.
async uploadFile() {
186

AWS Mobile Hub Developer Guide Developer GuideReact Native
let file = 'My upload text'; let name = 'myFile.txt'; const access = { level: "public" }; // note the access path Storage.put(name, file, access);}
Get a specific file
To download a file from cloud storage
Add the following code to a component where you display files.
async getFile() { let name = 'myFile.txt'; const access = { level: "public" }; let fileUrl = await Storage.get(name, access); // use fileUrl to get the file}
List all files
To list the files stored in the cloud for your app
Add the following code to a component where you list a collection of files.
async componentDidMount() { const path = this.props.path; const access = { level: "public" }; let files = await Storage.list(path, access); // use file list to get single files}
Use the following code to fetch file attributes such as the size or time of last file change.
file.Size; // file sizefile.LastModified.toLocaleDateString(); // last modified datefile.LastModified.toLocaleTimeString(); // last modified time
Delete a file
Add the following state to the element where you handle file transfers.
async deleteFile(key) { const access = { level: "public" }; Storage.remove(key, access);}
Next Steps
Learn more about the analytics in AWS Mobile which are part of the User File Storage (p. 211) feature.This feature uses Amazon Simple Storage Service (S3).
Learn about AWS Mobile CLI (p. 163).
Learn about AWS Mobile Amplify.
Access Your APIsImportantThe following content applies if you are already using the AWS Mobile CLI to configure yourbackend. If you are building a new mobile or web app, or you’re adding cloud capabilities to
187

AWS Mobile Hub Developer Guide Developer GuideReact Native
your existing app, use the new AWS Amplify CLI instead. With the new Amplify CLI, you canuse all of the features described in Announcing the AWS Amplify CLI toolchain, including AWSCloudFormation functionality that provides additional workflows.
Set Up Your Backend
BEFORE YOU BEGIN The steps on this page assume you have alreadycompleted the steps on Get Started (p. 176).
The AWS Mobile Cloud Logic (p. 190) feature lets you call APIs in the cloud. API calls are handled byyour serverless Lambda functions.
To enable cloud APIs in your app
awsmobile cloud-api enable
awsmobile push
Enabling Cloud Logic in your app adds a sample API, sampleCloudApi to your project that can be usedfor testing.
You can find the sample handler function for the API by running awsmobile console in your app rootfolder, and then choosing the Cloud Logic feature in your Mobile Hub project.
Quickly Test Your API From the CLI
The sampleCloudApi and its handler function allow you to make end to end API calls.
To test invocation of your unsigned APIs in the development environment
awsmobile cloud-api invoke <apiname> <method> <path> [init]
For the sampleCloudApi you may use the following examples to test the post method
awsmobile cloud-api invoke sampleCloudApi post /items '{"body": {"testKey":"testValue"}}'
188
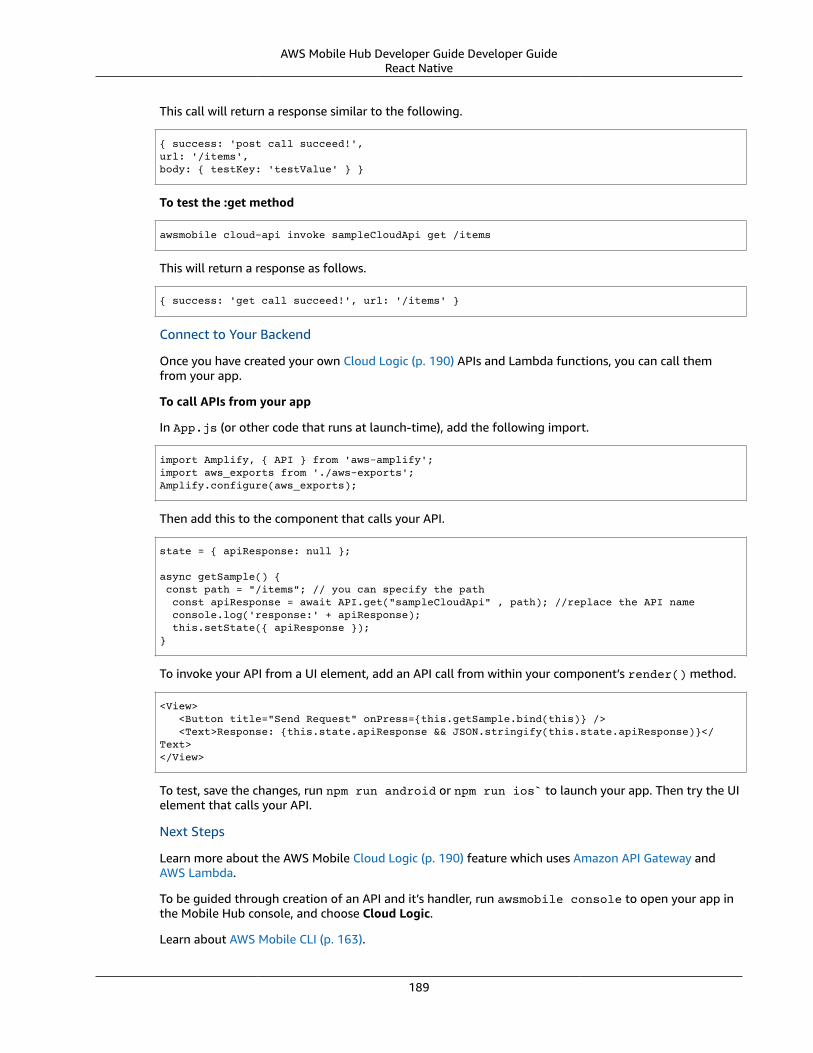
AWS Mobile Hub Developer Guide Developer GuideReact Native
This call will return a response similar to the following.
{ success: 'post call succeed!',url: '/items',body: { testKey: 'testValue' } }
To test the :get method
awsmobile cloud-api invoke sampleCloudApi get /items
This will return a response as follows.
{ success: 'get call succeed!', url: '/items' }
Connect to Your Backend
Once you have created your own Cloud Logic (p. 190) APIs and Lambda functions, you can call themfrom your app.
To call APIs from your app
In App.js (or other code that runs at launch-time), add the following import.
import Amplify, { API } from 'aws-amplify';import aws_exports from './aws-exports';Amplify.configure(aws_exports);
Then add this to the component that calls your API.
state = { apiResponse: null };
async getSample() { const path = "/items"; // you can specify the path const apiResponse = await API.get("sampleCloudApi" , path); //replace the API name console.log('response:' + apiResponse); this.setState({ apiResponse });}
To invoke your API from a UI element, add an API call from within your component’s render() method.
<View> <Button title="Send Request" onPress={this.getSample.bind(this)} /> <Text>Response: {this.state.apiResponse && JSON.stringify(this.state.apiResponse)}</Text></View>
To test, save the changes, run npm run android or npm run ios` to launch your app. Then try the UIelement that calls your API.
Next Steps
Learn more about the AWS Mobile Cloud Logic (p. 190) feature which uses Amazon API Gateway andAWS Lambda.
To be guided through creation of an API and it’s handler, run awsmobile console to open your app inthe Mobile Hub console, and choose Cloud Logic.
Learn about AWS Mobile CLI (p. 163).
189

AWS Mobile Hub Developer Guide Developer GuideMobile Hub Features
Learn about AWS Mobile Amplify.
AWS Mobile Hub FeaturesImportantThe following content applies if you are already using the AWS Mobile CLI to configure yourbackend. If you are building a new mobile or web app, or you’re adding cloud capabilities toyour existing app, use the new AWS Amplify CLI instead. With the new Amplify CLI, you canuse all of the features described in Announcing the AWS Amplify CLI toolchain, including AWSCloudFormation functionality that provides additional workflows.
The following pages contain reference material for the AWS Mobile CLI for Web (JavaScript).
• AWS Mobile CLI Reference (p. 163)• AWS Mobile CLI Credentials (p. 172)
AWS Mobile Hub Features
Looking for the AWS SDKs for iOS and Android? These SDKs and their docs are now part of AWSAmplify.
The content on this page applies only to apps that were configured using AWS Mobile Hub orawsmobile CLI. For existing apps that use AWS Mobile SDK prior to v2.8.0, we highly recommend youmigrate your app to use AWS Amplify and the latest SDK.
AWS Mobile Hub is a service that enables even a novice to easily deploy and configure mobile appbackend features using a range of powerful AWS services.
You create a free project, then choose and configure mobile app features using a point and click console.Mobile Hub takes care of the complexities in the background and then supplies you with step by stepintegration instructions.
Topics• Cloud Logic (p. 190)• NoSQL Database (p. 193)• Messaging and Analytics (p. 198)• Hosting and Streaming (p. 200)• Conversational Bots (p. 205)• User Sign-in (p. 206)• User File Storage (p. 211)
Cloud Logic
Looking for the AWS SDKs for iOS and Android? These SDKs and their docs are now part of AWSAmplify.
The content on this page applies only to apps that were configured using AWS Mobile Hub orawsmobile CLI. For existing apps that use AWS Mobile SDK prior to v2.8.0, we highly recommend youmigrate your app to use AWS Amplify and the latest SDK.
Choose the AWS Mobile Hub Cloud Logic mobile backend service feature to:
190
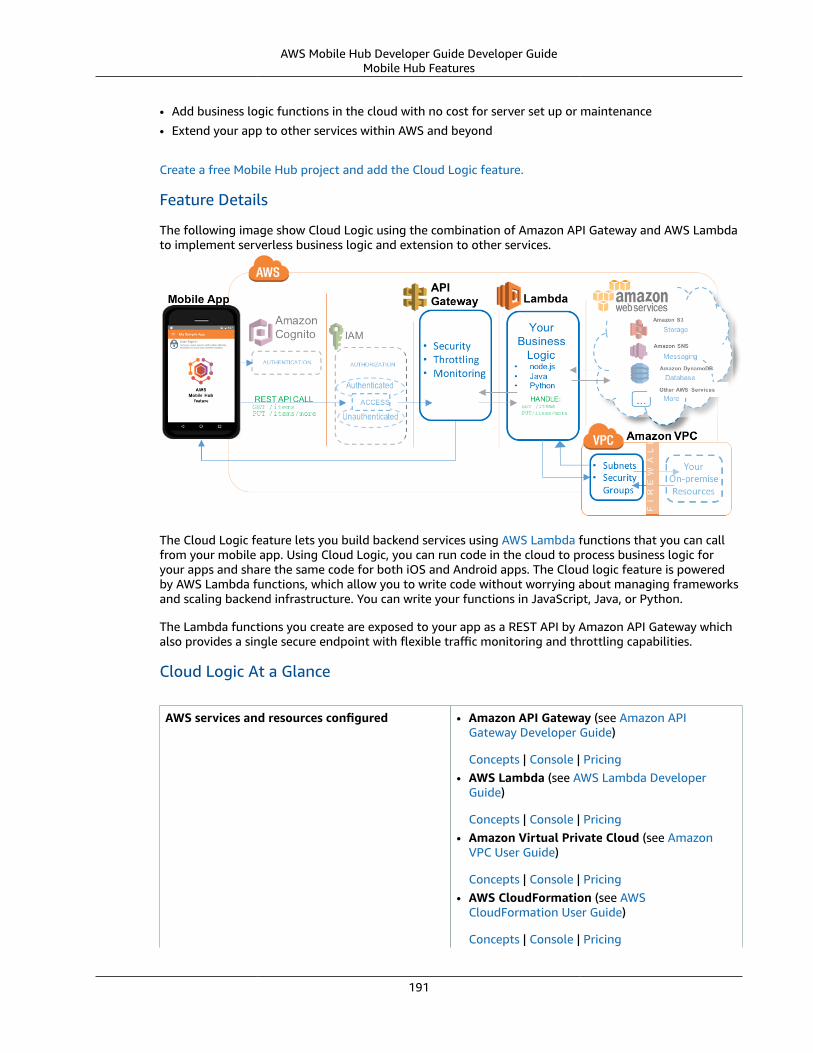
AWS Mobile Hub Developer Guide Developer GuideMobile Hub Features
• Add business logic functions in the cloud with no cost for server set up or maintenance
• Extend your app to other services within AWS and beyond
Create a free Mobile Hub project and add the Cloud Logic feature.
Feature Details
The following image show Cloud Logic using the combination of Amazon API Gateway and AWS Lambdato implement serverless business logic and extension to other services.
The Cloud Logic feature lets you build backend services using AWS Lambda functions that you can callfrom your mobile app. Using Cloud Logic, you can run code in the cloud to process business logic foryour apps and share the same code for both iOS and Android apps. The Cloud logic feature is poweredby AWS Lambda functions, which allow you to write code without worrying about managing frameworksand scaling backend infrastructure. You can write your functions in JavaScript, Java, or Python.
The Lambda functions you create are exposed to your app as a REST API by Amazon API Gateway whichalso provides a single secure endpoint with flexible traffic monitoring and throttling capabilities.
Cloud Logic At a Glance
AWS services and resources configured • Amazon API Gateway (see Amazon APIGateway Developer Guide)
Concepts | Console | Pricing• AWS Lambda (see AWS Lambda Developer
Guide)
Concepts | Console | Pricing• Amazon Virtual Private Cloud (see Amazon
VPC User Guide)
Concepts | Console | Pricing• AWS CloudFormation (see AWS
CloudFormation User Guide)
Concepts | Console | Pricing
191
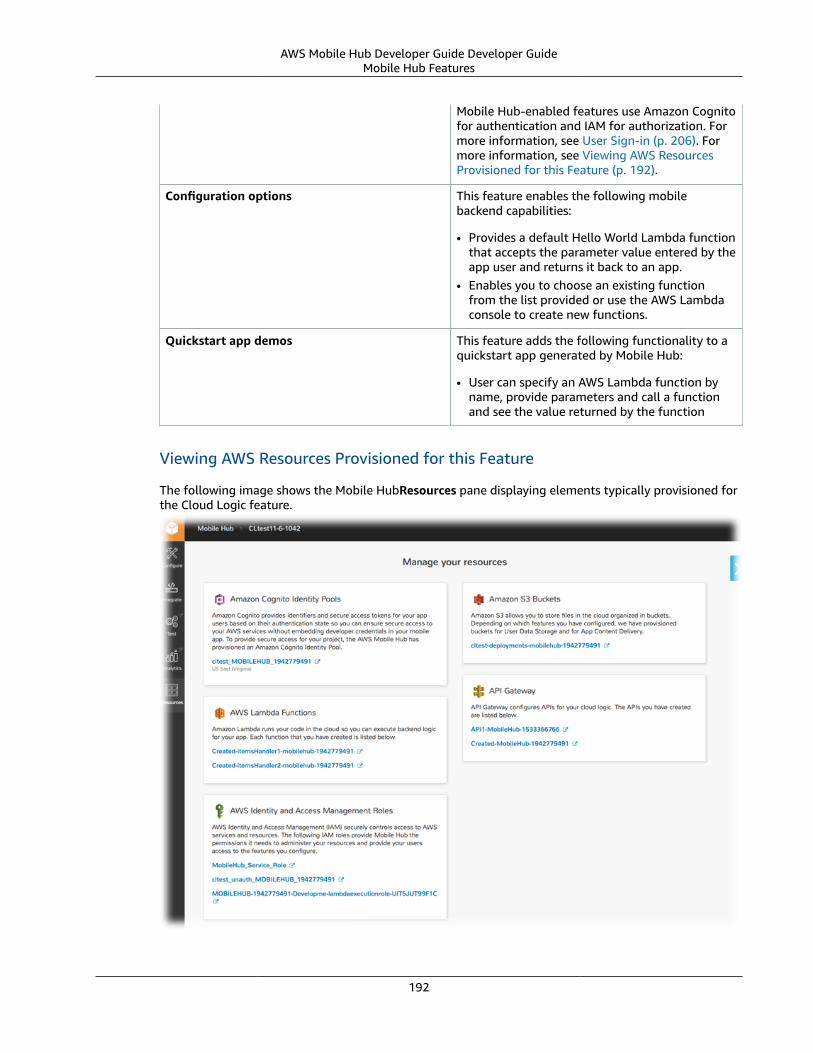
AWS Mobile Hub Developer Guide Developer GuideMobile Hub Features
Mobile Hub-enabled features use Amazon Cognitofor authentication and IAM for authorization. Formore information, see User Sign-in (p. 206). Formore information, see Viewing AWS ResourcesProvisioned for this Feature (p. 192).
Configuration options This feature enables the following mobilebackend capabilities:
• Provides a default Hello World Lambda functionthat accepts the parameter value entered by theapp user and returns it back to an app.
• Enables you to choose an existing functionfrom the list provided or use the AWS Lambdaconsole to create new functions.
Quickstart app demos This feature adds the following functionality to aquickstart app generated by Mobile Hub:
• User can specify an AWS Lambda function byname, provide parameters and call a functionand see the value returned by the function
Viewing AWS Resources Provisioned for this Feature
The following image shows the Mobile HubResources pane displaying elements typically provisioned forthe Cloud Logic feature.
192

AWS Mobile Hub Developer Guide Developer GuideMobile Hub Features
Quickstart App Details
Your quickstart app includes code to use AWS Lambda APIs to invoke any functions you have selected inyour project. Adding Cloud Logic to your quickstart app provides a Hello World default Lambda function.You can also choose an existing Lambda function from your AWS account, or you can create a new one.When you choose the edit button, you are taken to the function editor in the AWS Lambda console. Fromthe Lambda console, you can edit the code directly or upload a package of source and libraries as a .zipfile.
In the demo screen of the Cloud Logic quickstart app, you can enter the name and input parametersof the Lambda function you wish to invoke. The quickstart app then calls your Lambda function anddisplays the results it returns.
NoSQL Database
Looking for the AWS SDKs for iOS and Android? These SDKs and their docs are now part of AWSAmplify.
The content on this page applies only to apps that were configured using AWS Mobile Hub orawsmobile CLI. For existing apps that use AWS Mobile SDK prior to v2.8.0, we highly recommend youmigrate your app to use AWS Amplify and the latest SDK.
Choose the Mobile Hub NoSQL Database mobile backend feature to:
• Add easy to develop database capabilities with scalable performance and cost
Create a free Mobile Hub project and add the NoSQL DB feature in minutes.
Feature Details
The following image shows the typical connection between a mobile app and Amazon DynamoDB usingthe NoSQL pattern.
The NoSQL Database feature uses Amazon DynamoDB to enable you to create database tables that canstore and retrieve data for use by your apps.
NoSQL databases are widely recognized as the method of choice for many mobile backend solutionsdue to their ease of development, scalable performance, high availability, and resilience. For moreinformation, see From SQL to NoSQL in the Amazon DynamoDB Developer Guide.
193

AWS Mobile Hub Developer Guide Developer GuideMobile Hub Features
NoSQL Database At a Glance
AWS services and resources configured • Amazon DynamoDB Tables (see Working withTables in DynamoDB)
Concepts | Console | Pricing
Mobile Hub-enabled features use Amazon Cognitofor authentication and IAM for authorization. Formore information, see User Sign-in (p. 206). Formore information, see Viewing AWS ResourcesProvisioned for this Feature (p. 197).
Configuration options This feature enables the following mobile appbackend capabilities:
Configuring Your Tables (p. 195) - Using customschema, based on a sample schema provided, orby using a wizard that guides you through choiceswhile creating a table.
Data Permissions (p. 196) - Access to your app’sdata can be:
• Public (enables any mobile app user to read orwrite any item in the table).
• Protected (enables any mobile app user to readany item in the table but only the owner of anitem can update or delete it).
• Private (enables only the owner of anitem to read and write to a table) For moreinformation, see Configuring the NoSQLDatabase Feature (p. 194).
For more information, see Configuring the NoSQLDatabase Feature (p. 194).
Quickstart app demos This feature adds the following to a quickstartapp generated by Mobile Hub:
• Insert and remove sample data, based on theschema you specify in the console.
• Perform and see the results of NoSQLoperations on tables including Get, Scan, and allthe example queries displayed by the console asyou make design selections.
Configuring the NoSQL Database Feature
This section describes steps and options for configuring NoSQL Database features in Mobile Hub.
To add the NoSQL Database feature to your |AMH| project
1. Choose Enable NoSQL.
194

AWS Mobile Hub Developer Guide Developer GuideMobile Hub Features
2. Choose Add a new table.
3. Choose the initial schema for the table. You can use a provided example schema, or generate aschema through the wizard.
Example Table Schemas
AWS Mobile Hub provides a set of example table schemas for typical mobile apps. If you create a tableusing one of the example schema templates, the table initially has a set of attributes specific to eachexample. You can choose one of these templates as the starting schema for your table:
• News, which stores author, title, article content, keywords, and other attributes of news articles.
• Locations, which stores names, latitude, and longitude of geographic locations.
• Notes, which stores private notes for each user.
• Ratings, which stores user ratings for a catalog of items.
• Graffiti Wall, which stores shared drawing items.
To add a table using one of the example schema templates in your |AMH| project
1. Choose the example template to use for the initial schema of the table.
2. Type a new name in Table name to rename the table if you wish. Each template gives the table adefault name matching the name of the template.
3. Choose Public, Protected, or Private permissions to grant to the mobile app users for the table. Formore information, see Data Permissions (p. 196).
4. (Optional) Under What attributes do you want on this table?, you can add, rename, or delete tableattributes.
5. (Optional) Choose Add index to add name, partition key, and (optionally) sort key for a secondaryindex for your table.
6. Choose Create table.
Configuring Your Tables
This section describes options for configuring DynamoDB NoSQL tables for your app.
Topics• NoSQL Table Terminology (p. 195)
• Data Permissions (p. 196)
NoSQL Table Terminology
Similar to other database management systems, DynamoDB stores data in tables. A table is a collectionof data with the following elements.
Items
• Each table contains multiple items. An item is a group of attributes that is uniquely identifiable amongall of the other items. Items are similar to rows, records, or tuples in relational database systems.
Attributes
• Attributes are the columns in a DynamoDB table. The rows of the table are the individual records youadd, update, read, or delete as necessary for your app.
195
AWS Mobile Hub Developer Guide Developer GuideMobile Hub Features
The table schema provides a set of initial attributes based on the needs of each example. You canremove any of these attributes by choosing Remove. If you remove the partition key attribute, thenyou must designate another attribute as the partition key for the primary index of the table.
You can choose Add attribute to add a blank attribute to the table. Give the attribute a name, choosethe type of data it will store, and choose whether the new attribute is the partition key or the sort key.
Indexes
• Each table has a built-in primary index, which has a partition key and may also have a sort key. Thisindex allows specific types of queries. You can see the types of queries the table can perform byexpanding the Queries this table can perform section. To enable queries using other attributes, createadditional secondary indexes. Secondary indexes enable you to access data using a different partitionkey and optional sort key from those on the primary index.
Data Permissions
Best practice for data security is to allow the minimum access to your tables that will support your appdesign. Mobile Hub provides two methods to protect your data: user authentication using the User Sign-in (p. 206) feature; and NoSQL Database data table user permissions.
Note: When NoSQL Database is enabled your app communicates directly with the DynamoDB service.If you do not make the User Sign-in (p. 206) feature Required then, where not blocked by table userpermissions, unauthenticated users will have access to read and/or write data.
Grant Permissions Only to Authenticated Users
Unless users who have not signed-in need to read or write data in a table in your app, scope down accessby requiring users to sign in (authenticate) before they are allowed to use app features that performdatabase operations. The AWS Mobile Hub User Sign-in (p. 206) feature offers a range of methodsfor authenticating users that includes: federating with a sign-in provider like Facebook, Google, ActiveDirectory, or your existing custom service. In a few clicks, you can also create your own sign-in providerbacked by AWS services.
To add User Sign-in to your app, use the Configure more features button on a feature configurationpage, or the Configure icon on the left. Then choose and enable User Sign-in.
Grant Permissions to Table Data Items Per User
When you create a new table in NoSQL Database, you choose between Public, Private, or Protectedoptions, to determine which app users can read or write the table’s data. Mobile Hub attaches a fine-grained access control policy to the table, that can restrict the operations available to a user based onwhether or not they are the creator of data being accessed.
Public
• Public permissions allow all users to read or update all items (data rows) in the table.
Protected
• Protected permissions allow all users to read all items in the table, but only the owner of an item canupdate or delete that item.
Private
• Private permissions allow only the owner of an item to read or write to it.
196
AWS Mobile Hub Developer Guide Developer GuideMobile Hub Features
NoteUsers own a data item if their Amazon Cognito identity ID matches the value of the item’sprimary key.If you choose Protected or Private permissions for a table, then the partition key of the tablemust be userId, and be of type string. Secondary indexes for protected or private tablesfollow the same pattern as primary indexes.When a user creates an item in a protected or private table, AWS populates the value of theitem’s primary key with that user’s Amazon Cognito identity ID.Enforcement happens when a data operation is attempted on a protected or private item. IAMwill check if the item’s userId matches the current user’s Amazon Cognito identity ID, andallow or prevent the operation based on the policy attached to the table.When you choose Public, permissions for a table there is no ownership enforcement. There areno restrictions on name or data type of the primary key and secondary index primary keys of apublic table.
Managing Permissions to Restricted Items for Multiple Writers
After Mobile Hub provisions access restrictions for your tables with Protected or Private permissions,IAM ensures that only the mobile app user whose action creates an item in the table will be able towrite to the attribute values of that item. To design your schema for the case where multiple users needto write data to an existing item, one strategy is to structure your schema in a way that users write todifferent tables. In this design, the app queries both tables to join data.
For example, customers may create orders in an orders table and delivery service drivers may writedelivery tracking information to a deliveries table, where both tables have secondary indexes thatallow fast lookup based on orderId or customerId.
Retrieving Data
The operations you can use to retrieve data from your NoSQL database include the following:
• Get, which retrieves a single item from the table based on matching the primary key.
• Query, which finds items in a table or a secondary index using only primary key attribute values.
• Scan, which reads every item in a table or secondary index. By default, a Scan operation returnsall of the data attributes for every item in the table or index. You can use Scan to return only someattributes, rather than all of them.
• Query with Filter`s, which performs a :code:`Query but returns results that are filteredbased on a filter expression you create.
• Scan with Filters, which performs a Scan but returns results that are filtered based on a filterexpression you create.
For more information, see Query and Scan Operations in DynamoDB.
Viewing AWS Resources Provisioned for this Feature
The following image shows the Mobile HubResources pane displaying the AWS elements typicallyprovisioned for the NoSQL Database feature:
197

AWS Mobile Hub Developer Guide Developer GuideMobile Hub Features
Quickstart App Details
In the Mobile Hub quickstart app, the NoSQL Database demo shows a list of all tables created duringapp configuration. Selecting a table shows a list of all queries that are available for that table, based onthe choices made regarding its primary indexes, secondary indexes, and sort keys. Tables that you makeusing the example templates enable an app user to insert and remove sample data from within the app.
Messaging and Analytics
Looking for the AWS SDKs for iOS and Android? These SDKs and their docs are now part of AWSAmplify.
The content on this page applies only to apps that were configured using AWS Mobile Hub orawsmobile CLI. For existing apps that use AWS Mobile SDK prior to v2.8.0, we highly recommend youmigrate your app to use AWS Amplify and the latest SDK.
Choose the AWS Mobile Hub Messaging and Analytics feature to:
• Gather data to understand your app users’ behavior
• Use that information to add campaigns to engage with your users through push notification, e-mail,and SMS
Create a free Mobile Hub project and add the Messaging and Analytics feature.
198
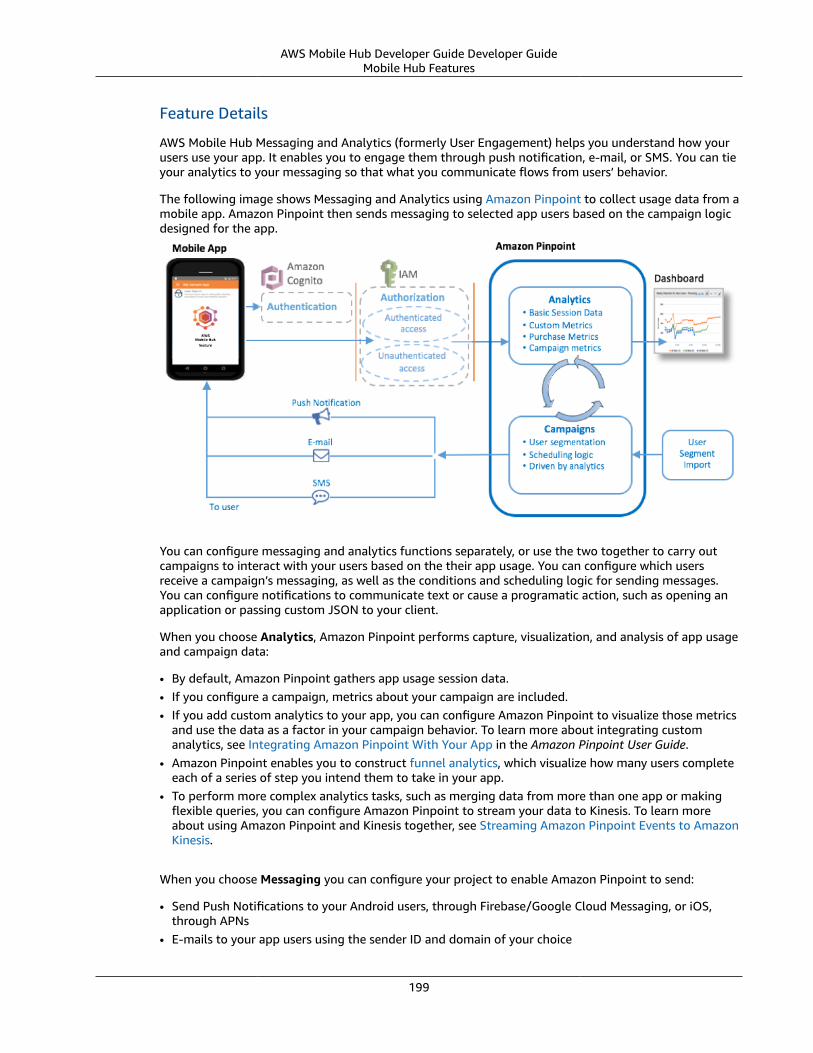
AWS Mobile Hub Developer Guide Developer GuideMobile Hub Features
Feature Details
AWS Mobile Hub Messaging and Analytics (formerly User Engagement) helps you understand how yourusers use your app. It enables you to engage them through push notification, e-mail, or SMS. You can tieyour analytics to your messaging so that what you communicate flows from users’ behavior.
The following image shows Messaging and Analytics using Amazon Pinpoint to collect usage data from amobile app. Amazon Pinpoint then sends messaging to selected app users based on the campaign logicdesigned for the app.
You can configure messaging and analytics functions separately, or use the two together to carry outcampaigns to interact with your users based on the their app usage. You can configure which usersreceive a campaign’s messaging, as well as the conditions and scheduling logic for sending messages.You can configure notifications to communicate text or cause a programatic action, such as opening anapplication or passing custom JSON to your client.
When you choose Analytics, Amazon Pinpoint performs capture, visualization, and analysis of app usageand campaign data:
• By default, Amazon Pinpoint gathers app usage session data.• If you configure a campaign, metrics about your campaign are included.• If you add custom analytics to your app, you can configure Amazon Pinpoint to visualize those metrics
and use the data as a factor in your campaign behavior. To learn more about integrating customanalytics, see Integrating Amazon Pinpoint With Your App in the Amazon Pinpoint User Guide.
• Amazon Pinpoint enables you to construct funnel analytics, which visualize how many users completeeach of a series of step you intend them to take in your app.
• To perform more complex analytics tasks, such as merging data from more than one app or makingflexible queries, you can configure Amazon Pinpoint to stream your data to Kinesis. To learn moreabout using Amazon Pinpoint and Kinesis together, see Streaming Amazon Pinpoint Events to AmazonKinesis.
When you choose Messaging you can configure your project to enable Amazon Pinpoint to send:
• Send Push Notifications to your Android users, through Firebase/Google Cloud Messaging, or iOS,through APNs
• E-mails to your app users using the sender ID and domain of your choice
199

AWS Mobile Hub Developer Guide Developer GuideMobile Hub Features
• SMS messages
Once you have enabled Messaging and Analytics options in your Mobile Hub project, use the AmazonPinpoint console to view visualizations of your analytics or configure your user segments and campaigns.You can also import user segment data into Amazon Pinpoint to use campaigns for any group of users.
Messaging and Analytics At a Glance
AWS services and resources configured • Amazon Pinpoint (see Amazon PinpointDeveloper Guide)
Concepts | Console
Mobile Hub-enabled features use Amazon Cognitofor authentication and IAM for authorization. Formore information, see User Sign-in (p. 206).
Configuration options This feature enables the following mobilebackend capabilities:
• Gather and visualize analytics of your app users’behavior.• Integrate Amazon Pinpoint user engagement
campaigns into your mobile app.• Communicate to app users using push
notifications through APNs, GCM, and FCM.• via Firebase or Google Cloud Messaging
(FCM/GCM) (see Setting Up Android PushNotifications)
• via Apple Push Notification service (APNs)(see Setting Up iOS Push Notifications)
For more information, see Configuring PushNotification.
• Communicate to app users through e-mail.• Communicate to app users through SMS.
Quickstart app demos This feature adds User Engagement functionalityto a quickstart app generated by Mobile Hub:
• Demonstrate enabling the app user to receivecampaign notifications. The app user can causeevents that generate session, custom, campaignand purchase data. Analytics for these eventsis available in the Amazon Pinpoint console inclose to real time.
• Demonstrate providing the app user with a viewof an Amazon Pinpoint data visualization, ontheir mobile phone.
Hosting and StreamingChoose AWS Mobile Hub Hosting and Streaming to:
200
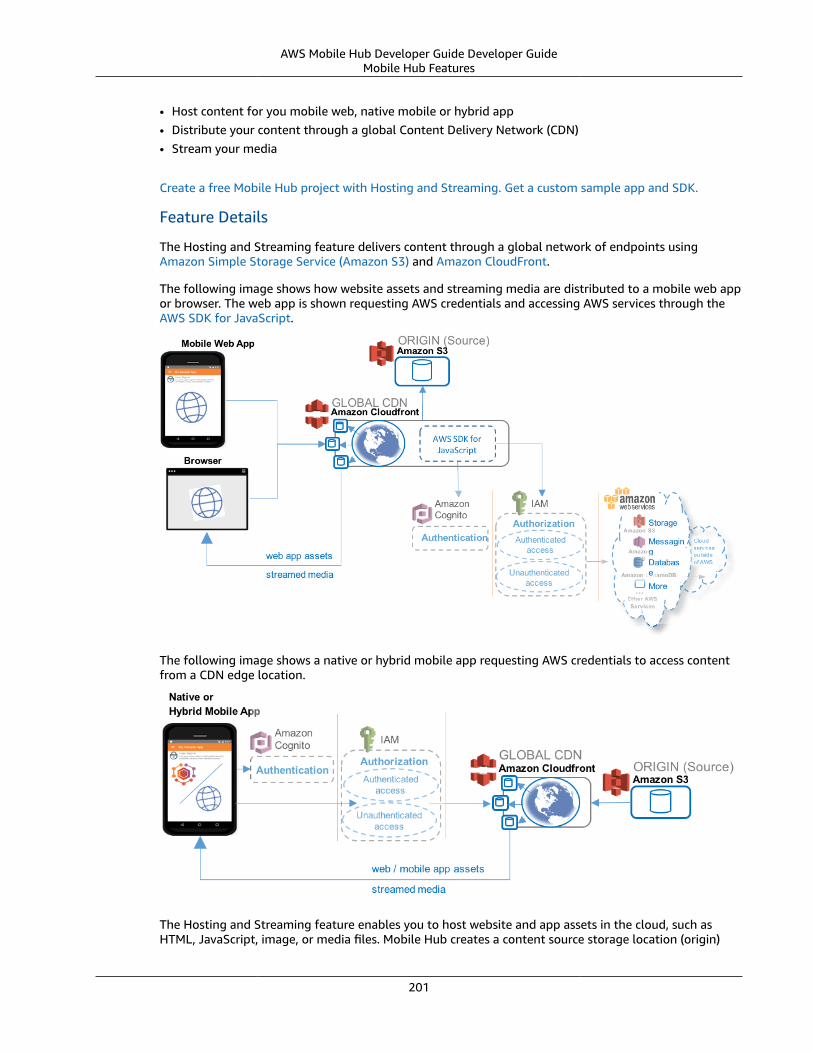
AWS Mobile Hub Developer Guide Developer GuideMobile Hub Features
• Host content for you mobile web, native mobile or hybrid app• Distribute your content through a global Content Delivery Network (CDN)• Stream your media
Create a free Mobile Hub project with Hosting and Streaming. Get a custom sample app and SDK.
Feature Details
The Hosting and Streaming feature delivers content through a global network of endpoints usingAmazon Simple Storage Service (Amazon S3) and Amazon CloudFront.
The following image shows how website assets and streaming media are distributed to a mobile web appor browser. The web app is shown requesting AWS credentials and accessing AWS services through theAWS SDK for JavaScript.
The following image shows a native or hybrid mobile app requesting AWS credentials to access contentfrom a CDN edge location.
The Hosting and Streaming feature enables you to host website and app assets in the cloud, such asHTML, JavaScript, image, or media files. Mobile Hub creates a content source storage location (origin)
201

AWS Mobile Hub Developer Guide Developer GuideMobile Hub Features
using an Amazon S3 bucket. The bucket is made accessible to the internet through the Amazon S3 abilityto statically host web content with no web server.
Low latency access to your content is provided to users in all regions by caching your source contenton a global network of edge locations. This Content Distribution network (CDN) is provided throughan Amazon CloudFront distribution which also supports media file streaming (see Amazon CloudFrontstreaming).
Hosting and Streaming At a Glance
AWS services and resources configured • Amazon CloudFront - Content DeliveryNetwork (see Amazon CloudFront)
Concepts | Console | Pricing• Amazon S3 Bucket (see Amazon S3 Getting
Started Guide <https://aws.amazon.com/cloudfront/pricing/>`__)
Concepts | Console | Pricing
Mobile Hub-enabled features use Amazon Cognitofor authentication and IAM for authorization. Formore information, see User Sign-in (p. 206).
For more information, see Viewing AWS ResourcesProvisioned for this Feature (p. 204).
Configuration options This feature enables the following mobilebackend capabilities:
• Web app content hosting (Internet access foryour content, no web servers required)
• AWS SDK for JavaScript (Call AWS services viastandard scripting)
• Global CDN (Global content distributionand media streaming) CloudFront offersseveral options for regional scope and costof your distribution. For more information,see Configuring the Hosting and StreamingFeature (p. 203).
Web app demo Sample
• The AWS SDK for Javascript and a custom-generated configuration file are provisioned toyour bucket.
For more information, see Web AppSupport (p. 203).
Quickstart native app demos This feature adds the following to a quickstartapp generated by Mobile Hub:
• View file list in AWS storage, download andview files, and manage their local cache.
202

AWS Mobile Hub Developer Guide Developer GuideMobile Hub Features
Web App Support
When you enable Hosting and Streaming, Mobile Hub provisions a local copy of the AWS SDK forJavaScript in the root of your bucket.
Mobile Hub also generates the project configuration files aws-config.js and aws-exports.js,which contain endpoint constants for each AWS services Mobile Hub configured for your project. aws-exports.js is provided for integration with ES6 compatible scripting languages like Node.js. Use thesevalues to make SDK calls to your services from your hosted web app.
NoteBest security practice is to reduce access to an app’s resources as much as possible. Theseconfiguration files are publically accessible and contain identifiers for all of your app’s AWSresources. If it suits your design, we recommend you protect your resources by allowing onlyauthenticated users to access them. You can do this in this project by enabling the Mobile HubUser Sign-in (p. 206) with the Require sign-in option.
You can also copy the appropriate configuration file into your hybrid native/web mobile app to enablecalling your AWS services from your app using JavaScript.
Configuring the Hosting and Streaming Feature
Topics
• Browsing Your Content (p. 203)
• Managing Your App Assets (p. 203)
• Using a Custom Domain for Your Web App (p. 204)
Browsing Your Content
With Hosting and Streaming enabled, you have several options:
• Launch from Amazon S3: This option browses to the un-cached index.html in the root of your sourcebucket.
• Launch from Amazon CloudFront: This option browses to the index.html that is cached on the CDNedge servers.
NoteProvisioning the edge locations for the distribution can take up to an hour. This link will notresolve until the distribution finishes propagating in the network.
• Manage files: This option opens the Amazon S3 console to review and manage the contents of yoursource bucket. You can also find your bucket in the Amazon S3 console by opening your project inMobile Hub and then choosing the Resources icon on the left. The name of the bucket configured forHosting and Streaming contains the string hosting.
Managing Your App Assets
You can choose from a variety of ways to manage your web app assets through use of the Amazon S3console, the AWS Command Line Interface (CLI) or one of the many third party applications available.
Using the Amazon S3 Console
To use the Amazon S3 console to review, upload, move or delete your files stored in your bucket,navigate to the Amazon S3 console and choose the bucket whose name contains your project name. Yourweb app content will reside in the root folder.
203

AWS Mobile Hub Developer Guide Developer GuideMobile Hub Features
Using AWS CLI
AWS CLI allows you to review, upload, move or delete your files stored in your bucket using thecommand line.
To install and configure the AWS CLI client, see Getting Set Up with the AWS Command Line Interface.
As an example, the sync command enables transfer of files to and from your local folder (source) andyour bucket (destination).
$ aws s3 sync {source destination} [--options]
The following command syncs all files from your current local folder to the folder in your web app’sbucket defined by path.
$ aws s3 sync . s3://my-web-app-bucket/path
To learn more about using AWS CLI to manage Amazon S3, see Using Amazon S3 with the AWSCommand Line Interface
Using a Custom Domain for Your Web App
To configure your Hosting and Streaming CDN as the destination of your custom domain, see RoutingTraffic to an Amazon CloudFront Web Distribution by Using Your Domain Name.
Viewing AWS Resources Provisioned for this Feature
The following image shows the Mobile HubResources pane displaying elements typically provisioned forthe Hosting and Streaming feature.
Quickstart App Details
In the Mobile Hub quickstart app, the Hosting and Streaming demo lists a set of image files that can bedownloaded and cached locally and displayed on the device. The user can also delete the local copy ofthe image files.
204
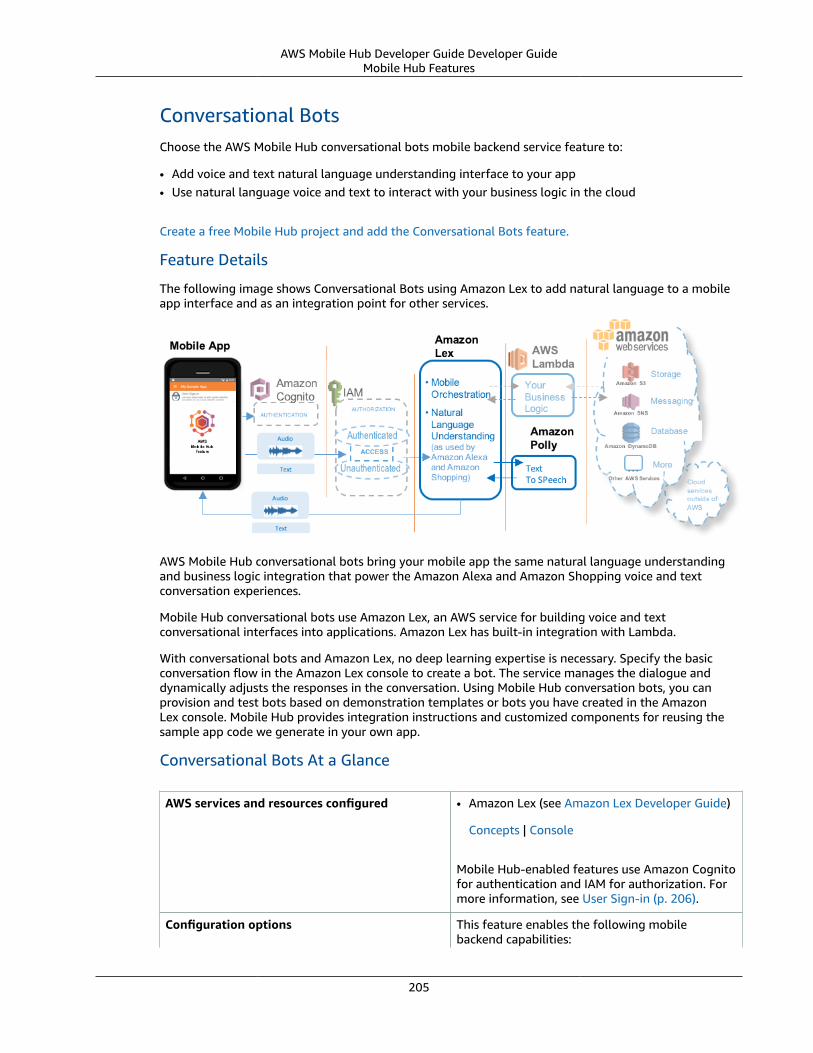
AWS Mobile Hub Developer Guide Developer GuideMobile Hub Features
Conversational BotsChoose the AWS Mobile Hub conversational bots mobile backend service feature to:
• Add voice and text natural language understanding interface to your app• Use natural language voice and text to interact with your business logic in the cloud
Create a free Mobile Hub project and add the Conversational Bots feature.
Feature Details
The following image shows Conversational Bots using Amazon Lex to add natural language to a mobileapp interface and as an integration point for other services.
AWS Mobile Hub conversational bots bring your mobile app the same natural language understandingand business logic integration that power the Amazon Alexa and Amazon Shopping voice and textconversation experiences.
Mobile Hub conversational bots use Amazon Lex, an AWS service for building voice and textconversational interfaces into applications. Amazon Lex has built-in integration with Lambda.
With conversational bots and Amazon Lex, no deep learning expertise is necessary. Specify the basicconversation flow in the Amazon Lex console to create a bot. The service manages the dialogue anddynamically adjusts the responses in the conversation. Using Mobile Hub conversation bots, you canprovision and test bots based on demonstration templates or bots you have created in the AmazonLex console. Mobile Hub provides integration instructions and customized components for reusing thesample app code we generate in your own app.
Conversational Bots At a Glance
AWS services and resources configured • Amazon Lex (see Amazon Lex Developer Guide)
Concepts | Console
Mobile Hub-enabled features use Amazon Cognitofor authentication and IAM for authorization. Formore information, see User Sign-in (p. 206).
Configuration options This feature enables the following mobilebackend capabilities:
205
AWS Mobile Hub Developer Guide Developer GuideMobile Hub Features
• Create and configure conversational bots inthe Amazon Lex service based on provideddemonstration templates or by using theAmazon Lex console to add your customizedtext and/or speech interactions to your app.
• Integrate your app by downloading and reusingthe code of the quickstart app, a packageof native iOS and Android SDKs, plus helpercode and on line guidance, all of which aredynamically generated to match your MobileHub project.
Quickstart app demos This feature adds the following functionality to aquickstart app generated by Mobile Hub:
• Enables user to interact with a conversationalbot that interacts with Amazon Lex.
User Sign-in
Looking for the AWS SDKs for iOS and Android? These SDKs and their docs are now part of AWSAmplify.
The content on this page applies only to apps that were configured using AWS Mobile Hub orawsmobile CLI. For existing apps that use AWS Mobile SDK prior to v2.8.0, we highly recommend youmigrate your app to use AWS Amplify and the latest SDK.
Choose the AWS Mobile Hub User Sign-in mobile backend feature to:
• Add AWS user authentication and secure identity access management to your mobile app.
Note: Secure unauthenticated access to AWS resources is available to all Mobile Hub projects with or without the User Sign-in feature.
• Enable your users to sign-in to access AWS resources with existing credentials from identity providerslike Facebook, Google, Microsoft Active Directory Federation Services or your own custom userdirectory.
Create a free Mobile Hub project and add the User Sign-in feature.
Feature Details
The following image shows a resource access policy being enforced for an unauthenticated user.
206

AWS Mobile Hub Developer Guide Developer GuideMobile Hub Features
The following image shows a resource access policy being enforced for an authenticated user.
This feature enables you to configure how your users gain access to AWS resources and services usedby your app, either with no sign in process or through authentication provided by one or more identityproviders. In both cases, AWS identity creation and credentials are provided by Amazon Cognito Identity,and access authorization comes through AWS Identity and Access Management (IAM).
When you create a project, Mobile Hub provisions the AWS identity, user role, and access policyconfiguration required to allow all users access to unrestricted resources. When you add the User Sign-in feature to your app, you are able to restrict access to allow only those who sign in with credentialsvalidated by an identity provider to use protected resources. Through Amazon Cognito Identity, your appuser obtains AWS credentials to directly access the AWS services that you enabled and configured foryour Mobile Hub project. Both authenticated and unauthenticated users are granted temporary, limited-privilege credentials with the same level of security enforcement.
Amazon Cognito can federate validated user identities from multiple identity providers to a single AWSidentity. Mobile Hub helps you integrate identity providers into your mobile app so that users can signin using their existing credentials from Facebook, Google, and your own identity system. You can alsocreate and configure your own email- and password-based user directory using Amazon Cognito YourUser Pools.
User Sign-in Feature At a Glance
AWS services and resources configured • Amazon Cognito
207

AWS Mobile Hub Developer Guide Developer GuideMobile Hub Features
Concepts | Console | Pricing• Amazon Cognito Identity Pool
(see Using Federated Identities)• Amazon Cognito Your User Pools
(see Creating and Managing User Pools)• Amazon Cognito SAML Federation
(see Overview of Configuring SAML 2.0-BasedFederation)
• IAM role and security policies (see ControlAccess to Mobile Hub Projects (p. 216))
Concepts | Console | Pricing
For more information, see Viewing AWS ResourcesProvisioned for this Feature (p. 210).
Configuration options This feature enables the following mobilebackend capabilities:
Sign-in Providers (users gain greater access whenthey sign in)
• via Google authentication (see Set Up YourBackend (p. 20))
• via Facebook authentication (see mobile-auth-setup)
• via Email and Password authentication (seeUser Sign-in Providers (p. 209))
• via SAML Federation authentication (see UserSign-in Providers (p. 209))
Required Sign-in (authenticated access)
Optional Sign-in (users gain greater accesswhen they sign in) For more information, seeConfiguring User Sign-in (p. 209)
Quickstart demo features This feature adds the following to a quickstartapp generated by Mobile Hub:
• Unauthenticated access (if allowed by yourapp’s configuration), displaying the ID that AWSassigns to the app instance’s device.
• Sign-in screen that authenticates users usingthe selected method: Facebook, Google, orEmail and Password (your own user pool).
• With Optional Sign-in and Require Sign-in, theapp demonstrates an access barrier to protectedfolders for unauthenticated users.
208

AWS Mobile Hub Developer Guide Developer GuideMobile Hub Features
Configuring User Sign-in
The following options are available for configuring your users’ sign-in experience.
User Sign-in Providers
• To enable Facebook user authentication, register your application with Facebook.
If you already have a registered Facebook app, copy the App ID from the Facebook Developers AppDashboard. Paste the ID into the Facebook App ID field and choose Save Changes.
If you do not have a Facebook App ID yet, you’ll need to create one before you can integrate Facebookin your mobile app. The Facebook Developers portal takes you through the process of setting up yourFacebook application.
For full instructions on integrating your application with Facebook, see Setting Up FacebookAuthentication.
• To authenticate your users through Google, fully integrate your sample app with Google+ Sign-in.
If you already have a registered Google Console project with the Google+ API, a web applicationOAuthClient and a client ID for the platform of your choice set up, then copy and paste the GoogleWeb App Client ID and client ID(s) from the Google Developers Console into those fields and chooseSave Changes.
Regardless of the platform you choose (Android or iOS), you’ll need to at least create the following.
• A Google Console project with the Google+ API enabled (used for Google Sign-in)
• A web application OAuth client ID
• An iOS and/or Android client ID, depending on which platform you are supporting
For full instructions on integrating your application with Google+, see :Setting Up GoogleAuthentication.
Email and Password
• Choose Email and Password sign-in when you want to create your own AWS-managed user directoryand sign-in process for your app’s users. Configure the characteristics of their sign-in experience by:
• Selecting user login options (email, username, and/or phone number)
• Enabling multi-factor authentication (none, required, optional) which adds delivery of an entry codevia text message to a user’s phone, and a prompt to enter that code along with the other factor tosign-in
• Selecting password character requirements (minimum length, upper/lower cases, numbers or specialcharacters allowed).
SAML Federation
• SAML Federation enables users with credentials in your existing identity store to sign in to your mobileapp using their familiar username and password. A user signs into to your identity provider (IdP) whichis configured to return a validating SAML assertion. Your app then uses Amazon Cognito FederatedIdentities to exchange the SAML assertion for typical temporary, limited privilege credentials to accessyour AWS backend services.
209

AWS Mobile Hub Developer Guide Developer GuideMobile Hub Features
SAML 2.0 (Security Assertion Markup Language 2.0) is an open standard used by many IdPs, includingMicrosoft Active Directory Federation Service and Shibboleth. Your IdP must be SAML 2.0 compatibleto use this Mobile Hub option. To establish federation between AWS and your IdP the two systemsmust exchange SAML federation metadata. AWS federation metadata can be found at https://signin.aws.amazon.com/static/saml-metadata.xml. This xml file demonstrates the form that yourIdP’s metadata should take. For more information on SAML federation metadata for your IdP, seeIntegrating Third-Party SAML Solution Providers with AWS.
To implement this exchange:
1. View your IdP’s documentation to understand how to use the AWS federation metadata file toregister AWS as a service provider.
2. Ensure that your Mobile Hub project is configured to use Email & Password sign-in to create anAmazon Cognito User Pool.
3. Configure your IdP as an Identity Provider for your user pool using the steps on Creating SAMLIdentity Providers for Your User Pool.
To learn more about how AWS supports SAML federation, see Overview of Configuring SAML 2.0-Based Federation.
User Sign-in Requirement
Sign-in is optional
• Users have the option to sign in (authenticate) with your chosen sign-in identity provider(s) or userscan skip sign-in (unauthenticated). Your app receives temporary, limited privilege access credentialsfrom Amazon Cognito Identity as either an authenticated user or an unauthenticated guest user sothat your app can access your AWS services securely.
Sign-in is required
• Users are required to sign in with one of your chosen sign-in providers. Your app receives temporary,limited privilege access credentials from Amazon Cognito Identity as an authenticated user so thatyour app can access your AWS services securely.
NoteIf user sign-in is not required, unauthenticated users can access to data in your database tablesand files in your storage buckets, unless those resources are explicitly restricted through anothermechanism.
User Sign-in and AWS Identity and Access Management (IAM)
When your mobile app is saved, Mobile Hub creates an Amazon Cognito identity pool and a new IAMrole. These are used to generate temporary AWS credentials for the quickstart app users to access yourAWS resources. The AWS IAM role security policies are updated based on the sign-in features enabled.
At this point, your mobile project is set up for users to sign in. Each chosen identity provider has beenadded to the login screen of the quickstart app.
For more information, see Control Access to Mobile Hub Projects (p. 216).
Viewing AWS Resources Provisioned for this Feature
The following image shows the Mobile HubResources pane displaying elements typically provisioned forthe User Sign-in feature.
210
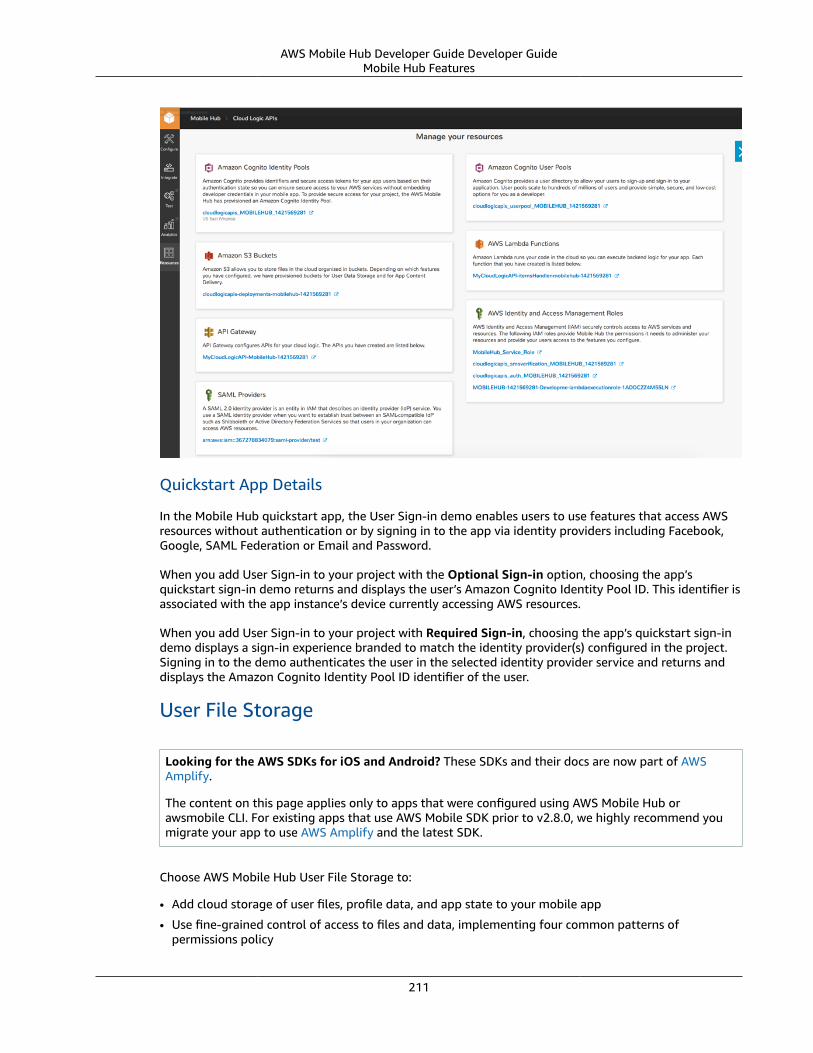
AWS Mobile Hub Developer Guide Developer GuideMobile Hub Features
Quickstart App Details
In the Mobile Hub quickstart app, the User Sign-in demo enables users to use features that access AWSresources without authentication or by signing in to the app via identity providers including Facebook,Google, SAML Federation or Email and Password.
When you add User Sign-in to your project with the Optional Sign-in option, choosing the app’squickstart sign-in demo returns and displays the user’s Amazon Cognito Identity Pool ID. This identifier isassociated with the app instance’s device currently accessing AWS resources.
When you add User Sign-in to your project with Required Sign-in, choosing the app’s quickstart sign-indemo displays a sign-in experience branded to match the identity provider(s) configured in the project.Signing in to the demo authenticates the user in the selected identity provider service and returns anddisplays the Amazon Cognito Identity Pool ID identifier of the user.
User File Storage
Looking for the AWS SDKs for iOS and Android? These SDKs and their docs are now part of AWSAmplify.
The content on this page applies only to apps that were configured using AWS Mobile Hub orawsmobile CLI. For existing apps that use AWS Mobile SDK prior to v2.8.0, we highly recommend youmigrate your app to use AWS Amplify and the latest SDK.
Choose AWS Mobile Hub User File Storage to:
• Add cloud storage of user files, profile data, and app state to your mobile app
• Use fine-grained control of access to files and data, implementing four common patterns ofpermissions policy
211
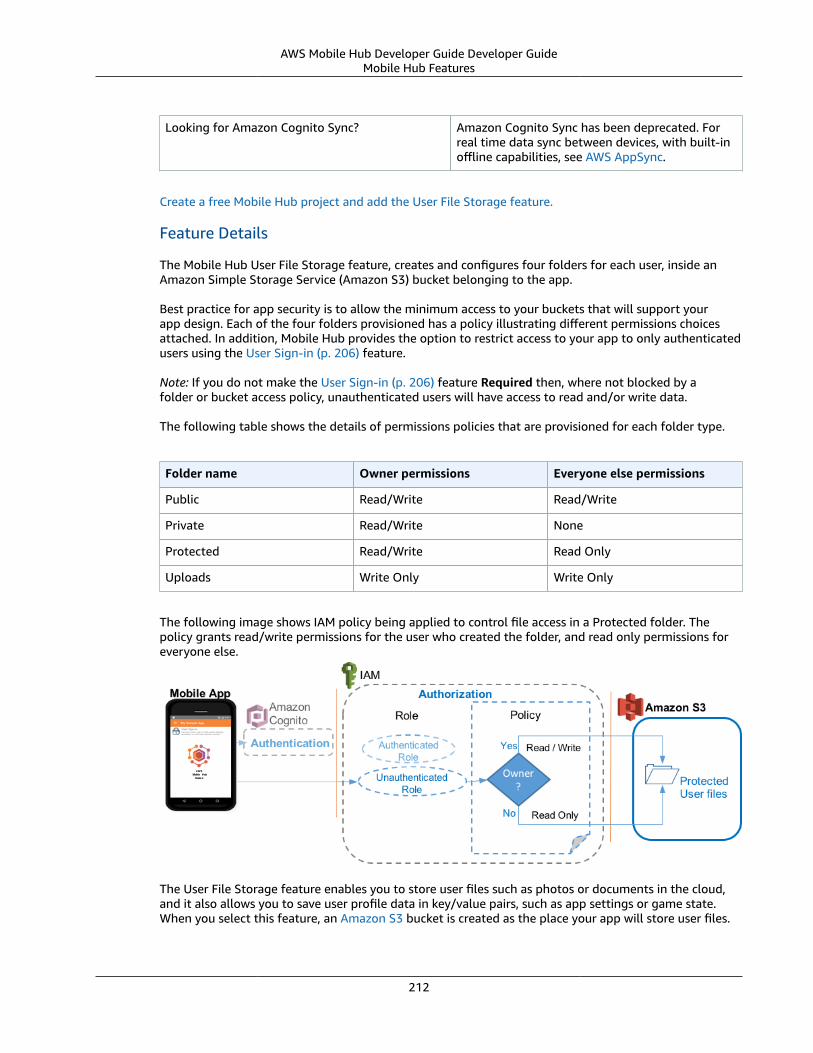
AWS Mobile Hub Developer Guide Developer GuideMobile Hub Features
Looking for Amazon Cognito Sync? Amazon Cognito Sync has been deprecated. Forreal time data sync between devices, with built-inoffline capabilities, see AWS AppSync.
Create a free Mobile Hub project and add the User File Storage feature.
Feature Details
The Mobile Hub User File Storage feature, creates and configures four folders for each user, inside anAmazon Simple Storage Service (Amazon S3) bucket belonging to the app.
Best practice for app security is to allow the minimum access to your buckets that will support yourapp design. Each of the four folders provisioned has a policy illustrating different permissions choicesattached. In addition, Mobile Hub provides the option to restrict access to your app to only authenticatedusers using the User Sign-in (p. 206) feature.
Note: If you do not make the User Sign-in (p. 206) feature Required then, where not blocked by afolder or bucket access policy, unauthenticated users will have access to read and/or write data.
The following table shows the details of permissions policies that are provisioned for each folder type.
Folder name Owner permissions Everyone else permissions
Public Read/Write Read/Write
Private Read/Write None
Protected Read/Write Read Only
Uploads Write Only Write Only
The following image shows IAM policy being applied to control file access in a Protected folder. Thepolicy grants read/write permissions for the user who created the folder, and read only permissions foreveryone else.
The User File Storage feature enables you to store user files such as photos or documents in the cloud,and it also allows you to save user profile data in key/value pairs, such as app settings or game state.When you select this feature, an Amazon S3 bucket is created as the place your app will store user files.
212

AWS Mobile Hub Developer Guide Developer GuideMobile Hub Features
User File Storage At a Glance
AWS services and resources configured • Amazon S3 bucket (see Amazon S3 GettingStarted Guide)
Concepts | Console | Pricing
Mobile Hub-enabled features use Amazon Cognitofor authentication and IAM for authorization. Formore information, see User Sign-in (p. 206). Formore information, see Viewing AWS ResourcesProvisioned for this Feature (p. 213).
Configuration options This feature enables the following configurationoptions mobile backend capabilities:
• Store user files and app data using Amazon S3.When you enable User File Storage four foldersare provisioned, each with a distinct accesspolicy configuration:• private - Each mobile app user can create,
read, update, and delete their own files inthis folder. No other app users can access thisfolder.
• protected - Each mobile app user cancreate, read, update, and delete their ownfiles in this folder. In addition, any app usercan read any other app user’s files in thisfolder.
• public ? Any app user can create, read,update, and delete files in this folder.
Quickstart demo features This feature adds the following to a quickstartapp generated by Mobile Hub:
• File explorer for the app’s S3 bucket allows theuser to:• Upload and view files in any Public folder.• View and download files in a Private folder
that the user created.• View and download files in a Protected folder
anyone created and upload files to that folderif the user created it.
• Upload files to any Uploads folder. Usersetting of choice of color theme can bepersisted to and retrieves from the cloud.
Viewing AWS Resources Provisioned for this Feature
The following image shows the Mobile HubResources pane displaying elements typically provisioned forthe User File Storage feature.
213

AWS Mobile Hub Developer Guide Developer GuideIAM Usage
AWS Identity and Access Management Usage in AWSMobile Hub
Looking for the AWS SDKs for iOS and Android? These SDKs and their docs are now part of AWSAmplify.
The content on this page applies only to apps that were configured using AWS Mobile Hub orawsmobile CLI. For existing apps that use AWS Mobile SDK prior to v2.8.0, we highly recommend youmigrate your app to use AWS Amplify and the latest SDK.
NoteIn depth understanding of AWS IAM, authentication, and access controls are not required toconfigure a backend for your mobile app using Mobile Hub.
• Control Access to Mobile Hub Projects (p. 216) - learn how to grant permissions for configuration ofyour Mobile Hub project.
• Mobile Hub Project Permissions Model (p. 215) - learn more about permissions you give Mobile Hubto configure AWS resources and services, see .
• IAM Authentication and Access Control for Mobile Hub (p. 219) - learn details of IAM and AWSauthentication and access controls.
214
AWS Mobile Hub Developer Guide Developer GuideIAM Usage
Mobile Hub Project Permissions Model
Looking for the AWS SDKs for iOS and Android? These SDKs and their docs are now part of AWSAmplify.
The content on this page applies only to apps that were configured using AWS Mobile Hub orawsmobile CLI. For existing apps that use AWS Mobile SDK prior to v2.8.0, we highly recommend youmigrate your app to use AWS Amplify and the latest SDK.
Important
To modify Mobile Hub projects in an account, a user must be granted administrativepermissions (p. 217) by an account Administrator. Read this section for more information.
If you are a user who needs additional permissions for a project, contact an administrator for the AWSaccount. For help with any issues related to the new permissions model, contact [email protected].
Topics
• Mobile Hub Permissions Model (p. 215)
• What if I Currently Use MobileHub_Service_Role to Grant Mobile Hub Permissions? (p. 215)
• Why Did the Permissions Model Change? (p. 216)
Mobile Hub Permissions Model
Currently, Mobile Hub’s permissions model uses the user’s permissions directly when they performoperations in the Mobile Hub console or command line interface. This model provides accountadministrators fine-grained access control over what operations their users can perform in the account,regardless of whether they are using Mobile Hub or they’re using the console or command line interfaceto interact with services directly.
In order to modify projects, users are required to have permissions to use Mobile Hub (granted byAWSMobileHubFullAccess IAM policy), and they must have permission to perform whatever actionsMobile Hub takes on their behalf. In almost every case, this means an account administrator must grantthe user the AdministratorAccess policy (p. 217) in order to provide access to the AWS resources MobileHub modifies. This is because, as project settings are modified, Mobile Hub will modify the IAM roles andpolicies used to enable the features affected by those settings. Changing IAM roles and policies allowsthe user to control access to resources in the account, and so they must have administrative permissions.
When an administrator does not want to grant administrative permissions for the full account, they canchoose instead to provide each user or team their own sub-account using AWS Organizations (p. 218).Within their sub-account, a user will have full administrative permissions. Sub-account owners are onlylimited in what they can do by the policy put in place by their administrator, and billing rolls up to theparent account.
What if I Currently Use MobileHub_Service_Role to Grant Mobile HubPermissions?
Previously, Mobile Hub assumed a service role called MobileHub_Service_Role in order to modifyservice configurations on your behalf using the following managed policy:
https://console.aws.amazon.com/iam/home?#/policies/arn:aws:iam::aws:policy/service-role/AWSMobileHub_ServiceUseOnly
215

AWS Mobile Hub Developer Guide Developer GuideIAM Usage
In that older model, all that was required to modify Mobile Hub projects was permissions to call MobileHub APIs, through the console or command line. An administrator could delegate those permissions byattaching the AWSMobileHub_FullAccess policy to an AWS IAM user, group, or role.
If the account of your Mobile Hub projects relies on the old model, the impact on those who are notgranted AdministratorAccess permissions will be as follows.
• IAM users, groups and roles that have the AWSMobileHub_FullAccess policy will no longer havesufficient permissions to perform any mutating operations in Mobile Hub, either via the console orawsmobile command line interface (CLI).
• In order for IAM users, groups, or roles to be able to perform mutating operations using MobileHub, they must have the appropriate permissions. The two choices for an administrator togrant users permission (p. 216) to invoke all available operations in Mobile Hub are: attach theAdministratorAccess policy to the user, or a role they are attached to, or a group they are amember of; or alternatively, to use AWS Organizations to manage permissions.
Why Did the Permissions Model Change?
AWS Mobile Hub creates IAM roles and assigns them permissions in order to enable use of AWS resourcesin mobile apps. Such operations are considered administrative because they include enabling permissionto perform operations on resources in the account. Previously, Mobile Hub’s service role provided userswho have been granted AWSMobileHub_FullAccess permissions with a path to escalate their ownprivileges to act on resources, potentially in ways their administrator did not intend to permit. Removingthe service role, removes the path to escalate privileges and puts control of user permissions directly inthe hands of the administrator for a Mobile Hub project.
Control Access to Mobile Hub Projects
Looking for the AWS SDKs for iOS and Android? These SDKs and their docs are now part of AWSAmplify.
The content on this page applies only to apps that were configured using AWS Mobile Hub orawsmobile CLI. For existing apps that use AWS Mobile SDK prior to v2.8.0, we highly recommend youmigrate your app to use AWS Amplify and the latest SDK.
Overview
This section describes two different ways to control access to your Mobile Hub projects:
• Grant a user administrative account permissions (p. 217)
For individual developers, or groups whose requirements for segmenting access to theirMobile Hub projects are simple, permission can be granted by attaching the managedAdministratorAccess (p. 219) or AWSMobileHub_ReadOnly (p. 219) AWS managed policies to a user,a role they are attached to, or a group they belong to.
Or:
• Use AWS Organizations to manage permissions (p. 218)
For organizations that require fine-grained access control and cost tracking for their Mobile Hubprojects, AWS account administrators can provide sub-accounts and determine the policies that applyto their users.
216

AWS Mobile Hub Developer Guide Developer GuideIAM Usage
To understand how Mobile Hub uses IAM policies attached to a user to create and modify services on ausers behalf, see Mobile Hub Project Permissions Model (p. 215).
To understand AWS Identity and Access Management (IAM) in more detail, see IAM Authenticationand Access Control for Mobile Hub (p. 219) and IAM Authentication and Access Control for MobileHub (p. 219).
Best Practice: Create IAM Users to Access AWS
To provide better security, we recommend that you do not use your AWS root account to access MobileHub. Instead, create an AWS Identity and Access Management (IAM) user in your AWS account, or use anexisting IAM user, and then access Mobile Hub with that user. For more information, see AWS SecurityCredentials in the AWS General Reference.
You can create an IAM user for yourself or a delegate user using the IAM console. First, create an IAMadministrator group, then create and assign a new IAM user to that group.
NoteBefore any IAM user within an account can create a mobile Hub project, a user withadministrative privileges for the account must navigate to the Mobile Hub console and createan initial project. This step provides confirmation that Mobile Hub can manage AWS services onyour behalf.To learn more about assigning access rights to IAM users or groups, see IAM Authentication andAccess Control for Mobile Hub (p. 219).
Grant Users Permissions to Mobile Hub Projects
Topics
• Create a New IAM User in Your Account and Grant Mobile Hub Permissions (p. 217)
• Create an IAM Group (p. 218)
• Grant Mobile Hub Permissions to an Existing Account User (p. 218)
Use the following steps to create a group and/or users, and grant users access to your Mobile Hubprojects.
To grant permissions to a role, see Adding Permissions in the AWS IAM User Guide.
Create a New IAM User in Your Account and Grant Mobile Hub Permissions
1. Open the IAM console. On the left, choose Users, and then choose Add User.
2. Type a user name, select the check boxes for Programmatic access and AWS Management Consoleaccess.
3. Choose the password policy you prefer. Then choose Next: Permissions.
4. In the Add user to group tab, select the Administrators or Read_Only group for the user, and chooseNext, Review.
In the process, you will see options to customize the user’s password, alert them about their newaccount via email, and to download their access key ID, key value and password.
5. Choose Create user.
6. To apply policy:
• If you have created a group to manage project permissions, choose Add user to group, select thegroup, choose Next: Review, then choose Create User.
217

AWS Mobile Hub Developer Guide Developer GuideIAM Usage
Or:
• If you are managing project permissions per user, choose Attach existing policies directly, selectthe policy you want to attach, AdministratorAccess or AWSMobileHub_ReadOnly, and then chooseCreate user.
Create an IAM Group
1. Sign in to the AWS Management Console and open the IAM console at http://console.aws.amazon.com/iam/.
2. In the navigation pane, choose Groups, and then choose Create New Group.
3. For Group Name, type a name for your group, such as Administrators or Read_Only, and thenchoose Next Step.
4. In the list of policies, select the check box next to the AdministratorAccess policy to grant fullpermissions to the group, or AWSMobileHub_ReadOnly to grant only read access. You can use theFilter menu and the Search box to filter the list of policies.
5. Choose Next Step, and then choose Create Group. Your new group is listed under Group Name.
Grant Mobile Hub Permissions to an Existing Account User
1. On the left, choose Policies.
2. Choose the link for the managed policy, AdministratorAccess or AWSMobileHub_ReadOnly you wantto attach.
3. Choose Attached Entities.
4. Choose Attach.
5. Choose the users, roles, or groups you want to grant permissions.
6. Choose Attach Policy.
Use AWS Organizations to Manage Permissions
AWS Organizations can be used to manage permissions for groups that need to segment access to theirMobile Hub projects. For example, an administrator could provide an account for each developer on ateam. Within their own account, each user would have the permissions granted by the administrator. Thesteps to achieve this would be:
1. If you do not have an AWS account, sign up for the AWS Free Tier.
2. Create an organization in the AWS Organizations console.
3. Create or add existing accounts for each user in the organization.
4. Invite the users.
5. Create a organizational unit for the developers.
6. Enable and attach a policy for members of the unit.
The policy you attach will apply within the scope of the AWS account of a user. You may want to limitaccess to services and capabilities not required for Mobile Hub use. For instance, the following policy,grants all permissions defined in the FullAWSAccess managed policy, but excludes access to theAmazon EC2 service.
"Statement": [ { "Effect": "Allow", "Action": "*",
218

AWS Mobile Hub Developer Guide Developer GuideIAM Usage
"Resource": "*" }, { "Effect": “Deny”, "Action": “ec2:*”, "Resource": "*" }]
For step by step instructions, see the tutorial at Creating and Managing an AWS Organization.
AWS Managed (Predefined) Policies for Mobile Hub Project Access
The AWS Identity and Access Management service controls user permissions for AWS services andresources. Specific permissions are required in order to view and modify configuration for any projectwith AWS Mobile Hub. These permissions have been grouped into the following managed policies, whichyou can attach to an IAM user, role, or group.
• AdministratorAccess
This policy provides unlimited access to AWS services in the account. That includes read and writeaccess to AWS Mobile Hub projects. Users with this policy attached to their IAM user, role, orgroup are allowed to create new projects, modify configuration for existing projects, and deleteprojects and resources. This policy also includes all of the permissions that are allowed under theAWSMobileHub_ReadOnly managed policy. After you sign in to the Mobile Hub console and create aproject, you can use the following link to view this policy and the IAM identities that are attached to it.
• https://console.aws.amazon.com/iam/home?region=us-east-1#/policies/arn:aws:iam::aws:policy/AdministratorAccess$jsonEditor
• AWSMobileHub_ReadOnly
This policy provides read-only access to AWS Mobile Hub projects. Users with this policy attached totheir IAM user, role, or group are allowed to view project configuration and generate sample quickstart app projects that can be downloaded and built on a developer’s desktop (e.g., in Android Studioor Xcode). This policy does not allow modification to Mobile Hub project configuration, and it doesnot allow the user to enable the use of AWS Mobile Hub in an account where it has not already beenenabled. After you sign in to the Mobile Hub console and create a project, you can use the followinglink to view this policy and the IAM identities that are attached to it.
• http://console.aws.amazon.com/iam/home?region=us-east-1#policies/arn:aws:iam::aws:policy/AWSMobileHub_ReadOnly
If your IAM user, role, or group has read-only permissions for use in an AWS Mobile Hub project, thenthe project information you see in the console will not reflect any changes made outside of MobileHub. For example, if you remove a Cloud Logic API in API Gateway, it may still be present in the CloudLogic Functions list of your Mobile Hub project, until a user with mobilehub:SynchronizeProjectpermissions visits the console. Users who are granted console access through the AdminstratorAccesspolicy have those permissions. If you need additional permissions in Mobile Hub, please contact youradministrator and request the AdminstratorAccess policy.
IAM Authentication and Access Control for Mobile Hub
Looking for the AWS SDKs for iOS and Android? These SDKs and their docs are now part of AWSAmplify.
219
AWS Mobile Hub Developer Guide Developer GuideIAM Usage
The content on this page applies only to apps that were configured using AWS Mobile Hub orawsmobile CLI. For existing apps that use AWS Mobile SDK prior to v2.8.0, we highly recommend youmigrate your app to use AWS Amplify and the latest SDK.
NoteIn depth understanding of AWS IAM, authentication, and access controls are not required toconfigure a backend for your mobile app using Mobile Hub.
Mobile Hub uses AWS credentials and permissions policies to allow a user to view and/or create andconfigure the back-end features the user selects for their mobile app.
The following sections provide details on how IAM works, how you can use IAM to securely control accessto your projects, and what IAM roles and policies Mobile Hub configures on your behalf.
Topics
• Authentication (p. 220)
• Access Control (p. 221)
Authentication
AWS resources and services can only be viewed, created or modified with the correct authenticationusing AWS credentials (which must also be granted access permissions (p. 221) to those resources andservices). You can access AWS as any of the following types of identities:
• AWS account root user
When you sign up for AWS, you provide an email address and password that is associated with yourAWS account. These are your root credentials and they provide complete access to all of your AWSresources.
ImportantFor security reasons, we recommend that you use the root credentials only to create anadministrator user, which is an IAM user with full permissions to your AWS account. Then, youcan use this administrator user to create other IAM users and roles with limited permissions.For more information, see IAM Best Practices and Creating an Admin User and Group in theIAM User Guide.
• IAM user
An IAM user is simply an identity within your AWS account that has specific custom permissions (forexample, read-only permissions to access your Mobile Hub project). You can use an IAM user nameand password to sign in to secure AWS webpages like the AWS Management Console, AWS DiscussionForums, or the AWS Support Center.
In addition to a user name and password, you can also generate access keys for each user. You canuse these keys when you access AWS services programmatically, either through one of the severalSDKs or by using the AWS Command Line Interface (CLI). The SDK and CLI tools use the access keys tocryptographically sign your request. If you don’t use the AWS tools, you must sign the request yourself.
• IAM role
An IAM role is another IAM identity you can create in your account that has specific permissions. Itis similar to an IAM user, but it is not associated with a specific person. An IAM role enables you toobtain temporary access keys that can be used to access AWS services and resources. IAM roles withtemporary credentials are useful in the following situations:
• Federated user access
220

AWS Mobile Hub Developer Guide Developer GuideIAM Usage
Instead of creating an IAM user, you can use preexisting user identities from your enterprise userdirectory or a web identity provider. These are known as federated users. AWS assigns a role to afederated user when access is requested through an identity provider. For more information aboutfederated users, see Federated Users and Roles in the IAM User Guide.
• Cross-account access
You can use an IAM role in your account to grant another AWS account permissions to access youraccount’s resources. For an example, see Tutorial: Delegate Access Across AWS Accounts Using IAMRoles in the IAM User Guide.
• AWS service access
You can use an IAM role in your account to grant an AWS service permissions to access youraccount’s resources. For example, you can create a role that allows Amazon Redshift to access anAmazon S3 bucket on your behalf and then load data stored in the bucket into an Amazon Redshiftcluster. For more information, see Creating a Role to Delegate Permissions to an AWS Service in theIAM User Guide.
• Applications running on Amazon EC2
Instead of storing access keys within the EC2 instance for use by applications running on theinstance and making AWS API requests, you can use an IAM role to manage temporary credentialsfor these applications. To assign an AWS role to an EC2 instance and make it available to all of itsapplications, you can create an instance profile that is attached to the instance. An instance profilecontains the role and enables programs running on the EC2 instance to get temporary credentials.For more information, see Using Roles for Applications on Amazon EC2 in the IAM User Guide.
Access Control
You can have valid credentials to authenticate your requests, but unless you have permissions you cannotaccess or modify a Mobile Hub project. The same is true for Mobile Hub when it creates and configuresservices and resources you have configured for your project.
The following sections describe how to manage permissions and understand those that are beingmanaged on your behalf by Mobile Hub.
• Control Access to Mobile Hub Projects (p. 216)
Overview of Access Permissions Management for Mobile HubProjects
Looking for the AWS SDKs for iOS and Android? These SDKs and their docs are now part of AWSAmplify.
The content on this page applies only to apps that were configured using AWS Mobile Hub orawsmobile CLI. For existing apps that use AWS Mobile SDK prior to v2.8.0, we highly recommend youmigrate your app to use AWS Amplify and the latest SDK.
NoteIn depth understanding of AWS IAM, authentication, and access controls are not required toconfigure a backend for your mobile app using Mobile Hub.
Every AWS resource is owned by an AWS account. Permissions to view, create, and/or access theresources (p. 216) are governed by policies.
221

AWS Mobile Hub Developer Guide Developer GuideIAM Usage
An account administrator can attach permissions policies to IAM identities (that is, users, groups, androles), and some services (such as AWS Lambda) also support attaching permissions policies to resources.
NoteAn account administrator (or administrator user) is a user with administrator privileges. For moreinformation, see IAM Best Practices in the IAM User Guide.When granting permissions, you decide who is getting the permissions, the resources they getpermissions for, and the specific actions that you want to allow on those resources.
Topics• Understanding Resource Ownership for AWS Mobile Hub (p. 222)• Managing Access to Resources (p. 222)• Specifying Policy Elements: Actions, Effects, Resources, and Principals (p. 223)
Understanding Resource Ownership for AWS Mobile Hub
The primary resource of a Mobile Hub project is the project itself. In first use of the Mobile Hub console,you allow Mobile Hub to manage permissions and access the project resource for you. A resource owneris the AWS account that created a resource. That is, the resource owner is the AWS account of theprincipal entity (the root account, an IAM user, or an IAM role) that authenticates the request that createsthe resource. The following examples illustrate how this works:
• If you use the root account credentials of your AWS account to create an AWS Mobile Hub project, yourAWS account is the owner of the resources associated with that project.
• If you create an IAM user in your AWS account and grant permissions to create Mobile Hub projectsto that user, the user can also create projects. However, your AWS account, to which the user belongs,owns the resources associated with the project.
• If you create an IAM role in your AWS account with permissions to create AWS Mobile Hub projects,anyone who can assume the role can create, edit, or delete projects. Your AWS account, to which therole belongs, owns the resources associated with that project.
Managing Access to Resources
A permissions policy describes who has access to what. The following section explains the availableoptions for creating permissions policies.
NoteThis section discusses using IAM in the context of AWS Mobile Hub. It doesn’t provide detailedinformation about the IAM service. For complete IAM documentation, see What Is IAM? in theIAM User Guide. For information about IAM policy syntax and descriptions, see AWS Identity andAccess Management Policy Reference in the IAM User Guide.
Policies attached to an IAM identity are referred to as identity-based policies (IAM polices) and policiesattached to a resource are referred to as resource-based policies.
Topics• Identity-Based Policies (IAM Policies) (p. 222)• Resource-Based Policies (p. 223)
Identity-Based Policies (IAM Policies)
You can attach policies to IAM identities. For example, you can do the following:
• Attach a permissions policy to a user or a group in your account? An account administrator can use apermissions policy that is associated with a particular user to grant permissions for that user to view ormodify an AWS Mobile Hub project.
222

AWS Mobile Hub Developer Guide Developer GuideIAM Usage
• Attach a permissions policy to a role (grant cross-account permissions) ? You can attach an identity-based permissions policy to an IAM role to grant cross-account permissions. For example, whenyou first enter Mobile Hub and agree, as account principal, to grant it permissions to provision andconfigure your project, you are granting the AWS managed MobileHub_Service_Role role cross-account permissions. An AWS managed policy, AWSMobileHub_ServiceUseOnly, is attached to thatrole in the context of your Mobile Hub project. The role has a trust policy that allows Mobile Hub toact as account principal with the ability to grant permissions for services and resources used by yourproject.
For more information about using IAM to delegate permissions, see Access Management in the IAMUser Guide.
As an example of using an identity-based policy, the following policy grants permissions to a user tocreate an Amazon S3 bucket. A user with these permissions can create a storage location using theAmazon S3 service.
{ "Version":"2012-10-17", "Statement":[ { "Effect":"Allow", "Action":"s3:CreateBucket*", "Resource":"*" } ] }
For more information about using identity-based policies with Mobile Hub , see :ref: reference-mobile-hub-project-permissions-model`.
For more information about users, groups, roles, and permissions, see Identities (Users, Groups, andRoles) in the IAM User Guide.
Resource-Based Policies
Other services, such as Amazon S3, also support resource-based permissions policies. For example, youcan attach a policy to an Amazon S3 bucket to manage access permissions to that bucket.
Specifying Policy Elements: Actions, Effects, Resources, and Principals
Each service that is configured by Mobile Hub defines a set of API operations. To grant Mobile Hubpermissions for these API operations, a set of actions is specified in an AWS managed policy. Performingan API operation can require permissions for more than one action.
The following are the basic policy elements:
• Resource - In a policy, you use an Amazon Resource Name (ARN) to identify the resource to which thepolicy applies.
• Action - You use action keywords to identify resource operations that you want to allow or deny.For example, the s3:Createbucket permission allows Mobile Hub to perform the AmazonS3CreateBucket operation.
• Effect - You specify the effect when the user requests the specific action?this can be either allow ordeny. If you don’t explicitly grant access to (allow) a resource, access is implicitly denied. You can alsoexplicitly deny access to a resource, which you might do to make sure that a user cannot access it, evenif a different policy grants access.
• Principal - In identity-based policies (IAM policies), the user that the policy is attached to is the implicitprincipal. For resource-based policies, you specify the user, account, service, or other entity that youwant to receive permissions (applies to resource-based policies only).
223
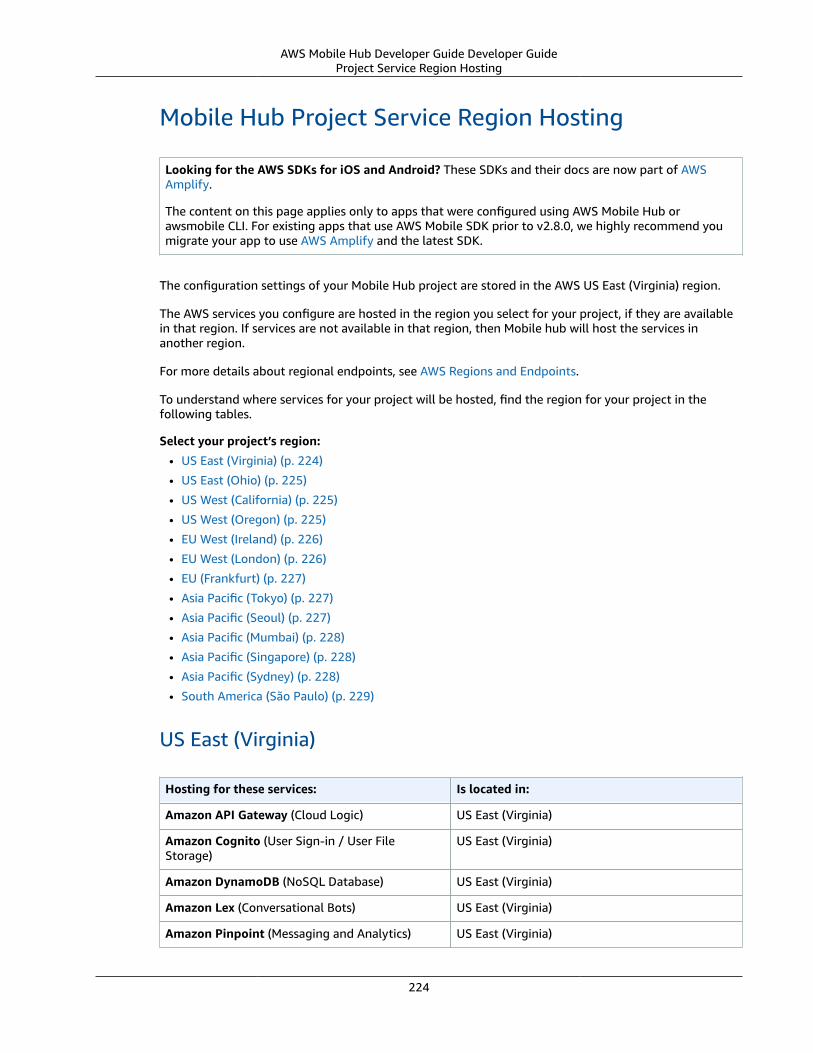
AWS Mobile Hub Developer Guide Developer GuideProject Service Region Hosting
Mobile Hub Project Service Region Hosting
Looking for the AWS SDKs for iOS and Android? These SDKs and their docs are now part of AWSAmplify.
The content on this page applies only to apps that were configured using AWS Mobile Hub orawsmobile CLI. For existing apps that use AWS Mobile SDK prior to v2.8.0, we highly recommend youmigrate your app to use AWS Amplify and the latest SDK.
The configuration settings of your Mobile Hub project are stored in the AWS US East (Virginia) region.
The AWS services you configure are hosted in the region you select for your project, if they are availablein that region. If services are not available in that region, then Mobile hub will host the services inanother region.
For more details about regional endpoints, see AWS Regions and Endpoints.
To understand where services for your project will be hosted, find the region for your project in thefollowing tables.
Select your project’s region:
• US East (Virginia) (p. 224)
• US East (Ohio) (p. 225)
• US West (California) (p. 225)
• US West (Oregon) (p. 225)
• EU West (Ireland) (p. 226)
• EU West (London) (p. 226)
• EU (Frankfurt) (p. 227)
• Asia Pacific (Tokyo) (p. 227)
• Asia Pacific (Seoul) (p. 227)
• Asia Pacific (Mumbai) (p. 228)
• Asia Pacific (Singapore) (p. 228)
• Asia Pacific (Sydney) (p. 228)
• South America (São Paulo) (p. 229)
US East (Virginia)
Hosting for these services: Is located in:
Amazon API Gateway (Cloud Logic) US East (Virginia)
Amazon Cognito (User Sign-in / User FileStorage)
US East (Virginia)
Amazon DynamoDB (NoSQL Database) US East (Virginia)
Amazon Lex (Conversational Bots) US East (Virginia)
Amazon Pinpoint (Messaging and Analytics) US East (Virginia)
224

AWS Mobile Hub Developer Guide Developer GuideProject Service Region Hosting
Hosting for these services: Is located in:
Amazon S3 (User File Storage / Messaging andHosting)
US East (Virginia)
AWS Lambda (Cloud Logic) US East (Virginia)
US East (Ohio)
Hosting for these services: Is located in:
Amazon API Gateway (Cloud Logic) US East (Ohio)
Amazon Cognito (User Sign-in / User FileStorage)
US East (Ohio)
Amazon DynamoDB (NoSQL Database) US East (Ohio)
Amazon Lex (Conversational Bots) US East (Virginia)
Amazon Pinpoint (Messaging and Analytics) US East (Virginia)
Amazon S3 (User File Storage / Messaging andHosting)
US East (Ohio)
AWS Lambda (Cloud Logic) US East (Ohio)
US West (California)
Hosting for these services: Is located in:
Amazon API Gateway (Cloud Logic) US West (California)
Amazon Cognito (User Sign-in / User FileStorage)
US West (Oregon)
Amazon DynamoDB (NoSQL Database) US West (California)
Amazon Lex (Conversational Bots) US East (Virginia)
Amazon Pinpoint (Messaging and Analytics) US East (Virginia)
Amazon S3 (User File Storage / Messaging andHosting)
US West (California)
AWS Lambda (Cloud Logic) US West (California)
US West (Oregon)
Hosting for these services: Is located in:
Amazon API Gateway (Cloud Logic) US West (Oregon)
225

AWS Mobile Hub Developer Guide Developer GuideProject Service Region Hosting
Hosting for these services: Is located in:
Amazon Cognito (User Sign-in / User FileStorage)
US West (Oregon)
Amazon DynamoDB (NoSQL Database) US West (Oregon)
Amazon Lex (Conversational Bots) US East (Virginia)
Amazon Pinpoint (Messaging and Analytics) US East (Virginia)
Amazon S3 (User File Storage / Messaging andHosting)
US West (Oregon)
AWS Lambda (Cloud Logic) US West (Oregon)
EU West (Ireland)
Hosting for these services: Is located in:
Amazon API Gateway (Cloud Logic) EU West (Ireland)
Amazon Cognito (User Sign-in / User FileStorage)
EU West (Ireland)
Amazon DynamoDB (NoSQL Database) EU West (Ireland)
Amazon Lex (Conversational Bots) US East (Virginia)
Amazon Pinpoint (Messaging and Analytics) US East (Virginia)
Amazon S3 (User File Storage / Messaging andHosting)
EU West (Ireland)
AWS Lambda (Cloud Logic) EU West (Ireland)
EU West (London)
Hosting for these services: Is located in:
Amazon API Gateway (Cloud Logic) EU West (London)
Amazon Cognito (User Sign-in / User FileStorage)
EU West (London)
Amazon DynamoDB (NoSQL Database) EU West (London)
Amazon Lex (Conversational Bots) US East (Virginia)
Amazon Pinpoint (Messaging and Analytics) US East (Virginia)
Amazon S3 (User File Storage / Messaging andHosting)
EU West (London)
AWS Lambda (Cloud Logic) EU West (London)
226

AWS Mobile Hub Developer Guide Developer GuideProject Service Region Hosting
EU (Frankfurt)
Hosting for these services: Is located in:
Amazon API Gateway (Cloud Logic) EU (Frankfurt)
Amazon Cognito (User Sign-in / User FileStorage)
EU (Frankfurt)
Amazon DynamoDB (NoSQL Database) EU (Frankfurt)
Amazon Lex (Conversational Bots) US East (Virginia)
Amazon Pinpoint (Messaging and Analytics) US East (Virginia)
Amazon S3 (User File Storage / Messaging andHosting)
EU (Frankfurt)
AWS Lambda (Cloud Logic) EU (Frankfurt)
Asia Pacific (Tokyo)
Hosting for these services: Is located in:
Amazon API Gateway (Cloud Logic) Asia Pacific (Tokyo)
Amazon Cognito (User Sign-in / User FileStorage)
Asia Pacific (Tokyo)
Amazon DynamoDB (NoSQL Database) Asia Pacific (Tokyo)
Amazon Lex (Conversational Bots) US East (Virginia)
Amazon Pinpoint (Messaging and Analytics) US East (Virginia)
Amazon S3 (User File Storage / Messaging andHosting)
Asia Pacific (Tokyo)
AWS Lambda (Cloud Logic) Asia Pacific (Tokyo)
Asia Pacific (Seoul)
Hosting for these services: Is located in:
Amazon API Gateway (Cloud Logic) Asia Pacific (Seoul)
Amazon Cognito (User Sign-in / User FileStorage)
Asia Pacific (Seoul)
Amazon DynamoDB (NoSQL Database) Asia Pacific (Seoul)
Amazon Lex (Conversational Bots) US East (Virginia)
Amazon Pinpoint (Messaging and Analytics) US East (Virginia)
227
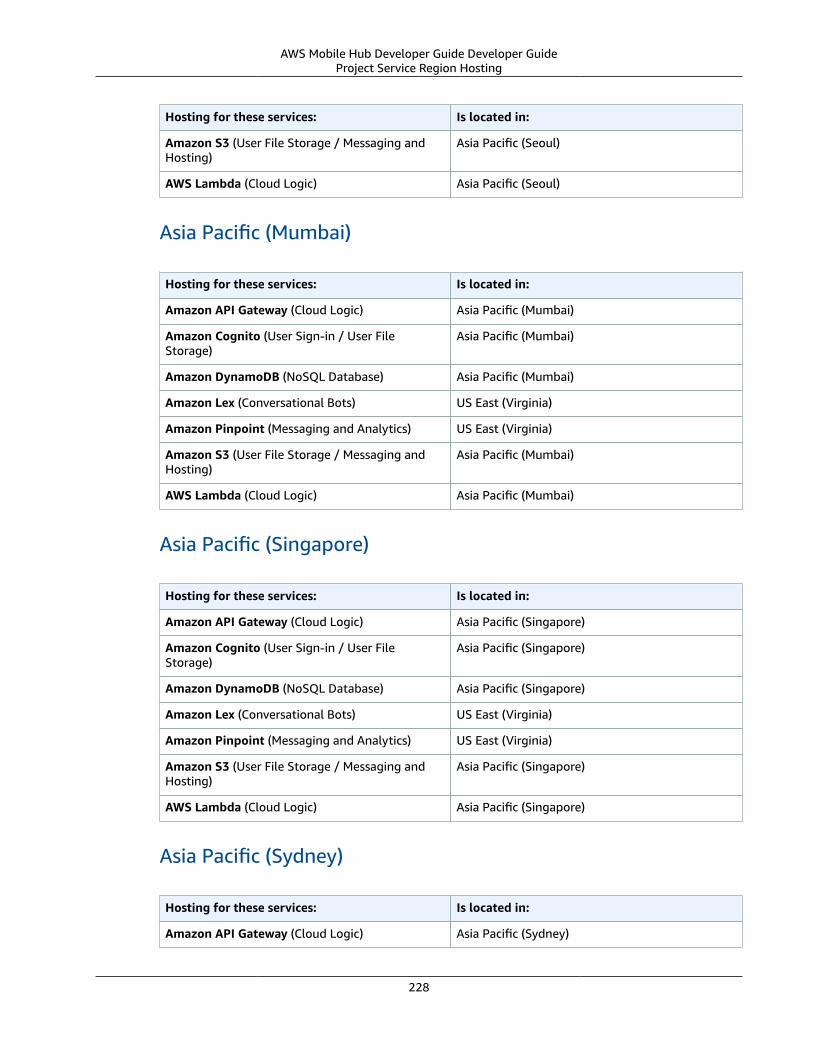
AWS Mobile Hub Developer Guide Developer GuideProject Service Region Hosting
Hosting for these services: Is located in:
Amazon S3 (User File Storage / Messaging andHosting)
Asia Pacific (Seoul)
AWS Lambda (Cloud Logic) Asia Pacific (Seoul)
Asia Pacific (Mumbai)
Hosting for these services: Is located in:
Amazon API Gateway (Cloud Logic) Asia Pacific (Mumbai)
Amazon Cognito (User Sign-in / User FileStorage)
Asia Pacific (Mumbai)
Amazon DynamoDB (NoSQL Database) Asia Pacific (Mumbai)
Amazon Lex (Conversational Bots) US East (Virginia)
Amazon Pinpoint (Messaging and Analytics) US East (Virginia)
Amazon S3 (User File Storage / Messaging andHosting)
Asia Pacific (Mumbai)
AWS Lambda (Cloud Logic) Asia Pacific (Mumbai)
Asia Pacific (Singapore)
Hosting for these services: Is located in:
Amazon API Gateway (Cloud Logic) Asia Pacific (Singapore)
Amazon Cognito (User Sign-in / User FileStorage)
Asia Pacific (Singapore)
Amazon DynamoDB (NoSQL Database) Asia Pacific (Singapore)
Amazon Lex (Conversational Bots) US East (Virginia)
Amazon Pinpoint (Messaging and Analytics) US East (Virginia)
Amazon S3 (User File Storage / Messaging andHosting)
Asia Pacific (Singapore)
AWS Lambda (Cloud Logic) Asia Pacific (Singapore)
Asia Pacific (Sydney)
Hosting for these services: Is located in:
Amazon API Gateway (Cloud Logic) Asia Pacific (Sydney)
228

AWS Mobile Hub Developer Guide Developer GuideTroubleshooting Projects
Hosting for these services: Is located in:
Amazon Cognito (User Sign-in / User FileStorage)
Asia Pacific (Sydney)
Amazon DynamoDB (NoSQL Database) Asia Pacific (Sydney)
Amazon Lex (Conversational Bots) US East (Virginia)
Amazon Pinpoint (Messaging and Analytics) US East (Virginia)
Amazon S3 (User File Storage / Messaging andHosting)
Asia Pacific (Sydney)
AWS Lambda (Cloud Logic) Asia Pacific (Sydney)
South America (São Paulo)
Hosting for these services: Is located in:
Amazon API Gateway (Cloud Logic) South America (São Paulo)
Amazon Cognito (User Sign-in / User FileStorage)
US East (Virginia)
Amazon DynamoDB (NoSQL Database) South America (São Paulo)
Amazon Lex (Conversational Bots) US East (Virginia)
Amazon Pinpoint (Messaging and Analytics) US East (Virginia)
Amazon S3 (User File Storage / Messaging andHosting)
US East (Virginia)
AWS Lambda (Cloud Logic) South America (São Paulo)
Mobile Hub Project Troubleshooting
Looking for the AWS SDKs for iOS and Android? These SDKs and their docs are now part of AWSAmplify.
The content on this page applies only to apps that were configured using AWS Mobile Hub orawsmobile CLI. For existing apps that use AWS Mobile SDK prior to v2.8.0, we highly recommend youmigrate your app to use AWS Amplify and the latest SDK.
The following sections describe issues you might encounter when setting up, importing or exportingMobile Hub projects, and their remedies.
Topics• Cannot Import an API (p. 230)• Cannot Import a NoSQL Table (p. 230)• Cannot Import Multiple NoSQL Tables (p. 231)• Cannot Import Push Credentials (p. 231)
229
AWS Mobile Hub Developer Guide Developer GuideTroubleshooting Projects
• Build Artifacts Can’t be Found (p. 231)
• Unable to Configure S3 Bucket During (p. 232)
• Administrator Required Error During Setup (p. 232)
• Account Setup Incomplete (p. 233)
• File Too Large to Import (p. 233)
Cannot Import an API
Error Message
• Project owner does not own existing API : arn:aws:execute-api:us-east-1:012345678901:abcdefghij.
(where the API identifier arn:aws:execute-api:us-east-1:012345678901:abcdefghij is specific to theproject being imported)
Description
• This message means that the API with the ID shown cannot be imported because it does not exist inthe current AWS account. This occurs when the APIs in the original project were created outside of theMobile Hub Cloud Logic feature and then imported.
Remedy
• To remedy this condition, take the following steps.
1. Modify the YAML of the project definition you are importing by removing the sections under thefeatures:components node that begin with the name of an API that was imported into theoriginal project’s Cloud Logic feature.
2. Save and import the project definition.
3. Enable the Mobile Hub Cloud Logic feature in your imported project and recreate the API and itshandler.
Cannot Import a NoSQL Table
Error Message
• There is already an existing DynamoDB table called ‘someprojectname-mobilehub-012345678-TableName’ in your account. Please choose a different name or remove the existing table and retryyour request.
(where the table name someprojectname-mobilehub-012345678-TableName is specific to the projectbeing imported)
Description
• This message occurs when you import a project containing the NoSQL Database Feature. It indicatesthat the Amazon DynamoDB table in the project configuration already exists. This can occur when aYAML tablename value was edited in the project definition file and there is more than one attempt toimport it into the same account.
Remedy
230

AWS Mobile Hub Developer Guide Developer GuideTroubleshooting Projects
• To remedy this condition, take the following steps
1. Modify any tablename values to remove the conflict.
2. Save and import the project definition.
3. Adjust the code of the imported app where it references the old tablename value.
Cannot Import Multiple NoSQL Tables
Error Message
• Project file(s) cannot be decoded. They may contain data that was encrypted by a different account.Failed to decode push feature. Failed to decode credential attribute.
Description
• This message occurs when you import Push Notifications messaging service credentials or AmazonSNS topic identifiers for features that are not associated with your AWS account.
Remedy
• To remedy this condition, take the following steps
1. Modify the YAML of the project definition you are importing by removing table definition sections.
2. Save and import the project definition.
3. Use the table definitions you removed to manually create those tables using the Mobile Hub NoSQLDatabase feature.
Cannot Import Push Credentials
Error Message
• Project file(s) cannot be decoded. They may contain data that was encrypted by a different account.Failed to decode push feature. Failed to decode credential attribute.
Description
• This message occurs when you import Push Notifications messaging service credentials or AmazonSNS topic identifiers for features that are not associated with your AWS account.
Remedy
• To remedy this condition, take the following steps
1. Modify the YAML of the project definition you are importing by removing the push: node.
2. Save and import the project definition.
3. Enable the Mobile Hub Push Notifications or User Engagement feature using your own messagingservice credentials and topics.
Build Artifacts Can’t be Found
Error Message
231

AWS Mobile Hub Developer Guide Developer GuideTroubleshooting Projects
• Unable to find build artifact uploads/exported-project-definition.zip in Amazon S3 bucket archive-deployments-mobilehub-0123456789 for project-name.
where exported-project-definition, the numerical portion of the Amazon S3 bucket identifier, and the project-name are specific to the
project being imported)
Description
• This message occurs when a project import fails because Mobile Hub can’t find the file of a Cloud LogicAPI handler function (Lambda) that is specified in the .yml project definition file.
Remedy
• To remedy this condition, take the following steps
The remedy for this condition is to make the location of the Lambda file(s) match the path specified inthe project definition YAML.
The error occurs if, for any reason, the path described in the codeFilename: key in the YAMLdoes not match the actual location of the Lambda function file relative to the root of the ...-deployments-... Amazon S3 bucket that Mobile Hub deploys when Cloud Logic is enabled.
Unable to Configure S3 Bucket DuringError Message
• It looks like there was a problem creating or configuring your S3 bucket.
Description
• Mobile Hub was unable to create a S3 bucket for your project’s deployment artifacts during MobileHub project import.
Remedy
• To remedy this condition, try the following steps
Check that you are not at maximum bucket capacity using the Amazon S3 console.
Administrator Required Error During SetupError Message
• It looks like you do not have permission for this operation.
Description
• The user does not have permission to create the required Mobile Hub Service Role during configurationof a Mobile Hub project.
Remedy
• To remedy this condition, try the following steps
232

AWS Mobile Hub Developer Guide Developer GuideExporting and Importing Projects
Contact an administrator for your AWS account and ask them to create the service role at thefollowing location: https://console.aws.amazon.com/mobilehub/home#/activaterole/.
Account Setup Incomplete
Error Message
• It looks like your AWS account is not fully set up.
Description
• This error can occur for a range of reasons during Mobile Hub project configuration.
Remedy
• To remedy this condition, try the following steps
• Sign out of the AWS console and lose down all browser windows. Then try to log in to the<problematic>`AWS Mobile console <>`__</problematic>and attempt the operation that initially caused the er.
• If the issue persists, post to the<problematic>`AWS Mobile Development forum<https://forums.aws.amazon.com/forum.jspa?forumID=88>`__</problematic>for support.
File Too Large to Import
Error Message
• The project file is too large. The max file size is 10 MB.
Description
• This message occurs when you attempt to import a project definition file that is larger than 10MB.
Remedy
• Reduce the size of the project export file. Project exporters may want to deliver large file payloadsoutside of their project definition files, along with providing instructions for importers about how touse AWS consoles to incorporate those accompanying files.
Exporting and Importing AWS Mobile Hub Projects
Looking for the AWS SDKs for iOS and Android? These SDKs and their docs are now part of AWSAmplify.
The content on this page applies only to apps that were configured using AWS Mobile Hub orawsmobile CLI. For existing apps that use AWS Mobile SDK prior to v2.8.0, we highly recommend youmigrate your app to use AWS Amplify and the latest SDK.
233
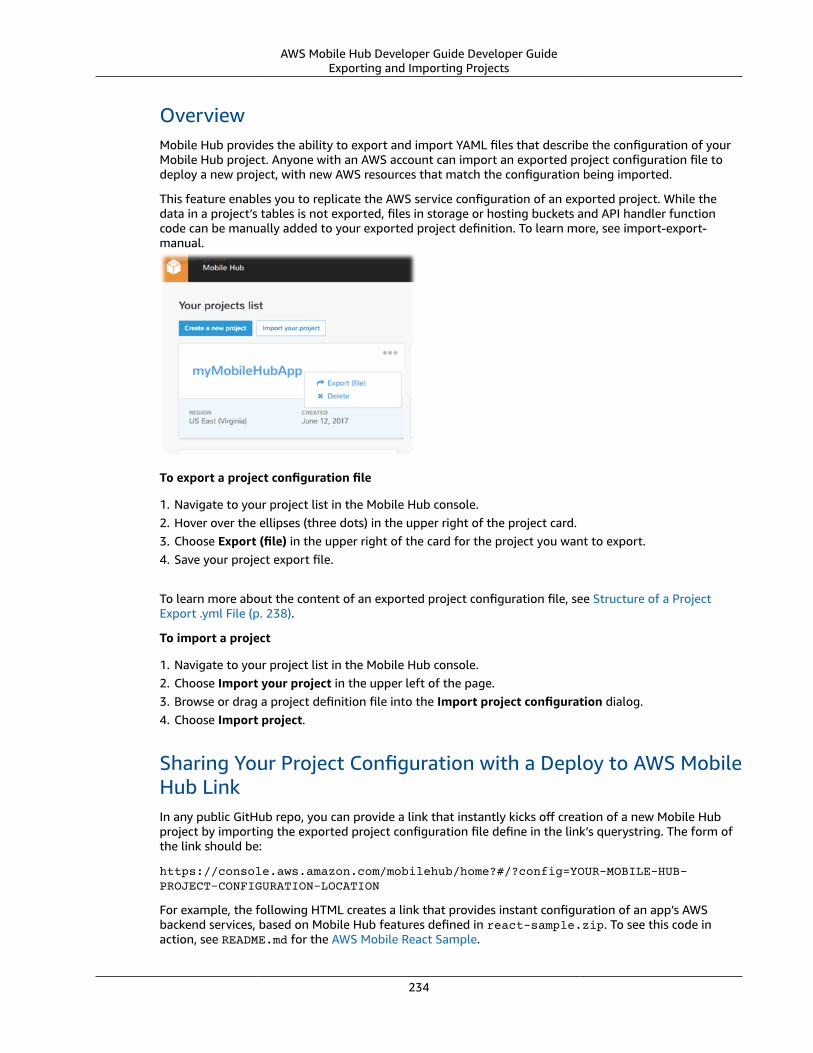
AWS Mobile Hub Developer Guide Developer GuideExporting and Importing Projects
OverviewMobile Hub provides the ability to export and import YAML files that describe the configuration of yourMobile Hub project. Anyone with an AWS account can import an exported project configuration file todeploy a new project, with new AWS resources that match the configuration being imported.
This feature enables you to replicate the AWS service configuration of an exported project. While thedata in a project’s tables is not exported, files in storage or hosting buckets and API handler functioncode can be manually added to your exported project definition. To learn more, see import-export-manual.
To export a project configuration file
1. Navigate to your project list in the Mobile Hub console.2. Hover over the ellipses (three dots) in the upper right of the project card.3. Choose Export (file) in the upper right of the card for the project you want to export.4. Save your project export file.
To learn more about the content of an exported project configuration file, see Structure of a ProjectExport .yml File (p. 238).
To import a project
1. Navigate to your project list in the Mobile Hub console.2. Choose Import your project in the upper left of the page.3. Browse or drag a project definition file into the Import project configuration dialog.4. Choose Import project.
Sharing Your Project Configuration with a Deploy to AWS MobileHub LinkIn any public GitHub repo, you can provide a link that instantly kicks off creation of a new Mobile Hubproject by importing the exported project configuration file define in the link’s querystring. The form ofthe link should be:
https://console.aws.amazon.com/mobilehub/home?#/?config=YOUR-MOBILE-HUB-PROJECT-CONFIGURATION-LOCATION
For example, the following HTML creates a link that provides instant configuration of an app’s AWSbackend services, based on Mobile Hub features defined in react-sample.zip. To see this code inaction, see README.md for the AWS Mobile React Sample.
234
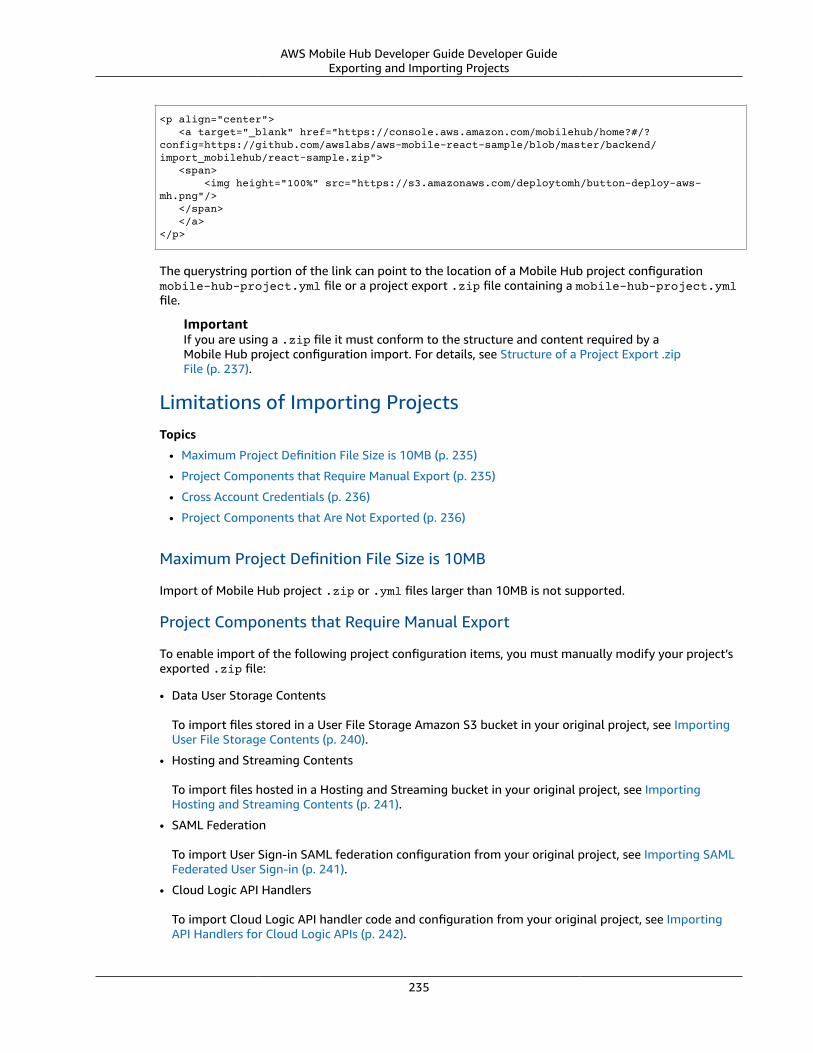
AWS Mobile Hub Developer Guide Developer GuideExporting and Importing Projects
<p align="center"> <a target="_blank" href="https://console.aws.amazon.com/mobilehub/home?#/?config=https://github.com/awslabs/aws-mobile-react-sample/blob/master/backend/import_mobilehub/react-sample.zip"> <span> <img height="100%" src="https://s3.amazonaws.com/deploytomh/button-deploy-aws-mh.png"/> </span> </a></p>
The querystring portion of the link can point to the location of a Mobile Hub project configurationmobile-hub-project.yml file or a project export .zip file containing a mobile-hub-project.ymlfile.
ImportantIf you are using a .zip file it must conform to the structure and content required by aMobile Hub project configuration import. For details, see Structure of a Project Export .zipFile (p. 237).
Limitations of Importing ProjectsTopics
• Maximum Project Definition File Size is 10MB (p. 235)
• Project Components that Require Manual Export (p. 235)
• Cross Account Credentials (p. 236)
• Project Components that Are Not Exported (p. 236)
Maximum Project Definition File Size is 10MB
Import of Mobile Hub project .zip or .yml files larger than 10MB is not supported.
Project Components that Require Manual Export
To enable import of the following project configuration items, you must manually modify your project’sexported .zip file:
• Data User Storage Contents
To import files stored in a User File Storage Amazon S3 bucket in your original project, see ImportingUser File Storage Contents (p. 240).
• Hosting and Streaming Contents
To import files hosted in a Hosting and Streaming bucket in your original project, see ImportingHosting and Streaming Contents (p. 241).
• SAML Federation
To import User Sign-in SAML federation configuration from your original project, see Importing SAMLFederated User Sign-in (p. 241).
• Cloud Logic API Handlers
To import Cloud Logic API handler code and configuration from your original project, see ImportingAPI Handlers for Cloud Logic APIs (p. 242).
235

AWS Mobile Hub Developer Guide Developer GuideExporting and Importing Projects
NoteCalling Cloud Logic APIs from a browser requires that Cross-Origin Resource Sharing (CORS)is configured for each API path. To enable CORS configuration when your project is imported,see Importing Cross-Origin Resource Sharing (CORS) Configuration (p. 244).
Cross Account Credentials
Some features require credentials and assets that are associated with the AWS account where they areconfigured. Mobile Hub projects that contain such features can only be imported into the account thatexported them. Features with this restriction include Cloud Logic APIs that were created outside of theMobile Hub project being exported, messaging provider credentials for Push Notification, and AmazonSNS topics.
Mobile Hub Feature Can be exported from one AWS account andimported into another?
User Sign-in Yes
NoSQL Database Yes
Cloud Logic Using APIs created within your Mobile Hub project:
Yes
Using APIs imported into your project:
No (for remedy, see Cannot Import anAPI (p. 230))
User File Storage Yes
App Content Delivery Yes
Connectors Yes
Push Notifications No (for remedy, see Cannot Import PushCredentials (p. 231))
Messaging and Analytics (Push Notification) No (for remedy, see Cannot Import PushCredentials (p. 231))
Project Components that Are Not Exported
The following items are not supported by the Mobile Hub import/export feature:
• Custom policy
When you enable a Mobile Hub feature, a set of AWS services is deployed. Mobile Hub attaches defaultaccess roles and policies to these objects. When a project is imported, the default roles and policies areapplied.
In your original project, you can modify or add to these defaults; for example, to set access to a datatable to read only. When you export your project configuration, any such customizations are notincluded in the project export. To enable your custom policy in an imported project, the importermust manually configure those policies in the imported project. In addition to your project exportfile, we recommend you provide both your policy JSON and step by step instructions for importers.
236
AWS Mobile Hub Developer Guide Developer GuideExporting and Importing Projects
These instructions should describe how to use AWS consoles or the AWS CLI to implement yourcustomizations.
• Legacy Cloud Logic
Import and export are not supported for projects using the legacy Cloud Logic feature. A project ofthis kind calls Lambda functions directly. The current version of Cloud Logic makes RESTful calls toAmazon API Gateway APIs linked to Lambda function handlers.
Mobile Hub Project Export Format
Looking for the AWS SDKs for iOS and Android? These SDKs and their docs are now part of AWSAmplify.
The content on this page applies only to apps that were configured using AWS Mobile Hub orawsmobile CLI. For existing apps that use AWS Mobile SDK prior to v2.8.0, we highly recommend youmigrate your app to use AWS Amplify and the latest SDK.
AWS Mobile Hub provides the ability to export a YAML file containing the configuration of your project.The YAML file itself can be imported or it can be included in a .zip file with other project componentsthat get deployed during project import. This section describes the anatomy of the YAML and a typicalMobile Hub project export .zip file. For more information about the Mobile Hub Import/Export feature,see Exporting and Importing AWS Mobile Hub Projects (p. 233).
Topics
• Structure of a Project Export .zip File (p. 237)
• Structure of a Project Export .yml File (p. 238)
Structure of a Project Export .zip File
When you choose Export (file), Mobile Hub generates a .zip file named for your project.
Default file structure
Mobile Hub also generates a mobile-hub-project.yml project configuration file in the .zip root.A valid mobile-hub-project.yml file in this location is required for Mobile Hub project import tosucceed.
Example file structure
File structure of the .zip file an exported project, configured to include deployment of both SAMLfederation and Cloud Logic API handlers, is as follows:
• /your-project-name.zip
• mobile-hub-project.yml
• saml.xml
• lambda API handler functions
• user data stored files
• hosted files
Files in a project export .zip file can be arranged in folders. The relative paths within the archive mustbe reflected in the project definition YAML key values that refer to their paths.
237
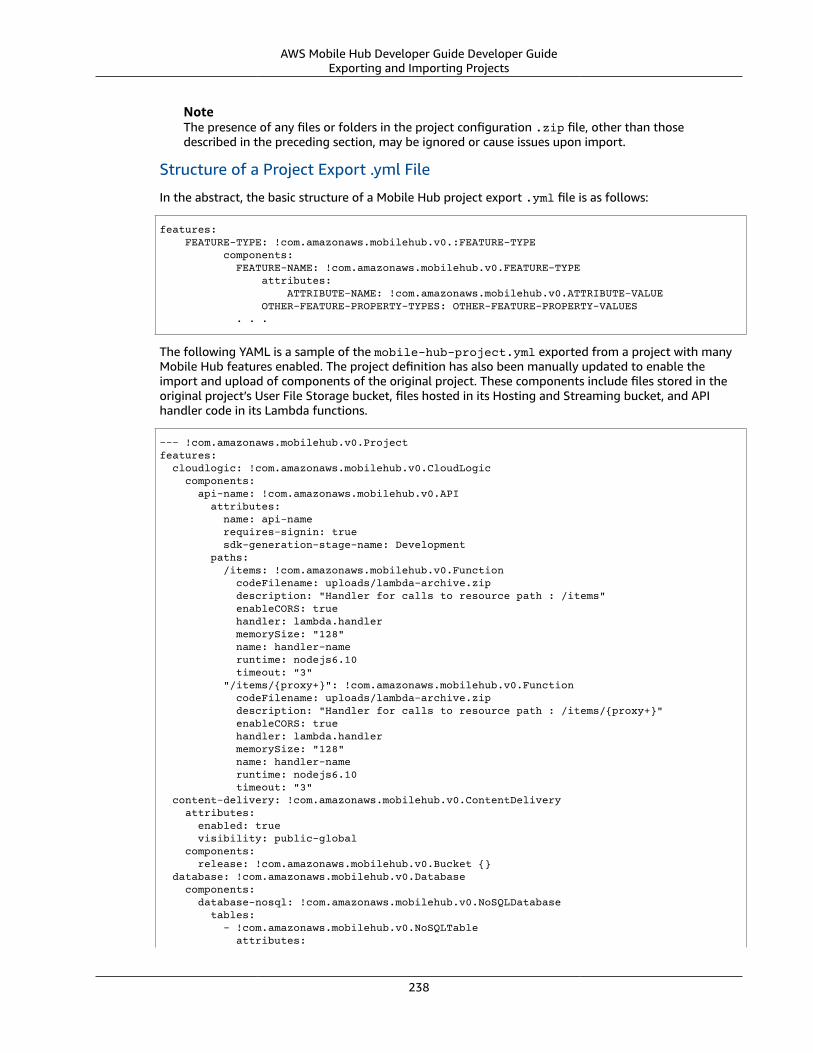
AWS Mobile Hub Developer Guide Developer GuideExporting and Importing Projects
NoteThe presence of any files or folders in the project configuration .zip file, other than thosedescribed in the preceding section, may be ignored or cause issues upon import.
Structure of a Project Export .yml File
In the abstract, the basic structure of a Mobile Hub project export .yml file is as follows:
features: FEATURE-TYPE: !com.amazonaws.mobilehub.v0.:FEATURE-TYPE components: FEATURE-NAME: !com.amazonaws.mobilehub.v0.FEATURE-TYPE attributes: ATTRIBUTE-NAME: !com.amazonaws.mobilehub.v0.ATTRIBUTE-VALUE OTHER-FEATURE-PROPERTY-TYPES: OTHER-FEATURE-PROPERTY-VALUES . . .
The following YAML is a sample of the mobile-hub-project.yml exported from a project with manyMobile Hub features enabled. The project definition has also been manually updated to enable theimport and upload of components of the original project. These components include files stored in theoriginal project’s User File Storage bucket, files hosted in its Hosting and Streaming bucket, and APIhandler code in its Lambda functions.
--- !com.amazonaws.mobilehub.v0.Projectfeatures: cloudlogic: !com.amazonaws.mobilehub.v0.CloudLogic components: api-name: !com.amazonaws.mobilehub.v0.API attributes: name: api-name requires-signin: true sdk-generation-stage-name: Development paths: /items: !com.amazonaws.mobilehub.v0.Function codeFilename: uploads/lambda-archive.zip description: "Handler for calls to resource path : /items" enableCORS: true handler: lambda.handler memorySize: "128" name: handler-name runtime: nodejs6.10 timeout: "3" "/items/{proxy+}": !com.amazonaws.mobilehub.v0.Function codeFilename: uploads/lambda-archive.zip description: "Handler for calls to resource path : /items/{proxy+}" enableCORS: true handler: lambda.handler memorySize: "128" name: handler-name runtime: nodejs6.10 timeout: "3" content-delivery: !com.amazonaws.mobilehub.v0.ContentDelivery attributes: enabled: true visibility: public-global components: release: !com.amazonaws.mobilehub.v0.Bucket {} database: !com.amazonaws.mobilehub.v0.Database components: database-nosql: !com.amazonaws.mobilehub.v0.NoSQLDatabase tables: - !com.amazonaws.mobilehub.v0.NoSQLTable attributes:
238
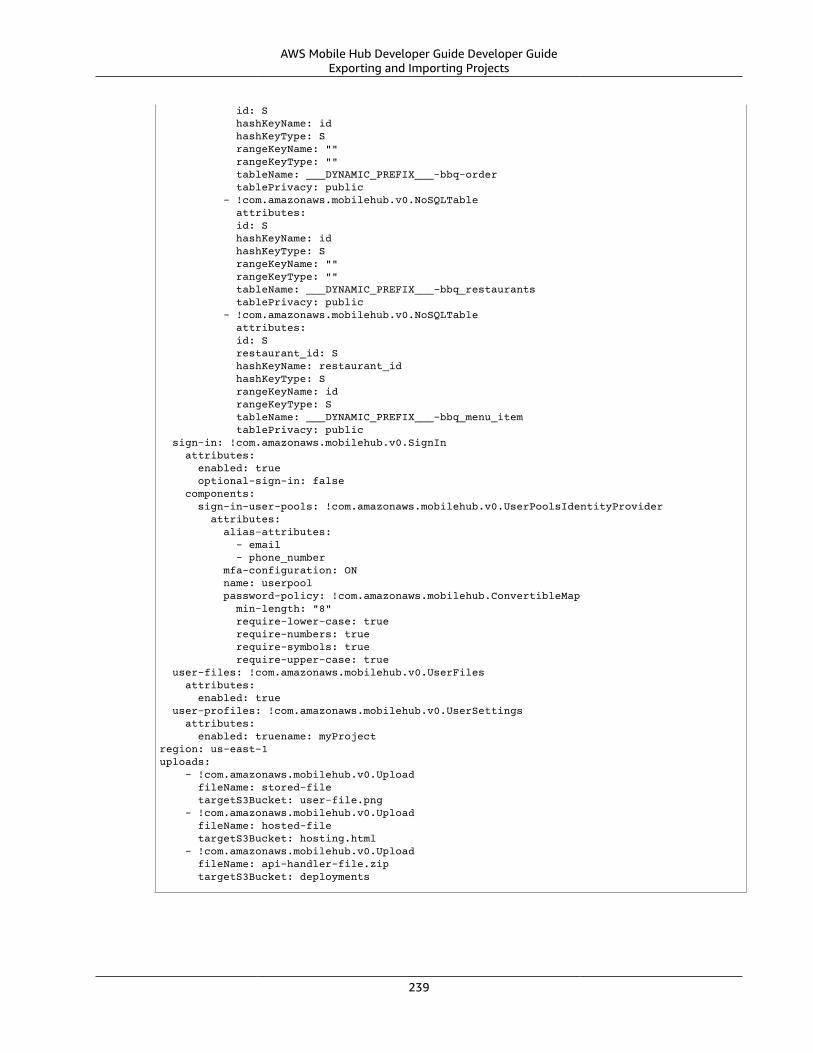
AWS Mobile Hub Developer Guide Developer GuideExporting and Importing Projects
id: S hashKeyName: id hashKeyType: S rangeKeyName: "" rangeKeyType: "" tableName: ___DYNAMIC_PREFIX___-bbq-order tablePrivacy: public - !com.amazonaws.mobilehub.v0.NoSQLTable attributes: id: S hashKeyName: id hashKeyType: S rangeKeyName: "" rangeKeyType: "" tableName: ___DYNAMIC_PREFIX___-bbq_restaurants tablePrivacy: public - !com.amazonaws.mobilehub.v0.NoSQLTable attributes: id: S restaurant_id: S hashKeyName: restaurant_id hashKeyType: S rangeKeyName: id rangeKeyType: S tableName: ___DYNAMIC_PREFIX___-bbq_menu_item tablePrivacy: public sign-in: !com.amazonaws.mobilehub.v0.SignIn attributes: enabled: true optional-sign-in: false components: sign-in-user-pools: !com.amazonaws.mobilehub.v0.UserPoolsIdentityProvider attributes: alias-attributes: - email - phone_number mfa-configuration: ON name: userpool password-policy: !com.amazonaws.mobilehub.ConvertibleMap min-length: "8" require-lower-case: true require-numbers: true require-symbols: true require-upper-case: true user-files: !com.amazonaws.mobilehub.v0.UserFiles attributes: enabled: true user-profiles: !com.amazonaws.mobilehub.v0.UserSettings attributes: enabled: truename: myProjectregion: us-east-1uploads: - !com.amazonaws.mobilehub.v0.Upload fileName: stored-file targetS3Bucket: user-file.png - !com.amazonaws.mobilehub.v0.Upload fileName: hosted-file targetS3Bucket: hosting.html - !com.amazonaws.mobilehub.v0.Upload fileName: api-handler-file.zip targetS3Bucket: deployments
239

AWS Mobile Hub Developer Guide Developer GuideExporting and Importing Projects
Manually Exported Project Components
Looking for the AWS SDKs for iOS and Android? These SDKs and their docs are now part of AWSAmplify.
The content on this page applies only to apps that were configured using AWS Mobile Hub orawsmobile CLI. For existing apps that use AWS Mobile SDK prior to v2.8.0, we highly recommend youmigrate your app to use AWS Amplify and the latest SDK.
This section describes how to manually add project components to an exported project definition.
Topics• Importing User File Storage Contents (p. 240)• Importing Hosting and Streaming Contents (p. 241)• Importing SAML Federated User Sign-in (p. 241)• Importing API Handlers for Cloud Logic APIs (p. 242)• Importing Cross-Origin Resource Sharing (CORS) Configuration (p. 244)
Importing User File Storage Contents
When a project that enables User File Storage is exported, files stored in its Amazon S3 bucket are notincluded in its exported project definition. You can manually configure the project definition to uploadthose files to the new bucket of the imported project.
To configure import and upload of project files stored in a User File Storage bucket
1. Uncompress your exported project .zip file.2. Copy and paste each file that you want uploaded during import into the unzipped file folder.3. Add file paths to your exported project definition:
a. Open the mobile-hub-project.yml file of the export in an editor.b. If not already present, create an uploads: node at the root level.c. For each file to be uploaded, add the following three items under uploads:.
i. The namespace - !com.amazonaws.mobilehub.v0.Uploadii. The key fileName: with the value of the path to the file within the project definition .zip file.iii. The key targetS3Bucket: with the value of user-files.
--- !com.amazonaws.mobilehub.v0.Projectfeatures: sign-in: !com.amazonaws.mobilehub.v0.SignIn {} user-files: !com.amazonaws.mobilehub.v0.UserFiles attributes: enabled: true user-profiles: !com.amazonaws.mobilehub.v0.UserSettings attributes: enabled: truename: userfilesregion: us-east-1uploads: - !com.amazonaws.mobilehub.v0.Upload fileName: {example1.png} targetS3Bucket: user-files - !com.amazonaws.mobilehub.v0.Upload fileName: {example2.xml} targetS3Bucket: user-files
240

AWS Mobile Hub Developer Guide Developer GuideExporting and Importing Projects
. . .
4. Rezip the files within the uncompressed project definition file (not the folder containing those files,because that causes a path error).
Importing Hosting and Streaming Contents
When a project that enables Hosting and Streaming is exported, files stored in its Amazon S3 bucketare not included in the exported project definition. You can manually configure the project definition toupload those files to the new bucket of the imported project.
To configure import and upload of project files stored in a Hosting and Streaming bucket
1. Uncompress your exported project .zip file.2. Copy and paste each file that you want uploaded during import into the unzipped file folder.3. Add file paths to your exported project definition:
a. Open the mobile-hub-project.yml file of the export in an editor.b. If not already present, create an uploads: node at the root level.c. For each file to be uploaded, add the following three items under uploads:.
i. The namespace - !com.amazonaws.mobilehub.v0.Uploadii. The key fileName: with the value of the path to the file within the project definition .zip file.iii. The key targetS3Bucket: with the value of hosting.
--- !com.amazonaws.mobilehub.v0.Projectfeatures: content-delivery: !com.amazonaws.mobilehub.v0.ContentDelivery attributes: enabled: true visibility: public-global components: release: !com.amazonaws.mobilehub.v0.Bucket {}
. . .
uploads: - !com.amazonaws.mobilehub.v0.Upload fileName: {example1.html} targetS3Bucket: hosting - !com.amazonaws.mobilehub.v0.Upload fileName: {example2.js} targetS3Bucket: hosting. . .
4. Rezip the files within the uncompressed project definition file (not the folder containing those files,because that causes a path error).
Importing SAML Federated User Sign-in
Configuring SAML federation for the Mobile Hub User Sign-in feature requires you to supply the SAMLXML configuration (saml.xml) of the identity provider you federate. The SAML XML configuration is notincluded in the .zip file exported by Mobile Hub.
To configure an exported project to deploy the original project’s SAML federation when it isimported
1. Uncompress your exported project .zip file.2. Copy your identity provider’s saml.xml file into the root folder of the uncompressed .zip file.
241

AWS Mobile Hub Developer Guide Developer GuideExporting and Importing Projects
3. Rezip the files within the uncompressed project definition file (not the folder containing those files,because that causes a path error).
Importing API Handlers for Cloud Logic APIs
The Mobile Hub Cloud Logic feature pairs a RESTful API surface (API Gateway) with serverless APIhandler functions (Lambda). While Mobile Hub supports exporting and importing the definitions of APIand handler objects that Cloud Logic configures, the API handler function code is not exported.
Mobile Hub enables you to manually configure your project export .zip file to deploy your API handlerfunction code as part of the project import when the following conditions are met:
• Your API handler accesses only DynamoDB tables. Import of API handlers that access other AWSservices, such as Amazon S3, is not currently supported.
• Your handler code is factored to use Lambda environmental variables to refer to those DynamoDBtables.
When Mobile Hub imports API handler code, it uses environmental variables to map data operationsto the new tables created by the import. You can define the key name of environmental variablesin the project’s definition YAML to match constant names you define in the project’s Lambda APIhandler function code. The following example shows a Lambda function constant being equated to anenvironmental variable.
const YOUR-FUNCTION-CONSTANT-NAME = process.env.KEY-NAME-DEFINED-IN-YAML;";
// exampleconst MENU_TABLE_NAME = process.env.MENU_TABLE_NAME;
The steps that follow these notes describe how to define your environmental variables in projectdefinition YAML.
NoteAn alternative is to use the MOBILE_HUB_DYNAMIC_PREFIX project identifier prefix thatMobile Hub generates. Mobile Hub configures its value to be the unique identifier for theimported project. When you append a valid table name to that prefix in your function code,it composes a valid identifier for the table in the imported project. The following exampleshows a Lambda function constant being equated to an environmental variable.
const YOUR-FUNCTION-CONSTANT-NAME = process.env.MOBILE_HUB_DYNAMIC_PREFIX + "-YOUR-TABLE-NAME";
// exampleconst MENU_TABLE_NAME = process.env.MOBILE_HUB_DYNAMIC_PREFIX + "-bbq-menu";
This method does not require additional manual configuration of the project definition YAML.
The AWS Mobile React sample app provides an end to end example of using environmental variables toaccess data tables through an API and its handler. Take the following steps for each API handler whosecode you want to import. Examples from the sample app are given in line.
To enable import of |LAM| handler functions for your exported Cloud Logic API
1. Uncompress your exported project .zip file.2. Copy your Lambda function(s) into the uncompressed file.
a. Go to the Amazon S3 console and search for your Mobile Hub project name.b. Choose the bucket with the name containing -deployments-, then choose the uploads folder.
242
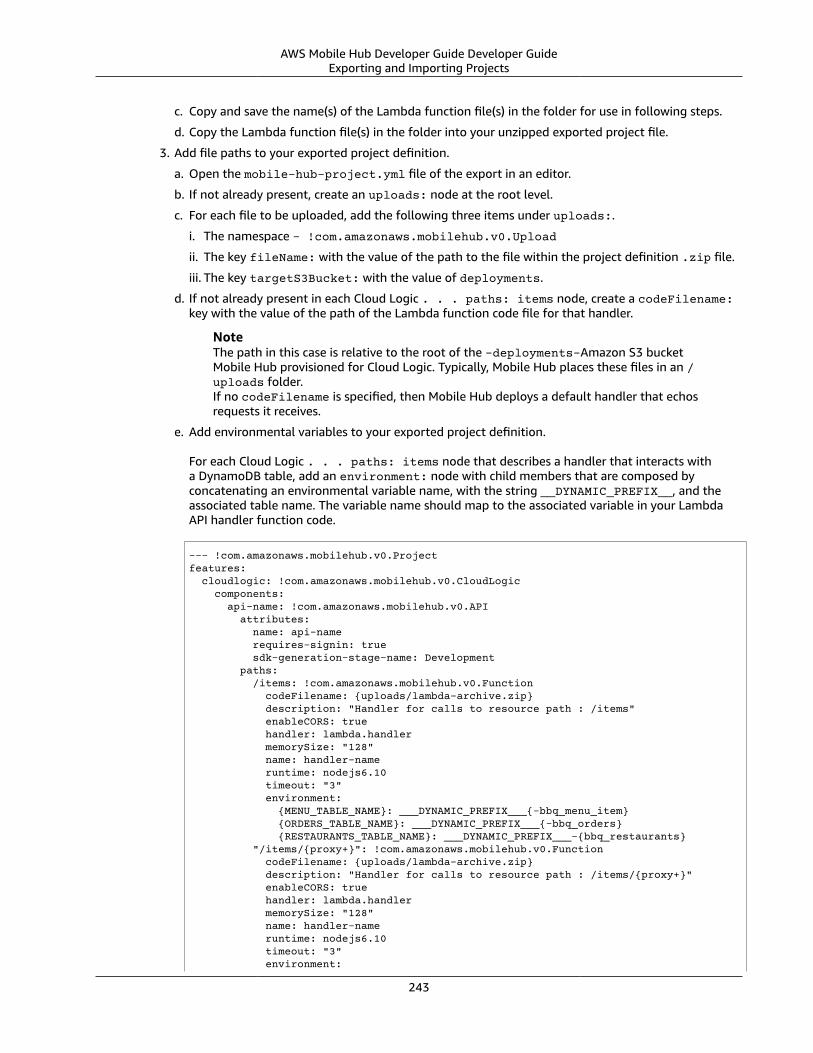
AWS Mobile Hub Developer Guide Developer GuideExporting and Importing Projects
c. Copy and save the name(s) of the Lambda function file(s) in the folder for use in following steps.
d. Copy the Lambda function file(s) in the folder into your unzipped exported project file.
3. Add file paths to your exported project definition.
a. Open the mobile-hub-project.yml file of the export in an editor.
b. If not already present, create an uploads: node at the root level.
c. For each file to be uploaded, add the following three items under uploads:.
i. The namespace - !com.amazonaws.mobilehub.v0.Upload
ii. The key fileName: with the value of the path to the file within the project definition .zip file.
iii. The key targetS3Bucket: with the value of deployments.
d. If not already present in each Cloud Logic . . . paths: items node, create a codeFilename:key with the value of the path of the Lambda function code file for that handler.
NoteThe path in this case is relative to the root of the -deployments-Amazon S3 bucketMobile Hub provisioned for Cloud Logic. Typically, Mobile Hub places these files in an /uploads folder.If no codeFilename is specified, then Mobile Hub deploys a default handler that echosrequests it receives.
e. Add environmental variables to your exported project definition.
For each Cloud Logic . . . paths: items node that describes a handler that interacts witha DynamoDB table, add an environment: node with child members that are composed byconcatenating an environmental variable name, with the string __DYNAMIC_PREFIX__, and theassociated table name. The variable name should map to the associated variable in your LambdaAPI handler function code.
--- !com.amazonaws.mobilehub.v0.Projectfeatures: cloudlogic: !com.amazonaws.mobilehub.v0.CloudLogic components: api-name: !com.amazonaws.mobilehub.v0.API attributes: name: api-name requires-signin: true sdk-generation-stage-name: Development paths: /items: !com.amazonaws.mobilehub.v0.Function codeFilename: {uploads/lambda-archive.zip} description: "Handler for calls to resource path : /items" enableCORS: true handler: lambda.handler memorySize: "128" name: handler-name runtime: nodejs6.10 timeout: "3" environment: {MENU_TABLE_NAME}: ___DYNAMIC_PREFIX___{-bbq_menu_item} {ORDERS_TABLE_NAME}: ___DYNAMIC_PREFIX___{-bbq_orders} {RESTAURANTS_TABLE_NAME}: ___DYNAMIC_PREFIX___-{bbq_restaurants} "/items/{proxy+}": !com.amazonaws.mobilehub.v0.Function codeFilename: {uploads/lambda-archive.zip} description: "Handler for calls to resource path : /items/{proxy+}" enableCORS: true handler: lambda.handler memorySize: "128" name: handler-name runtime: nodejs6.10 timeout: "3" environment:
243

AWS Mobile Hub Developer Guide Developer GuideExporting and Importing Projects
{MENU_TABLE_NAME}: ___DYNAMIC_PREFIX___{-bbq_menu_item} {ORDERS_TABLE_NAME}: ___DYNAMIC_PREFIX___{-bbq_orders} {RESTAURANTS_TABLE_NAME}: ___DYNAMIC_PREFIX___-{bbq_restaurants}. . .
uploads: - !com.amazonaws.mobilehub.v0.Upload fileName: {lambda-archive.zip} targetS3Bucket: deployments - !com.amazonaws.mobilehub.v0.Upload fileName: {lambda.jar} targetS3Bucket: deployments. . .
4. Save the .yml file and rezip the files within the uncompressed project definition file (not the foldercontaining those files, because that causes a path error).
5. Test your revised project export definition by importing it through the Mobile Hub console. You canverify your environmental variables through the Lambda console.
NoteBy default, the Mobile Hub NoSQL Database feature configures a table’s permissions to grantread and write access for Lambda functions. The kind of custom IAM policy configurationrequired to change the table’s permissions is not included in the export of a project. An importerof a project dependent on custom policy needs enough information to recreate the policyonce they have imported the project. For such a case, we recommend you provide both yourpolicy JSON and step by step instructions (console or AWS CLI) on how and where to attachit. For more information on those steps, see Authentication and Access Control for AmazonDynamoDB.
Importing Cross-Origin Resource Sharing (CORS) Configuration
By default, AWS security infrastructure prevents calls to an API Gateway API from a browser. ConfiguringCORS for each path of your API securely enables your API calls over the web. CORS configuration is notincluded in Mobile Hub project export. The following steps describe how to manually include import ofCORS configuration in your project export file.
To include CORS configuration for your |ABP| API paths
1. Unzip your exported project definition .zip file.2. Open the export’s mobile-hub-project.yml file in an editor.3. For each API path, add a key named enableCORS with the value true under ... paths: "/
items/. . .": !com.amazonaws.mobilehub.v0.Function, as shown in the followingfragment.
--- !com.amazonaws.mobilehub.v0.Project features: cloudlogic: !com.amazonaws.mobilehub.v0.CloudLogic components: ReactSample: !com.amazonaws.mobilehub.v0.API attributes: name: ReactSample requires-signin: false paths: "/items/{proxy+}": !com.amazonaws.mobilehub.v0.Function name: FirstHandler handler: lambda.handler enableCORS: true runtime: nodejs6.10 . . .
244

AWS Mobile Hub Developer Guide Developer GuideAmazon CloudFront Security
4. Rezip the files within the uncompressed project definition file (not the folder containing those files,because that causes a path error).
Amazon CloudFront Security Considerations forMobile Hub Users
Looking for the AWS SDKs for iOS and Android? These SDKs and their docs are now part of AWSAmplify.
The content on this page applies only to apps that were configured using AWS Mobile Hub orawsmobile CLI. For existing apps that use AWS Mobile SDK prior to v2.8.0, we highly recommend youmigrate your app to use AWS Amplify and the latest SDK.
When you enable the AWS Mobile Hub Hosting and Streaming (p. 200) feature, an Amazon CloudFrontdistribution is created in your account. The distribution caches the web assets you store within anassociated Amazon S3 bucket throughout a global network of Amazon edge servers. This provides yourcustomers with fast local access to the web assets.
This topic describes the key CloudFront security-related features that you might want to use for yourdistribution. For the same type of information regarding the source bucket, see s3-security.
Access managementHosting and Streaming makes assets in a distribution publically available. While this is the normalsecurity policy for Internet based resources, you should consider restricting access to the assets if thisis not the case. The best practice for security is to follow a ?minimal permissions? model and restrictaccess to resources as much as possible. You may want to modify resource-based policies, such as thedistribution policy or access control lists (ACLs), to grant access only to some users or groups of users.
To protect access to any AWS resources associated with a Hosting and Streaming web app, such asbuckets and database tables, we recommend restricting access to only authenticated users. You can addthis restriction to your Mobile Hub project by enabling the User Sign-in (p. 206) feature, with the sign-in required option.
For more information, see Authentication and Access Control for CloudFront in the Amazon CloudFrontDeveloper Guide.
Requiring the HTTPS ProtocolCloudFront supports use of the HTTPS protocol to encrypt communications to and from a distribution.This highly recommended practice protects both the user and the service. CloudFront enables you torequire HTTPS both between customers and your distribution endpoints, and CloudFront between yourdistribution’s caches and the source bucket where your assets originate. Global redirection of HTTPtraffic to HTTPS, use of HTTPS for custom domains and other options are also supported.
For more information, see Using HTTPS with CloudFront in the Amazon CloudFront Developer Guide.
Securing Private ContentCloudFront supports a range of methods for protecting private content in a distribution cache. Theseinclude the use of signed cookies and signed URLs to restrict access to authenticated, authorized users.
A best practice is to use techniques like these on both the connection between the user and thedistribution endpoint and between the distribution and the content Amazon S3 source bucket.
245

AWS Mobile Hub Developer Guide Developer GuideAmazon S3 Security
For more information, see the Serving Private Content through CloudFront section in the AmazonCloudFront Developer Guide.
Distribution Access LoggingDistribution logging helps you learn more about your app users, helps you meet your organization’s auditrequirements, and helps you understand your CloudFront costs. Each access log record provides detailsabout a single access request, such as the requester, distribution name, request time, request action,response status, and error code, if any. You can store logs in an Amazon S3 bucket. To help manage yourcosts, you can delete logs that you no longer need, or you can suspend logging.
For more information, see Access Logs for CloudFront in the Amazon CloudFront Developer Guide.
Amazon S3 Security Considerations for Mobile HubUsers
Looking for the AWS SDKs for iOS and Android? These SDKs and their docs are now part of AWSAmplify.
The content on this page applies only to apps that were configured using AWS Mobile Hub orawsmobile CLI. For existing apps that use AWS Mobile SDK prior to v2.8.0, we highly recommend youmigrate your app to use AWS Amplify and the latest SDK.
When you enable the Mobile Hub User File Storage or Hosting and Streaming features, it creates anAmazon S3 bucket in your account. This topic describes the key Amazon S3 security-related features thatyou might want to use for this bucket. Hosting and Streaming also configures a CloudFront distributionthat caches the assets stored in the bucket it creates. For the same type of information regarding thedistribution, see cloudfront-security.
Access managementBy default, access to Amazon S3 buckets and related objects are private: only the resource owner canaccess a bucket or assets contained in it. The administrator of a bucket can grant access that suits theirdesign by attaching resource-based policies, such as bucket policy or access control lists (ACLs) to grantaccess to users or groups of users.
The Amazon S3 configuration provisioned by the AWS Mobile Hub Hosting and Streaming (p. 200)feature is example of setting bucket policy to a allow access to all users. This access policy makes sensein the context of publicly hosting a web app through this feature. We recommend, if it meets app designcriteria, that developers also add the User Sign-in (p. 206) feature so that only authenticated usershave access to an app’s AWS resources like buckets and database.
For more information, see Managing Access Permissions to Your Amazon S3 Resources in the Amazon S3Developer Guide.
Object Lifecycle ManagementYou can use object lifecycle management to have Amazon S3 take actions on files (also referred to inAmazon S3 as objects) in a bucket based on specific criteria. For example, after a specific amount of timesince a mobile app user uploaded a file to the bucket, you might want to permanently delete that fileor move it to Amazon S3 Glacier. You might want to do this to reduce the amount of data in files thatother mobile app users can potentially access. You might also want to manage your costs by deleting orarchiving files that you know you or mobile app users no longer need.
246
AWS Mobile Hub Developer Guide Developer GuideAmazon S3 Security
For more information, see Object Lifecycle Management in the Amazon S3 Developer Guide.
Object EncryptionObject encryption helps increase the protection of the data in files while they are traveling to and froma bucket as well as while they are in a bucket. You can use Amazon S3 to encrypt the files, or you canencrypt the files yourself. Files can be encrypted with an Amazon S3-managed encryption key, a keymanaged by AWS Key Management Service (AWS KMS), or your own key.
For more information, see the Protecting Data Using Encryption section in the Amazon S3 DeveloperGuide.
Object VersioningObject versioning helps you recover data in files more easily after unintended mobile app user actionsand mobile app failures. Versioning enables you to store multiple states of the same file in a bucket. Youcan uniquely access each version by its related file name and version ID. To help manage your costs, youcan delete or archive older versions that you no longer need, or you can suspend versioning.
For more information, see the Using Versioning section in the Amazon S3 Developer Guide.
Bucket LoggingBucket logging helps you learn more about your app users, helps you meet your organization’s auditrequirements, and helps you understand your Amazon S3 costs. Each access log record provides detailsabout a single access request, such as the requester, bucket name, request time, request action, responsestatus, and error code, if any. You can store logs in the same bucket or in a different one. To help manageyour costs, you can delete logs that you no longer need, or you can suspend logging.
For more information, see Managing Bucket Logging in the Amazon S3 User Guide.
247