Embed Size (px)
Citation preview
585-215-718March 2002
Issue 1.1
������������
Version 3
Installation and User Guide

Copyright 2002 Avaya Inc. All Rights Reserved.
This material is protected by the copyright laws of the United States and other countries. It may not be reproduced, distributed, or altered in any fashion by any entity (either internal or external to Avaya Inc.), except in accordance with applicable agreements, contracts or licensing, without the express written consent of the Customer Training and Information Products organization and the business management owner of the material.
Notice
Every effort was made to ensure that the information in this book was complete and accurate at the time of printing. However, information is subject to change.
Mandatory Customer Information
European Union declaration of conformity
Avaya Business Communications Systems declares that the equipment specified in this document conforms to the referenced European Union (EU) Directives and Harmonized Standards listed below: EMC Directive 89/336/EEC Low Voltage Directive 73/23/EEC. The “CE” mark affixed to the equipment means that it conforms to the above Directives.
Heritage statement
Intellectual property related to this product (including trademarks) and registered to Lucent Technologies Inc. has been transferred or licensed to Avaya Inc.
Any reference within the text to Lucent Technologies Inc. or Lucent should be interpreted as references to Avaya Inc. The exception is cross-references to books published prior to April 1, 2001, which may retain their original Lucent titles.
Avaya Inc., formed as a result of Lucent's planned restructuring, designs, builds, and delivers voice, converged voice and data, customer relationship management, messaging, multi-service networking, and structured cabling products and services. Avaya Labs is the research and development arm for the company.
Security statement - Your responsibility for your system’s security
Toll fraud is the unauthorized use of your telecommunications system by an unauthorized party, for example, persons other than your company's employees, agents, subcontractors, or persons working on your company's behalf. Note that there may be a risk of toll fraud associated with your telecommunications system and, if toll fraud occurs, it can result in substantial additional charges for your telecommunications services.You and your system manager are responsible for the security of your system, such as programming and configuring your equipment to prevent unauthorized use. The system manager is also responsible for reading all installation, instruction, and system administration documents provided with this product in order to fully understand the features that can introduce risk of toll fraud and the steps that can be taken to reduce that risk. Avaya does not warrant that this product is immune from or will prevent unauthorized use of common-carrier telecommunication services or facilities accessed through or connected to it. Avaya will not be responsible for any charges that result from such unauthorized use.
Trademarks
CentreVu is a registered trademark Avaya Inc.DEFINITY is a registered trademark of Avaya Inc.INTEL is a registered trademark of Intel CorporationPentium is a registered trademark of Intel CorporationMS-DOS is a registered trademark of Microsoft CorporationWindows is a registered trademark of Microsoft CorporationWindows 95 is a registered trademark of Microsoft CorporationWindows 98 is a registered trademark of Microsoft CorporationWindows Millenium Edition is a registered trademark of Microsoft CorporationWindows NT is a registered trademark of Microsoft CorporationWindows 2000 is a registered trademark of Microsoft Corporation
Ordering information
For information about ordering, see the "About this document" section.
Support telephone numbers
Technical Support Telephone Number - Avaya National Customer Care Center
Avaya provides a telephone number for you to use to report problems or to ask questions about your call center. The support telephone number for customers in the U.S.A. and Canada is 1-800-242-2121. For technical support, customers outside the United States should call their Avaya Representative or Distributor.
Information Product Support Telephone Number
Support for this information product is not available. Any questions or comments regarding this information product should be directed to Avaya technical support at the telephone number listed above.
Avaya fraud interventionIf you suspect that you are being victimized by toll fraud and you need technical support or assistance, call Technical Service Center Toll Fraud Intervention Hotline at 1-800-643-2353.
This document was prepared by the CRM organization, Avaya, Denver, Colorado, U.S.A.

Contents
i i iIssue 1.1, March 2002
............................................................................................................................................................................................................................................................
About this information product . . . . . . . . . . . . . . . . . . . ix
1 Introduction . . . . . . . . . . . . . . . . . . . . . . . . . . . . 1-1
Overview . . . . . . . . . . . . . . . . . . . . 1-1
What is Avaya IP Agent? . . . . . . . . . . . . . . . . . . . . 1-2
Avaya IP Agent configurations . . . . . . . . . . . . . . . . . . 1-6
Compatible telephone types for Avaya IP Agent V3 . . . . . . . . . 1-9
Other considerations. . . . . . . . . . . . . . . . . . . . . . 1-10
2 Installing and uninstalling Avaya IP Agent . . . . . . . . . . . . . . . 2-1
Overview . . . . . . . . . . . . . . . . . . . . . 2-1
Prerequisites . . . . . . . . . . . . . . . . . . . . . . . . . . 2-2
Overview . . . . . . . . . . . . . . . . . . . . 2-2
Requirements . . . . . . . . . . . . . . . . . . . . . . . . . 2-3
Installing Avaya IP Agent . . . . . . . . . . . . . . . . . . . . . 2-7
Overview . . . . . . . . . . . . . . . . . . . . 2-7
Performing the installation . . . . . . . . . . . . . . . . . . . 2-8
Running the Configuration Wizard . . . . . . . . . . . . . . . . 2-16
Upgrades and reinstallation . . . . . . . . . . . . . . . . . . . . 2-22
Overview . . . . . . . . . . . . . . . . . . . . . 2-22
Upgrading CentreVu IP Agent V1.X to Avaya IP Agent V3 . . . . . . . 2-23
Upgrading CentreVu IP Agent V2 to Avaya IP Agent V3 . . . . . . . 2-25
Upgrading CentreVu Agent to Avaya IP Agent V3 . . . . . . . . . . 2-26
Reinstalling Avaya IP Agent V3 . . . . . . . . . . . . . . . . . 2-27
Uninstalling Avaya IP Agent V3 . . . . . . . . . . . . . . . . . . 2-29
Overview . . . . . . . . . . . . . . . . . . . . 2-29
Performing the uninstall . . . . . . . . . . . . . . . . . . . . 2-30
i v .Issue 1.1, March 2002
............................................................................................................................................................................................................................................................
3 Administering DEFINITY for Avaya IP Agent . . . . . . . . . . . . . . 3-1
Overview . . . . . . . . . . . . . . . . . . . . . 3-1
Configuring the DEFINITY system . . . . . . . . . . . . . . . . . 3-2
Overview . . . . . . . . . . . . . . . . . . . . . 3-2
Ensuring Telecommuter and Road Warrior compatibility . . . . . . . 3-3
Ensuring CALLMASTER VI compatibility . . . . . . . . . . . . . 3-6
Validating Feature Access Codes . . . . . . . . . . . . . . . . 3-8
Changing station settings for Road Warrior and Telecommuter configurations . . . . . . . . . . . . . . . . . . 3-11
Changing station settings for CALLMASTER VI configurations . . . . 3-16
Enhanced configuration . . . . . . . . . . . . . . . . . . . . . 3-19
Overview . . . . . . . . . . . . . . . . . . . . . 3-19
Configuring stations on DEFINITY systems for the Emergency Call Handling Service . . . . . . . . . . . . . . . . 3-20
Configuring Avaya IP Agent for the Emergency Call Handling Service . 3-21
Installing the Quality of Service Packet Scheduler . . . . . . . . . 3-24
Configuring Alternate Gatekeeper on DEFINITY systems . . . . . . . 3-26
Configuring server load balancing across gatekeepers . . . . . . . 3-27
Required DEFINITY circuit packs . . . . . . . . . . . . . . . . . 3-28
Overview . . . . . . . . . . . . . . . . . . . . . 3-28
Circuit pack descriptions and associated documentation . . . . . . 3-29
4 Running Avaya IP Agent . . . . . . . . . . . . . . . . . . . . . . 4-1
Overview . . . . . . . . . . . . . . . . . . . . . 4-1
Starting Avaya IP Agent . . . . . . . . . . . . . . . . . . . . 4-2
Registering with the DEFINITY system . . . . . . . . . . . . . . 4-3
Logging in to Avaya IP Agent (EAS) . . . . . . . . . . . . . . . 4-7
Logging in to Avaya IP Agent (non-EAS) . . . . . . . . . . . . . 4-9
Logging out of Avaya IP Agent. . . . . . . . . . . . . . . . . . 4-11
Exiting Avaya IP Agent . . . . . . . . . . . . . . . . . . . . . 4-12
vIssue 1.1, March 2002
............................................................................................................................................................................................................................................................
5 Avaya IP Agent basics . . . . . . . . . . . . . . . . . . . . . . . 5-1
Overview . . . . . . . . . . . . . . . . . . . . . 5-1
Handling incoming calls . . . . . . . . . . . . . . . . . . . . . 5-2
Overview . . . . . . . . . . . . . . . . . . . . . 5-2
Answering a call. . . . . . . . . . . . . . . . . . . . . . . . 5-3
Holding a call . . . . . . . . . . . . . . . . . . . . . . . . . 5-6
Releasing a call . . . . . . . . . . . . . . . . . . . . . . . . 5-7
Dropping a call . . . . . . . . . . . . . . . . . . . . . . . . 5-9
Transferring a call . . . . . . . . . . . . . . . . . . . . . . . . 5-10
Overview . . . . . . . . . . . . . . . . . . . . . 5-10
Basic call transfer . . . . . . . . . . . . . . . . . . . . . . . 5-11
Unsupervised call transfer . . . . . . . . . . . . . . . . . . . 5-13
Enhanced call transfer . . . . . . . . . . . . . . . . . . . . . 5-14
Other methods of transferring calls . . . . . . . . . . . . . . . . 5-16
Conferencing calls . . . . . . . . . . . . . . . . . . . . . . . 5-18
Overview . . . . . . . . . . . . . . . . . . . . . 5-18
Basic conference . . . . . . . . . . . . . . . . . . . . . . . 5-19
Enhanced conference . . . . . . . . . . . . . . . . . . . . . 5-22
Other methods of conferencing calls . . . . . . . . . . . . . . . 5-24
Handling outgoing calls . . . . . . . . . . . . . . . . . . . . . 5-26
Overview . . . . . . . . . . . . . . . . . . . . . 5-26
Recent Calls list . . . . . . . . . . . . . . . . . . . . . . . . 5-27
Administering and using Speed Dial . . . . . . . . . . . . . . . 5-29
Abbreviated Dial button . . . . . . . . . . . . . . . . . . . . 5-32
6 Dialog Reference. . . . . . . . . . . . . . . . . . . . . . . . . . 6-1
Overview . . . . . . . . . . . . . . . . . . . . . 6-1
Main window and menus . . . . . . . . . . . . . . . . . . . . . 6-2
Overview . . . . . . . . . . . . . . . . . . . . . 6-2
Menu bar . . . . . . . . . . . . . . . . . . . . . . . . . . . 6-3
Toolbars . . . . . . . . . . . . . . . . . . . . . . . . . . . 6-13
Information panels. . . . . . . . . . . . . . . . . . . . . . . 6-16

v i .Issue 1.1, March 2002
............................................................................................................................................................................................................................................................
Avaya IP Agent option dialogs. . . . . . . . . . . . . . . . . . . 6-18
Overview . . . . . . . . . . . . . . . . . . . . . 6-18
Program Options . . . . . . . . . . . . . . . . . . . . . . . 6-19
iClarity Settings dialogs . . . . . . . . . . . . . . . . . . . . . 6-31
Overview . . . . . . . . . . . . . . . . . . . . . 6-31
Login tab. . . . . . . . . . . . . . . . . . . . . . . . . . . 6-32
Server tab . . . . . . . . . . . . . . . . . . . . . . . . . . 6-34
Audio tab . . . . . . . . . . . . . . . . . . . . . . . . . . 6-36
Emergency tab . . . . . . . . . . . . . . . . . . . . . . . . 6-37
Advanced tab . . . . . . . . . . . . . . . . . . . . . . . . . 6-38
Agent Greetings settings dialogs . . . . . . . . . . . . . . . . . 6-40
Overview . . . . . . . . . . . . . . . . . . . . . 6-40
Greeting Description settings . . . . . . . . . . . . . . . . . . 6-41
ANI settings . . . . . . . . . . . . . . . . . . . . . . . . . 6-42
VDN settings . . . . . . . . . . . . . . . . . . . . . . . . . 6-43
Prompted Digits settings . . . . . . . . . . . . . . . . . . . . 6-44
Audio settings . . . . . . . . . . . . . . . . . . . . . . . . . 6-45
Overview . . . . . . . . . . . . . . . . . . . . . 6-45
Audio Options dialog . . . . . . . . . . . . . . . . . . . . . 6-46
Audio Tuning Wizard . . . . . . . . . . . . . . . . . . . . . . 6-49
7 Agent Greetings . . . . . . . . . . . . . . . . . . . . . . . . . . 7-1
Overview . . . . . . . . . . . . . . . . . . . . . 7-1
Creating Agent Greetings . . . . . . . . . . . . . . . . . . . . 7-3
Setting the active Agent Greeting . . . . . . . . . . . . . . . . 7-4
Deleting Agent Greetings . . . . . . . . . . . . . . . . . . . . 7-6
8 Using VuStats . . . . . . . . . . . . . . . . . . . . . . . . . . . 8-1
Overview . . . . . . . . . . . . . . . . . . . . . 8-1
Configuring a station for VuStats through the DEFINITY system. . . . 8-2
Viewing a single set of VuStats information in Avaya IP Agent . . . . 8-3
Running multiple VuStats in the VuStats Monitor . . . . . . . . . . 8-5
Adjusting intervals for monitoring VuStats. . . . . . . . . . . . . 8-8
v i iIssue 1.1, March 2002
............................................................................................................................................................................................................................................................
9 Using a Public Directory with Avaya IP Agent . . . . . . . . . . . . . . 9-1
Overview . . . . . . . . . . . . . . . . . . . . . 9-1
Defining a Public Directory service . . . . . . . . . . . . . . . . 9-2
Searching a Public Directory . . . . . . . . . . . . . . . . . . 9-4
Deleting a Public Directory service . . . . . . . . . . . . . . . . 9-8
10 Screen Pops . . . . . . . . . . . . . . . . . . . . . . . . . . . 10-1
Overview . . . . . . . . . . . . . . . . . . . . . 10-1
Creating a Windows application Screen Pop . . . . . . . . . . . . 10-3
Creating a DDE Screen Pop . . . . . . . . . . . . . . . . . . . 10-10
Setting the active Screen Pop . . . . . . . . . . . . . . . . . . 10-16
Modifying a Screen Pop . . . . . . . . . . . . . . . . . . . . 10-17
Deleting a Screen Pop . . . . . . . . . . . . . . . . . . . . . 10-19
A Quick Reference — Shortcut keys . . . . . . . . . . . . . . . . . . A-1
Overview . . . . . . . . . . . . . . . . . . . . . A-1
Shortcut keys . . . . . . . . . . . . . . . . . . . . . . . . . A-2
B Quick Reference — Language Support . . . . . . . . . . . . . . . . B-1
Overview . . . . . . . . . . . . . . . . . . . . . B-1
Supported languages for Avaya IP Agent . . . . . . . . . . . . . B-2
C Quick Reference — Troubleshooting . . . . . . . . . . . . . . . . . C-1
Overview . . . . . . . . . . . . . . . . . . . . . C-1
Troubleshooting. . . . . . . . . . . . . . . . . . . . . . . . C-2
GL Glossary. . . . . . . . . . . . . . . . . . . . . . . . GL-1
IN Index. . . . . . . . . . . . . . . . . . . . . . . . . . . . . . . IN-1

v i i i .Issue 1.1, March 2002
............................................................................................................................................................................................................................................................
i xIssue 1.1, March 2002
............................................................................................................................................................................................................................................................
About this information product
Purpose Avaya IP Agent Installation and User Guide, Version 3 includes information that you need to know in order to install and use Avaya IP Agent. It also provides information on features, basic operation, and administrative tasks.
Reason for reissue This is issue 1.1 of this document.
Safety labels Safety labels not applicable to this guide.
Intended audience This guide is intended for anyone who is installing or using Avaya IP Agent software and performing station administration on the DEFINITY® system (Enterprise Communications Server). It assumes that you are familiar with:
• The computer on which Avaya IP Agent will be installed and run
• Microsoft Windows® 95, Microsoft Windows 98, Microsoft Windows Millenium Edition, Microsoft Windows 2000, Microsoft Windows NT 4.0, or Microsoft Windows XP
• Standard Microsoft Windows conventions
• Call center configurations and operations

x Issue 1.1, March 2002
...........................................................................................................................................................................................................................................................
Conventions used The following conventions are used in this document:
Related documentation The following is a list of the documents that can help you configure and use Avaya IP Agent:
• DEFINITY Enterprise Communications System Administrator's Guide
• DEFINITY Enterprise Communications System Automatic Call Distribution (ACD) Supervisor Instructions
• DEFINITY Enterprise Communications System Automatic Call Distribution (ACD) Agent Instructions
To register for instructor-led courses, call:
1–800–255–8988
To order CD-ROM courses, call
1–800–225–7585
Inquiries for training originating outside the United States and Canada should call:
(1) (904) 636–3261
Convention Description
Initial capital letters Names of windows, dialog boxes, and keyboard keys. For example, The Name field is in the Properties dialog box.
KEY + KEY Key combinations for which you must press and hold down one key and then press another key at the same time. For example, Ctrl + F4 means that you press the Ctrl key and the F4 key at the same time.
Italic text Indicates references to other documents, products, trademarks, and also used for emphasis.
“ ” Sections and chapters that are referenced. For example, See “Chapter 2, Installing and uninstalling Avaya IP Agent,” for information on how to install the software.
x iIssue 1.1, March 2002
............................................................................................................................................................................................................................................................
To order documents by telephone, contact:
Globalware SolutionsVoice: 1-800-457-1235 or international voice: 410-568-3680Fax: 1-800-457-1764 or international fax: 410-891-0207
To order documents by mail, write to:
Globalware Solutions200 Ward Hill AvenueHaverhill, MA 01835USAAttention: Avaya Account Management
You can be placed on a Standing Order list for documents you may need. A Standing Order will enable you to automatically receive updated versions of individual documents or document sets, billed to account information that you provide. For more information on Standing Orders, or to be put on a list to receive future issues of this document, please contact the Avaya Publications Center.

x i i Issue 1.1, March 2002
...........................................................................................................................................................................................................................................................
1 - 1Issue 1.1, March 2002
............................................................................................................................................................................................................................................................
1 Introduction
.............................................................................................................................................................................................................................................................Overview
Purpose This chapter provides introductory and basic information about Avaya IP Agent.
This chapter includes the following sections:
• “What is Avaya IP Agent?” (1-2)
• “Avaya IP Agent configurations” (1-6)
• “Compatible telephone types for Avaya IP Agent V3” (1-9)
• “Other considerations” (1-10)
1 - 2 Issue 1.1, March 2002
...........................................................................................................................................................................................................................................................
Introduction
.............................................................................................................................................................................................................................................................What is Avaya IP Agent?
Description Avaya IP Agent is a software application that provides advanced telephony features for agents in a contact center. It also allows agents to work on-site at the contact center, off-site using Voice over Internet Protocol (VoIP), or off-site using analog connections over a Public Switched Telephone Network (PSTN). The advanced telephony features are controlled by Avaya IP Agent through its direct communcation with a DEFINITY R10 system.
Features Main features of Avaya IP Agent are:
• Support of DEFINITY systems R10 or later.
• Agents who are not located at the contact center can connect to the DEFINITY system in the contact center and receive calls as if they were present at their contact center workstation. For example, if an agent cannot travel to the contact center because of transportation problems or weather conditions, they can still take calls by using Avaya IP Agent to connect to the DEFINITY system.
• Agents using an analog telephone can still use the advanced call features provided by the DEFINITY system. For example, an agent working from home can still use such features as call transfer, placing a call on hold, and changing their agent state through their own telephone.
• “Screen Pops” can be initiated when a call is received or placed. Avaya IP Agent provides agents with the ability to display webpages, start applications, or retrieve and display customer information from a database. Screen pops are created using the Screen Pops Wizard which guides you through their creation. A screen pop can consist of any process or application that can be initiated through one of the commands in the following list:
– Windows® “Open” command
– Dynamic Data Exchange (DDE) “Execute” or “Poke” commands
• Road Warrior configuration (Voice over IP) — Agents can connect to the DEFINITY system using their PC and an IP network connection. In this configuration, a telephone set is not necessary because all audio is performed through the sound card of the PC.

IntroductionWhat is Avaya IP Agent?
1 - 3Issue 1.1, March 2002
............................................................................................................................................................................................................................................................
• Avaya CALLMASTER® VI compatibility — Avaya IP Agent supports use of Avaya CALLMASTER VI telephones. Sections of this document address configuration and use of Avaya CALLMASTER VI telephones as needed.
• Agent greetings — Agents can record and configure multiple agent greetings based on such variables as login status, agent state, agent ID, prompted digits, Automatic Number Identification (ANI), or Vector Directory Number (VDN). This feature is available only for Avaya CALLMASTER VI and Road Warrior (VoIP) configurations.
• Feature deactivation — Administrators can deactivate Avaya IP Agent features that should not be configured or used by agents. The features that can be deactivated include screen pops, screen pop administration, phone directory, public search directory, call history, phone features configuration, personal phone features, program options, and agent greeting selection.
• VuStats support — Avaya IP Agent can display multiple lines of VuStats information in the a dialog box. VuStats information helps to provide complete monitoring of the contact center.
• Speed dialer — Agents can assign telephone numbers to function keys (F2 through F8).
• Avaya IP Agent provides a complete call history of incoming and outgoing calls even for those missed calls where the caller does not leave a voice message.
• Avaya IP Agent provides a customizable telephone directory that lists addresses, multiple telephone numbers, speed-dial numbers, e-mail, and notes for each contact.
• Avaya IP Agent provides the ability to search through public or company information using the Lightweight Directory Access Protocol (LDAP).
• Clipboard dialing — Avaya IP Agent can dial any number copied to the clipboard or, in most PC applications Avaya IP Agent can dial a number that is highlighted.
• Configurable database location — Avaya IP Agent allows you to change the location where the Avaya IP Agent database is stored. This database contains the telephone directory and the call history information.
• Enhanced telephone features — Telephone features now support adding, renaming, and deleting of folders.
1 - 4 Issue 1.1, March 2002
...........................................................................................................................................................................................................................................................
IntroductionWhat is Avaya IP Agent?
• Enhanced system tray icon — An enhanced “Answer” icon in the Microsoft Windows system tray provides release, drop, hold, transfer, and conference functions.
• Drag-and-drop functions — An agent can use the drag-and-drop functionality to handle transfer and conference functions.
• Automatic login — An agent can automatically log in to the ACD when Avaya IP Agent is started. Avaya IP Agent uses the login information from the previous login to accomplish automatic login.
• Avaya IP Agent provides a compact, but instinctive, graphical user interface.
New features for Avaya IPAgent, Version 3
The following list provides the new features for Avaya IP Agent:
• Single-connect protocol for Road Warrior (VoIP) configurations — Previous to Avaya IP Agent V3, Road Warrior (VoIP) configurations required two station Right-to-Use (RTU) pathways in order to support the data and voice channels. Now, by using Avaya IP Agent V3 and DEFINITY R10 or later systems, both of these channels can be used over a single connection which allows more efficient use of RTUs.
• Emergency Call Handling Service (E911) — This feature allows IP Endpoints to use numbers that connect to emergency services, such as 911 in the United States. When used, this feature only reaches the emergency service in the Public Safety Answering Point area where the DEFINITY system is located. Agents or extensions in remote locations should not use this feature for emergencies.
• Redesigned iClarity login component with updated login to DEFINITY systems and IP audio settings — The iClarity IP Audio component has been redesigned to incorporate the login/registration with DEFINITY systems that was previously found in the DEFINITY® Login application. This redesigned component also provides support for the new features found in DEFINITY R10 systems.
• Support for Virtual Private Networks (VPNs) — New functionality has been added to the iClarity IP Audio component that supports use of “SHIM-based” IPSec client addresses by substituting for the local IP address within H.323 signaling messages.

IntroductionWhat is Avaya IP Agent?
1 - 5Issue 1.1, March 2002
............................................................................................................................................................................................................................................................
• Alternate Gatekeeper — When an IP Endpoint registers with a DEFINITY system, a C-LAN circuit pack IP address is sent to the IP Endpoint. If registration is successful, the DEFINITY system sends back the IP addresses of all the C-LAN circuit packs in the network region. These addresses can be used should call signaling on the original C-LAN circuit pack fails.
• Support for server load balancing across gatekeepers — This DEFINITY system feature allows registration and usage of IP Endpoints to be distributed across multiple C-LAN circuit packs within a network region which increases performance and reliability.
• Support for dynamic Quality of Service (QoS) — If the QoS parameters have not been configured on a Microsoft Windows 2000 IP Endpoint, the QoS parameters configured on the DEFINITY system are downloaded to the IP Endpoint and implemented. In order to use QoS, you must install the QoS Packet Scheduler. See the Chapter 3, “Administering DEFINITY for Avaya IP Agent” section or the documentation for your DEFINITY system for more information on QoS.
• Setup wizard for iClarity registration/login — This wizard helps guide you through entering the required information for login/registration to a DEFINITY system.

1 - 6 Issue 1.1, March 2002
...........................................................................................................................................................................................................................................................
Introduction
.............................................................................................................................................................................................................................................................Avaya IP Agent configurations
Introduction Avaya IP Agent supports three different configurations:
• “Road Warrior configuration (Voice over IP)” (1-6)
• “Telecommuter” (1-7)
• “CALLMASTER VI (DCP connection)” (1-7)
Road Warrior configuration(Voice over IP)
This configuration is used in situations where a PC can make a dial-up or network connection to a DEFINITY system. A telephone is not used in this configuration, which is valuable when a telephone is not available. All of the features of the DEFINITY sytem are available to the agent through this type of connection. The single network connection between the PC running Avaya IP Agent and the DEFINITY system carries two channels, one for signaling (data) and one for voice. Avaya IP Agent controls the data flow while the DEFINITY iClarity IP Audio (an H.323 V2–compliant audio application) handles the voice communications. This type of configuration provides the best IP audio quality that is possible with your connection speeds and network setup. The agent places and receives calls through the Avaya IP Agent interface using a headset connected to the PC.
What you need to know
The following are Road Warrior configuration requirements and capabilities:
• Connection — One dial-up or network connection from the PC with Avaya IP Agent to the DEFINITY system
• PC hardware — Sound card (full-duplex recommended) and modem or network interface card for connectivity to the DEFINITY system
• Telephone — Not supported in this configuration
• Voice quality — Dependent on the performance of the PC hardware and the amount of bandwidth available in the network connection
• Agent greetings — Stored on the PC
• Right-To-Use (RTU) DEFINITY connections — One station RTU
IntroductionAvaya IP Agent configurations
1 - 7Issue 1.1, March 2002
............................................................................................................................................................................................................................................................
Telecommuter This configuration is used in situations where a PC can make a dial-up or network connection to a DEFINITY system for the signaling (data) path and a voice path to a telephone sent through a Public Switched Telephone Network (PSTN) connection. The telephone can be an analog telephone, a cellular telephone, or an extension on a local or remote switch. This configuration provides toll-quality audio and full telephony functionality through Avaya IP Agent. Calls are placed and received through the Avaya IP Agent interface and the voice path is sent to the telephone. Agent greetings cannot be supported in this configuration because the greetings reside on the PC and cannot connect to the voice path.
What you need to know
The following are Telecommuter configuration requirements and capabilities:
• Connection — One dial-up or network connection from the PC installed with Avaya IP Agent to the DEFINITY system and a telephone capable of receiving calls through the DEFINITY system
• PC hardware — Modem or Network Interface Card (NIC) for connection to the DEFINITY system
• Telephone set — Any telephone capable of receiving calls from the DEFINITY system
• Voice Quality — High
• Agent Greetings — Not supported in this configuration
• Right-To-Use DEFINITY connections — One station RTU for signaling connection and one of the following:
– For off-site use, one trunk RTU
– For on-site use, one station RTU
CALLMASTER VI (DCPconnection)
The Avaya CALLMASTER VI is a small telephone with eight buttons, two headset jacks, and DCP connectivity. It is connected to a PC through a serial (RS-232) connection. This configuration is intended for use at the desk of an agent in the contact center. Functionality is provided through a DCP connection to the DEFINITY system and does not require a TCP/IP network connection.
1 - 8 Issue 1.1, March 2002
...........................................................................................................................................................................................................................................................
IntroductionAvaya IP Agent configurations
What you need to know
The following are Avaya CALLMASTER VI configuration requirements and capabilities:
• Connection — DCP connection for the Avaya CALLMASTER VI telephone set and a serial (RS-232) connection between the Avaya CALLMASTER VI and the PC
• PC hardware — Serial (RS-232) port
• Telephone — Avaya CALLMASTER VI
• Voice quality — High
• Agent greetings — Stored on the Avaya CALLMASTER VI telephone set
• Right-To-Use DEFINITY connections — One station RTU
Introduction
1 - 9Issue 1.1, March 2002
............................................................................................................................................................................................................................................................
.............................................................................................................................................................................................................................................................Compatible telephone types for Avaya IP Agent V3
Supported telephone types The following list provides the telephone types that can be set on the DEFINITY system and that Avaya supports for use with Avaya IP Agent:
• CALLMASTER — 602A*, 602D*
• CALLMASTER II — 603A1*, 603D1*
• CALLMASTER III — 603E1*
• CALLMASTER IV—603F1*
• CALLMASTER V—607A1
• CALLMASTER VI—606A1*
• 4606
• 4612
• 4624
• 6408D and 6408D+
• 6416D+ #
• 6424D+ #
• 8405D and 8405D+
• 8410D
• 8411D (For this telephone set, you must disable the data port, which is true for all softphones.)
• 8434D* #
* This telephone type is capable of displaying 80 characters.
# This telephone type can also use an expansion module.
Recommended telephonetypes
While all of the telephone types listed in the previous table work with Avaya IP Agent, the following types provide the most buttons, features, and the largest area of display:
• 606A1
• 8434D
Because of the larger number of characters used for display, these telephone types are better suited to handle VuStats or Prompted Digits information.
1 - 1 0 Issue 1.1, March 2002
...........................................................................................................................................................................................................................................................
Introduction
.............................................................................................................................................................................................................................................................Other considerations
Network compatibility Avaya IP Agent provides support for several H.323–compatible firewalls and Virtual Private Networks (VPNs). For “shim-based” VPNs, you must use the Advanced button in the iClarity IP Audio dialogs used for login to set an IPSec IP address, assigned by the VPN gateway, that is visible to the PC client application. For more information, contact your Avaya representative.
The VPN solution provided by iClarity IP Audio only supports VPNs that use one-to-one IP address substitution. VPNs that use many-to-one IP address substitution cannot be used with Avaya IP Agent.
2 - 1Issue 1.1, March 2002
............................................................................................................................................................................................................................................................
2 Installing and uninstalling Avaya IP Agent
.............................................................................................................................................................................................................................................................Overview
Purpose This section contains procedures and important information for installing and uninstalling Avaya IP Agent.
This section includes the following topics:
• “Prerequisites” (2-2)
• “Installing Avaya IP Agent” (2-7)
• “Upgrades and reinstallation” (2-22)
• “Uninstalling Avaya IP Agent V3” (2-29)
Avaya IP Agent softwareCD-ROM contents
The Avaya IP Agent CD-ROM contains the following:
• Avaya IP Agent installation program
• Avaya IP Agent program files
• Documentation in PDF format — Adobe Acrobat Reader 3.0 or later is required to view documents that are in PDF format.
• A readme.txt file that contains last minute information
2 - 2 Issue 1.1, March 2002
...........................................................................................................................................................................................................................................................
Installing and uninstalling Avaya IP Agent
Prerequisites
.............................................................................................................................................................................................................................................................Overview
Purpose This section provides information on the necessary hardware and software for successful installation and use of Avaya IP Agent.
This section contains the minimum or recommended requirements for the following:
• “DEFINITY system” (2-3)
• “Personal computer hardware” (2-3)
• “Personal computer software” (2-6)
Installing and uninstalling Avaya IP Agent
2 - 3Issue 1.1, March 2002
............................................................................................................................................................................................................................................................
.............................................................................................................................................................................................................................................................Requirements
Overview This section provides specific information regarding the minimum requirements for successful installation and use of Avaya IP Agent.
DEFINITY system The following DEFINITY systems can be used for the listed configurations:
• DEFINITY Enterprise Communication System (ECS) R10 or later
• DEFINITY IP 600 R10 or later
• DEFINITY ONE® R10 or later
• DEFINITY Business Communications System (BCS) R10 or later (Road Warrior (VoIP) and Telecommuter configurations only)
• DEFINITY Guestworks R10 or later (Road Warrior (VoIP) and Telecommuter configurations only)
Depending on the endpoint configuration being used, Avaya IP Agent requires the following additional DEFINITY components:
• Telecommuter — A Control LAN Circuit Pack (C-LAN) circuit pack (TN799B or greater)
• Road Warrior (VoIP) — A Control LAN Circuit Pack (C-LAN) circuit pack (TN799B or greater) and an IP Media Processor (TN2302AP) circuit pack
• Avaya CALLMASTER VI — No DEFINITY components required.
Personal computerhardware
Minimum PC hardware requirements for Avaya IP Agent are:
Processor
An x86 processor at 200 MHz or faster is required. For Road Warrior (VoIP) configurations, a minimum of a 300 MHz processor is required.
Hard disk space
Avaya IP Agent requires a minimum of 30 MB. Avaya IP Agent could require more hard disk space, depending on the amount of data stored for the phone directory, call history, and screen pops.
2 - 4 Issue 1.1, March 2002
...........................................................................................................................................................................................................................................................
Installing and uninstalling Avaya IP AgentRequirements
RAM
Road Warrior (VoIP) configurations:
• Microsoft Windows 2000, Microsoft Windows NT 4.0 , and Microsoft Windows XP — 128 MB
• Microsoft Windows 98 and Microsoft Windows Millenium Edition — 64 MB
• Microsoft Windows 95 — Unsupported
Telecommuter configurations:
• Microsoft Windows 2000, Microsoft Windows NT 4.0, and Microsoft Windows XP — 64 MB
• Microsoft Windows 98 and Microsoft Windows Millenium Edition — 32 MB
• Microsoft Windows 95 — Unsupported
Avaya CALLMASTER VI configurations:
• Microsoft Windows 2000, Microsoft Windows NT 4.0, and Microsoft Windows XP — 64 MB
• Microsoft Windows 98 and Microsoft Windows Millenium Edition — 32 MB
• Microsoft Windows 95 — 32 MB
Audio
Road Warrior (VoIP) configurations require a sound card and a headset or speakers/microphone. It is recommended that you use a sound card that supports full-duplex operation for maximum voice quality. Use of a headset provides higher voice quality than that of speakers and a microphone connected to your PC.
For a list of the soundcards supported by Avaya IP Agent, go to: http://support.avaya.com/inet/vt/pc2/faq/6128.jhtml
For a list of the headsets supported by Avaya IP Agent, go to: http://support.avaya.com/inet/vt/pc/ja/4591.jhtml
Important! Only the Road Warrior (VoIP) configuration supports the use of a microphone through the PC.
Installing and uninstalling Avaya IP AgentRequirements
2 - 5Issue 1.1, March 2002
............................................................................................................................................................................................................................................................
Important! Most USB headsets do not work with Microsoft Windows 95, Microsoft Windows NT 4.0, and Microsoft Windows 98 First Edition. The compatibility information between the USB headset and the operating system should be checked in the USB headset specifications supplied by the manufacturer.
Avaya IP Agent supports the use of USB headsets. However, it is possible on certain PCs using USB headsets, that the gain of the USB headset is not adjusted appropriately when changed through the Avaya IP Agent user interface. If this occurs, the microphone gain of the USB headset should be changed from the Audio application located in the Microsoft Windows Control Panel.
Networking
The following list provides the network requirements for each configuration type:
• Road Warrior (VoIP) configurations — a single network connection between the PC and the DEFINITY system
• Telecommuter configurations — one network connection and one telephone connection
• Avaya CALLMASTER VI configurations — a Digital Communcations Protocol (DCP) connection to the DEFINITY ECS and a serial (RS-232) connection between the PC and the Avaya CALLMASTER VI telephone
Important! Information regarding minimum network requirements can be found in the Avaya IP Voice Quality Networks Requirements White Paper located at http://support.avaya.com/inet/vt/pc2/ta/4986.jhtml.
Peripherals
The following peripherals are required for installation and use of Avaya IP Agent:
• CD-ROM drive for installation
• Mouse or compatible pointing device

2 - 6 Issue 1.1, March 2002
...........................................................................................................................................................................................................................................................
Installing and uninstalling Avaya IP AgentRequirements
Personal computersoftware
Avaya IP Agent requires the following software:
• One of the following Microsoft Windows operating systems:
– Windows 95 (supports only the Avaya CALLMASTER VI configuration)
– Windows 98
– Windows Millenium Edition
– Windows NT 4.0 Workstation and Server with Service Pack 4 (SP4) or later
– Windows 2000 Professional and Server
– Windows XP Home and Professional
• Microsoft Internet Explorer 5.0TM or later
Important! Microsoft Windows 2000 Advanced ServerTM and Windows 2000 Datacenter ServerTM are not supported.
Avaya IP Agent does not support use through Terminal Services on Windows 2000 Server or Windows NT Terminal Server.
Installing and uninstalling Avaya IP Agent
2 - 7Issue 1.1, March 2002
............................................................................................................................................................................................................................................................
Installing Avaya IP Agent
.............................................................................................................................................................................................................................................................Overview
Purpose This section provides the procedure for installing Avaya IP Agent and using the Configuration Wizard to enter DEFINITY registration information on a personal computer.
This section includes the following topics:
• “Performing the installation” (2-8)
• “Running the Configuration Wizard” (2-16)

2 - 8 Issue 1.1, March 2002
...........................................................................................................................................................................................................................................................
Installing and uninstalling Avaya IP Agent
.............................................................................................................................................................................................................................................................Performing the installation
Before you begin Ensure that you have done the following before you attempt to install Avaya IP Agent:
• Closed all applications.
• Inserted the Avaya IP Agent CD-ROM in the CD-ROM drive.
• Read the readme.txt file in the root directory of the Avaya IP Agent CD-ROM.
Distributed installation
If you want to install Avaya IP Agent on PCs that are not equipped with a CD-ROM drive, you can copy the contents of the CD-ROM to a network location. Running the install program from the network does not alter the installation program.
Unsupported installation methods
Avaya IP Agent does not provide a silent installation nor does it support installation through network management software such as Microsoft System Management ServerTM(SMS) or Hewlett-Packard OpenViewTM.
Steps To install Avaya IP Agent:
............................................................................................................................................................................
1 If the Avaya IP Agent installation program did not begin after the CD-ROM was inserted, run the SETUP.EXE file in the root directory of the CD-ROM.
Result: The system displays the Welcome window.
............................................................................................................................................................................
2 Select the Next button.
Result: The install program displays the Software License Agreement window.
Installing and uninstalling Avaya IP AgentPerforming the installation
2 - 9Issue 1.1, March 2002
............................................................................................................................................................................................................................................................
............................................................................................................................................................................
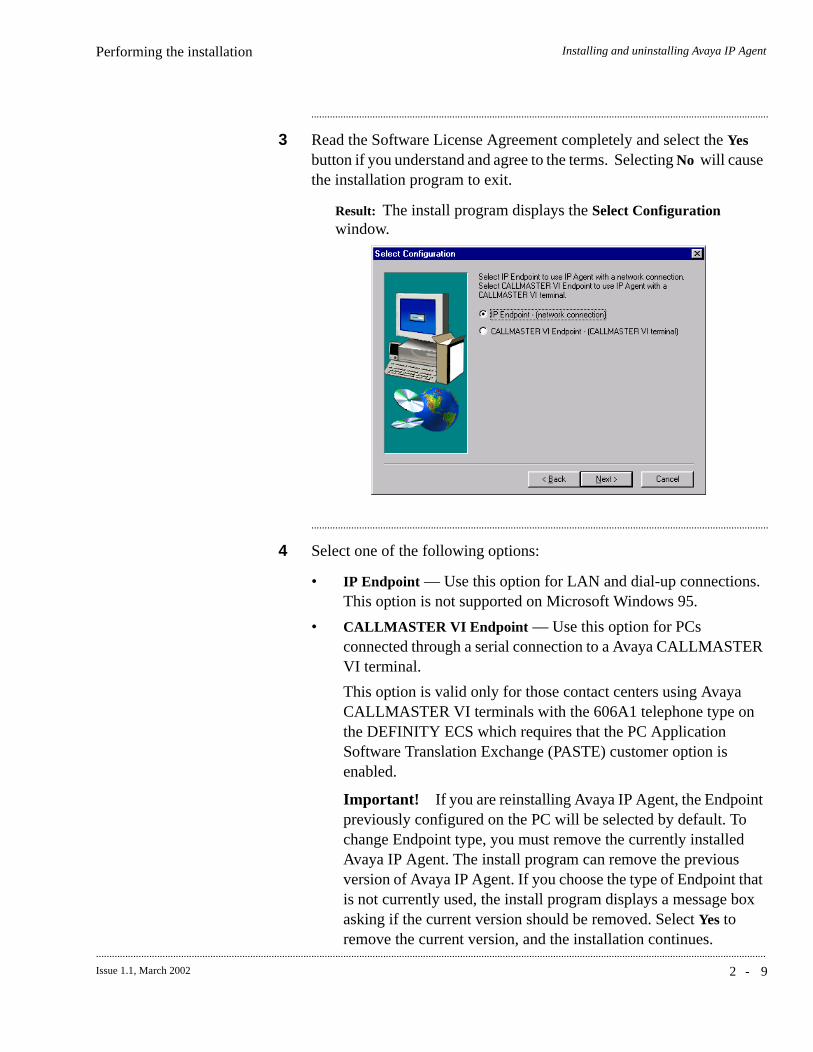
3 Read the Software License Agreement completely and select the Yes button if you understand and agree to the terms. Selecting No will cause the installation program to exit.
Result: The install program displays the Select Configuration window.
............................................................................................................................................................................
4 Select one of the following options:
• IP Endpoint — Use this option for LAN and dial-up connections. This option is not supported on Microsoft Windows 95.
• CALLMASTER VI Endpoint — Use this option for PCs connected through a serial connection to a Avaya CALLMASTER VI terminal.
This option is valid only for those contact centers using Avaya CALLMASTER VI terminals with the 606A1 telephone type on the DEFINITY ECS which requires that the PC Application Software Translation Exchange (PASTE) customer option is enabled.
Important! If you are reinstalling Avaya IP Agent, the Endpoint previously configured on the PC will be selected by default. To change Endpoint type, you must remove the currently installed Avaya IP Agent. The install program can remove the previous version of Avaya IP Agent. If you choose the type of Endpoint that is not currently used, the install program displays a message box asking if the current version should be removed. Select Yes to remove the current version, and the installation continues.
2 - 1 0 Issue 1.1, March 2002
...........................................................................................................................................................................................................................................................
Installing and uninstalling Avaya IP AgentPerforming the installation
............................................................................................................................................................................
5 Select the Next button.
............................................................................................................................................................................
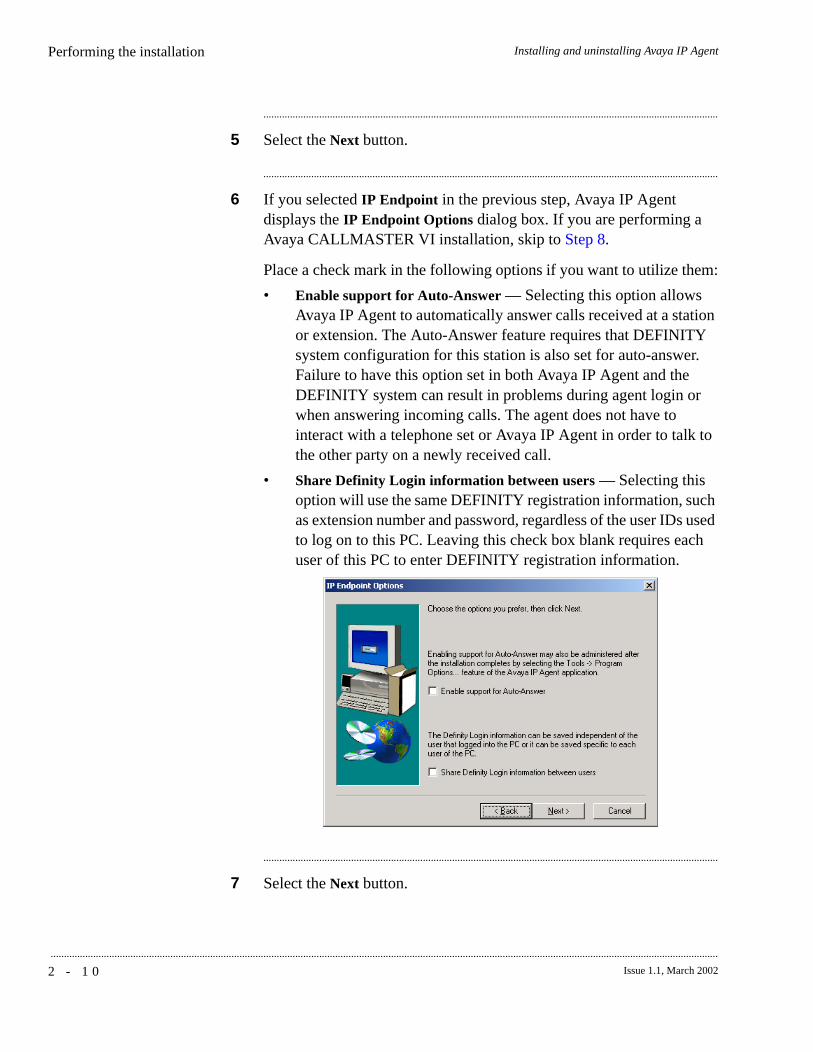
6 If you selected IP Endpoint in the previous step, Avaya IP Agent displays the IP Endpoint Options dialog box. If you are performing a Avaya CALLMASTER VI installation, skip to Step 8.
Place a check mark in the following options if you want to utilize them:
• Enable support for Auto-Answer — Selecting this option allows Avaya IP Agent to automatically answer calls received at a station or extension. The Auto-Answer feature requires that DEFINITY system configuration for this station is also set for auto-answer. Failure to have this option set in both Avaya IP Agent and the DEFINITY system can result in problems during agent login or when answering incoming calls. The agent does not have to interact with a telephone set or Avaya IP Agent in order to talk to the other party on a newly received call.
• Share Definity Login information between users — Selecting this option will use the same DEFINITY registration information, such as extension number and password, regardless of the user IDs used to log on to this PC. Leaving this check box blank requires each user of this PC to enter DEFINITY registration information.
............................................................................................................................................................................
7 Select the Next button.
Installing and uninstalling Avaya IP AgentPerforming the installation
2 - 1 1Issue 1.1, March 2002
............................................................................................................................................................................................................................................................
............................................................................................................................................................................
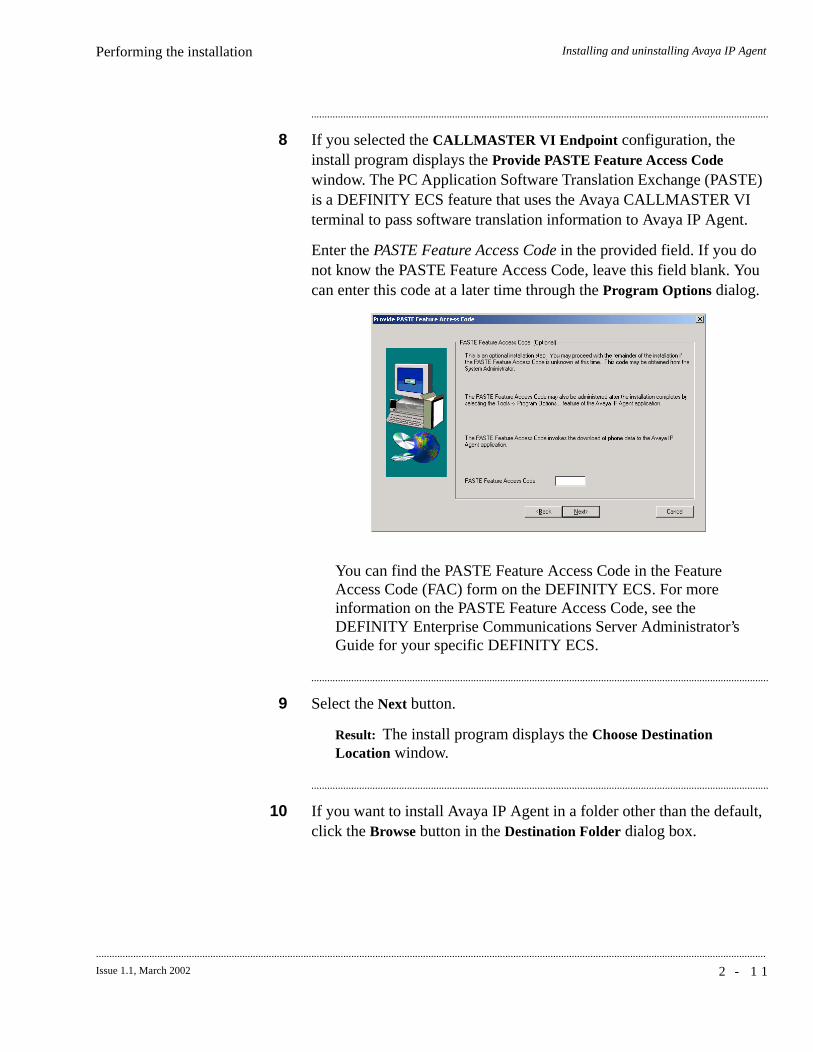
8 If you selected the CALLMASTER VI Endpoint configuration, the install program displays the Provide PASTE Feature Access Code window. The PC Application Software Translation Exchange (PASTE) is a DEFINITY ECS feature that uses the Avaya CALLMASTER VI terminal to pass software translation information to Avaya IP Agent.
Enter the PASTE Feature Access Code in the provided field. If you do not know the PASTE Feature Access Code, leave this field blank. You can enter this code at a later time through the Program Options dialog.
You can find the PASTE Feature Access Code in the Feature Access Code (FAC) form on the DEFINITY ECS. For more information on the PASTE Feature Access Code, see the DEFINITY Enterprise Communications Server Administrator’s Guide for your specific DEFINITY ECS.
............................................................................................................................................................................
9 Select the Next button.
Result: The install program displays the Choose Destination Location window.
............................................................................................................................................................................
10 If you want to install Avaya IP Agent in a folder other than the default, click the Browse button in the Destination Folder dialog box.
2 - 1 2 Issue 1.1, March 2002
...........................................................................................................................................................................................................................................................
Installing and uninstalling Avaya IP AgentPerforming the installation
............................................................................................................................................................................
11 When you are satisfied with the folder in which Avaya IP Agent will be installed, select the Next button.
Result: The install program displays the Setup Type window.
............................................................................................................................................................................
12 In the Setup Type window, select one of the following options and then select the Next button:
• Typical — This option installs the basic options in English as well as in the language of your Microsoft Windows operating system.
• Custom — This option installs the basic options in English as well as in any language you choose.
If you selected the Custom option, you will be presented with the Select Language Components window that allows you to specify the software language components to install. Proceed with the next step.
If you selected the Typical option, go to Step 17.
............................................................................................................................................................................
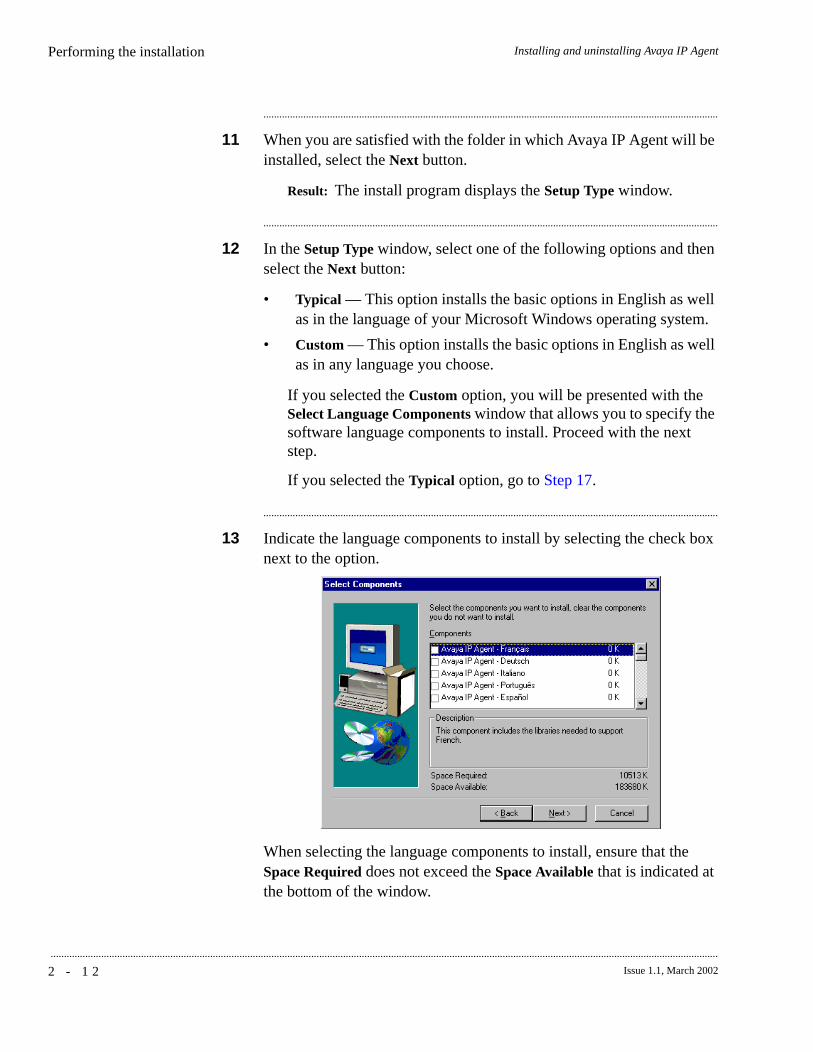
13 Indicate the language components to install by selecting the check box next to the option.
When selecting the language components to install, ensure that the Space Required does not exceed the Space Available that is indicated at the bottom of the window.
Installing and uninstalling Avaya IP AgentPerforming the installation
2 - 1 3Issue 1.1, March 2002
............................................................................................................................................................................................................................................................
............................................................................................................................................................................
14 Select the Next button.
Result: The install program displays the Select Program Folder window.
............................................................................................................................................................................
15 The Select Program Folder window allows you to choose one of the following methods to specify the folder name that will appear in the Start Menu:
• You can accept the default Avaya IP Agent folder name that appears in the Program Folders: field.
• You can enter a different folder name in the Program Folders: field.
• You can select an existing folder in the Existing Folders: field in which to install the Avaya IP Agent shortcuts.
............................................................................................................................................................................
16 Select the Next button.
Result: The install program displays the Select Program Shortcuts window.
............................................................................................................................................................................
17 Select the check box for the shortcut options you want to be performed.
Note: If you select a shortcut location but do not select any language, the install program displays a warning that you need to select at least one or more languages.
............................................................................................................................................................................
18 If you selected one of the check boxes on the upper portion this dialog box, you must highlight the languages in the Select the languages you would like to have added field for the shortcuts to be created in those languages.
2 - 1 4 Issue 1.1, March 2002
...........................................................................................................................................................................................................................................................
Installing and uninstalling Avaya IP AgentPerforming the installation
............................................................................................................................................................................
19 If you want Avaya IP Agent to run automatically when Microsoft Windows is started, select the check box for Automatically start the following version of Avaya IP Agent when Windows is started: and then select the language from the drop-down list.
Important! You must establish a connection to your corporate network before logging in to the DEFINITY system with Avaya IP Agent. If you are using a dial-up modem with a dynamically assigned IP address, do not select this option.
............................................................................................................................................................................
20 Select the Next button.
Result: The install program displays the Start Copying Files window.
This window displays the options that you selected. If you need to make any changes to the selections you made, select the Back button until you reach the necessary window.
............................................................................................................................................................................
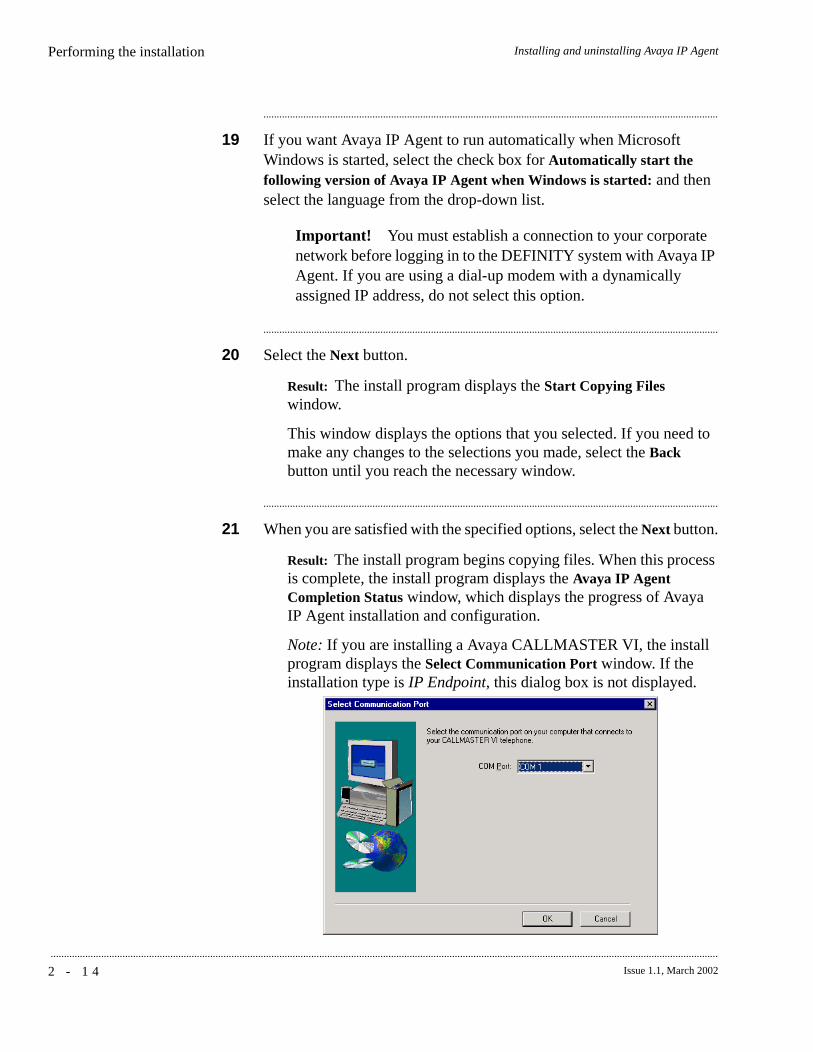
21 When you are satisfied with the specified options, select the Next button.
Result: The install program begins copying files. When this process is complete, the install program displays the Avaya IP Agent Completion Status window, which displays the progress of Avaya IP Agent installation and configuration.
Note: If you are installing a Avaya CALLMASTER VI, the install program displays the Select Communication Port window. If the installation type is IP Endpoint, this dialog box is not displayed.

Installing and uninstalling Avaya IP AgentPerforming the installation
2 - 1 5Issue 1.1, March 2002
............................................................................................................................................................................................................................................................
............................................................................................................................................................................
22 For Avaya CALLMASTER VI installations, select the communciations (COM) port that is used to connect to the Avaya CALLMASTER VI.
Result: When the configuration of Avaya IP Agent is complete, the install program displays the View the Release Information File window.
............................................................................................................................................................................
23 Select the check box provided in the View the Release Information File window to view the release information for Avaya IP Agent.
............................................................................................................................................................................
24 Select the Next button.
Result: The install program displays the readme.txt file.
............................................................................................................................................................................
25 When you have read the readme.txt file, close the application displaying it.
Result: The install program displays the Setup Complete window.
............................................................................................................................................................................
26 In the Setup Complete window, select one of the following options:
• Yes — This option automatically closes all currently running applications and restarts the computer.
• No — This option allows you to continue working without restarting your computer.
Important! You must restart your computer before running Avaya IP Agent.
............................................................................................................................................................................
27 Select the Finish button.
Result: The install program completes and performs a restart of the computer if you selected that option.
E N D O F S T E P S...........................................................................................................................................................................
2 - 1 6 Issue 1.1, March 2002
...........................................................................................................................................................................................................................................................
Installing and uninstalling Avaya IP Agent
.............................................................................................................................................................................................................................................................Running the Configuration Wizard
Overview This section provides the procedure for running the Configuration Wizard and entering the necessary information to register this station with a DEFINITY system.
If you have performed a fresh installation of Avaya IP Agent, the Configuration Wizard will appear when you first start Avaya IP Agent. The Configuration Wizard guides you through entering the configuration information necessary in order to register with a DEFINITY system.
This procedure only applies to Road Warrior (VoIP) and Telecommuter configurations.
Steps To configure your installation of Avaya IP Agent to register with a DEFINITY system.
............................................................................................................................................................................
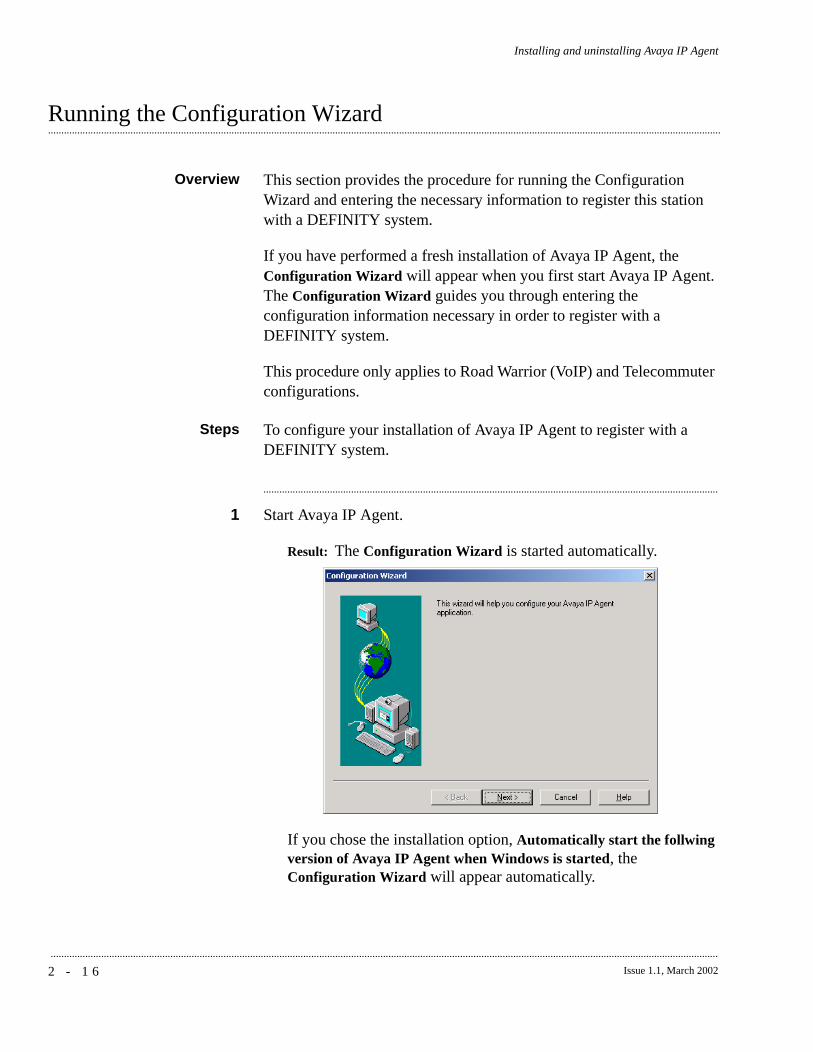
1 Start Avaya IP Agent.
Result: The Configuration Wizard is started automatically.
If you chose the installation option, Automatically start the follwing version of Avaya IP Agent when Windows is started, the Configuration Wizard will appear automatically.
Installing and uninstalling Avaya IP AgentRunning the Configuration Wizard
2 - 1 7Issue 1.1, March 2002
............................................................................................................................................................................................................................................................
............................................................................................................................................................................
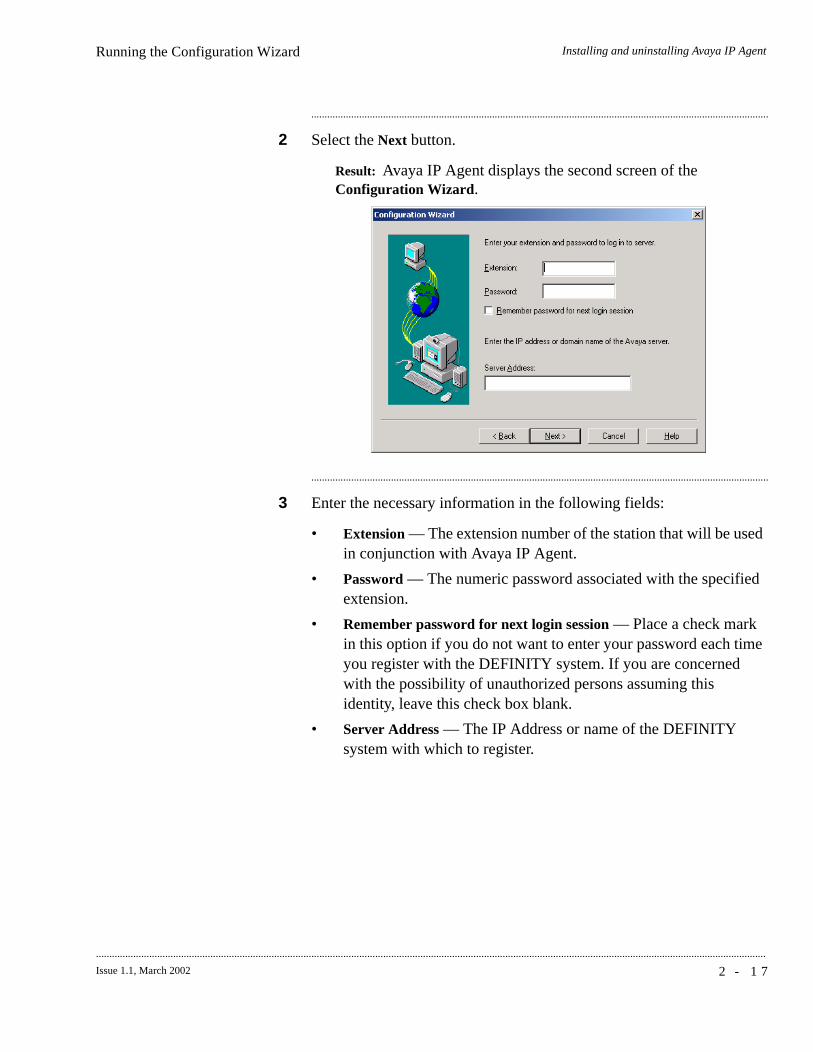
2 Select the Next button.
Result: Avaya IP Agent displays the second screen of the Configuration Wizard.
............................................................................................................................................................................
3 Enter the necessary information in the following fields:
• Extension — The extension number of the station that will be used in conjunction with Avaya IP Agent.
• Password — The numeric password associated with the specified extension.
• Remember password for next login session — Place a check mark in this option if you do not want to enter your password each time you register with the DEFINITY system. If you are concerned with the possibility of unauthorized persons assuming this identity, leave this check box blank.
• Server Address — The IP Address or name of the DEFINITY system with which to register.
2 - 1 8 Issue 1.1, March 2002
...........................................................................................................................................................................................................................................................
Installing and uninstalling Avaya IP AgentRunning the Configuration Wizard
............................................................................................................................................................................
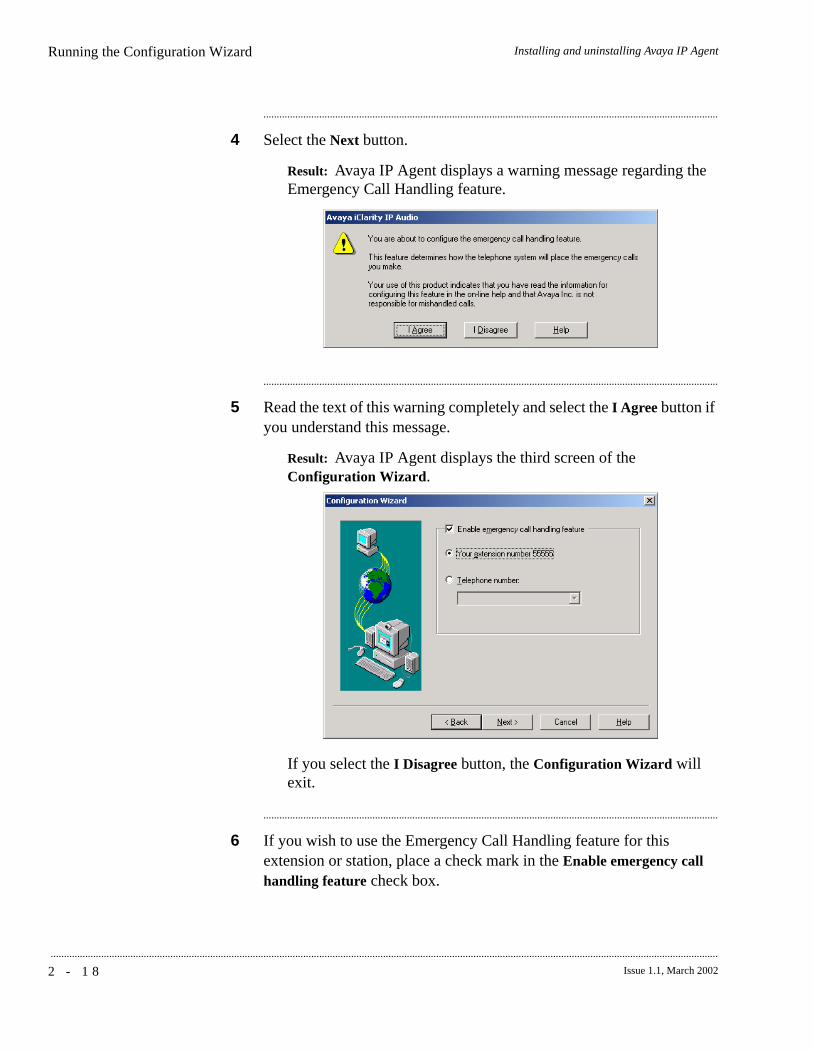
4 Select the Next button.
Result: Avaya IP Agent displays a warning message regarding the Emergency Call Handling feature.
............................................................................................................................................................................
5 Read the text of this warning completely and select the I Agree button if you understand this message.
Result: Avaya IP Agent displays the third screen of the Configuration Wizard.
If you select the I Disagree button, the Configuration Wizard will exit.
............................................................................................................................................................................
6 If you wish to use the Emergency Call Handling feature for this extension or station, place a check mark in the Enable emergency call handling feature check box.
Installing and uninstalling Avaya IP AgentRunning the Configuration Wizard
2 - 1 9Issue 1.1, March 2002
............................................................................................................................................................................................................................................................
............................................................................................................................................................................
7 If you enabled the Emergency Call Handling feature, select the location that will be sent through the DEFINITY system for calls placed to emergency services:
• Your extension number XXXXXXX — Select this option button if you want your extension number to be sent to emergency personnel. This selection is best used for those stations within the contact center.
• Telephone number — Select this option button if you want a telephone number other than your extension sent to emergency services. Specify the telephone number to send in the provided field.
This selection must be compatible with the configuration of the station on the DEFINITY system in the ������������ ��� field. Failure to use the same setting as on the DEFINITY system can cause errors in transmission of the desired number.
Important! Because IP Endpoints do not dial to and connect with local emergency services when dialing from remote locations, agents or extensions in remote locations should not use this feature for emergencies.
Avaya Inc. is not responsible or liable for any damages resulting from misplaced emergency calls made from an Avaya endpoint. Your use of this product indicates that you have read this advisory and agree to use an alternative telephone to dial all emergency calls from remote locations.
2 - 2 0 Issue 1.1, March 2002
...........................................................................................................................................................................................................................................................
Installing and uninstalling Avaya IP AgentRunning the Configuration Wizard
............................................................................................................................................................................
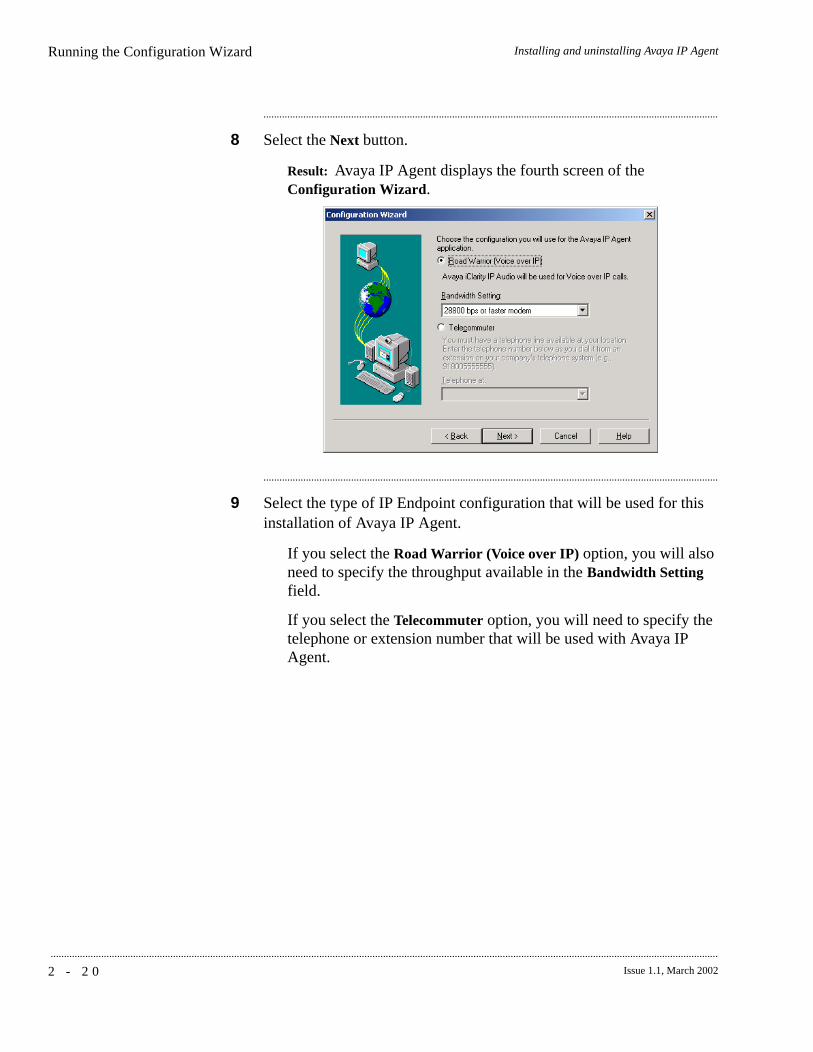
8 Select the Next button.
Result: Avaya IP Agent displays the fourth screen of the Configuration Wizard.
............................................................................................................................................................................
9 Select the type of IP Endpoint configuration that will be used for this installation of Avaya IP Agent.
If you select the Road Warrior (Voice over IP) option, you will also need to specify the throughput available in the Bandwidth Setting field.
If you select the Telecommuter option, you will need to specify the telephone or extension number that will be used with Avaya IP Agent.

Installing and uninstalling Avaya IP AgentRunning the Configuration Wizard
2 - 2 1Issue 1.1, March 2002
............................................................................................................................................................................................................................................................
............................................................................................................................................................................
10 Select the Next button.
Result: Avaya IP Agent displays the last screen in the Configuration Wizard.
............................................................................................................................................................................
11 If you selected the Road Warrior configuration, the Configuration Wizard will start the Audio Tuning Wizard so that your microphone and speakers can be properly adjusted. Follow the instructions in the Audio Tuning Wizard.
............................................................................................................................................................................
12 Select the Finish button.
E N D O F S T E P S...........................................................................................................................................................................
2 - 2 2 Issue 1.1, March 2002
...........................................................................................................................................................................................................................................................
Installing and uninstalling Avaya IP Agent
Upgrades and reinstallation
.............................................................................................................................................................................................................................................................Overview
Purpose This section provides information for installing Avaya IP Agent over a previous version of IP Agent, such as V1, V1.1, and V2, or CentreVu Agent..
This section contains the following topics:
• “Upgrading CentreVu IP Agent V1.X to Avaya IP Agent V3” (2-23)
• “Upgrading CentreVu IP Agent V2 to Avaya IP Agent V3” (2-25)
• “Upgrading CentreVu Agent to Avaya IP Agent V3” (2-26)
• “Reinstalling Avaya IP Agent V3” (2-27)

Installing and uninstalling Avaya IP Agent
2 - 2 3Issue 1.1, March 2002
............................................................................................................................................................................................................................................................
.............................................................................................................................................................................................................................................................Upgrading CentreVu IP Agent V1.X to Avaya IP Agent V3
Overview This section provides information on upgrading CentreVu IP AgentV1.X to Avaya IP Agent V3.
The installation procedure for upgrading to Avaya IP Agent is the same as listed in the “Performing the installation” (2-8) section except for the following:
• You cannot change the installation directory for Avaya IP Agent.
• If you select to not store information for multiple users during installation and multiple users were used previously, Avaya IP Agent will only migrate the application data for the user performing the update.
Data migration The following list describes how customizable data is effected when upgrading Avaya IP Agent:
• Call history — The call history is completely migrated during an upgrade.
• Phone directory — The phone directory is completely migrated during an upgrade.
• Program options — The settings you have configured for previous versions are completely migrated during an upgrade.
• Public search directory — LDAP servers and the associated settings are completely migrated during an upgrade.
• Screen pops — Screen pops are not migrated automatically during an upgrade. You must recreate your screen pops manually in Avaya IP Agent. However, once you have recreated the screen pops on one PC, you can export this information using the File > Export option from the menu bar and then import it into the remaining Avaya IP Agent PCs.
• Personalized phone labels — If you changed the name of a feature listed in the Phone Features or Personal Phone Features, these names cannot be saved during an upgrade. You will need to rename these features in Avaya IP Agent.

2 - 2 4 Issue 1.1, March 2002
...........................................................................................................................................................................................................................................................
Installing and uninstalling Avaya IP AgentUpgrading CentreVu IP Agent V1.X to Avaya IP Agent V3
• Personal phone features — Any features copied to the Personalized Phone Features window are not saved during an upgrade. These entries must be manually copied to this window.
For Avaya CALLMASTER VI configurations, Avaya IP Agent V3 does not import the previous PASTE information. Avaya IP Agent V3 will download the PASTE information from the DEFINITY system when it is run for the first time.
Installing and uninstalling Avaya IP Agent
2 - 2 5Issue 1.1, March 2002
............................................................................................................................................................................................................................................................
.............................................................................................................................................................................................................................................................Upgrading CentreVu IP Agent V2 to Avaya IP Agent V3
Overview This section provides information on upgrading CentreVu IP AgentV2 to Avaya IP Agent V3.
Data migration The installation procedure for upgrading to Avaya IP Agent is the same as listed in the “Performing the installation” (2-8) section except for the following:
• All data and settings used in CentreVu IP Agent V2 are migrated to Avaya IP Agent V3.
• The installation directory for CentreVu IP Agent is changed to Avaya IP Agent.
• If you select to not store information for multiple users during installation and multiple users were used previously, Avaya IP Agent will only migrate the application data for the user performing the update.

2 - 2 6 Issue 1.1, March 2002
...........................................................................................................................................................................................................................................................
Installing and uninstalling Avaya IP Agent
.............................................................................................................................................................................................................................................................Upgrading CentreVu Agent to Avaya IP Agent V3
Data migration The installation procedure for upgrading to Avaya IP Agent is the same as listed in the “Performing the installation” (2-8) section except for the following:
• No data or settings are migrated from CentreVu Agent to Avaya IP Agent.
• CentreVu Agent must be uninstalled before Avaya IP Agent can be installed. This uninstall will be initiated during the installation of Avaya IP Agent and will be carried out upon your confirmation.
Installing and uninstalling Avaya IP Agent
2 - 2 7Issue 1.1, March 2002
............................................................................................................................................................................................................................................................
.............................................................................................................................................................................................................................................................Reinstalling Avaya IP Agent V3
Overview This section provides information for reinstalling or upgrading to a later release of Avaya IP Agent V3.
When you are reinstalling Avaya IP Agent, the current endpoint configuration of the previous version is automatically selected. Other than this difference, the installation procedure is the same as listed in the “Performing the installation” (2-8) section.
Important! During a reinstall, the install program prompts you to remove the current version of Avaya IP Agent. If you cancel the installation and uninstall Avaya IP Agent manually, you will lose most of your current information, including call history, phone directory, and screen pops. To preserve your current Avaya IP Agent information, continue the installation when the first warning appears. Another prompt appears during installation, which asks if the install program should automatically remove the previous version. Allowing the install program to remove the previous version preserves your data.
Data migration The following information is migrated during a reinstall of Avaya IP Agent:
• Call history — The call history is completely migrated during a reinstall.
• Phone directory — The phone directory is completely migrated during a reinstall.
• Program options — The settings you have configured for previous versions are completely migrated during a reinstall.
• Public search directory — LDAP servers and the associated settings are completely migrated during a reinstall.
• Screen pops — Screen pops are not migrated automatically during a reinstall.
• Personalized phone labels — If you changed the name of a feature listed in the Phone Features or Personal Phone Features, these names are saved during an upgrade. You will need to rename these features in Avaya IP Agent.

2 - 2 8 Issue 1.1, March 2002
...........................................................................................................................................................................................................................................................
Installing and uninstalling Avaya IP AgentReinstalling Avaya IP Agent V3
• Personal phone features — Any features copied to the Personalized Phone Features window are saved during an upgrade.
• Custom lists — Folders and items within the folders that you have created for your Phone Features are saved during an upgrade.

Installing and uninstalling Avaya IP Agent
2 - 2 9Issue 1.1, March 2002
............................................................................................................................................................................................................................................................
Uninstalling Avaya IP Agent V3
.............................................................................................................................................................................................................................................................Overview
Purpose This section explains how to uninstall Avaya IP Agent. The uninstall program removes all files and directories that were created during the installation of Avaya IP Agent.
Introduction You can easily uninstall Avaya IP Agent using the Windows Add/Remove Programs wizard. Read-only folders that are shared with other applications are not removed. Files created in the Avaya IP Agent program directory after installation are not removed.
The uninstall program removes:
• All installed Avaya IP Agent files, including all language versions
• Folders associated with Avaya IP Agent
• DEFINITY iClarity IP Audio component from the computer.
2 - 3 0 Issue 1.1, March 2002
...........................................................................................................................................................................................................................................................
Installing and uninstalling Avaya IP Agent
.............................................................................................................................................................................................................................................................Performing the uninstall
Steps To uninstall the Avaya IP Agent application:
............................................................................................................................................................................
1 Close Avaya IP Agent if it is currently running.
............................................................................................................................................................................
2 From the Control Panel, double-click the Add/Remove Programs icon. Microsoft Windows displays the Add/Remove Programs Properties dialog box.
............................................................................................................................................................................
3 On the Install/Uninstall tab, find and highlight Avaya IP Agent in the list box.
............................................................................................................................................................................
4 Select the Add/Remove... button.
Result: Microsoft Windows displays the Confirm File Deletion message box.
............................................................................................................................................................................
5 Select Yes.
Result: The unInstallShieldwizard begins and the Remove Programs From Your Computer dialog box appears. The uninstall program enters a check by each component after it is removed.
............................................................................................................................................................................
6 When the uninstall program encounters a shared file that is no longer shared by other programs, it asks if the shared file should be removed. If you are unsure if a shared file is needed, it is recommended that you do not delete the shared file.
Installing and uninstalling Avaya IP AgentPerforming the uninstall
2 - 3 1Issue 1.1, March 2002
............................................................................................................................................................................................................................................................
Select one of the following options:
• Yes — This option deletes the shared file.
• Yes To All — This option deletes this and all other remaining shared files.
• No — This option does not delete the shared file.
• No to All — This option does not delete this or any other shared files.
Result: When the uninstall is complete, the message, “Uninstall successfully completed”, appears at the bottom of the Remove Programs From Your Computer dialog box.
............................................................................................................................................................................
7 Select OK.
Result: Microsoft Windows closes the Remove Program From Your Computer dialog box.
E N D O F S T E P S...........................................................................................................................................................................

2 - 3 2 Issue 1.1, March 2002
...........................................................................................................................................................................................................................................................
Installing and uninstalling Avaya IP AgentPerforming the uninstall
3 - 1Issue 1.1, March 2002
............................................................................................................................................................................................................................................................
3 Administering DEFINITY for Avaya IP Agent
.............................................................................................................................................................................................................................................................Overview
Purpose This section provides procedures and information on how to configure the following DEFINITY systems for use with Avaya IP Agent:
• DEFINITY Enterprise Communication Server (ECS)
• DEFINITY Business Communications Server (BCS) and Guestworks
Before agents can receive calls with Avaya IP Agent, the DEFINITY system must be configured to support such things as extension assignments, IP connectivity, and phone types.
Before you begin You should be familiar with administrating your DEFINITY system before attempting any of the procedures in this section.
Contents This chapter includes the following sections:
• “Configuring the DEFINITY system” (3-2)
• “Required DEFINITY circuit packs” (3-28)

3 - 2 Issue 1.1, March 2002
...........................................................................................................................................................................................................................................................
Administering DEFINITY for Avaya IP Agent
Configuring the DEFINITY system
.............................................................................................................................................................................................................................................................Overview
Purpose This section provides the procedure on how to configure a DEFINITY system for use with Avaya IP Agent.
This section contains the following topics:
• “Ensuring Telecommuter and Road Warrior compatibility” (3-3)
• “Ensuring CALLMASTER VI compatibility” (3-6)
• “Validating Feature Access Codes” (3-8)
• “Changing station settings for Road Warrior and Telecommuter configurations” (3-11)
• “Changing station settings for CALLMASTER VI configurations” (3-16)
The screens shown in this section are from a DEFINITY system with the Expert Agent Selection (EAS) feature. They may differ slightly form the screens you are actually using if your DEFINITY system does not have EAS. To accomodate for this, each step in the procedure identifies when there is a distinction between an EAS and non-EAS system.
Administering DEFINITY for Avaya IP Agent
3 - 3Issue 1.1, March 2002
............................................................................................................................................................................................................................................................
.............................................................................................................................................................................................................................................................Ensuring Telecommuter and Road Warrior compatibility
Overview This section provides the procedure for ensuring that your DEFINITY system is configured to support Avaya IP Agent in the Telecommuter and Road Warrior (VoIP) configurations.
Before you begin The settings for IP connections can be enabled only if your DEFINITY system supports use of Internet Protocol (IP) for calls.
Screens presented in this section may differ in appearance from those on your DEFINITY system. All options on the specified forms mentioned in this procedure are available, but may not be on the page noted.
Important! If any settings of your DEFINITY system do not conform with the steps in this procedure, you must contact Avaya to purchase the appropriate options or configuration before you can use Avaya IP Agent.
Steps To ensure that your DEFINITY system supports the Telecommuter and Road Warrior configurations:
............................................................................................................................................................................
1 Log in to the Station Administration Terminal (SAT) on the DEFINITY system.
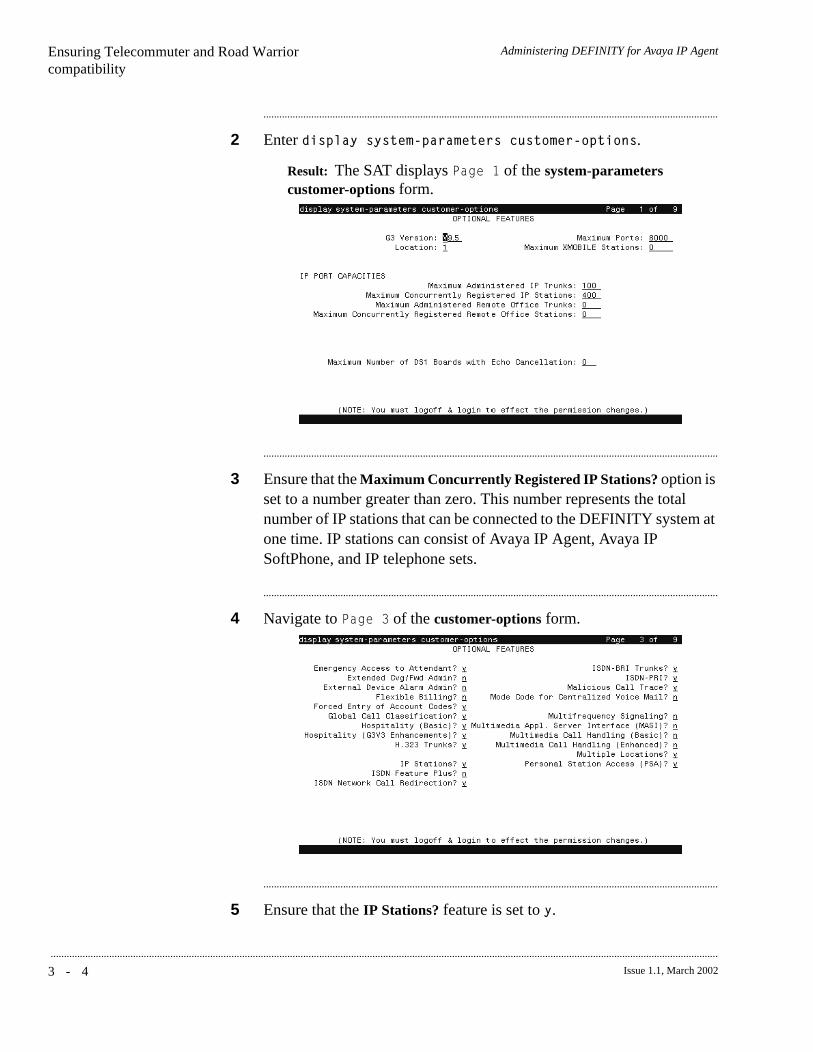
3 - 4 Issue 1.1, March 2002
...........................................................................................................................................................................................................................................................
Administering DEFINITY for Avaya IP AgentEnsuring Telecommuter and Road Warrior compatibility
............................................................................................................................................................................
2 Enter ��������������� �� ������� �������.
Result: The SAT displays � ���� of the system-parameters customer-options form.
............................................................................................................................................................................
3 Ensure that the Maximum Concurrently Registered IP Stations? option is set to a number greater than zero. This number represents the total number of IP stations that can be connected to the DEFINITY system at one time. IP stations can consist of Avaya IP Agent, Avaya IP SoftPhone, and IP telephone sets.
............................................................................................................................................................................
4 Navigate to � ���� of the customer-options form.
............................................................................................................................................................................
5 Ensure that the IP Stations? feature is set to �.

Administering DEFINITY for Avaya IP AgentEnsuring Telecommuter and Road Warrior compatibility
3 - 5Issue 1.1, March 2002
............................................................................................................................................................................................................................................................
............................................................................................................................................................................
6 Ensure that the Personal Station Access (PSA) feature is set to �.
............................................................................................................................................................................
7 Navigate to � ���� of the customer-options form.
............................................................................................................................................................................
8 Ensure that the Limit: field for the ������� Rel. � Product ID is set to the number of licenses you purchased for Avaya IP Agent V3.
E N D O F S T E P S...........................................................................................................................................................................

3 - 6 Issue 1.1, March 2002
...........................................................................................................................................................................................................................................................
Administering DEFINITY for Avaya IP Agent
.............................................................................................................................................................................................................................................................Ensuring CALLMASTER VI compatibility
Overview This section provides the procedure for ensuring that your DEFINITY system is configured to support Avaya IP Agent in the Avaya CALLMASTER VI configuration.
Before you begin Read and understand the following items before administering your DEFINITY system:
• Screens presented in this section may differ in appearance from those on your DEFINITY system. All options on the specified forms mentioned in this procedure are available, but may not be on the page noted.
• A DEFINITY BCS/Guestworks system does not currently support Avaya CALLMASTER VI configurations.
Important! If any DEFINITY system settings do not conform with the steps in this procedure, you must contact Avaya to purchase the appropriate options or configuration before you can use Avaya IP Agent.
Steps To ensure that your DEFINITY system supports Avaya IP Agent:
............................................................................................................................................................................
1 Log in to the Station Administration Terminal (SAT) on the DEFINITY system.
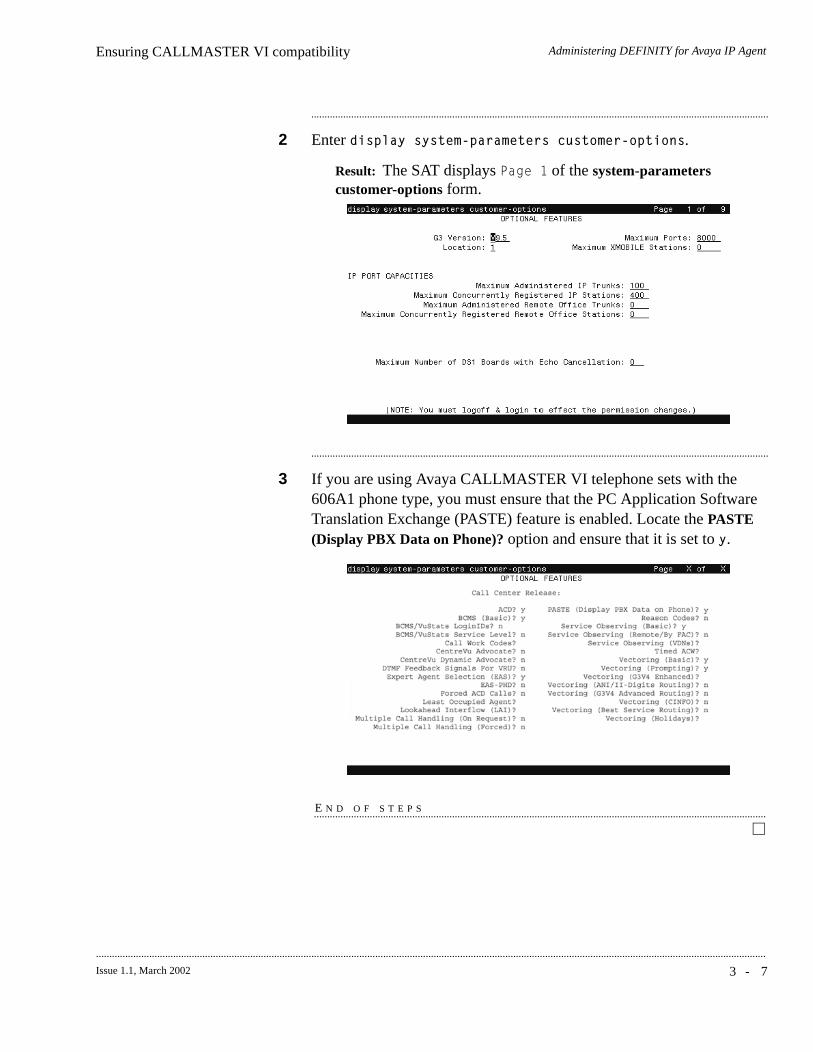
Administering DEFINITY for Avaya IP AgentEnsuring CALLMASTER VI compatibility
3 - 7Issue 1.1, March 2002
............................................................................................................................................................................................................................................................
............................................................................................................................................................................
2 Enter ��������������� �� ������� �������.
Result: The SAT displays � ���� of the system-parameters customer-options form.
............................................................................................................................................................................
3 If you are using Avaya CALLMASTER VI telephone sets with the 606A1 phone type, you must ensure that the PC Application Software Translation Exchange (PASTE) feature is enabled. Locate the PASTE (Display PBX Data on Phone)? option and ensure that it is set to �.
E N D O F S T E P S...........................................................................................................................................................................
3 - 8 Issue 1.1, March 2002
...........................................................................................................................................................................................................................................................
Administering DEFINITY for Avaya IP Agent
.............................................................................................................................................................................................................................................................Validating Feature Access Codes
Overview This section provides the procedure for administering the Feature Access Codes on a DEFINITY system. Feature Access Codes are used by Avaya IP Agent to provide agents with the ability to perform the following actions:
• Change their current work state
• Log in
• Log out
• Adjust the method with which they receive their next call (Auto-In, Manual-In)
• Request supervisor assistance
Before you begin Before changing Feature Access Codes on the DEFINITY system, you should have completed the “Ensuring Telecommuter and Road Warrior compatibility” (3-3) or the “Ensuring CALLMASTER VI compatibility” (3-6) procedure to verify that your DEFINITY system supports Avaya IP Agent.
Feature Access Codes (FACs) cannot be entered unless the fac capability is assigned in the dialplan.
To change settings on the DEFINITY system, you must have a DEFINITY system user ID with the proper administrative permissions.
Important! Screens presented in this section may differ in appearance from those of your DEFINITY system. All options on the specified forms mentioned in this procedure are available, but may not be on the page noted.
Steps To validate Feature Access Codes:
............................................................................................................................................................................
1 Log in to the Station Administration Terminal (SAT) on the DEFINITY system.
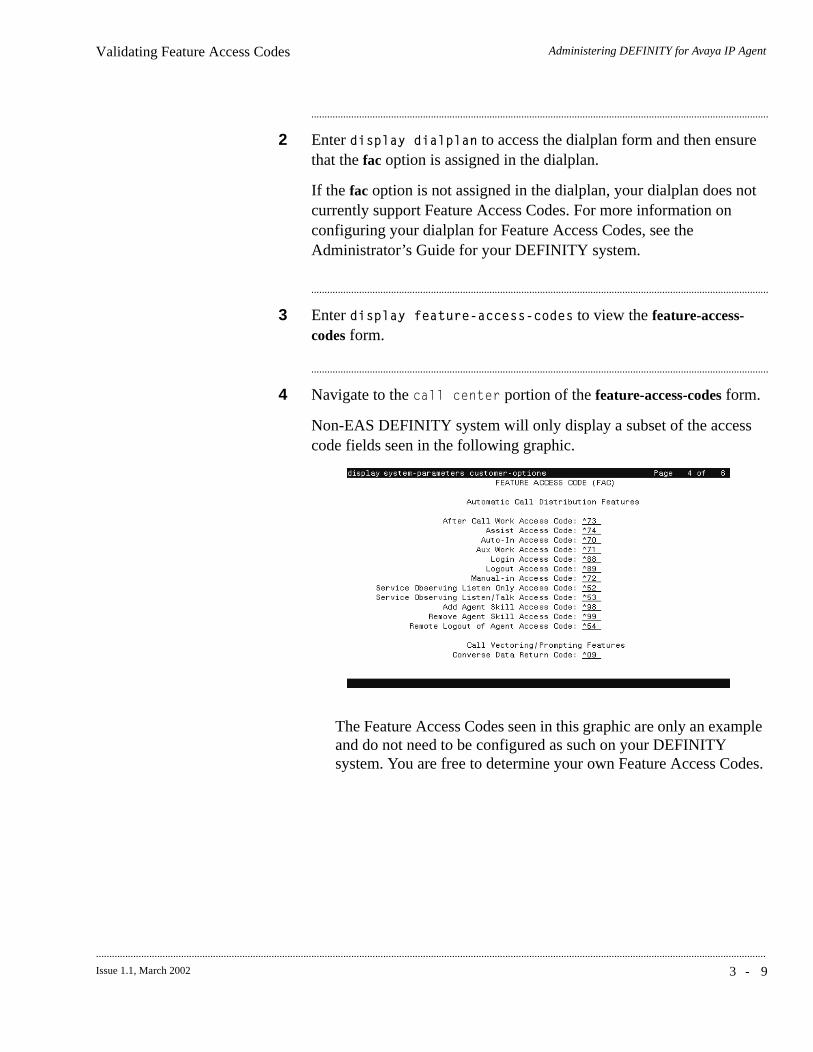
Administering DEFINITY for Avaya IP AgentValidating Feature Access Codes
3 - 9Issue 1.1, March 2002
............................................................................................................................................................................................................................................................
............................................................................................................................................................................
2 Enter ���������������� to access the dialplan form and then ensure that the fac option is assigned in the dialplan.
If the fac option is not assigned in the dialplan, your dialplan does not currently support Feature Access Codes. For more information on configuring your dialplan for Feature Access Codes, see the Administrator’s Guide for your DEFINITY system.
............................................................................................................................................................................
3 Enter ����������� ����������� to view the feature-access-codes form.
............................................................................................................................................................................
4 Navigate to the ������� portion of the feature-access-codes form.
Non-EAS DEFINITY system will only display a subset of the access code fields seen in the following graphic.
The Feature Access Codes seen in this graphic are only an example and do not need to be configured as such on your DEFINITY system. You are free to determine your own Feature Access Codes.
3 - 1 0 Issue 1.1, March 2002
...........................................................................................................................................................................................................................................................
Administering DEFINITY for Avaya IP AgentValidating Feature Access Codes
............................................................................................................................................................................
5 Administer the Feature Access Codes for Login and Logout as well as any other FACs that you want available for your agents.
For Avaya CALLMASTER VI configurations, you must also administer the PASTE feature access code which is located on a different page of this form.
If Feature Access Codes are not assigned, see the Administrator’s Guide for your DEFINITY system to find instructions on adding Feature Access Codes.
E N D O F S T E P S...........................................................................................................................................................................
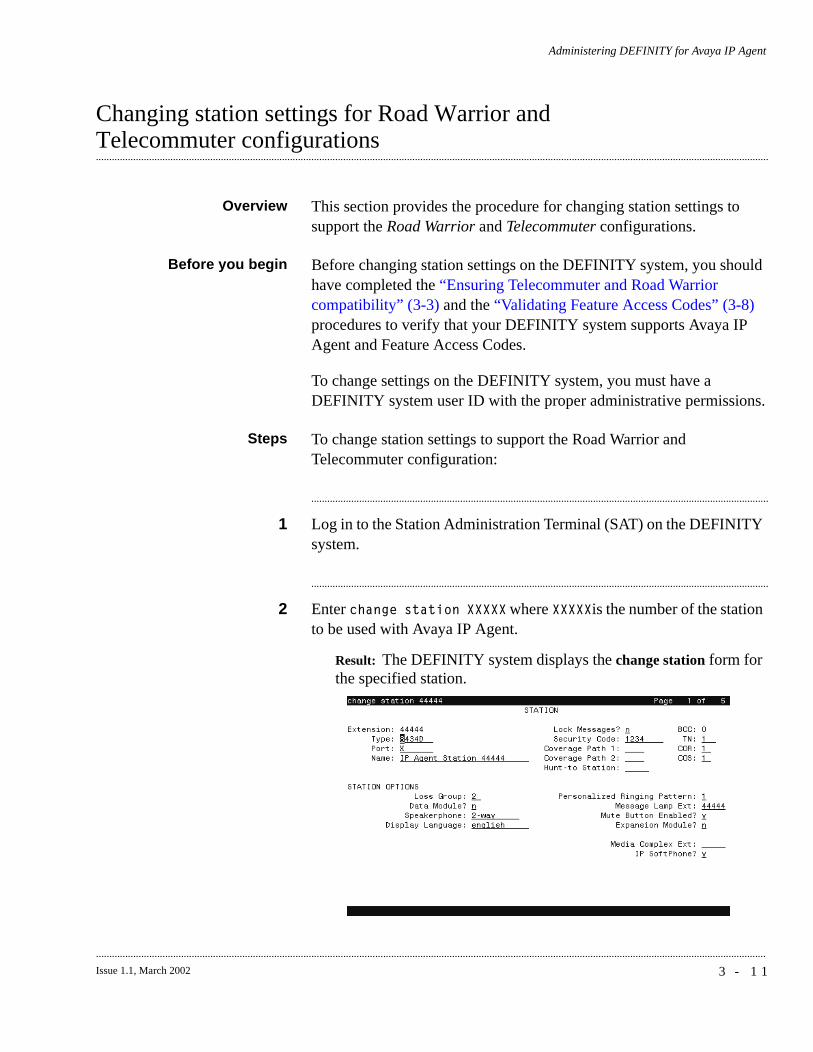
Administering DEFINITY for Avaya IP Agent
3 - 1 1Issue 1.1, March 2002
............................................................................................................................................................................................................................................................
Changing station settings for Road Warrior and
.............................................................................................................................................................................................................................................................Telecommuter configurations
Overview This section provides the procedure for changing station settings to support the Road Warrior and Telecommuter configurations.
Before you begin Before changing station settings on the DEFINITY system, you should have completed the “Ensuring Telecommuter and Road Warrior compatibility” (3-3) and the “Validating Feature Access Codes” (3-8) procedures to verify that your DEFINITY system supports Avaya IP Agent and Feature Access Codes.
To change settings on the DEFINITY system, you must have a DEFINITY system user ID with the proper administrative permissions.
Steps To change station settings to support the Road Warrior and Telecommuter configuration:
............................................................................................................................................................................
1 Log in to the Station Administration Terminal (SAT) on the DEFINITY system.
............................................................................................................................................................................
2 Enter ����������������� where �����is the number of the station to be used with Avaya IP Agent.
Result: The DEFINITY system displays the change station form for the specified station.
3 - 1 2 Issue 1.1, March 2002
...........................................................................................................................................................................................................................................................
Administering DEFINITY for Avaya IP AgentChanging station settings for Road Warrior and Telecommuter configurations
............................................................................................................................................................................
3 In the Phone Type: field, enter the type of telephone that Avaya IP Agent will emulate.
Avaya recommends using one of the following phone types because of the number of features available and the ability to display the most characters for contact center or call information.
• 8434D
• 606A1
Avaya IP Agent can take over the administration and functionality of a real DCP telephone. The physical telephone must be one of those listed in “Compatible telephone types for Avaya IP Agent V3” (1-9). The physical telephone is unusable while Avaya IP Agent is registered with its extension. The telephone will become usable again when the Avaya IP Agent session is disconnected from the DEFINITY system.
If you selected the 8434D phone type, and more feature buttons are needed for the station, enter � in the Expansion Module? field.
............................................................................................................................................................................
4 Enter one of the following options in the Port: field:
• X — This option specifies that station administration is done without hardware.
• port — This option is used when a remote agent takes direct control of a real extension that has a Digital Communications Protocol (DCP) connection to the DEFINITY system. Enter the port number of the actual telephone assigned to this extension. When a remote agent logs in to this extension using Avaya IP Agent, the actual telephone that is locally connected to the DEFINITY port is disabled and cannot be used.
............................................................................................................................................................................
5 Enter a number in the Security Code: field that will be used as a password during the extension login to the DEFINITY system.
If a security code is not entered, this station cannot log in to the DEFINITY system.
............................................................................................................................................................................
6 Set the IP Softphone? field to �.
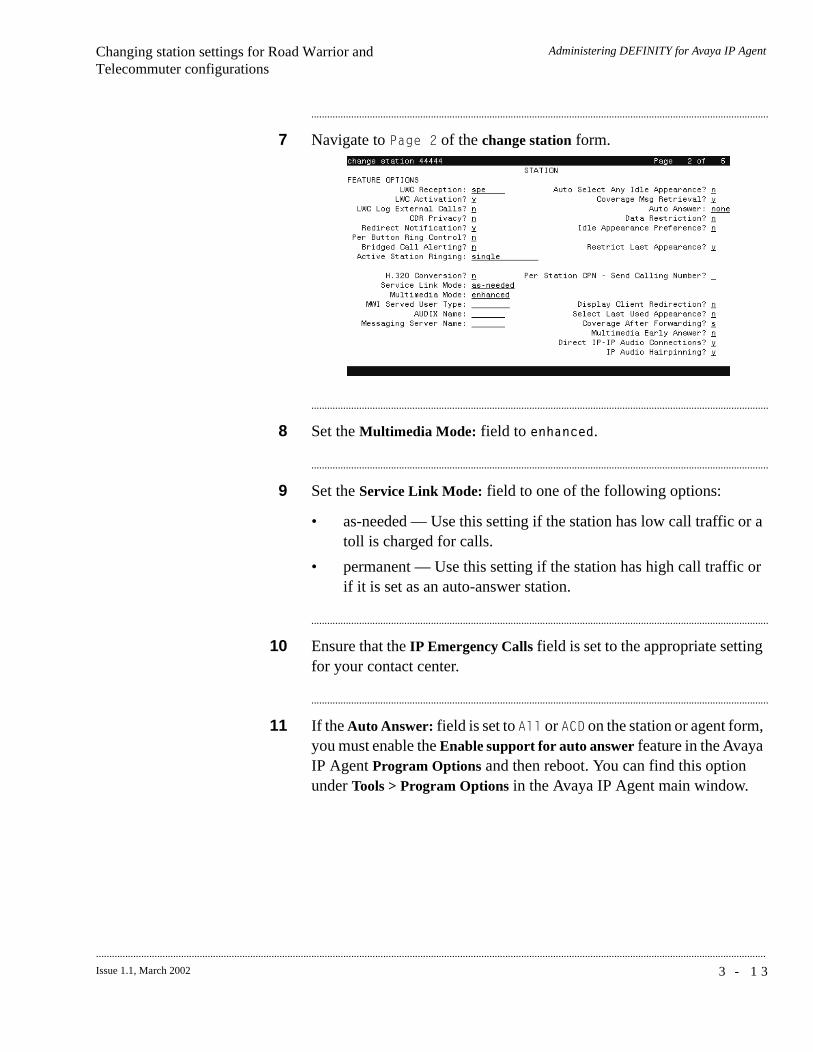
Administering DEFINITY for Avaya IP AgentChanging station settings for Road Warrior and Telecommuter configurations
3 - 1 3Issue 1.1, March 2002
............................................................................................................................................................................................................................................................
............................................................................................................................................................................
7 Navigate to � ���� of the change station form.
............................................................................................................................................................................
8 Set the Multimedia Mode: field to ������.
............................................................................................................................................................................
9 Set the Service Link Mode: field to one of the following options:
• as-needed — Use this setting if the station has low call traffic or a toll is charged for calls.
• permanent — Use this setting if the station has high call traffic or if it is set as an auto-answer station.
............................................................................................................................................................................
10 Ensure that the IP Emergency Calls field is set to the appropriate setting for your contact center.
............................................................................................................................................................................
11 If the Auto Answer: field is set to ��� or ��� on the station or agent form, you must enable the Enable support for auto answer feature in the Avaya IP Agent Program Options and then reboot. You can find this option under Tools > Program Options in the Avaya IP Agent main window.
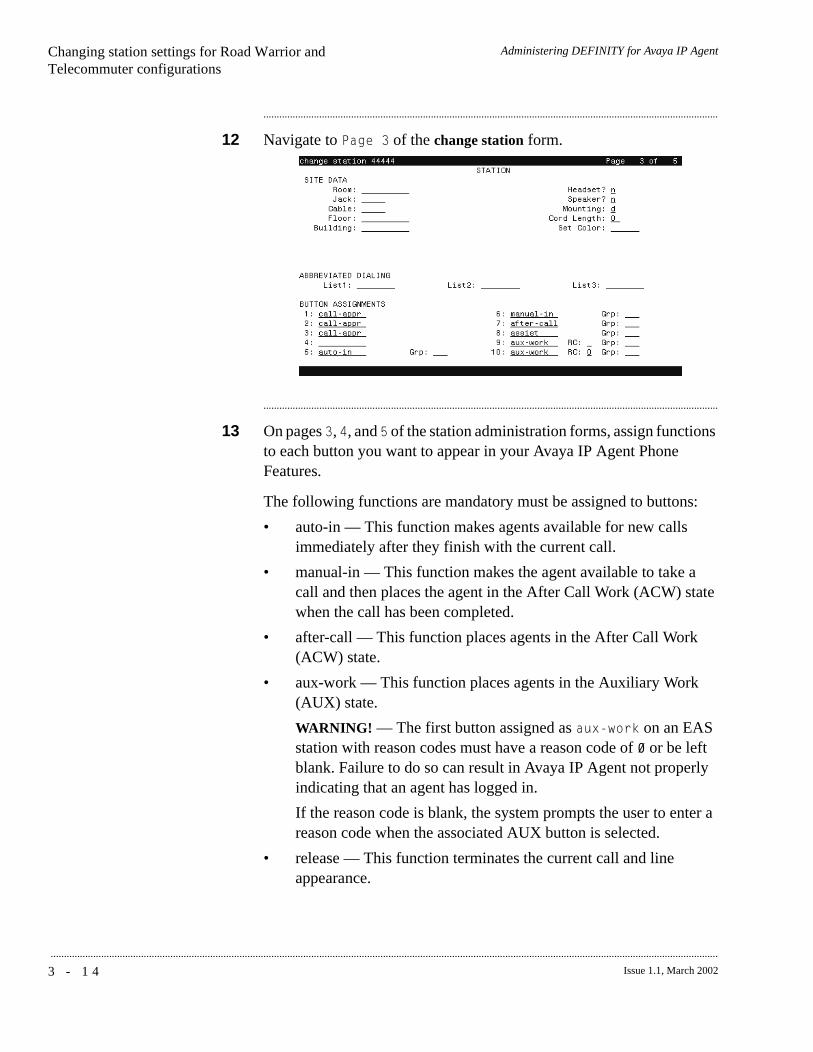
3 - 1 4 Issue 1.1, March 2002
...........................................................................................................................................................................................................................................................
Administering DEFINITY for Avaya IP AgentChanging station settings for Road Warrior and Telecommuter configurations
............................................................................................................................................................................
12 Navigate to � ���� of the change station form.
............................................................................................................................................................................
13 On pages �, �, and � of the station administration forms, assign functions to each button you want to appear in your Avaya IP Agent Phone Features.
The following functions are mandatory must be assigned to buttons:
• auto-in — This function makes agents available for new calls immediately after they finish with the current call.
• manual-in — This function makes the agent available to take a call and then places the agent in the After Call Work (ACW) state when the call has been completed.
• after-call — This function places agents in the After Call Work (ACW) state.
• aux-work — This function places agents in the Auxiliary Work (AUX) state.
WARNING! — The first button assigned as ������� on an EAS station with reason codes must have a reason code of � or be left blank. Failure to do so can result in Avaya IP Agent not properly indicating that an agent has logged in.
If the reason code is blank, the system prompts the user to enter a reason code when the associated AUX button is selected.
• release — This function terminates the current call and line appearance.
Administering DEFINITY for Avaya IP AgentChanging station settings for Road Warrior and Telecommuter configurations
3 - 1 5Issue 1.1, March 2002
............................................................................................................................................................................................................................................................
• callr-info — This function is only required with the Call Prompting feature so that agents are allowed to display information collected from the originator. The Call Prompting feature obtains information from a caller through a ������ !�!�� vector step.
Important! The �"##, "�##, and "#$�� telephone types do not possess a physical Drop button; therefore, you must assign a Drop function for each station to ensure proper operation of the Avaya IP Agent Drop feature.
Result: When this station is connected to the DEFINITY system, the assigned button functions are displayed in the Avaya IP Agent Phone Features window.
You can find information on all available button functions in the Administrator’s Guide for your DEFINITY system.
E N D O F S T E P S...........................................................................................................................................................................
3 - 1 6 Issue 1.1, March 2002
...........................................................................................................................................................................................................................................................
Administering DEFINITY for Avaya IP Agent
.............................................................................................................................................................................................................................................................Changing station settings for CALLMASTER VI configurations
Overview This section provides the procedure for changing station settings to support the Avaya CALLMASTER VI configurations for Avaya IP Agent.
Before you begin Before changing station settings on the DEFINITY system, you should have completed “Ensuring CALLMASTER VI compatibility” (3-6) and “Validating Feature Access Codes” (3-8) procedures to verify that your DEFINITY system supports Avaya IP Agent and Feature Access Codes.
To use Avaya CALLMASTER VI telephones, you must have the PASTE feature enabled on your DEFINITY system.
To change settings on the DEFINITY system, you must have a DEFINITY system user ID with the proper administrative permissions.
Steps To change station settings to support Avaya CALLMASTER VI configurations:
............................................................................................................................................................................
1 Log in to the Station Administration Terminal (SAT) on the DEFINITY system.
............................................................................................................................................................................
2 Enter ����������������� where ����� is the number of the station to be used with Avaya IP Agent.
Result: The DEFINITY system displays the change station form for the specified extension.
............................................................................................................................................................................
3 In the Type: field, enter �����.
............................................................................................................................................................................
4 In the Port: field, enter the number of the port providing the connection for the Avaya CALLMASTER VI telephone.
............................................................................................................................................................................
5 Navigate to � ���� of the change station form.
Administering DEFINITY for Avaya IP AgentChanging station settings for CALLMASTER VI configurations
3 - 1 7Issue 1.1, March 2002
............................................................................................................................................................................................................................................................
............................................................................................................................................................................
6 On pages �, �, �, and " of the station administration forms, assign functions to each button you want to appear in your Avaya IP Agent Phone Features.
The following functions are mandatory and must be assigned to buttons:
• auto-in — This function makes agents available for new calls immediately after they finish with the current call.
• manual-in — This function makes the agent available to take a call and then places the agent in the After Call Work (ACW) state when the call has been completed.
• after-call — This function places agents in the After Call Work (ACW) state.
• aux-work — This function places agents in the Auxiliary Work (AUX) state.
WARNING! — The first button assigned as ������� on an EAS station with reason codes must have a reason code of � or be left blank. Failure to do so can result in Avaya IP Agent not properly indicating that an agent has logged in.
If the reason code is blank, the system prompts the user to enter a reason code when the associated AUX button is selected.
• release — This function terminates the current call and line appearance.
• callr-info — This function is only required with the Call Prompting feature so that agents are allowed to display information collected from the originator. The Call Prompting feature obtains information from a caller through a ������ !�!�� vector step.
Result: When this station is connected to the DEFINITY system, the assigned button functions are displayed in the Avaya IP Agent Phone Features window.
You can find information on all available button functions in the Administrator's Guide for your DEFINITY system.
3 - 1 8 Issue 1.1, March 2002
...........................................................................................................................................................................................................................................................
Administering DEFINITY for Avaya IP AgentChanging station settings for CALLMASTER VI configurations
............................................................................................................................................................................
7 After you create a station and assign or modify buttons, you must perform a download for the Avaya CALLMASTER VI. Go to the PC connected to the Avaya CALLMASTER VI station and select Settings > Phone Configuration from the Avaya IP Agent menu bar.
Result: Avaya IP Agent displays a confirmation dialog box.
............................................................................................................................................................................
8 Select OK.
E N D O F S T E P S...........................................................................................................................................................................
Administering DEFINITY for Avaya IP Agent
3 - 1 9Issue 1.1, March 2002
............................................................................................................................................................................................................................................................
Enhanced configuration
.............................................................................................................................................................................................................................................................Overview
Purpose This section provides information and procedures for configuring advanced features in your contact center that uses Avaya IP Agent.
This section contains the following topics:
• “Configuring stations on DEFINITY systems for the Emergency Call Handling Service” (3-20)
• “Configuring Avaya IP Agent for the Emergency Call Handling Service” (3-21)
• “Installing the Quality of Service Packet Scheduler” (3-24)
• “Configuring Alternate Gatekeeper on DEFINITY systems” (3-26)
• “Configuring server load balancing across gatekeepers” (3-27)
3 - 2 0 Issue 1.1, March 2002
...........................................................................................................................................................................................................................................................
Administering DEFINITY for Avaya IP Agent
Configuring stations on DEFINITY systems for the
.............................................................................................................................................................................................................................................................Emergency Call Handling Service
Overview The Emergency Call Handling Service (E911) allows IP Endpoints to use numbers that connect to emergency services, such as 911 in the United States. When used, this feature only reaches the emergency service in the Public Safety Answering Point area where the DEFINITY system is located.
Important! Because IP Endpoints do not dial to and connect with local emergency services when dialing from remote locations, agents or extensions in remote locations should not use this feature for emergencies.
Avaya Inc. is not responsible or liable for any damages resulting from misplaced emergency calls made from an Avaya endpoint. Your use of this product indicates that you have read this advisory and agree to use an alternative telephone to dial all emergency calls from remote locations.
Configuration See your DEFINITY documentation for information on configuring a DEFINITY R10 system for Emergency Call Handling.
Administering DEFINITY for Avaya IP Agent
3 - 2 1Issue 1.1, March 2002
............................................................................................................................................................................................................................................................
Configuring Avaya IP Agent for the Emergency Call Handling
.............................................................................................................................................................................................................................................................Service
Overview This section provides the procedure for configuring Avaya IP Agent to use the Emergency Call Handling Service.
Before you begin The DEFINITY system to which you are connecting must have this extension properly configured for the Emergency Call Handling Service prior to using through Avaya IP Agent.
Steps To configure the Emergency Call Handling Service:
............................................................................................................................................................................
1 Start Avaya IP Agent.
Result: Windows displays Avaya IP Agent and the Login window.
............................................................................................................................................................................
2 In the Login window, select the Settings button.
Result: Avaya IP Agent displays the Settings dialog.
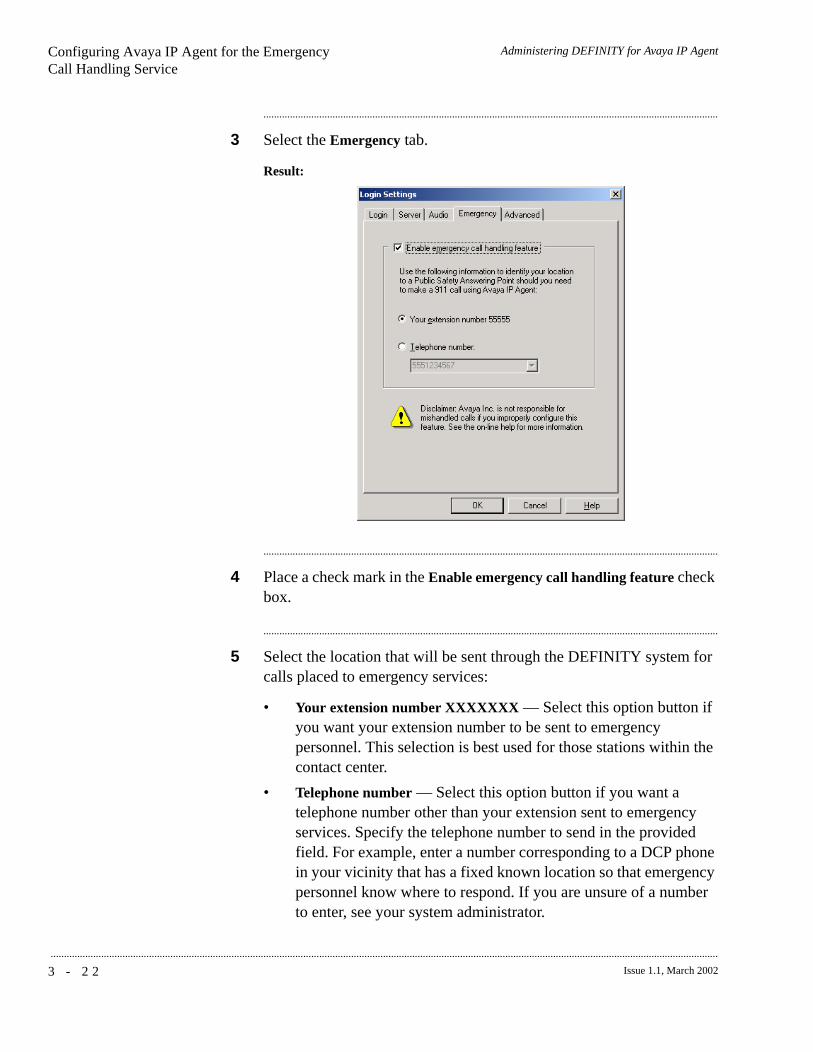
3 - 2 2 Issue 1.1, March 2002
...........................................................................................................................................................................................................................................................
Administering DEFINITY for Avaya IP AgentConfiguring Avaya IP Agent for the Emergency Call Handling Service
............................................................................................................................................................................
3 Select the Emergency tab.
Result:
............................................................................................................................................................................
4 Place a check mark in the Enable emergency call handling feature check box.
............................................................................................................................................................................
5 Select the location that will be sent through the DEFINITY system for calls placed to emergency services:
• Your extension number XXXXXXX — Select this option button if you want your extension number to be sent to emergency personnel. This selection is best used for those stations within the contact center.
• Telephone number — Select this option button if you want a telephone number other than your extension sent to emergency services. Specify the telephone number to send in the provided field. For example, enter a number corresponding to a DCP phone in your vicinity that has a fixed known location so that emergency personnel know where to respond. If you are unsure of a number to enter, see your system administrator.
Administering DEFINITY for Avaya IP AgentConfiguring Avaya IP Agent for the Emergency Call Handling Service
3 - 2 3Issue 1.1, March 2002
............................................................................................................................................................................................................................................................
............................................................................................................................................................................
6 Select the OK button.
............................................................................................................................................................................
7 In the Login dialog box, select the Login button.
Any calls to emergency services will show the selected telephone number.
E N D O F S T E P S...........................................................................................................................................................................
3 - 2 4 Issue 1.1, March 2002
...........................................................................................................................................................................................................................................................
Administering DEFINITY for Avaya IP Agent
.............................................................................................................................................................................................................................................................Installing the Quality of Service Packet Scheduler
Overview Quality of Service (QoS) can help improve voice transmission on your network and Microsoft Windows 2000 PC. However, before you can use Quality of Service, you must install the QoS Packet Scheduler.
Important! The Packet Scheduler is only available with Microsoft Windows 2000 SP1 or later.
Before you begin The following items should be read and understood before installing the Quality of Service Packet Scheduler:
• Some VPN client applications have conflicts with the Packet Scheduler. If your VPN exhibits problems, remove the Packet Scheduler from your PC.
• If you are using QoS in conjunction with a firewall, the range of ports for QoS set up on the DEFINITY system must overlap the range of firewall ports specified in Avaya IP Agent by 100 ports. If these ranges do not overlap by 100 ports, QoS is not used by iClarity IP Audio and transmissions are done within the range of firewall ports.
Steps To install the QoS Packet Scheduler:
............................................................................................................................................................................
1 Log in to the Microsoft Windows 2000 PC as a user with Administrator privileges.
............................................................................................................................................................................
2 From the Start menu, select Settings > Network and Dial-up Connections.
............................................................................................................................................................................
3 Select the local area connection on which you want to install QoS Packet Scheduler.
............................................................................................................................................................................
4 From the File menu, select Properties.
Result: Windows displays the Local Area Connection dialog box.
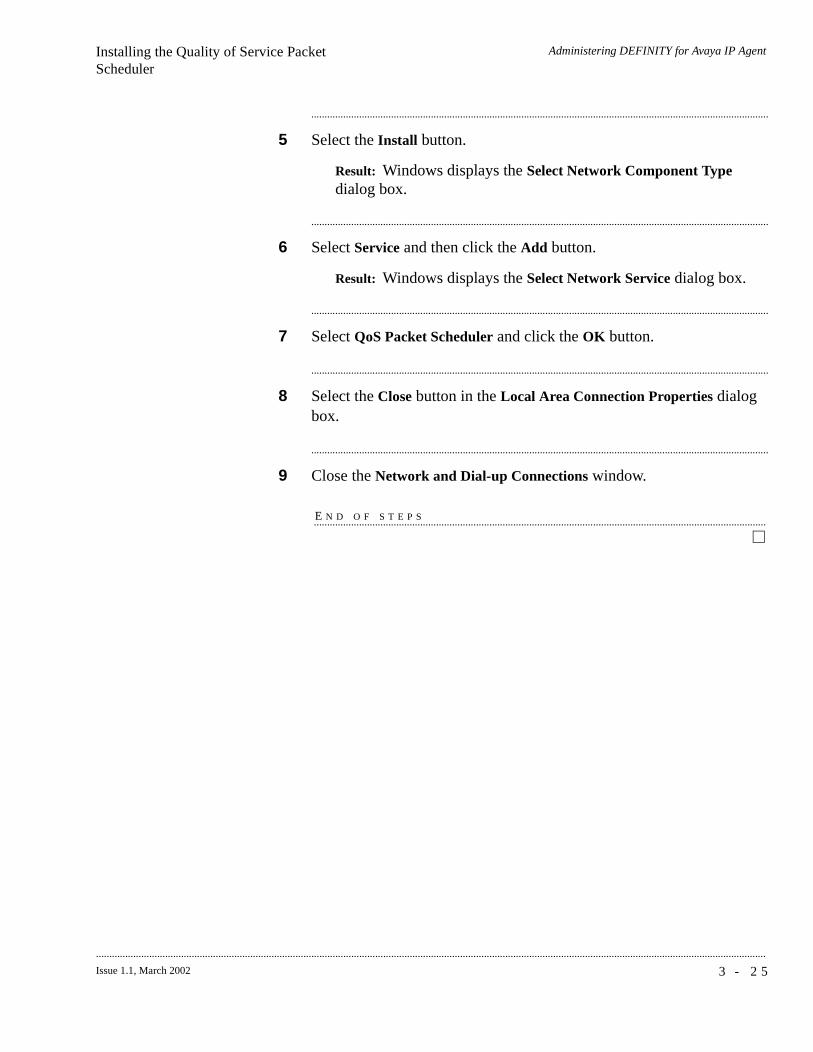
Administering DEFINITY for Avaya IP AgentInstalling the Quality of Service Packet Scheduler
3 - 2 5Issue 1.1, March 2002
............................................................................................................................................................................................................................................................
............................................................................................................................................................................
5 Select the Install button.
Result: Windows displays the Select Network Component Type dialog box.
............................................................................................................................................................................
6 Select Service and then click the Add button.
Result: Windows displays the Select Network Service dialog box.
............................................................................................................................................................................
7 Select QoS Packet Scheduler and click the OK button.
............................................................................................................................................................................
8 Select the Close button in the Local Area Connection Properties dialog box.
............................................................................................................................................................................
9 Close the Network and Dial-up Connections window.
E N D O F S T E P S...........................................................................................................................................................................
3 - 2 6 Issue 1.1, March 2002
...........................................................................................................................................................................................................................................................
Administering DEFINITY for Avaya IP Agent
.............................................................................................................................................................................................................................................................Configuring Alternate Gatekeeper on DEFINITY systems
Overview The Alternate Gatekeeper feature is used when an IP Endpoint registers with a DEFINITY system. When Avaya IP Agent registers with a DEFINITY system, a C-LAN circuit pack IP address is sent to the IP Endpoint. If registration is successful, the DEFINITY system sends back the IP addresses of all C-LAN circuit packs defined in the same network region. Avaya IP Agent can use these addresses as alternatives should call signaling on the original C-LAN circuit pack fail.
Configuration For information on defining Alternate Gatekeeper addresses, refer to your DEFINITY documentation.
Administering DEFINITY for Avaya IP Agent
3 - 2 7Issue 1.1, March 2002
............................................................................................................................................................................................................................................................
.............................................................................................................................................................................................................................................................Configuring server load balancing across gatekeepers
Overview “Load balancing” for a DEFINITY R10 or later system refers to the ability of distributing IP Endpoint traffic across all C-LAN circuit packs that are defined within the same network region.
Configuration “Load balancing” is achieved by defining all of the IP addresses of the C-LAN circuit packs to be part of a network region on a DEFINITY system. After this has been completed, IP Endpoints registering with the DEFINITY system will be automatically assigned to the different C-LAN circuit packs in sequential order. This method helps distribute IP Endpoints evenly amongst the C-LAN circuit packs.
For more information on defining C-LAN circuit packs within a network region, refer to the documentation for your DEFINITY system.
3 - 2 8 Issue 1.1, March 2002
...........................................................................................................................................................................................................................................................
Administering DEFINITY for Avaya IP Agent
Required DEFINITY circuit packs
.............................................................................................................................................................................................................................................................Overview
Purpose This section provides information on the circuit packs required for your DEFINITY system to support the Telecommuter and Road Warrior configurations with Avaya IP Agent.
This section contains “Circuit pack descriptions and associated documentation” (3-29).
Administering DEFINITY for Avaya IP Agent
3 - 2 9Issue 1.1, March 2002
............................................................................................................................................................................................................................................................
.............................................................................................................................................................................................................................................................Circuit pack descriptions and associated documentation
Overview This section provides descriptions and lists documentation resources for the circuit packs required on a DEFINITY system for use with Avaya IP Agent.
The following two circuit packs are used for remote agent connections over TCP/IP with Avaya IP Agent:
• Control LAN Circuit Pack (C-LAN) (TN799B or later)
• IP Media Processor (TN2302AP)
C-LAN circuit pack C-LAN is a packet port circuit pack for DEFINITY systems that provides TCP/IP connectivity to adjuncts for applications. It has one 10baseT Ethernet connection and up to 16 DS0 physical interfaces for PPP connections. Two integrated modems provide remote PPP connectivity over analog facilities. Multiple C-LAN circuit packs can be added to a system to increase TCP/IP capacity.
This circuit pack provides data signaling over TCP/IP for Avaya IP Agent. It is used for the Telecommuter and Road Warrior configurations where a data connection is made to the DEFINITY system. The voice path does not use this circuit pack.
It is recommended that the TN799C V4 or later C-LAN circuit pack is used for its increased ability in handling maximum capacities. Previous versions could encounter difficulties when the maximum number of active endpoints is reached.
IP Media Processor The IP Media Processor provides the transmission of voice data over an IP network. This enables support of applications that comply with the H.323-v2 protocols. It also reduces per-port costs and improves quality through its dynamic jitter buffers. Additionally, it performs echo cancellation, silence suppression, Dual Tone Multi-Frequency (DTMF) detection, and conferencing.
This circuit pack provides Voice over Internet Protocol (VoIP) for Avaya IP Agent. It is used for the Road Warrior configuration where a VoIP connection is made to the DEFINITY system.
3 - 3 0 Issue 1.1, March 2002
...........................................................................................................................................................................................................................................................
Administering DEFINITY for Avaya IP AgentCircuit pack descriptions and associated documentation
Documentation For installation procedures and configuration information for the C-LAN circuit pack, see the DEFINITY Administration for Network Connectivity document for your DEFINITY system.
The DEFINITY Installation, Upgrades and Additions for Compact Modular Cabinets document for your DEFINITY system provides installation and configuration information for the IP Media Processor circuit pack. It also provides helpful information on setup and configuration with a C-LAN circuit pack.
4 - 1Issue 1.1, March 2002
............................................................................................................................................................................................................................................................
4 Running Avaya IP Agent
.............................................................................................................................................................................................................................................................Overview
Purpose This chapter explains how to begin using Avaya IP Agent. It contains the following sections:
• “Starting Avaya IP Agent” (4-2)
• “Registering with the DEFINITY system” (4-3)
• “Logging in to Avaya IP Agent (EAS)” (4-7)
• “Logging in to Avaya IP Agent (non-EAS)” (4-9)
• “Exiting Avaya IP Agent” (4-12)
Introduction Before you can use Avaya IP Agent, you must first register with the DEFINITY system and register your extension through the Login window.
Once you are registered with the DEFINITY system, you can make yourself available for ACD calls by performing an agent login.
Avaya CALLMASTER VI configurations are not required to register with the DEFINITY system through the Login window. This functionality is automatically completed through the Avaya CALLMASTER VI telephone.
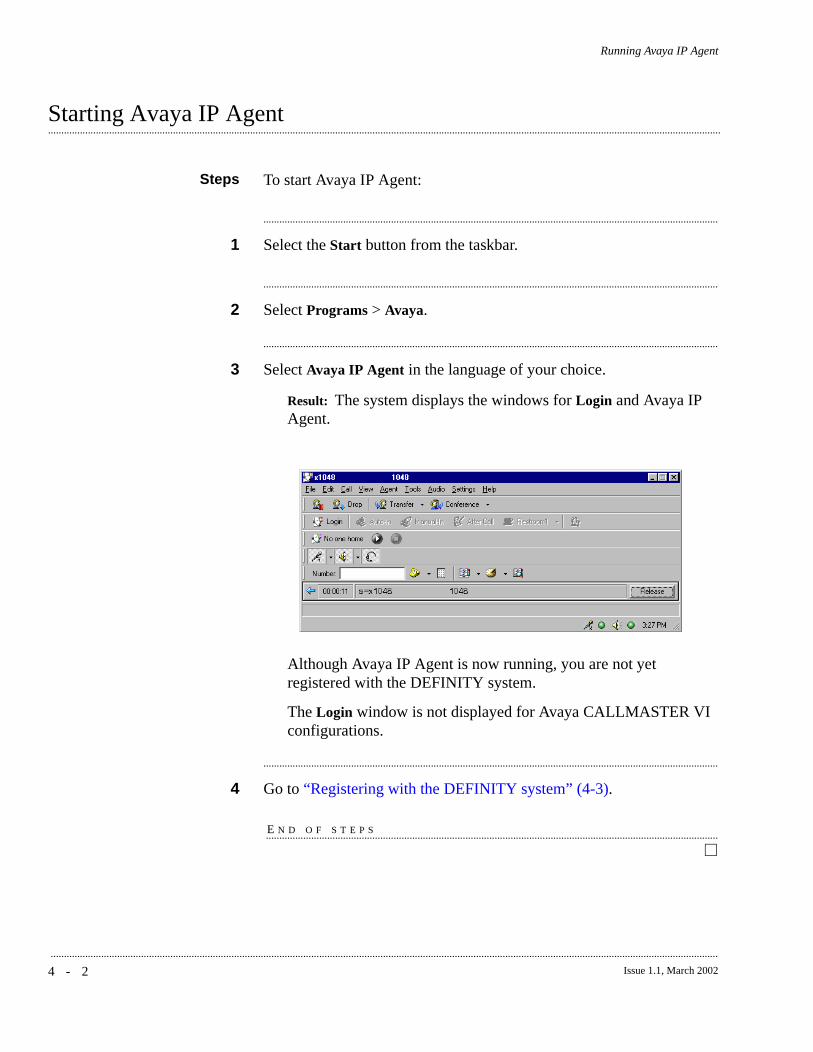
4 - 2 Issue 1.1, March 2002
...........................................................................................................................................................................................................................................................
Running Avaya IP Agent
.............................................................................................................................................................................................................................................................Starting Avaya IP Agent
Steps To start Avaya IP Agent:
............................................................................................................................................................................
1 Select the Start button from the taskbar.
............................................................................................................................................................................
2 Select Programs > Avaya.
............................................................................................................................................................................
3 Select Avaya IP Agent in the language of your choice.
Result: The system displays the windows for Login and Avaya IP Agent.
Although Avaya IP Agent is now running, you are not yet registered with the DEFINITY system.
The Login window is not displayed for Avaya CALLMASTER VI configurations.
............................................................................................................................................................................
4 Go to “Registering with the DEFINITY system” (4-3).
E N D O F S T E P S...........................................................................................................................................................................

Running Avaya IP Agent
4 - 3Issue 1.1, March 2002
............................................................................................................................................................................................................................................................
.............................................................................................................................................................................................................................................................Registering with the DEFINITY system
Overview This section provides the procedure for registering with a DEFINITY system. This must be done so that you can use Avaya IP Agent for placing and answering calls.
Before you begin If you attempt to log in to a DEFINITY system that is not R10 or later, Avaya IP Agent displays an error message for an “Invalid Station Type”. You must use a DEFINITY system of R10 or later with Avaya IP Agent.
Important! Avaya CALLMASTER VI configurations are not required to register through the Login window. This functionality is automatically completed through the Avaya CALLMASTER VI telephone. If you are using a Avaya CALLMASTER VI configuration, proceed to the section, “Logging in to Avaya IP Agent (EAS)” (4-7).
Steps To register with the DEFINITY system:
............................................................................................................................................................................
1 When you start Avaya IP Agent, the Login window appears. If this window does not appear, select File and then select Login from the Avaya IP Agent main window.
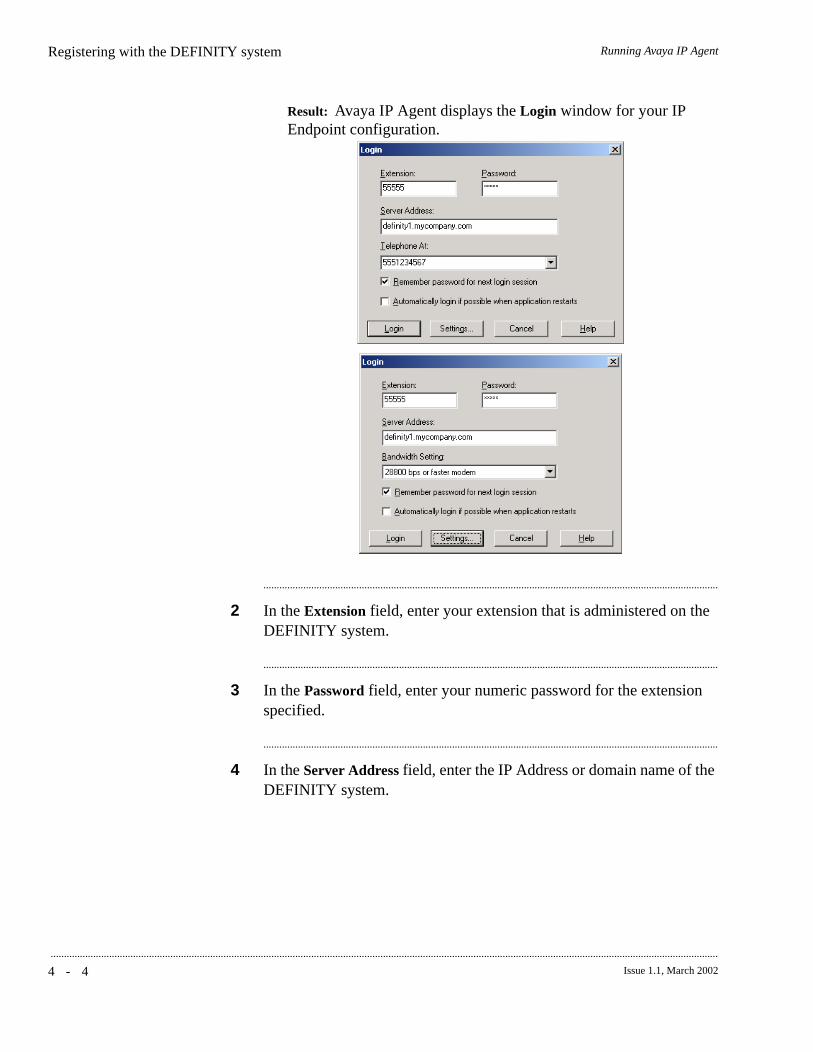
4 - 4 Issue 1.1, March 2002
...........................................................................................................................................................................................................................................................
Running Avaya IP AgentRegistering with the DEFINITY system
Result: Avaya IP Agent displays the Login window for your IP Endpoint configuration.
............................................................................................................................................................................
2 In the Extension field, enter your extension that is administered on the DEFINITY system.
............................................................................................................................................................................
3 In the Password field, enter your numeric password for the extension specified.
............................................................................................................................................................................
4 In the Server Address field, enter the IP Address or domain name of the DEFINITY system.
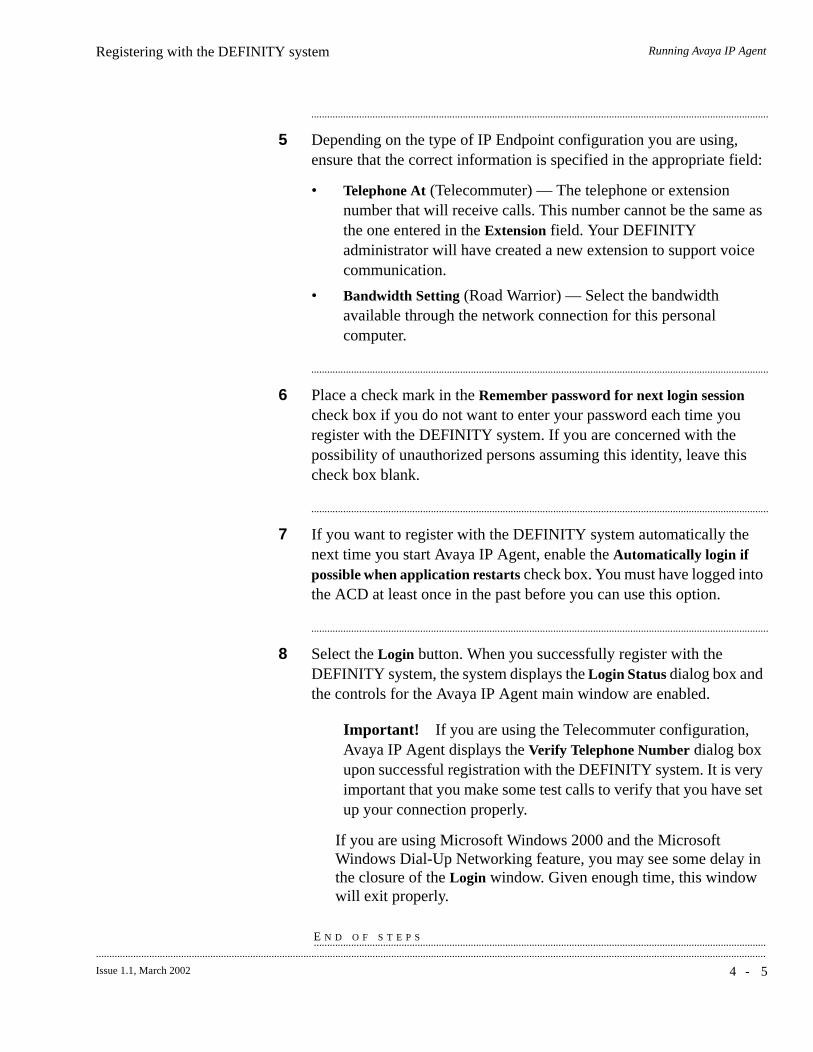
Running Avaya IP AgentRegistering with the DEFINITY system
4 - 5Issue 1.1, March 2002
............................................................................................................................................................................................................................................................
............................................................................................................................................................................
5 Depending on the type of IP Endpoint configuration you are using, ensure that the correct information is specified in the appropriate field:
• Telephone At (Telecommuter) — The telephone or extension number that will receive calls. This number cannot be the same as the one entered in the Extension field. Your DEFINITY administrator will have created a new extension to support voice communication.
• Bandwidth Setting (Road Warrior) — Select the bandwidth available through the network connection for this personal computer.
............................................................................................................................................................................
6 Place a check mark in the Remember password for next login session check box if you do not want to enter your password each time you register with the DEFINITY system. If you are concerned with the possibility of unauthorized persons assuming this identity, leave this check box blank.
............................................................................................................................................................................
7 If you want to register with the DEFINITY system automatically the next time you start Avaya IP Agent, enable the Automatically login if possible when application restarts check box. You must have logged into the ACD at least once in the past before you can use this option.
............................................................................................................................................................................
8 Select the Login button. When you successfully register with the DEFINITY system, the system displays the Login Status dialog box and the controls for the Avaya IP Agent main window are enabled.
Important! If you are using the Telecommuter configuration, Avaya IP Agent displays the Verify Telephone Number dialog box upon successful registration with the DEFINITY system. It is very important that you make some test calls to verify that you have set up your connection properly.
If you are using Microsoft Windows 2000 and the Microsoft Windows Dial-Up Networking feature, you may see some delay in the closure of the Login window. Given enough time, this window will exit properly.
E N D O F S T E P S...........................................................................................................................................................................
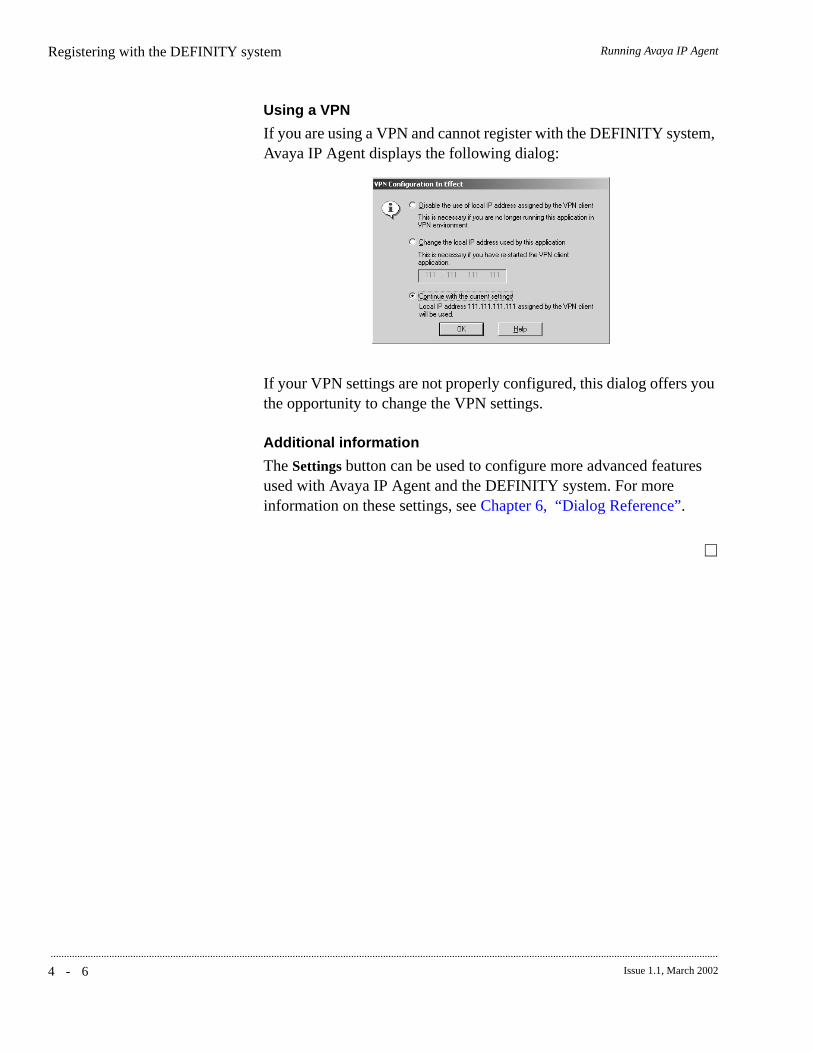
4 - 6 Issue 1.1, March 2002
...........................................................................................................................................................................................................................................................
Running Avaya IP AgentRegistering with the DEFINITY system
Using a VPN
If you are using a VPN and cannot register with the DEFINITY system, Avaya IP Agent displays the following dialog:
If your VPN settings are not properly configured, this dialog offers you the opportunity to change the VPN settings.
Additional information
The Settings button can be used to configure more advanced features used with Avaya IP Agent and the DEFINITY system. For more information on these settings, see Chapter 6, “Dialog Reference”.
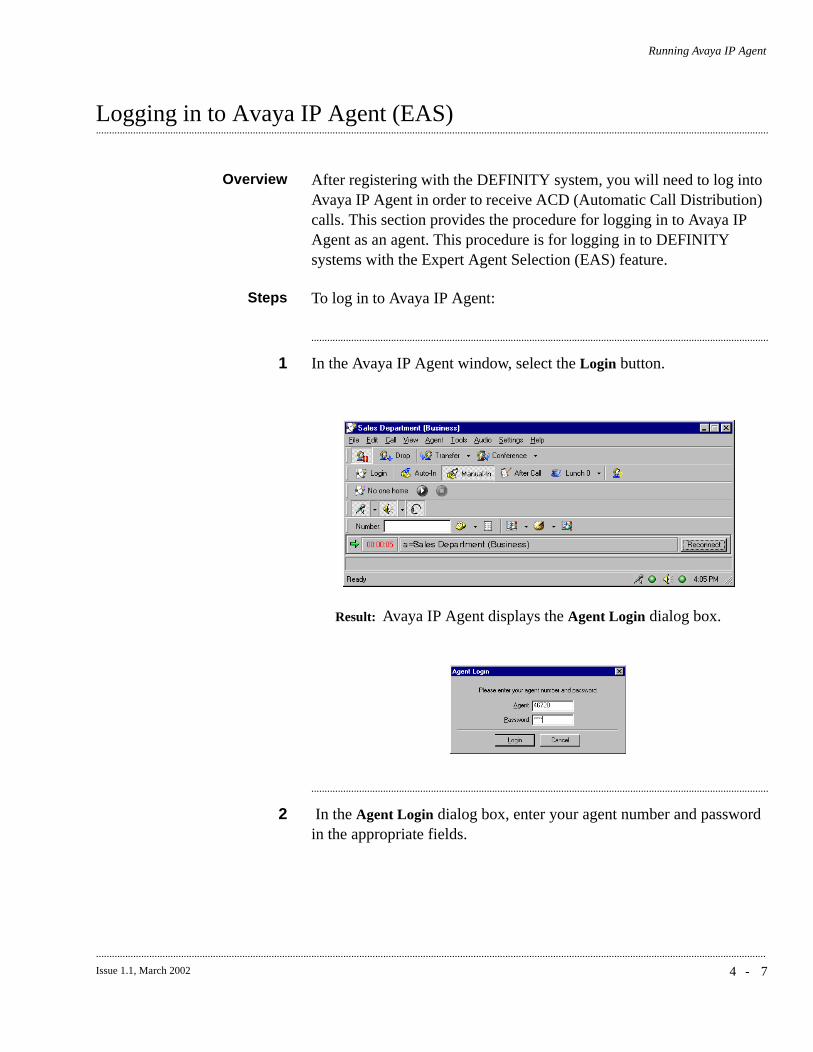
Running Avaya IP Agent
4 - 7Issue 1.1, March 2002
............................................................................................................................................................................................................................................................
.............................................................................................................................................................................................................................................................Logging in to Avaya IP Agent (EAS)
Overview After registering with the DEFINITY system, you will need to log into Avaya IP Agent in order to receive ACD (Automatic Call Distribution) calls. This section provides the procedure for logging in to Avaya IP Agent as an agent. This procedure is for logging in to DEFINITY systems with the Expert Agent Selection (EAS) feature.
Steps To log in to Avaya IP Agent:
............................................................................................................................................................................
1 In the Avaya IP Agent window, select the Login button.
Result: Avaya IP Agent displays the Agent Login dialog box.
............................................................................................................................................................................
2 In the Agent Login dialog box, enter your agent number and password in the appropriate fields.
4 - 8 Issue 1.1, March 2002
...........................................................................................................................................................................................................................................................
Running Avaya IP AgentLogging in to Avaya IP Agent (EAS)
............................................................................................................................................................................
3 Select the Login button.
Result: If you are in Telecommuter mode, the extension specified in the Login window will ring. For Road Warrior (VoIP) and Avaya CALLMASTER VI configurations, a line appearance will be created.
If you do not answer your telephone immediately or if you entered the wrong number for the voice connection, Avaya IP Agent displays an error message. Acknowledge the error message by selecting the OK button and then repeat the login procedure.
............................................................................................................................................................................
4 Answer the telephone.
Result: You will hear a confirmation tone, the buttons on the agent toolbar are enabled, and the agent will be automatically put in the AUX work mode.
............................................................................................................................................................................
5 To get out of AUX work mode, click either the Auto-In or Manual-In button.
For more information about Auto-In and Manual-In work modes, see “Selecting your work mode” (5-2).
You are now ready to begin receiving and making calls.
E N D O F S T E P S...........................................................................................................................................................................
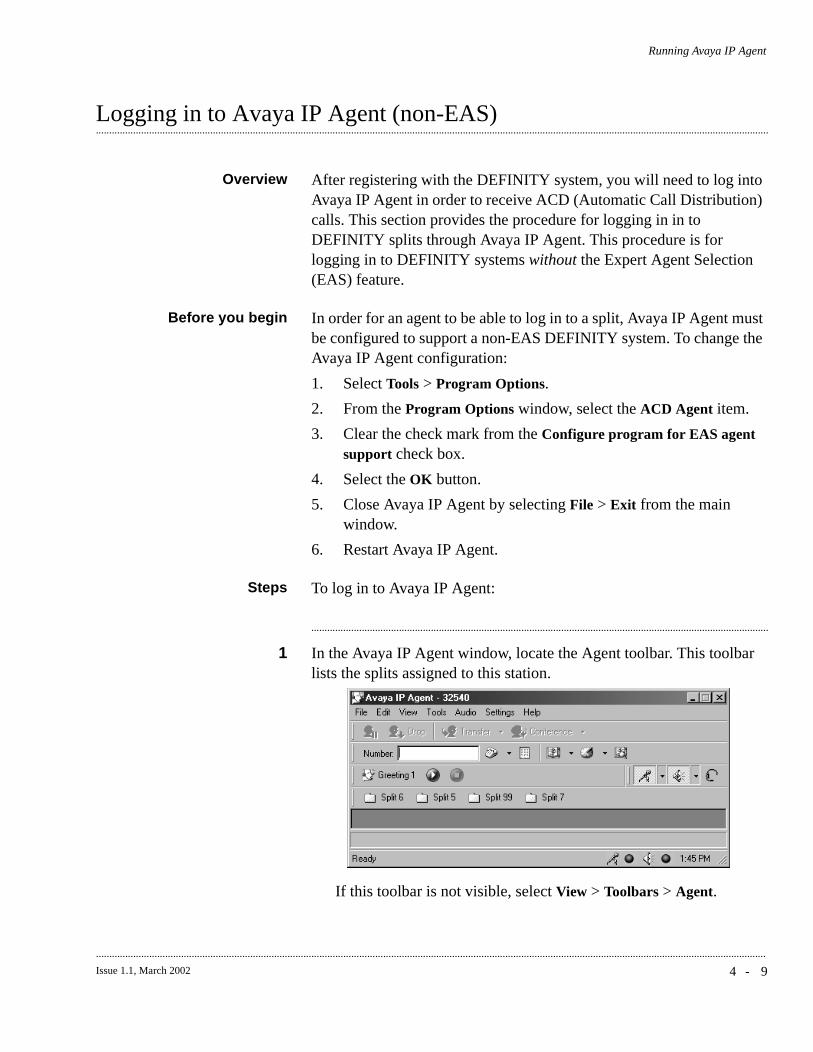
Running Avaya IP Agent
4 - 9Issue 1.1, March 2002
............................................................................................................................................................................................................................................................
.............................................................................................................................................................................................................................................................Logging in to Avaya IP Agent (non-EAS)
Overview After registering with the DEFINITY system, you will need to log into Avaya IP Agent in order to receive ACD (Automatic Call Distribution) calls. This section provides the procedure for logging in in to DEFINITY splits through Avaya IP Agent. This procedure is for logging in to DEFINITY systems without the Expert Agent Selection (EAS) feature.
Before you begin In order for an agent to be able to log in to a split, Avaya IP Agent must be configured to support a non-EAS DEFINITY system. To change the Avaya IP Agent configuration:
1. Select Tools > Program Options.
2. From the Program Options window, select the ACD Agent item.
3. Clear the check mark from the Configure program for EAS agent support check box.
4. Select the OK button.
5. Close Avaya IP Agent by selecting File > Exit from the main window.
6. Restart Avaya IP Agent.
Steps To log in to Avaya IP Agent:
............................................................................................................................................................................
1 In the Avaya IP Agent window, locate the Agent toolbar. This toolbar lists the splits assigned to this station.
If this toolbar is not visible, select View > Toolbars > Agent.

4 - 1 0 Issue 1.1, March 2002
...........................................................................................................................................................................................................................................................
Running Avaya IP AgentLogging in to Avaya IP Agent (non-EAS)
............................................................................................................................................................................
2 On the Agent toolbar, select the split you want to log into.
Result: Avaya IP Agent displays a menu with a Login option.
............................................................................................................................................................................
3 Select the Login option.
Result: Avaya IP Agent displays the Agent Login dialog box.
............................................................................................................................................................................
4 If necessary, enter the password for this split.
If you are logging in to a split that only consists of one or two digits, you may be required to place one or more leading �characters. This is dependent on the configuration of your DEFINITY system. See your system administrator for more information.
............................................................................................................................................................................
5 Select the Login button.
............................................................................................................................................................................
6 Select the split from the Agent toolbar again and select the appropriate work state from the resulting menu.
............................................................................................................................................................................
7 For each split you want to log into, repeat this procedure.
An agent can log in to a total of four splits.
E N D O F S T E P S...........................................................................................................................................................................
Running Avaya IP Agent
4 - 1 1Issue 1.1, March 2002
............................................................................................................................................................................................................................................................
.............................................................................................................................................................................................................................................................Logging out of Avaya IP Agent
Overview This section provides the procedure for logging out of Avaya IP Agent as an agent.
Steps ...........................................................................................................................................................................
1 Select the Logout button on the agent toolbar.
Result: If the DEFINITY system has been configured to require logout reason codes, Avaya IP Agent displays a prompt in the status bar for entry of the reason code.
............................................................................................................................................................................
2 Enter your logout reason code through the keyboard or the DialPad.
E N D O F S T E P S...........................................................................................................................................................................
4 - 1 2 Issue 1.1, March 2002
...........................................................................................................................................................................................................................................................
Running Avaya IP Agent
.............................................................................................................................................................................................................................................................Exiting Avaya IP Agent
Overview This section provides the procedure for exiting the Avaya IP Agent application.
Steps To exit Avaya IP Agent and log out of the DEFINITY system:
............................................................................................................................................................................
1 After you have logged out as an agent, select File > Exit from the main window.
Result: The Avaya IP Agent main window is closed and your extension is logged out of the DEFINITY system.
E N D O F S T E P S...........................................................................................................................................................................

5 - 1Issue 1.1, March 2002
............................................................................................................................................................................................................................................................
5 Avaya IP Agent basics
.............................................................................................................................................................................................................................................................Overview
Purpose This chapter contains information on the basic operations of Avaya IP Agent.
This chapter includes the following sections:
• “Handling incoming calls” (5-2)
• “Transferring a call” (5-10)
• “Conferencing calls” (5-18)
• “Handling outgoing calls” (5-26)
5 - 2 Issue 1.1, March 2002
...........................................................................................................................................................................................................................................................
Avaya IP Agent basics
Handling incoming calls
.............................................................................................................................................................................................................................................................Overview
Purpose This section describes those functions that you will be using every day when you receive an incoming call at your station, including answering a call, holding a call, releasing a call, and transferring a call.
This section contains the following topics:
• “Answering a call” (5-3)
• “Holding a call” (5-6)
• “Releasing a call” (5-7)
• “Dropping a call” (5-9)
Selecting your work mode You can elect to set your incoming calls for Auto-In mode or Manual-In mode by selecting the mode in the Agent toolbar. If you are in Auto-In mode and complete a call, you are automatically available to receive another call, or you may be placed in After Call Work (ACW) mode for an administered length of time. When the timed ACW interval expires, you are automatically returned to the Auto-In mode. If you try to change agent modes while active on a call, the change is not made until you disconnect from the call.
If you are in Manual-In mode and complete a call, you are automatically placed in After Call Work (ACW) mode. In order to become available to receive another ACD call, you must manually enter the Auto-In or Manual-In mode. If you try to change agent modes while not active on a call, the change takes place immediately.
Avaya IP Agent basics
5 - 3Issue 1.1, March 2002
............................................................................................................................................................................................................................................................
.............................................................................................................................................................................................................................................................Answering a call
Overview Answering a call depends on how the DEFINITY system and network is administered. Each contact center environment is different, which can affect the way you answer calls. It is suggested that each contact center evaluate its configuration and instruct the agent on the best way to answer the Avaya IP Agent phone. There are too many possible Avaya IP Agent configurations for Avaya to support all of them. The following are some suggested procedures on answering calls for different configurations.
Telecommuter Agent administration for auto-answer is set to station or none. Station Administration for auto-answer is set to none. Station Administration has service link set to “as-needed.” Each time a call is received, the analog phone set that provides the voice path will ring, as will the computer, depending upon the Avaya IP Agent option settings. To answer a call for this configuration:
............................................................................................................................................................................
1 Wait for the analog phone to ring and then answer it. Answering the analog phone will automatically be detected through Avaya IP Agent.
If there is another call ringing on the screen, do not hang up the analog phone. Instead, select the answer button on the Avaya IP Agent screen and you will be connected to this call. If you do not release the previous call, it will be automatically placed on hold.
............................................................................................................................................................................
2 After the calling party disconnects from the call or you select Release for that call, hang up the analog phone if no more calls are ringing on the Avaya IP Agent screen.
............................................................................................................................................................................
3 If there is another call ringing on the screen, do not hang up the analog phone. Select the Answer button on the Avaya IP Agent screen and you are now connected to this call. The previous call is placed on hold.
E N D O F S T E P S...........................................................................................................................................................................
5 - 4 Issue 1.1, March 2002
...........................................................................................................................................................................................................................................................
Avaya IP Agent basicsAnswering a call
Telecommuter (auto-answer)
Agent administration for auto-answer is set to station, ACD, or all. Station Administration for auto-answer is set to ACD or all. Station Administration has the service link set to “permanent.” During the event of agent login, your analog phone will ring to deliver the login confirmation tone. To answer a call for this configuration:
............................................................................................................................................................................
1 You should answer the phone and not hang it up for the remainder of your agent shift.
............................................................................................................................................................................
2 If the phone accidentally gets cut off or hung up, the DEFINITY system will ring the analog phone when it has a call to deliver. You will then need to answer the analog phone.
............................................................................................................................................................................
3 As with any auto-answer phone, the DEFINITY system will provide a zip tone (a beep) signaling that a new call has arrived .
E N D O F S T E P S...........................................................................................................................................................................
Road Warrior andCALLMASTER VI
In this configuration, the auto-answer feature is not activated. To answer a call for this configuration:
............................................................................................................................................................................
1 A person places a call to your contact center and is routed to your extension.
Result: A call appearance is displayed in a Call Information Panel (CIP) in the Avaya IP Agent main window.
............................................................................................................................................................................
2 Select the Answer button on the CIP.
Result: The call is connected and you can begin conversing with the calling party.
E N D O F S T E P S...........................................................................................................................................................................

Avaya IP Agent basicsAnswering a call
5 - 5Issue 1.1, March 2002
............................................................................................................................................................................................................................................................
Road Warrior andCALLMASTER VI (auto-
answer)
In this configuration, the auto-answer feature is enabled. To answer a call for this configuration:
............................................................................................................................................................................
1 A person places a call to your contact center and is routed to your extension.
Result: A call appearance is displayed in a Call Information Panel (CIP) in the Avaya IP Agent main window.
............................................................................................................................................................................
2 Avaya IP Agent automatically answers the call without any action from the agent who can now begin conversing with the other party.
E N D O F S T E P S...........................................................................................................................................................................

5 - 6 Issue 1.1, March 2002
...........................................................................................................................................................................................................................................................
Avaya IP Agent basics
.............................................................................................................................................................................................................................................................Holding a call
Overview You can put a call on hold by using either the Auto Hold or Manual Hold feature.
Steps
............................................................................................................................................................................
1 To manually put a call on hold, select the Hold button on the Phone Button toolbar.
Result: The button on your Call Information Panel (CIP) changes to Reconnect.
............................................................................................................................................................................
2 You can manually answer a second call while on an active call without having to put the first call on hold. The first call will automatically be put on hold when you answer the second call regardless of whether the Auto Hold or Manual Hold feature is administered for your station.
E N D O F S T E P S...........................................................................................................................................................................
Avaya IP Agent basics
5 - 7Issue 1.1, March 2002
............................................................................................................................................................................................................................................................
.............................................................................................................................................................................................................................................................Releasing a call
Overview There are three methods you can use to release a call. These methods will work only if the release feature has been administered for your station.
Steps To release a call:
...........................................................................................................................................................................
1 Perform one of the following actions:
• While on an active call, select the Release button located on the Call Information Panel (CIP). You will not hear a dial tone after you press Release.
• Select the Release button located on the Phone Button toolbar.
• Press the space bar on your keyboard.
• If you are using an Avaya CALLMASTER VI, press the Release button on the telephone.
• If you are using Telecommuter mode, you may choose to hang up the handset.
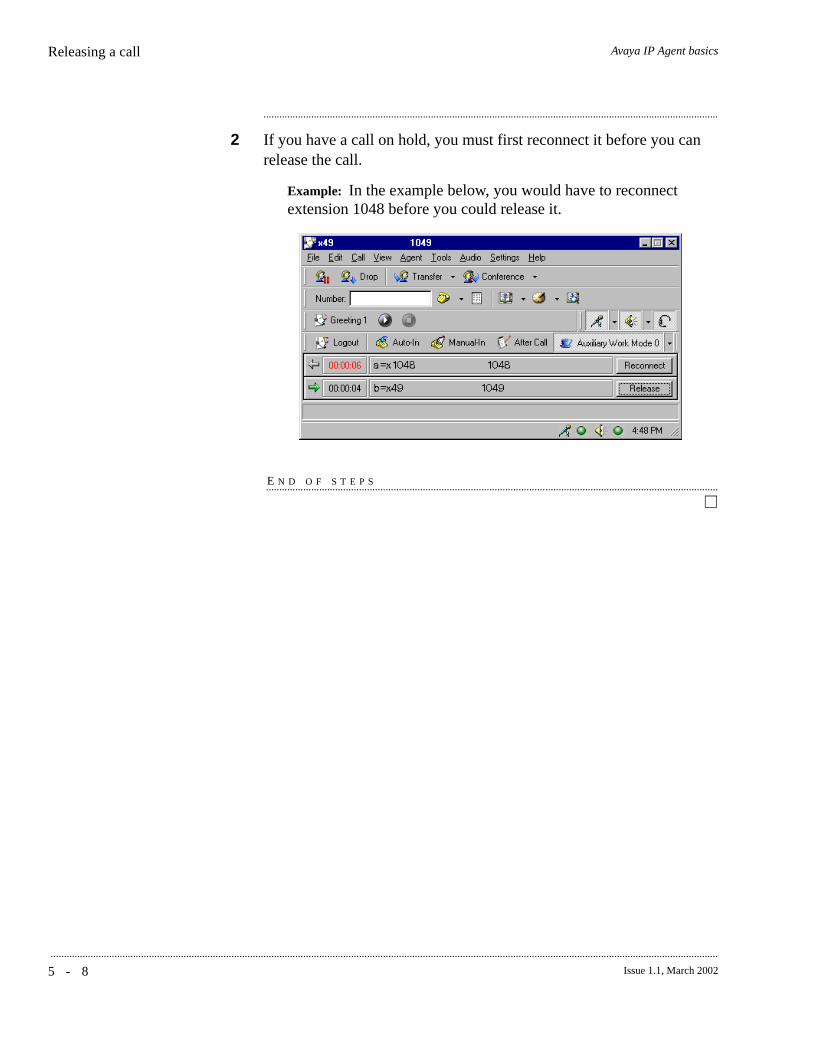
5 - 8 Issue 1.1, March 2002
...........................................................................................................................................................................................................................................................
Avaya IP Agent basicsReleasing a call
............................................................................................................................................................................
2 If you have a call on hold, you must first reconnect it before you can release the call.
Example: In the example below, you would have to reconnect extension 1048 before you could release it.
E N D O F S T E P S...........................................................................................................................................................................
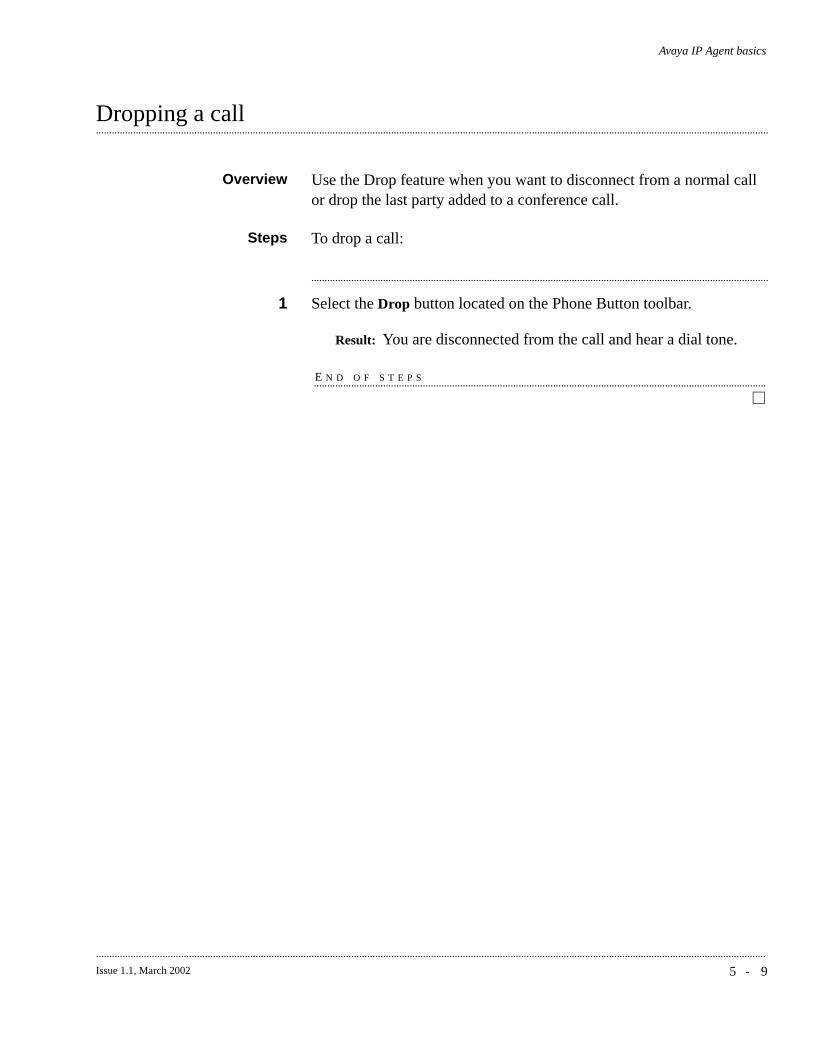
Avaya IP Agent basics
5 - 9Issue 1.1, March 2002
............................................................................................................................................................................................................................................................
.............................................................................................................................................................................................................................................................Dropping a call
Overview Use the Drop feature when you want to disconnect from a normal call or drop the last party added to a conference call.
Steps To drop a call:
............................................................................................................................................................................
1 Select the Drop button located on the Phone Button toolbar.
Result: You are disconnected from the call and hear a dial tone.
E N D O F S T E P S...........................................................................................................................................................................
5 - 1 0 Issue 1.1, March 2002
...........................................................................................................................................................................................................................................................
Avaya IP Agent basics
Transferring a call
.............................................................................................................................................................................................................................................................Overview
Purpose This section describes the following three methods of transferring calls:
• “Basic call transfer” (5-11)
• “Unsupervised call transfer” (5-13)
• “Enhanced call transfer” (5-14)
• “Other methods of transferring calls” (5-16)
Note
The Transfer button on the Phone Buttons toolbar can be configured for basic, unsupervised, or enhanced transfer in the Program Options dialog box in the Call Handling area. You can also choose a type of transfer different than that configured by selecting the Call menu and then selecting Transfer.
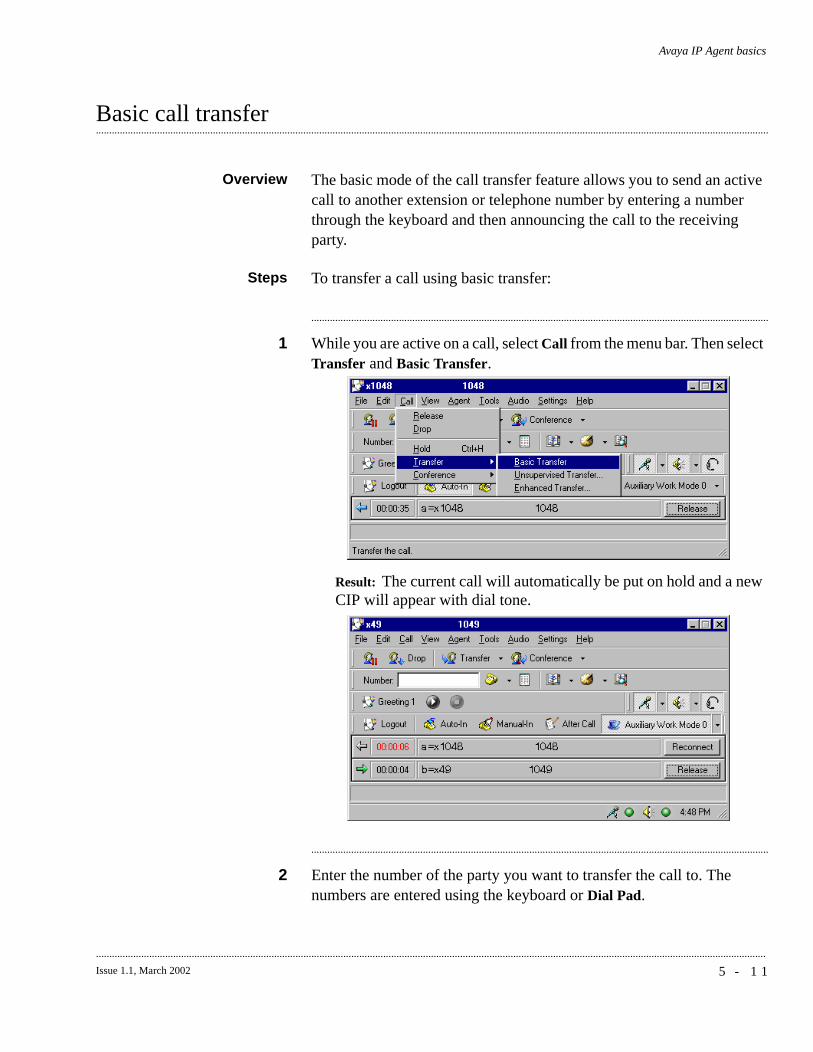
Avaya IP Agent basics
5 - 1 1Issue 1.1, March 2002
............................................................................................................................................................................................................................................................
.............................................................................................................................................................................................................................................................Basic call transfer
Overview The basic mode of the call transfer feature allows you to send an active call to another extension or telephone number by entering a number through the keyboard and then announcing the call to the receiving party.
Steps To transfer a call using basic transfer:
............................................................................................................................................................................
1 While you are active on a call, select Call from the menu bar. Then select Transfer and Basic Transfer.
Result: The current call will automatically be put on hold and a new CIP will appear with dial tone.
............................................................................................................................................................................
2 Enter the number of the party you want to transfer the call to. The numbers are entered using the keyboard or Dial Pad.
5 - 1 2 Issue 1.1, March 2002
...........................................................................................................................................................................................................................................................
Avaya IP Agent basicsBasic call transfer
............................................................................................................................................................................
3 When the second call is answered, you can privately talk to the party; then select Basic Transfer again to complete the transfer.
Result: Both CIPs disappear from your main callbar indicating that the transfer was successful.
You may complete the transfer at anytime after the number is entered, during the ringing state, or after the second party answers.
You may change the call transfer into a conference by selecting Basic Conference instead of Basic Transfer.
............................................................................................................................................................................
4 If there is no answer, the line is busy, or you decide the transfer is not needed, do the following to cancel the transfer:
• Select the Release button for the party that was going to receive the transfer which terminates the call.
• Return to the held call by selecting the Reconnect button on the CIP for that call.
E N D O F S T E P S...........................................................................................................................................................................
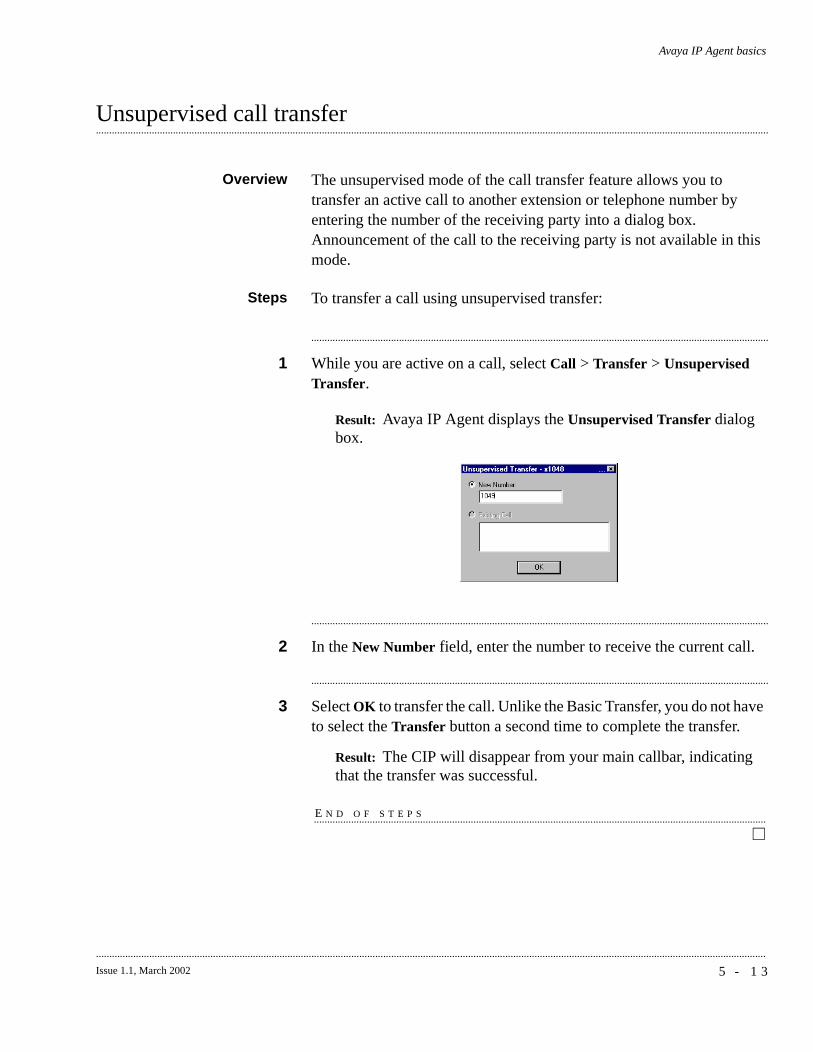
Avaya IP Agent basics
5 - 1 3Issue 1.1, March 2002
............................................................................................................................................................................................................................................................
.............................................................................................................................................................................................................................................................Unsupervised call transfer
Overview The unsupervised mode of the call transfer feature allows you to transfer an active call to another extension or telephone number by entering the number of the receiving party into a dialog box. Announcement of the call to the receiving party is not available in this mode.
Steps To transfer a call using unsupervised transfer:
............................................................................................................................................................................
1 While you are active on a call, select Call > Transfer > Unsupervised Transfer.
Result: Avaya IP Agent displays the Unsupervised Transfer dialog box.
............................................................................................................................................................................
2 In the New Number field, enter the number to receive the current call.
............................................................................................................................................................................
3 Select OK to transfer the call. Unlike the Basic Transfer, you do not have to select the Transfer button a second time to complete the transfer.
Result: The CIP will disappear from your main callbar, indicating that the transfer was successful.
E N D O F S T E P S...........................................................................................................................................................................
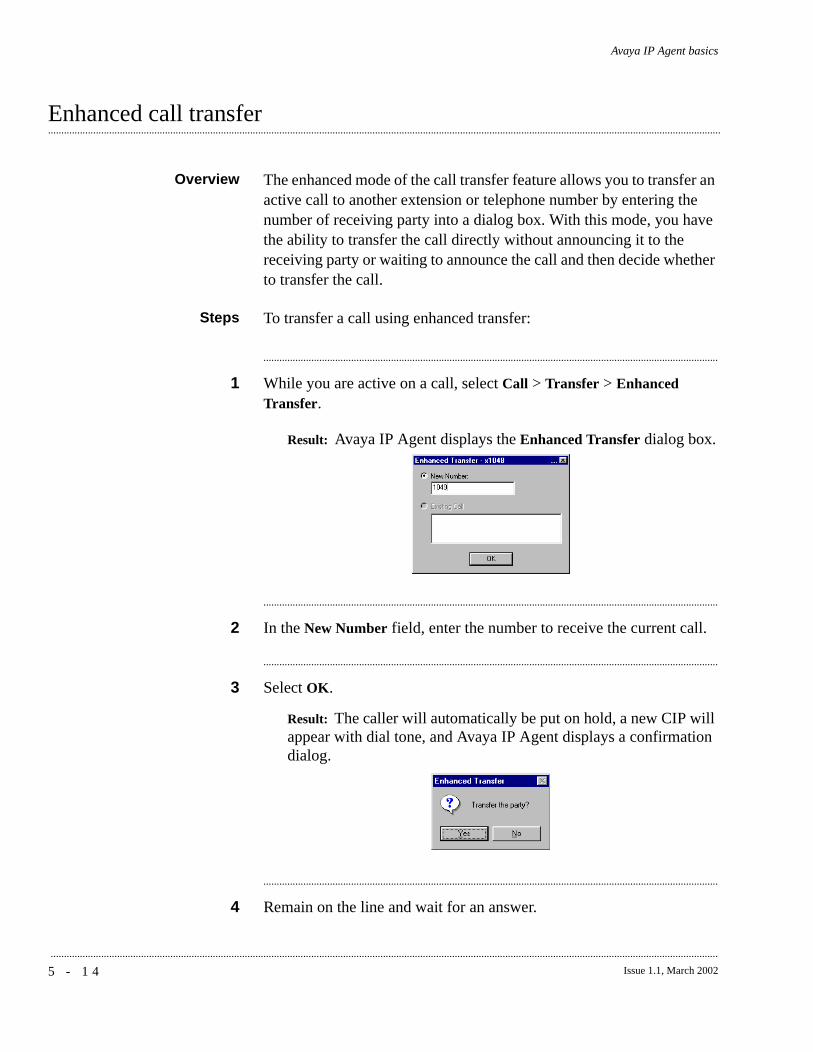
5 - 1 4 Issue 1.1, March 2002
...........................................................................................................................................................................................................................................................
Avaya IP Agent basics
.............................................................................................................................................................................................................................................................Enhanced call transfer
Overview The enhanced mode of the call transfer feature allows you to transfer an active call to another extension or telephone number by entering the number of receiving party into a dialog box. With this mode, you have the ability to transfer the call directly without announcing it to the receiving party or waiting to announce the call and then decide whether to transfer the call.
Steps To transfer a call using enhanced transfer:
............................................................................................................................................................................
1 While you are active on a call, select Call > Transfer > Enhanced Transfer.
Result: Avaya IP Agent displays the Enhanced Transfer dialog box.
............................................................................................................................................................................
2 In the New Number field, enter the number to receive the current call.
............................................................................................................................................................................
3 Select OK.
Result: The caller will automatically be put on hold, a new CIP will appear with dial tone, and Avaya IP Agent displays a confirmation dialog.
............................................................................................................................................................................
4 Remain on the line and wait for an answer.
Avaya IP Agent basicsEnhanced call transfer
5 - 1 5Issue 1.1, March 2002
............................................................................................................................................................................................................................................................
............................................................................................................................................................................
5 Perform one of the following actions:
E N D O F S T E P S...........................................................................................................................................................................
If... Then...
The number dialed is answered
announce the call and select the Yes button in the confirmation dialog.
Result: Both CIPs disappear from your main callbar indicating that the transfer was successful.
The number dialed is not answered or is busy
select the No button in the confirmation dialog and select the Reconnect button to return to the held call.
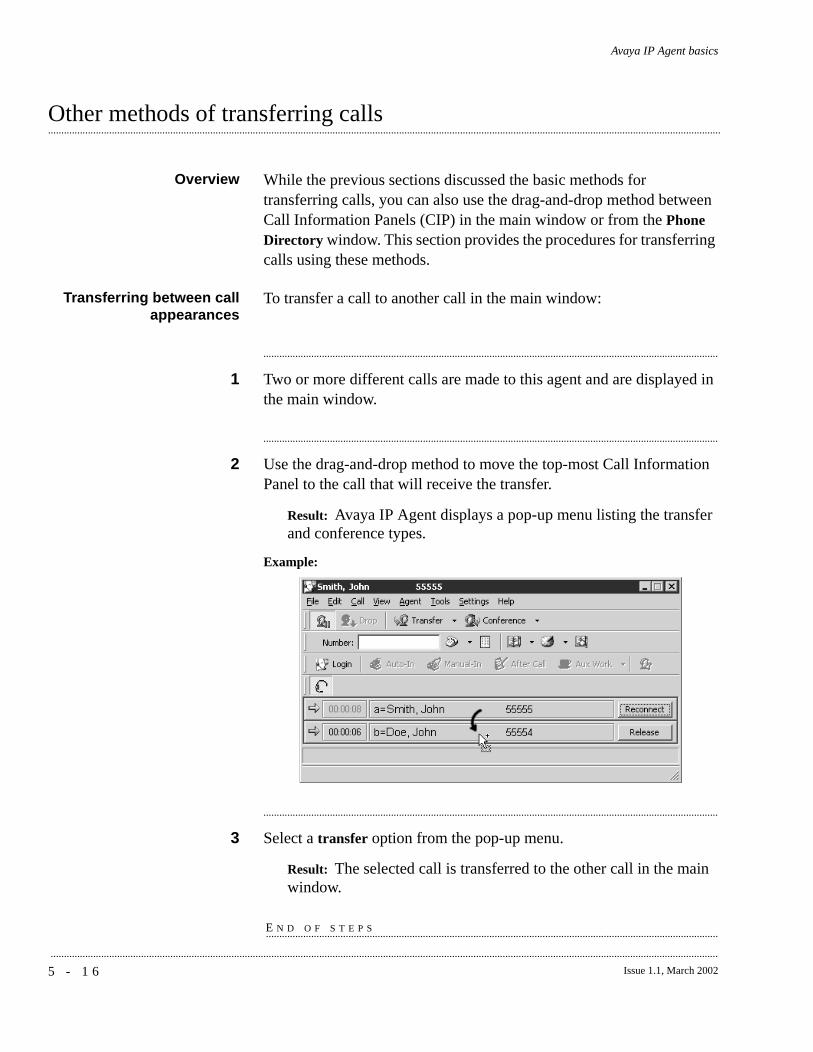
5 - 1 6 Issue 1.1, March 2002
...........................................................................................................................................................................................................................................................
Avaya IP Agent basics
.............................................................................................................................................................................................................................................................Other methods of transferring calls
Overview While the previous sections discussed the basic methods for transferring calls, you can also use the drag-and-drop method between Call Information Panels (CIP) in the main window or from the Phone Directory window. This section provides the procedures for transferring calls using these methods.
Transferring between callappearances
To transfer a call to another call in the main window:
............................................................................................................................................................................
1 Two or more different calls are made to this agent and are displayed in the main window.
............................................................................................................................................................................
2 Use the drag-and-drop method to move the top-most Call Information Panel to the call that will receive the transfer.
Result: Avaya IP Agent displays a pop-up menu listing the transfer and conference types.
Example:
............................................................................................................................................................................
3 Select a transfer option from the pop-up menu.
Result: The selected call is transferred to the other call in the main window.
E N D O F S T E P S...........................................................................................................................................................................
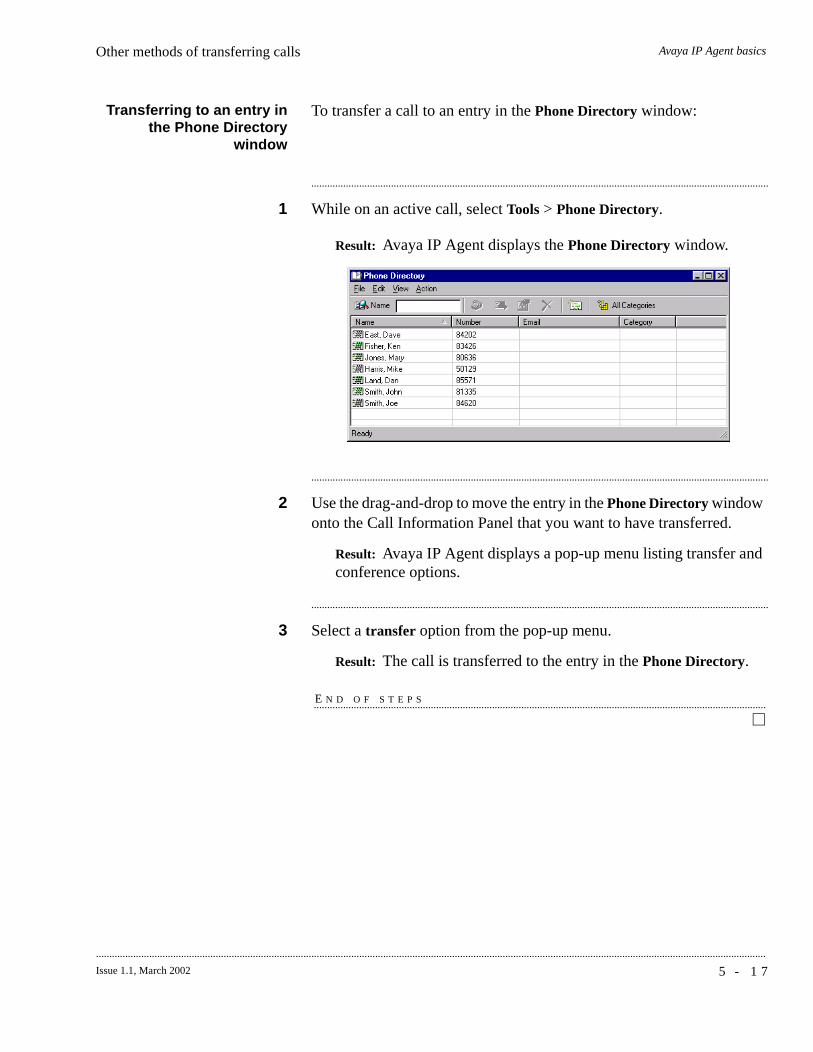
Avaya IP Agent basicsOther methods of transferring calls
5 - 1 7Issue 1.1, March 2002
............................................................................................................................................................................................................................................................
Transferring to an entry inthe Phone Directory
window
To transfer a call to an entry in the Phone Directory window:
............................................................................................................................................................................
1 While on an active call, select Tools > Phone Directory.
Result: Avaya IP Agent displays the Phone Directory window.
............................................................................................................................................................................
2 Use the drag-and-drop to move the entry in the Phone Directory window onto the Call Information Panel that you want to have transferred.
Result: Avaya IP Agent displays a pop-up menu listing transfer and conference options.
............................................................................................................................................................................
3 Select a transfer option from the pop-up menu.
Result: The call is transferred to the entry in the Phone Directory.
E N D O F S T E P S...........................................................................................................................................................................
5 - 1 8 Issue 1.1, March 2002
...........................................................................................................................................................................................................................................................
Avaya IP Agent basics
Conferencing calls
.............................................................................................................................................................................................................................................................Overview
Purpose This section provides information and procedures related to conferencing multiple calls together so that all parties can communicate simultaneously.
This section contains the following topics:
• “Basic conference” (5-19)
• “Enhanced conference” (5-22)
• “Other methods of conferencing calls” (5-24)
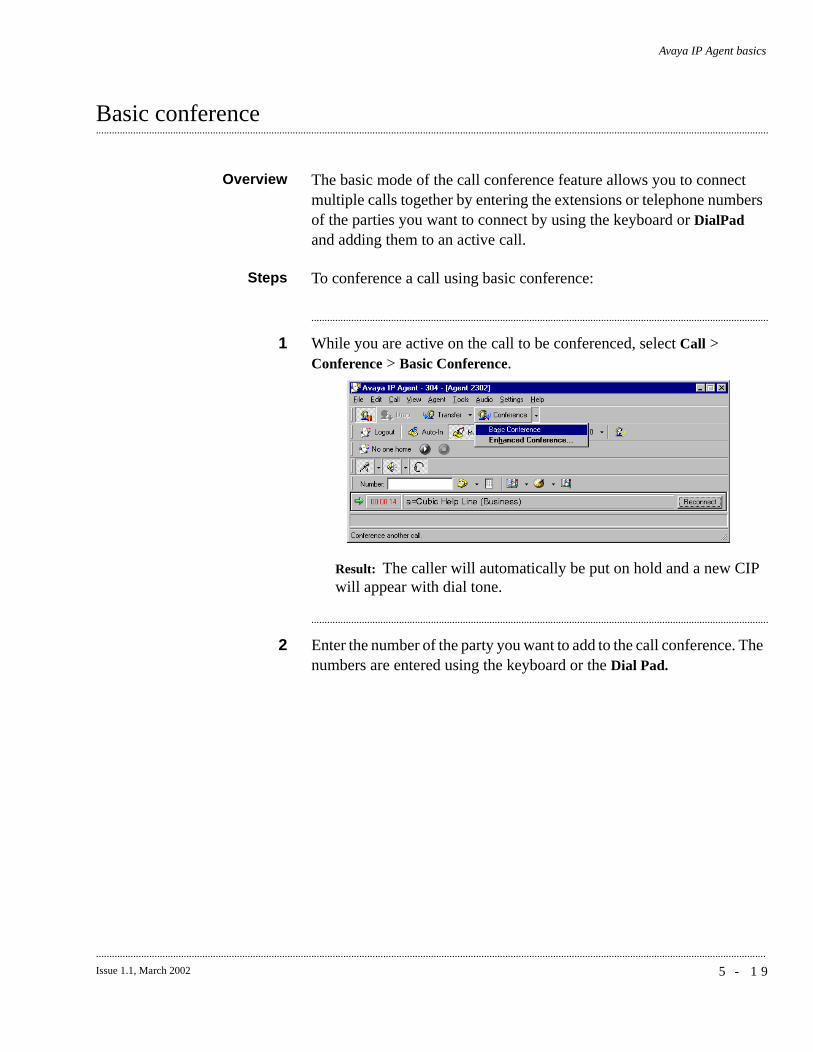
Avaya IP Agent basics
5 - 1 9Issue 1.1, March 2002
............................................................................................................................................................................................................................................................
.............................................................................................................................................................................................................................................................Basic conference
Overview The basic mode of the call conference feature allows you to connect multiple calls together by entering the extensions or telephone numbers of the parties you want to connect by using the keyboard or DialPad and adding them to an active call.
Steps To conference a call using basic conference:
............................................................................................................................................................................
1 While you are active on the call to be conferenced, select Call > Conference > Basic Conference.
Result: The caller will automatically be put on hold and a new CIP will appear with dial tone.
............................................................................................................................................................................
2 Enter the number of the party you want to add to the call conference. The numbers are entered using the keyboard or the Dial Pad.

5 - 2 0 Issue 1.1, March 2002
...........................................................................................................................................................................................................................................................
Avaya IP Agent basicsBasic conference
............................................................................................................................................................................
3 When the second call is answered, you can privately talk to the party and then select Basic Conference again to initiate the conference call.
Result: One CIP appears on your main callbar displaying "CONFERENCE 2" (indicating an active conference).
You may initiate the conference at any time after the number is entered, during the ringing state, or after the second party answers.
You may change the call conference into a transfer by selecting Basic Transfer instead of Basic Conference in Step 3.
............................................................................................................................................................................
4 Repeat the previous steps until you have conferenced all parties.
Result: The single CIP will display "CONFERENCE X," where X equals the number of parties you added to the call.
Example: If you added three parties to the call, the display on the CIP will say "CONFERENCE 3."
Avaya IP Agent basicsBasic conference
5 - 2 1Issue 1.1, March 2002
............................................................................................................................................................................................................................................................
............................................................................................................................................................................
5 If there is no answer, the line is busy, or you decide the conference is not needed:
• Select the Release button for the party that was going to be added to the conference.
• Return to the held call by selecting the call state Reconnect button for that held call.
E N D O F S T E P S...........................................................................................................................................................................
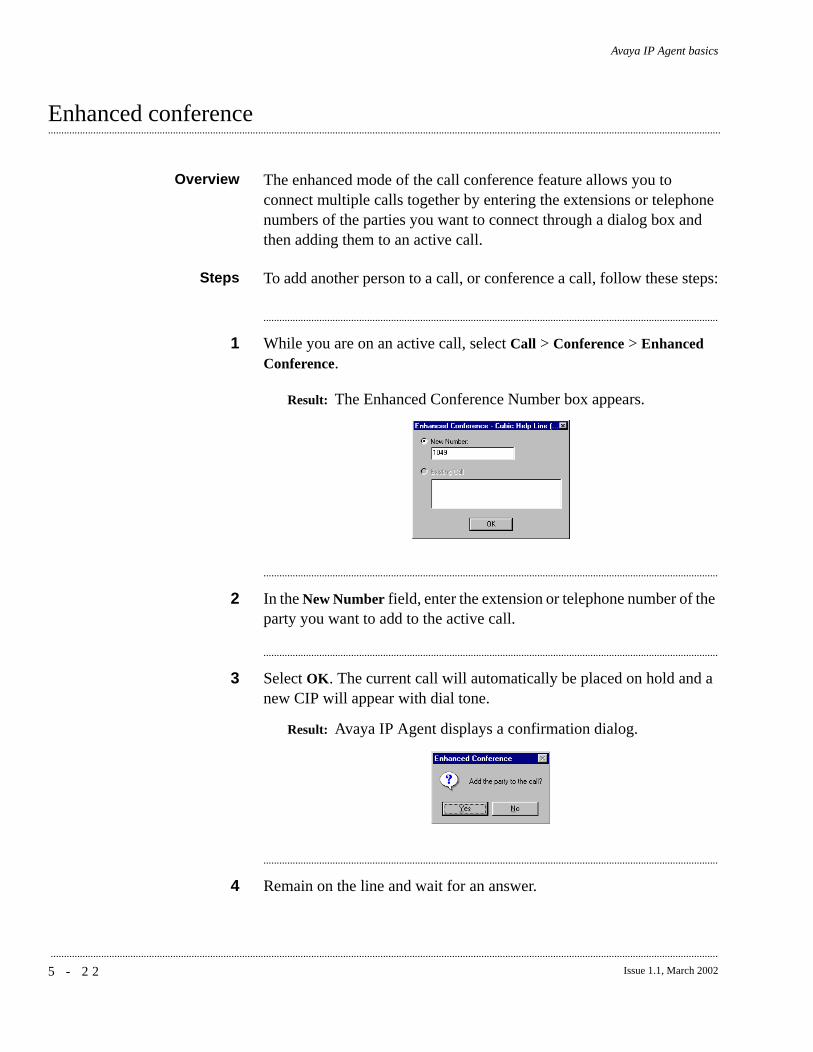
5 - 2 2 Issue 1.1, March 2002
...........................................................................................................................................................................................................................................................
Avaya IP Agent basics
.............................................................................................................................................................................................................................................................Enhanced conference
Overview The enhanced mode of the call conference feature allows you to connect multiple calls together by entering the extensions or telephone numbers of the parties you want to connect through a dialog box and then adding them to an active call.
Steps To add another person to a call, or conference a call, follow these steps:
............................................................................................................................................................................
1 While you are on an active call, select Call > Conference > Enhanced Conference.
Result: The Enhanced Conference Number box appears.
............................................................................................................................................................................
2 In the New Number field, enter the extension or telephone number of the party you want to add to the active call.
............................................................................................................................................................................
3 Select OK. The current call will automatically be placed on hold and a new CIP will appear with dial tone.
Result: Avaya IP Agent displays a confirmation dialog.
............................................................................................................................................................................
4 Remain on the line and wait for an answer.
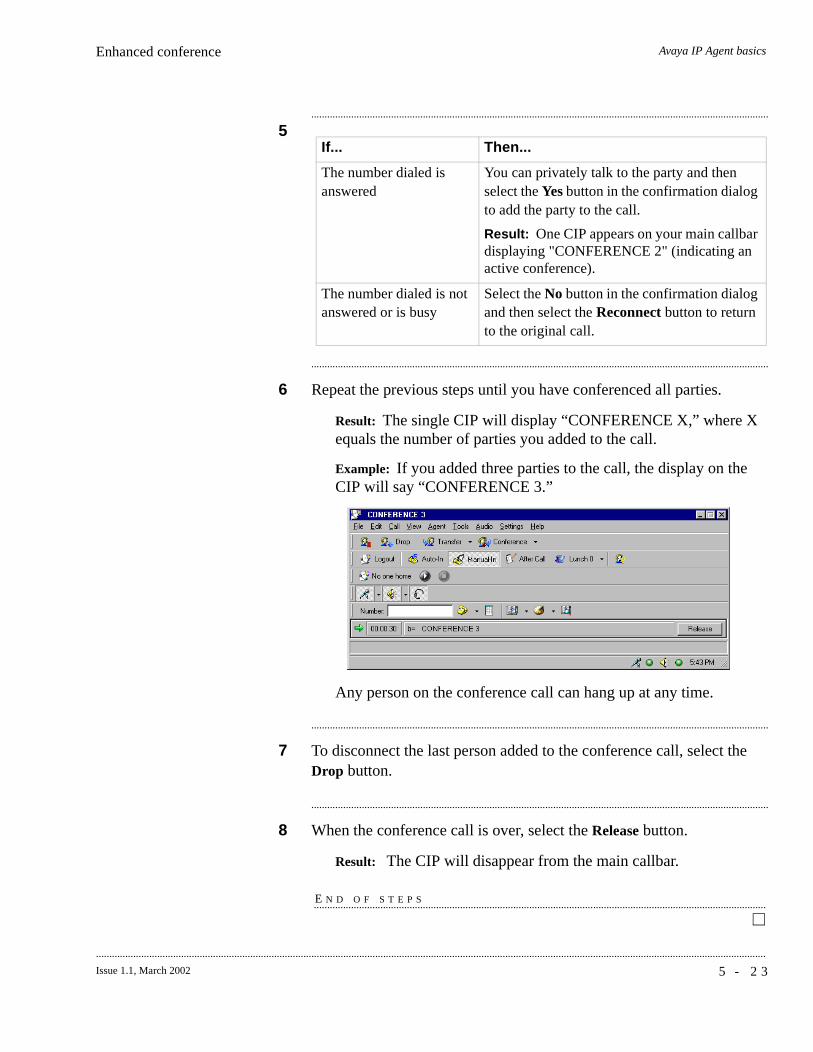
Avaya IP Agent basicsEnhanced conference
5 - 2 3Issue 1.1, March 2002
............................................................................................................................................................................................................................................................
............................................................................................................................................................................
5
............................................................................................................................................................................
6 Repeat the previous steps until you have conferenced all parties.
Result: The single CIP will display “CONFERENCE X,” where X equals the number of parties you added to the call.
Example: If you added three parties to the call, the display on the CIP will say “CONFERENCE 3.”
Any person on the conference call can hang up at any time.
............................................................................................................................................................................
7 To disconnect the last person added to the conference call, select the Drop button.
............................................................................................................................................................................
8 When the conference call is over, select the Release button.
Result: The CIP will disappear from the main callbar.
E N D O F S T E P S...........................................................................................................................................................................
If... Then...
The number dialed is answered
You can privately talk to the party and then select the Yes button in the confirmation dialog to add the party to the call.
Result: One CIP appears on your main callbar displaying "CONFERENCE 2" (indicating an active conference).
The number dialed is not answered or is busy
Select the No button in the confirmation dialog and then select the Reconnect button to return to the original call.
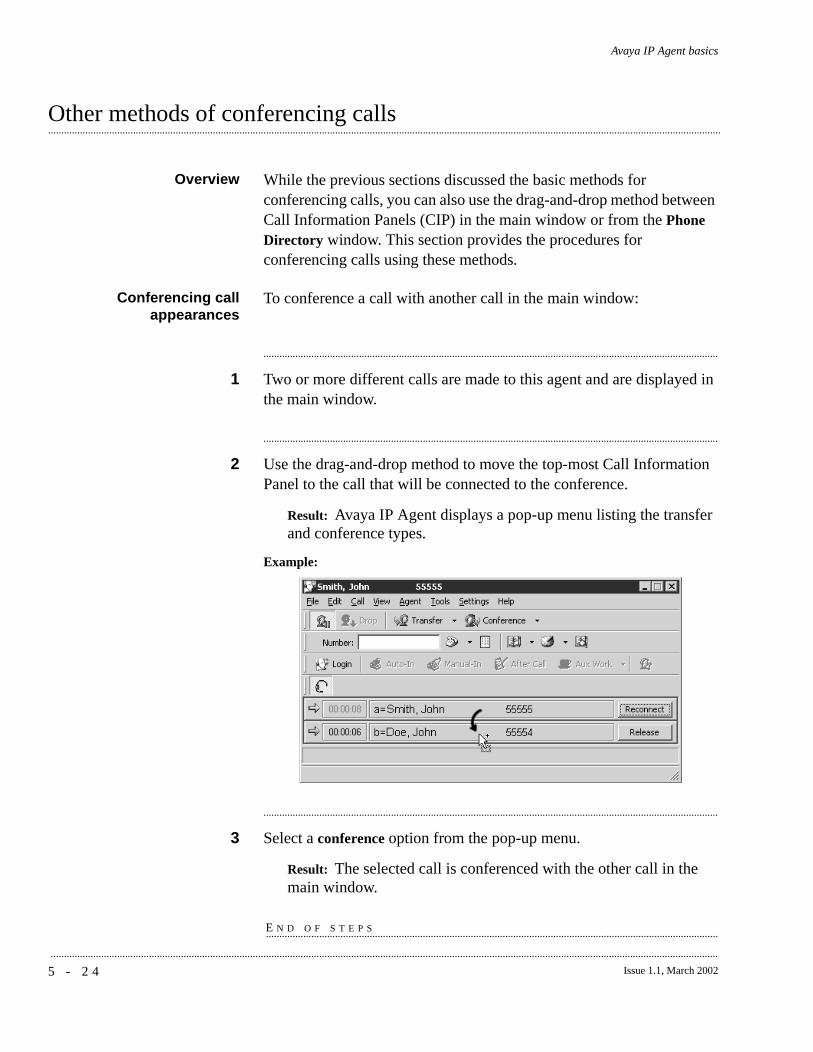
5 - 2 4 Issue 1.1, March 2002
...........................................................................................................................................................................................................................................................
Avaya IP Agent basics
.............................................................................................................................................................................................................................................................Other methods of conferencing calls
Overview While the previous sections discussed the basic methods for conferencing calls, you can also use the drag-and-drop method between Call Information Panels (CIP) in the main window or from the Phone Directory window. This section provides the procedures for conferencing calls using these methods.
Conferencing callappearances
To conference a call with another call in the main window:
............................................................................................................................................................................
1 Two or more different calls are made to this agent and are displayed in the main window.
............................................................................................................................................................................
2 Use the drag-and-drop method to move the top-most Call Information Panel to the call that will be connected to the conference.
Result: Avaya IP Agent displays a pop-up menu listing the transfer and conference types.
Example:
............................................................................................................................................................................
3 Select a conference option from the pop-up menu.
Result: The selected call is conferenced with the other call in the main window.
E N D O F S T E P S...........................................................................................................................................................................

Avaya IP Agent basicsOther methods of conferencing calls
5 - 2 5Issue 1.1, March 2002
............................................................................................................................................................................................................................................................
Conferencing with an entryin the Phone Directory
window
To conference a call to an entry in the Phone Directory window:
............................................................................................................................................................................
1 While on an active call, select Tools > Phone Directory.
Result: Avaya IP Agent displays the Phone Directory window.
............................................................................................................................................................................
2 Use the drag-and-drop to move the entry in the Phone Directory window you want to conference onto the Call Information Panel.
Result: Avaya IP Agent displays a pop-up menu listing transfer and conference options.
............................................................................................................................................................................
3 Select a conference option from the pop-up menu.
Result: The entry in the Phone Directory is conferenced with the agent and the selected call.
E N D O F S T E P S...........................................................................................................................................................................
5 - 2 6 Issue 1.1, March 2002
...........................................................................................................................................................................................................................................................
Avaya IP Agent basics
Handling outgoing calls
.............................................................................................................................................................................................................................................................Overview
Purpose There are several ways you can make the handling of outgoing calls more efficient. You can use a Recent Calls list, a Speed Dial number, or an abbreviated dial button.
This section contains the following topics:
• “Recent Calls list” (5-27)
• “Administering and using Speed Dial” (5-29)
• “Abbreviated Dial button” (5-32)
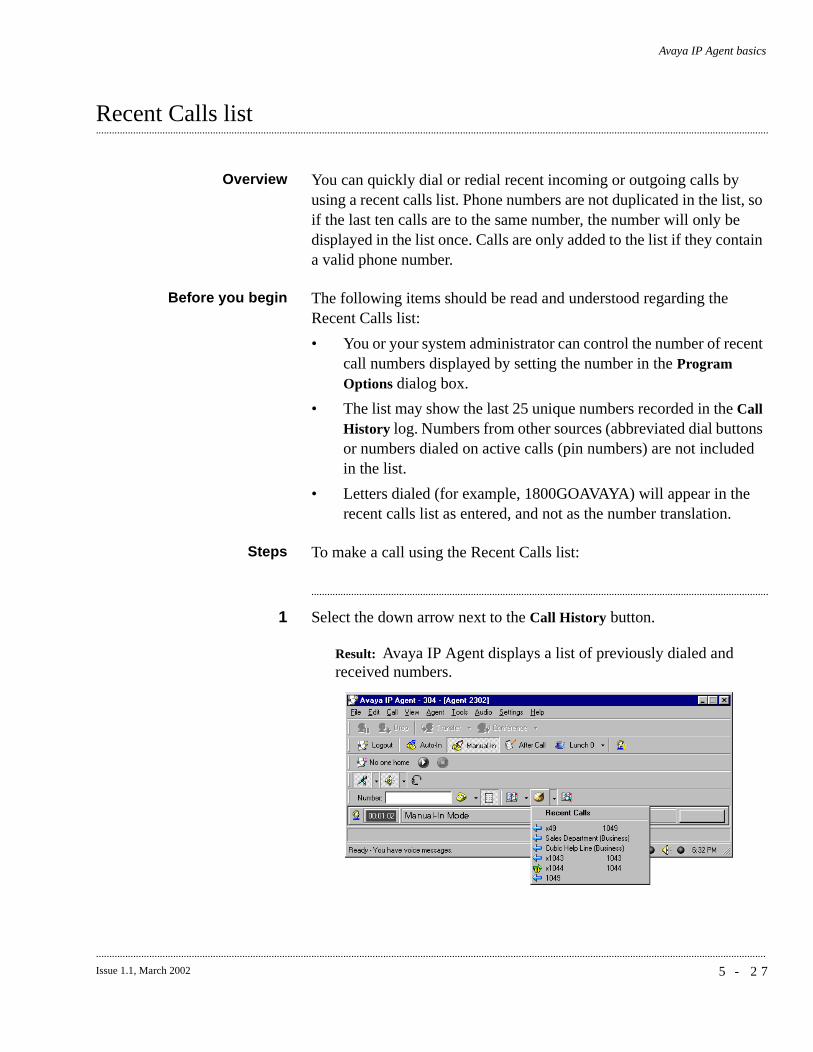
Avaya IP Agent basics
5 - 2 7Issue 1.1, March 2002
............................................................................................................................................................................................................................................................
.............................................................................................................................................................................................................................................................Recent Calls list
Overview You can quickly dial or redial recent incoming or outgoing calls by using a recent calls list. Phone numbers are not duplicated in the list, so if the last ten calls are to the same number, the number will only be displayed in the list once. Calls are only added to the list if they contain a valid phone number.
Before you begin The following items should be read and understood regarding the Recent Calls list:
• You or your system administrator can control the number of recent call numbers displayed by setting the number in the Program Options dialog box.
• The list may show the last 25 unique numbers recorded in the Call History log. Numbers from other sources (abbreviated dial buttons or numbers dialed on active calls (pin numbers) are not included in the list.
• Letters dialed (for example, 1800GOAVAYA) will appear in the recent calls list as entered, and not as the number translation.
Steps To make a call using the Recent Calls list:
............................................................................................................................................................................
1 Select the down arrow next to the Call History button.
Result: Avaya IP Agent displays a list of previously dialed and received numbers.

5 - 2 8 Issue 1.1, March 2002
...........................................................................................................................................................................................................................................................
Avaya IP Agent basicsRecent Calls list
............................................................................................................................................................................
2 Select the number you want to dial.
Result: A call appearance is created and the selected telephone number is dialed.
E N D O F S T E P S...........................................................................................................................................................................

Avaya IP Agent basics
5 - 2 9Issue 1.1, March 2002
............................................................................................................................................................................................................................................................
.............................................................................................................................................................................................................................................................Administering and using Speed Dial
Overview Avaya IP Agent lets you determine Speed Dial numbers in the Phone Directory Properties dialog box. A Speed Dial number can be any number in the Phone Directory, up to a maximum of 25 numbers.
Steps To use Speed Dial:
............................................................................................................................................................................
1 In the Avaya IP Agent main window, select Tools > Phone Directory.
Result: Avaya IP Agent displays the Phone Directory dialog box.
............................................................................................................................................................................
2
If... Then...
You are creating a new entry Select File > New Entry from the menu bar.
You are editing an entry Highlight the entry and select View > Properties from the menu bar.
Result: Avaya IP Agent displays the Properties dialog box.
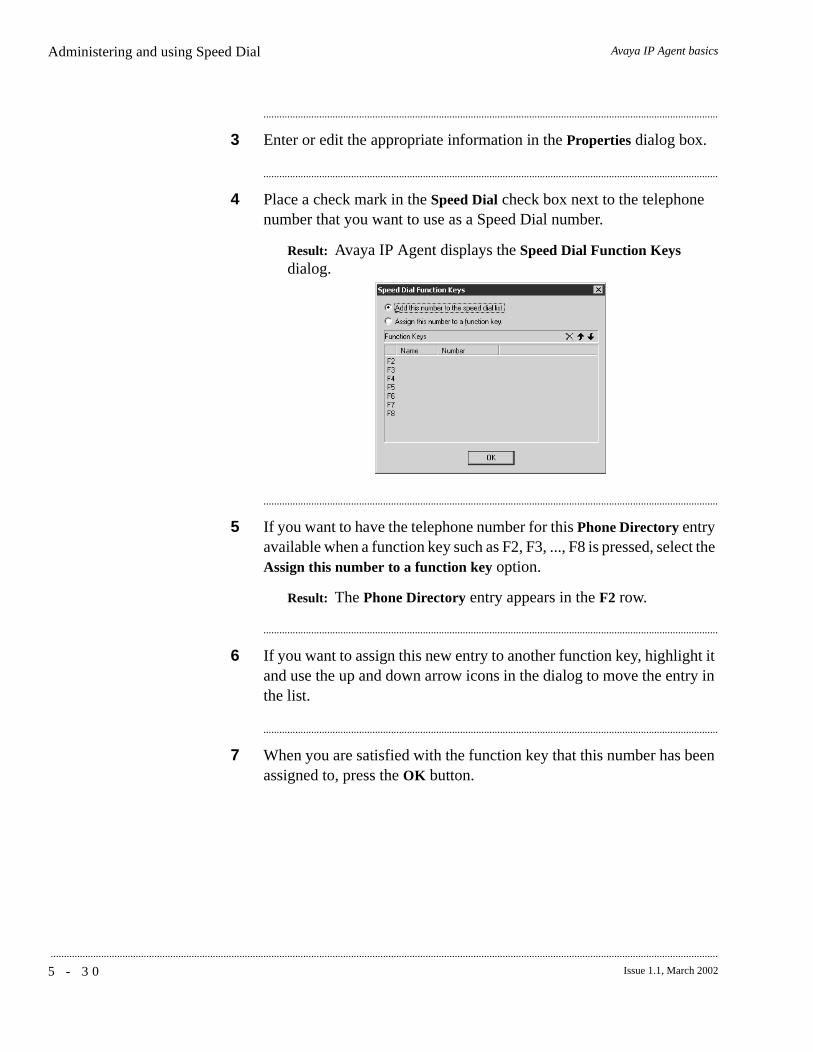
5 - 3 0 Issue 1.1, March 2002
...........................................................................................................................................................................................................................................................
Avaya IP Agent basicsAdministering and using Speed Dial
............................................................................................................................................................................
3 Enter or edit the appropriate information in the Properties dialog box.
............................................................................................................................................................................
4 Place a check mark in the Speed Dial check box next to the telephone number that you want to use as a Speed Dial number.
Result: Avaya IP Agent displays the Speed Dial Function Keys dialog.
............................................................................................................................................................................
5 If you want to have the telephone number for this Phone Directory entry available when a function key such as F2, F3, ..., F8 is pressed, select the Assign this number to a function key option.
Result: The Phone Directory entry appears in the F2 row.
............................................................................................................................................................................
6 If you want to assign this new entry to another function key, highlight it and use the up and down arrow icons in the dialog to move the entry in the list.
............................................................................................................................................................................
7 When you are satisfied with the function key that this number has been assigned to, press the OK button.
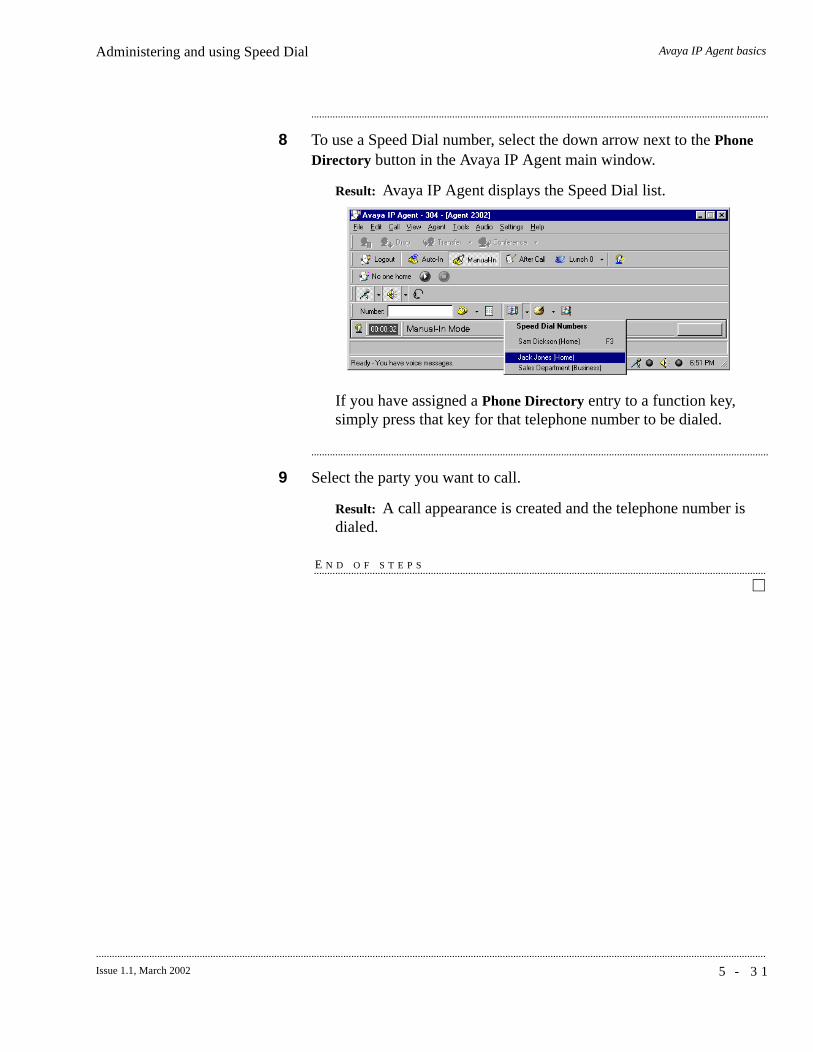
Avaya IP Agent basicsAdministering and using Speed Dial
5 - 3 1Issue 1.1, March 2002
............................................................................................................................................................................................................................................................
............................................................................................................................................................................
8 To use a Speed Dial number, select the down arrow next to the Phone Directory button in the Avaya IP Agent main window.
Result: Avaya IP Agent displays the Speed Dial list.
If you have assigned a Phone Directory entry to a function key, simply press that key for that telephone number to be dialed.
............................................................................................................................................................................
9 Select the party you want to call.
Result: A call appearance is created and the telephone number is dialed.
E N D O F S T E P S...........................................................................................................................................................................
5 - 3 2 Issue 1.1, March 2002
...........................................................................................................................................................................................................................................................
Avaya IP Agent basics
.............................................................................................................................................................................................................................................................Abbreviated Dial button
Overview If the Abbreviated Dial feature has been administered for the DEFINITY system for your physical station terminal, you can store selected telephone numbers in the Phone Features dialog box for quick and easy dialing. Each number can be a complete or partial telephone number, an extension number, a trunk, or feature code.
Steps To make a call using an Abbreviated Dial button:
............................................................................................................................................................................
1 Select Tools > Phone Features.
Result: Avaya IP Agent displays the Phone Features dialog.
............................................................................................................................................................................
2 In the Phone Features dialog, select the Abbreviated Dial button associated with the number you want to dial.
Result: A call appearance is created and the selected telephone number is dialed.
The button label for an abbreviated dial is a number (for example, 51008); and the button label for an auto dial button is autodial plus the number (for example, autodial 51008).
E N D O F S T E P S...........................................................................................................................................................................
6 - 1Issue 1.1, March 2002
............................................................................................................................................................................................................................................................
6 Dialog Reference
.............................................................................................................................................................................................................................................................Overview
Purpose This section provides descriptions of the graphical interfaces used in Avaya IP Agent and their basic functionality. Only those interfaces not described through other sections in this document appear here.
This section contains the following topics:
• “Main window and menus” (6-2)
• “Avaya IP Agent option dialogs” (6-18)
• “iClarity Settings dialogs” (6-31)
• “Agent Greetings settings dialogs” (6-40)
• “Audio settings” (6-45)
6 - 2 Issue 1.1, March 2002
...........................................................................................................................................................................................................................................................
Dialog Reference
Main window and menus
.............................................................................................................................................................................................................................................................Overview
Purpose This section describes the menus and panels in the Avaya IP Agent main window.
This section includes the following topics:
• “Menu bar” (6-3)
• “Toolbars” (6-13)
• “Information panels” (6-16)
Dialog Reference
6 - 3Issue 1.1, March 2002
............................................................................................................................................................................................................................................................
.............................................................................................................................................................................................................................................................Menu bar
Overview This section provides descriptions and additional information on the items and features found in the menu bar of the Avaya IP Agent window:
This section contains the following topics:
• “File menu” (6-4)
• “Edit menu” (6-5)
• “Call menu” (6-5)
• “View menu” (6-7)
• “Agent menu” (6-9)
• “Tools menu” (6-10)
• “Audio menu” (6-11)
• “Settings Menu” (6-12)
• “Help menu” (6-12)
Introduction The Avaya IP Agent main window provides full-function, multi-line telephony support on your PC. This window is also used to access all the features found in Avaya IP Agent.
This section defines all of the items available in the Avaya IP Agent menus. Some menu items only appear when they are valid for your current configuration. For example, the Call menu item is not available in an IP Endpoint configuration when a call is not currently active. Other menu items and buttons on the interface will be disabled when their functionality cannot be intiated at that time because of configuration, call instance, or agent state.

6 - 4 Issue 1.1, March 2002
...........................................................................................................................................................................................................................................................
Dialog ReferenceMenu bar
File menu
The following items are available on the File menu item:
• Login, Logout, DEFINITY Login, or DEFINITY Logout — These items appear as the first item in this menu and are used for logging the station or agent in and out of the DEFINITY system.
Note:These items to do not appear for Avaya CALLMASTER VI configurations.
• Import Settings — This menu item gives you the ability to open a file containing settings from another Avaya IP Agent installation and apply those settings to this installation.
• Export Settings — This menu item will save the settings from this installation of Avaya IP Agent and save them to a file. This file can then be re-imported to this PC or to another PC with Avaya IP Agent.
• Exit — Performs the necessary logouts for the agent and the DEFINITY system and closes Avaya IP Agent.
Imported and exported settings
Imported and exported files include all of the following settings:
• All settings available in the Program Options window
• Screen pops
• Lightweight Directory Access Protocol (LDAP) servers and settings
• Personal Phone features
• Phone features
• Abbreviated Dialing settings
• Call Center features
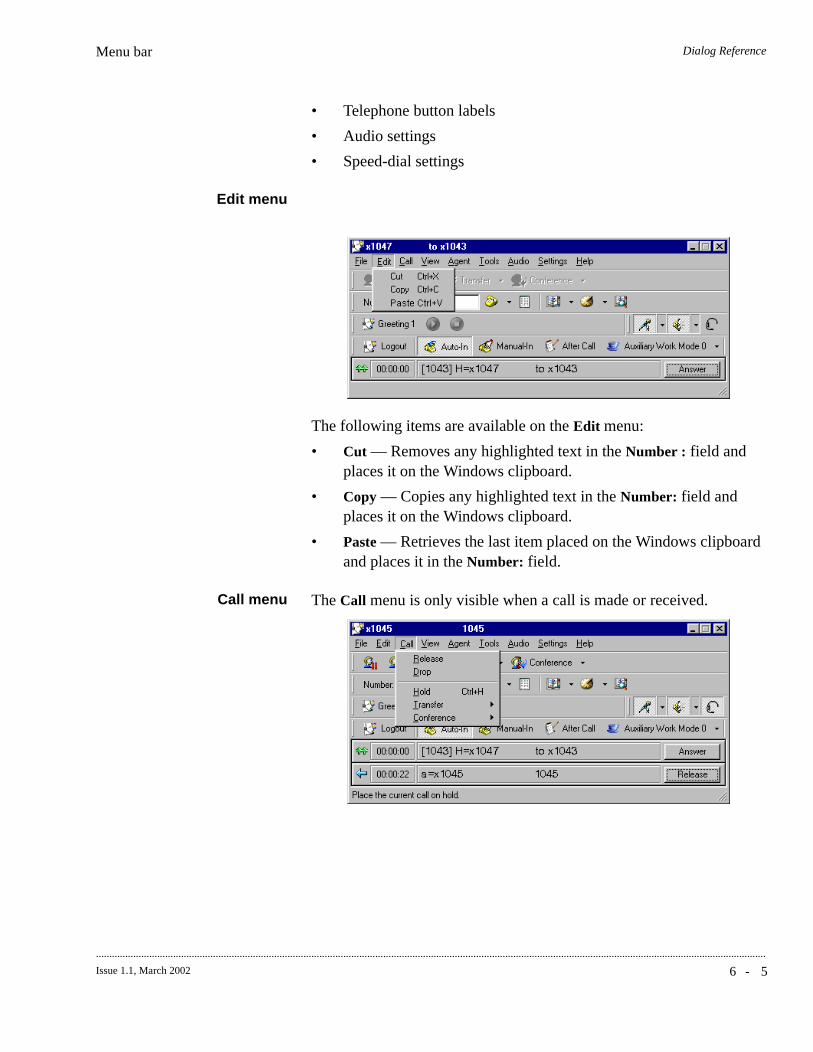
Dialog ReferenceMenu bar
6 - 5Issue 1.1, March 2002
............................................................................................................................................................................................................................................................
• Telephone button labels
• Audio settings
• Speed-dial settings
Edit menu
The following items are available on the Edit menu:
• Cut — Removes any highlighted text in the Number : field and places it on the Windows clipboard.
• Copy — Copies any highlighted text in the Number: field and places it on the Windows clipboard.
• Paste — Retrieves the last item placed on the Windows clipboard and places it in the Number: field.
Call menu The Call menu is only visible when a call is made or received.

6 - 6 Issue 1.1, March 2002
...........................................................................................................................................................................................................................................................
Dialog ReferenceMenu bar
The following items are available on the Call menu:
• Release — Terminates an active call.
• Drop — Disconnects from a call without requiring you to hang up the handset, turn off the speakerphone, or press the switchhook.
• Hold — Places a call on hold until you can return to it. While the call is on hold, you can place another call, activate a feature, or answer another call.
• Transfer — Sends a call from your extension to another extension or outside number. Use this feature when the other party on the call needs to speak with someone else. There are three different types of transfers available. See “Transfer types” (6-6) in this section for more information.
• Conference — Allows you to add other parties to a call There are two different types of transfers available. See “Conference types” (6-7) in this section for more information.
Important! 6400 series telephones must have a Drop button administered on the DEFINITY system in order for the Drop feature in the Avaya IP Agent window or menus to function properly.
Transfer types
The following types of call transfers are available with Avaya IP Agent:
• Basic Transfer — Select Transfer, dial the number, announce the call, and select Transfer again.
• Unsupervised Transfer — Select Transfer, enter the number to be called in the displayed dialog, and select OK to transfer the call. You are not able to talk to the party receiving the transferred call with this type of transfer.
• Enhanced Transfer — Select Transfer, enter the number to be called in the displayed dialog, and select OK. You can announce the call and then, in the displayed message box, select Yes to complete the transfer or No to cancel the transfer.
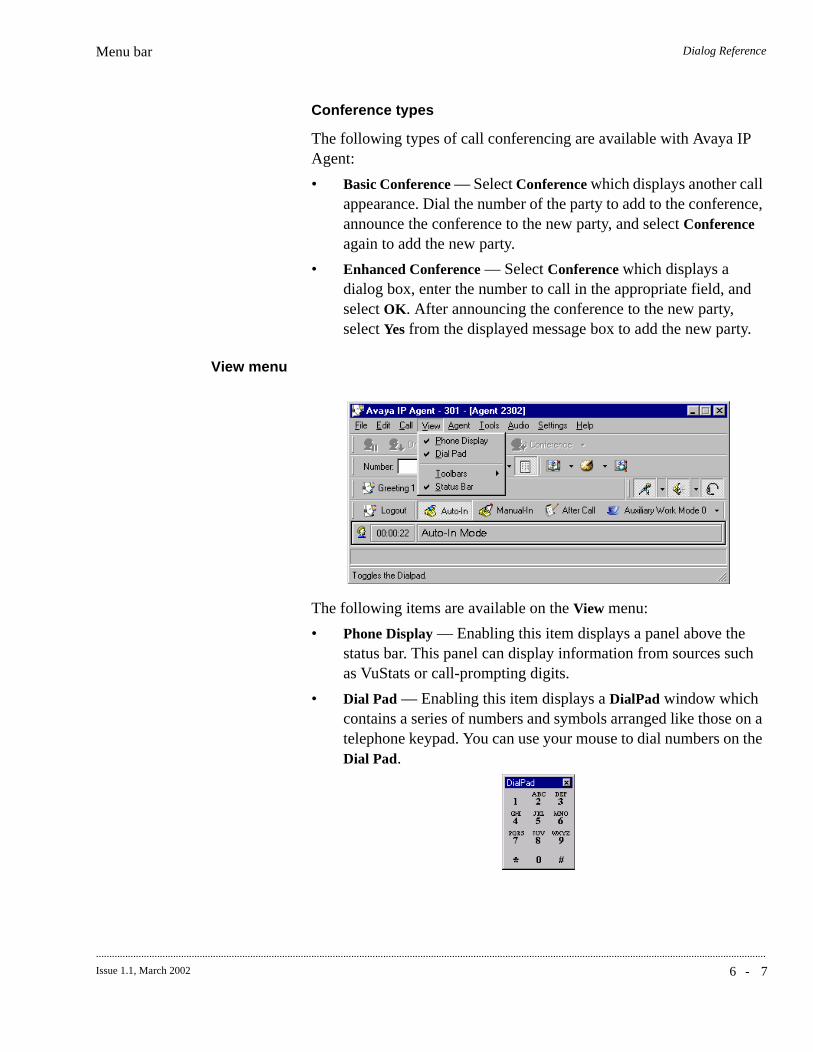
Dialog ReferenceMenu bar
6 - 7Issue 1.1, March 2002
............................................................................................................................................................................................................................................................
Conference types
The following types of call conferencing are available with Avaya IP Agent:
• Basic Conference — Select Conference which displays another call appearance. Dial the number of the party to add to the conference, announce the conference to the new party, and select Conference again to add the new party.
• Enhanced Conference — Select Conference which displays a dialog box, enter the number to call in the appropriate field, and select OK. After announcing the conference to the new party, select Yes from the displayed message box to add the new party.
View menu
The following items are available on the View menu:
• Phone Display — Enabling this item displays a panel above the status bar. This panel can display information from sources such as VuStats or call-prompting digits.
• Dial Pad — Enabling this item displays a DialPad window which contains a series of numbers and symbols arranged like those on a telephone keypad. You can use your mouse to dial numbers on the Dial Pad.
6 - 8 Issue 1.1, March 2002
...........................................................................................................................................................................................................................................................
Dialog ReferenceMenu bar
• Toolbars > Show Labels — Enabling this item displays labels for the buttons on the “Phone Buttons toolbar” (6-13) and the “Agent toolbar” (6-14).
• Toolbars > Phone Buttons — Enabling this item displays the “Phone Buttons toolbar” (6-13) which contains buttons for the Drop, Transfer, Conference, and Hold functions.
• Toolbars > Dial Number — Enabling this item displays the “Dial Number toolbar” (6-14) which provides a field for entering digits as well as the buttons used to access the call history, the phone directory, the DialPad, and the public directory search.
• Toolbars > Audio Control — Enabling this item displays the “Audio toolbar” (6-15) which allows the user to enable or disable audio transmission, audio receiving, and the headset. This toolbar is only available for Road Warrior (VoIP) configurations.
• Toolbars > Agent — Enabling this item displays the “Agent toolbar” (6-14) which an agent can use to change their work states as well as a Login/Logout button.
• Toolbars > Agent Greetings — Enabling this item displays the “Agent Greetings toolbar” (6-15) which is used to select, play, and stop agent greetings that have been previously recorded. This toolbar is only available for the Road Warrior (VoIP) and Avaya CALLMASTER VI configurations.
• Headset — Enabling this item displays the “Headset toolbar” (6-15) which contains a button for answering a call or creating a new call appearance when a call is not currently active.
• Status Bar — Enabling this item displays the Status Bar at the bottom of the Avaya IP Agent main window. The Status Bar is used to display different types of information such as current activity, notification of voice messages, the state of Avaya IP Agent, tooltips, and others.
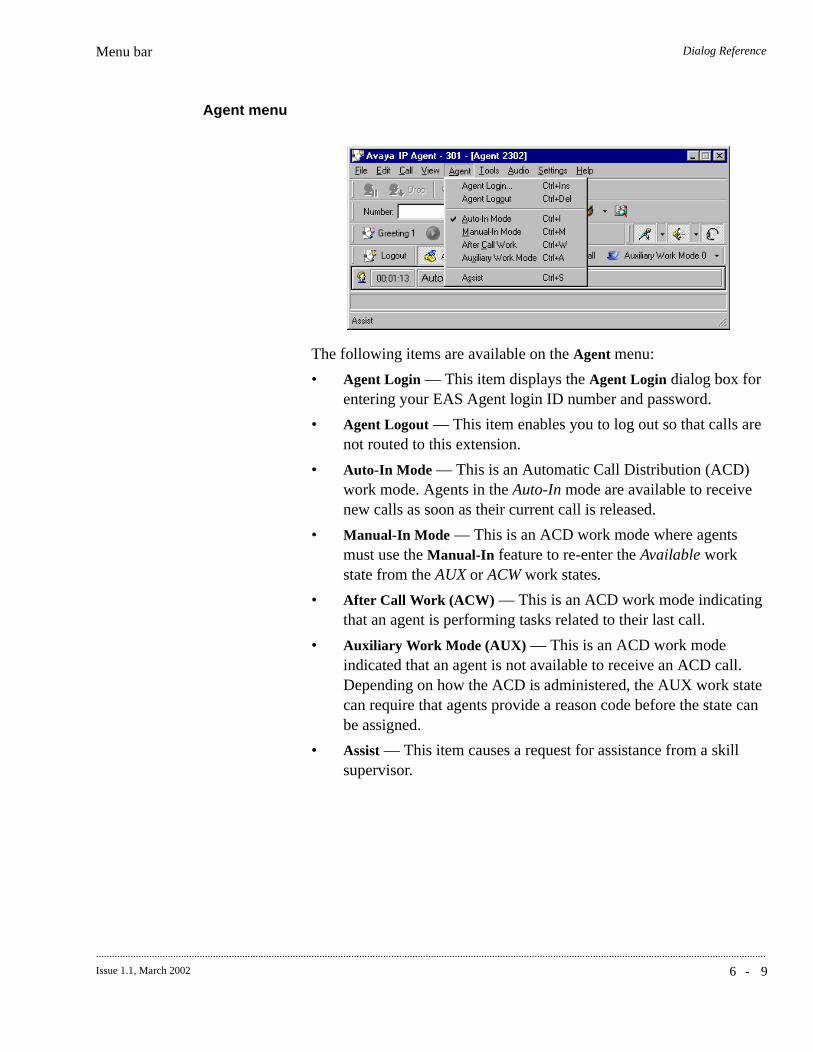
Dialog ReferenceMenu bar
6 - 9Issue 1.1, March 2002
............................................................................................................................................................................................................................................................
Agent menu
The following items are available on the Agent menu:
• Agent Login — This item displays the Agent Login dialog box for entering your EAS Agent login ID number and password.
• Agent Logout — This item enables you to log out so that calls are not routed to this extension.
• Auto-In Mode — This is an Automatic Call Distribution (ACD) work mode. Agents in the Auto-In mode are available to receive new calls as soon as their current call is released.
• Manual-In Mode — This is an ACD work mode where agents must use the Manual-In feature to re-enter the Available work state from the AUX or ACW work states.
• After Call Work (ACW) — This is an ACD work mode indicating that an agent is performing tasks related to their last call.
• Auxiliary Work Mode (AUX) — This is an ACD work mode indicated that an agent is not available to receive an ACD call. Depending on how the ACD is administered, the AUX work state can require that agents provide a reason code before the state can be assigned.
• Assist — This item causes a request for assistance from a skill supervisor.
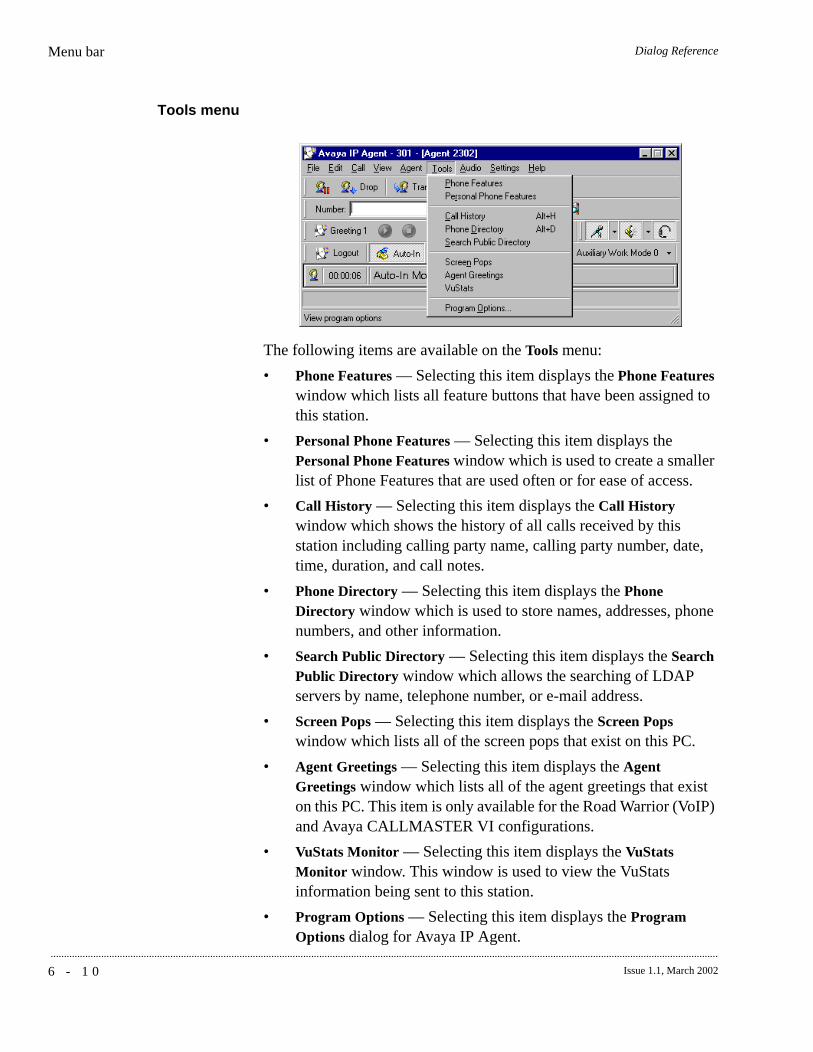
6 - 1 0 Issue 1.1, March 2002
...........................................................................................................................................................................................................................................................
Dialog ReferenceMenu bar
Tools menu
The following items are available on the Tools menu:
• Phone Features — Selecting this item displays the Phone Features window which lists all feature buttons that have been assigned to this station.
• Personal Phone Features — Selecting this item displays the Personal Phone Features window which is used to create a smaller list of Phone Features that are used often or for ease of access.
• Call History — Selecting this item displays the Call History window which shows the history of all calls received by this station including calling party name, calling party number, date, time, duration, and call notes.
• Phone Directory — Selecting this item displays the Phone Directory window which is used to store names, addresses, phone numbers, and other information.
• Search Public Directory — Selecting this item displays the Search Public Directory window which allows the searching of LDAP servers by name, telephone number, or e-mail address.
• Screen Pops — Selecting this item displays the Screen Pops window which lists all of the screen pops that exist on this PC.
• Agent Greetings — Selecting this item displays the Agent Greetings window which lists all of the agent greetings that exist on this PC. This item is only available for the Road Warrior (VoIP) and Avaya CALLMASTER VI configurations.
• VuStats Monitor — Selecting this item displays the VuStats Monitor window. This window is used to view the VuStats information being sent to this station.
• Program Options — Selecting this item displays the Program Options dialog for Avaya IP Agent.
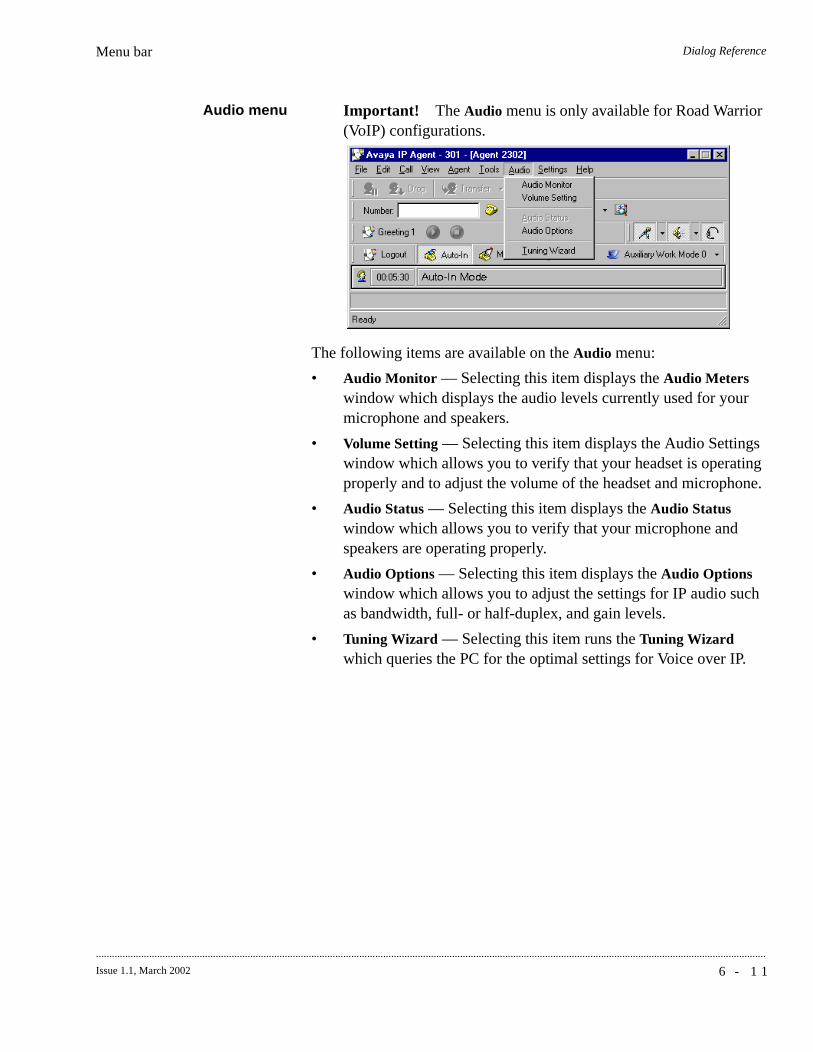
Dialog ReferenceMenu bar
6 - 1 1Issue 1.1, March 2002
............................................................................................................................................................................................................................................................
Audio menu Important! The Audio menu is only available for Road Warrior (VoIP) configurations.
The following items are available on the Audio menu:
• Audio Monitor — Selecting this item displays the Audio Meters window which displays the audio levels currently used for your microphone and speakers.
• Volume Setting — Selecting this item displays the Audio Settings window which allows you to verify that your headset is operating properly and to adjust the volume of the headset and microphone.
• Audio Status — Selecting this item displays the Audio Status window which allows you to verify that your microphone and speakers are operating properly.
• Audio Options — Selecting this item displays the Audio Options window which allows you to adjust the settings for IP audio such as bandwidth, full- or half-duplex, and gain levels.
• Tuning Wizard — Selecting this item runs the Tuning Wizard which queries the PC for the optimal settings for Voice over IP.
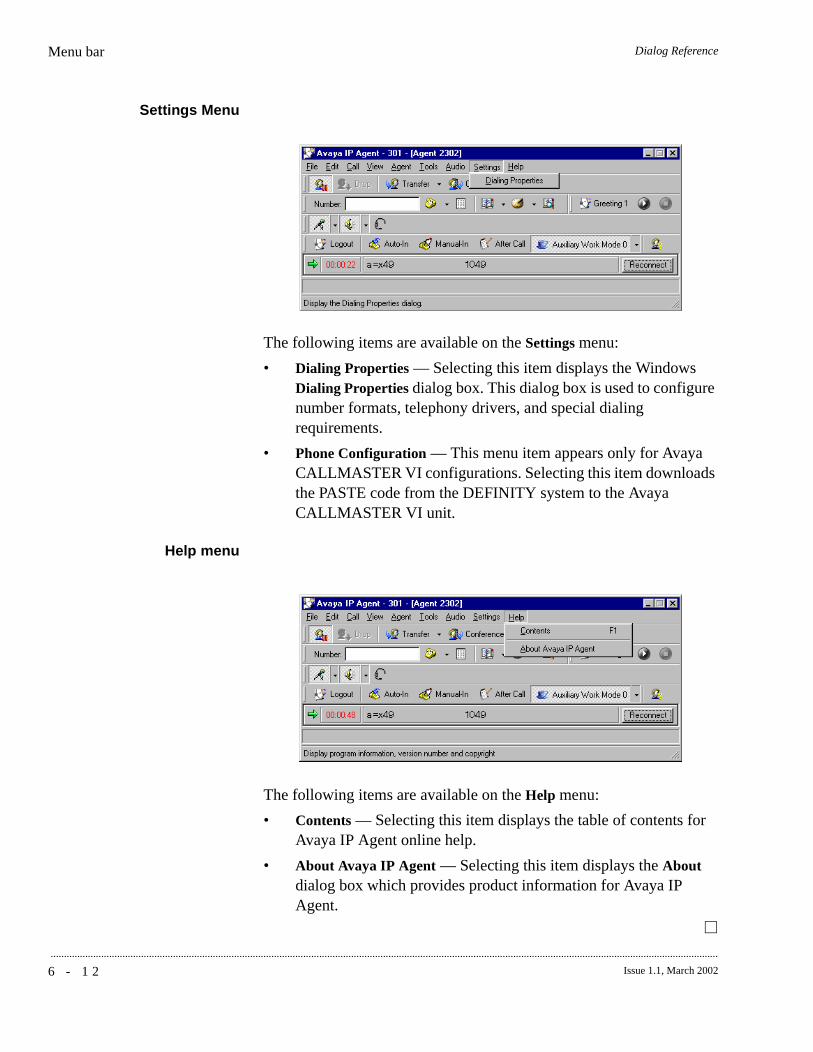
6 - 1 2 Issue 1.1, March 2002
...........................................................................................................................................................................................................................................................
Dialog ReferenceMenu bar
Settings Menu
The following items are available on the Settings menu:
• Dialing Properties — Selecting this item displays the Windows Dialing Properties dialog box. This dialog box is used to configure number formats, telephony drivers, and special dialing requirements.
• Phone Configuration — This menu item appears only for Avaya CALLMASTER VI configurations. Selecting this item downloads the PASTE code from the DEFINITY system to the Avaya CALLMASTER VI unit.
Help menu
The following items are available on the Help menu:
• Contents — Selecting this item displays the table of contents for Avaya IP Agent online help.
• About Avaya IP Agent — Selecting this item displays the About dialog box which provides product information for Avaya IP Agent.
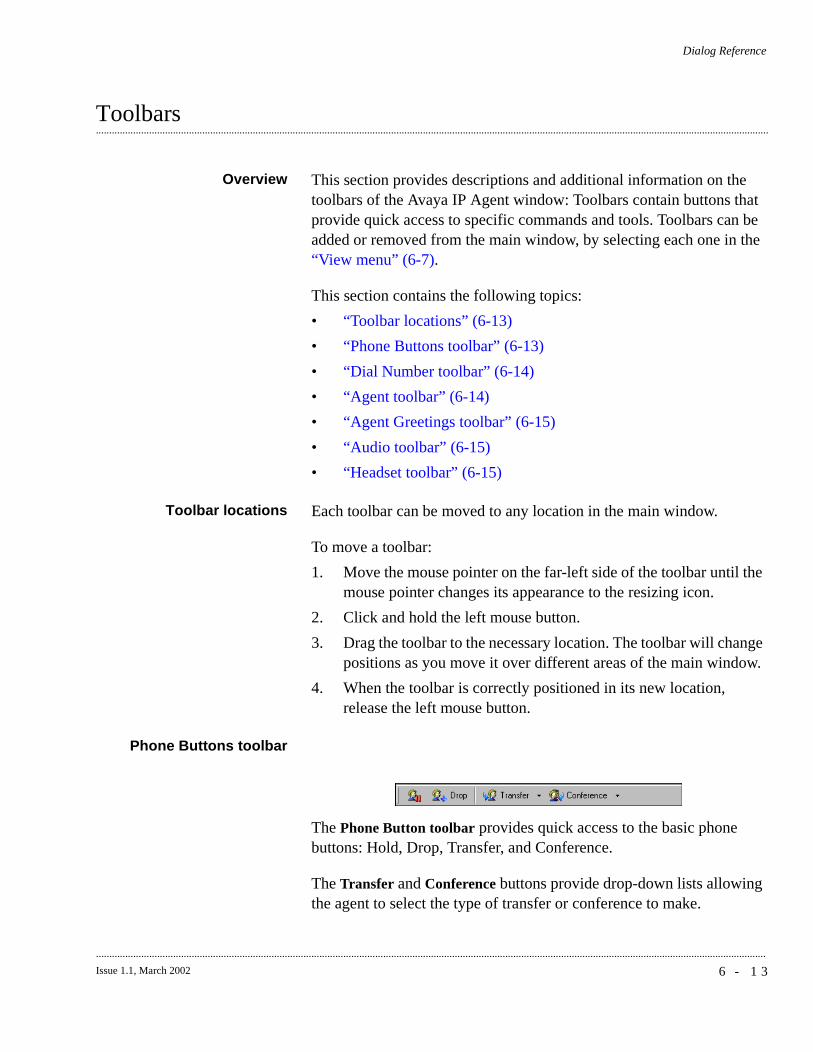
Dialog Reference
6 - 1 3Issue 1.1, March 2002
............................................................................................................................................................................................................................................................
.............................................................................................................................................................................................................................................................Toolbars
Overview This section provides descriptions and additional information on the toolbars of the Avaya IP Agent window: Toolbars contain buttons that provide quick access to specific commands and tools. Toolbars can be added or removed from the main window, by selecting each one in the “View menu” (6-7).
This section contains the following topics:
• “Toolbar locations” (6-13)
• “Phone Buttons toolbar” (6-13)
• “Dial Number toolbar” (6-14)
• “Agent toolbar” (6-14)
• “Agent Greetings toolbar” (6-15)
• “Audio toolbar” (6-15)
• “Headset toolbar” (6-15)
Toolbar locations Each toolbar can be moved to any location in the main window.
To move a toolbar:
1. Move the mouse pointer on the far-left side of the toolbar until the mouse pointer changes its appearance to the resizing icon.
2. Click and hold the left mouse button.
3. Drag the toolbar to the necessary location. The toolbar will change positions as you move it over different areas of the main window.
4. When the toolbar is correctly positioned in its new location, release the left mouse button.
Phone Buttons toolbar
The Phone Button toolbar provides quick access to the basic phone buttons: Hold, Drop, Transfer, and Conference.
The Transfer and Conference buttons provide drop-down lists allowing the agent to select the type of transfer or conference to make.

6 - 1 4 Issue 1.1, March 2002
...........................................................................................................................................................................................................................................................
Dialog ReferenceToolbars
Dial Number toolbar
The Dial Number toolbar provides a Number: field for entering telephone numbers to dial.
Additionally, this field can be used to enter the first characters of a name from the Phone Directory. If the first character of the string entered in this field is a letter, the title of the field will be changed from Number to Directory. When you enter a partial name in this field and then press the Enter key or click the telephone button on the right side of the field, a pop-up menu is displayed with a list of all entries in the Phone Directory that match the string of characters. For example, entering �� in the field and pressing the Enter key could display a pop-up menu with %� ��&�'!�, %�!�(&�'�(, %���(���&�)(�� �, and so forth. This field will only look for entries in the Phone Directory and cannot be used to search a public directory (LDAP).
This toolbar also provides single-click for the following:
• DialPad window
• Phone Directory window
• Speed-dial drop-down list
• Call History window
• Recent call drop-down list
• Search Public Directory window
Agent toolbar
The Agent toolbar provides buttons for agent login and logout and agent states for DEFINITY systems with Expert Agent Selection (EAS).
Dialog ReferenceToolbars
6 - 1 5Issue 1.1, March 2002
............................................................................................................................................................................................................................................................
Agent Greetings toolbar
The Agent Greetings toolbar lets you select, play, and stop greetings. This toolbar is only available for Road Warrior (VoIP) and Avaya CALLMASTER VI configurations.
Audio toolbar
The Audio toolbar allows control of the following areas:
• microphone status and volume
• speaker status and volume
• headset status
This toolbar is only available for Road Warrior (VoIP) and Avaya CALLMASTER VI configurations.
Headset toolbar
The Headset toolbar contains a button used to toggle the headset or handset on or off hook.
Important! If this station has been set as a 606A1 phone type on the DEFINITY system, this button may not function properly in the Telecommuter configuration.

6 - 1 6 Issue 1.1, March 2002
...........................................................................................................................................................................................................................................................
Dialog Reference
.............................................................................................................................................................................................................................................................Information panels
Overview This section contains descriptions and information on the areas of the main window that display information to the user.
There are three different types of panels in Avaya IP Agent:
• “Call Information Panel” (6-16)
• “Agent Information Panel” (6-16)
• “Phone Display Panel” (6-17)
Call Information Panel
Avaya IP Agent displays the Call Information Panel only during incoming and outgoing calls. It provides information about the call, such as call status, call display, call duration, and an Answer/ Release/ Reconnect button.
If a call is currently active and it is listed in the Phone Directory, the name for that contact in the Phone Directory will be listed in this panel instead of the information passed from the ACD.
The call status, incoming, outgoing, or on-hold, is displayed in the first section. Click the right mouse button on this panel to display a popup menu containing available options for this call, such as hold, transfer, and conference.
Agent Information Panel
Avaya IP Agent displays the Agent Information Panel when there are no calls and agent status information is available. If you are logged in, the status information also includes the agent mode state.

Dialog ReferenceInformation panels
6 - 1 7Issue 1.1, March 2002
............................................................................................................................................................................................................................................................
Phone Display Panel
The Phone Display panel is a 40-character display that is located above the Status Bar. This display area is updated automatically with information from the DEFINITY system including call and non-call related information, such as call-prompting digits, VuStats data, and the local date and time display from the ACD.
6 - 1 8 Issue 1.1, March 2002
...........................................................................................................................................................................................................................................................
Dialog Reference
Avaya IP Agent option dialogs
.............................................................................................................................................................................................................................................................Overview
Purpose Use the Program Options dialog to configure the many feature areas of Avaya IP Agent. Select Tools > Program Options... to display this dialog.
This section contains descriptions for the following Avaya IP Agent dialogs:
• “General Settings” (6-19)
• “ACD Agent” (6-20)
• “Call Handling” (6-21)
• “Call History” (6-22)
• “Call Information Display” (6-23)
• “Database Location” (6-24)
• “Sound Effects” (6-24)
• “User Interface Options” (6-25)
• “External Number Format” (6-26)
• “Event Logging” (6-27)
• “Voice Message Number” (6-28)
• “Feature Access” (6-29)
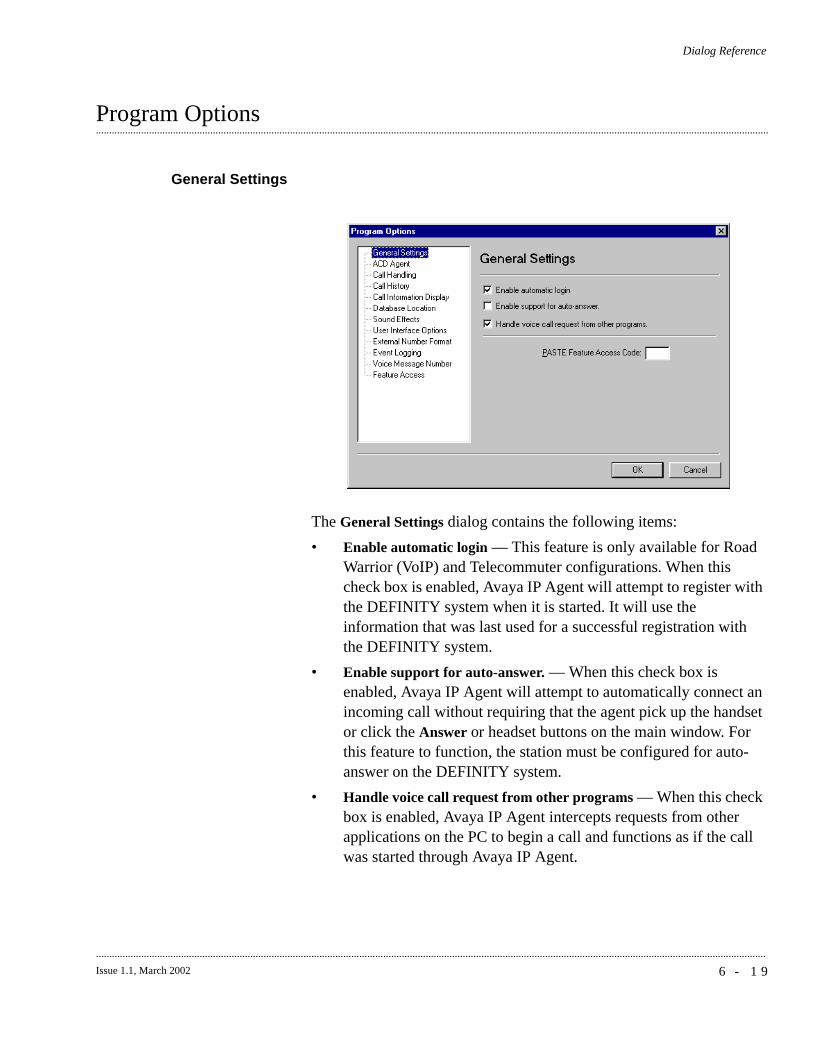
Dialog Reference
6 - 1 9Issue 1.1, March 2002
............................................................................................................................................................................................................................................................
.............................................................................................................................................................................................................................................................Program Options
General Settings
The General Settings dialog contains the following items:
• Enable automatic login — This feature is only available for Road Warrior (VoIP) and Telecommuter configurations. When this check box is enabled, Avaya IP Agent will attempt to register with the DEFINITY system when it is started. It will use the information that was last used for a successful registration with the DEFINITY system.
• Enable support for auto-answer. — When this check box is enabled, Avaya IP Agent will attempt to automatically connect an incoming call without requiring that the agent pick up the handset or click the Answer or headset buttons on the main window. For this feature to function, the station must be configured for auto-answer on the DEFINITY system.
• Handle voice call request from other programs — When this check box is enabled, Avaya IP Agent intercepts requests from other applications on the PC to begin a call and functions as if the call was started through Avaya IP Agent.
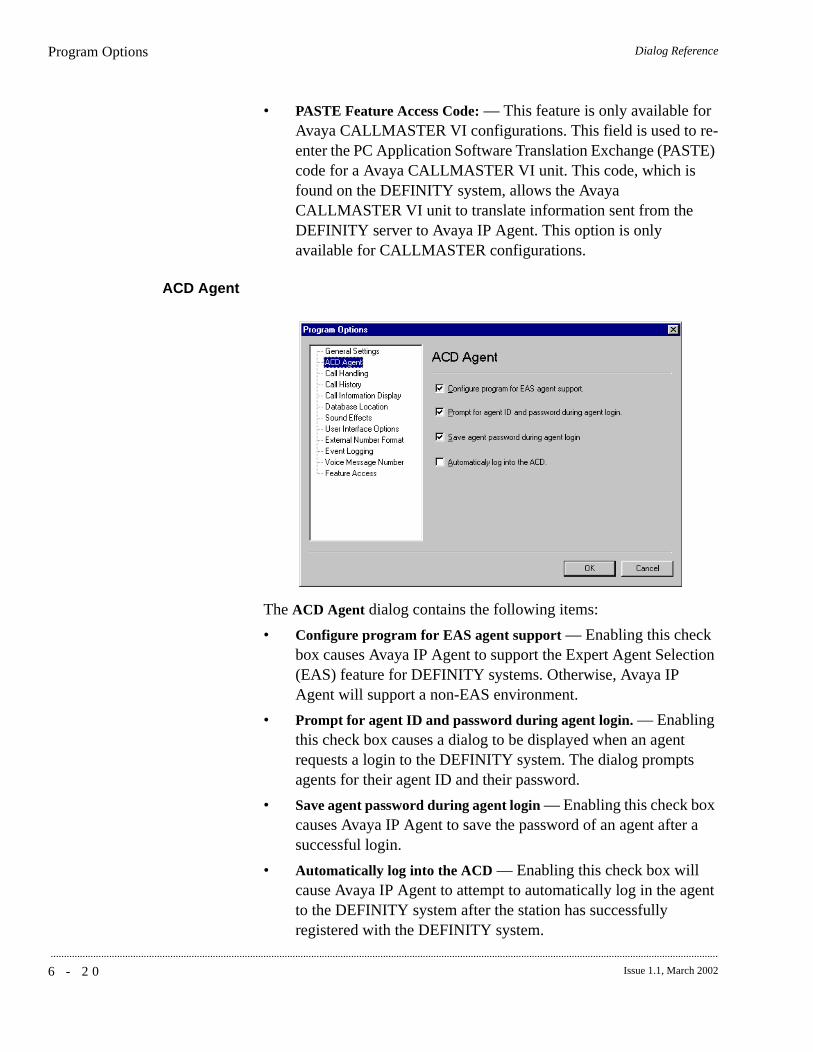
6 - 2 0 Issue 1.1, March 2002
...........................................................................................................................................................................................................................................................
Dialog ReferenceProgram Options
• PASTE Feature Access Code: — This feature is only available for Avaya CALLMASTER VI configurations. This field is used to re-enter the PC Application Software Translation Exchange (PASTE) code for a Avaya CALLMASTER VI unit. This code, which is found on the DEFINITY system, allows the Avaya CALLMASTER VI unit to translate information sent from the DEFINITY server to Avaya IP Agent. This option is only available for CALLMASTER configurations.
ACD Agent
The ACD Agent dialog contains the following items:
• Configure program for EAS agent support — Enabling this check box causes Avaya IP Agent to support the Expert Agent Selection (EAS) feature for DEFINITY systems. Otherwise, Avaya IP Agent will support a non-EAS environment.
• Prompt for agent ID and password during agent login. — Enabling this check box causes a dialog to be displayed when an agent requests a login to the DEFINITY system. The dialog prompts agents for their agent ID and their password.
• Save agent password during agent login — Enabling this check box causes Avaya IP Agent to save the password of an agent after a successful login.
• Automatically log into the ACD — Enabling this check box will cause Avaya IP Agent to attempt to automatically log in the agent to the DEFINITY system after the station has successfully registered with the DEFINITY system.
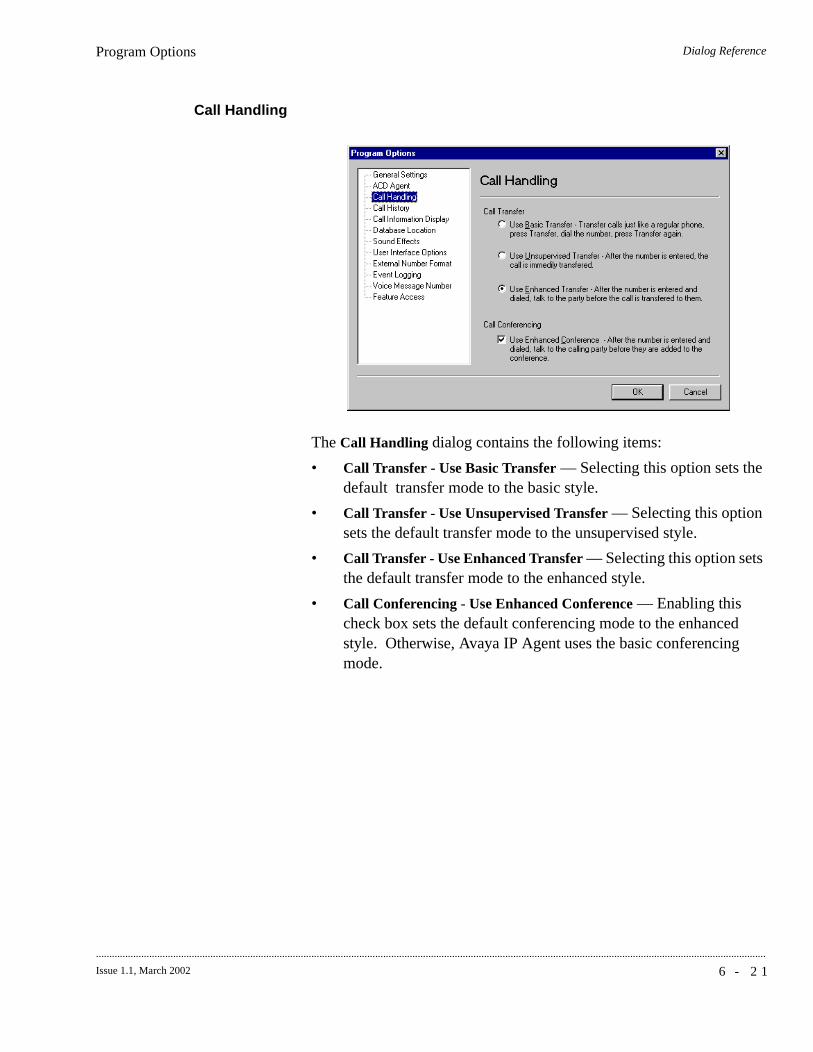
Dialog ReferenceProgram Options
6 - 2 1Issue 1.1, March 2002
............................................................................................................................................................................................................................................................
Call Handling
The Call Handling dialog contains the following items:
• Call Transfer - Use Basic Transfer — Selecting this option sets the default transfer mode to the basic style.
• Call Transfer - Use Unsupervised Transfer — Selecting this option sets the default transfer mode to the unsupervised style.
• Call Transfer - Use Enhanced Transfer — Selecting this option sets the default transfer mode to the enhanced style.
• Call Conferencing - Use Enhanced Conference — Enabling this check box sets the default conferencing mode to the enhanced style. Otherwise, Avaya IP Agent uses the basic conferencing mode.

6 - 2 2 Issue 1.1, March 2002
...........................................................................................................................................................................................................................................................
Dialog ReferenceProgram Options
Call History
The Call History dialog contains the following items:
• Log incoming calls — Enabling this check box causes Avaya IP Agent to make a record of all calls received at this station in the Call History log.
• Log outgoing calls — Enabling this check box causes Avaya IP Agent to make a record of all calls made from this station in the Call History log.
• Months to keep calls in log: — Use this field to specify the length in months that call records are stored in the Call History log.
• Number of recent calls displayed: — Use this field to specify the number of the last ingoing and outgoing calls that are displayed when you click the Call History quick list on the Number toolbar of the main window.
• Clear history — Selecting this button will clear all call records from the Call History log.
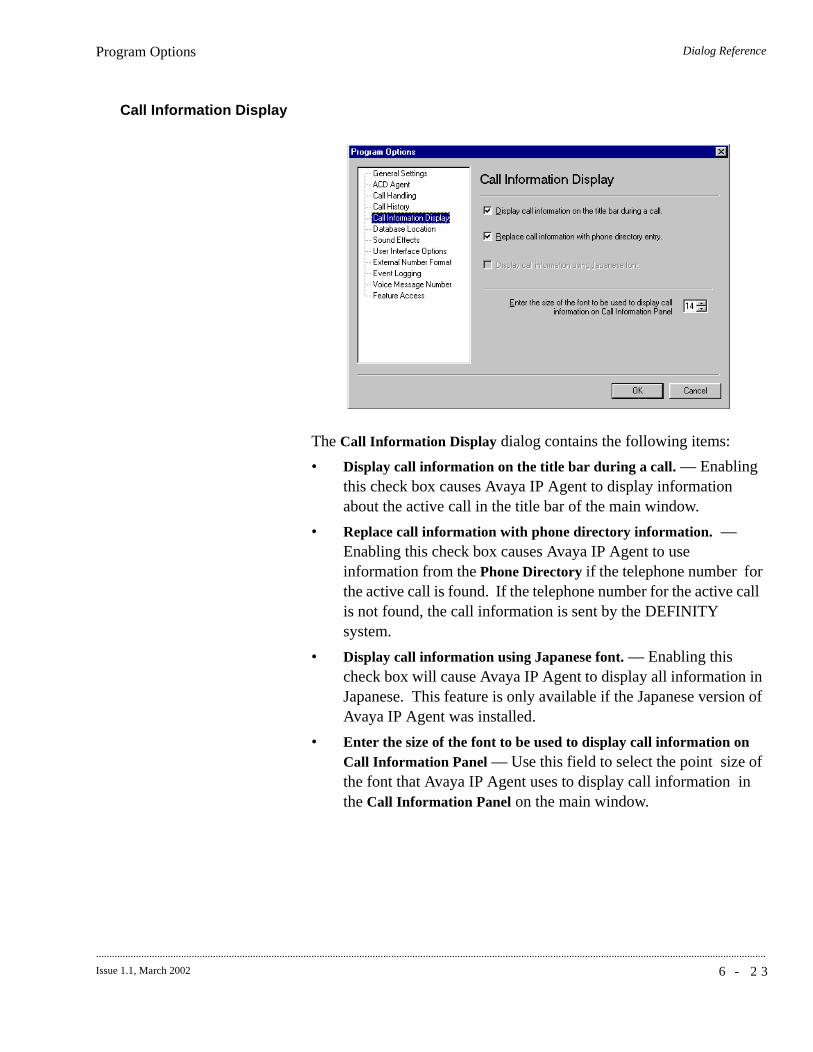
Dialog ReferenceProgram Options
6 - 2 3Issue 1.1, March 2002
............................................................................................................................................................................................................................................................
Call Information Display
The Call Information Display dialog contains the following items:
• Display call information on the title bar during a call. — Enabling this check box causes Avaya IP Agent to display information about the active call in the title bar of the main window.
• Replace call information with phone directory information. — Enabling this check box causes Avaya IP Agent to use information from the Phone Directory if the telephone number for the active call is found. If the telephone number for the active call is not found, the call information is sent by the DEFINITY system.
• Display call information using Japanese font. — Enabling this check box will cause Avaya IP Agent to display all information in Japanese. This feature is only available if the Japanese version of Avaya IP Agent was installed.
• Enter the size of the font to be used to display call information on Call Information Panel — Use this field to select the point size of the font that Avaya IP Agent uses to display call information in the Call Information Panel on the main window.
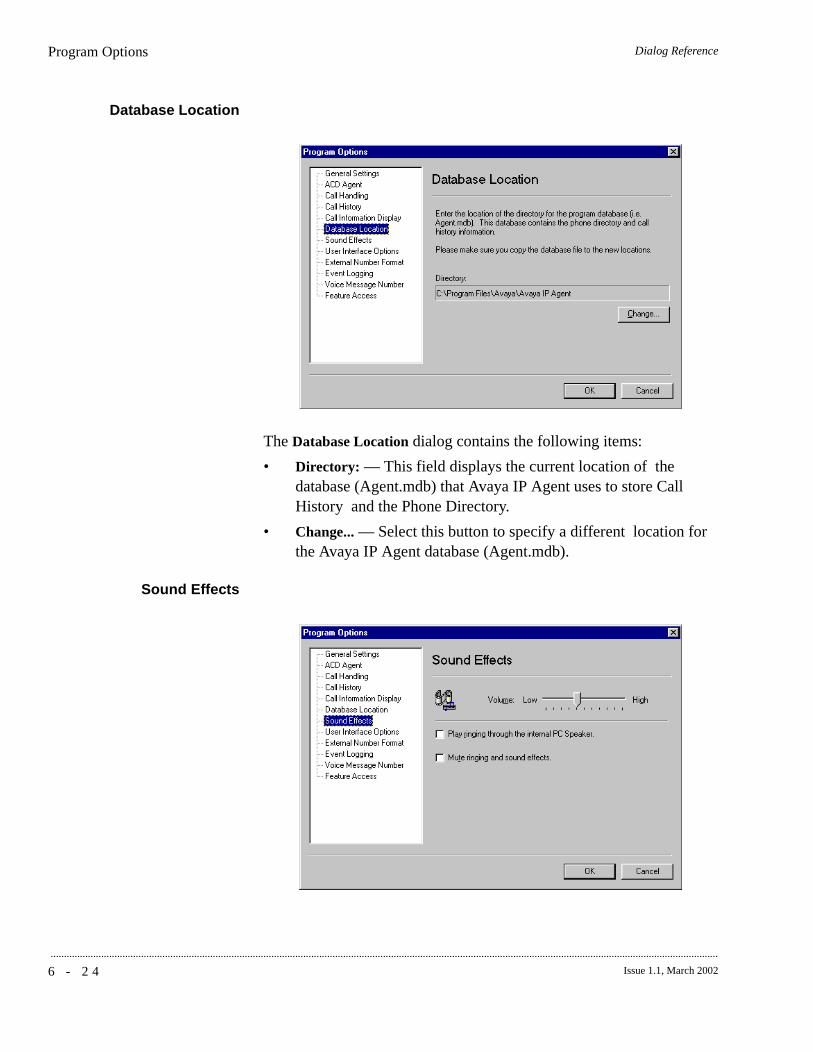
6 - 2 4 Issue 1.1, March 2002
...........................................................................................................................................................................................................................................................
Dialog ReferenceProgram Options
Database Location
The Database Location dialog contains the following items:
• Directory: — This field displays the current location of the database (Agent.mdb) that Avaya IP Agent uses to store Call History and the Phone Directory.
• Change... — Select this button to specify a different location for the Avaya IP Agent database (Agent.mdb).
Sound Effects
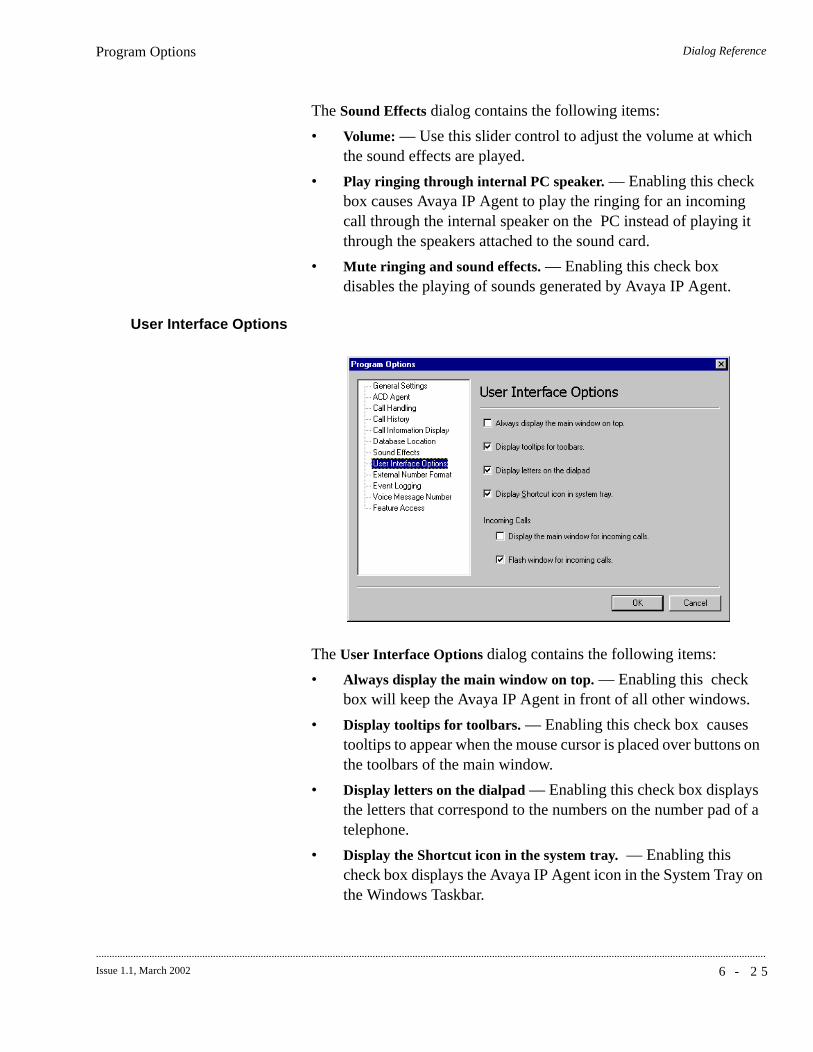
Dialog ReferenceProgram Options
6 - 2 5Issue 1.1, March 2002
............................................................................................................................................................................................................................................................
The Sound Effects dialog contains the following items:
• Volume: — Use this slider control to adjust the volume at which the sound effects are played.
• Play ringing through internal PC speaker. — Enabling this check box causes Avaya IP Agent to play the ringing for an incoming call through the internal speaker on the PC instead of playing it through the speakers attached to the sound card.
• Mute ringing and sound effects. — Enabling this check box disables the playing of sounds generated by Avaya IP Agent.
User Interface Options
The User Interface Options dialog contains the following items:
• Always display the main window on top. — Enabling this check box will keep the Avaya IP Agent in front of all other windows.
• Display tooltips for toolbars. — Enabling this check box causes tooltips to appear when the mouse cursor is placed over buttons on the toolbars of the main window.
• Display letters on the dialpad — Enabling this check box displays the letters that correspond to the numbers on the number pad of a telephone.
• Display the Shortcut icon in the system tray. — Enabling this check box displays the Avaya IP Agent icon in the System Tray on the Windows Taskbar.
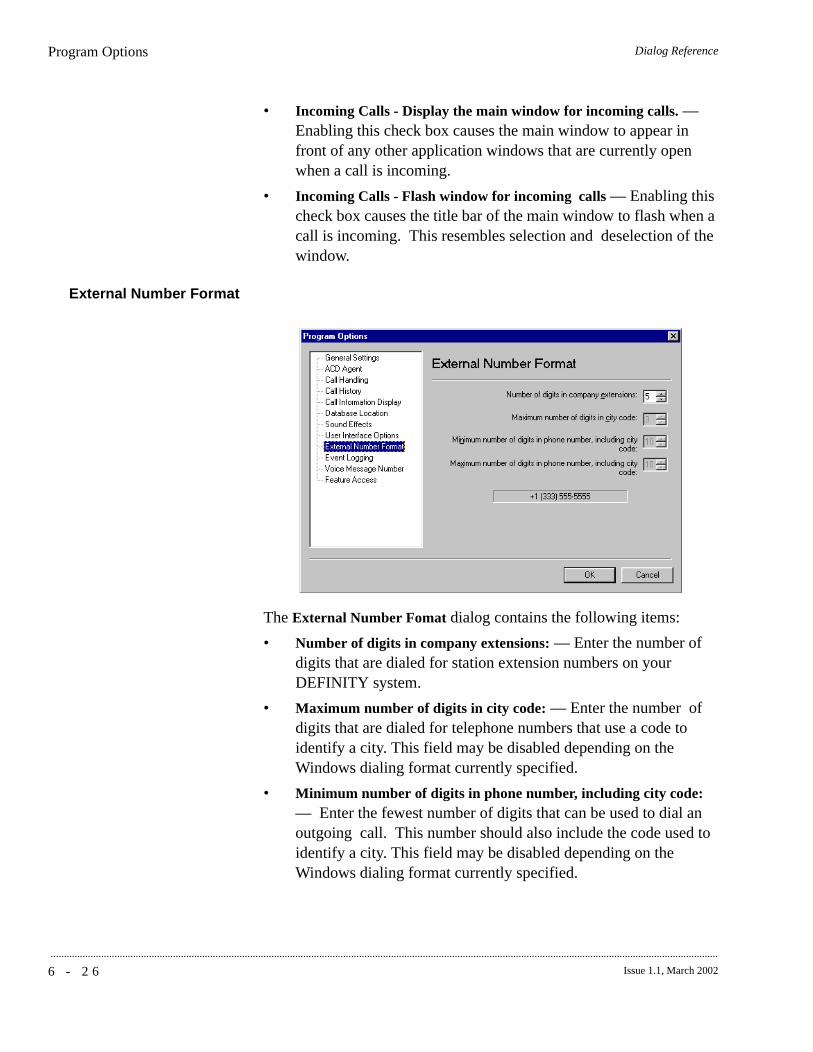
6 - 2 6 Issue 1.1, March 2002
...........................................................................................................................................................................................................................................................
Dialog ReferenceProgram Options
• Incoming Calls - Display the main window for incoming calls. — Enabling this check box causes the main window to appear in front of any other application windows that are currently open when a call is incoming.
• Incoming Calls - Flash window for incoming calls — Enabling this check box causes the title bar of the main window to flash when a call is incoming. This resembles selection and deselection of the window.
External Number Format
The External Number Fomat dialog contains the following items:
• Number of digits in company extensions: — Enter the number of digits that are dialed for station extension numbers on your DEFINITY system.
• Maximum number of digits in city code: — Enter the number of digits that are dialed for telephone numbers that use a code to identify a city. This field may be disabled depending on the Windows dialing format currently specified.
• Minimum number of digits in phone number, including city code: — Enter the fewest number of digits that can be used to dial an outgoing call. This number should also include the code used to identify a city. This field may be disabled depending on the Windows dialing format currently specified.
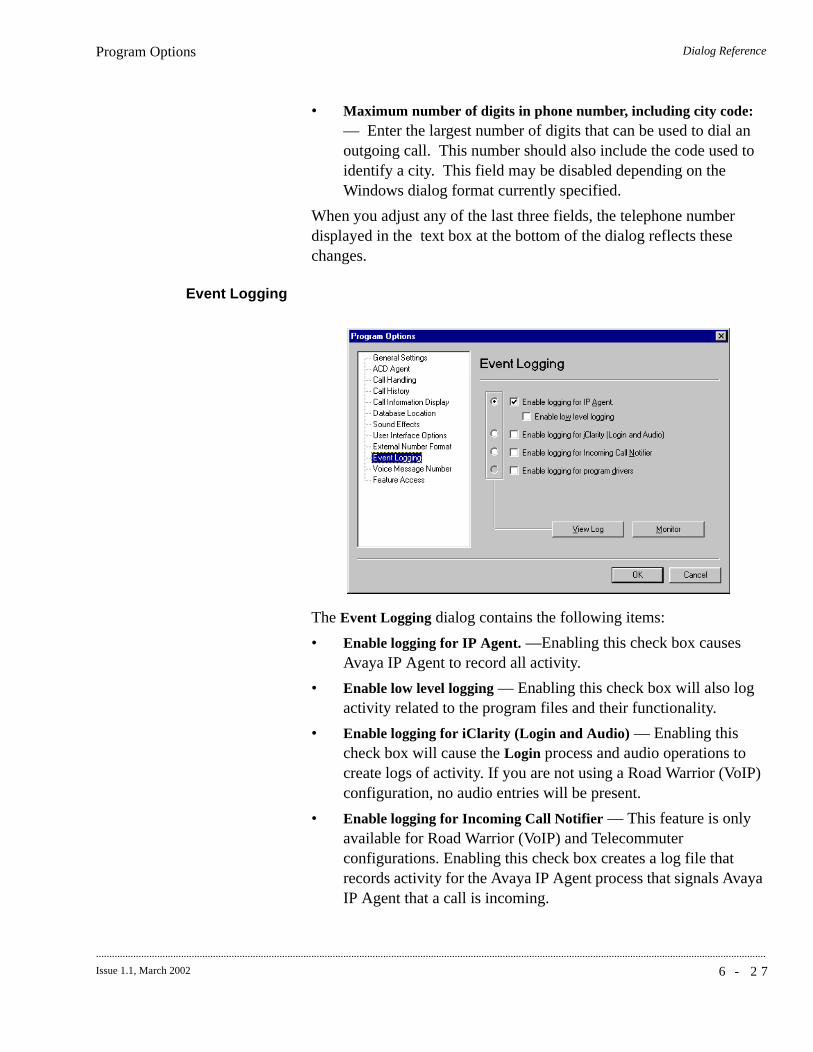
Dialog ReferenceProgram Options
6 - 2 7Issue 1.1, March 2002
............................................................................................................................................................................................................................................................
• Maximum number of digits in phone number, including city code: — Enter the largest number of digits that can be used to dial an outgoing call. This number should also include the code used to identify a city. This field may be disabled depending on the Windows dialog format currently specified.
When you adjust any of the last three fields, the telephone number displayed in the text box at the bottom of the dialog reflects these changes.
Event Logging
The Event Logging dialog contains the following items:
• Enable logging for IP Agent. —Enabling this check box causes Avaya IP Agent to record all activity.
• Enable low level logging — Enabling this check box will also log activity related to the program files and their functionality.
• Enable logging for iClarity (Login and Audio) — Enabling this check box will cause the Login process and audio operations to create logs of activity. If you are not using a Road Warrior (VoIP) configuration, no audio entries will be present.
• Enable logging for Incoming Call Notifier — This feature is only available for Road Warrior (VoIP) and Telecommuter configurations. Enabling this check box creates a log file that records activity for the Avaya IP Agent process that signals Avaya IP Agent that a call is incoming.
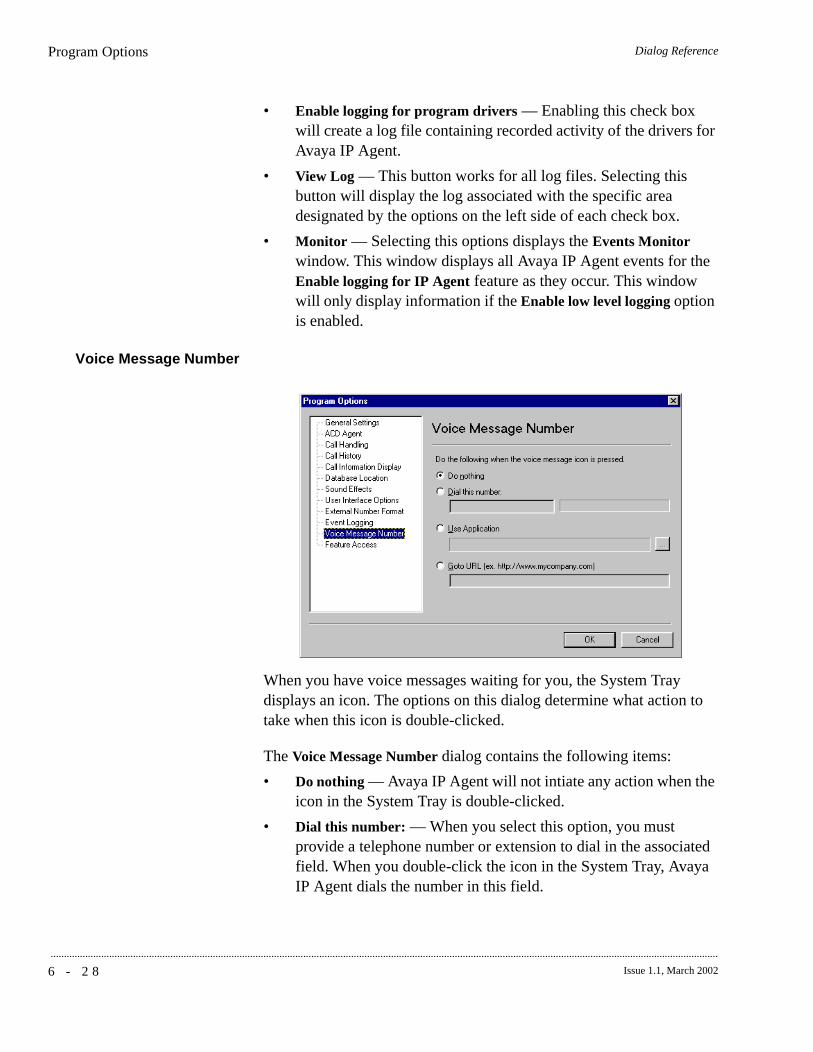
6 - 2 8 Issue 1.1, March 2002
...........................................................................................................................................................................................................................................................
Dialog ReferenceProgram Options
• Enable logging for program drivers — Enabling this check box will create a log file containing recorded activity of the drivers for Avaya IP Agent.
• View Log — This button works for all log files. Selecting this button will display the log associated with the specific area designated by the options on the left side of each check box.
• Monitor — Selecting this options displays the Events Monitor window. This window displays all Avaya IP Agent events for the Enable logging for IP Agent feature as they occur. This window will only display information if the Enable low level logging option is enabled.
Voice Message Number
When you have voice messages waiting for you, the System Tray displays an icon. The options on this dialog determine what action to take when this icon is double-clicked.
The Voice Message Number dialog contains the following items:
• Do nothing — Avaya IP Agent will not intiate any action when the icon in the System Tray is double-clicked.
• Dial this number: — When you select this option, you must provide a telephone number or extension to dial in the associated field. When you double-click the icon in the System Tray, Avaya IP Agent dials the number in this field.
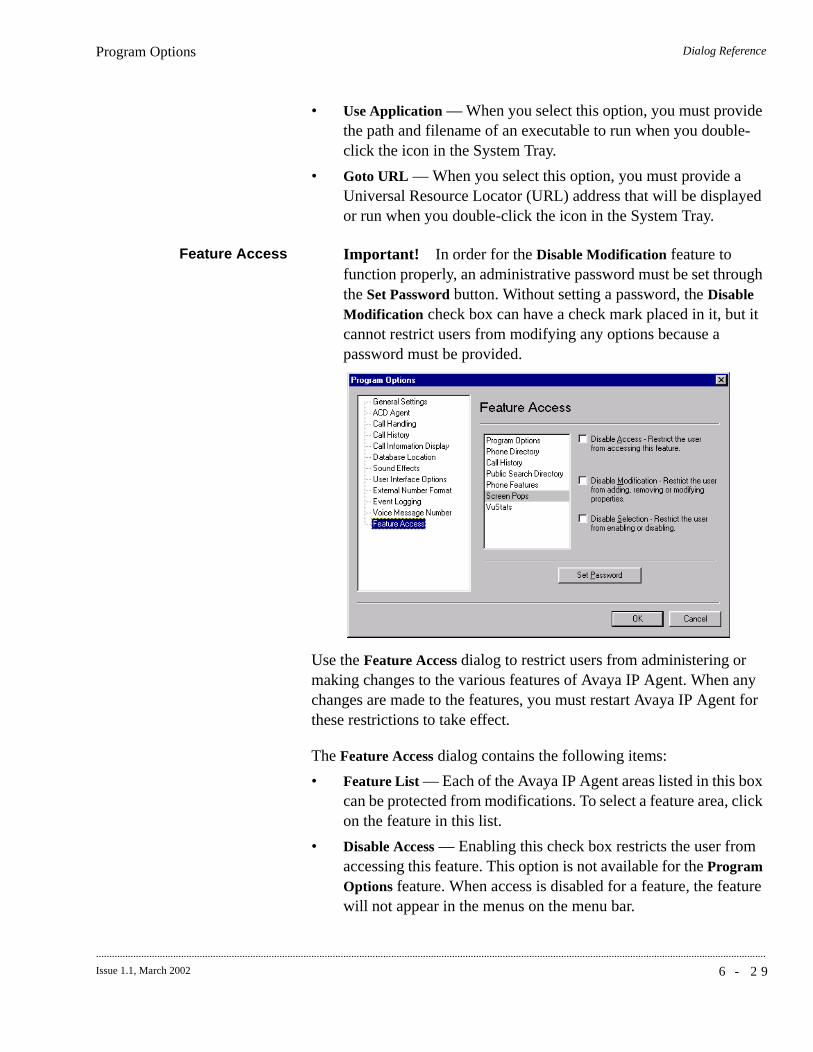
Dialog ReferenceProgram Options
6 - 2 9Issue 1.1, March 2002
............................................................................................................................................................................................................................................................
• Use Application — When you select this option, you must provide the path and filename of an executable to run when you double-click the icon in the System Tray.
• Goto URL — When you select this option, you must provide a Universal Resource Locator (URL) address that will be displayed or run when you double-click the icon in the System Tray.
Feature Access Important! In order for the Disable Modification feature to function properly, an administrative password must be set through the Set Password button. Without setting a password, the Disable Modification check box can have a check mark placed in it, but it cannot restrict users from modifying any options because a password must be provided.
Use the Feature Access dialog to restrict users from administering or making changes to the various features of Avaya IP Agent. When any changes are made to the features, you must restart Avaya IP Agent for these restrictions to take effect.
The Feature Access dialog contains the following items:
• Feature List — Each of the Avaya IP Agent areas listed in this box can be protected from modifications. To select a feature area, click on the feature in this list.
• Disable Access — Enabling this check box restricts the user from accessing this feature. This option is not available for the Program Options feature. When access is disabled for a feature, the feature will not appear in the menus on the menu bar.

6 - 3 0 Issue 1.1, March 2002
...........................................................................................................................................................................................................................................................
Dialog ReferenceProgram Options
• Disable Modification — Enabling this check box restricts the user from altering the feature.
• Disable Selection — Enabling this check box restricts the user from activating a screen pop by double-clicking it in the Screen Pops window.
• Set Password/Enter Password — Selecting this button displays the Change Password... dialog. When you enter a password, the options for the Feature Access dialog cannot be changed until the proper password is entered.
Dialog Reference
6 - 3 1Issue 1.1, March 2002
............................................................................................................................................................................................................................................................
iClarity Settings dialogs
.............................................................................................................................................................................................................................................................Overview
Purpose The iClarity Settings dialogs are used to specify the settings for Telecommuter and Road Warrior (VoIP) configurations. These dialogs are accessed by pressing the Settings button on the Login window used to register with a DEFINITY system.
This section contains the following topics:
• “Login tab” (6-32)
• “Server tab” (6-34)
• “Audio tab” (6-36)
• “Emergency tab” (6-37)
• “Advanced tab” (6-38)
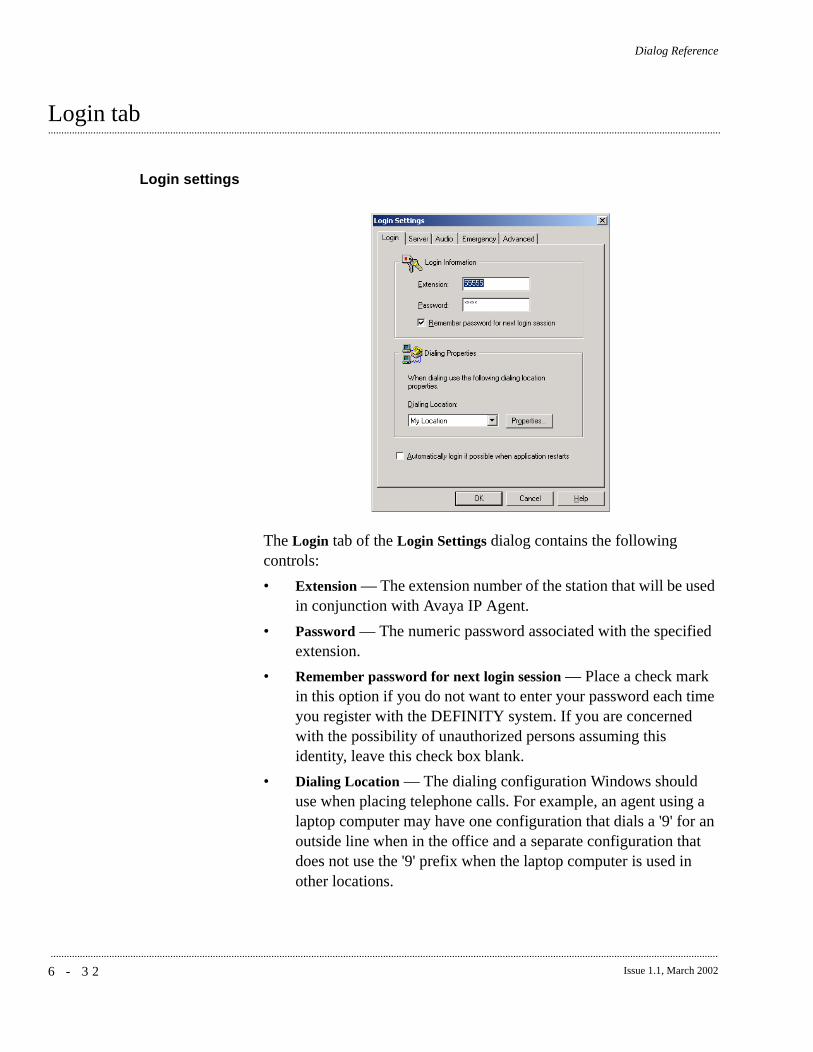
6 - 3 2 Issue 1.1, March 2002
...........................................................................................................................................................................................................................................................
Dialog Reference
.............................................................................................................................................................................................................................................................Login tab
Login settings
The Login tab of the Login Settings dialog contains the following controls:
• Extension — The extension number of the station that will be used in conjunction with Avaya IP Agent.
• Password — The numeric password associated with the specified extension.
• Remember password for next login session — Place a check mark in this option if you do not want to enter your password each time you register with the DEFINITY system. If you are concerned with the possibility of unauthorized persons assuming this identity, leave this check box blank.
• Dialing Location — The dialing configuration Windows should use when placing telephone calls. For example, an agent using a laptop computer may have one configuration that dials a '9' for an outside line when in the office and a separate configuration that does not use the '9' prefix when the laptop computer is used in other locations.

Dialog ReferenceLogin tab
6 - 3 3Issue 1.1, March 2002
............................................................................................................................................................................................................................................................
• Properties — The setting for the dialing configuration used for the location displayed in Dialing Location list.
• Automatically login if possible when application restarts — Placing a check mark in this check box causes automatic registration with the DEFINITY system when Avaya IP Agent is started.
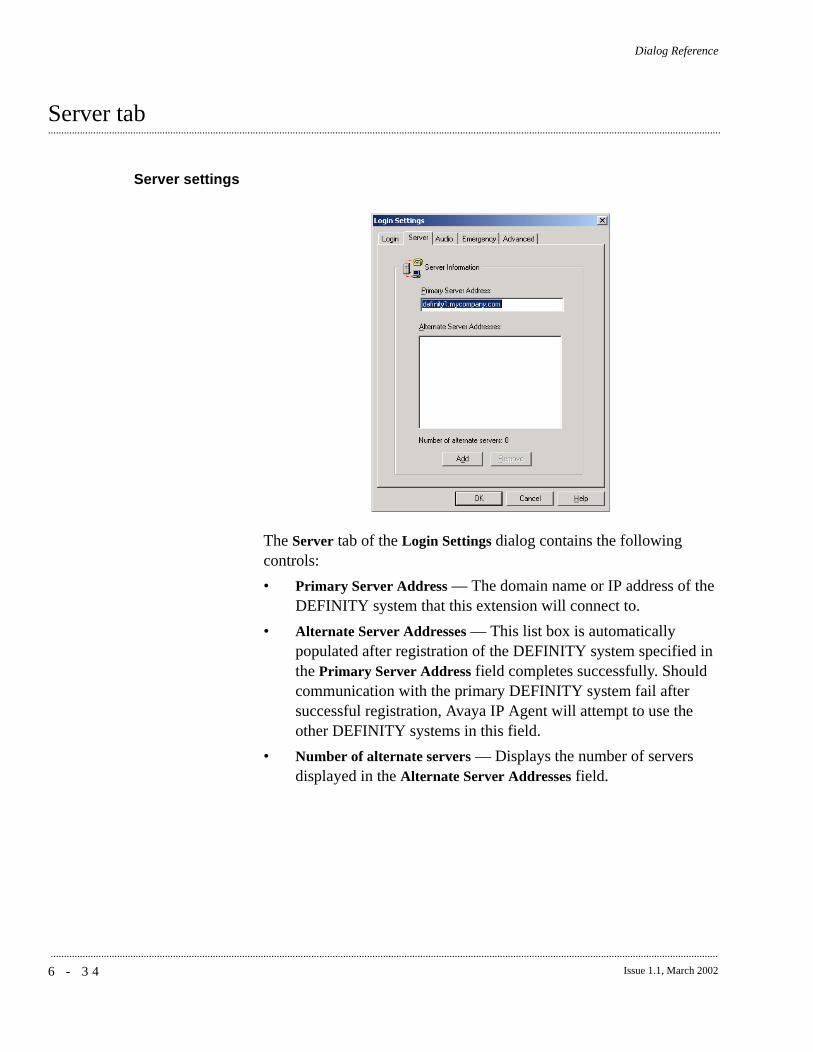
6 - 3 4 Issue 1.1, March 2002
...........................................................................................................................................................................................................................................................
Dialog Reference
.............................................................................................................................................................................................................................................................Server tab
Server settings
The Server tab of the Login Settings dialog contains the following controls:
• Primary Server Address — The domain name or IP address of the DEFINITY system that this extension will connect to.
• Alternate Server Addresses — This list box is automatically populated after registration of the DEFINITY system specified in the Primary Server Address field completes successfully. Should communication with the primary DEFINITY system fail after successful registration, Avaya IP Agent will attempt to use the other DEFINITY systems in this field.
• Number of alternate servers — Displays the number of servers displayed in the Alternate Server Addresses field.
Dialog ReferenceServer tab
6 - 3 5Issue 1.1, March 2002
............................................................................................................................................................................................................................................................
• Add — This button allows a manual addition of a DEFINITY system to the list of alternate DEFINITY systems.
• Remove — After you highlight an address in the Alternate Server Addresses field, selecting this button removes that entry from the list. Removing a DEFINITY system from the list in this manner only affects the current Avaya IP Agent session. If you log out of the DEFINITY system or shut down Avaya IP Agent and then reconnect, this list of alternate server addresses is again refreshed from the list kept on the DEFINITY system.
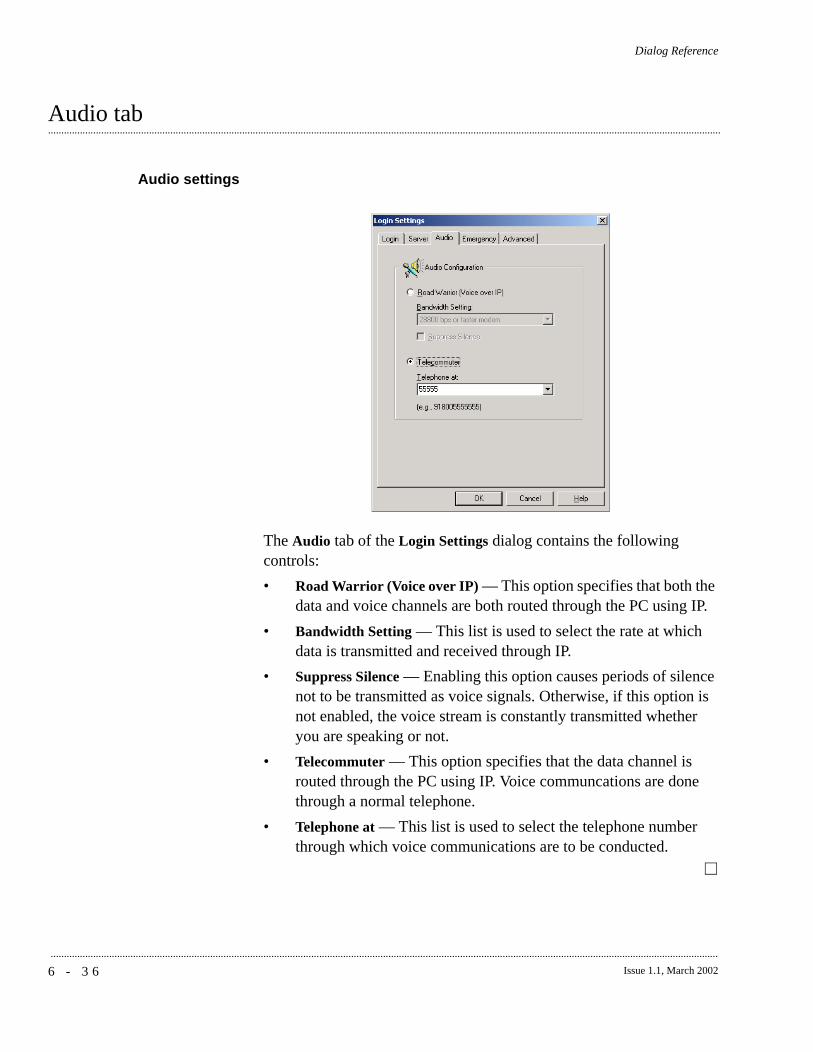
6 - 3 6 Issue 1.1, March 2002
...........................................................................................................................................................................................................................................................
Dialog Reference
.............................................................................................................................................................................................................................................................Audio tab
Audio settings
The Audio tab of the Login Settings dialog contains the following controls:
• Road Warrior (Voice over IP) — This option specifies that both the data and voice channels are both routed through the PC using IP.
• Bandwidth Setting — This list is used to select the rate at which data is transmitted and received through IP.
• Suppress Silence — Enabling this option causes periods of silence not to be transmitted as voice signals. Otherwise, if this option is not enabled, the voice stream is constantly transmitted whether you are speaking or not.
• Telecommuter — This option specifies that the data channel is routed through the PC using IP. Voice communcations are done through a normal telephone.
• Telephone at — This list is used to select the telephone number through which voice communications are to be conducted.
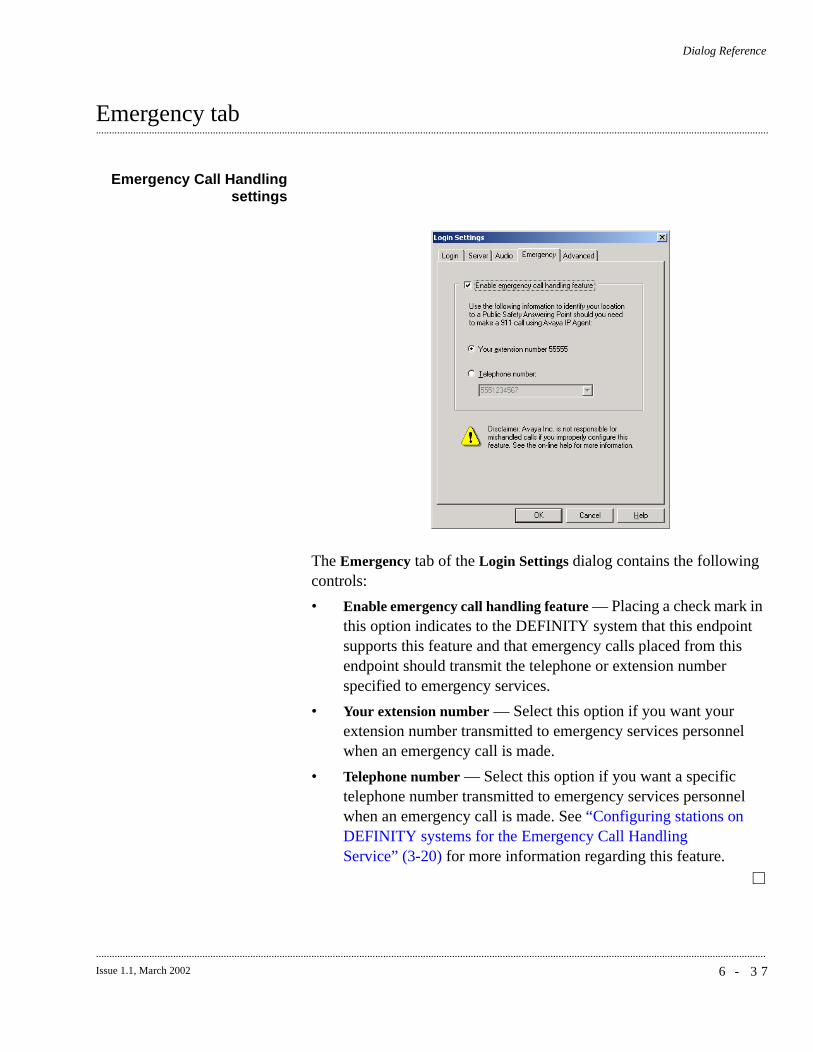
Dialog Reference
6 - 3 7Issue 1.1, March 2002
............................................................................................................................................................................................................................................................
.............................................................................................................................................................................................................................................................Emergency tab
Emergency Call Handlingsettings
The Emergency tab of the Login Settings dialog contains the following controls:
• Enable emergency call handling feature — Placing a check mark in this option indicates to the DEFINITY system that this endpoint supports this feature and that emergency calls placed from this endpoint should transmit the telephone or extension number specified to emergency services.
• Your extension number — Select this option if you want your extension number transmitted to emergency services personnel when an emergency call is made.
• Telephone number — Select this option if you want a specific telephone number transmitted to emergency services personnel when an emergency call is made. See “Configuring stations on DEFINITY systems for the Emergency Call Handling Service” (3-20) for more information regarding this feature.

6 - 3 8 Issue 1.1, March 2002
...........................................................................................................................................................................................................................................................
Dialog Reference
.............................................................................................................................................................................................................................................................Advanced tab
Advanced settings
The Advanced tab of the Login Settings dialog contains the following controls:
• Use the following IP address (as displayed by the VPN client) — Select this option if you need to replace the IP address of this PC with a different IP address so that transmissions from this PC are recognized by the VPN. The IP address specified cannot be #*#*#*#. The VPN information must be provided before registering with the DEFINITY system. For more information on using VPNs with Avaya IP Agent, see the README.TXT file in your Avaya IP Agent installation directory.
• Choose from the following port range to communicate with the server — This feature is used to restrict the iClarity IP Audio to a select range of ports with which to communicate through a network firewall. The range specified must contain at least 100 ports.

Dialog ReferenceAdvanced tab
6 - 3 9Issue 1.1, March 2002
............................................................................................................................................................................................................................................................
• Lowest port number — Use this field to specify the lowest port that the iClarity IP Audio will use. The minimum for this field is 1025.
• Highest port number — Use this field to specify the highest port that the iClarity IP Audio will use. The maximum for this field is 65535.
6 - 4 0 Issue 1.1, March 2002
...........................................................................................................................................................................................................................................................
Dialog Reference
Agent Greetings settings dialogs
.............................................................................................................................................................................................................................................................Overview
Purpose The Agent Greetings setting dialogs are used to configure a single Agent Greeting. Through these settings, you can configure the instances when this Agent Greeting will be played.
This section contains the following topics:
• “Greeting Description settings” (6-41)
• “ANI settings” (6-42)
• “VDN settings” (6-43)
• “Prompted Digits settings” (6-44)
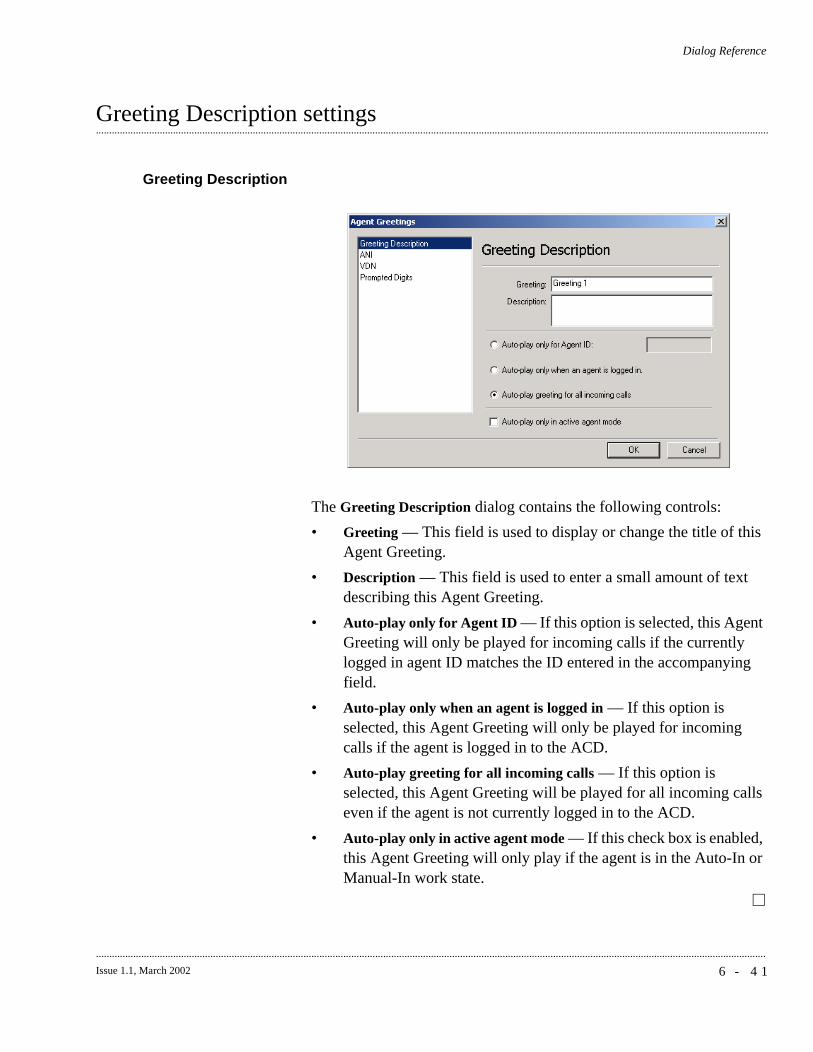
Dialog Reference
6 - 4 1Issue 1.1, March 2002
............................................................................................................................................................................................................................................................
.............................................................................................................................................................................................................................................................Greeting Description settings
Greeting Description
The Greeting Description dialog contains the following controls:
• Greeting — This field is used to display or change the title of this Agent Greeting.
• Description — This field is used to enter a small amount of text describing this Agent Greeting.
• Auto-play only for Agent ID — If this option is selected, this Agent Greeting will only be played for incoming calls if the currently logged in agent ID matches the ID entered in the accompanying field.
• Auto-play only when an agent is logged in — If this option is selected, this Agent Greeting will only be played for incoming calls if the agent is logged in to the ACD.
• Auto-play greeting for all incoming calls — If this option is selected, this Agent Greeting will be played for all incoming calls even if the agent is not currently logged in to the ACD.
• Auto-play only in active agent mode — If this check box is enabled, this Agent Greeting will only play if the agent is in the Auto-In or Manual-In work state.
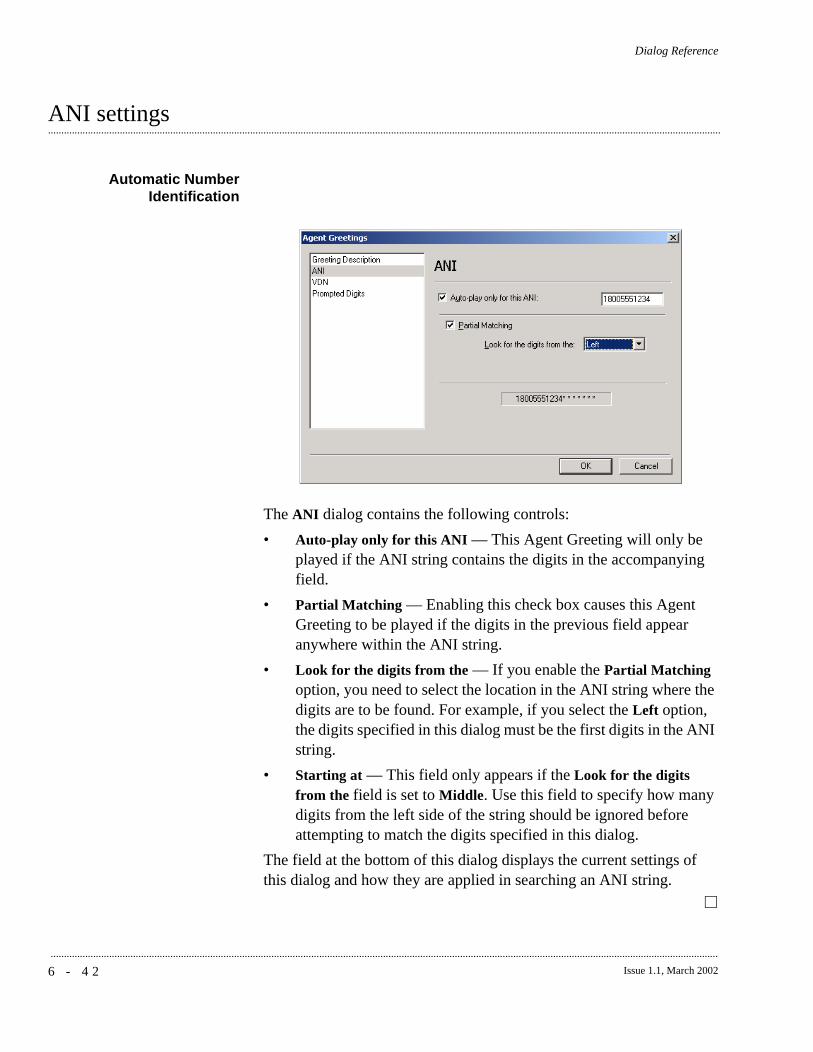
6 - 4 2 Issue 1.1, March 2002
...........................................................................................................................................................................................................................................................
Dialog Reference
.............................................................................................................................................................................................................................................................ANI settings
Automatic NumberIdentification
The ANI dialog contains the following controls:
• Auto-play only for this ANI — This Agent Greeting will only be played if the ANI string contains the digits in the accompanying field.
• Partial Matching — Enabling this check box causes this Agent Greeting to be played if the digits in the previous field appear anywhere within the ANI string.
• Look for the digits from the — If you enable the Partial Matching option, you need to select the location in the ANI string where the digits are to be found. For example, if you select the Left option, the digits specified in this dialog must be the first digits in the ANI string.
• Starting at — This field only appears if the Look for the digits from the field is set to Middle. Use this field to specify how many digits from the left side of the string should be ignored before attempting to match the digits specified in this dialog.
The field at the bottom of this dialog displays the current settings of this dialog and how they are applied in searching an ANI string.

Dialog Reference
6 - 4 3Issue 1.1, March 2002
............................................................................................................................................................................................................................................................
.............................................................................................................................................................................................................................................................VDN settings
Vector Directory Number
The VDN dialog contains the following controls:
• Auto-play only for this VDN — Enabling this feature causes this Agent Greeting to be played if the VDN on which the call is received matches the numeric string in the accompanying field.
• Partial Matching — Enabling this check box causes this Agent Greeting to be played if the digits in the previous field appear anywhere within the VDN string.
• Look for the digits from the — If you enable the Partial Matching option, you need to select the location in the VDN string where the digits are to appear. For example, if you select the Right option, the digits specified in this dialog must be the final digits in the VDN string.
• Starting at — This field only appears if the Look for the digits from the field is set to Middle. Use this field to specify how many digits from the left side of the string should be ignored before attempting to match the digits specified in this dialog.
The field at the bottom of this dialog displays the current settings of this dialog and how they are applied in searching a VDN string.

6 - 4 4 Issue 1.1, March 2002
...........................................................................................................................................................................................................................................................
Dialog Reference
.............................................................................................................................................................................................................................................................Prompted Digits settings
Prompted Digits
The Prompted Digits dialog contains the following controls:
• Auto-play for these prompted digits — Enabling this feature causes this Agent Greeting to be played if the digits entered by the caller during vector processing match the digits in the accompanying field.
• Partial Matching — Enabling this check box causes this Agent Greeting to be played if the digits in the previous field appear anywhere within the string of prompted digits.
• Look for the digits from the — If you enable the Partial Matching option, you need to select the location in the prompted digits string where the digits are to appear. For example, if you select the Middle option, the digits specified in this dialog must be within the string started from the position specified in the Starting at field.
• Starting at — This field only appears if the Look for the digits from the field is set to Middle. Use this field to specify how many digits from the left side of the string should be ignored before attempting to match the digits specified in this dialog.
The field at the bottom of this dialog displays the current settings of this dialog and how they are applied in searching the string of prompted digits.
Dialog Reference
6 - 4 5Issue 1.1, March 2002
............................................................................................................................................................................................................................................................
Audio settings
.............................................................................................................................................................................................................................................................Overview
Purpose This section provides descriptions of the Audio Options and Audio Tuning Wizard dialogs. These dialogs and the menu items for accessing them are only available for Road Warrior (VoIP) configurations.
This section contains the following topics:
• “Audio Options dialog” (6-46)
• “Audio Tuning Wizard” (6-49)
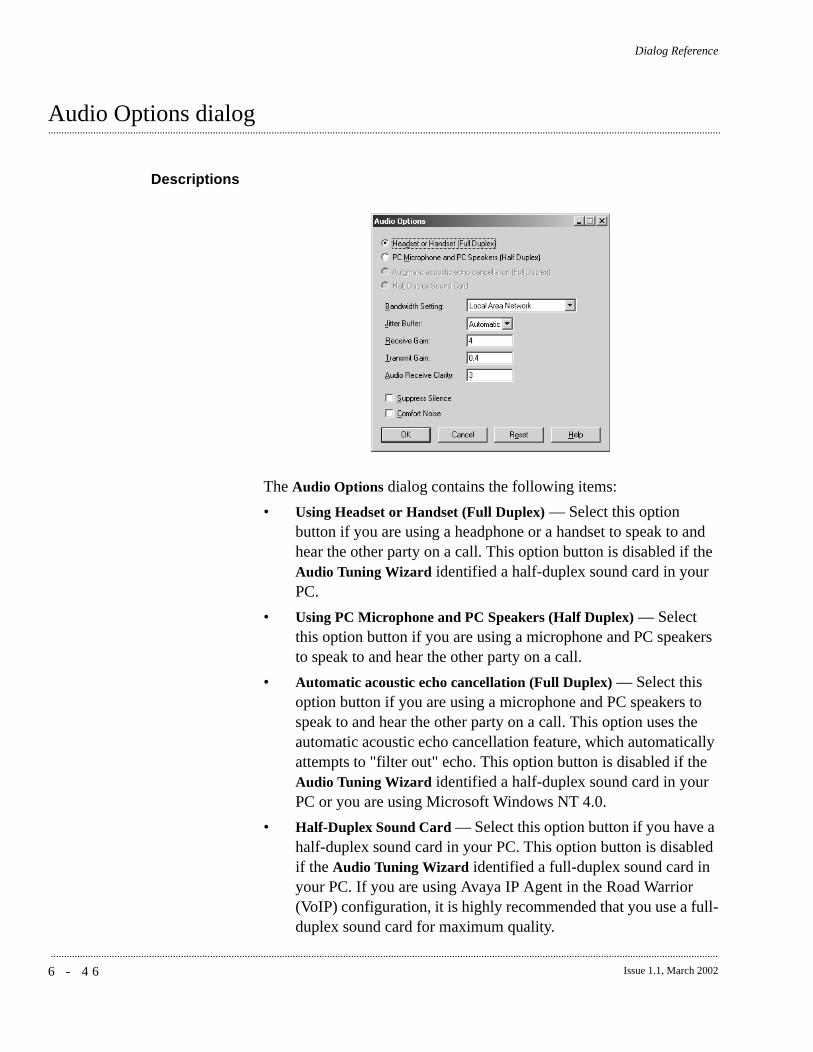
6 - 4 6 Issue 1.1, March 2002
...........................................................................................................................................................................................................................................................
Dialog Reference
.............................................................................................................................................................................................................................................................Audio Options dialog
Descriptions
The Audio Options dialog contains the following items:
• Using Headset or Handset (Full Duplex) — Select this option button if you are using a headphone or a handset to speak to and hear the other party on a call. This option button is disabled if the Audio Tuning Wizard identified a half-duplex sound card in your PC.
• Using PC Microphone and PC Speakers (Half Duplex) — Select this option button if you are using a microphone and PC speakers to speak to and hear the other party on a call.
• Automatic acoustic echo cancellation (Full Duplex) — Select this option button if you are using a microphone and PC speakers to speak to and hear the other party on a call. This option uses the automatic acoustic echo cancellation feature, which automatically attempts to "filter out" echo. This option button is disabled if the Audio Tuning Wizard identified a half-duplex sound card in your PC or you are using Microsoft Windows NT 4.0.
• Half-Duplex Sound Card — Select this option button if you have a half-duplex sound card in your PC. This option button is disabled if the Audio Tuning Wizard identified a full-duplex sound card in your PC. If you are using Avaya IP Agent in the Road Warrior (VoIP) configuration, it is highly recommended that you use a full-duplex sound card for maximum quality.
Dialog ReferenceAudio Options dialog
6 - 4 7Issue 1.1, March 2002
............................................................................................................................................................................................................................................................
• Bandwidth Setting — Select how your PC connects to the DEFINITY system. Avaya IP Agent uses the bandwidth setting to determine which codec to use with the DEFINITY system. The DEFINITY system supports the following codecs:
– G.729a — This codec may be used for 28800 bps or better modem connection; Cable, xDSL, or ISDN connection; and Local Area Network connection. (This codec is used for low-speed connections.)
– G.723 — This codec may be used for 28800 bps or better modem connection; Cable, xDSL, or ISDN connection; and Local Area Network connection. (This codec is used for low-speed connections.)
– G.711 u-law (CCITT u-law) — This codec may be used for Cable, xDSL, or ISDN connection and Local Area Network connection. (This codec is used for high-speed connections.)
– G.711 A-law (CCITT A-law) — This codec may be used for Cable, xDSL, or ISDN connection and Local Area Network connection. (This codec is used for high-speed connections.)
When you connect to the DEFINITY system, Avaya IP Agent checks the bandwidth setting you specified, and then determines the actual speed of the connection between your PC and the DEFINITY system. Avaya IP Agent then selects the appropriate codec.
NOTE: The actual speed of the connection between your PC and the DEFINITY system determines which codec Avaya IP Agent uses.
• Jitter Buffer — Displays the size of the jitter buffer, which stores packets to ensure a consistent delivery of voice to your speakers or headset so the voice stream you hear does not contain gaps. The larger the jitter buffer, the longer the delay receiving audio from the other party.
• Receive Gain — Sets the gain for incoming sound during a call. It is recommended that this setting be between ��� – �����.
• Transmit Gain — Set the gain for outgoing sound during a call. It is recommended that this setting be between ��� — ����.
• Audio Receive Clarity — Adjusts the clarity for incoming sound during a call.

6 - 4 8 Issue 1.1, March 2002
...........................................................................................................................................................................................................................................................
Dialog ReferenceAudio Options dialog
• Suppress Silence — Sets whether silence packets are transmitted when there is silence.
• Comfort Noise — Sets whether you want Avaya iClarity IP Audio to generate noise for you when the other party is not speaking. This noise indicates to you that the call is still active.

Dialog Reference
6 - 4 9Issue 1.1, March 2002
............................................................................................................................................................................................................................................................
.............................................................................................................................................................................................................................................................Audio Tuning Wizard
Descriptions The Audio Tuning Wizard is a program that will detect the hardware and settings for your PC. It will also have you test the levels for your microphone and speakers for optimum performance. Each dialog of the Audio Tuning Wizard provides complete instructions on the tasks to be performed and, for that reason, are not described in this document.

6 - 5 0 Issue 1.1, March 2002
...........................................................................................................................................................................................................................................................
Dialog ReferenceAudio Tuning Wizard
7 - 1Issue 1.1, March 2002
............................................................................................................................................................................................................................................................
7 Agent Greetings
.............................................................................................................................................................................................................................................................Overview
Purpose This chapter provides information and procedures regarding the creation and use of Agent Greetings through Avaya IP Agent.
The Agent Greeting feature frees you from having to repeatedly say the same greeting at the beginning of each call. When a call is answered, your microphone is muted and the selected greeting is played. After the greeting is complete, your microphone is unmuted and you are able to talk to the calling party.
Additionally, it is possible to configure Agent Greetings only to play for specific telephone numbers or VDNs from which calls originate.
Before you begin The following items should be read and understood before you work with the Agent Greetings feature:
• Avaya IP Agent supports agent greetings for Avaya CALLMASTER VI endpoints and IP endpoints using the Road Warrior configuration. The Telecommuter configuration does not support agent greetings.
• In the Road Warrior configuration, you can store the agent greetings on your computer. The Road Warrior configuration will support up to 30 greetings of 15 seconds each; however, the number of greetings you can store on your computer is based on the disk space available.
7 - 2 Issue 1.1, March 2002
...........................................................................................................................................................................................................................................................
Agent GreetingsOverview
• For viewing and configuring the optional settings for Agent Greetings, refer to the “Agent Greetings settings dialogs” (6-40) topic in Chapter 6, “Dialog Reference”.
• Agent Greetings for Avaya CALLMASTER VI configurations are stored on the unit itself and not on the PC.
Contents This chapter includes the following sections:
• “Creating Agent Greetings” (7-3)
• “Setting the active Agent Greeting” (7-4)
• “Deleting Agent Greetings” (7-6)
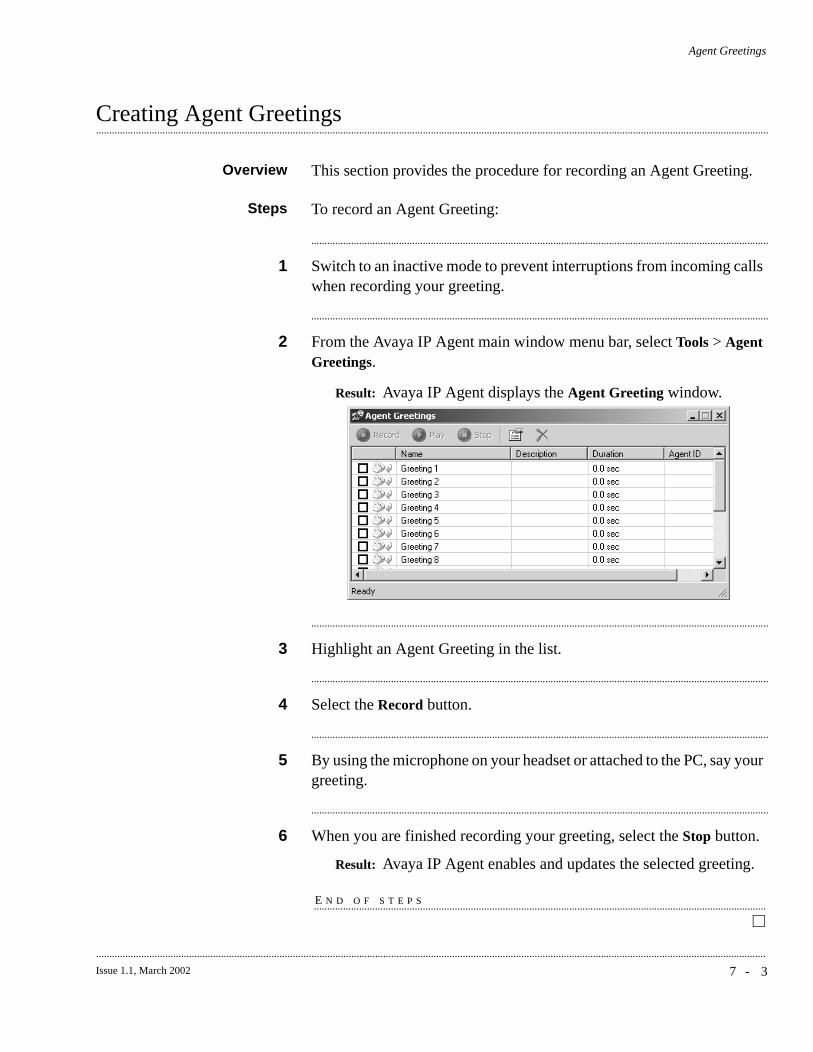
Agent Greetings
7 - 3Issue 1.1, March 2002
............................................................................................................................................................................................................................................................
.............................................................................................................................................................................................................................................................Creating Agent Greetings
Overview This section provides the procedure for recording an Agent Greeting.
Steps To record an Agent Greeting:
............................................................................................................................................................................
1 Switch to an inactive mode to prevent interruptions from incoming calls when recording your greeting.
............................................................................................................................................................................
2 From the Avaya IP Agent main window menu bar, select Tools > Agent Greetings.
Result: Avaya IP Agent displays the Agent Greeting window.
............................................................................................................................................................................
3 Highlight an Agent Greeting in the list.
............................................................................................................................................................................
4 Select the Record button.
............................................................................................................................................................................
5 By using the microphone on your headset or attached to the PC, say your greeting.
............................................................................................................................................................................
6 When you are finished recording your greeting, select the Stop button.
Result: Avaya IP Agent enables and updates the selected greeting.
E N D O F S T E P S...........................................................................................................................................................................

7 - 4 Issue 1.1, March 2002
...........................................................................................................................................................................................................................................................
Agent Greetings
.............................................................................................................................................................................................................................................................Setting the active Agent Greeting
Overview This section provides the procedure for setting an Agent Greeting as the one that will play for incoming calls.
Steps To activate an Agent Greeting:
............................................................................................................................................................................
1 From the Avaya IP Agent main window menu bar, select Tools > Agent Greetings.
Result: Avaya IP Agent displays the Agent Greeting window.
............................................................................................................................................................................
2 Place a check mark next to the Agent Greeting that will be used for all incoming calls.
There are some circumstances where it is possible to have more than one Agent Greeting active at a time. For example, if you set more than one Agent Greeting to play only if a call is received through different VDNs, these Agent Greetings can both be set active. This is the same for Agent Greetings that play for specific ANI or Prompted Digits as well, but not in combination.
............................................................................................................................................................................
3 Close the Agent Greetings window.
Result: Avaya IP Agent updates the Agent Greeting toolbar to display which greeting is currently active and will use this greeting for all incoming calls.
E N D O F S T E P S...........................................................................................................................................................................

Agent GreetingsSetting the active Agent Greeting
7 - 5Issue 1.1, March 2002
............................................................................................................................................................................................................................................................
Alternate method
If you have the Agent Greetings toolbar displayed in the Avaya IP Agent main window, you can use the mouse to click the Agent Greetings button and, from the resulting menu, select a new Agent Greeting. This action makes the selected Agent Greeting active.

7 - 6 Issue 1.1, March 2002
...........................................................................................................................................................................................................................................................
Agent Greetings
.............................................................................................................................................................................................................................................................Deleting Agent Greetings
Overview This section provides the procedure for deleting an existing Agent Greeting.
Steps To delete an existing Agent Greeting:
............................................................................................................................................................................
1 From the Avaya IP Agent main window menu bar, select Tools > Agent Greetings.
Result: Avaya IP Agent displays the Agent Greeting window.
............................................................................................................................................................................
2 Highlight an Agent Greeting in the list.
............................................................................................................................................................................
3 Select the Delete button.
Result: Avaya IP Agent deletes the selected Agent Greeting.
The Delete button appears as the X in the Agent Greetings window.
E N D O F S T E P S...........................................................................................................................................................................
8 - 1Issue 1.1, March 2002
............................................................................................................................................................................................................................................................
8 Using VuStats
.............................................................................................................................................................................................................................................................Overview
Purpose The VuStats feature is used to pass contact center information from the DEFINITY system to a display on a station or extension. This feature allows the monitoring of contact center activity and statistics.
When VuStats buttons are added to the VuStats window, Avaya IP Agent will automatically display and update the VuStats information. Using Avaya IP Agent, the user will be able to specify how long the program monitors each transmission of VuStats information before it moves to the next one.
This section includes the following topics:
• “Configuring a station for VuStats through the DEFINITY system” (8-2)
• “Viewing a single set of VuStats information in Avaya IP Agent” (8-3)
• “Running multiple VuStats in the VuStats Monitor” (8-5)
• “Adjusting intervals for monitoring VuStats” (8-8)
8 - 2 Issue 1.1, March 2002
...........................................................................................................................................................................................................................................................
Using VuStats
.............................................................................................................................................................................................................................................................Configuring a station for VuStats through the DEFINITY system
Overview In order for a Avaya IP Agent station to display VuStats information, the following configurations on the DEFINITY system must be made:
• The station must be assigned as a telephone type that has a display. Avaya recommends the 8434D or 606A1 telephone types.
• The station must have one or more buttons assigned with the +�� !�,� � feature. Different streams of VuStats information are available by specifying the -��� � and �� parameters of the +�� !�,� � feature.
• For different views and formats for the VuStats feature, multiple VuStats configurations can be assigned to the buttons for this station.
Configuration For information on configuring stations for the VuStats feature through your DEFINITY system, see the “VuStats (Category A)” section of the DEFINITY Guide to ACD Call Centers.
Definitions and reference material regarding the different VuStats fields on the forms of the DEFINITY system can be found in the DEFINITY Administrator's Guide.
Using VuStats
8 - 3Issue 1.1, March 2002
............................................................................................................................................................................................................................................................
.............................................................................................................................................................................................................................................................Viewing a single set of VuStats information in Avaya IP Agent
Overview This section provides the procedure for displaying a single set of VuStats information in the Phone Display bar of the Avaya IP Agent main window.
While a single set of VuStats information can be displayed in the VuStats Monitor as shown in the “Running multiple VuStats in the VuStats Monitor” (8-5) procedure, the method in this procedure saves viewable space on your Windows desktop.
Before you begin To view VuStats information in the main window, you must ensure that the Phone Display toolbar is visible. Select the View menu from the toolbar and verify that a check mark is present next to the Phone Display menu item. If a check mark is not present, select the item to enable it.
Steps To display VuStats in the Avaya IP Agent main window:
............................................................................................................................................................................
1 From the Avaya IP Agent main window menu bar, select Tools > Phone Features.
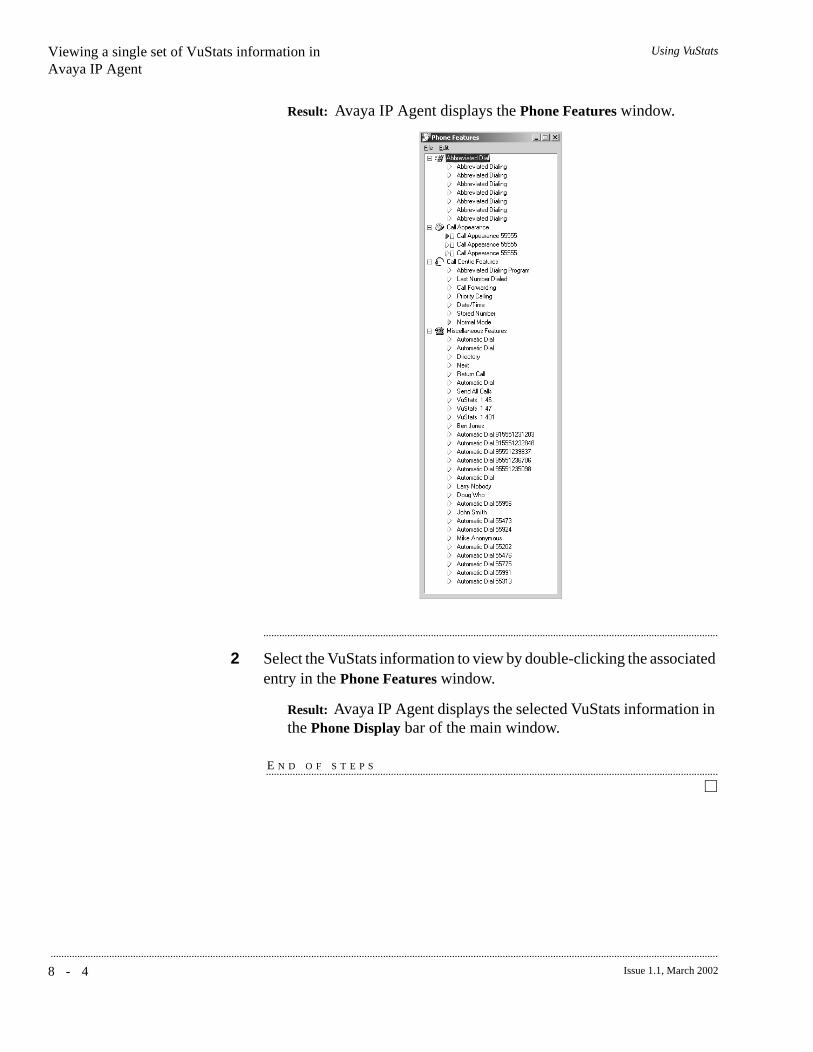
8 - 4 Issue 1.1, March 2002
...........................................................................................................................................................................................................................................................
Using VuStatsViewing a single set of VuStats information in Avaya IP Agent
Result: Avaya IP Agent displays the Phone Features window.
............................................................................................................................................................................
2 Select the VuStats information to view by double-clicking the associated entry in the Phone Features window.
Result: Avaya IP Agent displays the selected VuStats information in the Phone Display bar of the main window.
E N D O F S T E P S...........................................................................................................................................................................
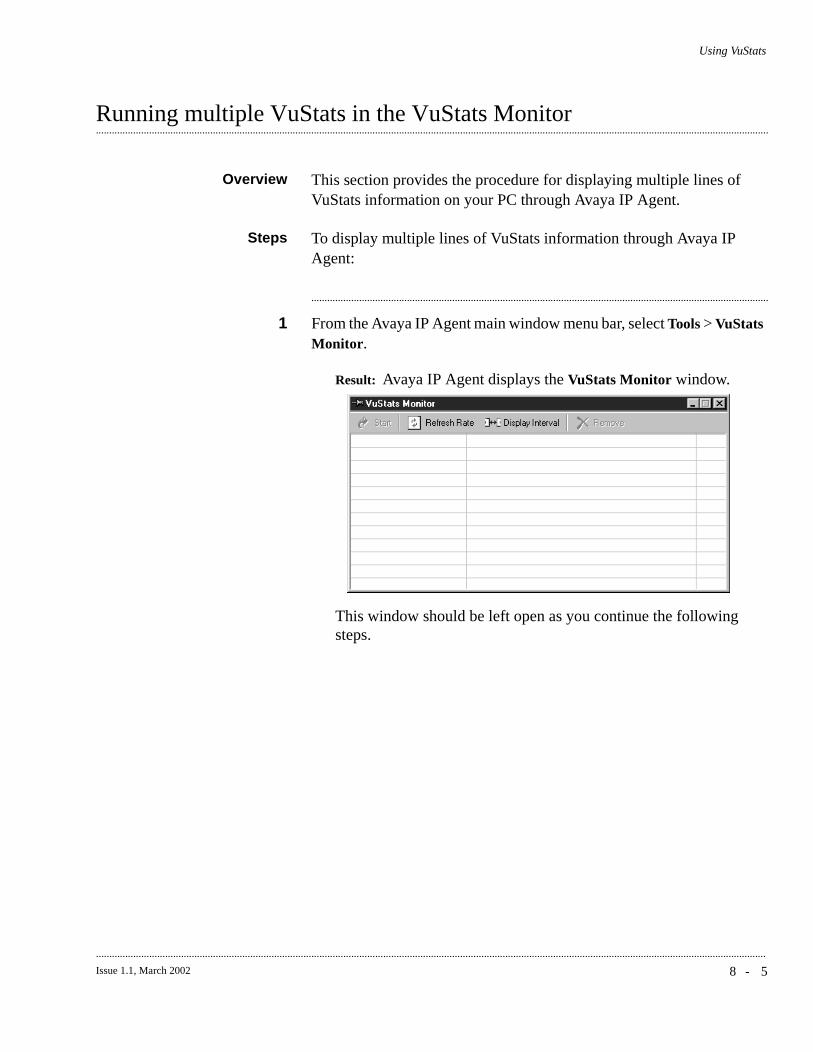
Using VuStats
8 - 5Issue 1.1, March 2002
............................................................................................................................................................................................................................................................
.............................................................................................................................................................................................................................................................Running multiple VuStats in the VuStats Monitor
Overview This section provides the procedure for displaying multiple lines of VuStats information on your PC through Avaya IP Agent.
Steps To display multiple lines of VuStats information through Avaya IP Agent:
............................................................................................................................................................................
1 From the Avaya IP Agent main window menu bar, select Tools > VuStats Monitor.
Result: Avaya IP Agent displays the VuStats Monitor window.
This window should be left open as you continue the following steps.
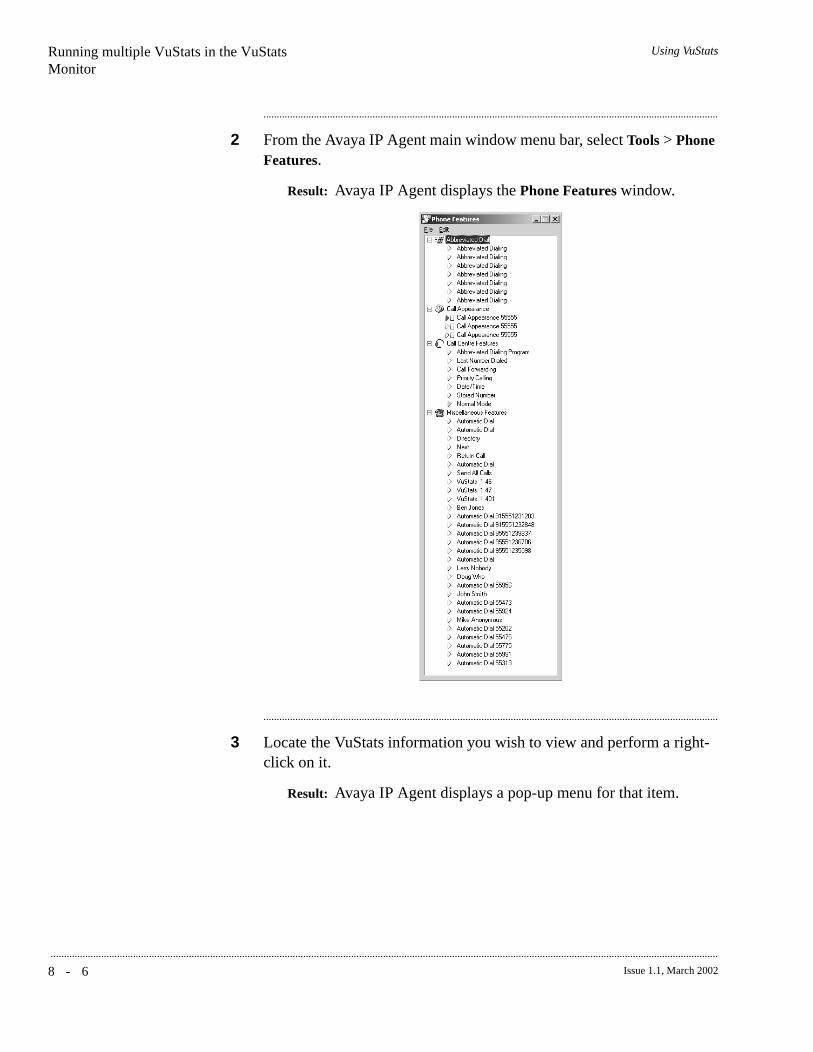
8 - 6 Issue 1.1, March 2002
...........................................................................................................................................................................................................................................................
Using VuStatsRunning multiple VuStats in the VuStats Monitor
............................................................................................................................................................................
2 From the Avaya IP Agent main window menu bar, select Tools > Phone Features.
Result: Avaya IP Agent displays the Phone Features window.
............................................................................................................................................................................
3 Locate the VuStats information you wish to view and perform a right-click on it.
Result: Avaya IP Agent displays a pop-up menu for that item.
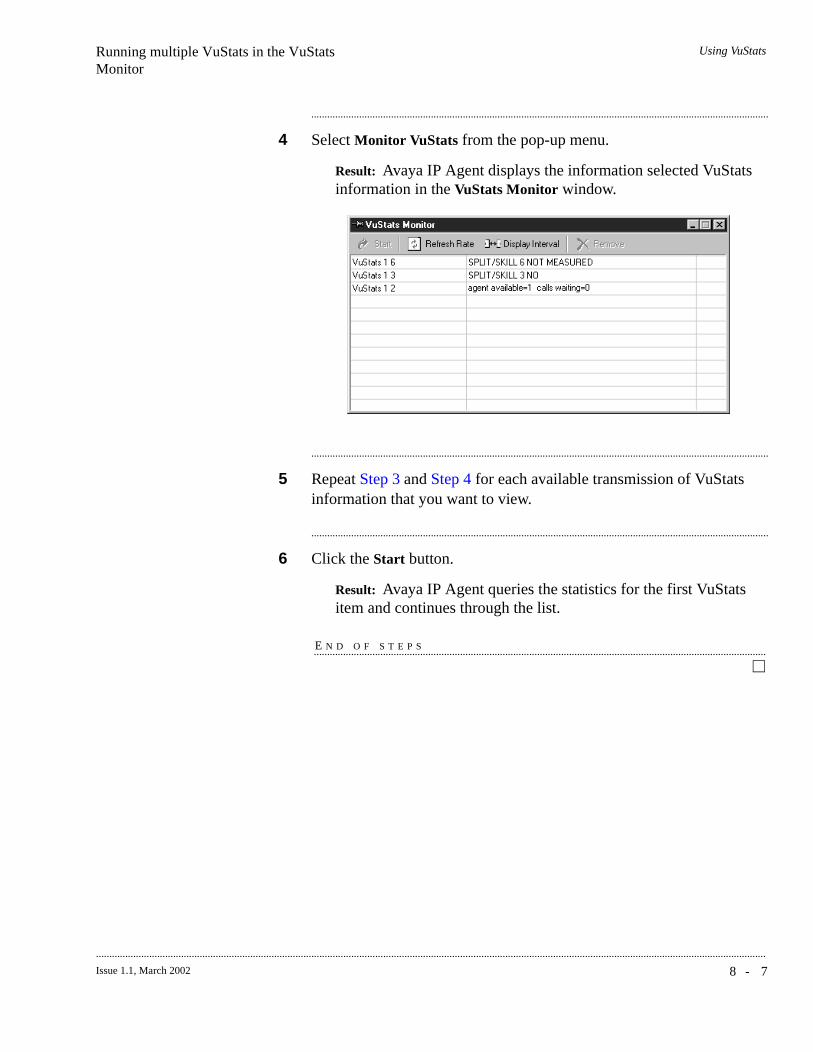
Using VuStatsRunning multiple VuStats in the VuStats Monitor
8 - 7Issue 1.1, March 2002
............................................................................................................................................................................................................................................................
............................................................................................................................................................................
4 Select Monitor VuStats from the pop-up menu.
Result: Avaya IP Agent displays the information selected VuStats information in the VuStats Monitor window.
............................................................................................................................................................................
5 Repeat Step 3 and Step 4 for each available transmission of VuStats information that you want to view.
............................................................................................................................................................................
6 Click the Start button.
Result: Avaya IP Agent queries the statistics for the first VuStats item and continues through the list.
E N D O F S T E P S...........................................................................................................................................................................
8 - 8 Issue 1.1, March 2002
...........................................................................................................................................................................................................................................................
Using VuStats
.............................................................................................................................................................................................................................................................Adjusting intervals for monitoring VuStats
Overview When VuStats are being displayed through the VuStats Monitor, you can configure the following time-related items:
• Refresh Rate — The period of time that passes before focus is changed from the last line of display in the list to the first line.
• Display Interval — The period of time that passes before the VuStats Monitor switches focus from one VuStats line of display to the next one in the list.
Before you begin You should ensure that you set the VuStats Monitor time intervals so that each line of display can be updated before the Refresh Rate changes focus to the top of the list. For example, if you have six VuStats lines of display in the VuStats Monitor and the Display Interval is set for 10 seconds, your Refresh Rate should be 60 seconds or greater.
If a VuStats line of display is not being completed before the next VuStats item begins to update, increase the Display Interval delay to a larger value.
Steps To change the periods of time used in the VuStats Monitor window:
............................................................................................................................................................................
1 Display VuStats information in the VuStats Monitor as shown in the “Running multiple VuStats in the VuStats Monitor” (8-5) procedure.
............................................................................................................................................................................
2 Click the Refresh Rate button on the toolbar of the VuStats Monitor window.
Result: Avaya IP Agent displays a menu with the following time intervals:
• 10 seconds
• 20 seconds
• 30 seconds
• 60 seconds
• 120 seconds

Using VuStatsAdjusting intervals for monitoring VuStats
8 - 9Issue 1.1, March 2002
............................................................................................................................................................................................................................................................
............................................................................................................................................................................
3 Select the interval that should pass before focus is switched from the last line of display to the first line.
............................................................................................................................................................................
4 Click the Display Interval button on the toolbar of the VuStats Monitor window.
Result: Avaya IP Agent displays a menu with the following time intervals:
• 1 second
• 3 seconds
• 5 seconds
• 10 seconds
............................................................................................................................................................................
5 Select the interval that should pass before focus is changed from one line of display to the next line.
When focus moves to a line of display, the VuStats data for that line is updated.
............................................................................................................................................................................
6 After setting one or both time intervals, click the Start button on the toolbar.
Result: The VuStats Monitor window begins displaying VuStats information according to the time intervals specified.
E N D O F S T E P S...........................................................................................................................................................................

8 - 1 0 Issue 1.1, March 2002
...........................................................................................................................................................................................................................................................
Using VuStatsAdjusting intervals for monitoring VuStats

9 - 1Issue 1.1, March 2002
............................................................................................................................................................................................................................................................
9 Using a Public Directory with Avaya IP Agent
.............................................................................................................................................................................................................................................................Overview
Purpose This section provides information and procedures regarding the Search Public Directory feature of Avaya IP Agent.
This feature provides access to corporate or public directory services allowing you to query by name, telephone number, or e-mail address.
This feature is also called Search LDAP (Lightweight Directory Access Protocol).
This chapter includes the following sections:
• “Defining a Public Directory service” (9-2)
• “Searching a Public Directory” (9-4)
• “Deleting a Public Directory service” (9-8)
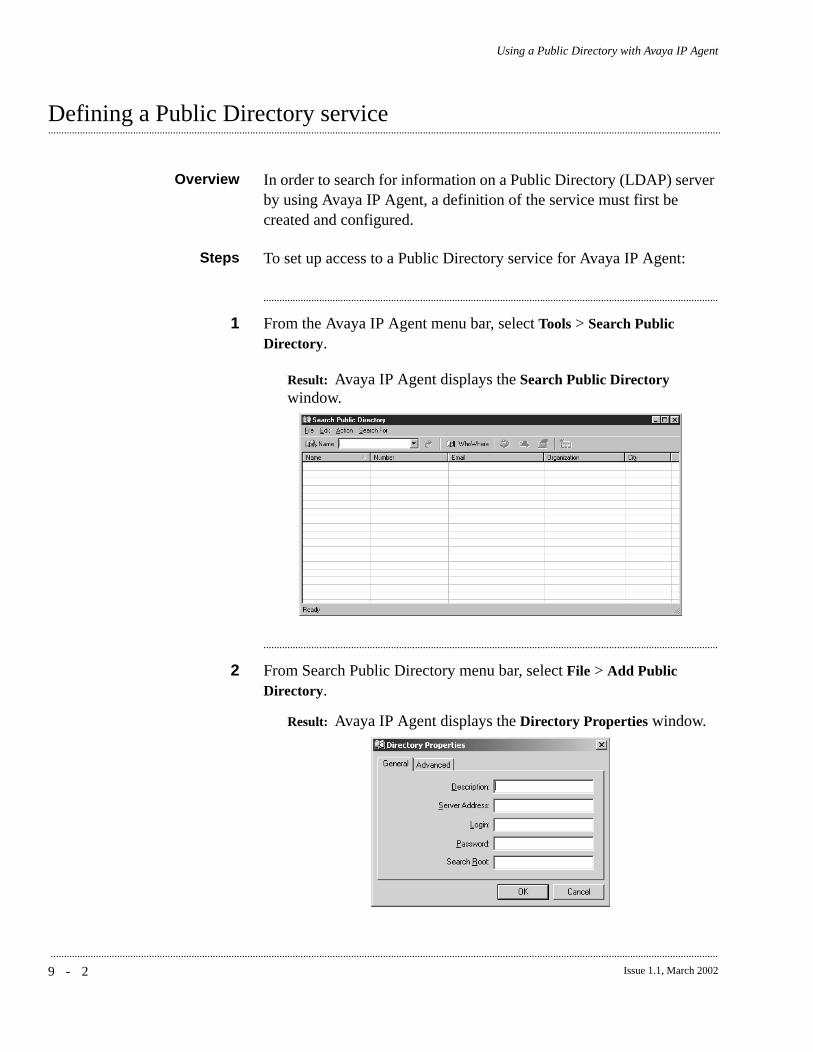
9 - 2 Issue 1.1, March 2002
...........................................................................................................................................................................................................................................................
Using a Public Directory with Avaya IP Agent
.............................................................................................................................................................................................................................................................Defining a Public Directory service
Overview In order to search for information on a Public Directory (LDAP) server by using Avaya IP Agent, a definition of the service must first be created and configured.
Steps To set up access to a Public Directory service for Avaya IP Agent:
............................................................................................................................................................................
1 From the Avaya IP Agent menu bar, select Tools > Search Public Directory.
Result: Avaya IP Agent displays the Search Public Directory window.
............................................................................................................................................................................
2 From Search Public Directory menu bar, select File > Add Public Directory.
Result: Avaya IP Agent displays the Directory Properties window.
Using a Public Directory with Avaya IP AgentDefining a Public Directory service
9 - 3Issue 1.1, March 2002
............................................................................................................................................................................................................................................................
............................................................................................................................................................................
3 In the following fields, enter the necessary information:
• Description — Enter a name by which you will identify this Public Directory server. This field is required.
• Server Address — Enter the network domain or IP address of the Public Directory server. This field is required.
• Login — If authorization is required by the Public Directory server, enter a valid username in this field.
• Password — Enter the password for the username specified in the previous field.
• Search Root — Enter an LDAP format string representing the type of information being sought. For example, ������������������������ specifies that information under the organization unit of “people” within the organization of “mycompany.com” is used for the search. Refer to the documentation for your LDAP system and company database configuration for more information on Base DN or Search Root strings.
If you an unsure of the settings for your Public Directory server, contact the administrator of that system.
............................................................................................................................................................................
4 Select the Advanced tab if changes to the following defaults are required:
• Port: �.�
• Search timeout: �## (secs)
• Maximum number of entries returned per search: �##
............................................................................................................................................................................
5 After entering all necessary information, select OK.
Result: Avaya IP Agent adds this Public Directory to the list of available services and closes the Directory Properties dialog box.
E N D O F S T E P S...........................................................................................................................................................................
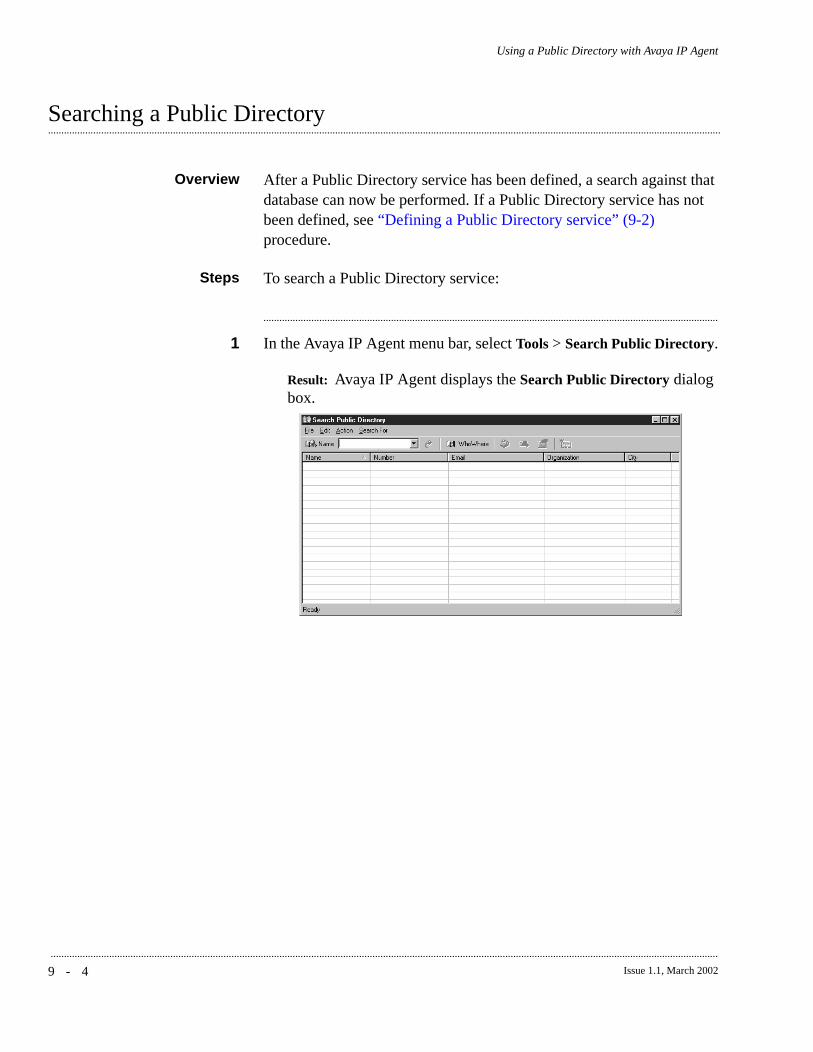
9 - 4 Issue 1.1, March 2002
...........................................................................................................................................................................................................................................................
Using a Public Directory with Avaya IP Agent
.............................................................................................................................................................................................................................................................Searching a Public Directory
Overview After a Public Directory service has been defined, a search against that database can now be performed. If a Public Directory service has not been defined, see “Defining a Public Directory service” (9-2) procedure.
Steps To search a Public Directory service:
............................................................................................................................................................................
1 In the Avaya IP Agent menu bar, select Tools > Search Public Directory.
Result: Avaya IP Agent displays the Search Public Directory dialog box.
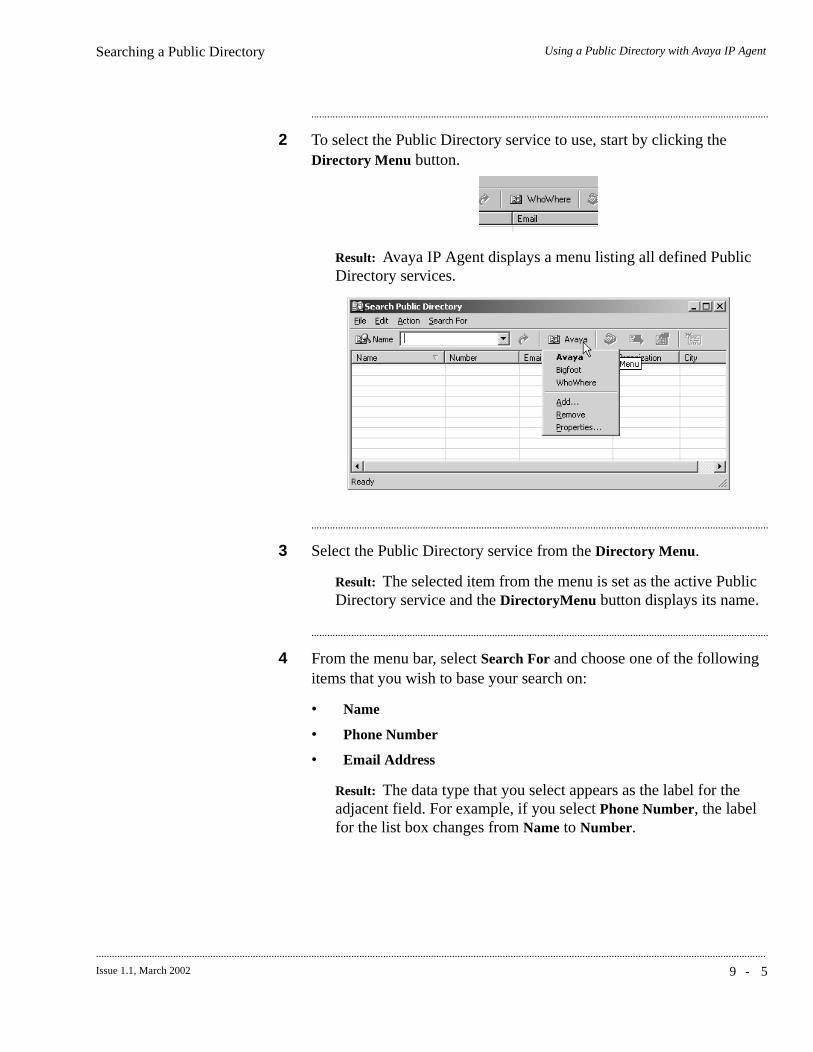
Using a Public Directory with Avaya IP AgentSearching a Public Directory
9 - 5Issue 1.1, March 2002
............................................................................................................................................................................................................................................................
............................................................................................................................................................................
2 To select the Public Directory service to use, start by clicking the Directory Menu button.
Result: Avaya IP Agent displays a menu listing all defined Public Directory services.
............................................................................................................................................................................
3 Select the Public Directory service from the Directory Menu.
Result: The selected item from the menu is set as the active Public Directory service and the DirectoryMenu button displays its name.
............................................................................................................................................................................
4 From the menu bar, select Search For and choose one of the following items that you wish to base your search on:
• Name
• Phone Number
• Email Address
Result: The data type that you select appears as the label for the adjacent field. For example, if you select Phone Number, the label for the list box changes from Name to Number.

9 - 6 Issue 1.1, March 2002
...........................................................................................................................................................................................................................................................
Using a Public Directory with Avaya IP AgentSearching a Public Directory
............................................................................................................................................................................
5 In the available field, enter a string to search for within the selected data type and press the Enter key.
Result: Avaya IP Agent sends the query to the Public Directory service, receives the data, and displays it in the Search Public Directory window.
For example, after setting the data type to Name, enter ���� in the field and press the Enter key.
............................................................................................................................................................................
6 Right-click on an entry in the set of resulting data.
Result: Avaya IP Agent displays a popup menu for the entry.
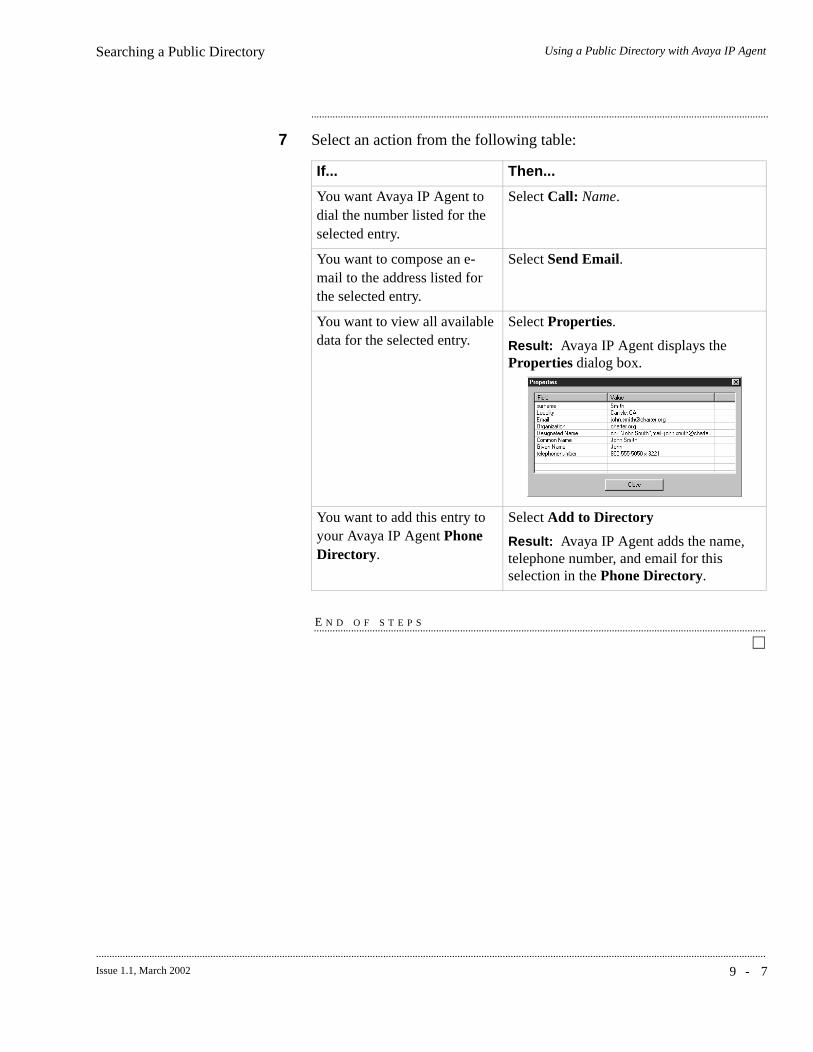
Using a Public Directory with Avaya IP AgentSearching a Public Directory
9 - 7Issue 1.1, March 2002
............................................................................................................................................................................................................................................................
............................................................................................................................................................................
7 Select an action from the following table:
E N D O F S T E P S...........................................................................................................................................................................
If... Then...
You want Avaya IP Agent to dial the number listed for the selected entry.
Select Call: Name.
You want to compose an e-mail to the address listed for the selected entry.
Select Send Email.
You want to view all available data for the selected entry.
Select Properties.
Result: Avaya IP Agent displays the Properties dialog box.
You want to add this entry to your Avaya IP Agent Phone Directory.
Select Add to Directory
Result: Avaya IP Agent adds the name, telephone number, and email for this selection in the Phone Directory.
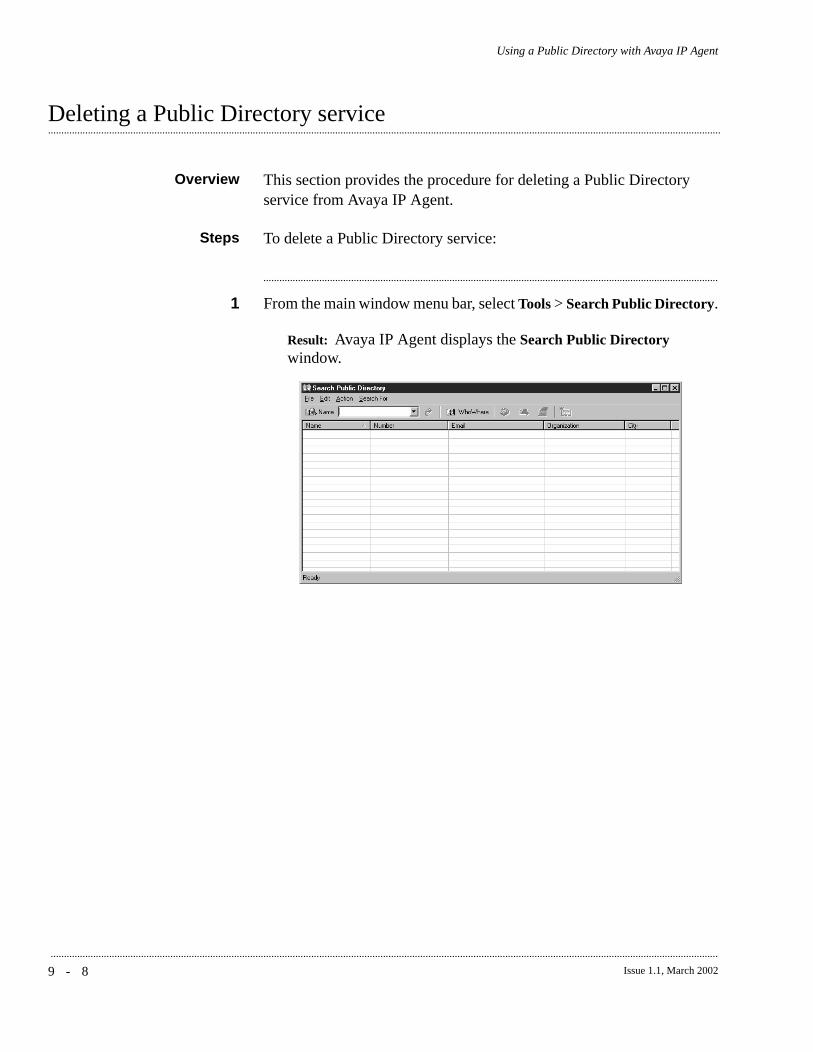
9 - 8 Issue 1.1, March 2002
...........................................................................................................................................................................................................................................................
Using a Public Directory with Avaya IP Agent
.............................................................................................................................................................................................................................................................Deleting a Public Directory service
Overview This section provides the procedure for deleting a Public Directory service from Avaya IP Agent.
Steps To delete a Public Directory service:
............................................................................................................................................................................
1 From the main window menu bar, select Tools > Search Public Directory.
Result: Avaya IP Agent displays the Search Public Directory window.
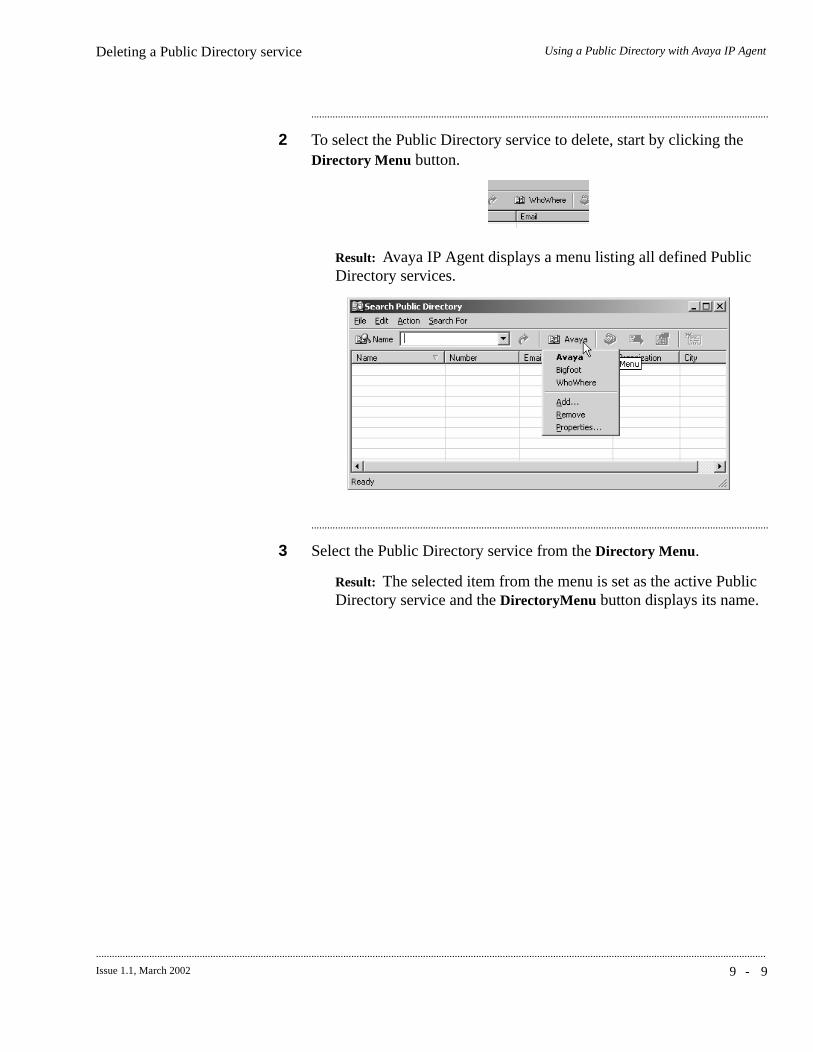
Using a Public Directory with Avaya IP AgentDeleting a Public Directory service
9 - 9Issue 1.1, March 2002
............................................................................................................................................................................................................................................................
............................................................................................................................................................................
2 To select the Public Directory service to delete, start by clicking the Directory Menu button.
Result: Avaya IP Agent displays a menu listing all defined Public Directory services.
............................................................................................................................................................................
3 Select the Public Directory service from the Directory Menu.
Result: The selected item from the menu is set as the active Public Directory service and the DirectoryMenu button displays its name.
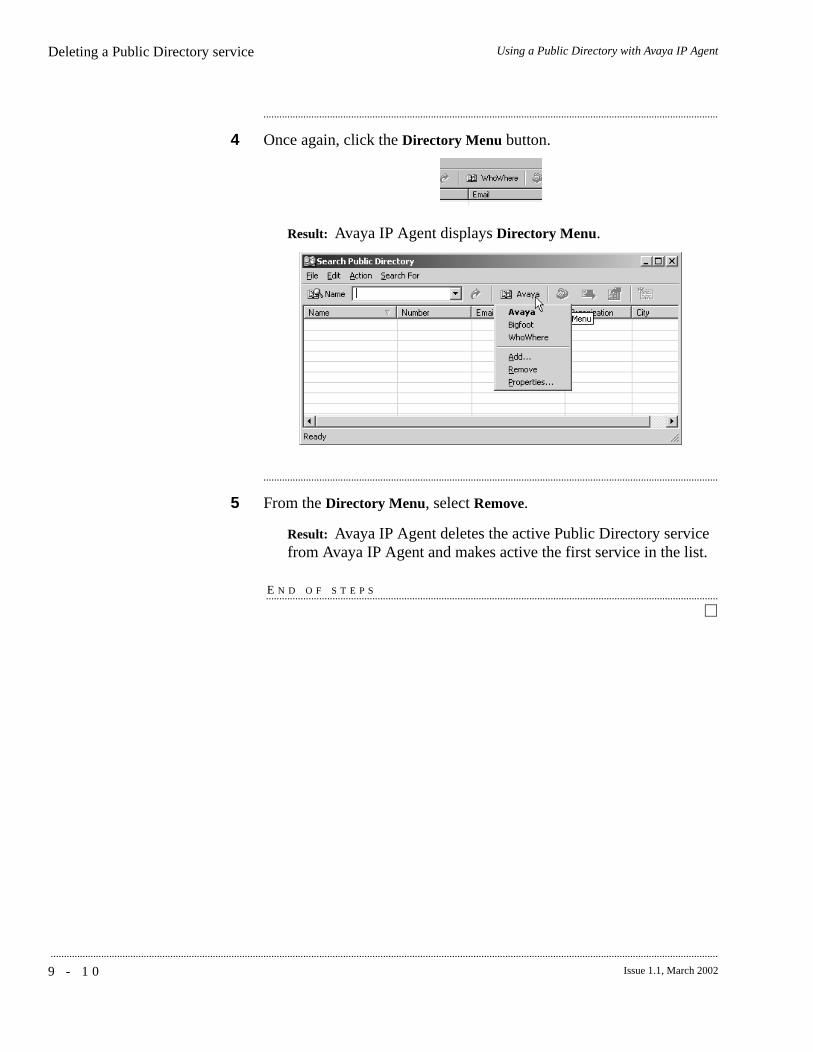
9 - 1 0 Issue 1.1, March 2002
...........................................................................................................................................................................................................................................................
Using a Public Directory with Avaya IP AgentDeleting a Public Directory service
............................................................................................................................................................................
4 Once again, click the Directory Menu button.
Result: Avaya IP Agent displays Directory Menu.
............................................................................................................................................................................
5 From the Directory Menu, select Remove.
Result: Avaya IP Agent deletes the active Public Directory service from Avaya IP Agent and makes active the first service in the list.
E N D O F S T E P S...........................................................................................................................................................................
1 0 - 1Issue 1.1, March 2002
............................................................................................................................................................................................................................................................
10 Screen Pops
.............................................................................................................................................................................................................................................................Overview
Purpose Screen Pops are used to start an application or interface when an incoming call is received by Avaya IP Agent or when an outgoing call is placed.
Screen Pops are most useful for:
• Starting an application that allows the agent to enter customer or critical information regarding the call
• Viewing data based on information transmitted with the call such as customer information, the area from which they are calling, the selections a customer made while being processed through a vector, or other information
There are two types of Screen Pops:
• Windows application — This type of Screen Pop starts a Windows application such as an HTML browser, a database interface, a trouble ticket program, or a custom application, just as a few examples. This type of Screen Pop also is capable of passing parameters as part of an HTML string when it is initialized.
• Dynamic Data Exchange (DDE) — This type of Screen Pop retrieves information you specify from a call and passes it to a DDE server. The DDE server can then send information from its database to an interface displayed on the PC.
1 0 - 2 Issue 1.1, March 2002
...........................................................................................................................................................................................................................................................
Screen PopsOverview
This section includes the following topics:
• “Creating a Windows application Screen Pop” (10-3)
• “Creating a DDE Screen Pop” (10-10)
• “Setting the active Screen Pop” (10-16)
• “Modifying a Screen Pop” (10-17)
• “Deleting a Screen Pop” (10-19)
Before you begin The following items should be read and understood before working with Screen Pops:
• Many DDE services have distinct features between them. It is for this reason that complete syntax for a DDE query cannot be specified in this document. For information regarding your DDE service, refer to the documentation supplied with that product.
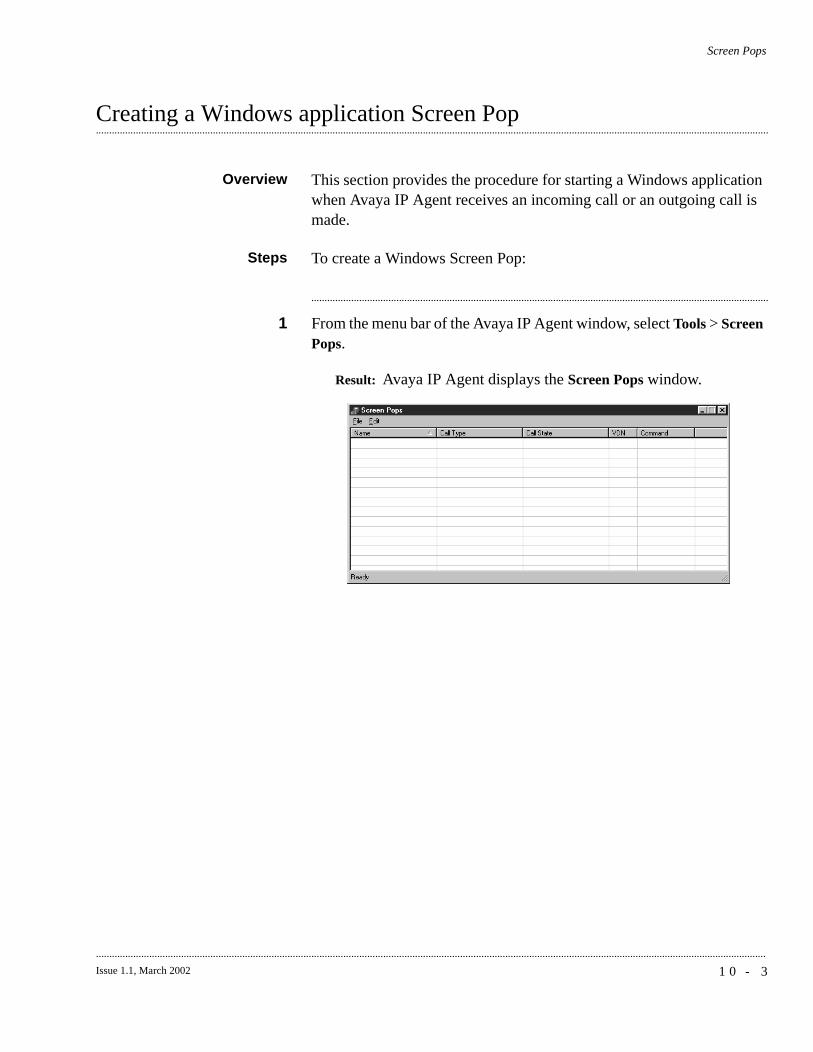
Screen Pops
1 0 - 3Issue 1.1, March 2002
............................................................................................................................................................................................................................................................
.............................................................................................................................................................................................................................................................Creating a Windows application Screen Pop
Overview This section provides the procedure for starting a Windows application when Avaya IP Agent receives an incoming call or an outgoing call is made.
Steps To create a Windows Screen Pop:
............................................................................................................................................................................
1 From the menu bar of the Avaya IP Agent window, select Tools > Screen Pops.
Result: Avaya IP Agent displays the Screen Pops window.
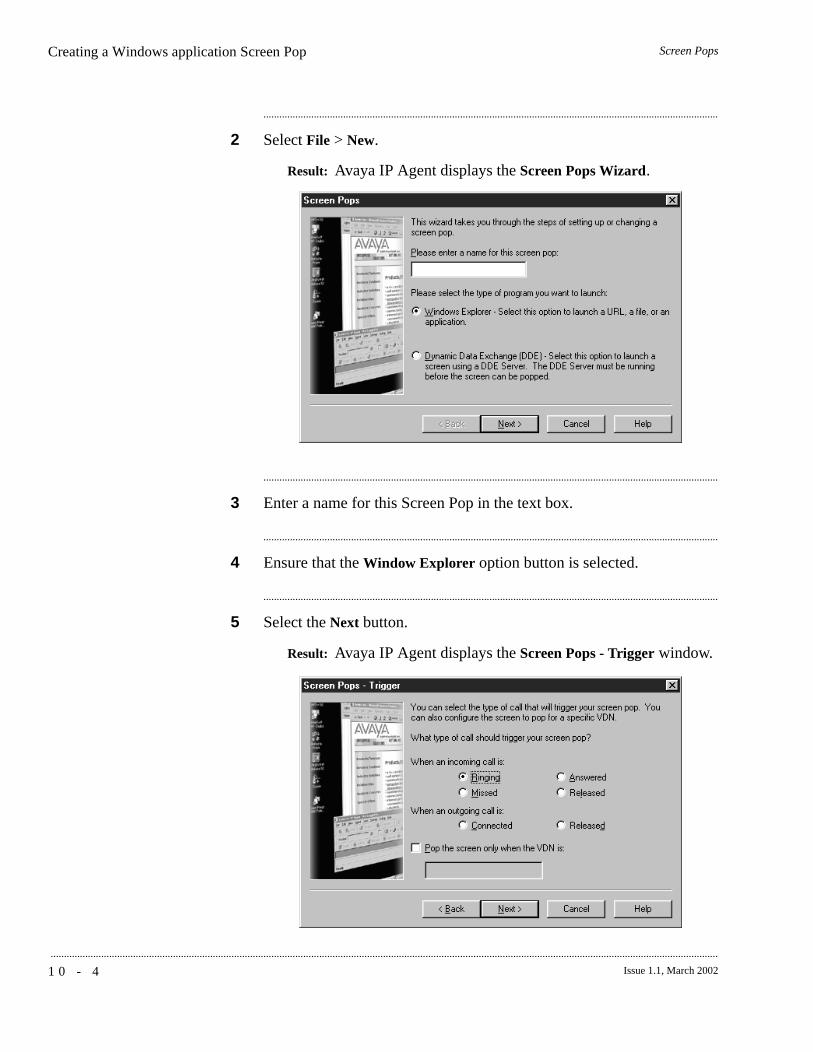
1 0 - 4 Issue 1.1, March 2002
...........................................................................................................................................................................................................................................................
Screen PopsCreating a Windows application Screen Pop
............................................................................................................................................................................
2 Select File > New.
Result: Avaya IP Agent displays the Screen Pops Wizard.
............................................................................................................................................................................
3 Enter a name for this Screen Pop in the text box.
............................................................................................................................................................................
4 Ensure that the Window Explorer option button is selected.
............................................................................................................................................................................
5 Select the Next button.
Result: Avaya IP Agent displays the Screen Pops - Trigger window.
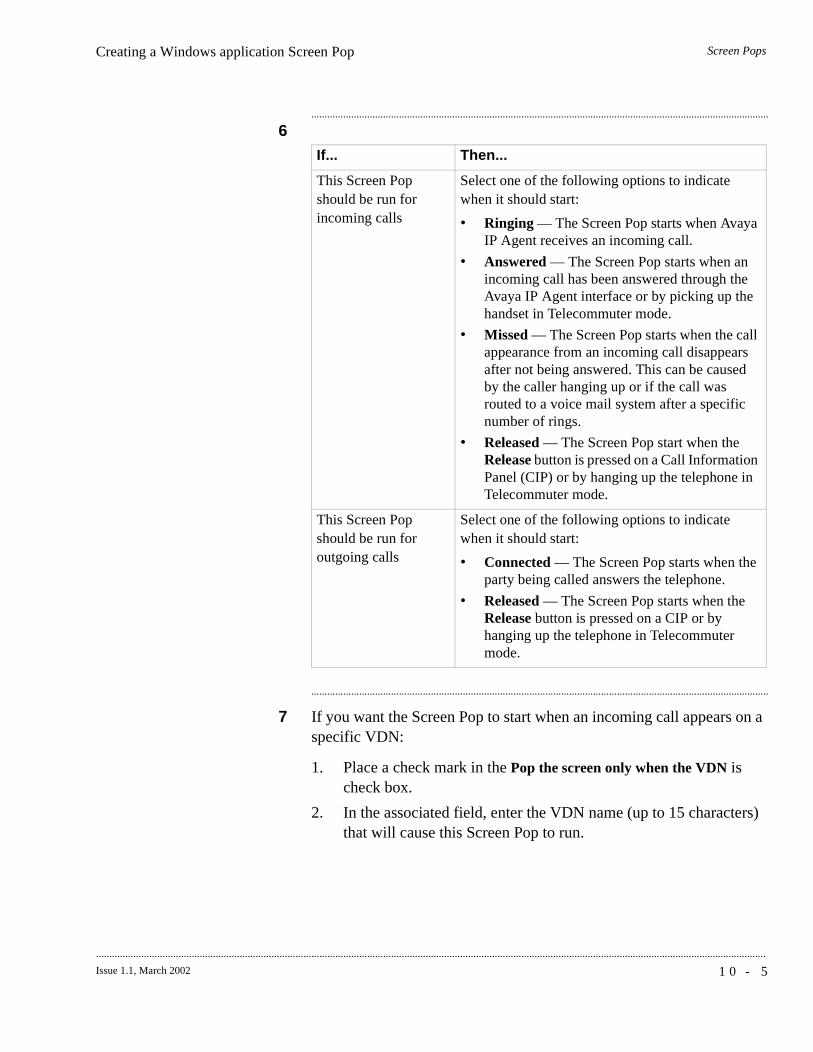
Screen PopsCreating a Windows application Screen Pop
1 0 - 5Issue 1.1, March 2002
............................................................................................................................................................................................................................................................
............................................................................................................................................................................
6
............................................................................................................................................................................
7 If you want the Screen Pop to start when an incoming call appears on a specific VDN:
1. Place a check mark in the Pop the screen only when the VDN is check box.
2. In the associated field, enter the VDN name (up to 15 characters) that will cause this Screen Pop to run.
If... Then...
This Screen Pop should be run for incoming calls
Select one of the following options to indicate when it should start:
• Ringing — The Screen Pop starts when Avaya IP Agent receives an incoming call.
• Answered — The Screen Pop starts when an incoming call has been answered through the Avaya IP Agent interface or by picking up the handset in Telecommuter mode.
• Missed — The Screen Pop starts when the call appearance from an incoming call disappears after not being answered. This can be caused by the caller hanging up or if the call was routed to a voice mail system after a specific number of rings.
• Released — The Screen Pop start when the Release button is pressed on a Call Information Panel (CIP) or by hanging up the telephone in Telecommuter mode.
This Screen Pop should be run for outgoing calls
Select one of the following options to indicate when it should start:
• Connected — The Screen Pop starts when the party being called answers the telephone.
• Released — The Screen Pop starts when the Release button is pressed on a CIP or by hanging up the telephone in Telecommuter mode.
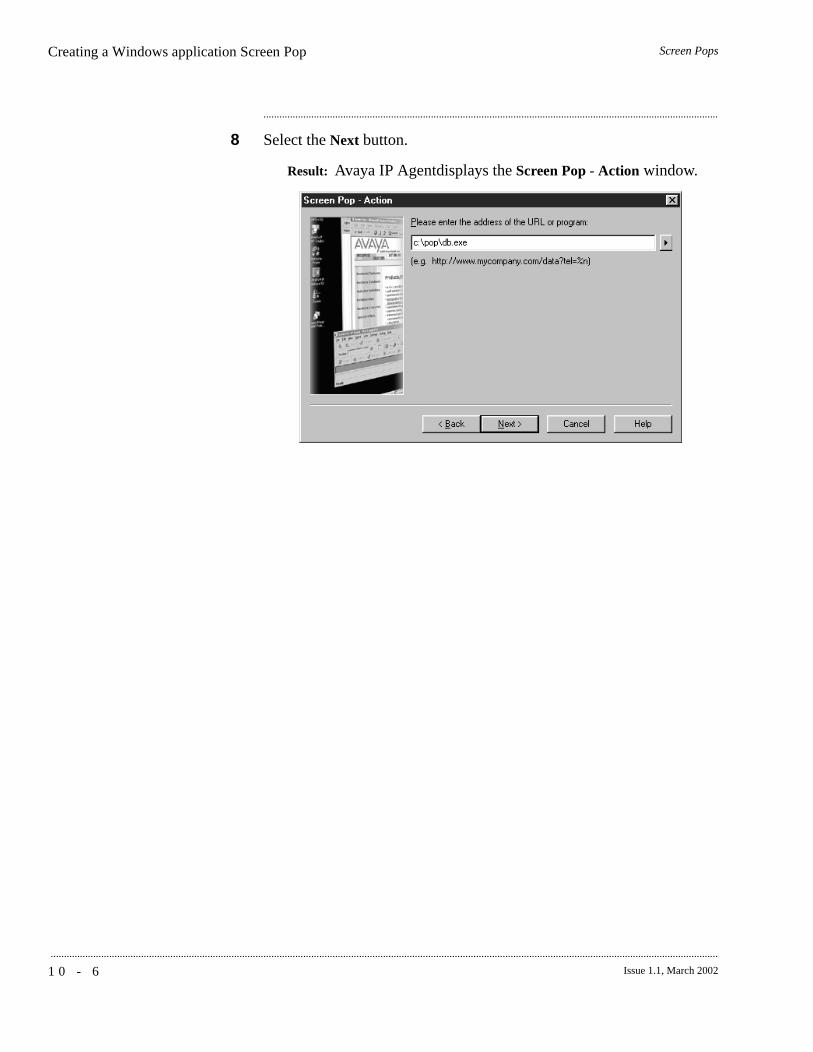
1 0 - 6 Issue 1.1, March 2002
...........................................................................................................................................................................................................................................................
Screen PopsCreating a Windows application Screen Pop
............................................................................................................................................................................
8 Select the Next button.
Result: Avaya IP Agentdisplays the Screen Pop - Action window.
Screen PopsCreating a Windows application Screen Pop
1 0 - 7Issue 1.1, March 2002
............................................................................................................................................................................................................................................................
............................................................................................................................................................................
9 In the field provided, enter one of the following:
• A Uniform Resource Locator (URL) address — This refers to a webpage. This could also include CGI scripts, java scripts, or many other web-enabled tools.
• A filename — This can be any filename with an extension specified in the Windows Registry as having an associated application that is used to open it,.for example, .HTM, .DOC, and .TXT. If a filename is specified which does not have a valid application association in the Registry, Windows will display an error message.
............................................................................................................................................................................
10 Information from the call can be made part of an URL address string specified in the field. To do so, select the arrow to the right of the field to display the Insert Call Data menu.
The information that may be available for retrieval from a call are:
• Caller Name (%n) — Passes the name of the other party on the call, if available
• Caller Number (%m) — Passes the telephone number of the other party on the call, if available
• Prompted Digits (%p) — Passes the digits the caller selected while being processed through a vector, if available.
• VDN (%v) — Passes the VDN name through which the call was connected
• Start Time (%s) — Passes the time when the telephone call was received by Avaya IP Agent
• Date (%d) — Passes the current date when the telephone call is received by Avaya IP Agent
Important! These parameters cannot be used for passing arguments to an executable program.
You may also specify these parameters manually within the URL address string.
............................................................................................................................................................................
11 After entering the URL address or filename, select the Next button.
1 0 - 8 Issue 1.1, March 2002
...........................................................................................................................................................................................................................................................
Screen PopsCreating a Windows application Screen Pop
............................................................................................................................................................................
12 If you specified any parameters to be used in the Action dialog box, you will be presented with the Format Call Information dialog box for each parameter where you can specify the number of characters or digits used for that parameter in the Screen Pop.
If you wish to limit the number of characters presented for each parameter, enable the check box on the specific parameter screen and then use the Number of characters to include and Location fields to adjust the boundaries of the string accordingly. After you have specified the boundaries of the parameter string, select the Next button.
Result: If more than one parameter was specified in the Action dialog box earlier, the Format Call Information for the next parameter is presented.
If there are no more parameters, Avaya IP Agent displays the Testing dialog box.
............................................................................................................................................................................
13 Select the Test button to verify that the configuration of this Screen Pop works as intended.
If you are using parameters in your Screen Pop, you will be presented with another dialog box that allows you to enter Caller Name, Caller Number, Prompted Digits, and VDN as test information. Select the Continue button when all necessary test information has been entered in these fields.
Result: Avaya IP Agent launches the Screen Pop.
............................................................................................................................................................................
14 After you have confirmed that the test of the Screen Pop was successful, close the Screen Pop and select the Next button on the Testing dialog box.
Result: Avaya IP Agent displays the Setup Completed dialog box.

Screen PopsCreating a Windows application Screen Pop
1 0 - 9Issue 1.1, March 2002
............................................................................................................................................................................................................................................................
............................................................................................................................................................................
15 Select the Finish button.
Result: Avaya IP Agent saves this Screen Pop and displays it in the Screen Pops window.
E N D O F S T E P S...........................................................................................................................................................................
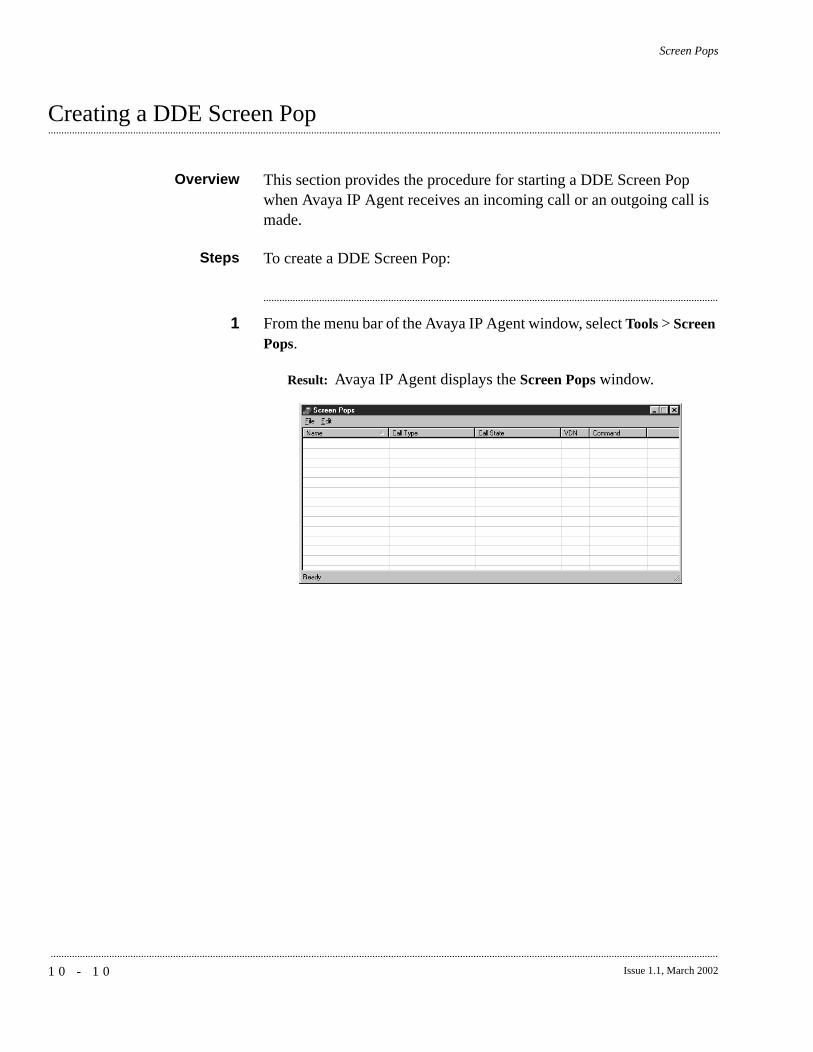
1 0 - 1 0 Issue 1.1, March 2002
...........................................................................................................................................................................................................................................................
Screen Pops
.............................................................................................................................................................................................................................................................Creating a DDE Screen Pop
Overview This section provides the procedure for starting a DDE Screen Pop when Avaya IP Agent receives an incoming call or an outgoing call is made.
Steps To create a DDE Screen Pop:
............................................................................................................................................................................
1 From the menu bar of the Avaya IP Agent window, select Tools > Screen Pops.
Result: Avaya IP Agent displays the Screen Pops window.

Screen PopsCreating a DDE Screen Pop
1 0 - 1 1Issue 1.1, March 2002
............................................................................................................................................................................................................................................................
............................................................................................................................................................................
2 Select File > New.
Result: Avaya IP Agent displays the Screen Pops Wizard.
............................................................................................................................................................................
3 Select the Dynamic Data Exchange (DDE) option button.
............................................................................................................................................................................
4 Select the Next button.
Result: Avaya IP Agent displays the Screen Pops - Trigger window.
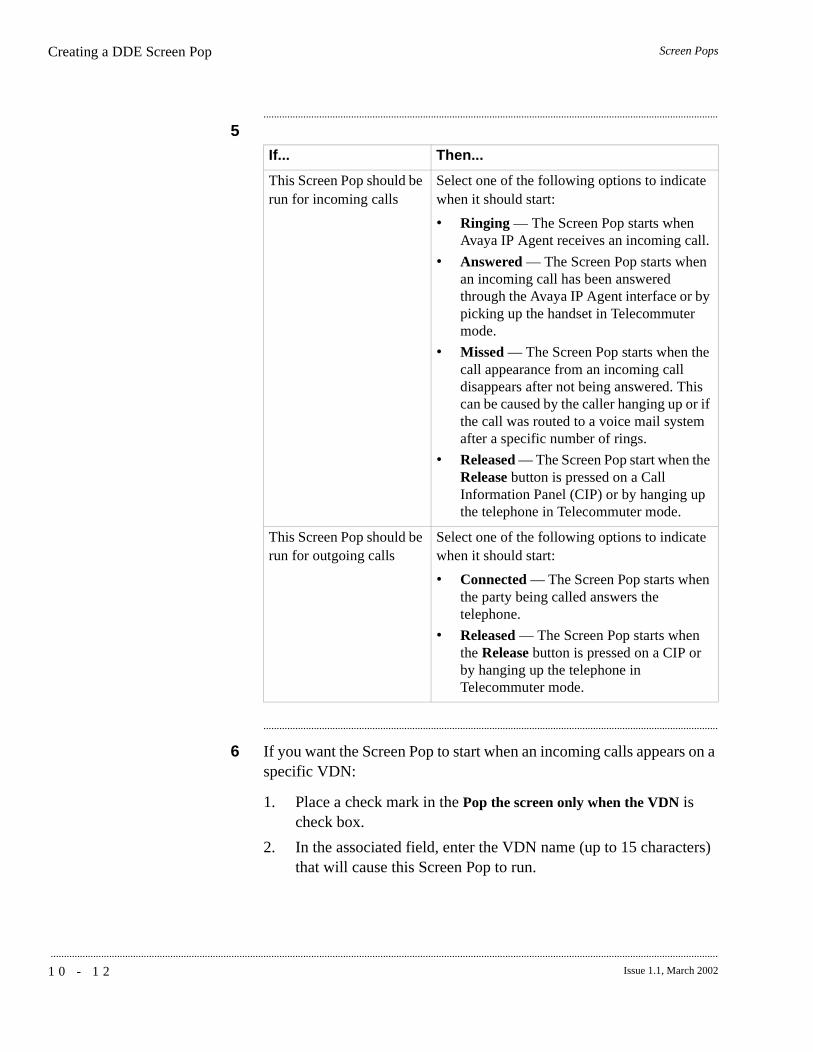
1 0 - 1 2 Issue 1.1, March 2002
...........................................................................................................................................................................................................................................................
Screen PopsCreating a DDE Screen Pop
............................................................................................................................................................................
5
............................................................................................................................................................................
6 If you want the Screen Pop to start when an incoming calls appears on a specific VDN:
1. Place a check mark in the Pop the screen only when the VDN is check box.
2. In the associated field, enter the VDN name (up to 15 characters) that will cause this Screen Pop to run.
If... Then...
This Screen Pop should be run for incoming calls
Select one of the following options to indicate when it should start:
• Ringing — The Screen Pop starts when Avaya IP Agent receives an incoming call.
• Answered — The Screen Pop starts when an incoming call has been answered through the Avaya IP Agent interface or by picking up the handset in Telecommuter mode.
• Missed — The Screen Pop starts when the call appearance from an incoming call disappears after not being answered. This can be caused by the caller hanging up or if the call was routed to a voice mail system after a specific number of rings.
• Released — The Screen Pop start when the Release button is pressed on a Call Information Panel (CIP) or by hanging up the telephone in Telecommuter mode.
This Screen Pop should be run for outgoing calls
Select one of the following options to indicate when it should start:
• Connected — The Screen Pop starts when the party being called answers the telephone.
• Released — The Screen Pop starts when the Release button is pressed on a CIP or by hanging up the telephone in Telecommuter mode.
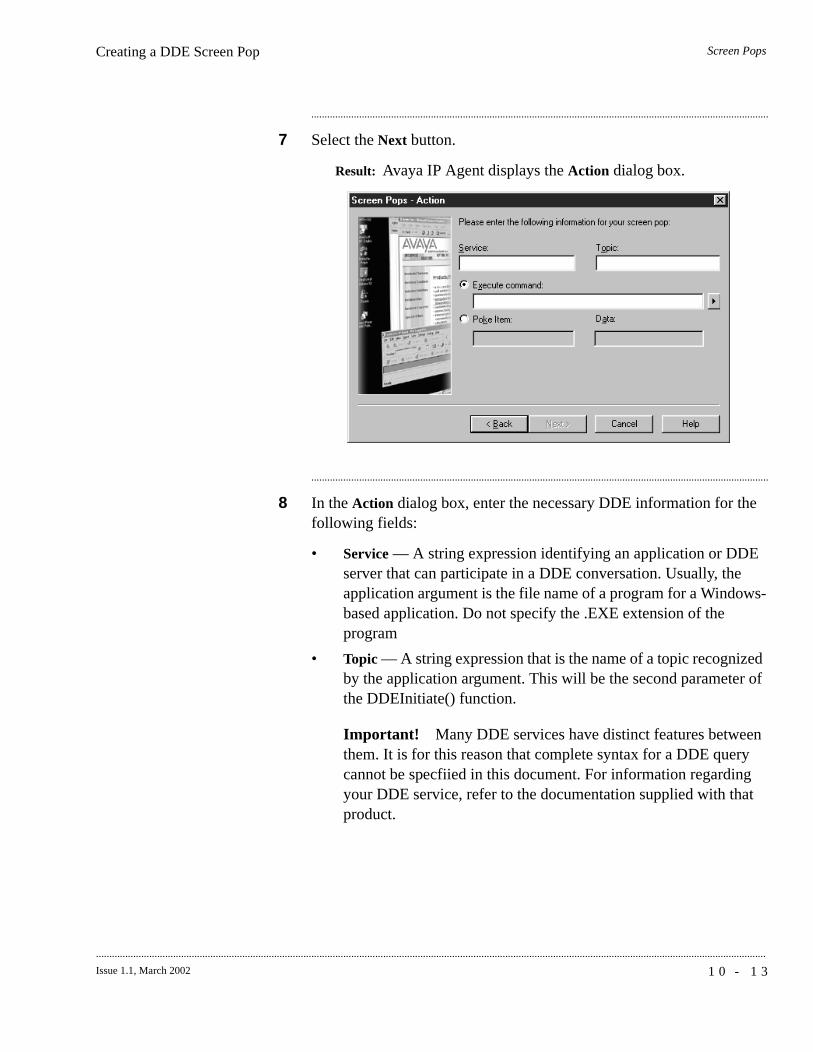
Screen PopsCreating a DDE Screen Pop
1 0 - 1 3Issue 1.1, March 2002
............................................................................................................................................................................................................................................................
............................................................................................................................................................................
7 Select the Next button.
Result: Avaya IP Agent displays the Action dialog box.
............................................................................................................................................................................
8 In the Action dialog box, enter the necessary DDE information for the following fields:
• Service — A string expression identifying an application or DDE server that can participate in a DDE conversation. Usually, the application argument is the file name of a program for a Windows-based application. Do not specify the .EXE extension of the program
• Topic — A string expression that is the name of a topic recognized by the application argument. This will be the second parameter of the DDEInitiate() function.
Important! Many DDE services have distinct features between them. It is for this reason that complete syntax for a DDE query cannot be specfiied in this document. For information regarding your DDE service, refer to the documentation supplied with that product.
1 0 - 1 4 Issue 1.1, March 2002
...........................................................................................................................................................................................................................................................
Screen PopsCreating a DDE Screen Pop
............................................................................................................................................................................
9 Select which option will be used for the DDE conversation from the following list:
• Execute command — A string expression specifying a command recognized by the server application. The string will only be changed to input caller information. The syntax must match the syntax required by the DDE program. For example, if embedded quotes are necessary, such as / ��0112 �111, then the string must be entered in that manner.
• Poke Item — A string expression that is the name of a data item recognized by the topic specified by the DDE Initiate() function.
Data — A string containing the data to be supplied to the other application.
............................................................................................................................................................................
10 Enter the appropriate information in the fields for the selected option. Use the arrow button to the right of the Execute command or Data fields to specify information to retrieve from the telephone call to pass onto the DDE conversation.
The information that may be available for retrieval from a call are:
• Caller Name (%n) — Passes the name of the other party on the call, if available
• Caller Number (%m) — Passes the telephone number of the other party on the call, if available
• Prompted Digits (%p) — Passes the digits the caller selected while being processed through a vector, if available.
• VDN (%v) — Passes the VDN name through which the call was connected
• Start Time (%s) — Passes the time when the telephone call was received by Avaya IP Agent
• Date (%d) — Passes the current date when the telephone call is received by Avaya IP Agent
You may also specify these parameters manually within the string.
Screen PopsCreating a DDE Screen Pop
1 0 - 1 5Issue 1.1, March 2002
............................................................................................................................................................................................................................................................
............................................................................................................................................................................
11 If you specified any parameters to be used in the Action dialog box, you will be presented with the Format Call Information dialog box for each parameter where you can specify the number of characters or digits used for that parameter in the Screen Pop.
If you wish to limit the number of characters presented for each parameter, enable the check box on the specific parameter screen and then use the Number of characters to include and Location fields to adjust the boundaries of the string accordingly. After you have specified the boundaries of the parameter string, select the Next button.
Result: If more than one parameter was specified in the Action dialog box earlier, the Format Call Information for the next parameter is presented.
If there are no more parameters, Avaya IP Agent displays the Testing dialog box.
............................................................................................................................................................................
12 Select the Test button to verify that the configuration of this Screen Pop works as intended.
If you are using parameters in your Screen Pop, you will be presented with another dialog box that allows you to enter Caller Name, Caller Number, Prompted Digits, and VDN as test information. Select the Continue button when all necessary test information has been entered in these fields.
Result: Avaya IP Agent launches the Screen Pop.
............................................................................................................................................................................
13 After you have confirmed that the test of the Screen Pop was successful, close the Screen Pop and select the Next button on the Testing dialog box.
Result: Avaya IP Agent displays the Setup Completed dialog box.
............................................................................................................................................................................
14 Select the Finish button.
Result: Avaya IP Agent saves this Screen Pop and displays it in the Screen Pops window.
E N D O F S T E P S...........................................................................................................................................................................
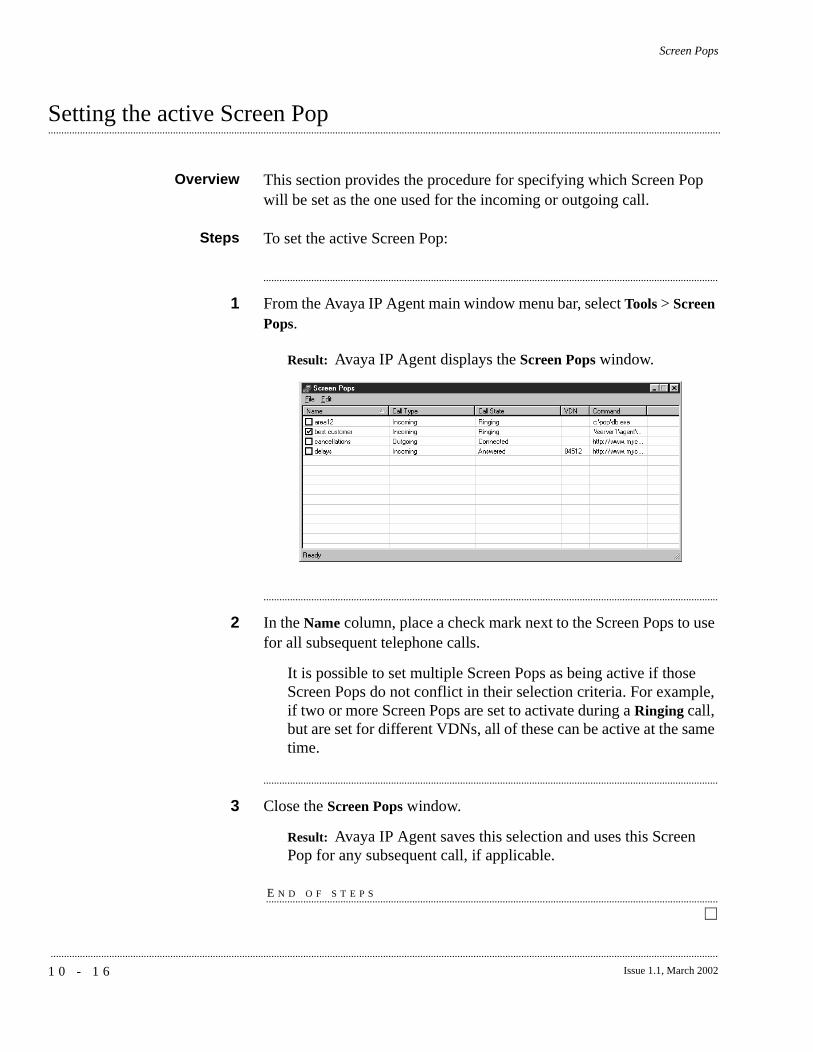
1 0 - 1 6 Issue 1.1, March 2002
...........................................................................................................................................................................................................................................................
Screen Pops
.............................................................................................................................................................................................................................................................Setting the active Screen Pop
Overview This section provides the procedure for specifying which Screen Pop will be set as the one used for the incoming or outgoing call.
Steps To set the active Screen Pop:
............................................................................................................................................................................
1 From the Avaya IP Agent main window menu bar, select Tools > Screen Pops.
Result: Avaya IP Agent displays the Screen Pops window.
............................................................................................................................................................................
2 In the Name column, place a check mark next to the Screen Pops to use for all subsequent telephone calls.
It is possible to set multiple Screen Pops as being active if those Screen Pops do not conflict in their selection criteria. For example, if two or more Screen Pops are set to activate during a Ringing call, but are set for different VDNs, all of these can be active at the same time.
............................................................................................................................................................................
3 Close the Screen Pops window.
Result: Avaya IP Agent saves this selection and uses this Screen Pop for any subsequent call, if applicable.
E N D O F S T E P S...........................................................................................................................................................................
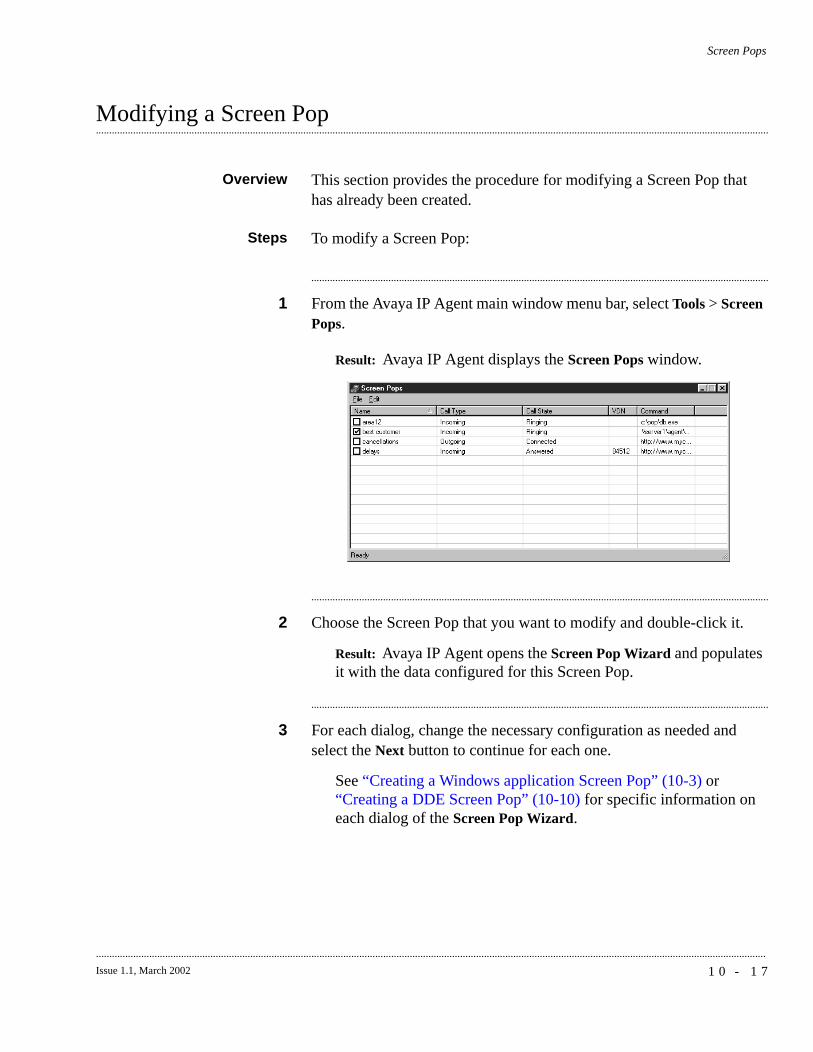
Screen Pops
1 0 - 1 7Issue 1.1, March 2002
............................................................................................................................................................................................................................................................
.............................................................................................................................................................................................................................................................Modifying a Screen Pop
Overview This section provides the procedure for modifying a Screen Pop that has already been created.
Steps To modify a Screen Pop:
............................................................................................................................................................................
1 From the Avaya IP Agent main window menu bar, select Tools > Screen Pops.
Result: Avaya IP Agent displays the Screen Pops window.
............................................................................................................................................................................
2 Choose the Screen Pop that you want to modify and double-click it.
Result: Avaya IP Agent opens the Screen Pop Wizard and populates it with the data configured for this Screen Pop.
............................................................................................................................................................................
3 For each dialog, change the necessary configuration as needed and select the Next button to continue for each one.
See “Creating a Windows application Screen Pop” (10-3) or “Creating a DDE Screen Pop” (10-10) for specific information on each dialog of the Screen Pop Wizard.
1 0 - 1 8 Issue 1.1, March 2002
...........................................................................................................................................................................................................................................................
Screen PopsModifying a Screen Pop
............................................................................................................................................................................
4 When you reach the Setup Completed dialog box, select the Finish button.
Result: Avaya IP Agent saves the changes made to the Screen Pop and closes the Screen Pop Wizard.
............................................................................................................................................................................
5 Close the Screen Pops window.
E N D O F S T E P S...........................................................................................................................................................................
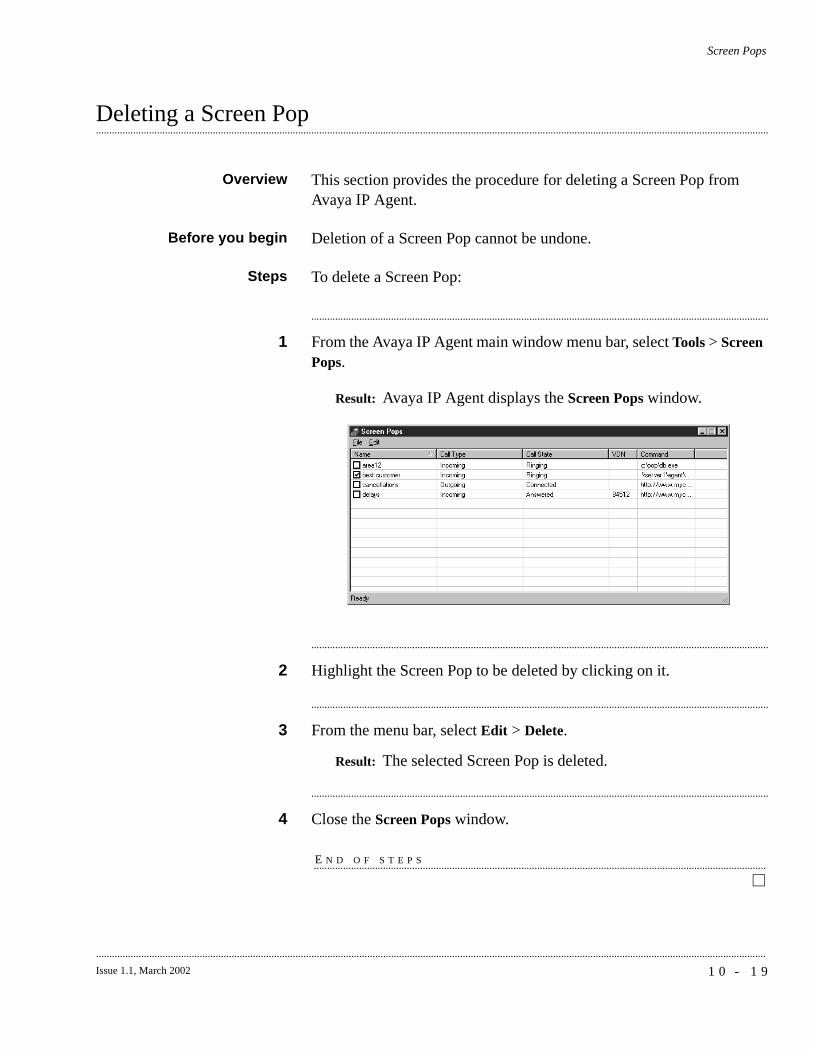
Screen Pops
1 0 - 1 9Issue 1.1, March 2002
............................................................................................................................................................................................................................................................
.............................................................................................................................................................................................................................................................Deleting a Screen Pop
Overview This section provides the procedure for deleting a Screen Pop from Avaya IP Agent.
Before you begin Deletion of a Screen Pop cannot be undone.
Steps To delete a Screen Pop:
............................................................................................................................................................................
1 From the Avaya IP Agent main window menu bar, select Tools > Screen Pops.
Result: Avaya IP Agent displays the Screen Pops window.
............................................................................................................................................................................
2 Highlight the Screen Pop to be deleted by clicking on it.
............................................................................................................................................................................
3 From the menu bar, select Edit > Delete.
Result: The selected Screen Pop is deleted.
............................................................................................................................................................................
4 Close the Screen Pops window.
E N D O F S T E P S...........................................................................................................................................................................

1 0 - 2 0 Issue 1.1, March 2002
...........................................................................................................................................................................................................................................................
Screen PopsDeleting a Screen Pop
A - 1Issue 1.1, March 2002
............................................................................................................................................................................................................................................................
Appendix A: Quick Reference — Shortcut keys
.............................................................................................................................................................................................................................................................Overview
Purpose This appendix contains quick reference information for shortcut keys.
Shortcut keys refer to key combinations that you can use to invoke a particular command. For example, to place a call on hold, you can press Ctrl + H. Some of the most commonly used shortcut keys are discussed in this section. In order for shortcut keys to work as documented, the Avaya IP Agent window must have focus as the current application.
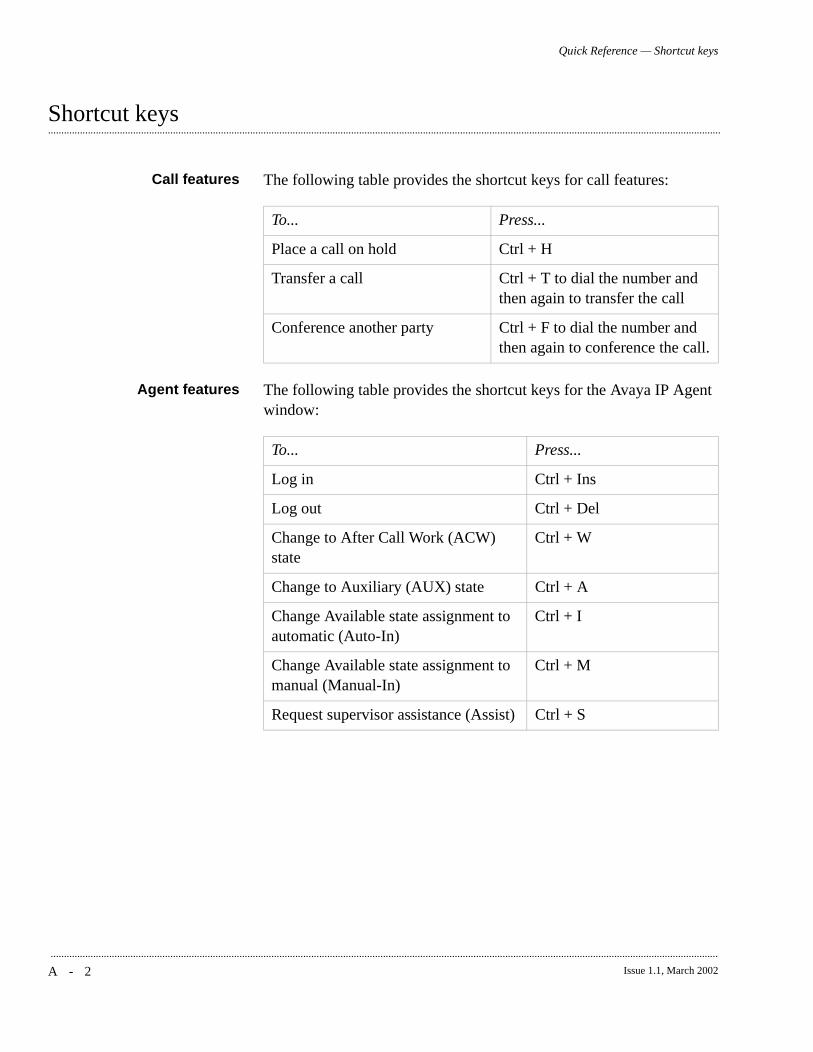
A - 2 Issue 1.1, March 2002
...........................................................................................................................................................................................................................................................
Quick Reference — Shortcut keys
.............................................................................................................................................................................................................................................................Shortcut keys
Call features The following table provides the shortcut keys for call features:
Agent features The following table provides the shortcut keys for the Avaya IP Agent window:
To... Press...
Place a call on hold Ctrl + H
Transfer a call Ctrl + T to dial the number and then again to transfer the call
Conference another party Ctrl + F to dial the number and then again to conference the call.
To... Press...
Log in Ctrl + Ins
Log out Ctrl + Del
Change to After Call Work (ACW) state
Ctrl + W
Change to Auxiliary (AUX) state Ctrl + A
Change Available state assignment to automatic (Auto-In)
Ctrl + I
Change Available state assignment to manual (Manual-In)
Ctrl + M
Request supervisor assistance (Assist) Ctrl + S
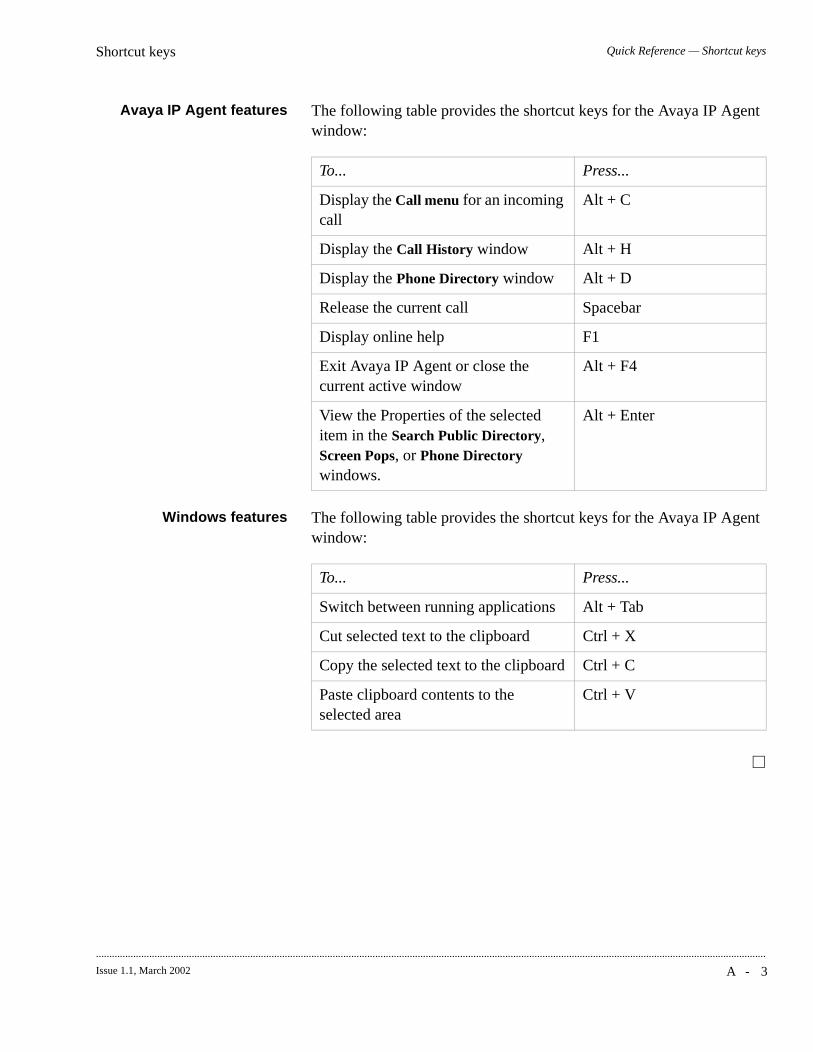
Quick Reference — Shortcut keysShortcut keys
A - 3Issue 1.1, March 2002
............................................................................................................................................................................................................................................................
Avaya IP Agent features The following table provides the shortcut keys for the Avaya IP Agent window:
Windows features The following table provides the shortcut keys for the Avaya IP Agent window:
To... Press...
Display the Call menu for an incoming call
Alt + C
Display the Call History window Alt + H
Display the Phone Directory window Alt + D
Release the current call Spacebar
Display online help F1
Exit Avaya IP Agent or close the current active window
Alt + F4
View the Properties of the selected item in the Search Public Directory, Screen Pops, or Phone Directory windows.
Alt + Enter
To... Press...
Switch between running applications Alt + Tab
Cut selected text to the clipboard Ctrl + X
Copy the selected text to the clipboard Ctrl + C
Paste clipboard contents to the selected area
Ctrl + V

A - 4 Issue 1.1, March 2002
...........................................................................................................................................................................................................................................................
Quick Reference — Shortcut keysShortcut keys
B - 1Issue 1.1, March 2002
............................................................................................................................................................................................................................................................
Appendix B: Quick Reference — Language Support
.............................................................................................................................................................................................................................................................Overview
Purpose This appendix contains quick reference information for supported languages.
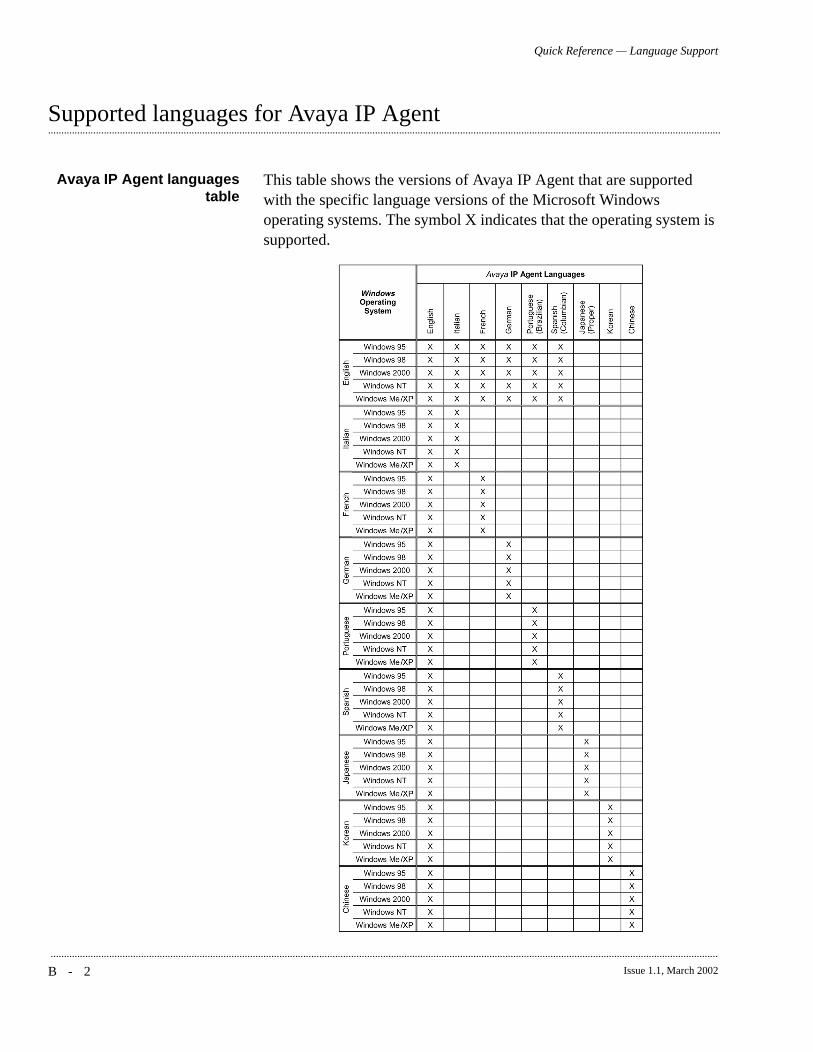
B - 2 Issue 1.1, March 2002
...........................................................................................................................................................................................................................................................
Quick Reference — Language Support
.............................................................................................................................................................................................................................................................Supported languages for Avaya IP Agent
Avaya IP Agent languagestable
This table shows the versions of Avaya IP Agent that are supported with the specific language versions of the Microsoft Windows operating systems. The symbol X indicates that the operating system is supported.
Quick Reference — Language SupportSupported languages for Avaya IP Agent
B - 3Issue 1.1, March 2002
............................................................................................................................................................................................................................................................
US English only Avaya IPAgent components
The following Avaya IP Agent components are provided only in English:
• Installation
• About screen
• Event log
• Avaya IP Agent internal files
• Shortcut keys for secondary callbars
• readme.txt file
• Uninstall program

B - 4 Issue 1.1, March 2002
...........................................................................................................................................................................................................................................................
Quick Reference — Language SupportSupported languages for Avaya IP Agent

C - 1Issue 1.1, March 2002
............................................................................................................................................................................................................................................................
Appendix C: Quick Reference — Troubleshooting
.............................................................................................................................................................................................................................................................Overview
Purpose This appendix contains information for troubleshooting problems with Avaya IP Agent.
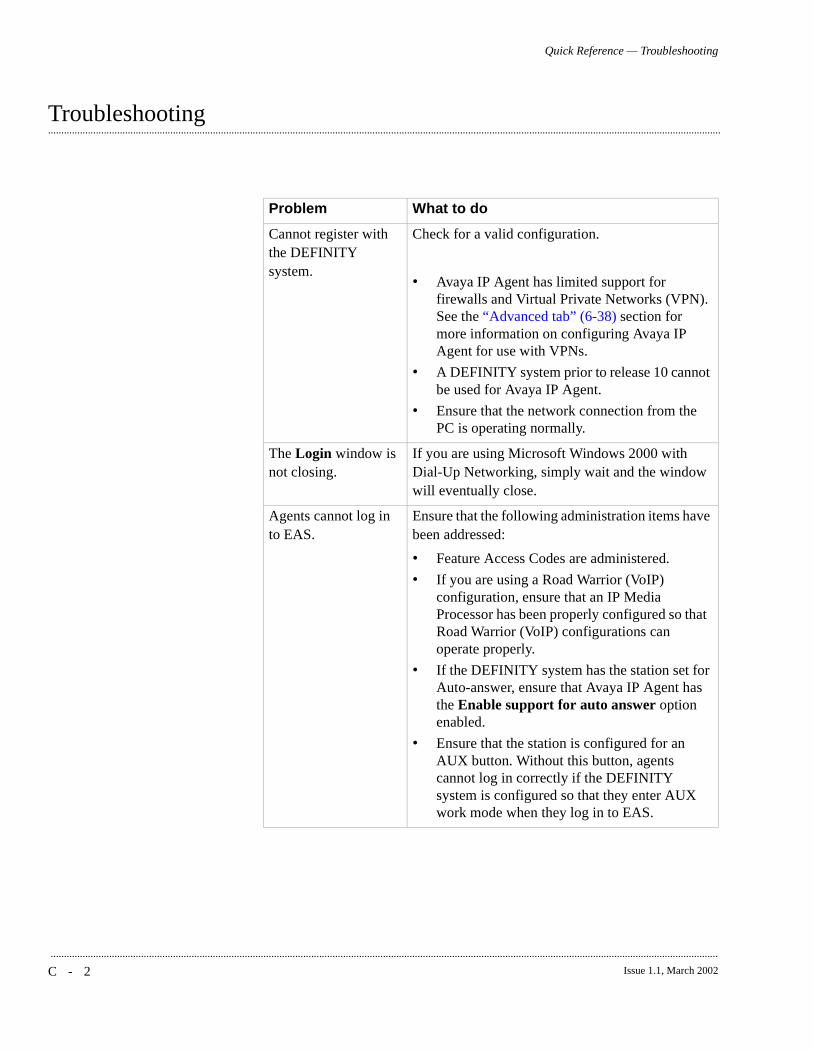
C - 2 Issue 1.1, March 2002
...........................................................................................................................................................................................................................................................
Quick Reference — Troubleshooting
.............................................................................................................................................................................................................................................................Troubleshooting
Problem What to do
Cannot register with the DEFINITY system.
Check for a valid configuration.
• Avaya IP Agent has limited support for firewalls and Virtual Private Networks (VPN). See the “Advanced tab” (6-38) section for more information on configuring Avaya IP Agent for use with VPNs.
• A DEFINITY system prior to release 10 cannot be used for Avaya IP Agent.
• Ensure that the network connection from the PC is operating normally.
The Login window is not closing.
If you are using Microsoft Windows 2000 with Dial-Up Networking, simply wait and the window will eventually close.
Agents cannot log in to EAS.
Ensure that the following administration items have been addressed:
• Feature Access Codes are administered.
• If you are using a Road Warrior (VoIP) configuration, ensure that an IP Media Processor has been properly configured so that Road Warrior (VoIP) configurations can operate properly.
• If the DEFINITY system has the station set for Auto-answer, ensure that Avaya IP Agent has the Enable support for auto answer option enabled.
• Ensure that the station is configured for an AUX button. Without this button, agents cannot log in correctly if the DEFINITY system is configured so that they enter AUX work mode when they log in to EAS.
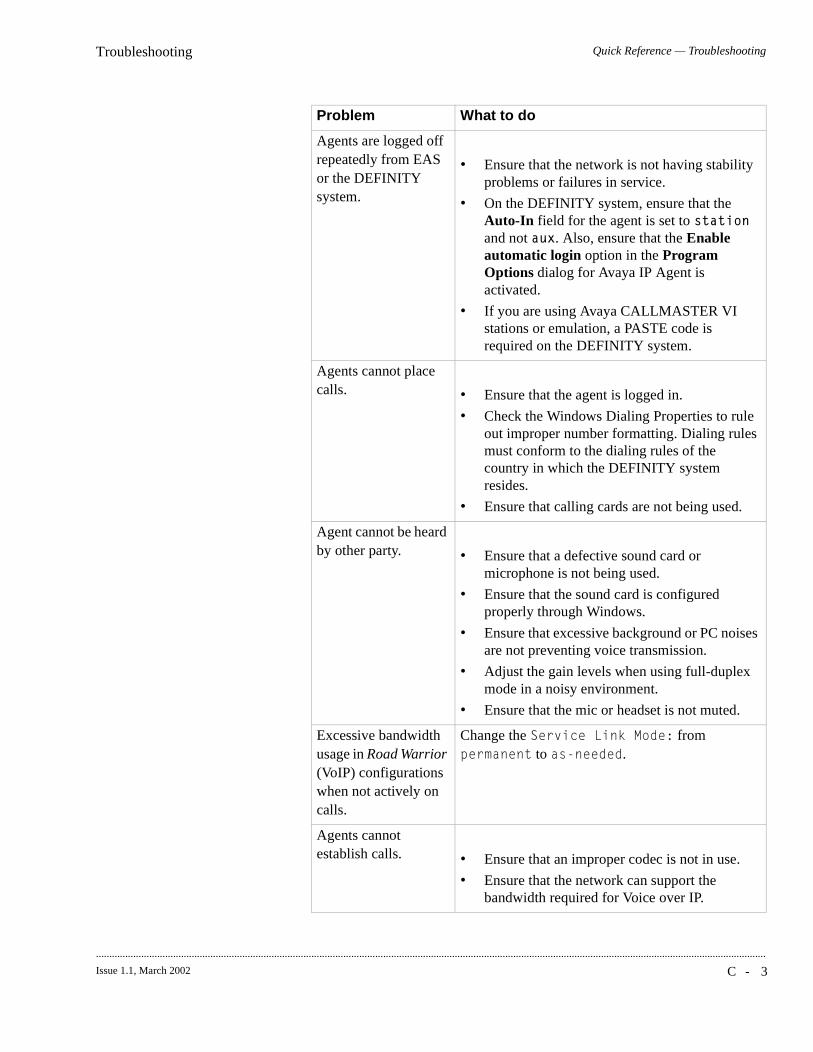
Quick Reference — TroubleshootingTroubleshooting
C - 3Issue 1.1, March 2002
............................................................................................................................................................................................................................................................
Agents are logged off repeatedly from EAS or the DEFINITY system.
• Ensure that the network is not having stability problems or failures in service.
• On the DEFINITY system, ensure that the Auto-In field for the agent is set to ����� and not �� . Also, ensure that the Enable automatic login option in the Program Options dialog for Avaya IP Agent is activated.
• If you are using Avaya CALLMASTER VI stations or emulation, a PASTE code is required on the DEFINITY system.
Agents cannot place calls. • Ensure that the agent is logged in.
• Check the Windows Dialing Properties to rule out improper number formatting. Dialing rules must conform to the dialing rules of the country in which the DEFINITY system resides.
• Ensure that calling cards are not being used.
Agent cannot be heard by other party. • Ensure that a defective sound card or
microphone is not being used.
• Ensure that the sound card is configured properly through Windows.
• Ensure that excessive background or PC noises are not preventing voice transmission.
• Adjust the gain levels when using full-duplex mode in a noisy environment.
• Ensure that the mic or headset is not muted.
Excessive bandwidth usage in Road Warrior (VoIP) configurations when not actively on calls.
Change the %��+!��2!��3� �4 from ,��� �� to ���� � .
Agents cannot establish calls. • Ensure that an improper codec is not in use.
• Ensure that the network can support the bandwidth required for Voice over IP.
Problem What to do
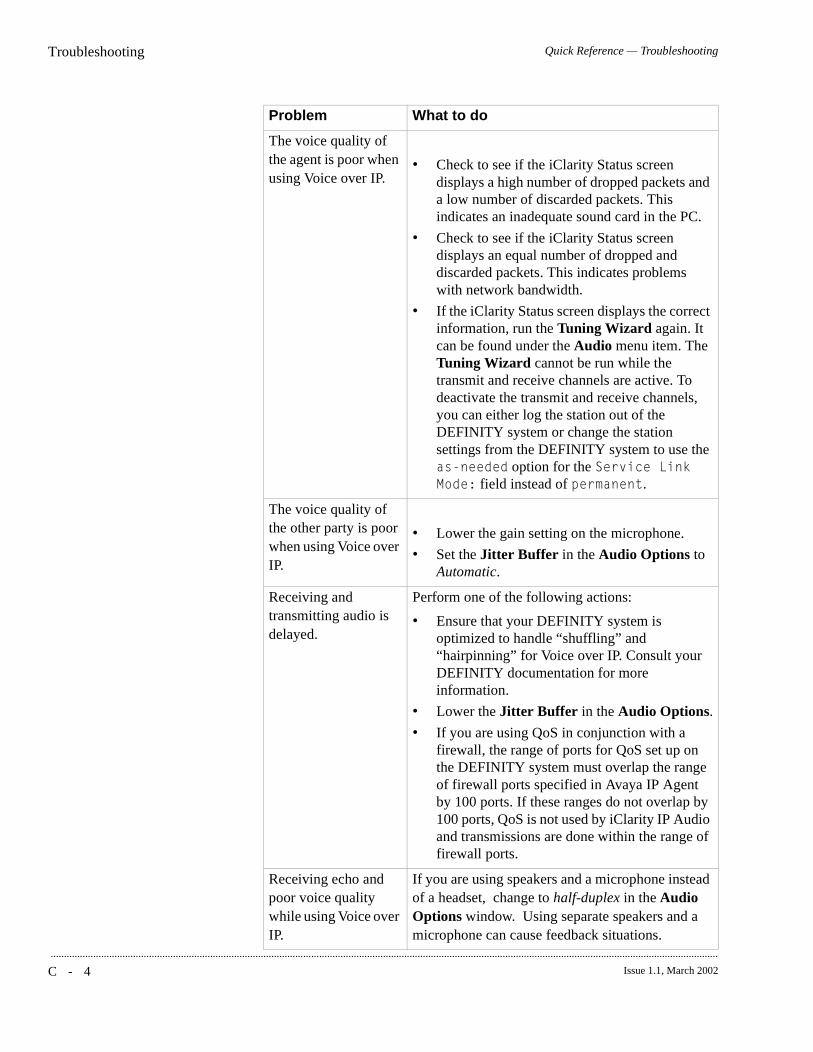
C - 4 Issue 1.1, March 2002
...........................................................................................................................................................................................................................................................
Quick Reference — TroubleshootingTroubleshooting
The voice quality of the agent is poor when using Voice over IP.
• Check to see if the iClarity Status screen displays a high number of dropped packets and a low number of discarded packets. This indicates an inadequate sound card in the PC.
• Check to see if the iClarity Status screen displays an equal number of dropped and discarded packets. This indicates problems with network bandwidth.
• If the iClarity Status screen displays the correct information, run the Tuning Wizard again. It can be found under the Audio menu item. The Tuning Wizard cannot be run while the transmit and receive channels are active. To deactivate the transmit and receive channels, you can either log the station out of the DEFINITY system or change the station settings from the DEFINITY system to use the ���� � option for the %��+!��2!��3� �4 field instead of ,��� ��.
The voice quality of the other party is poor when using Voice over IP.
• Lower the gain setting on the microphone.
• Set the Jitter Buffer in the Audio Options to Automatic.
Receiving and transmitting audio is delayed.
Perform one of the following actions:
• Ensure that your DEFINITY system is optimized to handle “shuffling” and “hairpinning” for Voice over IP. Consult your DEFINITY documentation for more information.
• Lower the Jitter Buffer in the Audio Options.
• If you are using QoS in conjunction with a firewall, the range of ports for QoS set up on the DEFINITY system must overlap the range of firewall ports specified in Avaya IP Agent by 100 ports. If these ranges do not overlap by 100 ports, QoS is not used by iClarity IP Audio and transmissions are done within the range of firewall ports.
Receiving echo and poor voice quality while using Voice over IP.
If you are using speakers and a microphone instead of a headset, change to half-duplex in the Audio Options window. Using separate speakers and a microphone can cause feedback situations.
Problem What to do
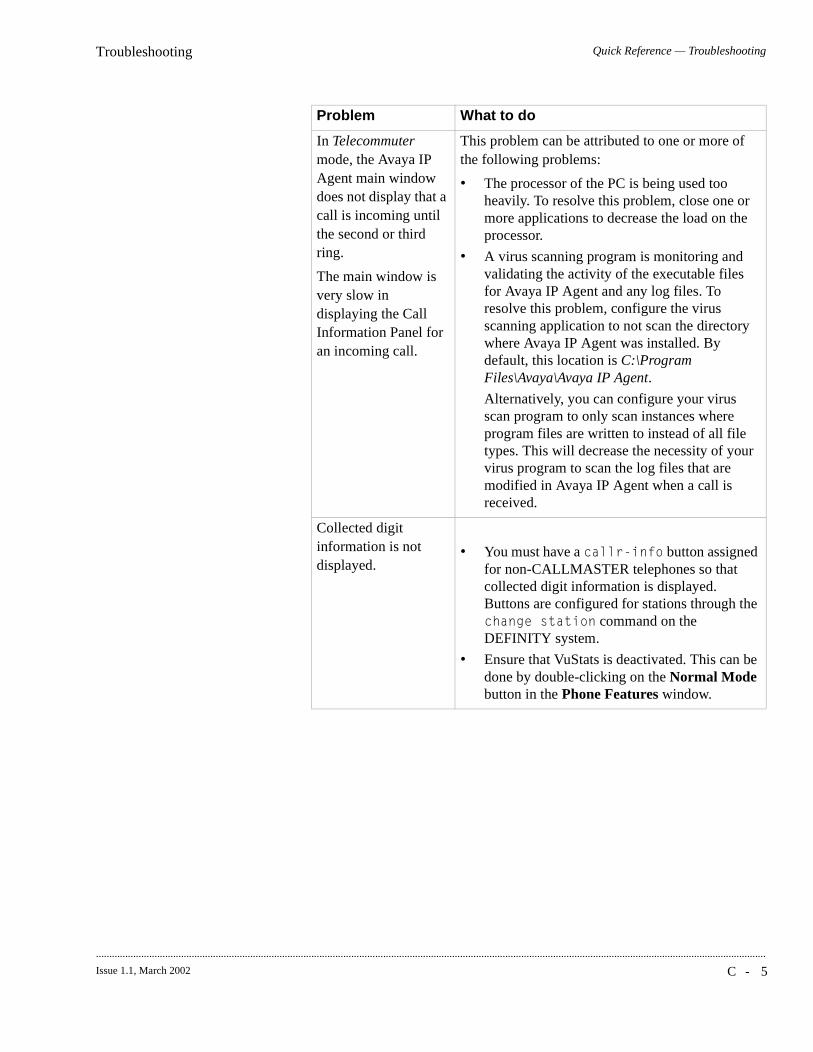
Quick Reference — TroubleshootingTroubleshooting
C - 5Issue 1.1, March 2002
............................................................................................................................................................................................................................................................
In Telecommuter mode, the Avaya IP Agent main window does not display that a call is incoming until the second or third ring.
The main window is very slow in displaying the Call Information Panel for an incoming call.
This problem can be attributed to one or more of the following problems:
• The processor of the PC is being used too heavily. To resolve this problem, close one or more applications to decrease the load on the processor.
• A virus scanning program is monitoring and validating the activity of the executable files for Avaya IP Agent and any log files. To resolve this problem, configure the virus scanning application to not scan the directory where Avaya IP Agent was installed. By default, this location is C:\Program Files\Avaya\Avaya IP Agent.
Alternatively, you can configure your virus scan program to only scan instances where program files are written to instead of all file types. This will decrease the necessity of your virus program to scan the log files that are modified in Avaya IP Agent when a call is received.
Collected digit information is not displayed.
• You must have a ����!-� button assigned for non-CALLMASTER telephones so that collected digit information is displayed. Buttons are configured for stations through the ( ����� �!� command on the DEFINITY system.
• Ensure that VuStats is deactivated. This can be done by double-clicking on the Normal Mode button in the Phone Features window.
Problem What to do
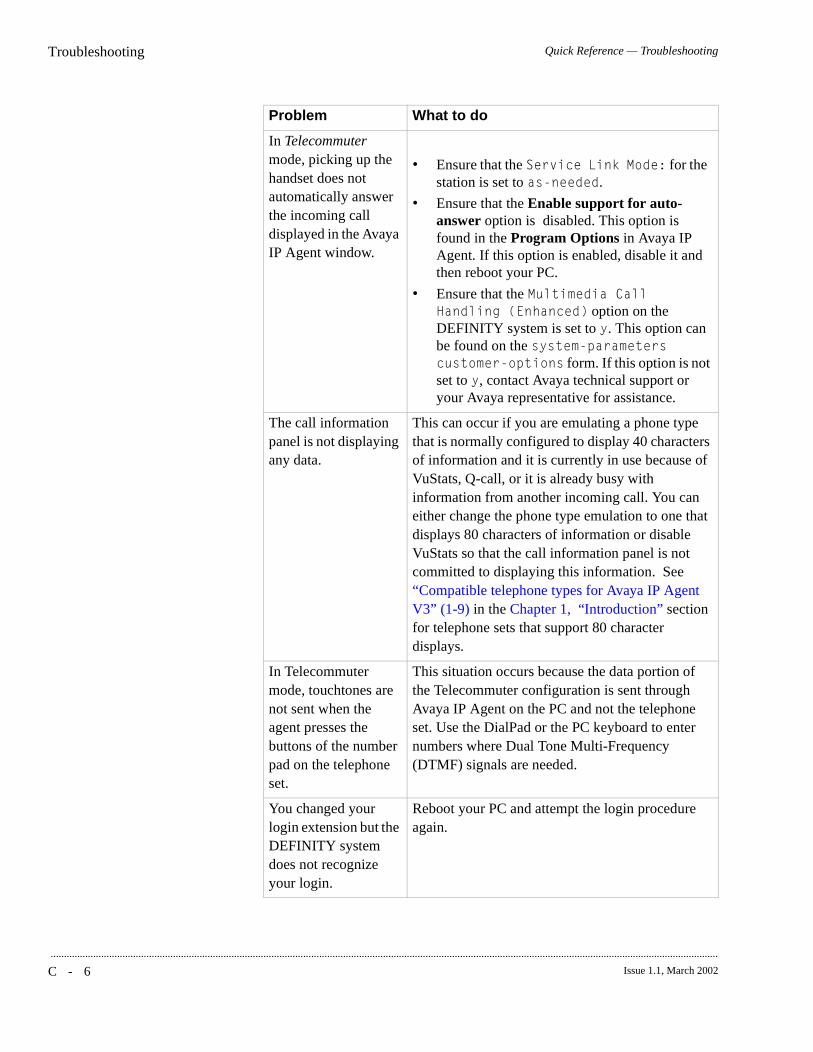
C - 6 Issue 1.1, March 2002
...........................................................................................................................................................................................................................................................
Quick Reference — TroubleshootingTroubleshooting
In Telecommuter mode, picking up the handset does not automatically answer the incoming call displayed in the Avaya IP Agent window.
• Ensure that the %��+!��2!��3� �4 for the station is set to ���� � .
• Ensure that the Enable support for auto-answer option is disabled. This option is found in the Program Options in Avaya IP Agent. If this option is enabled, disable it and then reboot your PC.
• Ensure that the 3���!�� ! �� ���5 �!��6�( � 7 option on the DEFINITY system is set to �. This option can be found on the �������, � ����������������,�!�� form. If this option is not set to �, contact Avaya technical support or your Avaya representative for assistance.
The call information panel is not displaying any data.
This can occur if you are emulating a phone type that is normally configured to display 40 characters of information and it is currently in use because of VuStats, Q-call, or it is already busy with information from another incoming call. You can either change the phone type emulation to one that displays 80 characters of information or disable VuStats so that the call information panel is not committed to displaying this information. See “Compatible telephone types for Avaya IP Agent V3” (1-9) in the Chapter 1, “Introduction” section for telephone sets that support 80 character displays.
In Telecommuter mode, touchtones are not sent when the agent presses the buttons of the number pad on the telephone set.
This situation occurs because the data portion of the Telecommuter configuration is sent through Avaya IP Agent on the PC and not the telephone set. Use the DialPad or the PC keyboard to enter numbers where Dual Tone Multi-Frequency (DTMF) signals are needed.
You changed your login extension but the DEFINITY system does not recognize your login.
Reboot your PC and attempt the login procedure again.
Problem What to do
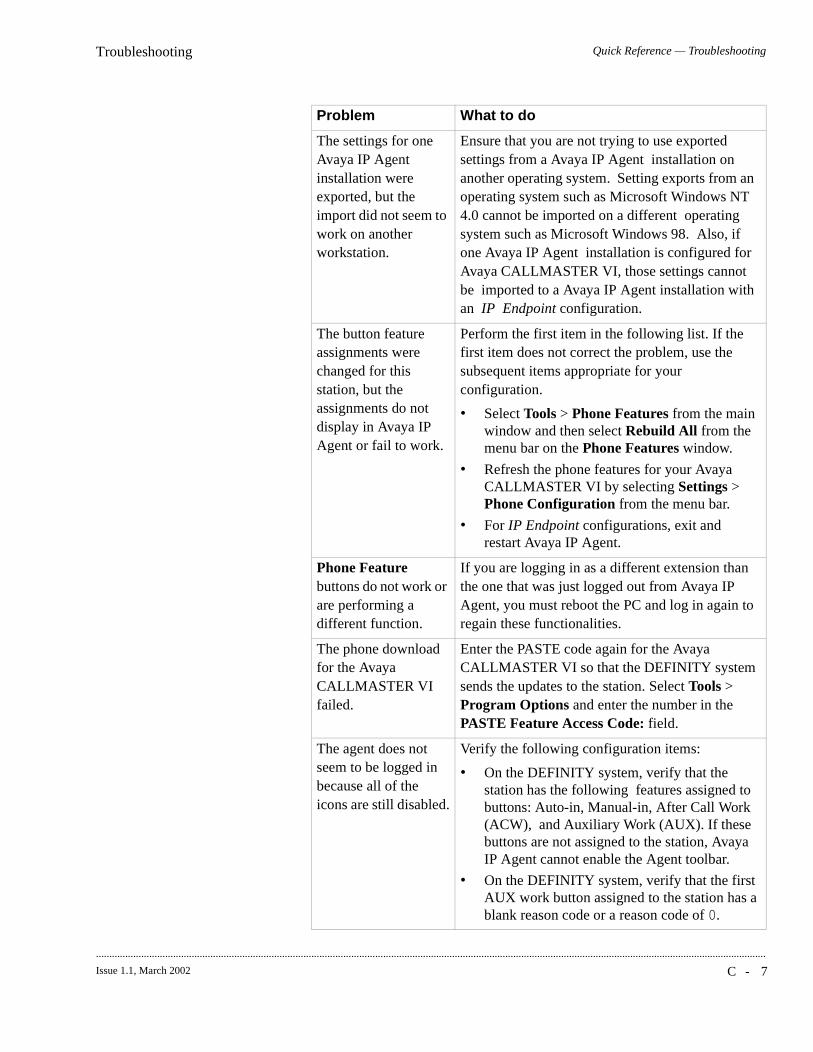
Quick Reference — TroubleshootingTroubleshooting
C - 7Issue 1.1, March 2002
............................................................................................................................................................................................................................................................
The settings for one Avaya IP Agent installation were exported, but the import did not seem to work on another workstation.
Ensure that you are not trying to use exported settings from a Avaya IP Agent installation on another operating system. Setting exports from an operating system such as Microsoft Windows NT 4.0 cannot be imported on a different operating system such as Microsoft Windows 98. Also, if one Avaya IP Agent installation is configured for Avaya CALLMASTER VI, those settings cannot be imported to a Avaya IP Agent installation with an IP Endpoint configuration.
The button feature assignments were changed for this station, but the assignments do not display in Avaya IP Agent or fail to work.
Perform the first item in the following list. If the first item does not correct the problem, use the subsequent items appropriate for your configuration.
• Select Tools > Phone Features from the main window and then select Rebuild All from the menu bar on the Phone Features window.
• Refresh the phone features for your Avaya CALLMASTER VI by selecting Settings > Phone Configuration from the menu bar.
• For IP Endpoint configurations, exit and restart Avaya IP Agent.
Phone Feature buttons do not work or are performing a different function.
If you are logging in as a different extension than the one that was just logged out from Avaya IP Agent, you must reboot the PC and log in again to regain these functionalities.
The phone download for the Avaya CALLMASTER VI failed.
Enter the PASTE code again for the Avaya CALLMASTER VI so that the DEFINITY system sends the updates to the station. Select Tools > Program Options and enter the number in the PASTE Feature Access Code: field.
The agent does not seem to be logged in because all of the icons are still disabled.
Verify the following configuration items:
• On the DEFINITY system, verify that the station has the following features assigned to buttons: Auto-in, Manual-in, After Call Work (ACW), and Auxiliary Work (AUX). If these buttons are not assigned to the station, Avaya IP Agent cannot enable the Agent toolbar.
• On the DEFINITY system, verify that the first AUX work button assigned to the station has a blank reason code or a reason code of #.
Problem What to do

C - 8 Issue 1.1, March 2002
...........................................................................................................................................................................................................................................................
Quick Reference — TroubleshootingTroubleshooting
Agent logs in but is immediately logged out.
If the station or agent is administered on the DEFINITY system as auto answer, Enable support for auto answer in the Program Options must be enabled in Avaya IP Agent. After changing this setting in Avaya IP Agent, you must reboot the PC for the change to take effect.
The agent is unable to record greetings.
Attempt the action appropriate for your configuration:
• For Avaya CALLMASTER VI configurations, check to see if the headset button in the Greetings window is activated. If so, click on the button to deactivate it and try to record the greeting again. The headset can also be deactivated through the headset button on the Avaya CALLMASTER VI unit.
• For Road Warrior (VoIP) configurations, the recording of agent greetings can only be done when the transmit and receive audio connections are inactive. You can logoff and restart Avaya IP Agent to record agent greetings, but the first call instance that occurs will once again disable the ability to record agent greetings.
• For telecommuter configurations, agent greetings are not supported.
I do not know how to stop the transmit and receive audio traffic.
Read the following items for the solution for your configuration:
• If the %��+!��2!��3� �4 for this station is set to ,��� ��, the transmission and receipt of audio over the network is only inactive when the agent first logs in. The first call that occurs on this station will cause the audio traffic to begin and remain active until the station is logged off of the DEFINITY system.
• If the %��+!��2!��3� �4 for this station is set to ���� � , the audio link will become inactive 10 seconds after release of a call.
Problem What to do
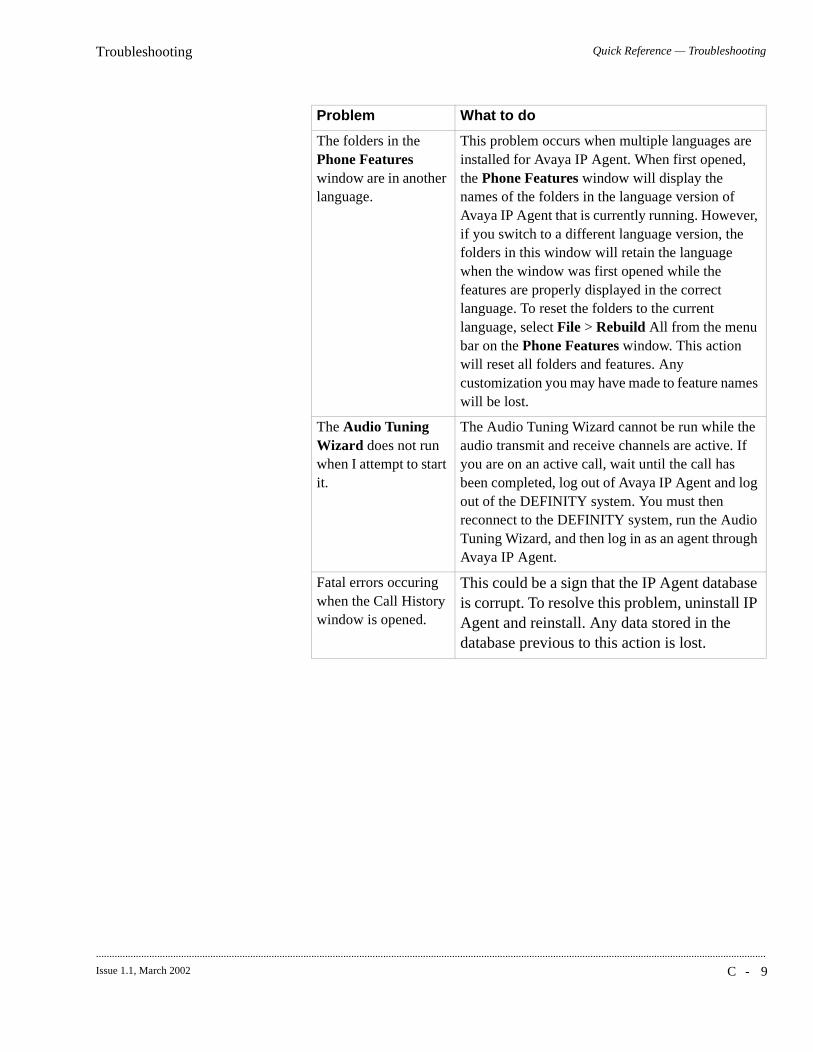
Quick Reference — TroubleshootingTroubleshooting
C - 9Issue 1.1, March 2002
............................................................................................................................................................................................................................................................
The folders in the Phone Features window are in another language.
This problem occurs when multiple languages are installed for Avaya IP Agent. When first opened, the Phone Features window will display the names of the folders in the language version of Avaya IP Agent that is currently running. However, if you switch to a different language version, the folders in this window will retain the language when the window was first opened while the features are properly displayed in the correct language. To reset the folders to the current language, select File > Rebuild All from the menu bar on the Phone Features window. This action will reset all folders and features. Any customization you may have made to feature names will be lost.
The Audio Tuning Wizard does not run when I attempt to start it.
The Audio Tuning Wizard cannot be run while the audio transmit and receive channels are active. If you are on an active call, wait until the call has been completed, log out of Avaya IP Agent and log out of the DEFINITY system. You must then reconnect to the DEFINITY system, run the Audio Tuning Wizard, and then log in as an agent through Avaya IP Agent.
Fatal errors occuring when the Call History window is opened.
This could be a sign that the IP Agent database is corrupt. To resolve this problem, uninstall IP Agent and reinstall. Any data stored in the database previous to this action is lost.
Problem What to do

C - 1 0 Issue 1.1, March 2002
...........................................................................................................................................................................................................................................................
Quick Reference — TroubleshootingTroubleshooting
G L - 1Issue 1.1, March 2002
............................................................................................................................................................................................................................................................
Glossary
A Abbreviated Dial FeatureAllows the agent to store selected telephone numbers for quicker and easier dialing. Each number can be a complete or partial telephone number, an extension number, or a trunk or feature code.
ACDSee Automatic Call Distribution.
Active CallA call appearance state where the voice (talk) path between two parties has been connected; for example, a caller and an agent.
ACWSee After Call Work.
Add/Remove ProgramsA Microsoft Windows feature that allows you to remove programs that have been installed on your computer. The Add/Remove Programs component is found in the Control Panel.
After Call Work (ACW)An ACD agent work mode in which agents are unavailable to receive ACD calls. Agents should enter the ACW mode to wrap-up call-related work before the next ACD call is delivered.
AgentA person who receives calls that are directed to a split or skill.
Agent Information PanelThis panel is displayed when there are no calls and there is status information. If the agent is logged in, the status information also includes the agent mode (for example, Auto-In and Manual-In).

G L - 2 Issue 1.1, March 2002
.........................................................................................................................................................................................................................................................
Agent ModeThe agent skill set associated with your EAS agent ID. To use Avaya IP Agent, you need to log in as an agent in order to receive ACD (Automatic Call Distribution) calls. Logging in as an agent enables the Agent Toolbar.
Agent SkillAn attribute that is associated with an EAS ACD agent. Agent skills can be thought of as the ability for an agent with a particular set of skills to handle a call that requires one of a set of skills. An agent can be assigned up to 20 skills. The meaning of each Agent Skill is defined by the customer. Examples of what could be considered skills are: the ability to speak a particular language or the expertise to handle a certain product.
Agent StateA feature of agent call handling. Agent states are the different call work modes and call states an agent can be in (logins, logouts, After Call Work, AUX, and so forth). Data about these states is displayed in the history log.
Agent ToolbarA toolbar that provides buttons for agent login and logout and agent modes, such as Auto-In, Manual-In, and After Call Work.
AssistAllows an agent to request assistance (whether on an active ACD call or not) from the split or skill supervisor by pressing the Assist button or by putting the call on hold and dialing the Assist feature access code, followed by the split group number. The agent must be logged into the split.
Auto DialA modem feature that opens the line and dials the telephone number of another computer to establish connection.
Auto-InAn ACD work mode. In the Auto-In mode, when an agent disconnects from a call, he or she is automatically available to receive another ACD call.
Automatic Call Distribution (ACD)A method of call distribution where EAS agents are placed called “skills.” An EAS agent can be logged into up to 20 skills simultaneously. For each skill, EAS distributes calls to the agents' voice terminals by using one of two call distribution methods: UCD or Expert Agent Distribution (EAD).
G L - 3Issue 1.1, March 2002
...........................................................................................................................................................................................................................................................
.............................................................................................................................................................................................................................................................
AutoPlayA Microsoft Windows feature that causes an application on a CD-ROM to run without any user interaction as soon as the CD-ROM is inserted into the drive.
AUXSee Auxiliary Work.
AUX RCSee Auxiliary Reason Code.
Auxiliary Reason Code (AUX RC)An EAS feature that enables a call center to track an agent’s time more precisely when the agent is in the AUX state. A customer-defined numeric code that describes the reason for entering the AUX work state, such as lunch or meetings.
Auxiliary Work (AUX ) ModeAn ACD agent work mode indicating the agent is unavailable (for example, on break or in training) to receive an ACD call.
AvailableAn agent state in which the extension is able to accept an ACD call. This is a substate of Auto-In and Manual-In mode.
Avaya IP SoftphoneA separate application from Avaya IP Agent, Avaya IP Softphone enables an agent to log into a DEFINITY system either onsite or remotely and make and receive telephone calls from their telephone extension. Avaya IP Softphone does not support agent login.
B Basic ConferenceAllows an agent to add parties to a call (up to five parties can be added, for a total of six on the call). The agent selects Conference, dials the number, talks to the party, and selects Conference again. See also Enhanced Conference.
Basic TransferA transfer option that lets the agent send the present call to another phone number or extension. The agent remains on the line until the call is answered and announces the call if desired. See also Enhanced Transfer and Unsupervised Transfer.
G L - 4 Issue 1.1, March 2002
.........................................................................................................................................................................................................................................................
.............................................................................................................................................................................................................................................................
.............................................................................................................................................................................................................................................................
C Call AppearanceThe call appearance is an IP Agent graphical control that provides the agent with a Call Information Panel and a Phone Display area. See Call Information Panel and Phone Display.
Call Information Panel The Call Information Panel (CIP) is a single panel (40-character display) that provides information about a single call, such as name, call duration, status icon, and control buttons (for example, Answer/Release and Reconnect).
Call ParkTo park a call for retrieval at any extension.
Call PickupTo answer a call to a member of your pickup group when your voice terminal is idle.
Call PromptingA switch feature that routes incoming calls based on information entered by the calling party, such as an account number. The caller is prompted to select an option from those listed in an announcement.
ConnectedA trunk state in which a caller and an agent are connected on an ACD call.
Cut-Through DialingAs a digit is entered, it is immediately dialed (as on a telephone). Cut-through dialing is provided using the Dial Pad or by entering digits from the keyboard when focus is not on the Number text box.
D DDE See Dynamic Data Exchange.
DEFINITY®This product term refers to any Avaya system used for receiving and distributing telephone calls for a contact center.
G L - 5Issue 1.1, March 2002
...........................................................................................................................................................................................................................................................
DEFINITY ECSDEFINITY Enterprise Communications Server. The DEFINITY ECS is a telecommunications system that routes voice and data information between various endpoints (for example, telephones, terminals, and computers), provides highly robust networking capabilities, includes an extensive set of standard features (for example, Attendant Consoles, Voice Processing Interface, Call Coverage, DS1/E1 Connectivity, Hospitality Support, Recorded Announcement, and Trunk-to-Trunk Transfer), and provides flexibility. It also allows for the addition of optional features and upgrades to the system as business needs change.
Delimited Text FileA file containing values separated by commas, tabs, semicolons, or other characters.
Dial AreaA frame located on the Avaya IP Agent main window that provides dialing capabilities.
Dial PadA toolbar that displays the 12 characters that are on the telephone dialpad. The 12 buttons are used to dial a number. Each character clicked is automatically sent. This is called cut-through dialing.
Dial Number ButtonA button (telephone icon) on the Dial Number toolbar that is used to get a dial tone (for cut-through dialing) or to dial the digits entered in the Number text box (senderized dialing).
Dial Number ToolbarA toolbar that provides a number text box access to the phone directory, call history, speed dial, and recent calls list. When an agent enters a string (for example, lan) followed by Enter, a popup menu displays with a list of the directory entries that start with that string. If the first character of the number is a letter, the title of the field will be changed from Number to Directory.
DNSSee Domain Naming System.
DomainA subnetwork comprised of a group of clients and servers under the control of one security database.

G L - 6 Issue 1.1, March 2002
.........................................................................................................................................................................................................................................................
.............................................................................................................................................................................................................................................................
Domain Naming System (DNS)Software that lets users locate computers on the Internet by host name. The DNS server maintains a database of host names and IP addresses.
DropAllows you to disconnect from an ACD call or non-ACD call. Drop disconnects you from a call and gives you a dial tone. Use Drop when you want to disconnect from a call and place another call. You can also use Drop to disconnect the last person added to a conference call.
Dynamic Data Exchange (DDE)A message protocol in Windows that allows application programs to request and exchange data between them automatically.
E EASSee Expert Agent Selection.
Enhanced ConferenceAllows you to add parties (up to six) to a call. You select Conference, type the number to be called into a text box, and click OK. After talking to the party, you can either click Yes to add the party or No to not add the party to the call. See also Basic Conference.
Enhanced TransferA transfer option that lets you send the present call to another phone number or extension. You select Conference, type the number to be called into a text box, and click OK. You are provided with a “Transfer the party?” text box in which you can select Yes to transfer the party or No to not transfer the party. See also Basic Transfer and Unsupervised Transfer.
EurofontA font set provided in DCP terminals that contains characters with diacritical marks common to other languages. Eurofont includes characters from the Russian, Greek, Baltic Rim, and central European languages, as well as the first 127 characters of the standard ANSI table. The True Type Font encoding used for Eurofont is non-standard relative to the encoding used in other Windows fonts. As a result, IP Agent is able to support Eurofont characters in the displays received from the DEFINITY system.
G L - 7Issue 1.1, March 2002
...........................................................................................................................................................................................................................................................
.............................................................................................................................................................................................................................................................
.............................................................................................................................................................................................................................................................
.............................................................................................................................................................................................................................................................
Expert Agent Selection (EAS)An optional DEFINITY system feature that builds on the power of the Call Vectoring and ACD features of the DEFINITY system to match skills required to handle a particular call to an agent who has at least one of the skills that a caller requires. Agents are assigned a single set of work mode buttons, rather than one set per split.
F FACSee Feature Access Code.
Feature Access Code (FAC)A 1-to-4 digit number with an optional leading * or # that is assigned in DEFINITY system administration to invoke features. For example, *81 may invoke Service Observing Listen Only. FACs require an available call appearance with dial tone before the FAC can be sent to the DEFINITY system. Assigned FACs may not be available to all users on DEFINITY system based on his/her class of restrictions and/or whether the feature has been enabled in the DEFINITY system.
Feature ButtonA button placed on the main window that can be assigned to any one of a number of DEFINITY system features that could be assigned to a physical extension’s button during station administration.
G Graphical User Interface (GUI)This is a picture based, rather than command-line based, interaction between the user and the computer.
Grayed OutWhen you do not have access to a menu or action list item, it will be grayed out (that is, dimmed or displayed in a different color from the rest of the menu or action list).
GUISee Graphical User Interface.
H HoldAllows an agent to disconnect from a call temporarily, use the toolbar for other call purposes, and then return to the original call.
HTMLSee HyperText Markup Language.
G L - 8 Issue 1.1, March 2002
.........................................................................................................................................................................................................................................................
.............................................................................................................................................................................................................................................................
.............................................................................................................................................................................................................................................................
.............................................................................................................................................................................................................................................................
HypertextA linkage between related text. For example, if you select a word in a sentence, information about that word is retrieved if it exists, or the next occurrence of the word is found.
HyperText Markup LanguageHTML. A standard for defining documents with hypertext links. See also Hypertext.
I Installation Folder A folder on the network that holds all of the IP Agent files. Setup.exe is run from this folder to install IP Agent on each computer.
Internet Protocol Address (IP Address)Each computer has its own unique IP address which is an identifier used for communicating across a network.
IP AddressSee Internet Protocol Address.
K KanafontA font set provided in DCP terminals that contains Katakana characters (used in Japanese language) as well as the first 127 characters of the standard ANSI table. The True Type Font encoding is non-standard relative to the encoding used on other DEFINITY fonts. As a result, IP Agent is able to support Katakana characters in displays received from the DEFINITY system.
L LANSee Local Area Network.
Local Area Network (LAN)A private interactive communication network that allows computers to communicate over short distances at high data transfer rates.
LogA file that contains a record of computer activity as well as backup and recovery data.
G L - 9Issue 1.1, March 2002
...........................................................................................................................................................................................................................................................
.............................................................................................................................................................................................................................................................
.............................................................................................................................................................................................................................................................
.............................................................................................................................................................................................................................................................
.............................................................................................................................................................................................................................................................
LoginAllows an agent to log into the DEFINITY system so that the agent can receive ACD calls. Non-EAS agents may log in to a maximum of four splits at once. EAS agents can be logged into as many as 20 skills simultaneously.
Login ID A login number and that allows an EAS agent to log into agent mode and the skills associated with that mode on the switch.
LogoutAllows you to log out of the DEFINITY system. When the you out of the DEFINITY system, you cannot receive ACD calls. If you are an EAS agent, you may be requested to enter a reason code before logging out.
M Manual-InAn ACD work mode. In the Manual-In mode, the agent automatically enters the ACW mode when he or she disconnects from an ACD call. To become available to receive another ACD call, the agent must manually enter the Auto-In or Manual-In mode.
N Network ServerA computer in a network shared by multiple users.
O Off-HookOff-hook means that the voice path to your telephone is fully functional.
On-HookOn-hook means that the voice path to your telephone is turned off.
P Phone DisplayA 40-character display that is located under the Call Information Panel of your Avaya IP Agent callbar. This display area receives information from the DEFINITY system so that you can see call and non-call related information, such as call prompting digits and VuStats from the DEFINITY system.
PSTNSee Public Switched Telephone Network.
Public Switched Telephone Network (PSTN)The worldwide voice telephone network.

G L - 1 0 Issue 1.1, March 2002
.........................................................................................................................................................................................................................................................
.............................................................................................................................................................................................................................................................
.............................................................................................................................................................................................................................................................
R RCSee Reason Code.
Readme FileA file that provides the latest information on a newly released product; in this case, Avaya IP Agent.
Read-onlyA folder or file that can be read, but not updated or erased.
Reason Code (RC)A customer-defined numeric code that describes the reason for entering the AUX work state or for logging out of the system.
RegistryThe system-wide depository of information supported by Windows. The registry contains information about the system and its applications, including clients and servers.
ReleaseAllows you to release an ACD call.
S Screen PopThe ability to automatically display information from other sources, such as databases or Web pages based on an IP Agent triggering criteria.
Send All CallsTo send all incoming calls (except priority, intercom, and personal central office calls) immediately to an assigned extension, AUDIX, or message center for coverage.
Senderized DialingWhen a dial string is entered, the Send Digits button or Enter key must be selected to actually dial the digits. This type of dialing allows for editing of dial strings before sending the digits.
SkillAn attribute that is assigned to an ACD Agent. Agent Skills can be thought of as the ability for an Agent with a particular set of skills to handle a call that requires one of those skills.

G L - 1 1Issue 1.1, March 2002
...........................................................................................................................................................................................................................................................
.............................................................................................................................................................................................................................................................
.............................................................................................................................................................................................................................................................
SoftphoneA software application that enables you to control telephone calls (both incoming and outgoing) directly from your computer.
SplitA group of extensions that receives special-purpose calls in an efficient, cost-effective manner. Normally, calls to a split arrive primarily over one or a few trunk groups.
Stroke CountsAllows an agent to record the number of times a particular customer-related event occurs. For example, an agent may be asked to press a button each time a customer requests information about a particular item. Stroke Count entries are numbered from 1 through 9. Each number is assigned to a specific item, and the agent enters that number (1–Stroke through 9–Stroke) whenever a customer asks about that item.
SwitchA private switching system providing voice-only or voice and data communications services including access to public and private networks) for a group of terminals within a customer's premises.
T TAPI Assisted DialingIP Agent supports telephony enabled applications such as Microsoft Scheduler. This support provides the ability for telephony enabled Windows applications to originate a call and have the call reflected in the IP agent application.
ToolbarA row of buttons used to activate various functions of the IP Agent application. The IP Agent main window can contain as many as five toolbars.
ToolTipsBrief descriptions that display when the mouse pointer is over a toolbar button.
U Unsupervised TransferA call transfer option that lets an agent send the present call to another phone number or extension. The agent selects Transfer, types the number to be called into a text box, and clicks OK to transfer the call. The agent does not talk to the party receiving the transferred call. See also Basic Transfer and Enhanced Transfer.
G L - 1 2 Issue 1.1, March 2002
.........................................................................................................................................................................................................................................................
.............................................................................................................................................................................................................................................................
V VDN of Origin Announcement (VOA)A short announcement that is assigned to a VDN through switch administration. The VOA identifies the origin or purpose of a call for the call center agent who answers the call.
VOASee VDN of Origin Announcement.
Voice TerminalA telephone equipped with specifically designed features (for example, the Conference or Hold button or Message light) and functional capabilities that distinguish it from a conventional telephone.
VuStatsInformation such as agent, split/skill, VDN, or trunk group data.
I N - 1Issue 1.1, March 2002
............................................................................................................................................................................................................................................................
Index
A
Abbreviated Dial button . . . . . . . . . . . 5-32abbreviated dialing . . . . . . . . . . . . . 5-32ACD Agent options dialog . . . . . . . . . . 6-20administering
DEFINITY for Avaya IP Agent . . . . . . 3-1agent
logout . . . . . . . . . . . . . . . . . . . 4-11Agent Greetings
activating . . . . . . . . . . . . . . . . . 7-4active, setting . . . . . . . . . . . . . . . 7-4ANI settings. . . . . . . . . . . . . . . .6-42creating . . . . . . . . . . . . . . . . . . 7-3deleting . . . . . . . . . . . . . . . . . . 7-6description, setting . . . . . . . . . . . . 6-41overview . . . . . . . . . . . . . . . . . 7-1Prompted Digits settings . . . . . . . . . 6-44recording . . . . . . . . . . . . . . . . . 7-3selective play by ANI . . . . . . . . . . . 6-42selective play by prompted digits . . . . . 6-44selective play by VDN . . . . . . . . . . 6-43settings . . . . . . . . . . . . . . . . . .6-40title, changing . . . . . . . . . . . . . . . 6-41VDN settings . . . . . . . . . . . . . . . 6-43
Agent Greetings toolbar . . . . . . . . . . . 6-15Agent Information Panel . . . . . . . . . . . 6-16Agent menu item . . . . . . . . . . . . . . 6-9agent states . . . . . . . . . . . . . . . . . 6-14Agent toolbar . . . . . . . . . . . . . . . . 6-14ANI settings
Agent Greetings . . . . . . . . . . . . . 6-42answering a call . . . . . . . . . . . . . . . 5-3Audio menu item. . . . . . . . . . . . . . . 6-11Audio Options dialog . . . . . . . . . . . . 6-46Audio settings . . . . . . . . . . . . . . . . 6-45Audio toolbar . . . . . . . . . . . . . . . . 6-15Audio Tuning Wizard . . . . . . . . . . . . 6-49auto answer . . . . . . . . . . . . . . . . . 5-3auto-in mode. . . . . . . . . . . . . . . . . 5-3
Avaya IP AgentEmergency Call Handling, configuring . . 3-21exiting . . . . . . . . . . . . . . . . . . 4-12installing . . . . . . . . . . . . . . . . . 2-8logging in to (EAS) . . . . . . . . . . . . 4-7logging in to (non-EAS). . . . . . . . . . 4-9logging out of . . . . . . . . . . . . . . . 4-11reinstalling . . . . . . . . . . . . . . . . 2-27removing . . . . . . . . . . . . . . . . . 2-29running . . . . . . . . . . . . . . . . . . 4-1starting . . . . . . . . . . . . . . . . . . 4-2supported languages . . . . . . . . . . . B-2supported phone types . . . . . . . . . . 1-9uninstalling . . . . . . . . . . . . . . . . 2-29
Avaya IP Agentinstalling . . . . . . . . . . . . . . . . . 2-1uninstalling . . . . . . . . . . . . . . . . 2-1
Avaya IP Agent login (EAS) . . . . . . . . . 4-7Avaya IP Agent login (non-EAS) . . . . . . 4-9
B
bandwidth . . . . . . . . . . . . . . . . . . 6-46basic conference . . . . . . . . . . . . . . 5-19basic transfer . . . . . . . . . . . . . . . . 5-11buttons
Abbreviated Dial . . . . . . . . . . . . . 5-32Avaya IP Agent logout . . . . . . . . . . 4-11Conference . . . . . . . . . . . . . . . . 5-19Drop . . . . . . . . . . . . . . . . . . . 5-9Login . . . . . . . . . . . . . . . . . . . 4-7Logout . . . . . . . . . . . . . . . . . . 4-11Release. . . . . . . . . . . . . . . . . . 5-7Speed Dial . . . . . . . . . . . . . . . . 5-29
C
call conferencingbasic conference . . . . . . . . . . . . . 5-19enhanced conference . . . . . . . . . . 5-22
Call Handling options dialog. . . . . . . . . 6-21Call History options dialog. . . . . . . . . . 6-22Call Information Display options dialog . . . 6-23
I N - 2 Issue 1.1,, March 2002
.........................................................................................................................................................................................................................................................
Call Information Panel . . . . . . . . . . . 6-16Call menu item . . . . . . . . . . . . . . . . 6-5call transfer . . . . . . . . . . . . . . . . . 5-10
basic. . . . . . . . . . . . . . . . . . . 5-11enhanced . . . . . . . . . . . . . . . . 5-14unsupervised . . . . . . . . . . . . . . 5-13
CALLMASTER VIDEFINITY station, changing. . . . . . . 3-16ensuring DEFINITY compatibility . . . . . 3-6
Circuit packdescriptions . . . . . . . . . . . . . . . 3-29
circuit packsDEFINITY, required for . . . . . . . . . 3-28
C-LAN circuit pack . . . . . . . . . . . . . 3-28C-LAN circuit packs
load balancing across . . . . . . . . . . 3-27compatibility
CALLMASTER VI on DEFINITY . . . . . 3-6Telecommuter and Road Warrior on
DEFINITY . . . . . . . . . . . . . . . . 3-3conference a call
basic. . . . . . . . . . . . . . . . . . . 5-19enhanced conference . . . . . . . . . . 5-22
Conference button . . . . . . . . . . . . . 5-19configuration
changing DEFINITY station for CALLMASTER VI . . . . . . . . . . . 3-16
changing DEFINITY station for Road Warrior. . . . . . . . . . . . . . 3-11
changing DEFINITY station for Telecommuter . . . . . . . . . . . . . 3-11
enhanced . . . . . . . . . . . . . . . . 3-19Configuration Wizard . . . . . . . . . . . . 2-16configure
DEFINITY for Avaya IP Agent. . . . . . . 3-1configuring
Feature Access Codes for DEFINITY . . . 3-8creating
Screen Pops. . . . . . . . . . . . . . . 10-1
D
Database Location options dialog . . . . . 6-24databases
querying . . . . . . . . . . . . . . . . . . 9-4DDE
Screen Pops. . . . . . . . . . . .10-1, 10-10DEFINITY
alternate gatekeepers . . . . . . . . . . 3-26circuit packs, required . . . . . . . . . . 3-28configuring for Avaya IP Agent . . . . . . 3-1configuring for Telecommuter and
Road Warrior. . . . . . . . . . . . . . . 3-3configuring with CALLMASTER VI . . . . 3-6load balancing . . . . . . . . . . . . . . 3-27registering with . . . . . . . . . . . . . . 4-3validating Feature Access Codes . . . . . 3-8VuStats, configuration . . . . . . . . . . . 8-2
DEFINITY registrationConfiguration Wizard . . . . . . . . . . . 2-16
DEFINTYEmergency Call Handling. . . . . . . . . 3-20
deletePublic Directory . . . . . . . . . . . . . . 9-8
deletingScreen Pops . . . . . . . . . . . . . . 10-19
Dial Number toolbar . . . . . . . . . . . . . 6-14Dialog Reference . . . . . . . . . . . . . . 6-1
main window and menus . . . . . . . . . 6-2dialogs
Audio Options. . . . . . . . . . . . . . . 6-46Program Options . . . . . . . . . . . . . 6-18
documentsrelated . . . . . . . . . . . . . . . . . . . x
Drop button . . . . . . . . . . . . . . . . . 5-9dropping a call . . . . . . . . . . . . . . . . 5-9Dynamic Data Exchange
see also DDE
E
Edit menu item. . . . . . . . . . . . . . . . 6-5Emergency Call Handling
Avaya IP Agent, configuring . . . . . . . 3-21DEFINITY, configuring stations on . . . . 3-20
enhanced conference . . . . . . . . . . . . 5-22enhanced transfer . . . . . . . . . . . . . . 5-14Event Logging options dialog . . . . . . . . 6-27exiting Avaya IP Agent . . . . . . . . . . . 4-12External Number Format options dialog . . . 6-26
F
Feature Access Codesvalidating for DEFINITY . . . . . . . . . 3-8
Feature Access options dialog . . . . . . . 6-29features
enhanced . . . . . . . . . . . . . . . . . 3-19File menu item. . . . . . . . . . . . . . . . 6-4Full-duplex audio . . . . . . . . . . . . . . 6-46
G
gaintransmit and receive . . . . . . . . . . . 6-46
gatekeepersDEFINITY, alternate . . . . . . . . . . . 3-26
General Settings options dialog . . . . . . . 6-19
H
Half-duplex audio . . . . . . . . . . . . . . 6-46hardware
requirements . . . . . . . . . . . . . . . 2-3Headset toolbar . . . . . . . . . . . . . . . 6-15Help menu item . . . . . . . . . . . . . . . 6-12
I N - 3Issue 1.1, March 2002
...........................................................................................................................................................................................................................................................
holding a call. . . . . . . . . . . . . . . . . 5-6hot keys
see shortcut keys
Iincoming calls
answering a call . . . . . . . . . . . . . 5-3dropping a call . . . . . . . . . . . . . . 5-9holding a call . . . . . . . . . . . . . . . 5-6releasing a call . . . . . . . . . . . . . . 5-7
Information panels . . . . . . . . . . . . . .6-16install
reinstalling . . . . . . . . . . . . . . . . 2-27installation . . . . . . . . . . . . . . . . . . 2-8
upgrading from Agent to IP Agent V3 . . 2-26upgrading from V1 to V3 . . . . . . . . . 2-23upgrading from V2 to V3 . . . . . . . . . 2-25
IP Agent windows . . . . . . . . . . . . . . 6-2IP Media Processor circuit pack . . . . . . . 3-28
Jjitter buffer . . . . . . . . . . . . . . . . . .6-46
LLDAP
see Pubic DirectoryLightweight Directory Access Protocol
see Public Directoryload balancing
IP endpoints . . . . . . . . . . . . . . . 3-27logging in (EAS)
to Avaya IP Agent . . . . . . . . . . . . 4-7logging in (non-EAS)
to Avaya IP Agent . . . . . . . . . . . . 4-9logging out
of agent mode . . . . . . . . . . . . . . 4-11Login button . . . . . . . . . . . . . . . . . 4-7logout . . . . . . . . . . . . . . . . . . . . 4-11
M
Main windowAgent Information Panel . . . . . . . . .6-16Call Information Panel . . . . . . . . . . 6-16information panels . . . . . . . . . . . . 6-16Phone Display Panel . . . . . . . . . . . 6-17
main windowexiting. . . . . . . . . . . . . . . . . . . 4-12
manual-in mode . . . . . . . . . . . . . . . 5-3menu bar, main . . . . . . . . . . . . . . . 6-3menus . . . . . . . . . . . . . . . . . . . . 6-2moving toolbars . . . . . . . . . . . . . . . 6-13
N
Number fieldsee Dial Number toolbar
O
Optionsaudio . . . . . . . . . . . . . . . . . . . 6-46
optionsdialog. . . . . . . . . . . . . . . . . . . 6-18
ordering documents and training . . . . . . . . xoutgoing calls
abbreviated dialing . . . . . . . . . . . . 5-32recent calls list . . . . . . . . . . . . . . 5-27speed dial list . . . . . . . . . . . . . . 5-29
P
phonesee telephone
Phone Buttons toolbar . . . . . . . . . . . 6-13Phone Display
VuStats. . . . . . . . . . . . . . . . . . . 8-3Phone Display Panel . . . . . . . . . . . . 6-17phone types
supported . . . . . . . . . . . . . . . . . 1-9prerequisites . . . . . . . . . . . . . . . . . 2-2problems
troubleshooting. . . . . . . . . . . . . . C-1Program Options
ACD Agent dialog . . . . . . . . . . . . 6-20Call Handling dialog . . . . . . . . . . . 6-21Call History dialog . . . . . . . . . . . . 6-22Call Information Display dialog. . . . . . 6-23Database Location dialog . . . . . . . . 6-24Event Logging dialog. . . . . . . . . . . 6-27External Number Format dialog . . . . . 6-26Feature Access dialog . . . . . . . . . . 6-29General Settings dialog . . . . . . . . . 6-19User Interface Options dialog . . . . . . 6-25Voice Message Number dialog . . . . . 6-28
Program Options dialog. . . . . . . . . . . 6-18Prompted Digits setttings
Agent Greetings . . . . . . . . . . . . . 6-44Public Directory . . . . . . . . . . . . . . . . 9-1
adding contacts to Phone Directory . . . . 9-4configuring . . . . . . . . . . . . . . . . . 9-2searching. . . . . . . . . . . . . . . . . . 9-4service definition, deleting . . . . . . . . . 9-8service, defining . . . . . . . . . . . . . . 9-2using with Avaya IP Agent . . . . . . . . . 9-1
Q
Quality of Service . . . . . . . . . . . . . . 3-24
Rrecent calls list . . . . . . . . . . . . . . . 5-27refresh
VuStats data . . . . . . . . . . . . . . . . 8-8Register
with DEFINITY, configuration . . . . . . 2-16
I N - 4 Issue 1.1,, March 2002
.........................................................................................................................................................................................................................................................
registeringwith the DEFINITY system . . . . . . . . 4-3
Reinstalling . . . . . . . . . . . . . . . . . 2-27Release button . . . . . . . . . . . . . . . . 5-7releasing a call . . . . . . . . . . . . . . . . 5-7removing Avaya IP Agent . . . . . . . . . 2-29requirements . . . . . . . . . . . . . . . . . 2-2
DEFINITY hardware. . . . . . . . . . . . 2-3PC hardware . . . . . . . . . . . . . . . 2-3software . . . . . . . . . . . . . . . . . . 2-6
Road WarriorAudio Tuning Wizard . . . . . . . . . . 6-49DEFINITY station, changing. . . . . . . 3-11ensuring DEFINITY compatibility . . . . . 3-3required DEFINITY circuit packs . . . . 3-28
S
Screen Popsactivating . . . . . . . . . . . . . . . . 10-16configuring. . . . . . . . . . . . . . . . 10-1creating . . . . . . . . . . . . . . . . . 10-3DDE, creating . . . . . . . . . . . . . . 10-10deleting . . . . . . . . . . . . . . . . . 10-19modifying . . . . . . . . . . . . . . . . 10-17setting the active . . . . . . . . . . . . 10-16
searchPublic Directory . . . . . . . . . . . . . . 9-4
Settingsaudio . . . . . . . . . . . . . . . . . . 6-46bandwidth . . . . . . . . . . . . . . . . 6-46gain, transmit and receive . . . . . . . . 6-46Jitter Buffer . . . . . . . . . . . . . . . 6-46
settingsaudio . . . . . . . . . . . . . . . . . . 6-45DEFINITY station, changing for
CALLMASTER VI . . . . . . . . . . . 3-16DEFINITY station, changing for
Road Warrior. . . . . . . . . . . . . . 3-11DEFINITY station, changing for
Telecommuter . . . . . . . . . . . . . 3-11Settings menu item. . . . . . . . . . . . . 6-12setup
Public Directory service . . . . . . . . . . 9-2Shortcut keys. . . . . . . . . . . . . . . . . A-1
agent features . . . . . . . . . . . . . . . A-2Avaya® IP Agent features. . . . . . . . . A-3Windows® features . . . . . . . . . . . . A-3
shortcut keyscall features . . . . . . . . . . . . . . . . A-2
softwarerequirements . . . . . . . . . . . . . . . 2-6
Speed Dial button . . . . . . . . . . . . . 5-29speed dialing . . . . . . . . . . . . . . . . 5-29starting
Avaya IP Agent . . . . . . . . . . . . . . 4-2
stationchanging DEFINITY settings for
CALLMASTER VI . . . . . . . . . . . . 3-16changing DEFINITY settings for
Road Warrior . . . . . . . . . . . . . . 3-11changing DEFINITY settings for
Telecommuter . . . . . . . . . . . . . . 3-11supported languages . . . . . . . . . . . . B-2supported phone types . . . . . . . . . . . 1-9
TTelecommuter
DEFINITY station, changing . . . . . . . 3-11ensuring DEFINITY compatibility . . . . . 3-3required DEFINITY circuit packs . . . . . 3-28
timeVuStats, refresh . . . . . . . . . . . . . 8-8
Toolbars . . . . . . . . . . . . . . . . . . . 6-13Agent . . . . . . . . . . . . . . . . . . . 6-14Agent Greetings . . . . . . . . . . . . . 6-15Audio . . . . . . . . . . . . . . . . . . . 6-15Dial Number . . . . . . . . . . . . . . . 6-14Headset. . . . . . . . . . . . . . . . . . 6-15moving . . . . . . . . . . . . . . . . . . 6-13Phone Buttons . . . . . . . . . . . . . . 6-13
Tools menu item. . . . . . . . . . . . . . . 6-10Training . . . . . . . . . . . . . . . . . . . . xtransfer a call . . . . . . . . . . . . . . . . 5-10
basic transfer . . . . . . . . . . . . . . . 5-11enhanced transfer . . . . . . . . . . . . 5-14unsupervised transfer. . . . . . . . . . . 5-13
Troubleshooting . . . . . . . . . . . . . . . C-1
Uuninstalling Avaya IP Agent . . . . . . . . . 2-29unsupervised transfer . . . . . . . . . . . . 5-13upgrading Agent to IP Agent V3. . . . . . . 2-26upgrading from V1 to V3. . . . . . . . . . . 2-23upgrading from V2 to V3. . . . . . . . . . . 2-25User Interface Options dialog . . . . . . . . 6-25
VVDN settings
Agent Greetings . . . . . . . . . . . . . 6-43View menu item . . . . . . . . . . . . . . . 6-7Voice Message Number options dialog . . . 6-28VoIP
Audio Tuning Wizard . . . . . . . . . . . 6-49VuStats . . . . . . . . . . . . . . . . . . . 8-1
DEFINITY station configuration. . . . . . 8-2multiple sets of data, viewing . . . . . . . 8-5overview . . . . . . . . . . . . . . . . . 8-1time intervals . . . . . . . . . . . . . . . 8-8viewing data in main window . . . . . . . 8-3VuStats Monitor, running . . . . . . . . . 8-5
VuStats Monitor . . . . . . . . . . . . . . . 8-5