Embed Size (px)
Citation preview
Avalanche Enabler 5.3User Guide
30/05/2012
Copyright © 2012 by Wavelink Corporation. All rights reserved.
Wavelink Corporation10808 South River Front Parkway, Suite 200South Jordan, Utah 84095Telephone: (801) 316‐9000Fax: (801) 316‐9099Email: [email protected] site: www.wavelink.com
No part of this publication may be reproduced or used in any form, or by any electrical or mechanical means, without permission in writing from Wavelink Corporation. This includes electronic or mechanical means, such as photocopying, recording, or information storage and retrieval systems. The material in this manual is subject to change without notice. The software is provided strictly on an “as is” basis. All software, including firmware, furnished to the user is on a licensed basis. Wavelink grants to the user a non‐transferable and nonexclusive license to use each software or firmware program delivered hereunder (licensed program). Except as noted below, such license may not be assigned, sublicensed, or otherwise transferred by the user without prior written consent of Wavelink. No right to copy a licensed program in whole or in part is granted, except as permitted under copyright law. The user shall not modify, merge, or incorporate any form or portion of a licensed program with other program material, create a derivative work from a licensed program, or use a licensed program in a network without written permission from Wavelink. The user agrees to maintain Wavelink’s copyright notice on the licensed programs delivered hereunder, and to include the same on any authorized copies it makes, in whole or in part. The user agrees not to decompile, disassemble, decode, or reverse engineer any licensed program delivered to the user or any portion thereof. Wavelink reserves the right to make changes to any software or product to improve reliability, function, or design. The information in this document is bound by the terms of the end user license agreement.
ii

Table of Contents
Chapter 1: Introduction 1
Interfacing with Mobile Devices 1About This Guide 2
Chapter 2: Installation and Configuration 4
Installing the Enabler via ActiveSync 4Running the Executable File 4Configuring the Enabler 5Manually Modifying the Enabler Configuration 5Importing Profile Settings to Configure the Enabler 7
Installing the Enabler on the Mobile Device 7Avalanche Enabler Configuration Package 8Adding the Avalanche Enabler Configuration Package 8Configuring the Avalanche Enabler Configuration Package 9Deploying the Configuration 10
Installing and Configuring the Windows Enabler 10Licensing 11
Chapter 3: Using the Avalanche Enabler 12
Launching the Enabler 12Changing Enabler Views 13Launching Applications 14Using Scan to Config 14Receiving Updates and Installing Applications 15Postponing Package Installation 15Initiating a Device-Side Update 16
Sending a Message to the Avalanche Console 16Managing Wireless Network Settings from the Enabler 16Viewing Enabler Status 18Exiting the Enabler 20
Chapter 4: Managing Devices from the Avalanche Console 21
Updating Mobile Devices 21Understanding Software Packages 21Before You Update 22Preparing the Server for a Serial Connection 22Preparing the Server for a WLAN Connection 23Preparing the Server for a WWAN Connection 23
Updating Mobile Devices 24Single Device Updates 24Group Updates 25Scheduled Update 25
Removing Packages from Devices 27
iii
Configuring the Terminal ID Settings 27Contacting Mobile Devices 28Sending Messages 28Pinging Mobile Devices 29
Configuring Mobile Device Properties 29Viewing and Editing Properties 29Creating Custom Properties 30Creating Device-Side Properties 31
Chapter 5: Enabler Configuration Utility 32
Configuring Connectivity 32Connection Tab 33Server Contact Tab 35Network Tab 38Name Server Tab 39Wireless Tab 41Adapter Tab 42Data Tab 44SaaS Tab 46
Configuring Performance 47User Interaction Tab 47Preferences Tab 49Execution Tab 52Scan Config Tab 53Registry Tab 54Alerts Tab 56Reporting Tab 57
Configuring Display 59Display Tab 60Taskbar Tab 62Menu Tab 64Shortcuts Tab 67
Wavelink Contact Information 70
iv

Chapter 1: Introduction 1
Chapter 1: IntroductionThe Enabler is an application that is installed on mobile devices to facilitate communication between the device and a mobile device server. The mobile device server allows communication between the mobile device and the Avalanche Console.
The Enabler can manage a number of functions on the mobile device to allow administrators to configure mobile devices. These functions include:
• Control of the WiFi radio. This allows you to configure the radio (IEEE 802.11) settings of the mobile device from the Avalanche Console or at the mobile device through the Enabler GUI.
• Control of network settings. This allows you to configure the IP settings of the mobile device from the Avalanche Console or at the mobile device through the Enabler GUI.
• Control of the WWAN radio. This allows you to configure WWAN settings on the mobile device in order to connect to the Avalanche Console when out of WiFi range.
You can also use the Enabler to perform the following tasks:
• Lock-down the mobile device to prevent users from accessing other installed components.
• Create shortcuts to other applications in the Enabler interface and launch them on the mobile device.
• View communication between the Enabler and the mobile device server, including software and configuration downloads.
• View messages sent by an administrator from the Avalanche Console to the mobile device.
The Enabler uses Flash memory to ensure that it survives a cold boot. Wavelink works within the constraints of the mobile device to determine the best method to restore the Enabler to the mobile device from the Flash memory storage location in the event of a cold boot.
• Interfacing with Mobile Devices
• About This Guide
Interfacing with Mobile DevicesThe Avalanche Enabler interfaces with the following components of a mobile device:
The File System
The Enabler requires about 1 MB of space on the mobile device and additional space on the Flash drive to provide for cold boot recovery.
Chapter 1: Introduction 2
Since part of the Enabler’s design provides for the download of configuration files and applications from a mobile device server, the Enabler may write other files to volatile and non-volatile memory. For example, the Enabler allows users to download and install the Wavelink Terminal Emulation Client over the network connection.
The Registry
The Enabler uses the mobile device registry to obtain and configure the IP settings of the radio card on the mobile device. Software packages that are installed through the Enabler may also add registry entries to the mobile device.
The WiFi Radio
The Enabler is designed to control and configure the WiFi radio (802.11) card on the mobile device. The Enabler interface allows users to configure the various components of the radio card on the mobile device, including the SSID and encryption/authentication settings.
The Cellular Radio
If the device has a cellular radio, the Enabler can use it to connect to the mobile device server to check for updates and transmit statistics.
NOTE: The Enabler can only use the cellular radio when the device has a Windows Mobile operating system.
About This GuideThis document assumes that you have the following:
• Familiarity with the mobile devices to which you are deploying the Enabler.
• A general understanding of the basic operational characteristics of your network operating systems.
• Knowledge of Wavelink Avalanche products.
• Administrative access to your network.
The term “Avalanche Console” applies to Avalanche MC, Avalanche SE, or Avalanche On Demand. If you are using Avalanche MC or SE, the instructions provided in this manual are for the Web Console.
This help uses the following typographical conventions:
Chapter 1: Introduction 3
Courier New
Any time you interact with the physical keyboard or type information into a text box that information appears in the Courier New text style. This text style is also used for file names or file paths listed in the text.
Examples:
The default location is C:\Program Files\Wavelink\Avalanche.
Press CTRL+ALT+DELETE.
Bold Any time this guide refers to an option, such as descriptions of different options in a dialog box, that option appears in the Bold text style. This is also used for tab names and menu items.
Example:
Click File > Open.
Italics Any time this guide refers to the titles of dialog boxes, that section appears in the Italics text style.
Example:
The Infrastructure Profiles dialog box appears.

Chapter 2: Installation and Configuration 4
Chapter 2: Installation and ConfigurationThe Avalanche Enabler is installed on your mobile devices using ActiveSync. You can configure the Enabler at the time of installation or later through the Avalanche Console using the Avalanche Enabler configuration package. If you have configured network or mobile device profiles that you want to use to configure the device, you can export those from the Avalanche Console and apply them on the Enabler at the time of installation.
Future configuration changes to the Enabler can be deployed from the Avalanche Console using the Enabler Configuration Package. Some configuration options are also available on the device once the Enabler has been installed.
This chapter provides the following information:
• Installing the Enabler via ActiveSync
• Avalanche Enabler Configuration Package
• Installing and Configuring the Windows Enabler
• Licensing
Installing the Enabler via ActiveSyncWavelink provides an executable file that you use to install the Enabler on your mobile device via an ActiveSync connection. You have the option to configure the Enabler before it is installed on the device by using the included configuration utility.
This section provides information about pre-configuring and installing the Enabler using ActiveSync. The following tasks are included:
• Running the Executable File
• Configuring the Enabler
• Installing the Enabler on the Mobile Device
Running the Executable File
You can obtain the Enabler executable file from the Wavelink web site or by contacting Wavelink Customer Service. Save this file on a computer with ActiveSync or Windows Mobile Device Center in order to be able to install the Enabler on your device.
To install:
1 Save the Enabler file to a computer with ActiveSync or Windows Mobile Device Center and double-click the Enabler executable file.
A Welcome dialog box appears.
Chapter 2: Installation and Configuration 5
2 Click Next.
The License Agreement screen appears.
3 Click I Agree to agree to the license agreement and continue installation.
The Choose Install Location screen appears.
4 Click Install to install the Enabler, or browse to the location where you want to save it.
The files are extracted and installed. When installation is finished, the Complete screen appears.
5 If you want to start the configuration utility immediately, ensure the Run Wavelink Avalanche Enabler box is enabled.
6 Click Finish.
Configuring the Enabler
To configure the Enabler at the time of installation, use the configuration utility included with the Enabler in the executable file. If you have created and exported network or mobile device profiles from the Avalanche Java Console, you can import those settings to configure the Enabler at the time of installation.
NOTE: Exporting profiles to configure the Enabler is not available with Avalanche On Demand.
You can also configure the Enabler from Avalanche using either the Enabler configuration utility package or a scan to config profile.
This section includes the following tasks:
• Manually Modifying the Enabler Configuration
• Importing Profile Settings to Configure the Enabler
Manually Modifying the Enabler Configuration
Before you install the Enabler on the device, you can use the configuration utility available with the ActiveSync interface to manually create an Avalanche Enabler configuration. You can also use the configuration utility to modify an existing configuration.
To create or modify an Avalanche Enabler configuration:
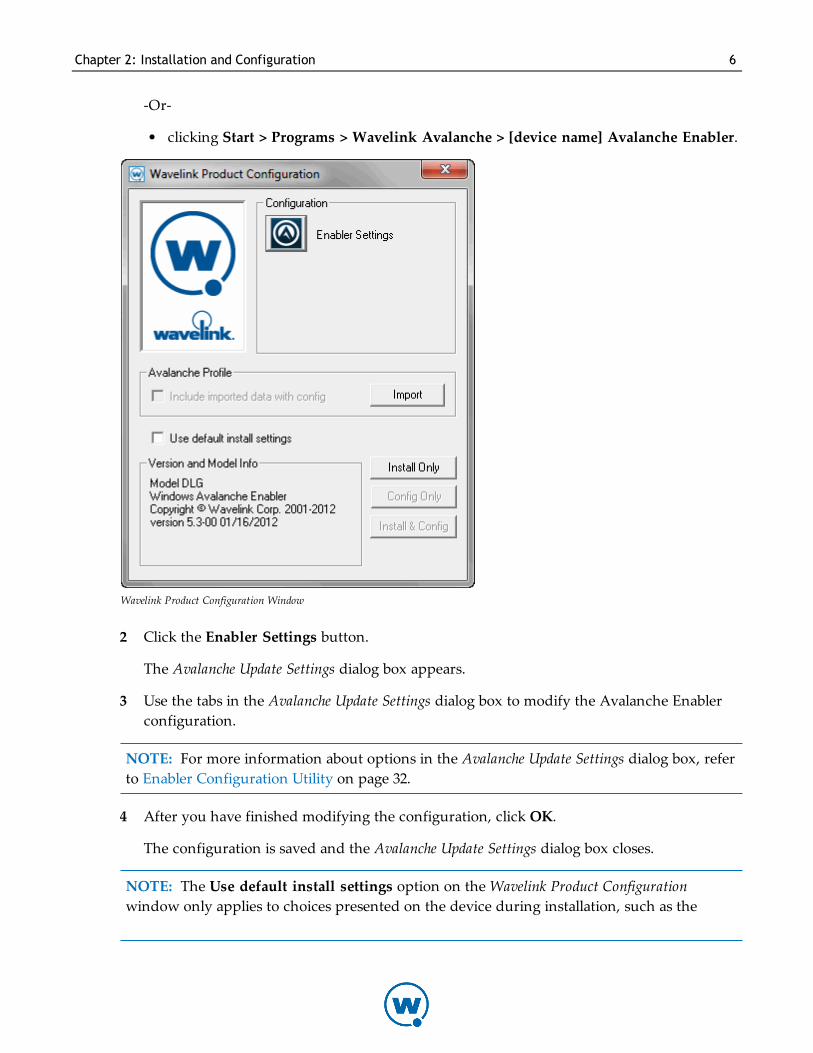
1 If you enabled Run Wavelink Avalanche Enabler, the Wavelink Product Configuration window will appear after you’ve finished the installation to your PC. You can also access this window by:
• double-clicking the Enabler shortcut on the desktop.
Chapter 2: Installation and Configuration 6
-Or-
• clicking Start > Programs > Wavelink Avalanche > [device name] Avalanche Enabler.
Wavelink Product Configuration Window
2 Click the Enabler Settings button.
The Avalanche Update Settings dialog box appears.
3 Use the tabs in the Avalanche Update Settings dialog box to modify the Avalanche Enabler configuration.
NOTE: For more information about options in the Avalanche Update Settings dialog box, refer to Enabler Configuration Utility on page 32.
4 After you have finished modifying the configuration, click OK.
The configuration is saved and the Avalanche Update Settings dialog box closes.
NOTE: The Use default install settings option on the Wavelink Product Configuration window only applies to choices presented on the device during installation, such as the
Chapter 2: Installation and Configuration 7
location to install. Enabling this option will not affect any configurations made through the Enabler configuration utility.
Importing Profile Settings to Configure the Enabler
If you have existing network or mobile device profiles with settings that you want to use for the new Enabler, you can use those settings when you are installing the Enabler on the device. Export the profile settings from the Avalanche Console and then import them with the Enabler Configuration Utility at the time of installation. For instructions on exporting network and/or mobile device profiles, see the Avalanche Java Console User Guide.
This option is not available for Avalanche On Demand users.
NOTE: When importing network profiles, the WWAN settings are not imported. These must be manually configured.
To import profile settings to configure the Enabler:
1 If you enabled Run Wavelink Avalanche Enabler, the Wavelink Product Configuration window will appear after you’ve finished the installation to your PC. You can also access this window by:
• double-clicking the Enabler shortcut on the desktop.
-Or-
• clicking Start > Programs > Wavelink Avalanche > [device name] Avalanche Enabler.
2 Click Import.
The Import Avalanche Settings dialog box appears.
3 Click [...] to navigate to the file you want to import, then click Open when you have selected it.
4 Type the encryption password set at the Avalanche Console in the Password text box.
5 Click Import.
The Include imported data with config option is enabled, and the Enabler will use the configuration when you use Config Only or Install & Config.
Installing the Enabler on the Mobile Device
After you have configured the Enabler as desired, use a Microsoft ActiveSync or Windows Mobile Device Center connection to install the Enabler on the mobile device.
To install the Enabler on the mobile device:
1 Ensure that you have an active partnership between the host system and the mobile device.
Chapter 2: Installation and Configuration 8
2 On the host system, access the Wavelink Product Configuration window.
3 If you want to use the default installation settings rather than respond to each prompt during the installation, enable the Use default install settings option.
4 Click Application & Config.
The Product Install dialog box appears and displays the progress of the download.
After the download is complete, the Wavelink Product Configuration window indicates that the Enabler has been successfully installed.
Avalanche Enabler Configuration PackageYou can configure the Enabler at the time of installation. However, if you want to configure the Enabler after it is installed, you can use the Avalanche Enabler configuration package. Using the configuration package, you can set configurations and deploy them to your devices from the Avalanche Console. (The package must be downloaded from the Wavelink Web site and added to an Avalanche software profile.)
This section provides information on the Avalanche Enabler configuration package, including:
• Adding the Avalanche Enabler Configuration Package
• Configuring the Avalanche Enabler Configuration Package
• Deploying the Configuration
Adding the Avalanche Enabler Configuration Package
Add the Avalanche Enabler configuration package to the Avalanche Console before you can configure the Enabler options. Once installed, you will have access to the configuration utility for the Enabler.
You can either create a new software profile for the Enabler package or add it to an existing profile. Steps to create a profile are included in these instructions. If you are adding a package to an existing profile, skip to step 8.
NOTE: In order to use package utilities to configure a package from the Web Console, you must have a current JRE installed on the computer where you are using the Web Console. Avalanche will download the package utility to the local computer to allow you to configure the package, and then save your changes to the package.
To add a software profile:
1 From the Profiles tab, click New Profile.
The New Profile dialog box appears.
Chapter 2: Installation and Configuration 9
2 Select Software Profile.
The New Profile Details page appears.
3 Type a name for the profile in the Name text box. Software profile names are case-sensitive and must be unique.
4 If desired, enable the profile now.
5 Click Launch wizard to use the Selection Criteria Builder to determine which devices the software profile will be applied to.
6 Click Save.
7 The Software Profile page appears. In the Software Packages panel, click New.
8 The Software Package Wizard appears. Select Install an Avalanche package.
9 Click Select Package to browse to the location of the software package. When you have selected the file, click Open.
10 In the Software Package Wizard, click Next.
11 A License Agreement appears. Accept the license agreement and click Next.
12 The package files will begin extracting locally. When the extraction is complete, click Next.
13 The Configure Software Package page appears. If desired, you can enable the package immediately.
14 Click Finish.
Configuring the Avalanche Enabler Configuration Package
You can configure the Enabler software package from the Software Packages panel on the Software Profile page.
To configure the Avalanche Enabler package:
1 From the Avalanche Console Profiles tab, click the name of the software profile that has the Enabler software package.
2 In the Software Packages panel, click Configure next to the name of the Enabler package you want to configure.
NOTE: If you do not have Java installed locally, click Install Java in the Configure column. After installing Java, the Configure option will be available.

Chapter 2: Installation and Configuration 10
3 Depending on your browser and security settings, you may be prompted to trust the Wavelink certificate. If you are prompted to select the program to use for opening the file, choose Java Web Start Launcher from the list and click OK.
4 The Configure Software Package dialog box appears and the package utility is downloaded. Click Next.
5 Select the utility you want to use and click Launch Config.
6 The utility is launched. Configure the package options as desired.
NOTE: If there is an error saying that Java was unable to launch the application, check the Java settings for your computer. From the Java Control Panel (accessible from the Windows Control Panel), go to the General tab. Click Settings in the Temporary Internet Files area. Ensure that the Keep temporary files on my computer option is disabled and apply the change.
7 When you are done configuring the package, click Next in the Configure Software Package dialog box.
8 The configuration is sent to the Enterprise Server. Click Finish to close the dialog box. The configurations will be applied when the package is deployed.
Deploying the Configuration
Once you have configured the Enabler settings, deploy the configuration to the mobile device from the Avalanche Console. To force the mobile device to connect to the mobile device server and retrieve the configuration, use the Enabler interface on the device.
Use one of the following methods to deploy the configuration:
• From the Mobile Device Inventory tab in the Avalanche Console, right-click on the device to which you want to deploy the configuration and select Update Now.
-Or-
• From the device, launch the Enabler and select File > Connect.
Installing and Configuring the Windows EnablerThe Windows Enabler is designed to run on desktop computers running Windows. The installer for the Windows Enabler allows you to configure the Enabler during installation. To configure the Windows Enabler after it is installed, click Start > Programs > Wavelink Avalanche > Avalanche Enabler Config. For information on the options available in the Configuration Utility, see Enabler Configuration Utility on page 32.

Chapter 2: Installation and Configuration 11
To install:
1 Save the Enabler file to a computer with ActiveSync or Windows Mobile Device Center and double-click the Enabler executable file.
A Welcome dialog box appears.
2 Click Next.
The License Agreement screen appears.
3 Click I Agree to agree to the license agreement and continue installation.
4 The Choose Components screen appears. If you want to configure the Enabler before starting the Enabler service, make sure the Configure the Enabler checkbox is enabled. This will open the Enabler Config Utility before the installation completes. Click Install to install the Enabler.
5 The files are extracted and installed. If you selected to configure the Enabler, the Enabler Configuration Utility will appear. Configure the options as desired and then click OK. You must close the Configuration Utility in order to complete the installation.
6 When installation is finished, the Complete screen appears. Click Finish.
LicensingThe Enabler does not require a license to function on the mobile device. You can install and use the Avalanche Enabler with limited functionality without obtaining a license.
However, each mobile device that reports to a mobile device server requires a license. Licensing mobile devices is managed through the Avalanche Console. For more information about licenses, refer to the Avalanche user guide. To obtain licenses, contact Wavelink Customer Service.
Chapter 3: Using the Avalanche Enabler 12
Chapter 3: Using the Avalanche EnablerThe Enabler has two primary components: the Enabler graphical interface and the Avalanche Monitor.
The Enabler interface allows you to interact with and configure the Enabler. The Monitor is the component of the Enabler that listens for communication requests from the mobile device server. By default, the Monitor runs in the background on the mobile device. You can, however, stop the Monitor from launching when the mobile device boots or configure the Monitor to terminate whenever the Enabler is terminated on the mobile device. If the Monitor is not active on the mobile device, then the mobile device will not be able to receive communications from Avalanche and will not receive automatic updates.
When the Monitor receives an update request from Avalanche, it contacts the mobile device server to download the update. The Monitor is also responsible for keeping track of periodic updates. When a periodic update is due, the Monitor queries the mobile device server for available updates.
This chapter provides the following information:
• Launching the Enabler
• Changing Enabler Views
• Launching Applications
• Using Scan to Config
• Receiving Updates and Installing Applications
• Sending a Message to the Avalanche Console
• Managing Wireless Network Settings from the Enabler
• Viewing Enabler Status
• Exiting the Enabler
Launching the EnablerWhen you launch the Enabler on the mobile device, the Enabler interface appears. This interface allows you to perform the following tasks:
• Configure the Avalanche Enabler settings.
• Launch applications in the Programs view.
• Connect to the Avalanche Console and download available updates.

Chapter 3: Using the Avalanche Enabler 13
To launch the Avalanche Enabler, select the Enabler icon from the Windows Start menu or desktop shortcut.
Changing Enabler ViewsThe Enabler has three views:
• Programs View. The Programs view shows the Avalanche-deployed applications and Avalanche-created shortcuts. Users can double-click an icon or shortcut to launch the application.
• Updates View. The Updates view displays information about the mobile device communication with the mobile device server.
• Split-Screen View. By default, the Enabler uses a split-screen mode to display both views. However, you can use the menus to force the Enabler to display only one of the previous views.
The Enabler View menu allows you to configure which types of software packages appear in the Programs view and how icons in the Programs view are arranged.
You can enable one of the following options in the Enabler View menu to specify how icons in the Programs view display:
Icons(Default) The Enabler displays only the icons for the applications and packages that appear in the Programs view.
List The Enabler displays the applications and packages that appear in the Programs view in a list-type format.
Details The Enabler displays the applications and packages that appear in the Programs view in a list format that also provides details (size, location, etc.) about each application or package.
You can enable one of the following options in the Enabler View menu to specify which type of software packages appear in the Programs view.
Launchable(Default) The Enabler displays only launchable executables or shortcuts in the Programs view.
All Packages The Enabler displays all software packages that the device has received, installed, and/or rejected.
To switch between views:
1 In the Enabler, access the View menu.

Chapter 3: Using the Avalanche Enabler 14
2 Depending on your view preference, choose one of the following:
• Enable only Programs (and disable Updates) to cause the Enabler to display only the Programs view.
• Enable only Updates (and disable Programs) to cause the Enabler to display only the Updates view.
• Enable both Programs and Updates to cause the Enabler to display both the Update and Programs views in split-screen mode.
Launching ApplicationsBy default, the Programs view of the Enabler displays the software packages that are installed on the mobile device and/or shortcuts to other applications on the mobile device. To launch an application from the Programs view of the Enabler, double-click the shortcut or the icon for the software package.
Using Scan to ConfigScan to Config allows you to use a Scan Wedge or scanner interface to relay settings to the Enabler by scanning barcodes. To configure network settings with Scan to Config, create and print barcodes containing the information. Barcodes are created using the Avalanche Console. For more information about creating the Scan to Config barcodes, refer to the user guide for your Avalanche Console.
To use Scan to Config:
1 Launch the Enabler on the mobile device.
2 Tap File > Scan Config.
The Scan Configuration dialog box appears.
3 If the barcodes were created using a password, enter the same password in the Passcode text box.
4 Using the mobile device, scan the barcodes.
The Remaining text box displays the numbers of the barcodes that still need to be scanned. The Scanned text box displays the numbers of barcodes already scanned. For example, if you have 10 barcodes to scan and you have scanned the first two, the Scanned text box will display 1, 2 and the Remaining text box will display 3, 4, 5, 6, 7, 8, 9, 10.
Once the barcodes are scanned, the mobile device is configured with the settings from the barcodes.
Chapter 3: Using the Avalanche Enabler 15
Receiving Updates and Installing ApplicationsWith the default configuration, updates and software packages that a mobile device downloads from the Avalanche Console are automatically installed without the consent of the user at the mobile device. You will only see the installation occurring if you are working in the Enabler. When an application-type software package is downloaded to the mobile device, a shortcut icon for the application appears in the Programs view of the Enabler. Double-click or otherwise select the application in the Programs view to launch the application.
NOTE: Depending on the configuration of a software package, shortcuts to the application may be created in other locations and appear in other menus on the mobile device.
Certain Enabler settings, however, allow a user to postpone or reject the installation of an update. The user can also initiate an update from the device. This is called a device-side update.
This section provides information about the following:
• Postponing Package Installation
• Initiating a Device-Side Update
Postponing Package Installation
If you have configured the Enabler to prompt the user before installing packages, then users at the mobile device will have the option to delay or postpone the installation of a package after it has been downloaded from the Avalanche Console. For more information about configuring the Enabler to prompt the user before installation, refer to User Interaction Tab on page 47.
To postpone the installation of a package:
1 Download an update from the Avalanche Console.
When a package download is complete, the Install Available dialog box appears.
2 Tap Later.
The Install Reminder dialog box appears.
3 Use the Install Reminder dialog box to configure the time interval until the Avalanche Enabler reminds you that the package is ready to install.
4 Tap OK.
After the configured time has elapsed, the Install Available dialog box appears again.

Chapter 3: Using the Avalanche Enabler 16
NOTE: Postponed packages are not stored in an area of the mobile device that will survive a cold boot.
Initiating a Device-Side Update
You can force the Enabler to connect to the mobile device server. When the mobile device connects to the server, it downloads any available updates. This action is called a device-side update. You must configure a server address (this can be done from the Connection tab) before the Enabler will be able to contact the server wirelessly.
To connect to a server:
1 Launch the Enabler on the mobile device.
2 Tap File > Connect.
If there are updates available, the mobile device downloads and installs them. The progress of the download/installation displays in the Updates view of the Enabler.
Sending a Message to the Avalanche ConsoleThe Enabler allows you to send a text message to a user at any Avalanche Console. The message appears as an alert in the Alerts tab of the Console. A person at the Console can respond by message or initiate a chat session.
To send a message to the Avalanche Console:
1 From the Enabler interface on the device, tap File > Send Alert Message.
2 In the dialog box that appears, type the message to send to the Console and click Send. The message is limited to 80 characters.
The message appears as an alert in the Alerts tab. A person at the Console can respond by sending a message back or by initiating a chat session.
Managing Wireless Network Settings from the EnablerIf the initial configuration of the device allows it, the device user can manage the wireless network settings for the device from the Enabler interface. This includes IP address assignment, DNS server addresses, and encryption and authentication.
If an Avalanche network profile is applied on the device, you can view the properties of the network profile. (This includes network profiles that are applied using Scan to Config.) You cannot modify the properties in a network profile, but you can switch to using manual configuration and provide new settings.
Chapter 3: Using the Avalanche Enabler 17
NOTE: Whether these options are available on the device depends upon the settings on the Adapter tab when the device was configured. You can enable or disable these options using the Enabler configuration utility or the Avalanche Enabler configuration package. For more information, see Adapter Tab on page 42.
To view and manage wireless network settings from the Enabler:
1 From the Enabler interface, tap File > Settings.
2 Enter a password in the Input Settings Password dialog box.
3 Select the Adapter tab.
4 Ensure the Manage Network Settings and Manage Wireless Settings options are enabled, depending on what you want to manage.
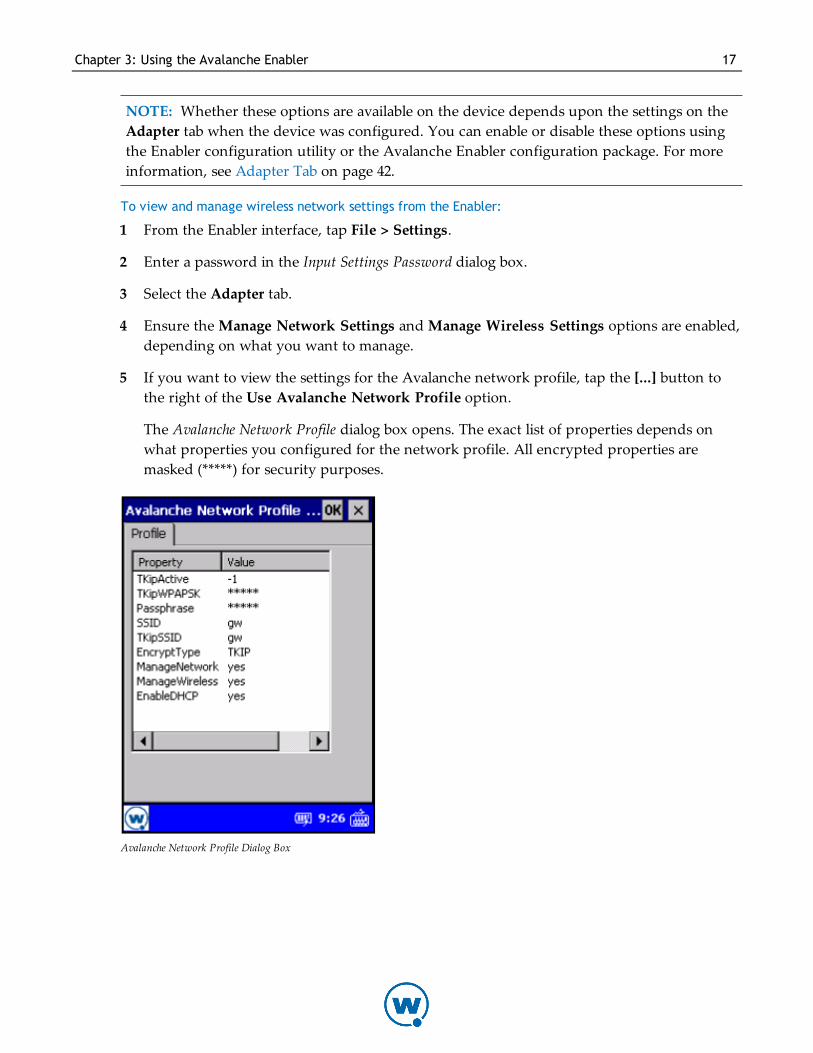
5 If you want to view the settings for the Avalanche network profile, tap the [...] button to the right of the Use Avalanche Network Profile option.
The Avalanche Network Profile dialog box opens. The exact list of properties depends on what properties you configured for the network profile. All encrypted properties are masked (*****) for security purposes.
Avalanche Network Profile Dialog Box

Chapter 3: Using the Avalanche Enabler 18
NOTE: Users can also review network profile properties by selecting Help > Adapter Info. No password is required. This option may be disabled from the Menu tab of the configuration utility, however.
6 If you want to use manual settings instead of a network profile, enable Use Manual Settings and tap the [...] button to the right of the option.
The Avalanche Network Profile dialog box opens. If the Manage Network Settings option is enabled, the Network and DNS tabs are available. If the Manage Wireless Settings option is enabled, the Wireless and Credentials tabs are available.
Avalanche Network Profile Dialog Box
7 Configure the settings as desired and tap OK.
8 Tap OK to save the settings and return to the Enabler main screen.
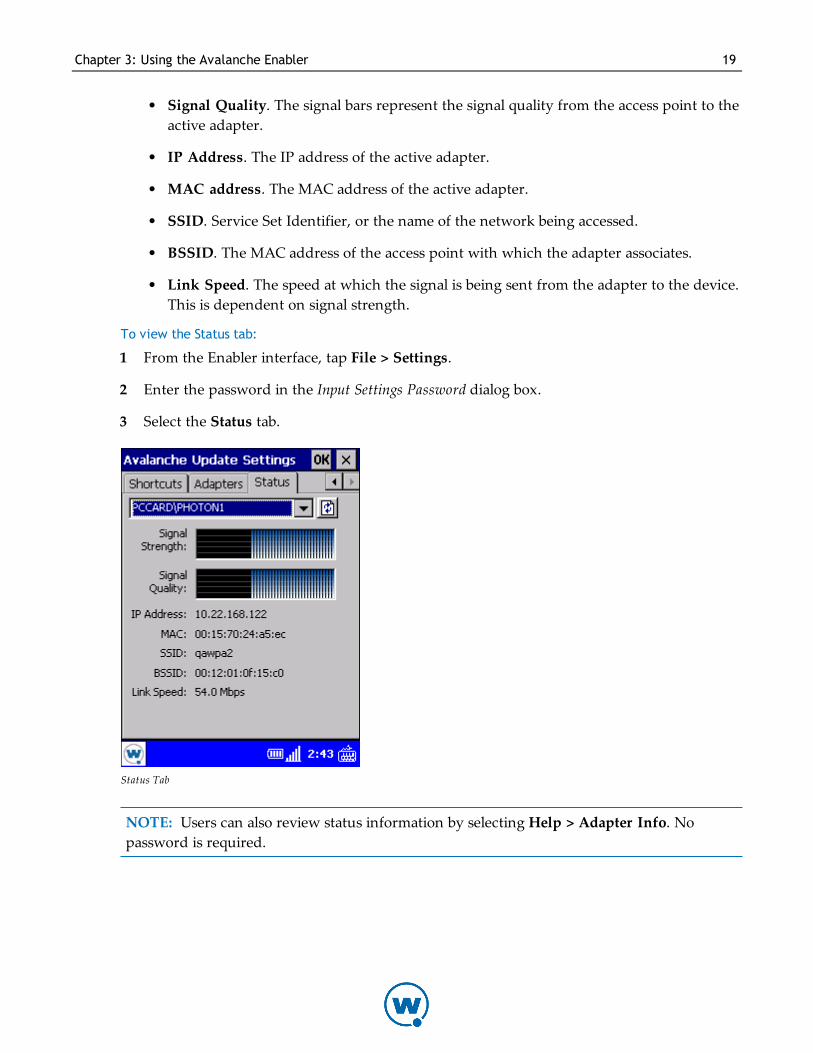
Viewing Enabler StatusThe Status tab provides information about the state of the device including:
• Signal Strength. The signal bars represent signal strength from the access point to the active adapter.
Chapter 3: Using the Avalanche Enabler 19
• Signal Quality. The signal bars represent the signal quality from the access point to the active adapter.
• IP Address. The IP address of the active adapter.
• MAC address. The MAC address of the active adapter.
• SSID. Service Set Identifier, or the name of the network being accessed.
• BSSID. The MAC address of the access point with which the adapter associates.
• Link Speed. The speed at which the signal is being sent from the adapter to the device. This is dependent on signal strength.
To view the Status tab:
1 From the Enabler interface, tap File > Settings.
2 Enter the password in the Input Settings Password dialog box.
3 Select the Status tab.
Status Tab
NOTE: Users can also review status information by selecting Help > Adapter Info. No password is required.
Chapter 3: Using the Avalanche Enabler 20
Exiting the EnablerUse the File menu to exit the Enabler. If the Monitor is password-protected and configured to terminate upon exiting the Enabler, you will be required to type a password. For information about configuring the Enabler shutdown options, see Preferences Tab on page 49.
To exit the Enabler:
1 Tap File > Exit.
The Input Exit Password dialog box appears.
2 Type the exit password and click OK.
NOTE: The default exit password is leave. For more information about configuring Enabler passwords, see User Interaction Tab on page 47.
If the Enabler shutdown option is not configured to monitor for updates, the Enabler will close immediately.
If the Enabler shutdown option is set to monitor for updates the Monitor dialog box appears. Determine the action that you want to take:
• Enable the Continue monitoring option to exit the Enabler but continue running the Monitor.
• Enable the Stop monitoring option to exit the Enabler and terminate the Monitor.
3 Click OK.
Chapter 4: Managing Devices from the Avalanche Console 21
Chapter 4: Managing Devices from the Avalanche ConsoleThis section provides information about using the Avalanche Console to manage mobile devices, including:
• Updating Mobile Devices
• Configuring the Terminal ID Settings
• Contacting Mobile Devices
• Configuring Mobile Device Properties
Updating Mobile DevicesUpdates are the method that Avalanche uses to download new information to mobile devices with an Enabler. The update might include a configuration change, a new application, an update to an existing application, or instructions to delete an existing application. Communication occurs between mobile devices and the mobile device server, and if the mobile device meets the selection criteria, it downloads the update from the server.
This section contains the following information:
• Understanding Software Packages
• Before You Update
• Updating Mobile Devices
• Removing Packages from Devices
Understanding Software Packages
An update is often an Avalanche software package. Software packages are divided into the following categories:
• Control. An internally used package specific to the Avalanche Console. A network profile is an example of a control package.
• Application. These packages install an application which can be run from the Application Menu screen on the mobile device. An example of an application package is the Telnet Client.
• Support. These packages deliver files and do not add new items to the Application Menu screen on the mobile device. An example of a support package is a package that updates an existing file.
Chapter 4: Managing Devices from the Avalanche Console 22
• Auto Run. These packages automatically run after download but do not appear in the mobile device’s application list. An Enabler Update Kit is an example of an auto run package.
An Enabler Update Kit is a specific Avalanche package that provides an upgrade to the Enabler software running on your mobile device. This package is deployed from the Avalanche Console and can be configured with the Avalanche Enabler configuration package.
Before You Update
Before you can update your mobile devices, you must create a software profile in the Avalanche Console and install the software package to that profile. You also must configure and enable the software package. For information on completing these tasks, see your Avalanche User Guide.
In order to perform updates, you also need to ensure you have a connection between the mobile device server and the mobile device. This can be a serial connection, a WLAN connection, or a WWAN connection.
This section contains instructions for the following tasks:
• Preparing the Server for a Serial Connection
• Preparing the Server for a WLAN Connection
• Preparing the Server for a WWAN Connection
NOTE: If you have Avalanche On Demand, you do not need to perform any of the tasks for preparing the server.
Preparing the Server for a Serial Connection
You can configure mobile device servers to automatically listen for mobile devices using the serial ports on the remote system.
Only one application on a host system can maintain ownership of a serial port. If the mobile device server controls the serial ports on the host system, then no other application will be able to use them. Likewise, if another application on the host system (for example, Microsoft ActiveSync) has control of the serial ports, then the mobile device server will not be able to use them.
Serial connections are required to implement mobile device and server authentication.
Serial settings are configured in the mobile device server profile. Once you configure the connections and update the mobile device server, the server will update your mobile devices according to the settings.
Chapter 4: Managing Devices from the Avalanche Console 23
NOTE: You can not force an update over the serial connection from the Avalanche Console. You must initiate the update from the device.
To establish serial port settings:
1 From the Profiles tab, select the profile from the Profile List.
2 Click Edit.
In the Mobile Device Server Profile tab, find the Server Resources region.
3 In the Reserved Serial Ports text box, specify the serial ports you want to reserve for the mobile device server to use.
4 Save your changes.
If you are using Avalanche SE, the mobile device server is updated with the changes. If you are using Avalanche MC, you must deploy the changes to the server.
In addition to configuring the mobile device server for serial updates, you must also set the Enabler to update over a serial connection. For information on how to configure this, see Connection Tab on page 33.
NOTE: The Avalanche Console does not support USB connections to mobile devices.
Preparing the Server for a WLAN Connection
Wireless updates are the preferred method for updating the mobile device. The following tasks ensure the mobile device and the Mobile Device Server can communicate:
• Ensure that the Mobile Device Server and the mobile device have a valid IP address.
• Ensure that the mobile device is configured with the correct IP address of the Mobile Device Server.
• Ensure that the mobile device is configured with the correct wireless network parameters (ESSID, encryption method, and encryption keys).
• Ensure that any firewall service between the mobile device and the Mobile Device Server allows Avalanche traffic. For information on the ports used by Avalanche, see the Avalanche User Guide appendix.
• If the mobile device and the Mobile Device Server are on separate IP networks, ensure that each has a valid IP route to the other.
Preparing the Server for a WWAN Connection
If the device has WWAN capabilities, it can send reports and receive updates even when a WLAN connection is not available. If you want the device to use a WWAN connection when a
Chapter 4: Managing Devices from the Avalanche Console 24
WLAN connection is not available, you should ensure that Avalanche has a network profile configured with the appropriate settings, and that profile has been deployed to the device.
Updating Mobile Devices
An update is the method Avalanche uses to send software packages to the mobile devices, delete orphan packages, and change network profile settings.
You can initiate a mobile device update from the mobile device or from the Avalanche Console. For instructions on how to request an update from the mobile device, see Initiating a Device-Side Update on page 16. From the Console, you can update a single device, a group of devices, or you can schedule an update to occur at a specific time.
• Single Device Updates
• Group Updates
• Scheduled Update
Single Device Updates
You can update a single device from the Avalanche Console, as long as the device meets the selection criteria for the update. The rules that govern which mobile devices can receive a particular update are determined by the selection criteria. For more information about building selection criteria, refer to the Avalanche user guide.
To update a mobile device:
1 In the Avalanche Console, select the Inventory tab.
2 Enable the checkbox to the left of the device or devices that you want to update.
3 Click Update.
The Update Now dialog box appears.
• Enable the Allow user to override the update option if you want to give the mobile device user the option to decide when the installation takes place. If this option is enabled, the user can select to install the update immediately or delay the installation by minutes, hours or days.
• Enable the Force package synchronization option if you want the mobile device server to verify the existence and state of each file of each package individually rather than consulting the meta-file, which would normally provide information on those files.
• Enable the Delete orphan packages option if you want to remove orphan packages from the mobile device.
4 Click Update Device(s).
Chapter 4: Managing Devices from the Avalanche Console 25
The Status field in the Activity area allows you to monitor the status of the update. When a device is up-to-date, the Inventory lists the device as Updated.
Group Updates
You can perform updates on groups of devices that are categorized into Mobile Device Groups.
To perform a group update:
1 From the Avalanche Console Inventory tab, click the name of the mobile device group you want to update in the Mobile Device Groups pane.
2 Enable the checkbox to the left of the device or devices that you want to update.
3 Click Update.
The Update Now dialog box appears.
• Enable the Allow User to Override the Update option if you want to give the mobile device user the option to decide when the installation takes place. If this option is enabled, the user can select to install the update immediately or delay the installation by minutes, hours or days.
• Enable the Force Package Synchronization option if you want the mobile device server to verify the existence and state of each file of each package individually rather than consulting the meta-file, which would normally provide information on those files.
• Enable the Delete Orphan Packages option if you want to remove orphan packages from the mobile device.
4 Click OK.
The selected device group will update according to the method you selected. When a device is up-to-date, the Mobile Device Inventory lists the device as Updated.
Scheduled Update
A scheduled update is when the mobile device server is configured to contact mobile devices at a specific time and send any available updates.
Scheduled updates are configured in the mobile device server profile. Once you configure the schedule from the Avalanche Console and update the mobile device server, the server will update your mobile devices according to the settings.
When you configure a mobile device server update, you have the following options:
• Event Type. You can select a one-time event, a recurring event, or a post-synchronization event. A post-synchronization event will take place after each synchronization between the
Chapter 4: Managing Devices from the Avalanche Console 26
Enterprise Server and the mobile device server. This ensures that each time the Server is updated, the devices are as well.
• Time Constraints. You can set the start time and, if desired, the end time for the event.
• Allow the mobile device user to override the update.When this option is enabled, the mobile device user is prompted when the update is scheduled to occur and has the option to decide when the installation takes place. If this option is enabled, the user can select to install the update immediately or delay the installation by minutes, hours or days.
• Delete orphaned packages during the update. When this option is enabled, packages that have been orphaned are removed from the device. A package is considered orphaned if it has been deleted from the Avalanche Console, if the software collection it belongs to has been disabled, or if the package has been disabled.
• Force package synchronization during the update. When this option is enabled, the mobile device server verifies the existence and state of each file of each package individually rather than consulting the meta-file, which would normally provide information on those files.
To schedule a profile-specific device update:
1 From the Profiles tab, click the name of the mobile device server profile.
2 Click Edit.
3 In the Device Update Schedule panel, click New.
The New Device Server Update dialog box appears.
4 Select the event type. If you select Recurring Event, use the drop-down list to select whether the update occurs on either a daily or weekly basis. If you select Weekly from this list, a second list becomes active, allowing you to select the day on which the update occurs.
5 Use the text boxes to provide a start date and start time.
6 If desired, enable the Stop if not completed by date option and set a stop time.
7 Enable the other update options as desired.
8 Click OK.
If you are using Avalanche SE, the mobile device server is updated with the changes. If you are using Avalanche MC, you must deploy the changes to the server.
NOTE: Many mobile devices incorporate a sleep function to preserve battery life. If a device is asleep, you must “wake” it before it can receive a server-initiated (pushed) update from
Chapter 4: Managing Devices from the Avalanche Console 27
Avalanche. Wake-up capability is dependent on the type of wireless infrastructure you are using and the mobile device type. Contact your hardware and/or wireless provider for details.
Removing Packages from Devices
The Avalanche Console will remove software packages from devices through an update. This can be a single-device, group, or scheduled update.
A software package will only be removed from a device during an update if the software package has been orphaned and you have selected the Delete orphan packages option. A software package is considered an orphan package if it meets any of the following criteria:
• The software package has been disabled in the Avalanche Console.
• The software package has been deleted in Avalanche Console.
• The mobile device server to which a device reports has no record of the software package. (For example, if a device is migrated to a new server and the device has software packages installed that are not part of the new Avalanche Console configuration.)
To delete a software package from a mobile device:
• Ensure the package is orphaned (disabled or deleted from the appropriate software profile). Then update the mobile device, ensuring that the Delete Orphan Packages option is enabled.
Configuring the Terminal ID SettingsThe mobile device server assigns each device a terminal ID the first time that the device communicates with the mobile device server. Set a range of numbers for the server to use, and it will assign them in order. Alternately, you can use a C-style format to configure specific terminal IDs.
The following options are available when configuring the terminal ID:
• Terminal ID lower bound. Specify the lowest terminal ID that the mobile device server will assign a mobile device.
• Terminal ID upper bound. Specify the highest terminal ID that the mobile device server will assign a mobile device.
• Optional Template. Use a C-style format to allow the mobile device server to assign alphanumeric IDs.

Chapter 4: Managing Devices from the Avalanche Console 28
Examples:Seattle-%d (generates IDs such as Seattle-4)Seattle-%05d (generates IDs such as Seattle-00004)
Terminal ID settings are configured in the mobile device server profile. Once you configure the settings and update the mobile device server, the server will update your mobile devices according to the settings.
To configure the terminal ID settings:
1 From the Profiles tab, click the name of the mobile device server profile.
2 Click Edit.
In the Mobile Device Server Profile tab, find the Server Resources area.
3 In the Terminal ID text boxes, configure the lower and upper limits for the range of terminal IDs that the mobile device server will assign to mobile devices.
Alternately, configure your own method using the Optional template text box.
4 Save your changes.
If you are using Avalanche SE, the mobile device server is updated with the changes. If you are using Avalanche MC, you must deploy the changes to the server.
Contacting Mobile DevicesFrom the Avalanche Console, you can send messages to the device user or ping a device to see if it is reachable.
• Sending Messages
• Pinging Mobile Devices
Sending Messages
You can send a text-based message to devices that are currently in range and running the Enabler.
To send a message:
1 In the Avalanche Console, select the Inventory tab.
2 Enable the checkbox to the left of the device that you want to send a message to.
3 Click Message.
4 The Send Message dialog box appears. Type the message to want to send to the device user in the text box and click Send.
Chapter 4: Managing Devices from the Avalanche Console 29
Pinging Mobile Devices
You can ping devices that are currently in range and running the Enabler. This is not an ICMP-level ping, but rather an application-level status check. This feature indicates whether the mobile device is active or not.
To ping a device:
1 In the Avalanche Console, select the Inventory tab.
2 Enable the checkbox to the left of the device that you want to ping.
3 Click Ping.
The Status column in the Mobile Devices panel displays the status of the ping request.
Configuring Mobile Device PropertiesMobile device properties consist of pre-defined and custom properties. Pre-defined properties are device-specific and dependent on the version of the Enabler running on the mobile device. Custom properties can be associated with individual mobile devices or with mobile device groups. Properties can be used as selection variables in selection criteria to control which devices receive particular updates.
The Enabler reports properties to the mobile device server when it connects for an update. The Avalanche Console displays these properties in the mobile device details.
This section contains information on the following:
• Viewing and Editing Properties
• Creating Custom Properties
• Creating Device-Side Properties
Viewing and Editing Properties
You can view the properties associated with a specific mobile device in the Mobile Device Details page of the Avalanche Console. Some of the pre-defined properties (and all of the custom properties) support editing of values. When you change the value of a property, the new value is downloaded to the mobile device at the next update.
To view the properties associated with a mobile device:
1 In the Avalanche Console, select the Inventory tab.
2 Click the name of the device whose properties you want to view.
Chapter 4: Managing Devices from the Avalanche Console 30
The Mobile Device Details page appears. The properties are displayed in the Properties panel.
3 Delete the property by selecting the checkbox to the left of the property and clicking Delete.
To edit a property for a mobile device:
1 Navigate to the Mobile Device Details page.
2 Select the checkbox to the left of the property that you want to edit and click Edit. Only properties that can be configured will have a checkbox.
3 The Edit Property dialog box appears. Type the new value for the property in the text box and click Save.
The new value downloads to the mobile device at the next update. If the device has not yet received an updated property value, the pending value appears in the Pending Value column for the property.
Creating Custom Properties
From the Avalanche Console, you can create custom properties on the mobile devices. These properties can then be used to build selection criteria for software updates or to filter in the Mobile Device Inventory panel.
NOTE: Like the pre-defined properties, custom properties appear as selection variables in the Selection Criteria Builder.
To create custom properties:
1 In the Avalanche Console, select the Inventory tab.
2 Click the name of the device whose properties you want to view.
3 Click New in the Properties panel.
4 Type the name of the Property Group you want the property to belong to.
5 Type the name and the value of the property in the Property Name and Property Value text boxes.
6 Click Save.
The property is added to the list in the Properties tab under the chosen group and the device will receive it the next time it updates.
Chapter 4: Managing Devices from the Avalanche Console 31
Creating Device-Side Properties
Avalanche provides the ability to turn third-party information that is generated at the mobile device into properties that can then be transferred to and displayed in the Avalanche Console. These properties are called device-side properties. You can use the device-side properties feature to obtain either static or dynamic information. For example, a device-side property could report a device’s serial number, or state changes within a specific application.
NOTE: It is important to note that the Avalanche Enabler sends device-side properties to the Enterprise Server; it does not collect the information. Vendors must create their own applications and utilities to gather the required information and write it to a plain-text file on the device.
Device-side properties must be written in key-value pairs to a plain-text file with a .prf extension and one vendor entry. Avalanche uses the vendor name to organize and display user-defined properties in the Properties panel of the Mobile Device Details page.
For more information about creating device-side properties, see the Creating Device-Side Avalanche Properties white paper on the Wavelink Web site.

Chapter 5: Enabler Configuration Utility 32
Chapter 5: Enabler Configuration UtilityThe Enabler can be configured using three methods: the Enabler configuration utility, the Avalanche Enabler configuration package, and through the Enabler interface (Click File > Settings) .
The Enabler configuration utility is accessed from the Wavelink Product Configuration window when installing the Enabler (see Configuring the Enabler on page 5). The Avalanche Enabler configuration package is added to a software profile in Avalanche, configured, and then deployed wirelessly to the device (see Configuring the Avalanche Enabler Configuration Package on page 9).
NOTE: Default values and the availability of some options may vary based on the device and the method you use to configure the Enabler. For example, if you access the configuration utility from the Avalanche Console, the Network, Name Server, and Wireless tabs will not be present, because the settings are configured in a network profile.
From the Enabler configuration utility, you can configure the connectivity, performance, and display of the Enabler. The following sections give information on configuring these options:
• Configuring Connectivity
• Configuring Performance
• Configuring Display
Configuring ConnectivityYou can configure the network and wireless settings for the Enabler from the configuration utility. This includes configuring the connection to the server over a serial, WiFi or WWAN connection, scheduling periodic updates, and setting the Avalanche server address, DNS and DCHP addresses, SSID and encryption.
The following tabs are used to configure connectivity settings for the Enabler:
• Connection Tab
• Server Contact Tab
• Network Tab
• Name Server Tab
• Wireless Tab
• Adapter Tab
• Data Tab

Chapter 5: Enabler Configuration Utility 33
• SaaS Tab
Connection Tab
Use the Connection tab in the Avalanche Update Settings dialog box to configure the IP address of the mobile device server to which the mobile device reports and to specify what type of connection to use.
By default, if the mobile device cannot contact the mobile device server over a serial connection, it broadcasts a request on the local wireless network. Any server on the local network can answer the request. If you want the mobile device to send requests to a specific mobile device server, you can configure the mobile device with the IP address or host name of the server.
NOTE: You can also use an Avalanche network profile to configure a mobile device with the IP address or host name of the mobile device server. For more information about configuring and using Avalanche network profiles, refer to the user guide associated with your Avalanche Console.
If the mobile device has a WWAN connection, you also have the option to allow the device to contact the Avalanche server using that connection. The mobile device will only try a WWAN connection when other connection methods fail.

Chapter 5: Enabler Configuration Utility 34
Connection Tab
The following list describes the options in the Connection tab:
Configure Address - Avalanche Server Address
Indicates the IP address (or host name) of the Avalanche server to which the mobile device reports. If you are using Avalanche On Demand, the server address can be found in the Avalanche Console by clicking Tools > My Account.
Possible Values: Any valid IP address or host name
Default Value: None
Serial - Check serial connection for updates
Indicates whether the mobile device should first check for a serial connection to the Avalanche server before using the wireless connection to connect. This option will not be available if Enable SaaS Mode on the SaaS tab is enabled.
Default Value: <Disabled>
Serial - Disable ActiveSync
Indicates whether ActiveSync should be enabled on the mobile device. Do not disable ActiveSync if you are using SecurePlus or Certificate Manager.
Default Value: <Disabled>
Chapter 5: Enabler Configuration Utility 35
Restrict Adapter Link Speed
Indicates that the Enabler should only allow a connection to the server if the detected link speed is greater than or equal to the configured value. When this option is enabled, you must enter the link speed in the Minimum Link Speed text box.
Default Value: <Disabled>
Minimum Link Speed
Indicates the minimum speed at which the mobile device will allow a connection to the server.
Default Value: <10000 kbs>
Allow Broadband Connections
Indicates whether the Enabler should attempt to connect to the server over a WWAN connection when other connection methods fail. This option is functional only for devices with a WWAN connection and Windows Mobile operating system.
Default Value: <Disabled>
Allow Phone Activation
Indicates if the Enabler has permission to activate the device’s phone when a WWAN connection is necessary.
Default Value: <Disabled>
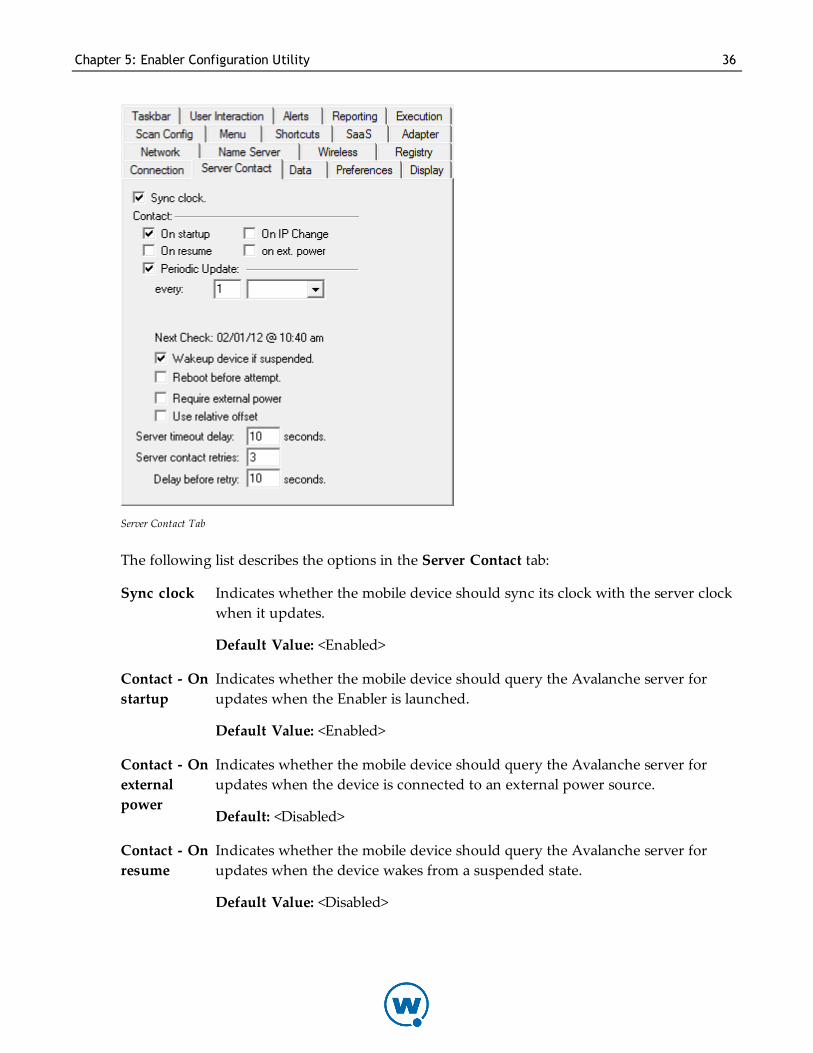
Server Contact Tab
Use the Server Contact tab in the Avalanche Update Settings dialog box to configure when and how the Enabler contacts the Avalanche server. The Monitor provides for periodic updates; if the Monitor is not running, then the mobile device will not be able to use the periodic updates feature.
Chapter 5: Enabler Configuration Utility 36
Server Contact Tab
The following list describes the options in the Server Contact tab:
Sync clock Indicates whether the mobile device should sync its clock with the server clock when it updates.
Default Value: <Enabled>
Contact - On startup
Indicates whether the mobile device should query the Avalanche server for updates when the Enabler is launched.
Default Value: <Enabled>
Contact - On external power
Indicates whether the mobile device should query the Avalanche server for updates when the device is connected to an external power source.
Default: <Disabled>
Contact - On resume
Indicates whether the mobile device should query the Avalanche server for updates when the device wakes from a suspended state.
Default Value: <Disabled>
Chapter 5: Enabler Configuration Utility 37
Contact - Periodic Update
Indicates whether the mobile device queries the Avalanche server periodically for updates.
Default Value: <Disabled>
Periodic Update - every
Indicates how often to check for updates.
Periodic Update - starting at
Indicates what time to start checking for updates.
NOTE: When you select the hour(s) option, the starting at drop-down menu only becomes available when the following time periods are entered in the every text box: 2, 3, 4, 6, 8, 12, 24.
Periodic Update - Wakeup device if suspended
Indicates whether to wake the device if it is suspended when it is time to check for an update.
Default Value: <Disabled>
Periodic Update - Reboot before attempt
Indicates whether the mobile device will perform a reboot before attempting a periodic update.
Default Value: <Disabled>
Require External Power
Indicates whether the mobile device should be updated only when it is connected to an external power source.
Default Value: <Disabled>
Use Relative Offset
Indicates whether the Enabler should allow the time to be offset when the device is unavailable at the configured update time. Enabling this option will ensure that the amount of time between updates remains the same, although the update will no longer occur at the set hour.
Default Value: <Disabled>
Server timeout delay
Indicates the number of seconds for the mobile device to wait before it stops trying to contact the server.
Chapter 5: Enabler Configuration Utility 38
Server contact retries
Indicates the number of times the mobile device will try to attempt a server connection.
Delay before retry
Indicates the number of seconds between connection attempts.
Network Tab
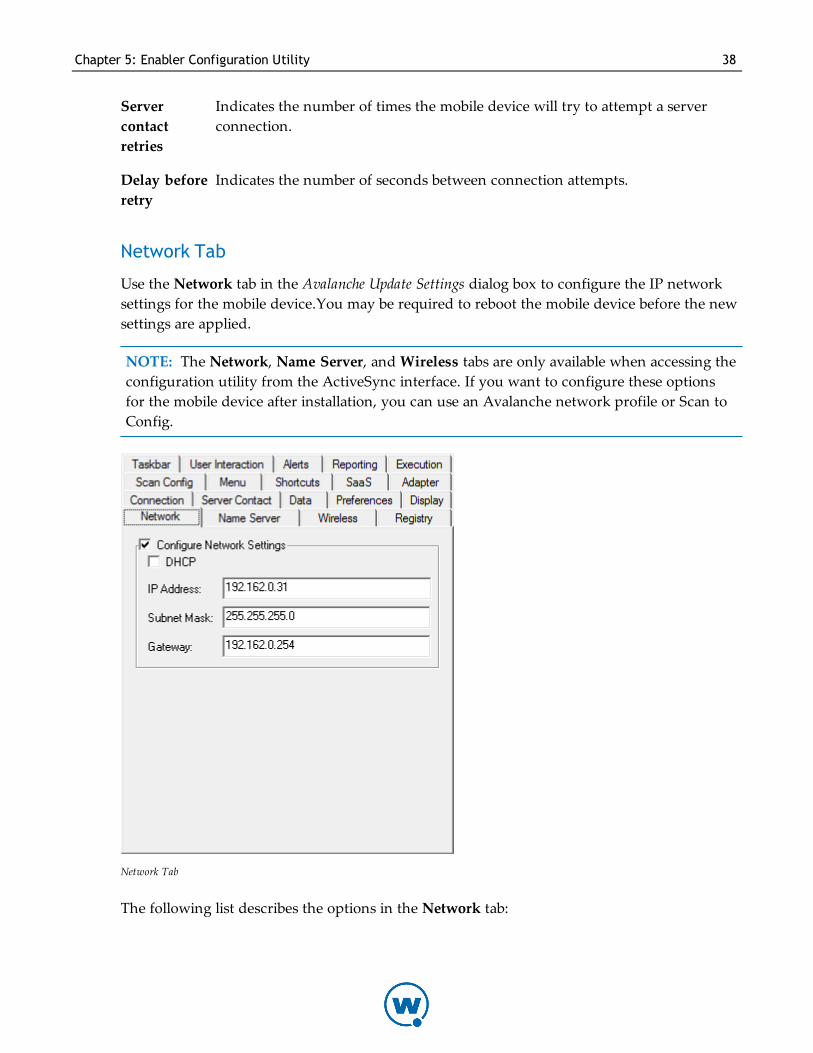
Use the Network tab in the Avalanche Update Settings dialog box to configure the IP network settings for the mobile device.You may be required to reboot the mobile device before the new settings are applied.
NOTE: The Network, Name Server, and Wireless tabs are only available when accessing the configuration utility from the ActiveSync interface. If you want to configure these options for the mobile device after installation, you can use an Avalanche network profile or Scan to Config.
Network Tab
The following list describes the options in the Network tab:
Chapter 5: Enabler Configuration Utility 39
Configure Network Settings
Indicates whether the Enabler configuration controls the IP network settings for the mobile device.
Default Value: <Disabled>
DHCP Indicates whether the mobile device receives its IP address from a DHCP server. If you enable the DHCP option, the DCHP server will provide the IP Address, Subnet Mask and Gateway fields. You will not be able to configure these manually.
Default Value: <Disabled>
IP Address
Indicates the IP address of the mobile device.
Possible Values: Any valid IP address
Subnet Mask
Indicates the subnet mask for the IP address of mobile device.
Possible Values: Any valid subnet mask
Gateway Indicates the gateway (router) the mobile device will use to send data to remote networks.
Possible Values: Any valid gateway address
Name Server Tab
Use the Name Server tab in the Avalanche Update Settings dialog box to manually configure the DNS and domain name settings for the mobile device. You may be required to reboot the mobile device before the new settings are applied.
When this tab is accessed through the Enabler interface, it is the DNS tab. For information on accessing this tab from the device, see Managing Wireless Network Settings from the Enabler on page 16.
NOTE: The Network, Name Server, and Wireless tabs are not available from the Avalanche Enabler configuration package. If you want to configure these options for the mobile device after installation using Avalanche, you can use an Avalanche network profile or Scan to Config.
Chapter 5: Enabler Configuration Utility 40
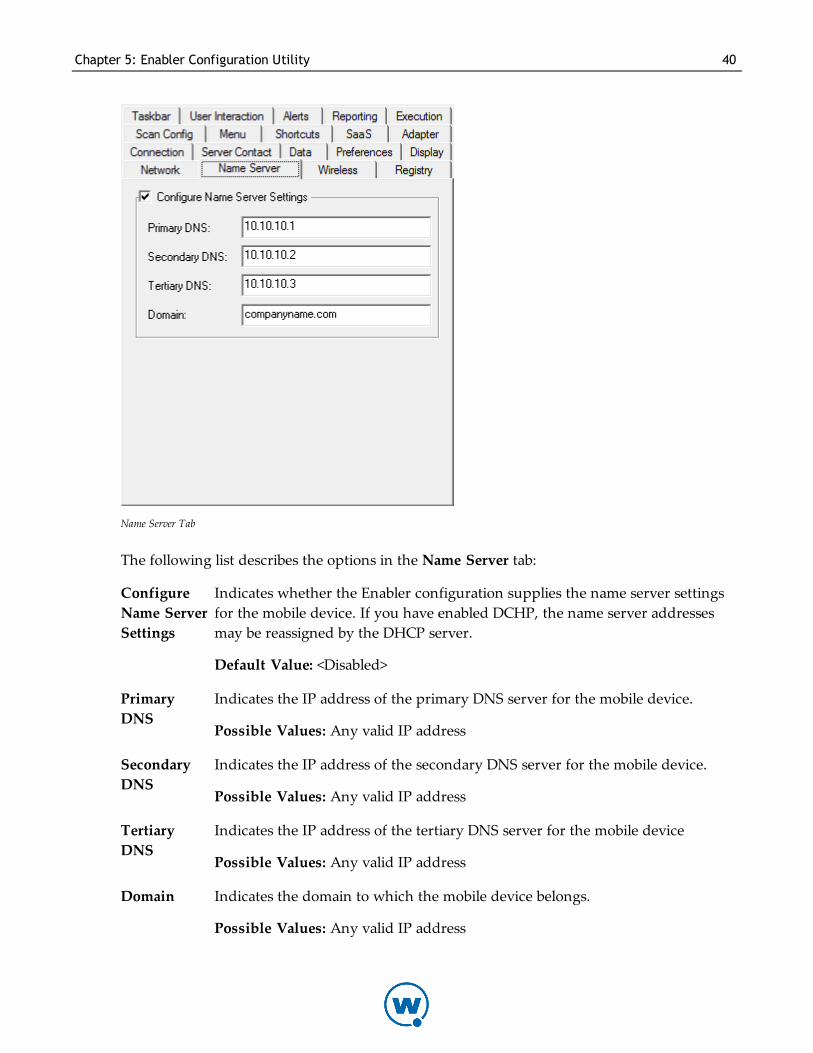
Name Server Tab
The following list describes the options in the Name Server tab:
Configure Name Server Settings
Indicates whether the Enabler configuration supplies the name server settings for the mobile device. If you have enabled DCHP, the name server addresses may be reassigned by the DHCP server.
Default Value: <Disabled>
Primary DNS
Indicates the IP address of the primary DNS server for the mobile device.
Possible Values: Any valid IP address
Secondary DNS
Indicates the IP address of the secondary DNS server for the mobile device.
Possible Values: Any valid IP address
Tertiary DNS
Indicates the IP address of the tertiary DNS server for the mobile device
Possible Values: Any valid IP address
Domain Indicates the domain to which the mobile device belongs.
Possible Values: Any valid IP address

Chapter 5: Enabler Configuration Utility 41
Wireless Tab
Use the Wireless tab in the Avalanche Update Settings dialog box to configure the wireless network settings for the mobile device. You may be required to reboot the mobile device before the new settings are applied.
When you access the Wireless tab from the Enabler configuration utility, it gives you options to set the encryption and authentication methods for the device, as well as save the credentials. Before you set these, know what the device and your network support.
When you access the Wireless tab on the device, you can set the encryption and authentication methods. The drop-down menus will display options that are supported on the device. Provision the credentials on the separate Credentials tab. For information on accessing these tabs on the device, see Managing Wireless Network Settings from the Enabler on page 16.
NOTE: The Network, Name Server, and Wireless tabs are only available when accessing the configuration utility from the ActiveSync interface. If you want to configure these options for the mobile device after installation, you can use an Avalanche network profile or Scan to Config.
Wireless Tab
Chapter 5: Enabler Configuration Utility 42
The following list describes the possible options in the Wireless tab:
Configure Wireless Settings
Indicates whether the Enabler configures the wireless settings for the mobile device.
Default Value: <Disabled>
SSID Indicates the SSID of the wireless network on which the mobile device participates. The SSID is a case-sensitive name that is limited to 32 characters.
Possible Values: Any valid SSID name
Encryption Algorithm
Indicates the encryption algorithm that the wireless network uses.
Possible Values:
• Open System (No Encryption)
• 40-bit Shared Key Algorithm
• 128-bit Shared Key Algorithm
• WPA PSK (TKIP 8-64 char)
• WPA2 PSK (AES 8-64 char)
Default Value: Open System (No Encryption)
Transmit Key If you select 40-bit or 128-bit shared key algorithms, provide the shared keys for your network. The selected key will be used by the Enabler to transmit.
Passkey If you selected WPA or WPA2, provide the passkey or passphrase for your network.
Adapter Tab
Use the Adapter tab in the Avalanche Update Settings dialog box to configure network and wireless management. Different options are available depending on whether it is accessed from the Wavelink Product Configuration window or from the device.
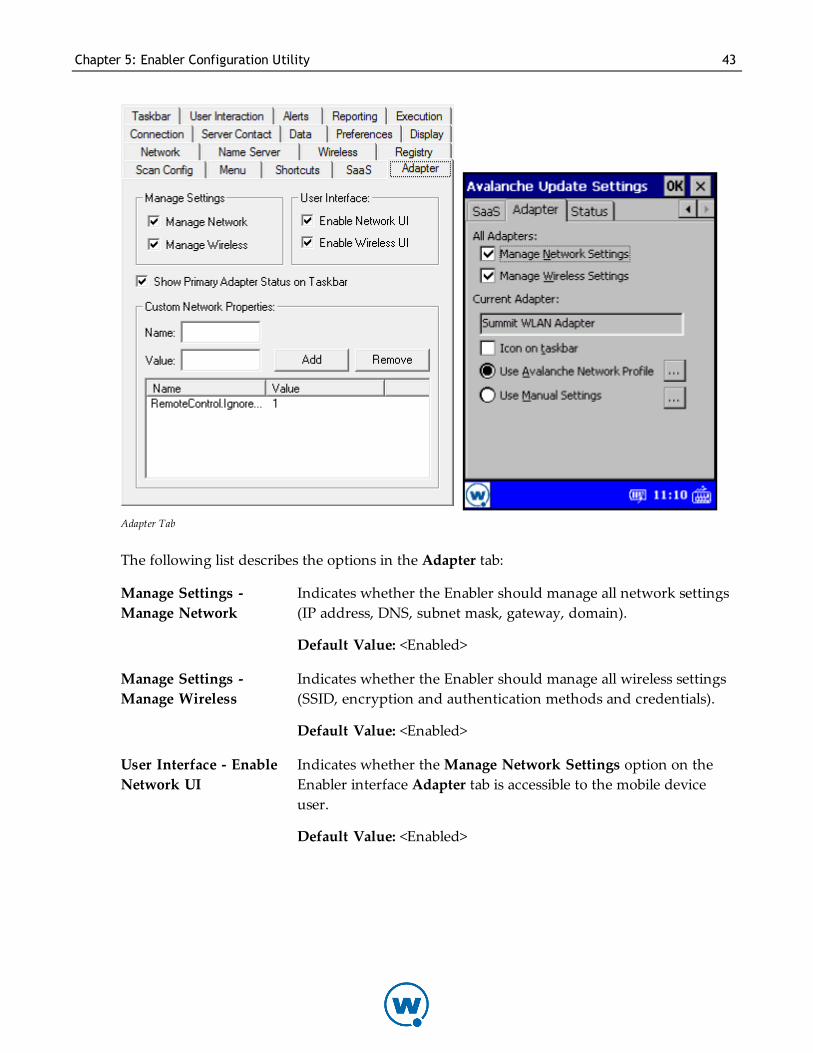
Chapter 5: Enabler Configuration Utility 43
Adapter Tab
The following list describes the options in the Adapter tab:
Manage Settings - Manage Network
Indicates whether the Enabler should manage all network settings (IP address, DNS, subnet mask, gateway, domain).
Default Value: <Enabled>
Manage Settings - Manage Wireless
Indicates whether the Enabler should manage all wireless settings (SSID, encryption and authentication methods and credentials).
Default Value: <Enabled>
User Interface - Enable Network UI
Indicates whether the Manage Network Settings option on the Enabler interface Adapter tab is accessible to the mobile device user.
Default Value: <Enabled>
Chapter 5: Enabler Configuration Utility 44
User Interface - Enable Wireless UI
Indicates whether the Manage Wireless Settings option on the Enabler interface Adapter tab is accessible to the mobile device user.
Default Value: <Enabled>
Show Primary Adapter Status on Taskbar (Icon on taskbar)
Indicates whether the mobile device will display the status of the primary adapter on the locked taskbar.
Default Value: <Enabled>
Custom Network Properties - Name
Indicates a name for a custom network property.
Custom Network Properties - Value
Indicates a value for a custom network property.
Custom Network Properties - Add
Adds the information in the Name and Value fields as a custom network property.
Custom Network Properties - Remove
Removes the selected network property from the properties list. This will not remove a property from the device.
Use Avalanche Network Profile
Uses the applied Avalanche network profile for network settings. Use the [...] button to view the Avalanche network profile.
Use Manual Settings Allows the device user to configure network settings that the Enabler will apply on the device. Use the [...] button to configure manual settings for the device.
When you configure manual settings from the device and tap [...], you have the option to configure the IP address, subnet mask, gateway address, DNS and domain name server addresses, SSID, as well as encryption and authentication methods and credentials. For more information on configuring manual network settings from the device, see Managing Wireless Network Settings from the Enabler on page 16.
Data Tab
Use the Data tab in the Avalanche Update Settings dialog box to configure when data is transferred to the mobile device server.

Chapter 5: Enabler Configuration Utility 45
Data Tab
The following list describes the options in the Data tab:
Transfer Data When Device is Idle
When this option is enabled, any periodic updates from the server will be postponed until the device has been idle for the specified length of time. This option does not stop real-time statistics from being sent to the server.
Default Value: <Disabled>
Idle Timeout
The length of time the device must be idle before a periodic update will run.
Default Value: 5 minutes
Allow Wi-Fi transmission
Indicates whether the device is allowed to transfer statistics using a Wi-Fi connection.
Default Value: <Enabled>
Allow WWAN transmission
Indicates whether the device is allowed to transfer statistics using a WWAN connection. This is only available for devices with WWAN capability.
Default Value: <Disabled>
Chapter 5: Enabler Configuration Utility 46
Report Interval
Indicates how frequently the Enabler should report statistics.
Default Value: 1 hour
Retransmit After Server Contact
Indicates whether the device will send real-time statistics to the server immediately following a connection to the server.
Default Value: <Disabled>
SaaS Tab
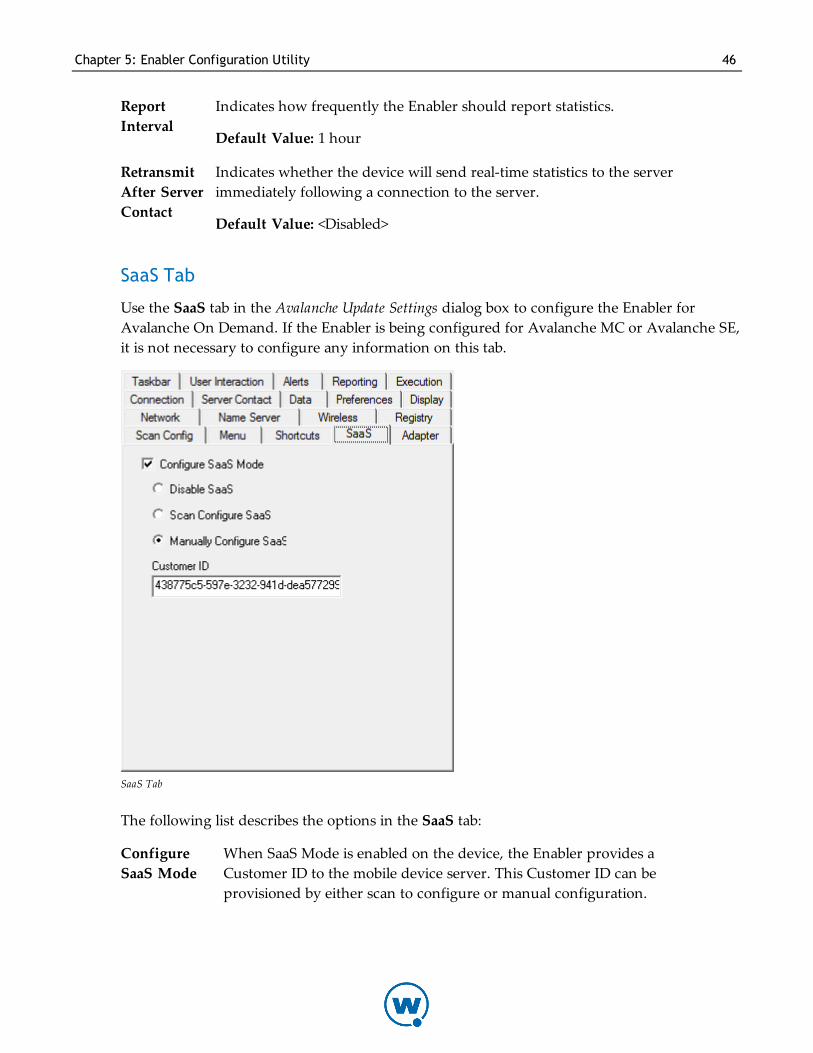
Use the SaaS tab in the Avalanche Update Settings dialog box to configure the Enabler for Avalanche On Demand. If the Enabler is being configured for Avalanche MC or Avalanche SE, it is not necessary to configure any information on this tab.
SaaS Tab
The following list describes the options in the SaaS tab:
Configure SaaS Mode
When SaaS Mode is enabled on the device, the Enabler provides a Customer ID to the mobile device server. This Customer ID can be provisioned by either scan to configure or manual configuration.
Chapter 5: Enabler Configuration Utility 47
Disable SaaS Stops the Enabler from sending a Company ID to the mobile device server. This option is only used if the device is changing from Avalanche On Demand to either Avalanche MC or Avalanche SE.
Scan Configuration SaaS
Indicates that the Scan to Configure dialog in the Enabler should launch the first time the Enabler is launched on the device. The user can then scan the Company ID barcodes to configure the device to connect to the Avalanche On Demand server.
Manual Configuration SaaS
Allows the user to provide the Company ID for Avalanche On Demand. This ID can be found in the Avalanche Console by clicking My Account.
NOTE: In order to manually configure the Enabler for Avalanche On Demand, you must provide the Company ID on the SaaS tab and the mobile device server address on the Connection tab. If you use the Scan to Configure barcodes, both settings are configured.
Configuring PerformanceYou can configure the performance settings for the Enabler from the configuration utility. This includes configuring passwords, startup preferences, the activity log, Scan Config and registry keys.
The following tabs are used to configure performance settings for the Enabler:
• User Interaction Tab
• Preferences Tab
• Execution Tab
• Scan Config Tab
• Registry Tab
• Alerts Tab
• Reporting Tab
User Interaction Tab
Use the User Interaction tab of the Avalanche Update Settings dialog box to configure passwords for the Enabler and to specify whether a user is notified before an Avalanche software package is installed. Passwords are not case sensitive.
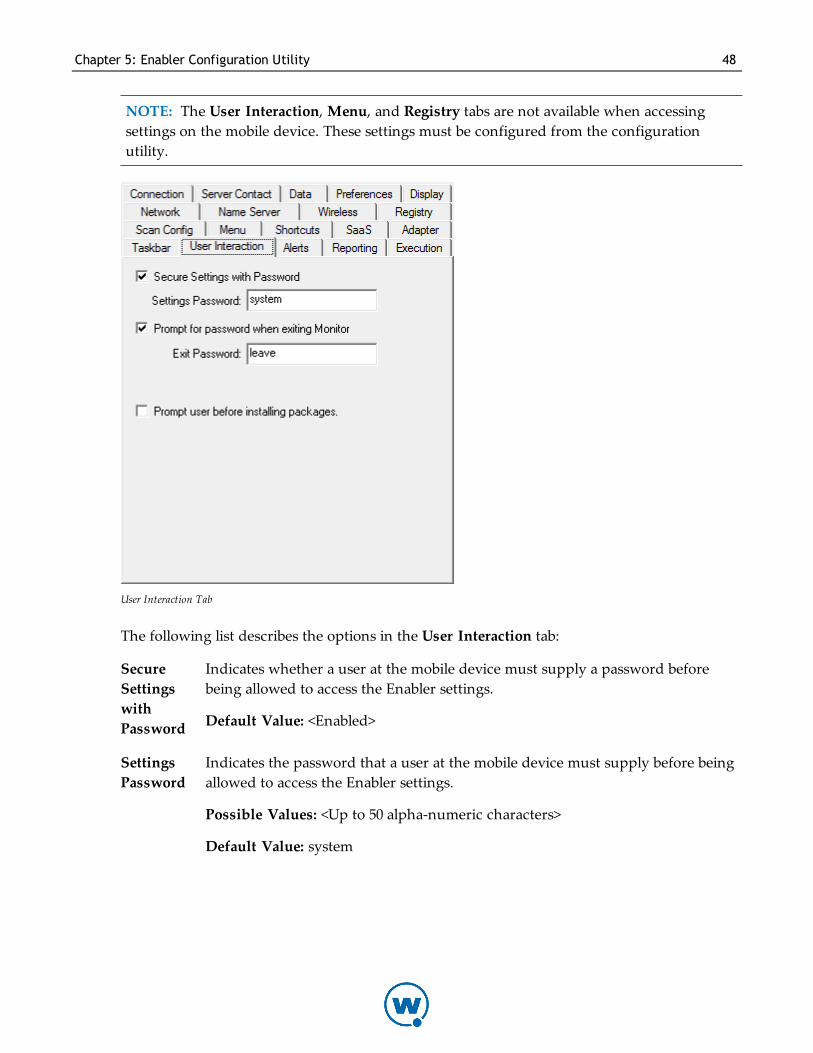
Chapter 5: Enabler Configuration Utility 48
NOTE: The User Interaction, Menu, and Registry tabs are not available when accessing settings on the mobile device. These settings must be configured from the configuration utility.
User Interaction Tab
The following list describes the options in the User Interaction tab:
Secure Settings with Password
Indicates whether a user at the mobile device must supply a password before being allowed to access the Enabler settings.
Default Value: <Enabled>
Settings Password
Indicates the password that a user at the mobile device must supply before being allowed to access the Enabler settings.
Possible Values: <Up to 50 alpha-numeric characters>
Default Value: system
Chapter 5: Enabler Configuration Utility 49
Prompt for password when exiting Monitor
Indicates whether a password is required before the Monitor terminates. If the Monitor is set to terminate when the Enabler is closed, the user will not be able to exit the Enabler interface without providing a password.
Default Value: <Enabled>
Exit Password
Indicates the password that the user at the mobile device must supply to allow the Monitor to terminate.
Possible Values: <Up to 50 alpha-numeric characters>
Default Value: leave
Prompt user before installing packages
Indicates whether the user receives a notification before an Avalanche-deployed package is installed. If the user receives a notification, they have the option to delay the installation of the package. When this option is disabled, the user receives no notification and cannot postpone the installation.
Default Value: <Disabled>
Preferences Tab
Use the Preferences tab in the Avalanche Update Settings dialog box to configure the startup and shutdown behavior of the Enabler, as well as the activity log and time zone settings.
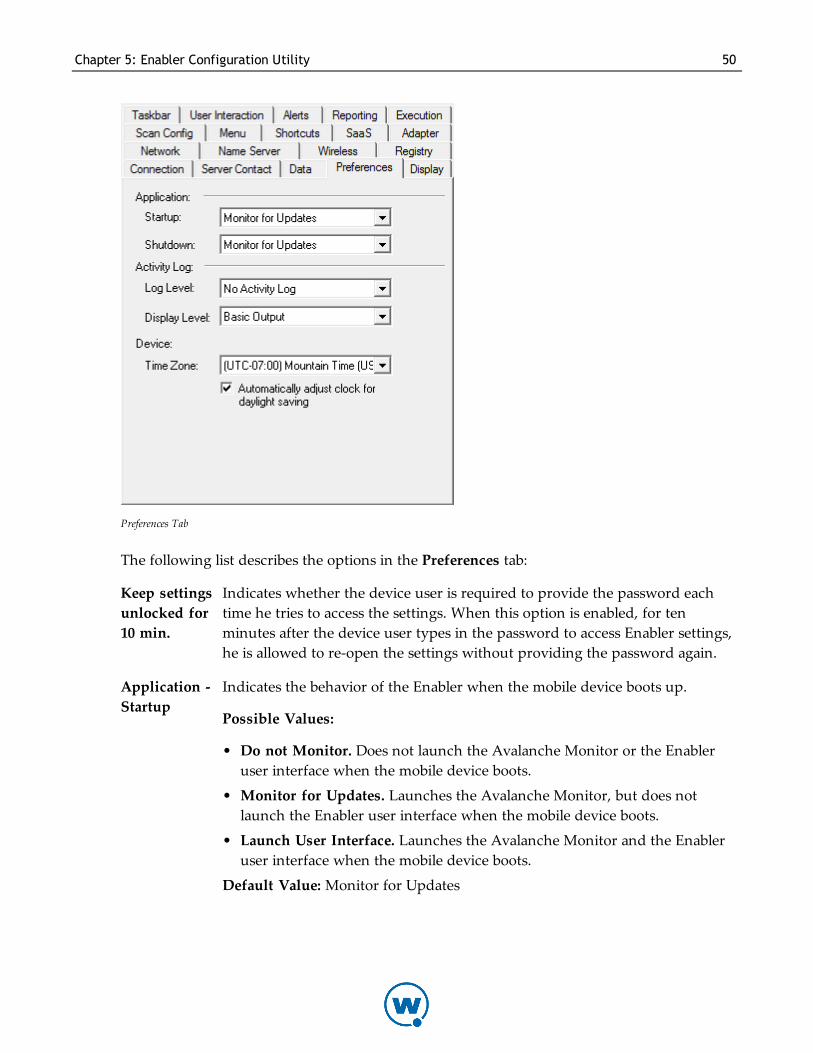
Chapter 5: Enabler Configuration Utility 50
Preferences Tab
The following list describes the options in the Preferences tab:
Keep settings unlocked for 10 min.
Indicates whether the device user is required to provide the password each time he tries to access the settings. When this option is enabled, for ten minutes after the device user types in the password to access Enabler settings, he is allowed to re-open the settings without providing the password again.
Application - Startup
Indicates the behavior of the Enabler when the mobile device boots up.
Possible Values:
• Do not Monitor. Does not launch the Avalanche Monitor or the Enabler user interface when the mobile device boots.
• Monitor for Updates. Launches the Avalanche Monitor, but does not launch the Enabler user interface when the mobile device boots.
• Launch User Interface. Launches the Avalanche Monitor and the Enabler user interface when the mobile device boots.
Default Value: Monitor for Updates
Chapter 5: Enabler Configuration Utility 51
Application - Shutdown
Indicates the behavior of the Avalanche Monitor when the Enabler is terminated.
Possible Values:
• Monitor for Updates. Forces the Avalanche Monitor to continue running.
• Exit Application. Terminates the Avalanche Monitor.
NOTE: If you have configured an exit password, the Avalanche Enabler will prompt the user for a password when the user attempts to exit the Avalanche Enabler. If the user cannot supply the password, neither the Avalanche Enabler nor the Avalanche Monitor will terminate.
Default Value: Monitor for Updates
Activity Log - Log Level
Indicates the amount of information (if any) saved to the Enabler log file. The log file (enabler.log) is saved to the installation directory on the mobile device. You can remove the log file from the device and view it in a text editor.
Possible Values:
• No Activity Log. Nothing is written to the log file.
• Critical. Saves only critical errors to the log file.
• Error. Writes Critical messages, along with configuration and/or communication problems to the log file.
• Warning. Writes Critical and Error messages to the log file, along with any possible operational problems.
• Info. Writes operational information to the log file.
• Debug. Writes large amounts of information to the log file that can be used to diagnose more serious problems.
Default Value: No Activity Log
Device - Time Zone
Configures the time zone for the Enabler clock.
Possible Values: Use local time zone, <Any other time zone (list)>
Default Value: Do not manage time zone
Automatically adjust clock for daylight saving
Indicates whether the Enabler clock should adjust to daylight saving time.
Default Value: <Disabled>
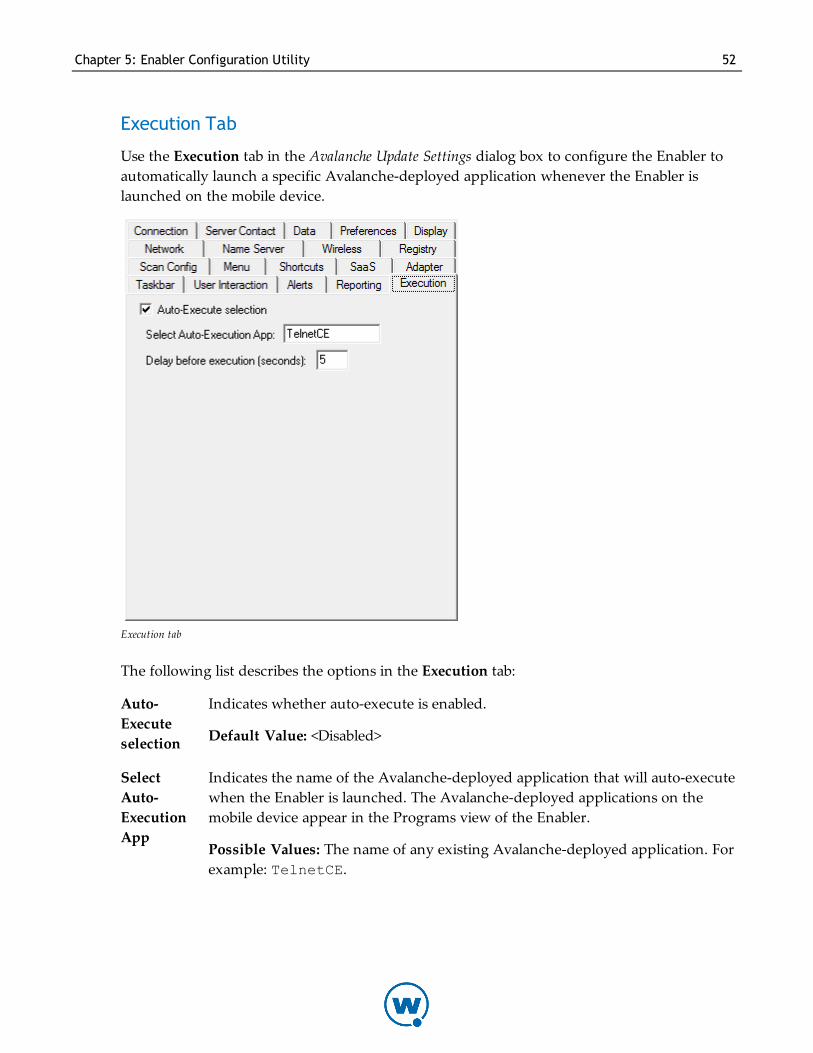
Chapter 5: Enabler Configuration Utility 52
Execution Tab
Use the Execution tab in the Avalanche Update Settings dialog box to configure the Enabler to automatically launch a specific Avalanche-deployed application whenever the Enabler is launched on the mobile device.
Execution tab
The following list describes the options in the Execution tab:
Auto-Execute selection
Indicates whether auto-execute is enabled.
Default Value: <Disabled>
Select Auto-Execution App
Indicates the name of the Avalanche-deployed application that will auto-execute when the Enabler is launched. The Avalanche-deployed applications on the mobile device appear in the Programs view of the Enabler.
Possible Values: The name of any existing Avalanche-deployed application. For example: TelnetCE.
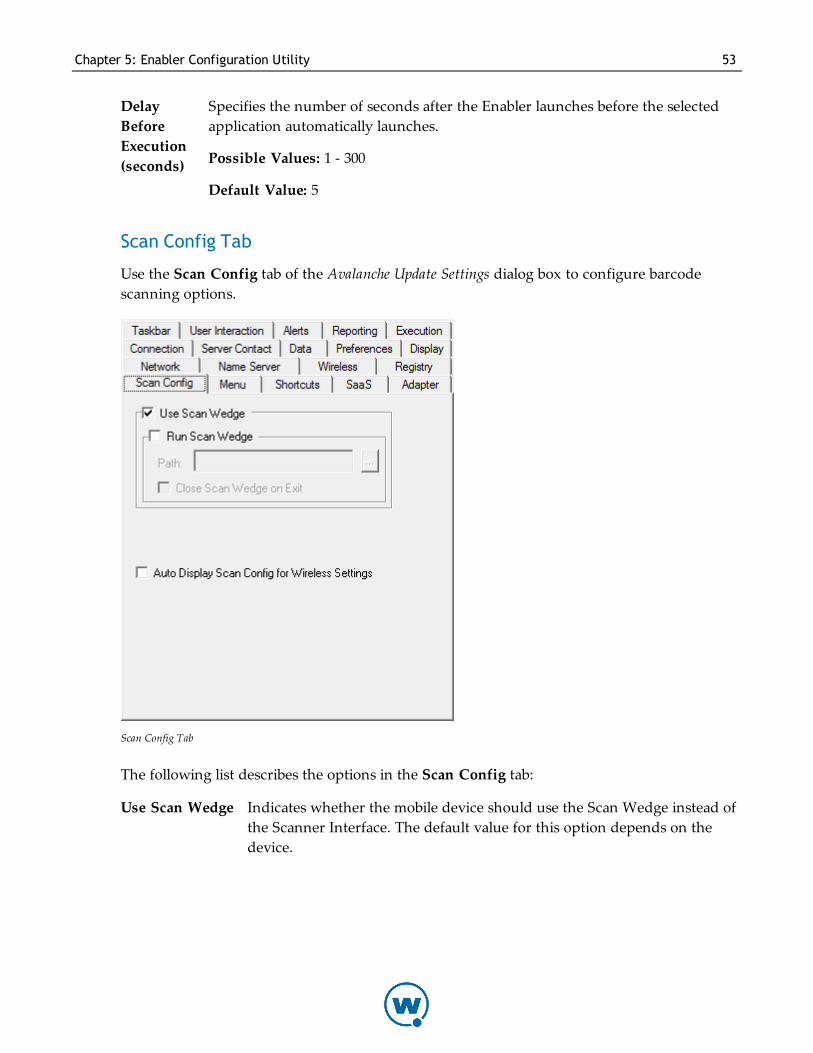
Chapter 5: Enabler Configuration Utility 53
Delay Before Execution (seconds)
Specifies the number of seconds after the Enabler launches before the selected application automatically launches.
Possible Values: 1 - 300
Default Value: 5
Scan Config Tab
Use the Scan Config tab of the Avalanche Update Settings dialog box to configure barcode scanning options.
Scan Config Tab
The following list describes the options in the Scan Config tab:
Use Scan Wedge Indicates whether the mobile device should use the Scan Wedge instead of the Scanner Interface. The default value for this option depends on the device.
Chapter 5: Enabler Configuration Utility 54
Run Scan Wedge Indicates whether the mobile device should use a specific Scan Wedge program. When this option is enabled, you must enter the program path in the Path text box (if no scan wedge is running by default).
Default Value: <Disabled>
Path Indicates the location of the Scan Wedge program.
Close Scan Wedge on Exit
Indicates whether the Enabler should automatically exit the Scan Wedge program when the barcode scan is complete.
Default Value: <Disabled>
Auto Display Scan Config (for Wireless Settings)
Indicates whether the Scanner Interface dialog box appears automatically when the Enabler is launched (if no network settings are present).
Default Value: <Disabled>
Registry Tab
The Enabler provides the ability to create registry keys. The registry contains extended information, settings and various other values for device operating systems. By configuring and creating new keys within the registry you can control a majority of the operating system functions. The limitations of the registry keys are dependent on the mobile device you are using.

Chapter 5: Enabler Configuration Utility 55
Registry Tab
The following list describes the options in the Registry tab:
Root The root directory of your registry entry.
Possible Values:
• HKEY_CLASSES_ROOT
• HKEY_CURRENT_USER
• HKEY_LOCAL_MACHINE
Key The path of the registry key location.
Example: \Software\Wavelink\Avalanche
Name The name of the registry key.
Value The value of the registry key.
Type The type of registry key.
Possible Values: String or DWORD
Chapter 5: Enabler Configuration Utility 56
Add Uses the current values of the registry key fields to create a new registry key.
Remove Removes the selected registry key from the list.
Alerts Tab
Use the Alerts tab of the Avalanche Update Settings dialog box to configure which alerts are sent to the mobile device server. Alerts can be viewed from the Alerts tab of the Avalanche Console.
Alerts Tab
The following list describes the options in the Alerts tab:
Enable Alerts Indicates whether alerts will be sent to the server for the following actions.
Default Value: <Enabled>
Low Flash Indicates whether an alert will be sent to the server when available flash memory reaches the specified percent.
Default Threshold: 5

Chapter 5: Enabler Configuration Utility 57
Low RAM Indicates whether an alert will be sent to the server when available RAM reaches the specified percent.
Default Threshold: 5
Battery Low Indicates whether an alert will be sent to the server when the battery reaches the specified percent.
Default Threshold: 20
Battery Critical Indicates whether an alert will be sent to the server when the battery reaches the specified percent.
Default Threshold: 8
Media Inserted Indicates whether an alert will be sent to the server when media (e.g., SD card) is inserted into the device.
Media Removed
Indicates whether an alert will be sent to the server when media (e.g., SD card) is removed from the device.
Property Changed Alert List - Add
Adds a property to the list of properties monitored by Avalanche. When changes to the values of the properties in the list are detected, an alert is sent to the server. This list is case-sensitive.
Example: Custom.Alert
Property Changed Alert List - Remove
Removes a property from the list of properties monitored by Avalanche.
Reporting Tab
Use the Reporting tab of the Avalanche Update Settings dialog box to configure the reporting information sent to the mobile device server.

Chapter 5: Enabler Configuration Utility 58
Reporting Tab
The following list describes the options in the Reporting tab:
Report Device Property Changes
Indicates whether the device reports property changes to the server.
Default Value: <Disabled>
Report Real-time Statistics Changes
Indicates whether the device reports real-time statistics changes to the server. This is for reporting only, and does not affect whether real-time statistics are sent to the server. To configure whether real-time statistics are sent to the server, see Data Tab on page 44.
Default Value: <Disabled>
Report Device Events
Indicates whether the device reports device events to the server.
Default Value: <Disabled>
Report GPS Position
Indicates whether the device reports a GPS position to the server.
Default Value: <Disabled>
Chapter 5: Enabler Configuration Utility 59
Report Device Software
Indicates whether the device reports its software to the server.
Default Value: <Enabled>
Report Device Statistics
Indicates whether the device reports general statistical information to the server.
Default Value: <Disabled>
Report Device Statistics - Statistics Gather Interval
The interval at which the Enabler gathers statistical information from the device. This applies to all the reporting enabled from this tab.
Default Value: 10 minutes
Report Device Statistics - Maximum File Size
The maximum file size for the statistical information gathered by the Enabler to send to the server.
Default Value: 512 KB
Report Interval
The interval at which the Enabler sends reporting information to the server. This applies to all the reporting enabled from this tab.
Default Value: 24 hours
Minimum Report Linkspeed
The minimum linkspeed that must be established before the device will attempt to send reporting information to the server. This applies to all the reporting enabled from this tab.
Default Value: 188 kbs
Configuring DisplayYou can configure the display settings for the Enabler from the configuration utility. This includes configuring the appearance of the main display and the taskbar.
The following tabs are used to configure display settings for the Enabler:
• Display Tab
• Taskbar Tab
• Menu Tab
• Shortcuts Tab
Chapter 5: Enabler Configuration Utility 60
Display Tab
Use the Display tab in the Avalanche Update Settings dialog box to control the appearance of the Enabler.
Display Tab
The following list describes the options in the Display tab:
Update Window Display - At startup
Specifies how the Update view displays when the Enabler first launches.
Possible Values:
• Half Screen. The Enabler displays a split-screen view. The Update screen appears beneath the Programs screen. This is the default value.
• Hidden. The Enabler does not display the Update screen.
• Full Screen. The Enabler displays only the Update screen.
Chapter 5: Enabler Configuration Utility 61
Update Window Display - On connect
Specifies how the Update view displays when the Enabler is connecting to the Avalanche Console.
Possible Values:
• Half Screen. The Enabler displays a split-screen view. The Update screen appears beneath the Programs screen.
• Full Screen. The Enabler displays only the Update screen.
• As Is. The Enabler retains the current view settings. This is the default value.
• Locked Full Screen. The Enabler displays the Update screen; the menu and taskbar are hidden and inaccessible to the user.
Update Window Display - Normal
Specifies how the Update view displays after the Enabler has connected to the server and downloaded any required updates.
Possible Values:
• Half Screen. The Enabler displays a split-screen view. The Update screen appears beneath the Programs screen.
• Hidden. The Enabler does not display the Update screen.
• As Is. The Enabler retains the current view settings. This is the default value.
View Menu Defaults - Icon Appearance
Specifies how the icons are displayed on the Enabler.
Possible Values:
• Icons. The Enabler displays the applications and packages as large icons. This is the default value.
• List. The Enabler displays the applications and packages in a list with small icons.
• Details. The Enabler displays the applications and packages in a list and provides details (size, location, etc.) about each application or package.
Chapter 5: Enabler Configuration Utility 62
View Menu Defaults - Icon Filter
Specifies which packages are displayed on the Enabler.
Possible Values:
• Launchable. The Enabler displays only launchable executables or shortcuts in the Programs view. This is the default value.
• All Packages. The Enabler displays all software packages that have been received, installed, or rejected. Shortcuts are not displayed.
Half Screen Split Layout
Determines how the split screen displays in a Windows Enabler.
Possible Values:
• Automatic. Displays the split screen aligned either horizontally or vertically, depending on the shape of the window the Enabler is displayed in.
• Vertical. Displays the split screen aligned vertically.
• Horizontal. Displays the split screen aligned horizontally.
Taskbar Tab
You can configure the Avalanche Enabler as the primary application on the mobile device to prevent users from accessing other components of the mobile device. This configuration will hide the desktop and disable the Windows Start menu. Users will be unable to exit the Avalanche Enabler without an exit password, and will only be able to launch applications that appear in the Programs view of the Avalanche Enabler.

Chapter 5: Enabler Configuration Utility 63
Taskbar Tab
The following list describes the options in the Taskbar tab:
Normal Displays the taskbar and allows normal taskbar functionality.
Default Value: <Enabled>
Hidden Hides the taskbar from view.
Default Value: <Disabled>
Locked Displays the taskbar, but restricts taskbar functionality.
Default Value: <Disabled>
Show Device Icons
Displays all icons on the mobile device. This option is only available if you enabled Locked.
Default Value: <Enabled>

Chapter 5: Enabler Configuration Utility 64
Show Time Displays the time on the taskbar. This option is only available if you enabled Locked.
Default Value: <Enabled>
Allow Wavelink Menu
Allows the user to access launched Enabler applications and the input keyboard. This option is only available if you enabled Locked or Hidden.
Default Value: <Disabled>
Menu Tab
Use the Menu tab in the Avalanche Update Settings dialog box to configure the behavior of the menu and taskbar.
NOTE: The User Interaction, Menu, and Registry tabs are not available when accessing settings on the mobile device. These settings must be configured from the configuration utility.
Menu Tab
The following list describes the options in the Menu tab:
Chapter 5: Enabler Configuration Utility 65
View Menu - Hide View Menu Specifies whether the View menu is visible to the mobile device user.
Default Value: <Disabled>
View Menu - Lock Updates/Programs Specifies whether the Updates and Programs options on the View menu are accessible to the mobile device user.
Default Value: <Disabled>
View Menu - Lock Icons/List/Details Specifies whether the mobile device user can change the appearance of icons.
Default Value: <Disabled>
Chapter 5: Enabler Configuration Utility 66
View Menu - Lock Launchable/All Programs
Specifies whether the mobile device user can change the display of applications and packages.
Default Value: <Disabled>
Help Menu - Hide Adapter Info Specifies whether adapter information is visible to the mobile device user.
Default Value: <Disabled>
View Menu Defaults - Icon Appearance Specifies the default appearance of items.
Possible Values: Icons, List, Details
Chapter 5: Enabler Configuration Utility 67
View Menu Defaults - Icon Filter Specfies the default applied to items.
Possible Values: Launchable, All packages
Shortcuts Tab
Use the Shortcuts tab in the Avalanche Update Settings dialog box to configure shortcuts to other applications on the mobile device. The shortcuts that you configure will appear in and can be executed from the Programs view of the Enabler. Before you create a shortcut, ensure that you know the correct path to the application executable or to a shortcut for the application executable.
NOTE: The Avalanche Enabler allows for shortcuts to application executables or to application executable shortcuts. You cannot use the shortcuts feature to create shortcuts to folders; however, you can create a shortcut to some documents and non-executable files.
Chapter 5: Enabler Configuration Utility 68
Shortcuts Tab
The following list describes the options in the Shortcuts tab:
Add Allows you to access the dialog box to create a new shortcut.
Edit Opens a dialog box that allows you to edit the shortcut that you have selected in the text box.
Delete Deletes the shortcut that you have selected in the text box.
Hide Registered Shortcuts
Prevents the registered Wavelink shortcuts from appearing in the Programs view. This option is only for specific Wavelink shortcuts.
When you click Add, the Shortcut - Add dialog box appears. The following list describes the options in the Shortcut - Add dialog box:
Title The name of the shortcut. This is the name that will appear in the Programs view of the Avalanche Enabler.
Chapter 5: Enabler Configuration Utility 69
Target The location (path and file name) of the application executable or an existing shortcut to the application executable.
CmdLine Any command line switches that you want applied when the application executable is launched.
Wavelink Contact Information 70
Wavelink Contact InformationIf you have comments or questions regarding this product, please contact Wavelink Customer Service.
E-mail Wavelink Customer Support at: [email protected]
For customers within North America and Canada, call the Wavelink Technical Support line at 801-316-9000 (option 2) or 888-699-9283.
For international customers, call the international Wavelink Technical Support line at +800 9283 5465.
For Europe, Middle East, and Africa, hours are 9 AM - 5 PM GMT.
For all other customers, hours are 7 AM - 7 PM MST.