Embed Size (px)
DESCRIPTION
R11 User Guide
Citation preview

7/16/2019 Autosys R11 User Guide
http://slidepdf.com/reader/full/autosys-r11-user-guide 1/459
Unicenter®
AutoSys®
JobManagement
User Guider11

7/16/2019 Autosys R11 User Guide
http://slidepdf.com/reader/full/autosys-r11-user-guide 2/459
This documentation and any related computer software help programs (hereinafter referred to as the
“Documentation”) is for the end user’s informational purposes only and is subject to change or withdrawal by CA at
any time.
This Documentation may not be copied, transferred, reproduced, disclosed, modified or duplicated, in whole or in
part, without the prior written consent of CA. This Documentation is confidential and proprietary information of CA
and protected by the copyright laws of the United States and international treaties.
Notwithstanding the foregoing, licensed users may print a reasonable number of copies of the Documentation for
their own internal use, and may make one copy of the related software as reasonably required for back-up and
disaster recovery purposes, provided that all CA copyright notices and legends are affixed to each reproduced copy.
Only authorized employees, consultants, or agents of the user who are bound by the provisions of the license for
the Product are permitted to have access to such copies.
The right to print copies of the Documentation and to make a copy of the related software is limited to the period
during which the applicable license for the Product remains in full force and effect. Should the license terminate for
any reason, it shall be the user’s responsibility to certify in writing to CA that all copies and partial copies of the
Documentation have been returned to CA or destroyed.
EXCEPT AS OTHERWISE STATED IN THE APPLICABLE LICENSE AGREEMENT, TO THE EXTENT PERMITTED BYAPPLICABLE LAW, CA PROVIDES THIS DOCUMENTATION “AS IS” WITHOUT WARRANTY OF ANY KIND, INCLUDING
WITHOUT LIMITATION, ANY IMPLIED WARRANTIES OF MERCHANTABILITY, FITNESS FOR A PARTICULAR PURPOSE
OR NONINFRINGEMENT. IN NO EVENT WILL CA BE LIABLE TO THE END USER OR ANY THIRD PARTY FOR ANY
LOSS OR DAMAGE, DIRECT OR INDIRECT, FROM THE USE OF THIS DOCUMENTATION, INCLUDING WITHOUT
LIMITATION, LOST PROFITS, BUSINESS INTERRUPTION, GOODWILL, OR LOST DATA, EVEN IF CA IS EXPRESSLY
ADVISED OF SUCH LOSS OR DAMAGE.
The use of any product referenced in the Documentation is governed by the end user’s applicable license
agreement.
The manufacturer of this Documentation is CA.
Provided with “Restricted Rights.” Use, duplication or disclosure by the United States Government is subject to the
restrictions set forth in FAR Sections 12.212, 52.227-14, and 52.227-19(c)(1) - (2) and DFARS Section 252.227
7014(b)(3), as applicable, or their successors.
All trademarks, trade names, service marks, and logos referenced herein belong to their respective companies.
Copyright © 2006 CA. All rights reserved.

7/16/2019 Autosys R11 User Guide
http://slidepdf.com/reader/full/autosys-r11-user-guide 3/459
CA Product References
This document references the following CA products:
eTrust® Identity and Access Management (eTrust IAM)
eTrust® Access Control (eTrust AC)
Unicenter® AutoSys® Job Management (Unicenter AutoSys JM)
Unicenter® CA-7™ Job Management (Unicenter CA-7)
Unicenter® CA-Jobtrac® Job Management (Unicenter CA-Jobtrac)
Unicenter® CA-Scheduler® Job Management (Unicenter CA-Scheduler)
Unicenter® Desktop and Server Management (Unicenter DSM)
Unicenter
®
Event Management Unicenter® Management Command Center (Unicenter MCC)
Unicenter® Management Portal
Unicenter® Network and Systems Management (Unicenter NSM)
Unicenter® Service Desk
Unicenter® Universal Job Management Agent (UUJMA)
Unicenter® Workload Control Center (Unicenter WCC)
Contact Technical SupportFor online technical assistance and a complete list of locations, primary service
hours, and telephone numbers, contact Technical Support at
http://ca.com/support.

7/16/2019 Autosys R11 User Guide
http://slidepdf.com/reader/full/autosys-r11-user-guide 4/459

7/16/2019 Autosys R11 User Guide
http://slidepdf.com/reader/full/autosys-r11-user-guide 5/459
Contents Chapter 1: Introduction 17Operating Environment Conventions ...................................................................................... 18Automated Job Control ........................................................................................................ 18Related Publications ............................................................................................................ 19Jobs .................................................................................................................................. 20
Defining Jobs ................................................................................................................ 20System Components............................................................................................................ 21
Event Server................................................................................................................. 22Application Server ......................................................................................................... 23Scheduler..................................................................................................................... 23Agent .......................................................................................................................... 24How the Event Server, Scheduler, Application Server, and Agents Interact............................. 25Client........................................................................................................................... 28Start and Stop Unicenter AutoSys JM Components.............................................................. 28Interface Components .................................................................................................... 30
Communications ................................................................................................................. 30Computers ......................................................................................................................... 30Instances........................................................................................................................... 31Events............................................................................................................................... 31Alarms .............................................................................................................................. 32Utilities.............................................................................................................................. 32Extending Functionality........................................................................................................ 33
Unicenter AutoSys JM Connect......................................................................................... 33Unicenter AutoSys JM Adapters........................................................................................ 33Unicenter Universal JM Agent .......................................................................................... 33Port Multiplexing (PMUX) ................................................................................................ 35SSL Encryption of Unicenter AutoSys JM Messages ............................................................. 36
About the Unicenter AutoSys JM Administrator Utility ............................................................... 37Start the Administrator................................................................................................... 38
Chapter 2: Security 39Security in Unicenter AutoSys JM .......................................................................................... 39System-Level Security ......................................................................................................... 40
Database Field Verification .............................................................................................. 40Job Definition Encryption ................................................................................................ 40Agent Authentication...................................................................................................... 41
Contents 5

7/16/2019 Autosys R11 User Guide
http://slidepdf.com/reader/full/autosys-r11-user-guide 6/459
User and Database Administrator Passwords...................................................................... 44Restricting Unicenter AutoSys JM Through the File System................................................... 45
eTrust Embedded Identity and Access Management ................................................................. 46Delegation of Administrative Privileges ............................................................................. 46Policy Synchronization.................................................................................................... 47Asset-Level Security ...................................................................................................... 49Resource Classes........................................................................................................... 50How an Application is Security-Enabled............................................................................. 64Create an Asset............................................................................................................. 64Update an Asset ............................................................................................................ 65Delete an Asset ............................................................................................................. 65List a Set of Assets ........................................................................................................ 66
Native Security ................................................................................................................... 66Security Control ............................................................................................................ 67Superusers ................................................................................................................... 68Asset-Level Security ...................................................................................................... 69Job Ownership .............................................................................................................. 70User Types ................................................................................................................... 71Permission Types........................................................................................................... 72Granting Permissions ..................................................................................................... 73Job Permissions and Windows.......................................................................................... 74Security on Events Sent by Users..................................................................................... 74
Chapter 3: Job Definitions 77Job Attributes ..................................................................................................................... 77Create a Job Definition Using JIL ........................................................................................... 78Create a Job Definition Using the Unicenter WCC GUI ............................................................... 78JIL Subcommands ............................................................................................................... 79Job Attributes ..................................................................................................................... 80Date and Time Attributes and Time Changes ........................................................................... 82
Daylight Time Changes................................................................................................... 83Standard Time Changes.................................................................................................. 84
Chapter 4: Job Types, Structure, and States 87Introducing Jobs ................................................................................................................. 87Job Types and Structure ...................................................................................................... 88
Basic Job Information..................................................................................................... 89Command Jobs.............................................................................................................. 89Box Jobs ...................................................................................................................... 90File Watcher Jobs .......................................................................................................... 91Create a New Job Type................................................................................................... 91
6 User Guide

7/16/2019 Autosys R11 User Guide
http://slidepdf.com/reader/full/autosys-r11-user-guide 7/459
Use a New Job Type....................................................................................................... 92Starting Conditions and Boxes ......................................................................................... 92
How the Agent Sets Job Profiles ............................................................................................ 93Environment Variables ................................................................................................... 94Use the Job Profiles Manager........................................................................................... 95Delete a Job Profile ........................................................................................................ 96Create a Variable Definition............................................................................................. 97Edit a Variable Definition ................................................................................................ 98Delete a Variable Definition ............................................................................................. 99
Basic Job Attributes............................................................................................................100Command Job Attributes................................................................................................100File Watcher Job Attributes ............................................................................................100Box Job Attributes ........................................................................................................101
Job States.........................................................................................................................102Starting Conditions.............................................................................................................106
Date and Time Dependencies .........................................................................................107Job Dependencies Based on Job Status ............................................................................108Managing Job Status .....................................................................................................110Cross-Instance Job Dependencies ...................................................................................111Job Dependencies Based on Exit Codes ............................................................................115Job Dependencies Based on Global Variables ....................................................................118
Job Run Numbers and Names ..............................................................................................119
Chapter 5: Box Job Logic
Basic Box Concepts ............................................................................................................121Default Box Job Behavior ...............................................................................................121Box Job Recommendations.............................................................................................122How a Box Runs ...........................................................................................................122How Job Status Changes Affect Box Status.......................................................................124
Box Job Attributes and Terminators ......................................................................................124Attributes in a Box Job Definition ....................................................................................125Attributes in a Job Definition ..........................................................................................125Time Conditions in a Box ...............................................................................................126Force Jobs in a Box to Start ...........................................................................................127
Box Job Flow Examples .......................................................................................................128Default Box Success and Box Failure ...............................................................................128Explicit Box Success and Box Failure ...............................................................................130Job Flow with Job Terminator Attribute ............................................................................132Job Flow with Box Terminator Attribute............................................................................134
Advanced Job Flows ...........................................................................................................136Job Flow with Time Conditions Running on the First of the Month.........................................136Job Flow with Time Conditions Running on the Second of the Month.....................................138
Contents 7
121

7/16/2019 Autosys R11 User Guide
http://slidepdf.com/reader/full/autosys-r11-user-guide 8/459
Job Flow with Time Conditions Running on the First of the Following Month ...........................139Resetting a Job Flow with Time Conditions Through INACTIVE Status Change........................140Resetting a Job Flow with Time Conditions Through Box Job................................................141
Chapter 6: Defining Jobs Using JIL 143JIL Syntax Rules ................................................................................................................144JIL Subcommands ..............................................................................................................146User-Defined Job Types ......................................................................................................148Submit a Job Definition in a JIL Script ...................................................................................150Submit a Job Definition in JIL Interactive Mode.......................................................................151Running a Job After Using JIL ..............................................................................................152How a Simple Command Job Is Created ................................................................................153How a File Watcher Job Is Created........................................................................................154How a Dependent Command Job Is Created...........................................................................155
Look-Back Conditions ....................................................................................................156How a Box Job Is Created ...................................................................................................157How Job Groupings Are Created ...........................................................................................158How Machines Are Added ....................................................................................................159How an Existing Job Is Put in a Box ......................................................................................161How Time Dependencies Are Set ..........................................................................................162Delete a Job ......................................................................................................................164Delete a Box Job................................................................................................................164Specifying One-Time Job Overrides.......................................................................................165
How Job Overrides Are Set.............................................................................................167Example JIL Script .............................................................................................................168
Chapter 7: Binary Large Object Definitions 171Binary Large Objects ..........................................................................................................172Types of Blobs ...................................................................................................................173Job Blobs ..........................................................................................................................174
Input Job Blobs ............................................................................................................174Output and Error Job Blobs ............................................................................................175
Global Blobs ......................................................................................................................175Manage Blobs Using JIL ......................................................................................................175Blob Attributes ..................................................................................................................176Create Input Job Blobs........................................................................................................177Delete Job Blobs ................................................................................................................178Create Global Blobs ............................................................................................................178Delete Global Blobs ............................................................................................................179
8 User Guide

7/16/2019 Autosys R11 User Guide
http://slidepdf.com/reader/full/autosys-r11-user-guide 9/459
Use Blobs in Job Definitions .................................................................................................180std_in_file Attribute ......................................................................................................180std_out_file and std_err_file Attributes ............................................................................181
Generate Blob Reports Using Autorep....................................................................................182
Chapter 8: Machines 185Real Machines ...................................................................................................................185Virtual Machines ................................................................................................................186Defining Machines ..............................................................................................................186
Specifying Machine Load (max_load) ...............................................................................188Specifying Job Load (job_load) .......................................................................................188Specifying Queuing Priority (priority)...............................................................................189Specifying Relative Processing Power (factor) ...................................................................190
Machine Definitions ............................................................................................................191Define a Real Machine ...................................................................................................192Delete a Real Machine ...................................................................................................192Define a Virtual Machine ................................................................................................193Delete a Virtual Machine ................................................................................................195Delete a Real Machine from a Virtual Machine...................................................................195
Machine Status ..................................................................................................................196Take a Machine Offline Manually .....................................................................................197Put a Machine Online Manually .......................................................................................197How Status Changes Automatically .................................................................................198How Status Affects Jobs on Virtual Machines.....................................................................198
Load Balancing ..................................................................................................................199Forcing a Job to Start .........................................................................................................202Queuing Jobs.....................................................................................................................202
How Unicenter AutoSys JM Queues Jobs...........................................................................203Using a Virtual Machine as a Subset of a Real Machine ....................................................... 206Using a Virtual Machine to Combine Subsets of Real Machines.............................................207
User-Defined Load Balancing ...............................................................................................208
Chapter 9: Monitoring and Reporting Jobs 209Monitors and Reports..........................................................................................................209
Monitors...................................................................................................................... 210Reports .......................................................................................................................210
Define a Monitor or Report ..................................................................................................210Essential Monitor and Report Attributes .................................................................................211
Common Essential Attributes—General ............................................................................211Common Essential Attributes—Events..............................................................................212Essential Report Attributes.............................................................................................215
Contents 9

7/16/2019 Autosys R11 User Guide
http://slidepdf.com/reader/full/autosys-r11-user-guide 10/459
Optional Monitor Attributes..................................................................................................216Verification Required for Alarms......................................................................................216
Define Monitors and Reports Using JIL ..................................................................................217Run a Report or Monitor......................................................................................................218
Chapter 10: Maintaining the Scheduler 219Overview of Scheduler Maintenance......................................................................................219Start the Scheduler ............................................................................................................220How the Scheduler Starts Processes .....................................................................................221How You Can Back Up Definitions .........................................................................................222
Back Up Calendar Definitions..........................................................................................222Back Up Job, Machine, and Monitor Definitions..................................................................223Back Up Global Variable Definitions .................................................................................224
Restore Definitions .............................................................................................................225Monitoring the Scheduler ....................................................................................................227
Scheduler Log File Location ............................................................................................228Start the Scheduler in Global Auto Hold Mode.........................................................................228How Shadow Scheduler Rollover Works .................................................................................230Restore the Primary Scheduler After a Rollover.......................................................................231Stop the Scheduler.............................................................................................................233Running the Scheduler in Test Mode .....................................................................................234
Chapter 11: Maintaining the Agent 237Overview of Agent Maintenance ...........................................................................................237Start the Agent..................................................................................................................238Maintenance Commands .....................................................................................................240
Chapter 12: Maintaining the Event Server 241Overview of Event Server Maintenance..................................................................................242Using Dual Event Server Mode .............................................................................................243Database Architecture ........................................................................................................244Database Storage Requirements ..........................................................................................246General Database Maintenance ............................................................................................246Reschedule Daily Database Maintenance................................................................................247How the DBMaint.bat Batch File or DBMaint Script Runs...........................................................248Modify the DBMaint.bat File or DBMaint Script ........................................................................249Reduce the Frequency of Sybase Deadlocks ...........................................................................250
10 User Guide

7/16/2019 Autosys R11 User Guide
http://slidepdf.com/reader/full/autosys-r11-user-guide 11/459
Event Server Rollover Recovery ...........................................................................................251Return to Dual Event Server Mode After a Rollover ............................................................252Synchronize the Event Servers .......................................................................................255Handle Errors...............................................................................................................260
High Availability Recovery ...................................................................................................261Detect Missing Databases ..............................................................................................261Configure the Scheduler Heartbeat Interval ......................................................................263
Recovery Scenarios Summary..............................................................................................264Non-High Availability in Single Event Server Mode .............................................................264Non-High Availability in Dual Event Server Mode ...............................................................264High Availability in Single Event Server Mode....................................................................265High Availability in Dual Event Server Mode......................................................................266
Chapter 13: Maintaining the Bundled Ingres Database 269Overview of Bundled Ingres Database Maintenance.................................................................269Ingres Architecture.............................................................................................................270Ingres Environment Variables ..............................................................................................271Ingres CA-MDB Security......................................................................................................272CA-MDB Files and File Sizes.................................................................................................273
Ingres CA-MDB Sizes ....................................................................................................274Monitoring Disk Space ...................................................................................................274Space Requirements for Unicenter AutoSys JM Tables in the CA-MDB...................................275
Connecting to a Remote Ingres CA-MDB................................................................................277Default Ingres Users...........................................................................................................278How to Create Ingres Users .................................................................................................278Start Ingres ......................................................................................................................279Stop Ingres.......................................................................................................................280Ingres SQL Utility...............................................................................................................281Display the Database Date and Time.....................................................................................281CA-MDB Backup.................................................................................................................282CA-MDB Recovery ..............................................................................................................285CA-MDB Troubleshooting.....................................................................................................287
Chapter 14: Configuring Unicenter AutoSys JM 289Configuration File...............................................................................................................290Configure File Parameters ...................................................................................................290Sample Configuration File....................................................................................................291
DBLibWaitTime Parameter—Configure Database Time-Out Period (Sybase Only) ....................291SNMP Connections ........................................................................................................292DBEventReconnect Parameter—Set Number of Scheduler Connection Attempts .....................293EDNumErrors and EDErrTimeInt Parameters—Define Error Threshold ...................................294
Contents 11
7/16/2019 Autosys R11 User Guide
http://slidepdf.com/reader/full/autosys-r11-user-guide 12/459
FileSystemThreshold Parameter—Set Minimum Scheduler Log Disk Space.............................294EvtTransferWaitTime Parameter—Set the Event Transfer Time-Out for Dual Event Server Mode295
RestartConstant, RestartFactor, and MaxRestartWait Parameter—Calculate Wait Time Between
DBMaintTime and DBMaintCmd Parameters—Configure Automatic Database Maintenance .......295SendeventMaxRetries Parameter—Set Maximum Number of sendevent Retries......................296SendeventRetryInterval Parameter—Set an Interval for sendevent Retries............................296Check_Hearbeat Parameter—Set the Interval Between Heartbeat Checks .............................297AutoRemoteDir Parameter—Define a Directory for Agent Logging ........................................298CleanTmpFiles Parameter—Automatically Remove Temporary Agent Log Files .......................299RemoteProFiles Parameter—Redirect stderr and stdout Output to a File ................................300MaxRestartTrys Parameter—Set Maximum Number of Job Restart Attempts ..........................301Restart Attempts ..........................................................................................................302MachineMethod Parameter—Specify Load Balancing Method................................................303KillSignals Parameter—Specify Signals for KILLJOB Events..................................................304AutoRemPort Parameter—Set Legacy Agent Port Number ...................................................305CrossPlatformScheduling Parameter—Activate the Cross-Platform Interface ..........................306AutoInstWideAppend Parameter—Specify Whether to Overwrite Standard Error and Standard Output ........................................................................................................................307InetdSleepTime Parameter—Define Interval Between Job Starts for an Agent ........................308UnicenterEvents Parameter—Activate Unicenter Event Integration .......................................308NotifyServerNode and NotifyAckTimeout Parameters—Activate Unicenter Notification Integration................................................................................................................................. 309ServiceDeskCust, ServiceDeskURL, and ServiceDeskUser Parameters—Activate Unicenter Service Desk Integration ..........................................................................................................310
auto.profile File..................................................................................................................311Sample auto.profile File .................................................................................................312ISDBGACTIV Parameter—Set Run Time Trace Level ...........................................................313
Configuring Remote Authentication .......................................................................................314Configuring Unicenter AutoSys JM Scheduler Authentication................................................314
Client-Side Security............................................................................................................315User-Defined Alarm Callbacks ..............................................................................................316
Notification Example .....................................................................................................317
Chapter 15: Dynamic Workload Placement
The CA Management Database and Unicenter DSM .................................................................320Dynamic Workload Placement Scenarios................................................................................321Manage Machine Definitions with autodwp .............................................................................322
Unicenter AutoSys JM Machine Attributes .........................................................................324Unicenter DSM Discovered Machine Attributes...................................................................325
12 User Guide
319

7/16/2019 Autosys R11 User Guide
http://slidepdf.com/reader/full/autosys-r11-user-guide 13/459
Chapter 16: Troubleshooting 327How System Components Are Affected When a Job Is Defined .................................................. 328Windows Services Troubleshooting .......................................................................................329Event Server Troubleshooting ..............................................................................................330
Event Server Is Down ...................................................................................................330Deadlocks.................................................................................................................... 331Not Enough User Connections.........................................................................................331
Scheduler Troubleshooting ..................................................................................................332Scheduler Is Down........................................................................................................333Scheduler Will Not Start ................................................................................................334Scheduler Will Not Start ................................................................................................337
Agent Troubleshooting ........................................................................................................339Agent Not Responding...................................................................................................340Agent Not Responding...................................................................................................341Agent Starts, Command Runs: No RUNNING Event Is Sent ................................................. 342
Job Failure Troubleshooting .................................................................................................345Agent Will Start: Command Will Not Run..........................................................................345Agent Not Found ..........................................................................................................351Jobs Run Only From the Command Line ...........................................................................352Jobs Run Twice ............................................................................................................354
Application Server Troubleshooting .......................................................................................355Application Server is Down.............................................................................................356Application Server Will Not Start .....................................................................................358Application Server Starts, Clients on Remote Machine Times out..........................................361
Chapter 17: Unicenter Integration 365Integrating Event Management ............................................................................................365
How Event Management Processes Events........................................................................366Installation Considerations .............................................................................................367Configure Message Forwarding .......................................................................................369
Integrating Unicenter Notification Services.............................................................................370How Unicenter Notification Services Works .......................................................................372Installation Considerations .............................................................................................373Configure Notification....................................................................................................374Send Notifications with Unicenter AutoSys JM ...................................................................375
Integrating Unicenter Service Desk.......................................................................................376Configure Unicenter AutoSys JM to Activate Its Unicenter Service Desk Interface ...................376Initiate a Service Desk Ticket with Unicenter AutoSys JM....................................................378
Contents 13

7/16/2019 Autosys R11 User Guide
http://slidepdf.com/reader/full/autosys-r11-user-guide 14/459
Appendix A: Cross-Platform Scheduling Considerations 379Integrating Cross-Platform Scheduling ..................................................................................380Definition of Terms.............................................................................................................381Enterprise Job Scheduling Prerequisites.................................................................................383Cross-Platform Considerations .............................................................................................384Configure Enterprise Job Scheduling .....................................................................................385PRIMARYCCISYSID—Cross-Platform Environment Variable .......................................................388Bi-Directional Scheduling ....................................................................................................389Unicenter AutoSys JM Connect Cross-Platform Dependencies....................................................390
Naming Conventions for Unicenter AutoSys JM Connect Cross-Platform Jobs ......................... 391How Job Scheduler Interdependencies Are Created............................................................391Define Cross-Platform Job Dependencies..........................................................................392
Running Jobs on UUJMA ......................................................................................................393Naming Conventions for UUJMA Job Names and User IDs ...................................................394How Jobs Are Run On UUJMA-Managed Computers ............................................................394Define UUJMA Computers ..............................................................................................395Add User IDs and Passwords on a UUJMA Computer ..........................................................396Job Definition Examples.................................................................................................398
Cross-Platform Interface Messages .......................................................................................400Unsupported Attributes for Unicenter AutoSys JM Connect or UUJMA Jobs ..................................401
Appendix B: Legacy Agent Considerations 403Running Jobs on Computers with Legacy Unicenter AutoSys JM Agents ...................................... 403
Define Legacy Agent Computers .....................................................................................404Define the Legacy Agent Port .........................................................................................405Add User IDs and Passwords for a Windows Legacy Agent Computer....................................405How Jobs Are Run On Legacy Agent Computers ................................................................407
Appendix C: Troubleshooting CAICCI 409Troubleshooting Tools for Remote CAICCI Connections ............................................................409
netstat Command—Check TCP/IP Statistics ......................................................................410nslookup Command—Verify Host Name and IP Address ......................................................410ping Command—Verify that a Host is Reachable................................................................411tracert/traceroute Command—Check the Route Between Hosts ...........................................411
CAICCI Command Line Controls ...........................................................................................412
ccicntrl Command—Manage CAICCI Services ....................................................................412cci show Command—View the Shared Memory Segment.....................................................413cci semashow and cci semaclear Commands—Verify if CAICCI Semaphores are Held ..............414cci shutdown Command—Shut Down the Daemon .............................................................414cci debugon and cci debugoff Commands—Turn Tracing On and Off .....................................415
14 User Guide
7/16/2019 Autosys R11 User Guide
http://slidepdf.com/reader/full/autosys-r11-user-guide 15/459
ccinet Command—Pass Commands to the CAICCI Remote Daemon......................................415ccic/ccii/ccir/ccis Commands—Test Application-to-Application CAICCI Communication ............417rmtcntrl Command—Manage the Remote Service ..............................................................418unicntrl Command—Enable the Main Command Line Binary ................................................419unifstat Command—Display Service Statuses....................................................................419
Appendix D: General Debugging 421ISDBGACTIV .....................................................................................................................421
Configure the Client Utilities to Run With Traces................................................................421Configure the Scheduler and Application Server to Run With Traces ..................................... 422Configure the Agent to Run With Traces...........................................................................423Trace Settings..............................................................................................................424
Appendix E: Message Port and SSL Configuration 425
Configuring Unicenter AutoSys JM to Use PMUX and SSL..........................................................425Port Multiplexing ................................................................................................................425
How to Configure the Application Server to Listen on a Different Virtual Port ......................... 426Virtual Ports Used by Unicenter AutoSys JM......................................................................427
How to Configure Unicenter AutoSys JM to Run with SSL .........................................................428
Appendix F: eTrust Identity and Access Management Policy Migration 431Requirements ....................................................................................................................431Security Policy Changes from Unicenter AutoSys JM r4.5 .........................................................432
Deprecated Security Classes and Resources......................................................................432eTrust AC Default Resource............................................................................................432Resource Naming Convention .........................................................................................433Asterisks in Resource Names..........................................................................................434
How to Migrate Security Policies from eTrust AC to eTrust IAM..................................................435Register Unicenter AutoSys JM Instances with the eTrust IAM Back-end Server .....................436Exporting Your eTrust AC Policy to a selang File ................................................................437Convert the selang File to a selang XML File .....................................................................438Convert the selang XML File to a Unicenter AutoSys JM r4.5 eTrust IAM XML File ................... 439Convert the Unicenter AutoSys JM r4.5 eTrust IAM XML File to a Unicenter AutoSys JM r11 eTrust IAM XML File................................................................................................................440Convert the Unicenter AutoSys JM r11 eTrust IAM XML File to a Unicenter AutoSys JM r11 eTrust IAM XML File with Regular Expression Policies...................................................................441Import the Unicenter AutoSys JM r11 eTrust IAM XML File to the eTrust IAM Back-end Server .442Cleanup ......................................................................................................................442
Contents 15

7/16/2019 Autosys R11 User Guide
http://slidepdf.com/reader/full/autosys-r11-user-guide 16/459
Appendix G: Aggregator Considerations 443About Unicenter AutoSys JM Aggregator ................................................................................443Running the Unicenter AutoSys JM Aggregator .......................................................................444Unicenter AutoSys JM Aggregator Statistics ...........................................................................445Appendix H: Tuning Unicenter AutoSys JM 447Tuning the Scheduler..........................................................................................................448Tuning the Application Server ..............................................................................................450Tuning the Agent ...............................................................................................................451
Index 453
16 User Guide
7/16/2019 Autosys R11 User Guide
http://slidepdf.com/reader/full/autosys-r11-user-guide 17/459
Chapter 1: Introduction This guide is for users responsible for defining jobs to Unicenter AutoSys JM and monitoring and managing these jobs. It assumes familiarity with the operating system on which jobs are run, and it assumes that you have already installed and are running Unicenter AutoSys JM. Note: For more information, see the Installation Guide. This section contains the following topics: Operating Environment Conventions (see page 18) Automated Job Control (see page 18) Related Publications (see page 19)Jobs (see page 20) System Components (see page 21)Communications (see page 30) Computers (see page 30) Instances (see page 31) Events (see page 31)Alarms (see page 32)Utilities (see page 32)Extending Functionality (see page 33) About the Unicenter AutoSys JM Administrator Utility (see page 37)
Introduction 17

7/16/2019 Autosys R11 User Guide
http://slidepdf.com/reader/full/autosys-r11-user-guide 18/459
Operating Environment Conventions
Operating Environment Conventions
The majority of the information in this guide applies generically to both the
Windows and UNIX operating environments. However, this guide uses the
following identifiers to denote operating environment-specific information:
Denotes information that is specific to Microsoft Windows operating
environments.
Unless otherwise noted, the term Windows refers to any Microsoft
Windows operating system supported by Unicenter AutoSys JM.
Note: For information about which specific Microsoft operating systems
Unicenter AutoSys JM supports, see the readme.
Denotes information that is specific to UNIX operating environments.
Denotes the end of operating environment-specific information.
Automated Job Control
Unicenter AutoSys JM is an automated job control system for scheduling,
monitoring, and reporting.
A job is any single command, executable, script, or batch file. These jobs can
reside on any configured machine that is attached to a network. Corresponding
job definitions contain a variety of qualifying attributes for associated jobs,
including the conditions specifying when and where a job should run.
As with most control systems, there are many ways to correctly define and
implement jobs. It is likely that the way you use Unicenter AutoSys JM to
address your distributed computing needs will evolve over time. As you
become more familiar with the product features and the characteristics of your
jobs, you can refine your use of Unicenter AutoSys JM.
However, before you install and use Unicenter AutoSys JM, you must
understand the basic system, its components, and how these componentswork together.
This chapter provides a brief overview of Unicenter AutoSys JM, its
architecture, and its features.
18 User Guide

7/16/2019 Autosys R11 User Guide
http://slidepdf.com/reader/full/autosys-r11-user-guide 19/459
Related Publications
Related Publications
As you use this guide, you may also find these books helpful:
Unicenter AutoSys Job Management Release Summary, which providesinformation about the new and enhanced features in this release.
Unicenter AutoSys Job Management for Windows Installation Guide,
which describes how to install Unicenter AutoSys JM and configure
components, databases, and high-availability features.
Unicenter AutoSys Job Management for UNIX Installation Guide,
which describes how to install Unicenter AutoSys JM and configure
components, databases, and high-availability features.
Unicenter AutoSys Job Management Reference Guide, which lists the
Unicenter AutoSys JM commands and job, machine, monitor, and report
definition parameters. It also describes system states and database tables
and views.
Unicenter AutoSys Job Management SDK User Guide, which describes
product APIs, their syntax, and examples for their use.
Introduction 19

7/16/2019 Autosys R11 User Guide
http://slidepdf.com/reader/full/autosys-r11-user-guide 20/459
J obs
Jobs
In the Unicenter AutoSys JM environment, a job is a single action that can be
performed on a valid Agent computer. On Windows, this action can be any
single command, executable, or batch file. On UNIX, this action can be any
single command or shell script. Corresponding job definitions include attributes
that define various characteristics of associated jobs, included when and where
the jobs should run.
Defining Jobs
You can use either of the following methods to define a job by assigning it a
name and specifying the attributes that describe its associated behavior.
Unicenter WCC
The Unicenter WCC GUI lets you interactively set the attributes that
describe when, where, and how a job should run. The fields in the
Unicenter WCC GUI correspond to the JIL subcommands and attributes. In
addition, from the Unicenter WCC GUI, you can define calendars, global
variables, and jobsets, and monitor and manage jobs. Unicenter WCC is
supplied with Unicenter AutoSys JM.
Job Information Language
Job Information Language (JIL) is a scripting language with its own syntax
that provides a way to define various Unicenter AutoSys JM assets such as
jobs, global variables, machines, job types, external instances, and blobs.
JIL scripts contain one or more JIL subcommands and one or moreattribute statements; these elements constitute a job definition.
When you enter the jil command, the JIL command prompt is displayed so
you can enter the job definitions one line at a time. When you exit the JIL
command prompt, the job definition is loaded into the database.
Alternatively, you can enter the definition as a text file and redirect the file
to the jil command. In this case, the jil command activates the language
processor, interprets the information in the text file, and loads this
information in the database.
The specification created using these methods comprise of a job definition.
20 User Guide

7/16/2019 Autosys R11 User Guide
http://slidepdf.com/reader/full/autosys-r11-user-guide 21/459
System Components
System Components
The main system components of Unicenter AutoSys JM are:
Event Server (database)
Application Server
Scheduler
Agent
Client
The following illustration shows the system components in a basic
configuration, and displays the communication paths between them:
Introduction 21

7/16/2019 Autosys R11 User Guide
http://slidepdf.com/reader/full/autosys-r11-user-guide 22/459
System Components
Event Server
The Event Server is the database in which the system state and object
definitions are stored. Objects include but are not limited to calendars, jobs,
and global variables. To aid in disaster recovery, much of the active state of the system, in particular the Scheduler, is stored in the Event Server. For
example, events and their current states, machine statuses, job statuses, and
machine queues are all stored in the Event Server.
Occasionally, the database is called a data server, which actually describes a
server instance. That is, it is either a UNIX process or Windows service and its
associated data space (or raw disk storage), which can include multiple
databases or tablespaces.
Note: The database refers to the specific server instance and the Unicenter
AutoSys JM database for that instance. Some database utilities let you specify
a particular server and database.
Unicenter AutoSys JM supports various database vendors including Ingres,
Oracle, Sybase, and Microsoft SQL Server. There are only two processes that
interface directly with the database: the Scheduler and the Application Server.
Therefore, those processes require a vendor database Client installation to
access the database. All other Unicenter AutoSys JM processes interface with
the Application Server and do not require database Client installations. The
Scheduler and the Application Server interact with the database using
vendor-specific native code libraries. They do not use Open Database
Connectivity (ODBC) or any other third-party interface.
Dual Event Servers
You can configure Unicenter AutoSys JM to run using two databases, or Dual
Event Servers. This feature provides complete redundancy so that, if you lose
one Event Server due to hardware, software, or network problems, operations
can continue on the second Event Server without loss of information or
functionality. This feature is independent of any replication or redundancy
offered by the database.
For various reasons, database users often run multiple instances of servers
that are unaware of the other servers on the network. When implementing
Unicenter AutoSys JM, the database can run for Unicenter AutoSys JM only, or
it can be shared with other applications.
Note: For more information, see the Installation Guide.
22 User Guide

7/16/2019 Autosys R11 User Guide
http://slidepdf.com/reader/full/autosys-r11-user-guide 23/459
System Components
Application Server
The Application Server , which runs either as a UNIX process or a Windows
service, manages communication between the Event Server, Agent, and client
utilities.
Scheduler
The Scheduler is the core component of Unicenter AutoSys JM. Sometimes
called the event_demon, the Scheduler is the program, running either as a
UNIX process or as a Windows service that actually runs Unicenter AutoSys
JM.
The Scheduler is event-driven. After you start it, the Scheduler periodically
queries the database for events to process. As events are retrieved, the
Scheduler acts on them as appropriate. Events have various origins: some aremanually sent by a user; others are sent by an Agent to indicate the progress
of a job. An event often requires an Agent process to perform an action. These
actions may include starting or stopping jobs, determining availability of
resources, monitoring existing jobs, or initiating corrective procedures.
High Availability Option: Shadow Scheduler
Unicenter AutoSys JM lets you set up a second Scheduler, called the Shadow
Scheduler. Each Scheduler should run on a separate computer.
Both the Primary Scheduler and the Shadow Scheduler periodically update the
Event Server to indicate that they are in active mode. The Shadow Scheduler
remains in an idle mode, receiving periodic messages called pings from thePrimary Scheduler. Basically, these messages indicate that the Primary
Scheduler is operating correctly. However, if the Primary Scheduler fails for
some reason, the Shadow Scheduler takes over the responsibility of
interpreting and processing events.
Note: For more information, see the Installation Guide.
Introduction 23

7/16/2019 Autosys R11 User Guide
http://slidepdf.com/reader/full/autosys-r11-user-guide 24/459
System Components
High Availability Option and Dual Event Servers: Tie-breaker Scheduler
When you run both the High Availability and Dual Event Server options, an
additional Scheduler process, called the Tie-breaker Scheduler , is required.
Without this process, both the Primary and Shadow Schedulers assume thatthe other Scheduler has failed and, therefore, both proceed with processing
events.
For example, imagine a scenario where the Shadow Scheduler is configured to
run on the same computer as one of the Event Servers, and this computer
gets disconnected from the network. The Shadow Scheduler continues to use
the Event Server on its node assuming there has been an Event Server failure
and that the Primary Scheduler has failed. However, it is actually the Shadow
Scheduler computer that has failed.
The Tie-breaker Scheduler running on a third node resolves this problem. It
remains permanently idle and updates the Event Servers periodically to
indicate its presence. In the example scenario, the Shadow Scheduler realizesthat it is the failed node when it does not receive updates from the Tie-breaker
Scheduler.
Agent
The Agent consists of two processes, a persistent or parent Agent and a
non-persistent or child Agent that is started by the parent for every job that is
run. The child Agent starts and monitors the job process and exits when the
job is completed.
On Windows, the parent Agent is a Windows service (autosysd.exe), and
the child Agent is an executable (auto_remote.exe).
On UNIX, the parent Agent is a binary (auto_remote), and the child
Agent is a split image of it.
The child Agent sends running and completion information about the job to the
Application Server. If the Agent cannot transfer the information, it waits and
retries until it can successfully communicate with the Application Server.
24 User Guide

7/16/2019 Autosys R11 User Guide
http://slidepdf.com/reader/full/autosys-r11-user-guide 25/459
System Components
How the Event Server, Scheduler, Application Server, and Agents Interact
This example scenario and the numbered explanations illustrate the
interactions between the Event Server, the Scheduler, the Application Server,
and the Agents.
In the example, the following Windows command is to run on the Agent
when the job starts. In this scenario, the Scheduler reads a STARTJOB event
for the job from the Event Server.
del C:\tmp\*.*
In the example, the following UNIX command line is used to run the
Agent when the job starts. In this scenario, the job starts when the Scheduler
reads a STARTJOB event for the job from the Event Server.
rm /temp/mystuff/*
Note: Understanding this example can help you answer questions that may
arise while using Unicenter AutoSys JM.
Introduction 25

7/16/2019 Autosys R11 User Guide
http://slidepdf.com/reader/full/autosys-r11-user-guide 26/459
System Components
The following illustration shows how the system components interact in an
example scenario on Windows and UNIX:
Note: In the previous illustration, the three primary components (Scheduler,
Event Server, and Agent) are shown running on different computers. Typically,
the Scheduler and the Event Server run on the same computer.
26 User Guide

7/16/2019 Autosys R11 User Guide
http://slidepdf.com/reader/full/autosys-r11-user-guide 27/459
System Components
The following steps explain the interactions in the example scenario:
1. The Scheduler reads a new event (a STARTJOB event for which a start
time condition has been met) from the Event Server. Then, the Scheduler
reads the appropriate job definition from the database, including the
command and the full path name to the profile to use for the job. For jobs
running on Windows computers, the Scheduler also retrieves the user IDs
and passwords required to run the job on the client computer. In the
example, the Agent runs the following command:
del C:\tmp\*.*
rm /temp/mystuff/*
2. The Scheduler issues a STARTING event to the Event Server, which the
Event Server processes later. Then the Scheduler passes the necessary
details about the job to the parent Agent. The details include the commandto run and how to contact the Application Server.
3. The parent Agent starts the child Agent, which is responsible for
monitoring the progress of the Client job. At this point, the parent has
completed and awaits additional jobs to run from the Scheduler.
4. The child Agent completes the communication with the Scheduler. The
Scheduler understands that the Agent has everything it requires to run the
Client job, and the Agent can continue without further interaction with the
Scheduler.
5. The Agent checks the resource to verify that the minimum number of
processes is available. Then the child Agent logs on to the computer as the
user listed as the owner in the job definition. On Windows, the Agent uses
the credentials passed to it from the Scheduler. Finally, the Agent creates
a child process that runs the command specified in the job definition.
6. When the Client job starts successfully, the Agent sends a RUNNING event
to the Application Server. The Application Server places the RUNNING
event in the Event Server.
7. The command completes and exits, and the Agent captures the command
exit code.
8. The Agent communicates the event, including the exit code and status, to
the Application Server, which in turn places the event in the Event Server.
If the job completes successfully, the Agent deletes the log file on the
Agent computer, based on configuration specifications. The child Agent
then exits.
To complete the operation, the Scheduler processes the events sent by the
Agent in Steps 6 and 8, which in turn may start other jobs.
Introduction 27

7/16/2019 Autosys R11 User Guide
http://slidepdf.com/reader/full/autosys-r11-user-guide 28/459
System Components
Four critical applications must be running for this process to work: the Event
Server, the Scheduler, the Agent, and the Application Server. If any of these is
not active, the job does not complete on time.
Client
A Client is any executable that interfaces with the Application Server. This
includes Unicenter AutoSys JM Command Line Interface (CLI) applications such
as JIL and autorep. It also includes the Unicenter WCC services which are
Clients of the Application Server and service the Unicenter WCC GUI
components and any user-defined binaries that link to the Unicenter AutoSys
JM SDK.
Note: For more information, see the SDK User Guide.
Client applications work by calling Application Programming Interfaces (APIs)
made available in the Application Server. A Client can run anywhere in the
enterprise provided it can reach the node on which the Application Server is
running. It does not require installation of a database vendor client. Clients are
the means by which users control the scheduling environment by creating and
monitoring the scheduling resources.
Start and Stop Unicenter AutoSys JM Components
You can use the following utility to start, stop, and determine the status
of Unicenter AutoSys JM components:
unisrvcntr
To view all the options of this utility, run the following command:
unisrvcntr -?
To determine the status of all the CA services that are installed on a machine,
run the following command:
unisrvcntr status
28 User Guide

7/16/2019 Autosys R11 User Guide
http://slidepdf.com/reader/full/autosys-r11-user-guide 29/459
System Components
Agent
Run the following command to start the Unicenter AutoSys JM Agent:
unisrvcntr start uajm_agent
Run the following command to stop the Unicenter AutoSys JM Agent:
unisrvcntr stop uajm_agent
Run the following command to determine the Unicenter AutoSys JM Agent
status:
unisrvcntr status uajm_agent
Application Server
Run the following command to start the Unicenter AutoSys JM Application
Server:
unisrvcntr start uajm_server.$AUTOSERV
Run the following command to stop the Unicenter AutoSys JM ApplicationServer:
unisrvcntr stop uajm_server.$AUTOSERV
Run the following command to determine the Unicenter AutoSys JM
Application Server status:
unisrvcntr status uajm_server.$AUTOSERV
Scheduler
Run the following command to start the Unicenter AutoSys JM Scheduler:
unisrvcntr start uajm_sched.$AUTOSERV
Run the following command to stop the Unicenter AutoSys JM Scheduler:
unisrvcntr stop uajm_sched.$AUTOSERV
Run the following command to determine the Unicenter AutoSys JM
Scheduler status:
unisrvcntr status uajm_sched.$AUTOSERV
Introduction 29

7/16/2019 Autosys R11 User Guide
http://slidepdf.com/reader/full/autosys-r11-user-guide 30/459
Communications
Interface Components
You can use either the Unicenter WCC GUI or CLI to define, monitor, and
report on jobs. In addition, the Job Status Console and its dialogs provide a
sophisticated method of monitoring jobs in real time. The Job Status Console
lets you view all defined jobs, whether they are currently active or not.
Unicenter AutoSys JM also provides the Unicenter AutoSys JM Administrator,
with which you can set configuration parameters, and the Job Profiles
Manager, with which you can set up job environment variables (or profiles) to
associate with jobs in their definitions.
Communications
Network communication between the Scheduler and the Agent, between the
Agent and the Application Server, and between the Client and the Application
Server is accomplished by proprietary middleware known as RRP .
Note: For more information, see the SDK User Guide.
RRP is implemented using proprietary technology known as libmsg over the
Dylan Socket Adapter (DSA). DSA is a CA transport provided with CA Common
Services that supports port multiplexing and SSL authentication and
encryption. libmsg is a high-performance, multi-threaded library that manages
delivery and acknowledgement of data using DSA.
Together, these technologies provide a robust, flexible, high-performance,portable method of communication for Unicenter AutoSys JM applications.
Computers
Unicenter AutoSys JM's architecture comprises the following types of
computers attached to a network:
The server is the computer on which the Application Server, Scheduler, or
Event Server (database) resides. In a basic configuration, the Application
Server, Scheduler, and Event Server reside on the same computer.
The Client is the computer on which the Client software resides. A Clientmust be installed on the server computer and can also be installed on
separate physical Client computers.
The Agent is the computer on which the Agent software resides and where
jobs run. An Agent must be installed on the server computer and can also
be installed on separate physical Agent computers. An Agent is also
installed by default when a Client is installed, but it is not required.
30 User Guide

7/16/2019 Autosys R11 User Guide
http://slidepdf.com/reader/full/autosys-r11-user-guide 31/459
Instances
Instances
An instance is a licensed version of Unicenter AutoSys JM software running as
a server and as one or more Clients or Agents on one or more computers. An
instance uses its own Event Server, Application Server, and Scheduler and
operates independently of other instances. An instance is defined by the
instance ID, which is a capitalized three-letter identifier defined by the
AUTOSERV environment variable.
It is possible to install multiple instances. For example, you can have one
instance for production and another for development. Multiple instances can
run on the same computer using a single copy of the binaries, and can
schedule jobs on the same computers without interfering or affecting the other
instances.
Events
Unicenter AutoSys JM is completely event-driven; for the Scheduler to activate
a job, an event must occur on which the job depends. For example, a job can
be activated when a prerequisite job has completed running successfully or a
required file has been received.
Events can come from a number of sources, including:
Jobs changing states, such as starting, finishing successfully, and so on.
Internal verification Agents, such as detected errors.
Events sent with the sendevent command, from the Unicenter WCC GUI,
or from user applications.
As each event is processed, the Scheduler scans the database for jobs that are
dependent on that event. If the event satisfies another job's starting
conditions, that job is either started immediately or queued for the next
qualified and available computer. The completion of one job can cause another
job to start so that jobs progress in a controlled sequence.
Introduction 31

7/16/2019 Autosys R11 User Guide
http://slidepdf.com/reader/full/autosys-r11-user-guide 32/459
Alarms
Alarms
Alarms are special events that notify operators of situations requiring their
attention. Alarms are integral to the automated use of Unicenter AutoSys JM.
That is, you can schedule jobs to run based on a number of conditions, but
some facility is necessary for addressing incidents that require manual
intervention. For example, a set of jobs could depend on the arrival of a file,
and the file may be long overdue. It is important that someone investigate the
situation, make a decision, and resolve the problem.
The following are some important aspects of alarms:
Alarms are informational only. Any action taken must be initiated by a
separate action event.
Alarms are system messages about a detected incident.
Alarms are sent through the system as events.
Alarms have special monitoring features to make sure they are noticed.
Utilities
Unicenter AutoSys JM uses its own specification language (JIL) and client
utilities to help you define, control, and report on jobs. The JIL language is
processed by the JIL Client executable, which reads and interprets the JIL
statements that you enter and then performs the appropriate actions.
Unicenter AutoSys JM also provides a set of essential client programs for
controlling and reporting on jobs. For example, the autorep command lets yougenerate a variety of reports about job execution, and the sendevent
command lets you manually control job processing.
Additional utilities are provided to assist you in troubleshooting, running
monitors and reports, and starting and stopping Unicenter AutoSys JM and its
components. Unicenter AutoSys JM also provides a database maintenance
utility that runs daily by default.
32 User Guide

7/16/2019 Autosys R11 User Guide
http://slidepdf.com/reader/full/autosys-r11-user-guide 33/459
Extending Functionality
Extending Functionality
Unicenter AutoSys JM provides easy integration with other enterprise
applications and Schedulers.
Unicenter AutoSys JM Connect
Unicenter AutoSys JM Connect enables the Scheduler to run jobs on
mainframe schedulers. It also creates dependencies between Unicenter
AutoSys JM jobs and jobs on the mainframe scheduler. The Scheduler uses
CAICCI, a communications protocol that is part of CA Common Services, to
communicate with Unicenter AutoSys JM Connect.
Unicenter AutoSys JM Adapters
Unicenter AutoSys JM provides the ability to interact with other enterprise
applications such as SAP through a special binary known as an adapter . The
application-specific adapters let you initiate, control, and report the status of
jobs related to an application using the sophisticated job scheduling
capabilities of Unicenter AutoSys JM. The adapter is a command which is run
by the job, so interaction with an adapter job is the same as with a normal
Unicenter AutoSys JM job.
Unicenter Universal JM Agent
The Unicenter Universal Job Management Agent (UUJMA) appears in variouscontexts. One such context is a UUJMA that can be run on distributed
platforms as a standalone job Agent that executes binaries and scripts in a
method similar to the Unicenter AutoSys JM Agent.
Additionally, all CA mainframe scheduling products can behave as UUJMA
Agents, providing an additional method for the Unicenter AutoSys JM
Scheduler to run jobs through those mainframe schedulers. However, unlike
Unicenter AutoSys JM Connect, UUJMA does not allow dependencies. In this
context, the job being run is a named job known to the Scheduler, and not a
command or script.
The Unicenter AutoSys JM Scheduler can appear as a UUJMA Agent to other
Schedulers in the enterprise. In this context, the job submitted to the UUJMAinterface is a job defined to Unicenter AutoSys JM and is not a command or
script.
As with Unicenter AutoSys JM Connect, the Scheduler uses CAICCI to
communicate with UUJMA Agents.
Introduction 33

7/16/2019 Autosys R11 User Guide
http://slidepdf.com/reader/full/autosys-r11-user-guide 34/459
Extending Functionality
The following illustration provides a high-level overview of UUJMA interactions:
More information:
Cross-Platform Scheduling Considerations (see page 379)
34 User Guide

7/16/2019 Autosys R11 User Guide
http://slidepdf.com/reader/full/autosys-r11-user-guide 35/459
Extending Functionality
Port Multiplexing (PMUX)
Port multiplexing (PMUX) increases security and the efficient use of the
physical ports available on any given host by restricting all Unicenter AutoSys
JM traffic to a single physical port, with one exception.
Note: CAICCI is not PMUX-enabled and uses its own physical ports.
All PMUX-enabled ports are considered virtual and traffic through those virtual
ports is restricted to a single physical port. Unicenter AutoSys JM
communicates across the enterprise through a PMUX port known as the
PmuxServerPort. The registered default PmuxServerPort value is 7163 and is
set at installation. Although it is not recommended, you can change the
PmuxServerPort to another value.
Like their physical counterparts, virtual ports can have only one process bound
to them. The bound process is generally considered a tcp-server. Any number
of remote or local Clients can connect to the tcp-server process bound to a
port.
To accommodate PMUX, there is a small demon broker process referred to as
the PMUX broker. On UNIX, the process name is csampmuxf. You do not
typically need to start this process because it starts automatically with the first
Unicenter AutoSys JM binary. However, if you want to enable other ports after
installation, you must configure those additional ports.
More Information:
Port Multiplexing (see page 425)
Introduction 35

7/16/2019 Autosys R11 User Guide
http://slidepdf.com/reader/full/autosys-r11-user-guide 36/459
Extending Functionality
SSL Encryption of Unicenter AutoSys JM Messages
A Unicenter AutoSys JM message is defined as any message sent between any
set of Unicenter AutoSys JM processes. There are three persistent server
processes:
event_demon
as_server
auto_remote (parent)
Binaries such as jil, sendevent, autorep, chase, and auto_remote (child) are
Client processes and communicate with one or more of the server processes.
This discussion applies to all the Unicenter AutoSys JM binaries, both the
persistent server processes and the non-persistent Client processes.
Note: For a complete list of Client processes, see the Reference Guide.
You can use SSL encryption for all messaging between any of these processes.
SSL encryption is turned off by default.
Important! If SSL encryption is turned on for any server process, it must be
turned on for all Client and server processes that communicate with it. Simply
put, processes on an SSL-enabled host cannot communicate with processes on
a host that is not SSL-enabled. All Unicenter AutoSys JM processes are subject
to the SSL setting of the host.
36 User Guide

7/16/2019 Autosys R11 User Guide
http://slidepdf.com/reader/full/autosys-r11-user-guide 37/459
About the Unicenter AutoSys J M Administrator Utility
About the Unicenter AutoSys JM Administrator Utility
The Unicenter AutoSys JM Administrator (the Administrator) is installedwith the Console Utilities so you can view and modify configuration parameters
for each instance you install. After you set them, these configuration
parameters are loaded into the Windows Registry.
On startup, Unicenter AutoSys JM reads this information to check which
databases to connect and how to react to certain error conditions. In
particular, the Scheduler bases much of its run-time behavior on the
parameters defined in the Administrator.
The Administrator has the following screens:
Unicenter AutoSys Instance
Lets you select the instance for which you want to view and modifysettings.
Unicenter AutoSys Agent
Lets you set the Agent's port number and the list of authorized Schedulers
(for remote authentication).
Unicenter AutoSys Event Server
Lets you specify Event Servers, either for Single Event Server or Dual
Event Server mode.
Unicenter AutoSys Scheduler
Lets you specify the Scheduler's behavior and the information necessary to
run a Shadow or Tie-breaker Scheduler.
Unicenter AutoSys Integration
Lets you specify information for Unicenter Notification, Unicenter Event
Management, and Unicenter Service Desk.
Unicenter AutoSys Notifications
Lets you specify user-defined alarm callbacks for certain types of system
alarms.
Unicenter AutoSys System
Lets you view the settings for certain variables. This information is helpful
when troubleshooting. You can modify the settings on this screen, but you
should do so with caution.
Unicenter AutoSys Security
Lets you set the Trusted Hosts and Trusted Users for remote
authentication.
Introduction 37

7/16/2019 Autosys R11 User Guide
http://slidepdf.com/reader/full/autosys-r11-user-guide 38/459
About the Unicenter AutoSys J M Administrator Utility
Unicenter AutoSys Services
Lets you view and change the status of the Agent, Scheduler and
Application Server services.
To modify many of these settings, you must have Windows Administrators
group privileges. If you do not have these privileges, but you do have
Windows Power User or User group privileges, you only have access to the
Unicenter AutoSys Instance, Security, and Services screens and actions.
Important! The Scheduler only reads the settings in the Unicenter AutoSys
JM Administrator on startup. Therefore, if you make a change to an
Administrator setting that you want to implement immediately, you must stop
the Scheduler using the sendevent -E STOP_DEMON command, and restart it
using the Unicenter AutoSys Services screen.
For information while using the Unicenter AutoSys JM Administrator, see the
Online Help. You can open the help system from the Unicenter AutoSys JMHelp icon in the program group, or from the Administrator. To open help for
the Administrator, press F1 while the Administrator has focus. To open help on
a specific Administrator screen, press Shift+F1 while that screen has focus.
Note: Many of the configuration parameters that you set on Windows
using the Unicenter AutoSys JM Administrator have a corresponding
configuration parameter on UNIX. However, on UNIX you set these parameters
in the $AUTOUSER/config.$AUTOSERV configuration file. When appropriate,
this guide provides both the Administrator field name and its UNIX
configuration file parameter equivalent. For more information about the
configuration file on UNIX platforms, see the User Guide.
Start the Administrator
To start the Administrator, select the Unicenter AutoSys Administrator
icon in the program group.
When you start the Unicenter AutoSys JM Administrator, the Unicenter
AutoSys Instance screen is displayed.
To navigate to the various Administrator screens
1. Select a computer.
2. Select an instance in the Unicenter AutoSys Instance screen and click OK.
The menu items and their corresponding toolbar buttons are enabled.
3. Use the menu items to access the Administrator screens.
38 User Guide

7/16/2019 Autosys R11 User Guide
http://slidepdf.com/reader/full/autosys-r11-user-guide 39/459
Chapter 2: Security This section contains the following topics: Security in Unicenter AutoSys JM (see page 39)System-Level Security (see page 40) eTrust Embedded Identity and Access Management (see page 46)Native Security (see page 66)
Security in Unicenter AutoSys JM
Unicenter AutoSys JM includes several key features that let you protect
sensitive assets and control who is authorized to perform certain secured
activities. This chapter helps you understand some of the decisions you mustmake to properly secure your enterprise and explains the Unicenter AutoSys
JM features that help you do so.
Unicenter AutoSys JM provides the following levels of security:
System-level security
Delegation of administrative privileges
Asset-level security
Unicenter AutoSys JM can run in either external security mode through eTrust
Embedded Identity and Access Management (eTrust Embedded IAM) or native
security mode. Each security mode has different methods of delegatingadministrative privileges to users and securing Unicenter AutoSys JM assets.
External security mode (eTrust Embedded IAM) is robust and provides the
most flexibility of the two modes. You can enable external security during
product installation, or an authorized user under the native model can enable
it later. When external security is enabled, eTrust Embedded IAM is used to
assign administrative rights to the user to define policies and to check whether
a given user can switch the security mode of the product back to native. While
external security is enabled, native security is not enforced.
Note: For more information about controlling the security setting with the
Unicenter AutoSys JM autosys_secure utility, see the Reference Guide.
More information:
eTrust Embedded Identity and Access Management (see page 46)
Restricting Unicenter AutoSys JM Through the File System (see page 45)
Security 39

7/16/2019 Autosys R11 User Guide
http://slidepdf.com/reader/full/autosys-r11-user-guide 40/459
System-Level Security
System-Level Security
Unicenter AutoSys JM provides the following security features at the system
level:
Database field verification
Job definition encryption
Agent authentication
User and database administrator passwords
At the system level, Unicenter AutoSys JM provides measures to prevent
unauthorized access to job information and to prevent unauthorized jobs from
running on a machine. These security features are always available and are in
effect regardless of the active security mode.
Note: On UNIX, the database field and control string encryption features
provide a level of security comparable to the security provided in the native
UNIX environment.
Database Field Verification
To secure the database, Unicenter AutoSys JM not only encrypts some fields
specified in a job definition, but also generates a checksum from fields in the
job definition and stores the checksum in the database. When a job is
accessed, its checksum is regenerated and compared to the one in the
database. If the checksums are different, this indicates that someone modifiedthe job definition in the database, probably by using an SQL command. In this
case, the job is disabled and cannot be run.
To re-enable a disabled job, access the job definition using either the JIL
update_job subcommand or the Unicenter WCC GUI and resave it. You must
be an owner or the EDIT Superuser to access the definition.
Job Definition Encryption
To secure the Agent from unauthorized access, the Scheduler encrypts the
information in a job definition sent over the socket to the Agent. The Agent
then decrypts the job information and processes the job. If the Agent receivesany job information from the Scheduler that it does not recognize, it issues an
error message and the job is not processed.
40 User Guide

7/16/2019 Autosys R11 User Guide
http://slidepdf.com/reader/full/autosys-r11-user-guide 41/459
System-Level Sec urity
Agent Authentication
Unicenter AutoSys JM provides two additional methods to authenticate an
Agent before permitting it to run a job on a computer:
User authentication
Scheduler authentication
By default, both user authentication and Scheduler authentication are
disabled. The EDIT Superuser must use the autosys_secure command to
enable them.
User Authentication
User authentication is a remote authentication method that uses
Microsoft authorization technologies to verify that a user has permission tostart a job on a Client computer. It accomplishes this by obtaining the primary
domain controller and contacting it to validate that the requesting user is
registered in that environment. Use the autosys_secure command to activate
this type of remote authentication.
User authentication is a remote authentication method that uses UNIX
ruserok() authentication to verify that a user has permission to start a job on
a Client computer. It accomplishes this by telling the Client's Agent to make
the ruserok() UNIX system call to check the Client computer's /etc/hosts.equiv
file and the user's .rhosts file to validate that the requesting user is registered
in that environment. This function call performs a local verification, and it is
not related to rshd or rlogind. Use the autosys_secure command to activatethis type of remote authentication.
The hosts.equiv or .rhosts file entries must match the job owner and machine
name field exactly. For example, if the owner is parrot@jungle, the hosts.equiv
or .rhosts file must contain jungle. Similarly, if the owner is
[email protected], the hosts.equiv or .rhosts file must contain
jungle.vine.com. If the values do not match, jobs fail to run on that computer
when ruserok() remote authentication is in use.
Note: For more information, see the Reference Guide.
Security 41

7/16/2019 Autosys R11 User Guide
http://slidepdf.com/reader/full/autosys-r11-user-guide 42/459
System-Level Security
How Scheduler Authentication Works
When Scheduler authentication is enabled, the Agent verifies that it has
permission to process requests from the requesting Scheduler before starting
each job.
On Windows, Scheduler Authentication is done by reading the
Authorized Scheduler Host Names registry entry on the computer on which the
Agent is running.
Before enabling Scheduler authentication, you must set up and properly
configure the Authorized Scheduler Host Names registry entry on every
Windows Client computer that uses this authentication method. The
Authorized Scheduler Host Names registry entry is configured from the
Unicenter AutoSys Agent screen of the Unicenter AutoSys JM Administrator
(autosysadmin).
On UNIX, Scheduler Authentication is done by reading the
/etc/.autostuff file on the computer on which the Agent is running.
Before enabling Scheduler authentication, you must set up and properly
configure the /etc/.autostuff file on every Client computer that participates in
this authentication method.
Note: For more information, see the Reference Guide.
The Scheduler checks whether the following starting conditions are satisfied
before running a job on an Agent computer:
Has the job definition been modified? If so, the job definition is invalid,
and the job does not run.
Can the Scheduler connect to the Agent computer as defined in the DES
encrypted job definition?
Does the user defined as the job owner (user@machine) have a logon
account on the Agent computer?
If user authentication is enabled:
Is the user a trusted user as verified by the primary domain
controller machine?
Is the user a trusted user as defined in the /etc/hosts.equiv and
$HOME/.rhosts files?
42 User Guide

7/16/2019 Autosys R11 User Guide
http://slidepdf.com/reader/full/autosys-r11-user-guide 43/459
System-Level Sec urity
If Scheduler authentication is enabled, does the requesting Scheduler have
permission to run jobs on this Agent computer?
Note: The EDIT Superuser can use the autosys_secure utility to enable
remote authentication.
The following illustration shows the permissions and security checks that occur
before a job is allowed to start:
Note: In the illustration, an asterisk (for example, Yes*) indicates checks that
are made only if the specific method of remote authentication is enabled.
Security 43

7/16/2019 Autosys R11 User Guide
http://slidepdf.com/reader/full/autosys-r11-user-guide 44/459
System-Level Security
User and Database Administrator Passwords
When you install Unicenter AutoSys JM and configure the database, a database
user called autosys is added. When using Ingres as the Relational Database
Management System (RDBMS), no database password is created becauseIngres uses operating system (OS) user ID and password authentication. For
other databases, a database password is also created. The autosys user is
granted rights to the Unicenter AutoSys JM objects and can make changes to
specific information in the database. To enhance system security, we
recommend that you use the appropriate database-specific utilities to change
the autosys user password.
You must supply the autosys and sa (system administrator) user IDs and
passwords to use specific utilities. For example, when using the ISQL utility to
query the database, you must know both the autosys user password and the
sa password.
Note: For information about changing the autosys user password, see the
Reference Guide.
44 User Guide

7/16/2019 Autosys R11 User Guide
http://slidepdf.com/reader/full/autosys-r11-user-guide 45/459
System-Level Sec urity
Restricting Unicenter AutoSys JM Through the File System
Another way to prevent unauthorized use of Unicenter AutoSys JM is to restrict
usage at the file system level.
First, you must make sure that only authorized users can change permissions
on the files and directories in the directory structure.
Then, check the level of security you must use. For example:
Only authorized users can use Unicenter AutoSys JM.
Any user can view jobs and reports about jobs (for example, by using
autorep to see the status of a job), but only authorized users can create
jobs and calendars or make changes to them.
If you want only authorized users to access Unicenter AutoSys JM, make sure
that only those users have execute permissions for the files in the bin
directory.
If you want all users to view reports about jobs, but only authorized users to
create and edit jobs and calendars, make sure that only the authorized users
have execute permission for the following files in the $AUTOSYS/bin directory.
This also prevents unauthorized users from making changes to the
configuration.
autocal_asc
autocal
archive_events
autotimezone
clean_files
DBMaint
dbspace
dbstatistics
jil
sendevent
You should also protect the files in the $AUTOUSER directory from modification
by ensuring that only users authorized to change the configuration have write
permission for the files. Read permission is necessary to source theenvironment files.
Security 45

7/16/2019 Autosys R11 User Guide
http://slidepdf.com/reader/full/autosys-r11-user-guide 46/459
eTrust Embedded Identity and Access Management
eTrust Embedded Identity and Access Management
Unicenter AutoSys JM running under external security provides comprehensive
protection of assets such as jobs, global variables, and calendars, and control
of critical tasks by authorized users. This level of security is made possible by
integration with eTrust IAM. eTrust IAM provides a central location to manage
your user base, create roles for your enterprise, and assign roles to users. In
addition, eTrust IAM is also used to maintain security policies that govern what
assets can be accessed by which users.
Security policies are enforced by the Application Server, which obtains policy
updates from the eTrust IAM back-end server. Because the Scheduler and
Agent do not enforce security, policy changes do not affect assets entered in
the database. For example if the security administrator withdraws a user’s
permission to create jobs, Unicenter AutoSys JM continues to run jobs created
by the user before the change.
Delegation of Administrative Privileges
During installation, a repository is created in the eTrust IAM back-end server
for the Unicenter AutoSys JM instance for policies visible to Unicenter AutoSys
JM. Only users with access rights to the Unicenter AutoSys JM instance can
connect to the repository through the eTrust IAM web interface and add or
remove policies.
Only an authorized administrator can assign access rights to the Unicenter
AutoSys JM application to a user. This can be done in one of the following
ways:
Add an eTrust IAM administrative scoping policy.
Make the user a member of the Unicenter AutoSys JM Admin group.
Note: For more information about using the eTrust IAM web interface and
creating administrative scoping policies, see the eTrust IAM documentation.
46 User Guide

7/16/2019 Autosys R11 User Guide
http://slidepdf.com/reader/full/autosys-r11-user-guide 47/459
eTrust Embedded Identity and Access Management
Policy Synchronization
eTrust IAM r8.2 provides the following two methods for synchronizing policies
between the eTrust IAM back-end server and the eTrust IAM client:
Cache update—The eTrust IAM client is configured to poll the eTrust IAM
back-end server at regular intervals and automatically downloads all
policies.
Synchronize push—The eTrust IAM client is configured to poll the eTrust
IAM back-end server at regular intervals and downloads all policies only if
requested to do so by the end user.
Unicenter AutoSys JM r11 relies primarily on the synchronize push feature to
update the local eTrust IAM-enabled application's policy cache. By using the
synchronize push feature, you can reduce the overhead incurred from
downloading the entire policy tree at frequent intervals from the eTrust IAM
back-end server. Instead of requesting and downloading the entire policy tree
at a regular interval, the eTrust IAM client downloads the policy tree on its
next interval, if it detects a synchronize push request on the eTrust IAM back-
end server.
Security 47

7/16/2019 Autosys R11 User Guide
http://slidepdf.com/reader/full/autosys-r11-user-guide 48/459
eTrust Embedded Identity and Access Management
Modify the UnicenterAutoSysJM Application Instance Configuration Values
The UnicenterAutoSysJM application instance is created on the eTrust IAM
back-end server and configured with the following default values:
Synchronize Poll Interval Time
Default: 30 seconds
When the eTrust IAM client connects to the UnicenterAutoSysJM
application instance for the first time, it acquires this value as the interval
to check for synchronization poll requests. The eTrust IAM client polls the
eTrust IAM back-end server every 30 seconds to check for a
synchronization push request. If the eTrust IAM client detects a request, it
proceeds and downloads the policy tree. If, however, there are no pending
synchronization push requests on the eTrust IAM back-end server, the
eTrust IAM client does nothing.
Cache Update Interval
Default: 3600 seconds (1 hour)
This value causes eTrust IAM clients connected to the UnicenterAutoSysJM
application instance on the eTrust IAM back-end server to automatically
download the entire policy tree every hour, regardless of whether or not
the policy changes are made.
The synchronize poll interval time and the cache update interval configuration
values can be modified from the eTrust IAM web interface.
To modify the configuration values
1. Log on to the UnicenterAutoSysJM application instance as a user with
administrative privileges.
The eTrust IAM web interface appears.
2. Select the Configure tab.
The Applications, Folders, Session, and Embedded IAM Server options
appear.
3. Click Applications.
The Applications pane appears.
4. Click UnicenterAutoSysJM.
The Application Instance pane appears.
5. Enter the Cache Update Time and the Synchronize Poll Interval, and clickSave.
The new configuration values are applied.
48 User Guide

7/16/2019 Autosys R11 User Guide
http://slidepdf.com/reader/full/autosys-r11-user-guide 49/459
eTrust Embedded Identity and Access Management
Enable Synchronize Push
After you have completed and saved changes to one or more policies using the
eTrust IAM web interface, you must enable the synchronize push feature. If
you do not perform this step, the eTrust IAM clients will not download thepolicy changes, even though you successfully established a connection to the
UnicenterAutoSysJM application instance on the eTrust IAM back-end server.
To enable the synchronize push feature after saving your policy
changes
1. Log on to the UnicenterAutoSysJM application instance as a user with
administrative privileges.
The eTrust IAM web interface appears.
2. Select the Configure tab.
The Applications, Folders, Session, and Embedded IAM Server options
appear.
3. Click Session.
The Session pane appears.
4. Click Synchronize Push.
The Synchronize Push pane appears.
5. Click Synchronize.
The synchronize push feature is enabled.
Within 30 seconds (the default synchronize poll interval) after the
synchronization push feature is enabled, the eTrust IAM client downloads the
latest policy tree and its local policy cache contains the latest policy changes.
You can repeat these steps to let the eTrust IAM-enabled client-side
application download the entire policy tree from the eTrust IAM back-end
server.
Asset-Level Security
You can choose to enable external security during product installation, or an
EXEC Superuser under the native model can activate it later. After you
activate eTrust IAM security, the job-level security and Superuser privileges
supported in native mode are no longer active. After you enable externalsecurity, policies in the as-control class govern who can disable eTrust IAM
security. Use the autosys_secure command to activate or disable security.
Note: For more information, see the Reference Guide.
Security 49

7/16/2019 Autosys R11 User Guide
http://slidepdf.com/reader/full/autosys-r11-user-guide 50/459
eTrust Embedded Identity and Access Management
Resource Classes
A Unicenter AutoSys JM instance is the repository for policies that reside on
the eTrust IAM server and that are visible to Unicenter AutoSys JM. Policies in
the instance are classified into resource classes that control access to jobs,calendars, cycles, machines, global variables, the owner field of a job, and so
on, and a specific class function to prevent unauthorized users from starting or
shutting down the Scheduler or disabling eTrust IAM security. A Unicenter
AutoSys JM instance can contain the following resource classes:
as-appl
as-calendar
as-cycle
as-control
as-group
as-gvar
as-job
as-jobtype
as-list
as-machine
as-owner
Before performing an action on a specified asset, Unicenter AutoSys JM issues
a security call to the appropriate class in the repository. For example, for job
assets, Unicenter AutoSys JM queries policies in the as-job class; for global
variable assets, it queries policies in the as-gvar class.
The resource name in an eTrust IAM policy consists of the name of the
Unicenter AutoSys JM instance, a period, and the name of the corresponding
asset. For example, when a user tries to update the payroll job in the ACE
instance, Unicenter AutoSys JM queries eTrust IAM as follows:
as-job ACE.payroll
50 User Guide

7/16/2019 Autosys R11 User Guide
http://slidepdf.com/reader/full/autosys-r11-user-guide 51/459
eTrust Embedded Identity and Access Management
The as-owner resource class is an exception to this rule, because it does not
require the name of the instance. For example, when a user tries to update
the job owner field of a job to parrot@jungle in the ACE instance, Unicenter
AutoSys JM queries eTrust IAM as follows:
as-owner parrot@jungle
Note: The security administrator must use the instance.object convention
when creating policies except as cited for the as-owner class. You can use
wildcards (for example,*) to create policies that apply to multiple assets
across different instances. Also, eTrust IAM supports the use of regular
expressions to define an asset in a policy. For more information about
resource classes, see the eTrust IAM documentation.
Best Match Policy Evaluation
When deciding whether to grant access to an asset, eTrust IAM only considers
policies whose resource names most closely match the requested asset name.The policy may contain the most matching characters and the fewest wildcard
characters compared to the asset name given to it by Unicenter AutoSys JM.
To evaluate whether a user has access to an asset, only policies that eTrust
IAM has collected using the best match criteria are considered. Consequently,
the best match policy evaluation used by eTrust IAM lets you benefit from a
hierarchical asset naming convention.
Example: Best Match Policy
You can select a job naming convention in which all payroll jobs in the ACE
instance are prefixed with the payroll identifier. Using such a job naming
convention lets you create a generic policy that can govern all payroll jobs
(where the resource name in the policy is ACE.payroll*). At the same time,you can fine-tune security for a specific job by creating a policy for a job called
payroll_employeeID5702 (where the resource name in the policy is
ACE.payroll_employeeID5702).
In this example, with best match policy evaluation, eTrust IAM only considers
the policy containing the resource name ACE.payroll_employeeID5702 when
deciding whether to grant access to the payroll_employeeID5702 job. Even
though there may be other matching policies (such as the policy with a
resource name of payroll*), eTrust IAM uses the best match policy evaluation
to find the set of policies with resource names that most closely match the
requested asset name.
Security 51

7/16/2019 Autosys R11 User Guide
http://slidepdf.com/reader/full/autosys-r11-user-guide 52/459
eTrust Embedded Identity and Access Management
Access Modes
Unicenter AutoSys JM uses one or more of the following access modes on each
of the resource classes:
READ
CREATE
DELETE
EXECUTE
WRITE
The use of these access modes is explained in more detail in the description of
each class.
as-appl Class
The as-appl class controls access to the job application field in a job definition
and controls which jobs can be included in an application job set.
EXECUTE
Controls whether a job definition can use the application job set name in
its application field.
In EXECUTE mode, this class accepts the following binary, which has the
indicated security checkpoint:
jil
insert_job, update_job (using the application attribute).
52 User Guide

7/16/2019 Autosys R11 User Guide
http://slidepdf.com/reader/full/autosys-r11-user-guide 53/459
eTrust Embedded Identity and Access Management
as-calendar Class
The as-calendar class controls access to calendar objects.
READ
Controls whether users can view calendars or their contents.
In READ mode, this class accepts the following binary, which has the
indicated security checkpoint:
autocal_asc
When as-list\AUTOCAL denied, LIST CALENDARS
LIST CALENDAR DATES
CREATE
Controls whether users can create a calendar.
In CREATE mode, this class accepts the following binary, which has theindicated security checkpoint:
autocal_asc
CREATE CALENDAR
DELETE
Controls whether users can delete a calendar.
In DELETE mode, this class accepts the following binary, which has the
indicated security checkpoint:
autocal_asc
DELETE CALENDAR
EXECUTE
Controls whether users can specify a calendar to run or to exclude in a job.
In EXECUTE mode, this class accepts the following binary, which has the
indicated security checkpoint:
jil
run_calendar, exclude_calendar
Security 53

7/16/2019 Autosys R11 User Guide
http://slidepdf.com/reader/full/autosys-r11-user-guide 54/459
eTrust Embedded Identity and Access Management
WRITE
Controls whether users can update existing calendar objects.
In WRITE mode, the class accepts the following binary, which has the
indicated security checkpoint:
autocal_asc
MODIFY CALENDAR
Note: Assets in this class can only contain the following characters: a-z, A-Z,
0-9, period (.), underscore (_), and hyphen (-). Assets in this class cannot
contain spaces.
as-control Class
The as-control class controls access to critical Unicenter AutoSys JM services.
EXECUTE
Controls critical resources through the sendevent -e STOP_DEMON and
autosys_secure binaries.
STOP_DEMON
Controls who can use the sendevent binary to stop the Scheduler.
SECADM
Controls who can use the autosys_secure binary to disable external
security.
EPLOG
Controls whether users can retrieve Scheduler log files from the
Application Server.
54 User Guide

7/16/2019 Autosys R11 User Guide
http://slidepdf.com/reader/full/autosys-r11-user-guide 55/459
eTrust Embedded Identity and Access Management
as-cycle Class
The as-cycle class controls access to cycle assets. Cycles are used in the
definition of advanced rules for generating calendar dates.
Note: For more information, see the Reference Guide.
READ
Controls whether users can view cycles or their contents.
In READ mode, this class accepts the following binary, which has the
indicated security checkpoint:
autocal_asc
When as-list\AUTOCAL denied, LIST CYCLE
LIST CYCLE DATES
CREATEControls whether users can create a cycle.
In CREATE mode, this class accepts the following binary, which has the
indicated security checkpoint:
autocal_asc
CREATE CYCLE
DELETE
Controls whether users can delete a cycle.
In DELETE mode, this class accepts the following binary, which has the
indicated security checkpoint:
autocal_asc
DELETE CYCLE
WRITE
Controls whether users can update existing cycles.
In WRITE mode, this class accepts the following binary, which has the
indicated security checkpoint:
autocal_asc
MODIFY CYCLES
Note: Assets in this class can only contain the following characters: a-z, A-Z,0-9, period (.), underscore (_), and hyphen (-). Assets in this class cannot
contain spaces.
Security 55

7/16/2019 Autosys R11 User Guide
http://slidepdf.com/reader/full/autosys-r11-user-guide 56/459
eTrust Embedded Identity and Access Management
as-group Class
The as-group class controls access to the job group field in a job definition and
controls which jobs can be included in a group job set.
EXECUTE
Controls whether a job definition can use the group job set name in its
group field.
In EXECUTE mode, this class accepts the following binary, which has the
indicated security checkpoints:
jil
insert_job, update_job (using the group attribute).
as-gvar Class
The as-gvar class controls access to global variable assets. Because globalvariable assets are only controlled through the sendevent binary, the access
modes are verified during sendevent execution.
READ
Controls whether users can view specific global variable objects.
In READ mode, this class accepts the following binary, which has the
indicated security checkpoint:
autorep
-g variable
autostatus
-g variable
sendevent
CREATE
Controls whether users can create specific global variable objects.
In CREATE mode, this class accepts the following binary, which has the
indicated security checkpoint:
sendevent
-g (new variable)
DELETE
Controls whether users can delete specific global variable objects.
In DELETE mode, this class accepts the following binary, which has the
indicated security checkpoints:
sendevent
-g variable=DELETE
56 User Guide

7/16/2019 Autosys R11 User Guide
http://slidepdf.com/reader/full/autosys-r11-user-guide 57/459
eTrust Embedded Identity and Access Management
EXECUTE
Controls whether users can use sendevent against all global variable
objects simultaneously.
In EXECUTE mode, this class accepts the following binary, which has theindicated security checkpoints:
sendevent
-e SET_GLOBAL, all-g options
WRITE
Controls whether users can update specific existing global variable objects.
In WRITE mode, this class accepts the following binary, which has the
indicated security checkpoint:
sendevent
-g (existing variable)
as-job Class
The as-job class controls access to job assets.
READ
Controls whether users can view jobs or their contents.
In READ mode, this class accepts the following binaries, which has the
indicated security checkpoints:
autorep
When as-list\AUTOREP denied, -J job, -q
autostatad
When as-list\AUTOSTAT denied, -J job
autostatus
-J job
job_depends
When as-list\JOBDEP denied, -J job
monbro
When as-list\MONBRO denied
Security 57

7/16/2019 Autosys R11 User Guide
http://slidepdf.com/reader/full/autosys-r11-user-guide 58/459
eTrust Embedded Identity and Access Management
CREATE
Controls whether users can create a job.
In CREATE mode, this class accepts the following binary, which has the
indicated security checkpoint:
jil
insert_job
DELETE
Controls whether users can delete jobs directly or with sendevent.
In DELETE mode, this class accepts the following binary, which has the
indicated security checkpoints:
jil
delete_job
sendevent
-e DELETEJOB
EXECUTE
Controls whether a user can issue a sendevent for the job.
In EXECUTE mode, this class accepts the following binary, which has the
indicated security checkpoints:
sendevent
-e STARTJOB -e KILLJOB -e FORCE_STARTJOB -e JOB_ON_ICE -e JOB_OFF_ICE -e JOB_ON_HOLD -e JOB_OFF_HOLD -e COMMENT -J job
58 User Guide

7/16/2019 Autosys R11 User Guide
http://slidepdf.com/reader/full/autosys-r11-user-guide 59/459
eTrust Embedded Identity and Access Management
WRITE
Controls whether users can update an existing job.
In WRITE mode, this class accepts the following binary, which has the
indicated security checkpoint:
jil
update_job
sendevent
-e CHANGE_PRIORITY
as-joblog Class
The as-joblog class controls access to job log files, including files that contain
normal or error outputs from a job run (as defined by the std_out_file and
std_err_file job attributes). The as-joblog class also includes log files that
contain output from the job Agent and job Agent profile files.
READ
Controls whether users can retrieve job log files from the Application
Server.
Note: No spaces are allowed between the >> characters and the full path or
file name in the std_out_file or std_err_file fields in a job definition.
Security 59

7/16/2019 Autosys R11 User Guide
http://slidepdf.com/reader/full/autosys-r11-user-guide 60/459
eTrust Embedded Identity and Access Management
as-jobtype Class
The as-jobtype class controls access to job_type assets.
READ
Controls whether users can view job types or their contents.
In READ mode, this class accepts the following binaries, which has the
indicated security checkpoints:
autorep
When as-list\AUTOREP denied, -Y job_type
job_depends
When as-list\JOBDEP denied, -J job
CREATE
Controls whether users can create a job type.In CREATE mode, this class accepts the following binary, which has the
indicated security checkpoint:
jil
insert_job_type
DELETE
Controls whether users can delete job types directly.
In DELETE mode, this class accepts the following binary, which has the
indicated security checkpoint:
jil
delete_job_type
Note: When installed, the as_jobtype class is defined with the DELETE
action. Its default policy is defined without the DELETE action. This
prevents a user from inadvertently deleting user-defined job types.
The default policy can be updated to include the DELETE action, or a
new policy can be defined that grants access to delete user-defined job
types.
EXECUTE
Controls whether users can specify a job type in a job.
In EXECUTE mode, this class accepts the following binary, which has the
indicated security checkpoint:
jil
job_type (with a value other than b, c, or f)
60 User Guide

7/16/2019 Autosys R11 User Guide
http://slidepdf.com/reader/full/autosys-r11-user-guide 61/459
eTrust Embedded Identity and Access Management
WRITE
Controls whether users can update an existing job type.
In WRITE mode, this class accepts the following binary, which has the
indicated security checkpoint:
jil
update_job_type
as-list Class
The as-list class controls whether programs are directed to bypass individual
security for read-only operation of a potentially large list of assets where the
information displayed does not constitute a security violation (for example, in
autorep).
Note: By using the default of this class, Unicenter AutoSys JM does not incur
the overhead associated with issuing a security call for each individual lineitem displayed.
READ
Controls security bypass through the following:
AUTOREP
Controls read access for the autorep binary. This value is ignored for
autorep reports created with the –q option. The binary has the
following security checkpoints for READ mode:
-m ALL, -J ALL, -J box, -G ALL
AUTOSTAT
Controls read access in the autostatad binary. The binary has the
following security checkpoint for READ mode:
-J %
MONBRO
Controls read access to the monbro binary. The binary has the
following security checkpoint for READ mode:
Event related to secured jobs
JOBDEP
Controls read access to the job_depends binary. The binary has the
following security checkpoints for READ mode:
-c –J ALL, -c –J %, -t %, -d %, -t ALL, -d ALL, -t box, -d box
Security 61

7/16/2019 Autosys R11 User Guide
http://slidepdf.com/reader/full/autosys-r11-user-guide 62/459
eTrust Embedded Identity and Access Management
as-machine Class
The as-machine class controls access to machine assets, including whether a
user can use a machine object in a job definition.
READ
Controls whether users can view machines or their contents.
In READ mode, this class accepts the following binary, which has the
indicated security checkpoint:
autorep
When as-list\AUTOREP denied, -m machine
CREATE
Controls whether users can create machine definitions.
In CREATE mode, this class accepts the following binary, which has the
indicated security checkpoint:
jil
insert_machine
DELETE
Controls whether users can delete machine definitions.
In DELETE mode, this class accepts the following binary, which has the
indicated security checkpoint:
jil
delete_machine
62 User Guide

7/16/2019 Autosys R11 User Guide
http://slidepdf.com/reader/full/autosys-r11-user-guide 63/459
eTrust Embedded Identity and Access Management
EXECUTE
Controls whether users can specify a machine in a job definition.
In EXECUTE mode, this class accepts the following binary, which has the
indicated security checkpoints:
jil
machine
sendevent
-e STARTJOB
-e KILLJOB
-e FORCE_STARTJOB
-e JOB_ON_ICE
-e JOB_OFF_ICE
-e JOB_ON_HOLD
-e JOB_OFF_HOLD
-e COMMENT -J job
as-owner Class
The as-owner class controls access to the job owner field in the job and
controls which owners can be specified in a job definition. For example, the
user ID of the job creator is used by default as the job owner when a job is
created. However, when a user other than the job creator is to be used as the
owner, security verifies whether the current user can use the specified owner
ID.
EXECUTE
Controls whether users can use specific user IDs.
In EXECUTE mode, this class accepts the following binary, which has the
indicated security checkpoint:
jil
owner
Security 63

7/16/2019 Autosys R11 User Guide
http://slidepdf.com/reader/full/autosys-r11-user-guide 64/459
eTrust Embedded Identity and Access Management
How an Application is Security-Enabled
The Application Server enforces security policies. However, because eTrust
IAM policies can have calendar dates and times associated with them, the time
of authorization is important. To properly authorize a request from a UnicenterAutoSys JM Client, the Application Server must know what the time is relative
to the Client. The logical flow when a Client makes a request to the Application
Server is as follows:
The Client calculates its offset (in seconds) from the GMT time zone and
sends it to the Application Server with the request.
When it receives the request, the Application Server checks its offset (in
seconds) from the GMT time zone.
The Application Server subtracts the Client’s offset from its own to obtain
the time zone difference in seconds from the Client.
The Application Server applies the difference to the current time and uses
this as the time in its authorization check. This time represents the actual
time relative to the Client’s time zone.
Create an Asset
To create an asset, you must validate that the user has the required
authorization. For the job assets, do the following:
Validate that the user can specify a different user in the owner job
attribute. Execute an authorization check against the user by passing in
the as-owner resource class name, the job owner, and the execute access
level.
Validate that the user can run the job on the computer that is specified in
the machine job attribute. Execute an authorization check against the user
by passing in the as-machine resource class name, the Unicenter AutoSys
JM instance-specific machine name, and the execute access level.
Validate that the user can use the calendar specified in the run_calendar
job attribute. Execute an authorization check against the user by passing
in the as-calendar resource class name, the Unicenter AutoSys JM
instance-specific calendar name, and the execute access level.
Note: You must repeat this step if a calendar name is also specified in the
exclude_calendar job attribute.
To create an asset, execute an authorization check against the user by passingthe security resource class name and the Unicenter AutoSys JM instance-
specific asset name, and create the access level.
64 User Guide

7/16/2019 Autosys R11 User Guide
http://slidepdf.com/reader/full/autosys-r11-user-guide 65/459
eTrust Embedded Identity and Access Management
Update an Asset
To update an asset, you must validate that the user has the required
authorization. For the job assets, do the following:
Validate that the user can specify a different user in the owner job
attribute. Execute an authorization check against the user passing in the
as-owner resource class name, the job owner, and the execute access
level.
Validate that the user can run the job on the computer specified in the
machine job attribute. Execute an authorization check against the user
passing in the Unicenter AutoSys JM instance-specific as-machine resource
class name, the machine name, and the execute access level.
Validate that the user can use the calendar specified in the run_calendar
job attribute. Execute an authorization check against the user passing in
the as-calendar resource class name, the Unicenter AutoSys JM instance-
specific calendar name, and the execute access level.
Note: You must repeat this step if a calendar name is also specified in the
exclude_calendar job attribute.
To update an asset, execute an authorization check against the user passing in
the security resource class name, the Unicenter AutoSys JM instance-specific
asset name, and the write access level.
Delete an Asset
To delete an asset, an authorization check is executed against the user
passing in the security resource class name, the Unicenter AutoSys JMinstance-specific asset name, and the delete access level.
Security 65

7/16/2019 Autosys R11 User Guide
http://slidepdf.com/reader/full/autosys-r11-user-guide 66/459
Native Security
List a Set of Assets
To list a set of assets using the reporting tools, execute an authorization check
against the user by passing the as-list class name, the Unicenter AutoSys JM
instance-specific reporting tool names, like AUTOCAL, and AUTOREP, and theread access level.
You can validate whether the user can view all the assets in a list without
issuing individual asset checks. Following are a set of conditions that are
applicable to enable the users to view the list of assets:
If as-list read access is granted, all assets are displayed with no further
authorization checks.
If as-list read access is denied, validate that the user can view an
individual asset in a list by executing an authorization check against the
user by passing in the security resource class name, the Unicenter
AutoSys JM instance-specific asset name, and the read access level. Only
the assets that are granted read access will be displayed. Assets that are
denied read access are not displayed. If every asset in the list is denied
read access, nothing will be displayed.
For job objects, an as-list read access authorization check against the user
is executed in the Unicenter AutoSys JM instance, where you want to view
the contents of a box job, based on the following:
If as-list read access is granted, information about the box job and all
jobs in it are displayed.
If as-job read access to the box job is denied, neither the box job nor
the jobs in it are displayed.
If a box is granted as-job read access, but one or more jobs in the boxis denied as-job read access, only the box job and jobs in the box
granted as-job read access are displayed. Jobs in the box that are
denied as-job read access are not displayed.
Native Security
Native security is the default security model under which Unicenter AutoSys JM
runs if the option to run under eTrust IAM was not selected during installation
or if the eTrust IAM policy permits a user to disable external security. Although
it provides a level of security for certain assets and activities, the scope of
protection is limited when compared to that of external security.
66 User Guide

7/16/2019 Autosys R11 User Guide
http://slidepdf.com/reader/full/autosys-r11-user-guide 67/459
Native Security
Security Control
External security is controlled by a setting in the Unicenter AutoSys JM
database. You can use the autosys_secure binary to turn external security on
or off.
To turn external security on
1. Invoke autosys_secure binary.
The following menu appears:
Please select from the following options:
[1] Activate EIAM instance security.
[2] Manage EDIT/EXEC superusers.
[3] Change AutoSys database password.
[4] Change AutoSys remote authentication method.
[5] Manage AutoSys User@Host users.
[6] Get Encrypted Password.[0] Exit AutoSys Security Utility.
>1
Are you sure you wish to activate EIAM security? [1(yes)/0(no)]: 1
2. Enter the EIAM Backend Server name (or press the enter key to cancel).
The external security turned on. The following message appears:
CAUAJM_I_60201 EIAM instance security successfully set.
To turn external security off
1. Invoke autosys_secure binary.
The following menu appears:Please select from the following options:
[1] Revert to NATIVE instance security.
[2] Regenerate EIAM certificate.
[3] Change AutoSys database password.
[4] Change AutoSys remote authentication method.
[5] Manage AutoSys User@Host users.
[6] Get Encrypted Password.
[0] Exit AutoSys Security Utility.
>1
Are you sure you wish to disable EIAM security? [1(yes)/0(no)]: 1
2. Press the enter key.
The external security turned off. The following message appears:
CAUAJM_I_60202 NATIVE instance security successfully set.
Note: For more information, see the Reference Guide.
Security 67

7/16/2019 Autosys R11 User Guide
http://slidepdf.com/reader/full/autosys-r11-user-guide 68/459
Native Security
Superusers
Under the native security model, users with administrative privileges are
known as Superusers. Unicenter AutoSys JM lets you define two levels of
Superusers: EDIT and EXEC. You can use the autosys_secure command todefine these Superusers.
Note: For more information, see the Installation Guide.
EDIT Superuser
Only the EDIT Superuser has permission to do the following:
Edit or delete any job regardless of its owner or its permissions.
Change the owner attribute of a job.
Use the autosys_secure command to add or change Windows user IDs and
passwords.
Use the autosys_secure command to change the database password or the
remote authentication method.
The EDIT Superuser can override user authentication (if enabled) on a
job-by-job basis by changing the owner of the job from the user@machine
form to the user form. User authentication of the job at run time is not
performed on the Client computer.
The purpose of the user@machine form is to prevent users from running jobs
on machines where they do not have the appropriate permission. For example,
root@machine prevents root on any machine from running root jobs on all
machines.
The EDIT Superuser must enter valid operating system user IDs and
passwords in the database. These user IDs and passwords are required to log
on to and run jobs on Client computers. When an Agent runs a job on a
computer, it logs on as the user defined in the owner attribute for the job. To
do this, the Scheduler retrieves encrypted versions of the IDs and passwords
for the user@host_or_domain and the user@machine from the Event Server
and passes them to the Agent.
Any user who knows an existing user ID and password can change that
password or delete that user and password.
Note: For more information, see the Reference Guide.
68 User Guide

7/16/2019 Autosys R11 User Guide
http://slidepdf.com/reader/full/autosys-r11-user-guide 69/459
Native Security
EXEC Superuser
Only the EXEC Superuser has permission to do the following:
Use the sendevent command or the Unicenter WCC GUI to issue
commands that affect the running or the state of any job.
Enable eTrust IAM.
Use the following command to stop the Scheduler:
sendevent -E STOP_DEMON
Note: EXEC Superuser privileges are typically granted to the night operator.
Asset-Level Security
The security scheme provides individuals and groups of users with Edit and
Execute permissions on a job-by-job basis.
For jobs running on UNIX, Unicenter AutoSys JM supports Owner, Group,
and World Edit and Execute permissions.
For jobs running on Windows, Unicenter AutoSys JM supports Owner and
World Edit and Execute permissions.
By default, only the user logged on as the owner of a job can edit or run a job.
However, the owner can extend permissions to other users and other
computers.
Security 69

7/16/2019 Autosys R11 User Guide
http://slidepdf.com/reader/full/autosys-r11-user-guide 70/459
Native Security
Job Ownership
By default, the owner of a job is the user who defines that job on a particular
computer.
When a user defines a job on UNIX, the user ID is retrieved from the
UNIX environment and attached to the job in the form of user @machine. The
owner is defined by the owner job attribute. By default, only the owner can
edit and execute the job.
The user @machine combination must have Execute permission for any
command specified in a job on the computer where the job command is to run.
The job owner must also have permission to access any device, resource, and
so on that the command needs to access. For this process to work, the job
owner must have the appropriate system permissions.
The owner's umask write permission is used as the default Edit permission for
the job, and the umask execute permission is used as the default Execute
permission for the job.
If a job is run on a Windows Client computer, the EDIT Superuser must
have entered the valid Windows user ID and password for the owner in the
database.
More information:
EDIT Superuser (see page 68)
70 User Guide

7/16/2019 Autosys R11 User Guide
http://slidepdf.com/reader/full/autosys-r11-user-guide 71/459
Native Security
User Types
Unicenter AutoSys JM uses the following three types of users for any job:
Owner
Creates the job.
Group
Resides in the same primary group as the owner.
World
Specifies all users.
Unicenter AutoSys JM uses the UNIX user ID (uid) and group ID (gid) of a job's owner to control the following: Who can edit, override, or delete a job definition. Who can execute the UNIX command specified in a job.The owner of a job can let other users edit and execute the job by setting the
permissions in the job definition.
Security 71

7/16/2019 Autosys R11 User Guide
http://slidepdf.com/reader/full/autosys-r11-user-guide 72/459
Native Security
Permission Types
72 User Guide
By default, only the owner has Edit and Execute permissions for a job, and all
Edit and Execute permissions are valid only on the computer on which the job
was defined. However, the owner can grant different types of permissionswhen defining a job.
Unicenter AutoSys JM associates different types of permissions with each job.
Every job has the following permission types:
Edit
Lets users edit, override, or delete a job definition.
Execute
Lets users use the sendevent command or the Unicenter WCC GUI to send
an execute event that affects the running of a job.
Machine
Lets users logged on to a computer other than the one on which a job was
created edit or execute the job.
Note: For a job to run on a computer other than the one on which it was
defined, the owner of that job must have an account on that computer.
More information:
Security on Events Sent by Users (see page 74)

7/16/2019 Autosys R11 User Guide
http://slidepdf.com/reader/full/autosys-r11-user-guide 73/459
Native Security
Granting Permissions
The owner of a job cannot override his or her ownership designation. Only the
EDIT Superuser has the authority to change the owner attribute for a job.
However, the owner can use JIL to set the permission attribute in the jobdefinition to grant other users Edit and Execute permissions for a job.
The following table shows the permissions that you can set using JIL:
JIL Description
gx Execute the job if logged onto the computer where the job was
created (the computer specified in the owner attribute; that is,
user@machine). This applies to users assigned to the job owner's
primary group.
ge Edit the job if logged onto the computer where the job was
created (the computer specified in the owner attribute; that is,
user@machine). This applies to users assigned to the job owner's
primary group.
mx Execute the job (otherwise, the user must be logged onto the
computer specified in the owner attribute; that is,
user@machine). This applies to users, regardless of the computer
logged onto.
me Edit the job (otherwise, the user must be logged onto the
computer specified in the owner attribute; that is,
user@machine). This applies to users, regardless of the computer
logged onto.
wx Execute the job if logged onto the computer where the job was
created (the computer specified in the owner attribute; that is,
user@machine). This applies to any user.
we Edit the job if logged onto the computer where the job was
created (the computer specified in the owner attribute; that is,
user@machine). This applies to any user.
Note: A job and the command it runs always runs as the user specified in the
owner attribute of the job definition. Execute permissions verify who can
execute events against the job, but not how the job runs. Even if World
Execute permissions are granted, the job still runs as the user, who is defined
in the owner attributes.
Security 73

7/16/2019 Autosys R11 User Guide
http://slidepdf.com/reader/full/autosys-r11-user-guide 74/459
Native Security
Job Permissions and Windows
If you are defining jobs and running them on different operating
systems, keep the following in mind:
When defining a job to run on a Windows computer, you can set Group
permissions, but they are ignored. Group permissions are used if a job is
edited or executed on a UNIX computer.
When editing a job from a Windows computer, the Group Edit permission
is ignored. In this case, the user editing the job must be the owner of the
job, or World Edit permissions must be specified for the job.
When executing a job from a Windows computer, the Group Execute
permission is ignored. In this case, the user executing the job must be the
owner of the job, or World Execute permissions must be specified for the
job.
Security on Events Sent by Users
If you have the appropriate permissions, you can use the sendevent command
or the Send Event dialog to send the following Execute events that affect the
running of a job:
CHANGE_PRIORITY
CHANGE_STATUS
DELETEJOB
FORCE_STARTJOB
JOB_OFF_HOLD
JOB_OFF_ICE
JOB_ON_HOLD
JOB_ON_ICE
KILLJOB
SEND_SIGNAL
STARTJOB
74 User Guide

7/16/2019 Autosys R11 User Guide
http://slidepdf.com/reader/full/autosys-r11-user-guide 75/459
Native Security
How a User Can Start a J ob by Sending an Event
Unicenter AutoSys JM verifies the following when a user sends an event to
start a job:
Has the job definition been modified? If so, the job definition is invalid,
and the job does not run.
Does the user match the owner as indicated in the job definition?
Is the user the EXEC Superuser as defined with autosys_secure?
Does the user have job execute permissions as indicated in the job
definition?
Is there a machine name in the owner value of the job definition? The
EDIT Superuser can remove this portion of the owner value.
Does the machine portion of the user logon credentials match the machine
portion of the job owner definition?
Does the job have machine permission as indicated by the job definition?
When you start a job by sending an event, the job permissions are verified as
shown in the following illustration:
Security 75

7/16/2019 Autosys R11 User Guide
http://slidepdf.com/reader/full/autosys-r11-user-guide 76/459

7/16/2019 Autosys R11 User Guide
http://slidepdf.com/reader/full/autosys-r11-user-guide 77/459
Chapter 3: Job Definitions This section contains the following topics: Job Attributes (see page 77)Create a Job Definition Using JIL (see page 78) Create a Job Definition Using the Unicenter WCC GUI (see page 78)JIL Subcommands (see page 79) Job Attributes (see page 80)Date and Time Attributes and Time Changes (see page 82)
Job Attributes
The specification of a job's attributes and behavior is called a job definition.You can use JIL or the Unicenter WCC GUI to create job definitions. Regardless
of how you create a job definition, the specified attributes are the same and
the job definition is always stored in the database.
Before modifying or deleting an existing job, make sure that the job is not
running. To help ensure that you do not lose job definitions in the event of a
system failure, you should back up your job definitions periodically.
J ob Definitions 77

7/16/2019 Autosys R11 User Guide
http://slidepdf.com/reader/full/autosys-r11-user-guide 78/459
Create a J ob Definition Using J IL
Create a Job Definition Using J IL
You must create a job definition for each Unicenter AutoSys JM job. Each job
definition must include the job name, attributes that describe its intended
behavior, and the values of those attributes.
To create a job definition using JIL
1. Enter the jil command at a command prompt.
The JIL command prompt appears.
2. Enter the insert_job subcommand followed by the appropriate
attribute:value statements that specify an action to perform at the JIL
command prompt, where the jil commands resemble the following:
insert_job: job_name
attribute:value
...
j o b _ n am e
Defines a unique name for the job.
a t t r i b u t e
Specifies the name of a valid JIL attribute.
v a l u e
Defines the setting to apply to the attribute.
The specified attributes and values are set for the indicated job.
Note: For more information, see the Reference Guide.
Create a Job Definition Using the Unicenter WCC GUI
For information about using the Unicenter WCC GUI to work with job
definitions, see the Unicenter Workload Control Center Job Editor Help.
78 User Guide

7/16/2019 Autosys R11 User Guide
http://slidepdf.com/reader/full/autosys-r11-user-guide 79/459
J IL Subcommands
JIL Subcommands
The following table lists the JIL subcommands used to add, edit, and delete
jobs and machines in the database, notes whether the command is required,
and provides a brief description of the command.
Note: For more information, see the Reference Guide.
Subcommands Required? Command Use
insert_job Yes Inserts a new job in the database.
update_job No Edits an existing job in the database.
override_job No Defines a one-time override for an
existing job definition. This override
affects the job for the next run only.
delete_job No Deletes a job from the database.
delete_box No Deletes an existing box job and all of
the jobs it contains.
insert_machine Yes Inserts a new machine definition in
the database. A machine must be
defined before it can be used in a job
definition.
update_machine No Updates an existing machine in the
database.
delete_machine No Deletes an existing machine from the
database.
J ob Definitions 79

7/16/2019 Autosys R11 User Guide
http://slidepdf.com/reader/full/autosys-r11-user-guide 80/459
J ob Attributes
Job Attributes
The following table lists job attributes, notes whether they are required for a
valid job definition, and summarizes the job types for which each attribute is
valid.
Note: For more information, see the Reference Guide.
Attribute Required? Job Types
alarm_if_fail No Box, Command, File Watcher
application No Box, Command, File Watcher
auto_delete No Box, Command, File Watcher
auto_hold No (When the job is in a box)
Box, Command, File Watcher
avg_runtime No Box, Command, File Watcher
box_failure No Box
box_name No Box, Command, File Watcher
box_success No Box
box_terminator No (When the job is in a box)
Box, Command, File Watcher
chk_files No Command, File Watcher
command Yes Command
condition No Box, Command, File Watcher
date_conditions No Box, Command, File Watcher
days_of_week No Box, Command, File Watcher
delete_box No Box
delete_job No Box, Command, File Watcher
description No Box, Command, File Watcher
exclude_calendar No Box, Command, File Watcher
group No Box, Command, File Watcher
heartbeat_interval No Command
insert_job Yes Box, Command, File Watcher
job_load No Command
job_name Yes Box, Command, File Watcher
80 User Guide

7/16/2019 Autosys R11 User Guide
http://slidepdf.com/reader/full/autosys-r11-user-guide 81/459
J ob Attributes
Attribute Required? Job Types
job_terminator No (When the job is in a box)
Box, Command, File Watcher
job_type Yes Box, Command, File Watcher
machine Yes Command, File Watcher
max_exit_success No Command
max_run_alarm No Box, Command, File Watcher
min_run_alarm No Box, Command, File Watcher
n_retrys No Box, Command, File Watcher
notification_id No Box, Command, File Watcher
notification_msg No Box, Command, File Watcher
override_job No Box, Command, File Watcher
owner Yes Box, Command, File Watcher
permission No Box, Command, File Watcher
priority No Box, Command
profile No Command, File Watcher
run_calendar No Box, Command, File Watcher
run_window No Box, Command, File Watcher
send_notification No Box, Command, File Watcher
service_desk No Box, Command, File Watcher
start_mins No Box, Command, File Watcher
start_times No Box, Command, File Watcher
std_err_file No Command
std_in_file No Command
std_out_file No Command
svcdesk_attr No Box, Command, File Watcher
svcdesk_desc No Box, Command, File Watcher
svcdesk_imp No Box, Command, File Watcher
svcdesk_sev No Box, Command, File Watcher
term_run_time No Box, Command, File Watcher
timezone No Box, Command, File Watcher
J ob Definitions 81

7/16/2019 Autosys R11 User Guide
http://slidepdf.com/reader/full/autosys-r11-user-guide 82/459
Date and Time Attributes and Time C hanges
Attribute Required? Job Types
update_job No Box, Command, File Watcher
watch_file Yes File Watcher
watch_file_min_size No File Watcher
watch_interval No File Watcher
Date and Time Attributes and Time Changes
Your operating system might automatically change the system clock to reflect
the switch to either standard time (ST) or daylight time (DT), and the
scheduling of time-dependent Unicenter AutoSys JM jobs might shift to adjust
for the time change. Jobs that are not time-dependent run as appropriate.
There are two types of time dependencies: absolute and relative.
Jobs with absolute time dependencies are defined to run at a specific time of
the day (for example, 9:30 on Thursday or 12:00 on December 25). The
following attributes define absolute time dependencies:
days_of_week
exclude_calendar
run_calendar
run_window
start_times
Relative time dependencies are based either on the current time or relative to
the start of the hour (for example, start a job at 10 and 20 minutes after the
hour, or terminate a job after it has run for 90 minutes). The following
attributes define relative time dependencies:
auto_delete
max_run_alarm
min_run_alarm
start_mins
term_run_time
watch_interval
During the time change, absolute time attributes behave differently than
relative time attributes.
82 User Guide

7/16/2019 Autosys R11 User Guide
http://slidepdf.com/reader/full/autosys-r11-user-guide 83/459
Date and Time Attributes and Time Changes
Daylight Time Changes
Because the clock loses an hour during the change from standard time to
daylight time in the spring, Unicenter AutoSys JM cannot schedule any jobs
using time-dependent attributes during that time.
The solution is to schedule jobs with absolute time dependencies for the
missing hour to start during the first minute of the next hour. In this case,
because the time change automatically occurs at 2:00 a.m., a job scheduled to
run on Sundays at 2:05 runs at 3:00:05 that day; a job scheduled to run
every day at 2:45 runs at 3:00:45. Although it might not be possible to start a
large number of jobs during the first minute of the hour, this feature does
preserve the scheduling order.
If you schedule a job to run more than once during the missing hour (for
example, at 2:05 and 2:25), only the first scheduled job run occurs. Additional
start times for the same job in the missing hour are ignored.
Jobs with relative time dependencies run as expected. For example, a job
specified to run at 0, 20, and 40 minutes after the hour is scheduled for 1:00
ST, 1:20 ST, 1:40 ST, 3:00 DT, 3:20 DT, and 3:40 DT.
Run windows are treated differently. When the specified end of the run window
falls during the missing hour, Unicenter AutoSys JM recalculates its end time,
so that the effective duration of the run window remains the same. For
example, the product recalculates a run window of 1:00 - 2:30 so that the
window ends at 3:30 and the run window still remains open for 90 minutes.
When the run window’s specified start time falls during the missing hour,
Unicenter AutoSys JM moves the start time to 3:00. The end time does notchange, so the run window is shortened. For example, a run window of
2:45 - 3:45 becomes 3:00 - 3:45, shortening the run window by 15 minutes.
When the run window’s start and end time both fall during the missing hour,
Unicenter AutoSys JM moves the start time to the first minute after 3:00 and
the end time to one hour later. Therefore, the resulting run window might be
lengthened. For example, a run window of 2:15 - 2:45 becomes 3:00 - 3:45,
or 15 minutes longer.
J ob Definitions 83

7/16/2019 Autosys R11 User Guide
http://slidepdf.com/reader/full/autosys-r11-user-guide 84/459
Date and Time Attributes and Time C hanges
Standard Time Changes
Because the clock gains one hour during the change from daylight time to
standard time in autumn, there are two 1:00-1:59 hours. Unicenter AutoSys
JM only runs jobs for which the start_time attribute is set to between 1:00 and1:59 during the second (standard time) hour. Jobs for which the start_mins
attribute is set run in both hours.
For example, a job scheduled to run on Sundays at 1:05 runs only at the
second 1:05. A job scheduled to run every 30 minutes runs at 1:00 DT and
1:30 DT, then again at 1:00 ST and 1:30 ST, and so on, as the following
illustration shows:
Jobs that are not time-based but have other dependencies still run during the
first hour.
Jobs with relative time dependencies run as expected. For example, if a job is
scheduled to run on Sunday at 0:30 and its term_run_time attribute is set to120 minutes, the job would normally terminate at 2:30. On the day of the
autumn time change, the job terminates at 1:30 standard time, which is 120
minutes after the job started.
When testing how the change from daylight time to standard time affects your
jobs, you must set the system clock to a time before 1:00 a.m. and allow the
entire hour to pass before you can observe the time change. If you manually
set the time to a period during the 1:00 a.m. to 2:00 a.m. window, the system
assumes that the time change has already occurred and does not reset at 2:00
a.m.
84 User Guide

7/16/2019 Autosys R11 User Guide
http://slidepdf.com/reader/full/autosys-r11-user-guide 85/459
Date and Time Attributes and Time Changes
Run windows are treated differently. When the specified start of a run window
is before the time change and its specified end occurs during the repeated
hour, the run window closes during the daylight time period (the first hour).
For example, a run window of 11:30 - 1:30 ends at 1:30 DT, not 1:30 ST (that
is, the run window remains open for its specified two hours, not for threehours). A problem might occur if there are also associated start times for the
job that occur during the repeated hour. If the job in our example also had a
start time of 1:15, the start time would be calculated for 1:15 ST and the job
would not run on the day of the time change.
When the specified opening of the run window falls during the repeated hour,
Unicenter AutoSys JM moves its start time to the second, standard time hour.
The end time does not change, so the length of the run window remains the
same. For example, a run window of 1:45 - 2:45 becomes 1:45 ST - 2:45 ST.
When both the specified start and end of the run window occur during the
repeated hour, the run window opens during the second, standard time hour.
J ob Definitions 85

7/16/2019 Autosys R11 User Guide
http://slidepdf.com/reader/full/autosys-r11-user-guide 86/459

7/16/2019 Autosys R11 User Guide
http://slidepdf.com/reader/full/autosys-r11-user-guide 87/459
Chapter 4: Job Types, Structure, and
StatesThis section contains the following topics: Introducing Jobs (see page 87) Job Types and Structure (see page 88)How the Agent Sets Job Profiles (see page 93) Basic Job Attributes (see page 100) Job States (see page 102)Starting Conditions (see page 106) Job Run Numbers and Names (see page 119)
Introducing Jobs
All activity controlled by Unicenter AutoSys JM is based on jobs. Other objects,
such as monitors, reports, and the Job Status Console, track job progress. A
job is the foundation for the entire operations cycle.
A job is any single command or executable, UNIX shell script, or Windows
batch file. Each job definition contains a variety of qualifying attributes,
including the conditions specifying when and where a job should run.
You can define jobs using JIL statements. When you use JIL statements, you
can input them interactively to the jil command, or you can store them in textfiles, which you can redirect into the jil command.
Note: The Scheduler must be running before you start any processes, so you
should start it before performing the tasks described in this chapter.
More information:
Schedulers (see page 112)Job Definitions (see page 77)
J ob Types, Structure, and States 87

7/16/2019 Autosys R11 User Guide
http://slidepdf.com/reader/full/autosys-r11-user-guide 88/459
J ob Types and Structure
Job Types and Structure
There are three basic types of classic jobs: command, file watcher, and box.
The structure of a job depends on the job type.
As their names imply, command jobs run commands, box jobs are containers
that hold other jobs or box jobs, and file watcher jobs watch for the arrival of
a specified file. These job types have a majority of job attributes in common,
and Unicenter AutoSys JM treats them all similarly. The primary differences
between them are the actions taken when the jobs run.
Unicenter AutoSys JM also supports definition of new job types.
The following illustration shows the structure of a job:
More information:
Create a New Job Type (see page 91)
88 User Guide

7/16/2019 Autosys R11 User Guide
http://slidepdf.com/reader/full/autosys-r11-user-guide 89/459
J ob Types and Structure
Basic Job Information
In the previous illustration, the attributes listed under Job comprise basic job
information and are common to all jobs regardless of type. These attributes
include the job name, starting conditions, specified alarms, restart conditions,and a variety of other settings that are not shown in the illustration (such as
the box, if any, in which the job resides).
A job's starting conditions can depend on the date, time, and status of any
other job.
Command Jobs
Command jobs are usually simply referred to as jobs. The command run by
the job can be a shell script, an executable program, a file transfer, and so on.
When a command job runs, the result is the execution of a specified commandon a Client computer. When all the starting conditions are met, Unicenter
AutoSys JM runs this command and captures its exit code upon completion.
The exit event (either SUCCESS or FAILURE) and the exit code value are
stored in the database.
Command jobs have the following supporting features:
Resource Criteria
Unicenter AutoSys JM verifies that an appropriate amount of free file space
is available before starting a process. If it is not available, an alarm is sent
and the job is rescheduled.
Profile Script
For each job, you can specify a script to be sourced before command
execution that defines the environment in which the command is to run.
All commands are run under the Bourne shell (/bin/sh). Therefore, all
statements in the profile must use /bin/sh syntax.
You can define a profile with environments variables that are stored
in the Windows registry by using the job profiles binary.
Standard I/O Files
For each job, you can specify the standard input, output, and error files.
J ob Types, Structure, and States 89

7/16/2019 Autosys R11 User Guide
http://slidepdf.com/reader/full/autosys-r11-user-guide 90/459
J ob Types and Structure
Box Jobs
A box job (or box) is a container of other jobs. You can use it to organize and
control process flow. The box itself performs no actions, although it can trigger
other jobs to run. An important feature of this type of job is that boxes cancontain other boxes. You can use boxes to contain other boxes that contain
jobs that are related by starting conditions or other criteria (not by similar
application types). This allows you to group the jobs and operate on them in a
logical manner.
Box jobs are powerful tools for organizing, managing, and administering large
numbers of jobs that have similar starting conditions or complex logic flows.
Knowing how and when to use boxes is often the result of some
experimentation.
Starting Conditions for Box J obs
When no other starting conditions are specified at the job level, a job in a box
runs when the starting conditions for the box are satisfied. When several jobs
in a box do not have job-level starting conditions, they all run in parallel.
When any job in a box changes state, other jobs check if they are eligible to
start running.
When the priority attribute is set for jobs in a box, they are processed in order
of priority, highest to lowest.
Note: For more information about the priority attribute, see the Reference
Guide.
Jobs in boxes run only once for each box execution. If you specify multiplestart times for a job during one box processing cycle, only the first start time
is used. This prevents jobs in boxes from inadvertently running multiple times.
Unicenter AutoSys JM starts a job when the current time matches, or is later
than, the specified start time. In addition to explicit starting conditions, jobs in
boxes have the implicit condition that the box job itself is running. This means
that jobs in a box start only if the box job is running. However, if a job in a
box starts and the box job is stopped, the started job runs to completion.
Note: Use caution when putting a job with more than one time-related
starting condition in a box. For example, assume that a job that runs at 15
and 45 minutes past the hour is put in a box that runs at the start of every
hour. The first time the box starts, the job runs at 15 minutes past the hour. Afuture start is then issued for 45 minutes past the hour, by which time the box
has completed. As a result, the job will not run until the box runs again at the
start of the next hour. At that time, the job runs as soon as the box starts
because it is past its start time. The job runs, another future start job is issued
for 15 minutes past the hour, the box completes, and the cycle repeats itself.
90 User Guide

7/16/2019 Autosys R11 User Guide
http://slidepdf.com/reader/full/autosys-r11-user-guide 91/459
File Watcher Jobs
J ob Types and Structure
A file watcher job is similar to a command job. However, instead of starting a
user-specified command on a Client computer, a file watcher job starts a
process that monitors for the existence and size of a specific operating systemfile. When that file reaches the specified minimum size and is no longer
growing in size, the file watcher job completes successfully, indicating that the
file has arrived.
Using file watcher jobs provides a means of integrating events that are
external to Unicenter AutoSys JM into the processing conditions of jobs. For
example, assume a file must be downloaded from a mainframe, and it is
expected to arrive after 2:00 a.m. After it arrives, a batch job is run to process
it, possibly even starting a whole sequence of jobs.
You could set up a file watcher job to start at 2:00 a.m., wait for the arrival of
the specified file, and exit. You could also set up the batch job so that the
completion of the file watcher job is its only starting condition.
Create a New Job Type
You can create new job types. For example, you have an adapter binary and
you want to create 300 jobs that invoke the adapter. You can create 300
command jobs and specify the command each time or you can define a single
job type (for example '0') that represents the adapter command and define
300 jobs of type '0'.
To create a new job type
1. Insert_job_type:0.
2. Enter the following command: special_adapter.
3. Enter the following description: This is a job type to run special adapter
commands.
The new job type is created.
J ob Types, Structure, and States 91

7/16/2019 Autosys R11 User Guide
http://slidepdf.com/reader/full/autosys-r11-user-guide 92/459
J ob Types and Structure
Use a New Job Type
After you create a new job type, you must define a job to use it.
To use a new job type
1. Insert_job:test.
2. Enter job_type:0.
3. Enter machine name: localhost.
The newly created job type can be used.
Unicenter AutoSys JM also supports delete_job_type and update_job_type.
You can use the delete_job_type to delete a job type, and the
update_job_type when you want to modify an existing job type.
Starting Conditions and Boxes
When you put a job in a box, it inherits all of the starting conditions of the
box. Therefore, all starting conditions defined for the box must be met and the
box must enter the RUNNING state before the job can run. If there are no
additional conditions on the job, it starts as soon as the box starts. A job runs
only once for each box execution.
By default, there is no sequential job processing in a box. For example, if three
jobs are in a box, all three jobs start when the box starts if they have no
additional conditions.
To implement a processing sequence for jobs in a box, you must specifyadditional starting conditions for each job. For example, you could specify that
Job1 has no starting conditions, Job2 depends on the completion of Job1, and
Job3 depends on the completion of Job2.
Note: Jobs that depend on a job that is ON_ICE run as if that starting
condition has been satisfied. In this scenario, if Job2 enters the ON_ICE state,
then Job1 and Job3 start simultaneously when the box they are in starts
running.
92 User Guide

7/16/2019 Autosys R11 User Guide
http://slidepdf.com/reader/full/autosys-r11-user-guide 93/459
How the Agent Sets J ob Profiles
How the Agent Sets Job Profiles
A job profile defines the appropriate non-system environment variables for a
job. Before running a command job, the Agent sets the assigned job profile on
the job's target computer. Use the following process to define and use a job
profile:
Use the Job Profiles Manager to define a profile that contains the
environment variables required for a specific job to run. The profile job
attribute is set to the name of the set of environments stored in the
registry as created by the Job Profiles Manager.
You can create a simple shell script file written to the Bourne shell
containing the environments you wish to source. The profile job attribute
is set to the filename of the shell script.
Use the profile attribute or the Unicenter WCC GUI to assign the profile to
one or more jobs.
The Agent on the job's target computer first sets the environment
variables for the job's execution, and then sets the specified job profile
variables.
Note: Only one job profile can be sourced for a job, and the environment
variables are set before the profile variables. Therefore, you can reference
system environment variables in job profiles. However, if a variable is set
more than once, the last value read is used.
The Agent searches for the assigned profile. By default, the Agent
searches for the profile on the computer on which the command is to run.
However, when assigning the job profile, you can specify both the
computer name and the profile name, which lets you run the job on one
computer while using a job profile defined on another computer.
Note: Job profiles are instance-specific. You cannot assign a profile
defined in one Unicenter AutoSys JM instance to a job defined in another.
J ob Types, Structure, and States 93

7/16/2019 Autosys R11 User Guide
http://slidepdf.com/reader/full/autosys-r11-user-guide 94/459
How the Agent Sets J ob Profiles
Environment Variables
You must define all the environment variables needed to run a job in its
assigned profile, because only one profile is sourced before a command job
runs.
If you do not assign a profile job attribute in the job definition, the Agent
uses the DEFAULT job profile. While Unicenter AutoSys JM supplies a DEFAULT
job profile, it does not define any environment variables in it. You must use
the Job Profiles Manager to define your own DEFAULT profile.
When the Agent reads the profile, the environment variables in the profile are
expanded. For example, if Path is a variable in the specified profile, Unicenter
AutoSys JM expands any environment variables specified as the value of Path,
uses this path to search for the command, and sets the new value for the
%Path% variable before running the command. You can specify the full pathname, in which case you can use variables set from the job profile in the path
name specification. The Agent reads profile variables in alphabetical order.
Therefore, if you plan to expand variables in the profile itself, you must define
the variables so that they are in the appropriate order when read
alphabetically.
Note: Although environment variables are set automatically in the command's
environment, user environment variables are not automatically set. All other
required environment variables must be defined in the job's profile, either in
the DEFAULT profile (which on Windows is initially empty) or in a user-defined
job profile.
For more information about the profile attribute, see the Reference Guide.
94 User Guide

7/16/2019 Autosys R11 User Guide
http://slidepdf.com/reader/full/autosys-r11-user-guide 95/459
How the Agent Sets J ob Profiles
Use the Job Profiles Manager
If you have Windows Administrators group privileges and Windows
Registry edit privileges, you can use the Job Profiles Manager to create, open,
and delete job profiles and to create, edit, and delete profile environment
variable definitions.
To use the Job Profiles Manager
1. Double-click the Instance Job Profile Management icon.
The Job Profiles Manager is displayed.
Note: Profiles are instance-specific. Therefore, if you have installed
multiple Unicenter AutoSys JM instances, make sure that you launch the
Job Profiles Manager for the appropriate instance. By default, the Job
Profiles Manager connects to the computer that you are logged on to.
2. (Optional) To connect to a host other than the computer you are currently
logged on to, type the appropriate name in the Host Name field and click
Connect.
The Job Profiles Manager connects to the specified host.
3. Do one of the following:
To open a profile, click and select a profile to open from the Profile
Name list.
The current settings for the selected profile appear in the Environment
Variables area. Double-click a variable to display it in the Variable and
Value fields for editing.
To create a profile, enter a new profile name in the Profile Name field.
A new profile is created.
Note: Variable definitions in Windows are not case-sensitive. However, the Job
Profiles Manager does replicate, in the job profile itself, the capitalization that
you enter in the Variable and Value fields.
J ob Types, Structure, and States 95

7/16/2019 Autosys R11 User Guide
http://slidepdf.com/reader/full/autosys-r11-user-guide 96/459
How the Agent Sets J ob Profiles
Delete a Job Profile
You can delete a job profile that is no longer needed for a job to run.
To delete a job profile
1. Select the profile to delete from the Profile Name list in the Job Profiles
Manager.
The current settings for the selected profile appear in the Environment
Variables area.
2. Click Delete Profile.
A confirmation message appears.
3. Click OK.
The job profile is deleted.
Note: You cannot delete the DEFAULT profile. However, you can add and
delete environment variables in the DEFAULT profile. When you click Cancel,
the Job Profiles Manager discards all modifications you made to the current
profile, but does not restore deleted variables.
96 User Guide

7/16/2019 Autosys R11 User Guide
http://slidepdf.com/reader/full/autosys-r11-user-guide 97/459
How the Agent Sets J ob Profiles
Create a Variable Definition
You can add a variable and value to a profile so that a job can use the
variable at run time.
To create a variable definition
1. Select the profile for which to create a variable definition from the Profile
Name list in the Job Profiles Manager.
The current settings for the selected profile appear in the Environment
Variables area.
2. Enter a variable name in the Variable field, enter a value for the variable in
the Value field, and click Set.
The variable definition is recorded and the new variable appears in the
Environment Variables area.3. When you finish adding variables, do one of the following to save the
settings for the current profile:
Select a new profile from the Profile Name list.
Your settings are saved and the current settings for the newly selected
profile appear in the Environment Variables area.
Click OK.
Your settings are saved and the Job Profiles Manager closes.
Note: When adding new profiles, you must either define the profile on the
computer where the command runs or specify the computer name (on which
the profile is defined) with the profile name when you are defining the job
environment profile or the profile attribute. If you do not use one of these
approaches, a Profile not found error displays when you attempt to start the
job. For more information, see the Reference Guide.
J ob Types, Structure, and States 97

7/16/2019 Autosys R11 User Guide
http://slidepdf.com/reader/full/autosys-r11-user-guide 98/459
How the Agent Sets J ob Profiles
Edit a Variable Definition
You can modify an existing variable definition in the profile if the job
requires a different value to run.
To edit a variable definition
1. Select the profile for which to edit a variable definition from the Profile
Name list in the Job Profiles Manager.
The current settings for the selected profile appear in the Environment
Variables area.
2. Double-click the variable to edit in the Environment Variables area.
The dialog refreshes to display the name of the selected variable in the
Variable field and its value in the Value field.
3. Modify the variable name and value as appropriate, and click Set.
The variable definition is recorded and the modified variable appears in the
Environment Variables area.
4. When you finish editing variables, do one of the following to save the
settings for the current profile:
Select a new profile from the Profile Name list.
Your settings are saved and the current settings for the newly selected
profile appear in the Environment Variables area.
Click OK.
Your settings are saved and the Job Profiles Manager closes.
Note: If you click Cancel, the Job Profiles Manager only discards
modifications you made to the current profile. Any changes you made to
other profiles were saved when you selected the current profile.
98 User Guide

7/16/2019 Autosys R11 User Guide
http://slidepdf.com/reader/full/autosys-r11-user-guide 99/459
How the Agent Sets J ob Profiles
Delete a Variable Definition
If you do not want an environment variable in the profile, you can delete
it.
To delete a variable definition
1. Select the profile from which to delete a variable definition from the Profile
Name list in the Job Profiles Manager.
The current settings for the selected profile appear in the Environment
Variables area.
2. Double-click the variable to delete in the Environment Variables area.
The dialog refreshes to display the name of the selected variable in the
Variable field and its value in the Value field.
3. Click Delete.
The variable and its value are deleted from the profile.
4. When you finish deleting variables, do one of the following to save the
settings for the current profile:
Select a new profile from the Profile Name list.
Your settings are saved and the current settings for the newly selected
profile appear in the Environment Variables area.
Click OK.
Your settings are saved and the Job Profiles Manager closes.
Note: You cannot undo the deletion of a variable, but you can cancel anyother modifications you made to the current profile by clicking Cancel.
When you click Cancel, the Job Profile Manager closes and Unicenter
AutoSys JM does not update the current profile. Any changes you made to
other profiles were saved when you selected the current profile.
J ob Types, Structure, and States 99

7/16/2019 Autosys R11 User Guide
http://slidepdf.com/reader/full/autosys-r11-user-guide 100/459
Basic J ob Attributes
Basic Job Attributes
This section discusses the required job attributes for each standard job types.
Additional optional attributes are available for more advanced job definitions.
The owner attribute, which is required for all job types, is automatically
assigned when you create a job definition.
Note: For more information, see the Reference Guide.
Command Job Attributes
The following attributes are required for all command job definitions:
job_name
Defines the name used to identify the job to Unicenter AutoSys JM.
command
Defines the shell script, command, or application that Unicenter AutoSys
JM runs when all of the job's starting conditions are met.
machine
Defines the name of the server on which to run the command.
condition
Defines the dependency conditions that must be met for the job to run.
This is not always required. For example, it may not be required in a case
where a job is always started manually.
File Watcher Job Attributes
The following attributes are required for all file watcher job definitions:
job_name
Defines the name used to identify the job to Unicenter AutoSys JM.
watch_file
Defines the name of the file to monitor.
machine
Defines the name of the server on which to run the command.
condition
Defines the dependency conditions that must be met for the job to run.
This is not always required. For example, it may not be required in a case
where a job is always started manually.
100 User Guide

7/16/2019 Autosys R11 User Guide
http://slidepdf.com/reader/full/autosys-r11-user-guide 101/459
Box Job Attributes
Basic J ob Attributes
The following attributes are required for all box job definitions:
box_name
Defines the name used to identify the job to Unicenter AutoSys JM. This
name is used by other jobs as the name of their parent box.
condition
Defines the dependency conditions that must be met for the job to run.
This is not always required. For example, it may not be required in a case
where a job is always started manually.
J ob Types, Structure, and States 101

7/16/2019 Autosys R11 User Guide
http://slidepdf.com/reader/full/autosys-r11-user-guide 102/459
J ob States
Job States
Unicenter AutoSys JM tracks the current state, or status, of every job. The
value of a job's status checks when to start jobs with dependencies on the
tracked job. The job status is displayed in the job report generated by the
autorep command and in the Unicenter WCC GUI.
A job can have one of the following statuses:
ACTIVATED
Indicates that the top-level box in which the job resides is currently in a
RUNNING state but the job has not yet started.
FAILURE
Indicates one of the following:
For a command job, the command exited with a code greater than the
max_exit_success (maximum exit code for success) attribute valuespecified for the job.
For a box job, at least one job in the box ended with a FAILURE status
or the box_failure (exit condition for box failure) attribute evaluated to
TRUE.
By default, any exit code greater than 0 is interpreted as FAILURE.
Unicenter AutoSys JM issues an alarm when a job fails.
INACTIVE
Indicates that the job has not yet been processed. Either it has never run,
or its status was intentionally changed to deactivate its previous
completion status.
ON_HOLD
Indicates that the job is on hold and will not run until it receives the
JOB_OFF_HOLD event.
ON_ICE
Indicates that the job is removed from all conditions and logic, but is still
defined. Operationally, this condition is equivalent to deactivating the job,
and it remains on ice until it receives the JOB_OFF_ICE event.
PEND_MACH
Indicates that a job can logically start (that is, all the starting conditions
have been met), but the machine to which it is assigned is currently
offline, either because of a MACH_OFFLINE event or because the computerwas proactively put in an inactive state. When the machine comes back
online and the required load units become available, Unicenter AutoSys JM
starts the job.
102 User Guide

7/16/2019 Autosys R11 User Guide
http://slidepdf.com/reader/full/autosys-r11-user-guide 103/459
J ob States
QUE_WAIT
Indicates that the job can logically start (that is, all the starting conditions
have been met), but the machines to which it is assigned do not have
enough available load units. When the required load units become
available, Unicenter AutoSys JM starts the job.
RESTART
Indicates that the job was unable to start because of hardware or
application problems, and has been scheduled to restart.
RUNNING
Indicates that the job is running. If the job is a box job, the jobs in the box
can start (other conditions permitting). If the job is a command or file
watcher job, the RUNNING status indicates that the specified process is
actually running on the client computer.
STARTING
Indicates that the Scheduler has initiated the start job procedure with the
Agent. This status is only for command and file watcher jobs.
SUCCESS
Indicates that the job exited with a code equal to or less than the max_exit_success (maximum exit code for success) attribute value specified for the job. If the job is a box, this value means that all the jobs in the box have
finished with a SUCCESS status or the box_success (exit condition for box
success) attribute evaluated to TRUE.
By default, only exit code 0 is interpreted as SUCCESS. However, you can
reserve a range of values up to the max_exit_success value to interpret asSUCCESS for each job.
TERMINATED
Indicates that the job ended while in the RUNNING state. A job can be
terminated if it receives a KILLJOB event or if it was defined to terminate if
its containing box failed. A job might also be terminated if it exceeds its
term_run_time (maximum run time) attribute value or if it receives a UNIX
kill command. If the job itself fails, it has a FAILURE status, not a
TERMINATED status. Unicenter AutoSys JM issues an alarm when a job is
terminated.
Note: Jobs that depend on a job that is ON_ICE run as though the job
succeeded. However, dependent jobs do not run when a job is ON_HOLD. If a job’s starting conditions are already satisfied when it is taken off hold, it is
scheduled to run. However, when a job is taken off ice, it does not run (even if
its starting conditions are already satisfied) until its starting conditions recur.
J ob Types, Structure, and States 103

7/16/2019 Autosys R11 User Guide
http://slidepdf.com/reader/full/autosys-r11-user-guide 104/459
J ob States
Example: Status of Simple Command Jobs
A change in job status is reported as a CHANGE_STATUS event, which the
Scheduler records in its log when the status is processed. For example, when
the job test_job changes from STARTING to RUNNING, the Scheduler logcontains the following entry:
EVENT: CHANGE_STATUS STATUS: RUNNING JOB: test_job
The following illustration shows the simplest state transition for a job, in which
an event satisfies the starting conditions for the job.
The job starts, processes, and completes with either a FAILURE or SUCCESS
exit code.
Note: In the following illustration, statuses are shown as shaded boxes:
104 User Guide

7/16/2019 Autosys R11 User Guide
http://slidepdf.com/reader/full/autosys-r11-user-guide 105/459
J ob States
Example: Status of Box Jobs
For a job in a box, the job enters the ACTIVATED state when the top-level box
in which it resides enters the RUNNING state, as the following illustration
shows. After the job starts, the remainder of the scenario is the same as forsimple jobs.
Note: In the following illustration, statuses are shown as shaded boxes:
A box always enters the RUNNING state as soon as all its starting conditions
are met. This RUNNING event usually starts jobs in the box.
If a job has an associated priority, all its starting conditions have been met,
and there are not enough machine resources available, it enters the
QUE_WAIT state. When resources become available, it enters the STARTING
state, and then runs.
Because the job state reflects the Scheduler status, a job might have actually
completed even if the Scheduler has not processed that event. In this case,
Unicenter AutoSys JM still shows the job's status as RUNNING. To view all the
events for a job, including those that have not yet processed, display the job
detail in the output of the autorep command.
J ob Types, Structure, and States 105

7/16/2019 Autosys R11 User Guide
http://slidepdf.com/reader/full/autosys-r11-user-guide 106/459
Starting Conditions
In addition, the job state always reflects the most recent event processed.
Therefore, after a job completes, the status remains as it was on completion.
If the job ended successfully, the status remains SUCCESS until the job runs
again.
Note: When a box job starts, all jobs in the box change their state to
ACTIVATED before they run. Jobs run immediately unless other conditions
apply. If a box completes before a job runs, the job is set to INACTIVE at box
completion. As a result, jobs do not retain their statuses from previous box
processing cycles when a new box cycle begins.
More information:
Box Jobs (see page 90)
Starting ConditionsUnicenter AutoSys JM verifies if it should start a job based on the evaluation of
the starting conditions defined for the job. All defined starting conditions must
be true for a job to start. These conditions can include one or more of the
following:
Date and time scheduling parameters are met.
Starting conditions specified in the job definition evaluate to TRUE.
For jobs in a box, the box is in the RUNNING state.
The current job state is not ON_HOLD or ON_ICE.
The job’s machine is not OFFLINE.
When an event changes any of the above conditions, Unicenter AutoSys JM
finds all the jobs that might be affected by this change and checks if it can
start them.
106 User Guide

7/16/2019 Autosys R11 User Guide
http://slidepdf.com/reader/full/autosys-r11-user-guide 107/459
Starting Conditions
Date and Time Dependencies
You can use JIL statements to schedule Unicenter AutoSys JM jobs to start at a
specific date and time. Unicenter AutoSys JM then calculates a matrix of
specified day, date, and time values and starts jobs accordingly. A time rangecannot span more than 24 hours.
For example, you can define a job to start on Monday, Wednesday, and Friday
at 8:00 a.m. and 5:00 p.m.
You can specify days of the week or actual dates, but you cannot specify both.
You can specify days of the week using JIL, but you can only specify actual
dates using custom calendars. You can also specify a time zone to apply to
your starting times, and you can define a job to start at one specific time of
day or hourly, denoted in minutes past the hour.
TZ Environment Variable
By default, jobs with time-based starting conditions that do not specify a time
zone are scheduled to start based on the time zone of the TZ environment
variable (that is, the time zone under which the Scheduler runs).
Before you start the Scheduler, make sure that the TZ environment variable is
set. The Scheduler must be started once after you upgrade your database to
insert the value of the TZ environment variable into the database. Do this
before executing jil or autorep.
Custom Calendars
You can use the autocal_asc utility to define any number of custom calendars,each with a unique name and containing any number of dates or date/time
combinations. You can use these calendars to specify days on which to run the
jobs with which they are associated or to specify days on which jobs with
which they are associated should not run. Calendars exist independently of
any jobs associated with them and are referenced by jobs through job
definitions.
J ob Types, Structure, and States 107

7/16/2019 Autosys R11 User Guide
http://slidepdf.com/reader/full/autosys-r11-user-guide 108/459
Starting Conditions
Job Dependencies Based on Job Status
You can define starting conditions to start jobs based on the current status of
one or more jobs that exist in the database. In this way you can program
simple or complex prerequisites for starting a job.
For example, you can implement a single-threaded, batch queue-like set of job
dependencies so that JobB starts when JobA achieves a SUCCESS status and
JobC starts when JobB achieves a SUCCESS status.
You can configure more complex conditions by combining a series of conditions
with the AND and OR logical operators. You can use the pipe symbol (|)
instead of the word OR and the ampersand symbol (&) instead of the word
AND. Spaces between conditions and delimiters are optional. You can specify
even more complex conditions by grouping the expressions in parentheses,
which force precedence. The equation is evaluated from left to right.
For example, in the following set of starting conditions, either both A and B
must be successful or both D and E must be successful for the statement to
evaluate as TRUE:
(success(JobA) and success(JobB)) or (success(JobD) AND success(Job E))
Note: If you specify a condition for an undefined job, the condition evaluates
as FALSE, and any jobs dependent on this condition do not run. You can use
the ujo_chk_cond stored procedure to check for this type of invalid condition
statement.
The syntax for defining job dependencies is the same whether the job is being
defined using JIL or the Unicenter WCC GUI, except that the JIL statement
begins with the JIL condition keyword.
108 User Guide

7/16/2019 Autosys R11 User Guide
http://slidepdf.com/reader/full/autosys-r11-user-guide 109/459
Starting Conditions
The following is the syntax for conditions based on job status:
status(job_name)
s t a t u s
Indicates the status as one of the following:
success
Indicates that the status condition for job_name is SUCCESS. You can
abbreviate this value to s.
failure
Indicates that the status condition for job_name is FAILURE. You can
abbreviate this value to f.
done
Indicates that the status condition for job_name is SUCCESS, FAILURE
or TERMINATED. You can abbreviate this value to d.
terminated
Indicates that the status condition for job_name is TERMINATED. You
can abbreviate this value to t.
notrunning
Indicates that the status condition for job_name is anything except
RUNNING. You can abbreviate this value to n.
j o b _ n am e
Identifies the job on which the new job is dependent.
You can also abbreviate the dependency specification EXIT CODE to e andVALUE (of a global variable) to v.
You can use the max_exit_success (maximum exit code for success) attribute
set for a job to control the value of the SUCCESS status. If you specify this
attribute, any job that exits with an exit code less than or equal to the
specified value is treated as a success. A FAILURE status means the job exited
with an exit code higher than this value. The default exit code for normal job
completion is 0. A TERMINATED status means the job was killed.
Note: You can use either uppercase or lowercase letters to specify a status.
However, you cannot use mixed case.
J ob Types, Structure, and States 109

7/16/2019 Autosys R11 User Guide
http://slidepdf.com/reader/full/autosys-r11-user-guide 110/459
Starting Conditions
Managing Job Status
Starting conditions that are based on job status use the current (or most
recent) completion status of the job. The current completion status is defined
by the job run, regardless of when that run occurred.
However, if you want to enforce the concept of time-based processing cycles,
where the completion status of a job for some previous time period should not
affect the processing of this time cycle, there are several options available.
When a box job starts, the status of all the jobs in the box changes to
ACTIVATED. Therefore, subsequent jobs in the box that depend on the
completion of jobs performed earlier in the same box only use the completion
statuses from this box run. Placing the jobs in one processing cycle inside a
top-level box and setting the box to start at the beginning of the processing
cycle prevents time-critical jobs from being affected by invalid information.
When a job is first entered into the database, and before it runs for the first
time, its status is set to INACTIVE. By changing the status of jobs that have
completed but whose completion status should no longer be used in dependent
job conditions to INACTIVE, the completion status from the last run is no
longer the current status and it is not used.
Use the sendevent command to change a job status to INACTIVE.
Alternatively, you could create a Unicenter AutoSys JM job to accomplish this.
If you change the status of a top-level box to INACTIVE, all the jobs in the box
also change to INACTIVE.
Deleting and reinserting the job using JIL accomplishes the same thing.
However, the past reporting history on the job is no longer available. Updatinga job using JIL does not change the status of the job.
110 User Guide

7/16/2019 Autosys R11 User Guide
http://slidepdf.com/reader/full/autosys-r11-user-guide 111/459
Starting Conditions
Cross-Instance Job Dependencies
A Unicenter AutoSys JM instance is one licensed version of Unicenter AutoSys
JM software running as a Unicenter AutoSys JM server and as one or more
Unicenter AutoSys JM Clients, on one or more computers. An instance uses itsown Scheduler and Event Server and operates independently of other
instances.
Multiple instances are not inherently connected, but they can communicate
with each other. You can define jobs to have cross-instance dependencies, and
multiple instances can send events to each other.
For example, you can use a sendevent command similar to the following to
send events between instances:
sendevent -E STARTJOB -J job_name -S autoserv
In this example, the job_name identifies a job defined for the instanceindicated by the autoserv , which identifies the instance's unique, capitalized
three-character identifier (for example, ACE).
You can also associate jobs with more than one instance. For example, a job
defined to run on one instance could have as a starting condition the
successful completion of a job running on a different instance. The
specification for such a job dependency might resemble the following:
condition: success(jobA) AND success(jobB PRD)
In this example, the success (jobB^PRD) condition specifies the successful
completion of a job named jobB running on a different instance specified with
the three-character identifier PRD. If the dependency specification does notinclude a caret (^) and a different instance ID, the current instance is used by
default.
When Unicenter AutoSys JM encounters a cross-instance dependency, it sends
an EXTERNAL_DEPENDENCY event from the requesting instance. If the target
instance cannot be reached, the product issues an INSTANCE_UNAVAILABLE
alarm.
J ob Types, Structure, and States 111

7/16/2019 Autosys R11 User Guide
http://slidepdf.com/reader/full/autosys-r11-user-guide 112/459
Starting Conditions
The following illustration shows two instances, each with a Single Event
Server, exchanging cross-instance job dependencies:
Different instances can run from the same executables and can have the same
values for $AUTOSYS and $AUTOUSER, both on the Scheduler machine and onmachines running remote Agents. However, each instance must have a
different value for $AUTOSERV.
For more information, see the Installation Guide.
Schedulers
When you implement cross-instance dependencies, different Schedulers can do
the following:
Run on different server computers or on the same server computer.
Access the same Client computers to start jobs.
Send events to other Unicenter AutoSys JM instances.
Note: If the Application Server of a target instance is down, the Scheduler
tries to send an event (or events) every five minutes until the target instance's
Application Server can be reached.
112 User Guide

7/16/2019 Autosys R11 User Guide
http://slidepdf.com/reader/full/autosys-r11-user-guide 113/459
Starting Conditions
Event Servers
Event Servers track cross-instance job dependencies. Each time a job
definition with a cross-instance job dependency is submitted to the database,
the Event Server does the following: Makes an entry in the ujo_ext_job table of the issuing instance. The
entries in this table specify the status of jobs in other instances in which
this instance has an interest.
Makes an entry in the ujo_req_job table of the receiving instance. The
entries in this table specify the jobs defined as job dependencies in a job
definition on the source instance.
The Event Server uses the job name, a caret symbol (^) and the instance
name to enter jobs in the ujo_ext_job and ujo_req_job tables. For example:
jobB^PRD
The use of multiple databases is completely independent of instances using
cross-instance dependencies. You can have multiple instances that each use
Dual Event Servers.
Note: When communicating with the Application Server, Schedulers can only
connect to those instances with a like Application Server. That is, instances
with Sybase data servers can only connect with other instances that have
Sybase data servers. The same holds true for instances with Oracle or Ingres
databases.
Example: Job Dependencies
For a job that runs only when the job named DB_BACKUP succeeds, you wouldspecify the job dependency as follows:
success(DB_BACKUP)
If JobC should only start when both JobA and JobB complete successfully or
when both JobD and JobE complete (regardless of whether JobD and JobE
failed, succeeded, or terminated), you would specify the following dependency
in the job definition for JobC:
(success(JobA) AND success(JobB)) OR (done(JobD) AND done(JobE))
As indicated in this example, you can use any job status as part of the
specification for a specific job's starting conditions. With this latitude, you canprogram branching paths that must be taken and provide alternate actions for
error conditions.
J ob Types, Structure, and States 113

7/16/2019 Autosys R11 User Guide
http://slidepdf.com/reader/full/autosys-r11-user-guide 114/459
Starting Conditions
For example, if JobB fails after partially processing, you might want to call a
routine called Backout that reverses the changes that were made. You would
specify the following job dependency in the job definition for Backout:
failure(JobB)
You can use the notrunning operator to keep multiple jobs from running
simultaneously. For example, assume you do not want to run a database
dump (DB_DUMP) and a file backup (BACKUP) at the same time because such
processing would adversely impact performance. However, you might have a
smaller job that can run as long as both of these resource-intensive jobs are
not running. You would specify the smaller job's dependency as follows:
notrunning(DB_DUMP) AND notrunning(BACKUP)
More information:
Specifying Job Load (job_load) (see page 188)
114 User Guide

7/16/2019 Autosys R11 User Guide
http://slidepdf.com/reader/full/autosys-r11-user-guide 115/459
Starting Conditions
Job Dependencies Based on Exit Codes
You can use the following syntax to base job dependencies on exit codes that
indicate completed tasks. In this way, you can implement even more specific
branching logic for recovering from job failures.
This method of defining job dependencies has the following format:
exitcode (job_name) operator value
j o b _ n am e
Defines the name of the job upon which the new job depends.
o p e r a t o r
Specifies one of the following exit code comparison operators:
=
Equal to.
!=
Not equal to.
<
Less than.
>
Greater than.
<=
Less than or equal to.
>=
Greater than or equal to.
v a l u e
Defines the numeric exit code value on which to base the dependency.
For example, if a broken communication line results in JobA failing with an exit
code of 4, and you want the system to run a script (JobB) that redials the line
when this code is encountered, you would enter the following for the job
dependency specification for the JobB redial job:
exitcode (JobA) = 4
You can use any job status or exit codes as part of the specification for
starting conditions. You can abbreviate the dependency specification exitcode
with the letter e (uppercase or lowercase).
J ob Types, Structure, and States 115

7/16/2019 Autosys R11 User Guide
http://slidepdf.com/reader/full/autosys-r11-user-guide 116/459
Starting Conditions
Exit Codes and Batch Files in Jobs Running on Windows
When you define jobs to run batch files on Windows, you should be
aware of and account for Windows-specific behavior.
Windows programs return any exit values that are programmed in the
executable code. This exit value is the last thing returned to Windows when
the program terminates.
Generally, a zero (0) exit code indicates success, while a non-zero exit code
indicates an error. The expected error values should be documented with each
individual program, but some programs can return unexpected exit codes.
Modify these programs so that they return expected values, and use these
values when specifying exit code dependencies.
Jobs are created using standard Windows process creation techniques. After
the job is created, the Agent waits for the job to complete. When the job
completes, Unicenter AutoSys JM gets the program exit code from Windows
and stores it in the database for later use.
When launching programs directly, the exit codes are returned and put in the
database. However, there are some exit code behaviors that you must take
into consideration when using a job to start *.BAT batch files.
The exit code returned from a batch file is the return code from the last
operation executed in that particular batch file. Consider the following
example:
REM test batch file
test
if errorlevel 1 goto bad
goto good
:bad
del test.tmp
:good
exit
This sample batch file returns a 0 exit code as long as test.tmp exists. If
test.tmp does not exist, the return code is from the del line and not from the
line that runs the test. Therefore, this batch file returns a 0 (successful) exit
code, even if test failed to execute as intended.
116 User Guide

7/16/2019 Autosys R11 User Guide
http://slidepdf.com/reader/full/autosys-r11-user-guide 117/459
Starting Conditions
To help handle situations like this, Unicenter AutoSys JM supplies a program
called FALSE.EXE. This program resides in the Windows %AUTOSYS/bin
directory and takes only one parameter, which is the exit code you want
FALSE.EXE to return on completion. You can use FALSE.EXE as follows:
REM test batch file
test
if errorlevel 1 goto bad
exit
:bad
del test.tmp
false 1
When test fails with error level 1, this batch file returns an exit code of 1 from
FALSE.EXE, whether the test.tmp file exists or not.
J ob Types, Structure, and States 117

7/16/2019 Autosys R11 User Guide
http://slidepdf.com/reader/full/autosys-r11-user-guide 118/459
Starting Conditions
Job Dependencies Based on Global Variables
You can base job dependencies on global variables set using the sendevent
command. When using global variables in this way, the job dependency is
satisfied only when the value of the expression evaluates to TRUE.
This method of defining job dependencies has the following format:
VALUE(global_name) operator value
g l o b a l_ n a m e
Defines the name of the global variable upon which the job depends.
Limits: This value can be up to 30 characters in length. The following
characters are valid: a-z, A-Z, 0-9, period (.), underscore (_), and
hyphen (-). You can include spaces in a global variable name.
o p e r a t o r
Specifies one of the following exit code comparison operators:
=
Equal to.
!=
Not equal to.
<
Less than.
>
Greater than.
<=
Less than or equal to.
>=
Greater than or equal to.
v a l u e
Defines the numeric or text value of the global variable on which to base
the dependency.
Limits: This value can be up to 30 characters in length and cannot contain
quotation marks or spaces. The following characters are valid: a-z, A-Z, 09, period (.), underscore (_), and hyphen (-).
Note: When using JIL, use the condition attribute to enter the above
expression in the appropriate JIL script.
118 User Guide

7/16/2019 Autosys R11 User Guide
http://slidepdf.com/reader/full/autosys-r11-user-guide 119/459
J ob Run Numbers and Names
For example, assume that a set of jobs in a box should only run with a
manager's approval. In this case, use the following syntax to set the global
variable named manager-ok to OK, and make the top-level box job dependent
on this global variable:
VALUE(manager-ok) = OK
You can abbreviate the dependency specification VALUE with the letter v
(uppercase or lowercase).
Job Run Numbers and Names
Unicenter AutoSys JM uses run numbers for jobs. The run number is a unique
integer associated with every run of a job.
Consecutive run numbers are assigned every time a top-level job starts. Atop-level job is a job that is not contained in a box, and these run numbers are
inherited by every job in a box. This means that all jobs in a top-level box
have the same run number as the number used for the run of the box. This
design permits runs of nested jobs to be associated together in the same run.
If a job restarts, the run number remains the same and the ntrys field is
incremented. In the standard reports (autorep command), these two values
are displayed in the run column as run_num/ntry.
The run_num/ntry value is defined in the run-time environment for the job,
and is accessible to shell scripts or executables run as the job's command. This
value is contained in the variable $AUTORUN.
Unicenter AutoSys JM also maintains a value for each job's name, which is
defined in the runtime environment for the job.
As with $AUTORUN, this value is accessible to shell scripts or executables run
as the job's UNIX command. The value is contained in the variable
$AUTO_JOB_NAME.
On Windows, the environment variables are %AUTORUN% and
%AUTO_JOB_NAME%.
J ob Types, Structure, and States 119

7/16/2019 Autosys R11 User Guide
http://slidepdf.com/reader/full/autosys-r11-user-guide 120/459

7/16/2019 Autosys R11 User Guide
http://slidepdf.com/reader/full/autosys-r11-user-guide 121/459
Chapter 5: Box Job Logic This section contains the following topics: Basic Box Concepts (see page 121) Box Job Attributes and Terminators (see page 124) Box Job Flow Examples (see page 128)Advanced Job Flows (see page 136)
Basic Box Concepts
A box is a container of jobs with similar starting conditions (either date and
time conditions or job dependency conditions). Use boxes to group jobs with
similar scheduling parameters, not to group jobs organizationally. Forexample, you can group jobs that run daily at 1:00 a.m. in a box and assign
them a daily start condition. However, you should not group a variety of
account processing jobs with diverse starting conditions in the same box.
Default Box Job Behavior
The following default rules apply to boxes:
Jobs in a box run only once for each box execution.
Jobs in a box start only if the box itself has a status of RUNNING.
Boxes are used primarily for jobs with the same starting conditions.
A box used to group sequential jobs can contain up to 1,000 jobs.
A box remains in RUNNING state until all the jobs it contains have run.
A box returns a status of SUCCESS when all the jobs it contains have run
and returned a status of SUCCESS.
A box returns a status of FAILURE when all the jobs it contains have run
and one or more of the jobs has returned a status of FAILURE.
A box runs until it reaches a status of SUCCESS or FAILURE.
Using the sendevent command to change the state of a box to INACTIVE
changes the state of all the jobs it contains to INACTIVE.
More information:
Box Job Attributes and Terminators (see page 124)
Box J ob Logic 121

7/16/2019 Autosys R11 User Guide
http://slidepdf.com/reader/full/autosys-r11-user-guide 122/459
Basic Box Concepts
Box Job Recommendations
Because all jobs in a box change status when a box starts running, you may
want to use boxes to implement job cycle behavior. However, placing jobs in a
box to achieve this behavior can affect your system adversely because the jobstatus changes put a larger load on the Scheduler when the box starts
running.
Do not put jobs in a box solely to run reports on all of them. When you run
autorep on a box, the command generates a report about the box and all the
jobs it contains (unless you use the -L0 option). If you use wildcard characters
when specifying a job name, the report could contain duplicate entries. For
example, suppose you have a box named acnt_box that contains three jobs
(acnt_job1, acnt_job2, and daily_rep). If you specify acnt% as the job name
for the autorep report, the resulting report will contain an entry for the box
acnt_box and an entry for each job in the box. The autorep command
continues searching for all job names matching the wildcard character and lists
acnt_job1 and acnt_job2 a second time.
Note: Job names can only contain the following characters: a-z, A-Z, 0-9,
period (.), underscore (_), and hyphen (-). You cannot include spaces in a job
name.
How a Box Runs
When a box starts running, the status of all the jobs it contains (including
subboxes) changes to ACTIVATED, which means they are eligible to run.
Because of this status change, jobs in boxes do not retain their statuses from
previous box cycles.
When a box starts running, the system performs the following actions:
Analyzes each job for additional starting conditions.
Starts all jobs with no additional starting conditions and without any
implied order or priority.
Maintains jobs with additional starting conditions in the ACTIVATED state
until those additional dependencies are met.
Maintains the box in the RUNNING state as long as there are jobs in it with
ACTIVATED or RUNNING status.
Changes the status of the job directly from ACTIVATED to INACTIVE if itscontaining box is terminated before the job starts.
Note: Jobs in a box cannot start unless the box has a status of RUNNING.
However, after a job starts running, it runs to completion even if the box is
stopped.
122 User Guide

7/16/2019 Autosys R11 User Guide
http://slidepdf.com/reader/full/autosys-r11-user-guide 123/459
Basic Box Concepts
After all the jobs in a box have completed successfully, the box completes with
a status of SUCCESS. The status of the box and the jobs it contains remain
unchanged until the next time the box runs.
If a box changes to TERMINATED state (for example, if a user sends a KILLJOBevent), it stays in TERMINATED state until the next time it is started,
regardless of any later state changes of the jobs it contains.
Example: Simple Box Job
This example shows the behavior of a simple box job.
The following illustration shows a box named simple_box that contains three
jobs (job_a, job_b, and job_c). job_a and job_b have no starting conditions.
The starting condition for job_c is the success of job_b.
When simple_box starts running, the status of all the jobs changes to
ACTIVATED. Because job_a and job_b have no additional starting conditions,
they start running. When job_b completes successfully, job_c starts. When
job_c completes successfully, the box completes with a SUCCESS status.
If job_b fails, job_c does not start but remains in the ACTIVATED state.
Because no contingency conditions have been defined, simple_box continues
running, waiting for the default completion criteria (that all jobs in the box
have run) to be met.
More information:
How Job Status Changes Affect Box Status (see page 124)
Box J ob Logic 123

7/16/2019 Autosys R11 User Guide
http://slidepdf.com/reader/full/autosys-r11-user-guide 124/459
Box J ob Attributes and Terminators
How Job Status Changes Affect Box Status
If a box that is not running contains a job that changes status because of a
FORCE_STARTJOB or CHANGE_STATUS event, the new job status could
change the status of its containing box. A status change for the box could thentrigger the start of downstream jobs that are dependent on the box.
If a box contained only one job, and the job changed status, the box status
would change as shown in the following table:
Current Box Status New Job Status New Box Status
SUCCESS TERMINATED or FAILURE FAILURE
SUCCESS SUCCESS Box status does not change
FAILURE SUCCESS SUCCESS
FAILURE FAILURE Box status does not change
INACTIVE SUCCESS SUCCESS
INACTIVE TERMINATED or FAILURE FAILURE
TERMINATED Any change Box status does not change
If another job is dependent on the status of the box, the status change could
trigger the job to start. If the box status does not change, dependent jobs are
not affected.
If the box contains other jobs in addition to the job that changed status, the
status of the box is evaluated again according to the success or failureconditions assigned to the box (either the default or user-assigned). Any jobs
in the box with a status of INACTIVE are ignored when the status of the box is
being re-evaluated. For example, consider an INACTIVE box that contains four
jobs, all with a status of INACTIVE (this is typical of a newly created box). If
one of the jobs is forced to start and completes successfully, the status of the
box changes to SUCCESS even though none of the other jobs ran.
Box Job Attributes and Terminators
The following sections describe how to use various job attributes to control the
behavior of box jobs and the jobs they contain.
Note: For more information, see the Reference Guide.
124 User Guide

7/16/2019 Autosys R11 User Guide
http://slidepdf.com/reader/full/autosys-r11-user-guide 125/459
Box J ob Attributes and Terminators
Attributes in a Box Job Definition
You can use the box_success and box_failure attributes to override the default
success or failure conditions for a box. When you include these attributes in a
box job definition, they check what conditions must be met to put the box in astate of SUCCESS or FAILURE. When you specify success conditions for a box,
you must also specify failure conditions; otherwise the product uses the
default failure conditions.
Example: Non-Default Success Condition
This example shows the behavior of a simple box job for which a non-default
success condition is defined.
Assume a box named simple_box that contains three jobs (job_a, job_b, and
job_c), where job_a and job_b have no starting conditions and the starting
condition for job_c is the successful completion of job_b. You could use the
box_success attribute as follows to define a success condition for simple_box:
box_success: success(job_a)
In this case, simple_box completes successfully if job_a runs successfully,
even if job_b is still running. If job_b has not completed successfully when
simple_box completes, job_c changes from ACTIVATED to INACTIVE without
running because the box it is in is no longer running.
Note: Do not define conflicting success and failure conditions when overriding
default box terminators.
Attributes in a Job Definition
You can use the following attributes in the job definition of a job in a box to
force either the job or the box to stop running:
box_terminator: y
Specifies that if the job completes with a FAILURE or TERMINATED status,
the box terminates. Define additional conditions for the other jobs in the
box in case the box is terminated.
job_terminator: y
Specifies that if the job's containing box completes with a FAILURE or
TERMINATED status, the job terminates. You must add this attribute toeach job definition that you want to terminate upon box failure.
More information:
Job Flow with Box Terminator Attribute (see page 134)
Job Flow with Job Terminator Attribute (see page 132)
Box J ob Logic 125

7/16/2019 Autosys R11 User Guide
http://slidepdf.com/reader/full/autosys-r11-user-guide 126/459
Box J ob Attributes and Terminators
Time Conditions in a Box
Each job in a box runs only once each time the box runs. Therefore, do not
define more than one time attribute for any job in a box because the job only
runs the first time. If you want to put a job in a box, but you also want it torun more than once, you must define multiple start time conditions for the box
itself, and define no time conditions for the job.
Note: The box must be running before the job can start. Do not assign a start
time for a job in a box if the box will not be running at that time. If you do,
the next time the box starts, the job starts immediately.
Example: Define Time Conditions for a Box Job
The following illustration shows a scenario that would not work properly if
placed in a box:
In the illustration, job_a is defined to run repeatedly until it succeeds;
job_report has one starting condition, the success of job_a.
At 3:00 a.m., bx_stat starts running, which causes job_a to start running. If
job_a is successful, job_report runs and is successful. However, if job_a fails,
it will not be able to run again until the next time the box starts, as jobs run
only once per box execution. Job job_report is still ACTIVATED waiting for the
success of job_a, and the status of the box is RUNNING. The box would remain
in this state indefinitely if job_a were not defined as a box terminator. This not
being the case, the failure of job_a will cause the box to enter into a
TERMINATED state, terminating job job_report in the process due to its
job_terminator attribute. Box bx_stat is now in a state that would permit it to
run again at 3:00 a.m. the following day.
126 User Guide

7/16/2019 Autosys R11 User Guide
http://slidepdf.com/reader/full/autosys-r11-user-guide 127/459
Box J ob Attributes and Terminators
Force Jobs in a Box to Start
You can use the sendevent command to send a FORCE_STARTJOB event to
force a job to start, even if its starting conditions have not been met.
You can also execute the FORCE_STARTJOB command by selecting the Force
Start Job button in the Job Activity Console, which is part of the Unicenter
WCC GUI.
Example: Force a Job in a Box to Start
This example defines a sendevent command that sends a FORCE_STARTJOB
event to force a job in a box to run. You could use the following command to
force the job run_stats to start:
sendevent -E FORCE_STARTJOB -J run_stats
In the following illustration, the box job bx_report contains three jobs(job_Fwatch, run_stats, and report_stats). If the job run_stats fails, the
bx_report box job terminates because run_stats has a box_terminator
attribute. If you force start run_stats, and it completes successfully,
report_stats would still not start because the box it is in is not running.
Box J ob Logic 127

7/16/2019 Autosys R11 User Guide
http://slidepdf.com/reader/full/autosys-r11-user-guide 128/459
Box J ob Flow Examples
Box Job Flow Examples
This section contains examples to help explain the flow of box jobs and the
jobs they contain. These scenarios will help provide a clearer understanding of
box job flow concepts.
Default Box Success and Box Failure
This scenario describes the default job flow for box job success and failure.
The box job do_statistics runs every day at 3:00 a.m. It contains three jobs:
update_accounts
Updates files. This job starts when do_statistics starts running. It has no
other starting conditions.
run_stats
Runs statistics. This job starts when update_accounts completes
successfully. It has no other starting conditions.
report_stats
Reports statistics. This job starts when run_stats completes successfully. It
has no other starting conditions.
No conditions for success or failure have been defined for do_statistics;
therefore the default conditions are applied. The box job completes
successfully when all the jobs it contains have run and completed successfully.
The box job fails when all jobs in the box have run and at least one has failed.
The box job remains in the RUNNING state until all the jobs it contains have
run.
128 User Guide

7/16/2019 Autosys R11 User Guide
http://slidepdf.com/reader/full/autosys-r11-user-guide 129/459
Box J ob Flow Examples
The following illustration shows this job flow:
box_name “do_statistics"
Box J ob Logic 129

7/16/2019 Autosys R11 User Guide
http://slidepdf.com/reader/full/autosys-r11-user-guide 130/459
Box J ob Flow Examples
Explicit Box Success and Box Failure
This scenario provides an example job flow in which specific conditions are
defined for the success or failure of a box job.
The box job do_statistics runs every day at 3:00 a.m. It contains three jobs:
update_accounts
Updates files. This job starts when do_statistics starts running. It has no
other starting conditions.
run_stats
Runs statistics. This job starts when update_accounts completes
successfully. It has no other starting conditions.
report_stats
Reports statistics. This job starts when run_stats completes successfully. It
has no other starting conditions.
The following conditions define the criteria for success or failure of the box job
do_statistics:
The box job can complete successfully only when all of the jobs it contains
have completed successfully.
The box job fails if any of the jobs it contains fails.
130 User Guide

7/16/2019 Autosys R11 User Guide
http://slidepdf.com/reader/full/autosys-r11-user-guide 131/459
Box J ob Flow Examples
The following illustration shows the job definitions and the job flow:
Box J ob Logic 131

7/16/2019 Autosys R11 User Guide
http://slidepdf.com/reader/full/autosys-r11-user-guide 132/459
Box J ob Flow Examples
Job Flow with Job Terminator Attribute
This scenario provides an example job flow in which the job_terminator
attribute is defined for a job in a box job.
The box job daily_accounts runs every day at 3:00 a.m. It contains two jobs:
daily_receipts
Processes receipts. This job runs when daily_accounts starts because it
has no other starting conditions.
daily_payables
Processes payables. This job runs when daily_accounts starts because it
has no other starting conditions. Because daily_payables includes a
job_terminator attribute, daily_account is terminated if this job fails.
A third job, daily_balance, is not contained in daily_accounts and runs only if
both daily_receipts and daily_payables complete successfully.
Because daily_accounts can only complete successfully if both of the jobs it
contains complete successfully, the failure of daily_receipts causes
daily_accounts to fail. This in turn triggers the job_terminator attribute in
daily_payables, which terminates the job if the box that contains it fails.
132 User Guide

7/16/2019 Autosys R11 User Guide
http://slidepdf.com/reader/full/autosys-r11-user-guide 133/459
Box J ob Flow Examples
The following illustration shows the job definitions and the job flow:
Box J ob Logic 133

7/16/2019 Autosys R11 User Guide
http://slidepdf.com/reader/full/autosys-r11-user-guide 134/459
Box J ob Flow Examples
Job Flow with Box Terminator Attribute
This scenario provides an example job flow in which the box_terminator
attribute is defined for jobs in a box job.
The box job daily_accounts runs every day at 3:00 a.m. It contains two jobs:
daily_receipts
Processes receipts. This job runs when daily_accounts starts because it
has no other starting conditions. Because daily_receipts includes a
box_terminator attribute, daily_accounts will be terminated if this job fails.
daily_payables
Processes payables. This job runs when daily_accounts starts because it
has no other starting conditions. Because daily_payables includes a
box_terminator attribute, daily_accounts will be terminated if this job fails.
A third job, daily_balance, is not contained in daily_accounts and will run only
if both daily_receipts and daily_payables complete successfully.
134 User Guide
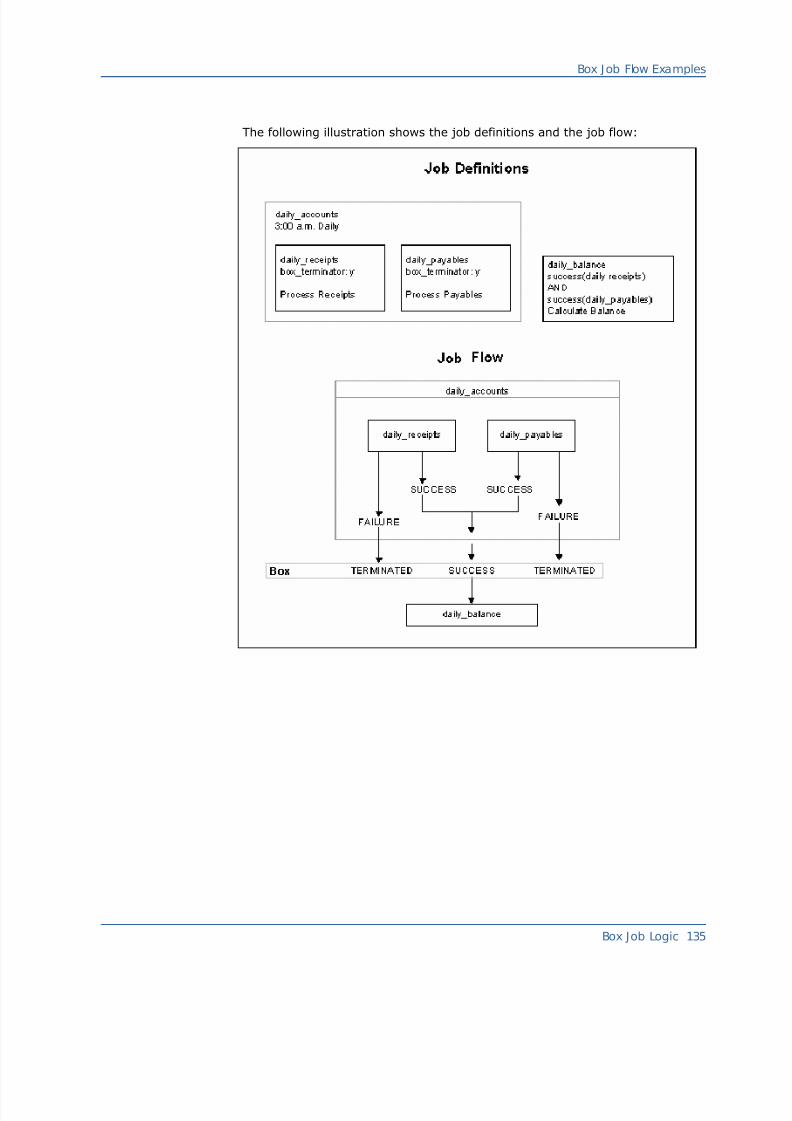
7/16/2019 Autosys R11 User Guide
http://slidepdf.com/reader/full/autosys-r11-user-guide 135/459
Box J ob Flow Examples
The following illustration shows the job definitions and the job flow:
Box J ob Logic 135

7/16/2019 Autosys R11 User Guide
http://slidepdf.com/reader/full/autosys-r11-user-guide 136/459
Advanced J ob Flows
Advanced Job Flows
This section contains examples to help explain the flow of box jobs and the
jobs they contain in advanced situations. These scenarios help provide a
clearer understanding of advanced job flow concepts.
Job Flow with Time Conditions Running on the First of the Month
This scenario is an example of a job flow that begins on the first of every
month.
136 User Guide

7/16/2019 Autosys R11 User Guide
http://slidepdf.com/reader/full/autosys-r11-user-guide 137/459
Advanced J ob Flows
The job flow consists of three jobs:
job_Fwatch
Waits for a specific file to be created by some mainframe process. This job
runs at 1:00 a.m. on the first of every month and waits for 90 minutesbefore giving up.
job_monthly
Re-indexes, organizes, and purges its records based on the file created by
the mainframe. This job runs at 2:00 a.m. on the first of the month only
when job_Fwatch completes successfully.
job_daily
Generates a report. This job runs daily at 3:00 a.m. when job_monthly
completes successfully.
The failure of job_Fwatch causes job_monthly to skip its scheduled run
because job_monthly can only complete successfully if job_Fwatch completessuccessfully. Job job_daily only runs if job_monthly completes successfully. By
the same logic, job_daily always runs if job_monthly was able to successfully
run at least once.
Note: The first time the cycle is run (for example, January 1), statuses behave
as expected.
Box J ob Logic 137

7/16/2019 Autosys R11 User Guide
http://slidepdf.com/reader/full/autosys-r11-user-guide 138/459
Advanced J ob Flows
Job Flow with Time Conditions Running on the Second of the Month
This scenario builds upon the previous scenario and takes place on the
following day.
On days of the month other than the first, job_Fwatch and job_monthly do not
run. They still have a status of SUCCESS in the database from the previous
run on the first day of the month. As a result, job_daily still runs.
138 User Guide

7/16/2019 Autosys R11 User Guide
http://slidepdf.com/reader/full/autosys-r11-user-guide 139/459
Advanced J ob Flows
Job Flow with Time Conditions Running on the First of the Following Month
This scenario builds upon the previous scenario and takes place on the first
day of the following month.
On the first day of the next month (for example, February 1), the file from the
mainframe fails to arrive in the 90 minute wait time; therefore, job_Fwatch
self-terminates. As a result, job_monthly misses its run for the month.
However, because its event status in the database is still SUCCESS from the
previous month, job_daily is able to run every day this month. When job_daily
runs, it uses the previous month's data leading to invalid reports for the
month.
Box J ob Logic 139

7/16/2019 Autosys R11 User Guide
http://slidepdf.com/reader/full/autosys-r11-user-guide 140/459
Advanced J ob Flows
Resetting a Job Flow with Time Conditions Through INACTIVE Status Change
This scenario builds upon the previous scenario and takes place on the last day
of the month.
To fix time-related statuses, you can use a sendevent command to change
them to INACTIVE at the end of their valid interval. You can create another job
to do this automatically.
Changing the status of job_monthly to INACTIVE at the end of every month
allows job_daily to run only in the months that job_monthly completes
successfully. In the following example, when job_Fwatch fails, job_monthly
will not run, job_daily will not run because its status has been reset to
INACTIVE.
140 User Guide

7/16/2019 Autosys R11 User Guide
http://slidepdf.com/reader/full/autosys-r11-user-guide 141/459
Advanced J ob Flows
Resetting a Job Flow with Time Conditions Through Box Job
This scenario builds upon the previous scenarios and takes place on the first
day of the month.
Instead of issuing a sendevent command to change the status of the jobs, you
can put the monthly process in a box, and set the box_failure or
box_terminator attribute appropriately.
The job flow now consists of a box called box_monthly that runs at 1:00 a.m.
on the first day of every month with the following jobs:
job_Fwatch
Waits for a specific file to be created by some mainframe process. This job
runs at 1:00am on the first of every month and waits for 90 minutes
before giving up.
job_monthly
Re-indexes, organizes, and purges its records based on the file created by
the mainframe. This job runs at 2:00 a.m. on the first of the month only
when job_Fwatch completes successfully.
Box J ob Logic 141

7/16/2019 Autosys R11 User Guide
http://slidepdf.com/reader/full/autosys-r11-user-guide 142/459
Advanced J ob Flows
A third job, job_daily, is not contained in box_monthly and runs only if
job_Fwatch and job_monthly complete successfully.
The failure of job_Fwatch causes box_monthly to terminate because
box_monthly can only complete successfully if both of the jobs it containscomplete successfully. This in turn triggers the job_terminator attribute in
job_monthly, which terminates the job if the box that contains it fails.
142 User Guide

7/16/2019 Autosys R11 User Guide
http://slidepdf.com/reader/full/autosys-r11-user-guide 143/459
Chapter 6: Defining Jobs Using JILThis section contains the following topics: JIL Syntax Rules (see page 144) JIL Subcommands (see page 146) User-Defined Job Types (see page 148)Submit a Job Definition in a JIL Script (see page 150)Submit a Job Definition in JIL Interactive Mode (see page 151) Running a Job After Using JIL (see page 152) How a Simple Command Job Is Created (see page 153) How a File Watcher Job Is Created (see page 154) How a Dependent Command Job Is Created (see page 155) How a Box Job Is Created (see page 157) How Job Groupings Are Created (see page 158) How Machines Are Added (see page 159) How an Existing Job Is Put in a Box (see page 161) How Time Dependencies Are Set (see page 162) Delete a Job (see page 164) Delete a Box Job (see page 164) Specifying One-Time Job Overrides (see page 165) Example JIL Script (see page 168)
Defining J obs Using J IL 143

7/16/2019 Autosys R11 User Guide
http://slidepdf.com/reader/full/autosys-r11-user-guide 144/459
J IL Syntax Rules
JIL Syntax Rules
JIL scripts contain one or more JIL subcommands and one or more attribute
statements; these elements constitute a job definition. When writing a JIL
script, you must follow these syntax rules:
Rule 1
Each subcommand uses the following form.
sub_command :job_name
s u b _ co m m a n d
Defines a JIL subcommand.
j o b _ n am e
Defines the name of the job on which to act.
Rule 2
You can follow each subcommand with one or more attribute statements.
These statements can occur in any order, and are applied to the job
specified in the preceding subcommand. A subsequent subcommand
begins a new set of attributes for a different job. The attribute statements
have the following form:
attribute_keyword :value
a t t r i b u t e _ k e y w o r d
Defines a valid JIL attribute.
v a l u e
Defines the setting to apply to the attribute.
Rule 3
You can enter multiple attribute statements on the same line, but you
must separate the attribute statements with at least one space.
Rule 4
A box job definition must exist before you can add jobs to it.
144 User Guide

7/16/2019 Autosys R11 User Guide
http://slidepdf.com/reader/full/autosys-r11-user-guide 145/459
J IL Syntax Rules
Rule 5
Valid value settings can include any of the following characters:
Uppercase and lowercase letters (A-Z, a-z)
Hyphens (-)
Underscores (_)
Numbers (0-9)
Colons (:), if the colon is escaped with quotation marks (" ") or a
preceding backslash (\)
The at character (@)
Rule 6
Because JIL parses on the combination of a keyword followed by a colon,
you must use escape characters (a backslash) with any colons used in an
attribute statement's value. For example, to define the start time for a job,specify 10\:00.
Note: When specifying drive letters in commands, you must use escape
characters with the colon (:). For example, "C:\tmp" and C\:\tmp are
valid; C:\tmp is not.
Rule 7
Use one of the following methods to indicate comments in a JIL script:
To comment an entire line, put a pound sign (#) in the first column.
To comment one or more lines, you can use the C programming
syntax for beginning a comment with a forward slash and asterisk (/*)
and ending it with an asterisk and a forward slash (*/). For example:
/* this is a comment */
Rule 8
You can use the blob_input attribute to manually enter multiline text. This
attribute is only valid for the insert_job, update_job, insert_blob, and
insert_glob subcommands. The blob_input attribute has the following
form:
blob_input:auto_blobt this is a multi-
line text
/auto_blobt
Note: Use the auto_blobt meta-tags to indicate the beginning and end of
multiline text. JIL interprets every character input between the auto_blobtmeta-tags literally. This implies that JIL does not enforce any of the
previously discussed rules for text entered in an open auto_blobt
meta-tag.
Defining J obs Using J IL 145

7/16/2019 Autosys R11 User Guide
http://slidepdf.com/reader/full/autosys-r11-user-guide 146/459
J IL Subcommands
JIL Subcommands You can use the following JIL subcommands to create, modify, override, or
delete Unicenter AutoSys JM assets:
insert_job
Adds a new command, box, or file watcher job definition to the database.
update_job
Updates an existing command, box, or file watcher job definition in the
database.
delete_job
Deletes a specified command, box, or file watcher job from the database.
If the specified job is a box job, the box job is deleted and the jobs in the
box become stand-alone jobs.
delete_box
Deletes a specified box job and all the jobs in that box from the database.
override_job
Defines a one-time override of specified attributes to apply to the next run
of a job.
insert_machine
Adds a new real or virtual machine definition to the database.
delete_machine
Deletes the specified real or virtual machine definition from the database.
insert_monbro
Adds a new monitor or report definition to the database.
update_monbro
Updates an existing monitor or report definition in the database.
delete_monbro
Deletes the specified monitor or report definition from the database.
insert_job_type
Adds a new job type definition to the database. This is the only way to
define a job type.
update_job_type
Updates an existing job type definition in the database. You can use this
command to change the values of the command and description attributes.
146 User Guide

7/16/2019 Autosys R11 User Guide
http://slidepdf.com/reader/full/autosys-r11-user-guide 147/459
J IL Subcommands
delete_job_type
Verifies that no jobs are currently defined with the specified job type, then
deletes the specified job type definition from the database.
insert_xinst
Adds a new external instance definition to the database.
update_xinst
Updates an existing external instance definition in the database.
delete_xinst
Deletes the specified external instance definition from the database.
insert_blob
Adds a new blob definition associated with an existing job.
delete_blob
Disassociates a blob definition from an existing job and deletes the blob
from the database.
insert_glob
Adds a new glob definition referenced by a given name.
delete_glob
Deletes the specified glob definition from the database.
Note: Blobs and globs can only contain the following characters: A-Z, a-z, and
0-9.
Defining J obs Using J IL 147

7/16/2019 Autosys R11 User Guide
http://slidepdf.com/reader/full/autosys-r11-user-guide 148/459
User-Defined J ob Types
User-Defined Job Types
Unicenter AutoSys JM lets you define custom job types if the functionality
provided by box, command and file watcher job types is not sufficient. A
custom job type is similar to a command job except that each custom job type
is associated with a custom program/script/adaptor. For example, a new job
type can be defined to perform FTP. For this to work, a custom
program/script/adaptor has to be provided which does FTP by taking a few
arguments. When a job with custom job type is defined, there is no need to
provide a command for that job. For example, if we define FTP job type as 'f',
a custom program/script/adaptor has to be provided as part of the definition of
type f .
insert_job_type:f
command: /home/scripts/myftp
When jobs of type FTP are defined, all of them execute /home/scripts/myftp
when those jobs are run.
insert_job: ftp_test
job_type: f
std_in_file: /tmp/ftp_params
When a new version of FTP script is used, only the definition of job type has to
be modified.
You can use the following jil commands to create, update, and delete
user-defined job types.
insert_job_type
delete_job_type
update_job_type
Only three attributes are associated with user-defined job types:
job_type
Defines the user-specified job type.
Limits: This value can be a singe-digit number (0-9). In Unicenter WCC,
this value can also be a letter (a-z, except b, c and f).
command
Defines the binary to associate with the job type.Limits: This value can be up to 510 characters in length.
The command attribute is optional. If you do not specify the command
attribute, the job type uses the command attribute of the job definition. If
you specify the command attribute, it overrides the job’s command
attribute.
148 User Guide

7/16/2019 Autosys R11 User Guide
http://slidepdf.com/reader/full/autosys-r11-user-guide 149/459
User-Defined J ob Types
description
Defines a description of the job type.
Limits: This value can be up to 256 characters in length.
Any other attribute is rejected and JIL fails.
Note: You must define a job type before you can use it to define a job. For
more information, see the Reference Guide.
Example: Use insert_job_type to Add a User-Defined Job Type
This example creates an association between a user-defined job type and an
executable.
insert_job_type: 5
description: Web Service Adapter
command:ws.exe
Example: Use delete_job_type to Delete a User-Defined Job Type
This example verifies that no jobs are currently using the specified job type,
and deletes the job type.
delete_job_type: 5
Example: Use update_job_type to Modify a User-Defined Job Type
This example modifies an existing job type, changing the values of the
description and command attributes.
update_job_type: 5
description: WorldView Adapter
command: wv.exe
Defining J obs Using J IL 149

7/16/2019 Autosys R11 User Guide
http://slidepdf.com/reader/full/autosys-r11-user-guide 150/459
Submit a J ob Definition in a J IL Script
Submit a Job Definition in a J IL Script
You can include job definitions in a JIL script, which you must submit to the
database before the job it defines can run.
To submit a job definition in a JIL script
1. Open the instance command prompt associated with the Unicenter
AutoSys JM instance for which you are defining the job.
The instance command prompt is displayed.
2. Issue the following command to redirect the JIL script file containing the
job definition to the jil command:
jil < script name
S cr i p t n am e
Defines the script to redirect to all the jil command.
The job definitions in the specified script are submitted to the database.
To specify the instance to which to send and apply definitions, use the
-S autoserv_instance argument to the jil command. For single-instance
environments, the command defaults to the only available instance. For the jil
command to work properly, the correct environment variables must be
assigned.
Note: You can also submit job definitions through the Unicenter WCC GUI. For
more information about environment variables, see the Installation Guide. For
more information about the jil command, see the Reference Guide.
Example: Submit a Job Definition in a JIL Script
This example redirects a file called my_jil_script to the jil command on the
PRD instance of Unicenter AutoSys JM.
jil –s PRD < my_jil_script
150 User Guide

7/16/2019 Autosys R11 User Guide
http://slidepdf.com/reader/full/autosys-r11-user-guide 151/459
Submit a J ob Definition in JIL Interactive Mode
Submit a Job Definition in JIL Interactive Mode
You can submit job definitions to the database in JIL interactive mode. You
might do this, for example, if you want to test specific job definitions or if a
job only needs to be run once.
To submit a job definition in JIL interactive mode
1. Open the instance command prompt associated with the Unicenter
AutoSys JM instance for which you are defining the job.
The instance command prompt is displayed.
2. Issue the jil command and press Enter.
To specify the instance to which to send and apply definitions, use the -S
autoserv_instance argument to the jil command. For single-instance
environments, the command defaults to the only available instance. For
the jil command to work properly, the correct environment variables mustbe assigned.
The JIL command prompt appears.
3. Enter jil commands and prompts as directed, and enter Exit at the
command prompt when you complete the job definition.
JIL interactive mode ends.
Note: You can also submit job definitions through the Unicenter WCC GUI. For
more information about environment variables, see the Installation Guide. For
more information about the jil command, see the Reference Guide.
Defining J obs Using J IL 151

7/16/2019 Autosys R11 User Guide
http://slidepdf.com/reader/full/autosys-r11-user-guide 152/459
Running a J ob After Using J IL
Running a Job After Using J IL
After you submit a job definition to the database, it runs according to the
starting parameters specified in its JIL script. That is, the Scheduler continually
polls the database, and when it verifies that the starting parameters are met it
runs the job.
If a JIL script does not specify any starting parameters for a job, the Scheduler
does not start the job automatically; the job starts only if you issue the
sendevent command.
Note: For more information, see the Reference Guide.
Example: Run a Job with the sendevent Command
This example assumes that a job named test_install has no starting
parameters specified in its JIL script. The only way to start it is to issue thefollowing command:
sendevent -E STARTJOB -J test_install
This command tells the Scheduler to start the job named test_install.
152 User Guide

7/16/2019 Autosys R11 User Guide
http://slidepdf.com/reader/full/autosys-r11-user-guide 153/459
How a Simple Command J ob Is Created
How a Simple Command Job Is Created
To create a basic command job, you must define (at a minimum) the
insert_job subcommand with the machine and command attributes. Because
the job_type attribute defaults to c (command), you must also specify it when
defining jobs of a type other than command (for example, box or file watcher
jobs).
Note: For more information, see the Reference Guide.
Example: Creating a Simple Command Job
This example shows a JIL script that defines a simple command job
named test_run:
insert_job: test_runjob_type: c /*(optional, it is the default) */machine: tibetcommand: "c:\bin\test.bat" This JIL script instructs Unicenter AutoSys JM to do the following:
Add a new job named test_run.
Define the job as a command job.
Run the job on the Client computer named tibet.
Run the c:\bin\test.bat command.
This example shows a JIL script that defines a simple command job
named test_run:
insert_job: test_run
job_type: c /*(optional, it is the default) */
machine: tibet
command: /bin/touch /tmp/test_run.out
This JIL script instructs Unicenter AutoSys JM to do the following: Add a new job named test_run. Define the job as a command job. Run the job on the Client computer named tibet. Run the UNIX /bin/touch command on the file named /tmp/test_run.out.
Defining J obs Using J IL 153

7/16/2019 Autosys R11 User Guide
http://slidepdf.com/reader/full/autosys-r11-user-guide 154/459
How a File Watcher Job Is Created
How a File Watcher Job Is Created
A file watcher job is similar to a command job. However, instead of starting a
user-specified command on a Client computer, a file watcher job starts a
process that monitors for the existence and size of a specific operating system
file. When that file reaches the specified minimum size and is no longer
growing in size, the file watcher job completes successfully, indicating that the
file has arrived.
Note: For more information, see the Reference Guide.
Example: Creating a File Watcher Job
This example shows a JIL script that defines a file watcher job named
EOD_watch:
insert_job: EOD_watch
job_type: f
machine: tibet
watch_file: /tmp/EodTransFile
watch_interval: 60
watch_file_min_size: 50000
This JIL script instructs Unicenter AutoSys JM to do the following:
Add a new job named EOD_watch.
Define the job as a file watcher job.
Run the job on the Client computer named tibet.
Watch for a file named EodTransFile in the /tmp directory (this filecontains end of day transactions).
Check for the file every 60 seconds.
Check if the file has reached the minimum file size of 50,000 bytes.
When the watched file reaches the specified minimum size and does not
change between check intervals (60 seconds in this example), it is considered
complete. When this occurs, the file watcher job ends with a SUCCESS status.
154 User Guide

7/16/2019 Autosys R11 User Guide
http://slidepdf.com/reader/full/autosys-r11-user-guide 155/459
How a Dependent Command Job Is Created
How a Dependent Command Job Is Created
Command jobs can be dependent on the successful completion of other jobs.
The only difference between a dependent command job and a simple
command job is its dependency on another job.
Note: For more information, see the Reference Guide.
Example: Creating a Dependent Command Job
This example shows a JIL script that defines a dependent command job named
EOD_post. EOD_post depends on the successful completion of the file watcher
job EOD_watch.
insert_job: EOD_post
job_type: c
machine: tibet
condition: success(EOD_watch)
command: $HOME/POST
This JIL script instructs Unicenter AutoSys JM to do the following:
Add a new job named EOD_post.
Define the job as a command job.
Run the job on the Client computer named tibet.
Run the job only if the file watcher job named EOD_watch completes with
a SUCCESS status.
Source the /etc/auto.profile file (Unicenter AutoSys JM sources this file by
default), and run the job named POST located in the job owner's homedirectory.
Note: Unicenter AutoSys JM lets you specify a time limit in the condition
attribute for use in job dependency evaluations. The job's execution
environment is verified exclusively by the profile, which is sourced immediately
before the job starts. By default, the file /etc/auto.profile, on the Client
computer, is sourced. You can use the profile attribute to override the default
profile.
More information:
How the Agent Sets Job Profiles (see page 93)
Defining J obs Using J IL 155

7/16/2019 Autosys R11 User Guide
http://slidepdf.com/reader/full/autosys-r11-user-guide 156/459
How a Dependent Command Job Is Created
Look-Back Conditions
Unicenter AutoSys JM supports look-back conditions. You can use look-back
conditions to base dependencies for a job on the last run of another job. The
last run is defined by the ending time of the last successful run of a job. If the job has run with the specified result, the condition or predecessor is satisfied
and the job starts. If not, the condition is not satisfied and the job for which
the look-back condition is defined does not start.
To specify a look-back dependency, enter the job name followed by a comma
(,) then HH (hours), period (.) and MM (minutes).
Example: Specifying Look-Back Conditions
This example shows a job definition with look-back conditions.
In the following job definition, the command job test_sample_04 can only start
if all of the following conditions are met:
The last run of test_sample_01 completed successfully during the last 12
hours.
The last run of test_sample_02 completed with a FAILURE status during
the last 24 hours.
The last run of test_sample_03 completed successfully at any time.
insert_job: test_sample_04
machine: localhost
command: sleep 10
condition: success(test_sample_01,12.00) AND failure(test_sample_02,24.00) AND
success(test_sample_03)
156 User Guide

7/16/2019 Autosys R11 User Guide
http://slidepdf.com/reader/full/autosys-r11-user-guide 157/459
How a Box J ob Is Created
How a Box Job Is Created
Box jobs are a convenient way to start multiple jobs. When you put jobs in a
box, you only have to start a single job (the box) for all the jobs in the box to
start running.
Assume you want to schedule a group of jobs to start running when a file
watcher job completes successfully. Instead of making each job dependent on
the file watcher job, you can create a box job that is dependent on the file
watcher job, remove the file watcher job dependency from the individual jobs,
and put all of those jobs in the box. When the file watcher job completes
successfully, the box job starts, which in turn starts all of the jobs it contains.
Note: For more information, see the Reference Guide.
Example: Creating a Box Job
This example shows how to define a box job named EOD_box that depends on
the success of a file watcher job to run:
insert_job: EOD_box
job_type: b
condition: success(EOD_watch)
This JIL script instructs Unicenter AutoSys JM to do the following:
Add a new job named EOD_box.
Define the job as a box job.
Run the job only if the file watcher job named EOD_watch completes with
a SUCCESS status.
More information:
Box Job Logic (see page 121)
Defining J obs Using J IL 157
7/16/2019 Autosys R11 User Guide
http://slidepdf.com/reader/full/autosys-r11-user-guide 158/459
How Job G roupings Are Created
How Job Groupings Are Created
Box jobs provide one method of grouping jobs, but are typically used when all
the jobs in the box share the same starting condition. Unicenter AutoSys JM
provides the group and application attributes so you can logically group sets of
jobs and boxes with unrelated starting conditions or dependencies. By
specifying both group and application attributes in a job definition, you can
make the job belong to both a group logical set and an application logical set.
Note: For more information, see the Reference Guide.
Example: Associate Jobs with Groups and Applications
This example shows how you can associate jobs with specific groups and
applications to control processing.
Assume you want to create a set of jobs that run a suite of applications calledEmployeePay that is used to manage employee salaries. The Accounting and
Human Resources groups each have their own jobs defined to use the
EmployeePay applications. The following JIL script defines two jobs
(HR_payroll and ACCT_salaryreport):
insert_job: HR_payroll
job_type: c
...
group: HumanResources
application: EmployeePay
insert_job: ACCT_salaryreport
job_type: c
...group: Accounting
application: EmployeePay
This JIL script instructs Unicenter AutoSys JM to do the following:
Add two new command jobs (HR_payroll and ACCT_salaryreport).
Associate job HR_payroll with the HumanResources group and the
EmployeePay application.
Associate job ACCT_salaryreport with the Accounting group and the
EmployeePay application.
To run a job associated with the EmployeePay application, enter the following:
sendevent -e STARTJOB -I EmployeePay
To run a job associated with the Accounting group, enter the following:
sendevent -e STARTJOB -B Accounting
158 User Guide

7/16/2019 Autosys R11 User Guide
http://slidepdf.com/reader/full/autosys-r11-user-guide 159/459
How Mac hines Are Added
To run a job associated with both the EmployeePay application and Accounting
group (intersection of both sets), enter the following:
sendevent -e STARTJOB -I EmployeePay -B Accounting
How Machines Are Added
The insert_machine subcommand adds a new machine definition to the
database for one of the following:
Real machine
Virtual machine
Unicenter NSM
Universal Job Management Agent
Unicenter AutoSys JM Connect
You can specify the machine type as r (real UNIX), v (virtual), n (real or virtual
Windows), u (Unicenter NSM or UUJMA), c (Unicenter AutoSys JM Connect), l
(legacy real UNIX), or L (legacy real Windows). The component real machines
in a virtual machine definition can be UNIX or Windows machines or a mix of
both.
If you are defining a virtual machine, follow the insert_machine subcommand
with one or more machine attributes that specify real machines.
You can specify any machine accessible through the TCP/IP protocol inthe machine attribute of a job; you need not explicitly define it using the
insert_machine command. However, any undefined machine has a default
factor value of 1.0 and no max_load value, meaning that there is no limit on
the job load assigned to it.
You can specify any machine defined in the /etc/hosts file on the
machine running the Scheduler in the machine attribute of a job; you need not
explicitly define it using the insert_machine command. However, any
undefined machine has a default factor value of 1.0 and no max_load value,
meaning that there is no limit on the job load assigned to it.
Note: For more information, see the Reference Guide.
Defining J obs Using J IL 159

7/16/2019 Autosys R11 User Guide
http://slidepdf.com/reader/full/autosys-r11-user-guide 160/459
How Mac hines Are Added
Example: Define a Virtual Machine to Include Two Real Machines
This example defines a virtual machine virtual_b to include two real Windows
machines (cheetah with a factor value of 5.0 and a max_load value of 400,
and wv with a factor value of 2 and a max_load value of 15):
insert_machine: virtual_b
type: n
machine: cheetah max_load: 400 factor: 5.0
machine: wv max_load: 15 factor: 2
Note: In this example, the two real machines (when specified in a job
definition through the virtual machine) vary considerably in capacity from a
scheduling standpoint. However, when these machines are explicitly specified
by name in a job definition, the factor and max_load attributes defined here
have no effect; they only have these values when used through the virtual
machine.
160 User Guide

7/16/2019 Autosys R11 User Guide
http://slidepdf.com/reader/full/autosys-r11-user-guide 161/459
How an Existing J ob Is Put in a Box
How an Existing Job Is Put in a Box
To place an existing job in a box, verify that the job is not running, and do
either of the following:
Use the update_job subcommand to change the current job definition.
Use the delete_job subcommand to delete the current job definition, and
use the insert_job subcommand to redefine the job.
This method is useful when the job definition contains many non-default
attributes that you want to deactivate instead of resetting them. However,
if you delete and redefine the job, you must redefine any non-default
attributes you want to keep from the previous definition.
Note: For more information, see the Reference Guide.
Example: Put an Existing Job in a Box
This example shows how to update the definition of an existing job to include
it in a box.
The following JIL script uses the update_job subcommand to change the
EOD_post job to put it in the EOD_box job:
update_job: EOD_post
condition: NULL
box_name: EOD_box
This JIL script instructs Unicenter AutoSys JM to do the following:
Update the job named EOD_post. Remove the previously defined starting conditions from the job definition,
so the job inherits the starting conditions of the box in which it resides.
Put the job named EOD_post in the box named EOD_box.
Defining J obs Using J IL 161

7/16/2019 Autosys R11 User Guide
http://slidepdf.com/reader/full/autosys-r11-user-guide 162/459
How Time Dependencies Are Set
How Time Dependencies Are Set
If you do not define starting conditions for a job, it only runs when you issue a
sendevent command for it. You can set time dependencies for a job so that it
runs automatically on specific days and at specific times.
Note: For more information, see the Reference Guide.
Example: Set Time Dependencies for a Job
This example shows how to use the date_conditions, days_of_week, and
start_times attributes to set time dependencies for a job.
To set the existing job test_run to run automatically on certain days at a
certain time (such as 10:00 a.m. and 2:00 p.m. on Mondays, Wednesdays,
and Fridays), you could modify the job using the following JIL script:
update_job: test_run
date_conditions: y
days_of_week: mo, we, fr
start_times: "10:00, 14:00"
This JIL script instructs Unicenter AutoSys JM to do the following:
Update the job named test_run.
Activate the conditions based on date.
Set the job to run on Mondays, Wednesdays, and Fridays.
Start the job at 10:00 a.m. and 2:00 p.m. on each of the specified days.
The times shown in the sample script are surrounded by quotation marks
because they contain a colon. You can also use a backslash (\) as an escape
character for the colon, as the following example shows:
start_times: 10\:00, 14\:00
Note: If a job runs daily at the same time (for example, 12:00) and you edit
the job definition and save it at 11:59, the job will not run until the next day
at 12:00.
When you save a start time job definition to the database within one minute of
the specified start time, the start time is placed in the future (that is,
tomorrow). However, if the start time is two minutes or more from the savetime, the job runs at the next occurrence of the specified start time (that is,
today).
162 User Guide

7/16/2019 Autosys R11 User Guide
http://slidepdf.com/reader/full/autosys-r11-user-guide 163/459
How Time Dependenc ies Are Set
Example: Base Time Settings on a Specific Time Zone
Use the timezone attribute to base the time settings for a job on a specific
time zone. If you specify a time zone that includes a colon, you must surround
the time zone name with quotation marks, as in the following example:
timezone: "IST-5:30"
Example: Run a Job Every Day
To run the job every day, instead of only on specific days, specify the all value
instead of listing the individual day values. For example:
days_of_week: all
Example: Schedule a Job to Run on Specific Dates
To schedule the job for specific dates, instead of specific days of the week,specify a custom calendar. Use the autocal_asc command to define the
calendar, and then use the run_calendar attribute to specify the calendar
name (for example, weekday_cal) in the job definition. For example:
run_calendar: weekday_cal
Example: Exclude a Job from Running on Specific Dates
To specify a custom calendar that defines the days on which the job should not
run, use the autocal_asc command to define the calendar, and use the
exclude_calendar attribute to specify the calendar name (for example,
holiday_cal) in the job definition. For example:
exclude_calendar: holiday_cal
Example: Schedule a Job to Run at Specific Times Every Hour
To run the job at specific times every hour instead of at specific times of the
day, use the start_mins attribute to specify the minutes past every hour that
the job should run. For example, to run a job at 15 minutes after and 15
minutes before each hour, add the following statement to the job definition:
start_mins: 15, 45
Defining J obs Using J IL 163

7/16/2019 Autosys R11 User Guide
http://slidepdf.com/reader/full/autosys-r11-user-guide 164/459
Delete a Job
Delete a Job
To delete a job, enter the delete_job subcommand followed by the name of
the job to delete. For example, to delete the job test_run, you would enter the
following:
delete_job: test_run
When JIL is in job verification mode (the default), the delete_job subcommand
scans the ujo_job_cond table and notifies you of any dependent conditions for
the deleted job before deleting it.
Delete a Box Job
To delete a box and every job it contains, enter the delete_box subcommand
followed by the name of the box job to delete. For example, to delete the boxEOD_box and every job in it, you would enter the following:
delete_box: EOD_box
To delete a box without deleting the jobs it contains, enter the delete_job
command followed by the name of the box job to delete. The jobs in the box
become stand-alone jobs. For example, to delete the box EOD_box without
deleting the jobs in it, you would enter the following:
delete_job: EOD_box
164 User Guide

7/16/2019 Autosys R11 User Guide
http://slidepdf.com/reader/full/autosys-r11-user-guide 165/459
Specifying One-Time J ob Overrides
Specifying One-Time Job Overrides
You can use the override_job subcommand to specify an override that changes
the behavior of a specific job during its next run. Job overrides are applied
only once. If a RESTART event is generated because of system problems,
Unicenter AutoSys JM reissues a job override until the job actually runs once,
or until the maximum number of retries limit is met. After this, Unicenter
AutoSys JM discards the override.
You can modify the following attributes in a job override:
auto_hold
command
condition
date_conditions
days_of_week
exclude_calendar
machine
max_run_alarm
min_run_alarm
n_retrys
profile
run_calendar
run_window
start_mins
start_times
std_err_file
std_in_file
std_out_file
term_run_time
watch_file
watch_file_min_size
watch_interval
Defining J obs Using J IL 165

7/16/2019 Autosys R11 User Guide
http://slidepdf.com/reader/full/autosys-r11-user-guide 166/459
Specifying One-Time J ob Overrides
JIL will not accept an override if it results in an invalid job definition. For
example, if a job definition has only one starting condition, start_times, JIL will
not let you set the start_times attribute to NULL because removing the start
condition makes the job definition invalid (no start time could be calculated).
Note: The maximum number of job restarts after system or network
failure is specified in the Max Restart Trys field on the Unicenter AutoSys
Scheduler screen in the Administrator.
Note: The maximum number of job restarts after system or network
failures is specified by editing the $AUTOUSER/config.$AUTOSERV file.
MaxRestartTrys is a variable in the Unicenter AutoSys JM instance
configuration file.
One-time job overrides are applied to jobs restarted due to system problems,but are not applied to jobs restarted because of application failures.
System problems include the following:
Machine unavailability
Media failures
Insufficient disk space
Application failures include the following:
Inability to read or write a file
Command not found
Exit status greater than the defined maximum exit status for success
Various syntax errors
166 User Guide

7/16/2019 Autosys R11 User Guide
http://slidepdf.com/reader/full/autosys-r11-user-guide 167/459
Specifying One-Time J ob Overrides
How Job Overrides Are Set
To set job overrides, use the override_job subcommand to specify the job and
attributes to override. You can also temporarily delete a job attribute in this
manner.
Example: Define a One-time Override for a Job
This example shows how to define a one-time job override. The following
script runs the job RunData with no conditions (where some had been
previously specified) and outputs the results to a different output file:
override_job: RunData
condition: NULL
std_out_file: "C:\tmp\SpecialRun.out"
override_job: RunData
condition: NULL
std_out_file: "tmp\SpecialRun.out"
Example: Cancel a Job Override Before it Runs
This example shows how to cancel a job override before it runs. To cancel
overrides for a job, enter the override_job subcommand followed by the job
name and the delete parameter. For example:
override_job: RunData delete
Note: After you submit a JIL script to the database, you cannot view the scriptor edit an override. To change the override values, you must submit another
JIL script with new values or use the Unicenter WCC Job Editor. However, the
original override remains stored in the ujo_overjob table in the database.
Defining J obs Using J IL 167

7/16/2019 Autosys R11 User Guide
http://slidepdf.com/reader/full/autosys-r11-user-guide 168/459
Example J IL Script
Example J IL Script
The following is a complete example of a JIL script. It incorporates the creation
and use of a command job, a file watcher job, and a box job to address this
processing scenario:
A file named /DOWNLOAD/MAINFRAME/SALE.RAW is expected to arrive
from the mainframe some time after 2:00 a.m.
When the file arrives, it is processed by the command file named
filter_mainframe_info, and the results are sent as an output to the file
named /DOWNLOAD/MAINFRAME/SALES.SQL.
When the above functions are completed, the file named
/DOWNLOAD/MAINFRAME/SALES.SQL (containing SQL statements) is run.
# Example of a Machineinsert_machine: lowgatetype: r # Example of Jobs insert_job: Nightly_Downloadjob_type: bdate_conditions: yesdays_of_week: allstart_times: "02:00"insert_job: Watch_4_filejob_type: fbox_name: Nightly_Download watch_file: /DOWNLOAD/MAINFRAME/SALES.RAWmachine: lowgateinsert_job: filter_datajob_type: cbox_name: Nightly_Download condition: success(Watch_4_file)command: filter_mainframe_infomachine: lowgatestd_in_file: /DOWNLOAD/MAINFRAME/SALES.RAWinsert_job: parse_datajob_type: cbox_name: Nightly_Download condition: success(filter_data)machine: lowgatecommand: isql -U mutt -P jeffstd_in_file: /DOWNLOAD/MAINFRAME/SALES.SQLstd_out_file: /DOWNLOAD/MAINFRAME/SALES.SQLstd_err_file: /LOG/FilterMFLog.err/insert_job: update_DBMSjob_type: c
168 User Guide

7/16/2019 Autosys R11 User Guide
http://slidepdf.com/reader/full/autosys-r11-user-guide 169/459
Example J IL Script
box_name: Nightly_Download
condition: success(filter_data)
machine: lowgate
command: isql -U mutt -P jeff
std_in_file:/DOWNLOAD/MAINFRAME/SALES.SQL
Defining J obs Using J IL 169

7/16/2019 Autosys R11 User Guide
http://slidepdf.com/reader/full/autosys-r11-user-guide 170/459

7/16/2019 Autosys R11 User Guide
http://slidepdf.com/reader/full/autosys-r11-user-guide 171/459
Chapter 7: Binary Large Object
DefinitionsThis section contains the following topics: Binary Large Objects (see page 172) Types of Blobs (see page 173) Job Blobs (see page 174) Global Blobs (see page 175) Manage Blobs Using JIL (see page 175)Blob Attributes (see page 176) Create Input Job Blobs (see page 177) Delete Job Blobs (see page 178) Create Global Blobs (see page 178)
Delete Global Blobs (see page 179) Use Blobs in Job Definitions (see page 180) Generate Blob Reports Using Autorep (see page 182)
Binary Large Objec t Definitions 171

7/16/2019 Autosys R11 User Guide
http://slidepdf.com/reader/full/autosys-r11-user-guide 172/459
Binary Large Objec ts
Binary Large Objects
Binary Large Objects (blobs) are binary data of variable length. Unicenter
AutoSys JM supports blobs in job definitions, and after they are defined, they
are stored in the database. This allows the blob data to be shared by jobs
running on multiple computers.
To understand the advantages of using blobs in Unicenter AutoSys JM
environment, refer to the following example, which explains the process that is
used to share data amongst the jobs that are running on a single computer:
1. When the jobs are running on a single computer, you can define a
command job to run a program that outputs the data to a file using the
std_out_file attribute.
2. When the job is completed, a file is created in the location specified by the
std_out_file attribute.
3. All the other jobs that depend on this output data can access this file.
4. You can also define a second command job to run a program that reads
the output data of the previous job, by specifying the file name in the
std_in_file attribute.
5. This second command job opens the file specified by the std_in_file
attribute and passes the data to the program, allowing it to complete
successfully.
Based on this example, as the output data is stored in a file on one computer,
it is not available to all the other jobs that are scheduled to run on other
computers. However, the use of blobs allows the data that is saved as output
by a job on one computer to be shared by all the other jobs that are running
across multiple computers.
Also, you can define a command job to run a program that uploads the output
data to the database as a blob using the std_out_file attribute. You can also
define a second command job to run a program that reads the blob data of the
previous job using the std_in_file attribute. The second command job
downloads the blob data specified by the std_in_file attribute from the
database and passes the data to the program, allowing it to complete
successfully.
172 User Guide

7/16/2019 Autosys R11 User Guide
http://slidepdf.com/reader/full/autosys-r11-user-guide 173/459
Types of Blobs
Blob data can be of the following types:
Binary Data
Requires a program that understands the format of the data to interpret
the bytes in binary data. For example:
Multimedia files which include the following:
Images
Video files
Audio files
Textual Data
Requires an operating system that can interpret the bytes in textual data,
which contains the characters that conform to the ASCII standard.
Note: Some operating systems handle the specification of a new line in
the textual data differently. In this instance, you must convert thenecessary textual data when it is copied across operating systems.
Unicenter AutoSys JM allows you to specify the type of blob data that is
being used and converts the textual data when it is downloaded across
multiple operating systems.
Types of Blobs
Unicenter AutoSys JM supports the following types of blobs:
Job blobs
Global blobs
Binary Large Objec t Definitions 173

7/16/2019 Autosys R11 User Guide
http://slidepdf.com/reader/full/autosys-r11-user-guide 174/459
J ob Blobs
Job Blobs
Job blobs are associated with an existing Unicenter AutoSys JM job and are
referenced by the job name. Job blobs can either be created at the time of the
job definition or after the job has been defined. They are deleted when the job
is deleted.
There are three types of job blobs, which include the following:
Input
Contains the input data that is reserved for the job to which they are
associated in textual data format.
Output
Stores the program output messages of a running job in textual or binary
data format.
Error
Stores the error messages of a running job in textual or binary data
format.
Input Job Blobs
Input blobs are uploaded to the database using JIL. You can insert an input job
blob multiple times. Each time it is inserted, it acquires a new version number.
When the job starts, the most recent version of the job input blob is used. All
the earlier versions of the blob remain in the database until they are manually
deleted. If you delete an input job blob, only the active version of the input job
blob is deleted. The version which was prior to the deleted version becomes
the new active version.
When you run a job, the Unicenter AutoSys JM Agent downloads the active
version of job's input blob from the database into a temporary file on the
computer. This file is then passed into the standard input of the program that
is executed by the job. When the job completes, the temporary file containing
the input blob data is deleted. The blob in the database, however, is not
deleted and remains as the active version for subsequent job runs.
174 User Guide

7/16/2019 Autosys R11 User Guide
http://slidepdf.com/reader/full/autosys-r11-user-guide 175/459
Global Blobs
Output and Error Job Blobs
Output and error job blobs store the program output and error messages of a
running job. When you run a job, the Unicenter AutoSys JM Agent creates
temporary files on the computer that are used to capture the standard outputand standard error messages from the program that was executed by the job.
After the job has completed its run, the Agent uploads the files containing the
output data as blobs into the database, overwriting the existing files, and
deletes the temporary files. An output job blob can be used as input by
another job. An error job blob, on the other hand, cannot be used as input by
another job.
Global Blobs
Global blobs are general purpose blobs in textual or binary data format. Like
the Unicenter AutoSys JM global variables, they are referenced by a uniquename. You can either upload the global blobs to the database using JIL or they
can be uploaded by the Unicenter AutoSys JM Agent, after a job has completed
its run. After a global blob is created, it is available to any job as input. Global
blobs remain in the database until they are deleted using JIL.
Manage Blobs Using J IL
The following section describes how to use JIL to do the following:
Upload blobs to the database
Delete blobs from the database
Note: For more information, see the Reference Guide.
Binary Large Objec t Definitions 175

7/16/2019 Autosys R11 User Guide
http://slidepdf.com/reader/full/autosys-r11-user-guide 176/459
Blob Attributes
Blob Attributes
The following table lists the subcommands and attributes associated with the
definition or destruction of a blob:
Task Subcommands Attributes
Create input job blob insert_job, update_job blob_input or blob_file
Create input job blob insert_blob blob_input or blob_file
Delete job blob delete_blob blob_type
Create global blob insert_glob blob_mode, blob_input, or
blob_file
Delete global blob delete_glob
The blob_input attribute lets you manually input the contents of a blob
containing textual data. The blob_input attribute has the following format:
blob_input: <auto_blobt>textual data</auto_blobt>
Note: The textual data begins immediately after the auto_blobt XML-style
open tag and may span multiple lines. JIL recognizes the end of the textual
data when it reads the auto_blobt XML-style end tag. This implies that the
literal character string </auto_blobt> cannot form part of the blob_input
value. If you want to include this character string as part of the textual blob
data, use the blob_file attribute.
The blob_file attribute allows the user to specify the location and name of a fileon the computer that serves as the input job blob or global blob file. The
blob_file attribute has the following format:
blob_file: filename
Note: If the blob_file attribute is used to specify an input job blob through the
insert_job or insert_blob subcommand, the file is interpreted as a text-based
file.
176 User Guide

7/16/2019 Autosys R11 User Guide
http://slidepdf.com/reader/full/autosys-r11-user-guide 177/459
Create Input Job Blobs
Create Input Job Blobs To create an input job blob in the database using JIL, do the following:
Upload an input job blob at the time of the definition of the associated job.
Upload an input job blob after you have defined the job.
Note: Input job blobs are referenced by the name of the job.
To create an input job blob at the time of the definition of the associated job,
use the insert_job JIL subcommand and specify either the blob_input or
blob_file attributes, as follows:
insert_job: test_job_with_blob
job_type: c
command: sleep 60
machine: juno
owner: jerry@juno
permission:
std_in_file: $$blobt
blob_input: <auto_blobt>multi-lined text data for job blob
</auto_blobt>
or
blob_file: /test_job_with_blob_file.txt
To create an input job blob after you have defined the job, use the insert_blob
JIL subcommand and specify either the blob_input or blob_file attributes, as
follows:
insert_blob: test_job_with_blob
blob_input: <auto_blobt>multi-lined text data for job blob
</auto_blobt>
or
blob_file: /test_job_with_blob_file.txt
JIL interprets the file name that is specified in the blob_file attribute as a file
that contains the textual data and performs a conversion of the new line
character. JIL also displays the version number of the most recent input job
blob.
Binary Large Objec t Definitions 177

7/16/2019 Autosys R11 User Guide
http://slidepdf.com/reader/full/autosys-r11-user-guide 178/459
Delete J ob Blobs
Delete Job Blobs You can use the JIL delete_blob subcommand to delete the following:
Active version of the input job blob
Output and error job blobs
You must specify whether to delete the job input or output blob data using the
blob_type attribute.
Note: Job blobs are referenced by the name of the job. JIL displays the
version number of the most recent job input blob.
To delete the most recent version of the input job blob, use the delete_blob
JIL subcommand and specify the blob_type attribute with the value of input,
as follows:
delete_blob: test_job_with_blob
blob_type: input
To delete the output and error job blobs, use the delete_blob JIL subcommand
and specify the blob_type attribute with the value of output , as follows:
delete_blob: test_job_with_blob
blob_type: output
Create Global Blobs
You can use the JIL insert_glob subcommand to upload blobs containingtextual or binary data.
As the global blobs are not associated with a job, you must do the following:
Provide a unique identifier.
Specify the mode of the blob data that is being used in the blob_mode
attribute.
Note: If you use the insert_glob JIL subcommand using the same name as an
existing global blob, the blob data is reinserted into the database. In this case,
the original blob data is deleted and the new blob data takes its place.
178 User Guide

7/16/2019 Autosys R11 User Guide
http://slidepdf.com/reader/full/autosys-r11-user-guide 179/459
Delete Global Blobs
To create a global blob containing textual data, use the insert_glob JIL
subcommand and specify the blob_mode attribute with a value of text and
either the blob_input or blob_file attributes, as follows:
insert_glob: my_text_global_blobblob_mode: text
blob_input: <auto_blobt>multi-lined text data for job blob
</auto_blobt>
or
blob_file: /my_text_global_blob_file.txt
Note: JIL interprets the file name that is specified in the blob_file attribute as
a file that contains textual data and performs a conversion of the new line
character.
To create a global blob containing binary data, use the insert_globsubcommand and specify the blob_mode attribute with a value of binary and
the blob_file attribute, as follows:
insert_glob: my_binary_global_blob
blob_mode: binary
blob_file: /my_binary_global_blob_file
Note: You cannot use the blob_input attribute to create a global blob that
contains the binary data.
Delete Global Blobs
You can use the JIL delete_glob subcommand to delete the existing global
blobs.
Note: You must provide a unique identifier because global blobs are not
associated with a job.
To delete a global blob, use the delete_glob JIL subcommand and provide the
name of an existing global blob, as follows:
delete_glob: my_global_blob
Binary Large Objec t Definitions 179

7/16/2019 Autosys R11 User Guide
http://slidepdf.com/reader/full/autosys-r11-user-guide 180/459
Use Blobs in Job Definitions
Use Blobs in Job Definitions
You can use the std_in_file, std_out_file, and std_err_file attributes of the JIL
insert_job, update_job, or override_job subcommands to reference blobs in
addition to files. Based on the keyword values you specify for these attributes,
Unicenter AutoSys JM downloads a blob for input or uploads a job’s output as
blob to meet the job’s needs.
The keywords are explained in the subsequent sections.
std_in_file Attribute
The keywords that are supported by the std_in_file attribute include the
following:
$$blobt
Uses the input job blob of the current job as input and treats the blob data
as textual data.
$$blob.< j o b n am e >
Uses the output job blob of the specified job as input and treats the blob
data as binary data.
$$blobt.< j o b n am e >
Uses the output job blob of the specified job as input and treats the blob
data as textual data.
$$glob.<g l o b a l b l o b n a m e >
Uses the specified global blob as input and treats the blob data as binary
data.
$$globt.<g l o b a l b l o b n a m e >
Uses the specified global blob as input and treats the blob data as textual
data.
Note: You cannot use the keyword $$blob to specify the use of the current
job's input blob.
To define a job that uses the output blob of its previous run as input
1. Define the job so that the job's name is in the std_in_file attribute using
either the $$blob.< job name> or $$blobt.< job name> keyword.
2. Apply a one-time override of the std_in_file attribute, so that the job reads
from a local file on the computer on its first run.
180 User Guide

7/16/2019 Autosys R11 User Guide
http://slidepdf.com/reader/full/autosys-r11-user-guide 181/459
Use Blobs in Job Definitions
std_out_file and std_err_file Attributes
The keywords that are supported by the std_out_file and std_err_file
attributes include the following:
$$blob
Uploads the output or error of the current job as a job blob and treats the
data as binary data.
$$blobt
Uploads the output or error of the current job as a job blob and treats the
data as textual data.
$$glob.<g l o b a l b l o b n a m e >
Uploads the output or error of the current job as a global blob with the
specified name and treats the data as binary data.
$$globt.<g l o b a l b l o b n a m e >
Uploads the output or error of the current job as a global blob with the
specified name and treats the data as textual data.
Note:
You cannot append data to an existing job or global blob.
Unicenter AutoSys JM does not support the use of > or >> character
strings in the std_out_file or std_err_file attributes.
Existing blob data is overwritten with the new data after the job run is
completed.
Binary Large Objec t Definitions 181

7/16/2019 Autosys R11 User Guide
http://slidepdf.com/reader/full/autosys-r11-user-guide 182/459
Generate Blob Reports Using Autorep
Generate Blob Reports Using Autorep
You can use the autorep utility to report on and download the input job blobs
and global blobs. To export the job definition using the autorep –J < jobname>
-q option includes exporting all versions of that job’s input blob. If a download
path is not specified, the contents of all input job blobs are displayed along
with the job definition. Otherwise, autorep downloads the input blob to the
specified directory and displays the input blob file names numbered by version
along with the job definition. Reports generated against one or more global
blobs are extracted in binary format unless otherwise specified using the –a
command line parameter. If a download path is not specified, autorep
downloads the global blob into a temporary directory.
Options specific to blob and glob data include the following:
-z g l o b n a m e
Specifies a glob name or mask whose contents are to be extracted. ALLmay be specified to extract all globs. Wildcard characters % and _ are also
supported.
-a
Specifies that the global blob can be downloaded as textual data.
-f o u t d i r
Specifies the directory name where input job blobs or global blobs are
extracted to.
Default:
The directory represented by environment variable %TEMP%.
The /tmp directory.
Note: For more information about autorep reports, job input, and global blobs,
see the Reference Guide.
182 User Guide

7/16/2019 Autosys R11 User Guide
http://slidepdf.com/reader/full/autosys-r11-user-guide 183/459
Generate Blob Reports Using Autorep
Example: Export Job Definition with Input Blobs
This example uses the autorep command to export a job definition:
autorep -J ALL -q
The output might resemble the following:
insert_job: test_job
job_type: c
command: sleep 60
machine: juno
owner: jerry@ca
permission: gx,ge,wx
alarm_if_fail: 1
If the job has one or more input blobs tied to it, in addition to the job
definition, the autorep command extracts each of the job blob definitions, andthe output might resemble the following:
insert_job: test_job_with_blob job_type: c
command: sleep 60
machine: juno
owner: jerry@juno
permission:
std_in_file: $$blobt
alarm_if_fail: 1
/* -- test_job_with_blob:insert_blob #1 -- */
insert_blob: test_job_with_blob
blob_input: <auto_blobt>multi-lined text data for job blob 1
</auto_blobt>/* -- test_job_with_blob:insert_blob #2 -- */
insert_blob: test_job_with_blob
blob_input: <auto_blobt> multi-lined text data for job blob 2
</auto_blobt>
/* -- test_job_with_blob:insert_blob #3 -- */
insert_blob: test_job_with_blob
blob_input: <auto_blobt> multi-lined text data for job blob 3
</auto_blobt>
You can also specify a location to download the blobs using the -f parameter
as follows:
autorep -J ALL -q -f /myblobsdir
The output might resemble the following:
insert_job: test_job_with_blob job_type: c
command: sleep 60
machine: juno
owner: jerry@juno
Binary Large Objec t Definitions 183

7/16/2019 Autosys R11 User Guide
http://slidepdf.com/reader/full/autosys-r11-user-guide 184/459
____________ _____________________________
___________ __________________________________
Generate Blob Reports Using Autorep
permission:
std_in_file: $$blobt
alarm_if_fail: 1
/* -- test_job_with_blob:insert_blob #1 -- */
insert_blob: test_job_with_blobblob_file: /myblobsdir/test_job_with_blob_1.txt
/* -- test_job_with_blob:insert_blob #2 -- */
insert_blob: test_job_with_blob
blob_file: /myblobsdir/test_job_with_blob_2.txt
/* -- test_job_with_blob:insert_blob #3 -- */
insert_blob: test_job_with_blob
blob_file: /myblobsdir/test_job_with_blob_3.txt
Example: Generate a Report for All Global Blobs
This example generates a report that downloads the contents of all global
blobs to the location /myblobsdir as binary data:
autorep -z ALL -f /myblobsdir
The report might resemble the following:
Glob Name File Name
MYGLOB /myblobsdir/MYGLOB
REPORT_CHART /myblobsdir/REPORT_CHART
ARCHIVED_DATA /myblobsdir/ARCHIVED_DATA
JOB_SNAPSHOT /myblobsdir/JOB_SNAPSHOT
This example generates a report that downloads the contents of all global
blobs to the location /myblobsdir as text data:
autorep -z ALL -f /myblobsdir -a
The report might resemble the following:
Glob Name File Name
MYGLOB /myblobsdir/MYGLOB.txt
REPORT_CHART /myblobsdir/REPORT_CHART.txt
ARCHIVED_DATA /myblobsdir/ARCHIVED_DATA.txt
JOB_SNAPSHOT /myblobsdir/JOB_SNAPSHOT.txt
184 User Guide

7/16/2019 Autosys R11 User Guide
http://slidepdf.com/reader/full/autosys-r11-user-guide 185/459
Chapter 8: Machines This section contains the following topics: Real Machines (see page 185) Virtual Machines (see page 186) Defining Machines (see page 186) Machine Definitions (see page 191) Machine Status (see page 196) Load Balancing (see page 199) Forcing a Job to Start (see page 202) Queuing Jobs (see page 202) User-Defined Load Balancing (see page 208)
Real Machines
A real machine is any network host that meets the following criteria:
It has been identified in the appropriate network so that Unicenter AutoSys
JM can access it.
It has undergone an Agent software installation so that Unicenter AutoSys
JM can run jobs on it.
Unless the machine is localhost, it has been defined to Unicenter AutoSys
JM as a real machine using JIL.
A real machine must meet these conditions to run jobs. However, forUnicenter AutoSys JM to perform intelligent load balancing and queuing while
running jobs, it must know the relative processing power of the various real
machines. Unicenter AutoSys JM uses the virtual machine logical construct to
provide both load balancing and queuing.
Machines 185

7/16/2019 Autosys R11 User Guide
http://slidepdf.com/reader/full/autosys-r11-user-guide 186/459
Virtual Machines
Virtual Machines
A virtual machine is comprised of one or more real machines. By defining
virtual machines to Unicenter AutoSys JM and then submitting jobs to run on
those machines, you can specify the following:
Run-time resource policies (or constraints) at a high level.
That Unicenter AutoSys JM automatically runs those policies in a
multi-machine environment.
Note: Previous releases of Unicenter AutoSys JM required that all machines in
a virtual machine be of the same type. That is no longer necessary. However,
virtual machines can never contain machines of type u (Unicenter NSM or
Unicenter Universal Job Management Agent) or type c (Unicenter AutoSys JM
Connect).
Defining Machines
You can use machine attribute statements in a JIL script to define both real
and virtual machines. The following JIL subcommand defines a real or virtual
machine:
insert_machine: machine_name
Note: You can only define real and virtual machines using JIL. There is no
Unicenter WCC GUI interface for defining real and virtual machines.
You can use the following JIL attributes to define machines:
type
Specifies a machine type, which can be one of the following:
r for UNIX real
v for UNIX and Windows virtual
n for Windows real
u for Unicenter NSM or Unicenter Universal Job Management Agent
c for Unicenter AutoSys JM Connect
l for a legacy (real) UNIX machine
L for a legacy (real) Windows machinemachine
Defines the name of a real machine to use as a component of a virtual
machine.
186 User Guide

7/16/2019 Autosys R11 User Guide
http://slidepdf.com/reader/full/autosys-r11-user-guide 187/459
Defining Machines
max_load
Defines the maximum load (in load units) that a machine can reasonably
handle. This attribute is used for load balancing and is only valid in a real
machine definition.
factor
Defines a factor to multiply by a real machine's available CPU cycles to
verify the relative available CPU cycles. This attribute is used for load
balancing and is only valid in a real machine definition.
You need only define a real or virtual machine if it meets one of the following
criteria:
It requires a max_load or factor attribute to be set for it.
It will be included in a virtual machine.
You must define virtual machines before you can use them.
Load balancing and queuing is possible only if real and virtual machines have
been defined to Unicenter AutoSys JM using these machine attributes. The
max_load and factor attributes, used when defining real machines, are key for
load balancing and queuing.
Note: For more information, see the Reference Guide.
Machines 187

7/16/2019 Autosys R11 User Guide
http://slidepdf.com/reader/full/autosys-r11-user-guide 188/459
Defining Machines
Specifying Machine Load (max_load)
The max_load attribute is only valid in a real machine definition. It defines the
maximum load (in load units) that a real machine can reasonably handle. Load
units are arbitrary values, the range of which is user-defined. You can use anyweighting scheme you prefer. For example, a load unit with a range of 10 to
100 would specify that machines with limited processing power are expected
to carry a load of only 10, while machines with ample processing power can
carry a load of 100. There is no direct relationship between the load unit value
and any of the machine's physical resources. Therefore, you should develop
conventions that are meaningful to you. You cannot use zero (0) or negative
numbers as load units.
The max_load attribute is primarily used to limit the load on a machine. As
long as a job's load will not exceed a machine's maximum load, the max_load
attribute does not influence which machine a job runs on.
If you do not define the max_load attribute in a real machine definition, its
value defaults to none (no limit).
Example: Set the Maximum Load for a Real Machine
This example sets the maximum load for a relatively low-performance real
machine, with a range of possible load values of 1 to 100:
max_load: 20
Specifying Job Load (job_load)
For load balancing to work, you must assign a job_load value to every job that
impacts the load on a machine. The job_load attribute in a job definition
defines the relative amount of processing power the job consumes (that is, the
relative load the job places on a machine). Load units are arbitrary values, the
range of which is user-defined. You can use any weighting scheme you prefer.
You can use the max_load attribute to assign a real machine a maximum job
load, then use the job_load attribute in the job definition to assign the job a
load value that indicates the relative amount of the machine's load that the job
should consume. This lets you control machine loading and prevent a machine
from being overloaded.
Example: Define the Relative Processing Load for a Job
This example sets the load for a job that typically uses 10% of the CPU, with a
range of possible load values from 1 to 100:
job_load: 10
188 User Guide

7/16/2019 Autosys R11 User Guide
http://slidepdf.com/reader/full/autosys-r11-user-guide 189/459
Defining Machines
Specifying Queuing Priority (priority)
When a job is ready to run on a designated machine but the current load on
that machine is too large to accept the new job’s load, Unicenter AutoSys JM
queues the job for that machine so it runs when sufficient resources areavailable.
For job queuing to take place, you must define the priority attribute in the job
definition. The queue priority establishes the relative priority of all jobs queued
for a given machine, the lower number indicating a higher priority. If you do
not set the priority attribute, the job runs immediately on a machine, and is
not put in the queue.
Example: Set the Job to Run with Highest Priority
This example sets the job to run with the highest priority without overriding
the machine load control mechanism:
priority: 1
Example: Set the Job to Run in the Background
This example sets the job to run in the background when the machine load is
low:
priority: 100
Machines 189

7/16/2019 Autosys R11 User Guide
http://slidepdf.com/reader/full/autosys-r11-user-guide 190/459
Defining Machines
Specifying Relative Processing Power (factor)
The factor attribute is only valid in a real machine definition. It defines a factor
to multiply by a real machine’s available CPU cycles to check the relative
available CPU cycles. The factor value is used to weigh available cycles on onemachine against those of another machine. When Unicenter AutoSys JM
checks the available cycles on each machine, it multiplies the percent of free
CPU cycles by the factor value to check which machine has more relative
processing power available.
Factor units are arbitrary values, the range of which is user-defined. The value
consists of a real number that can contain a decimal. Therefore, the factor
value is typically a number between 0.0 and 1.0. If you do not define the
factor attribute in a real machine definition, its value defaults to 1.0.
Example: Set the Factor for a Low-Performance Real Machine
This example sets the factor for a low-performance real machine, on a scale of
0.0 to 1.0:
factor: 0.1
Example: Set the Factor for a High-Performance Real Machine
This example sets the factor for a high-performance real machine, on a scale
of 0.0 to 1.0:
factor: 1.0
190 User Guide

7/16/2019 Autosys R11 User Guide
http://slidepdf.com/reader/full/autosys-r11-user-guide 191/459
Machine Definitions
Machine Definitions Unicenter AutoSys JM can infer whether you are defining a real or virtual
machine based solely on the attributes in the definition:
Any machine definition that contains a max_load or factor attribute must
be a real machine definition, because these attributes are only valid in real
machine definitions.
Any machine definition that contains a list of machine attributes is a virtual
machine definition.
The type attribute is required when defining a Windows real machine, but you
can omit it when defining a UNIX machine. Compare the following definitions:
/* real UNIX */
insert_machine: toad
max_load: 100
factor: 0.8
/* real Windows */
insert_machine: tiger
type: n
max_load: 100
factor: 0.8
/* virtual */
insert_machine: jungle
machine: toad
machine: tiger
To help you understand virtual machines and their capabilities, the followingsections provide a series of examples that demonstrate the different
combinations of real machines that can constitute a virtual machine. These
examples include the JIL statements used to define these machines.
Machines 191

7/16/2019 Autosys R11 User Guide
http://slidepdf.com/reader/full/autosys-r11-user-guide 192/459
Machine Definitions
Define a Real Machine
To run jobs to an Agent, you must define a real machine on which it must run.
To define a real machine
1. Assign a machine name. This must be its hostname.
2. Assign a machine type of r for UNIX or n for Windows.
3. (Optional) Assign a maximum load and a factor attribute value (optional).
A real machine is defined.
Example: Define a Windows Real Machine
This example defines a Windows real machine named jaguar:
insert_machine: jaguartype: n
max_load: 100
factor: 1.0
Example: Define a UNIX Real Machine
This example defines a UNIX real machine named jaguar:
insert_machine: jaguartype: r max_load: 100 factor: 1.0
Delete a Real Machine
To delete a real machine definition, include the delete_machine subcommand
followed by the name of the machine to delete in the JIL script.
Example: Delete a Real Machine
This example deletes the real machine definition for the computer named
jaguar:
delete_machine: jaguar
192 User Guide
7/16/2019 Autosys R11 User Guide
http://slidepdf.com/reader/full/autosys-r11-user-guide 193/459
Machine Definitions
Define a Virtual Machine
You can use a virtual machine when jobs run on any member of a group of
real machines that are currently available and meet the job_load requirements
of the job.
To define a virtual machine
1. Assign a machine name.
2. Assign the machine type v.
3. Specify the real machines that comprise the virtual machine.
A virtual machine is defined.
Example: Define a Windows Virtual Machine with Subsets of Real
Machines
This example defines two Windows real machines (lion and lotus), and a
virtual machine (gorilla), which is composed of slices, or subsets, of the
max_load specified for the real machines. Although the real machines were
defined with specific max_load values (100 and 80), the virtual machine only
makes use of the reduced loads specified in the virtual machine definition (10
and 9).
insert_machine: lion
type: n
max_load: 100
factor: 1
insert_machine: lotus
type: n
max_load: 80
factor: .8
insert_machine: gorilla
type: v
machine: lion
max_load: 10
machine: lotus
max_load: 9
Machines 193

7/16/2019 Autosys R11 User Guide
http://slidepdf.com/reader/full/autosys-r11-user-guide 194/459
Machine Definitions
Example: Define a UNIX Virtual Machine with Default Real
Machines
This example defines a UNIX virtual machine (sheep), which is composed of two UNIX real machines (cheetah and camel). Because the max_load and
factor attributes are not defined for the real machines, they use the default
values for these attributes (a factor of 1.0 and a max_load of none, indicating
unlimited load units).
insert_machine: cheetah
insert_machine: Camel
insert_machine: sheep
type: v
machine: cheetah
machine: camel
Example: Define a UNIX Virtual Machine with Non-Default RealMachines
This example defines two UNIX real machines (lion and lotus), and a virtual
machine (zebra), which is composed of the two real machines. The virtual
machine is a superset of the two real machines and uses the max_load and
factor attributes defined for them.
insert_machine: lion
type: r
max_load: 100
factor: 1
insert_machine: lotustype: r
max_load: 80
factor: .9
insert_machine: zebra
type: v
machine: lion
machine: lotus
194 User Guide

7/16/2019 Autosys R11 User Guide
http://slidepdf.com/reader/full/autosys-r11-user-guide 195/459
Machine Definitions
Delete a Virtual Machine
To delete a virtual machine, include the delete_machine subcommand followed
by the name of the machine to delete in the JIL script. When you delete a
virtual machine, the definitions for its component real machines are notdeleted.
Example: Delete a Virtual Machine
This example deletes the virtual machine definition for the computer named
gorilla:
delete_machine: gorilla
Delete a Real Machine from a Virtual Machine
To delete a real machine from a virtual machine, include the following in the
JIL script:
The delete_machine subcommand followed by the name of the virtual
machine that contains the real machine to delete.
The machine attribute followed by the name of the real machine to delete.
Example: Delete a Real Machine from a Virtual Machine
This example deletes the real machine named camel from the virtual machine
named sheep. The machine definitions for sheep and camel are not deleted
from the database.
delete_machine: sheep
machine: camel
Machines 195

7/16/2019 Autosys R11 User Guide
http://slidepdf.com/reader/full/autosys-r11-user-guide 196/459
Machine Status
Machine Status
Real machines have a run-time status attribute designed to reflect the
machine’s availability. The machine status lets the Scheduler run more
efficiently by not wasting time trying to contact machines that are out of
service. If a job is scheduled for a machine that is offline, it is set to
PEND_MACH status until the machine comes back online. In the case of a
virtual machine, offline machines are not considered as possible candidates for
running a job.
A machine can have one of following statuses:
Online
Indicates that the machine is available and accepting jobs to run.
Offline
Indicates that the machine has been manually removed from service andwill not accept jobs to run.
Missing
Indicates that the Scheduler has verified that the machine is not
responding and has automatically removed it from service. The machine
will not accept jobs to run.
196 User Guide

7/16/2019 Autosys R11 User Guide
http://slidepdf.com/reader/full/autosys-r11-user-guide 197/459
Machine Status
Take a Machine Offline Manually
To manually take a machine offline (for example, during hardware service),
use the sendevent command to send a MACH_OFFLINE event.
When you send a MACH_OFFLINE event, jobs that are currently running run to
completion even though the machine’s status is offline. You can use the
autorep command to monitor running jobs.
If you shut a machine down for servicing, you may want to let the running
jobs complete before continuing. With the machine offline, you can service the
machine while the Scheduler continues running. All jobs that are scheduled to
start on the offline machine are put in PEND_MACH status until the machine
returns to service.
Note: For more information, see the Reference Guide.
Example: Manually Take a Machine Offline
This example takes the machine cheetah offline:
sendevent -E MACH_OFFLINE -n cheetah
The Scheduler log displays a message similar to the following when the
machine is offline:
[11/28/2005 15:38:21] CAUAJM_I_40245 EVENT: MACH_OFFLINE MACHINE: cheetah
Put a Machine Online Manually
To manually put a machine online, use the sendevent command to send a
MACH_ONLINE event.
When you send a MACH_ONLINE event for a machine, jobs with a status of
PEND_MACH on that machine are automatically started.
Note: For more information, see the Reference Guide.
Example: Manually Put a Machine Online
This example returns the machine cheetah to online status:
sendevent –E MACH_ONLINE –n cheetah
The Scheduler log displays a message, similar to the following, when the
machine is online:
[11/28/2005 15:38:21] CAUAJM_I_40245 EVENT: MACH_ONLINE MACHINE: cheetah
Machines 197

7/16/2019 Autosys R11 User Guide
http://slidepdf.com/reader/full/autosys-r11-user-guide 198/459
Machine Status
How Status Changes Automatically
When the Scheduler verifies that a real machine is not reachable, it uses the
following process to manage machine and job status:
If the Scheduler fails to contact a machine's Agent, it attempts to qualify
the status of that machine by pinging the Agent every 10 seconds.
If the Agent fails to respond after three attempts, the Scheduler marks the
machine as missing, issues a MACHINE_UNAVAILABLE alarm, and logs a
message similar to the following:
[11/28/2005 16:01:46]
Taking offline.
CAUAJM_I_40253 Machine cheetah is not responding.
The Scheduler puts all jobs scheduled to start on the missing machine in
PEND_MACH status.
The Scheduler pings the missing machine’s Agent every 60 seconds to
check its availability. If the machine responds, the Scheduler sends a MACH_ONLINE event and
the machine returns to service.
When the machine returns to service, the Scheduler starts all jobs in
PEND_MACH status for that machine.
Note: If you understand the cause of a missing machine and intervene to
correct it, you can use the sendevent command to send a MACH_ONLINE
event to bring the machine back online instead of waiting for the
Scheduler to do so.
How Status Affects Jobs on Virtual Machines
If a job is defined to run on a virtual machine or a list of machines and one of
those machines is offline, the job will run on another available machine with
which it is associated.
If, however, all machines in the virtual list are offline, the Scheduler puts the
job in PEND_MACH status. If any of the machines with which the job is
associated comes back online, the Scheduler removes the job from
PEND_MACH status and runs it on the online machine, subject to the queuing
criteria.
198 User Guide

7/16/2019 Autosys R11 User Guide
http://slidepdf.com/reader/full/autosys-r11-user-guide 199/459
Load Balancing
Load Balancing
You can implement simple load balancing (wherein the workload is spread
across multiple machines based on each machine's capabilities) by using the
machine attribute to specify a virtual machine or multiple real machines in a
job definition. This is also an easy way to help ensure reliable job processing.
For example, the Scheduler can use load balancing to check which of the
machines in a job definition is best suited to run the job, and automatically
start it on that machine.
The advantages of building a virtual machine are:
Its definition can be changed and the new construct is immediately applied
globally.
The max_load and factor values can vary between machines.
Even when a set of real machines that have not been explicitly defined to
Unicenter AutoSys JM is specified in a job's machine attribute, theavailable CPU cycles are used to check which machine runs the job.
Alternatively, you can specify a list of real machines in the job's machine
attribute. The system configuration includes machines of varying processing
power, so you should specify the max_load and factor attributes for each real
machine. If the max_load attribute is not defined for any of the real machines
or all of them have ample load units available, Unicenter AutoSys JM chooses
which machine to run on based solely on available processing power.
Machines 199

7/16/2019 Autosys R11 User Guide
http://slidepdf.com/reader/full/autosys-r11-user-guide 200/459
Load Balancing
In either case, Unicenter AutoSys JM uses the following process to verify the
available relative processing cycles for each machine:
1. Unicenter AutoSys JM uses one of the following methods (specified in the
MachineMethod parameter in the Unicenter AutoSys JM configuration file)
to verify the percentage of CPU cycles available on each real machine in
the specified virtual machine:
For Windows Agents, Unicenter AutoSys JM opens a Windows
registry key named HKEY_PERFORMANCE_DATA, which provides a
variety of system performance data, including available CPU cycles.
For UNIX Agents, Unicenter AutoSys JM runs vmstat.
2. Unicenter AutoSys JM multiplies the available CPU cycles by the machine's
factor value.
3. Unicenter AutoSys JM chooses the machine with the most relativeprocessing cycles available, based on the calculation in Step 2.
If a real machine in the virtual machine is not online, the Scheduler does not
attempt to contact it and it is not considered in the load balancing algorithm.
If the machines have equal max_load and factor values, it is equivalent to
defining a job and specifying the following in the machine field:
machine: cheetah, camel
If the factor attribute is not specified for a machine, Unicenter AutoSys JM
assumes the default factor value for each machine (1.0).
200 User Guide

7/16/2019 Autosys R11 User Guide
http://slidepdf.com/reader/full/autosys-r11-user-guide 201/459
Load Balancing
Example: Load Balancing With a Virtual Machine
This example defines a virtual machine (marmot) with three real machines
(cheetah, hippogriff, and camel):
insert_machine: marmot
machine: cheetah
factor: 1
machine: hippogriff
factor: 8
machine: camel
factor: .3
To start a job on this virtual machine, specify marmot in the job's machine
attribute. The Scheduler performs the necessary calculations to verify on
which machine to run the job, and reflects these calculations in its output log.
The output is similar to the following:
EVENT: STARTJOB JOB: test_mach[11/22/2005 10:16:53] CAUAJM_I_40245 EVENT: STARTJOB JOB: tvm[11/22/2005 10:16:54] CAUAJM_I_10208 Checking Machine usages:[11/22/2005 10:16:59] <cheetah=78>[11/22/2005 10:17:02] <hippogriff=80*[.80]=64>[11/22/2005 10:17:07] <camel=20*[.30]=6>[11/22/2005 10:17:11] CAUAJM_I_40245 EVENT: CHANGE_STATUS STATUS: STARTINGJOB: tvm [11/22/2005 10:17:11] CAUAJM_I_10082 [cheetah connected for tvm]Note that even though the machine usage on cheetah was less than that of
machine hippogriff, machine cheetah was picked because of the result of the
factor calculation (machine cheetah had 78% of its processing power available,while machine hippogriff only had 64% available). Thus, the factors weigh
each machine to account for variations in processing power.
Machines 201

7/16/2019 Autosys R11 User Guide
http://slidepdf.com/reader/full/autosys-r11-user-guide 202/459
Forcing a J ob to Start
Forcing a Job to Start
If you use the sendevent command to send a FORCE_STARTJOB event to a
job, Unicenter AutoSys JM immediately starts the job on the machine specified
in the job definition, regardless of the current load on the machine or the
job_load value set for the job. If the job was defined to run on a virtual
machine or a list of real machines, Unicenter AutoSys JM checks which
machine has the most processing power available and runs the job on that
machine, even if the job_load value set for the job exceeds the max_load
value set for the machine.
Note: If you send a FORCE_STARTJOB event to a job that has a status of
ON_ICE or ON_HOLD, the job's status does not revert to its previous status
when it completes.
Example: Force a Job to Start
This example describes the effects of forcing a job to start. Assume you
scheduled Job1 to run every Monday at 3:00 A.M. On Sunday, you sent a
JOB_ON_HOLD event to put the job in ON_HOLD status, so that the job does
not run as scheduled on Monday. If you send a FORCE_STARTJOB event to
Job1 on Wednesday at 2:00 P.M., Job1 runs to completion (either success or
failure), and then runs again as scheduled on Monday at 3:00 A.M. Note that
the job did not revert to the ON_HOLD status after you forced it to start on
Wednesday.
Queuing Jobs
Queuing is a mechanism used in Unicenter AutoSys JM to check the run order
of jobs that cannot run immediately. There is no actual physical queue.
Instead, Unicenter AutoSys JM uses queuing policies, which are based on the
use and subsequent interaction of the job_load and priority attributes in a job
definition and the max_load and factor attributes in a machine definition. You
can also use the sendevent command to send a CHANGE_PRIORITY event to
change the priority of a job that is already queued.
Note: The constructs of job loads (specified in the job_load attribute) and
machine loads (specified in the max_load attribute) are user-defined
conventions that Unicenter AutoSys JM enforces. If you do not indicate what
the load of a job is, it does not figure in the product's queuing calculations.
This is different from the load balancing feature, which inspects the CPU toverify its usage.
The following sections discuss queuing jobs and give examples of how to use
load balancing and queuing to optimize job processing in your environment.
202 User Guide

7/16/2019 Autosys R11 User Guide
http://slidepdf.com/reader/full/autosys-r11-user-guide 203/459
Queuing Jobs
How Unicenter AutoSys JM Queues Jobs
For queuing to be most effective, you must set the priority attribute for all
jobs. By default, the priority attribute is set to 0, indicating that the job should
not be queued and should run immediately. When you let the priority attributedefault for a job, it runs even if its job load would push the machine over its
load limit. However, even when jobs have a priority of 0, Unicenter AutoSys JM
tracks job loads on each machine so that jobs with non-zero priorities can be
queued.
Unicenter AutoSys JM uses the following process to limit the job load on
machines and to queue jobs for processing:
If you set a job_load value for a job and you assigned a max_load for
every real machine comprising a virtual machine, Unicenter AutoSys JM
checks if each machine has sufficient available load units before running
the job.
When more than one job is queued, the priority value is considered first
when deciding which job to run next. If there are insufficient load units
available to run the highest priority job, it remains in the queue and lower
priority jobs are considered subsequently.
If each real machine has sufficient load units, Unicenter AutoSys JM
employs the load balancing and factor algorithms to verify on which
machine the job should start.
If only one of the machines has sufficient load units, the job runs on that
machine.
If none of the machines has sufficient load units, Unicenter AutoSys JM
puts the job in QUE_WAIT status for all of the machines. The job stays in
QUE_WAIT status until one of the machines has sufficient load unitsavailable.
When one of the machines has the necessary load units available,
Unicenter AutoSys JM reviews all the job's starting conditions to make sure
it may still run.
– If all of the job's starting conditions are satisfied (that is, they evaluate
as TRUE), the job runs and is removed from all other queues.
– If any of the starting conditions are no longer true, the Scheduler
generates the following message:
CAUAJM_I_40191 Job: job_name Starting Conditions are no longer TRUE.
De-Queuing this Job and setting to ACTIVATED.
Note: If a job is in QUE_WAIT status and you want it to run immediately, do
not force the job to start. Instead, use the sendevent command to send a
CHANGE_PRIORITY event that changes the job's priority to 0.
Machines 203

7/16/2019 Autosys R11 User Guide
http://slidepdf.com/reader/full/autosys-r11-user-guide 204/459
Queuing Jobs
Example: Job Queuing
This example shows a simple job queuing scenario that uses a previously
defined machine named lion with a max_load of 100:
insert_job: jobAmachine: lion job_load: 80priority: 1insert_job: jobBmachine: lion job_load: 90priority: 1In this example, if JobA was running when JobB started, Unicenter AutoSys JM
would put JobB in QUE_WAIT status until JobA completes, at which point JobB
can run.
Example: Job Queuing and Load Balancing
This example shows a situation in which a machine has 80 load units and
multiple jobs are waiting to start. In this example, JobB and JobC are
executing, while JobA and JobD are queued (in the QUE_WAIT state) and
waiting for available load units. The numbers in the following illustration
indicate the job_load assigned to each job, and the max_load set for the
machine.
The following JIL statements define the machine and the jobs in this example:
insert_machine: cheetah
max_load: 80
insert_job: JobA
machine: cheetah
job_load: 50priority: 60
insert_job: JobB
machine: cheetah
job_load: 50
priority: 50
204 User Guide

7/16/2019 Autosys R11 User Guide
http://slidepdf.com/reader/full/autosys-r11-user-guide 205/459
Queuing Jobs
insert_job: JobC
machine: cheetah
job_load: 30
priority: 80
insert_job: JobD
machine: cheetah
job_load: 30
priority: 70
In this example, JobB and JobC are already running because their starting
conditions were satisfied first. After JobB or JobC completes, JobA or JobD
starts. Whether JobA or JobD starts first is verified by a combination of the
priority and job_load attributes of each job, and the max_load machine
attribute. The result differs based on whether JobB or JobC finishes first. If
JobB finishes first, 50 load units become available, so either JobA or JobD
could run. Because JobA has a higher priority, it runs first. However, if JobC
finishes first, only 30 load units become available, so only JobD could run.
Machines 205

7/16/2019 Autosys R11 User Guide
http://slidepdf.com/reader/full/autosys-r11-user-guide 206/459
Queuing Jobs
Using a Virtual Machine as a Subset of a Real Machine
One variety of virtual machine can be considered a subset of a real machine.
Typically, you would use this type of virtual machine to construct an individual
queue on a given machine. One use for this construct might be to limit thenumber of jobs of a certain type that run on a machine at any given time.
Example: Define a Virtual Machine as a Subset of a Real Machine
This example shows how to define a virtual machine that functions as a subset
of a real machine, thereby acting as a queue.
In this example, cheetah is a real machine with a max_load value of 80. If you
create three different print jobs, but you want only one job to run on a
machine at a time, you can use a combination of the max_load attribute for a
virtual machine and the job_load attributes for the jobs themselves to control
how the jobs run.
To implement this scenario, you would first create the virtual machine named
cheetah_printQ as follows:
insert_machine: cheetah_printQ
machine: cheetah max_load: 15
Next, you would define the three print jobs as follows:
insert_job: Print1
machine: cheetah_printQ
job_load: 15
priority: 1
insert_job: Print2
machine: cheetah_printQ
job_load: 15
priority: 1
insert_job: Print3
machine: cheetah_printQ
job_load: 15
priority: 2
206 User Guide

7/16/2019 Autosys R11 User Guide
http://slidepdf.com/reader/full/autosys-r11-user-guide 207/459
Queuing Jobs
Although the real machine cheetah has a max_load value of 80, meaning that
all three jobs (with their job_load values of 15) could run on it simultaneously,
the virtual machine cheetah_printQ effectively resets the real machine's
max_load to 15. Because each job is defined to run on cheetah_printQ, not
cheetah, only one of the jobs can run at a time because each job requires allof the load units available on the specified machine.
Note: The load units associated with a virtual machine have no interaction
with the load units for the real machine. This example implies that the virtual
load of 15 does not subtract from the load units of 80 for the real machine.
Load units are simply a convention that lets the user restrict concurrent jobs
running on any one machine.
Using a Virtual Machine to Combine Subsets of Real Machines
You can also define virtual machines to combine subsets (or slices) of real
machines into one virtual machine. You might do this, for example, if there are
two machines that are print servers and you want only one print job to run at
a time on each.
Example: Define a Virtual Machine to Combine Subsets of Real
Machines
This example defines a virtual machine (printQ) that uses subsets of the loads
available on two real machines to control where jobs run.
To implement this, you would create the virtual machine named printQ, and
specify two real machines (cheetah and camel), as shown in the following JIL
statements:
insert_machine: printQ
type: v
machine: cheetah
max_load: 15
machine: camel
max_load: 15
When a job is ready to start on printQ, Unicenter AutoSys JM checks if the
component real machine (cheetah or camel) has enough load units available to
run the job.
If neither machine has enough available load units, the product puts the
job in QUE_WAIT status and starts it when there are enough load units.
If only one machine has enough available load units, the product starts the
job on that machine.
If both machines have enough available load units, the product checks the
usage on each, and starts the job on the machine with the most available
CPU resources.
Machines 207

7/16/2019 Autosys R11 User Guide
http://slidepdf.com/reader/full/autosys-r11-user-guide 208/459
User-Defined Load Balancing
User-Defined Load Balancing
As an alternative to using the load balancing methods that Unicenter AutoSys
JM provides, you can write your own programs or batch files to check which
machine to use at run time. If you specify the name of a program or batch file
as the value of the machine attribute in the job definition, the Scheduler runs
the batch file at job run time, and substitutes its output for the machine name.
If the machine returned by the script is offline, the product puts the job in
PEND_MACH status for that machine. When the missing machine returns to
service, the pending job runs on it regardless of whether the script would
return a different machine name at that point in time. Because a machine
must be defined for the Scheduler to run a job on it, you must have previously
defined the machine returned by the script to Unicenter AutoSys JM.
Example: User-Defined Load Balancing
This example shows how you would specify a user-defined program or batch
file in place of a real or virtual machine for processing a job.
For example, you might supply the following:
insert_job: run_free
machine: /usr/local/bin/pick_free_mach`
command: $HOME/DEL_STUFF
At run time, the script /usr/local/bin/pick_free_mach runs on the Scheduler
machine. The standard output is substituted for the name of the machine, and
the job runs on that machine.
Important! The escape character in the machine value above is the back-tic
character (`), not an apostrophe ('). You must escape a program or batch file
used as the machine attribute value with back-tic characters as shown for the
Scheduler to recognize that the machine value specifies a script. The
apostrophe and quotation mark characters do not work in this case.
208 User Guide

7/16/2019 Autosys R11 User Guide
http://slidepdf.com/reader/full/autosys-r11-user-guide 209/459
Chapter 9: Monitoring and Reporting
JobsThis section contains the following topics: Monitors and Reports (see page 209) Define a Monitor or Report (see page 210) Essential Monitor and Report Attributes (see page 211) Optional Monitor Attributes (see page 216) Define Monitors and Reports Using JIL (see page 217) Run a Report or Monitor (see page 218)
Monitors and ReportsMonitors provide a real-time view of the system. Reports (sometimes called
browsers) let you use a variety of reporting views to examine historical
information about job executions.
Monitors and reports are simply applications that run against the database.
Because all information is in the database, monitors and reports that retrieve
information from the database provide a complete picture of the state of the
entire system. Monitors and reports can run with any database, including Dual
Event Servers, and on any Unicenter AutoSys JM Client computer.
Monitors and reports let you filter and display only the information you areinterested in from of a vast collection of data. That is, they are tools that can
provide information meaningful to you.
Both monitors and reports filter events by type and by job or groups of jobs.
Reports also filter by time (monitors do not filter by time because they provide
real-time information).
Note: Because monitors provide a picture of the system's state in real time,
they will not provide any information if the Scheduler is down. On the other
hand, reports provide a picture of the system's state from a historical
perspective, not in real time.
Monitoring and Reporting J obs 209

7/16/2019 Autosys R11 User Guide
http://slidepdf.com/reader/full/autosys-r11-user-guide 210/459
Define a Monitor or Report
Monitors
Monitors provide a real-time view of the system. The following steps are
necessary to use a monitor:
1. Define which events to monitor.
2. Run the monitor.
A running monitor is an application that polls the database for new events that
meet the selection criteria. Monitors are strictly informational. They provide an
up-to-the-minute view of Unicenter AutoSys JM events as they occur. For box
jobs, all job levels can be observed, if appropriate.
Note: Monitor names can only contain the following characters: a-z, A-Z, 0-9,
period (.), underscore (_), and hyphen (-). You cannot include spaces or tabs
in a monitor name.
Reports
A report or browser is a query run against the database, based on the
selection criteria defined for that report. Its primary function is to enable you
to quickly get specific information, such as the finish time of the database
backup for the last two weeks or a list of all jobs that have an alarm
associated with them. In addition, all job levels in box jobs can be reported.
Like monitors, a report definition is stored in the database, enabling you to run
reports any time, without redefining the criteria. Reports can only display
events that are still in the database. Archived events are inaccessible and
cannot be displayed.
Note: Report names can only contain the following characters: a-z, A-Z, 0-9,
period (.), underscore (_), and hyphen (-). You cannot include spaces or tabs
in a report name.
Define a Monitor or Report
To define a monitor or report, issue the jil command and pass it the
insert_monbro subcommand followed by a set of attributes.
To define a new monitor or report, you assign it a name and specify attributesthat further define its behavior. Using these attributes, you can specify
everything from the name to assign to the monitor or report to the events it
should track. The monitor or report specification is stored in the database.
210 User Guide

7/16/2019 Autosys R11 User Guide
http://slidepdf.com/reader/full/autosys-r11-user-guide 211/459
Essential Monitor and Report Attributes
Essential Monitor and Report Attributes
The following topics describe the essential monitor and report attributes. You
must specify these attributes to define a valid monitor or report.
This section provides the following information for each attribute described:
Its name.
Its JIL attribute keyword.
A description of its use.
Common Essential Attributes—General
The following attributes are required for both monitors and reports. Although
defaults might be available, every monitor or report definition must include
these attributes, whether by default or by explicit specification.
Monitor or Report Name
insert_monbro: monbro_name
m o n b r o _ n a m e
Defines a unique name for the monitor or report.
Limits: A monitor cannot have the same name as a report, but a monitor
or report can have the same name as a job.
This value can be up to 30 characters in length and can contain the
following characters: A-Z, a-z, 0-9, period ( . ), underscore ( _ ), andhyphen ( - ). This value cannot include spaces or tabs.
Mode
mode: type
t y p e
Specifies whether to define a monitor or report.
Set type to m or monitor to define a monitor.
Set type to b or browser to define a report.
Monitoring and Reporting J obs 211

7/16/2019 Autosys R11 User Guide
http://slidepdf.com/reader/full/autosys-r11-user-guide 212/459
Essential Monitor and Report Attributes
Common Essential Attributes—Events
The events specification verifies which events to monitor or report. An event is
any change in the state of a job. Events can be programmatically generated
occurrences, such as alarms, or they can be manually generated occurrences,such as starting a job, putting a job on hold, or killing a job.
Monitors and reports can track events by filtering at several levels or based on
selected jobs. The events to track are verified by the combination of the
various event filters and the job filter, which are specified with any of the
essential attributes.
All Events
all_events: toggle
t o g g l e
Specifies whether to track all events for the specified jobs.
Set toggle to y or 1 to track all events. In this case, the other event
filtering attributes are ignored, and all events, regardless of source,
are reported for the selected jobs. These events include job status
events and alarms.
Set toggle to n or 0 if you do not want to track all events.
Note: Do not define a monitor to monitor all events for all jobs. Instead,
use the following command to display the Scheduler log in real time:
autosyslog -e
Running a monitor adds another connection to the database, and
establishes a process that continually polls the database. This cansignificantly impact system performance. Moreover, the Scheduler log
provides more diagnostic information than a monitor.
Default: 0
Alarms
alarm: toggle
t o g g l e
Specifies whether to track alarms. You can track alarms and job status
events in the same monitor or report.
Set toggle to y or 1 to track alarms.
Set toggle to n or 0 if you do not want to track alarms. This is the
default value.
Default: 0
212 User Guide

7/16/2019 Autosys R11 User Guide
http://slidepdf.com/reader/full/autosys-r11-user-guide 213/459
Essential Monitor and Report Attributes
All Job Status Events
all_status: toggle
t o o g l e
Specifies whether to track all job status events for the specified jobs. Job
status events occur whenever a job's status changes. You can track alarms
and job status events in the same monitor or report.
Set toggle to y or 1 to track all job status events. Set toggle to n or 0 if you do not want to track all job status events. Default: 0
Individual Job Status Events
The following table lists the additional monbro attributes used to request the
display of individual job status events:
JIL Keyword Field Name
running Displays RUNNING status events
success Displays SUCCESS status events
failure Displays FAILURE status events
terminated Displays TERMINATED status events
starting Displays STARTING status events
restart Displays RESTART status events
Note: For each JIL keyword, do the following:
Set toggle to y or 1 to track the individual job status event.
Set toggle to n or 0, if you do not want to track the individual job
status events.Default: n or 0.
Monitoring and Reporting J obs 213

7/16/2019 Autosys R11 User Guide
http://slidepdf.com/reader/full/autosys-r11-user-guide 214/459
Essential Monitor and Report Attributes
Job Filter
job_filter: type
t y p e
Defines which jobs to track. Monitors and reports can track events based
on selected jobs. The events to track are verified by the combination of
the various event filters and the job filter.
Set type to a to track all jobs (no job filtering). Set type to b to track a single box and the jobs it contains. Set type to j to track a single job. If you set type to b or j, you must also define the job_name attribute to specify the name of the box or job to track. Default: a
214 User Guide

7/16/2019 Autosys R11 User Guide
http://slidepdf.com/reader/full/autosys-r11-user-guide 215/459
Essential Monitor and Report Attributes
Essential Report Attributes
When defining reports, you must specify either the currun or the after_time
attribute in addition to the essential attributes described previously. The time
criteria specified in these mutually exclusive attributes let you select eventsthat occurred during a particular interval.
Current Run Only
currun: toggle
t o g g l e
Specifies whether to report events only for the current or most recent run
of the specified jobs.
Set toggle to y or 1 to report events only for the current or most
recent job run.
Set toggle to n or 0 if you do not want to restrict reporting to eventsfor the current or most recent job run. If you set toggle to n or 0, you
must define the after_time attribute.
This feature is useful for getting a sense of what is happening right now.
For example, you could select the job status event RESTART, turn off job
filtering, and set this attribute to y to see all the jobs that have been
automatically restarted in their current or latest run.
Default: 1
Events After a Certain Date and Time
after_time: "date_time"
d a t e _ t i m e
Defines that only events occurring for the specified jobs after the specified
date and time are reported.
Default: When you set the currun attribute to n or 0, the after_time
attribute defaults to 00:00 (12:00 a.m.) on the current day. When you set
the currun attribute to y or 1, the after_time attribute is ignored. When
you omit the date from the date_time value, after_time defaults to the
current day.
Limits: Specify date_time in the format "MM /DD /[YY ]YY hh:mm", where
MM is the month, DD is the day, [YY ]YY is the year, hh is the hour (in 24
hour format), and mm is the minutes. You must enclose the date_timevalue in quotation marks (").
You cannot use the after_time attribute in a monitor definition because
monitors only show events as they occur.
Monitoring and Reporting J obs 215

7/16/2019 Autosys R11 User Guide
http://slidepdf.com/reader/full/autosys-r11-user-guide 216/459
Optional Monitor Attributes
Optional Monitor Attributes
The following topics describe optional monitor attributes. You must specify
these attributes to define a valid monitor. There are no optional report
attributes.
This section provides the following information for each attribute described:
Its name.
Its JIL attribute keyword.
A description of its use.
Verification Required for Alarms
alarm_verif: toggle
t o g g l e
Specifies whether the monitor should require an operator response to
alarm events and provides an accounting of alarm events for which there
was an operator response. When the monitor detects an alarm event, it
prompts the operator for a response and repeats the prompt every 20
seconds until the operator responds. When the operator responds
(typically by entering a comment at the prompt), the monitor time stamps
the response and records it in the database, along with the alarm event.
Set toggle to y or 1 to require an operator response to alarms.
Set toggle to n or 0 if you do not want to require an operator response
to alarms.Default: 0
216 User Guide

7/16/2019 Autosys R11 User Guide
http://slidepdf.com/reader/full/autosys-r11-user-guide 217/459
Define Monitors and Reports Using J IL
Define Monitors and Reports Using J IL Use the following syntax to define a monitor or report using JIL:
subcommand:monbro_name
attribute_keyword :value
The only difference between defining monitors or reports and defining jobs is
that different subcommands are used. Use the following JIL subcommands to
define and manage monitors and reports:
insert_monbro
update_monbro
delete_monbro
Example: Define a Monitor Using JIL
This example uses the following JIL statements to define a monitor named
Regular. This monitor tracks job status events when a job changes state to
RUNNING, SUCCESS, FAILURE, or TERMINATED. It also defines a monitor
named Alarm that tracks all alarm events. When the monitor detects an alarm
event, it prompts the operator for a response and repeats the prompt every 20
seconds until the operator responds.
insert_monbro: Regular
mode: m
running: y
success: y
failure: y
terminated: y
/* Monitor for JUST ALARMS!
* Verification Required is ON so someone must type in a response.
*/
insert_monbro: Alarm
mode: m
alarm: y
alarm_verif: y
These JIL statements are stored in the $AUTOSYS/install/data/monbro.jil file.
Monitoring and Reporting J obs 217
7/16/2019 Autosys R11 User Guide
http://slidepdf.com/reader/full/autosys-r11-user-guide 218/459
Run a Report or Monitor
Example: Define a Report Using JIL
This example uses the following JIL statements to define a report named
Alarm_Rep that reports all alarms on any job from June 1, 1997 at 2:00 a.m.
to the present.
insert_monbro: Alarm_Rep
mode: b
alarm: y
after_time: "06/01/1997 2:00"
The quotation marks are required in the after_time value because it contains a
colon (:).
Note: Reports can only display events that are still in the database. Archived
events are inaccessible and cannot be displayed.
Run a Report or Monitor
To run a report or monitor, run the following command at the command
prompt:
monbro -N monitor_name
218 User Guide

7/16/2019 Autosys R11 User Guide
http://slidepdf.com/reader/full/autosys-r11-user-guide 219/459
Chapter 10: Maintaining the Scheduler
This section contains the following topics: Overview of Scheduler Maintenance (see page 219) Start the Scheduler (see page 220) How the Scheduler Starts Processes (see page 221)How You Can Back Up Definitions (see page 222) Restore Definitions (see page 225) Monitoring the Scheduler (see page 227)Start the Scheduler in Global Auto Hold Mode (see page 228) How Shadow Scheduler Rollover Works (see page 230) Restore the Primary Scheduler After a Rollover (see page 231) Stop the Scheduler (see page 233) Running the Scheduler in Test Mode (see page 234)
Overview of Scheduler Maintenance
The Scheduler (that is, the event_demon.exe executable) is the engine of
Unicenter AutoSys JM; when the Scheduler is not running, you cannot initiate
new actions. If you stop the Scheduler, any actions that have already started
run to completion.
The database that is designated as the Event Server must be available,
running, and properly identified before you can start the Scheduler.
Maintaining the Scheduler 219

7/16/2019 Autosys R11 User Guide
http://slidepdf.com/reader/full/autosys-r11-user-guide 220/459
Start the Scheduler
Start the Scheduler You must start the Scheduler to use Unicenter AutoSys JM to schedule and run
jobs. The database that is designated as the Event Server must be available,
running, and properly identified before you can start the Scheduler.
To start the scheduler at a Windows command prompt
1. Open the Unicenter AutoSys JM Administrator from the program group and
select Instance from the AutoSys menu.
The Unicenter AutoSys Instance screen opens.
2. (Optional) Enter the name of the computer on which the Scheduler is
installed in the Computer field, and click Connect.
Note: By default, the Computer field contains the name of the computer
you are logged on to, but you can connect to a remote computer toadminister the instance information by specifying the appropriate
computer name.
Unicenter AutoSys JM connects to the specified computer.
3. Select an instance from the AutoSys Instance list, specify the date format
in the Date Format field, and click OK.
The Unicenter AutoSys Instance screen closes.
4. Select Services from the AutoSys menu.
The Unicenter AutoSys Services screen opens.
5. Select the Scheduler from the Service list and click Start Service.
The Scheduler starts.
To start the Scheduler at a UNIX command prompt, enter the following
command:
eventor
Note: Most services, including the Agent and the Event Server (database
service), start automatically at system startup. We recommend that you start
the Scheduler and the Application Server manually after starting your system.
If you lose several systems simultaneously due to power failure, this approach
lets the Agents start on their respective computers before you start theScheduler.
220 User Guide

7/16/2019 Autosys R11 User Guide
http://slidepdf.com/reader/full/autosys-r11-user-guide 221/459
How the Scheduler Starts Processes
How the Scheduler Starts Processes
After you start the Scheduler, it performs the following tasks before it begins
processing:
Verifies that no other Scheduler is running on that computer.
Runs the chase command with the -A and -E parameters. The chase
command verifies from the database which jobs are in the STARTING or
RUNNING state, and on which computer. For each Client computer, the
chase command passes the Agent a list of jobs that should be running
there and instructs the Agent to verify that the processes are actually
running. This command also verifies that the Agent is running. If the chase
command detects errors, it sends an alarm. If a job is not running as
expected, the Scheduler sends the necessary corrective event for the job,
if the job definition allows it.
If a STARTJOB event is being processed and the job it started is still
active, the Scheduler does not restart it. The purpose of running the chasecommand is to guarantee that the Scheduler starts with all processes in a
known state. Problems are detected upon Scheduler startup. This method
is similar to a database checkpointing and rolling forward or back upon
recovery.
Note: You can turn off this Scheduler startup behavior by clearing the
Chase On Startup check box on the Unicenter AutoSys Administrator
Scheduler screen. For more information, see the Online Help.
Note: You can turn off this Scheduler startup behavior by running theeventor script with the -n command line option:
eventor -n
Maintaining the Scheduler 221

7/16/2019 Autosys R11 User Guide
http://slidepdf.com/reader/full/autosys-r11-user-guide 222/459
How You C an Back Up Definitions
How You Can Back Up Definitions
We recommend that you back up the following definitions periodically so you
have files to restore from in the event of a system failure:
Calendar definitions
Job definitions
Machine definitions
Monitor and report definitions
Global variables
Use the following process to back up your definitions:
1. Use the autocal_asc command to back up calendar definitions.
2. Use the autorep command to back up job and machine definitions.
3. Use the monbro command to back up monitor and report definitions.
4. Use the autorep command to back up global variables.
Back Up Calendar Definitions
You should back up your calendar definitions periodically so you have files to
restore from in the event of a system failure.
To back up calendar definitions, run each of the following commands from an
instance command prompt:
autocal_asc –E /directory/autosys.ecal –e ALL
autocal_asc –E /directory/autosys.ccal –c ALL
autocal_asc –E /directory/autosys.scal –s ALL
d i r e c t o r y
Defines a directory outside of the Unicenter AutoSys JM directory
structure.
222 User Guide
7/16/2019 Autosys R11 User Guide
http://slidepdf.com/reader/full/autosys-r11-user-guide 223/459
How You C an Back Up Definitions
Back Up Job, Machine, and Monitor Definitions
You should back up your job, machine, and monitor and report definitions
periodically so you have files to restore from in the event of a system failure.
To back up job, machine, and monitor definitions
1. Run the following command from an instance command prompt to save
your job definitions:
autorep -J ALL -q > /directory/autosys.jil
d i r e c t o r y
Defines a directory outside of the Unicenter AutoSys JM directory
structure. We recommend that you use the same directory in which
you saved your calendar definitions.
The command saves your job definitions to a file named autosys.jil.
2. Run the following command from an instance command prompt to append
your machine definitions to the file that contains your job definitions:
autorep -M ALL -q >> /directory/autosys.jil
Note: To append definitions to an existing file, you must enter >>
(instead of >) in the command. We recommend that you append your job,
machine, and monitor and report definitions to the same file so you have
only one file to restore following a system failure.
The command appends your machine definitions to the file that contains
your backed-up job definitions.
3. Run the following command from an instance command prompt to append
your monitor and report definitions to the file that contains your job andmachine definitions:
monbro -N ALL -q >> /directory/autosys.jil
The command appends your monitor and report definitions to the file that
contains your backed-up job and machine definitions.
Maintaining the Scheduler 223

7/16/2019 Autosys R11 User Guide
http://slidepdf.com/reader/full/autosys-r11-user-guide 224/459
How You C an Back Up Definitions
Back Up Global Variable Definitions
You should back up your global variable definitions periodically so you have
files to restore from in the event of a system failure.
To back up calendar definitions, run the following command from the instance
command prompt to save your global variables to their own file:
autorep -G ALL > /directory/globals.jil
d i r e c t o r y
Defines a directory outside of the Unicenter AutoSys JM directory
structure. We recommend that you use same directory in which you saved
your other definitions.
This command saves your global variables to a file named globals.jil. This file
is simply a record of what you must redefine following a system failure.
224 User Guide

7/16/2019 Autosys R11 User Guide
http://slidepdf.com/reader/full/autosys-r11-user-guide 225/459
Restore Definitions
Restore Definitions
If you think you might have lost data during a system failure or you want to
reset the definitions in your database to a previous level, you must restore
backed-up definitions. This procedure assumes that you have previously
backed up your global variables and your calendar, job, machine, monitor and
report definitions.
To restore definitions
1. Run each of the following commands from an instance command prompt
to restore your calendar definitions:
autocal_asc –I c:\directory\autosys.ecal
autocal_asc –I c:\directory\autosys.ccal
autocal_asc –I c:\directory\autosys.scal
d i r e c t o r y
Defines the directory to which you previously backed up the
definitions.
The commands restore your calendar definitions to the database.
2. Run the following command from an instance command prompt to restore
your job, machine, and monitor and report definitions:
jil < c:\directory\autosys.jil
d i r e c t o r y
Defines the directory to which you previously backed up thedefinitions.
The command restores your definitions to the database.
3. Open the globals.jil file that contains your backed-up global variables and
reference it as you manually redefine any global variables and reset the
necessary Administrator settings.
Your global variables are restored.
Maintaining the Scheduler 225

7/16/2019 Autosys R11 User Guide
http://slidepdf.com/reader/full/autosys-r11-user-guide 226/459
Restore Definitions
To restore definitions
1. Run each of the following commands from an instance command prompt
to restore your calendar definitions:autocal_asc –I /directory/autosys.ecal
autocal_asc –I /directory/autosys.ccal
autocal_asc –I /directory/autosys.scal
d i r e c t o r y
Defines the directory to which you previously backed up the
definitions.
The commands restore your calendar definitions to the database.
2. Run the following command from an instance command prompt to restore
your job, machine, and monitor and report definitions:
jil < /directory/autosys.jil
d i r e c t o r y
Defines the directory to which you previously backed up the
definitions.
The command restores your definitions to the database.
3. Open the globals.jil file that contains your backed-up global variables and
reference it as you manually redefine any global variables.
Your global variables are restored.
226 User Guide

7/16/2019 Autosys R11 User Guide
http://slidepdf.com/reader/full/autosys-r11-user-guide 227/459
Monitoring the Scheduler
Monitoring the Scheduler
The Scheduler writes its output to the following log file:
%AUTOUSER%\out\event_demon.%AUTOSERV%
This log file contains a record of all the actions taken by the Scheduler,
including startup and shutdown information.
To view the log file, run the following command:
autosyslog -e
The Scheduler writes its output to the following log file:
$AUTOUSER/out/event_demon.$AUTOSERV
This log file contains a record of all the actions taken by the Scheduler,
including startup and shutdown information. If the $AUTOUSER directory is
NFS mounted, you can view this output from any computer on the network.
To view the log file, run the following command:
autosyslog-e
When you run the autosyslog-e command, the last ten lines of the Scheduler
log file are displayed, and all subsequent additions to the log are automatically
displayed as they occur.
To terminate autosyslog, press Ctrl+C.
Maintaining the Scheduler 227

7/16/2019 Autosys R11 User Guide
http://slidepdf.com/reader/full/autosys-r11-user-guide 228/459
Start the Scheduler in Global Auto Hold Mode
Scheduler Log File Location
When the Scheduler has problems starting, it logs errors to a location that is
dependent upon when the starting process fails. You can find the error
description in one of the following locations:
If the Scheduler fails early in startup, it writes errors to the Windows Event
Log.
If the Scheduler fails during the startup procedure, it writes errors to the
designated Enterprise Wide Directory, in the following location:
event_demon.$AUTOSERV$.out
If the Scheduler encounters problems while running, it writes errors to the
following location:
$AUTOUSER/out/event_demon.$AUTOSERV
Start the Scheduler in Global Auto Hold Mode
If you restart a Scheduler after a period of downtime, you might want to start
it in Global Auto Hold mode. Starting the Scheduler in Global Auto Hold mode
prevents the system from being flooded with jobs that were scheduled to run
during the downtime. When you select Global Auto Hold, the Scheduler
evaluates all box, command, and file watcher jobs whose starting conditions
have been met and are eligible to run, but instead of starting the jobs the
Scheduler puts them in ON_HOLD status.
This approach lets you decide which jobs should run and selectively start them
by using the sendevent command to send a FORCE_STARTJOB event. The onlyway to start a job when Global Auto Hold is on is to send the
FORCE_STARTJOB event.
To start the Scheduler in Global Auto Hold mode
1. Open the Unicenter AutoSys JM Administrator from the program group and
select Instance from the AutoSys menu.
The Unicenter AutoSys Instance screen opens.
2. (Optional) Enter the name of the computer on which the Scheduler is
installed in the Computer field, and click Connect.
Note: By default, the Computer field contains the name of the computer
you are logged on to, but you can connect to a remote computer to
administer the instance information by specifying the appropriate
computer name.
Unicenter AutoSys JM connects to the specified computer.
228 User Guide

7/16/2019 Autosys R11 User Guide
http://slidepdf.com/reader/full/autosys-r11-user-guide 229/459
Start the Scheduler in Global Auto Hold Mode
3. Select an instance from the AutoSys Instance list, specify the date format
in the Date Format field, and click OK.
The Unicenter AutoSys Instance screen closes.
4. Select Scheduler from the AutoSys menu.
The Unicenter AutoSys Scheduler screen opens.
5. Select the Global Auto Hold check box, and click OK.
The Global Auto Hold mode is activated and the Unicenter AutoSys
Scheduler screen closes.
6. Select Services from the AutoSys menu.
The Unicenter AutoSys Services screen opens.
7. Select the Scheduler from the Service list and click Start Service.
The Scheduler starts.
To start the Scheduler in Global Auto Hold mode
1. Enter the following command at a UNIX command prompt:
eventor -G
The Scheduler starts.
2. Run the following command to send a Force Start Job event:
sendevent -E FORCE_STARTJOB -J job_name
J o b _ n a m e
Defines the name of the job to which to send the FORCE_STARTJOBevent.
The specified job starts.
Maintaining the Scheduler 229

7/16/2019 Autosys R11 User Guide
http://slidepdf.com/reader/full/autosys-r11-user-guide 230/459
How Shadow Scheduler Rollover Works
How Shadow Scheduler Rollover Works You can configure a Shadow Scheduler to use as a backup Scheduler. In this
scenario, both the Primary Scheduler and the Shadow Scheduler periodically
update the Event Server to indicate that they are active. The Shadow
Scheduler remains idle, checking the Event Server for periodic messages
(called pings) from the Primary Scheduler. These messages indicate that the
Scheduler is operating correctly. If the Primary Scheduler fails to ping the
Event Server, the Shadow Scheduler assumes responsibility for interpreting
and processing events.
If the Primary Scheduler and an Event Server are on the same machine, the
Scheduler failure could also mean an Event Server failure. In this case, if Dual
Event Servers are configured, Unicenter AutoSys JM rolls over to the Shadow
Scheduler and to Single Event Server mode. Unicenter AutoSys JM uses the
Tie-breaker Scheduler to resolve contentions and to eliminate the case where
one processor takes over because its own network is down. However, theShadow Scheduler is not guaranteed to take over in every case. For example,
in the case of network problems, Unicenter AutoSys JM might not be able to
determine which Scheduler works, and might shut down both Schedulers.
You can use the Unicenter AutoSys Scheduler screen of the
Administrator (accessed from the program group) to select the RoleDesignator
of Shadow Scheduler or Tie-breaker Scheduler.
Note: For more information, see the Online Help.
You can specify the Shadow Scheduler and the Tie-breaker Scheduler by
modifying the RoleDesignator parameter in the configuration file.
More information:
Dual Event Servers (see page 22) High Availability Option and Dual Event Servers: Tie-breaker Scheduler (see page 24)High Availability Option: Shadow Scheduler (see page 23) High Availability Recovery (see page 261)
230 User Guide

7/16/2019 Autosys R11 User Guide
http://slidepdf.com/reader/full/autosys-r11-user-guide 231/459
Restore the Primary Scheduler After a Rollover
Restore the Primary Scheduler After a Rollover
If you run Unicenter AutoSys JM with a Shadow Scheduler, the Shadow
Scheduler takes over interpreting and processing events if the Primary
Scheduler fails. You can restore the Primary Scheduler after the Shadow
Scheduler takes over.
To restore the Primary Scheduler after a rollover
1. Log on to the machine running the Shadow Scheduler as the EXEC
Superuser, and issue the following command:
sendevent -E STOP_DEMON
The Shadow Scheduler completes any processes it is currently performing,
and stops.
2. Open the Unicenter AutoSys JM Administrator from the program group onthe Primary Scheduler computer and select Instance from the AutoSys
menu.
The Unicenter AutoSys Instance screen opens.
3. (Optional) Enter the name of the computer on which the Primary
Scheduler is installed in the Computer field, and click Connect.
Note: By default, the Computer field contains the name of the computer
you are logged on to, but you can connect to a remote computer to
administer the instance information by specifying the appropriate
computer name.
Unicenter AutoSys JM connects to the specified computer.
4. Select an instance from the AutoSys Instance list, specify the date format
in the Date Format field, and click OK.
The Unicenter AutoSys Instance screen closes.
5. Select Services from the AutoSys menu.
The Unicenter AutoSys Services screen opens.
6. Select the Scheduler from the Service list and click Start Service.
The Scheduler starts.
7. Open the Unicenter AutoSys JM Administrator from the program group on
the Shadow Scheduler computer and select Instance from the AutoSys
menu.
The Unicenter AutoSys Instance screen opens.
Maintaining the Scheduler 231

7/16/2019 Autosys R11 User Guide
http://slidepdf.com/reader/full/autosys-r11-user-guide 232/459
Restore the Primary Scheduler After a Rollover
8. (Optional) Enter the name of the computer on which the Shadow
Scheduler is installed in the Computer field, and click Connect.
Note: By default, the Computer field contains the name of the computer
you are logged on to, but you can connect to a remote computer to
administer the instance information by specifying the appropriate
computer name.
Unicenter AutoSys JM connects to the specified computer.
9. Select an instance from the AutoSys Instance list, specify the date format
in the Date Format field, and click OK.
The Unicenter AutoSys Instance screen closes.
10. Select Services from the AutoSys menu.
The Unicenter AutoSys Services screen opens.
11. Select the Scheduler from the Service list and click Start Service.
The Scheduler service for the Shadow Scheduler is restored.
To restore the Primary Scheduler after a rollover
1. Log onto the machine running the Shadow Scheduler as the EXEC
Superuser, and issue the following command:
sendevent -E STOP_DEMON.
The Shadow Scheduler completes any processes it is currently performing,
and stops.
Note: If you are running with Dual Event Servers, the TieBreaker Scheduler must also be stopped and restarted.
2. On the Primary Scheduler machine, restart the Primary Scheduler by
issuing the following command;
eventor
The Primary Scheduler is restored.
3. On the Shadow Scheduler machine, issue the following command:
eventor.
The Shadow Scheduler is restarted.
232 User Guide

7/16/2019 Autosys R11 User Guide
http://slidepdf.com/reader/full/autosys-r11-user-guide 233/459
Stop the Scheduler
Stop the Scheduler
Stopping the Scheduler does not affect jobs that are already running. They
continue to run to completion, at which time their exit events are sent directly
to the database. When you stop the Scheduler, actions triggered by incoming
events sent from the Agents are not initiated until you restart the Scheduler.
Only the EXEC Superuser can stop the Scheduler. It is safe to stop the
Scheduler at any time, if you do it properly.
To stop the Scheduler, log on to any Unicenter AutoSys JM-configured
computer as the EXEC Superuser and issue the following command at an
instance command prompt:
sendevent -E STOP_DEMON
When you issue the sendevent command, the STOP_DEMON event is sent to
the database. The Scheduler reads the STOP_DEMON event, enters an orderly
shutdown cycle (completing any processing it is currently performing), and
exits.
There might be a delay between when you send the STOP_DEMON event and
when the Scheduler reads it and shuts down. If the Scheduler does not stop
immediately, do not send another STOP_DEMON event, because the Scheduler
will process that event the next time it starts, promptly shutting down.
To assign a high priority to the sendevent command, include the -P 1
argument, as follows:
sendevent -E STOP_DEMON -P 1
Note: Do not attempt to stop the Scheduler by terminating the process. This
method stops the Scheduler immediately, even if it is processing an event.
Also, if you are using Dual Event Servers and terminate the process in any
way other than with the sendevent command, the databases can lose
synchronization. For more information, see the Reference Guide.
Maintaining the Scheduler 233

7/16/2019 Autosys R11 User Guide
http://slidepdf.com/reader/full/autosys-r11-user-guide 234/459
Running the Scheduler in Test Mode
Running the Scheduler in Test Mode
You can run the Scheduler in test mode to troubleshoot problems, check your
configuration, and test the setup and execution of logic by the jil command,
without running the defined jobs. In test mode, the Scheduler runs a simple
test job instead of the defined jobs.
When running in test mode, you can check the following:
Whether the Scheduler and the Agents are installed and configured
properly. Running in test mode uses the same mechanisms of starting jobs
and sending events that Unicenter AutoSys JM uses in normal mode.
Whether the conditional logic for jobs, including nested boxes, is
functioning correctly.
To define the level at which test mode runs, set the value of the%AUTOTESTMODE% variable before you start the Scheduler. You can set
%AUTOTESTMODE% to one of the following values:
%AUTOTESTMODE% = 1
Runs each job with the following test mode variations:
The ntgetdate command runs on the remote computer instead of the
command specified in the job definition.
The Scheduler redirects standard output and standard errors for the
command to the \tmp\autotest %AUTO_JOB_NAME% file, where
%AUTO_JOB_NAME% is the job name as defined to Unicenter AutoSys
JM.
If the job being run in test mode is a file watcher job, it is not
disabled. The Scheduler runs it as it would in real mode.
This test mode disables the following functions:
Minimum and maximum run alarms
Sourcing a user-specified job profile file
All resource checks
%AUTOTESTMODE% = 2
Runs each job with the same behaviors as %AUTOTESTMODE = 1, adding
the following procedures:
Resource checks are performed.
A user-defined job profile is sourced.
The Scheduler redirects output from the ntgetdate command to the
user-defined standard output and standard error files (if they are defined).
Otherwise, the Scheduler redirects output to the
\tmp\autotest.%AUTO_JOB_NAME% file.
234 User Guide

7/16/2019 Autosys R11 User Guide
http://slidepdf.com/reader/full/autosys-r11-user-guide 235/459
Running the Scheduler in Test Mode
To define the level at which the test mode runs, set the value of the
$AUTOTESTMODE variable before you start the Scheduler. The levels of test
mode are verified by the value of the $AUTOTESTMODE variable. You can set$AUTOTESTMODE to one of the following values:
$AUTOTESTMODE = 1
Runs each job with the following test mode variations:
The ntgetdate command runs on the remote computer instead of the
command specified in the job definition.
The Scheduler redirects standard output and standard errors for the
command to the \tmp\autotest $AUTO_JOB_NAME$ file, where
$AUTO_JOB_NAME$ is the job name as defined to Unicenter AutoSys
JM.
If the job being run in test mode is a file watcher job, it is notdisabled. The Scheduler runs it as it would in real mode.
This test mode disables the following functions: Minimum and maximum run alarms Sourcing a user-specified job profile file All resource checks
$AUTOTESTMODE = 2
Runs each job with the same behaviors as $AUTOTESTMODE = 1, adding
the following procedures:
Resource checks are performed. A user-defined job profile is sourced.
The Scheduler redirects output from the ntgetdate command to the
user-defined standard output and standard error files (if they are
defined). Otherwise, the Scheduler redirects output to the
\tmp\autotest.$AUTO_JOB_NAME file.
Note: The Scheduler cannot run partially in test mode, and Unicenter AutoSys
JM does not provide a test mode for the database. Exercise extreme caution
when you run in test mode on a live production system.
Maintaining the Scheduler 235

7/16/2019 Autosys R11 User Guide
http://slidepdf.com/reader/full/autosys-r11-user-guide 236/459

7/16/2019 Autosys R11 User Guide
http://slidepdf.com/reader/full/autosys-r11-user-guide 237/459
Chapter 11: Maintaining the AgentThis section contains the following topics: Overview of Agent Maintenance (see page 237) Start the Agent (see page 238) Maintenance Commands (see page 240)
Overview of Agent Maintenance
An Agent is a Windows service or UNIX process that runs on a remote
computer. The Scheduler directs the Agent to perform specific tasks. The
Agent starts the command specified for a given job, sends running and
completion information about a task as an event to the database, and thenexits. If the Agent cannot transfer the information, it waits and tries again. It
continues to try to connect to the database until it can successfully transfer
the information.
Maintaining the Agent 237

7/16/2019 Autosys R11 User Guide
http://slidepdf.com/reader/full/autosys-r11-user-guide 238/459
Start the Agent
Start the Agent
The Agent service starts automatically when the computer starts. Under
normal circumstances you should not need to start the Agent manually. If the
Agent service is stopped, any user with Administrators group privileges can
restart it.
Important! You should not stop the Agent service. If the Agent service is
inadvertently stopped, follow the instructions in this topic to restart it.
To start the Agent
1. Open the Unicenter AutoSys JM Administrator from the program group and
select Instance from the AutoSys menu.
The Unicenter AutoSys Instance screen opens.
2. (Optional) Enter the name of the computer on which the Agent is installed
in the Computer field, and click Connect.
Note: By default, the Computer field contains the name of the computer
you are logged on to, but you can connect to a remote computer to
administer the instance information by specifying the appropriate
computer name.
Unicenter AutoSys JM connects to the specified computer.
3. Select the instance with which the Agent is associated from the AutoSys
Instance list, and click OK.
The Unicenter AutoSys Instance screen closes.
4. Select Services from the AutoSys menu.
The Unicenter AutoSys Services screen opens.
5. Select the Agent service from the Service list.
The Unicenter AutoSys Services screen refreshes to indicate the status of
the selected Agent. If the selected Agent is not running, Start Service is
enabled. If the selected Agent is running, Stop Service is enabled and
Start Service is disabled.
6. Click Start Service.
The Agent service starts.
Note: For more information, see the Online Help.
238 User Guide

7/16/2019 Autosys R11 User Guide
http://slidepdf.com/reader/full/autosys-r11-user-guide 239/459
Start the Agent
To manually restart the Agent, issue the following command at a UNIX
command prompt:
unisrvcntr start uajm_agent
More Information:
Agent Troubleshooting (see page 339)
Maintaining the Agent 239

7/16/2019 Autosys R11 User Guide
http://slidepdf.com/reader/full/autosys-r11-user-guide 240/459
Maintenance Commands
Maintenance Commands
The following maintenance commands are located in the %AUTOSYS/bin
directory. You can run these commands from the instance command prompt
window or as a job.
chase
Verifies that the expected jobs are running. The command queries every
computer that should be running a job and verifies that the Agent and the
job are running.
The chase command sends errors it detects to standard output. You can
use the following options with the chase command to further define the
actions to take when the command detects error conditions:
-A
Sends alarms to alert you when the command detects an error.
-E
Restarts missing jobs that are defined as restartable.
Note: The chase command cannot tell if a computer is down;
therefore, the command cannot tell if jobs on that computer are
running or if the network connection to the computer is down. If you
run the chase command with the -E option, jobs that have already run
or are running on the computer with the failed network connection
might restart when the network connection is re-established.
clean_files
Deletes old Agent log files. The command searches the database for all
computers that have had jobs started on them, and sends a command tothe database on that computer to purge all remaining log files from the
computer's enterprise-wide logging directory (for UNIX it is specified by
AutoRemoteDir in the configuration file, and for Windows it is specified in
the Enterprise Wide Logging Directory field in the Unicenter AutoSys
Scheduler screen). To remove only the log files older than a specific
number of days, enter the command as follows:
clean_files -d days
-d d a y s
Defines the threshold for deleting old Agent log files. When you run
the command, files older than the specified number of days are
deleted.
Note: For more information, see the Reference Guide.
240 User Guide

7/16/2019 Autosys R11 User Guide
http://slidepdf.com/reader/full/autosys-r11-user-guide 241/459
Chapter 12: Maintaining the Event
ServerThis section contains the following topics: Overview of Event Server Maintenance (see page 242) Using Dual Event Server Mode (see page 243) Database Architecture (see page 244) Database Storage Requirements (see page 246) General Database Maintenance (see page 246) Reschedule Daily Database Maintenance (see page 247) How the DBMaint.bat Batch File or DBMaint Script Runs (see page 248) Modify the DBMaint.bat File or DBMaint Script (see page 249) Reduce the Frequency of Sybase Deadlocks (see page 250)
Event Server Rollover Recovery (see page 251) High Availability Recovery (see page 261) Recovery Scenarios Summary (see page 264)
Maintaining the Event Server 241

7/16/2019 Autosys R11 User Guide
http://slidepdf.com/reader/full/autosys-r11-user-guide 242/459
Overview of Event Server Maintenance
Overview of Event Server Maintenance
All information is stored in a relational database known as the Event Server.
You can use Ingres, Oracle, Sybase, or Microsoft SQL Server for the Event
Server database.
An Event Server contains all of the information about a particular Unicenter
AutoSys JM instance, and can be associated with only one instance and one
running Scheduler. The Event Server contains the following objects:
Job definitions
Events
Monitor and report definitions
Calendar definitions
Machine definitions
Note: For more information specific to maintaining the bundles Ingres
database, see the appropriate chapter in this book. For more information
about the database tables and views and the event and alarm codes used in
the database, see the Reference Guide.
The Scheduler reads from the Event Server to check what actions to take. The
Agents send starting, running, and completion information about jobs to the
Event Server.
Due to the critical nature of the information stored in the database, you can
configure to run with Dual Event Servers (two databases). Dual databases
provide redundancy in the event of an Event Server crash.
Note: While Unicenter AutoSys JM uses the database solely as an SQL engine,
it does use Sybase Open Client C Library communications protocol, Oracle
SQL*Net V2, and Microsoft SQL Server Multi-Protocol Net-Library to send
events around the system.
More Information:
Overview of Bundled Ingres Database Maintenance (see page 269)
Configuring Unicenter AutoSys JM (see page 289)
242 User Guide

7/16/2019 Autosys R11 User Guide
http://slidepdf.com/reader/full/autosys-r11-user-guide 243/459
Using Dual Event Server Mode
Using Dual Event Server Mode
When you configure with Dual Event Servers, all of the data is duplicated on
two Event Servers. In Dual Event Server mode, both servers are peers and the
Scheduler is responsible for keeping the databases synchronized. The
Scheduler continually reads from both databases as it processes events.
Note: For information about installing a second Event Server, see the
Installation Guide.
Maintaining the Event Server 243

7/16/2019 Autosys R11 User Guide
http://slidepdf.com/reader/full/autosys-r11-user-guide 244/459
Database Architecture
Database Architecture The following illustration shows the layout of databases in a Unicenter
AutoSys JM environment to help you understand configuration options. It
shows how Unicenter AutoSys JM verifies which database to use, and how the
four primary components (the Scheduler, the Application Server, the Event
Server database, and the Agent) interact.
The illustration shows one instance configured with Dual Event Servers, which
are used only by this instance. The Scheduler and the Agent ensure that
events are written to the appropriate databases.
The controlling variable in the architecture is the environment variable named
%AUTOSERV%, which is the instance name. You define the configuration for
an instance at installation and with the Unicenter AutoSys JM Administrator. Inthe Administrator, you can specify which databases to use. This information is
stored in the Windows registry and all commands access it. The
%AUTOSERV% variable is set in the instance command prompt window, so
you must run commands using that window.
Note: For more information, see the Online Help.
244 User Guide

7/16/2019 Autosys R11 User Guide
http://slidepdf.com/reader/full/autosys-r11-user-guide 245/459
Database Architecture
The following illustration shows the layout of databases in a Unicenter
AutoSys JM environment to help you understand configuration options. It
depicts how Unicenter AutoSys JM checks which database to use, and how the
four primary components (the Scheduler, the Application Server, the EventServer database, and the Agent) interact.
The illustration shows one instance configured with Dual Event Servers, which
are used only by this instance. Both the Scheduler and the Agent help ensure
that events are written to the appropriate databases.
The controlling variable in the architecture is the environment variable named
$AUTOSERV, which is the instance name. You define the configuration for an
instance at installation and by modifying the $AUTOUSER/config.$AUTOSERV
configuration file. In this file, you can specify which databases to use, and all
commands access this information. The $AUTOSERV variable is set in the
instance command prompt window, so you must run commands using that
window.
Maintaining the Event Server 245

7/16/2019 Autosys R11 User Guide
http://slidepdf.com/reader/full/autosys-r11-user-guide 246/459
Database Storage Requirements
Database Storage Requirements
The limit on how much disk space a database location can use is based on the
underlying operating system and its file size limitations. Databases needs disk
space for more than just the database tables and stored procedures. They
require sufficient disk space for work locations used for sorting, temporary and
transient files. In addition, product operation and database backups can
require a lot of space.
The size requirements for your database depend on the following:
The number of jobs you define.
How many of the jobs have dependencies.
How often the jobs are run.
How often the database is cleaned (every time a job runs, it generates at
least three events and an entry in the ujo_job_runs table).
The standard sizes for databases are 3 GB (Ingres), 64 MB (Microsoft SQL
Server), 400 MB (Oracle) and 200 MB (Sybase). The database tables are
created with the option that they will automatically extend as long as there is
room in the file system. The table sizes specified are the recommended initial
size. If your job load is large, create a larger database.
Disk space is a critical factor for operation with the Ingres database. The CA
Management Database (CA-MDB) is a very large database which comprises all
the database entities for the entire CA product suite. It is very important to
make sure that there is sufficient available disk space for all of the defined
Ingres database locations. Our experience indicates that in a production
environment the Ingres database will quickly grow in size depending on thedatabase insert activity. Therefore, we recommend that at least 20 GB of disk
space is available for the Ingres data directory.
General Database Maintenance
Periodic maintenance is essential to keeping Unicenter AutoSys JM working
correctly. Each run of each job generates several events. If you do not remove
these events from the database periodically, the database eventually reaches
its size limit, bringing Unicenter AutoSys JM and its jobs to a halt. Therefore,
we recommend that you use the suggested periodic maintenance practices
described in this section.
246 User Guide

7/16/2019 Autosys R11 User Guide
http://slidepdf.com/reader/full/autosys-r11-user-guide 247/459
Reschedule Daily Database Maintenance
Reschedule Daily Database Maintenance
The Scheduler performs internal database maintenance once a day. It does not
process any events during maintenance, and it waits for the maintenance
activities to complete before resuming normal operation. By default, this
maintenance cycle starts at 3:30 a.m.
Note: You should schedule the maintenance command to run during a time of
minimal system activity. We highly recommend that you configure your
system to back up the database during the maintenance cycle.
To reschedule daily database maintenance
1. Open the Unicenter AutoSys JM Administrator from the program group and
select Scheduler from the AutoSys menu.
The Unicenter AutoSys Scheduler screen opens.
2. (Optional) Edit the location of the DBMaint.bat file in the Database
Maintenance Command field.
Unicenter AutoSys JM runs the DBMaint.bat file at this location at run time.
3. Edit the time of day the DBMaint.bat file should run in the Database
Maintenance Time field. Use 24-hour format for the time entry.
4. Click OK.
The Unicenter AutoSys Scheduler screen closes and the DBMaint.bat file
will run as scheduled.
Note: For more information, see the Online Help.
To reschedule daily database maintenance, define the DBMaintCmd and
DBMaintTime Parameters in the $AUTOUSER/config.$AUTOSERV configuration
file. Use a 24-hour format for the time entry.
More Information:
DBMaintTime and DBMaintCmd Parameters—Configure Automatic Database
Maintenance (see page 295)
Maintaining the Event Server 247

7/16/2019 Autosys R11 User Guide
http://slidepdf.com/reader/full/autosys-r11-user-guide 248/459
How the DBMaint.bat Batch File or DBMaint Script Runs
How the DBMaint.bat Batch File or DBMaint Script Runs
By default, Unicenter AutoSys JM runs the%AUTOSYS%\bin\DBMaint.bat file during its daily maintenance cycle. This
batch file runs the dbstatistics and archive_events commands.
By default, Unicenter AutoSys JM runs the $AUTOSYS/bin/DBMaint script
during its daily maintenance cycle. This script runs the dbstatistics and
archive_events commands.
DBMaint runs the dbstatistics command to perform the following tasks:
Update statistics in the database for optimal performance. For Sybase and
Microsoft SQL Server databases, dbstatistics updates statistics for the
event, job, job_status, and job_cond tables. For Oracle, it computesstatistics for all of the tables.
Run the dbspace command to check the available space in the database. If
the amount of free space is insufficient, dbspace issues warning messages
and generates a DB_PROBLEM alarm.
Note: If you use an Oracle database, running DBMaint may incorrectly
report that your database is nearly full. This can occur because dbspace
calculates how much space is not allocated for extents. The extents may
be nearly empty, but the command reports the whole extent as used
space.
Calculate and update the average job run statistics in the ujo_avg_job_run
table. When dbstatistics runs, it overwrites old data with the new data.
DBMaint runs the archive_events command to remove old information from
various database tables. Specifically, archive_events removes the following:
Events and alarms associated with them from the ujo_event table
Job run information from the ujo_job_runs table
Autotrack log information from the ujo_audit_info and ujo_audit_msg
tables
The output from DBMaint, %AUTOUSER%\out\DBMaint.out, reports how
much space is left in your database so you can monitor whether the eventtables are filling up.
The output from DBMaint, $AUTOUSER/out/DBMaint.out reports how
much space is left in your database so you can monitor whether the event
tables are filling up.
248 User Guide

7/16/2019 Autosys R11 User Guide
http://slidepdf.com/reader/full/autosys-r11-user-guide 249/459
Modify the DBMaint.bat File or DBMaint Script
Running DBMaint is a good way to calculate how many events that occur in a
single day you can safely maintain in the database before you should archive
them.
Note: If you are archiving large event tables, your SQL connection might timeout, causing the DBMaint script to fail. If this occurs, set the -I argument of
the archive_events command to a higher value. For more information, see the
Reference Guide.
Modify the DBMaint.bat File or DBMaint Script
You can modify the %AUTOSYS%\bin\DBMaint.bat batch file or the
$AUTOSYS/bin/DBMaintscript. For example, you might want to modify the
batch file or script to perform database backups.
Before you modify the batch file or script, make a backup copy, and modifythe copy. When you upgrade, you will not lose your changes. You can use your
enhanced batch file or script to modify the newly installed file.
The batch file name is specified in the Database Maintenance Command
field on the Unicenter AutoSys Scheduler screen.
The script name is specified in the DBMaintCmd parameter in the
$AUTOUSER/config.$AUTOSERV configuration file.
Maintaining the Event Server 249

7/16/2019 Autosys R11 User Guide
http://slidepdf.com/reader/full/autosys-r11-user-guide 250/459
Reduce the Frequency of Sybase Deadlocks
Reduce the Frequency of Sybase Deadlocks
Depending on your environment, the Scheduler log might contain many
Sybase deadlock messages. While these messages do not affect system
integrity, they can affect performance. To reduce the number of deadlocks,
you can turn on row-level locking.
To turn on row-level locking for the entire database, enter the following
command at an ISQL prompt:
sp_configure "lock scheme", 0, datarows;
You can also lock tables individually. To do so, enter the following command at
an ISQL prompt:
alter table tablename lock datarows;
t a b l en a m e
Defines the name of a table on which to configure row-level locking.
Based on usage, we recommend that you lock the following tables:
ujo_event
ujo_proc_event
ujo_job
ujo_job2
ujo_job_cond
ujo_job_status
ujo_job_runs
ujo_last_Eoid_counter
ujo_next_oid
250 User Guide

7/16/2019 Autosys R11 User Guide
http://slidepdf.com/reader/full/autosys-r11-user-guide 251/459
Event Server Rollover Recovery
Event Server Rollover Recovery
When Unicenter AutoSys JM is running in Dual Event Server mode and the
Scheduler detects an unrecoverable error condition on one of the Event
Servers, it automatically rolls over to Single Event Server mode on the
remaining Event Server. An unrecoverable error is defined as one of the
following:
The connection to the database is lost, and after the configured number of
reconnect attempts, the database remains unconnected.
A database had an unrecoverable error (for example, database corruption
or media failure).
The Administrator Event Server screen indicates a rollover and a switch
to Single Event Server mode in two ways:
The Status field shows which Event Server is DOWN.
The Database Rollover Has Occurred check box is selected.
The $AUTOUSER/config.$AUTOSERV configuration file indicates a
rollover and switch to Single Event Server mode by commenting out the
EventServer line that defines the Event Server that went offline.
Unicenter AutoSys JM makes these changes so that you and the utilities trying
to access the database are aware that it is now running in Single Event Server
mode, and to ensure that Client processes do not try to write to the inactive
Event Server.
Note: When an Event Server rollover occurs, the product edits the AutoSys
Administrator Event Server screen or $AUTOUSER/config.$AUTOSERV
configuration file on the Scheduler computers only. The
$AUTOUSER/config.$AUTOSERV configuration file on Client computers are not
modified.
Maintaining the Event Server 251

7/16/2019 Autosys R11 User Guide
http://slidepdf.com/reader/full/autosys-r11-user-guide 252/459
Event Server Rollover Rec overy
Return to Dual Event Server Mode After a Rollover
If one Event Server goes down in Dual Event Server mode, Unicenter AutoSys
JM automatically rolls over to the second Event Server and continues running
in Single Event Server mode. After you recover the Event Server that failed,you can reconfigure to run in Dual Event Server mode.
Important! Do not simply restart the failed Event Server and attempt to run
in Dual Event Server mode. Before starting the failed server, you must
synchronize the two Event Servers.
To return to Dual Event Server mode after a rollover
1. Log on to a Unicenter AutoSys JM-configured computer as the EXEC
Superuser, and issue the following command at an instance command
prompt:
sendevent -E STOP_DEMON
The Scheduler completes any processing it is currently performing, and
stops.
2. Open the Unicenter AutoSys JM Administrator from the program group and
select Services from the AutoSys menu.
The Unicenter AutoSys Services screen opens.
3. Select the Application Server from the Service list, and click Stop Service.
The Application Server stops.
4. Run one of the following scripts as appropriate to synchronize the Event
Servers:
For Ingres, run autobcpING.pl
For MSSQL, run autobcpMSQ.pl
For Oracle, run autobcpORA.pl
For Sybase, run autobcpSYB.pl
Note: The autobcpDB script is located in the
C:\Program Files\CA\UnicenterAutoSysJM\autosys\dbobj\ dbtype\
directory, where dbtype is ING (Ingres), MSQ (MSSQL), ORA (Oracle), or
SYB (Sybase).
252 User Guide

7/16/2019 Autosys R11 User Guide
http://slidepdf.com/reader/full/autosys-r11-user-guide 253/459
Event Server Rollover Recovery
5. Enable the second database:
a. Open the Unicenter AutoSys JM Administrator from the program group
and select Instance from the AutoSys menu.
The Unicenter AutoSys Instance screen opens.
b. (Optional) Enter the name of the computer on which the Event Server
is installed in the Computer field, and click Connect.
Note: By default, the Computer field contains the name of the
computer you are logged on to, but you can connect to a remote
computer to administer the instance information by specifying the
appropriate computer name.
Unicenter AutoSys JM connects to the specified computer.
c. Select the instance with which the Event Server is associated from the
AutoSys Instance list, and click OK.
The Unicenter AutoSys Instance screen closes.d. Select Event Server from the AutoSys menu.
The Unicenter AutoSys Event Server screen opens.e. Click Enable to start the disabled Event Server.
The selected Event Server starts.f. Click OK.
The Unicenter AutoSys Event Server screen closes.6. Start the Scheduler:
a. Select Services from the AutoSys menu. The Unicenter AutoSys Services screen opens.
b. Select the Scheduler from the Service list, and click Start Service.
The Scheduler starts.
Note: The Scheduler marks both Event Servers as being in Dual Event
Server mode. Unicenter AutoSys JM Client processes and commands check
the flags in both Event Servers for consistency; therefore, you must start
the Scheduler before running any other commands.
7. Select the Application Server service from the Service list, and click Start
Service.
The Application Server starts.
Maintaining the Event Server 253
7/16/2019 Autosys R11 User Guide
http://slidepdf.com/reader/full/autosys-r11-user-guide 254/459
Event Server Rollover Rec overy
To return to Dual Event Server mode after a rollover
1. Run the following command at a UNIX command prompt to stop the
Primary, Shadow, and Tie-breaker Schedulers:uajm_sched.$AUTOSERV stop
The Primary, Shadow and Tie-breaker Schedulers stop.
2. Run the following command at a UNIX command prompt to stop the
Application Server:
uajm_server.$AUTOSERV stop
The Application Server stops.
3. Run one of the following scripts as appropriate to synchronize the Event
Servers:
For Ingres, run autobcpING.pl
For Oracle, run autobcpORA.pl
For Sybase, run autobcpSYB.pl
Note: The autobcpDB script is located in the $AUTOSYS/dbobj/dbtype
directory, where dbtype is ING (Ingres), ORA (Oracle), or SYB (Sybase).
4. Edit the $AUTOUSER/config.$AUTOSERV configuration file on the server
computer to remove the rollover comment from the EventServer line that
defines the server that went off line. The Scheduler commented out this
line during the rollover to Single Event Server mode.
5. Run the following command at a UNIX command prompt to start the
Scheduler:
eventor
The Scheduler starts.
Note: The Scheduler marks both Event Servers as being in Dual Event
Server mode. Unicenter AutoSys JM Client processes and commands check
the flags in both Event Servers for consistency; therefore, you must start
the Scheduler before running any other commands.
6. Run the following command at a UNIX command prompt to start the
Application Server:
uajm_server.$AUTOSERV start
The Application Server starts.
254 User Guide

7/16/2019 Autosys R11 User Guide
http://slidepdf.com/reader/full/autosys-r11-user-guide 255/459
Event Server Rollover Recovery
Synchronize the Event Servers
Before you start the Scheduler and Application Server, you must synchronize
the Event Server databases. Unicenter AutoSys JM provides autobcpDB scripts
to synchronize the Event Server databases. These scripts identify onedatabase as the source and the other database as the target for the
synchronization process.
Before you synchronize the Event Servers, check the following:
Make sure that both the Event Servers are running.
Make sure that no Unicenter AutoSys JM Schedulers, Application Servers,
or GUI applications are running.
Make sure that the Event Servers have unique names (for example,
eventserver1::mdb and eventserver2::mdb).
For Ingres, make sure netutil contains entries for both Event Servers.
For Microsoft SQL Server, make sure both databases are defined correctly.
Use the Microsoft SQL Enterprise Manager to view the information.
For Oracle, make sure the TNSNAMES.ORA file contains valid entries for
both Event Servers.
For Sybase, make sure the SQL.INI file contains entries for both Event
Servers.
Know the path to the database software so you can supply it when you run
the autobcpDB script.
Make sure you have at least as much free disk space as the size of your
database for the temporary file that autobcpDB script creates. The script
deletes this temporary file after the synchronization process is complete.
Note: When you stop the Scheduler, any jobs that are running run to
completion. You can run the autobcpDB script while the jobs are running on
remote computers. In the worst-case scenario, there may be events on the
source Event Server that are not stored on the target Event Server. This is not
a problem, because the Scheduler always reads from both Event Servers. If
the Scheduler finds an event on one server that is not on the other, it copies
that event to the database that is missing it. If one Event Server missed an
event due to recovery or network problems, this feature also dynamically
synchronizes both Event Servers.
Maintaining the Event Server 255

7/16/2019 Autosys R11 User Guide
http://slidepdf.com/reader/full/autosys-r11-user-guide 256/459
Event Server Rollover Rec overy
To synchronize the Event Servers
1. Log on to a database machine as the EXEC Superuser, make sure that no
one is running JIL or using the Unicenter WCC GUI to change jobdefinitions, and enter the following command to stop the Scheduler:
sendevent -E STOP_DEMON
The Scheduler completes any processing it is currently performing, and
stops.
2. Open the Unicenter AutoSys JM Administrator from the program group and
select Services from the AutoSys menu.
The Unicenter AutoSys Services screen opens.
3. Select the Application Server from the Service list, and click Stop Service.
The Application Server stops.
4. Enter the following command at an instance command prompt:
cd %AUTOSYS%\dbobj\dbtype
d b t y p e
Specifies the type of database in use: ING (Ingres), MSQ (Microsoft
SQL), ORA (Oracle), or SYB (Sybase).
5. Run the appropriate command for your database type:
For Ingres, enter the following command:
perl autobcpING.pl source_db destination_db backupdir [dataonly]
For Microsoft SQL Server, enter the following command:
perl autobcpMSQ.pl source_server source_db destination_server destination_db
autosys_password dump_file
For Oracle, enter the following command:
perl autobcpORA.pl source_instance destination_instance autosys_password
dump_file oracle_path
For Sybase, enter the following command:
perl autobcpSYB.pl source_server source_db destination_server destination_db
autosys_password dump_file
a u t o s y s_ p a s sw o r d
Defines the password for the autosys user (by default, the autosysuser password is autosys).
d e s t i n a t i o n _ d b
Defines the destination Microsoft SQL Server or Sybase database.
256 User Guide

7/16/2019 Autosys R11 User Guide
http://slidepdf.com/reader/full/autosys-r11-user-guide 257/459
Event Server Rollover Recovery
d e s t i n a t i o n _ i n s t a n c e
Defines the destination Oracle instance (for example, AUTOSYSDB2).
d e s t i n a t i o n _ s e r v e r
Defines the destination Microsoft SQL Server or Sybase database (for
example, AUTOSYSDB2). For Sybase, this is defined in the SQL.INI
file.
d u m p _ f i l e
Defines the temporary file used in the transfer of data from one
database to the other.
s o u r c e _ d b
Defines the source Microsoft SQL Server or Sybase database (for
example, autosys).
s o u r c e _ i n s t a n c e
Defines the source Oracle instance (for example, AUTOSYSDB).
s o u r c e _ s e r v e r
Defines the name of the source Microsoft SQL Server or Sybase server
(for example, AUTOSYSDB). For Microsoft SQL Server, see the
Microsoft SQL Enterprise Manager. For Sybase, this is defined in the
SQL.INI file.
The Event Servers are synchronized.
6. Open the Unicenter AutoSys JM Administrator from the program group on
the server computer and select Event Server from the AutoSys menu.
Click Enable on the Event Server that went offline to bring it back online.
The Scheduler disabled this Event Server during the rollover to SingleEvent Server mode. Click OK to save the changes and exit the Event
Server screen.
7. In the Unicenter AutoSys JM Administrator, select Services from the
AutoSys menu.
The Unicenter AutoSys Services screen opens.
8. Select the Scheduler from the Service list, and click Start Service.
The Scheduler starts.
9. Select the Application Server from the Service list, and click Start Service.
The Application Server starts.
Maintaining the Event Server 257

7/16/2019 Autosys R11 User Guide
http://slidepdf.com/reader/full/autosys-r11-user-guide 258/459
Event Server Rollover Rec overy
To synchronize the Event Servers
1. Log on to a server machine as the EXEC Superuser, make sure that no one
is running JIL or using the Unicenter WCC GUI to change job definitions,and enter the following command to stop the Scheduler:
sendevent -E STOP_DEMON
The Scheduler completes any processing it is currently performing, and
stops.
2. Run the following command at a UNIX command prompt to stop the
Application Server:
uajm_server.$AUTOSERV stop
The Application Server stops.
3. Run the appropriate command for your database type:
For Ingres, run the following command:
perl autobcpING.pl source_db destination_db backupdir [dataonly]
For Oracle, run the following command:
perl autobcpORA.pl source_instance destination_instance autosys_password
dump_file oracle_path
For Sybase, run the following command:
perl autobcpSYB.pl source_server source_db destination_server destination_db
autosys_password dump_file
a u t o s y s_ p a s sw o r d
Defines the password for the autosys user (by default, the autosysuser password is autosys).
d e s t i n a t i o n _ d b
Defines the destination Sybase database.
d e s t i n a t i o n _ i n s t a n c e
Defines the destination Oracle instance (for example, AUTOSYSDB2).
d e s t i n a t i o n _ s e r v e r
Defines the destination Sybase server (for example, AUTOSYSDB2).
For Sybase, this is defined in the interfaces file.
d u m p _ f i l e
Defines the temporary file used in the transfer of data from one
database to the other.
s o u r c e _ d b
Defines the source Sybase database (for example, autosys).
258 User Guide

7/16/2019 Autosys R11 User Guide
http://slidepdf.com/reader/full/autosys-r11-user-guide 259/459
Event Server Rollover Recovery
s o u r c e _ i n s t a n c e
Defines the source Oracle instance (for example, AUTOSYSDB).
s o u r c e _ s e r v e r
Defines the name of the source Sybase server (for example,
AUTOSYSDB). For Sybase, this is defined in the interfaces file.
The Event Servers are synchronized.
4. Edit the $AUTOUSER/config.$AUTOSERV configuration file on the server
computer to remove the rollover comment from the EventServer line that
defines the sever that went off line. The Scheduler commented out this
line during the rollover to Single Event Server mode.
5. Run the following command to restart the Scheduler:
eventor
The Scheduler prints a message indicating that it is in Dual Event Server
mode.
6. Run the following command at a UNIX command prompt to start the
Application Server:
uajm_server.$AUTOSERV start
The Application Server starts.
Note: If Unicenter AutoSys JM is configured to run in Dual Event Server mode,
the Scheduler will not start unless both databases are available.
Example: Synchronize the Event Servers
This example shows the command and results of synchronizing Ingres EventServers and writing the output to the C:\temp\bcp:
perl autobcp DB.pl mdb vnode1::mdb C:\temp\bcp dat:perl autobcp DB.pl mdb vnode1::mdb C:\temp\bcp dataonly02/03/2006 10:28:37 Generating copy scripts.02/03/2006 10:28:41 Copying from source database mdb.02/03/2006 10:28:42 Deleting old data from target database vnode1::mdb.02/03/2006 10:28:43 Copying to target database vnode1::mdb.02/03/2006 10:28:56 Done.Note: For Ingres, if you run the autobcping.pl command from the source
database machine, we recommend that you run the optimizedb and sysmod
commands as follows (in that order) on the target database machine beforestarting in Dual Event Server mode:
optimizedb -umdbadmin -zk -zc -zv mdb
sysmod mdb
Maintaining the Event Server 259

7/16/2019 Autosys R11 User Guide
http://slidepdf.com/reader/full/autosys-r11-user-guide 260/459
Event Server Rollover Rec overy
Handle Errors
If the autobcpDB script detects an error, the script exits and displays the
following message:
The AutoSys data server is not accessible.Please check the data server and rerun this script.If this happens, verify the following, and rerun the autobcpDB script:
Are both Event Servers started?
To verify this, make sure you can connect to the database.
– For Ingres, the database service is called Ingres Intelligent Database.
– For Microsoft SQL Server, look for the following services:
MSSQLSERVER, SQLSERVERAGENT
– For Oracle, look for the following services (where * indicates theOracle SID): OracleService*, OracleStart*, and OracleTNSListener.
– For Sybase, the service name is user-configurable.
Did you specify the source and the target databases correctly in the
autobcpDB script?
Did you enter the passwords correctly in the autobcpDB script?
Did you set the Sybase or Oracle environment variables correctly?
– The Oracle environment variable, ORACLE_HOME, defines the path to
the top-level Oracle directory.
– The Sybase environment variables are DSQUERY and SYBASE. The
DSQUERY variable defines the name of the Sybase Event Server. The
SYBASE variable defines the complete path to the Sybase software
directory.
Did you specify the Event Server names and ports correctly?
– For Ingres, you can view this information with the netutil utility.
– For Microsoft SQL Server, this information can be viewed in the
Microsoft SQL Enterprise Manager.
– For Oracle, this information is located in the TNSNAMES.ORA file.
– For Sybase, this information is located in the interfaces file.
Note: The Scheduler marks both Event Servers as being in Dual Event Servermode. Unicenter AutoSys JM Client processes and commands check the flags
in both Event Servers for consistency; therefore, you must start the Scheduler
before running any other commands.
260 User Guide

7/16/2019 Autosys R11 User Guide
http://slidepdf.com/reader/full/autosys-r11-user-guide 261/459
High Availability Recovery
High Availability Recovery
Running Unicenter AutoSys JM with the High Availability and Dual Event Server
options provides protection from interruption of service due to network and
database failures. This section describes the behavior of the Scheduler and
Application Server when a failure is detected and how Unicenter AutoSys JM
attempts to recover.
Detect Missing Databases
When the Scheduler or Application Server fails to update one of the databases
while running in Dual Event Server mode, Unicenter AutoSys JM pauses the
run while it attempts to re-establish the connection with the database. You can
configure the number of reconnection attempts Unicenter AutoSys JM makes
before rolling over to Single Event Server mode.
To detect missing databases
1. Open the Unicenter AutoSys Event Server screen of the Unicenter AutoSys
JM Administrator and locate the DB Event Reconnect configuration
parameter.
2. Enter the number of times the Scheduler should attempt to reconnect to
the database before rolling over.
The number of reconnect attempts is configured.
Only the Primary and Shadow Schedulers roll over to Single Event Server
mode when the number of reconnection attempts is exceeded. The Primary orShadow Scheduler performs the following actions during a database rollover:
Sends a DB_ROLLOVER alarm to the Event Server.
Updates the Event Server to reflect that the system is running in Single
Event Server mode.
Updates the status of the failed Event Server in the Windows registry. This
registry entry activates the Enable button corresponding to the failed
Event Server in the Event Server screen of the Unicenter AutoSys JM
Administrator utility.
Maintaining the Event Server 261

7/16/2019 Autosys R11 User Guide
http://slidepdf.com/reader/full/autosys-r11-user-guide 262/459
High Availability Recovery
To detect missing databases
1. Open the Unicenter AutoSys JM configuration file and locate the
DBEventReconnect configuration parameter.2. Enter the number of times the Scheduler should attempt to reconnect to
the database before rolling over.
The number of reconnect attempts is configured.
Only the Primary and Shadow Schedulers roll over to Single Event Server
mode when the number of reconnection attempts is exceeded. The Primary or
Shadow Scheduler performs the following actions during a database rollover:
Sends a DB_ROLLOVER alarm to the Event Server.
Updates the Event Server to reflect that the system is running in Single
Event Server mode.
Saves a copy of the current Unicenter AutoSys JM configuration file as
config.rollover.$AUTOSERV, where $AUTOSERV identifies the instance. The
EventServer configuration parameter of the file is changed to include the
active Event Server.
The Tie-breaker Scheduler and the Application Server do not automatically roll
over to Single Event Server mode. They maintain both their connections to the
database and try to reconnect until they receive notification from either the
Primary or Secondary Schedulers to roll over.
Note: The Application Server does not service API requests from Unicenter
AutoSys JM Clients from the time the Application Server detects the failure of
one of the databases until the time it receives notification to roll over.
If any of the components lose all of their database connectivity, either before
or after database rollover occurs, the components shut down. If the Scheduler
or Application Server receives a request to shut down, the database
reconnection process is interrupted immediately after the active connection
attempt is completed.
262 User Guide

7/16/2019 Autosys R11 User Guide
http://slidepdf.com/reader/full/autosys-r11-user-guide 263/459
High Availability Recovery
Configure the Scheduler Heartbeat Interval
In High Availability mode, the Primary, Shadow, and Tie-breaker Schedulers
update the database with their statuses at regular intervals. If a Scheduler
does not update the databases after two intervals, that Scheduler isunavailable and the system leaves High Availability mode. You can configure
the length of each interval.
To configure the Scheduler Heartbeat Interval
1. Open the Unicenter AutoSys Scheduler screen of the Unicenter AutoSys JM
Administrator utility and locate the HA Poll Interval configuration
parameter.
2. Enter the interval (in seconds) to allow between status polls.
The interval is configured.
To configure the Scheduler Heartbeat Interval
1. Open the Unicenter AutoSys JM configuration file and locate the
HAPollInterval configuration parameter.
2. Enter the interval (in seconds) to allow between status polls.
The interval is configured.
In Single Event Server mode, the system enters High Availability mode when
both the Primary and Shadow Schedulers are running. If the Shadow
Scheduler does not update the database for two consecutive intervals, the
Primary Scheduler issues an EP_HIGH_AVAIL alarm with a message to indicatethat the Shadow Scheduler has not updated its status. If the Shadow
Scheduler returns and posts updates at regular intervals, the system re-enters
High Availability mode. If the Primary Scheduler does not update the database
for two consecutive intervals, the Shadow Scheduler issues an
EP_HIGH_AVAIL alarm with a message to indicate that the Primary has not
updated its status. It proceeds to fail over and become the new Primary
Scheduler. If the original Primary Scheduler returns, it detects that the
Shadow Scheduler has failed over and shuts down. The system remains in
failover status until the Primary Scheduler is shut down.
In Dual Event Server mode, the system enters High Availability mode when
the Primary, Shadow, and Tie-breaker Schedulers are running. The detection
and failover procedure is the same as in Single Event Server mode. However,
before either Scheduler makes the final decision to fail over, it also verifies if
the Tie-breaker Scheduler has sent regular updates. If either the Primary or
Shadow Scheduler fails to detect two consecutive updates from its counterpart
and the Tie-Breaker Scheduler, that Scheduler shuts itself down.
Maintaining the Event Server 263

7/16/2019 Autosys R11 User Guide
http://slidepdf.com/reader/full/autosys-r11-user-guide 264/459
Recovery Scenarios Summary
Recovery Scenarios Summary
The following sections summarize the recovery behavior of Unicenter AutoSys
JM after a point of failure. The recovery scenarios apply to Single Event Server
mode and Dual Event Server mode, as well as to non-High Availability and
High Availability modes.
Non-High Availability in Single Event Server Mode
If the connection to the single Event Server is lost, Unicenter AutoSys JM takes
the following actions:
The Scheduler attempts to reconnect to the database for the configured
number of times. If the Scheduler cannot reconnect, it shuts down.
The Application Server attempts to reconnect to the database for the
configured number of times. If the Application Server is unable toreconnect, it shuts down.
Non-High Availability in Dual Event Server Mode
If the connection to one of the Event Servers is lost, Unicenter AutoSys JM
takes the following actions:
The Scheduler attempts to reconnect to the database for the configured
number of times. If it cannot reconnect, it rolls over and notifies the
Application Server.
The Application Server attempts to reconnect to the database for theconfigured number of times. It continues to attempt to reconnect to the
database at regular intervals until one of the following occurs:
It re-establishes a connection.
It receives notification to roll over.
It receives a shutdown request.
264 User Guide

7/16/2019 Autosys R11 User Guide
http://slidepdf.com/reader/full/autosys-r11-user-guide 265/459
Recovery Scenarios Summary
If the connections to both Event Servers are lost, Unicenter AutoSys JM takes
the following actions:
The Scheduler attempts to reconnect to the database for the configured
number of times. If it cannot reconnect, it rolls over and notifies the
Application Server. If the Scheduler fails to connect to the second
database after the configured number of times, it shuts down.
The Application Server attempts to reconnect to the database for the
configured number of times. It continues to attempt to reconnect to the
database at regular intervals until one of the following occurs:
It re-establishes a connection.
It receives notification to roll over.
It receives a shutdown request.
It detects the loss of the second Event Server and shuts itself down.
High Availability in Single Event Server Mode
If the Primary Scheduler becomes unavailable, the Shadow Scheduler issues
an EP_ROLLOVER alarm and fails over as the new Primary Scheduler.
If the Shadow Scheduler becomes unavailable, the Primary Scheduler issues
an EP_HIGH_AVAIL alarm and continues to run.
If the Event Server connection is lost, Unicenter AutoSys JM takes the
following actions:
The Scheduler attempts to reconnect to the database for the configured
number of times. If it cannot reconnect, it shuts itself down.
The Application Server attempts to reconnect to the database for the
configured number of times. If it cannot reconnect, it shuts itself down.
Maintaining the Event Server 265

7/16/2019 Autosys R11 User Guide
http://slidepdf.com/reader/full/autosys-r11-user-guide 266/459
Recovery Scenarios Summary
High Availability in Dual Event Server Mode
If the Primary Scheduler becomes unavailable, the Shadow Scheduler issues
an EP_ROLLOVER alarm and fails over as the new Primary Scheduler.
If the Shadow Scheduler becomes unavailable, the Primary Scheduler issues
an EP_HIGH_AVAIL alarm and continues to run.
If the Tie-breaker Scheduler becomes unavailable, the Primary Scheduler
issues an EP_HIGH_AVAIL alarm and continues to run.
If the connection to one of the Event Servers is lost, Unicenter AutoSys JM
takes the following actions:
The Primary Scheduler attempts to reconnect to the database for the
configured number of times. If it cannot reconnect, it rolls over and
notifies the Application Server. The Primary Scheduler then checks for
status updates from the Shadow and Tie-breaker Schedulers. If theShadow and Tie-breaker Schedulers have updated the Event Server, the
Primary Scheduler continues to run. If neither the Shadow nor the
Tie-breaker Schedulers update the Event Server in two consecutive poll
intervals, the Primary Scheduler shuts down. If only the Shadow Scheduler
did not update the Event Server in two consecutive polling intervals, the
Primary Scheduler issues an EP_HIGH_AVAIL alarm and continues to run.
The Shadow Scheduler attempts to reconnect to the database for the
configured number of times. If it cannot reconnect, it rolls over and
notifies the Application Server. The Shadow Scheduler then checks for
status updates from the Primary and Tie-breaker Schedulers. If the
Primary and Tie-breaker Schedulers have updated the Event Server, the
Shadow Scheduler continues to run. If neither the Primary nor theTie-breaker Schedulers update the Event Server in two consecutive poll
intervals, the Shadow Scheduler shuts down. If only the Primary Scheduler
did not update the Event Server in two consecutive poll intervals, the
Shadow Scheduler fails over and becomes the new Primary Scheduler.
266 User Guide

7/16/2019 Autosys R11 User Guide
http://slidepdf.com/reader/full/autosys-r11-user-guide 267/459
Recovery Scenarios Summary
The Tie-breaker Scheduler attempts to reconnect to the database for the
configured number of times. It continues to attempt to reconnect to the
database at regular intervals until one of the following occurs:
It re-establishes a connection. It receives notification to roll over. It receives a shutdown request. In the meantime, it continues to update the accessible database with its status.
The Application Server attempts to reconnect to the database for the
configured number of times. It continues to attempt to reconnect to the database at regular intervals until one of the following occurs: It re-establishes a connection. It receives notification to roll over. It receives a shutdown request.
If the connections to both Event Servers are lost, Unicenter AutoSys JM takes
the following actions:
The Primary and Shadow Schedulers attempt to reconnect to the database
for the configured number of times, then roll over and notify the
Application Server. If the Schedulers fail to connect to the second
database after the configured number of times, they shut down.
The Tie-breaker Scheduler attempts to reconnect to the database for the
configured number of times. It continues to attempt to reconnect to the
database at regular intervals until one of the following occurs:
It re-establishes a connection. It receives notification to roll over. It receives a shutdown request. It detects the loss of the second Event Server to shutdown.
The Application Server attempts to reconnect to the database for the
configured number of times. It continues to attempt to reconnect to the
database at regular intervals until one of the following occurs:
It re-establishes a connection. It receives notification to roll over.
It receives a shutdown request.
It detects the loss of the second Event Server to shutdown.
Maintaining the Event Server 267

7/16/2019 Autosys R11 User Guide
http://slidepdf.com/reader/full/autosys-r11-user-guide 268/459

7/16/2019 Autosys R11 User Guide
http://slidepdf.com/reader/full/autosys-r11-user-guide 269/459
Chapter 13: Maintaining the Bundled
Ingres DatabaseThis section contains the following topics: Overview of Bundled Ingres Database Maintenance (see page 269) Ingres Architecture (see page 270) Ingres Environment Variables (see page 271) Ingres CA-MDB Security (see page 272)CA-MDB Files and File Sizes (see page 273) Connecting to a Remote Ingres CA-MDB (see page 277) Default Ingres Users (see page 278) How to Create Ingres Users (see page 278) Start Ingres (see page 279)
Stop Ingres (see page 280)Ingres SQL Utility (see page 281) Display the Database Date and Time (see page 281)CA-MDB Backup (see page 282) CA-MDB Recovery (see page 285) CA-MDB Troubleshooting (see page 287)
Overview of Bundled Ingres Database Maintenance
The previous chapter contained general database maintenance information and
information for users of databases other than Ingres. Because you canpurchase Unicenter AutoSys JM with a bundled Ingres database, this section is
specific to Ingres maintenance. It contains information to help you query the
database and perform basic maintenance procedures on Ingres databases.
Note: The following sections are specifically for Ingres users. For more
information, see the Ingres System Administrators Guide.
If you are using an existing database other than Ingres, consult your database
administrator for information about starting, stopping, and configuring your
database.
Maintaining the Bundled Ingres Database 269

7/16/2019 Autosys R11 User Guide
http://slidepdf.com/reader/full/autosys-r11-user-guide 270/459
Ingres Architec ture
Ingres Architecture
The Ingres database is based on Client/server architecture. It consists of the
following elements:
Ingres DBMS Servers (iidbms; including distributed servers)
Performs asynchronous disk input and output. This multi-threaded demon
process executes the Client’s request for database access.
General Communications Facility
Includes the following components:
Name Server (iigcn)
Tracks all DBMS, Star, Data Access, Bridge, ICE, and Communications
Servers associated with an installation. There is one Name Server
process per installation. The Name Server provides information to user
processes that enables a connection to a local DBMS Server. When aprocess wants to connect to a remote DBMS Server, the Name Server
provides information that lets the process first connect to a
Communications Server. The Communications Server establishes
communication with the remote DBMS Server. The Name Server
regularly verifies (by default, every five minutes) that all DBMS
Servers on its list are functioning. If a server shuts down, the Name
Server automatically deletes its registration.
Communications Server (iigcc)
Provides network communication for the Ingres .Net product. This
demon process monitors outgoing communication from local
applications to remote DBMS Servers and incoming communication
from remote applications to local DBMS Servers. An installation canhave multiple Communications Server processes. If the installation
uses Ingres .Net, it includes one or more Communications Servers.
Data Access Server (iigcd)
Translates requests from the Ingres JDBC Driver and the Ingres .NET
Data Provider into Ingres internal format and forwards the request to
the appropriate DBMS Server.
Bridge Server
Enables a Client application running on one type of local area network
to access a DBMS Server running on a different type of network.
Ingres Enterprise Relational Database Protocol Bridge (Ingres Bridge)
bridges a Client using one network protocol to a server using another.
Logging and Locking System
Coordinates database locking, recovery, and journaling, thereby helping to
ensure transaction consistency and recoverability.
270 User Guide

7/16/2019 Autosys R11 User Guide
http://slidepdf.com/reader/full/autosys-r11-user-guide 271/459
Ingres Environment Variables
Ingres Environment Variables
If you are using an Ingres Server, the Ingres ingprenv utility displays the
Ingres installation environment variables. Run ingprenv from the command
line to list Ingres environment variables and their values. The following is a
partial list of Ingres environment variables:
II_SYSTEM
Defines the parent directory of the Ingres directory, where many
components of the Ingres installation are located. You cannot change the
value of this environment variable without reinstalling Ingres.
II_INSTALLATION
Defines the two-character code used to identify a particular Ingres
installation.
II_CHARSETx x
Defines the character set used for string operations.
II_TIMEZONE_NAME
Defines the world time zone that verifies the Ingres installation’s location
for timing purposes.
II_DATABASE
Defines the default database file location.
II_CHECKPOINT
Defines the default checkpoint file location.
II_JOURNAL
Defines the default journal file location.
Maintaining the Bundled Ingres Database 271

7/16/2019 Autosys R11 User Guide
http://slidepdf.com/reader/full/autosys-r11-user-guide 272/459
Ingres CA-MDB Security
Ingres CA-MDB Security
CA-MDB security has the following characteristics:
The database owner is mdbadmin.
There is no OS user for mdbadmin.
mdbadmin owns all database objects.
There are two types of Ingres users:
Administrators
User ingres is the default System Administrator that comes with the
installation. The ingres user is automatically authorized with the maximum
Ingres privileges, enabling this user to perform all operations. This user is
often referred to as the installation owner .
The user that installs Ingres is automatically added to the Ingres userswith System Administrator privileges. Alternatively, the System
Administrator can use vdba or the accessdb Ingres utility to grant the
appropriate privileges.
Users
The System Administrator or any user with the maintain_users privilege
can add new users to the Ingres database.
272 User Guide

7/16/2019 Autosys R11 User Guide
http://slidepdf.com/reader/full/autosys-r11-user-guide 273/459
CA-MDB Files and File Sizes
CA-MDB Files and File Sizes
Ingres uses the term location to define the directory structures assigned to
store one or more of the following:
Database file, which include tables, indexes, and system catalogs.
Journal files needed for recovery.
Checkpoint files, which are used in database backup.
Work files, which are transient.
Dump files created as a result of an online checkpoint.
By default, each of these locations is created under the Ingres home directory
II_SYSTEM. For example, if II_SYSTEM is set to /opt/CA/SharedComponents,
the default database location is defined in this directory. In this case, the
database location or directory for the CA-MDB is
/opt/CA/SharedComponents/ingres/data/default.
A file is created in the database directory for each table and index. As the
number of rows in a table increases, the table size increases and so does the
space its file uses on the disk. The size of such a file cannot exceed the
maximum file size allowed for the operating system in use. On some operating
systems this limit is 2 GB.
Maintaining the Bundled Ingres Database 273

7/16/2019 Autosys R11 User Guide
http://slidepdf.com/reader/full/autosys-r11-user-guide 274/459
CA-MDB Files and File Sizes
Ingres CA-MDB Sizes
The CA Management Database (CA-MDB) comprises all the database entities
for the entire CA product suite.
The CA-MDB can be located on same machine as the application (local) or on a
separate database server (remote).
If remote, the CA-MDB must already exist on the remote server and you must
create an OS user ID on that server for use by the application.
The Ingres CA-MDB comes with three preconfigured database sizes:
SMALL
Accommodates up to 100 database connections (minimum 1 GB memory
required).
MEDIUM
Accommodates up to 500 database connections (minimum 2 GB memory
required). The default Ingres installation creates a medium-sized
database.
LARGE
Accommodates up to 1000 database connections.
Monitoring Disk Space
Disk space is a critical factor for operation with the Ingres database. The
amount of unused space on a disk is easy to monitor. There are no specialtools required (unless a raw location has been used). You can use operating
system tools to monitor available disk space.
274 User Guide

7/16/2019 Autosys R11 User Guide
http://slidepdf.com/reader/full/autosys-r11-user-guide 275/459
CA-MDB Files and File Sizes
Space Requirements for Unicenter AutoSys JM Tables in the CA-MDB
To help ensure that the CA-MDB remains functional, you must make sure that
the file system has sufficient disk space. The following table lists approximate
space requirements for Unicenter AutoSys JM tables in the CA-MDB usingvarious data sizes:
Database
category
Number of
jobs in the
database
Number
of jobs
each day
Total space
for one
month (in
pages)
Total space
for one
month (in
MB)
Total space
for three
months (in
pages)
Total space
for three
months (in
MB)
Tiny* 500 1500 7395 48.6 21398 167
Small 3000 4800 23595 184.3 68730 536.95
Medium 10000 17000 81448 636.3 239655 1872.3
Large 30000 54000 250337 1955.75 768106 6000.82
Huge 50000 90000 417115 3258.7 1279983 9999.9
* If the Unicenter AutoSys JM CA-MDB has 500 jobs defined and runs 1500
jobs each day, the CA-MDB can be classified as Tiny. Similarly, you could
extrapolate other categories from this table.
The following table lists approximate space requirements for individual
Unicenter AutoSys JM tables:
Table Name Type Number of
pages for one
month
Number of pages for
three months
ujo_audit_info Tiny
Small
860
2777
2580
8331
Medium 9823 29469
Large
Huge
31167
51945
93510
155835
ujo_audit_msg Tiny
Small
859
2806
2577
8413
Medium 9875 29625
Large
Huge
31312
52187
93936
156561
Maintaining the Bundled Ingres Database 275

7/16/2019 Autosys R11 User Guide
http://slidepdf.com/reader/full/autosys-r11-user-guide 276/459
CA-MDB Files and File Sizes
Table Name Type Number of Number of pages for
pages for one three months
month
ujo_job Tiny 20 20
Small 120 120
Medium 400 400
Large 1200 1200
Huge 2000 2000
ujo_job_cond Tiny 33 33
Small 203 203
Medium 676 676
Large 2033 2033
Huge 3388 3388
ujo_proc_event Tiny 5250 15750
Small 16802 50406
Medium 58620 157860
Large 189031 567093
Huge 315052 945156
ujo_job_runs Tiny 45 135
Small 270 810
Medium 900 2700
Large 2700 8100
Huge 4500 13500
ujo_job_status Tiny 22 22
Small 136 136
Medium 454 454
Large 1363 1363
Huge 2272 2272
ujo_job2 Tiny 10 10
Small 60 60
Medium 200 200
Large 600 600
Huge 1000 1000
276 User Guide

7/16/2019 Autosys R11 User Guide
http://slidepdf.com/reader/full/autosys-r11-user-guide 277/459
Connecting to a Remote Ingres CA-MDB
The space requirements in this table are for illustrative purposes only to show
how Ingres works and how Unicenter AutoSys JM tables grow in size as the
product continues to function. As stated earlier, you must regularly maintain
the CA-MDB to reclaim lost space and improve performance. You should run
the DBMaint utility shipped with the Unicenter AutoSys JM installationperiodically using the application configuration or from a Unicenter AutoSys JM
sourced command prompt to improve database performance.
Connecting to a Remote Ingres CA-MDB
You can connect to a remote Ingres CA-MDB through a Virtual Node (vnode).
A vnode identifies the name defined on the local instance that points to
connection and authorization data needed to access a particular remote
instance of the CA-MDB. This is used when:
Local users need to connect to the CA-MDB on a remote instance.
Applications access the CA-MDB on a remote instance.
Ingres.NET provides transparent access to the remote database. You can use
the Ingres netutil utility or the vdba to create a vnode.
Note: For improved connection speeds, you should use TCP/IP as the network
protocol when defining vnodes. For more information about creating and
maintaining vnodes, see the Ingres Connectivity Guide.
Maintaining the Bundled Ingres Database 277

7/16/2019 Autosys R11 User Guide
http://slidepdf.com/reader/full/autosys-r11-user-guide 278/459
Default Ingres Users
Default Ingres Users
The Unicenter AutoSys JM installation includes a default database user called
autosys with group ujoadmin. The autosys user is granted the appropriate
database permissions to access Unicenter AutoSys JM schema objects in the
CA-MDB.
To access a local or remote database, run the Ingres native SQL utility from a
command prompt with the following syntax:
Local
sql –uautosys –Gujoadmin mdb
Remote
sql –umdbadmin –Gujoadmin vnode::mdb
Using –Ggroupid (for example, -Gujoadmin) applies the group’s permissions tothe session. Ingres security is based on the OS security model. Therefore, you
must create an equivalent OS user (in this case, autosys) for the SQL
command above to work.
Note: For more information about the SQL utility, see the Ingres Command
Reference Guide.
How to Create Ingres Users
If you have System Administrator or maintain_users permissions for Ingres,
you can use the following process to create a new Ingres user:1. At a command prompt, enter the following command:
sql iidbdb
2. Create user xxxxx with group=ujoadmin and privileges=(security)\g\q.
3. Add user xxxxx at the OS level so you can access the Ingres database
using the Ingres SQL utility.
Note: Remember to use \g at the end of the query. This is the Ingres
equivalent to go and execute. Also, the DBMaint maintenance utility requires
the Ingres user to be a secure/privileged user to impersonate other users with
DBA privileges. For example, the usermod and optmizedb functions in DBMaint
must be called as user mdbadmin (the MDB owner with DBA privileges). This iswhy the create user command is run with the security privileges so the user
xxxxx can impersonate user mdbadmin in calls to usermod and optimizedb.
278 User Guide

7/16/2019 Autosys R11 User Guide
http://slidepdf.com/reader/full/autosys-r11-user-guide 279/459
Start Ingres
Start Ingres
To start the scheduler and application server, you must start Ingres if it is not
running. Starting Ingres involves running the command that starts the
database on the computer where Ingres is installed.
To start Ingres
1. Log on to your system through the System Administrator account for your
Ingres installation.
2. (Optional) Enter the following command at a command prompt:
% ingstop
All Ingres components that are currently running shut down.
3. Enter the following command at a command prompt:
% ingstart
Ingres does the following:
Checks if you have sufficient operating system resources to run the
Ingres components you have installed. If not, Ingres issues an error
message and exits.
Note: If ingstart fails due to insufficient resources, see the Ingres
Getting Started Guide or the Ingres System Administrator Guide.
If you are using a raw log file, Ingres checks if it is configured. If the
log file is not configured, Ingres issues an error message and exits.
Starts all servers that are part of your installation.
4. Enter the following sql commands in a Unicenter AutoSys JM sourcedenvironment to verify whether the database is running and accessible:
sql –uautosys –Gujoadmin mdb
select date(‘now’)\g
\q
If these commands return the date, the database is running and
accessible.
Maintaining the Bundled Ingres Database 279

7/16/2019 Autosys R11 User Guide
http://slidepdf.com/reader/full/autosys-r11-user-guide 280/459
Stop Ingres
Stop Ingres
You must stop Ingres before shutting down or restarting the computer. Before
you stop Ingres, you must stop the Scheduler and the Application Server.
To stop Ingres
1. Log on to a Unicenter AutoSys JM-configured computer as the EXEC
Superuser and issue the following command at an instance command
prompt:
sendevent -E STOP_DEMON
Note: If you are not sure whether the Scheduler is running, do not send
the STOP_DEMON event. If the Scheduler is not running and you send the
event, the event is queued and sent when the Scheduler restarts. Before
you attempt to stop the Scheduler, use the chk_auto_up command to
make sure it is running.
The Scheduler completes any processing it is currently performing, and
stops.
2. In the Unicenter AutoSys JM Administrator, select Services from the
AutoSys menu. Select the Application Server from the Service list, and
click Stop Service.
The Application Server stops.
3. Enter the following command at an instance command prompt:
unisrvcntr stop uajm_server.$AUTOSERVThe Application Server stops.
4. Enter the following command at a command prompt:
ingstop
All Ingres components that are currently running shut down.
Note: Ingres does not stop if there are currently active sessions to the
Ingres CA-MDB database, through SQL or any other application. If Ingres
fails to stop because of active sessions, close the active sessions and try to
stop Ingres again. As a last resort, you can issue the following command
to force Ingres to shut down:
ingstop –force
280 User Guide

7/16/2019 Autosys R11 User Guide
http://slidepdf.com/reader/full/autosys-r11-user-guide 281/459
Ingres SQL Utility
Ingres SQL Utility
Ingres includes a utility (SQL), which resides in the%II_SYSTEM%\ingres\bin directory. The Ingres installation is automatically
sourced to the environment after installation. As a result, you can access the
SQL utility from any command prompt.
Ingres includes a utility (SQL), which resides in the
$II_SYSTEM/ingres/bin directory. The Ingres installation is automatically
sourced to the environment after installation. As a result, you can access the
SQL utility from any command prompt.
Note: The SQL utility functions only with the Ingres database. If you use an
Oracle database, use SQLPLUS. If you use Microsoft SQL database, use ISQL
or OSQL. If you use a Sybase database, use ISQL.
Display the Database Date and Time
Jobs are scheduled and run based on the date and time on the computer on
which the database is running. If your jobs do not run when you expect them
to, you should verify the database date and time.
To display the database date and time, enter the following commands at the
command prompt:
sql –uautosys –Gujoadmin mdbselect date(‘now’)\g\q
Maintaining the Bundled Ingres Database 281

7/16/2019 Autosys R11 User Guide
http://slidepdf.com/reader/full/autosys-r11-user-guide 282/459
CA-MDB Backup
CA-MDB Backup
You must back up the database regularly so you can recover it if the system
fails.
This section contains information about the process of using the Ingres ckpdb
command to back up, or checkpoint, the Ingres database and discusses
various approaches for taking backups.
The following concepts are important to the backup process:
Checkpointing and Journaling
Checkpointing is the recommended method for backing up Ingres
databases.
You can run the checkpointing (ckpdb) command in online or offline
mode against the entire database or against a specific table or list of
tables.
Ingres stores checkpoints at
%II_SYSTEM%\ingres\ckp\ dbname, where dbname is the name of
each database on the server. Each subdirectory contains a
corresponding file named c*******.ckp for each checkpoint taken for
that database.
Ingres stores checkpoints at $II_SYSTEM/ingres/ckp/dbname,
where dbname is the name of each database on the server. Each
subdirectory contains a corresponding file named c*******.ckp for
each checkpoint taken for that database.
When you take an online checkpoint, Ingres saves all the data written
to the database in dump files, which are used when you recover the
database.
The aaaaaaaa.cnf configuration file for the database contains a list of
up to 99 checkpoints. When you take the 99th checkpoint, Ingres
overwrites the oldest checkpoint in the list with the newest one.
Use journaling to capture changes made to the database. You can
switch journaling on or off for the entire database or for a specific
table or list of tables.
Journaling is always active for the CA-MDB. Ingres stores
checkpoint journals at %II_SYSTEM%\ingres\jnl\mdb. There is a
subdirectory for each database created on the server. Journal files are
named j*******.jnl.
282 User Guide

7/16/2019 Autosys R11 User Guide
http://slidepdf.com/reader/full/autosys-r11-user-guide 283/459
CA-MDB Backup
Journaling is always active for the CA-MDB. Ingres stores
checkpoint journals at $II_SYSTEM/ingres/jnl/mdb. There is a
subdirectory for each database created on the server. Journal files are
named j*******.jnl.
Having a checkpoint and journals for a database lets you recover the
database from a failure such as a loss of database disks. The time
needed to recover a database depends on the size of the database, the
time it takes to replace the database files onto disk, and the size of the
journal files.
As an alternative to running ckpdb, you can take an operating system
backup of the database. Before you do this, you must shut down
Ingres. OS backups taken when Ingres is running cannot be supported
when restored; you risk data integrity problems if you take OS
backups while Ingres is running.
Backup Frequency
You should run a backup at the end of each housekeeping cycle. This
means that if a failure occurs you only need to recover the database
from the backup and apply the journal and there is no need to reapply
any housekeeping.
A more rigorous option is to run a backup before and after
housekeeping. This provides an additional recovery point at the start
of housekeeping, from which you could recover the database if
housekeeping fails.
An even more rigorous option is to run backups before, after, and at
suitable points during housekeeping. This results in minimum recovery
time based on the size of the checkpoint and the size of the journalfiles.
Removing Checkpoints
There are two ways to remove old checkpoints:
Issue the following command to delete the oldest available checkpoint,
including related journals and dump files:
alterdb -delete_oldest_ckp
The request fails if you try to delete the only remaining valid
checkpoint.
Issue the following command to destroy all previous checkpoints,
including related journals and dump files:
ckpdb –d
The aaaaaaaa.cnf configuration file for the database contains a list of up to
99 checkpoints. When you take the 99th checkpoint, Ingres overwrites the
oldest checkpoint in the list with the newest one.
Maintaining the Bundled Ingres Database 283

7/16/2019 Autosys R11 User Guide
http://slidepdf.com/reader/full/autosys-r11-user-guide 284/459
CA-MDB Backup
Best Practices
You should back up the database after CA-MDB maintenance.
After a checkpoint has completed, you should archive all the files for
that checkpoint (files in the checkpoint, journal, and dump directories)to tape and store them. After you archive the checkpoint files to tape,
you can delete them from disk. This means that the latest checkpoint
is always on disk. It also means that there must be enough disk space
available to hold two complete CA-MDB checkpoints.
Do not use the ckpdb or alterdb methods of deleting old checkpoints.
The aaaaaaaa.cnf configuration file for the database contains a list of
up to 99 checkpoints. When you take the 99th checkpoint, Ingres
overwrites the oldest checkpoint in the list with the newest one.
In this scenario, because the checkpoints are not being deleted, the
ability to recover to previous backups provides a great deal of
flexibility should recovery be required.
Example: Checkpoint a Database
This example shows the command for checkpointing the database mdb:
ckpdb –umdbadmin mdb
Note: For more information about the ckpdb command, see the Ingres
Command Reference Guide.
284 User Guide

7/16/2019 Autosys R11 User Guide
http://slidepdf.com/reader/full/autosys-r11-user-guide 285/459
CA-MDB Recovery
CA-MDB Recovery
This section contains information about the process of using the Ingres
rollforwarddb command to recover a database or specific tables from backups.
The following concepts are important to the recovery process:
Prerequisites for Database Recovery
For recovery to be possible, a database backup and its checkpoint files
must exist (without a backup, there can be no recovery).
You can use checkpoints and journals or checkpoints only for recovery.
You can use the rollforwarddb command to recover the entire
database, a specific table, or a list of tables from the most recent
checkpoint and the current journal and dump files.
You must be an Ingres user with DBA or System Administrator
privileges to issue the rollforwarddb command. The mdbadmin user(as owner of the CA-MDB database) and the OS user that installed the
database can issue the rollforwarddb command.
Database recovery depends on how a backup was performed.
– If the backup was performed online, the recovery command
applies the checkpoints, then the journals, then the dump files
from the dump folder.
– If the backup was performed offline, the database is recovered
from the checkpoint and journals are applied. You can also use a
specific set of checkpoint files to enable recovery from a specific
point in time.
– Journals are applied as necessary. When a recovery is complete,
the backed-up data (checkpoint files) is restored in the database
directory.
Make sure there are no active sessions connected to the database
before you attempt to run the rollforwarddb command. Recovery
requires exclusive access to the database when it runs.
When the rollforwarddb command completes, it makes the database
available.
If recovery is from a checkpoint on disk, you must copy the checkpoint
to disk before running the rollforwarddb command.
On UNIX, you can back the database up directly to tape. If you
backed up the database in this manner, you can recover it directly
from the tape drive.
Maintaining the Bundled Ingres Database 285

7/16/2019 Autosys R11 User Guide
http://slidepdf.com/reader/full/autosys-r11-user-guide 286/459
CA-MDB Recovery
Important! Before you recover a database with the rollforwarddb command,
you should back up the current database. This enables you to restore the
database in case of errors during recovery. You should also save all log files,
including the transaction log. Checkpointing is the recommended method for
backing up Ingres databases. For more information about the rollforwarddbcommand, see the Ingres Command Reference Guide.
Best Practices
Database recovery requires a previous backup and valid checkpoint
files.
You can recover a database or table from any available checkpoint. By
default, recovery is from the most recent checkpoint.
Use the verbose option on the rollforwarddb command to view
diagnostic information about the operations performed during the
recovery process.
You should back up all the log files and the transaction log file beforeyou start a recovery.
Example: Recover a Database from the Most Recent Checkpoint
This example shows the command for recovering the database mdb from the
most recent checkpoint:
rollforwarddb –umdbadmin mdb -v
Example: Recover a Database from a Previous Checkpoint
This example shows the command for recovering the database mdb from the
fourth oldest checkpoint:
rollforwarddb #c4 –umdbadmin mdb -v
Note: When recovering a database in Dual Event Server mode, you should run
the autobcpDB batch file or script to synchronize the two Event Server
databases before starting the Scheduler and the Application Server.
286 User Guide

7/16/2019 Autosys R11 User Guide
http://slidepdf.com/reader/full/autosys-r11-user-guide 287/459
CA-MDB Troubleshooting
CA-MDB Troubleshooting
The following information is important when troubleshooting the CA-MDB:
All database-related information is logged to the log files in the databaseinstallation.
All changes in the Ingres database (including errors) are written to the file
errlog.log file.
The Ingres archiver appends all archiver progress information to the file
iiacp.log file.
The Ingres recovery server adds recovery information to the file iircp.log
file.
If you use VDBA, the corresponding details are logged to the file iivdba.log
file.
Ingres startup information is logged to the file ingstart.log file.
The CA-MDB creation process writes status information to the file
install_mdb.log file.
Unicenter AutoSys JM returns any errors during failures with the
appropriate error message and return codes. When troubleshooting a problem
with Ingres or the CA-MDB, you should first review the Ingres log files. These
files are located in the %II_SYSTEM%\ingres\files directory. You should be
prepared to provide these log files when you contact CA Technical Support
regarding issues with Ingres or the CA-MDB.
Unicenter AutoSys JM returns any errors during failures with the
appropriate error message and return codes. When troubleshooting a problem
with Ingres or the CA-MDB, you should first review the Ingres log files. These
files are located in the $II_SYSTEM/ingres/files directory. You should be
prepared to provide these log files when you contact CA Technical Support
regarding issues with Ingres or the CA-MDB.
Maintaining the Bundled Ingres Database 287

7/16/2019 Autosys R11 User Guide
http://slidepdf.com/reader/full/autosys-r11-user-guide 288/459

7/16/2019 Autosys R11 User Guide
http://slidepdf.com/reader/full/autosys-r11-user-guide 289/459
Chapter 14: Configuring Unicenter
AutoSys JMYou can configure Unicenter AutoSys JM for Windows and UNIX applications.
You can configure Unicenter AutoSys JM on Windows using the options
available in the Unicenter AutoSys Administrator. For information about these
options, see the Online Help.
The parameters required to configure Unicenter AutoSys JM on UNIX
using are explained in the subsequent sections of this chapter.
This section contains the following topics: Configuration File (see page 290) Configure File Parameters (see page 290) Sample Configuration File (see page 291) auto.profile File (see page 311) Configuring Remote Authentication (see page 314)Client-Side Security (see page 315) User-Defined Alarm Callbacks (see page 316)
Configuring Unicenter AutoSys J M 289

7/16/2019 Autosys R11 User Guide
http://slidepdf.com/reader/full/autosys-r11-user-guide 290/459
Configuration File
Configuration File
UNIX run-time behavior is controlled by the parameters in theconfiguration file and the environment variables set in the /etc/auto.profile
file.
Upon startup, Unicenter AutoSys JM reads the configuration file to verify its
behavior, including which databases to connect to and how to react to certain
error conditions. In particular, the Scheduler bases much of its run-time
behavior on the parameters found in this file. If you change the settings in the
configuration file, you must stop and restart the Scheduler so that it can read
the new settings.
The configuration file has the following name:
$AUTOUSER/config.$AUTOSERV
The file is instance-specific, and the $AUTOSERV value is the name of the
instance with which the configuration file is associated. The $AUTOSERV value
must be three uppercase alphabetic characters and must be unique to each
instance.
Note: Events have a unique ID called eoid , which is prefixed by the first three
letters of $AUTOSERV value. This ensures an event's uniqueness and
traceability across multiple instances.
Configure File Parameters
You can modify the parameters in the configuration file to control
Unicenter AutoSys JM behavior and optimize your system.
The Scheduler only reads the settings in the configuration file on startup only.
Therefore, if you make changes to the file, you must stop and restart the
Scheduler for it to read the new settings.
To stop and restart the Scheduler
1. Issue the following command:
sendevent -E STOP_DEMON
The Scheduler stops.
2. Issue the following command:
eventor
The Scheduler restarts.
290 User Guide

7/16/2019 Autosys R11 User Guide
http://slidepdf.com/reader/full/autosys-r11-user-guide 291/459
Sample C onfiguration File
Sample Configuration File
Unicenter AutoSys JM includes a sample configuration file, located at$AUTOSYS/install/data/config.ACE. You can reference this file as you read
through this chapter or use it as the basis for your own configuration file. We
recommend that you make a copy of the sample configuration file before you
modify it.
DBLibWaitTime Parameter—Configure Database Time-Out Period (Sybase Only)
The DBLibWaitTime configuration parameter specifies the amount of
time the Scheduler will wait before breaking the connection with an Event
Server that is in an unknown state. The Scheduler continually maintains andverifies its connections with the databases, and when an Event Server enters
an unknown state, the Scheduler will break the connection after the wait time
specified by the DBLibWaitTime parameter.
The following line in the configuration file sets the timer for 90 seconds:
DBLibWaitTime=90
Typically, the database should never time out. However, if it does, Unicenter
AutoSys JM attempts to reconnect to the database the number of times
specified by the DBEventReconnect parameter. If the database connections
time out often, it probably indicates some kind of computer or data server
contention problem.
Note: If you set this value to DBLibWaitTime=0, no time-out value is applied
and the connection is continuous. Because it can cause the Scheduler to hang,
we do not recommend this setting.
Configuring Unicenter AutoSys J M 291

7/16/2019 Autosys R11 User Guide
http://slidepdf.com/reader/full/autosys-r11-user-guide 292/459
Sample C onfiguration File
SNMP Connections
Unicenter AutoSys JM can be integrated with Hewlett-Packard's Node
Manager software, versions 4.10 or higher. This enables OpenView users to do
the following:
Monitor all alarms generated by Unicenter AutoSys JM.
Monitor all UNIX signals received by the Scheduler.
Specify that certain commands be issued when an alarm or signal is
received by OpenView.
Unicenter AutoSys JM uses the Simple Network Management Protocol (SNMP)
to send alarms and signals to OpenView and uses the SNMP trap mechanism
to post alarms and signals.
Note: When the Scheduler receives a UNIX signal, it posts an SNMP event toOpenView. This can be particularly useful if a signal has been sent that shuts
down the Scheduler. The signal is posted to OpenView before the Scheduler
shuts down.
To integrate with OpenView, you must configure the SnmpManagerHosts and
SnmpCommunity parameters so OpenView can detect alarms.
SnmpManagerHosts Parameter—Define Computers that Send SNMP Traps
The SnmpManagerHosts parameter specifies the computers to which the
UNIX Scheduler will send SNMP traps. It contains a list of computers on thenetwork that are running SNMP managers, such as HP's OpenView or IBM's
NetView, and to which you want to send SNMP traps (for example, post SNMP
events). When you enter the name of a computer with this parameter, you
enable this functionality.
The entry in the configuration file resembles the following:
SnmpManagerHosts=host1,host2
SnmpCommunity Parameter—Define Community for All SNMP Traps
The SnmpCommunity parameter specifies the SNMP communityassociated with all SNMP traps sent. This parameter is effectively a password
that SNMP managers such as OpenView can be use to filter SNMP traps. This
value is almost always public, and so the entry in the Unicenter AutoSys JM
configuration file usually resembles the following:
SnmpCommunity=public
292 User Guide

7/16/2019 Autosys R11 User Guide
http://slidepdf.com/reader/full/autosys-r11-user-guide 293/459
Sample C onfiguration File
DBEventReconnect Parameter—Set Number of Scheduler Connection Attempts
You can configure Unicenter AutoSys JM to attempt to connect and
reconnect to databases a specified number of times. This behavior occurs on
the first attempt to connect to the database, and when a database connection
is lost and a reconnect attempt is made. This database connection behavior
also sets the rollover criteria for Dual Event Server mode.
The DBEventReconnect parameter controls the number of times a Scheduler
should attempt to connect (or reconnect) to an Event Server before shutting
down, or before rolling over to Single Event Server mode. This parameter is
used on startup and when there is a connection problem at run time.
In Single Event Server mode, the DBEventReconnect parameter is set to a
simple number as follows:
DBEventReconnect=50
This setting specifies that the Scheduler should attempt to connect with the
Event Server 50 times. If it cannot connect after 50 attempts, the Scheduler
shuts down.
In Dual Event Server mode, the DBEventReconnect parameter contains two
values (separated by a comma) that describe the connection and rollover
behaviors, as follows:
DBEventReconnect=50,5
This setting specifies that the Scheduler should attempt five connections with
the Event Servers. If it cannot connect after five attempts, the Scheduler rolls
over to Single Event Server mode, marking the other Event Server as down.
When in Single Event Server mode, the Scheduler attempts to connect with
the Event Server 50 times. If the Scheduler cannot connect to the Event
Server, it assumes there is a connection or configuration problem, and shuts
down.
Configuring Unicenter AutoSys J M 293

7/16/2019 Autosys R11 User Guide
http://slidepdf.com/reader/full/autosys-r11-user-guide 294/459
Sample C onfiguration File
EDNumErrors and EDErrTimeInt Parameters—Define Error Threshold
To guard against cascading errors, which can occur when the Scheduler
automatically reissues failed directives, you can set the EDNumErrors and
EDErrTimeInt parameters. The EDNumErrors parameter specifies the
maximum number of errors that can occur during the interval specified by the
EDErrTimeInt parameter. These parameters work together to force Unicenter
AutoSys JM to automatically shut the Scheduler down if too many errors occur
during the specified interval.
The primary reason for setting these parameters to shut the Scheduler down
in this situation is to avoid starting any new processes while there are serious
problems in the system.
The default settings specify to shut the processor down if more than 20 errors
occur within 60 seconds; the corresponding entries in the configuration file areas follows:
EDNumErrors=20EDErrTimeInt=60
FileSystemThreshold Parameter—Set Minimum Scheduler Log Disk Space
The Scheduler shuts down if there is less than 8196KB (8MB) of disk
space available to write to the Scheduler log file (event_demon.$AUTOSERV).
If the amount of disk space falls below that specified by the
FileSystemThreshold parameter, the Scheduler issues warnings similar to thefollowing:
CAUAJM_W_40358 The disk partition containing the Unicenter AutoSys JM Scheduler log file is full
CAUAJM_W_40359 The Unicenter AutoSys JM Scheduler will shutdown if partition has less than
8,388,608 bytes available.
The default FileSystemThreshold setting is 20480KB (20MB). Valid settings
must be less than 102400KB (100MB) and greater than 8192KB (8MB).
If the amount of disk space falls below 8192KB (8MB), the Scheduler issues an
EP_SHUTDOWN alarm, shuts down, and displays messages similar to the
following:
CAUAJM_W_40360 Error: No disk space left to write the Unicenter AutoSys JM Scheduler log file.
CAUAJM_I_40247 CA Unicenter AutoSys JM Scheduler processing of events complete.
CAUAJM_I_40248 CA Unicenter AutoSys JM Scheduler shutdown complete. Exiting.
The entry in the configuration file resembles the following:
FileSystemThreshold=20480
294 User Guide

7/16/2019 Autosys R11 User Guide
http://slidepdf.com/reader/full/autosys-r11-user-guide 295/459
Sample C onfiguration File
DBMaintTime and DBMaintCmd Parameters—Configure Automatic DatabaseMaintenance
To reschedule daily database maintenance, define the DBMaintCmd and
DBMaintTime parameters in the configuration file. Use a 24-hour format for
the time entry.
DBMaintTime
Defines the time of day at which the Scheduler should run internal
database maintenance.
Default: 03:30
DBMaintCmd
Defines the maintenance command to run at the time specified in the
DBMaintTime parameter.
Default: $AUTOSYS/bin/DBMaint
The configuration file contains the following default entries:
DBMaintTime=03:30DBMaintCmd=$AUTOSYS/bin/DBMaint
EvtTransferWaitTime Parameter—Set the Event Transfer Time-Out for Dual EventServer Mode
When you run Unicenter AutoSys JM in Dual Event Server mode, the
Scheduler copies missing events from one Event Server to the other after a
time-out delay specified in the EvtTransferWaitTime parameter in the
configuration file. Typically, you need not modify the default setting (5
seconds).
The configuration file contains the following record, which sets the default
time-out of five seconds:
EvtTransferWaitTime=5
Configuring Unicenter AutoSys J M 295

7/16/2019 Autosys R11 User Guide
http://slidepdf.com/reader/full/autosys-r11-user-guide 296/459
Sample C onfiguration File
SendeventMaxRetries Parameter—Set Maximum Number of sendevent Retries
The SendeventMaxRetries parameter defines the maximum number of
times that the sendevent command attempts to send an event to the Event
Server database.
For example, to set the number of retry attempts to 10, set the following value
in the configuration file:
SendeventMaxRetries=10
SendeventRetryInterval Parameter—Set an Interval for sendevent Retries
The SendeventRetryInterval parameter specifies the interval, inseconds, between attempts to send an event to the Event Server. There is no
default value.
For example, to set the interval to 15 seconds, set the following value in the
configuration file:
SendeventRetryInterval=15
296 User Guide

7/16/2019 Autosys R11 User Guide
http://slidepdf.com/reader/full/autosys-r11-user-guide 297/459
Sample C onfiguration File
Check_Hearbeat Parameter—Set the Interval Between Heartbeat Checks
You can program your user applications to send heartbeats that the
Agent monitors to check their continued progress. A heartbeat is a signal
(SIGUSR2) sent from the application to the Agent that started the application.
That Agent then sends a HEARTBEAT event to the Event Servers.
The Scheduler verifies that the HEARTBEAT event has occurred during the
heartbeat interval specified for the job.
The Scheduler, and not the Agent, checks if there is a HEARTBEAT between
the Agent and the Event Servers, and sends an alarm if the HEARTBEAT is
absent. Therefore, the HEARTBEAT option also provides a good indication of
the stability of the network.
The Check_Heartbeat parameter defines the interval (in minutes) that theScheduler uses when checking for heartbeats. If there are no applications
sending heartbeats, you need not set this parameter. By default, this
parameter is commented out in the configuration file.
For example, to instruct the Scheduler to check for missing heartbeats every
two minutes, set the following value in the configuration file:
Check_Heartbeat=2
Configuring Unicenter AutoSys J M 297

7/16/2019 Autosys R11 User Guide
http://slidepdf.com/reader/full/autosys-r11-user-guide 298/459
Sample C onfiguration File
AutoRemoteDir Parameter—Define a Directory for Agent Logging
At any time, the Agent writes output messages to files in the directory
specified by the AutoRemoteDir parameter. By default, the /tmp directory is
used for Agent logging.
Note: For some operating systems, locking of files located in the /tmp
directory is not supported (for example, on SunOS platforms when /tmp is
mounted on tmpfs). In such cases, you must see the AutoRemoteDir
parameter to specify a different directory, because Unicenter AutoSys JM uses
the locks to check if the Agent is running.
The Scheduler passes the AutoRemoteDir parameter to the Agent when it
starts. As a result, the Agent log files directory must already exist, and it must
be writable on every computer that is running.
In a cross-platform environment (for example, where a UNIX Scheduler starts
a Windows Agent), the path to the log files directory is translated to the
format expected by the recipient platform. A UNIX Agent removes the drive
letter and colon, if present, and replaces \ characters with / characters. For
example, C:\tmp becomes /tmp. Similarly, a Windows Agent adds the system
drive letter and colon if they are not present, and replaces all / characters with
\ characters. For example, /tmp becomes C:\tmp.
The configuration file contains the following record, which sets the default
directory (/tmp) for enterprise-wide logging:
AutoRemoteDir=/tmp
298 User Guide

7/16/2019 Autosys R11 User Guide
http://slidepdf.com/reader/full/autosys-r11-user-guide 299/459
Sample C onfiguration File
CleanTmpFiles Parameter—Automatically Remove Temporary Agent Log Files
For each job, Unicenter AutoSys JM creates a file in the Agent log
directory on the computer where the job runs. If you set the CleanTmpFiles
parameter to 0 (off), these files remain on each computer until you use the
clean_files command to remove them.
Instead of using the clean_files command, you can set the CleanTmpFiles
value in the configuration file to 1 (on), as follows:
CleanTmpFiles=1
When you set CleanTmpFiles on, the Agent removes the /tmp/auto_rem* file
when its tasks complete successfully (assuming the AutoRemoteDir parameter
specifies the default /tmp directory).
The format of the Agent log file name (that is, of the auto_rem* file name) is
as follows:
auto_rem.joid.run_number.ntry
j o i d
Defines the unique job object ID associated with the job.
r u n _ n u m
Defines the job’s run number.
n t r y
Defines the number of tries or restarts.
If the Agent cannot run the job successfully, it does not remove the files
because they are useful for diagnosing the problem.
To view the Agent output file, use the autosys_log command on the client
computer as follows:
autosys_log -J job_name
j o b _ n am e
Defines the name of the job for which to display the log file.
Regardless of how you set the CleanTmpFiles parameter, you should run the
clean_files command regularly to remove files from unsuccessful Agent
processes.
Configuring Unicenter AutoSys J M 299

7/16/2019 Autosys R11 User Guide
http://slidepdf.com/reader/full/autosys-r11-user-guide 300/459
Sample C onfiguration File
RemoteProFiles Parameter—Redirect stderr and stdout Output to a File
When you set the RemoteProFiles parameter to 1 (on), it redirects
stderr and stdout output generated when /etc/auto.profile is sourced to a file.
The configuration file contains the following record, which sets the default
RemoteProFiles value (1):
RemoteProFiles=1
The name of the file to which the product writes output is based on the log file
name, and has the following format:
auto_rem_pro.joid.run_number.ntry
j o i d
Defines the unique job object ID associated with the job.
r u n _ n u m
Defines the job’s run number.
n t r y
Defines the number of tries or restarts.
This output file contains entries if anything specified in the profile fails. For
example, if the profile attempts to use setenv to set an environment variable,
the Bourne shell cannot process the C shell syntax. In this case, the output file
contains the following record:
setenv: not found
Non-fatal errors that occur when a profile is sourced are not recorded and do
not appear in the output file.
300 User Guide

7/16/2019 Autosys R11 User Guide
http://slidepdf.com/reader/full/autosys-r11-user-guide 301/459
Sample C onfiguration File
To view the output file, use the autosys_log command on the Client computer
as follows:
autosys_log -J job_name -p
j o b _ n am e
Defines the name of the job for which to display the log file.
This command displays the log file and appends the profile output, if there is
any. If no profile output file exists, the log file contains the following record:
File: profile_output_file Does Not Exist.
Note: If you set CleanTmpFiles to 1 (on), the output file is removed when the
job completes successfully, and the profile log information is not available. If
you set CleanTmpFiles to o (off), the file remains until you use the clean_files
command to remove it.
MaxRestartTrys Parameter—Set Maximum Number of Job Restart Attempts
Unicenter AutoSys JM attempts to restart a job the number of times
specified by the MaxRestartTrys parameter if it cannot start the job due to
system problems such as computer unavailability, socket connection time-out,
inability of the Agent to start another process, or failure of the file system
space resource check.
For example, to set the number of job restart attempts to five, set the
following value in the configuration file:
MaxRestartTrys=5
Note: The MaxRestartTrys parameter governs retries that result from system
or network problems. It is different from the n_retrys job definition attribute,
which controls restarts when a job fails due to application failure (for example,
when Unicenter AutoSys JM cannot find a file or a command, or permissions
are not properly set).
Configuring Unicenter AutoSys J M 301

7/16/2019 Autosys R11 User Guide
http://slidepdf.com/reader/full/autosys-r11-user-guide 302/459
Sample C onfiguration File
RestartConstant, RestartFactor, and MaxRestartWait Parameter—Calculate WaitTime Between Restart Attempts
Unicenter AutoSys JM uses the following formula to calculate the amount
of time (in seconds) between each attempt to restart a job:
WaitTime=RestartConstant+( Num_of_Tries*RestartFactor) if WaitTime > MaxRestartWait,then WaitTime = MaxRestartWait Re s t a r t C o n s t a n t
Indicates the minimum time (in seconds) to wait between each attempt to
restart a job.
N um _ o f _ T r ie s
Identifies the value of the n_retrys attribute defined to a job.Re s t a r t F a c t o r
Indicates the time (in seconds) compounded to the RestartConstant. This
value multiplies with every job restart and is used to gradually increase
the number of seconds per retry attempt.
302 User Guide
7/16/2019 Autosys R11 User Guide
http://slidepdf.com/reader/full/autosys-r11-user-guide 303/459
Sample C onfiguration File
MachineMethod Parameter—Specify Load Balancing Method
The MachineMethod parameter defines the method used to check the
percentage of CPU cycles available on a real machine belonging to a virtual
machine. This method is used to help achieve load balancing. You can set the
MachineMethod parameter to the following values:
job_load
Verifies only the job load and does not require real-time usage of the
machine.
rstatd
Checks the CPU usage statistics of candidate machines.
If you set MachineMethod to rstatd, you must make sure that this demon
is running on all Client computers. To make sure that the demon is
running, do the following:
Edit the internet demon configuration file (/etc/inetd.conf) on all Client
computers, and uncomment the rstatd entry.
Send a SIGHUP signal (kill -1) to reset the running inetd process.
Sometimes, a kill -1 command is not sufficient to reset the inetd. If
rstatd fails, you might have to issue a kill -9 command, and restart
inetd. If necessary, check with your systems administrator.
Note: rstatd is not currently supported on NCR or Pyramid Client
computers.
vmstat
Checks the CPU usage statistics of candidate machines.
vmstat is the default MachineMethod value.
For example, to set the method to rstatd, set the following value in the
configuration file:
MachineMethod=rstatd
Configuring Unicenter AutoSys J M 303

7/16/2019 Autosys R11 User Guide
http://slidepdf.com/reader/full/autosys-r11-user-guide 304/459
Sample C onfiguration File
KillSignals Parameter—Specify Signals for KILLJOB Events
The KillSignals parameter defines a comma-separated list of signals to
send to a job that is the target of a KILLJOB event. If the job is running on a
UNIX computer, the parameter defines one or more UNIX signals to send to
the job. If a comma-delimited list of signals is defined, the signals are sent in
the order listed, with five-second intervals between each call.
To preserve backward compatibility, the configuration file contains the
following entry:
KillSignals=2,9
We recommend that you set the KillSignals parameter to 15,9. In most cases,
this leads Unicenter AutoSys JM to return a TERMINATED state for the target
job. If it does not, set the KillSignals parameter to 9.
Note: The sendevent -k command overrides the KillSignals value in the
configuration file.
If the target job is running on a Windows computer, the KillSignals
parameter is ignored and the job is simply terminated.
304 User Guide

7/16/2019 Autosys R11 User Guide
http://slidepdf.com/reader/full/autosys-r11-user-guide 305/459
Sample C onfiguration File
AutoRemPort Parameter—Set Legacy Agent Port Number
The Scheduler communicates to the Agent through a TCP/IP socket
connection. The AutoRemPort parameter defines the port number for this
socket connection. The internet services daemon (inetd) on the Client
computer uses the port number to point to the name of the service (found in
/etc/services). The service name is located in the inetd configuration file
(/etc/inetd.conf), where it finds the path to the legacy Agent binary.
It is possible to have different Unicenter AutoSys JM releases installed on the
same computer, where the versions are not cross-compatible between the
Scheduler and the Agent. By setting up multiple services and using different
port numbers, you can maintain multiple releases of the software.
The AutoRemPort value in the configuration file is set during installation. If you
change it, you must change the AutoRemPort value and the port numbers inall /etc/services files on all Unicenter AutoSys JM Client and server computers.
The configuration file contains the following default entry:
AutoRemPort=5280
Note: If you use NIS or NIS+, and want to change the AutoRemPort value,
you must modify /etc/services on your NIS or NIS+ master and push it to all
Client computers, then run a kill -1 process on inetd.
Configuring Unicenter AutoSys J M 305

7/16/2019 Autosys R11 User Guide
http://slidepdf.com/reader/full/autosys-r11-user-guide 306/459
Sample C onfiguration File
CrossPlatformScheduling Parameter—Activate the Cross-Platform Interface
The CrossPlatformScheduling parameter defines how the cross-platform
interface runs.
To enable the cross-platform interface to run jobs directly on a Unicenter
Workload Agent, set the CrossPlatformScheduling parameter to 1.
To enable bi-directional scheduling support, set the CrossPlatformScheduling
parameter to 2. After enabling cross-platform scheduling with bi-directional
support, an instance can dispatch jobs to a Unicenter Workload Agent and
receive jobs from a Unicenter Job Scheduling Manager.
By default, the cross-platform interface is not activated during Scheduler
startup. The configuration file contains the following default entry:
CrossPlatformScheduling=0
Note: To make changes to the CrossPlatformScheduling parameter effective,
you must stop and restart the Scheduler.
More Information:
Cross-Platform Scheduling Considerations (see page 379)
306 User Guide

7/16/2019 Autosys R11 User Guide
http://slidepdf.com/reader/full/autosys-r11-user-guide 307/459
Sample C onfiguration File
AutoInstWideAppend Parameter—Specify Whether to Overwrite Standard Errorand Standard Output
The AutoInstWideAppend parameter specifies whether an instance will
overwrite or append information to the standard error and standard output
files.
If you set this parameter to 0, the standard error and standard output files are
overwritten. If you set this parameter to 1 (the default), new information is
appended to the files.
The configuration file contains the following default entry:
AutoInstWideAppend=1
Each Client computer can use the AutoMachWideAppend variable in the /etc/auto.profile file to override the instance-wide setting. The
AutoMachWideAppend variable is set as follows:
#AUTOENV#AutoMachWideAppend=TRUE
Note: If you are running jobs across operating systems, the Scheduler of the
issuing instance controls the default behavior.
To override either the instance-wide or machine setting in a job definition by
entering the following notation as the first characters in the standard output
and standard error file specifications:
> Overwrite file
>> Append file
Note: For Windows, the default is to overwrite the standard error and
standard output files.
Configuring Unicenter AutoSys J M 307

7/16/2019 Autosys R11 User Guide
http://slidepdf.com/reader/full/autosys-r11-user-guide 308/459
Sample C onfiguration File
InetdSleepTime Parameter—Define Interval Between Job Starts for an Agent
The InetdSleepTime parameter controls how long (in seconds) inetd
waits between job starts on the same Agent computer. By default,
InetdSleepTime is set to 2, and there is no parameter in the configuration file.
To reduce the time the inetd waits between job starts on a computer, you can
add the InetdSleepTime parameter to the configuration file and lower the
value.
For example, to lower the InetdSleepTime setting to one second, add the
following entry to the configuration file:
InetdSleepTime=1
Note: Setting InetdSleepTime too low for your hardware could adversely
affect performance. You must also make sure your computer has a processor
fast enough to handle starting jobs at the shorter interval. Otherwise, frequent
socket connection failures will occur, causing numerous job restarts.
UnicenterEvents Parameter—Activate Unicenter Event Integration
Before enabling Unicenter event integration, you must (at a minimum)
install the Unicenter Event Agent on the Scheduler computer.
When you set UnicenterEvents to 1 (on), Unicenter AutoSys JM forwards all
messages written to the Scheduler log to the Unicenter Event Management
console.
By default, UnicenterEvents is set to 0 (off).
The configuration file contains the following default entry:
UnicenterEvents=0
More Information:
Unicenter Integration (see page 365)
308 User Guide

7/16/2019 Autosys R11 User Guide
http://slidepdf.com/reader/full/autosys-r11-user-guide 309/459
Sample C onfiguration File
NotifyServerNode and NotifyAckTimeout Parameters—Activate UnicenterNotification Integration
Before enabling Unicenter notification integration, you must (at a
minimum) install the Unicenter Notification Agent on the Scheduler computer.
You must set the NotifyServerNode and NotifyAckTimeout parameters to
activate Unicenter Notification. When you set these notification parameters,
the Scheduler can send a notification to Unicenter Notification, assuming that
the job the Scheduler is processing was defined with the appropriate job
notification attributes.
NotifyServerNode
Defines the node name of the Unicenter Notification Services server.
NotifyAckTimeout
Defines the amount of time (in seconds) the Client waits for an
acknowledgement from the specified Unicenter Notification Services server
before timing out.
Default: 30
Unicenter Notification integration is inactive by default.
The configuration file contains the following example entry:
#NotifyServerNode=unshost
#NotifyAckTimeout=30
More Information:
Unicenter Integration (see page 365)
Configuring Unicenter AutoSys J M 309

7/16/2019 Autosys R11 User Guide
http://slidepdf.com/reader/full/autosys-r11-user-guide 310/459
Sample C onfiguration File
ServiceDeskCust, ServiceDeskURL, and ServiceDeskUser Parameters—ActivateUnicenter Service Desk Integration
You must set either the ServiceDeskURL and ServiceDeskUser
parameters, or the ServiceDeskURL and ServiceDeskCust parameters to
activate Unicenter Service Desk integration. When these parameters are set
(and assuming that the job the Scheduler is processing has been defined with
the appropriate Unicenter Service Desk attributes), the Scheduler can open a
service desk ticket through Unicenter Service Desk.
ServiceDeskCust
Defines a valid Unicenter Service Desk customer ID.
ServiceDeskURL
Defines the URL of the Unicenter Service Desk server.
ServiceDeskUser
Defines user ID and password to use to log on to the specified Unicenter
Service Desk server.
Unicenter Service Desk integration is inactive by default.
The configuration file contains the following example entry:
#ServiceDeskURL=http://servicedeskhost:8080/axis/services/USD_R11_WebService
#ServiceDeskUser=<user/pw >
#ServiceDeskCust=
More Information:
Unicenter Integration (see page 365)
310 User Guide

7/16/2019 Autosys R11 User Guide
http://slidepdf.com/reader/full/autosys-r11-user-guide 311/459
auto.profile File
auto.profile File
The Agent is a process (called auto_remote) that is started so theScheduler can perform a specific task on a remote (Client) computer. The
Agent starts the command specified for a given job, sends running and
completion information about a task to the Event Server, and then exits.
The Agent starts on the Client computer as root. The Agent environment is
controlled through special descriptors in the /etc/auto.profile file, which is
located on the remote Client.
The /etc/auto.profile file serves two purposes:
It specifies a number of descriptors that set the environment for the Agent
on the Client computer. These descriptors are environment variables that
are preceded by the following characters:
#AUTOENV#
It specifies default settings for jobs that do not have a profile specified in
the job definition. A job profile sets environment variables for a job
immediately before the job starts.
A typical job reads /etc/auto.profile twice. First, the Agent reads the file, using
only the lines beginning with #AUTOENV# to set its own environment. Then, if
there is no explicit profile in the job definition, the Agent orders the shell to
read /etc/auto.profile before running the command for the job. The shell
interprets the entire file except lines beginning with #.
You should view the /etc/auto.profile file in a text editor to familiarize yourself with the environment settings in it.
More information:
AutoInstWideAppend Parameter—Specify Whether to Overwrite Standard Error and Standard Output (see page 307) Client-Side Security (see page 315)
Configuring Unicenter AutoSys J M 311

7/16/2019 Autosys R11 User Guide
http://slidepdf.com/reader/full/autosys-r11-user-guide 312/459
auto.profile File
Sample auto.profile File
The following is an example auto.profile file for a typical Unicenter
AutoSys JM installation.
The Agent looks for the #AUTOENV# descriptors and reads the variables that
follow to set its environment.
Important! The #AUTOENV# descriptor is not a comment. Do not remove the
# characters from this file.
# Set Unicenter AutoSys JM Environmental Variables
#
# This must be a Bourne shell script,
# AND the variables exported for your command
# to have access to them.
# The AUTOSYS and AUTOUSER variables are needed if the job's command uses
# any Unicenter AutoSys JM programs.
# AUTOSYS is already set in the environment for auto_remote, the UAJM Agent.
# AUTOUSER can be different for each instance in the case statement below.
hostname=`$AUTOSYS/bin/autoflags -n`
case $AUTOSERV in
ACE)
AUTOUSER=/opt/CA/UnicenterAutoSysJM/autouser.ACE
test -f $AUTOUSER/autosys.sh.$hostname &&
. $AUTOUSER/autosys.sh.$hostname
;;
esac
export AUTOUSER# Windowing system environment variable
DISPLAY=":0.0"
export DISPLAY
# set a PATH so executables can be found
PATH=".:$AUTOSYS/bin:$AUTOSYS/test/bin:/bin:/usr/bin:/usr/local/bin:/usr/openwin/
bin:/usr/bin/X11:/bin:/usr/ucb:/usr/etc"
export PATH
#############################################################################
# auto_remote Environment Variables
# OverrideAutoRemoteDir sets the log directory for this agent if the
# Scheduler is on a Windows machine or if its AutoRemoteDir value is
# otherwise unsuitable.
#AUTOENV#OverrideAutoRemoteDir=# ISDBGACTIV controls debug traces in the agent log file.
# Values can be comma-separated:
# OFF = No traces
# MS = Add milliseconds to time in output
# LIGHT = Light traces
# HEAVY = full traces
312 User Guide

7/16/2019 Autosys R11 User Guide
http://slidepdf.com/reader/full/autosys-r11-user-guide 313/459
auto.profile File
# DUMP = Cross-Platform Interface traces
# GBE = Scheduler Get Batch Event traces
# JOB = Job runtime traces
#AUTOENV#ISDBGACTIV=OFF
ISDBGACTIV Parameter—Set Run Time Trace Level
The ISDBGACTIV parameter controls the level of trace information to
return to the Scheduler and Application Server logs. You can set the
ISDBGACTIV parameter to the following values:
OFF
Returns no trace information. This is the default value.
MS
Adds milliseconds to the time in the output.
LIGHT
Returns light trace information.
HEAVY
Returns full trace information.
DUMP
Traces data sent and received by the cross-platform interface.
GWB
Scheduler Get Batch Event traces.
JOB
Traces the run time of a job.
You must separate multiple values with commas, as follows:
ISDBGACTIV=JOB,DUMP
Configuring Unicenter AutoSys J M 313

7/16/2019 Autosys R11 User Guide
http://slidepdf.com/reader/full/autosys-r11-user-guide 314/459
Configuring Remote Authentication
Configuring Remote Authentication
You can use either of the following methods to configure remoteauthentication:
UNIX ruserok() Authentication
When using this method, Unicenter AutoSys JM instructs a Client's Agent
to make the UNIX system ruserok() call. The ruserok() call checks the
Client computer's /etc/hosts.equiv and the user's .rhosts files to validate
that the requesting user is registered in that environment.
Unicenter AutoSys JM Agent Scheduler Authentication
When using this method, a specific Agent can be bound to one or more
Schedulers. In other words, an Agent must verify its permission to process
a Scheduler's requests before starting each job. The Agent does this by
reading the /etc/.autostuff file on the computer where it is running.
The EDIT Superuser can use the autosys_secure command to enable (or
disable) remote authentication. Remote authentication is disabled by default.
If you enable Agent Scheduler authentication, you must configure Unicenter
AutoSys JM to support it.
Configuring Unicenter AutoSys JM Scheduler Authentication
You can configure Agents to accept jobs only from trusted Schedulers.
To configure Unicenter AutoSys JM for Agent Scheduler Authentication, youmust do the following:
Enable Agent Scheduler authentication.
Create an ASCII file named.autostuff in the /etc directory of every Client
computer that participates in this authentication method.
After you complete these steps, the Agent only runs jobs submitted by
Schedulers listed in the .autostuff file.
314 User Guide

7/16/2019 Autosys R11 User Guide
http://slidepdf.com/reader/full/autosys-r11-user-guide 315/459
Client-Side Security
The /etc/.autostuff File
The /etc/.autostuff file should have read and write permissions for root
only. Entries in this file must be in the following form:
AUTOSERV:hostname
AUTOSERV
Defines the three-character name of the Unicenter AutoSys JM instance
with which the trusted Scheduler is associated.
h o s t n a m e
Defines the name of the host on which the trusted Scheduler is
associated.
Client-Side Security
The AUTOENV environment variable DENY_ACCESS restricts access to
the Agent computer.
You can use the auto.profile file for the Agent computer to specify a list of
users whose jobs are prohibited from running on that computer. The list is a
comma-delimited list of user names, with no spaces. The entry can contain up
to 512 characters. For example, you might specify the following in the
auto.profile file:
########################################################
# auto_remote environment variables
# DO NOT REMOVE
#AUTOENV#DENY_ACCESS=root,demon,admin
In this example, the Agent will not start jobs owned by root, demon, or admin.
If a job owned by one of these users is submitted to run on the Agent, the job
fails as if the job's owner did not have a valid account on the computer. There
will be no job restart attempts, regardless of the MaxRestartTrys setting in the
configuration file. When a job fails for this reason, the Scheduler log displays
the following error as a STARTJOBFAIL alarm on the job:
Permission ERROR: Could not SET uid=uid on Host: host
Configuring Unicenter AutoSys J M 315

7/16/2019 Autosys R11 User Guide
http://slidepdf.com/reader/full/autosys-r11-user-guide 316/459
User-Defined Alarm Callbacks
User-Defined Alarm Callbacks User-defined alarm callbacks provide a method for communicating
problems to administrators in a manner that is external to the event system.
That is, for certain types of alarms, you can configure Unicenter AutoSys JM to
call user-defined routines that communicate the problem to specific members
of your company. For example, by using electronic mail or a command line
pager utility, your administrator can be notified as soon as certain events
occur.
You can configure Unicenter AutoSys JM to call user-defined routines for the
following types of system alarms:
DB_ROLLOVER
Indicates that Unicenter AutoSys JM has rolled over from Dual Event
Server to Single Event Server mode.
DB_PROBLEM
Indicates that there is a problem with one of the databases.
EP_ROLLOVER
Indicates that the Shadow Scheduler is taking over processing.
EP_SHUTDOWN
Indicates that the Scheduler is shutting down due to a normal shutdown,
or an error condition.
EP_HIGH_AVAIL
The Tie-breaker Scheduler for resolving contentions between twoSchedulers cannot be reached, one of the Schedulers is shutting down, or
there are other Scheduler take-over problems.
To specify what executable should run as a user-defined callback for one of the
above alarms, you must create a file named notify.$AUTOSERV in the
$AUTOUSER directory. The $AUTOSYS/install/data/notify.ACE file provides the
following example:
# Notify for certain CRITICAL ALARMS
#
# Form is: ALARM executable
# We pass in $1 = numeric code# $2 = Text Message
# Only have 1 space between the ALARM and the executable
#
# The environment is inherited from the scheduler
# The following is executed: system( <executable>
# $1 $2 & );
316 User Guide

7/16/2019 Autosys R11 User Guide
http://slidepdf.com/reader/full/autosys-r11-user-guide 317/459
User-Defined Alarm Callbacks
#
#DB_ROLLOVER $AUTOUSER/notify_db
#DB_PROBLEM $AUTOUSER/notify_db
#EP_ROLLOVER $AUTOUSER/notify_ep
#EP_SHUTDOWN $AUTOUSER/notify_ep#EP_HIGH_AVAIL $AUTOUSER/notify_ep
Notification Example
This example gives the process for instructing Unicenter AutoSys JM to
call the program /usr/local/bin/pager when the Scheduler shuts down:
1. Copy the sample notification file from $AUTOSYS/install/data/notify.ACE to
$AUTOUSER/notify.$AUTOSERV
2.
Change the EP_SHUTDOWN line in the notification file to:EP_SHUTDOWN /usr/local/bin/pager $@
When the Scheduler shuts down, Unicenter AutoSys JM passes the pager
program a numeric code and a text message. The pager itself must be
programmed to accept these parameters.
Configuring Unicenter AutoSys J M 317

7/16/2019 Autosys R11 User Guide
http://slidepdf.com/reader/full/autosys-r11-user-guide 318/459

7/16/2019 Autosys R11 User Guide
http://slidepdf.com/reader/full/autosys-r11-user-guide 319/459
Chapter 15: Dynamic Workload
PlacementThis section contains the following topics: The CA Management Database and Unicenter DSM (see page 320)Dynamic Workload Placement Scenarios (see page 321) Manage Machine Definitions with autodwp (see page 322)
Dynamic Workload Plac ement 319

7/16/2019 Autosys R11 User Guide
http://slidepdf.com/reader/full/autosys-r11-user-guide 320/459
The CA Management Database and Unicenter DSM
The CA Management Database and Unicenter DSM
Previous chapters explained how Unicenter AutoSys JM relies on real and
virtual machined definitions to perform load balancing and job queuing. In the
day-to-day production environment, you can add new machines to the
network and update software on existing machines, in such a way as to
change the environment's run-time characteristics. Dynamic workload
placement makes it possible for Unicenter AutoSys JM to use existing
Unicenter AutoSys JM machine definitions or the asset data collected by
Unicenter Desktop and Server Management (Unicenter DSM) to automatically
update Unicenter AutoSys JM machines or to dynamically generate virtual
machines.
The dynamic workload placement feature is made possible by the CA
Management Database (CA-MDB). The CA-MDB combines data from distinct
disciplines such as operations, storage, security, life cycle, and service
management, and provides the foundation necessary to manage and optimizeyour IT infrastructures. The data contained in the CA-MDB is highly visible to
all CA products and makes cross-functional interoperability between solutions
possible. Unicenter DSM offers the ability to discover and classify any device
on a network, be it mainframe, server, workstation, router, switch, and so on.
As it discovers new devices, Unicenter DSM populates the CA-MDB with
information about the asset. The information Unicenter DSM collects and
stores in the CA-MDB includes:
Host name
Hardware vendor
Operating system
Primary network address
Installed software
Software status (active, disabled)
Asset status (online, shut down)
After the asset information is stored in the CA-MDB, it becomes available for
other CA products (including Unicenter AutoSys JM) to share.
320 User Guide

7/16/2019 Autosys R11 User Guide
http://slidepdf.com/reader/full/autosys-r11-user-guide 321/459
Dynamic Workload Placement Scenarios
Dynamic Workload Placement Scenarios
The Unicenter AutoSys JM Scheduler relies on the defined attributes of real
and virtual machines to decide whether it can schedule a job to run on a given
machine. As you add more machines to a production environment, or as the
software configuration of existing machines changes, maintaining the
Unicenter AutoSys JM machine definitions can become tedious. Similarly,
maintaining virtual machine definitions to take advantage of Unicenter
AutoSys JM's load-balancing and job queuing features can also pose a
challenge. Dynamic workload placement provides a way to efficiently manage
all Unicenter AutoSys JM machine definitions.
You might have an initial list of requirements for determining whether a
machine forms part of a virtual machine definition. For example, you might
choose to include a machine in your virtual machine definition based on
Unicenter AutoSys JM machine attributes such as the fully qualified name, the
type, the max_load value, the factor value, or even its online or offline status.However, as these attribute values change, a machine that is currently part of
a virtual machine definition may no longer meet the criteria used to generate
the original list. Similarly, a machine that was not previously part of a virtual
machine can meet the requirements in the future to join the virtual machine
list. With the dynamic workload placement feature, Unicenter AutoSys JM can
keep your virtual machine definition current; refreshing it with an updated list
of machines that always meets your criteria.
Unicenter AutoSys JM benefits from integration with the CA-MDB. One such
benefit is the recognition of asset data collected by Unicenter DSM. You can
choose to expand your list of requirements for adding an existing machine to
the Unicenter AutoSys JM virtual machine list based on additional search
criteria such as the asset’s hardware vendor, operating system, installedsoftware, or hardware and software status. Unicenter AutoSys JM can also use
the expanded search criteria to automatically create Unicenter AutoSys JM
machine definitions for assets newly discovered by Unicenter DSM. In this
manner, you can use the dynamic workload feature combined with Unicenter
DSM to keep your enterprise up to date with the latest Unicenter AutoSys JM
machine definitions based on qualifying discovered assets.
Note: For more information, see the Unicenter DSM documentation.
Dynamic Workload Plac ement 321

7/16/2019 Autosys R11 User Guide
http://slidepdf.com/reader/full/autosys-r11-user-guide 322/459
Manage Machine Definitions with autodwp
Manage Machine Definitions with autodwp
The autodwp command maintains Unicenter AutoSys JM machine definitions.
With the command, you can generate or refresh a virtual machine definition
with machine names selected by the search criteria specified in a machine
conditions file. You can base the criteria in the machine conditions file on
Unicenter AutoSys JM machine attributes, asset data collected by Unicenter
DSM, or both.
To use autodwp to dynamically search and create new Unicenter AutoSys JM
machine definitions, enter the autodwp command at a command prompt with
the following parameters:
autodwp -f machine_conditions_file
To use autodwp to dynamically update only existing Unicenter AutoSys JM
machine definitions, enter the autodwp command at a command prompt with
the following parameters:
autodwp -f machine_conditions_file -u
m a c h i n e _ c o n d i t i o n s _ f i le
Defines the full path and name of the file containing the criteria for
determining which machines to include in the virtual machine. The syntax
of the search criteria in the file resembles the following:
< machine_query_type_meta-tag> (attribute operator value) [boolean_operator (attribute operator value)] ... </ machine_query_type_meta-tag> ... m a ch i n e _ q u e r y _ t y p e _ m e t a - t ag
Defines the type of search criteria. This value can be one of the
following:
MA_ATTRIB_QUERY—Defines search criteria based on Unicenter
AutoSys JM machines.
CA_ASSET_QUERY—Defines search criteria based on machines
discovered by Unicenter DSM.
a t t r i b u t e
Defines a valid machine search criteria attribute.
o p e r a t o r
Defines the operator to apply to the attribute. Valid operators are: >
(greater than), < (less than), = (equal to), != (not equal to), >=
(greater than or equal to), and <= (less than or equal to).
322 User Guide

7/16/2019 Autosys R11 User Guide
http://slidepdf.com/reader/full/autosys-r11-user-guide 323/459
Manage Machine Definitions with autodwp
v a l u e
Defines the setting to apply to the attribute.
b o o l e a n _ o p e r a t o r
Defines the operator to use to join two or more expressions. Valid
Boolean operators are: && (and) and || (or).
Note: For more information about autodwp syntax, see the Reference Guide.
Example: Define Search Criteria Based on Unicenter AutoSys JM
Machines
This example shows the autodwp machine search criteria file entries for
refreshing a virtual machine definition with real UNIX or Windows Unicenter
AutoSys JM machines that are online:
<MA_ATTRIB_QUERY>(MachineType=r || MachineType=n) && MachineStatus=o</MA_ATTRIB_QUERY>Example: Define Search Criteria Based on Machines Discovered by
Unicenter DSM
This example shows the autodwp machine search criteria file entries for
refreshing a virtual machine definition with active machines discovered by
Unicenter DSM that are running Unicenter AutoSys JM:
<CA_ASSET_QUERY>CaAssetSoftware=AutoSys && (CaAssetHardwareAlive=true && CaAssetSoftwareAlive=true) </CA_ASSET_QUERY>
Dynamic Workload Plac ement 323

7/16/2019 Autosys R11 User Guide
http://slidepdf.com/reader/full/autosys-r11-user-guide 324/459
Manage Machine Definitions with autodwp
Unicenter AutoSys JM Machine Attributes
This section lists the valid attributes for search criteria based on Unicenter
AutoSys JM machines. The listed attributes are only valid in the
MA_ATTRIB_QUERY XML-style meta-tags.
MachineName
Corresponds to the machine name in the Unicenter AutoSys JM machine
definition.
MachineQueName
Corresponds to the virtual machine name to which a machine belongs, as
defined in the Unicenter AutoSys JM machine definition.
MachineType
Corresponds to the type attribute in the Unicenter AutoSys JM machine
definition.
MachineFactor
Corresponds to the factor attribute in the Unicenter AutoSys JM machine
definition.
MachineMaxLoad
Corresponds to the max_load attribute in the Unicenter AutoSys JM
machine definition.
MachineStatus
Corresponds to the online or offline status of the machine. Valid values
are:
m for offline
o for online
Note: For more information, see the Reference Guide.
324 User Guide

7/16/2019 Autosys R11 User Guide
http://slidepdf.com/reader/full/autosys-r11-user-guide 325/459
Manage Machine Definitions with autodwp
Unicenter DSM Discovered Machine Attributes
This section lists the valid attributes for search criteria based on machines
discovered by Unicenter DSM. The listed attributes are only valid in the
CA_ASSET_QUERY XML-style meta-tags.
CaAssetHostName
Corresponds to the host name of the asset discovered by Unicenter DSM.
CaAssetSoftware
Corresponds to the name of software installed on the asset discovered by
Unicenter DSM.
CaAssetVendor
Corresponds to the vendor of the asset discovered by Unicenter DSM.
CaAssetOS
Corresponds to the operating system of the asset discovered by Unicenter
DSM.
CaAssetNetwork
Corresponds to the primary network address of the asset discovered by
Unicenter DSM.
CaAssetSoftwareAlive
Corresponds to the status of software installed on the asset discovered by
Unicenter DSM. Valid values are True and False. The search is successful
only if the software is in active state.
CaAssetHardwareAlive
Corresponds to the status of the asset discovered by Unicenter DSM. Valid
values are True and False. The search is successful only if the machine is
up and running when the value is True.
Note: For more information, see the Reference Guide.
Dynamic Workload Plac ement 325

7/16/2019 Autosys R11 User Guide
http://slidepdf.com/reader/full/autosys-r11-user-guide 326/459

7/16/2019 Autosys R11 User Guide
http://slidepdf.com/reader/full/autosys-r11-user-guide 327/459
Chapter 16: Troubleshooting This section contains the following topics: How System Components Are Affected When a Job Is Defined (see page 328)Windows Services Troubleshooting (see page 329) Event Server Troubleshooting (see page 330) Scheduler Troubleshooting (see page 332) Agent Troubleshooting (see page 339) Job Failure Troubleshooting (see page 345) Application Server Troubleshooting (see page 355)
Troubleshooting 327

7/16/2019 Autosys R11 User Guide
http://slidepdf.com/reader/full/autosys-r11-user-guide 328/459
How System Components Are Affected When a J ob Is Defined
How System Components Are Affected When a Job IsDefined
Problems with Unicenter AutoSys JM usually involve interactions between themajor components instead of the individual components themselves. This
chapter presents a number of common problems, their symptoms, and
possible solutions. It provides useful information about troubleshooting the
primary components.
To troubleshoot Unicenter AutoSys JM more effectively, you must understand
the stages in the life of a job, the order in which they occur, and the roles
played by the four major components (that is, Application Server, Scheduler,
Agent, and Event Server).
When you define a job, Unicenter AutoSys JM saves its starting conditions to
the Event Server (database), and the following occurs:
When the job's starting conditions are met, the Scheduler starts an Agent
on the Client computer to run the job.
The Agent runs the job and returns the job's exit status to the Application
Server.
The Application Server updates the Event Server.
After the job completes, it does not run again until its starting conditions
are met.
Note: Ingres is the default database for Unicenter AutoSys JM, bundled with
the CA-MDB. Ingres, Sybase and Oracle are supported in UNIX, and Ingres,
MS SQL, Oracle and Sybase are supported in Windows. Database-specific toolslike SQLPLUS (Oracle), ISQL (Sybase/MS SQL) and SQL (Ingres) are
recommended for any database-specific tasks. You must use OSQL for MS SQL
2005, because ISQL is not available; however, for the purposes of this
documentation, the group ISQL contains OSQL. XQL and ZQL have been
phased out.
328 User Guide

7/16/2019 Autosys R11 User Guide
http://slidepdf.com/reader/full/autosys-r11-user-guide 329/459
Windows Services Troubleshooting
Windows Services Troubleshooting
Valid on Windows
You can start the Application Server, Scheduler, and Agents from the
Services screen of the Unicenter AutoSys Administrator, and you can start the
Event Server (the Ingres, Microsoft SQL Server, Oracle, or Sybase service)
from the Windows Services Control Manager. You can find details as to why a
service did not start in the Windows Event Viewer in the Administrative Tools
program group.
Typically, problems with starting services using the Unicenter AutoSys
Administrator indicate that the software was not successfully installed. In such
cases, the best approach is often to remove the existing Unicenter AutoSys JM
installation and reinstall it.
Note: For more information about how to remove Unicenter AutoSys JM, see
the Windows Installation Guide. For more information about starting services
with the Administrator, see the Online Help.
To verify that the Event Server service (the database service) is started, look
at the Windows Services Control Manager.
If you are running Ingres, verify that the Ingres icon in the task bar is
completely green in color. If the icon is not green, use Ingres Visual Manager
to start all the Ingres services.
If you are running Microsoft SQL Server, verify the status of the MSSQLServer
service.
If you are running Oracle, verify the status of the following services (substitute
your Oracle SID for the asterisk): OracleService*, OracleStart*, and
OracleTNSListener.
If you are running Sybase, verify that a service with a name that starts with
SYBSQL is started. It is possible that a different name was chosen for the
service when Sybase was installed.
Troubleshooting 329

7/16/2019 Autosys R11 User Guide
http://slidepdf.com/reader/full/autosys-r11-user-guide 330/459
Event Server Troubleshooting
Event Server Troubleshooting
This section describes scenarios for troubleshooting the Event Server.
Event Server Is Down
Valid on Windows and UNIX
Symptom:
When you run the chk_auto_up command, a message similar to the following
is displayed:
Couldn't connect with Server: AUTOSYS:autosys
Solution:
Either the database server is down, or the process in question cannot access
the database server.
To confirm that the database server is down, log on to the Event Server and
look to see if the database processes are active.
If the database is running, the problem could be that Unicenter AutoSys JM is
configured to the wrong Event Server or communication between Unicenter
AutoSys JM and the Event Server is not configured correctly.
330 User Guide

7/16/2019 Autosys R11 User Guide
http://slidepdf.com/reader/full/autosys-r11-user-guide 331/459
Event Server Troubleshooting
Deadlocks
Valid on Windows and UNIX
Symptom:
A message similar to the following appears in the Scheduler log when viewed
with the autosyslog -e command or in the database server error log:
Your server command (process id #11) was deadlocked with another process and has
been chosen as deadlock victim. Re-run your command.
Solution:
A deadlock is a condition that occurs when two users have a lock on separate
objects, and they each want to acquire an additional lock on the other user's
object. The first user is waiting for the second user to release the lock, but the
second user will not release it until the lock on the first user's object is freed.
The database server detects the situation and chooses the user whose process
has accumulated the least amount of CPU time. The database server rolls back
that user's transaction, notifies the application with the indicated error
message, and lets the other user's processes continue.
The Application Server tries to rerun the command until it is successful or until
it has exceeded the maximum number of retries.
Not Enough User Connections
Valid on Windows and UNIX
Symptom:
Unicenter AutoSys JM processes cannot make connections to the database;
they cannot start the Unicenter WCC GUI or send events.
Solution:
Verify the maximum number of user connections your system can support. If
the current number of connections does not exceed the capacity of your
environment, you can increase the number of user connections.
Note: For more information about increasing the maximum number of user
connections, contact your database administrator or see the database
documentation.
Troubleshooting 331

7/16/2019 Autosys R11 User Guide
http://slidepdf.com/reader/full/autosys-r11-user-guide 332/459
Scheduler Troubleshooting
Scheduler Troubleshooting
This topic describes Scheduler troubleshooting.
Output from the Scheduler is redirected to the following log file:
%AUTOUSER%\out\event_demon.%AUTOSERV%
$AUTOUSER/out/event_demon.$AUTOSERV
To view this file, issue the autosyslog -e command. This command displays the
Scheduler log file and shows each job-related event as it occurs. To terminate
this reporting, press Ctrl+C.
The Scheduler log records every Scheduler action in the order it wasperformed. Network problems are usually reflected in this file. This file is very
useful for reconstructing what happened when a problem occurs.
332 User Guide

7/16/2019 Autosys R11 User Guide
http://slidepdf.com/reader/full/autosys-r11-user-guide 333/459
Scheduler Troubleshooting
Scheduler Is Down
Valid on Windows and UNIX
Symptom:
Jobs do not start.
When you run the chk_auto_up command, it returns a message similar to
the following (assuming your Scheduler was installed on the machine
EPhost):
Checking machine: EPhostNo Scheduler is running on machine: EPhost.
The Scheduler log has not registered a date and time stamp for a while.
The Scheduler log should register date and time stamps each minute.
Solution:
Do one of the following to confirm that the Scheduler is down: Run the chk_auto_up command. Run the autosyslog -e command to display the Scheduler log, and check
for date and time stamps.
Open the Services screen of the Unicenter AutoSys Administrator,
select the Scheduler from the Service list, and check the Status icon.
If the Scheduler is down, use the Unicenter AutoSys Administrator to
restart it. To do so, select the Scheduler from the Service list and click
Start Service. The Status field should change to Running, and the icon
should turn green.
Note: For information about the Unicenter AutoSys JM Administrator, see
the Online Help.
Check for running Unicenter AutoSys JM Scheduler processes.
If the Scheduler is down, run the eventor command to start it.
Troubleshooting 333

7/16/2019 Autosys R11 User Guide
http://slidepdf.com/reader/full/autosys-r11-user-guide 334/459
Scheduler Troubleshooting
Scheduler Will Not Start
Valid on Windows
Symptom:
The autosyslog -e command displays messages indicating that it cannot
connect to the database.
Solution:
The database is down or there are problems with the database. To correct this,
verify that the database is running and that you can connect to it. After you
have done this and the database is accessible, the Scheduler should be able to
connect.
Symptom: The autosyslog -e command displays messages indicating that the
Scheduler log file does not exist, or that no entries were made when the
Scheduler service was started.
The Scheduler service does not remain running or never starts.
Solution:
Check for a file named event_demon.%AUTOSERV% in the directory specified
in the Enterprise-Wide Logging Directory field on the Scheduler screen of the
Unicenter AutoSys Administrator (by default, this directory is
%AUTOUSER%\out).
If the file exists, enter the following command at a command prompt to viewit:
type %AUTOUSER%\out\EVENT_DEMON.%AUTOSERV% | more
Correct the problems identified at the end of this file, and restart the
Scheduler.
Note: The Scheduler appends this file each time it starts.
334 User Guide
7/16/2019 Autosys R11 User Guide
http://slidepdf.com/reader/full/autosys-r11-user-guide 335/459
Scheduler Troubleshooting
Symptom:
The Scheduler does not remain running and does not write log output to the
%AUTOUSER%\out\event_demon.%AUTOSERV% file.
Solution:
This symptom could have various causes; and the resolution depends on which
of the following messages is displayed in the Windows event log. The Event
Log Viewer is located in the Administrative Tools program group.
The log file %AUTOUSER%\out\event_demon.%AUTOSERV% is
missing!
The Scheduler must have been started on the computer at least once or
this message appears. If the Scheduler has been started, make sure that
permissions are set on the log file that enables a system program to read
and write to it.
Incorrect options have been set to event_demon. It must not havebeen set properly.
This occurs if you have modified the Windows Registry so that the -A
option is not used when starting the Scheduler service. To fix this problem
with the Windows Registry settings, you must uninstall Unicenter AutoSys
JM, and reinstall it.
The environment variable AUTOSYS is not set.
The %AUTOSYS% system environment variable is not available to the
Scheduler. In the Windows Control Panel, click the System icon and make
sure the %AUTOSYS% environment variable is set properly in the System
Environment Variables region. You can also check the setting of this
variable on the System screen of the Unicenter AutoSys Administrator.
The environment variable AUTOSYS is too long.
The %AUTOSYS% environment variable value is set to a path that is more
than 80 characters in length. Uninstall Unicenter AutoSys JM, and reinstall
it to a directory path that is fewer than 80 characters in length.
chk_auto_up process is missing. Scheduler not operational. Call Tech
support.
The Scheduler runs the chk_auto_up command upon initialization, and
that process has terminated without properly notifying the Scheduler. This
indicates a serious problem with your local system account. Try setting the
Scheduler to log on as the administrator. If this is successful, you can run
the Scheduler. However, we recommend that you consider uninstalling andreinstalling Unicenter AutoSys JM.
Troubleshooting 335

7/16/2019 Autosys R11 User Guide
http://slidepdf.com/reader/full/autosys-r11-user-guide 336/459
Scheduler Troubleshooting
chk_auto_up times out while waiting for response from Application
Server
Verify whether the Application Server is running by viewing the Services
screen of the Unicenter AutoSys Administrator. On the screen, select the
Application Server from the Service list, and check the Status icon.
chk_auto_up is taking a while to complete...
The Scheduler runs the chk_auto_up command upon initialization, and it is
taking more than five minutes to complete. This might occur on large or
slow networks where the chk_auto_up command must query every
machine in the Authorized Scheduler Host Names list (located on the
Agent screen of the Unicenter AutoSys Administrator). To test for this
problem, run the chk_auto_up command at an instance command prompt,
and check how long it takes to complete. This message is only a warning,
and the Scheduler waits for the command to complete before starting.
Wait for chk_auto_up process failed. Windows Error Code
The Scheduler launches the chk_auto_up command upon initialization, and
it terminated prematurely with a Windows error code. Verify that
chk_auto_up.exe is located in the %AUTOSYS%\bin directory and has the
proper permissions for system programs to execute.
The Unicenter AutoSys JM environment has not been installed
correctly.
The Scheduler runs the chk_auto_up command upon initialization, and it
has reported that the setup is incorrect. Uninstall and reinstall Unicenter
AutoSys JM.
A Scheduler is already running. We will not start another one.
When the Scheduler was started, it detected another Scheduler runningwith the same instance ID. Only one Scheduler can run in an instance.
Either stop the other Scheduler, or do not attempt to start this Scheduler.
Scheduler cannot open its log file event_demon.%AUTOSERV%. Some
directory in the path is not accessible to the SYSTEM.
The Scheduler could not create the normal log file named in the message.
Make sure that the log file has permissions that enable a system program
to read and write it. Also verify that the disk drive has not run out of
space.
336 User Guide

7/16/2019 Autosys R11 User Guide
http://slidepdf.com/reader/full/autosys-r11-user-guide 337/459
Scheduler Troubleshooting
Could not rename the LARGE Scheduler file:
event_demon.%AUTOSERV% to backup archive file:
event_demon.%AUTOSERV%.d a t e . Fix file and directory permissions
so accessible by SYSTEM, or remove the files.
When the Scheduler starts, it checks the size of the
event_demon.%AUTOSERV% log file. If this file is larger than 256 KB, the
Scheduler tries to rename it to event_demon.%AUTOSERV%.date and
create a new event_demon.%AUTOSERV% log file. If the Scheduler cannot
do this, verify that event_demon.%AUTOSERV% has permissions that
enable a system program to read and write it. Also, verify that the disk
drive has not run out of space.
Scheduler Will Not Start
Valid on UNIX
Symptom:
The autosyslog -e command displays messages indicating that it cannot
connect to the database.
Solution:
The database is down or there are problems with the database. To correct this,
verify that the database is running and that you can connect to it. After you
have done this and the database is accessible, the Scheduler should be able to
connect.
Symptom:
The autosyslog -e command displays messages indicating that the
Scheduler log file does not exist, or that no entries were made when the
Scheduler service was started.
The Scheduler service does not remain running or never starts.
Solution:
Check for a file named event_demon.$AUTOSERV in the enterprise-wide
logging directory (by default, this directory is $AUTOUSER/out).
If the file exists, enter the following command at a command prompt to view
it:
type $AUTOUSER/out/event_demon.$AUTOSERV | more
Correct the problems identified at the end of this file, and restart the
Scheduler.
Note: The Scheduler appends this file each time it starts.
Troubleshooting 337

7/16/2019 Autosys R11 User Guide
http://slidepdf.com/reader/full/autosys-r11-user-guide 338/459
Scheduler Troubleshooting
Symptom:
The Scheduler does not remain running and does not write log output to the
$AUTOUSER/out/event_demon.$AUTOSERV file.
Solution:
This symptom could have various causes and the resolution depends on which
of the following messages occurs.
The log file $AUTOUSER/out/event_demon.$AUTOSERV is missing!
The Scheduler must have been started on the computer at least once or
this message appears. If the Scheduler has been started, make sure that
permissions are set on the log file that enables a system program to read
and write to it.
The environment variable AUTOSYS is not set.
The $AUTOSYS environment variable is not available to the Scheduler.
Make sure Unicenter AutoSys JM source file has been sourced in yoursession.
The Unicenter AutoSys JM environment has not been installed
correctly.
The Scheduler runs the chk_auto_up command upon initialization and it
has reported that the setup is incorrect. Make sure Unicenter AutoSys JM
source file has been sourced in your session.
A Scheduler is already running. We will not start another one.
When the Scheduler was started, it detected another Scheduler running
with the same instance ID. Only one Scheduler can run in an instance.
Either stop the other Scheduler, or do not attempt to start this Scheduler.
Scheduler cannot open its log file event_demon.$AUTOSERV. Some
directory in the path is not accessible to the SYSTEM.
The Scheduler could not create the normal log file named in the message.
Make sure that the log file has permissions that enable a system program
to read and write to it. Also verify that the disk drive has not run out of
space.
Could not rename the LARGE Scheduler file: event_demon.$AUTOSERV
to backup archive file: event_demon.$AUTOSERV.d a t e . Fix file and
directory permissions so accessible by SYSTEM, or remove the files.
When the Scheduler starts it checks the size of the
event_demon.$AUTOSERV log file. If this file is larger than 256 KB, theScheduler tries to rename it to event_demon.$AUTOSERV.date and create
a new event_demon.$AUTOSERV log file. If the Scheduler cannot to do
this, verify that event_demon.$AUTOSERV has permissions that enable a
system program to read and write it. Also, verify that the disk drive has
not run out of space.
338 User Guide

7/16/2019 Autosys R11 User Guide
http://slidepdf.com/reader/full/autosys-r11-user-guide 339/459
Agent Troubleshooting
Agent Troubleshooting
If you suspect there are problems with the Agent, you can use the autoping
command to verify them.
The autoping command tests the connections between the Scheduler and
Agent, and between the Application Server and the Agent. If you issue the
following command and it does not return an error, the Agent should start
properly:
autoping -m machine
m a ch i n e
Defines the name of the client computer to verify.
This computer must be a real machine that is accessible through
TCP/IP on the computer from which you issue the command.
This computer must be a real machine that is listed in the /etc/hosts
file on the computer from which you issue the command.
If you enter ALL instead of a machine name for the -m parameter, the
autoping command verifies the Application Server database connection for
all computers.
The Application Server writes RUNNING and completion statuses to the Event
Server when the Agent confirms these statuses to the Application Server.
You can use the autoping command to verify the Application Server databaseconnection on request of the Agent. To determine the database connections on
a computer, enter the following command:
autoping -m machine -D
The autoping command captures the output from the attempted database
connection and displays it.
If you use the -A parameter with the autoping command, it generates an
alarm containing the output from the attempted database connection, if
problems occur.
Troubleshooting 339

7/16/2019 Autosys R11 User Guide
http://slidepdf.com/reader/full/autosys-r11-user-guide 340/459
Agent Troubleshooting
Example: Verify a Database Connection
This example uses the autoping command to verify a database connection with
the machine venice, and displays the output from the command:
autoping -m venice -DAutoPinging Machine [venice] AND checking theAgent's DB Access.AutoPing WAS SUCCESSFUL!
Agent Not Responding
Valid on Windows
Symptom:
The autosyslog -e command displays a message that resembles the following:
Read stream socket failed
CAUAJM_E_40157 System Restart Job (Jobxxx) was unable to start
CAUAJM_I_40253 Machine is not responding. Taking Offline.
Solution:
To verify that the Agent service is started
1. Open the Unicenter AutoSys JM Administrator from the program group and
select Instance from the AutoSys menu.
2. (Optional) Enter the name of the computer on which the Agent is installedin the Computer field, and click Connect.
Note: By default, the Computer field contains the name of the computer
you are logged on to, but you can connect to a remote computer to
administer the instance information by specifying the appropriate
computer name.
Unicenter AutoSys JM connects to the specified computer.
3. Select the instance with which the Agent is associated from the AutoSys
Instance list, and click OK.
4. Select Services from the AutoSys menu.
5. Select the CA Unicenter AutoSys JM Agent service from the Service list.The Unicenter AutoSys Services screen refreshes to indicate the status of
the Agent. If the Agent is not running, Start Service is enabled. If the
Agent is running, Stop Service is enabled and Start Service is disabled.
6. Click Start Service.
The Agent service starts.
340 User Guide

7/16/2019 Autosys R11 User Guide
http://slidepdf.com/reader/full/autosys-r11-user-guide 341/459
Agent Troubleshooting
Agent Not Responding
Valid on UNIX
Symptom:
The autosyslog -e command displays a message that resembles the following:
Read stream socket failed
CAUAJM_E_40157 System Restart Job (Jobxxx) was unable to start
CAUAJM_I_40253 Machine is not responding. Taking Offline.
Solution:
To verify that the Agent service is started
1. Run the following command to check the status of the Agent:
unisrvcntr status uajm_agent
The Agent's current status is displayed.
2. If the Agent is not running, run the following command to start it:
unisrvcntr start uajm_agent
The Agent starts.
Note: For more information, see the UNIX Installation Guide.
Troubleshooting 341

7/16/2019 Autosys R11 User Guide
http://slidepdf.com/reader/full/autosys-r11-user-guide 342/459
Agent Troubleshooting
Agent Starts, Command Runs: No RUNNING Event Is Sent
Valid on Windows and UNIX
Symptom:
Job does not advance from STARTING state.
The Scheduler window (or log) or the results of running the autorep
command on the job contain the following event with nothing after it, but
the job runs to completion on the client computer:
CHANGE_STATUS Status: STARTING Job: test_install
Solution:
This is a common problem and is nearly always the result of the Agent being
unable to contact the Application Server.
First, make sure network problems are not preventing communication betweenthe Agent and the Application Server computers. If this is not the problem, use
the following database-specific solutions to confirm whether the Application
Server can contact the Event Server:
For Microsoft SQL Server and Sybase databases, the usual cause of this
connection problem is that the database settings on the Application Server
are different from those used by the Unicenter AutoSys JM Scheduler.
For Oracle databases, this problem usually occurs because the SQL*Net V2
connections are not set up properly.
For Sybase databases, this problem usually occurs because the interfaces
file is not set up properly on the computer running the Agent.
The Agent must be able to contact the Application Server, and the ApplicationServer must be able to connect to the database to send the RUNNING,
SUCCESS, FAILURE, or TERMINATED status events.
To verify the problem, issue the following command at an instance command
prompt on the machine where the job should have run to view the job log:
autosyslog -J job_name
j o b _ n am e
Defines the name of the job.
In the log, check the AutoRemoteDir\auto_rem* file value for the job.
The AutoRemoteDir value is the Local Agent Logging Directory value, specified
in the Unicenter AutoSys Agent screen in the Administrator.
If the Agent cannot send the event back to the Application Server, it writes a
message to that effect, and runs some diagnostics. The output from the
autosyslog command could provide a helpful DBMS error number from the
connect attempt.
342 User Guide
7/16/2019 Autosys R11 User Guide
http://slidepdf.com/reader/full/autosys-r11-user-guide 343/459
Agent Troubleshooting
To verify that all the database settings are correct, check the settings on
the Event Server screen of the Unicenter AutoSys Administrator for both the
Application Server and the Scheduler computers. Verify that the Application
Server's Event Server name, database, and port number settings are the sameas the settings on the Scheduler computer.
To verify that all the database settings are correct, check the settings in
the $AUTOUSER/config.$AUTOSERV configuration file for both the Application
Server and the Scheduler computers. Verify that the Application Server's Event
Server name, database, and port number settings are the same as the
settings on the Scheduler computer.
You should also make sure that the database settings (as verified by
Ingres, Microsoft SQL Server, Oracle, or Sybase) are the same as the settings
on the Event Server screen of the Unicenter AutoSys Administrator.
For Microsoft SQL Server databases, use the SQL Enterprise Manager to
check the Microsoft SQL Server database settings. Also make sure that
one of the following is true:
– Unicenter AutoSys JM Application Server computers are on the same
Windows domain.
– User accounts have been added on the database computers for all
users.
If you do not configure your Microsoft SQL Servers in one of these ways,
your jobs go into STARTING state and seem to remain in this condition.
This behavior results from the fact that the Agent cannot write the status
back to the Microsoft SQL Server databases because the job owner doesnot have proper permissions on that database server.
For Oracle databases, check for the following:
– Confirm that the Oracle TNS names file TNSNAMES.ORA exists, is
readable, and contains the correct information for the Event Server. By
default, the TNS names file is in the following location:
\ORANT\NETWORK\ADMIN\TNSNAMES.ORA
– Confirm that the Oracle TNS names file has an SQL*Net V2-formatted
entry for the Event Server.
For Sybase databases, make sure that the Sybase SQL.INI file exists, then
make sure that the settings are the same as the settings UnicenterAutoSys JM is using. This file is located in the %SYBASE%\INI directory.
Note: For more information, see the Online Help.
Troubleshooting 343

7/16/2019 Autosys R11 User Guide
http://slidepdf.com/reader/full/autosys-r11-user-guide 344/459
Agent Troubleshooting
Check the database settings against the settings in the
$AUTOUSER/config.$AUTOSERV configuration file.
For Oracle databases, check the following:Confirm that the Oracle TNS names file, TNSNAMES.ORA, exists, is
readable, and contains the correct information for the Event Server. By
default, the TNS names file is in the following location:
/ORANT\NETWORK/ADMIN/TNSNAMES.ORA
Confirm that the Oracle TNS names file has a SQL*Net V2 formatted entry
for the Event Server.
For Sybase databases, first make sure that the Sybase interfaces file
exists, then make sure that the settings are the same as the settings
Unicenter AutoSys JM is using. This file is located in the $SYBASE
directory.
To test that communication from the Application Server to the Event Server is
set up properly, try to log on to the Event Server from the Application Server
computer, using database-specific utilities like SQL (for Ingres), ISQL/w (for
Microsoft SQL Server), SQLPLUS (for Oracle), or ISQL (for Sybase). When you
log on to the Event Server, use the autosys user name and password.
When testing Oracle using SQLPLUS, be sure that your user
environment is accessing the same tnsnames.ora file as the auto_remote
(Agent). Set TNS_ADMIN to the same value that is in /etc/auto.profile.
Note: auto_remote only attempts to read the tnsnames.ora file once. After a
bad tnsnames.ora file is read, correcting it does not automatically cause a
running auto_remote to connect. After you correct the tnsnames.ora file, you
must terminate auto_remote and restart the job.
For Oracle, try to log onto the Event Server from the remote computer using
SQLPLUS with a V2 connect descriptor similar to the following:
sqlplus autosys/autosys@AUTOSYSDB
Note: For more information about testing the database setup, contact your
database administrator or see the database documentation.
344 User Guide

7/16/2019 Autosys R11 User Guide
http://slidepdf.com/reader/full/autosys-r11-user-guide 345/459
J ob Failure Troubleshooting
Job Failure Troubleshooting
This section describes job failure troubleshooting.
Agent Will Start: Command Will Not Run
Valid on Windows and UNIX
The Agent creates the following log file each time it starts on a computer:
AutoRemoteDir\auto_rem.pid
A u t o R em o t e D i r
Defines the Local Agent logging directory specified during
installation or in the Agent screen of the Unicenter AutoSys Administrator.By default, this directory is C:\%AUTOROOT%\agent\out.
Defines the local Agent logging directory specified during
installation. By default, this directory is
/opt/CA/UnicenterAutoSysJM/agent/out.
a u t o _ r e m .p i d
Defines the process ID of the Agent. After the Agent receives its
instructions from the Scheduler, it renames this file as follows to give it a
unique name:
AutoRemoteDir\auto_rem.joid .run_num.ntry
j o i d
Defines the unique job object ID associated with the job.
r u n _ n u m
Defines the job's run number.
n t r y
Defines the number of tries or restarts.
This file contains all the instructions passed to the Agent by the Scheduler, the
results of any resource checks, and a record of all actions taken. Any problems
experienced by the Agent are reported here, including the inability to sendevents to the databases, which is the most common problem.
Troubleshooting 345

7/16/2019 Autosys R11 User Guide
http://slidepdf.com/reader/full/autosys-r11-user-guide 346/459
J ob Failure Troubleshooting
To find the most recent instance of the Agent Log for a given job, issue the
following command on the computer where the job last ran:
autosyslog -J job_name
j o b _ n am e
Defines the name of the job.
Note: The Clean Temporary Files check box on the Scheduler screen of
the Unicenter AutoSys Administrator specifies whether Agent log files should
be cleaned up at the completion of a job. If this setting is selected (the
default), the file is removed when a job completes normally. If the job fails,
the log file is not deleted regardless of the setting. To turn off automatic
deletion of the Agent log files, clear the Clean Temporary Files check box on
the Unicenter AutoSys Scheduler screen.
Note: The CleanTmpFiles parameter in the
$AUTOUSER/config.$AUTOSERV configuration file specifies whether the Agent
log files are to be cleaned up at the completion of a job. If this parameter is
set to 1 (on, which is the default setting), the file is removed when a job
completes normally. If the job fails the log file is not deleted, regardless of the
setting. To turn off automatic deletion of the Agent log files, set the parameter
CleanTmpFiles=0.
346 User Guide

7/16/2019 Autosys R11 User Guide
http://slidepdf.com/reader/full/autosys-r11-user-guide 347/459
J ob Failure Troubleshooting
Symptom:
The Scheduler log as viewed with the autosyslog -e command displays a
message resembling the following:
Agent remote authentication! Error:<Remote Authentication has FAILED for
User: USER@HOST on machine:RAHOST.>
The Agent log as viewed with the autorep -J job_name command might also
display a message resembling the following:
Remote Authentication has FAILED for User:USER@HOST on machine:RAHOST.
Message: Couldn't find valid entry in security key.
Solution:
The job is trying to run on a host that is different from the host or domain on
which it was defined, and security (Agent user authentication) has denied
access for the host or domain on which the job was defined. In this case, the job was defined on the HOST host, and is trying to run on the RAHOST host.
For this example, you can resolve the problem in one of the following ways:
Log on to the RAHOST machine as the EDIT Superuser and add a Trusted
Host entry for HOST to the Trusted Hosts list.
Log on to the RAHOST machine as USER and add a Trusted User entry for
the USER@HOST user to the Trusted Users list.
Note: On Windows, you can add a trusted host and a trusted user in the
Security screen of the Unicenter AutoSys Administrator.
Troubleshooting 347

7/16/2019 Autosys R11 User Guide
http://slidepdf.com/reader/full/autosys-r11-user-guide 348/459
J ob Failure Troubleshooting
Symptom:
The Scheduler log as viewed with the autosyslog -e command displays a
message that resembles one of the following:
Owner UserId/Password error! ERROR: The password specified forUSER@HOSR_OR_DOMAIN is invalid! Run "autosys_secure" to enter the correct
password.
or
Owner UserId/Password error! ERROR: No valid password was found for USER@HOST or
USER@DOMAIN. Cannot run job for user USER! Run "autosys_secure" to enter the user
password.
The Agent log as viewed with the autorep -J job_name command might also
display a message that resembles one of the following:
The password specified for USER@DOMAIN is invalid! Run "autosys_secure" to enter
the correct password.
or
No valid password was found for USER@HOST or USER@DOMAIN. Cannot run job for user
USER! Run "autosys_secure" to enter the user password.
Solution:
The password for user @host_or_domain does not exist or is invalid. To fix this
problem, run the autosys_secure command to enter or change the user ID and
password.
Note: For more information, see the Reference Guide.
348 User Guide

7/16/2019 Autosys R11 User Guide
http://slidepdf.com/reader/full/autosys-r11-user-guide 349/459
J ob Failure Troubleshooting
Symptom:
The Scheduler log as viewed with the autosyslog -e command indicates that
the job immediately returned a FAILURE status.
Solution:
To verify what is wrong, run the autosyslog -e command on the Scheduler
machine and the autorep -J job_name command on the machine where the
job should have run, and review the resultant error messages.
For example, if the job's standard output file was read-only, a message
indicating this would appear in the Scheduler log.
You should also verify the following items:
Make sure the default profile or the job's specified user-defined profile
defines the appropriate job environment. In particular, make sure that the
path variable, if defined in a job profile, is correct. You should always
include the following in any job profile that defines a path variable to helpensure that all system path directories are accessible:
%PATH%
$PATH
Make sure the file system where the job command resides is accessible
from the machine where the job should have run.
Make sure the system permissions are correct for the job command to run.
Make sure the permissions are correct on any standard input and output
files specified for redirection.
Note: A valuable debugging technique is to specify a file to use for standard
output and standard error for a job that is having run problems. If there are
any command problems, most error messages are in that file.
Troubleshooting 349

7/16/2019 Autosys R11 User Guide
http://slidepdf.com/reader/full/autosys-r11-user-guide 350/459
J ob Failure Troubleshooting
Symptom:
When a job starts, the Scheduler log as viewed with the autosyslog -e
command displays a message that resembles the following:
Read Stream Socket Failed
Solution:
This error has the following possible causes:
An invalid path statement
Performance problems with the network or machine
Network problems
Usually, an invalid path statement for the directory causes a read-stream
socket failure. From the System dialog in the Windows Control Panel, select
the Environment tab and verify that all the directories in the System Variables
list for the path are valid on the hard drive.
Also, check for invalid characters and syntax in the path statement. A
semicolon (;), which separates individual directories, is often entered
incorrectly. Check for two semicolons in a row or for a trailing semicolon at the
end of the path. A network drive before the directory is also considered an
invalid character in the path. The directory must precede any network drives.
Correct any path problems and restart the computer. You must restart the
computer after making changes to the path.
Occasionally, performance problems on the network or computer might cause
the read-stream socket failure. The network might be down or slow due to
high traffic volume. The computer might be underpowered, or you are trying
to do too much on it at one time.
350 User Guide

7/16/2019 Autosys R11 User Guide
http://slidepdf.com/reader/full/autosys-r11-user-guide 351/459
J ob Failure Troubleshooting
Agent Not Found
Valid on UNIX
Symptom:
When trying to start a job or trying to start the Scheduler with a Shadow
Scheduler, the following message appears in the Scheduler log when viewed
with the autosyslog -e command:
Unknown Host Machine
Solution:
This message might occur in the following situations:
1. There is a network problem and the Scheduler cannot connect to the Agent
computer.
2. The Agent computer is not in /etc/hosts or DNS.
3. The Unicenter AutoSys JM configuration file lists the computer; however,
there is a space after the computer name. Check /etc/hosts or DNS for the
computer name, and correct it if necessary.
Check the configuration file, $AUTOUSER/config.$AUTOSERV ($AUTOSERV is
the name of the Unicenter AutoSys JM instance). A space after the computer
name is hard to see. Use an editor, such as vi (with the :set list option), to
edit the configuration file and remove anything after the name of the computer
and before the $ that marks the end of the line.
Troubleshooting 351

7/16/2019 Autosys R11 User Guide
http://slidepdf.com/reader/full/autosys-r11-user-guide 352/459
J ob Failure Troubleshooting
Jobs Run Only From the Command Line
Valid on UNIX
Symptom:
Jobs run from the command line, but they fail when run.
Solution:
This problem is nearly always in the shell environment where the job runs. The
following are the possible reasons for the problem:
The profile in the job definition is not a Bourne shell (sh) type profile. If
this is the case, the profile fails.
The default profile does not produce the proper environment for the job to
run. The default profile for all jobs is /etc/auto.profile, not the job owner'slogon profile $HOME/.profile. If the job owner's profile is not specified in
the job definition, it is never sourced.
To verify the difference between the job definition and the user
environment
1. Write the current owner's environment to a file. To do so, log in as the
owner of the job on the computer where the job runs and enter the
following command:
env >user.env
2. Write the Agent environment to a file by entering the following jil
command:
insert_job: auto_envmachine: client_hostnameowner: ownercommand: envstd_out_file: /tmp/auto.envstd_err_file: /tmp/auto.errc l i e n t _ h o s t n a m e
Defines the host name of the computer where the problem job runs.
o w n e r
Defines the owner of the job that will not run.
352 User Guide

7/16/2019 Autosys R11 User Guide
http://slidepdf.com/reader/full/autosys-r11-user-guide 353/459
J ob Failure Troubleshooting
3. Enter the following command to run the troubleshooting job:
sendevent -E STARTJOB -J auto_env
4. Enter the following command to check the two files for differences:
diff /tmp/auto.env user.env
The diff command shows you where the environment and the user
environment files differ. Make the necessary changes in the job definition
and the user profile.
It is also useful to define the std_err_file for the job that fails, because you
can check the errors from the shell for a clue about what is missing.
Note: No spaces are allowed between the >> characters and the full path or
file name in the std_out_file or std_err_file fields in a job definition.
Troubleshooting 353

7/16/2019 Autosys R11 User Guide
http://slidepdf.com/reader/full/autosys-r11-user-guide 354/459
J ob Failure Troubleshooting
Jobs Run Twice
Valid on UNIX
Symptom:
Failed to connect to socket errors occur during a job run and the job runs
more than once.
Solution:
The scenario has the following sequence of events:
1. The server opens a connection to the Client to run the job.
2. The Agent on the Client starts the job, and then tries to respond to the
server.
3. The server issues a failed to connect to socket error because the Agent
took longer than 30 seconds (the time-out value) to start the job and
respond.
4. The server checks whether the job can be restarted, and (if possible)
restarts the job. Meanwhile, the job is running and perhaps completed on
the Client.
5. The server opens another connection to the Client to run the job a second
time.
6. The Agent starts the job and responds to the server in time.
7. The job runs again.
The main reason for this scenario occurring is severe performance problems on
the Client. For example, the following might affect performance:
Running a full system backup on the Client at the same time as jobs are
starting might slow the system down and cause the timeout because it
cannot respond to the server.
Network problems. If a job's home directory is on an NFS drive and there
are bandwidth problems, the job might take so long to start that the
socket times out.
354 User Guide

7/16/2019 Autosys R11 User Guide
http://slidepdf.com/reader/full/autosys-r11-user-guide 355/459
Application Server Troubleshooting
Because socket time-out is not a customizable parameter, there is little you
can do to avoid this situation from a Unicenter AutoSys JM perspective.
However, you can analyze the performance of the Client by asking these
questions:
Are there too many processes running on the Client when you run jobs?
Are you having network problems?
Are you using NFS-mounted directories?
Do you need more memory or processors on the Client?
Application Server Troubleshooting
Valid on Windows and UNIX
This topic describes Application Server troubleshooting.Output from the Application Server is re-directed to the following log file:
%AUTOUSER%\out\as_server.%AUTOSERV%
$AUTOUSER/out/as_server.$AUTOSERV
At the instance command prompt enter the autosyslog -s command.
The Application Server log file appears. This file displays error messages
as they occur.
Press Ctrl+C.
Terminates error reporting.
You can view the details related to error messages in the Application Server
log records.
You can enable run-time traces to view incoming Client requests in the order
they were received by the Application Server and use them for troubleshooting
communications with the Unicenter AutoSys JM Client or an application using
the SDK.
Troubleshooting 355

7/16/2019 Autosys R11 User Guide
http://slidepdf.com/reader/full/autosys-r11-user-guide 356/459
Application Server Troubleshooting
Application Server is Down
Valid on Windows and UNIX
Symptom:
Unicenter AutoSys JM Client utilities on the local machine time out.
When you run the chk_auto_up command, it returns a message similar to
the following:
CAUAJM_E_50033 Error initializing tx subsystem: CAUAJM_E_10527 Timed out
waiting for response from the Unicenter AutoSys JM Application Server.
CAUAJM_E_10062 Failed to get initial configuration Unicenter AutoSys JM
Application Server: [<application server machine>:9,000]
Application Server log has registered an error message since it was
started.
Solution:
Do one of the following to confirm that the Application Server is down:
Run the chk_auto_up command.
Run the autosyslog -s command to view the Application Server log, and
check for date and time stamps of the last run as well as any other error
messages.
To test that communication from the Application Server to the Event
Server is set up properly, log on to the Event Server from the computer
where Application Server is available, by using the following:
– For Ingres, use the sql utility.
– For Microsoft SQL Server, use the ISQL/w graphical query interface.
– For Oracle, use the SQL*Plus command language interface.
– For Sybase, use the isql utility.
Use the Unicenter AutoSys JM user name and password to log on to the
Event Server.
You can also check the status of the Application Server in the Windows
Service Control Manager.
To check the status of the Application Server, use the Services screen of the
Unicenter AutoSys JM Administrator. Select the Application Server from theService list. Use the Status icon to check the status of the Application Server.
356 User Guide

7/16/2019 Autosys R11 User Guide
http://slidepdf.com/reader/full/autosys-r11-user-guide 357/459
Application Server Troubleshooting
If the Application Server is down, use the Services screen of the Unicenter
AutoSys Administrator to restart it. Select the Application Server from the
Service list, and click Start Service. The Status field changes to running, and
the Application Server icon turns Green.
Note: For information about the Unicenter AutoSys JM Administrator, see the
Online Help.
Symptom:
Unicenter AutoSys JM Client utilities on the local machine time out.
When you run the chk_auto_up command, it returns a message similar to
the following:
CAUAJM_E_50033 Error initializing tx subsystem: CAUAJM_E_10527 Timed out
waiting for response from the Unicenter AutoSys JM Application Server.
CAUAJM_E_10062 Failed to get initial configuration Unicenter AutoSys JMApplication Server: [<application server machine>:9,000]
The Application Server log has registered an error message since it was
started.
Solution:
Do one of the following to confirm that the Application Server is down: Run the chk_auto_up command. Run the following command:
unisrvcntr status uajm_server.$AUTOSERV
Run the autosyslog -s command to view the Application Server log, and
check for date and time stamps of the last run as well as any other error
messages.
To test that communication from the Application Server to the Event
Server is set up properly, log on to the Event Server from the computer
where Application Server is available, by using the following:
– For Ingres, use the sql utility.
– For Oracle, use the SQL*Plus command language interface.
– For Sybase, use the isql utility.
Use the Unicenter AutoSys JM user name and password to log on to the
Event Server.
Check for running as_server processes for the given $AUTOSERV using the
ps command.
Troubleshooting 357

7/16/2019 Autosys R11 User Guide
http://slidepdf.com/reader/full/autosys-r11-user-guide 358/459
Application Server Troubleshooting
If the Application Server is down, run the following command to start it:
unisrvcntr start uajm_server.$AUTOSERV
Note: For more information, see UNIX Installation Guide.
Application Server Will Not Start
Valid on Windows and UNIX
Symptom:
The autosyslog -s command displays messages indicating that it cannot
connect to the database.
Solution:
To confirm that the Application Server is down, log on to the Event Server
computer and run the chk_auto_up utility. If the database is running, there is
a possibility that Unicenter AutoSys JM is configured to the wrong Application
Server or communication between Unicenter AutoSys JM and the Application
Server is failing.
To test that communication from the Application Server to the Event Server is
set up properly, try to log on to the Event Server from the Application Server
computer, by using the following:
For Ingres, use the sql utility.
For Microsoft SQL Server, use the ISQL/w graphical query interface.
For Oracle, use the SQL*Plus command language interface.
For Sybase, use the isql utility.
Use the Unicenter AutoSys JM user name and password to log on to the Event
Server.
358 User Guide

7/16/2019 Autosys R11 User Guide
http://slidepdf.com/reader/full/autosys-r11-user-guide 359/459
Application Server Troubleshooting
Symptom:
The Application Server does not remain running and does not write log output
to the %AUTOUSER%\out\as_server.%AUTOSERV% file.
Solution:
Check the Windows event log message viewer, located in the Administrative
Tools program group, to verify the cause of the problem. Take the appropriate
solution based on the problem in the event log.
Incorrect options have been set to Application Server. It must not
have been set properly.
This occurs if you have modified the Windows Registry so that the -A
option is not used when starting the Application Server service. To fix this
problem with the Windows Registry settings, uninstall and reinstall
Unicenter AutoSys JM.
The environment variable AUTOSYS is not set.The %AUTOSYS% system environment variable is not available to the
Application Server. In the Windows Control Panel, click the System icon
and set the %AUTOSYS% environment variable in the System
Environment Variables region. You can also check the setting of this
variable on the System screen of the Unicenter AutoSys Administrator.
The environment variable AUTOSYS is too long.
The %AUTOSYS% environment variable value is set to a path that is more
than 80 characters in length. Uninstall and reinstall Unicenter AutoSys JM
to a directory path that has fewer than 80 characters.
Application Server cannot open its log file
as_server.%AUTOSERV%. Some directory in the path is notaccessible to the SYSTEM.
The Application Server was unable to create the normal log file named in
the message. Make sure that the log file has permissions that enable a
system program to read and write to the file. Also verify that the disk drive
has not run out of space.
Troubleshooting 359

7/16/2019 Autosys R11 User Guide
http://slidepdf.com/reader/full/autosys-r11-user-guide 360/459
Application Server Troubleshooting
Symptom:
The autosyslog -s command displays messages indicating that it cannot
connect to the database.
Solution:
The database server is down or there are problems with the database
installation. To test that communication from the Application Server to the
Event Server is set up properly, log on to the Event Server from the
Application Server computer, by using the following:
For Ingres, use the sql utility.
For Oracle, use the SQL*Plus command language interface.
For Sybase, use the isql utility.
Use the Unicenter AutoSys JM user name and password to log on to the EventServer.
Symptom:
The Application Server is not running and does not write log output to the
$AUTOUSER/out/as_server.$AUTOSERV file.
Solution:
This symptom could be attributed to a number of causes.
The environment variable AUTOSYS is not set.
The $AUTOSYS environment variable is not available to the Application
Server. Make sure the AutoSys source file has been sourced in yoursession.
The environment variable AUTOSYS is too long.
The $AUTOSYS environment variable value is set to a path that is more
than 80 characters in length. Uninstall and reinstall Unicenter AutoSys JM
to a directory path that has fewer than 80 characters.
Application Server cannot open its log file as_server.$AUTOSERV.
Some directory in the path is not accessible to the SYSTEM.
The Application Server was unable to create the normal log file named in
the message. Make sure that the log file has permissions that enable a
system program to read and write to the file. Also verify that the disk drive
has not run out of space.
360 User Guide

7/16/2019 Autosys R11 User Guide
http://slidepdf.com/reader/full/autosys-r11-user-guide 361/459
Application Server Troubleshooting
Application Server Starts, Clients on Remote Machine Times out
Valid on Windows and UNIX
Symptom:
When you run the chk_auto_up command from a remote machine, it returns a
message similar to the following:
CAUAJM_E_50033 Error initializing tx subsystem: CAUAJM_E_10527 Timed out waiting for response from the Unicenter AutoSys JM Application Server.CAUAJM_E_10062 Failed to get initial configuration Unicenter AutoSys JMApplication Server: [<application server machine>:9,000]Solution:
Check to make sure that network problems are not preventing communication
between the Client and the Application Server computers through the
Operating System ping command.
Use the following steps to confirm whether the Client computers can contact
the Application Server:
1. On the Client computer, open a command prompt to the bin folder of the
location specified by the %CSAM_SOCKADAPTER% environment variable,
and run the following command:
configedit Port=nnnn display
n n n n
Defines the port number to display.Default: 9000
2. On the Application Server computer, open a command prompt to the bin
folder of the location specified by the %CSAM_SOCKADAPTER%
environment variable, and run the following command:
configedit Port=nnnn display
n n n n
Defines the port number to display.Default: 9000
Troubleshooting 361

7/16/2019 Autosys R11 User Guide
http://slidepdf.com/reader/full/autosys-r11-user-guide 362/459
Application Server Troubleshooting
3. Compare the two previous outputs and make sure that both the
EnablePmux and EnableSSL settings are identical.
4. Run the following command on both computers and compare settings:
configedit PortRange=49152-50176 display
If the settings do not match, change the settings of either or both
computers to match and stop/start the services.
If the settings match, verify that physical port 7163 is not being blocked
by firewall software on either computer.
Symptom:
When you run the chk_auto_up command from a remote machine, it returns a
message similar to the following:
CAUAJM_E_50033 Error initializing tx subsystem: CAUAJM_E_10527 Timed out waiting for response from the Unicenter AutoSys JM Application Server.CAUAJM_E_10062 Failed to get initial configuration Unicenter AutoSys JMApplication Server: [<application server machine>:9,000]Solution:
Make sure network problems are not preventing communication between the
Client and the Application Server computers through the Operating System
ping command.
Use the following steps to confirm whether the Client computers can contact
the Application Server:
1. On the Client computer, open a command prompt to the bin folder of thelocation specified by the $CSAM_SOCKADAPTER environment variable, and
run the following command:
configedit Port=nnnn display
n n n n
Defines the port number to display.Default: 9000
2. On the Application Server computer , open a command prompt to the bin
folder of the location specified by the $CSAM_SOCKADAPTER environment
variable, and run the following command:
configedit Port=nnnn display
n n n n
Defines the port number to display.Default: 9000
362 User Guide

7/16/2019 Autosys R11 User Guide
http://slidepdf.com/reader/full/autosys-r11-user-guide 363/459
Application Server Troubleshooting
3. Compare the two previous outputs and make sure that both the
EnablePmux and EnableSSL settings are identical.
4. Run the following command on both computers and compare settings:
configedit PortRange=49152-50176 display
If the settings do not match, change the settings of either or both
computers to match and stop/start the services.
If the settings match, verify that physical port 7163 is not being blocked
by a firewall software on either computer.
More Information:
General Debugging (see page 421) How to Configure Unicenter AutoSys JM to Run with SSL (see page 428)
Troubleshooting 363

7/16/2019 Autosys R11 User Guide
http://slidepdf.com/reader/full/autosys-r11-user-guide 364/459

7/16/2019 Autosys R11 User Guide
http://slidepdf.com/reader/full/autosys-r11-user-guide 365/459
Chapter 17: Unicenter Integration This section contains the following topics:
Integrating Event Management (see page 365)
Integrating Unicenter Notification Services (see page 370)
Integrating Unicenter Service Desk (see page 376)
Integrating Event Management
The Event Management system collects events from almost every running
program or script that generates them, and provides a complete view of the
ongoing processing in your enterprise. Event Management checks which
messages are important, and responds to them based on user-defined policies.It can automate many manual problem resolution tasks, filter and consolidate
multiple events, and significantly reduce the need for human intervention.
Event Management can correlate various messages, monitor for unusual
conditions, and take proper corrective action.
With Event Management, you can do the following:
Identify events that are important to your organization and define
message record and action profiles that specify the special processing that
Unicenter NSM performs when the events occur.
Define calendars that establish dates and times for processing events.
Monitor event activity through the console log and immediately respond toevents as they occur.
Define console log views that restrict message access to authorized users
and user groups.
Note: The examples in this section focus on the Unicenter WCC GUI. You can
also perform most of the actions with Unicenter Management Portal.
Unicenter Integration 365

7/16/2019 Autosys R11 User Guide
http://slidepdf.com/reader/full/autosys-r11-user-guide 366/459
Integrating Event Management
How Event Management Processes Events
In the context of Event Management, an event is a message that an operating
system or other application issues to alert the user or other software
components of an important occurrence. Information such as date, time, nodeof origin, and user are typically associated with the event.
A typical event goes through the following stages:
1. A situation or event occurs that causes creation of a message. The
message can be informational, such as announcing that a job is
completed. It can also announce a more serious event, such as a server
about to go down.
2. The event is sent directly to Event Management or collected by various
components and sent to Event Management for processing.
3. The event is added to the console log, if a message policy does not
prevent it.
4. The event is matched against Event Management message policies and
Advanced Event Correlation (AEC) policies. If the event matches a policy,
various actions are executed automatically. Depending on the policy, the
event can also go to the Held Messages area of the console log or to Alert
Management System (AMS) for further tracking and processing.
5. When human intervention is required, a technician is notified by
Notification Services and then starts to resolve the situation. If it was a
held message, the technician also acknowledges the message or sends a
reply.
6. The situation that caused the message is resolved, and another event can
be created to announce the resolution.
366 User Guide

7/16/2019 Autosys R11 User Guide
http://slidepdf.com/reader/full/autosys-r11-user-guide 367/459
Integrating Event Management
Installation Considerations
To integrate Unicenter AutoSys JM with Event Management, you must have an
Event Agent installed on the Unicenter AutoSys JM server. The Event Agent
can be installed from CA Common Services (shipped with Unicenter AutoSysJM) or Unicenter NSM.
Note: You can skip this section if you already have an Event Agent installed on
the Unicenter AutoSys JM server.
If you do not already have an Event Agent installed on the Unicenter AutoSys
JM server, select the CA Common Services Event Agent from the list of
available components when installing Unicenter AutoSys JM. Selection of just
the Agent component implies that you have installed a Unicenter Event
Manager in your enterprise. If you want to integrate Unicenter AutoSys JM
with Event Management but do not have an Event Manager installed, select
the CA Common Services Event Manager component.
If you only selected the Event Agent component, the Unicenter AutoSys JM
installation prompts you for the machine name of the Unicenter Event Manager
node.
The installation sets the Event Manager node as an environmental
variable (CA_OPERA_NODE) in the Event Agent environment. When this
environmental variable is set, all messages that arrive on the Event Agent are
sent to that managing node. If this environmental variable is not set,
messages that arrive on the Event Agent that must be sent to another node
must have a Message Record with a FORWARD action defined in their local
message policy file.
If the Event Manager node changes after installation, you can use the
Unicenter cautenv command to modify this environmental variable. If you
modify the environmental variable, you must stop and restart the Event Agent
to implement your changes.
Unicenter Integration 367

7/16/2019 Autosys R11 User Guide
http://slidepdf.com/reader/full/autosys-r11-user-guide 368/459
Integrating Event Management
The installation records this machine name in the
$CAIGLBL0000/scripts/envset file under the following variables:
CAI_OPR_REMOTEDB
CAI_CAL_REMOTEDB
CA_CAL_SYSTEMID
To redefine the manager on systems running Unicenter NSM, modify the data
in these three environment variables and recycle Unicenter NSM.
For an Event Agent-only installation, this information specifies the manager
from which the Agent retrieves its policies. No messages are forwarded to the
manager or any other location unless it is specified in a policy defined for this
Agent. This policy resides on the manager as a Message Record defined for the
Event Agent node with a FORWARD action of the complete message text,
where the forwarding destination is the manager node.
After the policy is defined and reloaded on the manager and the Event Agent is
recycled to pick up the new policy, all messages that arrive on the Event Agent
are sent to that managing node.
To make sure that messages are properly forwarded from the Event Agent
residing on the Unicenter AutoSys JM server, do the following:
1. Make sure that the Event Management environment variables,
CAI_OPR_REMOTEDB, CAI_CAL_REMOTEDB, and CA_CAL_SYSTEMID
(located in the $CAIGLBL0000/scripts/envset file) are set to the Unicenter
Event Manager node on the Event Agent computer.
2. Define a Message Record/Action for the Event Agent node that forwards allmessages that occur on the Event Agent computer to the Event Manager
node. If the Event Manager is active, issue the opreload command to
cause a reload of all new event policies.
Recycle the Event Agent using the Unicenter commands unishutdown all and
unistart all.
Note: For more information about Event Management setup and configuration,
see the Unicenter Event Management documentation.
368 User Guide

7/16/2019 Autosys R11 User Guide
http://slidepdf.com/reader/full/autosys-r11-user-guide 369/459
Integrating Event Management
Configure Message Forwarding
After installing and configuring the basic software, you must configure the
Unicenter AutoSys JM server to activate its message forwarding interface.
Note: Event Management is installed as a component of Unicenter NSM or CA
Common Services. Unicenter AutoSys JM requires at least Event Management
r11.
The Unicenter Event Agent requires a valid CAICCI connection to the Unicenter
Event Manager computer if the manager is not installed locally on the
Unicenter AutoSys JM server computer.
To configure message forwarding
1. Log on to a Unicenter AutoSys JM-configured computer as the EXEC
Superuser and issue the following command at an instance command
prompt:
sendevent -E STOP_DEMON
The Scheduler completes any processing it is currently performing and
stops.
2. Open the Unicenter AutoSys Administrator and select a specific
instance. Then, open the Integration screen and select the Forward all
Unicenter AutoSys JM messages check box.
3. Set the parameter UnicenterEvents=1 in the
$AUTOUSER/config.$AUTOSERV configuration file.All Unicenter AutoSys JM messages generated to the Scheduler log are
forwarded to the Unicenter Event Management console. You can write
Event Management policies to act on any or all forwarded messages.
Note: For information about writing and implementing Event Management
policies, see the Unicenter Event Management documentation.
4. Issue the following command at an instance command prompt:
eventor
The Scheduler starts. Any messages written to the Scheduler log should
now also appear in the Event Management console.
Unicenter Integration 369

7/16/2019 Autosys R11 User Guide
http://slidepdf.com/reader/full/autosys-r11-user-guide 370/459
Integrating Unicenter Notification Services
Integrating Unicenter Notification Services
Unicenter Notification Services lets you use various protocols and devices to
send wired and wireless messages to operators or administrators who must
resolve problems or attend to emergencies.
Note: Unicenter Notification Services is different from Wireless Messaging,
which is still available in Event Management. Wireless Messaging lets you send
email and pages.
The following protocols are available:
Email - SMTP, POP3
Simple Mail Transfer Protocol (SMTP) is used to send one-way and
two-way email messages. Post Office Protocol version 3 (POP3) is used to
receive email from a mail server.
Wireless - WCTP
Wireless Communications Transfer Protocol (WCTP) uses XML over
Hypertext Transport Protocol (HTTP) to send and receive messages and
binary data between wire-line systems and one-way or two-way wireless
devices.
Page - SNPP
Simple Network Paging Protocol (SNPP) is based on TCP/IP and offers
one-way and two-way paging.
Page - TAP
Telocator Alphanumeric Protocol (TAP) sends pages by modem, and is the
oldest one-way paging protocol.
Short Message - SMS
Short Message Service (SMS) is used to send one-way text messages to
cellular telephones using HTTP.
Instant Message - Sametime
IBM Lotus Instant Messaging and Web Conferencing (Sametime Instant
Messaging - SIM) is used on Windows to send one-way and two-way
instant messages.
370 User Guide

7/16/2019 Autosys R11 User Guide
http://slidepdf.com/reader/full/autosys-r11-user-guide 371/459
Integrating Unicenter Notification Services
Voice - TAPI
Telephony Application Programming Interface (TAPI) is used on Windows
to send one-way voice messages that are synthesized from text using the
Microsoft Speech Application Programming Interface (SAPI) text-to-speech
(TTS) engine. The default speech is set in the Windows Control Panel. The
messages travel by telephone line to a human recipient using a
TAPI-compliant telephony device.
Script
Third-party or customer programs or scripts can be used to send one-way
messages. Scripts and command definitions are stored in the
UNSConnections.ini file in the install_path/config directory.
Unicenter Integration 371

7/16/2019 Autosys R11 User Guide
http://slidepdf.com/reader/full/autosys-r11-user-guide 372/459
Integrating Unicenter Notification Services
How Unicenter Notification Services Works
Unicenter Notification Services uses the following process to track all
notifications that you send. This is especially important for two-way
notifications that must be matched with responses.
1. You use one of the following features to create a notification message:
User interface
Command line or script
Event Console (by right-clicking a message)
Event Management NOTIFY action
Alert Management escalation
Application using the Notification Services Client SDK
2. Based on the recipient, provider, or protocol information in the request,
the Notification Services daemon (unotifyd) selects a protocol-specific
driver to send the notification.
Note: The daemon runs as a service on Windows and as a background
process on UNIX and Linux.
3. The daemon assigns a tracking ID, which it returns to the command or
program that sent the notification.
Note: If the daemon stops and restarts, it also restarts the outstanding
notifications stored on disk.
4. The daemon checks periodically for a response from the service provider, if
one was requested.
5. The daemon stores information about the notification on disk, and updatesthat information throughout the life cycle of the notification. This is called
checkpointing. Updates occur for the following events:
The request is created. The service provider received the notification. The provider delivered the notification. The recipient read the notification. The recipient sent a reply.
372 User Guide

7/16/2019 Autosys R11 User Guide
http://slidepdf.com/reader/full/autosys-r11-user-guide 373/459
Integrating Unicenter Notification Services
Installation Considerations
To integrate Unicenter AutoSys JM with Unicenter Notification Services, you
must have a Notification Agent installed on the Unicenter AutoSys JM server.
The Notification Agent can be installed from the Unicenter NSM media.
Note: You can skip this section if, you already have a Notification Agent
installed on the Unicenter AutoSys JM server.
If you do not already have a Notification Agent installed, on the Unicenter
AutoSys JM server, you must install it from the Unicenter NSM media. The
Notification Agent installation assumes you have installed a Notification
Manager in your enterprise. If you want to integrate Unicenter AutoSys JM
with Unicenter Notification Services but do not have a Notification Manager
installed, you must install the Notification Manager from the Unicenter NSM
media.
Note: For more information about Unicenter Notification Services setup and
configuration, see the Unicenter NSM documentation.
Unicenter Integration 373

7/16/2019 Autosys R11 User Guide
http://slidepdf.com/reader/full/autosys-r11-user-guide 374/459
Integrating Unicenter Notification Services
Configure Notification
After installing and configuring the basic software, you must configure the
Unicenter AutoSys JM server to activate its notification interface.
Note: Unicenter Notification Services is installed as a component of Unicenter
NSM. Unicenter AutoSys JM requires at least Unicenter Notification r11.
To send a notification request to Unicenter Notification Services, Unicenter
AutoSys JM requires the node name of the Unicenter Notification Manager.
If the manager is not installed locally on the Unicenter AutoSys JM server, the
Notification Agent requires a valid CAICCI connection to the Notification
Manager computer.
To configure notification
1. Log on to a Unicenter AutoSys JM-configured computer as the EXECSuperuser and issue the following command at an instance command
prompt:
sendevent -E STOP_DEMON
The Scheduler completes any processing it is currently performing and
stops.
2. Open the Integration screen of the Unicenter AutoSys Administrator,
enter the Unicenter Notification Services server name in the Server Node
field and click OK.
Modify the Client API Timeout parameter to set the wait time the Client
uses when requiring an acknowledgement from the Unicenter Notification
Services server. The default value (30 seconds) is sufficient for the server
to respond to a Client request.
Set the NotifyServerNode parameter in the
$AUTOUSER/config.$AUTOSERV configuration file to the node name of the
Unicenter Notification Services server.
3. (Optional) Modify the NotifyAckTimeout parameter in the
$AUTOUSER/config.$AUTOSERV configuration file to set the wait time the
Client uses when requiring an acknowledgement from the Unicenter
Notification Services server. The default value (30 seconds) is sufficient for
the server to respond to a Client request.
4. Issue the following command at an instance command prompt:
eventor
The Scheduler starts and the notification interface is activated.
374 User Guide

7/16/2019 Autosys R11 User Guide
http://slidepdf.com/reader/full/autosys-r11-user-guide 375/459
Integrating Unicenter Notification Services
Send Notifications with Unicenter AutoSys JM
The integration of Unicenter Notification Services with Unicenter AutoSys JM
lets you send wired and wireless messages based on the completion of a job.
The Unicenter AutoSys JM Scheduler sends a notification during terminalstatus processing based on the job’s send_notification attribute. If the
send_notification attribute is set, the Scheduler prepares and sends the
notification request using the job’s notification_id and notification_msg
attributes. Messages are written to the Scheduler log indicating whether the
notification request was sent and processed successfully. You can also use the
optional notification job attributes (notification_pri, notification_imp, and
notification_sev) to classify the notification based on priority, importance, and
severity.
Example: Send a Notification Request when a Job Completes
This example shows the JIL statements used in a job definition to send a
notification request to a recipient named administrator when job
notify_on_completion completes:
insert_job: notify_on_completion
machine: localhost
command: sleep 1
owner: user@localhost
send_notification: y
notification_id: administrator
notification_msg: “notify_on_completion has completed.”
Example: Send a Notification Request when a Job Fails
This example shows the JIL statements used in a job definition to send a
notification request to a recipient named operator when job notify_on_failure
fails:
insert_job: notify_on_failure
machine: localhost
command: false
owner: notify@localhost
send_notification: f
notification_id: operator
notification_msg: “notify_on_failure has failed.”
Note: For more information about the notification attributes of jobs, see the
Reference Guide.
Unicenter Integration 375

7/16/2019 Autosys R11 User Guide
http://slidepdf.com/reader/full/autosys-r11-user-guide 376/459
Integrating Unicenter Service Desk
Integrating Unicenter Service Desk
Unicenter Service Desk is an enterprise-level service desk solution that lets
you automate IT processes and provide audit trails for regulatory compliance.
Unicenter Service Desk enables you to improve efficiency, while fostering
customer satisfaction and improved productivity. It is easily configured to
support the ITIL model, leverage CA's collection of years of service, support
best practices, or implement your own processes. Unicenter Service Desk
provides a self-service interface that helps your customers resolve their own
issues. From this web interface, they can submit tickets, checks status and
browse the knowledge base.
Configure Unicenter AutoSys JM to Activate Its Unicenter Service Desk Interface
When Unicenter AutoSys JM is integrated with Unicenter Service Desk, the
default data files that are added to the Unicenter Service Desk databaseduring configuration are used to create requests through the web services. In
addition to the data files, Unicenter Service Desk also provides the default
templates and contacts for Unicenter AutoSys JM, that is, the default users
and templates use the names of the product for which they are applicable.
Note: Only the Unicenter Service Desk Administrator is authorized to modify
the default templates that are provided during the configuration process.
From a Unicenter Service Desk perspective, do the following:
1. Open the Unicenter Service Desk application and verify that it operates
properly.
2. Use a Windows command prompt to access the following location:
C:\Program Files\CA\Service Desk\data\integrations.
3. Run either of the following commands to complete the installation:
pdm_load –f itil_integAutoSys.dat
Specifies an ITIL configured Unicenter Service Desk installation.
pdm_load –f integAutoSys.dat
Specifies a default or non-ITIL configured Unicenter Service Desk
installation.
After installing and configuring the basic software, you must configure theUnicenter AutoSys JM server to activate its Unicenter Service Desk interface.
Note: Unicenter Service Desk is installed as a standalone product. Unicenter
AutoSys JM requires at least Unicenter Service Desk r11. Contact your
Unicenter Service Desk administrator if you need assistance with setting the
parameters in this section.
376 User Guide

7/16/2019 Autosys R11 User Guide
http://slidepdf.com/reader/full/autosys-r11-user-guide 377/459
Integrating Unicenter Service Desk
To initiate a service desk ticket to Unicenter Service Desk, Unicenter AutoSys
JM requires the Web Service Desk URL, login identifier, and password. The
Web Service Desk Customer can be substituted for the Web Service Desk login
identifier and password.
To configure Unicenter AutoSys JM to activate its Unicenter Service
Desk interface
1. Log on to a Unicenter AutoSys JM-configured computer as the EXEC
Superuser and issue the following command at an instance command
prompt:
sendevent -E STOP_DEMON
The Scheduler completes any processing it is currently performing, then
stops.
2. Open the Integration screen of the Unicenter AutoSys Administrator
and update the Web Service Login ID, Web Service Login Password, and
URL Location fields.
Note: If you use a Web Service Customer identifier to access Unicenter
Service Desk, update the Web Service Customer field instead of the Web
Service Login ID and Web Service Login Password fields.
Set the ServiceDeskURL parameter in the
$AUTOUSER/config.$AUTOSERV configuration file to the URL of your
Unicenter Service Desk Web server (for example,
http://localhost:8080/axis/services/USD_R11_WebService?wsdl).
Set the ServiceDeskUser parameter in the $AUTOUSER/config.$AUTOSERV
configuration file to your Unicenter Service Desk user ID and password.
Note: If you use a Service Desk Customer identifier to access Unicenter
Service Desk instead of a user ID and password, update the
ServiceDeskCust parameter instead of the ServiceDeskUser field.
3. Issue the following command at an instance command prompt:
eventor
The Scheduler starts.
Unicenter Integration 377

7/16/2019 Autosys R11 User Guide
http://slidepdf.com/reader/full/autosys-r11-user-guide 378/459
Integrating Unicenter Service Desk
Initiate a Service Desk Ticket with Unicenter AutoSys JM
The integration of Unicenter Service Desk into Unicenter AutoSys JM lets you
open a service desk ticket (request or incident) when a job fails. The Unicenter
AutoSys JM Scheduler initiates opening a service desk ticket during terminalstatus processing based on the job’s service_desk attribute. If set, the
Scheduler prepares and sends the service desk ticket using the job’s
svcdesk_desc, svcdesk_pri, svcdesk_imp, svcdesk_sev, and svcdesk_attr
attributes. Messages are written to the Scheduler log indicating whether the
service desk ticket was sent and processed successfully.
Only the service_desk attribute is mandatory. If the job’s svcdesk_desc,
svcdesk_pri, svcdesk_imp, svcdesk_sev, and svcdesk_attr attributes are not
set, they use the Unicenter AutoSys JM service desk template values set in
Unicenter Service Desk. This template is included in the Unicenter Service
Desk installation. Before initiating a Service Desk ticket, make sure Web
Services for Unicenter Service Desk is active.
Example: Initiate a Service Desk Incident
This example shows the JIL statements used in a job definition that initiates a
service desk incident with a priority of 1 for a job named
service_desk_on_failure:
insert_job: service_desk_on_failure_1
machine: localhost
command: false
owner: user@localhost
service_desk: y
svcdesk_pri: 1
svcdesk_desc: “service_desk_on_failure_1 has failed.”
Example: Initiate a Service Desk Request
This example shows the JIL statements used in a job definition that initiates a
service desk request with an impact of 3 and a severity of 4 for a job named
service_desk_on_failure_2:
insert_job: service_desk_on_failure_2
machine: localhost
command: false
owner: user@localhost
service_desk: y
svcdesk_imp: 3
svcdesk_sev: 4
svcdesk_desc: “service_desk_on_failure_2 has failed.”
Note: For more information about the service desk attributes of a job, see the
Reference Guide.
378 User Guide

7/16/2019 Autosys R11 User Guide
http://slidepdf.com/reader/full/autosys-r11-user-guide 379/459
Appendix A: Cross-Platform Scheduling
ConsiderationsThis section contains the following topics: Integrating Cross-Platform Scheduling (see page 380)Definition of Terms (see page 381) Enterprise Job Scheduling Prerequisites (see page 383) Cross-Platform Considerations (see page 384) Configure Enterprise Job Scheduling (see page 385)PRIMARYCCISYSID—Cross-Platform Environment Variable (see page 388) Bi-Directional Scheduling (see page 389)Unicenter AutoSys JM Connect Cross-Platform Dependencies (see page 390) Running Jobs on UUJMA (see page 393)
Cross-Platform Interface Messages (see page 400) Unsupported Attributes for Unicenter AutoSys JM Connect or UUJMA Jobs(see page 401)
Cross-Platform Scheduling Considerations 379

7/16/2019 Autosys R11 User Guide
http://slidepdf.com/reader/full/autosys-r11-user-guide 380/459
Integrating Cross-Platform Scheduling
Integrating Cross-Platform Scheduling
Unicenter AutoSys JM enterprise-wide scheduling lets you integrate jobs with
Unicenter Universal Job Management Agent (UUJMA) for UNIX, Windows,
AS/400, and OpenVMS, and with various CA scheduling products on the
mainframe. The following types of integration are supported:
Jobs can be defined to conditionally start based on the status of jobs
running on OS/390, AS/400, and OpenVMS systems.
Unicenter AutoSys JM can schedule jobs on Windows, UNIX, OS/390,
AS/400, and OpenVMS systems.
Unicenter AutoSys JM can receive work from other Unicenter workload
managers.
You can use cross-platform job dependency notation to define jobs to
conditionally start based on the status of a job running on the included set of
Unicenter Workload Agent computers. You can also create jobs that run on anyof the UUJMA computers (if the UUJMA computers are defined).
The UUJMA performs the following functions:
Receive job requests from one or more Unicenter workload managers,
such as Unicenter NSM Job Management Option (JMO), Unicenter AutoSys
JM Server, or Unicenter CA-7, and initiate the requested program, script,
JCL, or other unit of work. If scheduling to the mainframe, the command
or program to initiate is the job name of the job as defined in the
mainframe scheduling system.
Collect status information about job runs.
Send status information to the requesting workload manager.
Job scheduling to UUJMA computers is accomplished through the
Cross-Platform Interface of the Unicenter AutoSys JM Scheduler. For the
Unicenter AutoSys JM Scheduler to communicate with UUJMA computers, the
Scheduler must convert Unicenter AutoSys JM-based events such as
STARTJOB, RUNNING, SUCCESS, and FAILURE to events that UUJMA can
interpret. Similarly, the Scheduler must convert events returned from UUJMA
back to events the Unicenter AutoSys JM Scheduler can interpret.
380 User Guide

7/16/2019 Autosys R11 User Guide
http://slidepdf.com/reader/full/autosys-r11-user-guide 381/459
Definition of Terms
The following table lists the Unicenter AutoSys JM and UUJMA events:
Operation Unicenter AutoSys JM UUJMA
Starting a job STARTJOB SUBMITU
Job has started and is
running
RUNNING JOBINITU
Job has terminated
successfully with
exitcode
SUCCESS or FAILURE JOBTERMU
Job has failed to start FAILURE JOBFAILU
Definition of Terms
The following terms are used in this appendix.
Agent computer
Any computer that supports a Unicenter workload agent.
bi-directional job scheduling
The ability of Unicenter AutoSys JM to support both inbound and outbound job
scheduling.
CAICCI
CA International Common Communications Interface
cross-instance job dependency
A dependency between jobs running on different Unicenter AutoSys JM
instances.
cross-instance scheduling
The process of scheduling jobs or dependencies between Unicenter AutoSys JM
instances.
cross-platform scheduling
The process of scheduling jobs or dependencies between Unicenter AutoSys JM
and any Unicenter Workload Agent.
cross-platform job dependency
A dependency between Unicenter AutoSys JM and any Unicenter Workload
Agent.
Cross-Platform Scheduling Considerations 381

7/16/2019 Autosys R11 User Guide
http://slidepdf.com/reader/full/autosys-r11-user-guide 382/459
Definition of Terms
inbound job scheduling
The process of scheduling Unicenter AutoSys JM-defined jobs from a remote
Unicenter workload manager.
outbound job schedulingThe process of scheduling Unicenter AutoSys JM-defined jobs from Unicenter
AutoSys JM to a Unicenter Workload Agent.
Unicenter AutoSys JM
A workload manager that runs on UNIX and Windows.
Unicenter AutoSys JM Connect
Software that lets Unicenter AutoSys JM communicate with legacy OS/390
workload manager.
Unicenter AutoSys JM Scheduler
A Unicenter AutoSys JM process that communicates with Unicenter AutoSys JM
Connect, any supported UUJMA Agent, or Unicenter workload manager.
Commonly referred to as the Scheduler.
Unicenter Workload Manager
A Unicenter job management process that communicates with a workload
Agent. Examples include Unicenter NSM JMO, Unicenter AutoSys JM, or any CA
mainframe scheduling product.
Unicenter Workload Agent
Any Agent in the set of Unicenter-based scheduling Agents residing on UNIX,
Windows, AS/400, and VMS that are supported by Unicenter AutoSys JM. This
also includes the mainframe Unicenter AutoSys JM Connect solution and any
CA mainframe scheduling product.
382 User Guide

7/16/2019 Autosys R11 User Guide
http://slidepdf.com/reader/full/autosys-r11-user-guide 383/459
Enterprise J ob Scheduling Prerequisites
Enterprise Job Scheduling Prerequisites
Unicenter AutoSys JM lets you schedule or reroute jobs from multiple sources
throughout the enterprise.
Before you can implement enterprise job scheduling, you must install and
configure the basic software as instructed in the Installation Guide. You must
also install and configure Unicenter AutoSys JM Connect or a UUJMA, or both,
as instructed in the documentation for those components.
The required software and minimum versions are as follows:
Unicenter AutoSys JM r11 for Windows or Unicenter AutoSys JM r11 for
UNIX.
CAICCI Version 40.
To check the version of CAICCI you have installed, enter the following
command at a command prompt:rmtcntrl release
UUJMA requires TCP/IP and one or more of the following:
– Unicenter AutoSys JM Connect (OS/390).
– Unicenter AutoSys JM r11 for Windows or UNIX.
– Unicenter CA7, Unicenter CA-Scheduler, or Unicenter CA-JobTrac.
The following components must be present on the Unicenter AutoSys JM
Server computer:
Unicenter AutoSys JM Scheduler
CAICCI
Note: For more information, see the Installation Guide.
Cross-Platform Scheduling Considerations 383

7/16/2019 Autosys R11 User Guide
http://slidepdf.com/reader/full/autosys-r11-user-guide 384/459
Cross-Platform Considerations
Cross-Platform Considerations
Keep the following in mind when you are running jobs across platforms:
If you are running Unicenter AutoSys JM in High Availability mode, jobstatuses and cross-platform dependencies are not lost when the Shadow
Scheduler takes over. This assumes the PRIMARYCCISYSID environment
variable was correctly set on the Primary and Secondary Schedulers and
the UUJMA computers, and that jobs and external dependencies were sent
to Unicenter workload manager/Agent with proper release levels to
support PRIMARYCCISYSID.
When running a job from a Unicenter NSM Job Management Option (JMO)
scheduling manager, you may need to modify the default fail codes
currently set for the Unicenter JMO defined job. Exit codes 2 through 99
are defined as the default fail codes for Unicenter JMO jobs; thus an exit
code of 0 to 1 indicates success. When you run a job from Unicenter JMO
that executes a job in Unicenter AutoSys JM and the job fails with an exitcode 1, (for example, bad command), from Unicenter AutoSys JM job the
Unicenter AutoSys JM job ends with a status of FAILURE, but the Unicenter
JMO defined job ends with a status of SUCCESS or COMPLETE. You must
modify the fail codes to accommodate the differences in how success and
failure are interpreted between the two scheduling systems. That is, you
must define exit codes 1 through 99 as the fail codes for the Unicenter
JMO defined job and define only an exit code of 0 to indicate success.
If more than one instance of Unicenter AutoSys JM is running on a single
machine and you plan to activate the Cross-Platform Interface, only one
instance of Unicenter AutoSys JM can run with the Cross-Platform
Scheduling option set to a value of 2. That is, only one instance can
function as an Agent capacity (that is, only one instance can accept job
submissions from a remote Unicenter JMO, CA-7, CA-Scheduler, or
Unicenter CA-Jobtrac manager).
The chase and autoping commands return limited information about
Unicenter AutoSys JM Connect and UUJMA jobs and computers.
Remote user authentication is not supported for Unicenter AutoSys JM
Connect jobs. For UUJMA jobs, remote user authentication is performed
using the owner name associated with the job.
You cannot execute the following events on Unicenter AutoSys JM Connect
or UUJMA jobs and computers:
– CHANGE_PRIORITY
– SEND_SIGNAL
384 User Guide

7/16/2019 Autosys R11 User Guide
http://slidepdf.com/reader/full/autosys-r11-user-guide 385/459
Configure Enterprise J ob Scheduling
Configure Enterprise Job Scheduling
After installing and configuring the basic software and Unicenter AutoSys JM
Connect or a UUJMA Agent, or both, you must configure the Unicenter AutoSys
JM Server to activate its cross-platform scheduling interface.
To configure enterprise job scheduling
1. Log on to a Unicenter AutoSys JM-configured computer as the EXEC
Superuser and issue the following command at an instance command
prompt:
sendevent -E STOP_DEMON
The Scheduler completes any processing it is currently performing and
stops.
2. In the Unicenter AutoSys Administrator, select a specific instance,and select any of the following cross-platform scheduling parameters from
the Cross Platform Scheduling drop-down list on the Scheduler screen:
Select 1 – Enable outbound cross-platform scheduling (manager
only)
Runs jobs directly on a Unicenter workload Agent. When you select
this option, a Unicenter AutoSys JM instance can dispatch jobs to a
UUJMA Agent.
Select 2 – Enable outbound and inbound cross-platform scheduling
(manager and Agent)
Enables bi-directional scheduling support. When you select this option, a Unicenter AutoSys JM instance can dispatch jobs to a Unicenter Workload Agent and receive jobs from a Unicenter workload manager.
Edit the $AUTOUSER/config.$AUTOSERV configuration file and set
the CrossPlatformscheduling parameter as appropriate:
To run jobs directly on a Unicenter Workload Agent, set
CrossPlatformScheduling=1.
When you set CrossPlatformScheduling=1, a Unicenter AutoSys JM
instance can dispatch jobs to a UUJMA Agent.
To enable bi-directional scheduling support, setCrossPlatformScheduling=2.
When you set CrossPlatformScheduling=2, a Unicenter AutoSys JM
instance can dispatch jobs to a Unicenter workload Agent and receive
jobs from a Unicenter workload manager.
Cross-Platform Scheduling Considerations 385

7/16/2019 Autosys R11 User Guide
http://slidepdf.com/reader/full/autosys-r11-user-guide 386/459
Configure Enterprise J ob Scheduling
3. Issue the insert_machine jil command as appropriate to define the remote
node.
To define a UUJMA or Unicenter CA-7 node, issue the following jil
command and attribute:
insert_machine: remote_nodetype: u
To define a Unicenter AutoSys JM Connect node, issue the following jil
command and attribute:
insert_machine: remote_nodetype: c remote_node
Identifies the hostname of the computer running UUJMA, Unicenter
CA-7, or Unicenter AutoSys Connect.
4.
Issue the insert_xinst jil command as appropriate to define externalinstance entries to Unicenter AutoSys JM, thereby enabling cross-platform
dependencies.
Note: All external instance entries are stored in the Unicenter AutoSys JM
Event Server. Entries are created and maintained through the JIL
application and reported on through the autorep command.
To define a UUJMA remote node that supports external dependencies
to Unicenter AutoSys JM, issue the following jil commands and
attributes:
insert_xinst: UJAxtype: u xmachine: remote_node
To define a Unicenter AutoSys JM Connect node that supports external
dependencies to Unicenter AutoSys JM, issue the following jil
commands and attributes:
insert_xinst: A50xtype: c xmachine: remote_node
386 User Guide

7/16/2019 Autosys R11 User Guide
http://slidepdf.com/reader/full/autosys-r11-user-guide 387/459
Configure Enterprise J ob Scheduling
5. Start the Scheduler.
Select Services from the AutoSys menu in the Unicenter AutoSys
Administrator, select the Scheduler from the Service list on the UnicenterAutoSys JM Services screen, and click Start Service.
Issue the following command at an instance command prompt:
eventor
The Scheduler starts.
6. Review the Scheduler log to verify that the cross-platform scheduling
interface is active. The interface is active if the log contains the following
messages:
CAUAJM_I_40005 Cross Platform Interface Initialization in progressCAUAJM_I_40015 Cross Platform Interface is now active
Note: If you modify external instance entries while the Unicenter AutoSys JM
Scheduler is active, the Scheduler handles the modifications in real time. You
need not recycle the Scheduler when maintaining external instance entries.
Cross-Platform Scheduling Considerations 387

7/16/2019 Autosys R11 User Guide
http://slidepdf.com/reader/full/autosys-r11-user-guide 388/459
PRIMARYCC ISYSID—Cross-Platform Environment Variable
PRIMARYCCISYSID—Cross-Platform Environment Variable You can customize cross-platform scheduling by setting the
PRIMARYCCISYSID environment variable. You can also set it on the System
screen of the Unicenter AutoSys Administrator.
You can customize cross-platform scheduling by setting the
PRIMARYCCISYSID environment variable in /etc/auto.profile.
The environment variable is initially configured during Scheduler installation.
PRIMARYCCISYSID = cci_system_id
c ci _ s y s t e m _ i d
Defines the CAICCI system ID used by the cross-platform schedulinginterface when communicating with remote mainframe or UUJMA nodes.
This environment variable is key to providing failover support in the
Unicenter AutoSys JM environment if the Primary Scheduler shuts down or
becomes unreachable.
If the Primary Scheduler fails over, all communication on the Secondary
Scheduler proceeds as normal. Any statuses currently residing on the
Agent computers (mainframe or UUJMA) are dispatched to the Secondary
Scheduler computer for processing.
388 User Guide

7/16/2019 Autosys R11 User Guide
http://slidepdf.com/reader/full/autosys-r11-user-guide 389/459
Bi-Direc tional Scheduling
Bi-Directional Scheduling
You can use bi-directional scheduling to employ Unicenter AutoSys JM as the
workload manager, to define a job to run on any Unicenter Workload Agent
machine that is defined in the Event Server; and also employ Unicenter
AutoSys JM as the Workload Agent machine by using any Unicenter workload
manager to schedule a previously defined Unicenter AutoSys JM job.
You can also use the cross-platform interface to start jobs in other Unicenter
AutoSys JM instances. Any instance can initiate or be a recipient of any other
instance, regardless of platform or Event Server, provided the instances run on
distinct servers (although these instances can share the same Event Server).
To enable this feature, you must select a specific instance in the
Unicenter AutoSys JM Administrator and select option 2 - Enable outbound and
inbound cross-platform scheduling (manager and Agent) from the CrossPlatform Scheduling drop-down list on the Scheduler screen.
To enable this feature, you must set the cross-platform scheduling
parameter (CrossPlatformScheduling) in the $AUTOUSER/config.$AUTOSERV
configuration file to 2.
Note: There is no restriction on platforms, Event Servers, or number of
instances when running in bi-directional scheduling mode.
Example: Bi-Directional Scheduling
For example, a Linux Oracle instance can initiate jobs in a Windows MSSQL
environment, or a Windows MSSQL instance can initiate jobs in a Solaris
Ingres environment. In either case, you could add a Solaris Sybase and an AIX
Oracle or HP Ingres environment, if appropriate.
Cross-Platform Scheduling Considerations 389

7/16/2019 Autosys R11 User Guide
http://slidepdf.com/reader/full/autosys-r11-user-guide 390/459
Unicenter AutoSys J M C onnect Cross-Platform Dependencies
Unicenter AutoSys JM Connect Cross-PlatformDependencies
Jobs can have dependencies on jobs managed by the Unicenter AutoSys JMConnect scheduling software running in the OS/390 or z/OS environment. For
example, the following illustration shows that a job defined to run on a UNIX
or Windows computer could have as a starting condition the successful
completion of a Unicenter AutoSys JM Connect job running on a mainframe
system.
Note: CAICCI components are listed in the Installation Guide.
The Scheduler uses the cross-platform scheduling interface to communicatewith Unicenter AutoSys JM Connect.
Note: Throughout this section, jobs defined in the mainframe scheduling
products are referred to as Unicenter AutoSys JM Connect jobs. For
implementation details, see the Unicenter AutoSys JM Connect documentation.
390 User Guide

7/16/2019 Autosys R11 User Guide
http://slidepdf.com/reader/full/autosys-r11-user-guide 391/459
Unicenter AutoSys J M C onnect Cross-Platform Dependenc ies
Naming Conventions for Unicenter AutoSys JM Connect Cross-Platform Jobs
Due to naming limitations in the mainframe environment, the names of jobs
specified as job dependencies between Unicenter AutoSys JM and Unicenter
AutoSys JM Connect must follow these guidelines:
The first character of a job name must be an uppercase letter (A-Z), a
pound sign (#), an at sign (@), or a dollar sign ($).
The remaining characters in the job name can be any combination of
uppercase letters (A-Z), numbers (0-9), pound signs (#), at signs (@),
and dollar signs ($).
All letters (A-Z) must be in uppercase.
Job names can be up to eight characters in length.
Note: These limitations only apply to jobs that are referenced to Unicenter
AutoSys JM Connect.
How Job Scheduler Interdependencies Are Created
Unicenter AutoSys JM jobs can be dependent on the status of Unicenter
AutoSys JM Connect jobs, and Unicenter AutoSys JM Connect jobs can be
dependent on the status of Unicenter AutoSys JM jobs. Unicenter AutoSys JM
uses the following process to create this type of cross-platform dependency:
1. The Unicenter AutoSys JM Scheduler sends a request for the status of a
Unicenter AutoSys JM Connect job.
2. Unicenter AutoSys JM Connect registers the request.
3. The Unicenter AutoSys JM Connect job runs on the mainframe.
4. Unicenter AutoSys JM Connect sends the job status to the Unicenter
AutoSys JM Scheduler.
5. The Unicenter AutoSys JM Scheduler communicates the status to the Event
Server.
6. The Unicenter AutoSys JM Scheduler processes the status and starts the
job that is dependent on the completion of the Unicenter AutoSys JM
Connect job, if appropriate.
Cross-Platform Scheduling Considerations 391

7/16/2019 Autosys R11 User Guide
http://slidepdf.com/reader/full/autosys-r11-user-guide 392/459
Unicenter AutoSys J M C onnect Cross-Platform Dependencies
Define Cross-Platform Job Dependencies
To define a cross-platform job dependency, use the following notation in the
condition attribute of the dependent job definition:
condition: status( JOB_NAME^INS)
s t a t u s
Specifies one of the following statuses:
SUCCESS
TERMINATED
DONE
NOTRUNNING
When the specified Unicenter AutoSys JM Connect job completes with the
specified status, the job dependency is satisfied.JOB _NAME
Defines the name of the job.
Note: Job names for cross-platform dependencies must all be uppercase.
^
Indicates that the job resides on a different Unicenter AutoSys JM
instance.
I N S
Defines the three-letter uppercase identifier of the external instance on
which the specified job is running.
Example: Unicenter AutoSys JM Connect Cross-Platform Dependency
This example defines a dependency for a job that starts only upon the
successful completion of a Unicenter AutoSys JM Connect job (JOBA), which
runs on an external instance named CA7:
condition: success(JOBA CA7)
392 User Guide

7/16/2019 Autosys R11 User Guide
http://slidepdf.com/reader/full/autosys-r11-user-guide 393/459
Running J obs on UUJ MA
Running Jobs on UUJMA
Unicenter AutoSys JM can directly schedule jobs on a computer that is running
a supported Unicenter Workload Agent, assuming the computer running the
Agent has been defined to Unicenter AutoSys JM. For this example, we will use
the Unicenter Universal Job Management Agent (UUJMA).
Note: CAICCI components are listed in the Installation Guide.
The Scheduler communicates directly with UUJMA through CAICCI.
The communication components running on the computer receive information
from the Scheduler and pass it to UUJMA. Similarly, UUJMA passes information
through the communication components to the Scheduler.
Note: For jobs run to the mainframe or where Unicenter AutoSys JM is used
as a Unicenter Workload Agent, the execution string is a job name as defined
in the scheduling system or manager. Otherwise, the execution string is a
script name or executable.
Cross-Platform Scheduling Considerations 393

7/16/2019 Autosys R11 User Guide
http://slidepdf.com/reader/full/autosys-r11-user-guide 394/459
Running J obs on UUJ MA
Naming Conventions for UUJMA Job Names and User IDs
UUJMA job names and user IDs have the same naming restrictions as
Unicenter AutoSys JM, with the exception of jobs submitted to the mainframe.
Where the operating system permits, UUJMA job names can contain up to 64
alphanumeric characters and UUJMA user IDs can contain up to 30
alphanumeric characters. These job names and user IDs can contain both
uppercase and lowercase characters (when the operating system permits
mixed case). You cannot use blank spaces and tab characters in UUJMA job
names and user IDs.
Jobs submitted to the mainframe use the same naming conventions as jobs
that are run through Unicenter AutoSys JM Connect.
More information:
Cross-Platform Scheduling Considerations (see page 379) Naming Conventions for Unicenter AutoSys JM Connect Cross-Platform Jobs (see page 391)
How Jobs Are Run On UUJMA-Managed Computers
The process by which Unicenter AutoSys JM can run jobs directly on a
UUJMA-managed computer is as follows:
The Scheduler sends the job information to UUJMA.
The job changes to STARTING status.
UUJMA starts the job and sends an event to the Scheduler (JOBINITU if it
could start the job, or JOBFAILU if it could not start the job).
The Scheduler converts the JOBINITU event to RUNNING, puts it in the
database, and updates the job's status to RUNNING. If UUJMA sent a
JOBFAILU event, the Scheduler converts the event to FAILURE and
processes it accordingly.
If the job completes successfully, UUJMA sends a JOBTERMU event to the
Scheduler.
The Scheduler converts the JOBTERMU event to SUCCESS, FAILURE, or
TERMINATED based on the exit code of the job (if the job exited with a
normal end-of-job code, EOJ, the Scheduler converts JOBTERMU to
SUCCESS or FAILURE; if the job exited with an abnormal end of job code,AEOJ, the Scheduler converts JOBTERMU to TERMINATED).
394 User Guide

7/16/2019 Autosys R11 User Guide
http://slidepdf.com/reader/full/autosys-r11-user-guide 395/459
Running J obs on UUJ MA
Define UUJMA Computers
Before you can run jobs on a UUJMA computer, you must define the computer
to Unicenter AutoSys JM. To define a UUJMA computer, use the following JIL
statements:
insert_machine: remote_hosttype: machine_typer e m o t e _ h o s t
Defines the name of the UUJMA computer.
m a ch i n e _ t y p e
Specifies the type of machine you are defining:
u
Indicates a computer running UUJMA. This can be a computer running
Unicenter NSM JMO, Unicenter CA-7, Unicenter CA-Jobtrac, UnicenterCA-Scheduler, or Unicenter AutoSys JM.
c
Indicates a computer running Unicenter AutoSys JM Connect.
If Unicenter AutoSys JM Connect is running on the same computer as
Unicenter CA-7, Unicenter CA-Jobtrac, Unicenter CA-Scheduler, or any
OS/390 scheduling system, you should set machine_type to c.
Note: UUJMA-managed computers cannot be part of a virtual machine. The
job_load, max_load, and factor attributes are not supported for
UUJMA-managed computers.
Example: Define a UUJMA Computer
This example defines the computer MYAGENT, which is running UUJMA with
Unicenter NSM, Unicenter CA-7, Unicenter CA-Jobtrac, Unicenter
CA-Scheduler, or Unicenter AutoSys JM:
insert_machine: MYAGENTtype: u
Cross-Platform Scheduling Considerations 395

7/16/2019 Autosys R11 User Guide
http://slidepdf.com/reader/full/autosys-r11-user-guide 396/459
Running J obs on UUJ MA
Add User IDs and Passwords on a UUJMA Computer
After you define a UUJMA computer to Unicenter AutoSys JM, you can use the
machine attribute to specify that computer in a job definition. For example:
insert_job: as400ji
owner: bob@ZASYS400
machine: ZASYS400
command: DLYJOB DLY(16)
The owner identified in the owner attribute of the job definition must have an
account on the target UUJMA computer. The account must match the owner
name exactly for the job to run. You must specify the owner of the job
definition as user @machine. The EDIT Superuser must use the autosys_secure
command to add valid accounts and passwords on the UUJMA computer.
To add user IDs and passwords on a UUJMA Computer
1. Issue the following command at the command prompt:
$ autosys_secure
The Security Utility starts and displays the AutoSys Security Utility menu.
2. Select option 5 (Manage AutoSys User@Host users) from the menu:
AutoSys Security UtilityPlease select from the following options:[1] Activate EIAM instance security.
[2] Manage EDIT/EXEC superusers.
[3] Change AutoSys database password.
[4] Change AutoSys remote authentication method.
[5] Manage AutoSys User@Host users.[6] Get Encrypted Password.
[0] Exit AutoSys Security Utility.>5 The Manage AutoSys User@Host users menu is displayed.
396 User Guide

7/16/2019 Autosys R11 User Guide
http://slidepdf.com/reader/full/autosys-r11-user-guide 397/459
Running J obs on UUJ MA
3. Select option 1 (Create AutoSys User@Host or Domain password) from the
menu:
Manage AutoSys User@Host usersPlease select from the following options:[1] Create AutoSys User@Host or Domain password.
[2] Change AutoSys User@Host or Domain password.
[3] Delete AutoSys User@Host or Domain password.
[4] Show all AutoSys User@Host users.
[9] Exit from "Manage AutoSys User@Host users" menu.
[0] Exit AutoSys Security Utility.>1 The Security Utility prompts you to enter user information.
4. Enter the user name, user host or domain, and password information
when prompted:
CAUAJM_I_60207 Create an USER@HOST user:Input the user name (or hit enter to cancel): BOBEnter user Host or Domain (or hit enter to cancel): ZASYS400Enter new password: ******Enter new password again: ******You have successfully added a user when the Security Utility displays the
following message:
CAUAJM_I_60135 User Create successful.
Cross-Platform Scheduling Considerations 397

7/16/2019 Autosys R11 User Guide
http://slidepdf.com/reader/full/autosys-r11-user-guide 398/459
Running J obs on UUJ MA
Job Definition Examples
These examples require that you activate the cross-platform interface of the
Unicenter AutoSys JM Scheduler and that you define the proper computer
definition to the Event Server.
Example: Define a Job to Run on an AS/400 Computer
This example defines a command job to run on an AS/400 computer:
insert_job: as400_a1 job_type: c
command: DLYJOB DLY(15)
machine: usprncax
owner: user1@usprncax
permission: gx,wx
date_conditions: 1
days_of_week: all
start_mins: 30
Example: Define a Job to Run Through Unicenter AutoSys JM Connect
This example defines a command job to run in Unicenter CA-7 through
Unicenter AutoSys JM Connect:
insert_job: ca71 job_type: c
command: auto_cnct -a A87SOENF -j RYAKEJ01 -c RUN -p SCHEDULE=RYAKE01 -s CA7
machine: A87SOENF
owner: user1@A87SOENF
permission: gx,wx
date_conditions: 1
days_of_week: allstart_mins: 45
Example: Define a Job to Run Directly
This example defines a command job to run directly in Unicenter CA-7:
insert_job: ca72 job_type: c
command: RYAKEJ01
machine: A87SOENF
owner: user1@A87SOENF
permission: gx,wx
date_conditions: 1
days_of_week: allstart_mins: 45
398 User Guide

7/16/2019 Autosys R11 User Guide
http://slidepdf.com/reader/full/autosys-r11-user-guide 399/459
Running J obs on UUJ MA
Example: Define a Job to Run in Another Unicenter AutoSys JM
Instance
This example defines a command job to run in another Unicenter AutoSys JM
instance:
insert_job: ca72 job_type: c
command: job_in_other_instance
machine: othermachine
owner: user1@othermachine
permission: gx,wx
date_conditions: 1
days_of_week: all
start_mins: 45
The following assumptions were made in this example:
In the machine definition for othermachine, machine_type was set to u,
indicating a machine that runs UUJMA.
The cross-platform interface has been activated on the server (where job
ca72 is being submitted) by setting the CrossPlatformScheduling
parameter to 1 (run jobs directly on a UUJMA Agent). If this instance will
receive job submissions from any workload manager in the enterprise, set
the CrossPlatformScheduling parameter to 2 (enable bi-directional
scheduling support) instead.
The CrossPlatformScheduling parameter for the machine othermachine is
set to 2 (enable bi-directional scheduling support).
Example: Define a Job to Run on an OpenVMS Computer
This example defines a command job to run on an OpenVMS computer:
insert_job: vmsjob1
command: “@SYS$LOGIN:SCHEDULE_WAIT.COM “
machine: VMSNODE
owner: system@VMSNODE
max_exit_success: 1
Note: A job that runs successfully on an OpenVMS computer returns an exit
code of 1. By default, Unicenter AutoSys JM interprets an exit code of 1 as a
failure unless the max_exit_success attribute is properly set in the job
definition.
Cross-Platform Scheduling Considerations 399

7/16/2019 Autosys R11 User Guide
http://slidepdf.com/reader/full/autosys-r11-user-guide 400/459
Cross-Platform Interface Messages
Cross-Platform Interface Messages
All messages produced by the cross-platform interface are written to theUnicenter AutoSys JM Scheduler log, which is located in the
%AUTOUSER%\out directory.
All messages produced by the cross-platform interface are written to the
Unicenter AutoSys JM Scheduler log, which is located in the $AUTOUSER/out
directory.
The following message indicates that the Scheduler has transferred a job to
the cross-platform interface for submission to a UUJMA:
CAUAJM_I_10073 AutoSys --> Cross Platform Interface:
machine= machine_name job_name=job_name
m a c h i n e _ n a m e
Identifies the UUJMA computer to which the job is being submitted.
j o b _ n am e
Identifies the Unicenter AutoSys JM job name as defined to the Event
Server.
The following message indicates that an event status has been received from
UUJMA. The event status is converted to the appropriate Unicenter AutoSys JM
event status and inserted in the Event Server.
CAUAJM_I_40263 EVENTU: event_name
EXITCODE: exitcode/dbcode JOB: job_name
e v e n t _ n a m e
Identifies one of the following events:
JOBINITU
Indicates that a job has started on a UUJMA.
JOBTERMU
Indicates that a job has completed on a UUJMA.
JOBFAILU
Indicates that a job has failed to start on a UUJMA.
SUBMITU
Indicates that a job has been submitted to Unicenter AutoSys JM.
e x i t c o d e /d b c o d e
Identifies the actual job exit code returned by the UUJMA.
400 User Guide

7/16/2019 Autosys R11 User Guide
http://slidepdf.com/reader/full/autosys-r11-user-guide 401/459
Unsupported Attributes for Unicenter AutoSys J M C onnect or UUJMA J obs
j o b _ n am e
Identifies the Unicenter AutoSys JM job name as defined to the Event
Server.
Unsupported Attributes for Unicenter AutoSys JM Connect orUUJMA Jobs
The following table lists attributes that are not supported for Unicenter
AutoSys JM Connect or UUJMA-managed jobs. If you specify these attributes,
they are ignored.
JIL Attribute UI Field
chk_files Resource Check - File System Space...
heartbeat_interval Heartbeat Interval (mins)
job_load Job Load
job_terminator If the Box fails should this Job be Terminated?
job_type:f Job Type (File Watcher)
n_retrys Number of Times to Restart this Job after a FAILURE
priority Queue Priority
profile Job Environment Profile
std_err_file File to Redirect to Standard Error
std_in_file File to Redirect to Standard Input
std_out_file File to Redirect to Standard Output
term_run_time Terminate this Job Mins after starting
watch_file File To Watch For
watch_file_min_size Minimum File Size (in Bytes)
watch_interval Time Interval (secs) to check Steady State
Cross-Platform Scheduling Considerations 401

7/16/2019 Autosys R11 User Guide
http://slidepdf.com/reader/full/autosys-r11-user-guide 402/459

7/16/2019 Autosys R11 User Guide
http://slidepdf.com/reader/full/autosys-r11-user-guide 403/459
Appendix B: Legacy Agent
ConsiderationsThis section contains the following topics:
Running Jobs on Computers with Legacy Unicenter AutoSys JM Agents (see
page 403)
Running Jobs on Computers with Legacy Unicenter AutoSys JM Agents
Unicenter AutoSys JM can schedule jobs on a computer that is running aprevious product version (or legacy version) of the Unicenter AutoSys JM
Agent. Because legacy Agents connect directly to the database in order to add
job events, Unicenter AutoSys JM only works with legacy Agents running the
same database vendor as the Event Server. In addition, the Unicenter AutoSys
JM instance identifier (AUTOSERV) must match the instance identifier of the
legacy Agent.
Note: An Ingres instance of Unicenter AutoSys JM cannot communicate with
legacy Agent computers.
Legacy Agent Considerations 403

7/16/2019 Autosys R11 User Guide
http://slidepdf.com/reader/full/autosys-r11-user-guide 404/459
Running J obs on Computers with Legacy Unicenter AutoSys J M Agents
Define Legacy Agent Computers
With Unicenter AutoSys JM r11, the Scheduler component has the capability to
run jobs on both Unicenter AutoSys JM r11 and legacy Agent computers. Due
to the differences in the communication protocol used by Unicenter AutoSysJM r11 and legacy Agent computers, the Scheduler component must know
which communication protocol to invoke before contacting the Agent
computer. This is done by examining the Agent's machine definition type
attribute. If the type attribute is set to either l or L, the Scheduler component
prepares the job data using the legacy protocol before sending it to the Agent
computer; otherwise it prepares the data using Unicenter AutoSys JM r11
protocol.
Before you can run jobs on a legacy Agent computer, you must define the
computer to Unicenter AutoSys JM. To define a legacy Agent computer, use
the following JIL statements:
insert_machine: remote_hosttype: machine_typeremote_ h o s t
Defines the name of the legacy Agent computer.
machine_ t y p e
Specifies the type of machine you are defining:
l
Indicates a UNIX computer running a Unicenter AutoSys JM legacy
Agent. This machine type lets the Scheduler know how to use the
legacy communication protocol to communicate with the Agent and is
analogous to an r-type computer for Unicenter AutoSys JM r11.
L
Indicates a Windows computer running a Unicenter AutoSys JM legacy
Agent. This machine type lets the Scheduler know how to use the
legacy communication protocol to communicate with the Agent and is
analogous to an n-type computer for Unicenter AutoSys JM r11.
Note:
Legacy Agent computers may form part of a virtual machine. The job_load,
max_load, and factor attributes continue to support legacy Agent computers.
As part of the Event Server data migration from a previous product version to
Unicenter AutoSys JM r11, pre-defined machines of type 'r' are converted to
type 'l' and pre-defined machines of type 'n' are converted to type 'L'. For
more details about data migration from a previous product version, see the
Upgrade Guide.
404 User Guide

7/16/2019 Autosys R11 User Guide
http://slidepdf.com/reader/full/autosys-r11-user-guide 405/459
Running J obs on Computers with Legac y Unicenter AutoSys J M Agents
Example: Define a Legacy Agent Computer
This example defines the UNIX computer MYLEGACYUNIXAGENT, which is
running a previous version of Unicenter AutoSys JM:
insert_machine: MYLEGACYUNIXAGENT
type: l
Define the Legacy Agent Port
In addition to setting the type attribute of the machine definition for each
legacy Agent computer, the Legacy Agent Port value must also be set in the
Unicenter AutoSys JM environment. This value specifies the port number to be
used by the Scheduler to communicate with legacy Agent computers.
On Windows, the Legacy Agent Port value can be set in the Scheduler screen
of the Unicenter AutoSys Administrator, while on UNIX you can set this valueby locating and updating the AutoRemPort string in the
$AUTOUSER/config.<instance> file.
Note: Because Unicenter AutoSys JM r11 Agent has been decoupled from the
UNIX internet daemon (inetd), the installation does not add any service entries
to either the UNIX services (found in /etc/services) or the inetd configuration
files (/etc/inetd.conf).
Add User IDs and Passwords for a Windows Legacy Agent Computer
After you define a legacy Agent computer to Unicenter AutoSys JM, you canuse the machine attribute to specify that computer in a job definition. For
example:
insert_job: aslegacyjobowner: user@legacyagenthostmachine: legacyagenthostcommand: my_commandThe owner identified in the owner attribute of the job definition must have an
account on the target legacy Agent computer. The account must match the
owner name exactly for the job to run. You must specify the owner of the job
definition as user@machine. The EDIT Superuser must use the autosys_secure
command to add valid accounts and passwords for a Windows legacy Agentcomputer just as you do for a Windows Unicenter AutoSys JM r11 Agent.
Legacy Agent Considerations 405

7/16/2019 Autosys R11 User Guide
http://slidepdf.com/reader/full/autosys-r11-user-guide 406/459
Running J obs on Computers with Legacy Unicenter AutoSys J M Agents
To add user IDs and passwords for a Windows legacy Agent computer
1. Issue the following command at the command prompt:
$ autosys_secure
The Security Utility starts and displays the AutoSys Security Utility menu.
2. Select option 5 (Manage AutoSys User@Host users) from the menu:
AutoSys Security UtilityPlease select from the following options:[1] Activate EIAM instance security.
[2] Manage EDIT/EXEC superusers.
[3] Change AutoSys database password.
[4] Change AutoSys remote authentication method.
[5] Manage AutoSys User@Host users.
[6] Get Encrypted Password.
[0] Exit AutoSys Security Utility.
>5The Manage AutoSys User@Host users menu is displayed.
3. Select option 1 (Create AutoSys User@Host or Domain password) from the
menu:
Manage AutoSys User@Host usersPlease select from the following options:[1] Create AutoSys User@Host or Domain password.
[2] Change AutoSys User@Host or Domain password.
[3] Delete AutoSys User@Host or Domain password.
[4] Show all AutoSys User@Host users.
[9] Exit from "Manage AutoSys User@Host users" menu.
[0] Exit AutoSys Security Utility.
>1
The Security Utility prompts you to enter user information.
4. Enter the user name, user host or domain, and password information
when prompted:
CAUAJM_I_60207 Create an USER@HOST user:
Input the user name (or hit enter to cancel): user
Enter user Host or Domain (or hit enter to cancel): legacyagenthost
Enter new password: ******
Enter new password again: ******
You have successfully added a user when the Security Utility displays thefollowing message:
CAUAJM_I_60135 User Create successful.
406 User Guide

7/16/2019 Autosys R11 User Guide
http://slidepdf.com/reader/full/autosys-r11-user-guide 407/459
Running J obs on Computers with Legac y Unicenter AutoSys J M Agents
How Jobs Are Run On Legacy Agent Computers
The process by which Unicenter AutoSys JM can run jobs directly on a legacy
Agent computer is as follows:
After evaluating the job start conditions, the Scheduler places the job in a
STARTING status.
The Scheduler recognizes the type of the machine as a computer running a
legacy Agent.
The Scheduler obtains the port number of the legacy Agent computer from
its configuration settings.
The Scheduler initiates communication with the legacy Agent computer.
On Windows, the Agent service starts the Agent process. On UNIX, the
internet daemon (inetd) starts the Agent process.
The Scheduler prepares the job details using the legacy Agent
communication protocol. The Scheduler then sends the information to thenewly started Agent process.
The legacy Agent completes the communication protocol with the
Scheduler and starts the job.
The legacy Agent puts a RUNNING event directly into the Event Server.
The Scheduler processes the RUNNING event.
After the job completes, the legacy Agent puts a SUCCESS, FAILURE, or
TERMINATED event directly into the Event Server based on the exit code
of the job.
The Scheduler processes the end status event.
Note:
If the Scheduler log reports an error while trying to run a job on a computer
with a legacy Agent, see the Agent log file on the remote computer for details.
The legacy Agent log may report some database errors while trying to send
job status events even when the Scheduler log shows that the job has
completed successfully. The errors are due to the differences between the new
Unicenter AutoSys JM r11 database tables and the tables expected by the
legacy Agent. These database errors do not prevent the job event from being
sent to the Event Server and must be ignored.
Legacy Agent Considerations 407

7/16/2019 Autosys R11 User Guide
http://slidepdf.com/reader/full/autosys-r11-user-guide 408/459

7/16/2019 Autosys R11 User Guide
http://slidepdf.com/reader/full/autosys-r11-user-guide 409/459
Appendix C: Troubleshooting CAICCI
This section contains the following topics:
Troubleshooting Tools for Remote CAICCI Connections (see page 409)
CAICCI Command Line Controls (see page 412)
Troubleshooting Tools for Remote CAICCI Connections
This section describes tools for troubleshooting remote CAICCI connections for
Unicenter AutoSys JM. CAICCI, or CA International Common Communications
Interface, enables the cross-platform interface of Unicenter AutoSys JM to
communicate with remote UUJMA computers.
Troubleshooting CAICCI 409

7/16/2019 Autosys R11 User Guide
http://slidepdf.com/reader/full/autosys-r11-user-guide 410/459
Troubleshooting Tools for Remote CAICCI Connections
netstat Command—Check TCP/IP Statistics
The netstat command lets you check TCP/IP statistics, as follows:
netstat -a
Displays all connections to the local host involving a port, which can be
resolved to caic(ci). The important connections are ESTABLISHED and
LISTEN. If LISTEN is present, the kernel accepts connections on behalf of
the ccirmtd process. This means that a remote host attempting to connect
to this host should get the TCP/IP connected state. ESTABLISHED
connections are important because CAICCI transactions might not
transpire between the hosts in question if a TCP/IP ESTABLISHED
connection does not exist.
netstat output is of the form:
ip-address:port
In this output, the local host is listed to the left of the remote host. Oneside always has a port that resolves to CAICCI and the other side has a
numeric port. The side with the numeric port is the one that initiated the
connection.
Sometimes netstat -a does not return or may take a long time to return
with very little information. This usually indicates name resolution
problems. In this case, you can issue the following command so netstat
skips the name resolution and displays connection information:
netstat -an | grep 1721
Displays information about the network interfaces on the local hosts.
You can use the netstat -i command to check if the host has more thanone network card and to verify the host names or IP addresses of these
cards.
The netstat -i command also provides valuable statistics about network
collisions. A collision occurs when two hosts simultaneously attempt to
send on a network. The important thing to look for is a high ratio of
outgoing or incoming packets to collisions.
nslookup Command—Verify Host Name and IP Address
The nslookup command is a network utility provided by the operating system.
This command lets you make sure the name and IP address of the host towhich you want to connect are resolvable. If there is a question as to the
integrity of the DNS environment, you can use nslookup to verify the IP
address of the host with which you need to communicate. You can then enter
the IP address back into nslookup and verify that the same host name is
returned. You should verify the IP address and host name for both hosts.
410 User Guide

7/16/2019 Autosys R11 User Guide
http://slidepdf.com/reader/full/autosys-r11-user-guide 411/459
Troubleshooting Tools for Remote CAICCI Connections
ping Command—Verify that a Host is Reachable
The ping command is a network utility provided by the operating system. This
command lets you confirm that a remote host can be reached. You must ping
by IP address and host name. If you cannot ping a host, CAICCI cannotestablish a connection to that host.
tracert/traceroute Command—Check the Route Between Hosts
The tracert/traceroute command is a network utility provided by the operating
system. The tracert (Windows) and traceroute (UNIX) commands lets you
check the route taken between two hosts. If a Client cannot ping a host, this
command may show where the network path is failing.
Troubleshooting CAICCI 411

7/16/2019 Autosys R11 User Guide
http://slidepdf.com/reader/full/autosys-r11-user-guide 412/459
CAICCI Command Line Controls
CAICCI Command Line Controls This section lists CAICCI command line controls that are available on Windows
and UNIX.
ccicntrl Command—Manage CAICCI Services
Use the ccicntrl command as follows to manage CAICCI services:
ccicntrl [start|stop] [tpd, nrs, nrc, rmt]
Stops or starts the specified CAICCI services. The valid services are:
tpd
Transport
nrs
NR-Server
nrc
NR-Client
rmt
Remote
ccicntrl remove [tpd|nrs|nrc|rmt]
Removes the specified service. This does not affect the binary; instead,
the process is no longer available as a service.
ccicntrl install [tpd|nrs|nrc|rmt] path
Installs the specified service. path defines the directory in which the
executable resides.
ccicntrl status
Displays the status of the CAICCI services. The valid statuses are:
STOPPED
STARTED
START PENDING
STOP PENDING
NOT INSTALLED
RUNNING
412 User Guide

7/16/2019 Autosys R11 User Guide
http://slidepdf.com/reader/full/autosys-r11-user-guide 413/459
CAICCI Command Line Controls
cci show Command—View the Shared Memory Segment
The cci show command lets you view the shared memory segment where
CAICCI stores the RVT list. The RVT list includes applications that have
registered themselves with CAICCI to receive data sent by other CAICCIapplications. This is useful for determining general CAICCI information:
The number of free and active RVTs.
The key used to create the CAICCI resources.
The identifiers for the CAICCI resources.
The process IDs of the CAICCI daemons.
The time the shared memory was created.
You can also use this command to display information about a specific receiver, such as: The existence of a specific receiver. The number of pending messages for a specific receiver. The process ID (PID) of the process that created the receiver. The PID of the process that holds the semaphore for this receiver. The last send and receive time. The number of sends and receives.
Troubleshooting CAICCI 413

7/16/2019 Autosys R11 User Guide
http://slidepdf.com/reader/full/autosys-r11-user-guide 414/459
CAICCI Command Line Controls
cci semashow and cci semaclear Commands—Verify if CAICCI Semaphoresare Held
The cci semashow and cci semaclear commands identify whether any of the
CAICCI semaphores are being held. This is useful information for conditionswhen Unicenter AutoSys JM is hanging. When a problem exists, the output of
the command will be two or more lines, as follows:
CAICCI_I_0003 i[ X ] sema[YYYY ] pid[ Z ]
CAICCI_S_0046 Command completed successfully
When there is no problem with the CAICCI semaphores, only the last line is
returned.
X
Defines the particular semaphore identifier in the CAICCI semaphore
group.
YYYY
Defines the semaphore group.
Z
Defines the process ID of the process holding the semaphore.
To use the cci semashow to troubleshoot a hanging condition, run the
command and note the process IDs of those processes holding a CAICCI
semaphore. It is always a good idea to issue the ps -ef command with this
command. If the process holding the semaphore is defunct, the group
responsible for support of this application should be contacted because CAICCIdoes not release resources held by defunct processes.
Next, issue the following for each held semaphore in the semashow output:
cci semaclear X
The semaclear command releases the semaphore and lets Unicenter AutoSys
JM continue normal operation.
cci shutdown Command—Shut Down the Daemon
The cci shutdown command shuts down the daemon. You should not use thiscommand if Unicenter AutoSys JM is still running.
414 User Guide

7/16/2019 Autosys R11 User Guide
http://slidepdf.com/reader/full/autosys-r11-user-guide 415/459
CAICCI Command Line Controls
cci debugon and cci debugoff Commands—Turn Tracing On and Off
The cci debugon and cci debugoff commands turn main daemon tracing on and
off.
ccinet Command—Pass Commands to the CAICCI Remote Daemon
The ccinet command enables commands to be passed to the CAICCI remote
daemon. The following binary is used to pass commands to the CAICCI remote
daemon:
$CAIGLBL0000/cci/bin/rmt
The commands are passed to the CAICCI daemon processes using the
message queue facility. Therefore, if there is a problem with these facilities,
the commands cannot function correctly. The following commands are
available:
ccinet show
Displays the output data concerning the hosts to which the remote
daemon is or should be connected. It also outputs information about the
receivers available on those remote platforms, similar to the RVT
information displayed by the cci show command. The output from this
command is written to the ccirmtd trace file. Therefore, to capture this
output, you must enable the traces before running the command. This
data is also output to the system console. The output from this command
is usually important for solving issues involving remote communication.
ccinet debugon and ccinet debugoff
Identifies the remote traces to be enabled or disabled without recycling the
remote daemon. Trace data is written to:
$CAIGLBL0000/cci/logs/ccirmtd_pid .log
ccinet status
Displays information concerning the remote hosts to which the remote
daemon is or should be connected. This data is displayed in tabular form in
stdout. If you are receiving a message such as, no receiver online, check
this output. It can show that you are not connected to the host in
question.
ccinet release
Displays the release of the ccirmtd to stdout.
Note: The cci 666 command is no longer supported in Unicenter NSM.
Troubleshooting CAICCI 415

7/16/2019 Autosys R11 User Guide
http://slidepdf.com/reader/full/autosys-r11-user-guide 416/459
CAICCI Command Line Controls
ccinet disconnect s y s i d
Issues a disconnect command to the specified sysid and closes down the
connection. This has the effect of severing the connection between the
local and remote hosts. Neither side attempts to reestablish the
connection.
ccinet reconnect s y s i d
Issues a disconnect command to the specified sysid and closes down the
connection, then re-establishes the connection. If the hosts are not
connected, the local daemon attempts to connect to the remote host.
ccinet ping s y s i d
Sends a special CAICCI packet from the local daemon to the specified
sysid , to which the remote daemon responds. This is a useful diagnostic
tool that lets you check if the CAICCI connection is suitable at the most
basic level. Upon successful completion, the roundtrip time is displayed.
ccinet echo s y s id m e s sa g e
Attempts to display the specified message on the target system's console.
This is another useful tool for determining how well the CAICCI connection
between two hosts is functioning.
ccinet retry s y s i d N
Sets the retry time interval on the system identified by sysid as follows:
If you set N to a value greater than 0, the command sets the retry
time interval to N.
If you set N to -1, the command sets the retry time interval to 2, then
doubles it on each successive failure.
If you set N to 0, the command prevents the local host from
attempting to reconnect.
416 User Guide

7/16/2019 Autosys R11 User Guide
http://slidepdf.com/reader/full/autosys-r11-user-guide 417/459
CAICCI Command Line Controls
ccic/ccii/ccir/ccis Commands—Test Application-to-Application CAICCICommunication
The ccic, ccii, ccir, and ccis commands provide a suite of programs for testing
application-to-application CAICCI communication.
ccic machine_name number_of_data_packets_to_send
Exercises the converse feature of CAICCI.
m a ch i n e_ n a m e
Identifies the computer name.
p a c k e t s
Indicates the number of times to send to the test data packet.
ccii
Queries all remote CAICCI connections.
ccir
Receives test data sent by the ccic or ccis command. You can run this test
CAICCI receiver application on a machine where CAICCI is installed.
ccis machine_name number_of_data_packets_to_send
Exercises the send feature of CAICCI.
m a ch i n e_ n a m e
Identifies the computer name.
p a c k e t s
Indicates the number of times to send to the test data packet.
Troubleshooting CAICCI 417

7/16/2019 Autosys R11 User Guide
http://slidepdf.com/reader/full/autosys-r11-user-guide 418/459
CAICCI Command Line Controls
rmtcntrl Command—Manage the Remote Service
The rmtcntrl command enables the remote service. The remote service is
contacted in a manner similar to the remote daemon on UNIX. The following
commands are available:
rmtcntrl status
Displays information about the state of connections to remote hosts.
rmtcntrl debugon
Starts the remote service tracing. Open a unitrace window before issuing
this command. To open a unitrace window, enter unitrace at a command
prompt (assuming unitrace is in the current path).
rmtcntrl debugoff
Stops the remote service tracing. Open a unitrace window before issuing
this command. To open a unitrace window, enter unitrace at a command
prompt (assuming unitrace is in the current path).
rmtcntrl hats
Displays detailed information to standard output about the connections to other hosts. Note: rmtcntrl hats and rmtcntrl rrt are equivalent to ccinet show.
rmtcntrl rrt
Displays detailed information to standard output about the remote receivers. Note: rmtcntrl hats and rmtcntrl rrt are equivalent to ccinet show.
rmtcntrl ping s y s i d
Sends a CAICCI test packet to the specified remote host and displays the
round-trip time.
rmtcntrl reconnect [All|s y s i d ]
Disconnects from and reconnects the specified hosts or all of the remote
hosts to which it is connected.
rmtcntrl disconnect s y s i d
Disconnects from the specified remote host. Neither side attempts to
reconnect.
rmtcntrl release
Displays the release level of the remote service.
418 User Guide

7/16/2019 Autosys R11 User Guide
http://slidepdf.com/reader/full/autosys-r11-user-guide 419/459
CAICCI Command Line Controls
unicntrl Command—Enable the Main Command Line Binary
The unicntrl command enables the main command line binary. The following
command is available:
unicntrl [start | stop] cci
Stops or starts the CAICCI services.
unifstat Command—Display Service Statuses
The unifstat command displays the status of relevant services, including
CAICCI services. The valid statuses are as follows:
RUNNING
NOT ACTIVE
Troubleshooting CAICCI 419

7/16/2019 Autosys R11 User Guide
http://slidepdf.com/reader/full/autosys-r11-user-guide 420/459

7/16/2019 Autosys R11 User Guide
http://slidepdf.com/reader/full/autosys-r11-user-guide 421/459
Appendix D: General Debugging This section contains the following topics:
ISDBGACTIV (see page 421)
ISDBGACTIV
The ISDBGACTIV setting controls the display of trace messages. The
configuration of the ISDBGACTIV setting is different for the various
components. This section explains how to configure Unicenter AutoSys JM to
generate runtime traces.
Configure the Client Utilities to Run With Traces
For the client utilities, ISDBGACTIV is an OS environment variable you must
set before initiating the utilities.
On Windows, use the set command to set ISDBGACTIV.
On UNIX, use either the setenv or export command, depending on your
UNIX operating system, to set ISDBGACTIV.
Upon startup, the traceable applications search for the specified ISDBGACTIV
value and output the appropriate trace messages according to the value
assigned.
General Debugging 421

7/16/2019 Autosys R11 User Guide
http://slidepdf.com/reader/full/autosys-r11-user-guide 422/459
ISDBGACTIV
Configure the Scheduler and Application Server to Run With Traces
ISDBGACTIV is a registry key for the Scheduler and Application Server
on Windows. You can set it on the System screen in the Unicenter AutoSys
Administrator.
On UNIX, ISDBGACTIV is a parameter in the configuration file on UNIX.
Enter a value for the ISDBGACTIV parameter in the
$AUTOUSER/config.$AUTOSERV configuration file.
On startup, the traceable applications search for the specified ISDBGACTIV
value and output the appropriate trace messages.
Note: You can change the ISDBGACTIV value at any time while the traceable
applications are running.
For the Scheduler or Application Server to read the new value after it
has been set on Windows, you must locate the service in the Windows Service
Control Manager, and pause and resume the service.
For the Scheduler or Application Server to read the new value after it
has been set on UNIX, you must obtain the process id of the application, and
use the signal -HUP UNIX command to issue the SIGHUP signal. The new trace
level will be displayed in the log file for confirmation.
422 User Guide

7/16/2019 Autosys R11 User Guide
http://slidepdf.com/reader/full/autosys-r11-user-guide 423/459
ISDBGACTIV
Configure the Agent to Run With Traces
ISDBGACTIV is a registry key for the Agent on Windows. You can set it
on the Unicenter AutoSys Agent screen in the Unicenter AutoSys JM
Administrator.
ISDBGACTIV is an environment descriptor located in the
/etc/auto.profile file on the remote Client in UNIX. Enter a value for the
#AUTOENV#ISDBGACTIV entry in the /etc/auto.profile file.
On startup, the traceable applications search for the specified ISDBGACTIV
value, and output the appropriate trace messages. Job Agent processes
started by the Agent search for the value and set it once for the life of the
process.
Note: You can change the ISDBGACTIV value at any time while the Agent is
running.
For the Agent to read the new value after it has been set on Windows,
you must locate the service in the Windows Service Control Manager, and
pause and resume the service.
For the Agent to read the new value after it has been set on UNIX, you
must obtain the process id, and use the signal -HUP UNIX command to issue a
SIGHUP signal. The new trace level will be displayed in the log file forconfirmation.
General Debugging 423

7/16/2019 Autosys R11 User Guide
http://slidepdf.com/reader/full/autosys-r11-user-guide 424/459
ISDBGACTIV
Trace Settings
The following table describes how Unicenter AutoSys JM interprets the
ISDBGACTIV values:
ISDBGACTIV Description
Value
OFF
MS
LIGHT
HEAVY
JOB
DUMP
No Traces
Adds milliseconds to the timestamp in the log output
Light Traces
Heavy Traces
Traces the run time of a job
Traces data sent and received by the cross-platforminterface
GBE (Scheduler only) Traces scheduler events as they are
read from the ujo_event table
COMM Traces network communication activity at the sockets
level
Note: To combine trace settings, separate each setting with a comma (,). If
you use the OFF setting with other settings, the traceable applications will not
display a trace.
The Scheduler, Application Server, Agent, client utilities, and communication
and database infrastructure routines generate trace messages.
For components such as the Scheduler that generate their own log files, trace
messages are added to these log files at various places when the components
encounter them.
For applications (such as client utilities like jil, autorep, and sendevent) that
are executed interactively or in batches, trace messages are written to the
active window or to a file if streamed accordingly.
424 User Guide

7/16/2019 Autosys R11 User Guide
http://slidepdf.com/reader/full/autosys-r11-user-guide 425/459
Appendix E: Message Port and SSL
ConfigurationThis section contains the following topics: Configuring Unicenter AutoSys JM to Use PMUX and SSL (see page 425) Port Multiplexing (see page 425) How to Configure Unicenter AutoSys JM to Run with SSL (see page 428)
Configuring Unicenter AutoSys JM to Use PMUX and SSL
Unicenter AutoSys JM integrates with CA Common Services for its network
communication needs. CA Common Services, installed as part of the Unicenter
AutoSys JM product installation, includes Dylan Socket Adapter, an application
that serves as an abstract layer between Unicenter AutoSys JM and the
operating system network socket libraries. In addition to offering support for
standard peer-to-peer communications, Dylan Socket Adapter offers other
features, such as port multiplexing (PMUX) and secured encryption of
transport data.
Port Multiplexing
The PMUX feature of Dylan Socket Adapter enables network data intended for
multiple ports on the same host to be redirected through a single physical
port. Using PMUX increases availability of physical ports and reduces the
number of ports that are exposed through a firewall. Physical port 7163 has
officially been registered with the Internet Assignment Numbers Authority
(IANA) for use by CA products. Therefore, the ports that are configured for the
Unicenter AutoSys JM Application Server and Agent during installation are
considered to be virtual ports that map to physical port 7163.
Dylan Socket Adapter consists of a Connection Broker that receives incoming
data from the physical port and redirects it to the corresponding network
application that is listening on a virtual port. Similarly, the Connection Broker
redirects all outgoing data sent by network applications using different virtual
ports through the same physical port.
For the Connection Broker to effectively redirect network traffic to the correct
application, it must be told what virtual ports to recognize. During installation,
Unicenter AutoSys JM configures the virtual ports it intends to use. If,
however, you want to change any of the virtual ports originally set during
installation, you must perform an additional configuration step.
Message Port and SSL Configuration 425

7/16/2019 Autosys R11 User Guide
http://slidepdf.com/reader/full/autosys-r11-user-guide 426/459
Port Multiplexing
How to Configure the Application Server to Listen on a Different Virtual Port
There are several reasons why you might want to reconfigure the port on
which the Application Server listens. For example, you might want to
reconfigure the port if:
The default virtual port is in use by another CA product and you want that
product to continue using that virtual port.
You want to enable more than one Application Server to run on the same
host (which requires you to specify a unique virtual port for each
Application Server).
Use the following process to configure the Application Server to listen on a
different virtual port:
1. Shut down all instances of Unicenter AutoSys JM Scheduler, Application
Server, and Agent.
2. Open a command prompt to the bin folder of the location specified by the
CSAM_SOCKADAPTER environment variable and run the following
command:
configedit port=nnnn EnablePmux=True
n n n n
Defines the port number to configure.
3. Run the following command to display the configuration information for the
specified virtual port:
configedit port=nnnn display
4.
Stop the Dylan Socket Adapter, by doing the following:
Stop the CA Connection Broker service from the Windows Service
Control Manager.
Run the following command:
csampmux stop
5. Start the Dylan Socket Adapter, by doing the following:
Restart the CA Connection Broker service from the Windows Service Control Manager.
Run the following command: csampmux start
426 User Guide

7/16/2019 Autosys R11 User Guide
http://slidepdf.com/reader/full/autosys-r11-user-guide 427/459
Port Multiplexing
6. Enter the new port number for the Application Server.
In the Application Server Port field on the Instance Screen of the
Unicenter AutoSys Administrator.
In the AutoServerPort parameter in the
$AUTOUSER/config.$AUTOSERV configuration file.
7. Start all instances of Unicenter AutoSys JM Scheduler, Application Server,
and Agent.
8. Repeat this process on all computers with an Agent-only or Client
installation that communicates with the Application Server for which you
configured the new port.
Virtual Ports Used by Unicenter AutoSys JM
Both the Unicenter AutoSys JM Application Server and Agent require a
persistent port on which to listen for incoming connections. By default, the
Unicenter AutoSys JM installation configures Dylan Socket Adapter to
recognize virtual port 9000 for use by the Application Server and virtual port
49152 for use by the Agent. You can configure the Application Server to listen
on a different virtual port.
However, for interaction to and from the Unicenter AutoSys JM Application
Server and between the Scheduler and Agent, virtual ports are dynamically
assigned with values in the range of 49153 - 50176. This range of port values
is also known as the ephemeral port range and is reserved for short-term
communications. The Unicenter AutoSys JM installation also configures DylanSocket Adapter to register the ephemeral port range as virtual ports.
More Information:
Port Multiplexing (PMUX) (see page 35)
Message Port and SSL Configuration 427

7/16/2019 Autosys R11 User Guide
http://slidepdf.com/reader/full/autosys-r11-user-guide 428/459
How to Configure Unicenter AutoSys J M to Run with SSL
How to Configure Unicenter AutoSys JM to Run with SSL
The SSL feature of Dylan Socket Adapter provides an added layer of protection
by encrypting network data before transmission over the network and
decrypting the data upon receipt. Unicenter AutoSys JM does not enable SSL
by default. This section discusses how to configure Unicenter AutoSys JM to
use SSL.
Because the Unicenter AutoSys JM Scheduler, Agent, Application Server, and
Client interact with one another, if SSL is enabled for one of the components,
it must be enabled for all components (including remote computers) for
Unicenter AutoSys JM to work. It is impossible for a process on a host that is
SSL-enabled to communicate with a process on a host that is not SSL-enabled.
A Client can be on the same machine that hosts a server process but does not
have to be. Typically, a Client process is remote from the server process.
Clients communicate with servers across operating systems with no additionalconfiguration. The SSL encryption works across operating systems as well,
with no additional configuration other than what is required for each host. All
messages are encrypted, whether they are local or across the network.
Enablement of SSL within the Unicenter AutoSys JM inter-process
communication environment will result in additional overhead being incurred
at process startup time. Persistent processes such as the Scheduler,
Application Server, and Agent will incur this one time cost at startup and then
function normally thereafter. Client processes which are short running in
nature or are invoked repetitively such as JIL, autorep, or sendevent will incur
this cost for each process invocation.
Use the following process to configure Unicenter AutoSys JM to run with
SSL:
1. Shut down all instances of Unicenter AutoSys JM Scheduler, Application
Server, and Agent
2. Open a command prompt to the bin folder of the location specified by the
CSAM_SOCKADAPTER environment variable and run the following
command:
configedit port=nnnn EnableSSL=True
n n n n
Defines the port number to configure.
Note: By default, the Unicenter AutoSys JM installation configures 9000 as
the Application Server port. If you selected another port value for the
Application Server, use that port number when configuring SSL.
428 User Guide

7/16/2019 Autosys R11 User Guide
http://slidepdf.com/reader/full/autosys-r11-user-guide 429/459
How to Configure Unicenter AutoSys J M to Run with SSL
3. Run the following command to display the configuration information for the
specified virtual port:
configedit port=nnnn display
4. Run the following command to enable SSL for the virtual ports in theephemeral port range:
configedit PortRange=49152-50176 EnableSSL=True
5. Stop the CA Connection Broker service from the Windows Service Control
Manager.
6. Restart the CA Connection Broker service from the Windows Service
Control Manager.
7. Start all instances of Unicenter AutoSys JM Scheduler, Application Server,
and Agent.
8. Repeat this process on all machines with a Unicenter AutoSys JM
installation.
To enable SSL, run the following commands as user root from a
Unicenter AutoSys JM environment. In the example below, the port value of
9000 is the port on which the Application Server is listening. This Application
Server port is configurable and need not be 9000, but whatever it is set to,
you must enable it in this same manner. You can view or change this value by
locating AutoServerPort in the config.instance file. If you run more than one
Application Server, you must enable each Application Server in this manner.
Likewise, if you run more than a single Application Server, you must enable
each Application Server in this same manner.
# cd $CSAM_SOCKADAPTER/bin
#
# configedit port=9000 EnableSSL=true display
#
# configedit PortRange=49152-50176 EnableSSL=true display
The parameter EnableSSL= should show a value of true.
If you enable an Application Server port other than the default, you must also
consider how you want that port to behave under the port multiplexing feature
and enable it accordingly.
Note: You must run these commands on every host in the Unicenter AutoSysJM network. After the procedure is complete for a given host, you must stop
and restart all Unicenter AutoSys JM processes on the newly SSL-enabled host.
After all hosts are enabled, all Unicenter AutoSys JM network traffic is
encrypted under SSL.
Message Port and SSL Configuration 429

7/16/2019 Autosys R11 User Guide
http://slidepdf.com/reader/full/autosys-r11-user-guide 430/459

7/16/2019 Autosys R11 User Guide
http://slidepdf.com/reader/full/autosys-r11-user-guide 431/459
Appendix F: eTrust Identity and Access
Management Policy MigrationThis section contains the following topics: Requirements (see page 431) Security Policy Changes from Unicenter AutoSys JM r4.5 (see page 432) How to Migrate Security Policies from eTrust AC to eTrust IAM (see page 435)
Requirements
This appendix describes how to migrate your security policy from eTrust AC to
eTrust IAM.
The migration requires the following files:
antl.jar
se2xml.jar
AutoSys.xsl
PostRegex.xsl
selang2eiam.xsl
These files are included with the Unicenter AutoSys JM installation and are
located in the IAMMigrate subdirectory of the UnicenterAutoSysJM directory.
The following tools are used to migrate your existing eTrust AC policy to eTrust
IAM:
Unicenter AutoSys JM as_safetool Utility
Installs the default policies for all the instances that have eTrust AC
security policies associated with them. Unicenter AutoSys JM installs the
as_safetool utility.
eTrust IAM safex Utility
Imports the final generated XML file containing the migrated policies to the
eTrust IAM back-end server.
Note: The safex utility is only available on a computer on which the eTrust
IAM back-end server is installed. This utility is located in the iTechnology
directory in the SharedComponents directory at the same level as the
UnicenterAutoSysJM directory.
eTrust Identity and Access Management Policy Migration 431

7/16/2019 Autosys R11 User Guide
http://slidepdf.com/reader/full/autosys-r11-user-guide 432/459
Security Policy Changes from Unicenter AutoSys J M r4.5
Java Runtime Environment (JRE)
Runs the Java commands that are part of the migration policy. The
Unicenter AutoSys JM installation installs the JRE in the
SharedComponents directory at the same level as the UnicenterAutoSysJM
directory. To verify that the java command works, make sure the PATH
environment variable gets updated to include the location of the java
binary, and run the following command:
java -version
Security Policy Changes from Unicenter AutoSys JM r4.5
This section describes the changes to the security policy implementation in
Unicenter AutoSys JM r11. You will apply these changes to an eTrust AC policy
as part of the migration process before you import the policies to eTrust IAM:
Deprecated Security Classes and Resources
The following security classes and resources are deprecated in this release:
The as-view resource class has been deprecated and is not imported.
The following as-control resources have been deprecated and are not
imported:
– Resources ending with _ON, _OFF
– Resources beginning with WEBADM
The following as-list resources have been deprecated and are notimported:
– Resources beginning with AUTOCONS
– Resources beginning with JOBDEF
– Resources beginning with XPERT
eTrust AC Default Resource
In Unicenter AutoSys JM r4.5, every eTrust AC resource class contains a
default resource (with the name _default) defining the security policy for
assets that do not have a matching policy.
For Unicenter AutoSys JM r11, the default resource does not exist. Therefore,
the migration process converts the eTrust AC default resources to an
equivalent eTrust IAM policy for assets with no matching policies.
432 User Guide

7/16/2019 Autosys R11 User Guide
http://slidepdf.com/reader/full/autosys-r11-user-guide 433/459
Security Policy Changes from Unicenter AutoSys J M r4.5
Resource Naming Convention
In Unicenter AutoSys JM r4.5, eTrust AC resource names that were created for
all resource classes (except as-owner) were written as the protected asset
name followed by a period followed by the Unicenter AutoSys JM instance(<asset>.<instance>).
For Unicenter AutoSys JM r11, the order of the protected asset name and
Unicenter AutoSys JM instance in the eTrust IAM resource name has been
reversed (<instance>.<asset>). Therefore, the migration process applies the
following conversion rules to the resource names in all classes, except as
owner:
<asset>.<instance> becomes <instance>.<asset>
<asset>.* becomes *.<asset>
<asset>* becomes *.<asset>*
Note: The migration process relies on the eTrust AC resource name following
the syntax <asset>.<instance> to detect the Unicenter AutoSys JM instance.
For example, the migration process will not properly convert an eTrust AC
resource name with the syntax <asset>*<instance> with no period.
eTrust Identity and Access Management Policy Migration 433

7/16/2019 Autosys R11 User Guide
http://slidepdf.com/reader/full/autosys-r11-user-guide 434/459
Security Policy Changes from Unicenter AutoSys J M r4.5
Asterisks in Resource Names
In Unicenter AutoSys JM r4.5, eTrust AC resource names may contain multiple
asterisks (*) to form simple regular expressions.
In Unicenter AutoSys JM r11, by default, eTrust IAM can only interpret
asterisks in resource names if they are located in the first or last position.
Asterisks in positions other than the first or last character are treated literally
and not as special characters. For a resource name containing additional
asterisks to be treated as a regular expression, you must set the policy's
regular expression attribute. Policies with the regular expression attribute
support simple regular expressions with syntax and semantics similar to the
Perl 5 language. The final step of the migration process scans the converted
eTrust IAM policies for resource names containing asterisks in positions other
than first or last. If such a policy is found, the regular expression attribute of
the policy is set and every asterisk in the resource name is prefixed with a
period to conform to a Perl 5 regular expression. Therefore, the migration
process applies the following conversion rules to the resource names after the
Unicenter AutoSys JM r4.5 resource names are converted to their Unicenter
AutoSys JM r11 equivalents:
*[asset ] remains unchanged
[asset ]* remains unchanged
*[asset ]* remains unchanged
[asset ]*[asset ] becomes regular expression policy [asset ].*[asset ]
*[asset ]*[asset ] becomes regular expression policy .*[asset ].*[asset ]
[asset ]*[asset ]* becomes regular expression policy [asset ].*[asset ].*
*[asset ]*[asset ]* becomes regular expression policy .*[asset ].*[asset ].*
434 User Guide

7/16/2019 Autosys R11 User Guide
http://slidepdf.com/reader/full/autosys-r11-user-guide 435/459
How to Migrate Security Policies from eTrust AC to eTrust IAM
How to Migrate Security Policies from eTrust AC to eTrust IAM
In eTrust AC, policies are represented by a script file containing specific
commands written in selang, the eTrust AC command language. In eTrust IAM,
policies are represented by an XML file using specific eTrust IAM XML tags. The
migration process obtains the subset of eTrust AC security policies used by
Unicenter AutoSys JM r4.5 and translates them to an XML file containing
equivalent Unicenter AutoSys JM r11 policies. The resulting XML file is
imported to the eTrust IAM back-end server. Therefore, the migration of
security policies from eTrust AC to eTrust IAM consists of several intermediate
steps. These steps are necessary in light of the differences in the policy
evaluation of the two security engines as well as changes in the resource
naming convention between Unicenter AutoSys JM r4.5 and r11.
To migrate your security policies from eTrust AC to eTrust IAM, you must
perform the following tasks:
Register Unicenter AutoSys JM instances with eTrust IAM back-end server.
Export your eTrust AC policy to a selang file.
Convert the selang file to a selang XML file.
Convert the selang XML file to a Unicenter AutoSys JM r4.5 eTrust IAM
XML file.
Convert the Unicenter AutoSys JM r4.5 eTrust IAM XML file to a Unicenter
AutoSys JM r11 eTrust IAM XML file.
Convert the Unicenter AutoSys JM r11 eTrust IAM XML file to a Unicenter
AutoSys JM r11 eTrust IAM XML file with regular expression policies.
Import the Unicenter AutoSys JM r11 eTrust IAM XML file to the eTrust
IAM back-end server.
eTrust Identity and Access Management Policy Migration 435

7/16/2019 Autosys R11 User Guide
http://slidepdf.com/reader/full/autosys-r11-user-guide 436/459
How to Migrate Security Policies from eTrust AC to eTrust IAM
Register Unicenter AutoSys JM Instances with the eTrust IAM Back-end Server
The Unicenter AutoSys JM as-safetool utility is required to register Unicenter
AutoSys JM instances with the eTrust IAM back-end server. You must
individually register the Unicenter AutoSys JM instance names that arerepresented in the eTrust AC policies with the eTrust IAM back-end server.
To register Unicenter AutoSys JM instances with the eTrust IAM back-
end server
1. Open a Unicenter AutoSys JM command prompt.
2. Set the ASSAFETOOLPW, an operating system environment variable to the
password of the EiamAdmin user, the back-end server administrative
account, before running the as_safetool command.
Note: On Windows, use the set command to set the ASSAFETOOLPW
environment variable. On UNIX, you can either use the setenv or export
command to set ASSAFETOOLPW environment variable.
3. Enter the following command at the command prompt:
as_safetool -b <host name of the eIAM backend server> -s
A list of Unicenter AutoSys JM instances that are already registered with
the eTrust IAM back-end server appear.
4. Enter the following batch command for each Unicenter AutoSys JM
instance that is represented in the eTrust AC policy but is not part of the
list derived from the previous step:
as_safetool -b <host name of the eIAM backend server>-i <Unicenter AutoSys JM instance>Registers the Unicenter AutoSys JM instance with the eTrust IAM back-endserver.
Note: The as_safetool command installs some default eTrust IAM policies
for each Unicenter AutoSys JM instance. It is recommended that you
review these policies and update them accordingly.
436 User Guide

7/16/2019 Autosys R11 User Guide
http://slidepdf.com/reader/full/autosys-r11-user-guide 437/459
How to Migrate Security Policies from eTrust AC to eTrust IAM
Exporting Your eTrust AC Policy to a selang File
After registering the instances with the eTrust IAM back-end server, you must
export all the Unicenter AutoSys JM r4.5 resources from eTrust AC into a script
file containing the selang commands required to duplicate the database. Youshould only export resources from the following user-defined classes:
as-calendar as-control as-cycle as-gvar as-job as-list as-machine as-owner The eTrust AC dbmgr utility is required to export your eTrust AC policy to a
selang file. eTrust AC provides the dbmgr utility to export the necessary
resources into a script file containing the selang commands required to
duplicate the database.
Note: For more information about how to use the dbmgr utility to export
resources from the listed classes into a selang file, see the eTrust Access
Control Reference Guide.
eTrust Identity and Access Management Policy Migration 437

7/16/2019 Autosys R11 User Guide
http://slidepdf.com/reader/full/autosys-r11-user-guide 438/459
How to Migrate Security Policies from eTrust AC to eTrust IAM
Convert the selang File to a selang XML File
The JRE is required to convert the selang file to a selang XML file. This step
identifies the selang commands from the exported file created in the previous
step and generates an equivalent XML file containing the selang commands asXML tags. Once the script file is converted to an XML file, you can use an XML
parser to translate the eTrust AC XML tags to the equivalent eTrust IAM XML
tags.
Note: Make sure the PATH environment variable is updated to include the
location of the java binary.
To convert the selang file to a selang XML file, go to the IAMMigrate
subdirectory of the Unicenter AutoSys JM installation path and enter the
following command:
java -jar se2xml.jar <exported selang file name>
< e x p o r t e d s e la n g f i le n a m e >
Defines the name of the selang file.
This command generates an XML file with the name <exported selang file
name>.xml.
438 User Guide

7/16/2019 Autosys R11 User Guide
http://slidepdf.com/reader/full/autosys-r11-user-guide 439/459
How to Migrate Security Policies from eTrust AC to eTrust IAM
Convert the selang XML File to a Unicenter AutoSys JM r4.5 eTrust IAM XML File
The JRE is required to convert the selang XML file to a Unicenter AutoSys JM
r4.5 eTrust IAM XML file. This step uses an XML parser to identify the eTrust
AC tags from the XML file created in the previous step, and generates an XMLfile containing the equivalent eTrust IAM tags.
Note: Make sure the PATH environment variable is updated to include the
location of the java binary.
To convert the selang XML file to a Unicenter AutoSys JM r4.5 eTrust IAM XML
file, go to the IAMMigrate subdirectory of the Unicenter AutoSys JM installation
path and enter the following command:
java org.apache.xalan.xslt.Process -IN <exported selang file name>.xml
-XSL selang2eiam.xsl -OUT <AutoSys 4.5 eIAM file name>.xml
-PARAM ApplicationName UnicenterAutoSysJM
-PARAM PoliciesFolder <eIAM backend server policy folder name>
< e x p o r t e d s e la n g f i le n a m e > .xml
Defines the file name of the selang XML file.
< A u t o Sy s 4 .5 e I A M f i le n a m e > .xml
Defines the file name for the eTrust IAM XML file.
< e I A M b a ck e n d s e r v e r p o l ic y f o ld e r n a m e >
Defines the path name on the eTrust IAM back-end server to which to
import the policies.
Limits: You must precede this value with a slash. For example,
/MigratedPolicies.
This command generates an XML file with the name <AutoSys 4.5 eIAM file
name>.xml.
eTrust Identity and Access Management Policy Migration 439

7/16/2019 Autosys R11 User Guide
http://slidepdf.com/reader/full/autosys-r11-user-guide 440/459
How to Migrate Security Policies from eTrust AC to eTrust IAM
Convert the Unicenter AutoSys JM r4.5 eTrust IAM XML File to a Unicenter AutoSys JM r11 eTrust IAM XML File
The JRE is required to convert the Unicenter AutoSys JM r4.5 eTrust IAM XML
file to a Unicenter AutoSys JM r11 eTrust IAM XML file. The XML file created inthe previous step represents a direct conversion of the Unicenter AutoSys JM
r4.5 policies from the selang command language to eTrust IAM XML. This step
applies the security policy changes needed for the security policies to work
with Unicenter AutoSys JM r11.
Note: Make sure the PATH environment variable is updated to include the
location of the java binary.
To convert the Unicenter AutoSys JM r4.5 eTrust IAM XML file to a Unicenter
AutoSys JM r11 eTrust IAM XML file, go to the IAMMigrate subdirectory of the
Unicenter AutoSys JM installation path and enter the following command:
java -Xmx128M org.apache.xalan.xslt.Process -IN <AutoSys 4.5 eIAM file name>.xml
-XSL AutoSys.xsl -OUT <AutoSys r11 eIAM file name>.xml
< A u t o Sy s 4 .5 e I A M f i le n a m e > .xml
Defines the file name of the eTrust IAM XML file.
< A u t o Sy s r 1 1 e I A M f i le n a m e > .xml
Defines the file name for the eTrust IAM XML file.
This command generates an XML file with the name <AutoSys r11 eIAM file
name>.xml.
440 User Guide

7/16/2019 Autosys R11 User Guide
http://slidepdf.com/reader/full/autosys-r11-user-guide 441/459
How to Migrate Security Policies from eTrust AC to eTrust IAM
Convert the Unicenter AutoSys JM r11 eTrust IAM XML File to a Unicenter AutoSys JM r11 eTrust IAM XML File with Regular Expression Policies
The JRE is required to convert the Unicenter AutoSys JM r11 eTrust IAM XML
file to a Unicenter AutoSys JM r11 eTrust IAM XML file with regular expressionpolicies. This step scans the converted eTrust IAM policies for resource names
containing asterisks in positions other than first or last. If such a policy is
found, the regular expression attribute of the policy is set and every asterisk in
the resource name is prefixed with a period to conform to a Perl 5 regular
expression.
Note: Make sure the PATH environment variable is updated to include the
location of the java binary.
To convert the Unicenter AutoSys JM r11 eTrust IAM XML file to a Unicenter
AutoSys JM r11 eTrust IAM XML file with regular expression policies, go to the
IAMMigrate subdirectory of the Unicenter AutoSys JM installation path and
enter the following command:
java -Xmx128M org.apache.xalan.xslt.Process -IN <AutoSys r11 eIAM file name>.xml
-XSL PostRegex.xsl -OUT <AutoSys r11 REGEX eIAM file name>.xml
< A u t o Sy s r 1 1 e I A M f i le n a m e > .xml
Defines the file name of the eTrust IAM XML file.
< A u t o S y s r 1 1 R EGEX e I AM f i l e n am e > .xml
Defines the file name for the eTrust IAM XML file.
This command generates an XML file with the name <AutoSys r11 eIAM file
name>.xml.
eTrust Identity and Access Management Policy Migration 441

7/16/2019 Autosys R11 User Guide
http://slidepdf.com/reader/full/autosys-r11-user-guide 442/459
How to Migrate Security Policies from eTrust AC to eTrust IAM
Import the Unicenter AutoSys JM r11 eTrust IAM XML File to the eTrust IAM Back-end Server
The eTrust IAM safex utility is required to import the Unicenter AutoSys JM r11
eTrust IAM XML file to the eTrust IAM back-end server. This utility is onlyavailable on a computer where the eTrust IAM back-end server has been
installed.
The XML file created in the previous step represents the conversion from
Unicenter AutoSys JM r4.5 policies in the selang command language to
Unicenter AutoSys JM r11 policies in eTrust IAM XML. The final step in the
migration policy is to import this XML file to the eTrust IAM back-end server.
This adds the security policies to the appropriate repository for use by
Unicenter AutoSys JM r11.
To import the Unicenter AutoSys JM r11 eTrust IAM XML file to the eTrust IAM
back-end server, go to the iTechnology subdirectory of the SharedComponents
directory located at the same level as the Unicenter AutoSys JM installation
path and enter the following command:
safex -u EiamAdmin -p <EiamAdmin account password>
-f <AutoSys r11 REGEX eIAM file name>.xml
< Ei am A d m i n a cc o u n t p a ss w o r d >
Specifies the password of the EiamAdmin user, the back-end server
administrative account with permissions to update the eTrust IAM back-
end server.
< A u t o S y s r 1 1 R EGEX e I AM f i l e n am e > .xml
Defines the file name of the eTrust IAM XML file.
Note: The safex utility directs all output to stderr. It is recommended that you
capture this output and store it to a file so you can examine errors.
This command imports the converted eTrust AC policies to the
UnicenterAutoSysJM application instance on the eTrust IAM back-end server.
Cleanup
When you finish migrating eTrust AC policies to eTrust IAM, you can safely
remove the selang file and all the intermediate XML files created by the
previous steps.
442 User Guide

7/16/2019 Autosys R11 User Guide
http://slidepdf.com/reader/full/autosys-r11-user-guide 443/459
Appendix G: Aggregator
ConsiderationsThis section contains the following topics:
About Unicenter AutoSys JM Aggregator (see page 443)
Running the Unicenter AutoSys JM Aggregator (see page 444)
Unicenter AutoSys JM Aggregator Statistics (see page 445)
About Unicenter AutoSys JM Aggregator
The Unicenter AutoSys JM aggregator collects raw data from various product
tables and stores the data in statistics tables. This statistical information is
used by applications such as, Unicenter WCC to provide a quick and easy way
to generate custom and canned reports. Without aggregated statistics, an
application requiring this data would need to make numerous database
queries, not to mention the calculations required to produce this statistical
data.
The aggregation process computes and stores statistics based on hour
intervals. Once the aggregated data is available in the database, an application
can retrieve these aggregated statistics by using the product’s public SDK. By
utilizing the Unicenter AutoSys JM aggregator, an application can now extract
product based statistical data quickly and efficiently.
More information:
Unicenter AutoSys JM Aggregator Statistics (see page 445)
Aggregator Considerations 443

7/16/2019 Autosys R11 User Guide
http://slidepdf.com/reader/full/autosys-r11-user-guide 444/459
Running the Unicenter AutoSys J M Aggregator
Running the Unicenter AutoSys JM Aggregator
The aggregator should be run on a daily basis at a minimum. The aggregator
can be executed on an hourly basis and is the preferred recommendation.
Executing the program on an hourly basis reduces the amount of time required
to aggregate raw data as it is only aggregating the data that is collected in one
hour when compared to the data collected over a 24 hour period.
A second benefit to aggregate data on an hourly basis is that an application
which references aggregated data will be able to display statistical information
up to the previous hour as opposed to the prior day.
To aggregate data every hour, schedule it at the fifth minute so that previous
hour data can be viewed immediately. To aggregate once a day, schedule it so
that aggregation is done when the system is not loaded or lightly loaded.
Note: You should avoid scheduling the aggregator process during your dailyscheduled database maintenance or while executing the Unicenter AutoSys JM
DBMaint program.
444 User Guide

7/16/2019 Autosys R11 User Guide
http://slidepdf.com/reader/full/autosys-r11-user-guide 445/459
Unicenter AutoSys J M Aggregator Statistics
Unicenter AutoSys JM Aggregator Statistics
The following statistics are calculated on an hourly basis:
alarms_database_rollover
Generates the total number of DB_ROLLOVER alarms due to the database
rollover from dual event server mode to single event server mode.
alarms_job_failure
Generates the total number of JOBFAILURE alarms due to jobs that are in
FAILURE or TERMINATED status.
alarms_max_retrys
Generates the total number of MAX_RETRYS alarms.
alarms_max_runtime
Generates the total number of MAXRUNALARM alarms.alarms_min_runtime
Generates the total number of MINRUNALARM alarms.
alarms_scheduler_rollover
Generates the total number of EP_ROLLOVER alarms when the Shadow
Scheduler takes over.
alarms_scheduler_shutdown
Generates the total number of EP_SHUTDOWN alarms.
alarms_start_job_failure
Generates the total number of STARTJOBFAIL alarms.
alarms_unanswered
Generates the total number of alarms that are open, that is, alarms
neither acknowledged nor closed.
alarm_total
Generates the total number of alarms, irrespective of alarm status.
alarm_response_time_avg
Generates the average time taken to respond to an alarm.
jobs_failure
Generates the total number of jobs in FAILURE status.
jobs_inactive
Generates the total number of jobs in INACTIVE status.
jobs_onhold
Generates the total number of jobs in ON_HOLD status.
Aggregator Considerations 445

7/16/2019 Autosys R11 User Guide
http://slidepdf.com/reader/full/autosys-r11-user-guide 446/459
Unicenter AutoSys J M Aggregator Statistics
jobs_onice
Generates the total number of jobs in ON_ICE status.
jobs_restart
Generates the total number of jobs in RESTART status.
jobs_running
Generates the total number of jobs in RUNNING status.
jobs_starting
Generates the total number of jobs in STARTING status.
jobs_success
Generates the total number of jobs in SUCCESS status.
jobs_terminated
Generates the total number of jobs in TERMINATED status. job_failures
Generates the total number of jobs that are in FAILURE or TERMINATED
status.
job_runs
Generates the total number of jobs that ran in that hour.
job_force_starts
Generates the total number of jobs that were force started.
job_kills
Generates the total number of jobs for which KILLJOB event was sent.
job_open_svcdesk
Generates the total number of jobs for which a service desk issue was
opened. This statistic is different from others in that it is not for a
particular hour. It is computed for that Unicenter AutoSys JM instance
depending on when the aggregator was run.
total_events
Generates the total number of events processed.
total_latency
Generates the latency in processing all events. That is the total processing
time that is required for all the events.
Note: For more information, see the Reference Guide.
446 User Guide

7/16/2019 Autosys R11 User Guide
http://slidepdf.com/reader/full/autosys-r11-user-guide 447/459
Appendix H: Tuning Unicenter AutoSys
JMUnicenter AutoSys JM r11 supports scalability. If run on high-end computers,you can configure Unicenter AutoSys JM to make efficient use of the computer’s CPU, memory, and database connections in order to increase the overall productivity. This section contains the following topics: Tuning the Scheduler (see page 448) Tuning the Application Server (see page 450) Tuning the Agent (see page 451)
Tuning Unicenter AutoSys J M 447
7/16/2019 Autosys R11 User Guide
http://slidepdf.com/reader/full/autosys-r11-user-guide 448/459
Tuning the Scheduler
Tuning the Scheduler
On Windows, the registry keys are the Scheduler tuning parameters.You can set the tuning parameters on the Unicenter AutoSys JM Administrator
System screen.
On UNIX, the OS environment variables are the Scheduler tuning
parameters. You can use either the setenv or export command to set the
tuning parameters, depending on your UNIX operating system. The tuning
parameters may also be set in any one of the environment script files
(autosys.<UNIX shell>.<computer name>) located in the $AUTOUSER
directory.
Upon startup, the tuning parameters are read and applied by the Scheduler
and persist throughout the life of the process. You must shut down the
Scheduler to apply new values for the tuning parameters.
SCHED_SCALE
Controls the maximum limit of process threads that can be started
dynamically as a function of the scale value. This value does not represent
the total number of process threads that are active. Rather, it is a scale
value used by the Scheduler to calculate the maximum limit of threads
that can dynamically be started as the workload demands. A
SCHED_SCALE value of 1 therefore represents the lowest ceiling of
additional dynamic threads that can be started to process job events
(some arbitrary ceiling not necessarily equal to one). Increasing this value
increases the Scheduler’s ability to process job events.
Default: 5
Limit: 1 to 64
448 User Guide

7/16/2019 Autosys R11 User Guide
http://slidepdf.com/reader/full/autosys-r11-user-guide 449/459
Tuning the Scheduler
DB_CONNECTIONS
Controls the maximum number of database connections allotted to the
Scheduler. Increasing this value increases the Scheduler’s ability to
perform simultaneous database operations.
Default: 16
Limit: 1 to 128
Note: The Application Server also shares the same DB_CONNECTIONS
tuning parameter. If the Scheduler and Application Server are run on the same
Windows computer, then this value will be applied to both processes upon
startup.
Note: The Application Server also shares the same DB_CONNECTIONS
tuning parameter. If you set this value in the environment script files locatedin the $AUTOUSER directory and start the Scheduler and Application Server on
the same UNIX computer after sourcing the environment, then this value will
be applied to both processes upon startup.
Tuning Unicenter AutoSys J M 449

7/16/2019 Autosys R11 User Guide
http://slidepdf.com/reader/full/autosys-r11-user-guide 450/459
Tuning the Application Server
Tuning the Application Server
On Windows, the registry keys are the Scheduler tuning parameters.You can set the tuning parameters on the Unicenter AutoSys JM Administrator
System screen.
On UNIX, the OS environment variables are used as the Application
Server tuning parameters. You can use either the setenv or export command
to set the tuning parameters, depending on your UNIX operating system. The
tuning parameter may also be set in any one of the environment script files
(autosys.<UNIX shell>.<computer name>) located in the $AUTOUSER
directory.
Upon startup, the tuning parameters are read and applied by the Application
Server and persist throughout the life of the process. You must shut down the
Application Server to apply new values for the tuning parameters.
DB_CONNECTIONS
Controls the maximum number of database connections allotted to the
Application Server. Increasing this value increases the Application Server's
ability to process simultaneous Unicenter AutoSys JM Client and Agent
requests.
Default: 32
Limit: 1 to 128
Note: The Scheduler also shares the same DB_CONNECTIONS tuning
parameter. If the Scheduler and Application Server are run on the same
Windows computer, then this value will be applied to both processes upon
startup.
Note: The Scheduler also shares the same DB_CONNECTIONS tuning
parameter. If you set this value in the environment script files located in the
$AUTOUSER directory and start the Scheduler and Application Server on the
same UNIX computer after sourcing the environment, then this value will be
applied to both processes upon startup.
450 User Guide

7/16/2019 Autosys R11 User Guide
http://slidepdf.com/reader/full/autosys-r11-user-guide 451/459
Tuning the Agent
Tuning the Agent
On Windows, the registry keys are used as the Agent tuningparameters. You can set the tuning parameters on the Unicenter AutoSys JM
Administrator Agent screen.
On UNIX, the OS environment variables are used as the Agent tuning
parameters. You can use either the setenv or export command to set the
tuning parameters, depending on your UNIX operating system. The tuning
parameter may also be set in the uajm_start script file located in the
/etc/init.d, /etc/rc.d, or /sbin/init.d directory, based on the UNIX operating
system.
Upon startup, the tuning parameters are read and applied by the Agent and
persist throughout the life of the process. You must shut down the Agent to
apply new values for the tuning parameters.
RSP_REGULATOR
Controls the maximum job agent processes that can be started at the
same time. Increasing this value raises the maximum number of
simultaneous job agent processes.
Default: 5
Limit: 1 to 256
Note: The RSP_REGULATOR parameter does not necessarily limit the number
of job agent processes that run on a computer. It only controls how many job
agents can be started at the same time. Long running jobs (file watcher or
otherwise) will not prevent new job agents from starting and running on the
same computer.
Tuning Unicenter AutoSys J M 451

7/16/2019 Autosys R11 User Guide
http://slidepdf.com/reader/full/autosys-r11-user-guide 452/459

7/16/2019 Autosys R11 User Guide
http://slidepdf.com/reader/full/autosys-r11-user-guide 453/459
Index $$AUTORUN • 119 $AUTOTESTMODE • 234 $AUTOUSER/config.$AUTOSERV • 290 %
%AUTOTESTMODE% • 234 /
/etc/.autostuff file • 314, 315 A
access modes • 52 ACTIVATED status • 102 activating Unicenter Service Desk interface •
376 adding user IDs and passwords • 405 administrative privileges • 46 administrator
overview • 37 starting • 38
after_time report attribute • 215 agent
computer • 30, 381 log files directory • 298 maintaining • 237 overview • 24 setting job profiles • 93 starting • 238 troubleshooting • 339, 342, 345 tuning • 451 verifying • 339
aggregator overview • 443 running • 444 statistics • 445
alarm monitor/report attribute • 212 alarm_verif monitor attribute • 216 alarms
callbacks • 316 DB_PROBLEM • 316 DB_ROLLOVER • 316 EP_HIGH_AVAIL • 316 EP_ROLLOVER • 316
EP_SHUTDOWN • 316 overview • 32 verification • 216
all_events monitor/report attribute • 212 all_status monitor/report attribute • 213 application server
overview • 23 troubleshooting • 355, 356, 358, 361 tuning • 450
asset-level security • 49, 69 assets
creating • 64 deleting • 65 listing • 66
updating • 65
attributes box job • 101 command job • 100 file watcher job • 100 machine • 324, 325 monitor (optional) • 216 monitor and report (essential) • 211, 212,
213, 214 report (essential) • 215 unsupported • 401
auto.profile file • 311 autodwp command • 322 AutoInstWideAppend • 307 automated job control • 18autoping command • 339 AutoRemoteDir • 298 AutoRemPort • 305 AUTOSERV variable • 31autosyslog command • 340, 341 B
backing up calendar definitions • 222 definitions • 223 global variable definitions • 224 MDB • 282
batch files and exit codes • 116 best match policy • 51 bi-directional scheduling • 381, 389
Index 453

7/16/2019 Autosys R11 User Guide
http://slidepdf.com/reader/full/autosys-r11-user-guide 454/459
box jobs attributes • 101, 125 creating • 157 default behavior • 121 flow examples • 128, 130, 132, 134 forcing jobs in a box to start • 127 guidelines • 122 overview • 90, 121 running • 122 starting conditions • 90, 92status changes • 124 time conditions • 126
C
cache update interval • 48CAICCI
command line controls • 412 defined • 381 troubleshooting • 409
calculating wait time • 302 calendars
backing up • 222 custom • 107restoring definitions • 225
cci debugon and cci debugoff • 415 cci semashow and cci semaclear X • 414 cci show • 413 cci shutdown • 414 ccic/ccii/ccir/ccis commands • 417 ccicntrl command • 412
ccinet • 415 chase command • 240 Check_Heartbeat • 297 clean_files • 240 CleanTmpFiles • 299 client
computer • 30defined • 28
command jobs • 89, 100communications • 30 components
client • 28 dual event server • 22 event server • 22 interaction • 25, 328 overview • 21 scheduler • 23 troubleshooting • 328
computers agent • 30, 381 client • 30 server • 30
configurationfile • 290 configuring
application server • 426 enterprise job scheduling • 385 file parameters • 290 message forwarding • 369 notification • 374 remote authentication • 314 running with SSL • 428 scheduler authentication • 314
console utilities • 37 conventions • 18, 433 creating
box job • 157 dependent command job • 155 file watcher job • 154 job definition • 78 job groupings • 158 new job type • 91 simple command job • 153 variable definition • 97
cross-instance dependencies • 111 scheduling • 381
cross-platform considerations • 380, 384dependencies • 381, 392dependencies (Unicenter AutoSys JM
Connect) • 390, 391, 392environment variable • 388 interface messages • 400limitations • 380 scheduling • 380
CrossPlatformScheduling • 306 custom calendars • 107 D
databasearchitecture • 244 connections • 293 daily maintenance • 247 general maintenance • 246 maintenance • 269, 295 overview • 22
454 User Guide

7/16/2019 Autosys R11 User Guide
http://slidepdf.com/reader/full/autosys-r11-user-guide 455/459
passwords • 44 storage requirements • 246 vendors • 22 verifying connection • 339
database date and time • 281 date/time job dependencies • 107 daylight time changes • 83 DB_CONNECTIONS • 448, 450 DBEventReconnect • 293 DBLibWaitTime • 291 DBMaint script • 248, 249DBMaint.bat batch file • 248, 249 DBMaintCmd • 295 DBMaintTime • 295 deadlock • 250, 331 debugging • 421 defining
legacy agent computers • 404 legacy agent port • 405 machines • 186 monitor or report • 210 real machine • 192 virtual machine • 193
definitions • 381 deleting
box job • 164 job • 164 job profile • 96 real machine • 192, 195 variable definition • 99 virtual machine • 195
dependencies cross-platform • 390, 392 job scheduler interdependencies • 391
dependencies (job) date/time • 107 exit code • 115 global variables • 118 job status • 108
deprecated security classes • 432 dual event servers
defined • 22 dynamic workload placement • 320, 321
E
EDErrTimeInt • 294 edit permissions • 72 EDIT superuser • 68 EDNumErrors • 294
enabling synchronized push • 49 encrypting messages • 36enterprise job scheduling
configuring • 385 prerequisites • 383 environment variables defining • 94
eTrust AC default resource • 432 eTrust IAM
asset level security • 49 best match policy • 51 native security • 66 policy migration • 431 policy synchronization • 47resource classes • 50 security control • 67 security enabled applications • 64
event management • 365event servers
defined • 22 failure • 252 maintaining • 241, 242 overview • 22, 113 rollover recovery • 251 synchronizing • 255 troubleshooting • 330, 331
event transfer • 295 events
life cycle • 366 overview • 31 security • 74 starting a job • 75
EvtTransferWaitTime • 295 examples
advanced job flows • 136, 138, 139, 140,141
auto.profile • 312 box job flow • 128, 130, 132, 134 notification • 317
EXEC superuser • 69 execute permissions • 72exit codes
batch files • 116
FALSE.EXE • 116 job dependencies • 115, 116
extended functionality port multiplexing • 35Unicenter AutoSys JM Adapters • 33
Index 455
7/16/2019 Autosys R11 User Guide
http://slidepdf.com/reader/full/autosys-r11-user-guide 456/459
I
Unicenter AutoSys JM Agent • 33 Unicenter AutoSys JM Connect • 33
external instance entries • 385
Ffactor • 186, 190 FAILURE status • 102 FALSE.EXE • 116 file watcher jobs
attributes • 100 creating • 154 overview • 91
forcing jobs to start • 202G
gid • 71 global variables (job dependencies) • 118 group ID • 71 H
handling errors • 260 heartbeats • 297 high availability
dual event servers • 22 shadow scheduler • 23
INACTIVE status • 102 InetdSleepTime • 308 Ingres
architecture • 270 backing up and recovery • 282, 285 CA-MDB sizes • 274 connecting to remote MDB • 277 creating users • 278 default users • 278 disk space • 274 environment variables • 271 file size • 273 maintaining • 269 MDB security • 272 sql utility • 281 starting • 279 stopping • 280
installation considerations (event agent) • 367 instances
defined • 31 interface components • 30 ISDBGACTIV • 421
J
JIL adding machines • 159 changing a job • 161 creating a box job • 157 creating a file watcher job • 154 creating dependent command job • 155 creating job definition • 78 creating job groupings • 158 defined • 20 defining a monitor or report • 210 deleting a job • 164 example script • 168 placing jobs in a box • 161 running a job • 152 setting job overrides • 167 setting time dependencies • 162 specifying job overrides • 165 subcommands • 146 submitting job definitions • 150, 151 syntax rules • 144
job information language • 20, 32 job ownership • 70 job profiles manager • 95 job scheduling
inbound • 382 outbound • 382
job states • 102 job status • 108 job types
job types • 148 using • 92
job_load • 188 jobs
attributes • 100, 101 backing up definitions • 222 basic job information • 89 box jobs • 90 command jobs • 89 defining • 20 deleting • 164 dependencies • 108, 115, 118 edit permissions • 72 execute permssions • 72file watcher jobs • 91 managing job status • 110 naming conventions • 394 overview • 20, 87 permissions • 74
456 User Guide

7/16/2019 Autosys R11 User Guide
http://slidepdf.com/reader/full/autosys-r11-user-guide 457/459
placing jobs in a box • 161 restoring definitions • 225 run numbers and names • 119 running JIL • 152 running on UUJMA computers • 394 setting overrides • 167 setting time dependencies • 162 specifying job overrides • 165 starting conditions • 92, 106 states • 102 submitting definitions • 150 time/date dependencies • 107 types • 88
K
KillSignals • 304 Lload balancing • 199, 208log • 400 look-back conditions • 156 M
MachineMethod • 303 machines
attributes • 324, 325 definitions • 191 status • 196
maintenance commands • 240 managing job status • 110 max_load • 186, 188 MaxRestartTrys • 301 message forwarding • 369 message port and SSL configuration • 425 modifying configuration values • 48modifying DBMaint.bat file • 249 monitors • 209, 210 multiple machine queues • 207 N
naming conventions • 391 native security • 66 netstat command • 410 notifications
configuring • 374 installation considerations • 373 overview • 370 sending • 375 working • 372
NotifyAckTimeout • 309 NotifyServerNode • 309 nslookup command • 410 ntrys • 119 O
offline • 197 ON_HOLD status • 102 ON_ICE status • 102 online • 197 operating environment conventions • 18Oracle
database-specific tools • 328 P
passwords • 44 PEND_MACH status • 102, 198 permissions
edit • 72 execute • 72granting • 73 machine • 72types • 72 Windows NT • 74
ping command • 411 policy synchronization • 47port multiplexing • 425 Q
QUE_WAIT status • 102 queuing jobs • 202, 203, 206, 207 R
real machines defining • 192 deleting • 192, 195 overview • 185
related publications • 19RemoteProFiles • 300 reports • 209, 210 resource classes
as-appl class • 52 as-calendar class • 53 as-control class • 54 as-cycle class • 55 as-group class • 56 as-gvar class • 56 as-job class • 57 as-joblog class • 59
Index 457

7/16/2019 Autosys R11 User Guide
http://slidepdf.com/reader/full/autosys-r11-user-guide 458/459
as-jobtype class • 60 as-list class • 61as-machine class • 62 as-owner class • 63
resource naming convention • 433 RESTART status • 102 restoring definitions • 225 rmtcntrl command • 418 RSP_REGULATOR • 451 run number • 119 run_num/ntry • 119 running
monitor or report • 218 scheduler in test mode • 234
running jobs on legacy agent computers • 403, 407
RUNNING status • 102 S
sample configuration file • 291 SCHED_SCALE • 448 scheduler
authentication • 42 cascading errors • 294 log • 400 log disk space • 294 log file location • 228 maintaining • 219 monitoring • 227 overview • 23, 112
restoring primary • 231 rollover • 230 running in test mode • 234 start processing • 221 starting in global mode • 228 stopping • 233 troubleshooting • 332, 333, 334 tuning • 448
security agent authentication • 41 asset-level • 69client-side • 315 database field verification • 40 events sent by users • 74 granting permissions • 73 job definition encryption • 40 job permissions and windows • 74 native • 66 overview • 39
passwords • 44 permission types • 72 policy changes • 432 preventing unauthorized access • 40 restricting • 45 scheduler authentication • 42 security control • 67 system level • 40 user authentication • 41 user types • 71
security (events) • 74 security-enabled application • 64 sendevent command • 69 sendevent retries • 296 server
computer • 30service desk
configuring • 376 initiating • 378 overview • 376 setting parameters • 376
ServiceDeskCust • 310 ServiceDeskURL • 310 ServiceDeskUser • 310 shadow scheduler
high availability option • 23SNMP connections • 292 SnmpCommunity • 292 SnmpManagerHosts • 292space requirements • 275specifying relative process power • 190SSL • 425, 428 standard time change • 84starting conditions • 106, 108 STARTING status • 102 subcommands • 146 SUCCESS status • 102 superuser
EDIT • 68 EXEC • 69
synchronize poll interval time • 48synchronizing databases • 255 syntax rules • 144
system architecture (example) • 25
458 User Guide

7/16/2019 Autosys R11 User Guide
http://slidepdf.com/reader/full/autosys-r11-user-guide 459/459
T
TERMINATED status • 102time changes
date and time attributes • 82 daylight saving • 83 standard • 84
time dependencies • 107, 162 tracert command • 411 troubleshooting
agent • 339, 340, 341, 342, 345 application server • 345, 355, 356, 361 event server • 330, 331 job failure • 351, 352, 354 MDB • 287 scheduler • 332, 333, 334, 337 system components • 328tools (CAICCI) • 409 Windows services • 329
tuning agent • 451 application server • 450 scheduler • 448
TZ environment variable • 107 U
uid • 71 Unicenter AutoSys JM Connect • 382 Unicenter AutoSys JM Scheduler • 382Unicenter DSM • 320
running jobs • 393, 394 software requirements • 383
Vvariable definitions
creating • 97 deleting • 99 editing • 98
virtual machines defining • 193 deleting • 195 overview • 186
virtual port • 426