Embed Size (px)
Citation preview
9/12/2013
Julia Keffer
AUTOPSY FORENSIC BROWSER USER GUIDE

Autopsy Forensic Browser User Guide
Copyright Copyright © 2013. All rights reserved.
License This document is licensed under the Creative Commons Attribution-NonCommercial-ShareAlike 3.0 Unported license. Refer to http://creativecommons.org/licenses/by-nc-sa/3.0/. Autopsy 3 is licensed under Apache License, Version 2.
Disclaimer This document is provided to you for informational purposes only and is believed to be accurate as of the date of its publication, and is subject to change without notice. The author assumes no responsibility for any errors or omissions in this document and shall have no obligation to you as a result of having made this document available to you or based upon the information it contains.
Version Information Autopsy version 3.0.5
Document version 1.1

Autopsy Forensic Browser User Guide
Page i
Table of Contents Figures .................................................................................................................................................................. iii
Chapter 1 – Introduction ................................................................................................................................. 1
Organization ............................................................................................................ 1
Before you Begin ..................................................................................................... 2
Overview of Digital Forensics ..................................................................................... 2
Chapter 2 – Getting Started Using the Wizard .......................................................................................... 4
Creating a Case ....................................................................................................... 5
Adding a Disk Image ................................................................................................ 8
Configuring Disk Analysis .......................................................................................... 9
Using a Hash Database ........................................................................................... 14
Chapter 3 – Exploring Analyzed Data ........................................................................................................ 19
Using the Data Explorer .......................................................................................... 20
Using the Result Viewer .......................................................................................... 21
Viewing File Contents.............................................................................................. 23
Chapter 4 – Searching File Contents .......................................................................................................... 26
Searching Using Built-in Keywords ............................................................................ 26
Creating and Managing Keyword Lists ....................................................................... 28
Saving File Locations .............................................................................................. 33
Chapter 5 – Generating Reports .................................................................................................................. 37
Creating a Basic Report ........................................................................................... 38
Creating a Custom Report ....................................................................................... 40
Chapter 6 – Creating a Timeline .................................................................................................................. 44
Creating a Graphical Timeline .................................................................................. 45
Creating a Timeline Report ...................................................................................... 47
Chapter 7 – Collecting Files for Later Analysis ....................................................................................... 50
Extracting File and Directory Contents ....................................................................... 50
Extracting Unallocated Disk Space ............................................................................ 53
Autopsy Forensic Browser User Guide
Page ii
Appendix A: Toolbar Reference .................................................................................................................. 56
Appendix B: Troubleshooting ...................................................................................................................... 57
Appendix C: FAQ ............................................................................................................................................... 58
Glossary ............................................................................................................................................................... 59
Index ..................................................................................................................................................................... 60

Autopsy Forensic Browser User Guide
Page iii
Figures Figure 1: Autopsy Process Flow ............................................................................................ 4 Figure 2: Autopsy Welcome Window ..................................................................................... 5 Figure 3: Add Image Window ............................................................................................... 8 Figure 4: Configure Ingest Modules .................................................................................... 11 Figure 5: Autopsy Interface Window ................................................................................... 19 Figure 6: The Data Explorer Panel ...................................................................................... 20 Figure 7: Result Viewer – Directory Listing Table View ........................................................... 21 Figure 8: Result Viewer – Directory Listing Thumbnail View .................................................... 22 Figure 9: Result Viewer – Keyword Search View ................................................................... 22 Figure 10: HTML Report .................................................................................................... 37 Figure 11: Recent Activity Section ...................................................................................... 44

Chapter 1 – Introduction The Autopsy Forensic Browser enables you to conduct a digital
forensic investigation. It is a graphical interface to The Sleuth Kit and other tools. This guide covers information about using Autopsy version 3 on Windows.
This manual is for users with above average computer skills who have a basic understanding of digital forensics concepts. Users who are unfamiliar with the concepts may want to start with the section “Overview of Digital Forensics” on page 2.
Organization
The manual is organized as follows
• Description of digital forensics concepts (page 2) • Chapter 2 – Getting Started Using the Wizard (page 4)
• Getting started section to help you import your disk image into Autopsy and perform the initial automated analysis
• Chapter 3 – Exploring Analyzed Data (page 19)
• Overview of the user interface regions and explanation of the results of the initial automated analysis
• Procedures to help you perform the following tasks
• Search for keywords in the files in the disk image (page 26)
• Generate reports (page 37) • Create timeline views (page 44) • Extract data from the disk image to analyze with other
digital forensics tools (on page 50)
• Appendix A: Toolbar Reference (page 56) • Appendix B: Troubleshooting to help you resolve errors
(page 57) • Appendix C: FAQ (page 58) • Glossary (page 59) • Index (page 60)
Chapter 1 – Introduction Autopsy Forensic Browser User Guide
Page 2
The following symbols are used in this document.
Additional information that is not necessary to perform the procedure, but that may be important to know later.
Reminders and shortcuts to help you perform tasks.
Before you Begin
You need the following items to begin using Autopsy.
• Computer running Windows XP, Vista or 7 • One or more disk images that contain the information you
want to analyze in raw (single or split) or E01 format. The file system on the disk must be one of the following formats
• NTFS • FAT12, FAT16, FAT32 • HFS+ • ISO9660 • Ext2, Ext3 • UFS
• Hash database if you want to compare MD5 file sums or identify known and unknown files. The following hash database formats are supported
• NIST NSRL • EnCase • MD5 • HashKeeper
Overview of Digital Forensics
Digital forensics refers to the process of recovering data from digital devices, from computer hard drives to mobile devices. This activity is often associated with criminal or civil investigations.
Digital devices can provide many different types of information that are not obvious to the casual user.

Autopsy Forensic Browser User Guide Chapter 1 – Introduction
Page 3
Internet data, such as cookies, browsing history, downloads, and cached web pages can provide a timeline of user activity, even when the user clears their cache or other Internet data.
Metadata is information assigned to a file by the program that creates or modifies it. It can include when the file was created, the user who created it, and the file size.
System files and logs provide information about various types of system activity, such as what programs are installed, what devices are attached to the system, and the history of users who logged on to the system.
Deleted files can yield information that the user thought was no longer available. Operating systems do not actually remove files when the user deletes them; the space is marked as available for use. Until the operating system reuses the space, the deleted data can be accessed with tools such as Autopsy.
Autopsy provides a graphical user interface to the tools, including The Sleuth Kit that can automate much of the forensic analysis. Autopsy provides additional features to continue analyzing the data after the automated analysis completes.
Autopsy has been completely rewritten since version 2; however, the following features you may have used in version 2 are not yet available.
• Viewing arbitrary sectors • Notes and Event Sequencer
For further information and support, please visit the Autopsy Wiki at wiki.sleuthkit.org/Autopsy.
Chapter 2 – Getting Started Using the Wizard Autopsy Forensic Browser User Guide
Page 4
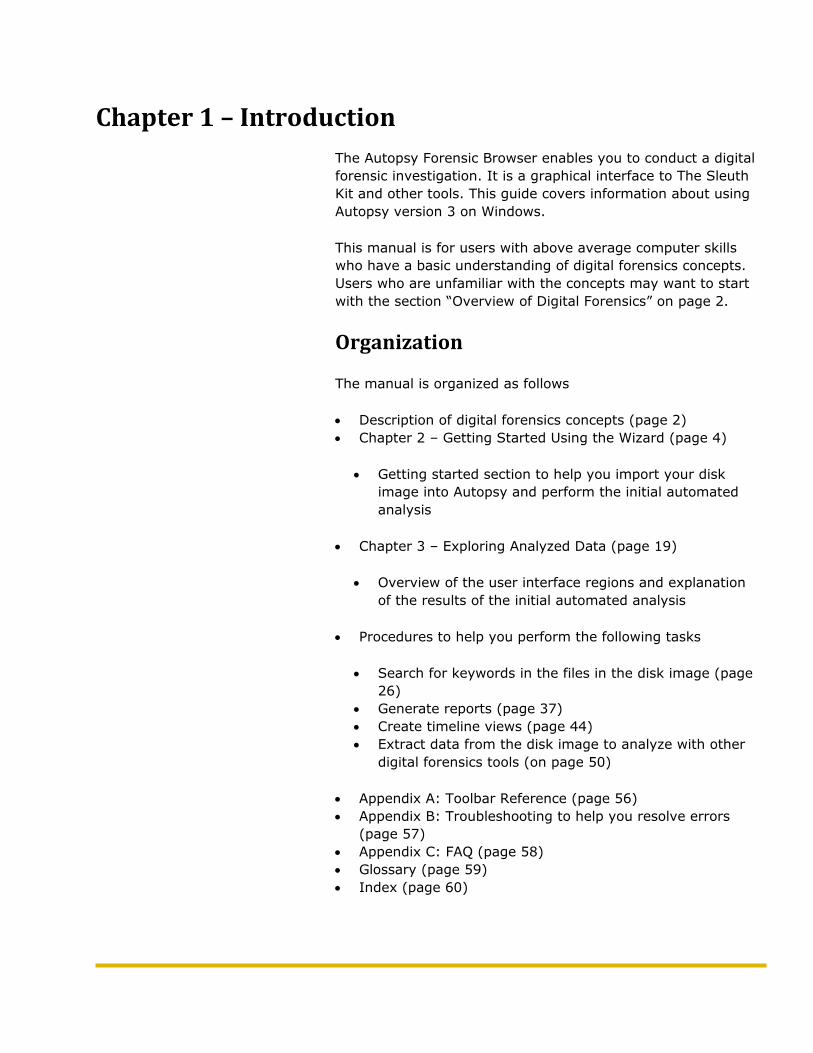
Chapter 2 – Getting Started Using the Wizard The first time you start Autopsy, the wizard will guide you
through the process of creating your first case, adding a disk image to the case, and configuring and starting the automated disk analysis, which Autopsy calls ingest. Figure 1 shows the process.
Figure 1: Autopsy Process Flow
At any time after you create the case, you can add additional images. You can also reconfigure ingest and restart the automated disk analysis.
In this section you will learn how to
• Create a case • Add a disk image to a case • Configure ingest to analyze the contents of the disk image • Cancel and restart ingest • Add a hash database to enhance data analysis
After this section, you will be prepared to continue further analysis of the image contents.
Autopsy Forensic Browser User Guide Chapter 2 – Getting Started Using the Wizard
Page 5
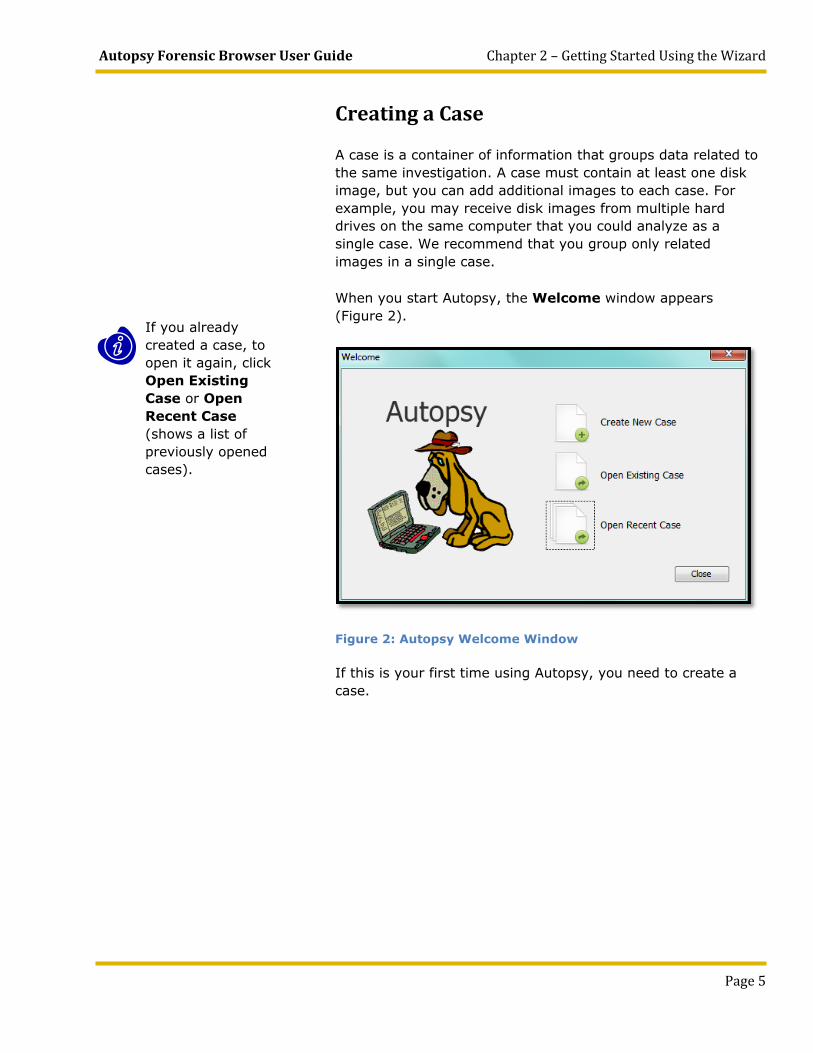
If you already created a case, to open it again, click Open Existing Case or Open Recent Case (shows a list of previously opened cases).
Creating a Case
A case is a container of information that groups data related to the same investigation. A case must contain at least one disk image, but you can add additional images to each case. For example, you may receive disk images from multiple hard drives on the same computer that you could analyze as a single case. We recommend that you group only related images in a single case.
When you start Autopsy, the Welcome window appears (Figure 2).
Figure 2: Autopsy Welcome Window
If this is your first time using Autopsy, you need to create a case.
Chapter 2 – Getting Started Using the Wizard Autopsy Forensic Browser User Guide
Page 6
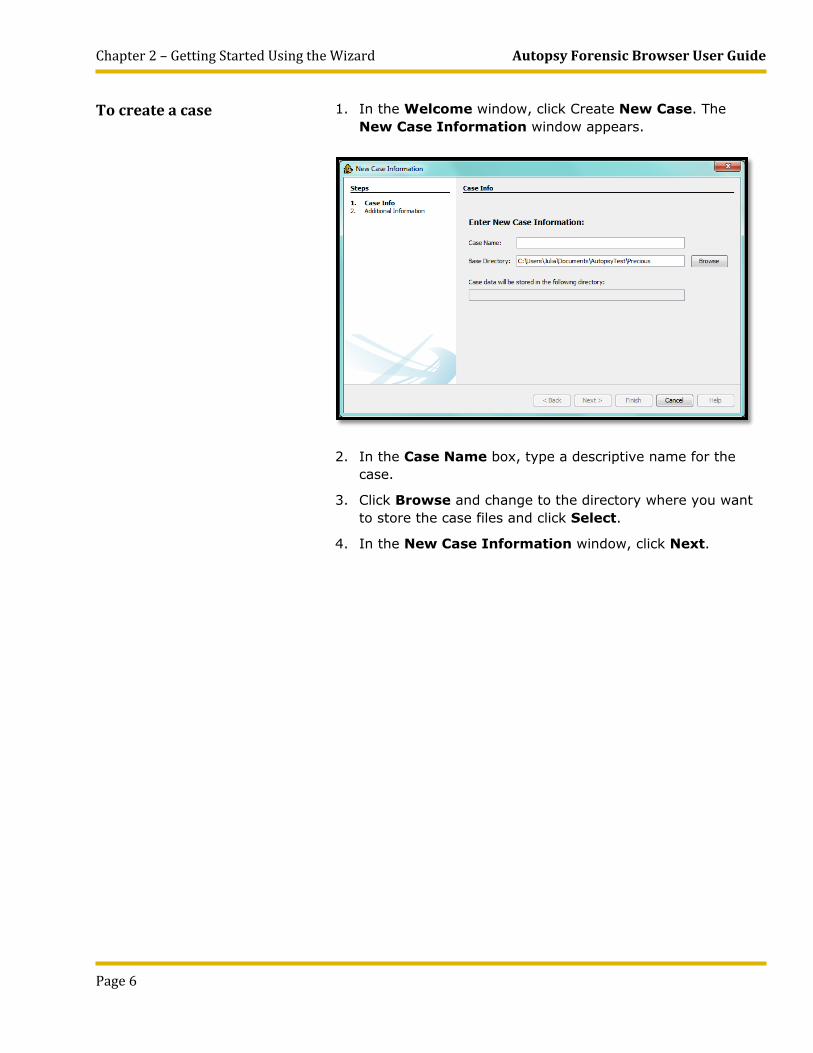
To create a case 1. In the Welcome window, click Create New Case. The New Case Information window appears.
2. In the Case Name box, type a descriptive name for the case.
3. Click Browse and change to the directory where you want to store the case files and click Select.
4. In the New Case Information window, click Next.
Autopsy Forensic Browser User Guide Chapter 2 – Getting Started Using the Wizard
Page 7
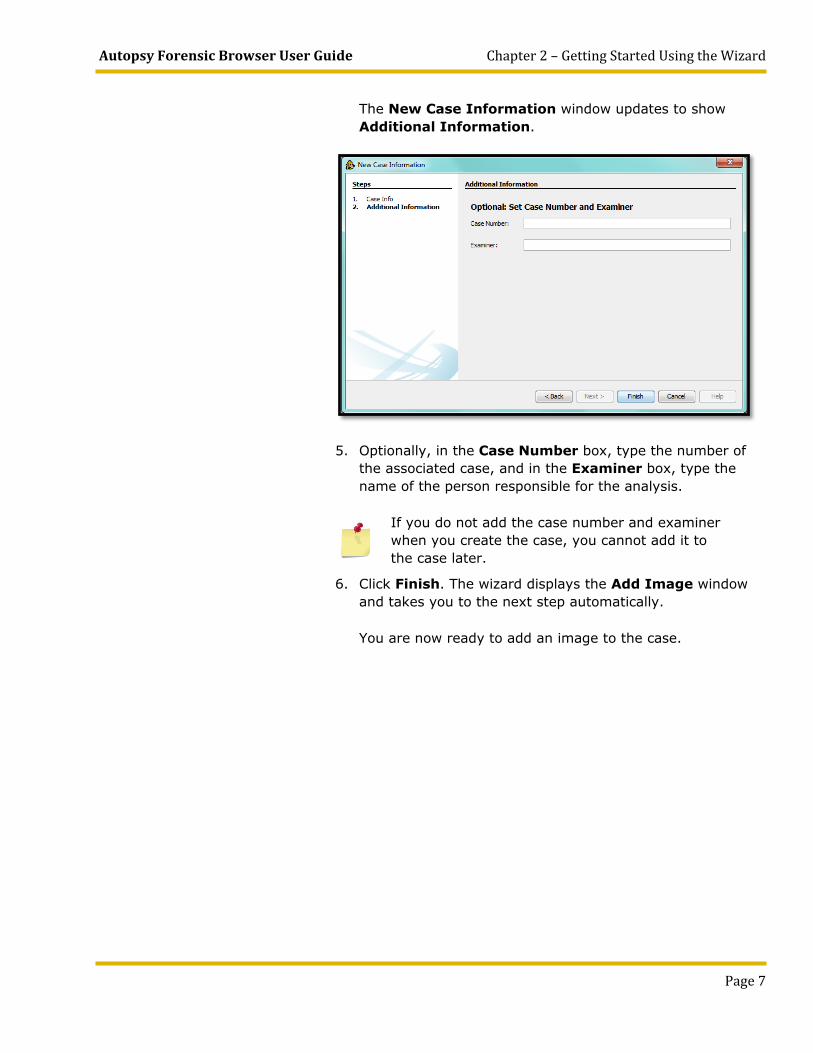
The New Case Information window updates to show Additional Information.
5. Optionally, in the Case Number box, type the number of the associated case, and in the Examiner box, type the name of the person responsible for the analysis.
If you do not add the case number and examiner when you create the case, you cannot add it to the case later.
6. Click Finish. The wizard displays the Add Image window and takes you to the next step automatically.
You are now ready to add an image to the case.
Chapter 2 – Getting Started Using the Wizard Autopsy Forensic Browser User Guide
Page 8
Adding a Disk Image
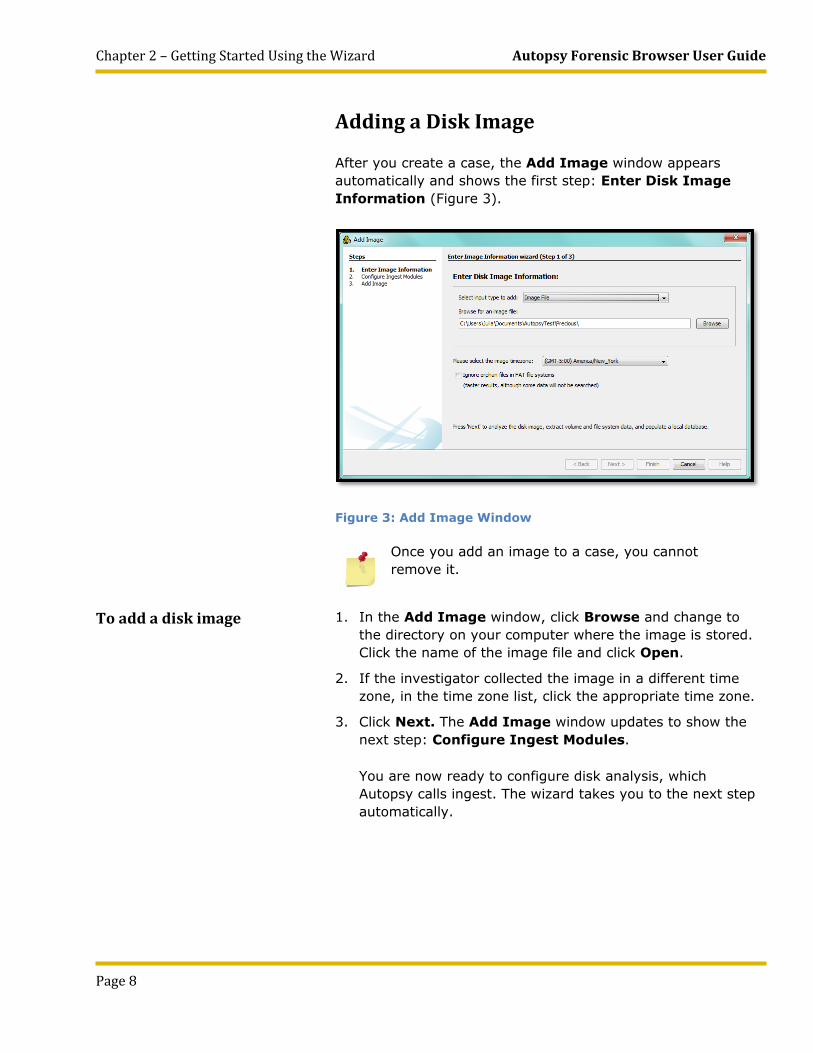
After you create a case, the Add Image window appears automatically and shows the first step: Enter Disk Image Information (Figure 3).
Figure 3: Add Image Window
Once you add an image to a case, you cannot remove it.
To add a disk image 1. In the Add Image window, click Browse and change to the directory on your computer where the image is stored. Click the name of the image file and click Open.
2. If the investigator collected the image in a different time zone, in the time zone list, click the appropriate time zone.
3. Click Next. The Add Image window updates to show the next step: Configure Ingest Modules.
You are now ready to configure disk analysis, which Autopsy calls ingest. The wizard takes you to the next step automatically.
Autopsy Forensic Browser User Guide Chapter 2 – Getting Started Using the Wizard
Page 9
Configuring Disk Analysis
Autopsy refers to the process of automatically analyzing the disk contents as ingest. Ingest extracts the most common types of information used in digital forensic analysis from a disk image, which avoids the need to perform the tasks manually. Autopsy processes the user-related files first, to find the most likely sources of interesting information. The process runs in the background, which enables you to begin browsing the data while the process continues.
In this section you will learn about
• The types of ingest modules • How to configure ingest • How to cancel and start ingest
At the end of this section, you will know how to customize ingest to analyze the type of information you want to know about in the disk image.

Chapter 2 – Getting Started Using the Wizard Autopsy Forensic Browser User Guide
Page 10
The ingest process uses modules that analyze specific types of data. There are five default modules that you can select to find the type of data you need for your investigation (Table 1).
Table 1: Ingest Modules
Module Name Purpose
Keyword Search
Creates an index of keywords using the Apache SOLR search server. You can search the index for keywords and define keyword lists that ingest uses to produce search results.
Hash Lookup Calculates the MD5 hash of each file. If you supply one or more hash databases, the module can look up the MD5 sum in databases to categorize the file type as known, unknown, or bad.
Thunderbird Parser
Extracts the contents of email folders from Outlook and Thunderbird email clients.
Exif Parser Analyzes the metadata for graphic image files (location, date, and device used to capture the image). Can detect file formats JPG, GIF, and PNG.
Recent Activity Extracts recent user activity by focusing on web artifacts and system settings.
• Extracts information about the last seven days of disk activity
• Categorizes files based on the file metadata
• Extracts Internet artifacts, such as downloads, browsing history, bookmarks, cookies, and search engine queries
• Determines the device IDs of any devices connected to the computer at the time the disk image was captured
The module only supports Windows file systems.
Autopsy Forensic Browser User Guide Chapter 2 – Getting Started Using the Wizard
Page 11
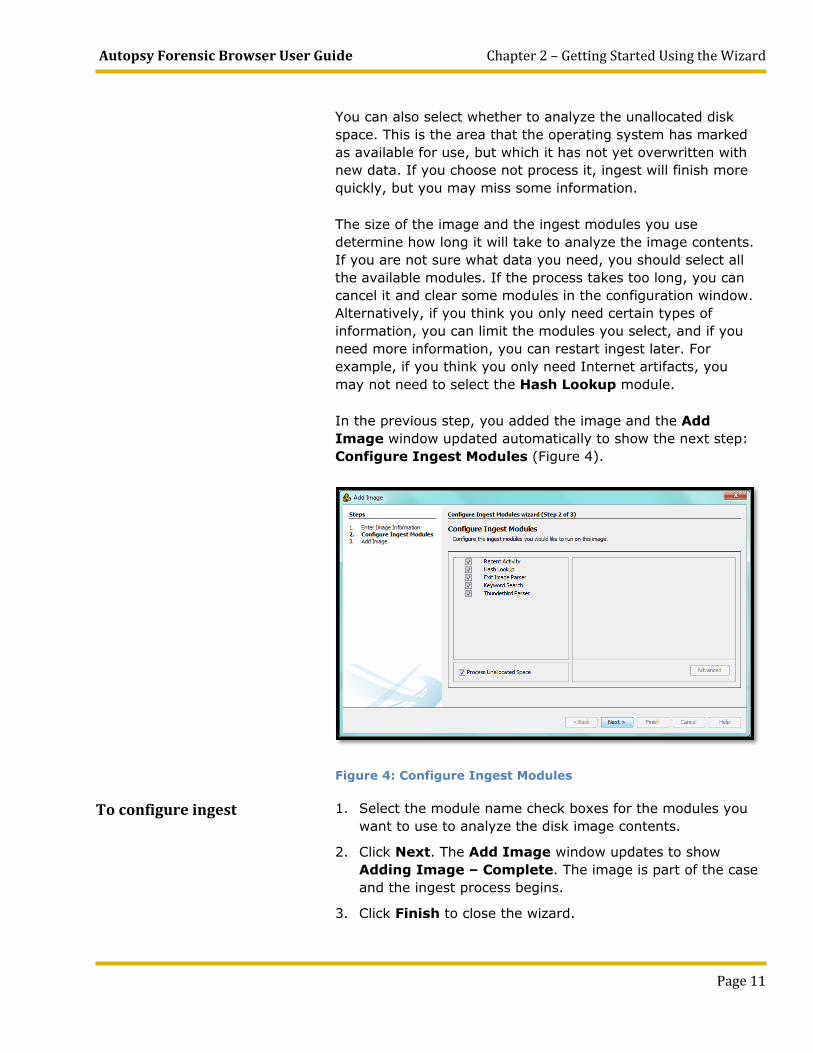
You can also select whether to analyze the unallocated disk space. This is the area that the operating system has marked as available for use, but which it has not yet overwritten with new data. If you choose not process it, ingest will finish more quickly, but you may miss some information.
The size of the image and the ingest modules you use determine how long it will take to analyze the image contents. If you are not sure what data you need, you should select all the available modules. If the process takes too long, you can cancel it and clear some modules in the configuration window. Alternatively, if you think you only need certain types of information, you can limit the modules you select, and if you need more information, you can restart ingest later. For example, if you think you only need Internet artifacts, you may not need to select the Hash Lookup module.
In the previous step, you added the image and the Add Image window updated automatically to show the next step: Configure Ingest Modules (Figure 4).
Figure 4: Configure Ingest Modules
To configure ingest 1. Select the module name check boxes for the modules you want to use to analyze the disk image contents.
2. Click Next. The Add Image window updates to show Adding Image – Complete. The image is part of the case and the ingest process begins.
3. Click Finish to close the wizard.

Chapter 2 – Getting Started Using the Wizard Autopsy Forensic Browser User Guide
Page 12
Autopsy begins analyzing the contents of the disk image. You can monitor the progress in the bottom right corner of the main window. See “Chapter 3 – Exploring Analyzed Data” on page 19 for information about viewing the results of the analysis.
To view progress messages, click the icon on the toolbar at the top of the window.
If ingest takes too long, cancel it and reduce the set of data to analyze.
To cancel ingest 1. In the bottom right corner of the main window, right-click the blue progress bar and then click Cancel Process.
Autopsy Forensic Browser User Guide Chapter 2 – Getting Started Using the Wizard
Page 13
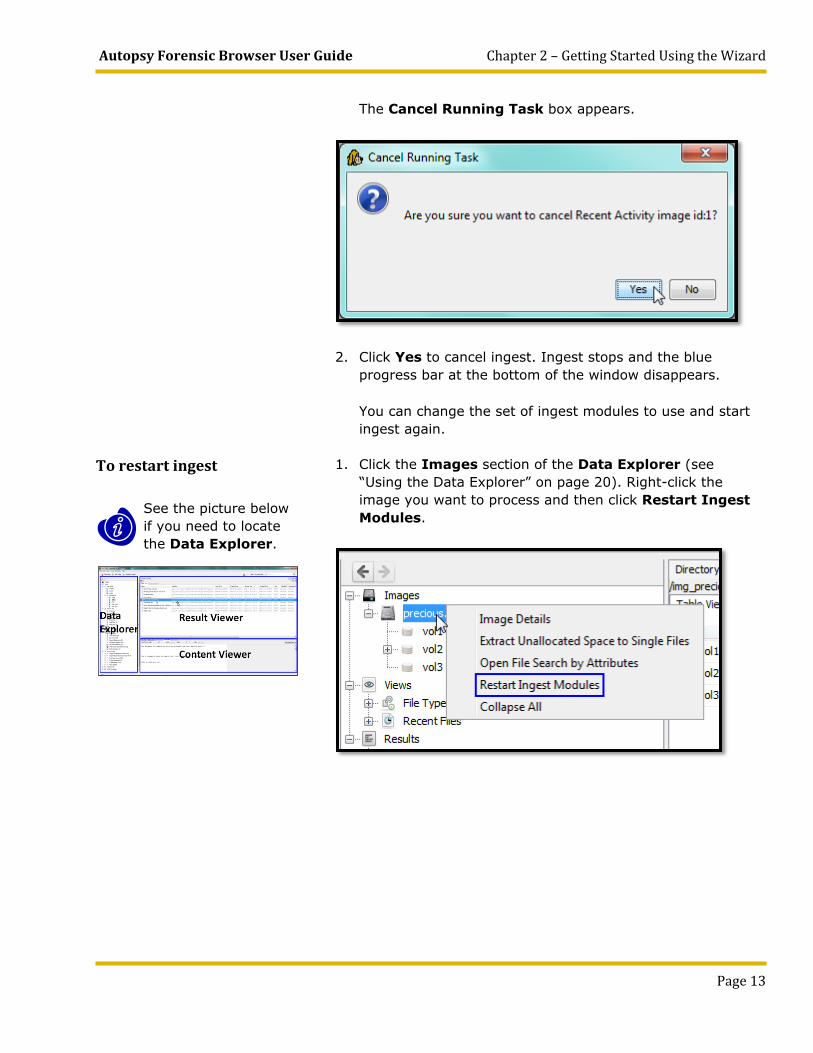
The Cancel Running Task box appears.
2. Click Yes to cancel ingest. Ingest stops and the blue progress bar at the bottom of the window disappears.
You can change the set of ingest modules to use and start ingest again.
To restart ingest
See the picture below if you need to locate the Data Explorer.
1. Click the Images section of the Data Explorer (see “Using the Data Explorer” on page 20). Right-click the image you want to process and then click Restart Ingest Modules.
Chapter 2 – Getting Started Using the Wizard Autopsy Forensic Browser User Guide
Page 14
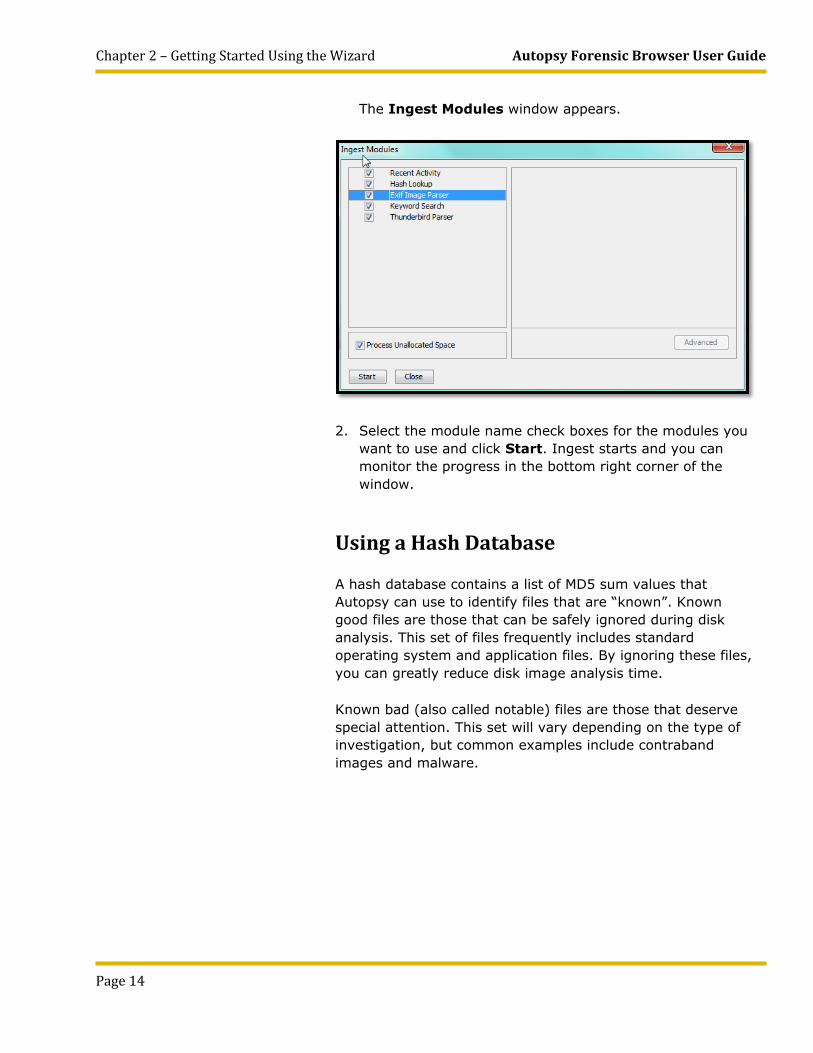
The Ingest Modules window appears.
2. Select the module name check boxes for the modules you want to use and click Start. Ingest starts and you can monitor the progress in the bottom right corner of the window.
Using a Hash Database
A hash database contains a list of MD5 sum values that Autopsy can use to identify files that are “known”. Known good files are those that can be safely ignored during disk analysis. This set of files frequently includes standard operating system and application files. By ignoring these files, you can greatly reduce disk image analysis time.
Known bad (also called notable) files are those that deserve special attention. This set will vary depending on the type of investigation, but common examples include contraband images and malware.
Autopsy Forensic Browser User Guide Chapter 2 – Getting Started Using the Wizard
Page 15
You can use hash databases with the following formats
• NIST NSRL • EnCase • MD5 • HashKeeper
To use a hash database, ensure that you enable the Hash Lookup ingest module.
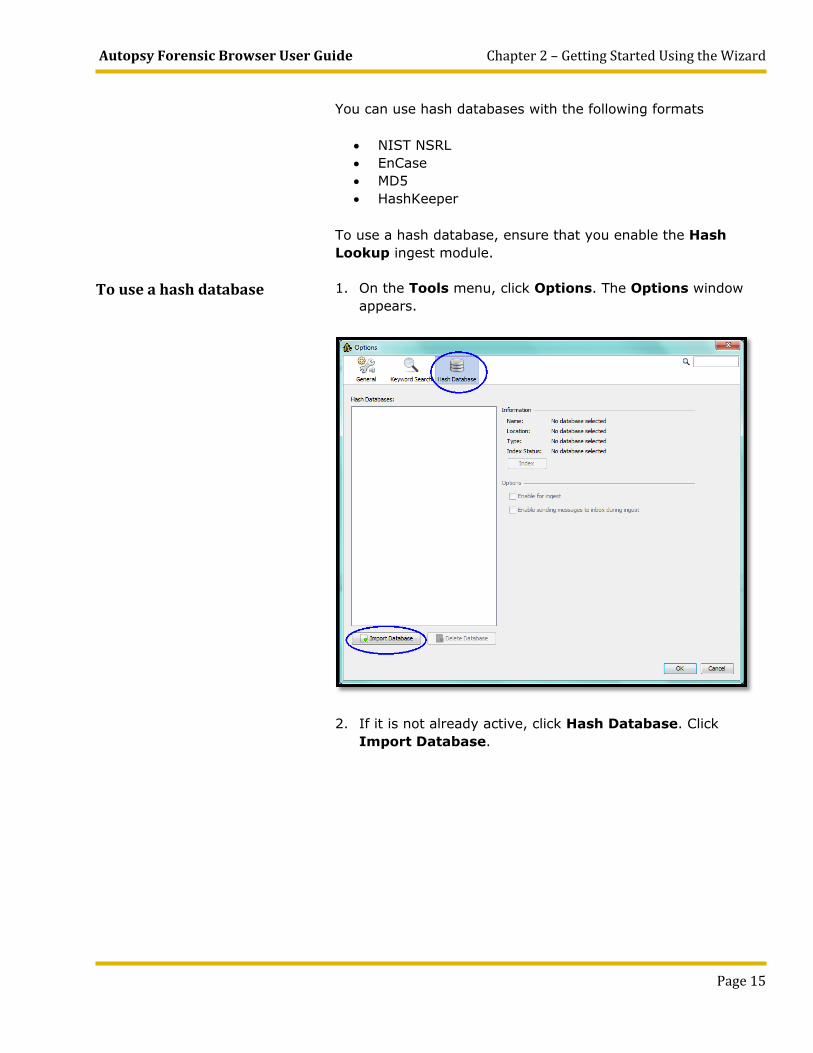
To use a hash database 1. On the Tools menu, click Options. The Options window appears.
2. If it is not already active, click Hash Database. Click Import Database.
Chapter 2 – Getting Started Using the Wizard Autopsy Forensic Browser User Guide
Page 16
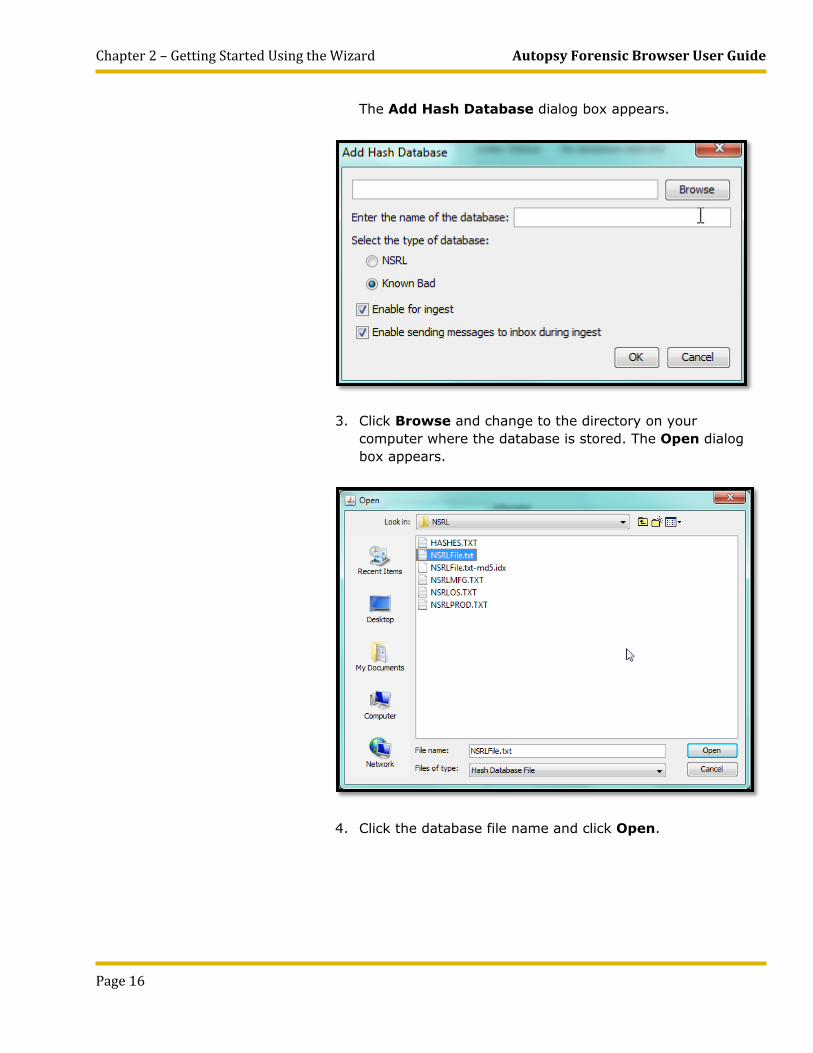
The Add Hash Database dialog box appears.
3. Click Browse and change to the directory on your computer where the database is stored. The Open dialog box appears.
4. Click the database file name and click Open.
Autopsy Forensic Browser User Guide Chapter 2 – Getting Started Using the Wizard
Page 17
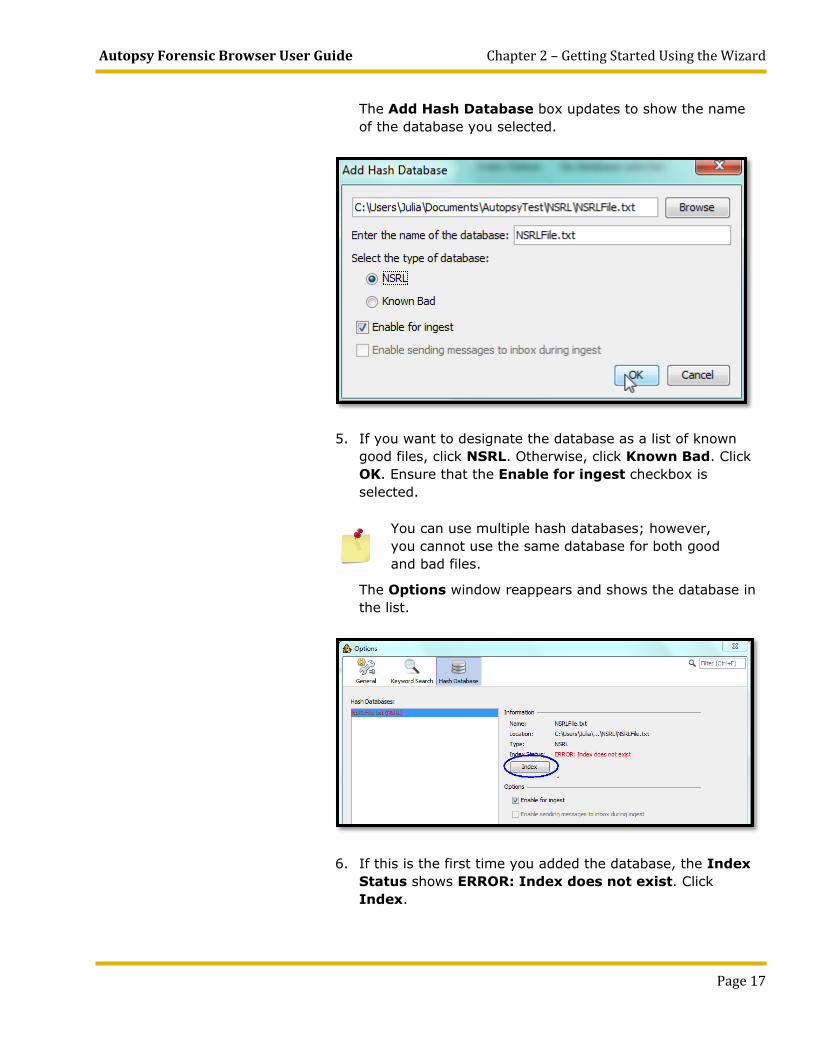
The Add Hash Database box updates to show the name of the database you selected.
5. If you want to designate the database as a list of known good files, click NSRL. Otherwise, click Known Bad. Click OK. Ensure that the Enable for ingest checkbox is selected.
You can use multiple hash databases; however, you cannot use the same database for both good and bad files.
The Options window reappears and shows the database in the list.
6. If this is the first time you added the database, the Index Status shows ERROR: Index does not exist. Click Index.

Chapter 2 – Getting Started Using the Wizard Autopsy Forensic Browser User Guide
Page 18
The Index database dialog box appears to show the progress of the indexing process.
When it finishes, the Index Status changes to Database and Index exist.
7. To close the Options window, click OK.
You have successfully added a hash database. To use the database with your image, you need to restart ingest. See “To restart ingest” on page 13.
Autopsy Forensic Browser User Guide Chapter 3 – Exploring Analyzed Data
Page 19
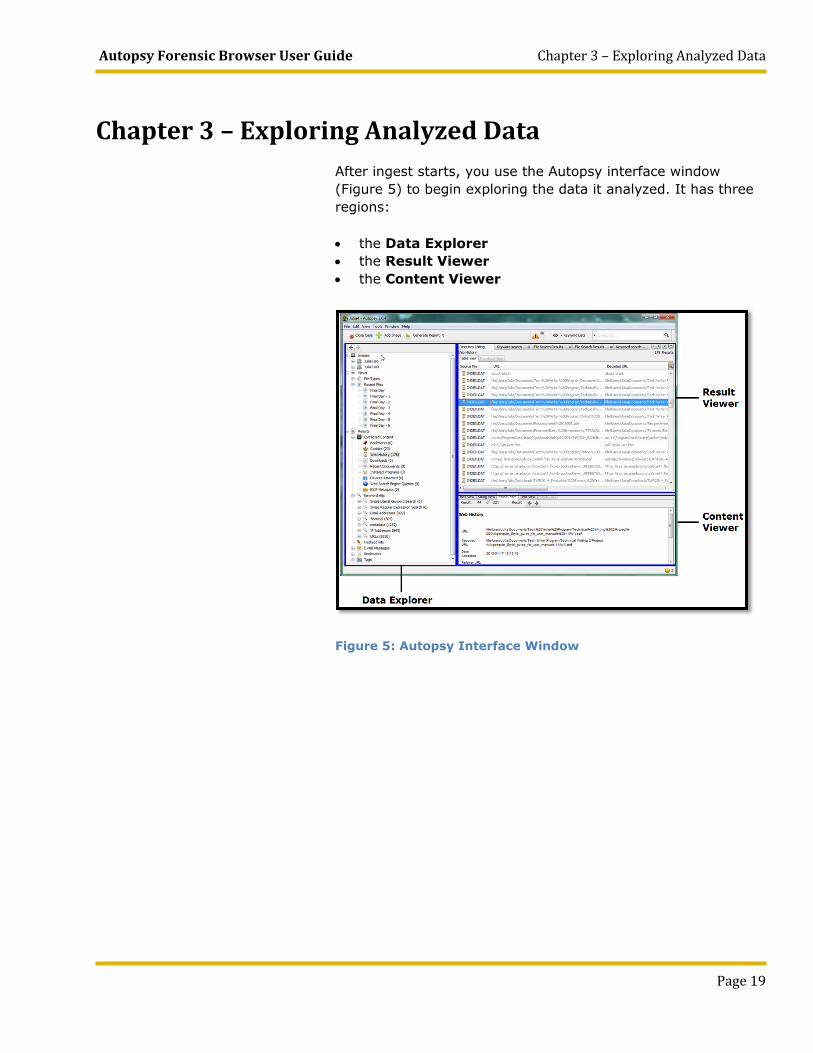
Chapter 3 – Exploring Analyzed Data After ingest starts, you use the Autopsy interface window
(Figure 5) to begin exploring the data it analyzed. It has three regions:
• the Data Explorer • the Result Viewer • the Content Viewer
Figure 5: Autopsy Interface Window
Chapter 3 – Exploring Analyzed Data Autopsy Forensic Browser User Guide
Page 20
Using the Data Explorer
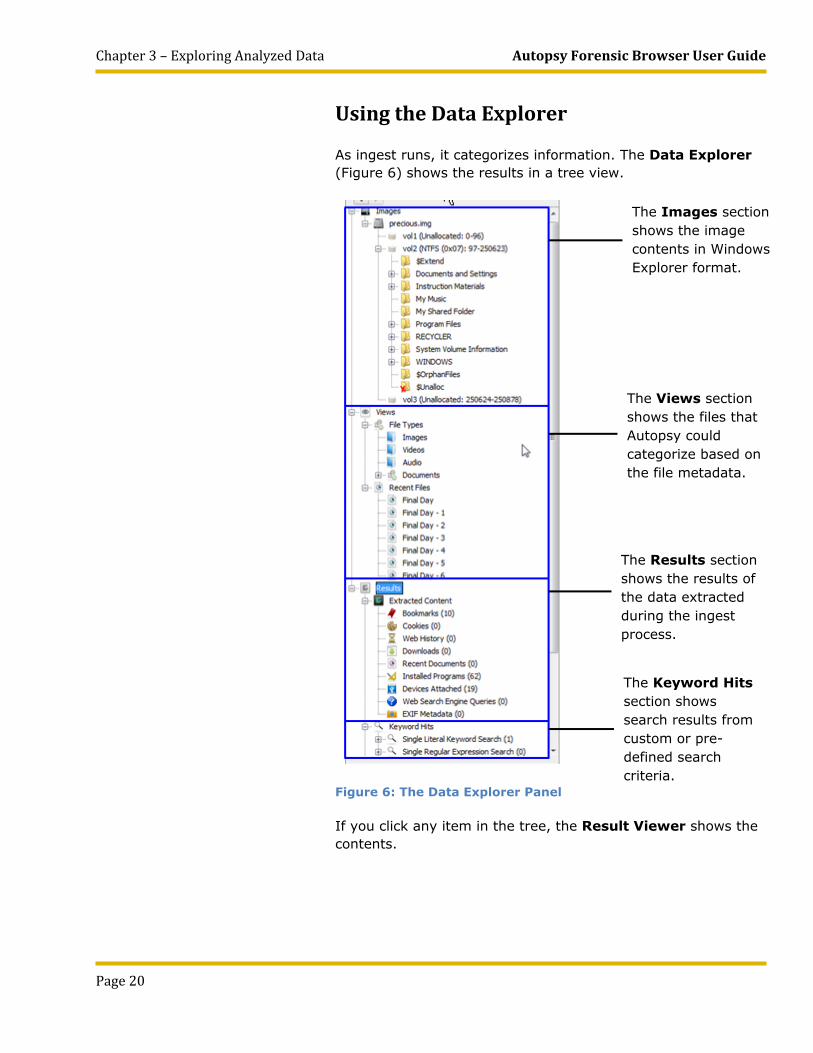
As ingest runs, it categorizes information. The Data Explorer (Figure 6) shows the results in a tree view.
Figure 6: The Data Explorer Panel
If you click any item in the tree, the Result Viewer shows the contents.
The Views section shows the files that Autopsy could categorize based on the file metadata.
The Images section shows the image contents in Windows Explorer format.
The Results section shows the results of the data extracted during the ingest process.
The Keyword Hits section shows search results from custom or pre-defined search criteria.
Autopsy Forensic Browser User Guide Chapter 3 – Exploring Analyzed Data
Page 21
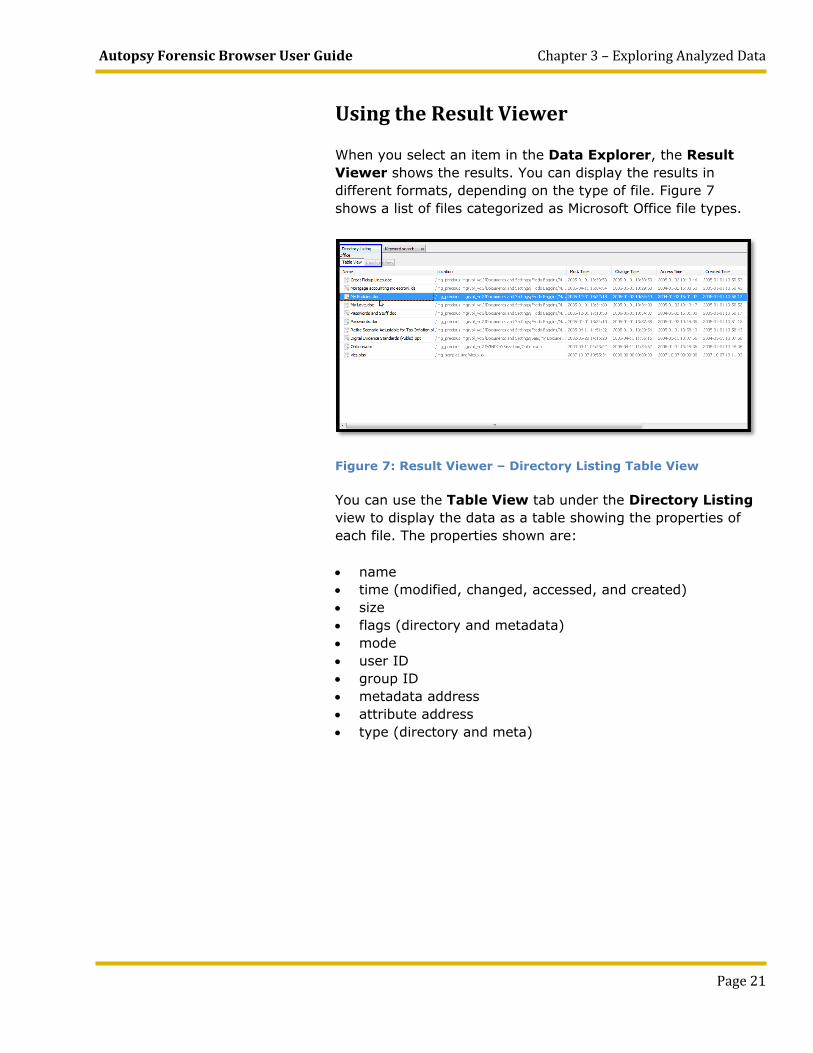
Using the Result Viewer
When you select an item in the Data Explorer, the Result Viewer shows the results. You can display the results in different formats, depending on the type of file. Figure 7 shows a list of files categorized as Microsoft Office file types.
Figure 7: Result Viewer – Directory Listing Table View
You can use the Table View tab under the Directory Listing view to display the data as a table showing the properties of each file. The properties shown are:
• name • time (modified, changed, accessed, and created) • size • flags (directory and metadata) • mode • user ID • group ID • metadata address • attribute address • type (directory and meta)
Chapter 3 – Exploring Analyzed Data Autopsy Forensic Browser User Guide
Page 22
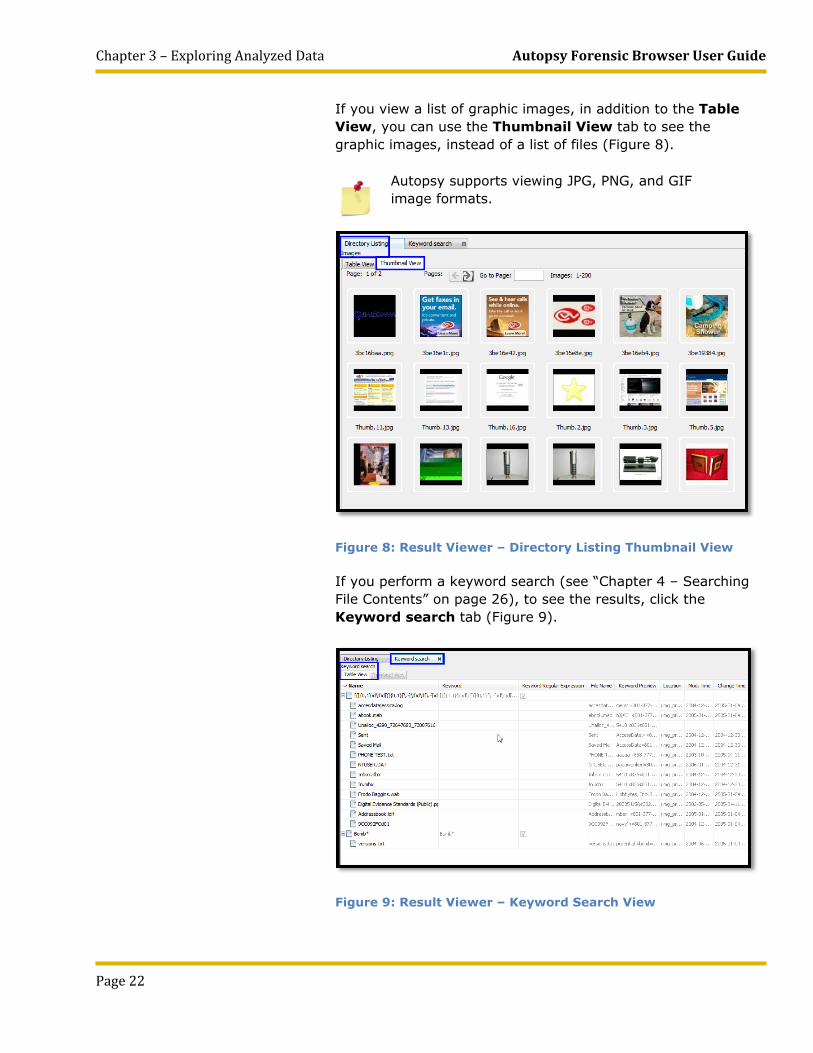
If you view a list of graphic images, in addition to the Table View, you can use the Thumbnail View tab to see the graphic images, instead of a list of files (Figure 8).
Autopsy supports viewing JPG, PNG, and GIF image formats.
Figure 8: Result Viewer – Directory Listing Thumbnail View
If you perform a keyword search (see “Chapter 4 – Searching File Contents” on page 26), to see the results, click the Keyword search tab (Figure 9).
Figure 9: Result Viewer – Keyword Search View
Autopsy Forensic Browser User Guide Chapter 3 – Exploring Analyzed Data
Page 23
The Keyword search tab separates the list into keyword matches for each keyword list. Once you close the Keyword search tab, to view the list again, click the list name under the Keyword Hits section of the Data Explorer.
When you click a file in any view of the Result Viewer, the contents appear in the Content Viewer.
Viewing File Contents
You can view the file contents in different formats, depending on the file type. You can view the file contents in either the Content Viewer at the bottom of the screen or in a new window
Text View
The Keyword Search ingest module creates an index of words it can identify in the files on the disk image. This index is the basis for running keyword searches. If ingest used the Keyword Search module, to view the search results for a file, click the Text tab.
The text view and the string view are different because the string view relies on searching the file for data that appears to be text. Some file types, such as PDF files, do not have text data at the byte level, but the keyword indexing process can interpret a PDF file and produce text. For files the module can identify, the file metadata (such as creation date and author) may appear at the end of the displayed text. Unlike the string view, the text view cannot view the data in another language.
If this tab is not available, either the file has no text or you did not enable Keyword Search ingest module.
Result View
The Result View shows file properties that were extracted during ingest. This tab is normally available for items shown under Results or Keyword Hits in the Data Explorer. For email messages, this is usually the most useful view.
String View The String View tab shows possible text strings in files, which could be in binary format. The view shows the strings after they have been decoded and interpreted as UTF8/16 for the selected language. The default language is English. To change the language, on the Tools menu, click Options.
Chapter 3 – Exploring Analyzed Data Autopsy Forensic Browser User Guide
Page 24
Hex View The Hex View tab shows the raw contents of a file. The file data is represented as hexadecimal values grouped in two groups of eight bytes, followed by one group of 16 ASCII characters which are derived from each pair of hexadecimal values (each byte). Non-printable ASCII characters and characters that require more than one character space are typically represented by a dot (".") in the following ASCII field.
Media View
The Media View is only available for graphic images (JPG, GIF, and PNG format) and video files. You can use the controls at the bottom of the screen to play a selected video. The size of the picture or video will be reduced to fit into the screen. If you want more complex analysis of the media, then you must extract the file.
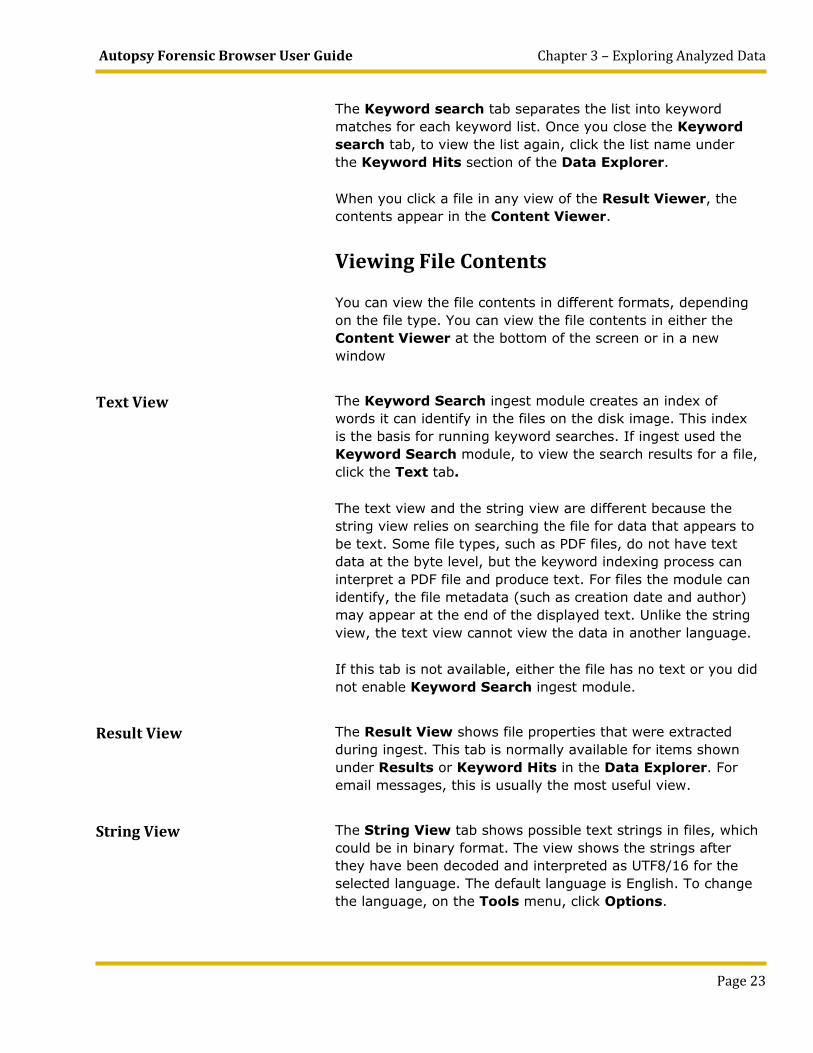
To view the file in the Content Viewer
See the picture below if you need to locate the Result Viewer.
1. Click the file in the list in the Result Viewer. The contents appear in the Content Viewer in the window at the bottom of the screen.
2. To view the file in various formats, click the tabs at the top of the Content Viewer window.
You can view the file contents in the Content Viewer in a new window or with an external program. Autopsy chooses the external viewer based on file type.
If you want to open the file in an external viewer from within Autopsy, you need to have the program installed on your computer.
Autopsy Forensic Browser User Guide Chapter 3 – Exploring Analyzed Data
Page 25
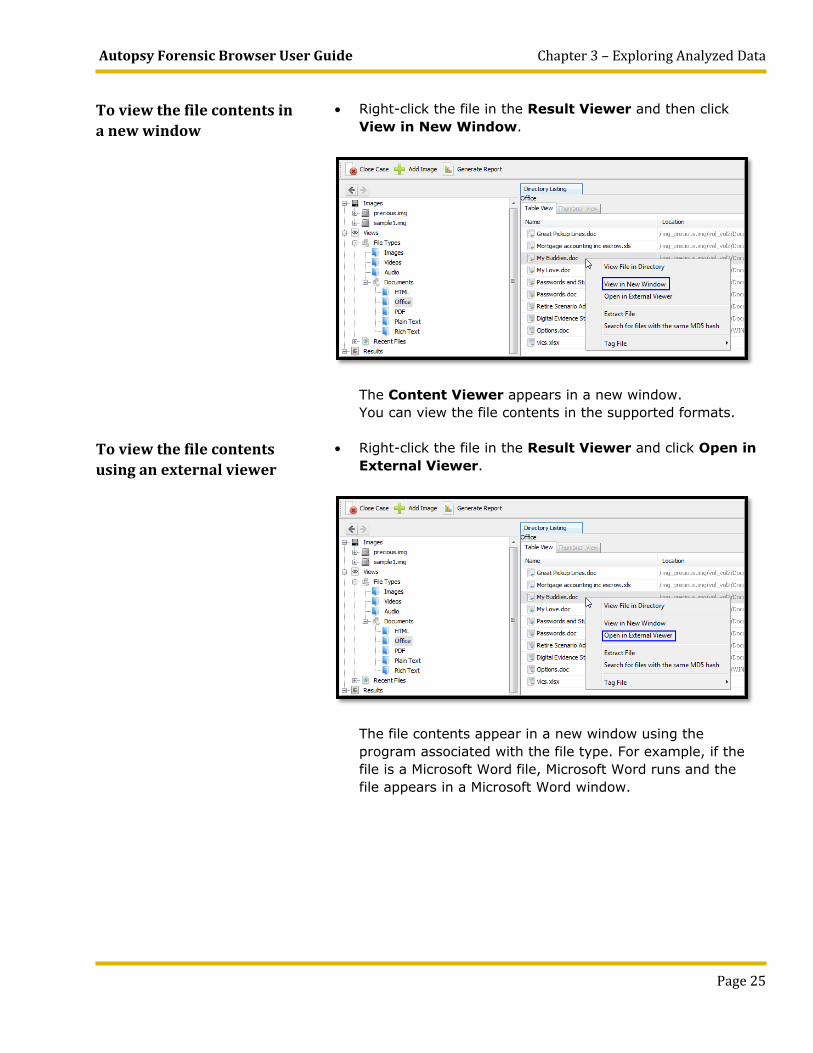
To view the file contents in a new window
• Right-click the file in the Result Viewer and then click View in New Window.
The Content Viewer appears in a new window. You can view the file contents in the supported formats.
To view the file contents using an external viewer
• Right-click the file in the Result Viewer and click Open in External Viewer.
The file contents appear in a new window using the program associated with the file type. For example, if the file is a Microsoft Word file, Microsoft Word runs and the file appears in a Microsoft Word window.
Chapter 4 – Searching File Contents Autopsy Forensic Browser User Guide
Page 26
Chapter 4 – Searching File Contents You can search the files in the disk image for specific
keywords. Keywords can be simple strings or regular expressions. If the search produces useful results, you can save the location of the files. In this section you will find information about
• How to search using built-in keywords • How to create a keyword list • How to save file locations
After these tasks, you may want to
• Generate a report (see “Chapter 5 – Generating Reports” on page 37)
• Extract the file contents from Autopsy for analysis with other tools (see “Chapter 7 – Collecting Files for Later Analysis” on page 50)
Searching Using Built-in Keywords
Autopsy includes built-in keyword search expressions that enable you to search for:
• URLs • IP Addresses • Email addresses • Phone numbers
To search using these expressions, ensure that the Keyword Search ingest module was enabled when you ran ingest. If not, see “To restart ingest” on page 13 to enable it and restart ingest.
These search expression can produce a large list of results with many false positives.

Autopsy Forensic Browser User Guide Chapter 4 – Searching File Contents
Page 27
To search using built-in keyword
You can select more than one search option and search for all keywords simultaneously.
1. On the toolbar, click Keyword Search. The menu appears.
2. Select the check box for the search options you want to use and click Search.
The information appears in the Keyword Hits section of the Data Explorer. The following example shows search results for all the built-in expressions.

Chapter 4 – Searching File Contents Autopsy Forensic Browser User Guide
Page 28
Creating and Managing Keyword Lists
The Keyword Search ingest module uses the keyword list when Autopsy analyzes the disk image contents. If you add new keywords to the list, you need to restart ingest to perform the search. Keyword lists are global to Autopsy; Autopsy uses them for all cases.
The list can contain simple strings or regular expressions. Regular expressions are a sequence of special characters that enable you to match a set of strings. The built-in searches for IP addresses and URLs are examples of regular expressions. Autopsy uses the Java regular expressions syntax.
To create a keyword list 1. On the toolbar, click Keyword Search. The menu appears.
2. In the bottom right corner of the menu, click Manage Lists.
Autopsy Forensic Browser User Guide Chapter 4 – Searching File Contents
Page 29
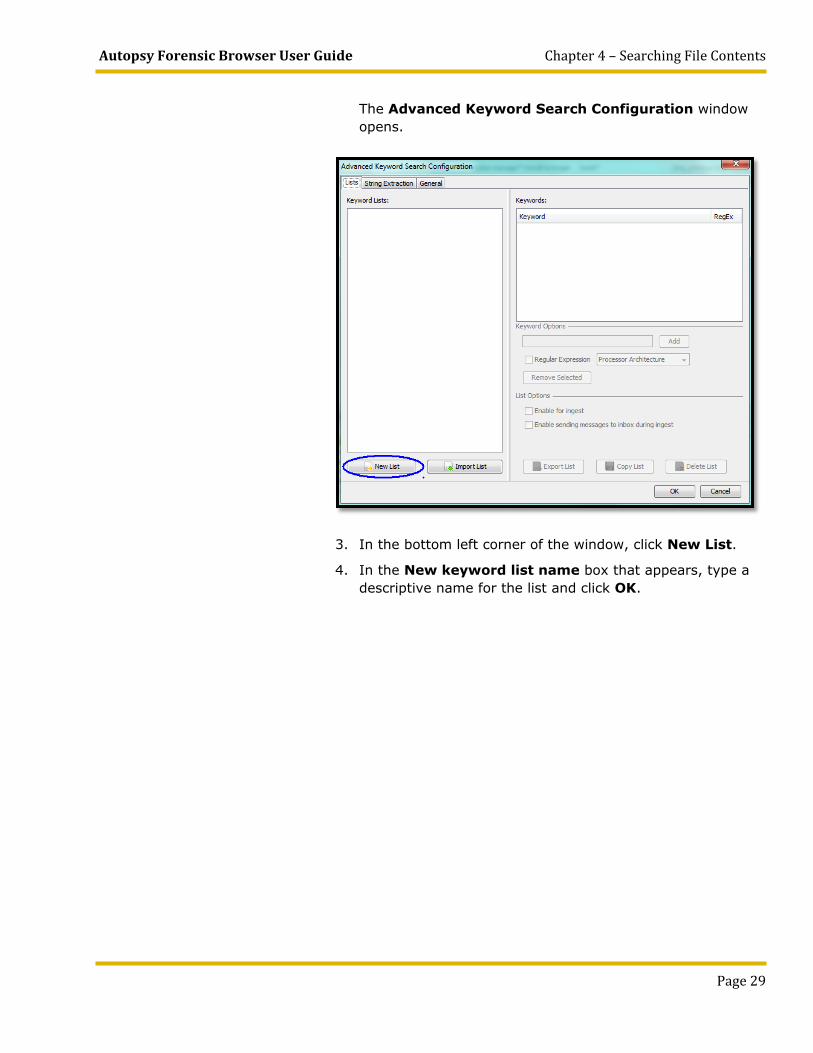
The Advanced Keyword Search Configuration window opens.
3. In the bottom left corner of the window, click New List.
4. In the New keyword list name box that appears, type a descriptive name for the list and click OK.
Chapter 4 – Searching File Contents Autopsy Forensic Browser User Guide
Page 30
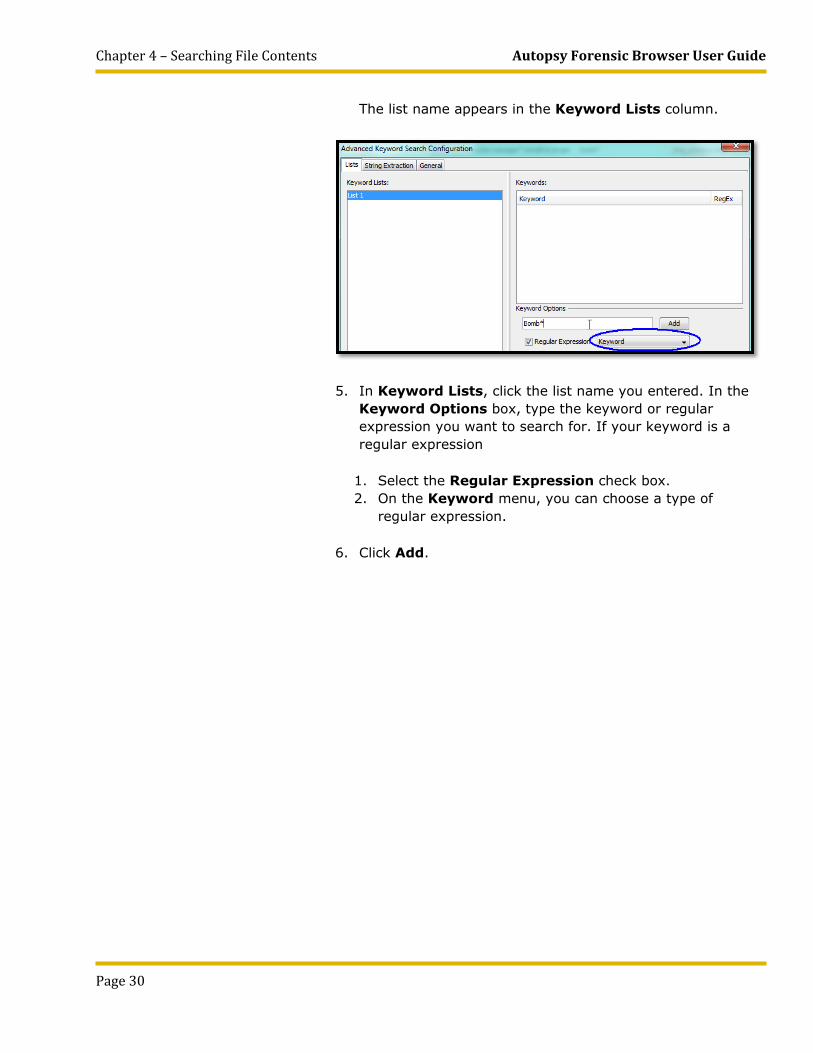
The list name appears in the Keyword Lists column.
5. In Keyword Lists, click the list name you entered. In the Keyword Options box, type the keyword or regular expression you want to search for. If your keyword is a regular expression
1. Select the Regular Expression check box. 2. On the Keyword menu, you can choose a type of
regular expression.
6. Click Add.
Autopsy Forensic Browser User Guide Chapter 4 – Searching File Contents
Page 31
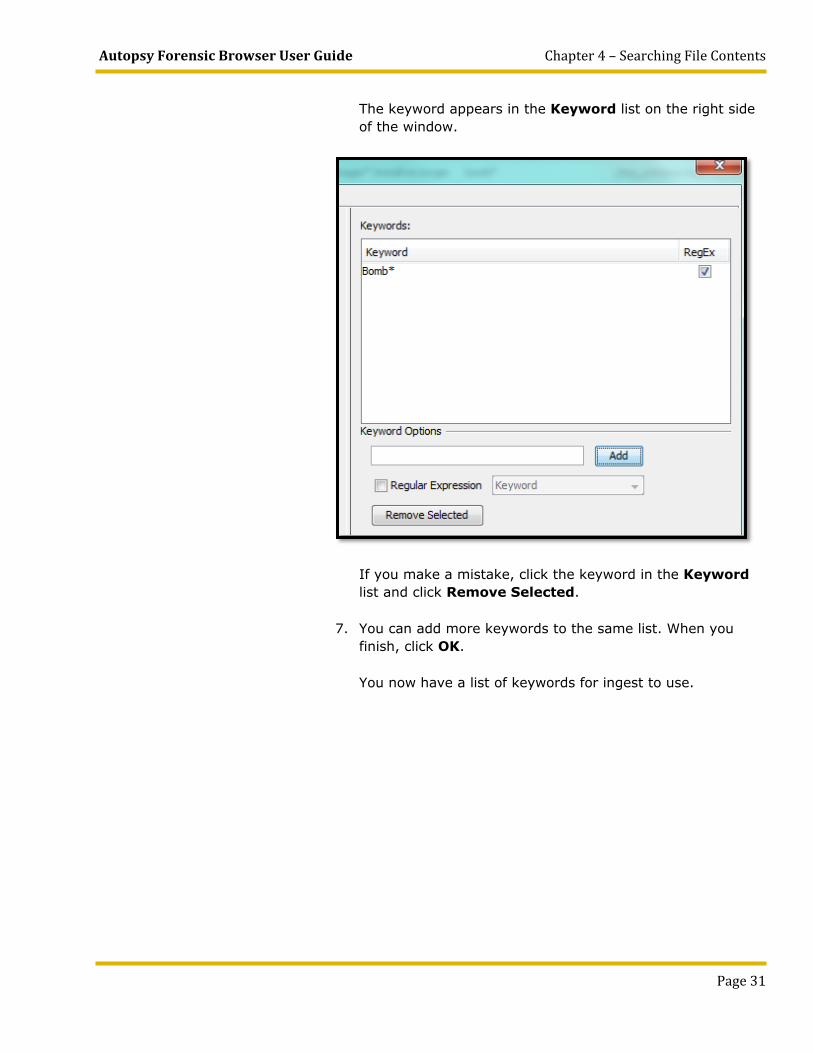
The keyword appears in the Keyword list on the right side of the window.
If you make a mistake, click the keyword in the Keyword list and click Remove Selected.
7. You can add more keywords to the same list. When you finish, click OK.
You now have a list of keywords for ingest to use.
Chapter 4 – Searching File Contents Autopsy Forensic Browser User Guide
Page 32
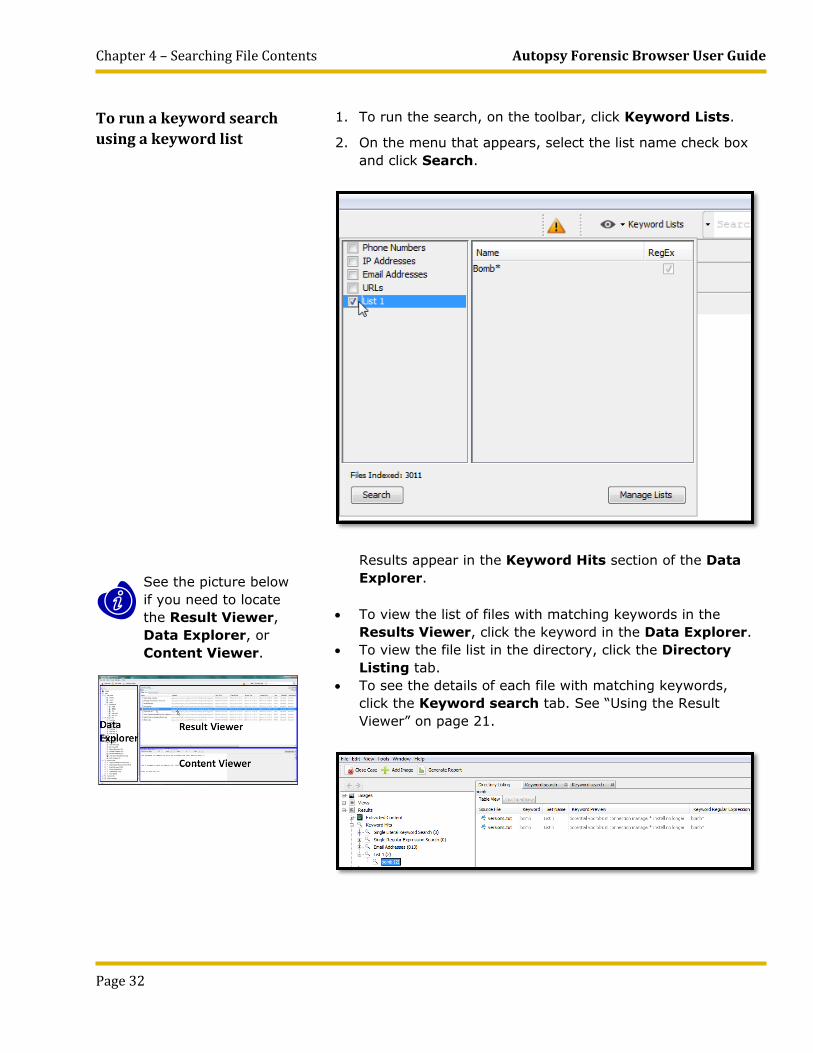
To run a keyword search using a keyword list
See the picture below if you need to locate the Result Viewer, Data Explorer, or Content Viewer.
1. To run the search, on the toolbar, click Keyword Lists.
2. On the menu that appears, select the list name check box and click Search.
Results appear in the Keyword Hits section of the Data Explorer.
• To view the list of files with matching keywords in the Results Viewer, click the keyword in the Data Explorer.
• To view the file list in the directory, click the Directory Listing tab.
• To see the details of each file with matching keywords, click the Keyword search tab. See “Using the Result Viewer” on page 21.

Autopsy Forensic Browser User Guide Chapter 4 – Searching File Contents
Page 33
Saving File Locations
You can save the file locations of any file you see in the Result Viewer. After you run a keyword search, you may want to save the location of a file with a keyword match. Autopsy uses tags, which are similar to bookmark folders in a bookmark list in a web browser. After you create a tag, you assign the file to the tag. Tagging the file is similar adding a bookmark to a web page bookmark folder. Before you tag a file, you need to create a tag list.
To create a tag list 1. In the Result Viewer, click the Keyword search tab.
2. Right-click the file you want to tag, point to Tag File and then click Create a new tag.

Chapter 4 – Searching File Contents Autopsy Forensic Browser User Guide
Page 34
The Create a new tag window opens.
3. In the Tag Name box, type a descriptive name for the tag. Click OK.
The tag name appears under the Tags area in the Data Explorer.

Autopsy Forensic Browser User Guide Chapter 4 – Searching File Contents
Page 35
To tag a file 4. In the Result Viewer, right-click the file you want to tag, point to Tag Source File and then click the name of the tag you want to apply to the file. In the example below, the tag Passwords is applied to the file.
5. To see the list of files you marked, under the Tags area in the Data Explorer, click the tag name.
Chapter 4 – Searching File Contents Autopsy Forensic Browser User Guide
Page 36
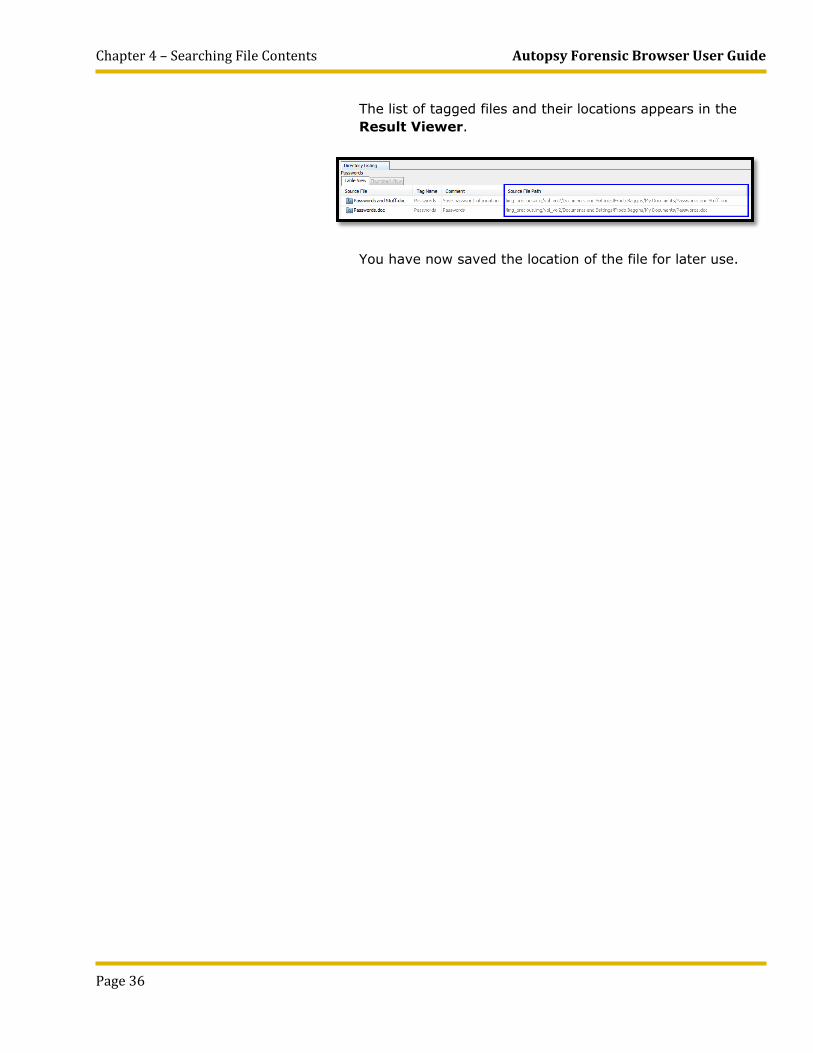
The list of tagged files and their locations appears in the Result Viewer.
You have now saved the location of the file for later use.

Autopsy Forensic Browser User Guide Chapter 5 – Generating Reports
Page 37
Chapter 5 – Generating Reports Autopsy enables you to create reports about the analyzed data
and any files you tagged. You may want to create a report to include as part of your overall investigation report.
You can create reports in HTML and CSV format.
To open reports in CSV format, you need a spreadsheet program that supports viewing the CSV file format, such as Microsoft Excel.
An HTML report shows links in the left pane for each category of analyzed data. If you click a link, the data appears in the main browser window. Figure 10 shows a sample report.
Figure 10: HTML Report
If you open a CSV report in Excel, the report uses a separate worksheet for each category of data. Each column contains one field of the report, which makes it suitable to convert into database format. Autopsy refers to CSV report format as Excel format.
Chapter 5 – Generating Reports Autopsy Forensic Browser User Guide
Page 38
In this section, you will learn about
• How to create HTML and Excel reports that show all available analyzed data
• How to create HTML and Excel reports that show only data you tagged (see “Saving File Locations” on page 33 for information about tags)
• How to create HTML and Excel reports that show data you select
At the end of this section, you will know how to create reports that contain information that is important to you.
Creating a Basic Report
A basic report uses the default data selections. You need to choose the format you want to use for the report (HTML or Excel).
To create a basic report
You can create more than one report format at the same time.
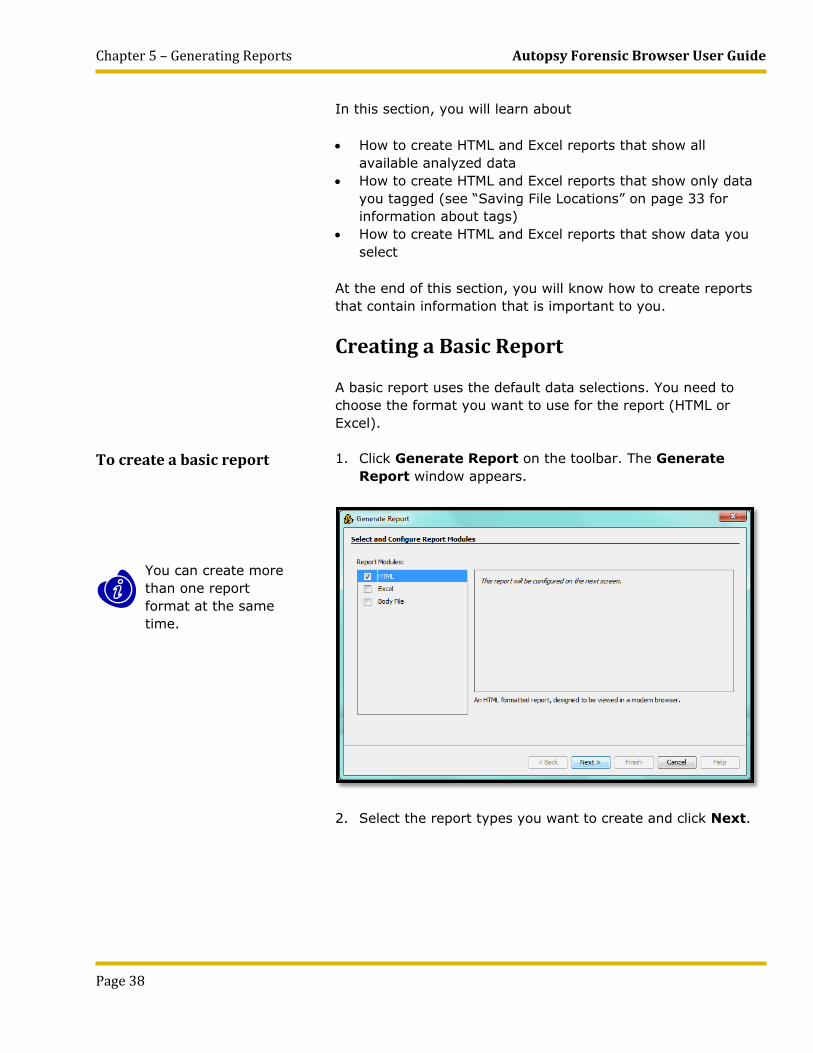
1. Click Generate Report on the toolbar. The Generate Report window appears.
2. Select the report types you want to create and click Next.
Autopsy Forensic Browser User Guide Chapter 5 – Generating Reports
Page 39
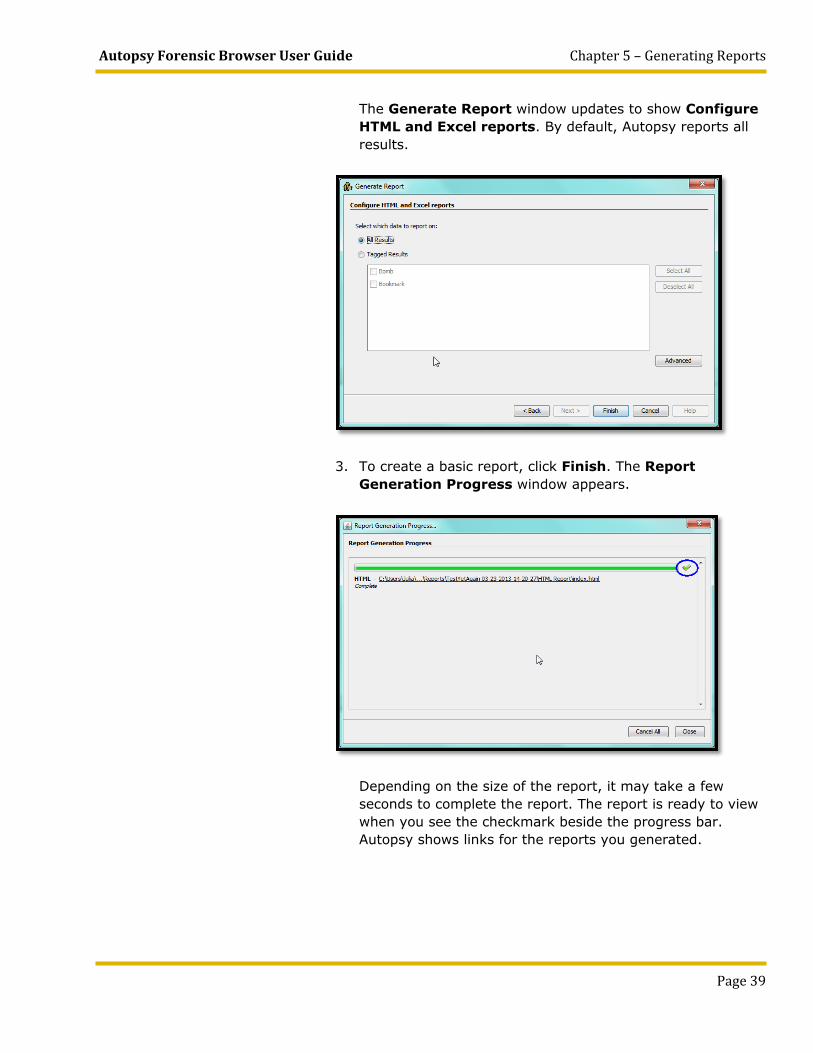
The Generate Report window updates to show Configure HTML and Excel reports. By default, Autopsy reports all results.
3. To create a basic report, click Finish. The Report Generation Progress window appears.
Depending on the size of the report, it may take a few seconds to complete the report. The report is ready to view when you see the checkmark beside the progress bar. Autopsy shows links for the reports you generated.

Chapter 5 – Generating Reports Autopsy Forensic Browser User Guide
Page 40
If you want to look at a report later, you can find it in the Reports subdirectory of the case directory you chose in “To create a case” on page 6.
4. To view the HTML report, click the link for an HTML report. Your default browser opens and shows the report. To view an Excel report, click the link for an Excel report. Microsoft Excel opens and shows the report.
5. To close the window, click Close.
Creating a Custom Report
You can create two kinds of custom reports
• A report that shows a list of files you tagged • A report that shows only the data you select, for example,
a report showing all Internet artifacts.
To create a report showing tagged files
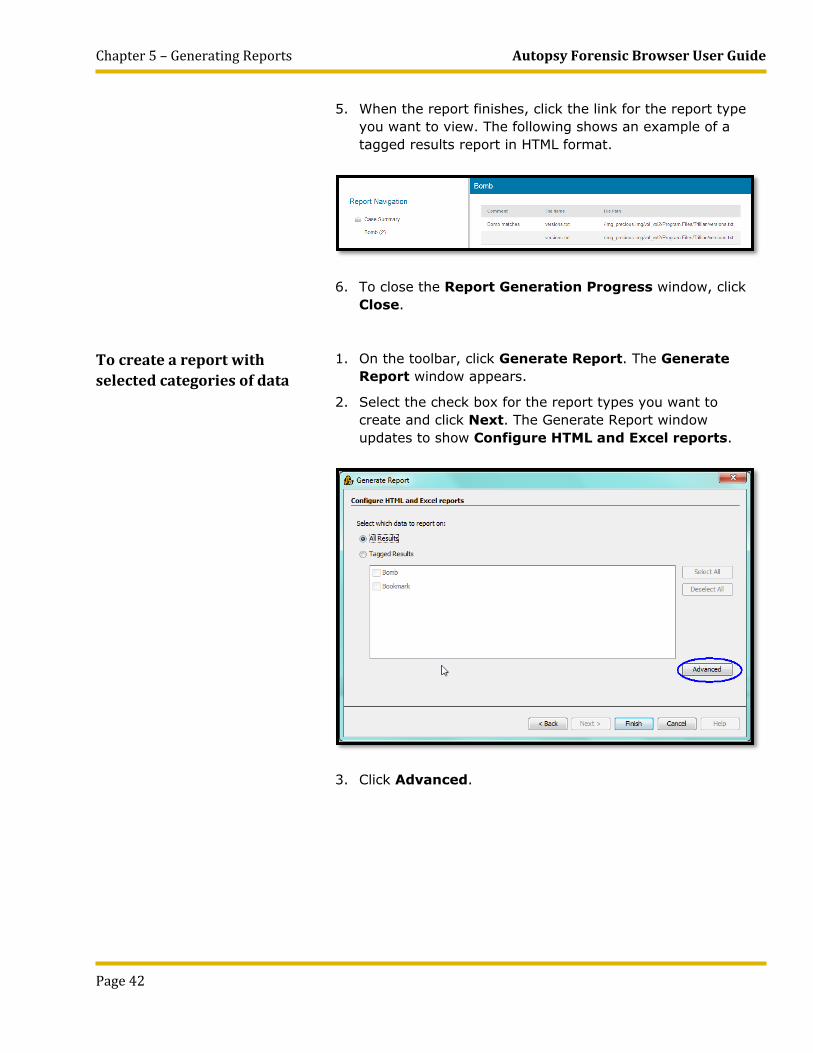
1. On the toolbar, click Generate Report. The Generate Report window appears.
2. Select the check box for the report types you want to create and click Next. The Generate Report window updates to show Configure HTML and Excel reports.
3. To create a report that shows a list of files you tagged, click Tagged Results.
Autopsy Forensic Browser User Guide Chapter 5 – Generating Reports
Page 41
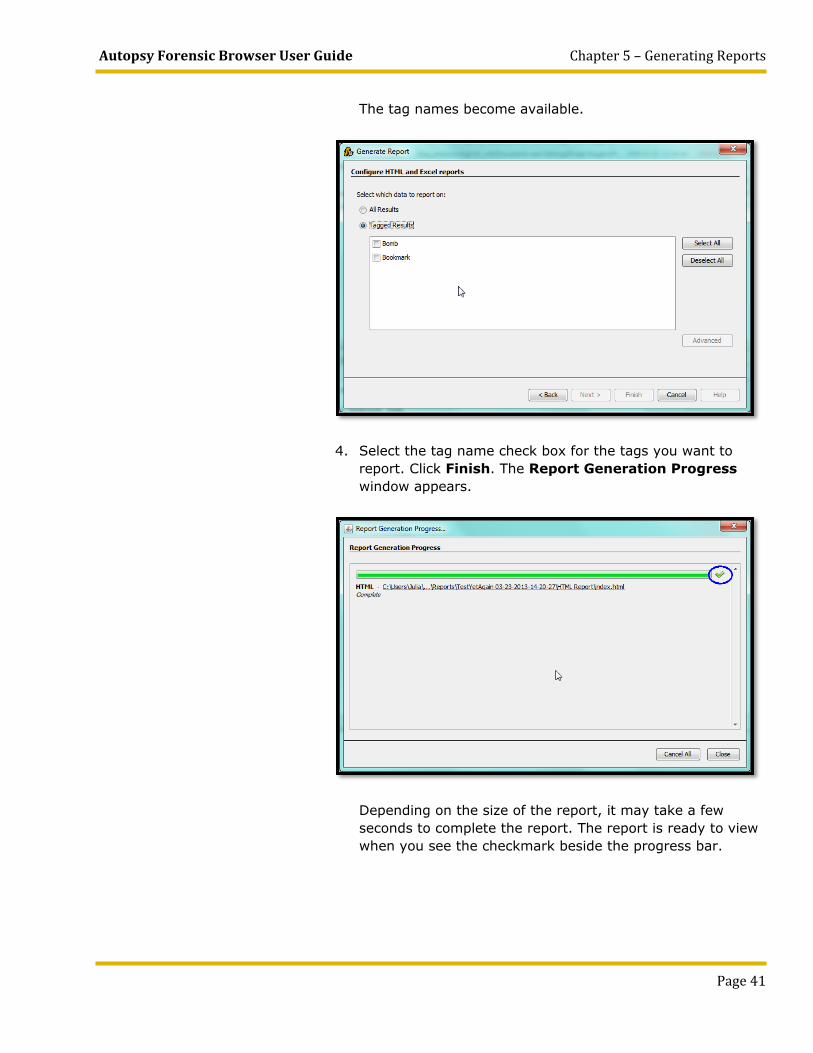
The tag names become available.
4. Select the tag name check box for the tags you want to report. Click Finish. The Report Generation Progress window appears.
Depending on the size of the report, it may take a few seconds to complete the report. The report is ready to view when you see the checkmark beside the progress bar.
Chapter 5 – Generating Reports Autopsy Forensic Browser User Guide
Page 42
5. When the report finishes, click the link for the report type you want to view. The following shows an example of a tagged results report in HTML format.
6. To close the Report Generation Progress window, click Close.
To create a report with selected categories of data
1. On the toolbar, click Generate Report. The Generate Report window appears.
2. Select the check box for the report types you want to create and click Next. The Generate Report window updates to show Configure HTML and Excel reports.
3. Click Advanced.

Autopsy Forensic Browser User Guide Chapter 5 – Generating Reports
Page 43
The Advanced Artifact Selection window appears.
4. Select the check box for the items you want to view in your report. To return to the Configure HTML and Excel reports window, click OK.
5. Click Finish. The Report Generation Progress window appears.
Depending on the size of the report, it may take a few seconds to complete the report. The report is ready to view when you see the checkmark beside the progress bar.
6. When the report finishes, click the link for the report type you want to view. To close the window, click Close.
Chapter 6 – Creating a Timeline Autopsy Forensic Browser User Guide
Page 44
Chapter 6 – Creating a Timeline
See the picture below if you need to locate the Result Viewer, or the Data Explorer.
Each file in the disk image has information about time the file was create or changed, when it was modified, and when it was accessed.
If the files were copied to another storage device, such as a USB flash drive, before the image was created, the original time data may be lost. Some programs do not preserve the original file attributes when files are copied.
Autopsy bases timeline information on MAC time, which is a numeric representation of a file’s time attributes, which are
• Modification time - the last time the file contents changed • Access time – the last the file was most recently opened to
read the contents • Change time – file permissions changed (Unix) • Creation time – when the file was created (Windows)
Different operating systems treat change time and creation time differently. Unix file systems do not store creation time, and consider that a file changed when the file’s metadata changed, not necessarily the file contents. Windows file systems creation time and change time indicates when the internal file data table entry changed.
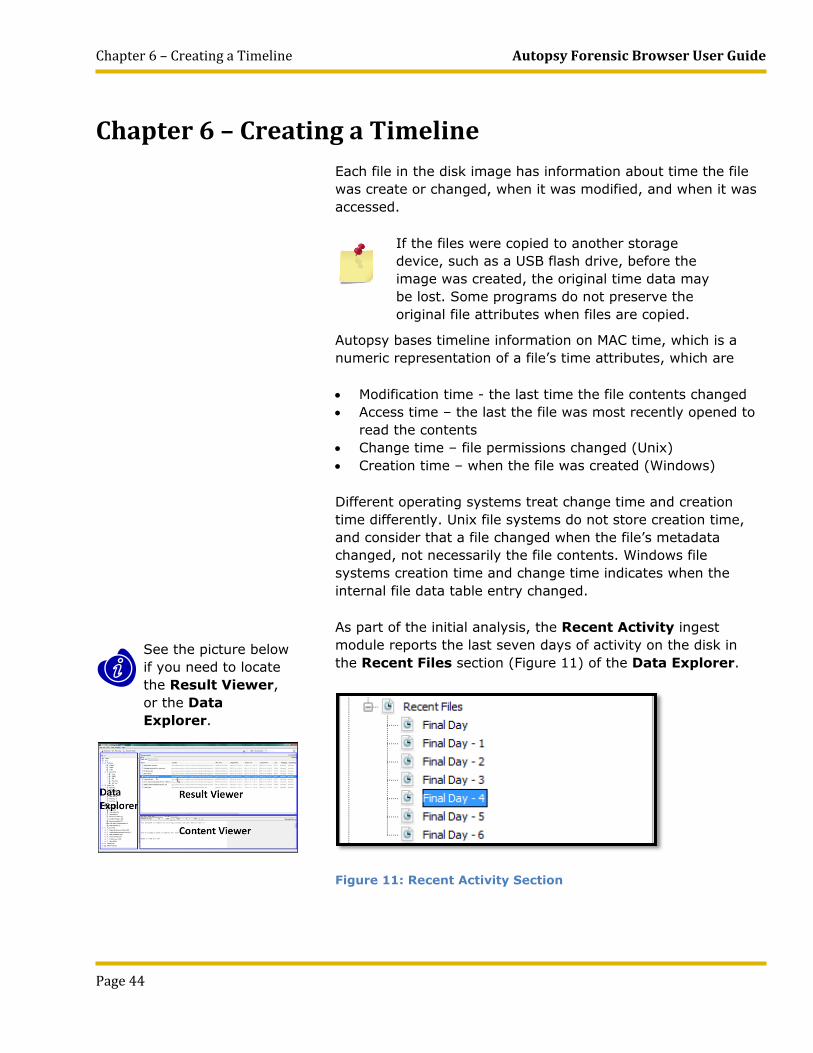
As part of the initial analysis, the Recent Activity ingest module reports the last seven days of activity on the disk in the Recent Files section (Figure 11) of the Data Explorer.
Figure 11: Recent Activity Section
Autopsy Forensic Browser User Guide Chapter 6 – Creating a Timeline
Page 45
Click the day you want to view and the results appear in the Result Viewer. If there was no activity on a given day, the Result Viewer will not show any results.
In this section, you will learn about
• How to create a graphical timeline using Autopsy’s timeline feature
• How to create a timeline report
At the end of this section, you will know how to view information about the files in the disk image based on time.
Creating a Graphical Timeline
You can use the timeline feature in Autopsy to create a graphical view of the file timelines. This feature is currently in beta status; however, you may find the data useful to quickly view file activity based on a particular date.
To create a graphical timeline
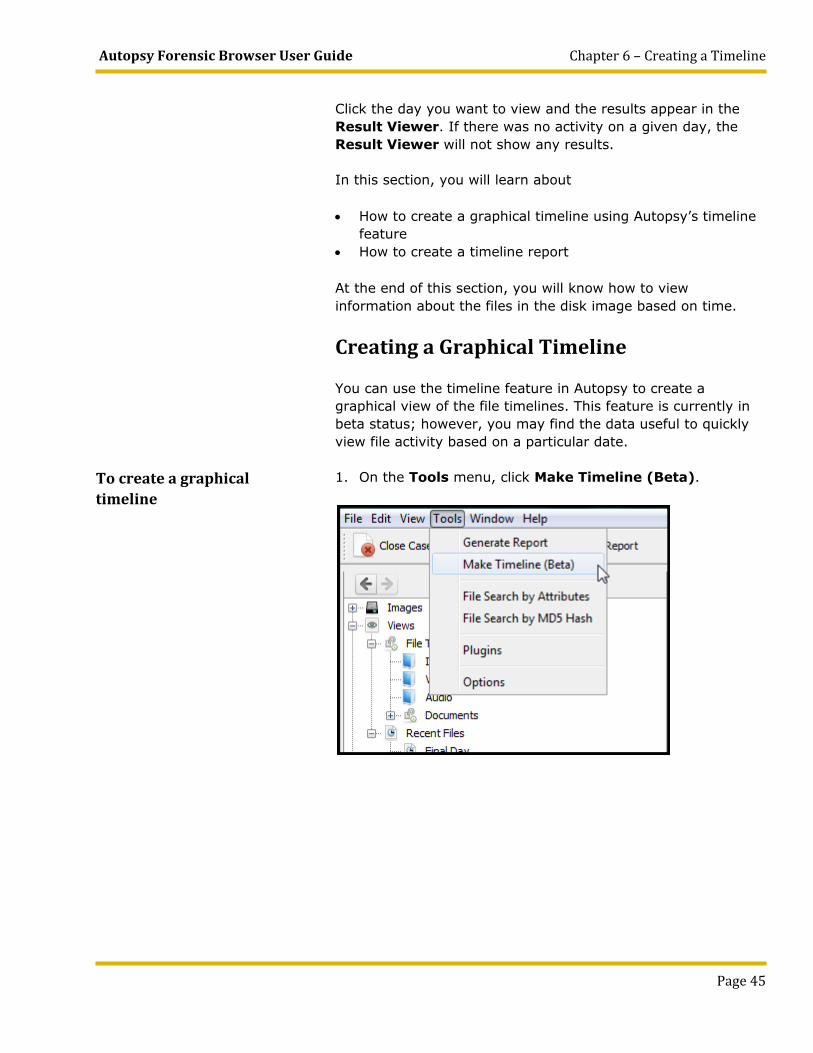
1. On the Tools menu, click Make Timeline (Beta).

Chapter 6 – Creating a Timeline Autopsy Forensic Browser User Guide
Page 46
The Autopsy Timeline window appears. You may have to minimize the main Autopsy window to view the timeline window.
2. To show the months when file activity took place, click the bar for the year you want to view. The graph updates to show the file activity for each month of the year.
3. To show the days when file activity took place, click the bar for the month you want to view. The graph updates to show the file activity for each day of the month.
4. To see the file activity for a particular day, click the day you want to view. The list of files appears in the Result Viewer.
5. To view the file contents, click a file in the Result Viewer. The file contents appear in the Content Viewer.
6. To return to a month or year view, click Zoom Out.

Autopsy Forensic Browser User Guide Chapter 6 – Creating a Timeline
Page 47
Creating a Timeline Report
Autopsy enables you to create a report containing the time information about each file in the disk image. You can view the report with a spreadsheet program, such as Microsoft Excel, and work with the data outside of Autopsy. Using a spreadsheet view, you can view the time information for every file in the disk image, whereas with the timeline view in Autopsy, you can only see the files on a per day basis.
Autopsy generates a text delimited file that you can import into Excel. The delimiter is “|” (vertical bar). For each item in the file system, the spreadsheet contains a subset of the information shown in the directory listing in the Result Viewer.
The spreadsheet does not show column headings. It shows the information in separate columns in the following order
• MD5 sum • File or directory name, including the full path • Meta Id • File permissions • User Id • Group Id • File size • Modified time • Access time • Change time • Created time
You can use the spreadsheet features to sort by modification time, access time, creation time, and change time.
To view the file, you need a spreadsheet program that can open delimited files, such as Microsoft Excel.
Chapter 6 – Creating a Timeline Autopsy Forensic Browser User Guide
Page 48
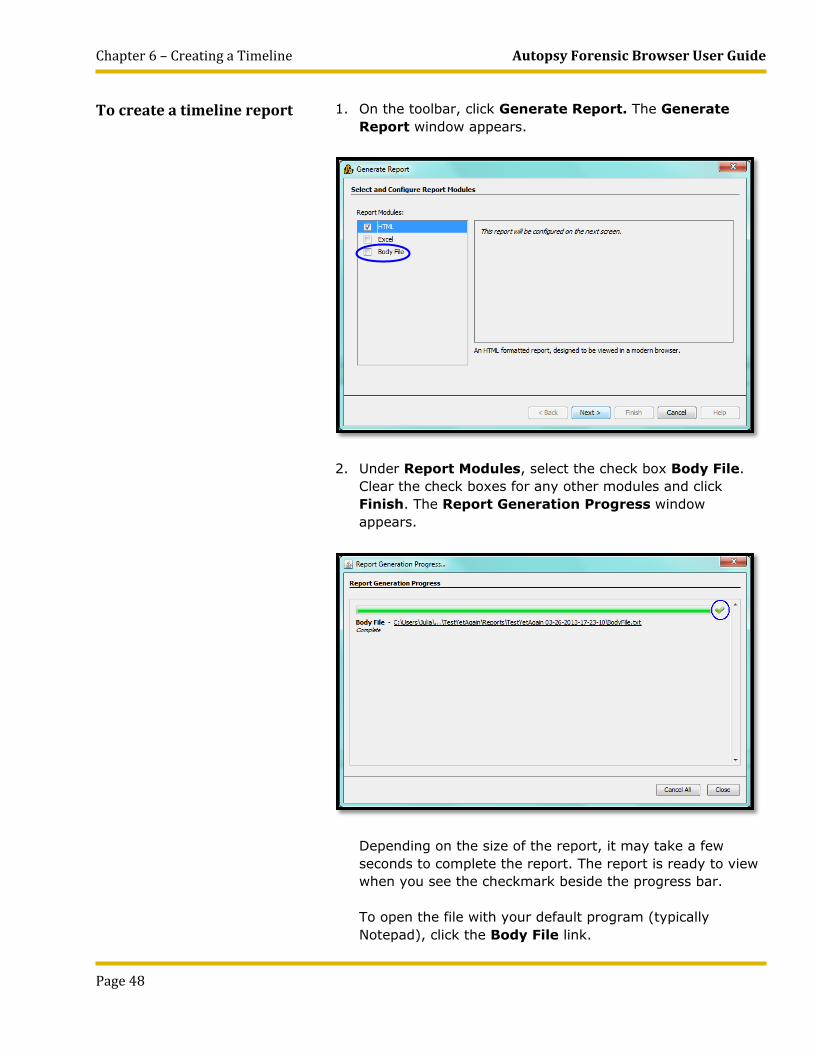
To create a timeline report 1. On the toolbar, click Generate Report. The Generate Report window appears.
2. Under Report Modules, select the check box Body File. Clear the check boxes for any other modules and click Finish. The Report Generation Progress window appears.
Depending on the size of the report, it may take a few seconds to complete the report. The report is ready to view when you see the checkmark beside the progress bar. To open the file with your default program (typically Notepad), click the Body File link.

Autopsy Forensic Browser User Guide Chapter 6 – Creating a Timeline
Page 49
3. To open the file in Excel or another spreadsheet program, run the program and open the file BodyFile.txt in the directory shown in the Report Generation Progress window.
4. Follow the procedure in your spreadsheet program to import a text file and be sure to specify the character “|” (vertical bar) as the delimiter.
5. To close the Report Generation Progress window, click Close.
Chapter 7 – Collecting Files for Later Analysis Autopsy Forensic Browser User Guide
Page 50
Chapter 7 – Collecting Files for Later Analysis You can extract data from the disk image to examine outside
Autopsy. For example, you may want to
• Examine data with other tools • Capture information to attach to a report • Examine unallocated space as a single, large file because it
may be easier to use with other data carving tools
The following sections describe how to:
• How to extract file and directory contents • How to extract unallocated disk space
At the end of this section you will know how to extract information from the disk image to use with other programs outside Autopsy.
Extracting File and Directory Contents
You can extract individual files and entire directories of files. You may want to extract files you tagged, files that Autopsy identified during ingest, such as Microsoft Offices files, or other files in the disk image. For example, you may want to extract the entire contents of the Documents and Settings directory from one of the user directories.
Autopsy Forensic Browser User Guide Chapter 7 – Collecting Files for Later Analysis
Page 51
To extract file and directory contents
See the picture below if you need to locate the Result Viewer, Data Explorer, or Content Viewer.
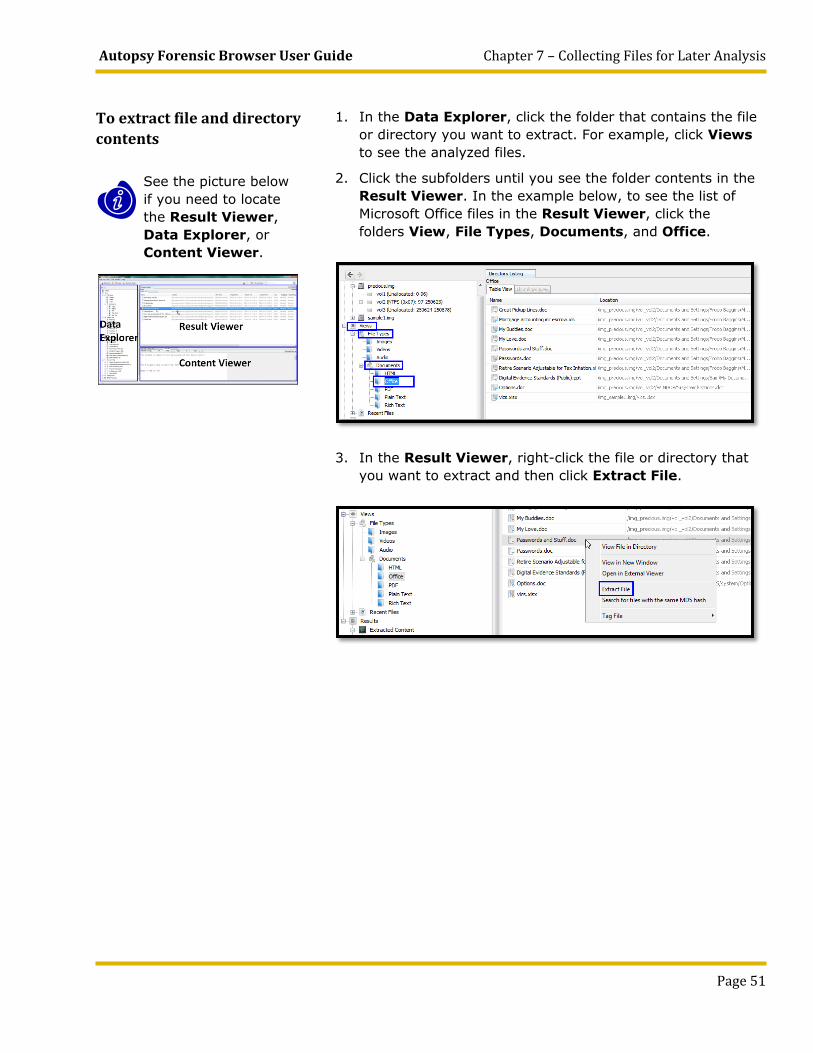
1. In the Data Explorer, click the folder that contains the file or directory you want to extract. For example, click Views to see the analyzed files.
2. Click the subfolders until you see the folder contents in the Result Viewer. In the example below, to see the list of Microsoft Office files in the Result Viewer, click the folders View, File Types, Documents, and Office.
3. In the Result Viewer, right-click the file or directory that you want to extract and then click Extract File.

Chapter 7 – Collecting Files for Later Analysis Autopsy Forensic Browser User Guide
Page 52
A new window opens to enable you to save the file.
4. If you want to save the file in a different directory, change to the directory where you want to store the file.
5. If you want to change the file name, in the File name box, type the file name you want to use.
6. Click Save. The Information dialog box appears.
7. To close the box, click OK.
You have finished extracting the file.
Autopsy Forensic Browser User Guide Chapter 7 – Collecting Files for Later Analysis
Page 53
Extracting Unallocated Disk Space
Unallocated disk space is composed of chunks of the file system that are not currently in use. Unallocated space can store deleted files and other interesting artifacts.
You can extract the individual contents of the unallocated space using the same steps as extracting individual files, or you can extract the space to a single file.
In the image, unallocated space is stored in blocks with distinct locations on the system. However, because of the way various carving tools work, it may be more useful to collect the data into a single, large file.
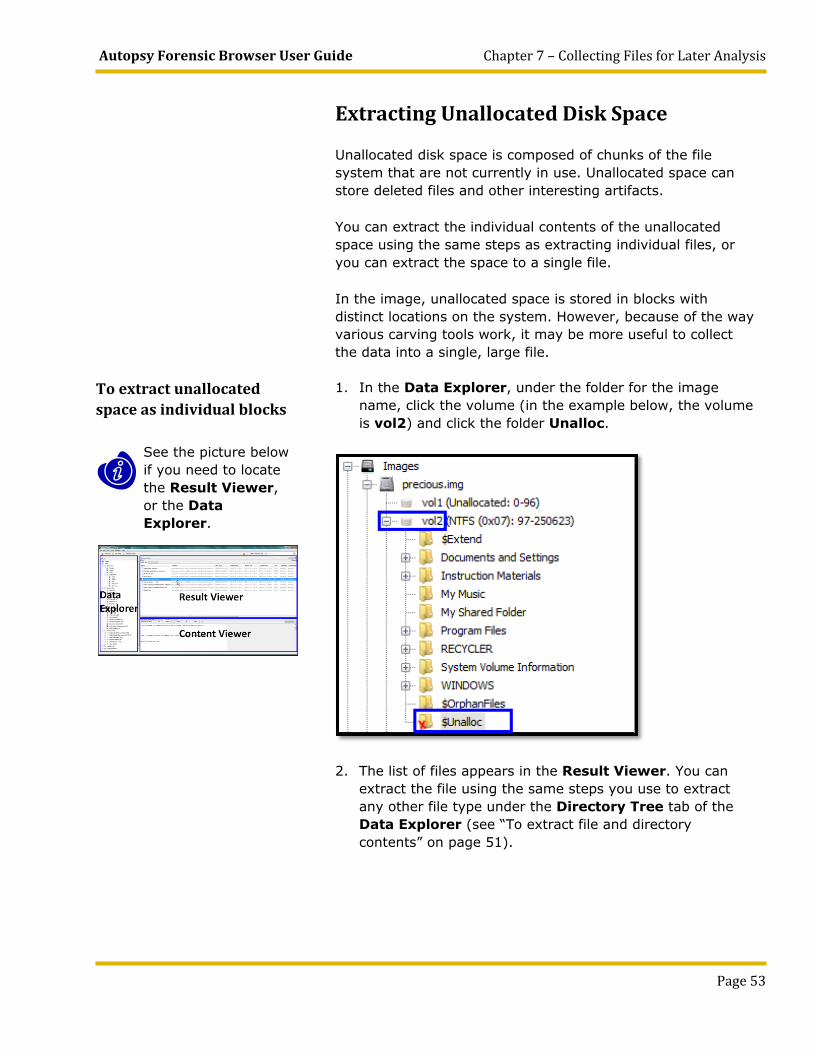
To extract unallocated space as individual blocks
See the picture below if you need to locate the Result Viewer, or the Data Explorer.
1. In the Data Explorer, under the folder for the image name, click the volume (in the example below, the volume is vol2) and click the folder Unalloc.
2. The list of files appears in the Result Viewer. You can extract the file using the same steps you use to extract any other file type under the Directory Tree tab of the Data Explorer (see “To extract file and directory contents” on page 51).
Chapter 7 – Collecting Files for Later Analysis Autopsy Forensic Browser User Guide
Page 54
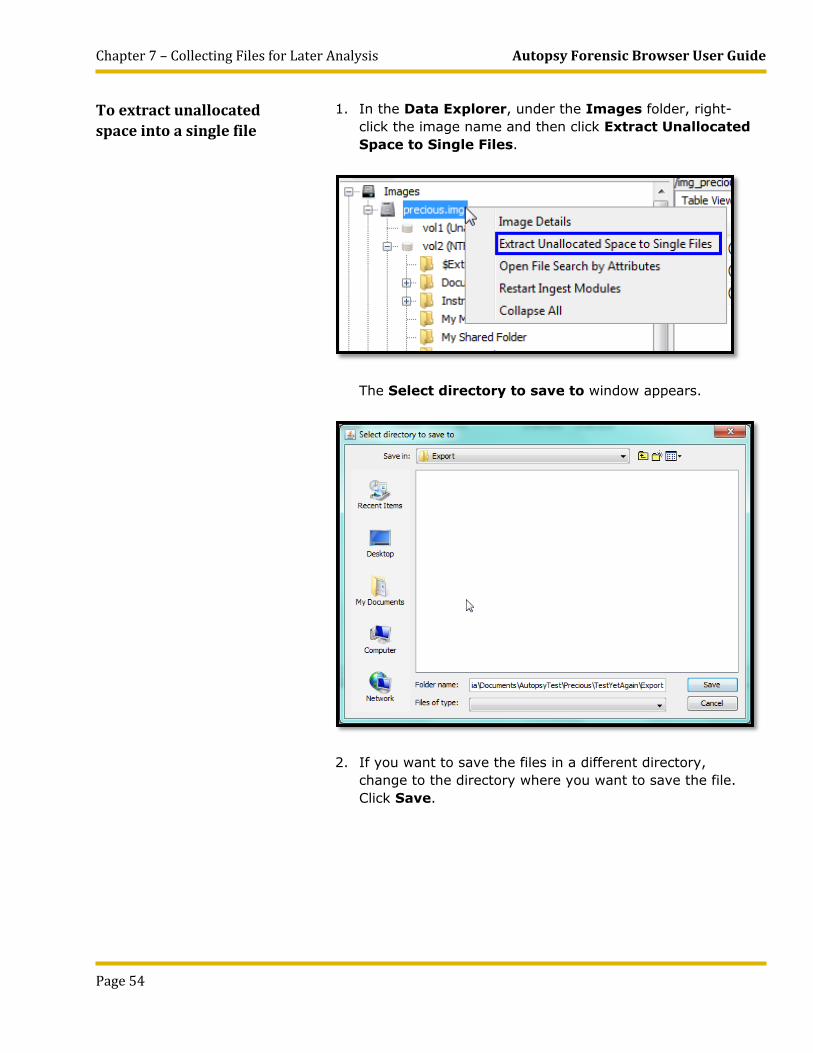
To extract unallocated space into a single file
1. In the Data Explorer, under the Images folder, right-click the image name and then click Extract Unallocated Space to Single Files.
The Select directory to save to window appears.
2. If you want to save the files in a different directory, change to the directory where you want to save the file. Click Save.

Autopsy Forensic Browser User Guide Chapter 7 – Collecting Files for Later Analysis
Page 55
The progress indicator in the bottom right corner of the screen shows the status of the extraction. A message appears when the process completes.
3. To view the extracted file, in Windows Explorer, change to the directory shown in the message. Files are named according to ImageName-Unalloc-ImageObjectID-VolumeID.dat. This naming scheme ensures that there are no duplicate file names, even if there are two images with the same name in a case.
You have finished extracting the unallocated space.
Appendix A: Toolbar Reference Autopsy Forensic Browser User Guide
Page 56
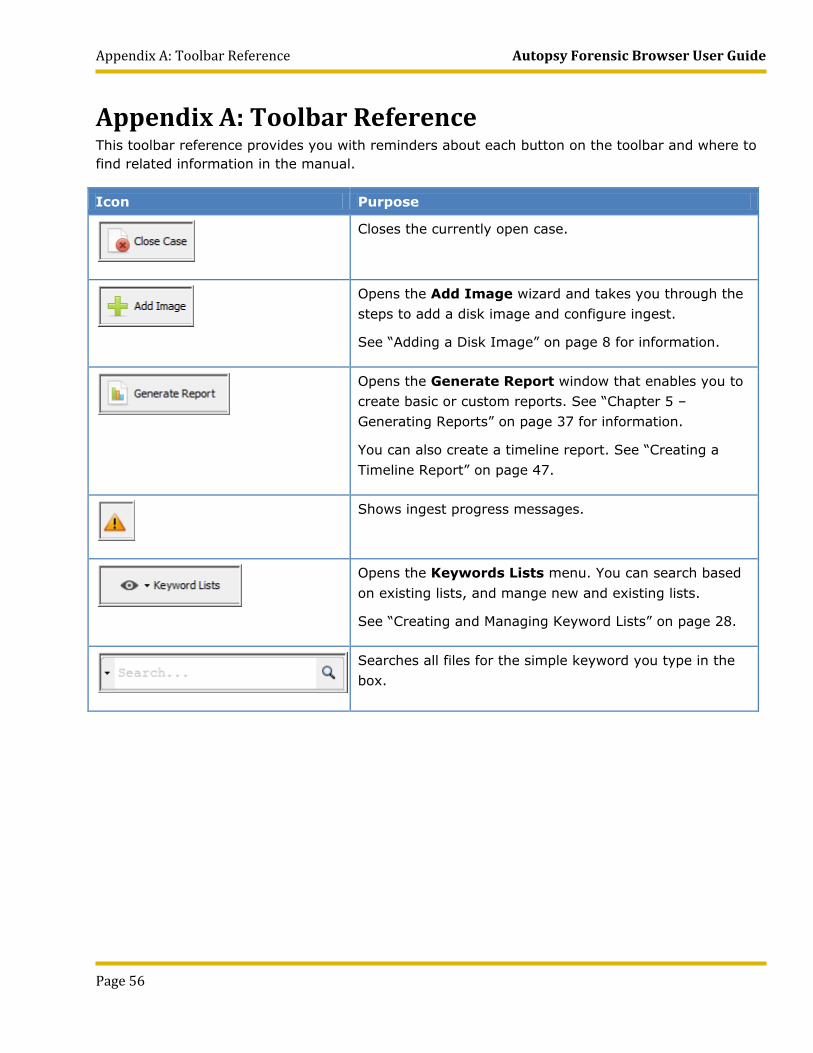
Appendix A: Toolbar Reference This toolbar reference provides you with reminders about each button on the toolbar and where to find related information in the manual.
Icon Purpose
Closes the currently open case.
Opens the Add Image wizard and takes you through the steps to add a disk image and configure ingest.
See “Adding a Disk Image” on page 8 for information.
Opens the Generate Report window that enables you to create basic or custom reports. See “Chapter 5 – Generating Reports” on page 37 for information.
You can also create a timeline report. See “Creating a Timeline Report” on page 47.
Shows ingest progress messages.
Opens the Keywords Lists menu. You can search based on existing lists, and mange new and existing lists.
See “Creating and Managing Keyword Lists” on page 28.
Searches all files for the simple keyword you type in the box.
Autopsy Forensic Browser User Guide Appendix B: Troubleshooting
Page 57
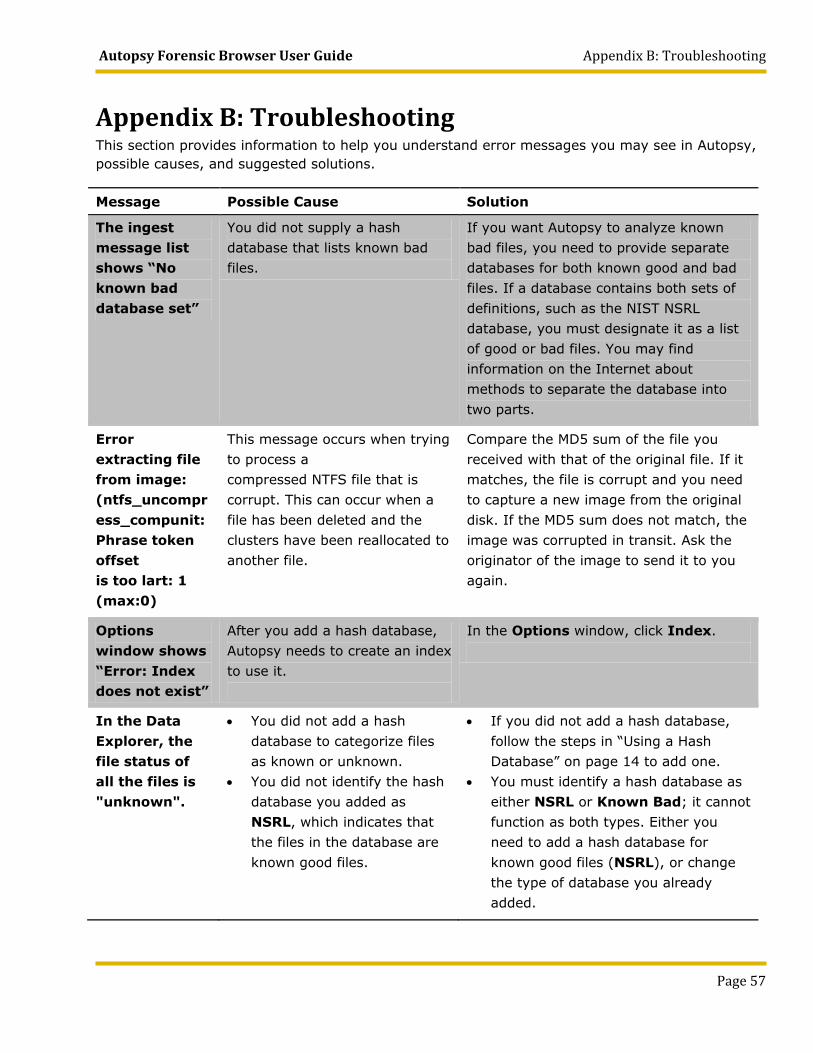
Appendix B: Troubleshooting This section provides information to help you understand error messages you may see in Autopsy, possible causes, and suggested solutions.
Message Possible Cause Solution
The ingest message list shows “No known bad database set”
You did not supply a hash database that lists known bad files.
If you want Autopsy to analyze known bad files, you need to provide separate databases for both known good and bad files. If a database contains both sets of definitions, such as the NIST NSRL database, you must designate it as a list of good or bad files. You may find information on the Internet about methods to separate the database into two parts.
Error extracting file from image: (ntfs_uncompress_compunit: Phrase token offset is too lart: 1 (max:0)
This message occurs when trying to process a compressed NTFS file that is corrupt. This can occur when a file has been deleted and the clusters have been reallocated to another file.
Compare the MD5 sum of the file you received with that of the original file. If it matches, the file is corrupt and you need to capture a new image from the original disk. If the MD5 sum does not match, the image was corrupted in transit. Ask the originator of the image to send it to you again.
Options window shows “Error: Index does not exist”
After you add a hash database, Autopsy needs to create an index to use it.
In the Options window, click Index.
In the Data Explorer, the file status of all the files is "unknown".
• You did not add a hash database to categorize files as known or unknown.
• You did not identify the hash database you added as NSRL, which indicates that the files in the database are known good files.
• If you did not add a hash database, follow the steps in “Using a Hash Database” on page 14 to add one.
• You must identify a hash database as either NSRL or Known Bad; it cannot function as both types. Either you need to add a hash database for known good files (NSRL), or change the type of database you already added.
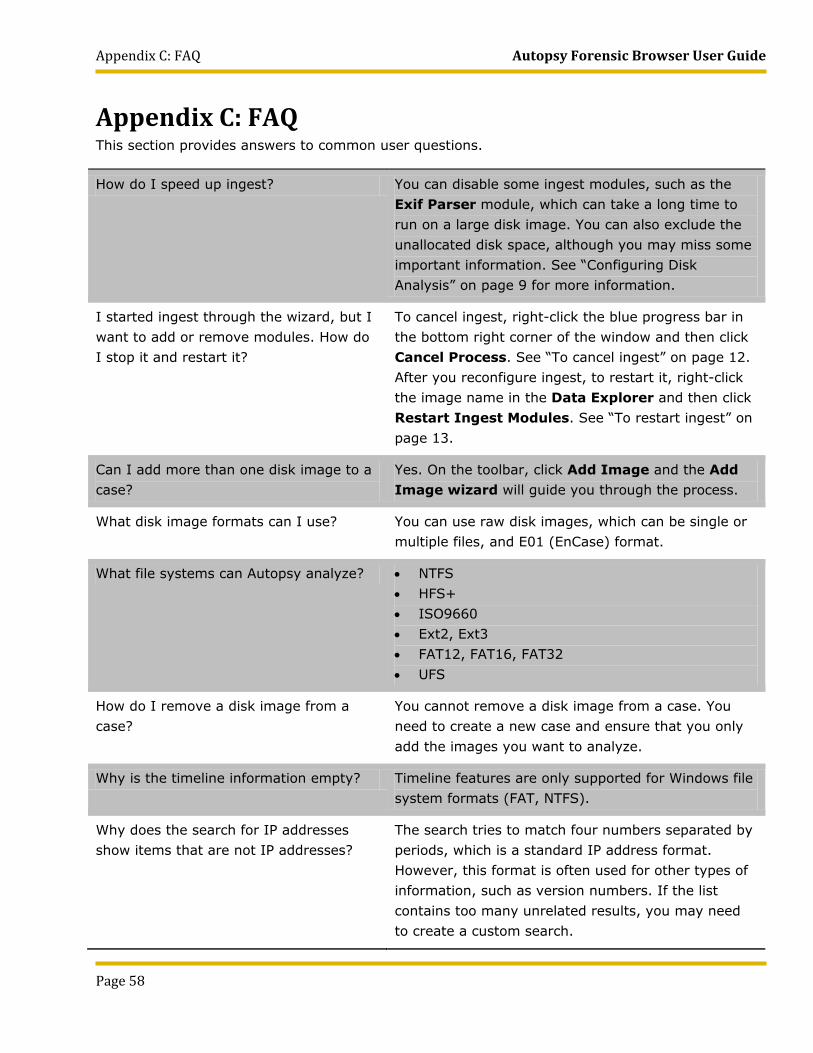
Appendix C: FAQ Autopsy Forensic Browser User Guide
Page 58
Appendix C: FAQ This section provides answers to common user questions.
How do I speed up ingest? You can disable some ingest modules, such as the Exif Parser module, which can take a long time to run on a large disk image. You can also exclude the unallocated disk space, although you may miss some important information. See “Configuring Disk Analysis” on page 9 for more information.
I started ingest through the wizard, but I want to add or remove modules. How do I stop it and restart it?
To cancel ingest, right-click the blue progress bar in the bottom right corner of the window and then click Cancel Process. See “To cancel ingest” on page 12. After you reconfigure ingest, to restart it, right-click the image name in the Data Explorer and then click Restart Ingest Modules. See “To restart ingest” on page 13.
Can I add more than one disk image to a case?
Yes. On the toolbar, click Add Image and the Add Image wizard will guide you through the process.
What disk image formats can I use?
You can use raw disk images, which can be single or multiple files, and E01 (EnCase) format.
What file systems can Autopsy analyze? • NTFS • HFS+ • ISO9660 • Ext2, Ext3 • FAT12, FAT16, FAT32 • UFS
How do I remove a disk image from a case?
You cannot remove a disk image from a case. You need to create a new case and ensure that you only add the images you want to analyze.
Why is the timeline information empty? Timeline features are only supported for Windows file system formats (FAT, NTFS).
Why does the search for IP addresses show items that are not IP addresses?
The search tries to match four numbers separated by periods, which is a standard IP address format. However, this format is often used for other types of information, such as version numbers. If the list contains too many unrelated results, you may need to create a custom search.
Autopsy Forensic Browser User Guide Glossary
Page 59
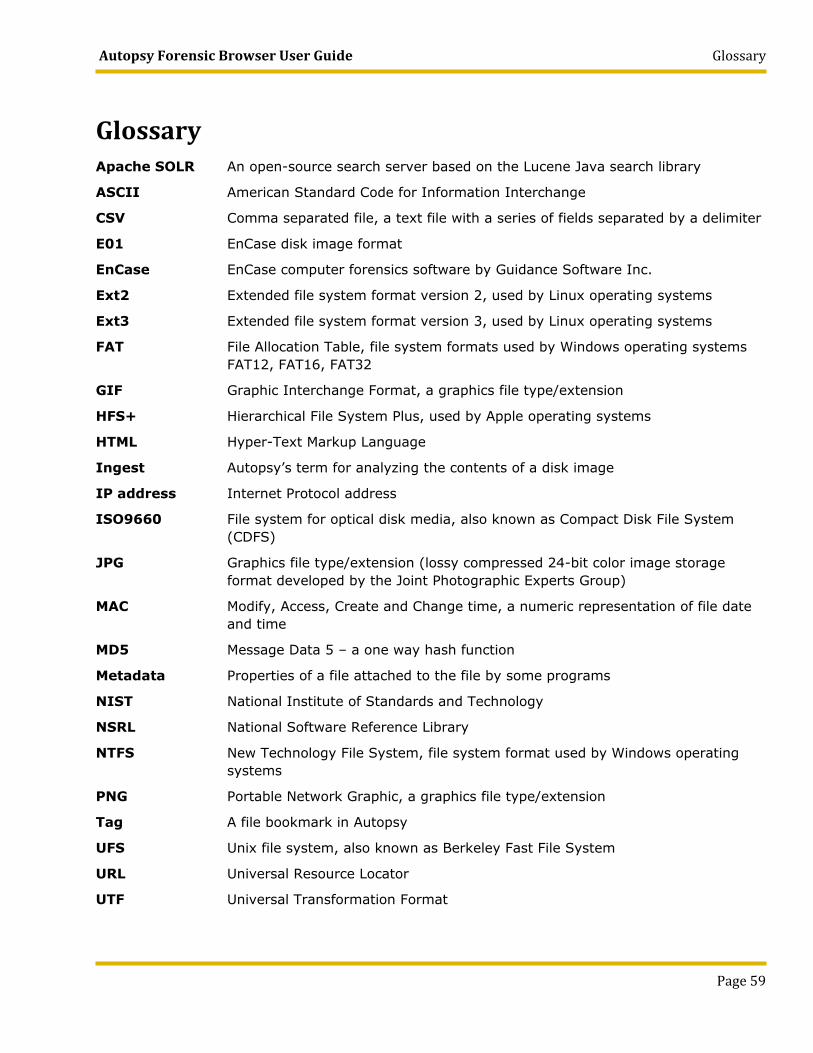
Glossary Apache SOLR An open-source search server based on the Lucene Java search library
ASCII American Standard Code for Information Interchange
CSV Comma separated file, a text file with a series of fields separated by a delimiter
E01 EnCase disk image format
EnCase EnCase computer forensics software by Guidance Software Inc.
Ext2 Extended file system format version 2, used by Linux operating systems
Ext3 Extended file system format version 3, used by Linux operating systems
FAT File Allocation Table, file system formats used by Windows operating systems FAT12, FAT16, FAT32
GIF Graphic Interchange Format, a graphics file type/extension
HFS+ Hierarchical File System Plus, used by Apple operating systems
HTML Hyper-Text Markup Language
Ingest Autopsy’s term for analyzing the contents of a disk image
IP address Internet Protocol address
ISO9660 File system for optical disk media, also known as Compact Disk File System (CDFS)
JPG Graphics file type/extension (lossy compressed 24-bit color image storage format developed by the Joint Photographic Experts Group)
MAC Modify, Access, Create and Change time, a numeric representation of file date and time
MD5 Message Data 5 – a one way hash function
Metadata Properties of a file attached to the file by some programs
NIST National Institute of Standards and Technology
NSRL National Software Reference Library
NTFS New Technology File System, file system format used by Windows operating systems
PNG Portable Network Graphic, a graphics file type/extension
Tag A file bookmark in Autopsy
UFS Unix file system, also known as Berkeley Fast File System
URL Universal Resource Locator
UTF Universal Transformation Format
Index Autopsy Forensic Browser User Guide
Page 60
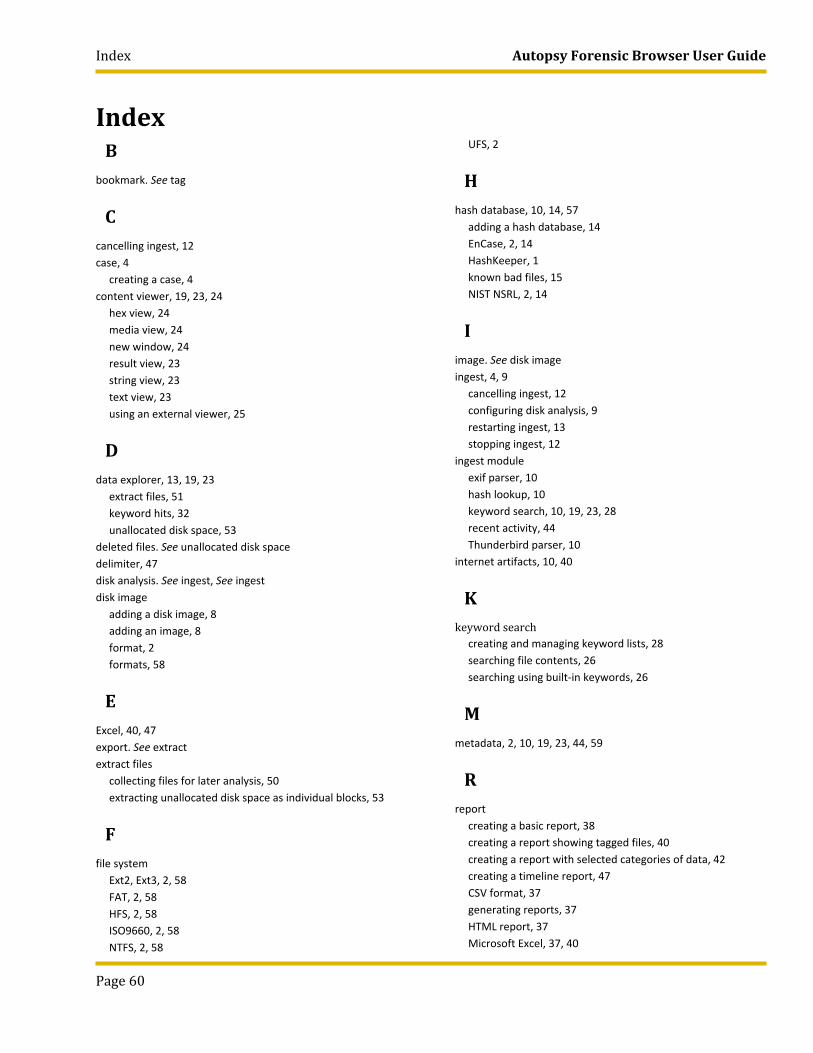
Index B
bookmark. See tag
C cancelling ingest, 12 case, 4
creating a case, 4 content viewer, 19, 23, 24
hex view, 24 media view, 24 new window, 24 result view, 23 string view, 23 text view, 23 using an external viewer, 25
D data explorer, 13, 19, 23
extract files, 51 keyword hits, 32 unallocated disk space, 53
deleted files. See unallocated disk space delimiter, 47 disk analysis. See ingest, See ingest disk image
adding a disk image, 8 adding an image, 8 format, 2 formats, 58
E Excel, 40, 47 export. See extract extract files
collecting files for later analysis, 50 extracting unallocated disk space as individual blocks, 53
F file system
Ext2, Ext3, 2, 58 FAT, 2, 58 HFS, 2, 58 ISO9660, 2, 58 NTFS, 2, 58
UFS, 2
H hash database, 10, 14, 57
adding a hash database, 14 EnCase, 2, 14 HashKeeper, 1 known bad files, 15 NIST NSRL, 2, 14
I image. See disk image ingest, 4, 9
cancelling ingest, 12 configuring disk analysis, 9 restarting ingest, 13 stopping ingest, 12
ingest module exif parser, 10 hash lookup, 10 keyword search, 10, 19, 23, 28 recent activity, 44 Thunderbird parser, 10
internet artifacts, 10, 40
K keyword search
creating and managing keyword lists, 28 searching file contents, 26 searching using built-in keywords, 26
M metadata, 2, 10, 19, 23, 44, 59
R report
creating a basic report, 38 creating a report showing tagged files, 40 creating a report with selected categories of data, 42 creating a timeline report, 47 CSV format, 37 generating reports, 37 HTML report, 37 Microsoft Excel, 37, 40
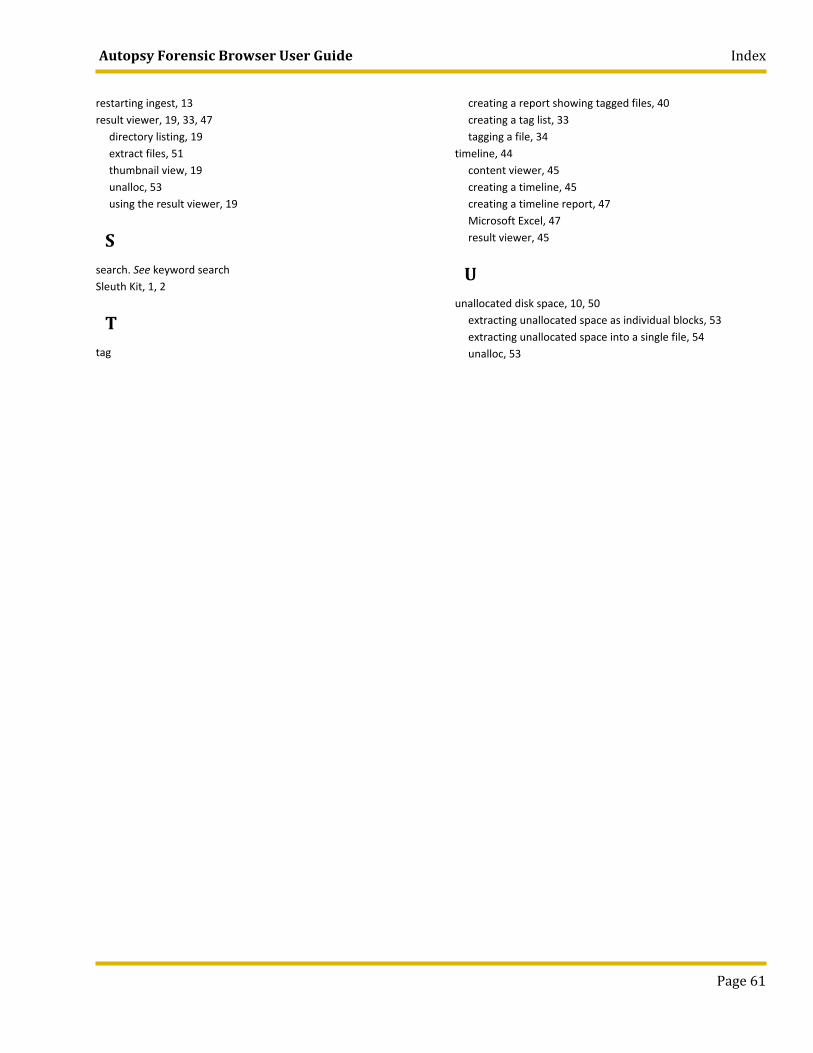
Autopsy Forensic Browser User Guide Index
Page 61
restarting ingest, 13 result viewer, 19, 33, 47
directory listing, 19 extract files, 51 thumbnail view, 19 unalloc, 53 using the result viewer, 19
S search. See keyword search Sleuth Kit, 1, 2
T tag
creating a report showing tagged files, 40 creating a tag list, 33 tagging a file, 34
timeline, 44 content viewer, 45 creating a timeline, 45 creating a timeline report, 47 Microsoft Excel, 47 result viewer, 45
U unallocated disk space, 10, 50
extracting unallocated space as individual blocks, 53 extracting unallocated space into a single file, 54 unalloc, 53