Embed Size (px)
Citation preview

Autofac DocumentationRelease 3.3
Autofac Contributors
February 15, 2016

Contents
1 Getting Started 31.1 Structuring the Application . . . . . . . . . . . . . . . . . . . . . . . . . . . . . . . . . . . . . . . 31.2 Add Autofac References . . . . . . . . . . . . . . . . . . . . . . . . . . . . . . . . . . . . . . . . . 41.3 Application Startup . . . . . . . . . . . . . . . . . . . . . . . . . . . . . . . . . . . . . . . . . . . . 51.4 Application Execution . . . . . . . . . . . . . . . . . . . . . . . . . . . . . . . . . . . . . . . . . . 61.5 Going Further . . . . . . . . . . . . . . . . . . . . . . . . . . . . . . . . . . . . . . . . . . . . . . 71.6 Need Help? . . . . . . . . . . . . . . . . . . . . . . . . . . . . . . . . . . . . . . . . . . . . . . . . 71.7 Building from Source . . . . . . . . . . . . . . . . . . . . . . . . . . . . . . . . . . . . . . . . . . 8
2 What’s New / Release Notes 9
3 Registering Components 113.1 Registration Concepts . . . . . . . . . . . . . . . . . . . . . . . . . . . . . . . . . . . . . . . . . . 11
3.1.1 Reflection Components . . . . . . . . . . . . . . . . . . . . . . . . . . . . . . . . . . . . . 113.1.2 Instance Components . . . . . . . . . . . . . . . . . . . . . . . . . . . . . . . . . . . . . . 123.1.3 Lambda Expression Components . . . . . . . . . . . . . . . . . . . . . . . . . . . . . . . . 133.1.4 Open Generic Components . . . . . . . . . . . . . . . . . . . . . . . . . . . . . . . . . . . 143.1.5 Services vs. Components . . . . . . . . . . . . . . . . . . . . . . . . . . . . . . . . . . . . 143.1.6 Default Registrations . . . . . . . . . . . . . . . . . . . . . . . . . . . . . . . . . . . . . . 153.1.7 Configuration of Registrations . . . . . . . . . . . . . . . . . . . . . . . . . . . . . . . . . 163.1.8 Dynamically-Provided Registrations . . . . . . . . . . . . . . . . . . . . . . . . . . . . . . 16
3.2 Passing Parameters to Register . . . . . . . . . . . . . . . . . . . . . . . . . . . . . . . . . . . . . . 163.2.1 Available Parameter Types . . . . . . . . . . . . . . . . . . . . . . . . . . . . . . . . . . . 163.2.2 Parameters with Reflection Components . . . . . . . . . . . . . . . . . . . . . . . . . . . . 163.2.3 Parameters with Lambda Expression Components . . . . . . . . . . . . . . . . . . . . . . . 17
3.3 Property and Method Injection . . . . . . . . . . . . . . . . . . . . . . . . . . . . . . . . . . . . . . 173.3.1 Property Injection . . . . . . . . . . . . . . . . . . . . . . . . . . . . . . . . . . . . . . . . 183.3.2 Method Injection . . . . . . . . . . . . . . . . . . . . . . . . . . . . . . . . . . . . . . . . 18
3.4 Assembly Scanning . . . . . . . . . . . . . . . . . . . . . . . . . . . . . . . . . . . . . . . . . . . 183.4.1 Scanning for Types . . . . . . . . . . . . . . . . . . . . . . . . . . . . . . . . . . . . . . . 183.4.2 Scanning for Modules . . . . . . . . . . . . . . . . . . . . . . . . . . . . . . . . . . . . . . 203.4.3 IIS Hosted Web Applications . . . . . . . . . . . . . . . . . . . . . . . . . . . . . . . . . . 21
4 Resolving Services 234.1 Passing Parameters to Resolve . . . . . . . . . . . . . . . . . . . . . . . . . . . . . . . . . . . . . . 24
4.1.1 Available Parameter Types . . . . . . . . . . . . . . . . . . . . . . . . . . . . . . . . . . . 244.1.2 Parameters with Reflection Components . . . . . . . . . . . . . . . . . . . . . . . . . . . . 244.1.3 Parameters with Lambda Expression Components . . . . . . . . . . . . . . . . . . . . . . . 25
i
4.1.4 Passing Parameters Without Explicitly Calling Resolve . . . . . . . . . . . . . . . . . . . . 254.2 Implicit Relationship Types . . . . . . . . . . . . . . . . . . . . . . . . . . . . . . . . . . . . . . . 25
4.2.1 Supported Relationship Types . . . . . . . . . . . . . . . . . . . . . . . . . . . . . . . . . 264.2.2 Composing Relationship Types . . . . . . . . . . . . . . . . . . . . . . . . . . . . . . . . . 324.2.3 Relationship Types and Container Independence . . . . . . . . . . . . . . . . . . . . . . . . 32
5 Controlling Scope and Lifetime 335.1 Working with Lifetime Scopes . . . . . . . . . . . . . . . . . . . . . . . . . . . . . . . . . . . . . . 34
5.1.1 Creating a New Lifetime Scope . . . . . . . . . . . . . . . . . . . . . . . . . . . . . . . . . 345.1.2 Tagging a Lifetime Scope . . . . . . . . . . . . . . . . . . . . . . . . . . . . . . . . . . . . 355.1.3 Adding Registrations to a Lifetime Scope . . . . . . . . . . . . . . . . . . . . . . . . . . . 36
5.2 Instance Scope . . . . . . . . . . . . . . . . . . . . . . . . . . . . . . . . . . . . . . . . . . . . . . 365.2.1 Instance Per Dependency . . . . . . . . . . . . . . . . . . . . . . . . . . . . . . . . . . . . 365.2.2 Single Instance . . . . . . . . . . . . . . . . . . . . . . . . . . . . . . . . . . . . . . . . . 375.2.3 Instance Per Lifetime Scope . . . . . . . . . . . . . . . . . . . . . . . . . . . . . . . . . . 375.2.4 Instance Per Matching Lifetime Scope . . . . . . . . . . . . . . . . . . . . . . . . . . . . . 385.2.5 Instance Per Request . . . . . . . . . . . . . . . . . . . . . . . . . . . . . . . . . . . . . . 395.2.6 Instance Per Owned . . . . . . . . . . . . . . . . . . . . . . . . . . . . . . . . . . . . . . . 405.2.7 Thread Scope . . . . . . . . . . . . . . . . . . . . . . . . . . . . . . . . . . . . . . . . . . 40
5.3 Disposal . . . . . . . . . . . . . . . . . . . . . . . . . . . . . . . . . . . . . . . . . . . . . . . . . 415.3.1 Registering Components . . . . . . . . . . . . . . . . . . . . . . . . . . . . . . . . . . . . 425.3.2 Resolve Components from Lifetime Scopes . . . . . . . . . . . . . . . . . . . . . . . . . . 435.3.3 Child Scopes are NOT Automatically Disposed . . . . . . . . . . . . . . . . . . . . . . . . 445.3.4 Advanced Hierarchies . . . . . . . . . . . . . . . . . . . . . . . . . . . . . . . . . . . . . . 44
5.4 Lifetime Events . . . . . . . . . . . . . . . . . . . . . . . . . . . . . . . . . . . . . . . . . . . . . 445.4.1 OnActivating . . . . . . . . . . . . . . . . . . . . . . . . . . . . . . . . . . . . . . . . . . 445.4.2 OnActivated . . . . . . . . . . . . . . . . . . . . . . . . . . . . . . . . . . . . . . . . . . . 455.4.3 OnRelease . . . . . . . . . . . . . . . . . . . . . . . . . . . . . . . . . . . . . . . . . . . . 45
5.5 Running Code at Startup . . . . . . . . . . . . . . . . . . . . . . . . . . . . . . . . . . . . . . . . . 455.5.1 Startable Components . . . . . . . . . . . . . . . . . . . . . . . . . . . . . . . . . . . . . . 455.5.2 Auto-Activated Components . . . . . . . . . . . . . . . . . . . . . . . . . . . . . . . . . . 46
6 Configuration 476.1 XML Configuration . . . . . . . . . . . . . . . . . . . . . . . . . . . . . . . . . . . . . . . . . . . 47
6.1.1 Syntax . . . . . . . . . . . . . . . . . . . . . . . . . . . . . . . . . . . . . . . . . . . . . . 476.1.2 Valid ‘component’ Attributes . . . . . . . . . . . . . . . . . . . . . . . . . . . . . . . . . . 486.1.3 Valid ‘component’ Nested Elements . . . . . . . . . . . . . . . . . . . . . . . . . . . . . . 486.1.4 Modules . . . . . . . . . . . . . . . . . . . . . . . . . . . . . . . . . . . . . . . . . . . . . 486.1.5 Additional Config Files . . . . . . . . . . . . . . . . . . . . . . . . . . . . . . . . . . . . . 486.1.6 Configuring the Container . . . . . . . . . . . . . . . . . . . . . . . . . . . . . . . . . . . 496.1.7 Multiple Files or Sections . . . . . . . . . . . . . . . . . . . . . . . . . . . . . . . . . . . . 49
6.2 Modules . . . . . . . . . . . . . . . . . . . . . . . . . . . . . . . . . . . . . . . . . . . . . . . . . 496.2.1 Introduction . . . . . . . . . . . . . . . . . . . . . . . . . . . . . . . . . . . . . . . . . . . 496.2.2 Advantages of Modules . . . . . . . . . . . . . . . . . . . . . . . . . . . . . . . . . . . . . 506.2.3 Example . . . . . . . . . . . . . . . . . . . . . . . . . . . . . . . . . . . . . . . . . . . . . 506.2.4 Adapting to the Deployment Environment . . . . . . . . . . . . . . . . . . . . . . . . . . . 516.2.5 Common Use Cases for Modules . . . . . . . . . . . . . . . . . . . . . . . . . . . . . . . . 52
7 Application Integration 537.1 ASP.NET . . . . . . . . . . . . . . . . . . . . . . . . . . . . . . . . . . . . . . . . . . . . . . . . . 53
7.1.1 OWIN . . . . . . . . . . . . . . . . . . . . . . . . . . . . . . . . . . . . . . . . . . . . . . 537.1.2 MVC . . . . . . . . . . . . . . . . . . . . . . . . . . . . . . . . . . . . . . . . . . . . . . 547.1.3 Web API . . . . . . . . . . . . . . . . . . . . . . . . . . . . . . . . . . . . . . . . . . . . 597.1.4 SignalR . . . . . . . . . . . . . . . . . . . . . . . . . . . . . . . . . . . . . . . . . . . . . 67
ii

7.1.5 Web Forms . . . . . . . . . . . . . . . . . . . . . . . . . . . . . . . . . . . . . . . . . . . 677.1.6 RIA / Domain Services . . . . . . . . . . . . . . . . . . . . . . . . . . . . . . . . . . . . . 67
7.2 Windows Communication Foundation (WCF) . . . . . . . . . . . . . . . . . . . . . . . . . . . . . . 677.3 Managed Extensibility Framework (MEF) . . . . . . . . . . . . . . . . . . . . . . . . . . . . . . . . 67
7.3.1 Consuming MEF Extensions in Autofac . . . . . . . . . . . . . . . . . . . . . . . . . . . . 677.3.2 Providing Autofac Components to MEF Extensions . . . . . . . . . . . . . . . . . . . . . . 68
7.4 Common Service Locator . . . . . . . . . . . . . . . . . . . . . . . . . . . . . . . . . . . . . . . . 687.5 Enterprise Library 5 . . . . . . . . . . . . . . . . . . . . . . . . . . . . . . . . . . . . . . . . . . . 68
7.5.1 Using the Configurator . . . . . . . . . . . . . . . . . . . . . . . . . . . . . . . . . . . . . 687.5.2 Specifying a Registration Source . . . . . . . . . . . . . . . . . . . . . . . . . . . . . . . . 69
7.6 NHibernate . . . . . . . . . . . . . . . . . . . . . . . . . . . . . . . . . . . . . . . . . . . . . . . . 697.7 Moq . . . . . . . . . . . . . . . . . . . . . . . . . . . . . . . . . . . . . . . . . . . . . . . . . . . . 69
7.7.1 Getting Started . . . . . . . . . . . . . . . . . . . . . . . . . . . . . . . . . . . . . . . . . 697.7.2 Configuring Mocks . . . . . . . . . . . . . . . . . . . . . . . . . . . . . . . . . . . . . . . 707.7.3 Configuring Specific Dependencies . . . . . . . . . . . . . . . . . . . . . . . . . . . . . . 70
7.8 FakeItEasy . . . . . . . . . . . . . . . . . . . . . . . . . . . . . . . . . . . . . . . . . . . . . . . . 717.8.1 Getting Started . . . . . . . . . . . . . . . . . . . . . . . . . . . . . . . . . . . . . . . . . 717.8.2 Configuring Fakes . . . . . . . . . . . . . . . . . . . . . . . . . . . . . . . . . . . . . . . . 727.8.3 Configuring Specific Dependencies . . . . . . . . . . . . . . . . . . . . . . . . . . . . . . 737.8.4 Options for Fakes . . . . . . . . . . . . . . . . . . . . . . . . . . . . . . . . . . . . . . . . 73
8 Best Practices and Recommendations 75
9 Advanced Topics 779.1 Registration Sources . . . . . . . . . . . . . . . . . . . . . . . . . . . . . . . . . . . . . . . . . . . 779.2 Adapters and Decorators . . . . . . . . . . . . . . . . . . . . . . . . . . . . . . . . . . . . . . . . . 77
9.2.1 Adapters . . . . . . . . . . . . . . . . . . . . . . . . . . . . . . . . . . . . . . . . . . . . . 779.2.2 Decorators . . . . . . . . . . . . . . . . . . . . . . . . . . . . . . . . . . . . . . . . . . . . 78
9.3 Circular Dependencies . . . . . . . . . . . . . . . . . . . . . . . . . . . . . . . . . . . . . . . . . . 799.3.1 Property/Property Dependencies . . . . . . . . . . . . . . . . . . . . . . . . . . . . . . . . 799.3.2 Constructor/Property Dependencies . . . . . . . . . . . . . . . . . . . . . . . . . . . . . . 799.3.3 Constructor/Constructor Dependencies . . . . . . . . . . . . . . . . . . . . . . . . . . . . . 80
9.4 Component Metadata / Attribute Metadata . . . . . . . . . . . . . . . . . . . . . . . . . . . . . . . 809.4.1 Adding Metadata to a Component Registration . . . . . . . . . . . . . . . . . . . . . . . . 809.4.2 Consuming Metadata . . . . . . . . . . . . . . . . . . . . . . . . . . . . . . . . . . . . . . 819.4.3 Strongly-Typed Metadata . . . . . . . . . . . . . . . . . . . . . . . . . . . . . . . . . . . . 819.4.4 Interface-Based Metadata . . . . . . . . . . . . . . . . . . . . . . . . . . . . . . . . . . . . 829.4.5 Attribute-Based Metadata . . . . . . . . . . . . . . . . . . . . . . . . . . . . . . . . . . . . 83
9.5 Named and Keyed Services . . . . . . . . . . . . . . . . . . . . . . . . . . . . . . . . . . . . . . . 859.5.1 Named Services . . . . . . . . . . . . . . . . . . . . . . . . . . . . . . . . . . . . . . . . . 869.5.2 Keyed Services . . . . . . . . . . . . . . . . . . . . . . . . . . . . . . . . . . . . . . . . . 86
9.6 Delegate Factories . . . . . . . . . . . . . . . . . . . . . . . . . . . . . . . . . . . . . . . . . . . . 879.6.1 Creation through Factories . . . . . . . . . . . . . . . . . . . . . . . . . . . . . . . . . . . 879.6.2 The Payoff . . . . . . . . . . . . . . . . . . . . . . . . . . . . . . . . . . . . . . . . . . . 889.6.3 Caveat . . . . . . . . . . . . . . . . . . . . . . . . . . . . . . . . . . . . . . . . . . . . . . 89
9.7 Owned Instances . . . . . . . . . . . . . . . . . . . . . . . . . . . . . . . . . . . . . . . . . . . . . 909.7.1 Lifetime and Scope . . . . . . . . . . . . . . . . . . . . . . . . . . . . . . . . . . . . . . . 909.7.2 Relationship Types . . . . . . . . . . . . . . . . . . . . . . . . . . . . . . . . . . . . . . . 90
9.8 Handling Concurrency . . . . . . . . . . . . . . . . . . . . . . . . . . . . . . . . . . . . . . . . . . 919.8.1 Component Registration . . . . . . . . . . . . . . . . . . . . . . . . . . . . . . . . . . . . 919.8.2 Service Resolution . . . . . . . . . . . . . . . . . . . . . . . . . . . . . . . . . . . . . . . 929.8.3 Lifetime Events . . . . . . . . . . . . . . . . . . . . . . . . . . . . . . . . . . . . . . . . . 929.8.4 Thread Scoped Services . . . . . . . . . . . . . . . . . . . . . . . . . . . . . . . . . . . . 929.8.5 Internals . . . . . . . . . . . . . . . . . . . . . . . . . . . . . . . . . . . . . . . . . . . . . 92
iii
9.8.6 Thread-Safe Types . . . . . . . . . . . . . . . . . . . . . . . . . . . . . . . . . . . . . . . 939.8.7 Deadlock Avoidance . . . . . . . . . . . . . . . . . . . . . . . . . . . . . . . . . . . . . . 93
9.9 Multitenant Applications . . . . . . . . . . . . . . . . . . . . . . . . . . . . . . . . . . . . . . . . . 939.9.1 What Is Multitenancy? . . . . . . . . . . . . . . . . . . . . . . . . . . . . . . . . . . . . . 949.9.2 General Principles . . . . . . . . . . . . . . . . . . . . . . . . . . . . . . . . . . . . . . . 949.9.3 ASP.NET Integration . . . . . . . . . . . . . . . . . . . . . . . . . . . . . . . . . . . . . . 989.9.4 WCF Integration . . . . . . . . . . . . . . . . . . . . . . . . . . . . . . . . . . . . . . . . 100
9.10 Aggregate Services . . . . . . . . . . . . . . . . . . . . . . . . . . . . . . . . . . . . . . . . . . . . 1069.10.1 Introduction . . . . . . . . . . . . . . . . . . . . . . . . . . . . . . . . . . . . . . . . . . . 1069.10.2 Required References . . . . . . . . . . . . . . . . . . . . . . . . . . . . . . . . . . . . . . 1069.10.3 Getting Started . . . . . . . . . . . . . . . . . . . . . . . . . . . . . . . . . . . . . . . . . 1069.10.4 How Aggregate Services are Resolved . . . . . . . . . . . . . . . . . . . . . . . . . . . . . 1079.10.5 Properties . . . . . . . . . . . . . . . . . . . . . . . . . . . . . . . . . . . . . . . . . . . . 1079.10.6 Methods . . . . . . . . . . . . . . . . . . . . . . . . . . . . . . . . . . . . . . . . . . . . . 1089.10.7 Property Setters and Void Methods . . . . . . . . . . . . . . . . . . . . . . . . . . . . . . . 1089.10.8 How It Works . . . . . . . . . . . . . . . . . . . . . . . . . . . . . . . . . . . . . . . . . . 1089.10.9 Performance Considerations . . . . . . . . . . . . . . . . . . . . . . . . . . . . . . . . . . 108
9.11 Type Interceptors . . . . . . . . . . . . . . . . . . . . . . . . . . . . . . . . . . . . . . . . . . . . . 1089.11.1 Enabling Interception . . . . . . . . . . . . . . . . . . . . . . . . . . . . . . . . . . . . . . 1089.11.2 Tips . . . . . . . . . . . . . . . . . . . . . . . . . . . . . . . . . . . . . . . . . . . . . . . 111
10 Examples 11310.1 log4net Integration Module . . . . . . . . . . . . . . . . . . . . . . . . . . . . . . . . . . . . . . . 113
11 Frequently Asked Questions 11511.1 How do I work with per-request lifetime scope? . . . . . . . . . . . . . . . . . . . . . . . . . . . . . 115
11.1.1 Registering Dependencies as Per-Request . . . . . . . . . . . . . . . . . . . . . . . . . . . 11511.1.2 How Per-Request Lifetime Works . . . . . . . . . . . . . . . . . . . . . . . . . . . . . . . 11611.1.3 Sharing Dependencies Across Apps Without Requests . . . . . . . . . . . . . . . . . . . . 11611.1.4 Testing with Per-Request Dependencies . . . . . . . . . . . . . . . . . . . . . . . . . . . . 11711.1.5 Troubleshooting Per-Request Dependencies . . . . . . . . . . . . . . . . . . . . . . . . . . 12011.1.6 Implementing Custom Per-Request Semantics . . . . . . . . . . . . . . . . . . . . . . . . . 122
11.2 How do I pick a service implementation by context? . . . . . . . . . . . . . . . . . . . . . . . . . . 12211.2.1 Option 1: Redesign Your Interfaces . . . . . . . . . . . . . . . . . . . . . . . . . . . . . . 12311.2.2 Option 2: Change the Registrations . . . . . . . . . . . . . . . . . . . . . . . . . . . . . . 12611.2.3 Option 3: Use Keyed Services . . . . . . . . . . . . . . . . . . . . . . . . . . . . . . . . . 12711.2.4 Option 4: Use Metadata . . . . . . . . . . . . . . . . . . . . . . . . . . . . . . . . . . . . . 128
11.3 How do I create a session-based lifetime scope in a web application? . . . . . . . . . . . . . . . . . 13011.4 Why aren’t my assemblies getting scanned after IIS restart? . . . . . . . . . . . . . . . . . . . . . . 13011.5 How do I conditionally register components? . . . . . . . . . . . . . . . . . . . . . . . . . . . . . . 13111.6 How do I share component registrations across application types? . . . . . . . . . . . . . . . . . . . 13111.7 How do I keep Autofac references isolated away from my app? . . . . . . . . . . . . . . . . . . . . 131
12 Glossary 133
13 Contributor Guide 13513.1 Introduction . . . . . . . . . . . . . . . . . . . . . . . . . . . . . . . . . . . . . . . . . . . . . . . 13513.2 Making Contributions . . . . . . . . . . . . . . . . . . . . . . . . . . . . . . . . . . . . . . . . . . 13513.3 Process . . . . . . . . . . . . . . . . . . . . . . . . . . . . . . . . . . . . . . . . . . . . . . . . . . 135
13.3.1 Suggest a Feature . . . . . . . . . . . . . . . . . . . . . . . . . . . . . . . . . . . . . . . . 13513.3.2 Fix a Defect . . . . . . . . . . . . . . . . . . . . . . . . . . . . . . . . . . . . . . . . . . . 13513.3.3 Git vs. Patches . . . . . . . . . . . . . . . . . . . . . . . . . . . . . . . . . . . . . . . . . 13613.3.4 Bugs and Code Review Issues . . . . . . . . . . . . . . . . . . . . . . . . . . . . . . . . . 13613.3.5 Announcement . . . . . . . . . . . . . . . . . . . . . . . . . . . . . . . . . . . . . . . . . 13613.3.6 License . . . . . . . . . . . . . . . . . . . . . . . . . . . . . . . . . . . . . . . . . . . . . 136
iv
13.4 Coding . . . . . . . . . . . . . . . . . . . . . . . . . . . . . . . . . . . . . . . . . . . . . . . . . . 13613.4.1 Developer Environment . . . . . . . . . . . . . . . . . . . . . . . . . . . . . . . . . . . . . 13613.4.2 Dependencies . . . . . . . . . . . . . . . . . . . . . . . . . . . . . . . . . . . . . . . . . . 13613.4.3 Build Process . . . . . . . . . . . . . . . . . . . . . . . . . . . . . . . . . . . . . . . . . . 13713.4.4 Unit Tests . . . . . . . . . . . . . . . . . . . . . . . . . . . . . . . . . . . . . . . . . . . . 13713.4.5 Code Review . . . . . . . . . . . . . . . . . . . . . . . . . . . . . . . . . . . . . . . . . . 13713.4.6 Documentation . . . . . . . . . . . . . . . . . . . . . . . . . . . . . . . . . . . . . . . . . 13713.4.7 Coding Standards . . . . . . . . . . . . . . . . . . . . . . . . . . . . . . . . . . . . . . . . 137
13.5 The Autofac.Extras Projects . . . . . . . . . . . . . . . . . . . . . . . . . . . . . . . . . . . . . . . 13813.6 The Wiki / Documentation . . . . . . . . . . . . . . . . . . . . . . . . . . . . . . . . . . . . . . . . 13813.7 Contributors . . . . . . . . . . . . . . . . . . . . . . . . . . . . . . . . . . . . . . . . . . . . . . . 138
14 Indices and tables 141
v

vi
Autofac Documentation, Release 3.3
Autofac is an addictive IoC container for Microsoft .NET 4.5, Silverlight 5, Windows Store apps, and Windows Phone8 apps. It manages the dependencies between classes so that applications stay easy to change as they grow in sizeand complexity. This is achieved by treating regular .NET classes as components.
We are moving the wiki documentation over to this ReadTheDocs site! However, that means things are a littledivided. If you find docs here missing, check the wiki - it might still be there. Thanks for your patience!
Contents:
Contents 1

Autofac Documentation, Release 3.3
2 Contents
CHAPTER 1
Getting Started
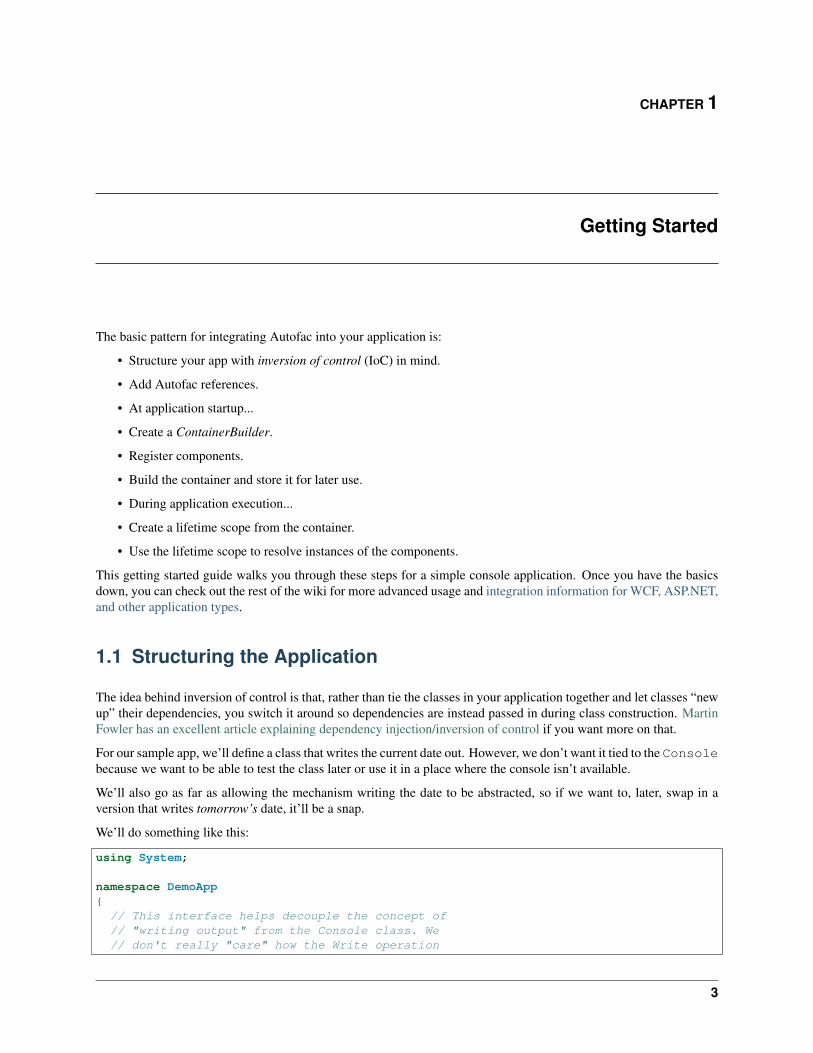
The basic pattern for integrating Autofac into your application is:
• Structure your app with inversion of control (IoC) in mind.
• Add Autofac references.
• At application startup...
• Create a ContainerBuilder.
• Register components.
• Build the container and store it for later use.
• During application execution...
• Create a lifetime scope from the container.
• Use the lifetime scope to resolve instances of the components.
This getting started guide walks you through these steps for a simple console application. Once you have the basicsdown, you can check out the rest of the wiki for more advanced usage and integration information for WCF, ASP.NET,and other application types.
1.1 Structuring the Application
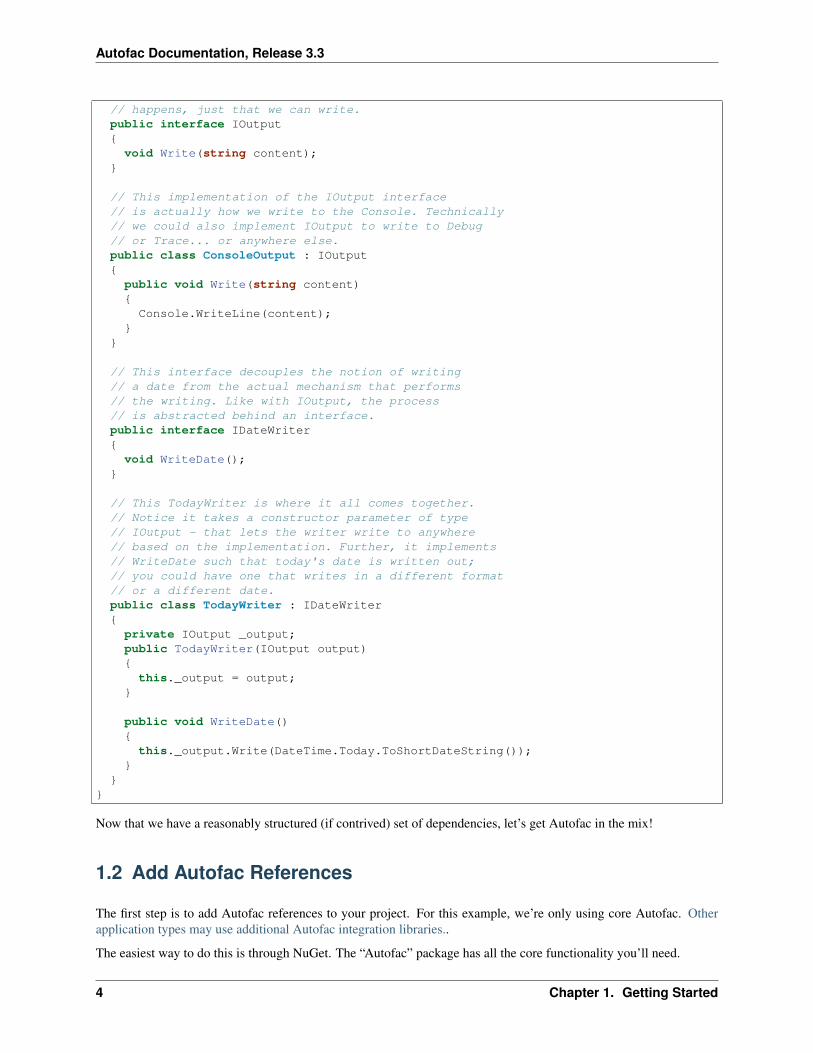
The idea behind inversion of control is that, rather than tie the classes in your application together and let classes “newup” their dependencies, you switch it around so dependencies are instead passed in during class construction. MartinFowler has an excellent article explaining dependency injection/inversion of control if you want more on that.
For our sample app, we’ll define a class that writes the current date out. However, we don’t want it tied to the Consolebecause we want to be able to test the class later or use it in a place where the console isn’t available.
We’ll also go as far as allowing the mechanism writing the date to be abstracted, so if we want to, later, swap in aversion that writes tomorrow’s date, it’ll be a snap.
We’ll do something like this:
using System;
namespace DemoApp{
// This interface helps decouple the concept of// "writing output" from the Console class. We// don't really "care" how the Write operation
3
Autofac Documentation, Release 3.3
// happens, just that we can write.public interface IOutput{void Write(string content);
}
// This implementation of the IOutput interface// is actually how we write to the Console. Technically// we could also implement IOutput to write to Debug// or Trace... or anywhere else.public class ConsoleOutput : IOutput{public void Write(string content){
Console.WriteLine(content);}
}
// This interface decouples the notion of writing// a date from the actual mechanism that performs// the writing. Like with IOutput, the process// is abstracted behind an interface.public interface IDateWriter{void WriteDate();
}
// This TodayWriter is where it all comes together.// Notice it takes a constructor parameter of type// IOutput - that lets the writer write to anywhere// based on the implementation. Further, it implements// WriteDate such that today's date is written out;// you could have one that writes in a different format// or a different date.public class TodayWriter : IDateWriter{private IOutput _output;public TodayWriter(IOutput output){
this._output = output;}
public void WriteDate(){
this._output.Write(DateTime.Today.ToShortDateString());}
}}
Now that we have a reasonably structured (if contrived) set of dependencies, let’s get Autofac in the mix!
1.2 Add Autofac References
The first step is to add Autofac references to your project. For this example, we’re only using core Autofac. Otherapplication types may use additional Autofac integration libraries..
The easiest way to do this is through NuGet. The “Autofac” package has all the core functionality you’ll need.
4 Chapter 1. Getting Started

Autofac Documentation, Release 3.3
1.3 Application Startup
At application startup, you need to create a ContainerBuilder and register your components with it. A component isan expression, .NET type, or other bit of code that exposes one or more services and can take in other dependencies.
In simple terms, think about a .NET type that implements an interface, like this:
public class SomeType : IService{}
You could address that type in one of two ways: - As the type itself, SomeType - As the interface, an IService
In this case, the component is SomeType and the services it exposes are SomeType and IService.
In Autofac, you’d register that with a ContainerBuilder something like this:
// Create your builder.var builder = new ContainerBuilder();
// Usually you're only interested in exposing the type// via its interface:builder.RegisterType<SomeType>().As<IService>();
// However, if you want BOTH services (not as common)// you can say so:builder.RegisterType<SomeType>().AsSelf().As<IService>();
For our sample app, we need to register all of our components (classes) and expose their services (interfaces) so thingscan get wired up nicely.
We also need to store the container so it can be used to resolve types later.
1.3. Application Startup 5
Autofac Documentation, Release 3.3
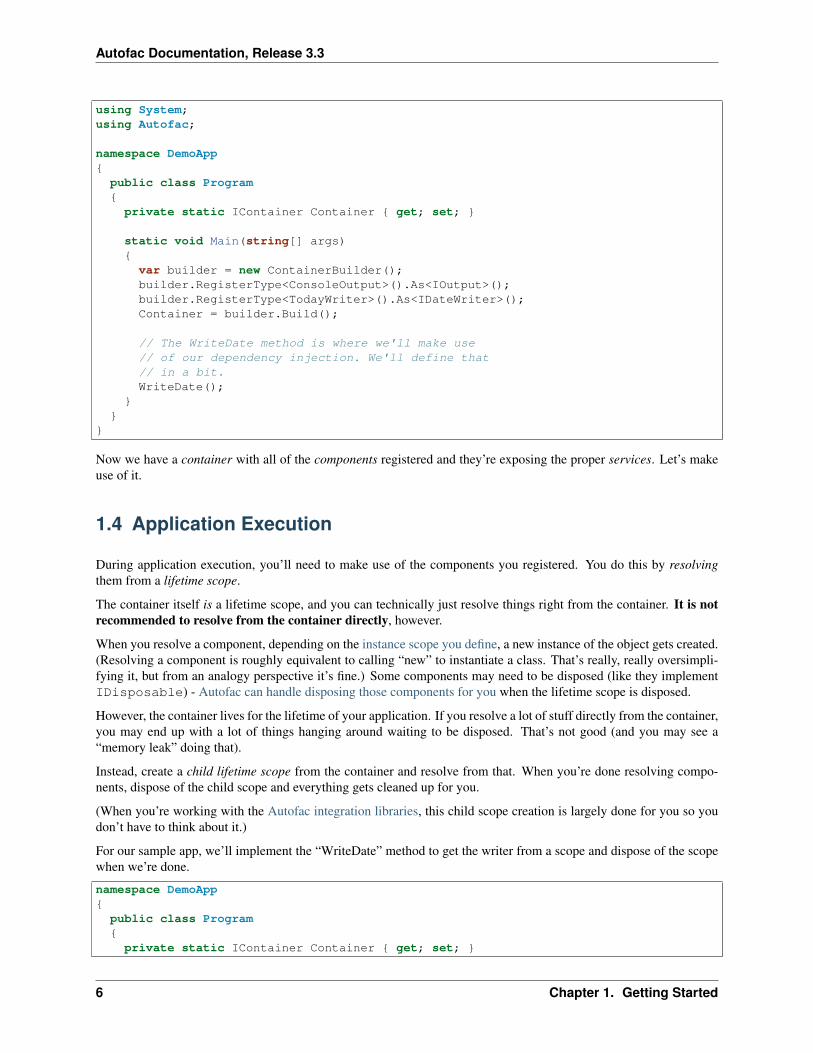
using System;using Autofac;
namespace DemoApp{
public class Program{private static IContainer Container { get; set; }
static void Main(string[] args){
var builder = new ContainerBuilder();builder.RegisterType<ConsoleOutput>().As<IOutput>();builder.RegisterType<TodayWriter>().As<IDateWriter>();Container = builder.Build();
// The WriteDate method is where we'll make use// of our dependency injection. We'll define that// in a bit.WriteDate();
}}
}
Now we have a container with all of the components registered and they’re exposing the proper services. Let’s makeuse of it.
1.4 Application Execution
During application execution, you’ll need to make use of the components you registered. You do this by resolvingthem from a lifetime scope.
The container itself is a lifetime scope, and you can technically just resolve things right from the container. It is notrecommended to resolve from the container directly, however.
When you resolve a component, depending on the instance scope you define, a new instance of the object gets created.(Resolving a component is roughly equivalent to calling “new” to instantiate a class. That’s really, really oversimpli-fying it, but from an analogy perspective it’s fine.) Some components may need to be disposed (like they implementIDisposable) - Autofac can handle disposing those components for you when the lifetime scope is disposed.
However, the container lives for the lifetime of your application. If you resolve a lot of stuff directly from the container,you may end up with a lot of things hanging around waiting to be disposed. That’s not good (and you may see a“memory leak” doing that).
Instead, create a child lifetime scope from the container and resolve from that. When you’re done resolving compo-nents, dispose of the child scope and everything gets cleaned up for you.
(When you’re working with the Autofac integration libraries, this child scope creation is largely done for you so youdon’t have to think about it.)
For our sample app, we’ll implement the “WriteDate” method to get the writer from a scope and dispose of the scopewhen we’re done.
namespace DemoApp{
public class Program{private static IContainer Container { get; set; }
6 Chapter 1. Getting Started
Autofac Documentation, Release 3.3
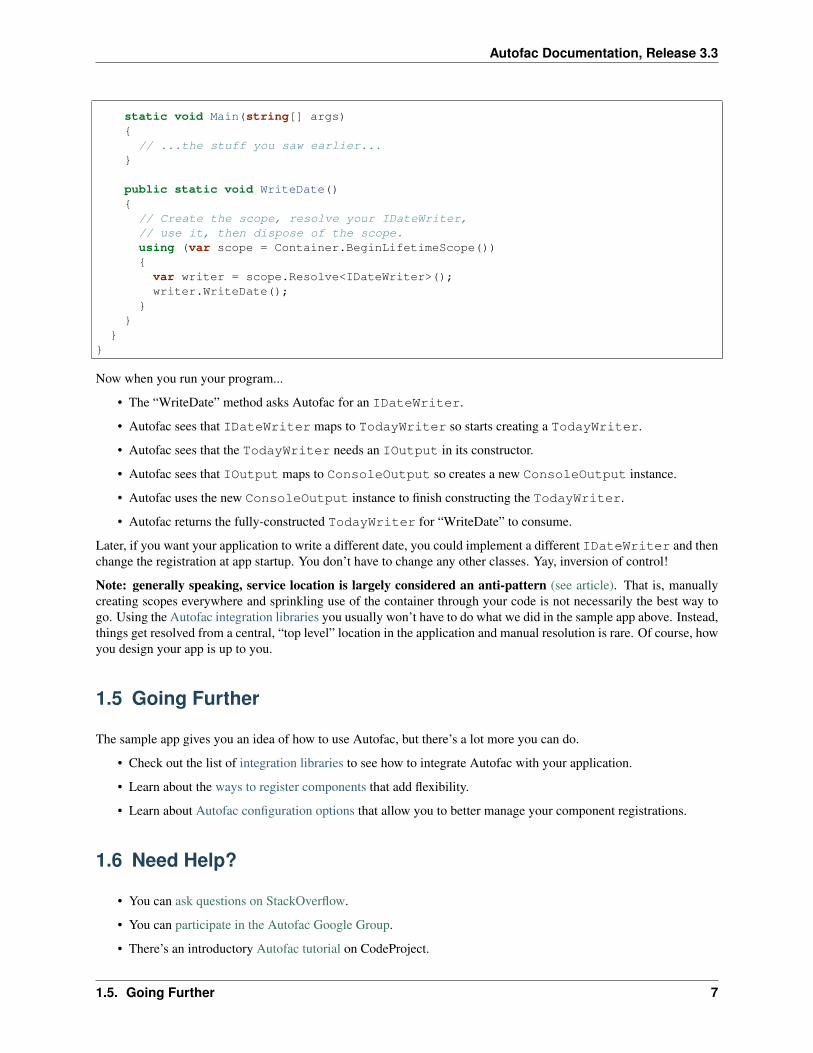
static void Main(string[] args){
// ...the stuff you saw earlier...}
public static void WriteDate(){
// Create the scope, resolve your IDateWriter,// use it, then dispose of the scope.using (var scope = Container.BeginLifetimeScope()){
var writer = scope.Resolve<IDateWriter>();writer.WriteDate();
}}
}}
Now when you run your program...
• The “WriteDate” method asks Autofac for an IDateWriter.
• Autofac sees that IDateWriter maps to TodayWriter so starts creating a TodayWriter.
• Autofac sees that the TodayWriter needs an IOutput in its constructor.
• Autofac sees that IOutput maps to ConsoleOutput so creates a new ConsoleOutput instance.
• Autofac uses the new ConsoleOutput instance to finish constructing the TodayWriter.
• Autofac returns the fully-constructed TodayWriter for “WriteDate” to consume.
Later, if you want your application to write a different date, you could implement a different IDateWriter and thenchange the registration at app startup. You don’t have to change any other classes. Yay, inversion of control!
Note: generally speaking, service location is largely considered an anti-pattern (see article). That is, manuallycreating scopes everywhere and sprinkling use of the container through your code is not necessarily the best way togo. Using the Autofac integration libraries you usually won’t have to do what we did in the sample app above. Instead,things get resolved from a central, “top level” location in the application and manual resolution is rare. Of course, howyou design your app is up to you.
1.5 Going Further
The sample app gives you an idea of how to use Autofac, but there’s a lot more you can do.
• Check out the list of integration libraries to see how to integrate Autofac with your application.
• Learn about the ways to register components that add flexibility.
• Learn about Autofac configuration options that allow you to better manage your component registrations.
1.6 Need Help?
• You can ask questions on StackOverflow.
• You can participate in the Autofac Google Group.
• There’s an introductory Autofac tutorial on CodeProject.
1.5. Going Further 7
Autofac Documentation, Release 3.3
1.7 Building from Source
The source code along with Visual Studio project files is available on GitHub. Build instructions are in a READMEin the root of the code, and more information about the project is in the Contributor Guide.
8 Chapter 1. Getting Started
CHAPTER 2
What’s New / Release Notes
• Core components
• Autofac
• Autofac.Configuration
• Integration libraries
• ASP.NET
• Web Forms
• MVC
• WebAPI
• SignalR
• RIA/Domain Services
• OWIN
– OWIN Core
– OWIN / WebAPI
– OWIN / MVC
• WCF
• MEF
• Common Service Locator
• Enterprise Library 5
• NHibernate
• Moq
• FakeItEasy
• Extended features
• Aggregate Services
• Attribute Metadata
• Dynamic Proxy / Interception
• Multitenant Applications
9

Autofac Documentation, Release 3.3
• Multitenant WCF Services
10 Chapter 2. What’s New / Release Notes
CHAPTER 3
Registering Components
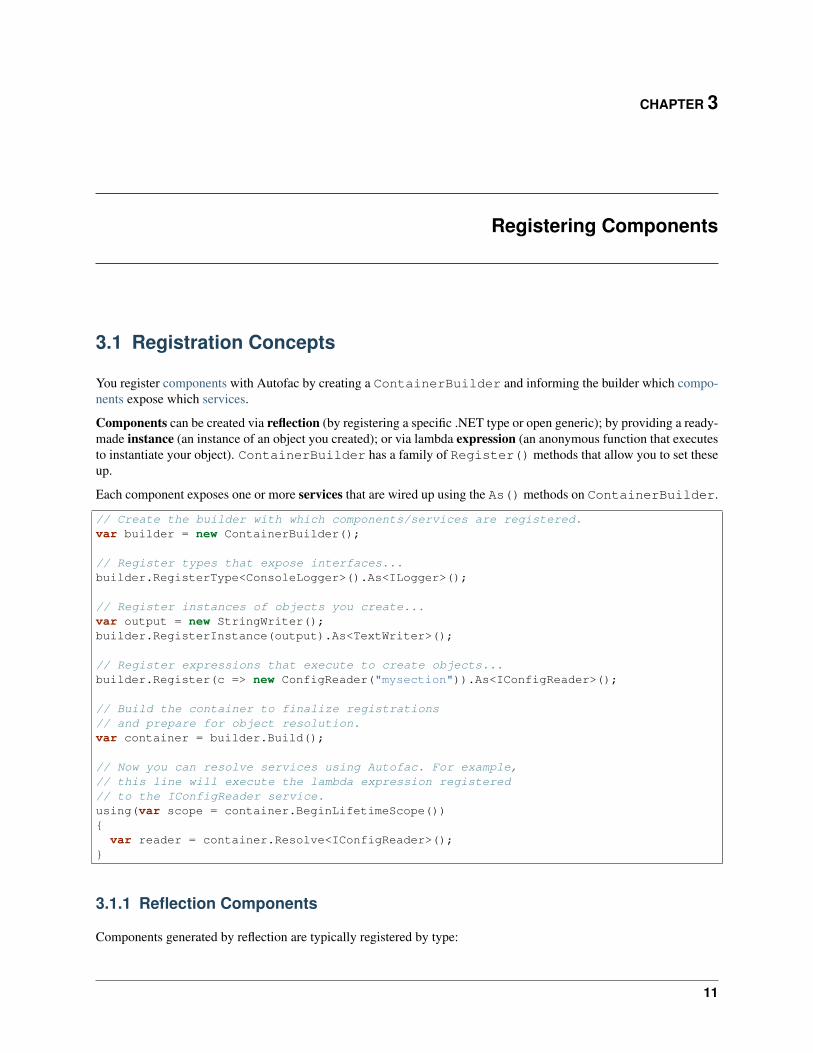
3.1 Registration Concepts
You register components with Autofac by creating a ContainerBuilder and informing the builder which compo-nents expose which services.
Components can be created via reflection (by registering a specific .NET type or open generic); by providing a ready-made instance (an instance of an object you created); or via lambda expression (an anonymous function that executesto instantiate your object). ContainerBuilder has a family of Register() methods that allow you to set theseup.
Each component exposes one or more services that are wired up using the As() methods on ContainerBuilder.
// Create the builder with which components/services are registered.var builder = new ContainerBuilder();
// Register types that expose interfaces...builder.RegisterType<ConsoleLogger>().As<ILogger>();
// Register instances of objects you create...var output = new StringWriter();builder.RegisterInstance(output).As<TextWriter>();
// Register expressions that execute to create objects...builder.Register(c => new ConfigReader("mysection")).As<IConfigReader>();
// Build the container to finalize registrations// and prepare for object resolution.var container = builder.Build();
// Now you can resolve services using Autofac. For example,// this line will execute the lambda expression registered// to the IConfigReader service.using(var scope = container.BeginLifetimeScope()){
var reader = container.Resolve<IConfigReader>();}
3.1.1 Reflection Components
Components generated by reflection are typically registered by type:
11
Autofac Documentation, Release 3.3
var builder = new ContainerBuilder();builder.RegisterType<ConsoleLogger>();builder.RegisterType(typeof(ConfigReader));
When using reflection-based components, Autofac automatically uses the constructor for your class with the mostparameters that are able to be obtained from the container.
For example, say you have a class with three constructors like this:
public class MyComponent{
public MyComponent() { /* ... */ }public MyComponent(ILogger logger) { /* ... */ }public MyComponent(ILogger logger, IConfigReader reader) { /* ... */ }
}
Now say you register components and services in your container like this:
var builder = new ContainerBuilder();builder.RegisterType<MyComponent>();builder.RegisterType<ConsoleLogger>().As<ILogger>();var container = builder.Build();
using(var scope = container.BeginLifetimeScope()){
var component = container.Resolve<MyComponent>();}
When you resolve your component, Autofac will see that you have an ILogger registered, but you don’t have anIConfigReader registered. In that case, the second constructor will be chosen since that’s the one with the mostparameters that can be found in the container.
You can manually choose a particular constructor to use and override the automatic choice by registering your compo-nent with the UsingConstructor method and a list of types representing the parameter types in the constructor:
builder.RegisterType<MyComponent>().UsingConstructor(typeof(ILogger), typeof(IConfigReader));
Note that you will still need to have the requisite parameters available at resolution time or there will be an error whenyou try to resolve the object. You can pass parameters at registration time or you can pass them at resolve time.
An important note on reflection-based components: Any component type you register via RegisterType mustbe a concrete type. While components can expose abstract classes or interfaces as services, you can’t register anabstract/interface component. It makes sense if you think about it: behind the scenes, Autofac is creating an instance ofthe thing you’re registering. You can’t “new up” an abstract class or an interface. You have to have an implementation,right?
3.1.2 Instance Components
In some cases, you may want to pre-generate an instance of an object and add it to the container for use by registeredcomponents. You can do this using the RegisterInstance method:
var output = new StringWriter();builder.RegisterInstance(output).As<TextWriter>();
Something to consider when you do this is that Autofac automatically handles disposal of registered components andyou may want to control the lifetime yourself rather than having Autofac call Dispose on your object for you. Inthat case, you need to register the instance with the ExternallyOwned method:
12 Chapter 3. Registering Components
Autofac Documentation, Release 3.3
var output = new StringWriter();builder.RegisterInstance(output)
.As<TextWriter>()
.ExternallyOwned();
Registering provided instances is also handy when integrating Autofac into an existing application where a singletoninstance already exists and needs to be used by components in the container. Rather than tying those componentsdirectly to the singleton, it can be registered with the container as an instance:
builder.RegisterInstance(MySingleton.Instance).ExternallyOwned();
This ensures that the static singleton can eventually be eliminated and replaced with a container-managed one.
The default service exposed by an instance is the concrete type of the instance. See “Services vs. Components,” below.
3.1.3 Lambda Expression Components
Reflection is a pretty good default choice for component creation. Things get messy, though, when component creationlogic goes beyond a simple constructor call.
Autofac can accept a delegate or lambda expression to be used as a component creator:
builder.Register(c => new A(c.Resolve<B>()));
The parameter c provided to the expression is the component context (an IComponentContext object) in whichthe component is being created. You can use this to resolve other values from the container to assist in creating yourcomponent. It is important to use this rather than a closure to access the container so that deterministic disposaland nested containers can be supported correctly.
Additional dependencies can be satisfied using this context parameter - in the example, A requires a constructorparameter of type B that may have additional dependencies.
The default service provided by an expression-created component is the inferred return type of the expression.
Below are some examples of requirements met poorly by reflective component creation but nicely addressed by lambdaexpressions.
Complex Parameters
Constructor parameters can’t always be declared with simple constant values. Rather than puzzling over how toconstruct a value of a certain type using an XML configuration syntax, use code:
builder.Register(c => new UserSession(DateTime.Now.AddMinutes(25)));
(Of course, session expiry is probably something you’d want to specify in a configuration file - but you get the gist ;))
Property Injection
While Autofac offers a more first-class approach to property injection, you can use expressions and property initializersto populate properties as well:
builder.Register(c => new A(){ MyB = c.ResolveOptional<B>() });
The ResolveOptional method will try to resolve the value but won’t throw an exception if the service isn’tregistered. (You will still get an exception if the service is registered but can’t properly be resolved.) This is one of theoptions for resolving a service.
3.1. Registration Concepts 13
Autofac Documentation, Release 3.3
Property injection is not recommended in the majority of cases. Alternatives like the Null Object pattern, over-loaded constructors or constructor parameter default values make it possible to create cleaner, “immutable” compo-nents with optional dependencies using constructor injection.
Selection of an Implementation by Parameter Value
One of the great benefits of isolating component creation is that the concrete type can be varied. This is often done atruntime, not just configuration time:
builder.Register<CreditCard>((c, p) =>{
var accountId = p.Named<string>("accountId");if (accountId.StartsWith("9")){
return new GoldCard(accountId);}else{
return new StandardCard(accountId);}
});
In this example, CreditCard is implemented by two classes, GoldCard and StandardCard - which class isinstantiated depends on the account ID provided at runtime.
Parameters are provided to the creation function through an optional second parameter named p in this example.
Using this registration would look like:
var card = container.Resolve<CreditCard>(new NamedParameter("accountId", "12345"));
A cleaner, type-safe syntax can be achieved if a delegate to create CreditCard instances is declared and a delegatefactory is used.
3.1.4 Open Generic Components
Autofac supports open generic types. Use the RegisterGeneric() builder method:
builder.RegisterGeneric(typeof(NHibernateRepository<>)).As(typeof(IRepository<>)).InstancePerLifetimeScope();
When a matching service type is requested from the container, Autofac will map this to an equivalent closed versionof the implementation type:
// Autofac will return an NHibernateRepository<Task>var tasks = container.Resolve<IRepository<Task>>();
Registration of a specialized service type (e.g. IRepository<Person>) will override the open generic version.
3.1.5 Services vs. Components
When you register components, you have to tell Autofac which services that component exposes. By default, mostregistrations will just expose themselves as the type registered:
14 Chapter 3. Registering Components

Autofac Documentation, Release 3.3
// This exposes the service "CallLogger"builder.RegisterType<CallLogger>();
Components can only be resolved by the services they expose. In this simple example it means:
// This will work because the component// exposes the type by default:scope.Resolve<CallLogger>();
// This will NOT work because we didn't// tell the registration to also expose// the ILogger interface on CallLogger:scope.Resolve<ILogger>();
You can expose a component with any number of services you like:
builder.RegisterType<CallLogger>().As<ILogger>().As<ICallInterceptor>();
Once you expose a service, you can resolve the component based on that service. Note, however, that once you exposea component as a specific service, the default service (the component type) is overridden:
// These will both work because we exposed// the appropriate services in the registration:scope.Resolve<ILogger>();scope.Resolve<ICallInterceptor>();
// This WON'T WORK anymore because we specified// service overrides on the component:scope.Resolve<CallLogger>();
If you want to expose a component as a set of services as well as using the default service, use the AsSelf method:
builder.RegisterType<CallLogger>().AsSelf().As<ILogger>().As<ICallInterceptor>();
Now all of these will work:
// These will all work because we exposed// the appropriate services in the registration:scope.Resolve<ILogger>();scope.Resolve<ICallInterceptor>();scope.Resolve<CallLogger>();
3.1.6 Default Registrations
If more than one component exposes the same service, Autofac will use the last registered component as the defaultprovider of that service:
builder.Register<ConsoleLogger>().As<ILogger>();builder.Register<FileLogger>().As<ILogger>();
In this scenario, FileLogger will be the default for ILogger because it was the last one registered.
To override this behavior, use the PreserveExistingDefaults() modifier:
3.1. Registration Concepts 15
Autofac Documentation, Release 3.3
builder.Register<ConsoleLogger>().As<ILogger>();builder.Register<FileLogger>().As<ILogger>().PreserveExistingDefaults();
In this scenario, ConsoleLogger will be the default for ILogger because the later registration for FileLoggerused PreserveExistingDefaults().
3.1.7 Configuration of Registrations
You can use XML or programmatic configuration (“modules”) to provide groups of registrations together or changeregistrations at runtime. You can also use use Autofac modules for some dynamic registration generation or conditionalregistration logic.
3.1.8 Dynamically-Provided Registrations
Autofac modules are the simplest way to introduce dynamic registration logic or simple cross-cutting features. Forexample, you can use a module to dynamically attach a log4net logger instance to a service being resolved.
If you find that you need even more dynamic behavior, such as adding support for a new implicit relationship type,you might want to check out the registration sources section in the advanced concepts area.
3.2 Passing Parameters to Register
When you register components you have the ability to provide a set of parameters that can be used during the resolutionof services based on that component. (If you’d rather provide the parameters at resolution time, you can do thatinstead.)
3.2.1 Available Parameter Types
Autofac offers several different parameter matching strategies:
• NamedParameter - match target parameters by name
• TypedParameter - match target parameters by type (exact type match required)
• ResolvedParameter - flexible parameter matching
NamedParameter and TypedParameter can supply constant values only.
ResolvedParameter can be used as a way to supply values dynamically retrieved from the container, e.g. byresolving a service by name.
3.2.2 Parameters with Reflection Components
When you register a reflection-based component, the constructor of the type may require a parameter that can’t beresolved from the container. You can use a parameter on the registration to provide that value.
Say you have a configuration reader that needs a configuration section name passed in:
public class ConfigReader : IConfigReader{
public ConfigReader(string configSectionName){// Store config section name
16 Chapter 3. Registering Components

Autofac Documentation, Release 3.3
}
// ...read configuration based on the section name.}
You could use a lambda expression component for that:
builder.Register(c => new ConfigReader("sectionName")).As<IConfigReader>();
Or you could pass a parameter to a reflection component registration:
// Using a NAMED parameter:builder.RegisterType<ConfigReader>()
.As<IConfigReader>()
.WithParameter("configSectionName", "sectionName");
// Using a TYPED parameter:builder.RegisterType<ConfigReader>()
.As<IConfigReader>()
.WithParameter(new TypedParameter(typeof(string), "sectionName"));
// Using a RESOLVED parameter:builder.RegisterType<ConfigReader>()
.As<IConfigReader>()
.WithParameter(new ResolvedParameter(
(pi, ctx) => pi.ParameterType == typeof(string) && pi.Name == "configSectionName",(pi, ctx) => "sectionName"));
3.2.3 Parameters with Lambda Expression Components
With lambda expression component registrations, rather than passing the parameter value at registration time youenable the ability to pass the value at service resolution time. (Read more about resolving with parameters.)
In the component registration expression, you can make use of the incoming parameters by changing the dele-gate signature you use for registration. Instead of just taking in an IComponentContext parameter, take in anIComponentContext and an IEnumerable<Parameter>:
// Use TWO parameters to the registration delegate:// c = The current IComponentContext to dynamically resolve dependencies// p = An IEnumerable<Parameter> with the incoming parameter setbuilder.Register((c, p) =>
new ConfigReader(p.Named<string>("configSectionName"))).As<IConfigReader>();
When resolving with parameters, your lambda will use the parameters passed in:
var reader = scope.Resolve<IConfigReader>(new NamedParameter("configSectionName", "sectionName"));
3.3 Property and Method Injection
While constructor parameter injection is the preferred method of passing values to a component being constructed,you can also use property or method injection to provide values.
Property injection uses writeable properties rather than constructor parameters to perform injection. Method injec-tion sets dependencies by calling a method.
3.3. Property and Method Injection 17
Autofac Documentation, Release 3.3
3.3.1 Property Injection
If the component is a lambda expression component, use an object initializer:
builder.Register(c => new A { B = c.Resolve<B>() });
To support circular dependencies, use an activated event handler:
builder.Register(c => new A()).OnActivated(e => e.Instance.B = e.Context.Resolve<B>());
If the component is a reflection component, use the PropertiesAutowired() modifier to inject properties:
builder.RegisterType<A>().PropertiesAutowired();
If you have one specific property and value to wire up, you can use the WithProperty() modifier:
builder.RegisterType<A>().WithProperty("PropertyName", propertyValue);
3.3.2 Method Injection
The simplest way to call a method to set a value on a component is to use a lambda expression component and handlethe method call right in the activator:
builder.Register(c => {var result = new MyObjectType();var dep = c.Resolve<TheDependency>();result.SetTheDependency(dep);return result;
});
If you can’t use a registration lambda, you can add an activating event handler:
builder.Register<MyObjectType>().OnActivating(e => {var dep = e.Context.Resolve<TheDependency>();e.Instance.SetTheDependency(dep);
});
3.4 Assembly Scanning
Autofac can use conventions to find and register components in assemblies. You can scan and register individual typesor you can scan specifically for Autofac modules.
3.4.1 Scanning for Types
Otherwise known as convention-driven registration or scanning, Autofac can register a set of types from an assemblyaccording to user-specified rules:
var dataAccess = Assembly.GetExecutingAssembly();
builder.RegisterAssemblyTypes(dataAccess).Where(t => t.Name.EndsWith("Repository")).AsImplementedInterfaces();
18 Chapter 3. Registering Components
Autofac Documentation, Release 3.3
Each RegisterAssemblyTypes() call will apply one set of rules only - multiple invocations ofRegisterAssemblyTypes() are necessary if there are multiple different sets of components to register.
Filtering Types
RegisterAssemblyTypes() accepts a parameter array of one or more assemblies. By default, all public, con-crete classes in the assembly will be registered. You can filter the set of types to register using some provided LINQ-style predicates.
To filter the types that are registered, use the Where() predicate:
builder.RegisterAssemblyTypes(asm).Where(t => t.Name.EndsWith("Repository"));
To exclude types from scanning, use the Except() predicate:
builder.RegisterAssemblyTypes(asm).Except<MyUnwantedType>();
The Except() predicate also allows you to customize the registration for the specific excluded type:
builder.RegisterAssemblyTypes(asm).Except<MyCustomisedType>(ct =>
ct.As<ISpecial>().SingleInstance());
Multiple filters can be used, in which case they will be applied with logical AND.
Specifying Services
The registration syntax for RegisterAssemblyTypes() is a superset of the registration syntax for single types,so methods like As() all work with assemblies as well:
builder.RegisterAssemblyTypes(asm).Where(t => t.Name.EndsWith("Repository")).As<IRepository>();
Additional overloads to As() and Named() accept lambda expressions that determine, for a type, which services itwill provide:
builder.RegisterAssemblyTypes(asm).As(t => t.GetInterfaces()[0]);
As with normal component registrations, multiple calls to As() are added together.
A number of additional registration methods have been added to make it easier to build up common conventions:
3.4. Assembly Scanning 19
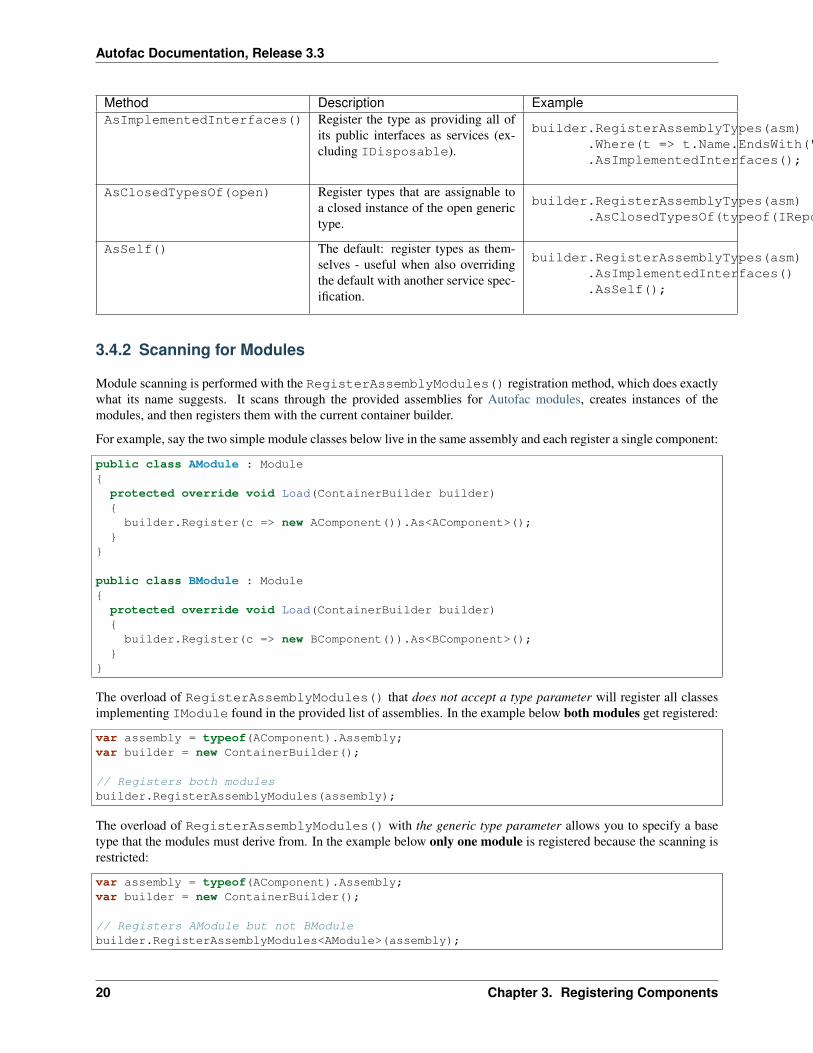
Autofac Documentation, Release 3.3
Method Description ExampleAsImplementedInterfaces() Register the type as providing all of
its public interfaces as services (ex-cluding IDisposable).
builder.RegisterAssemblyTypes(asm).Where(t => t.Name.EndsWith("Repository")).AsImplementedInterfaces();
AsClosedTypesOf(open) Register types that are assignable toa closed instance of the open generictype.
builder.RegisterAssemblyTypes(asm).AsClosedTypesOf(typeof(IRepository<>));
AsSelf() The default: register types as them-selves - useful when also overridingthe default with another service spec-ification.
builder.RegisterAssemblyTypes(asm).AsImplementedInterfaces().AsSelf();
3.4.2 Scanning for Modules
Module scanning is performed with the RegisterAssemblyModules() registration method, which does exactlywhat its name suggests. It scans through the provided assemblies for Autofac modules, creates instances of themodules, and then registers them with the current container builder.
For example, say the two simple module classes below live in the same assembly and each register a single component:
public class AModule : Module{
protected override void Load(ContainerBuilder builder){builder.Register(c => new AComponent()).As<AComponent>();
}}
public class BModule : Module{
protected override void Load(ContainerBuilder builder){builder.Register(c => new BComponent()).As<BComponent>();
}}
The overload of RegisterAssemblyModules() that does not accept a type parameter will register all classesimplementing IModule found in the provided list of assemblies. In the example below both modules get registered:
var assembly = typeof(AComponent).Assembly;var builder = new ContainerBuilder();
// Registers both modulesbuilder.RegisterAssemblyModules(assembly);
The overload of RegisterAssemblyModules() with the generic type parameter allows you to specify a basetype that the modules must derive from. In the example below only one module is registered because the scanning isrestricted:
var assembly = typeof(AComponent).Assembly;var builder = new ContainerBuilder();
// Registers AModule but not BModulebuilder.RegisterAssemblyModules<AModule>(assembly);
20 Chapter 3. Registering Components
Autofac Documentation, Release 3.3
The overload of RegisterAssemblyModules() with a Type object parameter works like the generic type pa-rameter overload but allows you to specify a type that might be determined at runtime. In the example below only onemodule is registered because the scanning is restricted:
var assembly = typeof(AComponent).Assembly;var builder = new ContainerBuilder();
// Registers AModule but not BModulebuilder.RegisterAssemblyModules(typeof(AModule), assembly);
3.4.3 IIS Hosted Web Applications
When using assembly scanning with IIS applications, you can run into a little trouble depending on how you do theassembly location. (This is one of our FAQs)
When hosting applications in IIS all assemblies are loaded into the AppDomain when the application first starts, butwhen the AppDomain is recycled by IIS the assemblies are then only loaded on demand.
To avoid this issue use the GetReferencedAssemblies() method on System.Web.Compilation.BuildManager to get alist of the referenced assemblies instead:
var assemblies = BuildManager.GetReferencedAssemblies().Cast<Assembly>();
That will force the referenced assemblies to be loaded into the AppDomain immediately making them available formodule scanning.
3.4. Assembly Scanning 21
Autofac Documentation, Release 3.3
22 Chapter 3. Registering Components
CHAPTER 4
Resolving Services
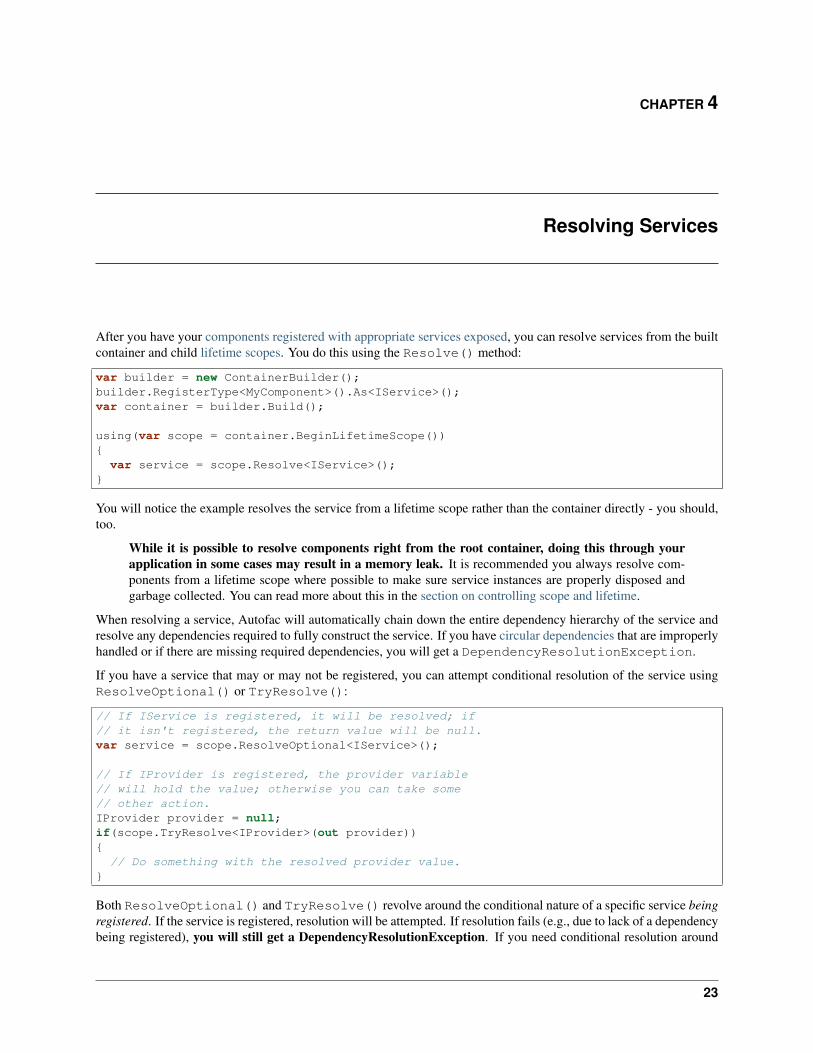
After you have your components registered with appropriate services exposed, you can resolve services from the builtcontainer and child lifetime scopes. You do this using the Resolve() method:
var builder = new ContainerBuilder();builder.RegisterType<MyComponent>().As<IService>();var container = builder.Build();
using(var scope = container.BeginLifetimeScope()){
var service = scope.Resolve<IService>();}
You will notice the example resolves the service from a lifetime scope rather than the container directly - you should,too.
While it is possible to resolve components right from the root container, doing this through yourapplication in some cases may result in a memory leak. It is recommended you always resolve com-ponents from a lifetime scope where possible to make sure service instances are properly disposed andgarbage collected. You can read more about this in the section on controlling scope and lifetime.
When resolving a service, Autofac will automatically chain down the entire dependency hierarchy of the service andresolve any dependencies required to fully construct the service. If you have circular dependencies that are improperlyhandled or if there are missing required dependencies, you will get a DependencyResolutionException.
If you have a service that may or may not be registered, you can attempt conditional resolution of the service usingResolveOptional() or TryResolve():
// If IService is registered, it will be resolved; if// it isn't registered, the return value will be null.var service = scope.ResolveOptional<IService>();
// If IProvider is registered, the provider variable// will hold the value; otherwise you can take some// other action.IProvider provider = null;if(scope.TryResolve<IProvider>(out provider)){
// Do something with the resolved provider value.}
Both ResolveOptional() and TryResolve() revolve around the conditional nature of a specific service beingregistered. If the service is registered, resolution will be attempted. If resolution fails (e.g., due to lack of a dependencybeing registered), you will still get a DependencyResolutionException. If you need conditional resolution around
23
Autofac Documentation, Release 3.3
a service where the condition is based on whether or not the service can successfully resolve, wrap the Resolve()call with a try/catch block.
Additional topics for resolving services:
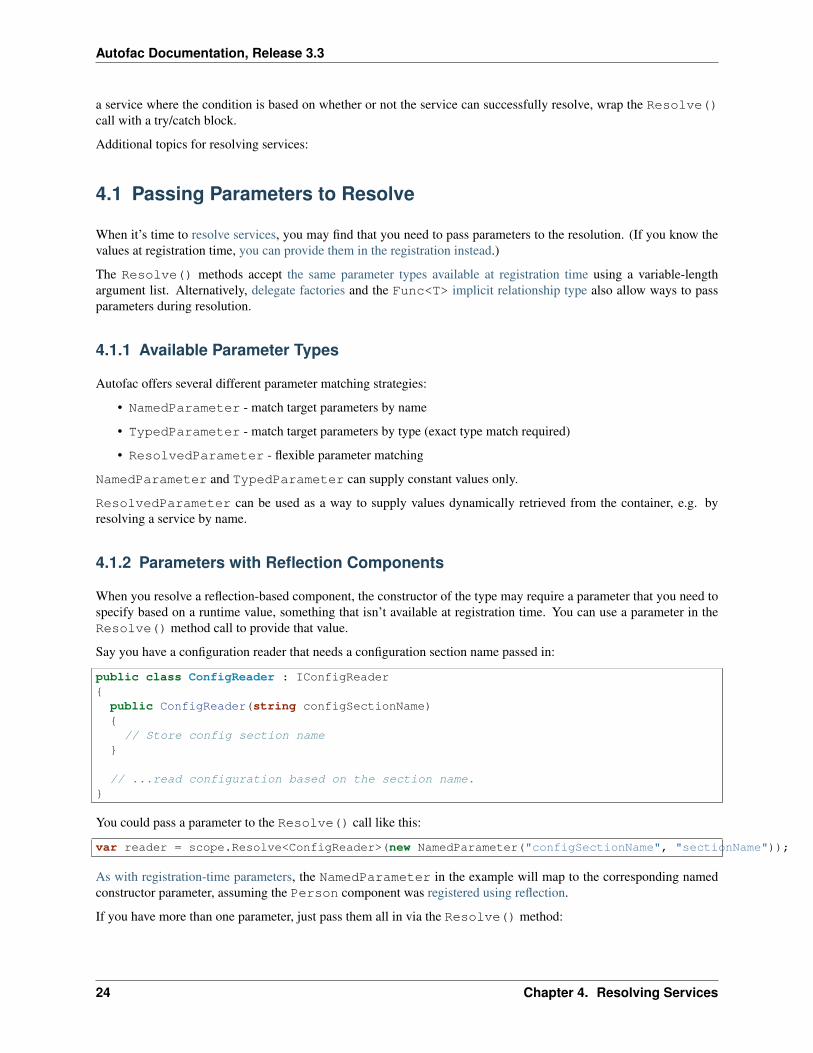
4.1 Passing Parameters to Resolve
When it’s time to resolve services, you may find that you need to pass parameters to the resolution. (If you know thevalues at registration time, you can provide them in the registration instead.)
The Resolve() methods accept the same parameter types available at registration time using a variable-lengthargument list. Alternatively, delegate factories and the Func<T> implicit relationship type also allow ways to passparameters during resolution.
4.1.1 Available Parameter Types
Autofac offers several different parameter matching strategies:
• NamedParameter - match target parameters by name
• TypedParameter - match target parameters by type (exact type match required)
• ResolvedParameter - flexible parameter matching
NamedParameter and TypedParameter can supply constant values only.
ResolvedParameter can be used as a way to supply values dynamically retrieved from the container, e.g. byresolving a service by name.
4.1.2 Parameters with Reflection Components
When you resolve a reflection-based component, the constructor of the type may require a parameter that you need tospecify based on a runtime value, something that isn’t available at registration time. You can use a parameter in theResolve() method call to provide that value.
Say you have a configuration reader that needs a configuration section name passed in:
public class ConfigReader : IConfigReader{
public ConfigReader(string configSectionName){// Store config section name
}
// ...read configuration based on the section name.}
You could pass a parameter to the Resolve() call like this:
var reader = scope.Resolve<ConfigReader>(new NamedParameter("configSectionName", "sectionName"));
As with registration-time parameters, the NamedParameter in the example will map to the corresponding namedconstructor parameter, assuming the Person component was registered using reflection.
If you have more than one parameter, just pass them all in via the Resolve() method:
24 Chapter 4. Resolving Services
Autofac Documentation, Release 3.3
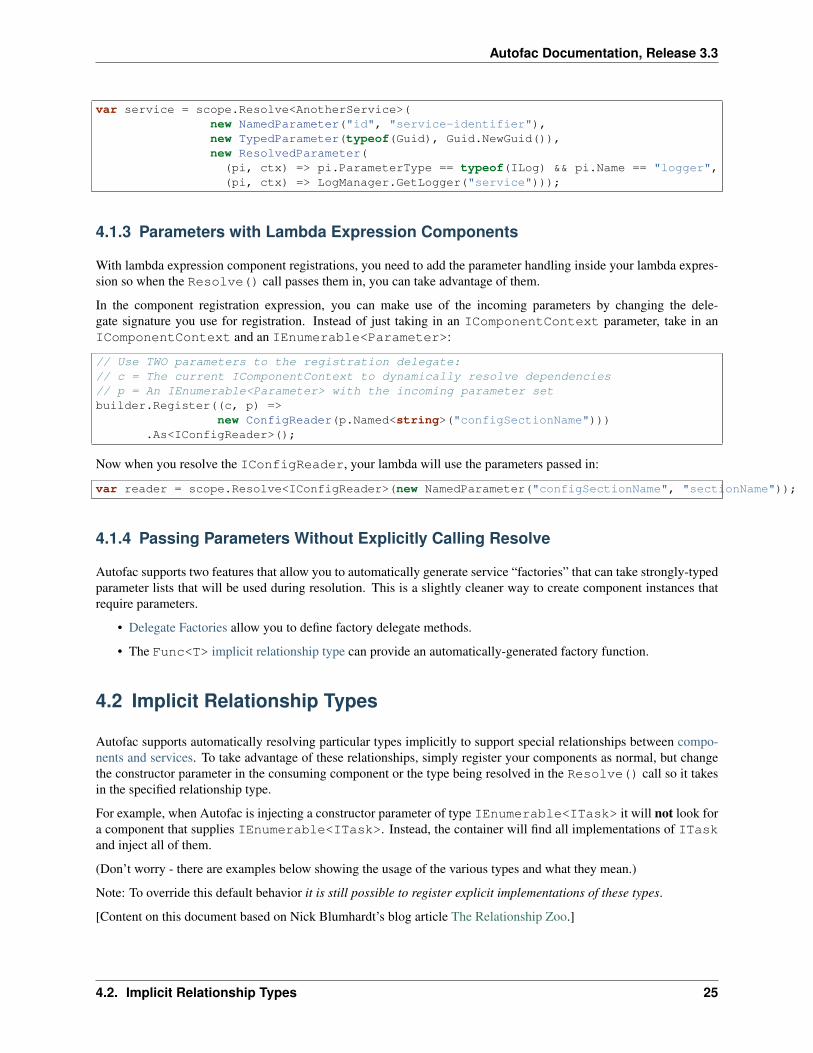
var service = scope.Resolve<AnotherService>(new NamedParameter("id", "service-identifier"),new TypedParameter(typeof(Guid), Guid.NewGuid()),new ResolvedParameter((pi, ctx) => pi.ParameterType == typeof(ILog) && pi.Name == "logger",(pi, ctx) => LogManager.GetLogger("service")));
4.1.3 Parameters with Lambda Expression Components
With lambda expression component registrations, you need to add the parameter handling inside your lambda expres-sion so when the Resolve() call passes them in, you can take advantage of them.
In the component registration expression, you can make use of the incoming parameters by changing the dele-gate signature you use for registration. Instead of just taking in an IComponentContext parameter, take in anIComponentContext and an IEnumerable<Parameter>:
// Use TWO parameters to the registration delegate:// c = The current IComponentContext to dynamically resolve dependencies// p = An IEnumerable<Parameter> with the incoming parameter setbuilder.Register((c, p) =>
new ConfigReader(p.Named<string>("configSectionName"))).As<IConfigReader>();
Now when you resolve the IConfigReader, your lambda will use the parameters passed in:
var reader = scope.Resolve<IConfigReader>(new NamedParameter("configSectionName", "sectionName"));
4.1.4 Passing Parameters Without Explicitly Calling Resolve
Autofac supports two features that allow you to automatically generate service “factories” that can take strongly-typedparameter lists that will be used during resolution. This is a slightly cleaner way to create component instances thatrequire parameters.
• Delegate Factories allow you to define factory delegate methods.
• The Func<T> implicit relationship type can provide an automatically-generated factory function.
4.2 Implicit Relationship Types
Autofac supports automatically resolving particular types implicitly to support special relationships between compo-nents and services. To take advantage of these relationships, simply register your components as normal, but changethe constructor parameter in the consuming component or the type being resolved in the Resolve() call so it takesin the specified relationship type.
For example, when Autofac is injecting a constructor parameter of type IEnumerable<ITask> it will not look fora component that supplies IEnumerable<ITask>. Instead, the container will find all implementations of ITaskand inject all of them.
(Don’t worry - there are examples below showing the usage of the various types and what they mean.)
Note: To override this default behavior it is still possible to register explicit implementations of these types.
[Content on this document based on Nick Blumhardt’s blog article The Relationship Zoo.]
4.2. Implicit Relationship Types 25
Autofac Documentation, Release 3.3
4.2.1 Supported Relationship Types
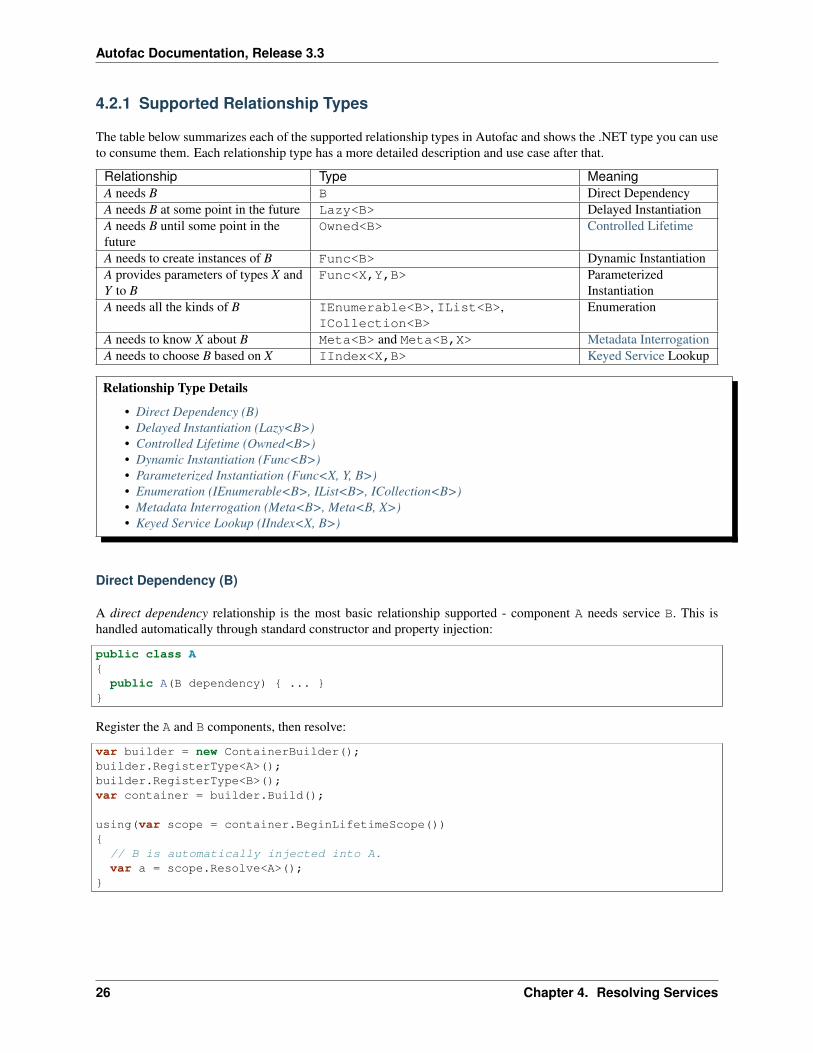
The table below summarizes each of the supported relationship types in Autofac and shows the .NET type you can useto consume them. Each relationship type has a more detailed description and use case after that.
Relationship Type MeaningA needs B B Direct DependencyA needs B at some point in the future Lazy<B> Delayed InstantiationA needs B until some point in thefuture
Owned<B> Controlled Lifetime
A needs to create instances of B Func<B> Dynamic InstantiationA provides parameters of types X andY to B
Func<X,Y,B> ParameterizedInstantiation
A needs all the kinds of B IEnumerable<B>, IList<B>,ICollection<B>
Enumeration
A needs to know X about B Meta<B> and Meta<B,X> Metadata InterrogationA needs to choose B based on X IIndex<X,B> Keyed Service Lookup
Relationship Type Details
• Direct Dependency (B)• Delayed Instantiation (Lazy<B>)• Controlled Lifetime (Owned<B>)• Dynamic Instantiation (Func<B>)• Parameterized Instantiation (Func<X, Y, B>)• Enumeration (IEnumerable<B>, IList<B>, ICollection<B>)• Metadata Interrogation (Meta<B>, Meta<B, X>)• Keyed Service Lookup (IIndex<X, B>)
Direct Dependency (B)
A direct dependency relationship is the most basic relationship supported - component A needs service B. This ishandled automatically through standard constructor and property injection:
public class A{
public A(B dependency) { ... }}
Register the A and B components, then resolve:
var builder = new ContainerBuilder();builder.RegisterType<A>();builder.RegisterType<B>();var container = builder.Build();
using(var scope = container.BeginLifetimeScope()){
// B is automatically injected into A.var a = scope.Resolve<A>();
}
26 Chapter 4. Resolving Services
Autofac Documentation, Release 3.3
Delayed Instantiation (Lazy<B>)
A lazy dependency is not instantiated until its first use. This appears where the dependency is infrequently used, orexpensive to construct. To take advantage of this, use a Lazy<B> in the constructor of A:
public class A{
Lazy<B> _b;
public A(Lazy<B> b) { _b = b }
public void M(){
// The component implementing B is created the// first time M() is called_b.Value.DoSomething();
}}
If you have a lazy dependency for which you also need metadata, you can use Lazy<B,M> instead of the longerMeta<Lazy<B>, M>.
Controlled Lifetime (Owned<B>)
An owned dependency can be released by the owner when it is no longer required. Owned dependencies usuallycorrespond to some unit of work performed by the dependent component.
This type of relationship is interesting particularly when working with components that implement IDisposable.Autofac automatically disposes of disposable components at the end of a lifetime scope, but that may mean a compo-nent is held onto for too long; or you may just want to take control of disposing the object yourself. In this case, you’duse an owned dependency.
public class A{
Owned<B> _b;
public A(Owned<B> b) { _b = b; }
public void M(){
// _b is used for some task_b.Value.DoSomething();
// Here _b is no longer needed, so// it is released_b.Dispose();
}}
Internally, Autofac creates a tiny lifetime scope in which the B service is resolved, and when you call Dispose() onit, the lifetime scope is disposed. What that means is that disposing of B will also dispose of its dependencies unlessthose dependencies are shared (e.g., singletons).
This also means that if you have InstancePerLifetimeScope() registrations and you resolve one asOwned<B> then you may not get the same instance as being used elsewhere in the same lifetime scope. This ex-ample shows the gotcha:
4.2. Implicit Relationship Types 27
Autofac Documentation, Release 3.3
var builder = new ContainerBuilder();builder.RegisterType<A>().InstancePerLifetimeScope();builder.RegisterType<B>().InstancePerLifetimeScope();var container = builder.Build();
using(var scope = container.BeginLifetimeScope()){
// Here we resolve a B that is InstancePerLifetimeScope();var b1 = scope.Resolve<B>();b1.DoSomething();
// This will be the same as b1 from above.var b2 = scope.Resolve<B>();b2.DoSomething();
// The B used in A will NOT be the same as the others.var a = scope.Resolve<A>();a.M();
}
This is by design because you wouldn’t want one component to dispose the B out from under everything else. However,it may lead to some confusion if you’re not aware.
If you would rather control B disposal yourself all the time, register B as ExternallyOwned().
Dynamic Instantiation (Func<B>)
Using an auto-generated factory can let you effectively call Resolve<T>() without tying your component to Aut-ofac. Use this relationship type if you need to create more than one instance of a given service, or if you’re not sure ifyou’re going to need a service and want to make the decision at runtime. This relationship is also useful in cases likeWCF integration where you need to create a new service proxy after faulting the channel.
Lifetime scopes are respected using this relationship type. If you register an object asInstancePerDependency() and call the Func<B> multiple times, you’ll get a new instance each time.However, if you register an object as SingleInstance() and call the Func<B> to resolve the object more thanonce, you will get the same object instance every time.
An example of this relationship looks like:
public class A{
Func<B> _b;
public A(Func<B> b) { _b = b; }
public void M(){
var b = _b();b.DoSomething();
}}
Parameterized Instantiation (Func<X, Y, B>)
You can also use an auto-generated factory to pass strongly-typed parameters to the resolution function. This is analternative to passing parameters during registration or passing during manual resoution:
28 Chapter 4. Resolving Services
Autofac Documentation, Release 3.3
public class A{
Func<int, string, B> _b;
public A(Func<int, string, B> b) { _b = b }
public void M(){
var b = _b(42, "http://hel.owr.ld");b.DoSomething();
}}
Internally, Autofac treats these as typed parameters. What that means is that auto-generated function factoriescannot have duplicate types in the input parameter list. For example, say you have a type like this:
public class DuplicateTypes{
public DuplicateTypes(int a, int b, string c){// ...
}}
You might want to register that type and have an auto-generated function factory for it. You will be able to resolve thefunction, but you won’t be able to execute it.
var func = scope.Resolve<Func<int, int, string, DuplicateTypes>>();
// Throws a DependencyResolutionException:var obj = func(1, 2, "three");
In a loosely coupled scenario where the parameters are matched on type, you shouldn’t really know about the orderof the parameters for a specific object’s constructor. If you need to do something like this, you should use a customdelegate type instead:
public delegate DuplicateTypes FactoryDelegate(int a, int b, string c);
Then register that delegate using RegisterGeneratedFactory():
builder.RegisterType<DuplicateTypes>();builder.RegisterGeneratedFactory<FactoryDelegate>(new TypedService(typeof(DuplicateTypes)));
Now the function will work:
var func = scope.Resolve<FactoryDelegate>();var obj = func(1, 2, "three");
Another option you have is to use a delegate factory, which you can read about in the advanced topics section.
Should you decide to use the built-in auto-generated factory behavior (Func<X, Y, B>) and only resolve a factorywith one of each type, it will work but you’ll get the same input for all constructor parameters of the same type.
var func = container.Resolve<Func<int, string, DuplicateTypes>>();
// This works and is the same as calling// new DuplicateTypes(1, 1, "three")var obj = func(1, "three");
4.2. Implicit Relationship Types 29
Autofac Documentation, Release 3.3
You can read more about delegate factories and the RegisterGeneratedFactory() method in the advancedtopics section.
Lifetime scopes are respected using this relationship type as well as when using delegate factories. If you register anobject as InstancePerDependency() and call the Func<X, Y, B> multiple times, you’ll get a new instanceeach time. However, if you register an object as SingleInstance() and call the Func<X, Y, B> to resolvethe object more than once, you will get the same object instance every time regardless of the different parameters youpass in. Just passing different parameters will not break the respect for the lifetime scope.
Enumeration (IEnumerable<B>, IList<B>, ICollection<B>)
Dependencies of an enumerable type provide multiple implementations of the same service (interface). This is helpfulin cases like message handlers, where a message comes in and more than one handler is registered to process themessage.
Let’s say you have a dependency interface defined like this:
public interface IMessageHandler{
void HandleMessage(Message m);}
Further, you have a consumer of dependencies like that where you need to have more than one registered and theconsumer needs all of the registered dependencies:
public class MessageProcessor{
private IEnumerable<IMessageHandler> _handlers;
public MessageProcessor(IEnumerable<IMessageHandler> handlers){this._handlers = handlers;
}
public void ProcessMessage(Message m){foreach(var handler in this._handlers){
handler.HandleMessage(m);}
}}
You can easily accomplish this using the implicit enumerable relationship type. Just register all of the dependenciesand the consumer, and when you resolve the consumer the set of all matching dependencies will be resolved as anenumeration.
var builder = new ContainerBuilder();builder.RegisterType<FirstHandler>().As<IMessageHandler>();builder.RegisterType<SecondHandler>().As<IMessageHandler>();builder.RegisterType<ThirdHandler>().As<IMessageHandler>();builder.RegisterType<MessageProcessor>();var container = builder.Build();
using(var scope = container.BeginLifetimeScope()){
// When processor is resolved, it'll have all of the// registered handlers passed in to the constructor.
30 Chapter 4. Resolving Services
Autofac Documentation, Release 3.3
var processor = scope.Resolve<MessageProcessor>();processor.ProcessMessage(m);
}
The enumerable support will return an empty set if no matching items are registered in the container. That is,using the above example, if you don’t register any IMessageHandler implementations, this will break:
// This throws an exception - none are registered!scope.Resolve<IMessageHandler>();
However, this works:
// This returns an empty list, NOT an exception:scope.Resolve<IEnumerable<IMessageHandler>>();
This can create a bit of a “gotcha” where you might think you’ll get a null value if you inject something using thisrelationship. Instead, you’ll get an empty list.
Metadata Interrogation (Meta<B>, Meta<B, X>)
The Autofac metadata feature lets you associate arbitrary data with services that you can use to make decisions whenresolving. If you want to make those decisions in the consuming component, use the Meta<B> relationship, whichwill provide you with a string/object dictionary of all the object metadata:
public class A{
Meta<B> _b;
public A(Meta<B> b) { _b = b; }
public void M(){if (_b.Metadata["SomeValue"] == "yes"){
_b.Value.DoSomething();}
}}
You can use strongly-typed metadata as well, by specifying the metadata type in the Meta<B, X> relationship:
public class A{
Meta<B, BMetadata> _b;
public A(Meta<B, BMetadata> b) { _b = b; }
public void M(){if (_b.Metadata.SomeValue == "yes"){
_b.Value.DoSomething();}
}}
If you have a lazy dependency for which you also need metadata, you can use Lazy<B,M> instead of the longerMeta<Lazy<B>, M>.
4.2. Implicit Relationship Types 31
Autofac Documentation, Release 3.3
Keyed Service Lookup (IIndex<X, B>)
In the case where you have many of a particular item (like the IEnumerable<B> relationship) but you want to pickone based on service key, you can use the IIndex<X, B> relationship. First, register your services with keys:
var builder = new ContainerBuilder();builder.RegisterType<DerivedB>().Keyed<B>("first");builder.RegisterType<AnotherDerivedB>().Keyed<B>("second");builder.RegisterType<A>();var container = builder.Build();
Then consume the IIndex<X, B> to get a dictionary of keyed services:
public class A{
IIndex<string, B> _b;
public A(IIndex<string, B> b) { _b = b; }
public void M(){var b = this._b["first"];_b.DoSomething();
}}
4.2.2 Composing Relationship Types
Relationship types can be composed, so:
IEnumerable<Func<Owned<ITask>>>
Is interpreted correctly to mean:
• All implementations, of
• Factories, that return
• Lifetime-controlled
• ITask services
4.2.3 Relationship Types and Container Independence
The custom relationship types in Autofac based on standard .NET types don’t force you to bind your application moretightly to Autofac. They give you a programming model for container configuration that is consistent with the way youwrite other components (vs. having to know a lot of specific container extension points and APIs that also potentiallycentralize your configuration).
For example, you can still create a custom ITaskFactory in your core model, but provide anAutofacTaskFactory implementation based on Func<Owned<ITask>> if that is desirable.
Note that some relationships are based on types that are in Autofac (e.g., IIndex<X, B>). Using those relationshiptypes do tie you to at least having a reference to Autofac, even if you choose to use a different IoC container for theactual resolution of services.
You may also be interested in checking out the list of advanced topics to learn about named and keyed services,working with component metadata, and other service resolution related topics.
32 Chapter 4. Resolving Services
CHAPTER 5
Controlling Scope and Lifetime
A great place to start learning about Autofac scope and lifetime is in Nick Blumhardt’s Autofac lifetime primer.There’s a lot to digest, though, and a lot of intermixed concepts there, so we’ll try to complement that article here.
You may recall from the registration topic that you add components to the container that implement services. Youthen end up resolving services and using those service instances to do your work.
The lifetime of a service is how long the service instance will live in your application - from the original instantiationto disposal. For example, if you “new up” an object that implements IDisposable and then later call Dispose() onit, the lifetime of that object is from the time you instantiated it all the way through disposal (or garbage collection ifyou didn’t proactively dispose it).
The scope of a service is the area in the application where that service can be shared with other components thatconsume it. For example, in your application you may have a global static singleton - the “scope” of that global objectinstance would be the whole application. On the other hand, you might create a local variable in a for loop that makesuse of the global singleton - the local variable has a much smaller scope than the global.
The concept of a lifetime scope in Autofac combines these two notions. Effectively, a lifetime scope equates with aunit of work in your application. A unit of work might begin a lifetime scope at the start, then services required for thatunit of work get resolved from a lifetime scope. As you resolve services, Autofac tracks disposable (IDisposable)components that are resolved. At the end of the unit of work, you dispose of the associated lifetime scope and Autofacwill automatically clean up/dispose of the resolved services.
The two important things lifetime scopes control are sharing and disposal.
• Lifetime scopes are nestable and they control how components are shared. For example, a “singleton”service might be resolved from a root lifetime scope while individual units of work may require their owninstances of other services. You can determine how a component is shared by setting its instance scope atregistration.
• Lifetime scopes track disposable objects and dispose of them when the lifetime scope is disposed. Forexample, if you have a component that implements IDisposable and you resolve it from a lifetime scope,the scope will hold onto it and dispose of it for you so your service consumers don’t have to know about theunderlying implementation. You have the ability to control this behavior or add new disposal behavior if youchoose.
As you work in your application, it’s good to remember these concepts so you make the most efficient use of yourresources.
It is important to always resolve services from a lifetime scope and not the root container. Due tothe disposal tracking nature of lifetime scopes, if you resolve a lot of disposable components from thecontainer (the “root lifetime scope”), you may inadvertently cause yourself a memory leak. The rootcontainer will hold references to those disposable components for as long as it lives (usually the lifetimeof the application) so it can dispose of them. You can change disposal behavior if you choose, but it’s a
33
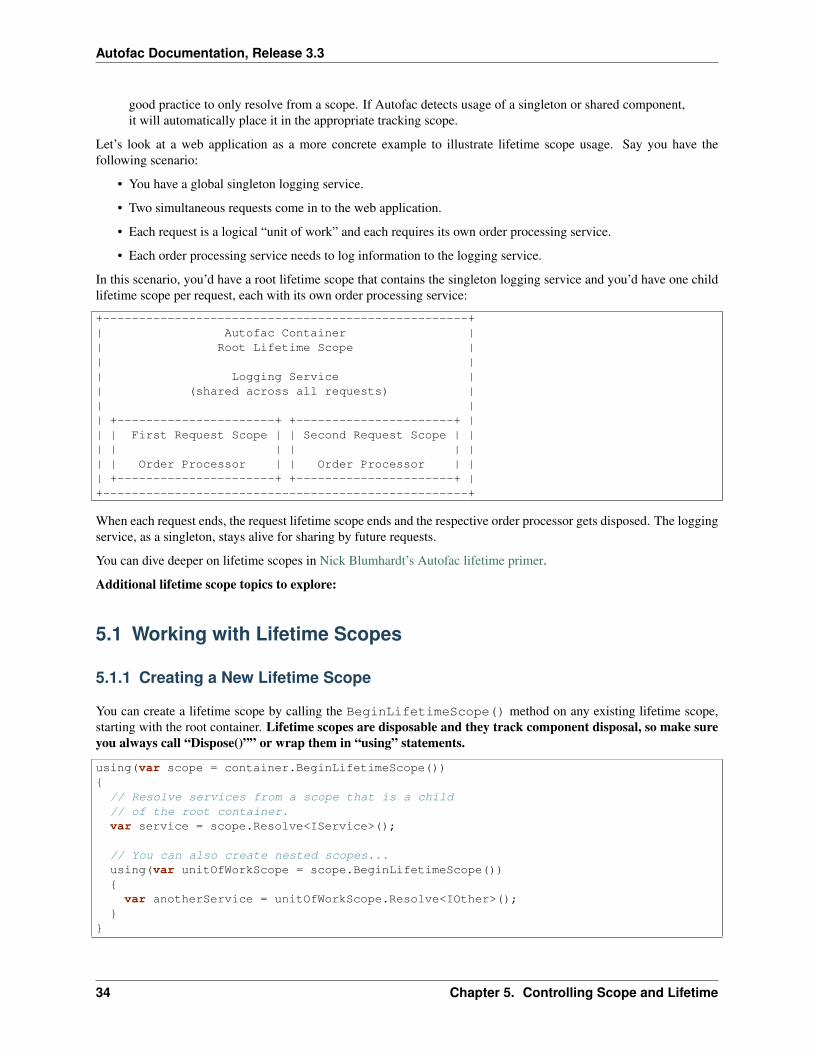
Autofac Documentation, Release 3.3
good practice to only resolve from a scope. If Autofac detects usage of a singleton or shared component,it will automatically place it in the appropriate tracking scope.
Let’s look at a web application as a more concrete example to illustrate lifetime scope usage. Say you have thefollowing scenario:
• You have a global singleton logging service.
• Two simultaneous requests come in to the web application.
• Each request is a logical “unit of work” and each requires its own order processing service.
• Each order processing service needs to log information to the logging service.
In this scenario, you’d have a root lifetime scope that contains the singleton logging service and you’d have one childlifetime scope per request, each with its own order processing service:
+---------------------------------------------------+| Autofac Container || Root Lifetime Scope || || Logging Service || (shared across all requests) || || +----------------------+ +----------------------+ || | First Request Scope | | Second Request Scope | || | | | | || | Order Processor | | Order Processor | || +----------------------+ +----------------------+ |+---------------------------------------------------+
When each request ends, the request lifetime scope ends and the respective order processor gets disposed. The loggingservice, as a singleton, stays alive for sharing by future requests.
You can dive deeper on lifetime scopes in Nick Blumhardt’s Autofac lifetime primer.
Additional lifetime scope topics to explore:
5.1 Working with Lifetime Scopes
5.1.1 Creating a New Lifetime Scope
You can create a lifetime scope by calling the BeginLifetimeScope() method on any existing lifetime scope,starting with the root container. Lifetime scopes are disposable and they track component disposal, so make sureyou always call “Dispose()”” or wrap them in “using” statements.
using(var scope = container.BeginLifetimeScope()){
// Resolve services from a scope that is a child// of the root container.var service = scope.Resolve<IService>();
// You can also create nested scopes...using(var unitOfWorkScope = scope.BeginLifetimeScope()){var anotherService = unitOfWorkScope.Resolve<IOther>();
}}
34 Chapter 5. Controlling Scope and Lifetime
Autofac Documentation, Release 3.3
5.1.2 Tagging a Lifetime Scope
There are some cases where you want to share services across units of work but you don’t want those services to beshared globally like singletons. A common example is “per-request” lifetimes in web applications. (You can readmore about per-request scoping in the “Instance Scope” topic.) In this case, you’d want to tag your lifetime scope andregister services as InstancePerMatchingLifetimeScope().
For example, say you have a component that sends emails. A logical transaction in your system may need to sendmore than one email, so you can share that component across individual pieces of the logical transaction. However,you don’t want the email component to be a global singleton. Your setup might look something like this:
// Register your transaction-level shared component// as InstancePerMatchingLifetimeScope and give it// a "known tag" that you'll use when starting new// transactions.var builder = new ContainerBuilder();builder.RegisterType<EmailSender>()
.As<IEmailSender>()
.InstancePerMatchingLifetimeScope("transaction");
// Both the order processor and the receipt manager// need to send email notifications.builder.RegisterType<OrderProcessor>()
.As<IOrderProcessor>();builder.RegisterType<ReceiptManager>()
.As<IReceiptManager>();
var container = builder.Build();
// Create transaction scopes with a tag.using(var transactionScope = container.BeginLifetimeScope("transaction")){
using(var orderScope = transactionScope.BeginLifetimeScope()){// This would resolve an IEmailSender to use, but the// IEmailSender would "live" in the parent transaction// scope and be shared across any children of the// transaction scope because of that tag.var op = orderScope.Resolve<IOrderProcessor>();op.ProcessOrder();
}
using(var receiptScope = transactionScope.BeginLifetimeScope()){// This would also resolve an IEmailSender to use, but it// would find the existing IEmailSender in the parent// scope and use that. It'd be the same instance used// by the order processor.var rm = receiptScope.Resolve<IReceiptManager>();rm.SendReceipt();
}}
Again, you can read more about tagged scopes and per-request scoping in the “Instance Scope” topic.
5.1. Working with Lifetime Scopes 35
Autofac Documentation, Release 3.3
5.1.3 Adding Registrations to a Lifetime Scope
Autofac allows you to add registrations “on the fly” as you create lifetime scopes. This can help you when you needto do a sort of “spot weld” limited registration override or if you generally just need some additional stuff in a scopethat you don’t want to register globally. You do this by passing a lambda to BeginLifetimeScope() that takes aContainerBuilder and adds registrations.
using(var scope = container.BeginLifetimeScope(builder =>{builder.RegisterType<Override>().As<IService>();builder.RegisterModule<MyModule>();
})){
// The additional registrations will be available// only in this lifetime scope.
}
5.2 Instance Scope
Instance scope determines how an instance is shared between requests for the same service. Note that you should befamiliar with the concept of lifetime scopes to better understand what’s happening here.
When a request is made for a service, Autofac can return a single instance (single instance scope), a new instance (perdependency scope), or a single instance within some kind of context, e.g. a thread or an HTTP request (per lifetimescope).
This applies to instances returned from an explicit Resolve() call as well as instances created internally by the containerto satisfy the dependencies of another component.
• Instance Per Dependency• Single Instance• Instance Per Lifetime Scope• Instance Per Matching Lifetime Scope• Instance Per Request• Instance Per Owned• Thread Scope
5.2.1 Instance Per Dependency
Also called ‘transient’ or ‘factory’ in other containers. Using per-dependency scope, a unique instance will bereturned from each request for a service.
This is the default if no other option is specified.
var builder = new ContainerBuilder();
// This...builder.RegisterType<Worker>();
// ...is the same as this:builder.RegisterType<Worker>().InstancePerDependency();
36 Chapter 5. Controlling Scope and Lifetime

Autofac Documentation, Release 3.3
When you resolve a component that is instance per dependency, you get a new one each time.
using(var scope = container.BeginLifetimeScope()){
for(var i = 0; i < 100; i++){// Every one of the 100 Worker instances// resolved in this loop will be brand new.var w = scope.Resolve<Worker>();w.DoWork();
}}
5.2.2 Single Instance
This is also known as ‘singleton.’ Using single instance scope, one instance is returned from all requests in theparent and all nested scopes.
var builder = new ContainerBuilder();builder.RegisterType<Worker>().SingleInstance();
When you resolve a single instance component, you always get the same instance no matter where you request it.
// It's generally not good to resolve things from the// container directly, but for singleton demo purposes// we do...var root = container.Resolve<Worker>();
// We can resolve the worker from any level of nested// lifetime scope, any number of times.using(var scope1 = container.BeginLifetimeScope()){
for(var i = 0; i < 100; i++){var w1 = scope1.Resolve<Worker>();using(var scope2 = scope1.BeginLifetimeScope()){
var w2 = scope2.Resolve<Worker>();
// root, w1, and w2 are always literally the// same object instance. It doesn't matter// which lifetime scope it's resolved from// or how many times.
}}
}
5.2.3 Instance Per Lifetime Scope
This scope applies to nested lifetimes. A component with per-lifetime scope will have at most a single instanceper nested lifetime scope.
This is useful for objects specific to a single unit of work that may need to nest additional logical units of work. Eachnested lifetime scope will get a new instance of the registered dependency.
5.2. Instance Scope 37
Autofac Documentation, Release 3.3
var builder = new ContainerBuilder();builder.RegisterType<Worker>().InstancePerLifetimeScope();
When you resolve the instance per lifetime scope component, you get a single instance per nested scope (e.g., per unitof work).
using(var scope1 = container.BeginLifetimeScope()){
for(var i = 0; i < 100; i++){// Every time you resolve this from within this// scope you'll get the same instance.var w1 = scope1.Resolve<Worker>();
}}
using(var scope2 = container.BeginLifetimeScope()){
for(var i = 0; i < 100; i++){// Every time you resolve this from within this// scope you'll get the same instance, but this// instance is DIFFERENT than the one that was// used in the above scope. New scope = new instance.var w2 = scope2.Resolve<Worker>();
}}
5.2.4 Instance Per Matching Lifetime Scope
This is similar to the ‘instance per lifetime scope’ concept above, but allows more precise control over instance sharing.
When you create a nested lifetime scope, you have the ability to “tag” or “name” the scope. A component withper-matching-lifetime scope will have at most a single instance per nested lifetime scope that matches a givenname. This allows you to create a sort of “scoped singleton” where other nested lifetime scopes can share an instanceof a component without declaring a global shared instance.
This is useful for objects specific to a single unit of work, e.g. an HTTP request, as a nested lifetime can be createdper unit of work. If a nested lifetime is created per HTTP request, then any component with per-lifetime scope willhave an instance per HTTP request. (More on per-request lifetime scope below.)
In most applications, only one level of container nesting will be sufficient for representing the scope of units of work. Ifmore levels of nesting are required (e.g. something like global->request->transaction) components can be configuredto be shared at a particular level in the hierarchy using tags.
var builder = new ContainerBuilder();builder.RegisterType<Worker>().InstancePerMatchingLifetimeScope("myrequest");
The supplied tag value is associated with a lifetime scope when you start it. You will get an exception if you try toresolve a per-matching-lifetime-scope component when there’s no correctly named lifetime scope.
// Create the lifetime scope using the tag.using(var scope1 = container.BeginLifetimeScope("myrequest")){
for(var i = 0; i < 100; i++){var w1 = scope1.Resolve<Worker>();using(var scope2 = scope1.BeginLifetimeScope())
38 Chapter 5. Controlling Scope and Lifetime
Autofac Documentation, Release 3.3
{var w2 = scope2.Resolve<Worker>();
// w1 and w2 are always the same object// instance because the component is per-matching-lifetime-scope,// so it's effectively a singleton within the// named scope.
}}
}
// Create another lifetime scope using the tag.using(var scope3 = container.BeginLifetimeScope("myrequest")){
for(var i = 0; i < 100; i++){// w3 will be DIFFERENT than the worker resolved in the// earlier tagged lifetime scope.var w3 = scope3.Resolve<Worker>();using(var scope4 = scope1.BeginLifetimeScope()){
var w4 = scope4.Resolve<Worker>();
// w3 and w4 are always the same object because// they're in the same tagged scope, but they are// NOT the same as the earlier workers (w1, w2).
}}
}
// You can't resolve a per-matching-lifetime-scope component// if there's no matching scope.using(var noTagScope = container.BeginLifetimeScope()){
// This throws an exception because this scope doesn't// have the expected tag and neither does any parent scope!var fail = noTagScope.Resolve<Worker>();
}
5.2.5 Instance Per Request
Some application types naturally lend themselves to “request” type semantics, for example ASP.NET web forms andMVC applications. In these application types, it’s helpful to have the ability to have a sort of “singleton per request.”
Instance per request builds on top of instance per matching lifetime scope by providing a well-known lifetimescope tag, a registration convenience method, and integration for common application types. Behind the scenes,though, it’s still just instance per matching lifetime scope.
What this means is that if you try to resolve components that are registered as instance-per-request but there’s nocurrent request... you’re going to get an exception.
There is a detailed FAQ outlining how to work with per-request lifetimes.
var builder = new ContainerBuilder();builder.RegisterType<Worker>().InstancePerRequest();
5.2. Instance Scope 39
Autofac Documentation, Release 3.3
5.2.6 Instance Per Owned
The Owned<T> implicit relationship type creates new nested lifetime scopes. It is possible to scope dependencies tothe owned instance using the instance-per-owned registrations.
var builder = new ContainerBuilder();builder.RegisterType<MessageHandler>();builder.RegisterType<ServiceForHandler>().InstancePerOwned<MessageHandler>();
In this example the ServiceForHandler service will be scoped to the lifetime of the owned MessageHandlerinstance.
using(var scope = container.BeginLifetimeScope()){
// The message handler itself as well as the// resolved dependent ServiceForHandler service// is in a tiny child lifetime scope under// "scope." Note that resolving an Owned<T>// means YOU are responsible for disposal.var h1 = scope.Resolve<Owned<MessageHandler>>();h1.Dispose();
}
5.2.7 Thread Scope
Autofac can enforce that objects bound to one thread will not satisfy the dependencies of a component bound toanother thread. While there is not a convenience method for this, you can do it using lifetime scopes.
var builder = new ContainerBuilder();builder.RegisterType<MyThreadScopedComponent>()
.InstancePerLifetimeScope();var container = builder.Build();
Then, each thread gets its own lifetime scope:
void ThreadStart(){
using (var threadLifetime = container.BeginLifetimeScope()){var thisThreadsInstance = threadLifetime.Resolve<MyThreadScopedComponent>();
}}
IMPORTANT: Given the multithreaded scenario, you must be very careful that the parent scope doesn’t getdisposed out from under the spawned thread. You can get into a bad situation where components can’t be resolvedif you spawn the thread and then dispose the parent scope.
Each thread executing through ThreadStart() will then get its own instance of MyThreadScopedComponent- which is essentially a “singleton” in the lifetime scope. Because scoped instances are never provided to outer scopes,it is easier to keep thread components separated.
You can inject a parent lifetime scope into the code that spawns the thread by taking an ILifetimeScope parameter.Autofac knows to automatically inject the current lifetime scope and you can create a nested scope from that.
public class ThreadCreator{
private ILifetimeScope _parentScope;
40 Chapter 5. Controlling Scope and Lifetime
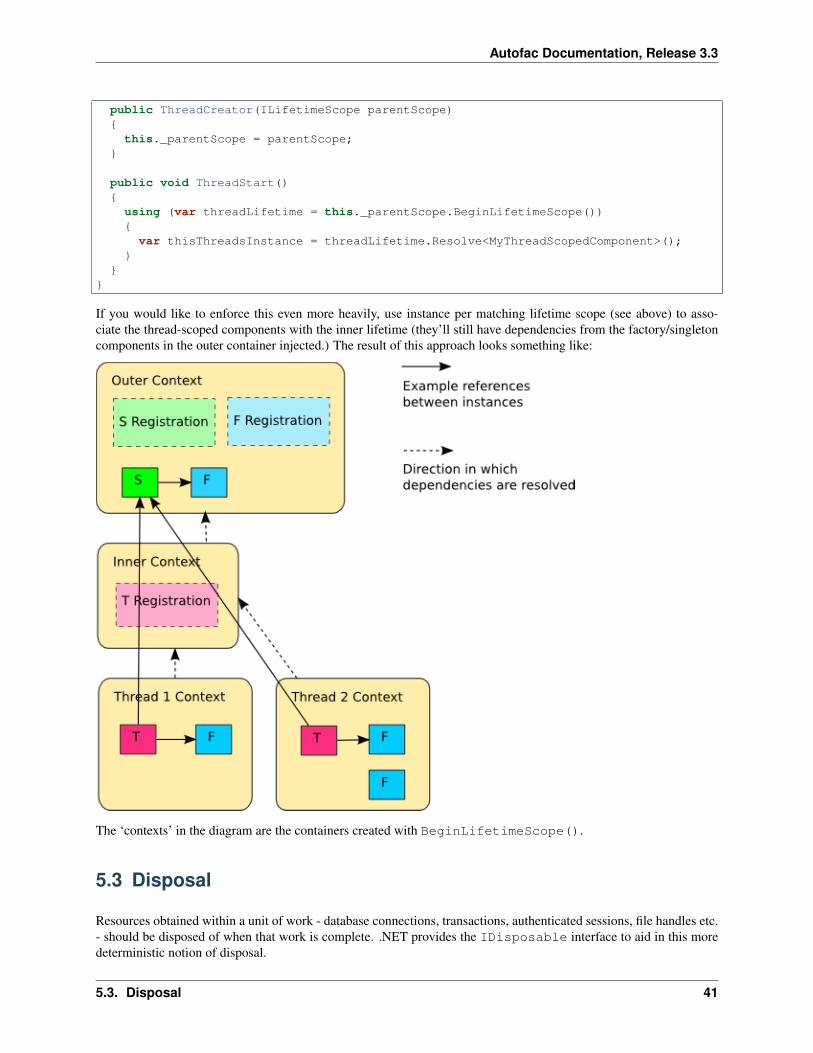
Autofac Documentation, Release 3.3
public ThreadCreator(ILifetimeScope parentScope){this._parentScope = parentScope;
}
public void ThreadStart(){using (var threadLifetime = this._parentScope.BeginLifetimeScope()){
var thisThreadsInstance = threadLifetime.Resolve<MyThreadScopedComponent>();}
}}
If you would like to enforce this even more heavily, use instance per matching lifetime scope (see above) to asso-ciate the thread-scoped components with the inner lifetime (they’ll still have dependencies from the factory/singletoncomponents in the outer container injected.) The result of this approach looks something like:
The ‘contexts’ in the diagram are the containers created with BeginLifetimeScope().
5.3 Disposal
Resources obtained within a unit of work - database connections, transactions, authenticated sessions, file handles etc.- should be disposed of when that work is complete. .NET provides the IDisposable interface to aid in this moredeterministic notion of disposal.
5.3. Disposal 41
Autofac Documentation, Release 3.3
Some IoC containers need to be told explicitly to dispose of a particular instance, through a method likeReleaseInstance(). This makes it very difficult to guarantee that the correct disposal semantics are used.
• Switching implementations from a non-disposable to a disposable component can mean modifying client code.
• Client code that may have ignored disposal when using shared instances will almost certainly fail to clean upwhen switched to non-shared instances.
Autofac solves these problems using lifetime scopes as a way of disposing of all of the components created during aunit of work.
using (var scope = container.BeginLifetimeScope()){
scope.Resolve<DisposableComponent>().DoSomething();
// Components for scope disposed here, at the// end of the 'using' statement when the scope// itself is disposed.
}
A lifetime scope is created when a unit of work begins, and when that unit of work is complete the nested containercan dispose all of the instances within it that are out of scope.
5.3.1 Registering Components
Autofac can automatically dispose of some components, but you have the ability to manually specify a disposalmechanism, too.
Components must be registered as InstancePerDependency() (the default) or some varia-tion of InstancePerLifetimeScope() (e.g., InstancePerMatchingLifetimeScope() orInstancePerRequest()).
If you have singleton components (registered as SingleInstance()) they will live for the life of the container.Since container lifetimes are usually the application lifetime, it means the component won’t be disposed until the endof the application.
Automatic Disposal
To take advantage of automatic deterministic disposal, your component must implement IDisposable. You canthen register your component as needed and at the end of each lifetime scope in which the component is resolved, theDispose() method on the component will be called.
var builder = new ContainerBuilder();builder.RegisterType<SomeDisposableComponent>();var container = builder.Build();// Create nested lifetime scopes, resolve// the component, and dispose of the scopes.// Your component will be disposed with the scope.
Specified Disposal
If your component doesn’t implement IDisposable but still requires some cleanup at the end of a lifetime scope,you can use the OnRelease lifetime event.
42 Chapter 5. Controlling Scope and Lifetime
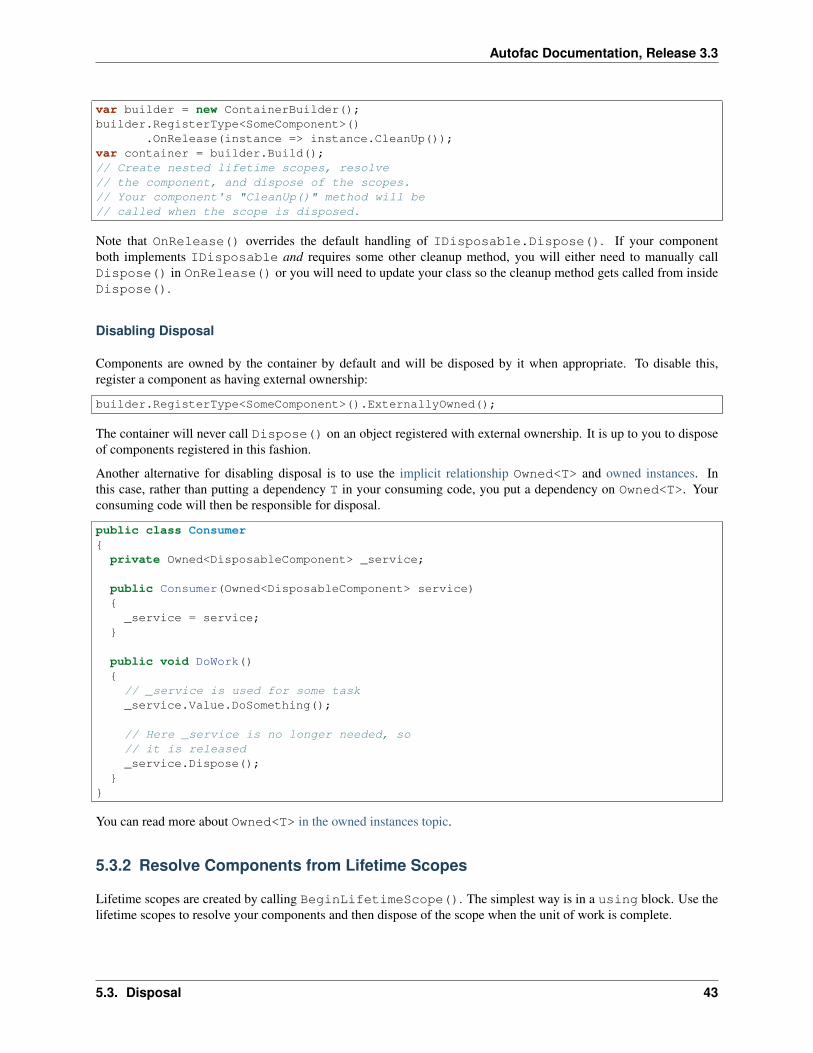
Autofac Documentation, Release 3.3
var builder = new ContainerBuilder();builder.RegisterType<SomeComponent>()
.OnRelease(instance => instance.CleanUp());var container = builder.Build();// Create nested lifetime scopes, resolve// the component, and dispose of the scopes.// Your component's "CleanUp()" method will be// called when the scope is disposed.
Note that OnRelease() overrides the default handling of IDisposable.Dispose(). If your componentboth implements IDisposable and requires some other cleanup method, you will either need to manually callDispose() in OnRelease() or you will need to update your class so the cleanup method gets called from insideDispose().
Disabling Disposal
Components are owned by the container by default and will be disposed by it when appropriate. To disable this,register a component as having external ownership:
builder.RegisterType<SomeComponent>().ExternallyOwned();
The container will never call Dispose() on an object registered with external ownership. It is up to you to disposeof components registered in this fashion.
Another alternative for disabling disposal is to use the implicit relationship Owned<T> and owned instances. Inthis case, rather than putting a dependency T in your consuming code, you put a dependency on Owned<T>. Yourconsuming code will then be responsible for disposal.
public class Consumer{
private Owned<DisposableComponent> _service;
public Consumer(Owned<DisposableComponent> service){_service = service;
}
public void DoWork(){// _service is used for some task_service.Value.DoSomething();
// Here _service is no longer needed, so// it is released_service.Dispose();
}}
You can read more about Owned<T> in the owned instances topic.
5.3.2 Resolve Components from Lifetime Scopes
Lifetime scopes are created by calling BeginLifetimeScope(). The simplest way is in a using block. Use thelifetime scopes to resolve your components and then dispose of the scope when the unit of work is complete.
5.3. Disposal 43
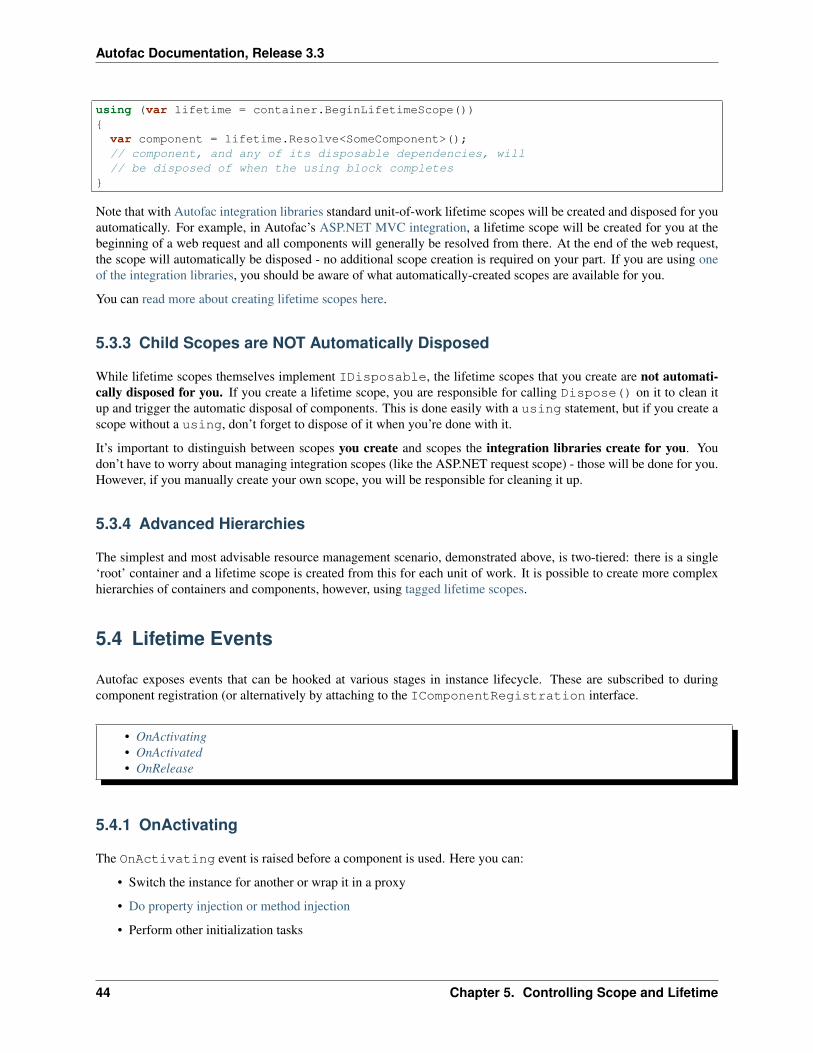
Autofac Documentation, Release 3.3
using (var lifetime = container.BeginLifetimeScope()){
var component = lifetime.Resolve<SomeComponent>();// component, and any of its disposable dependencies, will// be disposed of when the using block completes
}
Note that with Autofac integration libraries standard unit-of-work lifetime scopes will be created and disposed for youautomatically. For example, in Autofac’s ASP.NET MVC integration, a lifetime scope will be created for you at thebeginning of a web request and all components will generally be resolved from there. At the end of the web request,the scope will automatically be disposed - no additional scope creation is required on your part. If you are using oneof the integration libraries, you should be aware of what automatically-created scopes are available for you.
You can read more about creating lifetime scopes here.
5.3.3 Child Scopes are NOT Automatically Disposed
While lifetime scopes themselves implement IDisposable, the lifetime scopes that you create are not automati-cally disposed for you. If you create a lifetime scope, you are responsible for calling Dispose() on it to clean itup and trigger the automatic disposal of components. This is done easily with a using statement, but if you create ascope without a using, don’t forget to dispose of it when you’re done with it.
It’s important to distinguish between scopes you create and scopes the integration libraries create for you. Youdon’t have to worry about managing integration scopes (like the ASP.NET request scope) - those will be done for you.However, if you manually create your own scope, you will be responsible for cleaning it up.
5.3.4 Advanced Hierarchies
The simplest and most advisable resource management scenario, demonstrated above, is two-tiered: there is a single‘root’ container and a lifetime scope is created from this for each unit of work. It is possible to create more complexhierarchies of containers and components, however, using tagged lifetime scopes.
5.4 Lifetime Events
Autofac exposes events that can be hooked at various stages in instance lifecycle. These are subscribed to duringcomponent registration (or alternatively by attaching to the IComponentRegistration interface.
• OnActivating• OnActivated• OnRelease
5.4.1 OnActivating
The OnActivating event is raised before a component is used. Here you can:
• Switch the instance for another or wrap it in a proxy
• Do property injection or method injection
• Perform other initialization tasks
44 Chapter 5. Controlling Scope and Lifetime
Autofac Documentation, Release 3.3
In some cases, such as with RegisterType<T>(), the concrete type registered is used for type resolution and usedby ActivatingEventArgs. For example, the following will fail with a class cast exception:
builder.RegisterType<TConcrete>() // FAILS: will throw at cast of TInterfaceSubclass.As<TInterface>() // to type TConcrete.OnActivating(e => e.ReplaceInstance(new TInterfaceSubclass()));
A simple workaround is to do the registration in two steps:
builder.RegisterType<TConcrete>().AsSelf();builder.Register<TInterface>(c => c.Resolve<TConcrete>())
.OnActivating(e => e.ReplaceInstance(new TInterfaceSubclass()));
5.4.2 OnActivated
The OnActivated event is raised once a component is fully constructed. Here you can perform application-leveltasks that depend on the component being fully constructed - these should be rare.
5.4.3 OnRelease
The OnRelease event replaces the standard cleanup behavior for a component. The standard cleanup behaviorof components that implement IDisposable and that are not marked as ExternallyOwned() is to call theDispose() method. The standard cleanup behavior for components that do not implement IDisposable orare marked as externally owned is a no-op - to do nothing. OnRelease overrides this behavior with the providedimplementation.
5.5 Running Code at Startup
Autofac provides the ability for components to be notified or automatically activated when the container is built.
There are two automatic activation mechanisms available: - Startable components - Auto-activated components
In both cases, at the time the container is built, the component will be activated.
5.5.1 Startable Components
A startable component is one that is activated by the container when the container is initially built and has a specificmethod called to bootstrap an action on the component.
The key is to implement the Autofac.IStartable interface. When the container is built, the component will beactivated and the IStartable.Start() method will be called.
This only happens once, for a single instance of each component, the first time the container is built. Resolvingstartable components by hand won’t result in their Start() method being called. It isn’t recommended that startablecomponents implement other services, or be registered as anything other than SingleInstance().
Components that need to have something like a Start() method called each time they are activated should use alifetime event like OnActivated instead.
To create a startable component, implement Autofac.IStartable:
5.5. Running Code at Startup 45
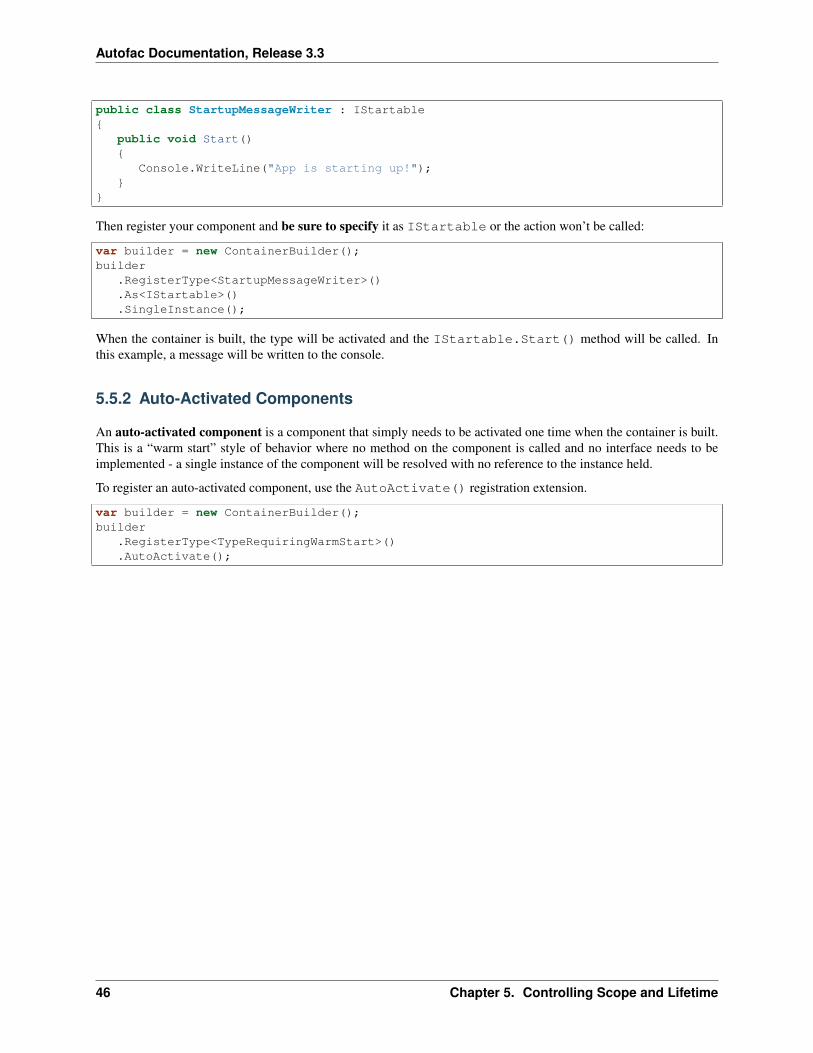
Autofac Documentation, Release 3.3
public class StartupMessageWriter : IStartable{
public void Start(){
Console.WriteLine("App is starting up!");}
}
Then register your component and be sure to specify it as IStartable or the action won’t be called:
var builder = new ContainerBuilder();builder
.RegisterType<StartupMessageWriter>()
.As<IStartable>()
.SingleInstance();
When the container is built, the type will be activated and the IStartable.Start() method will be called. Inthis example, a message will be written to the console.
5.5.2 Auto-Activated Components
An auto-activated component is a component that simply needs to be activated one time when the container is built.This is a “warm start” style of behavior where no method on the component is called and no interface needs to beimplemented - a single instance of the component will be resolved with no reference to the instance held.
To register an auto-activated component, use the AutoActivate() registration extension.
var builder = new ContainerBuilder();builder
.RegisterType<TypeRequiringWarmStart>()
.AutoActivate();
46 Chapter 5. Controlling Scope and Lifetime
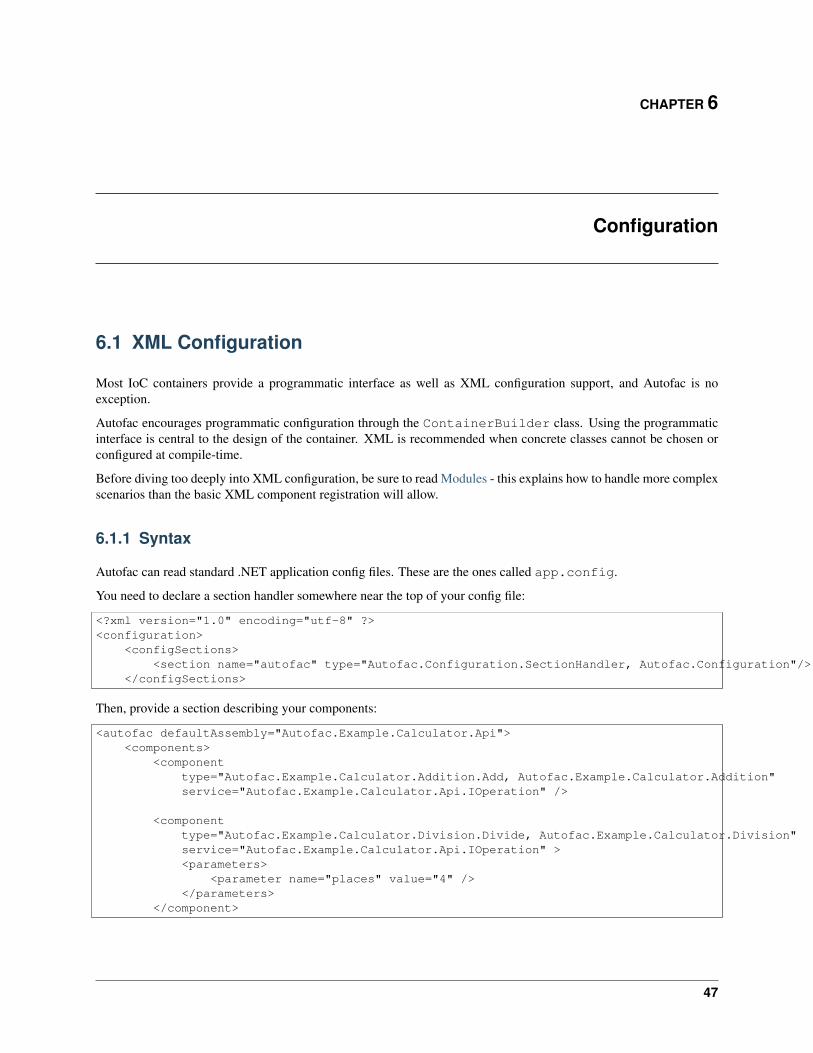
CHAPTER 6
Configuration
6.1 XML Configuration
Most IoC containers provide a programmatic interface as well as XML configuration support, and Autofac is noexception.
Autofac encourages programmatic configuration through the ContainerBuilder class. Using the programmaticinterface is central to the design of the container. XML is recommended when concrete classes cannot be chosen orconfigured at compile-time.
Before diving too deeply into XML configuration, be sure to read Modules - this explains how to handle more complexscenarios than the basic XML component registration will allow.
6.1.1 Syntax
Autofac can read standard .NET application config files. These are the ones called app.config.
You need to declare a section handler somewhere near the top of your config file:
<?xml version="1.0" encoding="utf-8" ?><configuration>
<configSections><section name="autofac" type="Autofac.Configuration.SectionHandler, Autofac.Configuration"/>
</configSections>
Then, provide a section describing your components:
<autofac defaultAssembly="Autofac.Example.Calculator.Api"><components>
<componenttype="Autofac.Example.Calculator.Addition.Add, Autofac.Example.Calculator.Addition"service="Autofac.Example.Calculator.Api.IOperation" />
<componenttype="Autofac.Example.Calculator.Division.Divide, Autofac.Example.Calculator.Division"service="Autofac.Example.Calculator.Api.IOperation" ><parameters>
<parameter name="places" value="4" /></parameters>
</component>
47
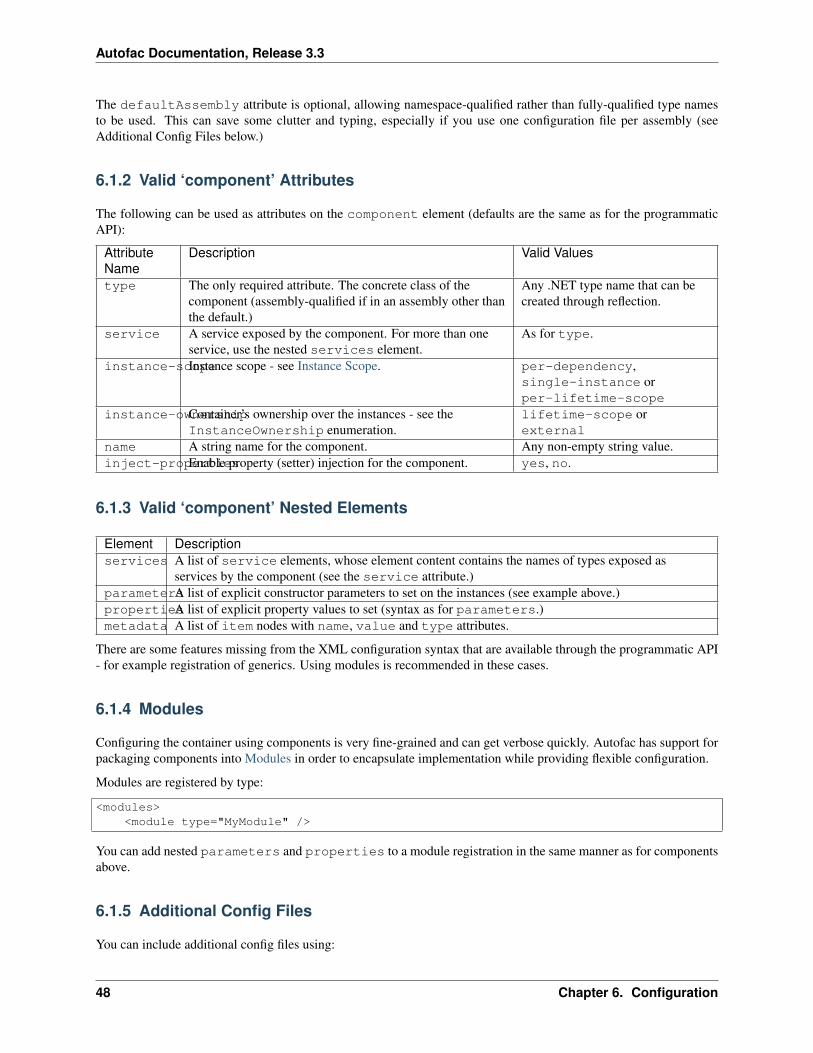
Autofac Documentation, Release 3.3
The defaultAssembly attribute is optional, allowing namespace-qualified rather than fully-qualified type namesto be used. This can save some clutter and typing, especially if you use one configuration file per assembly (seeAdditional Config Files below.)
6.1.2 Valid ‘component’ Attributes
The following can be used as attributes on the component element (defaults are the same as for the programmaticAPI):
AttributeName
Description Valid Values
type The only required attribute. The concrete class of thecomponent (assembly-qualified if in an assembly other thanthe default.)
Any .NET type name that can becreated through reflection.
service A service exposed by the component. For more than oneservice, use the nested services element.
As for type.
instance-scopeInstance scope - see Instance Scope. per-dependency,single-instance orper-lifetime-scope
instance-ownershipContainer’s ownership over the instances - see theInstanceOwnership enumeration.
lifetime-scope orexternal
name A string name for the component. Any non-empty string value.inject-propertiesEnable property (setter) injection for the component. yes, no.
6.1.3 Valid ‘component’ Nested Elements
Element Descriptionservices A list of service elements, whose element content contains the names of types exposed as
services by the component (see the service attribute.)parametersA list of explicit constructor parameters to set on the instances (see example above.)propertiesA list of explicit property values to set (syntax as for parameters.)metadata A list of item nodes with name, value and type attributes.
There are some features missing from the XML configuration syntax that are available through the programmatic API- for example registration of generics. Using modules is recommended in these cases.
6.1.4 Modules
Configuring the container using components is very fine-grained and can get verbose quickly. Autofac has support forpackaging components into Modules in order to encapsulate implementation while providing flexible configuration.
Modules are registered by type:
<modules><module type="MyModule" />
You can add nested parameters and properties to a module registration in the same manner as for componentsabove.
6.1.5 Additional Config Files
You can include additional config files using:
48 Chapter 6. Configuration
Autofac Documentation, Release 3.3
<files><file name="Controllers.config" section="controllers" />
6.1.6 Configuring the Container
First, you must reference Autofac.Configuration.dll in from your project.
To configure the container use a ConfigurationSettingsReader initialised with the name you gave to yourXML configuration section:
var builder = new ContainerBuilder();builder.RegisterModule(new ConfigurationSettingsReader("mycomponents"));// Register other components and call Build() to create the container.
The container settings reader will override default components already registered; you can write your application sothat it will run with sensible defaults and then override only those component registrations necessary for a particulardeployment.
6.1.7 Multiple Files or Sections
You can use multiple settings readers in the same container, to read different sections or even different config files ifthe filename is supplied to the ConfigurationSettingsReader constructor.
6.2 Modules
6.2.1 Introduction
IoC uses components as the basic building blocks of an application. Providing access to the constructor parametersand properties of components is very commonly used as a means to achieve deployment-time configuration.
This is generally a dubious practice for the following reasons:
• Constructors can change: Changes to the constructor signature or properties of a component can break de-ployed App.config files - these problems can appear very late in the development process.
• XML gets hard to maintain: Configuration files for large numbers of components can become unwieldy tomaintain - this is exacerbated by the fact that XML configuration is weakly-typed and hard to read.
• “Code” starts showing up in XML: Exposing the properties and constructor parameters of classes is an un-pleasant breach of the ‘encapsulation’ of the application’s internals - these details don’t belong in configurationfiles.
This is where modules can help.
A module is a small class that can be used to bundle up a set of related components behind a ‘facade’ to simplifyconfiguration and deployment. The module exposes a deliberate, restricted set of configuration parameters that canvary independently of the components used to implement the module.
The components within a module still make use dependencies at the component/service level to access componentsfrom other modules.
6.2. Modules 49
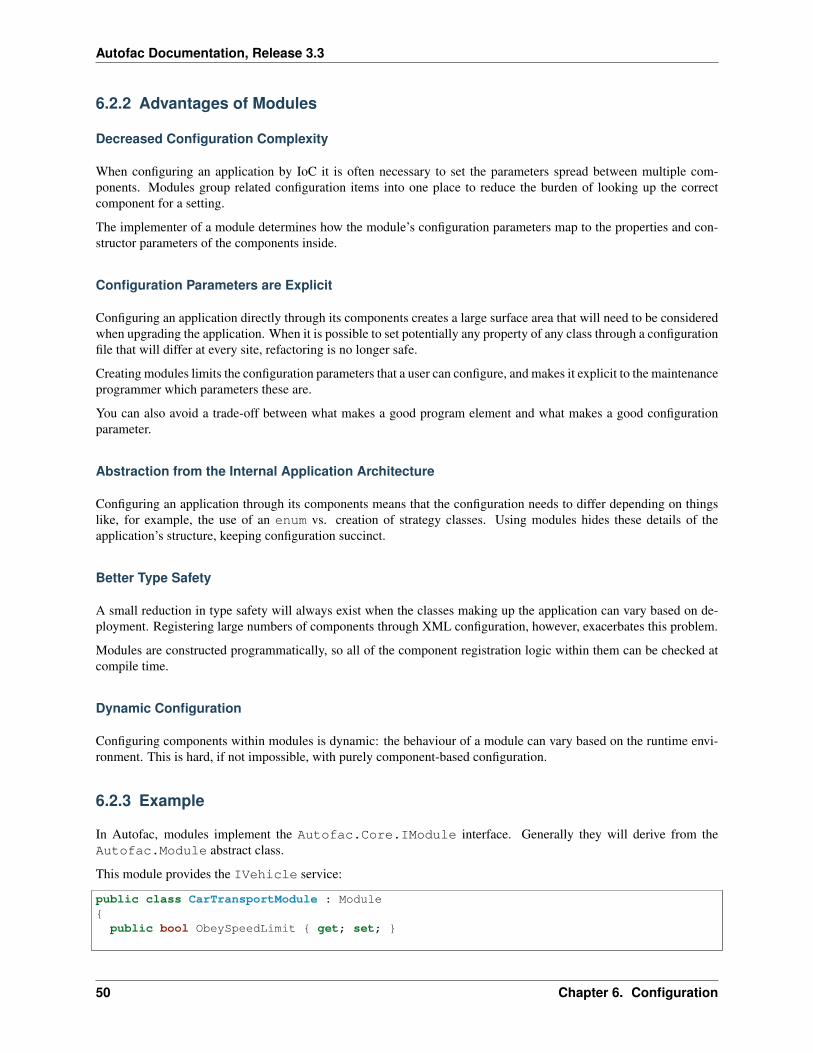
Autofac Documentation, Release 3.3
6.2.2 Advantages of Modules
Decreased Configuration Complexity
When configuring an application by IoC it is often necessary to set the parameters spread between multiple com-ponents. Modules group related configuration items into one place to reduce the burden of looking up the correctcomponent for a setting.
The implementer of a module determines how the module’s configuration parameters map to the properties and con-structor parameters of the components inside.
Configuration Parameters are Explicit
Configuring an application directly through its components creates a large surface area that will need to be consideredwhen upgrading the application. When it is possible to set potentially any property of any class through a configurationfile that will differ at every site, refactoring is no longer safe.
Creating modules limits the configuration parameters that a user can configure, and makes it explicit to the maintenanceprogrammer which parameters these are.
You can also avoid a trade-off between what makes a good program element and what makes a good configurationparameter.
Abstraction from the Internal Application Architecture
Configuring an application through its components means that the configuration needs to differ depending on thingslike, for example, the use of an enum vs. creation of strategy classes. Using modules hides these details of theapplication’s structure, keeping configuration succinct.
Better Type Safety
A small reduction in type safety will always exist when the classes making up the application can vary based on de-ployment. Registering large numbers of components through XML configuration, however, exacerbates this problem.
Modules are constructed programmatically, so all of the component registration logic within them can be checked atcompile time.
Dynamic Configuration
Configuring components within modules is dynamic: the behaviour of a module can vary based on the runtime envi-ronment. This is hard, if not impossible, with purely component-based configuration.
6.2.3 Example
In Autofac, modules implement the Autofac.Core.IModule interface. Generally they will derive from theAutofac.Module abstract class.
This module provides the IVehicle service:
public class CarTransportModule : Module{
public bool ObeySpeedLimit { get; set; }
50 Chapter 6. Configuration

Autofac Documentation, Release 3.3
protected override void Load(ContainerBuilder builder){builder.Register(c => new Car(c.Resolve<IDriver>())).As<IVehicle>();
if (ObeySpeedLimit)builder.Register(c => new SaneDriver()).As<IDriver>();
elsebuilder.Register(c => new CrazyDriver()).As<IDriver>();
}}
Encapsulated Configuration
Our CarTransportModule provides the ObeySpeedLimit configuration parameter without exposing the factthat this is implemented by choosing between a sane or a crazy driver. Clients using the module can use it by declaringtheir intentions:
builder.RegisterModule(new CarTransportModule() {ObeySpeedLimit = true
});
or in XML:
<module type="CarTransportModule"><properties><property name="ObeySpeedLimit" value="true" />
</properties></module>
This is valuable because the implementation of the module can vary without a flow on effect. That’s the idea ofencapsulation, after all.
Flexibility to Override
Although clients of the CarTransportModule are probably primarily concerned with the IVehicle service, themodule registers its IDriver dependency with the container as well. This ensures that the configuration is still ableto be overridden at deployment time in the same way as if the components that make up the module had been registeredindependently.
It is a ‘best practice’ when using Autofac to add any XML configuration after programmatic configuration, e.g.:
builder.RegisterModule(new CarTransportModule());builder.RegisterModule(new ConfigurationSettingsReader());
In this way, ‘emergency’ overrides can be made in the XML configuration file:
<componentservice="IDriver"type="LearnerDriver" />
So, modules increase encapsulation but don’t preclude you from tinkering with their innards if you have to.
6.2.4 Adapting to the Deployment Environment
Modules can be dynamic - that is, they can configure themselves to their execution environment.
6.2. Modules 51
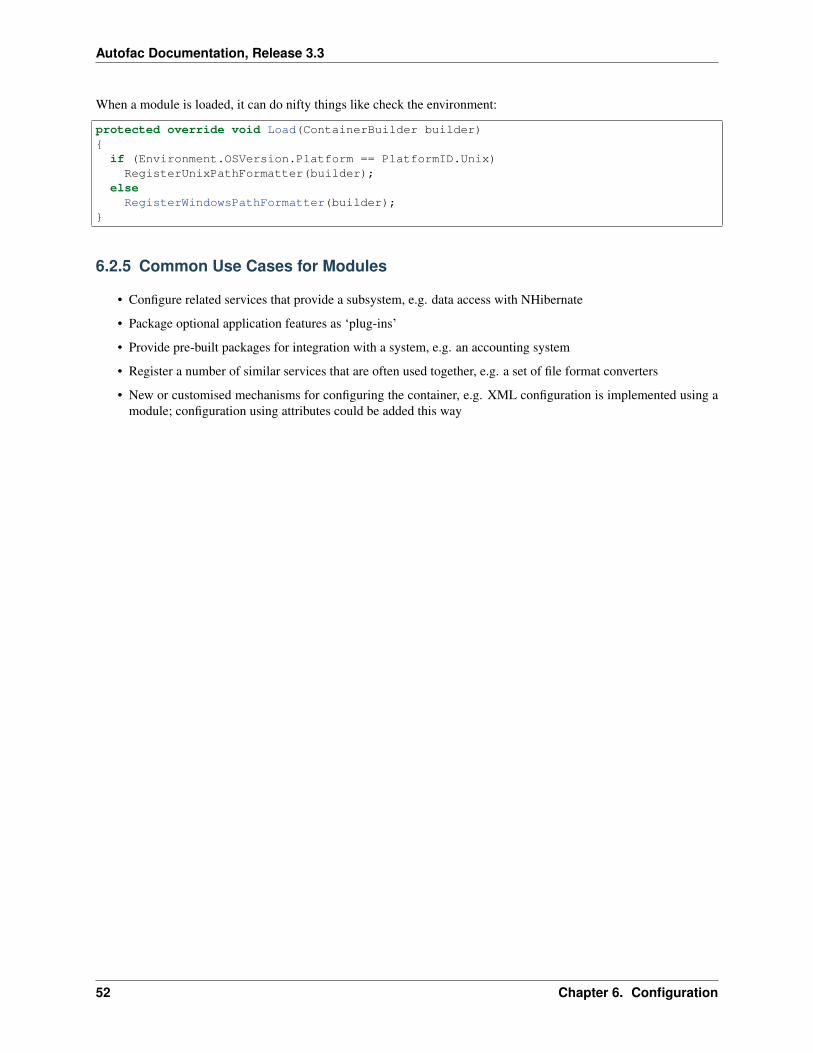
Autofac Documentation, Release 3.3
When a module is loaded, it can do nifty things like check the environment:
protected override void Load(ContainerBuilder builder){
if (Environment.OSVersion.Platform == PlatformID.Unix)RegisterUnixPathFormatter(builder);
elseRegisterWindowsPathFormatter(builder);
}
6.2.5 Common Use Cases for Modules
• Configure related services that provide a subsystem, e.g. data access with NHibernate
• Package optional application features as ‘plug-ins’
• Provide pre-built packages for integration with a system, e.g. an accounting system
• Register a number of similar services that are often used together, e.g. a set of file format converters
• New or customised mechanisms for configuring the container, e.g. XML configuration is implemented using amodule; configuration using attributes could be added this way
52 Chapter 6. Configuration
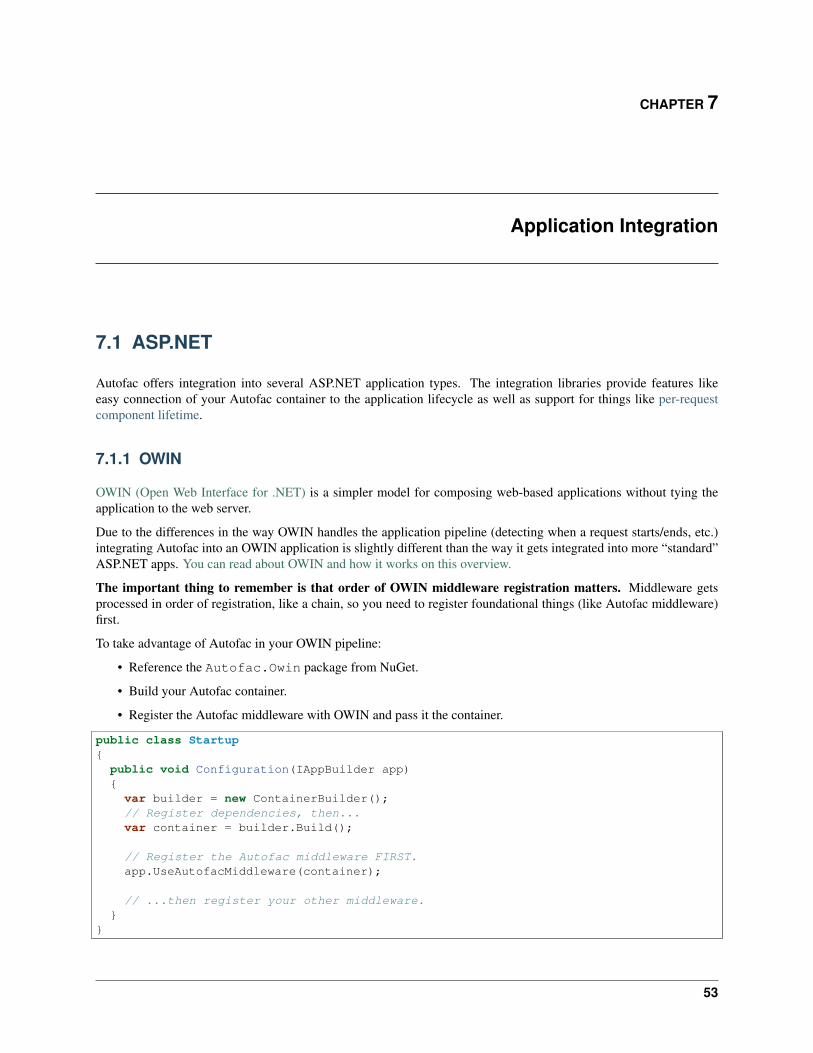
CHAPTER 7
Application Integration
7.1 ASP.NET
Autofac offers integration into several ASP.NET application types. The integration libraries provide features likeeasy connection of your Autofac container to the application lifecycle as well as support for things like per-requestcomponent lifetime.
7.1.1 OWIN
OWIN (Open Web Interface for .NET) is a simpler model for composing web-based applications without tying theapplication to the web server.
Due to the differences in the way OWIN handles the application pipeline (detecting when a request starts/ends, etc.)integrating Autofac into an OWIN application is slightly different than the way it gets integrated into more “standard”ASP.NET apps. You can read about OWIN and how it works on this overview.
The important thing to remember is that order of OWIN middleware registration matters. Middleware getsprocessed in order of registration, like a chain, so you need to register foundational things (like Autofac middleware)first.
To take advantage of Autofac in your OWIN pipeline:
• Reference the Autofac.Owin package from NuGet.
• Build your Autofac container.
• Register the Autofac middleware with OWIN and pass it the container.
public class Startup{
public void Configuration(IAppBuilder app){var builder = new ContainerBuilder();// Register dependencies, then...var container = builder.Build();
// Register the Autofac middleware FIRST.app.UseAutofacMiddleware(container);
// ...then register your other middleware.}
}
53
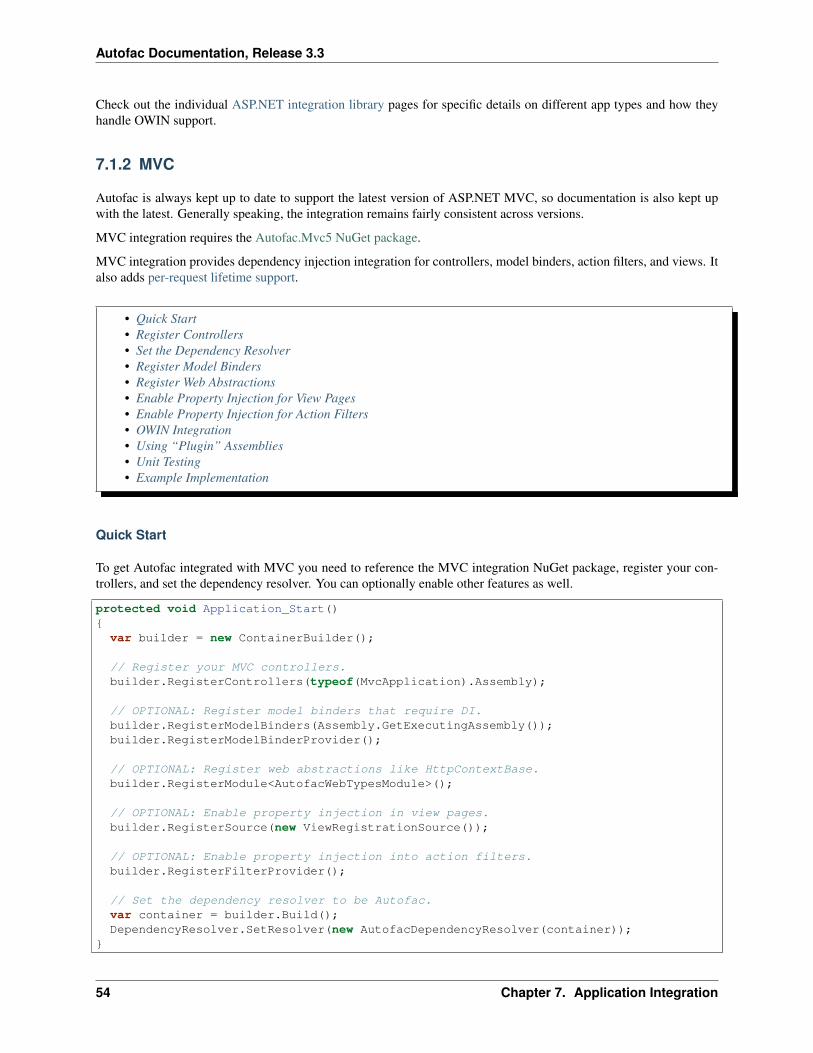
Autofac Documentation, Release 3.3
Check out the individual ASP.NET integration library pages for specific details on different app types and how theyhandle OWIN support.
7.1.2 MVC
Autofac is always kept up to date to support the latest version of ASP.NET MVC, so documentation is also kept upwith the latest. Generally speaking, the integration remains fairly consistent across versions.
MVC integration requires the Autofac.Mvc5 NuGet package.
MVC integration provides dependency injection integration for controllers, model binders, action filters, and views. Italso adds per-request lifetime support.
• Quick Start• Register Controllers• Set the Dependency Resolver• Register Model Binders• Register Web Abstractions• Enable Property Injection for View Pages• Enable Property Injection for Action Filters• OWIN Integration• Using “Plugin” Assemblies• Unit Testing• Example Implementation
Quick Start
To get Autofac integrated with MVC you need to reference the MVC integration NuGet package, register your con-trollers, and set the dependency resolver. You can optionally enable other features as well.
protected void Application_Start(){
var builder = new ContainerBuilder();
// Register your MVC controllers.builder.RegisterControllers(typeof(MvcApplication).Assembly);
// OPTIONAL: Register model binders that require DI.builder.RegisterModelBinders(Assembly.GetExecutingAssembly());builder.RegisterModelBinderProvider();
// OPTIONAL: Register web abstractions like HttpContextBase.builder.RegisterModule<AutofacWebTypesModule>();
// OPTIONAL: Enable property injection in view pages.builder.RegisterSource(new ViewRegistrationSource());
// OPTIONAL: Enable property injection into action filters.builder.RegisterFilterProvider();
// Set the dependency resolver to be Autofac.var container = builder.Build();DependencyResolver.SetResolver(new AutofacDependencyResolver(container));
}
54 Chapter 7. Application Integration
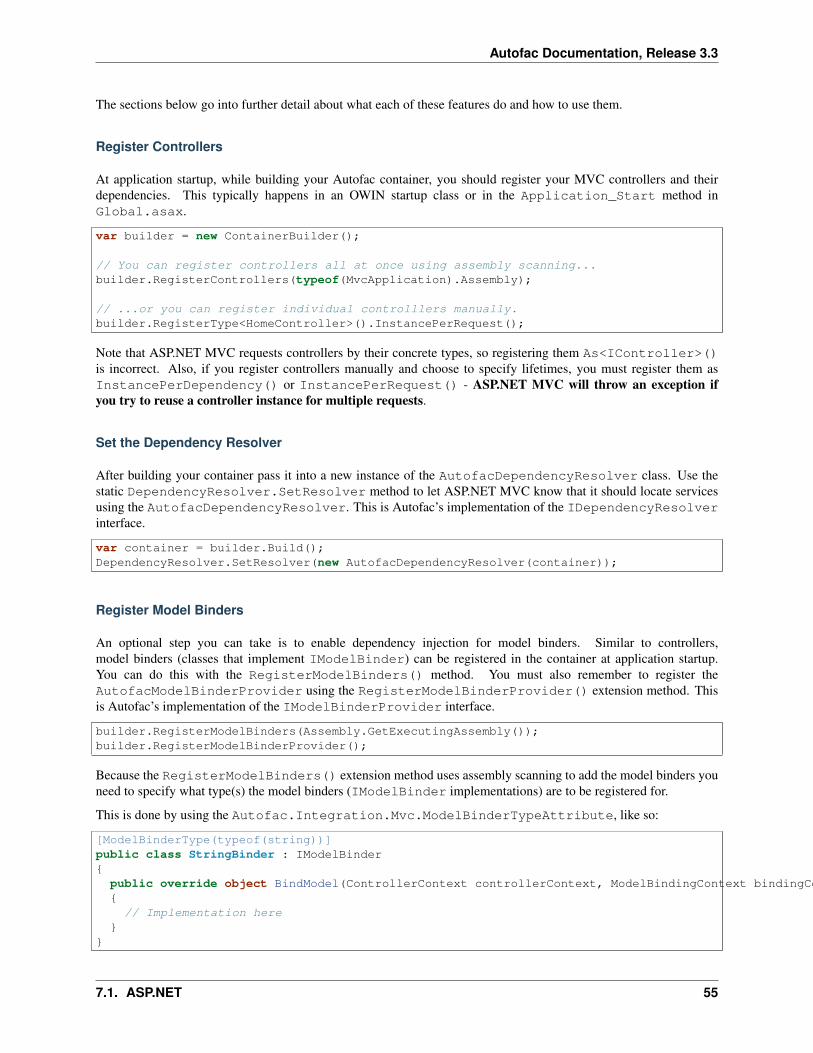
Autofac Documentation, Release 3.3
The sections below go into further detail about what each of these features do and how to use them.
Register Controllers
At application startup, while building your Autofac container, you should register your MVC controllers and theirdependencies. This typically happens in an OWIN startup class or in the Application_Start method inGlobal.asax.
var builder = new ContainerBuilder();
// You can register controllers all at once using assembly scanning...builder.RegisterControllers(typeof(MvcApplication).Assembly);
// ...or you can register individual controlllers manually.builder.RegisterType<HomeController>().InstancePerRequest();
Note that ASP.NET MVC requests controllers by their concrete types, so registering them As<IController>()is incorrect. Also, if you register controllers manually and choose to specify lifetimes, you must register them asInstancePerDependency() or InstancePerRequest() - ASP.NET MVC will throw an exception ifyou try to reuse a controller instance for multiple requests.
Set the Dependency Resolver
After building your container pass it into a new instance of the AutofacDependencyResolver class. Use thestatic DependencyResolver.SetResolver method to let ASP.NET MVC know that it should locate servicesusing the AutofacDependencyResolver. This is Autofac’s implementation of the IDependencyResolverinterface.
var container = builder.Build();DependencyResolver.SetResolver(new AutofacDependencyResolver(container));
Register Model Binders
An optional step you can take is to enable dependency injection for model binders. Similar to controllers,model binders (classes that implement IModelBinder) can be registered in the container at application startup.You can do this with the RegisterModelBinders() method. You must also remember to register theAutofacModelBinderProvider using the RegisterModelBinderProvider() extension method. Thisis Autofac’s implementation of the IModelBinderProvider interface.
builder.RegisterModelBinders(Assembly.GetExecutingAssembly());builder.RegisterModelBinderProvider();
Because the RegisterModelBinders() extension method uses assembly scanning to add the model binders youneed to specify what type(s) the model binders (IModelBinder implementations) are to be registered for.
This is done by using the Autofac.Integration.Mvc.ModelBinderTypeAttribute, like so:
[ModelBinderType(typeof(string))]public class StringBinder : IModelBinder{
public override object BindModel(ControllerContext controllerContext, ModelBindingContext bindingContext){// Implementation here
}}
7.1. ASP.NET 55
Autofac Documentation, Release 3.3
Multiple instances of the ModelBinderTypeAttribute can be added to a class if it is to be registered for multipletypes.
Register Web Abstractions
The MVC integration includes an Autofac module that will add HTTP request lifetime scoped registrations for the webabstraction classes. This will allow you to put the web abstraction as a dependency in your class and get the correctvalue injected at runtime.
The following abstract classes are included:
• HttpContextBase
• HttpRequestBase
• HttpResponseBase
• HttpServerUtilityBase
• HttpSessionStateBase
• HttpApplicationStateBase
• HttpBrowserCapabilitiesBase
• HttpFileCollectionBase
• RequestContext
• HttpCachePolicyBase
• VirtualPathProvider
• UrlHelper
To use these abstractions add the AutofacWebTypesModule to the container using the standardRegisterModule() method.
builder.RegisterModule<AutofacWebTypesModule>();
Enable Property Injection for View Pages
You can make property injection available to your MVC views by adding the ViewRegistrationSource to yourContainerBuilder before building the application container.
builder.RegisterSource(new ViewRegistrationSource());
Your view page must inherit from one of the base classes that MVC supports for creating views. When using the Razorview engine this will be the WebViewPage class.
public abstract class CustomViewPage : WebViewPage{
public IDependency Dependency { get; set; }}
The ViewPage, ViewMasterPage and ViewUserControl classes are supported when using the web formsview engine.
public abstract class CustomViewPage : ViewPage{
public IDependency Dependency { get; set; }}
56 Chapter 7. Application Integration
Autofac Documentation, Release 3.3
Ensure that your actual view page inherits from your custom base class. This can be achieved using the @inheritsdirective inside your .cshtml file for the Razor view engine:
@inherits Example.Views.Shared.CustomViewPage
When using the web forms view engine you set the Inherits attribute on the @ Page directive inside your .aspxfile instead.
<%@ Page Language="C#" MasterPageFile="~/Views/Shared/Site.Master" Inherits="Example.Views.Shared.CustomViewPage"%>
Enable Property Injection for Action Filters
To make use of property injection for your filter attributes call the RegisterFilterProvider() method on theContainerBuilder before building your container and providing it to the AutofacDependencyResolver.
builder.RegisterFilterProvider();
This allows you to add properties to your filter attributes and any matching dependencies that are registered in thecontainer will be injected into the properties.
For example, the action filter below will have the ILogger instance injected from the container (assuming youregister an ILogger. Note that the attribute itself does not need to be registered in the container.
public class CustomActionFilter : ActionFilterAttribute{
public ILogger Logger { get; set; }
public override void OnActionExecuting(ActionExecutingContext filterContext){Logger.Log("OnActionExecuting");
}}
The same simple approach applies to the other filter attribute types such as authorization attributes.
public class CustomAuthorizeAttribute : AuthorizeAttribute{
public ILogger Logger { get; set; }
protected override bool AuthorizeCore(HttpContextBase httpContext){Logger.Log("AuthorizeCore");return true;
}}
After applying the attributes to your actions as usual your work is done.
[CustomActionFilter][CustomAuthorizeAttribute]public ActionResult Index(){}
OWIN Integration
If you are using MVC as part of an OWIN application, you need to:
7.1. ASP.NET 57
Autofac Documentation, Release 3.3
• Do all the stuff for standard MVC integration - register controllers, set the dependency resolver, etc.
• Set up your app with the base Autofac OWIN integration.
• Add a reference to the Autofac.Mvc5.Owin NuGet package.
• In your application startup class, register the Autofac MVC middleware after registering the base Autofac mid-dleware.
public class Startup{
public void Configuration(IAppBuilder app){var builder = new ContainerBuilder();
// STANDARD MVC SETUP:
// Register your MVC controllers.builder.RegisterControllers(typeof(MvcApplication).Assembly);
// Run other optional steps, like registering model binders,// web abstractions, etc., then set the dependency resolver// to be Autofac.var container = builder.Build();DependencyResolver.SetResolver(new AutofacDependencyResolver(container));
// OWIN MVC SETUP:
// Register the Autofac middleware FIRST, then the Autofac MVC middleware.app.UseAutofacMiddleware(container);app.UseAutofacMvc();
}}
Using “Plugin” Assemblies
If you have controllers in a “plugin assembly” that isn’t referenced by the main application you’ll need to register yourcontroller plugin assembly with the ASP.NET BuildManager.
You can do this through configuration or programmatically.
If you choose configuration, you need to add your plugin assembly to the/configuration/system.web/compilation/assemblies list. If your plugin assembly isn’t inthe bin folder, you also need to update the /configuration/runtime/assemblyBinding/probingpath.
<?xml version="1.0" encoding="utf-8"?><configuration>
<runtime><assemblyBinding xmlns="urn:schemas-microsoft-com:asm.v1"><!--
If you put your plugin in a folder that isn't bin, add it to the probing path--><probing privatePath="bin;bin\plugins" />
</assemblyBinding></runtime><system.web><compilation>
<assemblies>
58 Chapter 7. Application Integration
Autofac Documentation, Release 3.3
<add assembly="The.Name.Of.Your.Plugin.Assembly.Here" /></assemblies>
</compilation></system.web>
</configuration>
If you choose programmatic registration, you need to do it during pre-application-start before the ASP.NETBuildManager kicks in.
Create an initializer class to do the assembly scanning/loading and registration with the BuildManager:
using System.IO;using System.Reflection;using System.Web.Compilation;
namespace MyNamespace{
public static class Initializer{public static void Initialize(){
var pluginFolder = new DirectoryInfo(HostingEnvironment.MapPath("~/plugins"));var pluginAssemblies = pluginFolder.GetFiles("*.dll", SearchOption.AllDirectories);foreach (var pluginAssemblyFile in pluginAssemblyFiles){
var asm = Assembly.LoadFrom(pluginAssemblyFile.FullName);BuildManager.AddReferencedAssembly(asm);
}}
}}
Then be sure to register your pre-application-start code with an assembly attribute:
[assembly: PreApplicationStartMethod(typeof(Initializer), "Initialize")]
Unit Testing
When unit testing an ASP.NET MVC app that uses Autofac where you have InstancePerRequest componentsregistered, you’ll get an exception when you try to resolve those components because there’s no HTTP request lifetimeduring a unit test.
The per-request lifetime scope topic outlines strategies for testing and troubleshooting per-request-scope components.
Example Implementation
The Autofac source contains a demo web application project called Remember.Web. It demonstrates many of theaspects of MVC that Autofac is used to inject.
7.1.3 Web API
Web API integration requires the Autofac.WebApi NuGet package.
Web API integration provides dependency injection integration for controllers, model binders, and action filters. Italso adds per-request lifetime support.
7.1. ASP.NET 59
Autofac Documentation, Release 3.3
• Quick Start• Get the HttpConfiguration• Register Controllers• Set the Dependency Resolver• Provide Filters via Dependency Injection
– Register the Filter Provider– Implement the Filter Interface– Register the Filter– Why We Use Non-Standard Filter Interfaces– Standard Web API Filters are Singletons
• Per-Controller-Type Services– Add the Controller Configuration Attribute– Supported Services– Service Registration– Clearing Existing Services– Per-Controller-Type Service Limitations
• OWIN Integration• Unit Testing
Quick Start
To get Autofac integrated with Web API you need to reference the Web API integration NuGet package, register yourcontrollers, and set the dependency resolver. You can optionally enable other features as well.
protected void Application_Start(){
var builder = new ContainerBuilder();
// Get your HttpConfiguration.var config = GlobalConfiguration.Configuration;
// Register your Web API controllers.builder.RegisterApiControllers(Assembly.GetExecutingAssembly());
// OPTIONAL: Register the Autofac filter provider.builder.RegisterWebApiFilterProvider(config);
// Set the dependency resolver to be Autofac.var container = builder.Build();config.DependencyResolver = new AutofacWebApiDependencyResolver(container);
}
The sections below go into further detail about what each of these features do and how to use them.
Get the HttpConfiguration
In Web API, setting up the application requires you to update properties and set values on an HttpConfigurationobject. Depending on how you’re hosting your application, where you get this configuration may be different. Throughthe documentation, we’ll refer to “your HttpConfiguration” and you’ll need to make a choice of how to get it.
For standard IIS hosting, the HttpConfiguration is GlobalConfiguration.Configuration.
60 Chapter 7. Application Integration
Autofac Documentation, Release 3.3
var builder = new ContainerBuilder();var config = GlobalConfiguration.Configuration;builder.RegisterApiControllers(Assembly.GetExecutingAssembly());var container = builder.Build();config.DependencyResolver = new AutofacWebApiDependencyResolver(container);
For self hosting, the HttpConfiguration is your HttpSelfHostConfiguration instance.
var builder = new ContainerBuilder();var config = new HttpSelfHostConfiguration("http://localhost:8080");builder.RegisterApiControllers(Assembly.GetExecutingAssembly());var container = builder.Build();config.DependencyResolver = new AutofacWebApiDependencyResolver(container);
For OWIN integration, the HttpConfiguration is the one you create in your app startup class and pass to theWeb API middleware.
var builder = new ContainerBuilder();var config = new HttpConfiguration();builder.RegisterApiControllers(Assembly.GetExecutingAssembly());var container = builder.Build();config.DependencyResolver = new AutofacWebApiDependencyResolver(container);
Register Controllers
At application startup, while building your Autofac container, you should register your Web API controllers andtheir dependencies. This typically happens in an OWIN startup class or in the Application_Start method inGlobal.asax.
var builder = new ContainerBuilder();
// You can register controllers all at once using assembly scanning...builder.RegisterApiControllers(Assembly.GetExecutingAssembly());
// ...or you can register individual controlllers manually.builder.RegisterType<ValuesController>().InstancePerRequest();
Set the Dependency Resolver
After building your container pass it into a new instance of the AutofacWebApiDependencyResolver class.Attach the new resolver to your HttpConfiguration.DependencyResolver to let Web API know that itshould locate services using the AutofacWebApiDependencyResolver. This is Autofac’s implementation ofthe IDependencyResolver interface.
var container = builder.Build();config.DependencyResolver = new AutofacWebApiDependencyResolver(container);
Provide Filters via Dependency Injection
Because attributes are created via the reflection API you don’t get to call the constructor yourself. That leaves you withno other option except for property injection when working with attributes. The Autofac integration with Web API pro-vides a mechanism that allows you to create classes that implement the filter interfaces (IAutofacActionFilter,IAutofacAuthorizationFilter and IAutofacExceptionFilter) and wire them up to the desired con-troller or action method using the registration syntax on the container builder.
7.1. ASP.NET 61
Autofac Documentation, Release 3.3
Register the Filter Provider
You need to register the Autofac filter provider implementation because it is does the work of wiring up the filter basedon the registration. This is done by calling the RegisterWebApiFilterProvider method on the containerbuilder and providing an HttpConfiguration instance.
var builder = new ContainerBuilder();builder.RegisterWebApiFilterProvider(config);
Implement the Filter Interface
Instead of deriving from one of the existing Web API filter attributes your class implements the appropriate filterinterface defined in the integration. The filter below is an action filter and implements IAutofacActionFilterinstead of System.Web.Http.Filters.IActionFilter.
public class LoggingActionFilter : IAutofacActionFilter{
readonly ILogger _logger;
public LoggingActionFilter(ILogger logger){_logger = logger;
}
public void OnActionExecuting(HttpActionContext actionContext){_logger.Write(actionContext.ActionDescriptor.ActionName);
}
public void OnActionExecuted(HttpActionExecutedContext actionExecutedContext){_logger.Write(actionExecutedContext.ActionContext.ActionDescriptor.ActionName);
}}
Register the Filter
For the filter to execute you need to register it with the container and inform it which controller, and optionally action,should be targeted. This is done using the AsActionFilterFor(), AsAuthorizationFilterFor() andAsExceptionFilterFor() extension methods on the ContainerBuilder.
These methods require a generic type parameter for the type of the controller, and an optional lambda expression thatindicates a specific method on the controller the filter should be applied to. If you don’t provide the lambda expressionthe filter will be applied to all action methods on the controller in the same way that placing an attribute based filter atthe controller level would.
In the example below the filter is being applied to the Get action method on the ValuesController.
var builder = new ContainerBuilder();
builder.Register(c => new LoggingActionFilter(c.Resolve<ILogger>())).AsWebApiActionFilterFor<ValuesController>(c => c.Get(default(int))).InstancePerApiRequest();
62 Chapter 7. Application Integration
Autofac Documentation, Release 3.3
When applying the filter to an action method that requires a parameter use the default keyword with the data typeof the parameter as a placeholder in your lambda expression. For example, the Get action method in the exampleabove required an int parameter and used efault(int) as a strongly-typed placeholder in the lambda expression.
It is also possible to provide a base controller type in the generic type parameter to have the filter applied to all derivedcontrollers. In addition, you can also make your lambda expression for the action method target a method on a basecontroller type and have it applied to that method on all derived controllers.
Why We Use Non-Standard Filter Interfaces
If you are wondering why special interfaces were introduced this should become more apparent if you take a look atthe signature of the IActionFilter interface in Web API.
public interface IActionFilter : IFilter{
Task<HttpResponseMessage> ExecuteActionFilterAsync(HttpActionContext actionContext, CancellationToken cancellationToken, Func<Task<HttpResponseMessage>> continuation);}
Now compare that to the Autofac interface that you need to implement instead.
public interface IAutofacActionFilter{
void OnActionExecuting(HttpActionContext actionContext);
void OnActionExecuted(HttpActionExecutedContext actionExecutedContext);}
The problem is that the OnActionExecuting and OnActionExecuted methods are actually defined onthe the ActionFilterAttribute and not on the IActionFilter interface. Extensive use of theSystem.Threading.Tasks namespace in Web API means that chaining the return task along with the appropri-ate error handling in the attribute actually requires a significant amount of code (the ActionFilterAttributecontains nearly 100 lines of code for that). This is definitely not something that you want to be handling yourself.
Autofac introduces the new interfaces to allow you to concentrate on implementing the code for your filter and not allthat plumbing. Internally it creates custom instances of the actual Web API attributes that resolve the filter implemen-tations from the container and execute them at the appropriate time.
Another reason for creating the internal attribute wrappers is to support the InstancePerRequest lifetime scopefor filters. See below for more on that.
Standard Web API Filters are Singletons
You may notice that if you use the standard Web API filters that you can’t use InstancePerRequest dependen-cies.
Unlike the filter provider in MVC, the one in Web API does not allow you to specify that the filter instances shouldnot be cached. This means that all filter attributes in Web API are effectively singleton instances that exist for theentire lifetime of the application.
If you are trying to get per-request dependencies in a filter, you’ll find that will only work if you use the Autofacfilter interfaces. Using the standard Web API filters, the dependencies will be injected once - the first time the filter isresolved - and never again.
If you are unable to use the Autofac interfaces and you need per-request or instance-per-dependency servicesin your filters, you must use service location. Luckily, Web API makes getting the current request scope very easy -it comes right along with the HttpRequestMessage.
7.1. ASP.NET 63
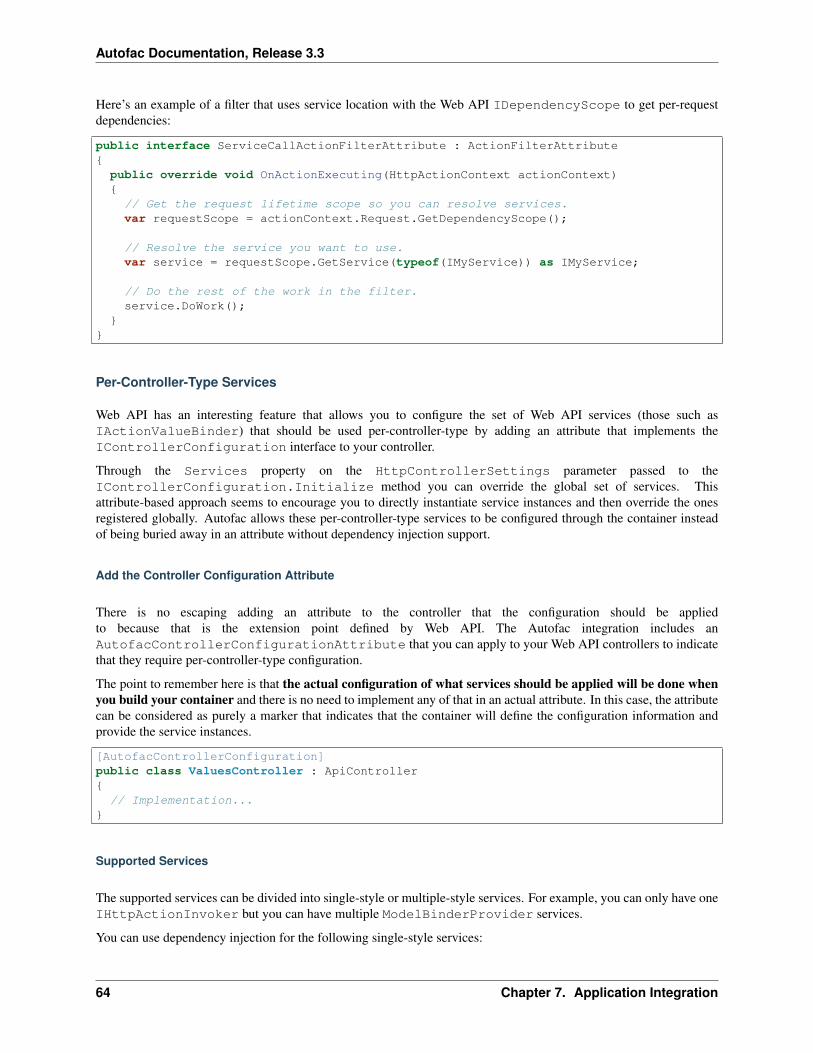
Autofac Documentation, Release 3.3
Here’s an example of a filter that uses service location with the Web API IDependencyScope to get per-requestdependencies:
public interface ServiceCallActionFilterAttribute : ActionFilterAttribute{
public override void OnActionExecuting(HttpActionContext actionContext){// Get the request lifetime scope so you can resolve services.var requestScope = actionContext.Request.GetDependencyScope();
// Resolve the service you want to use.var service = requestScope.GetService(typeof(IMyService)) as IMyService;
// Do the rest of the work in the filter.service.DoWork();
}}
Per-Controller-Type Services
Web API has an interesting feature that allows you to configure the set of Web API services (those such asIActionValueBinder) that should be used per-controller-type by adding an attribute that implements theIControllerConfiguration interface to your controller.
Through the Services property on the HttpControllerSettings parameter passed to theIControllerConfiguration.Initialize method you can override the global set of services. Thisattribute-based approach seems to encourage you to directly instantiate service instances and then override the onesregistered globally. Autofac allows these per-controller-type services to be configured through the container insteadof being buried away in an attribute without dependency injection support.
Add the Controller Configuration Attribute
There is no escaping adding an attribute to the controller that the configuration should be appliedto because that is the extension point defined by Web API. The Autofac integration includes anAutofacControllerConfigurationAttribute that you can apply to your Web API controllers to indicatethat they require per-controller-type configuration.
The point to remember here is that the actual configuration of what services should be applied will be done whenyou build your container and there is no need to implement any of that in an actual attribute. In this case, the attributecan be considered as purely a marker that indicates that the container will define the configuration information andprovide the service instances.
[AutofacControllerConfiguration]public class ValuesController : ApiController{
// Implementation...}
Supported Services
The supported services can be divided into single-style or multiple-style services. For example, you can only have oneIHttpActionInvoker but you can have multiple ModelBinderProvider services.
You can use dependency injection for the following single-style services:
64 Chapter 7. Application Integration
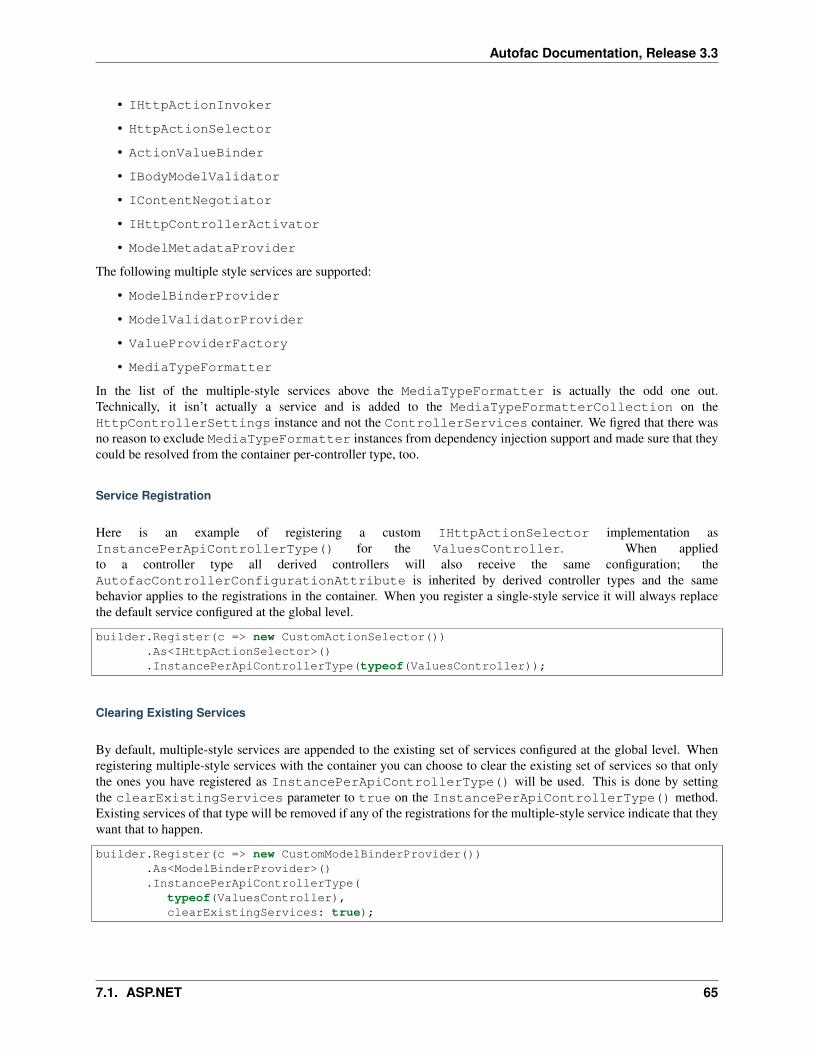
Autofac Documentation, Release 3.3
• IHttpActionInvoker
• HttpActionSelector
• ActionValueBinder
• IBodyModelValidator
• IContentNegotiator
• IHttpControllerActivator
• ModelMetadataProvider
The following multiple style services are supported:
• ModelBinderProvider
• ModelValidatorProvider
• ValueProviderFactory
• MediaTypeFormatter
In the list of the multiple-style services above the MediaTypeFormatter is actually the odd one out.Technically, it isn’t actually a service and is added to the MediaTypeFormatterCollection on theHttpControllerSettings instance and not the ControllerServices container. We figred that there wasno reason to exclude MediaTypeFormatter instances from dependency injection support and made sure that theycould be resolved from the container per-controller type, too.
Service Registration
Here is an example of registering a custom IHttpActionSelector implementation asInstancePerApiControllerType() for the ValuesController. When appliedto a controller type all derived controllers will also receive the same configuration; theAutofacControllerConfigurationAttribute is inherited by derived controller types and the samebehavior applies to the registrations in the container. When you register a single-style service it will always replacethe default service configured at the global level.
builder.Register(c => new CustomActionSelector()).As<IHttpActionSelector>().InstancePerApiControllerType(typeof(ValuesController));
Clearing Existing Services
By default, multiple-style services are appended to the existing set of services configured at the global level. Whenregistering multiple-style services with the container you can choose to clear the existing set of services so that onlythe ones you have registered as InstancePerApiControllerType() will be used. This is done by settingthe clearExistingServices parameter to true on the InstancePerApiControllerType() method.Existing services of that type will be removed if any of the registrations for the multiple-style service indicate that theywant that to happen.
builder.Register(c => new CustomModelBinderProvider()).As<ModelBinderProvider>().InstancePerApiControllerType(
typeof(ValuesController),clearExistingServices: true);
7.1. ASP.NET 65
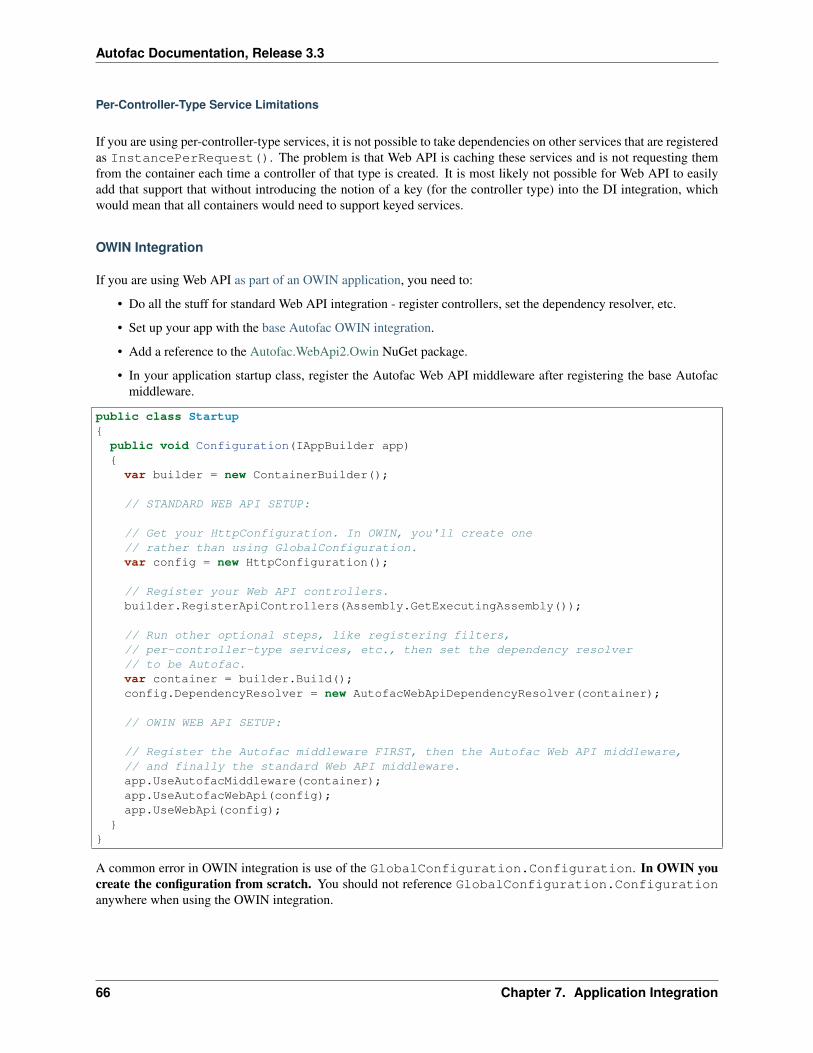
Autofac Documentation, Release 3.3
Per-Controller-Type Service Limitations
If you are using per-controller-type services, it is not possible to take dependencies on other services that are registeredas InstancePerRequest(). The problem is that Web API is caching these services and is not requesting themfrom the container each time a controller of that type is created. It is most likely not possible for Web API to easilyadd that support that without introducing the notion of a key (for the controller type) into the DI integration, whichwould mean that all containers would need to support keyed services.
OWIN Integration
If you are using Web API as part of an OWIN application, you need to:
• Do all the stuff for standard Web API integration - register controllers, set the dependency resolver, etc.
• Set up your app with the base Autofac OWIN integration.
• Add a reference to the Autofac.WebApi2.Owin NuGet package.
• In your application startup class, register the Autofac Web API middleware after registering the base Autofacmiddleware.
public class Startup{
public void Configuration(IAppBuilder app){var builder = new ContainerBuilder();
// STANDARD WEB API SETUP:
// Get your HttpConfiguration. In OWIN, you'll create one// rather than using GlobalConfiguration.var config = new HttpConfiguration();
// Register your Web API controllers.builder.RegisterApiControllers(Assembly.GetExecutingAssembly());
// Run other optional steps, like registering filters,// per-controller-type services, etc., then set the dependency resolver// to be Autofac.var container = builder.Build();config.DependencyResolver = new AutofacWebApiDependencyResolver(container);
// OWIN WEB API SETUP:
// Register the Autofac middleware FIRST, then the Autofac Web API middleware,// and finally the standard Web API middleware.app.UseAutofacMiddleware(container);app.UseAutofacWebApi(config);app.UseWebApi(config);
}}
A common error in OWIN integration is use of the GlobalConfiguration.Configuration. In OWIN youcreate the configuration from scratch. You should not reference GlobalConfiguration.Configurationanywhere when using the OWIN integration.
66 Chapter 7. Application Integration
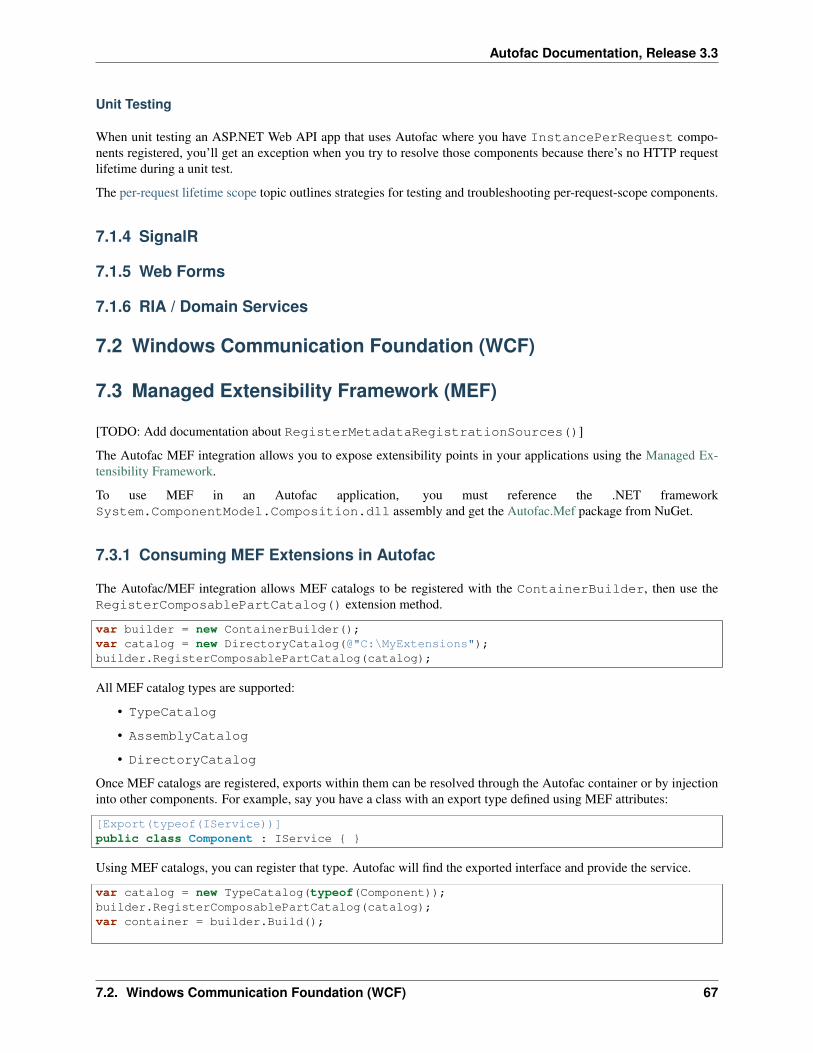
Autofac Documentation, Release 3.3
Unit Testing
When unit testing an ASP.NET Web API app that uses Autofac where you have InstancePerRequest compo-nents registered, you’ll get an exception when you try to resolve those components because there’s no HTTP requestlifetime during a unit test.
The per-request lifetime scope topic outlines strategies for testing and troubleshooting per-request-scope components.
7.1.4 SignalR
7.1.5 Web Forms
7.1.6 RIA / Domain Services
7.2 Windows Communication Foundation (WCF)
7.3 Managed Extensibility Framework (MEF)
[TODO: Add documentation about RegisterMetadataRegistrationSources()]
The Autofac MEF integration allows you to expose extensibility points in your applications using the Managed Ex-tensibility Framework.
To use MEF in an Autofac application, you must reference the .NET frameworkSystem.ComponentModel.Composition.dll assembly and get the Autofac.Mef package from NuGet.
7.3.1 Consuming MEF Extensions in Autofac
The Autofac/MEF integration allows MEF catalogs to be registered with the ContainerBuilder, then use theRegisterComposablePartCatalog() extension method.
var builder = new ContainerBuilder();var catalog = new DirectoryCatalog(@"C:\MyExtensions");builder.RegisterComposablePartCatalog(catalog);
All MEF catalog types are supported:
• TypeCatalog
• AssemblyCatalog
• DirectoryCatalog
Once MEF catalogs are registered, exports within them can be resolved through the Autofac container or by injectioninto other components. For example, say you have a class with an export type defined using MEF attributes:
[Export(typeof(IService))]public class Component : IService { }
Using MEF catalogs, you can register that type. Autofac will find the exported interface and provide the service.
var catalog = new TypeCatalog(typeof(Component));builder.RegisterComposablePartCatalog(catalog);var container = builder.Build();
7.2. Windows Communication Foundation (WCF) 67
Autofac Documentation, Release 3.3
// The resolved IService will be implemented// by type Component.var obj = container.Resolve<IService>();
7.3.2 Providing Autofac Components to MEF Extensions
Autofac components aren’t automatically available for MEF extensions to import. To provide an Autofac componentto MEF, the Exported() extension method must be used:
builder.RegisterType<Component>().Exported(x => x.As<IService>().WithMetadata("SomeData", 42));
7.4 Common Service Locator
The Autofac.Extras.CommonServiceLocator package allows you to use Autofac as the backing store for services inplaces where you require Microsoft Common Service Locator integration.
The Autofac.Extras.CommonServiceLocator package will also work in conjunction with the Autofac Microsoft Enter-prise Library integration package.
To use the Common Service Locator integration, build your Autofac container as normal, then simply set the currentservice locator to an AutofacServiceLocator.
var builder = new ContainerBuilder();
// Perform registrations and build the container.var container = builder.Build();
// Set the service locator to an AutofacServiceLocator.var csl = new AutofacServiceLocator(container);ServiceLocator.SetLocatorProvider(() => csl);
7.5 Enterprise Library 5
The Autofac.Extras.EnterpriseLibraryConfigurator package provides a way to use Autofac as the backing store fordependency injection in Microsoft Enterprise Library 5 instead of using Unity. It does this in conjunction with theAutofac Common Service Locator implementation.
In Enterprise Library 6, Microsoft removed the tightly-coupled dependency resolution mechanisms from theapplication blocks so there’s no more need for this configurator past Enterprise Library 5.
7.5.1 Using the Configurator
The simplest way to use the configurator is to set up your Enterprise Library configuration in your app.config orweb.config and use the RegisterEnterpriseLibrary() extension. This extension parses the configurationand performs the necessary registrations. You then need to set the EnterpriseLibraryContainer.Currentto use an AutofacServiceLocator from the Autofac Common Service Locator implementation.
var builder = new ContainerBuilder();builder.RegisterEnterpriseLibrary();var container = builder.Build();
68 Chapter 7. Application Integration
Autofac Documentation, Release 3.3
var csl = new AutofacServiceLocator(container);EnterpriseLibraryContainer.Current = csl;
7.5.2 Specifying a Registration Source
The RegisterEnterpriseLibrary() extension does allow you to specify your ownIConfigurationSource so if your configuration is not in app.config or web.config you can stilluse Autofac.
var config = GetYourConfigurationSource();var builder = new ContainerBuilder();builder.RegisterEnterpriseLibrary(config);var container = builder.Build();var csl = new AutofacServiceLocator(container);EnterpriseLibraryContainer.Current = csl;
7.6 NHibernate
http://chadly.net/2009/05/dependency-injection-with-nhibernate-and-autofac/
7.7 Moq
The Moq integration package allows you to automatically create mock dependencies for both concrete and mockabstract instances in unit tests using an Autofac container. You can get the Autofac.Extras.Moq package on NuGet.
7.7.1 Getting Started
Given you have a system under test and a dependency:
public class SystemUnderTest{
public SystemUnderTest(IDependency dependency){}
}
public interface IDependency{}
When writing your unit test, use the Autofac.Extras.Moq.AutoMock class to instantiate the system undertest. Doing this will automatically inject a mock dependency into the constructor for you. At the time you create theAutoMock factory, you can specify default mock behavior:
• AutoMock.GetLoose() - creates automatic mocks using loose mocking behavior.
• AutoMock.GetStrict() - creates automatic mocks using strict mocking behavior.
• AutoMock.GetFromRepository(repo) - creates mocks based on an existing configured repository.
7.6. NHibernate 69
Autofac Documentation, Release 3.3
[Test]public void Test(){
using (var mock = AutoMock.GetLoose()){// The AutoMock class will inject a mock IDependency// into the SystemUnderTest constructorvar sut = mock.Create<SystemUnderTest>();
}}
7.7.2 Configuring Mocks
You can configure the automatic mocks and/or assert calls on them as you would normally with Moq.
[Test]public void Test(){
using (var mock = AutoMock.GetLoose()){// Arrange - configure the mockmock.Mock<IDependency>().Setup(x => x.GetValue()).Returns("expected value");var sut = mock.Create<SystemUnderTest>();
// Actvar actual = sut.DoWork();
// Assert - assert on the mockmock.Mock<IDependency>().Verify(x => x.GetValue());Assert.AreEqual("expected value", actual);
}}
public class SystemUnderTest{
private readonly IDependency dependency;
public SystemUnderTest(IDependency strings){this.dependency = strings;
}
public string DoWork(){return this.dependency.GetValue();
}}
public interface IDependency{
string GetValue();}
7.7.3 Configuring Specific Dependencies
You can configure the AutoMock to provide a specific instance for a given service type:
70 Chapter 7. Application Integration
Autofac Documentation, Release 3.3
[Test]public void Test(){
using (var mock = AutoMock.GetLoose()){var dependency = new Dependency();mock.Provide<IDependency>(dependency);
// ...and the rest of the test.}
}
You can also configure the AutoMock to provide a specific implementation type for a given service type:
[Test]public void Test(){
using (var mock = AutoMock.GetLoose()){// Configure a component type that doesn't require// constructor parameters.mock.Provide<IDependency, Dependency>();
// Configure a component type that has some// constructor parameters passed in. Use Autofac// parameters in the list.mock.Provide<IOtherDependency, OtherDependency>(
new NamedParameter("id", "service-identifier"),new TypedParameter(typeof(Guid), Guid.NewGuid()));
// ...and the rest of the test.}
}
7.8 FakeItEasy
The FakeItEasy integration package allows you to automatically create fake dependencies for both concrete and fakeabstract instances in unit tests using an Autofac container. You can get the Autofac.Extras.FakeItEasy package onNuGet.
7.8.1 Getting Started
Given you have a system under test and a dependency:
public class SystemUnderTest{
public SystemUnderTest(IDependency dependency){}
}
public interface IDependency{}
7.8. FakeItEasy 71
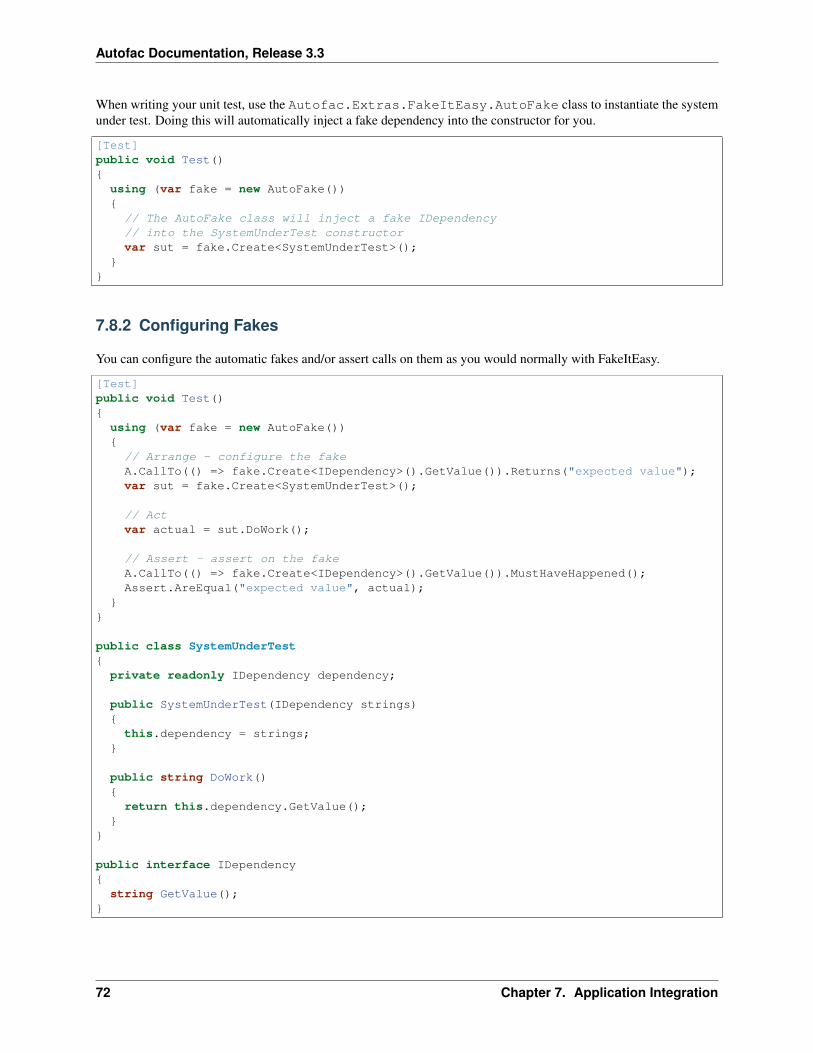
Autofac Documentation, Release 3.3
When writing your unit test, use the Autofac.Extras.FakeItEasy.AutoFake class to instantiate the systemunder test. Doing this will automatically inject a fake dependency into the constructor for you.
[Test]public void Test(){
using (var fake = new AutoFake()){// The AutoFake class will inject a fake IDependency// into the SystemUnderTest constructorvar sut = fake.Create<SystemUnderTest>();
}}
7.8.2 Configuring Fakes
You can configure the automatic fakes and/or assert calls on them as you would normally with FakeItEasy.
[Test]public void Test(){
using (var fake = new AutoFake()){// Arrange - configure the fakeA.CallTo(() => fake.Create<IDependency>().GetValue()).Returns("expected value");var sut = fake.Create<SystemUnderTest>();
// Actvar actual = sut.DoWork();
// Assert - assert on the fakeA.CallTo(() => fake.Create<IDependency>().GetValue()).MustHaveHappened();Assert.AreEqual("expected value", actual);
}}
public class SystemUnderTest{
private readonly IDependency dependency;
public SystemUnderTest(IDependency strings){this.dependency = strings;
}
public string DoWork(){return this.dependency.GetValue();
}}
public interface IDependency{
string GetValue();}
72 Chapter 7. Application Integration
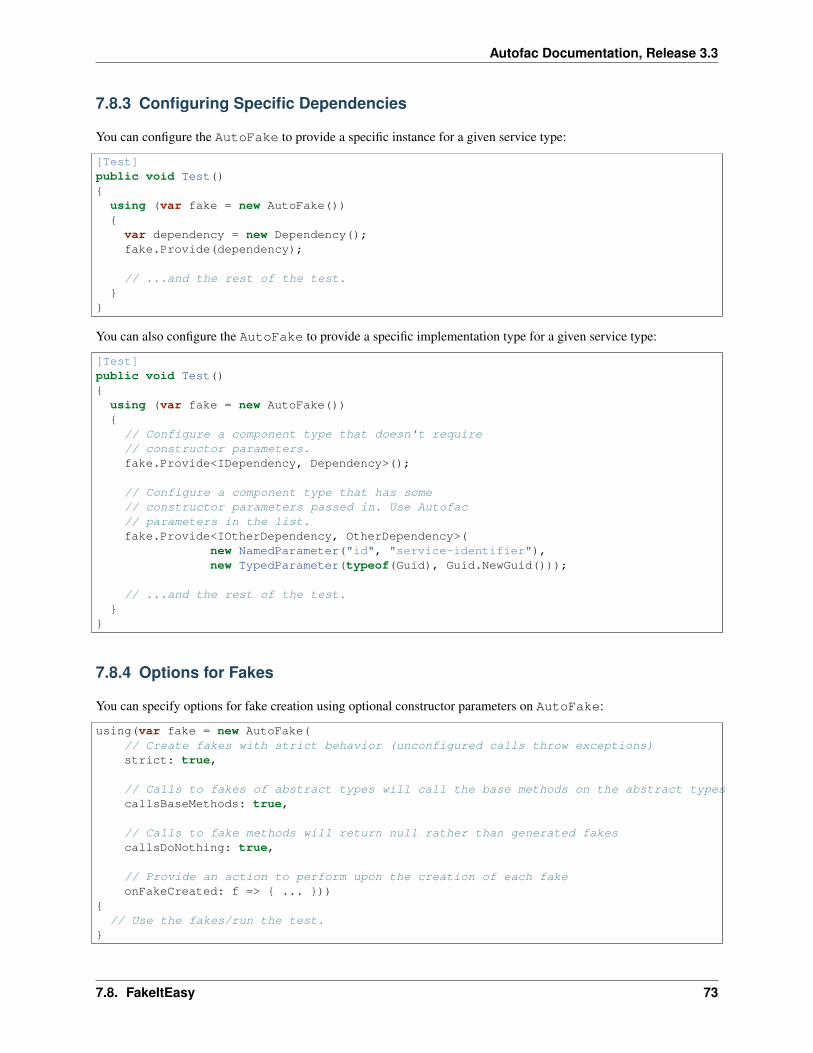
Autofac Documentation, Release 3.3
7.8.3 Configuring Specific Dependencies
You can configure the AutoFake to provide a specific instance for a given service type:
[Test]public void Test(){
using (var fake = new AutoFake()){var dependency = new Dependency();fake.Provide(dependency);
// ...and the rest of the test.}
}
You can also configure the AutoFake to provide a specific implementation type for a given service type:
[Test]public void Test(){
using (var fake = new AutoFake()){// Configure a component type that doesn't require// constructor parameters.fake.Provide<IDependency, Dependency>();
// Configure a component type that has some// constructor parameters passed in. Use Autofac// parameters in the list.fake.Provide<IOtherDependency, OtherDependency>(
new NamedParameter("id", "service-identifier"),new TypedParameter(typeof(Guid), Guid.NewGuid()));
// ...and the rest of the test.}
}
7.8.4 Options for Fakes
You can specify options for fake creation using optional constructor parameters on AutoFake:
using(var fake = new AutoFake(// Create fakes with strict behavior (unconfigured calls throw exceptions)strict: true,
// Calls to fakes of abstract types will call the base methods on the abstract typescallsBaseMethods: true,
// Calls to fake methods will return null rather than generated fakescallsDoNothing: true,
// Provide an action to perform upon the creation of each fakeonFakeCreated: f => { ... }))
{// Use the fakes/run the test.
}
7.8. FakeItEasy 73
Autofac Documentation, Release 3.3
74 Chapter 7. Application Integration

CHAPTER 8
Best Practices and Recommendations
75
Autofac Documentation, Release 3.3
76 Chapter 8. Best Practices and Recommendations
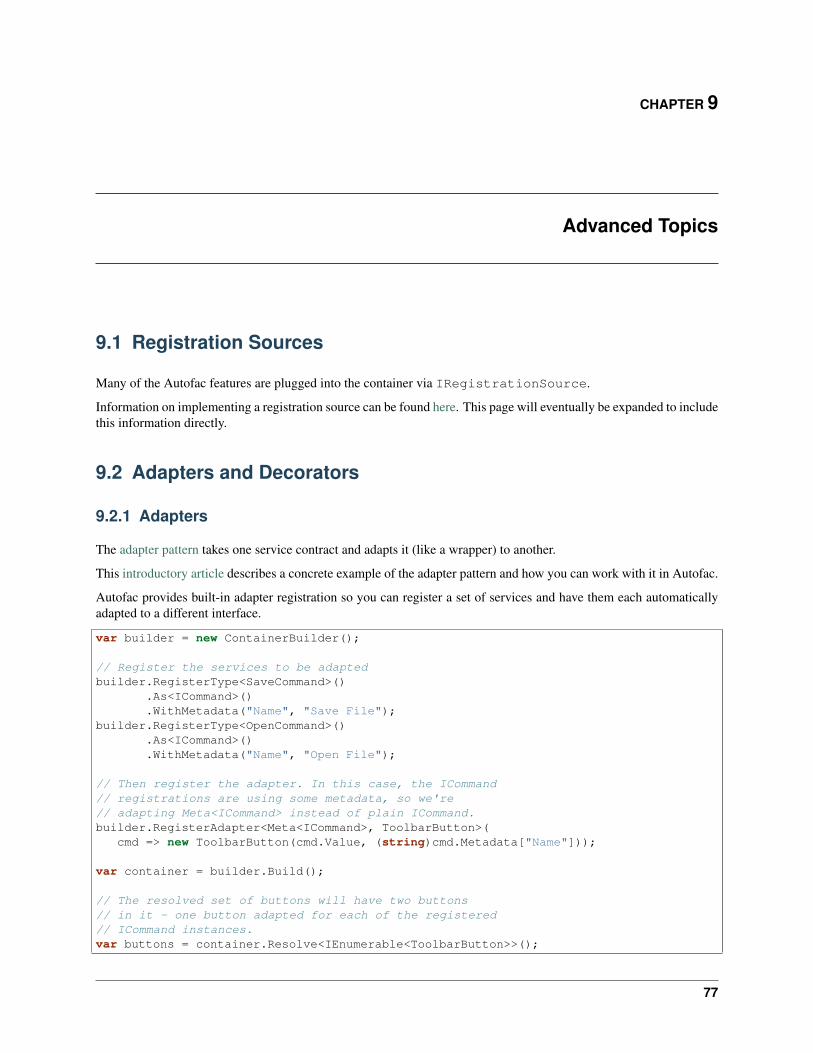
CHAPTER 9
Advanced Topics
9.1 Registration Sources
Many of the Autofac features are plugged into the container via IRegistrationSource.
Information on implementing a registration source can be found here. This page will eventually be expanded to includethis information directly.
9.2 Adapters and Decorators
9.2.1 Adapters
The adapter pattern takes one service contract and adapts it (like a wrapper) to another.
This introductory article describes a concrete example of the adapter pattern and how you can work with it in Autofac.
Autofac provides built-in adapter registration so you can register a set of services and have them each automaticallyadapted to a different interface.
var builder = new ContainerBuilder();
// Register the services to be adaptedbuilder.RegisterType<SaveCommand>()
.As<ICommand>()
.WithMetadata("Name", "Save File");builder.RegisterType<OpenCommand>()
.As<ICommand>()
.WithMetadata("Name", "Open File");
// Then register the adapter. In this case, the ICommand// registrations are using some metadata, so we're// adapting Meta<ICommand> instead of plain ICommand.builder.RegisterAdapter<Meta<ICommand>, ToolbarButton>(
cmd => new ToolbarButton(cmd.Value, (string)cmd.Metadata["Name"]));
var container = builder.Build();
// The resolved set of buttons will have two buttons// in it - one button adapted for each of the registered// ICommand instances.var buttons = container.Resolve<IEnumerable<ToolbarButton>>();
77
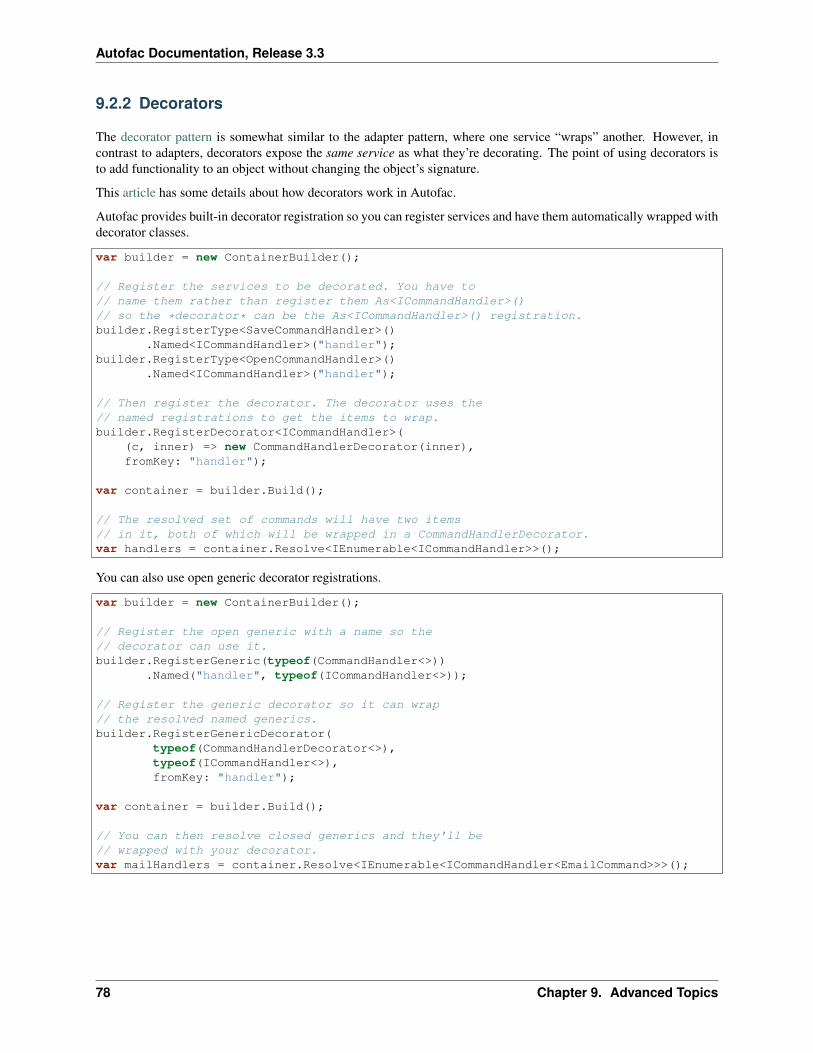
Autofac Documentation, Release 3.3
9.2.2 Decorators
The decorator pattern is somewhat similar to the adapter pattern, where one service “wraps” another. However, incontrast to adapters, decorators expose the same service as what they’re decorating. The point of using decorators isto add functionality to an object without changing the object’s signature.
This article has some details about how decorators work in Autofac.
Autofac provides built-in decorator registration so you can register services and have them automatically wrapped withdecorator classes.
var builder = new ContainerBuilder();
// Register the services to be decorated. You have to// name them rather than register them As<ICommandHandler>()// so the *decorator* can be the As<ICommandHandler>() registration.builder.RegisterType<SaveCommandHandler>()
.Named<ICommandHandler>("handler");builder.RegisterType<OpenCommandHandler>()
.Named<ICommandHandler>("handler");
// Then register the decorator. The decorator uses the// named registrations to get the items to wrap.builder.RegisterDecorator<ICommandHandler>(
(c, inner) => new CommandHandlerDecorator(inner),fromKey: "handler");
var container = builder.Build();
// The resolved set of commands will have two items// in it, both of which will be wrapped in a CommandHandlerDecorator.var handlers = container.Resolve<IEnumerable<ICommandHandler>>();
You can also use open generic decorator registrations.
var builder = new ContainerBuilder();
// Register the open generic with a name so the// decorator can use it.builder.RegisterGeneric(typeof(CommandHandler<>))
.Named("handler", typeof(ICommandHandler<>));
// Register the generic decorator so it can wrap// the resolved named generics.builder.RegisterGenericDecorator(
typeof(CommandHandlerDecorator<>),typeof(ICommandHandler<>),fromKey: "handler");
var container = builder.Build();
// You can then resolve closed generics and they'll be// wrapped with your decorator.var mailHandlers = container.Resolve<IEnumerable<ICommandHandler<EmailCommand>>>();
78 Chapter 9. Advanced Topics
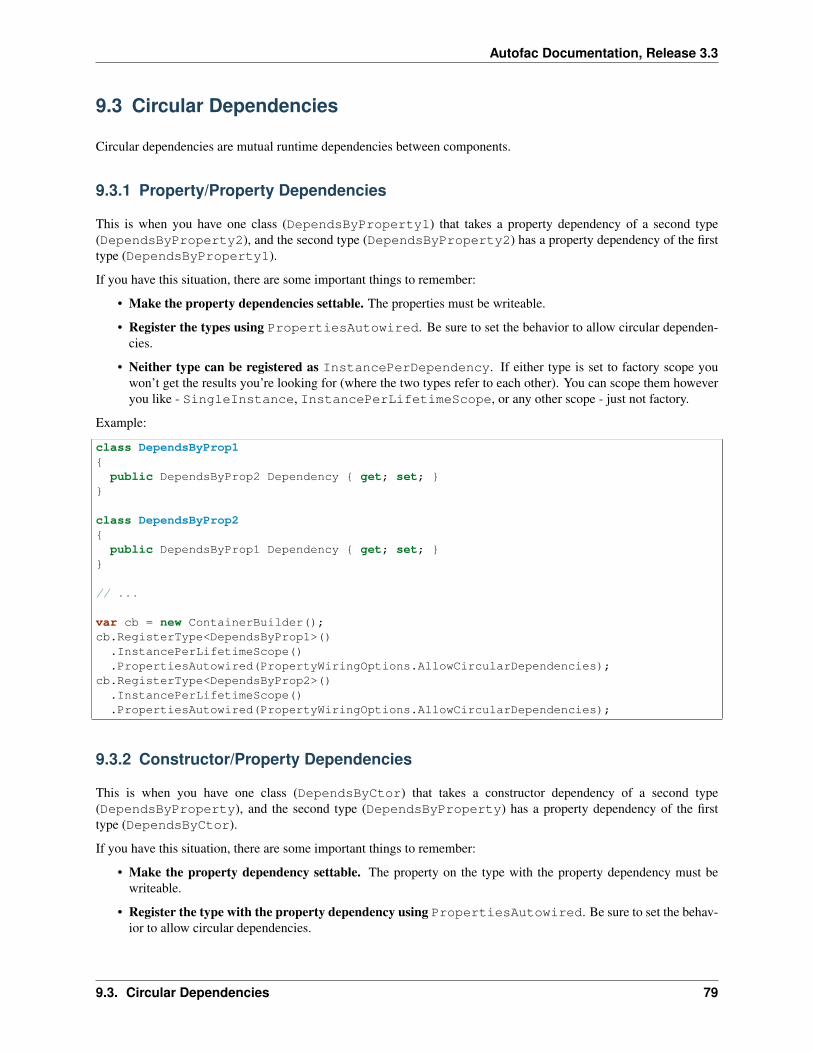
Autofac Documentation, Release 3.3
9.3 Circular Dependencies
Circular dependencies are mutual runtime dependencies between components.
9.3.1 Property/Property Dependencies
This is when you have one class (DependsByProperty1) that takes a property dependency of a second type(DependsByProperty2), and the second type (DependsByProperty2) has a property dependency of the firsttype (DependsByProperty1).
If you have this situation, there are some important things to remember:
• Make the property dependencies settable. The properties must be writeable.
• Register the types using PropertiesAutowired. Be sure to set the behavior to allow circular dependen-cies.
• Neither type can be registered as InstancePerDependency. If either type is set to factory scope youwon’t get the results you’re looking for (where the two types refer to each other). You can scope them howeveryou like - SingleInstance, InstancePerLifetimeScope, or any other scope - just not factory.
Example:
class DependsByProp1{
public DependsByProp2 Dependency { get; set; }}
class DependsByProp2{
public DependsByProp1 Dependency { get; set; }}
// ...
var cb = new ContainerBuilder();cb.RegisterType<DependsByProp1>()
.InstancePerLifetimeScope()
.PropertiesAutowired(PropertyWiringOptions.AllowCircularDependencies);cb.RegisterType<DependsByProp2>()
.InstancePerLifetimeScope()
.PropertiesAutowired(PropertyWiringOptions.AllowCircularDependencies);
9.3.2 Constructor/Property Dependencies
This is when you have one class (DependsByCtor) that takes a constructor dependency of a second type(DependsByProperty), and the second type (DependsByProperty) has a property dependency of the firsttype (DependsByCtor).
If you have this situation, there are some important things to remember:
• Make the property dependency settable. The property on the type with the property dependency must bewriteable.
• Register the type with the property dependency using PropertiesAutowired. Be sure to set the behav-ior to allow circular dependencies.
9.3. Circular Dependencies 79
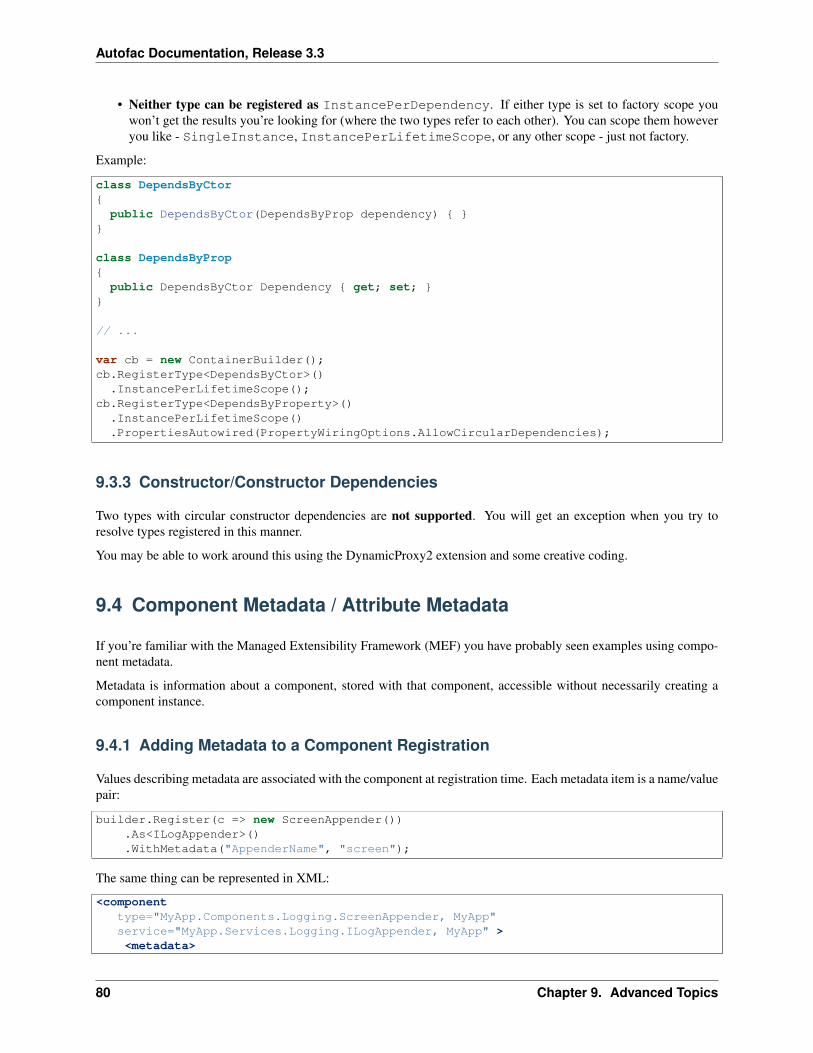
Autofac Documentation, Release 3.3
• Neither type can be registered as InstancePerDependency. If either type is set to factory scope youwon’t get the results you’re looking for (where the two types refer to each other). You can scope them howeveryou like - SingleInstance, InstancePerLifetimeScope, or any other scope - just not factory.
Example:
class DependsByCtor{
public DependsByCtor(DependsByProp dependency) { }}
class DependsByProp{
public DependsByCtor Dependency { get; set; }}
// ...
var cb = new ContainerBuilder();cb.RegisterType<DependsByCtor>()
.InstancePerLifetimeScope();cb.RegisterType<DependsByProperty>()
.InstancePerLifetimeScope()
.PropertiesAutowired(PropertyWiringOptions.AllowCircularDependencies);
9.3.3 Constructor/Constructor Dependencies
Two types with circular constructor dependencies are not supported. You will get an exception when you try toresolve types registered in this manner.
You may be able to work around this using the DynamicProxy2 extension and some creative coding.
9.4 Component Metadata / Attribute Metadata
If you’re familiar with the Managed Extensibility Framework (MEF) you have probably seen examples using compo-nent metadata.
Metadata is information about a component, stored with that component, accessible without necessarily creating acomponent instance.
9.4.1 Adding Metadata to a Component Registration
Values describing metadata are associated with the component at registration time. Each metadata item is a name/valuepair:
builder.Register(c => new ScreenAppender()).As<ILogAppender>().WithMetadata("AppenderName", "screen");
The same thing can be represented in XML:
<componenttype="MyApp.Components.Logging.ScreenAppender, MyApp"service="MyApp.Services.Logging.ILogAppender, MyApp" ><metadata>
80 Chapter 9. Advanced Topics
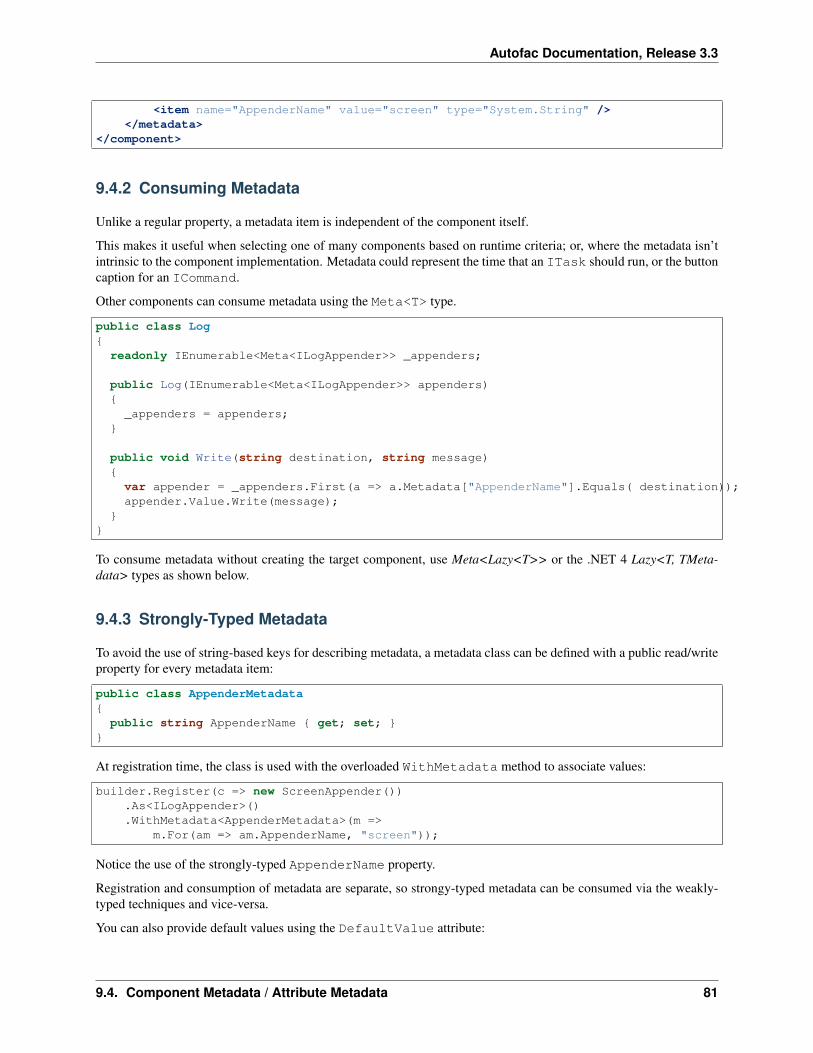
Autofac Documentation, Release 3.3
<item name="AppenderName" value="screen" type="System.String" /></metadata>
</component>
9.4.2 Consuming Metadata
Unlike a regular property, a metadata item is independent of the component itself.
This makes it useful when selecting one of many components based on runtime criteria; or, where the metadata isn’tintrinsic to the component implementation. Metadata could represent the time that an ITask should run, or the buttoncaption for an ICommand.
Other components can consume metadata using the Meta<T> type.
public class Log{
readonly IEnumerable<Meta<ILogAppender>> _appenders;
public Log(IEnumerable<Meta<ILogAppender>> appenders){_appenders = appenders;
}
public void Write(string destination, string message){var appender = _appenders.First(a => a.Metadata["AppenderName"].Equals( destination));appender.Value.Write(message);
}}
To consume metadata without creating the target component, use Meta<Lazy<T>> or the .NET 4 Lazy<T, TMeta-data> types as shown below.
9.4.3 Strongly-Typed Metadata
To avoid the use of string-based keys for describing metadata, a metadata class can be defined with a public read/writeproperty for every metadata item:
public class AppenderMetadata{
public string AppenderName { get; set; }}
At registration time, the class is used with the overloaded WithMetadata method to associate values:
builder.Register(c => new ScreenAppender()).As<ILogAppender>().WithMetadata<AppenderMetadata>(m =>
m.For(am => am.AppenderName, "screen"));
Notice the use of the strongly-typed AppenderName property.
Registration and consumption of metadata are separate, so strongy-typed metadata can be consumed via the weakly-typed techniques and vice-versa.
You can also provide default values using the DefaultValue attribute:
9.4. Component Metadata / Attribute Metadata 81
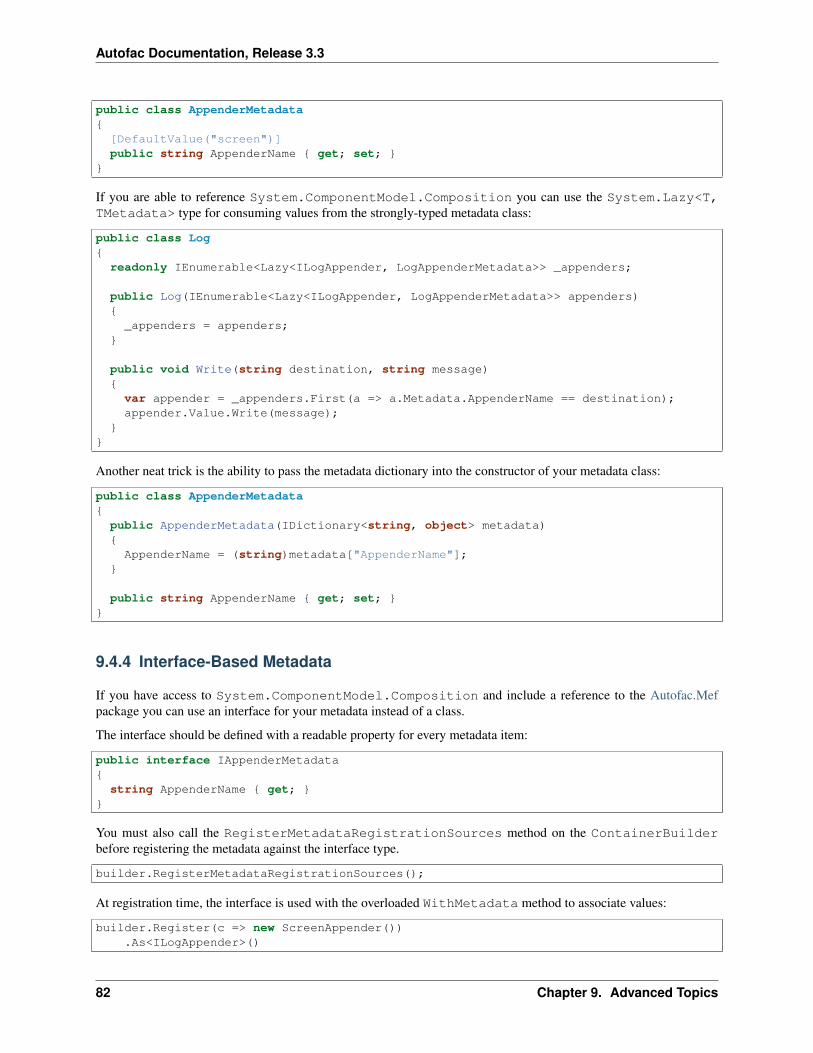
Autofac Documentation, Release 3.3
public class AppenderMetadata{
[DefaultValue("screen")]public string AppenderName { get; set; }
}
If you are able to reference System.ComponentModel.Composition you can use the System.Lazy<T,TMetadata> type for consuming values from the strongly-typed metadata class:
public class Log{
readonly IEnumerable<Lazy<ILogAppender, LogAppenderMetadata>> _appenders;
public Log(IEnumerable<Lazy<ILogAppender, LogAppenderMetadata>> appenders){_appenders = appenders;
}
public void Write(string destination, string message){var appender = _appenders.First(a => a.Metadata.AppenderName == destination);appender.Value.Write(message);
}}
Another neat trick is the ability to pass the metadata dictionary into the constructor of your metadata class:
public class AppenderMetadata{
public AppenderMetadata(IDictionary<string, object> metadata){AppenderName = (string)metadata["AppenderName"];
}
public string AppenderName { get; set; }}
9.4.4 Interface-Based Metadata
If you have access to System.ComponentModel.Composition and include a reference to the Autofac.Mefpackage you can use an interface for your metadata instead of a class.
The interface should be defined with a readable property for every metadata item:
public interface IAppenderMetadata{
string AppenderName { get; }}
You must also call the RegisterMetadataRegistrationSources method on the ContainerBuilderbefore registering the metadata against the interface type.
builder.RegisterMetadataRegistrationSources();
At registration time, the interface is used with the overloaded WithMetadata method to associate values:
builder.Register(c => new ScreenAppender()).As<ILogAppender>()
82 Chapter 9. Advanced Topics
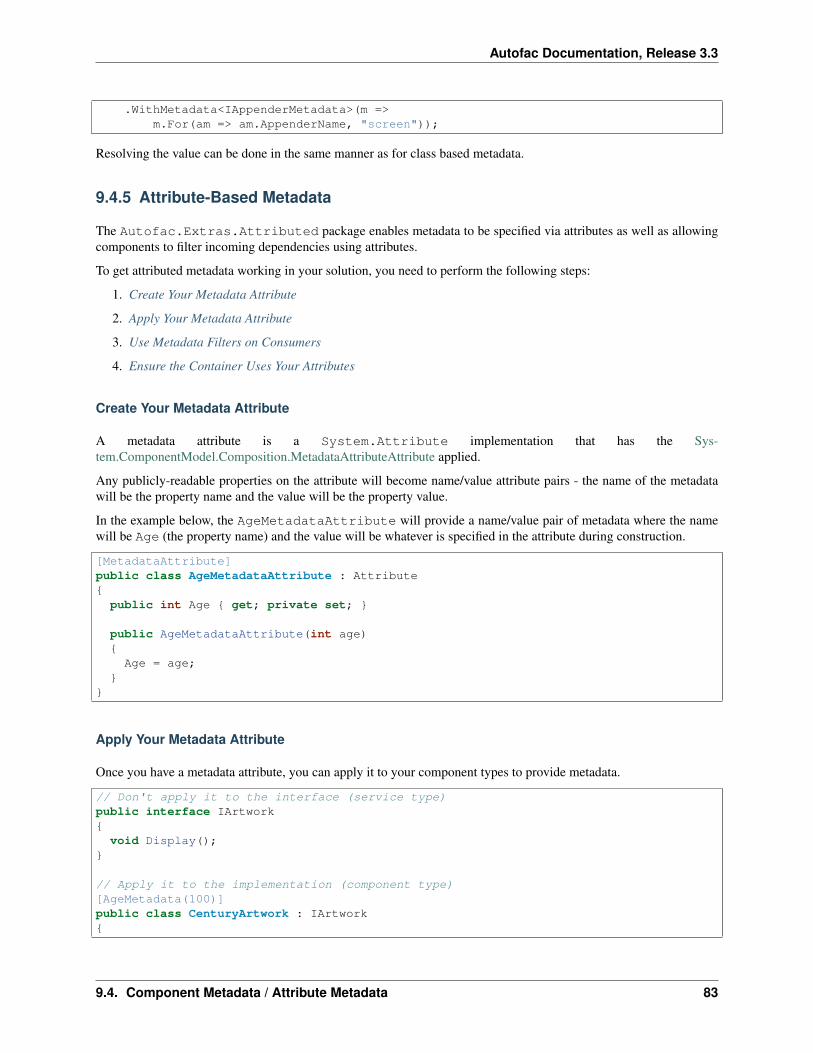
Autofac Documentation, Release 3.3
.WithMetadata<IAppenderMetadata>(m =>m.For(am => am.AppenderName, "screen"));
Resolving the value can be done in the same manner as for class based metadata.
9.4.5 Attribute-Based Metadata
The Autofac.Extras.Attributed package enables metadata to be specified via attributes as well as allowingcomponents to filter incoming dependencies using attributes.
To get attributed metadata working in your solution, you need to perform the following steps:
1. Create Your Metadata Attribute
2. Apply Your Metadata Attribute
3. Use Metadata Filters on Consumers
4. Ensure the Container Uses Your Attributes
Create Your Metadata Attribute
A metadata attribute is a System.Attribute implementation that has the Sys-tem.ComponentModel.Composition.MetadataAttributeAttribute applied.
Any publicly-readable properties on the attribute will become name/value attribute pairs - the name of the metadatawill be the property name and the value will be the property value.
In the example below, the AgeMetadataAttribute will provide a name/value pair of metadata where the namewill be Age (the property name) and the value will be whatever is specified in the attribute during construction.
[MetadataAttribute]public class AgeMetadataAttribute : Attribute{
public int Age { get; private set; }
public AgeMetadataAttribute(int age){Age = age;
}}
Apply Your Metadata Attribute
Once you have a metadata attribute, you can apply it to your component types to provide metadata.
// Don't apply it to the interface (service type)public interface IArtwork{
void Display();}
// Apply it to the implementation (component type)[AgeMetadata(100)]public class CenturyArtwork : IArtwork{
9.4. Component Metadata / Attribute Metadata 83
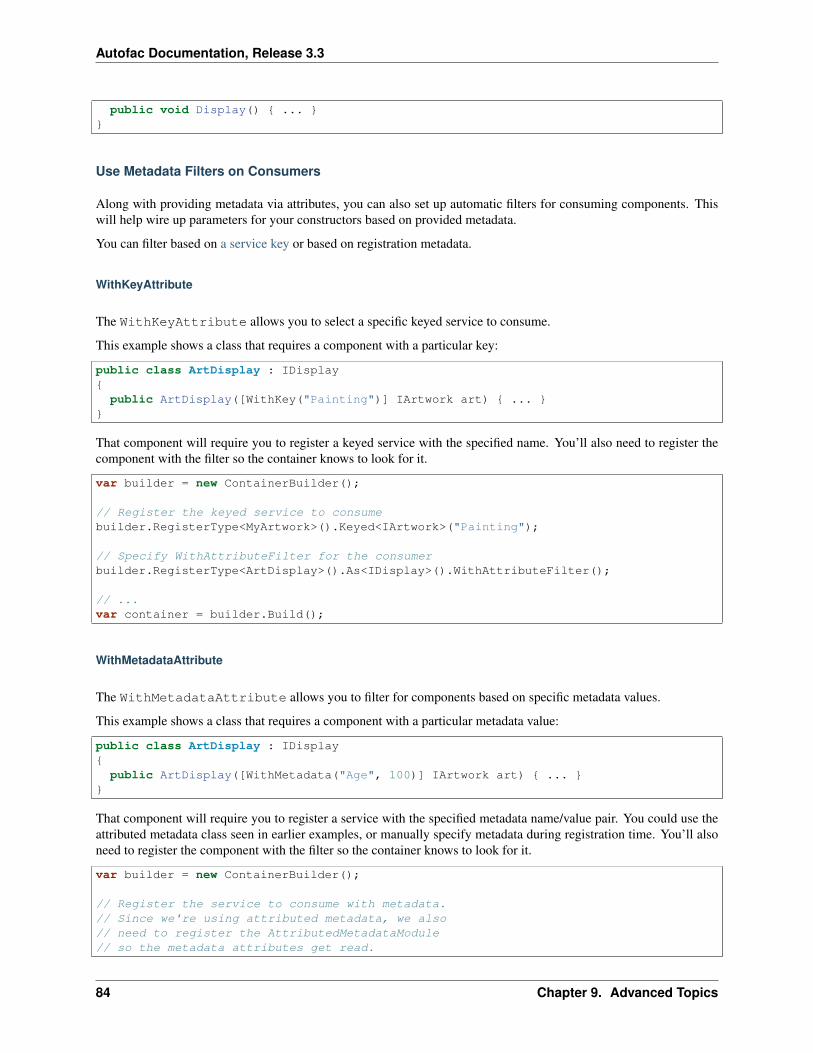
Autofac Documentation, Release 3.3
public void Display() { ... }}
Use Metadata Filters on Consumers
Along with providing metadata via attributes, you can also set up automatic filters for consuming components. Thiswill help wire up parameters for your constructors based on provided metadata.
You can filter based on a service key or based on registration metadata.
WithKeyAttribute
The WithKeyAttribute allows you to select a specific keyed service to consume.
This example shows a class that requires a component with a particular key:
public class ArtDisplay : IDisplay{
public ArtDisplay([WithKey("Painting")] IArtwork art) { ... }}
That component will require you to register a keyed service with the specified name. You’ll also need to register thecomponent with the filter so the container knows to look for it.
var builder = new ContainerBuilder();
// Register the keyed service to consumebuilder.RegisterType<MyArtwork>().Keyed<IArtwork>("Painting");
// Specify WithAttributeFilter for the consumerbuilder.RegisterType<ArtDisplay>().As<IDisplay>().WithAttributeFilter();
// ...var container = builder.Build();
WithMetadataAttribute
The WithMetadataAttribute allows you to filter for components based on specific metadata values.
This example shows a class that requires a component with a particular metadata value:
public class ArtDisplay : IDisplay{
public ArtDisplay([WithMetadata("Age", 100)] IArtwork art) { ... }}
That component will require you to register a service with the specified metadata name/value pair. You could use theattributed metadata class seen in earlier examples, or manually specify metadata during registration time. You’ll alsoneed to register the component with the filter so the container knows to look for it.
var builder = new ContainerBuilder();
// Register the service to consume with metadata.// Since we're using attributed metadata, we also// need to register the AttributedMetadataModule// so the metadata attributes get read.
84 Chapter 9. Advanced Topics
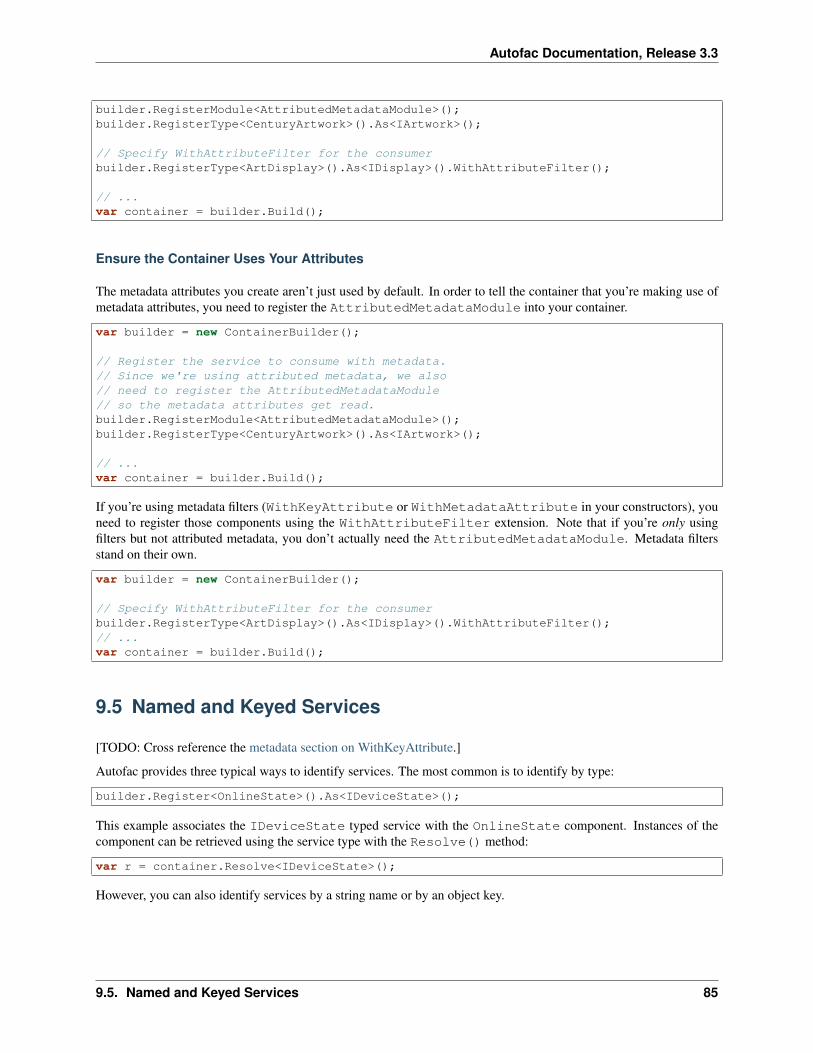
Autofac Documentation, Release 3.3
builder.RegisterModule<AttributedMetadataModule>();builder.RegisterType<CenturyArtwork>().As<IArtwork>();
// Specify WithAttributeFilter for the consumerbuilder.RegisterType<ArtDisplay>().As<IDisplay>().WithAttributeFilter();
// ...var container = builder.Build();
Ensure the Container Uses Your Attributes
The metadata attributes you create aren’t just used by default. In order to tell the container that you’re making use ofmetadata attributes, you need to register the AttributedMetadataModule into your container.
var builder = new ContainerBuilder();
// Register the service to consume with metadata.// Since we're using attributed metadata, we also// need to register the AttributedMetadataModule// so the metadata attributes get read.builder.RegisterModule<AttributedMetadataModule>();builder.RegisterType<CenturyArtwork>().As<IArtwork>();
// ...var container = builder.Build();
If you’re using metadata filters (WithKeyAttribute or WithMetadataAttribute in your constructors), youneed to register those components using the WithAttributeFilter extension. Note that if you’re only usingfilters but not attributed metadata, you don’t actually need the AttributedMetadataModule. Metadata filtersstand on their own.
var builder = new ContainerBuilder();
// Specify WithAttributeFilter for the consumerbuilder.RegisterType<ArtDisplay>().As<IDisplay>().WithAttributeFilter();// ...var container = builder.Build();
9.5 Named and Keyed Services
[TODO: Cross reference the metadata section on WithKeyAttribute.]
Autofac provides three typical ways to identify services. The most common is to identify by type:
builder.Register<OnlineState>().As<IDeviceState>();
This example associates the IDeviceState typed service with the OnlineState component. Instances of thecomponent can be retrieved using the service type with the Resolve() method:
var r = container.Resolve<IDeviceState>();
However, you can also identify services by a string name or by an object key.
9.5. Named and Keyed Services 85

Autofac Documentation, Release 3.3
9.5.1 Named Services
Services can be further identified using a service name. Using this technique, the Named() registration methodreplaces As().
builder.Register<OnlineState>().Named<IDeviceState>("online");
To retrieve a named service, the ResolveNamed() method is used:
var r = container.ResolveNamed<IDeviceState>("online");
Named services are simply keyed services that use a string as a key, so the techniques described in the next sectionapply equally to named services.
9.5.2 Keyed Services
Using strings as component names is convenient in some cases, but in others we may wish to use keys of other types.Keyed services provide this ability.
For example, an enum may describe the different device states in our example:
public enum DeviceState { Online, Offline }
Each enum value corresponds to an implementation of the service:
public class OnlineState : IDeviceState { }
The enum values can then be registered as keys for the implementations as shown below.
var builder = new ContainerBuilder();builder.RegisterType<OnlineState>().Keyed<IDeviceState>(DeviceState.Online);builder.RegisterType<OfflineState>().Keyed<IDeviceState>(DeviceState.Offline);// Register other components here
Resolving Explicitly
The implementation can be resolved explicitly with ResolveKeyed():
var r = container.ResolveKeyed<IDeviceState>(DeviceState.Online);
This does however result in using the container as a Service Locator, which is discouraged. As an alternative to thispattern, the IIndex type is provided.
Resolving with an Index
Autofac.Features.Indexed.IIndex<K,V> is a relationship type that Autofac implements automatically.Components that need to choose between service implementations based on a key can do so by taking a constructorparameter of type IIndex<K,V>.
public class Modem : IHardwareDevice{
IIndex<DeviceState, IDeviceState> _states;IDeviceState _currentState;
public Modem(IIndex<DeviceState, IDeviceState> states){
86 Chapter 9. Advanced Topics
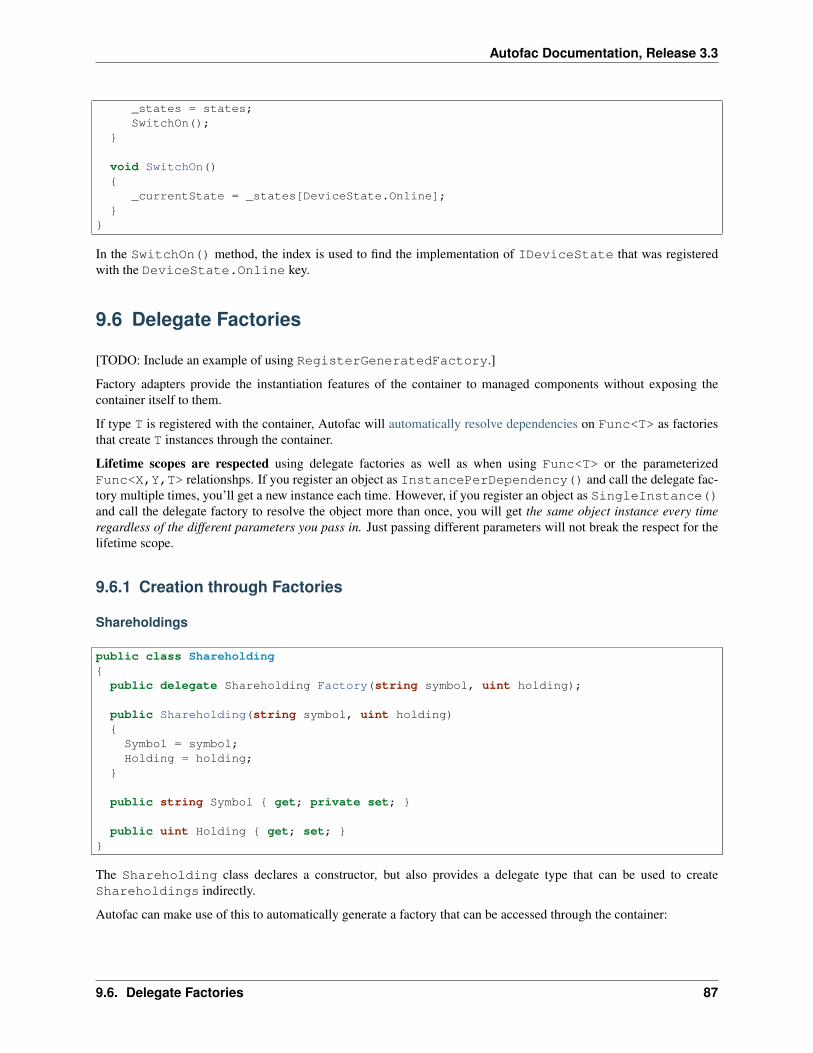
Autofac Documentation, Release 3.3
_states = states;SwitchOn();
}
void SwitchOn(){
_currentState = _states[DeviceState.Online];}
}
In the SwitchOn() method, the index is used to find the implementation of IDeviceState that was registeredwith the DeviceState.Online key.
9.6 Delegate Factories
[TODO: Include an example of using RegisterGeneratedFactory.]
Factory adapters provide the instantiation features of the container to managed components without exposing thecontainer itself to them.
If type T is registered with the container, Autofac will automatically resolve dependencies on Func<T> as factoriesthat create T instances through the container.
Lifetime scopes are respected using delegate factories as well as when using Func<T> or the parameterizedFunc<X,Y,T> relationshps. If you register an object as InstancePerDependency() and call the delegate fac-tory multiple times, you’ll get a new instance each time. However, if you register an object as SingleInstance()and call the delegate factory to resolve the object more than once, you will get the same object instance every timeregardless of the different parameters you pass in. Just passing different parameters will not break the respect for thelifetime scope.
9.6.1 Creation through Factories
Shareholdings
public class Shareholding{
public delegate Shareholding Factory(string symbol, uint holding);
public Shareholding(string symbol, uint holding){Symbol = symbol;Holding = holding;
}
public string Symbol { get; private set; }
public uint Holding { get; set; }}
The Shareholding class declares a constructor, but also provides a delegate type that can be used to createShareholdings indirectly.
Autofac can make use of this to automatically generate a factory that can be accessed through the container:
9.6. Delegate Factories 87
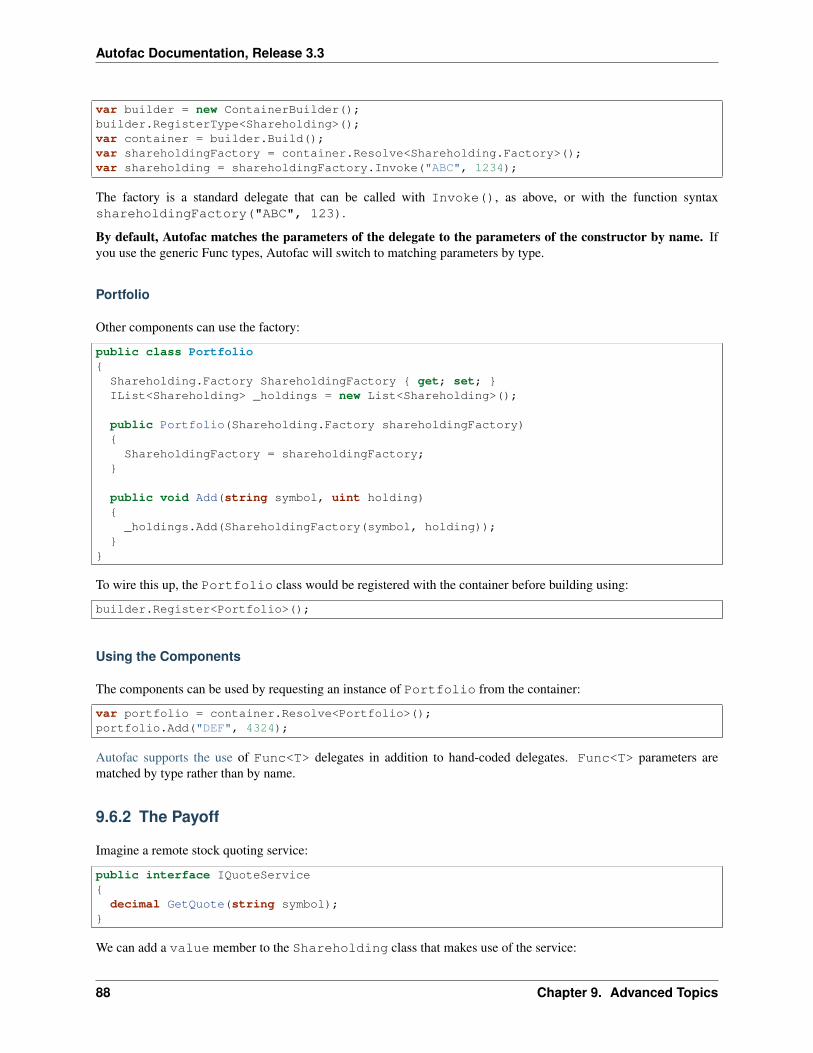
Autofac Documentation, Release 3.3
var builder = new ContainerBuilder();builder.RegisterType<Shareholding>();var container = builder.Build();var shareholdingFactory = container.Resolve<Shareholding.Factory>();var shareholding = shareholdingFactory.Invoke("ABC", 1234);
The factory is a standard delegate that can be called with Invoke(), as above, or with the function syntaxshareholdingFactory("ABC", 123).
By default, Autofac matches the parameters of the delegate to the parameters of the constructor by name. Ifyou use the generic Func types, Autofac will switch to matching parameters by type.
Portfolio
Other components can use the factory:
public class Portfolio{
Shareholding.Factory ShareholdingFactory { get; set; }IList<Shareholding> _holdings = new List<Shareholding>();
public Portfolio(Shareholding.Factory shareholdingFactory){ShareholdingFactory = shareholdingFactory;
}
public void Add(string symbol, uint holding){_holdings.Add(ShareholdingFactory(symbol, holding));
}}
To wire this up, the Portfolio class would be registered with the container before building using:
builder.Register<Portfolio>();
Using the Components
The components can be used by requesting an instance of Portfolio from the container:
var portfolio = container.Resolve<Portfolio>();portfolio.Add("DEF", 4324);
Autofac supports the use of Func<T> delegates in addition to hand-coded delegates. Func<T> parameters arematched by type rather than by name.
9.6.2 The Payoff
Imagine a remote stock quoting service:
public interface IQuoteService{
decimal GetQuote(string symbol);}
We can add a value member to the Shareholding class that makes use of the service:
88 Chapter 9. Advanced Topics
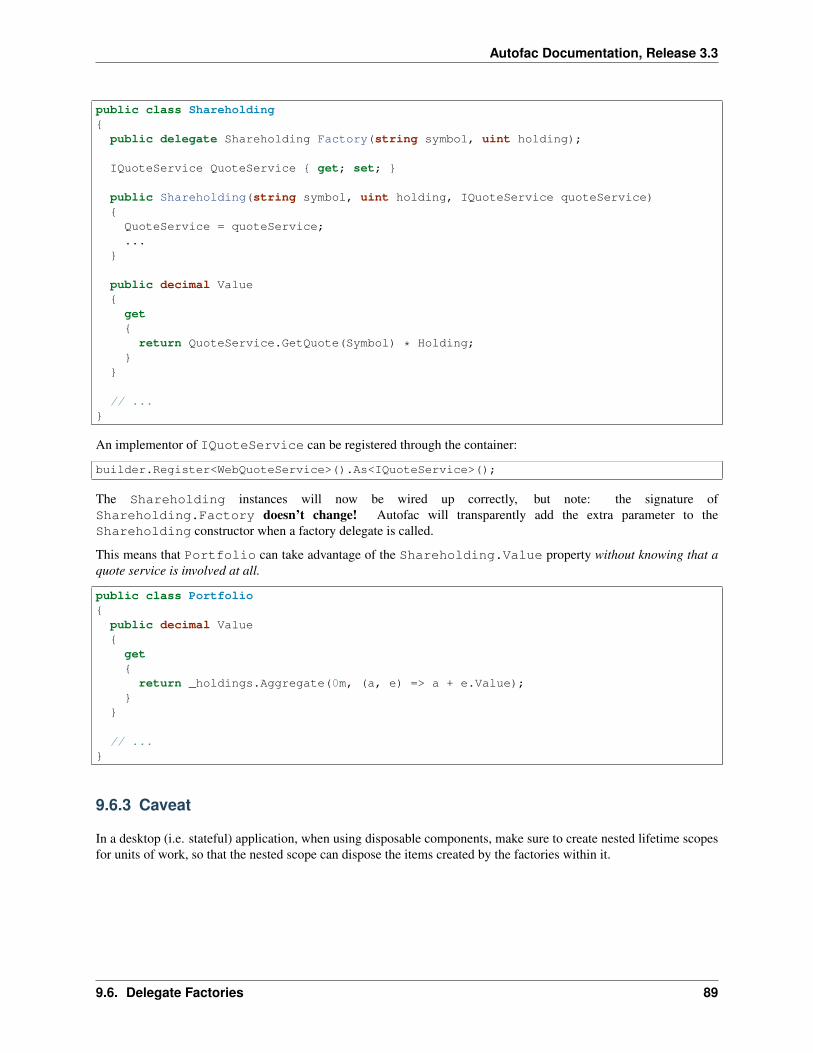
Autofac Documentation, Release 3.3
public class Shareholding{
public delegate Shareholding Factory(string symbol, uint holding);
IQuoteService QuoteService { get; set; }
public Shareholding(string symbol, uint holding, IQuoteService quoteService){QuoteService = quoteService;...
}
public decimal Value{get{
return QuoteService.GetQuote(Symbol) * Holding;}
}
// ...}
An implementor of IQuoteService can be registered through the container:
builder.Register<WebQuoteService>().As<IQuoteService>();
The Shareholding instances will now be wired up correctly, but note: the signature ofShareholding.Factory doesn’t change! Autofac will transparently add the extra parameter to theShareholding constructor when a factory delegate is called.
This means that Portfolio can take advantage of the Shareholding.Value property without knowing that aquote service is involved at all.
public class Portfolio{
public decimal Value{get{
return _holdings.Aggregate(0m, (a, e) => a + e.Value);}
}
// ...}
9.6.3 Caveat
In a desktop (i.e. stateful) application, when using disposable components, make sure to create nested lifetime scopesfor units of work, so that the nested scope can dispose the items created by the factories within it.
9.6. Delegate Factories 89
Autofac Documentation, Release 3.3
9.7 Owned Instances
9.7.1 Lifetime and Scope
Autofac controls lifetime using explicitly-delineated scopes. For example, the component providing the S service, andall of its dependencies, will be disposed/released when the using block ends:
IContainer container = // as per usualusing (var scope = container.BeginLifetimeScope()){
var s = scope.Resolve<S>();s.DoSomething();
}
In an IoC container, there’s often a subtle difference between releasing and disposing a component: releasing anowned component goes further than disposing the component itself. Any of the dependencies of the component willalso be disposed. Releasing a shared component is usually a no-op, as other components will continue to use itsservices.
9.7.2 Relationship Types
Autofac has a system of relationship types that can be used to provide the features of the container in a declarativeway. Instead of manipulating an IContainer or ILifetimeScope directly, as in the above example, relationshiptypes allow a component to specify exactly which container services are needed, in a minimal, declarative way.
Owned instances are consumed using the Owned<T> relationship type.
Owned of T
An owned dependency can be released by the owner when it is no longer required. Owned dependencies usuallycorrespond to some unit of work performed by the dependent component.
public class Consumer{
private Owned<DisposableComponent> _service;
public Consumer(Owned<DisposableComponent> service){_service = service;
}
public void DoWork(){// _service is used for some task_service.Value.DoSomething();
// Here _service is no longer needed, so// it is released_service.Dispose();
}}
When Consumer is created by the container, the Owned<DisposableComponent> that it depends upon willbe created inside its own lifetime scope. When Consumer is finished using the DisposableComponent,disposing the Owned<DisposableComponent> reference will end the lifetime scope that contains
90 Chapter 9. Advanced Topics
Autofac Documentation, Release 3.3
DisposableComponent. This means that all of DisposableComponent‘s non-shared, disposable depen-dencies will also be released.
Combining Owned with Func
Owned instances are usually used in conjunction with a Func<T> relationship, so that units of work can be begunand ended on-the-fly.
interface IMessageHandler{
void Handle(Message message);}
class MessagePump{
Func<Owned<IMessageHandler>> _handlerFactory;
public MessagePump(Func<Owned<IMessageHandler>> handlerFactory){_handlerFactory = handlerFactory;
}
public void Go(){while(true){
var message = NextMessage();
using (var handler = _handlerFactory()){
handler.Value.Handle(message);}
}}
}
Owned and Tags
The lifetimes created by Owned<T> use the tagging feature present as ILifetimeScope.Tag. The tag appliedto a lifetime of Owned<T> will be new TypedService(typeof(T)) - that is, the tag of the lifetime reflects itsentry point.
9.8 Handling Concurrency
Autofac is designed for use in highly-concurrent applications. The guidance below will help you be successful in thesesituations.
9.8.1 Component Registration
ContainerBuilder is not thread-safe and is designed to be used only on a single thread at the time the applicationstarts up. This is the most common scenario and works for almost all applications.
9.8. Handling Concurrency 91
Autofac Documentation, Release 3.3
Registration into a container after is is built, using ContainerBuilder.Update(), also is not thread-safe.For applications that register components after the container has been built (which should be very uncommon) addi-tional locking to protect the container from concurrent access during an Update() operation is necessary.
9.8.2 Service Resolution
All container operations are safe for use between multiple threads.
To reduce locking overhead, each Resolve operation takes place in a ‘context’ that provides the dependency-resolution features of the container. This is the parameter provided to component registration delegates.
Resolution context objects are single-threaded and should not be used except during the course of a dependencyresolution operation.
Avoid component registrations that store the context:
// THIS IS BROKEN - DON'T DO ITbuilder.Register(c => new MyComponent(c));
In the above example, the “c” IComponentContext parameter is being provided to MyComponent (which takesIComponent as a dependency). This code is incorrect because the temporary “c” parameter will be reused.
Instead resolve IComponentContext from “c” to access the non-temporary context:
builder.Register(c =>{
IContext threadSpecificContext = c.Resolve<IComponentContext>(); // access real context.return new MyComponent(threadSpecificContext);
}
Take care also not to initialize components with closures over the “c” parameter, as any reuse of “c” will cause issues.
The container hierarchy mechanism further reduces locking, by maintaining local copies of the component registra-tions for any factory/container components. Once the initial registration copy has been made, a thread using an ‘inner’container can create or access such components without blocking any other thread.
9.8.3 Lifetime Events
When making use of the LifetimeEvents available, don’t call back into the container in handlers for the Preparing,Activating or Activated events: use the supplied IComponentContext instead.
9.8.4 Thread Scoped Services
You can use Autofac to register services that are specific to a thread. The ThreadScoping page has more informationon this.
9.8.5 Internals
Keeping in mind the guidelines above, here’s a little more specific information about thread safety and locking inAutofac.
92 Chapter 9. Advanced Topics
Autofac Documentation, Release 3.3
9.8.6 Thread-Safe Types
The following types are safe for concurrent access by multiple threads:
• Container
• ComponentRegistry
• Disposer (default implementation of IDisposer)
• LifetimeScope (default implementation of ILifetimeScope)
These types cover practically all of the runtime/resolution scenarios.
The following types are designed for single-threaded access at configuration time:
• ContainerBuilder
So, a correct Autofac application will use a ContainerBuilder on a single thread to create the container at startup.Subsequent use of the container can occur on any thread.
9.8.7 Deadlock Avoidance
Autofac is designed in such a way that deadlocks won’t occur in normal use. This section is a guide for maintainersor extension writers.
Locks may be acquired in the following order:
• A thread holding a lock for any of the following may not acquire any further locks:
– ComponentRegistry
– Disposer
• A thread holding the lock for a LifetimeScope may subsequently acquire the lock for:
– Its parent LifetimeScope
– Any of the items listed above
9.9 Multitenant Applications
Autofac.Extras.Multitenant enables multitenant dependency injection support.
9.9. Multitenant Applications 93
Autofac Documentation, Release 3.3
• What Is Multitenancy?• General Principles
– Reference NuGet Packages– Register Dependencies– Identify the Tenant– Resolve Tenant-Specific Dependencies
• ASP.NET Integration– ASP.NET Application Startup– Tenant-Specific Controllers
• WCF Integration– Reference Packages for WCF Integration– Passing Tenant ID with a Behavior– Tenant Identification from OperationContext– Hosting Multitenant Services
* Managing Service Attributes* Tenant-Specific Service Implementations
– WCF Application Startup* WCF Client Application Startup* WCF Service Application Startup
9.9.1 What Is Multitenancy?
A multitenant application is an application that you can deploy one time yet allow separate customers, or “tenants,”to view the application as though it was their own.
Consider, for example, a hosted online store application - you, the tenant, lease the application, set some configurationvalues, and when an end user visits the application under your custom domain name, it looks like your company. Othertenants may also lease the application, yet the application is deployed only one time on a central, hosted server andchanges its behavior based on the tenant (or tenant’s end-users) accessing it.
Many changes in a multitenant environment are performed via simple configuration. For example, the colors or fontsdisplayed in the UI are simple configuration options that can be “plugged in” without actually changing the behaviorof the application.
In a more complex scenario, you may need to change business logic on a per-tenant basis. For example, a specifictenant leasing space on the application may want to change the way a value is calculated using some complex customlogic. How do you register a default behavior/dependency for an application and allow a specific tenant tooverride it?
This is the functionality that Autofac.Extras.Multitenant attempts to address.
9.9.2 General Principles
In general, a multitenant application has four tasks that need to be performed with respect to dependency resolution:
1. Reference NuGet Packages
2. Register Dependencies
3. Identify the Tenant
4. Resolve Tenant-Specific Dependencies
This section outlines how these three steps work. Later sections will expand on these topics to include information onhow to integrate these principles with specific application types.
94 Chapter 9. Advanced Topics
Autofac Documentation, Release 3.3
Reference NuGet Packages
Any application that wants to use multitenancy needs to add references to the NuGet packages...
• Autofac
• Autofac.Extras.Multitenant
That’s the bare minimum. WCF applications also need Autofac.Extras.Multitenant.Wcf.
Register Dependencies
Autofac.Extras.Multitenant introduces a new container type calledAutofac.Extras.Multitenant.MultitenantContainer. This container is used for managingapplication-level defaults and tenant-specific overrides.
The overall registration process is:
1. Create an application-level default container. This container is where you register the default dependenciesfor the application. If a tenant doesn’t otherwise provide an override for a dependency type, the dependenciesregistered here will be used.
2. Instantiate a tenant identification strategy. A tenant identification strategy is used to determine the ID for thecurrent tenant based on execution context. You can read more on this later in this document.
3. Create a multitenant container. The multitenant container is responsible for keeping track of the applicationdefaults and the tenant-specific overrides.
4. Register tenant-specific overrides. For each tenant wishing to override a dependency, register the appropriateoverrides passing in the tenant ID and a configuration lambda.
General usage looks like this:
// First, create your application-level defaults using a standard// ContainerBuilder, just as you are used to.var builder = new ContainerBuilder();builder.RegisterType<Consumer>().As<IDependencyConsumer>().InstancePerDependency();builder.RegisterType<BaseDependency>().As<IDependency>().SingleInstance();var appContainer = builder.Build();
// Once you've built the application-level default container, you// need to create a tenant identification strategy. The details of this// are discussed later on.var tenantIdentifier = new MyTenantIdentificationStrategy();
// Now create the multitenant container using the application// container and the tenant identification strategy.var mtc = new MultitenantContainer(tenantIdentifier, appContainer);
// Configure the overrides for each tenant by passing in the tenant ID// and a lambda that takes a ContainerBuilder.mtc.ConfigureTenant('1', b => b.RegisterType<Tenant1Dependency>().As<IDependency>().InstancePerDependency());mtc.ConfigureTenant('2', b => b.RegisterType<Tenant2Dependency>().As<IDependency>().SingleInstance());
// Now you can use the multitenant container to resolve instances.
If you have a component that needs one instance per tenant, you can use the InstancePerTenant() registra-tion extension method at the container level.
9.9. Multitenant Applications 95
Autofac Documentation, Release 3.3
var builder = new ContainerBuilder();builder.RegisterType<SomeType>().As<ISomeInterface>().InstancePerTenant();// InstancePerTenant goes in the main container; other// tenant-specific dependencies get registered as shown// above, in tenant-specific lifetimes.
Note that you may only configure a tenant one time. After that, you may not change that tenant’s overrides. Also, ifyou resolve a dependency for a tenant, their lifetime scope may not be changed. It is good practice to configure yourtenant overrides at application startup to avoid any issues. If you need to perform some business logic to “build” thetenant configuration, you can use the Autofac.Extras.Multitenant.ConfigurationActionBuilder.
var builder = new ContainerBuilder();// ... register things...var appContainer = builder.Build();var tenantIdentifier = new MyTenantIdentificationStrategy();var mtc = new MultitenantContainer(tenantIdentifier, appContainer);
// Create a configuration action builder to aggregate registration// actions over the course of some business logic.var actionBuilder = new ConfigurationActionBuilder();
// Do some logic...if(SomethingIsTrue()){
actionBuilder.Add(b => b.RegisterType<AnOverride>().As<ISomething>());}actionBuilder.Add(b => b.RegisterType<SomeClass>());if(AnotherThingIsTrue()){
actionBuilder.Add(b => b.RegisterModule<MyModule>());}
// Now configure a tenant using the built action.mtc.ConfigureTenant('1', actionBuilder.Build());
Identify the Tenant
In order to resolve a tenant-specific dependency, Autofac needs to know which tenant is making the resolution request.That is, “for the current execution context, which tenant is resolving dependencies?”
Autofac.Extras.Multitenant includes an ITenantIdentificationStrategy interface that you can implementto provide just such a mechanism. This allows you to retrieve the tenant ID from anywhere appropriate to yourapplication: an environment variable, a role on the current user’s principal, an incoming request value, or anywhereelse.
The following example shows what a simple ITenantIdentificationStrategy that a web application mightlook like.
using System;using System.Web;using Autofac.Extras.Multitenant;
namespace DemoNamespace{
public class RequestParameterStrategy : ITenantIdentificationStrategy{public bool TryIdentifyTenant(out object tenantId)
96 Chapter 9. Advanced Topics
Autofac Documentation, Release 3.3
{// This is an EXAMPLE ONLY and is NOT RECOMMENDED.tenantId = null;try{
var context = HttpContext.Current;if(context != null && context.Request != null){tenantId = context.Request.Params["tenant"];
}}catch(HttpException){
// Happens at app startup in IIS 7.0}return tenantId != null;
}}
}
In this example, a web application is using an incoming request parameter to get the tenant ID. (Notethat this is just an example and is not recommended because it would allow any user on the systemto very easily just switch tenants.) A slightly more robust version of this exact strategy is provided asAutofac.Extras.Multitenant.Web.RequestParameterTenantIdentificationStrategy but,again, is still not recommended for production due to the insecurity.
In your custom strategy implementation, you may choose to represent your tenant IDs as GUIDs, integers, or any othercustom type. The strategy here is where you would parse the value from the execution context into a strongly typedobject and succeed/fail based on whether the value is present and/or whether it can be parsed into the appropriate type.
Autofac.Extras.Multitenant uses System.Object as the tenant ID type throughout the system for max-imum flexibility.
Performance is important in tenant identification. Tenant identification happens every time you resolve a compo-nent, begin a new lifetime scope, etc. As such, it is very important to make sure your tenant identification strategy isfast. For example, you wouldn’t want to do a service call or a database query during tenant identification.
Be sure to handle errors well in tenant identification. Especially in situations like ASP.NET application startup, youmay use some contextual mechanism (like HttpContext.Current.Request) to determine your tenant ID, but ifyour tenant ID strategy gets called when that contextual information isn’t available, you need to be able to handle that.You’ll see in the above example that not only does it check for the current HttpContext, but also the Request.Check everything and handle exceptions (e.g., parsing exceptions) or you may get some odd or hard-to-troubleshootbehavior.
Resolve Tenant-Specific Dependencies
The way the MultitenantContainer works, each tenant on the system gets their ownAutofac.ILifetimeScope instance which contains the set of application defaults along with the tenant-specific overrides. Doing this...
var builder = new ContainerBuilder();builder.RegisterType<BaseDependency>().As<IDependency>().SingleInstance();var appContainer = builder.Build();
var tenantIdentifier = new MyTenantIdentificationStrategy();
9.9. Multitenant Applications 97
Autofac Documentation, Release 3.3
var mtc = new MultitenantContainer(tenantIdentifier, appContainer);mtc.ConfigureTenant('1', b => b.RegisterType<Tenant1Dependency>().As<IDependency>().InstancePerDependency());
Is very much like using the standard ILifetimeScope.BeginLifetimeScope(Action<ContainerBuilder>),like this:
var builder = new ContainerBuilder();builder.RegisterType<BaseDependency>().As<IDependency>().SingleInstance();var appContainer = builder.Build();
using(var scope = appContainer.BeginLifetimeScope(b => b.RegisterType<Tenant1Dependency>().As<IDependency>().InstancePerDependency()){// Do work with the created scope...
}
When you use the MultitenantContainer to resolve a dependency, behind the scenes it calls yourITenantIdentificationStrategy to identify the tenant, it locates the tenant’s lifetime scope (with theirconfigured overrides), and resolves the dependency from that scope. It does all this transparently, so you can use themultitenant container the same as you do other containers.
var dependency = mtc.Resolve<IDependency>();// "dependency" will be a tenant-specific value resolved from// the multitenant container. If the current tenant has overridden// the IDependency registration, that override will be resolved;// otherwise it will be the application-level default.
The important bit here is that all the work is going on transparently behind the scenes. Any call to Resolve,BeginLifetimeScope, Tag, Disposer, or the other methods/properties on the IContainer interface willall go through the tenant identification process and the result of the call will be tenant-specific.
If you need to specifically access a tenant’s lifetime scope or the application container, theMultitenantContainer provides:
• ApplicationContainer: Gets the application container.
• GetCurrentTenantScope: Identifies the current tenant and returns their specific lifetime scope.
• GetTenantScope: Allows you to provide a specific tenant ID for which you want the lifetime scope.
9.9.3 ASP.NET Integration
ASP.NET integration is not really any different than standard ASP.NET application integration. Really, the onlydifference is that you will set up your application’s Autofac.Integration.Web.IContainerProvider orSystem.,Web.Mvc.IDependencyResolver or whatever with an Autofac.Extras.Multitenant.MultitenantContainerrather than a regular container built by a ContainerBuilder. Since the MultitenantContainer handlesmultitenancy in a transparent fashion, “things just work.”
ASP.NET Application Startup
Here is a sample ASP.NET MVC Global.asax implementation illustrating how simple it is:
namespace MultitenantExample.MvcApplication{
public class MvcApplication : HttpApplication{public static void RegisterRoutes(RouteCollection routes)
98 Chapter 9. Advanced Topics
Autofac Documentation, Release 3.3
{// Register your routes - standard MVC stuff.
}
protected void Application_Start(){
// Set up the tenant ID strategy and application container.// The request parameter tenant ID strategy is used here as an example.// You should use your own strategy in production.var tenantIdStrategy = new RequestParameterTenantIdentificationStrategy("tenant");var builder = new ContainerBuilder();builder.RegisterType<BaseDependency>().As<IDependency>();
// If you have tenant-specific controllers in the same assembly as the// application, you should register controllers individually.builder.RegisterType<HomeController>();
// Create the multitenant container and the tenant overrides.var mtc = new MultitenantContainer(tenantIdStrategy, builder.Build());mtc.ConfigureTenant("1",
b =>{b.RegisterType<Tenant1Dependency>().As<IDependency>().InstancePerDependency();b.RegisterType<Tenant1Controller>().As<HomeController>();
});
// Here's the magic line: Set up the DependencyResolver using// a multitenant container rather than a regular container.DependencyResolver.SetResolver(new AutofacDependencyResolver(mtc));
// ...and everything else is standard MVC.AreaRegistration.RegisterAllAreas();RegisterRoutes(RouteTable.Routes);
}}
}
As you can see, it’s almost the same as regular MVC Autofac integration. You set up the application container, thetenant ID strategy, the multitenant container, and the tenant overrides as illustrated earlier in Register Dependenciesand Identify the Tenant. Then when you set up your DependencyResolver, give it the multitenant container.Everything else just works.
This similarity is true for other web applications as well. When setting up yourIContainerProviderAccessor for web forms, use the multitenant container instead of the standardcontainer. When setting up your Web API DependencyResolver, use the multitenant container instead of thestandard container.
Note in the example that controllers are getting registered individually rather than using the all-at-oncebuilder.RegisterControllers(Assembly.GetExecutingAssembly()); style of registration. Seebelow for more on why this is the case.
Tenant-Specific Controllers
You may choose, in an MVC application, to allow a tenant to override a controller. This is possible, but requires alittle forethought.
First, tenant-specific controllers must derive from the controller they are overriding. For example, if you havea HomeController for your application and a tenant wants to create their own implementation of it, they need to
9.9. Multitenant Applications 99
Autofac Documentation, Release 3.3
derive from it, like...
public class Tenant1HomeController : HomeController{
// Tenant-specific implementation of the controller.}
Second, if your tenant-specific controllers are in the same assembly as the rest of the application, you can’tregister your controllers in one line. You may have seen in standard ASP.NET MVC integration a line likebuilder.RegisterControllers(Assembly.GetExecutingAssembly()); to register all the con-trollers in the assembly at once. Unfortunately, if you have tenant-specific controllers in the same assembly, they’llall be registered at the application level if you do this. Instead, you need to register each application controller at theapplication level one at a time, and then configure tenant-specific overrides the same way.
The example Global.asax above shows this pattern of registering controllers individually.
Of course, if you keep your tenant-specific controllers in other assemblies, you can register all of the applicationcontrollers at once using builder.RegisterControllers(Assembly.GetExecutingAssembly());and it’ll work just fine. Note that if your tenant-specific controller assemblies aren’t referenced by the main application(e.g., they’re “plugins” that get dynamically registered at startup using assembly probing or some such) you’ll need toregister your assemblies with the ASP.NET BuildManager.
Finally, when registering tenant-specific controllers, register them “as” the base controller type. In the example above,you see the default controller registered in the application container like this:
var builder = new ContainerBuilder();builder.RegisterType<HomeController>();
Then when the tenant overrides the controller in their tenant configuration, it looks like this:
var mtc = new MultitenantContainer(tenantIdStrategy, builder.Build());mtc.ConfigureTenant("1", b => b.RegisterType<Tenant1Controller>().As<HomeController>());
Due to the relative complexity of this, it may be a better idea to isolate business logic into external dependenciesthat get passed into your controllers so the tenants can provide override dependencies rather than overridecontrollers.
9.9.4 WCF Integration
WCF integration is just slightly different than the standard WCF integration in that you need to use a different servicehost factory than the standard Autofac host factory and there’s a little additional configuration required.
Also, identifying a tenant is a little harder - the client needs to pass the tenant ID to the service somehow and theservice needs to know how to interpret that passed tenant ID. A simple solution to this is provided in the form of abehavior that passes the relevant information in message headers.
Reference Packages for WCF Integration
For an application consuming a multitenant service (a client application), add references to...
• Autofac
• Autofac.Extras.Multitenant
For an application providing a multitenant service (a service application), add references to...
• Autofac
• Autofac.Integration.Wcf
100 Chapter 9. Advanced Topics
Autofac Documentation, Release 3.3
• Autofac.Extras.Multitenant
• Autofac.Extras.Multitenant.Wcf
Passing Tenant ID with a Behavior
As mentioned earlier (Identify the Tenant), for multitenancy to work you have to identify which tenant is making agiven call so you can resolve the appropriate dependencies. One of the challenges in a service environment is that thetenant is generally established on the client application end and that tenant ID needs to be propagated to the service soit can behave appropriately.
A common solution to this is to propagate the tenant ID in message headers. The client adds a special header to anoutgoing message that contains the tenant ID. The service parses that header, reads out the tenant ID, and uses that IDto determine its functionality.
In WCF, the way to attach these “dynamic” headers to messages and read them back is through a behavior. You applythe behavior to both the client and the service ends so the same header information (type, URN, etc.) is used.
Autofac.Extras.Multitenant provides a simple tenant ID propagation behavior inAutofac.Extras.Multitenant.Wcf.TenantPropagationBehavior. Applied on the client side,it uses the tenant ID strategy to retrieve the contextual tenant ID and insert it into a message header on an outgoingmessage. Applied on the server side, it looks for this inbound header and parses the tenant ID out, putting it into anOperationContext extension.
The WCF Application Startup section below shows examples of putting this behavior in action both on the client andserver sides.
If you use this behavior, a corresponding server-side tenant identification strategy is also provided for you. See TenantIdentification from OperationContext, below.
Tenant Identification from OperationContext
Whether or not you choose to use the provided Autofac.Extras.Multitenant.Wcf.TenantPropagationBehaviorto propagate behavior from client to server in a message header (see above Passing Tenant ID with a Behavior), agood place to store the tenant ID for the life of an operation is in the OperationContext.
Autofac.Extras.Multitenant provides the Autofac.Extras.Multitenant.Wcf.TenantIdentificationContextExtensionas an extension to the WCF OperationContext for just this purpose.
Early in the operation lifecycle (generally in a System.ServiceModel.Dispatcher.IDispatchMessageInspector.AfterReceiveRequest()implementation), you can add the TenantIdentificationContextExtension to the currentOperationContext so the tenant can be easily identified. A sample AfterReceiveRequest() imple-mentation below shows this in action:
public object AfterReceiveRequest(ref Message request, IClientChannel channel, InstanceContext instanceContext){
// This assumes the tenant ID is coming from a message header; you can// get it from wherever you want.var tenantId = request.Headers.GetHeader<TTenantId>(TenantHeaderName, TenantHeaderNamespace);
// Here's where you add the context extension:OperationContext.Current.Extensions.Add(new TenantIdentificationContextExtension() { TenantId = tenantId });return null;
}
Once the tenant ID is attached to the context, you can use an appropriate ITenantIdentificationStrategyto retrieve it as needed.
9.9. Multitenant Applications 101
Autofac Documentation, Release 3.3
If you use the TenantIdentificationContextExtension, then the provided Auto-fac.Extras.Multitenant.Wcf.OperationContextTenantIdentificationStrategy will automatically work to getthe tenant ID from OperationContext.
Hosting Multitenant Services
In a WCF service application, service implementations may be tenant-specific yet share the same service contract.This allows you to provide your service contracts in a separate assembly to tenant-specific developers and allow themto implement custom logic without sharing any of the internals of your default implementation.
To enable this to happen, a custom strategy has been implemented for multitenant service location -Autofac.Extras.Multitenant.Wcf.MultitenantServiceImplementationDataProvider.
In your service’s .svc file, you must specify:
• The full type name of the service contract interface. In regular WCF integration Autofac allows you to useeither typed or named services. For multitenancy, you must use a typed service that is based on the servicecontract interface.
• The full type name of the Autofac host factory. This lets the hosting environment know which factory to use.(This is just like the standard Autofac WCF integration.)
An example .svc file looks like this:
<%@ ServiceHostService="MultitenantExample.WcfService.IMultitenantService, MultitenantExample.WcfService"Factory="Autofac.Integration.Wcf.AutofacServiceHostFactory, Autofac.Integration.Wcf" %>
When registering service implementations with the Autofac container, you must register the implementations as thecontract interface, like this:
builder.RegisterType<BaseImplementation>().As<IMultitenantService>();
Tenant-specific overrides may then register using the interface type as well:
mtc.ConfigureTenant("1", b =>b.RegisterType<Tenant1Implementation>().As<IMultitenantService>());
And don’t forget at app startup, around where you set the container, you need to tell Autofac you’re doing multitenancy:
AutofacHostFactory.ServiceImplementationDataProvider =new MultitenantServiceImplementationDataProvider();
Managing Service Attributes
When configuring WCF services in XML configuration (e.g., web.config), WCF automatically infers the nameof the service element it expects from the concrete service implementation type. For example, in a single-tenant implementation, your MyNamespace.IMyService service interface might have one implementation calledMyNamespace.MyService and that’s what WCF would expect to look for in web.config, like this:
<system.serviceModel><services><service name="MyNamespace.MyService" ... />
</services></system.serviceModel>
However, when using a multitenant service host, the concrete service type that implements the interface is a dynami-cally generated proxy type, so the service configuration name becomes an auto-generated type name, like this:
102 Chapter 9. Advanced Topics
Autofac Documentation, Release 3.3
<system.serviceModel><services><service name="Castle.Proxies.IMyService_1" ... />
</services></system.serviceModel>
To make this easier, Autofac.Extras.Multitenant provides the Autofac.Extras.Multitenant.Wcf.ServiceMetadataTypeAttribute,which you can use to create a “metadata buddy class” (similar to theSystem.ComponentModel.DataAnnotations.MetadataTypeAttribute) that you can mark withtype-level attributes and modify the behavior of the dynamic proxy.
In this case, you need the dynamic proxy to have a System.ServiceModel.ServiceBehaviorAttributeso you can define the ConfigurationName to expect.
First, mark your service interface with a ServiceMetadataTypeAttribute:
using System;using System.ServiceModel;using Autofac.Extras.Multitenant.Wcf;
namespace MyNamespace{
[ServiceContract][ServiceMetadataType(typeof(MyServiceBuddyClass))]public interface IMyService{// ...define your service operations...
}}
Next, create the buddy class you specified in the attribute and add the appropriate metadata.
using System;using System.ServiceModel;
namespace MyNamespace{
[ServiceBehavior(ConfigurationName = "MyNamespace.IMyService")]public class MyServiceBuddyClass{}
}
Now in your XML configuration file, you can use the configuration name you specified on the buddy class:
<system.serviceModel><services><service name="MyNamespace.IMyService" ... />
</services></system.serviceModel>
Important notes about metadata: - Only type-level attributes are copied. At this time, only attributes at the typelevel are copied over from the buddy class to the dynamic proxy. If you have a use case for property/method levelmetadata to be copied, please file an issue. - Not all metadata will have the effect you expect. For example, if youuse the ServiceBehaviorAttribute to define lifetime related information like InstanceContextMode,the service will not follow that directive because Autofac is managing the lifetime, not the standard service host.Use common sense when specifying metadata - if it doesn’t work, don’t forget you’re not using the standard servicelifetime management functionality. - Metadata is application-level, not per-tenant. The metadata buddy class infowill take effect at an application level and can’t be overridden per tenant.
9.9. Multitenant Applications 103
Autofac Documentation, Release 3.3
Tenant-Specific Service Implementations
If you are hosting multitenant services (Hosting Multitenant Services), you can provide tenant-specific service imple-mentations. This allows you to provide a base implementation of a service and share the service contract with tenantsto allow them to develop custom service implementations.
You must implement your service contract as a separate interface. You can’t mark your service implementationwith the ServiceContractAttribute. Your service implementations must then implement the interface. Thisis good practice anyway, but the multitenant service host won’t allow concrete types to directly define the contract.
Tenant-specific service implementations do not need to derive from the base implementation; they only need to imple-ment the service interface.
You can register tenant-specific service implementations in app startup (see WCF Application Startup).
WCF Application Startup
Application startup is generally the same as any other multitenant application (Register Dependencies), but there are acouple of minor things to do for clients, and a little bit of hosting setup for services.
WCF Client Application Startup
In a WCF client application, when you register your service clients you’ll need to register the behavior that prop-agates the tenant ID to the service. If you’re following the standard WCF integration guidance, then registering aservice client looks like this:
// Create the tenant ID strategy for the client application.var tenantIdStrategy = new MyTenantIdentificationStrategy();
// Register application-level dependencies.var builder = new ContainerBuilder();builder.RegisterType<BaseDependency>().As<IDependency>();
// The service client is not different per tenant because// the service itself is multitenant - one client for all// the tenants and ***the service implementation*** switches.builder.Register(c =>
new ChannelFactory<IMultitenantService>(new BasicHttpBinding(),new EndpointAddress("http://server/MultitenantService.svc"))).SingleInstance();
// Register an endpoint behavior on the client channel factory that// will propagate the tenant ID across the wire in a message header.// In this example, the built-in TenantPropagationBehavior is used// to send a string-based tenant ID across the wire.builder.Register(c =>
{var factory = c.Resolve<ChannelFactory<IMultitenantService>>();factory.Opening += (sender, args) => factory.Endpoint.Behaviors.Add(new TenantPropagationBehavior<string>(tenantIdStrategy));return factory.CreateChannel();
});
// Create the multitenant container.var mtc = new MultitenantContainer(tenantIdStrategy, builder.Build());
// ... register tenant overrides, etc.
104 Chapter 9. Advanced Topics

Autofac Documentation, Release 3.3
WCF Service Application Startup
In a WCF service application, you register your defaults and tenant-specific overrides just as you normally would(Register Dependencies) but you have to also:
• Set up the behavior for service hosts to expect an incoming tenant ID header (Passing Tenant ID with a Behavior)for tenant identification.
• Set the service host factory container to a MultitenantContainer.
In the example below, we are using the Autofac.Extras.Multitenant.Wcf.AutofacHostFactory rather than the stan-dard Autofac host factory (as outlined earlier).
namespace MultitenantExample.WcfService{
public class Global : System.Web.HttpApplication{protected void Application_Start(object sender, EventArgs e){
// Create the tenant ID strategy.var tenantIdStrategy = new OperationContextTenantIdentificationStrategy();
// Register application-level dependencies and service implementations.var builder = new ContainerBuilder();builder.RegisterType<BaseImplementation>().As<IMultitenantService>();builder.RegisterType<BaseDependency>().As<IDependency>();
// Create the multitenant container.var mtc = new MultitenantContainer(tenantIdStrategy, builder.Build());
// Notice we configure tenant IDs as strings below because the tenant// identification strategy retrieves string values from the message// headers.
// Configure overrides for tenant 1 - dependencies, service implementations, etc.mtc.ConfigureTenant("1",
b =>{b.RegisterType<Tenant1Dependency>().As<IDependency>().InstancePerDependency();b.RegisterType<Tenant1Implementation>().As<IMultitenantService>();
});
// Add a behavior to service hosts that get created so incoming messages// get inspected and the tenant ID can be parsed from message headers.AutofacHostFactory.HostConfigurationAction =
host =>host.Opening += (s, args) =>
host.Description.Behaviors.Add(new TenantPropagationBehavior<string>(tenantIdStrategy));
// Set the service implementation strategy to multitenant.AutofacHostFactory.ServiceImplementationDataProvider =
new MultitenantServiceImplementationDataProvider();
// Finally, set the host factory application container on the multitenant// WCF host to a multitenant container.AutofacHostFactory.Container = mtc;
}}
}
9.9. Multitenant Applications 105
Autofac Documentation, Release 3.3
9.10 Aggregate Services
9.10.1 Introduction
An aggregate service is useful when you need to treat a set of dependencies as one dependency. When a class de-pends on several constructor-injected services, or have several property-injected services, moving those services intoa separate class yields a simpler API.
An example is super- and subclasses where the superclass have one or more constructor-injected dependencies. Thesubclasses must usually inherit these dependencies, even though they might only be useful to the superclass. With anaggregate service, the superclass constructor parameters can be collapsed into one parameter, reducing the repetitive-ness in subclasses. Another important side effect is that subclasses are now insulated against changes in the superclassdependencies, introducing a new dependency in the superclass means only changing the aggregate service definition.
The pattern and this example are both further elaborated here.
Aggregate services can be implemented by hand, e.g. by building a class with constructor-injected dependencies andexposing those as properties. Writing and maintaining aggregate service classes and accompanying tests can quicklyget tedious though. The AggregateService extension to Autofac lets you generate aggregate services directly frominterface definitions without having to write any implementation.
9.10.2 Required References
You can add aggregate service support to your project using the Autofac.Extras.AggregateService NuGet package orby manually adding references to these assemblies:
• Autofac.dll
• Autofac.Extras.AggregateService.dll
• Castle.Core.dll (from the Castle project)
9.10.3 Getting Started
Lets say we have a class with a number of constructor-injected dependencies that we store privately for later use:
public class SomeController{
private readonly IFirstService _firstService;private readonly ISecondService _secondService;private readonly IThirdService _thirdService;private readonly IFourthService _fourthService;
public SomeController(IFirstService firstService,ISecondService secondService,IThirdService thirdService,IFourthService fourthService)
{_firstService = firstService;_secondService = secondService;_thirdService = thirdService;_fourthService = fourthService;
}}
106 Chapter 9. Advanced Topics
Autofac Documentation, Release 3.3
To aggregate the dependencies we move those into a separate interface definition and take a dependency on thatinterface instead.
public interface IMyAggregateService{
IFirstService FirstService { get; }ISecondService SecondService { get; }IThirdService ThirdService { get; }IFourthService FourthService { get; }
}
public class SomeController{
private readonly IMyAggregateService _aggregateService;
public SomeController(IMyAggregateService aggregateService){_aggregateService = aggregateService;
}}
Finally, we register the aggregate service interface.
using Autofac;using Autofac.Contrib.AggregateService;//...
var builder = new ContainerBuilder();builder.RegisterAggregateService<IMyAggregateService>();builder.Register(/*...*/).As<IFirstService>();builder.Register(/*...*/).As<ISecondService>();builder.Register(/*...*/).As<IThirdService>();builder.Register(/*...*/).As<IFourthService>();builder.RegisterType<SomeController>();var container = builder.Build();
The interface for the aggregate service will automatically have an implementation generated for you and the depen-dencies will be filled in as expected.
9.10.4 How Aggregate Services are Resolved
9.10.5 Properties
Read-only properties mirror the behavior of regular constructor-injected dependencies. The type of each property willbe resolved and cached in the aggregate service when the aggregate service instance is constructed.
Here is a functionally equivalent sample:
class MyAggregateServiceImpl: IMyAggregateService{
private IMyService _myService;
public MyAggregateServiceImpl(IComponentContext context){_myService = context.Resolve<IMyService>();
}
public IMyService MyService
9.10. Aggregate Services 107
Autofac Documentation, Release 3.3
{get { return _myService; }
}}
9.10.6 Methods
Methods will behave like factory delegates and will translate into a resolve call on each invocation. The method returntype will be resolved, passing on any parameters to the resolve call.
A functionally equivalent sample of the method call:
class MyAggregateServiceImpl: IMyAggregateService{
public ISomeThirdService GetThirdService(string data){var dataParam = new TypedParameter(typeof(string), data);return _context.Resolve<ISomeThirdService>(dataParam);
}}
9.10.7 Property Setters and Void Methods
Property setters and methods without return types does not make sense in the aggregate service. Their presence in theaggregate service interface does not prevent proxy generation. Calling such methods though will throw an exception.
9.10.8 How It Works
Under the covers, the AggregateService uses DynamicProxy2 from the Castle Project. Given an interface (the aggre-gate of services into one), a proxy is generated implementing the interface. The proxy will translate calls to propertiesand methods into Resolve calls to an Autofac context.
9.10.9 Performance Considerations
Due to the fact that method calls in the aggregate service pass through a dynamic proxy there is a small but non-zeroamount of overhead on each method call. A performance study on Castle DynamicProxy2 vs other frameworks canbe found here.
9.11 Type Interceptors
DynamicProxy2, part of the from the Castle Project core, provides a method interception framework.
The Autofac.Extras.DynamicProxy2 integration package enables method calls on Autofac components to beintercepted by other components. Common use-cases are transaction handling, logging, and declarative security.
9.11.1 Enabling Interception
The basic steps to get DynamicProxy2 integration working are:
• Create Interceptors
108 Chapter 9. Advanced Topics
Autofac Documentation, Release 3.3
• Register Interceptors with Autofac
• Enable Interception on Types
• Associate Interceptors with Types to be Intercepted
Create Interceptors
Interceptors implement the Castle.DynamicProxy.IInterceptor interface. Here’s a simple interceptor ex-ample that logs method calls including inputs and outputs:
public class CallLogger : IInterceptor{
TextWriter _output;
public CallLogger(TextWriter output){_output = output;
}
public void Intercept(IInvocation invocation){_output.Write("Calling method {0} with parameters {1}... ",
invocation.Method.Name,string.Join(", ", invocation.Arguments.Select(a => (a ?? "").ToString()).ToArray()));
invocation.Proceed();
_output.WriteLine("Done: result was {0}.", invocation.ReturnValue);}
}
Register Interceptors with Autofac
Interceptors must be registered with the container. You can register them either as typed services or as named services.If you register them as named services, they must be named IInterceptor registrations.
Which of these you choose depends on how you decide to associate interceptors with the types being intercepted.
// Named registrationbuilder.Register(c => new CallLogger(Console.Out))
.Named<IInterceptor>("log-calls");
// Typed registrationbuilder.Register(c => new CallLogger(Console.Out));
Enable Interception on Types
When you register a type being intercepted, you have to mark the type at registration time so Autofacknows to wire up that interception. You do this using the EnableInterfaceInterceptors() andEnableClassInterceptors() registration extensions.
var builder = new ContainerBuilder();builder.RegisterType<SomeType>()
.As<ISomeInterface>()
.EnableInterfaceInterceptors();
9.11. Type Interceptors 109
Autofac Documentation, Release 3.3
builder.Register(c => new CallLogger(Console.Out));var container = builder.Build();var willBeIntercepted = container.Resolve<ISomeInterface>();
Under the covers, EnableInterfaceInterceptors() creates an interface proxy that performs the interception,while EnableClassInterceptors() dynamically subclasses the target component to perform interception ofvirtual methods.
Both techniques can be used in conjunction with the assembly scanning support, so you can configure batches ofcomponents using the same methods.
Special case: WCF proxy and remoting objects While WCF proxy objects look like interfaces, theEnableInterfaceInterceptors() mechanism won’t work because, behind the scenes, .NET is actually us-ing a System.Runtime.Remoting.TransparentProxy object that behaves like the interface. If you wantinterception on a WCF proxy, you need to use the InterceptTransparentProxy() method.
var cb = new ContainerBuilder();cb.RegisterType<TestServiceInterceptor>();cb.Register(c => CreateChannelFactory()).SingleInstance();cb
.Register(c => c.Resolve<ChannelFactory<ITestService>>().CreateChannel())
.InterceptTransparentProxy(typeof(IClientChannel))
.InterceptedBy(typeof(TestServiceInterceptor))
.UseWcfSafeRelease();
Associate Interceptors with Types to be Intercepted
To pick which interceptor is associated with your type, you have two choices.
Your first option is to mark the type with an attribute, like this:
// This attribute will look for a TYPED// interceptor registration:[Intercept(typeof(CallLogger))]public class First{
public virtual int GetValue(){// Do some calculation and return a value
}}
// This attribute will look for a NAMED// interceptor registration:[Intercept("log-calls")]public class Second{
public virtual int GetValue(){// Do some calculation and return a value
}}
When you use attributes to associate interceptors, you don’t need to specify the interceptor at registration time. Youcan just enable interception and the interceptor type will automatically be discovered.
// Using the TYPED attribute:var builder = new ContainerBuilder();
110 Chapter 9. Advanced Topics

Autofac Documentation, Release 3.3
builder.RegisterType<First>().EnableClassInterceptors();
builder.Register(c => new CallLogger(Console.Out));
// Using the NAMED attribute:var builder = new ContainerBuilder();builder.RegisterType<Second>()
.EnableClassInterceptors();builder.Register(c => new CallLogger(Console.Out))
.Named<IInterceptor>("log-calls");
The second option is to declare the interceptor at Autofac registration time. You can do this using theInterceptedBy() registration extension:
var builder = new ContainerBuilder();builder.RegisterType<SomeType>()
.EnableClassInterceptors()
.InterceptedBy(typeof(CallLogger));builder.Register(c => new CallLogger(Console.Out));
9.11.2 Tips
Use Public Interfaces
Interface interception requires the interface be public. Non-public interface types can’t be intercepted.
Use Virtual Methods
Class interception requires the methods being intercepted to be virtual since it uses subclassing as the proxy technique.
Usage with Expressions
Components created using expressions, or those registered as instances, cannot be subclassed by the DynamicProxy2engine. In these cases, it is necessary to use interface-based proxies.
Interface Registrations
To enable proxying via interfaces, the component must provide its services through interfaces only. For best perfor-mance, all such service interfaces should be part of the registration, i.e. included in As<X>() clauses.
WCF Proxies
As mentioned earlier, WCF proxies and other remoting types are special cases and can’t use standard interface or classinterception. You must use InterceptTransparentProxy() on those types.
Class Interceptors and UsingConstructor
If you are using class interceptors via EnableClassInterceptors() then avoid using the constructor selectorUsingConstructor() with it. When class interception is enabled, the generated proxy adds some new construc-tors that also take the set of interceptors you want to use. When you specify UsingConstructor() you’ll bypassthis logic and your interceptors won’t be used.
9.11. Type Interceptors 111

Autofac Documentation, Release 3.3
112 Chapter 9. Advanced Topics
CHAPTER 10
Examples
10.1 log4net Integration Module
113

Autofac Documentation, Release 3.3
114 Chapter 10. Examples
CHAPTER 11
Frequently Asked Questions
11.1 How do I work with per-request lifetime scope?
In applications that have a request/response semantic (e.g., ASP.NET MVC or Web API), you can register depen-dencies to be “instance-per-request,” meaning you will get a one instance of the given dependency for each requesthandled by the application and that instance will be tied to the individual request lifecycle.
In order to understand per-request lifetime, you should have a good general understanding of how dependency lifetimescopes work in general. Once you understand how dependency lifetime scopes work, per-request lifetime scope iseasy.
• Registering Dependencies as Per-Request• How Per-Request Lifetime Works• Sharing Dependencies Across Apps Without Requests• Testing with Per-Request Dependencies
– Faking an MVC Request Scope– Faking a Web API Request Scope
• Troubleshooting Per-Request Dependencies– No Scope with a Tag Matching ‘AutofacWebRequest’– No Per-Request Filter Dependencies in Web API
• Implementing Custom Per-Request Semantics
11.1.1 Registering Dependencies as Per-Request
When you want a dependency registered as per-request, use the InstancePerRequest() registration extension:
var builder = new ContainerBuilder();builder.RegisterType<ConsoleLogger>()
.As<ILogger>()
.InstancePerRequest();var container = builder.Build();
You’ll get a new instance of the component for every inbound request for your application. The handling of the creationof the request-level lifetime scope and the cleanup of that scope are generally dealt with via the Autofac applicationintegration libraries for your application type.
115
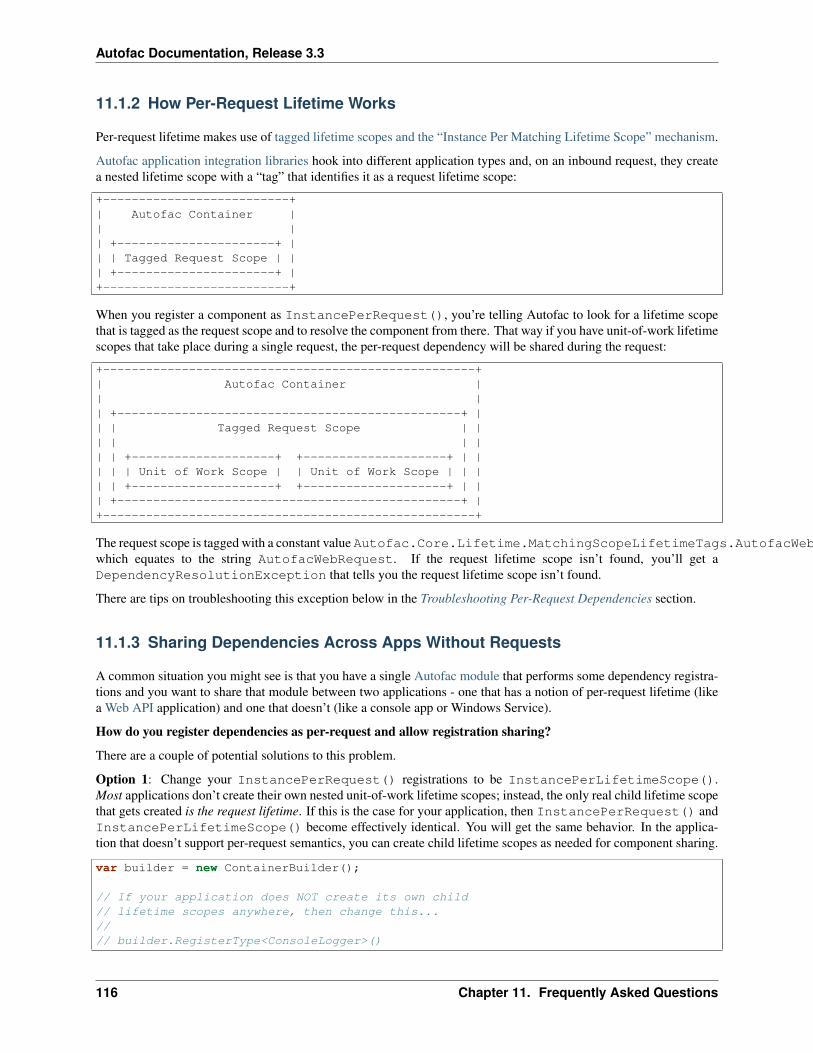
Autofac Documentation, Release 3.3
11.1.2 How Per-Request Lifetime Works
Per-request lifetime makes use of tagged lifetime scopes and the “Instance Per Matching Lifetime Scope” mechanism.
Autofac application integration libraries hook into different application types and, on an inbound request, they createa nested lifetime scope with a “tag” that identifies it as a request lifetime scope:
+--------------------------+| Autofac Container || || +----------------------+ || | Tagged Request Scope | || +----------------------+ |+--------------------------+
When you register a component as InstancePerRequest(), you’re telling Autofac to look for a lifetime scopethat is tagged as the request scope and to resolve the component from there. That way if you have unit-of-work lifetimescopes that take place during a single request, the per-request dependency will be shared during the request:
+----------------------------------------------------+| Autofac Container || || +------------------------------------------------+ || | Tagged Request Scope | || | | || | +--------------------+ +--------------------+ | || | | Unit of Work Scope | | Unit of Work Scope | | || | +--------------------+ +--------------------+ | || +------------------------------------------------+ |+----------------------------------------------------+
The request scope is tagged with a constant value Autofac.Core.Lifetime.MatchingScopeLifetimeTags.AutofacWebRequest,which equates to the string AutofacWebRequest. If the request lifetime scope isn’t found, you’ll get aDependencyResolutionException that tells you the request lifetime scope isn’t found.
There are tips on troubleshooting this exception below in the Troubleshooting Per-Request Dependencies section.
11.1.3 Sharing Dependencies Across Apps Without Requests
A common situation you might see is that you have a single Autofac module that performs some dependency registra-tions and you want to share that module between two applications - one that has a notion of per-request lifetime (likea Web API application) and one that doesn’t (like a console app or Windows Service).
How do you register dependencies as per-request and allow registration sharing?
There are a couple of potential solutions to this problem.
Option 1: Change your InstancePerRequest() registrations to be InstancePerLifetimeScope().Most applications don’t create their own nested unit-of-work lifetime scopes; instead, the only real child lifetime scopethat gets created is the request lifetime. If this is the case for your application, then InstancePerRequest() andInstancePerLifetimeScope() become effectively identical. You will get the same behavior. In the applica-tion that doesn’t support per-request semantics, you can create child lifetime scopes as needed for component sharing.
var builder = new ContainerBuilder();
// If your application does NOT create its own child// lifetime scopes anywhere, then change this...//// builder.RegisterType<ConsoleLogger>()
116 Chapter 11. Frequently Asked Questions
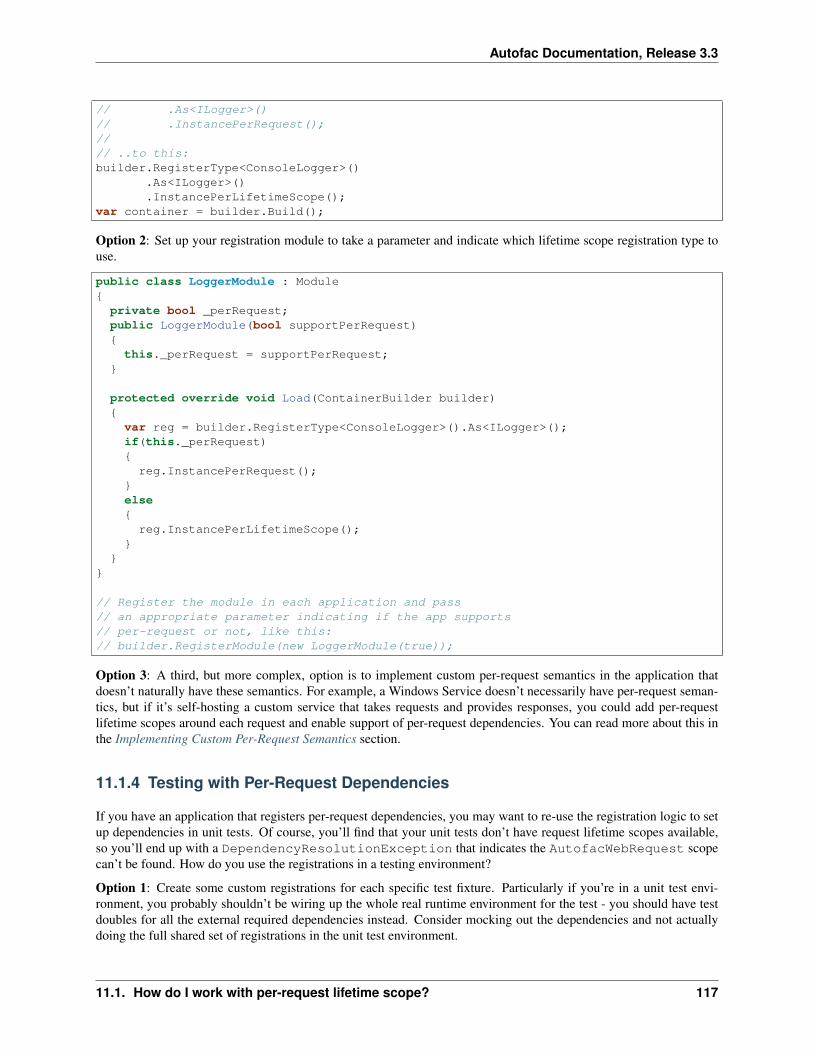
Autofac Documentation, Release 3.3
// .As<ILogger>()// .InstancePerRequest();//// ..to this:builder.RegisterType<ConsoleLogger>()
.As<ILogger>()
.InstancePerLifetimeScope();var container = builder.Build();
Option 2: Set up your registration module to take a parameter and indicate which lifetime scope registration type touse.
public class LoggerModule : Module{
private bool _perRequest;public LoggerModule(bool supportPerRequest){this._perRequest = supportPerRequest;
}
protected override void Load(ContainerBuilder builder){var reg = builder.RegisterType<ConsoleLogger>().As<ILogger>();if(this._perRequest){
reg.InstancePerRequest();}else{
reg.InstancePerLifetimeScope();}
}}
// Register the module in each application and pass// an appropriate parameter indicating if the app supports// per-request or not, like this:// builder.RegisterModule(new LoggerModule(true));
Option 3: A third, but more complex, option is to implement custom per-request semantics in the application thatdoesn’t naturally have these semantics. For example, a Windows Service doesn’t necessarily have per-request seman-tics, but if it’s self-hosting a custom service that takes requests and provides responses, you could add per-requestlifetime scopes around each request and enable support of per-request dependencies. You can read more about this inthe Implementing Custom Per-Request Semantics section.
11.1.4 Testing with Per-Request Dependencies
If you have an application that registers per-request dependencies, you may want to re-use the registration logic to setup dependencies in unit tests. Of course, you’ll find that your unit tests don’t have request lifetime scopes available,so you’ll end up with a DependencyResolutionException that indicates the AutofacWebRequest scopecan’t be found. How do you use the registrations in a testing environment?
Option 1: Create some custom registrations for each specific test fixture. Particularly if you’re in a unit test envi-ronment, you probably shouldn’t be wiring up the whole real runtime environment for the test - you should have testdoubles for all the external required dependencies instead. Consider mocking out the dependencies and not actuallydoing the full shared set of registrations in the unit test environment.
11.1. How do I work with per-request lifetime scope? 117
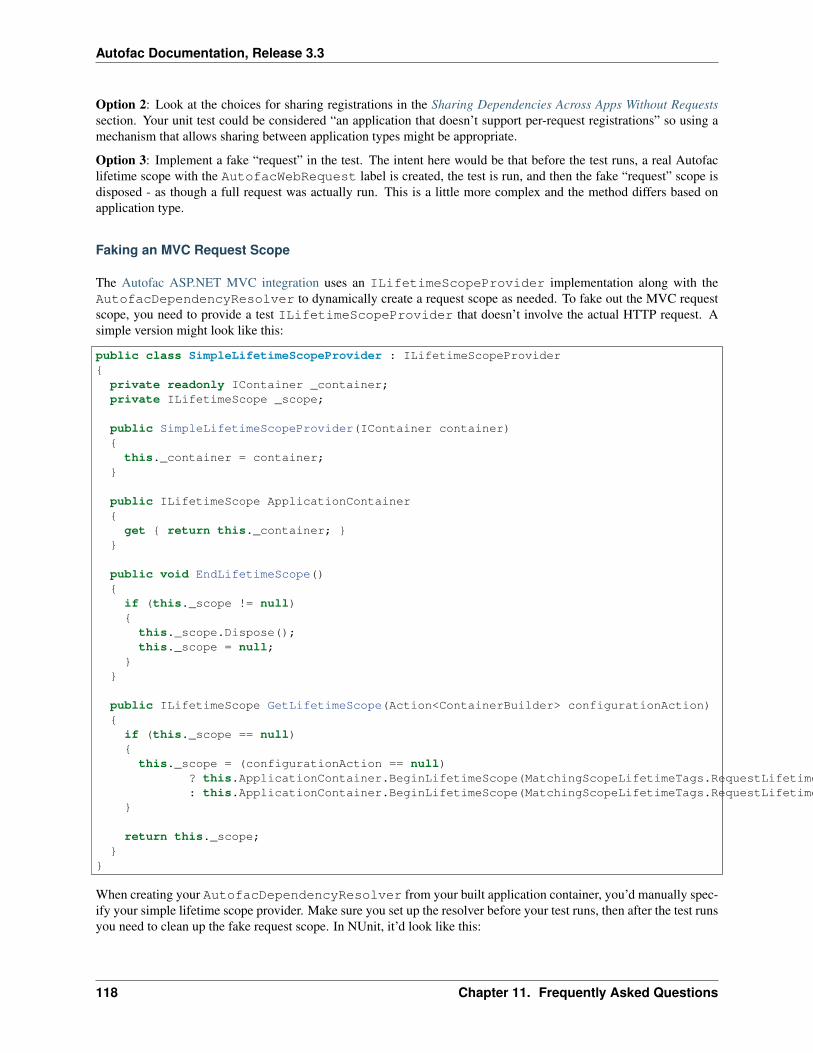
Autofac Documentation, Release 3.3
Option 2: Look at the choices for sharing registrations in the Sharing Dependencies Across Apps Without Requestssection. Your unit test could be considered “an application that doesn’t support per-request registrations” so using amechanism that allows sharing between application types might be appropriate.
Option 3: Implement a fake “request” in the test. The intent here would be that before the test runs, a real Autofaclifetime scope with the AutofacWebRequest label is created, the test is run, and then the fake “request” scope isdisposed - as though a full request was actually run. This is a little more complex and the method differs based onapplication type.
Faking an MVC Request Scope
The Autofac ASP.NET MVC integration uses an ILifetimeScopeProvider implementation along with theAutofacDependencyResolver to dynamically create a request scope as needed. To fake out the MVC requestscope, you need to provide a test ILifetimeScopeProvider that doesn’t involve the actual HTTP request. Asimple version might look like this:
public class SimpleLifetimeScopeProvider : ILifetimeScopeProvider{
private readonly IContainer _container;private ILifetimeScope _scope;
public SimpleLifetimeScopeProvider(IContainer container){this._container = container;
}
public ILifetimeScope ApplicationContainer{get { return this._container; }
}
public void EndLifetimeScope(){if (this._scope != null){
this._scope.Dispose();this._scope = null;
}}
public ILifetimeScope GetLifetimeScope(Action<ContainerBuilder> configurationAction){if (this._scope == null){
this._scope = (configurationAction == null)? this.ApplicationContainer.BeginLifetimeScope(MatchingScopeLifetimeTags.RequestLifetimeScopeTag): this.ApplicationContainer.BeginLifetimeScope(MatchingScopeLifetimeTags.RequestLifetimeScopeTag, configurationAction);
}
return this._scope;}
}
When creating your AutofacDependencyResolver from your built application container, you’d manually spec-ify your simple lifetime scope provider. Make sure you set up the resolver before your test runs, then after the test runsyou need to clean up the fake request scope. In NUnit, it’d look like this:
118 Chapter 11. Frequently Asked Questions
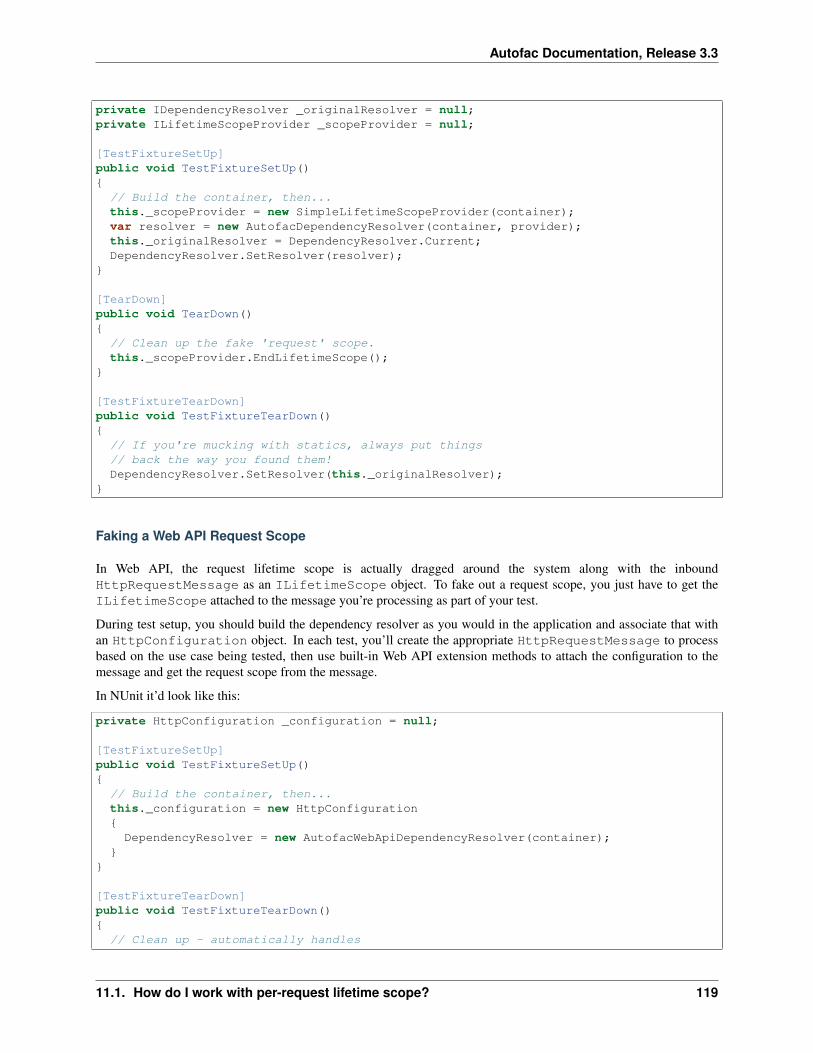
Autofac Documentation, Release 3.3
private IDependencyResolver _originalResolver = null;private ILifetimeScopeProvider _scopeProvider = null;
[TestFixtureSetUp]public void TestFixtureSetUp(){
// Build the container, then...this._scopeProvider = new SimpleLifetimeScopeProvider(container);var resolver = new AutofacDependencyResolver(container, provider);this._originalResolver = DependencyResolver.Current;DependencyResolver.SetResolver(resolver);
}
[TearDown]public void TearDown(){
// Clean up the fake 'request' scope.this._scopeProvider.EndLifetimeScope();
}
[TestFixtureTearDown]public void TestFixtureTearDown(){
// If you're mucking with statics, always put things// back the way you found them!DependencyResolver.SetResolver(this._originalResolver);
}
Faking a Web API Request Scope
In Web API, the request lifetime scope is actually dragged around the system along with the inboundHttpRequestMessage as an ILifetimeScope object. To fake out a request scope, you just have to get theILifetimeScope attached to the message you’re processing as part of your test.
During test setup, you should build the dependency resolver as you would in the application and associate that withan HttpConfiguration object. In each test, you’ll create the appropriate HttpRequestMessage to processbased on the use case being tested, then use built-in Web API extension methods to attach the configuration to themessage and get the request scope from the message.
In NUnit it’d look like this:
private HttpConfiguration _configuration = null;
[TestFixtureSetUp]public void TestFixtureSetUp(){
// Build the container, then...this._configuration = new HttpConfiguration{DependencyResolver = new AutofacWebApiDependencyResolver(container);
}}
[TestFixtureTearDown]public void TestFixtureTearDown(){
// Clean up - automatically handles
11.1. How do I work with per-request lifetime scope? 119
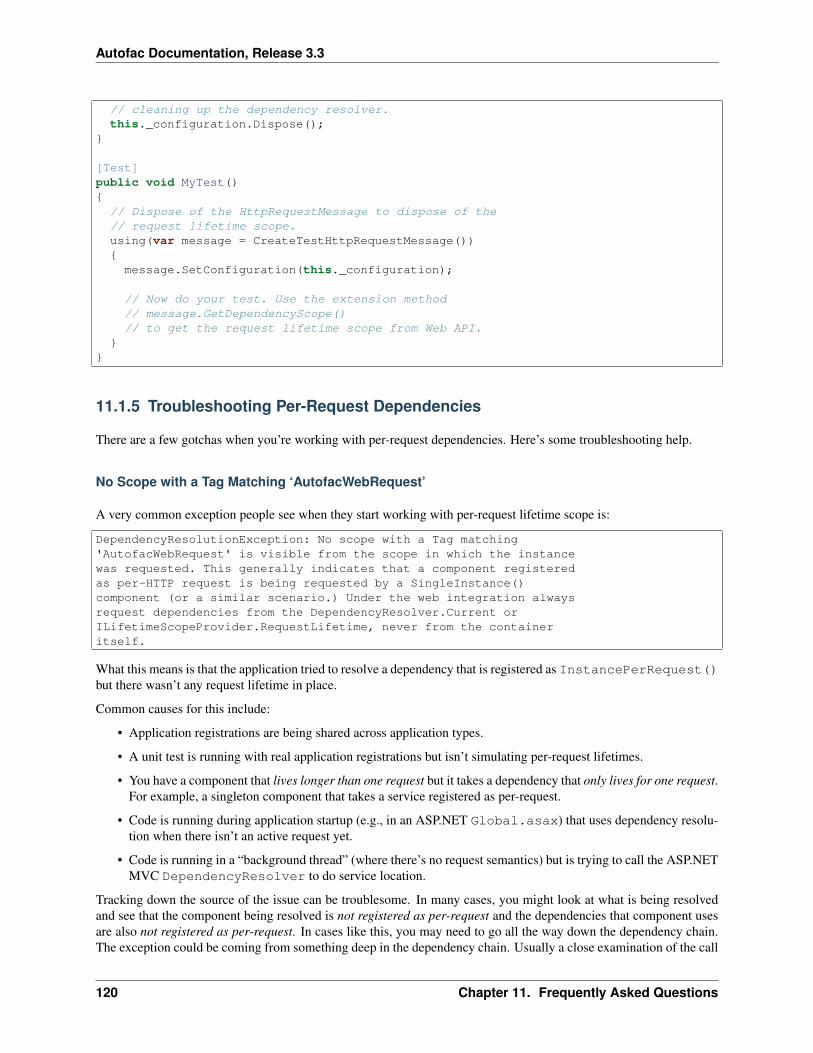
Autofac Documentation, Release 3.3
// cleaning up the dependency resolver.this._configuration.Dispose();
}
[Test]public void MyTest(){
// Dispose of the HttpRequestMessage to dispose of the// request lifetime scope.using(var message = CreateTestHttpRequestMessage()){message.SetConfiguration(this._configuration);
// Now do your test. Use the extension method// message.GetDependencyScope()// to get the request lifetime scope from Web API.
}}
11.1.5 Troubleshooting Per-Request Dependencies
There are a few gotchas when you’re working with per-request dependencies. Here’s some troubleshooting help.
No Scope with a Tag Matching ‘AutofacWebRequest’
A very common exception people see when they start working with per-request lifetime scope is:
DependencyResolutionException: No scope with a Tag matching'AutofacWebRequest' is visible from the scope in which the instancewas requested. This generally indicates that a component registeredas per-HTTP request is being requested by a SingleInstance()component (or a similar scenario.) Under the web integration alwaysrequest dependencies from the DependencyResolver.Current orILifetimeScopeProvider.RequestLifetime, never from the containeritself.
What this means is that the application tried to resolve a dependency that is registered as InstancePerRequest()but there wasn’t any request lifetime in place.
Common causes for this include:
• Application registrations are being shared across application types.
• A unit test is running with real application registrations but isn’t simulating per-request lifetimes.
• You have a component that lives longer than one request but it takes a dependency that only lives for one request.For example, a singleton component that takes a service registered as per-request.
• Code is running during application startup (e.g., in an ASP.NET Global.asax) that uses dependency resolu-tion when there isn’t an active request yet.
• Code is running in a “background thread” (where there’s no request semantics) but is trying to call the ASP.NETMVC DependencyResolver to do service location.
Tracking down the source of the issue can be troublesome. In many cases, you might look at what is being resolvedand see that the component being resolved is not registered as per-request and the dependencies that component usesare also not registered as per-request. In cases like this, you may need to go all the way down the dependency chain.The exception could be coming from something deep in the dependency chain. Usually a close examination of the call
120 Chapter 11. Frequently Asked Questions
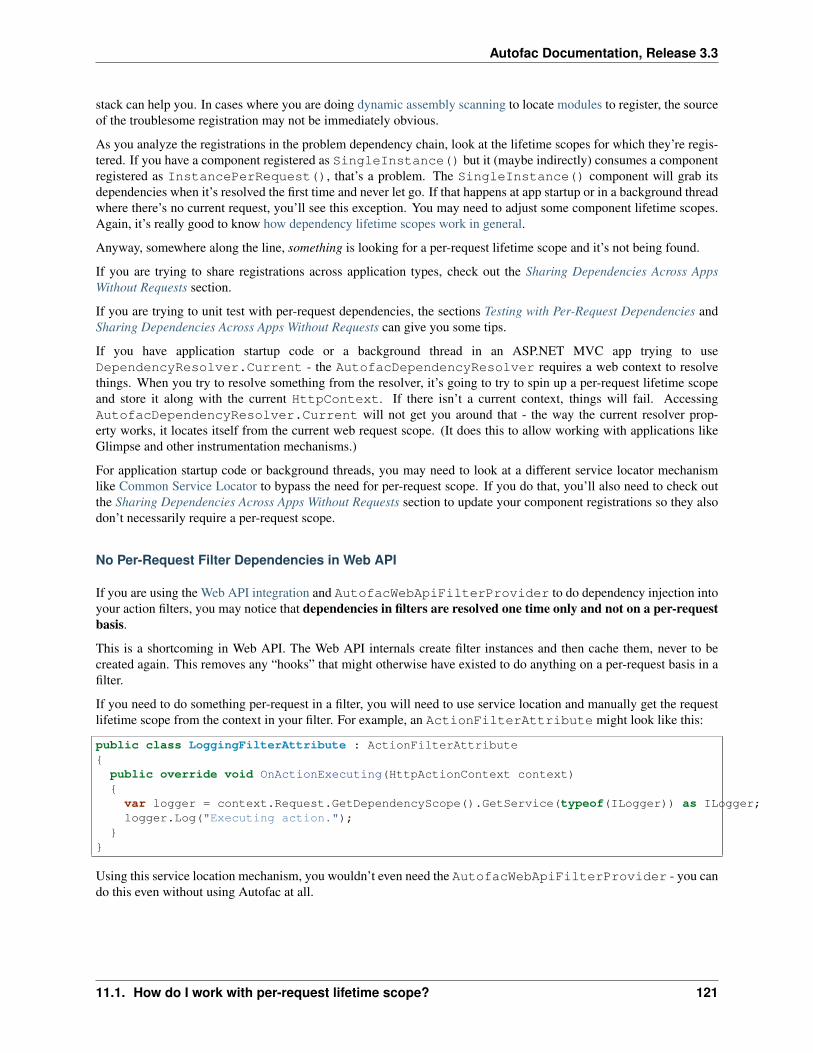
Autofac Documentation, Release 3.3
stack can help you. In cases where you are doing dynamic assembly scanning to locate modules to register, the sourceof the troublesome registration may not be immediately obvious.
As you analyze the registrations in the problem dependency chain, look at the lifetime scopes for which they’re regis-tered. If you have a component registered as SingleInstance() but it (maybe indirectly) consumes a componentregistered as InstancePerRequest(), that’s a problem. The SingleInstance() component will grab itsdependencies when it’s resolved the first time and never let go. If that happens at app startup or in a background threadwhere there’s no current request, you’ll see this exception. You may need to adjust some component lifetime scopes.Again, it’s really good to know how dependency lifetime scopes work in general.
Anyway, somewhere along the line, something is looking for a per-request lifetime scope and it’s not being found.
If you are trying to share registrations across application types, check out the Sharing Dependencies Across AppsWithout Requests section.
If you are trying to unit test with per-request dependencies, the sections Testing with Per-Request Dependencies andSharing Dependencies Across Apps Without Requests can give you some tips.
If you have application startup code or a background thread in an ASP.NET MVC app trying to useDependencyResolver.Current - the AutofacDependencyResolver requires a web context to resolvethings. When you try to resolve something from the resolver, it’s going to try to spin up a per-request lifetime scopeand store it along with the current HttpContext. If there isn’t a current context, things will fail. AccessingAutofacDependencyResolver.Current will not get you around that - the way the current resolver prop-erty works, it locates itself from the current web request scope. (It does this to allow working with applications likeGlimpse and other instrumentation mechanisms.)
For application startup code or background threads, you may need to look at a different service locator mechanismlike Common Service Locator to bypass the need for per-request scope. If you do that, you’ll also need to check outthe Sharing Dependencies Across Apps Without Requests section to update your component registrations so they alsodon’t necessarily require a per-request scope.
No Per-Request Filter Dependencies in Web API
If you are using the Web API integration and AutofacWebApiFilterProvider to do dependency injection intoyour action filters, you may notice that dependencies in filters are resolved one time only and not on a per-requestbasis.
This is a shortcoming in Web API. The Web API internals create filter instances and then cache them, never to becreated again. This removes any “hooks” that might otherwise have existed to do anything on a per-request basis in afilter.
If you need to do something per-request in a filter, you will need to use service location and manually get the requestlifetime scope from the context in your filter. For example, an ActionFilterAttribute might look like this:
public class LoggingFilterAttribute : ActionFilterAttribute{
public override void OnActionExecuting(HttpActionContext context){var logger = context.Request.GetDependencyScope().GetService(typeof(ILogger)) as ILogger;logger.Log("Executing action.");
}}
Using this service location mechanism, you wouldn’t even need the AutofacWebApiFilterProvider - you cando this even without using Autofac at all.
11.1. How do I work with per-request lifetime scope? 121
Autofac Documentation, Release 3.3
11.1.6 Implementing Custom Per-Request Semantics
You may have a custom application that handles requests - like a Windows Service application that takes requests,performs some work, and provides some output. In cases like that, you can implement a custom mechanism that pro-vides the ability to register and resolve dependencies on a per-request basis if you structure your application properly.The steps you would take are identical to the steps seen in other application types that naturally support per-requestsemantics.
• Build the container at application start. Make your registrations, build the container, and store a reference tothe global container for later use.
• When a logical request is received, create a request lifetime scope. The request lifetime scope should betagged with the tag Autofac.Core.Lifetime.MatchingScopeLifetimeTags.AutofacWebRequestso you can use standard registration extension methods like InstancePerRequest(). This will alsoenable you to share registration modules across application types if you so desire.
• Associate request lifetime scope with the request. This means you need the ability to get the requestscope from within the request and not have a single, static, global variable with the “request scope” - that’sa threading problem. You either need a construct like HttpContext.Current (as in ASP.NET) orOperationContext.Current (as in WCF); or you need to store the request lifetime along with the actualincoming request information (like Web API).
• Dispose of the request lifetime after the request is done. After the request has been processed and theresponse is sent, you need to call IDisposable.Dispose() on the request lifetime scope to ensure memoryis cleaned up and service instances are released.
• Dispose of the container at application end. When the application is shutting down, callIDisposable.Dispose() on the global application container to ensure any managed resources are prop-erly disposed and connections to databases, etc. are shut down.
How exactly you do this depends on your application, so an “example” can’t really be provided. A good way to seethe pattern is to look at the source for the integration libraries for various app types like MVC and Web API to see howthose are done. You can then adopt patterns and adapt accordingly to fit your application’s needs.
This is a very advanced process. You can pretty easily introduce memory leaks by not properly disposing of thingsor create threading problems by not correctly associating request lifetimes with requests. Be careful if you go downthis road and do a lot of testing and profiling to make sure things work as you expect.
11.2 How do I pick a service implementation by context?
There are times when you may want to register multiple components that all expose the same service but you want topick which component is used in different instances.
For this question, let’s imagine a simple order processing system. In this system, we have...
• A shipping processor that orchestrates the physical mailing of the order contents.
• A notification processor that sends an alert to a user when their order status changes.
In this simple system, the shipping processor might need to take different “plugins” to allow order delivery by differentmeans - postal service, UPS, FedEx, and so on. The notification processor might also need different “plugins” to allownotifications by different means, like email or SMS text.
Your initial class design might look like this:
// This interface lets you send some content// to a specified destination.public interface ISender{
122 Chapter 11. Frequently Asked Questions
Autofac Documentation, Release 3.3
void Send(Destination dest, Content content);}
// We can implement the interface for different// "sending strategies":public class PostalServiceSender : ISender { ... }public class EmailNotifier : ISender { ... }
// The shipping processor sends the physical order// to a customer given a shipping strategy (postal service,// UPS, FedEx, etc.).public class ShippingProcessor{
public ShippingProcessor(ISender shippingStrategy) { ... }}
// The customer notifier sends the customer an alert when their// order status changes using the channel specified by the notification// strategy (email, SMS, etc.).public class CustomerNotifier{
public CustomerNotifier(ISender notificationStrategy) { ... }}
When you register things in Autofac, you might have registrations that look like this:
var builder = new ContainerBuilder();builder.RegisterType<PostalServiceSender>().As<ISender>();builder.RegisterType<EmailNotifier>().As<ISender>();builder.RegisterType<ShippingProcessor>();builder.RegisterType<CustomerNotifier>();var container = builder.Build();
How do you make sure the shipping processor gets the postal service strategy and the customer notifiergets the email strategy?
• Option 1: Redesign Your Interfaces• Option 2: Change the Registrations• Option 3: Use Keyed Services• Option 4: Use Metadata
11.2.1 Option 1: Redesign Your Interfaces
When you run into a situation where you have a bunch of components that implement identical services but they can’tbe treated identically, this is generally an interface design problem.
From an object oriented development perspective, you’d want your objects to adhere to the Liskov substitution princi-ple and this sort of breaks that.
Think about it from another angle: the standard “animal” example in object orientation. Say you have some animalobjects and you are creating a special class that represents a bird cage that can hold small birds:
public abstract class Animal{
public abstract string MakeNoise();public abstract AnimalSize Size { get; }
11.2. How do I pick a service implementation by context? 123

Autofac Documentation, Release 3.3
}
public enum AnimalSize{
Small, Medium, Large}
public class HouseCat : Animal{
public override string MakeNoise() { return "Meow!"; }public override AnimalSize { get { return AnimalSize.Small; } }
}
public abstract class Bird : Animal{
public override string MakeNoise() { return "Chirp!"; }}
public class Parakeet : Bird{
public override AnimalSize { get { return AnimalSize.Small; } }}
public class BaldEagle : Bird{
public override string MakeNoise() { return "Screech!"; }public override AnimalSize { get { return AnimalSize.Large; } }
}
OK, there are our animals. Obviously we can’t treat them all equally, so if we made a bird cage class, we probablywouldn’t do it like this:
public class BirdCage{
public BirdCage(Animal animal){if(!(animal is Bird) || animal.Size != AnimalSize.Small){
// We only support small birds.throw new NotSupportedException();
}}
}
Designing your bird cage to take just any animal doesn’t make sense. You’d at least want to make it take onlybirds:
public class BirdCage{
public BirdCage(Bird bird){if(bird.Size != AnimalSize.Small){
// We know it's a bird, but it needs to be a small bird.throw new NotSupportedException();
}}
}
124 Chapter 11. Frequently Asked Questions
Autofac Documentation, Release 3.3
But if we change the class design just a little bit, we can make it even easier and force only the right kind of birds toeven be allowed to be used:
// We still keep the base Bird class...public abstract class Bird : Animal{
public override string MakeNoise() { return "Chirp!"; }}
// But we also add a "PetBird" class - for birds that// are small and kept as pets.public abstract class PetBird : Bird{
// We "seal" the override to ensure all pet birds are small.public sealed override AnimalSize { get { return AnimalSize.Small; } }
}
// A parakeet is a pet bird, so we change the base class.public class Parakeet : PetBird { }
// Bald eagles aren't generally pets, so we don't change the base class.public class BaldEagle : Bird{
public override string MakeNoise() { return "Screech!"; }public override AnimalSize { get { return AnimalSize.Large; } }
}
Now it’s easy to design our bird cage to only support small pet birds. We just use the correct base class in theconstructor:
public class BirdCage{
public BirdCage(PetBird bird) { }}
Obviously this is a fairly contrived example with flaws if you dive too far into the analogy, but the principal holds -redesigning the interfaces helps us ensure the bird cage only gets what it expects and nothing else.
Bringing this back to the ordering system, it might seem like every delivery mechanism is just “sending something”but the truth is, they send very different types of things. Maybe there’s a base interface that is for general “sending ofthings,” but you probably need an intermediate level to differentiate between the types of things being sent:
// We can keep the ISender interface if we want...public interface ISender{
void Send(Destination dest, Content content);}
// But we'll introduce intermediate interfaces, even// if they're just "markers," so we can differentiate between// the sort of sending the strategies can perform.public interface IOrderSender : ISender { }public interface INotificationSender : ISender { }
// We change the strategies so they implement the appropriate// interfaces based on what they are allowed to send.public class PostalServiceSender : IOrderSender { ... }public class EmailNotifier : INotificationSender { ... }
11.2. How do I pick a service implementation by context? 125
Autofac Documentation, Release 3.3
// Finally, we update the classes consuming the sending// strategies so they only allow the right kind of strategy// to be used.public class ShippingProcessor{
public ShippingProcessor(IOrderSender shippingStrategy) { ... }}
public class CustomerNotifier{
public CustomerNotifier(INotificationSender notificationStrategy) { ... }}
By doing some interface redesign, you don’t have to “choose a dependency by context” - you use the types todifferentiate and let auto-wireup magic happen during resolution.
If you have the ability to affect change on your solution, this is the recommended option.
11.2.2 Option 2: Change the Registrations
One of the things Autofac lets you do when you register components is to register lambda expressions rather than justtypes. You can manually associate the appropriate type with the consuming component in that way:
var builder = new ContainerBuilder();builder.Register(ctx => new ShippingProcessor(new PostalServiceSender()));builder.Register(ctx => new CustomerNotifier(new EmailNotifier()));var container = builder.Build();
If you want to keep the senders being resolved from Autofac, you can expose them both as their interface types and asthemselves, then resolve them in the lambda:
var builder = new ContainerBuilder();
// Add the "AsSelf" clause to expose these components// both as the ISender interface and as their natural type.builder.RegisterType<PostalServiceSender>()
.As<ISender>()
.AsSelf();builder.RegisterType<EmailNotifier>()
.As<ISender>()
.AsSelf();
// Lambda registrations resolve based on the specific type, not the// ISender interface.builder.Register(ctx => new ShippingProcessor(ctx.Resolve<PostalServiceSender>()));builder.Register(ctx => new CustomerNotifier(ctx.Resolve<EmailNotifier>()));var container = builder.Build();
If using the lambda mechanism feels too “manual” or if the processor objects take lots of parameters, you can manuallyattach parameters to the registrations:
var builder = new ContainerBuilder();
// Keep the "AsSelf" clause.builder.RegisterType<PostalServiceSender>()
.As<ISender>()
.AsSelf();builder.RegisterType<EmailNotifier>()
126 Chapter 11. Frequently Asked Questions
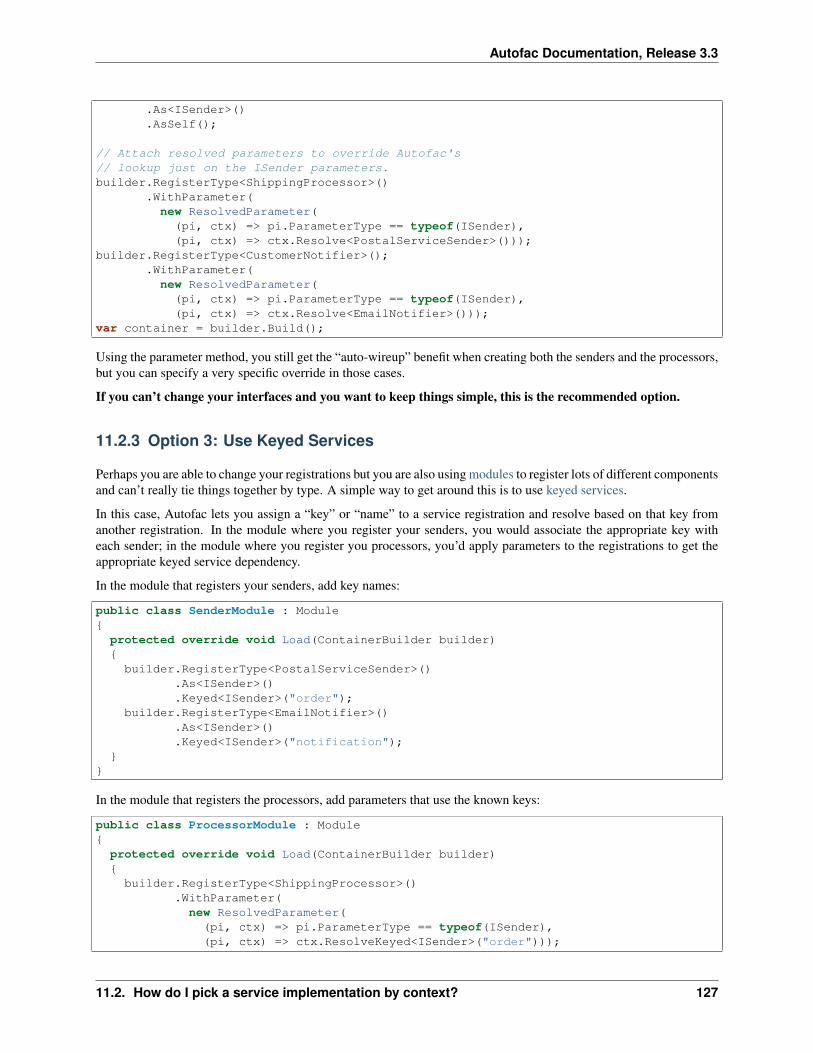
Autofac Documentation, Release 3.3
.As<ISender>()
.AsSelf();
// Attach resolved parameters to override Autofac's// lookup just on the ISender parameters.builder.RegisterType<ShippingProcessor>()
.WithParameter(new ResolvedParameter(
(pi, ctx) => pi.ParameterType == typeof(ISender),(pi, ctx) => ctx.Resolve<PostalServiceSender>()));
builder.RegisterType<CustomerNotifier>();.WithParameter(new ResolvedParameter(
(pi, ctx) => pi.ParameterType == typeof(ISender),(pi, ctx) => ctx.Resolve<EmailNotifier>()));
var container = builder.Build();
Using the parameter method, you still get the “auto-wireup” benefit when creating both the senders and the processors,but you can specify a very specific override in those cases.
If you can’t change your interfaces and you want to keep things simple, this is the recommended option.
11.2.3 Option 3: Use Keyed Services
Perhaps you are able to change your registrations but you are also using modules to register lots of different componentsand can’t really tie things together by type. A simple way to get around this is to use keyed services.
In this case, Autofac lets you assign a “key” or “name” to a service registration and resolve based on that key fromanother registration. In the module where you register your senders, you would associate the appropriate key witheach sender; in the module where you register you processors, you’d apply parameters to the registrations to get theappropriate keyed service dependency.
In the module that registers your senders, add key names:
public class SenderModule : Module{
protected override void Load(ContainerBuilder builder){builder.RegisterType<PostalServiceSender>()
.As<ISender>()
.Keyed<ISender>("order");builder.RegisterType<EmailNotifier>()
.As<ISender>()
.Keyed<ISender>("notification");}
}
In the module that registers the processors, add parameters that use the known keys:
public class ProcessorModule : Module{
protected override void Load(ContainerBuilder builder){builder.RegisterType<ShippingProcessor>()
.WithParameter(new ResolvedParameter((pi, ctx) => pi.ParameterType == typeof(ISender),(pi, ctx) => ctx.ResolveKeyed<ISender>("order")));
11.2. How do I pick a service implementation by context? 127
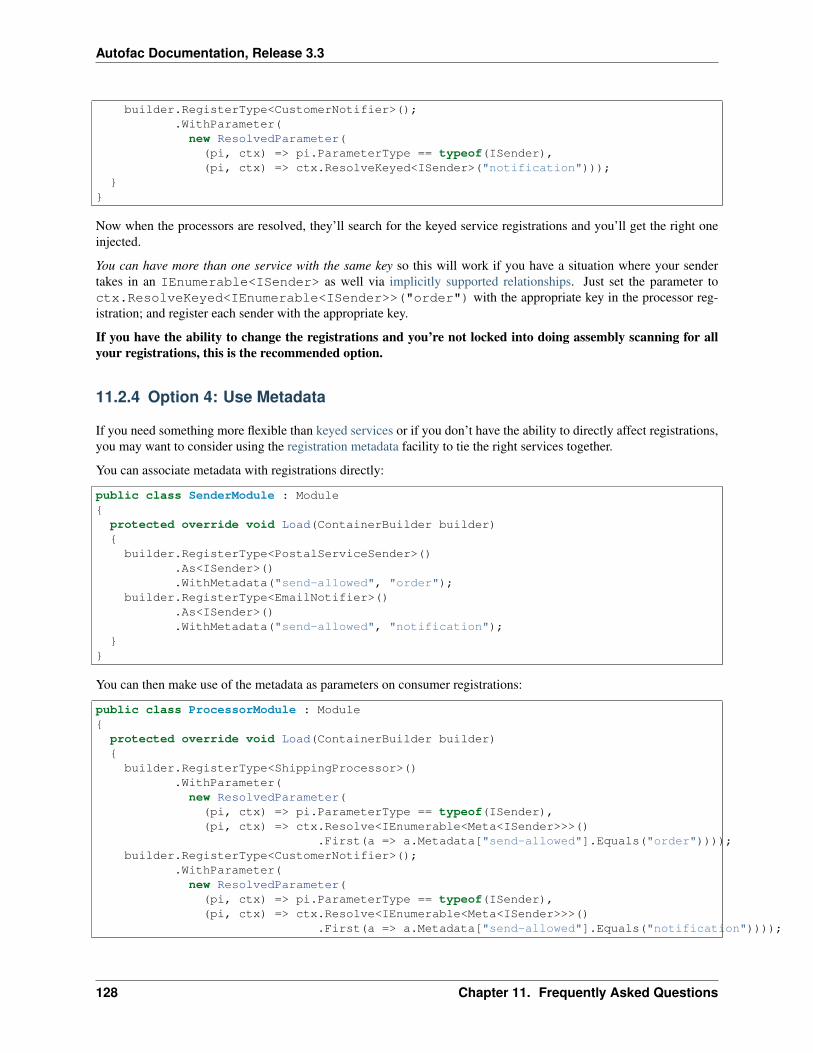
Autofac Documentation, Release 3.3
builder.RegisterType<CustomerNotifier>();.WithParameter(new ResolvedParameter((pi, ctx) => pi.ParameterType == typeof(ISender),(pi, ctx) => ctx.ResolveKeyed<ISender>("notification")));
}}
Now when the processors are resolved, they’ll search for the keyed service registrations and you’ll get the right oneinjected.
You can have more than one service with the same key so this will work if you have a situation where your sendertakes in an IEnumerable<ISender> as well via implicitly supported relationships. Just set the parameter toctx.ResolveKeyed<IEnumerable<ISender>>("order") with the appropriate key in the processor reg-istration; and register each sender with the appropriate key.
If you have the ability to change the registrations and you’re not locked into doing assembly scanning for allyour registrations, this is the recommended option.
11.2.4 Option 4: Use Metadata
If you need something more flexible than keyed services or if you don’t have the ability to directly affect registrations,you may want to consider using the registration metadata facility to tie the right services together.
You can associate metadata with registrations directly:
public class SenderModule : Module{
protected override void Load(ContainerBuilder builder){builder.RegisterType<PostalServiceSender>()
.As<ISender>()
.WithMetadata("send-allowed", "order");builder.RegisterType<EmailNotifier>()
.As<ISender>()
.WithMetadata("send-allowed", "notification");}
}
You can then make use of the metadata as parameters on consumer registrations:
public class ProcessorModule : Module{
protected override void Load(ContainerBuilder builder){builder.RegisterType<ShippingProcessor>()
.WithParameter(new ResolvedParameter((pi, ctx) => pi.ParameterType == typeof(ISender),(pi, ctx) => ctx.Resolve<IEnumerable<Meta<ISender>>>()
.First(a => a.Metadata["send-allowed"].Equals("order"))));builder.RegisterType<CustomerNotifier>();
.WithParameter(new ResolvedParameter((pi, ctx) => pi.ParameterType == typeof(ISender),(pi, ctx) => ctx.Resolve<IEnumerable<Meta<ISender>>>()
.First(a => a.Metadata["send-allowed"].Equals("notification"))));
128 Chapter 11. Frequently Asked Questions

Autofac Documentation, Release 3.3
}}
(Yes, this is just slightly more complex than using keyed services, but you may desire the flexibility the metadatafacility offers.)
If you can’t change the registrations of the sender components, but you’re allowed to change the object defini-tions, you can add metadata to components using the “attribute metadata” mechanism. First you’d create your custommetadata attribute:
[System.ComponentModel.Composition.MetadataAttribute]public class SendAllowedAttribute : Attribute{
public string SendAllowed { get; set; }
public SendAllowedAttribute(string sendAllowed){
this.SendAllowed = sendAllowed;}
}
Then you can apply your custom metadata attribute to the sender components:
[SendAllowed("order")]public class PostalServiceSender : IOrderSender { ... }
[SendAllowed("notification")]public class EmailNotifier : INotificationSender { ... }
When you register your senders, make sure to register the AttributedMetadataModule:
public class SenderModule : Module{
protected override void Load(ContainerBuilder builder){builder.RegisterType<PostalServiceSender>().As<ISender>();builder.RegisterType<EmailNotifier>().As<ISender>();builder.RegisterModule<AttributedMetadataModule>();
}}
The consuming components can then use the metadata just like normal - the names of the attribute properties becomethe names in the metadata:
public class ProcessorModule : Module{
protected override void Load(ContainerBuilder builder){builder.RegisterType<ShippingProcessor>()
.WithParameter(new ResolvedParameter((pi, ctx) => pi.ParameterType == typeof(ISender),(pi, ctx) => ctx.Resolve<IEnumerable<Meta<ISender>>>()
.First(a => a.Metadata["SendAllowed"].Equals("order"))));builder.RegisterType<CustomerNotifier>();
.WithParameter(new ResolvedParameter((pi, ctx) => pi.ParameterType == typeof(ISender),(pi, ctx) => ctx.Resolve<IEnumerable<Meta<ISender>>>()
.First(a => a.Metadata["SendAllowed"].Equals("notification"))));
11.2. How do I pick a service implementation by context? 129
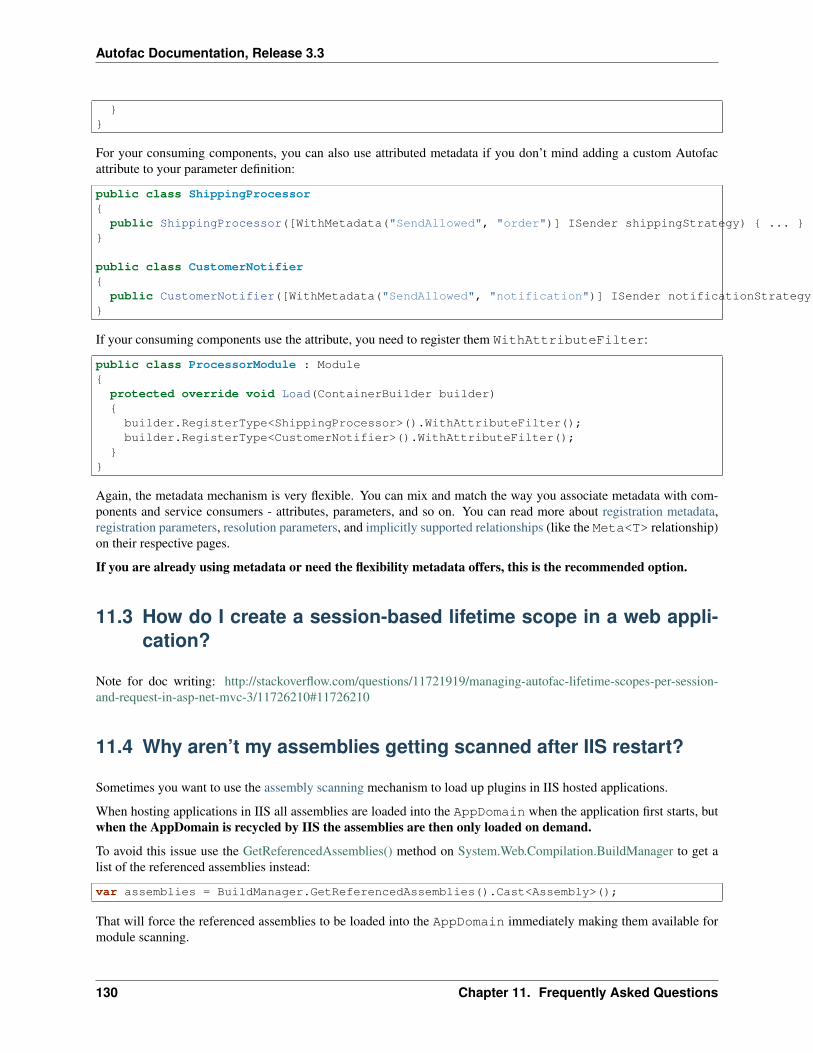
Autofac Documentation, Release 3.3
}}
For your consuming components, you can also use attributed metadata if you don’t mind adding a custom Autofacattribute to your parameter definition:
public class ShippingProcessor{
public ShippingProcessor([WithMetadata("SendAllowed", "order")] ISender shippingStrategy) { ... }}
public class CustomerNotifier{
public CustomerNotifier([WithMetadata("SendAllowed", "notification")] ISender notificationStrategy) { ... }}
If your consuming components use the attribute, you need to register them WithAttributeFilter:
public class ProcessorModule : Module{
protected override void Load(ContainerBuilder builder){builder.RegisterType<ShippingProcessor>().WithAttributeFilter();builder.RegisterType<CustomerNotifier>().WithAttributeFilter();
}}
Again, the metadata mechanism is very flexible. You can mix and match the way you associate metadata with com-ponents and service consumers - attributes, parameters, and so on. You can read more about registration metadata,registration parameters, resolution parameters, and implicitly supported relationships (like the Meta<T> relationship)on their respective pages.
If you are already using metadata or need the flexibility metadata offers, this is the recommended option.
11.3 How do I create a session-based lifetime scope in a web appli-cation?
Note for doc writing: http://stackoverflow.com/questions/11721919/managing-autofac-lifetime-scopes-per-session-and-request-in-asp-net-mvc-3/11726210#11726210
11.4 Why aren’t my assemblies getting scanned after IIS restart?
Sometimes you want to use the assembly scanning mechanism to load up plugins in IIS hosted applications.
When hosting applications in IIS all assemblies are loaded into the AppDomain when the application first starts, butwhen the AppDomain is recycled by IIS the assemblies are then only loaded on demand.
To avoid this issue use the GetReferencedAssemblies() method on System.Web.Compilation.BuildManager to get alist of the referenced assemblies instead:
var assemblies = BuildManager.GetReferencedAssemblies().Cast<Assembly>();
That will force the referenced assemblies to be loaded into the AppDomain immediately making them available formodule scanning.
130 Chapter 11. Frequently Asked Questions
Autofac Documentation, Release 3.3
Alternatively, rather than using AppDomain.CurrentDomain.GetAssemblies() for scanning, manuallyload the assemblies from the filesystem. Doing a manual load forces them into the AppDomain so you can startscanning.
11.5 How do I conditionally register components?
Note for doc writing: This will be about using modules or XML config to do the logic.
11.6 How do I share component registrations across applicationtypes?
Note for doc writing: This is that question where someone wants to use per-request lifetime scopes in a web app butsome other scope in a different kind of app.
11.7 How do I keep Autofac references isolated away from my app?
Note for doc writing: This is for those folks who don’t want any sort of Autofac reference in their app. We’ll bethinking assembly scanning, startup logic, CommonServiceLocator, that sort of thing.
11.5. How do I conditionally register components? 131
Autofac Documentation, Release 3.3
132 Chapter 11. Frequently Asked Questions
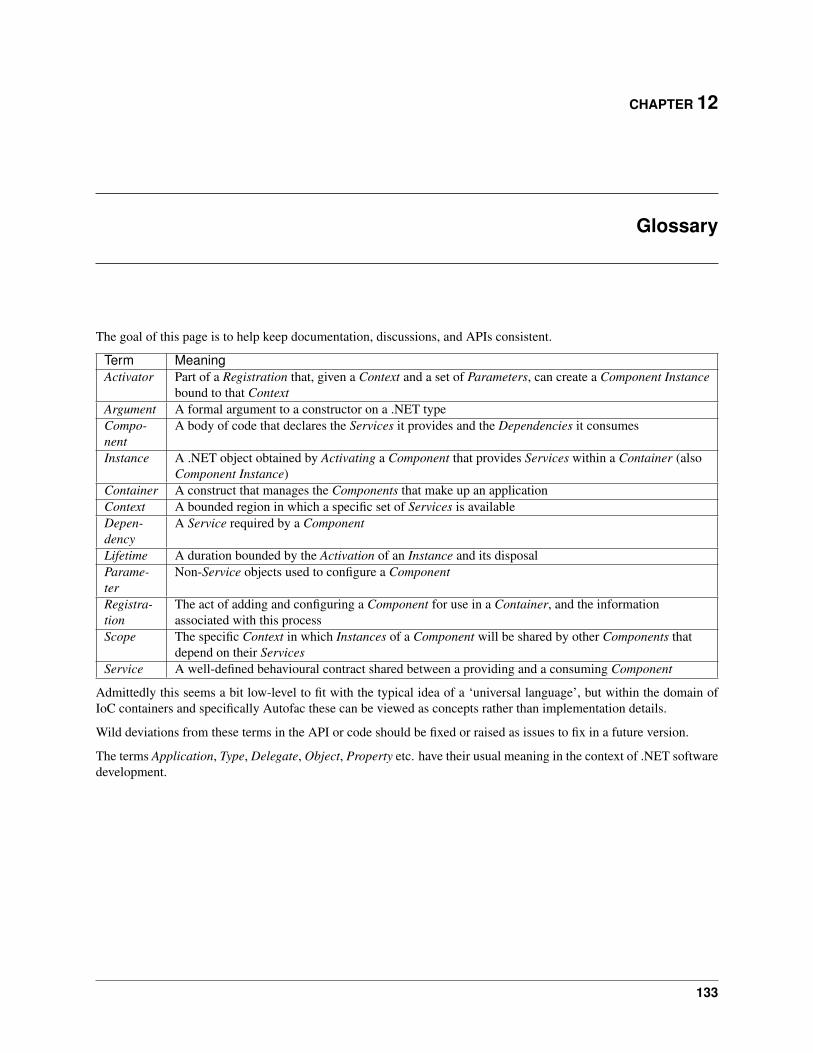
CHAPTER 12
Glossary
The goal of this page is to help keep documentation, discussions, and APIs consistent.
Term MeaningActivator Part of a Registration that, given a Context and a set of Parameters, can create a Component Instance
bound to that ContextArgument A formal argument to a constructor on a .NET typeCompo-nent
A body of code that declares the Services it provides and the Dependencies it consumes
Instance A .NET object obtained by Activating a Component that provides Services within a Container (alsoComponent Instance)
Container A construct that manages the Components that make up an applicationContext A bounded region in which a specific set of Services is availableDepen-dency
A Service required by a Component
Lifetime A duration bounded by the Activation of an Instance and its disposalParame-ter
Non-Service objects used to configure a Component
Registra-tion
The act of adding and configuring a Component for use in a Container, and the informationassociated with this process
Scope The specific Context in which Instances of a Component will be shared by other Components thatdepend on their Services
Service A well-defined behavioural contract shared between a providing and a consuming Component
Admittedly this seems a bit low-level to fit with the typical idea of a ‘universal language’, but within the domain ofIoC containers and specifically Autofac these can be viewed as concepts rather than implementation details.
Wild deviations from these terms in the API or code should be fixed or raised as issues to fix in a future version.
The terms Application, Type, Delegate, Object, Property etc. have their usual meaning in the context of .NET softwaredevelopment.
133

Autofac Documentation, Release 3.3
134 Chapter 12. Glossary
CHAPTER 13
Contributor Guide
13.1 Introduction
Contributions to Autofac, whether new features or bug fixes, are deeply appreciated and benefit the whole user com-munity.
The following guidelines help ensure the smooth running of the project, and keep a consistent standard across thecodebase. They are guidelines only - should you feel a need to deviate from them it is probably for a good reason - butplease adhere to them as closely as possible.
13.2 Making Contributions
If you’d like to contribute code or documentation to Autofac, we welcome pull requests and patches. Questions andsuggestions are welcome on the newsgroup..
Some suggestions for non-code contributions are provided here.
Your contributions must be your own work and licensed under the same terms as Autofac.
13.3 Process
13.3.1 Suggest a Feature
If you have an idea for an Autofac feature, the first place to suggest it is on the discussion forum.
Providing code, either via your blog or another distribution outlet, is a great way to get feedback and support fromthe broader Autofac community. Consider this if it is a possibility, even if it requires core changes. Distributing amodified Autofac.dll as a proof-of-concept is encouraged.
If your suggestion applies to a broad range of users and scenarios, it will be considered for inclusion in the coreAutofac assemblies. It is likely however that if your suggested feature is experimental, we’ll first seek to have it addedto the Autofac.Extras features (see below).
13.3.2 Fix a Defect
If you have an issue you’d like fixed, you may also contribute those fixes. Make sure the issue gets filed in the IssueTracker so it can be considered.
135
Autofac Documentation, Release 3.3
13.3.3 Git vs. Patches
Regardless of whether your contribution is accepted for the Core or the Extras, the preferred means of integrating thecode is via Git rather than a patch. GitHub offers the ability to create a public ‘fork‘ of the Autofac repository in whichyou can commit changes to later be pulled into the main Autofac repository.
If you plan to have ongoing input into the project, ask on the discussion list to be added to the committers list. Settingthis up will permit issues from the issue tracker to be assigned to you, which is convenient when maintaining codecontributions.
13.3.4 Bugs and Code Review Issues
From time to time, issues relating to the work you’ve done on Autofac may be assigned to you via the issue tracker.Feel free to reassign these to the project owners if you’re unable to address the issue.
13.3.5 Announcement
Feel free to announce your changes (once they’re built/working/checked in) on the Autofac discussion forum. Includea link to the wiki page and/or a blog post if these apply.
You may also add your name to the list of contributors in the documentation below (this will not be done for you).
13.3.6 License
By contributing to Autofac, you assert that:
1. The contribution is your own original work. 1. You have the right to assign the copyright for the work (it is notowned by your employer, or you have been given copyright assignment in writing). 1. You license it under the termsapplied to the rest of the Autofac project.
13.4 Coding
13.4.1 Developer Environment
There is a README file in the root of the codeline (or read it on GitHub)that explains the expected developerenvironment and how to build the project.
If your contribution somehow changes the required environment, this document needs to be updated.
13.4.2 Dependencies
The core Autofac assemblies depend on the .NET Base Class Libraries (BCL) only. Autofac.dll proper is aPortable Class Library so only depends on a subset of that BCL functionality. This is a conscious decision to keep theproject lightweight and easier to maintain.
For core integration assemblies (Autofac.Integration.*) the latest version of Autofac relies on the latest version of theintegration target. For example, Autofac.Integration.Mvc always relies on the latest ASP.NET MVC libraries. Thisalso helps keep the project easier to maintain.
The Autofac.Extras features include assemblies that depend on other Open Source (OSS) libraries. It is importantwhen including new dependencies that:
136 Chapter 13. Contributor Guide
Autofac Documentation, Release 3.3
1. The project can be built straight out of Git (no additional installation needs to take place on the developer’smachine). This means NuGet package references and/or checking in dependencies.
2. Any third-party libraries have licenses compatible with Autofac’s (the GPL and licenses like it are incompatible- please ask on the discussion forum if you’re unsure).
13.4.3 Build Process
Your contribution will need to be included in the main Autofac solution so it can be included in the build.
If it is a new assembly, you will also need to provide the generation of NuGet packages (library and symbol/source)so the assembly can be published. You should be able to follow the conventions already in the codeline to accomplishthis.
All projects run full FxCop analysis using a common ruleset. Any new assemblies should also participate in this.
13.4.4 Unit Tests
All contributions to Autofac and Autofac.Extras should be accompanied by unit tests (NUnit) demonstrating the impactof the change. 100% test coverage for code changes is encouraged but not mandatory.
13.4.5 Code Review
All check-ins to the Autofac source code repository are subject to review by any other project member. Please considerit a compliment that the other developers here will spend time reading your code.
Code review is a great way to share knowledge of how Autofac’s internals work, and to weed out possible issues beforethey get into a binary. If you’d like to contribute to the project by performing code reviews, please jump right in usingthe code review tools accessible from the commit log.
13.4.6 Documentation
It is strongly encouraged that you update the Autofac wiki when making changes. If your changes impact existingfeatures, the wiki may be updated regardless of whether a binary distribution has been made that includes the changes.A note discussing the version in which behavior changed can be included inline in the wiki, but don’t leave obsoletedocumentation in place - the documentation on the wiki should remain current so it’s not confusing to the reader.
For new features, consider adding an end-to-end example like on the Aggregate Services or MEF integration pages.This will help users get up to speed and correctly use your feature. There isn’t much point contributing code that noone knows how to use :)
Autofac generates documentation from XML API comments in the code. Please include these comments whencontributing.
The Golden Rule of Documentation: Write the documentation you’d want to read. Every developer has seenself explanatory docs and wondered why there wasn’t more information. (Parameter: “index.” Documentation: “Theindex.”) Please write the documentation you’d want to read if you were a developer first trying to understand how tomake use of a feature.
13.4.7 Coding Standards
Normal .NET coding guidelines apply. See the Framework Design Guidelines for suggestions. If you have access toReSharper, code should be ‘green’ - that is, have no ReSharper warnings or errors with the default settings.
13.4. Coding 137
Autofac Documentation, Release 3.3
Autofac source code uses four spaces for indents (rather than tabs).
13.5 The Autofac.Extras Projects
Autofac.Extras is a companion distribution alongside the main Autofac distribution. The Extras are distinguished by:
• Experimental features
• Integrations with other Open Source projects
• Alternatives to the ‘typical’ way of doing something in the core (e.g. a different configuration syntax)
In many cases, Autofac.Extras is a way of testing alternatives and getting visibility for new ideas that could eventuallyend up in the core.
If your contribution is accepted to Autofac.Extras it is unlikely that the rest of the project team will have the knowledgeto maintain it, so please expect to have bug reports assigned to you for the area (which you may subsequently reassignif you’re unable to action them).
13.6 The Wiki / Documentation
If you are doing some renaming or major changes to the wiki, it’s easier to check it out and work in atext editor sometimes than it is to do things through the GUI. The location of the wiki source in GitHub is:https://github.com/autofac/Autofac.wiki.git
13.7 Contributors
Contributions have been accepted from:
• Nicholas Blumhardt - original version
• Rinat Abdullin - many enhancements
• Petar Andrijasevic - WCF integration
• Daniel Cazzulino - WCF integration enhancements
• Slava Ivanyuk - Moq integration (now part of Moq Contrib)
• Craig G. Wilson - additional Resolve() overloads
• C J Berg - perf improvements
• Chad Lee - NHibernate Integration
• Peter Lillevold - generated factories improvements
• Tyson Stolarski - Silverlight port
• Vijay Santhanam - Documentation updates
• Jonathan S. Oliver - resolve bug fix
• Carl Hörberg - various
• Alex Ilyin - bug fixes
• Alex Meyer-Gleaves - scanning improvements
138 Chapter 13. Contributor Guide
Autofac Documentation, Release 3.3
• Mark Crowley - WCF integration improvements
• Travis Illig - multitenant support
• Steve Hebert - Autofac.Extras.Attributed project for metadata discovery
This isn’t a complete list; if you’re missing, please add your name or email the project owners.
Mention also has to be made of the many wonderful people who have worked in this field and shared their ideas andinsights.
13.7. Contributors 139

Autofac Documentation, Release 3.3
140 Chapter 13. Contributor Guide

CHAPTER 14
Indices and tables
• genindex
• modindex
• search
141


![SADT 11 Transcriptstatic.hackingui.com.s3.amazonaws.com/2016/08/... · [0:00:10.4] SS: We’re your hosts and today’s show is the first time that we’re explicitly covering this](https://img.dokumen.tips/doc/110x75/5f88d62810a21c15c92276c0/sadt-11-000104-ss-weare-your-hosts-and-todayas-show-is-the-irst-time.jpg)