Embed Size (px)
Citation preview

Audition: Music Recording
What is Adobe Audition?
Adobe Audition is a digital audio workstation used to record, edit, mix, restore, and apply effects to audio.
It includes a comprehensive toolset that consists of multitrack, waveform, and spectral display for creating,
mixing, and editing audio content. This powerful audio workstation is designed to accelerate video produc-
tion workflows and audio finishing — and deliver a polished mix with pristine sound.

Set-up
1. Plug in the XLR cable to the SM 57 (for instruments) or
the SM 58 (for vocals)
2. Adjust the mic to face your instrument
3. Plug in the other end of the XLR cable to the Mic 1 port on
the Mixer board
4. Plug in the USB cord to the Mixer board and computer
5. Plug in the power cable to the Mixer board, flip the power
switch on the back of the board
6. Adjust the volume slider at the bottom
XLR Microphone Set-up
There are a few different ways to record music in Audition.
Microphones
Option 1:
XLR microphone and mixer board
Option 2:
USB microphone
Pros: Cons:
-More versatility -Complicated
-More customizability -Requires more equipment
-Superior sound quality
Pros: Cons:
-Convenient -Less sound quality
-Ease of use
-Less of a learning curve

1. Open Adobe Audition
2. Select Edit > Preferences > Audio Hardware
3. Ensure that the Default Input is the
Mixer Board/Microphone and that the Default
Output is either the Speakers or Sennheiser
headphones
Settings
TIP:
It is important to place the media you will be editing in a secure location PRIOR to importing the
media to Audition. If you move the media after importing, Audition will not be able to find it.
1. Select the Waveform icon
2. Title your file
3. Ensure that the Sample Rate is set to 4800,
Channels is set to Stereo, and Bit Depth is set to 24
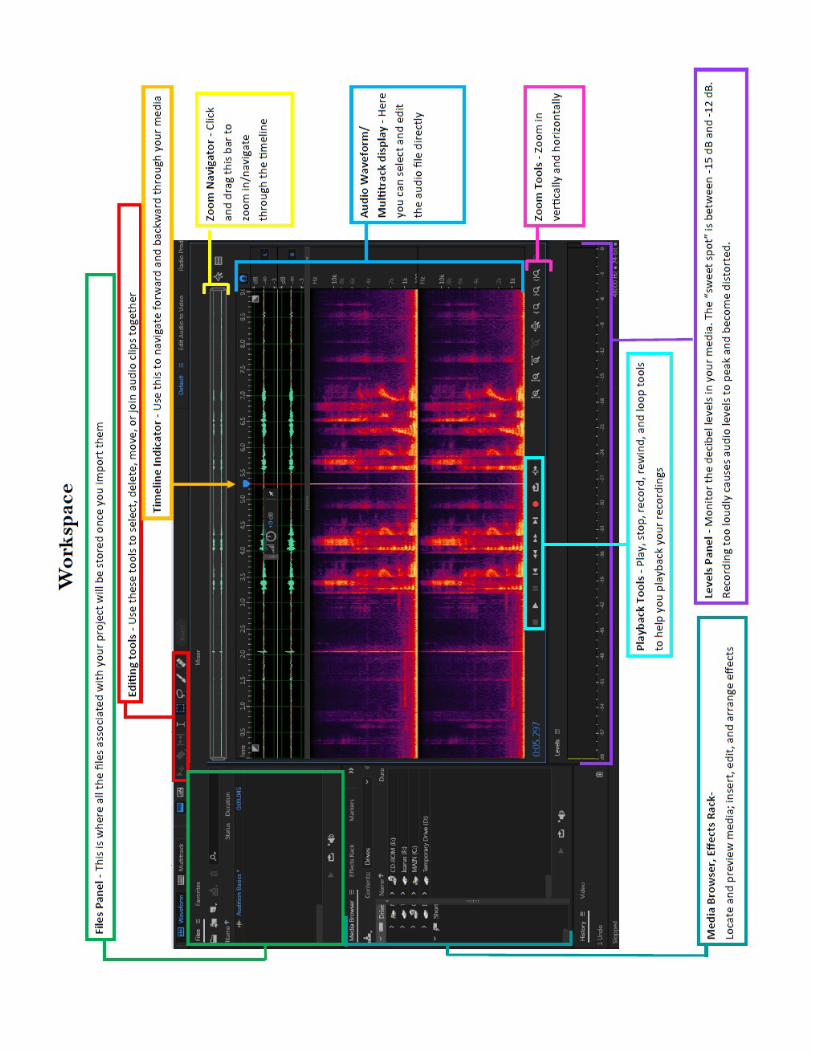
Creating a workspace
Set-up
XLR Microphone Set-up Cont’d
(Optional) Importing
There are multiple ways to import previously recorded material:
1. File > Import > Raw Data
2. Right-click in the media panel and select Import
3. Drag and drop the audio file into the workspace

1. With the microphone plugged in, press the red circle icon at the bottom of the work space, or press
Shift + Space
2. Once you are done recording, press the red circle again, or Shift + Space.
3. Ensure that your recording level stays around the -15dB to -12dB range. If you each above
-9dB, turn down the volume slider on the Mixer Board and decrease the recording level accordingly.
4. To play the recording, press the triangular Play button, or press Spacebar
5. If you are unhappy with your recording press Ctrl + Z to undo the recording and try again.
6. Select the Loop icon to loop-play your clip
Stay in this range
TIP:
If recording vocals, use one of our Pop Filters in the DCS to soften hard consonant sounds
with words containing P’s, K’s, T’s, etc.
Recording

Editing
Select the Spectral Frequency Display icon in the upper left area below the toolbar
This creates a visual representation of the frequencies in your audio:
TIP:
The brighter the color in the Spectral Frequency Display, the louder the frequency is.
Deleting Audio
1. Select the Time Selection Tool (T)
2. Click and drag the mouse over a selection of audio you would like to delete
3. Press the Delete key
Adjusting Audio Levels
1. Select the Time Selection Tool (T)
2. Click and drag the mouse over a selection of audio you would
like to lower or raise the volume on.
3. You will see a HUD (heads up display) appear in your workspace.
Click and hold the circular icon, dragging it up and down to ad-
just the volume.
NOTE: Editing in Waveform is “destructive” meaning any changes made in this mode will be
permanent once it’s saved. We advise making a copy of your original recording before editing.
Editing

Effects
Audition comes with many audio effects that can boost your recording to the next level. The Effects Rack is a
great way to preview multiple audio effects before permanently applying them.
Effects
This effect is used to reduce background noise and room hum.
1. Select the Time Selection Tool (T)
2. Click and drag a section of the audio where there are no instruments/vocals
3. Right-Click and select Capture Noise Print
4. Press Ctrl + A to select all audio in your workspace
5. Option 1:
-Go up to Effects > Noise Reduction/Restoration > Noise Reduction Process
Option 2:
-Select the Effects Rack and select the drop down triangle > Noise Reduction
6. Adjust the settings accordingly, pressing the Play icon on the bottom the effects dialogue box to listen
to the changes
-Toggle the power icon on and off to preview the effect
Noise Reduction
http://www.adobepress.com
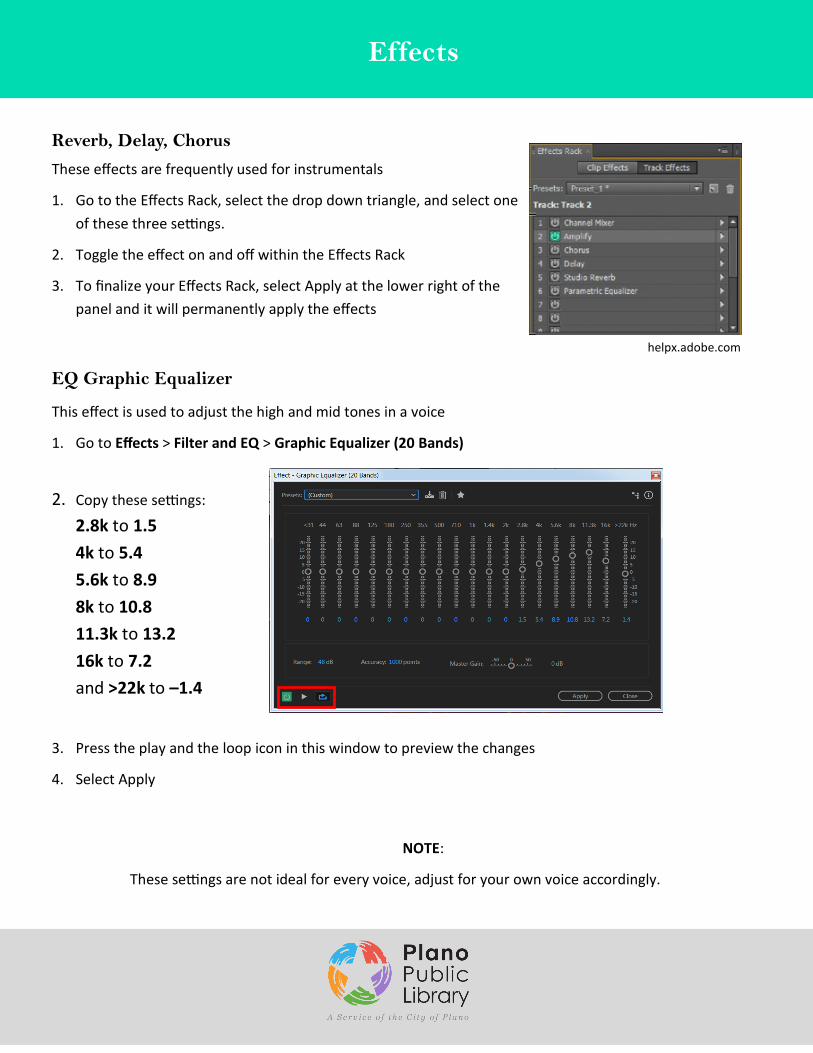
EQ Graphic Equalizer
This effect is used to adjust the high and mid tones in a voice
1. Go to Effects > Filter and EQ > Graphic Equalizer (20 Bands)
2. Copy these settings:
2.8k to 1.5
4k to 5.4
5.6k to 8.9
8k to 10.8
11.3k to 13.2
16k to 7.2
and >22k to –1.4
3. Press the play and the loop icon in this window to preview the changes
4. Select Apply
Effects
NOTE:
These settings are not ideal for every voice, adjust for your own voice accordingly.
Effects
Reverb, Delay, Chorus
These effects are frequently used for instrumentals
1. Go to the Effects Rack, select the drop down triangle, and select one
of these three settings.
2. Toggle the effect on and off within the Effects Rack
3. To finalize your Effects Rack, select Apply at the lower right of the
panel and it will permanently apply the effects
helpx.adobe.com

Parametric Equalizer
This effect is used to adjust the bass levels of a voice.
1. Go to Effects > Filter and EQ > Parametric Equalizer
2. De-select the 1, 2, 4, and 5 boxes.
3. Set the Range to 96 dB
4. Copy these settings:
L Frequency =
L Gain =
L Q/Width =
5. Preview your changes with the Play and Loop icon, once satisfied, select Apply
Effects
Single-Band Compressor
This effect is used to even out audio
levels, ensuring that one section isn’t
excessively loud or quiet.
1. Go to Effects > Amplitude and Com-
pression > Single-Band Compressor
2. Copy these settings
Effects

Normalize
Effects
This effect is used to increase the dB of your audio, that is now quieter due to compression, to that of a
normal range.
1. Go to Effects > Amplitude and Compression >
Normalize
2. Check the Normalize To box
3. Select the dB circle and type in - 0.1
Effects
Exporting
There will already be a .WAV file that will be updated when you save and close your Adobe Audition file,
but you can also export it as an MP3 file.
1. Select File > Export > File
2. Title the file, choose a location, and select the drop down menu next to Format and select MP3
Note:
Always save your files to a USB device or cloud server as the computers in the DCS are reset each day and
revert back to factory settings, deleting any work saved.

Lynda.com
“Audition CC 2018 Essential Training” - Paul Murphy
Youtube.com
“Five Adobe Audition CC Effects To Better Quality Voice Overs” - Mike Russell
Adobe.com
“Tutorials”
-https://helpx.adobe.com/audition/tutorials.html
“Keyboard Shortcuts”
-https://helpx.adobe.com/audition/using/default-keyboard-shortcuts.html
Additional Resources