Embed Size (px)
Citation preview

By Incandescent Workshop
A Game by Thom Robertson
Terran Star Naval
Academy
Tactical Manual 1.70


Contents Introduction ............................................................................. - 4 -
System Requirements .............................................................. - 4 -
Installation ................................................................................ - 5 -
The Artemis Bridge Simulator .................................................. - 6 -
Main Menu - 7 -
Start a Server - 8 -
Start a Client - 12 -
Bridge Consoles - 15 -
Main Screen: - 15 -
Captain - 16 -
Weapons - 19 -
Shields - 19 -
Munitions - 20 -
Beams - 20 -
Manual Targeting - 22 -
Beam Arcs - 23 -
Red Alert - 23 -
Helm - 25 -
Warp Drive - 27 -
Jump Drive - 28 -
Impulse - 30 -
Maneuvering: - 30 -
Engineering - 32 -
System Damage Display: - 34 -
Power and Coolant: - 34 -

Artemis Spaceship Bridge Simulator
- 2 -
Auxiliary Power Unit - 35 -
Benefits of Overcharging - 35 -
Damage Control - 36 -
Communications - 38 -
Scenario 1: Docking - 39 -
Scenario 2: Taunting - 40 -
- 42 - Guiding Friendly Vessels
- 42 -
Science - 44 -
Scanning - 46 -
Life Forms - 48 -
Anomalies - 49 -
Space Monsters - 49 -
Singularities - 50 -
Nebula - 50 -
Asteroids - 50 -
Observer/Spectator Mode: - 51 -
The Artemis Universe ............................................................. - 52 -
The USFP - 52 -
A Brief History of Interstellar War - 53 -
Terran Stellar Navy - 55 -
Stations - 55 -
Ships - 56 -
Projectile Weapons - 63 -
Earth’s Enemies - 65 -
Kralien Defense Fleet - 65 -
Arvonian Royal Armada - 69 -
Artemis Spaceship Bridge Simulator
- 3 -
Torgoth Deep Space Force - 72 -
Skaraan War Corporations - 75 -
Options - 79 -
Credits .................................................................................... - 80 -
Help and Support ................................................................... - 80 -
Artemis Spaceship Bridge Simulator
- 4 -
Dear Cadet,
Welcome to the Terran Stellar Navy. You have
embarked on a noble career, serving the United
Space Faring Planets and our allies. This manual
will teach you bridge operations aboard a host
of TSN vessels. In the pages ahead, you will
learn how to set-up and configure the Artemis
Spaceship Bridge Simulator, plus a wealth of
information vital for every TSN officer.
As you embark on your first mission, remember
that you start with your luck tank full and
your experience tank empty. If you study hard
and perform well you can fill up that
experience tank before your luck tank runs
dry.
On behalf of the Terran Stellar Navy, welcome
aboard and good luck.
Admiral Su Song, TSN Command
Artemis SBS 1.70 is a multiplayer, multi-computer networked game for Windows XP, Windows Vista, and Windows 7. It’s also an app for iPhones, iPads, and iPods, and is cross-compatible with the PC version. At least three devices are required to play Artemis – Server/View Screen, Helm, and Weapons. The simulation supports eight or more stations per bridge (Game Master and Captain’s Map optional). A single server can accommodate up to six bridges, allowing up to 36 players in a single battle.

Artemis Spaceship Bridge Simulator
- 5 -
While any DirectX 9 computer should be able to run Artemis, the software assumes things like 24-bits of color and a 16-bit Z-buffer, plus basic hardware shaders (Shader Model 2.0).
To install Artemis, simply run the Artemis Setup Wizard and follow the prompts as instructed. Artemis will install to the directory of your choice. To ensure that you are running the most updated version of Artemis SBS, verify your version by visiting the TSN Command Center at http://www.artemis.eochu.com/

Artemis Spaceship Bridge Simulator
- 6 -
Artemis Spaceship Bridge Simulator (SBS) allows each player to assume the role of a bridge crew member aboard a TSN space ship. A fully-crewed space ship requires six players and six or seven computers (some captains do not use the Captain’s Map station). For the best experience, each space ship’s crew should all be in the same room, although Artemis SBS does support internet play for a remote crew member.
This is the first screen each console displays when you launch Artemis SBS. 1. This box lets you to choose the resolution to display on this
machine.
Figure 1: Screen Preferences
1. Here you choose your preferred resolution
2. This box lets you decide between windowed or full-screen mode
3. Launches
the Artemis
Bridge
Simulator

Artemis Spaceship Bridge Simulator
- 7 -
2. Windowed Mode will run the Artemis Simulation in a
standalone window, while Full Screen will project the
simulation over your entire screen. New for V1.70: the “full-
screen windowed” option that will run the game in a
borderless window the full size of your desktop. It’s
(hopefully) the best of both worlds!
3. Start Game will launch the simulation with your preferred
settings.
Once you have selected your preference for resolution and visual mode, launch the simulator by selecting “Start Game.” From here, you will be brought to the Main Menu.
Main Menu
Until game play begins, each computer will show a randomly selected starfield background. The starfield has nothing to do with the version of the software, so don’t worry if they are not the same on each machine.
Figure 2: Main Menu
The version
of Artemis
you are
currently
running
1.Start
Server
2.Start
Client
3.Exit
Artemis

Artemis Spaceship Bridge Simulator
- 8 -
The Main Menu of Artemis SBS allows you to choose which
computer will act as your bridge’s main view screen.
1. Whichever machine has been designated the server/main
view screen for the simulation will select “Start Server.”
2. Each bridge officer will choose “Start Client” on his or her
console.
3. Terminate the Artemis program by selecting “Exit to
Windows.”
If you are unsure of whether or not you or a member of your
Bridge Crew is running the latest version of the Artemis
Spaceship Bridge Simulator, the Full Version number will be
displayed at the top of the Main Menu Screen. Updates are
available by visiting TSN Command at
http://www.artemis.eochu.com/
Start a Server
2.Ship Selection
3.Exit Artemis
Figure 3. Server Settings
1.Server’s Local IP Address 4.Simulation
Settings
5.Launch
Artemis
Simulation

Artemis Spaceship Bridge Simulator
- 9 -
This is the screen that controls Artemis’s server settings. The options you choose will affect your entire crew’s experience during simulation.
1. This box will display your server’s IP Address. Each console
must enter the server address. If multiple ships are
participating they will all use the same address (see the
following section).
2. This box allows you to select the type of USFP vessel your
crew will command. It displays a brief description of the
vessel and ship stats below the class type.
3. This button allows you to quickly shut-down and exit
Artemis.
4. This box controls the Artemis environment. From here you
can adjust the following settings:
Network Speed: can be set between 20ms and 500ms.
Difficulty: Rookie crews should begin at Level 1 and
work their way up.
Drives: Artemis SBS utilizes two means of faster-than-
light travel. Simulations can be run with vessels outfitted
with either Warp or Jump Drive engines.
Sensors: The Sensors setting will allow a crew to
experience the technology of different eras, or to patrol
the galaxy in an older, less up-to-date space ship.
Modes: The Artemis Simulator runs three modes:
o Invasion Mode creates a random mission
against hostile forces. The objective of Invasion
Mode is to hold the line against the aggressors,
defend all stations, and see to the safety of all
USFP Transports and their escorting Destroyers.
o Elite Co-op Mode allows multiple bridge crews
to fight side-by-side in the same battle. As with
Invasion Mode, the server will randomly create
a sector of space. The objective again is to fend

Artemis Spaceship Bridge Simulator
- 10 -
off all enemies. Elite Co-op Mode allows you to
adjust the parameters of enemy vessels to
simulate various levels of enemy technology.
See Figure 4.
Elite Co-op Mode is designed to challenge large
groups of people operating multiple bridges,
who want a cooperative challenge. This mode
gives you fine control over how dangerous you
want the enemies to be. It also gives you four
stations to defend. There are some rules
changes:
o The game is lost when all four stations
are destroyed
o The game is won when all enemies are
destroyed.
o If a player ship is destroyed, it will
immediately re-spawn. However, ALL
destroyed enemies will also re-spawn.
So don’t get killed!
o Mission Mode allows your crew to attempt a
previously scripted mission with a challenge and
objective of its own. To install a new Mission
Script, place its folder in the Artemis → dat →
Missions folder.
o Game Master: Some mission scripts, designated
as “modules,” allow one player to act as a real-
time Game Master. Game Masters can react to
player choices and issue unscripted messages.
To successfully run a game with a Game Master
you need:
a separate player and computer with
keyboard to serve as Game Master.

Artemis Spaceship Bridge Simulator
- 11 -
a special mission module written to be used
in Game Master mode.
a set of instructions to accompany the
mission module which tells the Game
Master how to present the adventure.
The Game Master module Three Bases is included with Artemis SBS, allowing numerous tactical situations.
A green link appears for each console linked to this server. One console is now connected.
Figure 4. Sample Settings for a Two-
Bridge Battle in Elite Co-Op Mode
Enemy beam range and damage power will be doubled.
Enemy ships will move at double normal speed.
Both bridges will use difficulty level 6.

Artemis Spaceship Bridge Simulator
- 12 -
Start a Client
This screen allows the Bridge Crew to connect to the Artemis Simulator. 1. All bridge officers must enter the host server’s address in
this field. Players on the server’s network use the local address shown on the server screen. Remote internet players must use the external address of the server’s network. The network must also be configured to forward port 2010 to the server machine’s local address.
2. When the server verifies the address click “Connect to Server.” Once clicked, you can see a small line of text that describes the progress of the client’s connection attempt. Successfully connecting to the server will move you to the Console Selection Screen.
3. Select “Back” to return to the Main Menu.
Troubleshooting tip: If consoles are unable to connect to the server it is usually due to a firewall. Check the server to make sure that Windows Firewall, or other security software, is not blocking Artemis. When playing over the internet, make sure the network firewall is not blocking Artemis.
1.Enter host server’s address
3.Return to Main Menu
2.Connect to the host server
Figure 5: Connecting to Server
Artemis Spaceship Bridge Simulator
- 13 -
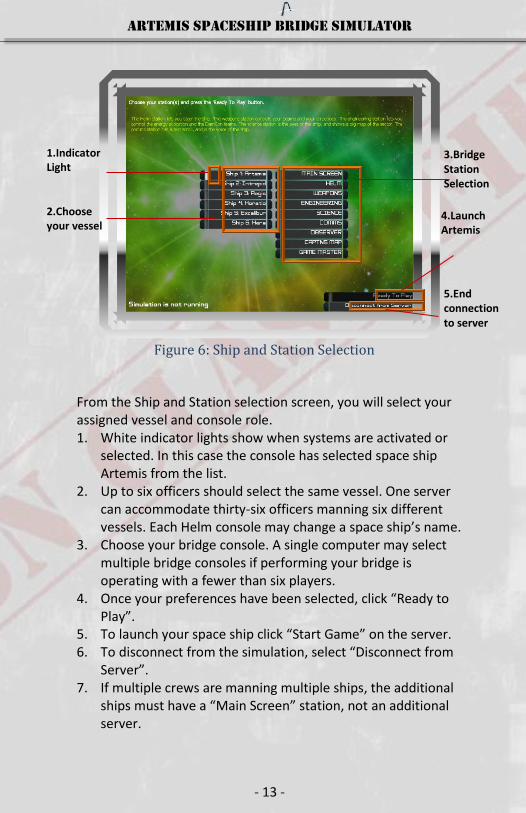
From the Ship and Station selection screen, you will select your assigned vessel and console role. 1. White indicator lights show when systems are activated or
selected. In this case the console has selected space ship Artemis from the list.
2. Up to six officers should select the same vessel. One server can accommodate thirty-six officers manning six different vessels. Each Helm console may change a space ship’s name.
3. Choose your bridge console. A single computer may select multiple bridge consoles if performing your bridge is operating with a fewer than six players.
4. Once your preferences have been selected, click “Ready to Play”.
5. To launch your space ship click “Start Game” on the server. 6. To disconnect from the simulation, select “Disconnect from
Server”. 7. If multiple crews are manning multiple ships, the additional
ships must have a “Main Screen” station, not an additional server.
4.Launch Artemis
3.Bridge Station Selection
1.Indicator Light
5.End connection to server
Figure 6: Ship and Station Selection
2.Choose your vessel

Artemis Spaceship Bridge Simulator
- 14 -
“THIS concludes our overview of the
installation and set-up of the Artemis Spaceship
Bridge Simulator. In the following sections you
will find a brief overview of the operations of
each station aboard a TSN vessel, an overview of
the tSN, aNd a ruNdowN of earth’S eNemieS.”
Admiral Su Song

Artemis Spaceship Bridge Simulator
- 15 -
Bridge Consoles
Main Screen:
By default, the main screen will project an external, aft-view of the ship. For single ship missions, this view comes from the device you have designated as server. The Helm console and Weapons console can change the Main Screen’s view. See the Helm and Weapons Sections for more information.
Figure 7: Viewport

Artemis Spaceship Bridge Simulator
- 16 -
Captain
A space ship’s captain bears greater responsibility than all the other officers combined. Decisions must be made and orders issued, often with little deliberation and incomplete information. A captain is also a coach and mentor, helping each member of the crew to perform at his or her best. As a space ship captain, you must maintain a harmony among your bridge crew. It is not necessary to know all of the jobs aboard your ship, though that can help when mentoring a new crew member. Lonely as it feels, you are not alone. Your chief engineer can report anything happening inside the ship, while your science and communications officers can report on the situation outside. But they have their jobs to do, and as tension rises, tempers flare, and disaster looms, only you can make the tough calls.
“I have issued the abandon ship order. Every member of the command crew has volunteered to stay behind and
carry out the self-destruct sequence. I recommend posthumous commendations for Gonzales, O’Reilly,
Kowalski, Bishop, and all the fine officers who cast their lives into this inferno. Because of their sacrifice today
Earth will see another golden sunrise tomorrow.” -Last Log Entry of Captain Yasmeen Ansari, TSN
Cassandra, Battle of Epsilon Eridani, April 20th, 2178

Artemis Spaceship Bridge Simulator
- 17 -
“When your ship is heroic you must give all of
the credit to your crew. But when anyone makes
a mistake the blame will fall on you, the sad
sack sucker in the center seat.”
-Admiral Su Song
Note: Many TSN Captains do not use the Captain’s Map,
relying instead on the forward view screen.
1. All stations include a top box to open the options window, switch between stations, and see long range scanners or the ship’s external viewer.
2. This position symbol of the target currently selected by the Captain is bracketed in yellow. Green position symbols are friendly, red enemy, yellow surrendered, and white unknown.
3. This box displays data on the object or vessel whose position symbol the Captain has selected. This includes owning race, class, designation, absolute bearing (direction), and range to
2. Player
vessel
3. Enemy
Vessel
Designated
N57
3.Data on selected vessel
1.OPTIN = Options Menu CAPTN = Captain LRS = Long Range Scanners VIS = Visual Display
Figure 8: Captain’s Map Console
2.Player Vessel
4.Enemy Vessel Designated N57

Artemis Spaceship Bridge Simulator
- 18 -
the target. In this case, the Captain’s Map is displaying information on Artemis herself.
4. Ships are automatically assigned a designation once identified.
The Captain’s main duty is to coordinate the crew in protecting the citizens and assets of the USFP. Good Captains always indicate who they are addressing, ask clear questions and issue unambiguous orders. It is a Captain’s prerogative to choose how to address the officers. Some address their crew by name or nickname, others prefer position, as shown in these examples.
Example Commands
“Helm, set course two-seven-zero.”
“Mister Smirnov, raise shields and load homing torpedoes.”
“Lieutenant Armstrong, ask DS4 to build a Type Six mine for us.”
“Report, Hawkeye! What is that Skaraan’s weakest shield frequency?”
“Engineering! More power to shields! Give it all she’s got!”

Artemis Spaceship Bridge Simulator
- 19 -
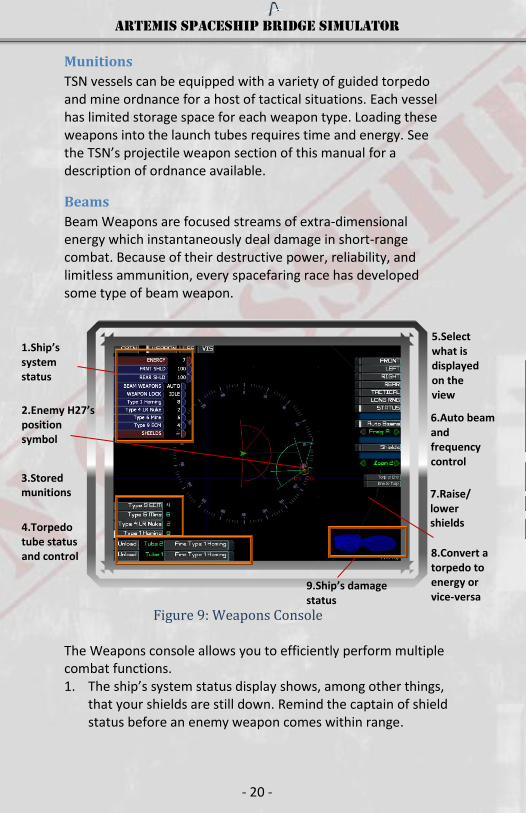
Weapons
The weapons console wields destructive power capable of decimating entire worlds, making weapons officers an elite brotherhood of TSN’s finest. As Weapons Officer, you will have control of the following systems:
Shields
The forward and rear shields are hemispheres of coherent energy capable of absorbing great amounts of damage. The Weapons console and Helm console both have buttons to raise or lower your ship’s defensive shields. Be sure to coordinate who’s doing what.
“Sure I was scared. Our tubes were dry, our power was low, and half the Torgoth Navy was closing in on DS27.
The skipper gave me just one pass, but that’s all I needed. We took one helluva beating as we warped
through the middle of their fleet - - - our poor Engineer was in tears - - - but it was worth it ’cause I bullseyed
the flagship’s engines. While the Torgies fixed their ship we managed to reach the station, and next time we
saw them our tubes were full of nukes.” - Weapons Officer Martin I. Kovu, Starship
Menelaus, following the First Torgoth Incursion
Artemis Spaceship Bridge Simulator
- 20 -
Munitions
TSN vessels can be equipped with a variety of guided torpedo and mine ordnance for a host of tactical situations. Each vessel has limited storage space for each weapon type. Loading these weapons into the launch tubes requires time and energy. See the TSN’s projectile weapon section of this manual for a description of ordnance available.
Beams
Beam Weapons are focused streams of extra-dimensional energy which instantaneously deal damage in short-range combat. Because of their destructive power, reliability, and limitless ammunition, every spacefaring race has developed some type of beam weapon.
The Weapons console allows you to efficiently perform multiple combat functions. 1. The ship’s system status display shows, among other things,
that your shields are still down. Remind the captain of shield status before an enemy weapon comes within range.
5.Select what is displayed on the view screen 6.Auto beam and frequency control
4.Torpedo tube status and control
1.Ship’s system status
3.Stored munitions 7.Raise/
lower shields
8.Convert a torpedo to energy or vice-versa
Figure 9: Weapons Console
2.Enemy H27’s position symbol
9.Ship’s damage status

Artemis Spaceship Bridge Simulator
- 21 -
2. An enemy position symbol shows its bearing, range, shield status, and beam arcs.
3. This box displays the number of munitions available by type. The white indicator light shows that you have selected to load Type 1 Homing torpedoes.
4. Here you can load, unload, and fire torpedoes and mines. Each tube holds a single torpedo/mine. The option to fire will become highlighted once a tube has been loaded.
5. As with the Helms Officer, the Weapons Officer can select what is displayed on the ship’s main screen. Currently the ship’s Status is selected. Change this setting only upon orders from the Captain.
6. This box allows you to set your Beam emitters to any of five different frequencies. Your science officer can scan for each target’s most vulnerable beam frequency. De-selecting “Auto Beams” (AND clicking on a target to lock it) will bring up the Manual Targeting Scope (see the following page).
7. Like the view screen, the Weapons and Helm Officer share control over whether the shields are raised or lowered.
8. Homing Torpedoes can be fabricated aboard TSN vessels or broken down into energy. When either option is selected, your staff below deck will be directed to immediately carry out the order.
9. This box displays your ship’s current condition. When sections of your vessel are damaged, subsystems will turn red on the display.
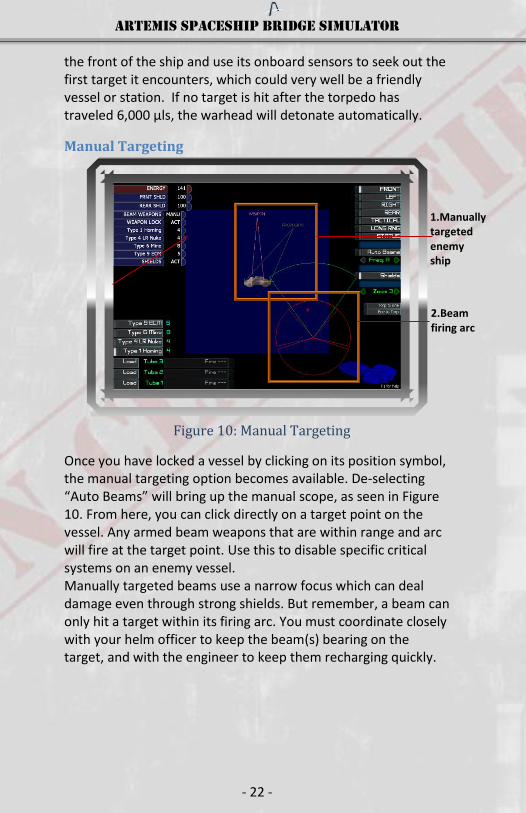
One critical duty of a Weapons Officer is to establish weapons locks on targets. To do this, simply click directly on the enemy vessel’s position symbol on the Weapons console. A spinning blue reticle will overlay the target, indicating that the console has a target lock. For confirmation, a similar reticle will appear on the main view screen. Without a target lock, automatic beams will not fire, and torpedoes will not track a selected target. To lock all weapons on a target: click on its position symbol. To remove weapons lock, select another target or click empty space. CAUTION: Any type of torpedo launched without a target lock is considered ‘dumb.’ A dumb fired torpedo will fly straight from
Artemis Spaceship Bridge Simulator
- 22 -
the front of the ship and use its onboard sensors to seek out the first target it encounters, which could very well be a friendly vessel or station. If no target is hit after the torpedo has traveled 6,000 µls, the warhead will detonate automatically.
Manual Targeting
Once you have locked a vessel by clicking on its position symbol, the manual targeting option becomes available. De-selecting “Auto Beams” will bring up the manual scope, as seen in Figure 10. From here, you can click directly on a target point on the vessel. Any armed beam weapons that are within range and arc will fire at the target point. Use this to disable specific critical systems on an enemy vessel. Manually targeted beams use a narrow focus which can deal damage even through strong shields. But remember, a beam can only hit a target within its firing arc. You must coordinate closely with your helm officer to keep the beam(s) bearing on the target, and with the engineer to keep them recharging quickly.
1.Manually targeted enemy ship
2.Beam firing arc
Figure 10: Manual Targeting

Artemis Spaceship Bridge Simulator
- 23 -
Beam Arcs
While torpedoes do not require your vessel to maintain line-of-sight once locked, a beam weapon can only hit a target within its firing arc, as displayed below:
Figure 11 shows the beam firing arcs for a TSN Light Cruiser. That vessel class has two beam emitters. The port beam bears from 9 o’clock to 2 o’clock and the starboard beam from 10 o’clock to 3 o’clock. Both beams bear directly forward, between 10 o’clock and 2 o’clock.
Red Alert
When the ship is placed on Red Alert, the crew will proceed to battle stations and the tactical display will turn red, as seen in the following figure:
Figure 12: Red Alert
Figure 11: Beam Firing Arc

Artemis Spaceship Bridge Simulator
- 24 -
“weapoNS iS more than blasting enemies into
space dust. Good Weapons Officers keep track of
ordnance and know when to use manual
targeting. more importantly, They avoid firing
on surrendered vessels. Most importantly, they
doN’t fire a Nuke aNywhere Near a frieNdly Ship.
Officially That never happens. Never. If you
doN’t believe me, look at my record books!”
- Admiral Su Song

Artemis Spaceship Bridge Simulator
- 25 -
Helm
Every manned vessel in the fleet is piloted by a Helm Officer. A few captains still use the ancient term “Helmsman,” especially in the civilian cargo fleet, but that title is not sanctioned by TSN High Command. To be an effective Helm Officer you must have quick reaction time and exceptional spatial visualization skills. In combat, you must constantly coordinate with the Captain, Engineer, and Weapons Officer. A good Helm Officer must communicate just as well as he or she steers. As Helm Officer you must keep a sharp eye on the area around your ship and keen ear for your Captain’s orders. Despite what
“I’ve been in a dozen battles, some of ‘em we lost. But on my
most terrifying mission nobody fired a shot. The Kraleans had ambushed one of our convoys, chased ’em all the way to Delta Pegasi, where they finally dove into the gravity null in that quad singularity. When we arrived it was my job to tow ‘em out! As I weaved Penelope between four swirling black
holes, my heart was pounding, y’know? It was like dancing . . . dancing with death.”
-Helm Officer Dianne Spollio, Starship Penelope

Artemis Spaceship Bridge Simulator
- 26 -
you might have heard, a Helm Officer’s job is not simply pushing a joystick left and right. Energy is shared by multiple systems across the ship and will be quickly drained in combat situations. Keeping an eye on your ship’s energy is vital, especially if a situation warrants a quick escape into warp. More importantly, Helm must be prepared to ask for the Engineer’s cooperation. Even a dreadnought can spin about nimbly when the Engineer allocates full power to maneuvering, and full power to warp drive can make warp factor 1 a speedy trip across the sector.
This is your Helms display. The green triangle in the center is your ship’s position symbol. The 360°central compass displays your available headings. In this instance, the ship is idle and facing a heading of one-one-eight.
1. This box displays a readout of your ship’s subsystem and weapons statuses. Notice that the shields are currently down. When steering into combat you should point this out to the Captain.
2. These sliders control your ship’s warp and impulse drives. The higher the slider, the faster the propulsion.
Figure 13: Helms Display
2.Warp
and
Impulse
Speed are
adjusted
by moving
the sliders
up and
down.
3. Maneuvering/Steering
4.View
screen
selection
1.Ship’s
subsystem
statuses
8.Current
zoom level
9.Damage
display
5.Initiate
docking
7.Raise/
lower
shields
6.Toggle reverse

Artemis Spaceship Bridge Simulator
- 27 -
Warp is for faster-than-light travel and has a maximum speed of Warp 4. Impulse propels the ship at sub-light velocities.
3. The digits to the left of this box display your heading. The blue slider is both an indicator and a control of your ship’s Higgs-bosonic rudder. You may also set the rudder using the arrow keys or joystick. You can also set a general heading by clicking the area around your ship’s position symbol; the rudder will rotate the ship to face the last point that you clicked.
4. Like the Weapons Officer, the Helms Officer has control over the Bridge’s view screen.
5. This box allows you to initiate docking once your ship is within 600 meters of a station. All USFP stations will allow you to dock at will, provided there are no hostile ships in the vicinity. If your Communications Officer warns the station to “Stand by for docking” your resupply time will be cut in half. To undock, activate either warp or impulse drive (see next page).
6. NEW V1.70: Helm has a reverse on/off toggle button. Warp cannot engage while in reverse.
7. Like the Weapons Officer, the Helms Officer can raise or lower the shields.
8. This control allows you to change your console’s map zoom level. Four levels are available.
9. NEW for V1.70; a reverse button can be toggled on or off. Ships cannot engage warp while in reverse.
10. This display will keep you aware of damage sustained by your ship.
11.
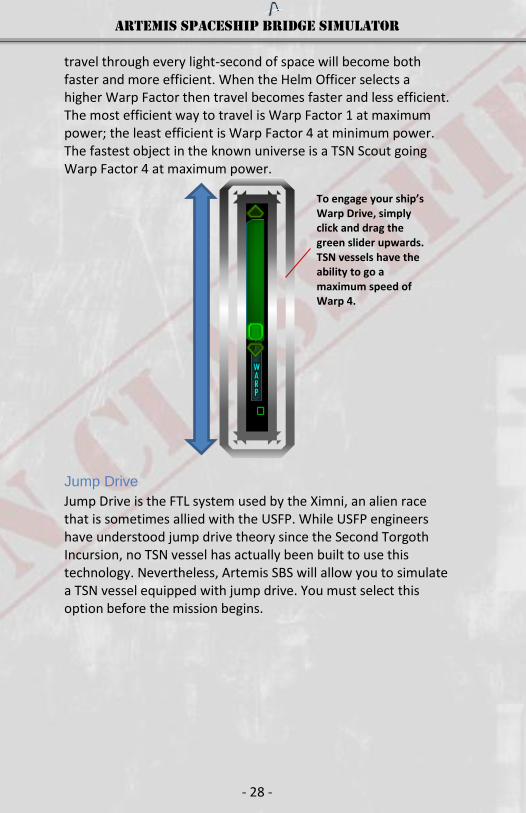
Warp Drive
Named after propulsion systems made popular by science-fiction in the 20th and 21st centuries, warp drive is the primary FTL technology used by USFP space ships. This system warps the space around a vessel, shortening the distance between two points. TSN vessels can currently achieve a maximum Warp Factor of 4. Remember, Warp Factors are not absolute speeds. When the Engineer allocates more power to warp drive, your
Artemis Spaceship Bridge Simulator
- 28 -
travel through every light-second of space will become both faster and more efficient. When the Helm Officer selects a higher Warp Factor then travel becomes faster and less efficient. The most efficient way to travel is Warp Factor 1 at maximum power; the least efficient is Warp Factor 4 at minimum power. The fastest object in the known universe is a TSN Scout going Warp Factor 4 at maximum power.
Jump Drive
Jump Drive is the FTL system used by the Ximni, an alien race that is sometimes allied with the USFP. While USFP engineers have understood jump drive theory since the Second Torgoth Incursion, no TSN vessel has actually been built to use this technology. Nevertheless, Artemis SBS will allow you to simulate a TSN vessel equipped with jump drive. You must select this option before the mission begins.
To engage your ship’s Warp Drive, simply click and drag the green slider upwards. TSN vessels have the ability to go a maximum speed of Warp 4.

Artemis Spaceship Bridge Simulator
- 29 -
To initiate the
ship’s jump drive,
you must first set
a course by
adjusting the
distance slider
(green) and
direction slider
(blue). Once a
course has been
plotted, click
“Initiate.”
You will be asked to “Confirm” or “Cancel.” Once the jump drive begins its countdown, it cannot be disengaged. The duration of the countdown depends on power the Engineer has allocated to the system.

Artemis Spaceship Bridge Simulator
- 30 -
Impulse
Impulse Engines are sub-light propulsion systems. Every ship in every fleet has some form of impulse drive. When all your impulse systems are operational and your Engineer puts full power into them, your TSN ship can outrun most enemies on impulse alone.
Maneuvering:
USFP space ships steer using Higgs-Bosonic Rudders (HBRs), capable of rotating enormous masses with ease. Your ship’s HBR position is controlled/displayed by your maneuver slider. Your bridge may also be equipped with a joystick or keyboard which can act as rudder control. By default the arrow keys equate to starboard and port turns in the helm.
Like the warp drive, the impulse engines are engaged by clicking and dragging the yellow slider. The impulse engines will display their output from 0 – 100%
Adjusting the slider to the left or right will change the ship’s heading. Remember, the rudder must be centered or the ship will continue to turn.

Artemis Spaceship Bridge Simulator
- 31 -
“while every job iS critical, oNly the helm
Officer can kill a whole crew in an instant.
Steer into a mine or warp through a black hole
aNd i’ll be writiNg a lot of letterS to bereaved
families - - - iNcludiNg yourS.”
– Admiral Su Song

Artemis Spaceship Bridge Simulator
- 32 -
Engineering
TSN Engineers have an old saying: “The hotter it gets outside, the smoother we run things inside.” With control over Energy Distribution and Damage Control, a good Engineer can make a Light Cruiser as tough as a Dreadnought, or make a Dreadnought twirl like a nimble Scout. As Chief Engineer you will answer directly to the captain for the ship’s performance. The efficiency of every system is affected by damage and power allocation, and both are your responsibility. Whether your ship needs more punch from the beam weapons, greater speed from the warp drive, or faster scan rates from the sensors, your quick actions can give the ship anything. “the beSt eNgiNeer i ever Saw could puSh every
system to the limit, repair damage in half the
estimated time, and never waste a milliwatt of
“. . . the blast devastated Centaur’s aft quarter. Engines, shields, everything gone. I had one Dam Con team back
there patching the inboard warp reactor with epoxy and shoelaces. Just then a Skaraan Executor warped up
and started blasting our defenseless ass. Captain had no choice, really, she ordered me to redline the warp drive. When the inboard reactor blew Ensign Diallo
died instantly. I hope he knows he saved us all.” -Engineer Artem Kostenko, TSN Centaur

Artemis Spaceship Bridge Simulator
- 33 -
power. i doN’t kNow how She did it. that’S why
we called her ‘the miracle maker.’”
-Admiral Su Song
The Engineer’s Console displays a 3D schematic of your vessel. It can be rotated in any direction by clicking and dragging the model’s virtual surface. Figure 14 depicts a TSN Light Cruiser. 1. This box displays the status of your ship’s subsystems and
total energy. 2. This box displays the amount of damage each critical system
has sustained. Many systems are represented by multiple nodes spread throughout the 3D schematic.
3. This toggle allows you to choose between autonomous and directed deployment of your damage control teams (DamCons).
4. This symbol indicates the location of a damage control team. 5. This symbol represents a subsystem. Subsystems will turn
red when damaged. 6. These are the controls for your space ship’s power and
coolant distribution system.
3.Autonomous/ manual control of DamCons
6. Power and Coolant Controls
4.Damage control team (DamCon)
5.Subsystem Node
1.Ship’s subsystem statuses
2.Subsystem damage readings
Figure 14:
Engineering Console
Figure 14: Engineering Console

Artemis Spaceship Bridge Simulator
- 34 -
System Damage Display:
The System Damage Display tracks the operational efficiency of the ship’s eight critical systems. A system displaying 100% is operating normally. When the system has been damaged, the display will update with the system’s new efficiency. A reading of 0% indicates that the system is offline and will be inoperable until repaired.
Power and Coolant:
Systems are normally powered at 100% (see Maneuvering in Figure 16). Systems may be “overcharged” by moving the power distribution sliders up (see Impulse in Figure 16). Systems powered at 100% will maintain a steady temperature without any coolant. Systems may be run at reduced power by lowering
5. Gray dots represent empty coolant slots that cannot be filled without diverting coolant from another system.
4. Heat buildup as a result of overcharging
3. White dots represent units of coolant currently in use
1.A subsystem fully overcharged
2.Yellow dots
represent
coolant units
available
coolant
Figure 16: Coolant Control
Figure 15: System Damage Display
2.Operational status of systems
1.System names

Artemis Spaceship Bridge Simulator
- 35 -
the sliders below 100%. Systems powered below 100% will gradually dissipate heat without any coolant.
Auxiliary Power Unit
If you set all systems to 0% your ship’s APU will gradually replenish energy. When systems are overcharged, they drain the ship’s energy at a tremendous rate. They also produce excessive heat. If allowed to overheat, a subsystem node will be destroyed, possibly injuring crew members in the vicinity. A destroyed node must be repaired by DamCon. To counter heat build-up, you may apply coolant to the system. Coolant is never depleted or destroyed, and you can redistribute it any time as needed. Standard TSN space ships have eight coolant units shared by all systems. Thus, if you allocate all eight units to warp drive you have none for other systems.
Benefits of Overcharging
Beam - increases the rate of fire and damage inflicted by all beam weapons Torpedo - decreases load and unload time for all torpedo tubes Tactical - increases the speed of Science scans, and counteracts damage to tactical systems Maneuvering - increases ship’s rate of turn Impulse - increases speed and efficiency of sublight drive Warp Drive - increases speed and efficiency of warp drive Jump Drive - decreases spin-up time for jump drive Front Shields - allows front shield to absorb more damage, AND increases its recovery rate Rear Shields- allows rear shield to absorb more damage, AND increases its recovery rate

Artemis Spaceship Bridge Simulator
- 36 -
Damage Control
Each TSN space ship includes eight systems critical for combat:
1. Primary Beam – Energy emitters, plus hardware for training the weapons on targets.
2. Torpedo – Torpedo loading rooms, torpedo carriage tracks, and torpedo fueling mechanisms.
3. Sensors – Internal and external sensor arrays. 4. Maneuver – The Higgs-bosonic rudders, which
rotate the ship using gravimetric waves. 5. Impulse – The ship’s sublight drive. 6. Warp – The vessel’s faster-than-light drive system. 7. Front Shield – The generators and emitters which
produce the ship’s forward shields. 8. Rear Shield – The generators and emitters which
produce the ship’s aft shields. Each of the eight systems is distributed across several (4-6) nodes, normally appearing as blue dots on the schematic (see Figure 17). Each node represents a component of the system as a whole. Each individual node also has a damage state from 0% (undamaged) to 100% (fully disabled). An undamaged node will appear blue. A node at any damage state from 1% to 100% will appear red. A damaged node will perform with reduced effectiveness in proportion to its damage state. If all of the system’s nodes are at a state of 100% damage, that system is completely offline. For example, if ALL of the Maneuver nodes are at 100% damage, then the ship will be unable to turn at all.
Figure 17: Damage Control

Artemis Spaceship Bridge Simulator
- 37 -
As Chief Engineer, you can deploy your Damage Control Teams (DamCons) to repair damage. Each DamCon includes six highly-trained engineers who report directly to you. DamCon duty is dangerous, and if a system is damaged while a DamCon is in the area that team may suffer casualties, reducing its effectiveness. If all six members of a team are lost, the team will disappear from your schematic. Your ship may take on fresh DamCon teams by docking at a friendly space station. Autonomously deployed DamCons will do their best to find damaged systems to repair, but only the Chief Engineer has the big picture of the whole ship. An autonomous DamCon may repair the ship’s bowling alley before the warp drive, simply because they didn’t know the warp drive was broken. To select a DamCon for deployment, click the DamCon’s icon on your schematic:
Once selected, a blue outline will appear around the DamCon icon. The display will also show the number of able-bodied members in that DamCon. To deploy the DamCon, you click a destination node. Once orders are received, the DamCon team will move through the ship to the damage and begin repairs. Remember, DamCon teams cannot move through damaged nodes. To reach a remote section of the ship they must create a path of undamaged nodes. When the ship is undamaged, a clever engineer will protect the DamCons by stationing them near the center of the ship.

Artemis Spaceship Bridge Simulator
- 38 -
Communications
TSN Communications Officers (Comms) represent the voice of the USFP across the cosmos. This would seem a solemn duty, and it is, but in practice communicating with aliens is a small part of the Comms job. If the Science Officer is the eyes of the ship, Comms is both the ears and the mouth. Messages from space stations and friendly ships contain vital information that the Captain needs to hear. As the saying goes, “sealed lips sink space ships.” On the following pages you will find two scenarios, each demonstrating a different duty of a Communications Officer.
“You do what you have to do, right? Obviously I never met Captain Noto-Yoto’s mother - - - I’ve never met any Kralean! But that didn’t matter to him. When I insulted
his mother he immediately swore an oath to destroy me, brought his ship hard about, and locked all his
weapons on Nemesis. I’m not proud of what I said, but I am proud of saving all those defenseless men and
women aboard DS3.” -Comms Officer Milo “Chit-Chat” Fitzgerald, TSN Nemesis

Artemis Spaceship Bridge Simulator
- 39 -
“The best Communications Officer I ever saw
could pick a fight with a Skaraan half a sector
away, talk a fleet of Torgoths into
surrendering, then organize a high-stakes
poker game, all before breakfast. That man
knew how to get things started . . . and
finished.”
- Admiral Su Song
In this scenario, the Captain of the space ship Perth instructs the Comms Officer to request docking with DS3, which has a loadout of torpedoes and mines. Although the Helm Officer will initiate the docking procedure, Comms can improve performance by alerting the station of your impending arrival. That is, once Comms alerts the station, its weapons load and refuel rate will be doubled for the next 30 seconds. To initiate any message, the Comms Officer clicks the Transmit button:
Scenario 1: Docking
Since DS3 is a Station, the Comms Officer chooses that category.
The Transmit button will open the ship’s hailing frequencies. From here, you will choose the recipient of your message.

Artemis Spaceship Bridge Simulator
- 40 -
After selecting “Station,” the Comms officer selects DS3 from the list of stations within range.
Not every duty of a Comms Officer is foreseeable, and those holding such positions must demonstrate a strong ability to adapt to changing situations. The next scenario demonstrates a less honorable but more vital duty that will often fall to Comms. In this scenario, the Captain of the space ship Perth sees a Kralean dreadnought closing in on an unarmed USFP Transport ship. Perth is too far away to engage the Kralean in combat. The only hope to save the Transport is for Comms to taunt the dreadnought’s captain.
Scenario 2: Taunting
With a line open to DS3, the Comms officer selects “Stand by for Docking.” Now Perth will receive its shipment of mines twice as quickly.
As in the previous scenario, the Comms officer opens hailing frequencies on the captain’s orders.

Artemis Spaceship Bridge Simulator
- 41 -
There are 3 taunts. Each enemy vessel can hear each taunt once. When the taunt is transmitted, that enemy will either become enraged or ignore that taunt. Once enraged by a successful taunt, the enemy (and any ships in its squadron) will blindly chase your vessel for 3 minutes.
Kralien Dreadnought B79 is bearing down on a friendly transport. Thus B79 will be found under the “Enemy” category.
After selecting the “Enemy” category, the Comms officer locates the Dreadnought in question by its designation: B79. Tip: Enemies are sorted by distance, so the first enemy listed is always the closest to you.
Knowing that Kraliens hold hygiene in high regard, the Comms Officer transmits a message calculated to draw the Dreadnought into combat and away from the transport.

Artemis Spaceship Bridge Simulator
- 42 -
Your other outgoing Comms messages include asking friendly vessels and stations for status reports, requesting a station to construct a certain type of torpedo, and ordering friendly vessels to change their courses.
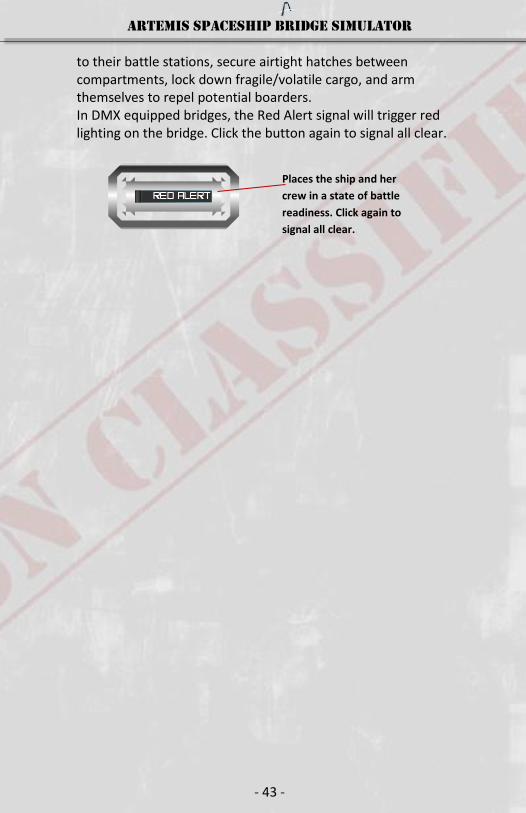
Guiding Friendly VesselsThe USFP’s sublight vessels, Destroyers and Transports, have limited sensor capability. They rely on you to direct them away from minefields, space monsters, enemies, and other hazards. In both wartime and peacetime, it is your duty to see that Transports are safe and Destroyers are deployed effectively.
As Comms Officer, you are also responsible for issuing ship-wide alerts. The Red Alert button triggers a klaxon heard on all decks plus other effects. When placed on Red Alert, the crew will rush
Once the frequencies are open, you will find friendly vessels listed under “Other Ship.”
Select the
friendly ship
from the list
presented.
In this case
it is De84, a
USFP
Destroyer.
Artemis Spaceship Bridge Simulator
- 43 -
to their battle stations, secure airtight hatches between compartments, lock down fragile/volatile cargo, and arm themselves to repel potential boarders. In DMX equipped bridges, the Red Alert signal will trigger red lighting on the bridge. Click the button again to signal all clear.
Places the ship and her
crew in a state of battle
readiness. Click again to
signal all clear.

Artemis Spaceship Bridge Simulator
- 44 -
Science
When the USFP launched its first interstellar vessels, their main mission was to carry Science Officers to explore the galaxy. This remains an important function, but in wartime science officers aboard TSN vessels become vital sources of tactical information. Besides relaying vital information to the Weapons Officer about the condition of enemy ships, Science Officers are charged with analyzing the many dangers and wonders that TSN crews are likely to encounter in the depths of space. As a TSN Science Officer, you are the Captain’s primary source of intelligence on friendly and enemy vessels. Your sensitive equipment can register ships and interstellar phenomena that do not appear on the long range or tactical scans. You can tell which enemies are strongest and which are weakest as well as pinpoint key vulnerabilities.
“Why did I turn down a tenured position at Europa University for a career in TSN? That’s like comparing a
petri dish to an ocean of wonders. Sure, Europa’s the most prestigious stellar research institute in the whole
USFP, but the wonders I see in one patrol . . . “ - Science Officer Nii Schonland, Starship Dionysus

Artemis Spaceship Bridge Simulator
- 45 -
“A good Science Officer is patient, logical, and
quick on the scope. But the greatest Science
Officer I ever saw always knew what
information every officer needed at just the
right moment. It almost seemed like he could
read minds.”
– Admiral Su Song
Science Officers are responsible for identifying and analyzing any and all signatures picked up by your ship’s sensor system. 1. This is your vessel. Unlike most ships which appear on your
sensors display, your vessel’s name will be displayed above the icon, instead of a designation number.
2. This position symbol is an enemy ship currently selected as a scan target for the ship’s sensors.
3. This is a friendly vessel. Their course brings them dangerously close to a singularity. Relay this data to the Captain, who will likely order Comms to divert them to a new vector.
4. The boxes indicated are among a few deep space terrain elements you are likely to encounter as a Science Officer.
7.Data obtained through full scan
2.An enemy vessel being scanned
1.This is your ship
3.Friendly vessel
4.Obstacles
6.An unknown reading worthy of investigation
5.Activate Scanner
Figure 18: Science Station

Artemis Spaceship Bridge Simulator
- 46 -
For a longer list, see the identification guide on the following page.
5. This button activates a sensor sweep of your selected scan target.
6. This is a strange reading picked up by your scanners. Convey your findings to the Captain.
7. This box displays valuable information about the enemy vessel selected as scan target.
Scanning
The Science Officer’s most important job is to keep abreast of the happenings around your space ship.
On a routine Deep Space Patrol, Science Officer Liam Larosa detects an anomalous energy reading in a sector adjacent to starship Nestor. Science Officer Larosa clicks on the source of the readings and determines that the object is an unidentified vessel.
The Science Officer’s analysis screen displays what little is known about the unknown vessel, including Direction (DIR) and Range.

Artemis Spaceship Bridge Simulator
- 47 -
To scan the vessel, Mr.
Larosa first clicks on the
unknown target’s
position symbol, then
selects “Scan” in the
lower-left hand corner of
the Science console. This
initiates a scan sweep,
indicated by the
sweeping arc around the
position symbol. This
symbol will remain gray
until the scan sweep is
complete, unless it
moves within range of a
ship or station’s
proximity scanners (in
which case the vessel will
be identified).
When the vessel has
been identified, its
position symbol will
show a color and
target designation.
In this case it is an
enemy vessel and is
given the
designation M03.
Below the enemy
ship position symbol
is the target’s
direction (132) and
range (7063).
The first time you scan a
vessel you obtain a level
1 surface scan. Following
a surface-scan, your
analysis window will
display the target
vessel’s class and
strength, in addition to
direction and range.

Artemis Spaceship Bridge Simulator
- 48 -
It is the duty of the Science Officer to relay critical information promptly, in terms easily understood by less-scientifically inclined crewmembers. Beyond friendly and enemy space ships, space holds many mysteries, hazards, and threats. The following pages present a dossier of the known entities you will encounter.
Life Forms
The first known species of “space whale” was Dilector canopus, a peaceful creature that travels in pods like the whales of ancient Earth. So far nine distinct species of space whales have been cataloged. None are dangerous or hostile, but on every mission it is possible that you will discover a new and dangerous species. The Torgoths and Arvonians have radically different attitudes about Space Whales (see pages 44-46). In combat these attitudes may be employed to tactical advantage.
Once an enemy has been
identified, you can run a
level 2 detailed scan by
clicking the “Scan”
button again to initiate a
second sensor sweep.
When the sweep is
complete, your analysis
window will display the
shield frequency
strength. In this case
Kralean Cruiser M03 is
weakest in frequency B.
This information can give
your Weapons Officer a
significant advantage in
combat, so be certain to
share it.

Artemis Spaceship Bridge Simulator
- 49 -
Anomalies
Anomalies are microscopic rifts in space-time connecting universes with physical laws incompatible with our own. These rifts manifest as hot spots of
energy leaking into our universe. A vigilant Science Officer can detect these anomalies, which a resourceful crew may use to recharge a depleted space ship.
Space Monsters
Little is known of the recently-discovered spacefaring organism Diogenes arcladytes, commonly called “Space Monsters.” They were first discovered in the Arcturus system and named for the crew of space ship Diogenes who perished in making the discovery. The following image was reconstructed from the final transmission from space ship Diogenes:
To date several TSN vessels have reported encounters with Diogenes arcladytes. The creatures can chase space ships at warp speed and can expend destructive energy blasts. So far they are immune to all known weapons. TSN Command has speculated that the predictable behavior of Diogenes arcladytes may yield some tactical value in combat situations.

Artemis Spaceship Bridge Simulator
- 50 -
Singularities
The discovery of micro-singularities baffled USFP scientists. While their gravitational power is quite
strong, they exert no force beyond their blue event horizons. Except in extreme circumstances, all USFP ships are advised to keep their distance from these alluring vortices. Nevertheless, these black holes are beautiful to behold, and few crews can pass up the chance to see one on the forward view screen.
Nebula
Nebulae are interstellar clouds comprised of dust and ionized gas. Faster-than-light travel inside a nebula is
limited to Warp Factor 1. Nebulae also impair sensors,
and enemy ships have been known to use them to screen sneak attacks.
Asteroids
Asteroids are small planetoids of solid rock and
metal. While they are not hostile, they will block beam weapons. All TSN torpedoes, even Type 4 Nuclear torpedoes, will detonate on impact with any asteroid. A competent Helm Officer will avoid colliding with asteroids. An excellent Helm Officer can use a convenient asteroid to destroy pursuing Torgoth drone missiles.

Artemis Spaceship Bridge Simulator
- 51 -
Observer/Spectator Mode:
A computer set to Observer Mode provides a screen to view the action from an external, cinematic perspective.
Observer Mode has no tactical value. Its viewpoint switches randomly between various units engaged in the action. This mode is useful to amuse and attract spectators to watch your gallant crew perform their feats of derring-do.
Figure 19: Observer Mode

Artemis Spaceship Bridge Simulator
- 52 -
The USFP
In the mid-22nd century mankind first found evidence of extra-terrestrial life. Instead of flying saucers landing on Earth or greetings by distant radio signals, we detected thermonuclear explosions in the constellation Aries. Someone must have fought a war near Teegarden’s Star twelve years earlier. At the time, Earth’s richest nations had sent a handful of unmanned probes to other stars, but the entire human race had never banded together to accomplish anything. Then the threat of interstellar war brought out the finest in us. Soon scientific breakthroughs came every day, and engineers were designing starships, terraforming planets, and building outposts in deep space. Even as we spread to the stars, our politicians devised schemes to gain allies. Thus the United Space Faring Planets was born. This united mankind in a single, benevolent government that was open to other races. The scheme found some success. As we spread across the cosmos we made contact with a few intelligent races which joined us, but they ranged from stone aged amphibians to meditative balloons floating in a warm gas giant. They were eager to learn, but had no space fleets of their own. Then in 2175 the human colony at New Lhasa received an ultrawave message from a race who called themselves Kraliens. The Kraliens claimed to own New Lhasa – later they claimed to own all planets everywhere – and demanded that the colonists pay rent. When a Kralien fleet appeared to collect that rent an Earth space ship was waiting. Within an hour we were at war.

Artemis Spaceship Bridge Simulator
- 53 -
A Brief History of
Interstellar War
The various spacefaring races hold vastly different attitudes toward each other. This has led to a century of almost constant saber rattling, alliance shifting, and outright warfare. We have experienced numerous periods of general peace, but even then there was almost always some dispute somewhere in the galaxy that would only be settled by bloodshed. When you adjust your Artemis SBS server’s difficulty and sensor range settings you are simulating the TSN’s technology at various points on this timeline.
Period Event Description
2136 - ? The Aries War The combatants are unknown, but in 2148 explosions from this war were detected by Earth astronomers.
2169 -2171 First Ximni
1-
Arvonian War This war took place before mankind had met other spacefaring races.
Figure 20: Opening shots of the USFP-Kralien
border dispute

Artemis Spaceship Bridge Simulator
- 54 -
2175 USFP-Kralean Border Dispute
Our first interstellar war ended when the Kralien fleets withdrew, but the Kraliens have never relinquished their territorial claims.
2188 – 2191 First Torgoth Incursion
The Torgoths allied with the Arvonians and Kraliens, forming the TAK Alliance. They took several USFP systems.
2192 – 2195 Second Ximni-Arvonian War
This war did not involve the USFP, though we did send one squadron to defend a significant Ximni sector.
2199 - 2201 Second Torgoth Incursion
The TAK Alliance attacked again, this time with Skaraan support. We countered by deploying our first Battleships.
2212 – 2213 The Unakalhai Uprising
A dark period in our history, when numerous systems rebelled. For two years human fought against human with USFP space ships on both sides.
2215 - 2219 The First Spiral Arm War
Every known race was swept up in this cataclysmic conflict. Late in the war the Ximni switched sides, joining the USFP.
2220 - 2225 The Ximni Civil War
USFP membership was so unpopular that it eventually tore the Ximni Republic in half.
2231 The Second Spiral Arm War
A re-hash of the First Spiral Arm War which ended the same way; with the Ximni switching sides.
2240 The War of Hegemony
All spacefaring races attacked the USFP-Ximni alliance.
1This timeline includes the Ximni, a new player-controlled race that will be
introduced in Artemis 2.0

Artemis Spaceship Bridge Simulator
- 55 -
Terran Stellar Navy
The Terran Stellar Navy is built around a small core of elite space ships. With a competent Engineer, your TSN ship can outrun, outgun, and outmaneuver any enemy ship you will encounter. The following briefs will acquaint you with the naval forces of the TSN as well as the ships fielded by Earth’s enemies.
Stations
USFP Deep Space Station
All USFP Deep Space Stations (DSs) are equipped to refuel and resupply your vessel.
When your vessel docks a station will replenish your energy, fill your torpedo storage with available arms, and assign replacement crew such as Damage Control Teams.

Artemis Spaceship Bridge Simulator
- 56 -
Ships
USFP Light Cruiser
The Light Cruiser is the workhorse of the TSN and our most widely produced vessel. Quick, well-armed, and versatile, this is the original Artemis class starship.
Front Shield Strength:
80 TRs
Rear Shield Strength:
80 TRs
Max Impulse Speed: .6 LS
Max FTL Speed: Warp 4
Standard Beam Emitters:
Forward: 2 Rear: 0
Torpedo Tubes: 2
Munitions Hold Capacity:
2 Nukes 8 Homing, 6 Mines, 4 ECM

Artemis Spaceship Bridge Simulator
- 57 -
USFP Scout
The Scout is the fastest, most energy efficient starship in the TSN. Its modest armament leaves no room for nuclear torpedoes and its shields are not intended for heavy combat. Scout crews must choose their battles wisely.
Front Shield Strength:
60 TRs
Rear Shield Strength: 60 TRs
Max Impulse Speed: .8 LS
Max FTL Speed: Warp 4
Standard Beam Emitter:
Forward: 1 Rear: 0
Torpedo Tubes: 1
Munitions Hold Capacity:
6 Homing 2 Mines 2 ECM

Artemis Spaceship Bridge Simulator
- 58 -
USFP Transports
Transports represent a variety of USFP unarmed, sublight vessels that carry cargo or passengers or both. They rely on TSN ships for defense navigational aid. A TSN Captain is responsible for the safety of all transports in the sector.
Front Shield Strength: 40 TRs
Rear Shield Strength: 40 TRs
Max Impulse Speed: .3 LS
Max FTL Speed: Warp 4
Beam Emitters: N/A
Torpedo Tubes: N/A
Munitions Hold Capacity:
N/A

Artemis Spaceship Bridge Simulator
- 59 -
USFP Missile Cruiser
The Missile Cruiser is outfitted with four torpedoes tubes and many munitions. It is designed as a support ship for long-range combat. Because it has no beam emitters, the Missile Cruiser is typically escorted by beam-capable ships.
Front Shield Strength:
110 TRs
Rear Shield Strength: 80 TRs
Max Impulse Speed: .6 LS
Max FTL Speed: Warp 4
Beam Emitters: N/A
Torpedo Tubes: 4
Munitions Hold Capacity:
8 Nukes 20 Homing 14 Mines 12 ECM

Artemis Spaceship Bridge Simulator
- 60 -
USFP Destroyer
The TSN’s Destroyers are lightly-armed sublight vessels designed to escort transports and perform local patrols. Like transports, Destroyers rely on TSN starships for navigational aid.
Front Shield Strength:
80 TRs
Rear Shield Strength:
80 TRs
Max Impulse Speed:
.5 LS
Max FTL Speed:
.7 LS
Standard Beam Emitters:
Forward: 2 Rear: 0
Torpedo Tubes:
N/A
Munitions Hold Capacity:
N/A

Artemis Spaceship Bridge Simulator
- 61 -
USFP Battleship
The Battleship is armed with four beam emitters, more than any other ship in the TSN fleet. Designed for frontal engagements, its forward shield can absorb tremendous punishment.
Front Shield Strength:
250 TRs
Rear Shield Strength:
150 TRs
Max Impulse Speed:
.6 LS
Max FTL Speed: Warp 4
Standard Beam Emitters:
Forward: 4 Rear: 0
Torpedo Tubes: 2
Munitions Hold Capacity:
2 Nukes 8 Homing 6 Mines 4 ECM

Artemis Spaceship Bridge Simulator
- 62 -
USFP Dreadnought
The Dreadnought is the most heavily armed and shielded vessel in the TSN. It is the only TSN ship fitted with an aft-mounted beam emitter.
Front Shield Strength: 200 TRs
Rear Shield Strength: 200 TRs
Max Impulse Speed: .5 LS
Max FTL Speed: Warp 4
Standard Beam Emitters:
Forward: 2 Rear: 1
Heavy Beam Emitter: Forward: 1
Torpedo Tubes: 3
Munitions Hold Capacity:
4 Nukes 10 Homing 8 Mines 5 ECM

Artemis Spaceship Bridge Simulator
- 63 -
Projectile Weapons
TSN space ships are armed with standard torpedo tubes which can load, fuel, and fire any of the following weapons. The Type 6 Mine uses a short-ranged warp engine to deploy in a fixed location behind the firing vessel. The Type 1, Type 4, and Type 9 torpedoes all have the same propulsion and guidance characteristics, differing only in their warheads. When fired with a target lock, Type 1, 4 and 9 torpedoes will home on the locked target at a moderate warp speed, detonating on impact. When fired without a target lock, they will launch directly ahead of the firing ship, their onboard guidance systems actively seeking any target that comes in range. Warning: Without a target lock these weapons will not discriminate between enemy and friendly ships.
Type 1 Homing Torpedo
The Type 1 Homing Torpedo carries a small thermonuclear warhead which will damage a single target on impact. Their simple parts may be fabricated aboard any TSN vessel using ship’s energy. In an emergency you may drain a Mark 1 to power your vessel.
Type 4 LR Nuclear Torpedo
The Type 4 Long Range Nuclear Torpedo, or “nuke,” carries a large fusion warhead which will severely damage anything within a blast radius of 1,000 units.

Artemis Spaceship Bridge Simulator
- 64 -
Type 6 Mine
The Type 6 Mine has a massive warhead equal to the Type 4 “nuke.” It is deployed using a small propulsion unit with no guidance system. The Type 6 has a simple proximity sensor which will detonate it when any vessel comes within range. A mine blast has no effect on Deep Space Stations.
Type 9 ECM Torpedo
The Type 9 torpedo carries a sophisticated Electronic Countermeasures (ECM) warhead. Any ship or station within 1,000 units of its detonation will have all shields reduced by half their maximum strength and become very vulnerable to beam weapons.

Artemis Spaceship Bridge Simulator
- 65 -
earth’S eNemieS
Our part of the galaxy is filled with intelligent beings adept at making war. While peace treaties are sometimes signed and alliances are sometimes formed, it seems at least one of these interstellar governments can usually find an excuse to go to war.
Kralien Defense Fleet
Despite human prejudices the Kraliens are not man-sized bugs. They are true vertebrates who happen to have hard carapaces like Earth’s beetles or lobsters. Kralien society is highly religious. Upon promotion all Kralien captains are ordained into a priest class. Their religion is unusual in that all Kraliens believe in the same set of gods: ancient super-beings that lived on the Kralien homeworld for several generations then left our galaxy forever. Even Earth’s scientists believe the Kralien religion is grounded in fact. Today’s Kraliens believe that their gods granted them ownership of the entire galaxy. They also believe that the gods answer the prayers of devout Kraliens. The Kralien government considers all non-Kraleans to be tenants living on their property. We are welcome to stay, but we owe them millions of years in back rent payments. For now the ships of the Kralien Defense Fleet are ill-equipped to collect that rent, so they are often seen in formation with those of stronger allies.

Artemis Spaceship Bridge Simulator
- 66 -
Kralien Cruiser
The Kralien Cruiser is a mass-produced, lightly armed ship with weaker shields than its TSN counterpart. It is the most frequently encountered enemy vessel
Front Shield Strength: 40 TRs
Rear Shield Strength: 40 TRs
Max Impulse Speed: .3 LS
Displacement: 9 kt
Beam Emitters: Forward: 2 Rear: 0
Torpedo Tubes: N/A
Maneuverability: Class 2

Artemis Spaceship Bridge Simulator
- 67 -
Kralien Battleship
The Kralien Battleship has beams and shields on par with the TSN Light Cruiser. Nevertheless it lacks torpedo launchers and warp drive of TSN ships.
Front Shield Strength:
80 TRs
Rear Shield Strength: 80 TRs
Max Impulse Speed: .3 LS
Displacement: 17 kt
Beam Emitters: Forward: 2 Rear: 0
Torpedo Tubes: N/A
Maneuverability: Class 2
Front Shield Strength:
80 TRs
Artemis Spaceship Bridge Simulator
- 68 -
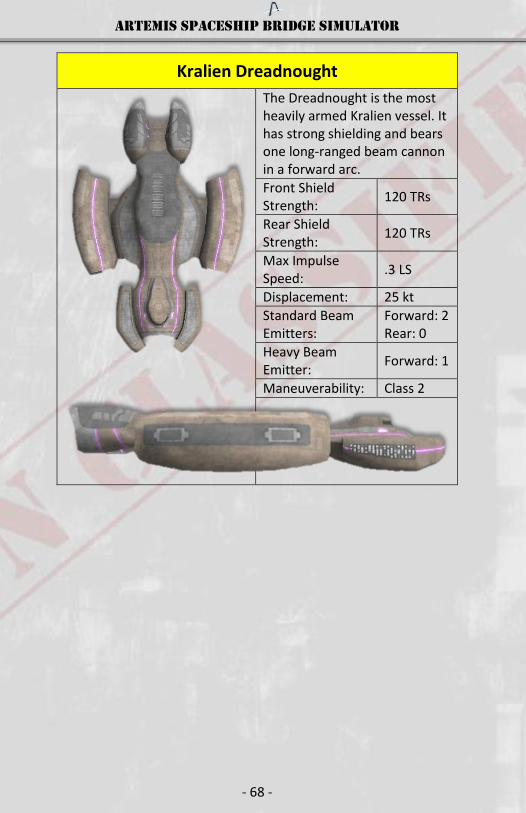
Kralien Dreadnought
The Dreadnought is the most heavily armed Kralien vessel. It has strong shielding and bears one long-ranged beam cannon in a forward arc.
Front Shield Strength:
120 TRs
Rear Shield Strength:
120 TRs
Max Impulse Speed:
.3 LS
Displacement: 25 kt
Standard Beam Emitters:
Forward: 2 Rear: 0
Heavy Beam Emitter:
Forward: 1
Maneuverability: Class 2

Artemis Spaceship Bridge Simulator
- 69 -
Arvonian Royal Armada
The Arvonians are a humanoid race most remarkable for their chameleon-like skin pigmentation. They prefer to run curving patterns of very bright colors across their faces, giving them a dazzling appearance that most humans find attractive. Arvonian males and females have the same slender build. Their culture is matriarchal, so their space ship captains and fighter squadron leaders are often women. The Arvonian people regard their royal family fondly. A century ago the Arvonian race was united under the benevolent rule of Queen Sansha. As their culture spread to the stars, governing became too complex for Sansha, so she decreed the construction of a super-intelligent master computer to assist her. That computer, whose name translates to “The Supreme Understander,” now runs the entire Arvonian government, deciding everything from war strategies to parking tickets. Most humans think of Arvonian society as a computer-controlled dystopia, yet the Arvonians adore The Supreme Understander. In fact, they revere all computers and refuse to put them in danger. Whenever a TSN torpedo or Torgoth drone is fired, Arvonians weep for the weapon’s onboard computer callously sent on a one-way mission. Thus the Arvonians use manned fighters instead of automated missiles. Arvonians also love space whales. If they see you harm a space whale the Arvonians will fight to the death rather than allow you to live.

Artemis Spaceship Bridge Simulator
- 70 -
Arvonian Fighter
The single-seat Fighter is the fastest, most maneuverable ship deployed by the Arvonians. Although individually fragile, a squadron of Arvonian Fighters can blast down the shields of the strongest TSN ship in just a few passes. Because of their limited range, Arvonian fighters can never surrender.
Front Shield Strength:
15 TRs
Rear Shield Strength:
15 TRs
Max Impulse Speed:
1.2 LS
Displacement: 15 t
Beam Emitters: Front: 2 Rear: 0
Torpedo Tubes: N/A
Maneuverability: Class 10

Artemis Spaceship Bridge Simulator
- 71 -
Arvonian Light Carrier
The Arvonian Light Carrier is a formidable foe. Even without its fighter squadron it has the size and power of a Kralien Dreadnought, yet with greater maneuverability.
Front Shield Strength:
120 TRs
Rear Shield Strength: 120 TRs
Max Impulse Speed: .3 LS
Displacement: 25 kt
Beam Emitters: Forward: 2 Rear: 2
Fighter compliment: 4 fighters
Maneuverability: Class 3

Artemis Spaceship Bridge Simulator
- 72 -
Arvonian Carrier
The Arvonian Carrier is as much a Battleship as it is a Carrier. With sturdy shields and impressive maneuverability, this heavy ship is often used as a strategic base, issuing orders to non-Arvonian ships in the fleet.
Front Shield Strength: 200 TRs
Rear Shield Strength: 200 TRs
Max Impulse Speed: .3 LS
Displacement: 45 kt
Beam Emitters: Forward: 4 Rear: 2
Fighter compliment: 6 fighters
Maneuverability: Class 3
Torgoth Deep Space Force
The Torgoth homeworld is a massive, rocky planet with relatively low density. Despite its colossal size the planet has lower gravity than Earth. This has yielded a spacefaring race with twice the height, four times the mass, and ten times the radiation resistance of a human. Though they vaguely resemble bipedal elephants, Torgoth biology is closer to dinosaurs than any other Earth creature. The Torgoth are supreme in hand-to-hand combat, with the ability to kill a human by simply stepping on him. As alien as the Torgoth are, their government is a representative democracy, much like the USFP. Unfortunately, the Torgoth Parliament is currently dominated by warmongers. It is obvious to everyone in the galaxy – except the Torgoth citizens – that the

Artemis Spaceship Bridge Simulator
- 73 -
warmongers in Parliament never intend to win any war. They simply keep the wars going so they can get re-elected over and over. Torgoth ships are as massive as the Torgoth beings. The smallest Torgoth ship weighs almost twice as much as the largest TSN vessel. Nevertheless, high gee forces are deadly to Torgoth so their ships only make the most gentle maneuvers. Torgoth enjoy slaughtering space whales for sport and will sometimes break off a pursuit to chase a whale. If a Torgoth slaughters a space whale, all Arvonians who witness the act will immediately withdraw from battle to report that their ally has committed an atrocity.
Torgath Goliath
The Torgoth’s smallest ship is an intimidating adversary, with six beam emitters and shields nearly double the strength of the TSN’s mighty Dreadnoughts.
Front Shield Strength: 350 TRs
Rear Shield Strength: 350 TRs
Max Impulse Speed: .3 LS
Displacement: 80 kt
Medium Beam Emitters: Forward: 4 Rear: 2
Drone Launchers: 1
Maneuverability: Class 2

Artemis Spaceship Bridge Simulator
- 74 -
Torgoth Leviathan
The Torgoth Leviathan has firepower similar to the Goliath but distributed differently. Its main forward beam weapon has tremendous range and packs a powerful punch.
Front Shield Strength: 400 TRs
Rear Shield Strength: 400 TRs
Max Impulse Speed: .3 LS
Displacement: 90 kt
Medium Beam Emitters: Forward: 2 Rear: 2
Heavy Beam Emitters: Forward: 1
Drone Launchers: 1
Maneuverability: Class 2

Artemis Spaceship Bridge Simulator
- 75 -
Torgoth Behemoth
A single Behemoth can withstand a barrage of ECM and nuclear torpedoes that would destroy most fleets. It compensates for poor maneuverability by bristling with beams in every direction.
Front Shield Strength: 600 TRs
Rear Shield Strength: 600 TRs
Max Impulse Speed: .3 LS
Displacement: 150 kt
Standard Beam Emitters:
Forward: 6 Rear: 4
Torpedo Tubes: 1
Maneuverability: Class 2
Skaraan War Corporations
An adult Skaraan body is about the size of a donkey. At the front is a centaur-like torso with two small arms and a horse-like head. At the rear is a muscular tail that can operate intricate controls. The Skaraan central government exists only to enforce civil laws. It has no diplomats and makes no policies, treaties, or tariffs relating to non-Skaraan affairs. Skaraans conduct defense and interplanetary trade through private corporations. These corporations operate strictly for profit, and have a reputation for being sneaky. Skaraan War Corporations have offered their services to the USFP but so far we have never hired them.

Artemis Spaceship Bridge Simulator
- 76 -
While Skaraan vessels are built around a set of standard hulls, each War Corporation outfits its ships with different technologies, making the Skaraans tricky enemies full of surprises. Every Skaraan vessel is equipped with some combination of the following abilities:
Skaraan Elite Ability Table
Warp Drive (5 second bursts)
Jump Drive (6,000 unit range)
Invisibility to Tactical
Cloaking device (60 seconds)
Invisibility on Main Screen
High-speed turning
Due to their ability to cloak, jump, or warp, Skaraan ships are often hired to attack USFP Deep Space Stations in the opening phases of an invasion.
Skaraan Defiler
The Skaraan Defiler is quick and maneuverable. Its elite abilities make it a formidable opponent.
Front Shield Strength: 250 TRs
Rear Shield Strength: 100 TRs
Max Impulse Speed: .8 LS
Max FTL Speed: Warp 1 or Jump
Medium Beam Emitters: Forward: 2 Rear: 0
Displacement: 40 kt
Maneuverability: Class 4

Artemis Spaceship Bridge Simulator
- 77 -
Skaraan Enforcer
The Skaraan Enforcer has a very powerful front shield. It was designed to steamroller through defensive minefields.
Front Shield Strength: 300 TRs
Rear Shield Strength: 150 TRs
Max Impulse Speed: .8 LS
Max FTL Speed: Warp 1 or Jump
Standard Beam Emitters:
Forward: 2 Rear: 2
Displacement: 50 kt
Maneuverability: Class 4

Artemis Spaceship Bridge Simulator
- 78 -
Skaraan Executor
Combining massive forward beam weapons with elite abilities, the Skaraan Executor is a perfect assault ship. It can destroy a Deep Space Station in minutes.
Front Shield Strength: 350 TRs
Rear Shield Strength: 300 TRs
Max Impulse Speed: .8 LS
Max FTL Speed: Warp 1 or Jump
Super Heavy Beam Emitters:
Forward: 2
Medium Beam Emitters:
Rear: 1
Displacement: 70 kt
Maneuverability: Class 4
Artemis Spaceship Bridge Simulator
- 79 -
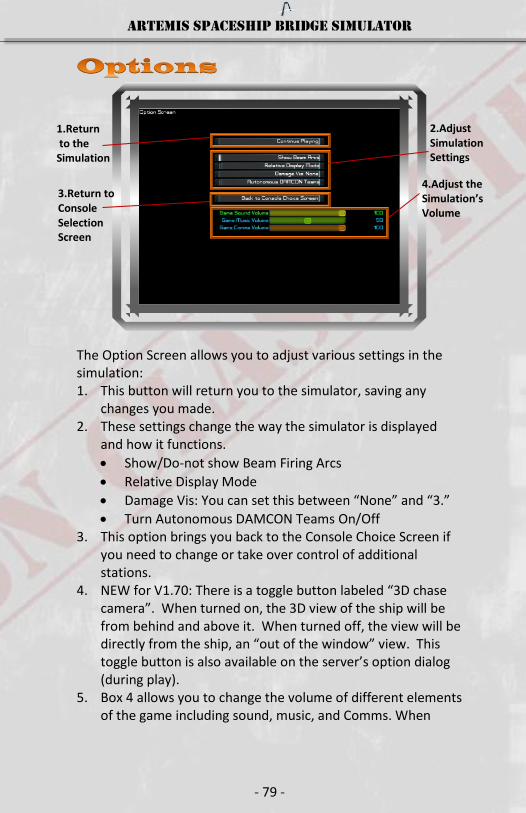
The Option Screen allows you to adjust various settings in the simulation: 1. This button will return you to the simulator, saving any
changes you made. 2. These settings change the way the simulator is displayed
and how it functions.
Show/Do-not show Beam Firing Arcs
Relative Display Mode
Damage Vis: You can set this between “None” and “3.”
Turn Autonomous DAMCON Teams On/Off 3. This option brings you back to the Console Choice Screen if
you need to change or take over control of additional stations.
4. NEW for V1.70: There is a toggle button labeled “3D chase camera”. When turned on, the 3D view of the ship will be from behind and above it. When turned off, the view will be directly from the ship, an “out of the window” view. This toggle button is also available on the server’s option dialog (during play).
5. Box 4 allows you to change the volume of different elements of the game including sound, music, and Comms. When
2.Adjust Simulation Settings
4.Adjust the Simulation’s Volume
1.Return to the Simulation
3.Return to Console Selection Screen
Artemis Spaceship Bridge Simulator
- 80 -
playing a mission with audio communications you should turn the music volume below 20%.
Created by Thom Robertson 3D Art Matt Mitman UI Art Dave Wellman Music John Robert Matz First Officer Brian C. Johnson Critical Assistance Adrian Wright and Max Gaming Special Thanks Mike Substelney Manual Michael Doyle and Mike Substelny
For technical or tactical guidance, please visit TSN Command at http://www.artemis.eochu.com/ The Artemis Official Soundtrack: http://johnrobertmatz.bandcamp.com/album/artemis-the-official-soundtrack