Embed Size (px)
Citation preview
Art Journaling Techniques 1
Art JournalingTechniques

Art Journaling Techniques 2
Art journaling is a popular and important part of mixed-media art, and it’s easy to see why: Anything goes in a journal, including drawing, writing, collage, painting, or doodling. You can practice and hone techniques, and keep everything completely private.
Work in a journal over time, and you’re bound to see your skills improve and your confidence soar. If you’ve never tried art journaling before, it’s time to start exploring, and we’ve got some great ideas to get you going. If you’re a veteran journaler, take your artwork even further and add some of these new techniques to your repertoire.
The articles we’ve selected just for you from Cloth Paper Scissors and Pages magazines are perfect for all levels, and no special skills are required—just bring your sense of adventure and have fun!
From the Editor
Art Journaling Techniques 3
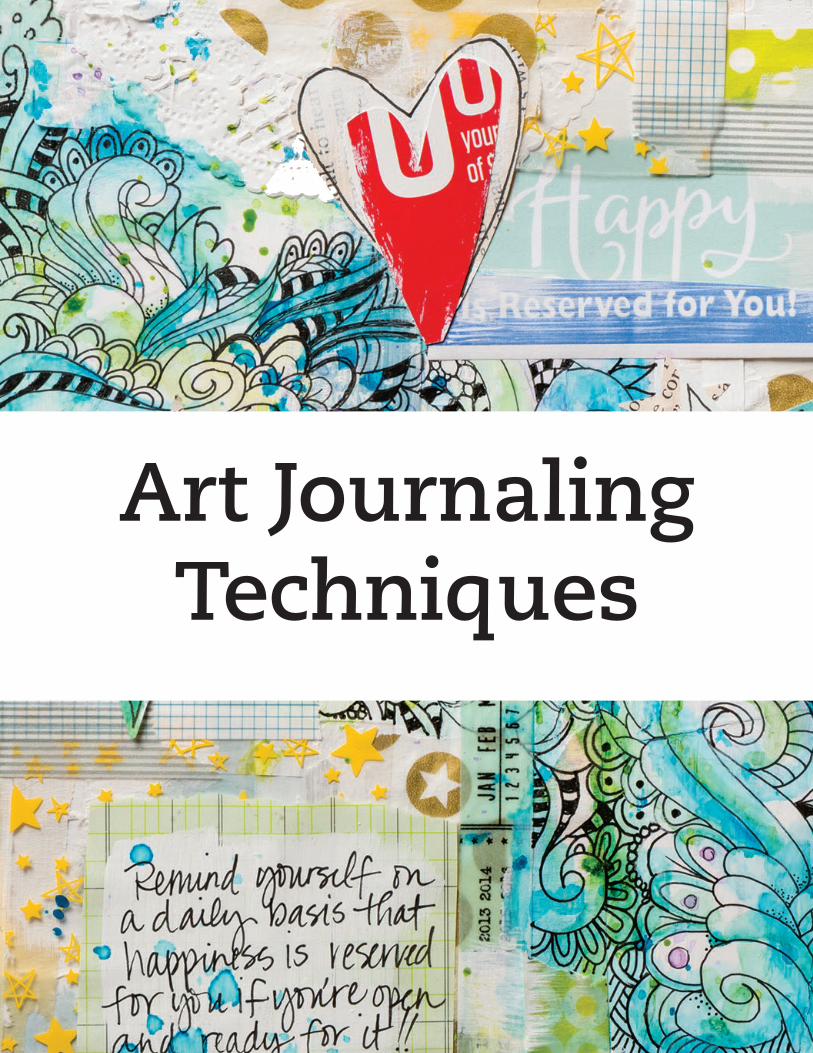
Table of Contents
4 The Benefits of Art Journaling the creative pulse
7 Black-and-White Journal Pages
11 Dress it Up magazine images become focal points
17 Add a Little Doodle to Your Collage
20 Visual Fieldnotes
Vice President, Group Publishing . . . Jamie Markle
Editorial Director . . . . . . . . . . . . . . .Jeannine Stein
Managing Editor . . . . . . . . . . . . .Barbara Delaney
Creative Services
Photography . . . . . . . . Sharon White Photography
Designer . . . . . . . . . . . . . . . . . . . . . . . . Anita Cook
Projects and information are for inspiration and personal use only. CLOTH PAPER SCISSORS is not responsible for any liability arising from errors, omissions, or mistakes contained in this eMag, and readers should proceed cautiously, especially with respect to technical information.
F+W Media, Inc. grants permission for any or all pages in this eMag to be copied for personal use.

Art Journaling Techniques 4
The Benefits of Art Journalingthe creative pulse
from Cloth PaPer SCiSSorS March/April 2016
There is no denying the popularity of art journaling. So many artists are doing it, and it is truly an international phenomenon. Books, magazines, and online communities are dedicated solely to journaling, and there are products galore to feed the fascination.
If you are a journaler, think about why you started. Were you looking for a safe space to process your thoughts and feelings? Was it to have a place to document your daily life experiences? Or did you start journaling because everybody else was doing it?
I put journaling into the same category as exercise—it’s good for you but not everybody does it. As with exercise, some people find the journaling process fun. They look forward to working out, eagerly stretching their creative muscles. Yet some are Artwork and photos by Seth Apter
by Seth Apter
Art Journaling Techniques 5
intimidated by the idea of journaling—to them it can feel like as much of a challenge as a day in the gym.
If this describes you, consider this: There are no rules with art journaling. Any and every art medium is available to the art journaler, and there is no right or wrong. Every journal is unique. Some journalers focus more on the visual aspects, while others concentrate on text. The benefits of journaling can be yours no matter how you journal or how often.
These benefits can be divided into two categories: practical and personal. From the practical standpoint, journaling contributes to our artistic proficiency; it can make us better artists. On the personal side, journaling is good for the soul. It can relieve stress and contribute to our overall well-being.
A journal is a place where we create only for ourselves. There’s no pressure to show our work to
others and, without the weight of outside criticism, journaling can free us to release our creativity and enhance our artistic skills. This for-your-eyes-only journaling, coupled with the focus on right-brain activity during the act of art journaling, allows you to be less critical and rely more on intuition. You take more risks, and that helps build self-confidence and personal satisfaction.
Working in a journal may be the closest thing we have as adults to creating with childlike abandon. Have you heard the phrase, “Dance like nobody’s watching”? I say, journal like no one is watching.
One of the best pieces of advice I ever received is that the way to get better at drawing is to draw. And then keep on drawing. This holds true with art journaling as well. A journal is the perfect place to practice a technique over and over again. As an added bonus,
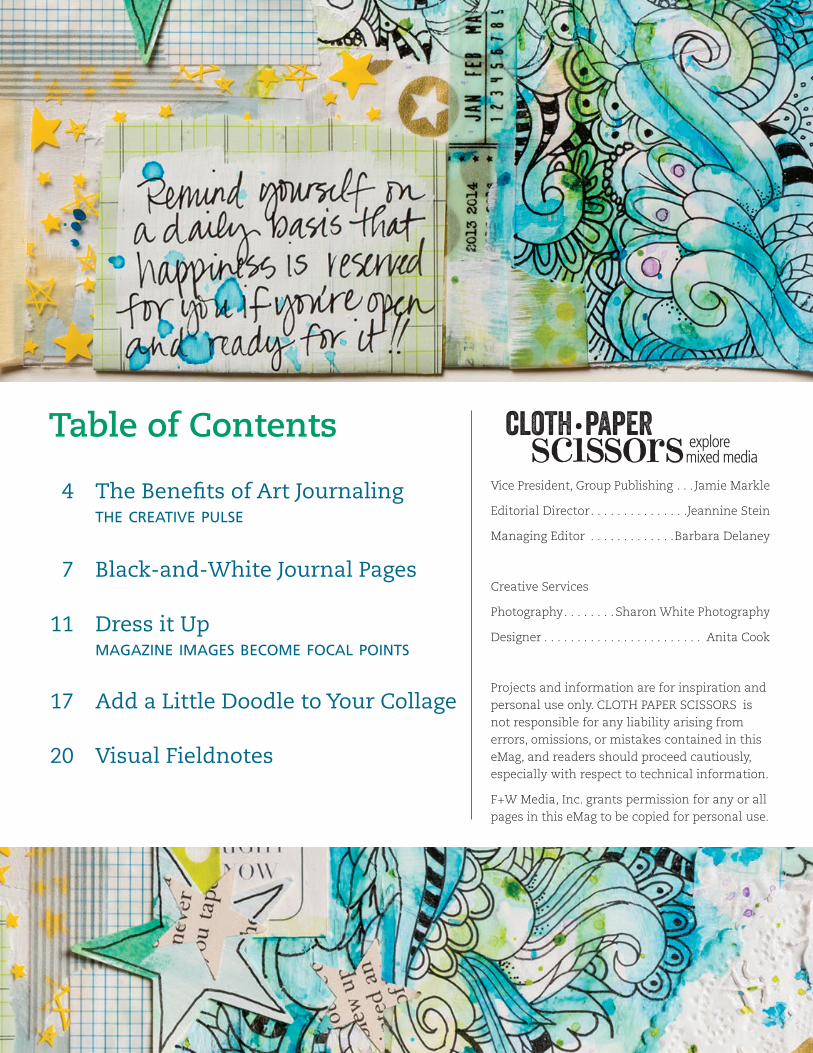
"Light the Way"
Art Journaling Techniques 6
you can flip through the pages and see the progress you have made. This documentation gives you the opportunity to reflect on your evolution as an artist, which is a major benefit of keeping a journal.
Art journaling offers a place to experiment with new techniques and supplies and try out new ideas. Working on pages in an inexpensive sketchbook allows us to take risks and be more comfortable with making mistakes.
Visual journaling can be a great stress reducer, and it’s a popular technique used in art therapy. Journaling about difficult circumstances tends to make situations feel more manageable. Think of the times you felt better after turning to your journal to express your emotions, deal with a bad day, or simply vent.
The boost in your well-being is not simply in your head, though. In fact, art journaling has been shown
to decrease physiological stress responses, reduce heart rate, and increase serotonin levels. Consider it your own personal therapy session.
If you’re already deep into your art journal, you’re probably familiar with the benefits and feel better for them. If you’re hesitant to jump into journaling, think about what you’ll gain by tapping into the power of art journaling. Once you do that, working out will seem painless.
Seth Apter is a mixed-media artist, instructor, author, and designer from New York City. He is the voice behind The Pulse, a series of collaborative projects. Seth is the author of the Mixed-Media artiSt and the PulSe of Mixed Media, and hosts the DVD Easy Mixed-Media Techniques for the Art Journal. Don't miss Seth's newest DVDs: Photo Play: Techniques for Altering Photos with Paint and Ink, Seth Apter’s Top 10 Collage Principles, Card Play: Mixed-Media Techniques for Small Works of Art, and The Altered Book: 10 Mixed-Media Techniques.
sethapter.com
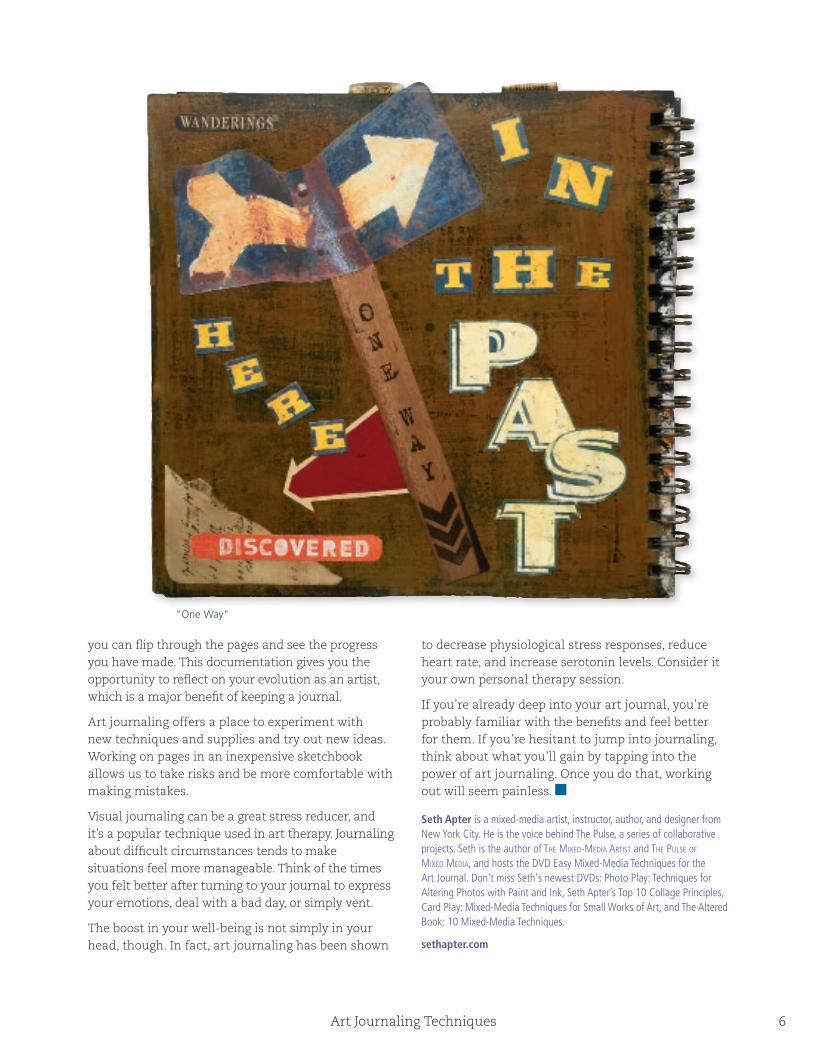
"One Way"
Art Journaling Techniques 7
from PageS Summer 2014
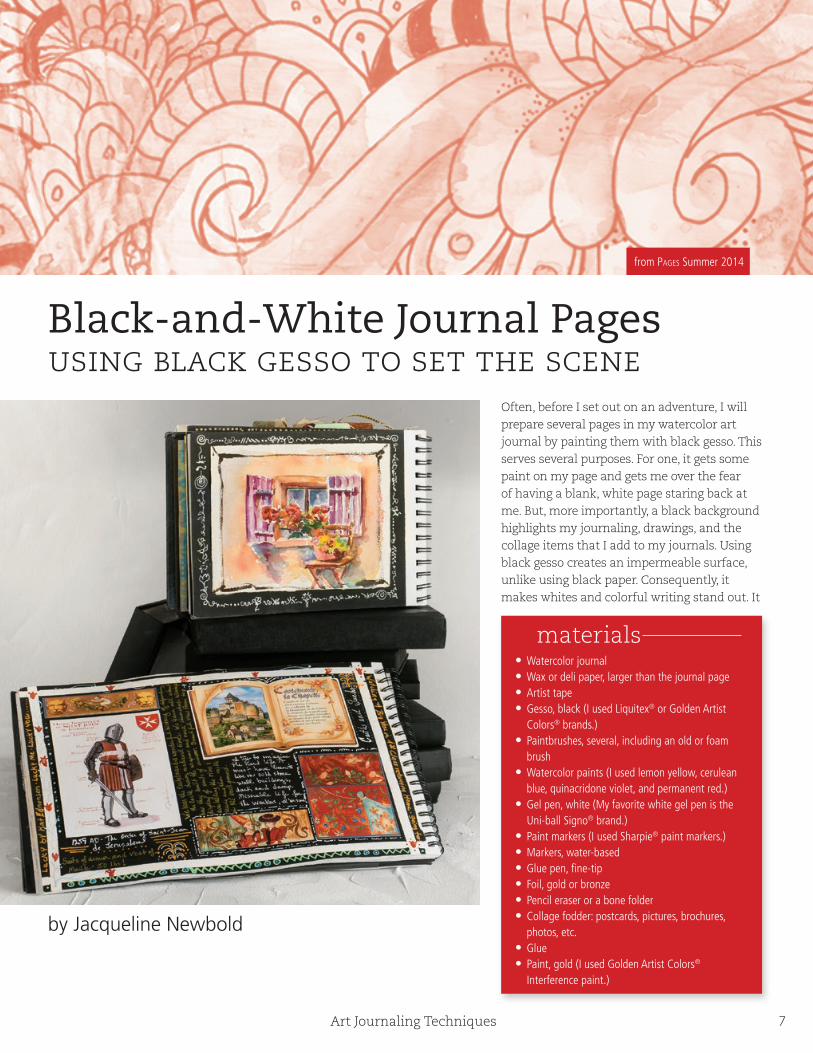
Black-and-White Journal Pagesusing black gesso to set the scene
Often, before I set out on an adventure, I will prepare several pages in my watercolor art journal by painting them with black gesso. This serves several purposes. For one, it gets some paint on my page and gets me over the fear of having a blank, white page staring back at me. But, more importantly, a black background highlights my journaling, drawings, and the collage items that I add to my journals. Using black gesso creates an impermeable surface, unlike using black paper. Consequently, it makes whites and colorful writing stand out. It
• Watercolor journal• Wax or deli paper, larger than the journal page• Artist tape• Gesso, black (I used Liquitex® or Golden Artist
Colors® brands.)• Paintbrushes, several, including an old or foam
brush• Watercolor paints (I used lemon yellow, cerulean
blue, quinacridone violet, and permanent red.)• Gel pen, white (My favorite white gel pen is the
Uni-ball Signo® brand.)• Paint markers (I used Sharpie® paint markers.)• Markers, water-based• Glue pen, fine-tip• Foil, gold or bronze• Pencil eraser or a bone folder• Collage fodder: postcards, pictures, brochures,
photos, etc.• Glue• Paint, gold (I used Golden Artist Colors®
Interference paint.)
materials
by Jacqueline Newbold

Art Journaling Techniques 8
adds a dramatic and distinctive setting for my art, and it is a great way to highlight collected ephemera and treasured memories from my travels.
One of my favorite pages that started out with black gesso is from a family vacation to the southwest part of France. The Dordogne area is known for its tasty truffles, fields of sunflowers, the Lascaux prehistoric cave paintings, and its colorful history. Beautiful villages dot the countryside, and medieval castles cling to limestone cliffs, their turrets and towers rising above the treetops. After a visit to the Chateau Castelnaud, a medieval chateau overlooking the Dordogne River, I stopped in a tiny trinket shop built into the stone façade to buy a postcard. The impressive rendition of a 1259 AD
knight boldly clad in a vest of mail armor was the perfect focus for my journal page. After adding other mementos depicting Renaissance castle life, I added my notes about the castles and chateaux we visited.
Black gesso with a white border
1 Protect the other pages in your journal from the black gesso by placing a piece of wax or deli paper behind the page you are painting. Using artist tape, make a frame around your journal page roughly ½" in from the edge, continuing the tape all the way off the edges of the paper, attaching the page to the piece of wax or deli paper.
note: If you don’t want a white frame, protect the back of the journal page and other pages by attaching the wax paper
1
3
2
4
Art Journaling Techniques 9
to the underside of the journal page using a couple of rolled pieces of tape or double-sided tape.
2 Squeeze a small amount of black gesso in the middle of the page. Using a foam brush or an old acrylic brush, spread the gesso from the middle of the page to the outer edges. Allow to dry.
tip: Prepare several pages ahead of time, randomly spacing them throughout your watercolor travel journal so they are ready to use during your trip.
5 6
7
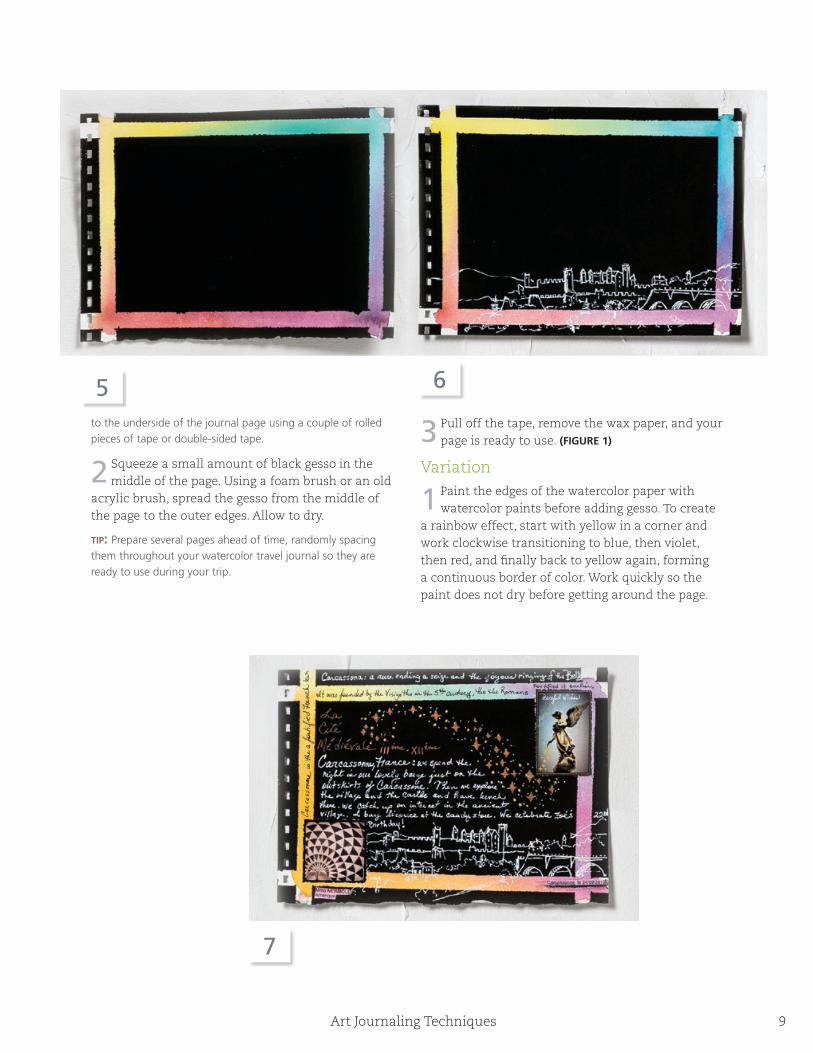
3 Pull off the tape, remove the wax paper, and your page is ready to use. (FIGURE 1)
Variation
1 Paint the edges of the watercolor paper with watercolor paints before adding gesso. To create a rainbow effect, start with yellow in a corner and work clockwise transitioning to blue, then violet, then red, and finally back to yellow again, forming a continuous border of color. Work quickly so the paint does not dry before getting around the page.
Art Journaling Techniques 10
Let the colors flow and mingle with each other by lifting the page/journal and tilting it back and forth. Let dry. (FIGURE 2)
2 Add artist tape to the page and paint with gesso. (FIGURES 3 AND 4)
3 Remove the artist tape, revealing a colorful rainbow border for your journaling. (FIGURE 5)
tip: Paint a couple of pages with black gesso in a separate journal in order to test markers, pens, and paints, to see which ones you like the most or work best over the gesso. Make notes on the brands and colors you like. (See above.)
Jacqueline Newbold is known for her color-filled watercolor paintings and mixed-media travel journals. Jacqueline has conducted watercolor workshops around the world. She has articles published in several art magazines about creating art while traveling.
newboldart.com djnewbold.blogspot.com
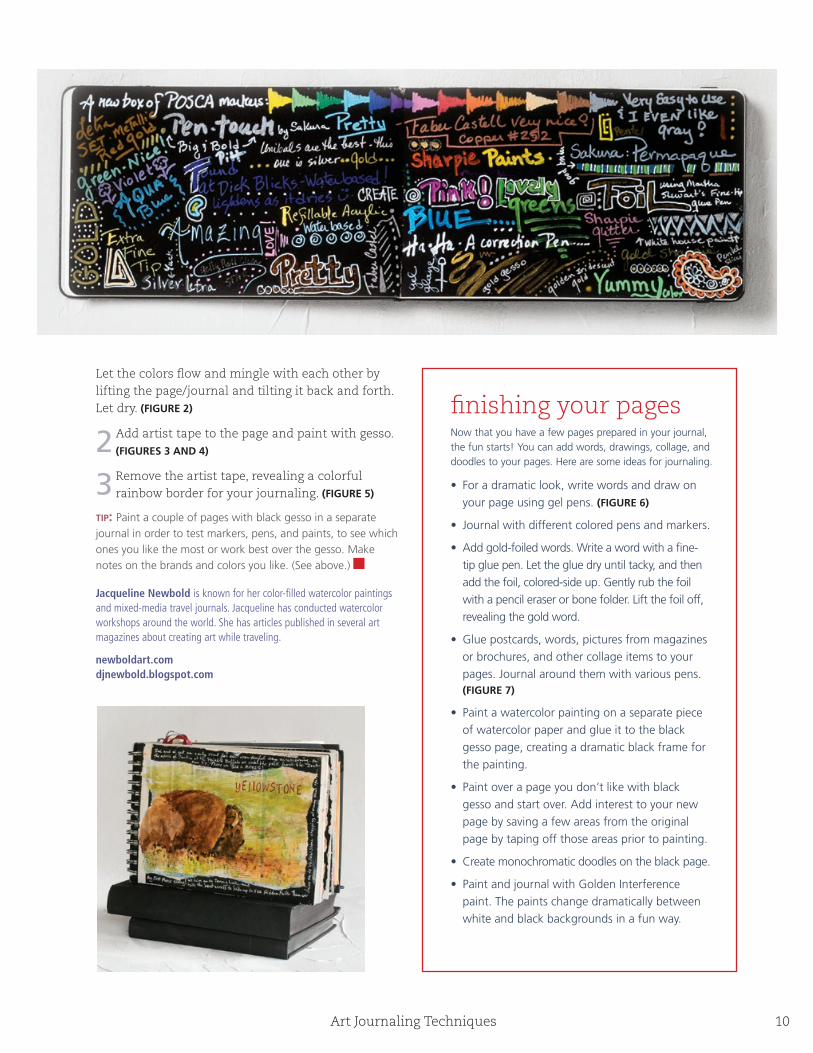
finishing your pages Now that you have a few pages prepared in your journal, the fun starts! You can add words, drawings, collage, and doodles to your pages. Here are some ideas for journaling.
• For a dramatic look, write words and draw on your page using gel pens. (FIGURE 6)
• Journal with different colored pens and markers.
• Add gold-foiled words. Write a word with a fine-tip glue pen. Let the glue dry until tacky, and then add the foil, colored-side up. Gently rub the foil with a pencil eraser or bone folder. Lift the foil off, revealing the gold word.
• Glue postcards, words, pictures from magazines or brochures, and other collage items to your pages. Journal around them with various pens. (FIGURE 7)
• Paint a watercolor painting on a separate piece of watercolor paper and glue it to the black gesso page, creating a dramatic black frame for the painting.
• Paint over a page you don’t like with black gesso and start over. Add interest to your new page by saving a few areas from the original page by taping off those areas prior to painting.
• Create monochromatic doodles on the black page.
• Paint and journal with Golden Interference paint. The paints change dramatically between white and black backgrounds in a fun way.
Art Journaling Techniques 11
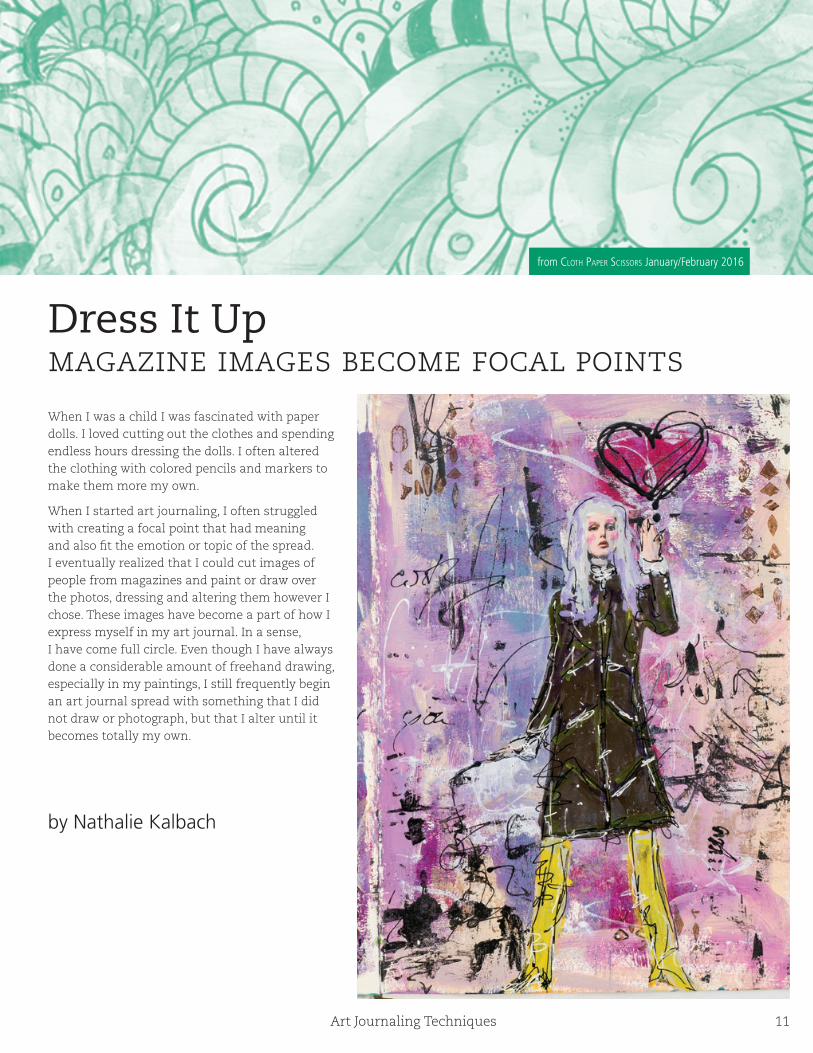
Dress It Upmagazine images become focal points
from Cloth PaPer SCiSSorS January/February 2016
by Nathalie Kalbach
When I was a child I was fascinated with paper dolls. I loved cutting out the clothes and spending endless hours dressing the dolls. I often altered the clothing with colored pencils and markers to make them more my own.
When I started art journaling, I often struggled with creating a focal point that had meaning and also fit the emotion or topic of the spread. I eventually realized that I could cut images of people from magazines and paint or draw over the photos, dressing and altering them however I chose. These images have become a part of how I express myself in my art journal. In a sense, I have come full circle. Even though I have always done a considerable amount of freehand drawing, especially in my paintings, I still frequently begin an art journal spread with something that I did not draw or photograph, but that I alter until it becomes totally my own.

Art Journaling Techniques 12
• Art journal (I used a Ranger Dylusions Creative Journal by Dyan Reaveley.)
• Paintbrushes (I used a Liquitex® Freestyle Bright size 12 and a Basics Fan No. 6.)
• Acrylic paints (I used Liquitex Soft Body paints: Titanium White, Mars Black, Deep Magenta, Unbleached Titanium, and Quinacridone Crimson.)
• Cosmetic wedges • Stencils (I used my Batik and Art Deco Wallpaper
stencils from StencilGirl Products.)• Unmounted rubber stamps (I used my n*Studio
Marks stamps from Stampendous!®.)• Baby wipes• Fashion magazine or catalog images• Scissors• Gel medium (I used Liquitex Matte Gel.)• White gesso (I used Liquitex brand.)• Water• Marker, acrylic (I used Liquitex Professional Paint
Markers, 2mm.)• Pencil (I used a #2 pencil.)• Pigment pen (I used a Derwent Graphik Line Painter.)• Gel pen, white (I used a uni-ball® Signo® pen.)
materials
1
2
1 Paint the background of your art journal pages using a color that goes with your mood or the theme of your spread. I used Deep Magenta. Add some White and Black paint in areas to create tints and shades of your color, creating dimension. (FIGURE 1)
2 Using a cosmetic wedge and a lighter color paint, stencil a background design onto the page. I used Unbleached Titanium. (FIGURE 2) Stencil another layer on top of that, using your original background color.
note: I use a cosmetic wedge for stenciling because it gives me more control over the amount of paint I use. By using a small amount of paint on the sponge the stencil image is more defined.
3 Ink up a stamp with another color, using the cosmetic wedge (I used Quinacridone Crimson). (FIGURE 3) The paint adds a bit of texture to the stamped image that regular stamping ink does not. Stamp the design, unifying
Art Journaling Techniques 13
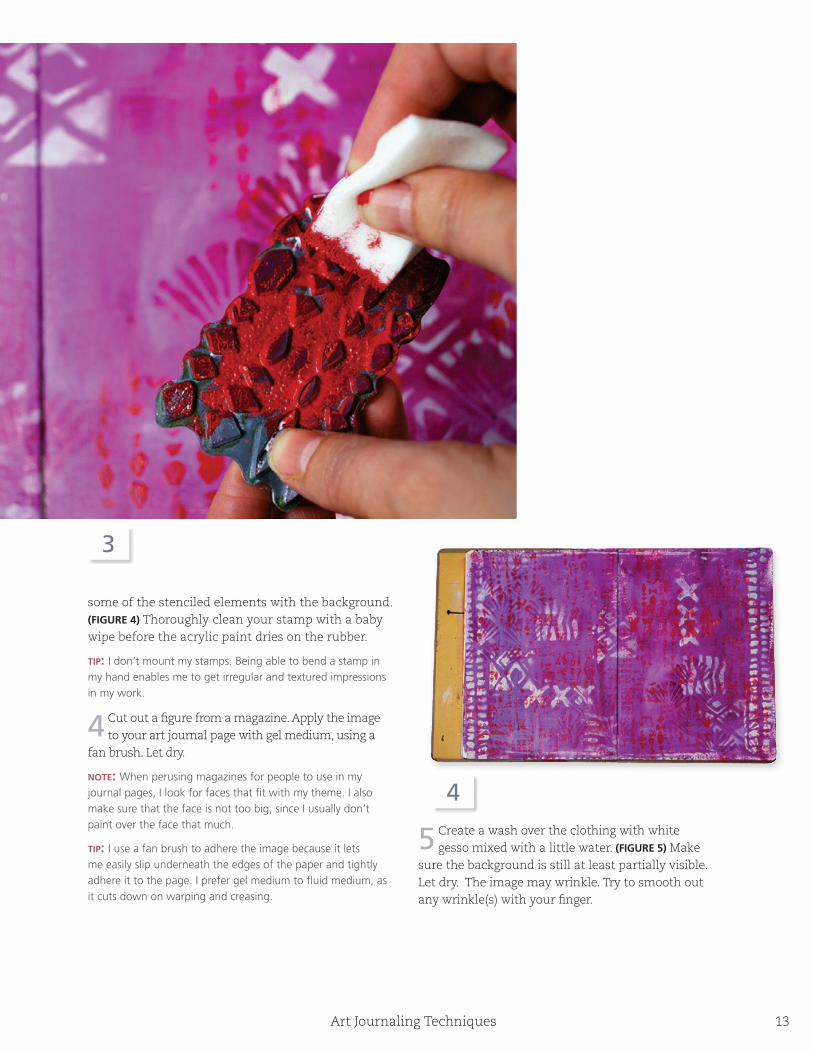
some of the stenciled elements with the background. (FIGURE 4) Thoroughly clean your stamp with a baby wipe before the acrylic paint dries on the rubber.
tip: I don’t mount my stamps. Being able to bend a stamp in my hand enables me to get irregular and textured impressions in my work.
4 Cut out a figure from a magazine. Apply the image to your art journal page with gel medium, using a fan brush. Let dry.
note: When perusing magazines for people to use in my journal pages, I look for faces that fit with my theme. I also make sure that the face is not too big, since I usually don’t paint over the face that much.
tip: I use a fan brush to adhere the image because it lets me easily slip underneath the edges of the paper and tightly adhere it to the page. I prefer gel medium to fluid medium, as it cuts down on warping and creasing.
5 Create a wash over the clothing with white gesso mixed with a little water. (FIGURE 5) Make sure the background is still at least partially visible. Let dry. The image may wrinkle. Try to smooth out any wrinkle(s) with your finger.
3
4
Art Journaling Techniques 14
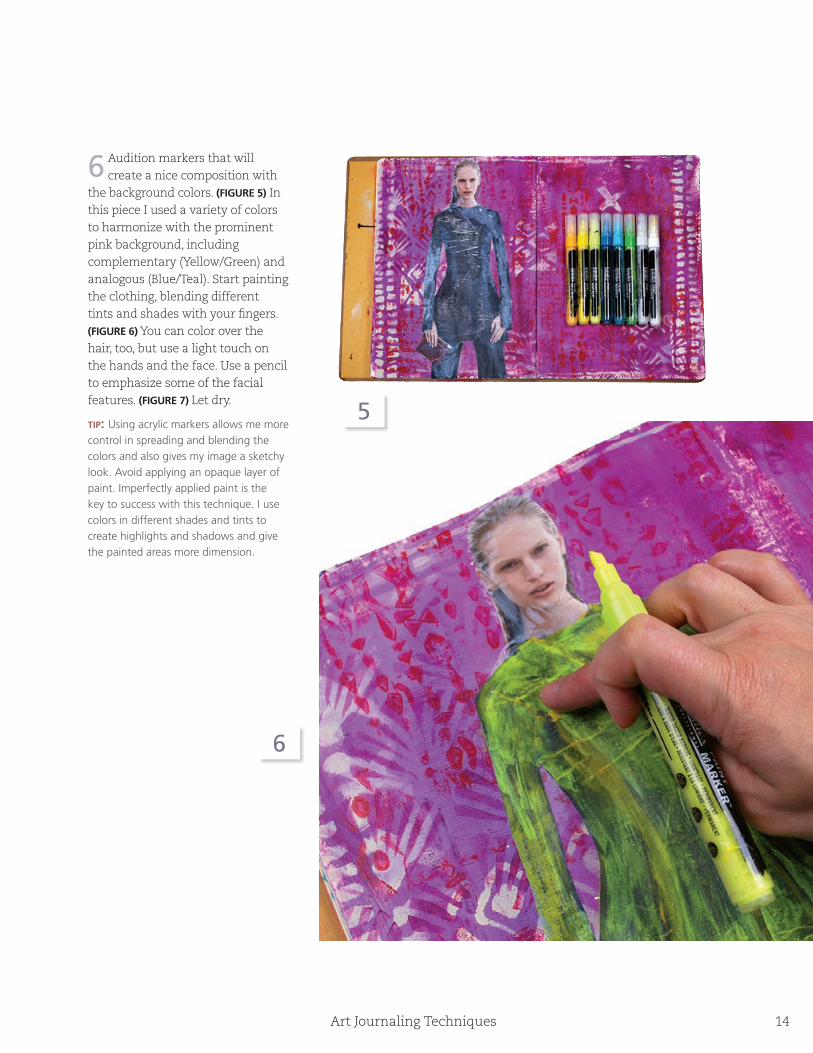
6 Audition markers that will create a nice composition with the background colors. (FIGURE 5) In this piece I used a variety of colors to harmonize with the prominent pink background, including complementary (Yellow/Green) and analogous (Blue/Teal). Start painting the clothing, blending different tints and shades with your fingers. (FIGURE 6) You can color over the hair, too, but use a light touch on the hands and the face. Use a pencil to emphasize some of the facial features. (FIGURE 7) Let dry.
tip: Using acrylic markers allows me more control in spreading and blending the colors and also gives my image a sketchy look. Avoid applying an opaque layer of paint. Imperfectly applied paint is the key to success with this technique. I use colors in different shades and tints to create highlights and shadows and give the painted areas more dimension.
5
6
Art Journaling Techniques 15
7
8
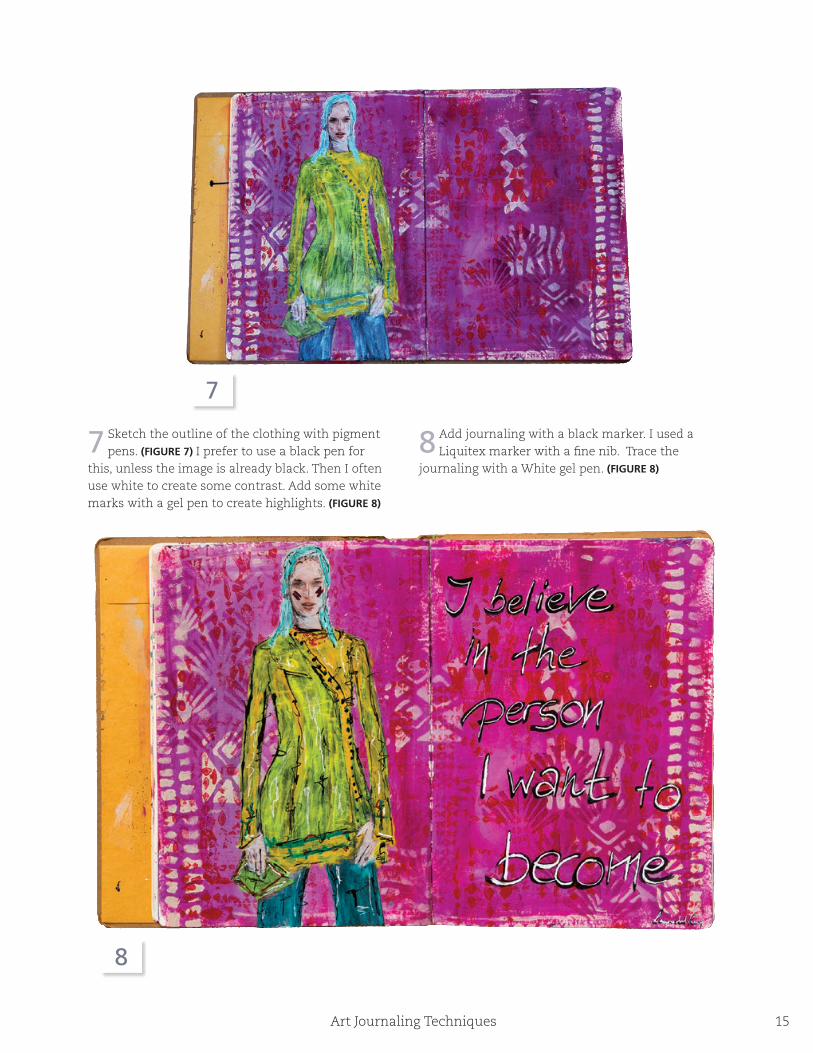
7 Sketch the outline of the clothing with pigment pens. (FIGURE 7) I prefer to use a black pen for this, unless the image is already black. Then I often use white to create some contrast. Add some white marks with a gel pen to create highlights. (FIGURE 8)
8 Add journaling with a black marker. I used a Liquitex marker with a fine nib. Trace the journaling with a White gel pen. (FIGURE 8)
Art Journaling Techniques 16
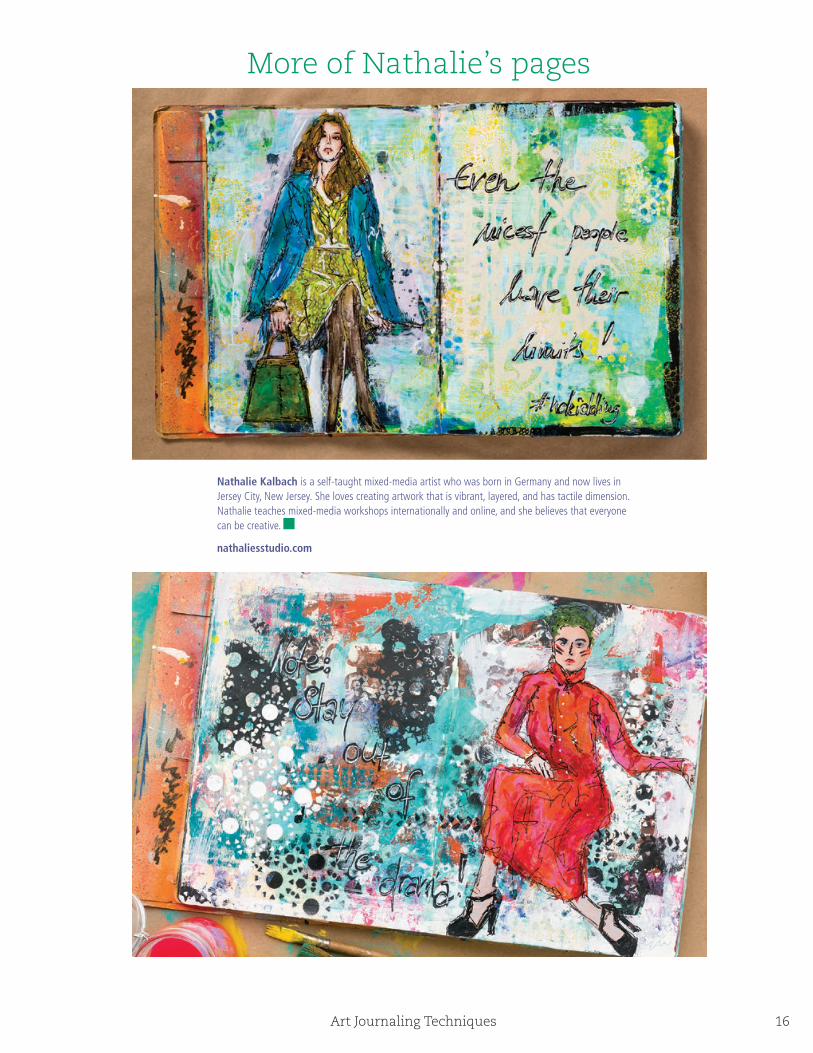
Nathalie Kalbach is a self-taught mixed-media artist who was born in Germany and now lives in Jersey City, New Jersey. She loves creating artwork that is vibrant, layered, and has tactile dimension. Nathalie teaches mixed-media workshops internationally and online, and she believes that everyone can be creative.
nathaliesstudio.com
More of Nathalie’s pages
Art Journaling Techniques 17
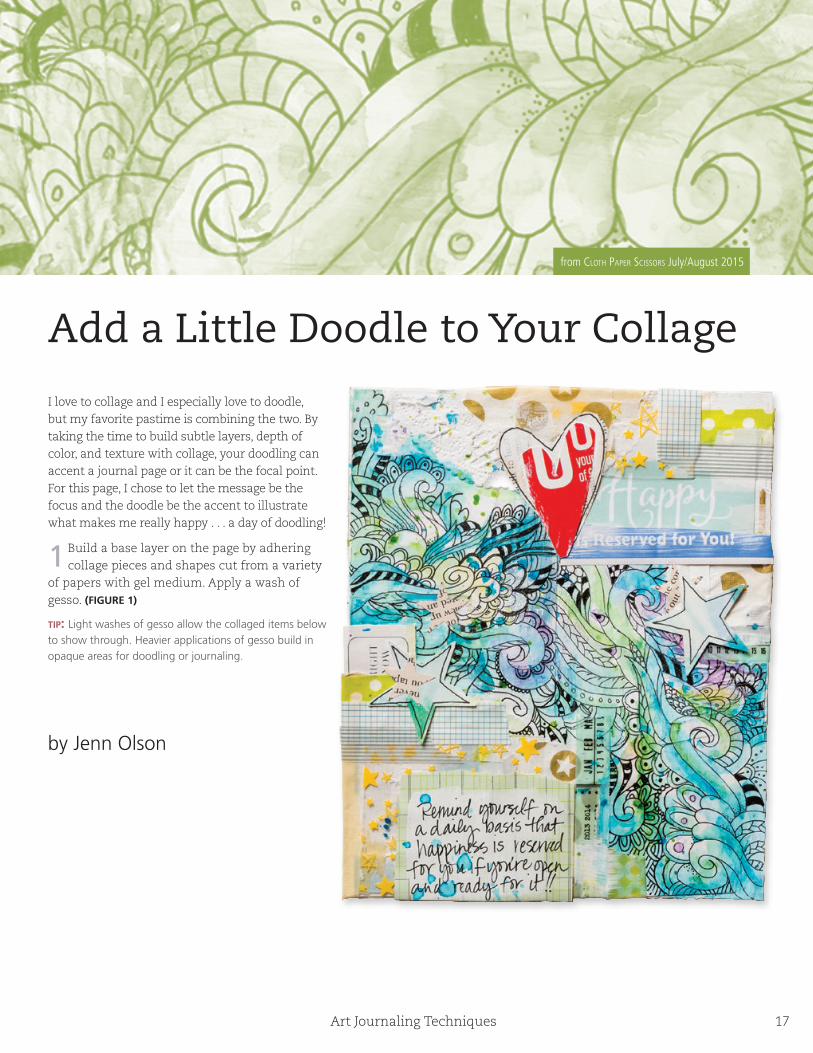
Add a Little Doodle to Your Collage
from Cloth PaPer SCiSSorS July/August 2015
I love to collage and I especially love to doodle, but my favorite pastime is combining the two. By taking the time to build subtle layers, depth of color, and texture with collage, your doodling can accent a journal page or it can be the focal point. For this page, I chose to let the message be the focus and the doodle be the accent to illustrate what makes me really happy . . . a day of doodling!
1 Build a base layer on the page by adhering collage pieces and shapes cut from a variety of papers with gel medium. Apply a wash of gesso. (FIGURE 1)
tip: Light washes of gesso allow the collaged items below to show through. Heavier applications of gesso build in opaque areas for doodling or journaling.
by Jenn Olson
Art Journaling Techniques 18
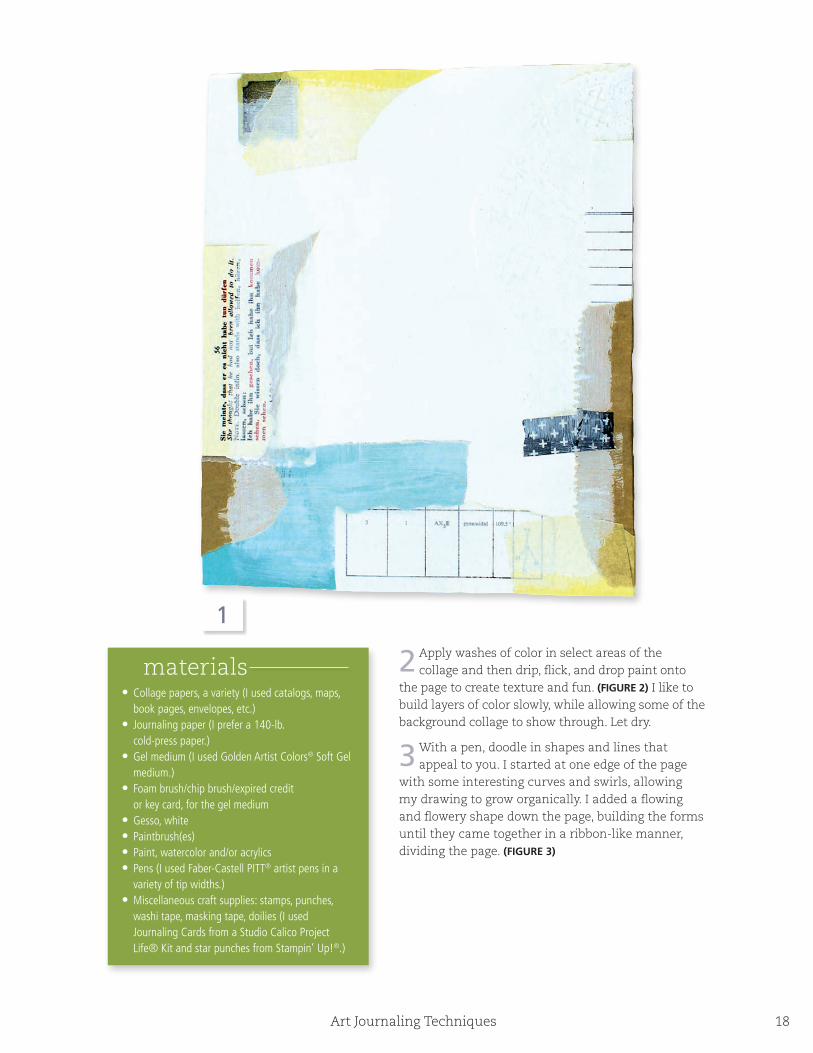
2 Apply washes of color in select areas of the collage and then drip, flick, and drop paint onto the page to create texture and fun. (FIGURE 2) I like to build layers of color slowly, while allowing some of the background collage to show through. Let dry.
3 With a pen, doodle in shapes and lines that appeal to you. I started at one edge of the page with some interesting curves and swirls, allowing my drawing to grow organically. I added a flowing and flowery shape down the page, building the forms until they came together in a ribbon-like manner, dividing the page. (FIGURE 3)
• Collage papers, a variety (I used catalogs, maps, book pages, envelopes, etc.)
• Journaling paper (I prefer a 140-lb. cold-press paper.)
• Gel medium (I used Golden Artist Colors® Soft Gel medium.)
• Foam brush/chip brush/expired credit or key card, for the gel medium
• Gesso, white • Paintbrush(es) • Paint, watercolor and/or acrylics• Pens (I used Faber-Castell PITT® artist pens in a
variety of tip widths.)• Miscellaneous craft supplies: stamps, punches,
washi tape, masking tape, doilies (I used Journaling Cards from a Studio Calico Project Life® Kit and star punches from Stampin’ Up!®.)
materials
1
Art Journaling Techniques 19
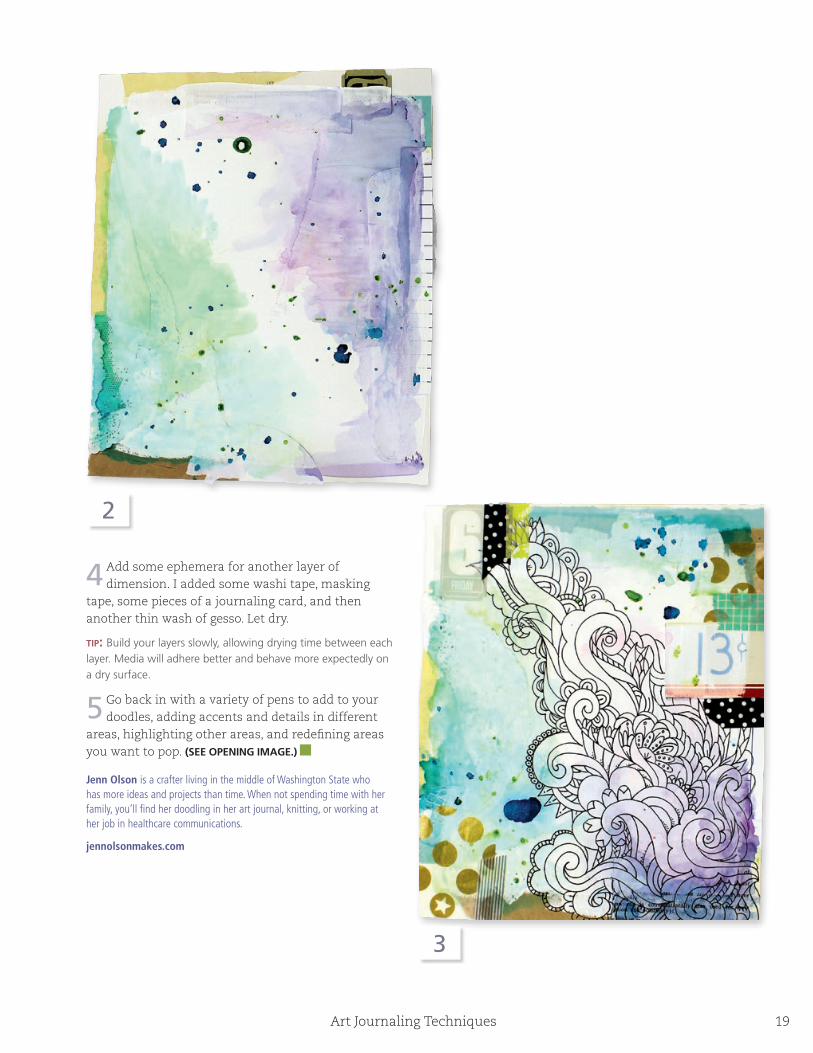
4 Add some ephemera for another layer of dimension. I added some washi tape, masking tape, some pieces of a journaling card, and then another thin wash of gesso. Let dry.
tip: Build your layers slowly, allowing drying time between each layer. Media will adhere better and behave more expectedly on a dry surface.
5 Go back in with a variety of pens to add to your doodles, adding accents and details in different areas, highlighting other areas, and redefining areas you want to pop. (SEE OPENING IMAGE.)
Jenn Olson is a crafter living in the middle of Washington State who has more ideas and projects than time. When not spending time with her family, you’ll find her doodling in her art journal, knitting, or working at her job in healthcare communications.
jennolsonmakes.com
2
3

Art Journaling Techniques 20
Visual Fieldnotesexplorations in travel journaling
from PageS Winter 2015
by Carol Hendrickson During my years teaching anthropology, I was lucky to have numerous opportunities to travel with college students. While I always asked them to keep a travel journal to take notes on what they were learning, I found that they—and I—observed the world more fully if we sketched and archived found objects in our journals in addition to writing notes. Because of this, I began encouraging all my students to keep visual fieldnotes as part of their travel journals.
Art Journaling Techniques 21
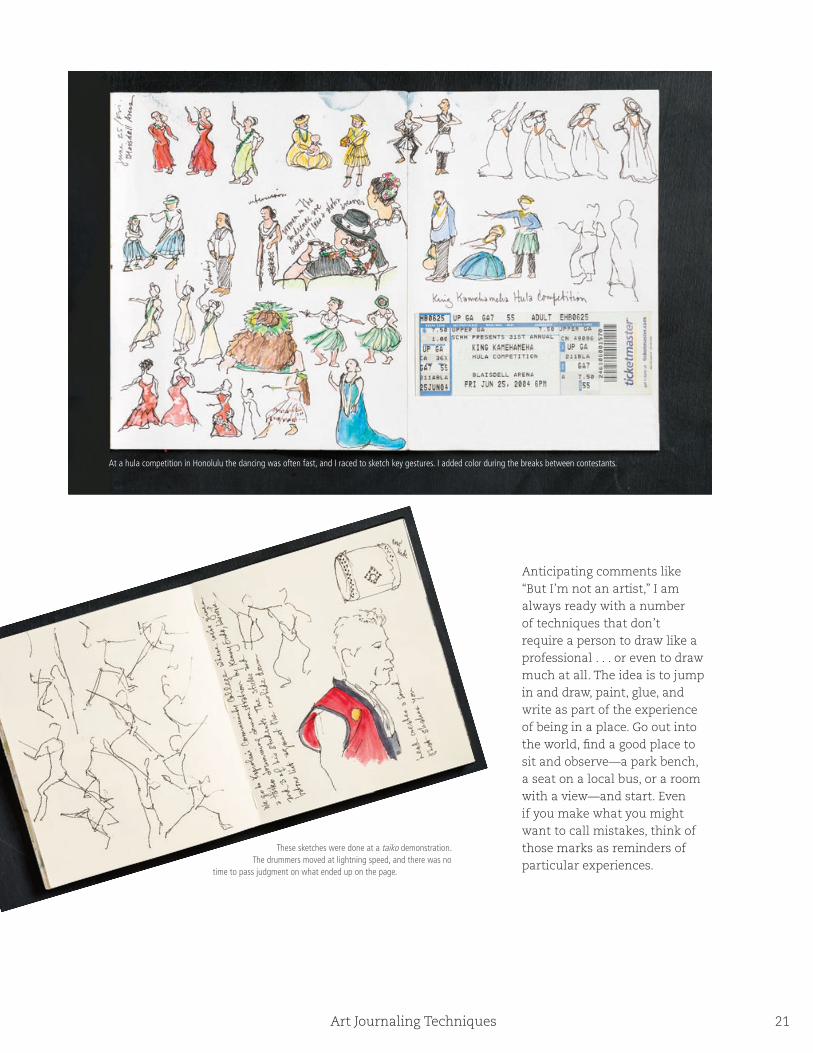
Anticipating comments like “But I’m not an artist,” I am always ready with a number of techniques that don’t require a person to draw like a professional . . . or even to draw much at all. The idea is to jump in and draw, paint, glue, and write as part of the experience of being in a place. Go out into the world, find a good place to sit and observe—a park bench, a seat on a local bus, or a room with a view—and start. Even if you make what you might want to call mistakes, think of those marks as reminders of particular experiences.
At a hula competition in Honolulu the dancing was often fast, and I raced to sketch key gestures. I added color during the breaks between contestants.
These sketches were done at a taiko demonstration. The drummers moved at lightning speed, and there was no
time to pass judgment on what ended up on the page.

Art Journaling Techniques 22
This series of suggestions is meant to spark your spirit of adventure and help you capture the sense of a place. My hope is always that people will discover additional ways to document the world around them and fill their journals with objects that reflect their trips, discoveries, and what they learned along the way.
Suggested travel materials• Journal, handmade or store bought (I like wire-
bound journals that fold flat and have sturdy covers to support my writing and drawing. Handmade journals with foldout pages are also a favorite of mine.)
While attending a course at the University of Hawai’i I had ample opportunity to do one of my favorite activities: people watch.
On this journal page I drew a line during a van ride, and the line recorded how smooth or bumpy the road was along the way.
Art Journaling Techniques 23
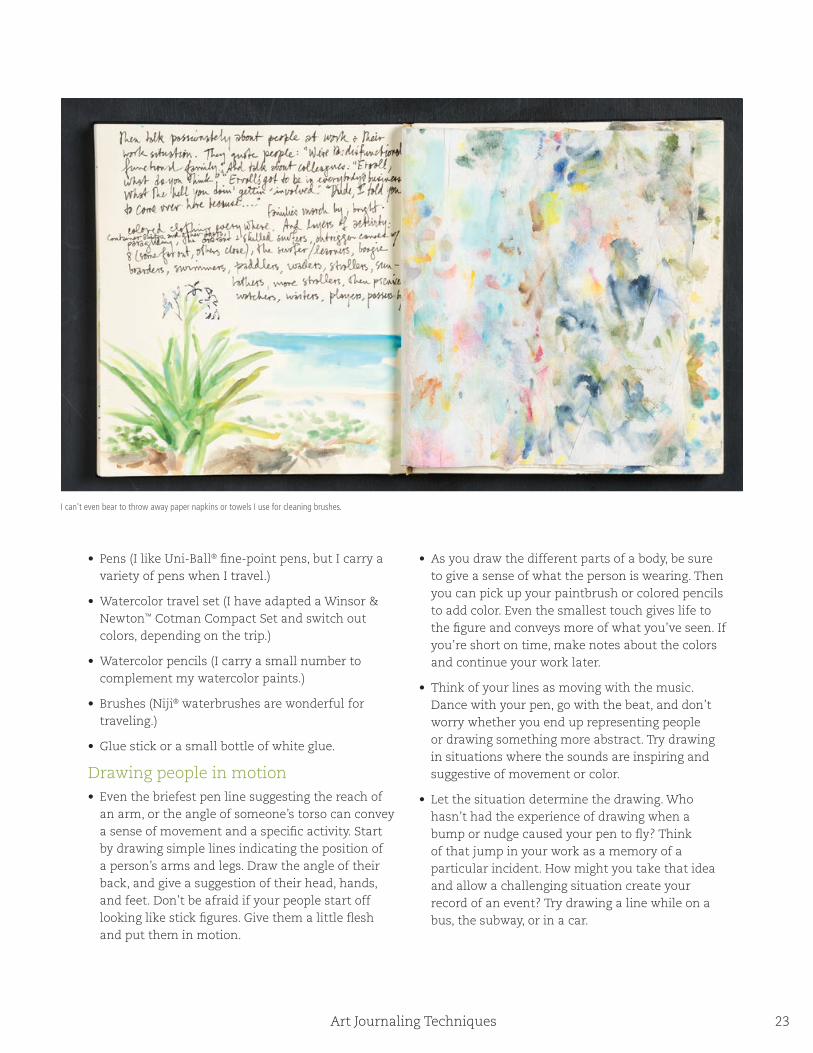
I can't even bear to throw away paper napkins or towels I use for cleaning brushes.
• Pens (I like Uni-Ball® fine-point pens, but I carry a variety of pens when I travel.)
• Watercolor travel set (I have adapted a Winsor & Newton™ Cotman Compact Set and switch out colors, depending on the trip.)
• Watercolor pencils (I carry a small number to complement my watercolor paints.)
• Brushes (Niji® waterbrushes are wonderful for traveling.)
• Glue stick or a small bottle of white glue.
Drawing people in motion• Even the briefest pen line suggesting the reach of
an arm, or the angle of someone’s torso can convey a sense of movement and a specific activity. Start by drawing simple lines indicating the position of a person’s arms and legs. Draw the angle of their back, and give a suggestion of their head, hands, and feet. Don’t be afraid if your people start off looking like stick figures. Give them a little flesh and put them in motion.
• As you draw the different parts of a body, be sure to give a sense of what the person is wearing. Then you can pick up your paintbrush or colored pencils to add color. Even the smallest touch gives life to the figure and conveys more of what you’ve seen. If you’re short on time, make notes about the colors and continue your work later.
• Think of your lines as moving with the music. Dance with your pen, go with the beat, and don’t worry whether you end up representing people or drawing something more abstract. Try drawing in situations where the sounds are inspiring and suggestive of movement or color.
• Let the situation determine the drawing. Who hasn’t had the experience of drawing when a bump or nudge caused your pen to fly? Think of that jump in your work as a memory of a particular incident. How might you take that idea and allow a challenging situation create your record of an event? Try drawing a line while on a bus, the subway, or in a car.

Art Journaling Techniques 24
Collage and sketch• You don’t have to rely on drawing all the time to give
a sense of a place. Collage photographs, postcards, or pictures from travel brochures with simple line drawings or washes of color to create a version of a scene you’re witnessing. Note also how simple dots of color can give the impression of people, what they’re wearing, and what they’re doing.
Now when I travel with students or by myself, I constantly draw, paint, glue, and write as part of my journey. We remember more when we take the time to look and listen closely and include lines, colors, objects, and words in our journal that remind us of the people, the place, and the way of life in the places we visit.
I often keep different journals while traveling, with one reserved for "official" anthropology notes. While on break from a faculty institute on the Big Islands of Hawai’i I entertained the fantasy of becoming a volcanologist.
Art Journaling Techniques 25
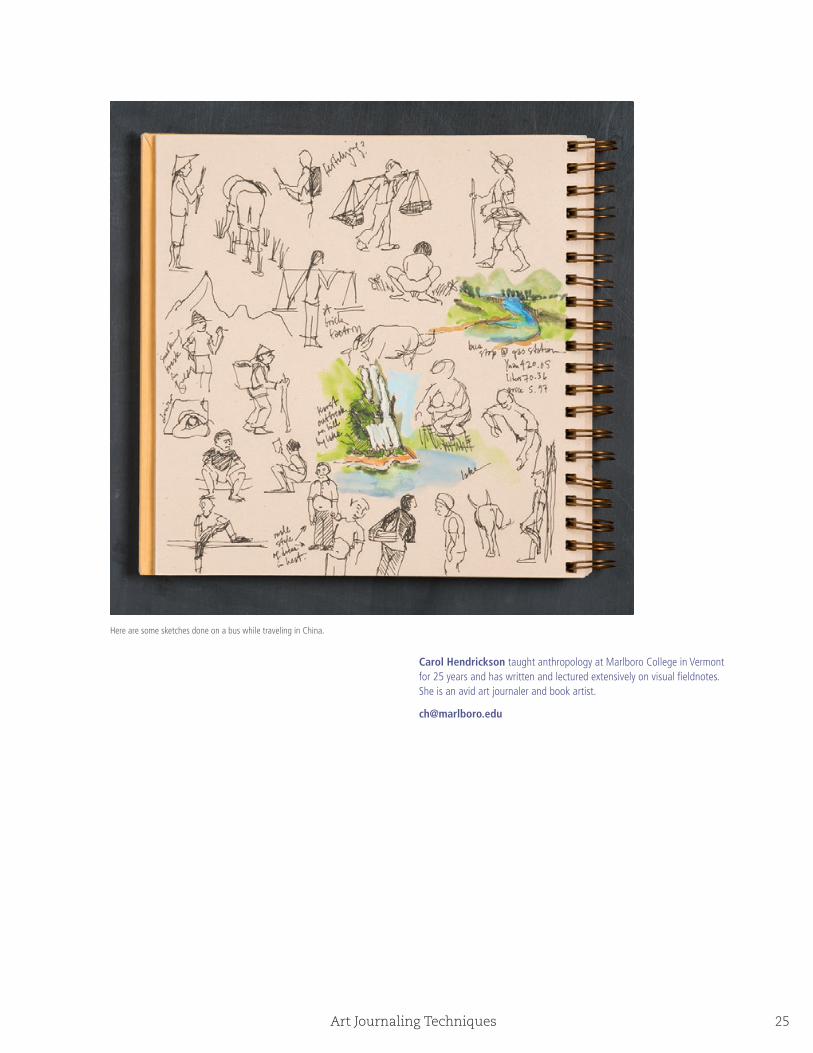
Carol Hendrickson taught anthropology at Marlboro College in Vermont for 25 years and has written and lectured extensively on visual fieldnotes. She is an avid art journaler and book artist.
Here are some sketches done on a bus while traveling in China.