Embed Size (px)
Citation preview

Art DecoDesigned by Mr. Quiltwww.mrquilt.com
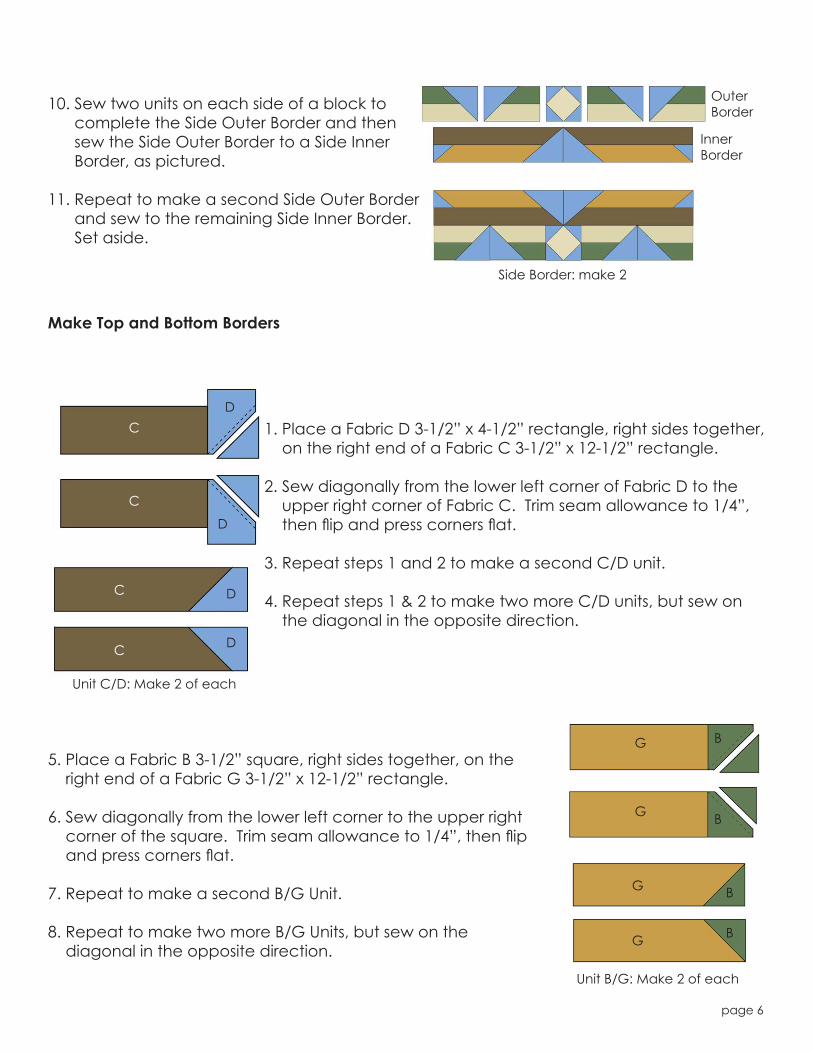
Finished quilt measures: 52” x 72”Shown in “Peacock Colorstory”. For “Vintage Colorstory” see page 10.
Pattern Level: Advanced Expert"My skills are sharp, so I'm ready to
take on the hard stuff."
Featuring

page 2
Fabric A- Trim the panel to 22-1/2” x 40-1/2”.
Fabric B- Cut five strips 3-1/2” x WOF. - Subcut four strips each into one rectangle 3-1/2” x 22-1/2” and two rectangles 3-1/2” x 10”. - Subcut one strip into four squares 3-1/2” x 3-1/2” and four rectangles 3-1/2” x 6-1/2”.
Fabric C- Cut four strips 3-1/2” x WOF. - Subcut each strip into one rectangle 3-1/2” x 22-1/2”, one rectangle 3-1/2” x 12-1/2” and one square 3-1/2” x 3-1/2”.
Color Fabric Name/SKU Yardage
E
B SRKM-14711-78PEACOCK
SRKM-14714-84CREAM
1/2yard
1/3yard
Color Fabric Name/SKU Yardage
Notes Before You Begin
- Please read through all of the instructions before beginning.- All of the seam allowances are 1/4” unless otherwise noted. - Width of fabric (WOF) is equal to at least 42” wide.- Press all seam allowances open after each seam is sewn, unless otherwise noted.- Remember to measure twice and cut once!
Copyright 2014, Robert Kaufman For individual use only - Not for resale
You will also need:1/4 yard Binding
4 3/8 yards Backing Fabric and Batting
A SRKM-14707-78PEACOCK
1panel
C SRKM-14712-2BLACK
1/2yard
D SRKM-14714-9NAVY
1-1/4yard
F SRKM-14715-84CREAM
3/4yard
G SRKM-14715-133GOLD
3/4yard
Cutting Instructions
Fabric and Supplies Needed

- Center the shorter Fabric E strips along the top and bottom of Panel A and sew. Start and stop the stitching 1/4” from the corners.
- Repeat with the longer Fabric E strips along the sides of the panel.
- Fold the quilt diagonally and miter the corners. Trim the excess fabric and repeat for the other three corners.
Add Mitered Border
EE
E
E
Fabric D- Cut four strips 6-1/2” x WOF. - Subcut two strips each into six squares 6-1/2” x 6-1/2”. - Subcut one strip into four squares 6-1/2” x 6-1/2” and one rectangle 6-1/2” x 12-1/2”. - Subcut one strip into three rectangles 6-1/2” x 12-1/2”.- Cut five strips 3-1/2” x WOF. - Subcut one strip into twelve squares 3-1/2” x 3-1/2”. - Subcut one strip into eight squares 3-1/2” x 3-1/2”. - Subcut one strip into four rectangles 3-1/2” x 6-1/2” and four rectangles 3-1/2” x 4-1/2”. - Subcut two rectangles 3-1/2” x 12-1/2”.
Fabric E- Cut four strips 2-1/2” x WOF. - Subcut two strips each into one strip 2-1/2” x 26-1/2”. Fabric F- Cut six strips 3-1/2” x WOF. - Subcut two strips each into four rectangles 3-1/2” x 10” - Subcut four strips each into one rectangle 3-1/2” x 22-1/2”, two rectangles 3-1/2” x 6-1/2 and one square 3-1/2” x 3-1/2”.- Cut two squares 6-1/2” x 6-1/2”.
Fabric G- Cut six strips 3-1/2” x WOF. - Subcut four strips each into one rectangle 3-1/2” x 22-1/2” and one rectangle 3-1/2” x 7-1/2”. - Subcut one strip into three rectangles 3-1/2” x 12-1/2”. - Subcut one strip into one rectangle 3-1/2” x 12-1/2” and four squares 3-1/2” x 3-1/2”.- Cut eight 3-3/4” circles.
page 3
Assembly Instructions
1. Place a Fabric D 3-1/2” square, right sides together, on the right end of a Fabric G 3-1/2” x 22-1/2” rectangle.
2. Sew diagonally from the upper left corner to the lower right corner. Trim to a 1/4” seam allowance, flip and press corner flat.
3. Repeat steps 1 and 2 to make a second unit.
4. Repeat steps 1 and 2 to make two more units, but sew on the diagonal in the opposite direction.
Make Side Inner Borders
5. Sew a Fabric C 3-1/2” x 22-1/2” rectangle long sides together with a D/G unit, as pictured.
6. Repeat with the three remaining D/G units and Fabric C strips.
7. Place a Fabric D 6-1/2” square, right sides together on the end of a C/D/G Unit as pictured below. Mirror the seam of the smaller fabric D triangle by sewing diagonally from corner to corner. Trim seam allowance to 1/4” and flip and press the corner flat.
8. Repeat step 7 to make three more units.
D
D
D
D
G
G
G
G
make 2
make 2
G
G
G
G
G
G
D
D
D
D
D
D
D
D
D
D
C
C
C
C
C
C
make 2
make 2
make 2
make 2
Seams are on the same diagonal.
page 4

9. Sew the units together to make two identical Side Inner Borders, as pictured. Set aside.
Make Side Outer Borders
1. Sew one Fabric B 3-1/2” x 10” rectangle, lengthwise, with one Fabric F 3-1/2” x 10” rectangle.
2. Repeat step 1 to make eight B/F sets.
B
F
B/F Set:make 8
3. Place a fabric D 6-1/2” square right sides together and aligned with the right edge of set B/F.
4. Sew diagonally from the top left corner to the bottom right corner of the square. Trim seam allowance to 1/4”, then flip and press corner flat.
5. Repeat steps 3 and 4 to make three more units.
6. Repeat steps 3 and 4 to make four more units, but sew on the diagonal in the opposite direction. Set aside.
B
B
B
B
F
F
F
F
D
D
D
D
B/D/F unit : make 4 of each
F
FF
FD
DD
DD
D D
7. Place two Fabric D 3-1/2” squares in opposite corners of a Fabric F 6-1/2” square with right sides together. Sew diagonally, as pictured, and trim seam allowances to 1/4”. Flip and press corners flat.
8. Repeat step 7 to the remaining two corners of the Fabric F square.
9. Repeat steps 7 and 8 to make a second block.
D
DD
Block: make 2
Side Inner Border: Make 2
page 5
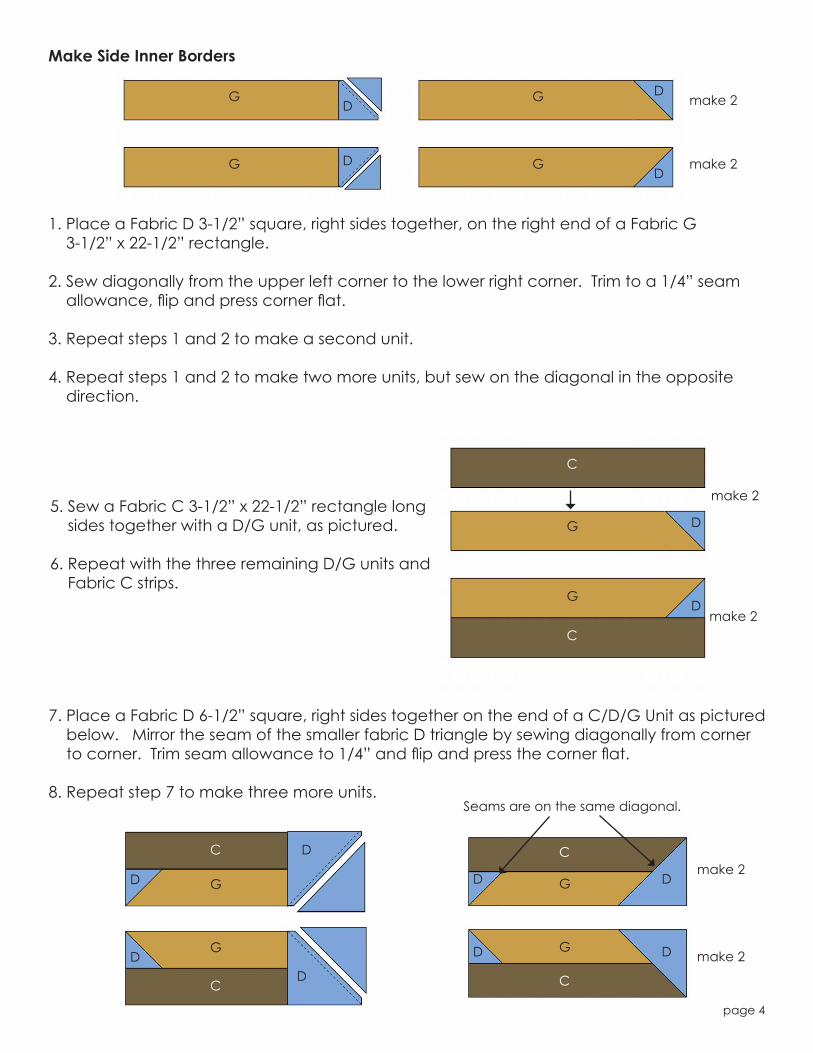
10. Sew two units on each side of a block to complete the Side Outer Border and then sew the Side Outer Border to a Side Inner Border, as pictured.
11. Repeat to make a second Side Outer Border and sew to the remaining Side Inner Border. Set aside.
Outer Border
InnerBorder
Make Top and Bottom Borders
1. Place a Fabric D 3-1/2” x 4-1/2” rectangle, right sides together, on the right end of a Fabric C 3-1/2” x 12-1/2” rectangle.
2. Sew diagonally from the lower left corner of Fabric D to the upper right corner of Fabric C. Trim seam allowance to 1/4”, then flip and press corners flat.
3. Repeat steps 1 and 2 to make a second C/D unit.
4. Repeat steps 1 & 2 to make two more C/D units, but sew on the diagonal in the opposite direction.
Unit C/D: Make 2 of each
C
C
C
C
D
D
D
D
Side Border: make 2
5. Place a Fabric B 3-1/2” square, right sides together, on the right end of a Fabric G 3-1/2” x 12-1/2” rectangle.
6. Sew diagonally from the lower left corner to the upper right corner of the square. Trim seam allowance to 1/4”, then flip and press corners flat.
7. Repeat to make a second B/G Unit.
8. Repeat to make two more B/G Units, but sew on the diagonal in the opposite direction.
Unit B/G: Make 2 of each
B
B
B
B
G
G
G
G
page 6

9. Place a Fabric D 3-1/2 square right sides together on the right end of a Fabric G 3-1/2” x 7-1/2” rectangle.
10. Sew diagonally from the lower left corner to the upper right corner of the square. Trim seam allowance to 1/4”, then flip and press corners flat.
11. Repeat steps 9 and 10 to make a second D/G Unit.
12. Repeat steps 9 and 10 to make two more D/G Units, but sew on the diagonal in the opposite direction.
Unit D/G: Make 2 each
G
G
G
G
D
D
D
D
13. Lay the units and pieces out as pictured on the right.
14. Sew pieces together into units and then sew units together to complete Top Left Border.
15. Repeat step 13 and 14 to create a second matching border for the Bottom Right Border.
16. Layout and sew the Top Right and Bottom Left Borders following the illustration on the right. They will be mirror images of the Top Left and Bottom Right Borders.
D/G Unit
C/D UnitB/
G U
nit
F3-1/2” x 22-1/2”
B3-1/2” x 22-1/2”
F3-1/2”
x6-1/2”
F3-1/2”
x6-1/2”
B3-1/2”
x6-1/2”
G3-1/2”
C3-1/2”
Top Left and Bottom Right Border
Top Right and Bottom Left Border
page 7

17. Place a Fabric D 6-1/2” square right sides together on the top right corner of the Top Left Border.
18. Sew diagonally from the top left corner to the bottom right corner of the square. Trim seam allowance and flip and press corners flat.
19. Repeat steps 17 and 18 on the Bottom Right Border and on the top left corner of the Bottom Left and Top Right Borders.
Assemble Quilt Top
1. Sew the Side Borders to the left and right sides of the Center Panel, as pictured on the left.
2. Sew the Top Left and Top Right Borders short sides together and then sew to the top of the Center Panel and Side Borders, as pictured on the right.
3. Repeat step 2 with the Bottom Left and Bottom Right Borders.
D
D
D
D
Top Left and Bottom Right Border
Top Right and Bottom Left Border
Top Left and Bottom Right Border
Top Right and Bottom Left Border
page 8

Assemble and Add Corners
1. Sew Fabric D pieces to the top and bottom of a Fabric F 3-1/2” square.
2. Sew Fabric D pieces to the sides of the Fabric F square.
3. Repeat to make a total of four blocks.Corner Block: Make 4
D6-1/2” x 12-1/2”
D3-1/2”
x 6-1/2”
D3-1/2”
D3-1/2”
x 12-1/2”
4. Place the Corner Blocks, right side down, on the four corners of the quilt top, as pictured, and sew diagonally from corner to corner on each block.
5. Trim seam allowances to 1/4”, then flip and press corners flat.
6. Place the Fabric G circles on the quilt top, as pictured on the left, and applique to the top using your preferred method.
Your quilt top is complete!Baste quilt, bind and enjoy.
F3-1/2”
page 9
page 10
Color Fabric Name/SKU Yardage
E
B SRKM-14711-200 VINTAGE
SRKM-14714-2 BLACK
1/2yard
1/3yard
Color Fabric Name/SKU Yardage
You will also need:1/4 yard Binding
4 3/8 yards Backing Fabric and Batting
A SRKM-14707-200 VINTAGE
1panel
C SRKM-14714-84 CREAM
1/2yard
D SRKM-14714-12 GREY
1-1/4yard
F SRKM-14715-2 BLACK
3/4yard
G SRKM-14714-153 SAND
3/4yard
Art Deco: Vintage Colorstory