Embed Size (px)
Citation preview

ICT Division, CMPDI(HQ) 1
USER’S MANUAL
APR Filling [Annual Property Returns]
CT Division, CMPDI(HQ)
ICT Division, CMPDI(HQ) 2
TABLE OF CONTENTSGENERAL INFORMATION......................................................................................................................... 3
1.1 SYSTEM OVERVIEW ................................................................................................................................. 3 1.2 ORGANIZATION OF THE MANUAL ............................................................................................................ 3
SYSTEM SUMMARY..................................................................................................................................... 4
2.1 SYSTEM CONFIGURATION ........................................................................................................................ 4 2.2 USER ACCESS LEVELS ............................................................................................................................. 4 2.3 CONTINGENCIES ....................................................................................................................................... 4
3.0 GETTING STARTED............................................................................................................................... 5
3.1 ACCESSING APR FILLING ........................................................................................................................ 5 3.2 LOGIN FOR APR FILLING ......................................................................................................................... 5
3.2.1 First time Login............................................................................................................................... 5 3.2.2 Password Change............................................................................................................................ 5 3.2.3 Re-login after password change ..................................................................................................... 6
3.3 RESET PASSWORD .................................................................................................................................... 6 3.4 WRONG CREDENTIALS............................................................................................................................. 7 3.5 SUCCESSFUL LOGIN ................................................................................................................................. 7 3.5 EXIT SYSTEM ........................................................................................................................................... 8
4.0 APR FILLING............................................................................................................................................ 8
4.1 FUNCTIONAL DESCRIPTION...................................................................................................................... 8 4.1.1 General Screen ................................................................................................................................ 8 4.1.2 Year selection .................................................................................................................................. 8 4.1.3 Left Portion...................................................................................................................................... 9 4.1.4 Main Screen................................................................................................................................... 10 4.1.5 Error cases .................................................................................................................................... 12 4.1.5 APR Acknowledgement ................................................................................................................. 13
4.2 FORM FILLING........................................................................................................................................ 13 4.2.1 Form 5A......................................................................................................................................... 13 4.2.2 Form 5A Liabilities ....................................................................................................................... 14 4.2.3 Form 5B......................................................................................................................................... 14 4.2.4 Form 5C......................................................................................................................................... 15 4.2.5 Form 5C Annexure ........................................................................................................................ 15 4.2.6 Acknowledgement.......................................................................................................................... 16 4.2.7 Print ............................................................................................................................................... 17
4.3 AFTER FILLING APR.............................................................................................................................. 17
5.0 APR UPLOAD.......................................................................................................................................... 19
5.1 APR UPLOAD SCREEN ........................................................................................................................... 19 5.2 YEAR SELECTION ................................................................................................................................... 20 5.3 UPLOAD FILE.......................................................................................................................................... 21
6.0 ADMINISTRATION ............................................................................................................................... 24
6.1 ADMINISTRATOR .................................................................................................................................... 24 6.1.1 Login.............................................................................................................................................. 24 6.1.2 Administrator Screen .................................................................................................................... 24 6.1.3 User Administration ...................................................................................................................... 25 6.1.4 Year Administration ...................................................................................................................... 26 6.1.5 Excel Upload ................................................................................................................................. 26
6.2 VIGILANCE ............................................................................................................................................. 27 6.2.1 Login.............................................................................................................................................. 28 6.2.2 Status Summary ............................................................................................................................. 28 6.2.3 Status Details................................................................................................................................. 29
GENERAL INFORMATION General Information section explains in general terms the system and the purpose for which it is intended.
1.1 System Overview APR Filling is a web based application which enables executives of the company to fill their Annual Property Returns as required by company rules in electronic format eliminating need for manual filling. The application is intended to bring Annual Property Returns of executives in the ambit of e-governance. APR Filling collects information about assets and annual property returns of executives as filled by them. The application provides electronic version of form used in collecting annual property returns. The application saves data collected to database which can be retrieved through various means.
1.2 Organization of the Manual The user’s manual consists of four sections: General information, System summary, Getting started and Using the system.
General information section explains in general terms the system and purpose for which it is intended. System summary outlines the uses of the system’s hardware and software requirements, system’s configuration, user access levels and system’s behavior in case of any contingencies. Getting started section explains how to access APR Filling application for filling Annual Property Returns. Using the system section provides detailed description of system functions for filling up Annual Property Returns.
2.0 SYSTEM SUMMARY SYSTEM SUMMARY System Summary section provides a general overview of the system. The summary outlines the uses of the system’s hardware and software requirements, system’s configuration, user access levels and system’s behavior in case of any contingencies.
2.1 System Configuration APR Filling requires a computer system with internet/intranet/VPN connection and web browsers, preferably internet explorer 8.0 onwards. The application is developed to work on any major web browsers and best viewed on internet explorer 8.0 and 9.0. Javascript must be enabled for web browser for accessing the application. Behavior of application on a web browser that has javascript disabled is undefined. To enable javascript in internet explorer -
1. On web browser menu click "Tools" menu and select "Internet Options". 2. In the "Internet Options" window select the "Security" tab. 3. On the "Security" tab click on the "Custom level..." button. 4. When the "Security Settings - Internet Zone" dialog window opens, look for the
"Scripting" section. 5. In the "Active Scripting" item select "Enable". 6. When the "Warning!" window pops out asking "Are you sure you want to change the
settings for this zone?" select "Yes". 7. In the "Internet Options" window click on the "OK" button to close it. 8. Click on the "Refresh" button of the web browser to refresh the page.
2.2 User Access Levels Only executives of the company can use the application for filling up Annual Property Returns as well as viewing previously filled Annual Property Returns like current year and previous years. Administrator can access the application for defined administrative works.
2.3 Contingencies Web enabled APR system has the capability of storing data at the point of last successful ‘Save’ action performed by the user. So reloading the page on accessing the application next time will display the data, till last successful ‘Save’ action performed. In case of power outage or internet/intranet/VPN connection failure unsaved data is not stored by the system after the last ‘Save’ action.
3.0 GETTING STARTED 3.0 GETTING STARTED Getting started section explains how to access APR Filling application for filling Annual Property Returns.
3.1 Accessing APR Filling The APR Filling application can be accessed via any web browser at the provided URL.
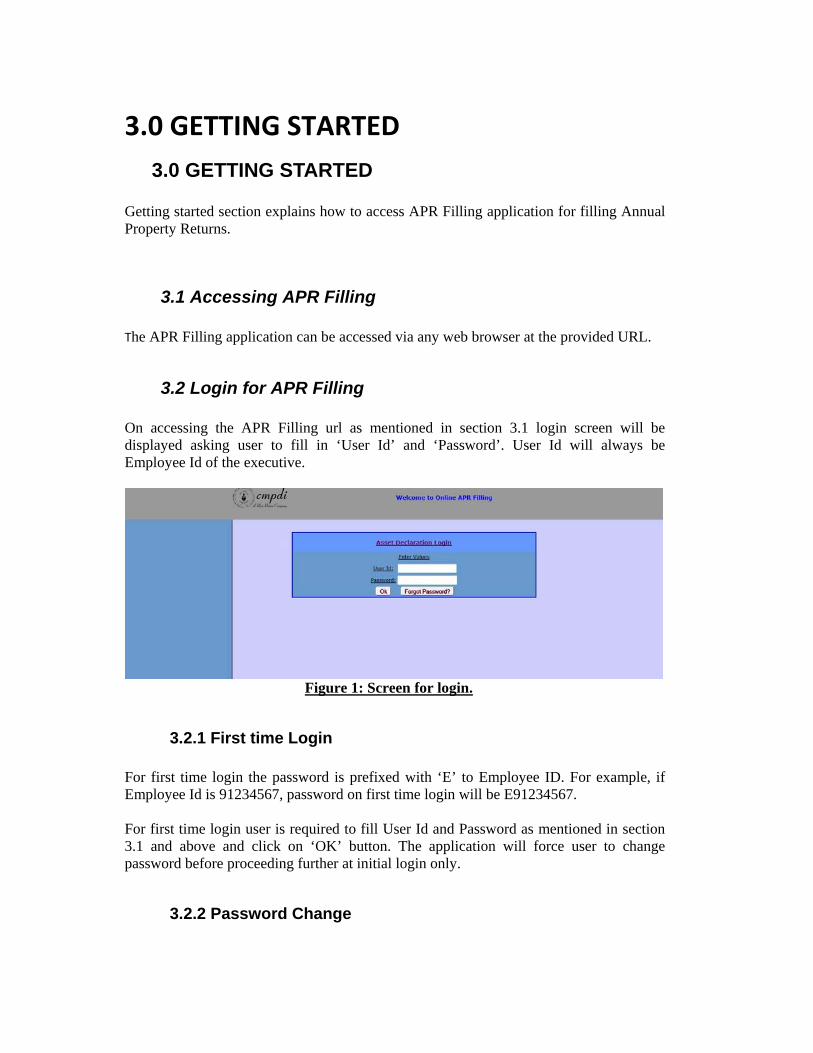
3.2 Login for APR Filling On accessing the APR Filling url as mentioned in section 3.1 login screen will be displayed asking user to fill in ‘User Id’ and ‘Password’. User Id will always be Employee Id of the executive.
Figure 1: Screen for login.
3.2.1 First time Login For first time login the password is prefixed with ‘E’ to Employee ID. For example, if Employee Id is 91234567, password on first time login will be E91234567. For first time login user is required to fill User Id and Password as mentioned in section 3.1 and above and click on ‘OK’ button. The application will force user to change password before proceeding further at initial login only.
3.2.2 Password Change
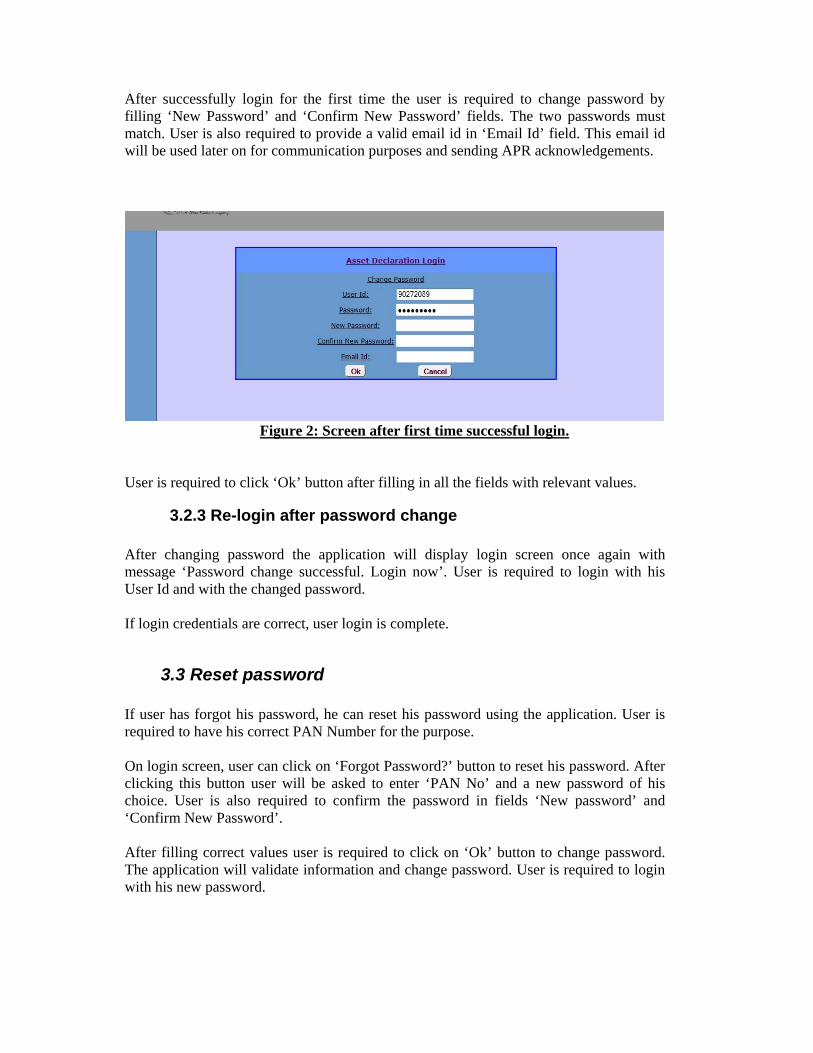
After successfully login for the first time the user is required to change password by filling ‘New Password’ and ‘Confirm New Password’ fields. The two passwords must match. User is also required to provide a valid email id in ‘Email Id’ field. This email id will be used later on for communication purposes and sending APR acknowledgements.
Figure 2: Screen after first time successful login. User is required to click ‘Ok’ button after filling in all the fields with relevant values.
3.2.3 Re-login after password change After changing password the application will display login screen once again with message ‘Password change successful. Login now’. User is required to login with his User Id and with the changed password. If login credentials are correct, user login is complete.
3.3 Reset password If user has forgot his password, he can reset his password using the application. User is required to have his correct PAN Number for the purpose. On login screen, user can click on ‘Forgot Password?’ button to reset his password. After clicking this button user will be asked to enter ‘PAN No’ and a new password of his choice. User is also required to confirm the password in fields ‘New password’ and ‘Confirm New Password’. After filling correct values user is required to click on ‘Ok’ button to change password. The application will validate information and change password. User is required to login with his new password.
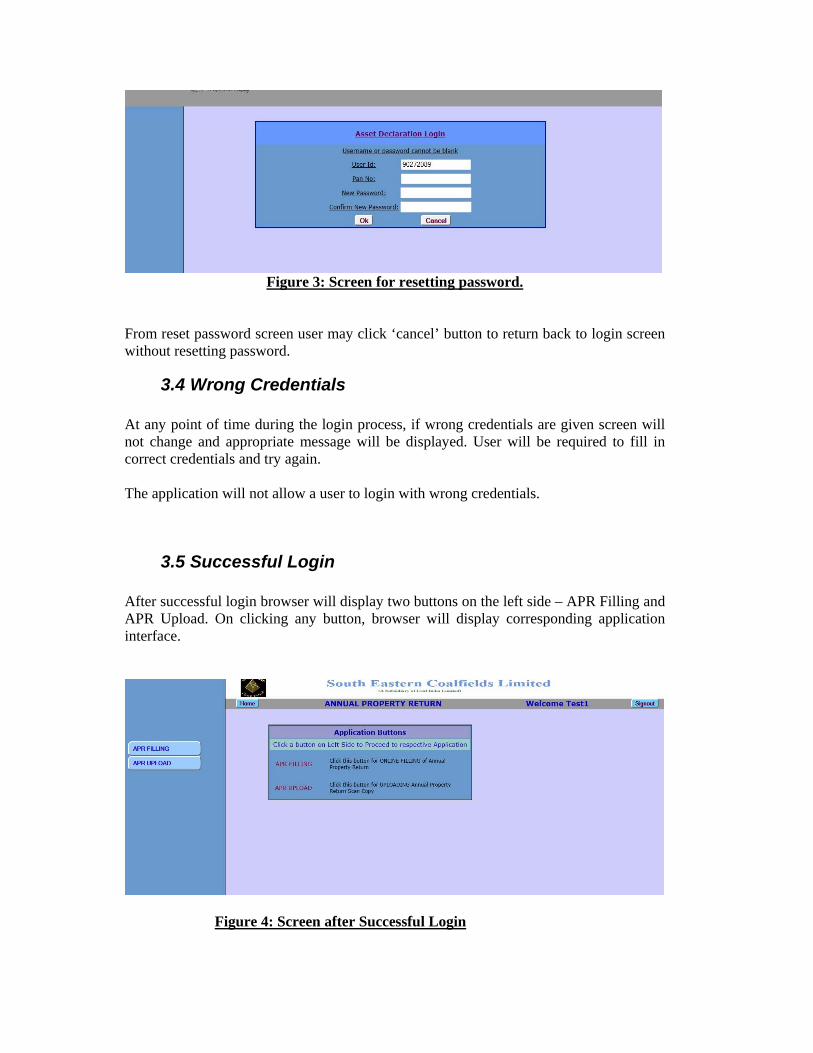
Figure 3: Screen for resetting password.
From reset password screen user may click ‘cancel’ button to return back to login screen without resetting password.
3.4 Wrong Credentials At any point of time during the login process, if wrong credentials are given screen will not change and appropriate message will be displayed. User will be required to fill in correct credentials and try again. The application will not allow a user to login with wrong credentials.
3.5 Successful Login After successful login browser will display two buttons on the left side – APR Filling and APR Upload. On clicking any button, browser will display corresponding application interface.
Figure 4: Screen after Successful Login
APR Filling interface enables users to fill Annual Property Returns online. APR Upload interface enables users to upload scanned pdf copy of immovable properties for public viewing.
3.5 Exit System After successful login user is required to click on ‘signout’ button to exit the application. Simply closing tab or single browser instance will keep the user session intact. Closing all browser instances will signout the user. For safe exit, signout is necessary. After successful login user can click ‘Home’ button on below company logo at any time to return to screen displayed in Figure 4.
4.0 USING THE SYSTEM 4.0 APR Filling This section describes how to complete online APR Filling.
4.1 Functional Description This section provides a description system functions.
4.1.1 General Screen The screen of APR filling has three portions. On the top is header portion with company logo, ‘Asset Declaration’ text, signout button and welcome message displaying name of the user. On the left there is left portion with a drop-down for year selection and several buttons displaying names of each form that is required to be filled in the process. Below header the main screen will be displayed. The basic navigation pattern of the application is to fill each form sequentially after selecting a particular year. After saving a form, the focus will move to next form automatically for filling. Once a form is filled, user can navigate to that particular form any time to make changes using left portion buttons corresponding to that form. However, if user has generated acknowledgement for selected year, the forms will be read-only and no changes will be allowed. In that case user will be allowed to navigate to all forms.
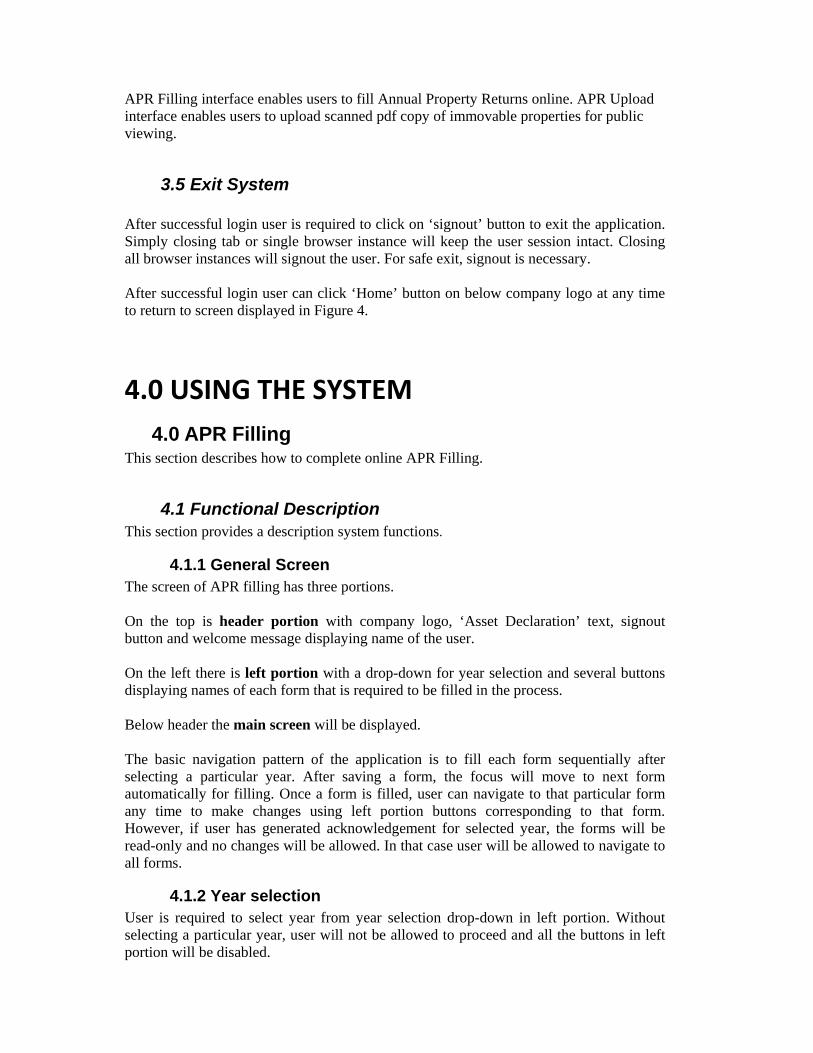
4.1.2 Year selection User is required to select year from year selection drop-down in left portion. Without selecting a particular year, user will not be allowed to proceed and all the buttons in left portion will be disabled.
A message ‘Select year first’ will be displayed in main screen if user has not selected year.
Figure 5: APR Filling screen On selecting a year ‘Form 5A’ will be loaded in the screen.
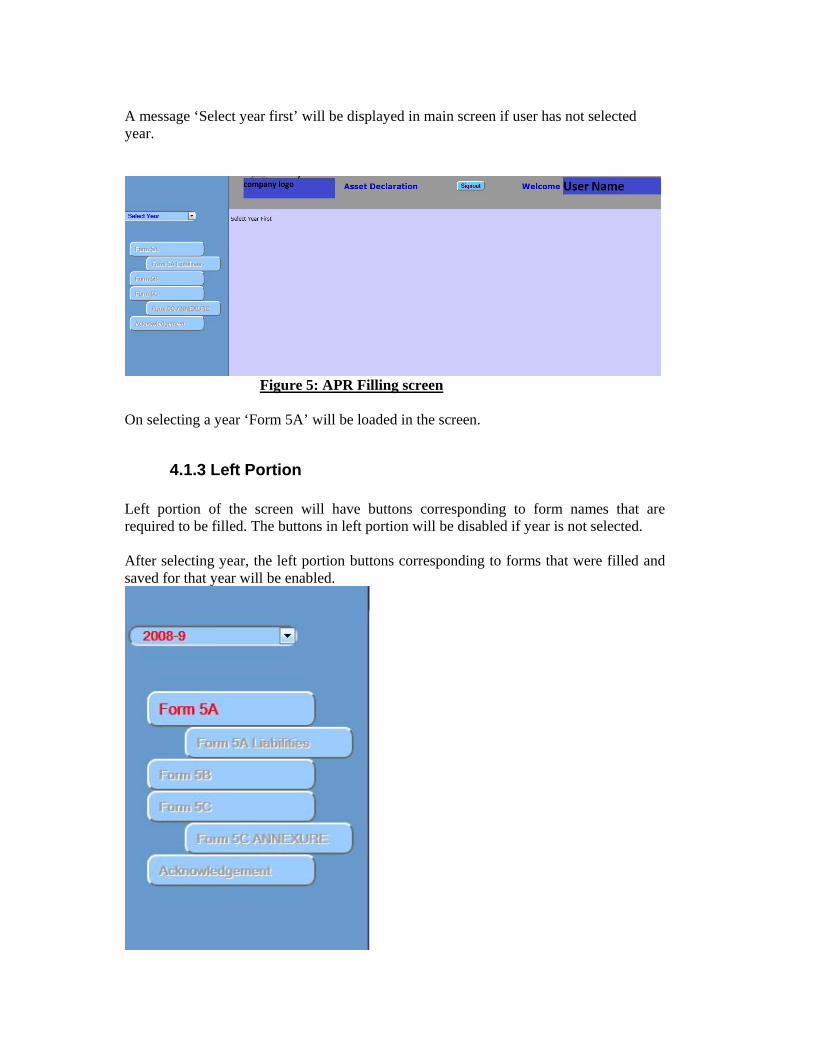
4.1.3 Left Portion Left portion of the screen will have buttons corresponding to form names that are required to be filled. The buttons in left portion will be disabled if year is not selected. After selecting year, the left portion buttons corresponding to forms that were filled and saved for that year will be enabled.
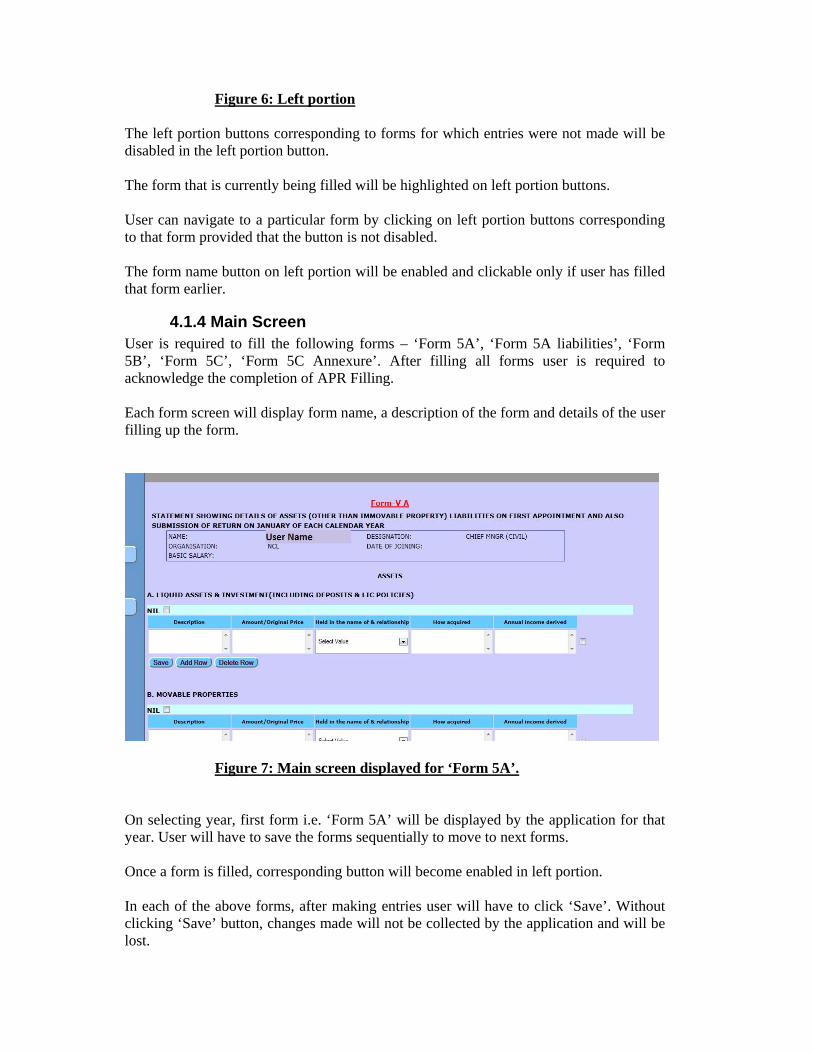
Figure 6: Left portion The left portion buttons corresponding to forms for which entries were not made will be disabled in the left portion button. The form that is currently being filled will be highlighted on left portion buttons. User can navigate to a particular form by clicking on left portion buttons corresponding to that form provided that the button is not disabled. The form name button on left portion will be enabled and clickable only if user has filled that form earlier.
4.1.4 Main Screen User is required to fill the following forms – ‘Form 5A’, ‘Form 5A liabilities’, ‘Form 5B’, ‘Form 5C’, ‘Form 5C Annexure’. After filling all forms user is required to acknowledge the completion of APR Filling. Each form screen will display form name, a description of the form and details of the user filling up the form.
Figure 7: Main screen displayed for ‘Form 5A’. On selecting year, first form i.e. ‘Form 5A’ will be displayed by the application for that year. User will have to save the forms sequentially to move to next forms. Once a form is filled, corresponding button will become enabled in left portion. In each of the above forms, after making entries user will have to click ‘Save’. Without clicking ‘Save’ button, changes made will not be collected by the application and will be lost.
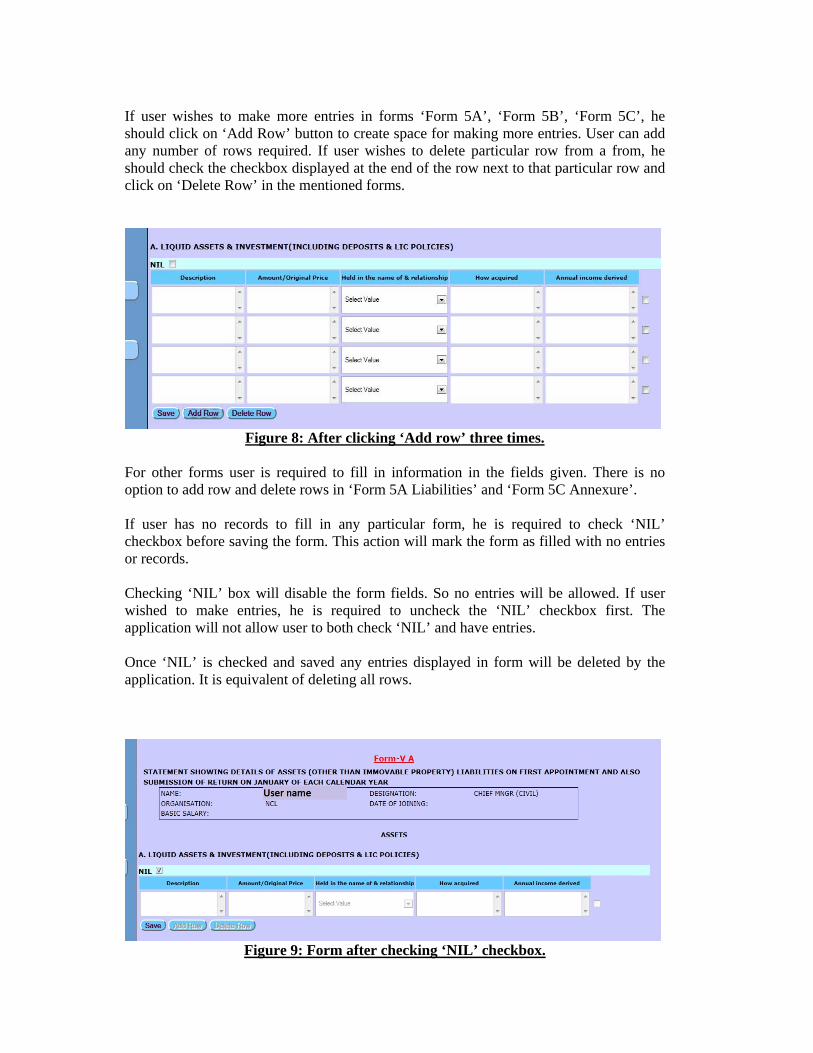
If user wishes to make more entries in forms ‘Form 5A’, ‘Form 5B’, ‘Form 5C’, he should click on ‘Add Row’ button to create space for making more entries. User can add any number of rows required. If user wishes to delete particular row from a from, he should check the checkbox displayed at the end of the row next to that particular row and click on ‘Delete Row’ in the mentioned forms.
Figure 8: After clicking ‘Add row’ three times.
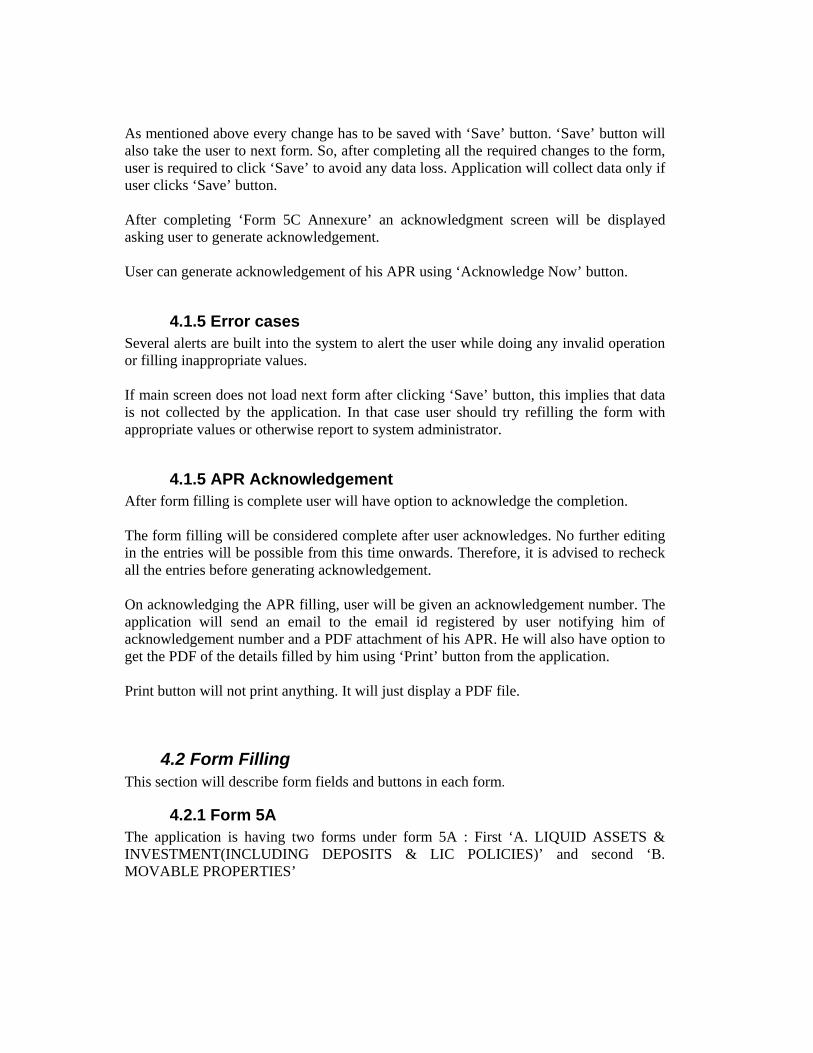
For other forms user is required to fill in information in the fields given. There is no option to add row and delete rows in ‘Form 5A Liabilities’ and ‘Form 5C Annexure’. If user has no records to fill in any particular form, he is required to check ‘NIL’ checkbox before saving the form. This action will mark the form as filled with no entries or records. Checking ‘NIL’ box will disable the form fields. So no entries will be allowed. If user wished to make entries, he is required to uncheck the ‘NIL’ checkbox first. The application will not allow user to both check ‘NIL’ and have entries. Once ‘NIL’ is checked and saved any entries displayed in form will be deleted by the application. It is equivalent of deleting all rows.
Figure 9: Form after checking ‘NIL’ checkbox.
As mentioned above every change has to be saved with ‘Save’ button. ‘Save’ button will also take the user to next form. So, after completing all the required changes to the form, user is required to click ‘Save’ to avoid any data loss. Application will collect data only if user clicks ‘Save’ button. After completing ‘Form 5C Annexure’ an acknowledgment screen will be displayed asking user to generate acknowledgement. User can generate acknowledgement of his APR using ‘Acknowledge Now’ button.
4.1.5 Error cases Several alerts are built into the system to alert the user while doing any invalid operation or filling inappropriate values. If main screen does not load next form after clicking ‘Save’ button, this implies that data is not collected by the application. In that case user should try refilling the form with appropriate values or otherwise report to system administrator.
4.1.5 APR Acknowledgement After form filling is complete user will have option to acknowledge the completion. The form filling will be considered complete after user acknowledges. No further editing in the entries will be possible from this time onwards. Therefore, it is advised to recheck all the entries before generating acknowledgement. On acknowledging the APR filling, user will be given an acknowledgement number. The application will send an email to the email id registered by user notifying him of acknowledgement number and a PDF attachment of his APR. He will also have option to get the PDF of the details filled by him using ‘Print’ button from the application. Print button will not print anything. It will just display a PDF file.
4.2 Form Filling This section will describe form fields and buttons in each form.
4.2.1 Form 5A The application is having two forms under form 5A : First ‘A. LIQUID ASSETS & INVESTMENT(INCLUDING DEPOSITS & LIC POLICIES)’ and second ‘B. MOVABLE PROPERTIES’

Figure 10: Form 5A
When user fills first form and clicks ‘Save’, the first form will be ‘disabled’ for writing and second form will be enabled for making entries. When user completes second form and clicks ‘Save’ he will move to next form i.e. ‘Form 5A Liabilities’. In both the forms columns ‘Description’, ‘Amount/Original Price’ and ‘Held in the name of & relationship’ is mandatory. User must fill in text values for ‘Description’, Numerical values for ‘Amount/Original price’ and select a relationship from the dropdown for ‘Held in the name of & relationship’ columns. After saving first form of ‘Form 5A’ screen for the first time, the second form will get ‘NIL’ check by default. Uncheck the ‘NIL’ form in order to fill the second form of the screen.
4.2.2 Form 5A Liabilities
Figure 11: Screen for ‘Form 5A Liabilities’.
If user has no entries to make in any of the fields, he is required to check ‘NIL’ checkbox before saving. On saving the user will move to next screen viz. ‘Form 5B’.
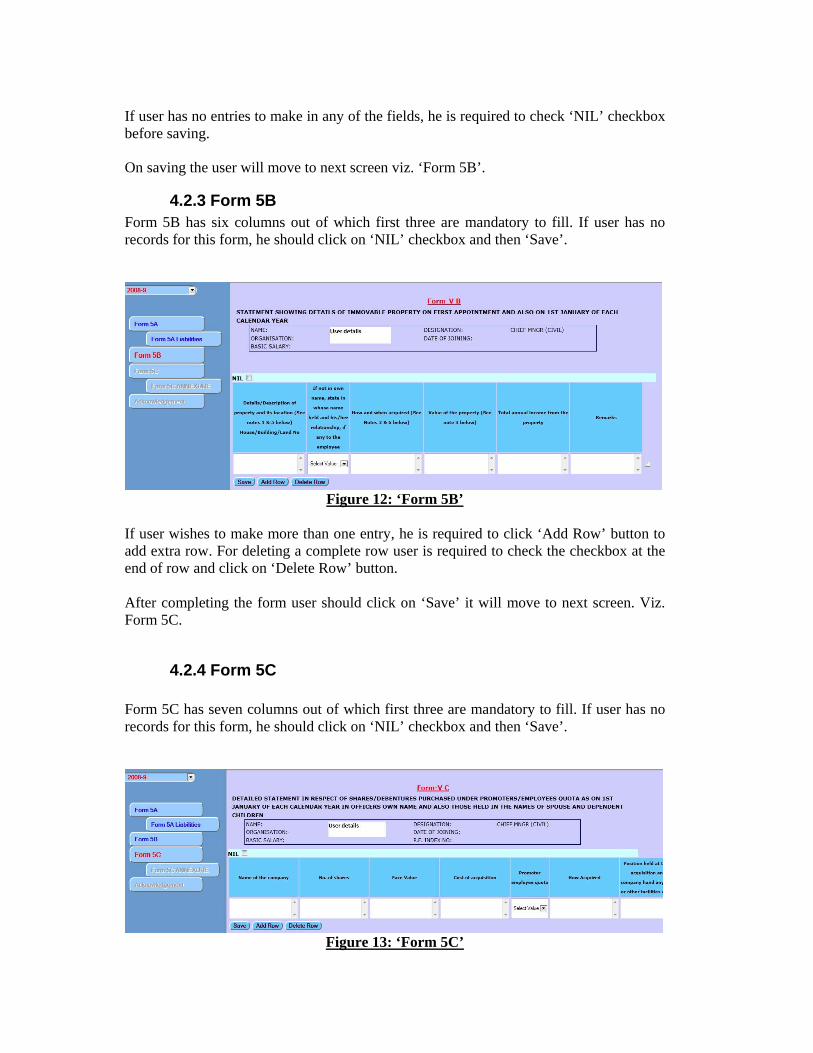
4.2.3 Form 5B Form 5B has six columns out of which first three are mandatory to fill. If user has no records for this form, he should click on ‘NIL’ checkbox and then ‘Save’.
Figure 12: ‘Form 5B’
If user wishes to make more than one entry, he is required to click ‘Add Row’ button to add extra row. For deleting a complete row user is required to check the checkbox at the end of row and click on ‘Delete Row’ button. After completing the form user should click on ‘Save’ it will move to next screen. Viz. Form 5C.
4.2.4 Form 5C Form 5C has seven columns out of which first three are mandatory to fill. If user has no records for this form, he should click on ‘NIL’ checkbox and then ‘Save’.
Figure 13: ‘Form 5C’
If user wishes to make more entries, he is required to click ‘Add Row’ button. For deleting a complete row user is required to check the checkbox at the end of row and click on ‘Delete Row’ button. After completing the form user should click on ‘Save’, it will take user to next screen Viz. Form 5C Annexure.
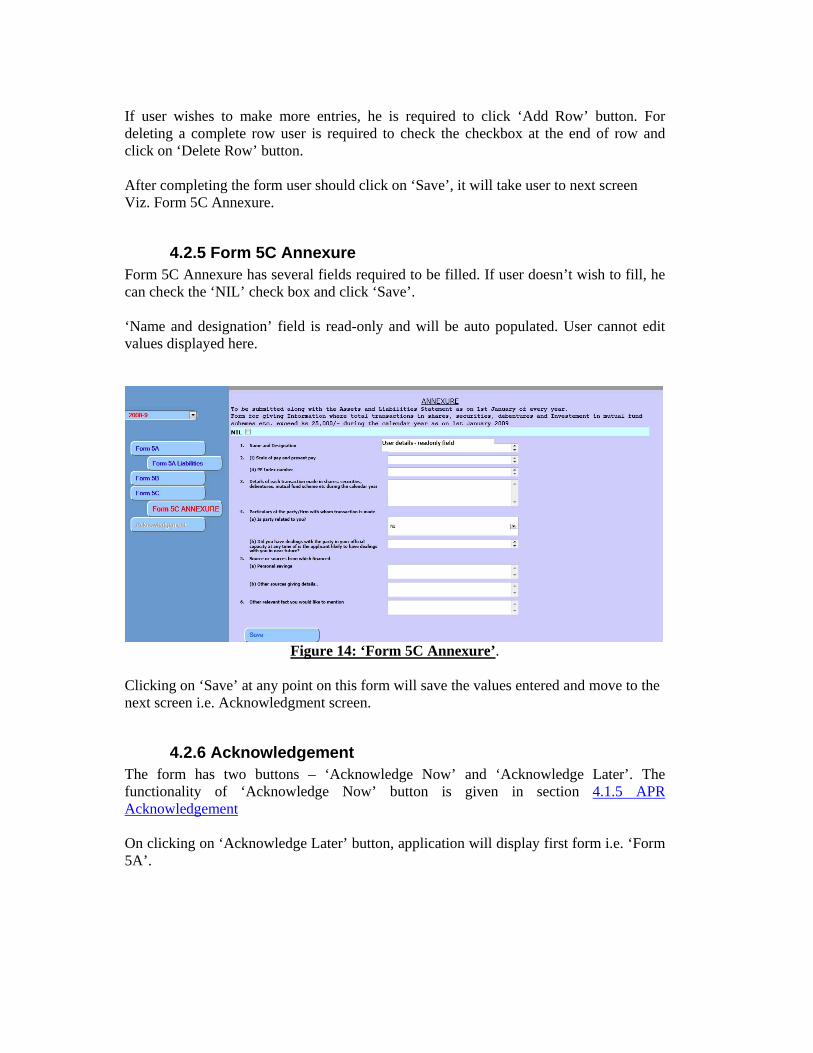
4.2.5 Form 5C Annexure Form 5C Annexure has several fields required to be filled. If user doesn’t wish to fill, he can check the ‘NIL’ check box and click ‘Save’. ‘Name and designation’ field is read-only and will be auto populated. User cannot edit values displayed here.
Figure 14: ‘Form 5C Annexure’.
Clicking on ‘Save’ at any point on this form will save the values entered and move to the next screen i.e. Acknowledgment screen.
4.2.6 Acknowledgement The form has two buttons – ‘Acknowledge Now’ and ‘Acknowledge Later’. The functionality of ‘Acknowledge Now’ button is given in section 4.1.5 APR Acknowledgement On clicking on ‘Acknowledge Later’ button, application will display first form i.e. ‘Form 5A’.
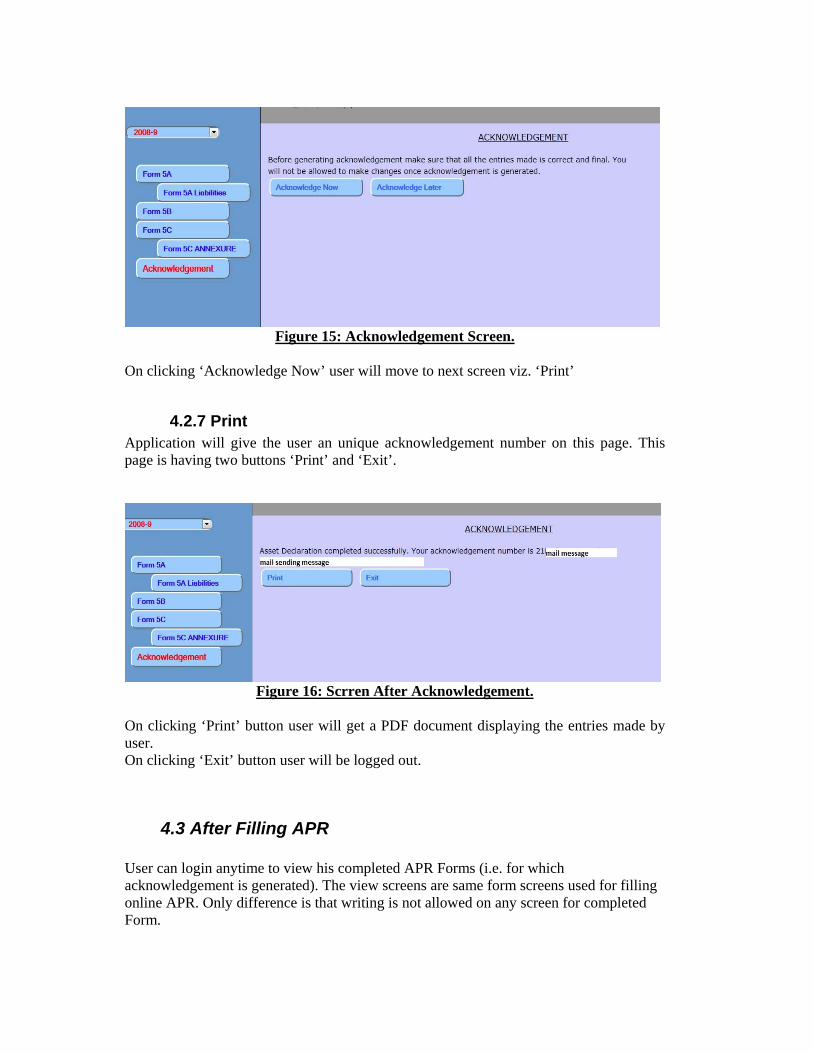
Figure 15: Acknowledgement Screen.
On clicking ‘Acknowledge Now’ user will move to next screen viz. ‘Print’
4.2.7 Print Application will give the user an unique acknowledgement number on this page. This page is having two buttons ‘Print’ and ‘Exit’.
Figure 16: Scrren After Acknowledgement.
On clicking ‘Print’ button user will get a PDF document displaying the entries made by user. On clicking ‘Exit’ button user will be logged out.
4.3 After Filling APR User can login anytime to view his completed APR Forms (i.e. for which acknowledgement is generated). The view screens are same form screens used for filling online APR. Only difference is that writing is not allowed on any screen for completed Form.
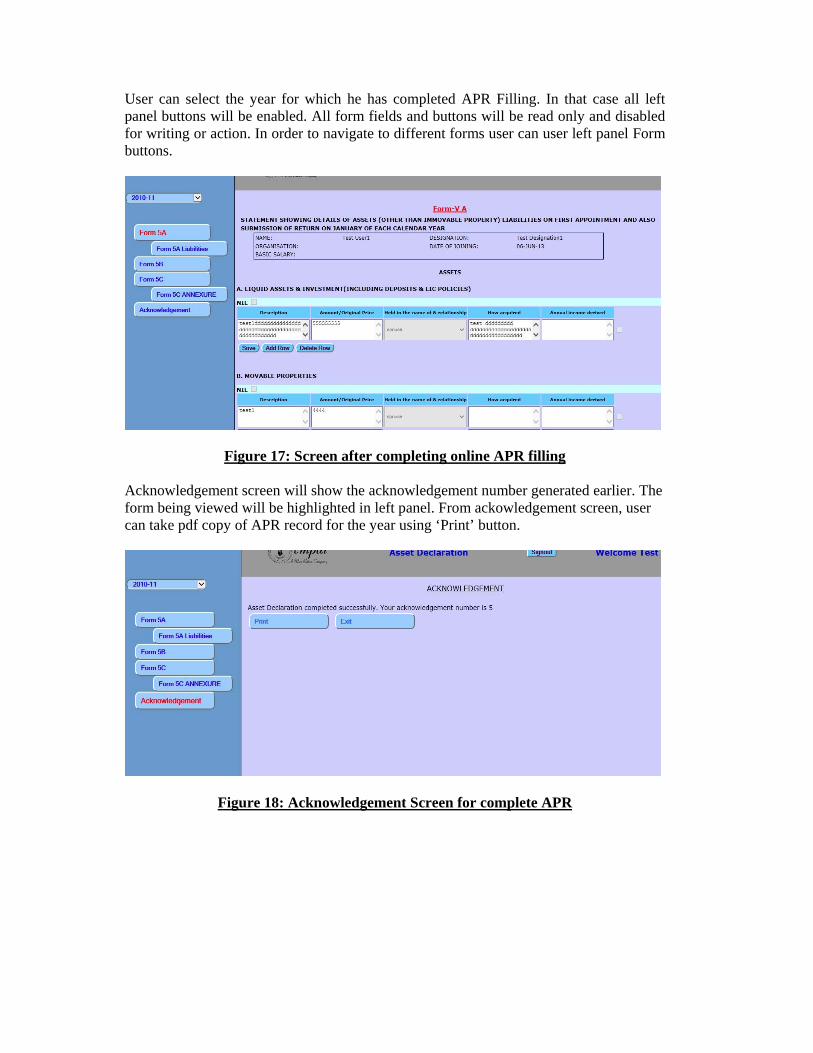
User can select the year for which he has completed APR Filling. In that case all left panel buttons will be enabled. All form fields and buttons will be read only and disabled for writing or action. In order to navigate to different forms user can user left panel Form buttons.
Figure 17: Screen after completing online APR filling Acknowledgement screen will show the acknowledgement number generated earlier. The form being viewed will be highlighted in left panel. From ackowledgement screen, user can take pdf copy of APR record for the year using ‘Print’ button.
Figure 18: Acknowledgement Screen for complete APR
5.0 APR Upload 5.0 APR Upload
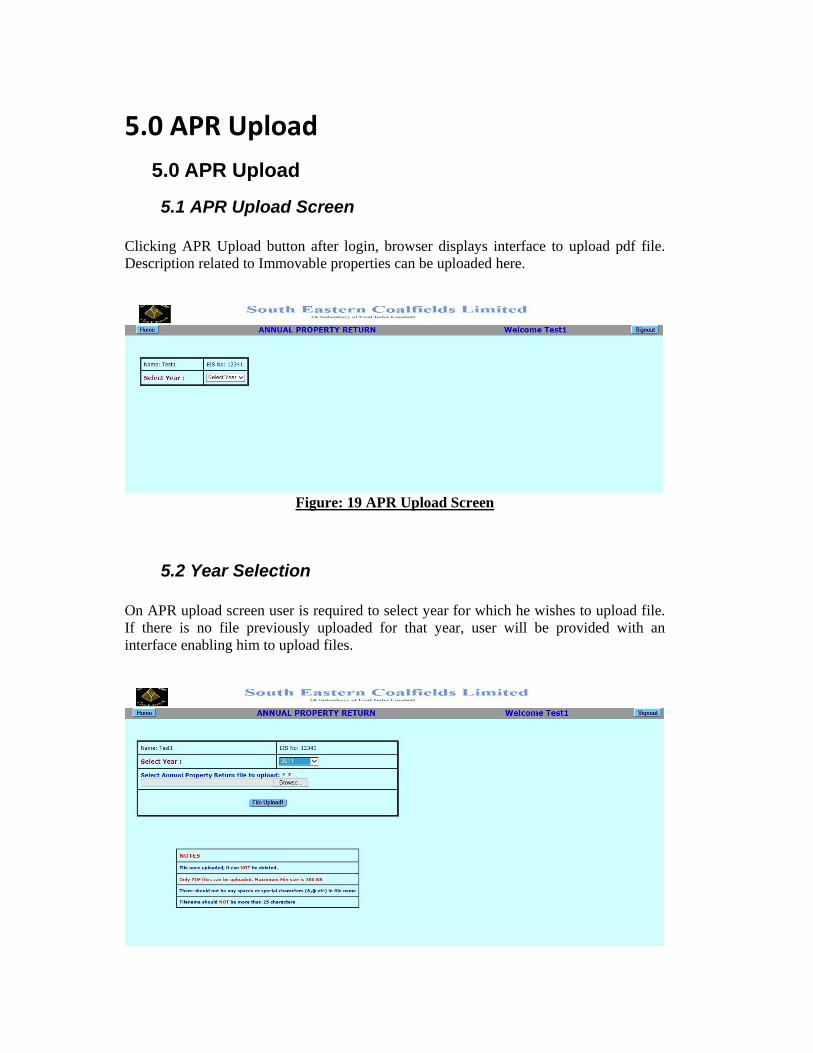
5.1 APR Upload Screen Clicking APR Upload button after login, browser displays interface to upload pdf file. Description related to Immovable properties can be uploaded here.
Figure: 19 APR Upload Screen
5.2 Year Selection On APR upload screen user is required to select year for which he wishes to upload file. If there is no file previously uploaded for that year, user will be provided with an interface enabling him to upload files.
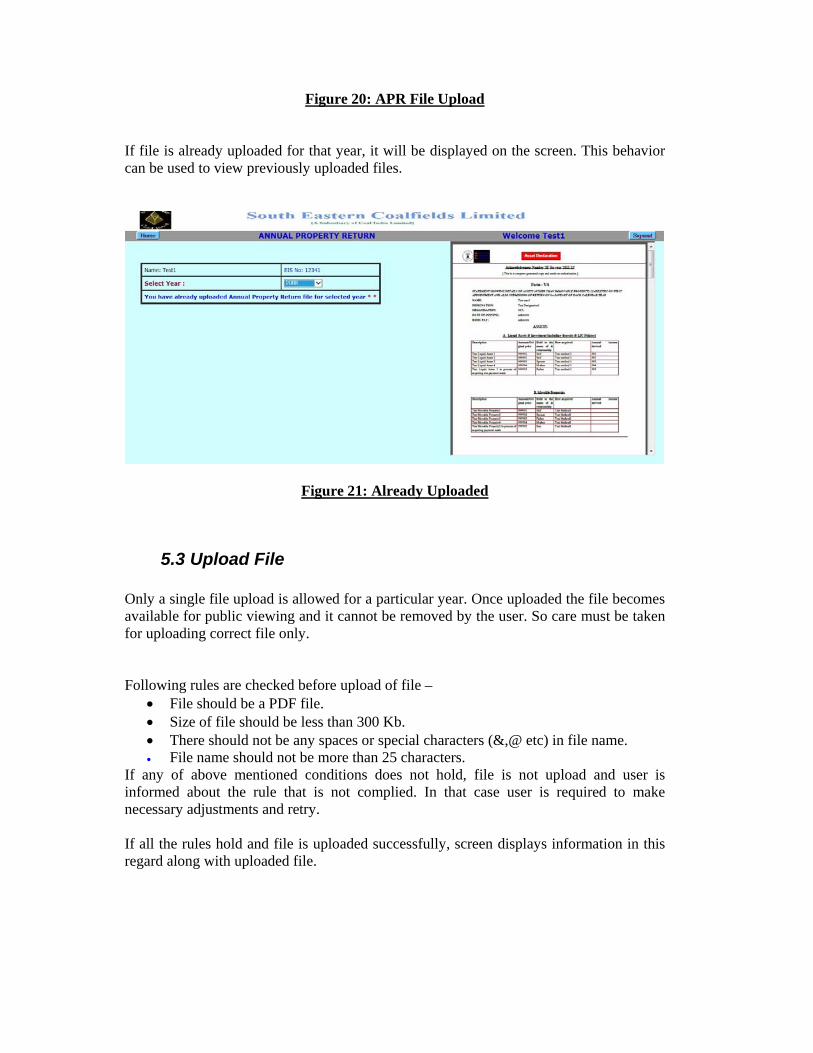
Figure 20: APR File Upload
If file is already uploaded for that year, it will be displayed on the screen. This behavior can be used to view previously uploaded files.
Figure 21: Already Uploaded
5.3 Upload File Only a single file upload is allowed for a particular year. Once uploaded the file becomes available for public viewing and it cannot be removed by the user. So care must be taken for uploading correct file only. Following rules are checked before upload of file –
• File should be a PDF file. • Size of file should be less than 300 Kb. • There should not be any spaces or special characters (&,@ etc) in file name. • File name should not be more than 25 characters.
If any of above mentioned conditions does not hold, file is not upload and user is informed about the rule that is not complied. In that case user is required to make necessary adjustments and retry. If all the rules hold and file is uploaded successfully, screen displays information in this regard along with uploaded file.
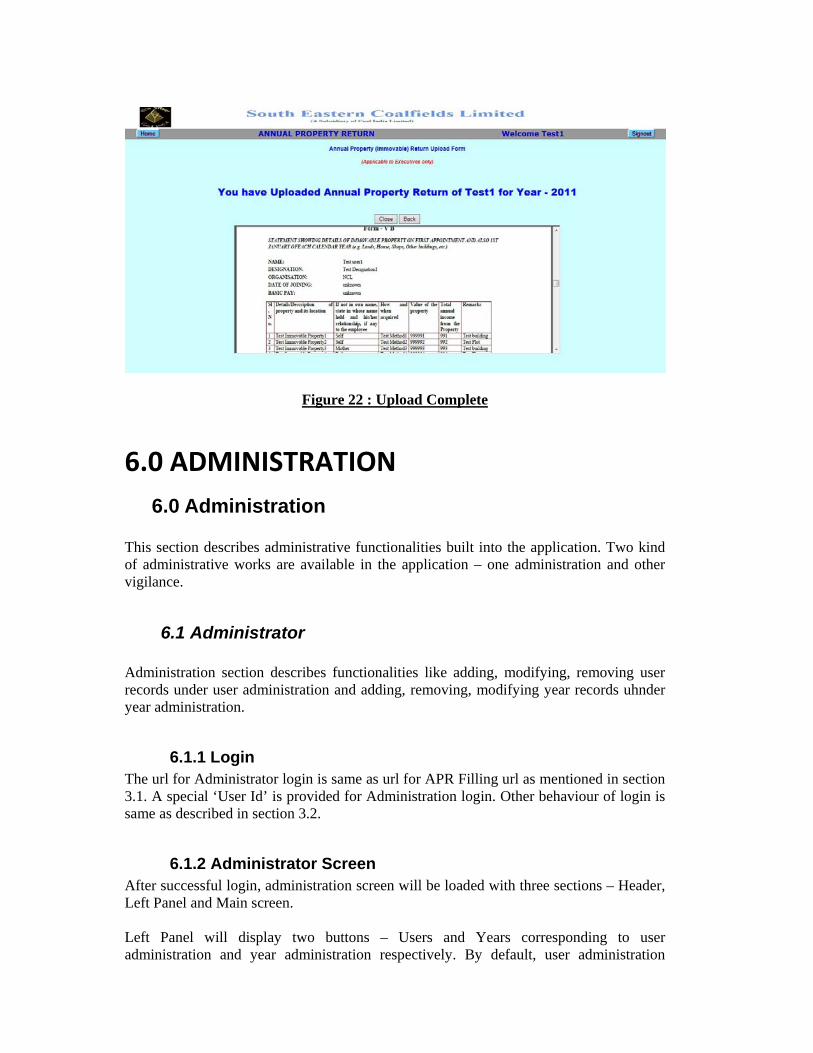
Figure 22 : Upload Complete
6.0 ADMINISTRATION 6.0 Administration This section describes administrative functionalities built into the application. Two kind of administrative works are available in the application – one administration and other vigilance.
6.1 Administrator Administration section describes functionalities like adding, modifying, removing user records under user administration and adding, removing, modifying year records uhnder year administration.
6.1.1 Login The url for Administrator login is same as url for APR Filling url as mentioned in section 3.1. A special ‘User Id’ is provided for Administration login. Other behaviour of login is same as described in section 3.2.
6.1.2 Administrator Screen After successful login, administration screen will be loaded with three sections – Header, Left Panel and Main screen. Left Panel will display two buttons – Users and Years corresponding to user administration and year administration respectively. By default, user administration

screen will be displayed. On clicking left panel button user will move to respective screen. The individual screens, i.e. user administration screen and year administration screen will differ only in Main screen. Header and left panel will not change.
6.1.3 User Administration User administration screen will display a tabular form with fields - Usertype, EIS No/Login Id, Name, Designation, Grade, Pan No, Date of Birth, Date of Joining. All fields except usertype and EIS No/Login Id will be readonly initially. No existing records will be loaded in the screen automatically. Usertype – Application defines three types of users
i. Employee: A user that can fill APR form. ii. Vigilance: A user that can perform monitoring of APR filling for the company iii. Administrator: A user that can perform user and year administration.
Usertype is a dropdown field and by default ‘Employee’ is selected. Other options in select dropdown are vigilance and administrator. Any value can be selected.
Figure 23: User Administration screen
EIS No/Login Id – This value will be used as User Id for login. Since EIS Number is used for login for employees, it is recommended to use EIS number for usertype employee. If usertype is employee application will prevent to give a non-numerical login id to the user. For other two user types, numeric login id is not allowed. After EIS No/Login Id is filled, application will search for that user in available records. If any such record exists, other fields will be populated, otherwise, fields will be empty. In any case, all fields will become writable except two date fields where calendars are provided to select appropriate dates. ‘Add More’ button will create addition rows – one each click. Each row can be filled independently of previous rows as described earlier. A checkbox at the end of row can be checked to delete record of the user from application permanently. However, if employee has already filled APR forms, or is in the process of filling, that record cannot be removed and application will prevent user from checking such employee records. ‘Save’ button will save the form. Effect of saving the form will be as follows –

All rows for which there is no value in EIS No/Login Id will be ignored. All rows for which checkbox is checked will be removed permanently from the application. For rest of the rows existing records will be modified and new records will be added.
6.1.4 Year Administration Year administration screen will display a tabular form with fields ‘Year from’, ‘Year to’ and ‘Period’. All existing year records will be loaded into the screen. ‘Add more’ button will add one blank row at the end. ‘Year to’ and ‘Period’ fields will not be writable in this row. Once user enters values in ‘Year from’ field, Year to and Period fields will be populated automatically as per following rule – Year to = Year from +1 and Period = Yearfrom-(last two digits of year to). For example, if user enters 2009 in Year from field , Year to will become 2010 and Period 2009-10. ‘Year to’ and ‘Period’ fields will become writable after that and can be edited, if required. If value entered in yearfrom is already existing in the table, application will alert user for that same. User can check checkbox in each row to remove that year from application permanently. If any employee has filled or is in process of filling APR Form for that year, application will alert the user and prevent him from checking that checkbox.
Figure 24: Year Administration
‘Save’ action will save the records. It will delete all records for which checkbox is checked, and will insert newly added records and update existing records.
6.1.5 Excel Upload Bulk data upload feature is provided to administrator through Excel upload screen.
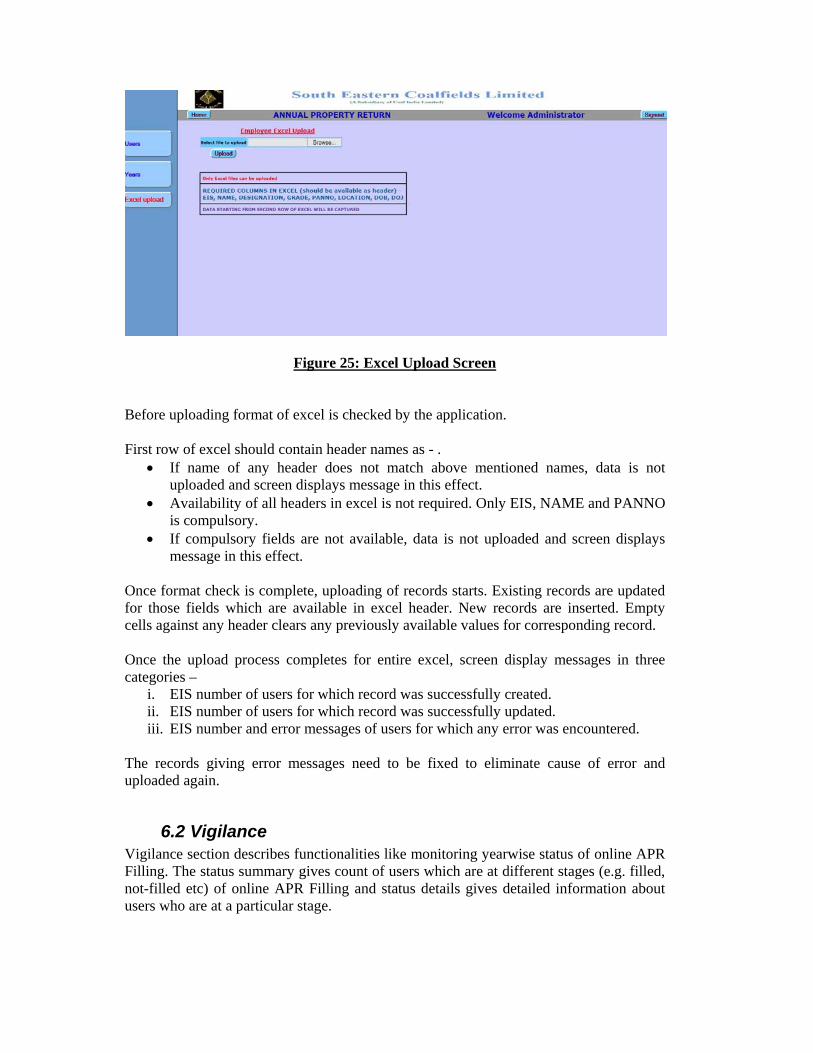
Figure 25: Excel Upload Screen Before uploading format of excel is checked by the application. First row of excel should contain header names as - .
• If name of any header does not match above mentioned names, data is not uploaded and screen displays message in this effect.
• Availability of all headers in excel is not required. Only EIS, NAME and PANNO is compulsory.
• If compulsory fields are not available, data is not uploaded and screen displays message in this effect.
Once format check is complete, uploading of records starts. Existing records are updated for those fields which are available in excel header. New records are inserted. Empty cells against any header clears any previously available values for corresponding record. Once the upload process completes for entire excel, screen display messages in three categories –
i. EIS number of users for which record was successfully created. ii. EIS number of users for which record was successfully updated. iii. EIS number and error messages of users for which any error was encountered.
The records giving error messages need to be fixed to eliminate cause of error and uploaded again.
6.2 Vigilance Vigilance section describes functionalities like monitoring yearwise status of online APR Filling. The status summary gives count of users which are at different stages (e.g. filled, not-filled etc) of online APR Filling and status details gives detailed information about users who are at a particular stage.
6.2.1 Login The url for Vigilance login is same as url for APR Filling url as mentioned in section 3.1. A special ‘User Id’ is provided for Vigilance login. Other behaviour of login is same as described in section 3.2.
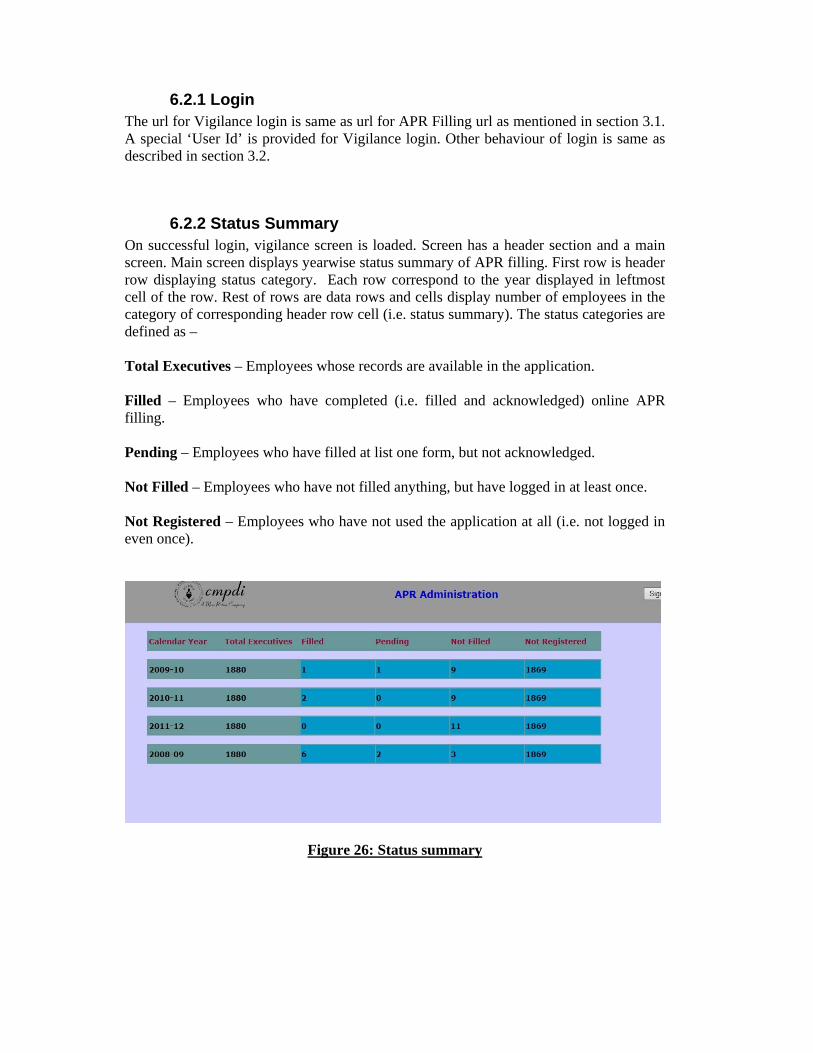
6.2.2 Status Summary On successful login, vigilance screen is loaded. Screen has a header section and a main screen. Main screen displays yearwise status summary of APR filling. First row is header row displaying status category. Each row correspond to the year displayed in leftmost cell of the row. Rest of rows are data rows and cells display number of employees in the category of corresponding header row cell (i.e. status summary). The status categories are defined as – Total Executives – Employees whose records are available in the application. Filled – Employees who have completed (i.e. filled and acknowledged) online APR filling. Pending – Employees who have filled at list one form, but not acknowledged. Not Filled – Employees who have not filled anything, but have logged in at least once. Not Registered – Employees who have not used the application at all (i.e. not logged in even once).
Figure 26: Status summary

6.2.3 Status Details Application can display list of employees for all status categories except ‘Total Executives’. Status details are applicable only for these categories. The list of employees will display Name, Designation, Pan No, email id for ‘Filled’, ‘Pending’ and ‘Not filled’ categories and Name, Designation, Pan No, EIS no for ‘Not registered categories’. Only one status details can be displayed at once. On clicking a particular status summary, the status details will be displayed directly below the status summary row, if applicable. All other status details will be removed for screen. On first line of status detail information regarding chosen year and chosen category will be given to identify the detail user is seeing. After that information, a table will be displayed contained information abour employees in tabular format. First two rows of table will be fixed and will not contain any employee details. Rest of the rows will be scrollable, if required and will display employee details. First row is reserved for heading to identify data in corresponding column. Second row is reserved for filtering records. Search boxes are available for all columns that display user details like name, designation, pan no, email id, eis no wherever applicable. It is having text input fields built in for filtering purpose. User can filter the records based on his preferences. Behaviour of status details under each status category is given below - Filled Details: Clicking on cell of status category ‘filled’ will display list of all users who have generated acknowledgement. Each row of user record will start with a serial number of the record followed by user details like name, designation, pan no, email id. After that a view link is provided to view pdf copy of user’s filled APR record. On clicking this link a window will open containing the pdf copy of APR record. Finally there is a approve checkbox for each employee. Checked checkbox means users record has been approved. To approve or disapprove any APR record, user will have to check or uncheck the corresponding checkbox and click ‘Save’ button at end of the details grid. In the header row of approve there is a checkbox provided. It may be used as global control for approving or disapproving all records at once.
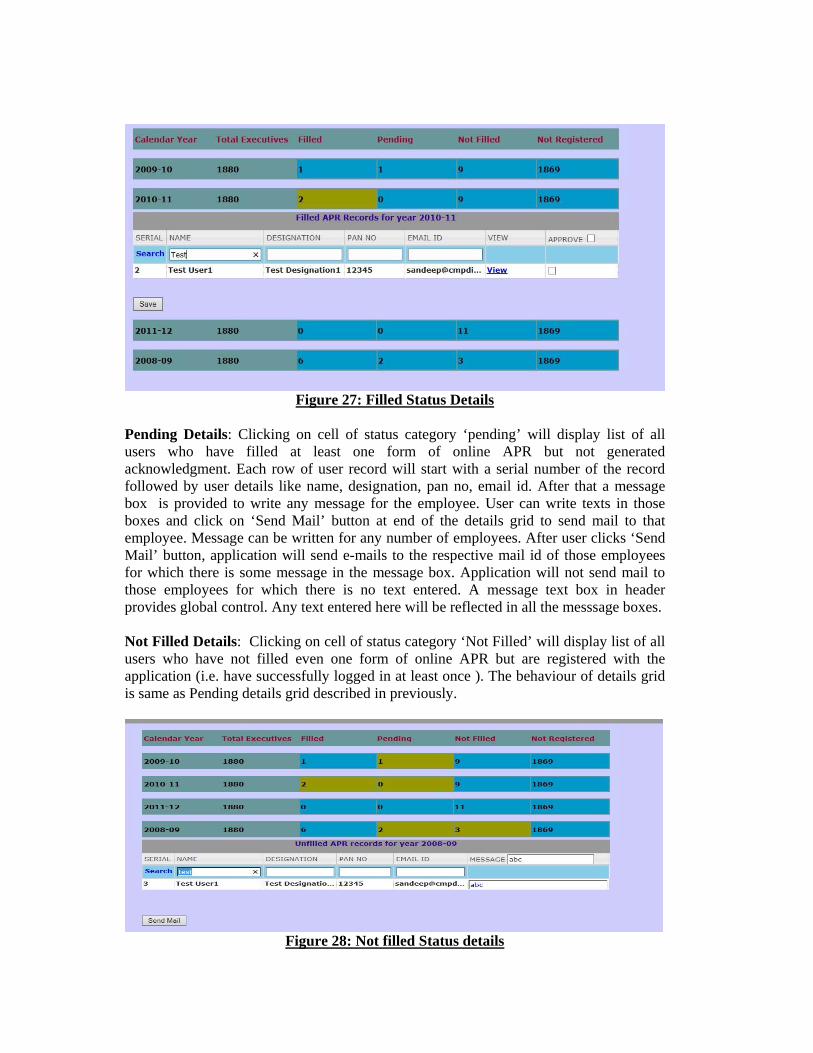
Figure 27: Filled Status Details
Pending Details: Clicking on cell of status category ‘pending’ will display list of all users who have filled at least one form of online APR but not generated acknowledgment. Each row of user record will start with a serial number of the record followed by user details like name, designation, pan no, email id. After that a message box is provided to write any message for the employee. User can write texts in those boxes and click on ‘Send Mail’ button at end of the details grid to send mail to that employee. Message can be written for any number of employees. After user clicks ‘Send Mail’ button, application will send e-mails to the respective mail id of those employees for which there is some message in the message box. Application will not send mail to those employees for which there is no text entered. A message text box in header provides global control. Any text entered here will be reflected in all the messsage boxes. Not Filled Details: Clicking on cell of status category ‘Not Filled’ will display list of all users who have not filled even one form of online APR but are registered with the application (i.e. have successfully logged in at least once ). The behaviour of details grid is same as Pending details grid described in previously.
Figure 28: Not filled Status details
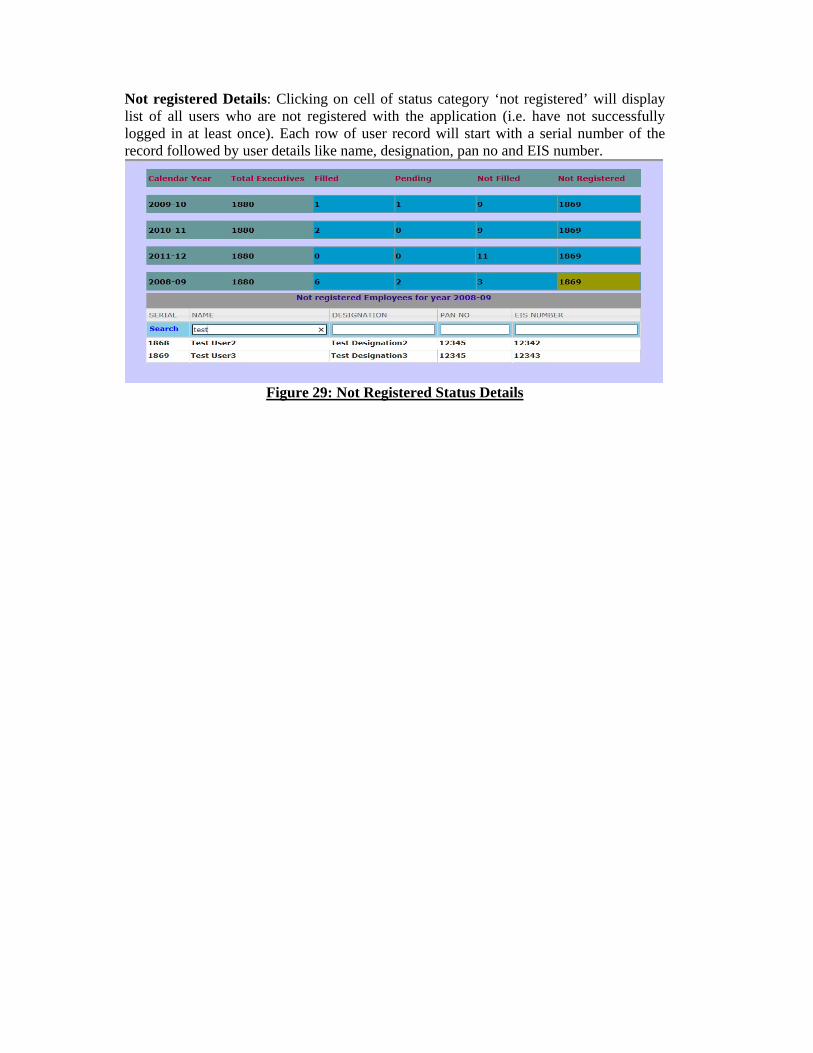
Not registered Details: Clicking on cell of status category ‘not registered’ will display list of all users who are not registered with the application (i.e. have not successfully logged in at least once). Each row of user record will start with a serial number of the record followed by user details like name, designation, pan no and EIS number.
Figure 29: Not Registered Status Details
![Skaffold - storage.googleapis.com · [getting-started getting-started] Hello world! [getting-started getting-started] Hello world! [getting-started getting-started] Hello world! 5](https://img.dokumen.tips/doc/110x75/5ec939f2a76a033f091c5ac7/skaffold-getting-started-getting-started-hello-world-getting-started-getting-started.jpg)


