Embed Size (px)
Citation preview
APPLICATION NOTE
Industrial Automation Business Group
1 Delta Products Corporation 5101 Davis Dr, RTP-Durham, NC 27709 USA (919) 767 3913 A2-A003
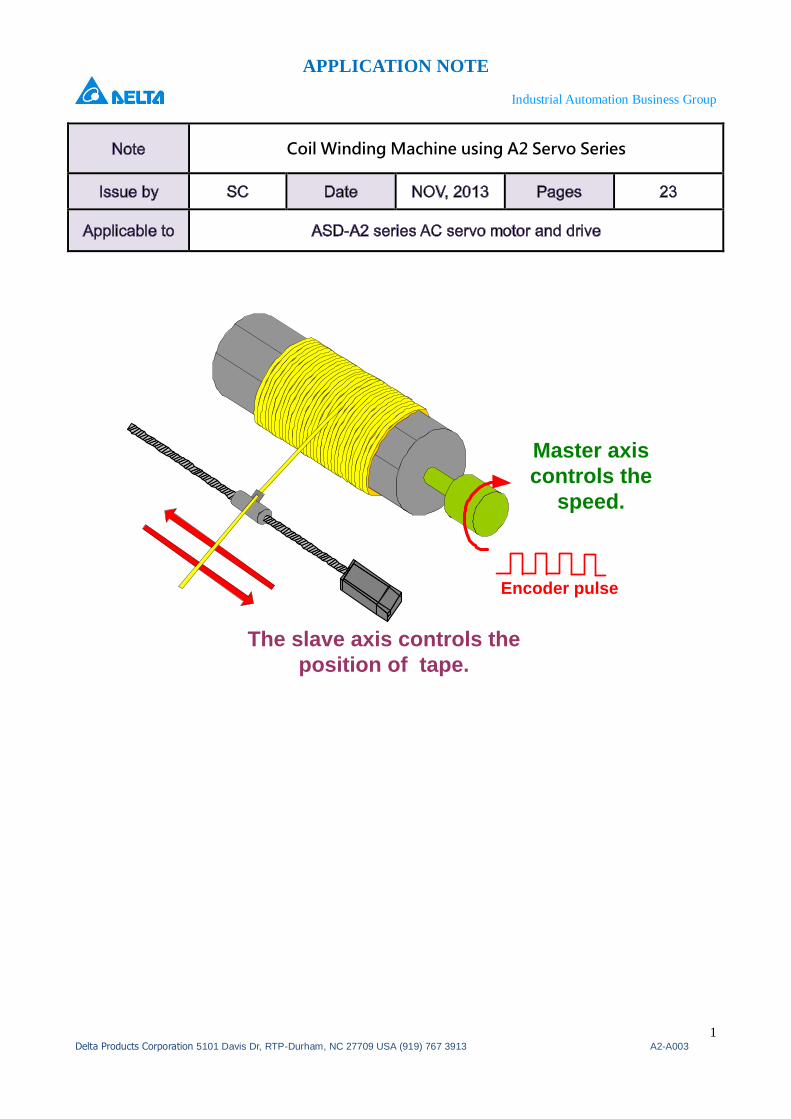
Coil Winding Machine using A2 Servo Series
Master axis
controls the
speed.
The slave axis controls the
position of tape.
Encoder pulse
APPLICATION NOTE
Industrial Automation Business Group
2 Delta Products Corporation 5101 Davis Dr, RTP-Durham, NC 27709 USA (919) 767 3913 A2-A003
Application Note for Coil Winding Machine
1 Description ............................................................................................................ 3
2 System theorem and scheme............................................................................... 3
2.1 Master axis ..................................................................................................... 3
2.2 Slave Axis (Tape Guide) ................................................................................ 4
3 Servo system setting ............................................................................................ 4
3.1 Tape placement .............................................................................................. 4
3.2 E-cam curve design ....................................................................................... 6
3.3 Example .......................................................................................................... 8
3.3.1 PR programming and execution ...................................................... 11
3.3.2 System adjustment ............................................................................ 16
4 Building the E-cam curve in ASDASoft ............................................................. 18

APPLICATION NOTE
Industrial Automation Business Group
3 Delta Products Corporation 5101 Davis Dr, RTP-Durham, NC 27709 USA (919) 767 3913 A2-A003
1 Description This chapter describes the ASDA-A2 solution in a Coil Winding machine application. The
configuration function of tape can be done by electronic cam of ASDA-A2. The ECAM in the
drive incorporates multiple ECAM profiles with switching occurring at the ends with no lost
pulses from the master axis. The main parameters such as the width of tape, the interval of
tape and the length of bobbin can be modified easily to fit any application. The detailed
description will be elaborated in later parts of this chapter.
2 System theorem and scheme The bobbin is the master axis. When it rolls, it sends out the encoder pulse to command the
slave axis simultaneously. The slave axis moves using its internal E-cam curve to
coordinate motion with the master axis to finish the wrapping on the bobbin. The ASDA-A2
servo drive is mainly in charge of the configuration of tape.
Master axis
controls the
speed.
The slave axis controls the
position of tape.
Encoder pulse
Diagram 2.1 Coil Winding machine system
2.1 Master axis
When the master axis rolls, it sends out the pulse to command the slave axis. If different
lengths for the bobbin are required, we can adjust the parameters of the slave axis to
complete the setting.
APPLICATION NOTE
Industrial Automation Business Group
4 Delta Products Corporation 5101 Davis Dr, RTP-Durham, NC 27709 USA (919) 767 3913 A2-A003
Length A Length B
Diagram 2.2 Different length of bobbin
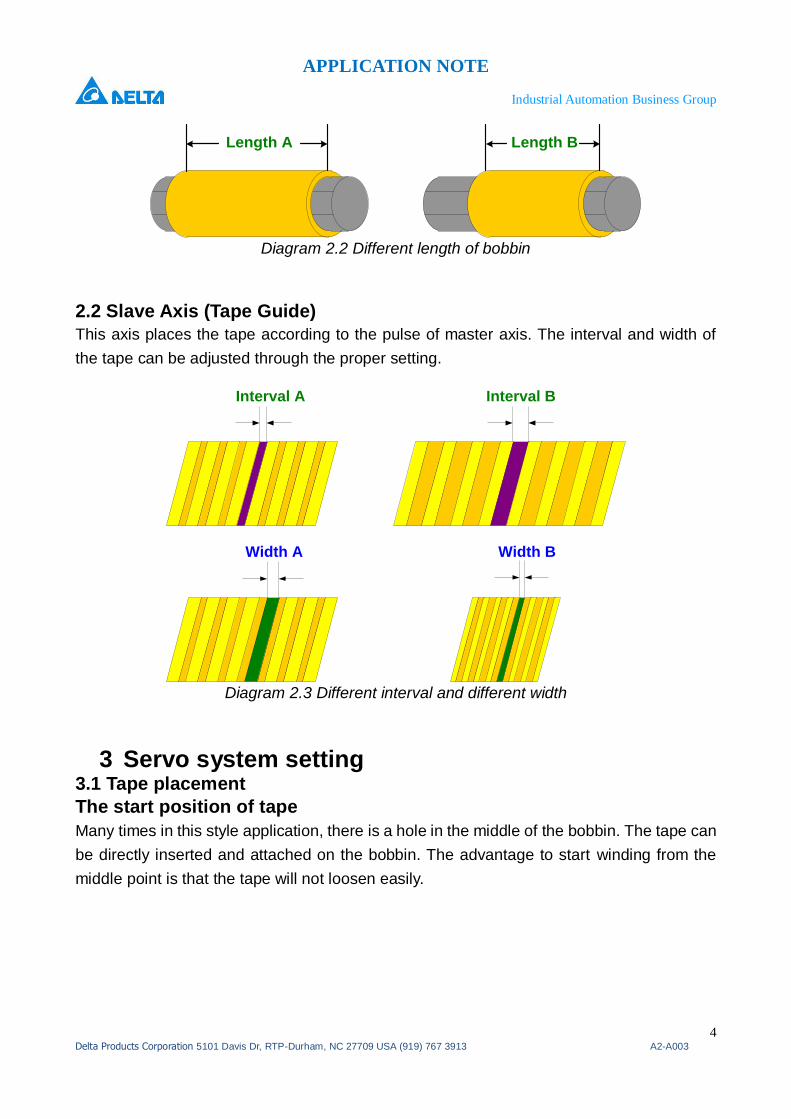
2.2 Slave Axis (Tape Guide)
This axis places the tape according to the pulse of master axis. The interval and width of
the tape can be adjusted through the proper setting.
Width A Width B
Interval BInterval A
Diagram 2.3 Different interval and different width
3 Servo system setting 3.1 Tape placement
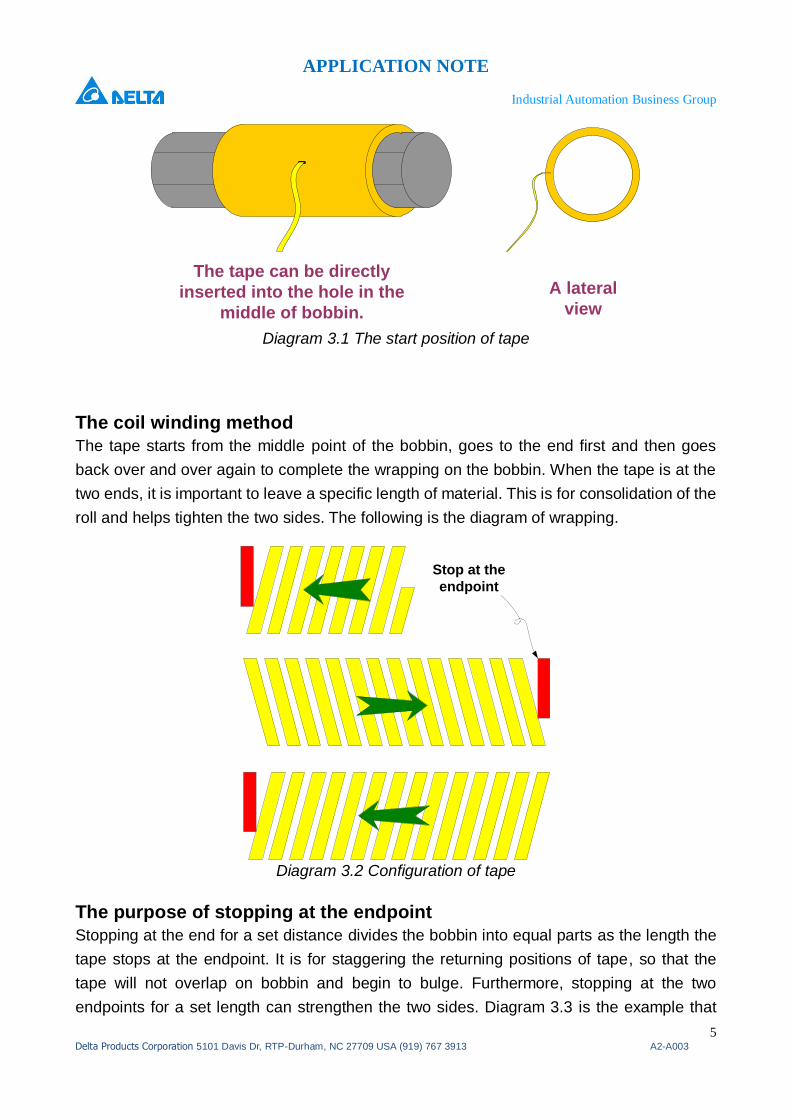
The start position of tape
Many times in this style application, there is a hole in the middle of the bobbin. The tape can
be directly inserted and attached on the bobbin. The advantage to start winding from the
middle point is that the tape will not loosen easily.
APPLICATION NOTE
Industrial Automation Business Group
5 Delta Products Corporation 5101 Davis Dr, RTP-Durham, NC 27709 USA (919) 767 3913 A2-A003
The tape can be directly
inserted into the hole in the
middle of bobbin.
A lateral
view
Diagram 3.1 The start position of tape
The coil winding method
The tape starts from the middle point of the bobbin, goes to the end first and then goes
back over and over again to complete the wrapping on the bobbin. When the tape is at the
two ends, it is important to leave a specific length of material. This is for consolidation of the
roll and helps tighten the two sides. The following is the diagram of wrapping.
Stop at the
endpoint
Diagram 3.2 Configuration of tape
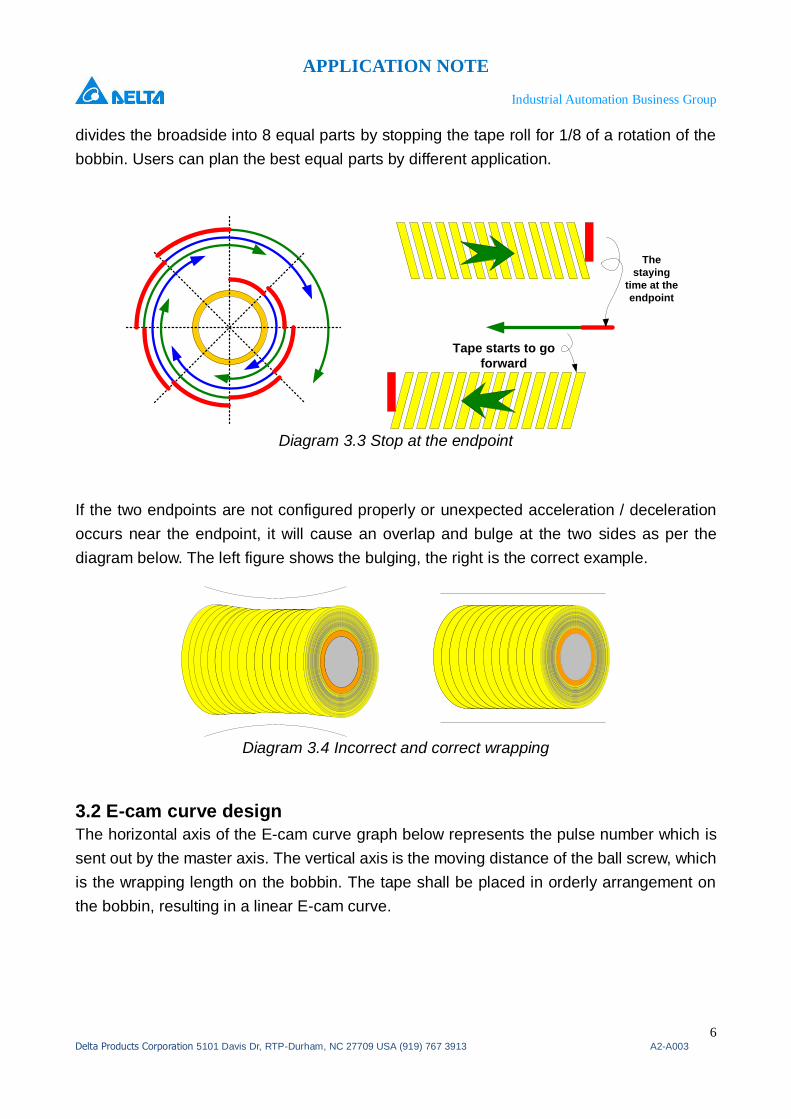
The purpose of stopping at the endpoint
Stopping at the end for a set distance divides the bobbin into equal parts as the length the
tape stops at the endpoint. It is for staggering the returning positions of tape, so that the
tape will not overlap on bobbin and begin to bulge. Furthermore, stopping at the two
endpoints for a set length can strengthen the two sides. Diagram 3.3 is the example that
APPLICATION NOTE
Industrial Automation Business Group
6 Delta Products Corporation 5101 Davis Dr, RTP-Durham, NC 27709 USA (919) 767 3913 A2-A003
divides the broadside into 8 equal parts by stopping the tape roll for 1/8 of a rotation of the
bobbin. Users can plan the best equal parts by different application.
The
staying
time at the
endpoint
Tape starts to go
forward
Diagram 3.3 Stop at the endpoint
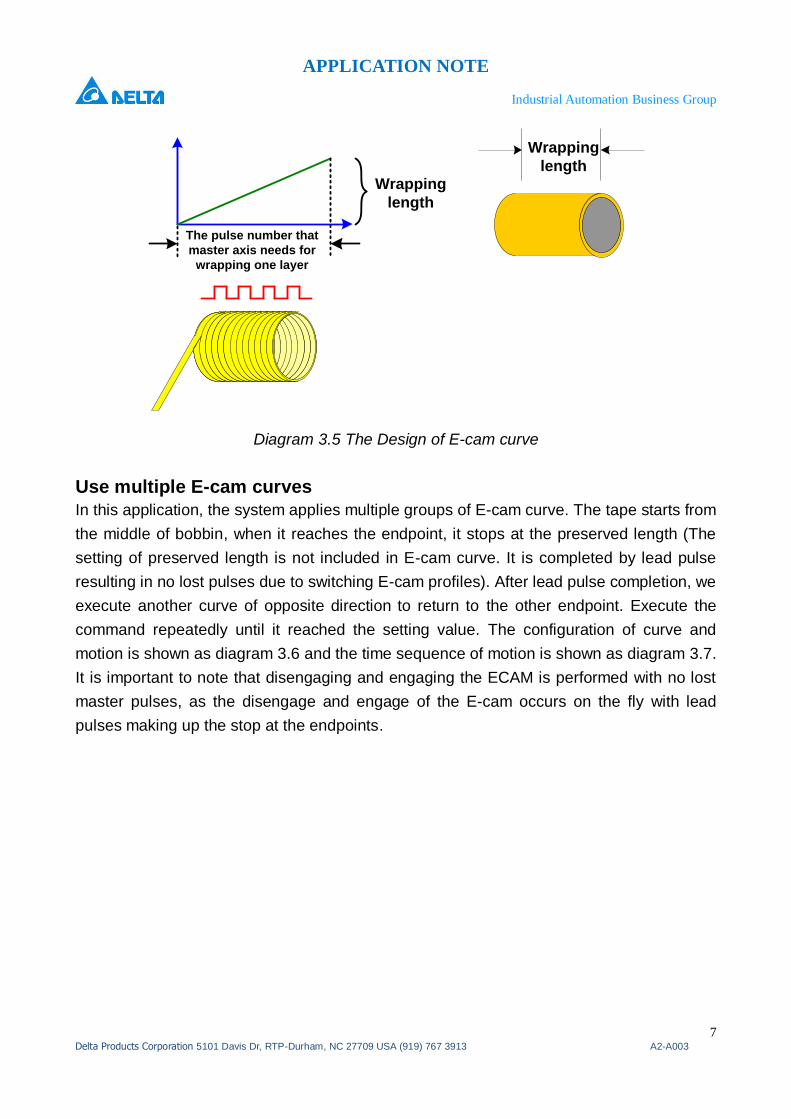
If the two endpoints are not configured properly or unexpected acceleration / deceleration
occurs near the endpoint, it will cause an overlap and bulge at the two sides as per the
diagram below. The left figure shows the bulging, the right is the correct example.
Diagram 3.4 Incorrect and correct wrapping
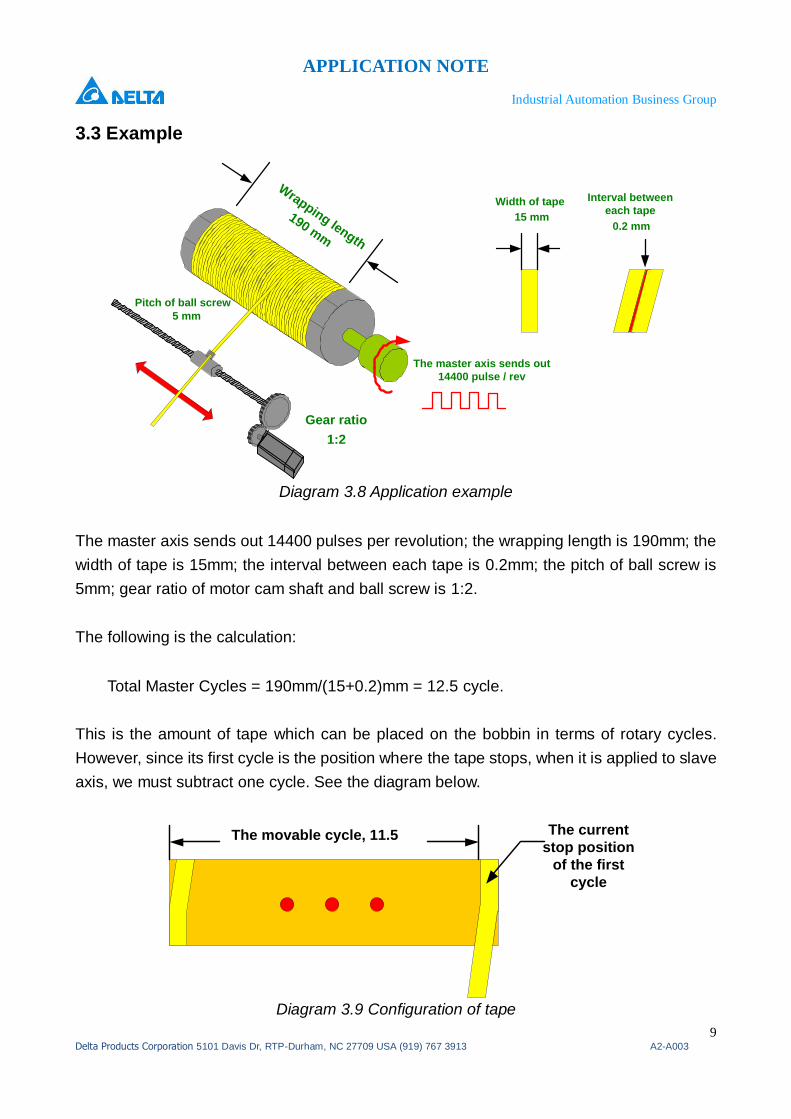
3.2 E-cam curve design
The horizontal axis of the E-cam curve graph below represents the pulse number which is
sent out by the master axis. The vertical axis is the moving distance of the ball screw, which
is the wrapping length on the bobbin. The tape shall be placed in orderly arrangement on
the bobbin, resulting in a linear E-cam curve.
APPLICATION NOTE
Industrial Automation Business Group
7 Delta Products Corporation 5101 Davis Dr, RTP-Durham, NC 27709 USA (919) 767 3913 A2-A003
Wrapping
length
The pulse number that
master axis needs for
wrapping one layer
Wrapping
length
Diagram 3.5 The Design of E-cam curve
Use multiple E-cam curves
In this application, the system applies multiple groups of E-cam curve. The tape starts from
the middle of bobbin, when it reaches the endpoint, it stops at the preserved length (The
setting of preserved length is not included in E-cam curve. It is completed by lead pulse
resulting in no lost pulses due to switching E-cam profiles). After lead pulse completion, we
execute another curve of opposite direction to return to the other endpoint. Execute the
command repeatedly until it reached the setting value. The configuration of curve and
motion is shown as diagram 3.6 and the time sequence of motion is shown as diagram 3.7.
It is important to note that disengaging and engaging the ECAM is performed with no lost
master pulses, as the disengage and engage of the E-cam occurs on the fly with lead
pulses making up the stop at the endpoints.

APPLICATION NOTE
Industrial Automation Business Group
8 Delta Products Corporation 5101 Davis Dr, RTP-Durham, NC 27709 USA (919) 767 3913 A2-A003
Half
wrapping
length
Wrapping
length
Wrapping
length
The pulse number that master axis needs for
wrapping 0.5 layer
The pulse number that master axis needs for
wrapping 1 layer
The pulse number that master axis needs for
wrapping 1 layer Diagram 3.6 Multiple groups of E-cam curve
Half wrapping
length
The pulse number that master axis needs for
wrapping 0.5 layer
Stops at the
endpoint
Starts from the
middle, go
The pulse number that master axis needs for
wrapping 1 layer
returnStops at the
endpoint
Wrapping length
The pulse number that master axis needs for
wrapping 1 layer Stops at the
endpointgo
Wrapping length
return
The pulse number that master axis needs for
wrapping 1 layer
Wrapping length
Diagram 3.7 Time sequence of motion
APPLICATION NOTE
Industrial Automation Business Group
9 Delta Products Corporation 5101 Davis Dr, RTP-Durham, NC 27709 USA (919) 767 3913 A2-A003
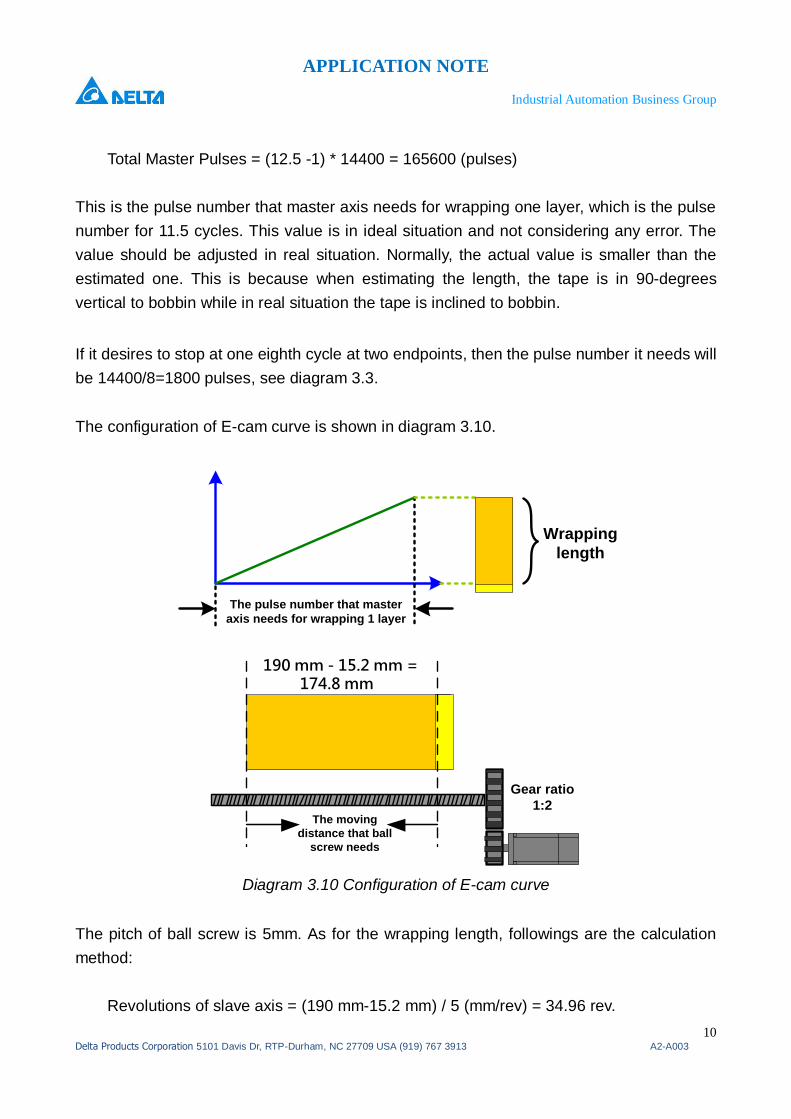
3.3 Example
The master axis sends out
14400 pulse / rev
Wrapping length
190 mm
Width of tape
15 mm
Interval between
each tape
0.2 mm
Gear ratio
1:2
Pitch of ball screw
5 mm
Diagram 3.8 Application example
The master axis sends out 14400 pulses per revolution; the wrapping length is 190mm; the
width of tape is 15mm; the interval between each tape is 0.2mm; the pitch of ball screw is
5mm; gear ratio of motor cam shaft and ball screw is 1:2.
The following is the calculation:
Total Master Cycles = 190mm/(15+0.2)mm = 12.5 cycle.
This is the amount of tape which can be placed on the bobbin in terms of rotary cycles.
However, since its first cycle is the position where the tape stops, when it is applied to slave
axis, we must subtract one cycle. See the diagram below.
The current
stop position
of the first
cycle
The movable cycle, 11.5
Diagram 3.9 Configuration of tape
APPLICATION NOTE
Industrial Automation Business Group
10 Delta Products Corporation 5101 Davis Dr, RTP-Durham, NC 27709 USA (919) 767 3913 A2-A003
Total Master Pulses = (12.5 -1) * 14400 = 165600 (pulses)
This is the pulse number that master axis needs for wrapping one layer, which is the pulse
number for 11.5 cycles. This value is in ideal situation and not considering any error. The
value should be adjusted in real situation. Normally, the actual value is smaller than the
estimated one. This is because when estimating the length, the tape is in 90-degrees
vertical to bobbin while in real situation the tape is inclined to bobbin.
If it desires to stop at one eighth cycle at two endpoints, then the pulse number it needs will
be 14400/8=1800 pulses, see diagram 3.3.
The configuration of E-cam curve is shown in diagram 3.10.
Wrapping
length
The pulse number that master
axis needs for wrapping 1 layer
The moving
distance that ball
screw needs
Gear ratio
1:2
190 mm - 15.2 mm = 174.8 mm
Diagram 3.10 Configuration of E-cam curve
The pitch of ball screw is 5mm. As for the wrapping length, followings are the calculation
method:
Revolutions of slave axis = (190 mm-15.2 mm) / 5 (mm/rev) = 34.96 rev.
APPLICATION NOTE
Industrial Automation Business Group
11 Delta Products Corporation 5101 Davis Dr, RTP-Durham, NC 27709 USA (919) 767 3913 A2-A003
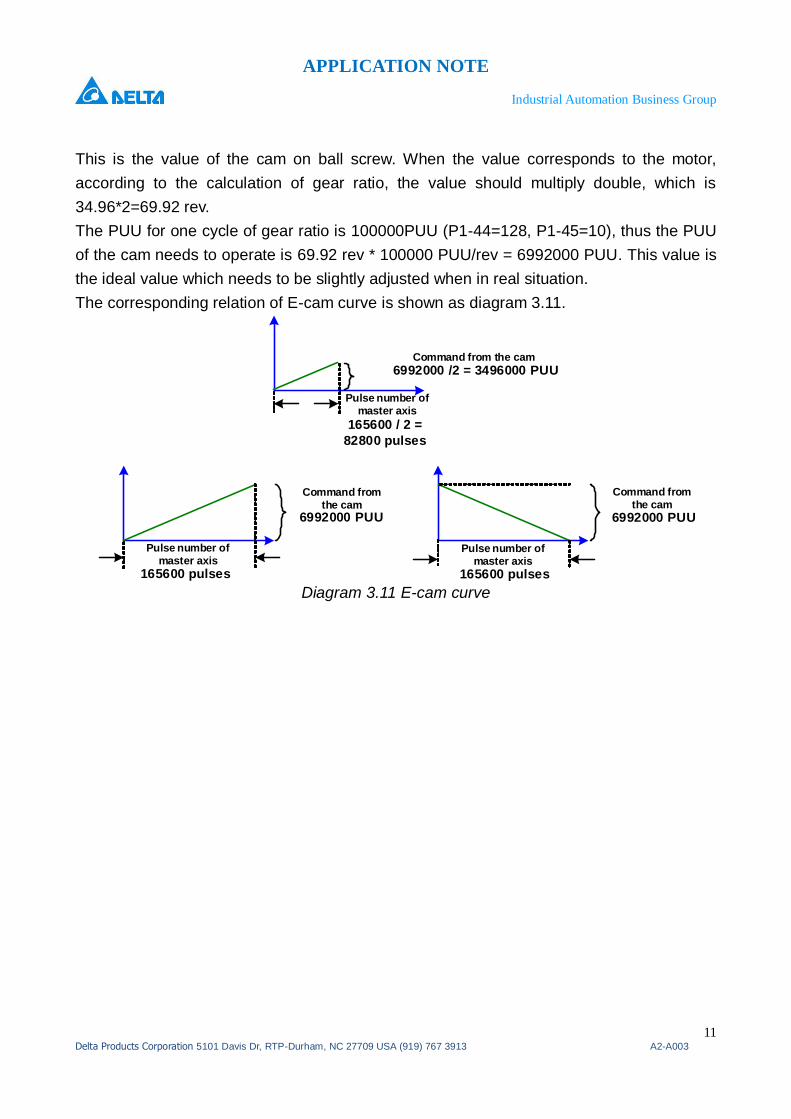
This is the value of the cam on ball screw. When the value corresponds to the motor,
according to the calculation of gear ratio, the value should multiply double, which is
34.96*2=69.92 rev.
The PUU for one cycle of gear ratio is 100000PUU (P1-44=128, P1-45=10), thus the PUU
of the cam needs to operate is 69.92 rev * 100000 PUU/rev = 6992000 PUU. This value is
the ideal value which needs to be slightly adjusted when in real situation.
The corresponding relation of E-cam curve is shown as diagram 3.11.
Command from the cam
6992000 PUU
Pulse number of master axis
165600 pulses
Command from the cam
6992000 PUU
Pulse number of master axis
165600 pulses
Pulse number of master axis
165600 / 2 =
82800 pulses
Command from the cam
6992000 /2 = 3496000 PUU
Diagram 3.11 E-cam curve
APPLICATION NOTE
Industrial Automation Business Group
12 Delta Products Corporation 5101 Davis Dr, RTP-Durham, NC 27709 USA (919) 767 3913 A2-A003
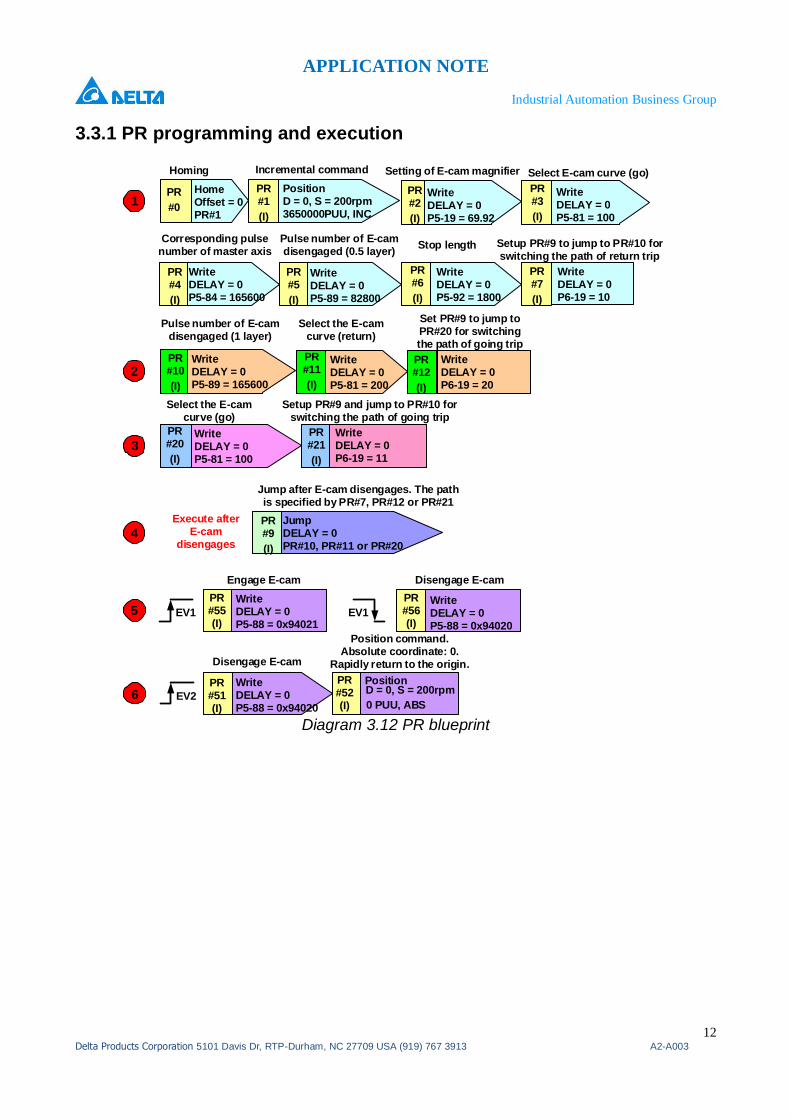
3.3.1 PR programming and execution
PR
#0
Homing
PR #1
(I)
PositionD = 0, S = 200rpm3650000PUU, INC
PR #2
(I)
WriteDELAY = 0P5-19 = 69.92
PR #3
(I)
WriteDELAY = 0P5-81 = 100
Select E-cam curve (go)
PR #20
(I)
PR #21
(I)
PR #10
(I)
Select the E-cam curve (return)
PR #12
(I)
PR #9
(I)
JumpDELAY = 0PR#10, PR#11 or PR#20
Jump after E-cam disengages. The path is specified by PR#7, PR#12 or PR#21
PR #55(I)
PR #56(I)
PR #51(I)
PR #52(I)
Execute after E-cam
disengages
EV1 EV1
EV2
PR #4
(I)
WriteDELAY = 0P5-84 = 165600
Corresponding pulse number of master axis
PR #5
(I)
WriteDELAY = 0P5-89 = 82800
Pulse number of E-cam disengaged (0.5 layer)
PR #7
(I)
Setup PR#9 to jump to PR#10 for switching the path of return trip
PR #6
(I)
WriteDELAY = 0P5-92 = 1800
Stop length
PR #11
(I)
Pulse number of E-cam disengaged (1 layer)
1
2
3
4
5
6
Engage E-cam Disengage E-cam
Position command. Absolute coordinate: 0.
Rapidly return to the origin.
HomeOffset = 0PR#1
Incremental command Setting of E-cam magnifier
WriteDELAY = 0P6-19 = 10
WriteDELAY = 0P5-81 = 200
WriteDELAY = 0P5-89 = 165600
Set PR#9 to jump to PR#20 for switching the path of going trip
WriteDELAY = 0P6-19 = 20
Select the E-cam curve (go)
WriteDELAY = 0P5-81 = 100
Setup PR#9 and jump to PR#10 for switching the path of going trip
WriteDELAY = 0P6-19 = 11
WriteDELAY = 0P5-88 = 0x94021
WriteDELAY = 0P5-88 = 0x94020
Disengage E-cam
WriteDELAY = 0P5-88 = 0x94020
PositionD = 0, S = 200rpm
0 PUU, ABS Diagram 3.12 PR blueprint
APPLICATION NOTE
Industrial Automation Business Group
13 Delta Products Corporation 5101 Davis Dr, RTP-Durham, NC 27709 USA (919) 767 3913 A2-A003
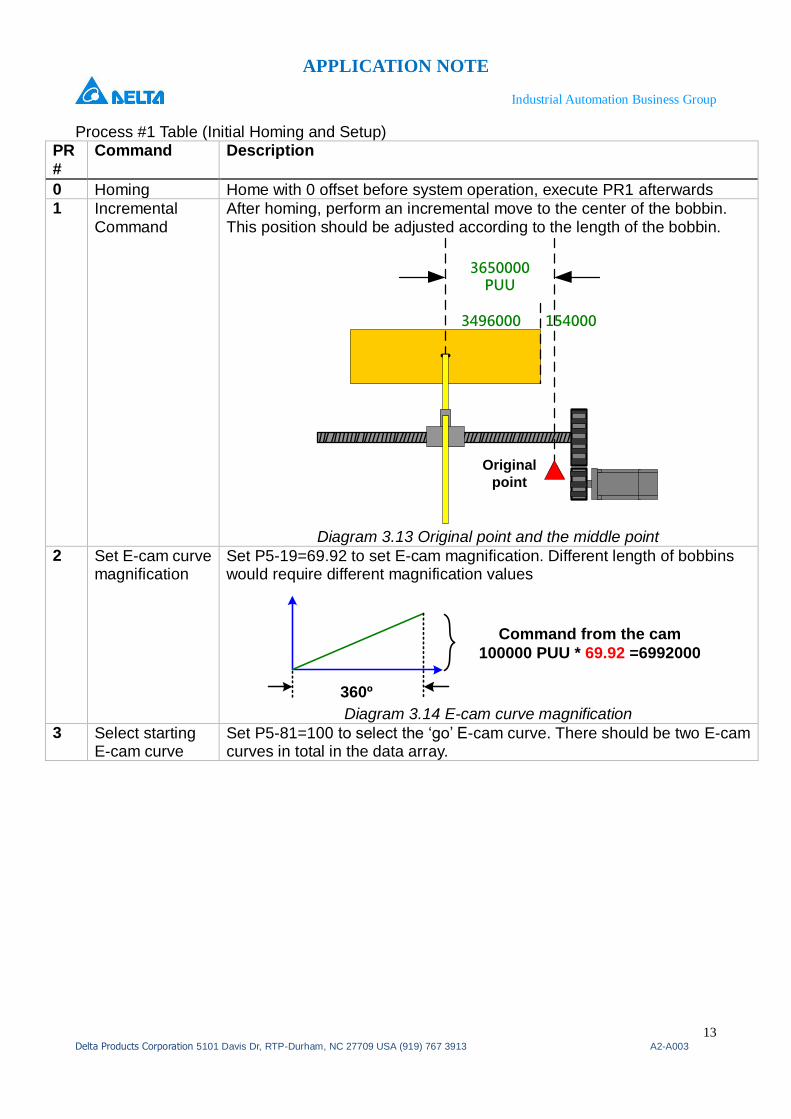
Process #1 Table (Initial Homing and Setup) PR #
Command Description
0 Homing Home with 0 offset before system operation, execute PR1 afterwards 1 Incremental
Command After homing, perform an incremental move to the center of the bobbin. This position should be adjusted according to the length of the bobbin.
3650000 PUU
Original
point
1540003496000
Diagram 3.13 Original point and the middle point
2 Set E-cam curve magnification
Set P5-19=69.92 to set E-cam magnification. Different length of bobbins would require different magnification values
Command from the cam
100000 PUU * 69.92 =6992000
360º Diagram 3.14 E-cam curve magnification
3 Select starting E-cam curve
Set P5-81=100 to select the ‘go’ E-cam curve. There should be two E-cam curves in total in the data array.

APPLICATION NOTE
Industrial Automation Business Group
14 Delta Products Corporation 5101 Davis Dr, RTP-Durham, NC 27709 USA (919) 767 3913 A2-A003
Data array
100
200
360º
Command
from the cam100000 PUU
Go
Return
Command from the cam
100000 PUU
360º
Diagram 3.15 E-cam curve command in data array
4 Set the master
axis pulse
number
Set P5-84=82800 for the pulses of wrapping for the length of the bobbin.
See diagram 3.11
5 Set the
disengage
length of the
E-cam
The disengaged length of the first E-cam is P5-89 = 82800 due to being
half length. See diagram 3.11
6 Stop length Set P5-92=1800 to set the stop length at the ends using the E-cam lead
pulse. See diagram 3.3
7 Setup PR#9 for
return to proper
location
Write P6-19=10. Our E-cam is configured to call PR#9 upon disengaging.
This is to setup the target that PR#9 jumps to after completing the first run
so the ‘return’ E-cam can be set.
Process #2 Table (Jump from PR#9 on ‘go’ E-cam disengaged)
PR# Command Description
10 Set the disengage
length of the E-cam
after first run
Set P5-89=165600 to set the pulse number that the slave
axis receives from the master before disengaging to 1 layer.
This PR is only called after the first run.
11 Select the e-cam
curve (return)
Set P5-81 to 200 to select the ‘return’ E-cam curve for
return trip on the bobbin. See diagram 3.15
APPLICATION NOTE
Industrial Automation Business Group
15 Delta Products Corporation 5101 Davis Dr, RTP-Durham, NC 27709 USA (919) 767 3913 A2-A003
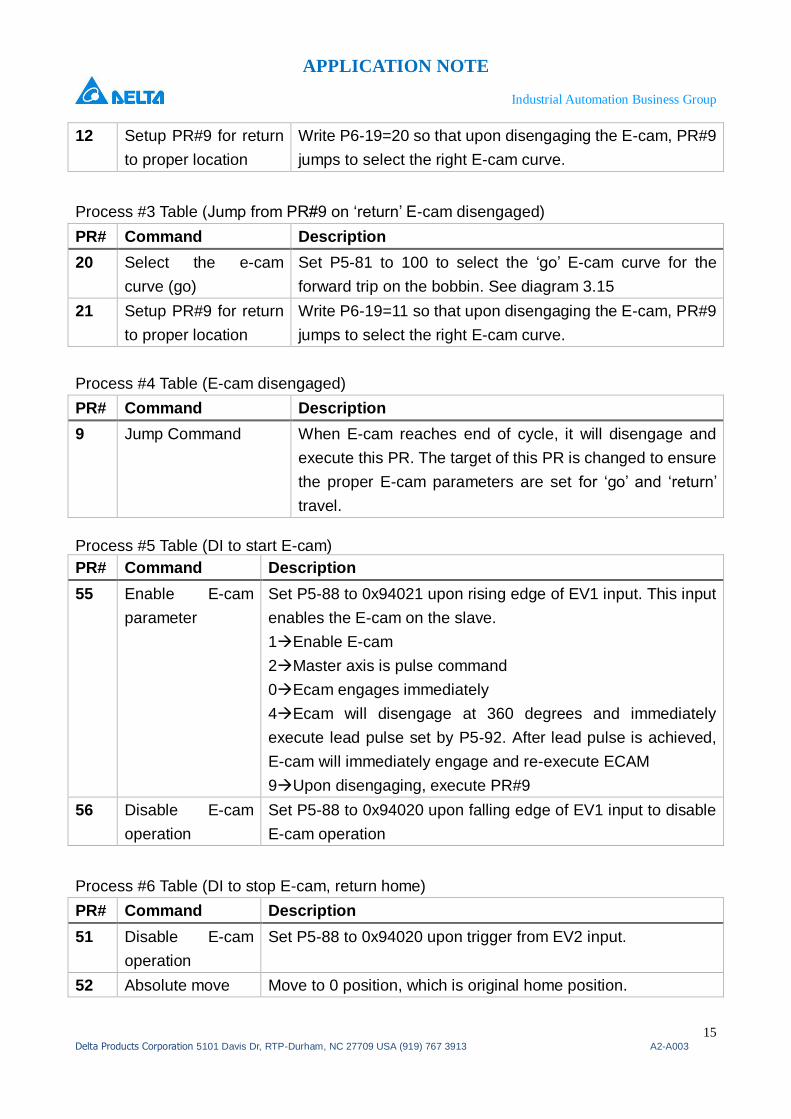
12 Setup PR#9 for return
to proper location
Write P6-19=20 so that upon disengaging the E-cam, PR#9
jumps to select the right E-cam curve.
Process #3 Table (Jump from PR#9 on ‘return’ E-cam disengaged)
PR# Command Description
20 Select the e-cam
curve (go)
Set P5-81 to 100 to select the ‘go’ E-cam curve for the
forward trip on the bobbin. See diagram 3.15
21 Setup PR#9 for return
to proper location
Write P6-19=11 so that upon disengaging the E-cam, PR#9
jumps to select the right E-cam curve.
Process #4 Table (E-cam disengaged)
PR# Command Description
9 Jump Command When E-cam reaches end of cycle, it will disengage and
execute this PR. The target of this PR is changed to ensure
the proper E-cam parameters are set for ‘go’ and ‘return’
travel.
Process #5 Table (DI to start E-cam)
PR# Command Description
55 Enable E-cam
parameter
Set P5-88 to 0x94021 upon rising edge of EV1 input. This input
enables the E-cam on the slave.
1Enable E-cam
2Master axis is pulse command
0Ecam engages immediately
4Ecam will disengage at 360 degrees and immediately
execute lead pulse set by P5-92. After lead pulse is achieved,
E-cam will immediately engage and re-execute ECAM
9Upon disengaging, execute PR#9
56 Disable E-cam
operation
Set P5-88 to 0x94020 upon falling edge of EV1 input to disable
E-cam operation
Process #6 Table (DI to stop E-cam, return home)
PR# Command Description
51 Disable E-cam
operation
Set P5-88 to 0x94020 upon trigger from EV2 input.
52 Absolute move Move to 0 position, which is original home position.

APPLICATION NOTE
Industrial Automation Business Group
16 Delta Products Corporation 5101 Davis Dr, RTP-Durham, NC 27709 USA (919) 767 3913 A2-A003
Diagram showing the main flow chart of PR application
Servo On and
start to execute
1
Trigger event 1
and enable E-cam
5
Execute the Full length
‘go’ E-cam curve
The wrapping length of bobbin
360º
Execute the E-cam
curve of return trip
The wrapping length of bobbin
360 º
Execute the half initial
‘go’ E-cam curve
Half wrapping length of bobbin
180º
Execute the lead
pulse set by P5-92.
PR#10 selects the
‘return’ E-cam curve
2
The curve
disengages and
jumps to PR#10
4
The curve disengages
and jumps to PR#20
4
The curve disengages
and jumps to PR#10
4
Execute the lead pulse
set by P5-92. PR#20
selects the ‘go’ E-cam
curve
3
Execute the lead
pulse set by P5-92.
PR#10 selects the
‘return’ E-cam curve
2
Diagram 3.16 Time sequence of PR execution
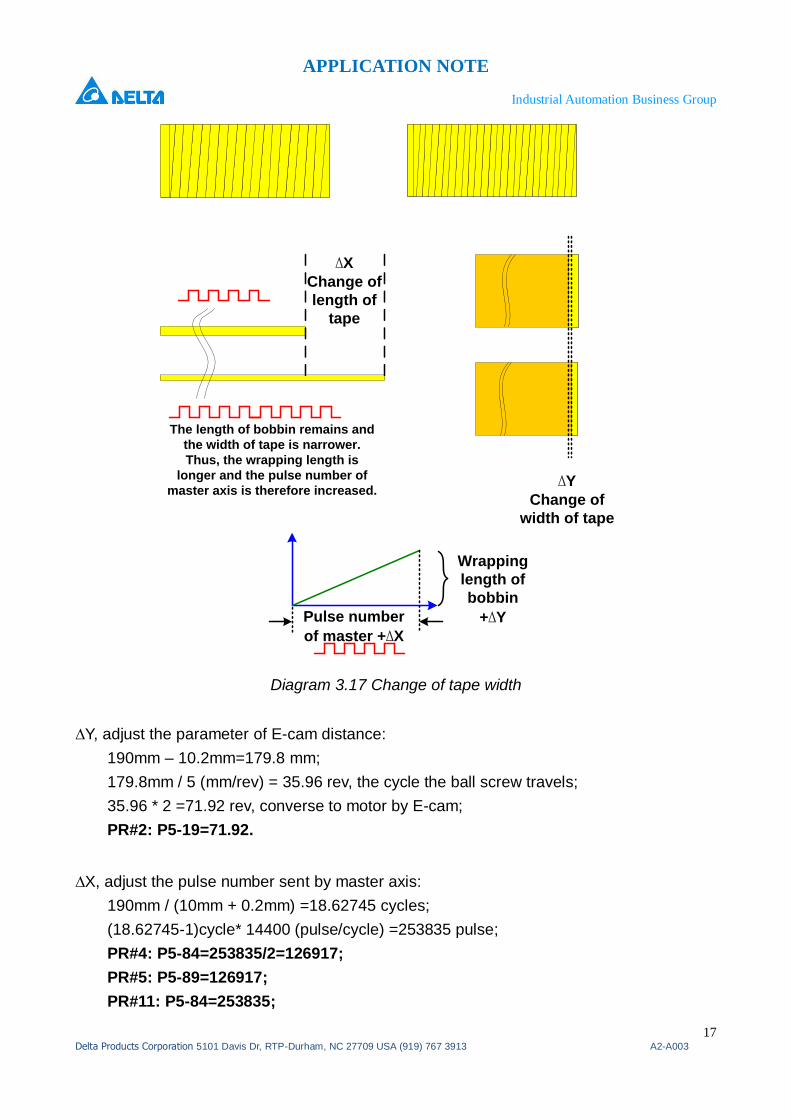
3.3.2 System adjustment The length of bobbin remains and the width of tape is changed.
See diagram 3.17. Assume the tape is changed from 15mm to 10mm and the interval and
the length of bobbin remain at 0.2mm and 190mm respectively.
APPLICATION NOTE
Industrial Automation Business Group
17 Delta Products Corporation 5101 Davis Dr, RTP-Durham, NC 27709 USA (919) 767 3913 A2-A003
Wrapping
length of
bobbin
+∆YPulse number
of master +∆X
The length of bobbin remains and
the width of tape is narrower.
Thus, the wrapping length is
longer and the pulse number of
master axis is therefore increased.∆Y
Change of
width of tape
∆XChange of
length of
tape
Diagram 3.17 Change of tape width
∆Y, adjust the parameter of E-cam distance:
190mm – 10.2mm=179.8 mm;
179.8mm / 5 (mm/rev) = 35.96 rev, the cycle the ball screw travels;
35.96 * 2 =71.92 rev, converse to motor by E-cam;
PR#2: P5-19=71.92.
∆X, adjust the pulse number sent by master axis:
190mm / (10mm + 0.2mm) =18.62745 cycles;
(18.62745-1)cycle* 14400 (pulse/cycle) =253835 pulse;
PR#4: P5-84=253835/2=126917;
PR#5: P5-89=126917;
PR#11: P5-84=253835;
APPLICATION NOTE
Industrial Automation Business Group
18 Delta Products Corporation 5101 Davis Dr, RTP-Durham, NC 27709 USA (919) 767 3913 A2-A003
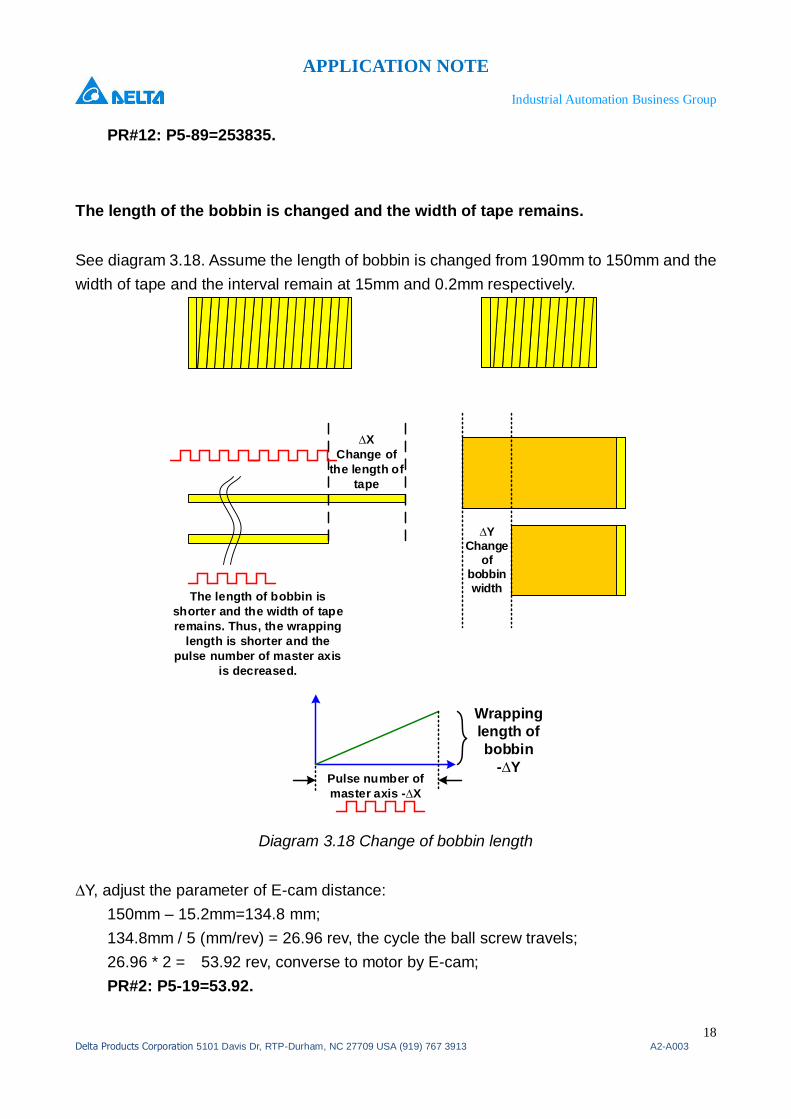
PR#12: P5-89=253835.
The length of the bobbin is changed and the width of tape remains.
See diagram 3.18. Assume the length of bobbin is changed from 190mm to 150mm and the
width of tape and the interval remain at 15mm and 0.2mm respectively.
Wrapping
length of
bobbin
-∆YPulse number of
master axis -∆X
The length of bobbin is
shorter and the width of tape
remains. Thus, the wrapping
length is shorter and the
pulse number of master axis
is decreased.
∆YChange
of bobbin width
∆X
Change of
the length of
tape
Diagram 3.18 Change of bobbin length
∆Y, adjust the parameter of E-cam distance:
150mm – 15.2mm=134.8 mm;
134.8mm / 5 (mm/rev) = 26.96 rev, the cycle the ball screw travels;
26.96 * 2 = 53.92 rev, converse to motor by E-cam;
PR#2: P5-19=53.92.
APPLICATION NOTE
Industrial Automation Business Group
19 Delta Products Corporation 5101 Davis Dr, RTP-Durham, NC 27709 USA (919) 767 3913 A2-A003
∆X, adjust the pulse number sent by master axis:
150mm / (15mm + 0.2mm) =9.8684 cycles;
(9.8684-1)cycle * 14400 (pulse/cycle) =127704 pulse;
PR#4: P5-84=127704/2=63852;
PR#5: P5-89=63852;
PR#11: P5-84=127704;
PR#12: P5-89=127704.
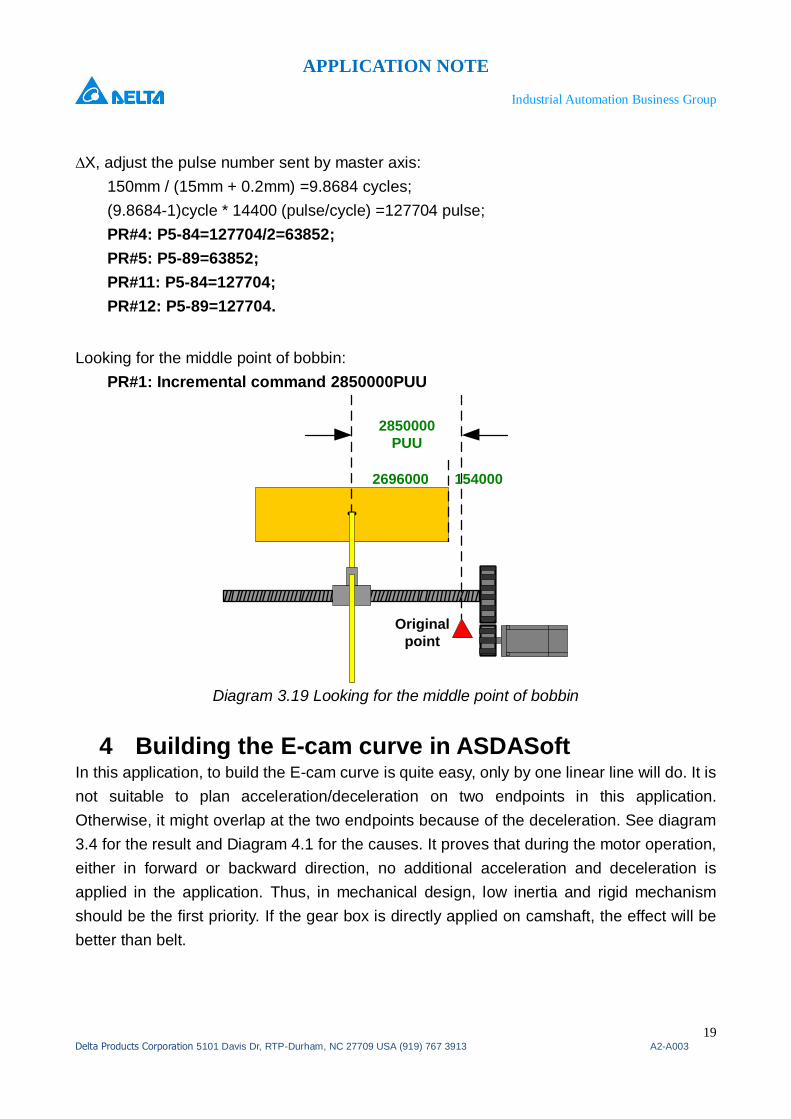
Looking for the middle point of bobbin:
PR#1: Incremental command 2850000PUU
2850000
PUU
Original
point
1540002696000
Diagram 3.19 Looking for the middle point of bobbin
4 Building the E-cam curve in ASDASoft In this application, to build the E-cam curve is quite easy, only by one linear line will do. It is
not suitable to plan acceleration/deceleration on two endpoints in this application.
Otherwise, it might overlap at the two endpoints because of the deceleration. See diagram
3.4 for the result and Diagram 4.1 for the causes. It proves that during the motor operation,
either in forward or backward direction, no additional acceleration and deceleration is
applied in the application. Thus, in mechanical design, low inertia and rigid mechanism
should be the first priority. If the gear box is directly applied on camshaft, the effect will be
better than belt.

APPLICATION NOTE
Industrial Automation Business Group
20 Delta Products Corporation 5101 Davis Dr, RTP-Durham, NC 27709 USA (919) 767 3913 A2-A003
bobbin
Packaging
tape
The acceleration
/deceleration at the endpoint
will cause the overlap of the
packaging tape
bobbin
Packaging
tape
No acceleration
/deceleration at
endpoint
Diagram 4.1 Tape overlap caused by acceleration/deceleration curve
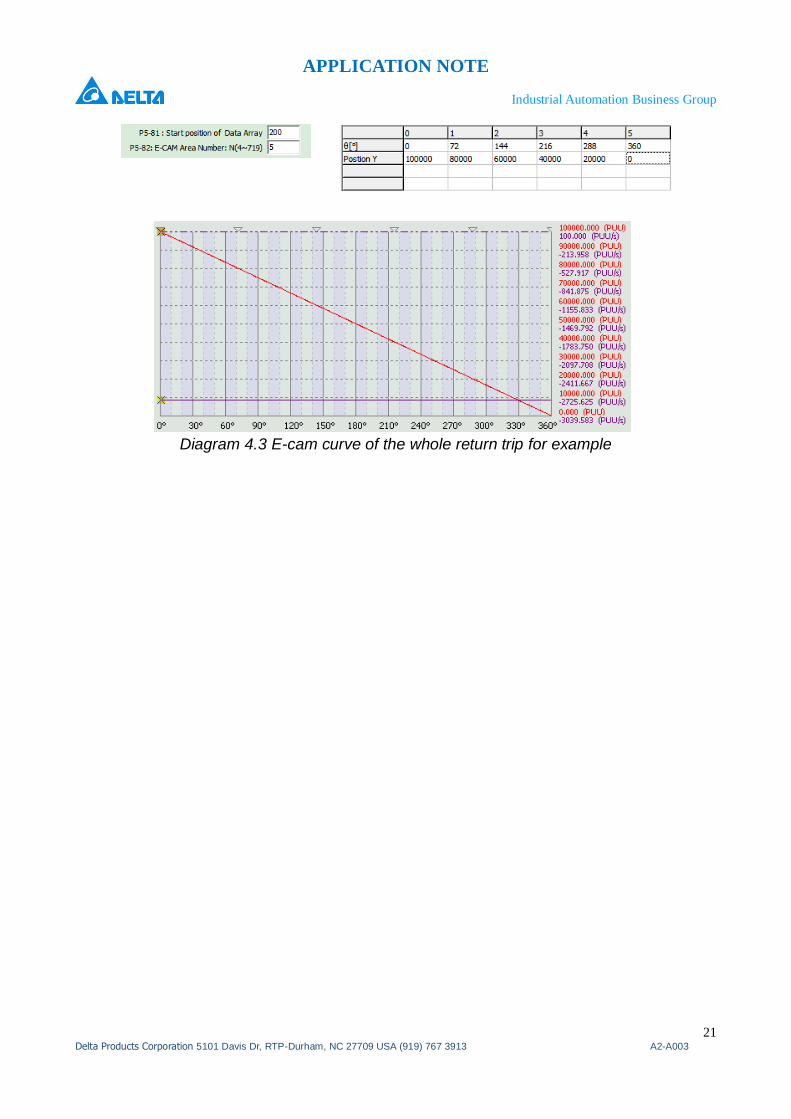
Only one linear line is needed to build in E-cam curve which is shown in the following
diagram. Note that the ‘going’ E-cam curve is used for both the half length travel and the full
length travel on the bobbin. For the half length travel, the only difference is the disengage
pulse number is ½ the full length travel.
Diagram 4.2 E-cam curve of the whole going trip for example
APPLICATION NOTE
Industrial Automation Business Group
21 Delta Products Corporation 5101 Davis Dr, RTP-Durham, NC 27709 USA (919) 767 3913 A2-A003
Diagram 4.3 E-cam curve of the whole return trip for example

APPLICATION NOTE
Industrial Automation Business Group
22 Delta Products Corporation 5101 Davis Dr, RTP-Durham, NC 27709 USA (919) 767 3913 A2-A003
Delta Products Corporation
Industrial Automation Business Group 5101 Davis Drive, RTP NC 27709
T: 919 767 3913