Embed Size (px)
Citation preview
Anterior Cruciate Ligament Reconstruction Using an EndoscopicTechnique With Patellar Tendon Autograft
Kyle R. Flik, M.D.* and Bernard R. Bach, Jr., M.D.†
Summary: The single-incision endoscopic-guided ACL reconstruction using patellartendon autograft is advocated for its high ultimate strength, bone to bone healing, andinterference fixation. Optimal outcomes are obtained when attention is paid to crucialtechnical aspects of the procedure. In addition, attempts should be made to reestablishfull range of motion in the affected knee prior to surgery. The technically-demandinggraft harvest portion of the procedure focuses on obtaining a graft with appropriately-sized bone plugs and adequate tendon girth while minimizing trauma to the knee.Notch preparation and tunnel placement allow for the graft to be appropriately orientedwithout impinging in the notch in extension. Metal interference screws are used forfixation both at the femur and the tibia. An aggressive physical therapy program isinitiated postoperatively. Key Words: Patellar tendon—Single-incision—Endoscop-ic—Technique.
Anterior cruciate ligament (ACL) reconstruction isone of the most common surgical procedures performedby orthopaedic surgeons. The number of ACL tearscontinues to rise because of the growing population andthe increased involvement in sport at many levels, espe-cially among young women and the middle-aged. Thereare over 100,000 ACL reconstructions performed annu-ally in the United States using a variety of techniquesaccording to the American Academy of OrthopaedicSurgery.
Most orthopaedists agree that a patient with an ACLtear who wishes to return to activities that involve cuttingor pivoting would benefit from reconstruction. However,there is controversy as to the best type of graft, fixation,and surgical technique that should be used. Regardlessof the technique used, the primary goal of ACL re-construction surgery is to provide a pain-free knee thatwill be functionally stable. The bone-patellar tendon-bone (BPTB) autograft is the most widely chosen graft
source and has the longest and most reviewed track-record.1–4,6,7,9,11,18,26,29,31,33,36 Advocates emphasize itshigh ultimate strength, bone to bone healing, and inter-ference fixation. This article describes our endoscopicsingle incision technique using a central third ipsilateralBPTB autograft. Surgical pearls and potential pitfalls arediscussed.
SURGICAL TIMING
When assessing a patient with an ACL deficient knee,contraindications to surgical fixation using BPTB au-tograft must be considered. Inappropriate candidates in-clude those with severe degenerative changes in theknee, patients unable or unwilling to comply with rigor-ous postoperative rehabilitation, skeletally immature pa-tients, and people with inadequate or poor quality patellatendon. Those that may not tolerate kneeling discomfortor numbness on the anterior knee should be consideredfor an alternate graft choice.
Surgical timing is controversial, but much of theliterature will support delaying surgical reconstructionuntil the patient has achieved near full range of motion,strength, and control of the knee with little or no effu-sion.23,30,34 The risk of arthrofibrosis is higher in thosepatients who undergo early reconstruction while the knee
From the *Department of Orthopedic Surgery, Division of SportsMedicine, Rush University Medical Center, Chicago, Illinois; †Divi-sion of Sports Medicine, Northeast Orthopaedics, LLP, Sports Medi-cine, Executive Woods, Albany, New York.
Address correspondence and reprint requests to Bernard R. Bach, Jr.,MD, 1725 W. Harrison St., Suite 1063, Chicago, IL 60612. E-mail:[email protected]
Techniques in Orthopaedics®
20(4):361–371 © 2005 Lippincott Williams & Wilkins, Inc., Philadelphia
361
is still acutely inflamed. If a locked or displaced menis-cus tear or a loose body is present, early surgical man-agement is warranted.
PATIENT PREPARATION
The process of patient preparation begins at the firstencounter by providing a thorough explanation of theprocedure and the rehabilitation process. It is crucial thatthe patient has appropriate expectations regarding thetiming and potential for full return to activity. On the dayof surgery, review of the consent should be routine. Thesize and suitability of the patella and patella tendonshould be assessed. The possibility of requiring an alter-nate graft source should be discussed with the patient.
Once in the operating room, a prophylactic dose ofpreoperative antibiotics is routinely administered. Afteranesthesia has been administered, a thorough examina-tion of both knees in the supine position is performed toconfirm instability. A positive pivot shift examination ispathognomonic of ACL insufficiency. The Lachman test,anterior and posterior drawer, varus/valgus stress, andposterolateral instability at 30 degrees and 90 degreesshould be assessed. Failure to recognize concomitantligamentous pathology is a preventable cause of ACLreconstruction failure.8,10
If pivot shift testing is unequivocal for ACL defi-ciency, then the graft harvest portion of the operation canbe performed before diagnostic arthroscopy. This allowsfor the inferomedial and inferolateral portals to be placedwithin the operative wound and not through new skinincisions. Additionally, anesthesia time can be preservedby having the graft prepared by an assistant during theinitial arthroscopy.
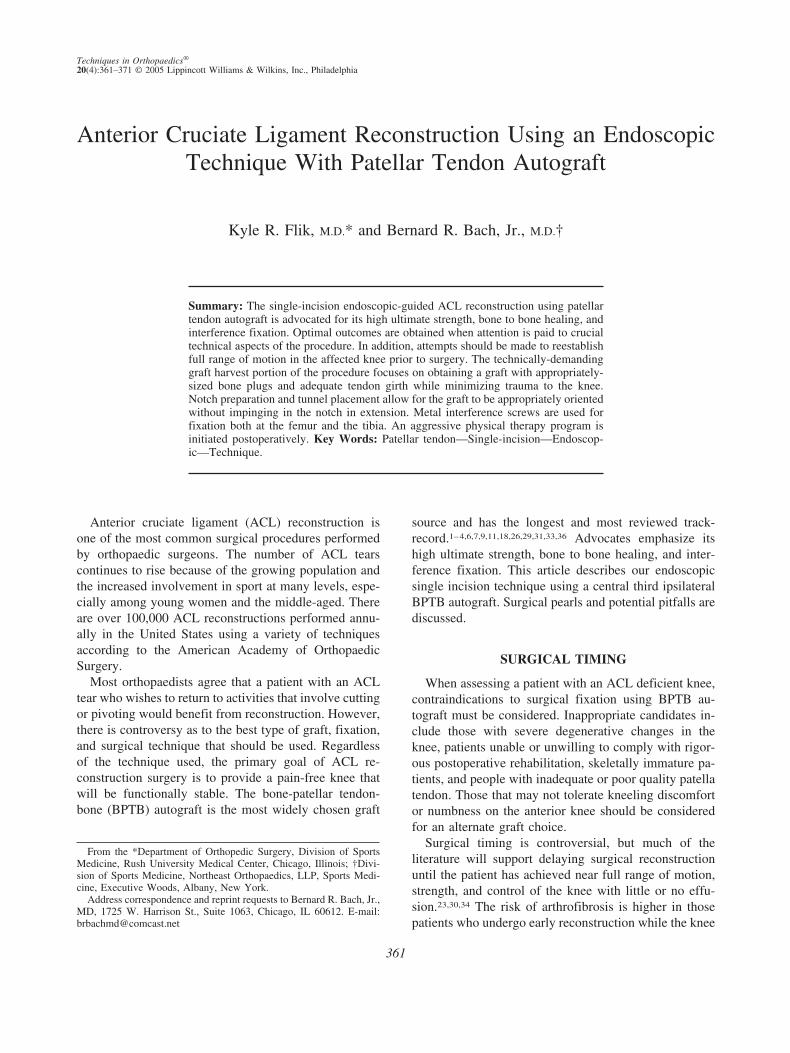
The knee should be cleanly shaven. Place a tourniquetas high as possible on the upper thigh before placing theleg in a leg holder. Secure the contralateral leg in a footholder with the hip and knee slightly flexed and thecommon peroneal nerve well padded. Confirm that theoperating table is flexed slightly at the waist to removeexcessive lumbar lordosis, and that the foot of the tableis completely flexed. The knee should be capable ofbeing hyperflexed to cycle the graft once it is passed andduring the placement of a parallel interference screw intothe femoral tunnel (Fig. 1A,B).
DIAGNOSTIC ARTHROSCOPY
Keep the tourniquet deflated if possible. Establish anoutflow portal either superomedially or superolaterallyand an inferolateral viewing portal adjacent to but not in
violation of the patella tendon. This facilitates visualiza-tion around the lateral femoral condyle. Create an infero-medial working portal. Attach the inflow to the viewingcannula. Perform a complete diagnostic arthroscopy toevaluate for articular cartilage damage, meniscus tears,loose bodies, and ACL and PCL integrity. A thoroughevaluation includes visualization of the suprapatellarpouch, patellofemoral joint, gutters, medial and lateralcompartments, and the intercondylar notch. Additionally,the posterior compartment can be visualized to furtherconfirm the lack of loose bodies or meniscal root tears.
Any repairable meniscus tear is aggressively fixed, asthe healing rate is improved when this is performedsimultaneously with ACL reconstruction.19 An inside-out technique allows for vertical mattress suture place-ment (strongest suture orientation) whereas protectingthe neurovascular structures.
FIG. 1. Photographs of basic OR set-up with patient positioningbefore (A) and after (B) draping.
362 FLIK AND BACH
Techniques in Orthopaedics®, Vol. 20, No. 4, 2005
BPTB GRAFT HARVEST
With the knee flexed, a vertical incision from the distalpole of the patella extending distally to the inferiorportion of the tibial tubercle is sufficient to gain access tothe patella and the tubercle for making the bone cuts.Check skin mobility as a smaller incision is frequentlypossible (Fig. 2). Keeping the incision just medial of themidline will enable the surgeon to make the tibial tunnelthrough the same incision. Incise sharply down to thetransverse fibers of the paratenon and create skin flaps.Using a number 15 blade, incise the paratenon in themidportion of the patella tendon and extend proximallyand distally with Metzenbaum scissors. Undermine be-neath the paratenon edges medially and laterally to ex-pose the entire width of the patella tendon.
Measure the width of the tendon and mark the midlineproximally and distally with a marking pen. Plan toharvest a 10-mm-wide graft from the middle third of thetendon with 10 � 25-mm bone plugs, which will beappropriate for most knees. Keeping the knee flexed toput the tendon on stretch, use a number 10 scalpel bladeto incise the tendon on one side of the graft. Allow thescalpel to follow the natural longitudinal fibers of thepatellar tendon (PT). Extending the knee will make iteasier to incise the patellar and tibial bone block edges.Use a retractor distally to protect the skin while makingthe longitudinal cuts with the scalpel. Cut the other sideof the graft to yield a 10 mm-wide graft. Pay closeattention to remain parallel to the first cut. Outline boththe distal cross cut on the tibial tubercle and the proximalcross cut on the patella.
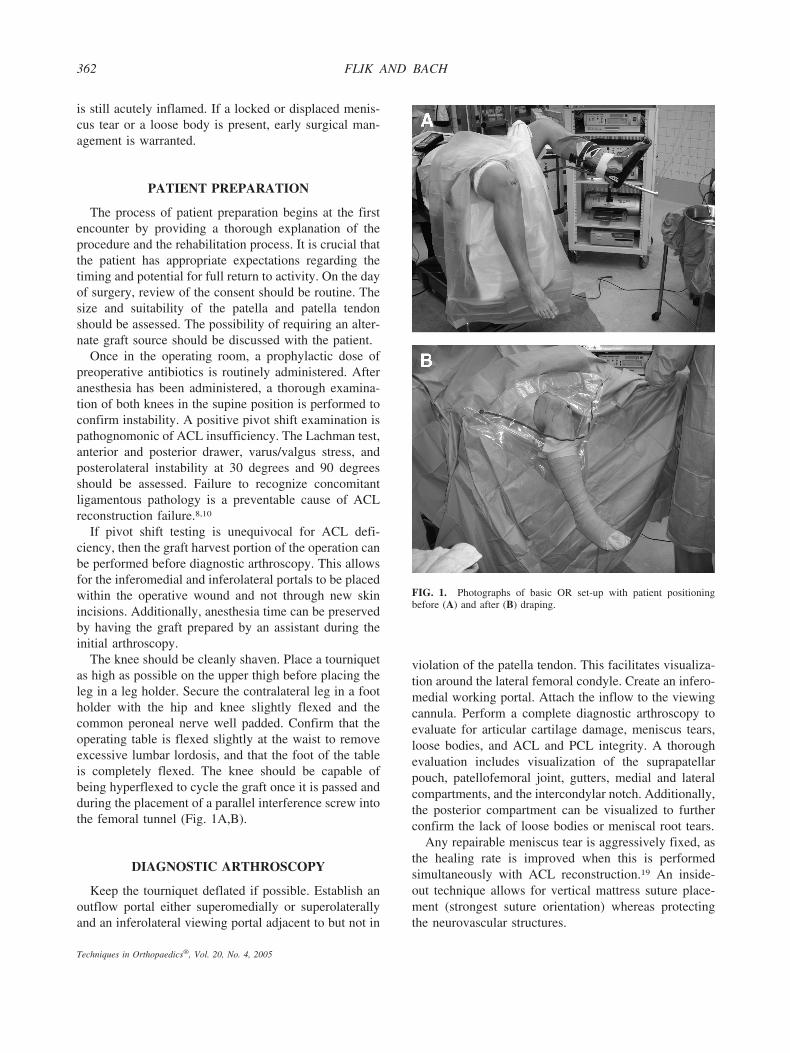
Using a number 238 blade on an oscillating saw,create the tibial and patella bone plugs. The tibial bone
plug is obtained first. While using the saw, the nondomi-nant hand of the operating surgeon should be in contactwith the patient’s leg at all times. Use the dominant handon the saw. The non-dominant thumb should stabilize thesaw while the index finger protects the graft by openingthe axilla between the graft and the adjacent PT (Fig. 3).Score the tibial cortex and remove an equilateral triangleof bone with the saw. This maximizes the remainingbone in the tubercle region beneath the remaining two-thirds of the tendon. When making the distal cross cut,hold the saw at a 45 degree oblique angle to the cortexand use the corner of the blade to prevent extension ofthe cut beyond the longitudinal cuts.
Leave the tibial bone block temporarily in place andturn attention to the patella bone plug. This cut is createdas a trapezoidal shape that may help avoid penetrationinto the articular surface. The depth of the cut should beno more than 6 or 7 mm. Again, make the proximal crosscut with the saw held at a 45 degree angle. To safelycomplete the corner cuts, place the blade parallel into thelongitudinal medial and lateral bone cuts and cut fromdistal to proximal.
Use a half-inch or quarter-inch curved osteotome togently raise the tibial bone plug from its bed. Avoidoveraggressive use of the osteotome or levering with theosteotome that may cause splintering of the bone plug orpatella fracture. Holding the tibial bone plug with a lappad, gently remove the patellar plug. Fat pad or other softtissue attachments should be removed with a Metzen-baum scissors. The graft is then taken by the surgeon andplaced on the back table for preparation. It is important to
FIG. 2. Photograph of the incision for patellar tendon harvest. Highlymobile skin may allow a slightly shorter incision.
FIG. 3. Photograph depicting the technique for making bone cutswith oscillating saw. For cuts on the right side of the tendon, the sawis held in the right hand with the left index finger in the “axilla” createdby the scalpel cut. The thumb of the left hand helps guide the sawblade.
363ACL RECONSTRUCTION USING PT AUTOGRAFT
Techniques in Orthopaedics®, Vol. 20, No. 4, 2005
communicate graft location and responsibility for graftsafekeeping with all members of the operating team.Pearls and pitfalls of graft harvesting is the topic of anentire subsequent chapter. Please review this chapter forfurther details and recommendations regarding BPTBgraft harvest technique.
GRAFT PREPARATION
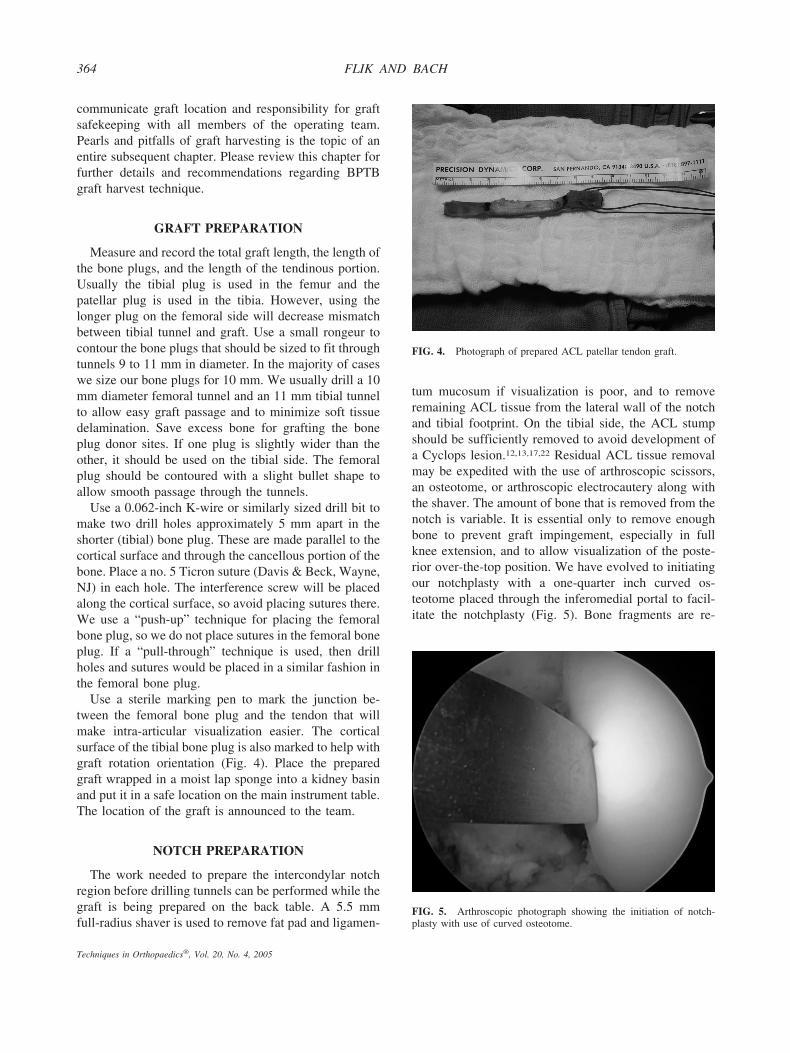
Measure and record the total graft length, the length ofthe bone plugs, and the length of the tendinous portion.Usually the tibial plug is used in the femur and thepatellar plug is used in the tibia. However, using thelonger plug on the femoral side will decrease mismatchbetween tibial tunnel and graft. Use a small rongeur tocontour the bone plugs that should be sized to fit throughtunnels 9 to 11 mm in diameter. In the majority of caseswe size our bone plugs for 10 mm. We usually drill a 10mm diameter femoral tunnel and an 11 mm tibial tunnelto allow easy graft passage and to minimize soft tissuedelamination. Save excess bone for grafting the boneplug donor sites. If one plug is slightly wider than theother, it should be used on the tibial side. The femoralplug should be contoured with a slight bullet shape toallow smooth passage through the tunnels.
Use a 0.062-inch K-wire or similarly sized drill bit tomake two drill holes approximately 5 mm apart in theshorter (tibial) bone plug. These are made parallel to thecortical surface and through the cancellous portion of thebone. Place a no. 5 Ticron suture (Davis & Beck, Wayne,NJ) in each hole. The interference screw will be placedalong the cortical surface, so avoid placing sutures there.We use a “push-up” technique for placing the femoralbone plug, so we do not place sutures in the femoral boneplug. If a “pull-through” technique is used, then drillholes and sutures would be placed in a similar fashion inthe femoral bone plug.
Use a sterile marking pen to mark the junction be-tween the femoral bone plug and the tendon that willmake intra-articular visualization easier. The corticalsurface of the tibial bone plug is also marked to help withgraft rotation orientation (Fig. 4). Place the preparedgraft wrapped in a moist lap sponge into a kidney basinand put it in a safe location on the main instrument table.The location of the graft is announced to the team.
NOTCH PREPARATION
The work needed to prepare the intercondylar notchregion before drilling tunnels can be performed while thegraft is being prepared on the back table. A 5.5 mmfull-radius shaver is used to remove fat pad and ligamen-
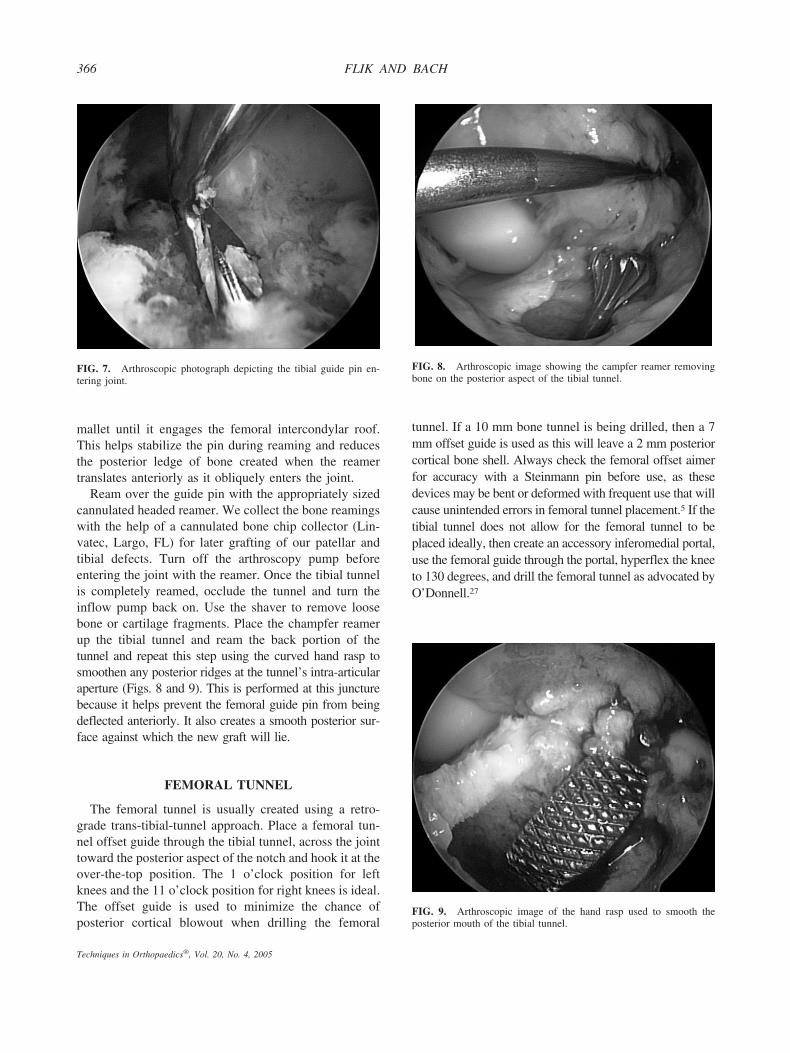
tum mucosum if visualization is poor, and to removeremaining ACL tissue from the lateral wall of the notchand tibial footprint. On the tibial side, the ACL stumpshould be sufficiently removed to avoid development ofa Cyclops lesion.12,13,17,22 Residual ACL tissue removalmay be expedited with the use of arthroscopic scissors,an osteotome, or arthroscopic electrocautery along withthe shaver. The amount of bone that is removed from thenotch is variable. It is essential only to remove enoughbone to prevent graft impingement, especially in fullknee extension, and to allow visualization of the poste-rior over-the-top position. We have evolved to initiatingour notchplasty with a one-quarter inch curved os-teotome placed through the inferomedial portal to facil-itate the notchplasty (Fig. 5). Bone fragments are re-
FIG. 4. Photograph of prepared ACL patellar tendon graft.
FIG. 5. Arthroscopic photograph showing the initiation of notch-plasty with use of curved osteotome.
364 FLIK AND BACH
Techniques in Orthopaedics®, Vol. 20, No. 4, 2005

moved with a grasper and used for grafting the distalpatella and tibial tubercle defects. Notchplasty is com-pleted with a spherical 5.5 mm bur. A spherical bur ispreferred to a barrel bur as it is less likely to create troughsin the lateral intercondylar wall. We often use the bur on“reverse” particularly with left knees to reduce the torqueeffect and tendency of the bur to “dig” into the lateral wallof the notch.
There is a vertical ridge along the lateral wall of thenotch approximately two-thirds of the distance posteri-orly that can be mistaken for the true posterior outlet ofthe notch (“resident’s ridge”). Always take a probe tofeel for the true back over-the-top position. This shouldfeel like a sharp edge; if it feels rounded, one shouldcontinue to fine tune this posterior region (Fig. 6). Becognizant, however, not to remove an excessive amountof bone at the ACL femoral insertion since this willcause lateralization of the isometric point.
TIBIAL TUNNEL
A tibial tunnel guide is used for drilling the tibialtunnel. In an attempt to match tunnel and graft length andto avoid mismatch, the n � 07 rule is helpful.24,28 Thisrule, which is useful but not absolute, adds 7 to thetendinous graft length to suggest a setting for the tibialguide in degrees (eg, 48 mm �7 � 55 degrees) that willprovide a close match between graft and tunnel lengths.We usually drill at a 55 degree angle, occasionallyincrease this to 60 degrees with longer tendons, butrarely will drill below 50 degrees with shorter tendons.The guide is placed through the inferomedial portal withthe aiming stylet positioned where the tibial tunnel will
enter the joint. We frequently will create an accessoryinferomedial portal or transpatellar portal to further dis-talize the initial starting point for the tibial drill tunnel.This creates a longer tibial tunnel. Accurate guide place-ment is best performed by using three distinct land-marks:15,16,25 1) the posterior aspect of the ACL tibialfootprint; 2) a line drawn along the posterior edge of theanterior horn of the lateral meniscus toward the midpointin the notch just lateral to the medial tibial spine; and 3)seven millimeters anterior to the PCL. We recommendentering the posterior aspect of the visible tibial footprintsince the point that the guide-pin is seen entering thejoint is posterior to where it actually exits the plateausurface because of the soft tissue overlying the plateau. Itis also important to note that as the reamer will enter thejoint in an oblique orientation, the more horizontal thetunnel is, the larger the intra-articular ellipse is created.
The tibial tunnel guide systems are variable withrespect to where the guide-pin makes contact with theintra-articular stylet portion of the guide. It is importantto be familiar with your specific guide. For example,with the Acufex Protac (Smith and Nephew Endoscopy,Mansfield, MA) the guidepin contacts the elbow of theaimer above the plateau surface. Therefore, we place theaimer stylet more posteriorly with respect to the ana-tomic reference marks outlined above.
Once the stylet is properly placed intra-articularly, thesleeve of the guide is advanced onto the anteromedialtibial surface to indicate where the tibial tunnel startingpoint will be. The tibial tunnel entrance is usually 1.5 cmmedial to the tubercle and 1 cm proximal to the pesanserine tendons. Once this location is identified, amedially based rectangular periosteal flap is made toexpose cortical bone. The tibial tunnel position is impor-tant in that it will dictate to an extent the position of thefemoral tunnel, which is created through this tibial tun-nel. While creating the periosteal flap, take care not todamage the nearby superficial medial collateral ligamentand the pes anserine tendons.
Slide the cannulated guide arm up to the tibial cortexthrough the periosteal window. In general this positionon the tibial cortex will be midway between the tibialtubercle and the posteromedial flare of the tibia and willcreate a 30 degree angle with the longitudinal axis of thetibia. This will create an appropriate medial to lateraloblique orientation that allows a transtibial approach tothe anatomic femoral ACL insertion. Drill the guide pinthrough the guide while observing arthroscopically as itenters the joint (Fig. 7). Remove the guide and check thatthe guide pin position is appropriate and that there isadequate clearance in the superior notch when the leg isbrought into extension. The pin can be advanced with a
FIG. 6. Arthroscopic photograph showing the probe confirming theover-the-top position.
365ACL RECONSTRUCTION USING PT AUTOGRAFT
Techniques in Orthopaedics®, Vol. 20, No. 4, 2005
mallet until it engages the femoral intercondylar roof.This helps stabilize the pin during reaming and reducesthe posterior ledge of bone created when the reamertranslates anteriorly as it obliquely enters the joint.
Ream over the guide pin with the appropriately sizedcannulated headed reamer. We collect the bone reamingswith the help of a cannulated bone chip collector (Lin-vatec, Largo, FL) for later grafting of our patellar andtibial defects. Turn off the arthroscopy pump beforeentering the joint with the reamer. Once the tibial tunnelis completely reamed, occlude the tunnel and turn theinflow pump back on. Use the shaver to remove loosebone or cartilage fragments. Place the champfer reamerup the tibial tunnel and ream the back portion of thetunnel and repeat this step using the curved hand rasp tosmoothen any posterior ridges at the tunnel’s intra-articularaperture (Figs. 8 and 9). This is performed at this juncturebecause it helps prevent the femoral guide pin from beingdeflected anteriorly. It also creates a smooth posterior sur-face against which the new graft will lie.
FEMORAL TUNNEL
The femoral tunnel is usually created using a retro-grade trans-tibial-tunnel approach. Place a femoral tun-nel offset guide through the tibial tunnel, across the jointtoward the posterior aspect of the notch and hook it at theover-the-top position. The 1 o’clock position for leftknees and the 11 o’clock position for right knees is ideal.The offset guide is used to minimize the chance ofposterior cortical blowout when drilling the femoral
tunnel. If a 10 mm bone tunnel is being drilled, then a 7mm offset guide is used as this will leave a 2 mm posteriorcortical bone shell. Always check the femoral offset aimerfor accuracy with a Steinmann pin before use, as thesedevices may be bent or deformed with frequent use that willcause unintended errors in femoral tunnel placement.5 If thetibial tunnel does not allow for the femoral tunnel to beplaced ideally, then create an accessory inferomedial portal,use the femoral guide through the portal, hyperflex the kneeto 130 degrees, and drill the femoral tunnel as advocated byO’Donnell.27
FIG. 7. Arthroscopic photograph depicting the tibial guide pin en-tering joint.
FIG. 8. Arthroscopic image showing the campfer reamer removingbone on the posterior aspect of the tibial tunnel.
FIG. 9. Arthroscopic image of the hand rasp used to smooth theposterior mouth of the tibial tunnel.
366 FLIK AND BACH
Techniques in Orthopaedics®, Vol. 20, No. 4, 2005
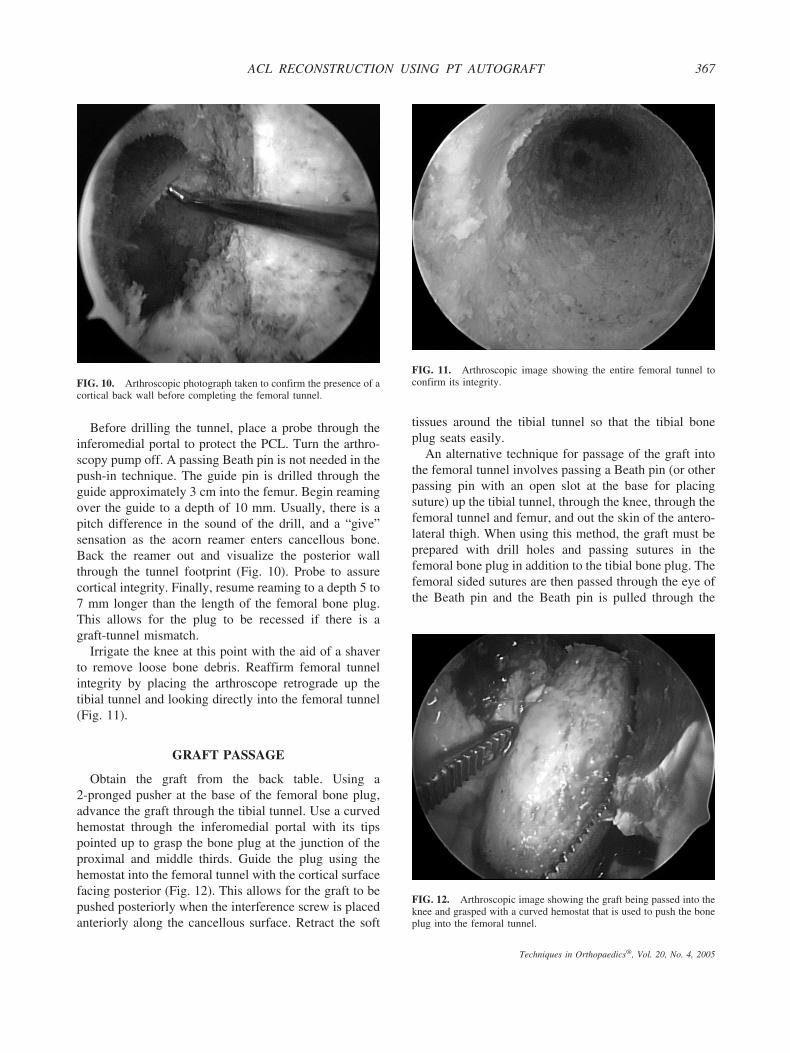
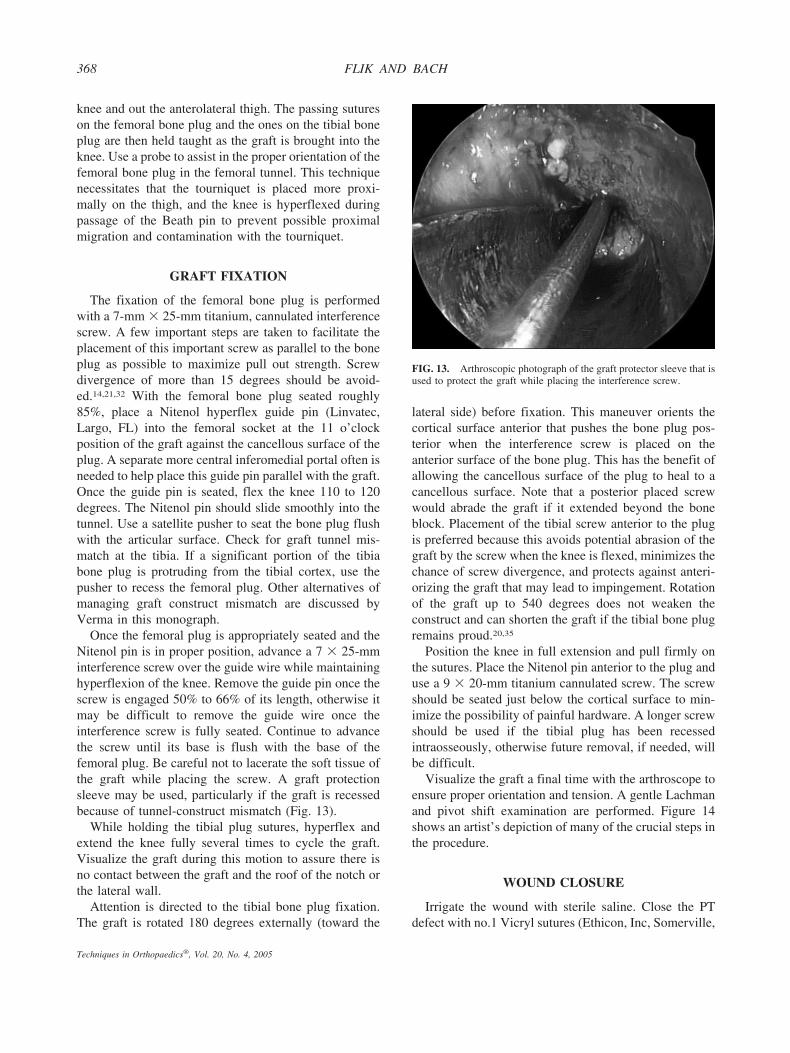
Before drilling the tunnel, place a probe through theinferomedial portal to protect the PCL. Turn the arthro-scopy pump off. A passing Beath pin is not needed in thepush-in technique. The guide pin is drilled through theguide approximately 3 cm into the femur. Begin reamingover the guide to a depth of 10 mm. Usually, there is apitch difference in the sound of the drill, and a “give”sensation as the acorn reamer enters cancellous bone.Back the reamer out and visualize the posterior wallthrough the tunnel footprint (Fig. 10). Probe to assurecortical integrity. Finally, resume reaming to a depth 5 to7 mm longer than the length of the femoral bone plug.This allows for the plug to be recessed if there is agraft-tunnel mismatch.
Irrigate the knee at this point with the aid of a shaverto remove loose bone debris. Reaffirm femoral tunnelintegrity by placing the arthroscope retrograde up thetibial tunnel and looking directly into the femoral tunnel(Fig. 11).
GRAFT PASSAGE
Obtain the graft from the back table. Using a2-pronged pusher at the base of the femoral bone plug,advance the graft through the tibial tunnel. Use a curvedhemostat through the inferomedial portal with its tipspointed up to grasp the bone plug at the junction of theproximal and middle thirds. Guide the plug using thehemostat into the femoral tunnel with the cortical surfacefacing posterior (Fig. 12). This allows for the graft to bepushed posteriorly when the interference screw is placedanteriorly along the cancellous surface. Retract the soft
tissues around the tibial tunnel so that the tibial boneplug seats easily.
An alternative technique for passage of the graft intothe femoral tunnel involves passing a Beath pin (or otherpassing pin with an open slot at the base for placingsuture) up the tibial tunnel, through the knee, through thefemoral tunnel and femur, and out the skin of the antero-lateral thigh. When using this method, the graft must beprepared with drill holes and passing sutures in thefemoral bone plug in addition to the tibial bone plug. Thefemoral sided sutures are then passed through the eye ofthe Beath pin and the Beath pin is pulled through the
FIG. 10. Arthroscopic photograph taken to confirm the presence of acortical back wall before completing the femoral tunnel.
FIG. 11. Arthroscopic image showing the entire femoral tunnel toconfirm its integrity.
FIG. 12. Arthroscopic image showing the graft being passed into theknee and grasped with a curved hemostat that is used to push the boneplug into the femoral tunnel.
367ACL RECONSTRUCTION USING PT AUTOGRAFT
Techniques in Orthopaedics®, Vol. 20, No. 4, 2005
knee and out the anterolateral thigh. The passing sutureson the femoral bone plug and the ones on the tibial boneplug are then held taught as the graft is brought into theknee. Use a probe to assist in the proper orientation of thefemoral bone plug in the femoral tunnel. This techniquenecessitates that the tourniquet is placed more proxi-mally on the thigh, and the knee is hyperflexed duringpassage of the Beath pin to prevent possible proximalmigration and contamination with the tourniquet.
GRAFT FIXATION
The fixation of the femoral bone plug is performedwith a 7-mm � 25-mm titanium, cannulated interferencescrew. A few important steps are taken to facilitate theplacement of this important screw as parallel to the boneplug as possible to maximize pull out strength. Screwdivergence of more than 15 degrees should be avoid-ed.14,21,32 With the femoral bone plug seated roughly85%, place a Nitenol hyperflex guide pin (Linvatec,Largo, FL) into the femoral socket at the 11 o’clockposition of the graft against the cancellous surface of theplug. A separate more central inferomedial portal often isneeded to help place this guide pin parallel with the graft.Once the guide pin is seated, flex the knee 110 to 120degrees. The Nitenol pin should slide smoothly into thetunnel. Use a satellite pusher to seat the bone plug flushwith the articular surface. Check for graft tunnel mis-match at the tibia. If a significant portion of the tibiabone plug is protruding from the tibial cortex, use thepusher to recess the femoral plug. Other alternatives ofmanaging graft construct mismatch are discussed byVerma in this monograph.
Once the femoral plug is appropriately seated and theNitenol pin is in proper position, advance a 7 � 25-mminterference screw over the guide wire while maintaininghyperflexion of the knee. Remove the guide pin once thescrew is engaged 50% to 66% of its length, otherwise itmay be difficult to remove the guide wire once theinterference screw is fully seated. Continue to advancethe screw until its base is flush with the base of thefemoral plug. Be careful not to lacerate the soft tissue ofthe graft while placing the screw. A graft protectionsleeve may be used, particularly if the graft is recessedbecause of tunnel-construct mismatch (Fig. 13).
While holding the tibial plug sutures, hyperflex andextend the knee fully several times to cycle the graft.Visualize the graft during this motion to assure there isno contact between the graft and the roof of the notch orthe lateral wall.
Attention is directed to the tibial bone plug fixation.The graft is rotated 180 degrees externally (toward the
lateral side) before fixation. This maneuver orients thecortical surface anterior that pushes the bone plug pos-terior when the interference screw is placed on theanterior surface of the bone plug. This has the benefit ofallowing the cancellous surface of the plug to heal to acancellous surface. Note that a posterior placed screwwould abrade the graft if it extended beyond the boneblock. Placement of the tibial screw anterior to the plugis preferred because this avoids potential abrasion of thegraft by the screw when the knee is flexed, minimizes thechance of screw divergence, and protects against anteri-orizing the graft that may lead to impingement. Rotationof the graft up to 540 degrees does not weaken theconstruct and can shorten the graft if the tibial bone plugremains proud.20,35
Position the knee in full extension and pull firmly onthe sutures. Place the Nitenol pin anterior to the plug anduse a 9 � 20-mm titanium cannulated screw. The screwshould be seated just below the cortical surface to min-imize the possibility of painful hardware. A longer screwshould be used if the tibial plug has been recessedintraosseously, otherwise future removal, if needed, willbe difficult.
Visualize the graft a final time with the arthroscope toensure proper orientation and tension. A gentle Lachmanand pivot shift examination are performed. Figure 14shows an artist’s depiction of many of the crucial steps inthe procedure.
WOUND CLOSURE
Irrigate the wound with sterile saline. Close the PTdefect with no.1 Vicryl sutures (Ethicon, Inc, Somerville,
FIG. 13. Arthroscopic photograph of the graft protector sleeve that isused to protect the graft while placing the interference screw.
368 FLIK AND BACH
Techniques in Orthopaedics®, Vol. 20, No. 4, 2005
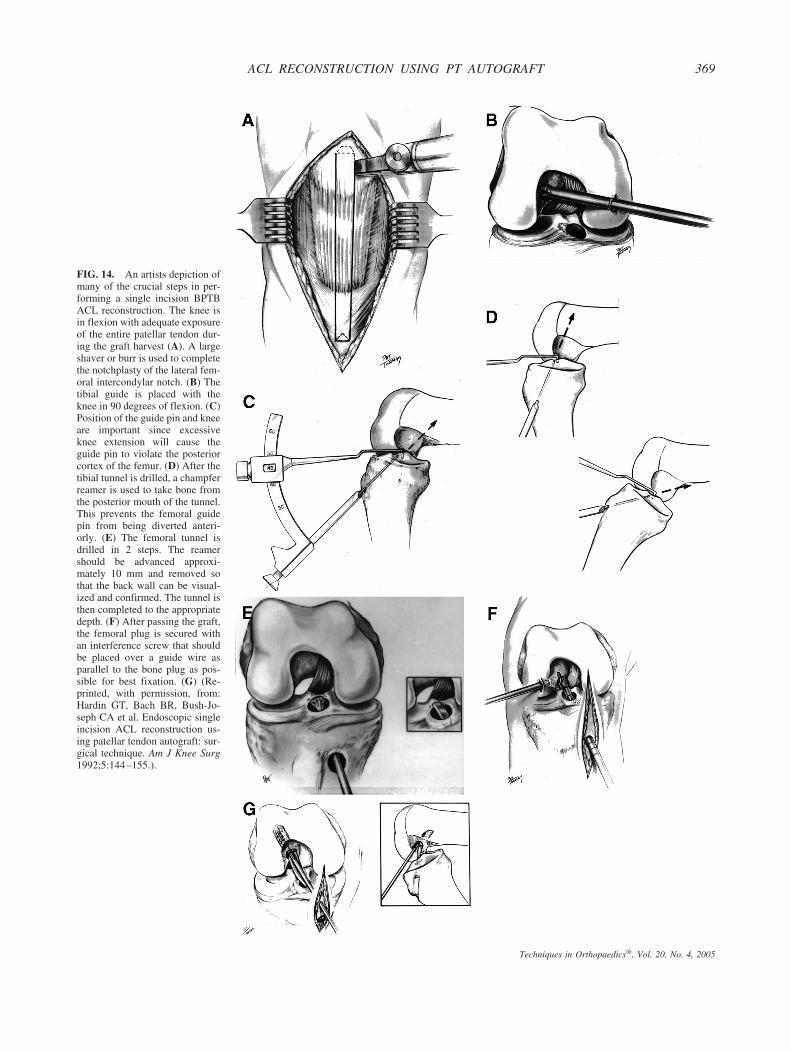
FIG. 14. An artists depiction ofmany of the crucial steps in per-forming a single incision BPTBACL reconstruction. The knee isin flexion with adequate exposureof the entire patellar tendon dur-ing the graft harvest (A). A largeshaver or burr is used to completethe notchplasty of the lateral fem-oral intercondylar notch. (B) Thetibial guide is placed with theknee in 90 degrees of flexion. (C)Position of the guide pin and kneeare important since excessiveknee extension will cause theguide pin to violate the posteriorcortex of the femur. (D) After thetibial tunnel is drilled, a champferreamer is used to take bone fromthe posterior mouth of the tunnel.This prevents the femoral guidepin from being diverted anteri-orly. (E) The femoral tunnel isdrilled in 2 steps. The reamershould be advanced approxi-mately 10 mm and removed sothat the back wall can be visual-ized and confirmed. The tunnel isthen completed to the appropriatedepth. (F) After passing the graft,the femoral plug is secured withan interference screw that shouldbe placed over a guide wire asparallel to the bone plug as pos-sible for best fixation. (G) (Re-printed, with permission, from:Hardin GT, Bach BR, Bush-Jo-seph CA et al. Endoscopic singleincision ACL reconstruction us-ing patellar tendon autograft: sur-gical technique. Am J Knee Surg1992;5:144–155.).
369ACL RECONSTRUCTION USING PT AUTOGRAFT
Techniques in Orthopaedics®, Vol. 20, No. 4, 2005
NJ) with the knee flexed to prevent shortening thetendon. Close the periosteal window at the tibial tunnelwith no. 1 Vicryl. Use any collected bone reamings topack the patellar bone defect. Close the paratenon with arunning 2-0 Vicryl suture, the subcutaneous layer withinterrupted 2-0 Vicryl, and the skin with a running 3-0Prolene. Close any arthroscopy portals made outside thewound with 3-0 Prolene. Cover the wound with Steri-strips (3M, St. Paul, MN) We do not routinely place ahemovac drain. For postoperative anesthesia we inject0.5% Marcaine (Abbot Pharmaceuticals, North Chicago,IL) into the wounds and portal regions. Apply a steriledressing, a commercially available cryotherapy device(Iceman, djOrtho, Carlsbad, CA), and an Ace wrap(Zimmer, Dover, OH). Finally, place a hinged knee brace(TROM, djOrtho, Carlsbad, CA) locked in extension.
POSTOPERATIVE COURSE ANDREHABILITATION
Patients are discharged home on the day of surgerywith a 2-week supply of an oral narcotic medication andan anti-inflammatory. An aggressive physical therapyprogram is initiated. We allow full weight-bearing withcrutches. The hinged knee brace is locked in extensionfor ambulation to protect the donor site. Range of motionis permitted as tolerated and immediate recovery ofextension or hyperextension is emphasized. Begin heelslides, prone heel hangs, quadriceps and hamstring sets,patellar mobilizations, and straight leg raises with thehinged brace in full extension beginning the first post-operative week. The brace is used for 6 weeks. Between2 and 4 weeks we begin weightbearing gastrocnemiusand soleus stretching as well as toe raises, closed chainextension exercises, balance exercises, hamstring curls,and stationary bicycling. Usually, by 12 weeks we ad-vance closed chain strengthening and allow straightahead running if ROM is normal. Sport specific exercisesand plyometrics are started between 4 and 6 months.Specifics of postoperative rehabilitation are discussed byMcCarty and results of this technique are reviewed byGlenn in this monograph.
REFERENCES
1. Aglietti P, Buzzi R, D’Andria S, Zaccherotti G. Arthroscopicanterior cruciate ligament reconstruction with patellar tendon.Arthroscopy 1992;8:510–516.
2. Aglietti P. Buzzi R, Giron F, Simeone AJ, Zaccherotti G. Arthro-scopic-assisted anterior cruciate ligament reconstruction with thecentral third patellar tendon. A 5–8-year follow-up. Knee SurgSports Traumatol Arthrosc 1997;5:138–144.
3. Bach BR, Jr, Jones GT, Sweet FA, Hager CA. Arthroscopy-assisted anterior cruciate ligament reconstruction using patellar
tendon substitution. Two- to four-year follow-up results. Am JSports Med 1994;22:758–767.
4. Bach BR, Jr., Levy ME, Bojchuk J, Tradonsky S, Bush-Joseph CA,Khan NH. Single-incision endoscopic anterior cruciate ligamentreconstruction using patellar tendon autograft minimum two-yearfollow-up evaluation. Am J Sports Med 1998;26:30–40.
5. Bach BR, Jr., Sellards RA. Femoral aimer deformation: potentialcause for altered femoral tunnel placement in anterior cruciateligament surgery. Arthroscopy 2003;19:E7.
6. Bach BR, Jr., Tradonsky S, Bojchuk J, Levy ME, Bush-Joseph CA,Khan NH. Arthroscopically assisted anterior cruciate ligamentreconstruction using patellar tendon autograft. Five- to nine-yearfollow-up evaluation. Am J Sports Med 1998;26:20–29.
7. Bradley JP, Klimkiewicz JJ, Rytel MJ, Powell JW. Anteriorcruciate ligament injuries in the National Football League: epide-miology and current treatment trends among team physicians.Arthroscopy 2002;18:502–509.
8. Brown CH, Jr., Carson EW. Revision anterior cruciate ligamentsurgery. Clin Sports Med 1999;18:109–171.
9. Buss DD, Warren RF, Wickiewicz TL, Galinat BJ, Panariello R.Arthroscopically assisted reconstruction of the anterior cruciateligament with use of autogenous patellar-ligament grafts. Resultsafter twenty-four to forty-two months. J Bone Joint Surg Am1993;75:1346–1355.
10. Carson EW, Anisko EM, Restrepo C, Panariello RA, O’Brien SJ,Warren RF. Revision anterior cruciate ligament reconstruction:etiology of failures and clinical results. J Knee Surg 2004;17:127–132.
11. Deehan DJ, Salmon LJ, Webb VJ, Davies A, Pinczewski LA.Endoscopic reconstruction of the anterior cruciate ligament with anipsilateral patellar tendon autograft. A prospective longitudinalfive-year study. J Bone Joint Surg Br 2000;82:984–991.
12. Delcogliano A, Franzese S, Branca A, Magi M, Fabbriciani C.Light and scan electron microscopic analysis of cyclops syndrome:etiopathogenic hypothesis and technical solutions. Knee SurgSports Traumatol Arthrosc 1996;4:194–199.
13. Delince P, Krallis P, Descamps PY, Fabeck L, Hardy D. Differentaspects of the cyclops lesion following anterior cruciate ligamentreconstruction: a multifactorial etiopathogenesis. Arthroscopy1998;14:869–876.
14. Hackl W, Benedetto KP, Hoser C, Kunzel KH, Fink C. Is screwdivergence in femoral bone-tendon-bone graft fixation avoidable inanterior cruciate ligament reconstruction using a single-incisiontechnique? A radiographically controlled cadaver study. Arthros-copy 2000;16:640–647.
15. Howell SM, Clark JA. Tibial tunnel placement in anterior cruciateligament reconstructions and graft impingement. Clin Orthop1992(283):187–195.
16. Jackson DW, Gasser SI. Tibial tunnel placement in ACL recon-struction. Arthroscopy 1994;10:124–131.
17. Jackson DW, Schaefer, RK. Cyclops syndrome: loss of extensionfollowing intra-articular anterior cruciate ligament reconstruction.Arthroscopy 1990;6:171–178.
18. Jomha NM, Pinczewski LA, Clingeleffer A, Otto DD. Arthro-scopic reconstruction of the anterior cruciate ligament with patel-lar-tendon autograft and interference screw fixation. The results atseven years. J Bone Joint Surg Br 1999;81:775–779.
19. Kim HJ, Rodeo SA. Approach to meniscal tears in anterior cruciateligament reconstruction. Orthop Clin North Am 2003;34:139–147.
20. Kyung HS, Ihn JC, Kim DH. Biomechanical properties afterpre-twist of canine patellar tendon. Int Orthop 2001;25:100–103.
21. Lemos MJ, Jackson DW, Lee TQ, Simon TM. Assessment ofinitial fixation of endoscopic interference femoral screws withdivergent and parallel placement. Arthroscopy 1995;11:37–41.
22. Marzo JM, Bowen MK, Warren RF, Wickiewicz TL, Altchek DW.Intraarticular fibrous nodule as a cause of loss of extension fol-lowing anterior cruciate ligament reconstruction. Arthroscopy1992;8:10–18.
23. Mayr HO, Weig TG, Plitz W. Arthrofibrosis following ACL
370 FLIK AND BACH
Techniques in Orthopaedics®, Vol. 20, No. 4, 2005
reconstruction-reasons and outcome. Arch Orthop Trauma Surg2004;124:518–522.
24. Miller MD, Hinkin DT. The “N � 7 rule” for tibial tunnelplacement in endoscopic anterior cruciate ligament reconstruction.Arthroscopy 1996;12:124–126.
25. Morgan CD, Kalman VR, Grawl DM. Definitive landmarks forreproducible tibial tunnel placement in anterior cruciate ligamentreconstruction. Arthroscopy 1995;11:275–288.
26. Nedeff DD, Bach BR, Jr. Arthroscopic anterior cruciate ligamentreconstruction using patellar tendon autografts: a comprehensivereview of contemporary literature. Am J Knee Surg 2001;14:243–258.
27. O’Donnell JB, Scerpella TA. Endoscopic anterior cruciate liga-ment reconstruction: modified technique and radiographic review.Arthroscopy 1995;11:577–584.
28. Olszewski AD, Miller MD, Ritchie JR. Ideal tibial tunnel lengthfor endoscopic anterior cruciate ligament reconstruction. Arthros-copy 1998;14:9–14.
29. Otto D, Pinczewski LA, Clingeleffer A, Odell R. Five-year resultsof single-incision arthroscopic anterior cruciate ligament recon-struction with patellar tendon autograft. Am J Sports Med 1998;26:181–188.
30. Passler JM, Schippinger G, Schweighofer F, Fellinger M, SeibertFJ. [Complications in 283 cruciate ligament replacement opera-
tions with free patellar tendon transplantation. Modification bysurgical technique and surgery timing]. Unfallchirurgie 1995;21:240–246.
31. Patel JV, Church JS, Hall AJ. Central third bone-patellar tendon-bone anterior cruciate ligament reconstruction: a 5-year follow-up.Arthroscopy 2000;16:67–70.
32. Pierz K, Baltz M, Fulkerson J. The effect of Kurosaka screwdivergence on the holding strength of bone-tendon-bone grafts.Am J Sports Med 1995;23:332–335.
33. Podskubka A, Kasal T, Vaculik J, Krystlik Z. [Arthroscopicreconstruction of the anterior cruciate ligament using the transtibialtechnique and a graft from the patellar ligament: results after 5–6years] Acta Chir Orthop Traumatol Cech 2002;69:169–174.
34. Shelbourne KD, Patel DV. Timing of surgery in anterior cruciateligament-injured knees. Knee Surg Sports Traumatol Arthrosc1995;3:148–156.
35. Verma N, Noerdlinger MA, Hallab N, Bush-Joseph CA, Bach BR,Jr. Effects of graft rotation on initial biomechanical failure char-acteristics of bone-patellar tendon-bone constructs. Am J SportsMed 2003;31:708–713.
36. Webb JM, Corry IS, Clingeleffer AJ, Pinczewski LA. Endoscopicreconstruction for isolated anterior cruciate ligament rupture.J Bone Joint Surg Br 1998;80:288–294.
371ACL RECONSTRUCTION USING PT AUTOGRAFT
Techniques in Orthopaedics®, Vol. 20, No. 4, 2005
![Anterior Cruciate Ligament Reconstruction.ppt [相容模式] · Observation in Anterior Cruciate Ligament Reconstruction Ching-Jen Wang, M.D. Department of Orthopedic Surgery Section](https://img.dokumen.tips/doc/110x75/5e90ed8f92183f367f7a3474/anterior-cruciate-ligament-c-observation-in-anterior-cruciate-ligament.jpg)