Embed Size (px)
Citation preview
Page 1
Aljex Accounts Payable
Version 1.0 Last Updated: March 2017
Page 2
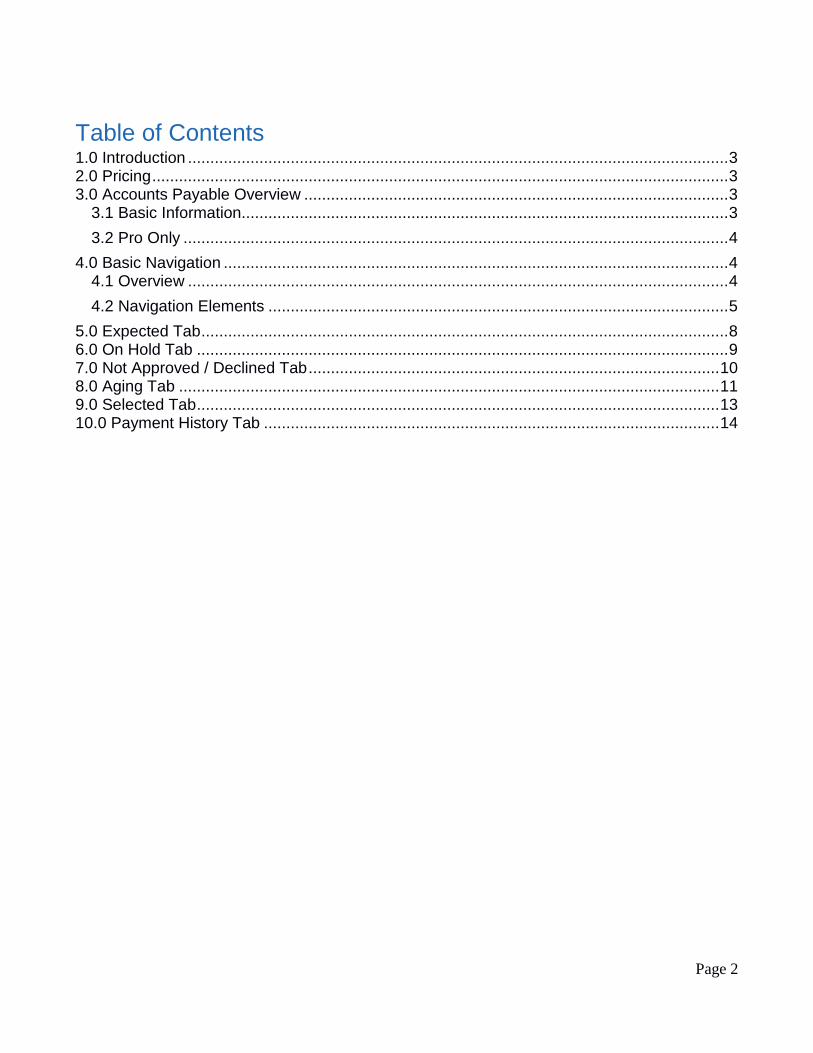
Table of Contents 1.0 Introduction ......................................................................................................................... 3 2.0 Pricing ................................................................................................................................. 3 3.0 Accounts Payable Overview ............................................................................................... 3
3.1 Basic Information ............................................................................................................. 3
3.2 Pro Only .......................................................................................................................... 4
4.0 Basic Navigation ................................................................................................................. 4 4.1 Overview ......................................................................................................................... 4
4.2 Navigation Elements ....................................................................................................... 5
5.0 Expected Tab ...................................................................................................................... 8 6.0 On Hold Tab ....................................................................................................................... 9 7.0 Not Approved / Declined Tab ............................................................................................ 10 8.0 Aging Tab ......................................................................................................................... 11 9.0 Selected Tab ..................................................................................................................... 13 10.0 Payment History Tab ...................................................................................................... 14
Page 3
1.0 Introduction The Accounts Payable Accounting module is designed to allow users to take their Vendor invoices from Expected status (Status ‘E’) through to paid. It divides visible purchase journals by tab to select only ones with similar status.
2.0 Pricing
Accounts Payable Pricing Breakdown
Details forthcoming
3.0 Accounts Payable Overview
3.1 Basic Information In order to use Accounts Payable (aka AP) you have to have the Accounting Menu available, and be labeled an accountant. If you cannot see or access it please contact support ([email protected]) You can get to AP in one of two ways. If you want to see the AP information on a single load:
• Go the tag page for your given load. • If you have the appropriate permissions, click on the Accounts Payable Link (bottom of
the page, miscellaneous section) • You should only see information for the given load. Check all tabs for data (be aware if
it’s already paid you won’t see anything). If you are an accountant and want to see all purchase journals:
• Go to the Accounting Menu. • Click Accounts Payable.
Page 4
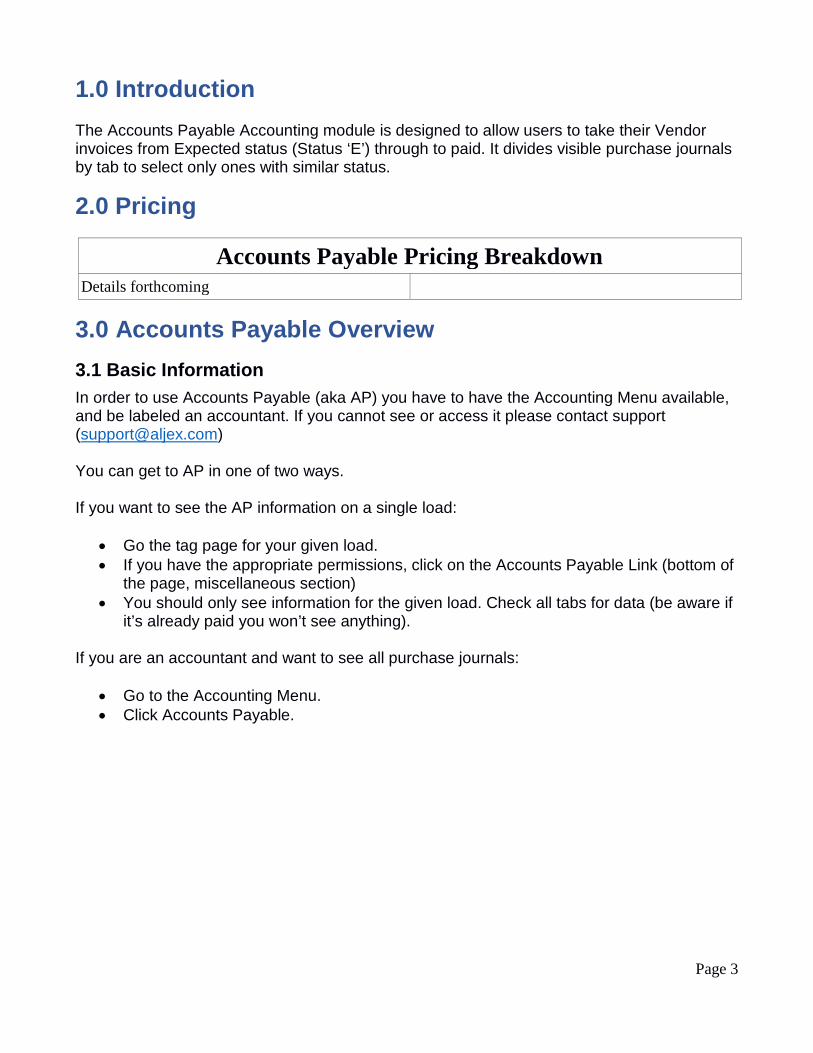
3.2 Pro Only
1. Click on a load to go to the tag page 2. At the bottom of the tag page, click on Accounts Payable 3. You should be in Accounts Payable - Expected (default) tab. All tabs will only display
information for the selected Pro #.
4.0 Basic Navigation
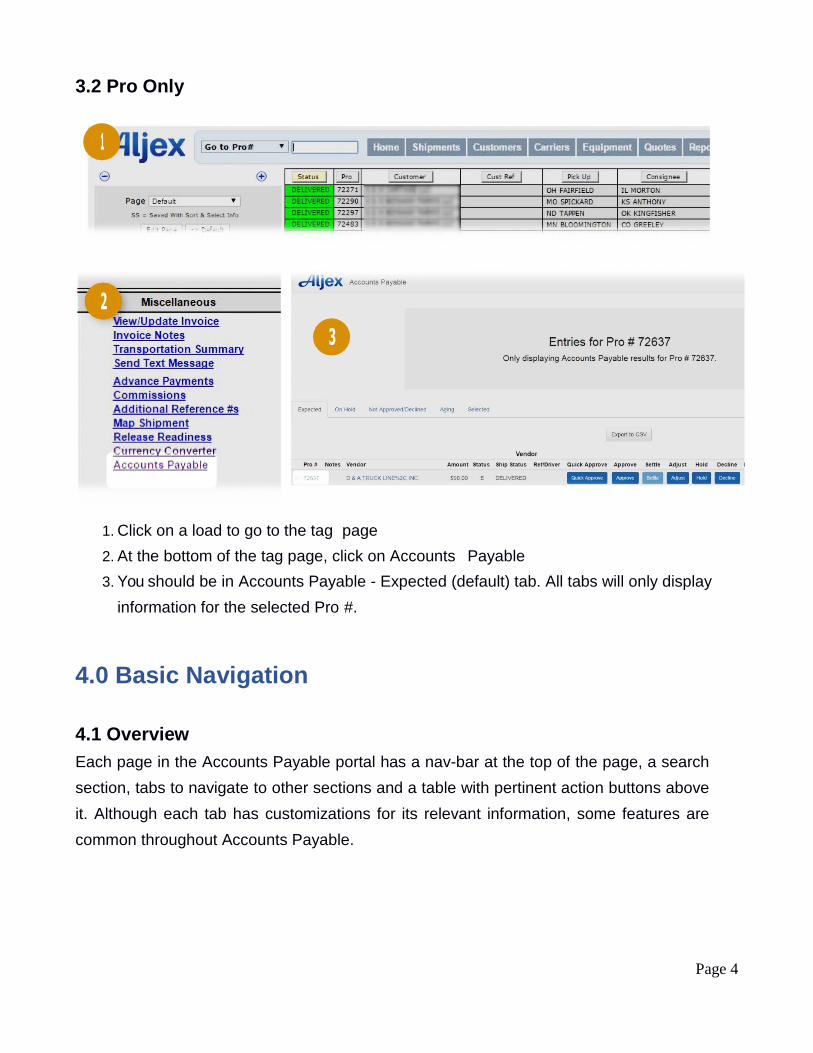
4.1 Overview Each page in the Accounts Payable portal has a nav-bar at the top of the page, a search section, tabs to navigate to other sections and a table with pertinent action buttons above it. Although each tab has customizations for its relevant information, some features are common throughout Accounts Payable.
Page 5
4.2 Navigation Elements
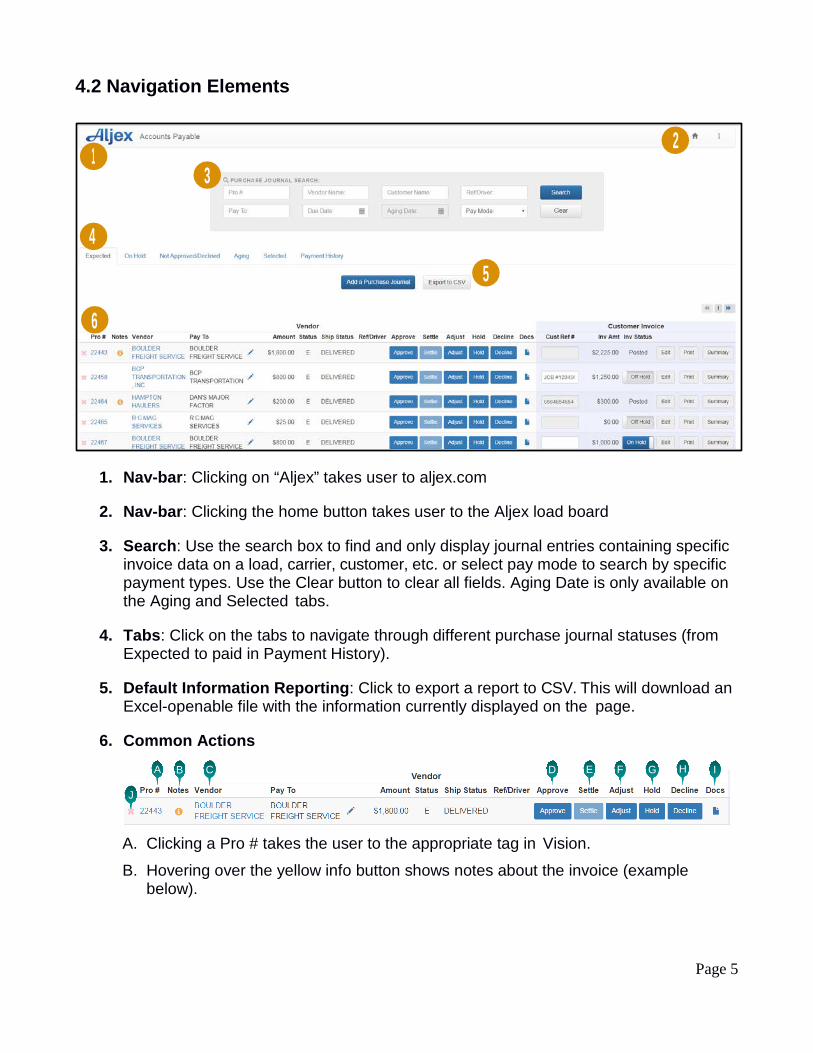
1. Nav-bar: Clicking on “Aljex” takes user to aljex.com
2. Nav-bar: Clicking the home button takes user to the Aljex load board
3. Search: Use the search box to find and only display journal entries containing specific invoice data on a load, carrier, customer, etc. or select pay mode to search by specific payment types. Use the Clear button to clear all fields. Aging Date is only available on the Aging and Selected tabs.
4. Tabs: Click on the tabs to navigate through different purchase journal statuses (from Expected to paid in Payment History).
5. Default Information Reporting: Click to export a report to CSV. This will download an Excel-openable file with the information currently displayed on the page.
6. Common Actions
A. Clicking a Pro # takes the user to the appropriate tag in Vision.
B. Hovering over the yellow info button shows notes about the invoice (example below).
1
2 3
4
5
6
A B C D E F G H I
J
Page 6
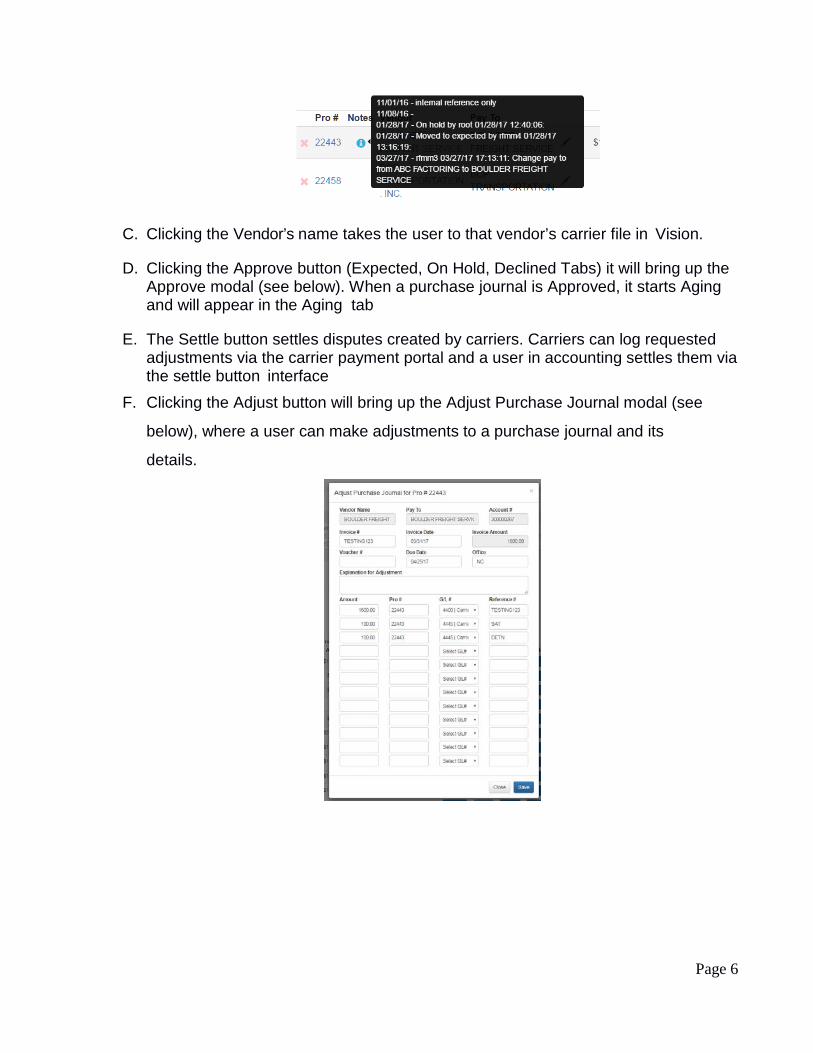
C. Clicking the Vendor’s name takes the user to that vendor’s carrier file in Vision.
D. Clicking the Approve button (Expected, On Hold, Declined Tabs) it will bring up the Approve modal (see below). When a purchase journal is Approved, it starts Aging and will appear in the Aging tab
E. The Settle button settles disputes created by carriers. Carriers can log requested adjustments via the carrier payment portal and a user in accounting settles them via the settle button interface
F. Clicking the Adjust button will bring up the Adjust Purchase Journal modal (see
below), where a user can make adjustments to a purchase journal and its
details.
Page 7
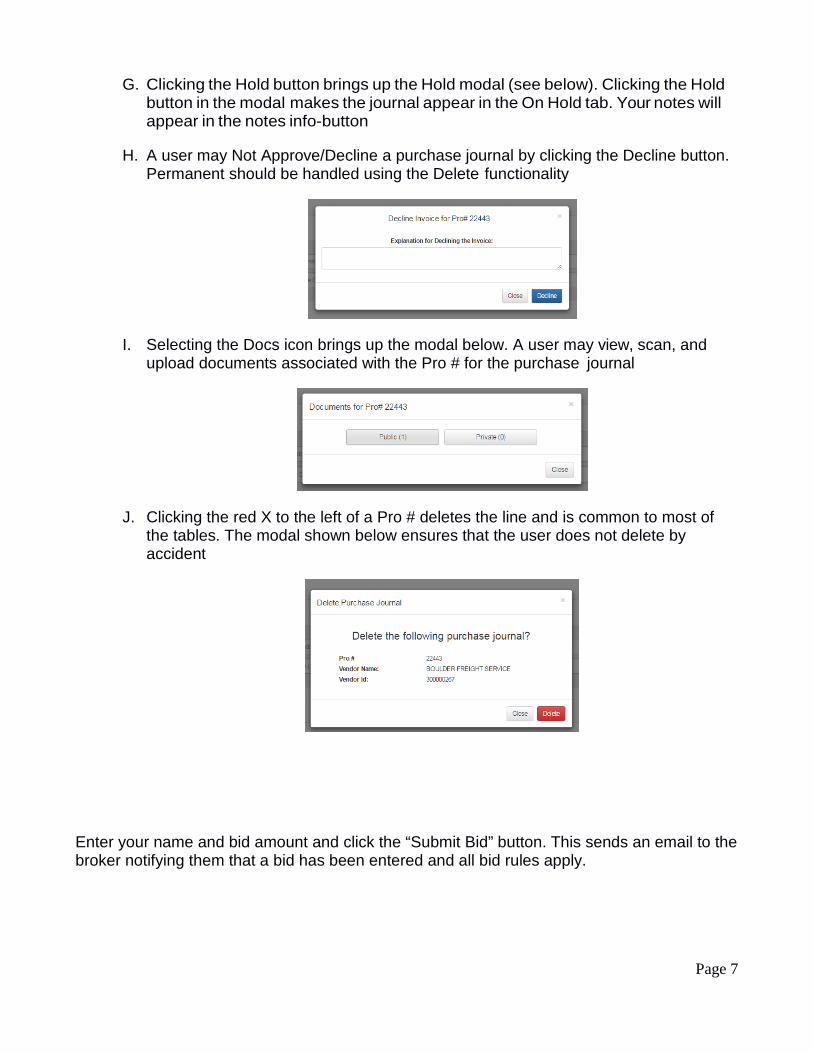
G. Clicking the Hold button brings up the Hold modal (see below). Clicking the Hold button in the modal makes the journal appear in the On Hold tab. Your notes will appear in the notes info-button
H. A user may Not Approve/Decline a purchase journal by clicking the Decline button. Permanent should be handled using the Delete functionality
I. Selecting the Docs icon brings up the modal below. A user may view, scan, and upload documents associated with the Pro # for the purchase journal
J. Clicking the red X to the left of a Pro # deletes the line and is common to most of the tables. The modal shown below ensures that the user does not delete by accident
Enter your name and bid amount and click the “Submit Bid” button. This sends an email to the broker notifying them that a bid has been entered and all bid rules apply.
Page 8
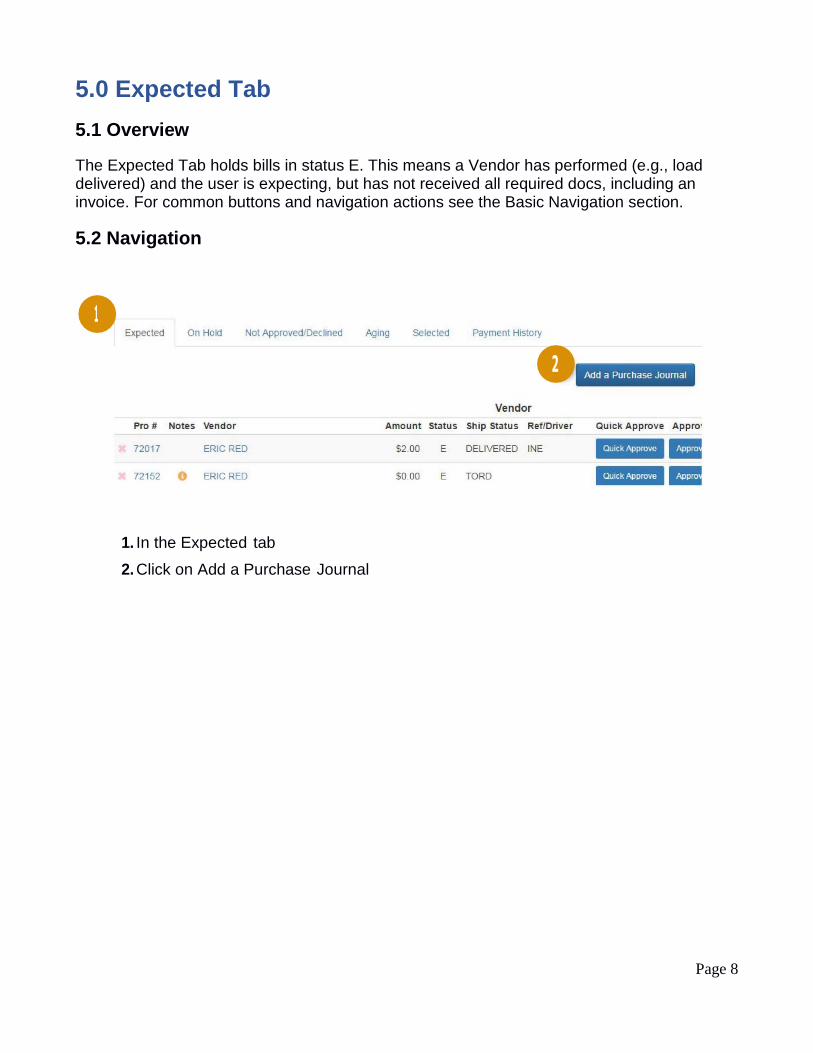
5.0 Expected Tab 5.1 Overview
The Expected Tab holds bills in status E. This means a Vendor has performed (e.g., load delivered) and the user is expecting, but has not received all required docs, including an invoice. For common buttons and navigation actions see the Basic Navigation section.
5.2 Navigation
1. In the Expected tab
2. Click on Add a Purchase Journal
Page 9
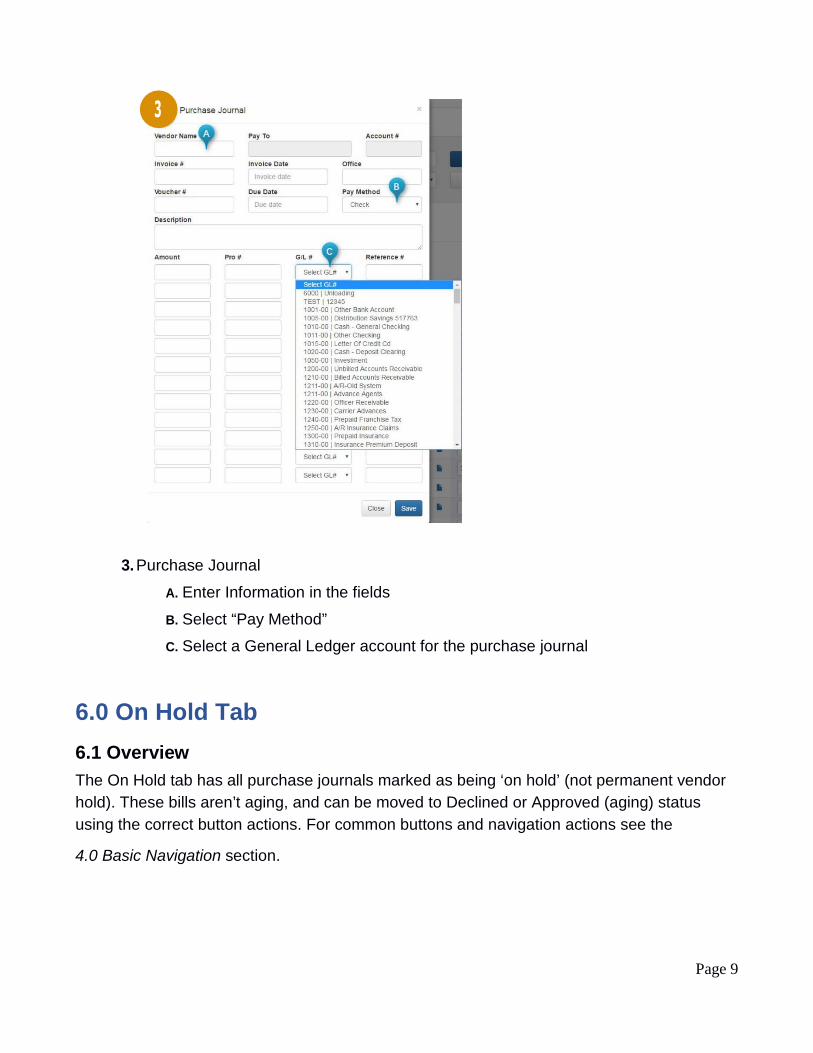
3. Purchase Journal
A. Enter Information in the fields
B. Select “Pay Method”
C. Select a General Ledger account for the purchase journal
6.0 On Hold Tab 6.1 Overview The On Hold tab has all purchase journals marked as being ‘on hold’ (not permanent vendor hold). These bills aren’t aging, and can be moved to Declined or Approved (aging) status using the correct button actions. For common buttons and navigation actions see the
4.0 Basic Navigation section.
Page 10
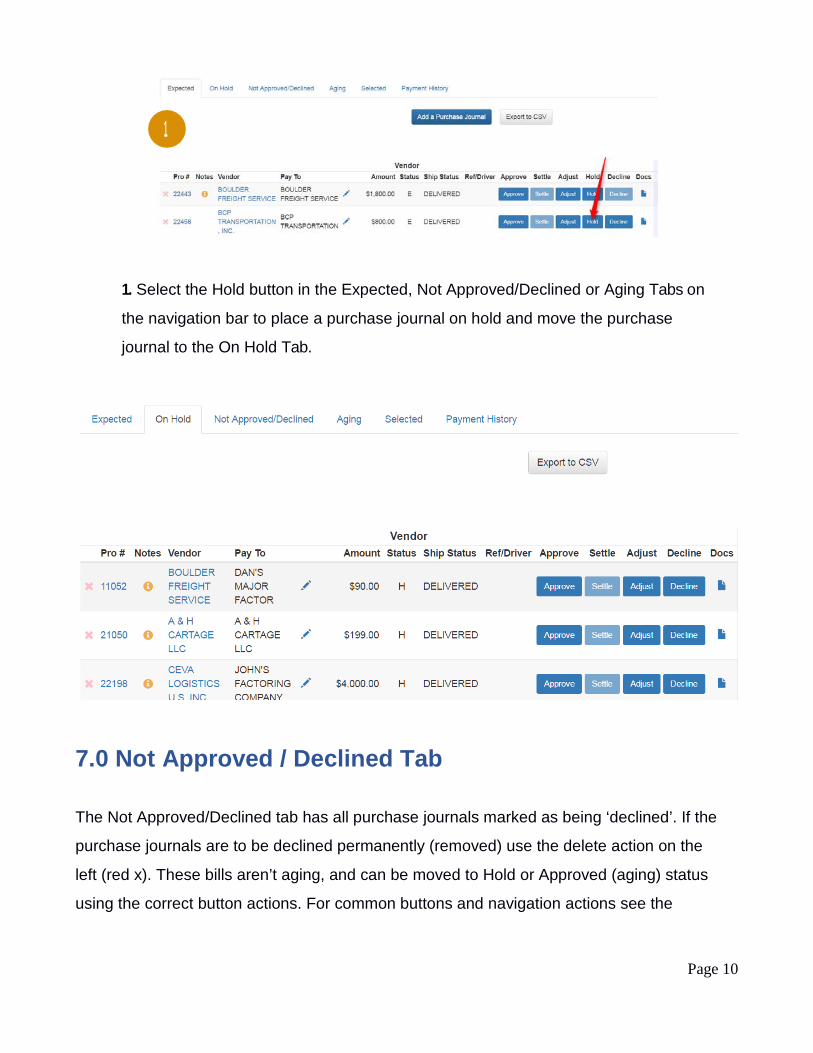
1. Select the Hold button in the Expected, Not Approved/Declined or Aging Tabs on
the navigation bar to place a purchase journal on hold and move the purchase
journal to the On Hold Tab.
7.0 Not Approved / Declined Tab
The Not Approved/Declined tab has all purchase journals marked as being ‘declined’. If the
purchase journals are to be declined permanently (removed) use the delete action on the
left (red x). These bills aren’t aging, and can be moved to Hold or Approved (aging) status
using the correct button actions. For common buttons and navigation actions see the
1
Page 11
4.0 Basic Navigation section
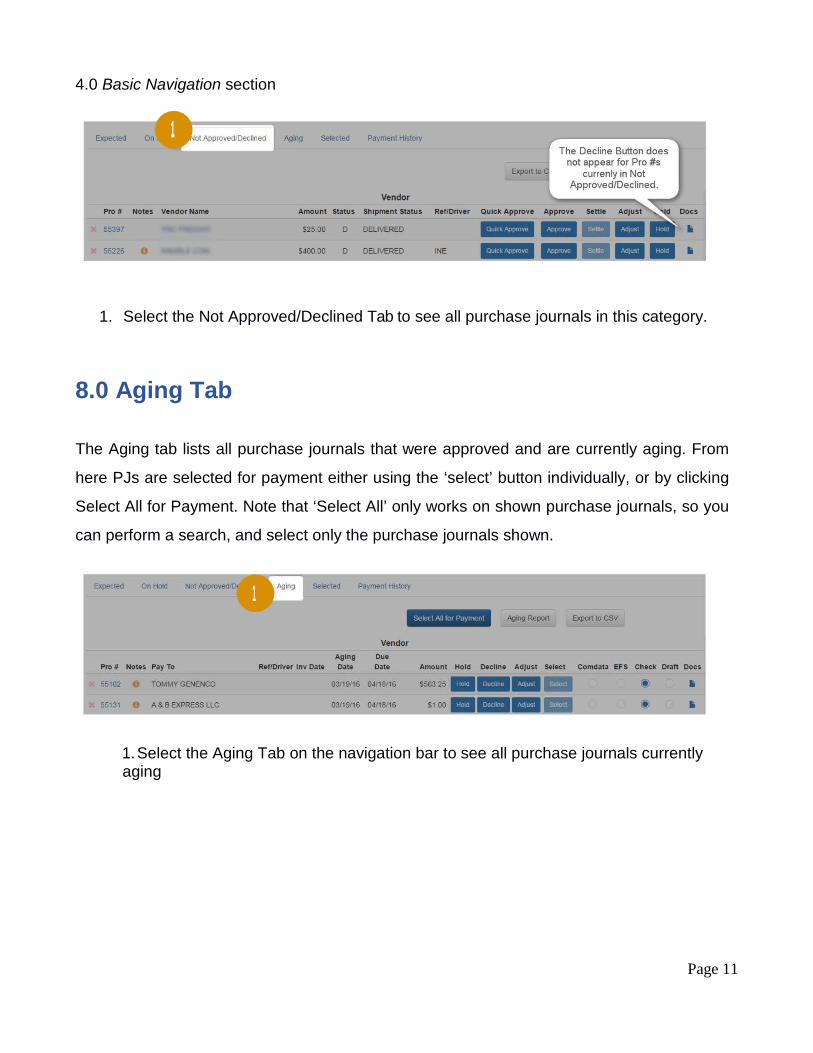
1. Select the Not Approved/Declined Tab to see all purchase journals in this category.
8.0 Aging Tab
The Aging tab lists all purchase journals that were approved and are currently aging. From
here PJs are selected for payment either using the ‘select’ button individually, or by clicking
Select All for Payment. Note that ‘Select All’ only works on shown purchase journals, so you
can perform a search, and select only the purchase journals shown.
1. Select the Aging Tab on the navigation bar to see all purchase journals currently aging
1
Page 12
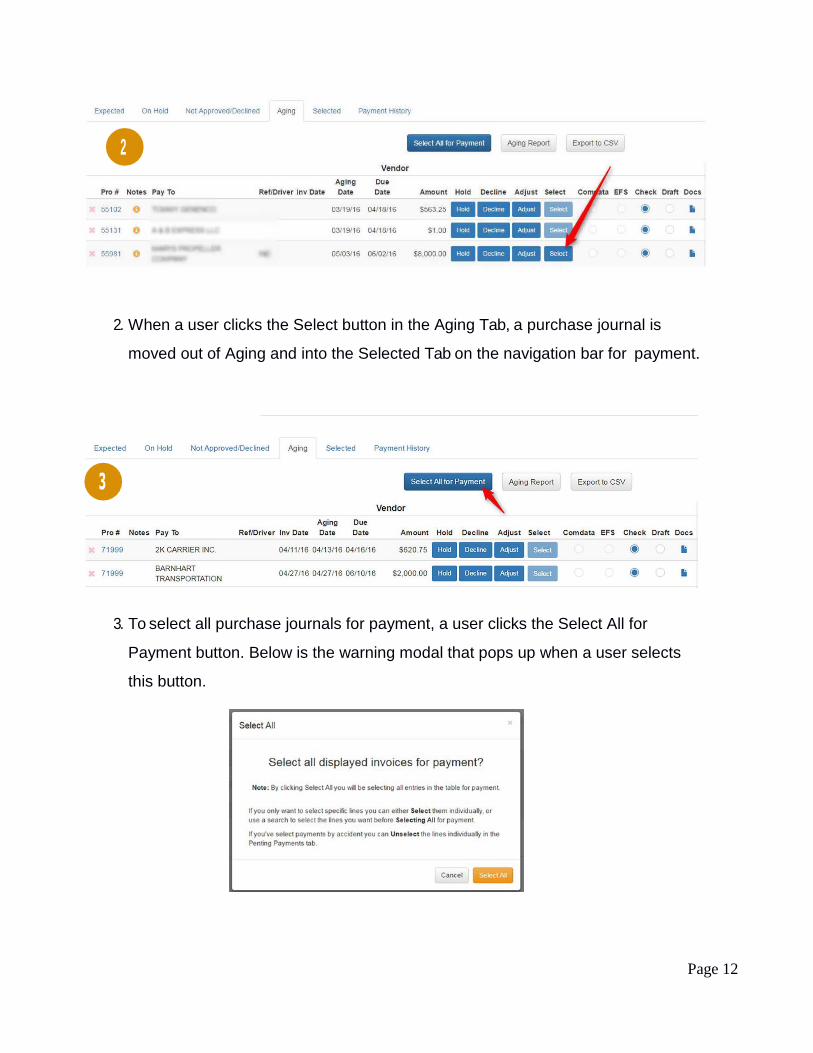
2. When a user clicks the Select button in the Aging Tab, a purchase journal is
moved out of Aging and into the Selected Tab on the navigation bar for payment.
3. To select all purchase journals for payment, a user clicks the Select All for
Payment button. Below is the warning modal that pops up when a user selects
this button.
2
Page 13
4. Additionally in the Aging Tab, a user may select payment type by clicking on the
radial buttons for Comdata, EFS, Check, and Draft.
9.0 Selected Tab
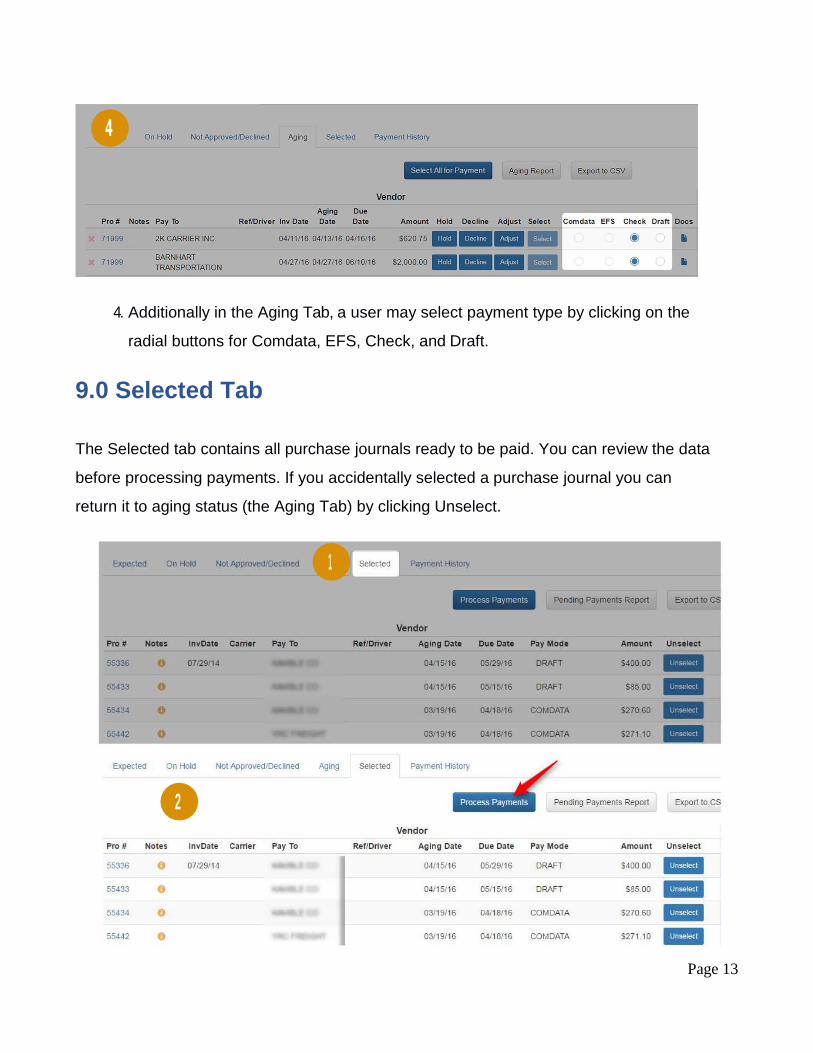
The Selected tab contains all purchase journals ready to be paid. You can review the data
before processing payments. If you accidentally selected a purchase journal you can
return it to aging status (the Aging Tab) by clicking Unselect.
1
2
Page 14
2. Click the Process Payments button to process payments. Below is the modal that
pops up to continue the payment process.
3. Click the Unselected button to move a purchase journal from the Selected Tab back into the Aging Tab
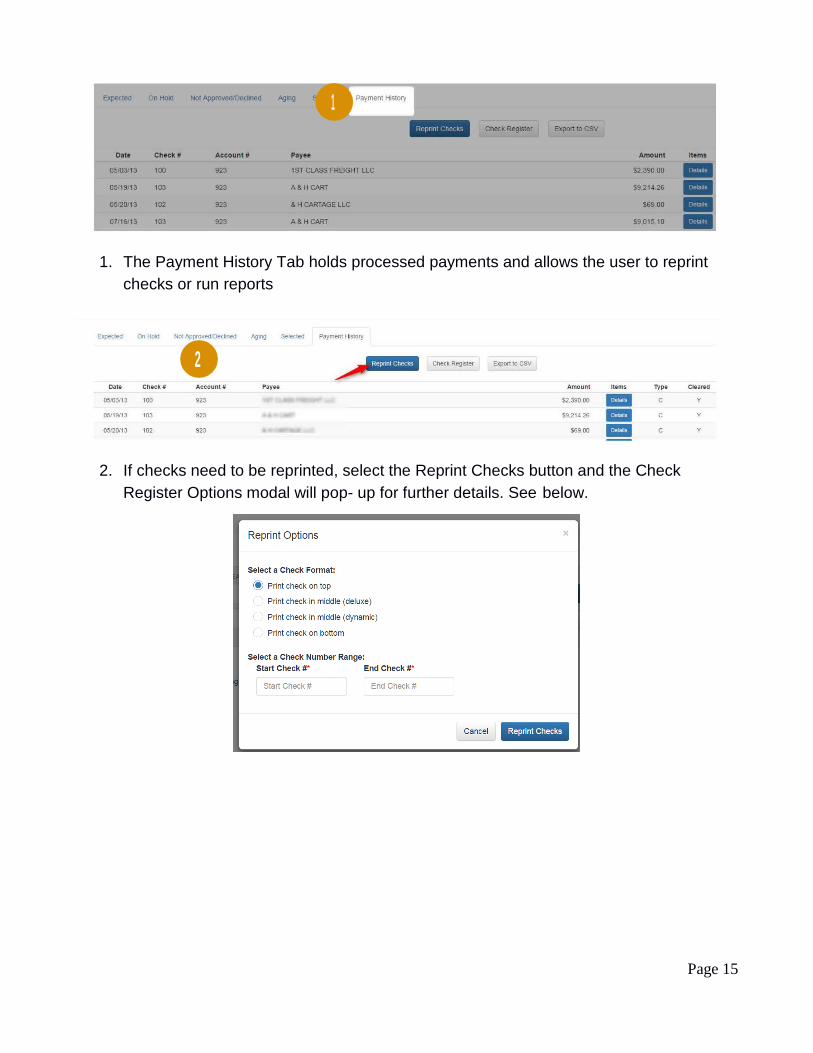
10.0 Payment History Tab
The Payment History tab contains previously paid checks. You can use the search above to
look for specific ones. Note the search bar is different in the Payment History page.
3
Page 15
1. The Payment History Tab holds processed payments and allows the user to reprint checks or run reports
2. If checks need to be reprinted, select the Reprint Checks button and the Check Register Options modal will pop- up for further details. See below.
1
2
Page 16
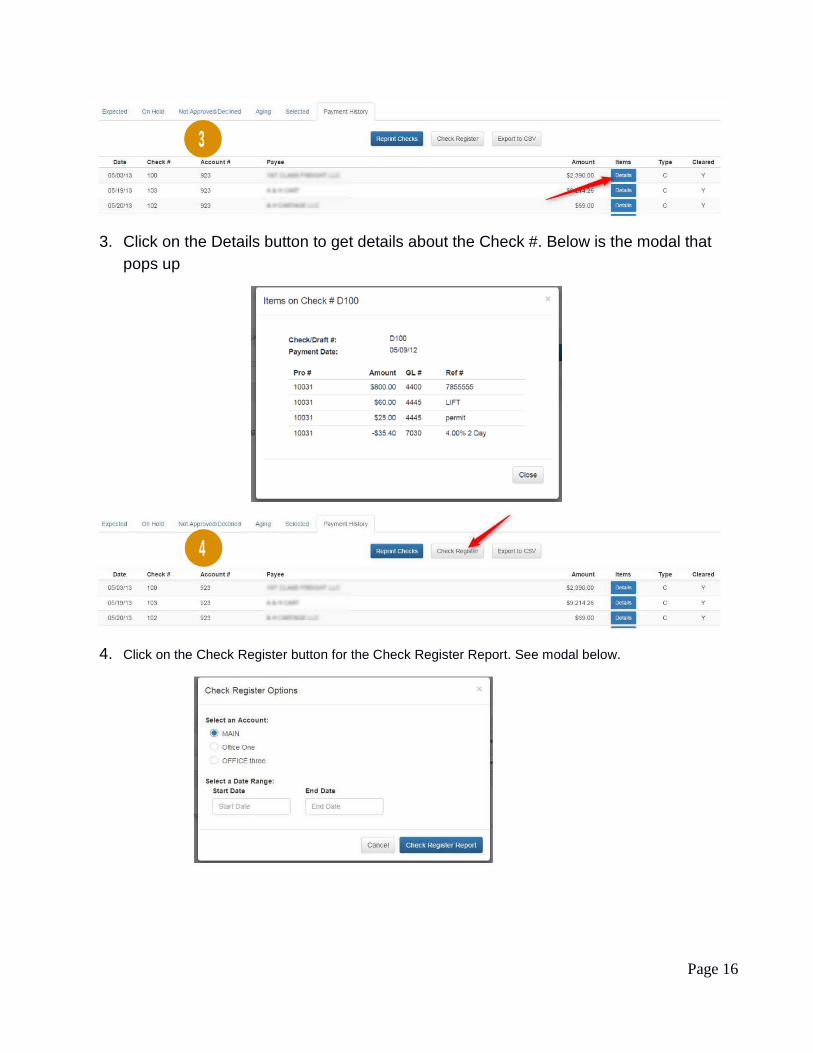
3. Click on the Details button to get details about the Check #. Below is the modal that pops up
4. Click on the Check Register button for the Check Register Report. See modal below.
3
4