Embed Size (px)
Citation preview

© 2014 Century International Arms, Inc. All rights reserved.
WARNING: Make sure your firearm is not loaded! Remove the magazine and
inspect the chamber to ensure it is empty!
To install your new AK Double Trigger, you first need to disassemble your firearm.
WARNING: Before beginning the disassembly process, check to ensure the
firearm is not loaded.
1. Remove the magazine from the firearm.
2. Move the safety lever to the "FIRE" position by rotating the safety lever downward.
3. Check the chamber to ensure it does not contain a round by pulling back on the bolt cocking
handle. Inspect the chamber to ensure it is empty. Once you determine the chamber is empty
and no magazine is in the firearm, let the bolt go forward.
4. While maintaining a safe muzzle direction, remove the receiver cover by holding the firearm in a
secure position (across your lap, resting on a table, etc.) and grasping the rear part of the
receiver with your right hand, press the recoil spring cam forward. Then remove the receiver
cover from the back end first with your left hand.
5. Remove the recoil spring assembly from the firearm by holding the forward portion of the
receiver with your left hand and pressing on the back of the recoil spring cam with your right
hand until its rear face leaves the groove in the rear of the receiver. Lift the recoil spring cam
and remove the recoil spring assembly from the bolt carrier channel. NOTE: The recoil springassembly is under spring pressure. Hold firmly on to the assembly when removing it or injury could result.
6. Remove the bolt carrier and bolt from the firearm by holding the receiver with your left hand
and the cocking handle with your right hand. Pull the bolt carrier and bolt to the rear as far as
possible. Once the back of the bolt carrier contacts the backplate of the receiver. Lift the rear
portion of the bolt carrier and remove it and the bolt from the receiver.
Package Includes1. Trigger Assembly (trigger, disconnector,
disconnector spring, bushing)
2. Triggerguard
3. Magazine release lever
4. Magazine release lever pin
5. C-Clip
6. Hammer
AK DOUBLE TRIGGER KIT
INSTRUCTION MANUAL
100% AMERICAN MADE!
Installation Tools Required1. Hammer
2. Flat Screwdriver
3. Needle Nose Vise Grips
4. Pliers
5. Hack Saw or Motorized Cut Off Tool
6. File/Sandpaper
7. Punch
Disassembly
Visit the manuals tab on our website at
www.centuryarms.com for downloadable
PDF and to watch instruction video.

Illustration #5 Illustration #6
Illustration #7 Illustration #8
Page 2 AK Double Trigger Kit Manual
Illustration #1 Illustration #2
Illustration #4Illustration #3
7. While holding the hammer down pull the trigger to release the hammer and slowly let it go
forward. Place needle nose vise grips locked on the hammer. (See Illustration #1.) Move the
hammer spring arms onto the vise grips. (See Illustrations #2 - #3.)
8. Remove the shepherds hook from the trigger pin (See Illustration #4), then remove the trigger
pin. (See Illustration #5.)
9. Remove the safety lever and the shepherd hook from the receiver. Lift the trigger mechanism from
the gun.
10. Leaving the vise grips on the hammer, push the hammer pin over and remove it from the
receiver. Slide the vise grips with the hammer to the back of the receiver and lift out. (See
Illustration #6.))
11. Use the pliers to grasp the spring legs one at a time, slightly lift them and pull out to the side to
release the tension. (See Illustration #7.) CAUTION:The spring is under tension!12. Once the tension is removed from the spring, remove the spring from the hammer. Make sure to
note the position of the spring. (See Illustration #8.)
13. Remove the pistol grip.

1. Reinstall the spring on the hammer. (See
Illustration #8.) Attach the vise grips back on
the hammer and rewind the spring. (See
Illustration #13.)
2. Slide the hammer assembly in at the rear of the
receiver. The smooth side of the hammer should
be facing the chamber. (See Illustration #13.)
Move the hammer with the vise grips attached
forward until you can install the hammer pin.
3. Drop the new trigger assembly into the
receiver. Do not install the trigger pin at this time!
4. Install the safety lever and sheppards hook, ensure
that the sheppards hook is setting in the
hammer pin groove properly.
5. Lift up on the sheppards hook, install the trigger
pin. Release the sheppards hook ensuring that it
is properly riding in the groove on the trigger
pin. (See Illustration #14.)
6. Release the vise grips from the hammer which will allow the hammer spring to fall back into
place, resting on the rear of the trigger. (See Illustration #15.) Ensure that the spring has
properly engaged the trigger. Caution: Once the spring is released the hammer is underspring tension!
Illustration #9 Illustration #10
Illustration #11
AK Double Trigger Kit Manual Page 3
14. Drive the magazine locking lever pin out of the receiver. Note the magazine release lever is
under spring tension! (See Illustration #9.)
15. Remove the triggerguard. Using a hack saw or motor tool cut the triggerguard off at the top of
the magazine catch housing (See Illustration #10.) Then cut the triggerguard at the receiver.
(See Illustration #11.) Once both sides are cut off (See Illustration #12) use a file or sandpaper
to de-burr the edges.
16. Set aside the original pistol grip, safety lever, trigger pin, hammer pin, sheppards hook, magazine
catch spring and hammer spring.
Assembly
Illustration #13
Illustration #12
Illustration #14
Illustration #15
WARNING: Be sure to use all of the parts included with this AK Double Trigger
Kit as they are designed to mate together. Do not use existing, or other, trigger parts
with your AK Double Trigger.
8. With the firearm cocked move the safety to
the safe position. Pull the trigger the hammer
should not move! The safety tab should
capture the rear of the trigger, preventing the
hammer from going forward.
9. Install the magazine release lever, spring and
triggerguard. Start by putting the triggerguard
in place on the magazine release housing. (See
Illustration #17.) Place the spring in the
release lever (the short side of the spring must
be against the release lever, temporary install
the magazine release pin to hold everything
together. (See Illustration #18.) Use the vise
grips to depress the spring in the magazine
release lever. (See Illustration #19.) Remove
the magazine release pin and insert the
assembly into the release housing, while
holding the assembly together with the vise
grips. (See Illustration #20.) Once the
triggerguard, magazine release lever and
spring are properly aligned install the magazine
release pin and c-clip. (See Illustration #21.)
10. Reinstall your bolt carrier and bolt, recoil
spring assembly and your receiver cover.
11. Your firearm is now fully assembled with
your new Double Trigger.
Illustration #17
AK Double Trigger KitDistributed by:
Century International Arms, Inc. 236 Bryce Boulevard, Fairfax, VT 05454
www.centuryarms.comSales: 1-800-527-1252 - 1-561-265-4530
Entire Contents © Century International Arms, Inc. All rights reserved. AK Double Trigger Kit Manual
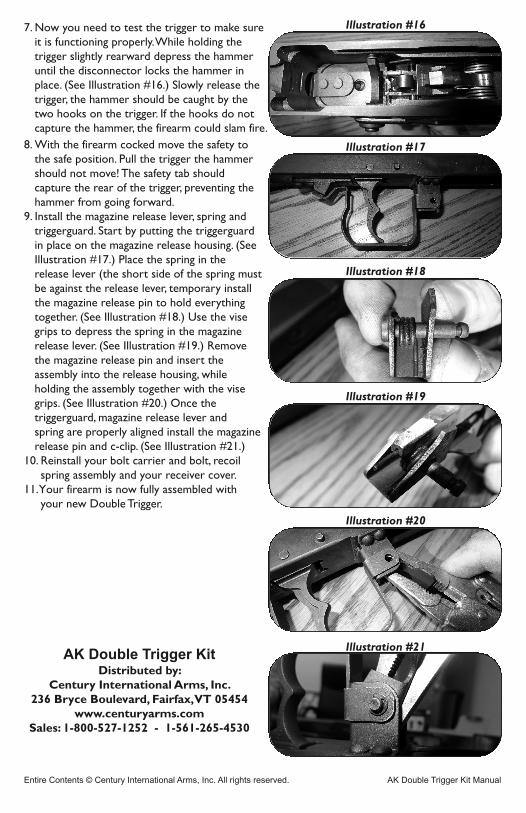
7. Now you need to test the trigger to make sure
it is functioning properly. While holding the
trigger slightly rearward depress the hammer
until the disconnector locks the hammer in
place. (See Illustration #16.) Slowly release the
trigger, the hammer should be caught by the
two hooks on the trigger. If the hooks do not
capture the hammer, the firearm could slam fire.
Illustration #16
Illustration #18
Illustration #19
Illustration #20
Illustration #21


![NDIA SCAR 2006 BLACKfinal2may06.ppt [Read-Only] · 2017. 5. 19. · Trigger Incorporate Double Action Trigger (T) MEETS (T) REQUIREMENT MEETS (T) REQUIREMENT Detached, Shall not Exceed](https://img.dokumen.tips/doc/110x75/60afdde9a100b05e1820da64/ndia-scar-2006-read-only-2017-5-19-trigger-incorporate-double-action-trigger.jpg)


