Embed Size (px)
Citation preview

Skills Photoshop Masterclass
Your guideJeff Morgan
66 | PhotoPlus June 2011
Stand head and shoulders above other photographers and enjoy a lofty new viewpoint for your images…
Aerial poleDiscover the PhotoPlus method for…
photographyWhat you’ll need• Camera pole• Spirit level • Wide-angle lens• Remote release• Photoshop CS or Elements• Kolor Autopano Pro
How long it’ll takeOne day
The skills you’ll learn How to use a camera pole
How to capture a pole pano
How to shoot into the sun
How to process a panorama
Checklist
ON YOUR
VIDEO DISC
method for…
Aerial polePhotoPlus method for…PhotoPlus method for…PhotoPlus method for…
CAN49.masterclass 66 5/11/11 8:25:13 PM

PhotoPlus June 2011 | 67
Create a Rothko-style image Page 54
Most images are captured from between one and two metres from the ground, because that’s
the height that the majority of us see the world from. It’s easier to raise the camera to our eyes and snap a picture than it is to change perspective. Try changing your angle of view, however, and it can result in far more dynamic photographs.
A great way to make your images more interesting is to get up high or get down low. Putting your camera on the ground and shooting from a worm’s eye perspective instantly gives your images impact. Similarly, fi nding high angles to shoot from, such as a stairway, bridge or an upper-story window, instantly lifts your
images out of the ordinary. A common example is portrait photographers who carry a stepladder in their car to achieve a higher perspective for group shots. Changing your angle of view is a great photographic technique to master.
This month we’re introducing you to the camera pole – a very useful tool for changing your point of view. You can use a pole not just to give your photographs a fresh perspective, but to look over things that obstruct your view of the surroundings, such as hedgerows, fences, or sea defences.
For this Masterclass, we got up early and headed down to Vicar’s Close in Wells, Somerset. Here’s how we got on…
Stand head and shoulders above other photographers and enjoy a lofty new viewpoint for your images…
Aerial pole
CAN49.masterclass 67 5/11/11 8:26:20 PM

68 | PhotoPlus June 2011
Skills Photoshop Masterclass
Get a fresh perspective on the world!
Capturing a pole panoramaSTEP BY STEP
Extra kitFor a pano, rotate on your lens’s nodal point to avoid perspective
errors. The Nodal Ninja R1 Pano head (£330) was easy to use, but not essential with a wide-angle lens if your camera is swaying on the pole. When the camera isn’t in front of you use a radio shutter release, but you can also use a wired or infrared device – see the Mini Test (page 94).
Shooting settingsWith our 8mm lens we manually prefocused to 1m,
with ISO100 for best quality, Manual exposure, and an f/8 aperture for a large depth of fi eld with the whole scene in focus. The sun in the frame in some shots would give different exposure readings, so we tested on the ground, checked the histogram and overexposure warning, then altered the shutter speed. We allowed the sun to burn out a little of the sky, and 1/400 sec gave a good balance of sky and shadows.
Keep it upUnlike a tripod, even if a pole is fi rmly anchored to the ground, the top sways in the breeze, so it’s important
to use a fast shutter speed to minimise camera movement. It’s also best to ensure the pole is as upright as possible, so a
bubble spirit level taped to the pole is a huge help. We used a Fanotec Rotator Footplate to stabilise the pole and control the
rotation; it’s marked with 45-degree click stops, so for our four shots we rotated it two clicks each time and fi red the shutter.
CAN49.masterclass 68 5/11/11 8:26:45 PM

PhotoPlus June 2011 | 69
Group shotsA pole is useful for other types of photography too; it’s great for group portraits, but if you’re not using an
ultra-wide-angle lens you’ll need to see what you’re shooting. The Hähnel Inspire Wireless Live
View Remote Control (£180, www.hahnel.ie) enables you
to see the Live View image from your camera and to fi re the shutter remotely. If your camera doesn’t support Live View, the unit has a built-in video camera you can use to help you estimate the
fi eld of view, even if it doesn’t show it exactly.
Up the poleWe used a Fanotec Series 1 pole (£324) that extends to 2.75m high. The pole comes in
four sections that collapse down to just 0.81m, and because it’s made from carbon fi bre it only weighs 0.75kg, making it easy to carry. It’s just like working with a very long monopod, although somewhat harder to handle,
so take extra care not to smash your camera against anything! For an
even higher view, the Fanotec Series 2 pole (£660)
stretches to 6m high.
Wide boysA big drawback to having your D-SLR way above
your head is not being able to frame up the shot. For a lot of pole photography you’ll use wide-angle lenses to simply include everything. We used a Sigma 8mm f/3.5 DG lens on a Canon EOS 7D, which captures a huge angle of view and makes a panorama quick and easy. Also clean your lens before attaching it to your pole to help control lens fl are.
A big drawback to having
quick and easy. Also clean your lens before attaching it to your
Choose a new kit lens Page 96
CAN49.masterclass 69 5/11/11 8:27:09 PM

Skills Photoshop Masterclass
70 | PhotoPlus June 2011
Centre the panoramaSelect the Vanishing Point tool in the top menu bar – an icon with a small green square and red
arrows. Click on the centre grid line on the right-hand side of the image, level with the centre of the door and just above it. Next, click on the blue gear wheel icon in the top tool bar; this launches the Render box used to confi gure the stitching of the panorama. You’ll see the output size of your panorama in pixels on the top line.
Export edited imagesClick the blue underlined text at the bottom of the screen, called Workfl ow Options, then set Space to
sRGB and Depth to 16 Bits/Channel (or 8 Bits/Channel if you have 2GB of RAM or less). Set Resolution to 300 and Sharpen For to Screen, and hit OK. Click Save Images in the bottom-left, pick a destination folder, choose the TIFF format, and hit Save>Done. Close Photoshop and any other programs as the next step is memory intensive.
Build a 360-degree panoramaSTEP BY STEP
Render itIn the Render window, go to Blending presets and pick Simple; it works for this image but you may
need other options for your shots. Click the drop-down menu in the Format box and pick TIFF for best quality; you’ll tidy the image in Photoshop so don’t compress it as a JPEG. If saved the images as 16-bit TIFFs earlier, change this now to 16 bits. Change Compression mode to none and DPI to 300. Under Output, pick a folder to save the panorama, then select Render.
Synchronise imagesClick the second tab, Tone Curve, and in the drop-down menu click Strong Contrast (because
you’ve lightened the image so much). On the third tab, Detail, in the Noise Reduction section, set Luminance and Colour to 25 (since Fill Light is so high). Click the Select All button in the top-left, then click Synchronize. Ensure Settings is selected in the menu, and hit OK.
360 photographySeveral devices enable you to take photos that span 360 degrees. With some you can shoot into a mirror ball that refl ects the entire panorama in one image; others enable you to stitch enough images together to form a complete circle.
VR photographyVirtual Reality (VR) photography is similar to 360 photography, except there’s usually some playback interaction where the viewer can scan inside an image, exploring it from different angles. The view is normally not just circular, but also up and down, so you need to take extra images and use special software to build the immersive viewing experience.
Phrase Book
All the specialist equipment used
here was provided by 360 Tactical VR (www.360tacticalvr.com), in East Kilbride. It supplies everything from poles to lenses to software and is expert in all things panoramic. Many photographers have also constructed their own poles, from such things as a strong fi shing pole, a window washer pole, a painter’s pole, or even a windsurfer mast! We even made one with an extending landing net pole and bolted it onto a monopod tilt head.
Super Tip!
Build a 360-degree panorama
Fire up Kolor Autopano ProIn Kolor Autopano Pro, click File>SelectImages, and locate your four saved TIFFs. Press the green
Detect button in the Group 1 box. A box opens on the right, and you’ll see it’s made a good attempt to stitch the panorama together. Double-click this to launch a full-screen window of the stitched panorama box. It’s a full 360-degree panorama, so you need to tell the app where the panorama ends are split for your fl at image.
Process RAW fi lesSelect pole_start1.cr2 through to pole_start4.cr2 on your Video Disc, then right-click and pick Open
in Camera Raw. Set Exposure to +0.25, Recovery to 30 and Fill Light to 70 – set high, as shooting into the sun compromises shadow detail. Set the following: Blacks 5, Brightness +60, Contrast +25, Clarity +40, Vibrance +15, Saturation 0, Temperature 5750, and Tint +2.
CAN49.masterclass 70 5/11/11 8:27:15 PM
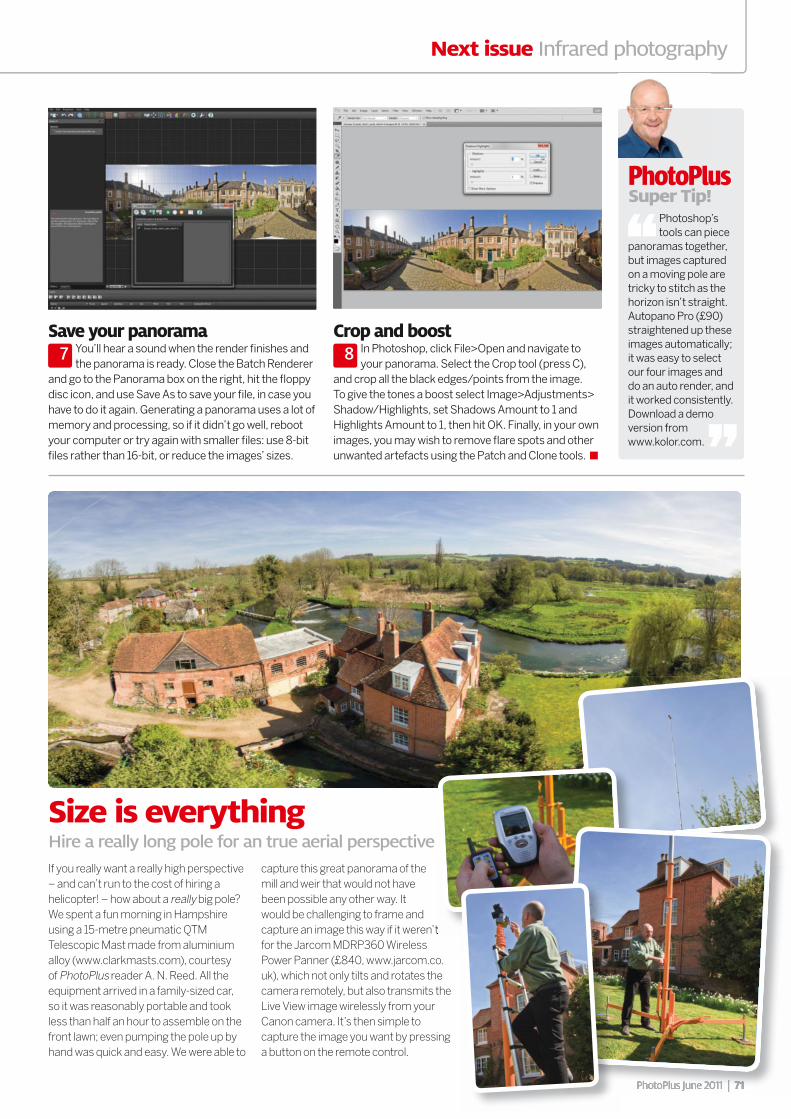
If you really want a really high perspective – and can’t run to the cost of hiring a helicopter! – how about a really big pole? We spent a fun morning in Hampshire using a 15-metre pneumatic QTM Telescopic Mast made from aluminium alloy (www.clarkmasts.com), courtesy of PhotoPlus reader A. N. Reed. All the equipment arrived in a family-sized car, so it was reasonably portable and took less than half an hour to assemble on the front lawn; even pumping the pole up by hand was quick and easy. We were able to
capture this great panorama of the mill and weir that would not have been possible any other way. It would be challenging to frame and capture an image this way if it weren’t for the Jarcom MDRP360 Wireless Power Panner (£840, www.jarcom.co.uk), which not only tilts and rotates the camera remotely, but also transmits the Live View image wirelessly from your Canon camera. It’s then simple to capture the image you want by pressing a button on the remote control.
Crop and boostIn Photoshop, click File>Open and navigate to your panorama. Select the Crop tool (press C),
and crop all the black edges/points from the image. To give the tones a boost select Image>Adjustments>Shadow/Highlights, set Shadows Amount to 1 and Highlights Amount to 1, then hit OK. Finally, in your own images, you may wish to remove fl are spots and other unwanted artefacts using the Patch and Clone tools.
Save your panoramaYou’ll hear a sound when the render fi nishes and the panorama is ready. Close the Batch Renderer
and go to the Panorama box on the right, hit the fl oppy disc icon, and use Save As to save your fi le, in case you have to do it again. Generating a panorama uses a lot of memory and processing, so if it didn’t go well, reboot your computer or try again with smaller fi les: use 8-bit fi les rather than 16-bit, or reduce the images’ sizes.
Photoshop’s tools can piece
panoramas together, but images captured on a moving pole are tricky to stitch as the horizon isn’t straight. Autopano Pro (£90) straightened up these images automatically; it was easy to select our four images and do an auto render, and it worked consistently. Download a demo version from www.kolor.com.
Super Tip!
Next issue Infrared photography
Size is everythingHire a really long pole for an true aerial perspective
capture an image this way if it weren’t
CAN49.masterclass 71 5/11/11 8:27:58 PM