Embed Size (px)
Citation preview

ACTAtek Agent Manual
Version 1.6
May 10, 2007
Hectrix Limited
HECTRIX LTD.
Revision HistoryRevision Date Description Author
1 2005/07/27 - Initial Release Cheong
1.1 2006/01/03
- Updated Configurator settings
- Added MSSQL Server configuration
- Added start ACTAtekAgent as Windows Service Clement1.2 2006/09/27 - Instructions to output .txt / .csv format Cheong1.3 2006/11/08 - Updated pictures and contents Ken1.4 2007/02/02 - Address updated Cheong1.5 2007/04/27 - Address updated Cheong1.6 2007/05/10 - Additional instructions to run as Windows Service Keith
ACTAtek Agent Manual ii

HECTRIX LTD.
ACTAtek Agent ManualCopyright 2004 - 2007 Hectrix Limited, All rights reserved.
No part of this document may be reproduced, transmitted, transcribed, stored in a retrievalsystem, or translated into any language, in any form or by any means, electronic, mechanical,magnetic, optical, chemical, manual or otherwise without the prior written permission ofHectrix Limited.
ACTAtek is a registered trademark of Hectrix Limited
All trademarks, registered trademarks, and service marks are the property of their respectiveowners.
Offices:Americas:Hectrix Inc.13372 Newport Ave suite A, Tustin, CA 92780, USA.
Tel: (714)-505-0433Fax: (714)-544-5077E-mail: [email protected]
Singapore and Malaysia:ACTAtek Pte Ltd8, Boon Lay Way, #06-09Tradehub 21, Singapore 609964
Tel: (65) 6515-4520Fax: (65) 6515-4521Email: [email protected]
Asia and the Rest of the World:Hectrix Ltd.1101-1103, 11/F., Yardley Comm. Bldg.3 Connaught Road West,Sheung Wan, Hong Kong.
Tel: (852) 2319 1333Fax: (852) 2776 8997 Email: [email protected]
Europe:Hectrix UKUnit 7 Lightning Way, West Heath,Birmingham, B31 3PH, United Kingdom
Tel: +44 121 411 2288Fax: +44 121 411 2288Sales Tel: +44 121 288 9923Email: [email protected]
ACTAtek Agent Manual iii
HECTRIX LTD.
Table of ContentsChapter 1.ACTAtek Agent ................................................................................................... 1
1.1.Introduction................................................................................................................ 1
1.1.1.System Requirements:........................................................................................ 1
1.2.Installing the ACTAtek Agent..................................................................................... 2
1.3.ODBC Setup.............................................................................................................. 5
1.4.ACTAtek Agent Configurator:..................................................................................... 8
1.4.1.Agent Info........................................................................................................... 8
1.4.2.To connect ACTAtek Agent with a Database....................................................10
1.4.3.ACTAtek Agent (Attach Primary terminals only)............................................... 12
1.4.4.ACTAtekAgent Running Mode ......................................................................... 13
1.5.Starting ACTAtekAgent............................................................................................ 14
1.5.1.Start ACTAtekAgent as application................................................................... 14
1.5.2.Start ACTAtekAgent as Windows service......................................................... 17
1.6.De-registering ACTAtek .......................................................................................... 21
1.7.Viewing the Database Logs..................................................................................... 22
1.8.Connecting ACTAtek Agent with Oracle 10g Database........................................... 23
1.9.Connecting ACTAtek Agent with MySQL Server..................................................... 26
1.10.Connecting ACTAtek Agent with MS SQL Server.................................................. 28
1.10.1.ODBC Setup................................................................................................... 28
1.10.2.ACTAtekAgent Configurator........................................................................... 34
1.11.Connecting ACTAtek Agent to output .txt / .csv format.......................................... 35
1.11.1.ODBC Setup................................................................................................... 35
1.11.2.ACTAtek Agent Configurator.......................................................................... 37
1.12.Connecting ACTAtek Agent Behind Routers......................................................... 39
1.12.1.Example Scenario........................................................................................... 39
1.12.2.Agent Configurator Setup............................................................................... 40
1.12.3.Router Setup................................................................................................... 43
1.13.Trouble Shooting.................................................................................................... 45
1.13.1.Network Troubleshooting................................................................................ 45
1.13.1.1.Network basic command description:...................................................... 45
1.13.1.1.1.Ping ................................................................................................. 45
1.13.1.1.2.Network reachable terminal.............................................................. 45
ACTAtek Agent Manual iv
HECTRIX LTD.
1.13.1.1.3.Network unreachable terminal.......................................................... 45
1.13.1.1.4.Ipconfig............................................................................................. 45
1.13.1.1.5.Telnet............................................................................................... 46
1.13.1.2.Network Troubleshooting cases.............................................................. 47
1.13.1.2.1.Always show “Disconnected” in the Server List of the Terminal List
using web browser............................................................................................. 47
1.13.1.2.2.“FATAL: Server Thread died unexpectedly” in command prompt.... 47
1.13.1.2.3.Symptom Login Failed in command prompt..................................... 47
1.13.1.2.4.“Connection timeout” in command prompt....................................... 48
1.14.Messages and Actions:.......................................................................................... 49
1.14.1.General Messages.......................................................................................... 49
1.14.1.1.No Trusted Certificate found.................................................................... 49
1.14.1.2.Registering Primary terminal login only................................................... 49
1.14.1.3.login failed............................................................................................... 49
1.14.1.4.parse time error, wrong magic ................................................................ 50
1.14.1.5.x.x.x.x specified agent not registered...................................................... 50
1.14.1.6.connection time out................................................................................. 50
1.14.1.7.connection refused.................................................................................. 51
1.14.1.8.read timed out.......................................................................................... 51
1.14.2.Database related messages:.......................................................................... 52
1.14.2.1.Start Agent failed:.................................................................................... 52
1.14.2.1.1.ERROR: Create Table IO exception:................................................52
1.14.2.1.2.Create Table: Invalid authorization specification.............................. 52
1.14.2.1.3.Error: LOG ERROR: Column not found........................................... 52
1.15.Reporting Problems to Support:............................................................................. 53
1.15.1.Basic information............................................................................................ 53
1.15.2.Customer information:.................................................................................... 53
1.15.3.Software information:...................................................................................... 54
1.15.4.You should also prepare information on following:......................................... 54
ACTAtek Agent Manual v

HECTRIX LTD.
Chapter 1. ACTAtek Agent
1.1. Introduction
The Agent is primarily used to download the event log from the ACTAtek database in real timeand without any hassle. It saves time and administrative efforts in backing up the data fromthe ACTAtek to a local computer.
The following documentation will give you a step by step illustration on how to install and oper-ate the Agent. For any comments, or tech support, please write to [email protected] . Allquestions and comments are welcome.
1.1.1. System Requirements:
1. JAVA Run-time 1.4 or higher. To download the JAVA Run-Time, please visit:
http://java.sun.com/j2se/1.4.2/download.html OR
http://jdl.sun.com/webapps/download/AutoDL?BundleId=9992
2. ACTAtek Firmware 1.29.11 or higher.
3. The computer you are running ACTAtekAgent should NOT be behind any firewall.
If your firewall is enabled, please ensure ACTAtek Agent can listen to its service
port default to 1668 or the port defined in ACTAtek Agent Configurator.
4. Please make sure both the ACTAtek Agent and ACTAtek firmware versions are
uptodate with latest version. For latest software release please
visit http://support.hectrix.com
5. ACTAtek Agent supports both JDBC and ODBC databases.
ACTAtek Agent Manual 1
HECTRIX LTD.
1.2. Installing the ACTAtek Agent
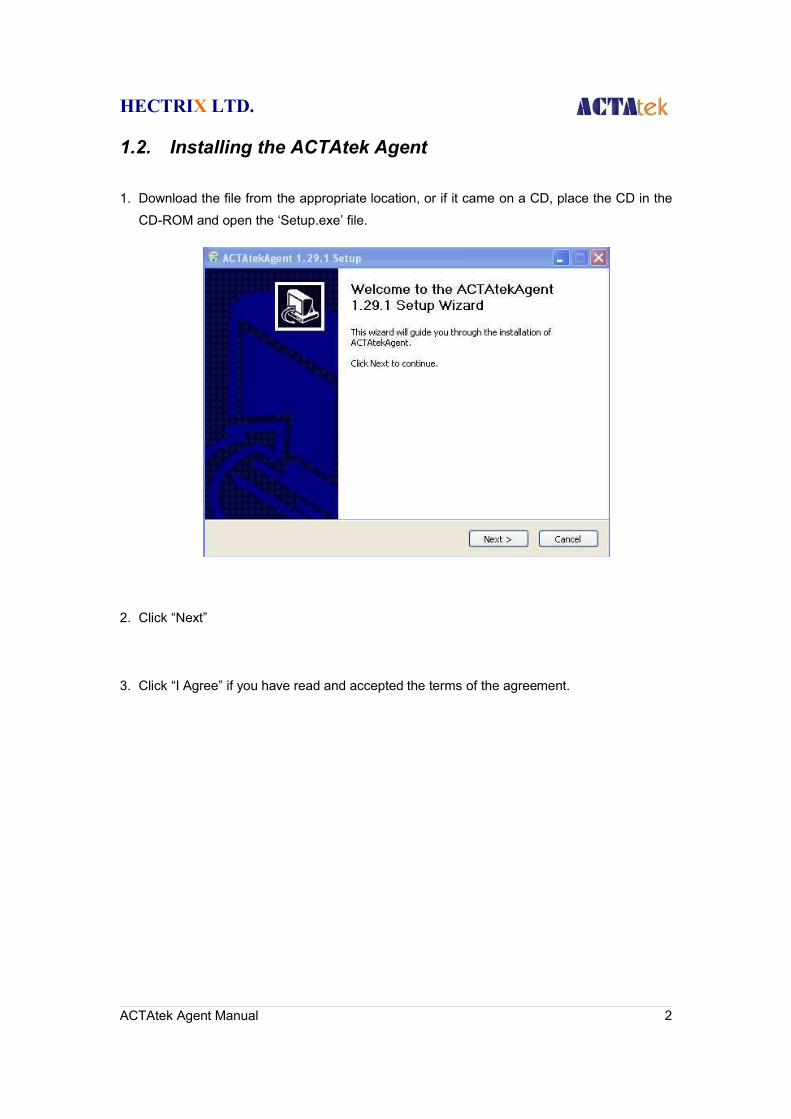
1. Download the file from the appropriate location, or if it came on a CD, place the CD in theCD-ROM and open the ‘Setup.exe’ file.
2. Click “Next”
3. Click “I Agree” if you have read and accepted the terms of the agreement.
ACTAtek Agent Manual 2
HECTRIX LTD.
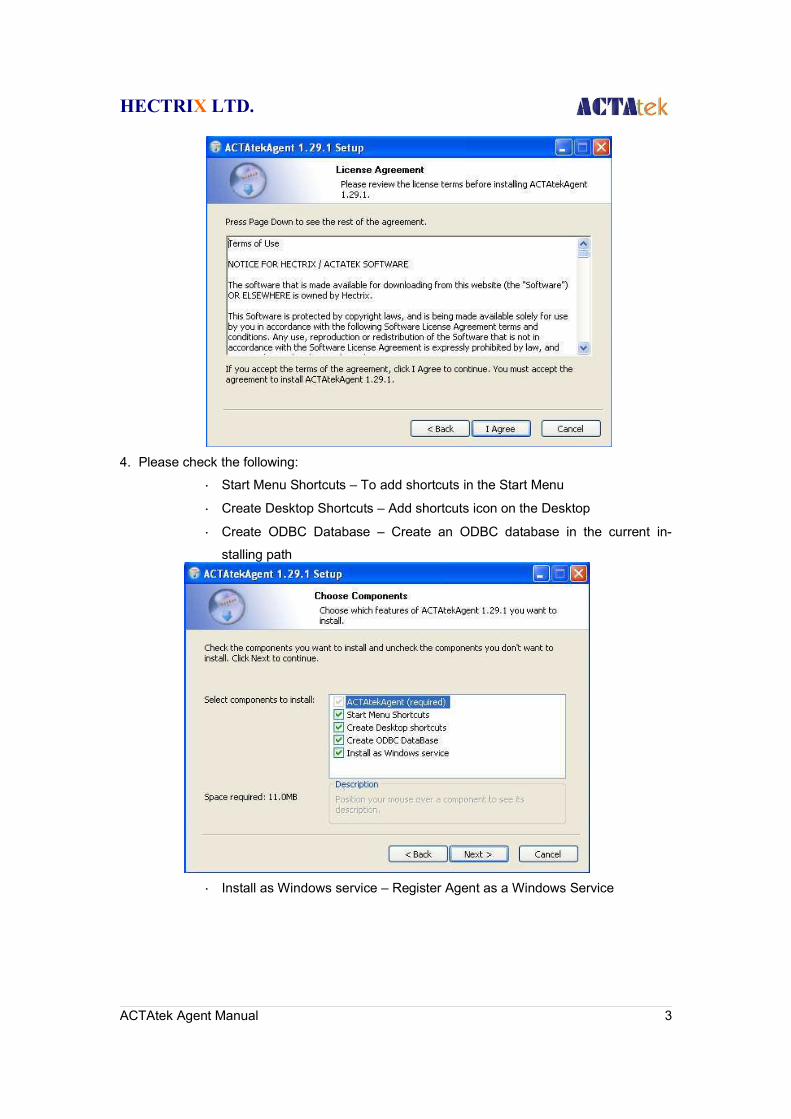
4. Please check the following:
• Start Menu Shortcuts – To add shortcuts in the Start Menu
• Create Desktop Shortcuts – Add shortcuts icon on the Desktop
• Create ODBC Database – Create an ODBC database in the current in-
stalling path
• Install as Windows service – Register Agent as a Windows Service
ACTAtek Agent Manual 3
HECTRIX LTD.
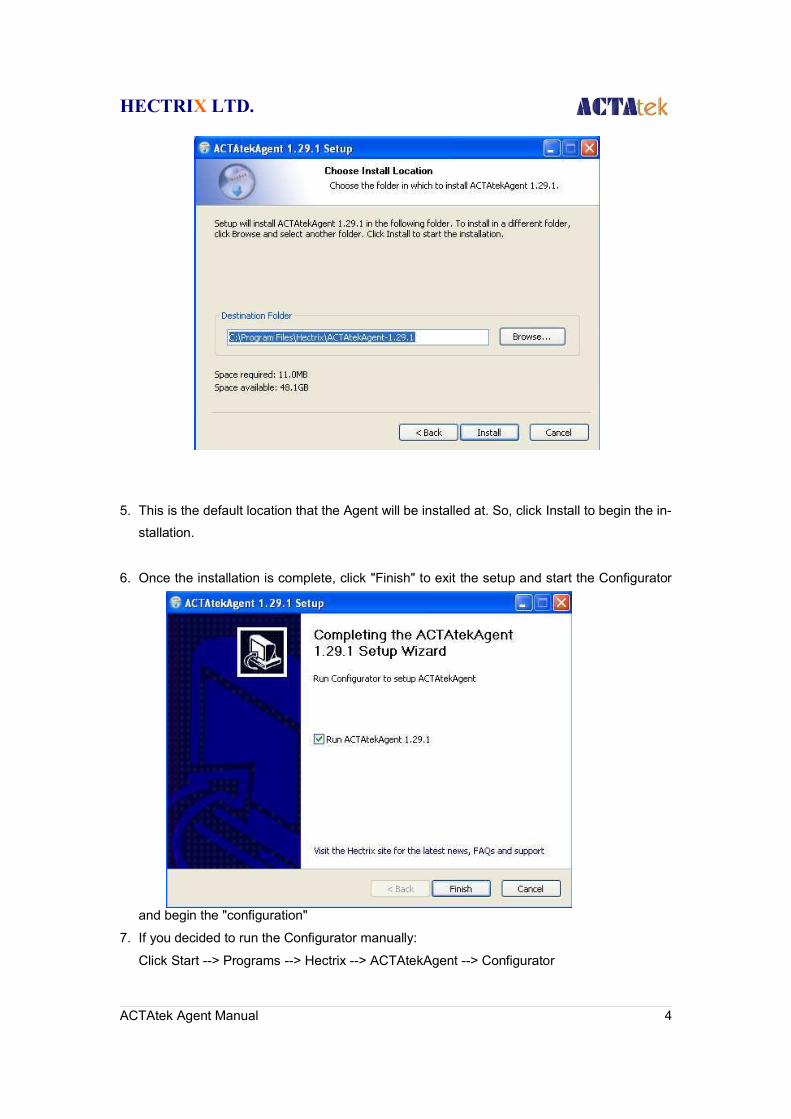
5. This is the default location that the Agent will be installed at. So, click Install to begin the in-stallation.
6. Once the installation is complete, click "Finish" to exit the setup and start the Configurator
and begin the "configuration"
7. If you decided to run the Configurator manually:
Click Start --> Programs --> Hectrix --> ACTAtekAgent --> Configurator
ACTAtek Agent Manual 4

HECTRIX LTD.
1.3. ODBC Setup
From the installer above, an ODBC database is installed in the current path. The database isnamed “actatek”. But if you want to create another, you can follow the following steps
Taking Windows XP as an example on how to do this, please follow the below steps.
1. Start - > Control Panel
2. Select ‘Administrative Tools’
3. Under Administrative Tools, select ‘Data Sources (ODBC)’.
ACTAtek Agent Manual 5
HECTRIX LTD.
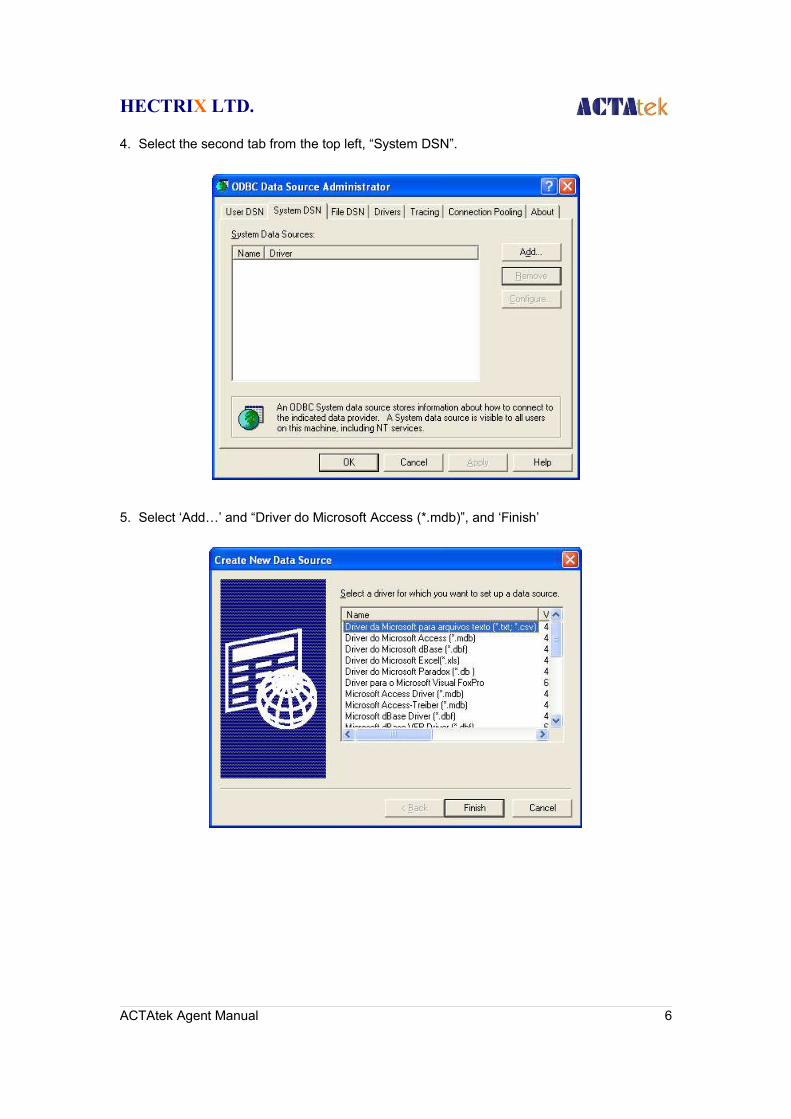
4. Select the second tab from the top left, “System DSN”.
5. Select ‘Add…’ and “Driver do Microsoft Access (*.mdb)”, and ‘Finish’
ACTAtek Agent Manual 6
HECTRIX LTD.
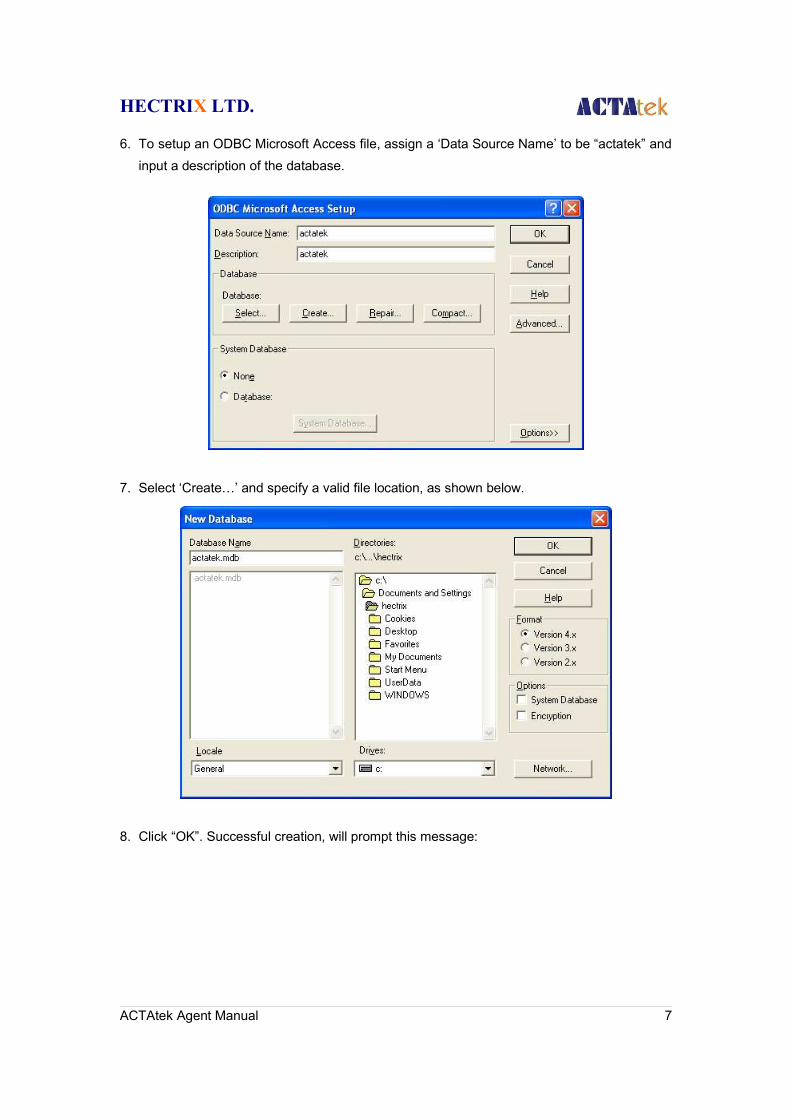
6. To setup an ODBC Microsoft Access file, assign a ‘Data Source Name’ to be “actatek” andinput a description of the database.
7. Select ‘Create…’ and specify a valid file location, as shown below.
8. Click “OK”. Successful creation, will prompt this message:
ACTAtek Agent Manual 7
HECTRIX LTD.
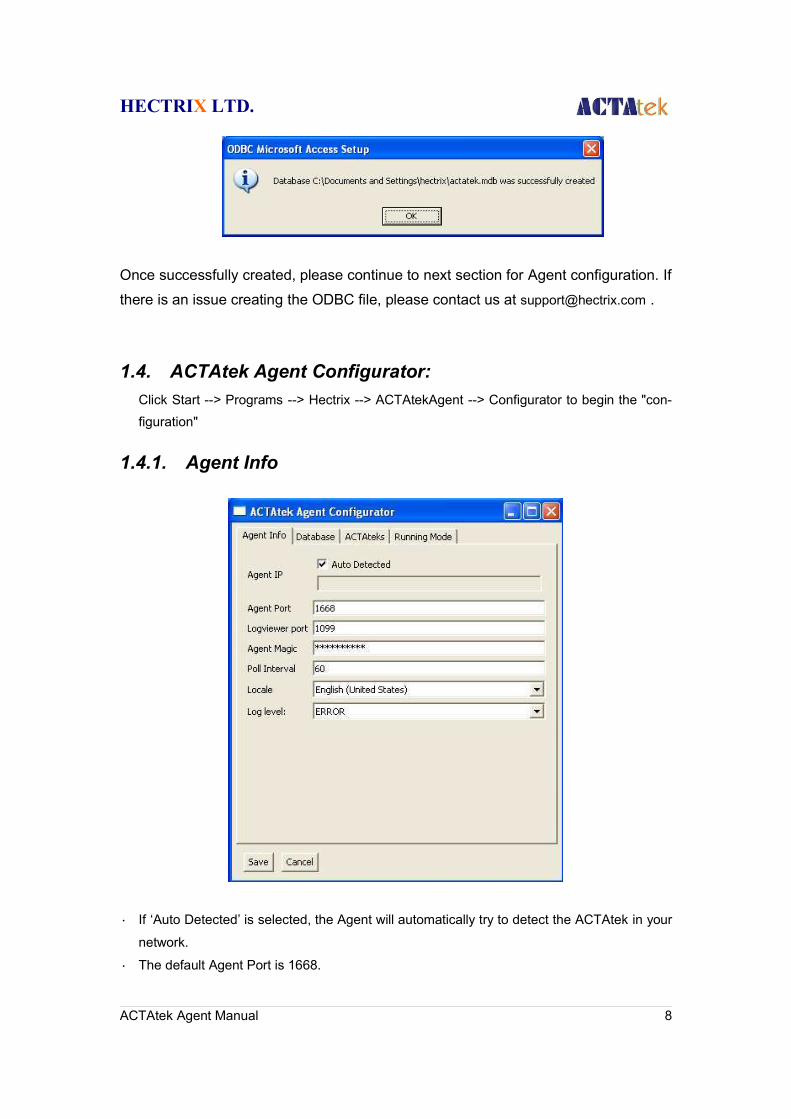
Once successfully created, please continue to next section for Agent configuration. If
there is an issue creating the ODBC file, please contact us at [email protected] .
1.4. ACTAtek Agent Configurator:Click Start --> Programs --> Hectrix --> ACTAtekAgent --> Configurator to begin the "con-figuration"
1.4.1. Agent Info
• If ‘Auto Detected’ is selected, the Agent will automatically try to detect the ACTAtek in your
network.
• The default Agent Port is 1668.
ACTAtek Agent Manual 8

HECTRIX LTD.
• The default Logviewer Port is 1099.
• The Agent Magic is the encryption code of Agent. Please limit the number of characters of
the code since it does not need to be too long.
• Poll Interval should be set to > 60 seconds.
• Select the appropriate locale to match your ACTAtek device.
• Log Level decides which level of log statement is going to be logged.
ACTAtek Agent Manual 9
HECTRIX LTD.
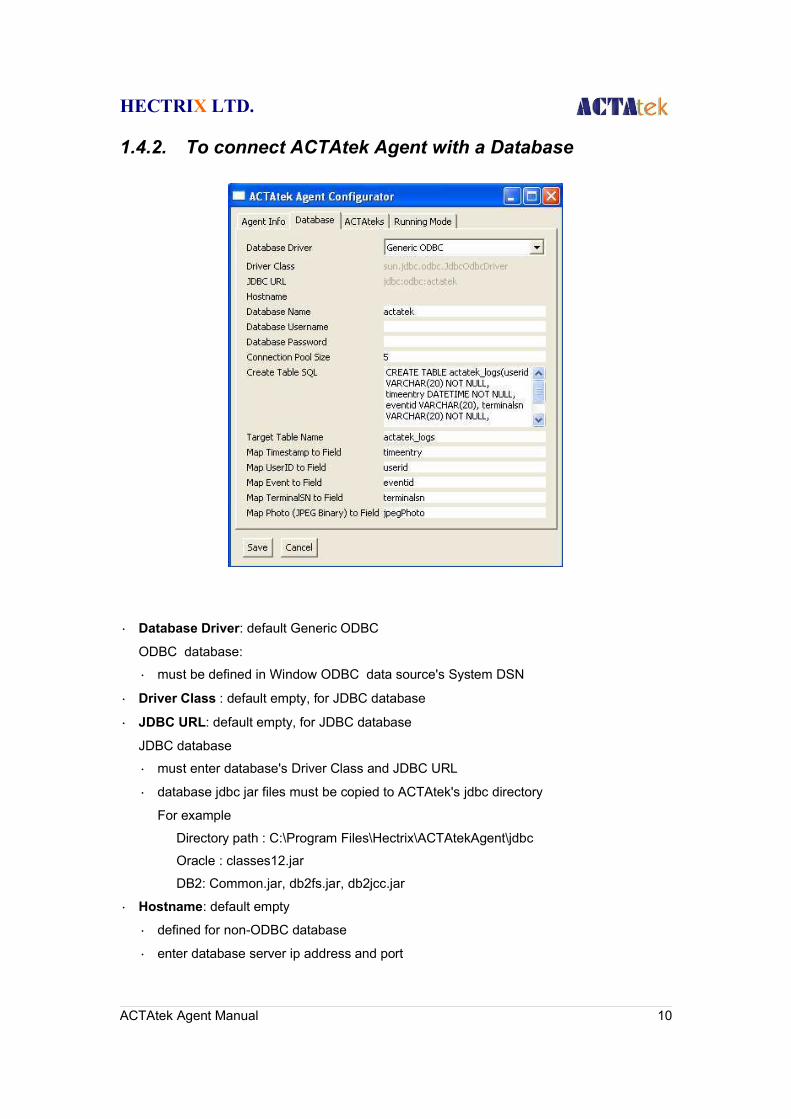
1.4.2. To connect ACTAtek Agent with a Database
• Database Driver: default Generic ODBC
ODBC database:
• must be defined in Window ODBC data source's System DSN
• Driver Class : default empty, for JDBC database
• JDBC URL: default empty, for JDBC database
JDBC database
• must enter database's Driver Class and JDBC URL
• database jdbc jar files must be copied to ACTAtek's jdbc directory
For example
Directory path : C:\Program Files\Hectrix\ACTAtekAgent\jdbc
Oracle : classes12.jar
DB2: Common.jar, db2fs.jar, db2jcc.jar
• Hostname: default empty
• defined for non-ODBC database
• enter database server ip address and port
ACTAtek Agent Manual 10

HECTRIX LTD.
• Database Name: actatek (default ms-access database)
• Database Username and Password: default empty (eg empty for ms-access db)
• enter database administrator id and password
• Connection Pool Size: 5 (default)
• Create Table SQL: SQL command, default definition has 6 fields
Optional: Photo: default long binary (for ms access)
IP and remark default Varchar(255)
• Target Table Name: Use table name same as Create Table SQL
• Map Event log field to Table column name or leave empty if not used:
Map Timestamp to Field, Map UserID to Field, Map Event to Field, Map TerminalSN toField, Map Photo (JPEG Binary) to Field, Map IP to Field, Map Remark to Field.
Please use name same as column name as defined in SQL CREATE TABLE
ACTAtek Agent Manual 11

HECTRIX LTD.
1.4.3. ACTAtek Agent (Attach Primary terminals only)
• Right click on the blank space, you will see “Add ACTAtek” or “Delete ACTAtek”
• Please enter the corresponding “ACTAtek IP”, “Port”, “Protocol”, “Admin” and “Password”
• Please be reminded that if you choose Port 80, you need to have http protocol. If you
choose Port 443, you need to have https protocol
• The default running mode is Real Time. Running mode is discussed in following section.
• Save it after all setting completed. The following screen will appear:
• The configuration will be effective at Next ACTAtekAgent startup.
ACTAtek Agent Manual 12

HECTRIX LTD.
1.4.4. ACTAtekAgent Running Mode
Real Time Mode• Real time mode is the default for real time event log transfer.
Schedule Mode• Schedule mode is for schedule log transfer at specify time.
Get mode: Previous day logs: transfer only previous day event log.
All logs: Transfer all event log. If log already found in
database, ACTAtekAgent will not insert duplicate.
Period: Default run Daily.
Time: The startup time of daily event log transfer.
ACTAtek Agent Manual 13
HECTRIX LTD.
1.5. Starting ACTAtekAgentACTAtekAgent can be started by one of the following ways:
• ACTAtekAgent can be started as an application.
Note: If the desktop is reboot, user has to manually statup ACTAtekAgent again.
OR
• ACTAtekAgent can be started as a Window Service.
ACTAtekAgent is automatically startup as a service after Window started.
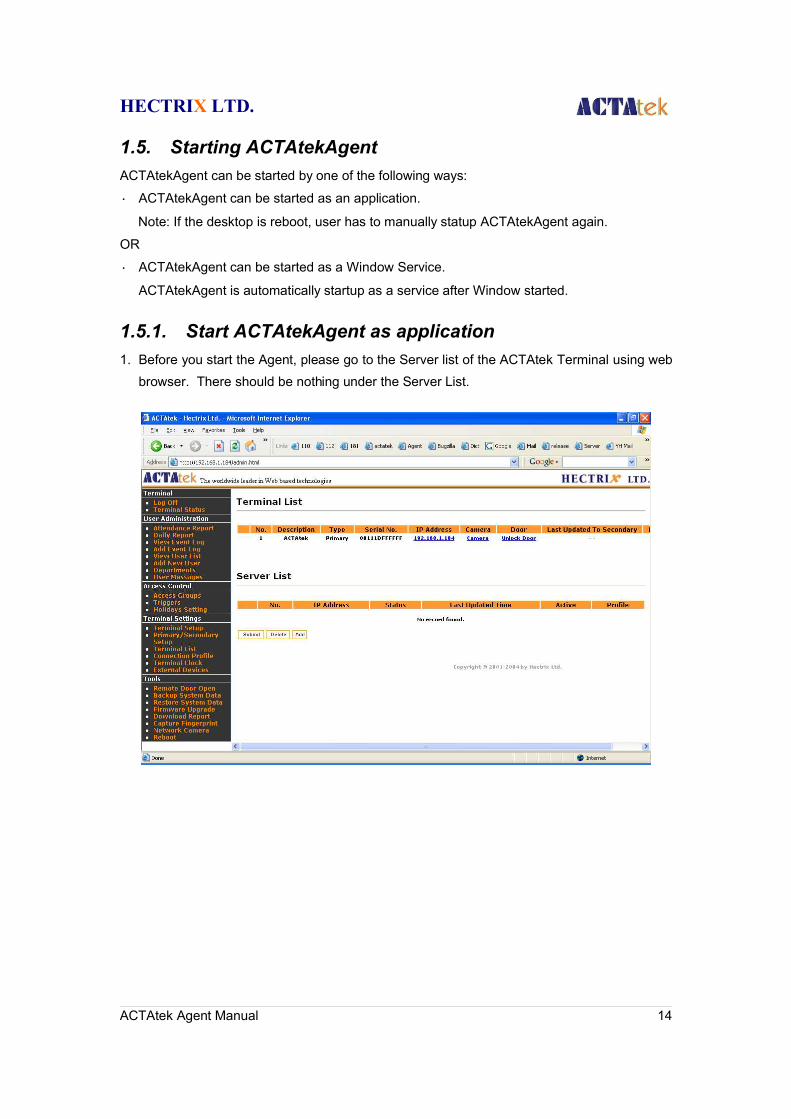
1.5.1. Start ACTAtekAgent as application1. Before you start the Agent, please go to the Server list of the ACTAtek Terminal using web
browser. There should be nothing under the Server List.
ACTAtek Agent Manual 14
HECTRIX LTD.
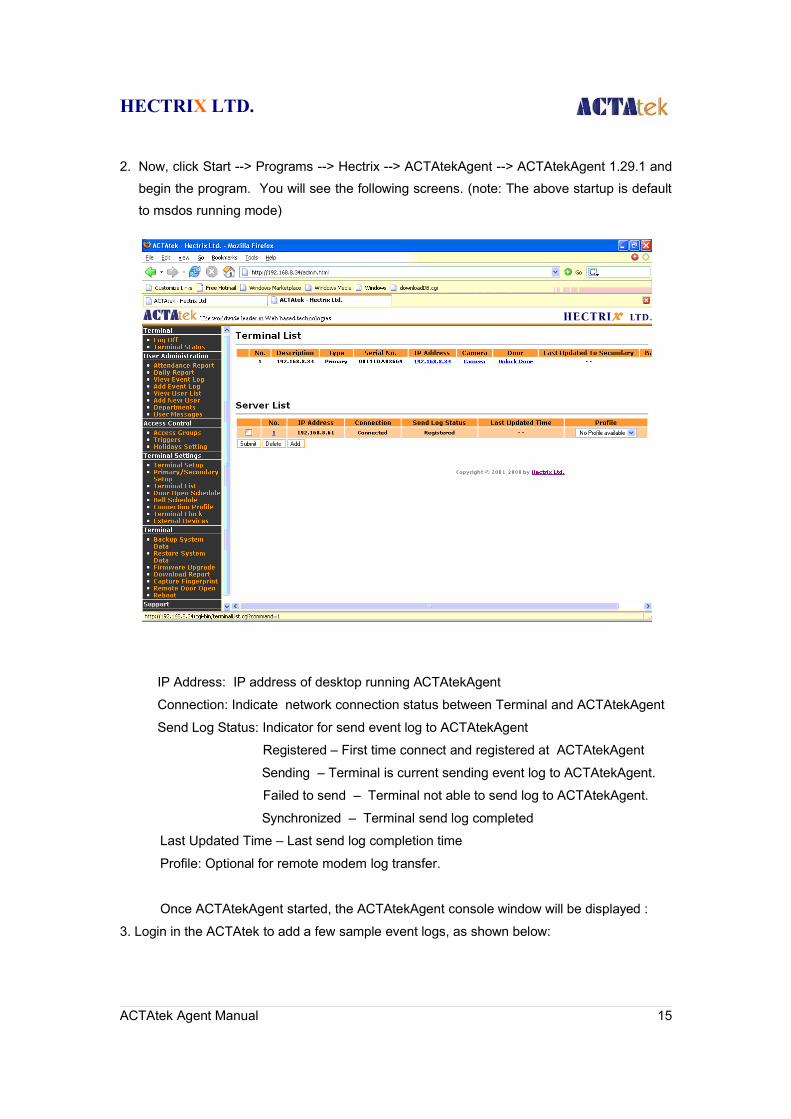
2. Now, click Start --> Programs --> Hectrix --> ACTAtekAgent --> ACTAtekAgent 1.29.1 andbegin the program. You will see the following screens. (note: The above startup is defaultto msdos running mode)
IP Address: IP address of desktop running ACTAtekAgent
Connection: Indicate network connection status between Terminal and ACTAtekAgent
Send Log Status: Indicator for send event log to ACTAtekAgent
Registered – First time connect and registered at ACTAtekAgent
Sending – Terminal is current sending event log to ACTAtekAgent.
Failed to send – Terminal not able to send log to ACTAtekAgent.
Synchronized – Terminal send log completed
Last Updated Time – Last send log completion time
Profile: Optional for remote modem log transfer.
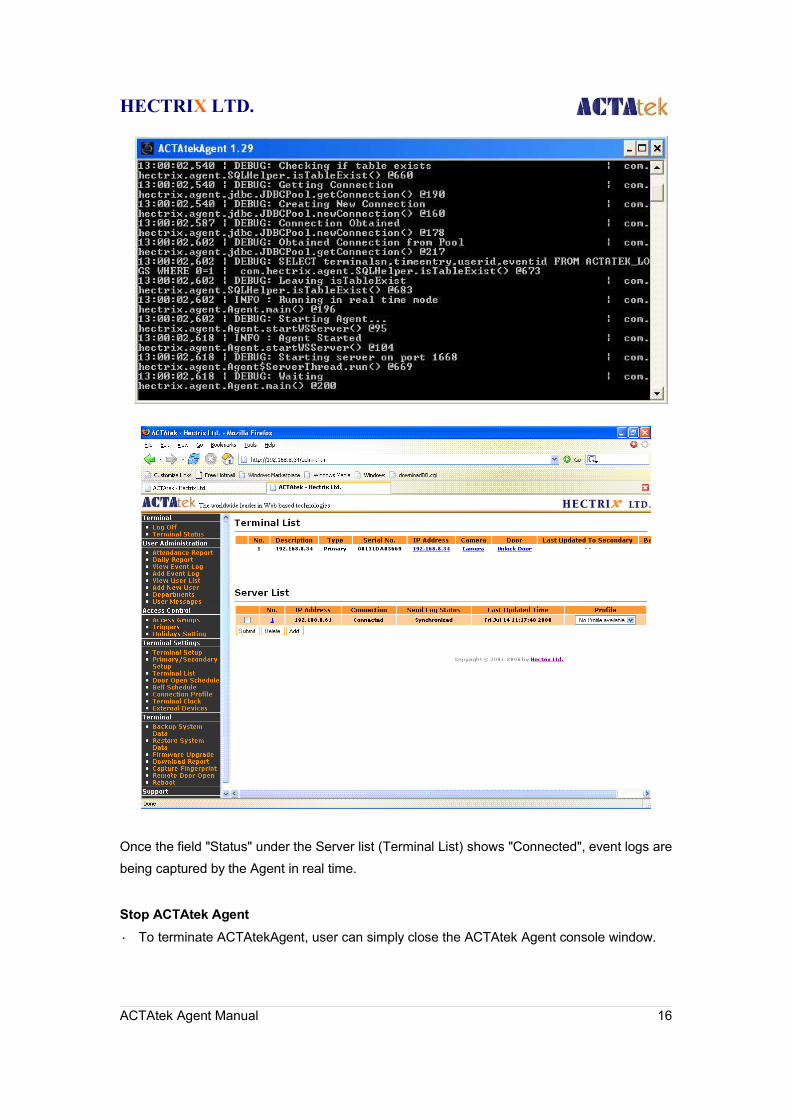
Once ACTAtekAgent started, the ACTAtekAgent console window will be displayed :
3. Login in the ACTAtek to add a few sample event logs, as shown below:
ACTAtek Agent Manual 15
HECTRIX LTD.
Once the field "Status" under the Server list (Terminal List) shows "Connected", event logs arebeing captured by the Agent in real time.
Stop ACTAtek Agent • To terminate ACTAtekAgent, user can simply close the ACTAtek Agent console window.
ACTAtek Agent Manual 16
HECTRIX LTD.
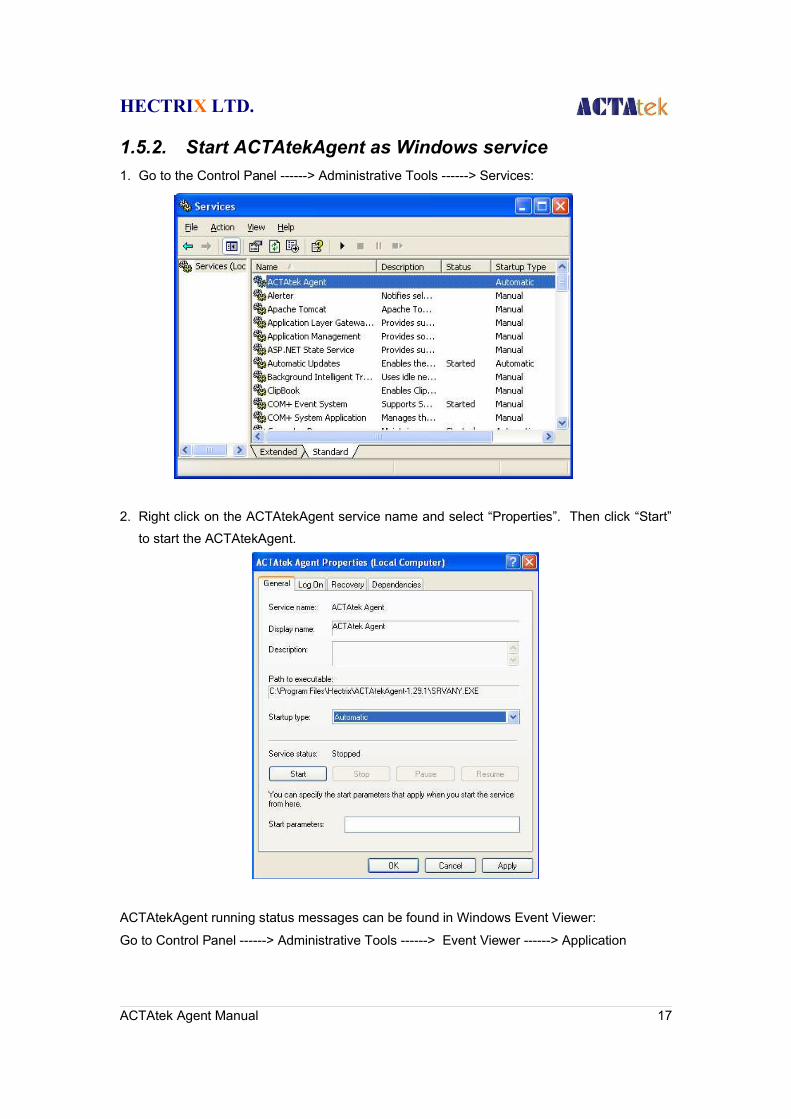
1.5.2. Start ACTAtekAgent as Windows service1. Go to the Control Panel ------> Administrative Tools ------> Services:
2. Right click on the ACTAtekAgent service name and select “Properties”. Then click “Start”to start the ACTAtekAgent.
ACTAtekAgent running status messages can be found in Windows Event Viewer:
Go to Control Panel ------> Administrative Tools ------> Event Viewer ------> Application
ACTAtek Agent Manual 17
HECTRIX LTD.
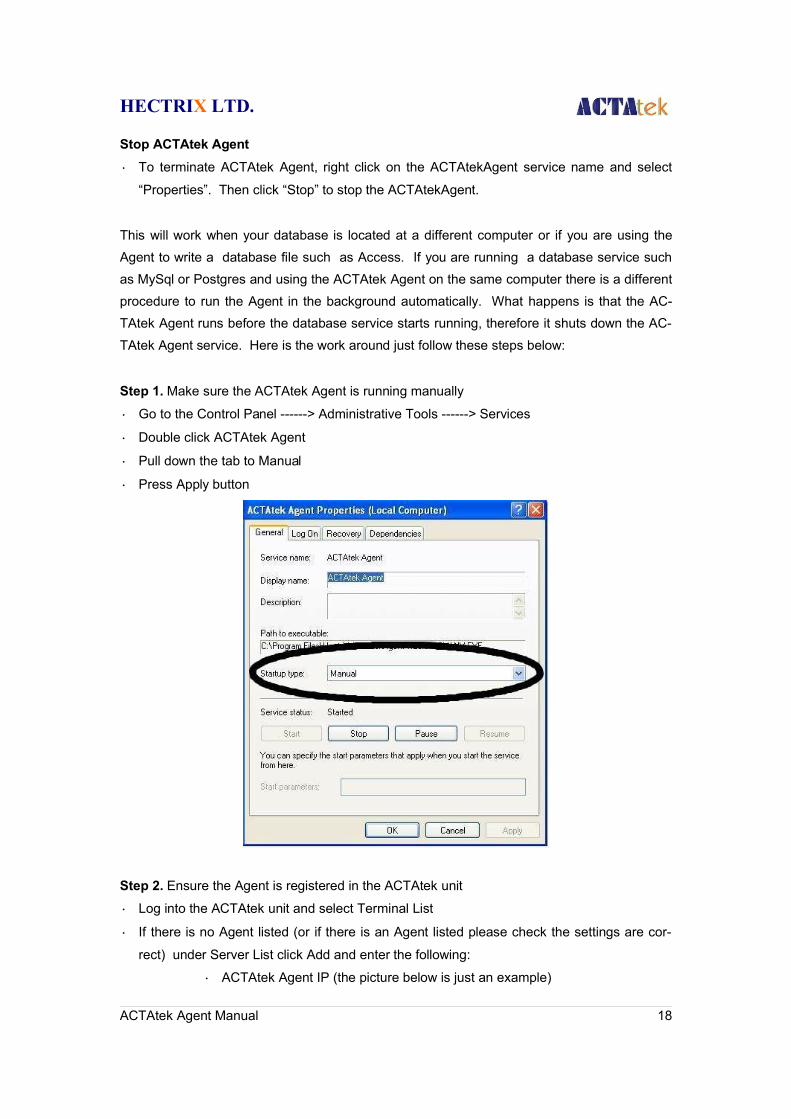
Stop ACTAtek Agent • To terminate ACTAtek Agent, right click on the ACTAtekAgent service name and select
“Properties”. Then click “Stop” to stop the ACTAtekAgent.
This will work when your database is located at a different computer or if you are using theAgent to write a database file such as Access. If you are running a database service suchas MySql or Postgres and using the ACTAtek Agent on the same computer there is a differentprocedure to run the Agent in the background automatically. What happens is that the AC-TAtek Agent runs before the database service starts running, therefore it shuts down the AC-TAtek Agent service. Here is the work around just follow these steps below:
Step 1. Make sure the ACTAtek Agent is running manually
• Go to the Control Panel ------> Administrative Tools ------> Services
• Double click ACTAtek Agent
• Pull down the tab to Manual
• Press Apply button
Step 2. Ensure the Agent is registered in the ACTAtek unit
• Log into the ACTAtek unit and select Terminal List
• If there is no Agent listed (or if there is an Agent listed please check the settings are cor-
rect) under Server List click Add and enter the following:
• ACTAtek Agent IP (the picture below is just an example)
ACTAtek Agent Manual 18
HECTRIX LTD.
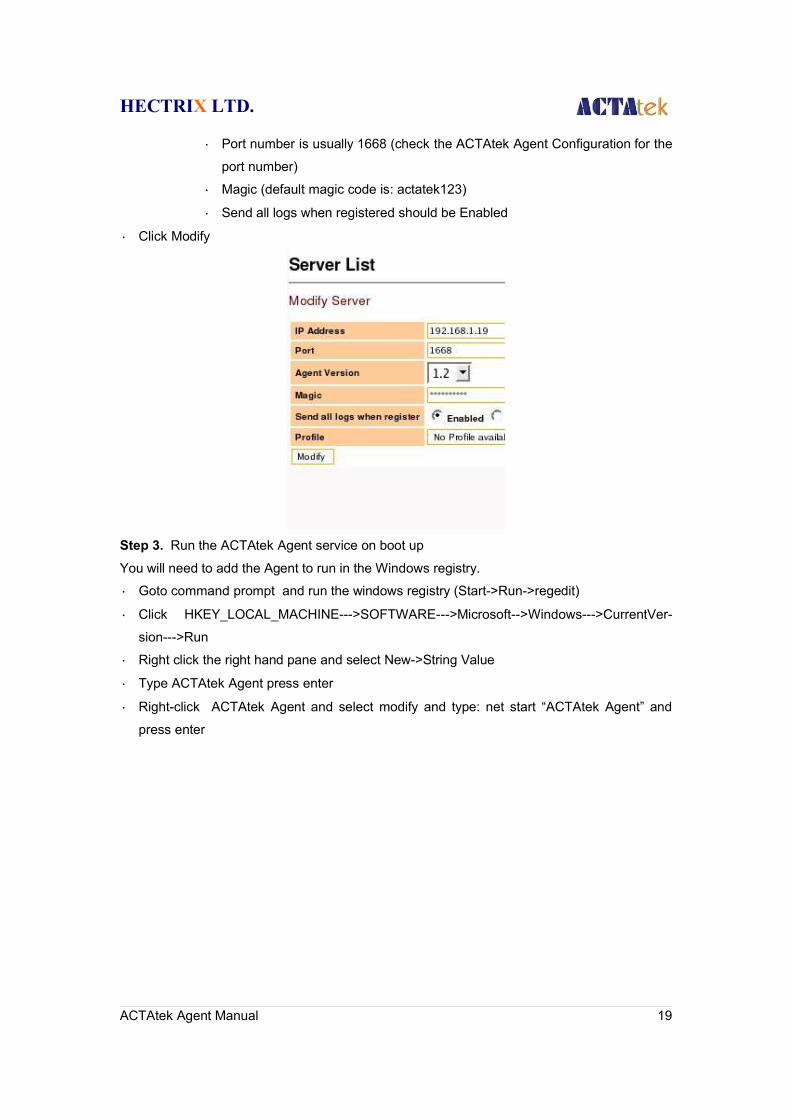
• Port number is usually 1668 (check the ACTAtek Agent Configuration for the
port number)
• Magic (default magic code is: actatek123)
• Send all logs when registered should be Enabled
• Click Modify
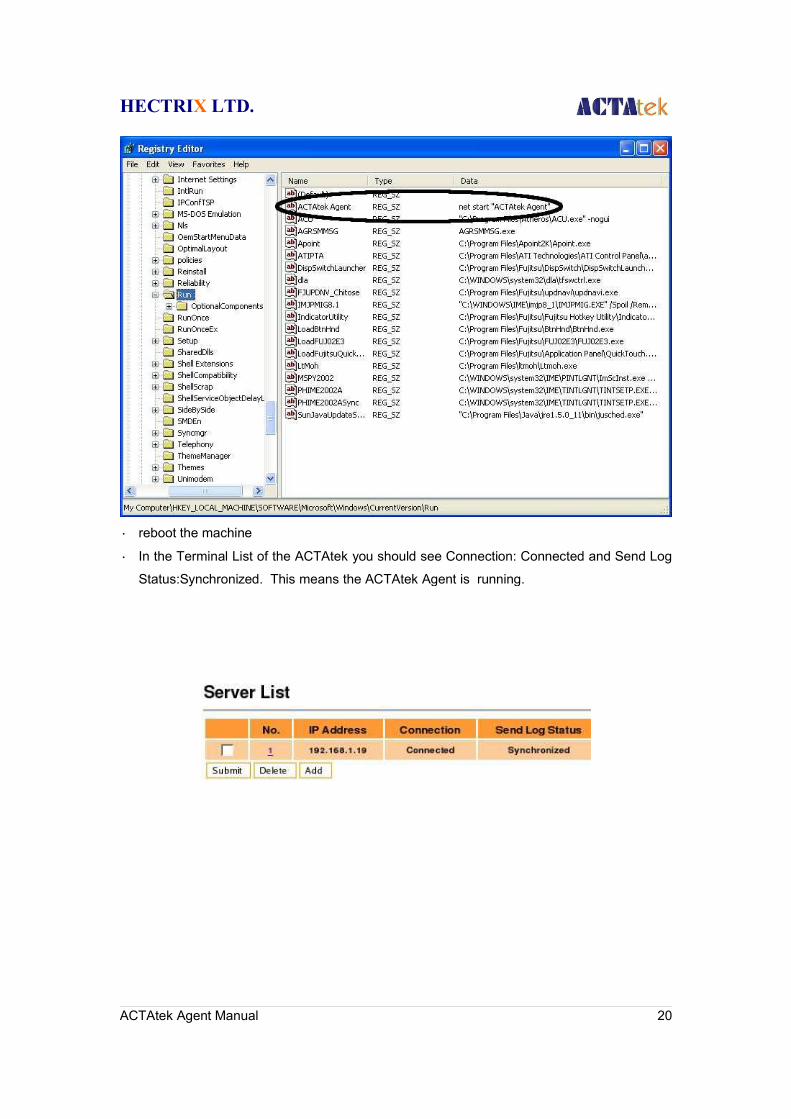
Step 3. Run the ACTAtek Agent service on boot up
You will need to add the Agent to run in the Windows registry.
• Goto command prompt and run the windows registry (Start->Run->regedit)
• Click HKEY_LOCAL_MACHINE--->SOFTWARE--->Microsoft-->Windows--->CurrentVer-
sion--->Run
• Right click the right hand pane and select New->String Value
• Type ACTAtek Agent press enter
• Right-click ACTAtek Agent and select modify and type: net start “ACTAtek Agent” and
press enter
ACTAtek Agent Manual 19
HECTRIX LTD.
• reboot the machine
• In the Terminal List of the ACTAtek you should see Connection: Connected and Send Log
Status:Synchronized. This means the ACTAtek Agent is running.
ACTAtek Agent Manual 20
HECTRIX LTD.
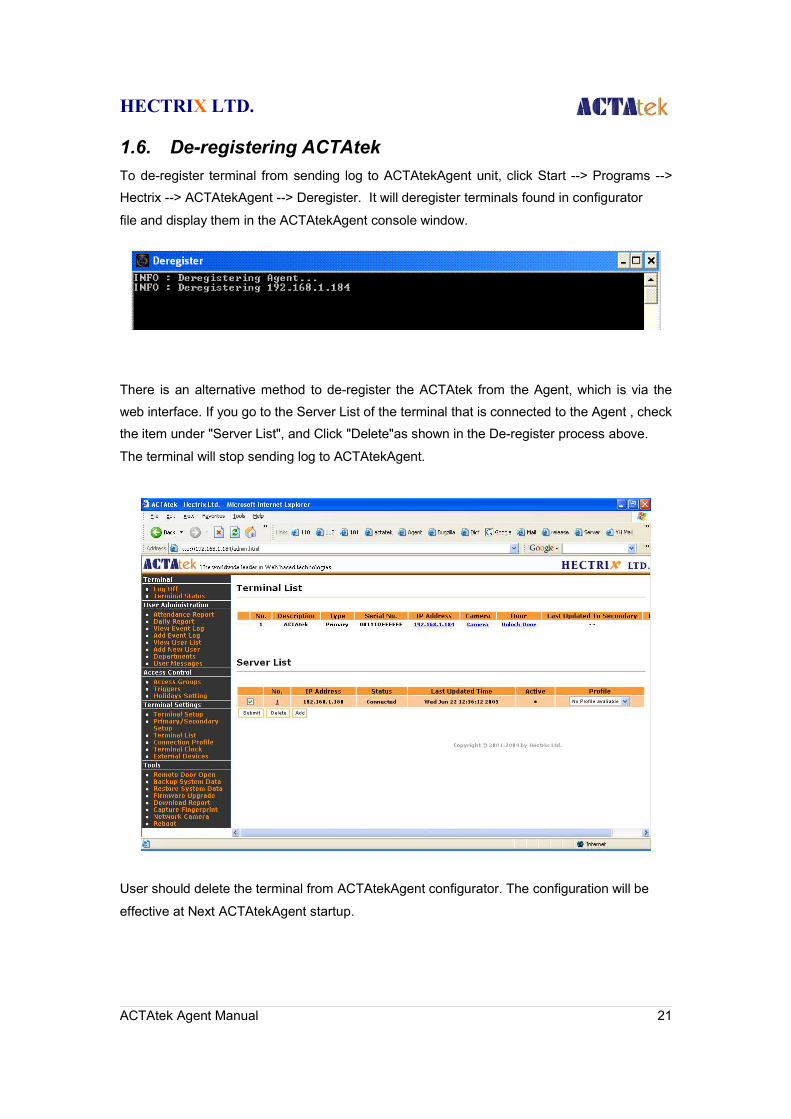
1.6. De-registering ACTAtek To de-register terminal from sending log to ACTAtekAgent unit, click Start --> Programs -->Hectrix --> ACTAtekAgent --> Deregister. It will deregister terminals found in configurator
file and display them in the ACTAtekAgent console window.
There is an alternative method to de-register the ACTAtek from the Agent, which is via theweb interface. If you go to the Server List of the terminal that is connected to the Agent , checkthe item under "Server List", and Click "Delete"as shown in the De-register process above.
The terminal will stop sending log to ACTAtekAgent.
User should delete the terminal from ACTAtekAgent configurator. The configuration will be
effective at Next ACTAtekAgent startup.
ACTAtek Agent Manual 21
HECTRIX LTD.
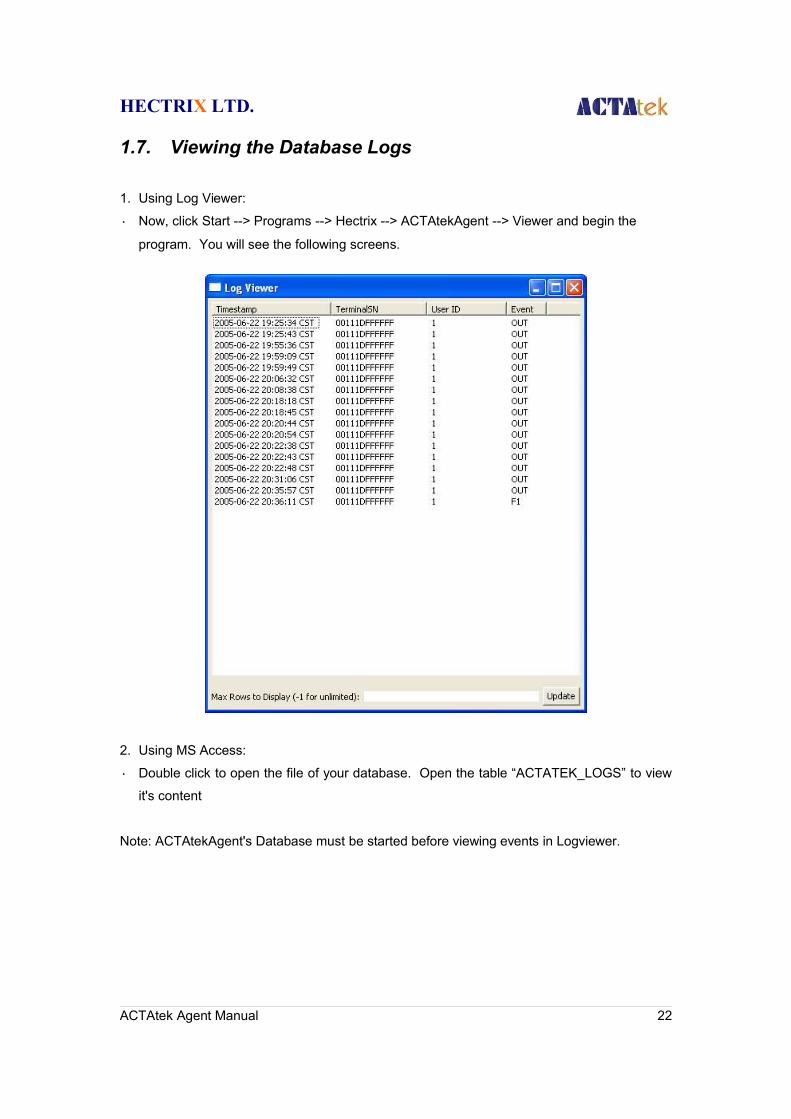
1.7. Viewing the Database Logs
1. Using Log Viewer:
• Now, click Start --> Programs --> Hectrix --> ACTAtekAgent --> Viewer and begin the
program. You will see the following screens.
2. Using MS Access:
• Double click to open the file of your database. Open the table “ACTATEK_LOGS” to view
it's content
Note: ACTAtekAgent's Database must be started before viewing events in Logviewer.
ACTAtek Agent Manual 22
HECTRIX LTD.
1.8. Connecting ACTAtek Agent with Oracle 10g Database
1. Since the database setting is different for each customer, it is highly recommended thatyou consult with your DBA for the database administration and setting.
2. You need to Copy Oracle's classes12.zip to the Agent's JDBC in Window's directory. Fol-lowing are the steps:
• classes12.zip location: ${ORACLE_HOME}/jdbc/lib/classes12.zip
• copy the file C:\Program Files\Hectrix\ACTAtekAgent-1.27\jdbc
3. Preparation :
• Database Server and Firewall must set rule to allow ACTAtek Agent to
access the Oracle database Port (default 1521)
• Database login userid must be granted necessary rights eg. Connection and Table access
• Default table name is actatek_logs and will use default tablespace.
• Table will be created, if it doesn't already exist. If the table exists, ACTAtek Agent will use
the existing table.
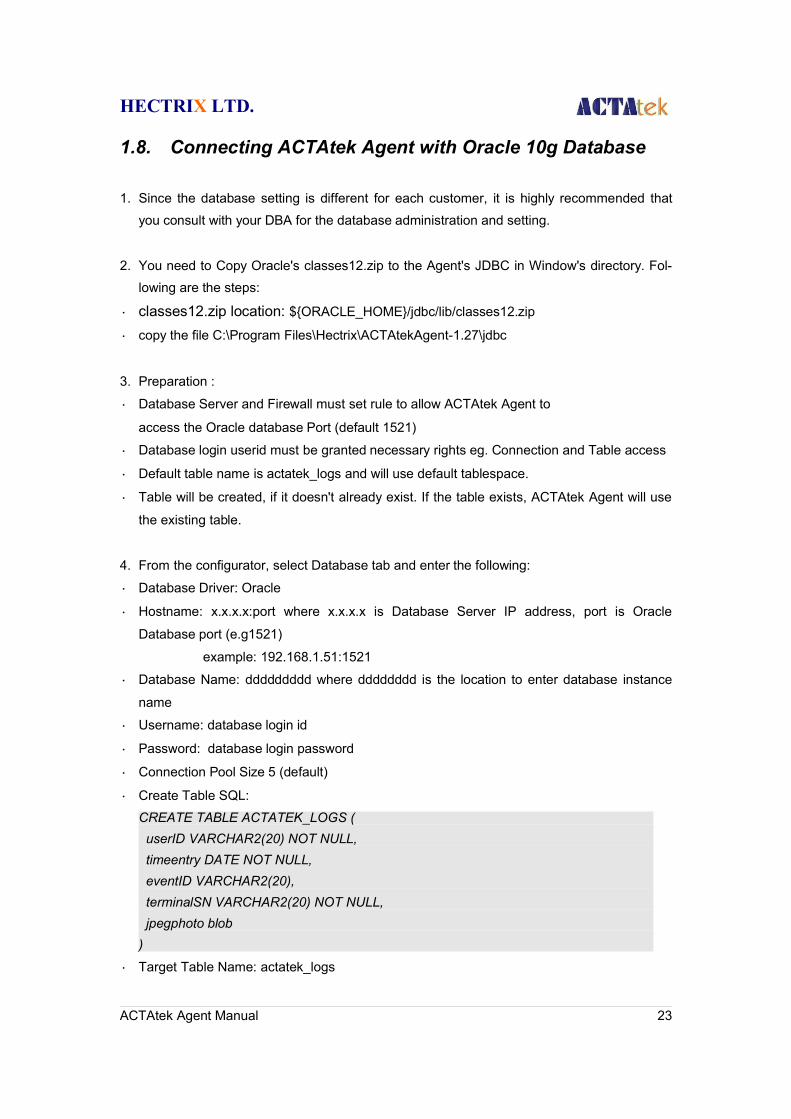
4. From the configurator, select Database tab and enter the following:
• Database Driver: Oracle
• Hostname: x.x.x.x:port where x.x.x.x is Database Server IP address, port is Oracle
Database port (e.g1521)
example: 192.168.1.51:1521
• Database Name: ddddddddd where dddddddd is the location to enter database instance
name
• Username: database login id
• Password: database login password
• Connection Pool Size 5 (default)
• Create Table SQL:CREATE TABLE ACTATEK_LOGS ( userID VARCHAR2(20) NOT NULL, timeentry DATE NOT NULL, eventID VARCHAR2(20), terminalSN VARCHAR2(20) NOT NULL, jpegphoto blob)
• Target Table Name: actatek_logs
ACTAtek Agent Manual 23

HECTRIX LTD.
• Map Timestamp to Field: timeentry
• Map UserID to Field: userid
• Map Event to Field: eventID
• Map TerminalSN to Field:terminalsn
• Map Photo (JPEG Binary) to Field: jpegphoto
ACTAtek Agent Manual 24
HECTRIX LTD.
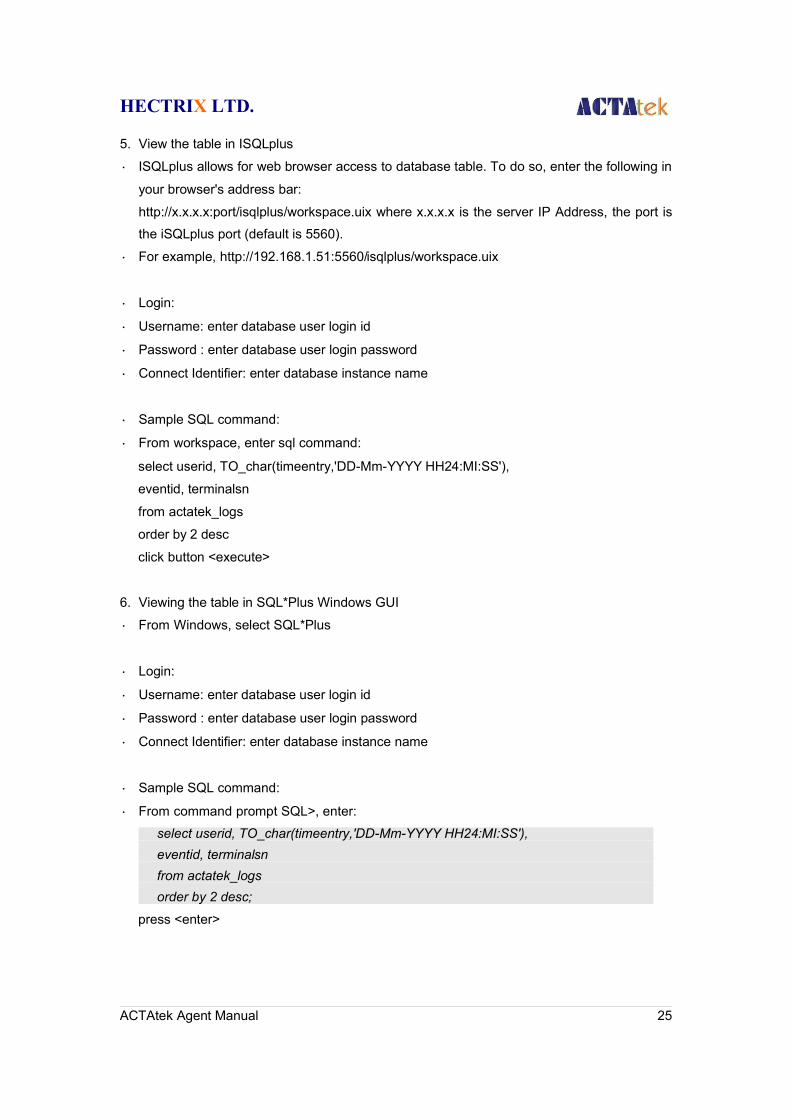
5. View the table in ISQLplus
• ISQLplus allows for web browser access to database table. To do so, enter the following in
your browser's address bar:
http://x.x.x.x:port/isqlplus/workspace.uix where x.x.x.x is the server IP Address, the port isthe iSQLplus port (default is 5560).
• For example, http://192.168.1.51:5560/isqlplus/workspace.uix
• Login:
• Username: enter database user login id
• Password : enter database user login password
• Connect Identifier: enter database instance name
• Sample SQL command:
• From workspace, enter sql command:
select userid, TO_char(timeentry,'DD-Mm-YYYY HH24:MI:SS'),
eventid, terminalsn
from actatek_logs
order by 2 desc
click button <execute>
6. Viewing the table in SQL*Plus Windows GUI
• From Windows, select SQL*Plus
• Login:
• Username: enter database user login id
• Password : enter database user login password
• Connect Identifier: enter database instance name
• Sample SQL command:
• From command prompt SQL>, enter:
select userid, TO_char(timeentry,'DD-Mm-YYYY HH24:MI:SS'), eventid, terminalsn from actatek_logs order by 2 desc;
press <enter>
ACTAtek Agent Manual 25
HECTRIX LTD.
1.9. Connecting ACTAtek Agent with MySQL Server
1. Since the database setting is different for each customer, it is highly recommended thatyou consult with your DBA for the database administration and setting.
2. In the ACTAtekAgent's JDBC directory, default will include a mysql jdbc driver.
• Please download the MySQL JDBC driver from:
http://www.mysql.com/products/connector/j/
and put the corresponding JAR file into:
C:\Program Files\Hectrix\ACTAtekAgent-1.27\jdbc
You should find mysql jdbc driver e.g.mysql-connector-java-3.0.14-production-bin
3. Preparation :
• Database login userid must be granted necessary rights eg. Connection and table access
rights.
• Default table name is actatek_logs
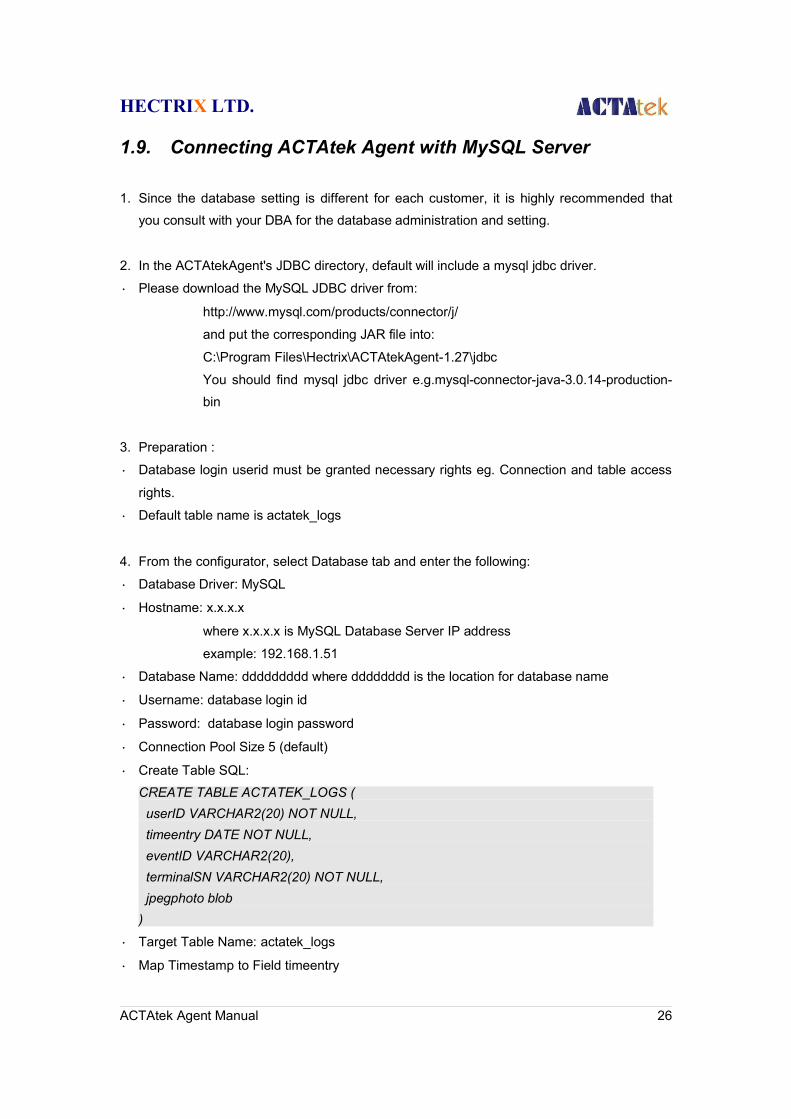
4. From the configurator, select Database tab and enter the following:
• Database Driver: MySQL
• Hostname: x.x.x.x
where x.x.x.x is MySQL Database Server IP address
example: 192.168.1.51
• Database Name: ddddddddd where dddddddd is the location for database name
• Username: database login id
• Password: database login password
• Connection Pool Size 5 (default)
• Create Table SQL:CREATE TABLE ACTATEK_LOGS ( userID VARCHAR2(20) NOT NULL, timeentry DATE NOT NULL, eventID VARCHAR2(20), terminalSN VARCHAR2(20) NOT NULL, jpegphoto blob)
• Target Table Name: actatek_logs
• Map Timestamp to Field timeentry
ACTAtek Agent Manual 26
HECTRIX LTD.
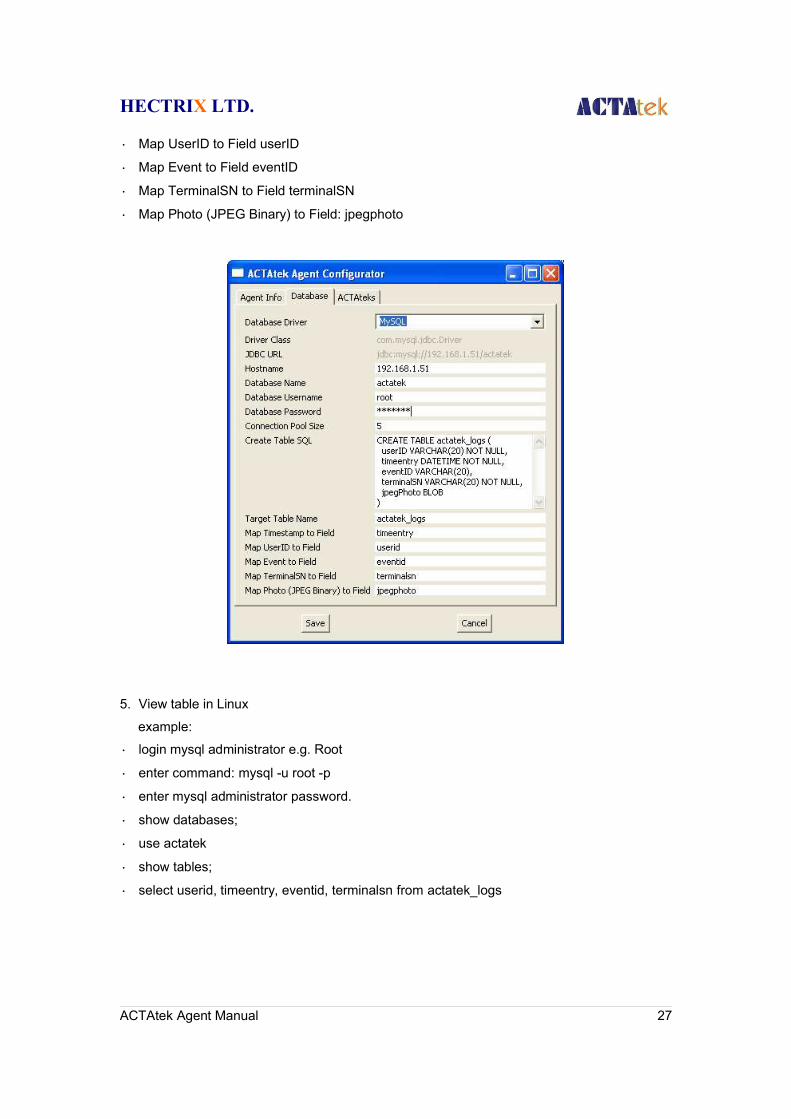
• Map UserID to Field userID
• Map Event to Field eventID
• Map TerminalSN to Field terminalSN
• Map Photo (JPEG Binary) to Field: jpegphoto
5. View table in Linux
example:
• login mysql administrator e.g. Root
• enter command: mysql -u root -p
• enter mysql administrator password.
• show databases;
• use actatek
• show tables;
• select userid, timeentry, eventid, terminalsn from actatek_logs
ACTAtek Agent Manual 27

HECTRIX LTD.
1.10. Connecting ACTAtek Agent with MS SQL ServerCurrently, ACTAtekAgent may require an ODBC system data source to act as a bridge to con-nect to the MS SQL Server. The following will illustrate how to setup an example of suchODBC connection to the data provider and the corresponding ACTAtekAgent configuration.
1.10.1. ODBC Setup
From Windows XP,
1. Start - > Control Panel
2. Select Administrative Tools;
3. Under Administrative Tools, select Data Sources (ODBC)
ACTAtek Agent Manual 28
HECTRIX LTD.
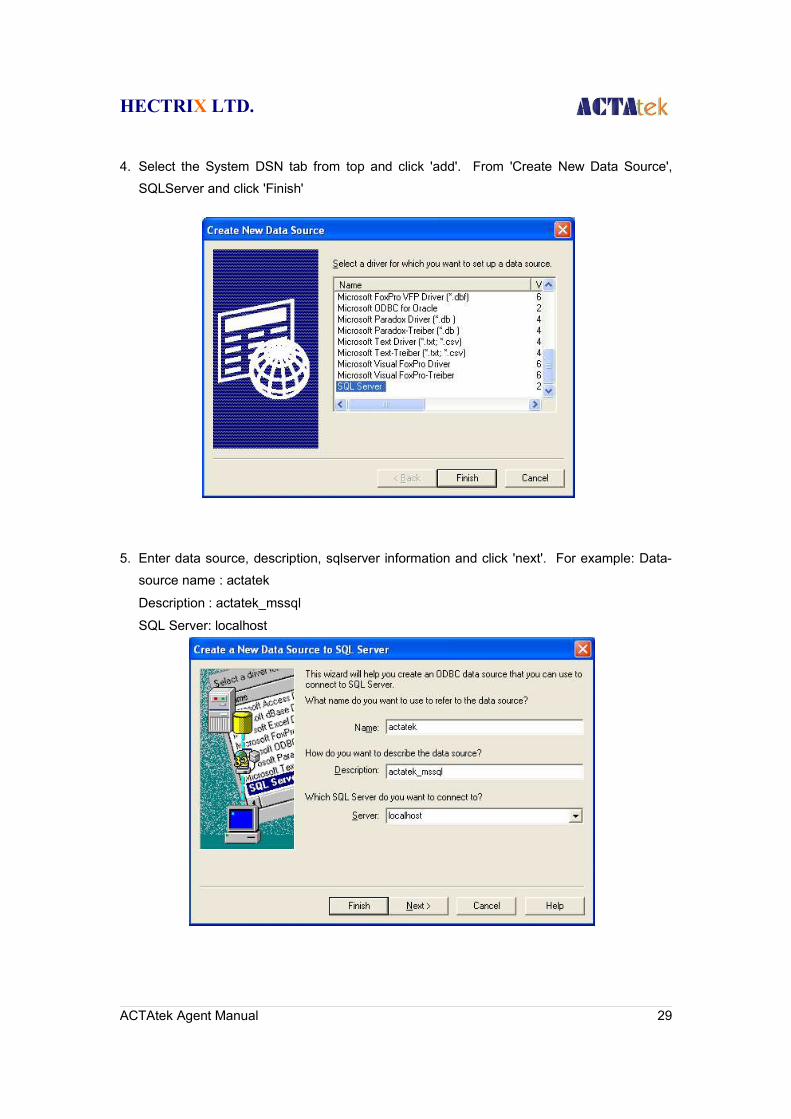
4. Select the System DSN tab from top and click 'add'. From 'Create New Data Source',SQLServer and click 'Finish'
5. Enter data source, description, sqlserver information and click 'next'. For example: Data-source name : actatek
Description : actatek_mssql
SQL Server: localhost
ACTAtek Agent Manual 29
HECTRIX LTD.
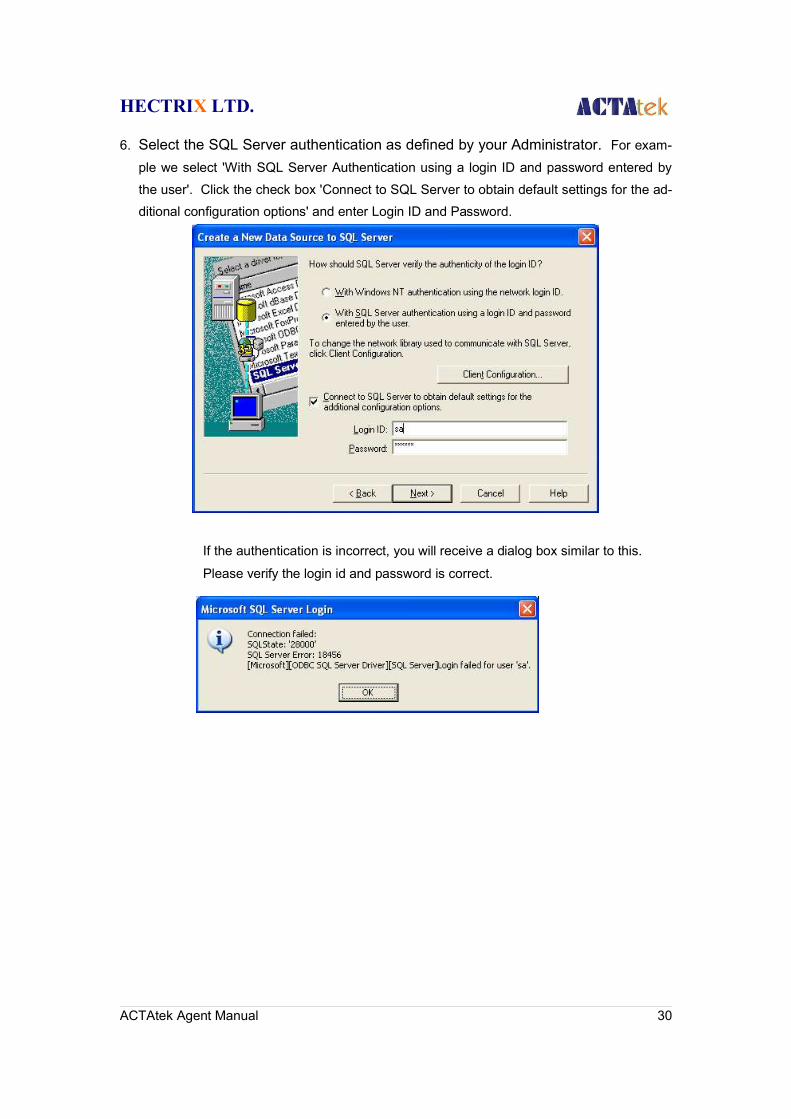
6. Select the SQL Server authentication as defined by your Administrator. For exam-
ple we select 'With SQL Server Authentication using a login ID and password entered bythe user'. Click the check box 'Connect to SQL Server to obtain default settings for the ad-ditional configuration options' and enter Login ID and Password.
If the authentication is incorrect, you will receive a dialog box similar to this.
Please verify the login id and password is correct.
ACTAtek Agent Manual 30
HECTRIX LTD.
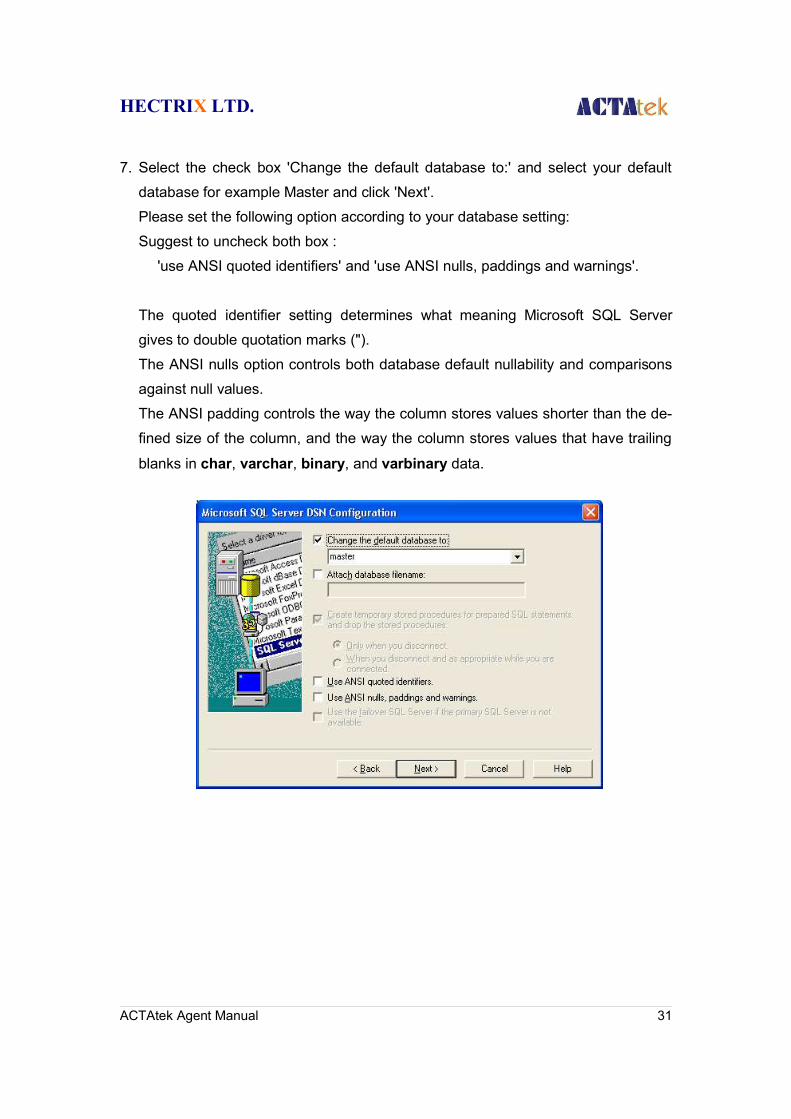
7. Select the check box 'Change the default database to:' and select your default
database for example Master and click 'Next'.
Please set the following option according to your database setting:
Suggest to uncheck both box :
'use ANSI quoted identifiers' and 'use ANSI nulls, paddings and warnings'.
The quoted identifier setting determines what meaning Microsoft SQL Server
gives to double quotation marks (").
The ANSI nulls option controls both database default nullability and comparisons
against null values.
The ANSI padding controls the way the column stores values shorter than the de-
fined size of the column, and the way the column stores values that have trailing
blanks in char, varchar, binary, and varbinary data.
ACTAtek Agent Manual 31
HECTRIX LTD.
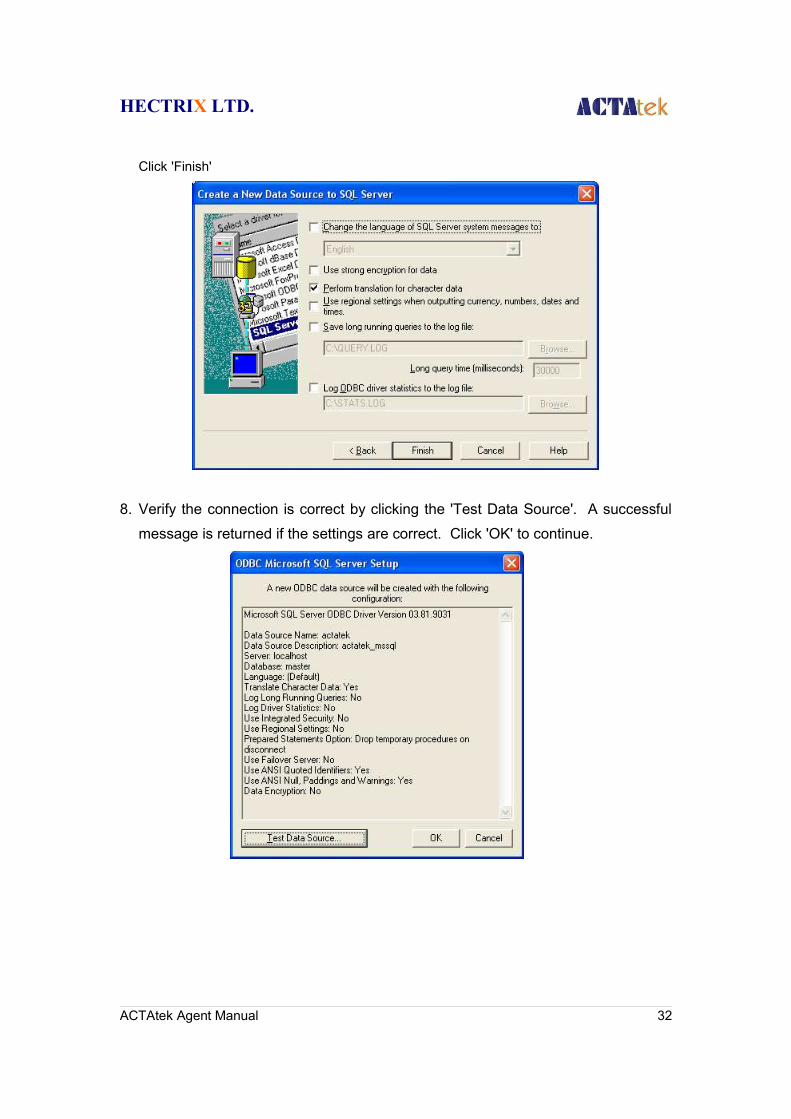
Click 'Finish'
8. Verify the connection is correct by clicking the 'Test Data Source'. A successful
message is returned if the settings are correct. Click 'OK' to continue.
ACTAtek Agent Manual 32
HECTRIX LTD.
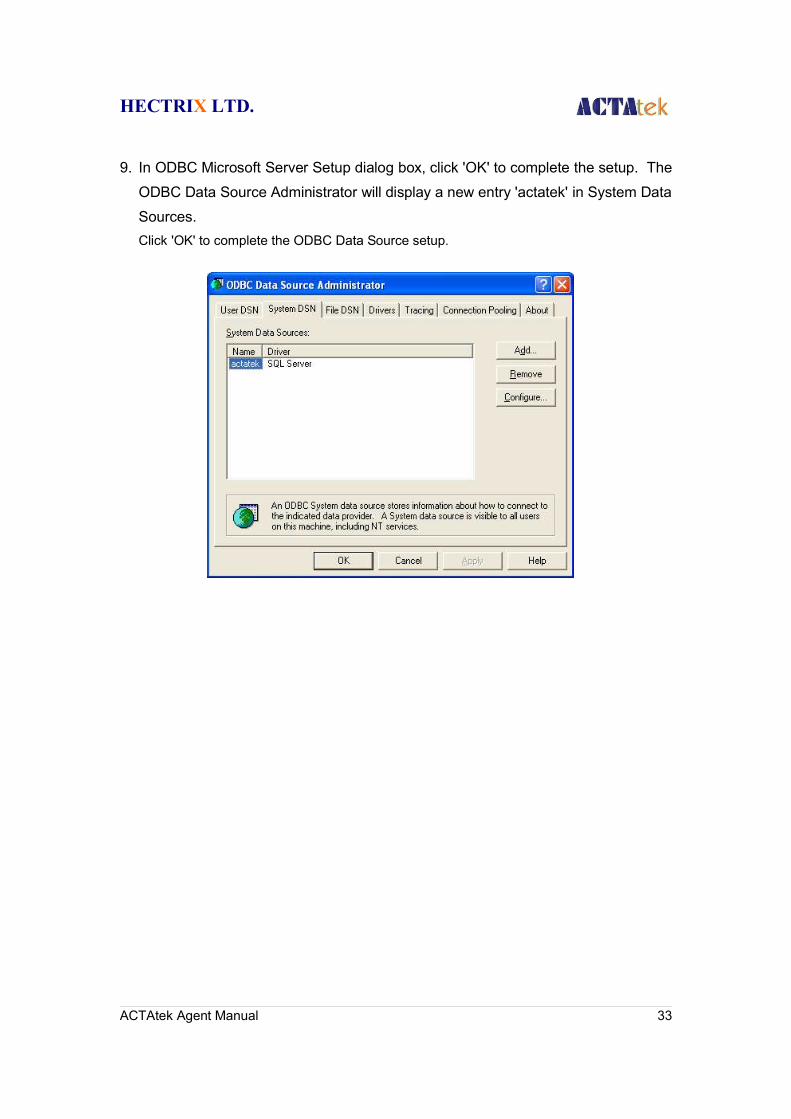
9. In ODBC Microsoft Server Setup dialog box, click 'OK' to complete the setup. The
ODBC Data Source Administrator will display a new entry 'actatek' in System Data
Sources. Click 'OK' to complete the ODBC Data Source setup.
ACTAtek Agent Manual 33
HECTRIX LTD.
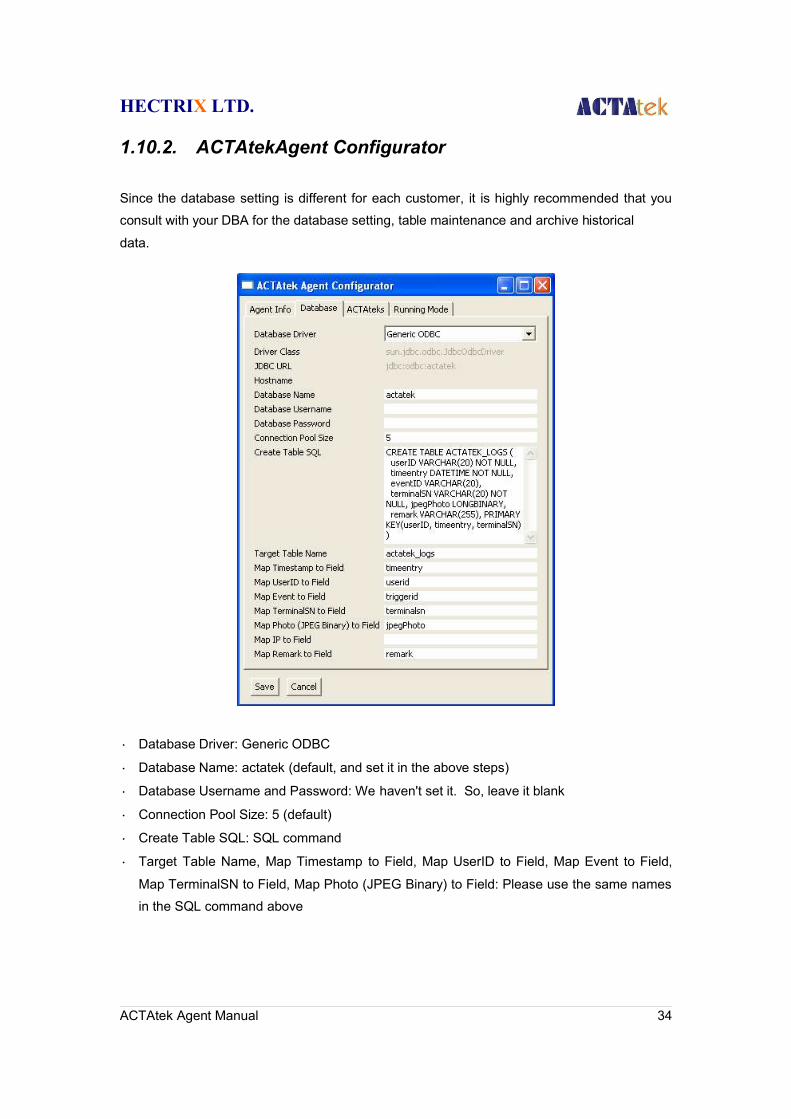
1.10.2. ACTAtekAgent Configurator
Since the database setting is different for each customer, it is highly recommended that youconsult with your DBA for the database setting, table maintenance and archive historical
data.
• Database Driver: Generic ODBC
• Database Name: actatek (default, and set it in the above steps)
• Database Username and Password: We haven't set it. So, leave it blank
• Connection Pool Size: 5 (default)
• Create Table SQL: SQL command
• Target Table Name, Map Timestamp to Field, Map UserID to Field, Map Event to Field,
Map TerminalSN to Field, Map Photo (JPEG Binary) to Field: Please use the same namesin the SQL command above
ACTAtek Agent Manual 34
HECTRIX LTD.
1.11. Connecting ACTAtek Agent to output .txt / .csv format
1.11.1. ODBC Setup1. From Windows XP,
2. Start - > Control Panel
3. Select Administrative Tools;
4. Under Administrative Tools, select Data Sources (ODBC)
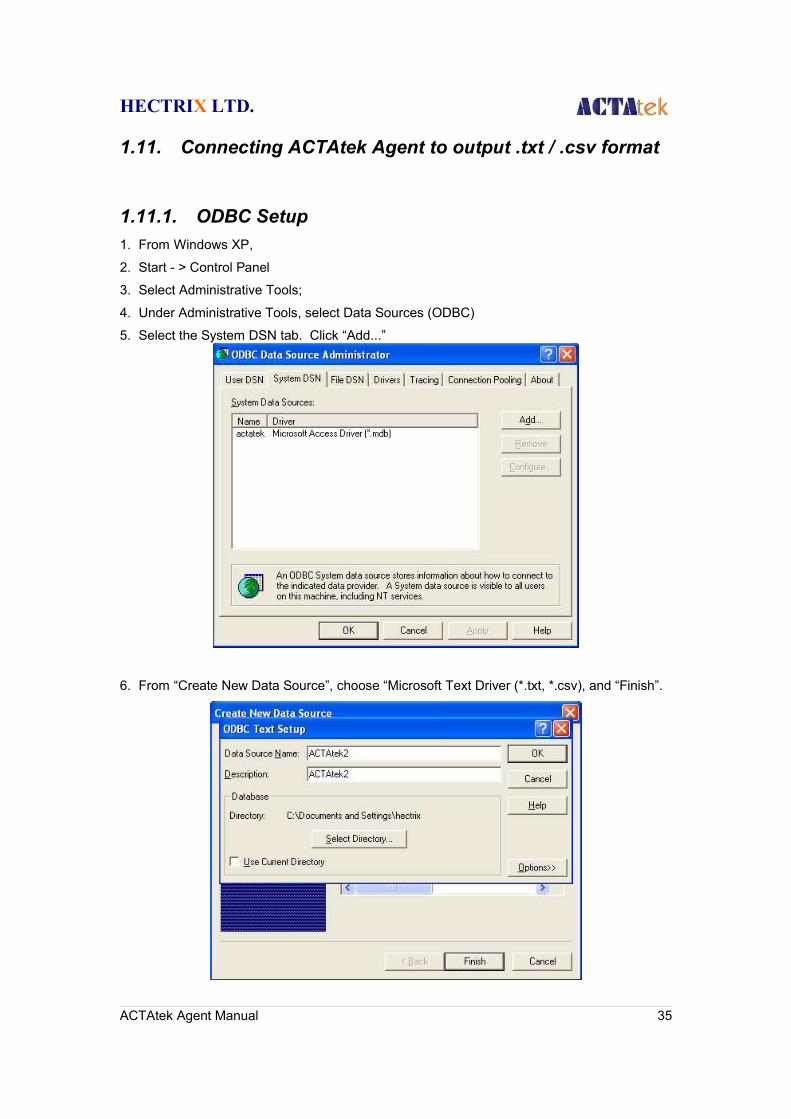
5. Select the System DSN tab. Click “Add...”
6. From “Create New Data Source”, choose “Microsoft Text Driver (*.txt, *.csv), and “Finish”.
ACTAtek Agent Manual 35
HECTRIX LTD.
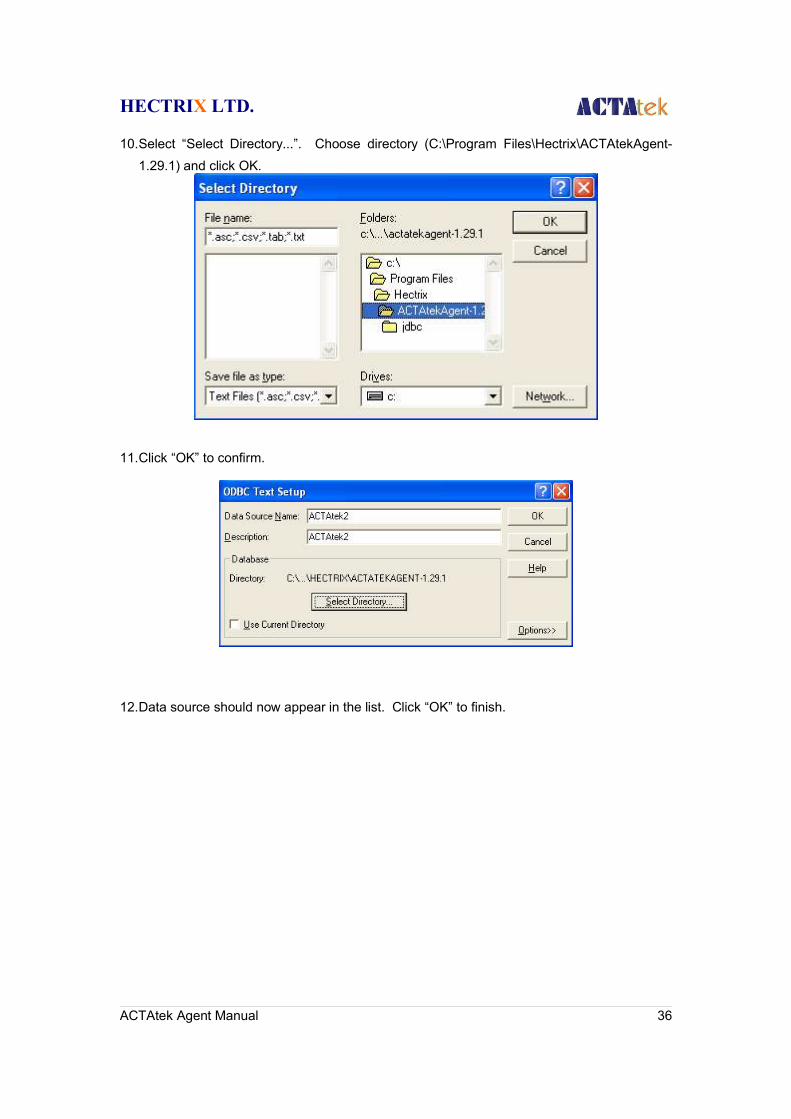
10.Select “Select Directory...”. Choose directory (C:\Program Files\Hectrix\ACTAtekAgent-1.29.1) and click OK.
11.Click “OK” to confirm.
12.Data source should now appear in the list. Click “OK” to finish.
ACTAtek Agent Manual 36
HECTRIX LTD.
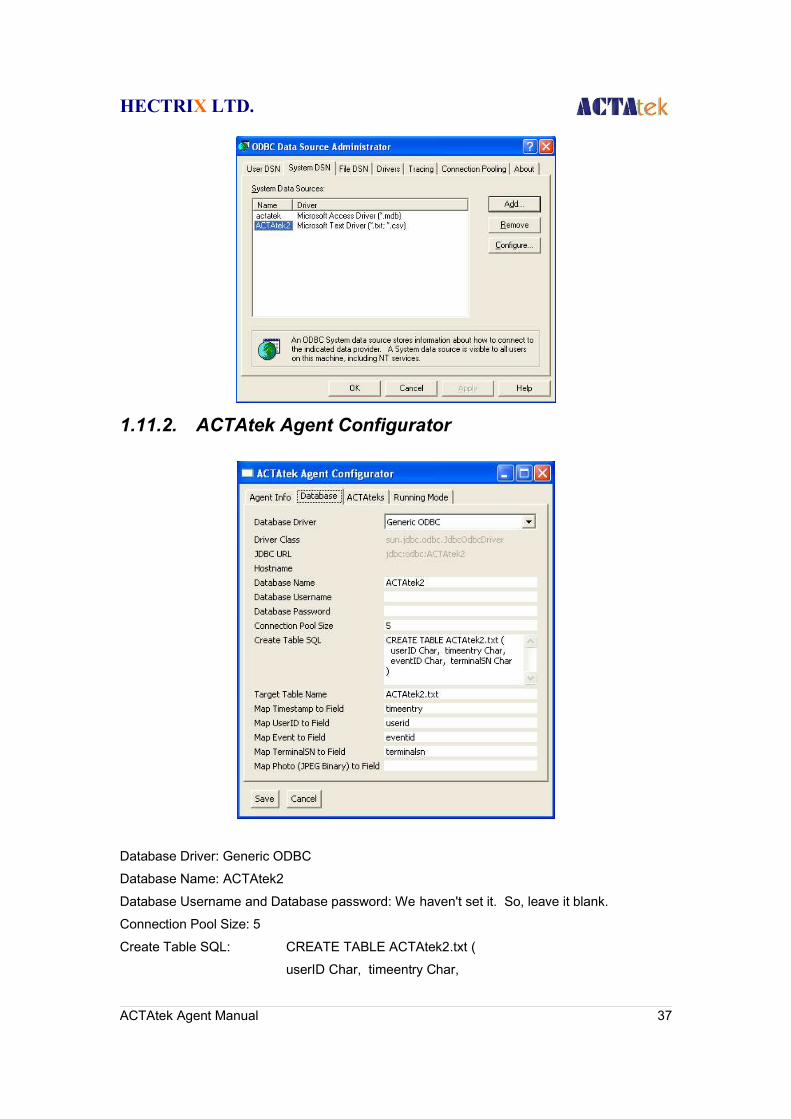
1.11.2. ACTAtek Agent Configurator
Database Driver: Generic ODBC
Database Name: ACTAtek2
Database Username and Database password: We haven't set it. So, leave it blank.
Connection Pool Size: 5
Create Table SQL: CREATE TABLE ACTAtek2.txt (
userID Char, timeentry Char,
ACTAtek Agent Manual 37

HECTRIX LTD.
eventID Char, terminalSN Char
)
Target Table Name, Map Timestamp to Field, Map UserID to Field, Map Event to Field, MapTerminalSN to Field, Map Photo (JPEG Binary) to Field: Please use the same names in theSQL command above.
ACTAtek Agent Manual 38
HECTRIX LTD.
1.12. Connecting ACTAtek Agent Behind Routers
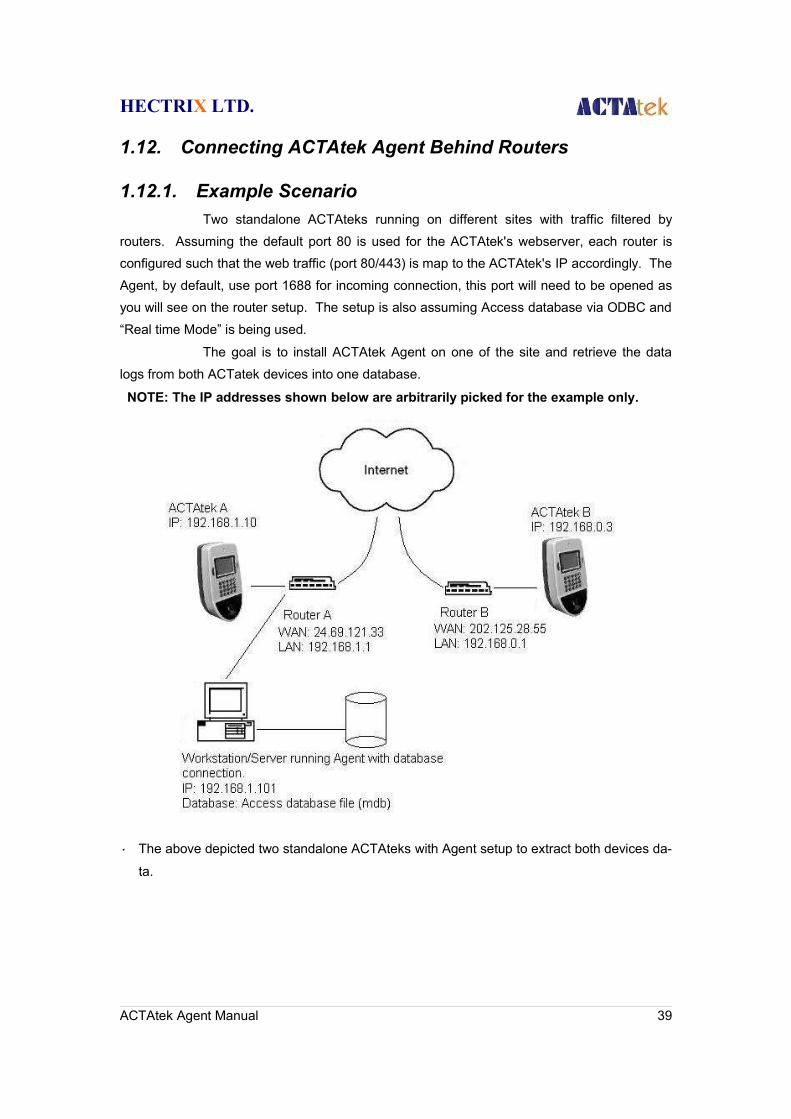
1.12.1. Example ScenarioTwo standalone ACTAteks running on different sites with traffic filtered by
routers. Assuming the default port 80 is used for the ACTAtek's webserver, each router isconfigured such that the web traffic (port 80/443) is map to the ACTAtek's IP accordingly. TheAgent, by default, use port 1688 for incoming connection, this port will need to be opened asyou will see on the router setup. The setup is also assuming Access database via ODBC and“Real time Mode” is being used.
The goal is to install ACTAtek Agent on one of the site and retrieve the datalogs from both ACTatek devices into one database.
NOTE: The IP addresses shown below are arbitrarily picked for the example only.
• The above depicted two standalone ACTAteks with Agent setup to extract both devices da-
ta.
ACTAtek Agent Manual 39
HECTRIX LTD.
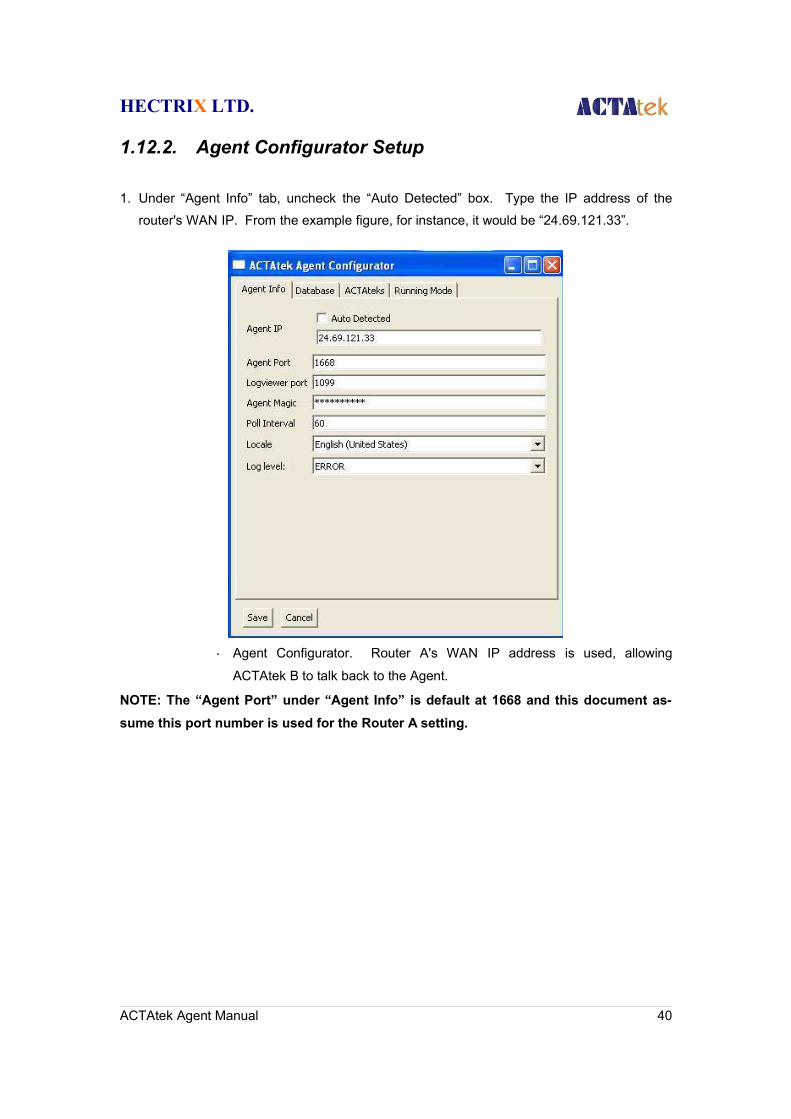
1.12.2. Agent Configurator Setup
1. Under “Agent Info” tab, uncheck the “Auto Detected” box. Type the IP address of therouter's WAN IP. From the example figure, for instance, it would be “24.69.121.33”.
• Agent Configurator. Router A's WAN IP address is used, allowing
ACTAtek B to talk back to the Agent.
NOTE: The “Agent Port” under “Agent Info” is default at 1668 and this document as-sume this port number is used for the Router A setting.
ACTAtek Agent Manual 40
HECTRIX LTD.
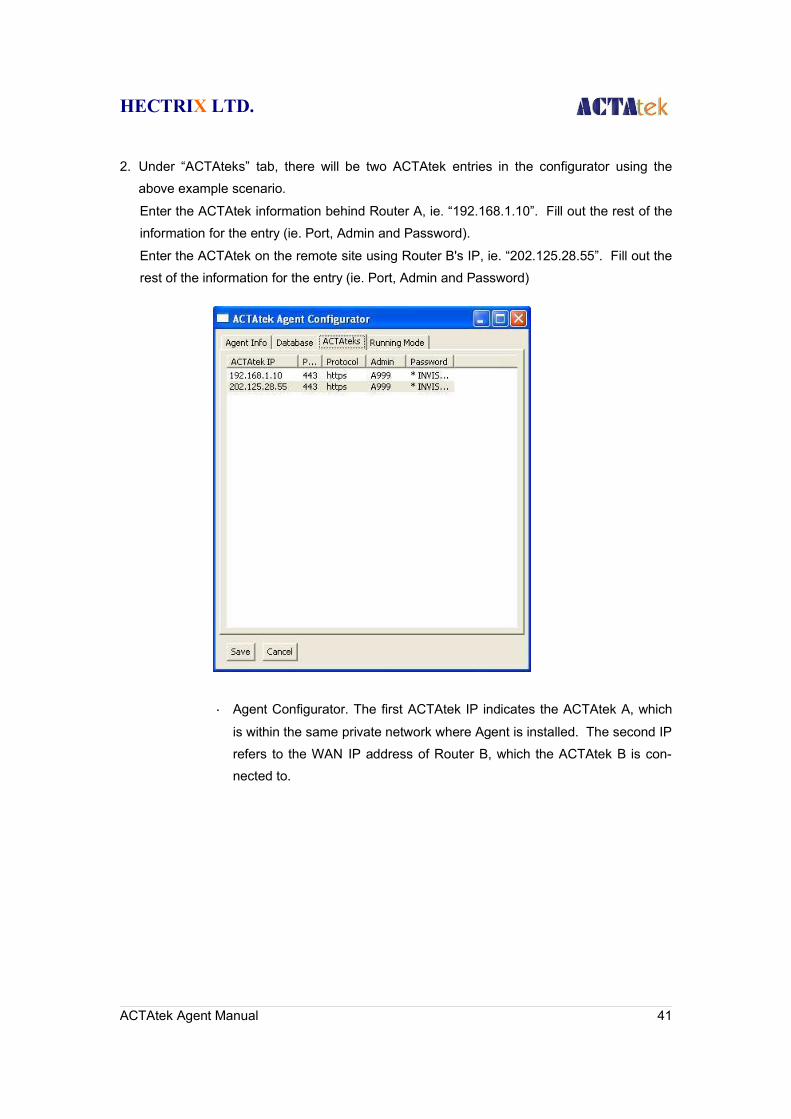
2. Under “ACTAteks” tab, there will be two ACTAtek entries in the configurator using theabove example scenario.
Enter the ACTAtek information behind Router A, ie. “192.168.1.10”. Fill out the rest of theinformation for the entry (ie. Port, Admin and Password).
Enter the ACTAtek on the remote site using Router B's IP, ie. “202.125.28.55”. Fill out therest of the information for the entry (ie. Port, Admin and Password)
• Agent Configurator. The first ACTAtek IP indicates the ACTAtek A, which
is within the same private network where Agent is installed. The second IPrefers to the WAN IP address of Router B, which the ACTAtek B is con-nected to.
ACTAtek Agent Manual 41

HECTRIX LTD.
3. Finish the Agent Configurator by filling out necessary entry under the “Database” tab. Click“Save” to complete the Agent setup.
• Agent Configurator. Database setting is default. Configuration may vary if
different database setting applies.
ACTAtek Agent Manual 42
HECTRIX LTD.
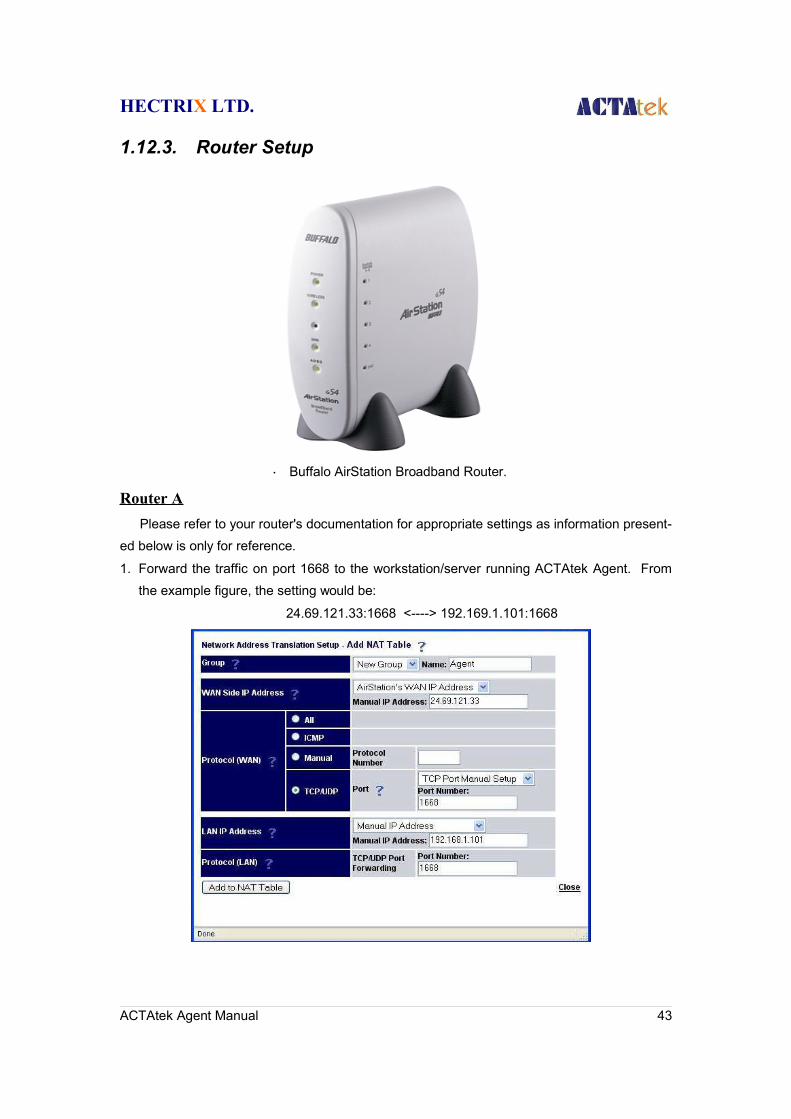
1.12.3. Router Setup
• Buffalo AirStation Broadband Router.
Router A Please refer to your router's documentation for appropriate settings as information present-ed below is only for reference.
1. Forward the traffic on port 1668 to the workstation/server running ACTAtek Agent. Fromthe example figure, the setting would be:
24.69.121.33:1668 <----> 192.169.1.101:1668
ACTAtek Agent Manual 43
HECTRIX LTD.
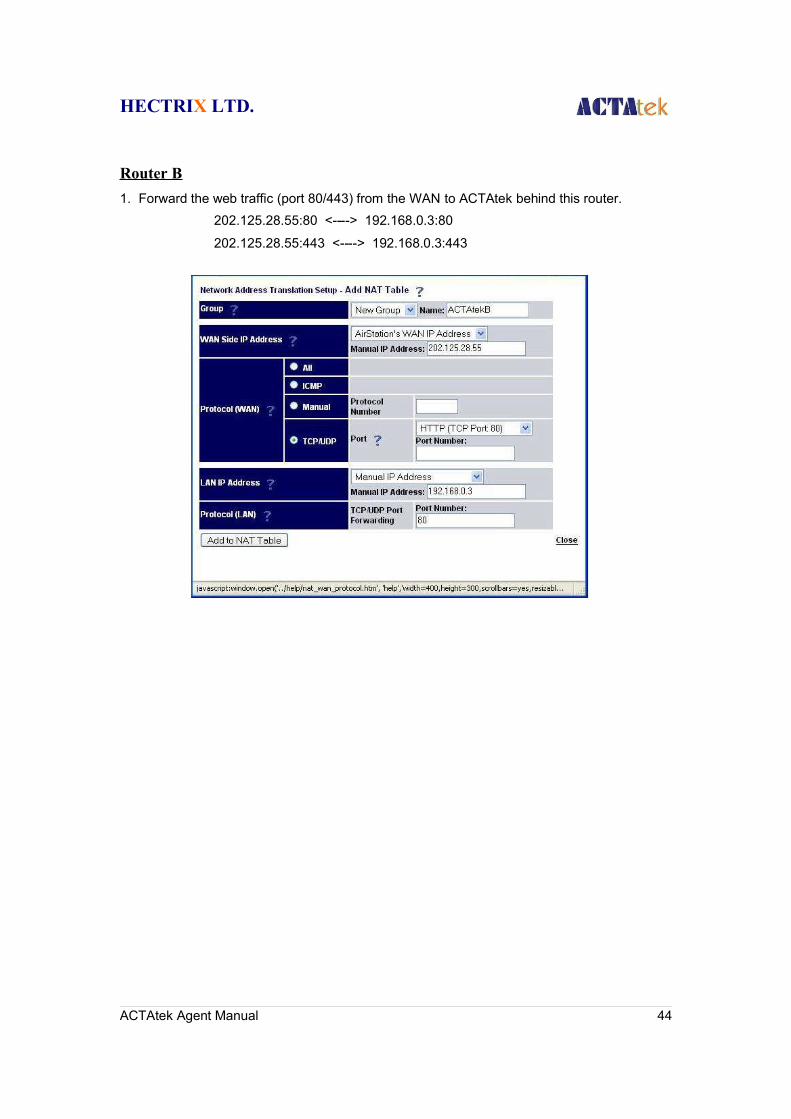
Router B1. Forward the web traffic (port 80/443) from the WAN to ACTAtek behind this router.
202.125.28.55:80 <----> 192.168.0.3:80
202.125.28.55:443 <----> 192.168.0.3:443
ACTAtek Agent Manual 44
HECTRIX LTD.
1.13. Trouble Shooting
1.13.1. Network Troubleshooting
1.13.1.1. Network basic command description:
1.13.1.1.1. Ping Use the MS-DOS command prompt of the PC on which the ACTAtek Agent is installed to pingthe target ACTAtek. For example, successful ping (command “ping x.x.x.x”) will display the
following messages:
1.13.1.1.2. Network reachable terminalexample:
Pinging x.x.x.x with 32 bytes of data:
• Reply from x.x.x.x: bytes=32 time=1ms TTL=225
• Ping statistics for x.x.x.x:
• Packets: Sent = 1, Received = 1, Lost = 0 (0% loss),
• Approximate round trip times in milli-seconds:
• Minimum = 0ms, Maximum = 1ms, Average = 0ms
1.13.1.1.3. Network unreachable terminalexample:
Pinging x.x.x.x with 32 bytes of data:
Request timed out
Ping statistics for x.x.x.x:
Packets: Sent = 1, Received = 0, Lost = 1 (100% loss)
1.13.1.1.4. IpconfigFrom MS-DOS command prompt of the PC on which the ACTAtek Agent is installed to run aipconfig command to obtain the PC's network information.
Ethernet adapter Local Area Connection:Connection-specific DNS suffix :IP Address: x.x.x.xSubnet Mask: x.x.x.xDefault Gateway: x.x.x.x
ACTAtek Agent Manual 45
HECTRIX LTD.
1.13.1.1.5. TelnetUse the MS-DOS prompt of the PC on which the ACTAtek Agent is installed to telnet to theACTAtek Terminal. The command would be : "telnet x.x.x.x 80".
- The following messages will be displayed for successful or rejected attempts
Network reachable terminal:• Showing blank screen
• press Ctl-C and “Enter”, following screen will show
HTTP/1.1 400 Page not foundServer: GoAhead-WebsDate: xxx mmm dd hh:mm:ss yyyyPragma: no-cacheCache-Control: no-cacheContent-Type: text/html
<html><head><title>Document Error: Page not found</title></head><body><h2>Access Error: Page not found</h2><p>Bad request type</p></body></html>
Connection to host lost.
Network unreachable terminal: Connecting to x.x.x.x ...Could not open connection to the host, on port 80:Connect failed
A connection attempt failed because the connected party did not properly repsond after a peri-od of time, or established connection failed because connected host has failed to respond.
ACTAtek Agent Manual 46
HECTRIX LTD.
1.13.1.2. Network Troubleshooting cases
1.13.1.2.1. Always show “Disconnected” in the Server List of the TerminalList using web browserTo check:
Start the ACTAtek Agent and use another computer in the SAME network to connect to thecomputer with the PC with the ACTAtek Agent installed. To do so, open MS-DOS commandprompt, and type "telnet x.x.x.x 1668", where x.x.x.x is the IP Address of the PC with the AC-TAtek Agent installed and 1668 is the port of the ACTAtek Agent. If the connection is not suc-cessful, the firewall is enabled and must be disabled for the Agent to work.
Cause: Firewall enabled, blocking port access
Action:• Set firewall to allow port 1668 access.
1.13.1.2.2. “FATAL: Server Thread died unexpectedly” in command promptCause: A java process javaw was not cleanly started
Action:• From ACTAtekAgent's PC press buttons “Alt + Ctrl + Delete” to enter Task Manager.
• Select Processes Tab
• Select javaws process and press <end process> button.
• Start ACTAtekAgent in debug mode to check for any error:
In dos prompt type: agent -d 3
1.13.1.2.3. Symptom Login Failed in command prompt.Cause: Wrong login information
Action: • Go under Server List from Terminal List option of the web interface of the ACTAtek in use.
Delete ALL items under the server list.
• Go to the Configurator of the Agent --> Tab ACTAteks
• Right click your mouse to re-add the ACTAtek (... Make Sure ALL information is accurate!)
then, click Save.
• Right click your mouse and add ACTAtek (x.x.x.x, 80, http, administrator id and password,
MAKE SURE THE CONTENTS ARE CORRECT, then SAVE it
• In the tab "Database", change the "Create Table SQL" content to:
CREATE TABLE ACTATEK_LOGS ( userID VARCHAR(20) NOT NULL, timeentry DATETIME NOT NULL,
ACTAtek Agent Manual 47
HECTRIX LTD.
eventID VARCHAR(20), terminalSN VARCHAR(20) NOT NULL)
• Also, delete the content in the "Map Photo (JPEG Binary) to Field" field.
• Go to the command prompt (Start --> Run --> cmd), change the current path to the Agent's
path (example C:\ProgramFiles\Hectrix\ACTAtekAgent-1.29.1>)
• Type "agent.exe -d 3" to restart the agent in "Debug mode"
• At the Terminal login, enter a valid userid, check the event log from the web interface to
see if there are any logs for import. (with UserID, timestamp, trigger and terminalSN showin the command prompt)
1.13.1.2.4. “Connection timeout” in command promptCan you ping the Terminal from ACTAtekAgent's PC? If NOT.
• Verify the Terminal's and the Agent's Configurator's IP Address, protocol, port number are
the same.
For example http default to port 80 and https default to port 443.
• Ensure that the Terminal is powered on
• Ensure that the IP Address is UNIQUE.
• Check Network cable is connected and the network adapter green light is flashing.
ACTAtek Agent Manual 48
HECTRIX LTD.
1.14. Messages and Actions:The following are some of the common messages you might receive from the ACTAtek Agent,possible causes and recommended actions are provided for your reference. For messagesnot listed, please contact us at [email protected] for assistance.
1.14.1. General Messages
1.14.1.1. No Trusted Certificate foundCause:• Configurator setting of https was set with incorrect ID/Password
Action:• Set correct terminal id/password
1.14.1.2. Registering Primary terminal login onlyCause:• Trying to register a secondary terminal in the Agent Configurator.
Action:• Set Target terminal as a standalone primary unit.
• From the configurator, remove the secondary terminal and re-add the primary terminal, if
any.
1.14.1.3. login failedCause (1):• ACTAtek terminal not exist
Action:• Ensure the terminal is powered on and the ACTAtek Agent is reachable through the net-
work to the ACTAtek Terminal. Use the PING command to confirm.
Cause (2):• Wrong id/password
Action:• Ensure correct terminal administrator id/password
ACTAtek Agent Manual 49
HECTRIX LTD.
1.14.1.4. parse time error, wrong magic Cause:• Wrong Magic number in the server list
Action:• Ensure server list's magic number setting is the same as Agent's magic number.
1.14.1.5. x.x.x.x specified agent not registeredCause:• The terminal's server list does not have the correct Agent setting.
Action:• Verify the terminal server list and the agent settings are the same. (2 bullet points - should
be just one).
• Agent eg. Port, IP, magic number.
• Verify the terminal server list status is "connected".
• Verify the Agent Configurator has the appropriate terminal entry.
• Restart the Agent to register the terminals from the Agent's Configurator list.
1.14.1.6. connection time outCause:• Terminal not accessible. For example
• Terminal is in rebooting state
• Terminal network is unreachable
• More than one terminal with same IP address.
Action:• Reboot the terminal and ensure the reboot is complete and the terminal is able to authenti-
cate users.
• Ensure all terminals have unique IP address.
• Ensure all terminals have correct network setting:
• verify terminal setting eg IP, id, password, port
• reset Agent's PC mac table. Use ms dos command to clear the IP to Mac table: tarp -d
ACTAtek Agent Manual 50

HECTRIX LTD.
1.14.1.7. connection refusedCause:• Configurator terminal port entry is different from terminal port
Action:• Ensure configuration's terminal port entry and terminal port are the same
• Ensure port is accessible for example: ensure port 443 is used by https:// only
1.14.1.8. read timed outCause:• Terminal IP address was modified without updating configurator
Action:• Ensure configurator's terminal IP entry is the same as terminal IP
ACTAtek Agent Manual 51
HECTRIX LTD.
1.14.2. Database related messages:
1.14.2.1. Start Agent failed:
1.14.2.1.1. ERROR: Create Table IO exception:the network adapter could not establish the connection
Cause:
• Database server or Database not available
Action:• Ensure database is running and accessible to ACTAtekAgent
1.14.2.1.2. Create Table: Invalid authorization specificationSymptom:• message from server: "Access denied for user: 'root@hectrix' (Using password: YES)"
Cause:• Message from Mysql database. Wrong Database Username/Password
Action:• Re-enter Database Username/Password (case sensitive)
1.14.2.1.3. Error: LOG ERROR: Column not foundSymptom:• message from server: "Unknown column ' JpegPhoto' in field list'"
Cause:• Map field does not have corresponding map to table column
Action:• Ensure the table's and map field columns are the same.
ACTAtek Agent Manual 52
HECTRIX LTD.
1.15. Reporting Problems to Support:Before reporting any problems, please have the following information handy.
1.15.1. Basic information
1. Brief description of symptoms and steps done and any error messages
2. Captured the message screen. To do so, press the <Alt> and <PrintScreen> buttons onyour keyboard while at the command prompt or agent where the problem is and messageis displayed.
• From Windows menu select All Programs -> Accessories -> Wordpad.
• Go to Start -> All Programs -> Accessories --> Wordpad
• Once in wordpad, hit <Ctrl><v>
• Save the file and email the attachment to [email protected]
3. From the web interface, save THE ACTAtek Terminal status and setup pages OR from theACTAtek Terminal copy down the terminal information, such as, model number, serialnumber, firmware version, etc.
4. Prepare the following files about the ACTAtekAgent
• ActatekAgent configuration file: agent.properties
• location: C:\Documents and Settings\user1\
• ActatekAgent log file: agent.txt and agent.log.1
• location: C:\Program Files\Hectrix\ACTAtekAgent
5. ACTAtek Server List status:
6. From the web interface, Terminal List/Server List, copy the Agent entry ie. agent IP,
status, date, time
1.15.2. Customer information:1. Your HECTRIX Customer Support Warranty number
2. Your company name and address
3. Name, telephone number and email of contact person
ACTAtek Agent Manual 53
HECTRIX LTD.
1.15.3. Software information:1. Operating system version
2. ACTAtekAgent Version
3. Java Runtime version (From ms-dos enter command: java -version)
4. ACTAtek Terminal information
• Model Number
• Serial Number
• Firmware version
• FAM version
1.15.4. You should also prepare information on following:1. Is this a recurring problem or one time problem?
2. Please provide the steps that lead to the failure or error?
3. Is there any non-ACTAtek equipment in use with ACTAtek Terminal?
4. Did you perform a Terminal reboot, ACTAtekAgent restart?
5. Have you made any recent changes to the ACTAtek Terminal and ACTAtekAgent setting?
ACTAtek Agent Manual 54