Embed Size (px)
Citation preview
ACS Technologies Year-End Closing
2012
Copyright
Copyright © 2011 ACS Technologies Group, Inc. All rights reserved. Reproduction of any part of
this publication by mechanical or electronic means, including facsimile transmission and e-mail,
without the express permission of ACS Technologies Group, Inc. is strictly prohibited.
Version 10.6/11.2
Last Updated 10/5/12 - 7:12 AM
Contents
3
Contents Introduction to This Guide .......................................................................................................... 5
Unit 1: Basic Year-End Procedures ............................................................................................... 6
Lesson 1: Year-End Procedures ................................................................................................ 7
Lesson 2: What do you need to know? .................................................................................... 8
Lesson 3: Modules and When they Close ................................................................................. 9
Lesson 4: Mental Checklist .................................................................................................... 12
Module specific procedures .............................................................................................. 12
Printing Reports ................................................................................................................ 12
Backing up your data ......................................................................................................... 13
Lesson 5: Forms and Supplies….Plan Ahead ........................................................................... 14
Forms to consider: ............................................................................................................ 14
Supplies to consider: ......................................................................................................... 14
Plan your calendar: ........................................................................................................... 14
Lesson 6: Backups ................................................................................................................. 16
Unit 2: Closing the Contributions Module (Prior to ACS version 11.0) ........................................ 18
Lesson 1: General Tips ........................................................................................................... 19
Lesson 2: Special Transaction Types and Prepayments .......................................................... 20
Lesson 3: Entering Prepayments ............................................................................................ 22
Lesson 4: Entering Next Year’s Pledges .................................................................................. 24
Lesson 5: Reassigning Envelope Numbers .............................................................................. 27
Lesson 6: Flagging Arrears ..................................................................................................... 29
Lesson 7: Making Corrections ................................................................................................ 32
Lesson 8: Statements and Reports......................................................................................... 35
Lesson 9: Year-End Options/Procedures ................................................................................ 41
Year-End Options: ............................................................................................................. 41
Year-End Procedures ......................................................................................................... 41
Unit 3: Closing Payroll ............................................................................................................... 46
Lesson 1: Closing Payroll ....................................................................................................... 47
Complete Last Payroll: ....................................................................................................... 47
Load Tax Update: .............................................................................................................. 47
Contents
4
Closing Flexibility: .............................................................................................................. 47
Employee Record Maintenance: ........................................................................................ 48
Reports: ............................................................................................................................ 48
Lesson 2: Year-End Reports ................................................................................................... 50
Lesson 3: W-2s, 941s, and W-2 Extracts ................................................................................. 59
W-2 Extract ........................................................................................................................... 75
W-2 Adjustments .............................................................................................................. 79
Lesson 4: Updating Pay Rates and Vacation/Sick Time ........................................................... 81
Lesson 5: Month-End Procedures .......................................................................................... 83
Lesson 6: Common Errors in Preparing W-2 Forms ................................................................ 84
Unit 4: Closing Accounts Payable............................................................................................... 85
Lesson 1: Year-End Reports ................................................................................................... 86
Lesson 2: Printing 1099 Forms ............................................................................................... 94
Lesson 3: Month End Procedures ........................................................................................ 100
Posting and Receiving Purchase Orders ............................................................................... 102
Unit 5: Closing Fixed Assets ..................................................................................................... 103
Lesson 1: Take Inventory using our CPT 711 Portable Bar Code Scanner .............................. 104
Lesson 2: Calculating Depreciation ...................................................................................... 111
Lesson 3: Depreciation Journal - Post Depreciation ............................................................. 114
Lesson 4: Month End Procedures ........................................................................................ 118
Lesson 5: Year-End Reports ................................................................................................ 120
Unit 6: Closing General Ledger ................................................................................................ 122
Lesson 1: Next Year’s Budget............................................................................................... 123
Lesson 2: Edit by Grid .......................................................................................................... 125
Lesson 3: Exporting Budgets to Excel ................................................................................... 128
Lesson 4: Month End Procedures ........................................................................................ 130
Lesson 5: Year-End Reports ................................................................................................ 131
Lesson 6: Closing the Current Year ..................................................................................... 141
Introduction to This Guide
5
Introduction to This Guide This guide is designed to walk you through the transition into the new year. This guide provides
comprehensive instructions on closing the Contributions, General Ledger, Accounts Payable,
Payroll, and Fixed Assets modules.
This guide includes the following concepts:
Closing the books in ACS
Printing year-end reports and statements
Printing W-2s and 1099s
Making correcting entries
Additional information
Unit 1: Basic Year-End Procedures
6
Unit 1: Basic Year-End Procedures This unit covers general information related to year-end closing procedures and backups.
About year-end procedures
Modules and when they close
What you need to know
Forms and supplies
ACS for Windows backup
Unit 1: Basic Year-End Procedures
7
Lesson 1: Year-End Procedures
Year-end Procedures, or “closing the books”, means advancing the default year in ACS
to the next year. In many cases, this is as simple as selecting a new reporting year in the
software or selecting to close the month. However, in the General Ledger and the Payroll
modules, additional procedures are required to meet accounting and tax requirements.
Year-end can also include mailing forms and statements, making year-end journal entries, or
making corrections to the previous year. The Contributions module often presents special year-
end challenges as last minute donors come forward, sometimes with out of the ordinary
contributions such as stock.
After closing the year, you can still post transactions to and print reports for the previous year
provided you have selected Allow Posting to Prior Periods in you GL Setup. Most modules let
you enter the next year's data prior to closing the year; however, you must close the year in
Contributions before entering contributions for the next year (unless you use ACS 11.0 or
higher). Beginning with ACS 11.0, pledges and gifts are tracked by postdate rather than year,
eliminating the need to close the year at year-end.
Accounts Payable, Fixed Assets, and Payroll do not have year-end procedures. For these
modules, handle year-end just as you do month-end procedures: by selecting to close the
month. Accounts Payable and Payroll also have special forms, (W2s and 1099s) to print at the
end of the year.
Before starting the year-end process, be sure to:
1. Complete all daily/weekly, month-end, and quarter-end procedures.
2. Back up all financial data files.
3. Print 1099s.
4. Print W2s
Unit 1: Basic Year-End Procedures
8
Lesson 2: What do you need to know?
Closing the books in ACS for Windows primarily advances the default year to the next
year.
For modules that do not have year-end procedures (Accounts Payable, Fixed Assets, and
Payroll), the last month of the year is no different than any other month of the year. Once you
close the month, you can begin posting to the new month immediately. Contributions version
11.0 and after does not have a monthly or yearend closing.
If you selected Allow Posting to Prior Periods in GL Setup, you can make entries to a previous
month or year after closing the period. You can also print reports for previous periods.
You can print Contributions statements for previous periods. However, after closing the year,
any multi-year pledge rolls forward and becomes a pledge for the next year. At this point, a
contribution statement printed for the prior year does not reflect the pledge amount for that
multi-year pledge. (This does not apply to Contributions version 11.0 and after)
The Contributions module (prior to ACS 11.0) forces you to close the year before making entries
to a future year, so that ACS knows how to handle unfulfilled pledges and prepayments. You
cannot post entries to the next year until you perform year-end closing procedures; however,
you can enter and post prepayments on next year's pledges.
A number of other year-end activities must be complete in various modules to meet accounting
or tax requirements. These include printing W-2s from Payroll, 1099s from Accounts Payable,
Contribution Statements, Accounts and calculating depreciation in Fixed Assets. ACS for
Windows provides the tools to do all of these.

Unit 1: Basic Year-End Procedures
9
Lesson 3: Modules and When they Close
This section discusses modules and when they close.
Module Month Year
Contributions X
Contributions 11.0
Accounts Payable X
Payroll X
Fixed Assets X
General Ledger (Close Months 1-11)
X X
Figure 1: Modules and when they close
The Contributions module prior to version 11.0 closes at year-end. You can print
statements for the quarter and the year. You can also print contribution statements for
previous periods. However, after a year is closed, any multi-year pledge rolls forward
and becomes a pledge for the next year. Therefore, a contribution statement printed
for the prior year at that point will not reflect the pledge amount for that multi-year
pledge.
Only Contributions prior to 11.0 forces you to close the year before making entries to a
future period, you cannot post entries to the next year until you perform year-end
closing procedures. This is driven primarily by pledging, so the system will know how to
handle unfulfilled pledges, prepayments to pledges.
The Contributions module has no monthly or quarterly closing, and you can make
corrections for a previous month, quarter, or year.
If you are on version 11 of ACS, there is no year-end closing in Contributions. When you
generate Contributions reports and statements, you can specify date ranges rather than
selecting a year, allowing reports to better fit your needs.
Accounts Payable closes at month-end, and you can print vendor 1099s at year-end.
Accounts Payable has month-end closing and no year-end closing procedures.
Payroll closes at month-end. You can view W-2s and the fourth quarter 941s at any time
during the current quarter or for a previous quarter. Payroll has no quarter-end or year-
end closing procedures.
Accounts Receivable has only a month-end closing. You can print statements showing
the customers’ appropriate tax-deductible amounts.
Unit 1: Basic Year-End Procedures
10
Fixed Assets has only a month-end closing. You can calculate and post depreciation on a
monthly or yearly basis.
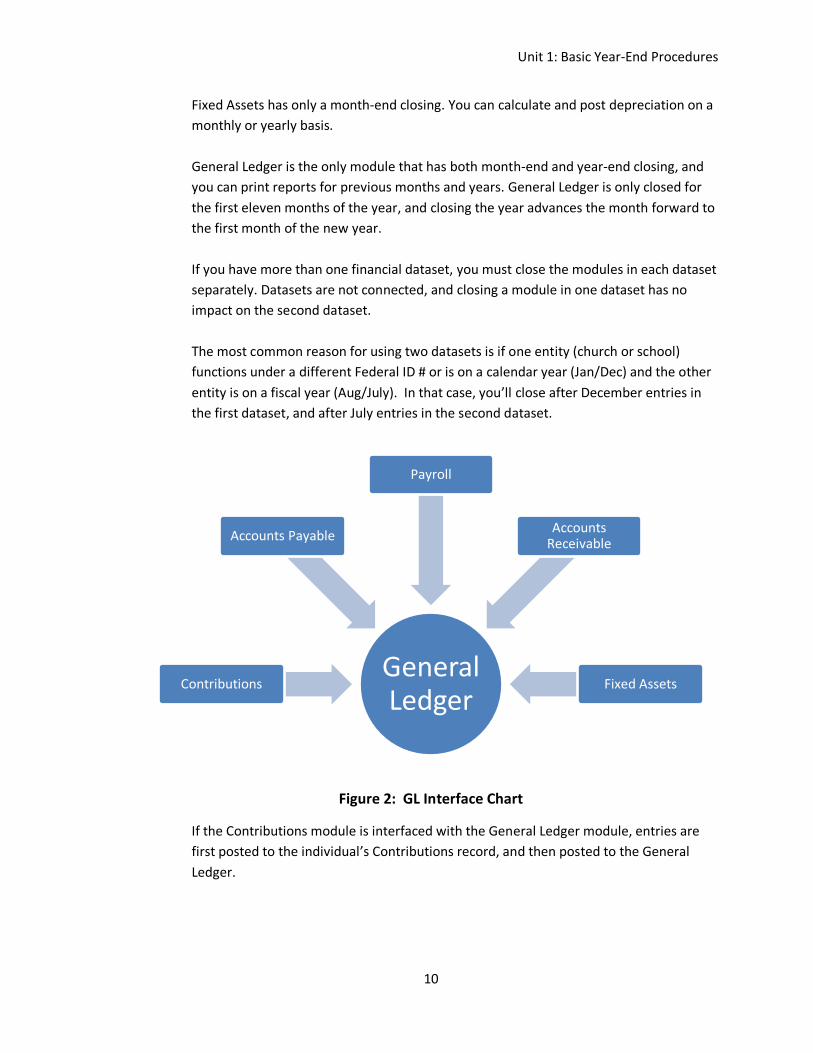
General Ledger is the only module that has both month-end and year-end closing, and
you can print reports for previous months and years. General Ledger is only closed for
the first eleven months of the year, and closing the year advances the month forward to
the first month of the new year.
If you have more than one financial dataset, you must close the modules in each dataset
separately. Datasets are not connected, and closing a module in one dataset has no
impact on the second dataset.
The most common reason for using two datasets is if one entity (church or school)
functions under a different Federal ID # or is on a calendar year (Jan/Dec) and the other
entity is on a fiscal year (Aug/July). In that case, you’ll close after December entries in
the first dataset, and after July entries in the second dataset.
Figure 2: GL Interface Chart
If the Contributions module is interfaced with the General Ledger module, entries are
first posted to the individual’s Contributions record, and then posted to the General
Ledger.
General Ledger
Contributions
Accounts Payable
Payroll
Accounts Receivable
Fixed Assets
Unit 1: Basic Year-End Procedures
11
Accounts Payable, Payroll, and Fixed Assets are automatically interfaced with the
General Ledger. You can set Accounts Payable to operate on a cash or accrual basis. In
Fixed Assets, you can calculate depreciation and post it to the General Ledger.
It’s a good idea to close the month in all other modules before closing the year in
General Ledger. You need to verify all transactions are posted from before making
entries in GL. If needed, you can post to a closed year.
Terminology
Close the month – Advance the calendar to the next month.
Close the year – Advance the calendar to the next year.
Unit 1: Basic Year-End Procedures
12
Lesson 4: Mental Checklist
This lesson gives tips on what to do before closing the year or month in each module.
Module specific procedures
Contributions: Complete post all transactions for the year. If interfaced, post all activity
to the General Ledger.
Accounts Payable: Enter and post all invoices, then print and post all checks for the
month.
Purchase Orders: Create and post invoices for all remaining orders that have been
received for the month.
Payroll: Complete calculations, print checks, and post the last payroll for the month.
Fixed Assets: If depreciating, calculate and post depreciation for the month or year.
General Ledger: Post any end-of-month or end-of year transactions.
Printing Reports
All Modules: Print YTD reports.
Complete and print the 941 for the 4th Quarter and W-2s in Payroll, 1099s in Accounts
Payable, and statements in Contributions. You can go back and print prior month/year
reports if needed.
Experiment with the various report options in each module to determine which reports
meet your office’s needs. Consult your CPA /Treasurer to determine which reports you
need.
Unit 1: Basic Year-End Procedures
13
Backing up your data
You have heard “horror stories” of data lost with no backup, so why take any chances
with the data you worked so hard to set up and maintain?
You should ALWAYS make a backup before closing. Contributions even require an ACS
backup prior to closing the year (prior to 11.0). Later in the class, we’ll discuss why you
should perform a backup and the procedures to complete a backup.
Unit 1: Basic Year-End Procedures
14
Lesson 5: Forms and Supplies….Plan Ahead
This lesson provides tips and suggestions on ordering forms and supplies, along with
some suggested reading.
Plan for Forms & Supply needs; think about what forms you need to fulfill reporting
requirements and order early!
Estimate how many of each you need, then include some extras. A few extra forms are a good
“safety net” in case your printer jams or you discover you have miscalculated.
Forms to consider:
Contribution Flex Statements
Contribution Charitable Tax reports
1099s (and summary form 1096)
W-2s (and summary form W3)
Window envelopes for each of the above
Supplies to consider:
Paper
Printer supplies
CDs, flash drive, etc. for backups
Plan your calendar:
You can complete some activities now:
Begin reassigning envelope numbers (if needed)
Enter next year’s pledges
Enter next year's budget
Preprint key reports to plan for forms needs or check for errors
Some activities have deadlines. Be sure you are clear on what those deadlines are. Check with
the IRS or your tax consultant to verify deadlines for:
W-2s, 941 and 1099s
Contributor Statements & Charitable Contribution Reports.
Unit 1: Basic Year-End Procedures
15
Some activities have to wait:
If using ACS 10.6 or lower, you must complete December entries and close the year
before entering January contributions. In the current year, you can enter and post
prepayments on next year's pledges, but be sure you are clear on how to do this. If using
ACS 11.0 or higher, you can enter and post contributions at any time.
When reassigning envelope numbers, do not click Apply until you are ready to start
using the new envelope numbers. The best time to do this is during your year-end
procedures.
Obtain copies of any of the following Federal Publications that you may need. These include:
Publication 15 - Circular E Employer's Tax Guide
Publication 501 - Exemptions, Standard Deductions, and Filing Information
Publication 505 - Tax Withhold and Estimated Tax
Publication 517 - Social Security and Other Information for Members of the Clergy and
Religious Workers
Publication 526 - Charitable Contributions
Publication 529 - Miscellaneous Deductions
These publications and others are available from your local IRS office or at the IRS website at
http://www.irs.gov.Individual States have Web sites where state information is available.
Useful Information
Plan ahead…don’t wait until the last minute! Order ACS forms that you need early.
Waiting until the last minute is costly if you have to place an overnight order.
Unit 1: Basic Year-End Procedures
16
Lesson 6: Backups
Backing up your data is one of the most important computer-related tasks you must
perform every day. A backup is an exact copy of your data files. ACS provides a program for you
to back up and restore your ACS data.
Generally, backups are stored on an external storage device such as a removable disk (CD or
flash drive) or tape. You can store backups on a local or network hard drive, but this is not
recommended for routine backups. Backups made to local or network drives are useful for
correcting an operator error but are useless in the case of a system or hard drive failure, theft,
or a natural disaster.
ACS provides the following methods to back up and restore your data:
ACS Backup–You can access ACS manual backup from the ACS Program Group,
from a shortcut on the desktop, or from ACS Utility Manager. You should back this data
up to removable media and take it offsite. In this guide, discussion related to required
backups (i.e. prior to closing Contributions) refers to this method of backup.
ACS Scheduled Backups–The ACS Scheduled Backup program lets you establish
and maintain a schedule for regularly backing up your ACS data. Backups created in the
ACS Automatic Backup program are saved to a hard drive or a network drive. You must
run the utility to configure the ACS Backup Service Program.
LiveStor–ACS offers a remote backup program designed to protect your data
files by automatically transferring them over the Internet and storing them safely in ACS
secure servers. If you are interested in this option, select Backup Files Online from
Online Resources on your Menu Bar.
For more information about LiveStor, visit www.livestor.com, or contact the LiveStor
Sales team at [email protected].
Unit 1: Basic Year-End Procedures
17
Here’s how to perform a manual backup of your data:
1. Close all ACS applications. The backup may not complete properly if anyone is logged
into ACS.
2. On the Microsoft® Windows® task bar, click Start > All Programs > ACS Technologies >
ACS Tools, then click ACS Backup.
3. Enter your ACS user name and password and click OK.
4. On the Backup/Restore tab, under Data Options, select the backup that you want to
perform.
5. Under Additional Options, make the appropriate selections.
6. Under Configurations, verify the Backup Destination Directory. If necessary, click
Lookup to select a different location.
7. If you are backing up to an external storage device, make sure it is properly connected.
8. Click Backup. If you selected to change the file name, enter a file name and click OK.
Useful Information
To ensure that a backup file was created successfully, you can verify the backup file.
If you use ACS OnDemand, ACS OnDemand automatically backs up your data on a daily, weekly,
and monthly basis. However, you should still make a backup before performing year-end
procedures.
Unit 2: Closing the Contributions Module (Prior to ACS version 11.0)
18
Unit 2: Closing the Contributions Module (Prior to ACS
version 11.0)
This unit covers how to close the Contributions Module in ACS versions prior to 11.0.
Discussions include:
General Tips
Special transaction types and prepayments
Making corrections
Statements and charitable contribution reports
Entering next year’s pledges
Reassigning envelope numbers
Flagging arrears pledges
Closing the Contributions module
Unit 2: Closing the Contributions Module (Prior to ACS version 11.0)
19
Lesson 1: General Tips
ACS Technologies offers the following tips to assist you in closing the year in
Contributions.
1. Reassign envelope numbers in December, but do not apply the changes until after year-
end closing.
2. Begin entering the next year’s pledges when you receive them.
3. Begin printing Charitable Contributions statements after you enter and post the last gift
entries for the year.
4. If possible, send contributions statements early so that you can identify and correct any
errors.
5. You can print contributions statements and charitable contributions reports after
closing the year, but they do not reflect proper pledge totals if you have multi-year
pledges.
6. Charitable Contributions Reports for previous years do not print detail if the Retain past
2 years, summarize 3rd year option is selected in Setup.
7. The Pledge Gift Analysis report only prints for the current year.
8. When entering pledges for years with 53 Sundays, you can:
a. Adjust the Total Pledge to the equivalent of a 52 Sunday total amount.
b. Start the pledge on the second Sunday of January.
c. Allow the contributors to give for 53 Sundays.
For more information on how to set up pledges for a 53-week year, please refer to
Knowledge Base article #5090.
Unit 2: Closing the Contributions Module (Prior to ACS version 11.0)
20
Lesson 2: Special Transaction Types and Prepayments
There are several types of contributions, including Regular Entry, Gift with Description,
Gift for Item of Value, Non-Cash Gift, or Non-Deductible gift. ACS allows you to select the type of
gift that you want to enter.
Statements and Charitable Contributions Reports reflect special transaction types.
If the Contributions module interfaces with the General Ledger module, entries are
first posted to each individual’s record in Contributions, followed by a second
posting to General Ledger.
An individual or organization must have a record in People or Organizations to have
a giving record. This includes any record to which you will post contributions and/or
send a statement.
After selecting a record, you can access the Inquiry by Individual window from the
Add Transaction window.
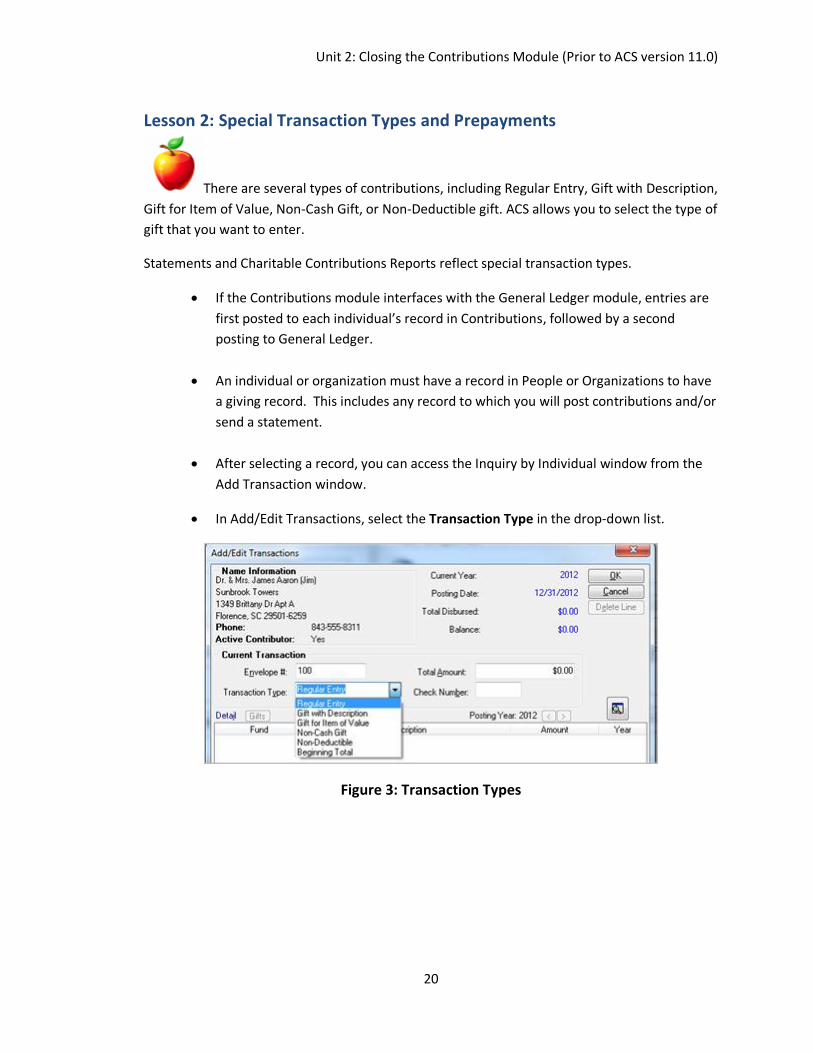
In Add/Edit Transactions, select the Transaction Type in the drop-down list.
Figure 3: Transaction Types
Unit 2: Closing the Contributions Module (Prior to ACS version 11.0)
21
Terminology
Regular Entry – A monetary gift of any size to any fund that needs no description.
Gift with Description – A monetary gift of any size to any fund that requires a description. You
can use this without entering a description.
Gift for Item of Value – A monetary gift for which the donor receives some value or service, for
example, a $200.00 check for the Youth Car Wash that cost $10.00.
Non-Cash Gift – A gift where actual cash is not received, for example, a contributor donates a
computer to the church office, a car for the Youth Garage Sale, or stock certificates toward the
Building Fund.
Non-Deductible – Money paid that is not tax deductible, for example, a check for a members’
ski trip.
Unit 2: Closing the Contributions Module (Prior to ACS version 11.0)
22
Lesson 3: Entering Prepayments
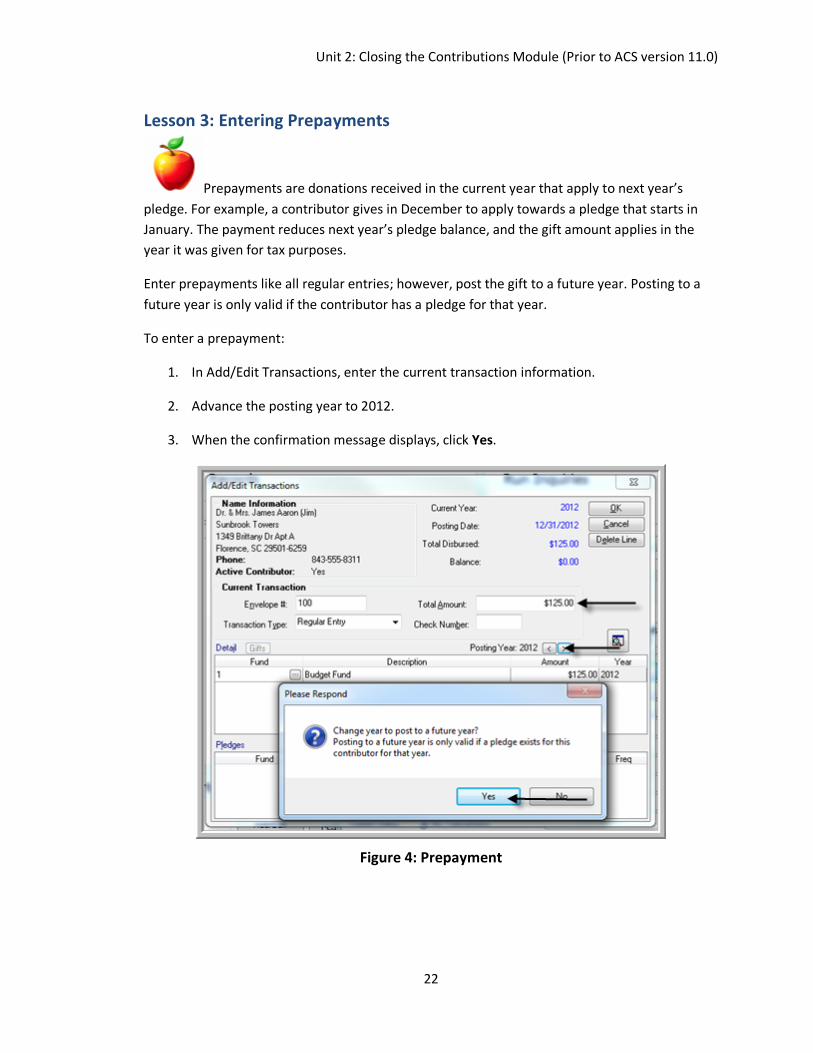
Prepayments are donations received in the current year that apply to next year’s
pledge. For example, a contributor gives in December to apply towards a pledge that starts in
January. The payment reduces next year’s pledge balance, and the gift amount applies in the
year it was given for tax purposes.
Enter prepayments like all regular entries; however, post the gift to a future year. Posting to a
future year is only valid if the contributor has a pledge for that year.
To enter a prepayment:
1. In Add/Edit Transactions, enter the current transaction information.
2. Advance the posting year to 2012.
3. When the confirmation message displays, click Yes.
Figure 4: Prepayment
Unit 2: Closing the Contributions Module (Prior to ACS version 11.0)
23
Useful Information
A confirmation message displays to verify that you have correctly entered a Prepayment.
The Flex and Quarterly statements print transactions based on the posting year, but the
Charitable Tax Report and Plain Paper statements print based on the transaction date.
When Display Pledges is selected in Contributions Setup, you can change the pledge year to the
next year to make sure the contributor’s pledge has been entered.
Unit 2: Closing the Contributions Module (Prior to ACS version 11.0)
24
Lesson 4: Entering Next Year’s Pledges
This lesson walks you through adding pledges for the next year.
If your church or organization conducts an annual budget pledge campaign or any other pledge
campaign that begins at the beginning of the calendar year, you can enter the pledges as soon
as you receive the pledge cards from contributors. Entering the pledge information for the new
year does not affect the contributor’s giving record for the current year in any way.
If your pledge campaign is not a recurring one, such as the annual budget, the first step in
entering pledges is to set up the pledge fund. You want to give the fund a unique name so that
contributions for this pledge are kept separate from other pledge funds in ACS.
1. The year selected in the Year drop-down list remains the same for any record selected
until you close the Add/Edit Pledges window.
2. To sort the data in the grid, click any column heading. Right-click to resize and auto size
the column width.
3. To keep a record of all pledges entered, select Record Entries. You can print the pledge
entries.
4. Use Mass Add to add the same pledge for multiple individuals.
Figure 5: Mass Add Pledges
Unit 2: Closing the Contributions Module (Prior to ACS version 11.0)
25
You can enter pledges for next year at any time. A contributor can have a pledge for any
fund/funds, and pledges can be for one year or multiple years. For example, a
contributor can have a pledge to the General Fund for the year and a pledge to the
Building Fund for a 3-year period.
When adding pledges one at a time to multiple contributors, fund and year information
repeat from the previous pledge.
The Frequency selected determines when the pledge becomes due.
Figure 6: Add/Edit Pledges
Unit 2: Closing the Contributions Module (Prior to ACS version 11.0)
26
Terminology
Year—The pledge year. The pledge year for a multi-year pledge is the year it begins. After the
first year is closed, it becomes a pledge for the next year, even though the start date remains
the same.
Term in Months—Length of the pledge is expressed in months.
Start Date—Date the pledge begins.
Amount—Amount to be paid each period.
Frequency—Frequency of the pledge payments.
Initial Payment—Amount a contributor gives to a fund in addition to the basic pledge. This
increases the total pledge.
Frequencies–Include As Can, Bi-Monthly, Monthly, One Time, Quarterly, Semi-Annual, or
Weekly/Yearly.
Unit 2: Closing the Contributions Module (Prior to ACS version 11.0)
27
Lesson 5: Reassigning Envelope Numbers
This lesson walks you through reassigning your envelope numbers. You can reassign
envelope numbers in Contributions Setup. Remember to back up your data before reassigning
envelope numbers.
ACS does not require you to renumber envelopes. However, if you have a lot of gaps in your
envelope numbers, renumbering could mean purchasing fewer boxes. If you need to reassign
numbers, you can perform the first two steps prior to the end of the year. You can do this when
you order boxed envelopes or when you need to send a file to your envelope company for the
next year.
Complete the final step in reassigning envelope numbers AFTER the contribution year is closed.
Once you reassign envelopes, you cannot undo the reassignment except by restoring a backup.
If you reassign before you are ready and do not have a valid backup, you must use the Find
Person option or work from your list of new/old numbers to post each entry.
Guidelines for reassigning envelopes:
Envelope numbers are only reassigned for those individuals whose member statuses
you select.
You can reassign numbers for individuals who currently do not have a member status.
You can include individuals with blank envelope numbers.
When using the Exclusion Range option, you can exclude envelope numbers within a selected
range so that records with these numbers are not reassigned new envelope numbers.
You can reassign envelope numbers at any time of the year, but you must make sure you are
ready to post using the new envelope numbers before clicking Apply. You can also use the Print
Reports option to preview your envelope number changes before clicking Apply.
Many organizations reassign envelope numbers in the fall so they have time to get envelopes
printed. They apply the changes as part of their year-end procedures.
To reassign envelope numbers:
1. Under Advanced Tools, click the Settings tab.
2. Select Contributions in the drop-down list, and click Go .
3. Click the Envelope Number Maint tab.
Unit 2: Closing the Contributions Module (Prior to ACS version 11.0)
28
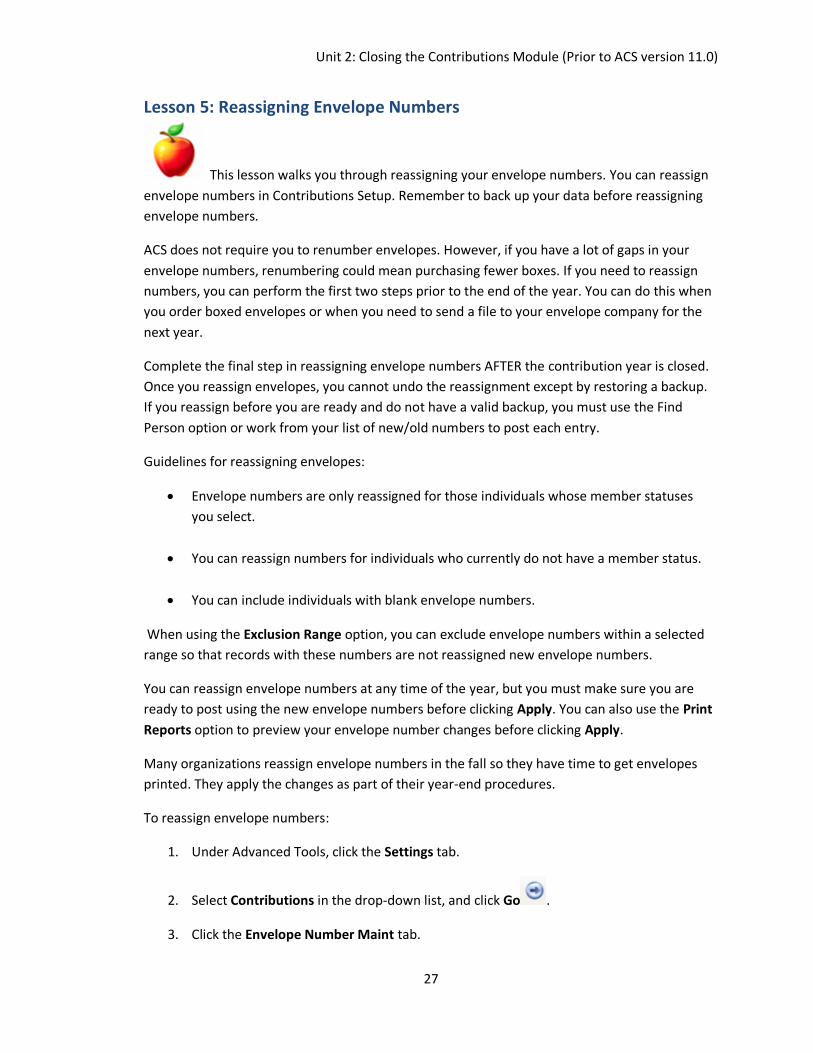
4. Enter the envelope Starting Number and Increment.
5. Under Selected Member Statuses, select the member statuses you want to assign
envelope numbers for. You can also select the Use Last Search Results option.
6. Optional: Select any additional options.
7. Click Reassign, click Yes.
8. To preview the changes to envelope numbers, click Print Reports.
9. To replace the old envelope numbers with the new envelope numbers, click Apply.
Figure 7: Reassign Envelope Numbers
Useful Information
CAUTION!!
Clicking Clear clears all current envelope numbers and cannot be undone without restoring a
backup.
Make sure you backup your data before reassigning envelope numbers.
Do not click Apply until you are ready to start using the new envelope numbers.
Unit 2: Closing the Contributions Module (Prior to ACS version 11.0)
29
Lesson 6: Flagging Arrears
This lesson walks you through flagging pledges as arrears. An Arrears record refers to
a pledge that has a balance from the previous year. Arrears records carry over pledges into the
new year for contributors who have not fulfilled their pledge obligation in the current year.
When transactions are posted to the pledge fund, gift entries post to the prior year’s pledge
until it is fulfilled. Enter arrears payments as you enter any gift in Contributions.
A pledge is not in arrears until the pledge period has ended. Therefore, a multi-year pledge is
not in arrears until the end of the last year.
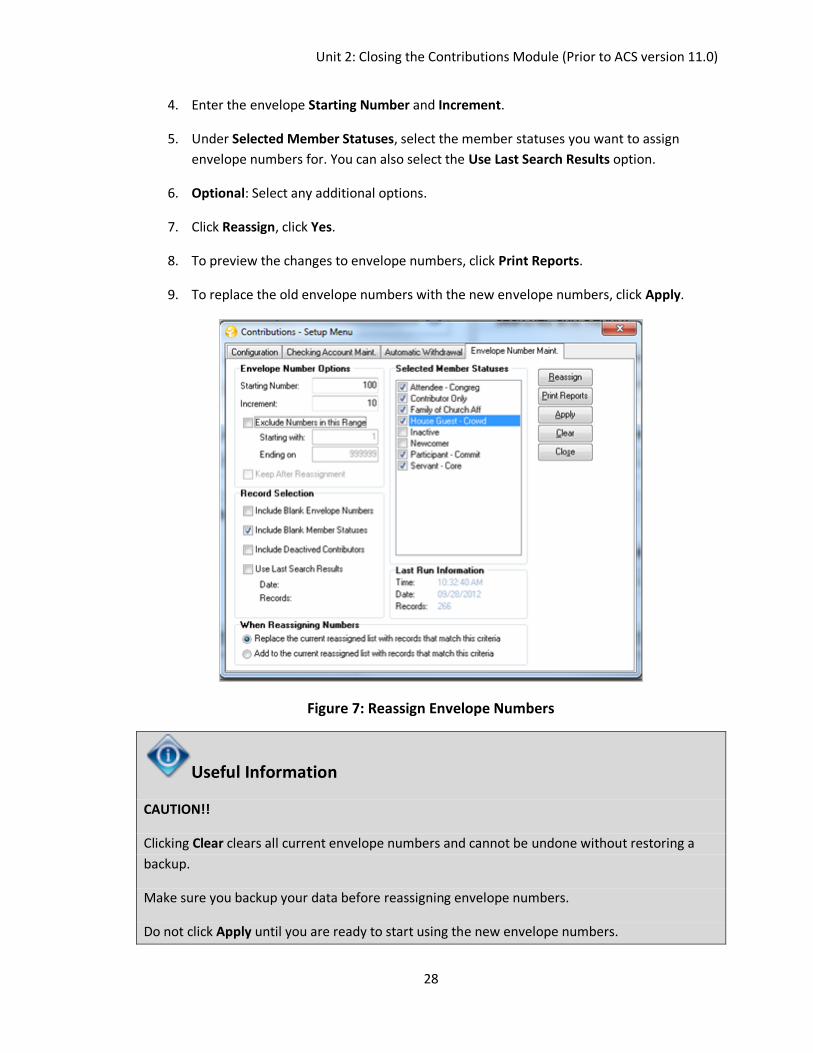
Posting arrears payments is not required. To automatically post to an arrears record before
posting to a current year pledge record, select Post Arrears in Contributions Setup.
Arrears records are set up at the fund and individual level, allowing you to selectively post
arrears payments. You must set up arrears records in Contributions Setup, Add/Edit Fund Codes,
or Add/Edit Pledges. Arrears information prints on the Flex Statement only.
Once you set up the Contributions module for arrears payments, ACS automatically recognizes
an arrears payment and posts it to the correct pledge. You do not have to select any special
settings in Add/Edit Transactions.
Figure 8: Setup - Post Arrears
Unit 2: Closing the Contributions Module (Prior to ACS version 11.0)
30
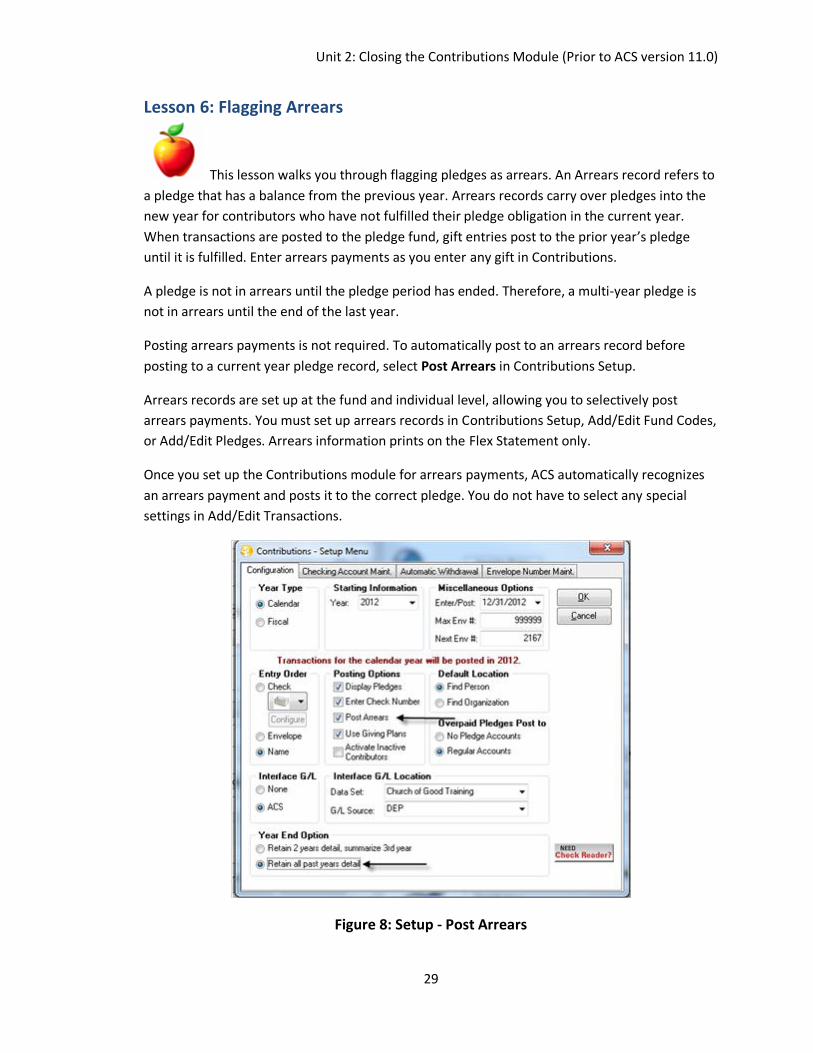
After you select Post Arrears, you must flag the particular fund as an Arrears Fund. This
lets you flag individual contributors’ unfulfilled pledges in arrears (individually) or flag all
unfulfilled pledges for a particular fund in arrears when you close the year.
Gifts posted to the fund in the new year automatically post against the arrears pledge
until it is fulfilled. Then, gifts post toward the current year pledge.
Figure 9: Mark Arrears Fund
Unit 2: Closing the Contributions Module (Prior to ACS version 11.0)
31
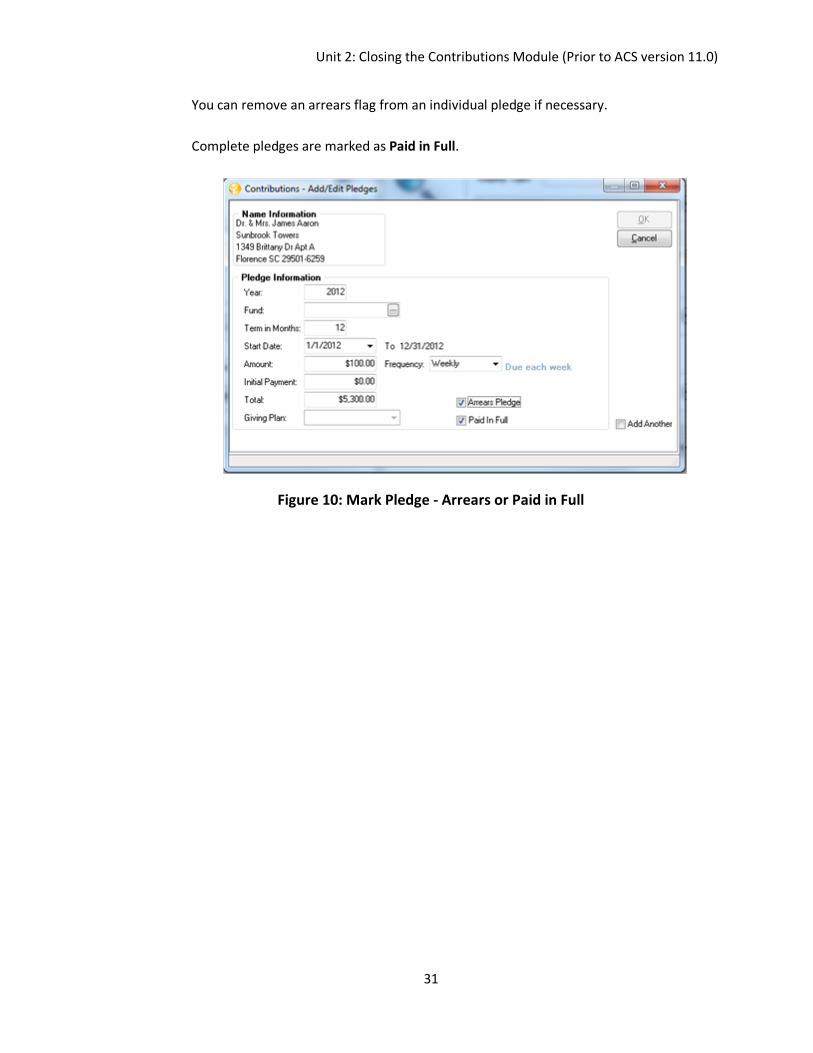
You can remove an arrears flag from an individual pledge if necessary.
Complete pledges are marked as Paid in Full.
Figure 10: Mark Pledge - Arrears or Paid in Full
Unit 2: Closing the Contributions Module (Prior to ACS version 11.0)
32
Lesson 7: Making Corrections
This lesson walks you through making corrections in contributions once
transactions have been posted.
You should reverse any mistakes as originally entered and re-entered correctly. Make
any corrections in separate batches and post them to the original entry date.
If an amount was posted to the wrong fund, post a negative amount to that fund and a
positive to the correct fund.
If an amount was posted to the wrong individual, post a negative amount to that
individual and a positive to the correct individual.
If you are interfaced with General Ledger (post to GL), make sure you post the
corrections to General Ledger.
Useful Information
To avoid further errors when making corrections, make sure there are no other pending
transactions, posted or unposted.
Perform your corrections separately from your normal transactions. If a whole batch was
entered incorrectly, re-enter the corrections as a batch. Make sure that you select the correct
transaction date.
Unit 2: Closing the Contributions Module (Prior to ACS version 11.0)
33
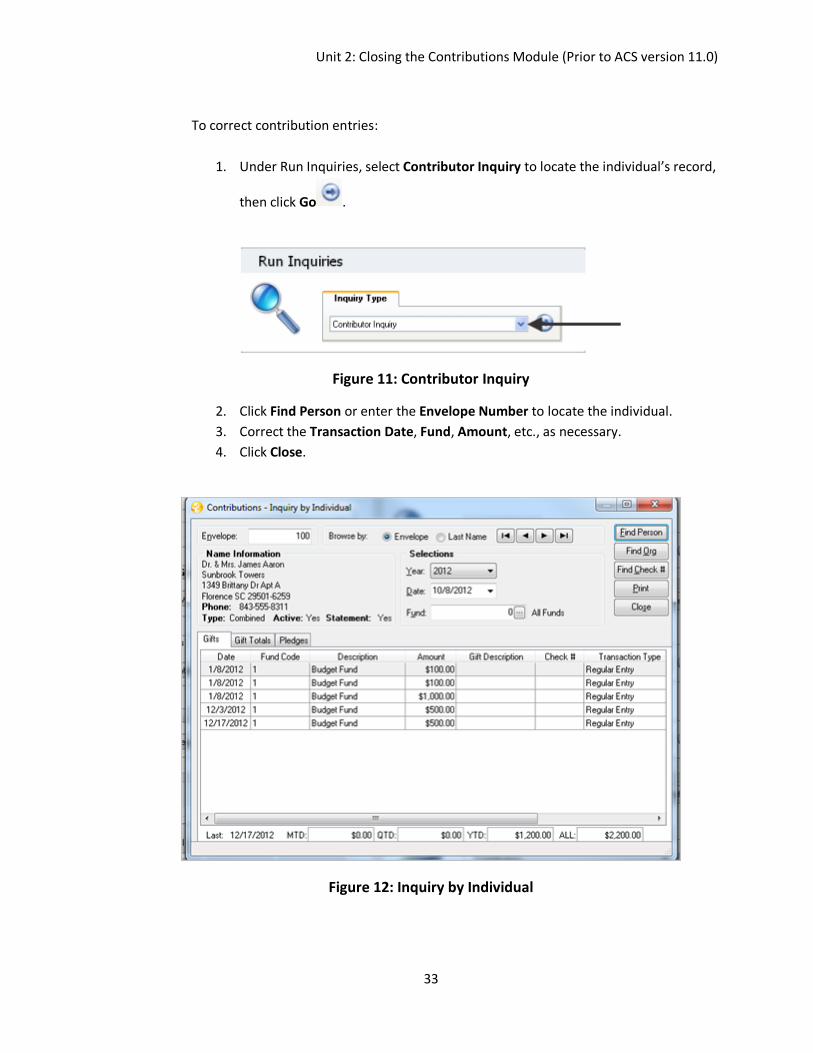
To correct contribution entries:
1. Under Run Inquiries, select Contributor Inquiry to locate the individual’s record,
then click Go .
Figure 11: Contributor Inquiry
2. Click Find Person or enter the Envelope Number to locate the individual.
3. Correct the Transaction Date, Fund, Amount, etc., as necessary.
4. Click Close.
Figure 12: Inquiry by Individual
Unit 2: Closing the Contributions Module (Prior to ACS version 11.0)
34
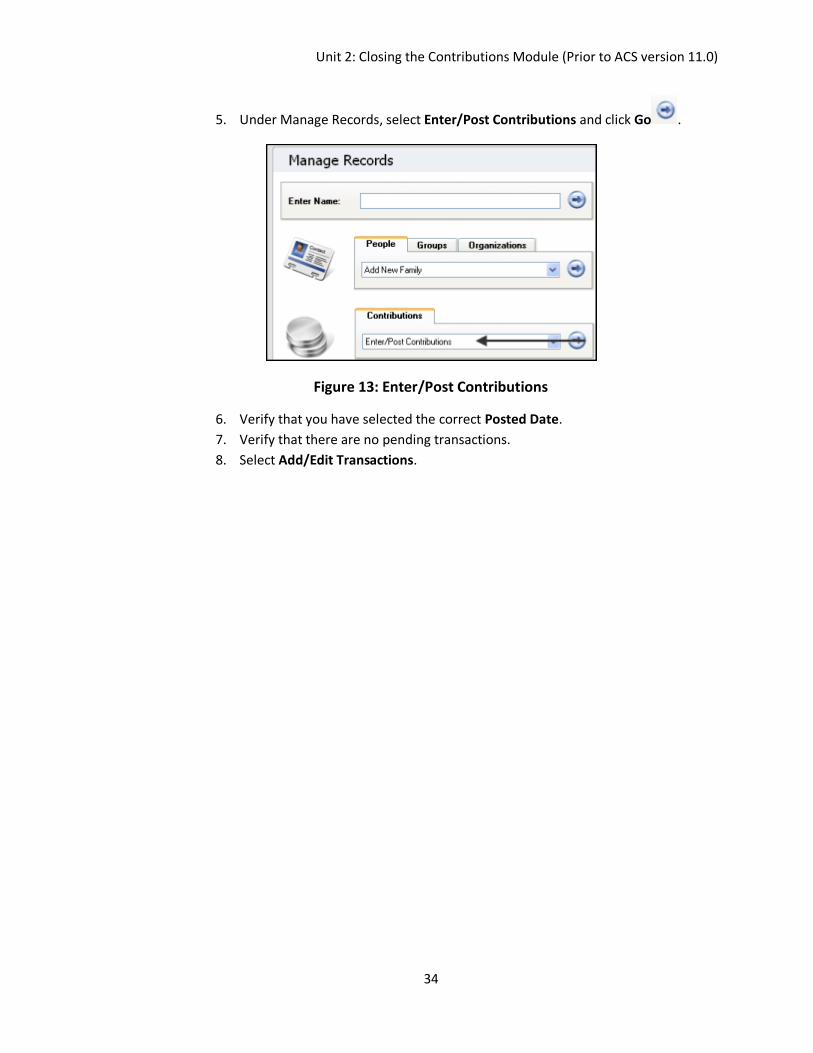
5. Under Manage Records, select Enter/Post Contributions and click Go .
Figure 13: Enter/Post Contributions
6. Verify that you have selected the correct Posted Date.
7. Verify that there are no pending transactions.
8. Select Add/Edit Transactions.
Unit 2: Closing the Contributions Module (Prior to ACS version 11.0)
35
Lesson 8: Statements and Reports
This lesson describes how Gifts display on Flex Statements and the Charitable
Contributions Report.
How gifts are reflected on Flex Statements:
Regular Entry - These entries print on the Flex Statements.
Gift with Description - These entries print on the Flex Statements, but descriptions do
not print.
Gift for Item of Value - These entries print on the Flex Statement for the total amount
posted.
Non-Cash - If a gift is posted as non-cash with a zero dollar amount, nothing prints on
the Flex Statement. If posted as non-cash with a dollar value, in order to apply toward a
pledge, the dollar amount prints.
Non-Deductible - These entries print on Flex Statement as all other entries.
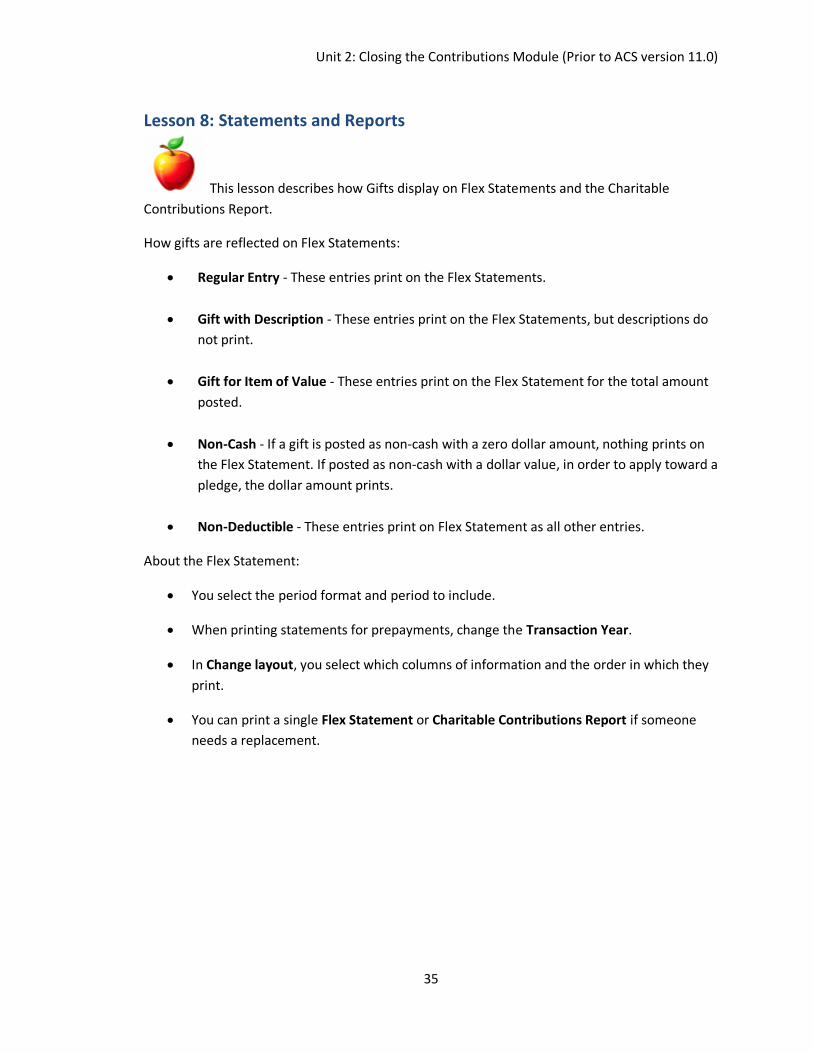
About the Flex Statement:
You select the period format and period to include.
When printing statements for prepayments, change the Transaction Year.
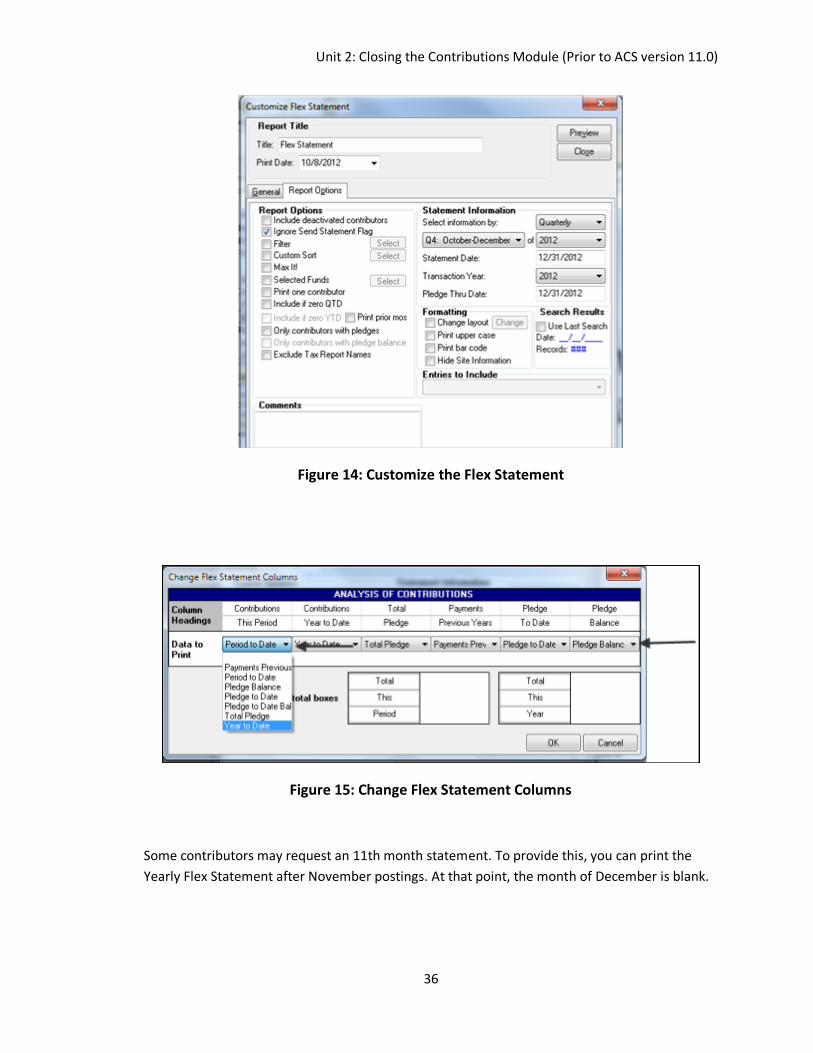
In Change layout, you select which columns of information and the order in which they
print.
You can print a single Flex Statement or Charitable Contributions Report if someone
needs a replacement.
Unit 2: Closing the Contributions Module (Prior to ACS version 11.0)
36
Figure 14: Customize the Flex Statement
Figure 15: Change Flex Statement Columns
Some contributors may request an 11th month statement. To provide this, you can print the
Yearly Flex Statement after November postings. At that point, the month of December is blank.
Unit 2: Closing the Contributions Module (Prior to ACS version 11.0)
37
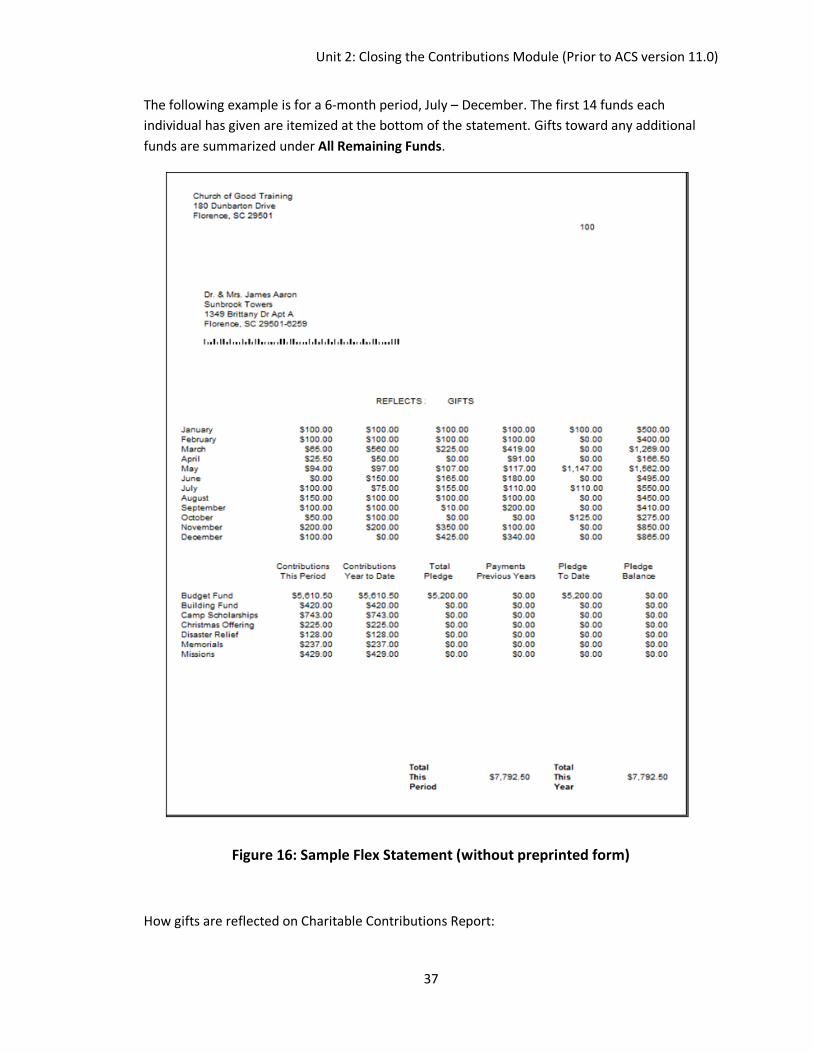
The following example is for a 6-month period, July – December. The first 14 funds each
individual has given are itemized at the bottom of the statement. Gifts toward any additional
funds are summarized under All Remaining Funds.
Figure 16: Sample Flex Statement (without preprinted form)
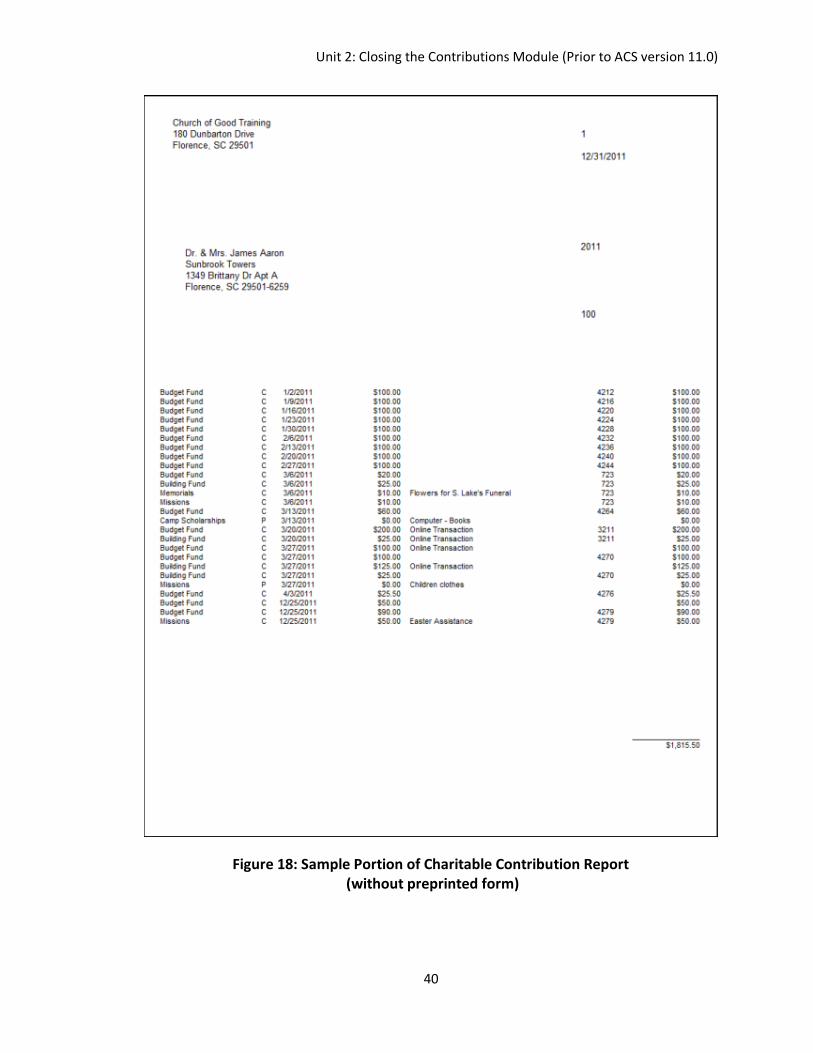
How gifts are reflected on Charitable Contributions Report:
Unit 2: Closing the Contributions Module (Prior to ACS version 11.0)
38
Regular Entry - These entries print on the Charitable Contributions Report.
Gift with Description - These entries print on the report. The description also prints
on the Charitable Contributions Report.
Gift for Item of Value - These entries print on the Charitable Report. The difference
between the total gift (200.00 gross) and the value of service (5.00) prints in the
Charitable Amount Column (195.00) on the Charitable Report. The description
prints on the Charitable Contributions Report.
Non-Cash Gift - If posted as non-cash with a zero dollar amount, the entry with
description prints on the Charitable Contributions Report as Property (P) and as
zero dollars. If posted with a dollar value, in order to apply against a pledge, the
entry still prints on the Charitable Contributions Report as zero dollars.
Non-Deductible - These do not print on the Charitable Report.
If possible, send contribution statements out early so that you can identify and correct
any errors. You can print Contribution Statements and Charitable Tax reports after
closing the year, but they do not reflect proper pledge totals if you have multi-year
pledges.
Charitable Contribution Reports for previous years do not print detail if you select
Retain past 2 years, summarize 3rd year in Setup.
Unit 2: Closing the Contributions Module (Prior to ACS version 11.0)
39
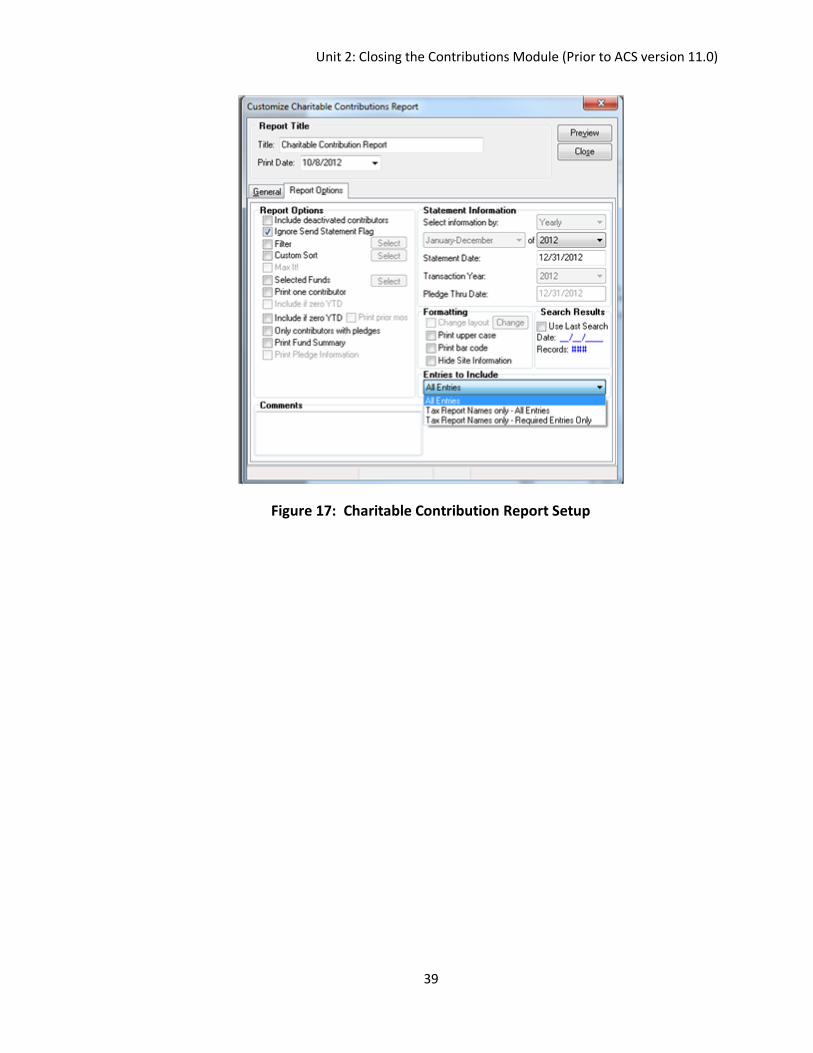
Figure 17: Charitable Contribution Report Setup
Unit 2: Closing the Contributions Module (Prior to ACS version 11.0)
40
Figure 18: Sample Portion of Charitable Contribution Report (without preprinted form)

Unit 2: Closing the Contributions Module (Prior to ACS version 11.0)
41
Lesson 9: Year-End Options/Procedures
This lesson walks you through the final steps in the contribution year-end closing
procedure.
At the end of the year, you must perform year-end procedures. This process rolls any multi-year
pledges over to the new year. Depending on your setup, it may summarize historical data older
than two years. It also sets the default post year to the new year.
Year-End Options:
Year-End Options are located in Setup. The option you select determines how ACS stores
historical contribution information. Before clearing the year, verify the option you selected. The
Year-End Options include:
Retain 2 years detail, summarize 3rd year – Keeps detail for the two most recent
years and summarizes information for the third year. If you choose to keep
summary information, each contributor has a single transaction for each fund.
Retain all past years detail – Keeps detail for all prior years.
Year-End Procedures
Before closing the year in Contributions, make sure all of your contributions for the current year
are entered and posted. This includes any monies received on or before December 31st,
including prepayments.
You must perform a backup before you can close the year.
If you receive any contributions after December 31st, the envelope must be postmarked on or
before December 31st for the contributor to receive credit in the current year for tax purposes.
If there are unposted or uncleared contributions, this message displays:
Figure 19: Uncleared Posting message
Unit 2: Closing the Contributions Module (Prior to ACS version 11.0)
42
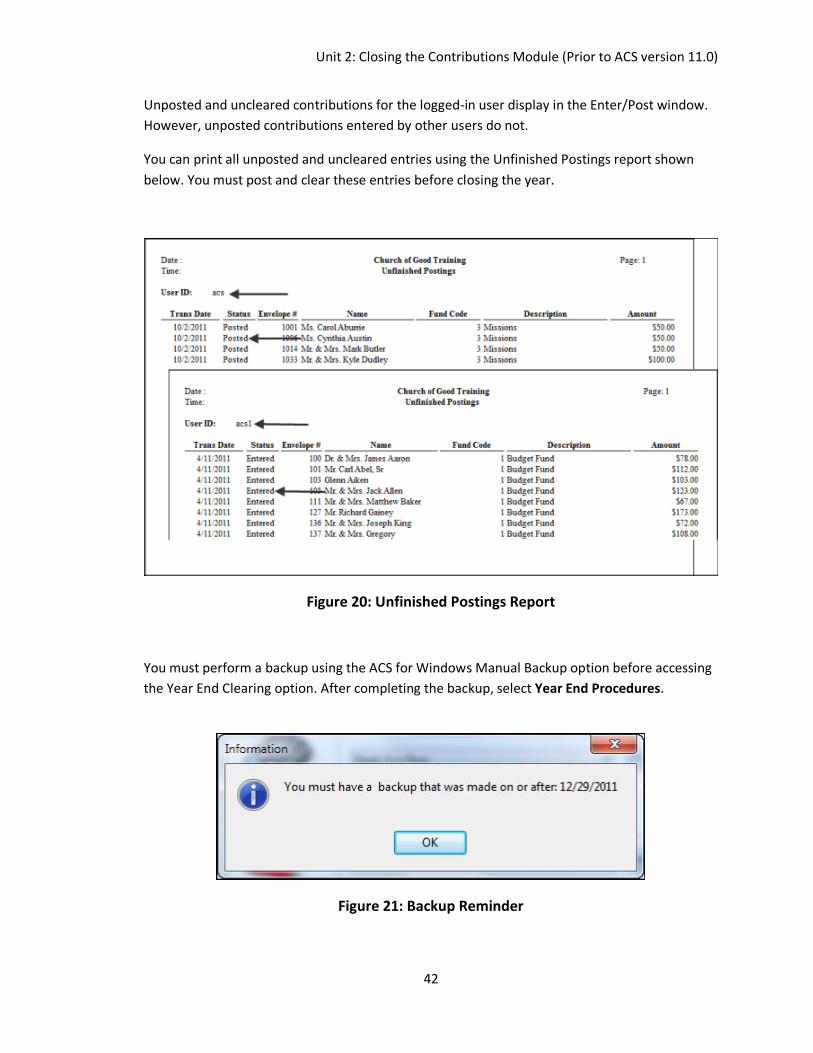
Unposted and uncleared contributions for the logged-in user display in the Enter/Post window.
However, unposted contributions entered by other users do not.
You can print all unposted and uncleared entries using the Unfinished Postings report shown
below. You must post and clear these entries before closing the year.
Figure 20: Unfinished Postings Report
You must perform a backup using the ACS for Windows Manual Backup option before accessing
the Year End Clearing option. After completing the backup, select Year End Procedures.
Figure 21: Backup Reminder
Unit 2: Closing the Contributions Module (Prior to ACS version 11.0)
43
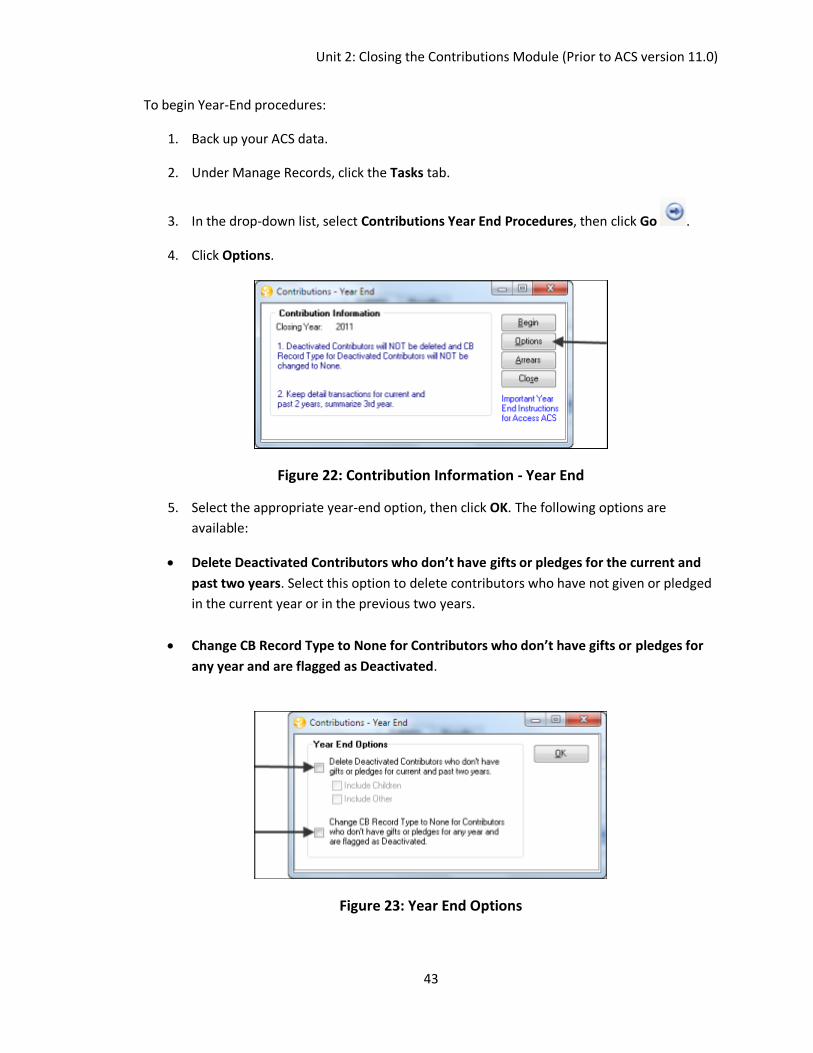
To begin Year-End procedures:
1. Back up your ACS data.
2. Under Manage Records, click the Tasks tab.
3. In the drop-down list, select Contributions Year End Procedures, then click Go .
4. Click Options.
Figure 22: Contribution Information - Year End
5. Select the appropriate year-end option, then click OK. The following options are
available:
Delete Deactivated Contributors who don’t have gifts or pledges for the current and
past two years. Select this option to delete contributors who have not given or pledged
in the current year or in the previous two years.
Change CB Record Type to None for Contributors who don’t have gifts or pledges for
any year and are flagged as Deactivated.
Figure 23: Year End Options
Unit 2: Closing the Contributions Module (Prior to ACS version 11.0)
44
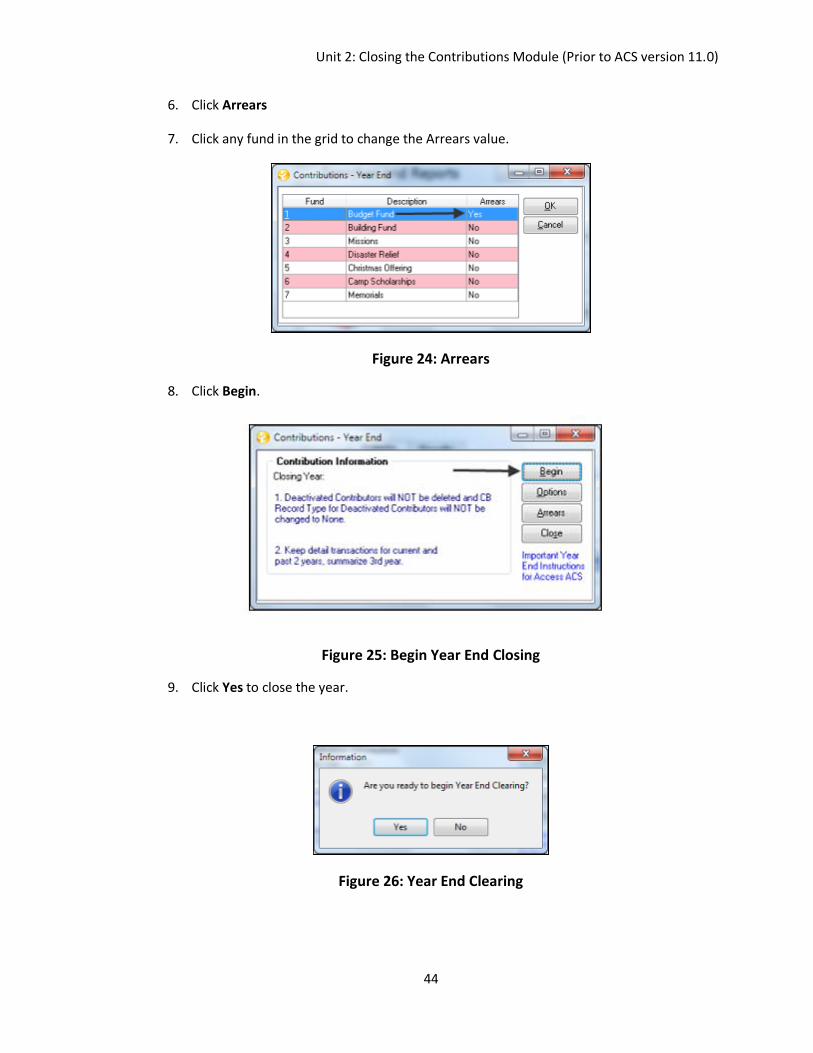
6. Click Arrears
7. Click any fund in the grid to change the Arrears value.
Figure 24: Arrears
8. Click Begin.
Figure 25: Begin Year End Closing
9. Click Yes to close the year.
Figure 26: Year End Clearing
Unit 2: Closing the Contributions Module (Prior to ACS version 11.0)
45
Terminology
Include Children - Includes records with a family position of Child when deleting deactivated
contributors.
Include Other – Includes records with a family position of Other when deleting deactivated
individuals.
Arrears - A pledge record that has a balance due from a previous year.
Useful Information
If you delete contributors who have not given or pledged in the current year or in the previous
two years, you will be given the options to Include Children and Include Other.
You cannot post entries to the next year until you perform year-end closing procedures.
Unit 3: Closing Payroll
46
Unit 3: Closing Payroll
The Payroll module complies with all IRS requirements and prints W-2, W-3 and 941 forms. In
addition, ACS Technologies offers annual tax updates to keep your tax tables up-to-date with
the latest federal and state laws. This unit will assist you with the year-end issues in the Payroll
module, including printing W2s for employees, the 4th Quarter 941, and more.
This unit covers the closing procedures related to the Payroll Module, including:
Payroll Closing Tips
Year-End Reports
W-2’s, W-3’s and 941’s
Common Errors in Preparing W-2s
Month End Procedures
Updating Pay Rates and Vacation/Sick Time
Closing Payroll
Unit 3: Closing Payroll
47
Lesson 1: Closing Payroll
Payroll only has a month-end closing. However, at year-end, there are some additional
procedures you should follow.
Complete Last Payroll:
You must complete the last payroll of the current year before issuing your Forms W-2.
Make any corrections to employees’ paychecks for the current year, including voiding
and reissuing checks, if necessary.
May sure to date any reissued checks in the correct tax year so they display on the Form
W-2.
Make sure all pay information for the current year is posted before closing the month of
December.
Check posting date and posting period on your entries before you post.
Load Tax Update:
Before compiling the first payroll of the new year or printing federal forms (W-2, W-3,
941, 1099, or 1096), ACS Technologies recommends that you load the tax update.
ACS Technologies publishes the tax updates on the ACS Web site at
www.acstechnologies.com/taxableupdates.
Closing Flexibility:
You can still access and manipulate all payroll data even after closing the last month of
the year. For example, if you close December, the posting month changes to January of
the next year; however, you can still print the previous year's W-2 forms and 941s by
selecting the desired year on the W-2 and 941 tabs. If you need to print January checks
before closing December, simply process checks as usual (making sure check dates are
correct). When you are ready to post the checks set the posting month to January.
941s/W-2s/W-2 Extract - Reconcile Form 941 and W-2 employee information as soon as
possible. Begin by printing your Form 941 worksheet for all four quarters; then, run your
W-2 forms on blank paper and compare the information. If you find an error, you can
make adjustments to quarterly or yearly totals from the W2 Totals option in Utilities.
The W-2 extract allows you to create, edit, view and print your employee's W-2
information.
Unit 3: Closing Payroll
48
When you are sure the information is correct, you can copy an extract file of the W-2
information and submit it to the Social Security Administration. All employers who file
250 or more W-2 forms must extract W-2 information to a file for transmittal to the
Social Security Administration.
ACS follows the Social Security Administration’s MMFEF-1 specification for the extract
file.
The Social Security Administration does not accept compressed files on magnetic media.
Do not use any compression utility such as WinZip, PkZip, or DynaZip on the extract file.
The IRS no longer accepts 3-1/2 inch diskettes for filing information returns.
With the W-2 Extract option, you can:
Print the extract file.
Edit employer or employee information.
Save the extract file to your hard drive and upload the file to the Social Security
Administration’s Web site.
Employee Record Maintenance:
After closing the year, be sure to adjust employee vacation/sick accrual rates and
balances. If your organization does not track vacation and sick time using an accrual
method, be certain to enter beginning vacation and sick amounts for the new year.
If employees' salaries and hourly rates will change in the new year, make those changes
now. In addition, deactivate any employees no longer working in your organization.
Reports:
Be sure to review all the reports in the Payroll module to determine which reports your
organization will need.
Here is a list of Payroll reports commonly printed at year-end:
Liability Report - Displays the total liability for a selected period, including tax
deductions, employer contributions, worker's compensation, taxable wages, and
adjustments.
Employee Detail Report - Displays all the information in the employee records. You
can print this report for one or for all employees.
Worker's Compensation Report - Displays worker's compensation by employee.
941-A Report - Print this report only if your state requires 941-A reporting. The
report displays quarterly gross pay, the taxable pay amount, and the difference
between gross and taxable pay for all employees in a selected state (or states).
Unit 3: Closing Payroll
49
Useful Information
The Tax Update file contains the upcoming year’s payroll tax tables and any federal form
changes required for filing for the calendar year ending December 31.
Through the year, ACS Technologies publishes up-to-date tax tables on the Support page of our
ACS Web site at www.acstechnologies.com/taxtableupdates.
Unit 3: Closing Payroll
50
Lesson 2: Year-End Reports
This section is designed to familiarize you with the recommended reports used
during Year-End Procedures for Payroll. You can print all Reports and Period End Reports for
current and previous periods.
Be sure to review all the reports in the Payroll Module to determine which reports your
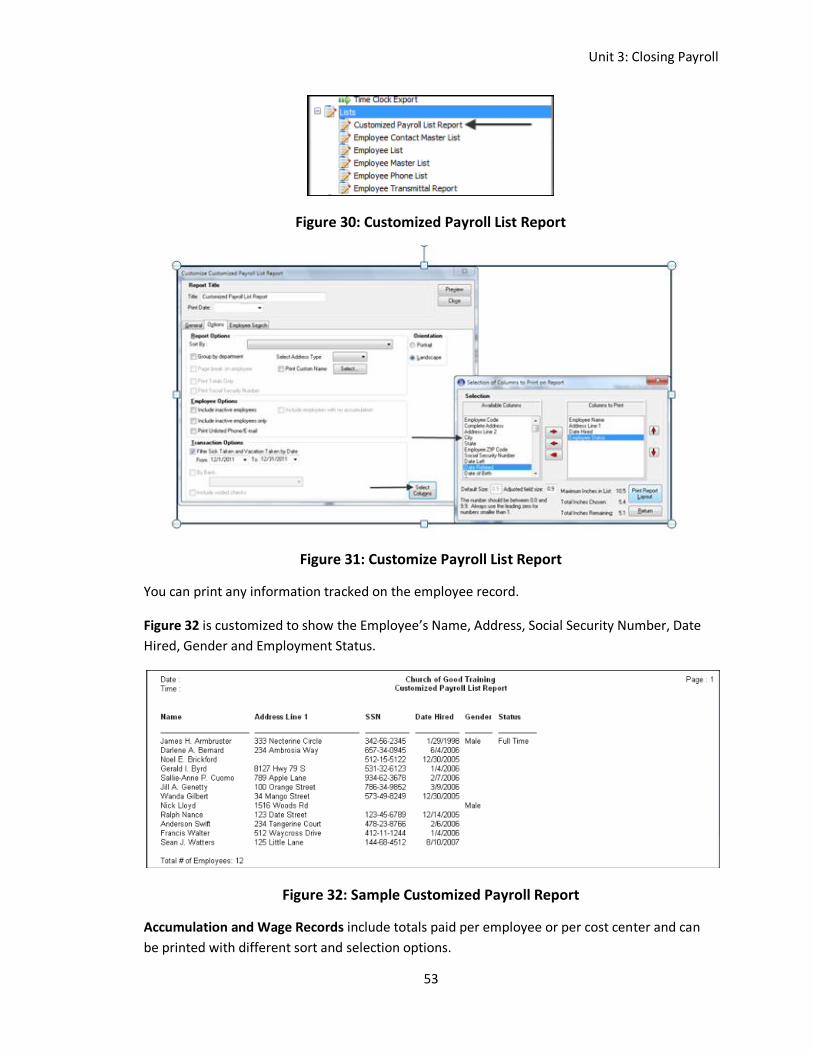
organization needs. Reports commonly printed in Payroll at year-end include the Liability
Report, the Customized Payroll List Accumulation report, and the Wage Records report.
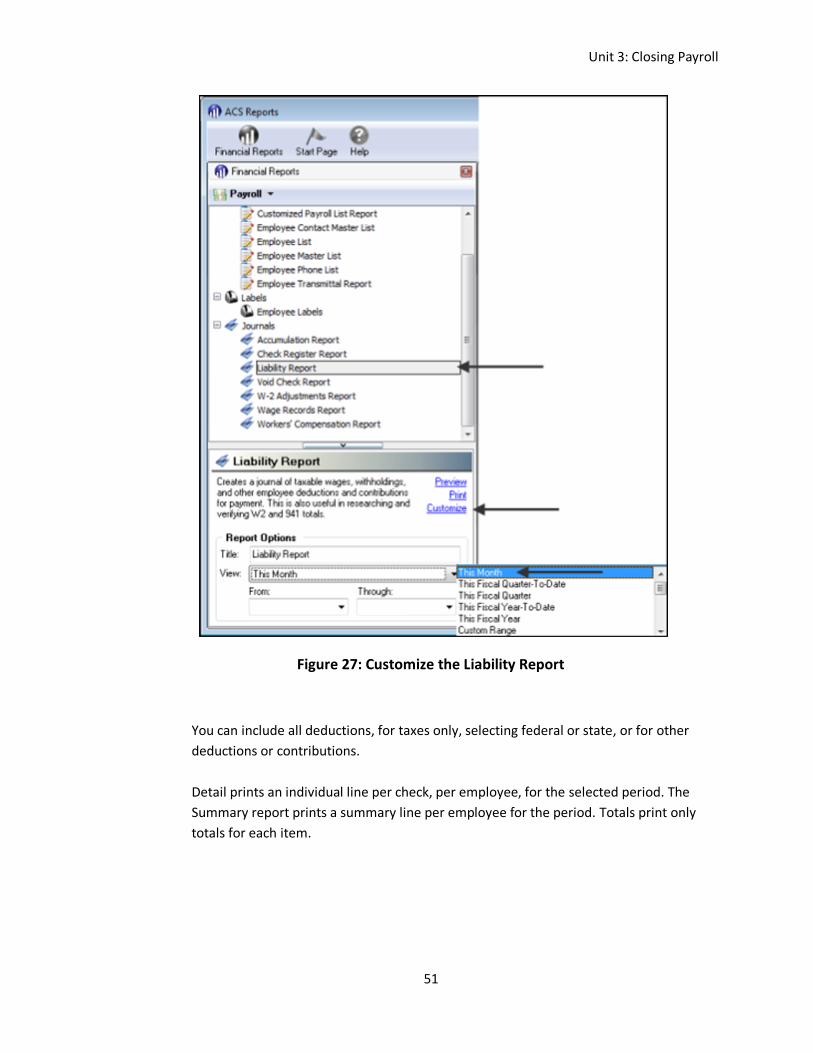
The Liability Report
You can print this report for this month, fiscal quarter-to-date, fiscal quarter, fiscal year-
to-date, fiscal year, or a custom date range.
Unit 3: Closing Payroll
51
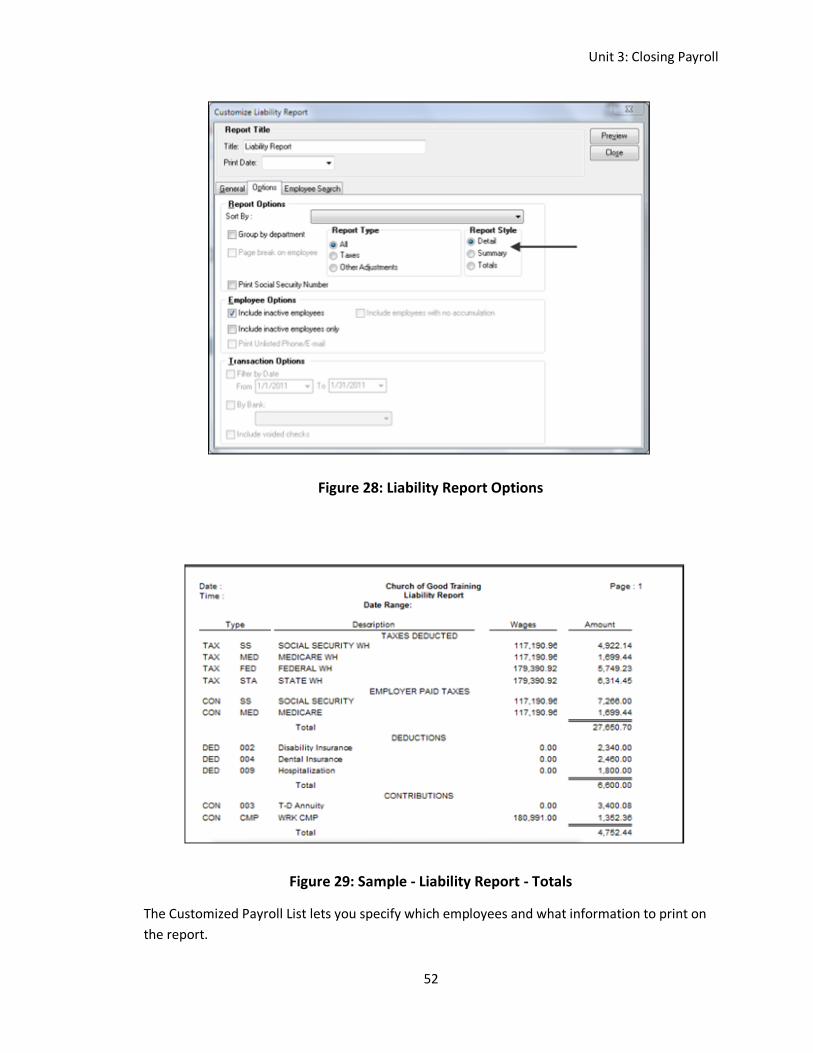
Figure 27: Customize the Liability Report
You can include all deductions, for taxes only, selecting federal or state, or for other
deductions or contributions.
Detail prints an individual line per check, per employee, for the selected period. The
Summary report prints a summary line per employee for the period. Totals print only
totals for each item.
Unit 3: Closing Payroll
52
Figure 28: Liability Report Options
Figure 29: Sample - Liability Report - Totals
The Customized Payroll List lets you specify which employees and what information to print on
the report.
Unit 3: Closing Payroll
53
Figure 30: Customized Payroll List Report
Figure 31: Customize Payroll List Report
You can print any information tracked on the employee record.
Figure 32 is customized to show the Employee’s Name, Address, Social Security Number, Date
Hired, Gender and Employment Status.
Figure 32: Sample Customized Payroll Report
Accumulation and Wage Records include totals paid per employee or per cost center and can
be printed with different sort and selection options.

Unit 3: Closing Payroll
54
Totals display a breakdown of hours and adjustment amounts. Department selections and
groups are available.
You can print the report for this Month, Fiscal Quarter-To-Date, Fiscal Quarter, Fiscal Year-To-
Date, Fiscal Year, or a Custom Date Range.
Figure 33: Customize Accumulation Report
Unit 3: Closing Payroll
55
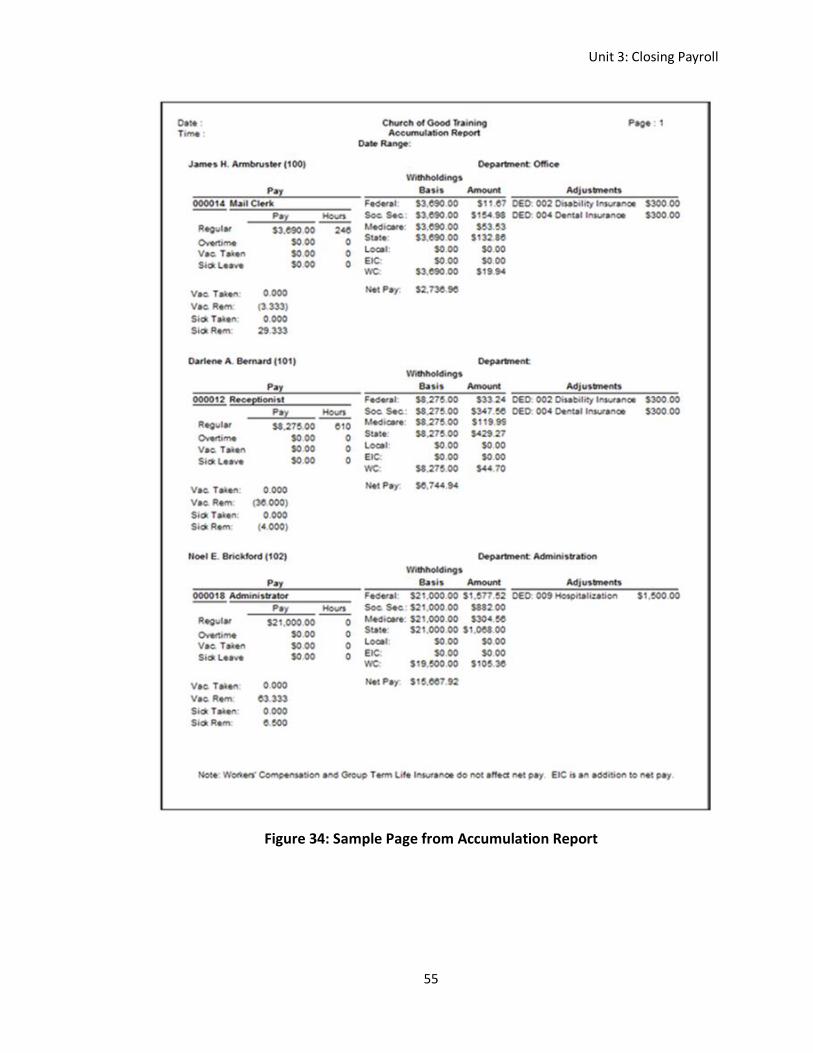
Figure 34: Sample Page from Accumulation Report
Unit 3: Closing Payroll
56
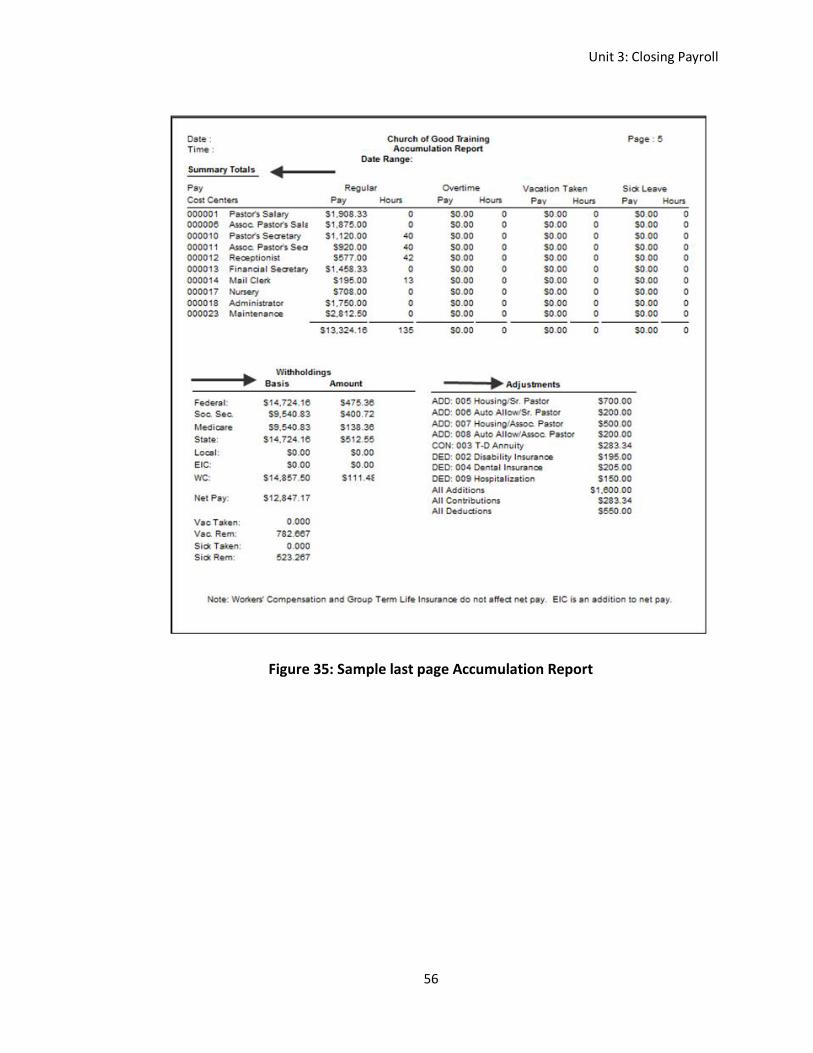
Figure 35: Sample last page Accumulation Report
Unit 3: Closing Payroll
57
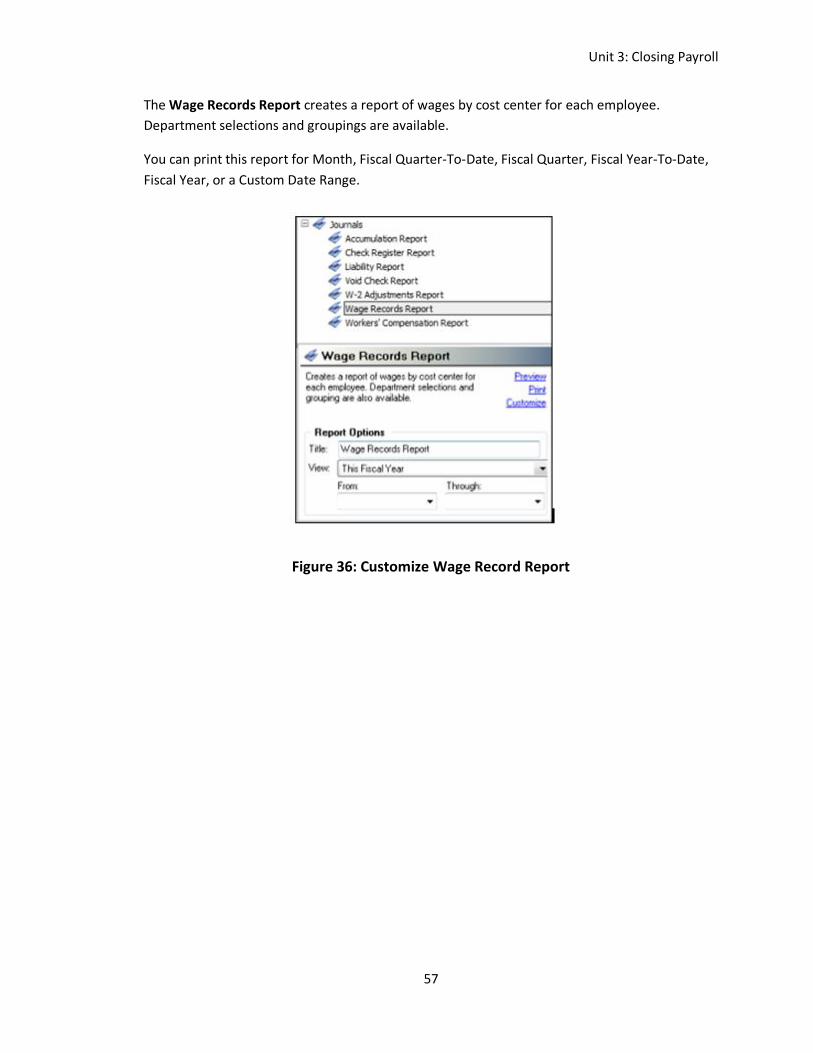
The Wage Records Report creates a report of wages by cost center for each employee.
Department selections and groupings are available.
You can print this report for Month, Fiscal Quarter-To-Date, Fiscal Quarter, Fiscal Year-To-Date,
Fiscal Year, or a Custom Date Range.
Figure 36: Customize Wage Record Report
Unit 3: Closing Payroll
58
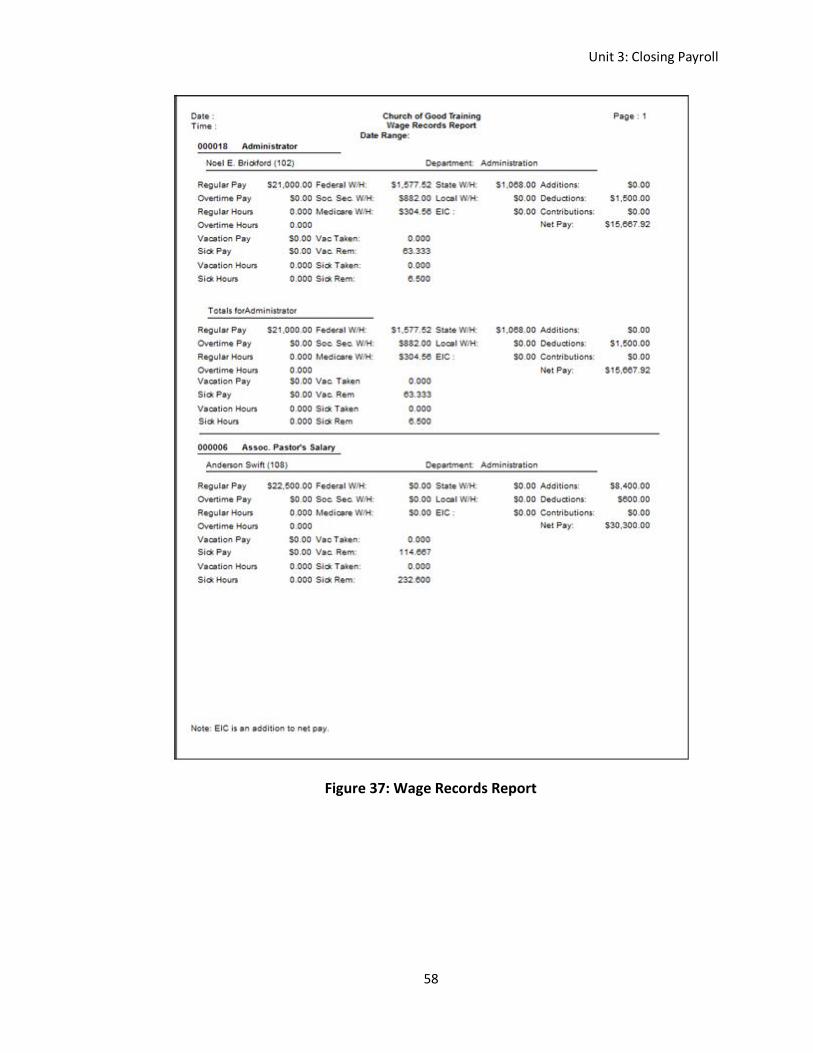
Figure 37: Wage Records Report
Unit 3: Closing Payroll
59
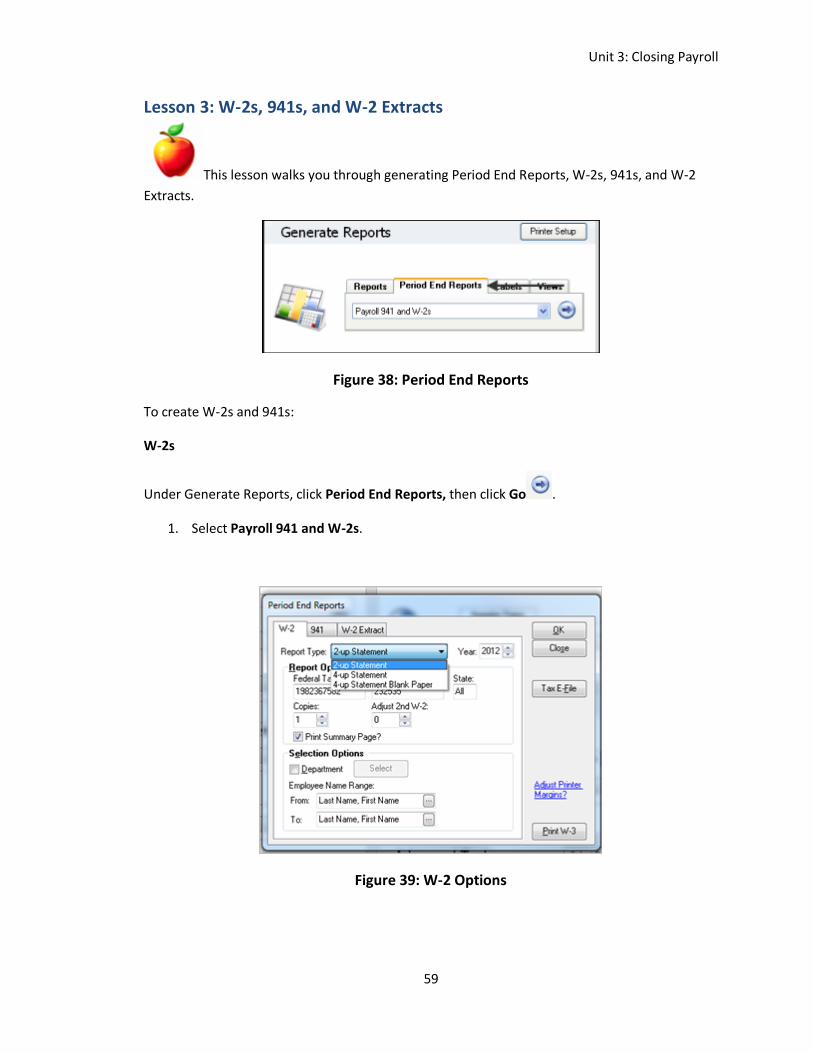
Lesson 3: W-2s, 941s, and W-2 Extracts
This lesson walks you through generating Period End Reports, W-2s, 941s, and W-2
Extracts.
Figure 38: Period End Reports
To create W-2s and 941s:
W-2s
Under Generate Reports, click Period End Reports, then click Go .
1. Select Payroll 941 and W-2s.
Figure 39: W-2 Options
Unit 3: Closing Payroll
60
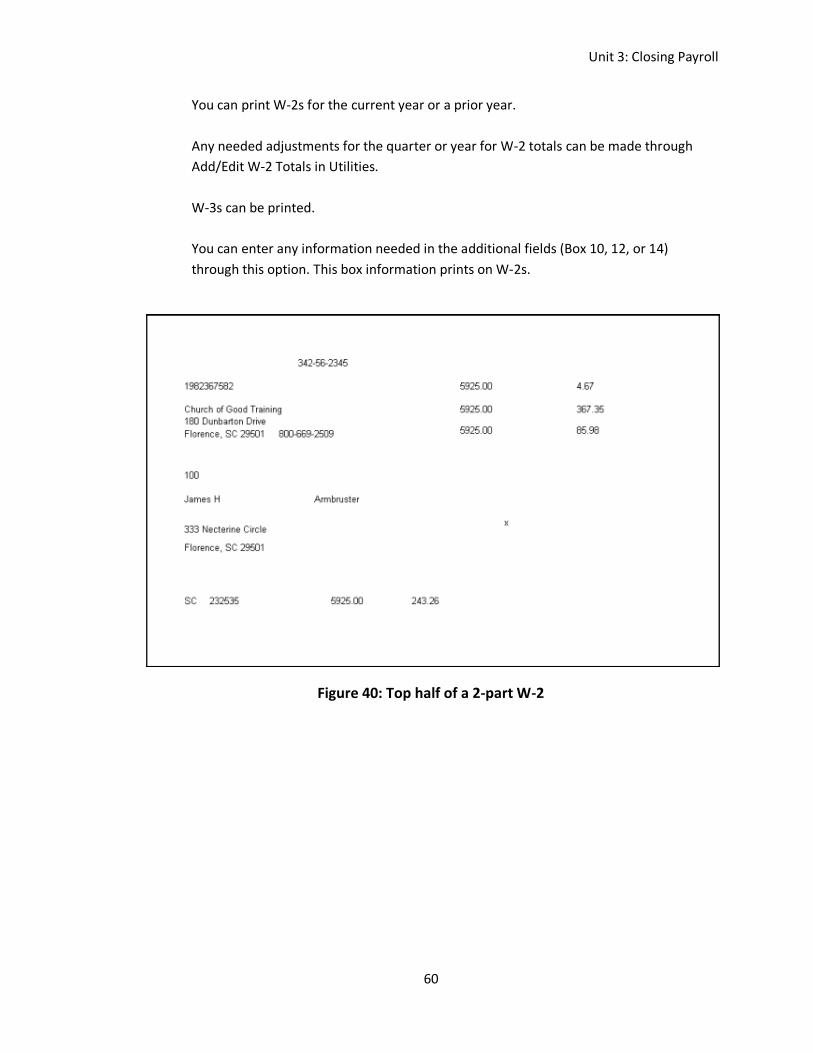
You can print W-2s for the current year or a prior year.
Any needed adjustments for the quarter or year for W-2 totals can be made through
Add/Edit W-2 Totals in Utilities.
W-3s can be printed.
You can enter any information needed in the additional fields (Box 10, 12, or 14)
through this option. This box information prints on W-2s.
Figure 40: Top half of a 2-part W-2
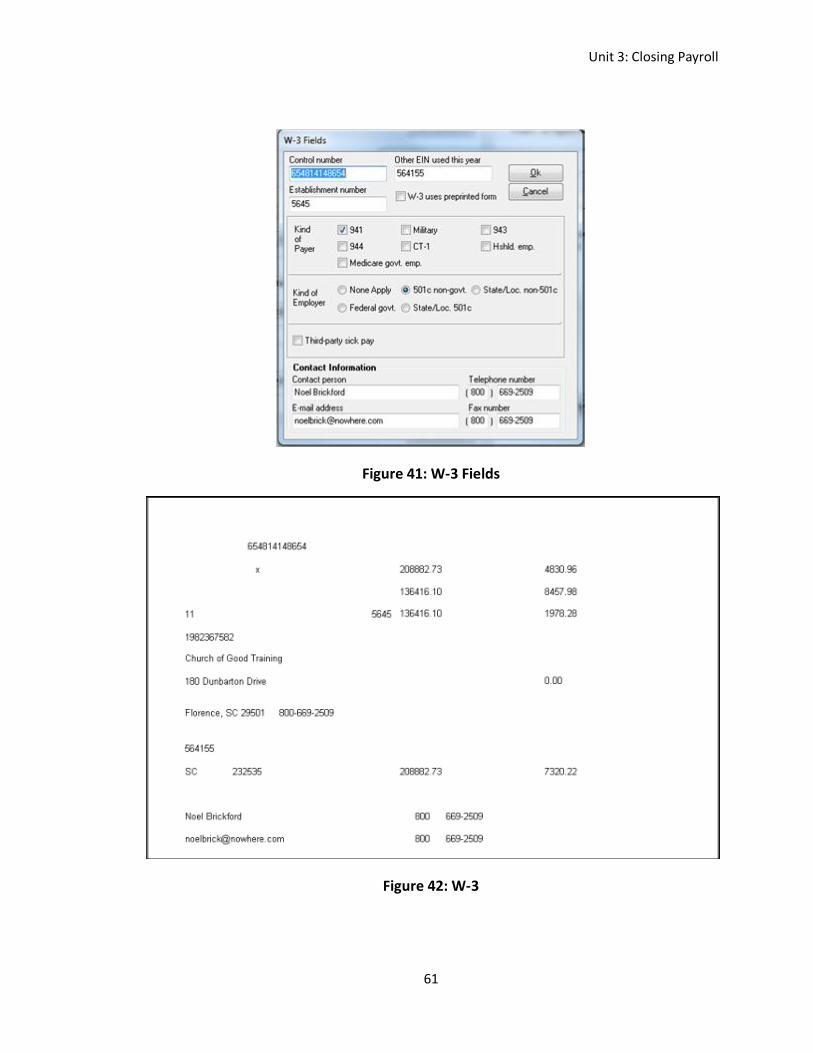
Unit 3: Closing Payroll
61
Figure 41: W-3 Fields
Figure 42: W-3
Unit 3: Closing Payroll
62
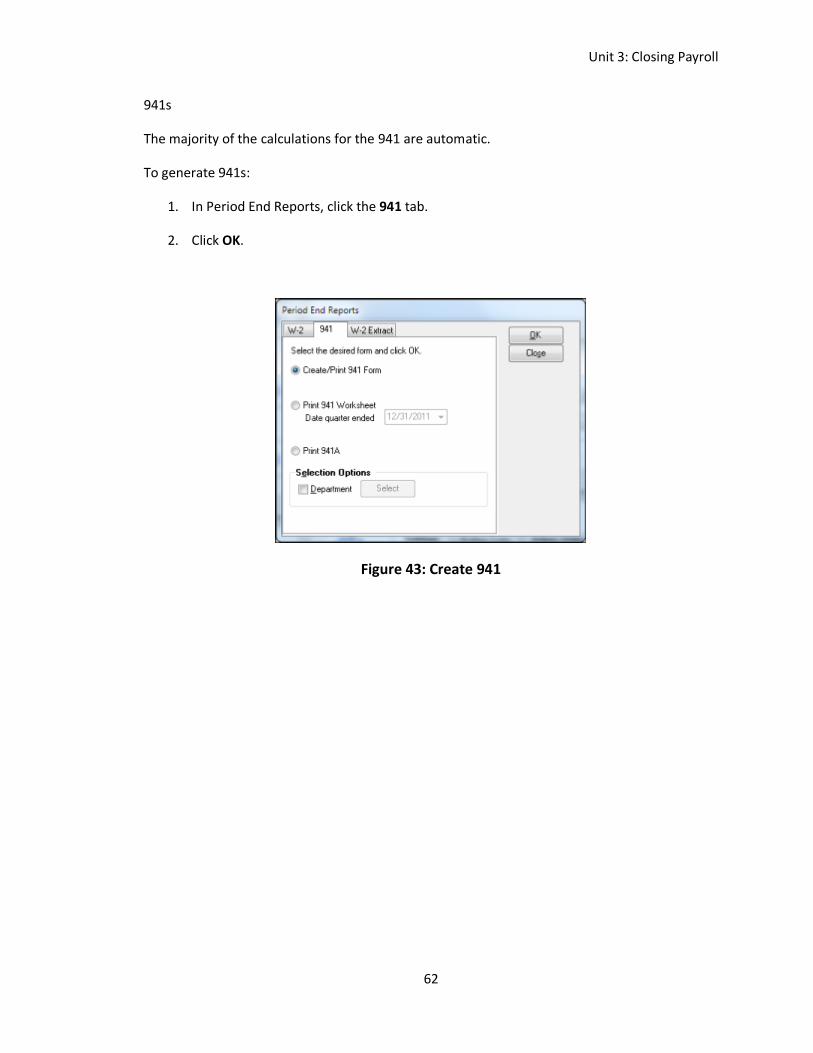
941s
The majority of the calculations for the 941 are automatic.
To generate 941s:
1. In Period End Reports, click the 941 tab.
2. Click OK.
Figure 43: Create 941
Unit 3: Closing Payroll
63
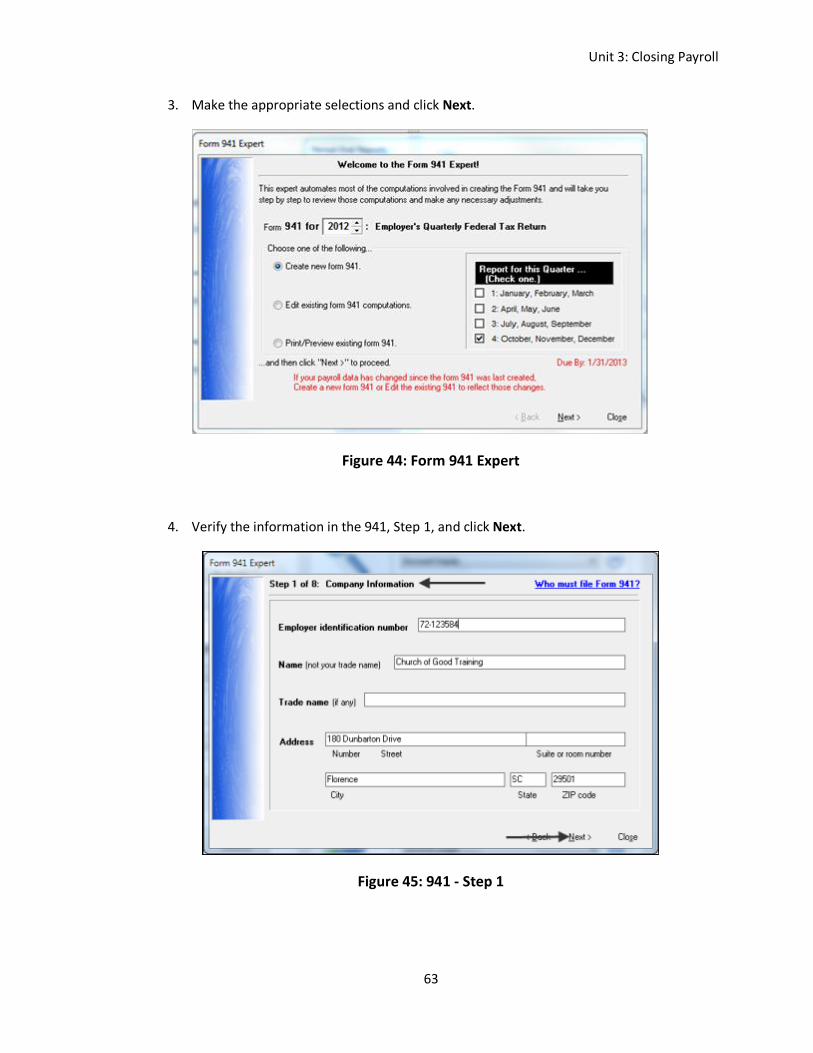
3. Make the appropriate selections and click Next.
Figure 44: Form 941 Expert
4. Verify the information in the 941, Step 1, and click Next.
Figure 45: 941 - Step 1
Unit 3: Closing Payroll
64
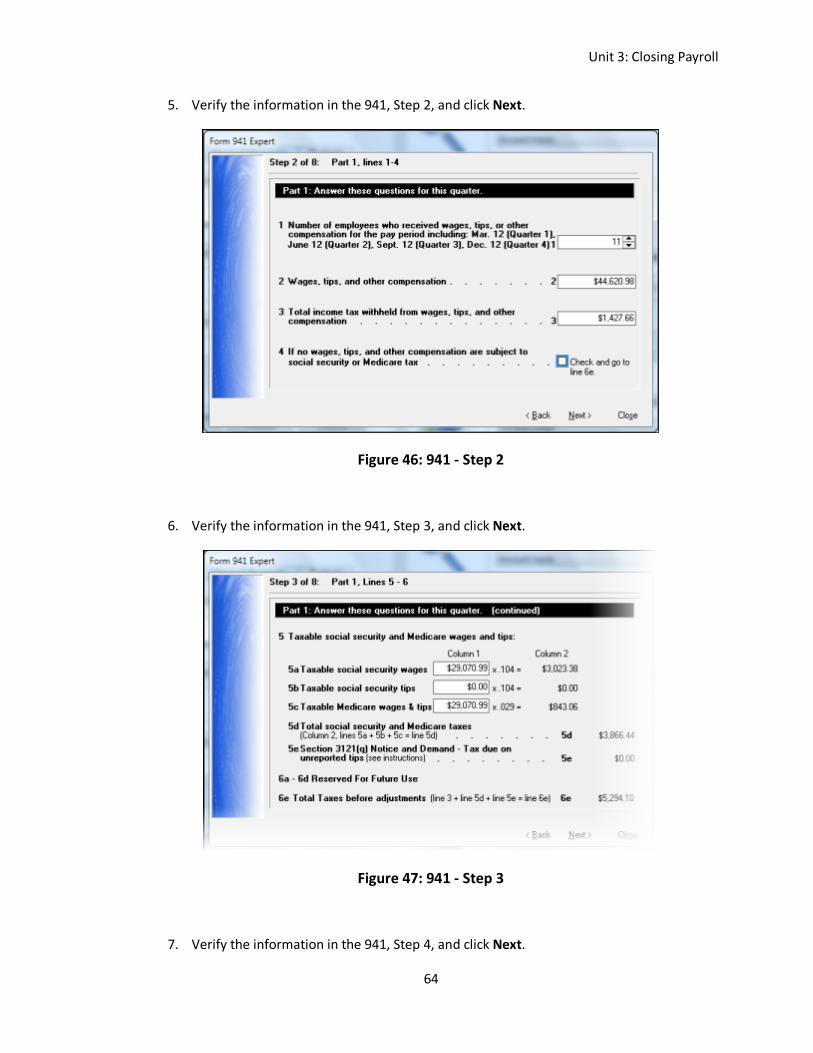
5. Verify the information in the 941, Step 2, and click Next.
Figure 46: 941 - Step 2
6. Verify the information in the 941, Step 3, and click Next.
Figure 47: 941 - Step 3
7. Verify the information in the 941, Step 4, and click Next.
Unit 3: Closing Payroll
65
Figure 48: 941 - Step 4
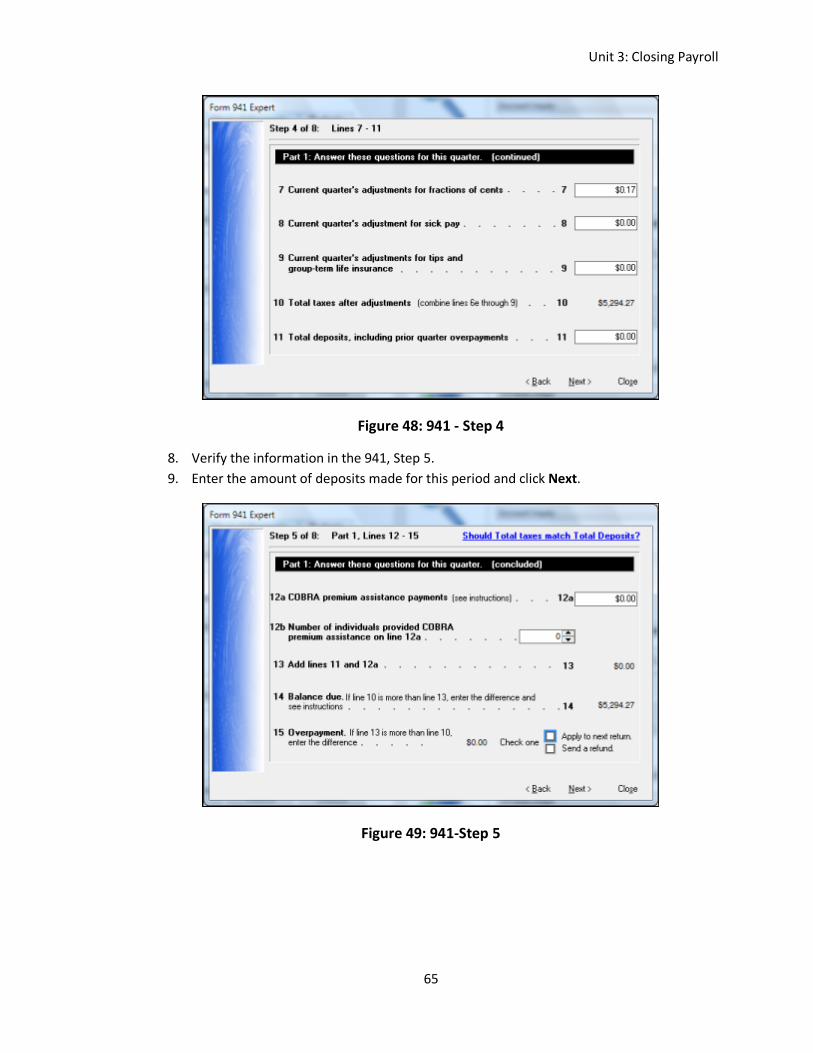
8. Verify the information in the 941, Step 5.
9. Enter the amount of deposits made for this period and click Next.
Figure 49: 941-Step 5
Unit 3: Closing Payroll
66
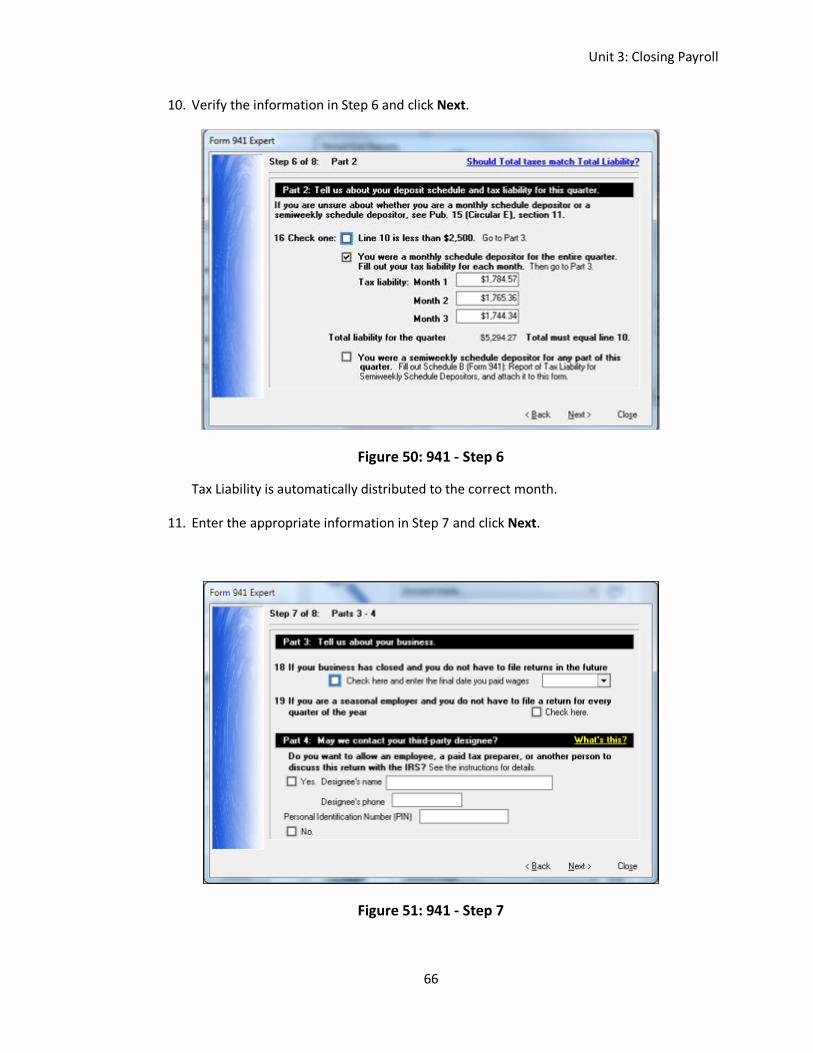
10. Verify the information in Step 6 and click Next.
Figure 50: 941 - Step 6
Tax Liability is automatically distributed to the correct month.
11. Enter the appropriate information in Step 7 and click Next.
Figure 51: 941 - Step 7
Unit 3: Closing Payroll
67
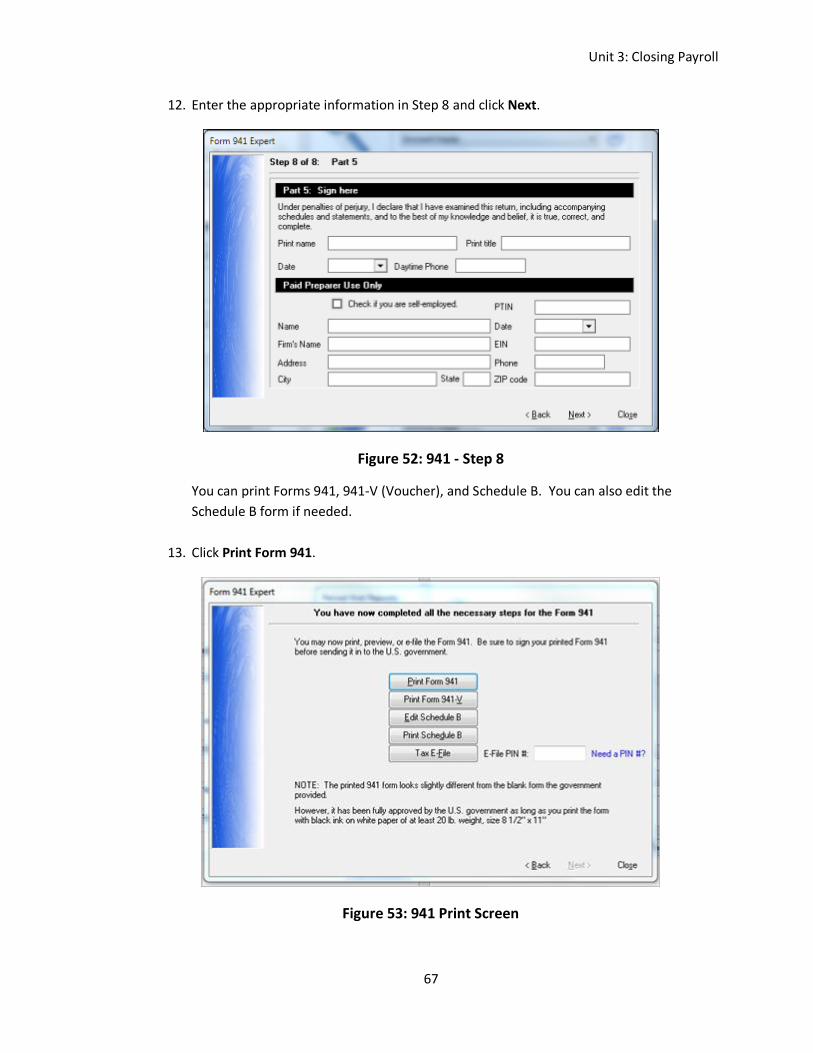
12. Enter the appropriate information in Step 8 and click Next.
Figure 52: 941 - Step 8
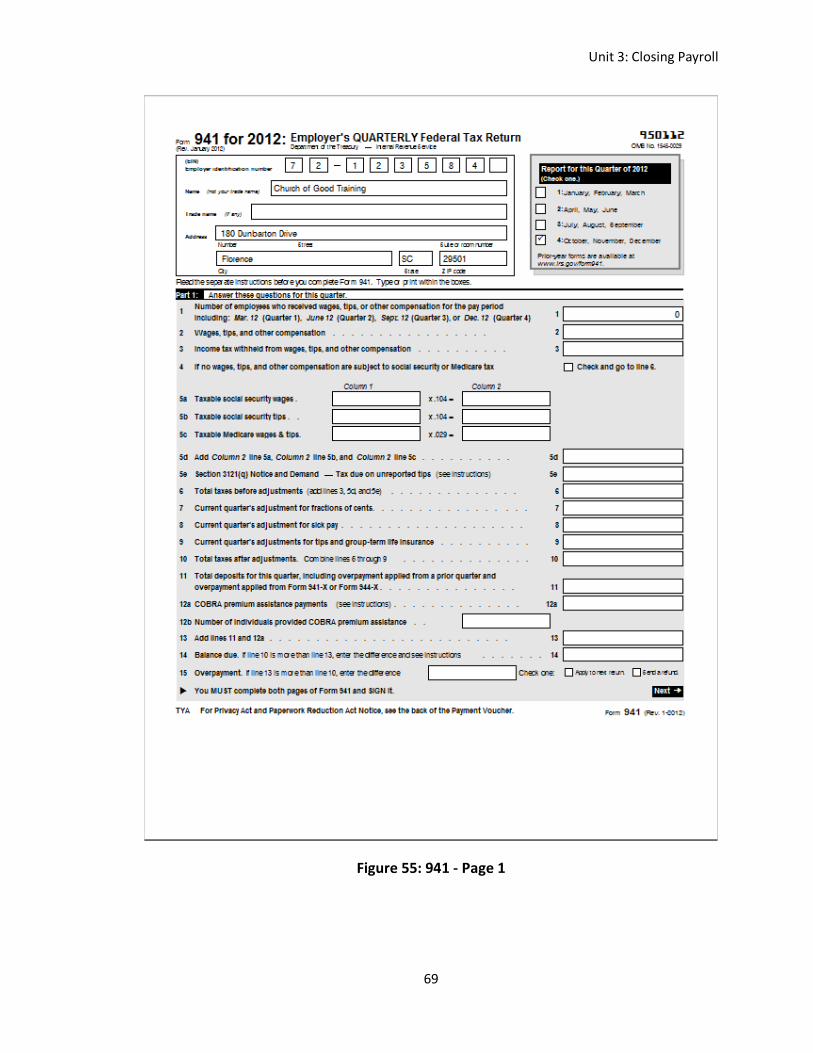
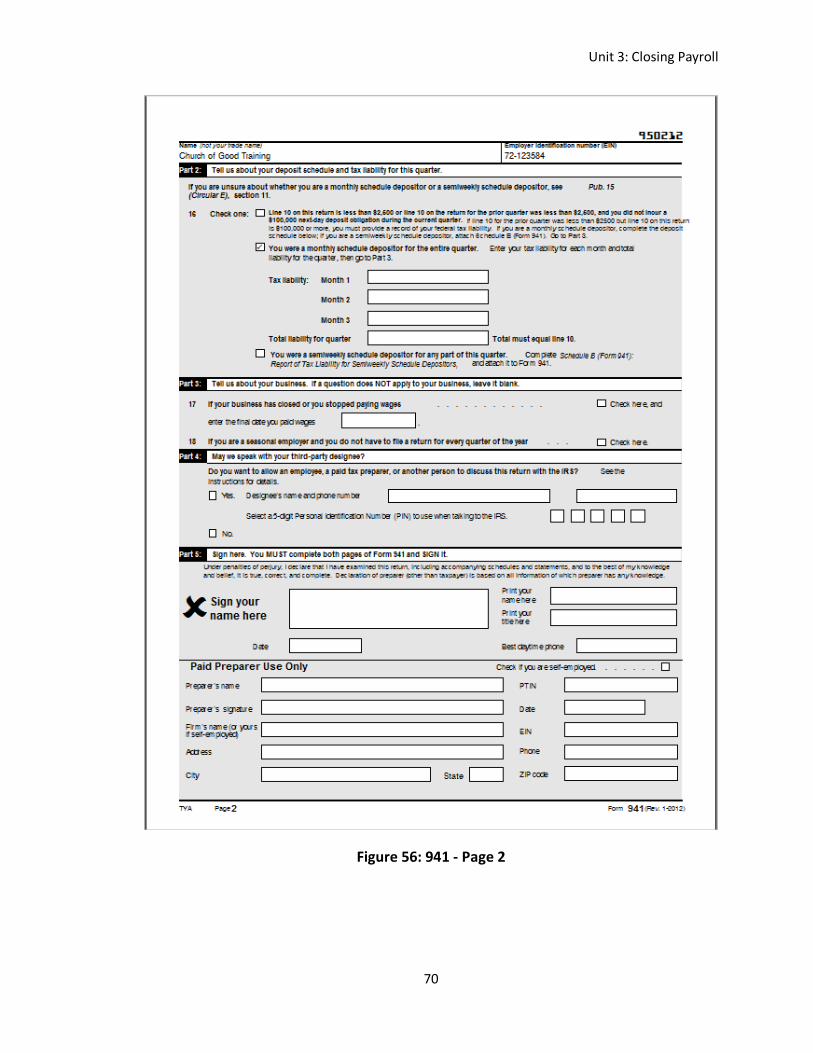
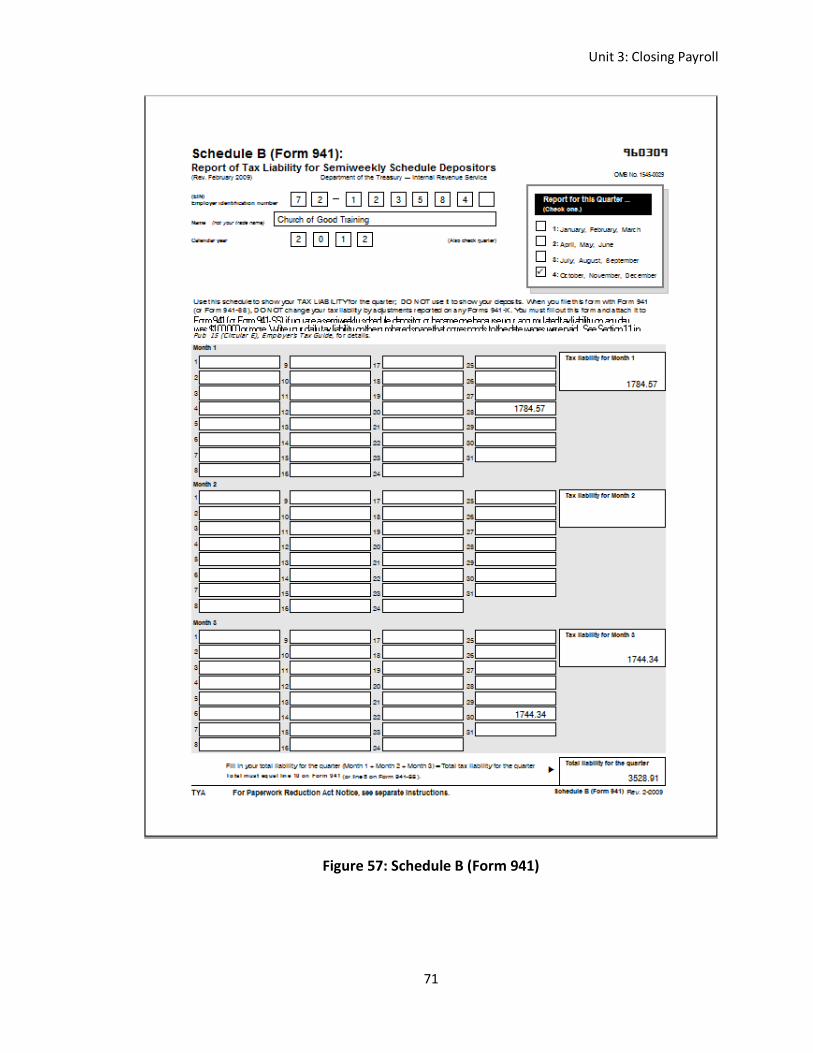
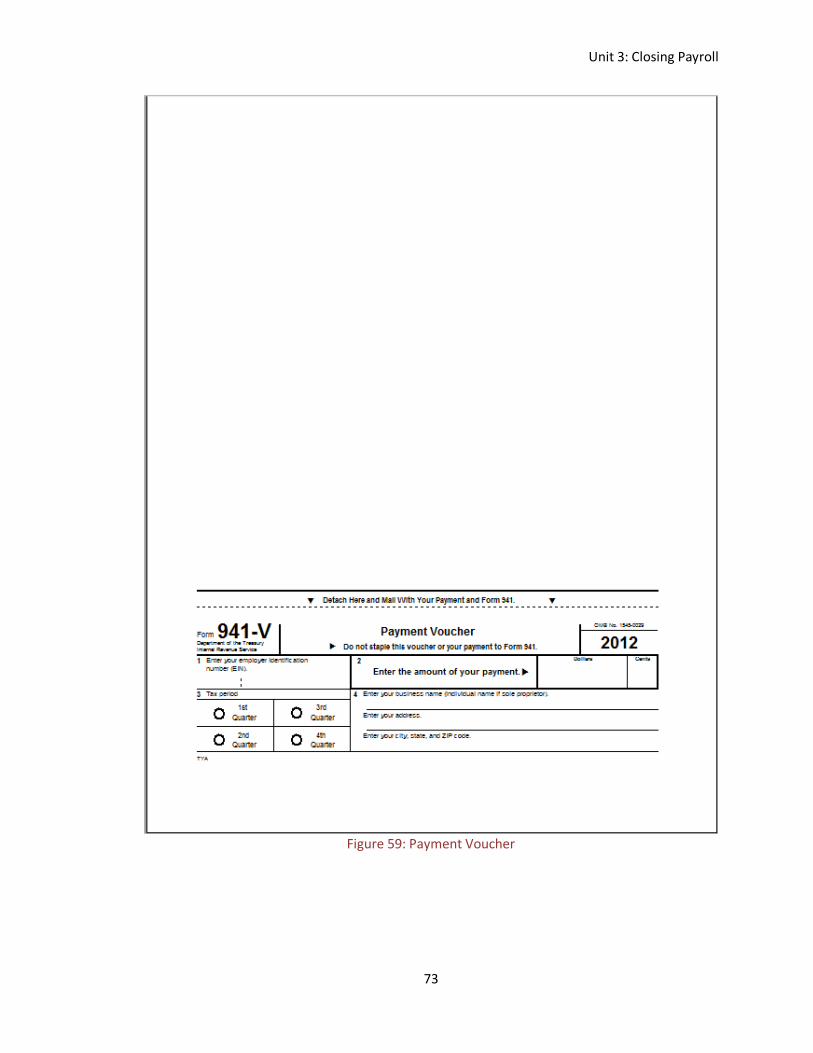
You can print Forms 941, 941-V (Voucher), and Schedule B. You can also edit the
Schedule B form if needed.
13. Click Print Form 941.
Figure 53: 941 Print Screen
Unit 3: Closing Payroll
68
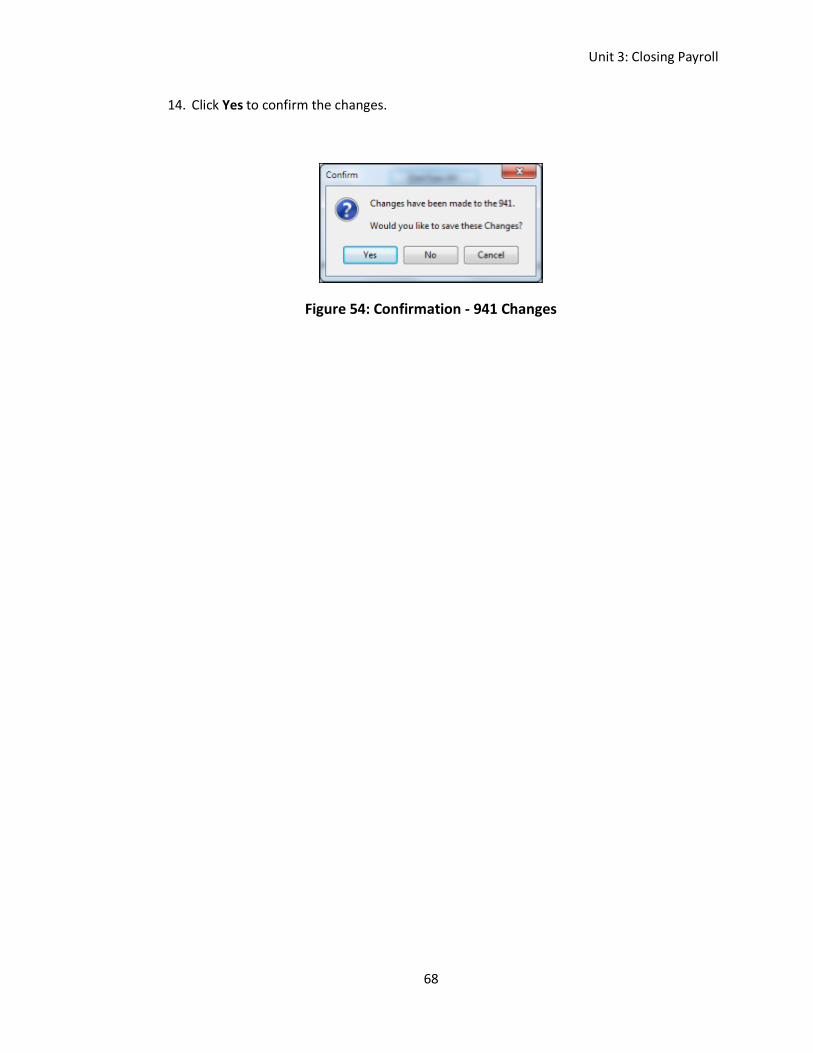
14. Click Yes to confirm the changes.
Figure 54: Confirmation - 941 Changes
Unit 3: Closing Payroll
69
Figure 55: 941 - Page 1
Unit 3: Closing Payroll
70
Figure 56: 941 - Page 2
Unit 3: Closing Payroll
71
Figure 57: Schedule B (Form 941)
Unit 3: Closing Payroll
72
Useful Information
Perform a test run of W-2s on plain paper before printing them on actual forms.
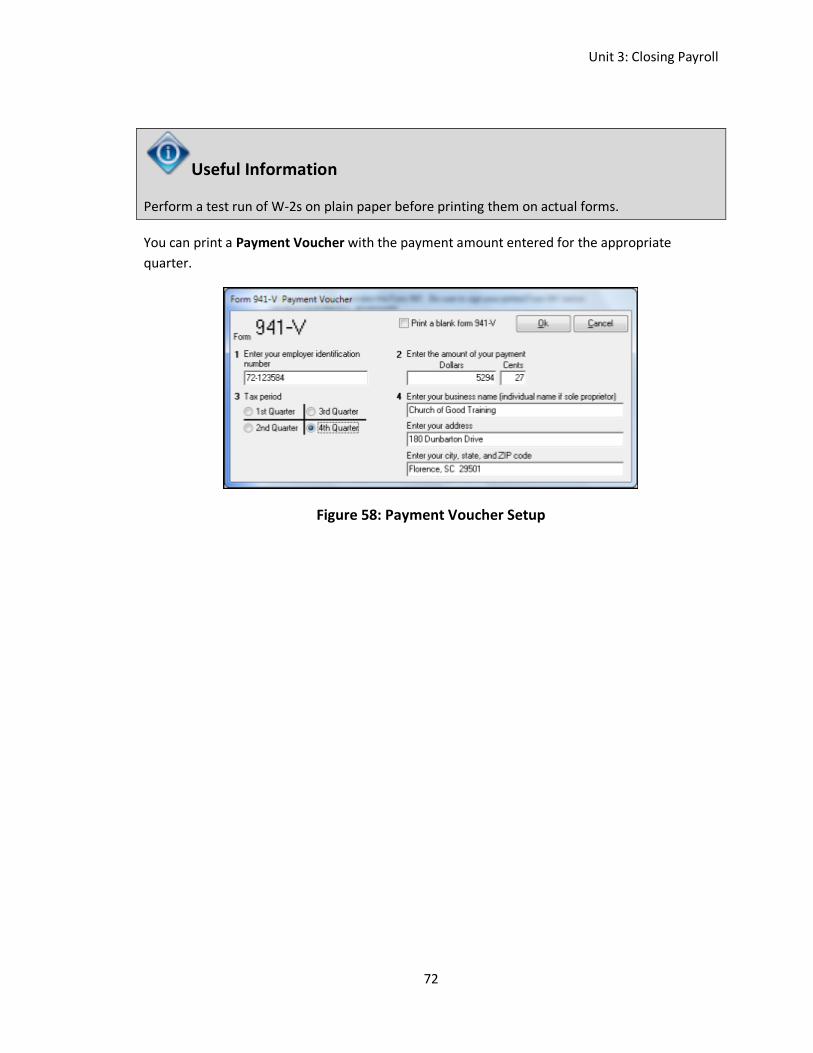
You can print a Payment Voucher with the payment amount entered for the appropriate
quarter.
Figure 58: Payment Voucher Setup
Unit 3: Closing Payroll
73
Figure 59: Payment Voucher
Unit 3: Closing Payroll
74
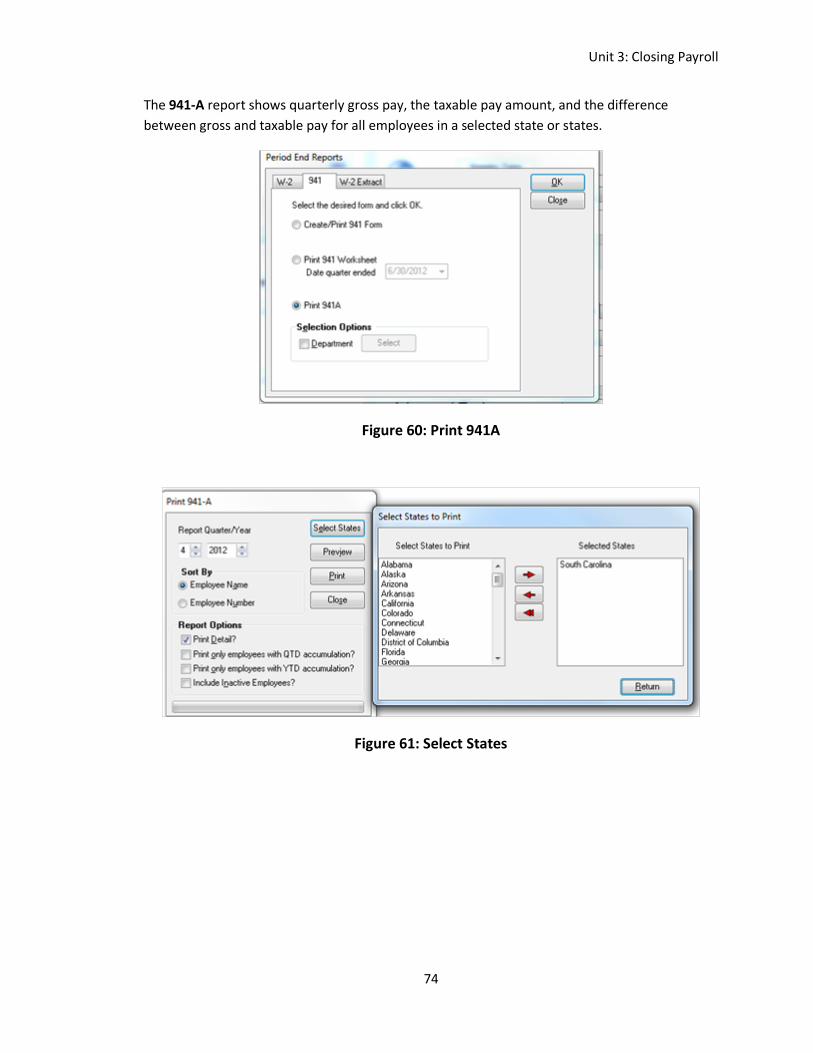
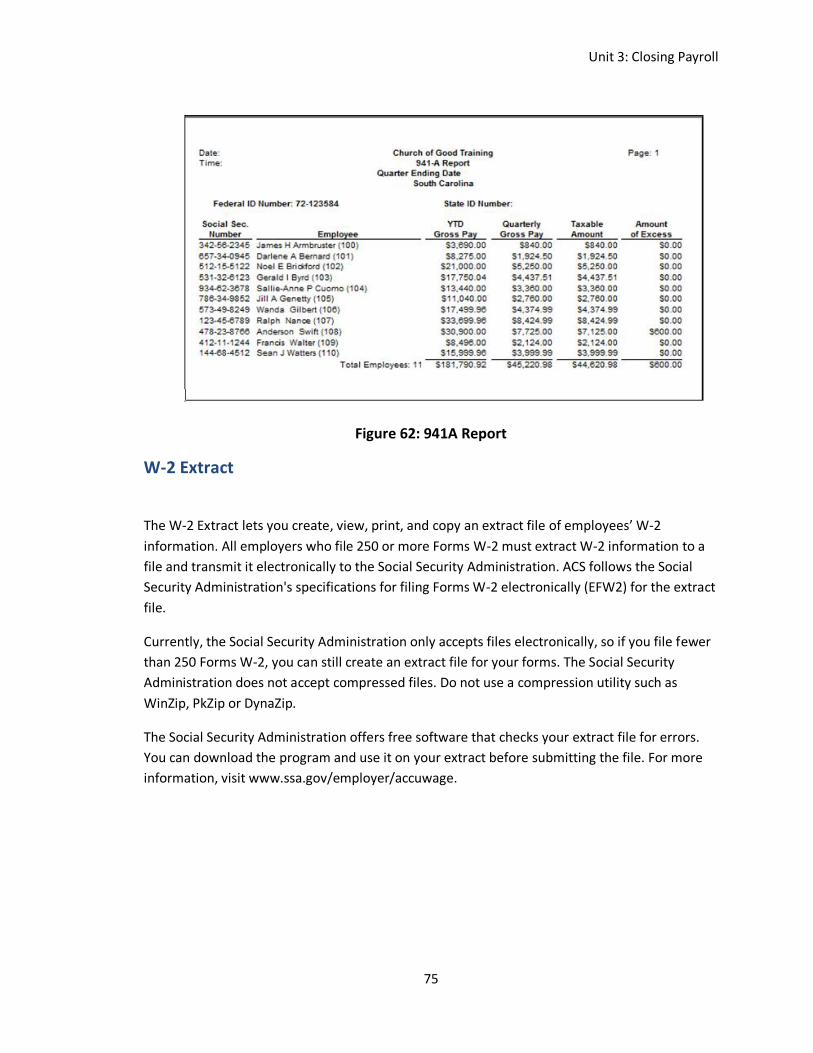
The 941-A report shows quarterly gross pay, the taxable pay amount, and the difference
between gross and taxable pay for all employees in a selected state or states.
Figure 60: Print 941A
Figure 61: Select States
Unit 3: Closing Payroll
75
Figure 62: 941A Report
W-2 Extract
The W-2 Extract lets you create, view, print, and copy an extract file of employees’ W-2
information. All employers who file 250 or more Forms W-2 must extract W-2 information to a
file and transmit it electronically to the Social Security Administration. ACS follows the Social
Security Administration's specifications for filing Forms W-2 electronically (EFW2) for the extract
file.
Currently, the Social Security Administration only accepts files electronically, so if you file fewer
than 250 Forms W-2, you can still create an extract file for your forms. The Social Security
Administration does not accept compressed files. Do not use a compression utility such as
WinZip, PkZip or DynaZip.
The Social Security Administration offers free software that checks your extract file for errors.
You can download the program and use it on your extract before submitting the file. For more
information, visit www.ssa.gov/employer/accuwage.
Unit 3: Closing Payroll
76
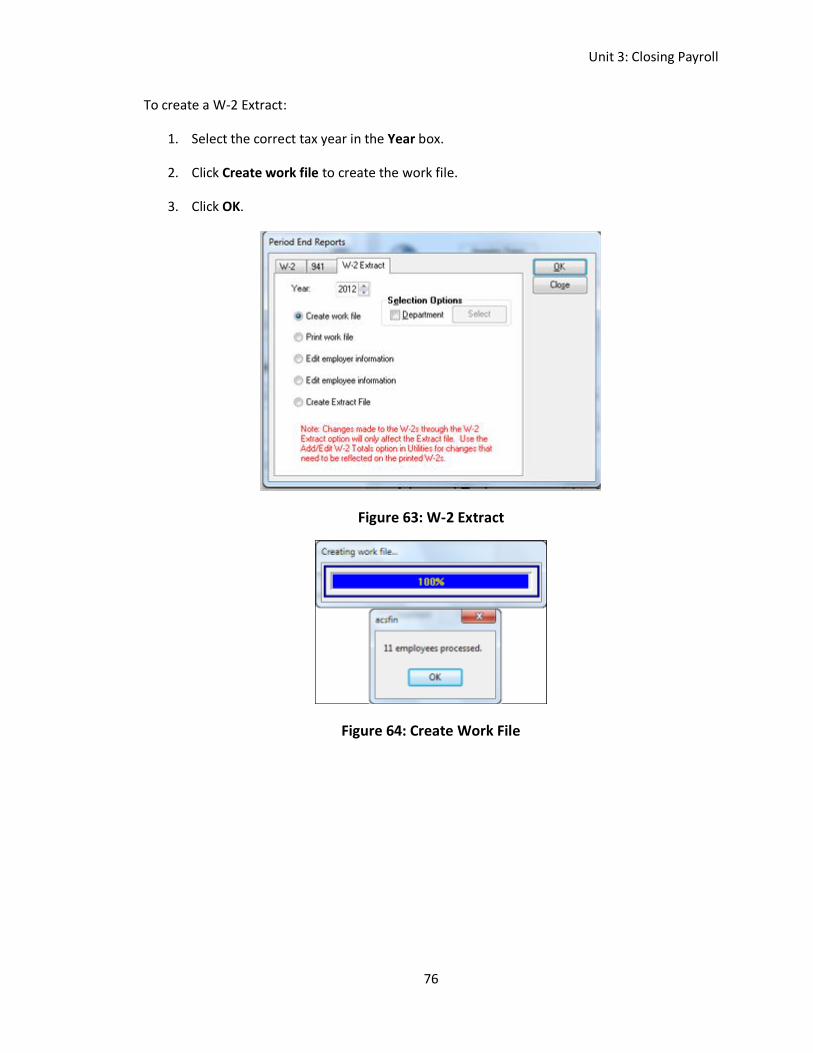
To create a W-2 Extract:
1. Select the correct tax year in the Year box.
2. Click Create work file to create the work file.
3. Click OK.
Figure 63: W-2 Extract
Figure 64: Create Work File
Unit 3: Closing Payroll
77
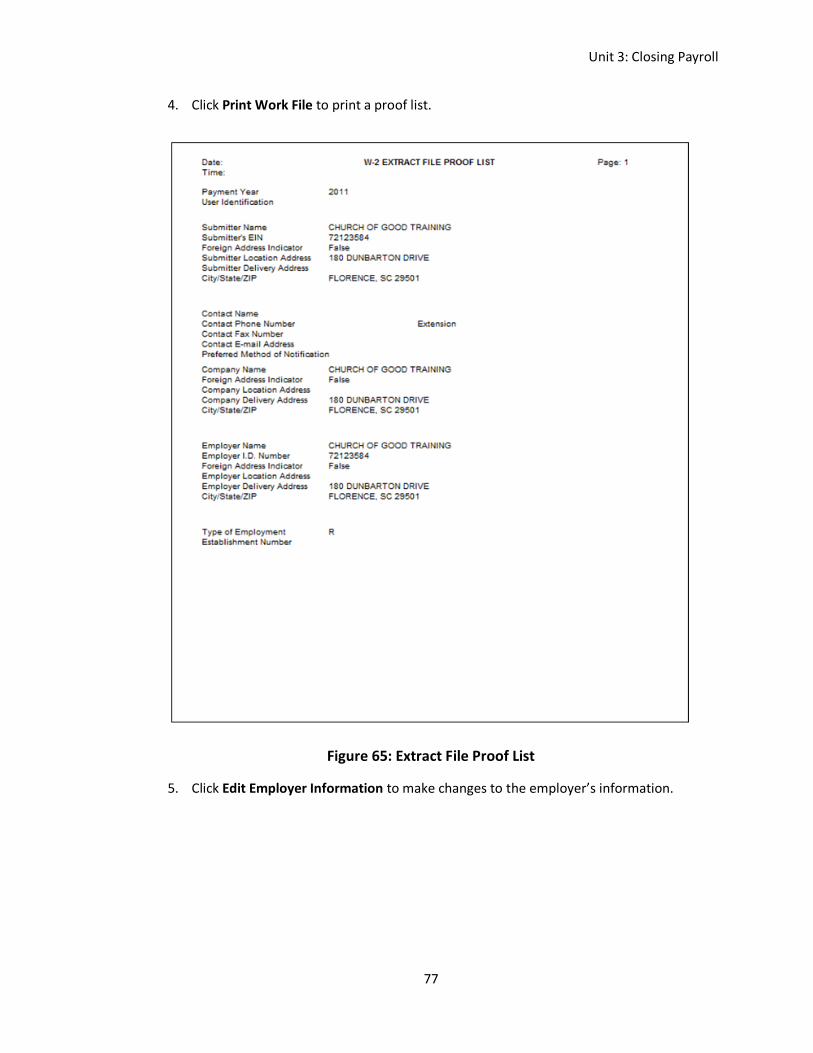
4. Click Print Work File to print a proof list.
Figure 65: Extract File Proof List
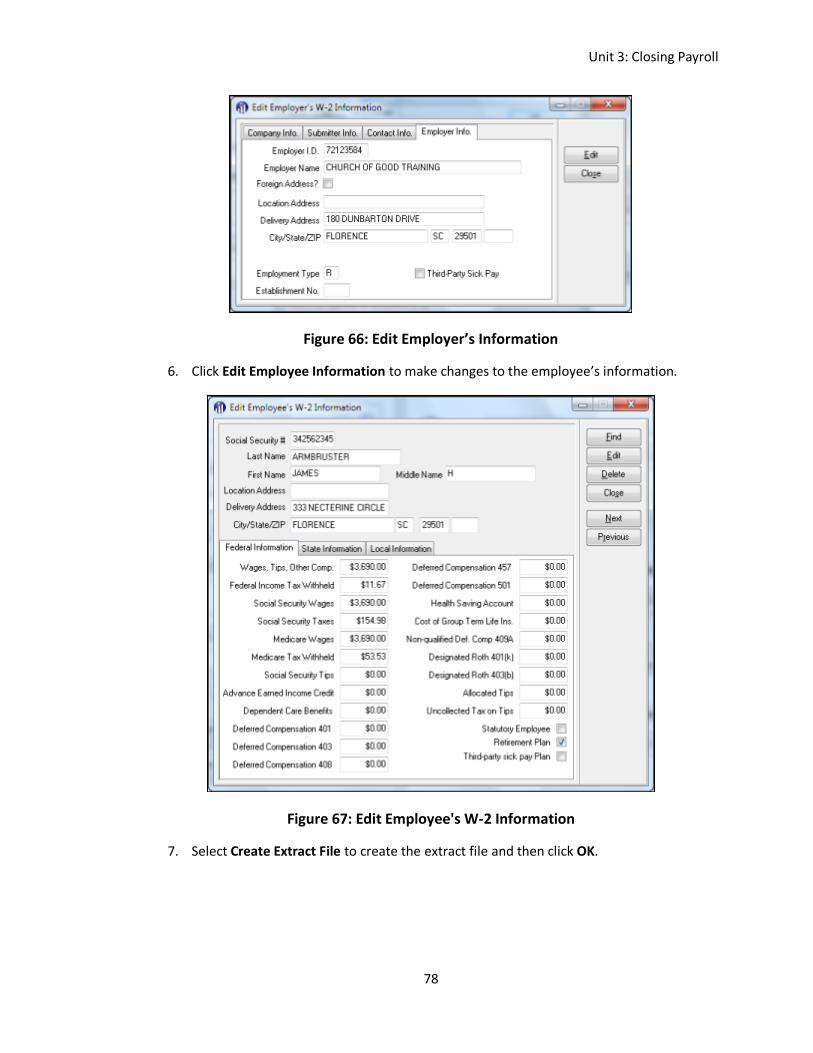
5. Click Edit Employer Information to make changes to the employer’s information.
Unit 3: Closing Payroll
78
Figure 66: Edit Employer’s Information
6. Click Edit Employee Information to make changes to the employee’s information.
Figure 67: Edit Employee's W-2 Information
7. Select Create Extract File to create the extract file and then click OK.
Unit 3: Closing Payroll
79
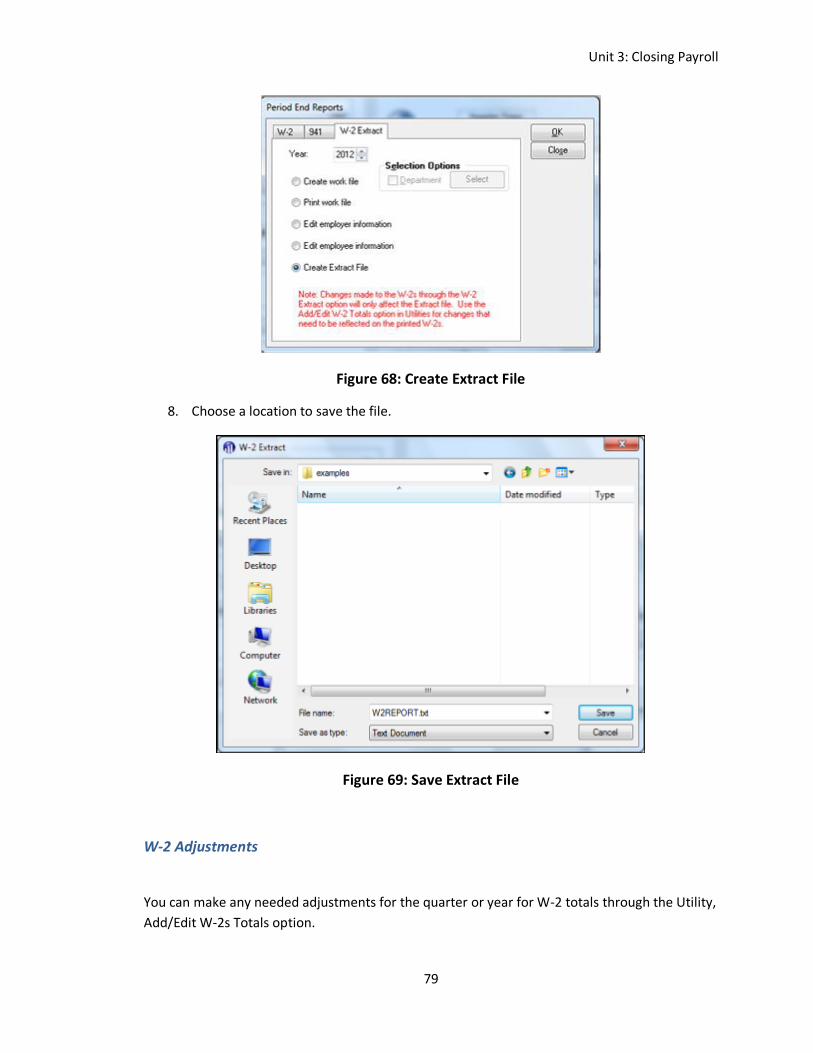
Figure 68: Create Extract File
8. Choose a location to save the file.
Figure 69: Save Extract File
W-2 Adjustments
You can make any needed adjustments for the quarter or year for W-2 totals through the Utility,
Add/Edit W-2s Totals option.

Unit 3: Closing Payroll
80
1. On the Workbench Menu, click the Period End Procedures tab.
2. In the drop-down list, select Add/Edit W-2 Totals and click Go .
Figure 70: Add/Edit W-2 Totals
3. Select Override and enter information needed in the additional fields. The information
you enter prints accordingly on W-2s.
Figure 71: Input W-2 Information
Unit 3: Closing Payroll
81
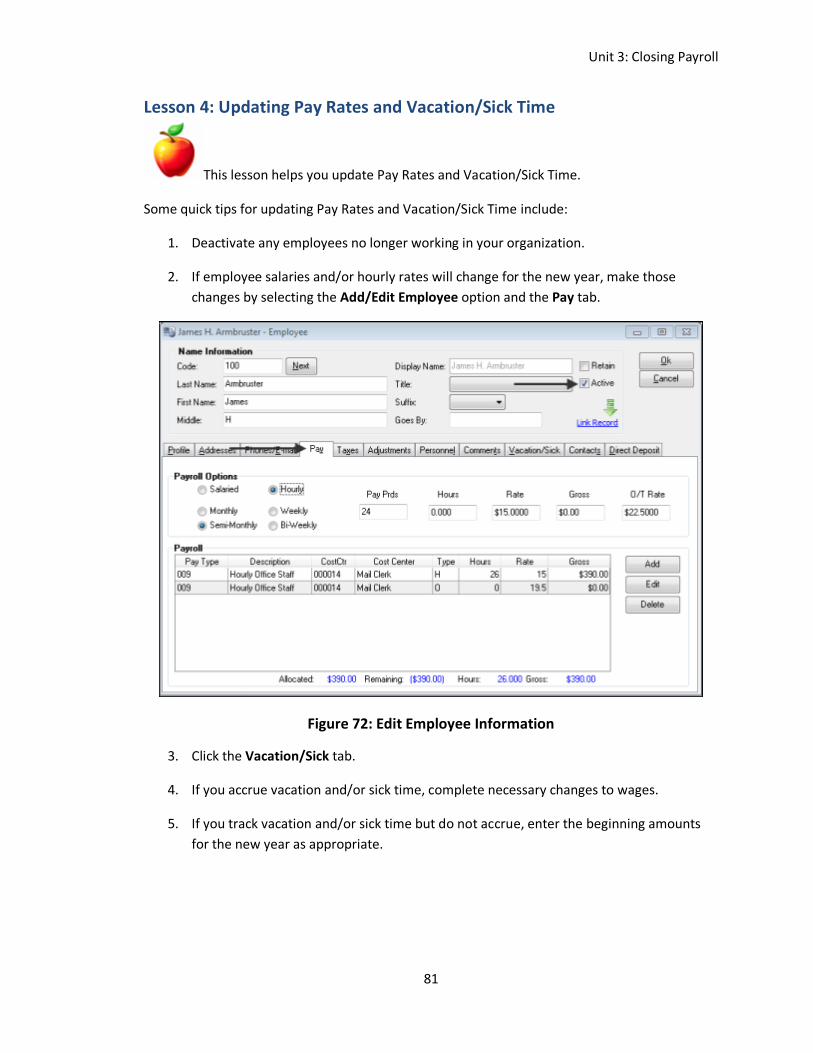
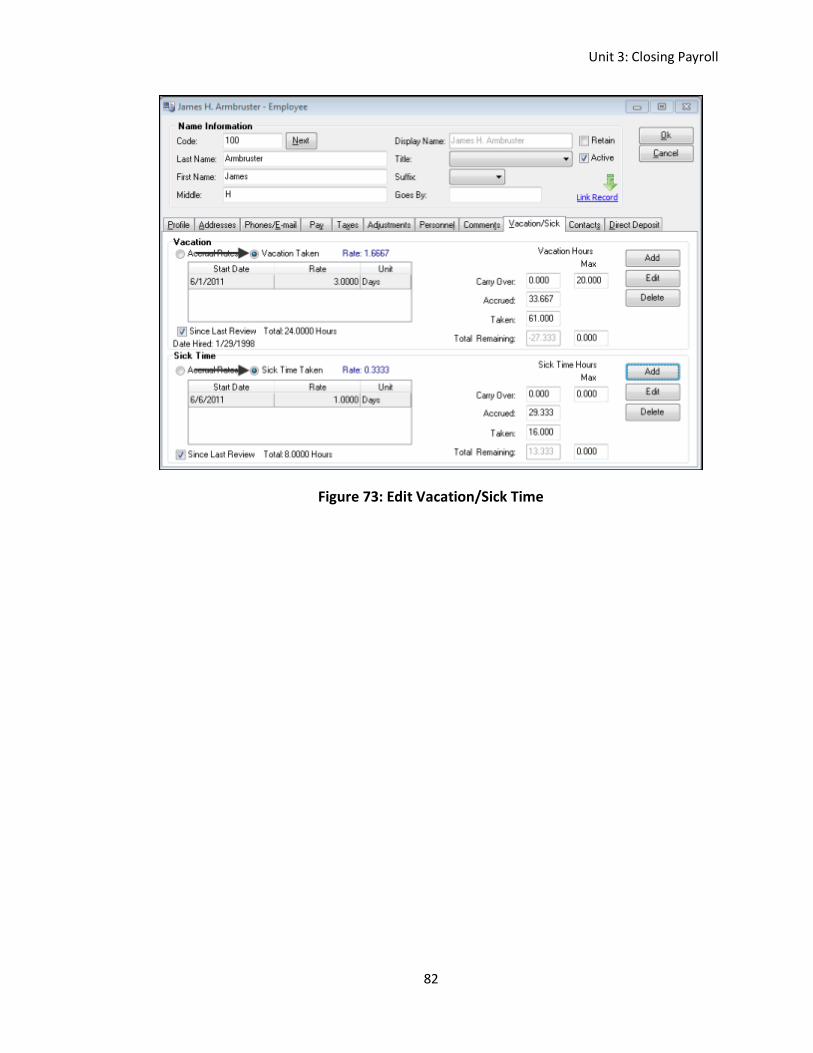
Lesson 4: Updating Pay Rates and Vacation/Sick Time
This lesson helps you update Pay Rates and Vacation/Sick Time.
Some quick tips for updating Pay Rates and Vacation/Sick Time include:
1. Deactivate any employees no longer working in your organization.
2. If employee salaries and/or hourly rates will change for the new year, make those
changes by selecting the Add/Edit Employee option and the Pay tab.
Figure 72: Edit Employee Information
3. Click the Vacation/Sick tab.
4. If you accrue vacation and/or sick time, complete necessary changes to wages.
5. If you track vacation and/or sick time but do not accrue, enter the beginning amounts
for the new year as appropriate.
Unit 3: Closing Payroll
82
Figure 73: Edit Vacation/Sick Time
Unit 3: Closing Payroll
83
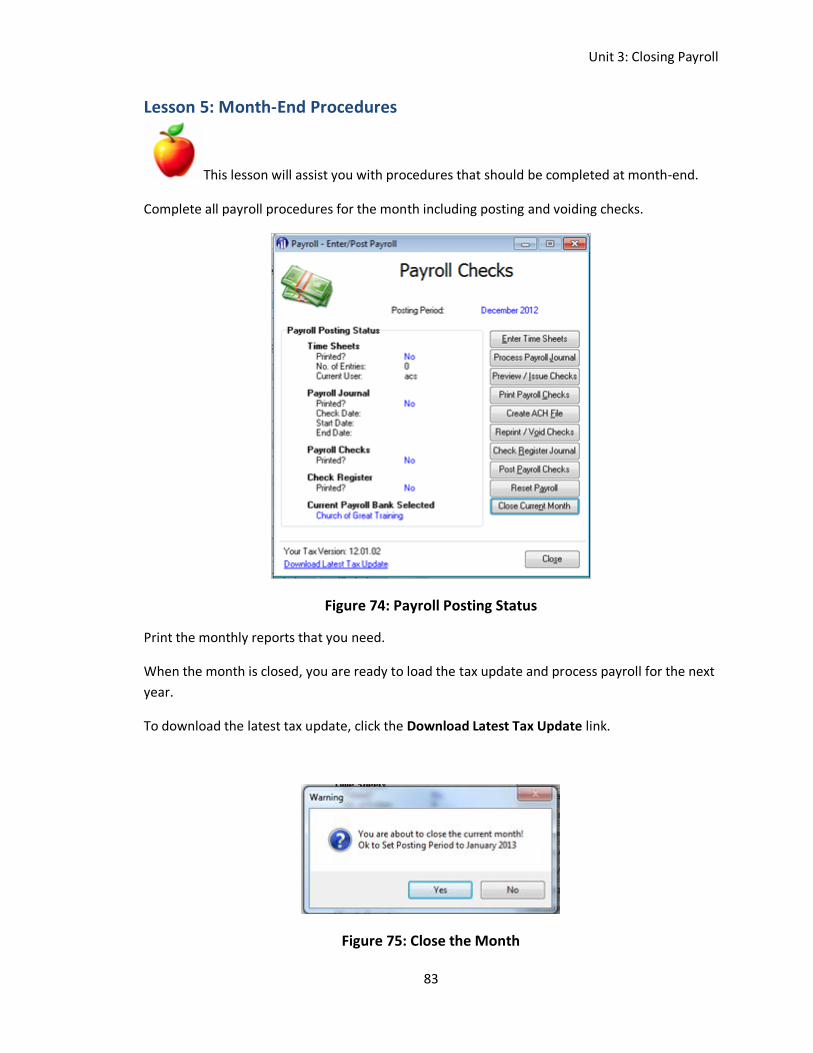
Lesson 5: Month-End Procedures
This lesson will assist you with procedures that should be completed at month-end.
Complete all payroll procedures for the month including posting and voiding checks.
Figure 74: Payroll Posting Status
Print the monthly reports that you need.
When the month is closed, you are ready to load the tax update and process payroll for the next
year.
To download the latest tax update, click the Download Latest Tax Update link.
Figure 75: Close the Month
Unit 3: Closing Payroll
84
Lesson 6: Common Errors in Preparing W-2 Forms
This lesson is designed to help you avoid common errors in preparing W-2s. According
to the Social Security Administration, the following is a list of common errors made when
preparing W-2 forms. Below each error, note the instructions for verifying your data in the
Payroll module.
1. Incorrect Employee Name
On the Add/Edit Employees Data tab, make sure the information in the name fields is
correct.
2. Using Titles with Employee Names
On the Add/Edit Employees Data tab, make sure that you have not entered a title as
part of an employee’s name in any of the name fields.
3. Incorrect Social Security Number
On the Add/Edit Employees Data tab, make sure the correct Social Security Number is
entered in the SSN field.
4. Incorrect Address
On the Add/Edit Employees Data tab, make sure you have entered the correct address.
Check the Address, Zip Code and City/State fields.
5. Incorrect or Omitted Employer Identification Number (EIN)
On the Utilities tab, select the Dataset option; edit the Dataset you are working with.
Check to see that Federal ID, State ID, and, if needed, State Unemployment ID are
entered and correct.
6. Nonstandard W-2/W-3 Forms
You can purchase standard forms directly from ACS. For a complete list of forms, visit
the ACS Technologies Web site at
http://www.acstechnologies.com/services/forms_supplies, or call 1-800-736-7425.
Press the extension for forms and supplies.
Unit 4: Closing Accounts Payable
85
Unit 4: Closing Accounts Payable
This unit covers the closing procedures related to the Accounts Payable Module.
Closing the month in Accounts Payable changes the default posting month, but does not prevent
you from entering and posting invoices in that month after it has been closed. However, if you
attempt to close and invoices have been entered, but not posted, Accounts Payable displays a
warning message. If you are certain you want to close the month, acknowledge the message and
proceed.
This unit will assist you with the closing process for the Accounts Payable Module. It includes:
Year-End Reports, including Vendor Labels
Period End Reports, including 1099’s
Month End Procedures
Unit 4: Closing Accounts Payable
86
Lesson 1: Year-End Reports
This lesson is designed to familiarize you with year-end reports. You will learn how to
access, customize, and print year-end reports.
The first step is to determine which reports you need at year-end.
The YTD Purchases List can help you determine if records have been flagged correctly as 1099
Vendors.
The YTD Purchases List prints total YTD Purchases and 1099 totals paid to vendors. You may
need to delete vendors on this list who have not been paid this year.
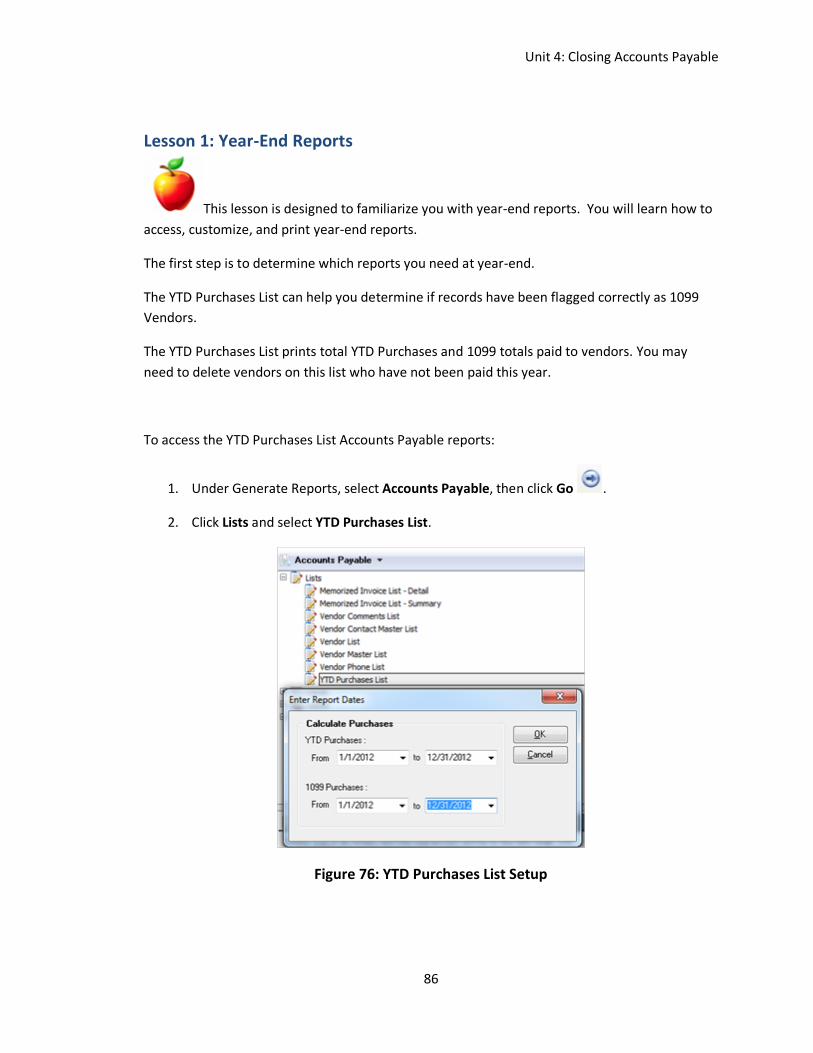
To access the YTD Purchases List Accounts Payable reports:
1. Under Generate Reports, select Accounts Payable, then click Go .
2. Click Lists and select YTD Purchases List.
Figure 76: YTD Purchases List Setup
Unit 4: Closing Accounts Payable
87
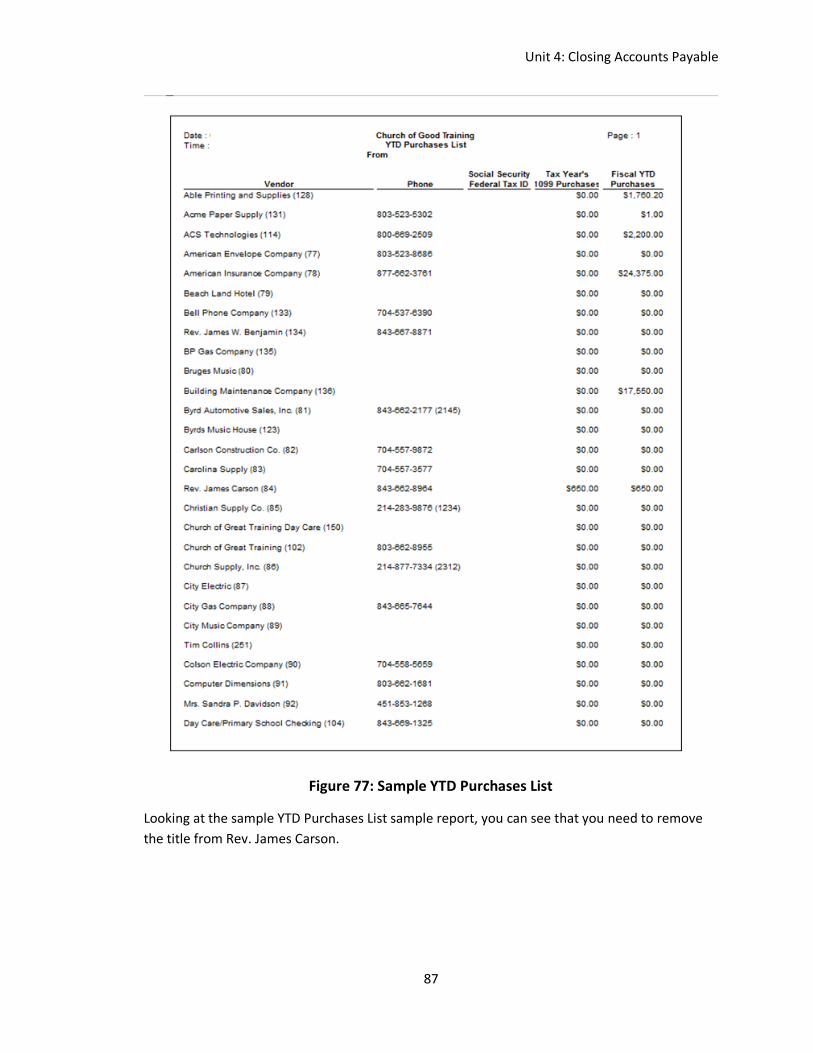
Figure 77: Sample YTD Purchases List
Looking at the sample YTD Purchases List sample report, you can see that you need to remove
the title from Rev. James Carson.
Unit 4: Closing Accounts Payable
88
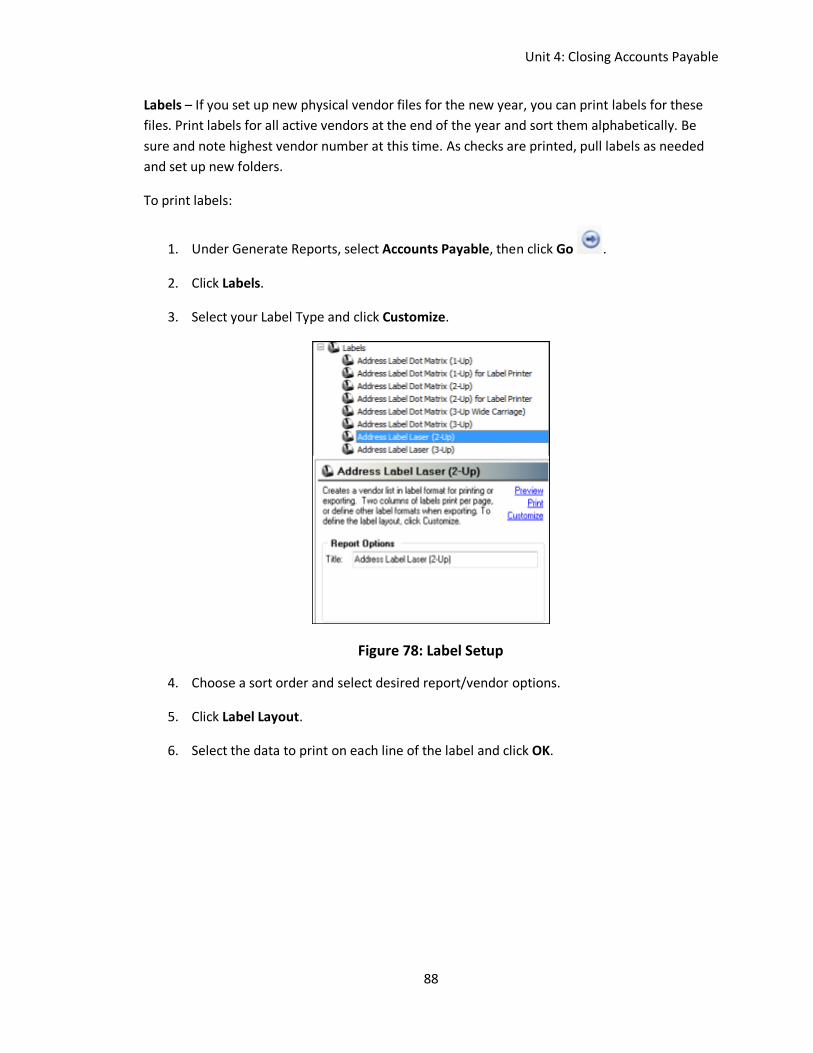
Labels – If you set up new physical vendor files for the new year, you can print labels for these
files. Print labels for all active vendors at the end of the year and sort them alphabetically. Be
sure and note highest vendor number at this time. As checks are printed, pull labels as needed
and set up new folders.
To print labels:
1. Under Generate Reports, select Accounts Payable, then click Go .
2. Click Labels.
3. Select your Label Type and click Customize.
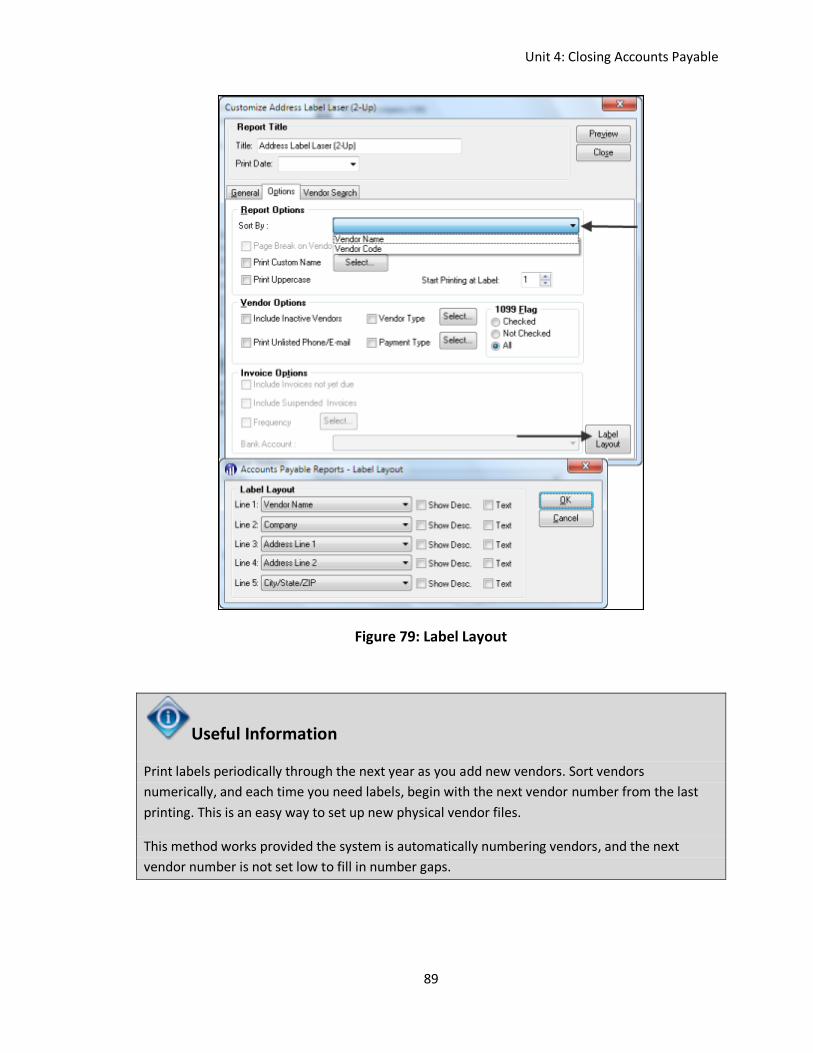
Figure 78: Label Setup
4. Choose a sort order and select desired report/vendor options.
5. Click Label Layout.
6. Select the data to print on each line of the label and click OK.
Unit 4: Closing Accounts Payable
89
Figure 79: Label Layout
Useful Information
Print labels periodically through the next year as you add new vendors. Sort vendors
numerically, and each time you need labels, begin with the next vendor number from the last
printing. This is an easy way to set up new physical vendor files.
This method works provided the system is automatically numbering vendors, and the next
vendor number is not set low to fill in number gaps.
Unit 4: Closing Accounts Payable
90
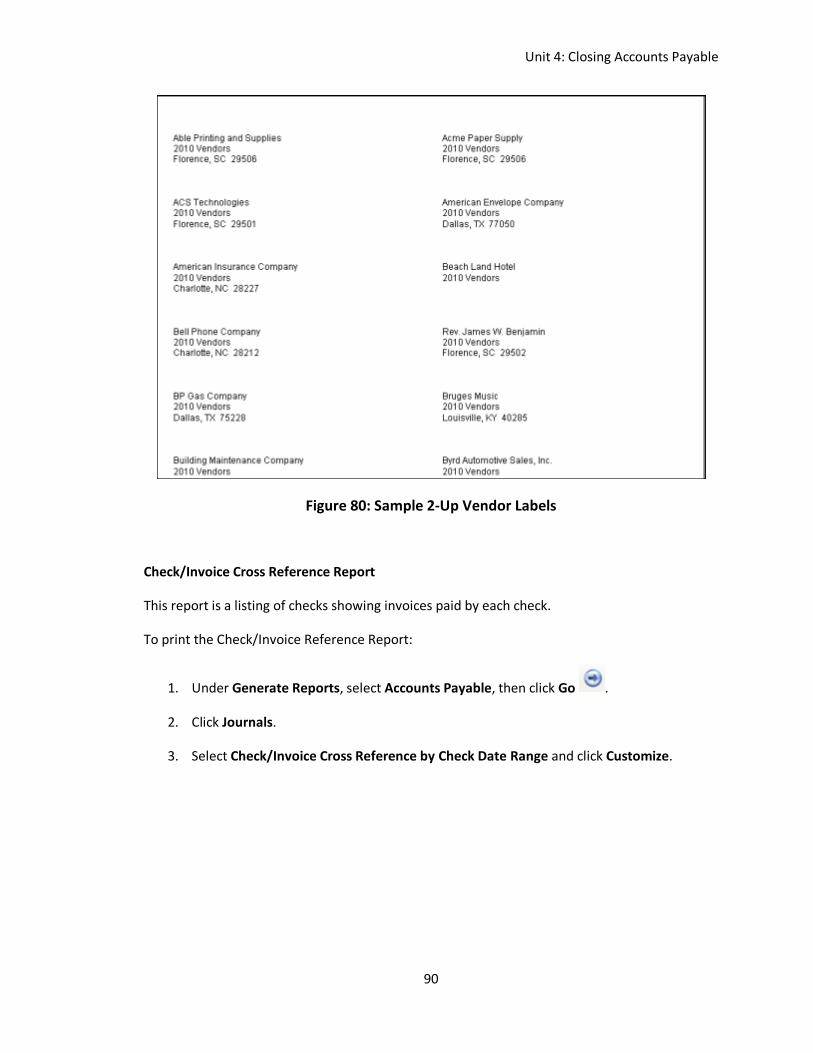
Figure 80: Sample 2-Up Vendor Labels
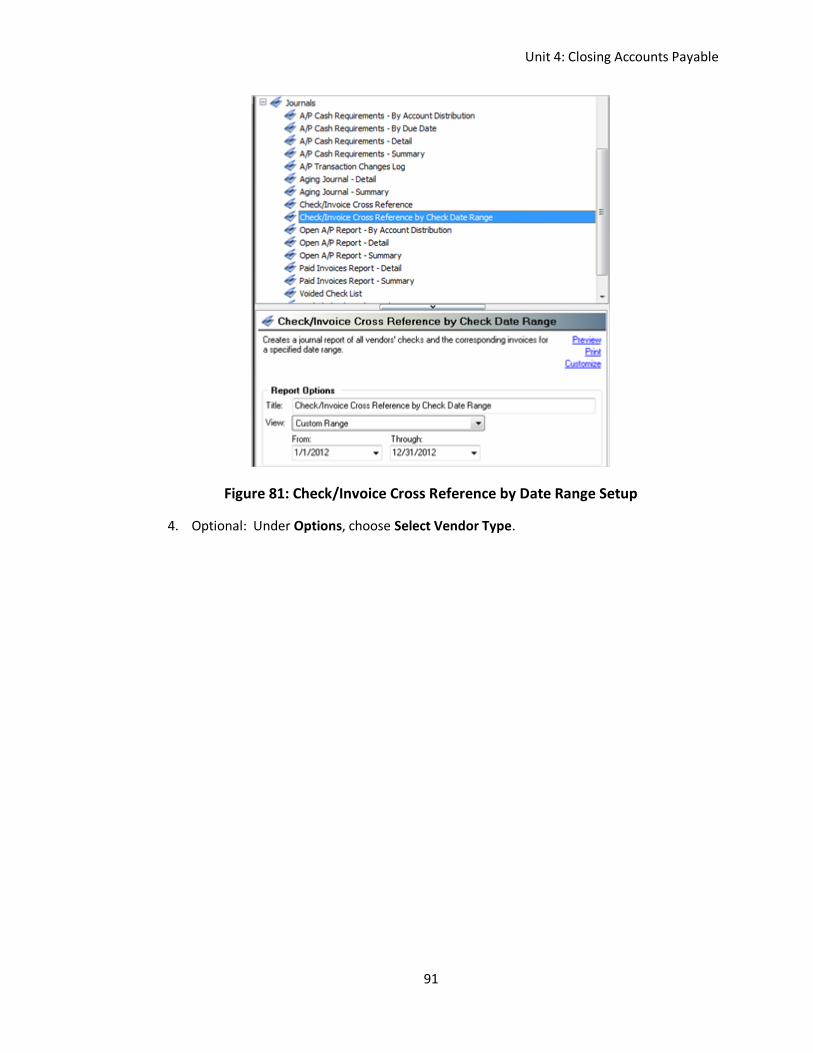
Check/Invoice Cross Reference Report
This report is a listing of checks showing invoices paid by each check.
To print the Check/Invoice Reference Report:
1. Under Generate Reports, select Accounts Payable, then click Go .
2. Click Journals.
3. Select Check/Invoice Cross Reference by Check Date Range and click Customize.
Unit 4: Closing Accounts Payable
91
Figure 81: Check/Invoice Cross Reference by Date Range Setup
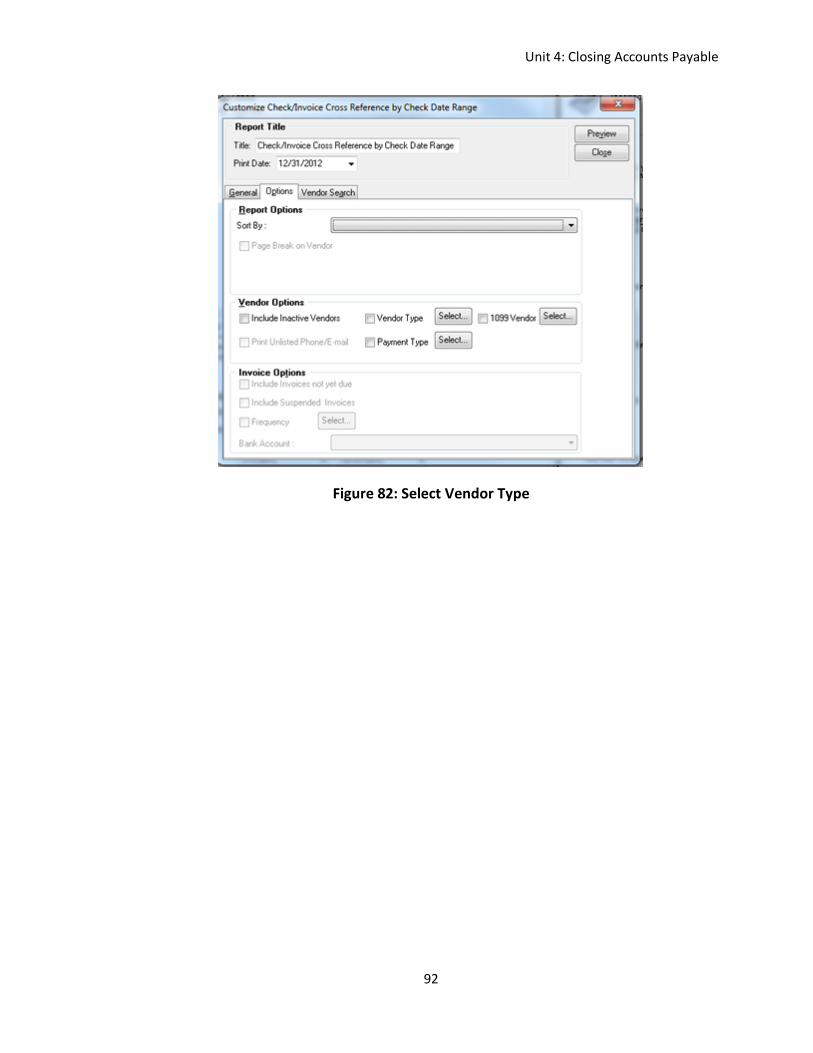
4. Optional: Under Options, choose Select Vendor Type.
Unit 4: Closing Accounts Payable
92
Figure 82: Select Vendor Type
Unit 4: Closing Accounts Payable
93
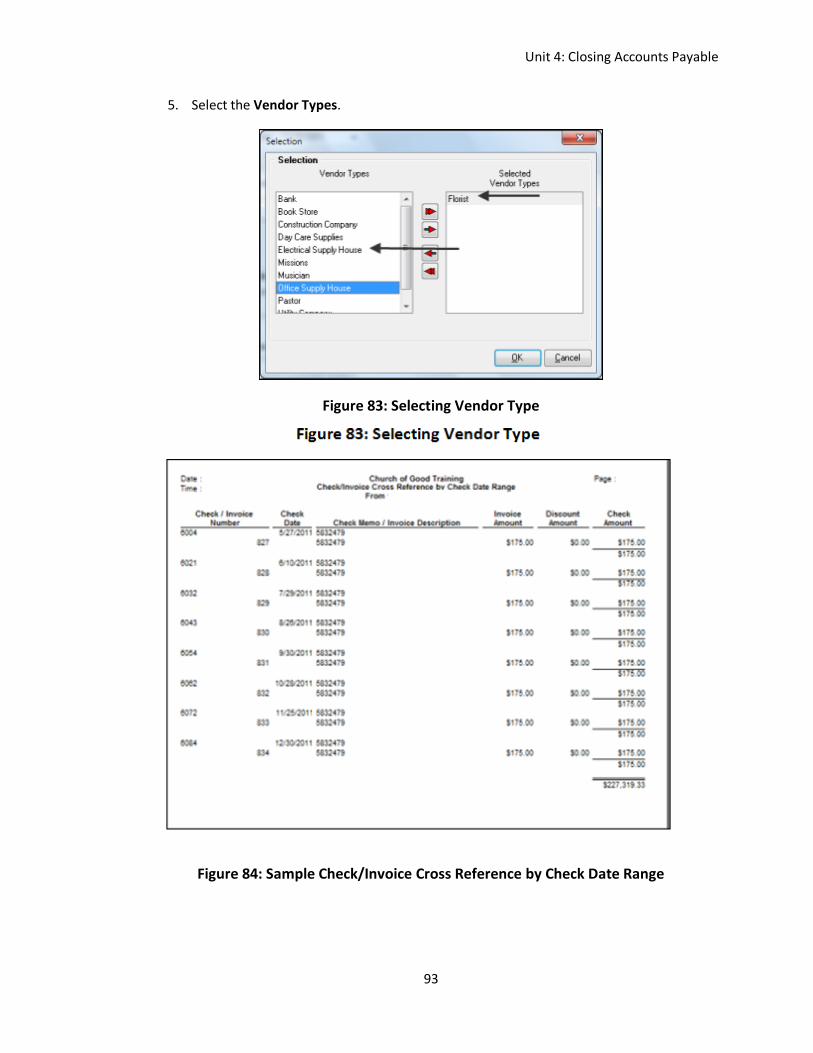
5. Select the Vendor Types.
Figure 83: Selecting Vendor Type
Figure 84: Sample Check/Invoice Cross Reference by Check Date Range
Unit 4: Closing Accounts Payable
94
Lesson 2: Printing 1099 Forms
This lesson is designed to familiarize you with printing the Form 1099.
Before you print 1099 forms,
Make sure that 1099 vendor information is complete and accurate.
Print a Year-to-Date Purchases list. Check the list and make sure that all 1099 vendors
have a valid phone number and social security number on file.
Make sure that 1099 totals are correct for each vendor.
Enter any 1099 adjustments. Then, print 1099 forms on blank paper and proofread your
changes.
If a vendor is a one-time vendor, their record is automatically deactivated when the
check is complete. If the vendor should receive a 1099, be sure to select Include
Deactivated Vendors when you print 1099 form.
Vendors paid less than six hundred dollars can receive a 1099.
You can print 1099s for the prior year after closing the month of December.
To print 1099 forms:
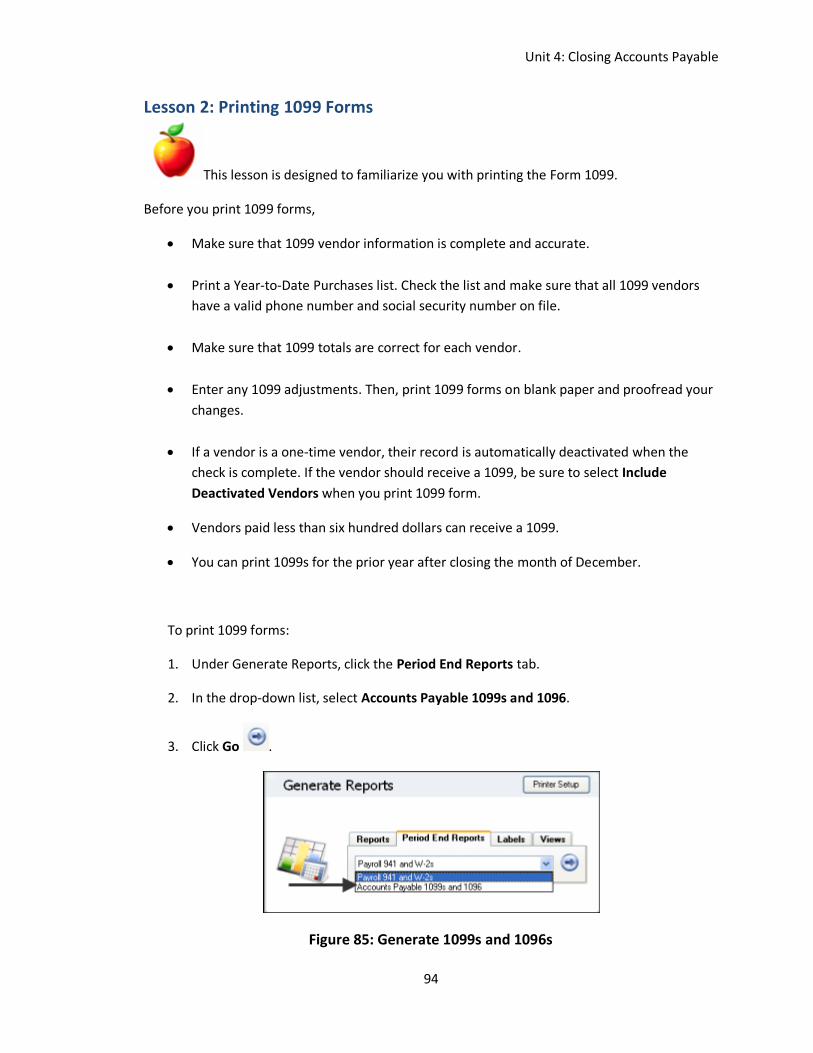
1. Under Generate Reports, click the Period End Reports tab.
2. In the drop-down list, select Accounts Payable 1099s and 1096.
3. Click Go .
Figure 85: Generate 1099s and 1096s
Unit 4: Closing Accounts Payable
95
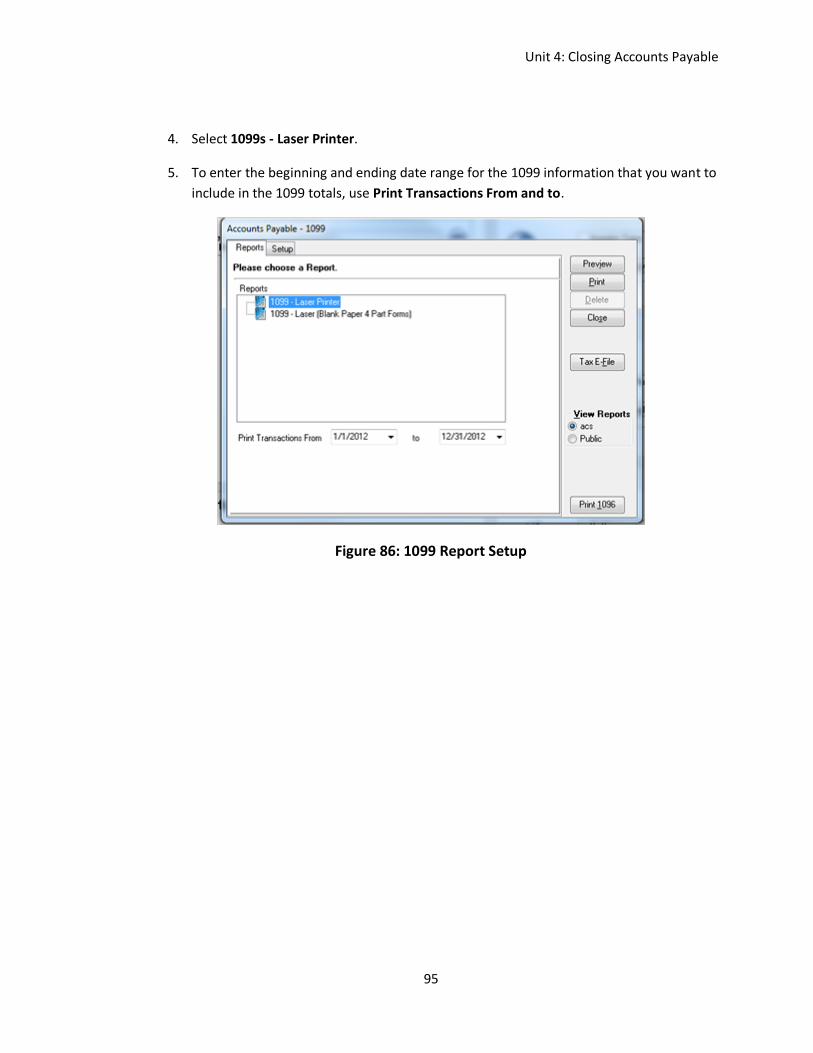
4. Select 1099s - Laser Printer.
5. To enter the beginning and ending date range for the 1099 information that you want to
include in the 1099 totals, use Print Transactions From and to.
Figure 86: 1099 Report Setup
Unit 4: Closing Accounts Payable
96
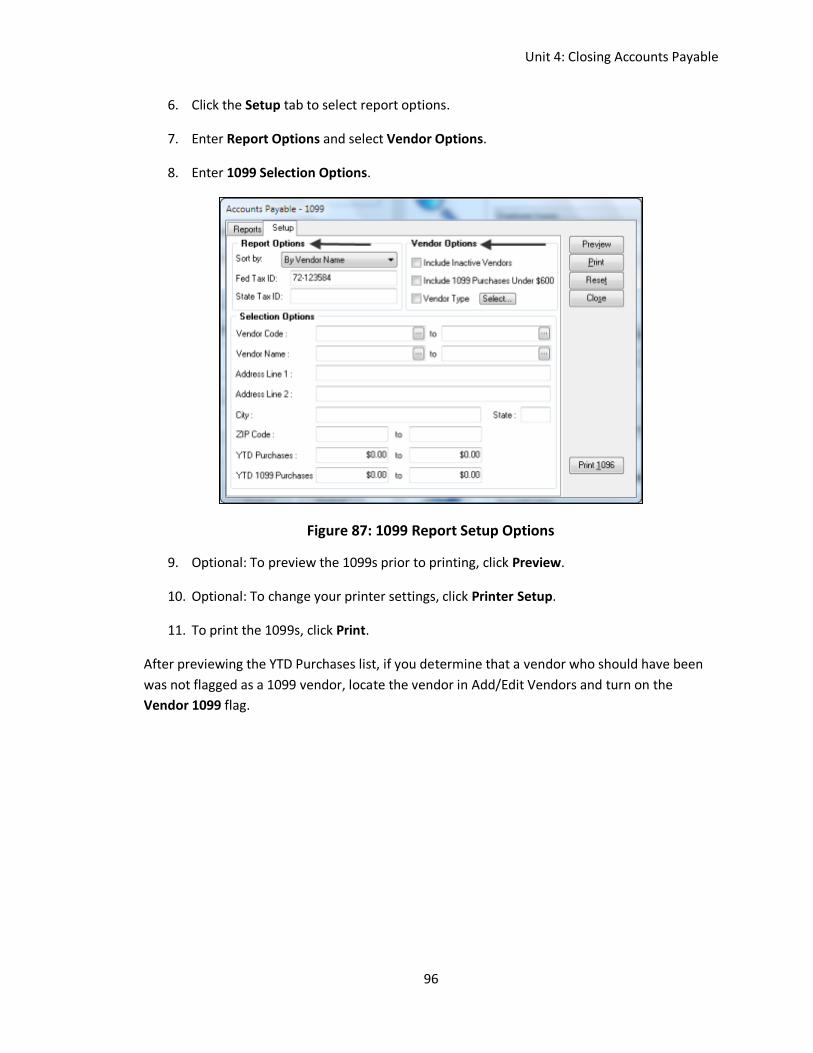
6. Click the Setup tab to select report options.
7. Enter Report Options and select Vendor Options.
8. Enter 1099 Selection Options.
Figure 87: 1099 Report Setup Options
9. Optional: To preview the 1099s prior to printing, click Preview.
10. Optional: To change your printer settings, click Printer Setup.
11. To print the 1099s, click Print.
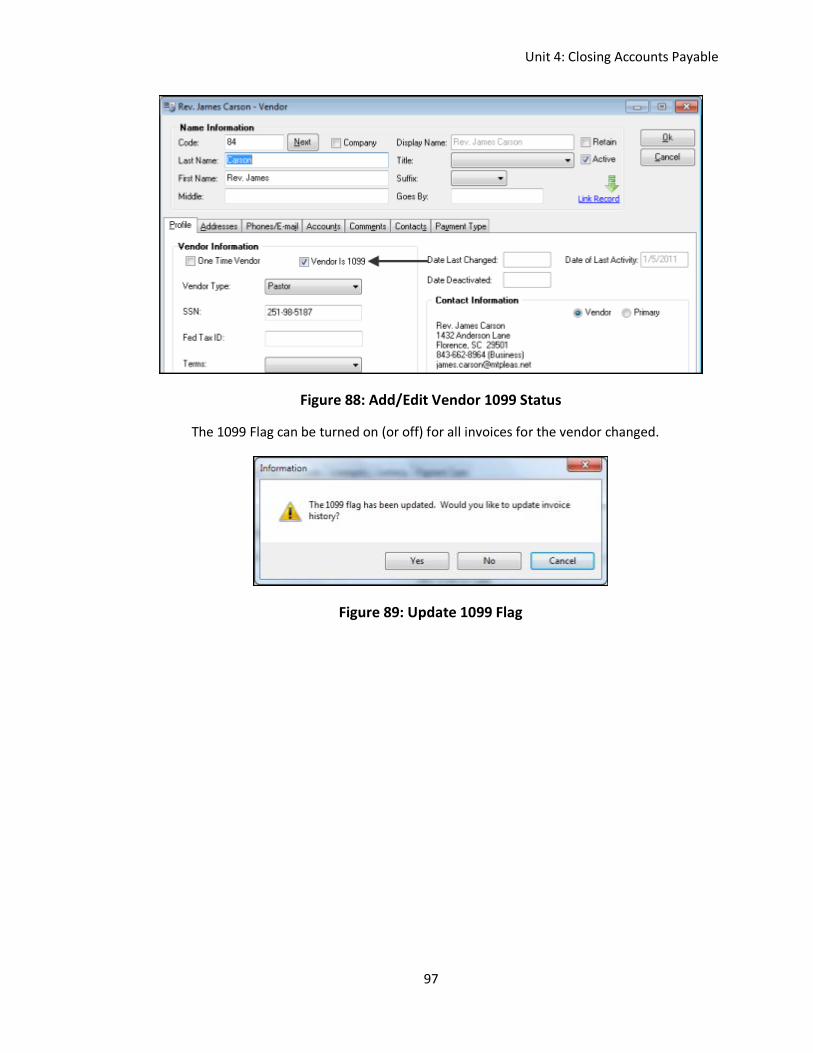
After previewing the YTD Purchases list, if you determine that a vendor who should have been
was not flagged as a 1099 vendor, locate the vendor in Add/Edit Vendors and turn on the
Vendor 1099 flag.
Unit 4: Closing Accounts Payable
97
Figure 88: Add/Edit Vendor 1099 Status
The 1099 Flag can be turned on (or off) for all invoices for the vendor changed.
Figure 89: Update 1099 Flag
Unit 4: Closing Accounts Payable
98
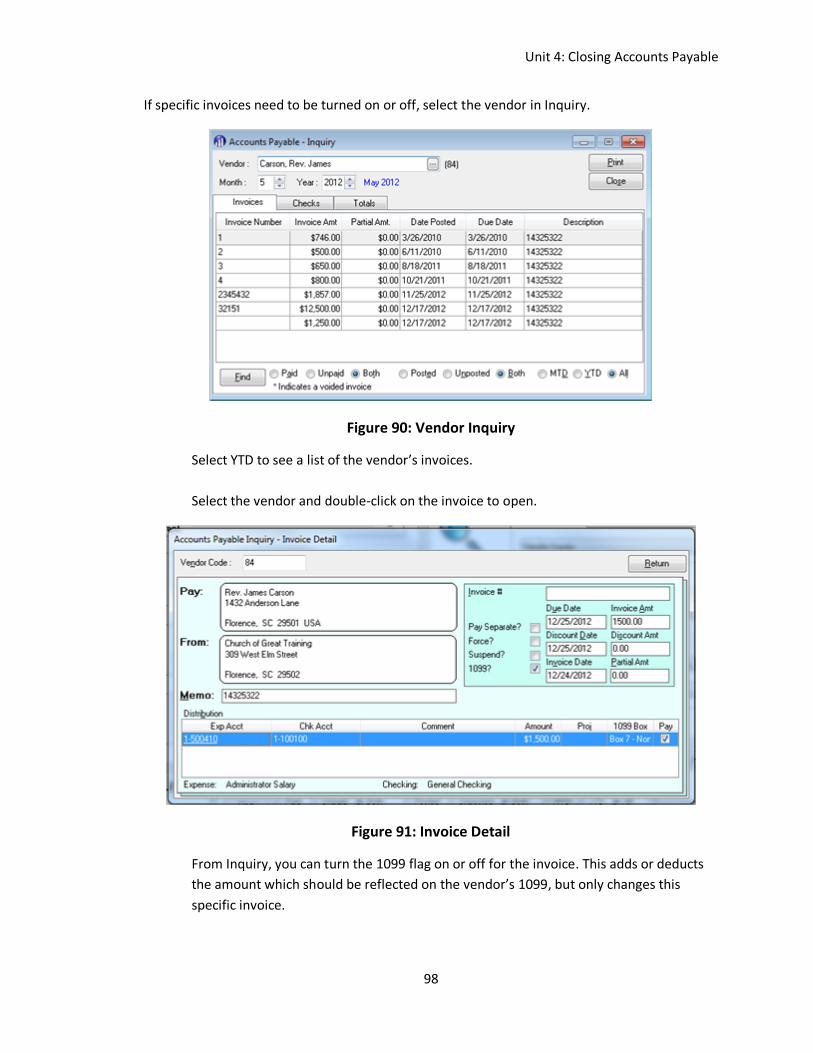
If specific invoices need to be turned on or off, select the vendor in Inquiry.
Figure 90: Vendor Inquiry
Select YTD to see a list of the vendor’s invoices.
Select the vendor and double-click on the invoice to open.
Figure 91: Invoice Detail
From Inquiry, you can turn the 1099 flag on or off for the invoice. This adds or deducts
the amount which should be reflected on the vendor’s 1099, but only changes this
specific invoice.
Unit 4: Closing Accounts Payable
99
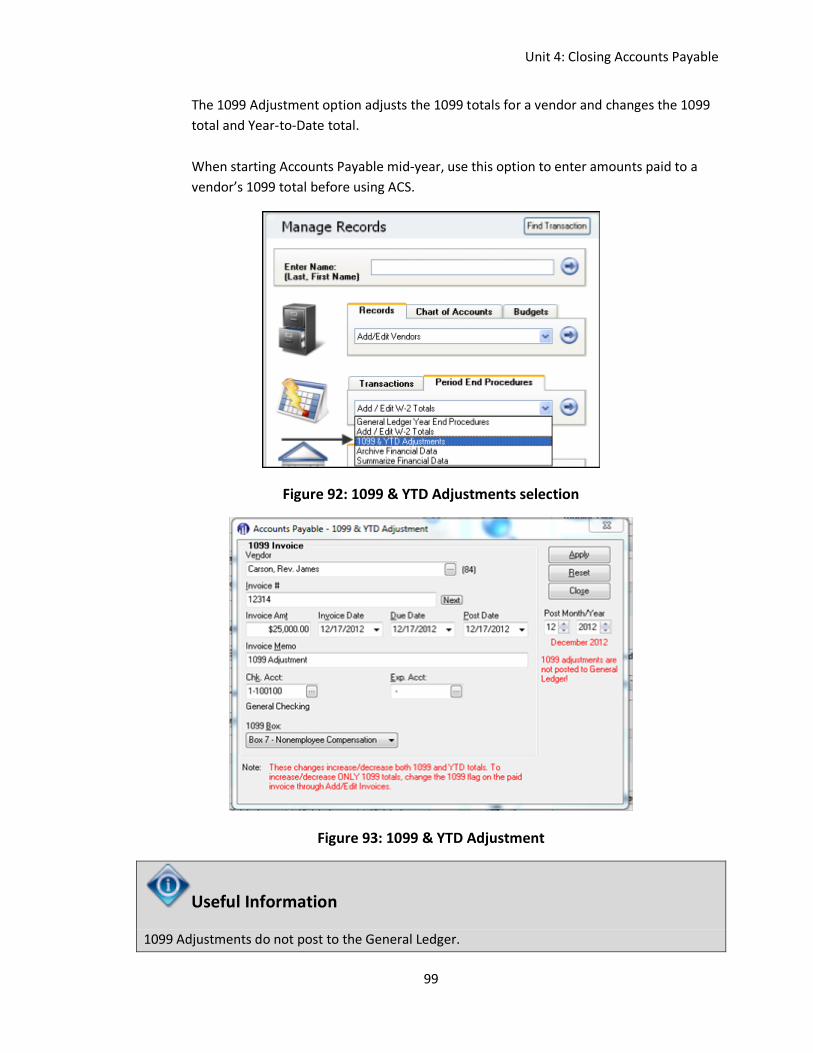
The 1099 Adjustment option adjusts the 1099 totals for a vendor and changes the 1099
total and Year-to-Date total.
When starting Accounts Payable mid-year, use this option to enter amounts paid to a
vendor’s 1099 total before using ACS.
Figure 92: 1099 & YTD Adjustments selection
Figure 93: 1099 & YTD Adjustment
Useful Information
1099 Adjustments do not post to the General Ledger.
Unit 4: Closing Accounts Payable
100
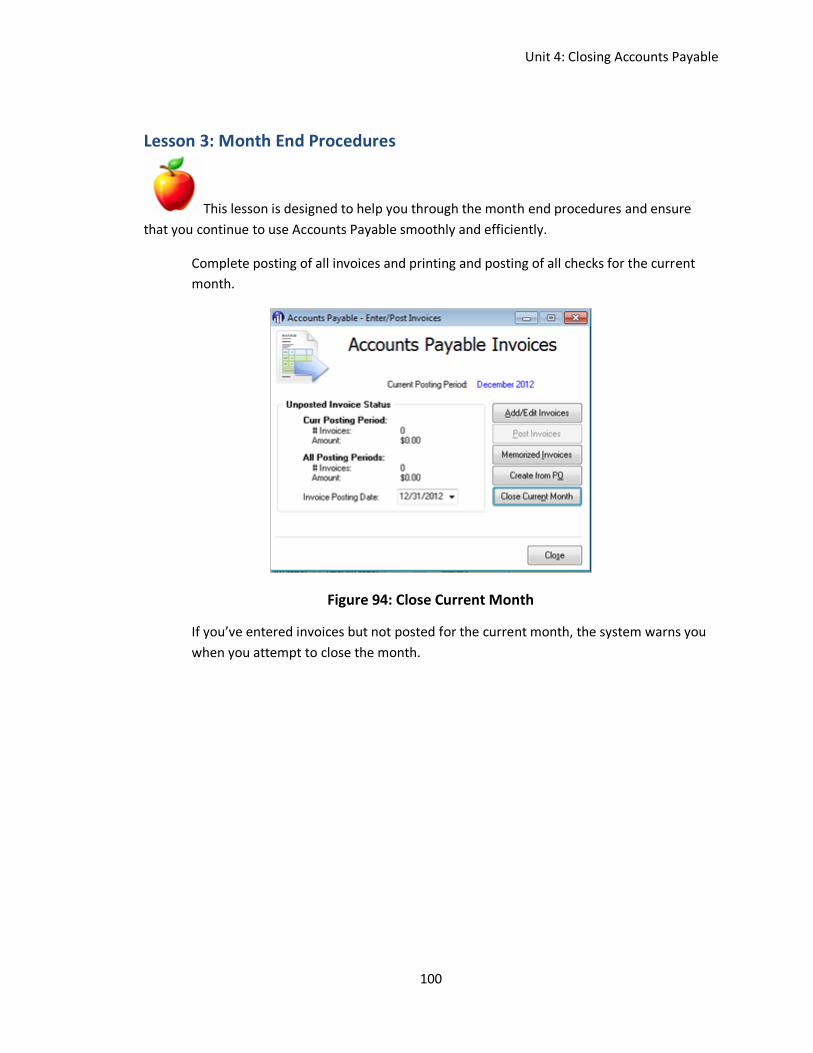
Lesson 3: Month End Procedures
This lesson is designed to help you through the month end procedures and ensure
that you continue to use Accounts Payable smoothly and efficiently.
Complete posting of all invoices and printing and posting of all checks for the current
month.
Figure 94: Close Current Month
If you’ve entered invoices but not posted for the current month, the system warns you
when you attempt to close the month.
Unit 4: Closing Accounts Payable
101
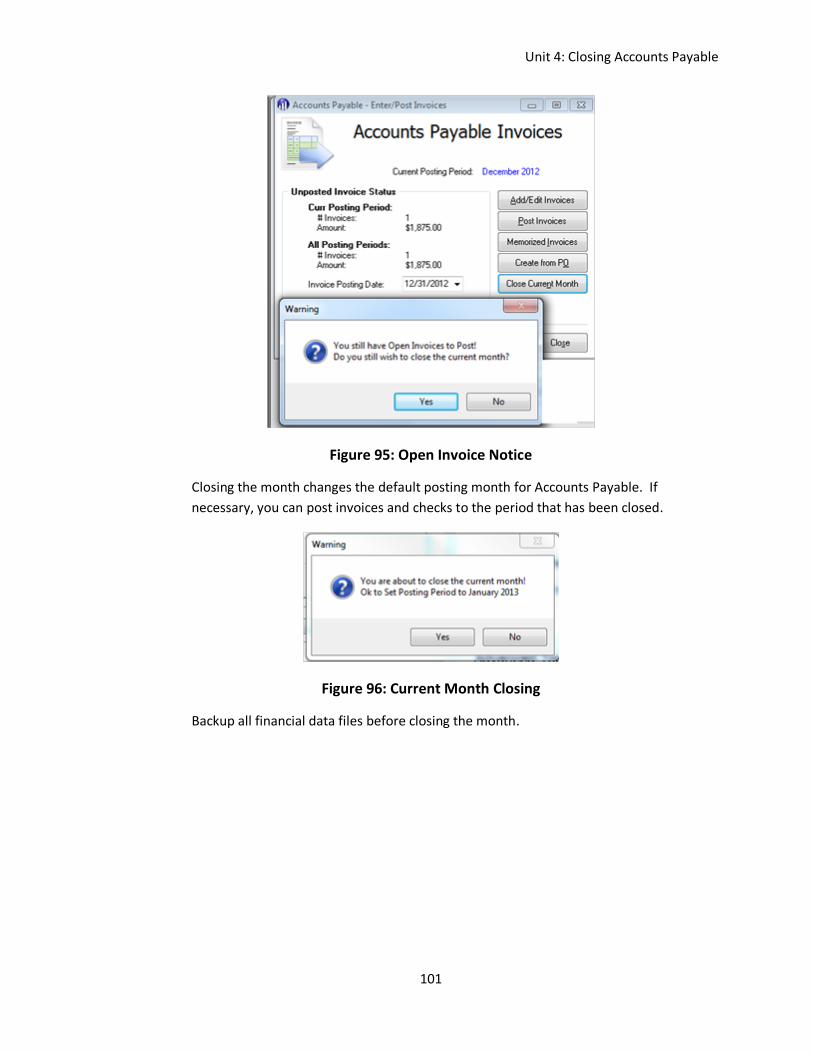
Figure 95: Open Invoice Notice
Closing the month changes the default posting month for Accounts Payable. If
necessary, you can post invoices and checks to the period that has been closed.
Figure 96: Current Month Closing
Backup all financial data files before closing the month.
Unit 4: Closing Accounts Payable
102
Unit 5: Closing Purchase Orders
Posting and Receiving Purchase Orders
The Purchase Orders module automates the purchasing process by sharing data with the Accounts Payable module. In the Purchase Orders module, you can post and receive purchase orders, then generate invoices in Accounts Payable.
With the Purchase Orders module, you can maintain a list of buyers in your organization and set buying limits for each buyer. You can also check your budget when entering purchase orders, and you can keep track of encumbered amounts that print on reports generated in the General Ledger module.
The Purchase Orders module does not have a month-end or year-end closing. When you update the current period in Accounts Payable, the accounting period in Purchase Orders also updates.
If you have unposted purchase orders, you can still close the month in Accounts Payable and post these orders to the correct month at a later time. Closing the month will only change the default posting month.
Unit 5: Closing Fixed Assets
103
Unit 5: Closing Fixed Assets
This unit covers the closing procedures related to the Fixed Assets module. You can use Fixed
Assets to track valuable items and equipment.
In Fixed Assets, you can create lists of specific items in your inventory. For each asset, you can
record important information such as acquisition date, cost, maintenance, and useful life. You
can then depreciate those items and print reports based on the information that you enter.
Fixed Assets has only a month-end closing. If depreciation is calculated and posted, you can do
this on a monthly or yearly basis.
This unit will assist you with steps necessary to close the Fixed Assets Module such as,
Taking Inventory
Calculating Depreciation
Month-End Procedures
Year-End Reports
Unit 5: Closing Fixed Assets
104
Lesson 1: Take Inventory using our CPT 711 Portable Bar Code Scanner
This lesson is designed to assist you with taking inventory using the CPT 711 Portable
Bar Code Scanner.
Taking inventory is an important function that you want to perform periodically. A lot of
organizations choose to include inventory as part of their year-end procedures. Knowing what
items are on hand allows you to plan for needed purchases to replace assets, increase the
number of assets on hand, and discard broken assets or those no longer needed.
You can use our CPT 711 portable bar code scanner to maintain or take inventory of assets
previously entered into Fixed Assets. You can also print bar code labels and affix them to your
assets to help you track inventory.
Before scanning your assets, you must export and download your asset data to the scanner.
Once you export the asset data, the data displays as you scan the assets. You can edit and
import pertinent information back into ACS.
To create the export file
1. Under Manage Records, click the Records tab.
2. Select Add/Edit Fixed Assets in the drop-down list, click Go .
3. Click Import.
4. Click Export Fixed Assets to look up the file, and then click Next.
5. Select a location to save the file and enter a file name.
6. Click Save.
To download the file to the scanner
1. Connect one end of the RS-232 cable to the scanner cradle. Connect the other end
to your PC.
2. Place the scanner in the cradle. On the bar code scanner, press 3. Utilities.
3. Press 8. Download Lookup.
4. On your desktop, double-click the CPT Scanner icon. The bar code emulator displays.
You can install the CPT Scanner Emulator by running the CPTScanner.exe file.

Unit 5: Closing Fixed Assets
105
5. Click Menu, and then Download Lookup File Via RS-232 or IrDA. Find the export file
that you created and click Open. A message displays indicating that the download is
complete.
Unit 5: Closing Fixed Assets
106
To maintain or take inventory:
1. On the bar code scanner, press 1. Collect Data.
2. Press 2. Maintain.
3. Scan the item bar code label. The asset item information displays.
4. Optional: Edit the item description. Scan a new location, department, or condition using
the Location/Department/Condition/Bar code List. Edit the quantity.
To upload data from the scanner to a file:
1. Connect one end of the RS-232 cable to the scanner cradle. Connect the other end to
your PC.
2. Place the scanner in the cradle. On the bar code scanner, press 2.Upload Data.
3. On your desktop, double-click the CPT Scanner button. The bar code emulator displays.
You can install the CPT Scanner Emulator by running the CPTScanner.exe file from any
ACS version 7.0.1.2 or higher.
4. Click Menu, and then Receive Data Via RS232-or IrDA.
5. Select a location to save the file and enter a name, then click Save. A message displays
to confirm that you want to view the scanned data.
6. Optional: Click Yes to view the received data.
7. A prompt will display on the scanner to delete the imported data. Select All Data and
press Enter.
8. A confirmation message displays on the scanner. Select Yes and press Enter.
To import the uploaded file
1. Under Manage Records, click the Records tab.
2. Select Add/Edit Fixed Assets in the drop-down list, and click Go .
3. Click Import.
4. Click Import from File, and then click Next.
5. Find the import file that you created and click Open.
6. The Ready to Import window displays with the items to import. You can change all
displayed information except the Item Number.
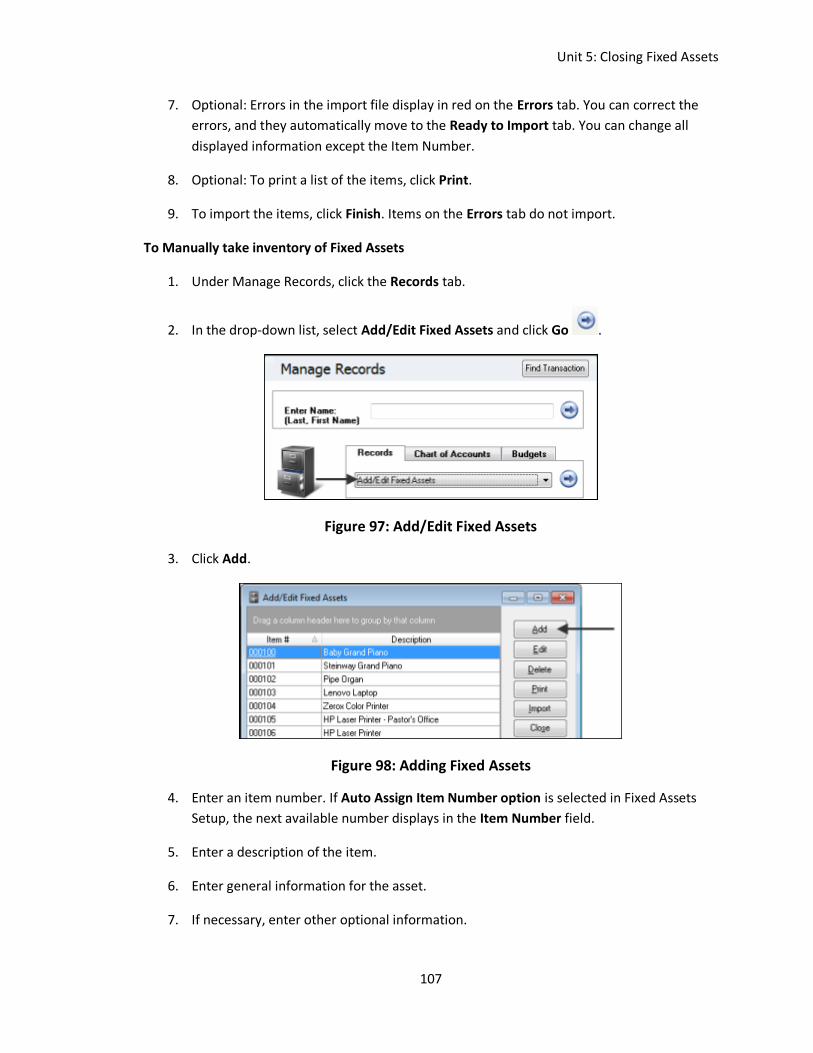
Unit 5: Closing Fixed Assets
107
7. Optional: Errors in the import file display in red on the Errors tab. You can correct the
errors, and they automatically move to the Ready to Import tab. You can change all
displayed information except the Item Number.
8. Optional: To print a list of the items, click Print.
9. To import the items, click Finish. Items on the Errors tab do not import.
To Manually take inventory of Fixed Assets
1. Under Manage Records, click the Records tab.
2. In the drop-down list, select Add/Edit Fixed Assets and click Go .
Figure 97: Add/Edit Fixed Assets
3. Click Add.
Figure 98: Adding Fixed Assets
4. Enter an item number. If Auto Assign Item Number option is selected in Fixed Assets
Setup, the next available number displays in the Item Number field.
5. Enter a description of the item.
6. Enter general information for the asset.
7. If necessary, enter other optional information.
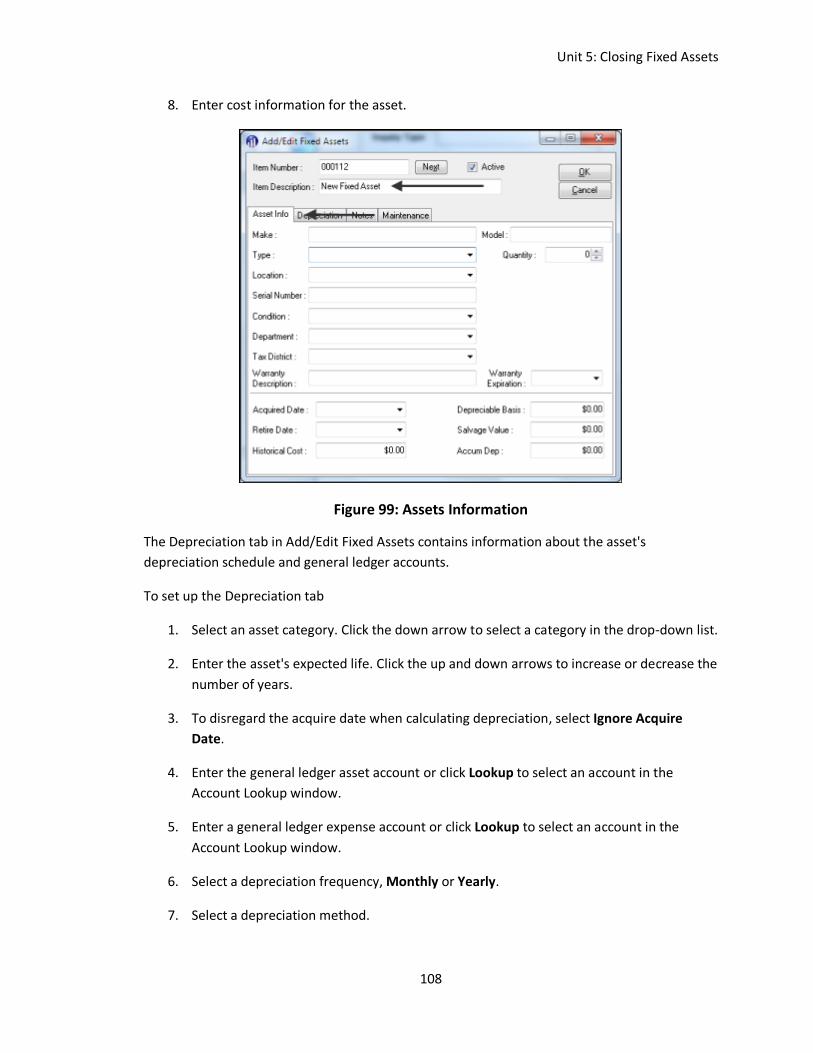
Unit 5: Closing Fixed Assets
108
8. Enter cost information for the asset.
Figure 99: Assets Information
The Depreciation tab in Add/Edit Fixed Assets contains information about the asset's
depreciation schedule and general ledger accounts.
To set up the Depreciation tab
1. Select an asset category. Click the down arrow to select a category in the drop-down list.
2. Enter the asset's expected life. Click the up and down arrows to increase or decrease the
number of years.
3. To disregard the acquire date when calculating depreciation, select Ignore Acquire
Date.
4. Enter the general ledger asset account or click Lookup to select an account in the
Account Lookup window.
5. Enter a general ledger expense account or click Lookup to select an account in the
Account Lookup window.
6. Select a depreciation frequency, Monthly or Yearly.
7. Select a depreciation method.
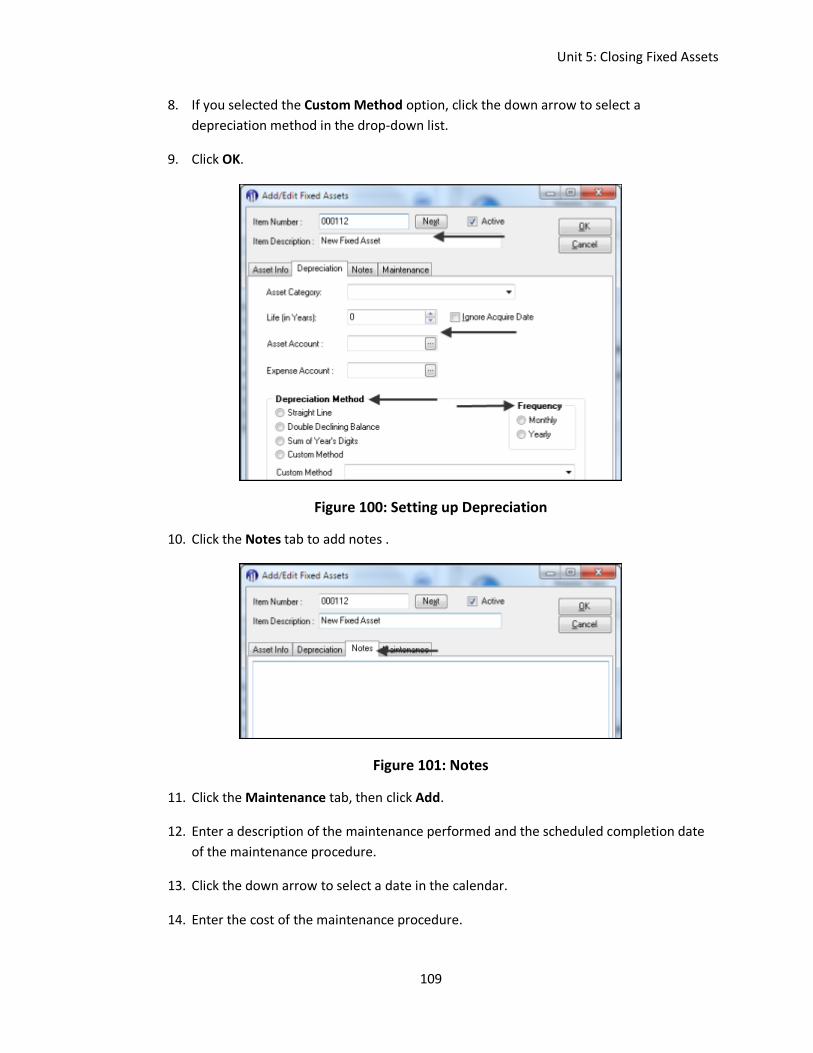
Unit 5: Closing Fixed Assets
109
8. If you selected the Custom Method option, click the down arrow to select a
depreciation method in the drop-down list.
9. Click OK.
Figure 100: Setting up Depreciation
10. Click the Notes tab to add notes .
Figure 101: Notes
11. Click the Maintenance tab, then click Add.
12. Enter a description of the maintenance performed and the scheduled completion date
of the maintenance procedure.
13. Click the down arrow to select a date in the calendar.
14. Enter the cost of the maintenance procedure.

Unit 5: Closing Fixed Assets
110
15. When maintenance procedure is complete, select Completed.
16. Click OK twice.
Figure 102: Maintenance Record
Useful Information
If you select an asset category, the category’s defaults display in the following fields: Life, Asset
Account, Expense Account, Frequency, and Depreciation Methods.
To save the maintenance record, you must click OK twice.
For more information on depreciation methods, press the F1 help key.
Unit 5: Closing Fixed Assets
111
Lesson 2: Calculating Depreciation
This lesson is designed to assist you calculating depreciation.
Calculating depreciation deducts the cost of using an asset over the life of the asset. As the asset
ages, the asset loses value. To reflect the decline in value, the asset depreciates over a period of
months or years, depending on the life of the asset.
When calculating depreciation, ACS compares the depreciation date to the acquisition date
unless you select to Disregard Acquire Date. If less than one year has passed since the asset was
acquired, ACS divides the yearly amount by 12 and then multiplies by the number of months in
service. The result is the correct depreciation amount for the first year.
If no Depreciable Basis is entered for an Asset, ACS uses the Historical Cost to calculate
depreciation. If a Depreciable Basis is entered for the asset, ACS uses that instead of the
Historical Cost. Items depreciate up to salvage value unless you enter a retire date.
Once you decide which depreciation method to use, you must also decide how often (for
example, monthly or yearly) to calculate the depreciation expense and post it to the general
ledger.
To calculate depreciation
1. Under Manage Records, click the Transactions tab.
2. Select Fixed Assets Depreciation and click Go .
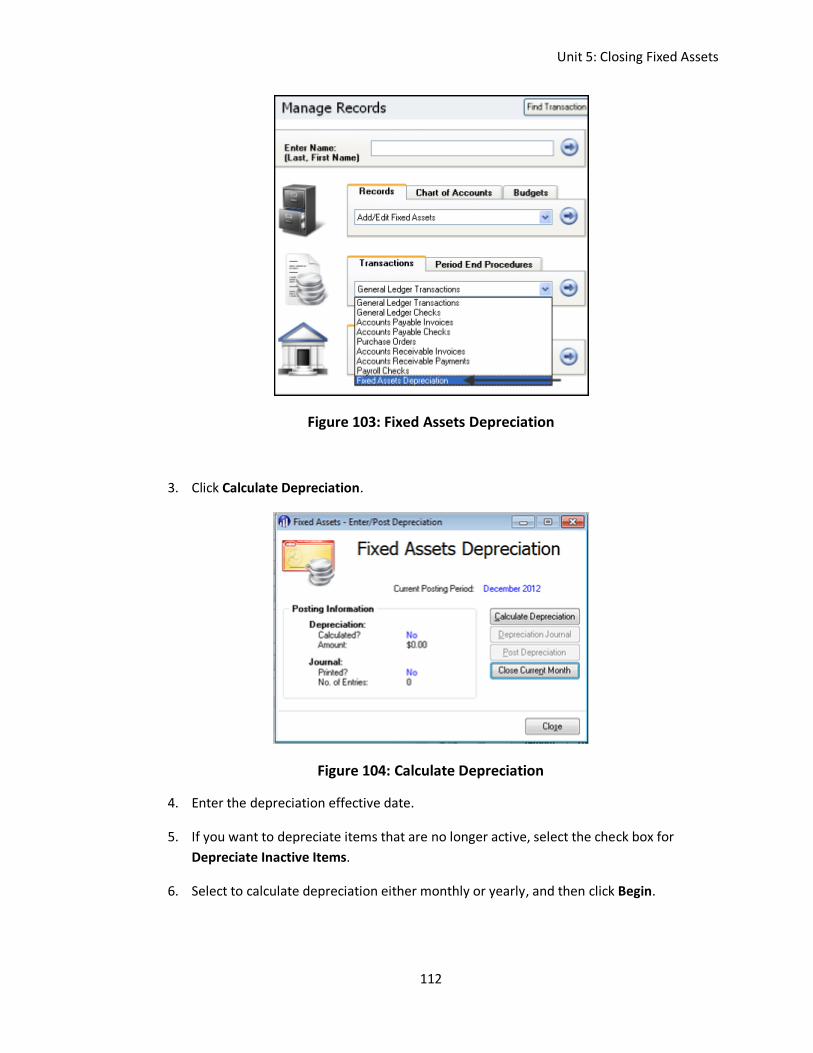
Unit 5: Closing Fixed Assets
112
Figure 103: Fixed Assets Depreciation
3. Click Calculate Depreciation.
Figure 104: Calculate Depreciation
4. Enter the depreciation effective date.
5. If you want to depreciate items that are no longer active, select the check box for
Depreciate Inactive Items.
6. Select to calculate depreciation either monthly or yearly, and then click Begin.
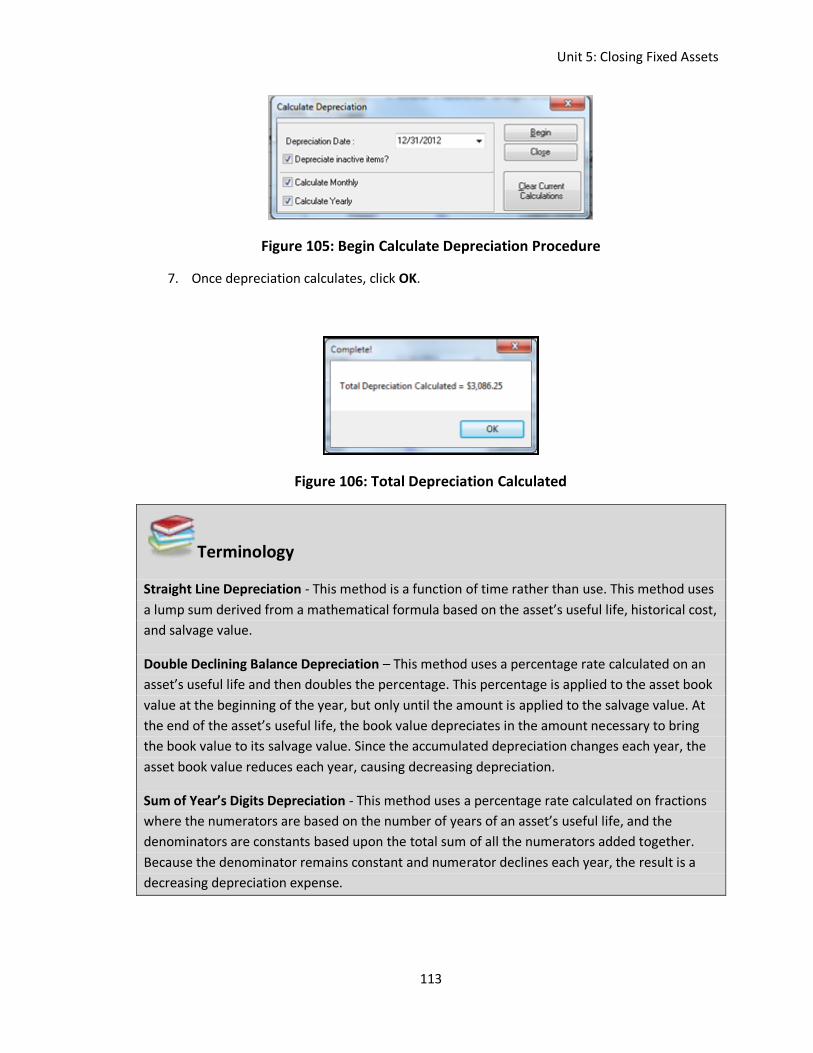
Unit 5: Closing Fixed Assets
113
Figure 105: Begin Calculate Depreciation Procedure
7. Once depreciation calculates, click OK.
Figure 106: Total Depreciation Calculated
Terminology
Straight Line Depreciation - This method is a function of time rather than use. This method uses
a lump sum derived from a mathematical formula based on the asset’s useful life, historical cost,
and salvage value.
Double Declining Balance Depreciation – This method uses a percentage rate calculated on an
asset’s useful life and then doubles the percentage. This percentage is applied to the asset book
value at the beginning of the year, but only until the amount is applied to the salvage value. At
the end of the asset’s useful life, the book value depreciates in the amount necessary to bring
the book value to its salvage value. Since the accumulated depreciation changes each year, the
asset book value reduces each year, causing decreasing depreciation.
Sum of Year’s Digits Depreciation - This method uses a percentage rate calculated on fractions
where the numerators are based on the number of years of an asset’s useful life, and the
denominators are constants based upon the total sum of all the numerators added together.
Because the denominator remains constant and numerator declines each year, the result is a
decreasing depreciation expense.
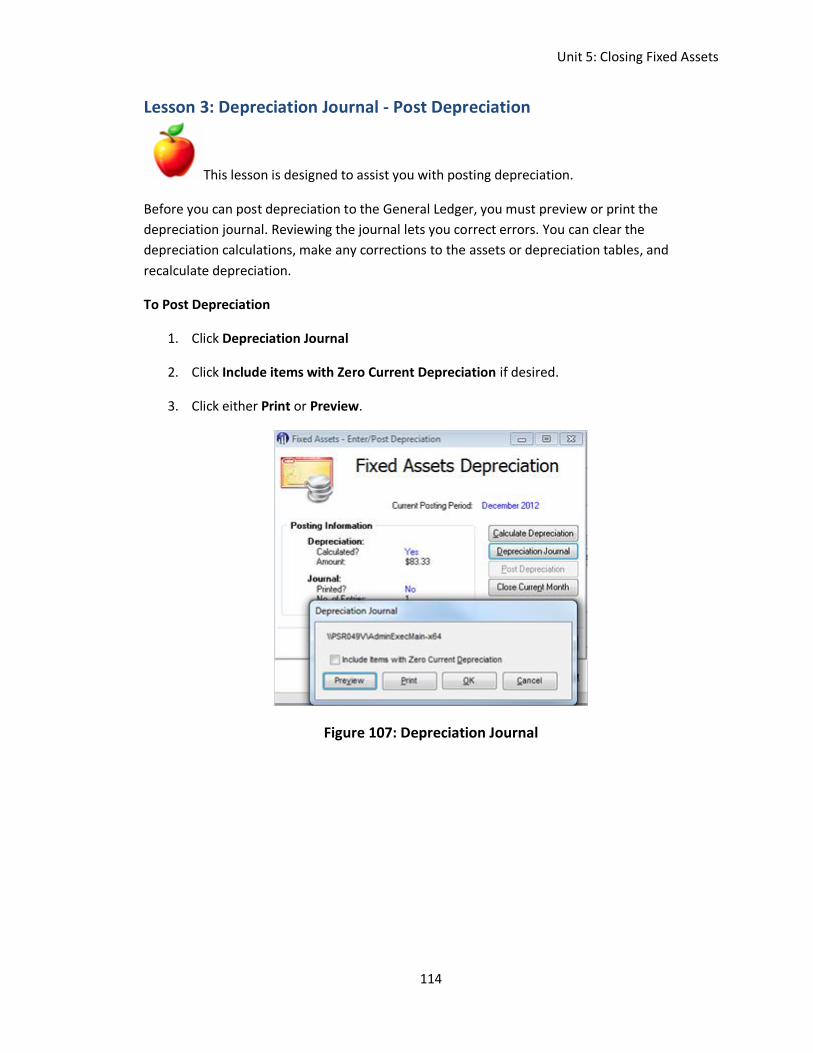
Unit 5: Closing Fixed Assets
114
Lesson 3: Depreciation Journal - Post Depreciation
This lesson is designed to assist you with posting depreciation.
Before you can post depreciation to the General Ledger, you must preview or print the
depreciation journal. Reviewing the journal lets you correct errors. You can clear the
depreciation calculations, make any corrections to the assets or depreciation tables, and
recalculate depreciation.
To Post Depreciation
1. Click Depreciation Journal
2. Click Include items with Zero Current Depreciation if desired.
3. Click either Print or Preview.
Figure 107: Depreciation Journal
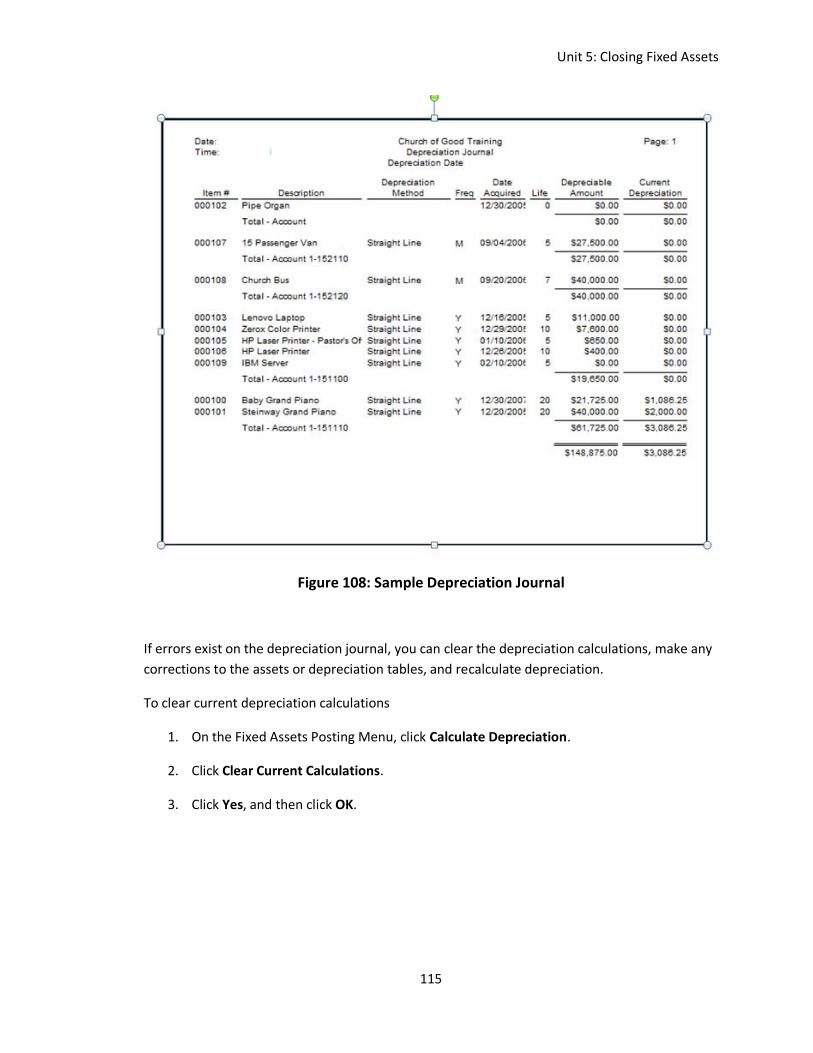
Unit 5: Closing Fixed Assets
115
Figure 108: Sample Depreciation Journal
If errors exist on the depreciation journal, you can clear the depreciation calculations, make any
corrections to the assets or depreciation tables, and recalculate depreciation.
To clear current depreciation calculations
1. On the Fixed Assets Posting Menu, click Calculate Depreciation.
2. Click Clear Current Calculations.
3. Click Yes, and then click OK.
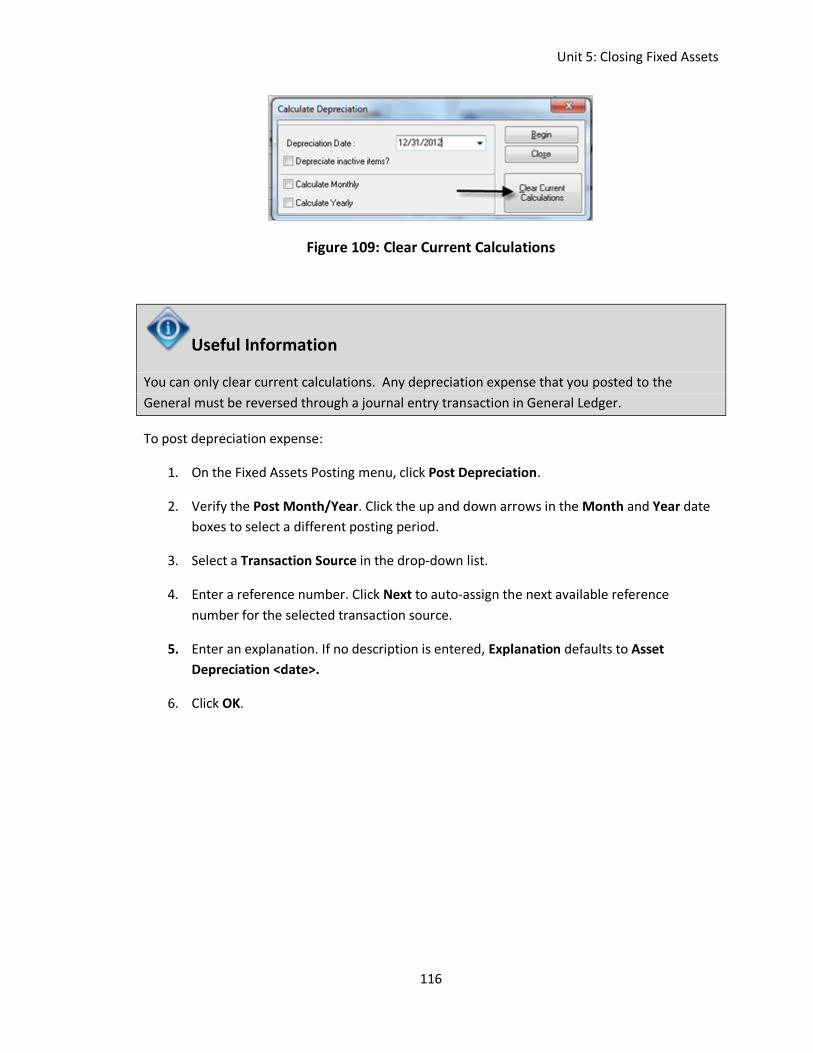
Unit 5: Closing Fixed Assets
116
Figure 109: Clear Current Calculations
Useful Information
You can only clear current calculations. Any depreciation expense that you posted to the
General must be reversed through a journal entry transaction in General Ledger.
To post depreciation expense:
1. On the Fixed Assets Posting menu, click Post Depreciation.
2. Verify the Post Month/Year. Click the up and down arrows in the Month and Year date
boxes to select a different posting period.
3. Select a Transaction Source in the drop-down list.
4. Enter a reference number. Click Next to auto-assign the next available reference
number for the selected transaction source.
5. Enter an explanation. If no description is entered, Explanation defaults to Asset
Depreciation <date>.
6. Click OK.

Unit 5: Closing Fixed Assets
117
Figure 110: Post Depreciation
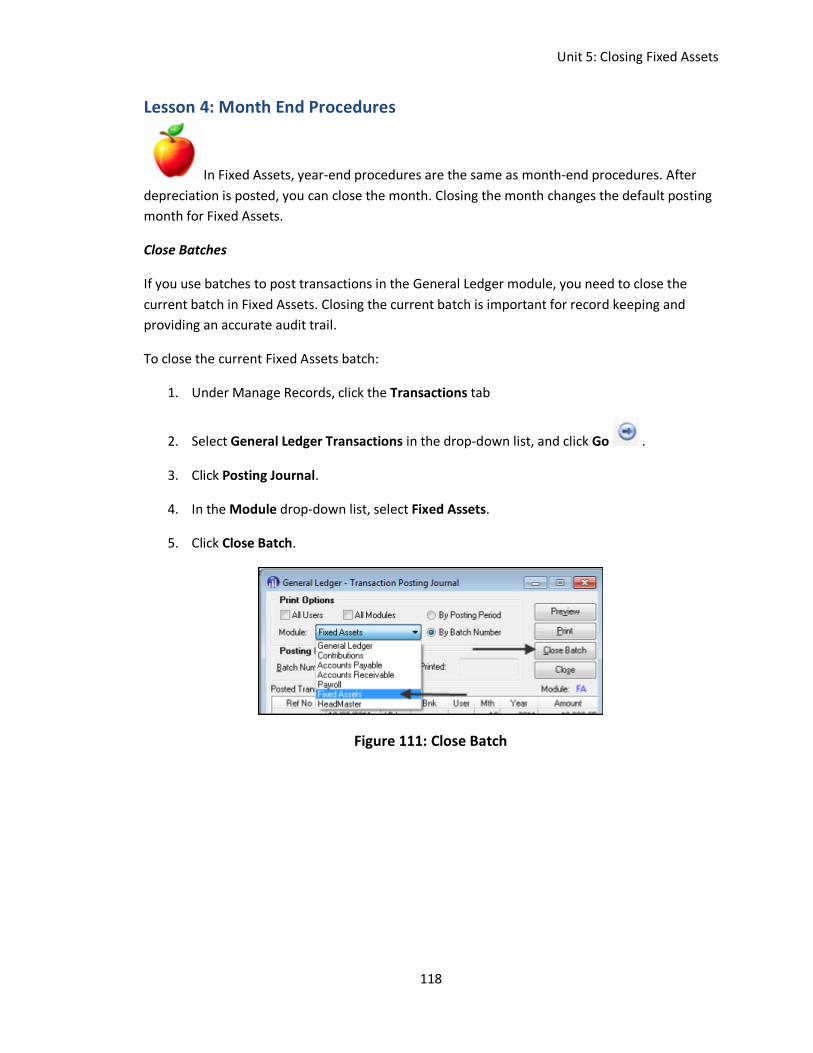
Unit 5: Closing Fixed Assets
118
Lesson 4: Month End Procedures
In Fixed Assets, year-end procedures are the same as month-end procedures. After
depreciation is posted, you can close the month. Closing the month changes the default posting
month for Fixed Assets.
Close Batches
If you use batches to post transactions in the General Ledger module, you need to close the
current batch in Fixed Assets. Closing the current batch is important for record keeping and
providing an accurate audit trail.
To close the current Fixed Assets batch:
1. Under Manage Records, click the Transactions tab
2. Select General Ledger Transactions in the drop-down list, and click Go .
3. Click Posting Journal.
4. In the Module drop-down list, select Fixed Assets.
5. Click Close Batch.
Figure 111: Close Batch
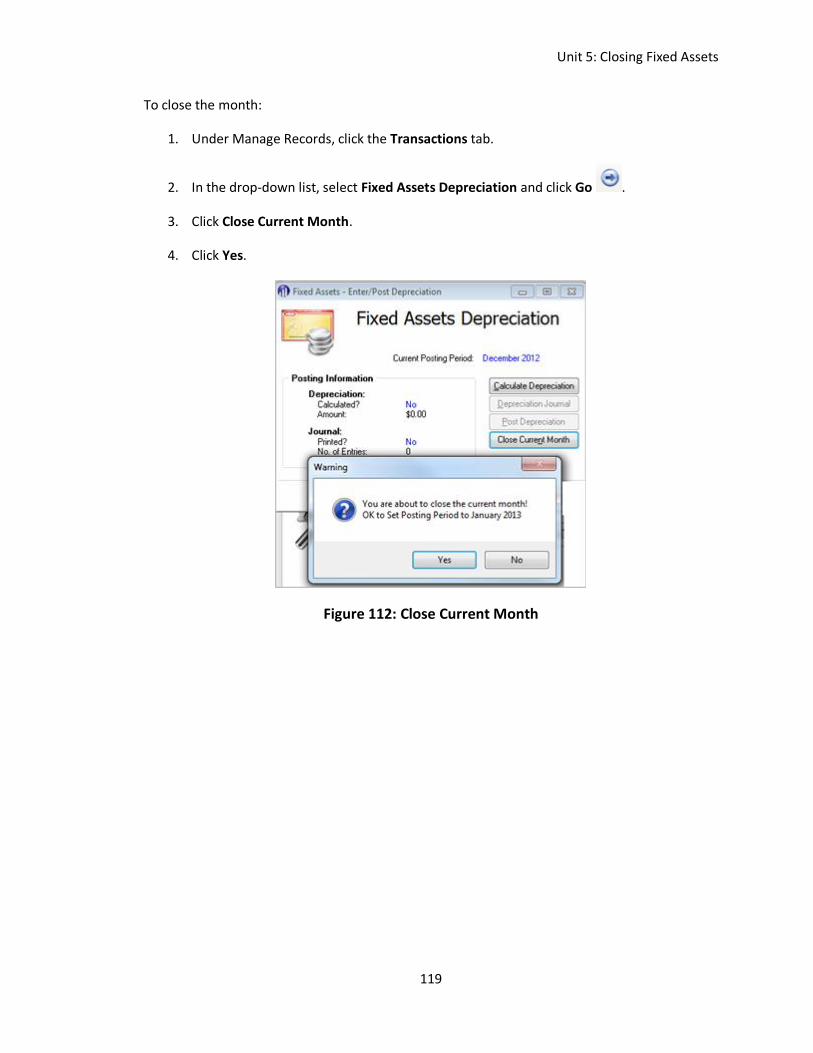
Unit 5: Closing Fixed Assets
119
To close the month:
1. Under Manage Records, click the Transactions tab.
2. In the drop-down list, select Fixed Assets Depreciation and click Go .
3. Click Close Current Month.
4. Click Yes.
Figure 112: Close Current Month
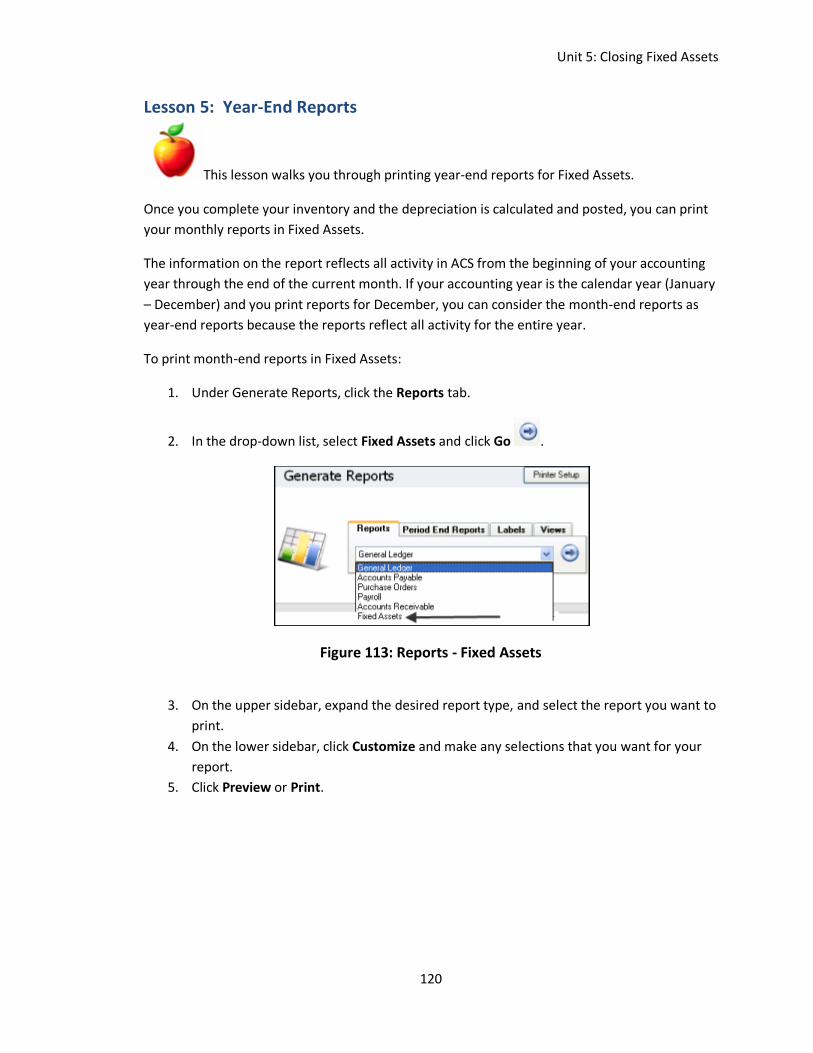
Unit 5: Closing Fixed Assets
120
Lesson 5: Year-End Reports
This lesson walks you through printing year-end reports for Fixed Assets.
Once you complete your inventory and the depreciation is calculated and posted, you can print
your monthly reports in Fixed Assets.
The information on the report reflects all activity in ACS from the beginning of your accounting
year through the end of the current month. If your accounting year is the calendar year (January
– December) and you print reports for December, you can consider the month-end reports as
year-end reports because the reports reflect all activity for the entire year.
To print month-end reports in Fixed Assets:
1. Under Generate Reports, click the Reports tab.
2. In the drop-down list, select Fixed Assets and click Go .
Figure 113: Reports - Fixed Assets
3. On the upper sidebar, expand the desired report type, and select the report you want to
print.
4. On the lower sidebar, click Customize and make any selections that you want for your
report.
5. Click Preview or Print.
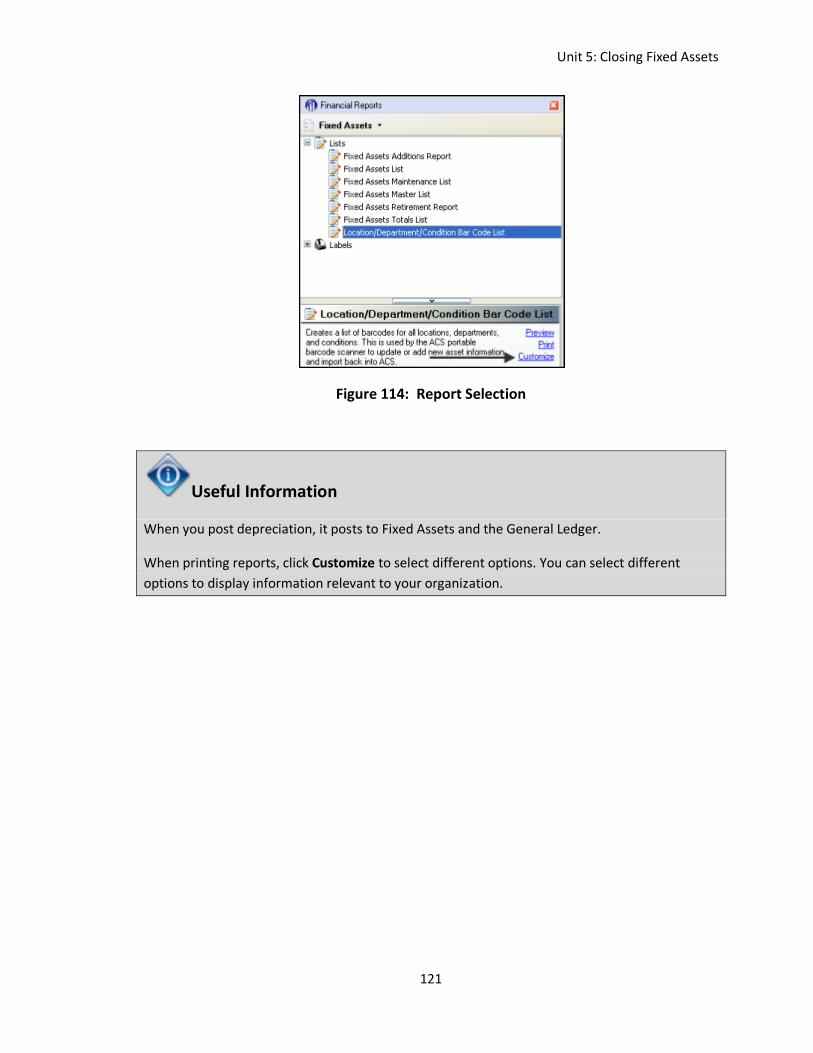
Unit 5: Closing Fixed Assets
121
Figure 114: Report Selection
Useful Information
When you post depreciation, it posts to Fixed Assets and the General Ledger.
When printing reports, click Customize to select different options. You can select different
options to display information relevant to your organization.
Unit 6: Closing General Ledger
122
Unit 6: Closing General Ledger
This unit covers the closing procedures related to the General Ledger Module, including year-
end reports and backup procedures.
General Ledger is the only module that has a monthly and yearly closing. Use the monthly
closing procedure to close months one through eleven only.
Close the last month of the fiscal year using the Period End Procedures.
This unit covers:
Next Year’s Budget
Month-End Procedures
Year-End Reports
Year-End Procedures
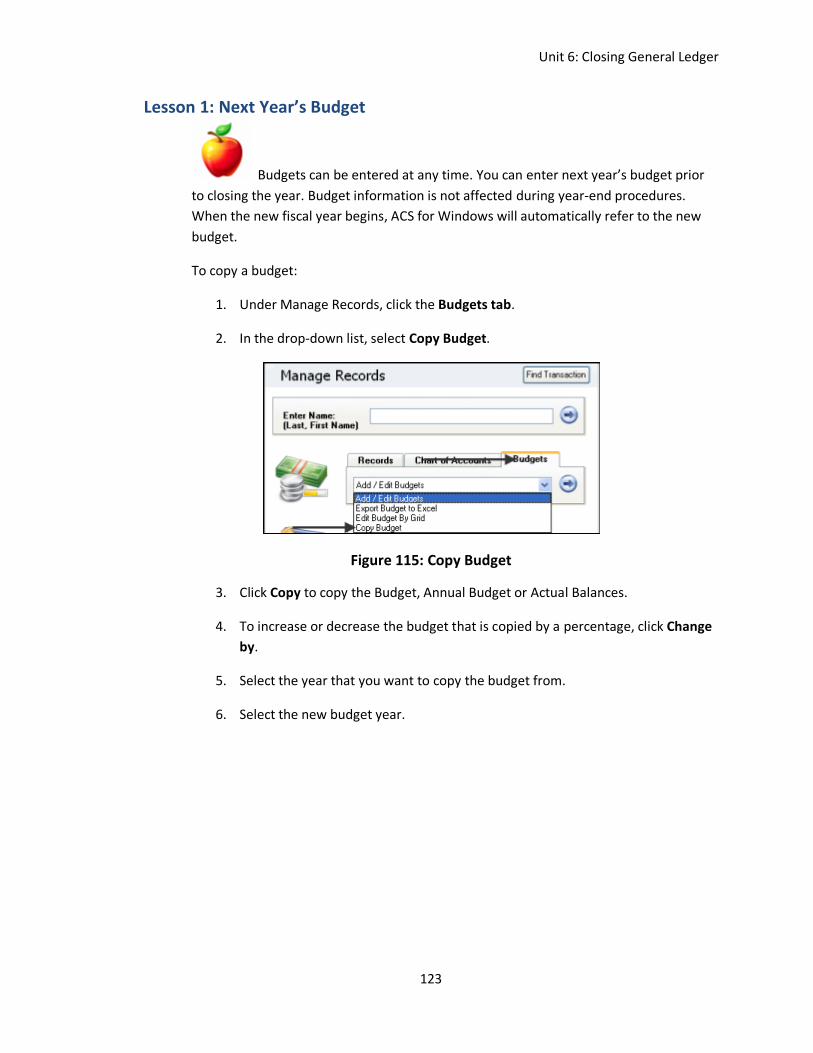
Unit 6: Closing General Ledger
123
Lesson 1: Next Year’s Budget
Budgets can be entered at any time. You can enter next year’s budget prior
to closing the year. Budget information is not affected during year-end procedures.
When the new fiscal year begins, ACS for Windows will automatically refer to the new
budget.
To copy a budget:
1. Under Manage Records, click the Budgets tab.
2. In the drop-down list, select Copy Budget.
Figure 115: Copy Budget
3. Click Copy to copy the Budget, Annual Budget or Actual Balances.
4. To increase or decrease the budget that is copied by a percentage, click Change
by.
5. Select the year that you want to copy the budget from.
6. Select the new budget year.
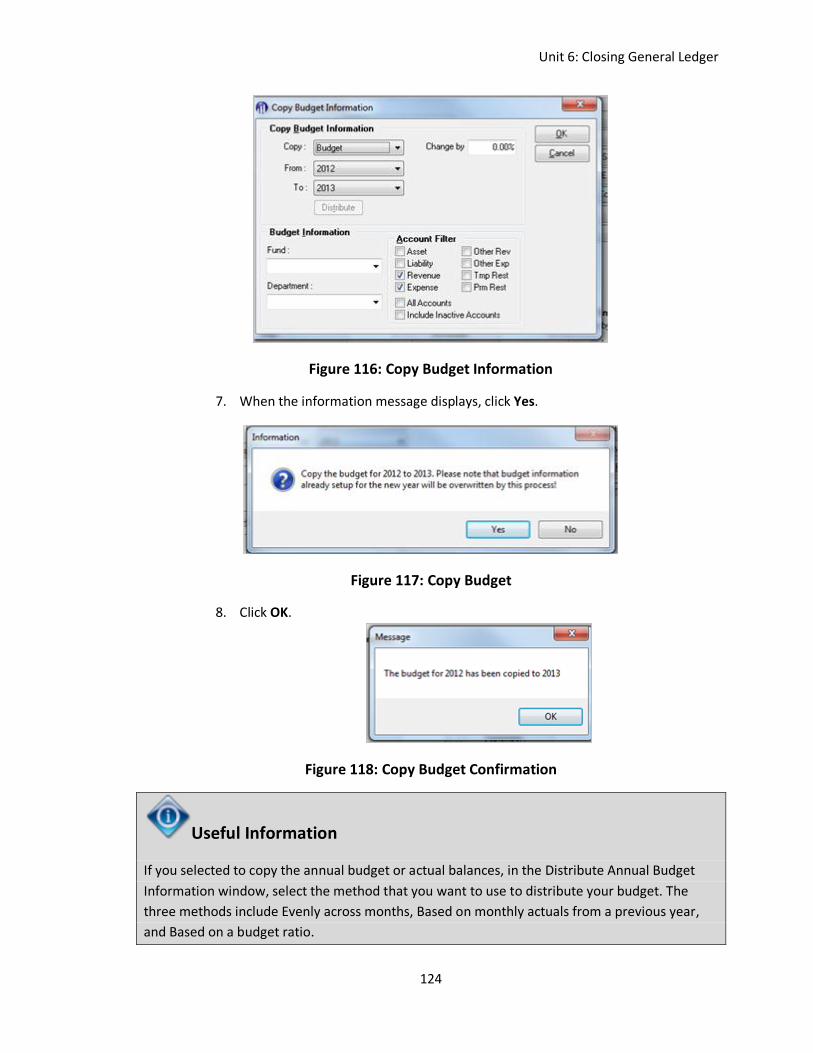
Unit 6: Closing General Ledger
124
Figure 116: Copy Budget Information
7. When the information message displays, click Yes.
Figure 117: Copy Budget
8. Click OK.
Figure 118: Copy Budget Confirmation
Useful Information
If you selected to copy the annual budget or actual balances, in the Distribute Annual Budget
Information window, select the method that you want to use to distribute your budget. The
three methods include Evenly across months, Based on monthly actuals from a previous year,
and Based on a budget ratio.
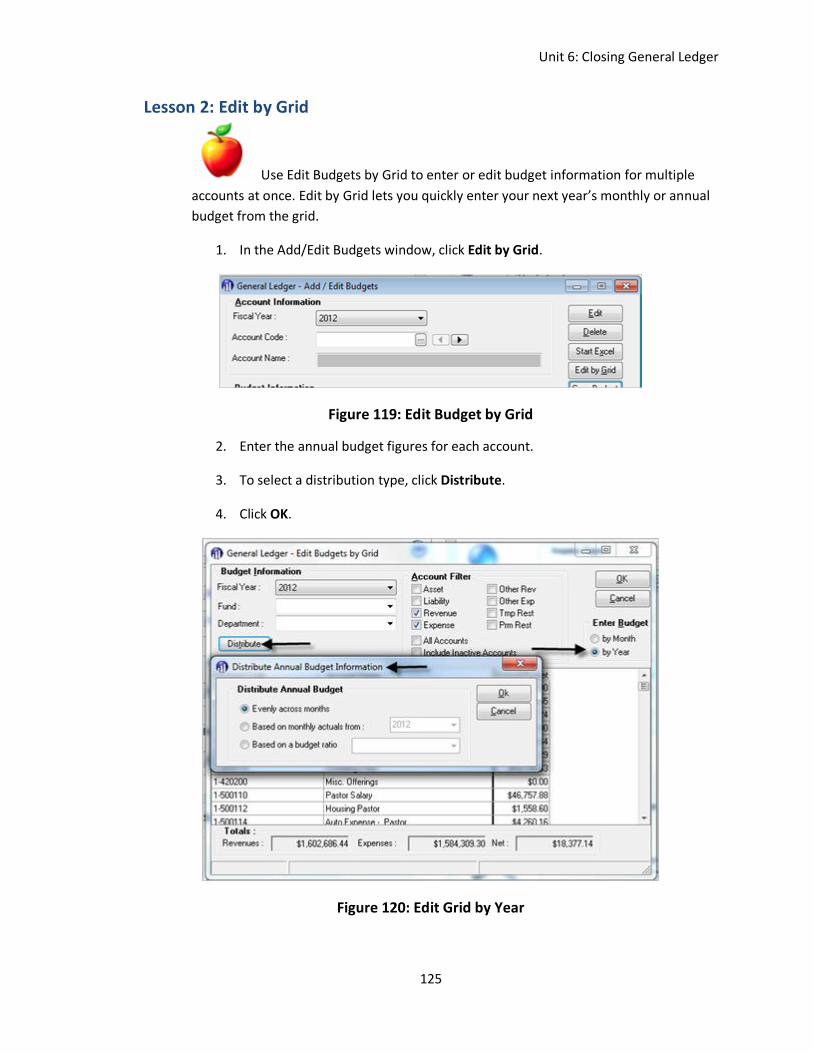
Unit 6: Closing General Ledger
125
Lesson 2: Edit by Grid
Use Edit Budgets by Grid to enter or edit budget information for multiple
accounts at once. Edit by Grid lets you quickly enter your next year’s monthly or annual
budget from the grid.
1. In the Add/Edit Budgets window, click Edit by Grid.
Figure 119: Edit Budget by Grid
2. Enter the annual budget figures for each account.
3. To select a distribution type, click Distribute.
4. Click OK.
Figure 120: Edit Grid by Year

Unit 6: Closing General Ledger
126
Figure 121: Edit Grid by Month

Unit 6: Closing General Ledger
127
Terminology
Evenly across months – Distributes your annual budget evenly over the twelve months of the
year. If the annual budget does not divide evenly by 12, ACS adds or subtracts the remaining
amount from the last month of the year.
Based on monthly actuals from – Distributes your annual budget across the months based on a
percentage of the actual monthly balances of the From year.
Based on a budget ratio – Distributes your annual budget based on a ratio. Select a budget
ratio code in the drop-down list.
Useful Information
You can filter budgets by Fund and/or Account.
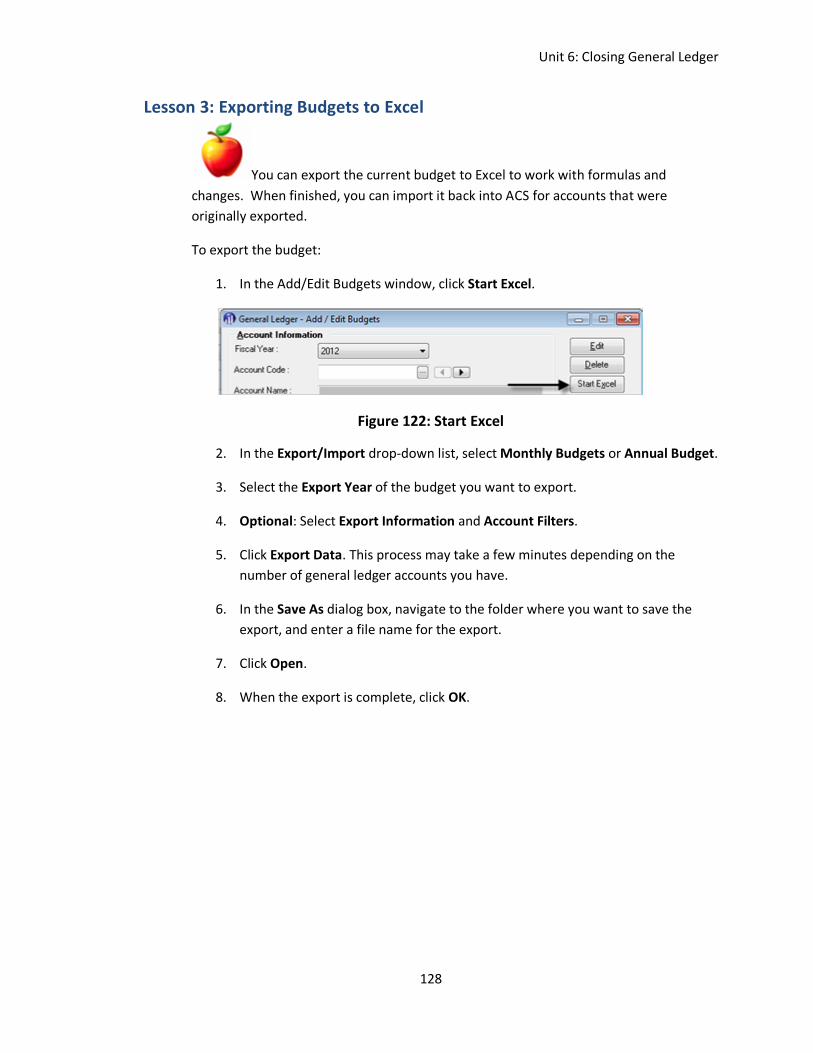
Unit 6: Closing General Ledger
128
Lesson 3: Exporting Budgets to Excel
You can export the current budget to Excel to work with formulas and
changes. When finished, you can import it back into ACS for accounts that were
originally exported.
To export the budget:
1. In the Add/Edit Budgets window, click Start Excel.
Figure 122: Start Excel
2. In the Export/Import drop-down list, select Monthly Budgets or Annual Budget.
3. Select the Export Year of the budget you want to export.
4. Optional: Select Export Information and Account Filters.
5. Click Export Data. This process may take a few minutes depending on the
number of general ledger accounts you have.
6. In the Save As dialog box, navigate to the folder where you want to save the
export, and enter a file name for the export.
7. Click Open.
8. When the export is complete, click OK.
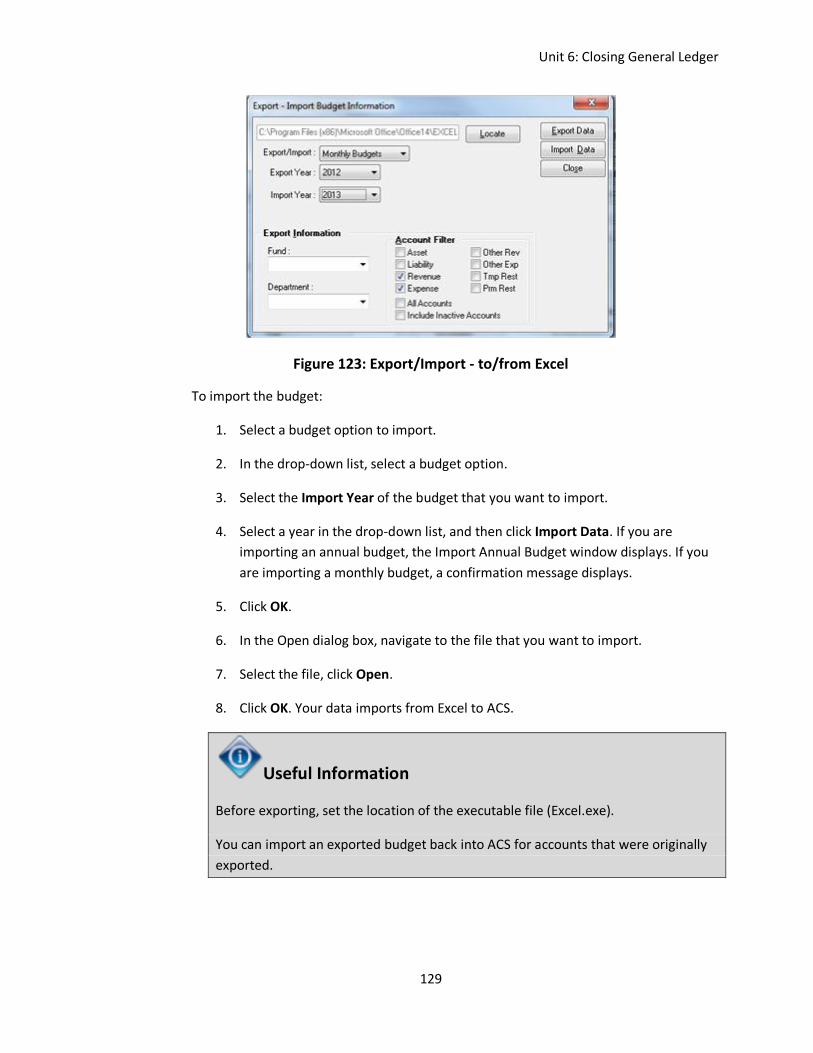
Unit 6: Closing General Ledger
129
Figure 123: Export/Import - to/from Excel
To import the budget:
1. Select a budget option to import.
2. In the drop-down list, select a budget option.
3. Select the Import Year of the budget that you want to import.
4. Select a year in the drop-down list, and then click Import Data. If you are
importing an annual budget, the Import Annual Budget window displays. If you
are importing a monthly budget, a confirmation message displays.
5. Click OK.
6. In the Open dialog box, navigate to the file that you want to import.
7. Select the file, click Open.
8. Click OK. Your data imports from Excel to ACS.
Useful Information
Before exporting, set the location of the executable file (Excel.exe).
You can import an exported budget back into ACS for accounts that were originally
exported.
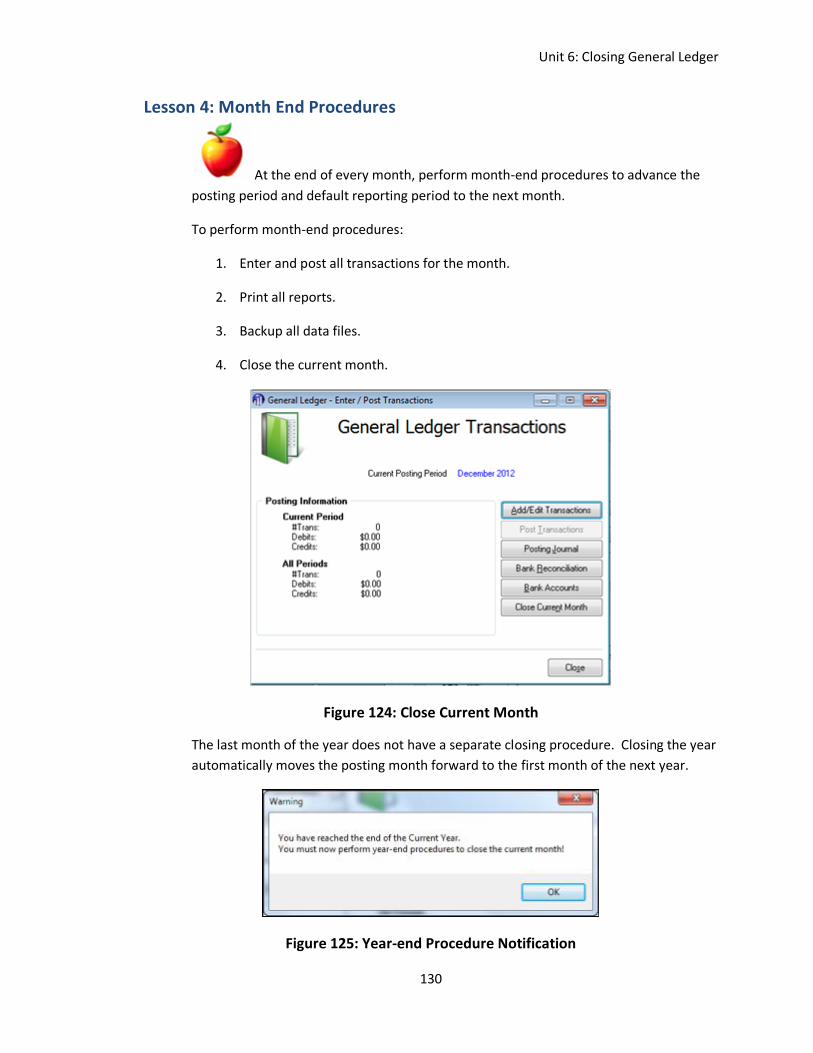
Unit 6: Closing General Ledger
130
Lesson 4: Month End Procedures
At the end of every month, perform month-end procedures to advance the
posting period and default reporting period to the next month.
To perform month-end procedures:
1. Enter and post all transactions for the month.
2. Print all reports.
3. Backup all data files.
4. Close the current month.
Figure 124: Close Current Month
The last month of the year does not have a separate closing procedure. Closing the year
automatically moves the posting month forward to the first month of the next year.
Figure 125: Year-end Procedure Notification
Unit 6: Closing General Ledger
131
Lesson 5: Year-End Reports
Determine what yearly reports are needed. You can group reports in a batch so that
only the reports you select are included when you print the batch.
Of the reports to consider, the Posting Journal prints each account with beginning balances,
every debit and credit, and ending balances. You can customize this report for specific reporting
periods. This report is especially helpful if your organization is audited.
Figure 126: Report Selection
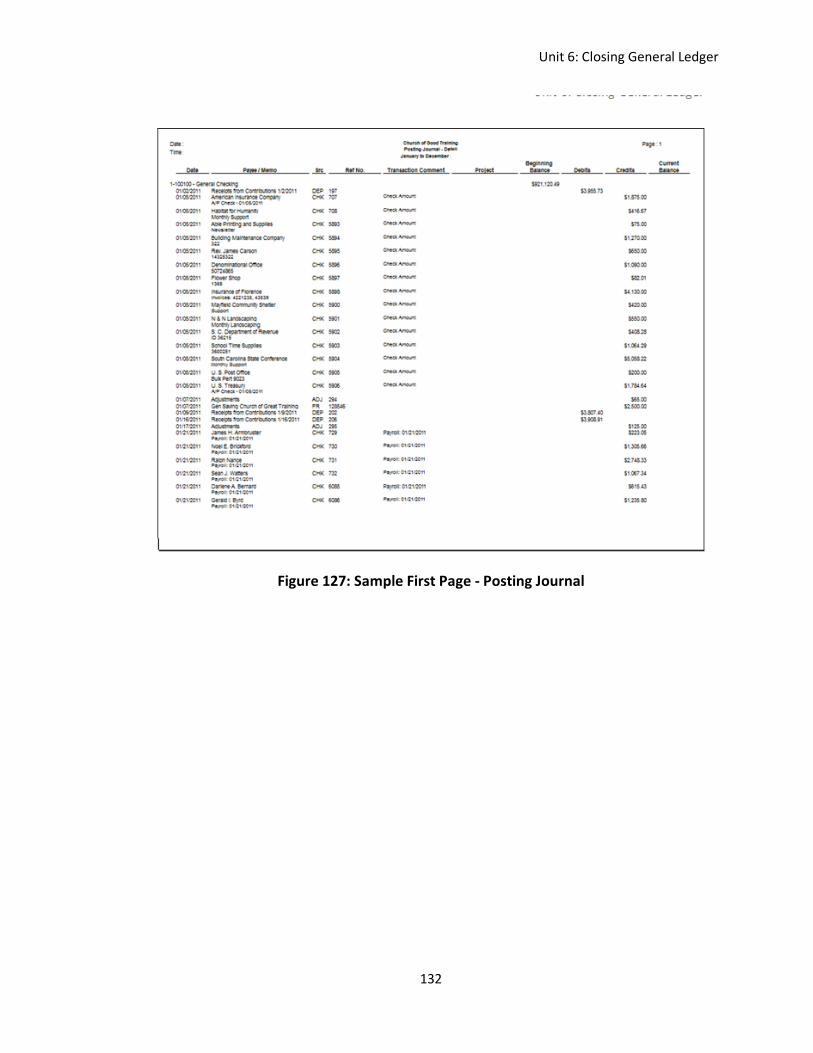
Unit 6: Closing General Ledger
132
Figure 127: Sample First Page - Posting Journal
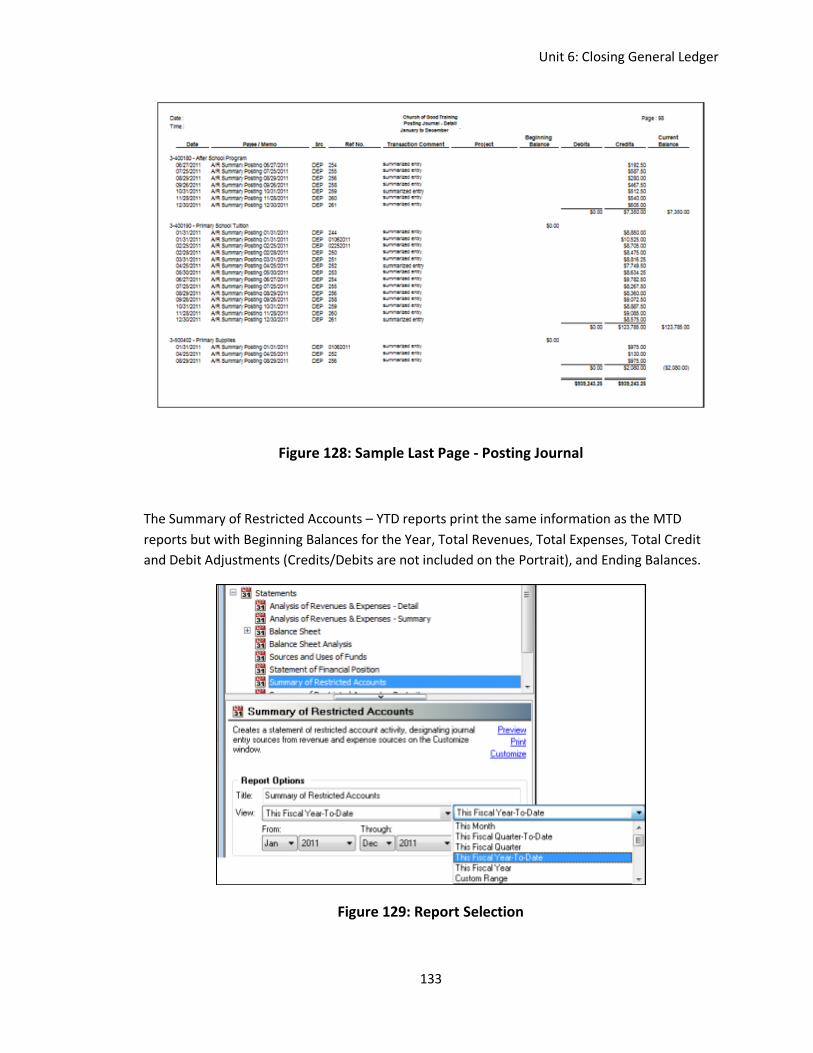
Unit 6: Closing General Ledger
133
Figure 128: Sample Last Page - Posting Journal
The Summary of Restricted Accounts – YTD reports print the same information as the MTD
reports but with Beginning Balances for the Year, Total Revenues, Total Expenses, Total Credit
and Debit Adjustments (Credits/Debits are not included on the Portrait), and Ending Balances.
Figure 129: Report Selection
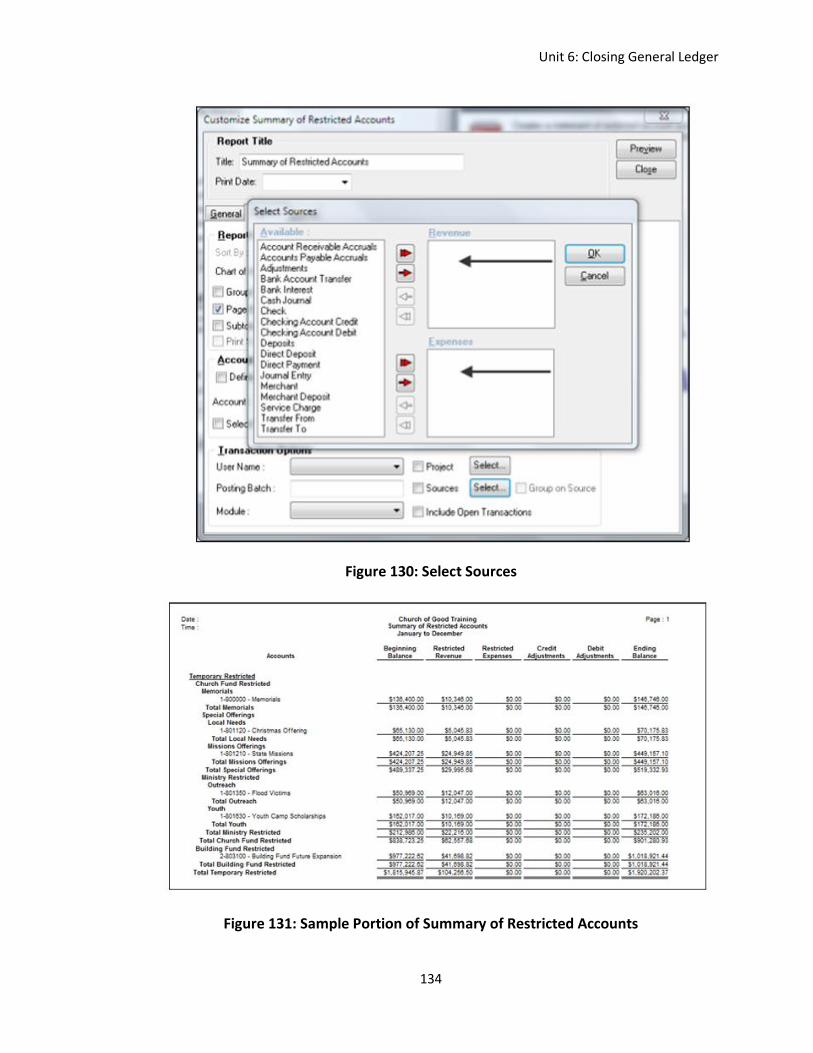
Unit 6: Closing General Ledger
134
Figure 130: Select Sources
Figure 131: Sample Portion of Summary of Restricted Accounts
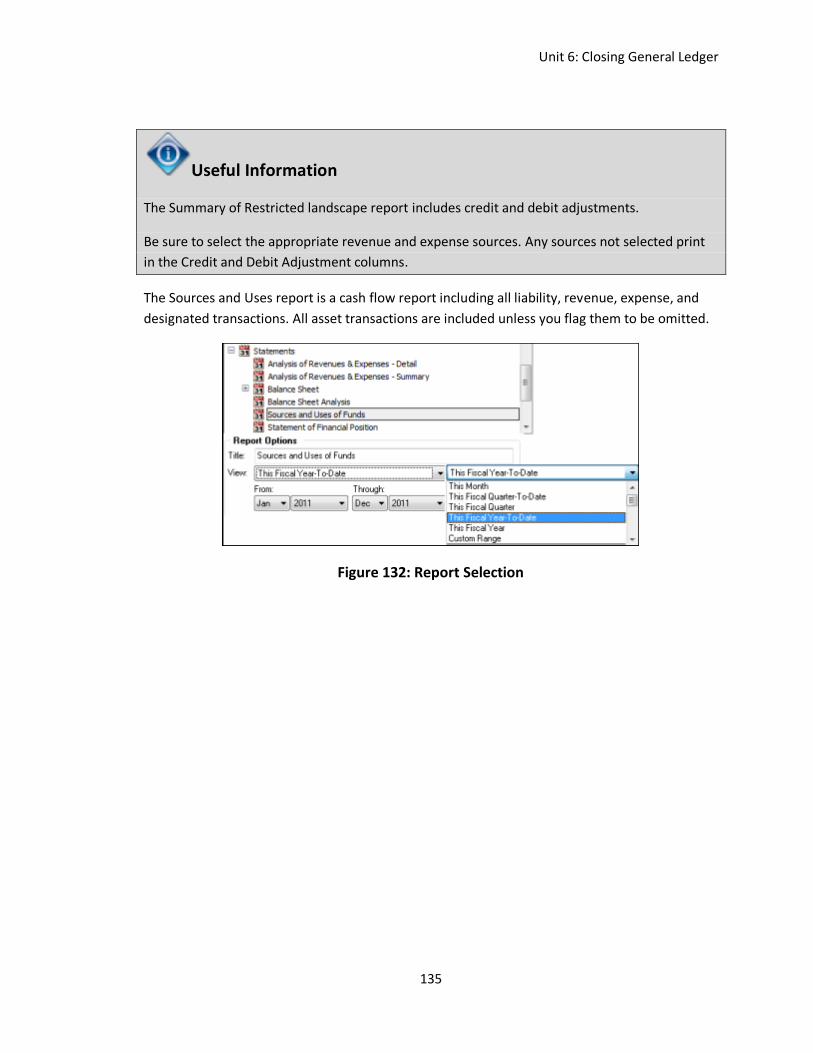
Unit 6: Closing General Ledger
135
Useful Information
The Summary of Restricted landscape report includes credit and debit adjustments.
Be sure to select the appropriate revenue and expense sources. Any sources not selected print
in the Credit and Debit Adjustment columns.
The Sources and Uses report is a cash flow report including all liability, revenue, expense, and
designated transactions. All asset transactions are included unless you flag them to be omitted.
Figure 132: Report Selection
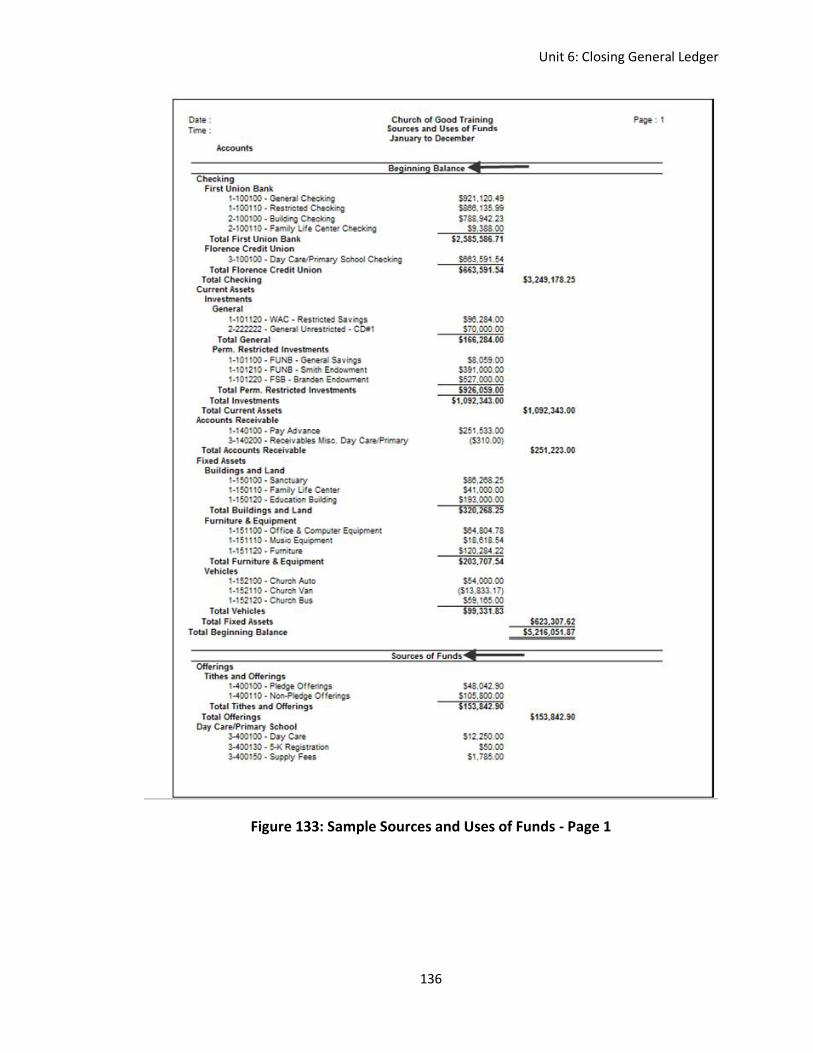
Unit 6: Closing General Ledger
136
Figure 133: Sample Sources and Uses of Funds - Page 1

Unit 6: Closing General Ledger
137
Figure 134: Sample Sources and Uses of Funds - Page 2
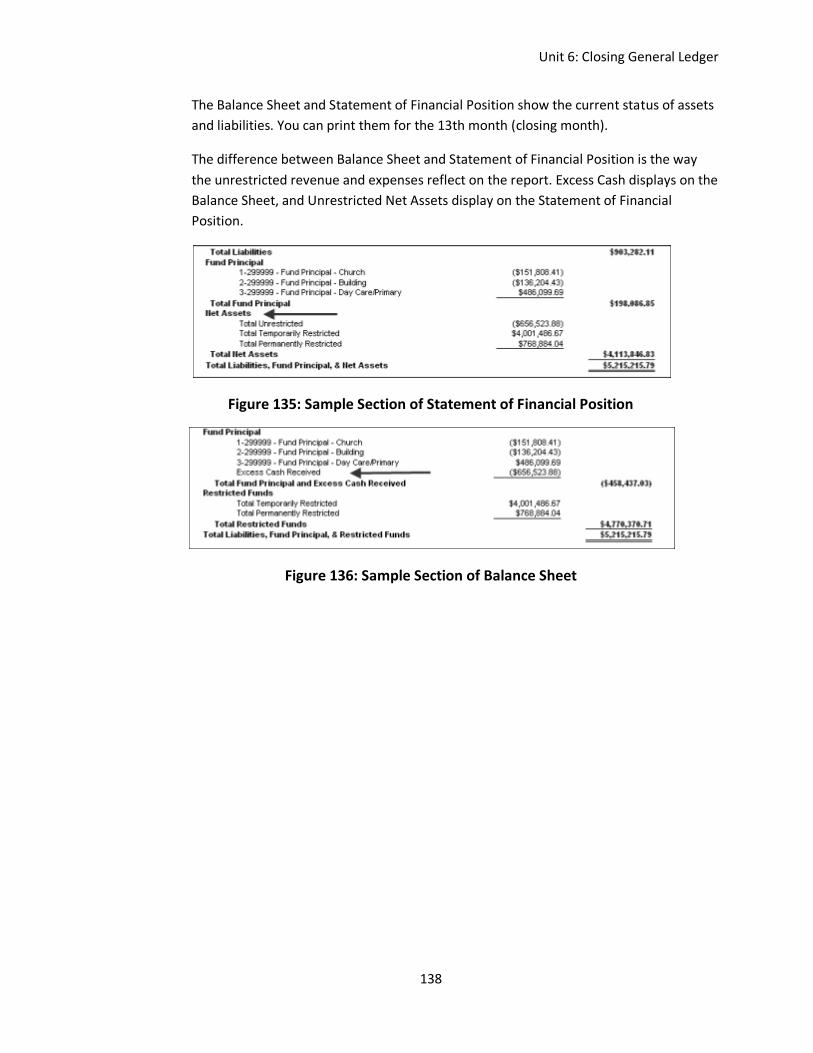
Unit 6: Closing General Ledger
138
The Balance Sheet and Statement of Financial Position show the current status of assets
and liabilities. You can print them for the 13th month (closing month).
The difference between Balance Sheet and Statement of Financial Position is the way
the unrestricted revenue and expenses reflect on the report. Excess Cash displays on the
Balance Sheet, and Unrestricted Net Assets display on the Statement of Financial
Position.
Figure 135: Sample Section of Statement of Financial Position
Figure 136: Sample Section of Balance Sheet
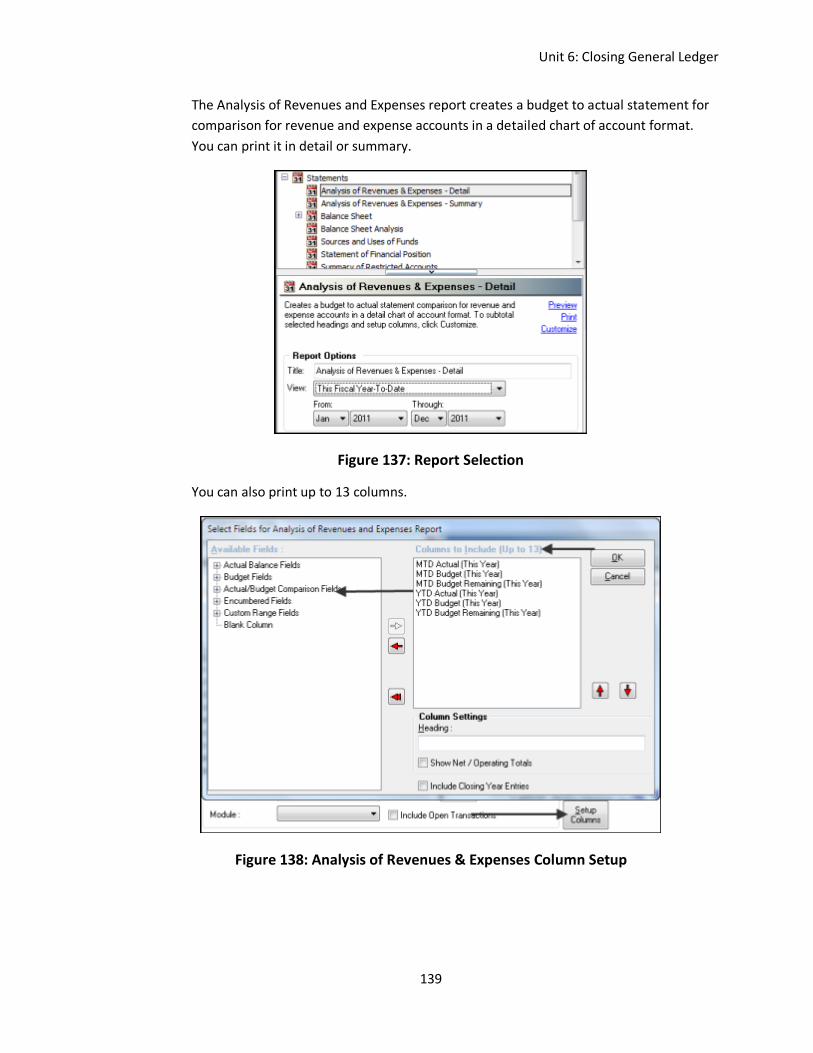
Unit 6: Closing General Ledger
139
The Analysis of Revenues and Expenses report creates a budget to actual statement for
comparison for revenue and expense accounts in a detailed chart of account format.
You can print it in detail or summary.
Figure 137: Report Selection
You can also print up to 13 columns.
Figure 138: Analysis of Revenues & Expenses Column Setup
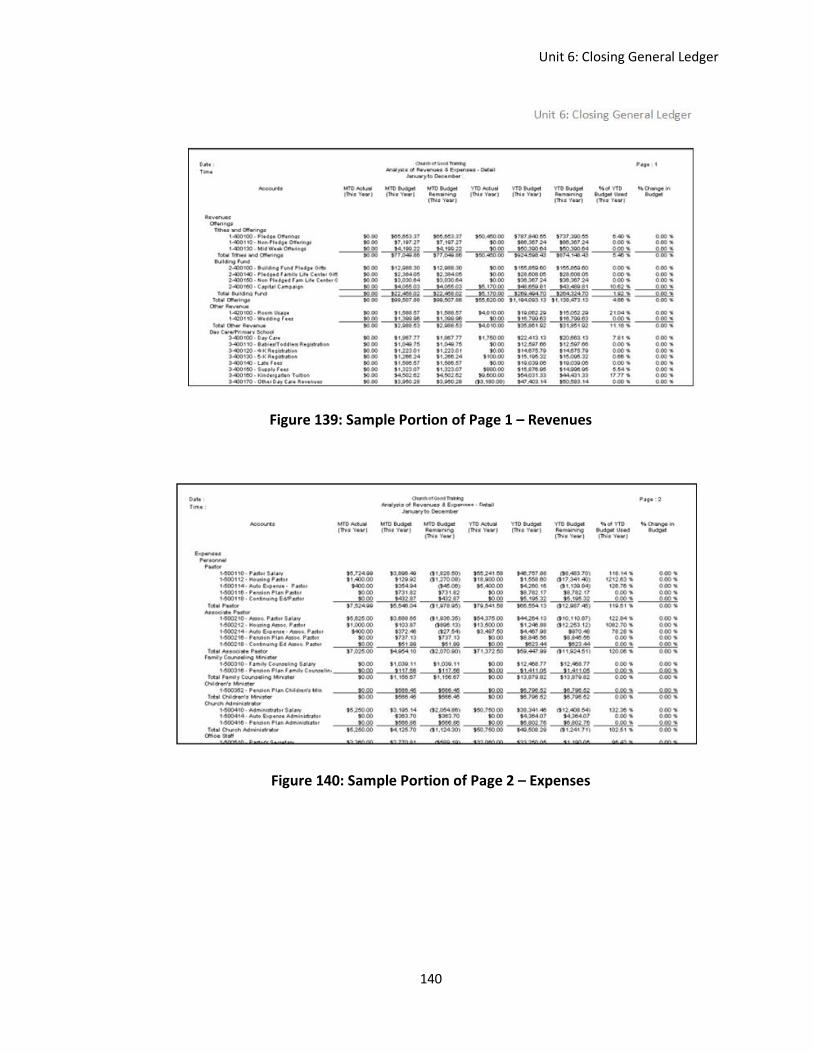
Unit 6: Closing General Ledger
140
Figure 139: Sample Portion of Page 1 – Revenues
Figure 140: Sample Portion of Page 2 – Expenses
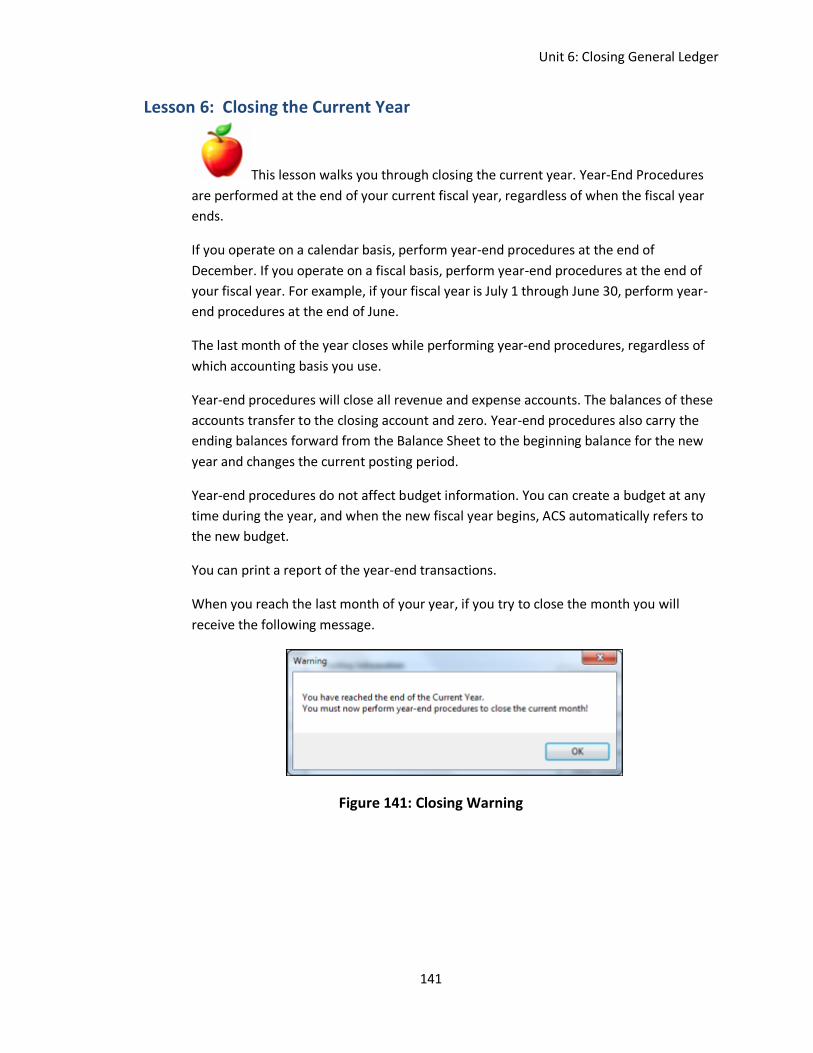
Unit 6: Closing General Ledger
141
Lesson 6: Closing the Current Year
This lesson walks you through closing the current year. Year-End Procedures
are performed at the end of your current fiscal year, regardless of when the fiscal year
ends.
If you operate on a calendar basis, perform year-end procedures at the end of
December. If you operate on a fiscal basis, perform year-end procedures at the end of
your fiscal year. For example, if your fiscal year is July 1 through June 30, perform year-
end procedures at the end of June.
The last month of the year closes while performing year-end procedures, regardless of
which accounting basis you use.
Year-end procedures will close all revenue and expense accounts. The balances of these
accounts transfer to the closing account and zero. Year-end procedures also carry the
ending balances forward from the Balance Sheet to the beginning balance for the new
year and changes the current posting period.
Year-end procedures do not affect budget information. You can create a budget at any
time during the year, and when the new fiscal year begins, ACS automatically refers to
the new budget.
You can print a report of the year-end transactions.
When you reach the last month of your year, if you try to close the month you will
receive the following message.
Figure 141: Closing Warning
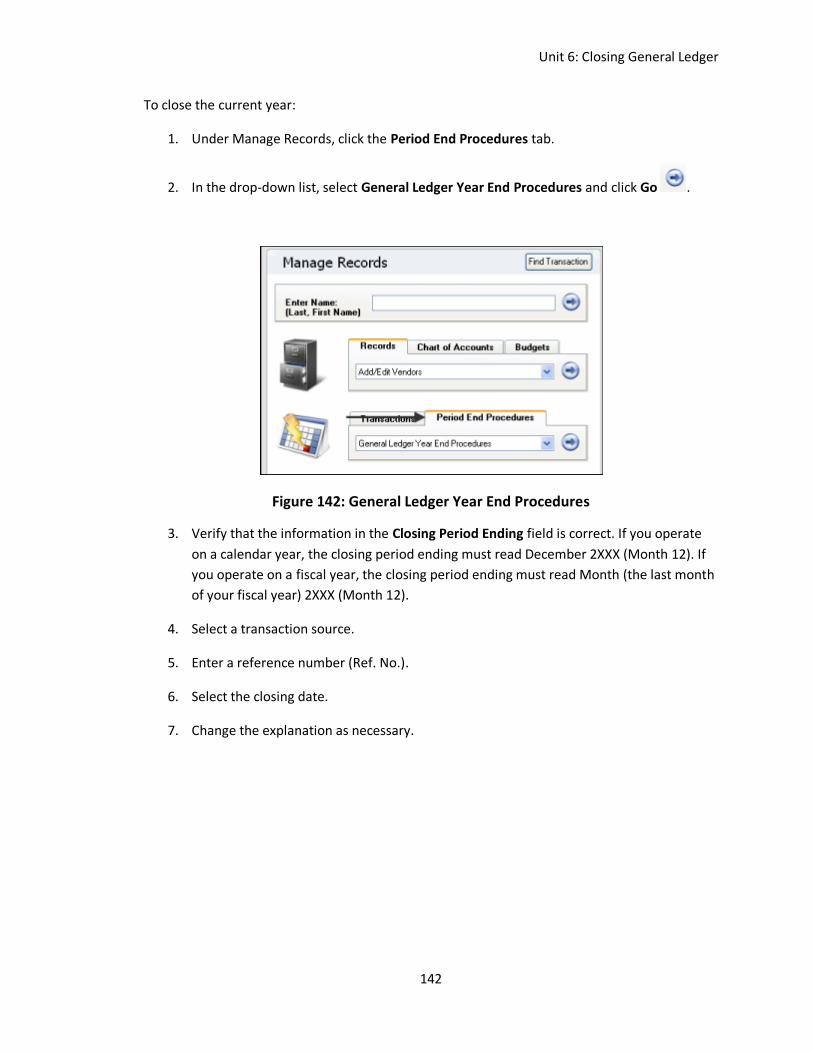
Unit 6: Closing General Ledger
142
To close the current year:
1. Under Manage Records, click the Period End Procedures tab.
2. In the drop-down list, select General Ledger Year End Procedures and click Go .
Figure 142: General Ledger Year End Procedures
3. Verify that the information in the Closing Period Ending field is correct. If you operate
on a calendar year, the closing period ending must read December 2XXX (Month 12). If
you operate on a fiscal year, the closing period ending must read Month (the last month
of your fiscal year) 2XXX (Month 12).
4. Select a transaction source.
5. Enter a reference number (Ref. No.).
6. Select the closing date.
7. Change the explanation as necessary.
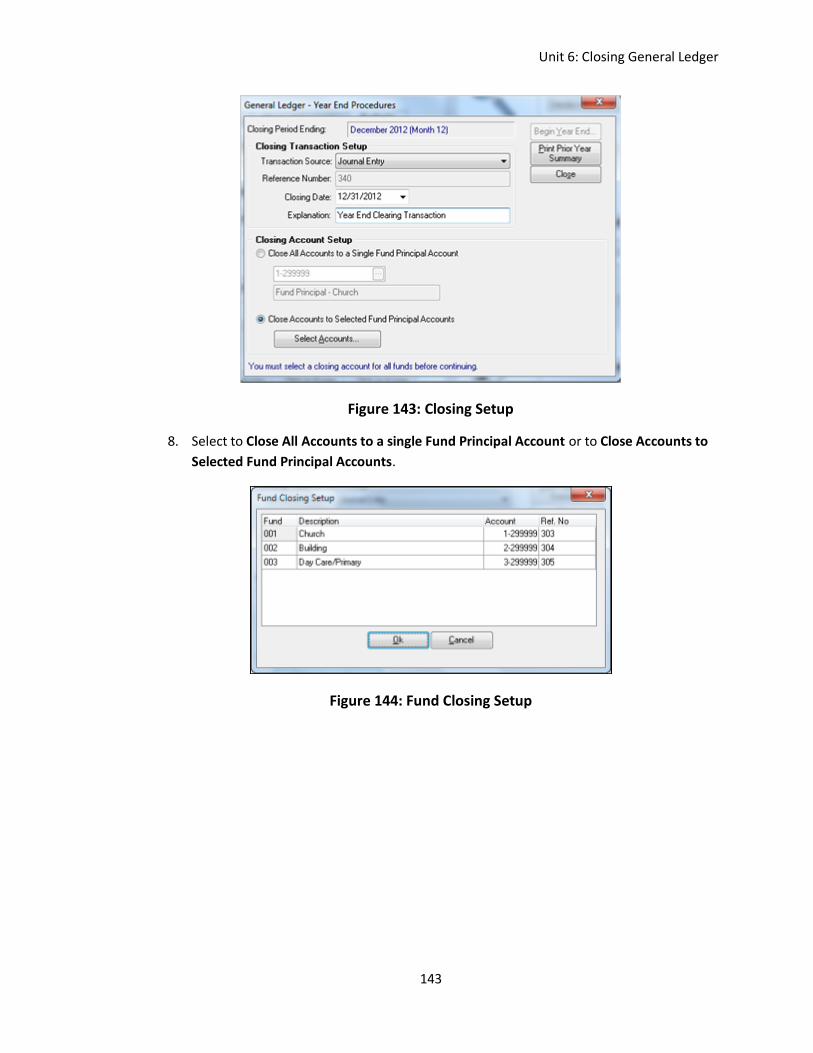
Unit 6: Closing General Ledger
143
Figure 143: Closing Setup
8. Select to Close All Accounts to a single Fund Principal Account or to Close Accounts to
Selected Fund Principal Accounts.
Figure 144: Fund Closing Setup
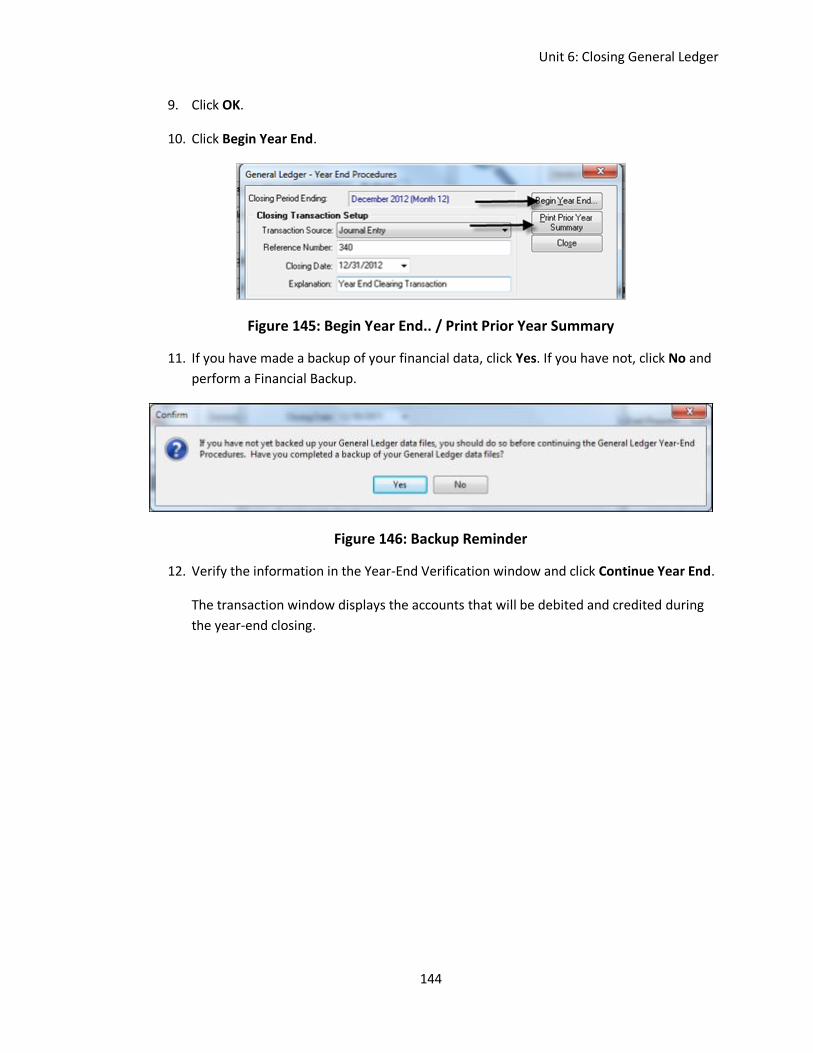
Unit 6: Closing General Ledger
144
9. Click OK.
10. Click Begin Year End.
Figure 145: Begin Year End.. / Print Prior Year Summary
11. If you have made a backup of your financial data, click Yes. If you have not, click No and
perform a Financial Backup.
Figure 146: Backup Reminder
12. Verify the information in the Year-End Verification window and click Continue Year End.
The transaction window displays the accounts that will be debited and credited during
the year-end closing.
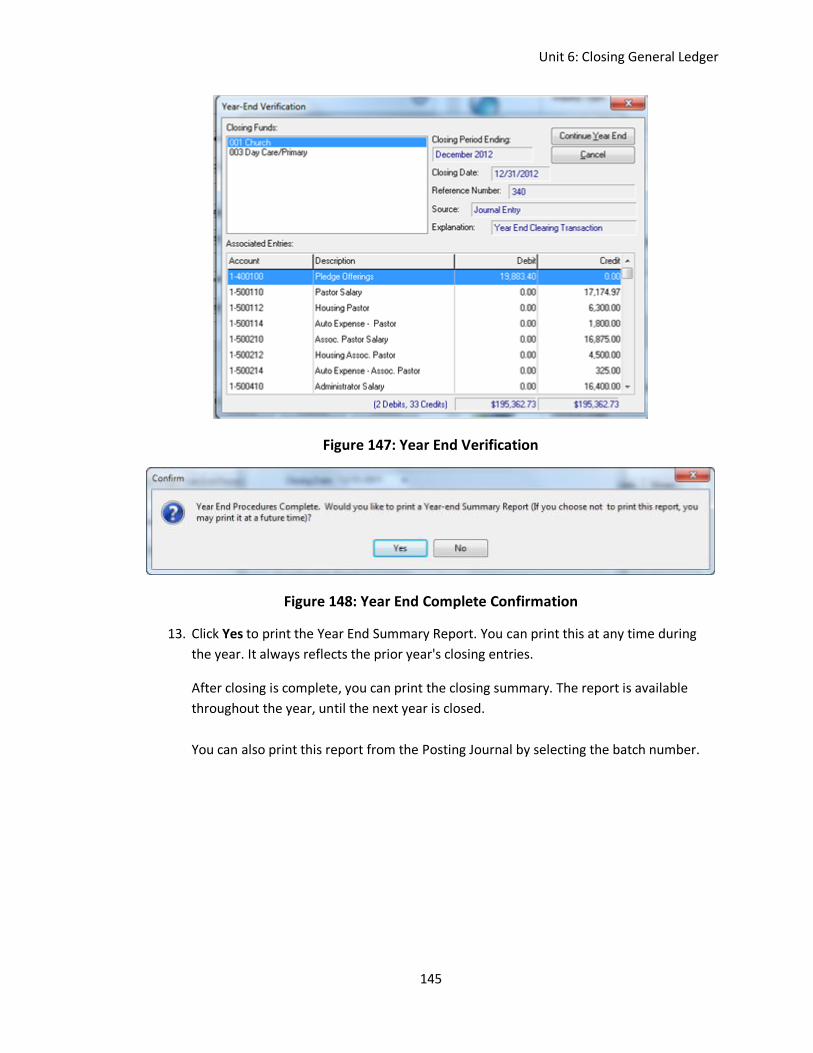
Unit 6: Closing General Ledger
145
Figure 147: Year End Verification
Figure 148: Year End Complete Confirmation
13. Click Yes to print the Year End Summary Report. You can print this at any time during
the year. It always reflects the prior year's closing entries.
After closing is complete, you can print the closing summary. The report is available
throughout the year, until the next year is closed.
You can also print this report from the Posting Journal by selecting the batch number.
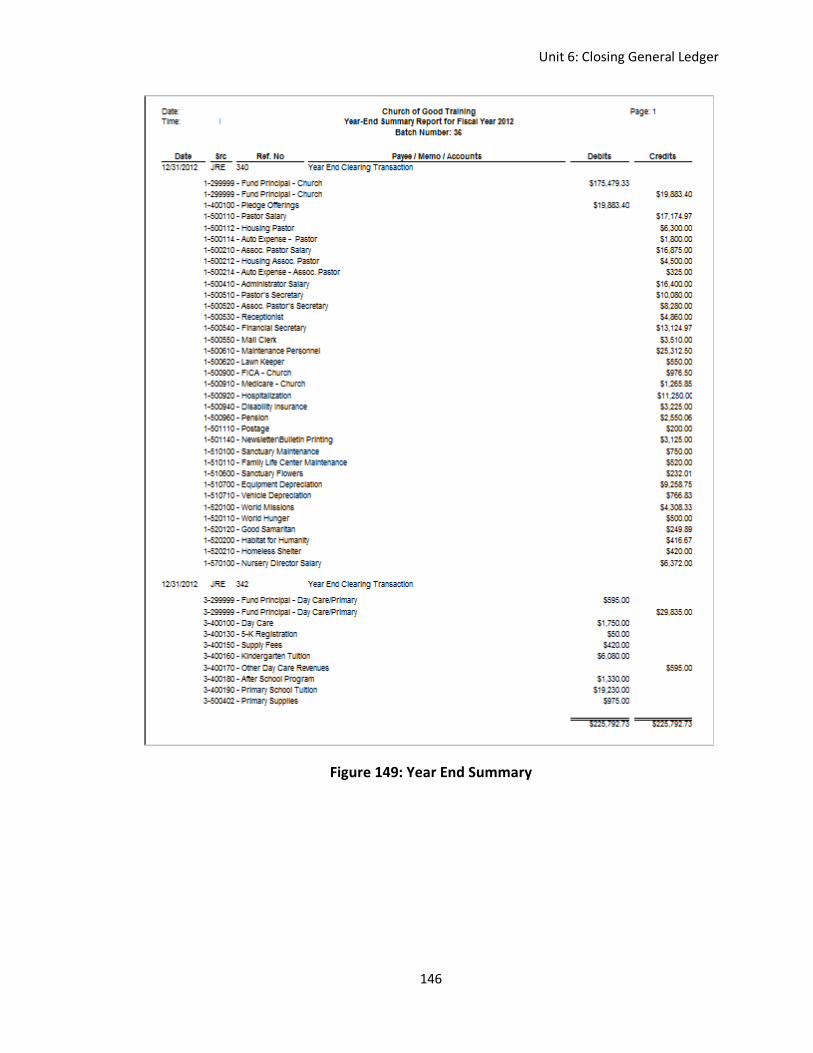
Unit 6: Closing General Ledger
146
Figure 149: Year End Summary
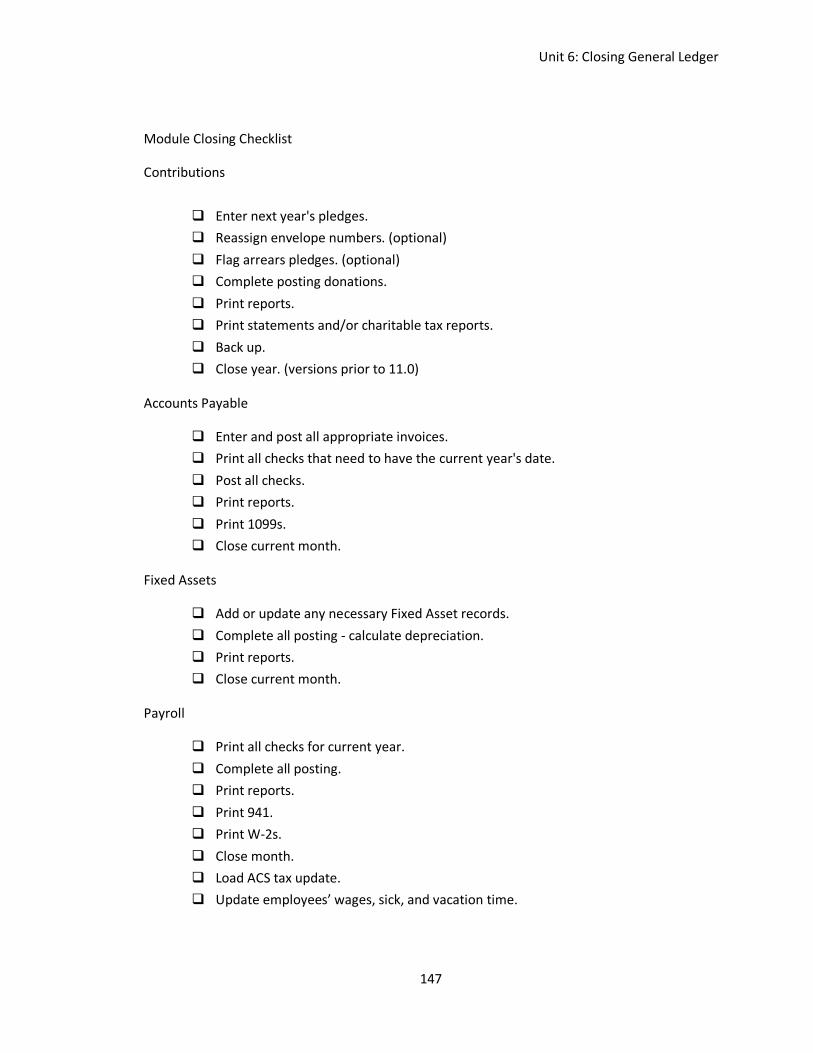
Unit 6: Closing General Ledger
147
Module Closing Checklist
Contributions
Enter next year's pledges.
Reassign envelope numbers. (optional)
Flag arrears pledges. (optional)
Complete posting donations.
Print reports.
Print statements and/or charitable tax reports.
Back up.
Close year. (versions prior to 11.0)
Accounts Payable
Enter and post all appropriate invoices.
Print all checks that need to have the current year's date.
Post all checks.
Print reports.
Print 1099s.
Close current month.
Fixed Assets
Add or update any necessary Fixed Asset records.
Complete all posting - calculate depreciation.
Print reports.
Close current month.
Payroll
Print all checks for current year.
Complete all posting.
Print reports.
Print 941.
Print W-2s.
Close month.
Load ACS tax update.
Update employees’ wages, sick, and vacation time.

Unit 6: Closing General Ledger
148
General Ledger
Enter next year's budget.
Complete all posting.
Print reports.
Back up.
Close year.