Embed Size (px)
Citation preview
Oracle® CloudAccessibility Guide for Oracle AccountReconciliation Cloud
E94154-01
Oracle Cloud Accessibility Guide for Oracle Account Reconciliation Cloud,
E94154-01
Copyright © 2017, Oracle and/or its affiliates. All rights reserved.
Primary Author: EPM Information Development Team
This software and related documentation are provided under a license agreement containing restrictions onuse and disclosure and are protected by intellectual property laws. Except as expressly permitted in yourlicense agreement or allowed by law, you may not use, copy, reproduce, translate, broadcast, modify,license, transmit, distribute, exhibit, perform, publish, or display any part, in any form, or by any means.Reverse engineering, disassembly, or decompilation of this software, unless required by law forinteroperability, is prohibited.
The information contained herein is subject to change without notice and is not warranted to be error-free. Ifyou find any errors, please report them to us in writing.
If this is software or related documentation that is delivered to the U.S. Government or anyone licensing it onbehalf of the U.S. Government, then the following notice is applicable:
U.S. GOVERNMENT END USERS: Oracle programs, including any operating system, integrated software,any programs installed on the hardware, and/or documentation, delivered to U.S. Government end users are"commercial computer software" pursuant to the applicable Federal Acquisition Regulation and agency-specific supplemental regulations. As such, use, duplication, disclosure, modification, and adaptation of theprograms, including any operating system, integrated software, any programs installed on the hardware,and/or documentation, shall be subject to license terms and license restrictions applicable to the programs.No other rights are granted to the U.S. Government.
This software or hardware is developed for general use in a variety of information management applications.It is not developed or intended for use in any inherently dangerous applications, including applications thatmay create a risk of personal injury. If you use this software or hardware in dangerous applications, then youshall be responsible to take all appropriate fail-safe, backup, redundancy, and other measures to ensure itssafe use. Oracle Corporation and its affiliates disclaim any liability for any damages caused by use of thissoftware or hardware in dangerous applications.
Oracle and Java are registered trademarks of Oracle and/or its affiliates. Other names may be trademarks oftheir respective owners.
Intel and Intel Xeon are trademarks or registered trademarks of Intel Corporation. All SPARC trademarks areused under license and are trademarks or registered trademarks of SPARC International, Inc. AMD, Opteron,the AMD logo, and the AMD Opteron logo are trademarks or registered trademarks of Advanced MicroDevices. UNIX is a registered trademark of The Open Group.
This software or hardware and documentation may provide access to or information about content, products,and services from third parties. Oracle Corporation and its affiliates are not responsible for and expresslydisclaim all warranties of any kind with respect to third-party content, products, and services unless otherwiseset forth in an applicable agreement between you and Oracle. Oracle Corporation and its affiliates will not beresponsible for any loss, costs, or damages incurred due to your access to or use of third-party content,products, or services, except as set forth in an applicable agreement between you and Oracle.
Contents
Documentation Accessibility
Documentation Feedback
1 Introduction
Overview 1-1
Recommendations 1-1
General Considerations and Notes 1-1
Online Help 1-1
2 Accessibility for Oracle Account Reconciliation Cloud
Using the Tab Key 2-1
Switching Between Tabs in the User Interface 2-1
Making Multiple Selections 2-1
3 Data Management
Accessibility Features 3-1
Recommended Screen Reader Settings 3-1
Using Screen Reader Mode 3-1
Using the Tab Key 3-1
Accessibility Details 3-1
Activating Keyboard Shortcuts in Browsers 3-2
Setup and Configure-System Settings 3-2
Setup and Configure-Application Settings 3-2
Setup: Register Source System 3-2
Setup: Register Target Application 3-2
Setup: Integration-Import Format 3-3
Setup: Integration-Location 3-4
Setup: Integration-Period Mapping 3-4
iii
Setup: Integration-Category Mapping 3-5
Setup: Data Load-Logic Group 3-5
Setup: Data Load-Check Rule Group 3-6
Setup: Data Load-Check Entity Group 3-8
Setup: Reports-Report Definition 3-9
Setup: Batch-Batch Definition 3-11
Workflow: Data Load-Data Load Rule 3-12
Workflow: Data Load-Data Load Mapping 3-12
Workflow: Other-Report Execution 3-12
Workflow: Monitor-Process Details 3-13
iv

Documentation Accessibility
For information about Oracle's commitment to accessibility, visit the OracleAccessibility Program website at http://www.oracle.com/pls/topic/lookup?ctx=acc&id=docacc.
Access to Oracle Support
Oracle customers that have purchased support have access to electronic supportthrough My Oracle Support. For information, visit http://www.oracle.com/pls/topic/lookup?ctx=acc&id=info or visit http://www.oracle.com/pls/topic/lookup?ctx=acc&id=trsif you are hearing impaired.
v
Documentation Feedback
Send feedback on this documentation to: [email protected]
Follow EPM Information Development on these social media sites:
LinkedIn - http://www.linkedin.com/groups?gid=3127051&goback=.gmp_3127051
Twitter - http://twitter.com/hyperionepminfo
Facebook - http://www.facebook.com/pages/Hyperion-EPM-Info/102682103112642
Google+ - https://plus.google.com/106915048672979407731/#106915048672979407731/posts
YouTube - https://www.youtube.com/user/EvolvingBI
Documentation Feedback
vi
1Introduction
Related Topics
• Overview
• Recommendations
• General Considerations and Notes
OverviewOracle customers have access to electronic support through My Oracle Support. Forinformation, visit http://www.oracle.com/pls/topic/lookup?ctx=acc&id=info or visit http://www.oracle.com/pls/topic/lookup?ctx=acc&id=trs if you are hearing impaired.
For information about Oracle's commitment to accessibility, visit the OracleAccessibility Program website.
All videos for this Cloud service have HTML equivalent topics.
RecommendationsIf you use screen reading software, Oracle recommends that you use InternetExplorer; some service component screens may not display properly if you use GoogleChrome.
General Considerations and NotesThese are general considerations for using online help in Oracle AccountReconciliation Cloud.
Online HelpWhen screen reader support is enabled, the help window is rearranged so that thehelp topic is first in document order, displaying above the help toolbar. This is toensure that the screen reader reads the help topic first when online help is invoked.
Additional information you may need when using online help:
• To help screen reader users, when a page loads in the Help Topic frame, scriptingshifts focus to the loaded document. For example, when help is opened, focus isset on the Help Topic frame document.
• Use the Virtual PC Cursor option in the screen reader to read the help topic. PressInsert+Z to toggle the Virtual PC Cursor and use JAWS commands to read thetext.
• HTML elements such as form controls typically function as would be expected foryour browser (and screen reader, if applicable). Exceptions:
1-1

– Contents page: The tree that displays the selected help system’s table ofcontents, includes these link types:
* Links containing the target topic titles. If you activate these links, the targettopic opens in the Help topic frame, and focus moves to that topic.
* Links that open subtopics. When focus is on these links, screen readerreads one of the following:
* Collapse Node if the subtopic links are expanded; activating the linkremoves the subtopic links from the tab order.
* Expand Node if the subtopic links are collapsed; activating the linkplaces the subtopic links in the tab order.
After activating this type of link, the next link in the tab order is the topic,followed by any subtopics.
These links are located before their corresponding topic links in tab order.Press Shift+Tab to determine whether a topic has subtopics; if the screenreader reads Expand Node or Collapse Node, then the topic hassubtopics.
– Index and Contents pages: When a selection is made from the "Selectproduct" drop-down list, the values currently on the "Select help system" drop-down list change to reflect the help system types available for the product.After changing the product, you must select the desired help system type.
• Search page:
– If you are using a screen reader, and are in the search form or the forms toselect a different help system in the Index and Contents tabs, the screenreader may use the Enter key for some purpose other than submitting theform. For example, the screen reader may use Enter to toggle Forms Mode insome contexts. If that happens, you can submit the form by using the shortcutfor moving focus to the next button.
– If the "All" checkbox is selected in "Search help for the following products," anyselected product check boxes are cleared.
– If the "All" checkbox is selected in "Search help for the following products,"and then a product checkbox is selected, then the "All" checkbox is cleared.
– If the "All" checkbox is selected in "Search the following types of helpsystems," any selected help type check boxes are cleared.
– If the "All" checkbox is selected in "Search the following types of helpsystems," and then a help type checkbox is selected, then the "All" checkboxis cleared.
Chapter 1General Considerations and Notes
1-2
Table 1-1 Online Help — Keyboard Shortcuts
Keys Action
Ctrl+Shift+1 Open and move focus to the table of contentspage, in the Navigation frame. The displayedTable of Contents entries are for the helpsystem that contains the currently displayedhelp topic.The Table of Contents consists of framescontaining the following:
• A form to select a Table of Contents for adifferent help system. If you select adifferent help system, the help topic frameis also updated to display the helpsystem's launch page.
• The Table of Contents links.
Ctrl+Shift+2 Open and move focus to the index, in theNavigation frame. The displayed index entriesare for the help system that contains thecurrently displayed help topic.The index consists of frames containing thefollowing:
• A form to select an index for a differenthelp system. If you select a different helpsystem, the help topic frame is alsoupdated to display the help system'slaunch page.
• Shortcut links to index entries, which aregrouped by letter.
• Index entry links
Ctr+Shift+3 Open and move focus to the Search frame inthe Navigation frame.
Ctrl+Shift+4 Move focus to the content frame, which is theframe that contains help topics and searchresults.
Note:
If a page is notreading asexpected, trytoggling offForms Mode.
Chapter 1General Considerations and Notes
1-3
Table 1-1 (Cont.) Online Help — Keyboard Shortcuts
Keys Action
Ctrl+Shift+5 Move focus to the toolbar frame, whichcontains links to various help features.
Note:
The toolbarincludes a link tothe help topicdescribingaccessibilityinformation forOracle AccountReconciliationCloud.
Chapter 1General Considerations and Notes
1-4
2Accessibility for Oracle AccountReconciliation Cloud
Related Topics
• Using the Tab Key
• Switching Between Tabs in the User Interface
• Making Multiple Selections
Using the Tab KeyUse the Tab key to navigate through Oracle Account Reconciliation Cloud screens.The default tab order flows from left to right, top to bottom.
Switching Between Tabs in the User InterfaceTo switch from one tab to another tab, use the arrow keyboards keys.
Making Multiple SelectionsYou can use the CTRL key and arrow keys to make multiple selections of items thatare not adjacent to each other.
To select multiple random items:
1. Press the CTRL key and hold it down until all selections have been made.
2. Use the up and down arrows keys to navigate to the item to be selected, and thenpress the Space Bar to select or deselect the item.
3. Repeat these steps for each item to be selected or deselected.
4. Release the CTRL key to finalize the selections.
2-1
3Data Management
Related Topics
• Accessibility Features
Accessibility FeaturesTab Indexes are provided for group boxes, text boxes, and buttons.
Tip:
To have your screen reader announce the number of items in a group box,click Alt and the Up Arrow key.
Abbreviations such as “POV” for Point of View are used across screens. Screenreaders will read them as “POV” instead of "pee-oh-vee". To add abbreviationequivalents to the screen reader dictionary, so that you can replace “POV” with “Pointof View,” refer to your screen reader documentation.
Recommended Screen Reader Settings• Turn PC Cursor Mode ON when tabbing through read-only fields in a table.
• Turn PC Cursor Mode OFF when entering data in editable fields.
Using Screen Reader ModeNote the following:
• Use buttons, radio buttons, and check boxes for selection.
• Click icons for additional information.
• When a popup such as a confirmation of information message appears after yousave or launch a rule, use the Down Arrow keys to read the message after thescreen reader announces the popup.
Using the Tab KeyThe default tab order is from left to right, and top to bottom.
Accessibility DetailsThe following topics contain detailed information about accessibility.
3-1
Activating Keyboard Shortcuts in Browsers
Table 3-1 Activating Keyboard Shortcuts in Various Browsers
Browser Activation Keyboard Shortcuts
Internet Explorer Alt+Mnemonic
Mozilla Firefox Alt+Shift+Mnemonic
Google Chrome Alt+Mnemonic
Setup and Configure-System Settings
Table 3-2 Setup and Configure-System Settings
Mnemonic Action
S Saves the edit.
C Cancels the edit.
Setup and Configure-Application Settings
Table 3-3 Setup and Configure-Application Settings
Mnemonic Action
S Saves the edit.
C Cancels the edit.
Setup: Register Source System
Table 3-4 Setup: Register Source System
Mnemonic Action
S Saves the edit.
C Cancels the edit.
A Adds a blank source system row so that youcan add source system detail.
D Deletes the selected source system row.
Setup: Register Target Application
Table 3-5 Setup: Register Target Application
Mnemonic Action
S Saves the edit.
Chapter 3Accessibility Features
3-2
Table 3-5 (Cont.) Setup: Register Target Application
Mnemonic Action
C Cancels the edit.
A Two Add buttons are available in the userinterface. They are located as follows:
1. Target Application Summary region—Thefirst time the mnemonic A is typed on thekeyboard, the control is placed in theTarget Application Summary region.When you click Enter, a new targetapplication can be selected from theApplication window for registration.
2. Application (Dimension) Details region—The second time the mnemonic A is typedon the keyboard, the control is placed inthe Application (Dimension) Detailsregion. When you click Enter, anadditional dimension can be added for thetarget application.
D Two Delete buttons are available in the userinterface. They are located as follows:
1. Target Application Summary region—Thefirst time the mnemonic D is typed on thekeyboard, the control is placed in theTarget Application Summary region.When you click Enter, the selected targetapplication is deleted (after you reconfirmthe deletion by clicking OK).
2. Application (Dimension) Details region—The second time the mnemonic D is typedon the keyboard, the control is placed inthe Application (Dimension) Detailsregion. When you click Enter, theselected dimension is deleted (after youreconfirm the deletion by clicking OK).
R Refresh metadata from the selected targetapplication.
Setup: Integration-Import Format
Table 3-6 Setup: Integration-Import Format
Mnemonic Action
S Saves the edit.
C Cancels the edit.
A Adds a blank Import Format row so that youcan specify new import format detail.
Chapter 3Accessibility Features
3-3
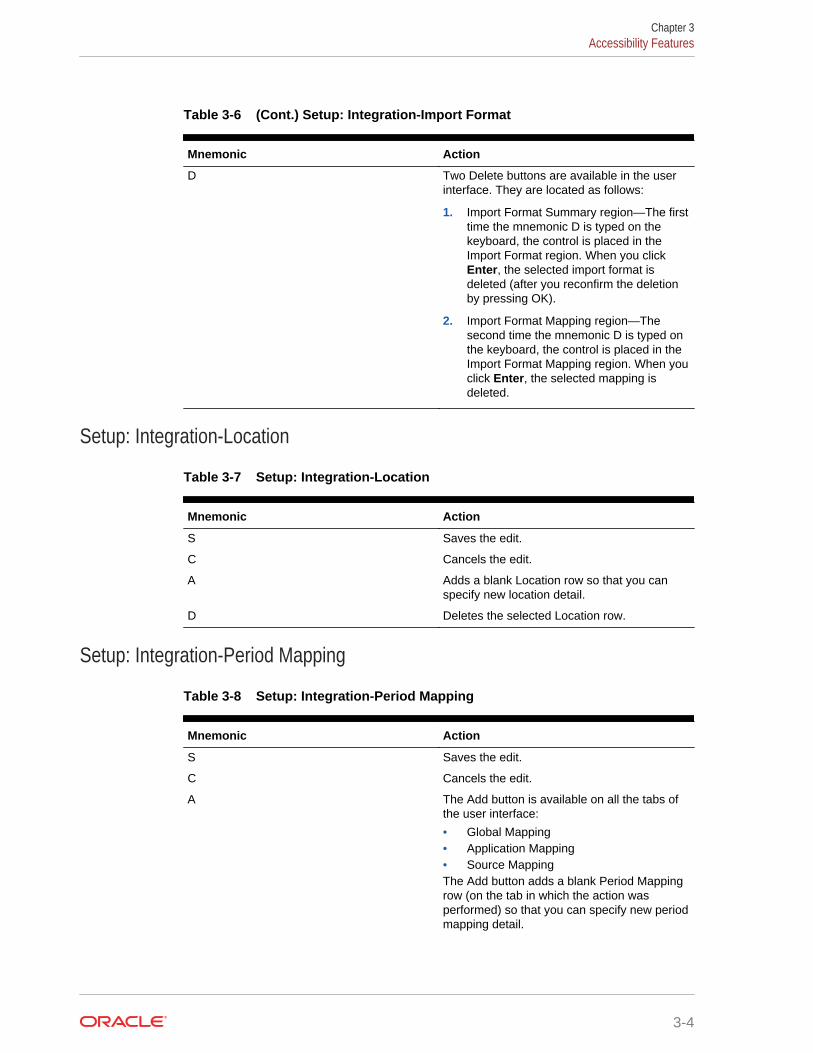
Table 3-6 (Cont.) Setup: Integration-Import Format
Mnemonic Action
D Two Delete buttons are available in the userinterface. They are located as follows:
1. Import Format Summary region—The firsttime the mnemonic D is typed on thekeyboard, the control is placed in theImport Format region. When you clickEnter, the selected import format isdeleted (after you reconfirm the deletionby pressing OK).
2. Import Format Mapping region—Thesecond time the mnemonic D is typed onthe keyboard, the control is placed in theImport Format Mapping region. When youclick Enter, the selected mapping isdeleted.
Setup: Integration-Location
Table 3-7 Setup: Integration-Location
Mnemonic Action
S Saves the edit.
C Cancels the edit.
A Adds a blank Location row so that you canspecify new location detail.
D Deletes the selected Location row.
Setup: Integration-Period Mapping
Table 3-8 Setup: Integration-Period Mapping
Mnemonic Action
S Saves the edit.
C Cancels the edit.
A The Add button is available on all the tabs ofthe user interface:
• Global Mapping• Application Mapping• Source MappingThe Add button adds a blank Period Mappingrow (on the tab in which the action wasperformed) so that you can specify new periodmapping detail.
Chapter 3Accessibility Features
3-4
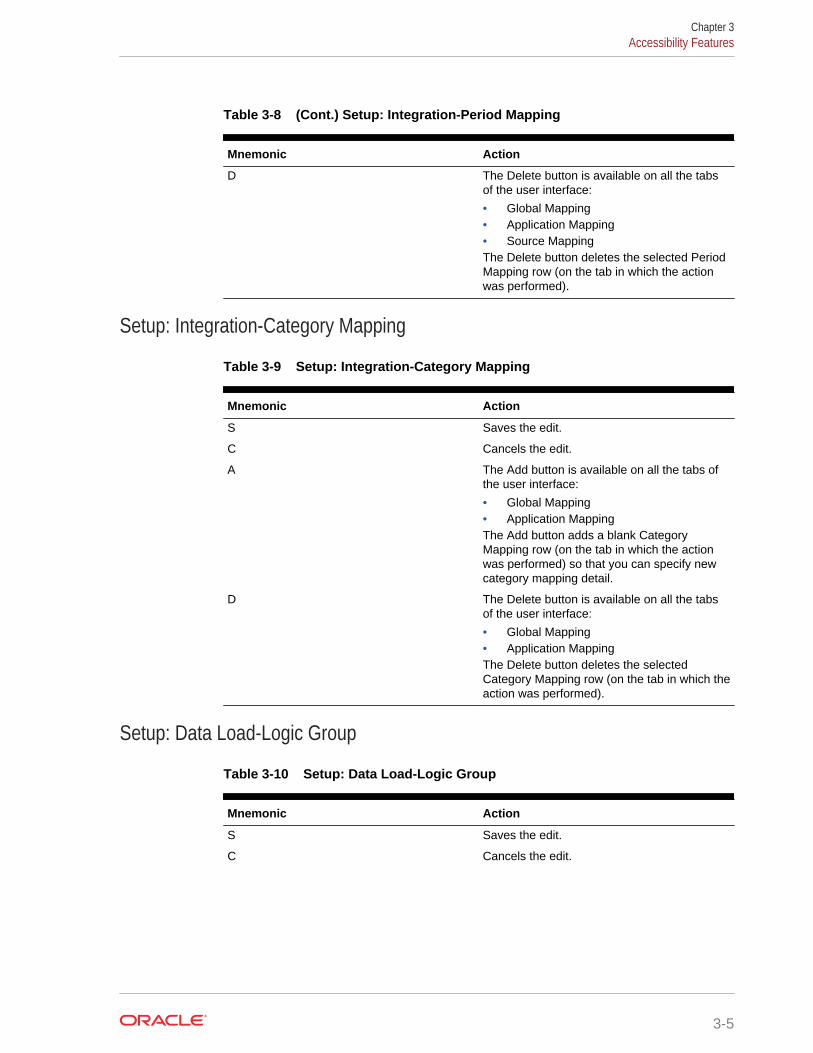
Table 3-8 (Cont.) Setup: Integration-Period Mapping
Mnemonic Action
D The Delete button is available on all the tabsof the user interface:
• Global Mapping• Application Mapping• Source MappingThe Delete button deletes the selected PeriodMapping row (on the tab in which the actionwas performed).
Setup: Integration-Category Mapping
Table 3-9 Setup: Integration-Category Mapping
Mnemonic Action
S Saves the edit.
C Cancels the edit.
A The Add button is available on all the tabs ofthe user interface:
• Global Mapping• Application MappingThe Add button adds a blank CategoryMapping row (on the tab in which the actionwas performed) so that you can specify newcategory mapping detail.
D The Delete button is available on all the tabsof the user interface:
• Global Mapping• Application MappingThe Delete button deletes the selectedCategory Mapping row (on the tab in which theaction was performed).
Setup: Data Load-Logic Group
Table 3-10 Setup: Data Load-Logic Group
Mnemonic Action
S Saves the edit.
C Cancels the edit.
Chapter 3Accessibility Features
3-5
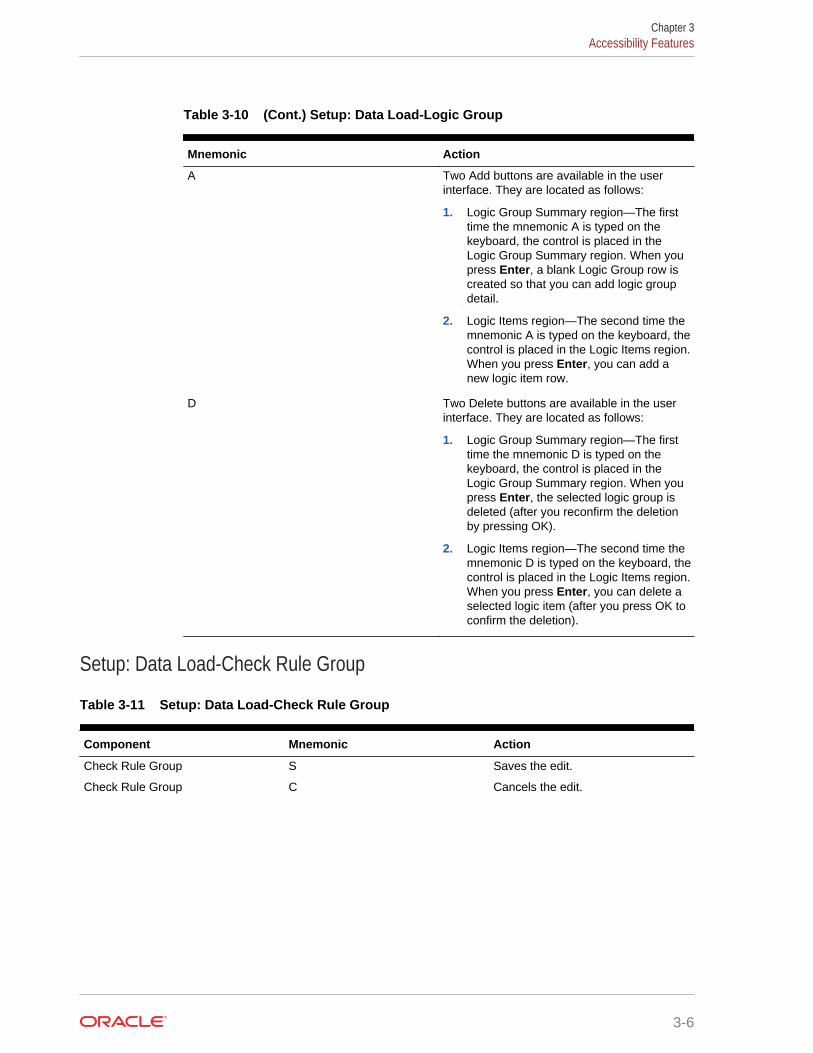
Table 3-10 (Cont.) Setup: Data Load-Logic Group
Mnemonic Action
A Two Add buttons are available in the userinterface. They are located as follows:
1. Logic Group Summary region—The firsttime the mnemonic A is typed on thekeyboard, the control is placed in theLogic Group Summary region. When youpress Enter, a blank Logic Group row iscreated so that you can add logic groupdetail.
2. Logic Items region—The second time themnemonic A is typed on the keyboard, thecontrol is placed in the Logic Items region.When you press Enter, you can add anew logic item row.
D Two Delete buttons are available in the userinterface. They are located as follows:
1. Logic Group Summary region—The firsttime the mnemonic D is typed on thekeyboard, the control is placed in theLogic Group Summary region. When youpress Enter, the selected logic group isdeleted (after you reconfirm the deletionby pressing OK).
2. Logic Items region—The second time themnemonic D is typed on the keyboard, thecontrol is placed in the Logic Items region.When you press Enter, you can delete aselected logic item (after you press OK toconfirm the deletion).
Setup: Data Load-Check Rule Group
Table 3-11 Setup: Data Load-Check Rule Group
Component Mnemonic Action
Check Rule Group S Saves the edit.
Check Rule Group C Cancels the edit.
Chapter 3Accessibility Features
3-6

Table 3-11 (Cont.) Setup: Data Load-Check Rule Group
Component Mnemonic Action
Check Rule Group A Two Add buttons are available in theuser interface. They are located asfollows:
1. Check Rule Group Summaryregion—The first time themnemonic A is typed on thekeyboard, the control is placedin the Check Rule GroupSummary region. When youpress Enter, a blank Check RuleGroup Summary row is createdso that you can add check rulegroup detail.
2. Rule Item Details region—Thesecond time the mnemonic A istyped on the keyboard, thecontrol is placed in the Rule ItemDetails region. When you pressEnter, a blank rule item iscreated in which you can specifycheck rule item detail.
Check Rule Group D Two Delete buttons are available inthe user interface. They are locatedas follows:
1. Check Rule Group Summaryregion—The first time themnemonic D is typed on thekeyboard, the control is placedin the Check Rule GroupSummary region. When youpress Enter, the selected checkrule group is deleted (after youpress OK to confirm thedeletion).
2. Rule Item region—The secondtime the mnemonic D is typedon the keyboard, the control isplaced in the Rule Item region.When you press Enter, you candelete a selected rule item row(after you reconfirm the deletionby pressing OK).
Chapter 3Accessibility Features
3-7
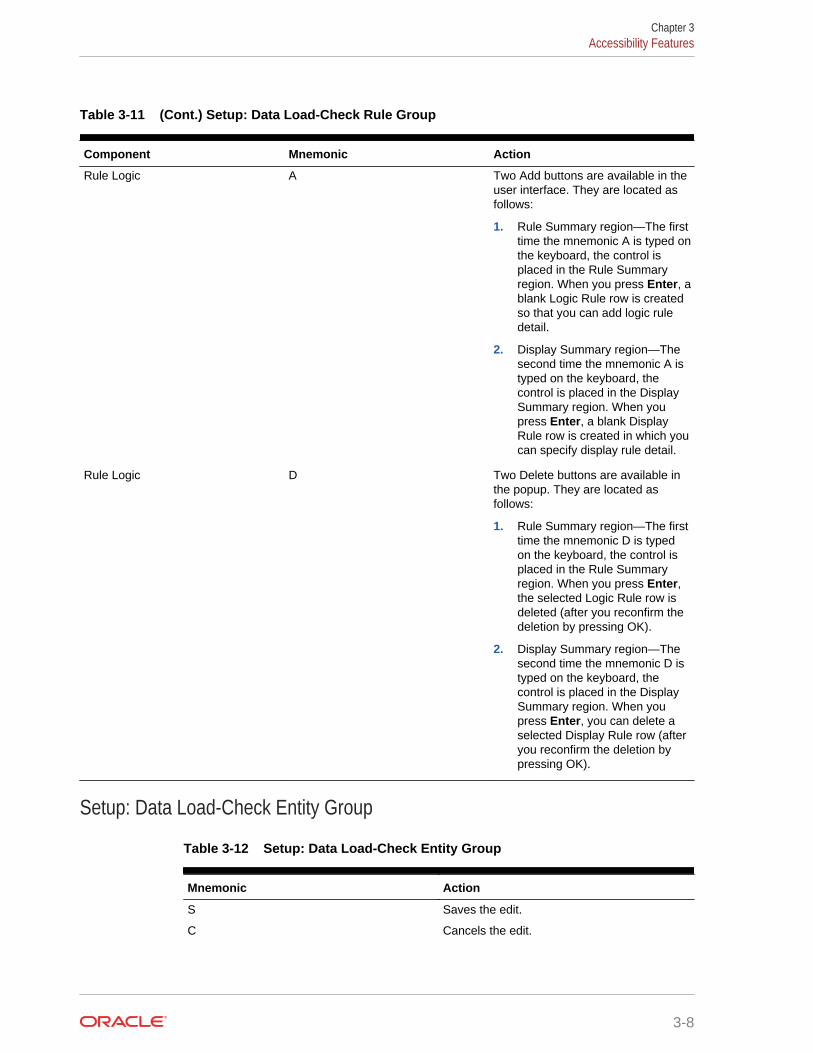
Table 3-11 (Cont.) Setup: Data Load-Check Rule Group
Component Mnemonic Action
Rule Logic A Two Add buttons are available in theuser interface. They are located asfollows:
1. Rule Summary region—The firsttime the mnemonic A is typed onthe keyboard, the control isplaced in the Rule Summaryregion. When you press Enter, ablank Logic Rule row is createdso that you can add logic ruledetail.
2. Display Summary region—Thesecond time the mnemonic A istyped on the keyboard, thecontrol is placed in the DisplaySummary region. When youpress Enter, a blank DisplayRule row is created in which youcan specify display rule detail.
Rule Logic D Two Delete buttons are available inthe popup. They are located asfollows:
1. Rule Summary region—The firsttime the mnemonic D is typedon the keyboard, the control isplaced in the Rule Summaryregion. When you press Enter,the selected Logic Rule row isdeleted (after you reconfirm thedeletion by pressing OK).
2. Display Summary region—Thesecond time the mnemonic D istyped on the keyboard, thecontrol is placed in the DisplaySummary region. When youpress Enter, you can delete aselected Display Rule row (afteryou reconfirm the deletion bypressing OK).
Setup: Data Load-Check Entity Group
Table 3-12 Setup: Data Load-Check Entity Group
Mnemonic Action
S Saves the edit.
C Cancels the edit.
Chapter 3Accessibility Features
3-8
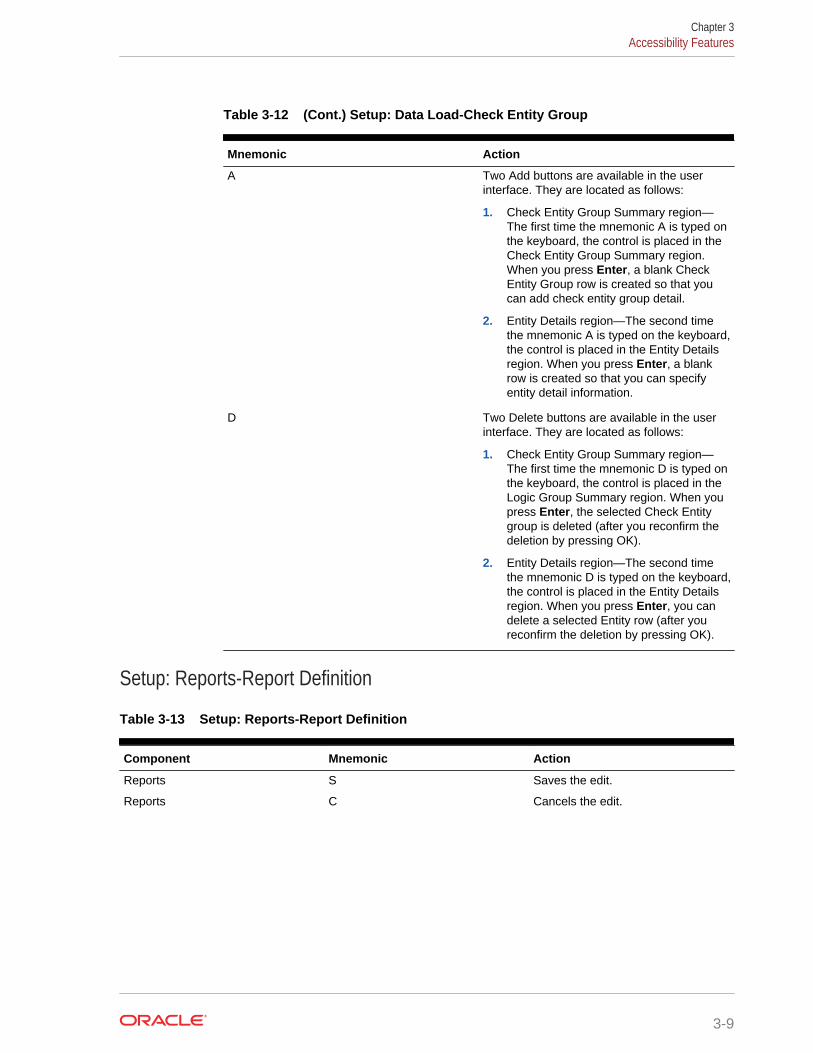
Table 3-12 (Cont.) Setup: Data Load-Check Entity Group
Mnemonic Action
A Two Add buttons are available in the userinterface. They are located as follows:
1. Check Entity Group Summary region—The first time the mnemonic A is typed onthe keyboard, the control is placed in theCheck Entity Group Summary region.When you press Enter, a blank CheckEntity Group row is created so that youcan add check entity group detail.
2. Entity Details region—The second timethe mnemonic A is typed on the keyboard,the control is placed in the Entity Detailsregion. When you press Enter, a blankrow is created so that you can specifyentity detail information.
D Two Delete buttons are available in the userinterface. They are located as follows:
1. Check Entity Group Summary region—The first time the mnemonic D is typed onthe keyboard, the control is placed in theLogic Group Summary region. When youpress Enter, the selected Check Entitygroup is deleted (after you reconfirm thedeletion by pressing OK).
2. Entity Details region—The second timethe mnemonic D is typed on the keyboard,the control is placed in the Entity Detailsregion. When you press Enter, you candelete a selected Entity row (after youreconfirm the deletion by pressing OK).
Setup: Reports-Report Definition
Table 3-13 Setup: Reports-Report Definition
Component Mnemonic Action
Reports S Saves the edit.
Reports C Cancels the edit.
Chapter 3Accessibility Features
3-9
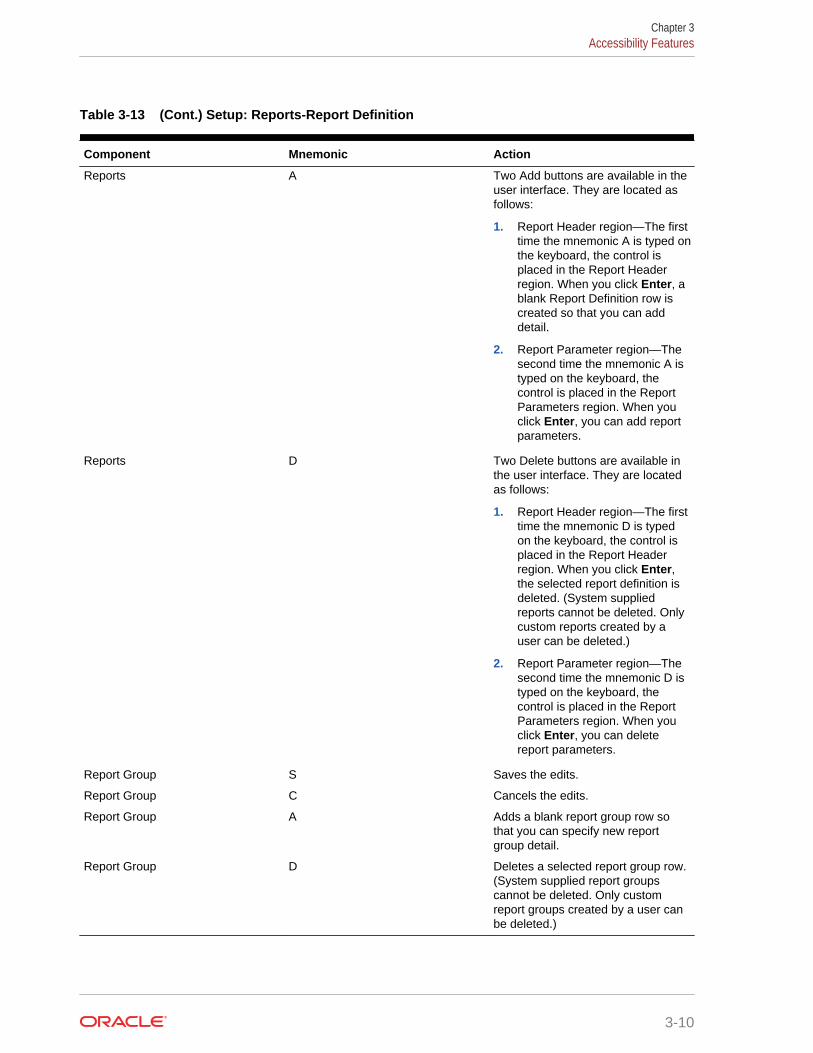
Table 3-13 (Cont.) Setup: Reports-Report Definition
Component Mnemonic Action
Reports A Two Add buttons are available in theuser interface. They are located asfollows:
1. Report Header region—The firsttime the mnemonic A is typed onthe keyboard, the control isplaced in the Report Headerregion. When you click Enter, ablank Report Definition row iscreated so that you can adddetail.
2. Report Parameter region—Thesecond time the mnemonic A istyped on the keyboard, thecontrol is placed in the ReportParameters region. When youclick Enter, you can add reportparameters.
Reports D Two Delete buttons are available inthe user interface. They are locatedas follows:
1. Report Header region—The firsttime the mnemonic D is typedon the keyboard, the control isplaced in the Report Headerregion. When you click Enter,the selected report definition isdeleted. (System suppliedreports cannot be deleted. Onlycustom reports created by auser can be deleted.)
2. Report Parameter region—Thesecond time the mnemonic D istyped on the keyboard, thecontrol is placed in the ReportParameters region. When youclick Enter, you can deletereport parameters.
Report Group S Saves the edits.
Report Group C Cancels the edits.
Report Group A Adds a blank report group row sothat you can specify new reportgroup detail.
Report Group D Deletes a selected report group row.(System supplied report groupscannot be deleted. Only customreport groups created by a user canbe deleted.)
Chapter 3Accessibility Features
3-10
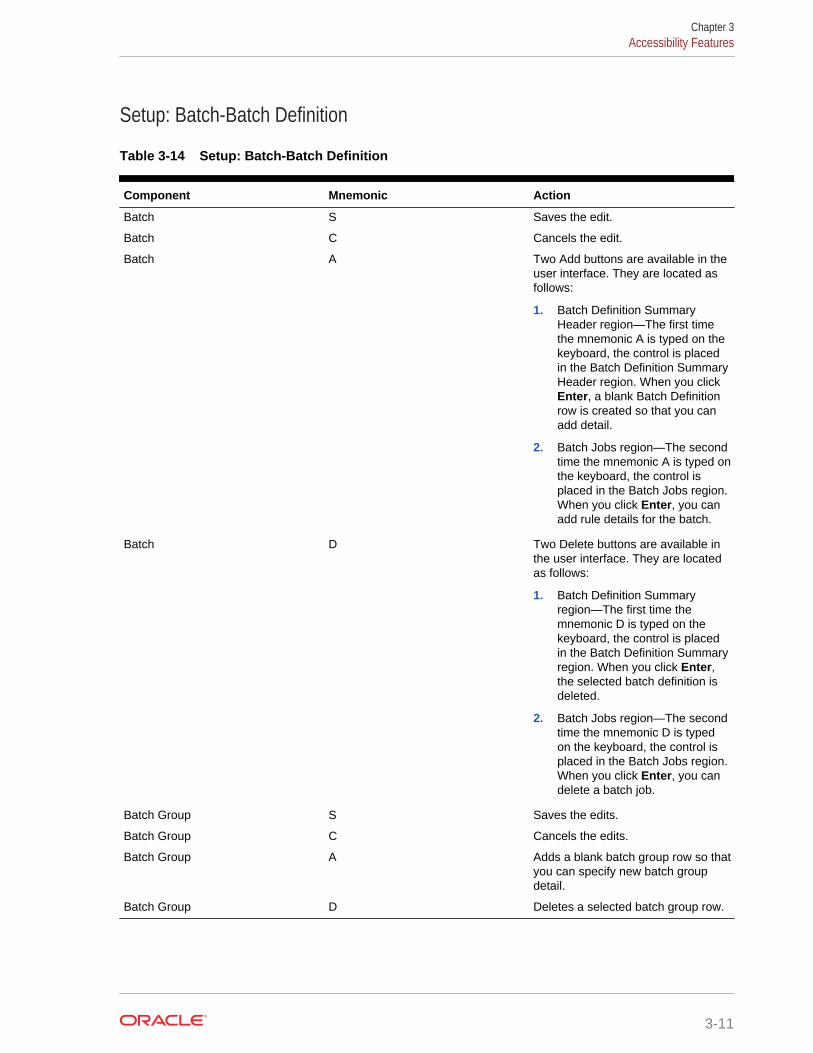
Setup: Batch-Batch Definition
Table 3-14 Setup: Batch-Batch Definition
Component Mnemonic Action
Batch S Saves the edit.
Batch C Cancels the edit.
Batch A Two Add buttons are available in theuser interface. They are located asfollows:
1. Batch Definition SummaryHeader region—The first timethe mnemonic A is typed on thekeyboard, the control is placedin the Batch Definition SummaryHeader region. When you clickEnter, a blank Batch Definitionrow is created so that you canadd detail.
2. Batch Jobs region—The secondtime the mnemonic A is typed onthe keyboard, the control isplaced in the Batch Jobs region.When you click Enter, you canadd rule details for the batch.
Batch D Two Delete buttons are available inthe user interface. They are locatedas follows:
1. Batch Definition Summaryregion—The first time themnemonic D is typed on thekeyboard, the control is placedin the Batch Definition Summaryregion. When you click Enter,the selected batch definition isdeleted.
2. Batch Jobs region—The secondtime the mnemonic D is typedon the keyboard, the control isplaced in the Batch Jobs region.When you click Enter, you candelete a batch job.
Batch Group S Saves the edits.
Batch Group C Cancels the edits.
Batch Group A Adds a blank batch group row so thatyou can specify new batch groupdetail.
Batch Group D Deletes a selected batch group row.
Chapter 3Accessibility Features
3-11
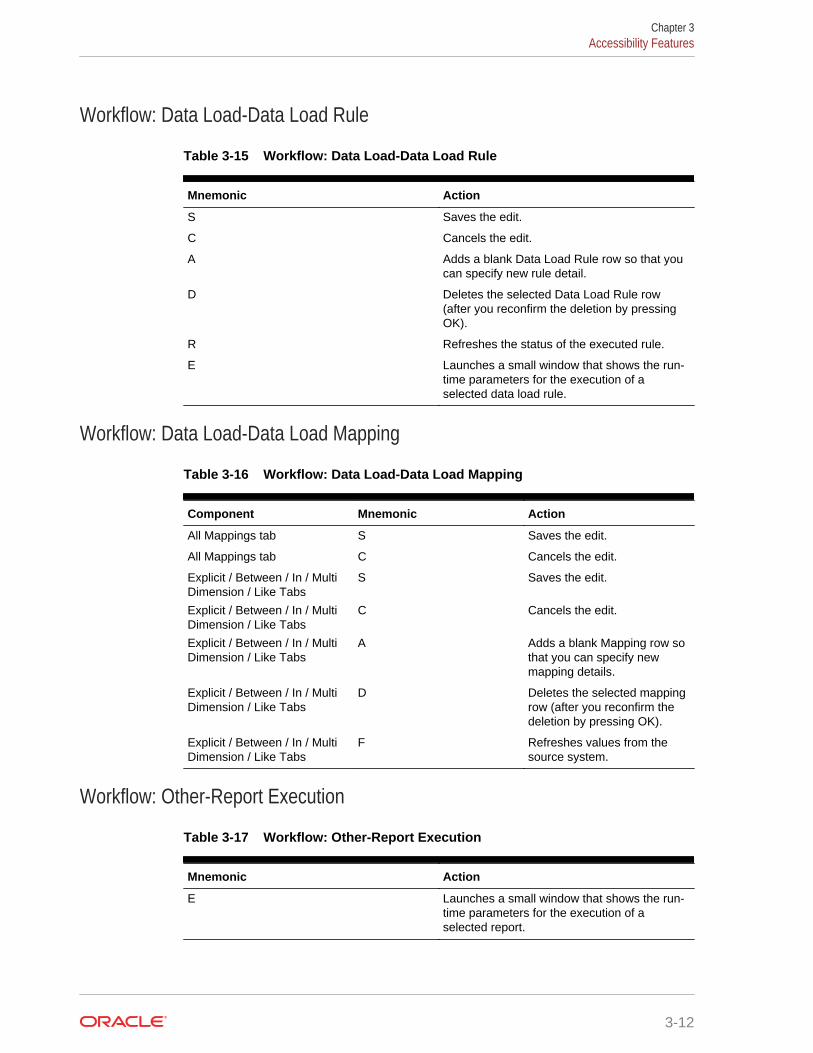
Workflow: Data Load-Data Load Rule
Table 3-15 Workflow: Data Load-Data Load Rule
Mnemonic Action
S Saves the edit.
C Cancels the edit.
A Adds a blank Data Load Rule row so that youcan specify new rule detail.
D Deletes the selected Data Load Rule row(after you reconfirm the deletion by pressingOK).
R Refreshes the status of the executed rule.
E Launches a small window that shows the run-time parameters for the execution of aselected data load rule.
Workflow: Data Load-Data Load Mapping
Table 3-16 Workflow: Data Load-Data Load Mapping
Component Mnemonic Action
All Mappings tab S Saves the edit.
All Mappings tab C Cancels the edit.
Explicit / Between / In / MultiDimension / Like Tabs
S Saves the edit.
Explicit / Between / In / MultiDimension / Like Tabs
C Cancels the edit.
Explicit / Between / In / MultiDimension / Like Tabs
A Adds a blank Mapping row sothat you can specify newmapping details.
Explicit / Between / In / MultiDimension / Like Tabs
D Deletes the selected mappingrow (after you reconfirm thedeletion by pressing OK).
Explicit / Between / In / MultiDimension / Like Tabs
F Refreshes values from thesource system.
Workflow: Other-Report Execution
Table 3-17 Workflow: Other-Report Execution
Mnemonic Action
E Launches a small window that shows the run-time parameters for the execution of aselected report.
Chapter 3Accessibility Features
3-12
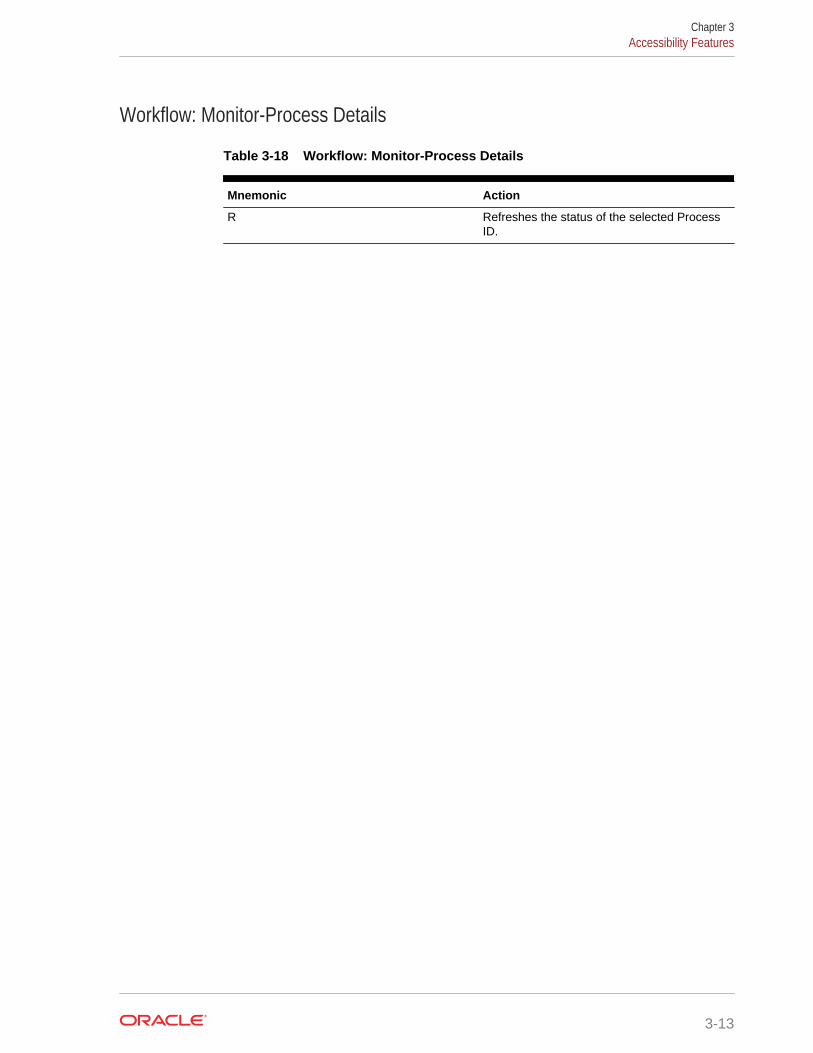
Workflow: Monitor-Process Details
Table 3-18 Workflow: Monitor-Process Details
Mnemonic Action
R Refreshes the status of the selected ProcessID.
Chapter 3Accessibility Features
3-13


![Current and Savings Account Oracle FLEXCUBE Universal ... · Current and Savings Account Oracle FLEXCUBE Universal Banking Release 12.0 [June] [2012] Oracle Part Number E51527-01](https://img.dokumen.tips/doc/110x75/5d4c0eb988c99342768bcd67/current-and-savings-account-oracle-flexcube-universal-current-and-savings.jpg)


![Current Account Creation Oracle FLEXCUBE Universal Banking · 2013-12-26 · Current Account Creation . Oracle FLEXCUBE Universal Banking . Release 12.0 [12] May] [20 Oracle Part](https://img.dokumen.tips/doc/110x75/5f0ee15b7e708231d4416417/current-account-creation-oracle-flexcube-universal-banking-2013-12-26-current.jpg)