Embed Size (px)
Citation preview
A guide to managing farm dairy effluent
Bay of Plenty
2
Acknowledgements
Thanks to the following for their contributions toward the writing of this booklet:
Helen Ritchie
Dairying and the Environment Committee
Fonterra
Dairy Effluent Action Team
Ack
now
ledg
emen
ts
© DairyNZ Limited September 2011
Disclaimer:
DairyNZ Limited and the Bay of Plenty Regional Council (“DairyNZ”, “Bay of Plenty Regional Council”, “we”, “our”) endeavours to ensure that the
information in this publication is accurate and current. However, we do not accept liability for any error or omission.
The information that appears in this publication is intended to provide the best possible dairy farm management practices, systems and advice that
DairyNZ and the Bay of Plenty Regional Council has access to, it is not a technical manual for effluent system construction. It may be subject to change
at any time, without notice. DairyNZ Limited and the Bay of Plenty Regional Council takes no responsibility whatsoever for the currency and/or accuracy
of this information, its completeness or fitness for purpose.
Please note all references to legal requirements are correct at the time of printing.
This booklet has been put together by the Bay of Plenty Regional Council and DairyNZ.:

3
Man
agin
g fa
rm d
airy
eff
luen
t
This booklet will cover
Introduction 4
Farm benefits of good effluent management 4
Nutrient benefit 4
How solids content affects nutrient value 5
How storage affects nutrient value 5
Solid fertiliser equivalent of effluent from
100 cows under different scenarios 5
How much effluent does your farm system generate? 7
Code of Practice and Standards for Farm Dairy Effluent System Design 7
Matching your effluent system to your situation 8
Future proof your system 10
Changing an existing system - look at
the big picture 10
Building in contingencies 10
Working with soil and water features on
your farm 11
Collection and storage 12
Storage Principle One: Collect all effluent in a
sealed storage facility 13
Storage Principle Two: Reduce effluent volume 14
Stormwater diversion 15
Storage Principle Three: Have enough storage 16
Decide how many days’ storage you need 16
Effective effluent storage facilities 16
Capturing the value of effluent 17
Effluent irrigation terms 17
Capturing Value Principle One: Know what
you are putting on 18
Take effluent into account in your nutrient
management planning 18
Effluent and farm nutrient requirements 18
Using a nutrient budget for your effluent block 19
Options for managing potassium (K) levels 20
Work out what your irrigator applies in each pass 21
Capturing Value Principle Two: Keep it in the
root zone 23
Capturing Value Principle Three: Be aware of
uneven spray patterns 25
Operating an effluent system 26
Operating Principle One: Adjust your plan
according to conditions 26
The right amount at the right time 26
How can I measure if my soil is dry enough
to irrigate 27
Matching soil water deficit to effluent
irrigation opportunity 28
Keep good records 29
Operating Principle Two: Set up your irrigation
system properly 30
Operating Principle Three: Don’t just
“set and forget” 31
Correct operation of irrigation systems 32
Operating Principle Four: Stay on top of
maintenance so it doesn’t get on top of you 33
Maintenance of land application systems 33
Maintenance of pumps, pipelines and irrigators 34
What to do when something goes wrong 34
Maintenance and management practices 35
Operating Principle Five: Manage your storage 36
Pond maintenance 37
Desludging storage ponds 37
Clear roles and responsibilities 38
Staff safety 39
Working with effluent contractors 39
Stand-off areas and feed pads 40
What will need to change? 41
Dealing with more effluent 41
Dealing with more nutrients 41
Dealing with more coarse solids in effluent 42
Regional Council perspective 43
The Bay of Plenty Regional Water and Land Plan 44
Permitted activities 44
Controlled activities 44
Discretionary activities 44
Other activities 45
Applying for a resource consent 45
Using this booklet to help you comply
with your consent conditions 46
What if I don’t comply 46
Tools and resources 47

4
Introduction
Farm dairy effluent is a valuable resource and if managed well can increase pasture production and reduce
fertiliser costs. However, effluent also poses an environmental risk due to the nutrients and disease-
causing bugs it contains. Untreated effluent entering waterways or groundwater can have a detrimental
effect on human health and water quality, and is a breach of best management practices.
This booklet will help you comply with the Bay of Plenty rules and your consent conditions so you can minimise
the effects on surface and groundwater quality and get the most from the nutrient value of your effluent.
The dairy industry is committed to achieving effluent compliance 365 days of the year.
Farm benefits of good effluent management
• Nutrient benefits: for productive soil, pasture and crops
– and savings on fertiliser inputs, reducing losses off farm
• Preventing animal health issues: metabolic disorders can
be caused by build-up of potassium (K) levels, even
when you manage effluent to stay within N-load limits.
Nutrient budgets and larger effluent blocks can help
you avoid this
• Better growth conditions: the water content of effluent
can give your pasture a boost during dry weather. The
organic matter in effluent will make your soil ‘spongier’,
enhance soil life and worm activity, and improve soil
properties (aeration and drainage, water holding
capacity). This makes the soil more productive and less
prone to compaction or erosion
• Complying with your resource consent.
Nutrient benefit
Farm dairy effluent offers a source of nitrogen (N), phosphorus (P), potassium (K), magnesium (Mg) and sulphur (S),
as well as trace elements to increase pasture or crop production.
A good effluent system is one of the few capital costs on a farm where you can get a return on your investment by
savings made through cost reductions (i.e. applying less fertiliser). As fertiliser becomes more expensive, the return
on the investment is greater.
“How we manage the
impact that farming has on the
environment has become more important
as we strive to maintain good environmental
standards in the areas where we live. Over time,
streams, rivers, lakes and estuaries may come under
increasing pressure. Good effluent management is part of
the answer to keeping them in good health and is part of
farmers’ contribution to the community – that adds to the
important economic role that farming plays. Good effluent
management also makes good sense by using nutrients
well and helping to minimise nutrient loss through
leaching or runoff.”
Stuart Morrison –
Bay of Plenty farmer
5
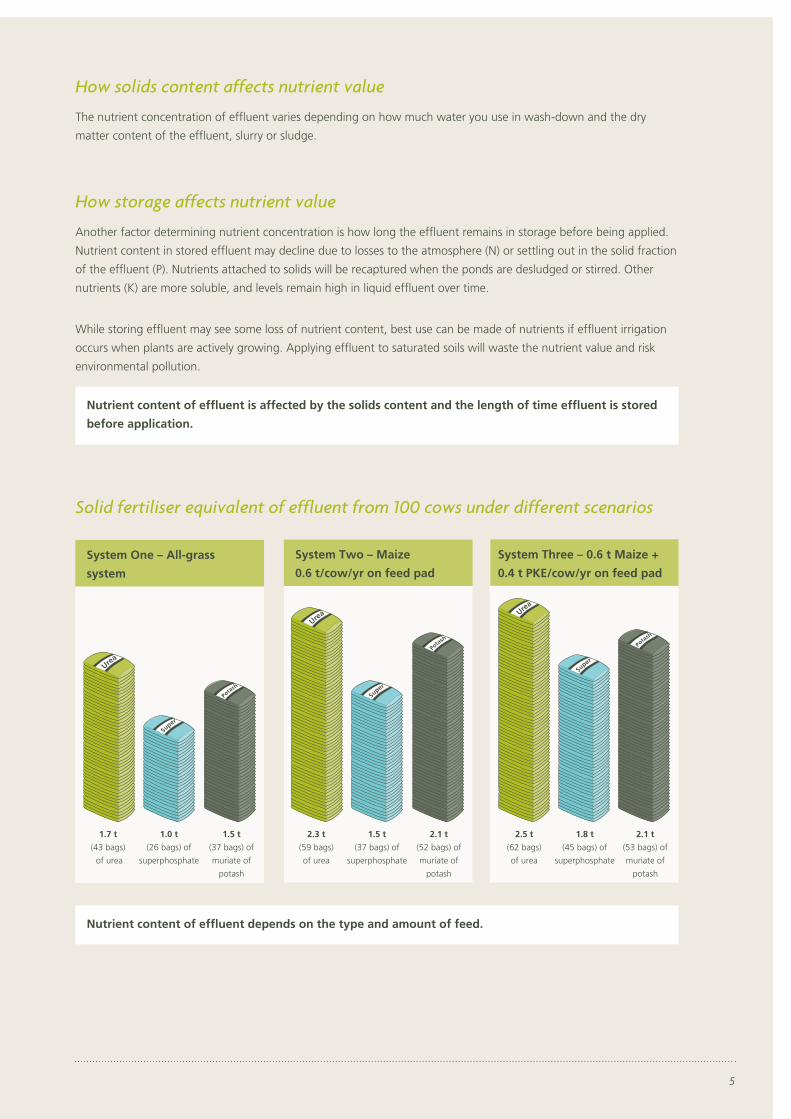
How solids content affects nutrient value
The nutrient concentration of effluent varies depending on how much water you use in wash-down and the dry
matter content of the effluent, slurry or sludge.
How storage affects nutrient value
Another factor determining nutrient concentration is how long the effluent remains in storage before being applied.
Nutrient content in stored effluent may decline due to losses to the atmosphere (N) or settling out in the solid fraction
of the effluent (P). Nutrients attached to solids will be recaptured when the ponds are desludged or stirred. Other
nutrients (K) are more soluble, and levels remain high in liquid effluent over time.
While storing effluent may see some loss of nutrient content, best use can be made of nutrients if effluent irrigation
occurs when plants are actively growing. Applying effluent to saturated soils will waste the nutrient value and risk
environmental pollution.
Nutrient content of effluent is affected by the solids content and the length of time effluent is stored
before application.
System Three – 0.6 t Maize +
0.4 t PKE/cow/yr on feed pad
2.3 t
(59 bags)
of urea
1.5 t
(37 bags) of
superphosphate
2.1 t
(52 bags) of
muriate of
potash
2.5 t
(62 bags)
of urea
1.8 t
(45 bags) of
superphosphate
2.1 t
(53 bags) of
muriate of
potash
1.7 t
(43 bags)
of urea
1.0 t
(26 bags) of
superphosphate
1.5 t
(37 bags) of
muriate of
potash
System One – All-grass
system
System Two – Maize
0.6 t/cow/yr on feed pad
Solid fertiliser equivalent of effluent from 100 cows under different scenarios
Nutrient content of effluent depends on the type and amount of feed.
6
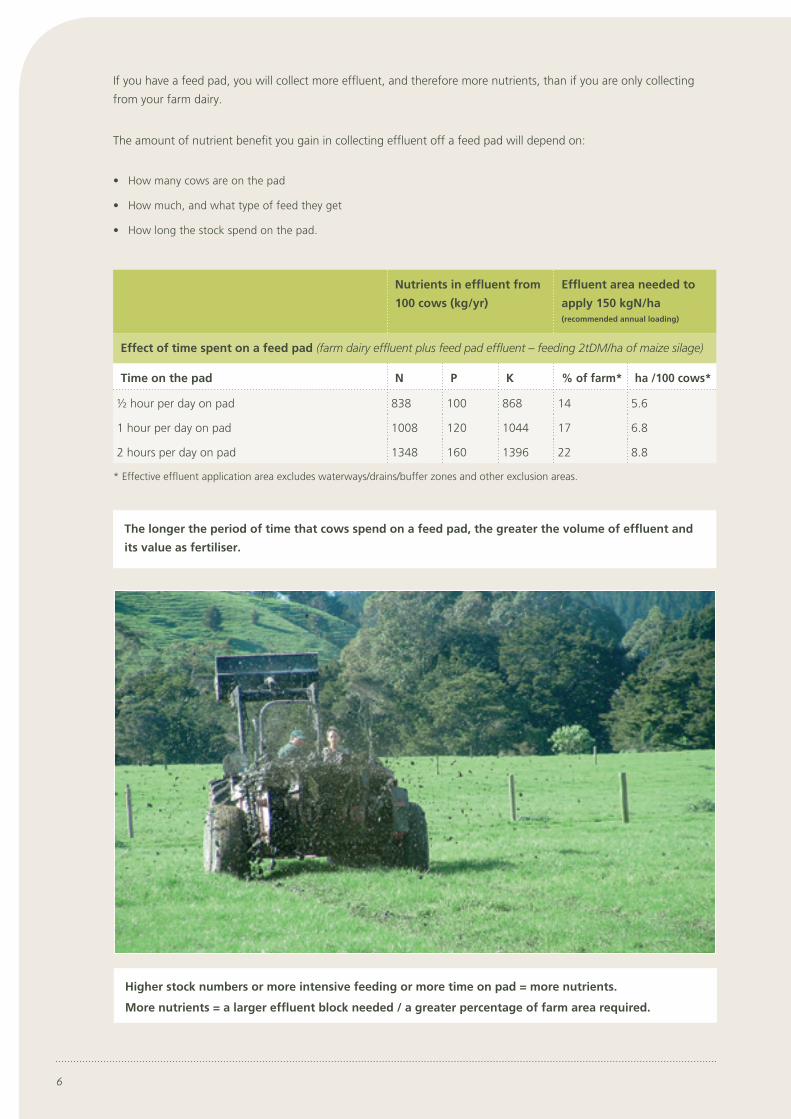
If you have a feed pad, you will collect more effluent, and therefore more nutrients, than if you are only collecting
from your farm dairy.
The amount of nutrient benefit you gain in collecting effluent off a feed pad will depend on:
• How many cows are on the pad
• How much, and what type of feed they get
• How long the stock spend on the pad.
Nutrients in effluent from
100 cows (kg/yr)
Effluent area needed to
apply 150 kgN/ha
(recommended annual loading)
Effect of time spent on a feed pad (farm dairy effluent plus feed pad effluent – feeding 2tDM/ha of maize silage)
Time on the pad N P K % of farm* ha /100 cows*
½ hour per day on pad 838 100 868 14 5.6
1 hour per day on pad 1008 120 1044 17 6.8
2 hours per day on pad 1348 160 1396 22 8.8
Higher stock numbers or more intensive feeding or more time on pad = more nutrients.
More nutrients = a larger effluent block needed / a greater percentage of farm area required.
* Effective effluent application area excludes waterways/drains/buffer zones and other exclusion areas.
The longer the period of time that cows spend on a feed pad, the greater the volume of effluent and
its value as fertiliser.

7
As your farm system changes, update nutrient budgets regularly to see if you still have enough area in
your effluent block to avoid applying too much N and K (see pg 19). Use the pond storage calculator to
see if you still have adequate storage (contact the Bay of Plenty Regional Council consents team to discuss).
Code of Practice and Standards for Farm Dairy Effluent System Design
A code of practice and standards have been written to provide guidance to
the effluent services sector on the design of effluent systems. The code
and standards will ensure that systems are designed so that they deliver
the right amount of effluent to the right place at the right time. Good
system design will help to maximise financial benefits from nutrients and
help farmers achieve compliance. An accreditation system will be linked to
the code and standards so that farmers will have some assurance that
effluent system designers provide high quality advice. The code and
standards are available on the DairyNZ website, dairynz.co.nz.
Use an accredited effluent professional to design your system and supervise the installation.
How much effluent does your farm system generate?
Less effluent and nutrients generated if: More effluent and nutrients generated if:
Cow numbers low Cow numbers high
Low N fertiliser applied High N fertiliser applied
No supplementary feeding High supplementary feeding
Water-efficient washdown system and technique used High water use in dairy/yards/pads
Once-a-day milking Twice-a-day milking
Effluent only collected from yards/dairy Effluent collected from feed pad or stand-off area
Herd not under stress in yards/dairy Herd under stress in yards/dairy
No rainwater enters system No stormwater diversion in place
“There is a lot
of information out there
so farmers should seek that
information and not necessarily
wait for someone to bring them
the information.”
Mac Pacey –
Bay of Plenty farmer

8
Are your soils poorly drained or
underlain with artificial drainage?
A system that can deliver effluent at low depths is best. A sprinkler-type
system is lower risk – if you operate a travelling irrigator in these conditions it
has to be run at high speed to deliver low depths. You will also need extra
storage as you can’t operate your traveller when soils are too wet.
Do you have free draining soils above
a sensitive receiving water body like a
shallow aquifer or a lake fed by
groundwater springs?
Depth is important and so is nutrient loading – keep within the 150kg N/ha/yr
Nitrogen loading. (Other factors are also important to prevent N loss in these
areas, such as wintering practices).
Is your land undulating or sloping
(more than 8°)?
Rate is critical – so there is no runoff. If your land also has poor soakage
properties, use a low application system. If it is free-draining and sloping,
travelling irrigators should be set to a fast speed.
Are you in a high rainfall area? Check you have enough pond storage to see you through the wet periods
– contact the Bay of Plenty Regional Council consents team to use the pond
storage calculator.
Matching your effluent system to your situation
Whether you are starting from scratch or upgrading, the effluent system you choose should be suited to the conditions
of your farm, your farming system and your staffing situation.
1
2
3
4

9
Low application systems decrease the likelihood of surface ponding and runoff and provide more
flexibility when the soil is wet. These systems allow precision in how much water and N is applied.
Some low application options may require other changes to your storage and solids removal systems.
Are your soils poorly drained or
underlain with artificial drainage?
A system that can deliver effluent at low depths is best. A sprinkler-type
system is lower risk – if you operate a travelling irrigator in these conditions it
has to be run at high speed to deliver low depths. You will also need extra
storage as you can’t operate your traveller when soils are too wet.
Do you have free draining soils above
a sensitive receiving water body like a
shallow aquifer or a lake fed by
groundwater springs?
Depth is important and so is nutrient loading – keep within the 150kg N/ha/yr
Nitrogen loading. (Other factors are also important to prevent N loss in these
areas, such as wintering practices).
Is your land undulating or sloping
(more than 8°)?
Rate is critical – so there is no runoff. If your land also has poor soakage
properties, use a low application system. If it is free-draining and sloping,
travelling irrigators should be set to a fast speed.
Are you in a high rainfall area? Check you have enough pond storage to see you through the wet periods
– contact the Bay of Plenty Regional Council consents team to use the pond
storage calculator.
Do you have a large herd, intensive
feeding system, or a stand-off or feed
pad in regular use?
Consider a solids separation system to deal with the extra nutrients and solids in
your effluent. Check you have a large enough area for spreading effluent.
Do you need a low capital input
system, even though ongoing labour
input may be higher?
Consider travelling irrigators with adequate storage, or you can compare the cost
of hiring a contract spreader.
Are you willing to spend a little more
up front to reduce ongoing labour
because you have limited labour
available?
A sprinkler system capable of covering a large area all at once can allow you
to get your pond levels down without daily shifting of equipment.
If you have no special risk factors
associated with your property...
You still need to ensure you have adequate storage to manage through wet
periods (you can use the Bay of Plenty Regional Council pond storage
calculator), and check your irrigator’s application rate (see pg 21).
5
6
7
8
10
Future-proof your system
When you are installing a new system or upgrading an existing one, it pays to consider possible future scenarios.
Think about whether you are likely to:
• Bring more land into operation
• Increase stock numbers or supplementary feed significantly
• Install or increase use of a feed pad or stand-off area
• Have stock spend more time in the dairy or on stand-off areas.
In more intensive systems, using vehicles to transport the effluent to more distant parts of the farm or even off the
property (e.g. to a cropping block or runoff) may be useful.
Where effluent is very fibrous (e.g. from feed pads), extra steps in effluent treatment may be needed to remove solids
prior to effluent irrigation.
Changing an existing system – look at the big picture
If you are retrofitting an existing set-up, look at the whole system and consider the implications of any change. Talk
with other farmers who have tried systems and consult professionals.
If you are thinking of switching application methods (e.g. sprinklers instead of a travelling irrigator), find out what else
will need to change in the system (e.g. storage, solids separation, different pressure or pumping requirements, labour
inputs or maintenance).
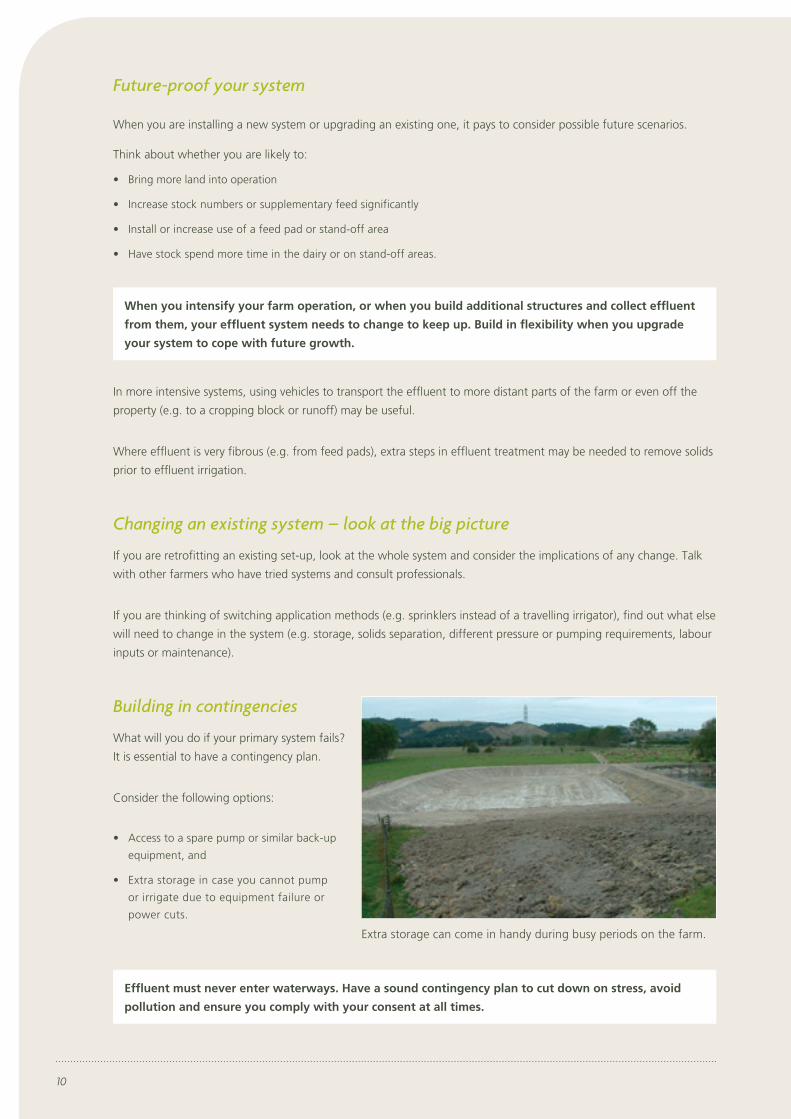
Building in contingencies
What will you do if your primary system fails?
It is essential to have a contingency plan.
Consider the following options:
• Access to a spare pump or similar back-up
equipment, and
• Extra storage in case you cannot pump
or irrigate due to equipment failure or
power cuts.
When you intensify your farm operation, or when you build additional structures and collect effluent
from them, your effluent system needs to change to keep up. Build in flexibility when you upgrade
your system to cope with future growth.
Effluent must never enter waterways. Have a sound contingency plan to cut down on stress, avoid
pollution and ensure you comply with your consent at all times.
Extra storage can come in handy during busy periods on the farm.

11
Working with soil and water features on your farm
Within your farm you will most likely have high-risk and low-risk areas for effluent irrigation. Prepare an effluent
irrigation plan that shows these different areas. You will need to register a plan with the Bay of Plenty Regional
Council as part of your resource consent, similar to the one below.
Some high-risk areas are obvious because water can be seen ponding or running off from these soils during rainfall.
Other risks are less visible. The ideal soil for irrigation absorbs and filters the effluent through many small pores –
this is called ‘matrix flow’. Typical examples include ash, fine pumice, or loamy soils. Soils with high clay content or
artificial drainage often have larger cracks and channels. While the effluent might ‘disappear’ when applied, it can
travel through these cracks and channels to reach subsurface drains or groundwater, and then flow underground to
contaminate ground water. This is called ‘bypass flow’. Soils with bypass flow are higher risk zones.
Some helpful soil information can be found on the Bay of Plenty Regional Council website boprc.govt.nz.
An effluent application plan
A written effluent application plan can help you identify suitable areas of the farm for effluent application,
and can help all staff to see this and to keep accurate records.
From a plan or map of the farm, identify waterways, natural drainage patterns, soil types and sub-surface drainage,
prevailing wind direction and neighbours’ dwellings.
• Mark out the ideal area for effluent application, noting irrigator runs for each paddock and colour-coded risk zones.
• No-application zones include all land within 20m of a drain, waterway or bore, or the boundary of a neighbouring
property. (These are marked in red in the map below). Risk zones include mole or tile drainage areas, very wet soils or
very free-draining areas with porous subsoil and accessible groundwater.
• At the start of each season, work out an irrigation rotation plan that considers different risk zones, desired application
rates and storage capacity
• In addition to planning your effluent irrigation, make a plan for maintenance showing tasks, dates to do them and who is
responsible, with a space to note when it is done
• Consider conditions on the day that might increase the risk of effluent entering no-application zones (e.g. wind direction
and speed).
Key
Effluent pond
Dairy shed
Tile lines
Waterways
Example showing
effluent runs
Risk zones
No application zones
High risk zones
Low risk zones

12
Collection and storage
There are three key good practice principles of effluent collection and storage:
1. Collect all effluent in a sealed storage facility
2. Reduce effluent volume
3. Have enough storage.
Some dairy farms irrigate effluent directly from the farm dairy sump to land on a daily basis. But daily application is
labour-intensive, high maintenance and prone to system failure. Storage offers flexibility for effluent irrigation to fit
around farm activities and current conditions.
If excess effluent is applied onto an already wet soil, pathogens and nutrients can enter surface waterways and
groundwater. This means that storing effluent over wet periods (also known as ‘deferred irrigation’) is an essential
strategy for keeping waterways clean.
Another advantage of storage is that it allows solids to settle and this reduces blockages and wear and tear on
pumps, pipes and spray equipment.
Storage is required because saturated soils cannot absorb effluent. Irrigating effluent in wet
conditions is a waste of nutrients and risks polluting waterways. It is better for nutrient efficiency,
pasture growth, and the environment if irrigation is deferred until soils are drier.

13
Storage Principle One: Collect all effluent in a sealed storage facility
The good practice requirement for sealing applies not only to your storage ponds but to all areas where effluent
collects such as feed pads, silage bunkers and storage piles for sludge or stone trap cleanings.
Avoid placing these storage facilities in sites with high water tables or at risk of flooding.
Stormwater drains should be installed and maintained to prevent rainwater flowing overland into any of these areas.
Remember:
• Silage leachate should not reach any surface water body, and it should not pond at the pit site or flow overland
• Stock should not be stood off on unsealed areas where effluent can reach waterways or leach through to groundwater
• Putting any stock effluent into farm dumps or offal holes is not permitted under the Bay of Plenty Regional Council rules.
All areas where stock spend long periods should be sealed. Effluent on these areas should drain to the
storage pond, or be scraped and stored on a sealed surface before application back to land.
The Bay of Plenty Regional Council requires that all effluent storage ponds within the Rotorua lakes
catchments be sealed and strongly recommends that storage ponds elsewhere in the region are also
sealed. This is to ensure that leaching of nutrients from effluent to groundwater is prevented. Contact
the Bay of Plenty Regional Council for more information on pond sealing
A synthetic (e.g. plastic or rubber) or compacted clay liner, or a concrete pond interior will ensure your ponds are
sealed so no nutrients can leach to groundwater. If you are using a clay seal or liner, have the clay type checked by an
engineer and get a certificate from them stating that the clay type is suitable and the pond is sealed.
Remember to inform anyone doing any maintenance work on the pond if synthetic or clay liners are present. A
ripped liner or split clay can be an expensive mistake. You can use the template for employing effluent contractors on
compliancetoolkit.co.nz > create forms > effluent contractors acknowledgement form.
For storage of silage and scrapings from stand-off areas, feed pads or stone traps, a concrete pad is best to allow for
ease of cleaning by machinery.
Avoiding problems
• Make sure you will be able to clean the
sludge from your storage pond with a
digger – do not make the pond too wide
or too deep
• Put a barrier on the bottom of the pond
(e.g. on railway sleepers) to avoid
breaking the pond seal when desludging
• Make sure contractors are aware of the
care required with pond liners.
Note: Continuously stirred ponds will not need to be cleaned out as solids will remain in suspension. Consult your effluent
system designer to help decide which stirrer will suit your application.
A well designed concrete pad for dewatering stone trap solids.
Raised lip
Well fenced
14
Storage Principle Two: Reduce effluent volume
Using less water around the yard will reduce effluent volume and therefore cut down on how much storage you
require. Careful stock management can also help reduce the effluent deposited on the yards and in the dairy.
For new areas:
• Design the pitch of the yard for easy wash-down
• Install guttering and downpipes to ensure roof water does not enter the system
• Create drains around the yards and ponds to prevent rainwater flowing off the land and entering your storage pond
• Install a stormwater diversion system to take clean rainwater off the yard into stormwater drains and not into the
ponds. Manual and automated systems exist – choose an option that works for your farm
• If you are standing your herd off, consider a system that requires less water for effluent collection e.g. scrapable pads
or a ‘herd home’ type system with slatted floors above effluent bunkers.
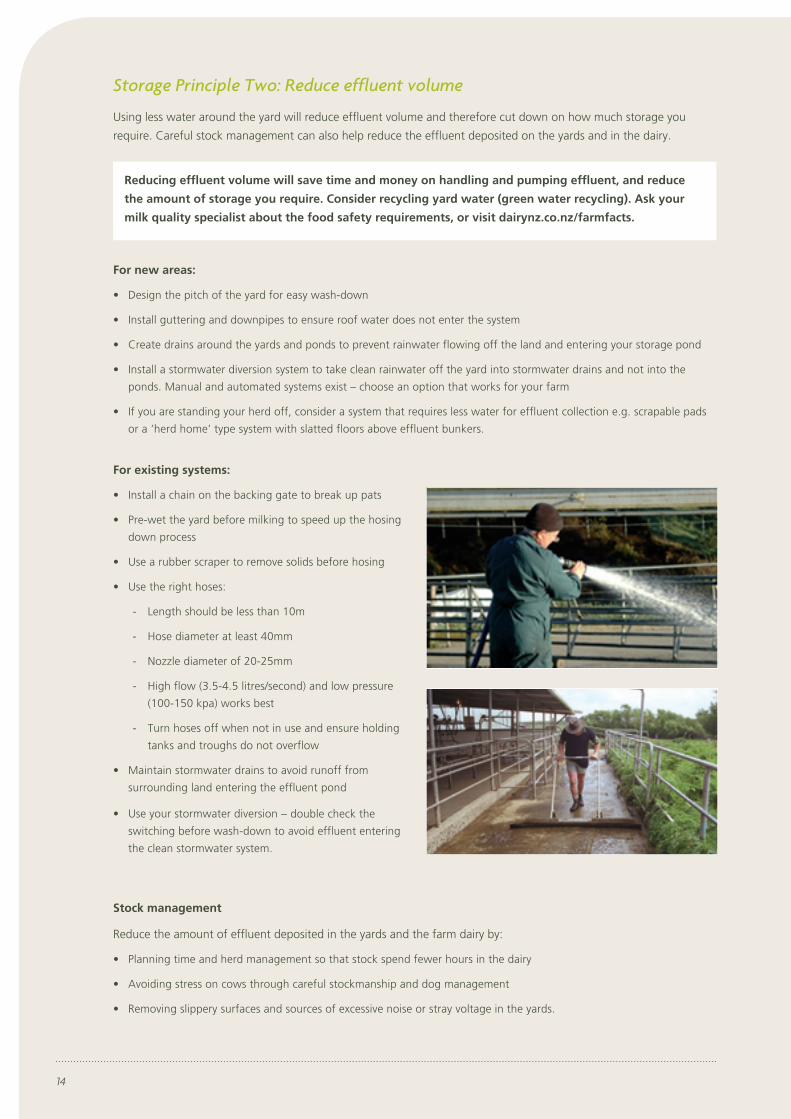
For existing systems:
• Install a chain on the backing gate to break up pats
• Pre-wet the yard before milking to speed up the hosing
down process
• Use a rubber scraper to remove solids before hosing
• Use the right hoses:
- Length should be less than 10m
- Hose diameter at least 40mm
- Nozzle diameter of 20-25mm
- High flow (3.5-4.5 litres/second) and low pressure
(100-150 kpa) works best
- Turn hoses off when not in use and ensure holding
tanks and troughs do not overflow
• Maintain stormwater drains to avoid runoff from
surrounding land entering the effluent pond
• Use your stormwater diversion – double check the
switching before wash-down to avoid effluent entering
the clean stormwater system.
Stock management
Reduce the amount of effluent deposited in the yards and the farm dairy by:
• Planning time and herd management so that stock spend fewer hours in the dairy
• Avoiding stress on cows through careful stockmanship and dog management
• Removing slippery surfaces and sources of excessive noise or stray voltage in the yards.
Reducing effluent volume will save time and money on handling and pumping effluent, and reduce
the amount of storage you require. Consider recycling yard water (green water recycling). Ask your
milk quality specialist about the food safety requirements, or visit dairynz.co.nz/farmfacts.
15
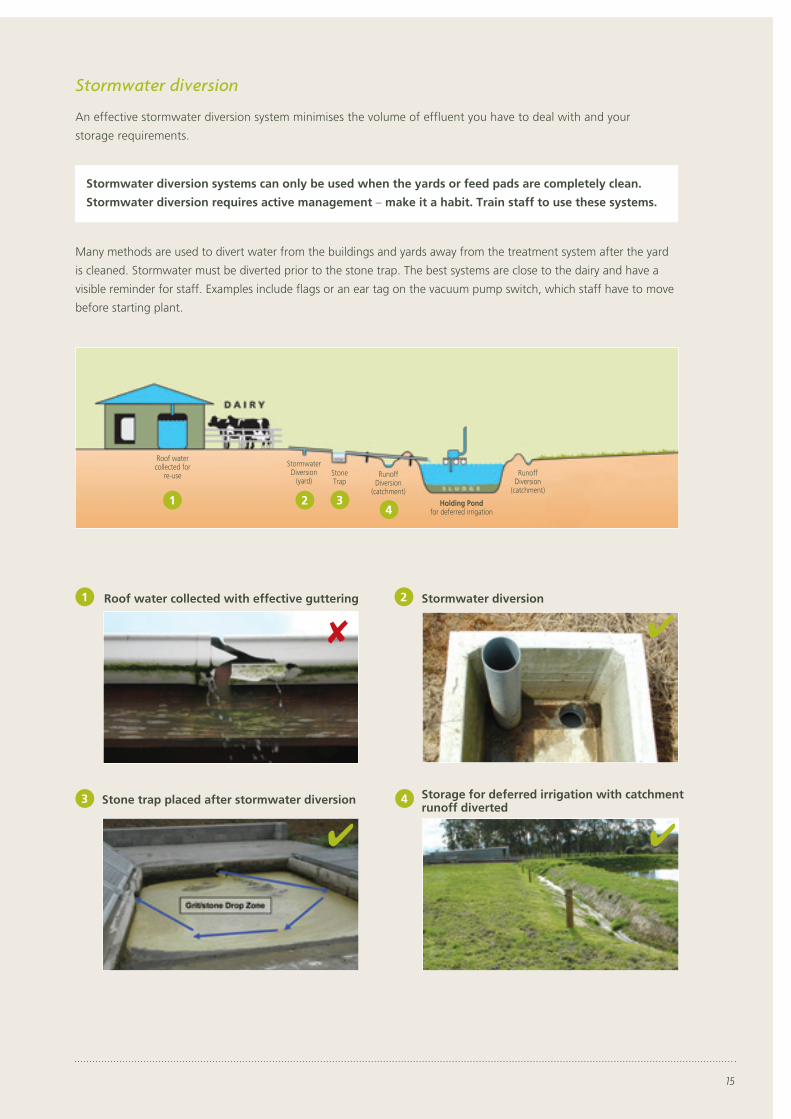
Stormwater diversion
An effective stormwater diversion system minimises the volume of effluent you have to deal with and your
storage requirements.
Many methods are used to divert water from the buildings and yards away from the treatment system after the yard
is cleaned. Stormwater must be diverted prior to the stone trap. The best systems are close to the dairy and have a
visible reminder for staff. Examples include flags or an ear tag on the vacuum pump switch, which staff have to move
before starting plant.
Stormwater diversion systems can only be used when the yards or feed pads are completely clean.
Stormwater diversion requires active management – make it a habit. Train staff to use these systems.
1
3
2
4
Roof water collected with effective guttering
Stone trap placed after stormwater diversion
Stormwater diversion
Storage for deferred irrigation with catchment runoff diverted
1 2 34
Roof water collected for
re-use
Stormwater Diversion
(yard)Stone Trap
Runoff Diversion
(catchment)
Runoff Diversion
(catchment)
Holding Pondfor deferred irrigation

16
Storage Principle Three: Have enough storage
You need enough storage to see you through:
• Rainy periods when the soil is too wet to irrigate
• Busy periods when farm labour is stretched and you do not want to irrigate
• Equipment failures (pumps or irrigator) when you cannot irrigate.
Store effluent for use when nutrients are most needed ie drier months or putting down a crop.
Decide how many days’ storage you need
Pond size should take account of local worst-case scenarios. If you are winter milking you will require more storage
to see you through the wettest months. Some systems also require freeboard to be maintained i.e. when relying on
contractors to pump ponds.
How long soils remain wet depends on local conditions, including:
• Soil types
• Seasonal rainfall and weather patterns
• Water tables.
If effluent blocks have artificial subsurface drains, extra storage is needed so as not to irrigate onto these soils when
they are very wet, or very dry and cracked. Under very wet or very dry conditions, effluent can pass easily through the
soil into the drains and then enter waterways.
It may be necessary to have two storage ponds rather than a single large pond if:
• The pond is likely to be too large for effective pumping, de-sludging and/or stirring
• Herd size increases or additional effluent is collected from stand-off areas or feed pads.
A pond storage calculator has been developed by Massey University in conjunction with the dairy
industry and regional councils to help you assess your farm’s storage requirements. Consent
conditions usually specify the volume of storage required, based on the results of the effluent pond
storage calculator. Contact the Bay of Plenty Regional Council consent team to use the calculator.
If your water table is high, if your soils are heavy, or if your effluent block has mole or tile drainage,
then you need enough storage to carry you through wet periods until you can irrigate safely again.
Effective effluent storage facilities
Stone trap not emptied and inadequate storage
causing system overload. Unsealed storage facilities
leach contaminants into groundwater.
A well-fenced pond with a liner to ensure it is sealed.
Adequate storage capacity enables effluent to be
applied at the most beneficial times for pasture.
17
Capturing the value of effluent
You can make significant savings from reduced fertiliser bills if you know what your effluent contains. This will
also help you comply with your consent conditions.
There are three key principles to capturing the value of effluent:
1. Know what you are putting on – the amount of nutrients applied annually, and how much water and
nitrogen are applied in each irrigation pass
2. Keep it in the root zone – plan effluent application according to your soil type
3. Be aware of uneven spray patterns – test your irrigator’s output to see how even it is.
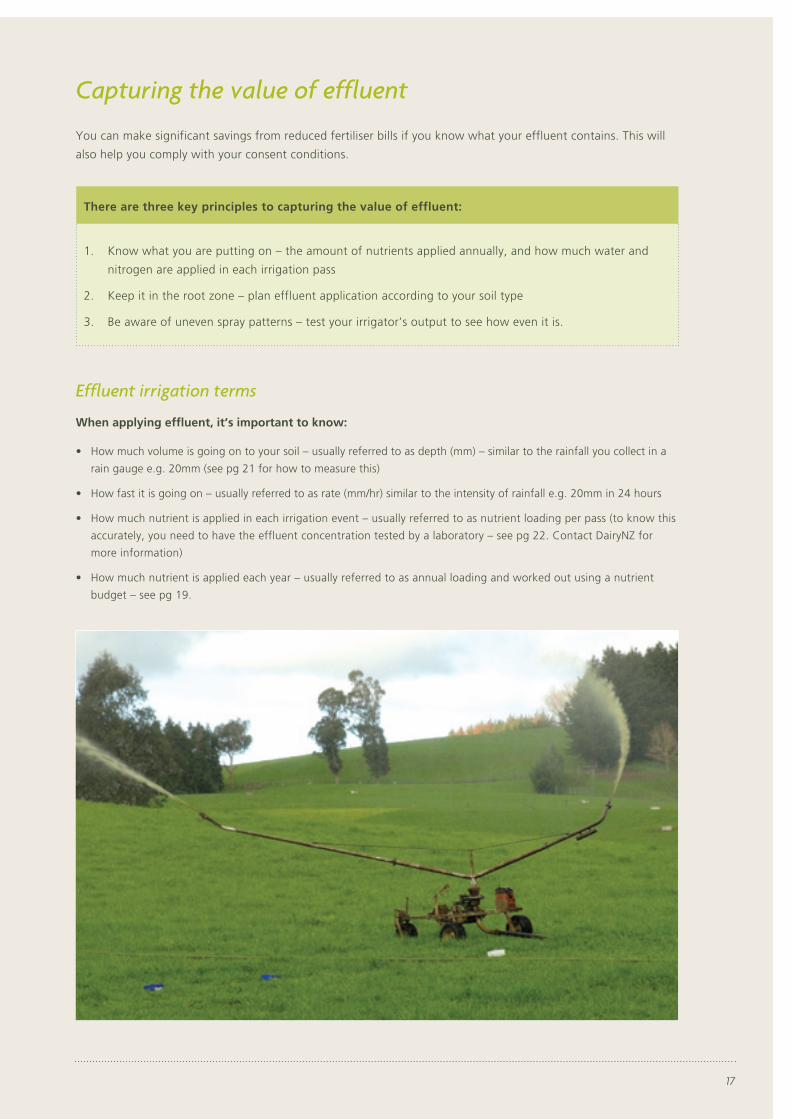
Effluent irrigation terms
When applying effluent, it’s important to know:
• How much volume is going on to your soil – usually referred to as depth (mm) – similar to the rainfall you collect in a
rain gauge e.g. 20mm (see pg 21 for how to measure this)
• How fast it is going on – usually referred to as rate (mm/hr) similar to the intensity of rainfall e.g. 20mm in 24 hours
• How much nutrient is applied in each irrigation event – usually referred to as nutrient loading per pass (to know this
accurately, you need to have the effluent concentration tested by a laboratory – see pg 22. Contact DairyNZ for
more information)
• How much nutrient is applied each year – usually referred to as annual loading and worked out using a nutrient
budget – see pg 19.

18
Capturing Value Principle One: Know what you are putting on
If you know what you are putting on, you can ensure:
• You have enough area in your effluent block to meet the annual Nitrogen (N) loading recommendation (150kg N/ha/yr
on pasture) and to avoid animal health problems from excess K
• You do not apply excess N in a single effluent application (e.g. no more than 50kg N/ha at once) which meets plant demand
• You do not apply more liquid than your soil can absorb and hold – to avoid ponding, runoff and leaching to groundwater.
Take effluent into account in your nutrient management planning
To help you create your farm’s nutrient management plan:
• Do annual soil tests and a nutrient budget (e.g. using OVERSEER®) for your effluent block separate to other areas, and
adjust your fertiliser accordingly
• Use your nutrient budget to work out the irrigation area needed to keep your effluent inputs within annual nutrient
loading recommendations (e.g. 150kg N/ha/yr) – see pg 19
• Consider how to manage K levels (you may need to extend your effluent spreading area, or remove K through crops)
– see pg 20
• Consider how much N you want to apply in each irrigation event – similar to your urea applications. Calculate how to
manage your system to deliver the optimum amount of N at one time – see pg 22.
Effluent and farm nutrient requirements
Effluent can supply nutrients to help meet farm maintenance levels. In the case of potassium (K), standard effluent
applications may supply double the amount required for maintenance.
Nutrients applied compared to farm maintenance requirements
Nutrients applied Effluent nutrients: kg/ha from
100 cows spread over 4 ha
(all grass system)
Maintenance requirements
(1000kg MS/ha)
P 18 50
K 135 80
S 12 60
This shows that in the case of an all-grass system, effluent from 100 cows spread over four hectares can provide
one third of the required P, more than the required K and one fifth of the required sulphur. This indicates that
while N loading is at an acceptable level, a larger area for effluent spreading would be needed in order to decrease
the K loading.
See pg 20 for other ideas to manage K.
Application rates that meet N-loading requirements may cause an excess of pasture K, which should
be checked by regular soil tests and preparing a nutrient budget for your effluent block.
19
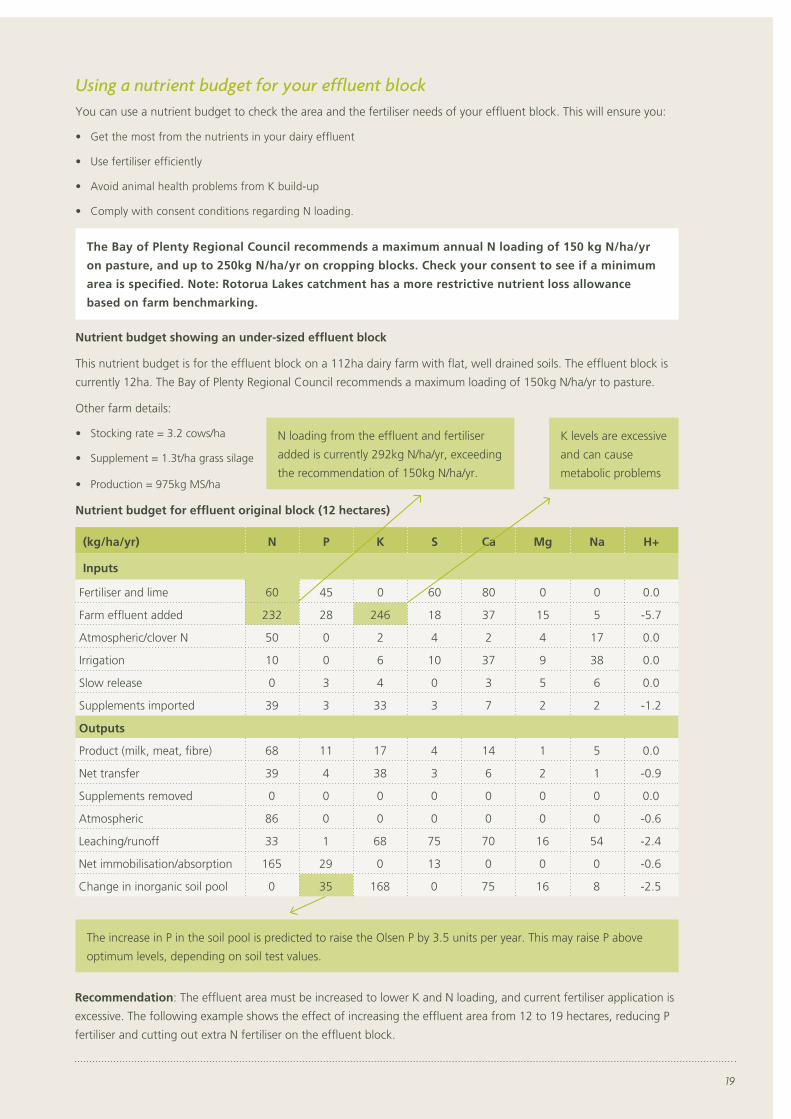
Using a nutrient budget for your effluent blockYou can use a nutrient budget to check the area and the fertiliser needs of your effluent block. This will ensure you:
• Get the most from the nutrients in your dairy effluent
• Use fertiliser efficiently
• Avoid animal health problems from K build-up
• Comply with consent conditions regarding N loading.
Nutrient budget showing an under-sized effluent block
This nutrient budget is for the effluent block on a 112ha dairy farm with flat, well drained soils. The effluent block is
currently 12ha. The Bay of Plenty Regional Council recommends a maximum loading of 150kg N/ha/yr to pasture.
Other farm details:
• Stocking rate = 3.2 cows/ha
• Supplement = 1.3t/ha grass silage
• Production = 975kg MS/ha
Nutrient budget for effluent original block (12 hectares)
(kg/ha/yr) N P K S Ca Mg Na H+
Inputs
Fertiliser and lime 60 45 0 60 80 0 0 0.0
Farm effluent added 232 28 246 18 37 15 5 -5.7
Atmospheric/clover N 50 0 2 4 2 4 17 0.0
Irrigation 10 0 6 10 37 9 38 0.0
Slow release 0 3 4 0 3 5 6 0.0
Supplements imported 39 3 33 3 7 2 2 -1.2
Outputs
Product (milk, meat, fibre) 68 11 17 4 14 1 5 0.0
Net transfer 39 4 38 3 6 2 1 -0.9
Supplements removed 0 0 0 0 0 0 0 0.0
Atmospheric 86 0 0 0 0 0 0 -0.6
Leaching/runoff 33 1 68 75 70 16 54 -2.4
Net immobilisation/absorption 165 29 0 13 0 0 0 -0.6
Change in inorganic soil pool 0 35 168 0 75 16 8 -2.5
Recommendation: The effluent area must be increased to lower K and N loading, and current fertiliser application is
excessive. The following example shows the effect of increasing the effluent area from 12 to 19 hectares, reducing P
fertiliser and cutting out extra N fertiliser on the effluent block.
The Bay of Plenty Regional Council recommends a maximum annual N loading of 150 kg N/ha/yr
on pasture, and up to 250kg N/ha/yr on cropping blocks. Check your consent to see if a minimum
area is specified. Note: Rotorua Lakes catchment has a more restrictive nutrient loss allowance
based on farm benchmarking.
N loading from the effluent and fertiliser
added is currently 292kg N/ha/yr, exceeding
the recommendation of 150kg N/ha/yr.
K levels are excessive
and can cause
metabolic problems
The increase in P in the soil pool is predicted to raise the Olsen P by 3.5 units per year. This may raise P above
optimum levels, depending on soil test values.

20
Nutrient budget for an expanded effluent block (19 hectares)
(kg/ha/yr) N P K S Ca Mg Na H+
Inputs
Fertiliser and lime 0 20 0 60 80 0 0 0.0
Farm effluent added 146 18 156 11 23 10 3 -3.6
Atmospheric/clover N 81 0 2 4 2 4 17 0.0
Irrigation 10 0 6 10 37 9 38 0.0
Slow release 0 3 5 0 3 5 6 0.0
Supplements imported 39 3 33 3 7 2 2 -1.2
Output
Product (milk, meat, fibre) 68 11 17 4 14 1 5 0.0
Net transfer 39 4 39 3 6 2 1 -0.9
Supplements removed 0 0 0 0 0 0 0 0.0
Atmospheric 60 0 0 0 0 0 0 -0.3
Leaching/runoff 27 0 58 71 66 16 54 -1.9
Net immobilisation/absorption 81 28 0 11 0 0 0 -0.3
Changes in inorganic soil pool 0 1 90 0 66 10 6 -1.3
Effluent K levels have been reduced significantly but are still above
pasture requirements. Using the effluent block for silage or a crop will
reduce pasture K levels and lower the risk of metabolic problems.
N loadings of 146kg N/ha/yr with no
additional N fertiliser are now within
the recommended loadings.
Options for managing potassium (K) levels
Over time the application of farm dairy effluent to land increases both soil and pasture potassium levels – particularly
in winter and spring. This can increase the potential for metabolic problems in dairy cows at calving and in early
lactation. Some management considerations for K levels are:
• Carry out a nutrient budget for your farm using the latest version of OVERSEER® with your fertiliser rep or consultant. Do
separate soil tests and nutrient budgets for your effluent block and adjust fertiliser application rates to take into account
the increased nutrients being added through effluent
• Increase the area irrigated – this will reduce the amount of both N and K applied per hectare. The area irrigated may need
to double to bring K application rates down to maintenance levels. Aim to keep K levels below QTK 10
• Plan to avoid grazing effluent irrigation areas with springer herd and recently calved cows to avoid milk fever and grass
staggers. Where this is not possible, take additional measures to prevent these metabolic disorders, such as increasing
magnesium supplementation. Take herbage samples – they shouldn’t exceed 3-3.5% K
• Analyse pasture from effluent and non-effluent areas and adjust feed/supplementation in consultation with a farm
consultant or veterinarian if necessary
• Harvest silage or hay off your effluent blocks to reduce K levels, or if levels are very high, consider a crop e.g. maize
• Consider using a contractor who is capable of efficiently spreading stored effluent to remote paddocks outside the
effluent spray irrigation area.
Soil P is not predicted to change much under this scenario, as inputs and outputs are balanced. Using the nutrient
budget to reduce fertiliser inputs will result in savings for the farm.
21
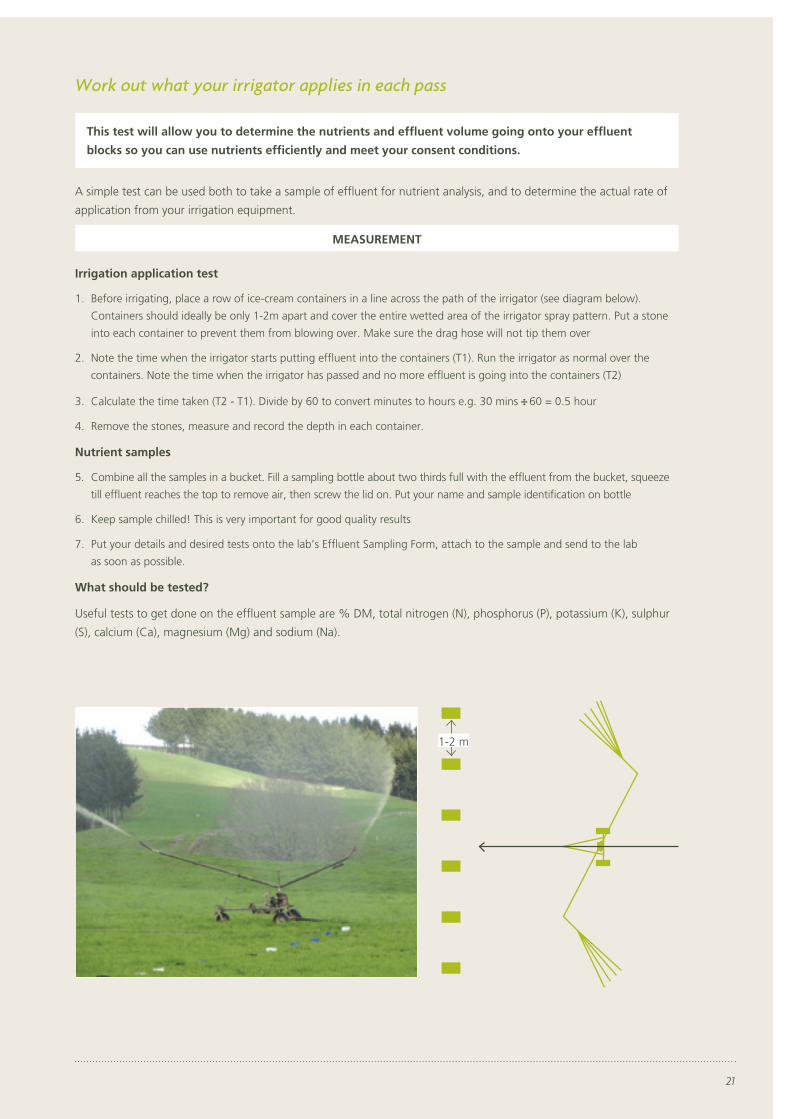
Work out what your irrigator applies in each pass
A simple test can be used both to take a sample of effluent for nutrient analysis, and to determine the actual rate of
application from your irrigation equipment.
Irrigation application test
1. Before irrigating, place a row of ice-cream containers in a line across the path of the irrigator (see diagram below).
Containers should ideally be only 1-2m apart and cover the entire wetted area of the irrigator spray pattern. Put a stone
into each container to prevent them from blowing over. Make sure the drag hose will not tip them over
2. Note the time when the irrigator starts putting effluent into the containers (T1). Run the irrigator as normal over the
containers. Note the time when the irrigator has passed and no more effluent is going into the containers (T2)
3. Calculate the time taken (T2 - T1). Divide by 60 to convert minutes to hours e.g. 30 mins –: 60 = 0.5 hour
4. Remove the stones, measure and record the depth in each container.
Nutrient samples
5. Combine all the samples in a bucket. Fill a sampling bottle about two thirds full with the effluent from the bucket, squeeze
till effluent reaches the top to remove air, then screw the lid on. Put your name and sample identification on bottle
6. Keep sample chilled! This is very important for good quality results
7. Put your details and desired tests onto the lab’s Effluent Sampling Form, attach to the sample and send to the lab
as soon as possible.
What should be tested?
Useful tests to get done on the effluent sample are % DM, total nitrogen (N), phosphorus (P), potassium (K), sulphur
(S), calcium (Ca), magnesium (Mg) and sodium (Na).
This test will allow you to determine the nutrients and effluent volume going onto your effluent
blocks so you can use nutrients efficiently and meet your consent conditions.
MEASUREMENT
1-2 m
22
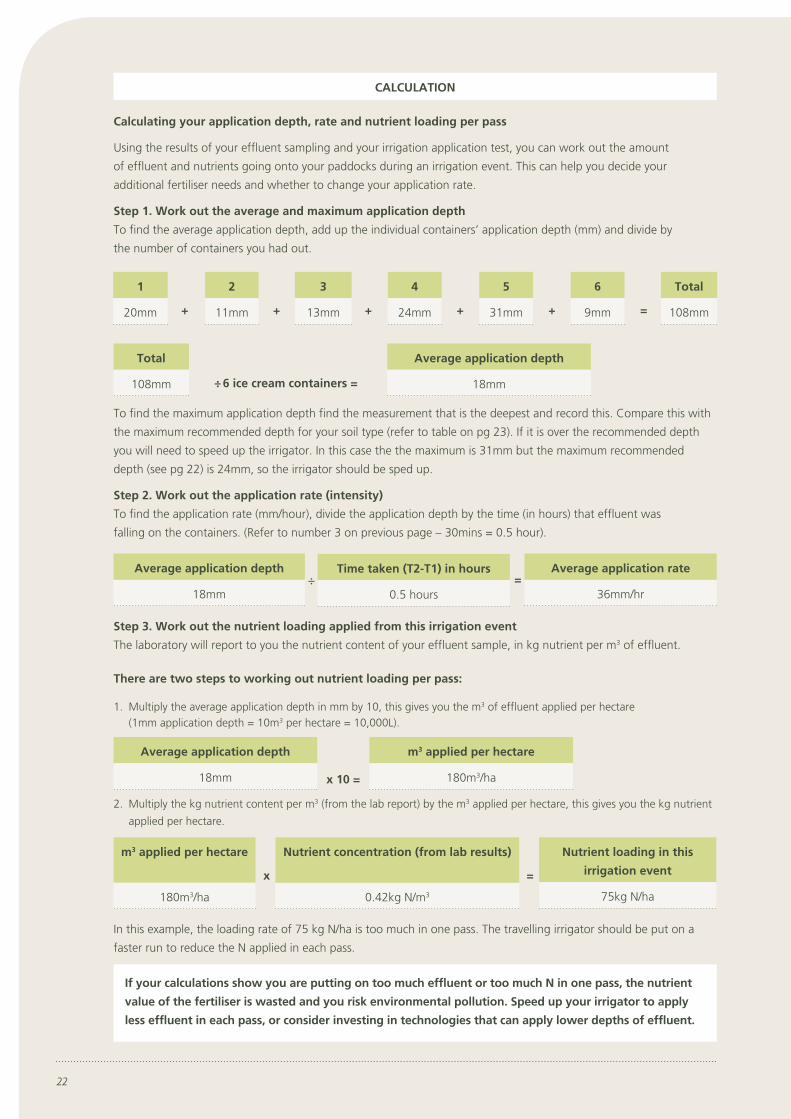
Calculating your application depth, rate and nutrient loading per pass
Using the results of your effluent sampling and your irrigation application test, you can work out the amount
of effluent and nutrients going onto your paddocks during an irrigation event. This can help you decide your
additional fertiliser needs and whether to change your application rate.
Step 1. Work out the average and maximum application depth
To find the average application depth, add up the individual containers’ application depth (mm) and divide by
the number of containers you had out.
To find the maximum application depth find the measurement that is the deepest and record this. Compare this with
the maximum recommended depth for your soil type (refer to table on pg 23). If it is over the recommended depth
you will need to speed up the irrigator. In this case the the maximum is 31mm but the maximum recommended
depth (see pg 22) is 24mm, so the irrigator should be sped up.
Step 2. Work out the application rate (intensity)
To find the application rate (mm/hour), divide the application depth by the time (in hours) that effluent was
falling on the containers. (Refer to number 3 on previous page – 30mins = 0.5 hour).
Step 3. Work out the nutrient loading applied from this irrigation event
The laboratory will report to you the nutrient content of your effluent sample, in kg nutrient per m3 of effluent.
There are two steps to working out nutrient loading per pass:
1. Multiply the average application depth in mm by 10, this gives you the m3 of effluent applied per hectare (1mm application depth = 10m3 per hectare = 10,000L).
2. Multiply the kg nutrient content per m3 (from the lab report) by the m3 applied per hectare, this gives you the kg nutrient
applied per hectare.
In this example, the loading rate of 75 kg N/ha is too much in one pass. The travelling irrigator should be put on a
faster run to reduce the N applied in each pass.
Average application depth
18mm
m3 applied per hectare
180m3/hax 10 =
Average application depth
18mm
Average application rate
36mm/hr
m3 applied per hectare
180m3/ha
Nutrient loading in this
irrigation event
75kg N/ha
Nutrient concentration (from lab results)
0.42kg N/m3
x =
–: 6 ice cream containers =
1
20mm
Total
108mm
2
11mm
3
13mm
Average application depth
18mm
4
24mm
5
31mm
6
9mm
Total
108mm+ + + + + =
CALCULATION
Time taken (T2-T1) in hours
0.5 hours
If your calculations show you are putting on too much effluent or too much N in one pass, the nutrient
value of the fertiliser is wasted and you risk environmental pollution. Speed up your irrigator to apply
less effluent in each pass, or consider investing in technologies that can apply lower depths of effluent.
=÷

23
Capturing Value Principle Two: Keep it in the root zone
If too much effluent is applied at one time, it can run off the soil surface, cause ponding and pasture damage, or
effluent can leach through to groundwater. If this happens, the nutrient benefit is lost and pollution can result.
Different soils have varying capacities to absorb and hold effluent:
• Sandy soils soak up effluent quickly so you can apply the required amount of effluent in a short period of time. But
sandy soils do not hold large volumes and effluent may drain freely through these soils to groundwater. So you can
only apply a low depth, or volume of effluent in any one event, though you can put that amount on quite fast (like a
short, intense rainfall)
• Clay soils will hold greater volumes of effluent than sandy soils, so overall you can apply a greater depth in any single
event. But they absorb liquid slowly, so you cannot apply a high rate. This means if you have a travelling irrigator you
need to use a high speed, but if you have sprinklers you can apply a low rate of effluent over a longer time (like a less
intense rainfall over a longer period)
• Loamy soils (mixtures of sand, silt and clay) can hold the greatest volumes of effluent overall, and can absorb effluent
moderately fast.
Measure the application depth that your irrigator applies (see pg 22) and then compare the results with the
recommendations below for your soil type. The depth is the total amount of effluent to apply in one event, (like mm
of rainfall) suited to what your soil type can absorb and hold. Note that if the soil conditions are wet, you need to
reduce your effluent application depth by speeding up your irrigator or operating your sprinklers for a shorter time.
Effluent application depth recommendations for various soil textures under pasture cover
Soil texture Maximum application depth
Sand 15mm
Loamy Sand 18mm
Sandy Loam 24mm
Fine Sandy Loam 24mm
Silt Loam 24mm
Clay Loam 18mm
Clay 18mm
Check the Bay of Plenty Regional Council website boprc.govt.nz (search soil) for soil information in your area. Or
better still, have the soils on your farm mapped for accurate information.
Heavy soils have a high risk of ponding and runoff. Runoff is also a risk on sloping soils. Free-
draining soils may not show any surface ponding or runoff but there is a risk of effluent draining
through into groundwater.
If soils are wet, application depth should drop, or application should be deferred until conditions are
drier. If soils are very dry and cracked, application depth should drop or application should be deferred.
These figures are for soils with
50% water holding capacity
prior to the application of
effluent, not wet soils!

24
You can also calculate your system’s average application rate (see pg 22), which is the intensity of the application (like
mm of rainfall per hour). If you have had your soil infiltration rate measured, your application rate should not be
higher than your infiltration rate; otherwise ponding and runoff can occur. If you do not know your infiltration rate,
visually check there is no ponding or runoff when you apply effluent.
Remember:
• If you test your travelling irrigator’s output and it is delivering more effluent than is shown in the table on pg 23, you
need to speed up your irrigator
• Soils over mole and tile drains need to receive light and even applications. Applications should be kept to a depth
of 10mm and only when soil conditions allow. Travelling irrigators should be operated at the fastest speed or
ideally a low application system is best on these soils. If a low application system is used then 9-12mm can be
applied over 3-6 hours
Test what your irrigation equipment delivers (see pg 22). If the average depth is more than the
recommended figure for your soil, or if you are observing ponding or runoff, speed up your
travelling irrigator, or run your sprinkler system for a shorter time.
Irrigating at times of low soil moisture and at a rate
the soil can absorb.
Do not apply more effluent than the soil can absorb.
Ponding causes pasture damage and leaching to
groundwater.

25
Capturing Value Principle Three: Be aware of uneven spray patterns
The best use is made of nutrients if they can be applied evenly across the paddock.
Different equipment has a varying capacity to achieve this. Sprinkler systems and oscillating irrigators have a more
even spray pattern than a standard travelling irrigator. A standard travelling irrigator operating at a faster speed will
have a more even pattern than the same irrigator at a lower speed.
Effect of uneven spray patterns
Travelling irrigators have an uneven spray pattern, increasing the load applied to certain parts of the paddock. Areas at
the outer edge of a travelling irrigator’s spray pattern receive effluent for longer periods, so there is a band of heavier
effluent loading on each side of the irrigator’s run, with lighter loading in the middle.
Typically, the rate at the outer edge of the spray trajectory is double the rate nearer in. It is important
to ensure the application does not exceed 25mm per pass at any point. Travelling irrigator runs must
be wide enough apart so there is no overlap on the outer edges. Sprinklers or oscillating irrigators can
apply effluent more evenly.
17.5 17.57.5 7.512.5 12.52.5 2.5
Dep
th a
pplie
d (m
m)
Distance from cable (m)
Depth of effluent applied from a travelling irrigator
90.0
80.0
70.0
60.0
50.0
40.0
30.0
20.0
10.0
0.0
The green line shows actual depth applied during testing. Orange line shows depth applied when the correct
travel speed setting was used, after adjustment.
What this means is that you need to test your irrigator’s actual output, including the spray pattern it applies, to keep
within the maximum depth for your soil.
To work out the depth your system applies, the spray pattern, the rate (how long it takes to apply that depth),
and the nutrient loading being applied, refer to pg 21-22.

26
Operating an effluent system
Daily management of your system is critical to avoiding problems and making the most of the nutrient value of
your effluent.
The following are some principles for smooth operation of your effluent system:
1. Adjust your plan according to conditions
2. Set up your irrigation system properly
3. Don’t just “set and forget”
4. Stay on top of maintenance so it doesn’t get on top of you
5. Manage your storage.
Operating Principle One: Adjust your plan according to conditions
Create a land application plan according to your own farm features. Then adjust your plan depending on day-to-day
soil and weather conditions.
The right amount at the right time
Check your consent conditions to see what restrictions there are on applying effluent after rainfall events, and any
rest period specified between applications. In the Bay of Plenty it is usually recommended paddocks are rested for 14
days between applications.
Pasture growth and N uptake is slower in winter so you should aim to apply less effluent in wet, cold conditions.
It’s important to have a clear decision-making process about when to irrigate (see roles and responsibilities pg 38).
It may be inappropriate to proceed with your planned effluent irrigation if:
• The soil is too wet following rainfall – effluent may pond, run off to waterways, or leach through to groundwater
• The soil is very dry and cracked, especially over tile or mole drains – effluent may travel through soil cracks to
underground drains and then flow into waterways
You may need to speed up your irrigator so you do not apply too much effluent for the conditions. Adequate storage
facilities give you the flexibility to apply effluent when the time is right.

27
How can I measure if my soil is dry enough to irrigate?
Before irrigating, check that the soil moisture deficit is greater than the maximum application depth.
The most accurate way to be sure about irrigation is to use monitoring technology. Getting good advice before
investing in this type of technology is vital.
• Handheld instantaneous measurement options such as probes cost around $300-$800. They need to be calibrated to
your soil type and situation by a qualified technician
• A step up from instant measurements is a ground sensor which can be read either by hand-held devices or by sending
readings back to a computer. These options start at $2500 for a tape and hand-held device, moving up to about
$4000 for a telemetric system which allows for remote monitoring
• The next step up again is a fully integrated system which monitors climatic data, effluent pond level, soil moisture
levels, soil mapping, irrigator positioning and run recording and can be used for full irrigation scheduling, with remote
monitoring. You can be sent text alerts and recommendations based on your farm’s irrigation system. These systems
are more costly but allow for precise monitoring and are particularly good for large operations or absentee owners.
If you do not have a soil moisture meter, you need to observe the conditions.
Do not irrigate if:
• Water is ponding or forming puddles on the ground
• You can hear water or wet mud as you walk
• You stamp your foot several times in one spot and water comes to the surface
• There are drowning worms on the surface of the paddock from previous rain or irrigation
• It has been raining heavily or is likely to rain heavily within 24 hours.
Remember any excess N from effluent that is not taken up by pasture is a loss to your production
system and a risk to the environment.
The Bay of Plenty Regional Council have some monitoring sites on their website,
boprc.govt.nz > live monitoring > land.
28
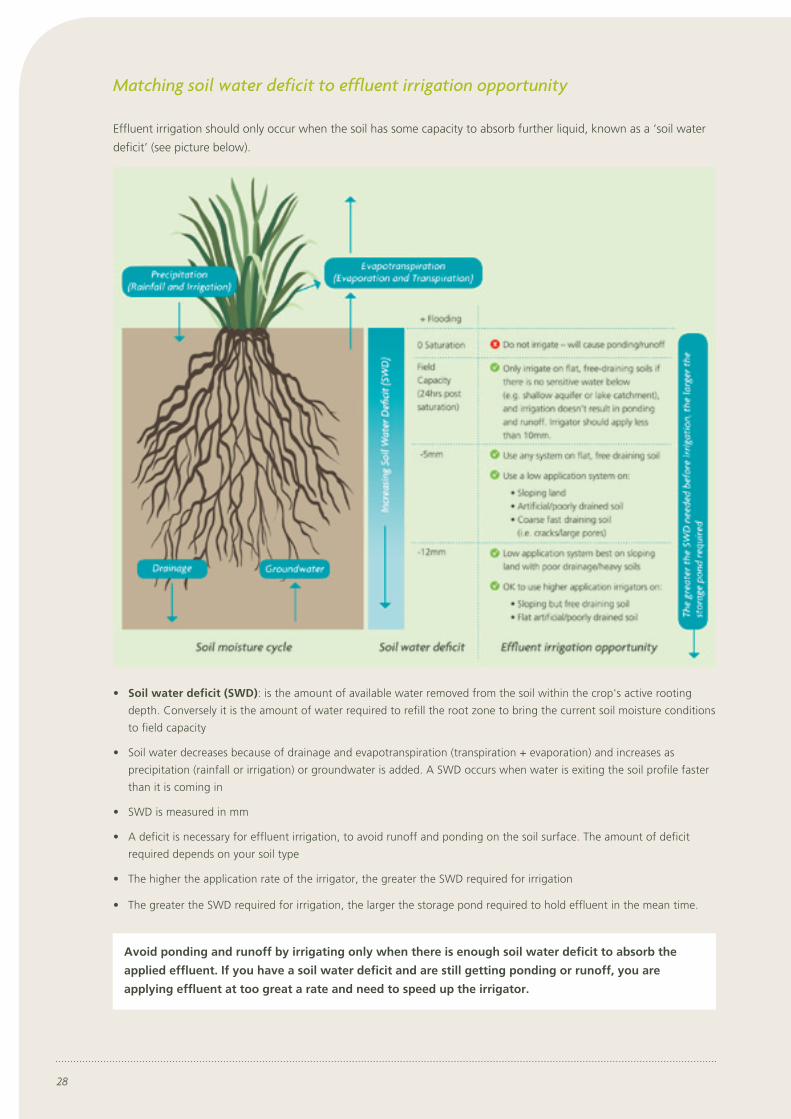
• Soil water deficit (SWD): is the amount of available water removed from the soil within the crop's active rooting
depth. Conversely it is the amount of water required to refill the root zone to bring the current soil moisture conditions
to field capacity
• Soil water decreases because of drainage and evapotranspiration (transpiration + evaporation) and increases as
precipitation (rainfall or irrigation) or groundwater is added. A SWD occurs when water is exiting the soil profile faster
than it is coming in
• SWD is measured in mm
• A deficit is necessary for effluent irrigation, to avoid runoff and ponding on the soil surface. The amount of deficit
required depends on your soil type
• The higher the application rate of the irrigator, the greater the SWD required for irrigation
• The greater the SWD required for irrigation, the larger the storage pond required to hold effluent in the mean time.
Matching soil water deficit to effluent irrigation opportunity
Avoid ponding and runoff by irrigating only when there is enough soil water deficit to absorb the
applied effluent. If you have a soil water deficit and are still getting ponding or runoff, you are
applying effluent at too great a rate and need to speed up the irrigator.
Effluent irrigation should only occur when the soil has some capacity to absorb further liquid, known as a ‘soil water
deficit’ (see picture below).

29
Keep good records
As you implement your plan, record keeping is essential - check your resource consent to see what types of records
are required.
Keep a running log sheet to record applications (an example is included below).
Keeping records of effluent application
During the season, record actual effluent application runs, noting when each shift occurred and observations
about soil conditions. Adjust the plan accordingly.
Effluent recording application recording sheet example
Paddock Date Run number Signature Comment (e.g. signs of ponding or runoff)
1 15/8/10 7 FNP
1 16/10/10 8 FNP
1 12/12/10 4 WJP
2 6/9/10 10 WJP Ponding at south end, too wet?
Avoiding problems
• Apply effluent at the lowest possible application rate and only when soil conditions are appropriate (ensure you have
adequate storage to be flexible)
• Speed up your irrigator in wet conditions by changing gears – “if in doubt run it flat out”
• Only spread effluent where it cannot enter drains and waterways. Check waterways and drain outlets to ensure no
effluent is reaching the water
• Be aware of where your mole and tile drains are, and if possible, run your irrigators across them rather than following
along the drains. Soils that have these drains are high-risk areas and should be avoided when irrigating during wet
periods – use your farm map to plan and record this
• Record which paddock and irrigator run is used on which day – this will ensure that you are not returning to those
runs too early. Refer to the DairyNZ website dairynz.co.nz for recording templates
• Apply effluent onto short pasture. Graze the area a few days prior to application
• Withhold cows from grazing pastures treated with fresh farm dairy effluent for at least 10 days to minimise
animal health risks
• Mark your run numbers in your effluent block paddocks with ear tags or similar, so you can enter on your recording log
which run numbers you have covered each day.
See the DairyNZ website dairynz.co.nz for templates you can use for record keeping.
30
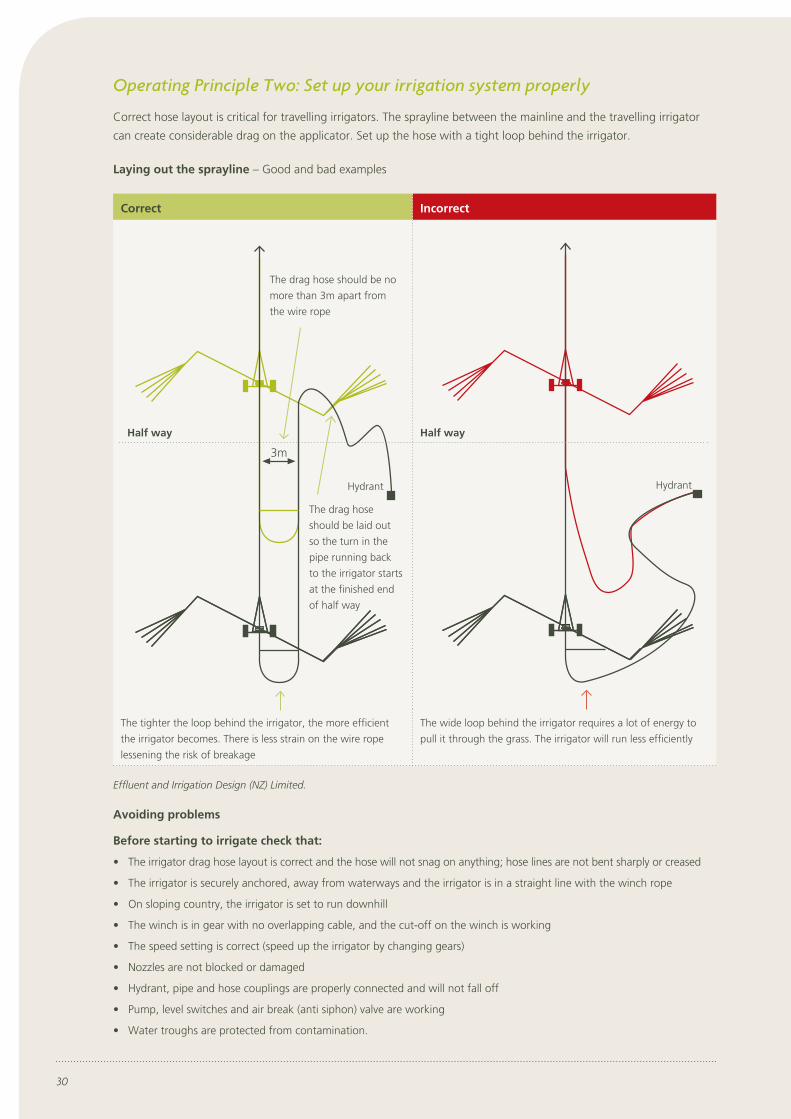
Operating Principle Two: Set up your irrigation system properly
Correct hose layout is critical for travelling irrigators. The sprayline between the mainline and the travelling irrigator
can create considerable drag on the applicator. Set up the hose with a tight loop behind the irrigator.
Laying out the sprayline – Good and bad examples
Correct Incorrect
The tighter the loop behind the irrigator, the more efficient
the irrigator becomes. There is less strain on the wire rope
lessening the risk of breakage
The wide loop behind the irrigator requires a lot of energy to
pull it through the grass. The irrigator will run less efficiently
Effluent and Irrigation Design (NZ) Limited.
Avoiding problems
Before starting to irrigate check that:
• The irrigator drag hose layout is correct and the hose will not snag on anything; hose lines are not bent sharply or creased
• The irrigator is securely anchored, away from waterways and the irrigator is in a straight line with the winch rope
• On sloping country, the irrigator is set to run downhill
• The winch is in gear with no overlapping cable, and the cut-off on the winch is working
• The speed setting is correct (speed up the irrigator by changing gears)
• Nozzles are not blocked or damaged
• Hydrant, pipe and hose couplings are properly connected and will not fall off
• Pump, level switches and air break (anti siphon) valve are working
• Water troughs are protected from contamination.
Half way
The drag hose should be no
more than 3m apart from
the wire rope
3m
The drag hose
should be laid out
so the turn in the
pipe running back
to the irrigator starts
at the finished end
of half way
Hydrant
Half way
Hydrant

31
Operating Principle Three: Don’t just “set and forget”
Over-application is a common problem and may be caused by the irrigator getting stuck or not being moved on time.
Effluent systems must be managed properly, according to the requirements of your particular equipment:
• Sprinkler systems usually have fixed application rates. The application depth is controlled by the length of time the
effluent is applied. Sprinkler systems with timing control can be pulsed e.g. 15 minutes on and 45 minutes off, giving
control over the total depth applied and the hourly rate. Spacing and pressure must be correct with these systems
• Travelling irrigators apply varying depth according to the speed they travel (faster speed = lower depth applied). Pressure
variations also affect how much effluent is applied in one spot
• Any reduction in pressure at the irrigator can result in effluent being applied at higher application depths and rates.
Pressure reduction can result from:
- Low pump capacity or poor pump performance
- Nozzle damage
- Too much hose or incorrect hose layout
- Irrigators travelling uphill
After starting your irrigator, visually check that it appears to be operating at the correct pressure.
Avoiding problems
• Listen for excessive noise or vibration from the pump
• Watch the irrigator to see it is working as planned
• Check for leaks
• Be sure you have enough run length left for the time you plan to irrigate
• Set a reminder on your cell phone to tell you to shift the irrigator
• When shifting to the next spot, tow the irrigator no faster than walking pace.
A number of irrigator monitoring/control systems are available e.g. “Gator Buddy”. These can shut the system down
when it malfunctions. Warning can be by flashing light, siren and/or text message.
Use your cell phone alarm to remind you when to
shift the irrigator.
Gator Buddy.

32
No ponding. Irrigator set to fastest speed and hose
layout is correct.
Poor hose layout creates drag on the irrigator;
irrigator slows down and applies too much effluent.
Correct operation of irrigation systems
Sub-optimal pressure or incorrect spacing can
give a high depth of effluent even from a low
application system.
Sub-optimal pressure and blocked nozzles mean
system delivers higher depths of effluent.
Optimal pressure to deliver the correct depth of effluent.
Systems operating at the correct spacing and
layout to deliver good application depths and a
uniform spread.
33
Operating Principle Four: Stay on top of maintenance so it doesn’t get on top of you
Timely maintenance can help reduce stress and ensure the system performs as it should.
Maintenance of land application systems
Daily
• Check for blockages, split pipes or pump problems.
Regularly
• Clean and grease all moving parts on the applicator
• Check that the nozzles are not blocked or damaged
• Ensure above-ground connections are clear of dirt, and the sprayline is free of cuts or splits
• Flush clean water through the delivery line and sprinklers to keep them from blocking
• Check tyre pressure on the irrigator
Six-monthly to annually
• Service the pump; check the pump seals as these are the components most susceptible to wear
• Check wheel bearings on the irrigator
• Have a nutrient analysis done on the stored effluent, soil and pasture
• Measure what your irrigator is actually applying (should be no more than 25mm per application). See pg 21 for instructions
• Train staff in correct effluent management practice
• Check the conditions of any hydrants, couplings or any potential weak spots on the effluent pipe network.
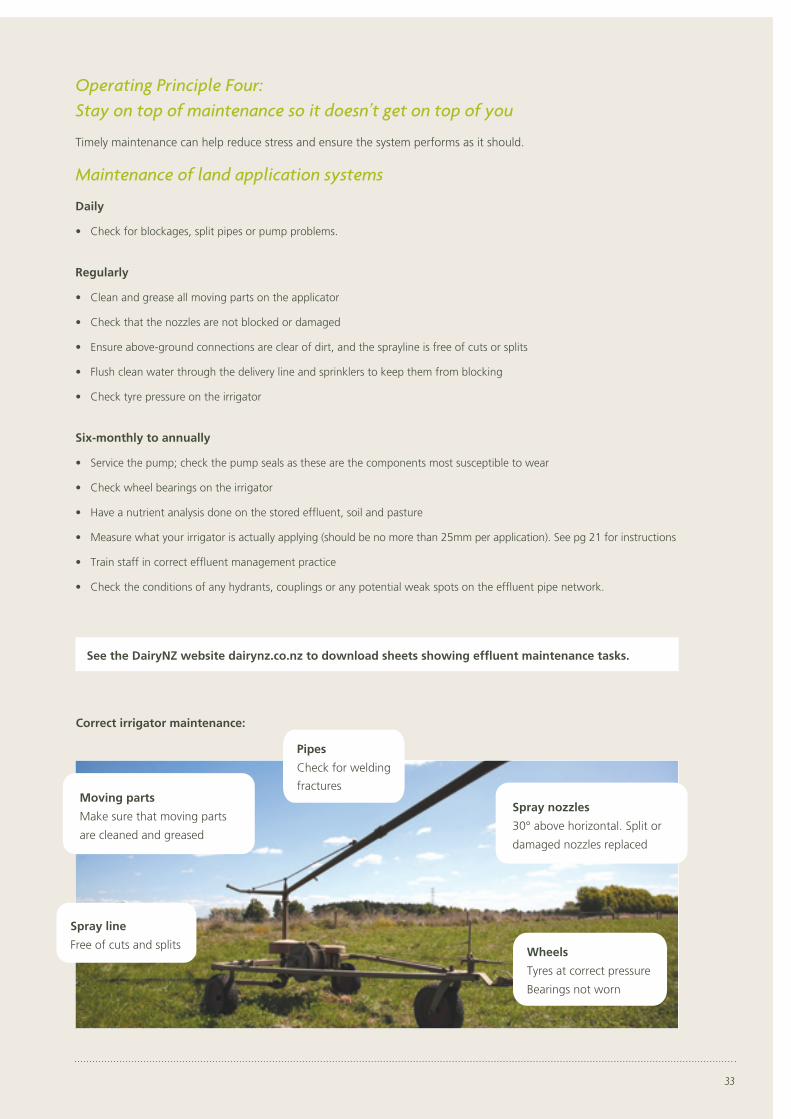
Correct irrigator maintenance:
Wheels
Tyres at correct pressure
Bearings not worn
Spray nozzles
30° above horizontal. Split or
damaged nozzles replaced
Spray line
Free of cuts and splits
Moving parts
Make sure that moving parts
are cleaned and greased
Pipes
Check for welding
fractures
See the DairyNZ website dairynz.co.nz to download sheets showing effluent maintenance tasks.

34
Maintenance of pumps, pipelines and irrigators
What to do when something does go wrong
A contingency plan should be in place for equipment failure or power cuts. Consider a back-up petrol, diesel or
PTO pump. Having extra storage is also a good strategy.
If storage is limited and there is an equipment failure:
• Contact the repairer immediately to assess the problem
• Limit or cease water use in the dairy yard and scrape effluent where possible
• Complete repairs or install back-up before the next milking. Where necessary, arrange for a vacuum tanker to empty
the sump and spread effluent to your effluent block.
Avoiding problems
• Regularly maintain your irrigation system. Make sure the pipes and sprinklers are not blocked or damaged and that the
pump is in good working order
• Have a maintenance schedule posted in the farm dairy and sign off on maintenance tasks as they are done
• Leave a list of important phone contacts in the farm dairy in case of equipment failure
• PTO driven pumps must not run dry, even for very short periods, as the mechanical seals will fail. Grease every time
they are used.
Check irrigator nozzle (replace at same time that dairy rubberware is replaced).
Check irrigator tyre pressure.
Grease the irrigator.Grease nipples.
Dairy effluent escaping to water should be reported to the Pollution Hotline 0800 884 883.

35
Maintenance and management practices
Regularly check your irrigation system and flush
clean water through to prevent blockages. Check
all moving parts are clean and greased.
A poorly maintained irrigator, with higher potential
to break down and cause problems.
Regularly check nozzles and sprinklers for blockages,
and replace any damaged or split parts. Do not cut
bigger holes in the nozzle as it will not spread properly.
A split pipe causing effluent to pond and leach
through to groundwater.
Effluent escaping due to a damaged hose that has
not been properly maintained.
Ensure pumps are regularly oiled and cleaned.
Check pump impellers for wear. Listen for any
unusual noises when pump is operating.

36
Operating Principle Five: Manage your storage
Manage your storage by irrigating when there is a soil moisture deficit (when soils are not saturated). Emptying ponds
over autumn will ensure that storage capacity is available during busy spring periods. Irrigating at drier times also
makes the best use of the water in the effluent.
Check your resource consent to see if it specifies the freeboard you need to maintain in your storage ponds.
Your current storage capacity is only the volume left in the pond. If the pond is full, no matter what
the size, there is no storage capacity left. Manage your storage so it never overflows, keep it as empty
as possible to give you flexibility.
Winter
Spring
Summer
Autumn
Winter – should be empty if
effective stormwater diversion
is in place.
Spring – pond filling as
effluent is generated, but not
emptied if staff workloads are
high during calving. Small
volumes can be irrigated when
soils are drying out.
Summer – ponds should be
emptied by irrigating all the
effluent.
Autumn – Should be empty by
the start of autumn and remain
empty through winter. If it is a
wet autumn smaller volumes
should be irrigated.

37
Pond maintenance
Daily
• Before and after every milking, check that the stormwater or washwater diversion is in the correct position.
Weekly to monthly
• Clean and clear the effluent stone trap and gratings; store on a sealed surface or apply directly to land if conditions allow
• Check that the pond walls are stable, and that there is no seepage. Visible wetness or pasture that is growing
exceptionally well are indicators of seepage problems
• Control weeds in and around ponds
• Check that the fencing remains stock-proof; exclude stock at all times
• Check levels on storage ponds, and that float switches are clear and working.
Six-monthly to annually
• When the areas around the ponds are dry, graze them in a well controlled manner
• Check that there is not excessive crusting in the pond, especially around the pump intake
• Desludge ponds regularly. This could be every one, two or three years and will vary depending on cow numbers, use of
feed pad, pond size etc. Consult your local FDE accredited designer for advice if you’re not sure.
Desludging storage ponds
• Mix sludge with liquid effluent before spreading directly onto pasture to prevent plant damage
• If possible, the surface liquid effluent should be removed before desludging by suction drawing it into a vehicle spreader
• Alternatively, pond stirring to mix the various layers of the pond before emptying can remove the need for excavators to
desludge ponds. Note that wave action created by pond stirrers can damage imported clay liners
• Use vehicle spreaders when soils are dry
• Sludge usually has a higher nutrient content than liquid effluent, so application rates need to be lower
• Do not allow grazing of pasture recently treated with sludge. Either wait for rain or allow a 10-day stock withholding
period before grazing
• If dewatering sludge or scraping from stone traps, it should be placed on an impermeable surface where runoff can
flow back to the stone trap.
Avoiding problems
• Maintain drains above the storage facility so that rainwater doesn’t enter the pond
• Empty the sump and stone trap regularly – if it is full it is not working
• Prevent rubbish entering the system – have rubbish bins in the farm dairy and yards
• Where ponds are lined with a plastic or imported clay liner, ensure that the pumps, stirrers or other machinery never
interfere with the liner. Contractors should be made aware that a liner is present
• Ensure that pond fences are stock-proof and child-proof for safety and to prevent damage to pipework and embankments
• If you are planning to plant trees around a storage pond, consult a local engineer first. Some trees may affect pond
bank stability.
Don’t use your pond like a rubbish bin. Aim to keep out all items which may cause blockages.
38
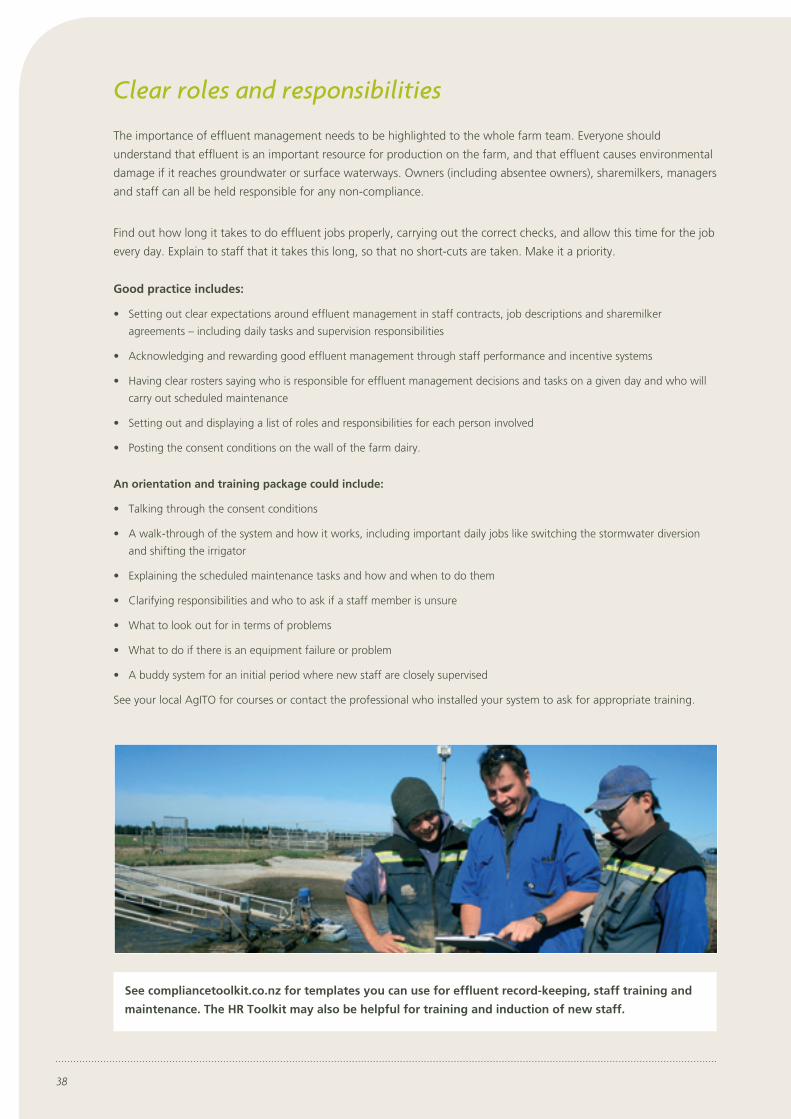
Clear roles and responsibilities
The importance of effluent management needs to be highlighted to the whole farm team. Everyone should
understand that effluent is an important resource for production on the farm, and that effluent causes environmental
damage if it reaches groundwater or surface waterways. Owners (including absentee owners), sharemilkers, managers
and staff can all be held responsible for any non-compliance.
Find out how long it takes to do effluent jobs properly, carrying out the correct checks, and allow this time for the job
every day. Explain to staff that it takes this long, so that no short-cuts are taken. Make it a priority.
Good practice includes:
• Setting out clear expectations around effluent management in staff contracts, job descriptions and sharemilker
agreements – including daily tasks and supervision responsibilities
• Acknowledging and rewarding good effluent management through staff performance and incentive systems
• Having clear rosters saying who is responsible for effluent management decisions and tasks on a given day and who will
carry out scheduled maintenance
• Setting out and displaying a list of roles and responsibilities for each person involved
• Posting the consent conditions on the wall of the farm dairy.
An orientation and training package could include:
• Talking through the consent conditions
• A walk-through of the system and how it works, including important daily jobs like switching the stormwater diversion
and shifting the irrigator
• Explaining the scheduled maintenance tasks and how and when to do them
• Clarifying responsibilities and who to ask if a staff member is unsure
• What to look out for in terms of problems
• What to do if there is an equipment failure or problem
• A buddy system for an initial period where new staff are closely supervised
See your local AgITO for courses or contact the professional who installed your system to ask for appropriate training.
See compliancetoolkit.co.nz for templates you can use for effluent record-keeping, staff training and
maintenance. The HR Toolkit may also be helpful for training and induction of new staff.

39
Staff safety
Every year many people are seriously injured or killed carrying out everyday tasks on farm. The effluent system is a
particularly hazardous area. A Health and Safety Plan is a legal farm requirement. Use the DairyNZ Compliance Toolkit
(compliancetoolkit.co.nz) to ensure you meet your obligations to keep people safe on your farm.
Some practical things to consider when designing or managing your effluent system are:
• Provide training for system operators that includes instructions on how to operate and maintain the farm dairy effluent
system in a safe manner. Safety information, including emergency protocols, should be included in the farm operations
manual and farm induction
• Make sure staff and visitors are aware of hidden hazards like pipework, wire ropes, hydrants in the paddock and
overhead or buried power lines
• Earth all electrical equipment
• Turn off and secure moving parts when shifting or checking irrigators (boom arms etc)
• Guard moving parts on pumps or machinery
• Install barriers around storage facilities
• Use non-slip surfaces next to storage facilities
• Stabilise pontoons and have an approved gantry for servicing pumps and stirrers
• Ensure exit/rescue options are in place e.g.ropes and ladders for storage facilities.
Working with effluent contractors
No matter who is applying the effluent, consent conditions still apply. Farm owners and contractors can potentially be
liable for non-compliance.
It is important to tell the contractor what is required in writing. Ensure the following matters are clear:
• Maximum application depth and rate
• No ponding or runoff
• Keep safe distance from waterways
• Procedure at the end of the job.
Avoiding problems
• Make sure staff and contractors know the rules and consent conditions and how to comply
• Be thorough with orientation and training – supervise staff until they know the system
• Have an effluent management plan that everyone understands, including:
- Paddock layout and scheduled runs
- Record keeping of daily runs
- Maintenance schedule and a record of when tasks are done
• Be clear on responsibilities for deciding when the plan needs to change
• Make sure staff know the contingency plan in case of system break-down or wet conditions.
Download an Effluent Contractors Acknowledgment template from compliancetoolkit.co.nz (under forms)

40
Stand-off areas and feed pads
The major differences when you add effluent from a feed pad or stand-off area to your existing dairy effluent system are:
• Higher volume
• More nutrients
• Higher solids content.
Stand-off areas and feed pads should include an effluent management system providing:
• Sealed storage areas for any solid effluent scraped off the area (e.g. sawdust, manure)
• Sufficient capacity in your storage and application system for additional liquid effluent
• Sealing, bunding and collection of liquid effluent from the pad so that it cannot drain into groundwater or surface water.
Drains underneath soft surfaces should have a sealed layer below them and should direct effluent to a treatment system.
The use of unsealed stand-off areas or “sacrifice paddocks” should be avoided.
Stand-off and feed pads can have different surface materials (such as concrete, limestone, wood chip, bark or sawdust). Each of these requires different management. Some wood-based products are highly absorbent and can be scraped and composted or spread to land. But you may still be asked to demonstrate that you have an appropriate seal and collection system beneath the pad to ensure no effluent is reaching groundwater.
Some roofed herd shelters do not require washing down. In some covered shelters, effluent falls through the slatted concrete floor into bunkers below where the liquid evaporates in the warm conditions created by the shelter’s plastic roofing. The semi-dried effluent is then removed and spread to land.
It is crucial that no effluent from a pad runs off into waterways or leaks through to groundwater. It is
far cheaper to set up a good effluent system during pad construction than to try and adapt it later.
Slatted concrete floors where effluent collects and
dehydrates before removal.Effluent from feed pads must not run off to
waterways or leak into ground water.
41
What will need to change?
Every stand-off and feed pad situation is different. The effluent treatment system should be designed for your particular situation. Plan your effluent system around a high-use scenario to allow for future flexibility. Talk to the Bay of Plenty Regional Council prior to putting in a new feed pad or stand-off pad to check what resource consent implications there may be.
To cope with the increased load on your effluent system, you may need:
• Extra storage for liquid and solid effluent
• A means to remove the solids and fibrous material from the effluent before irrigating
• More irrigation area to deal with the extra volume and nutrients.
Dealing with more effluent
The amount of extra storage required will depend on the pad design and use. A pad can generate up to 10 times the effluent coming from a farm dairy, depending on:
• The size of the pad and cow numbers
• The time stock spend on the pad
• The feed given, and any lost feed
• Cleaning methods (scrape vs wash) and wash-down frequency
• Exposure of the surface to rainfall.
You can reduce effluent volume from the pad by:
• Use of a stormwater diversion system when the pad is clean
• Roofing the pad
• Designing the pad for easy scraping to reduce the frequency of washdowns
• Using recycled yard water for washdown.
Dealing with more nutrients
Effluent sampling and nutrient budgets will help you work out the area you will need to spread your effluent and comply with your consent. Include the nutrient value from your pad into your nutrient management planning so you make the best use of the valuable nutrients collected from your pad.
If you are separating solids, you will need to take account of nutrients in the solid and liquid fractions of your effluent. Some of the N will be separated out with the solids, but much of the K is soluble and remains in the liquid. Test liquid effluent for K content.
If you are putting the effluent from stand-off areas or feed pads into your existing effluent system,
you are likely to overload the system and will need to upgrade it to cater for the higher volume,
nutrients and solids content.
If you add a feed pad or stand-off pad to your farm system, or significantly increase your herd
numbers, contact the Bay of Plenty Regional Council to see if your resource consent needs updating.

42
Dealing with more coarse solids in effluent
Effluent from pads has more coarse solid material in it. This can cause blockages and wear in the system.
Solids washed off the pad can be:
• Settled out in a separate pond with a baffle or T-piece outlet to retain the solids
• Held behind a “weeping wall” structure
• Removed with other technology such as mechanical solids separation.
Remember, settling ponds receiving effluent from a feed pad will require more frequent desludging.
Retained solids can be dried on a sealed surface and spread on land at a suitable rate to avoid nutrient overloading.
Scrapings from feed pads must be stored on
a sealed, bunded area.
Solids separation machines provide easily handled
solid and liquid products.
Cow shelters which have a slatted floor where effluent is collected and contained and can be spread at a suitable time.
Weeping wall system showing solids retained by the wall and liquid seeping into pond.
Weeping walls
• Need to be designed and constructed by experts (contact the DairyNZ sustainability team for a recommendation)
• Should have an exit point for effluent leaving the weeping wall that is lower than the weeping wall bed
Please contact the Bay of Plenty Regional Council or a sustainable dairying specialist for advice prior to construction.

43
Regional Council perspective
The Bay of Plenty Regional Council encourages dairy farmers to irrigate or spread effluent to land wherever this can be done in a sustainable way. Farmers apply for a resource consent to apply effluent to land, and the consent sets out the conditions for your farm. Consents for land application are not normally notified to the public and do not usually require written approval from affected persons.
There are still some discharges from effluent treatment ponds into water. This activity requires resource consent and a full assessment of environmental effects, including consultation with iwi and other affected parties. The duration of a consent to discharge to water is usually shorter than that granted for land application. The consent application may also be notified and could result in a hearing being needed. This can be an expensive process.
There are also some properties still using land or pond soakage for small herds. These farms are encouraged to transition to land application. This activity should not occur within 20m of streams or drains.
Application of effluent to land is the treatment option preferred by the Bay of Plenty Regional Council,
unless specific site conditions make this ineffective.
If you believe that land treatment may not be effective for your site and you want to pursue a
discharge to water, contact a Bay of Plenty Regional Council consent officer and engage a suitably
qualified professional to help advise you.
Farm dairy effluent discharges to water, and pond or land soakage systems are not acceptable in the
Rotorua lakes catchments i.e. ponds must be sealed. Effluent storage ponds in all other catchments
should be fully sealed to prevent seepage to groundwater, and have sufficient capacity to store
effluent when conditions are not suitable for land application. Ponds should be sized using the pond
storage calculator.
Look up the rule in the Bay of Plenty Water and Land Plan
Permitted
The activity is not allowed.
Discretionary
The activity can be carried out without a resource consent as long as you comply
with the criteria outlined in the Bay of
Plenty Water and Land Plan.
A resource consent is needed to carry out
the activity – it may or may not be granted.
ProhibitedControlled
A resource consent is needed, but this
will always be granted
– conditions may vary.

44
The Bay of Plenty Regional Water and Land Plan
The following is a summary of relevant rules in the Bay of Plenty Regional Water and Land Plan (operative as of December 2008).
Permitted activities
Silage stacks or pits are permitted (no consent needed) under Rule 27, as long as:
• No leachate reaches a surface water body
• There is no ponding or overland flow from the silage pit or stack
• Stormwater is diverted from the silage pit or stack
• It is not located within 50m of:
- a bore, stream, river, lake, wetland or land drainage canal
- a geothermal surface feature
- the coastal marine area
- a gully, depression or area that is flooded during storm events
- an area where the groundwater is less than 1m below the base of the pit or stack.
If the above conditions cannot be met then the pit or stack must be sealed and the leachate collected and directed to the farm effluent system. Otherwise, wrapped bales can be used. It is recommended that silage pits and stacks are covered to prevent rainwater entry, and that silage is made in a way that minimises excess moisture.
Controlled activities
Applying effluent to land is a controlled activity (needs a consent, which will be granted with conditions) under Rule 32. Conditions can be set regarding:
• Nitrogen application rate
• Discharge rate and volume
• Location of irrigation in relation to surface water or groundwater bores
• Application site in relation to soil type, slope and area
• Measures to avoid, remedy or mitigate effects on water (for example storage capacity and sealing)
• The duration of the consent
• Monitoring and charges.
Discretionary activities
Discharging effluent to water is discretionary (needs a consent, which may or may not be granted) under Rule 37. Applications must show how the water body will be affected, related to the relevant Water Quality Classification of the water body.

45
Other activities
The Bay of Plenty Regional Council may not require a resource consent application for calf-rearing facilities as long as:
• There is no ponding or runoff of liquid effluent from the facility and
• All soft materials removed (e.g. sawdust) are spread to land at appropriate application rates to prevent odour and nutrient
or bacterial runoff.
Runoff from feed pads needs to be covered by consent. Where the effluent is directed into the farm dairy effluent system, this needs to be considered in the farm’s resource consent. You may need to update your consent to include these areas. Contact a Bay of Plenty Regional Council consents officer to discuss further.
Applying for a resource consent
You will need to complete a Base Form and Form II when applying for a resource consent, which you can get from
the Bay of Plenty Regional Council. You will need to supply the following information that is specific to consents for
discharging effluent:
• The number of animals using the shed or effluent collection area (including any planned growth in herd size or
production units), and the volume and quality of the effluent produced by the system
• A description of the effluent collection, storage, treatment and disposal system, including the rate and depth of
effluent application
• An explanation of how the system will be managed so that it complies with the standards and terms, including a
contingency plan for equipment failure or other emergencies
• Details of any other sources of effluent that need to be consented e.g. feed pad, stand-off pad, silage leachate etc
Other general information required with your consent application includes:
• A description of the activity for which consent is sought, including the methods and processes to be used. The
description should identify the location(s) of the discharge(s) by way of a map, and include the correct NZMS reference
• The site characteristics of the discharge location, including hydrogeological information (soil and water properties
of your site). Note: this information is required as part of the effluent pond storage calculator.
If you want to discharge from a pond into a waterway you will need to supply:
• The nature of the discharge (contaminants, quantity, frequency, duration, hazardous properties etc.)
• A description of the consultation undertaken in relation to the application, and the outcomes of that consultation
• An assessment of any actual or potential effects which the activity may have on the environment, and the ways in
which any adverse effects may be avoided, remedied or mitigated. Note: this is only required when applying for a
consent to discharge to surface waters. The effects of effluent discharge to land, when done in a way that complies
with the guidelines is already understood.
Where effluent discharges directly to water, or to land where it may then get to water, resource
consent is required under Section 15 of the Resource Management Act. This is why effluent from
stand-off areas and feed pads needs to be contained and collected.
If you are increasing cow numbers you may need a variation on your consent. If you are increasing your
effluent area, but not cow numbers, you do not generally need to apply for a variation on your consent.
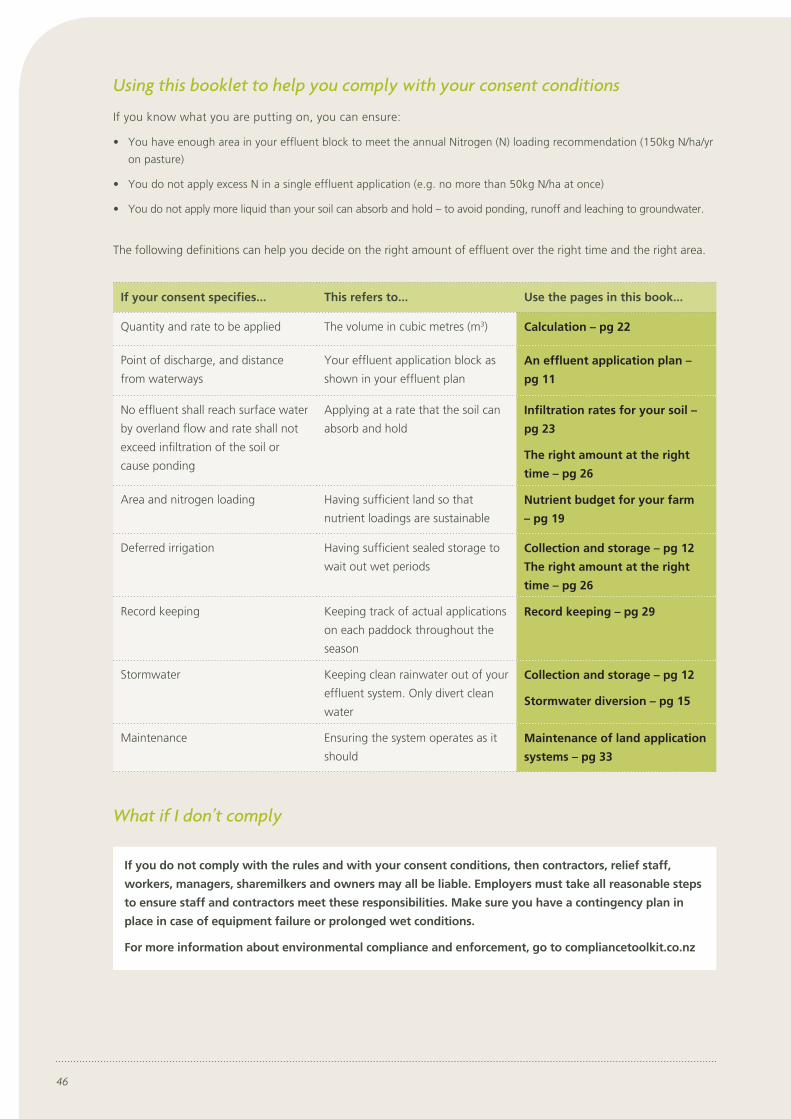
46
Using this booklet to help you comply with your consent conditions
If you know what you are putting on, you can ensure:
• You have enough area in your effluent block to meet the annual Nitrogen (N) loading recommendation (150kg N/ha/yr
on pasture)
• You do not apply excess N in a single effluent application (e.g. no more than 50kg N/ha at once)
• You do not apply more liquid than your soil can absorb and hold – to avoid ponding, runoff and leaching to groundwater.
The following definitions can help you decide on the right amount of effluent over the right time and the right area.
If your consent specifies... This refers to... Use the pages in this book...
Quantity and rate to be applied The volume in cubic metres (m3) Calculation – pg 22
Point of discharge, and distance
from waterways
Your effluent application block as
shown in your effluent plan
An effluent application plan –
pg 11
No effluent shall reach surface water
by overland flow and rate shall not
exceed infiltration of the soil or
cause ponding
Applying at a rate that the soil can
absorb and hold
Infiltration rates for your soil –
pg 23
The right amount at the right
time – pg 26
Area and nitrogen loading Having sufficient land so that
nutrient loadings are sustainable
Nutrient budget for your farm
– pg 19
Deferred irrigation Having sufficient sealed storage to
wait out wet periods
Collection and storage – pg 12
The right amount at the right
time – pg 26
Record keeping Keeping track of actual applications
on each paddock throughout the
season
Record keeping – pg 29
Stormwater Keeping clean rainwater out of your
effluent system. Only divert clean
water
Collection and storage – pg 12
Stormwater diversion – pg 15
Maintenance Ensuring the system operates as it
should
Maintenance of land application
systems – pg 33
What if I don’t comply
If you do not comply with the rules and with your consent conditions, then contractors, relief staff,
workers, managers, sharemilkers and owners may all be liable. Employers must take all reasonable steps
to ensure staff and contractors meet these responsibilities. Make sure you have a contingency plan in
place in case of equipment failure or prolonged wet conditions.
For more information about environmental compliance and enforcement, go to compliancetoolkit.co.nz

47
The following are a series of practical tools which have been developed by DairyNZ with farmers. They are available to download on the dairynz.co.nz website under publications and tools, or order a copy by calling 0800 4 DairyNZ (0800 4 324 7969).
Tools and resources available to help with effluent management
Training staff
Effluent Training Record
To help make sure you cover all the bases when training new staff. Serves as a file away record of training should you ever need it
AgITO Dealing with Dairy Farm Effluent
A one day course looking at the reasons why, and how to treat dairy effluent on farm. Suitable for all the farm team. Includes a one-on-one practical assessment on the participant’s farm. AgITO 0800 691 111
AgITO Effluent Management Planning
A one day course for farm owners, herd managers, supervisors, sharemilkers etc. Templates and tutor expertise to help you create an effluent management plan for your farm. Includes a follow up session to discuss practical implications. AgITO 0800 691 111
Top Tips for Effluent Irrigators
Make sure your staff get it right every time with this poster for the dairy, outlining top tips for trouble free effluent irrigators
Effluent Management Plan
A visual plan to pin up in the dairy so all staff know the drill with effluent management
Managing and monitoring
Irrigator Run Sheet
Get the best financial return from the fertiliser in effluent by recording where it goes with this one page template for recording irrigator runs. Includes: date, paddock number, run number and sign off area for person responsible for moving the irrigator
A Guide to Managing Farm Dairy Effluent
A good practice guide for farm decision makers. Topics include design, nutrient value, management, monitoring, measuring and storage
Fonterra Dairy Diary
A handy all-in-one place for recording daily monitoring and management information, including effluent
Upgrading your system
Farm Dairy Effluent Systems: Planning the Right
System for Your Farm
A farmer guide to the farm dairy effluent system design standards and code of practice. Helps you plan your system with your designer so you get a system which is fit for purpose
Improving farm performance
FarmFacts
A set of fact sheets explaining all things dairy including effluent – one of DairyNZ’s most popular resources
Nutrient Management Case Studies
Nutrient use efficiency is all about finding productivity gains on your farm. Pick up some ideas on where you may be able to use your nutrients more effectively from farmers from across the country
Minimising Muck, Maximising Money Guide and
Case Studies
Avoid the pitfalls when designing feed pads and stand-off facilities with this guide to design and management of feed pad and stand-off areas, including case studies from farmers around the country
Compliance Toolkit
Are you complying with your legal requirements? Find out with this easy to use online tool for cutting through the red tape. Covers all aspects of farm compliance; employment, health and safety, animal welfare and environment. Download copies of the Compliance Checklist for dairy regions across the country, or use the consent scoping tool to minimise your compliance risks. Visit compliancetoolkit.co.nz
Best Management Practices for Maize
Covers using effluent on maize crops so you can optimise the fertiliser value of effluent, crop yield and improve soil condition by adding organic material
Farm Enviro Walk
A good practice self-assessment for environmental performance on farm. Covers effluent, soil, nutrient, waterways and other hotspots on farm. A useful training tool

DairyNZCorner Ruakura and Morrinsville RoadsPrivate Bag 3221Hamilton 3240
0800 4 DairyNZ (0800 4 324 7969)
dairynz.co.nz
Bay of Plenty Regional Council
Freephone 0800 884 880
Fax 0800 884 882
boprc.govt.nz
Whakatane5 Quay StWhakatane
Rotorua1125 Arawa St
Rotorua
Tauranga6 Rata StMount Maunganui