Embed Size (px)
Citation preview

A beginner learns guitar
by mark dvorak
This collection of short essays is intended for those who are new to the guitar and for those who haven’t yet started, but are thinking about it. The chapters are presented in chronological order and will invite you to visualize much about your hands and your instrument.
Reading through these pages while away from your instrument might at first be helpful. Even better, print them out and read them while you are away from the computer.
contents
a good place to begin, 2
common fingers, 3
just plain D, 4
A seventh, 5
movement, 7
Gee, 9
tuning, 12
practicing, 15
time and space, 17
C, 19
F, 20
A major, 22
A minor, 23
just for kicks, 24
E, E seventh, E minor, 25
the family D, 26
B7 and G7, 28
you are not alone, 29
a good place to begin
Find yourself a comfortable chair. Make it a hard chair with a straight back and one without arms. Put it in a place away from the television. Away from the telephone. Find a spot outside the traffic patterns of your household and away from congregating areas.
When you find that spot, find your guitar. Don't worry too much about what is or is not proper posture but try and sit a little forward in your chair as you hold your instrument. Get comfortable.
Whether the strings are made of steel or nylon, guitars have six of them. Holding your guitar, they are somewhat parallel to the floor and ceiling.
Let's name the string closest to the floor the first string. And we'll call the string closest to the ceiling the sixth string. In between are the fifth, fourth, third and second strings. This is how most people number them. Six closest to the ceiling, one closest to the floor.
Next, look at the fingerboard. The narrow metal bars that run across its width are called frets. Some acoustic guitars have twenty frets. Some have eighteen. Either way, notice how the frets are closer together up near the body and farther apart down near the headstock.
The word fret actually refers to the narrow metal bar itself. But when we say a guitarist frets his instrument, we actually mean he is placing his fingers on the strings in the spaces between the frets. The space closest to the headstock is the first fret, the next space is the second fret, the next the third, and so on.
One of your hands will strum or pluck the strings somewhere near the sound hole and the other hand will fret the strings. On each hand we name your fingers the same way your kindergarten teacher and God named them: thumb, index, middle, ring and pinky.
As a guitar student, you will focus a lot of time and energy training your fretting hand, particularly here in the early going. In the long run however, the hand that does the strumming and plucking becomes more important. That's the hand that makes the rhythm. That's the hand that makes the sound.
2
common fingers
Guitarists make chord forms with the fingers of their fretting hand. The sound made when strings are plucked or strummed while holding these forms in place are called chords. Chords are what you hear, forms are what you make with your fingers.
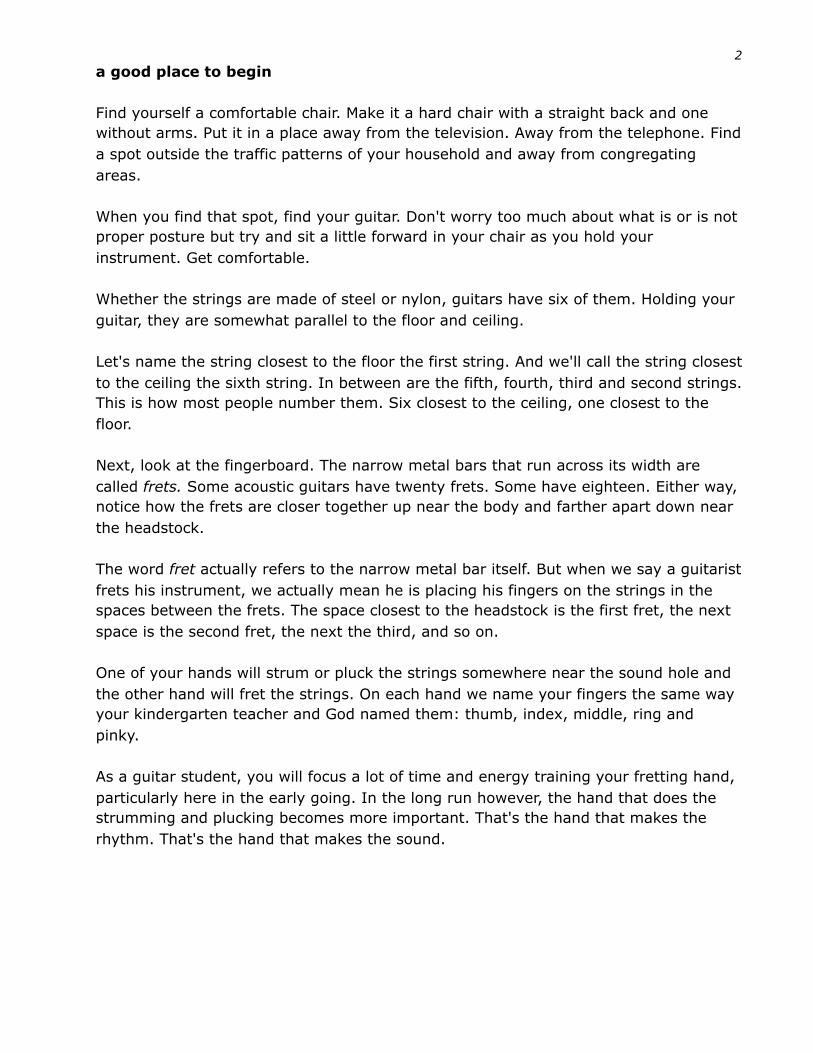
Let's fool around with a chord form. Find the middle finger of your fretting hand and use it to hold down the first string at the second fret.
The joints of that finger ought to be bent a little, or a lot. Stand the end of that finger up as straight as it will go, using the very tip to hold down the string. A long fingernail will make this difficult.
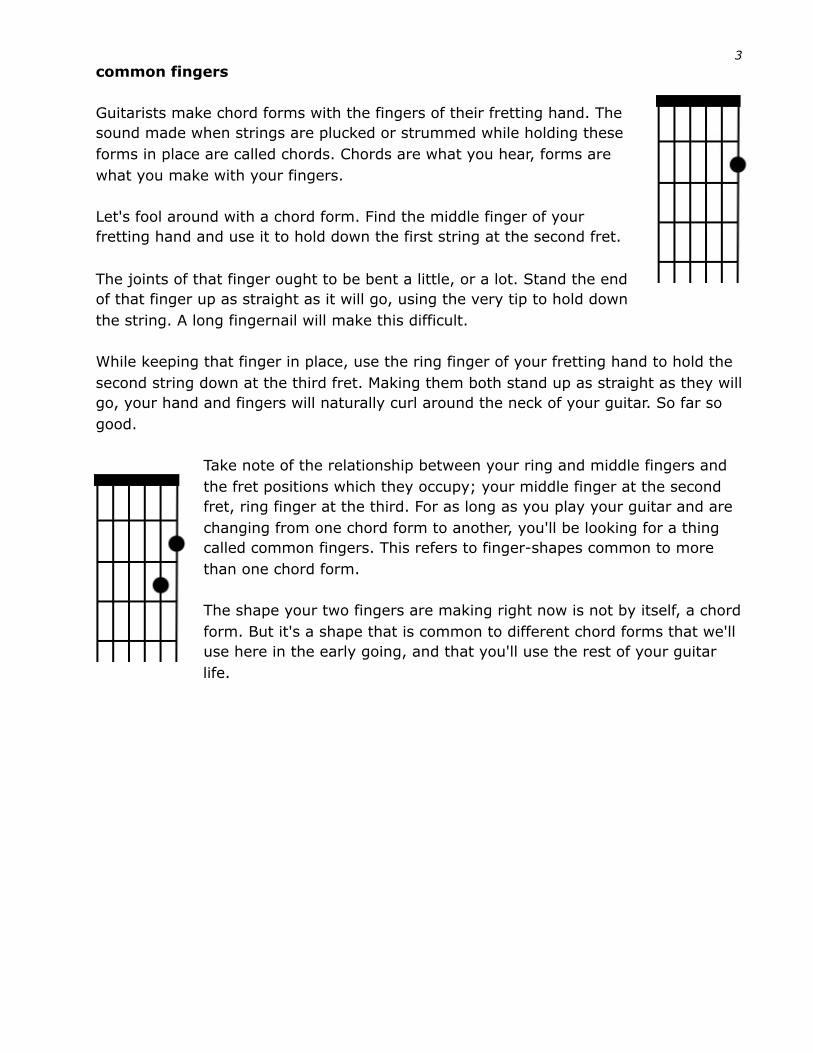
While keeping that finger in place, use the ring finger of your fretting hand to hold the second string down at the third fret. Making them both stand up as straight as they will go, your hand and fingers will naturally curl around the neck of your guitar. So far so good.
Take note of the relationship between your ring and middle fingers and the fret positions which they occupy; your middle finger at the second fret, ring finger at the third. For as long as you play your guitar and are changing from one chord form to another, you'll be looking for a thing called common fingers. This refers to finger-shapes common to more than one chord form.
The shape your two fingers are making right now is not by itself, a chord form. But it's a shape that is common to different chord forms that we'll use here in the early going, and that you'll use the rest of your guitar life.
3
just plain D
On the guitar, let's say a chord is the sound of two or more strings strummed or plucked at the same time. Placing fingers on strings at various positions on the fret board in fact, changes the length of those strings. When strummed or plucked, the sounds produced by those strings are now organized in a specific way. Let's learn one of those ways.
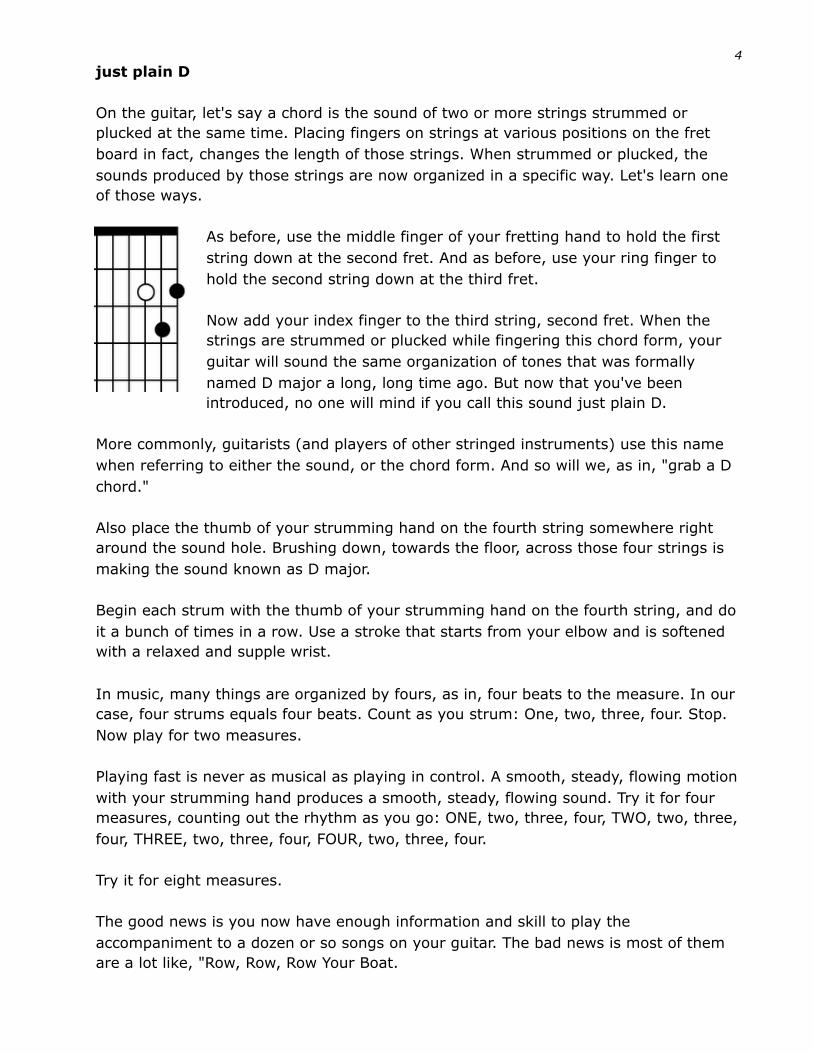
As before, use the middle finger of your fretting hand to hold the first string down at the second fret. And as before, use your ring finger to hold the second string down at the third fret.
Now add your index finger to the third string, second fret. When the strings are strummed or plucked while fingering this chord form, your guitar will sound the same organization of tones that was formally named D major a long, long time ago. But now that you've been introduced, no one will mind if you call this sound just plain D.
More commonly, guitarists (and players of other stringed instruments) use this name when referring to either the sound, or the chord form. And so will we, as in, "grab a D chord."
Also place the thumb of your strumming hand on the fourth string somewhere right around the sound hole. Brushing down, towards the floor, across those four strings is making the sound known as D major.
Begin each strum with the thumb of your strumming hand on the fourth string, and do it a bunch of times in a row. Use a stroke that starts from your elbow and is softened with a relaxed and supple wrist.
In music, many things are organized by fours, as in, four beats to the measure. In our case, four strums equals four beats. Count as you strum: One, two, three, four. Stop. Now play for two measures.
Playing fast is never as musical as playing in control. A smooth, steady, flowing motion with your strumming hand produces a smooth, steady, flowing sound. Try it for four measures, counting out the rhythm as you go: ONE, two, three, four, TWO, two, three, four, THREE, two, three, four, FOUR, two, three, four.
Try it for eight measures.
The good news is you now have enough information and skill to play the accompaniment to a dozen or so songs on your guitar. The bad news is most of them are a lot like, "Row, Row, Row Your Boat.
4
A seventh
Chords are made up of tones. As D major is the full name of a specific collection of tones, A seventh is also specific. We call chords first by their root tone, D or A for example, and then by another name to indicate which specific collection of tones are added to that root. Examples of these other names are major or minor or dominant seventh or major sixth and on and on. Think of these second names as different kinds of side dishes which can accompany an entree.
Musicians mix tones together to make chords, just as painters mix pigments to create new shades of color. And as the sounds become more complex, so do the names. Not to worry.
Figuring out what various collections of notes are called and why they are so named is less important at this point, than gaining control of your hands so you can change chords smoothly and strum and pluck the strings in a musically fortunate way.
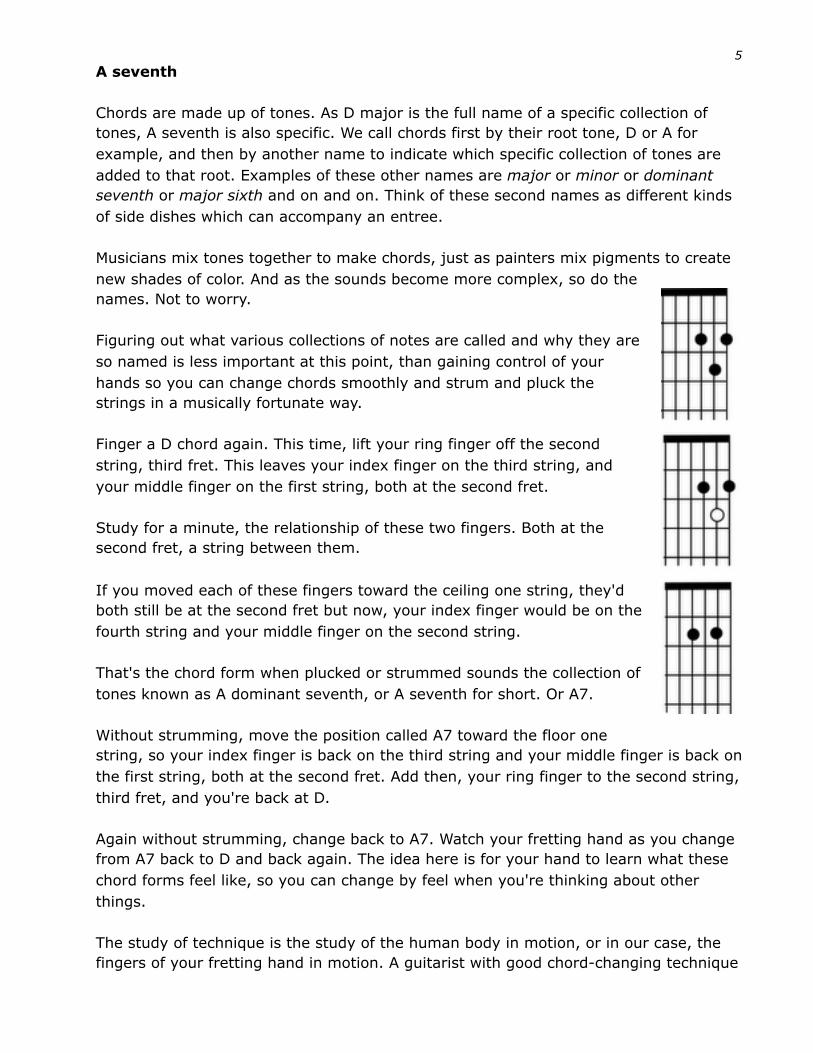
Finger a D chord again. This time, lift your ring finger off the second string, third fret. This leaves your index finger on the third string, and your middle finger on the first string, both at the second fret.
Study for a minute, the relationship of these two fingers. Both at the second fret, a string between them.
If you moved each of these fingers toward the ceiling one string, they'd both still be at the second fret but now, your index finger would be on the fourth string and your middle finger on the second string.
That's the chord form when plucked or strummed sounds the collection of tones known as A dominant seventh, or A seventh for short. Or A7.
Without strumming, move the position called A7 toward the floor one string, so your index finger is back on the third string and your middle finger is back on the first string, both at the second fret. Add then, your ring finger to the second string, third fret, and you're back at D.
Again without strumming, change back to A7. Watch your fretting hand as you change from A7 back to D and back again. The idea here is for your hand to learn what these chord forms feel like, so you can change by feel when you're thinking about other things.
The study of technique is the study of the human body in motion, or in our case, the fingers of your fretting hand in motion. A guitarist with good chord-changing technique
5
is one who has eliminated a lot of unnecessary motion when changing from one chord form to another. Keep your hand close to the fret board when you change, feeling your way across the strings from D to A7 and back.
Try making this change to a rhythm. Finger a D chord, and tap your foot to a slow and steady beat. Again without strumming, count out two measures or eight beats, along with the rhythm you are tapping. Change to A7 again counting out two measures. We could write this little exercise down on paper, each chord symbol representing one measure, or four beats:
D D A7 A7
Tap out your rhythm slowly enough so you can change chords right on the beat. D, two, three, four, D, two, three, four, A7, two, three, four, A7, two, three, four. Do it slower. Repeat.
If it's a little awkward and takes longer to change chords than you had hoped, keep wiggling your fingers as you count until they begin to do what you want them to. They will.
Maybe it's not so awkward. Maybe you're able to do this easily, without a lot of fumbling and worry. Rejoice!
Let's add our strum. when on a D chord remember to begin your strum from the fourth string. When fingering an A7 chord, begin your strum from the fifth string. D, two, three, four, D, two, three, four, A7, two, three, four, A7, two, three, four. Repeat.
6
movement
There's a thing in music called movement. A kind of movement is realized when the story to a song unfolds as you sing or chant the words. A good story begins at the beginning, then takes you somewhere. And then it takes you back home again.
A similar kind of movement takes place when one organization of sounds changes into another organization. And then changes back again.
A song is happening when a progression of words and a progression of sounds are moving forward together. And a good song writer composes each of these lines of movement so that they get along really well. Or at least, stay out of each other's way.
So one way to say it is, language and organized sounds are the building materials of songs. Let's leave the words alone for a minute and concentrate on guitar. The materials we're exploring here are common and have been with us for a long time. Everybody uses them to make all kinds of new songs. Or to make old songs new again.
We already know how to finger the chord form that will make D major when sounded. A good question: Where do we go when we want to put the sound of D major into some kind of musical motion?
Answer: A seventh.
Why? Who knows?
As you become more aware of how sounds are organized in our part of the world, so will clues begin to appear which will help you to answer this for yourself. For now though, let's say that D is your house and that A seventh, or A7, is the place where you got your guitar.
So, beginning your piece by strumming four measures D, and continuing by strumming four measures A7 would be to say that you've gone musically, from your house to the place where you got your guitar.
We can write your little journey down on paper. Each chord symbol represents one measure. Each D symbol means four beats, or four strums of D. Each A7, four beats or four strums of A7.
D D D D
A7 A7 A7 A7
7
But how do we get back home?
One solution is to simply slap out another measure of D, so the entire piece, or progression, is nine measures in duration. See how you like it.
D D D D
A7 A7 A7 A7 D
To some ears, this progression lacks symmetry. Another way to say it is, it sounds lop-sided. To play a D chord the eighth measure instead of A7 is the more common solution. This resolves our journey. This gets us back home within the very common format of eight measures. See if you like this chord progression better:
D D D A7
A7 A7 A7 D
To keep the structure in segments that are four measures in duration is to say the structure is regular. Nice and even. There are plenty of exceptions of course, but this is how it's done most of the time - nice and even.
So when D is the place to begin, A7 is the place you're going. And then you come back to D. These two chords are related as such when you begin on D.
8
Gee
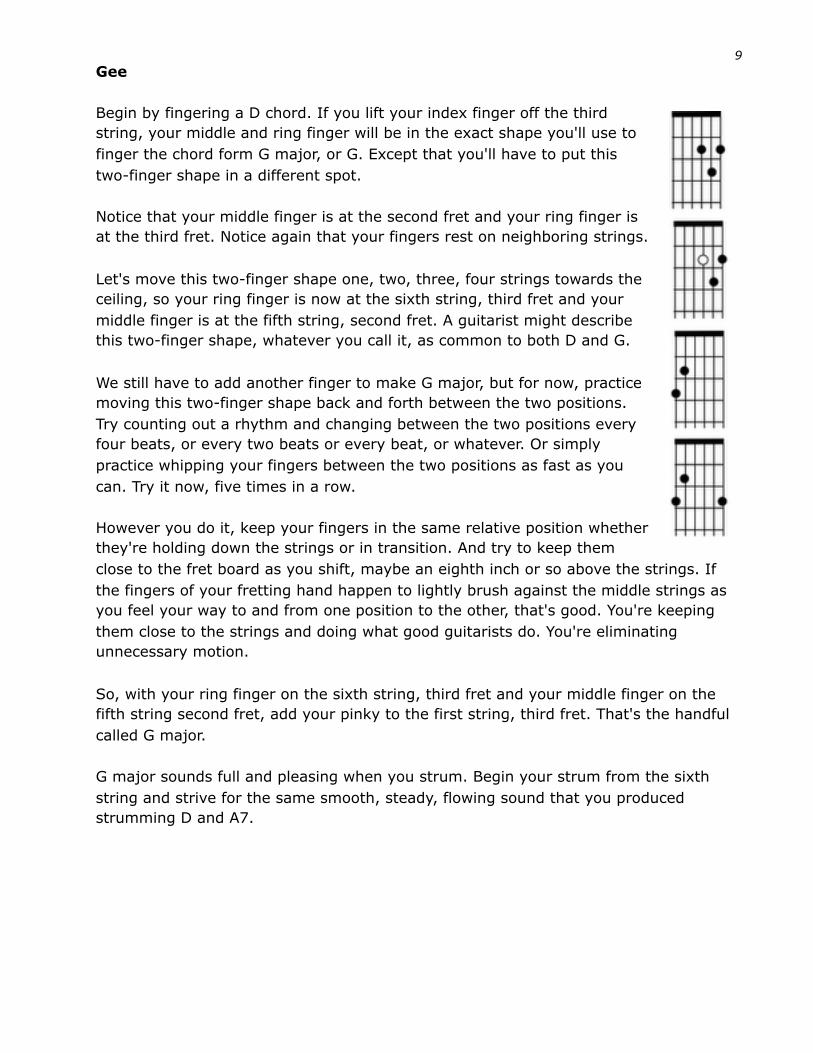
Begin by fingering a D chord. If you lift your index finger off the third string, your middle and ring finger will be in the exact shape you'll use to finger the chord form G major, or G. Except that you'll have to put this two-finger shape in a different spot.
Notice that your middle finger is at the second fret and your ring finger is at the third fret. Notice again that your fingers rest on neighboring strings.
Let's move this two-finger shape one, two, three, four strings towards the ceiling, so your ring finger is now at the sixth string, third fret and your middle finger is at the fifth string, second fret. A guitarist might describe this two-finger shape, whatever you call it, as common to both D and G.
We still have to add another finger to make G major, but for now, practice moving this two-finger shape back and forth between the two positions. Try counting out a rhythm and changing between the two positions every four beats, or every two beats or every beat, or whatever. Or simply practice whipping your fingers between the two positions as fast as you can. Try it now, five times in a row.
However you do it, keep your fingers in the same relative position whether they're holding down the strings or in transition. And try to keep them close to the fret board as you shift, maybe an eighth inch or so above the strings. If the fingers of your fretting hand happen to lightly brush against the middle strings as you feel your way to and from one position to the other, that's good. You're keeping them close to the strings and doing what good guitarists do. You're eliminating unnecessary motion.
So, with your ring finger on the sixth string, third fret and your middle finger on the fifth string second fret, add your pinky to the first string, third fret. That's the handful called G major.
G major sounds full and pleasing when you strum. Begin your strum from the sixth string and strive for the same smooth, steady, flowing sound that you produced strumming D and A7.
9
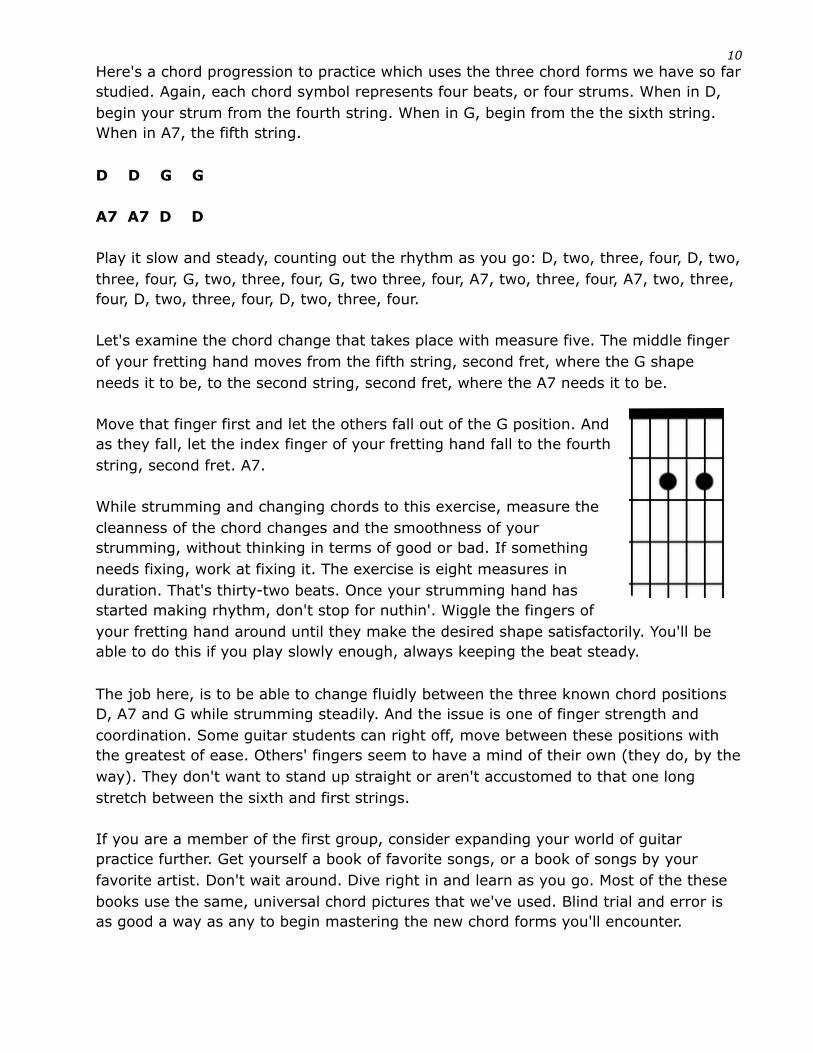
Here's a chord progression to practice which uses the three chord forms we have so far studied. Again, each chord symbol represents four beats, or four strums. When in D, begin your strum from the fourth string. When in G, begin from the the sixth string. When in A7, the fifth string.
D D G G
A7 A7 D D
Play it slow and steady, counting out the rhythm as you go: D, two, three, four, D, two, three, four, G, two, three, four, G, two three, four, A7, two, three, four, A7, two, three, four, D, two, three, four, D, two, three, four.
Let's examine the chord change that takes place with measure five. The middle finger of your fretting hand moves from the fifth string, second fret, where the G shape needs it to be, to the second string, second fret, where the A7 needs it to be.
Move that finger first and let the others fall out of the G position. And as they fall, let the index finger of your fretting hand fall to the fourth string, second fret. A7.
While strumming and changing chords to this exercise, measure the cleanness of the chord changes and the smoothness of your strumming, without thinking in terms of good or bad. If something needs fixing, work at fixing it. The exercise is eight measures in duration. That's thirty-two beats. Once your strumming hand has started making rhythm, don't stop for nuthin'. Wiggle the fingers of your fretting hand around until they make the desired shape satisfactorily. You'll be able to do this if you play slowly enough, always keeping the beat steady.
The job here, is to be able to change fluidly between the three known chord positions D, A7 and G while strumming steadily. And the issue is one of finger strength and coordination. Some guitar students can right off, move between these positions with the greatest of ease. Others' fingers seem to have a mind of their own (they do, by the way). They don't want to stand up straight or aren't accustomed to that one long stretch between the sixth and first strings.
If you are a member of the first group, consider expanding your world of guitar practice further. Get yourself a book of favorite songs, or a book of songs by your favorite artist. Don't wait around. Dive right in and learn as you go. Most of the these books use the same, universal chord pictures that we've used. Blind trial and error is as good a way as any to begin mastering the new chord forms you'll encounter.
10
If you are a member of the second group, consider doing the same thing. Find printed versions of the songs you really, really love. Think of these printed versions as travel brochures and road maps. They represent a scenic route that leads to some beautiful destination.
There aren't any short cuts that I know of. At least, I haven't found any. This I do know: to practice simple things over and over is to progress, one step at a time, towards your destination. And that's how it happens for everyone. One step at a time.
Find your chair, pick up your guitar and today, improve upon something that you already understand. Then send me a post card.
11

tuning
With a pluck of your thumb, a single string is sent vibrating into motion. What we hear is the air around that string vibrating with the same frequency. There's a moment right after impact when the tone flares and then a moment when it settles a bit and rings. Then it begins to fade. Listen to it fade. Can you hear the moment when the tone disappears completely?
Tuning your guitar is listening to your guitar. Believe it or not, all humans are born with the ability to distinguish differences in pitch, and so were you. Musicians sometimes describe a pitch as being high or low. Or higher or lower than another pitch.
Pitch can be measured by the number of vibrations, or cycles, per second. If you sound the first string of your guitar while holding it down at the fifth fret, it will vibrate somewhere around 440 times per second. Let's say that's a lot of vibration, and on the guitar, it is. Hold down the third string at second fret and pluck again. The sound you hear is vibrating around 220 cycles per second. That one's somewhere in the middle. Sound the fifth string open (don't hold it down at any fret), and it’s around 110 cycles per second. We're starting to get down there.
Without using machines or calculations, our amazing ears can tell, almost immediately, that these three tones are different in pitch. Can't they?
I don't like to tune using one of those electronic tuners, but I have one. And I do use it. It's a Sabine. I've added a thing to it called an Iso-Clip, which is a small alligator clip attached to a wire that plugs into the Sabine. The Iso-Clip prevents my Sabine from hearing anything but the sounds that come from my guitar. Very helpful when trying to get in tune in a noisy room.
When I get in tune using my machine, I turn it on and attach the Iso-Clip to the post of one of the tuners. When I pluck a string, the Sabine tells me to which pitch that string is closest, and whether I need to tighten or loosen the tension of the string to bring it into pitch. So I monkey around with the tuning gear until the little green light goes on. Then I pluck the next string, and so on. Believe me, I use my tuning machine. But I don't like using it as much as I like listening to my guitar.
If you're exasperated from trying to get your guitar in tune, or curious about an electronic tuner, I'd say go on down to the guitar store and get one. Nothing beats being in tune. Get an Iso-Clip too.
Then try this. You need two people and two guitars to do this and one of the guitars has to already be in tune. Find a quiet place and sit close, facing each other. The guitarist whose instrument is in tune will give the tones and the other will match those
12
tones. Name your strings one through six, one closest to the floor as you hold your guitars, and six closest to the ceiling.
You can start with any string, but we'll start with the fifth string. The giver sounds the fifth string over and over to a slow, steady beat. Like, one tone every two or three seconds, or something. The matcher also sounds his or her fifth string to that same slow, steady beat. Listen for the moment after impact and after the little flare up of sound. Listen for the sound of the two tones ringing and listen to them fade. Before they fade away completely is the time to strike your strings and listen to them again. Do it some more and don't say anything, just listen.
Decision time. Continuing to sound your fifth strings in unison, the matcher need only determine if the sound of his or her string is the same or different from the sound of the giver's. It's not yet time to worry whether it's higher or lower in pitch.
Determine only whether it's the same, or different, or maybe you can't tell. Those are your choices. Again: same, different, don't know. Make your decision in one second or less. Really.
If you think they're the same, then they're the same. Move on to the next string. If you think the two strings have different pitches, or you're not sure - sometimes it's hard to tell - here's what to do.
Find the tuning gear that controls the tension of the fifth string by tracing that string from the point at which you're plucking all the way down the neck, past the nut to where it's tied off on the post. Turn the tuning gear each way while plucking the fifth string and you'll be able to tell which way tightens the string, or raises the pitch, and which way loosens the string, or lowers the pitch. There.
Have the giver begin sounding his fifth string as before. The matcher also sounds his fifth string, one hand steady on the tuning gear. As fifth strings sound in unison, the matcher begins to loosen his fifth string to a point where he is absolutely certain it is lower in pitch than the giver's. If you're not sure, keep loosening. If your idea of absolute certainty is loosening your fifth string until it flops around like a sagging clothes line, so be it. The idea here is to begin using your ears and to begin trusting them. If you can't tell when your string is lower in pitch than the giver's, keep loosening the string until you can.
If the matcher is now certain his or her string is lower in pitch that the giver's, the matcher is also certain which way to now go. Up. Continuing to sound fifth strings in unison, the matcher begins tightening steadily, perhaps a quarter turn at a time. Maybe less, but always steadily increasing the tension. Sound the strings in unison to a slow beat, turn the gear steadily.
13
When the matcher's string begins nearing the pitch of the giver's, you'll hear waves of sound ringing, almost clashing. Think how circles of ripples expand and finally collide when two stones are plopped side by side, into calm water. It's kind of like that.
The clashing ceases when the two strings are in unison not only in rhythm, but now also in pitch. Ahh. It's not uncommon for the eyes of the giver and matcher to meet when this moment occurs. Isn't that funny?
Try this whole thing again for the fourth string. Then the third, second and first strings. Save the sixth string for last, it's the lowest in pitch and sometimes the most difficult to hear. By the time you get to it, you'll be in good practice.
Keep the process moving. Listen, lower your pitch, bring it up to what you think is in tune, and move on to the next string. That's better than laboring over your pitches and worrying about perfection. Your ears are not muscles, but like tiny muscles, intensive listening can tire them out quickly.
If a string seems cantankerous and doesn't want to get in tune, skip it. Go back to it after you've done the others. When you've attended to all six strings, strum a G chord (we use all six strings when strumming a G chord) and listen for a quality of wholeness. If you think you're there, then you're there. If not, try each one again. Or get out your electronic tuner.
14
practicing
Practicing means working on something. There's a kind of practice that falls into the category of general maintenance. It is focussed on improving the strength and dexterity of your fingers, or helps you make better sense of what you are hearing. Stretching exercises, studying scales, tuning by ear, smoothing out new or difficult chord changes and progressions, and experimenting with different rhythmic patterns are all examples.
Boring? Sometimes. Pointless? Not in the long run. Over the course of time, this kind of practicing pays great dividends. And it pays relatively quickly.
Another kind of practice is the practice of bringing the songs that are inside your head out into the world. This kind of practice begins with first recognizing just what is inside your head.
There are songs still in there you heard and sang as a child. Maybe you've forgotten most of these. There are songs still in there you remember from junior high school, still familiar and maybe a little cornier now than when you first heard them. Maybe there are songs in your head that you remember your parents or grandparents listening to. Or singing. There are annoying commercial jingles and catchy pop tunes in your head too. They seem to always get stuck back in your ear.
Inside of you also, are songs which touch you and excite you. They come from the radio and the ipod and the television. They come from the famous and not so famous people you hear perform in concert or at a music festival. These songs come pouring through the stereo speakers in your car or in your room. And you hear them from friends and strangers alike, wherever guitars are being played.
In certain ways, we define ourselves by these songs. We walk to them. We dress to them. We drive to them and work to them. We celebrate to them. Friendships are made or deepen because of them. They are the soundtrack to our lives.
Practicing means getting to know the words to one of these songs and singing them out loud as best you can.
Practicing means getting to know the chords to that song and constructing a chord chart on paper or in your head, to guide you through the progression.
Practicing means gathering enough information to understand the mechanics demanded by the chord progression. Which finger? Which string? Which fret?
15
Practicing means sounding strings and changing the chords of your song to a rock-solid rhythm until what you hear becomes an acceptable rough sketch of the masterpiece you remember.
Practicing means polishing up your sound-sketch until your ears recognize the moment a clearer, sharper sound image begins to emerge.
Practicing means adding an intro and ending to your song. It means deciding where in your piece to play louder and where to play softer. Practicing means figuring out and adding runs, fills, and perhaps an instrumental break or other ornamentation, to further embellish your piece.
Practicing means listening to yourself.
16
time and space
The major difficulty a practicing guitarist faces has nothing to do with songs, chord forms or sound. The major difficulty has to do with finding or making the circumstances which make regular practice possible.
Real achievement requires many hours and each who has the desire to learn the guitar must find a way to weave regular practice into the fabric of daily life. There's no other way to satisfy that desire. Talent has nothing to do with making progress. An expensive instrument has nothing to do with making progress. Regular, sustained practice is what makes progress.
Where in your schedule can you find an hour, five days a week to practice? Maybe you can only find three. Maybe it's twenty minutes, and not an hour. The length of the time spent working on your music is less important than the frequency with which you return to your practice.
Think for a minute, about the demands on your time. Job, school and family responsibilities are the main ones, and time spent in these areas isn't very often negotiable. If your time is tight, expect to make a different sort of progress than one who has fewer responsibilities and lots of flexible time available.
In the place where you live, where is there a quiet spot? Maybe there's a room, or a corner of a room that you can turn into your music space. I have a comfortable chair and a small desk in mine. On my desk I can spread out written pages better than I was able on my old music stand. But fussing with my music stand was still better than using the floor or the busy kitchen table. On another counter in my room is a nice stereo for listening to all kinds of music. I used to use a portable boom box for studying recorded music I wanted to learn. It was right on my desk and at my finger tips. Nowadays I use a lap top computer for replaying specific passages of a CD. Bookshelves organize my music books, notebooks and old lps. I still have a cassette rack and a CD shelf so all my important stuff is available and easy to find.
I bought a used two-drawer file cabinet some years back to store the things I have written out. File folders of songs, ideas for songs, completed arrangements and other notes fill one entire drawer. In the other I keep a collection of news clips, magazine articles, pictures, different kinds of hand outs and other information I feel pertinent to my music practice. My cabinet bulges.
The walls of my music room are covered with things. Maybe two-dozen framed photographs of guitar heroes, friends and people with whom I have made music. There are several beautiful prints, some posters and other drawings and paintings given to me as presents. There are some plaques awarded me for one reason or another and a couple of poems, nicely printed and framed, hanging on my wall too. Knick-knacks and
17

other memorabilia have over the years, found their way to the tops of bookshelves, into drawers and into the crannies and corners of my music room. Some of it is junk really. But to me, a kind of treasure. All this stuff reminds me to practice well and work hard.
Over time, music space evolves. It is the place where thoughts get thunk, where work gets done and ideas are born into the world as guitar music. Your music space is a laboratory where discoveries are made and it is a blacksmith shop where things get hammered into shape. It becomes all the places you have already been and it becomes everywhere you want to go.
Your music space is the private place where the sometimes holy art of practice becomes manifest. Let's go back to work.
18
C
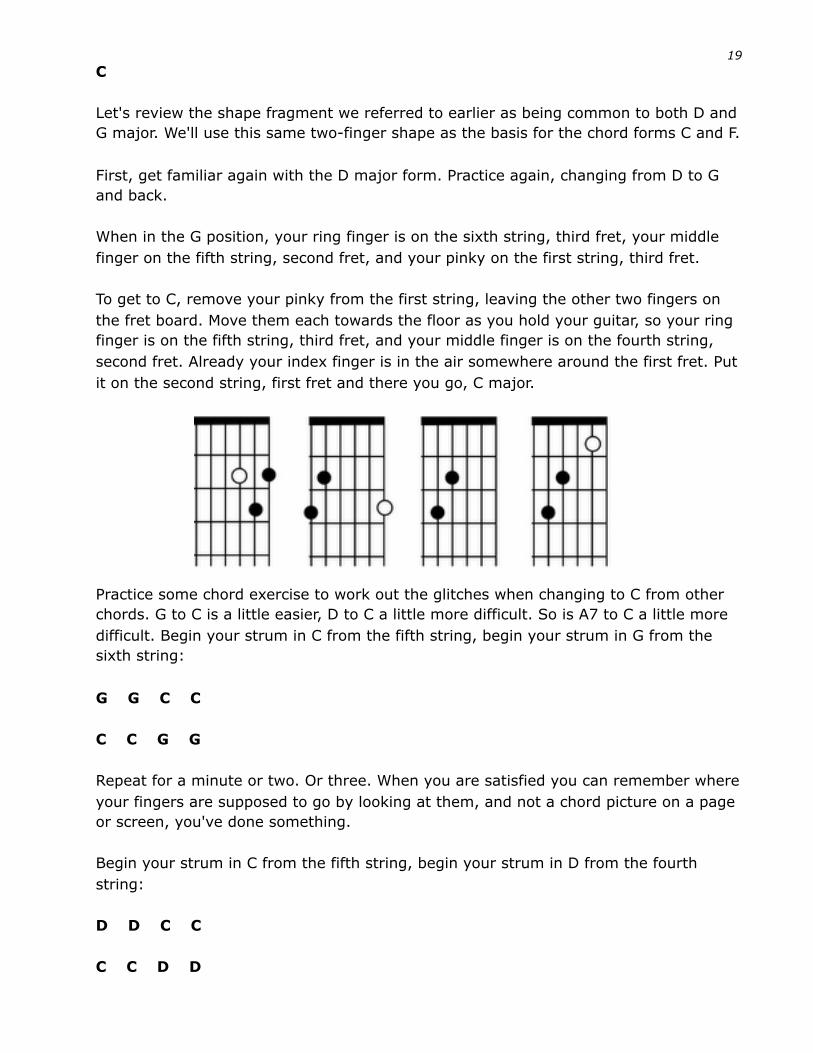
Let's review the shape fragment we referred to earlier as being common to both D and G major. We'll use this same two-finger shape as the basis for the chord forms C and F.
First, get familiar again with the D major form. Practice again, changing from D to G and back.
When in the G position, your ring finger is on the sixth string, third fret, your middle finger on the fifth string, second fret, and your pinky on the first string, third fret.
To get to C, remove your pinky from the first string, leaving the other two fingers on the fret board. Move them each towards the floor as you hold your guitar, so your ring finger is on the fifth string, third fret, and your middle finger is on the fourth string, second fret. Already your index finger is in the air somewhere around the first fret. Put it on the second string, first fret and there you go, C major.
Practice some chord exercise to work out the glitches when changing to C from other chords. G to C is a little easier, D to C a little more difficult. So is A7 to C a little more difficult. Begin your strum in C from the fifth string, begin your strum in G from the sixth string:
G G C C
C C G G
Repeat for a minute or two. Or three. When you are satisfied you can remember where your fingers are supposed to go by looking at them, and not a chord picture on a page or screen, you've done something.
Begin your strum in C from the fifth string, begin your strum in D from the fourth string:
D D C C
C C D D
19
Practice each exercise again, this time listening to the sound. Work at fixing up muffled or buzzing strings. Work at being able to change chords right on the first beat of measures three and seven. If you can't, slow down to a tempo you can handle. Speed will come. Next cut the duration of each chord change from two measures to one, like this:
G C G C
G C G C
And:
D C D C
D C D C
Spending five or ten or fifteen minutes at this sort of thing is a long time. But five or ten or fifteen minutes is all it takes for your fingers to begin remembering the positions. With that, the speed and accuracy of your chord changing will improve.
F
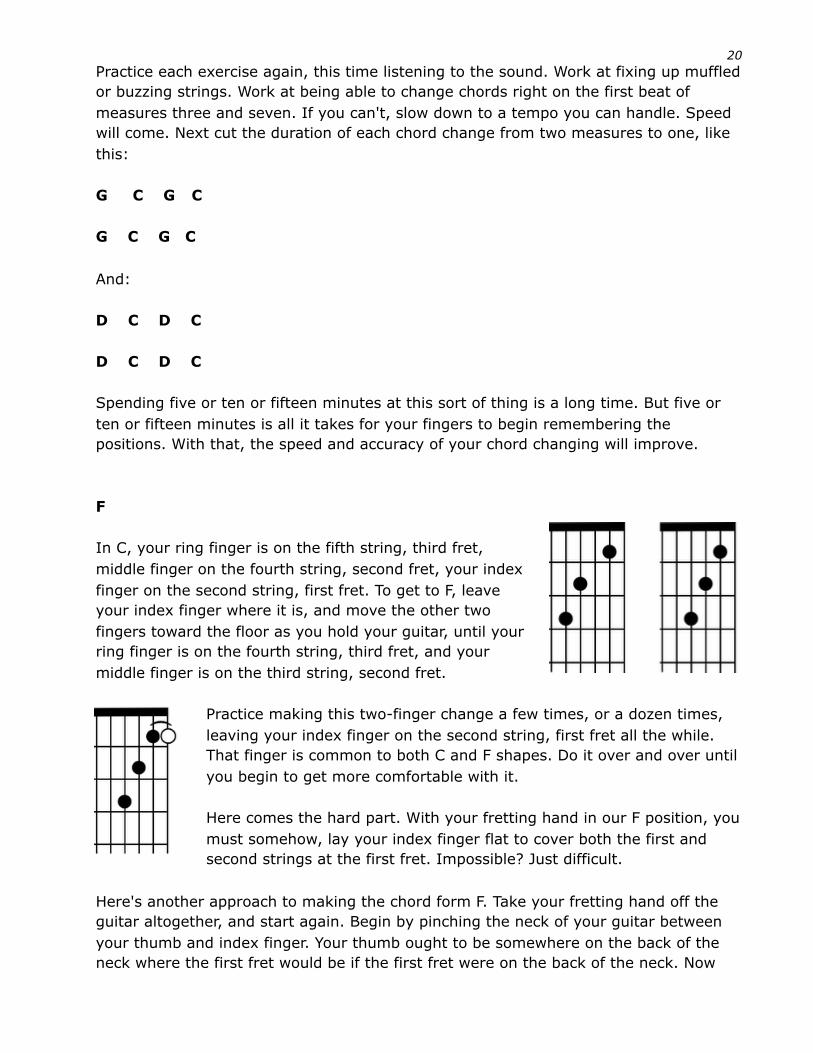
In C, your ring finger is on the fifth string, third fret, middle finger on the fourth string, second fret, your index finger on the second string, first fret. To get to F, leave your index finger where it is, and move the other two fingers toward the floor as you hold your guitar, until your ring finger is on the fourth string, third fret, and your middle finger is on the third string, second fret.
Practice making this two-finger change a few times, or a dozen times, leaving your index finger on the second string, first fret all the while. That finger is common to both C and F shapes. Do it over and over until you begin to get more comfortable with it.
Here comes the hard part. With your fretting hand in our F position, you must somehow, lay your index finger flat to cover both the first and second strings at the first fret. Impossible? Just difficult.
Here's another approach to making the chord form F. Take your fretting hand off the guitar altogether, and start again. Begin by pinching the neck of your guitar between your thumb and index finger. Your thumb ought to be somewhere on the back of the neck where the first fret would be if the first fret were on the back of the neck. Now
20
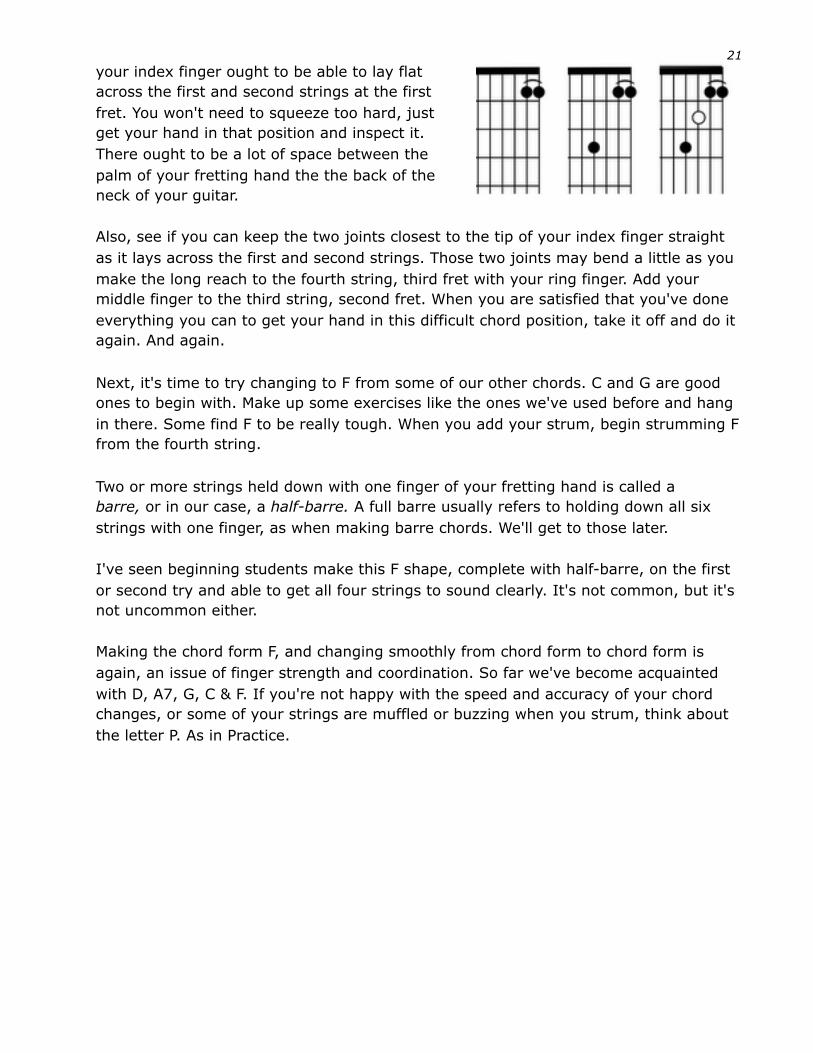
your index finger ought to be able to lay flat across the first and second strings at the first fret. You won't need to squeeze too hard, just get your hand in that position and inspect it. There ought to be a lot of space between the palm of your fretting hand the the back of the neck of your guitar.
Also, see if you can keep the two joints closest to the tip of your index finger straight as it lays across the first and second strings. Those two joints may bend a little as you make the long reach to the fourth string, third fret with your ring finger. Add your middle finger to the third string, second fret. When you are satisfied that you've done everything you can to get your hand in this difficult chord position, take it off and do it again. And again.
Next, it's time to try changing to F from some of our other chords. C and G are good ones to begin with. Make up some exercises like the ones we've used before and hang in there. Some find F to be really tough. When you add your strum, begin strumming F from the fourth string.
Two or more strings held down with one finger of your fretting hand is called a barre, or in our case, a half-barre. A full barre usually refers to holding down all six strings with one finger, as when making barre chords. We'll get to those later.
I've seen beginning students make this F shape, complete with half-barre, on the first or second try and able to get all four strings to sound clearly. It's not common, but it's not uncommon either.
Making the chord form F, and changing smoothly from chord form to chord form is again, an issue of finger strength and coordination. So far we've become acquainted with D, A7, G, C & F. If you're not happy with the speed and accuracy of your chord changes, or some of your strings are muffled or buzzing when you strum, think about the letter P. As in Practice.
21
A major
A7, A major and A minor are all somewhat similar to each other in terms of their form and their sound. Musicians describe them as being related because they share the same root tone, A.
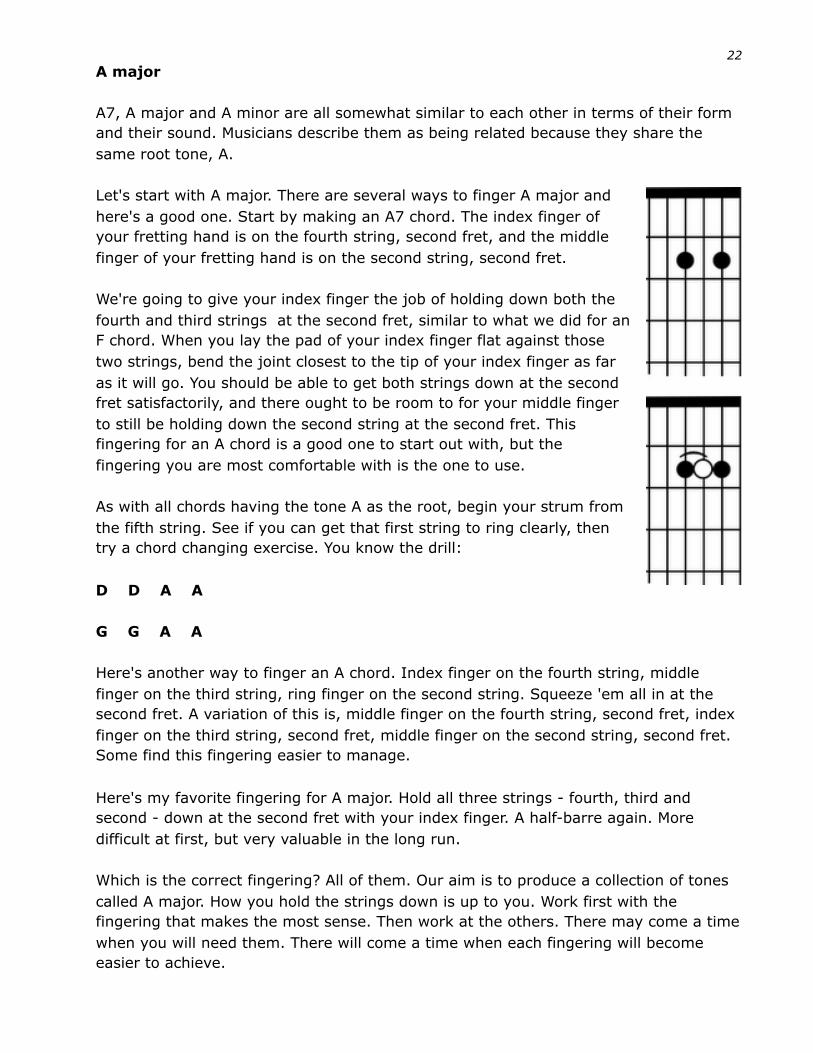
Let's start with A major. There are several ways to finger A major and here's a good one. Start by making an A7 chord. The index finger of your fretting hand is on the fourth string, second fret, and the middle finger of your fretting hand is on the second string, second fret.
We're going to give your index finger the job of holding down both the fourth and third strings at the second fret, similar to what we did for an F chord. When you lay the pad of your index finger flat against those two strings, bend the joint closest to the tip of your index finger as far as it will go. You should be able to get both strings down at the second fret satisfactorily, and there ought to be room to for your middle finger to still be holding down the second string at the second fret. This fingering for an A chord is a good one to start out with, but the fingering you are most comfortable with is the one to use.
As with all chords having the tone A as the root, begin your strum from the fifth string. See if you can get that first string to ring clearly, then try a chord changing exercise. You know the drill:
D D A A
G G A A
Here's another way to finger an A chord. Index finger on the fourth string, middle finger on the third string, ring finger on the second string. Squeeze 'em all in at the second fret. A variation of this is, middle finger on the fourth string, second fret, index finger on the third string, second fret, middle finger on the second string, second fret. Some find this fingering easier to manage.
Here's my favorite fingering for A major. Hold all three strings - fourth, third and second - down at the second fret with your index finger. A half-barre again. More difficult at first, but very valuable in the long run.
Which is the correct fingering? All of them. Our aim is to produce a collection of tones called A major. How you hold the strings down is up to you. Work first with the fingering that makes the most sense. Then work at the others. There may come a time when you will need them. There will come a time when each fingering will become easier to achieve.
22
A minor
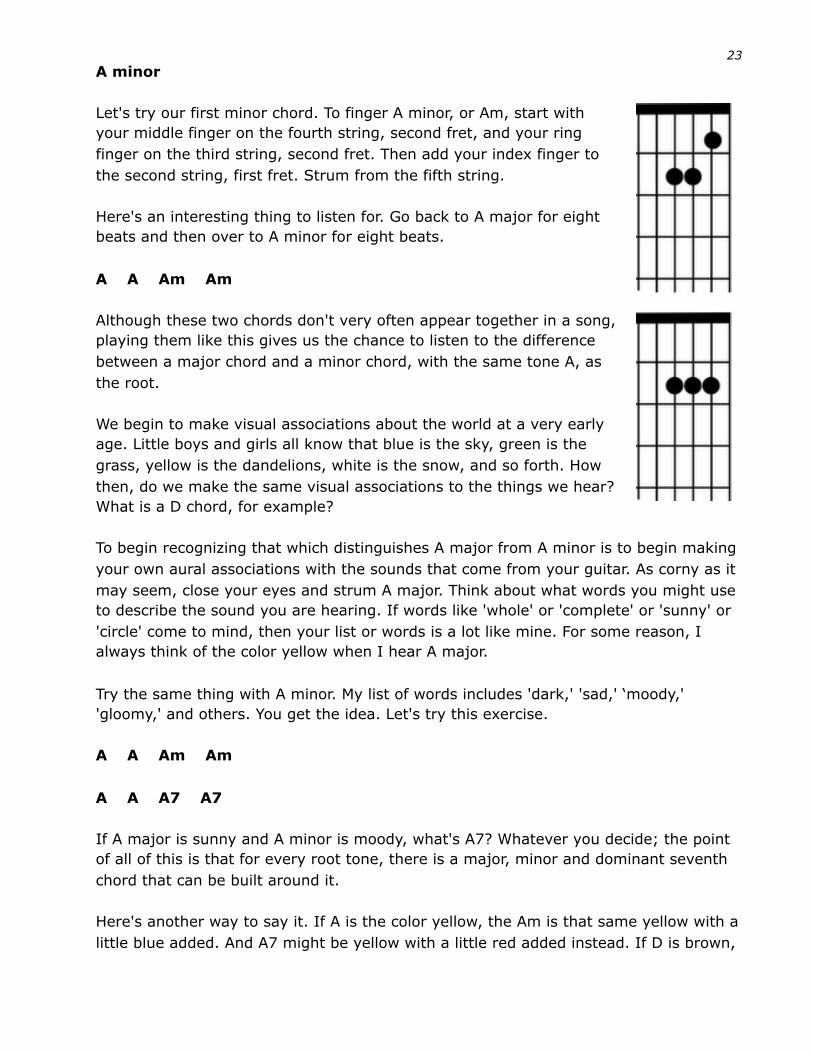
Let's try our first minor chord. To finger A minor, or Am, start with your middle finger on the fourth string, second fret, and your ring finger on the third string, second fret. Then add your index finger to the second string, first fret. Strum from the fifth string.
Here's an interesting thing to listen for. Go back to A major for eight beats and then over to A minor for eight beats.
A A Am Am
Although these two chords don't very often appear together in a song, playing them like this gives us the chance to listen to the difference between a major chord and a minor chord, with the same tone A, as the root.
We begin to make visual associations about the world at a very early age. Little boys and girls all know that blue is the sky, green is the grass, yellow is the dandelions, white is the snow, and so forth. How then, do we make the same visual associations to the things we hear? What is a D chord, for example?
To begin recognizing that which distinguishes A major from A minor is to begin making your own aural associations with the sounds that come from your guitar. As corny as it may seem, close your eyes and strum A major. Think about what words you might use to describe the sound you are hearing. If words like 'whole' or 'complete' or 'sunny' or 'circle' come to mind, then your list or words is a lot like mine. For some reason, I always think of the color yellow when I hear A major.
Try the same thing with A minor. My list of words includes 'dark,' 'sad,' ‘moody,' 'gloomy,' and others. You get the idea. Let's try this exercise.
A A Am Am
A A A7 A7
If A major is sunny and A minor is moody, what's A7? Whatever you decide; the point of all of this is that for every root tone, there is a major, minor and dominant seventh chord that can be built around it.
Here's another way to say it. If A is the color yellow, the Am is that same yellow with a little blue added. And A7 might be yellow with a little red added instead. If D is brown,
23
then Dm would be brown with the same blue added, and D7 would be brown with a little red. Something like that.
If you are able to identify the sounds of a major, minor and dominant seventh chord by listening means you are using your ears well. If you're not able to do this so well, no matter. Our main focus is on learning chord forms, identifying them by name, and gaining the skill to change from one to another. Try again some other day.
just for kicks
Just for kicks, here's one more chord progression to practice that uses the Am chord in a more familiar context. Four beats, or four strums to the measure. On a C chord and Am, begin your strum on the fifth string. On an F, begin your strum on the fourth string. On G, begin from the sixth string.
C Am F G
C Am F G
If this sounds a little familiar to you, the above is one of the most common chord progressions used in the history of popular music. See if you can't find some songs that use these chords, either in the order given, or in a variation.
Maybe you noticed that C and Am have two fingers in common. Changing from C to Am involves little more than moving your ring finger from the fifth string, third fret, where C needs it to be, to the third string, second fret, where Am needs it to be.
Am and F have one finger in common, the index finger at the second string, first fret. Leave it there as you wiggle your ring and middle fingers into position. Then try to flatten your index finger to a half-barre to cover both the first and second strings at the first fret. That's a lot to juggle in one measure, but keep strumming.
To get to G from the F position, first get your ring finger to the sixth string, same fret. Your middle finger will follow as you let go of the half-barre. Then add your pinky to the first string, third fret.
To play this progression well, a lot of fingers have to fly around the frets. If it seems difficult, that's because it is. But I'll bet it's not as difficult as when you first tried to change from D to A7 and back. Maybe not, but this is what making progress feels like. The day you can handle these changes is the day you've gained good dexterity in your fretting hand.
24
E, E seventh and E minor
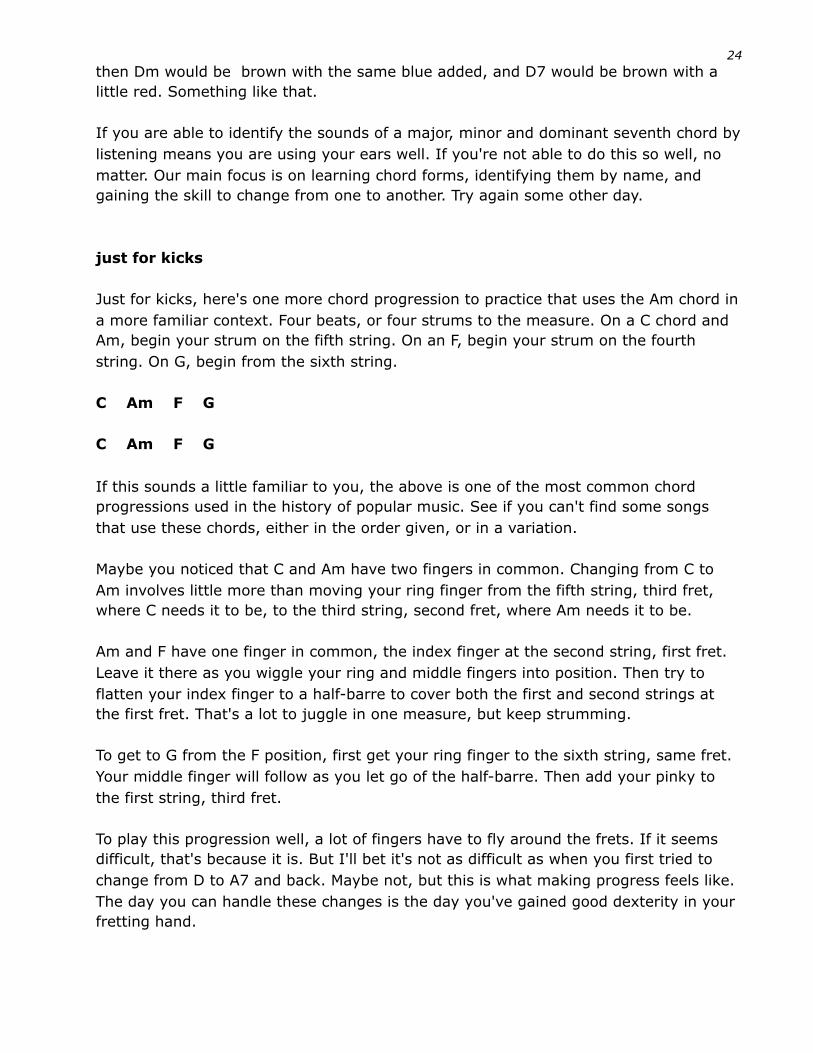
Now that you're familiar with Am, you can also make E major. Both chords use the exact same form, but use it in a different place. When in Am, the middle finger of your fretting hand is on the fourth string, second fret, and the ring finger of your fretting hand is on the third string, second fret. The index finger is on the second string, first fret.
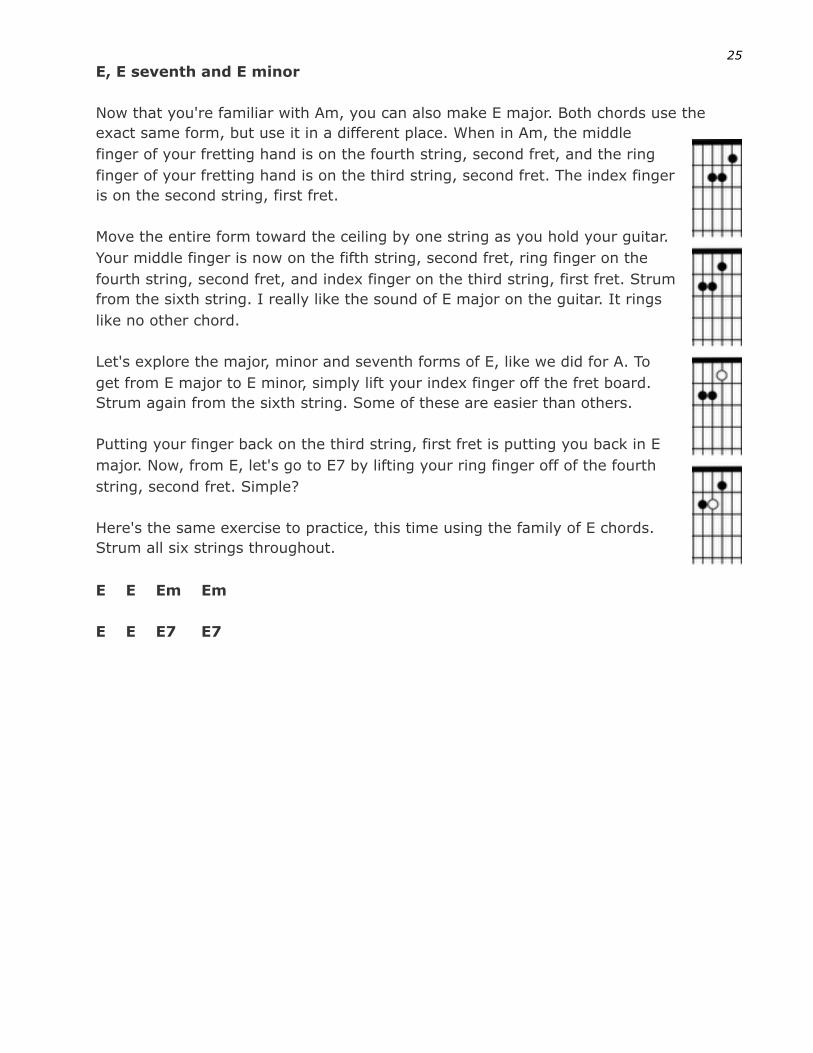
Move the entire form toward the ceiling by one string as you hold your guitar. Your middle finger is now on the fifth string, second fret, ring finger on the fourth string, second fret, and index finger on the third string, first fret. Strum from the sixth string. I really like the sound of E major on the guitar. It rings like no other chord.
Let's explore the major, minor and seventh forms of E, like we did for A. To get from E major to E minor, simply lift your index finger off the fret board. Strum again from the sixth string. Some of these are easier than others.
Putting your finger back on the third string, first fret is putting you back in E major. Now, from E, let's go to E7 by lifting your ring finger off of the fourth string, second fret. Simple?
Here's the same exercise to practice, this time using the family of E chords. Strum all six strings throughout.
E E Em Em
E E E7 E7
25
the family D
It could be said that chord forms are related by the finger shapes they have in common. The D and A7 forms are related by the common position of your index and middle fingers. The D and G forms are related similarly, but with a different finger shape in common. The Am and E forms are identical, and therefore related in this way too.
The sounds that chords make are related by the tone in which they are commonly rooted. We explored A seventh, A major and A minor and learned because of their common root tone, they are all members of the chord family A. So are E major, E minor and E seventh members of the chord family E.
For now let's agree that the major, minor and seventh chords of a given family are like immediate members. They are like brothers and sisters. Everyone else is a distant cousin. And like a distant cousin, they sometimes live in a different place. They look different and they sound different. You'll see these aliens appear from time to time in music books. And they sometimes have exotic names like Am6 or Fma7 or Gsus4 or Bbº7. They sometimes sound exotic too.
For now it's only important that A minor 6th is related to the family A, and F major seventh is related to the family F, and G suspended 4th is related to the family G and B flat diminished 7th is in a strange way, related to the family B flat. And so on. More times than not, you can substitute a Am for Am6, F for F major seventh and G for G suspended 4th. For B flat diminished seventh, I don't know...just leave it alone for now. Like distant cousins, it's nice when they're around but you don't have to invite them over every weekend.
So chords are related by their root tones. And we can say chord forms are related by the similarity of their shape on the finger board. Though each of these is important to
recognize, songs aren't very often built upon either of these sorts of relationships. Understanding how chords are related to song structure is the big issue for which we are preparing. We'll get to that soon enough but for now, let's study a few more chord forms.
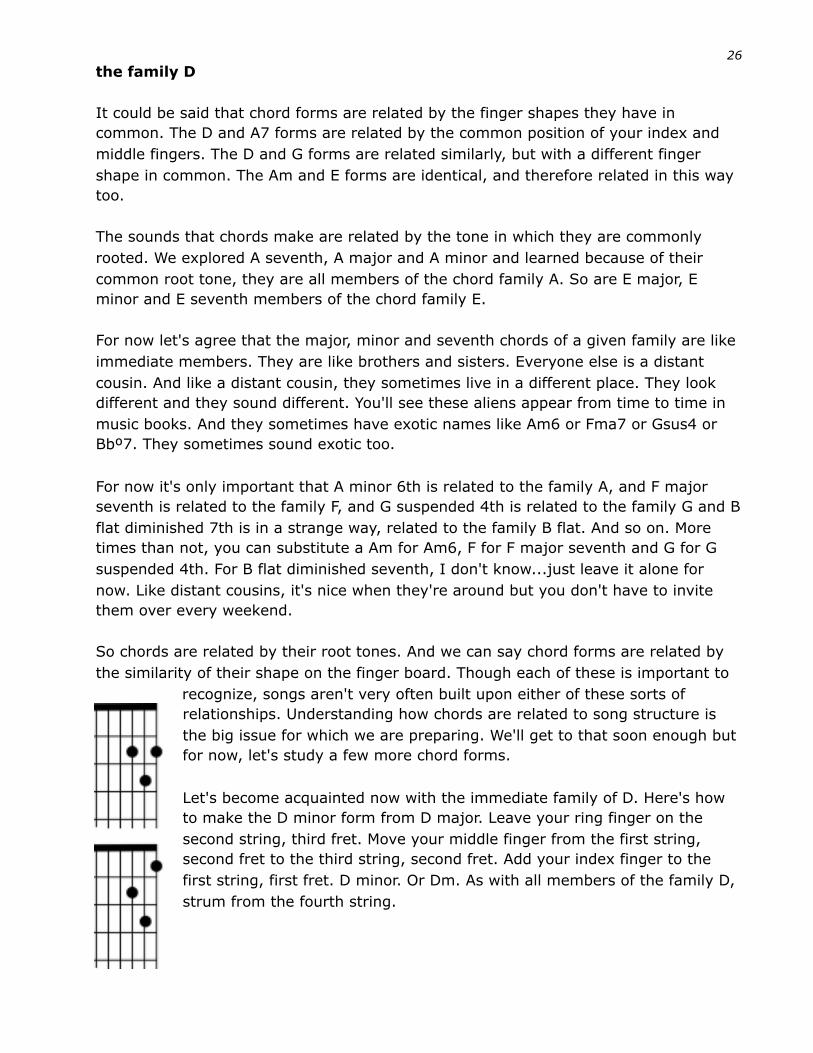
Let's become acquainted now with the immediate family of D. Here's how to make the D minor form from D major. Leave your ring finger on the second string, third fret. Move your middle finger from the first string, second fret to the third string, second fret. Add your index finger to the first string, first fret. D minor. Or Dm. As with all members of the family D, strum from the fourth string.
26
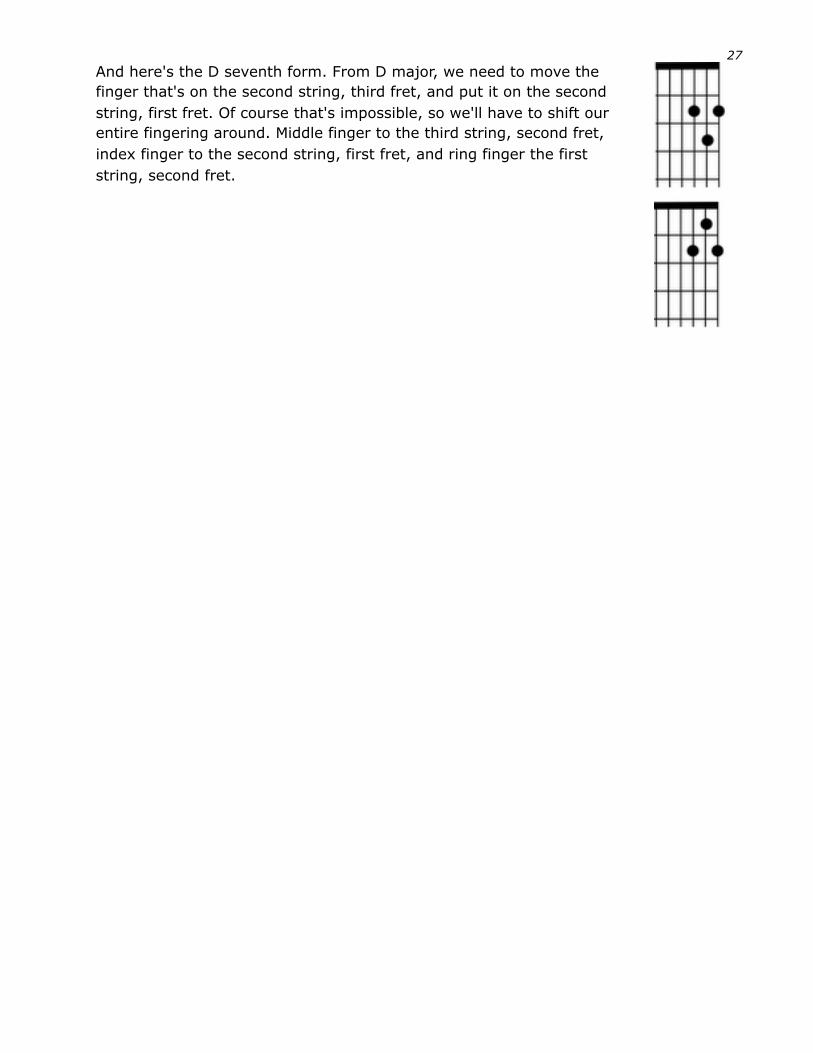
And here's the D seventh form. From D major, we need to move the finger that's on the second string, third fret, and put it on the second string, first fret. Of course that's impossible, so we'll have to shift our entire fingering around. Middle finger to the third string, second fret, index finger to the second string, first fret, and ring finger the first string, second fret.
27
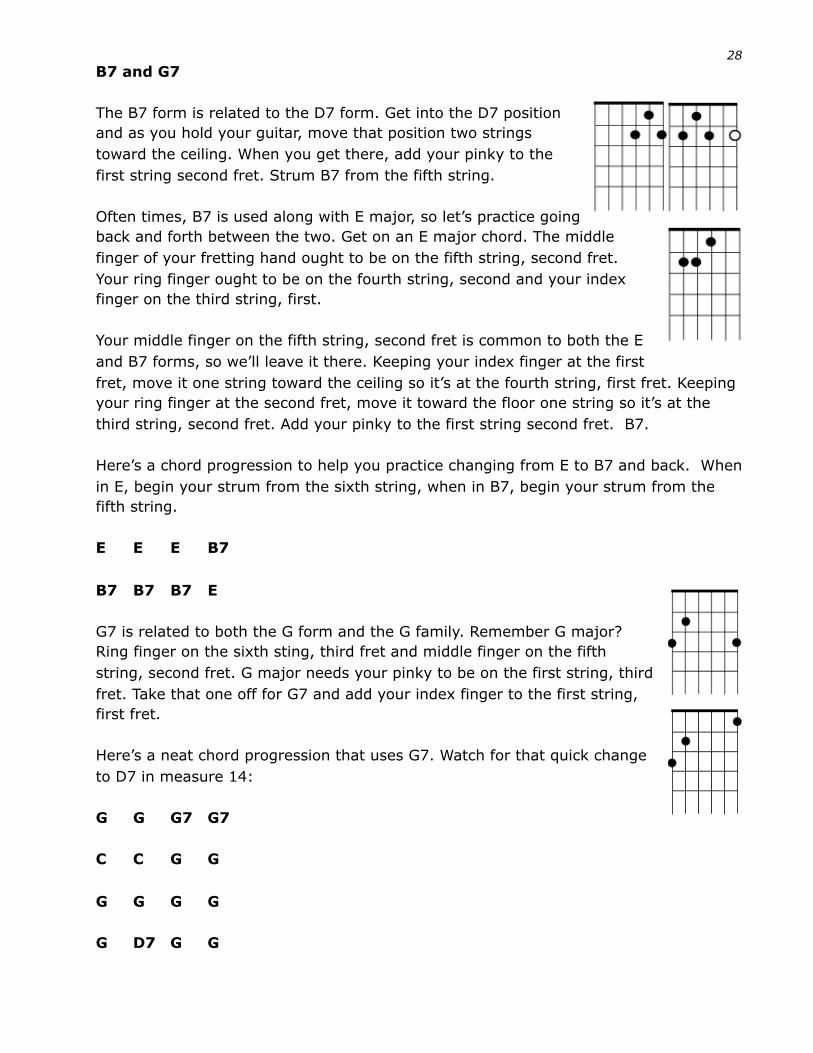
B7 and G7
The B7 form is related to the D7 form. Get into the D7 position and as you hold your guitar, move that position two strings toward the ceiling. When you get there, add your pinky to the first string second fret. Strum B7 from the fifth string.
Often times, B7 is used along with E major, so let’s practice going back and forth between the two. Get on an E major chord. The middle finger of your fretting hand ought to be on the fifth string, second fret. Your ring finger ought to be on the fourth string, second and your index finger on the third string, first.
Your middle finger on the fifth string, second fret is common to both the E and B7 forms, so we’ll leave it there. Keeping your index finger at the first fret, move it one string toward the ceiling so it’s at the fourth string, first fret. Keeping your ring finger at the second fret, move it toward the floor one string so it’s at the third string, second fret. Add your pinky to the first string second fret. B7.
Here’s a chord progression to help you practice changing from E to B7 and back. When in E, begin your strum from the sixth string, when in B7, begin your strum from the fifth string.
E E E B7
B7 B7 B7 E
G7 is related to both the G form and the G family. Remember G major? Ring finger on the sixth sting, third fret and middle finger on the fifth string, second fret. G major needs your pinky to be on the first string, third fret. Take that one off for G7 and add your index finger to the first string, first fret.
Here’s a neat chord progression that uses G7. Watch for that quick change to D7 in measure 14: G G G7 G7 C C G G
G G G G G D7 G G
28
you are not alone
In our short study, we’ve become acquainted with all of the basic chords forms, and we’ve explored a handful of simple exercises to help you visualize and master the fingerings.
Every guitarist who ever was and who ever will be, begins from the very same place you have: the beginning. And from there on out you are mostly on your own. The old adage says that everyone has to teach themselves, but from time to time everyone also needs help. Classes and lessons are worthwhile stops along your way, while books, tablature, DVD, video and recordings are some of the clues others have left behind to help mark the route each has taken.
The art of practice - the art of beginning - is the art of opening. Each return to practice marks another step closer toward one’s own creative center. And with practice comes the promise that our music will one day reveal a beautiful reflection of who we are and from where we’ve come.
You are not alone. The way to playing guitar well is thoroughly known, and those who take the time and care, to make just a single, clear, purposeful tone on their instrument, join the many thousands of others who have already ventured down this path. Age and talent have nothing to do with making progress, or making music. They who listen well and show up to work, get to where they are going.
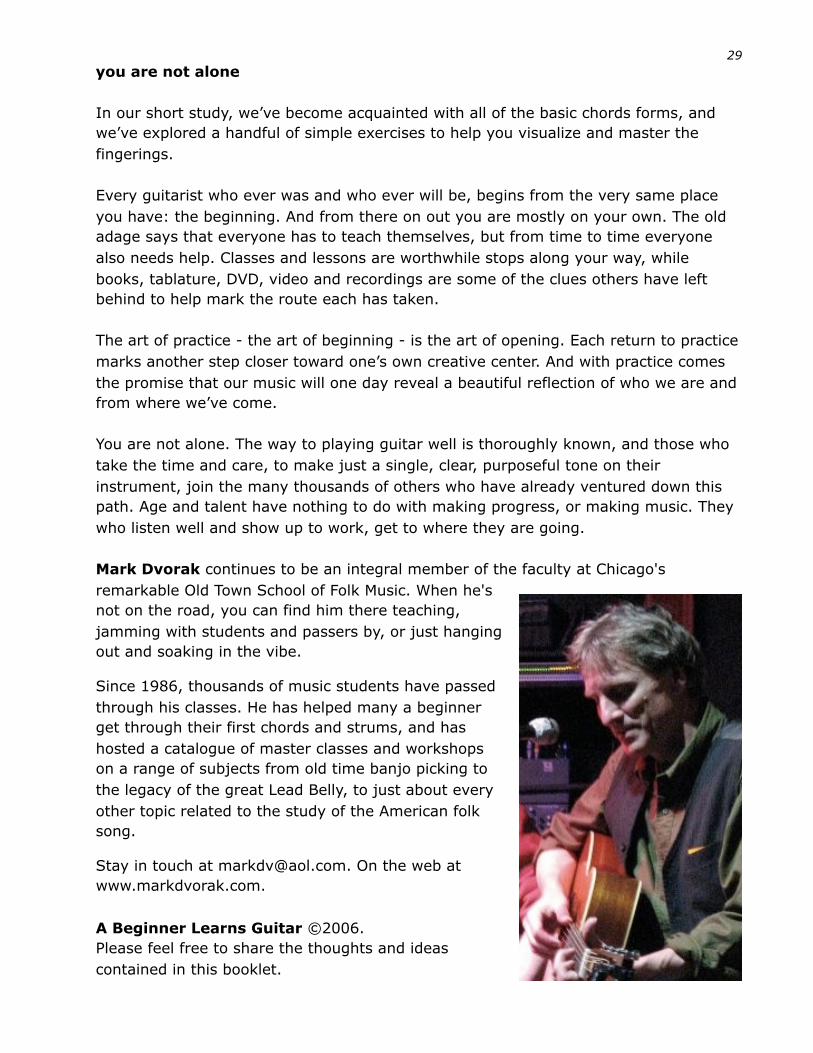
Mark Dvorak continues to be an integral member of the faculty at Chicago's remarkable Old Town School of Folk Music. When he's not on the road, you can find him there teaching, jamming with students and passers by, or just hanging out and soaking in the vibe.
Since 1986, thousands of music students have passed through his classes. He has helped many a beginner get through their first chords and strums, and has hosted a catalogue of master classes and workshops on a range of subjects from old time banjo picking to the legacy of the great Lead Belly, to just about every other topic related to the study of the American folk song.
Stay in touch at [email protected]. On the web at www.markdvorak.com.
A Beginner Learns Guitar ©2006. Please feel free to share the thoughts and ideas contained in this booklet.
29