Embed Size (px)
Citation preview

JBoss Enterprise Application Platform6.1
Security Guide
For Use with Red Hat JBoss Enterprise Application Platform 6
Last Updated: 2017-10-16


JBoss Enterprise Application Platform 6.1 Security Guide
For Use with Red Hat JBoss Enterprise Application Platform 6
Sande Gilda
David Ryan
Misty [email protected]

Legal Notice
Copyright © 2015 Red Hat, Inc..
This document is licensed by Red Hat under the Creative Commons Attribution-ShareAlike 3.0Unported License. If you distribute this document, or a modified version of it, you must provideattribution to Red Hat, Inc. and provide a link to the original. If the document is modified, all Red Hattrademarks must be removed.
Red Hat, as the licensor of this document, waives the right to enforce, and agrees not to assert,Section 4d of CC-BY-SA to the fullest extent permitted by applicable law.
Red Hat, Red Hat Enterprise Linux, the Shadowman logo, JBoss, OpenShift, Fedora, the Infinitylogo, and RHCE are trademarks of Red Hat, Inc., registered in the United States and othercountries.
Linux ® is the registered trademark of Linus Torvalds in the United States and other countries.
Java ® is a registered trademark of Oracle and/or its affiliates.
XFS ® is a trademark of Silicon Graphics International Corp. or its subsidiaries in the United Statesand/or other countries.
MySQL ® is a registered trademark of MySQL AB in the United States, the European Union andother countries.
Node.js ® is an official trademark of Joyent. Red Hat Software Collections is not formally related toor endorsed by the official Joyent Node.js open source or commercial project.
The OpenStack ® Word Mark and OpenStack logo are either registered trademarks/service marksor trademarks/service marks of the OpenStack Foundation, in the United States and other countriesand are used with the OpenStack Foundation's permission. We are not affiliated with, endorsed orsponsored by the OpenStack Foundation, or the OpenStack community.
All other trademarks are the property of their respective owners.
Abstract
This book is a guide to securing Red Hat JBoss Enterprise Application Platform 6 and its patchreleases.

. . . . . . . . . . . . . . . . . . . . . . . . . . . . . . . . . . . . . . . . . . . . . . . . . . . . . . . . . . . . . . . . . . . . . . . . . . . . . . . . . . . . . . . . . . . . . . . . . . . . . . . . . . . . . . . . . . . . . . . . . . . . . . . . . . . . . . . . . . . . . . . . . . . . . . . . . . . . . . . . . . . . . . . . . . . . . . . . . . . . . . . . . . . . . . . . . . . . . . . . . . . . . . . . . . . . . . . . . . . . . . . . . . . . . . . . . . . . . . . . . . . . . . . . . . . . . . . . . . . . . . . . . . . . . . . . . . . . . . . .
. . . . . . . . . . . . . . . . . . . . . . . . . . . . . . . . . . . . . . . . . . . . . . . . . . . . . . . . . . . . . . . . . . . . . . . . . . . . . . . . . . . . . . . . . . . . . . . . . . . . . . . . . . . . . . . . . . . . . . . . . . . . . . . . . . . . . . . . . . . . . . . . . . . . . . . . . . . . . . . . . . . . . . . . . . . . . . . . . . . . . . . . . . . . . . . . . . . . . . . . . . . . . . . . . . . . . . . . . . . . . . . . . . . . . . . . . . . . . . . . . . . . . . . . . . . . . . . . . . . . . . . . . . . . . . . . . . . . . . . .
. . . . . . . . . . . . . . . . . . . . . . . . . . . . . . . . . . . . . . . . . . . . . . . . . . . . . . . . . . . . . . . . . . . . . . . . . . . . . . . . . . . . . . . . . . . . . . . . . . . . . . . . . . . . . . . . . . . . . . . . . . . . . . . . . . . . . . . . . . . . . . . . . . . . . . . . . . . . . . . . . . . . . . . . . . . . . . . . . . . . . . . . . . . . . . . . . . . . . . . . . . . . . . . . . . . . . . . . . . . . . . . . . . . . . . . . . . . . . . . . . . . . . . . . . . . . . . . . . . . . . . . . . . . . . . . . . . . . . . . .
. . . . . . . . . . . . . . . . . . . . . . . . . . . . . . . . . . . . . . . . . . . . . . . . . . . . . . . . . . . . . . . . . . . . . . . . . . . . . . . . . . . . . . . . . . . . . . . . . . . . . . . . . . . . . . . . . . . . . . . . . . . . . . . . . . . . . . . . . . . . . . . . . . . . . . . . . . . . . . . . . . . . . . . . . . . . . . . . . . . . . . . . . . . . . . . . . . . . . . . . . . . . . . . . . . . . . . . . . . . . . . . . . . . . . . . . . . . . . . . . . . . . . . . . . . . . . . . . . . . . . . . . . . . . . . . . . . . . . . . .
. . . . . . . . . . . . . . . . . . . . . . . . . . . . . . . . . . . . . . . . . . . . . . . . . . . . . . . . . . . . . . . . . . . . . . . . . . . . . . . . . . . . . . . . . . . . . . . . . . . . . . . . . . . . . . . . . . . . . . . . . . . . . . . . . . . . . . . . . . . . . . . . . . . . . . . . . . . . . . . . . . . . . . . . . . . . . . . . . . . . . . . . . . . . . . . . . . . . . . . . . . . . . . . . . . . . . . . . . . . . . . . . . . . . . . . . . . . . . . . . . . . . . . . . . . . . . . . . . . . . . . . . . . . . . . . . . . . . . . . .
. . . . . . . . . . . . . . . . . . . . . . . . . . . . . . . . . . . . . . . . . . . . . . . . . . . . . . . . . . . . . . . . . . . . . . . . . . . . . . . . . . . . . . . . . . . . . . . . . . . . . . . . . . . . . . . . . . . . . . . . . . . . . . . . . . . . . . . . . . . . . . . . . . . . . . . . . . . . . . . . . . . . . . . . . . . . . . . . . . . . . . . . . . . . . . . . . . . . . . . . . . . . . . . . . . . . . . . . . . . . . . . . . . . . . . . . . . . . . . . . . . . . . . . . . . . . . . . . . . . . . . . . . . . . . . . . . . . . . . . .
. . . . . . . . . . . . . . . . . . . . . . . . . . . . . . . . . . . . . . . . . . . . . . . . . . . . . . . . . . . . . . . . . . . . . . . . . . . . . . . . . . . . . . . . . . . . . . . . . . . . . . . . . . . . . . . . . . . . . . . . . . . . . . . . . . . . . . . . . . . . . . . . . . . . . . . . . . . . . . . . . . . . . . . . . . . . . . . . . . . . . . . . . . . . . . . . . . . . . . . . . . . . . . . . . . . . . . . . . . . . . . . . . . . . . . . . . . . . . . . . . . . . . . . . . . . . . . . . . . . . . . . . . . . . . . . . . . . . . . . .
Table of Contents
PART I. SECURITY FOR RED HAT JBOSS ENTERPRISE APPLICATION PLATFORM 6
CHAPTER 1. INTRODUCTION1.1. ABOUT RED HAT JBOSS ENTERPRISE APPLICATION PLATFORM 6 (JBOSS EAP 6)1.2. ABOUT SECURITY1.3. SECURITY FOR THE SYSTEM ADMINISTRATOR1.4. SECURITY FOR THE J2EE DEVELOPER
PART II. SECURING THE PLATFORM
CHAPTER 2. THE SECURITY SUBSYSTEM2.1. ABOUT THE SECURITY SUBSYSTEM2.2. ABOUT THE STRUCTURE OF THE SECURITY SUBSYSTEM2.3. ABOUT ENCRYPTION2.4. ABOUT DECLARATIVE SECURITY2.5. SECURITY REFERENCES2.6. CONFIGURE THE SECURITY SUBSYSTEM2.7. JAVA EE DECLARATIVE SECURITY OVERVIEW2.8. SECURITY IDENTITY2.9. SECURITY ROLES2.10. EJB METHOD PERMISSIONS2.11. ENTERPRISE BEANS SECURITY ANNOTATIONS2.12. WEB CONTENT SECURITY CONSTRAINTS2.13. ENABLE FORM-BASED AUTHENTICATION2.14. ENABLE DECLARATIVE SECURITY
CHAPTER 3. MANAGEMENT INTERFACE SECURITY3.1. SECURE THE MANAGEMENT INTERFACES3.2. DEFAULT USER SECURITY CONFIGURATION3.3. OVERVIEW OF ADVANCED MANAGEMENT INTERFACE CONFIGURATION3.4. DISABLE THE HTTP MANAGEMENT INTERFACE3.5. REMOVE SILENT AUTHENTICATION FROM THE DEFAULT SECURITY REALM3.6. DISABLE REMOTE ACCESS TO THE JMX SUBSYSTEM3.7. CONFIGURE SECURITY REALMS FOR THE MANAGEMENT INTERFACES3.8. PASSWORD VAULTS FOR SENSITIVE STRINGS
3.8.1. About Securing Sensitive Strings in Clear-Text Files3.8.2. Create a Java Keystore to Store Sensitive Strings3.8.3. Mask the Keystore Password and Initialize the Password Vault3.8.4. Configure JBoss EAP 6 to Use the Password Vault3.8.5. Store and Retrieve Encrypted Sensitive Strings in the Java Keystore3.8.6. Store and Resolve Sensitive Strings In Your Applications
3.9. LDAP3.9.1. About LDAP3.9.2. Use LDAP to Authenticate to the Management Interfaces
CHAPTER 4. JAVA SECURITY MANAGER4.1. ABOUT THE JAVA SECURITY MANAGER4.2. ABOUT JAVA SECURITY MANAGER POLICIES4.3. RUN JBOSS EAP 6 WITHIN THE JAVA SECURITY MANAGER4.4. WRITE A JAVA SECURITY MANAGER POLICY4.5. DEBUG SECURITY MANAGER POLICIES
CHAPTER 5. PATCH INSTALLATION
6
77778
9
101010111112131414161720212324
252525262728303031313134353639414142
464646464750
52
Table of Contents
1

. . . . . . . . . . . . . . . . . . . . . . . . . . . . . . . . . . . . . . . . . . . . . . . . . . . . . . . . . . . . . . . . . . . . . . . . . . . . . . . . . . . . . . . . . . . . . . . . . . . . . . . . . . . . . . . . . . . . . . . . . . . . . . . . . . . . . . . . . . . . . . . . . . . . . . . . . . . . . . . . . . . . . . . . . . . . . . . . . . . . . . . . . . . . . . . . . . . . . . . . . . . . . . . . . . . . . . . . . . . . . . . . . . . . . . . . . . . . . . . . . . . . . . . . . . . . . . . . . . . . . . . . . . . . . . . . . . . . . . . .
. . . . . . . . . . . . . . . . . . . . . . . . . . . . . . . . . . . . . . . . . . . . . . . . . . . . . . . . . . . . . . . . . . . . . . . . . . . . . . . . . . . . . . . . . . . . . . . . . . . . . . . . . . . . . . . . . . . . . . . . . . . . . . . . . . . . . . . . . . . . . . . . . . . . . . . . . . . . . . . . . . . . . . . . . . . . . . . . . . . . . . . . . . . . . . . . . . . . . . . . . . . . . . . . . . . . . . . . . . . . . . . . . . . . . . . . . . . . . . . . . . . . . . . . . . . . . . . . . . . . . . . . . . . . . . . . . . . . . . . .
. . . . . . . . . . . . . . . . . . . . . . . . . . . . . . . . . . . . . . . . . . . . . . . . . . . . . . . . . . . . . . . . . . . . . . . . . . . . . . . . . . . . . . . . . . . . . . . . . . . . . . . . . . . . . . . . . . . . . . . . . . . . . . . . . . . . . . . . . . . . . . . . . . . . . . . . . . . . . . . . . . . . . . . . . . . . . . . . . . . . . . . . . . . . . . . . . . . . . . . . . . . . . . . . . . . . . . . . . . . . . . . . . . . . . . . . . . . . . . . . . . . . . . . . . . . . . . . . . . . . . . . . . . . . . . . . . . . . . . . .
. . . . . . . . . . . . . . . . . . . . . . . . . . . . . . . . . . . . . . . . . . . . . . . . . . . . . . . . . . . . . . . . . . . . . . . . . . . . . . . . . . . . . . . . . . . . . . . . . . . . . . . . . . . . . . . . . . . . . . . . . . . . . . . . . . . . . . . . . . . . . . . . . . . . . . . . . . . . . . . . . . . . . . . . . . . . . . . . . . . . . . . . . . . . . . . . . . . . . . . . . . . . . . . . . . . . . . . . . . . . . . . . . . . . . . . . . . . . . . . . . . . . . . . . . . . . . . . . . . . . . . . . . . . . . . . . . . . . . . . .
. . . . . . . . . . . . . . . . . . . . . . . . . . . . . . . . . . . . . . . . . . . . . . . . . . . . . . . . . . . . . . . . . . . . . . . . . . . . . . . . . . . . . . . . . . . . . . . . . . . . . . . . . . . . . . . . . . . . . . . . . . . . . . . . . . . . . . . . . . . . . . . . . . . . . . . . . . . . . . . . . . . . . . . . . . . . . . . . . . . . . . . . . . . . . . . . . . . . . . . . . . . . . . . . . . . . . . . . . . . . . . . . . . . . . . . . . . . . . . . . . . . . . . . . . . . . . . . . . . . . . . . . . . . . . . . . . . . . . . . .
. . . . . . . . . . . . . . . . . . . . . . . . . . . . . . . . . . . . . . . . . . . . . . . . . . . . . . . . . . . . . . . . . . . . . . . . . . . . . . . . . . . . . . . . . . . . . . . . . . . . . . . . . . . . . . . . . . . . . . . . . . . . . . . . . . . . . . . . . . . . . . . . . . . . . . . . . . . . . . . . . . . . . . . . . . . . . . . . . . . . . . . . . . . . . . . . . . . . . . . . . . . . . . . . . . . . . . . . . . . . . . . . . . . . . . . . . . . . . . . . . . . . . . . . . . . . . . . . . . . . . . . . . . . . . . . . . . . . . . . .
. . . . . . . . . . . . . . . . . . . . . . . . . . . . . . . . . . . . . . . . . . . . . . . . . . . . . . . . . . . . . . . . . . . . . . . . . . . . . . . . . . . . . . . . . . . . . . . . . . . . . . . . . . . . . . . . . . . . . . . . . . . . . . . . . . . . . . . . . . . . . . . . . . . . . . . . . . . . . . . . . . . . . . . . . . . . . . . . . . . . . . . . . . . . . . . . . . . . . . . . . . . . . . . . . . . . . . . . . . . . . . . . . . . . . . . . . . . . . . . . . . . . . . . . . . . . . . . . . . . . . . . . . . . . . . . . . . . . . . . .
. . . . . . . . . . . . . . . . . . . . . . . . . . . . . . . . . . . . . . . . . . . . . . . . . . . . . . . . . . . . . . . . . . . . . . . . . . . . . . . . . . . . . . . . . . . . . . . . . . . . . . . . . . . . . . . . . . . . . . . . . . . . . . . . . . . . . . . . . . . . . . . . . . . . . . . . . . . . . . . . . . . . . . . . . . . . . . . . . . . . . . . . . . . . . . . . . . . . . . . . . . . . . . . . . . . . . . . . . . . . . . . . . . . . . . . . . . . . . . . . . . . . . . . . . . . . . . . . . . . . . . . . . . . . . . . . . . . . . . . .
5.1. ABOUT PATCHING MECHANISMS5.2. SUBSCRIBE TO PATCH MAILING LISTS5.3. INSTALL PATCHES IN ZIP FORM5.4. INSTALL PATCHES IN RPM FORM5.5. SEVERITY AND IMPACT RATING OF JBOSS SECURITY PATCHES
CHAPTER 6. SECURITY DOMAINS6.1. ABOUT SECURITY DOMAINS6.2. ABOUT PICKETBOX6.3. ABOUT AUTHENTICATION6.4. CONFIGURE AUTHENTICATION IN A SECURITY DOMAIN6.5. ABOUT AUTHORIZATION6.6. CONFIGURE AUTHORIZATION IN A SECURITY DOMAIN6.7. ABOUT SECURITY AUDITING6.8. CONFIGURE SECURITY AUDITING6.9. ABOUT SECURITY MAPPING6.10. CONFIGURE SECURITY MAPPING IN A SECURITY DOMAIN
CHAPTER 7. SSL ENCRYPTION7.1. ABOUT SSL ENCRYPTION7.2. IMPLEMENT SSL ENCRYPTION FOR THE JBOSS EAP 6 WEB SERVER7.3. GENERATE A SSL ENCRYPTION KEY AND CERTIFICATE7.4. SSL CONNECTOR REFERENCE
CHAPTER 8. SECURITY REALMS8.1. ABOUT SECURITY REALMS8.2. ADD A NEW SECURITY REALM8.3. ADD A USER TO A SECURITY REALM
CHAPTER 9. SUBSYSTEM CONFIGURATION9.1. TRANSACTION SUBSYSTEM CONFIGURATION
9.1.1. Configure the ORB for JTS Transactions9.2. JMS CONFIGURATION
9.2.1. Reference for HornetQ Configuration Attributes
CHAPTER 10. WEB, HTTP CONNECTORS, AND HTTP CLUSTERING10.1. CONFIGURE A MOD_CLUSTER WORKER NODE
CHAPTER 11. NETWORK SECURITY11.1. SECURE THE MANAGEMENT INTERFACES11.2. SPECIFY WHICH NETWORK INTERFACE JBOSS EAP 6 USES11.3. CONFIGURE NETWORK FIREWALLS TO WORK WITH JBOSS EAP 611.4. NETWORK PORTS USED BY JBOSS EAP 6
PART III. SECURING APPLICATIONS
CHAPTER 12. APPLICATION SECURITY12.1. ENABLING/DISABLING DESCRIPTOR BASED PROPERTY REPLACEMENT12.2. DATASOURCE SECURITY
12.2.1. About Datasource Security12.3. EJB APPLICATION SECURITY
12.3.1. Security Identity12.3.1.1. About EJB Security Identity12.3.1.2. Set the Security Identity of an EJB
12.3.2. EJB Method Permissions
5252535455
5757575758596061616262
6464646569
73737374
7575757676
8181
8585858688
92
939394949495959596
Security Guide
2

. . . . . . . . . . . . . . . . . . . . . . . . . . . . . . . . . . . . . . . . . . . . . . . . . . . . . . . . . . . . . . . . . . . . . . . . . . . . . . . . . . . . . . . . . . . . . . . . . . . . . . . . . . . . . . . . . . . . . . . . . . . . . . . . . . . . . . . . . . . . . . . . . . . . . . . . . . . . . . . . . . . . . . . . . . . . . . . . . . . . . . . . . . . . . . . . . . . . . . . . . . . . . . . . . . . . . . . . . . . . . . . . . . . . . . . . . . . . . . . . . . . . . . . . . . . . . . . . . . . . . . . . . . . . . . . . . . . . . . . .
. . . . . . . . . . . . . . . . . . . . . . . . . . . . . . . . . . . . . . . . . . . . . . . . . . . . . . . . . . . . . . . . . . . . . . . . . . . . . . . . . . . . . . . . . . . . . . . . . . . . . . . . . . . . . . . . . . . . . . . . . . . . . . . . . . . . . . . . . . . . . . . . . . . . . . . . . . . . . . . . . . . . . . . . . . . . . . . . . . . . . . . . . . . . . . . . . . . . . . . . . . . . . . . . . . . . . . . . . . . . . . . . . . . . . . . . . . . . . . . . . . . . . . . . . . . . . . . . . . . . . . . . . . . . . . . . . . . . . . . .
. . . . . . . . . . . . . . . . . . . . . . . . . . . . . . . . . . . . . . . . . . . . . . . . . . . . . . . . . . . . . . . . . . . . . . . . . . . . . . . . . . . . . . . . . . . . . . . . . . . . . . . . . . . . . . . . . . . . . . . . . . . . . . . . . . . . . . . . . . . . . . . . . . . . . . . . . . . . . . . . . . . . . . . . . . . . . . . . . . . . . . . . . . . . . . . . . . . . . . . . . . . . . . . . . . . . . . . . . . . . . . . . . . . . . . . . . . . . . . . . . . . . . . . . . . . . . . . . . . . . . . . . . . . . . . . . . . . . . . . .
. . . . . . . . . . . . . . . . . . . . . . . . . . . . . . . . . . . . . . . . . . . . . . . . . . . . . . . . . . . . . . . . . . . . . . . . . . . . . . . . . . . . . . . . . . . . . . . . . . . . . . . . . . . . . . . . . . . . . . . . . . . . . . . . . . . . . . . . . . . . . . . . . . . . . . . . . . . . . . . . . . . . . . . . . . . . . . . . . . . . . . . . . . . . . . . . . . . . . . . . . . . . . . . . . . . . . . . . . . . . . . . . . . . . . . . . . . . . . . . . . . . . . . . . . . . . . . . . . . . . . . . . . . . . . . . . . . . . . . . .
12.3.2.1. About EJB Method Permissions12.3.2.2. Use EJB Method Permissions
12.3.3. EJB Security Annotations12.3.3.1. About EJB Security Annotations12.3.3.2. Use EJB Security Annotations
12.3.4. Remote Access to EJBs12.3.4.1. About Remote Method Access12.3.4.2. About Remoting Callbacks12.3.4.3. About Remoting Server Detection12.3.4.4. Configure the Remoting Subsystem12.3.4.5. Use Security Realms with Remote EJB Clients12.3.4.6. Add a New Security Realm12.3.4.7. Add a User to a Security Realm12.3.4.8. About Remote EJB Access Using SSL Encryption
12.4. JAX-RS APPLICATION SECURITY12.4.1. Enable Role-Based Security for a RESTEasy JAX-RS Web Service12.4.2. Secure a JAX-RS Web Service using Annotations
12.5. SECURE REMOTE PASSWORD PROTOCOL12.5.1. About Secure Remote Password Protocol (SRP)12.5.2. Configure Secure Remote Password (SRP) Protocol
CHAPTER 13. SINGLE SIGN ON (SSO)13.1. ABOUT SINGLE SIGN ON (SSO) FOR WEB APPLICATIONS13.2. ABOUT CLUSTERED SINGLE SIGN ON (SSO) FOR WEB APPLICATIONS13.3. CHOOSE THE RIGHT SSO IMPLEMENTATION13.4. USE SINGLE SIGN ON (SSO) IN A WEB APPLICATION13.5. ABOUT KERBEROS13.6. ABOUT SPNEGO13.7. ABOUT MICROSOFT ACTIVE DIRECTORY13.8. CONFIGURE KERBEROS OR MICROSOFT ACTIVE DIRECTORY DESKTOP SSO FOR WEBAPPLICATIONS
CHAPTER 14. ROLE-BASED SECURITY IN APPLICATIONS14.1. ABOUT APPLICATION SECURITY14.2. ABOUT SECURITY AUDITING14.3. ABOUT SECURITY MAPPING14.4. ABOUT THE SECURITY EXTENSION ARCHITECTURE14.5. ABOUT JAVA AUTHENTICATION AND AUTHORIZATION SERVICE (JAAS)14.6. USE A SECURITY DOMAIN IN YOUR APPLICATION14.7. USE ROLE-BASED SECURITY IN SERVLETS14.8. USE A THIRD-PARTY AUTHENTICATION SYSTEM IN YOUR APPLICATION
CHAPTER 15. MIGRATION15.1. CONFIGURE APPLICATION SECURITY CHANGES
CHAPTER 16. AUTHENTICATION AND AUTHORIZATION16.1. ABOUT AUTHENTICATION16.2. ABOUT AUTHORIZATION16.3. JAVA AUTHENTICATION AND AUTHORIZATION SERVICE (JAAS)16.4. ABOUT JAVA AUTHENTICATION AND AUTHORIZATION SERVICE (JAAS)16.5. JAVA AUTHORIZATION CONTRACT FOR CONTAINERS (JACC)
16.5.1. About Java Authorization Contract for Containers (JACC)16.5.2. Configure Java Authorization Contract for Containers (JACC) Security
16.6. JAVA AUTHENTICATION SPI FOR CONTAINERS (JASPI)
96969999
100101101102103103111111112112113113114115115115
118118119119120122123123
123
128128128128129130134136138
146146
147147147147147152152152153
Table of Contents
3

. . . . . . . . . . . . . . . . . . . . . . . . . . . . . . . . . . . . . . . . . . . . . . . . . . . . . . . . . . . . . . . . . . . . . . . . . . . . . . . . . . . . . . . . . . . . . . . . . . . . . . . . . . . . . . . . . . . . . . . . . . . . . . . . . . . . . . . . . . . . . . . . . . . . . . . . . . . . . . . . . . . . . . . . . . . . . . . . . . . . . . . . . . . . . . . . . . . . . . . . . . . . . . . . . . . . . . . . . . . . . . . . . . . . . . . . . . . . . . . . . . . . . . . . . . . . . . . . . . . . . . . . . . . . . . . . . . . . . . . .
. . . . . . . . . . . . . . . . . . . . . . . . . . . . . . . . . . . . . . . . . . . . . . . . . . . . . . . . . . . . . . . . . . . . . . . . . . . . . . . . . . . . . . . . . . . . . . . . . . . . . . . . . . . . . . . . . . . . . . . . . . . . . . . . . . . . . . . . . . . . . . . . . . . . . . . . . . . . . . . . . . . . . . . . . . . . . . . . . . . . . . . . . . . . . . . . . . . . . . . . . . . . . . . . . . . . . . . . . . . . . . . . . . . . . . . . . . . . . . . . . . . . . . . . . . . . . . . . . . . . . . . . . . . . . . . . . . . . . . . .
16.6.1. About Java Authentication SPI for Containers (JASPI) Security16.6.2. Configure Java Authentication SPI for Containers (JASPI) Security
APPENDIX A. REFERENCEA.1. INCLUDED AUTHENTICATION MODULESA.2. INCLUDED AUTHORIZATION MODULESA.3. INCLUDED SECURITY MAPPING MODULESA.4. INCLUDED SECURITY AUDITING PROVIDER MODULESA.5. JBOSS-WEB.XML CONFIGURATION REFERENCEA.6. EJB SECURITY PARAMETER REFERENCE
APPENDIX B. REVISION HISTORY
153154
155155182182183183186
188
Security Guide
4

Table of Contents
5

PART I. SECURITY FOR RED HAT JBOSS ENTERPRISEAPPLICATION PLATFORM 6
Security Guide
6

CHAPTER 1. INTRODUCTION
1.1. ABOUT RED HAT JBOSS ENTERPRISE APPLICATION PLATFORM6 (JBOSS EAP 6)
Red Hat JBoss Enterprise Application Platform 6 (JBoss EAP 6) is a fast, secure, powerful middlewareplatform built upon open standards, and compliant with the Java Enterprise Edition 6 specification. Itintegrates JBoss Application Server 7 with high-availability clustering, powerful messaging, distributedcaching, and other technologies to create a stable and scalable platform.
The new modular structure allows for services to be enabled only when required, significantly increasingstart up speed. The Management Console and Management Command Line Interface remove the needto edit XML configuration files by hand, adding the ability to script and automate tasks. In addition, itincludes APIs and development frameworks that can be used to develop secure, powerful, and scalableJava EE applications quickly.
Report a bug
1.2. ABOUT SECURITY
Computer security is the all encompassing term given to the field of information technology that dealswith securing the virtual environments that power the digital age. This can include data protection andintegrity, application security, risk and vulnerability assessment and authentication and authorizationprotocols.
Computer data is an all important asset for most organizations. Data protection is vital and forms the coreof most businesses. JBoss EAP 6 provides a multi-layered approach to security to take care of data at allstages.
Truly secure systems are the ones that are designed from the ground up with security as the mainfeature. Such systems use the principle of Security by Design. In such systems, malicious attacks andinfiltration's are accepted as part and parcel of normal security apparatus and systems are designed towork around them.
Security can be applied at the operating system, middleware and application level. For more informationabout security at the operating system level as it applies to RHEL, refer to the following document:https://access.redhat.com/site/documentation/en-US/Red_Hat_Enterprise_Linux/6/html-single/Security_Guide/index.html
In the coming chapters, you will read about the different levels and layers of security within JBoss EAP 6.These layers provides the infrastructure for all security functionality within the platform.
Report a bug
1.3. SECURITY FOR THE SYSTEM ADMINISTRATOR
System Administrators, tasked with providing always on computer systems and networks, must beproficient in dealing with attacks on their networks and must also be proactive in thwarting such attacksby the use of planned security drills and audits.
For a successful system administrator, planning for security breaches is a combination of art andscience. Security threats, whether they be physical, network or data based, are varying in nature and asuccessful security system administrator can prepare for outages.
CHAPTER 1. INTRODUCTION
7

Report a bug
1.4. SECURITY FOR THE J2EE DEVELOPER
Application level security falls in the hands of the J2EE Developer. Even this can be divided into threeseparate roles:
Application Developer - responsible for security at the development level and for defining theroles, rules and business logic into the application logic.
Application Assembler - responsible for ensuring that the packaging of EAR's and WAR's is doneso that cross-application vulnerabilities are minimized.
Application Deployer - responsible for securing the deployment of EAR's and assigning andmaintaining access control lists.
It is not uncommon for all three roles to be played by the same set of developers.
JBoss EAP 6, as a component platform, provides declarative security. Rather than embed security logicinto a business component, you describe the security roles and permissions in a standard XMLdescriptor. This way, business level code is isolated from the security code. Read more aboutdeclarative security in JBoss EAP 6 here Section 2.4, “About Declarative Security”.
Declarative security is bolstered by programmatic security. J2EE developers can use J2EE APIs in codeto determine authorization and enforce enhanced security.
Report a bug
Security Guide
8

PART II. SECURING THE PLATFORM
PART II. SECURING THE PLATFORM
9

CHAPTER 2. THE SECURITY SUBSYSTEM
2.1. ABOUT THE SECURITY SUBSYSTEM
The security subsystem provides the infrastructure for all security functionality in JBoss EAP 6. Mostconfiguration elements rarely need to be changed. The only configuration element which may need to bechanged is whether to use deep-copy-subject-mode. In addition, you can configure system-wide securityproperties. Most of the configuration relates to security domains.
Deep Copy Mode
If deep copy subject mode is disabled (the default), copying a security data structure makes a referenceto the original, rather than copying the entire data structure. This behavior is more efficient, but is proneto data corruption if multiple threads with the same identity clear the subject by means of a flush orlogout operation.
Deep copy subject mode causes a complete copy of the data structure and all its associated data to bemade, as long as they are marked cloneable. This is more thread-safe, but less efficient.
System-Wide Security Properties
You can set system-wide security properties, which are applied to java.security.Security class.
Security Domain
A security domain is a set of Java Authentication and Authorization Service (JAAS) declarative securityconfigurations which one or more applications use to control authentication, authorization, auditing, andmapping. Three security domains are included by default: jboss-ejb-policy, jboss-web-policy,and other. You can create as many security domains as you need to accommodate the needs of yourapplications.
Report a bug
2.2. ABOUT THE STRUCTURE OF THE SECURITY SUBSYSTEM
The security subsystem is configured in the managed domain or standalone configuration file. Most ofthe configuration elements can be configured using the web-based management console or the console-based management CLI. The following is the XML representing an example security subsystem.
Example 2.1. Example Security Subsystem Configuration
<subsystem xmlns="urn:jboss:domain:security:1.2"> <security-management> ... </security-management> <security-domains> <security-domain name="other" cache-type="default"> <authentication> <login-module code="Remoting" flag="optional"> <module-option name="password-stacking" value="useFirstPass"/> </login-module> <login-module code="RealmUsersRoles" flag="required"> <module-option name="usersProperties" value="${jboss.domain.config.dir}/application-users.properties"/> <module-option name="rolesProperties"
Security Guide
10

The <security-management>, <subject-factory> and <security-properties> elementsare not present in the default configuration. The <subject-factory> and <security-properties> elements have been deprecated in JBoss EAP 6.1 onwards.
Report a bug
2.3. ABOUT ENCRYPTION
Encryption refers to obfuscating sensitive information by applying mathematical algorithms to it.Encryption is one of the foundations of securing your infrastructure from data breaches, system outages,and other risks.
Encryption can be applied to simple string data, such as passwords. It can also be applied to datacommunication streams. The HTTPS protocol, for instance, encrypts all data before transferring it fromone party to another. If you connect from one server to another using the Secure Shell (SSH) protocol, allof your communication is sent in an encrypted tunnel .
Report a bug
2.4. ABOUT DECLARATIVE SECURITY
Declarative security is a method to separate security concerns from your application code by using thecontainer to manage security. The container provides an authorization system based on either filepermissions or users, groups, and roles. This approach is usually superior to programmatic security,which gives the application itself all of the responsibility for security.
JBoss EAP 6 provides declarative security via security domains.
Report a bug
value="${jboss.domain.config.dir}/application-roles.properties"/> <module-option name="realm" value="ApplicationRealm"/> <module-option name="password-stacking" value="useFirstPass"/> </login-module> </authentication> </security-domain> <security-domain name="jboss-web-policy" cache-type="default"> <authorization> <policy-module code="Delegating" flag="required"/> </authorization> </security-domain> <security-domain name="jboss-ejb-policy" cache-type="default"> <authorization> <policy-module code="Delegating" flag="required"/> </authorization> </security-domain> </security-domains> <vault> ... </vault></subsystem>
CHAPTER 2. THE SECURITY SUBSYSTEM
11

2.5. SECURITY REFERENCES
Both Enterprise Java Beans (EJBs) and servlets can declare one or more <security-role-ref> elements.
Figure 2.1. Security Roles Reference Model
This element declares that a component is using the <role-name> element's role-nameType attributevalue as an argument to the isCallerInRole(String) method. By using the isCallerInRolemethod, a component can verify whether the caller is in a role that has been declared with a <security-role-ref> or <role-name> element. The <role-name> element value must link to a <security-role> elementthrough the <role-link> element. The typical use of isCallerInRole is to perform a security check thatcannot be defined by using the role-based <method-permissions> elements.
Example 2.2. ejb-jar.xml descriptor fragment
NOTE
This fragment is an example only. In deployments, the elements in this section mustcontain role names and links relevant to the EJB deployment.
<!-- A sample ejb-jar.xml fragment --> <ejb-jar> <enterprise-beans> <session> <ejb-name>ASessionBean</ejb-name> ... <security-role-ref> <role-name>TheRoleICheck<role-name> <role-link>TheApplicationRole</role-link> </security-role-ref> </session> </enterprise-beans> ... </ejb-jar>
Security Guide
12

Example 2.3. web.xml descriptor fragment
Report a bug
2.6. CONFIGURE THE SECURITY SUBSYSTEM
You can configure the security subsystem using the Management CLI or web-based ManagementConsole.
Each top-level element within the security subsystem contains information about a different aspect of thesecurity configuration. Refer to Section 2.2, “About the Structure of the Security Subsystem” for anexample of security subsystem configuration.
<security-management>
This section overrides high-level behaviors of the security subsystem. Each setting is optional. It isunusual to change any of these settings except for deep copy subject mode.
Option Description
deep-copy-subject-mode Specifies whether to copy or link to security tokens,for additional thread safety.
authentication-manager-class-name Specifies an alternate AuthenticationManagerimplementation class name to use.
authorization-manager-class-name Specifies an alternate AuthorizationManagerimplementation class name to use.
audit-manager-class-name Specifies an alternate AuditManagerimplementation class name to use.
identity-trust-manager-class-name Specifies an alternate IdentityTrustManagerimplementation class name to use.
mapping-manager-class-name Specifies the MappingManager implementationclass name to use.
<subject-factory>
<web-app> <servlet> <servlet-name>AServlet</servlet-name> ... <security-role-ref> <role-name>TheServletRole</role-name> <role-link>TheApplicationRole</role-link> </security-role-ref> </servlet> ...</web-app>
CHAPTER 2. THE SECURITY SUBSYSTEM
13

The subject factory controls creation of subject instances. It may use the authentication manager toverify the caller. The main use of the subject factory is for JCA components to establish a subject.It isunusual to need to modify the subject factory.
<security-domains>
A container element which holds multiple security domains. A security domain may containinformation about authentication, authorization, mapping, and auditing modules, as well as JASPIauthentication and JSSE configuration. Your application would specify a security domain to manageits security information.
<security-properties>
Contains names and values of properties which are set on the java.security.Security class.
Report a bug
2.7. JAVA EE DECLARATIVE SECURITY OVERVIEW
The J2EE security model is declarative in that you describe the security roles and permissions in astandard XML descriptor rather than embedding security into your business component. This isolatessecurity from business-level code because security tends to be more a function of where the componentis deployed than an inherent aspect of the component's business logic. For example, consider anAutomated Teller Machine (ATM) that is to be used to access a bank account. The securityrequirements, roles and permissions will vary independent of how you access the bank account, basedon what bank is managing the account, where the ATM is located, and so on.
Securing a J2EE application is based on the specification of the application security requirements via thestandard J2EE deployment descriptors. You secure access to EJBs and web components in anenterprise application by using the ejb-jar.xml and web.xml deployment descriptors.
Report a bug
2.8. SECURITY IDENTITY
An Enterprise Java Bean (EJB) can specify the identity another EJB must use when it invokes methodson components using the <security-identity> element.
Figure 2.2. J2EE Security Identity Data Model
Security Guide
14

The invocation identity can be that of the current caller, or it can be a specific role. The applicationassembler uses the <security-identity> element with a <use-caller-identity> child element. This indicatethat the current caller's identity should be propagated as the security identity for method invocationsmade by the EJB. Propagation of the caller's identity is the default used in the absence of an explicit<security-identity> element declaration.
Alternatively, the application assembler can use the <run-as> or <role-name> child element to specifythat a specific security role supplied by the <role-name> element value must be used as the securityidentity for method invocations made by the EJB.
Note that this does not change the caller's identity as seen by the EJBContext.getCallerPrincipal() method. Rather, the caller's security roles are set to the singlerole specified by the <run-as> or <role-name> element value.
One use case for the <run-as> element is to prevent external clients from accessing internal EJBs. Youconfigure this behavior by assigning the internal EJB <method-permission> elements, which restrictaccess to a role never assigned to an external client. EJBs that must in turn use internal EJBs are thenconfigured with a <run-as> or <role-name> equal to the restricted role. The following descriptor fragmentdescribes an example<security-identity> element usage.
When you use <run-as> to assign a specific role to outgoing calls, a principal named anonymous isassigned to all outgoing calls. If you want another principal to be associated with the call, you mustassociate a <run-as-principal> with the bean in the jboss.xml file. The following fragment associates aprincipal named internal with RunAsBean from the prior example.
<ejb-jar> <enterprise-beans> <session> <ejb-name>ASessionBean</ejb-name> <!-- ... --> <security-identity> <use-caller-identity/> </security-identity> </session> <session> <ejb-name>RunAsBean</ejb-name> <!-- ... --> <security-identity> <run-as> <description>A private internal role</description> <role-name>InternalRole</role-name> </run-as> </security-identity> </session> </enterprise-beans> <!-- ... --></ejb-jar>
<session> <ejb-name>RunAsBean</ejb-name> <security-identity> <run-as-principal>internal</run-as-principal> </security-identity></session>
CHAPTER 2. THE SECURITY SUBSYSTEM
15

The <run-as> element is also available in servlet definitions in a web.xml file. The following exampleshows how to assign the role InternalRole to a servlet:
Calls from this servlet are associated with the anonymous principal. The <run-as-principal> elementis available in the jboss-web.xml file to assign a specific principal to go along with the run-as role.The following fragment shows how to associate a principal named internal to the servlet above.
Report a bug
2.9. SECURITY ROLES
The security role name referenced by either the security-role-ref or security-identityelement needs to map to one of the application's declared roles. An application assembler defines logicalsecurity roles by declaring security-role elements. The role-name value is a logical applicationrole name like Administrator, Architect, SalesManager, etc.
The J2EE specifications note that it is important to keep in mind that the security roles in the deploymentdescriptor are used to define the logical security view of an application. Roles defined in the J2EEdeployment descriptors should not be confused with the user groups, users, principals, and otherconcepts that exist in the target enterprise's operational environment. The deployment descriptor rolesare application constructs with application domain-specific names. For example, a banking applicationmight use role names such as BankManager, Teller, or Customer.
In JBoss EAP, a security-role element is only used to map security-role-ref/role-namevalues to the logical role that the component role references. The user's assigned roles are a dynamicfunction of the application's security manager. JBoss does not require the definition of security-roleelements in order to declare method permissions. However, the specification of security-roleelements is still a recommended practice to ensure portability across application servers and fordeployment descriptor maintenance.
Example 2.4. An ejb-jar.xml descriptor fragment that illustrates the security-role elementusage.
<servlet> <servlet-name>AServlet</servlet-name> <!-- ... --> <run-as> <role-name>InternalRole</role-name> </run-as> </servlet>
<servlet> <servlet-name>AServlet</servlet-name> <run-as-principal>internal</run-as-principal> </servlet>
<!-- A sample ejb-jar.xml fragment --><ejb-jar> <assembly-descriptor> <security-role> <description>The single application role</description>
Security Guide
16

Example 2.5. An example web.xml descriptor fragment that illustrates the security-roleelement usage.
Report a bug
2.10. EJB METHOD PERMISSIONS
An application assembler can set the roles that are allowed to invoke an EJB's home and remoteinterface methods through method-permission element declarations.
Figure 2.3. J2EE Method Permissions Element
Each method-permission element contains one or more role-name child elements that define thelogical roles that are allowed to access the EJB methods as identified by method child elements. Youcan also specify an unchecked element instead of the role-name element to declare that anyauthenticated user can access the methods identified by method child elements. In addition, you candeclare that no one should have access to a method that has the exclude-list element. If an EJB has
<role-name>TheApplicationRole</role-name> </security-role> </assembly-descriptor></ejb-jar>
<!-- A sample web.xml fragment --><web-app> <security-role> <description>The single application role</description> <role-name>TheApplicationRole</role-name> </security-role></web-app>
CHAPTER 2. THE SECURITY SUBSYSTEM
17

methods that have not been declared as accessible by a role using a method-permission element,the EJB methods default to being excluded from use. This is equivalent to defaulting the methods intothe exclude-list.
Figure 2.4. J2EE Method Element
There are three supported styles of method element declarations.
The first is used for referring to all the home and component interface methods of the named enterprisebean:
The second style is used for referring to a specified method of the home or component interface of thenamed enterprise bean:
If there are multiple methods with the same overloaded name, this style refers to all of the overloadedmethods.
The third style is used to refer to a specified method within a set of methods with an overloaded name:
<method> <ejb-name>EJBNAME</ejb-name> <method-name>*</method-name></method>
<method> <ejb-name>EJBNAME</ejb-name> <method-name>METHOD</method-name> </method>
<method>
Security Guide
18

The method must be defined in the specified enterprise bean's home or remote interface. The method-param element values are the fully qualified name of the corresponding method parameter type. If thereare multiple methods with the same overloaded signature, the permission applies to all of the matchingoverloaded methods.
The optional method-intf element can be used to differentiate methods with the same name andsignature that are defined in both the home and remote interfaces of an enterprise bean.
Example 2.6, “An ejb-jar.xml descriptor fragment that illustrates the method-permission element usage.”provides complete examples of the method-permission element usage.
Example 2.6. An ejb-jar.xml descriptor fragment that illustrates the method-permissionelement usage.
<ejb-name>EJBNAME</ejb-name> <method-name>METHOD</method-name> <method-params> <method-param>PARAMETER_1</method-param> <!-- ... --> <method-param>PARAMETER_N</method-param> </method-params></method>
<ejb-jar> <assembly-descriptor> <method-permission> <description>The employee and temp-employee roles may access any method of the EmployeeService bean </description> <role-name>employee</role-name> <role-name>temp-employee</role-name> <method> <ejb-name>EmployeeService</ejb-name> <method-name>*</method-name> </method> </method-permission> <method-permission> <description>The employee role may access the findByPrimaryKey, getEmployeeInfo, and the updateEmployeeInfo(String) method of the AardvarkPayroll bean </description> <role-name>employee</role-name> <method> <ejb-name>AardvarkPayroll</ejb-name> <method-name>findByPrimaryKey</method-name> </method> <method> <ejb-name>AardvarkPayroll</ejb-name> <method-name>getEmployeeInfo</method-name> </method> <method> <ejb-name>AardvarkPayroll</ejb-name> <method-name>updateEmployeeInfo</method-name> <method-params> <method-param>java.lang.String</method-param>
CHAPTER 2. THE SECURITY SUBSYSTEM
19

Report a bug
2.11. ENTERPRISE BEANS SECURITY ANNOTATIONS
Enterprise beans use Annotations to pass information to the deployer about security and other aspects ofthe application. The deployer can set up the appropriate enterprise bean security policy for theapplication if specified in annotations, or the deployment descriptor.
Any method values explicitly specified in the deployment descriptor override annotation values. If amethod value is not specified in the deployment descriptor, those values set using annotations are used.The overriding granularity is on a per-method basis
Those annotations that address security and can be used in an enterprise beans include the following:
@DeclareRoles
Declares each security role declared in the code. For information about configuring roles, refer to theJava EE 5 Tutorial Declaring Security Roles Using Annotations.
@RolesAllowed, @PermitAll, and @DenyAll
</method-params> </method> </method-permission> <method-permission> <description>The admin role may access any method of the EmployeeServiceAdmin bean </description> <role-name>admin</role-name> <method> <ejb-name>EmployeeServiceAdmin</ejb-name> <method-name>*</method-name> </method> </method-permission> <method-permission> <description>Any authenticated user may access any method of the EmployeeServiceHelp bean</description> <unchecked/> <method> <ejb-name>EmployeeServiceHelp</ejb-name> <method-name>*</method-name> </method> </method-permission> <exclude-list> <description>No fireTheCTO methods of the EmployeeFiring bean may be used in this deployment</description> <method> <ejb-name>EmployeeFiring</ejb-name> <method-name>fireTheCTO</method-name> </method> </exclude-list> </assembly-descriptor></ejb-jar>
Security Guide
20

Specifies method permissions for annotations. For information about configuring annotation methodpermissions, refer to the Java EE 5 Tutorial Specifying Method Permissions Using Annotations.
@RunAs
Configures the propagated security identity of a component. For information about configuringpropagated security identities using annotations, refer to the Java EE 5 Tutorial Configuring aComponent’s Propagated Security Identity.
Report a bug
2.12. WEB CONTENT SECURITY CONSTRAINTS
In a web application, security is defined by the roles that are allowed access to content by a URL patternthat identifies the protected content. This set of information is declared by using the web.xmlsecurity-constraint element.
Figure 2.5. Web Content Security Constraints
The content to be secured is declared using one or more <web-resource-collection> elements. Each<web-resource-collection> element contains an optional series of <url-pattern> elements followed by an
CHAPTER 2. THE SECURITY SUBSYSTEM
21

optional series of <http-method> elements. The <url-pattern> element value specifies a URL patternagainst which a request URL must match for the request to correspond to an attempt to access securedcontent. The <http-method> element value specifies a type of HTTP request to allow.
The optional <user-data-constraint> element specifies the requirements for the transport layer of theclient to server connection. The requirement may be for content integrity (preventing data tampering inthe communication process) or for confidentiality (preventing reading while in transit). The <transport-guarantee> element value specifies the degree to which communication between the client and servershould be protected. Its values are NONE, INTEGRAL, and CONFIDENTIAL. A value of NONE means thatthe application does not require any transport guarantees. A value of INTEGRAL means that theapplication requires the data sent between the client and server to be sent in such a way that it can notbe changed in transit. A value of CONFIDENTIAL means that the application requires the data to betransmitted in a fashion that prevents other entities from observing the contents of the transmission. Inmost cases, the presence of the INTEGRAL or CONFIDENTIAL flag indicates that the use of SSL isrequired.
The optional <login-config> element is used to configure the authentication method that should be used,the realm name that should be used for the application, and the attributes that are needed by the formlogin mechanism.
Figure 2.6. Web Login Configuration
The <auth-method> child element specifies the authentication mechanism for the web application. As aprerequisite to gaining access to any web resources that are protected by an authorization constraint, auser must have authenticated using the configured mechanism. Legal <auth-method> values are BASIC,DIGEST, FORM, and CLIENT-CERT. The <realm-name> child element specifies the realm name to usein HTTP basic and digest authorization. The <form-login-config> child element specifies the log in aswell as error pages that should be used in form-based log in. If the <auth-method> value is not FORM,then form-login-config and its child elements are ignored.
The following configuration example indicates that any URL lying under the web application's /restricted path requires an AuthorizedUser role. There is no required transport guarantee andthe authentication method used for obtaining the user identity is BASIC HTTP authentication.
Example 2.7. web.xml Descriptor Fragment
Security Guide
22

Report a bug
2.13. ENABLE FORM-BASED AUTHENTICATION
Form-based authentication provides flexibility in defining a custom JSP/HTML page for log in, and aseparate page to which users are directed if an error occurs during login.
Form-based authentication is defined by including <auth-method>FORM</auth-method> in the<login-config> element of the deployment descriptor, web.xml. The login and error pages are alsodefined in <login-config>, as follows:
When a web application with form-based authentication is deployed, the web container uses FormAuthenticator to direct users to the appropriate page. JBoss EAP maintains a session pool sothat authentication information does not need to be present for each request. When FormAuthenticator receives a request, it queries org.apache.catalina.session.Manager foran existing session. If no session exists, a new session is created. FormAuthenticator then verifiesthe credentials of the session.
<web-app> <security-constraint> <web-resource-collection> <web-resource-name>Secure Content</web-resource-name> <url-pattern>/restricted/*</url-pattern> </web-resource-collection> <auth-constraint> <role-name>AuthorizedUser</role-name> </auth-constraint> <user-data-constraint> <transport-guarantee>NONE</transport-guarantee> </user-data-constraint> </security-constraint> <!-- ... --> <login-config> <auth-method>BASIC</auth-method> <realm-name>The Restricted Zone</realm-name> </login-config> <!-- ... --> <security-role> <description>The role required to access restricted content </description> <role-name>AuthorizedUser</role-name> </security-role></web-app>
<login-config> <auth-method>FORM</auth-method> <form-login-config> <form-login-page>/login.html</form-login-page> <form-error-page>/error.html</form-error-page> </form-login-config></login-config>
CHAPTER 2. THE SECURITY SUBSYSTEM
23

NOTE
Each session is identified by a session ID, a 16 byte string generated from randomvalues. These values are retrieved from /dev/urandom (Linux) by default, and hashedwith MD5. Checks are performed at session ID creation to ensure that the ID created isunique.
Once verified, the session ID is assigned as part of a cookie, and then returned to the client. This cookieis expected in subsequent client requests and is used to identify the user session.
The cookie passed to the client is a name value pair with several optional attributes. The identifierattribute is called JSESSIONID . Its value is a hex-string of the session ID. This cookie is configured tobe non-persistent. This means that on the client side it will be deleted when the browser exits. On theserver side, sessions expire after 60 seconds of inactivity, at which time session objects and theircredential information are deleted.
Say a user attempts to access a web application that is protected with form-based authentication. FormAuthenticator caches the request, creates a new session if necessary, and redirects the user tothe login page defined in login-config. (In the previous example code, the login page is login.html.) The user then enters their user name and password in the HTML form provided. Username and password are passed to FormAuthenticator via the j_security_check form action.
The FormAuthenticator then authenticates the user name and password against the realm attachedto the web application context. In JBoss Enterprise Application Platform, the realm is JBossWebRealm.When authentication is successful, FormAuthenticator retrieves the saved request from the cacheand redirects the user to their original request.
NOTE
The server recognizes form authentication requests only when the URI ends with /j_security_check and at least the j_username and j_password parameters exist.
Report a bug
2.14. ENABLE DECLARATIVE SECURITY
The Java EE security elements that have been covered so far describe the security requirements onlyfrom the application's perspective. Because Java EE security elements declare logical roles, theapplication deployer maps the roles from the application domain onto the deployment environment. TheJava EE specifications omit these application server-specific details.
To map application roles onto the deployment environment, you must specify a security manager thatimplements the Java EE security model using JBoss EAP-specific deployment descriptors. Refer to thecustom login module example for details of this security configuration.
Report a bug
Security Guide
24

CHAPTER 3. MANAGEMENT INTERFACE SECURITY
3.1. SECURE THE MANAGEMENT INTERFACES
Summary
In a test environment, it is typical to run JBoss EAP 6 with no security layer on the managementinterfaces, comprised of the Management Console, Management CLI, and any other APIimplementation. This allows for rapid development and configuration changes.
In addition, a silent authentication mode is present by default, allowing a local client on the host machineto connect to the Management CLI without requiring a username or password. This behavior is aconvenience for local users and Management CLI scripts, but it can be disabled if required. Theprocedure is described in the topic Section 3.5, “Remove Silent Authentication from the Default SecurityRealm”.
When you begin testing and preparing your environment to move to production, it is vitally important tosecure the management interfaces by at least the following methods:
Section 11.2, “Specify Which Network Interface JBoss EAP 6 Uses”
Section 11.3, “Configure Network Firewalls to Work with JBoss EAP 6”
Report a bug
3.2. DEFAULT USER SECURITY CONFIGURATION
Introduction
All management interfaces in JBoss EAP 6 are secured by default. This security takes two differentforms:
Local interfaces are secured by a SASL contract between local clients and the server theyconnect to. This security mechanism is based on the client's ability to access the local filesystem.This is because access to the local filesystem would allow the client to add a user or otherwisechange the configuration to thwart other security mechanisms. This adheres to the principle thatif physical access to the filesystem is achieved, other security mechanisms are superfluous. Themechanism happens in four steps:
NOTE
HTTP access is considered to be remote, even if you connect to the localhostusing HTTP.
1. The client sends a message to the server which includes a request to authenticate with thelocal SASL mechanism.
2. The server generates a one-time token, writes it to a unique file, and sends a message tothe client with the full path of the file.
3. The client reads the token from the file and sends it to the server, verifying that it has localaccess to the filesystem.
4. The server verifies the token and then deletes the file.
CHAPTER 3. MANAGEMENT INTERFACE SECURITY
25

Remote clients, including local HTTP clients, use realm-based security. The default realm withthe permissions to configure the JBoss EAP 6 remotely using the management interfaces is ManagementRealm. A script is provided which allows you to add users to this realm (or realmsyou create). For more information on adding users, refer to the Getting Started chapter of theInstallation guide for JBoss EAP 6. For each user, the username, a hashed password, and therealm are stored in a file.
Standalone server
JPP_HOME/standalone/configuration/mgmt-users.properties
Even though the contents of the mgmt-users.properties are masked, the file should still betreated as a sensitive file. It is recommended that it be set to the file mode of 600, which givesno access other than read and write access by the file owner.
Report a bug
3.3. OVERVIEW OF ADVANCED MANAGEMENT INTERFACECONFIGURATION
The Management interface configuration in the EAP_HOME/domain/configuration/host.xml or EAP_HOME/standalone/configuration/standalone.xml controls which network interfaces thehost controller process binds to, which types of management interfaces are available at all, and whichtype of authentication system is used to authenticate users on each interface. This topic discusses howto configure the Management Interfaces to suit your environment.
The Management subsystem consists of a <management> element that includes several configurableattributes, and the following three configurable child elements. The security realms and outboundconnections are each first defined, and then applied to the management interfaces as attributes.
<security-realms>
<outbound-connections>
<management-interfaces>
Security Realms
The security realm is responsible for the authentication and authorization of users allowed to administerJBoss EAP 6 via the Management API, Management CLI, or web-based Management Console.
Two different file-based security realms are included in a default installation: ManagementRealm and ApplicationRealm. Each of these security realms uses a -users.properties file to store usersand hashed passwords, and a -roles.properties to store mappings between users and roles.Support is also included for an LDAP-enabled security realm.
NOTE
Security realms can also be used for your own applications. The security realmsdiscussed here are specific to the management interfaces.
Outbound Connections
Security Guide
26

Some security realms connect to external interfaces, such as an LDAP server. An outbound connectiondefines how to make this connection. A pre-defined connection type, ldap-connection, sets all of therequired and optional attributes to connect to the LDAP server and verify the credential.
Management Interfaces
A management interface includes properties about how connect to and configure JBoss EAP. Suchinformation includes the named network interface, port, security realm, and other configurableinformation about the interface. Two interfaces are included in a default installation:
http-interface is the configuration for the web-based Management Console.
native-interface is the configuration for the command-line Management CLI and the REST-like Management API.
Each of the three main configurable elements of the host management subsystem are interrelated. Asecurity realm refers to an outbound connection, and a management interface refers to a security realm.
Report a bug
3.4. DISABLE THE HTTP MANAGEMENT INTERFACE
In a managed domain, you only need access to the HTTP interface on the domain controller, rather thanon domain member servers. In addition, on a production server, you may decide to disable the web-based Management Console altogether.
NOTE
Other clients, such as JBoss Operations Network, also operate using the HTTP interface.If you want to use these services, and simply disable the Management Console itself, youcan set the console-enabled attribute of the HTTP interface to false, instead ofdisabling the interface completely.
/host=master/core-service=management/management-interface=http-interface/:write-attribute(name=console-enabled,value=false)
To disable access to the HTTP interface, which also disables access to the web-based ManagementConsole, you can delete the HTTP interface altogether.
The following JBoss CLI command allows you to read the current contents of your HTTP interface, incase you decide to add it again.
Example 3.1. Read the Configuration of the HTTP Interface
/host=master/core-service=management/management-interface=http-interface/:read-resource(recursive=true,proxies=false,include-runtime=false,include-defaults=true){ "outcome" => "success", "result" => { "console-enabled" => true, "interface" => "management", "port" => expression "${jboss.management.http.port:9990}", "secure-port" => undefined,
CHAPTER 3. MANAGEMENT INTERFACE SECURITY
27

"security-realm" => "ManagementRealm" }}
To remove the HTTP interface, issue the following command:
Example 3.2. Remove the HTTP Interface
/host=master/core-service=management/management-interface=http-interface/:remove
To re-enable access, issue the following commands to re-create the HTTP Interface with the defaultvalues.
Example 3.3. Re-Create the HTTP Interface
/host=master/core-service=management/management-interface=http-interface:add(console-enabled=true,interface=management,port="${jboss.management.http.port:9990}",security-realm=ManagementRealm)
Report a bug
3.5. REMOVE SILENT AUTHENTICATION FROM THE DEFAULTSECURITY REALM
Summary
The default installation of JBoss EAP 6 contains a method of silent authentication for a localManagement CLI user. This allows the local user the ability to access the Management CLI withoutusername or password authentication. This functionality is enabled as a convenience, and to assist localusers running Management CLI scripts without requiring authentication. It is considered a useful featuregiven that access to the local configuration typically also gives the user the ability to add their own userdetails or otherwise disable security checks.
The convenience of silent authentication for local users can be disabled where greater security control isrequired. This can be achieved by removing the local element within the security-realm section ofthe configuration file. This applies to both the standalone.xml for a Standalone Server instance, or host.xml for a Managed Domain. You should only consider the removal of the local element if youunderstand the impact that it might have on your particular server configuration.
The preferred method of removing silent authentication is by use of the Management CLI, which directlyremoves the local element visible in the following example.
Example 3.4. Example of the local element in the security-realm
<security-realms> <security-realm name="ManagementRealm"> <authentication> <local default-user="$local"/>
Security Guide
28

Procedure 3.1. Remove Silent Authentication from the Default Security Realm
Remove silent authentication with the Management CLIRemove the local element from the Management Realm and Application Realm as required.
a. Remove the local element from the Management Realm.
For Standalone Servers
/core-service=management/security-realm=ManagementRealm/authentication=local:remove
For Managed Domains
/host=HOST_NAME/core-service=management/security-realm=ManagementRealm/authentication=local:remove
b. Remove the local element from the Application Realm.
For Standalone Servers
/core-service=management/security-realm=ApplicationRealm/authentication=local:remove
For Managed Domains
/host=HOST_NAME/core-service=management/security-realm=ApplicationRealm/authentication=local:remove
Result
The silent authentication mode is removed from the ManagementRealm and the ApplicationRealm.
Report a bug
<properties path="mgmt-users.properties" relative-to="jboss.server.config.dir"/> </authentication> </security-realm> <security-realm name="ApplicationRealm"> <authentication> <local default-user="$local" allowed-users="*"/> <properties path="application-users.properties" relative-to="jboss.server.config.dir"/> </authentication> <authorization> <properties path="application-roles.properties" relative-to="jboss.server.config.dir"/> </authorization> </security-realm></security-realms>
CHAPTER 3. MANAGEMENT INTERFACE SECURITY
29

3.6. DISABLE REMOTE ACCESS TO THE JMX SUBSYSTEM
Remote JMX connectivity allows you to trigger JDK and application management operations. In order tosecure an installation, disable this function. You can do this either by removing the remote connectionconfiguration, or removing the JMX subsystem entirely. The JBoss CLI commands reference the defaultprofile in a managed domain configuration. To modify a different profile, modify the /profile=defaultpart of the command. For a standalone server, remove that portion of the command completely.
NOTE
In a managed domain the remoting connector is removed from the JMX subsystem bydefault. This command is provided for your information, in case you add it duringdevelopment.
Example 3.5. Remove the Remote Connector from the JMX Subsystem
/profile=default/subsystem=jmx/remoting-connector=jmx/:remove
Example 3.6. Remove the JMX Subsystem
Run this command for each profile you use, if you use a managed domain.
/profile=default/subsystem=jmx/:remove
Report a bug
3.7. CONFIGURE SECURITY REALMS FOR THE MANAGEMENTINTERFACES
The Management Interfaces use security realms to control authentication and access to the configurationmechanisms of JBoss EAP 6. This topic shows you how to read and configure security realms. Thesecommands use the Management CLI.
Read a Security Realm's Configuration
This example shows the default configuration for the ManagementRealm security realm. It uses a filecalled mgmt-users.properties to store its configuration information.
Example 3.7. Default ManagementRealm
/host=master/core-service=management/security-realm=ManagementRealm/:read-resource(recursive=true,proxies=false,include-runtime=false,include-defaults=true){ "outcome" => "success", "result" => { "authorization" => undefined, "server-identity" => undefined, "authentication" => {"properties" => {
Security Guide
30

"path" => "mgmt-users.properties", "plain-text" => false, "relative-to" => "jboss.domain.config.dir" }} }}
Write a Security Realm
The following commands create a new security realm called TestRealm and set the name and directoryfor the relevant properties file.
Example 3.8. Writing a Security Realm
/host=master/core-service=management/security-realm=TestRealm/:add/host=master/core-service=management/security-realm=TestRealm/authentication=properties/:add(path=TestUsers.properties, relative-to=jboss.domain.config.dir)
Apply a Security Realm to the Management Interface
After adding a security realm, supply its name as a reference to the Management Interface.
Example 3.9. Add a Security Realm to a Management Interface
/host=master/core-service=management/management-interface=http-interface/:write-attribute(name=security-realm,value=TestRealm)
Report a bug
3.8. PASSWORD VAULTS FOR SENSITIVE STRINGS
3.8.1. About Securing Sensitive Strings in Clear-Text Files
Web applications and other deployments often include clear-text files, such as XML deploymentdescriptors, which include sensitive information such as passwords and other sensitive strings. JBossEAP 6 includes a password vault mechanism which enables you to encrypt sensitive strings and storethem in an encrypted keystore. The vault mechanism manages decrypting the strings for use withsecurity domains, security realms, or other verification systems. This provides an extra layer of security.The mechanism relies upon tools that are included in all supported Java Development Kit (JDK)implementations.
Report a bug
3.8.2. Create a Java Keystore to Store Sensitive Strings
Prerequisites
CHAPTER 3. MANAGEMENT INTERFACE SECURITY
31

The keytool command must be available to use. It is provided by the Java RuntimeEnvironment (JRE). Locate the path for the file. In Red Hat Enterprise Linux, it is installed to /usr/bin/keytool.
Procedure 3.2. Setup a Java Keystore
1. Create a directory to store your keystore and other encrypted information.Create a directory to hold your keystore and other important information. The rest of thisprocedure assumes that the directory is /home/USER/vault/.
2. Determine the parameters to use with keytool.Determine the following parameters:
alias
The alias is a unique identifier for the vault or other data stored in the keystore. The alias inthe example command at the end of this procedure is vault. Aliases are case-insensitive.
keyalg
The algorithm to use for encryption. The default is DSA. The example in this procedure uses RSA. Check the documentation for your JRE and operating system to see which otherchoices may be available to you.
keysize
The size of an encryption key impacts how difficult it is to decrypt through brute force. Thedefault size of keys is 1024. It must be between 512 and 2048, and a multiple of 64. Theexample in this procedure uses 2048.
keystore
The keystore is a database which holds encrypted information and the information about howto decrypt it. If you do not specify a keystore, the default keystore to use is a file called .keystore in your home directory. The first time you add data to a keystore, it is created.The example in this procedure uses the vault.keystore keystore.
The keytool command has many other options. Refer to the documentation for your JRE oryour operating system for more details.
3. Determine the answers to questions the keystore command will ask.The keystore needs the following information in order to populate the keystore entry:
Keystore password
When you create a keystore, you must set a password. In order to work with the keystore inthe future, you need to provide the password. Create a strong password that you willremember. The keystore is only as secure as its password and the security of the file systemand operating system where it resides.
Key password (optional)
In addition to the keystore password, you can specify a password for each key it holds. Inorder to use such a key, the password needs to be given each time it is used. Usually, thisfacility is not used.
First name (given name) and last name (surname)
Security Guide
32

This, and the rest of the information in the list, helps to uniquely identify the key and place itinto a hierarchy of other keys. It does not necessarily need to be a name at all, but it shouldbe two words, and must be unique to the key. The example in this procedure uses Accounting Administrator. In directory terms, this becomes the common name of thecertificate.
Organizational unit
This is a single word that identifies who uses the certificate. It may be the application or thebusiness unit. The example in this procedure uses AccountingServices. Typically, allkeystores used by a group or application use the same organizational unit.
Organization
This is usually a single-word representation of your organization's name. This typicallyremains the same across all certificates used by an organization. This example uses MyOrganization.
City or municipality
Your city.
State or province
Your state or province, or the equivalent for your locality.
Country
The two-letter code for your country.
All of this information together will create a hierarchy for your keystores and certificates, ensuringthat they use a consistent naming structure but are unique.
4. Run the keytool command, supplying the information that you gathered.
Example 3.10. Example input and output of keystore command
$ keytool -genkey -alias vault -keyalg RSA -keysize 2048 -keystore /home/USER/vault/vault.keystoreEnter keystore password: vault22 Re-enter new password:vault22 What is your first and last name? [Unknown]: Accounting AdministratorWhat is the name of your organizational unit? [Unknown]: AccountingServicesWhat is the name of your organization? [Unknown]: MyOrganizationWhat is the name of your City or Locality? [Unknown]: RaleighWhat is the name of your State or Province? [Unknown]: NCWhat is the two-letter country code for this unit? [Unknown]: USIs CN=Accounting Administrator, OU=AccountingServices, O=MyOrganization, L=Raleigh, ST=NC, C=US correct? [no]: yes
CHAPTER 3. MANAGEMENT INTERFACE SECURITY
33

Enter key password for <vault> (RETURN if same as keystore password):
Result
A file named vault.keystore is created in the /home/USER/vault/ directory. It stores a single key,called vault, which will be used to store encrypted strings, such as passwords, for JBoss EAP 6.
Report a bug
3.8.3. Mask the Keystore Password and Initialize the Password Vault
Prerequisites
Section 3.8.2, “Create a Java Keystore to Store Sensitive Strings”
The EAP_HOME/bin/vault.sh application needs to be accessible via a command-lineinterface.
1. Run the vault.sh command.Run EAP_HOME/bin/vault.sh. Start a new interactive session by typing 0.
2. Enter the directory where encrypted files will be stored.This directory should be reasonably secure, but JBoss EAP 6 needs to be able to access it. Ifyou followed Section 3.8.2, “Create a Java Keystore to Store Sensitive Strings”, your keystore isin a directory called vault/ in your home directory. This example uses the directory /home/USER/vault/.
NOTE
Do not forget to include the trailing slash on the directory name. Either use / or \,depending on your operating system.
3. Enter the path to the keystore.Enter the full path to the keystore file. This example uses /home/USER/vault/vault.keystore.
4. Encrypt the keystore password.The following steps encrypt the keystore password, so that you can use it in configuration filesand applications securely.
a. Enter the keystore password.When prompted, enter the keystore password.
b. Enter a salt value.Enter an 8-character salt value. The salt value, together with the iteration count (below), areused to create the hash value.
c. Enter the iteration count.Enter a number for the iteration count.
d. Make a note of the masked password information.
Security Guide
34
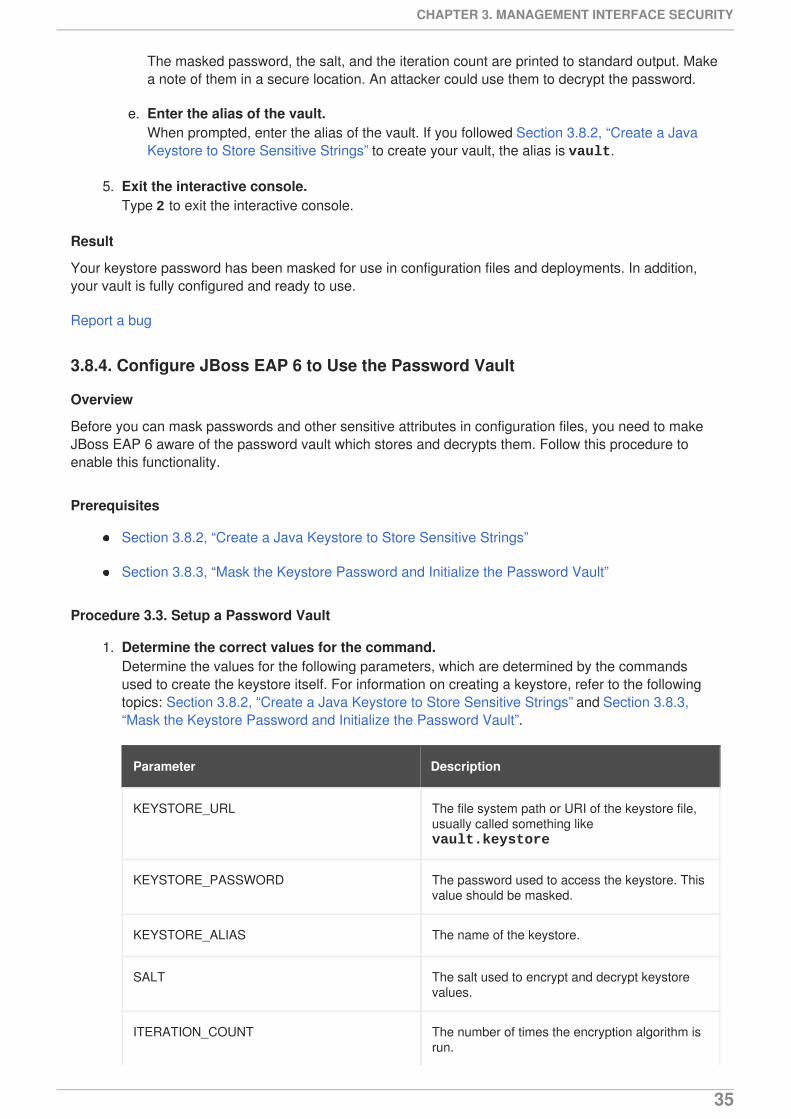
The masked password, the salt, and the iteration count are printed to standard output. Makea note of them in a secure location. An attacker could use them to decrypt the password.
e. Enter the alias of the vault.When prompted, enter the alias of the vault. If you followed Section 3.8.2, “Create a JavaKeystore to Store Sensitive Strings” to create your vault, the alias is vault.
5. Exit the interactive console.Type 2 to exit the interactive console.
Result
Your keystore password has been masked for use in configuration files and deployments. In addition,your vault is fully configured and ready to use.
Report a bug
3.8.4. Configure JBoss EAP 6 to Use the Password Vault
Overview
Before you can mask passwords and other sensitive attributes in configuration files, you need to makeJBoss EAP 6 aware of the password vault which stores and decrypts them. Follow this procedure toenable this functionality.
Prerequisites
Section 3.8.2, “Create a Java Keystore to Store Sensitive Strings”
Section 3.8.3, “Mask the Keystore Password and Initialize the Password Vault”
Procedure 3.3. Setup a Password Vault
1. Determine the correct values for the command.Determine the values for the following parameters, which are determined by the commandsused to create the keystore itself. For information on creating a keystore, refer to the followingtopics: Section 3.8.2, “Create a Java Keystore to Store Sensitive Strings” and Section 3.8.3,“Mask the Keystore Password and Initialize the Password Vault”.
Parameter Description
KEYSTORE_URL The file system path or URI of the keystore file,usually called something like vault.keystore
KEYSTORE_PASSWORD The password used to access the keystore. Thisvalue should be masked.
KEYSTORE_ALIAS The name of the keystore.
SALT The salt used to encrypt and decrypt keystorevalues.
ITERATION_COUNT The number of times the encryption algorithm isrun.
CHAPTER 3. MANAGEMENT INTERFACE SECURITY
35

ENC_FILE_DIR The path to the directory from which the keystorecommands are run. Typically the directorycontaining the password vault.
host (managed domain only) The name of the host you are configuring
Parameter Description
2. Use the Management CLI to enable the password vault.Run one of the following commands, depending on whether you use a managed domain orstandalone server configuration. Substitute the values in the command with the ones from thefirst step of this procedure.
Managed Domain
/host=YOUR_HOST/core-service=vault:add(vault-options=[("KEYSTORE_URL" => "PATH_TO_KEYSTORE"), ("KEYSTORE_PASSWORD" => "MASKED_PASSWORD"), ("KEYSTORE_ALIAS" => "ALIAS"), ("SALT" => "SALT"),("ITERATION_COUNT" => "ITERATION_COUNT"), ("ENC_FILE_DIR" => "ENC_FILE_DIR")])
Standalone Server
/core-service=vault:add(vault-options=[("KEYSTORE_URL" => "PATH_TO_KEYSTORE"), ("KEYSTORE_PASSWORD" => "MASKED_PASSWORD"), ("KEYSTORE_ALIAS" => "ALIAS"), ("SALT" => "SALT"),("ITERATION_COUNT" => "ITERATION_COUNT"), ("ENC_FILE_DIR" => "ENC_FILE_DIR")])
The following is an example of the command with hypothetical values:
/core-service=vault:add(vault-options=[("KEYSTORE_URL" => "/home/user/vault/vault.keystore"), ("KEYSTORE_PASSWORD" => "MASK-3y28rCZlcKR"), ("KEYSTORE_ALIAS" => "vault"), ("SALT" => "12438567"),("ITERATION_COUNT" => "50"), ("ENC_FILE_DIR" => "/home/user/vault/")])
Result
JBoss EAP 6 is configured to decrypt masked strings using the password vault. To add strings to thevault and use them in your configuration, refer to the following topic: Section 3.8.5, “Store and RetrieveEncrypted Sensitive Strings in the Java Keystore”.
Report a bug
3.8.5. Store and Retrieve Encrypted Sensitive Strings in the Java Keystore
Summary
Security Guide
36

Including passwords and other sensitive strings in plain-text configuration files is insecure. JBoss EAP 6includes the ability to store and mask these sensitive strings in an encrypted keystore, and use maskedvalues in configuration files.
Prerequisites
Section 3.8.2, “Create a Java Keystore to Store Sensitive Strings”
Section 3.8.3, “Mask the Keystore Password and Initialize the Password Vault”
Section 3.8.4, “Configure JBoss EAP 6 to Use the Password Vault”
The EAP_HOME/bin/vault.sh application needs to be accessible via a command-lineinterface.
Procedure 3.4. Setup the Java Keystore
1. Run the vault.sh command.Run EAP_HOME/bin/vault.sh. Start a new interactive session by typing 0.
2. Enter the directory where encrypted files will be stored.If you followed Section 3.8.2, “Create a Java Keystore to Store Sensitive Strings”, your keystoreis in a directory called vault/ in your home directory. In most cases, it makes sense to store allof your encrypted information in the same place as the key store. This example uses thedirectory /home/USER/vault/.
NOTE
Do not forget to include the trailing slash on the directory name. Either use / or \,depending on your operating system.
3. Enter the path to the keystore.Enter the full path to the keystore file. This example uses /home/USER/vault/vault.keystore.
4. Enter the keystore password, vault name, salt, and iteration count.When prompted, enter the keystore password, vault name, salt, and iteration count. Ahandshake is performed.
5. Select the option to store a password.Select option 0 to store a password or other sensitive string.
6. Enter the value.When prompted, enter the value twice. If the values do not match, you are prompted to try again.
7. Enter the vault block.Enter the vault block, which is a container for attributes which pertain to the same resource. Anexample of an attribute name would be ds_ExampleDS. This will form part of the reference tothe encrypted string, in your datasource or other service definition.
8. Enter the attribute name.Enter the name of the attribute you are storing. An example attribute name would be password.
Result
CHAPTER 3. MANAGEMENT INTERFACE SECURITY
37

A message such as the one below shows that the attribute has been saved.
Attribute Value for (ds_ExampleDS, password) saved
9. Make note of the information about the encrypted string.A message prints to standard output, showing the vault block, attribute name, shared key, andadvice about using the string in your configuration. Make note of this information in a securelocation. Example output is shown below.
********************************************Vault Block:ds_ExampleDSAttribute Name:passwordShared Key:N2NhZDYzOTMtNWE0OS00ZGQ0LWE4MmEtMWNlMDMyNDdmNmI2TElORV9CUkVBS3ZhdWx0Configuration should be done as follows:VAULT::ds_ExampleDS::password::N2NhZDYzOTMtNWE0OS00ZGQ0LWE4MmEtMWNlMDMyNDdmNmI2TElORV9CUkVBS3ZhdWx0********************************************
10. Use the encrypted string in your configuration.Use the string from the previous step in your configuration, in place of a plain-text string. Adatasource using the encrypted password above is shown below.
... <subsystem xmlns="urn:jboss:domain:datasources:1.0"> <datasources> <datasource jndi-name="java:jboss/datasources/ExampleDS" enabled="true" use-java-context="true" pool-name="H2DS"> <connection-url>jdbc:h2:mem:test;DB_CLOSE_DELAY=-1</connection-url> <driver>h2</driver> <pool></pool> <security> <user-name>sa</user-name> <password>${VAULT::ds_ExampleDS::password::N2NhZDYzOTMtNWE0OS00ZGQ0LWE4MmEtMWNlMDMyNDdmNmI2TElORV9CUkVBS3ZhdWx0}</password> </security> </datasource> <drivers> <driver name="h2" module="com.h2database.h2"> <xa-datasource-class>org.h2.jdbcx.JdbcDataSource</xa-datasource-class> </driver> </drivers> </datasources> </subsystem>...
You can use an encrypted string anywhere in your domain or standalone configuration filewhere expressions are allowed.
Security Guide
38

NOTE
To check if expressions are allowed within a particular subsystem, run thefollowing CLI command against that subsystem:
From the output of running this command, look for the value for the expressions-allowed parameter. If this is true, then you can use expressionswithin the configuration of this particular subsystem.
After you store your string in the keystore, use the following syntax to replace any clear-textstring with an encrypted one.
${VAULT::<replaceable>VAULT_BLOCK</replaceable>::<replaceable>ATTRIBUTE_NAME</replaceable>::<replaceable>ENCRYPTED_VALUE</replaceable>}
Here is a sample real-world value, where the vault block is ds_ExampleDS and the attribute is password.
<password>${VAULT::ds_ExampleDS::password::N2NhZDYzOTMtNWE0OS00ZGQ0LWE4MmEtMWNlMDMyNDdmNmI2TElORV9CUkVBS3ZhdWx0}</password>
Report a bug
3.8.6. Store and Resolve Sensitive Strings In Your Applications
Overview
Configuration elements of JBoss EAP 6 support the ability to resolve encrypted strings against valuesstored in a Java Keystore, via the Security Vault mechanism. You can add support for this feature to yourown applications.
First, add the password to the vault. Second, replace the clear-text password with the one stored in thevault. You can use this method to obscure any sensitive string in your application.
Prerequisites
Before performing this procedure, make sure that the directory for storing your vault files exists. It doesnot matter where you place them, as long as the user who executes JBoss EAP 6 has permission toread and write the files. This example places the vault/ directory into the /home/USER/vault/directory. The vault itself is a file called vault.keystore inside the vault/ directory.
Example 3.11. Adding the Password String to the Vault
Add the string to the vault using the EAP_HOME/bin/vault.sh command. The full series ofcommands and responses is included in the following screen output. Values entered by the user areemphasized. Some output is removed for formatting. In Microsoft Windows, the name of thecommand is vault.bat. Note that in Microsoft Windows, file paths use the \ character as adirectory separator, rather than the / character.
[user@host bin]$ ./vault.sh
/host=master/core-service=management/security-realm=TestRealm:read-resource-description(recursive=true)
CHAPTER 3. MANAGEMENT INTERFACE SECURITY
39

************************************** JBoss Vault ******************************************Please enter a Digit:: 0: Start Interactive Session 1: Remove Interactive Session 2: Exit0Starting an interactive sessionEnter directory to store encrypted files:/home/user/vault/Enter Keystore URL:/home/user/vault/vault.keystoreEnter Keystore password: ...Enter Keystore password again: ...Values matchEnter 8 character salt:12345678Enter iteration count as a number (Eg: 44):25
Enter Keystore Alias:vaultVault is initialized and ready for useHandshake with Vault completePlease enter a Digit:: 0: Store a password 1: Check whether password exists 2: Exit0Task: Store a passwordPlease enter attribute value: saPlease enter attribute value again: saValues matchEnter Vault Block:DSEnter Attribute Name:thePassAttribute Value for (DS, thePass) saved
Please make note of the following:********************************************Vault Block:DSAttribute Name:thePassShared Key:OWY5M2I5NzctYzdkOS00MmZhLWExZGYtNjczM2U5ZGUyOWIxTElORV9CUkVBS3ZhdWx0Configuration should be done as follows:VAULT::DS::thePass::OWY5M2I5NzctYzdkOS00MmZhLWExZGYtNjczM2U5ZGUyOWIxTElORV9CUkVBS3ZhdWx0********************************************
Please enter a Digit:: 0: Store a password 1: Check whether password exists 2: Exit2
The string that will be added to the Java code is the last value of the output, the line beginning with VAULT.
The following servlet uses the vaulted string instead of a clear-text password. The clear-text version iscommented out so that you can see the difference.
Example 3.12. Servlet Using a Vaulted Password
package vaulterror.web; import java.io.IOException;
Security Guide
40

Your servlet is now able to resolve the vaulted string.
Report a bug
3.9. LDAP
3.9.1. About LDAP
import java.io.Writer; import javax.annotation.Resource;import javax.annotation.sql.DataSourceDefinition;import javax.servlet.ServletException;import javax.servlet.annotation.WebServlet;import javax.servlet.http.HttpServlet;import javax.servlet.http.HttpServletRequest;import javax.servlet.http.HttpServletResponse;import javax.sql.DataSource; /*@DataSourceDefinition( name = "java:jboss/datasources/LoginDS", user = "sa", password = "sa", className = "org.h2.jdbcx.JdbcDataSource", url = "jdbc:h2:tcp://localhost/mem:test")*/@DataSourceDefinition( name = "java:jboss/datasources/LoginDS", user = "sa", password = "VAULT::DS::thePass::OWY5M2I5NzctYzdkOS00MmZhLWExZGYtNjczM2U5ZGUyOWIxTElORV9CUkVBS3ZhdWx0", className = "org.h2.jdbcx.JdbcDataSource", url = "jdbc:h2:tcp://localhost/mem:test")@WebServlet(name = "MyTestServlet", urlPatterns = { "/my/" }, loadOnStartup = 1)public class MyTestServlet extends HttpServlet { private static final long serialVersionUID = 1L; @Resource(lookup = "java:jboss/datasources/LoginDS") private DataSource ds; @Override protected void doGet(HttpServletRequest req, HttpServletResponse resp) throws ServletException, IOException { Writer writer = resp.getWriter(); writer.write((ds != null) + ""); }}
CHAPTER 3. MANAGEMENT INTERFACE SECURITY
41

Lightweight Directory Access Protocol (LDAP) is a protocol for storing and distributing directoryinformation across a network. This directory information includes information about users, hardwaredevices, access roles and restrictions, and other information.
Some common implementations of LDAP include OpenLDAP, Microsoft Active Directory, IBM TivoliDirectory Server, Oracle Internet Directory, and others.
JBoss EAP 6 includes several authentication and authorization modules which allow you to use a LDAPserver as the authentication and authorization authority for your Web and EJB applications.
Report a bug
3.9.2. Use LDAP to Authenticate to the Management Interfaces
To use an LDAP directory server as the authentication source for the Management Console,Management CLI, or Management API, you need to perform the following procedures:
1. Create an outbound connection to the LDAP server.
2. Create an LDAP-enabled security realm.
3. Reference the new security domain in the Management Interface.
Create an Outbound Connection to an LDAP Server
The LDAP outbound connection allows the following attributes:
Table 3.1. Attributes of an LDAP Outbound Connection
Attribute Required Description
name yes The name to identify thisconnection. This name is used inthe security realm definition.
url yes The URL address of the directoryserver.
search-dn yes The fully distinguished name (DN)of the user authorized to performsearches.
search-credentials yes The password of the userauthorized to perform searches.
initial-context-factory no The initial context factory to usewhen establishing the connection.Defaults to com.sun.jndi.ldap.LdapCtxFactory.
Example 3.13. Add an LDAP Outbound Connection
This example adds an outbound connection with the following properties set:
Search DN: cn=search,dc=acme,dc=com
Security Guide
42

Search Credential: myPass
URL: ldap://127.0.0.1:389
/host=master/core-service=management/ldap-connection=ldap_connection/:add(search-credential=myPass,url=ldap://127.0.0.1:389,search-dn="cn=search,dc=acme,dc=com")
Example 3.14. XML Representing an LDAP Outbound Connection
Create an LDAP-Enabled Security Realm
The Management Interfaces can authenticate against LDAP server instead of the property-file basedsecurity realms configured by default. The LDAP authenticator operates by first establishing aconnection to the remote directory server. It then performs a search using the username which the userpassed to the authentication system, to find the fully-qualified distinguished name (DN) of the LDAPrecord. A new connection is established, using the DN of the user as the credential, and passwordsupplied by the user. If this authentication to the LDAP server is successful, the DN is verified to be valid.
The LDAP security realm needs the following configuration attributes and elements in order to performits functions.
connection
The name of the connection defined in <outbound-connections> to use to connect to the LDAPdirectory.
base-dn
The distinguished name of the context to begin searching for the user.
recursive
Whether the search should be recursive throughout the LDAP directory tree, or only search thespecified context. Defaults to false.
user-dn
The attribute of the user that holds the distinguished name. This is subsequently used to testauthentication as the user can complete. Defaults to dn.
One of username-filter or advanced-filter, as a child element
The username-filter takes a single attribute called attribute, whose value is the name of theLDAP attribute which holds the username, such as userName or sambaAccountName.
<outbound-connections> <ldap name="ldap_connection" url="ldap://127.0.0.1:389" search-dn="cn=search,dc=acme,dc=com" search-credential="myPass" /></outboundconnections>
CHAPTER 3. MANAGEMENT INTERFACE SECURITY
43

The advanced-filter takes a single attribute called filter. This attribute contains a filter queryin standard LDAP syntax. Be cautious to escape any & characters by changing them to &. Anexample of a filter is:
(&(sAMAccountName={0})(memberOf=cn=admin,cn=users,dc=acme,dc=com))
After escaping the ampersand character, the filter appears as:
(&(sAMAccountName={0})(memberOf=cn=admin,cn=users,dc=acme,dc=com))
Example 3.15. XML Representing an LDAP-enabled Security Realm
This example uses the following parameters:
connection - ldap_connection
base-dn - cn=users,dc=acme,dc=com.
username-filter - attribute="sambaAccountName"
WARNING
It is important to ensure that you do not allow empty LDAP passwords; unless youspecifically desire this in your environment, it is a serious security concern.
EAP 6.1 includes a patch for CVE-2012-5629, which sets the allowEmptyPasswordsoption for the LDAP login modules to false if the option is not already configured. Forolder versions, this option should be configured manually
Example 3.16. Add an LDAP Security Realm
The command below adds a security realm and sets its attributes for a standalone server.
/host=master/core-service=management/security-realm=ldap_security_realm/authentication=ldap:add(base-dn="DC=mycompany,DC=org", recursive=true, username-
<security-realm name="TestRealm"> <authentication> <ldap connection="ldap_connection" base-dn="cn=users,dc=acme,dc=com"> <username-filter attribute="sambaAccountName" /> </ldap> </authentication></security-realm>
Security Guide
44

attribute="MyAccountName", connection="ldap_connection")
Apply the New Security Realm to the Management Interface
After you create a security realm, you need to reference it in the configuration of your managementinterface. The management interface will use the security realm for HTTP digest authentication.
Example 3.17. Apply the Security Realm to the HTTP Interface
After this configuration is in place, and you restart the host controller, the web-based ManagementConsole will use LDAP to authenticate its users.
/host=master/core-service=management/management-interface=http-interface/:write-attribute(name=security-realm,value=TestRealm)
Report a bug
CHAPTER 3. MANAGEMENT INTERFACE SECURITY
45

CHAPTER 4. JAVA SECURITY MANAGER
4.1. ABOUT THE JAVA SECURITY MANAGER
Java Security Manager
The Java Security Manager is a class that manages the external boundary of the JavaVirtual Machine (JVM) sandbox, controlling how code executing within the JVM caninteract with resources outside the JVM. When the Java Security Manager is activated,the Java API checks with the security manager for approval before executing a widerange of potentially unsafe operations.
The Java Security Manager uses a security policy to determine whether a given action will be permittedor denied.
Report a bug
4.2. ABOUT JAVA SECURITY MANAGER POLICIES
Security Policy
A set of defined permissions for different classes of code. The Java Security Managercompares actions requested by applications against the security policy. If an action isallowed by the policy, the Security Manager will permit that action to take place. If theaction is not allowed by the policy, the Security Manager will deny that action. Thesecurity policy can define permissions based on the location of code or on the code'ssignature.
The Java Security Manager and the security policy used are configured using the Java Virtual Machineoptions java.security.manager and java.security.policy.
Report a bug
4.3. RUN JBOSS EAP 6 WITHIN THE JAVA SECURITY MANAGER
To specify a Java Security Manager policy, you need to edit the Java options passed to the domain orserver instance during the bootstrap process. For this reason, you cannot pass the parameters asoptions to the domain.sh or standalone.sh scripts. The following procedure guides you through thesteps of configuring your instance to run within a Java Security Manager policy.
Prerequisites
Before you following this procedure, you need to write a security policy, using the policytoolcommand which is included with your Java Development Kit (JDK). This procedure assumesthat your policy is located at EAP_HOME/bin/server.policy.
The domain or standalone server must be completely stopped before you edit any configurationfiles.
Perform the following procedure for each physical host or instance in your domain, if you have domainmembers spread across multiple systems.
Procedure 4.1. Edit Configuration Files
Security Guide
46

1. Open the configuration file.Open the configuration file for editing. This file is located in one of two places, depending onwhether you use a managed domain or standalone server. This is not the executable file used tostart the server or domain.
Managed DomainEAP_HOME/bin/domain.conf
Standalone ServerEAP_HOME/bin/standalone.conf
2. Add the Java options at the end of the file.Add the following line to a new line at the very end of the file. You can modify the -Djava.security.policy value to specify the exact location of your security policy. It shouldgo onto one line only, with no line break. You can modify the -Djava.security.debug to logmore or less information, by specifying the debug level. The most verbose is failure,access,policy.
JAVA_OPTS="$JAVA_OPTS -Djava.security.manager -Djboss.home.dir=$PWD/.. -Djava.security.policy==$PWD/server.policy -Djava.security.debug=failure"
3. Start the domain or server.Start the domain or server as normal.
Report a bug
4.4. WRITE A JAVA SECURITY MANAGER POLICY
Introduction
An application called policytool is included with most JDK and JRE distributions, for the purpose ofcreating and editing Java Security Manager security policies. Detailed information about policytool islinked from http://docs.oracle.com/javase/6/docs/technotes/tools/.
Basic Information
A security policy consists of the following configuration elements:
CodeBase
The URL location (excluding the host and domain information) where the code originates from. Thisparameter is optional.
SignedBy
The alias used in the keystore to reference the signer whose private key was used to sign the code.This can be a single value or a comma-separated list of values. This parameter is optional. If omitted,presence or lack of a signature has no impact on the Java Security Manager.
Principals
A list of principal_type/principal_name pairs, which must be present within the executing thread'sprincipal set. The Principals entry is optional. If it is omitted, it signifies "any principals".
Permissions
CHAPTER 4. JAVA SECURITY MANAGER
47

A permission is the access which is granted to the code. Many permissions are provided as part ofthe Java Enterprise Edition 6 (Java EE 6) specification. This document only covers additionalpermissions which are provided by JBoss EAP 6.
Procedure 4.2. Setup a new Java Security Manager Policy
1. Start policytool.Start the policytool tool in one of the following ways.
Red Hat Enterprise LinuxFrom your GUI or a command prompt, run /usr/bin/policytool.
Microsoft Windows ServerRun policytool.exe from your Start menu or from the bin\ of your Java installation. Thelocation can vary.
2. Create a new policy.To create a new policy, select Add Policy Entry. Add the parameters you need, then click Done.
3. Edit an existing policySelect the policy from the list of existing policies, and select the Edit Policy Entry button.Edit the parameters as needed.
4. Delete an existing policy.Select the policy from the list of existing policies, and select the Remove Policy Entrybutton.
Permission Specific to JBoss EAP 6
org.jboss.security.SecurityAssociation.getPrincipalInfo
Provides access to the org.jboss.security.SecurityAssociation getPrincipal() and getCredential() methods. The risk involved with using this runtime permission is the ability to seethe current thread caller and credentials.
org.jboss.security.SecurityAssociation.getSubject
Provides access to the org.jboss.security.SecurityAssociation getSubject() method.
org.jboss.security.SecurityAssociation.setPrincipalInfo
Provides access to the org.jboss.security.SecurityAssociation setPrincipal(), setCredential(), setSubject(), pushSubjectContext(), and popSubjectContext()methods. The risk involved with using this runtime permission is the ability to set the current threadcaller and credentials.
org.jboss.security.SecurityAssociation.setServer
Provides access to the org.jboss.security.SecurityAssociation setServer() method.The risk involved with using this runtime permission is the ability to enable or disable multi-threadstorage of the caller principal and credential.
org.jboss.security.SecurityAssociation.setRunAsRole
Provides access to the org.jboss.security.SecurityAssociation pushRunAsRole(),
Security Guide
48

popRunAsRole(), pushRunAsIdentity(), and popRunAsIdentity() methods. The riskinvolved with using this runtime permission is the ability to change the current caller run-as roleprincipal.
org.jboss.security.SecurityAssociation.accessContextInfo
Provides access to the org.jboss.security.SecurityAssociation accessContextInfo(), and accessContextInfo() getter and setter methods. This allows youto both set and get the current security context info.
org.jboss.naming.JndiPermission
Provides special permissions to files and directories in a specified JNDI tree path, or recursively to allfiles and subdirectories. A JndiPermission consists of a pathname and a set of valid permissionsrelated to the file or directory.
The available permissions include:
bind
rebind
unbind
lookup
list
listBindings
createSubcontext
all
Pathnames ending in /* indicate that the specified permissions apply to all files and directories of thepathname. Pathnames ending in /- indicate recursive permissions to all files and subdirectories ofthe pathname. Pathnames consisting of the special token <<ALL BINDINGS>> matches any file inany directory.
org.jboss.security.srp.SRPPermission
A custom permission class for protecting access to sensitive SRP information like the private sessionkey and private key. This permission does not have any actions defined. The getSessionKey()target provides access to the private session key which results from the SRP negotiation. Access tothis key allows you to encrypt and decrypt messages that have been encrypted with the session key.
org.hibernate.secure.HibernatePermission
This permission class provides basic permissions to secure Hibernate sessions. The target for thisproperty is the entity name. The available actions include:
insert
delete
update
read
CHAPTER 4. JAVA SECURITY MANAGER
49

* (all)
org.jboss.metadata.spi.stack.MetaDataStackPermission
Provides a custom permission class for controlling how callers interact with the metadata stack. Theavailable permissions are:
modify
push (onto the stack)
pop (off the stack)
peek (onto the stack)
* (all)
org.jboss.config.spi.ConfigurationPermission
Secures setting of configuration properties. Defines only permission target names, and no actions.The targets for this property include:
<property name> (the property this code has permission to set)
* (all properties)
org.jboss.kernel.KernelPermission
Secures access to the kernel configuration. Defines only permission target names and no actions.The targets for this property include:
access (to the kernel configuration)
configure (implies access)
* (all)
org.jboss.kernel.plugins.util.KernelLocatorPermission
Secures access to the kernel. Defines only permission target names and no actions. The targets forthis property include:
kernel
* (all)
Report a bug
4.5. DEBUG SECURITY MANAGER POLICIES
You can enable debugging information to help you troubleshoot security policy-related issues. The java.security.debug option configures the level of security-related information reported. Thecommand java -Djava.security.debug=help will produce help output with the full range ofdebugging options. Setting the debug level to all is useful when troubleshooting a security-relatedfailure whose cause is completely unknown, but for general use it will produce too much information. Asensible general default is access:failure.
Security Guide
50

Procedure 4.3. Enable general debugging
This procedure will enable a sensible general level of security-related debug information.Add the following line to the server configuration file.
If the JBoss EAP 6 instance is running in a managed domain, the line is added to the bin/domain.conf file for Linux or the bin/domain.conf.bat file for Windows.
If the JBoss EAP 6 instance is running as a standalone server, the line is added to the bin/standalone.conf file for Linux, or the bin\standalone.conf.bat file forWindows.
Linux
Windows
Result
A general level of security-related debug information has been enabled.
Report a bug
JAVA_OPTS="$JAVA_OPTS -Djava.security.debug=access:failure"
JAVA_OPTS="%JAVA_OPTS% -Djava.security.debug=access:failure"
CHAPTER 4. JAVA SECURITY MANAGER
51

CHAPTER 5. PATCH INSTALLATION
5.1. ABOUT PATCHING MECHANISMS
JBoss security and bug patches are released in two forms.
Planned updates: As part of a micro, minor or major upgrade of an existing product.
Asynchronous updates: As a one off patch which is released outside the normal upgrade cycle ofthe existing product.
Deciding whether a patch is released as part of a planned update or an out-of-cycle one-off depends onthe severity of the flaw being fixed. Flaws of low impact are typically deferred, to be resolved in the nextminor release of the affected products. Flaws of moderate or higher impact are typically addressed inorder of importance as an update to the product with an asynchronous release and contain only aresolution to the flaw at hand.
The severity of a security flaw is based on the assessment of the bug by the Security Response Team atRed Hat, combined with several consistent factors:
How easily can a flaw be exploited?
What kind of damage can be done if exploited?
Are there typically other factors involved that lower the impact of the flaw (such as firewalls,Security-Enhanced Linux, compiler directives, and so forth)?
Red Hat maintains a mailing list for notifying subscribers about security related flaws. See Section 5.2,“Subscribe to Patch Mailing Lists”
For more information on how Red Hat rates JBoss security flaws, please click on the following link:http://securityblog.redhat.com/2012/09/19/how-red-hat-rates-jboss-security-flaws/
Report a bug
5.2. SUBSCRIBE TO PATCH MAILING LISTS
Summary
The JBoss team at Red Hat maintains a mailing list for security announcements for Red Hat JBossEnterprise Middleware products. This topic covers what you need to do to subscribe to this list.
Prerequisites
None
Procedure 5.1. Subscribe to the JBoss Watch List
1. Click the following link to go to the JBoss Watch mailing list page: JBoss Watch Mailing List.
2. Enter your email address in the Subscribing to Jboss-watch-list section.
3. [You may also wish to enter your name and select a password. Doing so is completely optionalbut recommended.]
Security Guide
52

4. Press the Subscribe button to start the subscription process.
5. You can browse the archives of the mailing list by going to: JBoss Watch Mailing List Archives.
Result
After confirmation of your email account, you will be subscribed to receive security relatedannouncements from the JBoss patch mailing list.
Report a bug
5.3. INSTALL PATCHES IN ZIP FORM
Summary
JBoss security patches are distributed in two forms: zip (for all products) and RPM (for a subset ofproducts). JBoss bug fix patches are only distributed in zip format. This task describes the steps youneed to take to install the patches (security or bug fixes) via the zip format.
Prerequisites
Valid access and subscription to the Red Hat Customer Portal.
A current subscription to a JBoss product installed in a zip format.
Procedure 5.2. Apply a patch to a JBoss product via the zip method
Security updates for JBoss products are provided by an erratum (for both zip and RPM methods). Theerratum encapsulates a list of the resolved flaws, their severity ratings, the affected products, textualdescription of the flaws, and a reference to the patches. Bug fix updates are not announced via anerratum.
For zip distributions of JBoss products, the errata includes a link to a URL on the Customer Portal wherethe patch zip can be downloaded. This download contains the patched versions of existing JBossproducts and only includes the files that have been changed from the previous install.
WARNING
Before installing a patch, you must backup your JBoss product along with allcustomized configuration files.
1. Get notified about the security patch either via being a subscriber to the JBoss watch mailing listor by browsing the JBoss watch mailing list archives.
NOTE
Only security patches are announced on the JBoss watch mailing list.
2. Read the errata for the security patch and confirm that it applies to a JBoss product in yourenvironment.
CHAPTER 5. PATCH INSTALLATION
53

3. If the security patch applies to a JBoss product in your enviornment, then follow the link todownload the patch from the Red Hat Customer Portal.
4. The downloadable zip file from the customer portal will contain all the files required to fix thesecurity issue or bug. Download this patch zip file in the same location as your JBoss product.
5. Unzip the patch file in the same location where the JBoss product is installed. The patchedversions overwrite the existing files.
Result
The JBoss product is patched with the latest update using the zip format.
Report a bug
5.4. INSTALL PATCHES IN RPM FORM
Summary
JBoss patches are distributed in two forms: ZIP (for all products) and RPM (for a subset of products).This task describes the steps you need to take to install the patches via the RPM format. This RPMupdate method is used to ship security asynchronous patches and macro/minor/major product updatesonly.
Prerequisites
A valid subscription to the Red Hat Network.
A current subscription to a JBoss product installed via an RPM package.
Procedure 5.3. Apply a patch to a JBoss product via the RPM method
Security updates for JBoss products are provided by an erratum (for both zip and RPM methods). Theerratum encapsulates a list of the resolved flaws, their severity ratings, the affected products, textualdescription of the flaws, and a reference to the patches.
For RPM distributions of JBoss products, the errata include references to the updated RPM packages.The patch can be installed by using yum or another RPM tool to update the relevant packages.
WARNING
Before installing a patch, you must backup your JBoss product along with allcustomized configuration files.
1. Get notified about the security patch either via being a subscriber to the JBoss watch mailing listor by browsing the JBoss watch mailing list archives.
2. Read the errata for the security patch and confirm that it applies to a JBoss product in yourenvironment.
Security Guide
54

3. If the security patch applies to a JBoss product in your environment, then follow the link todownload the updated RPM package which is included in the errata.
4. Use
yum update
or a similar command to install the patch.
Result
The JBoss product is patched with the latest update using the RPM format.
Report a bug
5.5. SEVERITY AND IMPACT RATING OF JBOSS SECURITY PATCHES
To communicate the risk of each JBoss security flaw, Red Hat uses a four-point severity scale of low,moderate, important and critical, in addition to Common Vulnerability Scoring System (CVSS) version 2base scores which can be used to identify the impact of the flaw.
Table 5.1. Severity Ratings of JBoss Security Patches
Severity Description
Critical This rating is given to flaws that could be easilyexploited by a remote unauthenticated attacker andlead to system compromise (arbitrary code execution)without requiring user interaction. These are thetypes of vulnerabilities that can be exploited byworms. Flaws that require an authenticated remoteuser, a local user, or an unlikely configuration are notclassed as critical impact.
Important This rating is given to flaws that can easilycompromise the confidentiality, integrity, oravailability of resources. These are the types ofvulnerabilities that allow local users to gain privileges,allow unauthenticated remote users to viewresources that should otherwise be protected byauthentication, allow authenticated remote users toexecute arbitrary code, or allow local or remote usersto cause a denial of service.
Moderate This rating is given to flaws that may be more difficultto exploit but could still lead to some compromise ofthe confidentiality, integrity, or availability ofresources, under certain circumstances. These arethe types of vulnerabilities that could have had acritical impact or important impact but are less easilyexploited based on a technical evaluation of the flaw,or affect unlikely configurations.
Low This rating is given to all other issues that have asecurity impact. These are the types of vulnerabilitiesthat are believed to require unlikely circumstances tobe able to be exploited, or where a successful exploitwould give minimal consequences.
CHAPTER 5. PATCH INSTALLATION
55

The impact component of a CVSS v2 score is based on a combined assessment of three potentialimpacts: Confidentiality (C), Integrity (I) and Availability (A). Each of these can be rated as None (N),Partial (P) or Complete (C).
Because the JBoss server process runs as an unprivileged user and is isolated from the host operatingsystem, JBoss security flaws are only rated as having impacts of either None (N) or Partial (P).
Example 5.1. CVSS v2 Impact Score
The example below shows a CVSS v2 impact score, where exploiting the flaw would have no impacton system confidentiality, partial impact on system integrity and complete impact on systemavailability (that is, the system would become completely unavailable for any use, for example, via akernel crash).
C:N/I:P/A:C
Combined with the severity rating and the CVSS score, organizations can make informed decisions onthe risk each issue places on their unique environment and schedule upgrades accordingly.
For more information about CVSS2, please see: CVSS2 Guide.
Report a bug
Security Guide
56

CHAPTER 6. SECURITY DOMAINS
6.1. ABOUT SECURITY DOMAINS
Security domains are part of the JBoss EAP 6 security subsystem. All security configuration is nowmanaged centrally, by the domain controller of a managed domain, or by the standalone server.
A security domain consists of configurations for authentication, authorization, security mapping, andauditing. It implements Java Authentication and Authorization Service (JAAS) declarative security.
Authentication refers to verifying the identity of a user. In security terminology, this user is referred to asa principal. Although authentication and authorization are different, many of the included authenticationmodules also handle authorization.
An authorization is a security policy, which contains information about actions which are allowed orprohibited. In security terminology, this is often referred to as a role.
Security mapping refers to the ability to add, modify, or delete information from a principal, role, orattribute before passing the information to your application.
The auditing manager allows you to configure provider modules to control the way that security eventsare reported.
If you use security domains, you can remove all specific security configuration from your applicationitself. This allows you to change security parameters centrally. One common scenario that benefits fromthis type of configuration structure is the process of moving applications between testing and productionenvironments.
Report a bug
6.2. ABOUT PICKETBOX
Picketbox is the foundational security framework that provides the authentication, authorization, auditand mapping capabilities to Java applications running in JBoss EAP 6. It provides the followingcapabilities, in a single framework with a single configuration:
Section 6.3, “About Authentication”
Section 6.5, “About Authorization” and access control
Section 6.7, “About Security Auditing”
Section 6.9, “About Security Mapping” of principals, roles, and attributes
Report a bug
6.3. ABOUT AUTHENTICATION
Authentication refers to identifying a subject and verifying the authenticity of the identification. The mostcommon authentication mechanism is a username and password combination. Other commonauthentication mechanisms use shared keys, smart cards, or fingerprints. The outcome of a successfulauthentication is referred to as a principal, in terms of Java Enterprise Edition declarative security.
JBoss EAP 6 uses a pluggable system of authentication modules to provide flexibility and integrationwith the authentication systems you already use in your organization. Each security domain contains one
CHAPTER 6. SECURITY DOMAINS
57

or more configured authentication modules. Each module includes additional configuration parameters tocustomize its behavior. The easiest way to configure the authentication subsystem is within the web-based management console.
Authentication is not the same as authorization, although they are often linked. Many of the includedauthentication modules can also handle authorization.
Report a bug
6.4. CONFIGURE AUTHENTICATION IN A SECURITY DOMAIN
To configure authentication settings for a security domain, log into the management console and followthis procedure.
Procedure 6.1. Setup Authentication Settings for a Security Domain
1. Open the security domain's detailed view.Click the Profiles label at the top right of the management console. In a managed domain,select the profile to modify from the Profile selection box at the top left of the Profile view.Click the Security menu item at the left, and click Security Domains from the expandedmenu. Click the View link for the security domain you want to edit.
2. Navigate to the Authentication subsystem configuration.Click the Authentication label at the top of the view if it is not already selected.
The configuration area is divided into two areas: Login Modules and Details. The loginmodule is the basic unit of configuration. A security domain can include several login modules,each of which can include several attributes and options.
3. Add an authentication module.Click the Add button to add a JAAS authentication module. Fill in the details for your module.The Code is the class name of the module. The Flags controls how the module relates to otherauthentication modules within the same security domain.
Explanation of the Flags
The Java Enterprise Edition 6 specification provides the following explanation of the flags forsecurity modules. The following list is taken fromhttp://docs.oracle.com/javase/6/docs/technotes/guides/security/jaas/JAASRefGuide.html#AppendixARefer to that document for more detailed information.
Flag Details
required The LoginModule is required to succeed. If itsucceeds or fails, authentication still continues toproceed down the LoginModule list.
requisite LoginModule is required to succeed. If itsucceeds, authentication continues down theLoginModule list. If it fails, control immediatelyreturns to the application (authentication doesnot proceed down the LoginModule list).
Security Guide
58

sufficient The LoginModule is not required to succeed. If itdoes succeed, control immediately returns to theapplication (authentication does not proceeddown the LoginModule list). If it fails,authentication continues down the LoginModulelist.
optional The LoginModule is not required to succeed. If itsucceeds or fails, authentication still continues toproceed down the LoginModule list.
Flag Details
After you have added your module, you can modify its Code or Flags by clicking the Editbutton in the Details section of the screen. Be sure the Attributes tab is selected.
4. Optional: Add or remove module options.If you need to add options to your module, click its entry in the Login Modules list, and selectthe Module Options tab in the Details section of the page. Click the Add button, andprovide the key and value for the option. Use the Remove button to remove an option.
Result
Your authentication module is added to the security domain, and is immediately available to applicationswhich use the security domain.
The jboss.security.security_domain Module Option
By default, each login module defined in a security domain has the jboss.security.security_domain module option added to it automatically. This option causesproblems with login modules which check to make sure that only known options are defined. The IBMKerberos login module, com.ibm.security.auth.module.Krb5LoginModule is one of these.
You can disable the behavior of adding this module option by setting the system property to true whenstarting JBoss EAP 6. Add the following to your start-up parameters.
-Djboss.security.disable.secdomain.option=true
You can also set this property using the web-based Management Console. In a standalone server, youcan set system properties in the Profile section of the configuration. In a managed domain, you canset system properties for each server group.
Report a bug
6.5. ABOUT AUTHORIZATION
Authorization is a mechanism for granting or denying access to a resource based on identity. It isimplemented as a set of declarative security roles which can be granted to principals.
JBoss EAP 6 uses a modular system to configure authorization. Each security domain can contain oneor more authorization policies. Each policy has a basic module which defines its behavior. It is configuredthrough specific flags and attributes. The easiest way to configure the authorization subsystem is byusing the web-based management console.
CHAPTER 6. SECURITY DOMAINS
59

Authorization is different from authentication, and usually happens after authentication. Many of theauthentication modules also handle authorization.
Report a bug
6.6. CONFIGURE AUTHORIZATION IN A SECURITY DOMAIN
To configure authorization settings for a security domain, log into the management console and followthis procedure.
Procedure 6.2. Setup Authorization in a Security Domain
1. Open the security domain's detailed view.Click the Profiles label at the top right of the management console. In a managed domain,select the profile to modify from the Profile selection box at the top left of the Profile view.Click the Security menu item at the left, and click Security Domains from the expandedmenu. Click the View link for the security domain you want to edit.
2. Navigate to the Authorization subsystem configuration.Click the Authorization label at the top of the view if it is not already selected.
The configuration area is divided into two areas: Policies and Details. The login module isthe basic unit of configuration. A security domain can include several authorization policies, eachof which can include several attributes and options.
3. Add a policy.Click the Add button to add a JAAS authorization policy module. Fill in the details for yourmodule. The Code is the class name of the module. The Flags controls how the module relatesto other authorization policy modules within the same security domain.
Explanation of the Flags
The Java Enterprise Edition 6 specification provides the following explanation of the flags forsecurity modules. The following list is taken fromhttp://docs.oracle.com/javase/6/docs/technotes/guides/security/jaas/JAASRefGuide.html#AppendixARefer to that document for more detailed information.
Flag Details
Required The LoginModule is required to succeed. If itsucceeds or fails, authorization still continues toproceed down the LoginModule list.
Requisite LoginModule is required to succeed. If itsucceeds, authorization continues down theLoginModule list. If it fails, control immediatelyreturns to the application (authorization does notproceed down the LoginModule list).
Sufficient The LoginModule is not required to succeed. If itdoes succeed, control immediately returns to theapplication (authorization does not proceeddown the LoginModule list). If it fails,authorization continues down the LoginModulelist.
Security Guide
60

Optional The LoginModule is not required to succeed. If itsucceeds or fails, authorization still continues toproceed down the LoginModule list.
Flag Details
After you have added your module, you can modify its Code or Flags by clicking the Editbutton in the Details section of the screen. Be sure the Attributes tab is selected.
4. Optional: Add, edit, or remove module options.If you need to add options to your module, click its entry in the Login Modules list, and selectthe Module Options tab in the Details section of the page. Click the Add button, andprovide the key and value for the option. To edit an option that already exists, click the key or tochange it. Use the Remove button to remove an option.
Result
Your authorization policy module is added to the security domain, and is immediately available toapplications which use the security domain.
Report a bug
6.7. ABOUT SECURITY AUDITING
Security auditing refers to triggering events, such as writing to a log, in response to an event thathappens within the security subsystem. Auditing mechanisms are configured as part of a securitydomain, along with authentication, authorization, and security mapping details.
Auditing uses provider modules. You can use one of the included ones, or implement your own.
Report a bug
6.8. CONFIGURE SECURITY AUDITING
To configure security auditing settings for a security domain, log into the management console andfollow this procedure.
Procedure 6.3. Setup Security Auditing for a Security Domain
1. Open the security domain's detailed view.Click the Profiles label at the top right of the management console. In a standalone server,the tab is labeled Profile. In a managed domain, select the profile to modify from the Profileselection box at the top left of the Profile view. Click the Security menu item at the left, andclick Security Domains from the expanded menu. Click the View link for the security domainyou want to edit.
2. Navigate to the Auditing subsystem configuration.Click the Audit label at the top of the view if it is not already selected.
The configuration area is divided into two areas: Provider Modules and Details. Theprovider module is the basic unit of configuration. A security domain can include several providermodules each of which can include attributes and options.
CHAPTER 6. SECURITY DOMAINS
61

3. Add a provider module.Click the Add button to add a provider module. Fill in the Code section with the classname of theprovider module.
After you have added your module, you can modify its Code by clicking the Edit button in the Details section of the screen. Be sure the Attributes tab is selected.
4. Verify if your module is workingThe goal of an audit module is to provide a way to monitor the events in the security subsystem.This monitoring can be done by means of writing to a log file, email notifications or any othermeasurable auditing mechanism.
For example, JBoss EAP 6 includes the LogAuditProvider module by default. If enabledfollowing the steps above, this audit module writes security notifications to a audit.log file inthe log subfolder within the EAP_HOME directory.
To verify if the steps above have worked in the context of the LogAuditProvider, perform anaction that is likely to trigger a notification and then check the audit log file.
For a full list of included security auditing provider modules, see here: Section A.4, “IncludedSecurity Auditing Provider Modules”
5. Optional: Add, edit, or remove module options.If you need to add options to your module, click its entry in the Modules list, and select the Module Options tab in the Details section of the page. Click the Add button, and providethe key and value for the option. To edit an option that already exists, remove it by clicking the Remove label, and add it again with the correct options by clicking the Add button.
Result
Your security auditing module is added to the security domain, and is immediately available toapplications which use the security domain.
Report a bug
6.9. ABOUT SECURITY MAPPING
Security mapping allows you to combine authentication and authorization information after theauthentication or authorization happens, but before the information is passed to your application. Oneexample of this is using an X509 certificate for authentication, and then converting the principal from thecertificate to a logical name which your application can display.
You can map principals (authentication), roles (authorization), or credentials (attributes which are notprincipals or roles).
Role Mapping is used to add, replace, or remove roles to the subject after authentication.
Principal mapping is used to modify a principal after authentication.
Attribute mapping is used to convert attributes from an external system to be used by your application,and vice versa.
Report a bug
6.10. CONFIGURE SECURITY MAPPING IN A SECURITY DOMAIN
Security Guide
62

To configure security mapping settings for a security domain, log into the management console andfollow this procedure.
Procedure 6.4. Setup Security Mapping Settings in a Security Domain
1. Open the security domain's detailed view.Click the Profiles label at the top right of the management console. This tab is labeled Profile in a standalone server. In a managed domain, select the profile to modify from the Profile selection box at the top left of the Profile view. Click the Security menu item at theleft, and click Security Domains from the expanded menu. Click the View link for the securitydomain you want to edit.
2. Navigate to the Mapping subsystem configuration.Click the Mapping label at the top of the view if it is not already selected.
The configuration area is divided into two areas: Modules and Details. The mapping moduleis the basic unit of configuration. A security domain can include several mapping modules, eachof which can include several attributes and options.
3. Add a module.Click the Add button to add a security mapping module. Fill in the details for your module. The Code is the class name of the module. The Type field refers to the type of mapping this moduleperforms. Allowed values are principal, role, attribute or credential.
After you have added your module, you can modify its Code or Type by clicking the Edit buttonin the Details section of the screen. Be sure the Attributes tab is selected.
4. Optional: Add, edit, or remove module options.If you need to add options to your module, click its entry in the Modules list, and select the Module Options tab in the Details section of the page. Click the Add button, and providethe key and value for the option. To edit an option that already exists, click the Remove label keyto remove it, and add it again with the new value. Use the Remove button to remove an option.
Result
Your security mapping module is added to the security domain, and is immediately available toapplications which use the security domain.
Report a bug
CHAPTER 6. SECURITY DOMAINS
63

CHAPTER 7. SSL ENCRYPTION
7.1. ABOUT SSL ENCRYPTION
Secure Sockets Layer (SSL) encrypts network traffic between two systems. Traffic between the twosystems is encrypted using a two-way key, generated during the handshake phase of the connection andknown only by those two systems.
For secure exchange of the two-way encryption key, SSL makes use of Public Key Infrastructure (PKI), amethod of encryption that utilizes a key pair . A key pair consists of two separate but matchingcryptographic keys - a public key and a private key. The public key is shared with others and is used toencrypt data, and the private key is kept secret and is used to decrypt data that has been encrypted usingthe public key.
When a client requests a secure connection, a handshake phase takes place before securecommunication can begin. During the SSL handshake the server passes its public key to the client in theform of a certificate. The certificate contains the identity of the server (its URL), the public key of theserver, and a digital signature that validates the certificate. The client then validates the certificate andmakes a decision about whether the certificate is trusted or not. If the certificate is trusted, the clientgenerates the two-way encryption key for the SSL connection, encrypts it using the public key of theserver, and sends it back to the server. The server decrypts the two-way encryption key, using its privatekey, and further communication between the two machines over this connection is encrypted using thetwo-way encryption key.
Report a bug
7.2. IMPLEMENT SSL ENCRYPTION FOR THE JBOSS EAP 6 WEBSERVER
Introduction
Many web applications require a SSL-encrypted connection between clients and server, also known as aHTTPS connection. You can use this procedure to enable HTTPS on your server or server group.
Prerequisites
You need a set of SSL encryption keys and a SSL encryption certificate. You may purchasethese from a certificate-signing authority, or you can generate them yourself using command-lineutilities. To generate encryption keys using Red Hat Enterprise Linux utilities, refer toSection 7.3, “Generate a SSL Encryption Key and Certificate”.
You need to know the following details about your specific environment and set-up:
The full directory name and path to your certificate files
The encryption password for your encryption keys.
You need to run the Management CLI and connect it to your domain controller or standaloneserver.
Security Guide
64

NOTE
This procedure uses commands appropriate for a JBoss EAP 6 configuration that uses amanaged domain. If you use a standalone server, modify Management CLI commands byremoving the /profile=default from the beginning of any Management CLIcommands.
Procedure 7.1. Configure the JBoss Web Server to use HTTPS
1. Add a new HTTPS connector.Execute the following Management CLI command, changing the profile as appropriate. Thiscreates a new secure connector, called HTTPS, which uses the https scheme, the httpssocket binding (which defaults to 8443), and is set to be secure.
Example 7.1. Management CLI Command
/profile=default/subsystem=web/connector=HTTPS/:add(socket-binding=https,scheme=https,protocol=HTTP/1.1,secure=true)
2. Configure the SSL encryption certificate and keys.Execute the following CLI commands to configure your SSL certificate, substituting your ownvalues for the example ones. This example assumes that the keystore is copied to the serverconfiguration directory, which is EAP_HOME/domain/configuration/ for a manageddomain.
Example 7.2. Management CLI Command
/profile=default/subsystem=web/connector=HTTPS/ssl=configuration:add(name=https,certificate-key-file="${jboss.server.config.dir}/keystore.jks",password=SECRET, key-alias=KEY_ALIAS)
For a full listing of parameters you can set for the SSL properties of the connector, refer toSection 7.4, “SSL Connector Reference”.
3. Deploy an application.Deploy an application to a server group which uses the profile you have configured. If you use astandalone server, deploy an application to your server. HTTP requests to it use the new SSL-encrypted connection.
Report a bug
7.3. GENERATE A SSL ENCRYPTION KEY AND CERTIFICATE
To use a SSL-encrypted HTTP connection (HTTPS), as well as other types of SSL-encryptedcommunication, you need a signed encryption certificate. You can purchase a certificate from aCertificate Authority (CA), or you can use a self-signed certificate. Self-signed certificates are notconsidered trustworthy by many third parties, but are appropriate for internal testing purposes.
This procedure enables you to create a self-signed certificate using utilities which are available on RedHat Enterprise Linux.
CHAPTER 7. SSL ENCRYPTION
65

Prerequisites
You need the keytool utility, which is provided by any Java Development Kit implementation.OpenJDK on Red Hat Enterprise Linux installs this command to /usr/bin/keytool.
Understand the syntax and parameters of the keytool command. This procedure usesextremely generic instructions, because further discussion of the specifics of SSL certificates orthe keytool command are out of scope for this documentation.
Procedure 7.2. Generate a SSL Encryption Key and Certificate
1. Generate a keystore with public and private keys.Run the following command to generate a keystore named server.keystore with the alias jboss in your current directory.
keytool -genkeypair -alias jboss -keyalg RSA -keystore server.keystore -storepass mykeystorepass --dname "CN=jsmith,OU=Engineering,O=mycompany.com,L=Raleigh,S=NC,C=US"
The following table describes the parameters used in the keytool command:
Parameter Description
-genkeypair The keytool command to generate a key paircontaining a public and private key.
-alias The alias for the keystore. This value is arbitrary,but the alias jboss is the default used by theJBoss Web server.
-keyalg The key pair generation algorithm. In this case itis RSA.
-keystore The name and location of the keystore file. Thedefault location is the current directory. Thename you choose is arbitrary. In this case, thefile will be named server.keystore.
-storepass This password is used to authenticate to thekeystore so that the key can be read. Thepassword must be at least 6 characters long andmust be provided when the keystore isaccessed. In this case, we used mykeystorepass. If you omit this parameter,you will be prompted to enter it when youexecute the command.
Security Guide
66

-keypass This is the password for the actual key.
NOTE
Due to an implementationlimitation this must be the sameas the store password.
--dname A quoted string describing the distinguishedname for the key, for example:"CN=jsmith,OU=Engineering,O=mycompany.com,L=Raleigh,C=US". This string is aconcatenation of the following components:
CN - The common name or host name. Ifthe hostname is "jsmith.mycompany.com",the CN is "jsmith".
OU - The organizational unit, for example"Engineering"
O - The organization name, for example"mycompany.com".
L - The locality, for example "Raleigh" or"London"
S - The state or province, for example "NC".This parameter is optional.
C - The 2 letter country code, for example"US" or "UK",
Parameter Description
When you execute the above command, you are prompted for the following information:
If you did not use the -storepass parameter on the command line, you are asked to enterthe keystore password. Re-enter the new password at the next prompt.
If you did not use the -keypass parameter on the command line, you are asked to enter thekey password. Press Enter to set this to the same value as the keystore password.
When the command completes, the file server.keystore now contains the single key with thealias jboss.
2. Verify the key.Verify that the key works properly by using the following command.
keytool -list -keystore server.keystore
CHAPTER 7. SSL ENCRYPTION
67

You are prompted for the keystore password. The contents of the keystore are displayed (in thiscase, a single key called jboss). Notice the type of the jboss key, which is keyEntry. Thisindicates that the keystore contains both a public and private entry for this key.
3. Generate a certificate signing request.Run the following command to generate a certificate signing request using the public key fromthe keystore you created in step 1.
keytool -certreq -keyalg RSA -alias jboss -keystore server.keystore -file certreq.csr
You are prompted for the password in order to authenticate to the keystore. The keytoolcommand then creates a new certificate signing request called certreq.csr in the currentworking directory.
4. Test the newly generated certificate.Test the contents of the certificate by using the following command.
openssl req -in certreq.csr -noout -text
The certificate details are shown.
5. Optional: Submit your certificate to a Certificate Authority (CA).A Certificate Authority (CA) can authenticate your certificate so that it is considered trustworthyby third-party clients. The CA supplies you with a signed certificate, and optionally with one ormore intermediate certificates.
6. Optional: Export a self-signed certificate from the keystore.If you only need it for testing or internal purposes, you can use a self-signed certificate. You canexport one from the keystore you created in step 1 as follows:
keytool -export -alias jboss -keystore server.keystore -file server.crt
You are prompted for the password in order to authenticate to the keystore. A self-signedcertificate, named server.crt, is created in the current working directory.
7. Import the signed certificate, along with any intermediate certificates.Import each certificate, in the order that you are instructed by the CA. For each certificate toimport, replace intermediate.ca or server.crt with the actual file name. If yourcertificates are not provided as separate files, create a separate file for each certificate, andpaste its contents into the file.
NOTE
Your signed certificate and certificate keys are valuable assets. Be cautious withhow you transport them between servers.
keytool -import -keystore server.keystore -alias intermediateCA -file intermediate.ca
keytool -import -alias jboss -keystore server.keystore -file server.crt
Security Guide
68

8. Test that your certificates imported successfully.Run the following command, and enter the keystore password when prompted. The contents ofyour keystore are displayed, and the certificates are part of the list.
keytool -list -keystore server.keystore
Result
Your signed certificate is now included in your keystore and is ready to be used to encrypt SSLconnections, including HTTPS web server communications.
Report a bug
7.4. SSL CONNECTOR REFERENCE
JBoss Web connectors may include the following SSL configuration attributes. The CLI commandsprovided are designed for a managed domain using profile default. Change the profile name to theone you wish to configure, for a managed domain, or omit the /profile=default portion of thecommand, for a standalone server.
Table 7.1. SSL Connector Attributes
Attribute Description CLI Command
Name The display name of the SSLconnector. /profile=default/sub
system=web/connector=HTTPS/ssl=configuration/:write-attribute(name=name,value=https)
verify-client Set to true to require a validcertificate chain from the clientbefore accepting a connection.Set to want if you want the SSLstack to request a clientCertificate, but not fail if one is notpresented. Set to false (thedefault) to not require a certificatechain unless the client requests aresource protected by a securityconstraint that uses CLIENT-CERT authentication.
/profile=default/subsystem=web/connector=HTTPS/ssl=configuration/:write-attribute(name=verify-client,value=want)
verify-depth The maximum number ofintermediate certificate issuerschecked before deciding that theclients do not have a validcertificate. The default value is 10.
/profile=default/subsystem=web/connector=HTTPS/ssl=configuration/:write-attribute(name=verify-depth,value=10)
CHAPTER 7. SSL ENCRYPTION
69

certificate-key-file The full file path and file name ofthe keystore file where the signedserver certificate is stored. WithJSSE encryption, this certificatefile will be the only one, whileOpenSSL uses several files. Thedefault value is the .keystorefile in the home directory of theuser running JBoss EAP 6. If your keystoreType does not use afile, set the parameter to an emptystring.
/profile=default/subsystem=web/connector=HTTPS/ssl=configuration/:write-attribute(name=certificate-key-file,value=../domain/configuration/server.keystore)
certificate-file If you use OpenSSL encryption,set the value of this parameter tothe path to the file containing theserver certificate.
/profile=default/subsystem=web/connector=HTTPS/ssl=configuration/:write-attribute(name=certificate-file,value=server.crt)
password The password for both thetrustore and keystore. In thefollowing example, replacePASSWORD with your ownpassword.
/profile=default/subsystem=web/connector=HTTPS/ssl=configuration/:write-attribute(name=password,value=PASSWORD)
protocol The version of the SSL protocol touse. Supported values include SLv2, SSLv3, TLSv1, SSLv2+SSLv3, and ALL. Thedefault is ALL.
/profile=default/subsystem=web/connector=HTTPS/ssl=configuration/:write-attribute(name=protocol,value=ALL)
cipher-suite A comma-separated list of theencryption ciphers which areallowed. The JVM default forJSSE contains weak cipherswhich should not be used. Theexample only lists two possibleciphers, but real-world exampleswill likely use more.
/profile=default/subsystem=web/connector=HTTPS/ssl=configuration/:write-attribute(name=cipher-suite, value="TLS_RSA_WITH_AES_128_CBC_SHA,TLS_RSA_WITH_AES_256_CBC_SHA")
Attribute Description CLI Command
Security Guide
70

key-alias The alias used to for the servercertificate in the keystore. In thefollowing example, replaceKEY_ALIAS with your certificate'salias.
/profile=default/subsystem=web/connector=HTTPS/ssl=configuration/:write-attribute(name=key-alias,value=KEY_ALIAS)
truststore-type The type of the truststore. Varioustypes of keystores are available,including PKCS12 and Java'sstandard JKS.
/profile=default/subsystem=web/connector=HTTPS/ssl=configuration/:write-attribute(name=truststore-type,value=jks)
keystore-type The type of the keystore, Varioustypes of keystores are available,including PKCS12 and Java'sstandard JKS.
/profile=default/subsystem=web/connector=HTTPS/ssl=configuration/:write-attribute(name=keystore-type,value=jks)
ca-certificate-file The file containing the CAcertificates. This is the truststoreFile, in the caseof JSSE, and uses the samepassword as the keystore. The ca-certificate-file file isused to validate client certificates.
/profile=default/subsystem=web/connector=HTTPS/ssl=configuration/:write-attribute(name=certificate-file,value=ca.crt)
Attribute Description CLI Command
CHAPTER 7. SSL ENCRYPTION
71

ca-certificate-password The Certificate password for the ca-certificate-file. Inthe following example, replace theMASKED_PASSWORD with yourown masked password.
/profile=default/subsystem=web/connector=HTTPS/ssl=configuration/:write-attribute(name=ca-certificate-password,value=MASKED_PASSWORD)
ca-revocation-url A file or URL which contains therevocation list. It refers to the crlFile for JSSE or the SSLCARevocationFile forSSL.
/profile=default/subsystem=web/connector=HTTPS/ssl=configuration/:write-attribute(name=ca-revocation-url,value=ca.crl)
session-cache-size The size of the SSLSessioncache. This attribute applies onlyto JSSE connectors. The defaultis 0, which specifies an unlimitedcache size.
/profile=default/subsystem=web/connector=HTTPS/ssl=configuration/:write-attribute(name=session-cache-size,value=100)
session-timeout The number of seconds before acached SSLSession expires. Thisattribute applies only to JSSEconnectors. The default is 86400seconds, which is 24 hours.
/profile=default/subsystem=web/connector=HTTPS/ssl=configuration/:write-attribute(name=session-timeout,value=43200)
Attribute Description CLI Command
Report a bug
Security Guide
72

CHAPTER 8. SECURITY REALMS
8.1. ABOUT SECURITY REALMS
A security realm is a series of mappings between users and passwords, and users and roles. Securityrealms are a mechanism for adding authentication and authorization to your EJB and Web applications.JBoss EAP 6 provides two security realms by default:
ManagementRealm stores user, password, and role information for the Management API, whichprovides the functionality for the Management CLI and web-based Management Console. Itprovides an authentication system for managing JBoss EAP 6 itself. You could also use the ManagementRealm if your application needed to authenticate with the same business rules youuse for the Management API.
ApplicationRealm stores user, password, and role information for Web Applications andEJBs.
Each realm is stored in two files on the filesystem:
REALM-users.properties stores usernames and hashed passwords.
REALM-users.roles stores user-to-role mappings.
The properties files are stored in the domain/configuration/ and standalone/configuration/directories. The files are written simultaneously by the add-user.sh or add-user.bat command.When you run the command, the first decision you make is which realm to add your new user to.
Report a bug
8.2. ADD A NEW SECURITY REALM
1. Run the Management CLI.Start the jboss-cli.sh or jboss-cli.bat command and connect to the server.
2. Create the new security realm itself.Run the following command to create a new security realm named MyDomainRealm on adomain controller or a standalone server.
/host=master/core-service=management/security-realm=MyDomainRealm:add()
3. Create the references to the properties file which will store information about the newrole.Run the following command to create a pointer a file named myfile.properties, which willcontain the properties pertaining to the new role.
NOTE
The newly-created properties file is not managed by the included add-user.shand add-user.bat scripts. It must be managed externally.
CHAPTER 8. SECURITY REALMS
73

/host=master/core-service=management/security-realm=MyDomainRealm/authentication=properties:add(path=myfile.properties)
Result
Your new security realm is created. When you add users and roles to this new realm, the information willbe stored in a separate file from the default security realms. You can manage this new file using yourown applications or procedures.
Report a bug
8.3. ADD A USER TO A SECURITY REALM
1. Run the add-user.sh or add-user.bat command.Open a terminal and change directories to the EAP_HOME/bin/ directory. If you run Red HatEnterprise Linux or another UNIX-like operating system, run add-user.sh. If you run MicrosoftWindows Server, run add-user.bat.
2. Choose whether to add a Management User or Application User.For this procedure, type b to add an Application User.
3. Choose the realm the user will be added to.By default, the only available realm is ApplicationRealm. If you have added a custom realm,you can type its name instead.
4. Type the username, password, and roles, when prompted.Type the desired username, password, and optional roles when prompted. Verify your choice bytyping yes, or type no to cancel the changes. The changes are written to each of the propertiesfiles for the security realm.
Report a bug
Security Guide
74

CHAPTER 9. SUBSYSTEM CONFIGURATION
9.1. TRANSACTION SUBSYSTEM CONFIGURATION
9.1.1. Configure the ORB for JTS Transactions
In a default installation of JBoss EAP 6, the ORB is disabled. You can enable the ORB using thecommand-line Management CLI.
NOTE
In a managed domain, the JacORB subsystem is available in full and full-ha profilesonly. In a standalone server, it is available when you use the standalone-full.xml orstandalone-full-ha.xml configurations.
Procedure 9.1. Configure the ORB using the Management Console
1. View the profile settings.Select Profiles (managed domain) or Profile (standalone server) from the top right of themanagement console. If you use a managed domain, select either the full or full-ha profilefrom the selection box at the top left.
2. Modify the Initializers SettingsExpand the Subsystems menu at the left, if necessary. Expand the Container sub-menu andclick JacORB.
In the form that appears in the main screen, select the Initializers tab and click the Editbutton.
Enable the security interceptors by setting the value of Security to on.
To enable the ORB for JTS, set the Transaction Interceptors value to on, rather than thedefault spec.
Refer to the Need Help? link in the form for detailed explanations about these values. Click Save when you have finished editing the values.
3. Advanced ORB ConfigurationRefer to the other sections of the form for advanced configuration options. Each section includesa Need Help? link with detailed information about the parameters.
Configure the ORB using the Management CLI
You can configure each aspect of the ORB using the Management CLI. The following commandsconfigure the initializers to the same values as the procedure above, for the Management Console. Thisis the minimum configuration for the ORB to be used with JTS.
These commands are configured for a managed domain using the full profile. If necessary, change theprofile to suit the one you need to configure. If you use a standalone server, omit the /profile=fullportion of the commands.
Example 9.1. Enable the Security Interceptors
CHAPTER 9. SUBSYSTEM CONFIGURATION
75

/profile=full/subsystem=jacorb/:write-attribute(name=security,value=on)
Example 9.2. Enable the ORB for JTS
/profile=full/subsystem=jacorb/:write-attribute(name=transactions,value=on)
Report a bug
9.2. JMS CONFIGURATION
9.2.1. Reference for HornetQ Configuration Attributes
The JBoss EAP 6 implementation of HornetQ exposes the following attributes for configuration. You canuse the Management CLI in particular to exposure the configurable or viewable attributes with the read-resource operation.
Example 9.3. Example
Table 9.1. HornetQ Attributes
Attribute Example Value Type
allow-failback true BOOLEAN
async-connection-execution-enabled
true BOOLEAN
backup false BOOLEAN
cluster-password somethingsecure STRING
cluster-user HORNETQ.CLUSTER.ADMIN.USER
STRING
clustered false BOOLEAN
connection-ttl-override
-1 LONG
[standalone@localhost:9999 /] /subsystem=messaging/hornetq-server=default:read-resource
Security Guide
76

create-bindings-dir
true BOOLEAN
create-journal-dir
true BOOLEAN
failback-delay 5000 LONG
failover-on-shutdown
false BOOLEAN
id-cache-size 2000 INT
jmx-domain org.hornetq STRING
jmx-management-enabled
false BOOLEAN
journal-buffer-size
100 LONG
journal-buffer-timeout
100 LONG
journal-compact-min-files
10 INT
journal-compact-percentage
30 INT
journal-file-size
102400 LONG
journal-max-io 1 INT
journal-min-files
2 INT
journal-sync-non-transactional
true BOOLEAN
journal-sync-transactional
true BOOLEAN
journal-type ASYNCIO STRING
Attribute Example Value Type
CHAPTER 9. SUBSYSTEM CONFIGURATION
77

live-connector-ref
reference STRING
log-journal-write-rate
false BOOLEAN
management-address
jms.queue.hornetq.management
STRING
management-notification-address
hornetq.notifications STRING
memory-measure-interval
-1 LONG
memory-warning-threshold
25 INT
message-counter-enabled
false BOOLEAN
message-counter-max-day-history
10 INT
message-counter-sample-period
10000 LONG
message-expiry-scan-period
30000 LONG
message-expiry-thread-priority
3 INT
page-max-concurrent-io
5 INT
perf-blast-pages -1 INT
persist-delivery-count-before-delivery
false BOOLEAN
persist-id-cache true BOOLEAN
persistence-enabled
true BOOLEAN
Attribute Example Value Type
Security Guide
78

remoting-interceptors
undefined LIST
run-sync-speed-test
false BOOLEAN
scheduled-thread-pool-max-size
5 INT
security-domain other STRING
security-enabled true BOOLEAN
security-invalidation-interval
10000 LONG
server-dump-interval
-1 LONG
shared-store true BOOLEAN
started true BOOLEAN
thread-pool-max-size
30 INT
transaction-timeout
300000 LONG
transaction-timeout-scan-period
1000 LONG
version 2.2.16.Final(HQ_2_2_16_FINAL,122)
STRING
wild-card-routing-enabled
true BOOLEAN
Attribute Example Value Type
CHAPTER 9. SUBSYSTEM CONFIGURATION
79

WARNING
The value of journal-file-size must be higher than the size of message sentto server, or the server won't be able to store the message.
Report a bug
Security Guide
80

CHAPTER 10. WEB, HTTP CONNECTORS, AND HTTPCLUSTERING
10.1. CONFIGURE A MOD_CLUSTER WORKER NODE
The master is only configured once, via the mod_cluster subsystem. To configure the mod_clustersubsystem, refer to Configure the mod_cluster Subsystem in the Administration and ConfigurationGuide. Each worker node is configured separately, so repeat this procedure for each node you wish toadd to the cluster.
If you use a managed domain, each server in a server group is a worker node which shares an identicalconfiguration. Therefore, configuration is done to an entire server group. In a standalone server,configuration is done to a single JBoss EAP 6 instance. The configuration steps are otherwise identical.
Worker Node Configuration
If you use a standalone server, it must be started with the standalone-ha profile.
If you use a managed domain, your server group must use the ha or full-ha profile, and the ha-sockets or full-ha-sockets socket binding group. JBoss EAP 6 ships with a cluster-enabled server group called other-server-group which meets these requirements.
NOTE
Where Management CLI commands are given, they assume you use a managed domain.If you use a standalone server, remove the /profile=full-ha portion of thecommands.
Procedure 10.1. Configure a Worker Node
1. Configure the network interfaces.By default, the network interfaces all default to 127.0.0.1. Every physical host which hostseither a standalone server or one or more servers in a server group needs its interfaces to beconfigured to use its public IP address, which the other servers can see.
To change the IP address of a JBoss EAP 6 host, you need to shut it down and edit itsconfiguration file directly. This is because the Management API which drives the ManagementConsole and Management CLI relies on a stable management address.
Follow these steps to change the IP address on each server in your cluster to the master's publicIP address.
a. Shut down the server completely.
b. Edit either the host.xml, which is in EAP_HOME/domain/configuration/ for amanaged domain, or the standalone-ha.xml file, which is in EAP_HOME/standalone/configuration/ for a standalone server.
c. Locate the <interfaces> element. Three interfaces are configured, management, public, and unsecured. For each of these, change the value 127.0.0.1 to the externalIP address of the host.
d. For hosts that participate in a managed domain but are not the master, locate the <host
CHAPTER 10. WEB, HTTP CONNECTORS, AND HTTP CLUSTERING
81

element. Note that it does not have the closing > symbol, because it contains attributes.Change the value of its name attribute from master to a unique name, a different one perslave. This name will also be used for the slave to identify to the cluster, so make a note ofit.
e. For newly-configured hosts which need to join a managed domain, find the <domain-controller> element. Comment out or remove the <local /> element, and add thefollowing line, changing the IP address (X.X.X.X) to the address of the domain controller.This step does not apply for a standalone server.
<remote host="X.X.X.X" port="${jboss.domain.master.port:9999}" security-realm="ManagementRealm"/>
f. Save the file and exit.
2. Configure authentication for each slave server.Each slave server needs a username and password created in the domain controller's orstandalone master's ManagementRealm. On the domain controller or standalone master, runthe EAP_HOME/add-user.sh command. Add a user with the same username as the slave, tothe ManagementRealm. When asked if this user will need to authenticate to an external JBossAS instance, answer yes. An example of the input and output of the command is below, for aslave called slave1, with password changeme.
user:bin user$ ./add-user.sh
What type of user do you wish to add? a) Management User (mgmt-users.properties) b) Application User (application-users.properties)(a): a
Enter the details of the new user to add.Realm (ManagementRealm) : Username : slave1Password : changemeRe-enter Password : changemeAbout to add user 'slave1' for realm 'ManagementRealm'Is this correct yes/no? yesAdded user 'slave1' to file '/home/user/jboss-eap-6.0/standalone/configuration/mgmt-users.properties'Added user 'slave1' to file '/home/user/jboss-eap-6.0/domain/configuration/mgmt-users.properties'Is this new user going to be used for one AS process to connect to another AS process e.g. slave domain controller?yes/no? yesTo represent the user add the following to the server-identities definition <secret value="Y2hhbmdlbWU=" />
3. Copy the Base64-encoded <secret> element from the add-user.sh output.If you plan to specify the Base64-encoded password value for authentication, copy the <secret> element value from the last line of the add-user.sh output as you will need it in thestep below.
4. Modify the slave host's security realm to use the new authentication.
Security Guide
82

a. Re-open the slave host's host.xml or standalone-ha.xml file.
b. Locate the <security-realms> element. This is where you configure the security realm.
c. You can specify the secret value in one of the following ways:
Specify the Base64-encoded password value in the configuration file.
i. Add the following block of XML code directly below the <security-realm name="ManagementRealm"> line,
<server-identities> <secret value="Y2hhbmdlbWU="/></server-identities>
ii. Replace the "Y2hhbmdlbWU=" with the secret value returned from the add-user.sh output in the previous step.
Configure the host to get the password from the vault.
i. Use the vault.sh script to generate a masked password. It will generate a stringlike the following: VAULT::secret::password::ODVmYmJjNGMtZDU2ZC00YmNlLWE4ODMtZjQ1NWNmNDU4ZDc1TElORV9CUkVBS3ZhdWx0.
You can find more information on the vault in the Password Vaults for SensitiveStrings section of this guide starting here: Section 3.8.1, “About Securing SensitiveStrings in Clear-Text Files”.
ii. Add the following block of XML code directly below the <security-realm name="ManagementRealm"> line.
<server-identities> <secret value="${VAULT::secret::password::ODVmYmJjNGMtZDU2ZC00YmNlLWE4ODMtZjQ1NWNmNDU4ZDc1TElORV9CUkVBS3ZhdWx0}"/></server-identities>
Be sure to replace the secret value with the masked password generated in theprevious step.
NOTE
When creating a password in the vault, it must be specified in plaintext, not Base64-encoded.
Specify the password as a system property.
i. Add the following block of XML code directly below the <security-realm name="ManagementRealm"> line
<server-identities>
CHAPTER 10. WEB, HTTP CONNECTORS, AND HTTP CLUSTERING
83

<secret value=${server.identity.password}/></server-identities>
ii. When you specify the password as a system property, you can configure the host ineither of the following ways:
Start the server entering the password in plain text as a command lineargument, for example:
-Dserver.identity.password=changeme
NOTE
The password must be entered in plain text and will be visible toanyone who issues a ps -ef command.
Place the password in a properties file and pass the properties file URL as acommand line argument.
A. Add the key/value pair to a properties file. For example:
server.identity.password=changeme
B. Start the server with the command line arguments
--properties=URL_TO_PROPERTIES_FILE
.
d. Save and exit the file.
5. Restart the server.The slave will now authenticate to the master using its host name as the username and theencrypted string as its password.
Report a bug
Security Guide
84

CHAPTER 11. NETWORK SECURITY
11.1. SECURE THE MANAGEMENT INTERFACES
Summary
In a test environment, it is typical to run JBoss EAP 6 with no security layer on the managementinterfaces, comprised of the Management Console, Management CLI, and any other APIimplementation. This allows for rapid development and configuration changes.
In addition, a silent authentication mode is present by default, allowing a local client on the host machineto connect to the Management CLI without requiring a username or password. This behavior is aconvenience for local users and Management CLI scripts, but it can be disabled if required. Theprocedure is described in the topic Section 3.5, “Remove Silent Authentication from the Default SecurityRealm”.
When you begin testing and preparing your environment to move to production, it is vitally important tosecure the management interfaces by at least the following methods:
Section 11.2, “Specify Which Network Interface JBoss EAP 6 Uses”
Section 11.3, “Configure Network Firewalls to Work with JBoss EAP 6”
Report a bug
11.2. SPECIFY WHICH NETWORK INTERFACE JBOSS EAP 6 USES
Overview
Isolating services so that they are accessible only to the clients who need them increases the security ofyour network. JBoss EAP 6 includes two interfaces in its default configuration, both of which bind to theIP address 127.0.0.1, or localhost, by default. One of the interfaces is called management, and isused by the Management Console, CLI, and API. The other is called public, and is used to deployapplications. These interfaces are not special or significant, but are provided as a starting point.
The management interface uses ports 9990 and 9999 by default, and the public interface uses port8080, or port 8443 if you use HTTPS.
You can change the IP address of the management interface, public interface, or both.
WARNING
If you expose the management interfaces to other network interfaces which areaccessible from remote hosts, be aware of the security implications. Most of thetime, it is not advisable to provide remote access to the management interfaces.
1. Stop JBoss EAP 6.Stop JBoss EAP 6 by sending an interrupt in the appropriate way for your operating system. Ifyou are running JBoss EAP 6 as a foreground application, the typical way to do this is to press Ctrl+C.
CHAPTER 11. NETWORK SECURITY
85

2. Restart JBoss EAP 6, specifying the bind address.Use the -b command-line switch to start JBoss EAP 6 on a specific interface.
Example 11.1. Specify the public interface.
EAP_HOME/bin/domain.sh -b 10.1.1.1
Example 11.2. Specify the management interface.
EAP_HOME/bin/domain.sh -bmanagement=10.1.1.1
Example 11.3. Specify different addresses for each interface.
EAP_HOME/bin/domain.sh -bmanagement=127.0.0.1 -b 10.1.1.1
Example 11.4. Bind the public interface to all network interfaces.
EAP_HOME/bin/domain.sh -b 0.0.0.0
It is possible to edit your XML configuration file directly, to change the default bind addresses. However,if you do this, you will no longer be able to use the -bcommand-line switch to specify an IP address atrun-time, so this is not recommended. If you do decide to do this, be sure to stop JBoss EAP 6completely before editing the XML file.
Report a bug
11.3. CONFIGURE NETWORK FIREWALLS TO WORK WITH JBOSSEAP 6
Summary
Most production environments use firewalls as part of an overall network security strategy. If you needmultiple server instances to communicate with each other or with external services such as web serversor databases, your firewall needs to take this into account. A well-managed firewall only opens the portswhich are necessary for operation, and limits access to the ports to specific IP addresses, subnets, andnetwork protocols.
A full discussion of firewalls is out of the scope of this documentation.
Prerequisites
Determine the ports you need to open. Refer to Section 11.4, “Network Ports Used By JBossEAP 6” to determine the list of ports for your situation.
An understanding of your firewall software is required. This procedure uses the system-config-firewall command in Red Hat Enterprise Linux 6. Microsoft Windows Serverincludes a built-in firewall, and several third-party firewall solutions are available for each
Security Guide
86

platform.
Assumptions
This procedure configures a firewall in an environment with the following assumptions:
The operating system is Red Hat Enterprise Linux 6.
JBoss EAP 6 runs on host 10.1.1.2. Optionally, the server has its own firewall.
The network firewall server runs on host 10.1.1.1 on interface eth0, and has an externalinterface eth1.
You want traffic on port 5445 (a port used by JMS) forwarded to JBoss EAP 6. No other trafficshould be allowed through the network firewall.
Procedure 11.1. Manage Network Firewalls and JBoss EAP 6 to work together
1. Log into the Management Console.Log into the Management Console. By default, it runs on http://localhost:9990/console/.
2. Determine the socket bindings used by the socket binding group.Click the Profiles label at the top right of the Management Console. At the left-hand side of thescreen, a series of menus is shown. The bottom menu heading is General Configuration.Click the Socket Binding Groups item below this heading. The Socket Binding Declarations screen appears. Initially, the standard-sockets group is shown. You canchoose a different group by selecting it from the combo box on the right-hand side.
NOTE
If you use a standalone server, it has only one socket binding group.
The list of socket names and ports is shown, six values per page. You can go through the pagesby using the arrow navigation below the table.
3. Determine the ports you need to open.Depending on the function of the particular port and the needs of your environment, some of theports may need to be accessible across your firewall. If you are unsure of the purpose of asocket binding, refer to Section 11.4, “Network Ports Used By JBoss EAP 6” for a list of thedefault socket bindings and their purposes.
4. Configure your firewall to forward traffic to JBoss EAP 6.Perform these steps to configure your network firewall to allow traffic on the desired port.
a. Log into your firewall machine and access a command prompt, as the root user.
b. Issue the command system-config-firewall to launch the firewall configuration utility.A GUI or command-line utility launches, depending on the way you are logged into thefirewall system. This task makes the assumption that you are logged in via SSH and usingthe command-line interface.
c. Use the TAB key on your keyboard to navigate to the Customize button, and press the ENTER key. The Trusted Services screen appears.
CHAPTER 11. NETWORK SECURITY
87

d. Do not change any values, but use the TAB key to navigate to the Forward button, andpress ENTER to advanced to the next screen. The Other Ports screen appears.
e. Use the TAB key to navigate to the <Add> button, and press ENTER. The Port and Protocol screen appears.
f. Enter 5445 in the Port / Port Range field, then use the TAB key to move to the Protocol field, and enter tcp. Use the TAB key to navigate to the OK button, and press ENTER.
g. Use the TAB key to navigate to the Forward button until you reach the Port Forwardingscreen.
h. Use the TAB key to navigate to the <Add> button, and press the ENTER key.
i. Fill in the following values to set up port forwarding for port 5445.
Source interface: eth1
Protocol: tcp
Port / Port Range: 5445
Destination IP address: 10.1.1.2
Port / Port Range: 5445
Use the TAB key to navigate to the OK button, and press ENTER.
j. Use the TAB key to navigate to the Close button, and press ENTER.
k. Use the TAB key to navigate to the OK button, and press ENTER. To apply the changes, readthe warning and click Yes.
5. Configure a firewall on your JBoss EAP 6 host.Some organizations choose to configure a firewall on the JBoss EAP 6 server itself, and close allports that are not necessary for its operation. Consult Section 11.4, “Network Ports Used ByJBoss EAP 6” and determine which ports to open, then close the rest. The default configurationof Red Hat Enterprise Linux 6 closes all ports except 22 (used for Secure Shell (SSH) and 5353(used for multicast DNS). While you are configuring ports, make sure you have physical accessto your server so that you do not inadvertently lock yourself out.
Result
Your firewall is configured to forward traffic to your internal JBoss EAP 6 server in the way you specifiedin your firewall configuration. If you chose to enable a firewall on your server, all ports are closed exceptthe ones needed to run your applications.
Report a bug
11.4. NETWORK PORTS USED BY JBOSS EAP 6
The ports used by the JBoss EAP 6 default configuration depend on several factors:
Whether your server groups use one of the default socket binding groups, or a custom group.
Security Guide
88

The requirements of your individual deployments.
NOTE
A numerical port offset can be configured, to alleviate port conflicts when you run multipleservers on the same physical server. If your server uses a numerical port offset, add theoffset to the default port number for its server group's socket binding group. For instance,if the HTTP port of the socket binding group is 8080, and your server uses a port offset of100, its HTTP port is 8180.
Unless otherwise stated, the ports use the TCP protocol.
The default socket binding groups
full-ha-sockets
full-sockets
ha-sockets
standard-sockets
Table 11.1. Reference of the default socket bindings
Name Port MulicastPort
Description full-ha-sockets
full-sockets
ha-socket
standard-socket
ajp 8009 Apache JServProtocol. Used forHTTP clustering andload balancing.
Yes Yes Yes Yes
http 8080 The default port fordeployed webapplications.
Yes Yes Yes Yes
https 8443 SSL-encryptedconnection betweendeployed webapplications andclients.
Yes Yes Yes Yes
jacorb 3528 CORBA services forJTS transactions andother ORB-dependent services.
Yes Yes No No
jacorb-ssl
3529 SSL-encryptedCORBA services.
Yes Yes No No
CHAPTER 11. NETWORK SECURITY
89

jgroups-diagnostics
7500 Multicast. Used forpeer discovery in HAclusters.
Yes No Yes No
jgroups-mping
45700 Multicast. Used todiscover initialmembership in a HAcluster.
Yes No Yes No
jgroups-tcp
7600 Unicast peerdiscovery in HAclusters using TCP.
Yes No Yes No
jgroups-tcp-fd
57600 Used for HA failuredetection over TCP.
Yes No Yes No
jgroups-udp
55200 45688 Unicast peerdiscovery in HAclusters using UDP.
Yes No Yes No
jgroups-udp-fd
54200 Used for HA failuredetection over UDP.
Yes No Yes No
messaging
5445 JMS service. Yes Yes No No
messaging-group
Referenced byHornetQ JMSbroadcast anddiscovery groups.
Yes Yes No No
messaging-throughput
5455 Used by JMSRemoting.
Yes Yes No No
mod_cluster
23364 Multicast port forcommunicationbetween JBoss EAP6 and the HTTP loadbalancer.
Yes No Yes No
Name Port MulicastPort
Description full-ha-sockets
full-sockets
ha-socket
standard-socket
Security Guide
90

osgi-http
8090 Used by internalcomponents whichuse the OSGisubsystem.
Yes Yes Yes Yes
remoting
4447 Used for remote EJBinvocation.
Yes Yes Yes Yes
txn-recovery-environment
4712 The JTA transactionrecovery manager.
Yes Yes Yes Yes
txn-status-manager
4713 The JTA / JTStransation manager.
Yes Yes Yes Yes
Name Port MulicastPort
Description full-ha-sockets
full-sockets
ha-socket
standard-socket
Management Ports
In addition to the socket binding groups, each host controller opens two more ports for managementpurposes:
9990 - The Web Management Console port
9999 - The port used by the Management Console and Management API
Report a bug
CHAPTER 11. NETWORK SECURITY
91

PART III. SECURING APPLICATIONS
Security Guide
92

CHAPTER 12. APPLICATION SECURITY
12.1. ENABLING/DISABLING DESCRIPTOR BASED PROPERTYREPLACEMENT
Summary
Finite control over descriptor property replacement was introduced in jboss-as-ee_1_1.xsd. Thistask covers the steps required to configure descriptor based property replacement.
Descriptor based property replacement flags have boolean values:
When set to true, property replacements are enabled.
When set to false, property replacements are disabled.
Procedure 12.1. jboss-descriptor-property-replacement
jboss-descriptor-property-replacement is used to enable or disable property replacement inthe following descriptors:
jboss-ejb3.xml
jboss-app.xml
jboss-web.xml
*-jms.xml
*-ds.xml
The default value for jboss-descriptor-property-replacement is true.
1. In the Management CLI, run the following command to determine the value of jboss-descriptor-property-replacement:
/subsystem=ee:read-attribute(name="jboss-descriptor-property-replacement")
2. Run the following command to configure the behavior:
/subsystem=ee:write-attribute(name="jboss-descriptor-property-replacement",value=VALUE)
Procedure 12.2. spec-descriptor-property-replacement
spec-descriptor-property-replacement is used to enable or disable property replacement inthe following descriptors:
ejb-jar.xml
persistence.xml
CHAPTER 12. APPLICATION SECURITY
93

The default value for spec-descriptor-property-replacement is false.
1. In the Management CLI, run the following command to confirm the value of spec-descriptor-property-replacement:
/subsystem=ee:read-attribute(name="spec-descriptor-property-replacement")
2. Run the following command to configure the behavior:
/subsystem=ee:write-attribute(name="spec-descriptor-property-replacement",value=VALUE)
Result
The descriptor based property replacement tags have been successfully configured.
Report a bug
12.2. DATASOURCE SECURITY
12.2.1. About Datasource Security
The preferred solution for datasource security is the use of either security domains or password vaults.Examples of each are included below. For more information, refer to:
Security domains: Section 6.1, “About Security Domains”.
Password vaults: Section 3.8.1, “About Securing Sensitive Strings in Clear-Text Files”.
Example 12.1. Security Domain Example
Example 12.2. Password Vault Example
Report a bug
12.3. EJB APPLICATION SECURITY
<security> <security-domain>mySecurityDomain</security-domain></security>
<security> <user-name>admin</user-name> <password>${VAULT::ds_ExampleDS::password::N2NhZDYzOTMtNWE0OS00ZGQ0LWE4MmEtMWNlMDMyNDdmNmI2TElORV9CUkVBS3ZhdWx0}</password></security>
Security Guide
94

12.3.1. Security Identity
12.3.1.1. About EJB Security Identity
The security identity, which is also known as invocation identity, refers to the <security-identity>tag in the security configuration. It refers to the identity another EJB must use when it invokes methodson components.
The invocation identity can be either the current caller, or it can be a specific role. In the first case, the <use-caller-identity> tag is present, and in the second case, the <run-as> tag is used.
For information about setting the security identity of an EJB, refer to Section 12.3.1.2, “Set the SecurityIdentity of an EJB”.
Report a bug
12.3.1.2. Set the Security Identity of an EJB
Example 12.3. Set the security identity of an EJB to be the same as its caller
This example sets the security identity for method invocations made by an EJB to be the same as thecurrent caller's identity. This behavior is the default if you do not specify a <security-identity>element declaration.
Example 12.4. Set the security identity of an EJB to a specific role
To set the security identity to a specific role, use the <run-as> and <role-name> tags inside the <security-identity> tag.
<ejb-jar> <enterprise-beans> <session> <ejb-name>ASessionBean</ejb-name> <!-- ... --> <security-identity> <use-caller-identity/> </security-identity> </session> <!-- ... --> </enterprise-beans></ejb-jar>
<ejb-jar> <enterprise-beans> <session> <ejb-name>RunAsBean</ejb-name> <!-- ... --> <security-identity> <run-as> <description>A private internal role</description> <role-name>InternalRole</role-name> </run-as> </security-identity>
CHAPTER 12. APPLICATION SECURITY
95

By default, when you use <run-as>, a principal named anonymous is assigned to outgoing calls. Toassign a different principal, uses the <run-as-principal>.
NOTE
You can also use the <run-as> and <run-as-principal> elements inside a servletelement.
See also:
Section 12.3.1.1, “About EJB Security Identity”
Section A.6, “EJB Security Parameter Reference”
Report a bug
12.3.2. EJB Method Permissions
12.3.2.1. About EJB Method Permissions
EJB provides a <method-permisison> element declaration. This declaration sets the roles which areallowed to invoke an EJB's interface methods. You can specify permissions for the followingcombinations:
All home and component interface methods of the named EJB
A specified method of the home or component interface of the named EJB
A specified method within a set of methods with an overloaded name
For examples, see Section 12.3.2.2, “Use EJB Method Permissions”.
Report a bug
12.3.2.2. Use EJB Method Permissions
Overview
The <method-permission> element defines the logical roles that are allowed to access the EJBmethods defined by <method> elements. Several examples demonstrate the syntax of the XML.Multiple method permission statements may be present, and they have a cumulative effect. The
</session> </enterprise-beans> <!-- ... --></ejb-jar>
<session> <ejb-name>RunAsBean</ejb-name> <security-identity> <run-as-principal>internal</run-as-principal> </security-identity></session>
Security Guide
96

<method-permission> element is a child of the <assembly-descriptor> element of the <ejb-jar> descriptor.
The XML syntax is an alternative to using annotations for EJB method permissions.
Example 12.5. Allow roles to access all methods of an EJB
Example 12.6. Allow roles to access only specific methods of an EJB, and limiting whichmethod parameters can be passed.
Example 12.7. Allow any authenticated user to access methods of EJBs
Using the <unchecked/> element allows any authenticated user to use the specified methods.
<method-permission> <description>The employee and temp-employee roles may access any method of the EmployeeService bean </description> <role-name>employee</role-name> <role-name>temp-employee</role-name> <method> <ejb-name>EmployeeService</ejb-name> <method-name>*</method-name> </method></method-permission>
<method-permission> <description>The employee role may access the findByPrimaryKey, getEmployeeInfo, and the updateEmployeeInfo(String) method of the AcmePayroll bean </description> <role-name>employee</role-name> <method> <ejb-name>AcmePayroll</ejb-name> <method-name>findByPrimaryKey</method-name> </method> <method> <ejb-name>AcmePayroll</ejb-name> <method-name>getEmployeeInfo</method-name> </method> <method> <ejb-name>AcmePayroll</ejb-name> <method-name>updateEmployeeInfo</method-name> <method-params> <method-param>java.lang.String</method-param> </method-params> </method></method-permission>
<method-permission> <description>Any authenticated user may access any method of the EmployeeServiceHelp bean</description>
CHAPTER 12. APPLICATION SECURITY
97

Example 12.8. Completely exclude specific EJB methods from being used
Example 12.9. A complete <assembly-descriptor> containing several <method-permission> blocks
<unchecked/> <method> <ejb-name>EmployeeServiceHelp</ejb-name> <method-name>*</method-name> </method></method-permission>
<exclude-list> <description>No fireTheCTO methods of the EmployeeFiring bean may be used in this deployment</description> <method> <ejb-name>EmployeeFiring</ejb-name> <method-name>fireTheCTO</method-name> </method></exclude-list>
<ejb-jar> <assembly-descriptor> <method-permission> <description>The employee and temp-employee roles may access any method of the EmployeeService bean </description> <role-name>employee</role-name> <role-name>temp-employee</role-name> <method> <ejb-name>EmployeeService</ejb-name> <method-name>*</method-name> </method> </method-permission> <method-permission> <description>The employee role may access the findByPrimaryKey, getEmployeeInfo, and the updateEmployeeInfo(String) method of the AcmePayroll bean </description> <role-name>employee</role-name> <method> <ejb-name>AcmePayroll</ejb-name> <method-name>findByPrimaryKey</method-name> </method> <method> <ejb-name>AcmePayroll</ejb-name> <method-name>getEmployeeInfo</method-name> </method> <method> <ejb-name>AcmePayroll</ejb-name> <method-name>updateEmployeeInfo</method-name>
Security Guide
98

Report a bug
12.3.3. EJB Security Annotations
12.3.3.1. About EJB Security Annotations
EJBs use security annotations to pass information about security to the deployer. These include:
@DeclareRoles
Declares which roles are available.
@SecurityDomain
Specifies the security domain to use for the EJB. If the EJB is annotated for authorization with @RolesAllowed, authorization will only apply if the EJB is annotated with a security domain.
@RolesAllowed, @PermitAll, @DenyAll
<method-params> <method-param>java.lang.String</method-param> </method-params> </method> </method-permission> <method-permission> <description>The admin role may access any method of the EmployeeServiceAdmin bean </description> <role-name>admin</role-name> <method> <ejb-name>EmployeeServiceAdmin</ejb-name> <method-name>*</method-name> </method> </method-permission> <method-permission> <description>Any authenticated user may access any method of the EmployeeServiceHelp bean</description> <unchecked/> <method> <ejb-name>EmployeeServiceHelp</ejb-name> <method-name>*</method-name> </method> </method-permission> <exclude-list> <description>No fireTheCTO methods of the EmployeeFiring bean may be used in this deployment</description> <method> <ejb-name>EmployeeFiring</ejb-name> <method-name>fireTheCTO</method-name> </method> </exclude-list> </assembly-descriptor></ejb-jar>
CHAPTER 12. APPLICATION SECURITY
99

Specifies which method permissions are allowed. For information about method permissions, refer toSection 12.3.2.1, “About EJB Method Permissions”.
@RolesAllowed, @PermitAll, @DenyAll
Specifies which method permissions are allowed. For information about method permissions, refer toSection 12.3.2.1, “About EJB Method Permissions”.
@RunAs
Configures the propagated security identify of a component.
For more information, refer to Section 12.3.3.2, “Use EJB Security Annotations”.
Report a bug
12.3.3.2. Use EJB Security Annotations
Overview
You can use either XML descriptors or annotations to control which security roles are able to callmethods in your Enterprise JavaBeans (EJBs). For information on using XML descriptors, refer toSection 12.3.2.2, “Use EJB Method Permissions”.
Annotations for Controlling Security Permissions of EJBs
@DeclareRoles
Use @DeclareRoles to define which security roles to check permissions against. If no@DeclareRoles is present, the list is built automatically from the @RolesAllowed annotation.
@SecurityDomain
Specifies the security domain to use for the EJB. If the EJB is annotated for authorization with @RolesAllowed, authorization will only apply if the EJB is annotated with a security domain.
@RolesAllowed, @PermitAll, @DenyAll
Use @RolesAllowed to list which roles are allowed to access a method or methods. Use @PermitAllor @DenyAll to either permit or deny all roles from using a method or methods.
@RunAs
Use @RunAs to specify a role a method will always be run as.
Example 12.10. Security Annotations Example
@Stateless@RolesAllowed({"admin"})@SecurityDomain("other")public class WelcomeEJB implements Welcome { @PermitAll public String WelcomeEveryone(String msg) { return "Welcome to " + msg; } @RunAs("tempemployee")
Security Guide
100

In this code, all roles can access method WelcomeEveryone. The GoodBye method runs as the tempemployee role. Only the admin role can access method GoodbyeAdmin, and any othermethods with no security annotation..
Report a bug
12.3.4. Remote Access to EJBs
12.3.4.1. About Remote Method Access
JBoss Remoting is the framework which provides remote access to EJBs, JMX MBeans, and othersimilar services. It works within the following transport types, with or without SSL:
Supported Transport Types
Socket / Secure Socket
RMI / RMI over SSL
HTTP / HTTPS
Servlet / Secure Servlet
Bisocket / Secure Bisocket
JBoss Remoting also provides automatic discovery via Multicast or JNDI.
It is used by many of the subsystems within JBoss EAP 6, and also enables you to design, implement,and deploy services that can be remotely invoked by clients over several different transport mechanisms.It also allows you to access existing services in JBoss EAP 6.
Data Marshalling
The Remoting system also provides data marshalling and unmarshalling services. Data marshallingrefers to the ability to safely move data across network and platform boundaries, so that a separatesystem can perform work on it. The work is then sent back to the original system and behaves as thoughit were handled locally.
Architecture Overview
When you design a client application which uses Remoting, you direct your application to communicatewith the server by configuring it to use a special type of resource locator called an InvokerLocator,which is a simple String with a URL-type format. The server listens for requests for remote resources ona connector, which is configured as part of the remoting subsystem. The connector hands therequest off to a configured ServerInvocationHandler. Each ServerInvocationHandlerimplements a method invoke(InvocationRequest), which knows how to handle the request.
public String GoodBye(String msg) { return "Goodbye, " + msg; } public String public String GoodbyeAdmin(String msg) { return "See you later, " + msg; }}
CHAPTER 12. APPLICATION SECURITY
101

The JBoss Remoting framework contains three layers that mirror each other on the client and serverside.
JBoss Remoting Framework Layers
The user interacts with the outer layer. On the client side, the outer layer is the Client class,which sends invocation requests. On the server side, it is the InvocationHandler, which isimplemented by the user and receives invocation requests.
The transport is controlled by the invoker layer.
The lowest layer contains the marshaller and unmarshaller, which convert data formats to wireformats.
Report a bug
12.3.4.2. About Remoting Callbacks
When a Remoting client requests information from the server, it can block and wait for the server toreply, but this is often not the ideal behavior. To allow the client to listen for asynchronous events on theserver, and continue doing other work while waiting for the server to finish the request, your applicationcan ask the server to send a notification when it has finished. This is referred to as a callback. One clientcan add itself as a listener for asynchronous events generated on behalf of another client, as well. Thereare two different choices for how to receive callbacks: pull callbacks or push callbacks. Clients check forpull callbacks synchronously, but passively listen for push callbacks.
In essence, a callback works by the server sending an InvocationRequest to the client. Your server-side code works the same regardless of whether the callback is synchronous or asynchronous. Only theclient needs to know the difference. The server's InvocationRequest sends a responseObject to theclient. This is the payload that the client has requested. This may be a direct response to a request or anevent notification.
Your server also tracks listeners using an m_listeners object. It contains a list of all listeners that havebeen added to your server handler. The ServerInvocationHandler interface includes methods thatallow you to manage this list.
The client handles pull and push callback in different ways. In either case, it must implement a callbackhandler. A callback handler is an implementation of interface org.jboss.remoting.InvokerCallbackHandler, which processes the callback data. Afterimplementing the callback handler, you either add yourself as a listener for a pull callback, or implementa callback server for a push callback.
Pull Callbacks
For a pull callback, your client adds itself to the server's list of listeners using the Client.addListener() method. It then polls the server periodically for synchronous delivery ofcallback data. This poll is performed using the Client.getCallbacks().
Push Callback
A push callback requires your client application to run its own InvocationHandler. To do this, you need torun a Remoting service on the client itself. This is referred to as a callback server. The callback serveraccepts incoming requests asynchronously and processes them for the requester (in this case, theserver). To register your client's callback server with the main server, pass the callback server's InvokerLocator as the second argument to the addListener method.
Report a bug
Security Guide
102

12.3.4.3. About Remoting Server Detection
Remoting servers and clients can automatically detect each other using JNDI or Multicast. A RemotingDetector is added to both the client and server, and a NetworkRegistry is added to the client.
The Detector on the server side periodically scans the InvokerRegistry and pulls all server invokers ithas created. It uses this information to publish a detection message which contains the locator andsubsystems supported by each server invoker. It publishes this message via a multicast broadcast or abinding into a JNDI server.
On the client side, the Detector receives the multicast message or periodically polls the JNDI server toretrieve detection messages. If the Detector notices that a detection message is for a newly-detectedremoting server, it registers it into the NetworkRegistry. The Detector also updates the NetworkRegistryif it detects that a server is no longer available.
Report a bug
12.3.4.4. Configure the Remoting Subsystem
Overview
JBoss Remoting has three top-level configurable elements: the worker thread pool, one or moreconnectors, and a series of local and remote connection URIs. This topic presents an explanation ofeach configurable item, example CLI commands for how to configure each item, and an XML example ofa fully-configured subsystem. This configuration only applies to the server. Most people will not need toconfigure the Remoting subsystem at all, unless they use custom connectors for their own applications.Applications which act as Remoting clients, such as EJBs, need separate configuration to connect to aspecific connector.
NOTE
The Remoting subsystem configuration is not exposed to the web-based ManagementConsole, but it is fully configurable from the command-line based Management CLI.Editing the XML by hand is not recommended.
Adapting the CLI Commands
The CLI commands are formulated for a managed domain, when configuring the default profile. Toconfigure a different profile, substitute its name. For a standalone server, omit the /profile=defaultpart of the command.
Configuration Outside the Remoting Subsystem
There are a few configuration aspects which are outside of the remoting subsystem:
Network Interface
The network interface used by the remoting subsystem is the unsecure interface defined in the domain/configuration/domain.xml or standalone/configuration/standalone.xml.
<interfaces> <interface name="management"/> <interface name="public"/> <interface name="unsecure"/></interfaces>
CHAPTER 12. APPLICATION SECURITY
103

The per-host definition of the unsecure interface is defined in the host.xml in the same directoryas the domain.xml or standalone.xml. This interface is also used by several other subsystems.Exercise caution when modifying it.
socket-binding
The default socket-binding used by the remoting subsystem binds to TCP port 4777. Refer to thedocumentation about socket bindings and socket binding groups for more information if you need tochange this.
Remoting Connector Reference for EJB
The EJB subsystem contains a reference to the remoting connector for remote method invocations.The following is the default configuration:
Secure Transport Configuration
Remoting transports use StartTLS to use a secure (HTTPS, Secure Servlet, etc) connection if theclient requests it. The same socket binding (network port) is used for secured and unsecuredconnections, so no additional server-side configuration is necessary. The client requests the secureor unsecured transport, as its needs dictate. JBoss EAP 6 components which use Remoting, such asEJBs, the ORB, and the JMS provider, request secured interfaces by default.
WARNING
StartTLS works by activating a secure connection if the client requests it, andotherwise defaulting to an unsecured connection. It is inherently susceptible to aMan in the Middle style exploit, wherein an attacker intercepts the client's requestand modifies it to request an unsecured connection. Clients must be written to failappropriately if they do not receive a secure connection, unless an unsecuredconnection actually is an appropriate fall-back.
<interfaces> <interface name="management"> <inet-address value="${jboss.bind.address.management:127.0.0.1}"/> </interface> <interface name="public"> <inet-address value="${jboss.bind.address:127.0.0.1}"/> </interface> <interface name="unsecure"> <!-- Used for IIOP sockets in the standard configuration. To secure JacORB you need to setup SSL --> <inet-address value="${jboss.bind.address.unsecure:127.0.0.1}"/> </interface></interfaces>
<remote connector-ref="remoting-connector" thread-pool-name="default"/>
Security Guide
104

Worker Thread Pool
The worker thread pool is the group of threads which are available to process work which comes inthrough the Remoting connectors. It is a single element <worker-thread-pool>, and takes severalattributes. Tune these attributes if you get network timeouts, run out of threads, or need to limit memoryusage. Specific recommendations depend on your specific situation. Contact Red Hat Global SupportServices for more information.
Table 12.1. Worker Thread Pool Attributes
Attribute Description CLI Command
read-threads The number of read threads tocreate for the remoting worker.Defaults to 1.
/profile=default/subsystem=remoting/:write-attribute(name=worker-read-threads,value=1)
write-threads The number of write threads tocreate for the remoting worker.Defaults to 1.
/profile=default/subsystem=remoting/:write-attribute(name=worker-write-threads,value=1)
task-keepalive The number of milliseconds tokeep non-core remoting workertask threads alive. Defaults to 60.
/profile=default/subsystem=remoting/:write-attribute(name=worker-task-keepalive,value=60)
task-max-threads The maximum number of threadsfor the remoting worker taskthread pool. Defaults to 16.
/profile=default/subsystem=remoting/:write-attribute(name=worker-task-max-threads,value=16)
task-core-threads The number of core threads forthe remoting worker task threadpool. Defaults to 4.
/profile=default/subsystem=remoting/:write-attribute(name=worker-task-core-threads,value=4)
task-limit The maximum number ofremoting worker tasks to allowbefore rejecting. Defaults to 16384.
/profile=default/subsystem=remoting/:write-attribute(name=worker-task-limit,value=16384)
Connector
The connector is the main Remoting configuration element. Multiple connectors are allowed. Eachconsists of a element <connector> element with several sub-elements, as well as a few possibleattributes. The default connector is used by several subsystems of JBoss EAP 6. Specific settings for theelements and attributes of your custom connectors depend on your applications, so contact Red HatGlobal Support Services for more information.
Table 12.2. Connector Attributes
CHAPTER 12. APPLICATION SECURITY
105

Attribute Description CLI Command
socket-binding The name of the socket binding touse for this connector.
/profile=default/subsystem=remoting/connector=remoting-connector/:write-attribute(name=socket-binding,value=remoting)
authentication-provider The Java Authentication ServiceProvider Interface for Containers(JASPIC) module to use with thisconnector. The module must be inthe classpath.
/profile=default/subsystem=remoting/connector=remoting-connector/:write-attribute(name=authentication-provider,value=myProvider)
security-realm Optional. The security realmwhich contains your application'susers, passwords, and roles. AnEJB or Web Application canauthenticate against a securityrealm. ApplicationRealm isavailable in a default JBoss EAP 6installation.
/profile=default/subsystem=remoting/connector=remoting-connector/:write-attribute(name=security-realm,value=ApplicationRealm)
Table 12.3. Connector Elements
Attribute Description CLI Command
sasl Enclosing element for SimpleAuthentication and Security Layer(SASL) authenticationmechanisms
N/A
properties Contains one or more <property> elements, eachwith a name attribute and anoptional value attribute.
/profile=default/subsystem=remoting/connector=remoting-connector/property=myProp/:add(value=myPropValue)
Outbound Connections
You can specify three different types of outbound connection:
Outbound connection to a URI.
Local outbound connection – connects to a local resource such as a socket.
Remote outbound connection – connects to a remote resource and authenticates using asecurity realm.
All of the outbound connections are enclosed in an <outbound-connections> element. Each of these
Security Guide
106

connection types takes an outbound-socket-binding-ref attribute. The outbound-connectiontakes a uri attribute. The remote outbound connection takes optional username and security-realm attributes to use for authorization.
Table 12.4. Outbound Connection Elements
Attribute Description CLI Command
outbound-connection Generic outbound connection. /profile=default/subsystem=remoting/outbound-connection=my-connection/:add(uri=http://my-connection)
local-outbound-connection Outbound connection with aimplicit local:// URI scheme.
/profile=default/subsystem=remoting/local-outbound-connection=my-connection/:add(outbound-socket-binding-ref=remoting2)
remote-outbound-connection Outbound connections forremote:// URI scheme, usingbasic/digest authentication with asecurity realm.
/profile=default/subsystem=remoting/remote-outbound-connection=my-connection/:add(outbound-socket-binding-ref=remoting,username=myUser,security-realm=ApplicationRealm)
SASL Elements
Before defining the SASL child elements, you need to create the initial SASL element. Use the followingcommand:
/profile=default/subsystem=remoting/connector=remoting-connector/security=sasl:add
The child elements of the SASL element are described in the table below.
Attribute Description CLI Command
include-mechanisms Contains a value attribute,which is a space-separated list ofSASL mechanisms.
/profile=default/subsystem=remoting/connector=remoting-connector/security=sasl:write-attribute(name=include-mechanisms,value=["DIGEST","PLAIN","GSSAPI"])
CHAPTER 12. APPLICATION SECURITY
107

qop Contains a value attribute,which is a space-separated list ofSASL Quality of protection values,in decreasing order of preference.
/profile=default/subsystem=remoting/connector=remoting-connector/security=sasl:write-attribute(name=qop,value=["auth"])
strength Contains a value attribute,which is a space-separated list ofSASL cipher strength values, indecreasing order of preference.
/profile=default/subsystem=remoting/connector=remoting-connector/security=sasl:write-attribute(name=strength,value=["medium"])
reuse-session Contains a value attribute whichis a boolean value. If true, attemptto reuse sessions.
/profile=default/subsystem=remoting/connector=remoting-connector/security=sasl:write-attribute(name=reuse-session,value=false)
server-auth Contains a value attribute whichis a boolean value. If true, theserver authenticates to the client.
/profile=default/subsystem=remoting/connector=remoting-connector/security=sasl:write-attribute(name=server-auth,value=false)
policy An enclosing element whichcontains zero or more of thefollowing elements, which eachtake a single value.
forward-secrecy –whether mechanisms arerequired to implementforward secrecy(breaking into onesession will notautomatically provideinformation for breakinginto future sessions)
/profile=default/subsystem=remoting/connector=remoting-connector/security=sasl/sasl-policy=policy:add
/profile=default/subsystem=remoting/connector=remoting-
Attribute Description CLI Command
Security Guide
108

no-active – whethermechanisms susceptibleto non-dictionary attacksare permitted. A value of false permits, and true denies.
no-anonymous – whethermechanisms that acceptanonymous login arepermitted. A value of false permits, and true denies.
no-dictionary – whethermechanisms susceptibleto passive dictionaryattacks are allowed. Avalue of false permits,and true denies.
no-plain-text – whethermechanisms which aresusceptible to simpleplain passive attacks areallowed. A value of false permits, and true denies.
pass-credentials –whether mechanismswhich pass clientcredentials are allowed.
connector/security=sasl/sasl-policy=policy:write-attribute(name=forward-secrecy,value=true)
/profile=default/subsystem=remoting/connector=remoting-connector/security=sasl/sasl-policy=policy:write-attribute(name=no-active,value=false)
/profile=default/subsystem=remoting/connector=remoting-connector/security=sasl/sasl-policy=policy:write-attribute(name=no-anonymous,value=false)
/profile=default/subsystem=remoting/connector=remoting-connector/security=sasl/sasl-policy=policy:write-attribute(name=no-dictionary,value=true)
/profile=default/subsystem=remoting/connector=remoting-connector/security=sasl/sasl-policy=policy:write-attribute(name=no-plain-text,value=false)
/profile=default/subsystem=remoting/connector=remoting-connector/security=sasl/sasl-policy=policy:write-
Attribute Description CLI Command
CHAPTER 12. APPLICATION SECURITY
109

attribute(name=pass-credentials,value=true)properties Contains one or more
<property> elements, eachwith a name attribute and anoptional value attribute.
/profile=default/subsystem=remoting/connector=remoting-connector/security=sasl/property=myprop:add(value=1)
/profile=default/subsystem=remoting/connector=remoting-connector/security=sasl/property=myprop2:add(value=2)
Attribute Description CLI Command
Example 12.11. Example Configurations
This example shows the default remoting subsystem that ships with JBoss EAP 6.
This example contains many hypothetical values, and is presented to put the elements and attributesdiscussed previously into context.
<subsystem xmlns="urn:jboss:domain:remoting:1.1"> <connector name="remoting-connector" socket-binding="remoting" security-realm="ApplicationRealm"/></subsystem>
<subsystem xmlns="urn:jboss:domain:remoting:1.1"> <worker-thread-pool read-threads="1" task-keepalive="60' task-max-threads="16" task-core-thread="4" task-limit="16384" write-threads="1" /> <connector name="remoting-connector" socket-binding="remoting" security-realm="ApplicationRealm"> <sasl> <include-mechanisms value="GSSAPI PLAIN DIGEST-MD5" /> <qop value="auth" /> <strength value="medium" /> <reuse-session value="false" /> <server-auth value="false" /> <policy> <forward-secrecy value="true" /> <no-active value="false" /> <no-anonymous value="false" /> <no-dictionary value="true" /> <no-plain-text value="false" /> <pass-credentials value="true" /> </policy> <properties> <property name="myprop1" value="1" /> <property name="myprop2" value="2" />
Security Guide
110

Configuration Aspects Not Yet Documented
JNDI and Multicast Automatic Detection
Report a bug
12.3.4.5. Use Security Realms with Remote EJB Clients
One way to add security to clients which invoke EJBs remotely is to use security realms. A securityrealm is a simple database of username/password pairs and username/role pairs. The terminology isalso used in the context of web containers, with a slightly different meaning.
To authenticate an EJB to a specific username and password which exists in a security realm, followthese steps:
Add a new security realm to the domain controller or standalone server.
Add the following parameters to the jboss-ejb-client.properties file, which is in theclasspath of the application. This example assumes the connection is referred to as default bythe other parameters in the file.
Create a custom Remoting connector on the domain or standalone server, which uses your newsecurity realm.
Deploy your EJB to the server group which is configured to use the profile with the customRemoting connector, or to your standalone server if you are not using a managed domain.
Report a bug
12.3.4.6. Add a New Security Realm
1. Run the Management CLI.
</properties> </sasl> <authentication-provider name="myprovider" /> <properties> <property name="myprop3" value="propValue" /> </properties> </connector> <outbound-connections> <outbound-connection name="my-outbound-connection" uri="http://myhost:7777/"/> <remote-outbound-connection name="my-remote-connection" outbound-socket-binding-ref="my-remote-socket" username="myUser" security-realm="ApplicationRealm"/> <local-outbound-connection name="myLocalConnection" outbound-socket-binding-ref="my-outbound-socket"/> </outbound-connections></subsystem>
remote.connection.default.username=appuserremote.connection.default.password=apppassword
CHAPTER 12. APPLICATION SECURITY
111

Start the jboss-cli.sh or jboss-cli.bat command and connect to the server.
2. Create the new security realm itself.Run the following command to create a new security realm named MyDomainRealm on adomain controller or a standalone server.
/host=master/core-service=management/security-realm=MyDomainRealm:add()
3. Create the references to the properties file which will store information about the newrole.Run the following command to create a pointer a file named myfile.properties, which willcontain the properties pertaining to the new role.
NOTE
The newly-created properties file is not managed by the included add-user.shand add-user.bat scripts. It must be managed externally.
/host=master/core-service=management/security-realm=MyDomainRealm/authentication=properties:add(path=myfile.properties)
Result
Your new security realm is created. When you add users and roles to this new realm, the information willbe stored in a separate file from the default security realms. You can manage this new file using yourown applications or procedures.
Report a bug
12.3.4.7. Add a User to a Security Realm
1. Run the add-user.sh or add-user.bat command.Open a terminal and change directories to the EAP_HOME/bin/ directory. If you run Red HatEnterprise Linux or another UNIX-like operating system, run add-user.sh. If you run MicrosoftWindows Server, run add-user.bat.
2. Choose whether to add a Management User or Application User.For this procedure, type b to add an Application User.
3. Choose the realm the user will be added to.By default, the only available realm is ApplicationRealm. If you have added a custom realm,you can type its name instead.
4. Type the username, password, and roles, when prompted.Type the desired username, password, and optional roles when prompted. Verify your choice bytyping yes, or type no to cancel the changes. The changes are written to each of the propertiesfiles for the security realm.
Report a bug
12.3.4.8. About Remote EJB Access Using SSL Encryption
Security Guide
112

By default, the network traffic for Remote Method Invocation (RMI) of EJB2 and EJB3 Beans is notencrypted. In instances where encryption is required, Secure Sockets Layer (SSL) can be utilized so thatthe connection between the client and server is encrypted. Using SSL also has the added benefit ofallowing the network traffic to traverse firewalls that block the RMI port.
Report a bug
12.4. JAX-RS APPLICATION SECURITY
12.4.1. Enable Role-Based Security for a RESTEasy JAX-RS Web Service
Summary
RESTEasy supports the @RolesAllowed, @PermitAll, and @DenyAll annotations on JAX-RS methods.However, it does not recognize these annotations by default. Follow these steps to configure the web.xml file and enable role-based security.
WARNING
Do not activate role-based security if the application uses EJBs. The EJB containerwill provide the functionality, instead of RESTEasy.
Procedure 12.3. Enable Role-Based Security for a RESTEasy JAX-RS Web Service
1. Open the web.xml file for the application in a text editor.
2. Add the following <context-param> to the file, within the web-app tags:
<context-param> <param-name>resteasy.role.based.security</param-name> <param-value>true</param-value></context-param>
3. Declare all roles used within the RESTEasy JAX-RS WAR file, using the <security-role> tags:
<security-role> <role-name>ROLE_NAME</role-name></security-role><security-role> <role-name>ROLE_NAME</role-name></security-role>
4. Authorize access to all URLs handled by the JAX-RS runtime for all roles:
<security-constraint> <web-resource-collection> <web-resource-name>Resteasy</web-resource-name> <url-pattern>/PATH</url-pattern> </web-resource-collection>
CHAPTER 12. APPLICATION SECURITY
113

<auth-constraint> <role-name>ROLE_NAME</role-name> <role-name>ROLE_NAME</role-name> </auth-constraint></security-constraint>
Result
Role-based security has been enabled within the application, with a set of defined roles.
Example 12.12. Example Role-Based Security Configuration
Report a bug
12.4.2. Secure a JAX-RS Web Service using Annotations
Summary
This topic covers the steps to secure a JAX-RS web service using the supported security annotations
Procedure 12.4. Secure a JAX-RS Web Service using Supported Security Annotations
<web-app>
<context-param> <param-name>resteasy.role.based.security</param-name> <param-value>true</param-value> </context-param>
<servlet-mapping> <servlet-name>Resteasy</servlet-name> <url-pattern>/*</url-pattern> </servlet-mapping>
<security-constraint> <web-resource-collection> <web-resource-name>Resteasy</web-resource-name> <url-pattern>/security</url-pattern> </web-resource-collection> <auth-constraint> <role-name>admin</role-name> <role-name>user</role-name> </auth-constraint> </security-constraint>
<security-role> <role-name>admin</role-name> </security-role> <security-role> <role-name>user</role-name> </security-role> </web-app>
Security Guide
114

1. Enable role-based security. For more information, refer to: Section 12.4.1, “Enable Role-BasedSecurity for a RESTEasy JAX-RS Web Service”
2. Add security annotations to the JAX-RS web service. RESTEasy supports the followingannotations:
@RolesAllowed
Defines which roles can access the method. All roles should be defined in the web.xml file.
@PermitAll
Allows all roles defined in the web.xml file to access the method.
@DenyAll
Denies all access to the method.
Report a bug
12.5. SECURE REMOTE PASSWORD PROTOCOL
12.5.1. About Secure Remote Password Protocol (SRP)
The Secure Remote Password (SRP) protocol is an implementation of a public key exchangehandshake described in the Internet Standards Working Group Request For Comments 2945(RFC2945). The RFC2945 abstract states:
This document describes a cryptographically strong network authentication mechanismknown as the Secure Remote Password (SRP) protocol. This mechanism is suitable fornegotiating secure connections using a user-supplied password, while eliminating thesecurity problems traditionally associated with reusable passwords. This system alsoperforms a secure key exchange in the process of authentication, allowing securitylayers (privacy and/or integrity protection) to be enabled during the session. Trusted keyservers and certificate infrastructures are not required, and clients are not required tostore or manage any long-term keys. SRP offers both security and deploymentadvantages over existing challenge-response techniques, making it an ideal drop-inreplacement where secure password authentication is needed.
The complete RFC2945 specification can be obtained from http://www.rfc-editor.org/rfc.html. Additionalinformation on the SRP algorithm and its history can be found at http://srp.stanford.edu/.
Algorithms like Diffie-Hellman and RSA are known as public key exchange algorithms. The concept ofpublic key algorithms is that you have two keys, one public that is available to everyone, and one that isprivate and known only to you. When someone wants to send encrypted information to you, they encryptthe information using your public key. Only you are able to decrypt the information using your private key.Contrast this with the more traditional shared password based encryption schemes that require thesender and receiver to know the shared password. Public key algorithms eliminate the need to sharepasswords.
Report a bug
12.5.2. Configure Secure Remote Password (SRP) Protocol
CHAPTER 12. APPLICATION SECURITY
115

To use Secure Remote Password (SRP) Protocol in your application, you first create an MBean whichimplements the SRPVerifierStore interface. Information about the implementation is provided in TheSRPVerifierStore Implementation.
Procedure 12.5. Integrate the Existing Password Store
1. Create the hashed password information store.If your passwords are already stored in an irreversible hashed form, you need to do this on aper-user basis.
You can implement setUserVerifier(String, VerifierInfo) as a noOp method, or amethod that throws an exception stating that the store is read-only.
2. Create the SRPVerifierStore interface.Create a custom SRPVerifierStore interface implementation that can obtain the VerifierInfo from the store you created.
The verifyUserChallenge(String, Object) can be used to integrate existing hardwaretoken based schemes like SafeWord or Radius into the SRP algorithm. This interface method iscalled only when the client SRPLoginModule configuration specifies the hasAuxChallengeoption.
3. Create the JNDI MBean.Create a MBean that exposes the SRPVerifierStore interface available to JNDI, andexposes any configurable parameters required.
The default org.jboss.security.srp.SRPVerifierStoreService allows you toimplement this. You can also implement the MBean using a Java properties file implementationof SRPVerifierStore.
The SRPVerifierStore Implementation
The default implementation of the SRPVerifierStore interface is not recommended for productionsystems, becauase it requires all password hash information to be available as a file of serializedobjects.
The SRPVerifierStore implementation provides access to the SRPVerifierStore.VerifierInfo object for a given username. The getUserVerifier(String)method is called by the SRPService at the start of a user SRP session to obtain the parameters neededby the SRP algorithm.
Elements of a VerifierInfo Object
username
The username or user ID used to authenticate
verifier
A one-way hash of the password the user enters as proof of identity. The org.jboss.security.Util class includes a calculateVerifier method which performs thepassword hashing algorithm. The output password takes the form H(salt | H(username | ':' | password)), where H is the SHA secure hash function as defined by RFC2945. The username isconverted from a string to a byte[] using UTF-8 encoding.
salt
Security Guide
116

A random number used to increase the difficulty of a brute force dictionary attack on the verifierpassword database in the event that the database is compromised. The value should be generatedfrom a cryptographically strong random number algorithm when the user's existing clear-textpassword is hashed.
g
The SRP algorithm primitive generator. This can be a well known fixed parameter rather than a per-user setting. The org.jboss.security.srp.SRPConf utility class provides several settings for g,including a suitable default obtained via SRPConf.getDefaultParams().g().
N
The SRP algorithm safe-prime modulus. This can be a well-known fixed parameter rather than a per-user setting. The org.jboss.security.srp.SRPConf utility class provides several settings for Nincluding a good default obtained via SRPConf.getDefaultParams().N().
Example 12.13. The SRPVerifierStore Interface
Report a bug
package org.jboss.security.srp;
import java.io.IOException;import java.io.Serializable;import java.security.KeyException;
public interface SRPVerifierStore{ public static class VerifierInfo implements Serializable {
public String username;
public byte[] salt; public byte[] g; public byte[] N; }
public VerifierInfo getUserVerifier(String username) throws KeyException, IOException;
public void setUserVerifier(String username, VerifierInfo info) throws IOException;
public void verifyUserChallenge(String username, Object auxChallenge) throws SecurityException;}
CHAPTER 12. APPLICATION SECURITY
117

CHAPTER 13. SINGLE SIGN ON (SSO)
13.1. ABOUT SINGLE SIGN ON (SSO) FOR WEB APPLICATIONS
Overview
Single Sign On (SSO) allows authentication to one resource to implicitly authorize access to otherresources.
Clustered and Non-Clustered SSO
Non-clustered SSO limits the sharing of authorization information to applications on the same virtualhost. In addition, there is no resiliency in the event of a host failure. Clustered SSO data can be sharedbetween applications in multiple virtual hosts, and is resilient to failover. In addition, clustered SSO isable to receive requests from a load balancer.
How SSO Works
If a resource is unprotected, a user is not challenged to authenticate at all. If a user accesses a protectedresource, the user is required to authenticate.
Upon successful authentication, the roles associated with the user are stored and used for authorizationof all other associated resources.
If the user logs out of an application, or an application invalidates the session programmatically, allpersisted authorization data is removed, and the process starts over.
A session timeout does not invalidate the SSO session if other sessions are still valid.
Limitations of SSO
No propagation across third-party boundaries.
SSO can only be used between applications deployed within JBoss EAP 6 containers.
Container-managed authentication only.
You must use container-managed authentication elements such as <login-config> in yourapplication's web.xml.
Requires cookies.
SSO is maintained via browser cookies and URL rewriting is not supported.
Realm and security-domain limitations
Unless the requireReauthentication parameter is set to true, all web applications configuredfor the same SSO valve must share the same Realm configuration in web.xml and the samesecurity domain.
You can nest the Realm element inside the Host element or the surrounding Engine element, but notinside a context.xml element for one of the involved web applications.
The <security-domain> configured in the jboss-web.xml must be consistent across all webapplications.
All security integrations must accept the same credentials (for instance, username and password).
Security Guide
118

Report a bug
13.2. ABOUT CLUSTERED SINGLE SIGN ON (SSO) FOR WEBAPPLICATIONS
Single Sign On (SSO) is the ability for users to authenticate to a single web application, and by means ofa successful authentication, to be granted authorization to multiple other applications. Clustered SSOstores the authentication and authorization information in a clustered cache. This allows for applicationson multiple different servers to share the information, and also makes the information resilient to a failureof one of the hosts.
A SSO configuration is called a valve. A valve is connected to a security domain, which is configured atthe level of the server or server group. Each application which should share the same cachedauthentication information is configured to use the same valve. This configuration is done in theapplication's jboss-web.xml.
Some common SSO valves supported by the web subsystem of JBoss EAP 6 include:
Apache Tomcat ClusteredSingleSignOn
Apache Tomcat IDPWebBrowserSSOValve
SPNEGO-based SSO provided by PicketLink
Depending on the specific type of valve, you may need to do some additional configuration in yoursecurity domain, in order for your valve to work properly.
Report a bug
13.3. CHOOSE THE RIGHT SSO IMPLEMENTATION
JBoss EAP 6 runs Java Enterprise Edition (EE) applications, which may be web applications, EJBapplications, web services, or other types. Single Sign On (SSO) allows you to propagate securitycontext and identity information between these applications. Depending on your organization's needs, afew different SSO solutions are available. The solution you use depends on whether you use webapplications, EJB applications, or web services; whether your applications run on the same server,multiple non-clustered servers, or multiple clustered servers; and whether you need to integrate into adesktop-based authentication system or you only need authentication between your applicationsthemselves.
Kerberos-Based Desktop SSO
If your organization already uses a Kerberos-based authentication and authorization system, such asMicrosoft Active Directory, you can use the same systems to transparently authenticate to yourenterprise applications running in JBoss EAP 6.
Non-Clustered and Web Application SSO
If you need to propagate security information among applications which run within the same server groupor instance, you can use non-clustered SSO. This only involves configuring the valve in yourapplication's jboss-web.xml descriptor.
Clustered Web Application SSO
If you need to propagate security information among applications running in a clustered environmentacross multiple JBoss EAP 6 instances, you can use the clustered SSO valve. This is configured in yourapplication's jboss-web.xml.
CHAPTER 13. SINGLE SIGN ON (SSO)
119

Report a bug
13.4. USE SINGLE SIGN ON (SSO) IN A WEB APPLICATION
Overview
Single Sign On (SSO) capabilities are provided by the web and Infinispan subsystems. Use thisprocedure to configure SSO in web applications.
Prerequisites
You need to have a configured security domain which handles authentication and authorization.
The infinispan subsystem needs to be present. It is present in the full-ha profile for amanaged domain, or by using the standalone-full-ha.xml configuration in a standaloneserver.
The web cache-container and SSO cache-container must each be present. The initialconfiguration files already contain the web cache-container, and some of the configurationsalready contain the SSO cache-container as well. Use the following commands to check for andenable the SSO cache container. Note that these commands modify the ha profile of a manageddomain. You can change the commands to use a different profile, or remove the /profile=full portion of the command, for a standalone server.
Example 13.1. Check for the web cache-container
The profiles and configurations mentioned above include the web cache-container by default.Use the following command to verify its presence. If you use a different profile, substitute itsname instead of ha.
/profile=ha/subsystem=infinispan/cache-container=web/:read-resource(recursive=false,proxies=false,include-runtime=false,include-defaults=true)
If the result is success the subsystem is present. Otherwise, you need to add it.
Example 13.2. Add the web cache-container
Use the following three commands to enable the web cache-container to your configuration.Modify the name of the profile as appropriate, as well as the other parameters. Theparameters here are the ones used in a default configuration.
/profile=ha/subsystem=infinispan/cache-container=web:add(aliases=["standard-session-cache"],default-cache="repl",module="org.jboss.as.clustering.web.infinispan")
/profile=ha/subsystem=infinispan/cache-container=web/transport=TRANSPORT:add(lock-timeout=60000)
/profile=ha/subsystem=infinispan/cache-container=web/replicated-cache=repl:add(mode="ASYNC",batching=true)
Security Guide
120

Example 13.3. Check for the SSO cache-container
Run the following Management CLI command:
/profile=ha/subsystem=infinispan/cache-container=web/:read-resource(recursive=true,proxies=false,include-runtime=false,include-defaults=true)
Look for output like the following: "sso" => {
If you do not find it, the SSO cache-container is not present in your configuration.
Example 13.4. Add the SSO cache-container
/profile=ha/subsystem=infinispan/cache-container=web/replicated-cache=sso:add(mode="SYNC", batching=true)
The web subsystem needs to be configured to use SSO. The following command enables SSOon the virtual server called default-host, and the cookie domain domain.com. The cachename is sso, and reauthentication is disabled.
/profile=ha/subsystem=web/virtual-server=default-host/sso=configuration:add(cache-container="web",cache-name="sso",reauthenticate="false",domain="domain.com")
Each application which will share the SSO information needs to be configured to use the same<security-domain> in its jboss-web.xml deployment descriptor and the same Realm in its web.xml configuration file.
Differences Between Clustered and Non-Clustered SSO Valves
Clustered SSO allows sharing of authentication between separate hosts, while non-clustered SSO doesnot. The clustered and non-clustered SSO valves are configured the same way, but the clustered SSOincludes the cacheConfig, processExpiresInterval and maxEmptyLife parameters, whichcontrol the clustering replication of the persisted data.
Example 13.5. Example Clustered SSO Configuration
Because clustered and non-clustered SSO configurations are so similar, only a clusteredconfiguration is shown. This example uses a security domain called tomcat.
<jboss-web> <security-domain>tomcat</security-domain> <valve> <class-name>org.jboss.web.tomcat.service.sso.ClusteredSingleSignOn</class-name> <param> <param-name>maxEmptyLife</param-name> <param-value>900</param-value> </param>
CHAPTER 13. SINGLE SIGN ON (SSO)
121
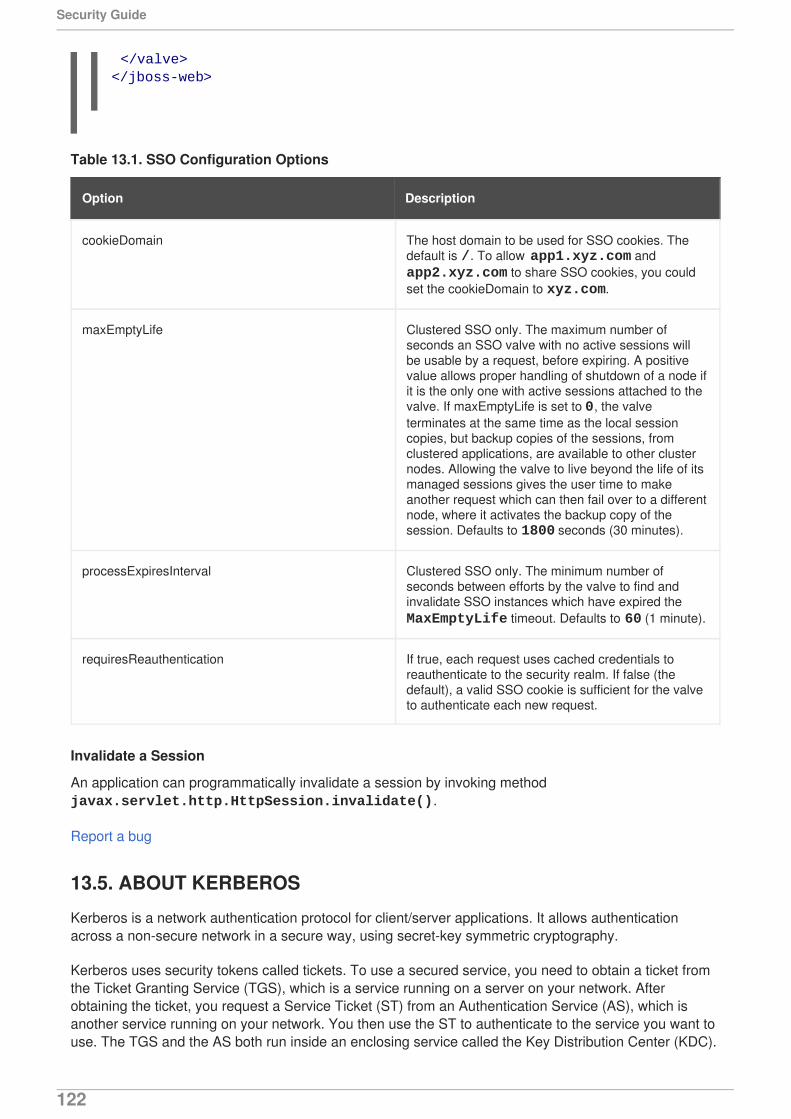
Table 13.1. SSO Configuration Options
Option Description
cookieDomain The host domain to be used for SSO cookies. Thedefault is /. To allow app1.xyz.com and app2.xyz.com to share SSO cookies, you couldset the cookieDomain to xyz.com.
maxEmptyLife Clustered SSO only. The maximum number ofseconds an SSO valve with no active sessions willbe usable by a request, before expiring. A positivevalue allows proper handling of shutdown of a node ifit is the only one with active sessions attached to thevalve. If maxEmptyLife is set to 0, the valveterminates at the same time as the local sessioncopies, but backup copies of the sessions, fromclustered applications, are available to other clusternodes. Allowing the valve to live beyond the life of itsmanaged sessions gives the user time to makeanother request which can then fail over to a differentnode, where it activates the backup copy of thesession. Defaults to 1800 seconds (30 minutes).
processExpiresInterval Clustered SSO only. The minimum number ofseconds between efforts by the valve to find andinvalidate SSO instances which have expired the MaxEmptyLife timeout. Defaults to 60 (1 minute).
requiresReauthentication If true, each request uses cached credentials toreauthenticate to the security realm. If false (thedefault), a valid SSO cookie is sufficient for the valveto authenticate each new request.
Invalidate a Session
An application can programmatically invalidate a session by invoking method javax.servlet.http.HttpSession.invalidate().
Report a bug
13.5. ABOUT KERBEROS
Kerberos is a network authentication protocol for client/server applications. It allows authenticationacross a non-secure network in a secure way, using secret-key symmetric cryptography.
Kerberos uses security tokens called tickets. To use a secured service, you need to obtain a ticket fromthe Ticket Granting Service (TGS), which is a service running on a server on your network. Afterobtaining the ticket, you request a Service Ticket (ST) from an Authentication Service (AS), which isanother service running on your network. You then use the ST to authenticate to the service you want touse. The TGS and the AS both run inside an enclosing service called the Key Distribution Center (KDC).
</valve></jboss-web>
Security Guide
122

Kerberos is designed to be used in a client-server environment, and is rarely used in Web applicationsor thin client environments. However, many organizations already use a Kerberos system for desktopauthentication, and prefer to reuse their existing system rather than create a second one for their WebApplications. Kerberos is an integral part of Microsoft Active Directory, and is also used in many Red HatEnterprise Linux environments.
Report a bug
13.6. ABOUT SPNEGO
Simple and Protected GSS_API Negotiation Mechanism (SPNEGO) provides a mechanism forextending a Kerberos-based Single Sign On (SSO) environment for use in Web applications.
When an application on a client computer, such as a web browser, attempts to access a protect page onthe web server, the server responds that authorization is required. The application then requests aservice ticket from the Kerberos Key Distribution Center (KDC). After the ticket is obtained, theapplication wraps it in a request formatted for SPNEGO, and sends it back to the Web application, viathe browser. The web container running the deployed Web application unpacks the request andauthenticates the ticket. Upon successful authentication, access is granted.
SPNEGO works with all types of Kerberos providers, including the Kerberos service included in Red HatEnterprise Linux and the Kerberos server which is an integral part of Microsoft Active Directory.
Report a bug
13.7. ABOUT MICROSOFT ACTIVE DIRECTORY
Microsoft Active Directory is a directory service developed by Microsoft to authenticate users andcomputers in a Microsoft Windows domain. It is included as part of Microsoft Windows Server. Thecomputer in the Microsoft Windows Server is referred to as the domain controller. Red Hat EnterpriseLinux servers running the Samba service can also act as the domain controller in this type of network.
Active Directory relies on three core technologies which work together:
Lightweight Directory Access Protocol (LDAP), for storing information about users, computers,passwords, and other resources.
Kerberos, for providing secure authentication over the network.
Domain Name Service (DNS) for providing mappings between IP addresses and host names ofcomputers and other devices on the network.
Report a bug
13.8. CONFIGURE KERBEROS OR MICROSOFT ACTIVE DIRECTORYDESKTOP SSO FOR WEB APPLICATIONS
Introduction
To authenticate your web or EJB applications using your organization's existing Kerberos-basedauthentication and authorization infrastructure, such as Microsoft Active Directory, you can use theJBoss Negotation capabilities built into JBoss EAP 6. If you configure your web application properly, asuccessful desktop or network login is sufficient to transparently authenticate against your webapplication, so no additional login prompt is required.
CHAPTER 13. SINGLE SIGN ON (SSO)
123

Difference from Previous Versions of the Platform
There are a few noticeable differences between JBoss EAP 6 and earlier versions:
Security domains are configured centrally, for each profile of a managed domain, or for eachstandalone server. They are not part of the deployment itself. The security domain a deploymentshould use is named in the deployment's jboss-web.xml or jboss-ejb3.xml file.
Security properties are configured as part of the security domain, as part of its centralconfiguration. They are not part of the deployment.
You can no longer override the authenticators as part of your deployment. However, you canadd a NegotiationAuthenticator valve to your jboss-web.xml descriptor to achieve the sameeffect. The valve still requires the <security-constraint> and <login-config> elementsto be defined in the web.xml. These are used to decide which resources are secured. However,the chosen auth-method will be overridden by the NegotiationAuthenticator valve in the jboss-web.xml.
The CODE attributes in security domains now use a simple name instead of a fully-qualified classname. The following table shows the mappings between the classes used for JBossNegotiation, and their classes.
Table 13.2. Login Module Codes and Class Names
Simple Name Class Name Purpose
Kerberos com.sun.security.auth.module.Krb5LoginModule
Kerberos login module
SPNEGO org.jboss.security.negotiation.spnego.SPNEGOLoginModule
The mechanism which enablesyour Web applications toauthenticate to your Kerberosauthentication server.
AdvancedLdap org.jboss.security.negotiation.AdvancedLdapLoginModule
Used with LDAP servers otherthan Microsoft Active Directory.
AdvancedAdLdap org.jboss.security.negotiation.AdvancedADLoginModule
Used with Microsoft ActiveDirectory LDAP servers.
Jboss Negotiation Toolkit
The JBoss Negotiation Toolkit is a debugging tool which is available for download fromhttps://community.jboss.org/servlet/JiveServlet/download/16876-2-34629/jboss-negotiation-toolkit.war. Itis provided as an extra tool to help you to debug and test the authentication mechanisms beforeintroducing your application into production. It is an unsupported tool, but is considered to be veryhelpful, as SPNEGO can be difficult to configure for web applications.
Procedure 13.1. Setup SSO Authentication for your Web or EJB Applications
1. Configure one security domain to represent the identity of the server. Set systemproperties if necessary.The first security domain authenticates the container itself to the directory service. It needs touse a login module which accepts some type of static login mechanism, because a real user is
Security Guide
124

not involved. This example uses a static principal and references a keytab file which contains thecredential.
The XML code is given here for clarity, but you should use the Management Console orManagement CLI to configure your security domains.
2. Configure a second security domain to secure the web application or applications. Setsystem properties if necessary.The second security domain is used to authenticate the individual user to the Kerberos orSPNEGO authentication server. You need at least one login module to authenticate the user,and another to search for the roles to apply to the user. The following XML code shows anexample SPNEGO security domain. It includes an authorization module to map roles toindividual users. You can also use a module which searches for the roles on the authenticationserver itself.
3. Specify the security-constraint and login-config in the web.xmlThe web.xml descriptor contain information about security constraints and login configuration.The following are example values for each.
<security-domain name="host" cache-type="default"> <authentication> <login-module code="Kerberos" flag="required"> <module-option name="storeKey" value="true"/> <module-option name="useKeyTab" value="true"/> <module-option name="principal" value="host/testserver@MY_REALM"/> <module-option name="keyTab" value="/home/username/service.keytab"/> <module-option name="doNotPrompt" value="true"/> <module-option name="debug" value="false"/> </login-module> </authentication></security-domain>
<security-domain name="SPNEGO" cache-type="default"> <authentication> <!-- Check the username and password --> <login-module code="SPNEGO" flag="requisite"> <module-option name="password-stacking" value="useFirstPass"/> <module-option name="serverSecurityDomain" value="host"/> </login-module> <!-- Search for roles --> <login-module code="UserRoles" flag="required"> <module-option name="password-stacking" value="useFirstPass" /> <module-option name="usersProperties" value="spnego-users.properties" /> <module-option name="rolesProperties" value="spnego-roles.properties" /> </login-module> </authentication></security-domain>
CHAPTER 13. SINGLE SIGN ON (SSO)
125

4. Specify the security domain and other settings in the jboss-web.xml descriptor.Specify the name of the client-side security domain (the second one in this example) in the jboss-web.xml descriptor of your deployment, to direct your application to use this securitydomain.
You can no longer override authenticators directly. Instead, you can add theNegotiationAuthenticator as a valve to your jboss-web.xml descriptor, if you need to. The <jacc-star-role-allow> allows you to use the asterisk (*) character to match multiple rolenames, and is optional.
5. Add a dependency to your application's MANIFEST.MF, to locate the Negotiation classes.The web application needs a dependency on class org.jboss.security.negotiation tobe added to the deployment's META-INF/MANIFEST.MF manifest, in order to locate the JBossNegotiation classes. The following shows a properly-formatted entry.
Result
<security-constraint> <display-name>Security Constraint on Conversation</display-name> <web-resource-collection> <web-resource-name>examplesWebApp</web-resource-name> <url-pattern>/*</url-pattern> </web-resource-collection> <auth-constraint> <role-name>RequiredRole</role-name> </auth-constraint></security-constraint>
<login-config> <auth-method>SPNEGO</auth-method> <realm-name>SPNEGO</realm-name></login-config> <security-role> <description> role required to log in to the Application</description> <role-name>RequiredRole</role-name></security-role>
<jboss-web> <security-domain>java:/jaas/SPNEGO</security-domain> <valve> <class-name>org.jboss.security.negotiation.NegotiationAuthenticator</class-name> </valve> <jacc-star-role-allow>true</jacc-star-role-allow></jboss-web>
Manifest-Version: 1.0Build-Jdk: 1.6.0_24Dependencies: org.jboss.security.negotiation
Security Guide
126
Your web application accepts and authenticates credentials against your Kerberos, Microsoft ActiveDirectory, or other SPNEGO-compatible directory service. If the user runs the application from a systemwhich is already logged into the directory service, and where the required roles are already applied to theuser, the web application does not prompt for authentication, and SSO capabilities are achieved.
Report a bug
CHAPTER 13. SINGLE SIGN ON (SSO)
127

CHAPTER 14. ROLE-BASED SECURITY IN APPLICATIONS
14.1. ABOUT APPLICATION SECURITY
Securing your applications is a multi-faceted and important concern for every application developer.JBoss EAP 6 provides all the tools you need to write secure applications, including the following abilities:
Section 16.1, “About Authentication”
Section 16.2, “About Authorization”
Section 14.2, “About Security Auditing”
Section 14.3, “About Security Mapping”
Section 2.4, “About Declarative Security”
Section 12.3.2.1, “About EJB Method Permissions”
Section 12.3.3.1, “About EJB Security Annotations”
See also Section 14.6, “Use a Security Domain in Your Application”.
Report a bug
14.2. ABOUT SECURITY AUDITING
Security auditing refers to triggering events, such as writing to a log, in response to an event thathappens within the security subsystem. Auditing mechanisms are configured as part of a securitydomain, along with authentication, authorization, and security mapping details.
Auditing uses provider modules. You can use one of the included ones, or implement your own.
Report a bug
14.3. ABOUT SECURITY MAPPING
Security mapping allows you to combine authentication and authorization information after theauthentication or authorization happens, but before the information is passed to your application. Oneexample of this is using an X509 certificate for authentication, and then converting the principal from thecertificate to a logical name which your application can display.
You can map principals (authentication), roles (authorization), or credentials (attributes which are notprincipals or roles).
Role Mapping is used to add, replace, or remove roles to the subject after authentication.
Principal mapping is used to modify a principal after authentication.
Attribute mapping is used to convert attributes from an external system to be used by your application,and vice versa.
Report a bug
Security Guide
128

14.4. ABOUT THE SECURITY EXTENSION ARCHITECTURE
The architecture of the JBoss EAP 6 security extensions consists of three parts. These three partsconnect your application to your underlying security infrastructure, whether it is LDAP, Kerberos, oranother external system.
JAAS
The first part of the infrastructure is the JAAS API. JAAS is a pluggable framework which provides alayer of abstraction between your security infrastructure and your application.
The main implementation in JAAS is org.jboss.security.plugins.JaasSecurityManager,which implements the AuthenticationManager and RealmMapping interfaces. JaasSecurityManager integrates into the EJB and web container layers, based on the <security-domain> element of the corresponding component deployment descriptor.
For more information about JAAS, refer to Section 16.3, “Java Authentication and Authorization Service(JAAS)”.
The JaasSecurityManagerService MBean
The JaasSecurityManagerService MBean service manages security managers. Although itsname begins with Jaas, the security managers it handles need not use JAAS in their implementation.The name reflects the fact that the default security manager implementation is the JaasSecurityManager.
The primary role of the JaasSecurityManagerService is to externalize the security managerimplementation. You can change the security manager implementation by providing an alternateimplementation of the AuthenticationManager and RealmMapping interfaces.
The second fundamental role of the JaasSecurityManagerService is to provide a JNDI javax.naming.spi.ObjectFactory implementation to allow for simple code-free management ofthe binding between the JNDI name and the security manager implementation. To enable security,specify the JNDI name of the security manager implementation via the <security-domain>deployment descriptor element.
When you specify a JNDI name, an object-binding needs to already exist. To simplify the setup of thebinding between the JNDI name and security manager, the JaasSecurityManagerService binds anext naming system reference, nominating itself as the JNDI ObjectFactory under the name java:/jaas. This permits a naming convention of the form java:/jaas/XYZ as the value for the <security-domain> element, and the security manager instance for the XYZ security domain iscreated as needed, by creating an instance of the class specified by the SecurityManagerClassName attribute, using a constructor that takes the name of the securitydomain.
NOTE
You do not need to include the java:/jaas prefix in your deployment descriptor. Youmay do so, for backward compatibility, but it is ignored.
The JaasSecurityDomain MBean
The org.jboss.security.plugins.JaasSecurityDomain is an extension of JaasSecurityManager which adds the notion of a KeyStore, a KeyManagerFactory, and a TrustManagerFactory for supporting SSL and other cryptographic use cases.
CHAPTER 14. ROLE-BASED SECURITY IN APPLICATIONS
129

Further information
For more information, and practical examples of the security architecture in action, refer to Section 14.5,“About Java Authentication and Authorization Service (JAAS)”.
Report a bug
14.5. ABOUT JAVA AUTHENTICATION AND AUTHORIZATION SERVICE(JAAS)
The security architecture of JBoss EAP 6 is comprised of the security configuration subsystem,application-specific security configurations which are included in several configuration files within theapplication, and the JAAS Security Manager, which is implemented as an MBean.
Domain, Server Group, and Server Specific Configuration
Server groups (in a managed domain) and servers (in a standalone server) include the configuration forsecurity domains. A security domain includes information about a combination of authentication,authorization, mapping, and auditing modules, with configuration details. An application specifies whichsecurity domain it requires, by name, in its jboss-web.xml.
Application-specific Configuration
Application-specific configuration takes place in one or more of the following four files.
Table 14.1. Application-Specific Configuration Files
File Description
ejb-jar.xml The deployment descriptor for an EnterpriseJavaBean (EJB) application, located in the META-INF directory of the EJB. Use the ejb-jar.xml tospecify roles and map them to principals, at theapplication level. You can also limit specific methodsand classes to certain roles. It is also used for otherEJB-specific configuration not related to security.
web.xml The deployment descriptor for a Java EnterpriseEdition (EE) web application. Use the web.xml todeclare the security domain the application uses forauthentication and authorization, as well as resourceand transport constraints for the application, such aslimiting which types of HTTP requests are allowed.You can also configure simple web-basedauthentication in this file. It is also used for otherapplication-specific configuration not related tosecurity.
jboss-ejb3.xml Contains JBoss-specific extensions to the ejb-jar.xml descriptor.
jboss-web.xml Contains JBoss-specific extensions to the web.xmldescriptor..
Security Guide
130

NOTE
The ejb-jar.xml and web.xml are defined in the Java Enterprise Edition (Java EE)specification. The jboss-ejb3.xml provides JBoss-specific extensions for the ejb-jar.xml, and the jboss-web.xml provides JBoss-specific extensions for the web.xml.
The JAAS Security Manager MBean
The Java Authentication and Authorization Service (JAAS) is a framework for user-level security in Javaapplications, using pluggable authentication modules (PAM). It is integrated into the Java RuntimeEnvironment (JRE). In JBoss EAP 6, the container-side component is the org.jboss.security.plugins.JaasSecurityManager MBean. It provides the defaultimplementations of the AuthenticationManager and RealmMapping interfaces.
The JaasSecurityManager MBean integrates into the EJB and web container layers based on thesecurity domain specified in the EJB or web deployment descriptor files in the application. When anapplication deploys, the container associates the security domain specified in the deployment descriptorwith the security manager instance of the container. The security manager enforces the configuration ofthe security domain as configured on the server group or standalone server.
Flow of Interaction between the Client and the Container with JAAS
The JaasSecurityManager uses the JAAS packages to implement the AuthenticationManager andRealmMapping interface behavior. In particular, its behavior derives from the execution of the loginmodule instances that are configured in the security domain to which the JaasSecurityManager has beenassigned. The login modules implement the security domain's principal authentication and role-mappingbehavior. You can use the JaasSecurityManager across different security domains by plugging indifferent login module configurations for the domains.
To illustrate how the JaasSecurityManager uses the JAAS authentication process, the following stepsoutline a client invocation of method which implements method EJBHome. The EJB has already beendeployed in the server and its EJBHome interface methods have been secured using <method-permission> elements in the ejb-jar.xml descriptor. It uses the jwdomain security domain, which isspecified in the <security-domain> element of the jboss-ejb3.xml file. The image below shows thesteps, which are explained afterward.
CHAPTER 14. ROLE-BASED SECURITY IN APPLICATIONS
131

Figure 14.1. Steps of a Secured EJB Method Invocation
1. The client performs a JAAS login to establish the principal and credentials for authentication.This is labeled Client Side Login in the figure. This could also be performed via JNDI.
To perform a JAAS login, you create a LoginContext instance and pass in the name of theconfiguration to use. Here, the configuration name is other. This one-time login associates thelogin principal and credentials with all subsequent EJB method invocations. The process doesnot necessarily authenticate the user. The nature of the client-side login depends on the login
Security Guide
132

module configuration that the client uses. In this example, the other client-side loginconfiguration entry uses the ClientLoginModule login module. This module binds the username and password to the EJB invocation layer for later authentication on the server. Theidentity of the client is not authenticated on the client.
2. The client obtains the EJBHome method and invokes it on the server. The invocation includes themethod arguments passed by the client, along with the user identity and credentials from theclient-side JAAS login.
3. On the server, the security interceptor authenticates the user who invoked the method. Thisinvolves another JAAS login.
4. The security domain under determines the choice of login modules. The name of the securitydomain is passed to the LoginContext constructor as the login configuration entry name. TheEJB security domain is jwdomain. If the JAAS authentication is successful, a JAAS Subject iscreated. A JAAS subject includes a PrincipalSet, which includes the following details:
A java.security.Principal instance that corresponds to the client identity from thedeployment security environment.
A java.security.acl.Group called Roles, which contains the role names from theuser's application domain. Objects of type org.jboss.security.SimplePrincipalobjects represent the role names. These roles validate access to EJB methods according toconstraints in ejb-jar.xml and the EJBContext.isCallerInRole(String) methodimplementation.
An optional java.security.acl.Group named CallerPrincipal, which contains asingle org.jboss.security.SimplePrincipal that corresponds to the identity of theapplication domain's caller. The CallerPrincipal group member is the value returned by the EJBContext.getCallerPrincipal() method. This mapping allows a Principal in theoperational security environment to map to a Principal known to the application. In theabsence of a CallerPrincipal mapping, the operational principal is the same as theapplication domain principal.
5. The server verifies that the user calling the EJB method has the permission to do so. Performingthis authorization involves the following steps:
Obtain the names of the roles allowed to access the EJB method from the EJB container.The role names are determined by ejb-jar.xml descriptor <role-name> elements of all<method-permission> elements containing the invoked method.
If no roles have been assigned, or the method is specified in an exclude-list element, accessto the method is denied. Otherwise, the doesUserHaveRole method is invoked on thesecurity manager by the security interceptor to check if the caller has one of the assignedrole names. This method iterates through the role names and checks if the authenticateduser's Subject Roles group contains a SimplePrincipal with the assigned role name.Access is allowed if any role name is a member of the Roles group. Access is denied if noneof the role names are members.
If the EJB uses a custom security proxy, the method invocation is delegated to the proxy. Ifthe security proxy denies access to the caller, it throws a java.lang.SecurityException. Otherwise, access to the EJB method is allowed andthe method invocation passes to the next container interceptor. TheSecurityProxyInterceptor handles this check and this interceptor is not shown.
CHAPTER 14. ROLE-BASED SECURITY IN APPLICATIONS
133

For web connection requests, the web server checks the security constraints defined in web.xml that match the requested resource and the accessed HTTP method.
If a constraint exists for the request, the web server calls the JaasSecurityManager toperform the principal authentication, which in turn ensures the user roles are associated withthat principal object.
Report a bug
14.6. USE A SECURITY DOMAIN IN YOUR APPLICATION
Overview
To use a security domain in your application, first you must configure the domain in either the server'sconfiguration file or the application's descriptor file. Then you must add the required annotations to theEJB that uses it. This topic covers the steps required to use a security domain in your application.
Procedure 14.1. Configure Your Application to Use a Security Domain
1. Define the Security DomainYou can define the security domain either in the server's configuration file or the application'sdescriptor file.
Configure the security domain in the server's configuration fileThe security domain is configured in the security subsystem of the server's configurationfile. If the JBoss EAP 6 instance is running in a managed domain, this is the domain/configuration/domain.xml file. If the JBoss EAP 6 instance is running as astandalone server, this is the standalone/configuration/standalone.xml file.
The other, jboss-web-policy, and jboss-ejb-policy security domains areprovided by default in JBoss EAP 6. The following XML example was copied from the security subsystem in the server's configuration file.
<subsystem xmlns="urn:jboss:domain:security:1.2"> <security-domains> <security-domain name="other" cache-type="default"> <authentication> <login-module code="Remoting" flag="optional"> <module-option name="password-stacking" value="useFirstPass"/> </login-module> <login-module code="RealmDirect" flag="required"> <module-option name="password-stacking" value="useFirstPass"/> </login-module> </authentication> </security-domain> <security-domain name="jboss-web-policy" cache-type="default"> <authorization> <policy-module code="Delegating" flag="required"/> </authorization> </security-domain> <security-domain name="jboss-ejb-policy" cache-
Security Guide
134

You can configure additional security domains as needed using the Management Consoleor CLI.
Configure the security domain in the application's descriptor fileThe security domain is specified in the <security-domain> child element of the <jboss-web> element in the application's WEB-INF/jboss-web.xml file. The following exampleconfigures a security domain named my-domain.
This is only one of many settings which you can specify in the WEB-INF/jboss-web.xmldescriptor.
2. Add the Required Annotation to the EJBYou configure security in the EJB using the @SecurityDomain and @RolesAllowedannotations. The following EJB code example limits access to the other security domain byusers in the guest role.
type="default"> <authorization> <policy-module code="Delegating" flag="required"/> </authorization> </security-domain> </security-domains></subsystem>
<jboss-web> <security-domain>my-domain</security-domain></jboss-web>
package example.ejb3;
import java.security.Principal;
import javax.annotation.Resource;import javax.annotation.security.RolesAllowed;import javax.ejb.SessionContext;import javax.ejb.Stateless;
import org.jboss.ejb3.annotation.SecurityDomain;
/** * Simple secured EJB using EJB security annotations * Allow access to "other" security domain by users in a "guest" role. */@Stateless@RolesAllowed({ "guest" })@SecurityDomain("other")public class SecuredEJB {
// Inject the Session Context @Resource private SessionContext ctx;
CHAPTER 14. ROLE-BASED SECURITY IN APPLICATIONS
135

For more code examples, see the ejb-security quickstart in the JBoss EAP 6 Quickstartsbundle, which is available from the Red Hat Customer Portal.
Report a bug
14.7. USE ROLE-BASED SECURITY IN SERVLETS
To add security to a servlet, you map each servlet to a URL pattern, and create security constraints onthe URL patterns which need to be secured. The security constraints limit access to the URLs to roles.The authentication and authorization are handled by the security domain specified in the WAR's jboss-web.xml.
Prerequisites
Before you use role-based security in a servlet, the security domain used to authenticate and authorizeaccess needs to be configured in the JBoss EAP 6 container.
Procedure 14.2. Add Role-Based Security to Servlets
1. Add mappings between servlets and URL patterns.Use <servlet-mapping> elements in the web.xml to map individual servlets to URLpatterns. The following example maps the servlet called DisplayOpResult to the URL pattern /DisplayOpResult.
2. Add security constraints to the URL patterns.To map the URL pattern to a security constraint, use a <security-constraint>. Thefollowing example constrains access from the URL pattern /DisplayOpResult to be accessedby principals with the role eap_admin. The role needs to be present in the security domain.
/** * Secured EJB method using security annotations */ public String getSecurityInfo() { // Session context injected using the resource annotation Principal principal = ctx.getCallerPrincipal(); return principal.toString(); }}
<servlet-mapping> <servlet-name>DisplayOpResult</servlet-name> <url-pattern>/DisplayOpResult</url-pattern></servlet-mapping>
<security-constraint> <display-name>Restrict access to role eap_admin</display-name> <web-resource-collection> <web-resource-name>Restrict access to role eap_admin</web-resource-name> <url-pattern>/DisplayOpResult/*</url-pattern> </web-resource-collection> <auth-constraint> <role-name>eap_admin</role-name>
Security Guide
136

You need to specify the authentication method, which can be any of the following: BASIC, FORM, DIGEST, CLIENT-CERT, SPNEGO. This example uses BASIC authentication.
3. Specify the security domain in the WAR's jboss-web.xmlAdd the security domain to the WAR's jboss-web.xml in order to connect the servlets to theconfigured security domain, which knows how to authenticate and authorize principals againstthe security constraints. The following example uses the security domain called acme_domain.
Example 14.1. Example web.xml with Role-Based Security Configured
</auth-constraint> </security-constraint>
<security-role> <role-name>eap_admin</role-name></security-role>
<login-config> <auth-method>BASIC</auth-method></login-config>
<jboss-web> ... <security-domain>acme_domain</security-domain> ...</jboss-web>
<web-app xmlns="http://java.sun.com/xml/ns/javaee" xmlns:xsi="http://www.w3.org/2001/XMLSchema-instance" xsi:schemaLocation="http://java.sun.com/xml/ns/javaee http://java.sun.com/xml/ns/javaee/web-app_3_0.xsd" version="3.0">
<display-name>Use Role-Based Security In Servlets</display-name>
<welcome-file-list> <welcome-file>/index.jsp</welcome-file></welcome-file-list>
<servlet-mapping> <servlet-name>DisplayOpResult</servlet-name> <url-pattern>/DisplayOpResult</url-pattern></servlet-mapping>
<security-constraint> <display-name>Restrict access to role eap_admin</display-name> <web-resource-collection> <web-resource-name>Restrict access to role eap_admin</web-resource-name> <url-pattern>/DisplayOpResult/*</url-pattern> </web-resource-collection> <auth-constraint>
CHAPTER 14. ROLE-BASED SECURITY IN APPLICATIONS
137

Report a bug
14.8. USE A THIRD-PARTY AUTHENTICATION SYSTEM IN YOURAPPLICATION
You can integrate third-party security systems with JBoss EAP 6. These types of systems are usuallytoken-based. The external system performs the authentication and passes a token back to the Webapplication through the request headers. This is often referred to as perimeter authentication. Toconfigure perimeter authentication in your application, add a custom authentication valve. If you have avalve from a third-party provider, be sure it is in your classpath and follow the examples below, alongwith the documentation for your third-party authentication module.
NOTE
The location for configuring valves has changed in JBoss EAP 6. There is no longer a context.xml deployment descriptor. Valves are configured directly in the jboss-web.xml descriptor instead. The context.xml is now ignored.
Example 14.2. Basic Authentication Valve
This valve is used for Kerberos-based SSO. It also shows the most simple pattern for specifying athird-party authenticator for your Web application.
Example 14.3. Custom Valve With Header Attributes Set
<role-name>eap_admin</role-name> </auth-constraint> </security-constraint>
<security-role> <role-name>eap_admin</role-name> </security-role>
<login-config> <auth-method>BASIC</auth-method> </login-config>
</web-app>
<jboss-web> <valve> <class-name>org.jboss.security.negotiation.NegotiationAuthenticator</class-name> </valve></jboss-web>
<jboss-web> <valve> <class-
Security Guide
138

This example shows how to set custom attributes on your valve. The authenticator checks for thepresence of the header ID and the session key, and passes them into the JAAS framework whichdrives the security layer, as the username and password value. You need a custom JAAS loginmodule which can process the username and password and populate the subject with the correctroles. If no header values match the configured values, regular form-based authentication semanticsapply.
Writing a Custom Authenticator
Writing your own authenticator is out of scope of this document. However, the following Java code isprovided as an example.
Example 14.4. GenericHeaderAuthenticator.java
name>org.jboss.web.tomcat.security.GenericHeaderAuthenticator</class-name> <param> <param-name>httpHeaderForSSOAuth</param-name> <param-value>sm_ssoid,ct-remote-user,HTTP_OBLIX_UID</param-value> </param> <param> <param-name>sessionCookieForSSOAuth</param-name> <param-value>SMSESSION,CTSESSION,ObSSOCookie</param-value> </param> </valve></jboss-web>
/* * JBoss, Home of Professional Open Source. * Copyright 2006, Red Hat Middleware LLC, and individual contributors * as indicated by the @author tags. See the copyright.txt file in the * distribution for a full listing of individual contributors. * * This is free software; you can redistribute it and/or modify it * under the terms of the GNU Lesser General Public License as * published by the Free Software Foundation; either version 2.1 of * the License, or (at your option) any later version. * * This software is distributed in the hope that it will be useful, * but WITHOUT ANY WARRANTY; without even the implied warranty of * MERCHANTABILITY or FITNESS FOR A PARTICULAR PURPOSE. See the GNU * Lesser General Public License for more details. * * You should have received a copy of the GNU Lesser General Public * License along with this software; if not, write to the Free * Software Foundation, Inc., 51 Franklin St, Fifth Floor, Boston, MA * 02110-1301 USA, or see the FSF site: http://www.fsf.org. */ package org.jboss.web.tomcat.security;
import java.io.IOException;import java.security.Principal;import java.util.StringTokenizer;
CHAPTER 14. ROLE-BASED SECURITY IN APPLICATIONS
139

import javax.management.JMException;import javax.management.ObjectName;import javax.servlet.http.Cookie;import javax.servlet.http.HttpServletRequest;import javax.servlet.http.HttpServletResponse;
import org.apache.catalina.Realm;import org.apache.catalina.Session;import org.apache.catalina.authenticator.Constants;import org.apache.catalina.connector.Request;import org.apache.catalina.connector.Response;import org.apache.catalina.deploy.LoginConfig;import org.jboss.logging.Logger;
import org.jboss.as.web.security.ExtendedFormAuthenticator;
/** * JBAS-2283: Provide custom header based authentication support * * Header Authenticator that deals with userid from the request header Requires * two attributes configured on the Tomcat Service - one for the http header * denoting the authenticated identity and the other is the SESSION cookie * * @author <a href="mailto:[email protected]">Anil Saldhana</a> * @author <a href="mailto:[email protected]">Stefan Guilhen</a> * @version $Revision$ * @since Sep 11, 2006 */public class GenericHeaderAuthenticator extends ExtendedFormAuthenticator { protected static Logger log = Logger .getLogger(GenericHeaderAuthenticator.class);
protected boolean trace = log.isTraceEnabled();
// JBAS-4804: GenericHeaderAuthenticator injection of ssoid and // sessioncookie name. private String httpHeaderForSSOAuth = null;
private String sessionCookieForSSOAuth = null;
/** * <p> * Obtain the value of the <code>httpHeaderForSSOAuth</code> attribute. This * attribute is used to indicate the request header ids that have to be * checked in order to retrieve the SSO identity set by a third party * security system. * </p> * * @return a <code>String</code> containing the value of the * <code>httpHeaderForSSOAuth</code> attribute.
Security Guide
140
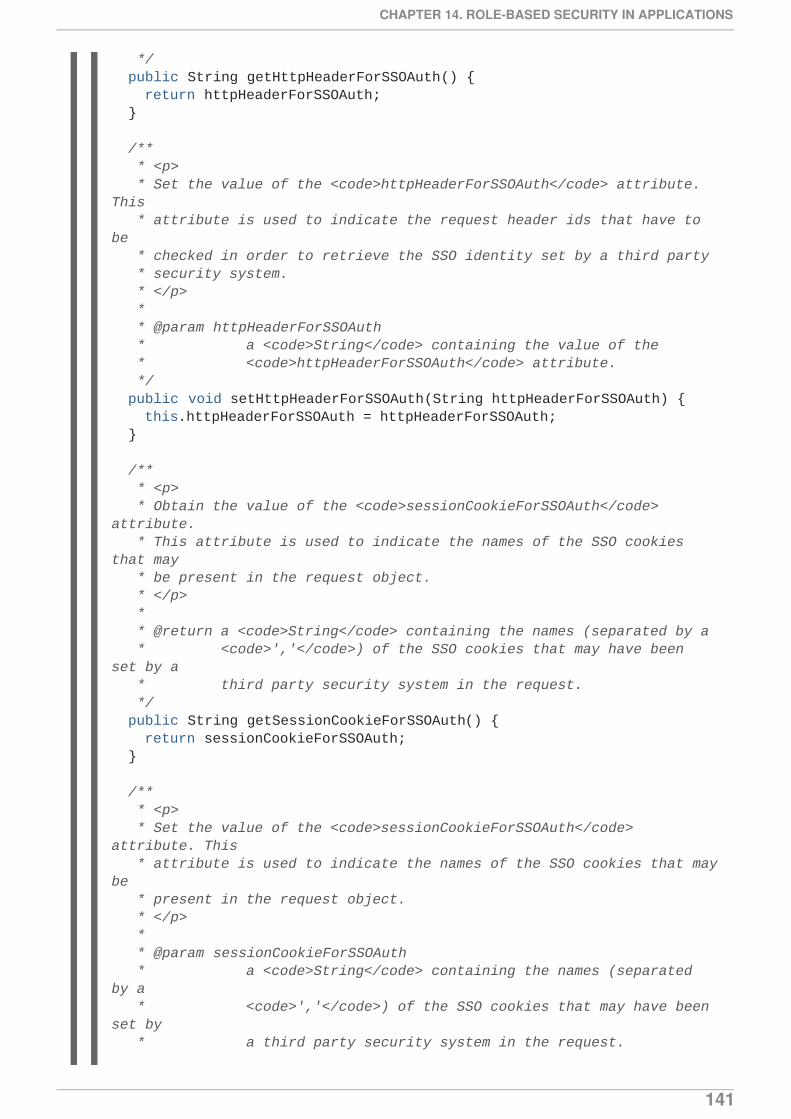
*/ public String getHttpHeaderForSSOAuth() { return httpHeaderForSSOAuth; }
/** * <p> * Set the value of the <code>httpHeaderForSSOAuth</code> attribute. This * attribute is used to indicate the request header ids that have to be * checked in order to retrieve the SSO identity set by a third party * security system. * </p> * * @param httpHeaderForSSOAuth * a <code>String</code> containing the value of the * <code>httpHeaderForSSOAuth</code> attribute. */ public void setHttpHeaderForSSOAuth(String httpHeaderForSSOAuth) { this.httpHeaderForSSOAuth = httpHeaderForSSOAuth; }
/** * <p> * Obtain the value of the <code>sessionCookieForSSOAuth</code> attribute. * This attribute is used to indicate the names of the SSO cookies that may * be present in the request object. * </p> * * @return a <code>String</code> containing the names (separated by a * <code>','</code>) of the SSO cookies that may have been set by a * third party security system in the request. */ public String getSessionCookieForSSOAuth() { return sessionCookieForSSOAuth; }
/** * <p> * Set the value of the <code>sessionCookieForSSOAuth</code> attribute. This * attribute is used to indicate the names of the SSO cookies that may be * present in the request object. * </p> * * @param sessionCookieForSSOAuth * a <code>String</code> containing the names (separated by a * <code>','</code>) of the SSO cookies that may have been set by * a third party security system in the request.
CHAPTER 14. ROLE-BASED SECURITY IN APPLICATIONS
141

*/ public void setSessionCookieForSSOAuth(String sessionCookieForSSOAuth) { this.sessionCookieForSSOAuth = sessionCookieForSSOAuth; }
/** * <p> * Creates an instance of <code>GenericHeaderAuthenticator</code>. * </p> */ public GenericHeaderAuthenticator() { super(); }
public boolean authenticate(Request request, HttpServletResponse response, LoginConfig config) throws IOException { log.trace("Authenticating user");
Principal principal = request.getUserPrincipal(); if (principal != null) { if (trace) log.trace("Already authenticated '" + principal.getName() + "'"); return true; }
Realm realm = context.getRealm(); Session session = request.getSessionInternal(true);
String username = getUserId(request); String password = getSessionCookie(request);
// Check if there is sso id as well as sessionkey if (username == null || password == null) { log.trace("Username is null or password(sessionkey) is null:fallback to form auth"); return super.authenticate(request, response, config); } principal = realm.authenticate(username, password);
if (principal == null) { forwardToErrorPage(request, response, config); return false; }
session.setNote(Constants.SESS_USERNAME_NOTE, username); session.setNote(Constants.SESS_PASSWORD_NOTE, password); request.setUserPrincipal(principal);
register(request, response, principal, HttpServletRequest.FORM_AUTH, username, password); return true; }
Security Guide
142

/** * Get the username from the request header * * @param request * @return */ protected String getUserId(Request request) { String ssoid = null; // We can have a comma-separated ids String ids = ""; try { ids = this.getIdentityHeaderId(); } catch (JMException e) { if (trace) log.trace("getUserId exception", e); } if (ids == null || ids.length() == 0) throw new IllegalStateException( "Http headers configuration in tomcat service missing");
StringTokenizer st = new StringTokenizer(ids, ","); while (st.hasMoreTokens()) { ssoid = request.getHeader(st.nextToken()); if (ssoid != null) break; } if (trace) log.trace("SSOID-" + ssoid); return ssoid; }
/** * Obtain the session cookie from the request * * @param request * @return */ protected String getSessionCookie(Request request) { Cookie[] cookies = request.getCookies(); log.trace("Cookies:" + cookies); int numCookies = cookies != null ? cookies.length : 0;
// We can have comma-separated ids String ids = ""; try { ids = this.getSessionCookieId(); log.trace("Session Cookie Ids=" + ids); } catch (JMException e) { if (trace) log.trace("checkSessionCookie exception", e); } if (ids == null || ids.length() == 0) throw new IllegalStateException( "Session cookies configuration in tomcat service missing");
StringTokenizer st = new StringTokenizer(ids, ",");
CHAPTER 14. ROLE-BASED SECURITY IN APPLICATIONS
143

while (st.hasMoreTokens()) { String cookieToken = st.nextToken(); String val = getCookieValue(cookies, numCookies, cookieToken); if (val != null) return val; } if (trace) log.trace("Session Cookie not found"); return null; }
/** * Get the configured header identity id in the tomcat service * * @return * @throws JMException */ protected String getIdentityHeaderId() throws JMException { if (this.httpHeaderForSSOAuth != null) return this.httpHeaderForSSOAuth; return (String) mserver.getAttribute(new ObjectName( "jboss.web:service=WebServer"), "HttpHeaderForSSOAuth"); }
/** * Get the configured session cookie id in the tomcat service * * @return * @throws JMException */ protected String getSessionCookieId() throws JMException { if (this.sessionCookieForSSOAuth != null) return this.sessionCookieForSSOAuth; return (String) mserver.getAttribute(new ObjectName( "jboss.web:service=WebServer"), "SessionCookieForSSOAuth"); }
/** * Get the value of a cookie if the name matches the token * * @param cookies * array of cookies * @param numCookies * number of cookies in the array * @param token * Key * @return value of cookie */ protected String getCookieValue(Cookie[] cookies, int numCookies, String token) { for (int i = 0; i < numCookies; i++) { Cookie cookie = cookies[i]; log.trace("Matching cookieToken:" + token + " with cookie name=" + cookie.getName()); if (token.equals(cookie.getName())) { if (trace)
Security Guide
144

Report a bug
log.trace("Cookie-" + token + " value=" + cookie.getValue()); return cookie.getValue(); } } return null; }}
CHAPTER 14. ROLE-BASED SECURITY IN APPLICATIONS
145

CHAPTER 15. MIGRATION
15.1. CONFIGURE APPLICATION SECURITY CHANGES
Configure security for basic authentication
In previous versions of JBoss EAP, properties files placed in the EAP_HOME/server/SERVER_NAME/conf/ directory were on classpath and could be easily found bythe UsersRolesLoginModule. In JBoss EAP 6, the directory structure has changed. Properties filesmust be packaged within the application to make them available in the classpath.
IMPORTANT
You must stop the server before editing the server configuration file for your change to bepersisted on server restart.
To configure security for basic authentication, add a new security domain under security-domains tothe standalone/configuration/standalone.xml or the domain/configuration/domain.xml server configuration file:
If the JBoss EAP 6 instance is running as a standalone server, ${jboss.server.config.dir}refers to the EAP_HOME/standalone/configuration/ directory. If the instance is running in amanaged domain, ${jboss.server.config.dir} refers to the EAP_HOME/domain/configuration/ directory.
Modify security domain names
In JBoss EAP 6, security domains no longer use the prefix java:/jaas/ in their names.
For Web applications, you must remove this prefix from the security domain configurations in thejboss-web.xml.
For Enterprise applications, you must remove this prefix from the security domain configurationsin the jboss-ejb3.xml file. This file has replaced the jboss.xml in JBoss EAP 6.
Report a bug
<security-domain name="example"> <authentication> <login-module code="UsersRoles" flag="required"> <module-option name="usersProperties" value="${jboss.server.config.dir}/example-users.properties"/> <module-option name="rolesProperties" value="${jboss.server.config.dir}/example-roles.properties"/> </login-module> </authentication></security-domain>
Security Guide
146

CHAPTER 16. AUTHENTICATION AND AUTHORIZATION
16.1. ABOUT AUTHENTICATION
Authentication refers to identifying a subject and verifying the authenticity of the identification. The mostcommon authentication mechanism is a username and password combination. Other commonauthentication mechanisms use shared keys, smart cards, or fingerprints. The outcome of a successfulauthentication is referred to as a principal, in terms of Java Enterprise Edition declarative security.
JBoss EAP 6 uses a pluggable system of authentication modules to provide flexibility and integrationwith the authentication systems you already use in your organization. Each security domain contains oneor more configured authentication modules. Each module includes additional configuration parameters tocustomize its behavior. The easiest way to configure the authentication subsystem is within the web-based management console.
Authentication is not the same as authorization, although they are often linked. Many of the includedauthentication modules can also handle authorization.
Report a bug
16.2. ABOUT AUTHORIZATION
Authorization is a mechanism for granting or denying access to a resource based on identity. It isimplemented as a set of declarative security roles which can be granted to principals.
JBoss EAP 6 uses a modular system to configure authorization. Each security domain can contain oneor more authorization policies. Each policy has a basic module which defines its behavior. It is configuredthrough specific flags and attributes. The easiest way to configure the authorization subsystem is byusing the web-based management console.
Authorization is different from authentication, and usually happens after authentication. Many of theauthentication modules also handle authorization.
Report a bug
16.3. JAVA AUTHENTICATION AND AUTHORIZATION SERVICE (JAAS)
Java Authentication and Authorization Service (JAAS) is a security API which consists of a set of Javapackages designed for user authentication and authorization. The API is a Java implementation of thestandard Pluggable Authentication Modules (PAM) framework. It extends the Java Enterprise Editionaccess control architecture to support user-based authorization.
In JBoss EAP 6, JAAS only provides declarative role-based security. For more information aboutdeclarative security, refer to Section 2.4, “About Declarative Security”.
JAAS is independent of any underlying authentication technologies, such as Kerberos or LDAP. You canchange your underlying security structure without changing your application. You only need to changethe JAAS configuration.
Report a bug
16.4. ABOUT JAVA AUTHENTICATION AND AUTHORIZATION SERVICE(JAAS)
CHAPTER 16. AUTHENTICATION AND AUTHORIZATION
147

The security architecture of JBoss EAP 6 is comprised of the security configuration subsystem,application-specific security configurations which are included in several configuration files within theapplication, and the JAAS Security Manager, which is implemented as an MBean.
Domain, Server Group, and Server Specific Configuration
Server groups (in a managed domain) and servers (in a standalone server) include the configuration forsecurity domains. A security domain includes information about a combination of authentication,authorization, mapping, and auditing modules, with configuration details. An application specifies whichsecurity domain it requires, by name, in its jboss-web.xml.
Application-specific Configuration
Application-specific configuration takes place in one or more of the following four files.
Table 16.1. Application-Specific Configuration Files
File Description
ejb-jar.xml The deployment descriptor for an EnterpriseJavaBean (EJB) application, located in the META-INF directory of the EJB. Use the ejb-jar.xml tospecify roles and map them to principals, at theapplication level. You can also limit specific methodsand classes to certain roles. It is also used for otherEJB-specific configuration not related to security.
web.xml The deployment descriptor for a Java EnterpriseEdition (EE) web application. Use the web.xml todeclare the security domain the application uses forauthentication and authorization, as well as resourceand transport constraints for the application, such aslimiting which types of HTTP requests are allowed.You can also configure simple web-basedauthentication in this file. It is also used for otherapplication-specific configuration not related tosecurity.
jboss-ejb3.xml Contains JBoss-specific extensions to the ejb-jar.xml descriptor.
jboss-web.xml Contains JBoss-specific extensions to the web.xmldescriptor..
NOTE
The ejb-jar.xml and web.xml are defined in the Java Enterprise Edition (Java EE)specification. The jboss-ejb3.xml provides JBoss-specific extensions for the ejb-jar.xml, and the jboss-web.xml provides JBoss-specific extensions for the web.xml.
The JAAS Security Manager MBean
The Java Authentication and Authorization Service (JAAS) is a framework for user-level security in Javaapplications, using pluggable authentication modules (PAM). It is integrated into the Java RuntimeEnvironment (JRE). In JBoss EAP 6, the container-side component is the
Security Guide
148

org.jboss.security.plugins.JaasSecurityManager MBean. It provides the defaultimplementations of the AuthenticationManager and RealmMapping interfaces.
The JaasSecurityManager MBean integrates into the EJB and web container layers based on thesecurity domain specified in the EJB or web deployment descriptor files in the application. When anapplication deploys, the container associates the security domain specified in the deployment descriptorwith the security manager instance of the container. The security manager enforces the configuration ofthe security domain as configured on the server group or standalone server.
Flow of Interaction between the Client and the Container with JAAS
The JaasSecurityManager uses the JAAS packages to implement the AuthenticationManager andRealmMapping interface behavior. In particular, its behavior derives from the execution of the loginmodule instances that are configured in the security domain to which the JaasSecurityManager has beenassigned. The login modules implement the security domain's principal authentication and role-mappingbehavior. You can use the JaasSecurityManager across different security domains by plugging indifferent login module configurations for the domains.
To illustrate how the JaasSecurityManager uses the JAAS authentication process, the following stepsoutline a client invocation of method which implements method EJBHome. The EJB has already beendeployed in the server and its EJBHome interface methods have been secured using <method-permission> elements in the ejb-jar.xml descriptor. It uses the jwdomain security domain, which isspecified in the <security-domain> element of the jboss-ejb3.xml file. The image below shows thesteps, which are explained afterward.
CHAPTER 16. AUTHENTICATION AND AUTHORIZATION
149
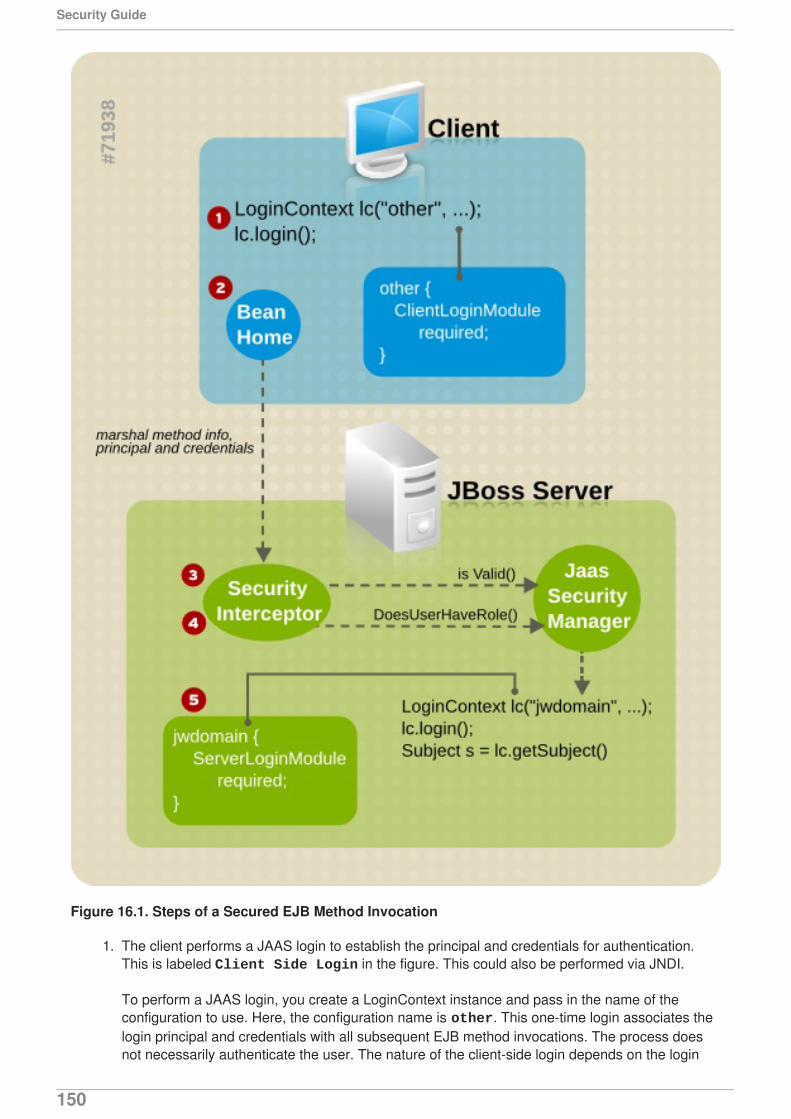
Figure 16.1. Steps of a Secured EJB Method Invocation
1. The client performs a JAAS login to establish the principal and credentials for authentication.This is labeled Client Side Login in the figure. This could also be performed via JNDI.
To perform a JAAS login, you create a LoginContext instance and pass in the name of theconfiguration to use. Here, the configuration name is other. This one-time login associates thelogin principal and credentials with all subsequent EJB method invocations. The process doesnot necessarily authenticate the user. The nature of the client-side login depends on the login
Security Guide
150

module configuration that the client uses. In this example, the other client-side loginconfiguration entry uses the ClientLoginModule login module. This module binds the username and password to the EJB invocation layer for later authentication on the server. Theidentity of the client is not authenticated on the client.
2. The client obtains the EJBHome method and invokes it on the server. The invocation includes themethod arguments passed by the client, along with the user identity and credentials from theclient-side JAAS login.
3. On the server, the security interceptor authenticates the user who invoked the method. Thisinvolves another JAAS login.
4. The security domain under determines the choice of login modules. The name of the securitydomain is passed to the LoginContext constructor as the login configuration entry name. TheEJB security domain is jwdomain. If the JAAS authentication is successful, a JAAS Subject iscreated. A JAAS subject includes a PrincipalSet, which includes the following details:
A java.security.Principal instance that corresponds to the client identity from thedeployment security environment.
A java.security.acl.Group called Roles, which contains the role names from theuser's application domain. Objects of type org.jboss.security.SimplePrincipalobjects represent the role names. These roles validate access to EJB methods according toconstraints in ejb-jar.xml and the EJBContext.isCallerInRole(String) methodimplementation.
An optional java.security.acl.Group named CallerPrincipal, which contains asingle org.jboss.security.SimplePrincipal that corresponds to the identity of theapplication domain's caller. The CallerPrincipal group member is the value returned by the EJBContext.getCallerPrincipal() method. This mapping allows a Principal in theoperational security environment to map to a Principal known to the application. In theabsence of a CallerPrincipal mapping, the operational principal is the same as theapplication domain principal.
5. The server verifies that the user calling the EJB method has the permission to do so. Performingthis authorization involves the following steps:
Obtain the names of the roles allowed to access the EJB method from the EJB container.The role names are determined by ejb-jar.xml descriptor <role-name> elements of all<method-permission> elements containing the invoked method.
If no roles have been assigned, or the method is specified in an exclude-list element, accessto the method is denied. Otherwise, the doesUserHaveRole method is invoked on thesecurity manager by the security interceptor to check if the caller has one of the assignedrole names. This method iterates through the role names and checks if the authenticateduser's Subject Roles group contains a SimplePrincipal with the assigned role name.Access is allowed if any role name is a member of the Roles group. Access is denied if noneof the role names are members.
If the EJB uses a custom security proxy, the method invocation is delegated to the proxy. Ifthe security proxy denies access to the caller, it throws a java.lang.SecurityException. Otherwise, access to the EJB method is allowed andthe method invocation passes to the next container interceptor. TheSecurityProxyInterceptor handles this check and this interceptor is not shown.
CHAPTER 16. AUTHENTICATION AND AUTHORIZATION
151

For web connection requests, the web server checks the security constraints defined in web.xml that match the requested resource and the accessed HTTP method.
If a constraint exists for the request, the web server calls the JaasSecurityManager toperform the principal authentication, which in turn ensures the user roles are associated withthat principal object.
Report a bug
16.5. JAVA AUTHORIZATION CONTRACT FOR CONTAINERS (JACC)
16.5.1. About Java Authorization Contract for Containers (JACC)
Java Authorization Contract for Containers (JACC) is a standard which defines a contract betweencontainers and authorization service providers, which results in the implementation of providers for useby containers. It was defined in JSR-115, which can be found on the Java Community Process websiteat http://jcp.org/en/jsr/detail?id=115. It has been part of the core Java Enterprise Edition (Java EE)specification since Java EE version 1.3.
JBoss EAP 6 implements support for JACC within the security functionality of the security subsystem.
Report a bug
16.5.2. Configure Java Authorization Contract for Containers (JACC) Security
To configure Java Authorization Contract for Containers (JACC), you need to configure your securitydomain with the correct module, and then modify your jboss-web.xml to include the correctparameters.
Add JACC Support to the Security Domain
To add JACC support to the security domain, add the JACC authorization policy to the authorization stackof the security domain, with the required flag set. The following is an example of a security domainwith JACC support. However, the security domain is configured in the Management Console orManagement CLI, rather than directly in the XML.
Configure a Web Application to use JACC
The jboss-web.xml is located in the META-INF/ or WEB-INF/ directory of your deployment, andcontains overrides and additional JBoss-specific configuration for the web container. To use your JACC-enabled security domain, you need to include the <security-domain> element, and also set the <use-jboss-authorization> element to true. The following application is properly configured touse the JACC security domain above.
<security-domain name="jacc" cache-type="default"> <authentication> <login-module code="UsersRoles" flag="required"> </login-module> </authentication> <authorization> <policy-module code="JACC" flag="required"/> </authorization></security-domain>
<jboss-web>
Security Guide
152

Configure an EJB Application to Use JACC
Configuring EJBs to use a security domain and to use JACC differs from Web Applications. For an EJB,you can declare method permissions on a method or group of methods, in the ejb-jar.xml descriptor.Within the <ejb-jar> element, any child <method-permission> elements contain information aboutJACC roles. Refer to the example configuration for more details. The EJBMethodPermission class ispart of the Java Enterprise Edition 6 API, and is documented athttp://docs.oracle.com/javaee/6/api/javax/security/jacc/EJBMethodPermission.html.
Example 16.1. Example JACC Method Permissions in an EJB
You can also constrain the authentication and authorization mechanisms for an EJB by using a securitydomain, just as you can do for a web application. Security domains are declared in the jboss-ejb3.xml descriptor, in the <security> child element. In addition to the security domain, you can alsospecify the run-as principal , which changes the principal the EJB runs as.
Example 16.2. Example Security Domain Declaration in an EJB
Report a bug
16.6. JAVA AUTHENTICATION SPI FOR CONTAINERS (JASPI)
16.6.1. About Java Authentication SPI for Containers (JASPI) Security
<security-domain>jacc</security-domain> <use-jboss-authorization>true</use-jboss-authorization></jboss-web>
<ejb-jar> <method-permission> <description>The employee and temp-employee roles may access any method of the EmployeeService bean </description> <role-name>employee</role-name> <role-name>temp-employee</role-name> <method> <ejb-name>EmployeeService</ejb-name> <method-name>*</method-name> </method> </method-permission></ejb-jar>
<security> <ejb-name>*</ejb-name> <security-domain>myDomain</security-domain> <run-as-principal>myPrincipal</run-as-principal></security>
CHAPTER 16. AUTHENTICATION AND AUTHORIZATION
153

Java Application SPI for Containers (JASPI or JASPIC) is a pluggable interface for Java applications. Itis defined in JSR-196 of the Java Community Process. Refer to http://www.jcp.org/en/jsr/detail?id=196for details about the specification.
Report a bug
16.6.2. Configure Java Authentication SPI for Containers (JASPI) Security
To authenticate against a JASPI provider, add a <authentication-jaspi> element to your securitydomain. The configuration is similar to a standard authentication module, but login module elements areenclosed in a <login-module-stack> element. The structure of the configuration is:
Example 16.3. Structure of the authentication-jaspi element
The login module itself is configured in exactly the same way as a standard authentication module.
Because the web-based management console does not expose the configuration of JASPIauthentication modules, you need to stop JBoss EAP 6 completely before adding the configurationdirectly to EAP_HOME/domain/configuration/domain.xml or EAP_HOME/standalone/configuration/standalone.xml.
Report a bug
<authentication-jaspi> <login-module-stack name="..."> <login-module code="..." flag="..."> <module-option name="..." value="..."/> </login-module> </login-module-stack> <auth-module code="..." login-module-stack-ref="..."> <module-option name="..." value="..."/> </auth-module></authentication-jaspi>
Security Guide
154

APPENDIX A. REFERENCE
A.1. INCLUDED AUTHENTICATION MODULES
The following authentication modules are included in JBoss EAP 6. Some of these handle authorizationas well as authentication. These usually include the word Role within the Code name.
When you configure these modules, use the Code value or the full (package qualified) name to refer tothe module.
Authentication Modules
Table A.1, “Client”
Table A.3, “Certificate”
Table A.5, “CertificateUsers”
Table A.7, “CertificateRoles”
Table A.9, “Database”
Table A.11, “DatabaseCertificate”
Table A.13, “Identity”
Table A.15, “Ldap”
Table A.17, “LdapExtended”
Table A.19, “RoleMapping”
Table A.21, “RunAs”
Table A.23, “Simple”
Table A.24, “ConfiguredIdentity”
Table A.26, “SecureIdentity”
Table A.28, “PropertiesUsers”
Table A.30, “SimpleUsers”
Table A.32, “LdapUsers”
Table A.33, “Kerberos”
Table A.35, “SPNEGOUsers”
Table A.37, “AdvancedLdap”
Table A.39, “AdvancedADLdap”
Table A.40, “UsersRoles”
APPENDIX A. REFERENCE
155

Custom Authentication Modules
Table A.1. Client
Code Client
Class org.jboss.security.ClientLoginModule
Description This login module is designed to establish calleridentity and credentials when JBoss EAP 6 is actingas a client. It should never be used as part of asecurity domain used for actual server authentication.
Table A.2. Client Module Options
Option Type Default Description
multi-threaded true or false false Set to true if each threadhas its own principal andcredential storage. Setto false to indicate thatall threads in the VMshare the same identityand credential.
password-stacking
useFirstPass or false
false Set to useFirstPass toindicate that this loginmodule should look forinformation stored in theLoginContext to use asthe identity. This optioncan be used whenstacking other loginmodules with this one.
restore-login-identity
true or false false Set to true if the identityand credential seen atthe start of the login()method should berestored after thelogout() method isinvoked.
Table A.3. Certificate
Code Certificate
Class org.jboss.security.auth.spi.BaseCertLoginModule
Description This login module is designed to authenticate usersbased on X509 Certificates. A use case forthis is CLIENT-CERT authentication of a webapplication.
Security Guide
156

Table A.4. Certificate Module Options
Option Type Default Description
securityDomain string none Name of the securitydomain that has theJSSE configuration forthe truststore holding thetrusted certificates.
verifier Class none The class name of the org.jboss.security.auth.certs.X509CertificateVerifier to use forverification of the logincertificate.
Table A.5. CertificateUsers
Code CertificateUsers
Class org.jboss.security.auth.spi.UsersRolesLoginModule
Description Uses a properties resources. The first mapsusernames to passwords, and the second mapsusernames to roles.
Table A.6. CertificateUsers Module Options
Option Type Default Description
unauthenticatedIdentity
A string none Defines the principalname that should beassigned to requestswhich contain noauthenticationinformation. This canallow unprotectedservlets to invokemethods on EJBs thatdo not require a specificrole. Such a principalhas no associated rolesand can only accesseither unsecured EJBsor EJB methods that areassociated with the unchecked permissionconstraint.
APPENDIX A. REFERENCE
157

password-stacking
useFirstPass or false
false Set to useFirstPassto indicate that this loginmodule should look forinformation stored in theLoginContext to useas the identity. Thisoption can be usedwhen stacking otherlogin modules with thisone.
hashAlgorithm A string none The name of the java.security.MessageDigestalgorithm to use to hashthe password. There isno default so this optionmust be explicitly set toenable hashing. WhenhashAlgorithm isspecified, the clear textpassword obtained fromthe CallbackHandler ishashed before it ispassed to UsernamePasswordLoginModule.validatePassword as theinputPasswordargument. The expectedPasswordstored in the users.propertiesfile must be comparablyhashed. Refer tohttp://docs.oracle.com/javase/6/docs/api/java/security/MessageDigest.html for information on java.security.MessageDigest and thealgorithms this classsupports.
hashEncoding base64 or hex base64 The string format for thehashed password, if hashAlgorithm isalso set.
hashCharset A string The default encoding setin the container'senvironment.
The encoding used toconvert the clear-textpassword to a bytearray.
Option Type Default Description
Security Guide
158

usersProperties The fully-qualified filepath and name of aproperties file orresource
users.properties The file containing themappings between usersand passwords. Eachproperty in the file hasthe format username=password.
rolesProperties The fully-qualified filepath and name of aproperties file orresource
roles.properties The file containing themappings between usersand roles. Each propertyin the file has the formatusername=role1,role2,...,roleN.
ignorePasswordCase
true or false false Whether the passwordcomparison shouldignore case. This isuseful for hashedpassword encodingwhere the case of thehashed password is notsignificant.
principalClass A fully-qualifiedclassname.
none A Principalimplementation classwhich contains aconstructor that takes aString argument for theprincpal name.
roleGroupSeparator
A single character . (a single period) The character used toseperate the usernamefrom the role groupname in the rolesGroup file.
defaultUsersProperties
string defaultUsers.properties
Name of the resource orfile to fall back to if theusersProperties file can'tbe found.
defaultRolesProperties
string defaultRoles.properties
Name of the resource orfile to fall back to if the rolesPropertiesfile cannot be found.
hashUserPassword true or false true Whether to hash thepassword entered by theuser, when hashAlgorithm isspecified. Defaults to true.
Option Type Default Description
APPENDIX A. REFERENCE
159

hashStorePassword
true or false true Whether the storepassword returned from getUsersPassword() should be hashed,when hashAlgorithm isspecified.
digestCallback A fully-qualifiedclassname.
none The class name of the org.jboss.crypto.digest.DigestCallback implementationthat includes pre or postdigest content such assalt values. Only used if hashAlgorithm isspecified.
storeDigestCallback
A fully-qualifiedclassname.
none The class name of the org.jboss.crypto.digest.DigestCallback implementationthat includes pre/postdigest content like saltsfor hashing the storepassword. Only used if hashStorePassword is true and hashAlgorithm isspecified.
callback.option.STRING
Various none All options prefixed with callback.option.are passed to the DigestCallback.init(Map) method.The input username isalways passed in via thejavax.security.auth.login.nameoption, and theinput/store password ispassed in via the javax.security.auth.login.password option to the digestCallback or storeDigestCallback.
Option Type Default Description
Table A.7. CertificateRoles
Code CertificateRoles
Security Guide
160

Class org.jboss.security.auth.spi.CertRolesLoginModule
Description This login module extends the Certificate loginmodule to add role mapping capabilities from aproperties file. It takes all of the same options as theCertificate login module, and adds the followingoptions.
Table A.8. CertificateRoles Module Options
Option Type Default Description
rolesProperties A string roles.properties The name of theresource or filecontaining the roles toassign to each user. Therole properties file mustbe in the formatusername=role1,role2where the username isthe DN of the certificate,escaping any = (equals)and space characters.The following example isin the correct format:
CN\=unit-tests-client,\ OU\=Red\ Hat\ Inc.,\ O\=Red\ Hat\ Inc.,\ ST\=North\ Carolina,\ C\=US=JBossAdmin
defaultRolesProperties
A string defaultRoles.properties
Name of the resource orfile to fall back to if the rolesPropertiesfile cannot be found.
roleGroupSeparator
A single character . (a single period) Which character to useas the role groupseparator in the roleProperties file.
Table A.9. Database
Code Database
Class org.jboss.security.auth.spi.DatabaseServerLoginModule
APPENDIX A. REFERENCE
161

Description A JDBC-based login module that supportsauthentication and role mapping. It is based on twological tables, with the following definitions.
Principals: PrincipalID (text), Password (text)
Roles: PrincipalID (text), Role (text), RoleGroup (text)
Table A.10. Database Module Options
Option Type Default Description
dsJndiName A JNDI resource none The name of the JNDIresource storing theauthenticationinformation. This optionis required.
principalsQuery A prepared SQLstatement
select Password from Principals where PrincipalID=?
The prepared SQLquery to obtain theinformation about theprincipal.
rolesQuery A prepared SQLstatement
select Role, RoleGroup from Roles where PrincipalID=?
The prepared SQLquery to obtain theinformation about theroles. It should beequivalent to select Role, RoleGroup from Roles where PrincipalID=?,where Role is the rolename and theRoleGroup column valueshould always be either Roles with a capital Ror CallerPrincipal.
Table A.11. DatabaseCertificate
Code DatabaseCertificate
Class org.jboss.security.auth.spi.DatabaseCertLoginModule
Description This login module extends the Certificate loginmodule to add role mapping capabilities from adatabase table. It has the same options plus theseadditional options:
Security Guide
162

Table A.12. DatabaseCertificate Module Options
Option Type Default Description
dsJndiName A JNDI resource The name of the JNDIresource storing theauthenticationinformation. This optionis required.
rolesQuery A prepared SQLstatement
select Role,RoleGroup from Roles where PrincipalID=?
SQL prepared statementto be executed in orderto map roles. It shouldbe an equivalent to select Role, RoleGroup from Roles where PrincipalID=?,where Role is the rolename and theRoleGroup column valueshould always be either Roles with a capital Ror CallerPrincipal.
suspendResume true or false true Whether any existingJTA transaction shouldbe suspended duringdatabase operations.
Table A.13. Identity
Code Identity
Class org.jboss.security.auth.spi.IdentityLoginModule
Description Associates the principal specified in the moduleoptions with any subject authenticated against themodule. The type of Principal class used is org.jboss.security.SimplePrincipal..If no principal option is specified a principal with thename of guest is used.
Table A.14. Identity Module Options
Option Type Default Description
principal A string guest The name to use for theprincipal.
roles A comma-separated listof strings
none A comma-delimited listof roles which will beassigned to the subject.
APPENDIX A. REFERENCE
163

Table A.15. Ldap
Code Ldap
Class org.jboss.security.auth.spi.LdapLoginModule
Description Authenticates against an LDAP server, when theusername and password are stored in an LDAPserver that is accessible using a JNDI LDAP provider.Many of the options are not required, because theyare determined by the LDAP provider or theenvironment.
Table A.16. Ldap Module Options
Option Type Default Description
java.naming.factory.initial
class name com.sun.jndi.ldap.LdapCtxFactory
InitialContextFactory implementationclass name.
java.naming.provider.url
ldap:// URL none URL for the LDAPserver.
java.naming.security.authentication
none, simple, or thename of a SASLmechanism
simple The security level to useto bind to the LDAPserver.
java.naming.security.protocol
A transport protocol If unspecified,determined by theprovider.
The transport protocol touse for secure access,such as SSL.
java.naming.security.principal
A string none The name of theprincipal forauthenticating the callerto the service. This isbuilt from otherproperties describedbelow.
java.naming.security.credentials
A credential type none The type of credentialused by theauthentication scheme.Some examples includehashed password, clear-text password, key, orcertificate. If this propertyis unspecified, thebehavior is determinedby the service provider.
Security Guide
164

principalDNPrefix
A string none Prefix added to theusername to form theuser DN. You canprompt the user for ausername and build thefully-qualified DN byusing the principalDNPrefix and principalDNSuffix.
principalDNSuffix
string Suffix added to theusername to form theuser DN. You canprompt the user for ausername and build thefully-qualified DN byusing the principalDNPrefix and principalDNSuffix.
useObjectCredential
true or false false Whether the credentialshould be obtained asan opaque Object usingthe org.jboss.security.auth.callback.ObjectCallbacktype of Callback ratherthan as a char[]password using a JAASPasswordCallback. Thisallows for passing non-char[] credentialinformation to the LDAPserver.
rolesCtxDN A fully-qualified DN none The fully-qualified DN forthe context to search foruser roles.
userRolesCtxDNAttributeName
An attribute none The attribute in the userobject that contains theDN for the context tosearch for user roles.This differs from rolesCtxDN in thatthe context to search fora user's roles may beunique for each user.
roleAttributeID An attribute roles Name of the attributecontaining the userroles.
Option Type Default Description
APPENDIX A. REFERENCE
165

roleAttributeIsDN
true or false false Whether or not the roleAttributeIDcontains the fully-qualified DN of a roleobject. If false, the rolename is taken from thevalue of the roleNameAttributeId attribute of thecontext name. Certaindirectory schemas, suchas Microsoft ActiveDirectory, require thisattribute to be set to true.
roleNameAttributeID
An attribute group Name of the attributewithin the roleCtxDNcontext which containsthe role name. If the roleAttributeIsDN property is set to true, this property isused to find the roleobject's name attribute.
uidAttributeID An attribute uid Name of the attribute inthe UserRolesAttributeDN that correspondsto the user ID. This isused to locate the userroles.
matchOnUserDN true or false false Whether or not thesearch for user rolesshould match on theuser's fully distinguishedDN or the usernameonly. If true, the fulluser DN is used as thematch value. If false,only the username isused as the match valueagainst the uidAttributeNameattribute.
allowEmptyPasswords
true or false true Whether to allow emptypasswords. Most LDAPservers treat emptypasswords asanonymous loginattempts. To rejectempty passwords, setthis to false.
Option Type Default Description
Security Guide
166

Table A.17. LdapExtended
Code LdapExtended
Class org.jboss.security.auth.spi.LdapExtLoginModule
Description An alternate LDAP login module implementation thatuses searches to locate the bind user and associatedroles. The roles query recursively follows DNs tonavigate a hierarchical role structure. It uses thesame java.naming options as the Ldap module,and uses the following options instead of the otheroptions of the Ldap module.
The authentication happens in 2 steps:
1. An initial bind to the LDAP server is doneusing the bindDN and bindCredentialoptions. The bindDN is a LDAP user withthe ability to search both the baseCtxDNand rolesCtxDN trees for the user androles. The user DN to authenticate against isqueried using the filter specified by the baseFilter attribute.
2. The resulting user DN is authenticated bybinding to the LDAP server using the userDN as the InitialLdapContextenvironment Context.SECURITY_PRINCIPAL. The Context.SECURITY_CREDENTIALSproperty is set to the String passwordobtained by the callback handler.
Table A.18. LdapExtended Module Options
Option Type Default Description
baseCtxDN A fully-qualified DN none The fixed DN of the top-level context to beginthe user search.
bindDN A fully-qualified DN none The DN used to bindagainst the LDAP serverfor the user and rolesqueries. This DN needsread and searchpermissions on the baseCtxDN and rolesCtxDN values.
bindCredential A string, optionallyencrypted
none The password for the bindDN. This can beencrypted if the jaasSecurityDomain is specified.
APPENDIX A. REFERENCE
167

jaasSecurityDomain
A JMX ObjectName none The JMX ObjectNameof the JaasSecurityDomain to use to decrypt the bindCredential.The encrypted form ofthe password is theformat returned by the JaasSecurityDomain.encrypt64(byte[]) method.
baseFilter LDAP filter string none A search filter used tolocate the context of theuser to authenticate. Theinput username oruserDN obtained fromthe login modulecallback is substitutedinto the filter anywhere a{0} expression is used.A common example forthe search filter is (uid={0}).
rolesCtxDN fully-qualified DN none The fixed DN of thecontext to search foruser roles. This is notthe DN where the actualroles are, but the DNwhere the objectscontaining the user rolesare. For example, in aMicrosoft ActiveDirectory server, this isthe DN where the useraccount is.
Option Type Default Description
Security Guide
168

roleFilter LDAP filter string A search filter used tolocate the rolesassociated with theauthenticated user. Theinput username oruserDN obtained fromthe login modulecallback is substitutedinto the filter anywhere a{0} expression is used.The authenticateduserDN is substitutedinto the filter anywhere a{1} is used. Anexample search filterthat matches on theinput username is (member={0}). Analternative that matcheson the authenticateduserDN is (member={1}).
roleAttributeIsDN
true or false false Whether or not the roleAttributeIDcontains the fully-qualified DN of a roleobject. If false, the rolename is taken from thevalue of the roleNameAttributeId attribute of thecontext name. Certaindirectory schemas, suchas Microsoft ActiveDirectory, require thisattribute to be set to true.
defaultRole Role name none A role included for allauthenticated users
parseRoleNameFromDN
true or false false A flag indicating if theDN returned by a querycontains theroleNameAttributeID. Ifset to true, the DN ischecked for theroleNameATtributeID. Ifset to false, the DN isnot checked for theroleNameAttributeID.This flag can improvethe performance ofLDAP queries.
Option Type Default Description
APPENDIX A. REFERENCE
169

parseUsername true or false false A flag indicating if theDN is to be parsed forthe username. If set to true, the DN is parsedfor the username. If setto false the DN is notparsed for theusername. This option isused together withusernameBeginStringandusernameEndString.
usernameBeginString
a string none Defines the string whichis to be removed fromthe start of the DN toreveal the username.This option is usedtogether with usernameEndString.
usernameEndString
a string none Defines the string whichis to be removed fromthe end of the DN toreveal the username.This option is usedtogether with usernameBeginString.
roleNameAttributeID
An attribute group Name of the attributewithin the roleCtxDNcontext which containsthe role name. If the roleAttributeIsDN property is set to true, this property isused to find the roleobject's name attribute.
distinguishedNameAttribute
An attribute distinguishedName
The name of theattribute in the userentry that contains theDN of the user. Thismay be necessary if theDN of the user itselfcontains specialcharacters (backslashfor example) thatprevent correct usermapping. If the attributedoes not exist, theentry's DN is used.
Option Type Default Description
Security Guide
170

roleRecursion An integer 0 The numbers of levels ofrecursion the role searchwill go below a matchingcontext. Disablerecursion by setting thisto 0.
searchTimeLimit An integer 10000 (10 seconds) The timeout inmilliseconds for user orrole searches.
searchScope One of: OBJECT_SCOPE, ONELEVEL_SCOPE, SUBTREE_SCOPE
SUBTREE_SCOPE The search scope touse.
allowEmptyPasswords
true or false true Whether to allow emptypasswords. Most LDAPservers treat emptypasswords asanonymous loginattempts. To rejectempty passwords, setthis to false.
Option Type Default Description
Table A.19. RoleMapping
Code RoleMapping
Class org.jboss.security.auth.spi.RoleMappingLoginModule
Description Maps a role which is the end result of theauthentication process to a declarative role. Thismodule must be flagged as optional when youadd it to the security domain.
Table A.20. RoleMapping Module Options
Option Type Default Description
rolesProperties The fully-qualified filepath and name of aproperties file orresource
roles.properties The fully-qualified filepath and name of aproperties file orresource which mapsroles to replacementroles. The format is original_role=role1,role2,role3
APPENDIX A. REFERENCE
171

replaceRole true or false false Whether to add to thecurrent roles, or replacethe current roles with themapped ones. Replacesif set to true.
Option Type Default Description
Table A.21. RunAs
Code RunAs
Class Class: org.jboss.security.auth.spi.RunAsLoginModule
Description A helper module that pushes a run as role onto thestack for the duration of the login phase ofauthentication, and pops the run as role off thestack in either the commit or abort phase. This loginmodule provides a role for other login modules thatmust access secured resources in order to performtheir authentication, such as a login module whichaccesses a secured EJB. RunAsLoginModulemust be configured before the login modules thatrequire a run as role to be established.
Table A.22. RunAs Options
Option Type Default Description
roleName A role name. nobody The name of the role touse as the run as roleduring the login phase.
Table A.23. Simple
Code Simple
Class org.jboss.security.auth.spi.SimpleServerLoginModule
Security Guide
172

Description A module for quick setup of security for testingpurposes. It implements the following simplealgorithm:
If the password is null, authenticate the userand assign an identity of guest and a roleof guest.
Otherwise, if the password is equal to theuser, assign an identity equal to theusername and both admin and guestroles.
Otherwise, authentication fails.
Simple Module Options
The Simple module has no options.
Table A.24. ConfiguredIdentity
Code ConfiguredIdentity
Class org.picketbox.datasource.security.ConfiguredIdentityLoginModule
Description Associates the principal specified in the moduleoptions with any subject authenticated against themodule. The type of Principal class used is org.jboss.security.SimplePrincipal.
Table A.25. ConfiguredIdentity Module Options
Option Type Default Description
principal Name of a principal. none The principal which willbe associated with anysubject authenticatedagainst the module.
Table A.26. SecureIdentity
Code SecureIdentity
Class org.picketbox.datasource.security.SecureIdentityLoginModule
Description This module is provided for legacy purposes. Itallows you to encrypt a password and then use theencrypted password with a static principal. If yourapplication uses SecureIdentity, considerusing a password vault mechanism instead.
APPENDIX A. REFERENCE
173

Table A.27. SecureIdentity Module Options
Option Type Default Description
username string none The username forauthentication.
password encrypted string none The password to use forauthentication. Toencrypt the password,use the module directlyat the command line.
java org.picketbox.datasource.security.SecureIdentityLoginModule password_to_encrypt
Paste the result of thiscommand into themodule option's valuefield.
managedConnectionFactoryName
A JCA resource none The name of the JCAconnection factory foryour datasource.
Table A.28. PropertiesUsers
Code PropertiesUsers
Class org.jboss.security.auth.spi.PropertiesUsersLoginModule
Description Uses a properties file to store usernames andpasswords for authentication. No authorization (rolemapping) is provided. This module is onlyappropriate for testing.
Table A.29. PropertiesUsers Module Options
Option Type Default Description
properties The fully-qualified filepath and name of a Javaproperties file orresource.
none The properties filecontaining theusernames and clear-text passwords to beused for authentication.
Security Guide
174

Table A.30. SimpleUsers
Code SimpleUsers
Class org.jboss.security.auth.spi.SimpleUsersLoginModule
Description This login module stores the username and clear-textpassword in a Java properties file. It is included fortesting only, and is not appropriate for a productionenvironment.
Table A.31. SimpleUsers Module Options
Option Type Default Description
username string none The username to use forauthentication.
password string none The clear-text passwordto use for authentication.
Table A.32. LdapUsers
Code LdapUsers
Class org.jboss.security.auth.spi.LdapUsersLoginModule
Description The LdapUsers module is superseded by the ExtendedLDAP and AdvancedLdap modules.
Table A.33. Kerberos
Code Kerberos
Class com.sun.security.auth.module.Krb5LoginModule
Description Performs Kerberos login authentication, usingGSSAPI. This module is part of the securityframework from the API provided by SunMicrosystems. Details can be found athttp://docs.oracle.com/javase/1.4.2/docs/guide/security/jaas/spec/com/sun/security/auth/module/Krb5LoginModule.html. This module needs to be paired withanother module which handles the authentication androles mapping.
Table A.34. Kerberos Module Options
APPENDIX A. REFERENCE
175
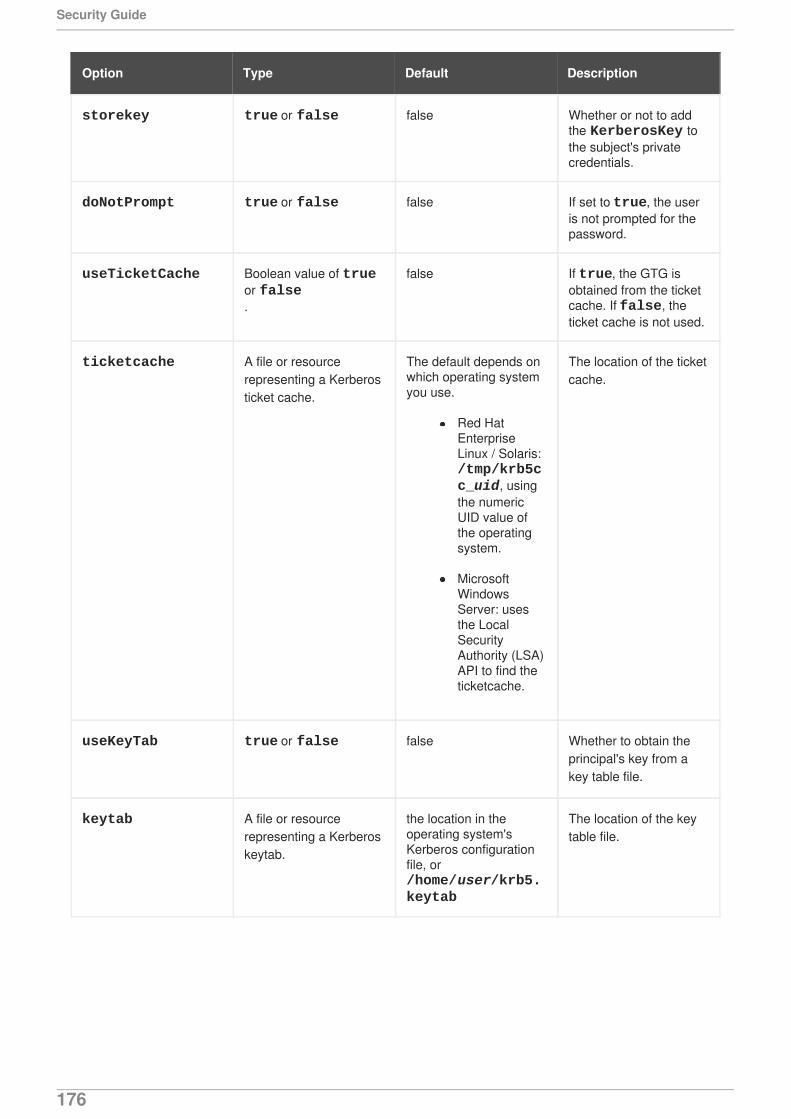
Option Type Default Description
storekey true or false false Whether or not to addthe KerberosKey tothe subject's privatecredentials.
doNotPrompt true or false false If set to true, the useris not prompted for thepassword.
useTicketCache Boolean value of trueor false.
false If true, the GTG isobtained from the ticketcache. If false, theticket cache is not used.
ticketcache A file or resourcerepresenting a Kerberosticket cache.
The default depends onwhich operating systemyou use.
Red HatEnterpriseLinux / Solaris: /tmp/krb5cc_uid, usingthe numericUID value ofthe operatingsystem.
MicrosoftWindowsServer: usesthe LocalSecurityAuthority (LSA)API to find theticketcache.
The location of the ticketcache.
useKeyTab true or false false Whether to obtain theprincipal's key from akey table file.
keytab A file or resourcerepresenting a Kerberoskeytab.
the location in theoperating system'sKerberos configurationfile, or /home/user/krb5.keytab
The location of the keytable file.
Security Guide
176

principal A string none The name of theprincipal. This can eitherbe a simple user nameor a service name suchas host/testserver.acme.com. Use thisinstead of obtaining theprincipal from the keytable, or when the keytable contains more thanone principal.
useFirstPass true or false false Whether to retrieve theusername and passwordfrom the module'sshared state, using javax.security.auth.login.nameand javax.security.auth.login.password as the keys. Ifauthentication fails, noretry attempt is made.
tryFirstPass true or false false Same as useFirstPass, but ifauthentication fails, themodule uses the CallbackHandler toretrieve a new usernameand password. If thesecond authenticationfails, the failure isreported to the callingapplication.
storePass true or false false Whether to store theusername and passwordin the module's sharedstate. This does nothappen if the keysalready exist in theshared state, or ifauthentication fails.
clearPass true or false false Set this to true to clearthe username andpassword from theshared state after bothphases of authenticationcomplete.
Option Type Default Description
Table A.35. SPNEGOUsers
APPENDIX A. REFERENCE
177

Code SPNEGOUsers
Class org.jboss.security.negotiation.spnego.SPNEGOLoginModule
Description Allows SPNEGO authentication to a Microsoft ActiveDirectory server or other environment which supportsSPNEGO. SPNEGO can also carry Kerberoscredentials. This module needs to be paired withanother module which handles authentication androle mapping.
Table A.36. SPNEGO Module Options
Option Type Default Description
storeKey true or false false Whether or not to storethe key.
useKeyTab true or false false Whether to use a keytable.
principal String reperesenting aprincipal for Kerberosauhentication.
none The name of theprincipal forauthentication.
keyTab A file or resourcerepresenting a keytab.
none The location of a keytable.
doNotPrompt true or false false Whether to prompt for apassword.
debug true or false false Whether to record moreverbose messages fordebugging purposes.
Table A.37. AdvancedLdap
Code AdvancedLdap
Class org.jboss.security.negotiation.AdvancedLdapLoginModule
Description A module which provides additional functionality,such as SASL and the use of a JAAS securitydomain.
Table A.38. AdvancedLdap Module Options
Security Guide
178

Option Type Default Description
bindAuthentication
string none The type of SASLauthentication to use forbinding to the directoryserver.
jassSecurityDomain
string none The name of the JAASsecurity domain to use.
java.naming.provider.url
string none The URI of the directoryserver.
baseCtxDN A fully qualifiedDistinguished Name(DN).
none The distinguished nameto use as the base forsearches.
baseFilter String representing aLDAP search filter.
none The filter to use tonarrow down searchresults.
roleAttributeID A string representing anLDAP attribute.
none The LDAP attributewhich contains thenames of authorizationroles.
roleAttributeIsDN
true or false false Whether the roleattribute is aDistinguished Name(DN).
roleNameAttributeID
String representing anLDAP attribute.
none The attribute containedwithin the RoleAttributeIdwhich contains theactual role attribute.
recurseRoles true or false false Whether to recorsivelysearch the RoleAttributeIdfor roles.
Table A.39. AdvancedADLdap
Code AdvancedADLdap
Class org.jboss.security.negotiation.AdvancedADLoginModule
Description This module extends the AdvancedLdap loginmodule, and adds extra parameters that are relevantto Microsoft Active Directory.
APPENDIX A. REFERENCE
179

Table A.40. UsersRoles
Code UsersRoles
Class org.jboss.security.auth.spi.UsersRolesLoginModul
Description A simple login module that supports multiple usersand user roles stored in two different properties files.
Table A.41. UsersRoles Module Options
Option Type Default Description
usersProperties Path to a file orresource.
users.properties The file or resourcewhich contains the user-to-password mappings.The format of the file is user=hashed-password
rolesProperties Path to a file orresource.
roles.properties The file or resourcewhich contains the user-to-role mappings. Theformat of the file is username=role1,role2,role3
password-stacking
useFirstPass or false
false A value of useFirstPassindicates that this loginmodule should first lookto the information storedin the LoginContextfor the identity. Thisoption can be usedwhen stacking otherlogin modules with thisone.
Security Guide
180

hashAlgorithm A string representing apassword hashingalgorithm.
none The name of the java.security.MessageDigestalgorithm to use to hashthe password. There isno default so this optionmust be explicitly set toenable hashing. When hashAlgorithm isspecified, the clear textpassword obtained fromthe CallbackHandler ishashed before it ispassed to UsernamePasswordLoginModule.validatePassword as theinputPasswordargument. Thepassword stored in the users.propertiesfile must be comparablyhashed.
hashEncoding base64 or hex base64 The string format for thehashed password, ifhashAlgorithm is alsoset.
hashCharset A string The default encoding setin the container'sruntime environment
The encoding used toconvert the clear-textpassword to a bytearray.
unauthenticatedIdentity
A principal name none Defines the principalname assigned torequests which containno authenticationinformation. This canallow unprotectedservlets to invokemethods on EJBs thatdo not require a specificrole. Such a principalhas no associated rolesand can only accessunsecured EJBs or EJBmethods that areassociated with the unchecked permissionconstraint.
Option Type Default Description
Custom Authentication Modules
APPENDIX A. REFERENCE
181

Authentication modules are implementations of javax.security.auth.spi.LoginModule. Refer tothe API documentation for more information about creating a custom authentication module.
Report a bug
A.2. INCLUDED AUTHORIZATION MODULES
The following modules provide authorization services.
Code Class
DenyAll org.jboss.security.authorization.modules.AllDenyAuthorizationModule
PermitAll org.jboss.security.authorization.modules.AllPermitAuthorizationModule
Delegating org.jboss.security.authorization.modules.DelegatingAuthorizationModule
Web org.jboss.security.authorization.modules.WebAuthorizationModule
JACC org.jboss.security.authorization.modules.JACCAuthorizationModule
Report a bug
A.3. INCLUDED SECURITY MAPPING MODULES
The following security mapping roles are provided in JBoss EAP 6.
Code Class
PropertiesRoles org.jboss.security.mapping.providers.role.PropertiesRolesMappingProvider
SimpleRoles org.jboss.security.mapping.providers.role.SimpleRolesMappingProvider
DeploymentRoles org.jboss.security.mapping.providers.DeploymentRolesMappingProvider
DatabaseRoles org.jboss.security.mapping.providers.role.DatabaseRolesMappingProvider
LdapRoles org.jboss.security.mapping.providers.role.LdapRolesMappingProvider
Security Guide
182

Report a bug
A.4. INCLUDED SECURITY AUDITING PROVIDER MODULES
JBoss EAP 6 provides one security auditing provider.
Code Class
LogAuditProvider org.jboss.security.audit.providers.LogAuditProvider
Report a bug
A.5. JBOSS-WEB.XML CONFIGURATION REFERENCE
Introduction
The jboss-web.xml is a file within your deployment's WEB-INF or META-INF directory. It containsconfiguration information about features the JBoss Web container adds to the Servlet 3.0 specification.Settings specific to the Servlet 3.0 specification are placed into web.xml in the same directory.
The top-level element in the jboss-web.xml file is the <jboss-web> element.
Mapping Global Resources to WAR Requirements
Many of the available settings map requirements set in the application's web.xml to local resources. Theexplanations of the web.xml settings can be found athttp://docs.oracle.com/cd/E13222_01/wls/docs81/webapp/web_xml.html.
For instance, if the web.xml requires jdbc/MyDataSource, the jboss-web.xml may map the globaldatasource java:/DefaultDS to fulfill this need. The WAR uses the global datasource to fill its needfor jdbc/MyDataSource.
Table A.42. Common Top-Level Attributes
Attribute Description
env-entry A mapping to an env-entry required by the web.xml.
ejb-ref A mapping to an ejb-ref required by the web.xml.
ejb-local-ref A mapping to an ejb-local-ref required by the web.xml.
service-ref A mapping to a service-ref required by the web.xml.
resource-ref A mapping to a resource-ref required by the web.xml.
APPENDIX A. REFERENCE
183

resource-env-ref A mapping to a resource-env-ref required bythe web.xml.
message-destination-ref A mapping to a message-destination-refrequired by the web.xml.
persistence-context-ref A mapping to a persistence-context-refrequired by the web.xml.
persistence-unit-ref A mapping to a persistence-unit-refrequired by the web.xml.
post-construct A mapping to a post-context required by the web.xml.
pre-destroy A mapping to a pre-destroy required by the web.xml.
data-source A mapping to a data-source required by the web.xml.
context-root The root context of the application. The default valueis the name of the deployment without the .warsuffix.
virtual-host The name of the HTTP virtual-host the applicationaccepts requests from. It refers to the contents of theHTTP Host header.
annotation Describes an annotation used by the application.Refer to <annotation> for more information.
listener Describes a listener used by the application. Refer to<listener> for more information.
session-config This element fills the same function as the <session-config> element of the web.xmland is included for compatibility only.
valve Describes a valve used by the application. Refer to<valve> for more information.
overlay The name of an overlay to add to the application.
security-domain The name of the security domain used by theapplication. The security domain itself is configured inthe web-based management console or themanagement CLI.
Attribute Description
Security Guide
184

security-role This element fills the same function as the <security-role> element of the web.xml andis included for compatibility only.
use-jboss-authorization If this element is present and contains the caseinsensitive value "true", the JBoss web authorizationstack is used. If it is not present or contains any valuethat is not "true", then only the authorizationmechanisms specified in the Java Enterprise Editionspecifications are used. This element is new to JBossEAP 6.
disable-audit If this empty element is present, web security auditingis disabled. Otherwise, it is enabled. Web securityauditing is not part of the Java EE specification. Thiselement is new to JBoss EAP 6.
disable-cross-context If false, the application is able to call anotherapplication context. Defaults to true.
Attribute Description
The following elements each have child elements.
<annotation>
Describes an annotation used by the application. The following table lists the child elements of an <annotation>.
Table A.43. Annotation Configuration Elements
Attribute Description
class-name Name of the class of the annotation
servlet-security The element, such as @ServletSecurity, whichrepresents servlet security.
run-as The element, such as @RunAs, which represents therun-as information.
multi-part The element, such as @MultiPart, whichrepresents the multi-part information.
<listener>
Describes a listener. The following table lists the child eleents of a <listener>.
Table A.44. Listener Configuration Elements
APPENDIX A. REFERENCE
185
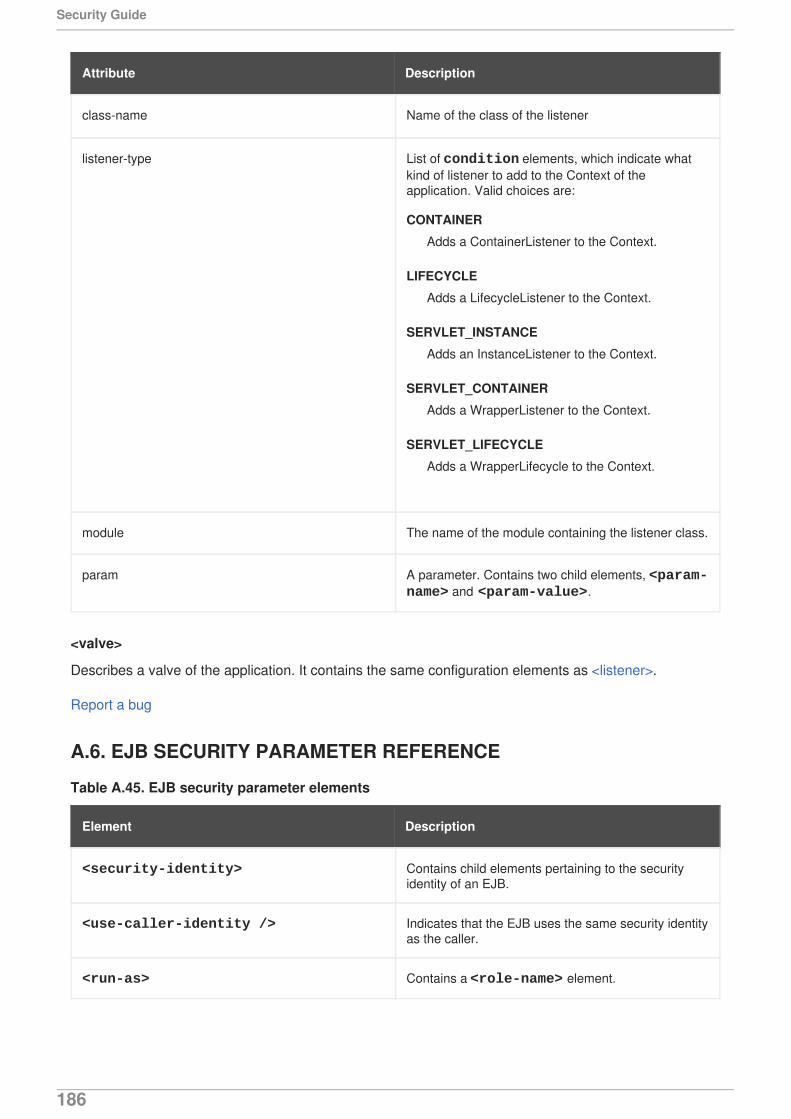
Attribute Description
class-name Name of the class of the listener
listener-type List of condition elements, which indicate whatkind of listener to add to the Context of theapplication. Valid choices are:
CONTAINER
Adds a ContainerListener to the Context.
LIFECYCLE
Adds a LifecycleListener to the Context.
SERVLET_INSTANCE
Adds an InstanceListener to the Context.
SERVLET_CONTAINER
Adds a WrapperListener to the Context.
SERVLET_LIFECYCLE
Adds a WrapperLifecycle to the Context.
module The name of the module containing the listener class.
param A parameter. Contains two child elements, <param-name> and <param-value>.
<valve>
Describes a valve of the application. It contains the same configuration elements as <listener>.
Report a bug
A.6. EJB SECURITY PARAMETER REFERENCE
Table A.45. EJB security parameter elements
Element Description
<security-identity> Contains child elements pertaining to the securityidentity of an EJB.
<use-caller-identity /> Indicates that the EJB uses the same security identityas the caller.
<run-as> Contains a <role-name> element.
Security Guide
186

<run-as-principal> If present, indicates the principal assigned tooutgoing calls. If not present, outgoing calls areassigned to a principal named anonymous.
<role-name> Specifies the role the EJB should run as.
<description> Describes the role named in <role-name>.
Element Description
Example A.1. Security identity examples
This example shows each tag described in Table A.45, “EJB security parameter elements”. They canalso be used inside a <servlet>.
Report a bug
<ejb-jar> <enterprise-beans> <session> <ejb-name>ASessionBean</ejb-name> <security-identity> <use-caller-identity/> </security-identity> </session> <session> <ejb-name>RunAsBean</ejb-name> <security-identity> <run-as> <description>A private internal role</description> <role-name>InternalRole</role-name> </run-as> </security-identity> </session> <session> <ejb-name>RunAsBean</ejb-name> <security-identity> <run-as-principal>internal</run-as-principal> </security-identity> </session> </enterprise-beans></ejb-jar>
APPENDIX A. REFERENCE
187

APPENDIX B. REVISION HISTORY
Revision 2.0.0-3 Fri Jul 17 2015 Scott MumfordBuilt from Content Specification: 13944, Revision: 765278 by smumford
Security Guide
188