Embed Size (px)
Citation preview

5 Free Cold Connection
Jewelry Projects: How to Rivet Jewelry and More

www.JewelryMakingDaily.com 2
5 Free Cold Connection Jewelry Projects: How to Rivet JewelRy and MoRe
Copyright interweave Press. all rights reserved. interweave grants permission for any or all pages in this issue to be copied for personal use.
COLD COnneCTiOns are hot, hot, hot! Whether you’re new to making jewelry with metals and haven’t yet mastered soldering, or are an old hand at the bench but love the rugged, handwrought feel that jewelry rivets and wire connections lend to your designs, you’ll love the sampling of cold connection jewelry projects in this free e-book.
Forge five rustic bronze hearts and rivet them together into a textured necklace with character and movement. Create a bangle bracelet with copper wire riveted together with contrast-ing silver – or for a more subtle look, use copper rivets. Cut out simple flower shapes from aluminum and copper sheet and con-nect them with copper wire into a fun and easy floral necklace.
Looking for something that will take advantage of intermedi-ate metalsmithing skills? Use premade mokume sheet to create a heart pendant set with a luscious red faceted gem, and add an extra hands-on touch by riveting your silver bail to your pen-dant. Or make a keepsake swivel locket in silver for a challenging project that also hinges on the magic of jewelry rivets.
Whatever your style or skill level, get ready to put your bench blocks, hammers, cutters, pliers and more to use now and make any or all of these five fabulous jewelry designs that all take advantage of cold connections.
merle whiteeditorial Director, interweave Jewelry group
FORGED HEARTS BY LINDA LARSEN
MOKUME HEART BY ROGER HALAS
SWIVEL LOCKETBY NANZ AALUND
SAWN ALUMINUM AND COPPER NECKLACE BY HELEN I. DRIGGS
BODACIOUS COPPER BANGLE BY KIM ST. JEAN
3
6
9
13
17
contents

www.JewelryMakingDaily.com 3
5 Free Cold Connection Jewelry Projects: How to Rivet JewelRy and MoRe
Forged HeartsRiveted and textured moveable heart links.
By LinDa Larsen
I have recently discovered a passion for forging. i enjoy shaping and moving metal and discovering all the shapes you can forge it
into. i was inspired by alexander Calder jewelry to make this forged heart necklace.
Tools & supplies• 8-gauge bronze wire or substitute, 24"
• 10-gauge bronze wire, 3"
• 16-gauge sterling wire, 8"
• Ball peen hammer • Heavy duty round nose pliers• Heavy duty super flush cutters or
snips, or jeweler’s saw• Flat nose pliers• Anvil or bench block• Flex shaft or drill• 1/16" drill bit• Torch, with propane, oxy mix, or MAPP gas• Ribbon or fibers• File• Center punch• 3M wheel (optional)• Grinding wheel (optional)• Texture hammer or design stamps
(optional)Resource: All supplies are available from Objects and Elements, ObjectsandElements.com
Pho
to o
f fi
nis
hed
Pie
ce
by J
im L
aw
son
, aLL
oth
er P
ho
tos
co
urt
esy
of
the
au
tho
r.
forged hearts By LinDa Larsen
www.JewelryMakingDaily.com 4
5 Free Cold Connection Jewelry Projects: How to Rivet JewelRy and MoRe
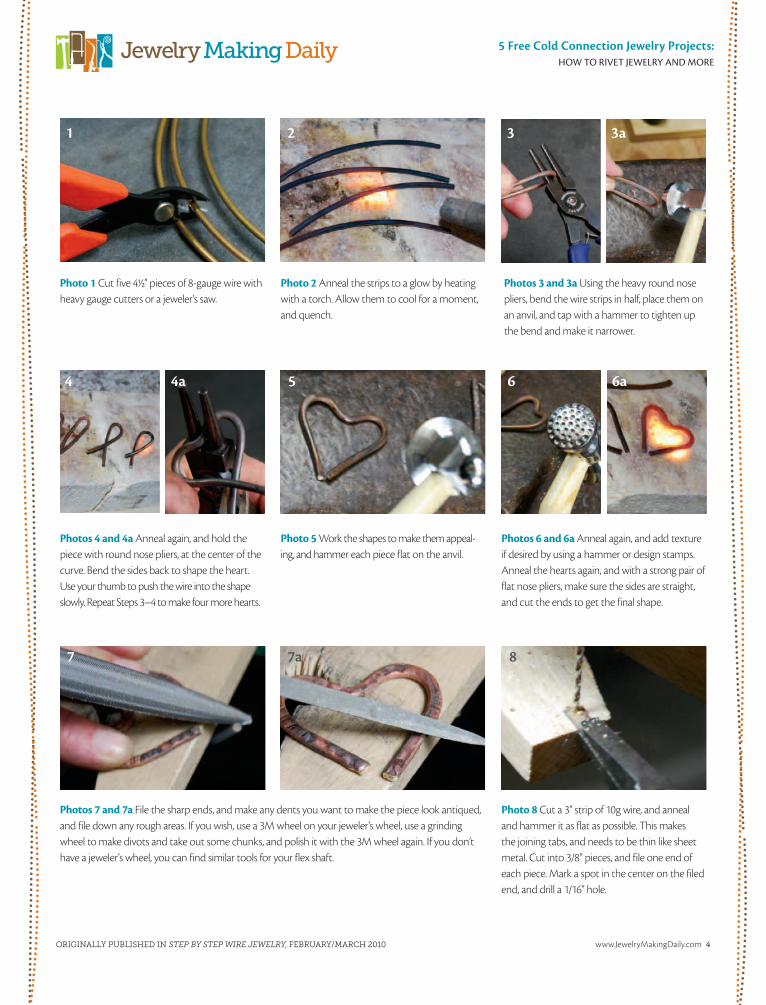
Photo 1 Cut five 4½" pieces of 8-gauge wire with heavy gauge cutters or a jeweler’s saw.
Photo 2 anneal the strips to a glow by heating with a torch. allow them to cool for a moment, and quench.
Photos 3 and 3a Using the heavy round nose pliers, bend the wire strips in half, place them on an anvil, and tap with a hammer to tighten up the bend and make it narrower.
Photos 4 and 4a anneal again, and hold the piece with round nose pliers, at the center of the curve. Bend the sides back to shape the heart. Use your thumb to push the wire into the shape slowly. repeat steps 3–4 to make four more hearts.
Photo 5 Work the shapes to make them appeal-ing, and hammer each piece flat on the anvil.
Photos 6 and 6a anneal again, and add texture if desired by using a hammer or design stamps. anneal the hearts again, and with a strong pair of flat nose pliers, make sure the sides are straight, and cut the ends to get the final shape.
Photos 7 and 7a File the sharp ends, and make any dents you want to make the piece look antiqued, and file down any rough areas. if you wish, use a 3M wheel on your jeweler’s wheel, use a grinding wheel to make divots and take out some chunks, and polish it with the 3M wheel again. if you don’t have a jeweler’s wheel, you can find similar tools for your flex shaft.
Photo 8 Cut a 3" strip of 10g wire, and anneal and hammer it as flat as possible. This makes the joining tabs, and needs to be thin like sheet metal. Cut into 3/8" pieces, and file one end of each piece. Mark a spot in the center on the filed end, and drill a 1/16" hole.
1 2 3 3a
4a4 5 6 6a
7 7a 8
orIgInally publIshed In step by step wIre jewelry, february/march 2010

www.JewelryMakingDaily.com 5
5 Free Cold Connection Jewelry Projects: How to Rivet JewelRy and MoRe
LinDa Larsen has spent many years creating anything that has color and texture. Fashion has always been a keen interest and after making her first piece of jewelry she was hooked. she has joined her talents with susan Lenart Kazmer and they have published their first book and now have an online jewelry supply store featuring many of their original designs. you can reach her at [email protected]
Photo 12 Lay the first heart face up on the drilling surface, and fit the second heart with the previously drilled hole over the tab. Lay them so that the two hearts are touching and curving slightly up. Hold them in place, and drill through the previously drilled hole and on through the tab, so the two holes are lined up.
Photo 13 rivet as before. Use a file to remove the end of the tab if it shows from the front. Continue in this manner until all the hearts are riveted in place. Use a soft flame, and slowly heat to bring up the bronze patina or leave it shiny if you prefer. Tie on a ribbon to wear it around your neck.
wiretips
Photos 9 and 9a Take the first two hearts to be joined, and mark where you want the rivet with a center punch. Drill a 1/16" hole in each. Be careful not to wiggle the drill, as you want a very tight fit between the hole and the riveting wire.
Photos 10 and 10a Cut a 1/2" piece of 16g wire. Hold the wire in a pair of flat nose pliers on the hammering surface, snip just above the pliers to get a flat surface on the wire end. Using a ball peen hammer, gently hammer around the sides of the wire until it forms a nail head.
Photos 11 and 11a Lay the nail head side of the rivet face down, and add the tab and the first heart. Press down on the assembly with your fingers, and snip the excess off. This will give you a flat surface to hammer with the ball peen hammer and finish your rivet. Flip over, and finish the rivet on the back. Flip back and forth until the rivet is tight.
• If you don’t have a large anvil, put the smaller tool on a very heavy sturdy surface. The more resistance you have, the better the results.
• You can cut down the hammering time by running the pieces through a rolling mill, and then finishing with a hammer to make it look more organic.
• When I use a jeweler’s wheel, I like to handle my pieces with my bare hands as I have more control. I keep a small dish of water handy to drop them in and cool them off when they become too hot to hold.
9 9a 10 10a
11 11a 12
13
orIgInally publIshed In step by step wIre jewelry, february/march 2010

www.JewelryMakingDaily.com 6
5 Free Cold Connection Jewelry Projects: How to Rivet JewelRy and MoRe
the nice thing about aluminum is that it’s easy to saw, soft to forge, and a nice color. i like to combine it with copper for the color contrast. this is an easy project that requires few
tools, especially good for beginners who want to put their newfound sawing skills to use. the dapping block will help you forge the flowers into 3d, and the spirals and forged wire that join them together might remind you of tendrils and leaves. Make as many units as you like — and feel free to try other metals after you’ve got the hang of cutting out the tight curves and sharp points of the petals. i used a baker’s dozen for my necklace.
Sawn Aluminum & Copper Necklace
By HeLen i. Driggs
No torch and low cost
OPe
nin
g P
HO
TO: Ji
M L
aW
sOn
PrO
JeC
T PH
OTO
s: H
eLen
i. D
rig
gs
maTeRials
20-gauge aluminum sheet
20-gauge copper sheet
14-gauge round copper wire
Doublestick tape
Appropriate patinas
Rubbing alcohol; cotton balls
Tools
Hand tools: jeweler’s saw; 2/0 blades; needle files: round barette, flat, half round; sanding sticks; ball peen or chasing hammer; centerpunch; wood dapping block and punches; bench block; forging hammer; optional decorative stamps
Additional tools: drill or flex shaft; 3/32 (#43) drill bit
layout tools: ruler
sawn alumInum and copper necKlace By HeLen i. Driggs

www.JewelryMakingDaily.com 7
5 Free Cold Connection Jewelry Projects: How to Rivet JewelRy and MoRe
Photo 5 insert flower into largest dimple in dapping block. Dap into hemisphere with punch, working evenly across form. repeat for all cut flower shapes. Patina as desired. Cut thirteen 3" lengths of wire.
Photo 6 With round nose pliers, form a tight spiral at one end of a cut wire. Use forging ham-mer to work harden and flatten spiral only.
Photo 7 Bend wire 90° at outside edge of spiral.
Photo 8 Thread aluminum flower on wire with cupped side facing spiral. slide flower to end of wire.
Photo 9 Bend wire 90° under flower and spiral. They should lie facing up at end of wire.
Photo 10 Forge unspiraled end of wire flat to about 1/8" wide. Control hammer marks and curvature of forged wire to keep flat. Center punch a divot on flat area of wire about1⁄4 " from end. of wire about 1⁄4 " from end.
1 2
6 8
9 10
3 4
5 7
Illustration Photocopy or scan and print pattern as many times as needed to create desired length; necklace demonstrated uses 13 blossoms. Clean and prepolish the sheet. Coat an area on each pattern with doublestick tape.
Photo 1 attach photocopied pattern pieces to sheet in a way that minimizes metal waste.
Photo 2 saw out pattern pieces. ensure petal intersections are cleanly cut out.
Photo 3 With centerpunch and ball peen or chasing hammer, punch a divot on center of flower indicated on pattern.
Photo 4 Drill holes in center of each flower. remove pattern and tape, using alcohol on a cotton ball to remove tape residue. File and sand edges of all pieces. remove burrs from drilled holes. stamp or texture one side of some or all flowers if desired.
orIgInally publIshed In lapIdary journal jewelry artIst, august 2008

www.JewelryMakingDaily.com 8
5 Free Cold Connection Jewelry Projects: How to Rivet JewelRy and MoRe
Photo 11 Drill divot. sand any burrs from drilled hole, preserving hammer marks on forged end of wire. set aside. Make another forged spiral wire end and thread on a copper flower.
Photo 12 insert unspiraled end of wire into drilled hole of previous unit. slide unit as far as it will go through drilled hole and slide both parts away from plain end of second unit. Forge unspiraled wire end flat, ensuring previ-ous unit remains in position and being careful to place hammer marks only on second wire. When second wire is about 1⁄8 " wide, divot
and drill hole as for first unit. Continue spiral-ing wire lengths, threading alternate metal flowers, forging ends flat and drilling for all remaining flowers.
Photo 13 Make clasp hook by forming a looped end and hook. Forge looped ends flat. roll inward with round nose pliers. Hammer large loop of hook to work harden.
Photo 14 Join clasp to last unit by turning a loop upward on unforged wire end. Thread clasp hook on wire and close. Work harden closed loop with hammer.
HeLen i. Driggs is the Managing editor for Lapidary Journal Jewelry Artist and an experienced metalsmith. a BFa graduate of Moore College of art, she has worked as an information graphics artist, art director, writer, and editor. she is a member of the Pennsylva-nia society of goldsmiths and the society of north american goldsmiths.
11 12 13 14
orIgInally publIshed In lapIdary journal jewelry artIst, august 2008

www.JewelryMakingDaily.com 9
5 Free Cold Connection Jewelry Projects: How to Rivet JewelRy and MoRe
Bodacious Copper BangleRiveted and coiled grounding wire bracelet.
By KiM sT. Jean
never having worked with this heavy-gauge wire, i ran into several road blocks. when i removed the tape holding the coil together, it jumped out at me like a striking cobra.
Coming away from that unscathed, i had to figure out how to cut it. out came the jeweler’s saw. while i wrestled the tail end of my copper cobra, and tried to saw its head off in the perfect bangle length, i knew there had to be a better way. one huge pair of cable cutters later, this was the beginning of the Bodacious Bangle. the copper grounding wire and the cable cutters are available at hardware stores.
Tools & supplies•6-gauge copper grounding wire•26-gauge dead soft sterling wire•16-gauge dead soft sterling wire•Chasing hammers•Anvil or bench block•Drawplate•Jeweler’s saw or large cable cutters
•2/0 saw blades•Flush cutters•Chain nose pliers•Hand punch•Eyelet setter•Large, bushy flamed torch (MAPP)•Annealing pan•Quench bowl
•Two-hole punch• Bracelet bending pliers or bracelet mandrel
•Hose clamp•Spring-loaded punch•Flexible measuring tape•Brass brush, soap, and water•Pickle and pickle pot (optional)
Pho
to o
f fi
nis
hed
Pie
ce
by
Jim
La
wso
n; a
LL o
ther
Ph
oto
s c
ou
rte
sy o
f a
uth
or
bodacIous copper bangle By KiM sT. Jean

www.JewelryMakingDaily.com 10
5 Free Cold Connection Jewelry Projects: How to Rivet JewelRy and MoRe
Photos 1 and 1a Use a hose clamp to deter-mine the size. it can be adjusted by twisting the screw until the form slides easily on and off your wrist. Take the measurement of the clamp with a flexible measuring tape, and cut the length you need from the coil of wire. you can also measure the wire against another existing bangle.
Photo 2 anneal the whole length of the wire with the torch.
Photos 3 and 3a Paddle and flare out the ends of the wire with a heavy hammer. Texture the body of the bangle with a chasing hammer.
Photo 4 anneal the wire again with the torch. starting in the center of the wire, use bracelet bending pliers or a bracelet mandrel to shape the bangle.
Photos 5 and 5a Overlap the ends of the brace-let, creating the platform for the attachments. Try the bracelet on. if you are satisfied with the fit, hammer dimples in the spots where you want to place the attachments.
Photos 6 and 6a Pierce a hole in the top paddled edge with the hole punch. Make another hole on the bottom, using the top hole as the guide.
Photo 7 Cut 1" of 16g sterling (or finer) wire, and ball the end of the wire with the torch.
wire definition
Annealing is the process of using heat to return wire and metals to a malleable state. Manipulating wire with tools will cause it to become brittle and much harder to work with. Heavy gauges of wire, additionally, are difficult to work. Heating the wire with a torch to a dull red (in a dimly-lit room), will enable you to more easily work the metal again. You can anneal the same piece a number of times.
1 1a 2 3 3a
4 5 5a 6 6a
7
orIgInally publIshed In step by step wIre jewelry, summer prevIew 2009

www.JewelryMakingDaily.com 11
5 Free Cold Connection Jewelry Projects: How to Rivet JewelRy and MoRe
Photos 8 and 8a Place the balled wire in the back of a drawplate. Hammer the ball flat to create a rivet.
Photos 9 and 9a insert the rivet into the holes made in step 6. Cut the end of the wire on the rivet, so it is 1mm long.
Photo 10 Place the bracelet on an anvil, and flatten the rivet by gently tapping around the edges of the wire, mushrooming the wire over the hole. repeat steps 7–10 for a second hole if desired. To drill additional holes for a lashing attachment, follow the previous guidelines.
Photo 11 Pickle the whole bracelet to clean off the fire scale. if you do not have pickle, sand off the fire scale. Clean the pickled bracelet with a soft brass brush, soap, and water.
wire tips• You can use many different mediums
to embellish your bracelet, such as leather, jute, ribbon, and various other metals.
• If making this for a man, you can modify this design into a cuff, since men’s wrists tend to be larger. Follow the directions, skipping Steps 5-10, and don’t attach the ends together.
For a more subtle effect, use copper rivets in your copper bracelet.
try copper rivets!
8 8a 9a 10
11
9
orIgInally publIshed In step by step wIre jewelry, summer prevIew 2009

www.JewelryMakingDaily.com 12
5 Free Cold Connection Jewelry Projects: How to Rivet JewelRy and MoRe
KiM sT. Jean after teaching in a public school system for 10 years, Kim decided to explore jewelry making, and combined her creativity with her love of teaching. she has taught in Tucson for swarovski’s® Create your style seminars, the Bead and Button show, Bead Fest, and the sFMs Wildacres retreat. she teaches regularly at the Down the street Bead shows, and has also taught at the William Holland school of Lapidary arts. she is the co-owner of expressive impressions, inc., in Charlotte, n.C. expressive-impressions.com. Contact Kim at [email protected] or visit her Web site at kimstjean.com
Photo 15 Tighten the loop by pulling the tail wire where you began making the coil.
Photos 16 and 16a Tuck the tail up inside the coiled wire. Cut the excess wire off both ends. repeat steps 13–16 as many times around the bracelet as desired.
Photos 12 and 12a To make a lashing at-tachment, drill a hole through both layers of the paddle. Thread a 3" piece of 26g wire through the holes, leaving ¼" sticking out of the bottom hole. Wrap around the outside of the bracelet, and back through the hole. Thread the wire back under the “sewn” wires, and repeat three times. Cut off the excess wire.
Photos 14 and 14a Wrap the wire around the bracelet, starting at the open end of the hook, and wrap over the wires of the hook down to the bent point. Thread the end of the wire through the loop created at the end of the hook.
Photo 13 Cut a 3' piece of 26g wire. Measure 1" on the wire, and bend to make a long hook. Place the hook near the paddle ends.
orIgInally publIshed In step by step wIre jewelry, summer prevIew 2009
12 13
15 16 16a
12a 14a14

www.JewelryMakingDaily.com 13
5 Free Cold Connection Jewelry Projects: How to Rivet JewelRy and MoRe
m a T e R i a l s One ounce mokume gane billet12 gauge round sterling silver wire14 gauge sterling silver sheet26 gauge fine silver sheet8mm gemstone, any varietyFerric chloride patina
T o o l ssoldeRing Tools: torch setup. FoRging Tools: medium weight hammer, anvil, large mushroom dapping set.oTHeR Tools: flex shaft; round carbide cutting bur; 5/16"and 5/64" drill bits; sanding drumHand Tools: jewelers saw, small file, bezel pusher, duct tapeFinisHing Tools: 400 grit sandpaper, 400 grit radial bristle brush
s o u R c e s Most of the tools and materials for this project will be available from well stocked jewelry supply vendors.
Op
en
ing
ph
Ot
O: Jim
La
ws
On
; pr
OJe
ct
ph
Ot
Os
: by
th
e a
ut
hO
r
Skills n forging n stone setting n soldering
Mokume Gane Heart Pendant
Combine alternative metals with conventional materials
By rOger HaLas
l ike a living, breathing entity, mokume is one of those things that is never exactly predictable, which makes it fascinat-
ing to work with. it will inspire you, let you experiment, and if you’re accustomed to working with precious metals, it will let you save some money.
this project covers the basics of mokume coupled with some rudimentary fabrication skills. it will familiarize you with the principle of annealing a laminate, which can be tricky. it also covers forging, and how this affects the ultimate pattern, plus finishing and how a patina can really charge some life into a piece. altogether, this is a challenging exercise, but if you keep your head clear you will end up with a result that will dazzle that special someone in your life.
moKume gane heart pendant By rOger HaLas

www.JewelryMakingDaily.com 14
5 Free Cold Connection Jewelry Projects: How to Rivet JewelRy and MoRe
Photo 1 start out with a mokume gane billet. The most readily available choice is a sterling silver and copper combination, which works fine, but you can go with something else. Here, i used a laminate involving four metals: sterling silver, bronze, and two traditional Japanese alloys, shibuichi and shakudo. The reason: mokume gane is all about contrasts. More metals, more contrast. More fun.
Photo 2 anneal the billet, being careful not to melt the edges. When doing this, flux the billet and spread medium silver solder around the edges. This binds it, which prevents it from splitting apart during forging.
Photo 3 Using the medium weight hammer, forge the billet. i find it best to start out in the center and then work my way out in a circular pattern. The billet will cool fast, so when it starts to harden, it will make a clanging sound. at that point, stop hammering, and heat up the metal again. Continue forging to about 5mm in thickness.
Photo 4 With the round cutting bur, start cutting divots on one side of the billet. By doing this, you’ll expose the metal layers beneath, revealing a series of bull’s-eyes.
Photo 5 Use the sanding drum to grind a sweep across the other side of the billet, making it thinner as you move toward the edge. This will create the impression that the finished heart has two distinct sides.
Photo 6 Heat the billet again, then forge it level. Here, it’s extremely important that you forge evenly in every direction, using calculated hammer blows, otherwise the bull’s-eyes will start to distort. i find this to look messy so i avoid it. Forge the metal down until it’s about the equivalent of 12 gauge sheet.
1
2
4
5 6
3
orIgInally publIshed In lapIdary journal jewelry artIst, may 2010

www.JewelryMakingDaily.com 15
5 Free Cold Connection Jewelry Projects: How to Rivet JewelRy and MoRe
Photo 7 grind the edges of your new mokume sheet into the shape of a heart. File the top of the heart to refine the cusp. although it is a slower process, using the small hand file provides more control than a motorized tool.
Photo 8 Use the 5/64 inch bit to drill a hole near the base of the cusp. This will accommodate the 12 gauge wire that will ultimately rivet the bail to the heart. Drill a hole on the right side of the heart with the 5/16 inch bit for the 8mm stone setting. The opening will allow light to pass through the setting and will brighten the stone color.
Photo 9 Dome the heart. To make this easier, heat the piece, but don’t get it too hot. Then work it over with the large mushroom head in the appropriate dapping block. adding this curvature gives the finished piece a sense of dimension, rather than just sitting flat. it’s not totally neces-sary, but i think it looks better.
Photo 10 When domed, sand the top layer of metal to refine the mokume pattern. The flex shaft with an aluminum oxide sanding drum
works fine, or you can do this by hand with sandpaper — either method works.
Photo 11 Cut 1.5mm x 26.5mm strip of 26ga. fine silver sheet. Bend this around the 5/16 inch drill bit to create a bezel for the 8mm stone. solder ends together.
Photo 12 Before soldering the bezel to the heart, go over the heart with the 400 grit radial bristle brush. This creates a nice, even finish on the piece which makes it semi-polished while still porous enough to respond effectively to a patina.
7 8
9
10 11
12orIgInally publIshed In lapIdary journal jewelry artIst, may 2010

www.JewelryMakingDaily.com 16
5 Free Cold Connection Jewelry Projects: How to Rivet JewelRy and MoRe
Photo 13 Solder the bezel onto the heart.
Photo 14 Set the stone with the bezel pusher, being careful not to chip the stone. Here, because of the colors of the metals, I decided to use a garnet.
Photo 15 Make the bail. Cut 1.75" x 1.25" of 16ga. sterling sheet. Round off the ends with a file. Drill two holes with the 5/64" bit.
Photo 16 Bend the bail by hand around the 5/16" drill bit. Then, saw it down the middle with the jeweler’s saw and pull the two sides apart — like bunny ears. Refine with 400 grit sandpaper. Polishing the bail with a buffer looks better, because it cre-ates contrast, but that’s up to you.
Photo 17 Cover the front of the piece with duct tape to protect it while you’re riveting the bail. Cut 8mm of the 14 gauge round sterling wire. Hammer the rivet into place. Patina the piece with ferric chloride, then buff it with a rouge cloth. Since this is a larger piece, I put mine on a fairly thick chain.
rOger HaLas is a self-taught lapidary, metalsmith and jewelry designer in southern California. When not making jewelry he works as a professional photographer, martial arts instructor and aspiring screenwriter who encourages others to explore their creativity.
13 14
15
16
17
orIgInally publIshed In lapIdary journal jewelry artIst, may 2010

www.JewelryMakingDaily.com 17
5 Free Cold Connection Jewelry Projects: How to Rivet JewelRy and MoRe
A pendant that opens with a tube rivet hinge and a volcano cold connection setting for the stone
BY NANZ AALUNDSkills n Sawingn Filing n Sandingn Rivets; domed and tuben Solderingn Bezel making (optional)n Keum-boo (optional)n Roll-printing n Use of hydraulic press w/matrix diestime it took16 hours
Swivel Locket
16 hours
m a T e R i a l sCabochon gemstone20 or 22-gauge sterling sheet10 gauge (2.4 mm OD) silver stubbingBezel wire
T o o l sHand tools: Awl, brass slide gauge, bench anvil or block,
bench vise, burnisher, dividers, dapping punches, dapping block, drill bits, riveting hammer: either a cross-peen or fi nely fi nished ball-peen, hand fi les, jeweler’s saw and blades, rawhide or nylon mallet, round nose pliersoldering tools: Torch and soldering equipment are also needed for this project
optional tools: Circle cutter, fl ex shaft, hydraulic press, matrix dies, tumble polisher or pin fi nisher
s o u R c e s Most of the tools and materials for this project will be available from well stocked jewelry supply vendors.
swIvel locKet By nanZ aaLUnD
be careful who you let open this locket — many people will try to pry it open as if it were a book without knowing any better. this swivel style
locket is considered nontraditional because the hinge is a tube rivet. the single tube rivet hinge at the top of the locket lets it open in a sideways swivel instead..
i used roll-printed metal, but you can use letter stamped, hammered, or etched metal to enhance your piece. the major difficulty when using textured metal is having solder flow into the texture and ruining it. So, i’ll show you a way to use bezel wire and a cold connected stone setting to eliminate this difficulty.
www.JewelryMakingDaily.com 18
5 Free Cold Connection Jewelry Projects: How to Rivet JewelRy and MoRe
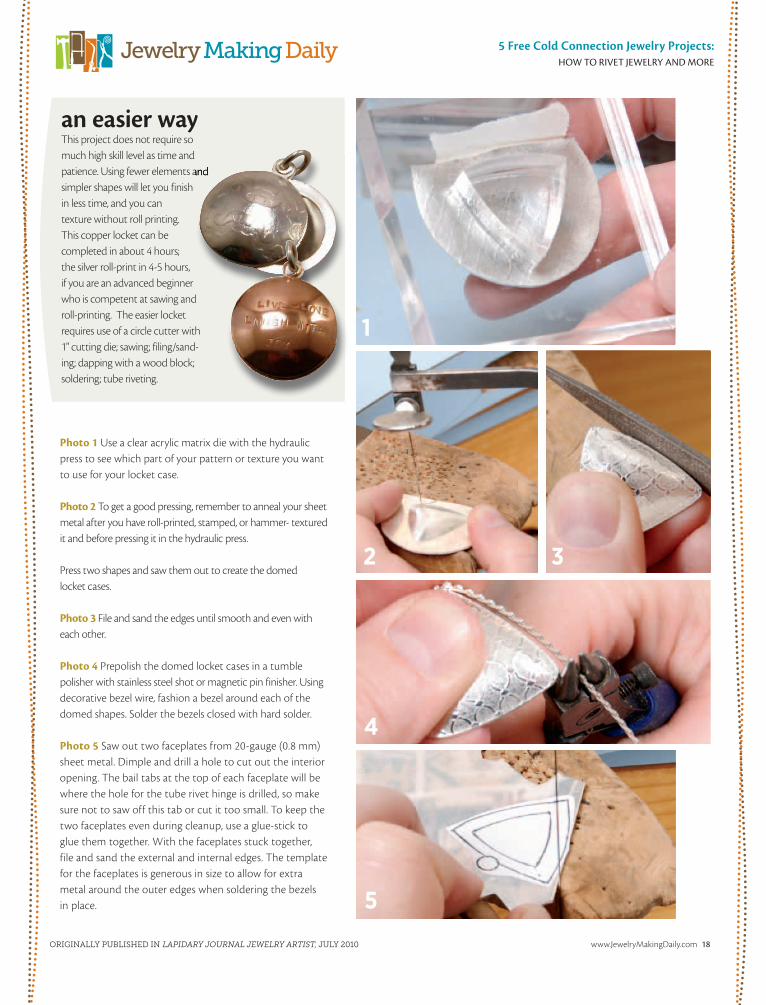
Photo 1 Use a clear acrylic matrix die with the hydraulic press to see which part of your pattern or texture you want to use for your locket case.
Photo 2 To get a good pressing, remember to anneal your sheet metal after you have roll-printed, stamped, or hammer- textured it and before pressing it in the hydraulic press.
Press two shapes and saw them out to create the domed locket cases.
Photo 3 File and sand the edges until smooth and even with each other.
Photo 4 Prepolish the domed locket cases in a tumble polisher with stainless steel shot or magnetic pin finisher. Using decorative bezel wire, fashion a bezel around each of the domed shapes. solder the bezels closed with hard solder.
Photo 5 saw out two faceplates from 20-gauge (0.8 mm) sheet metal. Dimple and drill a hole to cut out the interior opening. The bail tabs at the top of each faceplate will be where the hole for the tube rivet hinge is drilled, so make sure not to saw off this tab or cut it too small. To keep the two faceplates even during cleanup, use a glue-stick to glue them together. With the faceplates stuck together, file and sand the external and internal edges. The template for the faceplates is generous in size to allow for extra metal around the outer edges when soldering the bezels in place.
This project does not require so much high skill level as time and patience. Using fewer elements and simpler shapes will let you finish in less time, and you can texture without roll printing. This copper locket can be completed in about 4 hours; the silver roll-print in 4-5 hours, if you are an advanced beginner who is competent at sawing and roll-printing. The easier locket requires use of a circle cutter with 1" cutting die; sawing; filing/sand-ing; dapping with a wood block;soldering; tube riveting.
1
2 3
4
5
patience. Using fewer elements and
an easier way
orIgInally publIshed In lapIdary journal jewelry artIst, july 2010

www.JewelryMakingDaily.com 19
5 Free Cold Connection Jewelry Projects: How to Rivet JewelRy and MoRe
Photo 6 Orient the placement of the bezel with the bail tab at the top of each faceplate and solder with medium solder. Trim the extra metal around the outer edge of the bezel with files and sandpapers. Dimple the center of one bail tab and use a drill bit to create a 10-gauge (2.4 mm) hole. Check your local hardware store (bring your millimeter gauge) to get this larger size drill bit. Mark the second bail tab using the first drill hole. Dimple and drill the second bail tab. Clean up any flashing from around the drill holes. Prepol-ish the faceplates with the bezels in place.
Photo 7 To assemble the faceplates with a tube rivet, select a piece of silver tubing with an outside diameter of 2.4 mm. Use an awl or scribe point to flare one end of the tube. Measuring from the flared end, cut a 4mm length of tube. Thread the tube through the bail tab holes.
Photo 8 secure one dapping punch in a bench vise to hold it as you balance the tube rivet between the dapping punches. Tap the dapping punch lightly with a rawhide mallet to flare the other end of the tube rivet.
Photo 9 With the tube flared at each end, you can then move the faceplate assembly to a bench anvil and use a ball-peen hammer to continue setting the tube rivet.
Photo 10 Only when the rivet is set can you trim the extra metal from around the rivet. Use sandpaper snap-on disks with a flex shaft to get into the tight corners at the base of the bail tabs.
i will be using a cold connection stone setting technique called a “volcano” to set a pink tourmaline cabochon on one side of the locket. The easiest way to make this setting is to first measure the diameter of the gemstone. if the gemstone has a base diameter of 5 mm, select a die from a circle (disk) cutter of 4.5 mm to cut a hole in a 20-gauge plate. if your circle cutter does not have a cutting die in the size you need, you can cut a smaller hole and use a cylinder bur to enlarge the hole.
Photo 11 Use a dapping punch and a dapping block to flare the hole from behind. Once the hole is flared, test it on the cabochon for fit. The plate around the flared hole should lie flat with the cabochon in place. When the correct fit of the volcano plate is established the plate can then be shaped, trimmed, and polished to the decorative needs of your design.
6
7 8
9
10 11
www.JewelryMakingDaily.com 20
5 Free Cold Connection Jewelry Projects: How to Rivet JewelRy and MoRe
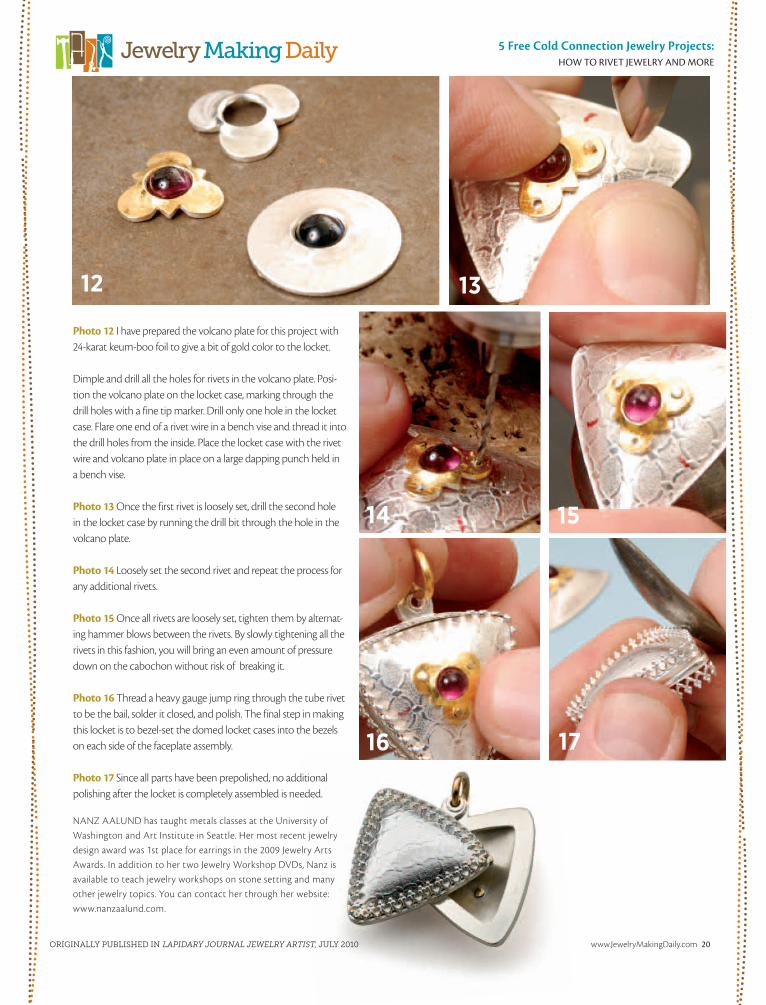
Photo 12 i have prepared the volcano plate for this project with 24-karat keum-boo foil to give a bit of gold color to the locket.
Dimple and drill all the holes for rivets in the volcano plate. Posi-tion the volcano plate on the locket case, marking through the drill holes with a fine tip marker. Drill only one hole in the locket case. Flare one end of a rivet wire in a bench vise and thread it into the drill holes from the inside. Place the locket case with the rivet wire and volcano plate in place on a large dapping punch held in a bench vise.
Photo 13 Once the first rivet is loosely set, drill the second hole in the locket case by running the drill bit through the hole in the volcano plate.
Photo 14 Loosely set the second rivet and repeat the process for any additional rivets.
Photo 15 Once all rivets are loosely set, tighten them by alternat-ing hammer blows between the rivets. By slowly tightening all the rivets in this fashion, you will bring an even amount of pressure down on the cabochon without risk of breaking it.
Photo 16 Thread a heavy gauge jump ring through the tube rivet to be the bail, solder it closed, and polish. The final step in making this locket is to bezel-set the domed locket cases into the bezels on each side of the faceplate assembly.
Photo 17 since all parts have been prepolished, no additional polishing after the locket is completely assembled is needed.
nanZ aaLUnD has taught metals classes at the University of Washington and art institute in seattle. Her most recent jewelry design award was 1st place for earrings in the 2009 Jewelry arts awards. in addition to her two Jewelry Workshop DVDs, nanz is available to teach jewelry workshops on stone setting and many other jewelry topics. you can contact her through her website: www.nanzaalund.com.
12 13
14 15
16 17
orIgInally publIshed In lapIdary journal jewelry artIst, july 2010