Embed Size (px)
Citation preview
5 ELOQUA HACKS YOU CAN USE TODAY
If you’re the “Eloqua person” at your company, you’ve probably run into a situation where someone asks “Can we . . . in Eloqua?” Often, the answer is simply using an Eloqua native functionality. However, on occasion there is a request that needs a little creative thinking (an Eloquirk?).
Through our work as power users, we’ve come across a few things that might be helpful for you. Here are five Eloqua hacks that you can use today. Enjoy – and contact us if you have questions about the practical application of these technology tips.
Page 2
Page 5
Page 7
Page 10
Page 11
Apply a preview message to your next email campaign.Looking for best practices to drive email conversion rates?
Use the Events module registration feature.
Need to cross-reference your Eloqua database without uploading contacts?
HACK 2
Use your Analyzer license to remove data from form submission reports.
Is data compliance driving a need for reports with no PII data?
HACK 4
Use CDO services to send the message.
Do you have a need (and legal approval) to send transactional messages from Eloqua?
HACK 5
Use your Analyzer license to create custom reports.Is reporting from a CDO challenging?
HACK 3
HACK 1
1
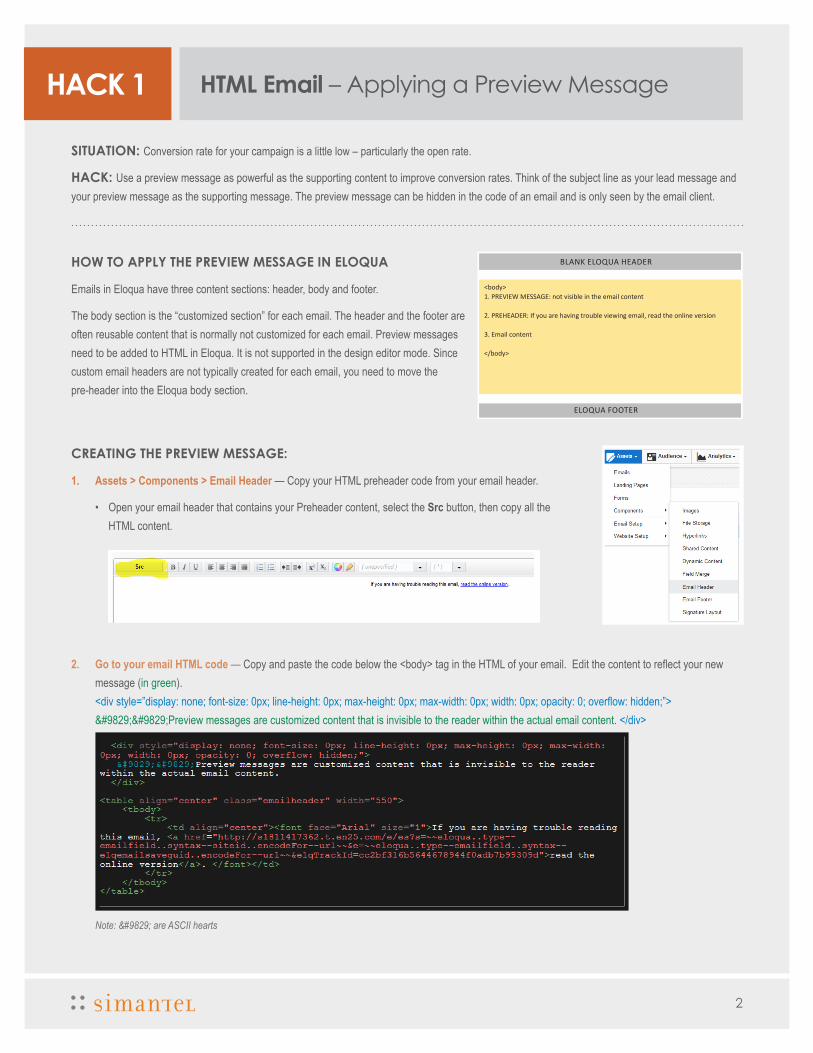
SITUATION: Conversion rate for your campaign is a little low – particularly the open rate.
HACK: Use a preview message as powerful as the supporting content to improve conversion rates. Think of the subject line as your lead message and your preview message as the supporting message. The preview message can be hidden in the code of an email and is only seen by the email client.
HOW TO APPLY THE PREVIEW MESSAGE IN ELOQUA
Emails in Eloqua have three content sections: header, body and footer.
The body section is the “customized section” for each email. The header and the footer are often reusable content that is normally not customized for each email. Preview messages need to be added to HTML in Eloqua. It is not supported in the design editor mode. Since custom email headers are not typically created for each email, you need to move the pre-header into the Eloqua body section.
CREATING THE PREVIEW MESSAGE:
1. Assets > Components > Email Header — Copy your HTML preheader code from your email header.
• Open your email header that contains your Preheader content, select the Src button, then copy all the HTML content.
2. Go to your email HTML code — Copy and paste the code below the <body> tag in the HTML of your email. Edit the content to reflect your new message (in green). <div style=”display: none; font-size: 0px; line-height: 0px; max-height: 0px; max-width: 0px; width: 0px; opacity: 0; overflow: hidden;”> ♥♥Preview messages are customized content that is invisible to the reader within the actual email content. </div>
Note: ♥ are ASCII hearts
HACK 1 HTML Email – Applying a Preview Message
BLANK ELOQUA HEADER
<body>1. PREVIEW MESSAGE: not visible in the email content
2. PREHEADER: If you are having trouble viewing email, read the online version
3. Email content
</body>
ELOQUA FOOTER
2
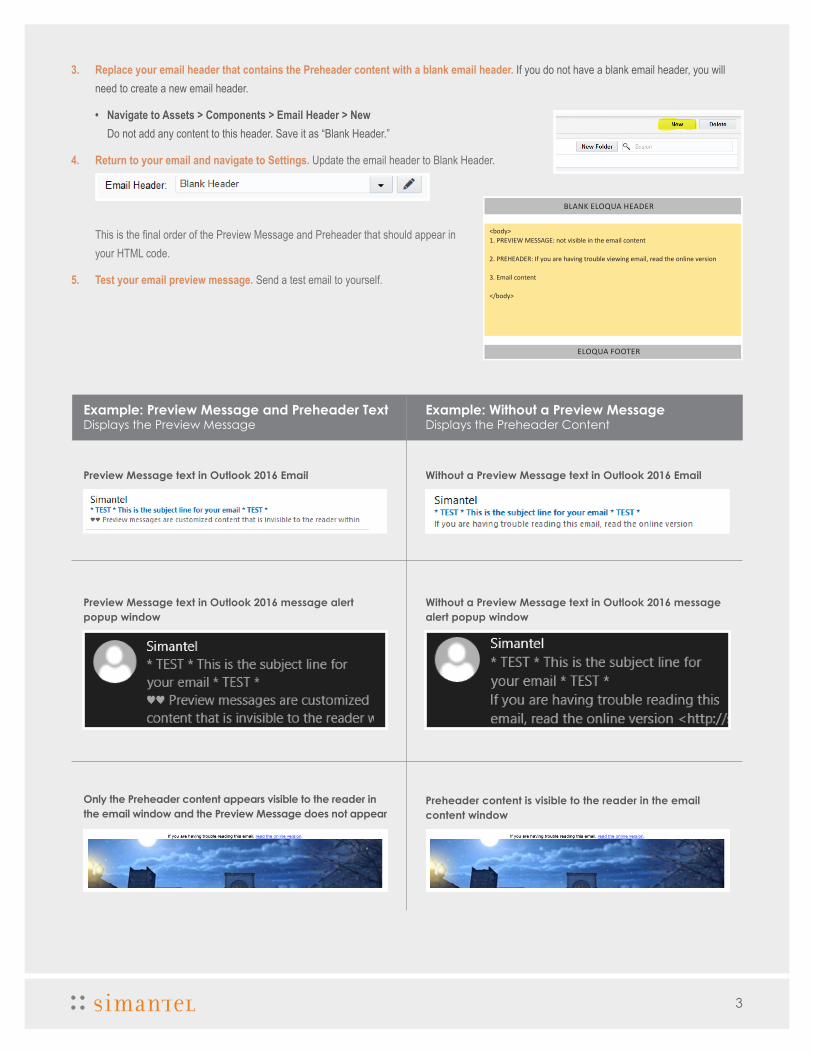
3. Replace your email header that contains the Preheader content with a blank email header. If you do not have a blank email header, you will need to create a new email header.
• Navigate to Assets > Components > Email Header > New Do not add any content to this header. Save it as “Blank Header.”
4. Return to your email and navigate to Settings. Update the email header to Blank Header.
This is the final order of the Preview Message and Preheader that should appear in your HTML code.
5. Test your email preview message. Send a test email to yourself.
BLANK ELOQUA HEADER
<body>1. PREVIEW MESSAGE: not visible in the email content
2. PREHEADER: If you are having trouble viewing email, read the online version
3. Email content
</body>
ELOQUA FOOTER
Example: Preview Message and Preheader Text Displays the Preview Message
Example: Without a Preview Message Displays the Preheader Content
Preview Message text in Outlook 2016 Email Without a Preview Message text in Outlook 2016 Email
Preview Message text in Outlook 2016 message alert popup window
Without a Preview Message text in Outlook 2016 message alert popup window
Only the Preheader content appears visible to the reader in the email window and the Preview Message does not appear
Preheader content is visible to the reader in the email content window
3
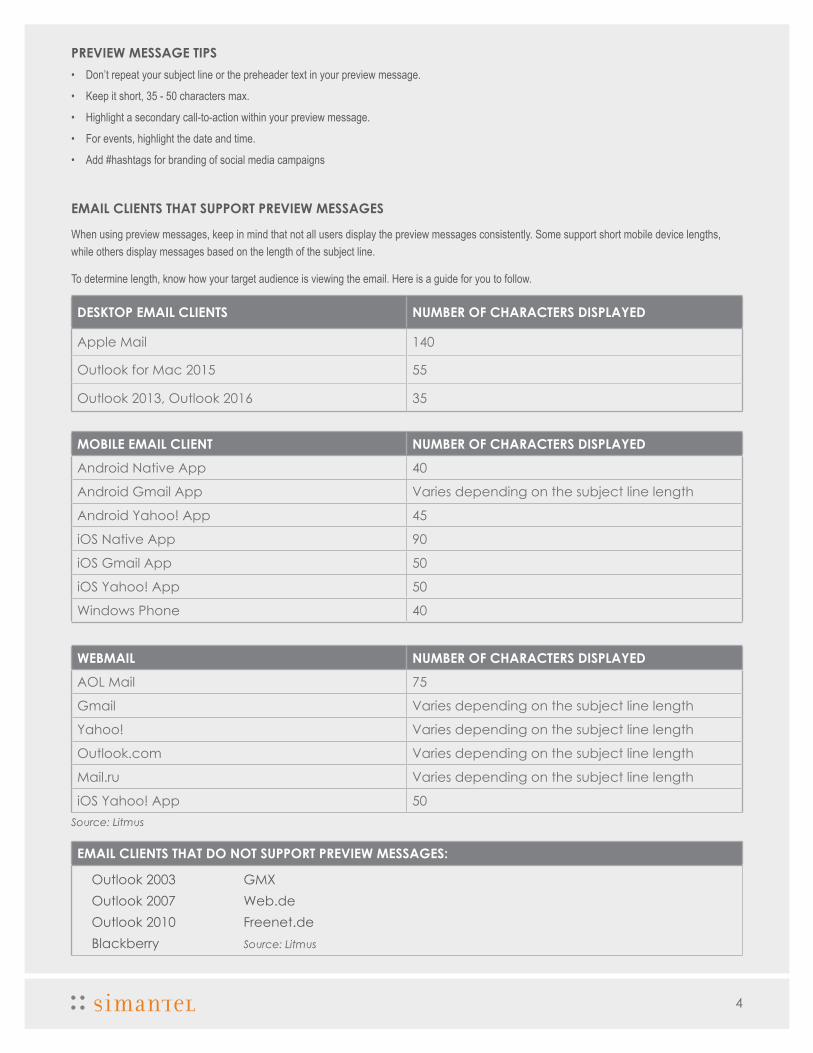
PREVIEW MESSAGE TIPS• Don’t repeat your subject line or the preheader text in your preview message.
• Keep it short, 35 - 50 characters max.
• Highlight a secondary call-to-action within your preview message.
• For events, highlight the date and time.
• Add #hashtags for branding of social media campaigns
EMAIL CLIENTS THAT SUPPORT PREVIEW MESSAGES
When using preview messages, keep in mind that not all users display the preview messages consistently. Some support short mobile device lengths, while others display messages based on the length of the subject line.
To determine length, know how your target audience is viewing the email. Here is a guide for you to follow.
DESKTOP EMAIL CLIENTS NUMBER OF CHARACTERS DISPLAYED
Apple Mail 140
Outlook for Mac 2015 55
Outlook 2013, Outlook 2016 35
MOBILE EMAIL CLIENT NUMBER OF CHARACTERS DISPLAYED
Android Native App 40
Android Gmail App Varies depending on the subject line length
Android Yahoo! App 45
iOS Native App 90
iOS Gmail App 50
iOS Yahoo! App 50
Windows Phone 40
WEBMAIL NUMBER OF CHARACTERS DISPLAYED
AOL Mail 75
Gmail Varies depending on the subject line length
Yahoo! Varies depending on the subject line length
Outlook.com Varies depending on the subject line length
Mail.ru Varies depending on the subject line length
iOS Yahoo! App 50Source: Litmus
EMAIL CLIENTS THAT DO NOT SUPPORT PREVIEW MESSAGES:
Outlook 2003Outlook 2007Outlook 2010Blackberry
GMXWeb.deFreenet.deSource: Litmus
4
HACK 2 Events Module – Finding Unmapped Contacts
SITUATION: You have an external list and want to know how many of the contacts are currently in your Eloqua database.
HACK: Use the Events Module to determine how many of the contacts on the external list already exist in your database. Don’t worry, any unmapped records do not get added to your contact database.
1. Orchestration > Tools > Events
2. Events > New Event Registration
3. Insert event name following your naming convention protocol, a description, and place in a folder. Click Save.
4. Click Edit on the ‘Registrant Info’ section.
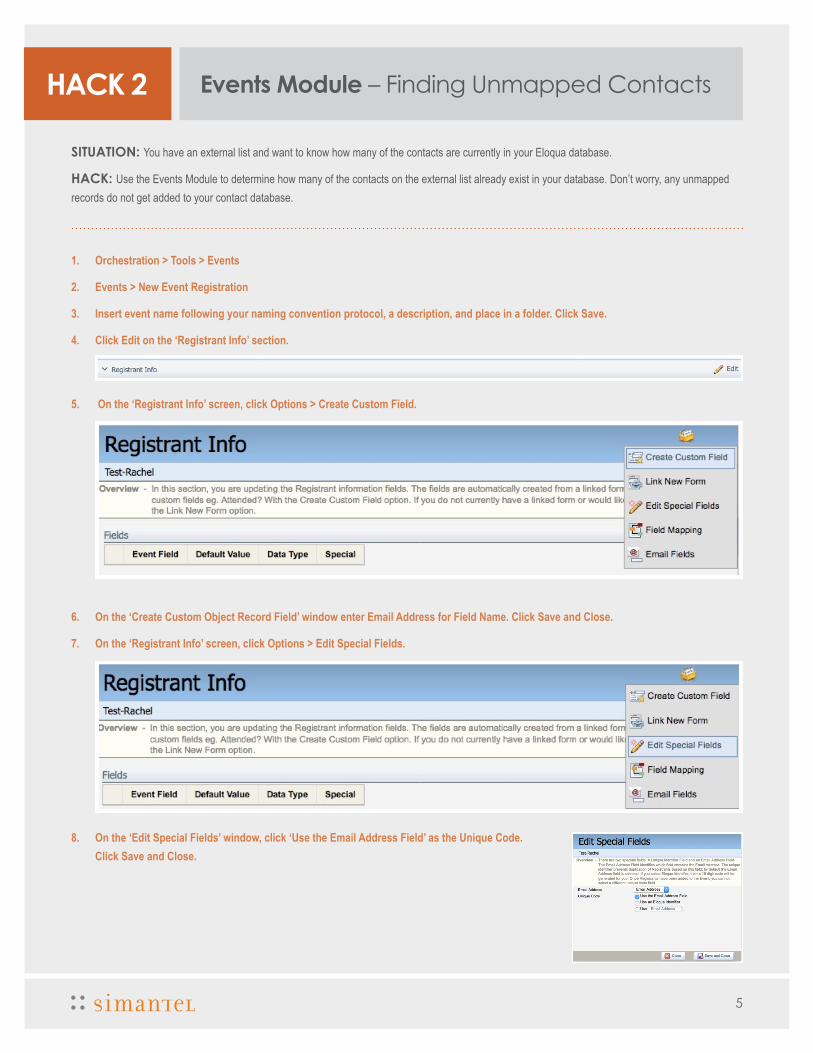
5. On the ‘Registrant Info’ screen, click Options > Create Custom Field.
6. On the ‘Create Custom Object Record Field’ window enter Email Address for Field Name. Click Save and Close.
7. On the ‘Registrant Info’ screen, click Options > Edit Special Fields.
8. On the ‘Edit Special Fields’ window, click ‘Use the Email Address Field’ as the Unique Code. Click Save and Close.
5
9. Save and Close the ‘Registrant Info’ screen.
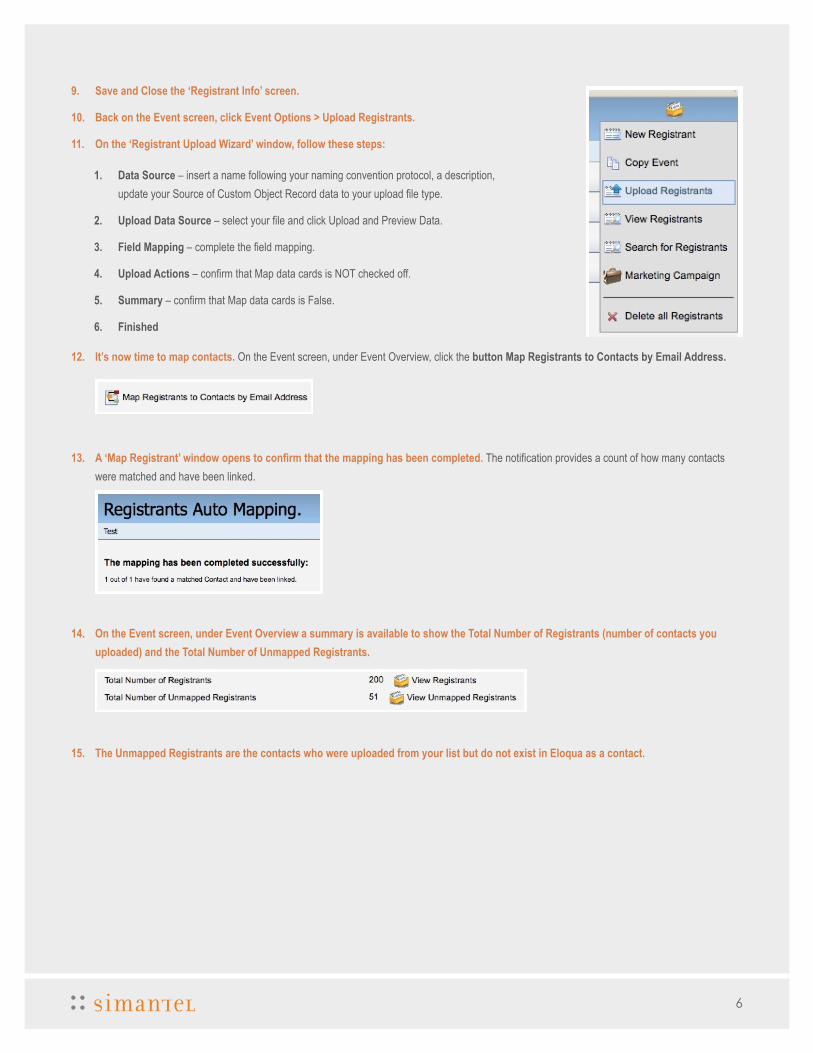
10. Back on the Event screen, click Event Options > Upload Registrants.
11. On the ‘Registrant Upload Wizard’ window, follow these steps:
12. It’s now time to map contacts. On the Event screen, under Event Overview, click the button Map Registrants to Contacts by Email Address.
13. A ‘Map Registrant’ window opens to confirm that the mapping has been completed. The notification provides a count of how many contacts were matched and have been linked.
14. On the Event screen, under Event Overview a summary is available to show the Total Number of Registrants (number of contacts you uploaded) and the Total Number of Unmapped Registrants.
15. The Unmapped Registrants are the contacts who were uploaded from your list but do not exist in Eloqua as a contact.
1. Data Source – insert a name following your naming convention protocol, a description, update your Source of Custom Object Record data to your upload file type.
2. Upload Data Source – select your file and click Upload and Preview Data.
3. Field Mapping – complete the field mapping.
4. Upload Actions – confirm that Map data cards is NOT checked off.
5. Summary – confirm that Map data cards is False.
6. Finished
6
HACK 3 Analyzer – Custom Data Object Reporting
SITUATION: You have information saved to a Custom Data Object (CDO) that is not saved to the contact record. You also have activity data that is available in a Classic Insight report. But, you need all sets of data in one, holistic report.
HACK: Custom Data Objects (CDO) can be added to reporting to gather a more complete view of a contact’s history. The CDO reporting can provide insight to data points that were not saved to the contact record. All types of CDO fields can be used in reporting – text, large text, numeric and date. Note: An analyzer license is required for this “hack.”
CUSTOM DATA REPORTING SETUP
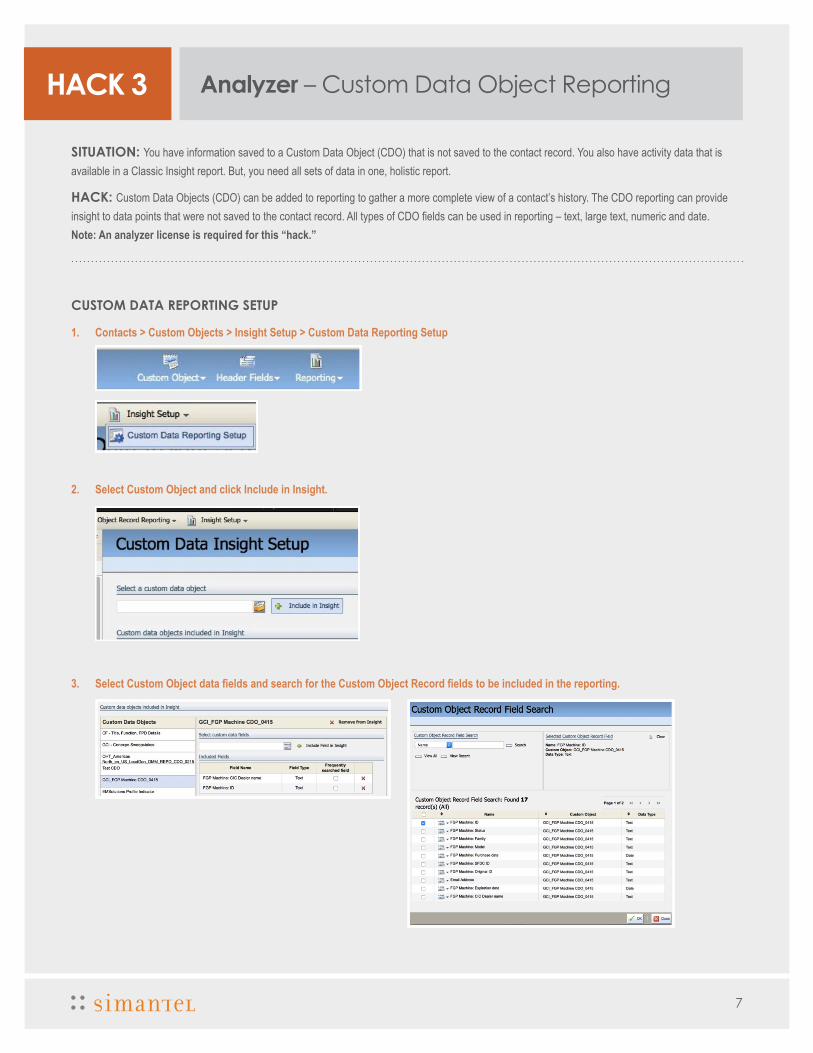
1. Contacts > Custom Objects > Insight Setup > Custom Data Reporting Setup
2. Select Custom Object and click Include in Insight.
3. Select Custom Object data fields and search for the Custom Object Record fields to be included in the reporting.
7
4. Once the fields are selected click Include Field in Insight. Note: There is a limit of 25 Custom Object Record fields per Custom Data Object report.
5. Click the Save button at the bottom of the main screen, and you’ll see a message stating that it will take 10 minutes for the custom object to be updated in Insight.
ADDING CUSTOM DATA OBJECTS TO STANDARD REPORTS With Analyzer, you can access your CDO data and add it to standard Insight reports.
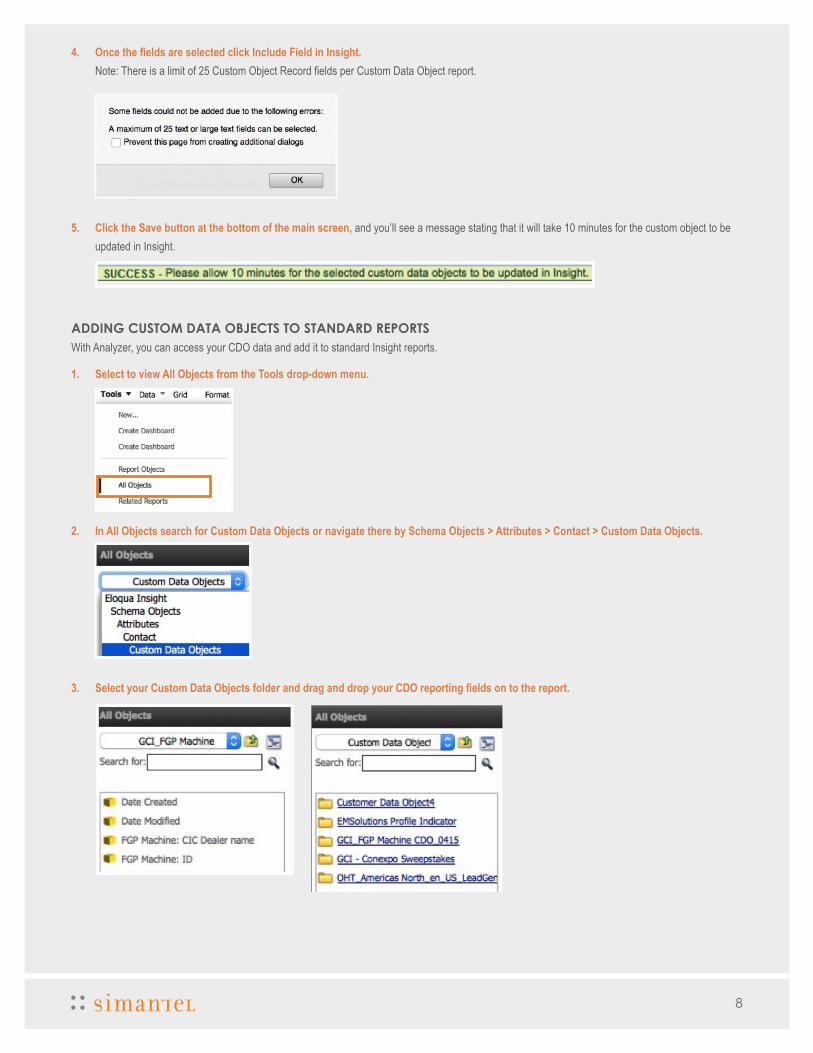
1. Select to view All Objects from the Tools drop-down menu.
2. In All Objects search for Custom Data Objects or navigate there by Schema Objects > Attributes > Contact > Custom Data Objects.
3. Select your Custom Data Objects folder and drag and drop your CDO reporting fields on to the report.
8

When using custom data object fields on your standard or custom reports all functionality for customization remains and all sharing options exist. You can still sort, format, export, and most importantly, set up subscriptions.
All columns of this report are able to be filtered. For example:
• Campaign Most Recent.
◦ Select one or more specific campaigns to display
• Form Submit Date/Time.
◦ Select a date range of form submission date
PRO HACK: CUSTOM CDO REPORT CONFIGURATION Inside your individual Eloqua account, you must set-up which Custom Data Object fields will be available in Insight.
1. Follow the CUSTOM DATA REPORTING SETUP process. Note: The first set-up is in your individual Eloqua account and not within Insight/Analyzer.
2. Login to Insight with the Analyzer license to build a custom report that is built on the CDO. In addition, contact and account fields can be added to the report like email address domain.
3. Create Report > New Report > Report Builder.
4. Choose the attributes of the report. Select Schema Objects > Attributes > Contact > Custom Data Objects > Select the name of the custom data object > move the CDO fields over to the right.
5. Skip steps 2, 3 and 4. Click Run Report. Right click on the column header and select Filter On to begin building filters on the new custom CDO report.
CDO REPORTING CONSIDERATION If set-up of the CDO is set to be unique based on email address, then your report will be deduped. If the contact submits the form multiple times, then the CDO will only capture the most recent form submission. Consider your reporting needs when setting up the CDO to determine if a unique identifier other than email address should be selected.
CDO REPORTING LIMITATIONS There is a limit of 25 Custom Object Record fields per Custom Data Object report. Custom data objects fields from different custom data objects can be added to the same report. If you hit limitations and have additional CDO fields to add, then follow the Custom Data Insight Set-up to make different CDOs available within Insight.
9
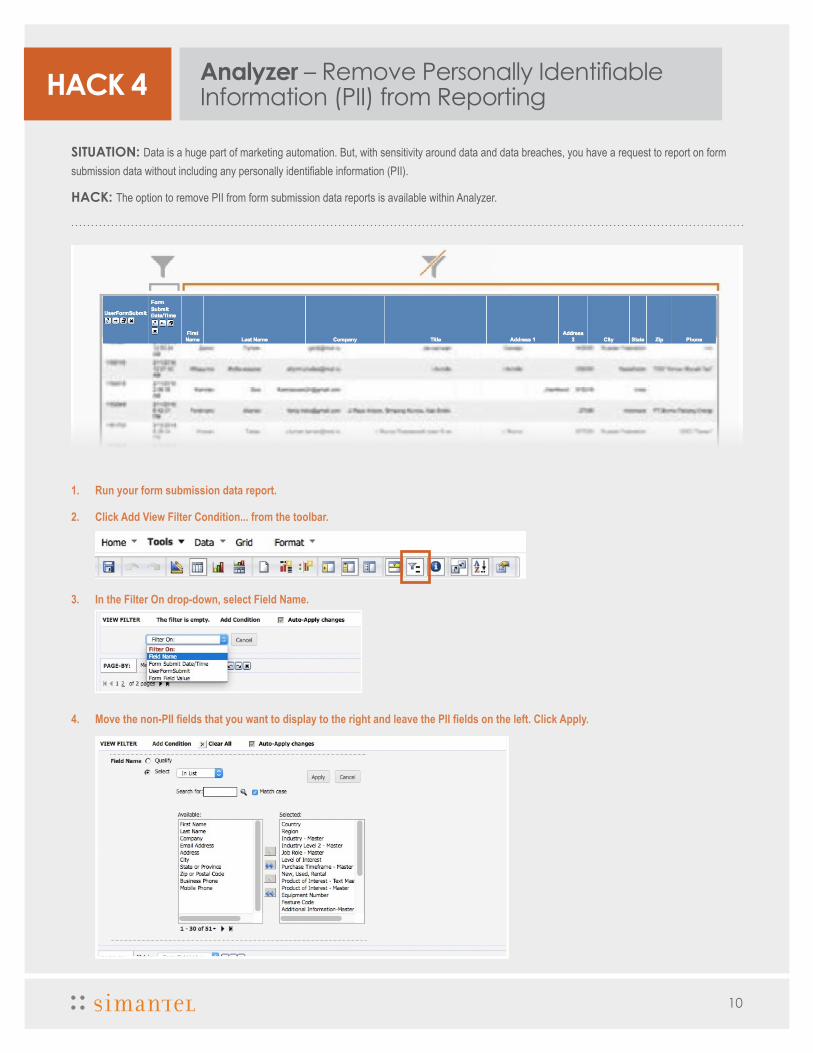
HACK 4 Analyzer – Remove Personally Identifiable Information (PII) from Reporting
SITUATION: Data is a huge part of marketing automation. But, with sensitivity around data and data breaches, you have a request to report on form submission data without including any personally identifiable information (PII).
HACK: The option to remove PII from form submission data reports is available within Analyzer.
1. Run your form submission data report.
2. Click Add View Filter Condition... from the toolbar.
3. In the Filter On drop-down, select Field Name.
4. Move the non-PII fields that you want to display to the right and leave the PII fields on the left. Click Apply.
10

HACK 5 Custom Data Object – Transactional Email Sends Reporting
SITUATION: You have a transaction based relationship with contacts in the United States that are not currently opted in to marketing communications and may not even be in your Eloqua database. You need to send a transactional message to these contacts.
HACK: After consultation with your data privacy legal counsel, you can send transactional messages from a Custom Data Object (CDO) without uploading the contact as globally subscribed. Note: The CDO Service will only send to Unknown Contacts who were previously a contact in your Eloqua database.
1. Create a new Custom Object by navigating to Audience > Custom Objects.
2. Click the dropdown for Custom Object > New Custom Object.
3. Give the Custom Object a name, description and place it in a folder.
4. In the “Default Entity Mapping used in upload” section, choose the Entity Type and the Entity Field. Entity field will usually be Email Address. Click Save.
5. On the Custom Object Record Fields page, click Custom Objects Fields > Add a New Field.
6. Add a Custom Object Record Field for Email Address. At a minimum Email Address is required, but more fields can be added if the data is available. Once all fields are added click Save.
11
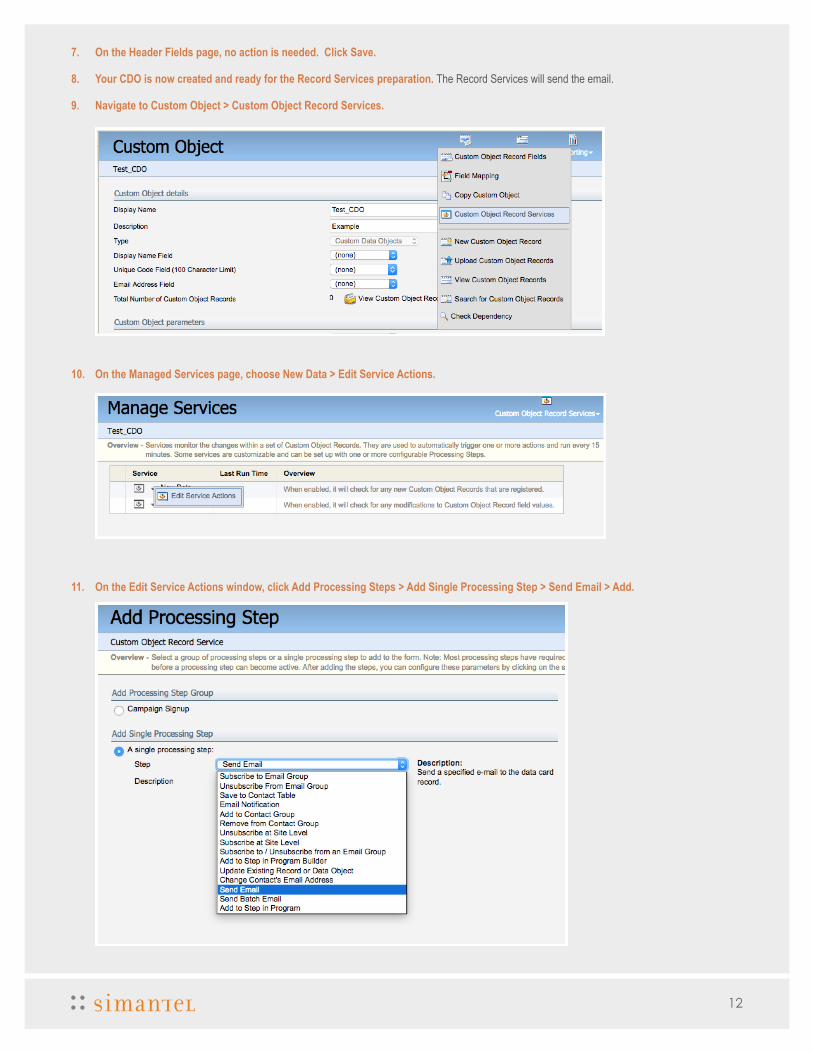
7. On the Header Fields page, no action is needed. Click Save.
8. Your CDO is now created and ready for the Record Services preparation. The Record Services will send the email.
9. Navigate to Custom Object > Custom Object Record Services.
10. On the Managed Services page, choose New Data > Edit Service Actions.
11. On the Edit Service Actions window, click Add Processing Steps > Add Single Processing Step > Send Email > Add.
12
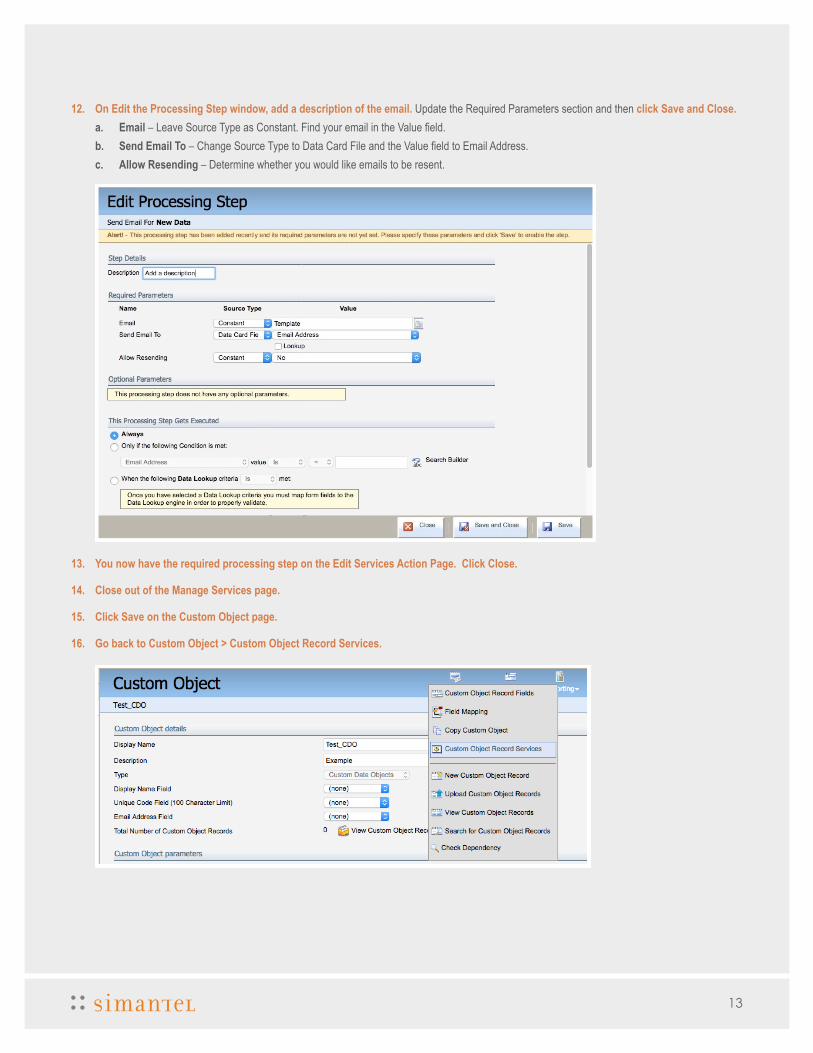
12. On Edit the Processing Step window, add a description of the email. Update the Required Parameters section and then click Save and Close. a. Email – Leave Source Type as Constant. Find your email in the Value field. b. Send Email To – Change Source Type to Data Card File and the Value field to Email Address. c. Allow Resending – Determine whether you would like emails to be resent.
13. You now have the required processing step on the Edit Services Action Page. Click Close.
14. Close out of the Manage Services page.
15. Click Save on the Custom Object page.
16. Go back to Custom Object > Custom Object Record Services.
13
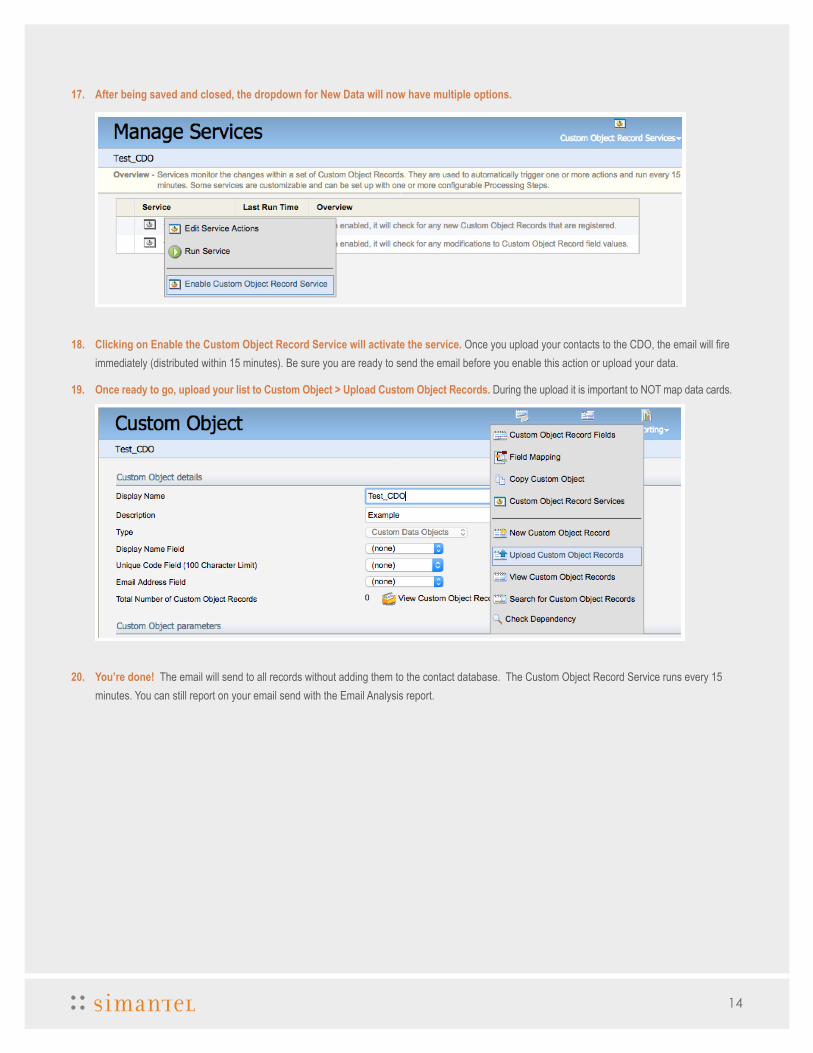
17. After being saved and closed, the dropdown for New Data will now have multiple options.
18. Clicking on Enable the Custom Object Record Service will activate the service. Once you upload your contacts to the CDO, the email will fire immediately (distributed within 15 minutes). Be sure you are ready to send the email before you enable this action or upload your data.
19. Once ready to go, upload your list to Custom Object > Upload Custom Object Records. During the upload it is important to NOT map data cards.
20. You’re done! The email will send to all records without adding them to the contact database. The Custom Object Record Service runs every 15 minutes. You can still report on your email send with the Email Analysis report.
14