Embed Size (px)
Citation preview

Introduction
to
Microsoft
Office Access
2003
Himmelfarb Health Sciences Library
The George Washington University Medical Center
2300 Eye St., NW
Washington, DC 20037


Table of Contents
INTRODUCTION TO ACCESS DATABASES .................................................................................... 1
CREATE A NEW DATABASE ............................................................................................................ 2
TABLES............................................................................................................................................ 3
THE LOOKUP WIZARD ................................................................................................................... 5
PRIMARY KEYS ............................................................................................................................... 5
INPUT MASK ................................................................................................................................... 7
RELATIONSHIPS ........................................................................................................................... 10
REFERENTIAL INTEGRITY ............................................................................................................ 11
FORMS .......................................................................................................................................... 13
QUERIES ....................................................................................................................................... 18
SORTING RECORDS ...................................................................................................................... 22
FILTERS ......................................................................................................................................... 23
REPORTS ....................................................................................................................................... 23
SWITCHBOARDS........................................................................................................................... 28
IMPORT AN EXCEL FILE INTO ACCESS ........................................................................................ 29
ONLINE HELP ............................................................................................................................... 31
BACK UP YOUR DATABASE .......................................................................................................... 31
OPEN AN ACCESS FILE ................................................................................................................. 31


1
Introduction to Microsoft Office Access 2003
INTRODUCTION TO ACCESS DATABASES
What is a relational database?
Microsoft Office Access 2003—a relational database—is used to store related groups of data that users can
retrieve by filtering, sorting, and combining information from separate datasheets, or tables. This process
of information retrieval is known as a query.
How is an Access database structured?
A database is made up of different objects, such as tables, forms and queries. Listed below are
descriptions of the object types that are used to create databases.
Object Purpose
Tables Where data is entered and stored.
Queries Organize, combine and filter data in order to retrieve just the information you want.
Forms Allow you to view, enter and update data outside of a table.
Reports Allow you to print information assembled from Tables/Queries in a custom layout.
Pages Data displayed in a web page.
Macros Automated tasks created by a series of instructions.
Modules Run Visual Basic Code.
In most applications, these objects would be saved as separate files. In Access, however, the entire
database is saved as one file, using the extension of .mdb. All objects are contained within this file.
The basic building blocks of a database are its tables, where data is initially entered. A separate table is
created for each type of information. For instance, if you were a business keeping track of inventory
bought and sold, you might create three separate tables: one with information about your suppliers, one
with buyer information, and one listing your current inventory. The inventory table would likely contain
a list of suppliers and buyers for the items. In this way, the inventory table shares common information
with the two other tables. They are linked.
Access vs. Excel
Why store categories of information in separate tables? Why not create one all-inclusive spreadsheet,
using Microsoft Excel? Excel is ideally suited to storing numerical data because of its ability to perform
complex calculations and to graph data. Access, on the other hand, is designed to manage records by
means of storing related data in separate tables whose information can then be combined and retrieved
based on criteria that you define. A business wanting to keep track of suppliers, buyers and orders
would be best served by using a database, since those three categories contain relational data.
2
About saving in Access
Access automatically saves data as you move from one record to another. (NOTE: This means once you
type over old information, that old information is lost and you’d need to re-enter it to get it back.)
Access does prompt the user to save newly created objects before closing them out, and to save objects to
which you made structural changes. The user can choose to save those changes or not.
CREATE A NEW DATABASE
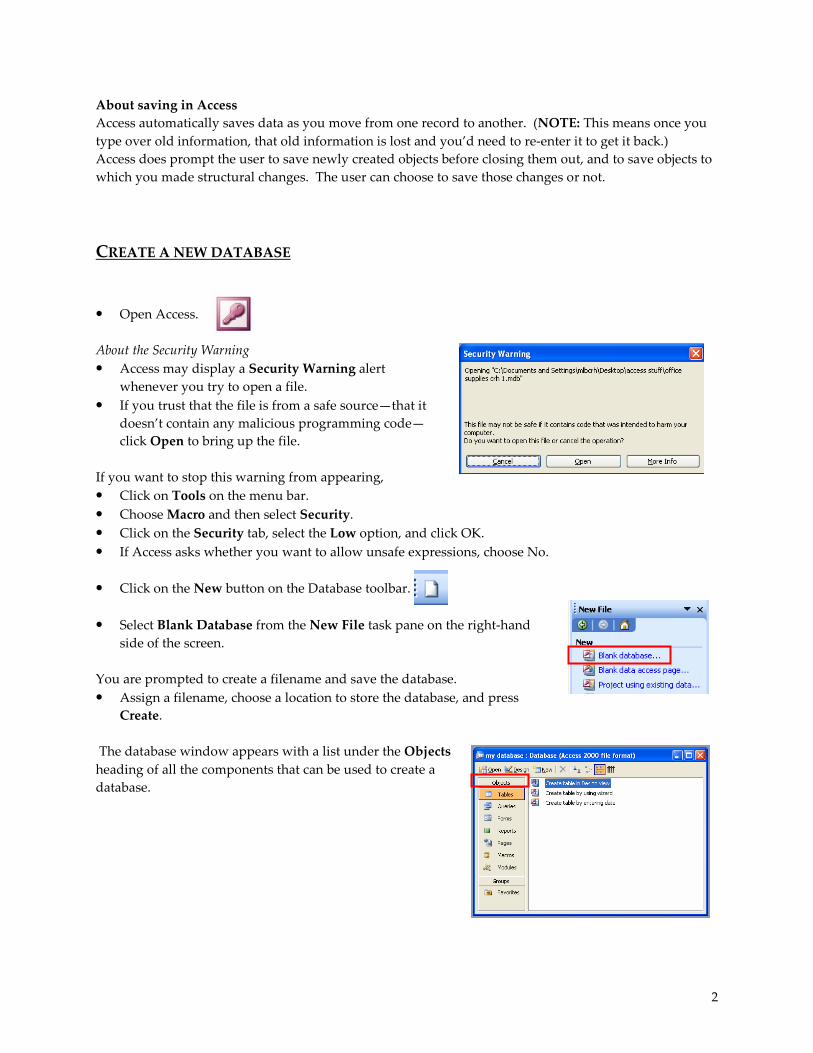
• Open Access.
About the Security Warning
• Access may display a Security Warning alert
whenever you try to open a file.
• If you trust that the file is from a safe source—that it
doesn’t contain any malicious programming code—
click Open to bring up the file.
If you want to stop this warning from appearing,
• Click on Tools on the menu bar.
• Choose Macro and then select Security.
• Click on the Security tab, select the Low option, and click OK.
• If Access asks whether you want to allow unsafe expressions, choose No.
• Click on the New button on the Database toolbar.
• Select Blank Database from the New File task pane on the right-hand
side of the screen.
You are prompted to create a filename and save the database.
• Assign a filename, choose a location to store the database, and press
Create.
The database window appears with a list under the Objects
heading of all the components that can be used to create a
database.

3
TABLES
Table structure
A table in Access is basically a datasheet made up of columns and rows. The columns contain fields and
the rows contain records. A field is a category, such as unit price, phone number, user ID, into which
you enter information. A record is all the pieces of information from the various fields that apply to one
entity, such as an employee, a department, or a vendor. An employee record, for example, might include
Employee ID, Phone, E-mail address, and Department. The intersection of a row and a column is
referred to as a cell.
Create a table
• Click on Tables under the Objects listing.
To the right, you’ll see several methods listed for creating a
table: using Design view, using the Wizard, and by directly
entering data in a datasheet.
Methods for creating a table:
Design view Offers the most control and flexibility in the creation of your table.
Wizard Walks you through the steps, but offers less creative control to the user.
Enter data (into a datasheet) “From scratch” method. Will probably need to use Design View to refine.
Design view allows you first to define the structure of your table in one area and then to enter data in
another. Even if you use another method, you’ll likely need to turn to Design view to refine the structure
and layout of the table. It’s the most useful method to become familiar with.
Create a table using Design view
• Double-click Create table in Design view.
←Records (sets of information stored in rows)
Fields (categories listed in columns)
Cell

4
The Design view screen allows you to enter field names, define the data type for each, and add an
optional description.
Field Name A category heading, such as Address or Phone Number
Data Type The type of data being entered, such as text, numbers, currency, date/time, etc.
Description Describes the category and/or how to enter data in a consistent way (e.g., “Enter 12/pk
rather than 12/pack or pack of 12”).
• Enter your first field name in the upper-left cell, beneath the Field Name heading. (NOTE: it’s
recommended that you use no spaces when typing a field name. Type PhoneNumber, for example,
rather than Phone Number.)
• Press Enter to move to the Data Type field for that entry. Click on the down arrow that now appears
and choose from the list of Data Type options.
Data Type Use
Text Text and/or numbers not used in calculations (e.g., phone numbers, street
addresses, zip codes). Limit of 255 characters per entry.
Memo Text and/or numbers requiring more than 255 characters per entry (e.g., notes)
Number Numeric data being used in calculations, excluding currency AND excluding
numbers that should not be rounded off during calculations.
Date/Time Date or time
Currency Currency (e.g., $5.00 or $0.75) or numbers that should not be rounded off during
calculations.
AutoNumber Usually sequential, auto-generated numbers, each which uniquely identifies a
record. A new number is generated as each new record is created.
Yes/No Use in fields where the entry can only be one of two values, such as Yes/No or
True/False.
OLE Object Formatted text, long documents, images, or other objects created in other
applications that are being inserted into or linked to from Access.
Hyperlink A link usually to a website.
Lookup Wizard… A field that allows you to choose an entry from another table or from a list of values
that you determine.
5
• NOTE: If you are prompted at any point to save your table, choose Yes.
• If you are saving for the first time, Access prompts you to enter a Table Name and click OK. Do so.
• TIP: Enter as clear and descriptive a name as possible. If you create many tables in a database, it may
be hard otherwise to tell them apart.
Access will then prompt you that no primary key has been assigned and asks if you’d like to create a
primary key now.
• Choose No to create your own or Yes to allow Access to create one for you. It’s preferable to set your
own, although that is not always possible. See below for more information about primary keys.
THE LOOKUP WIZARD
The Lookup Wizard creates what’s called a lookup column. The lookup column lets you see a drop-down
list containing entries from a linked table, allowing you to click on an entry rather than typing it in
manually. Not only does this simplify data entry, it also cuts down on typos and inconsistencies in how
data is entered.
Let’s say you’ve created a Supplier table with a Supplier Name field. Next, you create an Inventory table
with a Supplier Name field in it. When you click on the Supplier Name field in your Inventory Table, a
combo box containing a drop-down list of all the supplier names from the Suppliers table appears for
you to choose from. Click on your choice and the name appears in the field. NOTE: Should you later
add names to the Supplier Name field in the Supplier table, those names will then automatically appear
the next time you click on the combo box for that field in the Inventory Table.
To use the Lookup wizard,
• Choose Lookup Wizard… from the Data Type list in Design view.
• Choose I want the Lookup column to choose the values in a table or query.
• Select the table you want to use as your link and click Next.
• Click on the field you want to link and then press > to move it into the Selected Fields window and
press Next.
• To sort the listings, click on the down arrow by the first Sort Order window and click on your field.
• To sort in Ascending order, click Next. To sort in Descending order, click on the Ascending button
next to the window—this changes it to Descending—and click Next.
• Click Finish.
• Press Yes when prompted to save your table.
PRIMARY KEYS
A primary key is used to establish links between tables that allow you to combine and retrieve data from
them. It is a field (or multiple fields) that uniquely identifies each record in your table. A SSN field, for

6
instance, could be used as a primary key field in an employee database, since no two people have the
same one. A primary key is all but essential for your database to operate efficiently.
Create a primary key
Once you save a table, Access prompts you that no primary key has been defined, and asks if you’d like
to create one. You can either set a primary key yourself, or you can let Access do it for you.
Which should you choose?
If your table contains a field, such as employee IDs, that guarantees no duplicate entries, you should use
that field as your primary key.
If all your fields could potentially contain duplicate entries, let Access create a primary key for you. The
program creates an ID field with automatically generated, consecutive numbers. A new number is
generated each time you create a record. Because these numbers are meaningless, except to identify
uniquely each individual record in your table, you should always try to create a primary key from
amongst your table fields.
If Access prompts you that a primary key has not been defined,
• Click Yes if you want Access to assign one. Access inserts an ID field above all your other fields. Its
data type is AutoNumber. An image of a key appears in the gray box—called a row selector—to the
left of the ID field name. (TIP: You can rename this field name by clicking in the cell, deleting the
text, and typing your own text in its place.)
• Click No if you plan to assign your own primary key.
• To assign a primary key, click anywhere on the field name you plan to use.
• Click on the key icon from the Database toolbar. An image of a key appears in the row selector.
NOTE: The primary key should be the top field on the list. To change a row’s position,
• Click once inside the gray cell to the left of that row.
• Click again in the cell and hold down the left mouse button.
• Drag the row to its new location and release the mouse button.
NOTE: To remove a primary key from a field, click anywhere inside the field name and click on the
primary key icon from the Database toolbar. To designate a different field name, click inside that field
name and click on the primary key icon.
7
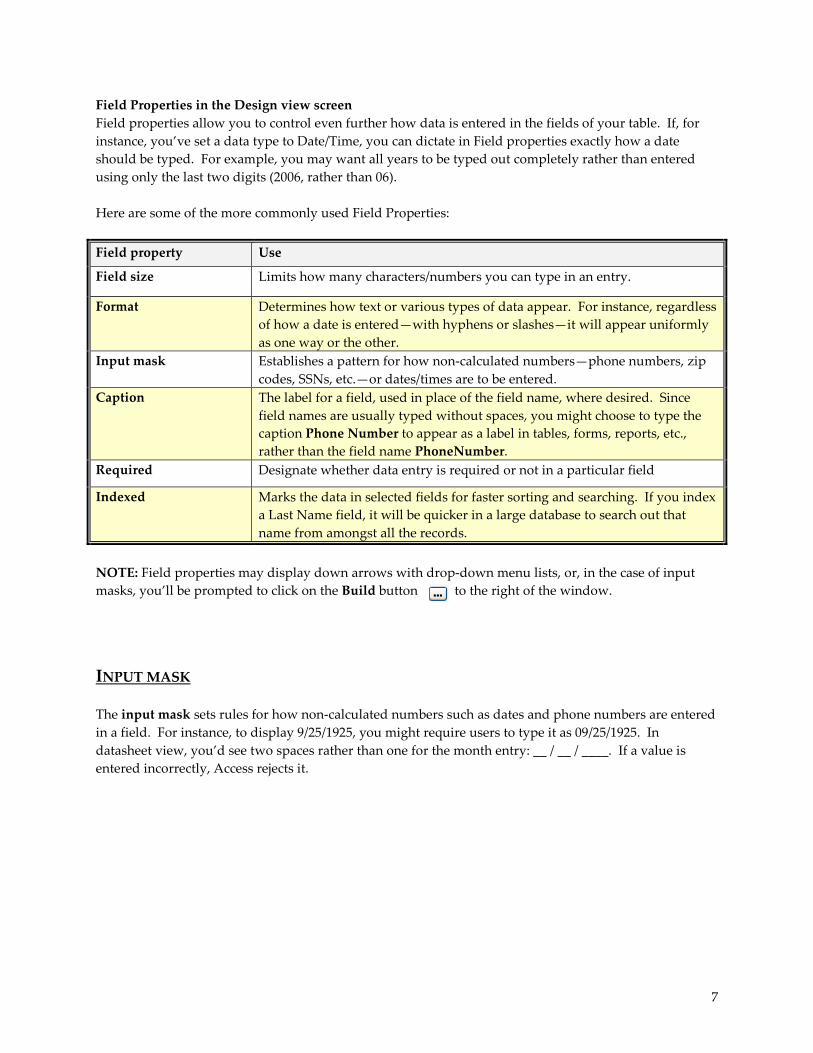
Field Properties in the Design view screen
Field properties allow you to control even further how data is entered in the fields of your table. If, for
instance, you’ve set a data type to Date/Time, you can dictate in Field properties exactly how a date
should be typed. For example, you may want all years to be typed out completely rather than entered
using only the last two digits (2006, rather than 06).
Here are some of the more commonly used Field Properties:
Field property Use
Field size Limits how many characters/numbers you can type in an entry.
Format Determines how text or various types of data appear. For instance, regardless
of how a date is entered—with hyphens or slashes—it will appear uniformly
as one way or the other.
Input mask Establishes a pattern for how non-calculated numbers—phone numbers, zip
codes, SSNs, etc.—or dates/times are to be entered.
Caption The label for a field, used in place of the field name, where desired. Since
field names are usually typed without spaces, you might choose to type the
caption Phone Number to appear as a label in tables, forms, reports, etc.,
rather than the field name PhoneNumber.
Required Designate whether data entry is required or not in a particular field
Indexed Marks the data in selected fields for faster sorting and searching. If you index
a Last Name field, it will be quicker in a large database to search out that
name from amongst all the records.
NOTE: Field properties may display down arrows with drop-down menu lists, or, in the case of input
masks, you’ll be prompted to click on the Build button to the right of the window.
INPUT MASK
The input mask sets rules for how non-calculated numbers such as dates and phone numbers are entered
in a field. For instance, to display 9/25/1925, you might require users to type it as 09/25/1925. In
datasheet view, you’d see two spaces rather than one for the month entry: __ / __ / ____. If a value is
entered incorrectly, Access rejects it.
8
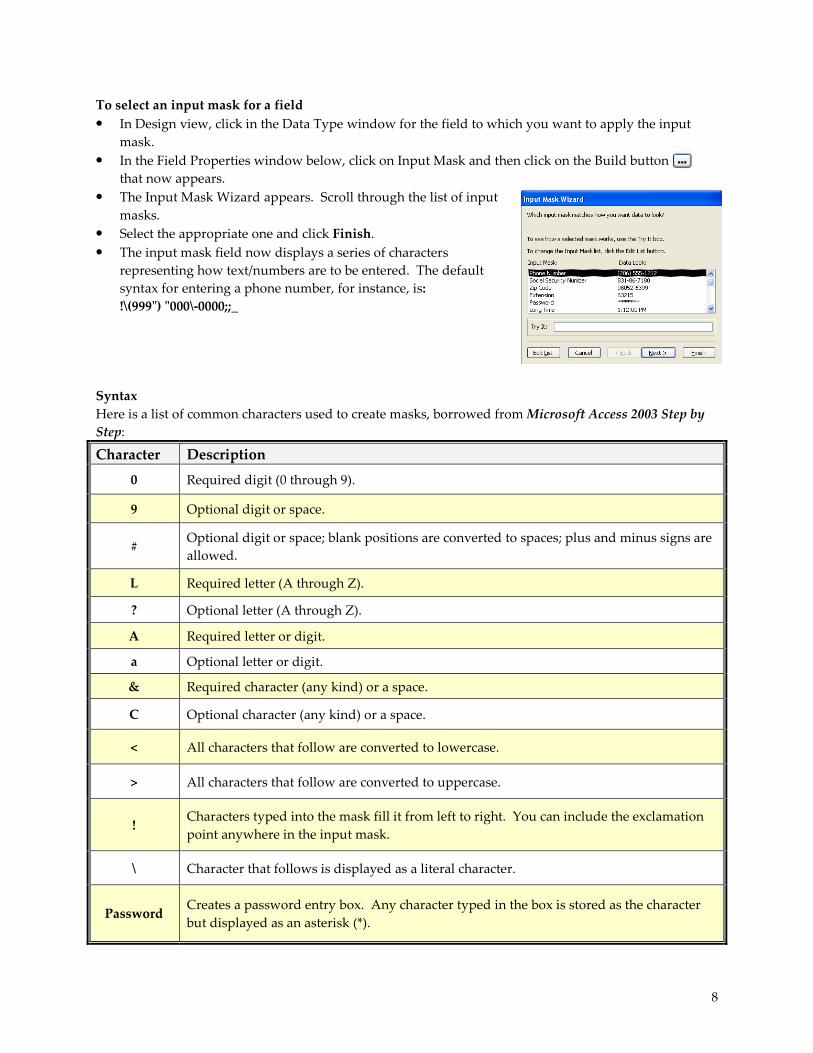
To select an input mask for a field
• In Design view, click in the Data Type window for the field to which you want to apply the input
mask.
• In the Field Properties window below, click on Input Mask and then click on the Build button
that now appears.
• The Input Mask Wizard appears. Scroll through the list of input
masks.
• Select the appropriate one and click Finish.
• The input mask field now displays a series of characters
representing how text/numbers are to be entered. The default
syntax for entering a phone number, for instance, is:
!\(999") "000\-0000;;_
Syntax
Here is a list of common characters used to create masks, borrowed from Microsoft Access 2003 Step by
Step:
Character Description
0 Required digit (0 through 9).
9 Optional digit or space.
# Optional digit or space; blank positions are converted to spaces; plus and minus signs are
allowed.
L Required letter (A through Z).
? Optional letter (A through Z).
A Required letter or digit.
a Optional letter or digit.
& Required character (any kind) or a space.
C Optional character (any kind) or a space.
< All characters that follow are converted to lowercase.
> All characters that follow are converted to uppercase.
! Characters typed into the mask fill it from left to right. You can include the exclamation
point anywhere in the input mask.
\ Character that follows is displayed as a literal character.
Password Creates a password entry box. Any character typed in the box is stored as the character
but displayed as an asterisk (*).
9
It is not necessary to know what each bit of syntax means, since Access creates masks automatically for
you. But it can be useful to understand the syntax behind a mask. For example, one of the date mask
defaults is: 99/99/0000;0;_ In this mask the year, represented by 0000, must be entered using all four
digits. If you wanted the year to be configured so that you’d only need to enter the last two digits, you
could delete two of the zeroes in the year portion of the mask. The mask would now look like this:
99/99/00;0;_ and a date would change in its appearance from, say, 10/29/1960 to 10/29/60.
To insert a new field name between rows
• Position the mouse pointer on the gray cell (row selector) in front of the row above which you want
to add a new field name.
• Click with the right mouse button and select Insert Rows (with the left mouse button).
• Enter the new field name.
Save the table
Before moving ahead, you will need to (re)save your table.
• Press Save from the Table Design toolbar.
• If you are saving for the first time, Access prompts you to enter a Table Name and click OK. Do so.
• TIP: Enter as clear and descriptive a name as possible. If you create many tables in a database, it may
be hard otherwise to tell them apart.
• If you are saving for the first time, Access will then prompt you that no primary key has been
assigned and asks if you’d like to create a primary key now.
• Choose No to create your own or Yes to allow Access to create one for you. It’s preferable to set your
own, although that is not always possible. See page 5 for more information.
To enter data in your table
• Press Save one last time.
• Click on the View icon from the Table Design toolbar.
• Type your data in the table, pressing Enter to move from field to field and then from record to record.
(NOTE: Access automatically adds additional rows as necessary to accommodate your data.)
To freeze a column or columns so that they remain in view as you type across your datasheet
If you have many fields to enter information into, you may wish to freeze your initial column so that you
know you’re entering data on the correct row.
• Click inside the column you want to freeze. (NOTE: To select multiple columns, click and hold down
the left mouse button on the field name—a column selector—and drag the mouse across the other
adjacent column selectors. Then release the mouse button.)
• Choose Format form the menu bar and select Freeze Columns.
To unfreeze a column or columns
• Choose Format from the menu bar and select Unfreeze All Columns.

10
To return to Design view to make any structural or layout changes
• Click on the Design view icon on the Table Datasheet toolbar.
• Make any needed changes and then click on the View icon to return to data entry.
When done
• Close the table by clicking on the red x in the table’s (not the program’s!) upper right corner.
NOTE: You are only prompted to resave the table if you made structural or layout changes to it.
Additions, deletions, and changes in data entry are saved automatically.
All tables you’ve created so far appear in a list beneath the Create table options in the Database window.
To delete a table
• Right mouse click on the table listing and choose Delete.
• Click Yes to confirm the deletion.
RELATIONSHIPS
Setting up relationships between tables links them so that you can combine the data stored in each. One
way of linking tables was already mentioned: the Lookup Wizard. Another way to establish
relationships is to choose Relationships from the Tools menu on the menu bar. But first,
In order to set up relationships,
• Two tables must have a field in common. Note the example below.
List of tables created thus far

11
• The field in one table is usually designated as the primary key (each entry in that field uniquely
identifies its record).
• The matching field in the second table references that in the first, and is known as a foreign key.
In the Supplier table above, the Supplier field is the primary key. In the Inventory table beneath it, the
Supplier field is a foreign key.
One-to-many relationship
• This relationship is an example of the most common type in Access: the one-to-many relationship.
That is, the item chalk only has one supplier, Demco. But Demco may supply many additional
products to the business setting up this database. Demco may supply erasers, chalkboards, pens and
pencils, each of which would appear in the Item column, with Demco listed in the next column over
as its supplier.
Set up relationships between tables
• Close out any tables that are currently open. Relationships cannot be set up while tables are open.
• Select Tools from the Menu Bar and choose Relationships…
The field lists from the tables in your database will appear side-by-side in the Relationships window.
If during the creation of any tables, you used the Lookup wizard to create a lookup column in a data type
field in Design view (see page 5), then you’ll see a join line that connects the tables. Access has in this
case already set up a relationship between the two tables.
If no relationship exist between tables,
• Position your mouse pointer on the field name in common in one of the field lists, hold down the left
mouse button and drag it over the same field name in the other field list. (TIP: If the field name in
either or both field lists isn’t displaying, use the vertical scroll bar to scroll down until you see the
field name displayed.)
• The line that appears connecting the two represents the link between tables.
REFERENTIAL INTEGRITY
You will likely want to maintain the consistency of the link between tables by enforcing referential
integrity. This rule ensures that a record cannot be added to the foreign key field unless the record
already exists in the primary key field.
12
When enforcing referential integrity, you should also choose to enforce the rule by which any changes
made to records in the primary key—e.g., change in a supplier’s name listed in the field—will also be
changed automatically in the linked table. This rule is known as: Cascade Update Related Fields.
Another rule—Cascade Delete Related Records—guarantees that any deletions made to entries in the
primary key field will also be deleted in linked tables.
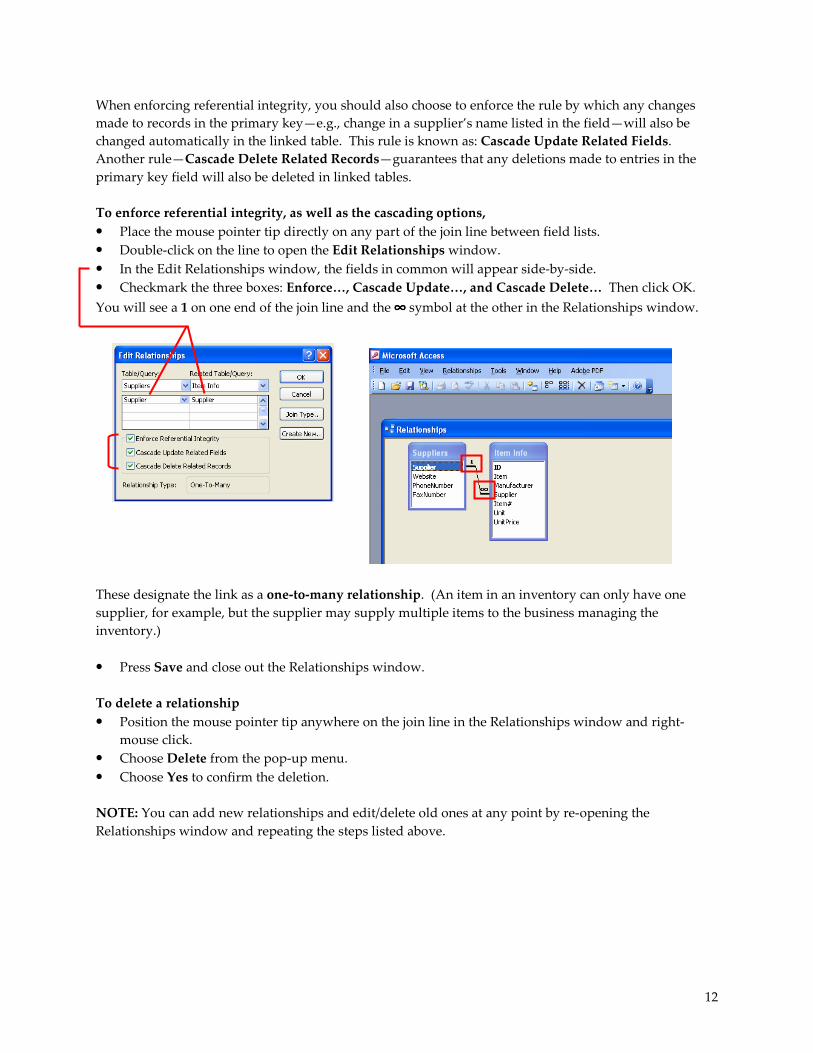
To enforce referential integrity, as well as the cascading options,
• Place the mouse pointer tip directly on any part of the join line between field lists.
• Double-click on the line to open the Edit Relationships window.
• In the Edit Relationships window, the fields in common will appear side-by-side.
• Checkmark the three boxes: Enforce…, Cascade Update…, and Cascade Delete… Then click OK.
You will see a 1 on one end of the join line and the ∞∞∞∞ symbol at the other in the Relationships window.
These designate the link as a one-to-many relationship. (An item in an inventory can only have one
supplier, for example, but the supplier may supply multiple items to the business managing the
inventory.)
• Press Save and close out the Relationships window.
To delete a relationship
• Position the mouse pointer tip anywhere on the join line in the Relationships window and right-
mouse click.
• Choose Delete from the pop-up menu.
• Choose Yes to confirm the deletion.
NOTE: You can add new relationships and edit/delete old ones at any point by re-opening the
Relationships window and repeating the steps listed above.
13
FORMS
Forms allow for easier data entry and editing than tables do. In a large table, with so many rows and
columns, it’s possible to type information in the wrong column or in the wrong row accidentally. Forms
allow you to edit and add data in a format that displays fields for just one record at-a-time. NOTE: Any
information typed in a form is automatically added to the source table.
TIP: If you’d rather enter all your data in a form than type it directly in the source table, feel free. Simply
set up your field names, data types, and field properties in the table’s Design view, save and close the
table, and then create your form. As information is entered into the form, it is added automatically to the
source table.
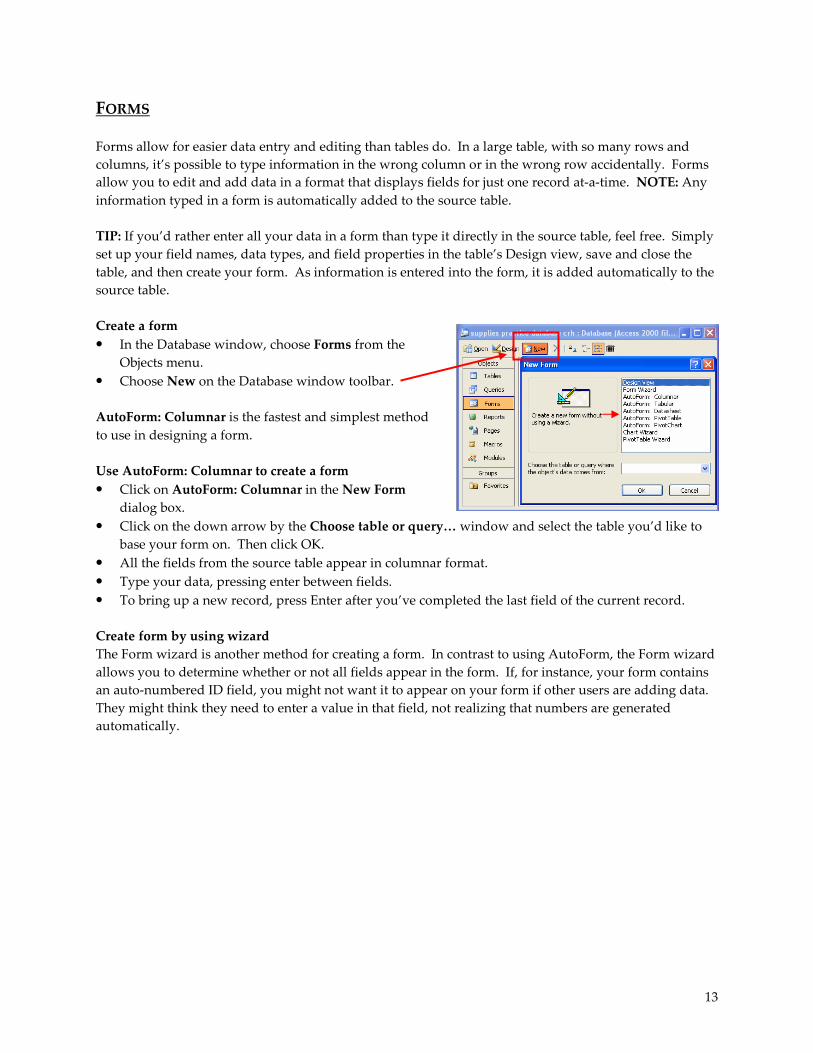
Create a form
• In the Database window, choose Forms from the
Objects menu.
• Choose New on the Database window toolbar.
AutoForm: Columnar is the fastest and simplest method
to use in designing a form.
Use AutoForm: Columnar to create a form
• Click on AutoForm: Columnar in the New Form
dialog box.
• Click on the down arrow by the Choose table or query… window and select the table you’d like to
base your form on. Then click OK.
• All the fields from the source table appear in columnar format.
• Type your data, pressing enter between fields.
• To bring up a new record, press Enter after you’ve completed the last field of the current record.
Create form by using wizard
The Form wizard is another method for creating a form. In contrast to using AutoForm, the Form wizard
allows you to determine whether or not all fields appear in the form. If, for instance, your form contains
an auto-numbered ID field, you might not want it to appear on your form if other users are adding data.
They might think they need to enter a value in that field, not realizing that numbers are generated
automatically.
14
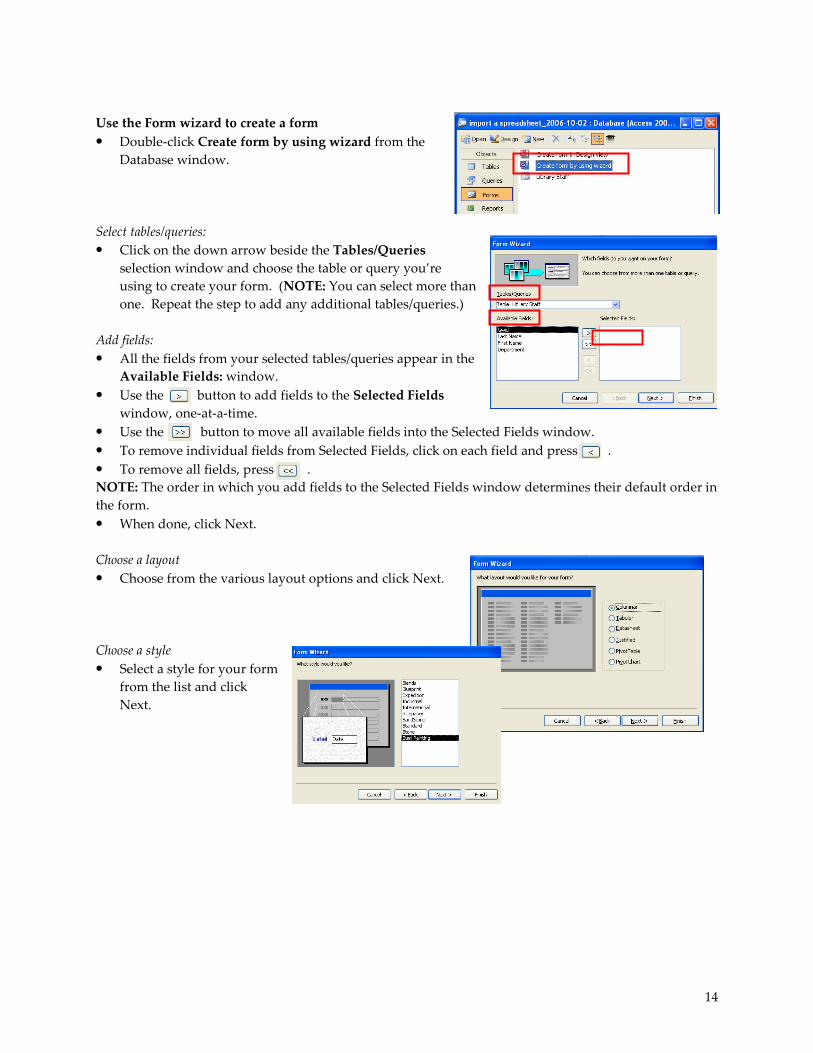
Use the Form wizard to create a form
• Double-click Create form by using wizard from the
Database window.
Select tables/queries:
• Click on the down arrow beside the Tables/Queries
selection window and choose the table or query you’re
using to create your form. (NOTE: You can select more than
one. Repeat the step to add any additional tables/queries.)
Add fields:
• All the fields from your selected tables/queries appear in the
Available Fields: window.
• Use the button to add fields to the Selected Fields
window, one-at-a-time.
• Use the button to move all available fields into the Selected Fields window.
• To remove individual fields from Selected Fields, click on each field and press .
• To remove all fields, press .
NOTE: The order in which you add fields to the Selected Fields window determines their default order in
the form.
• When done, click Next.
Choose a layout
• Choose from the various layout options and click Next.
Choose a style
• Select a style for your form
from the list and click
Next.
15
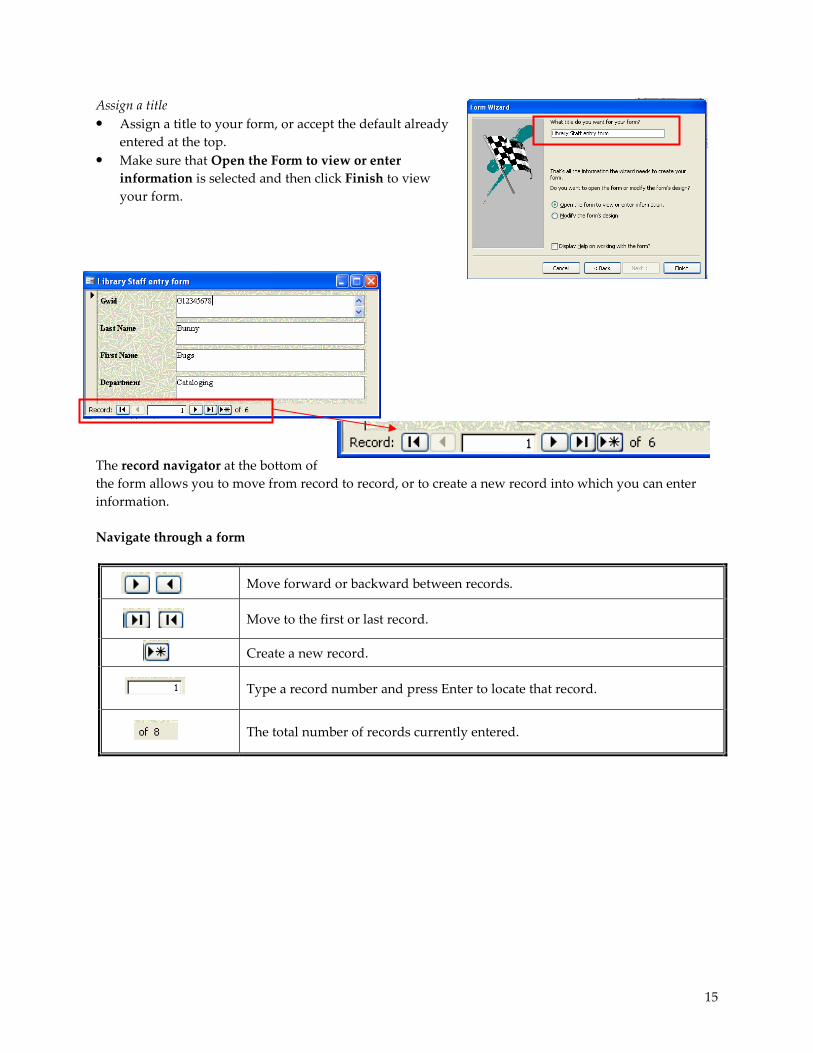
Assign a title
• Assign a title to your form, or accept the default already
entered at the top.
• Make sure that Open the Form to view or enter
information is selected and then click Finish to view
your form.
The record navigator at the bottom of
the form allows you to move from record to record, or to create a new record into which you can enter
information.
Navigate through a form
Move forward or backward between records.
Move to the first or last record.
Create a new record.
Type a record number and press Enter to locate that record.
The total number of records currently entered.
16
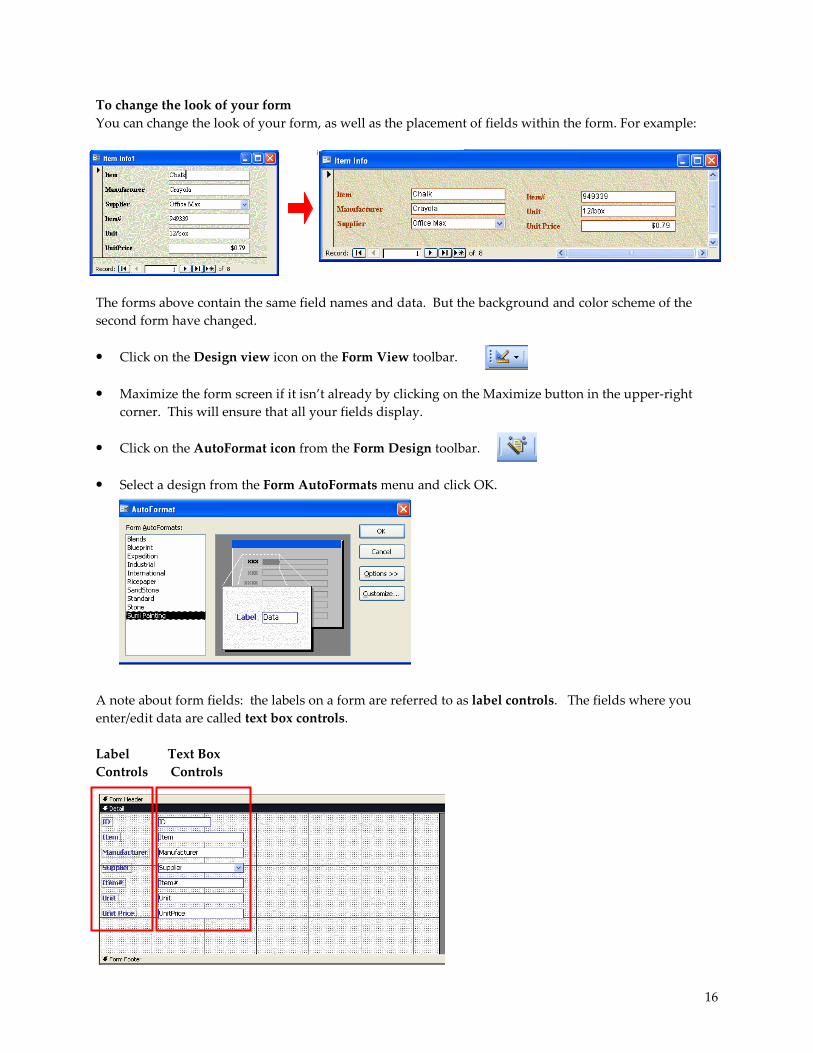
To change the look of your form
You can change the look of your form, as well as the placement of fields within the form. For example:
The forms above contain the same field names and data. But the background and color scheme of the
second form have changed.
• Click on the Design view icon on the Form View toolbar.
• Maximize the form screen if it isn’t already by clicking on the Maximize button in the upper-right
corner. This will ensure that all your fields display.
• Click on the AutoFormat icon from the Form Design toolbar.
• Select a design from the Form AutoFormats menu and click OK.
A note about form fields: the labels on a form are referred to as label controls. The fields where you
enter/edit data are called text box controls.
Label Text Box
Controls Controls

17
To move a label control and its text box control elsewhere on the form,
• Click and hold down the left mouse button anywhere inside either. The mouse pointer changes to an
open black hand. (NOTE: If you’ve already clicked inside either and released the mouse button,
simply position the pointer anywhere around the border—except on a handle—and the mouse
pointer will change to the open black hand. Then click on the border.)
• Drag the controls to a new location and release the mouse button.
To move either a label control or its text box control separately,
• Click once inside either.
• Then position the mouse pointer tip on the large upper left corner handle by the item and click and
hold down the left mouse button.
• Drag the control to a new location and release the
mouse button.
NOTE: Your workspace may not appear wide enough to move your controls around in.
To create more horizontal space to work in,
• Drag your label control and/or text box control to the right; the background will automatically
expand to accommodate the new placement.
To create more vertical space to work in,
• Position the mouse pointer tip at the bottom edge of your section, where it meets the Form Footer
section selector until the mouse pointer changes to a two-sided arrow.
• Hold down the left mouse button and drag vertically to stretch your form
background area.
• Release the mouse button when done.
To make further changes to the formatting or to other
properties of a control,
• Click on the control so that handles appear around
it.
• Click on the Properties icon on the Form Design
toolbar.
• Navigate the Properties window and make any
desired changes before closing out the window.
NOTE: To make identical changes to all controls at once,
• Choose Select All from Edit on the menu bar. All
controls are now selected. Any changes you make in the Properties window will apply across the
board.
18
NOTE: To make changes to selected controls at once, hold down the shift key and click on each control
you wish to change.
NOTE: A number of properties display a build button when you click on them. Back color and
Fore Color, for example, allow you to click on the build button and then select from a color palette.
Otherwise, you’d have to enter a number to represent a given color (notice how they’re entered in the
Properties window; it’s difficult to figure out what color they’re referring to when they say 16777215,
rather than showing a color swatch.)
To see the changes in Form view,
• Press Save to store changes to the structure and layout of your form in Form Design view.
• Click on the Form view icon on the Form Design toolbar.
To exit a form
You only need to press Save if you’ve made changes to the physical design of the form. Data entries are
automatically saved.
• Press Save if necessary.
• Close out the form by clicking on the red x in the form’s upper right corner.
A list of created forms appears in the Database window when you select Forms from the Objects menu.
To delete a form
• Right mouse click on the form and choose Delete.
• Click Yes to confirm the deletion.
QUERIES
Queries in Access allow you to combine data from multiple tables (and/or other queries) into a new
datasheet. It also allows you to extract data from an individual table or other query. Users can create a
number of different types of queries, but this section will focus on the most common type: Select
Queries.
• To create a query, choose Query from the Objects menu in the Database window.
• Double-click on Create query in Design view. (NOTE: you can use the Query wizard to create a
query, but you’d likely need to turn to Design view to fine-tune it.)
List of forms created thus far

19
The Show Table window appears.
• Click on the Tables, Queries, or Both tab, depending upon
what you’re basing your query on.
• A list of tables and/or queries appears.
• Double-click on each query/table from which you’d like to
build your query.
As you double-click on each, a list of field names for them appears
in the upper pane of the Select Query window.
• Close the Show Table window.

20
• To choose fields to appear in your query, double-click on each field you want to include from each
list. (NOTE: You may need to scroll through the list to see every field listed.)
• As you double-click, field names appear below in the Field window, one beside the other, and the
tables/queries they come from are listed in the row beneath.
Notice the other options listed in this screen: Sort, Show, and Criteria.
Sort allows you to sort listings in a field in ascending or descending order.
Show gives you the option to display or hide a particular field on the query datasheet.
Criteria lets you set limits to which data from a field will appear on the query datasheet. For example,
you may wish to display only those items whose unit price is less than $10.00. Or, in an employee
database, you may only wish to display in a State Residence field those employees who live in Virginia.
NOTE: the Criteria field lets you add additional limits—note the “or” row beneath it.
Common syntax used to limit query searches
• To search for a range of values—such as a price range—in a field, use any of the following operators:
> (greater than), < (less than), >= (greater than or equal to), or <= (less than or equal to).
• To search for all entries in a field which have a particular word or name, type an asterisk followed by
the word. (NOTE: Access enters it as Like “*word”, but you don’t have to type it that way.)
• To search for listings that start with a given letter, type the letter, followed by an asterisk.
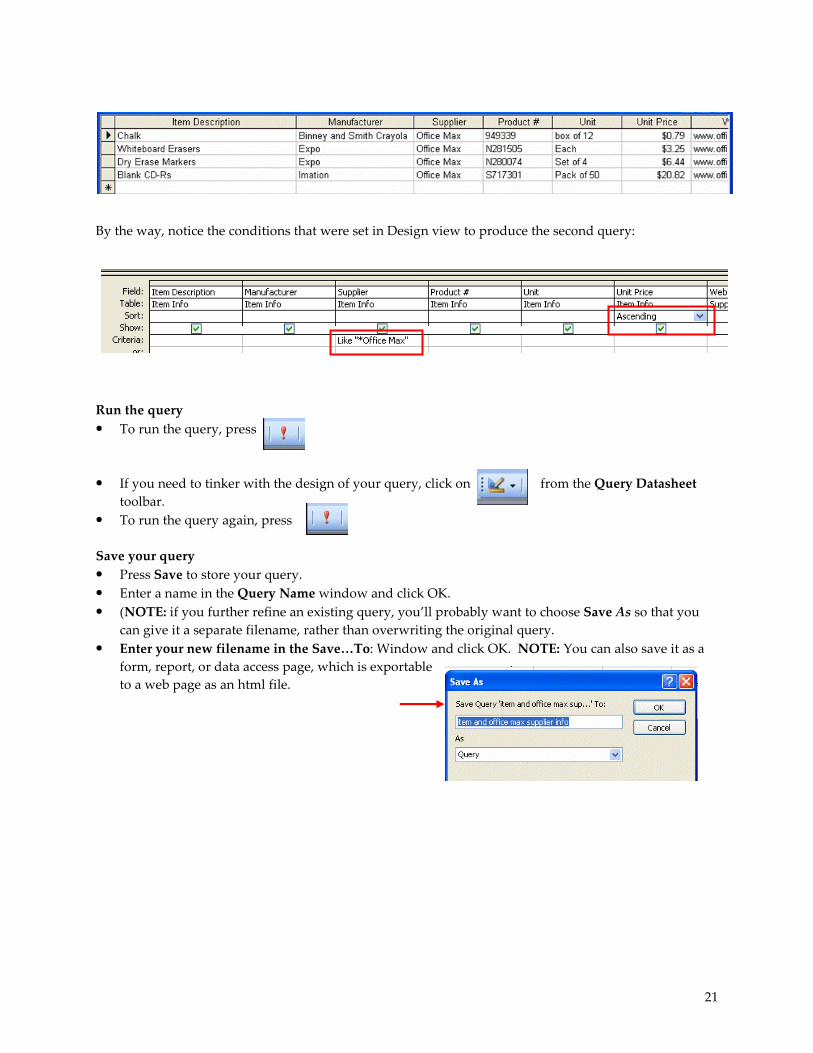
Compare the two following datasheets:
The first one is a query in which the user combined Item and Supplier tables.
The second is a query in which the user combined the two tables, and then limited their results in the
Supplier field to Office Max, and then sorted the results by price.
21
By the way, notice the conditions that were set in Design view to produce the second query:
Run the query
• To run the query, press
• If you need to tinker with the design of your query, click on from the Query Datasheet
toolbar.
• To run the query again, press
Save your query
• Press Save to store your query.
• Enter a name in the Query Name window and click OK.
• (NOTE: if you further refine an existing query, you’ll probably want to choose Save As so that you
can give it a separate filename, rather than overwriting the original query.
• Enter your new filename in the Save…To: Window and click OK. NOTE: You can also save it as a
form, report, or data access page, which is exportable
to a web page as an html file.
22
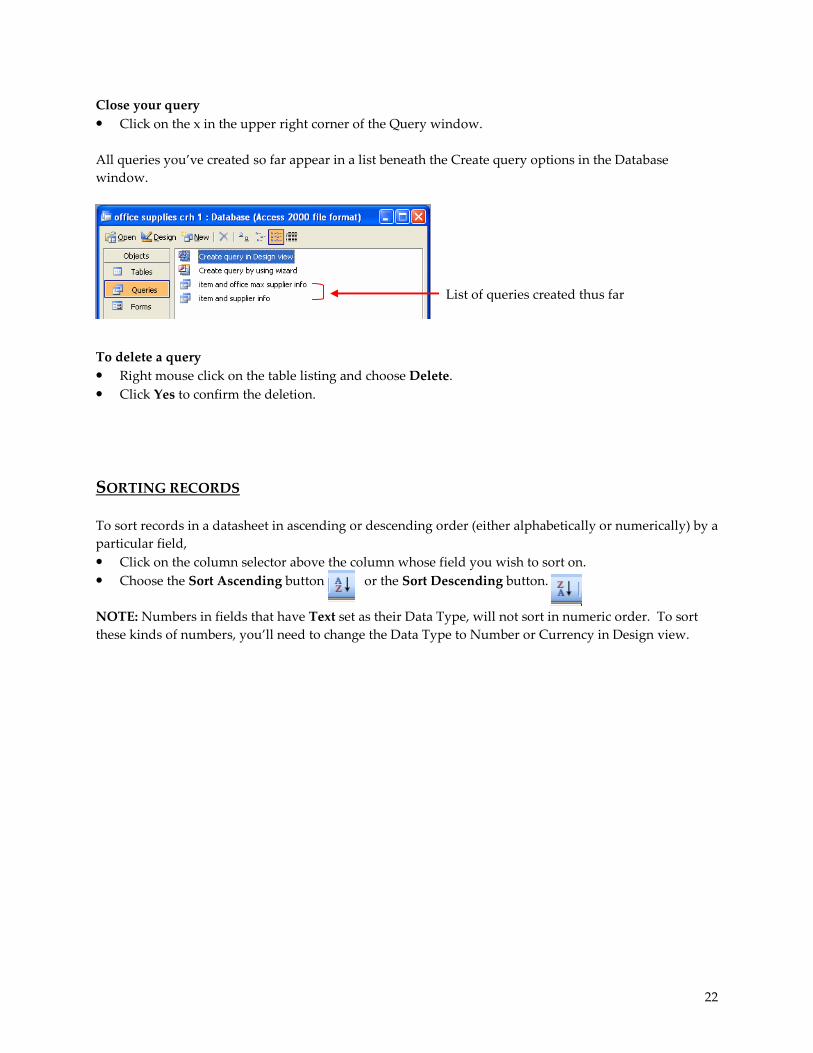
Close your query
• Click on the x in the upper right corner of the Query window.
All queries you’ve created so far appear in a list beneath the Create query options in the Database
window.
To delete a query
• Right mouse click on the table listing and choose Delete.
• Click Yes to confirm the deletion.
SORTING RECORDS
To sort records in a datasheet in ascending or descending order (either alphabetically or numerically) by a
particular field,
• Click on the column selector above the column whose field you wish to sort on.
• Choose the Sort Ascending button or the Sort Descending button.
NOTE: Numbers in fields that have Text set as their Data Type, will not sort in numeric order. To sort
these kinds of numbers, you’ll need to change the Data Type to Number or Currency in Design view.
List of queries created thus far
23
FILTERS
You can also limit data to a table or query by filtering records for a selected value. For instance, you
might only want to display in an inventory table those items purchased from a particular manufacturer.
The easiest filtering method is called Filter by Selection.
To filter by selection
• In your datasheet, click on the value you want to select for filtering.
• Press the Filter by Selection icon on the Table or Query Datasheet toolbar.
(NOTE: To remove a filter, you’d click on the Remove Filter icon on the Table or Query
Datasheet toolbar.
The result resembles that of a query in which records are limited. Filters, however, are temporary. Once
you close the table or query, the filter is automatically removed, even if you are prompted to save.
Unfiltered data reappears once you reopen the table or query.
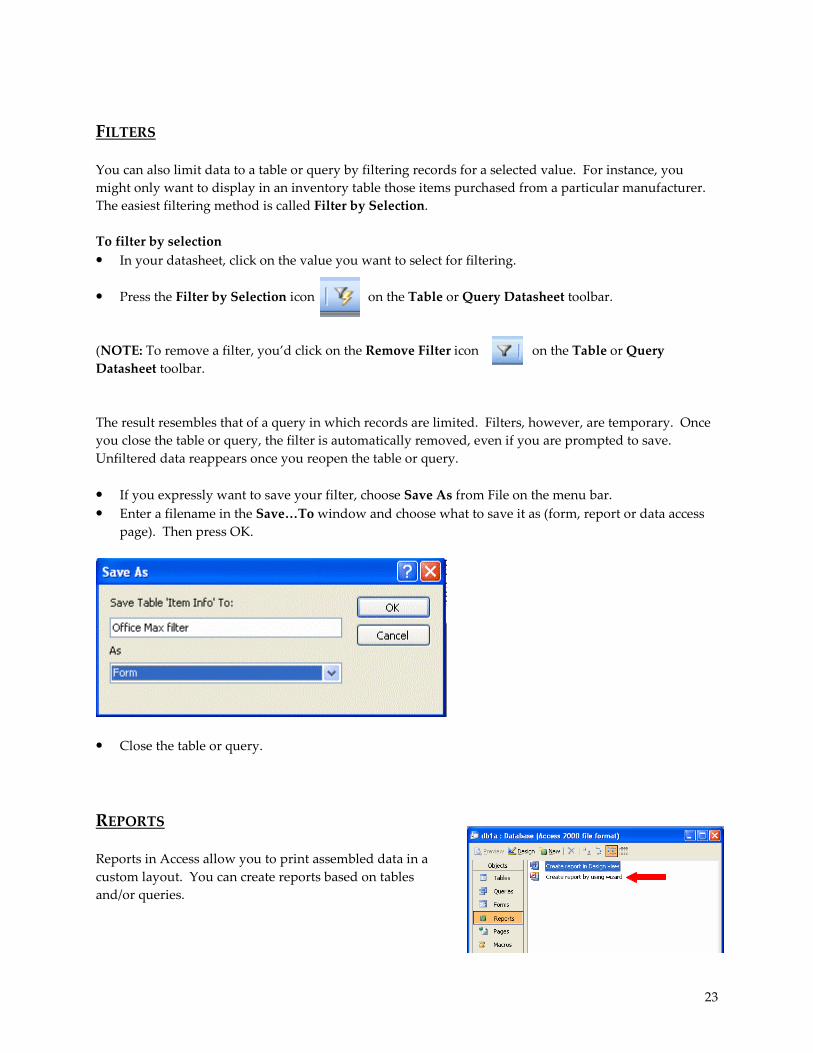
• If you expressly want to save your filter, choose Save As from File on the menu bar.
• Enter a filename in the Save…To window and choose what to save it as (form, report or data access
page). Then press OK.
• Close the table or query.
REPORTS
Reports in Access allow you to print assembled data in a
custom layout. You can create reports based on tables
and/or queries.

24
To create a report,
• Click on Reports from the Objects menu in the Database window.
There are several methods for creating a report. We will focus on the Reports wizard.
Use the Reports wizard to set up a report
• Double-click Create report by using wizard in the Database window.
• The Report wizard launches.
Select tables/queries:
• Click on the down arrow beside the
Tables/Queries selection window and choose the
table or query you’re basing your report on.
(NOTE: You can select more than one. Repeat the
step to add any additional table/queries.)
Add fields:
• All the fields from your selected tables/queries
appear in the Available Fields: window.
• Use the button to add fields to the Selected
Fields window, one-at-a-time.
• Use the button to move all available fields into the Selected Fields window.
• To remove individual fields from Selected Fields, click on each field and press .
• To remove all fields, press .
NOTE: The order in which you add fields to the Selected Fields window determines their default order in
the report.
• When done, click Next.
Create grouping levels
• If desired, use the right arrow button to create
grouping levels (group your report listing by a
category or categories), and use the up and down
arrow buttons to promote or demote a field’s position.
The left arrow button removes selected fields from
grouping levels.
• When done, click Next.

25
Sort by category (field)
• You can select a sort order for up to four fields. Click
on the down arrow to select a field and then choose
ascending or descending order.
• When done, click Next.
Choose a layout
• Choose from the various layout options and click Next.
• Choose a page orientation—portrait or landscape.
Choose a style
• Select a pre-formatted report style and click Next.
Assign a title
• Enter a title for your report, or stick with the default
title assigned by Access.
• Make sure that Preview the report is selected and click
Finish.
• The report appears in Print Preview.
NOTE: Any changes to data in the source tables/queries are
automatically updated in your report.
26
If the report runs off the side of the page
Before playing with the placement of report controls, consider changes you can make to the page setup of
the report.
• To reduce the size of the page margins, choose Page Setup from File on the menu bar, click on the
Margins tab, and reduce the margin size.
• To print landscape rather than portrait (this gives you much more horizontal room across the page),
click on the Page tab in Page Setup and select Landscape.
• Press OK when done.
If you need to fine-tune further the placement of columns in your report, Design view allows you to
modify the layout.
• Click on the Design view icon on the Print Preview toolbar.
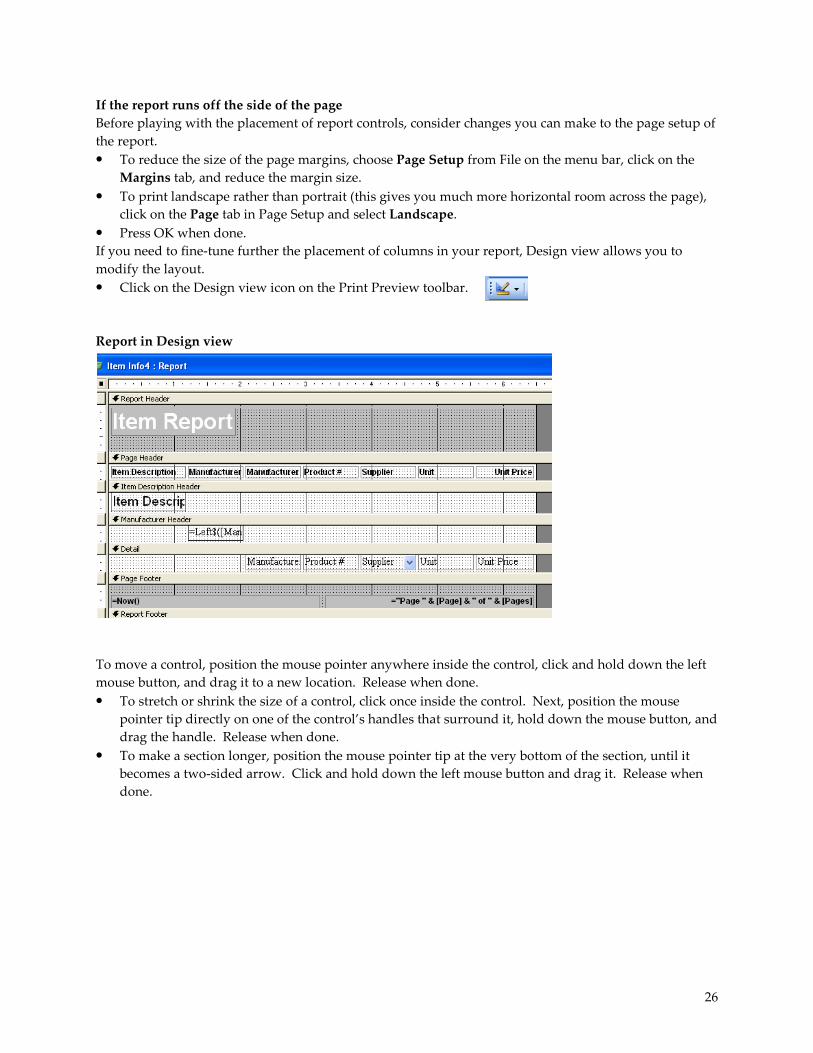
Report in Design view
To move a control, position the mouse pointer anywhere inside the control, click and hold down the left
mouse button, and drag it to a new location. Release when done.
• To stretch or shrink the size of a control, click once inside the control. Next, position the mouse
pointer tip directly on one of the control’s handles that surround it, hold down the mouse button, and
drag the handle. Release when done.
• To make a section longer, position the mouse pointer tip at the very bottom of the section, until it
becomes a two-sided arrow. Click and hold down the left mouse button and drag it. Release when
done.

27
If you need to make further changes to formatting or to other properties of a control,
• Click on the control so that handles appear around it.
• Click on the Properties icon on the Formatting (Form/Report) toolbar.
• Navigate the Properties window and make any desired changes
before closing out the window.
NOTE: To make identical changes to all controls at once,
• Choose Select All from Edit on the menu bar. All controls are now
selected. Any changes you make in the Properties window will apply
across the board.
NOTE: To make changes to selected controls at once, hold down the shift
key and click on each control you wish to change.
NOTE: A number of properties display a build button when you
click on them. Back color and Fore Color, for example, allow you to click on the build button and then
select from a color palette. Otherwise, you’d have to enter a number to represent a given color (notice
how they’re entered in the Properties window; it’s difficult to figure out what color they’re referring to
when they say 16777215, rather than showing a color swatch.)
View your report
• To see how your changes look in the report, click on Print Preview on the Formatting (Form/Report)
toolbar.
Close your report
• Click on the x in the upper right corner of the report.
• If prompted to save, choose Yes or No depending on what you want to do.
All reports you’ve created so far appear in a list beneath the Create report options in the Database
window.
To delete a report
• Right mouse click on the table listing and choose Delete.
• Click Yes to confirm the deletion.
List of reports created thus far
28
SWITCHBOARDS
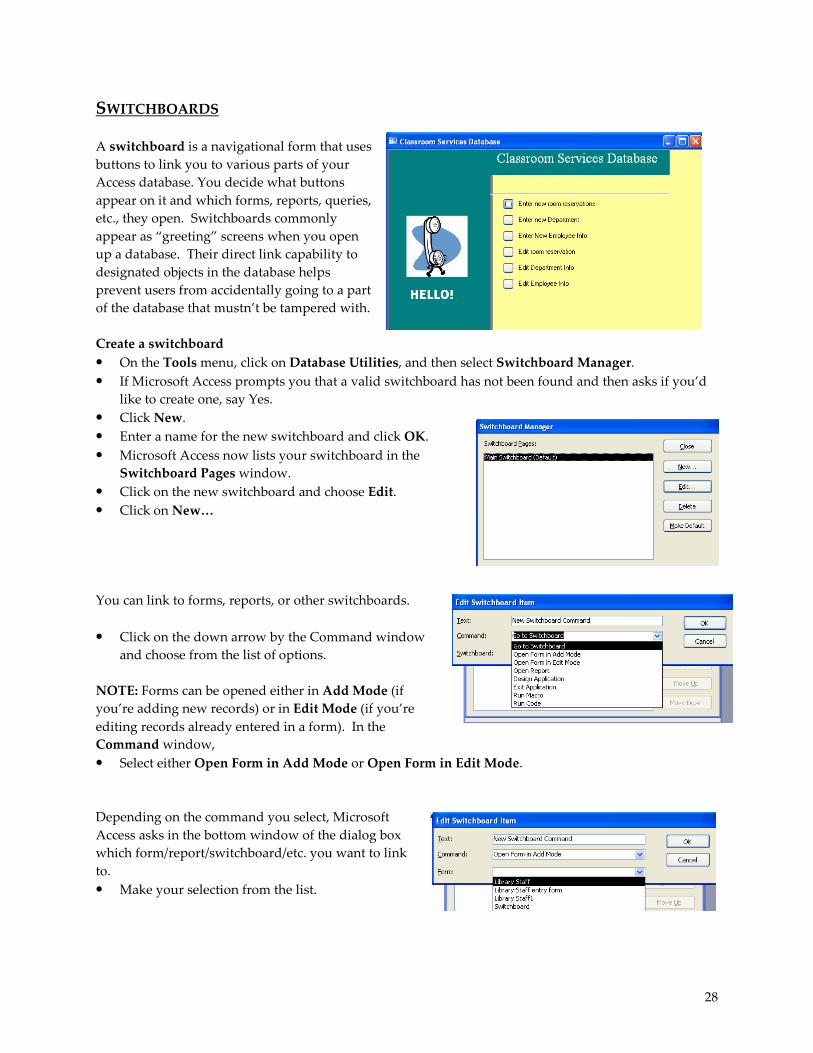
A switchboard is a navigational form that uses
buttons to link you to various parts of your
Access database. You decide what buttons
appear on it and which forms, reports, queries,
etc., they open. Switchboards commonly
appear as “greeting” screens when you open
up a database. Their direct link capability to
designated objects in the database helps
prevent users from accidentally going to a part
of the database that mustn’t be tampered with.
Create a switchboard
• On the Tools menu, click on Database Utilities, and then select Switchboard Manager.
• If Microsoft Access prompts you that a valid switchboard has not been found and then asks if you’d
like to create one, say Yes.
• Click New.
• Enter a name for the new switchboard and click OK.
• Microsoft Access now lists your switchboard in the
Switchboard Pages window.
• Click on the new switchboard and choose Edit.
• Click on New…
You can link to forms, reports, or other switchboards.
• Click on the down arrow by the Command window
and choose from the list of options.
NOTE: Forms can be opened either in Add Mode (if
you’re adding new records) or in Edit Mode (if you’re
editing records already entered in a form). In the
Command window,
• Select either Open Form in Add Mode or Open Form in Edit Mode.
Depending on the command you select, Microsoft
Access asks in the bottom window of the dialog box
which form/report/switchboard/etc. you want to link
to.
• Make your selection from the list.
29
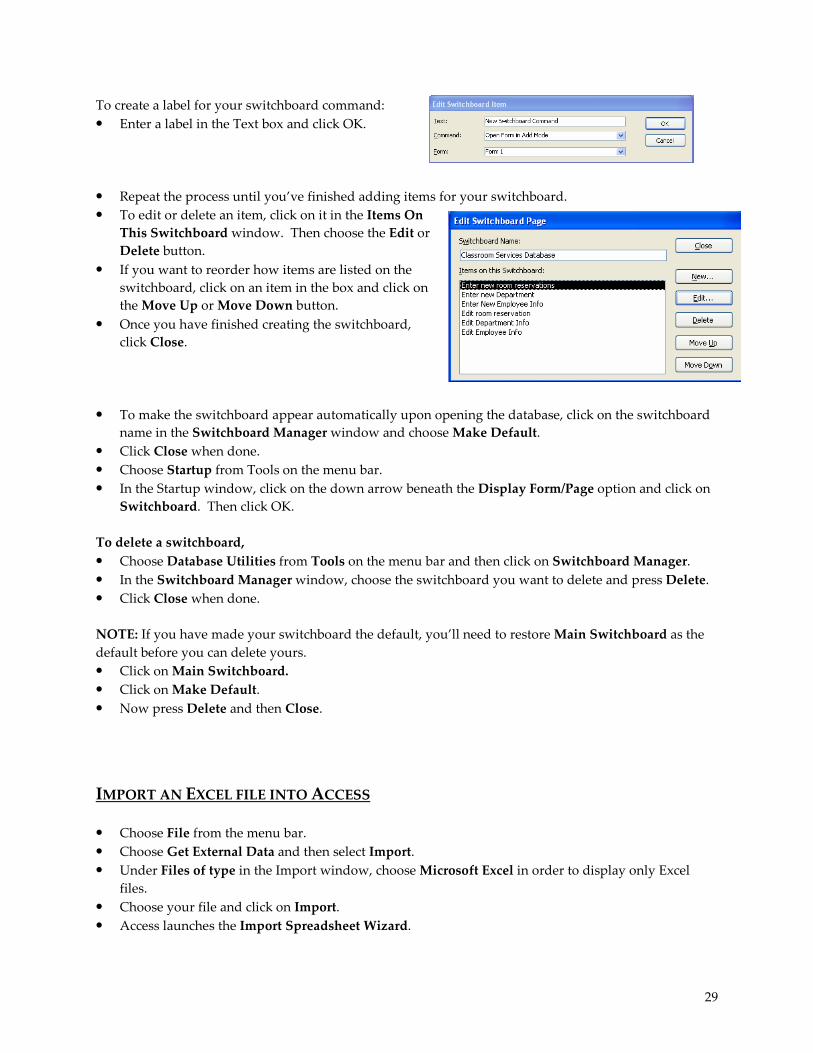
To create a label for your switchboard command:
• Enter a label in the Text box and click OK.
• Repeat the process until you’ve finished adding items for your switchboard.
• To edit or delete an item, click on it in the Items On
This Switchboard window. Then choose the Edit or
Delete button.
• If you want to reorder how items are listed on the
switchboard, click on an item in the box and click on
the Move Up or Move Down button.
• Once you have finished creating the switchboard,
click Close.
• To make the switchboard appear automatically upon opening the database, click on the switchboard
name in the Switchboard Manager window and choose Make Default.
• Click Close when done.
• Choose Startup from Tools on the menu bar.
• In the Startup window, click on the down arrow beneath the Display Form/Page option and click on
Switchboard. Then click OK.
To delete a switchboard,
• Choose Database Utilities from Tools on the menu bar and then click on Switchboard Manager.
• In the Switchboard Manager window, choose the switchboard you want to delete and press Delete.
• Click Close when done.
NOTE: If you have made your switchboard the default, you’ll need to restore Main Switchboard as the
default before you can delete yours.
• Click on Main Switchboard.
• Click on Make Default.
• Now press Delete and then Close.
IMPORT AN EXCEL FILE INTO ACCESS
• Choose File from the menu bar.
• Choose Get External Data and then select Import.
• Under Files of type in the Import window, choose Microsoft Excel in order to display only Excel
files.
• Choose your file and click on Import.
• Access launches the Import Spreadsheet Wizard.

30
• The first step of the wizard asks you to select the
worksheet or named range you’d like to import
from the Excel file (usually a worksheet is
selected).
Data from the worksheet is partially displayed below.
Do not be concerned by its appearance in this window.
It won’t look like this in Access.
• Click Next.
• If your first rows are headings, click on the First row
contains column headings option and they will be
converted to field names in Access.
• Click Next.
• Choose whether the data is going into a new table or
an existing one (a combo box lets you select the table).
• The next screen lets you specify information about your fields. (You can change the field names here
as well.)
• When done with this screen, click Next.
• You can specify a primary key (a combo box lets you select which field) or you can have Access
create one for you. (NOTE: If you assign the primary key, make sure all entries in that field are
unique.)
• Click Next.
• Choose a name for the table and click Finish.
NOTE: Excel spreadsheets do not always translate well in the importing process. You may need to
consult Access’s Online Help menu to troubleshoot any problems you encounter.

31
ONLINE HELP
• Choose Help from the menu bar and then select Microsoft Office Access Help.
• Enter a topic in the Search window and press Enter.
• Choose from the list of topics offered to see help for your question or problem.
• Close Online Help when done.
BACK UP YOUR DATABASE
• Save and close all objects in the database.
• Choose Back Up Database from File on the menu bar.
• In the Save Backup As dialog box, Access adds to your filename the current date. You can accept
that as your backup filename or you can assign a different one.
• Choose where to save the backup and press Save.
OPEN AN ACCESS FILE
• Choose Open from File on the menu bar.
• Locate your file using the Look in window, click on the file, and then choose Open.
(1/29/07)


![[Microsoft Access 2003] - Manual](https://img.dokumen.tips/doc/110x75/55cf9e07550346d033b05e90/microsoft-access-2003-manual.jpg)