Embed Size (px)
Citation preview
Personal Communications for Windows, Version 5.7
3270 Emulator User’s Reference
SC31-8838-02
���


Personal Communications for Windows, Version 5.7
3270 Emulator User’s Reference
SC31-8838-02
���

NoteBefore using this information and the product it supports, read the information in “Notices”, on page 87.
Third Edition (September 2003)
This edition applies to Version 5.7 of Personal Communications (program number: 5639–I70) and to all subsequentreleases and modifications until otherwise indicated in new editions.
© Copyright International Business Machines Corporation 1989, 2003. All rights reserved.US Government Users Restricted Rights – Use, duplication or disclosure restricted by GSA ADP Schedule Contractwith IBM Corp.
Contents
Figures . . . . . . . . . . . . . . . v
Tables . . . . . . . . . . . . . . . vii
About This Book. . . . . . . . . . . ixWho Should Read This Book. . . . . . . . . ixHow to Use This Book . . . . . . . . . . . ix
Command Syntax Symbols . . . . . . . . ix
Part 1. General Information . . . . . 1
Chapter 1. Personal CommunicationsHighlights . . . . . . . . . . . . . . 3
Chapter 2. Problem Analysis . . . . . . 9Log Viewer . . . . . . . . . . . . . . . 9Trace Facility . . . . . . . . . . . . . . 9Information Bundler . . . . . . . . . . . 10Internet Service . . . . . . . . . . . . . 11
Part 2. Using PersonalCommunications . . . . . . . . . 13
Chapter 3. Considerations for UsingPC/3270 Sessions . . . . . . . . . . 15Power Management . . . . . . . . . . . 15
Sleep Permission . . . . . . . . . . . 15Host-Session Window Operations . . . . . . . 16
Cursor Color . . . . . . . . . . . . . 16Releasing Insert Mode with Attention Keys . . . 16Scroll Bar . . . . . . . . . . . . . . 16Scroll-Lock Key . . . . . . . . . . . . 163270-Session Screen-Size Control . . . . . . 17Customizing a Display Translation Table . . . 18
Support for Long File Names . . . . . . . . 19File Transfer Function . . . . . . . . . . . 19
Host File Name and Reserved Words . . . . . 19Changing the Packet Size When Import/ExportIs Idle . . . . . . . . . . . . . . . 19Wait Option for Multiple File Transfer . . . . 19NOTRUNC and BLANK Options (SBCS Only) . 19Setting the VTAM PSERVIC Statement . . . . 20
Graphic Functions . . . . . . . . . . . . 20Graphics Protocols . . . . . . . . . . . 20Drawing-Buffer Size . . . . . . . . . . 22Using Bitmaps for Drawing . . . . . . . . 22Print Buffer Size . . . . . . . . . . . . 22Edit-Copy Buffer . . . . . . . . . . . 23Printer Fonts . . . . . . . . . . . . . 23Plotter . . . . . . . . . . . . . . . 23Hole in Screen Caused by Clearing a GraphicCharacter . . . . . . . . . . . . . . 23
Miscellaneous Restrictions for Graphic Functions 24Considerations for Graphics Functions . . . . 24
Print Processing . . . . . . . . . . . . . 24Using a Printer with the Non-SNA DFTAttachment . . . . . . . . . . . . . 24Print Job Control Using SNA Timeout . . . . 24SDDLU Considerations . . . . . . . . . 26
Default Key Function Assignments . . . . . . 27Setting the 3270 Keyboard Layout Default . . . 28Default Key Functions for a 3270 Layout . . . 28Default Key Functions for the Combined Package 31
Keyboard Setup . . . . . . . . . . . . . 31Keyboard File . . . . . . . . . . . . 31Win32 Cut, Copy, and Paste Hotkeys . . . . . 32
Usage Notes for Sessions in OLE Documents . . . 32Changing Fonts . . . . . . . . . . . . 32Initial Selection of Font . . . . . . . . . 32WordPad . . . . . . . . . . . . . . 32WordPro . . . . . . . . . . . . . . 33Updating Linked Files . . . . . . . . . . 33
Inactivity Timeout for Communication Links . . . 33Environment Considerations. . . . . . . . . 33
Virtual Memory . . . . . . . . . . . . 33Emulator Session Icons . . . . . . . . . 34Disabling CDRA Tables . . . . . . . . . 34
Chapter 4. Transferring Files . . . . . 35Sending Files to the Host System . . . . . . . 35Receiving Files from the Host System. . . . . . 36Using List Files . . . . . . . . . . . . . 36
Creating List Files . . . . . . . . . . . 37Editing Lists . . . . . . . . . . . . . 37
Managing Templates . . . . . . . . . . . 38Adding Templates . . . . . . . . . . . 38Replacing and Deleting Templates . . . . . . 38Testing Templates . . . . . . . . . . . 39
Defining Transfer Types . . . . . . . . . . 39Items to Be Specified . . . . . . . . . . 39
Setting General Transfer Options . . . . . . . 43Bidi Options . . . . . . . . . . . . . 43Host Type . . . . . . . . . . . . . . 43Host Command . . . . . . . . . . . . 43Default PC Directory . . . . . . . . . . 43Default Partitioned Data Set (MVS/TSO Only) . 43Default VM Disk (VM Only). . . . . . . . 43PC Code Page . . . . . . . . . . . . 43Packet Size . . . . . . . . . . . . . 44File-Transfer Timeout . . . . . . . . . . 44Extension for List-Files . . . . . . . . . 44Clear Session Before Transfer . . . . . . . 44Show Status Window . . . . . . . . . . 44Enhanced Protocol (SBCS Global NetworkConnection Only) . . . . . . . . . . . 44Lam-Alef Expansion (Arabic Only) . . . . . 45
Setting Up the Translation Table . . . . . . . 45
© Copyright IBM Corp. 1989, 2003 iii

Changing the Translation Table . . . . . . . 45Customizing the Translation Table . . . . . . 45User-Font Area (DBCS Only) . . . . . . . 46
Import/Export (3270 CICS Only) . . . . . . . 46Creating IDP Files . . . . . . . . . . . . 47File Transfer Commands for PC/3270. . . . . . 47
File Transfer Methods . . . . . . . . . . 47Requirements and Restrictions . . . . . . . 48Sending and Receiving Files from the DOSCommand Prompt . . . . . . . . . . . 48Configuring File-Transfer Code Translation . . . 71
Chapter 5. Printing . . . . . . . . . 73Display Sessions . . . . . . . . . . . . . 73Printer Sessions . . . . . . . . . . . . . 73Telnet 3270E Printer Association . . . . . . . 74Setting Up the Printer . . . . . . . . . . . 74
Defining a Printer for a Session. . . . . . . 74Using PDT Files . . . . . . . . . . . . 75
PDT Files . . . . . . . . . . . . . . . 75Basic Support. . . . . . . . . . . . . 75Double-Byte Character Support . . . . . . . 76
Page Setup Parameters . . . . . . . . . . 78Printing to Disk . . . . . . . . . . . . . 82Printing Japan Postal Bar Code . . . . . . . . 82Workstation Profile Parameter for Code Page . . . 82
Part 3. Appendixes. . . . . . . . . 85
Appendix. Notices . . . . . . . . . . 87Trademarks . . . . . . . . . . . . . . 88
Index . . . . . . . . . . . . . . . 89
iv Personal Communications 3270 Emulator User’s Reference

Figures
1. VM/CMS SEND Command Syntax . . . . 492. VM/CMS RECEIVE Command Syntax . . . 523. MVS/TSO SEND Command Syntax . . . . 554. MVS/TSO RECEIVE Command Syntax 605. CICS SEND Personal Communications GUI
Syntax . . . . . . . . . . . . . . 64
6. CICS SEND Command Line Syntax . . . . 657. CICS RECEIVE Personal Communications GUI
Syntax . . . . . . . . . . . . . . 688. CICS RECEIVE Command Syntax . . . . . 69
© Copyright IBM Corp. 1989, 2003 v

vi Personal Communications 3270 Emulator User’s Reference

Tables
1. Machine Types and Model Numbers forSupported LU Types . . . . . . . . . 27
2. Win32 Keyboard Map Functions for a 3270Layout . . . . . . . . . . . . . . 28
3. Default Key Functions for a 3270 Layout 284. Default Key Functions for the Combined
Package . . . . . . . . . . . . . . 315. New Keyboard Map Functions for a 3270
Layout . . . . . . . . . . . . . . 32
6. Mode Values for File Transfer Options . . . 407. Transfer File Options . . . . . . . . . 408. Old Printer Definition Files . . . . . . . 769. Printer Models and Supported PDTs . . . . 77
10. DBCS Supported PDTs . . . . . . . . . 7711. Page Setup Parameters — Text . . . . . . 7812. Page Setup Parameters — Text Options 7913. Page Setup Parameters - Graphics . . . . . 81
© Copyright IBM Corp. 1989, 2003 vii

viii Personal Communications 3270 Emulator User’s Reference
About This Book
IBM® Personal Communications for Windows® reference books are comprised offour volumes: a 3270 Emulator User’s Reference, a 5250 Emulator User’s Reference,a VT Emulator User’s Reference and an Administrator’s Guide and Reference.These volumes provide information for using IBM Personal CommunicationsiSeries™ for Windows operating systems (hereafter called PC400) and IBM PersonalCommunications for Windows operating systems. In this book, Windows refers toWindows 95, Windows 98, Windows NT®, Windows Me, Windows 2000, andWindows XP. When information is applies only to a specific operating systems, thisis indicated in the text. PC/3270 refers to the 3270 portion of the combinedpackage. Throughout this book, workstation refers to all supported personalcomputers. When only one model or architecture of the personal computer isreferred to, only that type is specified.
Who Should Read This BookThis book is intended for the person who uses Personal Communications on aworkstation to access hosts using 3270 terminal emulation.
How to Use This BookThis book contains reference information that you might need to refer to wheninstalling or operating Personal Communications.
Personal Communications is designed to use various communication adapters andto work with other workstation and host system software. Refer to the appropriatedocumentation for the products you use.
Command Syntax SymbolsParentheses, brackets, ellipses, and slashes have the following meanings or uses:
( ) Parentheses enclose operands that govern the action of certain commandoptions.
[ ] Brackets indicate an optional command argument. If you do not use theoptional item, the program selects a default.
... Ellipsis after an argument indicates that you can repeat the preceding itemany number of times.
/ For 3270, a slash must precede the Time Sharing Option Extensions(TSO/E) password. A slash must also precede parameters of DOScommands entered from the command line.
\ A backslash is included as part of any directory name. An initial backslashindicates the first-level directory, and an additional backslash is inserted inthe directory name to indicate another level.
All directives, operands, and other syntax can be typed in either uppercase orlowercase, unless otherwise indicated.
© Copyright IBM Corp. 1989, 2003 ix

x Personal Communications 3270 Emulator User’s Reference

Part 1. General Information
© Copyright IBM Corp. 1989, 2003 1

2 Personal Communications 3270 Emulator User’s Reference
Chapter 1. Personal Communications Highlights
Personal Communications brings the power of personal networking to yourworkstation by providing a variety of connectivity options supporting local areanetwork (LAN) and wide area network (WAN) environments. Whether you needhost terminal emulation, client/server applications, or connectivity, PersonalCommunications offers a robust set of communications, networking, andadministrative features.
Personal Communications is a full-function emulator package with an easy-to-usegraphical interface, which includes many useful features such as file transfer anddynamic configuration, and emulator APIs including the IBM Host Access ClassLibrary.
Personal Communications also provides a variety of SNA-based client applicationprogramming interfaces (APIs). You can create applications that use thepeer-to-peer client APIs, which are based on LU 6.2 (and provided by PersonalCommunications). Using these APIs you can simultaneously access and processinformation on peer workstations.
With Personal Communications, you can participate in Advanced-Peer-to-PeerNetworks (APPN) as an end node, and use the advanced network features,high-performance routing (HPR), and dependent LU requester (DLUR).
Personal Communications provides the following functions:v zSeries™ Connections
LAN LAN via IEEE 802.23270 Communications Server for WindowsTelnet32703270 via iSeriesAPPC 3270 via LANMicrosoft® SNA client over FMIDependent Logical Unit Requester (DLUR)VT-over-Telnet (TCP/IP)3174 Peer Communication
COAX SNA Distributed Function TerminalNon-SNA Distributed Function Terminal
COM portTelnet 3270SNA-over-AsyncIBM Global Network® (not in Japan)Home3270IBM Global Network - SNA-over-AsyncDependent Logical Unit Requester (DLUR) via
SNA-over-Async
Hayes AutoSyncAPPC 3270 via SNA-over-AsyncAPPC 3270 via Hayes AutoSyncVT-over-AsyncVT-over-Telnet (TCP/IP)X.25 Hayes AutoSyncX.25 DLUR via Hayes AutoSync
© Copyright IBM Corp. 1989, 2003 3

X.25 APPC 3270 via Hayes AutoSync5250 3270 via iSeries
Dependent Logical Unit Requester (DLUR)SDLC Synchronous Data Link Control
3270 via iSeries (passthru)APPC 3270 via SDLCDependent Logical Unit Requester (DLUR)
SNA/IPLU 0, 1, 2, 3APPC 3270LU 0, 1, 2, 3 via DLUR
IBM ISA/MCA WACSynchronous Data Link Control3270 via iSeries (passthru)APPC 3270 via SDLCDependent Logical Unit Requester (DLUR)X.25 Qualified Logical Link ControlX.25 3270 via iSeriesAPPC 3270 via X.25X.25 DLURCommunications Server ClientCommunications Server
IBM-EEDLCLU (0, 1, 2, 3) via DLURAPPC 3270
OEM LU (0, 1, 2, 3)3270 via iSeries (passthru)APPC 3270Dependent LU Requester (DLUR)
v iSeries ConnectionsLAN LAN via IEEE 802.2
Telnet5250 over TCP/IPVT over TelnetTelnet5250 over IPX/SPX
5250 Twinaxial Data Link Control (APPC)Twinaxial Data Link Control (Console)
COM portSNA-over-AsyncHayes AutoSyncSNA-over-Async (Console)VT over AsyncVT over TelnetTelnet 5250X.25 Hayes AutoSync
SDLC Synchronous Data Link ControlSNA/IP
5250IBM ISA/MCA WAC
Synchronous Data Link Control (WAC)X.25 Qualified Logical Link Control
IBM-EEDLC5250
OEM APPC 5250v ASCII Emulator Connections
LAN VT over Telnet
4 Personal Communications 3270 Emulator User’s Reference
COM portVT-over-AsyncVT over Telnet
v S/3X Emulator Connections5250 Twinaxial Data Link Control (Console)
v Client/Server ConnectionsLAN LAN via IEEE 802.2Twinaxial
Twinaxial Data Link Control (APPC)COM port
SNA-over-AsyncHayes AutoSyncX.25
SDLC Synchronous Data Link ControlIBM WAC
Synchronous Data Link ControlX.25
AnyNet® SNA over TCP/IPAPPC
Enterprise ExtenderHPR over IP
v Configuration of SNA Node (APPN) Sessions– Emulator– Client/server applications
v SNA Node Operations– Starting and stopping resources– Deleting resources– Displaying resource information– Changing session limits– Initiation of path switches
v Log Viewer– View Message Log, Trace Log, and Merged Log files– Summary and Detail views– Set default Message Log size and location– Filter and search Log files– Message Log entries Help
v Trace Capability– 3270/5250 emulator data– APPN® and APPC API data– Connectivity data, such as LAN or SDLC– User services data, such as node initialization
v APPC Applets– Display SNA sense data (GETSENSE)– Transfer files (AFTP and AFTPD)– Check connection (APING)
v Sample Programs
– Located in \Personal Communications\samples subdirectoryv Installation and Configuration
– Partial installation option– Program sharing on a network server– Automatic detection of installed communication adapters– Dynamic change of communication configurations– Automatic Dial Facility (Async (IGN), SDLC, Home3270, SNA-A)
Chapter 1. Personal Communications Highlights 5

– Silent Installation– ASCII SNA-node configuration– Verification of ASCII configuration
v OEM Adaptor Cards
An open API enables vendors and other equipment manufacturers (OEMs) toprovide adapter cards that allow for additional connectivity options, forexample, additional X.25, ISDN, SDLC or twinax support.
v Host Session Function– Up to 26 sessions– Variable screen size and automatic font scaling– Function settings (of the host code page, for example) for each session
v Host Graphics Support– Built-in vector graphics support for GDDM® and other graphics applications
v File Transfer Function– Easy operation through graphical user interface (GUI) windows– Batch transfer of multiple files– Concurrent file transfer through multiple sessions– Background file transfer– File transfer invocation by macro– OfficeVision/MVS™ Import/Export functions– VT File Transfer (XModem and YModem)
v Edit (Cut and Paste) Function
You can use the clipboard to cut, copy, and paste a selected area.In addition, youcan paste data in other applications, such as spreadsheet programs, that supportthe PasteLink function.– Support of spreadsheet data format (Sylk, Biff3, Wk3 formats)– Copy Append– Paste Next– Paste to Trim Rectangle– Paste Stop at Protected Line
v Graphical User Interface (GUI)– Customizable 3D iconic tool bar– 3D-button hotspots– Pop-up keypad– Macro function, including record and play– VBScripts, including record and play– Keyboard-function setup and remapping– Mouse-button-function setup and remapping– Display setup (cursor type, graphics, sound, colors, for example)– Automatic font size adjustment or fixed font size– Window-appearance setup– Menu-bar customization– 3270 Light Pen emulation by using a mouse– Status bar with history– Page setup (Text and Graphics)– Revised Configuration Dialog– Online help
v Print Function– Printer session (for PC/3270: SCS, LU 3, or non-SNA)– Graphics local print– Printing with the Windows NT printer drivers– Print function by printer definition table (PDT)– Multiple host-print functions in multiple sessions– Print-job control by SNA bracket timeout
6 Personal Communications 3270 Emulator User’s Reference

– PDF-to-PDT conversion tool– PC400 print function by OS/400® Host Print Transform (HPT)– PC400 printing supported by the iSeries Advanced Print Support Utility– ZipPrint
v Programming Interfaces– 16/32-bit Emulator High-Level Language Application Programming Interface
(EHLLAPI)– 16/32-bit Dynamic Data Exchange (DDE)– 32-bit Node Operations Facility (NOF)– 16/32-bit Personal Communications API (PCSAPI)– 32-bit Advanced Program-to-Program Communication (APPC)– 32-bit Common Programming Interface for Communications (CPI-C)– 32-bit Automation Object API– 32-bit ActiveX/OLE 2.0– Host Access Beans for Java™
– ActiveX Controlsv PC400 Client Function
– Data transfer– PC Organizer– Text Assist– Enhanced Programmable Terminal User Interface (ENPTUI)
Chapter 1. Personal Communications Highlights 7

8 Personal Communications 3270 Emulator User’s Reference

Chapter 2. Problem Analysis
This chapter describes the information that will help you analyze problems withPersonal Communications, and ways to report a problem to IBM. For detailedinformation about contacting IBM, refer to Quick Beginnings.
For information about Personal Communications and support, refer to thefollowing Web sites:v The Personal Communications home page provides access to general product
information, and download services. To view this page, use an Internet browserand go to the following Internet address or Universal Resource Locator (URL):http://www.ibm.com/software/network/pcomm
v The Personal Communications support page provides links to code fixes, tips,newsgroups, support options, and services. To view this page or to submit asoftware defect report, use an Internet browser and go to the following Internetaddress:http://www.ibm.com/software/network/pcomm/support
Personal Communications provides several utilities to help you with problemanalysis. They can be invoked by selecting their icons from the Programs → IBMPersonal Communications → Administrative and PD Aids subfolder on theWindows Start menu.
The following sections describe these utilities and how to use them.
Log ViewerThe Personal Communications log viewer utility enables you to view, merge, sort,search, and filter information contained in message and trace logs. Use the logviewer during problem analysis to work with message and trace log entries. Thedefault name of the message log output file is PCSMSG.MLG; its file extensionmust be .MLG. The file extension for trace logs must be .TLG.
To view message or trace logs:1. From the Administrative and PD Aids subfolder, click Log Viewer; or, from an
active session, click Actions → Launch → Log Viewer.2. From the list of logged messages, double-click a message to display the
message text.
For more information about log viewer functions, refer to Administrator’s Guide andReference.
Trace FacilityThe Personal Communications trace facility enables you to log trace informationfor certain Personal Communications functions.
To start a trace, perform the following steps:1. From the Administrative and PD Aids folder, click Trace Facility; or, from an
active session, click Actions → Launch → Trace Facility. The trace status on thetitle bar displays the current state:
© Copyright IBM Corp. 1989, 2003 9

Active Trace data is being collected by the trace facility.
InactiveNo trace data is being collected.
2. From the main dialog box, click Set Up to set the desired trace systemparameters.
3. Click OK to return to the main trace dialog box.4. From the main trace dialog box, select the type of data you want to trace from
the Function Name, Component Name, and Trace Option list boxes.
Function NameA specific set of Personal Communications features, such as 3270/5250Emulator or User Services.
Component NameThe name of a specific part of a function, such as API data (for the3270 Emulator function) or Node Initialization (for the User Servicesfunction).
Trace OptionsThe options associated with a particular component, such as EHLLAPI(for the API component) or API trace (for the Node Initializationcomponent).
5. Start tracing data by clicking Start, or apply changes to the trace options byclicking Apply.
6. Run the operation that you want to trace.7. Optionally, stop the trace by clicking Stop.8. Save the trace data to your hard disk by clicking Save.9. Click Format to specify a formatted trace file name and to format the trace
data. The Information Bundler utility should be used immediately after thetrace is complete to ensure that the correct information is gathered.
Note: If you have changed the default path for the formatted trace file, theInformation Bundler will not find the trace information. Copy the tracefiles to the system-class application data directory.
10. Click OK.11. Click Clear to clear the trace buffer where you saved a trace.12. Use the log viewer to view the formatted trace log.
Information BundlerThe Personal Communications Information Bundler utility gathers system files,trace and log files, and registry information and creates a self-extracting .EXE file.This .EXE file is sent to support personnel via FTP for problem resolution. Thisutility should be executed immediately after the trace is complete to ensure thatthe correct information is gathered. To use the information bundler utility:1. From the PD Aids folder in the Personal Communications program group,
double-click the Information Bundler icon; or, from an active session, clickActions → Launch → Information Bundler.
2. A .EXE file containing system and Personal Communications information iscreated in the Personal Communications system-class application data directory.By default this file is called X12345.EXE. Refer to the installation documentationfor the location of the system-class application data directory for each Windowsoperating system.
10 Personal Communications 3270 Emulator User’s Reference

Internet ServiceThe Internet Service utility enables you to send the .EXE file containing diagnosticdata collected by the Information Bundler to an FTP server. This utility will notwork unless TCP/IP is configured and you have a direct connection to the internet.To use Internet Service:1. Double-click the Internet Service icon located in the Personal Communications
program group; or, from an active session, click Actions → Launch → InternetService.The Internet Service window contains four data fields that must have validvalues before you can submit your problem report.
2. Verify that the FTP Address field contains the default addresstestcase.software.ibm.com. This is the service anonymous FTP server.
3. Type your e–mail address in the field provided.4. In the Problem Determination Filename field, type the file name and path of
the .EXE file created with the Information Bundler. This file is located in thePersonal Communications installation directory.
5. In the PMR Number field, type the PMR number that you received as a resultof contacting IBM support personnel.
6. When all fields in the window have been filled with valid values, clickTransmit to submit your problem determination information.
Chapter 2. Problem Analysis 11

12 Personal Communications 3270 Emulator User’s Reference

Part 2. Using Personal Communications
© Copyright IBM Corp. 1989, 2003 13

14 Personal Communications 3270 Emulator User’s Reference
Chapter 3. Considerations for Using PC/3270 Sessions
This chapter contains hints and tips for using PC/3270 sessions. Supplementaryinformation other than the items described in this book may be included in theReadme HTML file in the Personal Communications directory.
Power ManagementPersonal Communications complies with Windows 2000 Power Managementrequirements for handling sleep events. This support minimizes sessioninterruptions due to network disconnections caused by sleep on Windows 2000and subsequent versions.
Note: In this context, the term ″sleep″ means that the system is on standby or is inhibernation. To applications such as Personal Communications, standby andhibernation are the same.
The benefits of this power management system include the following:v Power consumption is reduced via the Advanced Configuration and Power
Interface (ACPI); the system is able to enter a lower power state (or sleep mode)that appears to be ″off″ but is still powered enough to enable the system topower up (or wake) to handle timed events or device related needs such asreceiving a fax.
v The PC is instantly available to the user because it can rapidly return from a lowpower state to a fully-functional state.
v Customers can rely on their PCs to power down and up in a way that is easilyunderstood and predictable.
The following Personal Communications components are affected by this PowerManagement arrangement:v Emulator sessionsv Transfers that utilize an emulator session
Sleep PermissionBefore entering a sleep state (stand by or hibernate), Windows 2000 normallyrequests permission from the applications that are running. When one or moreemulator sessions are connected and Windows signals that the user is available forinteraction, Personal Communications asks the user to grant or deny sleeppermission. If the user grants permission, Personal Communications logs the eventand then notifies Windows. When user interaction is not possible, sleep permissionis denied.
When Personal Communications is not in the connected state, Windows 2000 mayautomatically sleep, without prompting the user for permission.
You can specify a setting in the User Preference Manager that allows the system tostandby or hibernate without prompting. In default mode (unchecked), if there isat least one connected session, you will be prompted to allow the system tostandby or hibernate. If there are no connected sessions, Personal Communicationsallows the system to standby or hibernate without prompting. Refer to QuickBeginnings for information on using the User Preference Manager.
© Copyright IBM Corp. 1989, 2003 15

Critical SleepWhen Windows 2000 resumes after an emergency suspension, PersonalCommunications may display and log a warning message.
Host-Session Window Operations
Cursor ColorBy default, PC/3270 draws the underline cursor in white. If the background colorof the current field is white, the color of the underline cursor automaticallyswitches to black. PC/3270 draws the block and half-block cursors in the samecolor as the current field, reversing the background and forground colors. Thisbehavior is identical to a 327x terminal.
If you want to change the default cursor color assignment, modify the pcswin.inifile and add the CursorColor value to the Session stanza, as follows:
[Session]CursorColor=<red_value> <green_value> <blue_value>
Here, <red_value>, <green_value>, and <blue_value> are integers from 0 to 255that specify the color intensity for each color primitive respectively. The colorvalues range from 0 0 0 for black to 255 255 255 for white. PC/3270 then drawsthe underline cursor and the block cursors in this new color, mixing this new colorwith the existing screen colors using an XORed (exclusive or) operation. The value0 0 0 (black) is not recommended because XORing 0 0 0 with any existing colorresults in the existing color, which makes the cursor invisible.
If you select a blinking cursor, it will always be drawn white, mixing the whitewith the existing screen colors using an XORed operation. You cannot change thecursor color when it is blinking.
Releasing Insert Mode with Attention KeysAs on a non-programmable terminal, you can release insert mode when you pressan Attention key. If you want this to happen, add this parameter to the [Keyboard]section of the workstation profile (*.WS):
[Keyboard]ResetInsertByAttn=Y <- Added.
Scroll BarIf you choose Font from the Appearance menu in the host session window andchoose Fixed Size from the Select Display Font window, the entire operatorinformation area might not appear on the screen. If you specify With Scroll Bar,the OIA will not scroll. The session window size is restricted to be smaller than thescreen size.
Scroll-Lock KeyWhen the Scroll Lock keyboard indicator is turned on, the cursor movement keysand the Page Up and Page Down keys are used to scroll windows only when youspecify With Scroll-Bar in the Window Setup window. If you specify WithoutScroll-Bar, you cannot use the Scroll Lock key, because the entire screen isdisplayed. For example, cursor-movement keys do nothing in Scroll Lock mode.
16 Personal Communications 3270 Emulator User’s Reference

3270-Session Screen-Size ControlAlthough you can specify the screen size of the 3270 session in the PC/3270configuration, the final screen size is determined by the host according to the SNABIND negotiation.
Sometimes, you might want to use a particular screen size when it is difficult tohave the host VTAM® table changed. The following method will satisfy yourrequirement; however, because it violates SNA rules, some applications that referto the VTAM table only might not work.
Modify your workstation profile (.WS) to insert the following line into the [LU]section:
[LU]InfScreenSize=Y
Personal Communications processes byte 24 of the host BIND image correctly andaccording to the SNA architecture. Byte 24 is the last 2 bytes ofPSERVIC=X’028000000000000000000300’ (03 in this case) in the log mode.
If byte 24 is X'03', the default screen size is 24 x 80 and the alternate is what youconfigured with PC/3270.
If byte 24 is X'00' or X'02', the default and alternate screen sizes are 24 x 80.
If byte 24 is X'7E' or X'7F', bytes 20–23 in the BIND control the default andalternate screen sizes.
If you have X'03' in the BIND image, you can customize whatever screen size youwant. The host will query Personal Communications and use the alternate screensize.
The following table shows the details of the BIND image processing:
Byte in BIND by Host ==> Result (Screen size)-------------------- --------------------
24 20 21 22 23 Default Alternate== == == == == ======= =========
a) 00 -- -- -- -- ==> 24 x 80 24 x 80
b) 02 -- -- -- -- ==> 24 x 80 24 x 80
c) 03 -- -- -- -- ==> 24 x 80 R x C
d) 7E Rd Cd -- -- ==> Rd x Cd Rd x Cd
e) 7F Rd Cd Ra Ca ==> Rd x Cd Ra x Ca
Legend: RxC: Screen Size defined by PC/3270 configuration(R,C) = (24,80) , (32,80) , (43,80) or (27,132)
Rd: Rows in the default screen size modeCd: Columns in the default screen size mode
(Rd,Cd) = (24,80) , (32,80) , (43,80) or (27,132)Rd*Cd <= R*C
Ra: Rows in the alternate screen size mode
Chapter 3. Considerations for Using PC/3270 Sessions 17

Ca: Columns in the alternate screen size mode(Ra,Ca) = (24,80) , (32,80) , (43,80) or (27,132)Ra*Ca <= R*C
PC/3270 supports Query Replies. Make sure that the Query Reply of ImplicitPartition returns the final screen size upon receipt of the BIND command.
Customizing a Display Translation TablePC/3270 displays the host EBCDIC character using the workstation (ANSI) graphicsymbol so that the character defined by the zSeries EBCDIC host code page isdisplayed correctly using the same graphic symbol defined by ANSI. However,you might need your original translation, because your host or workstationapplication is not designed to use the standard translation.
You can use your original translation table if you refer to the following procedureas an example. Note that the data integrity caused by the user-defined table isyour responsibility.
The following procedure is an example of how to remap left and right brackets.1. Terminate all running 3270 sessions2. Modify the PC/3270 workstation profile (*.WS).
[Translation]IBMDefaultView=NDefaultView=C:\Personal Communications\PRIVATE\BRACKET.XLT
3. Create the display translation table file (.XLT). In this example, the followingBRACKET.XLT file is created in the Personal Communications privatesubdirectory.[Profile]id=XLTDescription=User-defined Display Translation Table
[Option]Replace=Y
[SB Xlate]; EBCDIC=ANSI; The next line displays EBCDIC X’AD’ as; an ANSI X’5B’ (left bracket)AD=5B; The next line displays EBCDIC X’BD’ as; an ANSI X’5D’ (right bracket)BD=5D
4. Create your own keyboard layout (.KMP) if you need to enter your new leftand right brackets graphic symbols:[Keyboard]KEY27=ansi ddKEY28=ansi a8
The information on the right should be lowercase characters. PC/3270translates ANSI X'dd' into EBCDIC X'ad'. It is displayed as [ by the tablecreated in step 3.
5. Click on the PC/3270 icon corresponding to the modified workstation profile.
18 Personal Communications 3270 Emulator User’s Reference

Support for Long File NamesLike Windows, Personal Communications supports long file names. You can giveany name (up to 255 characters) to a file; you are not limited to eight characterswith a three-character extension. You can use spaces in the file name, but not thesymbols /, \, :, *, ?, “, <, >, or |. In addition, the tilde () character should not beused in CMS or MVS host file names.
File Transfer Function
Host File Name and Reserved WordsYou should not use the following words as a VM file name or file type, as a MVSdata set name, or as a CICS® file name, because they are reserved for use as optioncommands:v ASCIIv APPENDv TIMEv CLEARv NOCLEARv SILENTv QUIETv PROGRESSv JISCIIv SOv NOSOv BLANKv USERv CRLFv BINARYv NOCRLF
Changing the Packet Size When Import/Export Is IdleWhen import/export is idle, select Preferences → Transfer from the Edit menu.When you change the packet size on the Setup window, end import/export, andthen rerun it.
Wait Option for Multiple File TransferIf multiple file transfers do not succeed, insert the following statement into the[Transfer] section of your .WS file:
[Transfer]wait=1000
This parameter causes a 1000 msec (1 sec) delay between file transfers. If this doesnot help, you might need to increase the value again.
NOTRUNC and BLANK Options (SBCS Only)If you want to add trailing blanks (spaces) to fill the logical record length for eachrecord when downloading a text file, use the following options in the AdditionalOptions edit field of the Transfer-Type Definition window.
NOTRUNC : for VM/CMS (PTF# UR35492)NOTRUNC : for MVS/TSO (PTF# UR34797)BLANK : for CICS
Chapter 3. Considerations for Using PC/3270 Sessions 19

Setting the VTAM PSERVIC StatementFile transfer problems can occur if extended attribute support has not been set onin the VTAM PSERVIC statement. For extended attribute support, set on the highorder bit in PSERVIC byte1 (zero byte origin) as follows: x’xx80xxxxxx...’.
Graphic FunctionsThis section provides information, restrictions, and considerations for graphicfunctions.
Graphics ProtocolsPersonal Communications allows you to use host graphics applications, such asGDDM and others. Two types of graphics are supported:v Vectorv Programmed symbols
Two protocols are supported for vector graphics:v Advancedv Native
See Configuring Graphics in the online helps for a description of these protocolsand to learn how to configure your sessions for graphics.
The following functions are supported:v Multiple mixed alphanumeric and graphics host sessionsv Use of standard OS/2® printing and plotting facilitiesv Creation of PIF (Picture Interchange Format) filesv Clipping graphics data into the clipboard
Vector GraphicsVector graphics are computer graphics in which display images are generated fromdisplay commands and coordinate data. Personal Communications provides vectorgraphics support for the OS/2-Link (advanced) or the 3179G or GOCA (native)protocols. Choose the protocol that is appropriate for your host applications.
Advanced Protocol: Use the advanced protocol when you have GDDM Version 2Release 3 or later and are using any of the following operating systems:v MVSv VSEv VM/SPv VM/XA SP™
Note: The advanced protocol is not supported by the CICS pseudo-conversationalmode with versions of GDDM earlier than Version 3, and not by IMS/VS atall. It is, however, supported by the CICS pseudo-conversational mode withGDDM Version 3 Release 1 or later.
The advanced protocol is equivalent to that used by OS/2-Link, so it supports thesame subsystems. However, no download of code from the host system is requiredfor Personal Communications because all the OS/2-Link graphics modules areintegrated into the program.
Native Protocol: Choose the native protocol when you intend to use older GDDMversions or non-GDDM host-graphics applications, such as those originally
20 Personal Communications 3270 Emulator User’s Reference

intended for use on 3270 nonprogrammable terminals as the 3179G, 3192G or3472G. The native protocol also allows IMS/VS users to display GDDM graphics.
Note: A 3174 controller requires a terminal to respond within a certain time; if itdoes not, a machine check 207 message appears. If you are using a coaxialattachment for graphics in native mode, this can happen for various reasons,such as the complexity of the graphics drawing-orders or the speed of yourworkstation. In this case, you should change to advanced mode.
Programmed SymbolsRaster graphics are displayed with programmed symbols, which are downloadedto your workstation. Personal Communications support up to six sets (PSAthrough PSF) of triple-plane and multiple-color programmed symbols.
Use programmed symbols as the graphics type when you intend to use hostgraphics applications originally written for the 3279G terminal.
Graphics applications use one or both of these methods to display graphicalscreens. Personal Communications allows you to enable or disable support forvector graphics and programmed symbols. Choose the type of support that ourhost applications require.
Note: If you use the OS2-Link (advanced) protocol under the GDDM program, donot choose programmed symbols. Also, do not choose programmed symbolswhen you use the OS2-Link protocol with other applications.
Enabling Programmed Symbol Sets: PC/3270 provides up to six sets oftriple-plane programmed symbols, depending on the type of graphics support thatyou choose. By default:v Two sets (PSA and PSB) of single-plane programmed symbols are usable if you
choose both programmed symbols and vector graphics.v Three sets (PSA, PSB, and PSE) of single-plane programmed symbols and three
sets (PSC, PSD, and PSF) of triple-plane programmed symbols are usable if youchoose programmed symbols, but not vector graphics.
You can change the number of programmed-symbol sets and triple or single planesavailable for each programmed-symbol set by editing the [3270] section of theworkstation profile:PSSPlanes=xxxxxx
Each x represents a number (0, 1, or 3) that indicates how many planes are to beavailable for each set; the first column indicates the number of planes for PSA, thesecond column for PSB, and so on. For example, to enable six triple-planeprogrammed symbol sets, enter the following:
PSSPlanes=333333
To enable two single-plane and two triple-plane sets, enter the following:PSSPlanes=113300
How to Handle Errors Caused by Insufficient MemoryGraphic execution module PCSGRP.DLL uses a large amount of global memory forgraphic drawing or printing. When the workstation has insufficient installedmemory, results might not be correct. For example, an area might not be clearlyshaded.
Chapter 3. Considerations for Using PC/3270 Sessions 21
In this case, increase the amount of installed workstation memory by at least1 MB. For host graphic printing, add 1 more megabyte.
Memory might have to be further extended depending on the host graphicapplication and printer driver used.
Drawing-Buffer SizeThe drawing-buffer size varies depending on the contents set for Redraw of agraphic function.
To set Redraw, click Preferences → Appearance → Display Setup from the Editmenu in the session window. Select Graphics from Category.
Selecting Host from the optional items of Redraw requires no buffer.
If you select Retained, the graphic execution module stores all redrawing data intoa buffer. Such a buffer is called a retained buffer. The buffer size varies dependingon the complexity of the graphic data from an application program. For example, asimple table has a buffer size of 10 KB to 20 KB, while a complicated graphicimage has a buffer size of 200 KB to 300 KB.
When you select Bitmap to set Redraw, the buffer size will be the same as the sumof the retained buffer size and compatible bit map size:
(Height) x (Width) x (Number of planes) x (Bits/Pixel) / 8 bytes
For example, when you select a 7x12 font for a VGA 16-Color Display Model 2(24x80), the bitmap size is:
(7x80) x (12x24) x 1 x 4 / 8 = 80 KB
When you select a 12x20 font for an IBM PS/55 High-Resolution 256-Color DisplayModel 2, the bitmap size is:
(12x80) x (20x24) x 1 x 8 / 8 = 460 KB
Using Bitmaps for DrawingThe graphic execution module uses a bit map compatible with the display unit todraw an area instruction in overpaint mode. An image instruction requires oneplane bit map.
(Buffer for area) = (Area width) x (Area height) x (Number of planes) x(Bits/Pixel) / 8
(Image buffer) = (Image width) x (Image height) / 8
Print Buffer SizeThe retained buffer must be used for printing. The retained buffer is the same sizeas that used for redrawing. This is also applied when you specified Bit Map forRedraw on the Display Setup window.
If graphic printing is called in Bitmap mode, the graphic printing modulegenerates a bitmap compatible with the connected printer, draws an image on thebitmap, and transfers the bit image to the printer.
22 Personal Communications 3270 Emulator User’s Reference
This operation is generally performed quickly. When memory is frequentlyswapped, the process slows down in proportion to the number of swap operations.If a large bit map is not allocated, the graphic printing module prints a graphicimage normally using only the retained buffer.
Example:
Proprinter (240x144 DPI) character size:Bitmap size = (240x8) x (144x11) x 1 x 1 / 8 = 380 KB
Example:
EPSON (ESC/P) (360x180 DPI color) character size:Bitmap size = (360x8.5) x (180x11) x 3 x 1 / 8 = 2.3 MB
Note: With some printers, different printing results might be obtained in bitmapmode and non-bitmap mode. If the desired results are not obtained, changethe current bitmap mode. For example, specify non-bitmap mode to print inbitmap mode.
Edit-Copy BufferAn editing operation causes the graphic execution module to copy a bit map andDIBitmap to the clipboard. The bit map is compatible with the display; DIBitmapis a 4-bit/pixel bit map.
Printer FontsThe printer driver can handle two font sets, the device font and GDI font. Thedevice font is a hardware font built into the printer. The GDI fonts are System(without brackets) or other software fonts for Windows.
When you select a font set for graphic printing from the Printer Control window,use the GDI fonts for the following reasons:v In bitmap mode, a GDI font can be used for printing. However, the device font
cannot be used, because an image cannot be drawn on a memory bit map whenusing the device font.
v In bitmap mode, the device font cannot be used for printing when OR andexclusive OR attributes are mixed.
PlotterBecause a plotter does not support a raster, the following restrictions are imposedon drawing. Use a plotter for figures and tables that have mainly lines.v No shading is supported.v Some shading patterns cannot be distinguished.v Image order drawing requires much time, and the final printout is of poor
quality.v The OR and exclusive OR are not correctly reflected.
Hole in Screen Caused by Clearing a Graphic CharacterWhen a character overlaps a graphic image, the graphic image is cleared at theposition where the character is to be displayed. When you enter a null character orspace having the transparent attribute at the position where a graphic image isdisplayed, the graphic image in that character cell is not cleared.
Chapter 3. Considerations for Using PC/3270 Sessions 23

If you select Host or Retained to set Redraw on the Display Setup window, whencharacters in a graphic image are cleared, a hole appears in the graphic area. Thisis because these two modes do not have a bitmap image, and partial redrawingcannot be performed on the screen.
If you select Bitmap mode as Redraw Graphics, you can find no hole on thegraphic region by the application that overrides any alphanumeric characters (aswell as NULL and SPACE) on the graphic image.
To restore the screen, perform either of the following actions:v Press the PA3 key to have the application program redraw the screen.v Minimize and restore the graphic image retained in Retained mode, then redraw
it or select Bitmap mode.
Note: When you change the setting of Redraw in the Display Setup window, theset contents are valid from the next drawing.
Miscellaneous Restrictions for Graphic FunctionsIf advanced protocol is selected, graphic functions cannot be used in the IMS/VSand CICS pseudo-conversational mode with versions of GDDM earlier thanVersion 3.
Considerations for Graphics Functions
Native-Graphics DatastreamIf the host sends an Object Structured Field (Object Picture, Object Data, ObjectControl) with a zero value in the length field, Personal Communications rejects itand displays PROG754.
Printout to LPT1When you use a host application that prints to your PC’s LPT1, you must firstselect the printer in the Printer Setup dialog of the File menu.
Print Processing
Using a Printer with the Non-SNA DFT AttachmentFor the non-SNA DFT attachment, PC/3270 regards any print job within 30seconds after the previous one as a continuous job with the previous one. Itdetermines the job end artificially by a timeout value.
You can change the standard timeout value by modifying the [CNDFT] section ofthe workstation profile (*.WS):
[CNDFT]PrtTimeOut=nn
Note: The variable nn is the decimal value of the timeout in seconds.
Print Job Control Using SNA TimeoutPC/3270 treats the data packet, which begins with an SNA Begin Bracket (BB) andends with an SNA End Bracket (EB), as one job, and spools it to the Windowsprint manager. However, some applications might not use SNA BB and EBappropriately, and an unexpected page eject can occur. This section describes twotimeout controls that you can customize.
24 Personal Communications 3270 Emulator User’s Reference

Concatenation of Multiple Print JobsWhen a new print job comes from the host before the timer specified by theworkstation profile expires, the job is concatenated to the previous one, and theyare regarded as one job. You can change the timer value by specifying thefollowing parameter in the [printers] section of the workstation profile (*.WS):
[printers]ConcatenateTime=nn
Note: The variable nn is as follows; its unit is one second:
0 No concatenation of print jobs
1 – 32767 Concatenation of print jobs by this timeout value
When a non-SNA attachment is used, the timer should not be specified in theworkstation profile.
Termination of a Print JobIf an end of a print job (SNA End of Bracket) does not come from the host beforethe timer specified by the workstation profile has expired, the job is automaticallyterminated. You can change the timer value by specifying the following parameterin the [printers] section of the workstation profile (*.WS):
[printers]TerminateTime=nn
Note: The variable nn is as follows; its unit is one second:
0 No automatic termination of a print job
1 – 32767 Automatic termination of a print job by this timeout value
When a non-SNA attachment is used, the timer should not be specified in theworkstation profile.
SCS TRN Command (LU 1)You can change the operation of the SCS TRN command by adding a parameter tothe [printers] section of the workstation profile (*.WS):
ATRN=YTransfers data that is controlled by the SCS TRN command to the printerdriver without conversion. This parameter is the default for SBCS. In thecases below, this parameter is assumed to be ATRN=N.v The printer driver does not support PASSTHRU.v The printer driver supports the BANDING function.v BANDING=Y is specified in the [printers] section of the workstation
profile (*.WS).
When you use a printer driver for which the PASSTHRU function isincomplete, sense code X'1003' is returned to the host system for the SCSTRN command.
This is the default value.
ATRN=NConverts data that is controlled by the SCS TRN command and transfersthe result to the printer driver. This parameter is the default for DBCS.
Note: The SCS TRN command (LU 1) is available in PDT mode only.
Chapter 3. Considerations for Using PC/3270 Sessions 25

SCS SPD/SLD Command (LU 1)If the selected font cannot be used with the values specified for CPI or LPI, thiscommand temporarily switches to a valid font.
Ignoring Blank PagesIf you cannot print a blank page correctly, check for the following things:v Some printers ignore a blank page if so specified with the Printer Setup option
(or setting the printer’s DIP switches). Check whether the printer is set to enablethis option.
v Some printer drivers ignore a blank page if so set with the Printer Driver Setupoption. Check whether this option is supported by the printer driver.
Printing Reverse-Display Characters with GDI FontsSome printer drivers that do not support reverse-display character printing printreverse-display characters as spaces. To avoid this, add the REVERSE=N line to the[printers] section of the workstation profile (*.WS).
CPI/LPI of Device FontsIf the printer driver cannot use the device font for the specified CPI or LPI, datacan be printed with other CPI or LPI values.
Printing Reverse-Display Characters with Device FontsMost printer drivers do not support reverse-display-character printing with devicefonts.
PCSERR999 Error MessagesMessage PCSERR999 - Personal Communications internal error: module-name -xxx might appear when there is insufficient memory. Because the print job remainsin the print manager, you should delete it.
Printable AreaCharacters might not be printed over a large enough area, depending on theprinter driver used. When using a printer driver that allows you to set themargins, specify the minimum margins to maximize the printable area.
SVF Control CodeIf the maximum print line (MPL) is less than the paper size in the SVF controlcode, a page feed is performed when the printing position reaches MPL.
PDT ModePrinting in PDT mode is restricted as follows:v A graphic image is printed through the Windows printer driver specified in File
→ Printer Setup, even if the printer is set up for PDT mode.v APL characters cannot be printed.v PostScript printers are not supported.
SDDLU ConsiderationsPC/3270 supports the self-defining dependent logical units (SDDLU) function ofACF/VTAM® Version 3 Release 4.1 (MVS) or Version 3 Release 4 (VM). SDDLUprovides the ability to dynamically create dependent LUs on predefined PUs andto reconfigure dependent LUs without interruption to any other user on thenetwork and without intervention by system programming or operations staff.
PC/3270 SDDLU is supported for all connections except DFT (coaxial connection).
PC/3270 network stations support SDDLU by:
26 Personal Communications 3270 Emulator User’s Reference

v Accepting a format-1 Activate PU (ACTPU), which signals that VTAM requires aNetwork Management Vector Transport (NMVT) containing the Product Set ID(PSID) and LOCADDR of the LU.
v Using LOCADDRs 02, 03, 04, and so on, in that sequence, by default. However,if you specify the LU addresses explicitly, it will use the addresses that youspecify.
v Sending an unsolicited NMVT to VTAM when an LU switches on.
PSID DefinitionsPC/3270 defines the default PSID for each LU type. Generally, the PSID containssuch things as the machine type and the model number. The following tabledescribes the machine type and model number definitions for each LU typesupported by PC/3270.
Table 1. Machine Types and Model Numbers for Supported LU Types
MachineType
ModelNumber LU Type Screen/Buffer Size
3270 002 Display Model 2 screen 24 rows by 80 columns
3270 003 Display Model 3 screen 32 rows by 80 columns
3270 004 Display Model 4 screen 43 rows by 80 columns
3270 005 Display Model 5 screen 27 rows by 132 columns
3270 DS2* Printer 3270 data stream 24 rows by 80 columns
3270 DS3* Printer 3270 data stream 32 rows by 80 columns
3270 DS4* Printer 3270 data stream 43 rows by 80 columns
3270 DS5* Printer 3270 data stream 27 rows by 132 columns
3270 00A Display 48 rows by 80 columns
3270 00B Display 62 rows by 160 columns
3270 00C Display 24 rows by 132 columns
* PC/3270 assumes that the 3270 data stream is the default printer-session type. If you usethe SNA Character String (SCS) data stream, you must use a different designation for thePSID, such as 3270SCS. You must define this yourself, as shown in the next example.
Assigning User-Defined PSIDsYou can replace the default PSID values with your own definitions or define newPSIDs, by preparing a PSID definition file or by changing the Windowsworkstation profile. The PSIDs you use must be defined to VTAM.
Add a statement such as the following one to the [LU] definition in theworkstation profile. This example supersedes the default PSID with LUA0001.
PSID = LUA0001
Default Key Function AssignmentsThis section lists the functions assigned, by default, to each key on your keyboard.
For more information about each function, refer to the Keyboard choice on theHelp menu.
You can change the default key assignments to the following default functiontables, by selecting Keyboard Setup from the Assist menu.
Chapter 3. Considerations for Using PC/3270 Sessions 27

When the Keyboard Setup window appears, select one of the following choices:v 3270 for a 3270 keyboard layoutv 5250 for a 5250 keyboard layoutv 3270+5250 for a combined keyboard layoutv VT for a DEC VT220 keyboard layout
Personal Communications includes two .KMP keyboard map files that map thestandard Win32 hotkeys for Cut, Copy, and Paste to Ctrl+X, Ctrl+C and Ctrl+V,respectively. The key values for the following functions have also been changed:Page Up (3270 only), Page Down (3270 only), Enter and New Line. You can utilizethese keyboard map files, or can add these key values to an existing map file.
For 3270 sessions, the .KMP file provided is pcswinkb3.kmp. The remapping isgiven in the following table.
Table 2. Win32 Keyboard Map Functions for a 3270 Layout
Function of Key Key
Edit Cut Ctrl+X
Edit Copy Ctrl+C
Edit Paste Ctrl+V
Page Up PF7
Page Down PF8
New Line Right Ctrl
Setting the 3270 Keyboard Layout DefaultTo make the 3270 keyboard layout defaults available, do the following:1. Click Preferences → Keyboard from the Edit menu. The Keyboard dialog box is
displayed.2. Select the IBM Default radio button next to Current Keyboard.3. Click OK.
Default Key Functions for a 3270 LayoutTable 3 shows the default key functions for PC/3270. The key used is the same forall the supported keyboard types.
Table 3. Default Key Functions for a 3270 Layout
Function of Key Key
APL Ctrl+F8
Attention Esc
Alternate Cursor Alt+F11
Backspace �─ (Backspace)
Back Tab Shift+─�|
Back Tab Word Alt+←
Break Break
Change Format Toggle Alt+F3
Change Screen Ctrl+PageUp
Clear Pause
28 Personal Communications 3270 Emulator User’s Reference
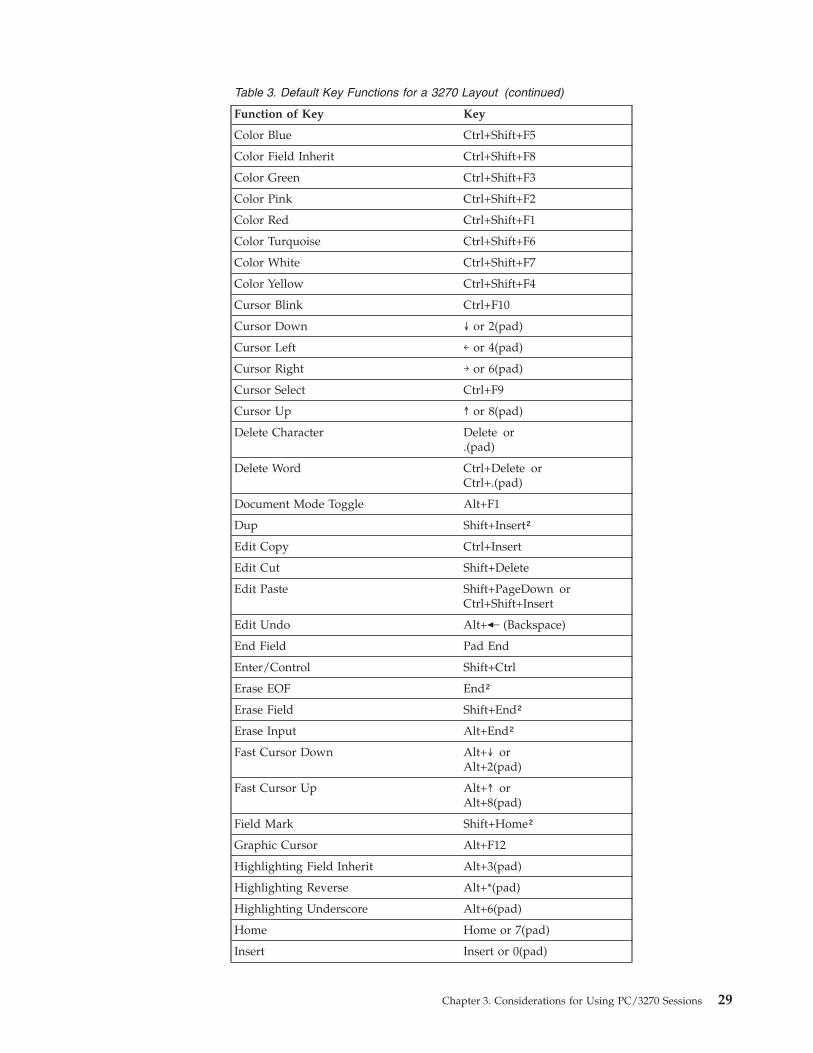
Table 3. Default Key Functions for a 3270 Layout (continued)
Function of Key Key
Color Blue Ctrl+Shift+F5
Color Field Inherit Ctrl+Shift+F8
Color Green Ctrl+Shift+F3
Color Pink Ctrl+Shift+F2
Color Red Ctrl+Shift+F1
Color Turquoise Ctrl+Shift+F6
Color White Ctrl+Shift+F7
Color Yellow Ctrl+Shift+F4
Cursor Blink Ctrl+F10
Cursor Down ↓ or 2(pad)
Cursor Left ← or 4(pad)
Cursor Right → or 6(pad)
Cursor Select Ctrl+F9
Cursor Up ↑ or 8(pad)
Delete Character Delete or.(pad)
Delete Word Ctrl+Delete orCtrl+.(pad)
Document Mode Toggle Alt+F1
Dup Shift+Insert²
Edit Copy Ctrl+Insert
Edit Cut Shift+Delete
Edit Paste Shift+PageDown orCtrl+Shift+Insert
Edit Undo Alt+�─ (Backspace)
End Field Pad End
Enter/Control Shift+Ctrl
Erase EOF End²
Erase Field Shift+End²
Erase Input Alt+End²
Fast Cursor Down Alt+↓ orAlt+2(pad)
Fast Cursor Up Alt+↑ orAlt+8(pad)
Field Mark Shift+Home²
Graphic Cursor Alt+F12
Highlighting Field Inherit Alt+3(pad)
Highlighting Reverse Alt+*(pad)
Highlighting Underscore Alt+6(pad)
Home Home or 7(pad)
Insert Insert or 0(pad)
Chapter 3. Considerations for Using PC/3270 Sessions 29

Table 3. Default Key Functions for a 3270 Layout (continued)
Function of Key Key
Jump Next Alt+PageUp
Mark Down Shift+↓
Mark Left Shift+←
Mark Right Shift+→
Mark Up Shift+↑
Move Mark Down Ctrl+↓ orCtrl+2(pad)
Move Mark Left Ctrl+← orCtrl+4(pad)
Move Mark Right Ctrl+→ orCtrl+6(pad)
Move Mark Up Ctrl+↑ orCtrl+8(pad)
PA1 Alt+Insert²
PA2 Alt+Home²
PA3 Shift+PageUp²
Pause Ctrl+F7
PF1 to PF12 F1 to F12
PF13 to PF24 Shift+F1 to F12
Play Ctrl+F6
PS Field Inherit Ctrl+Shift+(pad)0
Print (Local Copy) Not assigned
Quit (Device Cancel) Alt+Left Ctrl
Record Ctrl+F5
Reset/Control Left Ctrl
Response Time Monitor Ctrl+F11
Rule Ctrl+Home
Sys Request Shift+Esc
Tab Field ─�| or Shift+─�|(pad)
Tab Word Alt+→
Test Ctrl+PageDown
Transparency Field Inherit Ctrl+Shift+8(pad)
Transparency Opaque Ctrl+Shift+/(pad)
Word Wrap Toggle Alt+F2
Note:² Indicates the key on the main keyboard.(pad) Indicates a key on the numeric keypad.
Note: The Enhanced keyboard has some duplicated keys. The functionsof the duplicated keys are the same except when you specify a singlekey. For example, Del means any Delete key, whereas Pad Del specifiesonly the Delete key on the numeric keypad.
30 Personal Communications 3270 Emulator User’s Reference

Default Key Functions for the Combined PackageTable 4 shows the default key functions for the combined package. The key used isthe same for all the supported keyboard types.
When you use the 3270+5250 keyboard layout, the key definitions for the 3270 and5250 layouts are combined with those listed here.
Table 4. Default Key Functions for the Combined Package
Function of Key Key
Change Screen Not assigned
Character Advance Shift+BackSpace
Help Not assigned
Host Print Not assigned
PA3 Not assigned
Roll Down PageUp
Roll Up PageDown
Printer Setup Not assigned
Keyboard Setup
You can use Keyboard Setup to modify the function defined for each key on thekeyboard, except some reserved keys.
You can define the following functions for the keys.v Performing a key functionv Playing a macrov Entering characters
Note: By default, the Enter function is assigned to the Ctrl key. To change thisassignment or, if you are using a non-IBM compatible keyboard and theEnter key does not work properly, you need to customize your keyboard.For 3270 and 5250 sessions, you may use the keyboard map files providedwith Personal Communications (see “Win32 Cut, Copy, and Paste Hotkeys”on page 32).
Keyboard File
When you specify a key, you can save the new keyboard layout in a file (.KMP). Ifyou create two or more keyboard files, you can alternate between them asrequired.
To assign a function to a key on the keyboard:1. Select Preferences → Keyboard from the Edit menu2. When the Keyboard Setup window appears, select Customize.
Note: Select Spain from the Language menu during keyboard setup if youwant Catalan support.
3. Assign the key functions, referring to the online help for detailed instructions.4. Save your changes and exit the Customize Keyboard window.5. Click OK after completing the setup.
Chapter 3. Considerations for Using PC/3270 Sessions 31
You can reset either the entire keyboard or specific keys to defaults:v To reset the entire keyboard, set the current keyboard to IBM Default in the
Keyboard Setup window.v To reset specific keys, select a key in the Customize Keyboard window and then
select Default from the Current Actions for Selected Key box.
Note: There are seven keys that you cannot redefine and they are gray or dimmedin Keyboard Setup. These keys are Alt, AltGr, Print Screen, Scroll Lock,CapsLock, NumLock, and Shift.
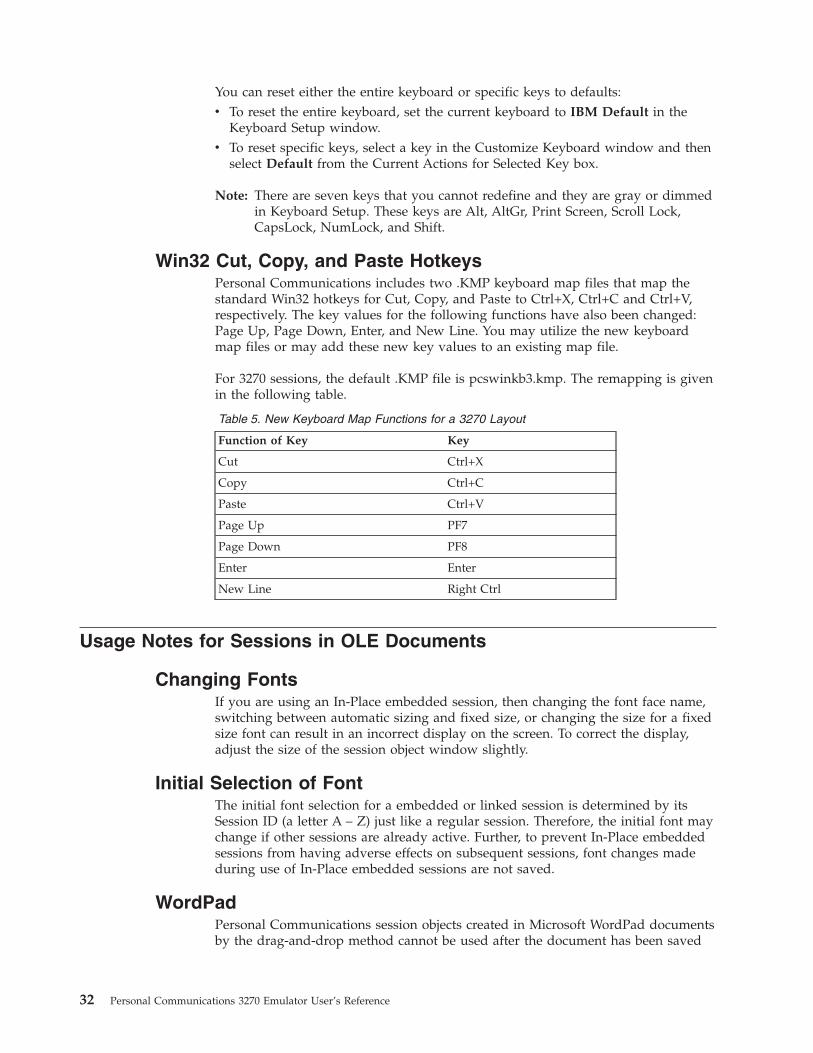
Win32 Cut, Copy, and Paste HotkeysPersonal Communications includes two .KMP keyboard map files that map thestandard Win32 hotkeys for Cut, Copy, and Paste to Ctrl+X, Ctrl+C and Ctrl+V,respectively. The key values for the following functions have also been changed:Page Up, Page Down, Enter, and New Line. You may utilize the new keyboardmap files or may add these new key values to an existing map file.
For 3270 sessions, the default .KMP file is pcswinkb3.kmp. The remapping is givenin the following table.
Table 5. New Keyboard Map Functions for a 3270 Layout
Function of Key Key
Cut Ctrl+X
Copy Ctrl+C
Paste Ctrl+V
Page Up PF7
Page Down PF8
Enter Enter
New Line Right Ctrl
Usage Notes for Sessions in OLE Documents
Changing FontsIf you are using an In-Place embedded session, then changing the font face name,switching between automatic sizing and fixed size, or changing the size for a fixedsize font can result in an incorrect display on the screen. To correct the display,adjust the size of the session object window slightly.
Initial Selection of FontThe initial font selection for a embedded or linked session is determined by itsSession ID (a letter A – Z) just like a regular session. Therefore, the initial font maychange if other sessions are already active. Further, to prevent In-Place embeddedsessions from having adverse effects on subsequent sessions, font changes madeduring use of In-Place embedded sessions are not saved.
WordPadPersonal Communications session objects created in Microsoft WordPad documentsby the drag-and-drop method cannot be used after the document has been saved
32 Personal Communications 3270 Emulator User’s Reference
and closed. This limitation may be fixed by some future version of WordPad. Forthe present, you should only create Personal Communications objects in WordPadby using the Insert-Object menu item.
Some versions of Microsoft Word and Microsoft WordPad incorrectly save the stateof embedded objects that are displayed as icons. If you open a document thatcontains a Personal Communications session object that was created to display asan icon, and the object is activated, then it may activate In-Place instead of as aseparate window. This problem may be fixed in future versions of these containers.
WordProIf you attempt to open a link to a Personal Communications session in a Lotus®
WordPro document, current versions of WordPro may give unpredictable results.This limitation may be fixed by some future version of WordPro. For the present,you should only use embedded Personal Communications objects in WordProdocuments. You can use the “Display as Icon” option if a separate window isdesired.
Updating Linked FilesFiles that are linked into Word 97 or Excel 97 do not update automatically. Youmust manually save the linked file before your edits are reflected in the containerwindow.
Inactivity Timeout for Communication LinksThe Inactivity Timeout automatically disconnects a link after it has been idle for aspecified length of time. Its purpose is to avoid excessive charges on dial-up links,such as switched-line connections with SNA/A, Asynchronous IIN, HayesAutoSync, or SDLC. Inactivity Timeout is not recommended for other types ofconnections.
To enable Inactivity Timeout, add the following statement to the PU section ofyour workstation profile (.WS file):
[PU]InactiveTimeout=xx
The value xx, in the range 1 to 999, is the number of minutes a link remainsconnected when there is no activity over it. The default value, InactiveTimeout=0disables Inactivity Timeout.
Note: The Inactivity Timeout function monitors only attention keys (that is, theEnter, Clear, and PFx keys). It is recommended that you set a comparablylonger value for xx if, for example, you expect to key in large amounts ofdata on the screen before pressing the Enter key.
Environment ConsiderationsThe following are environmental considerations for Personal Communications.
Virtual MemoryIf you receive a message stating that the system is low on virtual memory, increasethe virtual memory paging file. If you get this message as you are trying to opennew host sessions or starting a Personal Communications function such as File
Chapter 3. Considerations for Using PC/3270 Sessions 33

Transfer, it is apparent that virtual memory settings should be increased. Refer theoperating system documentation for instructions on how to increase the size of thepaging file.
Emulator Session IconsEmulator session icons that were not migrated during installation of PersonalCommunications Version 5.7 will not function correctly if they were not created inthe application data directory specified during installation of Version 5.7. The iconscan be updated by using the File → Import option from the Session Manager. Thisoption will not copy the prior icons to the application data directory specifiedduring installation; the icons must be moved manually
Disabling CDRA TablesThis release uses the standard IBM CDRA translation tables when convertingbetween ASCII and EBCDIC. From some code page pairs, the standard tables differfrom those that Personal Communications has used in the past. For code pagesthat were supported in prior releases, you can configure Personal Communicationsto use the old tables. A switch is available in PCSWIN.INI to disable the use ofCDRA tables. This switch is located in the Translate section and is namedUseOnlyPCOMM. This switch takes a binary value and is defaulted to FALSE(except for Japan, Korea, Taiwan, and PRC where it defaults to TRUE). For thecode pages that are new to Version 5.7, you must use the standard tables. Settingthe switch will apply to all sessions, as well as data transfer and command line filetransfer.
34 Personal Communications 3270 Emulator User’s Reference

Chapter 4. Transferring Files
Personal Communications File Transfer enables you to transfer one or more filesbetween a host system and workstation at the same time. Transfer types andtranslation tables can be defined in advance.
Host RequirementsFor PC/3270 File Transfer in SBCS mode, you need one or more of thefollowing host file-transfer programs (referred to as IND$FILE):v IBM 3270-PC File Transfer Program, 5665-311 (MVS/TSO)v IBM 3270-PC File Transfer Program, 5664-281 (VM/SP 2.1)v IBM CICS/VS 3270-PC File Transfer Program, 5798-DQH (CICS/VS 1.5)
For PC/3270 File Transfer in DBCS mode, you need one or more of thefollowing host file-transfer programs (referred to as APVUFILE):v VM/CMS File Transfer Program, 5799-BWK (Japan)v VM/CMS File Transfer Program, 5799-PGX (Korea, China, Taiwan)v MVS/TSO File Transfer Program, 5799-BWJ (Japan)v MVS/TSO File Transfer Program, 5799-PGY (Korea, China, Taiwan)v CICS (MVS, VSE) File Transfer Program, 5799-BWL (Japan)v CICS (MVS, VSE) File Transfer Program, 5799-PGZ (Korea, China, Taiwan)
Note:PCT400 was withdrawn from marketing 3/98.
You can perform the following file transfer functions:v Send files to the host systemv Receive files from the host systemv Use lists of filesv Create templates to define file names and transfer typesv Define transfer typesv Set transfer optionsv Modify translation tablesv Import or export files (PC/3270 CICS only)v Create interactive document profile (IDP) files (PC/3270 CICS only)v Transfer files via the XMODEM or YMODEM protocols
Sending Files to the Host SystemTo send a file from your workstation to the host system:1. Sign on to the host system.2. Click Send File to Host from the Actions menu of the session window. (You
can also select the Send button on the tool bar.)The Send File to Host window appears.
3. Specify the name of the workstation file to be sent to the host system byentering the name in the PC File text box, or click the Browse button to open adialog box for selecting the file.
© Copyright IBM Corp. 1989, 2003 35
4. Enter the name under which the file will be stored on the host; then enter orselect the Transfer Type. If a template is provided for the file type you aretransferring, the host file name and the transfer type appear automatically.
Using List FilesSelect Open List; then select the list to be used for transfer. See “CreatingList Files” on page 37 for details of how to create list files.
5. Click Send.The file is sent to the host system. The send status appears in the Send a FileStatus window.
Receiving Files from the Host SystemTo transfer a file from the host system to your workstation:1. Sign on to the host system.2. Click Receive File from Host from the Actions menu. (You can also select the
Receive button from the tool bar.)The Receive File from Host window appears.
3. Specify the name of the host file to be received. Enter the name in the Host Filetext box, or specify it as follows:
Using the Clipboard buttonIf you have copied one or more host file names to the clipboard, you canpaste the names into the transfer list; click the Clipboard button to open adialog box for this. Select one or more of the pasted file names to betransferred. Then click OK.
4. Enter or modify the suggested name under which the file will be stored on theworkstation, and enter or select the Transfer Type; or click the Browse buttonto open a dialog box for selecting a location for the file.
Using List FilesSelect Open List, and select the list to be used for transfer. (See “CreatingList Files” on page 37 for an explanation of how to create list files.)
If a template is provided for the file type you are transferring, the workstationfile name and the generated transfer type appear automatically.
5. Click Receive.The receive status appears in the Receive a File Status window.
Using List FilesIf the same files are transmitted frequently, you can create a list of the files andsave it.
A list file can be used for both Send and Receive. The default list file extension is.SRL.
36 Personal Communications 3270 Emulator User’s Reference

Creating List FilesTo create a list file:1. Select Receive File from Host from the Actions menu or Send File to Host
from the Actions menu of the session window; or click the Send or Receivebuttons on the tool bar.The corresponding window appears.
2. Select a file to be transferred from the Host-File Name or PC-File Name listbox by pointing to the name of a file to be selected. While holding down theCtrl key, click the left mouse button.The file name, its corresponding workstation or host file name (according to theavailable templates), and the transfer type appear in the Transfer List part ofthe window.
Note: You can also click the Browse button (for sending files) or the Clipboardbutton (for receiving files) to open the corresponding dialog box, whichallows you to select files for transferring; when you click OK, theselected files are shown in the Transfer List.
3. Click the Add to List button to include a selected file in the Transfer List.4. After all desired files have been selected, click Save List.
The Save File-Transfer List File As window appears.5. Enter or select a list name, and click OK.
Editing ListsTo edit the contents of a previously created list:1. As explained in “Sending Files to the Host System” on page 35 and “Receiving
Files from the Host System” on page 36, display the Send File to Host orReceive File from Host window.
2. Select Open List.The Open File-Transfer List File window appears.
3. Select the name corresponding to the list file to be edited, then click OK.4. The contents of the selected list appear in the Send File to Host or Receive File
from Host window.5. Edit the contents of the list file.
Changing the contents of a listChoose the file to be changed from the list, and overwrite the items to bechanged in the text box; then click the Update in List button.
Removing a file from the listChoose the file to be removed, and click Remove from List.
Adding a file to the listDouble-click the file to be added from the list of host or workstation files.
6. Select Save List.The Save File-Transfer List File As window appears.
Chapter 4. Transferring Files 37
7. Enter a name and then click OK.
Managing TemplatesA template is a set of rules to be used by the workstation to automatically generatea workstation or host file name and transfer type when you specify a file to besent or received.
You can have up to 32 templates. They are automatically numbered from 1 to 32.
When you specify a file to be transferred, the workstation scans the templates,starting from template 1. It uses the first matching template to generate a name forthe transferred file and the transfer type.
To manage a template:1. Click Receive File from Host from the Actions menu or Send File to Host
from the Actions menu of the session window; or click the Send or Receivebuttons on the tool bar.The Send File to Host or Receive File from Host window appears.
2. Select Template.The Template window appears. The contents of the window depend on theconnected host system.
Adding TemplatesThe list box for the Template window lists the currently stored templates.
To add a template:1. Select any template from the list box.
The contents of the selected template appear under the list box.2. Change the workstation or host file names or extensions by overwriting them;
then select the transfer type. (For details of the transfer types, see “DefiningTransfer Types” on page 39.)
3. Click Add.The window for determining where in the list to display the new templateappears.
4. Select a template number and specify whether to display the new templatebefore or after the template that has that number. Click OK.The new template is added to the list in the appropriate position.
Replacing and Deleting TemplatesTo change the contents of a currently stored template, or to delete a template:1. Select the template to be changed or deleted.
The contents of the selected template appear under the list box.2. To change the contents, overwrite the appropriate part and then click Replace.
To delete a template, click Delete.The selected template is changed or deleted, and the contents of the templatelist box are changed.
38 Personal Communications 3270 Emulator User’s Reference

Testing TemplatesTo test the contents of an added or changed template:1. Select the template to be tested from the list box.
The number of the selected template appears in the Test Templates box in thelower part of the window.
2. Select or enter data for the following items:
Test ModeDetermine which mode is to be used for the test: the mode in which afile is transmitted from the workstation to the host system (send), orthe mode in which a file is transmitted from the host system to theworkstation (receive).
TemplatesDetermine which templates to test: only the template selected in step 1,or all registered templates.
Source FileEnter the name of the file to be used for the test.
3. Click Test.Target File indicates the name that has been generated by the template.
Note: Testing a template does not transfer a file.
Defining Transfer TypesTransfer types define the option information used for controlling file transfer. Upto 32 transfer types can be defined for each host system. Text, binary, and append(excluding CICS) are the defaults.
To add or change transfer types:1. Click Edit → Preferences → Transfer from the session window.2. Click the tab for your host type or modem protocol.
The property page for the selected host or modem protocol appears. The itemsthat appear depend on the selected host system.
3. Enter transfer-type names in the Transfer Type box, or select them from thedrop-down list.
4. Select or enter the required items (see “Items to Be Specified”).To add or replace a transfer type, click Save. To delete a transfer type, clickDelete.
5. A dialog box displays, asking for confirmation. Click OK.
Items to Be SpecifiedChoosing the appropriate property page enables you to set the items described inthe following sections.
File OptionsThe file options that can be used depend on the type of the connected host systemand the host code page selected when the session was configured. Table 6 onpage 40 lists the mode values for the file transfer options. Table 7 on page 40 liststhe transfer options.
Chapter 4. Transferring Files 39

Table 6. Mode Values for File Transfer Options
Mode Host Code Page
DBCS 930 (Japan Katakana)930 (Japan Katakana - Extended)939 (Japan Latin - Extended)1390 (New Japanese Katakana - Extended)1399 (New Japanese Latin - Extended)933 (Hangeul)1364 (Hangeul 1364)935 (Simplified Chinese)937 (Traditional Chinese)1371 (Taiwan 1372)
SBCS Others
Table 7 lists the options for PC/3270.
Table 7. Transfer File Options
File Option HostSystem
Mode Conversion Details
ASCII VM/CMSMVS/TSOICS
SBCSDBCS
Converts codes as follows when a file is sent:
v Converts 1-byte workstation codes to EBCDICcodes
v Converts 2-byte workstation codes to IBM hostDBCS codes
v Adds SO (hex 0E) and SI (hex 0F) before andafter the DBCS field
v Converts RS (hex 1E) and US (hex 1F) to SO(hex 0E) and SI (hex 0F)
Converts codes as follows when a file is received:
v Converts EBCDIC codes to 1-byte workstationcodes
v Converts IBM host DBCS codes to 2-byteworkstation codes
v Removes SO (hex 0E) and SI (hex 0F) frombefore and after a DBCS field
JISCII VM/CMSMVS/TSOCICS
DBCS Converts codes as follows when a file is sent:
v Converts 1-byte workstation codes to EBCDICcodes
v Converts 2-byte workstation codes to IBM kanjicodes
v Adds SO (hex 0E) and SI (hex 0F) before andafter the kanji field
v Converts RS (hex 1E) and US (hex 1F) to SO(hex 0E) and SI (hex 0F)
Converts codes as follows when a file is received:
v Converts EBCDIC codes to 1-byte workstationcodes
v Converts IBM kanji codes to 2-byte workstationcodes
v Removes SO (hex 0E) and SI (hex 0F) frombefore and after a kanji field
40 Personal Communications 3270 Emulator User’s Reference
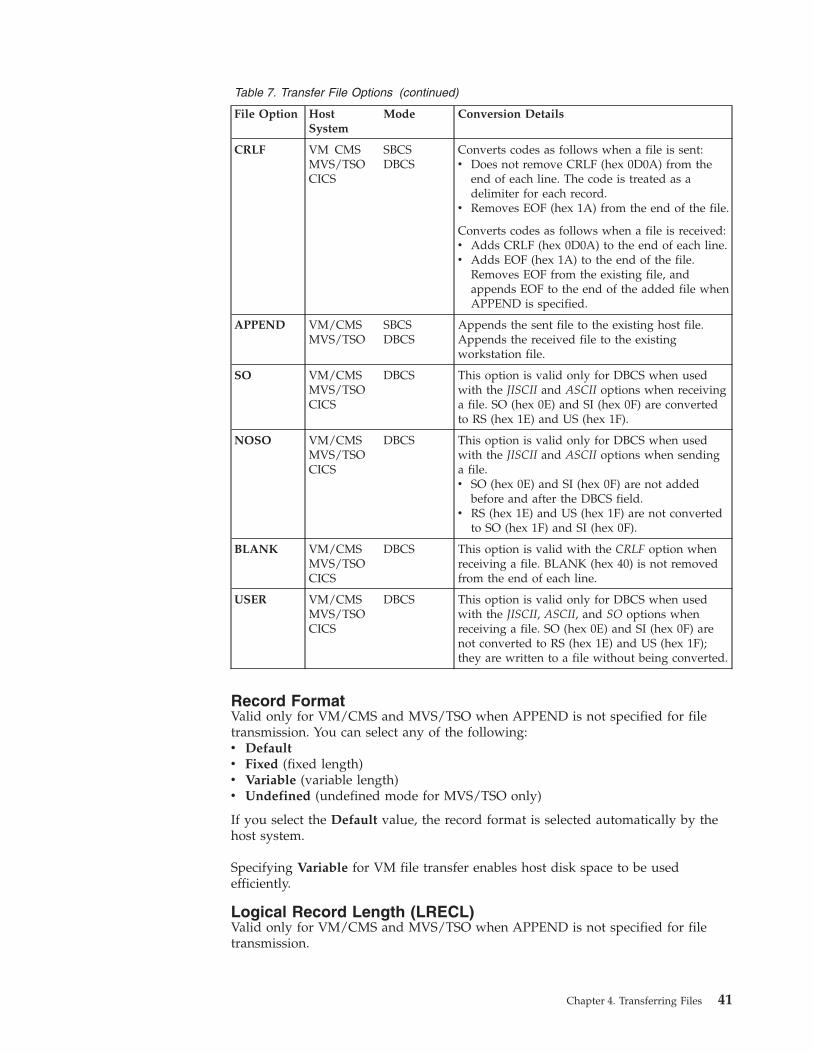
Table 7. Transfer File Options (continued)
File Option HostSystem
Mode Conversion Details
CRLF VM CMSMVS/TSOCICS
SBCSDBCS
Converts codes as follows when a file is sent:v Does not remove CRLF (hex 0D0A) from the
end of each line. The code is treated as adelimiter for each record.
v Removes EOF (hex 1A) from the end of the file.
Converts codes as follows when a file is received:v Adds CRLF (hex 0D0A) to the end of each line.v Adds EOF (hex 1A) to the end of the file.
Removes EOF from the existing file, andappends EOF to the end of the added file whenAPPEND is specified.
APPEND VM/CMSMVS/TSO
SBCSDBCS
Appends the sent file to the existing host file.Appends the received file to the existingworkstation file.
SO VM/CMSMVS/TSOCICS
DBCS This option is valid only for DBCS when usedwith the JISCII and ASCII options when receivinga file. SO (hex 0E) and SI (hex 0F) are convertedto RS (hex 1E) and US (hex 1F).
NOSO VM/CMSMVS/TSOCICS
DBCS This option is valid only for DBCS when usedwith the JISCII and ASCII options when sendinga file.v SO (hex 0E) and SI (hex 0F) are not added
before and after the DBCS field.v RS (hex 1E) and US (hex 1F) are not converted
to SO (hex 1F) and SI (hex 0F).
BLANK VM/CMSMVS/TSOCICS
DBCS This option is valid with the CRLF option whenreceiving a file. BLANK (hex 40) is not removedfrom the end of each line.
USER VM/CMSMVS/TSOCICS
DBCS This option is valid only for DBCS when usedwith the JISCII, ASCII, and SO options whenreceiving a file. SO (hex 0E) and SI (hex 0F) arenot converted to RS (hex 1E) and US (hex 1F);they are written to a file without being converted.
Record FormatValid only for VM/CMS and MVS/TSO when APPEND is not specified for filetransmission. You can select any of the following:v Defaultv Fixed (fixed length)v Variable (variable length)v Undefined (undefined mode for MVS/TSO only)
If you select the Default value, the record format is selected automatically by thehost system.
Specifying Variable for VM file transfer enables host disk space to be usedefficiently.
Logical Record Length (LRECL)Valid only for VM/CMS and MVS/TSO when APPEND is not specified for filetransmission.
Chapter 4. Transferring Files 41

Enter the logical record length to be used (host record byte count) in the LRECLtext box. If Variable and Undefined Mode are specified as the record format, thelogical record length is the maximum record length within a file. The maximumvalue is 32767.
The record length of a file sent from a workstation to the host system might exceedthe logical record length specified here. If so, the host file transfer program dividesthe file by the logical record length.
When sending a text file from a workstation to a host, if the text file contains2-byte workstation codes (such as kanji codes), the record length of the file ischanged because SO and SI have been inserted.
To send a file containing long records to the host system, specify a sufficiently longlogical record length.
Because the record length of a workstation file exceeds the logical record length, amessage does not appear normally if each record is divided. To display a message,add the following specification to the [Transfer] item of the workstation profile:DisplayTruncateMessage = Y
TSO Allocation Parameter (MVS/TSO)Valid only for MVS/TSO when APPEND is not specified for file transmission. Thefollowing items can be specified:
[Allocation Amounts]
PrimaryEnter the number of tracks or cylinders allocated to this file transfer.
SecondaryIf the primary allocation is not sufficient for the entire file transfer, enteradditional storage capacity allocated to the file transfer.
[Allocation Units]
TracksSpecify this parameter to allocate a host file by track. Ask your systemmanager whether to use tracks or cylinders as the unit.
CylindersSpecify this parameter to allocate a host file in units of cylinders.
AVblocksSpecify this parameter to allocate a host file in units of blocks.
[Block size]
This item is used only to create a new data set. Enter the block size of a new hostdata set, in bytes, in the text box. If this item is omitted, the workstation assumesthe value that appears in the Logical Record Length box. The maximum value is32767. If AVblocks is selected, the block size is the block size of the new data set.
Additional OptionsYou can enter the required host command options in the Additional Options textbox.
42 Personal Communications 3270 Emulator User’s Reference

Setting General Transfer OptionsTo set advanced options:1. Click Edit → Preferences → Transfer from the session window.
The setup dialog is displayed.2. Change the required settings on the property page labeled General. Click Bidi
Options to modify options for Arabic or Hebrew sessions.3. Click OK.
The following sections contain information about the items which can be definedfor file transfer options.
Bidi OptionsThe following options apply if the session is configured for an Arabic or Hebrewhost code page.v Host File Orientationv PC File Orientationv Lam-Alef Expansionv Lam-Alef Compressionv Symmetric Swappingv Round Tripv Numeral Shape
Refer to the Quick Beginnings document or the online help for information aboutthese options.
Host TypeYou can specify from the drop-down list box the type of host (MVS/TSO, VM, orCICS) to which your workstation is connected.
Host CommandYou can specify host command to be called when file transfer starts. If nothing isentered in this text box, IND$FILE or its equivalent for other countries is used for3270 SBCS and DBCS sessions.
Default PC DirectoryYou can specify the default directory that appears in the Send File to Host orReceive File From Host window. To select the directory, click the Browse button.
Default Partitioned Data Set (MVS/TSO Only)You can specify the MVS partitioned data set to be used as the default.
Default VM Disk (VM Only)You can specify the VM disk to be used as the default.
PC Code PageWhen a file is transferred, EBCDIC codes are converted to 1-byte workstationcodes, and vice versa. A valid value is automatically selected from among thefollowing values for SBCS sessions: 437, 737, 806, 813, 819, 833, 850, 852, 854, 857,858, 860, 861, 862, 863, 864, 865, 866, 869, 874, 912, 915, 916, 920, 921, 922, 1008,
Chapter 4. Transferring Files 43

1089, 1124, 1125, 1127, 1129, 1131, 1133, 1153, 1155, 1156, 1157, 1158, 1160, 1164, 1250,1251, 1252, 1253, 1254, 1255, 1256, 1257, and 1258; and from the following valuesfor DBCS sessions: 897 and 1041 (Japanese); 1088 and 1126 (Hangeul); 1114(Simplified Chinese and Traditional Chinese)—according to the host code pagespecified when the workstation is configured. For an explanation of how to selecthost code pages, see the online help for the host code page.
Packet SizeThe amount of memory (in bytes) used by the workstation for transmission andreception. If a large value is entered, a file is transferred more quickly, but thememory overhead is larger. The default value is 12288. In the case of Telnet3270,you can specify a packet size larger than 8000 bytes by adding the following lineto the Telnet3270 stanza in your workstation profile:SendBufferSize=nnnn
File-Transfer TimeoutYou can define the time the workstation waits for a response from the host system(in seconds). If the host system does not respond, the transfer is canceled, and anerror message appears. A number in the range 20–65535 (or 0) can be specified.The default is 60 seconds for ASCII sessions; for all others, it is 30 seconds. Specifyan appropriate value such that the error message does not appear too early. If youspecify 0, a timeout is not set.
If a packet or block size is relatively large for low-speed lines, such as SDLC orCOM port lines, it is recommended that 150 seconds or greater be specified.
Extension for List-FilesYou can change the default extension (.SRL) of file-transfer list files.
Clear Session Before TransferYou can specify whether a Clear command is sent to the host system before a fileis transferred. Choose any of these option buttons:
DefaultA Clear command is sent before a file is transferred (VM/CMS or CICSonly).
Yes A Clear command is sent for MVS also.
No A Clear command is not sent for any host system.
Show Status WindowYou can choose the method of displaying the file-transfer-progress status.
In SessionWhen file transfer starts, the status window appears. The name of the filebeing transferred and the transfer progress appear.
In iconWhen file transfer starts, the status icon appears on the screen. If the iconis restored, the status window appears.
Enhanced Protocol (SBCS Global Network Connection Only)This option enables faster file transfer in most cases. The packet size for EnhancedProtocol is fixed, so the File Transfer Packet Size setting is ignored.
44 Personal Communications 3270 Emulator User’s Reference

Lam-Alef Expansion (Arabic Only)If you want the Lam-Alef characters transferred from the host to be expanded intothe two-character representation for Windows, click this check box.
Note: This will change the size of the record on the personal computer; this shouldnot be a problem for normal text files, but exercise caution when formattedfiles and databases are being transferred.
Setting Up the Translation TableYou can create or edit the translation table to be used for sending or receiving files.
When you use a DBCS session as the host session, that is, when 930 or 939(Japanese), 933 or 1364 (Hangeul), 935 (Simplified Chinese), or 937 (TraditionalChinese) is specified during configuration as the host code page, you can createand change a translation table for the user-font area. A DBCS translation table isthen used for displaying a screen, printing, and sending and receiving files.
Changing the Translation TableTo change the translation table:1. Click Edit → Preferences → Transfer from the session window.2. Click the Translation Table tab on the resulting window.
The Translation-Table Setup property page appears.3. The table currently being used (IBM default or the name of a user-defined
table) is shown. Choose either IBM Default or User-Defined.4. If you choose User-Defined, enter a translation-table name in the File Name
text box, or select a name by clicking Browse.5. Click OK.
Customizing the Translation TableYou can create a user-specific translation table for transmission or reception, or youcan edit an existing translation table.
To create or edit a translation table:1. On the Translation Tables property page, click Customize in the Upload or
Download window.The Customize Translation window appears.If you chose IBM Default or if you chose New from the File menu, the defaultvalues appear in the table.
Translation source codesPC code-points when an upload translation table is edited. Hostcode-points when a download translation table is edited.
Translation target codesHost code-points when an upload translation table is edited. PCcode-points when a download translation table is edited.
2. Double-click the code to be changed in the table, and change the value in theentry field that subsequently appears.
3. Click Save or Save As from the File menu.4. If asked, enter a name in the Save Translation File As window and click OK.5. Click Exit from the File menu of the Customize Translation window.
Chapter 4. Transferring Files 45
User-Font Area (DBCS Only)For DBCS sessions, the following code ranges can be defined by the user with theDBCS translation table:
Host kanji codeFirst byte: from X'69' to X'7F'
Second byte: from X'41' to X'FE'
Workstation kanji codeFirst byte: from X'F0' to X'F9'
Second byte: from X'40' to X'7E', from X'80' to X'FC'
Host kanji numbersThe host kanji-numbers area corresponds to the user-font area of host kanjicodes. For example, the host kanji number 10561 corresponds to the hostkanji code 6941.
JIS KUTEN numbersFrom section 95 to section 114 (from 1 to 94)
Traditional Chinese host codeFrom X'C241' to X'E2FD' (low byte X'41' to X'FD', skipping X'7F')
Traditional Chinese workstation codeFrom X'FA40' to X'FEFE' (low byte X'40' to X'7E', X'A1' to X'FE')From X'8E40' to X'A0FE' (low byte X'40' to X'7E', X'A1' to X'FE')From X'8140' to X'8DFE' (low byte X'40' to X'7E', X'A1' to X'FE')From X'8181' to X'8C82' (low byte X'81' to X'A0')From X'F9D6' to X'F9FE'
Simplified Chinese host codeFrom X'7641' to X'7FFD' (low byte X'41' to X'FD', skipping X'7F')
Simplified Chinese workstation codeFrom X'8DA1' to X'A0FE' (low byte X'A1' to X'FE')
Hangeul host codeFrom X'D441' to X'DDFD' (low byte X'41' to X'FD', skipping X'7F')
Hangeul workstation codeFrom X'C9A1' to X'C9FE' (low byte X'A1' to X'FE')From X'FEA1' to X'FEFE' (low byte X'A1' to X'FE')From X'8FA1' to X'A0FE' (low byte X'A1' to X'FE')
Import/Export (3270 CICS Only)Import/Export is an office system communication program and an applicationprogram executed under the IBM Customer Information Control System (CICS).
Clicking Import/Export loads a module into workstation memory. You can thenstart Import or Export from a menu on the host screen.
When you export a document from the host, the workstation receives two files: oneis the file itself, and the other is the interchange document profile (IDP) file, whichcontains document header information.
When you Import a file to a host system, it must be accompanied by an IDP file ofthe same name. If the necessary IDP file does not exist, you can create it asdescribed in “Creating IDP Files” on page 47.
46 Personal Communications 3270 Emulator User’s Reference

To transmit files using Import/Export:1. Verify that the window of the host session is active and ready for file transfer.2. Click Import/Export from the Actions menu of the session window.
The minimized Import/Export Status window appears.3. Click Import or Export from the host application menu.4. Specify the host and workstation file names of the file to be transferred. Run
Import or Export.When Import or Export starts, the Import/Export Status window is maximized.After the file is transferred, the window is closed.
Creating IDP FilesTo send a document to the host system using Import, you must have an IDP filethat includes information on the document. If you have previously exported thefile, you should have an IDP. If not, or if you have deleted the IDP file, you mustcreate an IDP file.
To create an IDP file:1. Click Edit → Preferences → Transfer from the session window.2. Click the IDP Files tab on the setup window.3. Enter the name for the IDP file to be created, or click Browse to select it.
The IDP file has the same name as the file to be transferred, and the extension(.IDP).
4. Click OK.
File Transfer Commands for PC/3270You can send data files to and receive them from IBM host systems that arerunning:
CICS/MVSCustomer Information Control System running under MVS
CICS/VSECICS running under Virtual Storage Extended
MVS/TSOMultiple Virtual Storage/Time Sharing Option
OV/MVSOfficeVision/MVS
VM/CMSVirtual Machine/Conversational Monitor System
For more information on using these commands, click Send File to Host from theActions menu and File Transfer from Command prompt in the help panel.
File Transfer MethodsYou can transfer files in the following ways with PC/3270:v By clicking Receive File from Host from the Actions menu or Send File to Host
from the Actions menu of the workstation windowv By using the SEND and RECEIVE commands at the DOS command promptv By using an EHLLAPI application that invokes file transferv By using a macro that has send or receive commands as macro statements
Chapter 4. Transferring Files 47
v By clicking the Send or Recv icon on the tool bar
Requirements and RestrictionsInstall the file transfer program, IND$FILE, on your host system. Ask your systemadministrator for additional file transfer procedures and precautions. An alternatehost command name can be used by defining a DOS environment variableIND_FILE in AUTOEXEC.BAT or in a particular DOS box. For example:
SET IND_FILE = MYXFER
Similarly, for DBCS sessions, you can define a DOS environment variableIND_FILE in AUTOEXEC.BAT or in a particular DOS box. For example:
SET IND_FILE = MYXFER
You should not use the following words as a VM file name or file type, as an MVSdata set name, or as a CICS file name, because they are reserved for use as optioncommands.
ASCII, APPEND, TIME, CLEAR, NOCLEAR, SILENT, QUIET, PROGRESS,JISCII, SO, NOSO, BLANK, USER, CRLF, BINARY, NOCRLF
If you want to send to or receive from a subdirectory other than \PersonalCommunications, you must specify the full path name.
Sending and Receiving Files from the DOS Command PromptThe workstation is the point of reference for the SEND and RECEIVE commands:You send from the workstation to the host and receive from the host to theworkstation.
To send or receive a file:1. Make sure you are logged on to your host.2. Make sure the Ready message of the host system is displayed, except if you are
transferring files through the command option of the ISPF application.
Note: In the latter case, you must specify the NOCLEAR option for the filetransfer command.
If your screen is blank, make sure that no applications are running and thatyour host session is not in a holding state.
Note: If you receive any messages from host application programs while youare transferring files, the transfer might not succeed. To preventmessages from interfering, enter the appropriate host command to setmessages off temporarily. When file transfer is finished, set messages onagain.
3. Switch to your DOS window session or DOS full-screen session.4. If you use a hard disk, make sure the SEND.EXE and RECEIVE.EXE files are in
your current directory or in your path. If you want to send to or receive from asubdirectory other than \Personal Communications, you must specify the fullpath name.
5. Type the appropriate SEND or RECEIVE command at the DOS commandprompt.Details on the SEND and RECEIVE commands and their options are explainedin the following sections.
48 Personal Communications 3270 Emulator User’s Reference

Using the VM/CMS SEND CommandUse the following information when sending a file to VM/CMS:
Figure 1 shows the command and information that you must provide. Enter it asshown (including parentheses). You can use either uppercase or lowercase letters.
Notes:
1. � means to insert a space. There must not be a space between h: and fn.2. For DBCS sessions, insert a left bracket ([) before (options.
�A� The workstation drive and path of the file to send.
�B� The name of the workstation file to send.
�C� Host session specifications for the file to be sent to the host.h: The short name of the session (which can be omitted if it is a)fn File nameft File typefm File mode
�D� Optional changes made to the file during transfer. More than one optioncan be selected. Valid options are:v APPENDv ASCIIv CLEARv CRLFv JISCII (for Japanese DBCS sessions)v LRECL nv NOCLEARv NOSOv PROGRESSv QUIETv RECFM xv TIME(n)
The parts of the VM/CMS SEND command are:
SEND The command.
d: The name of the diskette or hard disk drive on which the file is located.
path The path to the subdirectory that the file is in.
filename.extThe name of the file to be sent, including the extension.
h: The short name of the host session to which you want to send the file. Thedefault is a:.
fn ft fmThe name the file is to have on your VM/CMS disk. You must specify the
Figure 1. VM/CMS SEND Command Syntax
Chapter 4. Transferring Files 49

file name (fn) and file type (ft). You can omit file mode (fm) if you wantthe file placed on your A-disk. You can create a new name or use a namethat is already on your disk. If you use a new name, the file that you sendis added to your disk. If you use the name of an existing file, the file thatyou send either replaces or is added to the old file. (Refer to thedescription of the APPEND option.)
(options or [(options (for DBCS)These options can be specified:
APPENDSpecifies that the file being sent is to be added to the end of anexisting VM/CMS file. Omit this option if you want the file toreplace an existing file. You cannot specify the LRECL n or RECFMx option if you use the APPEND option.
ASCII Performs the following:v Converts 1-byte workstation codes to EBCDIC codes.v Converts 2-byte codes to IBM host DBCS codes.v Inserts SO/SI characters into the DBCS field and, if control
characters (→ or ←) are found, converts the control characters toSO/SI characters.
CLEARClears the workstation window at the beginning of the file transfer.CLEAR is the default.
CRLF Specifies preserving of the carriage return and line feed codes. Youneed the ASCII and CRLF options for text or source files that youwant to view or edit, such as SCRIPT files. You do not need themfor binary files, such as programs.
JISCII This option is valid for Japanese DBCS sessions only and performsthe following:v Converts 1-byte workstation codes to EBCDIC codes.v Converts 2-byte codes to IBM kanji codes.v Inserts SO/SI characters into the DBCS field and, if control
characters (→ or ←) are found, converts the control characters toSO/SI characters.
LRECL nSpecifies the file’s record length. Include a record length only ifyou want the file to have a record length on your VM/CMS diskother than 80. Replace n with the record length you want. If youomit this option, the record length is set to 80 for fixed-lengthrecords or to a maximum of 80 for variable-length records.
NOCLEARSuppresses the sending of a Clear command at the beginning ofthe file transfer.
NOSOThis option is valid only for DBCS when used with the JISCII orASCII option and performs the following:v Does not convert SO (hex 0E) and SI (hex 0F) before and after
the DBCS field.v Does not convert RS (hex 1E) and US (hex 1F) to SO (hex 0E)
and SI (hex 0F).
50 Personal Communications 3270 Emulator User’s Reference

PROGRESSShows a message indicating that the file transfer is in progress orhas ended. Such messages do not show the current transferredbytes.
QUIETDoes not show any messages.
RECFM xSpecifies the file record format. Use this parameter to specifyvariable-length or fixed-length records in the file. Replace x with Vfor variable or F for fixed. By default, the file has fixed-lengthrecords unless you specify the CRLF option; then the file hasvariable-length records unless you specify otherwise.
TIME(n)Specifies the length of time n, in units of 30 seconds, that theprogram waits for a response from the host before it sends an errormessage. Replace n with an integer value in the range from 0through 2184. If you specify 0, timeout will not be set. The defaultis 1. To avoid a premature error message, specify an adequatevalue. In cases of large packet sizes, of large block sizes, or forslow communication lines (such as SDLC and COM port), 5 (150seconds) is recommended. There should be no blank spaces isbetween TIME and (n).
Command Syntax for Sending Files to VM/CMS: The following examples showthe command syntax you can use to send files to a VM/CMS host. The parametersof the SEND command can be combined into a single set of parentheses.
Note: For Japanese DBCS sessions, use the JISCII rather than the ASCII option. ForHangeul, Simplified Chinese, and Traditional Chinese DBCS sessions, usethe ASCII rather than the JISCII option.
v To send a workstation file from your default drive and add it as a new file onyour VM/CMS A-disk:SEND pc.txt a:cmsfile script a (ASCII CRLF LRECL 72 RECFM V
SEND pc.txt a:cmsfile script a [(JISCII CRLF LRECL 72 RECFM V (for DBCS)
Note: If you use a command that exceeds one line, do not press Enter when youfill that line; continue typing your command.
This command sends a workstation file named PC.TXT from your default driveto your host in your host session named a. You do not need to specify theworkstation drive if the file you are sending is on the current drive. Thecommand creates a new file, named CMSFILE SCRIPT, on your A-disk. Therecords in the file can vary in length up to 72 characters.
v To send a workstation file from your default drive to replace a file on yourVM/CMS A-disk:SEND pc.txt a:cmsfile script a (ASCII CRLF
SEND pc.txt a:cmsfile script a [(JISCII CRLF (for DBCS)
This command sends a workstation file named PC.TXT from your default driveto your VM/CMS A-disk in your host session named a. You do not need toname the workstation drive if the file you are sending is on the default drive.The file replaces a SCRIPT file named CMSFILE. The new CMSFILE has thesame record length and format as the old CMSFILE.
Chapter 4. Transferring Files 51

If you do not have a file called CMSFILE SCRIPT on your A-disk, PC.TXT isadded to your A-disk as a new file called CMSFILE SCRIPT. The records in thefile are 80 characters long and have fixed length.
v To send a binary workstation file from a drive other than your default drive:SEND a:pc.exe c:cmsfile exebin b (recfm v
This command sends a workstation file named PC.EXE from a diskette in driveA to your VM/CMS B-disk in your host session named c. It is a new file, or itreplaces a file named CMSFILE.
When transferring a binary file, you must specify a variable record format(recfm v), otherwise, blank characters are added to the file.
v To send a file from your hard disk and add it to the end of a file on yourVM/CMS A-disk:SEND c:pc.txt cmsfile script a (ASCII CRLF APPEND
SEND c:pc.txt cmsfile script a [(JISCII CRLF APPEND (for DBCS)
This command sends a workstation file named PC.TXT from your hard disk toyour host session. You do not need to name the host session if you are sendingto the a session. The file is added to the end of a script file named CMSFILE onyour VM/CMS A-disk.
v To send a file from a subdirectory on your hard disk to your VM/CMS A-disk:SEND c:\sd1\pc.txt cmsfile script a (ASCII CRLF
SEND c:\sd1\pc.txt cmsfile script a [(JISCII CRLF (for DBCS)
This command sends a file named PC.TXT from subdirectory SD1 on your harddisk to your host session. It replaces a SCRIPT file named CMSFILE on yourVM/CMS A-disk.
Using the VM/CMS RECEIVE CommandUse the following information when receiving a file from VM/CMS:
Figure 2 shows the command and information you must provide. Enter it as shown(including parentheses), except that you can use either uppercase or lowercaseletters.
Notes:
1. � means to insert a space. There must not be a space between h: and fn.2. For DBCS sessions, insert a left bracket ([) before (options.
�A� The workstation drive and path of the file to be received.
�B� The name of the workstation file to be received.
�C� Host session specifications for the file to be received from the host.h: The short name of the session (which can be omitted if it is a)fn File name
Figure 2. VM/CMS RECEIVE Command Syntax
52 Personal Communications 3270 Emulator User’s Reference

ft File typefm File mode
�D� Optional changes made to the file during transfer. More than one optioncan be selected. Valid options are:v APPENDv ASCIIv BLANKv CLEARv CRLFv JISCII (for Japanese DBCS sessions)v NOCLEARv PROGRESSv QUIETv SOv TIME(n)v USER
The parts of the VM/CMS RECEIVE command are:
RECEIVEThe command.
d: The name of the diskette or hard disk drive on which the file is to bereceived.
path The path indicating the directory to which the file is to be stored.
filename.extThe name of the workstation file, including the extension. Use a new nameor one that already exists. If you use a new name, the file that you receiveis added to your diskette or hard disk. If you use the name of an existingfile, the file that you receive either replaces or supplements the existingfile. (Refer to the APPEND option.)
h: The short name of the host session from which you want to get the file.The default is a:.
fn ft fmThe name of the file you want to receive from your VM/CMS disk. Thefile name fn is required.
(options or [(options (for DBCS)These options can be specified:
APPENDSpecifies that the file being received is to be added to the end of anexisting file. Omit this part of the VM/CMS file that is received toreplace an existing file.
ASCII Performs the following:v Converts EBCDIC codes to 1-byte workstation codes.v Converts IBM host DBCS codes to 2-byte codes.v Removes SO and SI characters from a DBCS field.
BLANKThis option is valid with the CRLF option. Use it to retain BLANK(x’40’) at the end of each line.
CRLF Specifies the carriage return and line feed codes. You need ASCII
Chapter 4. Transferring Files 53

and CRLF for text or source files that you want to view or edit,such as SCRIPT files. You do not need them for binary files, suchas programs.
CLEARClears the workstation window at the beginning of the file transfer.
JISCII This option is valid for Japanese DBCS sessions only and performsthe following:v Converts EBCDIC codes to 1-byte workstation codes.v Converts IBM kanji codes to 2-byte codes.v Removes SO and SI characters from a DBCS field.
NOCLEARSuppresses the sending of a Clear command at the beginning ofthe file transfer.
PROGRESSShows a message indicating that the file transfer is in progress orhas ended. Such messages do not show the current transferredbytes.
QUIETDoes not show any messages.
SO This option is valid only for DBCS when used with the JISCII orASCII option; it converts SO (hex 0E) and SI (hex 0F) to RS (hex1E) and US (hex 1F).
TIME(n)Specifies the length of time, in units of 30 seconds, that theprogram waits for a response from the host before it sends an errormessage. The value n is an integer value in the range from 0through 2184. If you specify 0, timeout is not set. The default is 1.To avoid a premature error message, specify an adequate value. Incases of large packet sizes, of large block sizes, or for slowcommunication lines (such as SDLC and COM port), 5 (150seconds) is recommended. There should be no blank spacesbetween TIME and (n).
USER This option is valid only for DBCS with the options JISCII, ASCII,and SO. SO (hex 0E) and SI (hex 0F) are not converted to RS (hex1E) and US (hex 1F); they are written to a file without beingconverted.
Command Syntax for Receiving Files from VM/CMS: The following examplesshow the command syntax you can use to receive files from a VM/CMS host. Theparameters of the RECEIVE command can be combined into a single set ofparentheses.
Note: For Japanese DBCS sessions, use the JISCII rather than the ASCII option. ForHangeul, Simplified Chinese, and Traditional Chinese DBCS sessions, usethe ASCII rather than the JISCII option.
v To receive a file from your VM/CMS A-disk to your default drive for aworkstationsession:RECEIVE pc.txt a:cmsfile script a (ASCII CRLF
RECEIVE pc.txt a:cmsfile script a [(JISCII CRLF (for DBCS)
54 Personal Communications 3270 Emulator User’s Reference

This command sends a SCRIPT file CMSFILE from your VM/CMS A-disk in ahost session named A to your workstation session. It adds the file to yourdefault drive (diskette or hard disk) with the name PC.TXT.
v To receive a file from your VM/CMS B-disk and replace a file on a drive otherthan your default:RECEIVE a:pc.txt a:cmsfile script b (ASCII CRLF
RECEIVE a:pc.txt a:cmsfile script b [(JISCII CRLF (for DBCS)
This command sends a SCRIPT file named CMSFILE SCRIPT from yourVM/CMS B-disk in a host session named A to a drive other than the default foryour PC session. It replaces a file named PC.TXT on a diskette in drive A.
v To receive a file from your VM/CMS A-disk and add it to the end of a file onyour hard disk:RECEIVE c:pc.txt a:cmsfile script a (ASCII CRLF APPEND
RECEIVE c:pc.txt a:cmsfile script a [(JISCII CRLF APPEND (for DBCS)
This command sends a SCRIPT file named CMSFILE SCRIPT from yourVM/CMS A-disk in a host session named A to your workstation session. It addsthe contents of CMSFILE to the end of a file named PC.TXT on your hard disk.
v To receive a file from your VM/CMS A-disk and place it in a subdirectory onyour default drive:RECEIVE \sd1\pc.txt a:cmsfile script a (ASCII CRLF
RECEIVE \sd1\pc.txt a:cmsfile script a [(JISCII CRLF (for DBCS)
This command sends a SCRIPT file named CMSFILE SCRIPT from yourVM/CMS A-disk to your default drive. It creates or replaces a file namedPC.TXT in a subdirectory named \SD1.
Using the MVS/TSO SEND CommandUse the following information when entering the SEND command to theMVS/TSO host:
Figure 3 shows the command and information you must provide. Enter text asshown (including parentheses), except that you can use either uppercase orlowercase letters.
Notes:
1. � means to insert a space. There must not be a space between h: and fn.2. For DBCS sessions, insert a left bracket ([) before options.
�A� The workstation drive and path of the file to send.
�B� The name of the workstation file to send.
Figure 3. MVS/TSO SEND Command Syntax
Chapter 4. Transferring Files 55
�C� The short name of the host session and the data set name of the file tosend.
�D� The member name if the file is in a partitioned data set.
�E� The password of the data set if it has one.
�F� Optional changes made to the file during transfer. More than one optioncan be specified. Valid options are:v APPENDv ASCIIv BLKSIZE(n)v CLEARv CRLFv JISCII (for Japanese DBCS sessions)v LRECL(n)v NOCLEAR
You must use the NOCLEAR option when you are transferring files whilein ISPF command mode on the host.v NOSOv PROGRESSv QUIETv RECFM(x)v SPACE(n[,n1]) unitv TIME(n)
The parts of the MVS/TSO SEND command are:
SEND The command.
d: The name of the diskette or hard disk drive where the file is located.
path The path indicating the directory where the file is located.
filename.extThe name of the file to be sent. Include the extension if the file has one.
h: The name of the MVS/TSO host session to which you want to send thefile. You can omit this name if you have only one host. If you have morethan one host, this is the short name of the MVS/TSO host session. Thedefault short name is A.
data-set-nameThe data set name that the file you send is to have on your MVS/TSOvolume; this name is required. Enclose the data set name with the membername in single quotation marks if you are using a fully qualified data setname.
This option creates a new name or uses a data set name already on yourTSO volume. If you use a new name, the file that you send is added toyour MVS/TSO volume. If you use the name of an existing data set, thefile you send either replaces or supplements the existing data set. Refer tothe APPEND option.
(member-name)The member name if the file is to be put into a partitioned data set. If youuse member-name, you cannot use LRECL(n), BLKSIZE(n), RECFM(x), andSPACE(n,[n1]) unit.
56 Personal Communications 3270 Emulator User’s Reference

Note: If someone else is using the partitioned data set, you cannot send afile to your MVS/TSO host.
/passwordThe password of the data set, if the data set has a password.
options or [(options (for DBCS)These options can be specified:
APPENDSpecifies that the file being sent is added to the end of an existingMVS/TSO data set. Omit this option if you want the file to replacean existing MVS/TSO data set. You cannot use LRECL(n),RECFM(x), SPACE(n[,n1]) unit, or BLKSIZE(n) options if you usethe APPEND option.
Note: This option is not valid when sending data to a member of apartitioned data set.
ASCII Performs the following:v Converts 1-byte workstation codes to EBCDIC codes.v Converts 2-byte codes to IBM host DBCS codes.v Inserts SO and SI characters in the DBCS field.
BLKSIZE(n)Specifies the size of the blocks of data in a new data set on yourMVS/TSO volume. This part is optional. To set the block size for anew data set, replace n with the new size. If you omit this option,the block size is determined in the following manner:v If the record format is variable, the block size is 6233.v If the record format is fixed, the block size is the largest multiple
of the record length that is less than 6233:BLKSIZE = LRECL * (6233/LRECL)
If you use the (member-name) or APPEND option, do not use thisoption.
CLEARClears the workstation window at the beginning of the file transfer.
CRLF Specifies the global use of carriage return and line feed codes. Youneed to specify ASCII and CRLF options for sending text or sourcefiles that you want to view or edit, such as SCRIPT files. You donot need them for binary files.
JISCII This option is valid for Japanese DBCS sessions only and performsthe following:v Converts 1-byte workstation codes to EBCDIC codes.v Converts 2-byte codes to IBM kanji codes.v Inserts SO and SI characters in the DBCS field.
LRECL(n)Specifies the record length for a new data set on your MVS/TSOvolume, where n is a whole number from 1 through 32760representing the number of characters per record. If you want toset the record length for a new data set, replace n with the newlength. If you omit this option, the record length is set to 80 for
Chapter 4. Transferring Files 57

fixed-length records and to 255 for variable-length records. If youuse the (member-name) or APPEND options, do not use thisoption.
NOCLEARSuppresses the sending of a Clear command at the beginning ofthe file transfer. This option is required for ISPF command mode.
NOSOThis option is valid only for DBCS when used with the JISCII orASCII option and performs the following:v Does not insert SO (hex 0E) and SI (hex 0F) before and after a
DBCS field.v Does not convert RS (hex 1E) and US (hex 1F) to SO (hex 0E)
and SI (hex 0F).
PROGRESSShows a message indicating that the file transfer is in progress orhas ended. Such messages do not show the current transferredbytes.
QUIETDoes not show any messages.
RECFM(x)Specifies the record format for a new data set on your MVS/TSOvolume, where x = V, F, or U. For variable-, fixed- orundefined-length records in the data set, replace the x with V, F, orU, respectively.
If you omit this option, the record format of the host data set isdetermined by the setting of the CRLF parameter: if you specifyCRLF, the data set has variable-length records; if you do notspecify CRLF, it has fixed-length records. If you use the(member-name) or APPEND options, do not use this option.
SPACE(n[,n1]) unitSpecifies an amount of space to be set aside for a new data set onyour MVS/TSO volume. To set aside a certain number of blocks,tracks, or cylinders for the new data set:v Provide unit as the type of space you want (AVBLOCK,
TRACKS, or CYLINDERS).v Give n as the amount of space that you want the data set to
occupy (in the unit of measure you select).v If the data set needs more space than you ask for with n, give
n,n1 where n1 is the size of additional space to be used onlywhen necessary.
These values are similar to the values on the ALLOCATEcommand of MVS/TSO.
If you omit this option, you get space for one block. The length ofthe block is set by the BLKSIZE(n) or LRECL(n) options. If you usethe (member-name) or APPEND options, do not use this option.
TIME(n)Specifies the length of time, in units of 30 seconds, that theprogram waits for a response from the host before it sends an errormessage. The value n is an integer value in the range from 0
58 Personal Communications 3270 Emulator User’s Reference
through 2184. If you specify 0, timeout is not set. The default is 1.To avoid a premature error message, specify an adequate value. Incases of large packet sizes, of large block sizes, or for slowcommunication lines (such as SDLC and COM port), 5 (150seconds) is recommended. There should be no blank spacesbetween TIME and (n).
Command Syntax for Sending Files to MVS/TSO: The following examples showthe command syntax you can use to send files from your workstation to anMVS/TSO host:
Note: For Japanese DBCS sessions, use the JISCII rather than the ASCII option. ForHangeul, Simplified Chinese, and Traditional Chinese DBCS sessions, usethe ASCII rather than the JISCII option.
v To send a file from your default drive to replace a file on the MVS/TSO host:SEND pc.txt g:ds.script ASCII CRLF
SEND pc.txt g:ds.script [JISCII CRLF (for DBCS)
This command sends a workstation file named PC.TXT from your default driveto your MVS/TSO host in a host session named G. It creates or replaces a dataset named DS.SCRIPT on your MVS/TSO volume.
v To send a file from a drive other than the default to your MVS/TSO host:SEND a:pc.txt g:ds.script ASCII CRLF
SEND a:pc.txt g:ds.script [JISCII CRLF (for DBCS)
This command sends a workstation file named PC.TXT from a diskette indrive A to your MVS/TSO host in a host session named G. It replaces a data setnamed DS.SCRIPT on your MVS/TSO volume.
v To send a file from your default drive to your MVS/TSO host and add it to theend of an MVS/TSO data set:SEND a:pc.txt g:ds.script ASCII CRLF APPEND
SEND a:pc.txt g:ds.script [JISCII CRLF APPEND (for DBCS)
This command sends a workstation file named PC.TXT from a diskette indrive A to your MVS/TSO host in a host session named G. It adds the file tothe end of a data set named DS.SCRIPT on your MVS/TSO volume.
v To send a file to your MVS/TSO host and add it to the end of a data set that hasa password:SEND a:pc.txt g:ds.script/odyssey8 ASCII CRLF APPEND
SEND a:pc.txt g:ds.script/odyssey8 [JISCII CRLF APPEND (for DBCS)
This command sends a workstation file named PC.TXT from a diskette indrive A to your MVS/TSO host in a host session named G. It adds the file tothe end of a data set named DS.SCRIPT on your MVS/TSO volume. This dataset has a password of odyssey8.
v To send a file from a subdirectory on your hard disk to a partitioned data set onyour MVS/TSO host:SEND c:\sd1\pc.txt g:ds.script (m1) ASCII CRLF
SEND c:\sd1\pc.txt g:ds.script (m1) [JISCII CRLF (for DBCS)
Chapter 4. Transferring Files 59

This command sends a workstation file named PC.TXT from a subdirectorynamed \SD1 on your hard disk to your MVS/TSO host in a host session namedG. It creates or replaces a member named M1 in a partitioned data set namedDS.SCRIPT on your MVS/TSO volume.
v To send a file from your default drive and add it as a new data set on yourMVS/TSO volume:SEND pc.txt g:ds.script/aeneid20 ASCII CRLF LRECL(132)
BLKSIZE(132) RECFM(V) SPACE(20,10) TRACKS
SEND pc.txt g:ds.script/aeneid20 [JISCII CRLF LRECL(132)BLKSIZE(132) RECFM(V) SPACE(20,10) TRACKS (for DBCS)
This command sends a workstation file named PC.TXT from your default driveto your MVS/TSO host. It adds the file as a new data set named DS.SCRIPT onyour MVS/TSO volume. A password of aeneid20 is assigned. The records in thedata set can vary in length up to 132 characters. Data blocks are the same lengthas the records. Twenty tracks are set aside for this data set. If more tracks areneeded, they are added in groups of 10.
Using the MVS/TSO RECEIVE CommandUse the following information when receiving a file from MVS/TSO:
Figure 4 shows the command and information you must provide. Enter it as shown(including parentheses), except that you can use either uppercase or lowercaseletters.
Notes:
1. � means to insert a space. There must not be a space between h: and fn.2. For DBCS sessions, insert a left bracket ([) before (options.
�A� The workstation drive and path to the directory where the file is to bestored.
�B� The name of the workstation file to receive.
�C� The short name of the host session, and the data set name of the file youare receiving.
�D� The member name if the file is put in a partitioned data set.
�E� The password of the data set, if any.
�F� Optional changes made to the file during transfer. More than one optioncan be specified. Valid options are:v APPENDv ASCIIv BLANKv CRLF
Figure 4. MVS/TSO RECEIVE Command Syntax
60 Personal Communications 3270 Emulator User’s Reference

v JISCII (for Japanese DBCS sessions)v PROGRESSv QUIETv SOv TIME(n)v USER
The parts of the MVS/TSO RECEIVE commands are:
RECEIVEThe command.
d: The name of the diskette or hard disk drive where the file is to be located.Use A:, B:, C:, D: through Z:. This part is optional if the file is received onthe current drive.
path The subdirectory where you want the data set located. This part isoptional.
filename.extThe name the file is to have on your diskette or hard disk. Creates a newname or uses a name that is already on your diskette or hard disk.
If you use a new name, the data set that you receive is added to yourdiskette or hard disk. If you use the name of an existing file, the data setthat you receive either replaces or supplements the existing file. (Refer tothe APPEND option on page 61.)
h: The short name of the MVS/TSO session where the data set is located. Ifyou have only one host, this part is optional. Use this option if you havemore than one host. The default short name is A.
data-set-nameThe name of the data set or the partitioned data set that contains themember you want to send to your workstation session. You must use thequalified name. Enclose the data set name with the member name in singlequotation marks if you are using a fully qualified data set name.
(member-name)The member name of a partitioned data set to send to your workstationsession. This part is optional. Use it only if the data set is a member of apartitioned data set.
/passwordThe password of the data set. Use it only if the data set has a password.
(options or [(options (for DBCS)These options can be specified:
APPENDAdds the data set to the end of an existing file. Omit this part ifyou want the MVS/TSO data set to replace an existing workstationfile.
ASCII Performs the following:v Converts EBCDIC codes to 1-byte workstation codes.v Converts IBM host DBCS codes to 2-byte codes.v Removes SO and SI characters from a DBCS field.
BLANKThis option is valid with the option CRLF; it retains BLANK (hex40) at the end of each line.
Chapter 4. Transferring Files 61

CRLF Specifies the use of carriage return and line feed codes. You needASCII and CRLF for text or source files that you want to view oredit, such as SCRIPT files. You do not need them for binary files.
JISCII This option is valid for Japanese DBCS sessions only and performsthe following:v Converts EBCDIC codes to 1-byte workstation codes.v Converts IBM kanji codes to 2-byte codes.v Removes SO and SI characters from a DBCS field.
PROGRESSShows a message indicating that the file transfer is in progress orhas ended. Such messages do not show the current transferredbytes.
QUIETDoes not show any messages.
SO This option is valid only for DBCS when used with the JISCII orASCII option; it converts SO (hex 0E) and SI (hex 0F) to RS (hex1E) and US (hex 1F).
TIME(n)Specifies the length of time, in units of 30 seconds, the programwaits for a response from the host before it sends an errormessage. Replace n with an integer value in the range from 0through 2184. If you specify 0, timeout is not set. The default is 1.To avoid a premature error message, specify an adequate value. Incases of large packet sizes, of large block sizes, or for slowcommunication lines (such as SDLC and COM port), 5 (150seconds) is recommended. There should be no blank spacesbetween TIME and (n).
USER This option is valid only for DBCS when used with the JISCII,ASCII and SO options. SO (hex 0E) and SI (hex 0F) are notconverted to RS (hex 1E) and US (hex 1F); they are written to a filewithout being converted.
Command Syntax for Receiving Files from MVS/TSO: The following examplesshow the command syntax you can use to receive files from your MVS/TSO hostto your workstation:
Note: For Japanese DBCS sessions, use the JISCII rather than the ASCII option. ForHangeul, Simplified Chinese, and Traditional Chinese DBCS sessions, usethe ASCII rather than the JISCII option.
v To receive a data set from an MVS/TSO host to the default drive for yourworkstation session:RECEIVE pc.txt g:ds.script ASCII CRLF
RECEIVE pc.txt g:ds.script [JISCII CRLF (for DBCS)
This command sends a data set named DS.SCRIPT from your MVS/TSO volumein a host session named G to your OS/2 session. It creates or replaces the file onthe default drive with the name PC.TXT.
v To receive a data set from an MVS/TSO host to a drive other than your defaultdrive:RECEIVE A:pc.txt g:ds.script ASCII CRLF
RECEIVE A:pc.txt g:ds.script [JISCII CRLF (for DBCS)
62 Personal Communications 3270 Emulator User’s Reference

This command sends a data set named DS.SCRIPT from your MVS/TSO volumein a host session named G. It replaces a file named PC.TXT on a diskette indrive A.
v To receive a data set from an MVS/TSO host and add it to a workstation file:RECEIVE a:pc.txt g:ds.script ASCII CRLF APPEND
RECEIVE a:pc.txt g:ds.script [JISCII CRLF APPEND (for DBCS)
This command sends a data set named DS.SCRIPT from your MVS/TSO volumein a host session named G. It adds the data set to the end of a file namedPC.TXT on the diskette in drive A.
v To receive a data set from an MVS/TSO host and place it in a subdirectory onyour hard disk:RECEIVE c:\sd1\pc.txt ds.script ASCII CRLF
RECEIVE c:\sd1\pc.txt ds.script [JISCII CRLF (for DBCS)
This command sends a data set named DS.SCRIPT from your MVS/TSO volumein a host session named G. It creates or replaces a file named PC.TXT in asubdirectory named \SD1 on your hard disk.
v To receive a data set that has a password from an MVS/TSO host to yourdefault drive:RECEIVE A:pc.txt g:ds.script/odyssey8 ASCII CRLF APPEND
RECEIVE A:pc.txt g:ds.script/odyssey8 [JISCII CRLF APPEND (for DBCS)
This command sends a data set named DS.SCRIPT from your MVS/TSO volumein a host session named G. The data set has the password odyssey8. The data setis added to the end of a file named PC.TXT on the diskette in drive A.
v To receive a member of a partitioned data set from an MVS/TSO host to yourDOS session:RECEIVE c:\sd1\pc.txt g:ds.script (m1) ASCII CRLF
RECEIVE c:\sd1\pc.txt g:ds.script (m1) [JISCII CRLF (for DBCS)
This command sends a member named M1 from a partitioned data set namedDS.SCRIPT in a host session named G. The member is placed on your hard diskin a subdirectory named \SD1. It replaces or creates a file named PC.TXT.
v To receive a member of a partitioned data set that has a password to yourWindows session:RECEIVE a:pc.txt g:ds.script (m2)/ili1 ASCII CRLF APPEND
RECEIVE a:pc.txt g:ds.script (m2)/ili1 [JISCII CRLF APPEND (for DBCS)
This command sends a member named M2 from a partitioned data set namedDS.SCRIPT in a host session named G. The data set has a password of ili1. Themember is added to a file named PC.TXT on the diskette in drive A.
Using the CICS SEND CommandPlease note the differences between the Personal Communications GUI andCommand Line syntaxes. These two syntaxes are not interchangeable.
Using CICS SEND with the Personal Communications GUI: Use the followinginformation when sending a file to CICS using the Personal Communicationsgraphical user interface (GUI):
Chapter 4. Transferring Files 63

Figure 5 shows the command and information you must provide. Enter it as shown(including parentheses), except that you can use either uppercase or lowercaseletters.
Notes:
1. � means to insert a space. There must not be a space between h: and fn.2. For DBCS sessions, insert a left bracket ([) before (options.
�A� The workstation drive and path of the file to send.
�B� The name of the workstation file to send.
�C� The short name of the host session, and the host file name of the file tosend.
�D� Optional changes made to the file during transfer. More than one optioncan be specified. Valid options are:v ASCIIv BINARY (for SBCS sessions)v CLEARv CRLFv JISCII (for Japanese DBCS sessions)v NOCLEARv NOCRLF (for SBCS sessions)v NOSOv PROGRESSv QUIETv TIME(n)
Note: For SBCS sessions, the default options are ASCII and CRLF; forDBCS sessions, the default option is BINARY.
Using CICS SEND with the Personal Communications Command Line: Use thefollowing information when sending a file to CICS using the PersonalCommunications command line:
Figure 6 on page 65 shows the command and information you must provide. Enterit as shown (including parentheses), except that you can use either uppercase orlowercase letters.
Notes:
1. � means to insert a space. There must not be a space between h: and fn.2. For DBCS sessions, insert a left bracket ([) before (options.
Figure 5. CICS SEND Personal Communications GUI Syntax
64 Personal Communications 3270 Emulator User’s Reference

�A� The workstation drive and path of the file to send.
�B� The name of the workstation file to send.
�C� The short name of the host session (h:), the host file name (fn), and the filetype (ft).
�D� Optional changes made to the file during transfer. More than one optioncan be specified. Valid options are:v ASCIIv BINARY (for SBCS sessions)v CLEARv CRLFv JISCII (for Japanese DBCS sessions)v NOCLEARv NOCRLF (for SBCS sessions)v NOSOv PROGRESSv QUIETv TIME(n)
Note: For SBCS sessions, the default options are ASCII and CRLF; forDBCS sessions, the default option is BINARY.
CICS SEND Command Description and Options: The parts of the CICS SENDcommand are:
SEND The command.
d: The name of the diskette or hard disk drive where the file is located.
path The path to the subdirectory that the file is in.
filename.extThe name of the file to be sent, including the extension.
h: The short name of the host session where you want to send the file. If youhave only one host, this part is optional. The default is session A.
fn The name the file is to have on your CICS disk. You must specify the filename. You can create a new name or use a name that is already on thedisk.
ft The type of file in CICS. For use only with command line syntax, see“Using CICS SEND with the Personal Communications Command Line”on page 64.
(options or [(options (for DBCS)These options can be specified:
ASCII Performs the following:v Converts 1-byte workstation codes to EBCDIC codes.v Converts 2-byte codes to IBM host DBCS codes.
SEND b
A B C D
[ ] [ d: ] [ path ]" [ h: ] fn [ ft ] [ b (options) ]filename.ext [ ] b"
Figure 6. CICS SEND Command Line Syntax
Chapter 4. Transferring Files 65

v Inserts SO and SI characters in a DBCS field and converts thecontrol characters ← and →, if they are present, to SO and SIcharacters.
The default is ASCII CRLF. You need these control terms for textor source files that you want to view or edit, such as SCRIPT files.You do not need them for binary files.
Notes:
1. CRLF and NOCRLF are mutually exclusive options.2. BINARY and ASCII are mutually exclusive options.3. The assumed defaults, if the optional parameters are omitted,
are CRLF ASCII.
BINARYSpecifies that the data in the file is binary data. The data can beencrypted, compiled programs, or other data. It is not translated bythe host file transfer program but copied unaltered into atemporary storage queue.
This option is valid for SBCS sessions only.
CLEARClears the workstation window at the beginning of the file transfer.
CRLF Specifies carriage return and line feed codes in the text file.
JISCII This option is valid for Japanese DBCS sessions only and performsthe following:v Converts 1-byte workstation codes to EBCDIC codes.v Converts 2-byte codes to IBM kanji codes.v Inserts SO and SI characters in a DBCS field and converts the
control characters ← and →, if they are present, to SO and SIcharacters.
NOCLEARSuppresses the sending of a Clear command at the beginning offile transfer. This option is required for ISPF command mode.
NOCRLFSpecifies that the PC file does not consist of logical recordsdelimited by carriage return and line feed characters. Noconcatenation or splitting of records is performed by the CICS filetransfer program.
The file is written into a temporary storage using one item on thequeue to represent each inbound data buffer. The items on theCICS temporary storage queue can be of different lengths, butnone can be more than 32767 characters.
This option is valid for SBCS sessions only.
NOSOThis option is valid only for DBCS when used with the JISCII orASCII option and performs the following:v Does not insert SO (hex 0E) and SI (hex 0F) before and after a
DBCS field.v Does not convert RS (hex 1E) and US (hex 1F) to SO (hex 0E)
and SI (hex 0F).
66 Personal Communications 3270 Emulator User’s Reference

PROGRESSShows a message indicating that the file transfer is in progress orhas ended. Such messages do not show the current transferredbytes.
QUIETDoes not show any messages.
TIME(n)Specifies the length of time, in units of 30 seconds, the programwaits for a response from the host before it sends an errormessage. Replace n with an integer value in the range from 0through 2184. If you specify 0, timeout is not set. The default is 1.To avoid a premature error message, specify an adequate value. Incases of large packet sizes, large block sizes, or for slowcommunication lines (such as SDLC and COM port), 5 (150seconds) is recommended. There should be no blank spacesbetween TIME and (n).
Command Syntax for Sending Files to CICS: The following examples show thecommand syntax you can use to send files from your workstation to your CICShost.
Note: For Japanese DBCS sessions, use the JISCII rather than the ASCII option. ForHangeul, Simplified Chinese, and Traditional Chinese DBCS sessions, usethe ASCII rather than the JISCII option.
v To send a workstation file from your default drive and add it as a new file onyour CICS host:SEND pc.txt a:cicsfile (ASCII CRLF)
SEND pc.txt a:cicsfile [(JISCII CRLF) (for DBCS)
Note: Enter the complete CICS SEND command on one line.
This command sends a workstation file named PC.TXT from your default driveon your workstation to your host session A. You do not need to provide theworkstation drive name if the file you are sending is on the current drive. Thecommand creates a new file named CICSFILE.
v To send a basic workstation file from a drive other than your default to replace afile on your CICS host:SEND a:myprog.exe a:basprog
This command sends a workstation file named MYPROG.EXE from a diskette indrive A to your CICS host in your host session named A. It is written to a filenamed BASPROG, replacing any existing file by that name in host session A.
Using the CICS RECEIVE CommandPlease note the differences between the Personal Communications GUI andCommand Line syntaxes. These two syntaxes are not interchangeable.
Using CICS RECEIVE with the Personal Communications GUI: Use thefollowing information when receiving files from CICS using the PersonalCommunications GUI:
Figure 7 on page 68 shows the command and information you must provide. Enterit as shown (including parentheses), except that you can use either uppercase orlowercase.
Chapter 4. Transferring Files 67

Notes:
1. � means to insert a space. There must not be a space between h: and fn.2. For DBCS sessions, insert a left bracket ([) before (options.
�A� The workstation drive and path where the file is to be received.
�B� The name of the workstation file.
�C� The short name of the host session (h:) from which you are receiving thefile, and the host file name (fn).
�D� Optional changes made to the file during transfer. More than one optioncan be specified. Valid options are:v ASCIIv BINARY (for SBCS sessions)v BLANKv CLEARv CRLFv JISCII (for Japanese DBCS sessions)v NOCLEARv NOCRLF (for SBCS sessions)v PROGRESSv QUIETv SOv TIME(n)v USER
Note: The default options for SBCS sessions are ASCII and CRLF; thedefault option for DBCS sessions is BINARY.
Using CICS RECEIVE with the Personal Communications Command Line: Usethe following information when receiving files from CICS using the PersonalCommunications command line:
Figure 8 on page 69 shows the command and information you must provide. Enterit as shown (including parentheses), except that you can use either uppercase orlowercase.
Notes:
1. � means to insert a space. There must not be a space between h: and fn.2. For DBCS sessions, insert a left bracket ([) before (options.
Figure 7. CICS RECEIVE Personal Communications GUI Syntax
68 Personal Communications 3270 Emulator User’s Reference

�A� The workstation drive and path where the file is to be received.
�B� The name of the workstation file.
�C� The short name of the host session (h:) from which you are receiving thefile, the host file name (fn), and the file type (ft).
�D� Optional changes made to the file during transfer. More than one optioncan be specified. Valid options are:v ASCIIv BINARY (for SBCS sessions)v BLANKv CLEARv CRLFv JISCII (for Japanese DBCS sessions)v NOCLEARv NOCRLF (for SBCS sessions)v PROGRESSv QUIETv SOv TIME(n)v USER
Note: The default options for SBCS sessions are ASCII and CRLF; thedefault option for DBCS sessions is BINARY.
CICS RECEIVE Description and Options: The parts of the CICS RECEIVEcommand are:
RECEIVEThe command.
d: The name of the diskette or hard disk drive where the file is to bereceived.
path The path to the subdirectory where the file is to be located.
filename.extThe name of the workstation file, including the extension. You can create anew name or use a name that is already on your workstation diskette orhard disk. If you use a new name, the file that you receive is added toyour diskette or hard disk. If you use the name of an existing file, the filethat you receive either replaces or supplements the existing file. Refer tothe APPEND option.
h: The short name of the CICS session where the data set is located. If youhave only one host, this part is optional. The default session is A.
fn The name of the file you want to receive from your CICS host.
ft The type of file in CICS. For use only with command line syntax, see“Using CICS RECEIVE with the Personal Communications CommandLine” on page 68.
RECEIVE b
A B C D
[ ] [ d: ] [ path ]" [ h: ] fn [ ft ] [ b (options) ]filename.ext [ ] b"
Figure 8. CICS RECEIVE Command Syntax
Chapter 4. Transferring Files 69

(options or [(options (for DBCS)These options can be specified:
ASCII Performs the following:v Converts EBCDIC codes to 1-byte workstation codes.v Converts IBM host DBCS codes to 2-byte codes.v Inserts SO and SI characters in a DBCS field and converts the
control characters ← and →, if they are present, to SO and SIcharacters.
The default is ASCII CRLF. You need ASCII and CRLF controlterms for text or source files that you want to view or edit, such asSCRIPT files. You do not need them for binary files.
Notes:
1. CRLF and NOCRLF are mutually exclusive options.2. BINARY and ASCII are mutually exclusive options.3. The assumed defaults, if the optional parameters are omitted,
are CRLF ASCII.
BINARYThe data in the file is binary data. The data can be encrypted data,compiled programs, or other data. It is not translated by the hostfile transfer program but is copied without changes into theworkstation file.
This option is valid for SBCS sessions only.
BLANKThis option is valid only when used with the CRLF option; itretains BLANK (hex 40) at the end of each line.
CLEARClears the workstation window at the beginning of the file transfer.
CRLF Specifies the use of the carriage return and line feed codes.
JISCII This option is valid for Japanese DBCS sessions only and performsthe following:v Converts EBCDIC codes to 1-byte workstation codes.v Converts IBM kanji codes to 2-byte codes.v Inserts SO and SI characters in a DBCS field and converts the
control characters ← and →, if they are present, to SO and SIcharacters.
NOCLEARSuppresses the sending of a Clear command at the beginning offile transfer. This option is required for ISPF command mode.
NOCRLFSpecifies that the host computer file does not consist of logicalrecords. The items in the temporary storage queue are sent in orderand concatenated in your workstation into a single string of data.
This option is valid for SBCS sessions only.
PROGRESSShows a message indicating that the file transfer is in progress orhas ended. Such messages do not show the current transferredbytes.
70 Personal Communications 3270 Emulator User’s Reference

QUIETDoes not show any messages.
SO This option is valid only for DBCS when used with the JISCII orASCII option; it converts SO (hex 0E) and SI (hex 0F) to RS (hex1E) and US (hex 1F).
TIME(n)Specifies the length of time, in units of 30 seconds, the programwaits for a response from the host before it sends an errormessage. Replace n with an integer value in the range from 0through 2184. If you specify 0, timeout is not set. The default is 1.To avoid a premature error message, specify an adequate value. Incases of large packet sizes, of large block sizes, or for slowcommunication lines (such as SDLC and COM port), 5 (150seconds) is recommended. There should be no blank spacesbetween TIME and (n).
USER This option is valid only for DBCS when used with the optionsJISCII, ASCII, and SO. SO (hex 0E) and SI (hex 0F) are notconverted to RS (hex 1E) and US (hex 1F); they are written to a filewithout being converted.
Command Syntax for Receiving Files from CICS: The following examples showthe command syntax you can use to receive files from your CICS host to yourworkstation.
Note: For Japanese DBCS sessions, use the JISCII rather than the ASCII option. ForHangeul, Simplified Chinese, and Traditional Chinese DBCS sessions, usethe ASCII rather than the JISCII option.
v To receive a file from your CICS host to your default drive for a workstationsession:RECEIVE pc.txt A:cicsfile (ASCII CRLF)
RECEIVE pc.txt A:cicsfile [(JISCII CRLF) (for DBCS)
This command sends a file named CICSFILE from your CICS host in session Ato your workstation session. It adds the file to your default drive (diskette orhard disk) with the name PC.TXT.
v To receive a basic file from your CICS host and replace a file on a drive otherthan your default:RECEIVE a:myprog.exe a:myprog
This command sends a file named MYPROG from your CICS host in session Ato a drive other than the default for your workstation session. It replaces a filenamed MYPROG.EXE on a diskette in drive A.
Configuring File-Transfer Code TranslationWhen you transfer a file between the host and the workstation using the ASCIIoption (JISCII, for Japanese DBCS sessions), the host-system file-transfer programperforms translation from EBCDIC to ASCII (JISCII, for Japanese DBCS sessions) orvice versa, according to the host and PC code pages specified during PC/3270configuration. However, you might want to use different translation from thatsupplied by IBM. For the details, refer to Chapter 4, “Transferring Files”, onpage 35.
Chapter 4. Transferring Files 71

72 Personal Communications 3270 Emulator User’s Reference

Chapter 5. Printing
You can use Personal Communications to print from display or printer sessions.For considerations and restrictions on printing, refer to Chapter 3, “Considerationsfor Using PC/3270 Sessions”, on page 15.
Display SessionsFrom display sessions, you can print all (Print Screen) or part (Trim Print) of thescreen of your session window on a workstation printer. For more information,refer to Quick Beginnings or the online help.
From a 3270 display session, you can also use the ZipPrint utility to print PROFS®
or OfficeVision® (OV) notes, calendars, documents, CMS files, XEDIT workspaces,and host-session screens. See the online help for more information.
Using the File → Print Screen Collection → Collect Screen feature, you can add acapture of all or part of the screen to a collection of captures. You can then print allthe collected captures at the same time, using the File → Print Screen Collection →Print Collection feature. After printing, the collected captures are deleted.
All the collected screens can be deleted without printing by clicking File → PrintScreen Collection → Purge Collection. An individual screen or part of thecollection cannot be deleted.
The File → Print Screen Collection → Print Collection on Exit option ensures thatthe collected screens are printed before you close or disconnect the session. Thisoption is enabled by default. To end the session without printing the collectedscreen, clear the Print Collection on Exit option. All the collected screens are thendeleted when you close or disconnect the session.
Note: The Collect Screen feature works independently of the normal Print Screenfunction. You can still use Print Screen to print individual screens, whilecollecting multiple screens.
You can add the Collect Screen and Print Collection functions to the toolbar, apopup keypad, a custom keyboard map, or a mouse customization, using the Edit→ Preferences menu in the session window. The settings in the Page Setup dialogare used (shared with the normal Print Screen function).
In PDT mode, there is an option available for printing more than one screen in apage. Refer to the Administrator’s Guide and Reference for more information.
Printer SessionsFrom printer sessions, you can direct printing from a zSeries system to aworkstation printer.
Note: When you use a host application which prints to your workstation’s LPT1,you must first select the printer in the Printer Setup dialog of the Filemenu.
© Copyright IBM Corp. 1989, 2003 73

Configure a printer session to designate a workstation printer as a system printerthat will use either a Windows printer driver or a printer definition table (PDT)provided with Personal Communications.v Use Windows printer drivers for Personal Communications to print files based
on printer setup parameters, such as scaling, duplex options, and pageorientation, that you define in Printer Setup.
v Use PDT files for Personal Communications to print files based on page setupinformation, such as control codes and the printer output format, defined in thePDT. You can customize PDTs to define your own controls, by editing thecorresponding printer definition file (PDF) and converting it to a PDT.
Telnet 3270E Printer AssociationThe Telnet 3270E standard lets you specify an association between a display and aprinter session. This is unique to telnet, and is not available in the SNAenvironment. When you configure a display session, Personal Communications letsyou specify an associated printer session. This function is implemented onCommunications Server and zSeries TN3270E servers.
The association starts at the telnet server. In the server’s configuration, there is aone-to-one correspondence when defining associated printers. When LU namesand relations are already defined by the server, the server will assign the printerLU for the client. Each printer LU is configured as associated with a particulardisplay LU.
Advantages of this association are as follows:v If sessions are associated, the person who configures the client workstation does
not have to know any detail about the printer session because the associatedpairs are defined at the telnet server.
v When you start the display session, the associated printer session is startedautomatically. If the printer session is configured to direct output to a printerthat is near you, and if you ensure that your host applications print to thatsession, it is obviously convenient.
Note: Stopping a TN3270E session will automatically close an associated printersession, if that option was selected when configuring the session.
Setting Up the PrinterFollowing is a description of how to set up your printer with either a Windowsprinter driver or a PDT file.
For an explanation of how to customize a PDT, refer to Chapter 3, “Considerationsfor Using PC/3270 Sessions”, on page 15.
You can map a key sequence to bring up the Printer Setup dialog. There is nodefault key combination for this function. See “Default Key Function Assignments”on page 27 for more information about keyboard functions.
Defining a Printer for a SessionTo choose or change the Windows printer driver to be used, follow these steps:1. Click Printer Setup from the File menu of the session window.
The Printer Setup window lists the available printers.
74 Personal Communications 3270 Emulator User’s Reference

2. Select a printer from the list box. If desired, select the check box Show thisdialog before every print.
Note: The Default selection causes the current Windows default printer to beused.
3. Confirm that Use PDT is not selected.
Using PDT FilesTo use a PDT file:1. Click File → Printer Setup from the menu bar of the session window.
The Printer Setup window appears.2. Click the printer to be used from the list box.3. Click Setup; specify the paper size.4. Click OK.5. Click the Use PDT check box, then Select PDT.
The Select PDT file window appears.6. Do one of the following:
v To use an existing PDT, select the PDT file to be used; then click OK.v To use a PDF that you have modified, you must first convert it to a PDT. Todo so:a. Click Convert PDF.b. Select the PDF file to be converted from the list, then click Convert.
The window displays the result of the conversion. If there are any errorsduring the conversion, they are listed in the window.
c. When you select Save List, the window list is saved in *.LST file in thePDFPDT subdirectory.To close without saving the list, click Close.After the file is converted, control returns to the Select PDT file window andthe converted PDT file appears in the list.
d. Select the PDT file; then click OK.7. Click OK in the Printer Setup window.
PDT Files
Basic SupportPDTs (printer definition tables) are compiled from PDFs (printer definition files).PDFs contain printer commands that must be understood/supported by yourprinter.
The following are the basic printer languages:
PCL Printer Control Language (Hewlett-Packard)
PPDS ProPrinter Data Stream (IBM)
ESC/P Printer Control Language (Epson)
POSTSCRIPT(No PDFs for this language)
Chapter 5. Printing 75

Many printers support two or more of these languages. Most print drivers use aPJL (Printer Job Language) to switch between languages and to perform other jobcontrol functions, such as setting the number of copies.
You do not need a PDF for each different printer model; with the increasingnumber of models, PDFs are named for the printer language, not the printermodel.
Older SBCS PDFs and PDTs are not shipped with Personal Communications, butare available at the following website:http://www.ibm.com/software/network/pcomm. If you have already modifiedPDFs, any PDF and PDTs with names different from those in Table 8 are retainedduring an install.
Note: All DBCS PDFs and PDTs are still shipped with Personal Communications.
The End_Job statement in a PDF contains the printer commands that are sent to theprinter at the end of each print job. If the End_Job contains a character defined asform feed (FFF in the PDT), a form feed (FF) is sent to the printer. FF in theEnd_Job statement is not needed if the host application ends the job with the FF, asis commonly done. Some print drivers add the FF if needed, and most printdrivers ignore extra FFsl. So the FFF is usually protection against the hostapplication not using a FF, and usually causes no problem. However, if you get anextra blank page, remove the FFF.
Note: This procedure is valid for host printer sessions but not for Print Screenfrom a display session
Table 8. Old Printer Definition Files
Printer Definition File (PDF) Name Remarks
esc_p (3270 only) (DBCS only)
ibm5577 (No FFF) (DBCS only)
ibm5577a (No FFF)
ibm5577b (No FFF)
ibm5585 (No FFF) (3270 only) (DBCS only)
ibm5587 (No FFF) (3270 only) (DBCS only)
lbp4
lips3a4 (No FFF) (DBCS only)
lips3b4 (No FFF) (DBCS only)
nppages (No FFF) (3270 only)
The supplied basic_ascii PDF does not contain any printer commands, whichresults in only ASCII text being sent to a printer or file. An accompanying PDT isalso shipped. This PDF is for SBCS only.
Double-Byte Character SupportThe PDTs provided by Personal Communications and the corresponding printersare listed in Table 9 on page 77. The DBCS PDTs are as follows:v IBM5577.PDTv IBM5577B.PDTv IBM5585.PDT
76 Personal Communications 3270 Emulator User’s Reference

v IBM5587.PDTv ESC_P.PDTv LIPS3A4.PDTv LIPS3B4.PDTv ESC_BIG5.PDTv ESC_CNS.PDTv ESC_5550.PDTv ESC_TCA.PDTv KS_JO.PDTv KS_WAN.PDTv KSSM_JO.PDTv KSSM_WAN.PDTv NPPAGES.PDT
Table 9 lists the printers to use with supported PDTs.
Table 9. Printer Models and Supported PDTs
File Name Printer Name/Model
IBM5577.PDT IBM 4208-501, -5C2, -5K2IBM 4216-510IBM 5572-B02IBM 5573-HC2IBM 5575-B02, -F02, -H02, BC2, -FK1EIBM 5577-B02, -G02, -H02, FC2, -HC2, -KC2,-HK2IBM 5579-H02, -KC2
IBM5585.PDT IBM 5585-H01, -HC1IBM 5587-G01IBM 5587-H01 (with extended functions)IBM 5589-H01
IBM5587.PDT IBM 5587-G01IBM 5587-H01 (without extended functions
ESC_P.PDT ESC/P printer for China or Japan
ESC_BIG5.PDT ESC/P printer with Big5 DBCS code
ESC_CNS.PDT ESC/P printer with CNS DBCS code
ESC_5550.PDT ESC/P printer 5550 DBCS code
ESC_TCA.PDT ESC/P printer with TCA DBCS code
KS_JO.PDT KS printer with combination code
KS_WAN.PDT KS printer with completion code
KSSM_JO.PDT KSSM printer with combination code
KSSM_WAN.PDT KSSM printer with completion code
NPPAGES.PDT IBM NP12, NP17, NP24 printers for Japan
Table 10 lists the PDTs that are supported for DBCS only.
Table 10. DBCS Supported PDTs
File Name Printer Name/Model
NPPAGES.PDT IBM NP12, NP17, and NP24 in PAGES mode (Japan only)
IBM5585.PDT All types of IBM 5585 printers
IBM5587.PDT All types of IBM 5587 printers
IBM5577.PDT All types of IBM 5577 printers
Chapter 5. Printing 77
Table 10. DBCS Supported PDTs (continued)
File Name Printer Name/Model
IBM5577B.PDT IBM 5577-S02/T02 for Postal Bar Code Support (Japan only)
Page Setup ParametersYou can set Page Setup parameters, such as the maximum number of lines perpage, the maximum number of columns, and fonts. These parameters are initiallyset to the defaults. Use this function to change specific control items.
Note: When a PDT file is used, this function cannot be used.
You can set the following parameters.
Table 11. Page Setup Parameters — Text
Parameter Description
CPI Specifies the number of characters to be printed per inch. If CPIwas not set previously, a CPI value suitable for the font selectedfrom the Font list box is assumed as the default.
LPI Specifies the number of lines to be printed per inch. If LPI was notset previously, an LPI value suitable for the font selected from theFont list box is assumed as the default.
Maximum Number ofLines per Page
Specifies the maximum number of lines per page. A number in therange 1–255 can be specified. The default is 66. See Note 1.
Maximum Number ofCharacters per Line
Specifies the maximum number of characters per line. A number inthe range 1–255 can be specified. The default is 132. See Note 2.
Font Lists, in the list box, the monospaced fonts that can be used withthe currently selected printer.
The fonts in brackets [ ] are device fonts specific to the printerdriver. The other fonts are graphics display interface (GDI) fontsprinted in bit map formats.
Notes:
1. When you set this to a value other than the default, Personal Communications uses itto scale the LPI and font to the best fit for the page.
2. When you set this to a value other than the default, Personal Communications uses itto scale the CPI and font to the best fit for the page.
From a Personal Communications display session, you can set additionalparameters by selecting the Text Options tab, as follows:
78 Personal Communications 3270 Emulator User’s Reference
Table 12. Page Setup Parameters — Text Options
Group Options Setting
Print Options The followingoptions can be selected as printoptions. These options are notavailable for the printer session.
Suppress null lines Determines whether to deletelines containing only null ornon-printable characters (nullor non-printable fieldcharacters, and field attributes)or to print them as null lines.
SelectedNull lines are notprinted.
Not selectedNull lines are printed.
This option can be used when:
v The Print Screen commandis used
v LU type 3 printing, ornon-SNA printing is done
v The combination of bits 2and 3 of the WCC is not 00.
Print nulls as spaces Determines whether to printNULL control codes as nullcharacters.
SelectedThe codes are printedas blanks.
Not selectedThe codes are treatedas null characters.
This option can be used when:
v The Print Screen commandis used
v LU type 1 or 3 printing, ornon-SNA printing is done.
Ignore FF when atfirst print position
Determines whether to ignorethe FF code at the beginningof the buffer address.
SelectedThe FF code isignored and notexecuted.
Not selectedThe FF code isexecuted.
This option can be used when:
v The Print Screen commandis used
v LU type 1, LU type 2, LUtype 3, or non-SNA printingis done.
Chapter 5. Printing 79

Table 12. Page Setup Parameters — Text Options (continued)
Group Options Setting
FF takes a printposition if followedby data
Determines whether to printnull characters if data followsthe FF code.Selected
FF is executed, and ablank character isprinted at thebeginning of the nextpage. Therefore, thenext data is printedin the second columnof the line.
Not selectedFF is executed, andthe next data isprinted at thebeginning of the firstline on the next page.
This option can be used when:
v The Print Screen commandis used
v Host initiated local copyand LU type 3 printing, ornon-SNA printing is done
v In both PDT and standardmodes
Suppress auto new line when: CR at maximum printposition +1 Determines whether to
perform automatic new linewhen CR is the maximumnumber of columns to beprinted away from the firstcolumn.Selected
Automatic new line isnot done. Thecharacters after theCR code are printedon the same line.
Not selectedAutomatic new line isdone.Determines whetherto perform automaticnew line/carriagereturn before newline/carriage return(NL) is done whenNL is the maximumnumber of columns tobe printed away fromthe first column.
80 Personal Communications 3270 Emulator User’s Reference

Table 12. Page Setup Parameters — Text Options (continued)
Group Options Setting
NL at maximum printposition +1 Selected
Automatic new line isnot done.
Not selectedAfter automatic newline is done, new lineis done again.
This option can be used whenLU type 3 printing ornon-SNA printing is done andthe combination of bits 2 and3 of the WCC is 00.
This option cannot be used in5250 sessions.
Form Feed PositionNote: This cannot be used for5250 sessions.
Any position Determines that printing canstart at any position on thepage.
Column 1 only Determines that printing startsat column 1 of the page.
From a Personal Communications 3270 session, you can set additional parametersby selecting the Graphics tab.
Table 13. Page Setup Parameters - Graphics
Parameter Description
Scaling By default, the screen size (display resolution) is mapped to theprinted page size (printer resolution)—this is called BestFit. It isdone automatically if you change either resolution (includingchanging printers). The /2, /3, and /4 values reduce the printedpage size.
Black-on-White This option allows you to determine how the black pixels on thescreen are printed.
Yes Black pixels are printed as white pixels. Pixels other thanblack are printed as black pixels when you use amonochrome printer. When you use a color printer, theyare printed in the same color as on the screen.
No Black pixels are printed in black. Pixels other than blackare printed as white pixels when you use a monochromeprinter. When you use a color printer, they are printed inthe same color as on the screen.
To set or change setup items:1. Click File → Page Setup from the menu bar of the session window.
The Page Setup window appears.2. Select the tab that contains the parameters you want to change.
Note: To switch from the current settings back to the defaults, select Default.3. When all the items have been set, click OK or Apply.
Chapter 5. Printing 81
Printing to DiskIf you are using a PDT, you can save a host print-job or the contents of the sessionwindow (Print Screen) to a workstation file instead of printing it.
Two types of Print-to-Disk function are provided by Personal Communications:
Print-to-Disk AppendAppends multiple host print jobs or print screen jobs to a singleworkstation file.
Print-to-Disk SeparateSaves each host-print job or screen to a separate workstation file. You canspecify the file name, but the extension is automatically assigned as adecimal number from 000 to 999. If you delete a file, its number will bere-used. When all 999 numbers have been used, the extension isautomatically assigned a decimal number from 1000 to 9999.
Notes:
1. Print-to-Disk is not available for the Print-Graphics function.2. Print-to-Disk can be used only when you use a printer definition table (PDT)
file.
To set up Print-to-Disk:1. Click File → Printer Setup from the menu bar in the session window.
The Printer Setup window lists the supported printers.2. Select Print to Disk Append or Print to Disk Separate from the list box.3. Click Select PDT.
The Select PDT file window appears.4. Select a PDT file from the list; then click OK.
The Printer Setup window reappears.5. Click Setup.
The File Selecting window appears.6. Specify a file name, drive, and path; then click OK.
Note: If you specify the name of an existing file, subsequent print jobs areappended to the data in the original file in the case of Print to DiskAppend.
Printing Japan Postal Bar CodeIn support of the new postal bar code implemented in Japan, PersonalCommunications provides print capabilities for postal bar codes.
Workstation Profile Parameter for Code PageOccasionally a font does not support the desired code page. The wrong charactersmay be printed within the specific character set (Latin 2, for example). PersonalCommunications has a workstation profile parameter that allows the program touse a different code page that is supported by the desired font.
You can use the PrinterFontCodePage parameter if the following conditions aremet:
82 Personal Communications 3270 Emulator User’s Reference

v If you can specify the printer font code page with which the desired font isencoded.
v If Personal Communications provides the translation table for the host code pageand the printer font code page.
However, since some Personal Communications releases may require manualadjustment of the workstation profile, try using different fonts before altering the.ws file. Fonts are listed in the Personal Communications Page Setup panel for alldisplay sessions and 3270 host print sessions. For 5250 print sessions, thePCSPD.DAT file can be manually changed to control the fonts used. The CourierNew font should support most languages and corresponding code pages.
To edit the .ws file, you must change the PrinterFontCodePage parameter to thevalue of the supported code page you wish to use. This option must be put in the[printers] section, and is case-sensitive. See the following example for the properparameter syntax. The parameter does not need to be placed immediately after the[printers] section label.[printers]PrinterFontCodePage=852
In this case, the desired font is encoded with code page 852. PersonalCommunications uses a different, existing translation table to translate data fromEBCDIC to 852, versus using the standard Windows code page.
Chapter 5. Printing 83

84 Personal Communications 3270 Emulator User’s Reference

Part 3. Appendixes
© Copyright IBM Corp. 1989, 2003 85

86 Personal Communications 3270 Emulator User’s Reference

Appendix. Notices
This information was developed for products and services offered in the U.S.A.IBM may not offer the products, services, or features discussed in this document inother countries. Consult your local IBM representative for information on theproducts and services currently available in your area. Any reference to an IBMproduct, program, or service is not intended to state or imply that only that IBMproduct, program, or service may be used. Any functionally equivalent product,program, or service that does not infringe any IBM intellectual property right maybe used instead. However, it is the user’s responsibility to evaluate and verify theoperation of any non-IBM product, program, or service.
IBM may have patents or pending patent applications covering subject matterdescribed in this document. The furnishing of this document does not give youany license to these patents. You can send license inquiries, in writing, to:
IBM Director of LicensingIBM Corporation500 Columbus AvenueThornwood, NY 10594U.S.A.
For license inquiries regarding double-byte (DBCS) information, contact the IBMIntellectual Property Department in your country or send inquiries, in writing, to:
IBM World Trade Asia CorporationLicensing2-31 Roppongi 3-chome, Minato-kuTokyo 106, Japan
The following paragraph does not apply to the United Kingdom or any othercountry where such provisions are inconsistent with local law:INTERNATIONAL BUSINESS MACHINES CORPORATION PROVIDES THISPUBLICATION “AS IS” WITHOUT WARRANTY OF ANY KIND, EITHEREXPRESS OR IMPLIED, INCLUDING, BUT NOT LIMITED TO, THE IMPLIEDWARRANTIES OF NON-INFRINGEMENT, MERCHANTABILITY OR FITNESSFOR A PARTICULAR PURPOSE. Some states do not allow disclaimer of express orimplied warranties in certain transactions, therefore, this statement may not applyto you.
This information could include technical inaccuracies or typographical errors.Changes are periodically made to the information herein; these changes will beincorporated in new editions of the publication. IBM may make improvementsand/or changes in the product(s) and/or the program(s) described in thispublication at any time without notice.
Any references in this information to non-IBM documentation or non-IBM Websites are provided for convenience only and do not in any manner serve as anendorsement of those documents or Web sites. The materials for those documentsor Web sites are not part of the materials for this IBM product and use of thosedocuments or Web sites is at your own risk.
Licensees of this program who wish to have information about it for the purposeof enabling: (i) the exchange of information between independently created
© Copyright IBM Corp. 1989, 2003 87

programs and other programs (including this one) and (ii) the mutual use of theinformation which has been exchanged, should contact:
IBM CorporationDepartment T01Building 062P.O. Box 12195RTP, NC 27709-2195U.S.A.
Such information may be available, subject to appropriate terms and conditions,including in some cases, payment of a fee.
The licensed program described in this information and all licensed materialavailable for it are provided by IBM under terms of the IBM Customer Agreementor any equivalent agreement between us.
Information concerning non-IBM products was obtained from the suppliers ofthose products, their published announcements or other publicly available sources.IBM has not tested those products and cannot confirm the accuracy ofperformance, compatibility or any other claims related to non-IBM products.Questions on the capabilities of non-IBM products should be addressed to thesuppliers of those products.
All statements regarding IBM’s future direction or intent are subject to change orwithdrawal without notice, and represent goals and objectives only.
TrademarksThe following terms are trademarks of the IBM Corporation in the United States orother countries, or both:
ACF/VTAMAnyNetAPPNCICSGDDMIBMIBM Global NetworkIBMLinkiSeries
OfficeVisionOfficeVision/MVSOS/2OS/400PROFSSAASPVTAMzSeries
Microsoft, Windows, Windows NT, and the Windows logo are trademarks ofMicrosoft Corporation in the United States, other countries, or both.
Java and all Java-based trademarks and logos are trademarks of Sun Microsystems,Inc. in the United States, other countries, or both.
Lotus is a trademark of Lotus Development Corporation in the United States, othercountries, or both.
Other company, product, and service names may be trademarks or service marksof others.
Notices
88 Personal Communications 3270 Emulator User’s Reference

Index
Aadding a file to the list 37adding templates 38additional options 42
Cchanging advanced items 43changing the contents of a list 37changing the packet size 19changing the translation table 45clear session before transfer 44Collect Screen
Print Collection on Exit 73Purge Collection 73
commandsMVS/TSO send 55
Commands for PC/3270, File Transfer 47commands, VM/CMS
VM/CMS RECEIVE 52VM/CMS SEND 49
considerations and restrictionsSDDLU 26
CPI/LPI of device fonts 26creating IDP files 47creating list files 37cursor color 16customizing a display translation table 18customizing the translation table 45
DData Transfer
power management 15default disk 43default key functions
combined package 31PC/3270 package 28
default partitioned data set 43default PC directory 43definitions, PSID 27DOS commands
RECEIVE.EXE 48SEND.EXE 48
drawing-buffer size 22
Eedit-copy buffer 23editing lists 37enhanced protocol 44errors caused by insufficient memory 21extended attribute support 20extension for list-files 44
Ffile option
APPEND 40, 41
file option (continued)ASCII 40, 41BLANK 40, 41CRLF 40, 41
file transfer 47, 49bidirectional options 43CICS receive
using command line 68using GUI 67
CICS sendusing command line 64using GUI 63
host 48MVS/TSO receive 60MVS/TSO send 55VM/CMS receive 52VM/CMS send 49
File Transferpower management 15
File Transfer Commands for PC/3270 47Configuring File-Transfer Code Translation 71File Transfer Methods 47Requirements and Restrictions 48Sending and Receiving from DOS 48
file-transfer code translation 71file-transfer timeout 44Files, Transferring 35
Ggraphic protocol
advanced protocol 20native protocol 20
graphics protocols 20
HHints and Tips
Usage Notes for Sessions in OLE Documents 32hole in screen caused by clearing a graphic character 23host command 43host file transfer
IND$FILE 48host type 43
IIDP file 47ignoring blank pages 26import/export 19, 46IND$FILE 48ISPF 56
Kkey functions
assignments 28new keyboard map 32
default 28, 31
© Copyright IBM Corp. 1989, 2003 89

key functions (continued)Win32 edit hotkeys
Enter 32New Line 32Page Down 32Page Up 32
keyboardfile 31setup
new keyboard map 31
Llist file 36logical record length (LRECL) 41long file names 19
Mmanaging templates 38MVS/TSO
ISPF 56
Ppacket size 44Page Setup 78PC code page 43PC/3270 Sessions, Considerations for the Use of
File Transfer Function 19Graphic Functions 20Print Processing 24Support for Long File Names 19
PC/3270, File Transfer Commands for 47PCSERR999 error messages 26PDF 75PDT files 75PDT mode 26plotter 23Power Management
data transfer 15file transfer 15resume 15sleep 15wake 15
print buffer size 22print job control by using SNA timeout 24Print Screen Collection
Print Collection on Exit 73Purge Collection 73
printable area 26printer association
TN3270E 74printer definition file 75printer definition table 75printer setup 74printer, defining for a session 74printing
TN3270E printer association 74Printing 73
code page 82Collect Screen
Print Collection on Exit 73Purge Collection 73
defining a printer for a session 74Japan Postal Barcode 82
Printing (continued)multiple print screen 73Page Setup parameters 78PDT Files 75Print Screen Collection
Print Collection on Exit 73Purge Collection 73
PrinterFontCodePage parameter 82printing to disk 82setup 74translation table 82
printing reverse-display characters with device fonts 26printing reverse-display characters with GDI fonts 26printing to disk 82problem determination and reporting 9
problem determination aids 9Information Bundler 10Internet Service 11log viewer 9trace facility 9
program, hostIND$FILE 48
programmed symbol sets, enabling 21programmed symbols 21PSERVIC 20PSID definitions 27
RRECEIVE command 48receiving files from a host 48receiving files from the host system 36record format 41releasing insert mode 16removing a file from the list 37replacing and deleting templates 38
Ssaving
keyboard layout 31screen-size control 17scroll bar 16scroll-lock key 16SCS SPD/SLD command (LU 1) 26SCS TRN command (LU 1) 25SDDLU 26SEND command 48sending files to a host 48sending files to the host system 35session, defining a printer 74setting transfer options 43show status window 44SVF control code 26
Ttemplate 38testing templates 39
source file 39templates 39test mode 39
trademarks 88Transfer Commands for PC/3270, File 47transfer types 39transferring files 47
90 Personal Communications 3270 Emulator User’s Reference
Transferring Files 35Creating IDP Files 47Defining Transfer Types 39Import/Export (3270 CICS Only) 46Managing Templates 38Receiving Files from the Host System 36Sending Files to the Host System 35Setting Advanced Transfer Options 43Setting Up the Translation Table 45Using List Files 36
transferring files using import/export 46TSO allocation parameter (MVS/TSO) 42
allocation amounts 42allocation units 42
AVblocks 42Cylinders 42Tracks 42
Allocation Units 42block size 42
Uusing a printer with the non-SNA DFT attachment 24using bitmaps for drawing 22using list files 36using the Clipboard button 36
Vvector graphics 20VM/CMS command
SEND 49
Index 91

92 Personal Communications 3270 Emulator User’s Reference
Readers’ Comments — We’d Like to Hear from You
Personal Communications for Windows, Version 5.73270 Emulator User’s Reference
Publication No. SC31-8838-02
Overall, how satisfied are you with the information in this book?
Very Satisfied Satisfied Neutral Dissatisfied VeryDissatisfied
Overall satisfaction h h h h h
How satisfied are you that the information in this book is:
Very Satisfied Satisfied Neutral Dissatisfied VeryDissatisfied
Accurate h h h h h
Complete h h h h h
Easy to find h h h h h
Easy to understand h h h h h
Well organized h h h h h
Applicable to your tasks h h h h h
Please tell us how we can improve this book:
Thank you for your responses. May we contact you? h Yes h No
When you send comments to IBM, you grant IBM a nonexclusive right to use or distribute your comments in anyway it believes appropriate without incurring any obligation to you.
Name Address
Company or Organization
Phone No.
Readers’ Comments — We’d Like to Hear from YouSC31-8838-02
SC31-8838-02
����Cut or FoldAlong Line
Cut or FoldAlong Line
Fold and Tape Please do not staple Fold and Tape
Fold and Tape Please do not staple Fold and Tape
NO POSTAGENECESSARYIF MAILED IN THEUNITED STATES
BUSINESS REPLY MAILFIRST-CLASS MAIL PERMIT NO. 40 ARMONK, NEW YORK
POSTAGE WILL BE PAID BY ADDRESSEE
IBM CorporationInformation DevelopmentDepartment CGMD / Bldg 500P.O. Box 12195Research Triangle Park, NC27709-9990
_ _ _ _ _ _ _ _ _ _ _ _ _ _ _ _ _ _ _ _ _ _ _ _ _ _ _ _ _ _ _ _ _ _ _ _ _ _ _ _ _ _ _ _ _ _ _ _ _ _ _ _ _ _ _ _ _ _ _ _ _ _ _ _ _ _ _ _ _ _ _ _ _ _ _ _ _ _ _ _ _ _ _ _ _ _ _ _ _
_ _ _ _ _ _ _ _ _ _ _ _ _ _ _ _ _ _ _ _ _ _ _ _ _ _ _ _ _ _ _ _ _ _ _ _ _ _ _ _ _ _ _ _ _ _ _ _ _ _ _ _ _ _ _ _ _ _ _ _ _ _ _ _ _ _ _ _ _ _ _ _ _ _ _ _ _ _ _ _ _ _ _ _ _ _ _ _ _
__
__
__
__
__
__
__
__
__
__
__
__
__
__
__
__
__
__
__
__
__
__
__
__
__
__
__
__
__
__
__
__
__
__
__
__
__
__
__
__
__
__
__
__
__
__
__
__
__
_


����
Program Number: 5639–I70
Printed in U.S.A.
SC31-8838-02