Embed Size (px)
Citation preview

© Colin Foster, 2003 www.foster77.co.uk
2.13 Symmetry
Pupils need to be able to recognise and describe fully a transformation that’s already happened.
Certain information is needed to describe a transformation fully:
reflection rotation translation enlargement where is the mirror
line?
give its equation if on
co-ordinate axes
where is the centre of
rotation?
what is the angle of rotation?
what is the sense of the
rotation?
positive (anti-clockwise) or
negative (clockwise)
how far and in what
direction has the shape
moved?
give the vector
distance to the right
distance up
where is the centre of
enlargement?
what is the scale factor?
For enlargement you can draw a scale factor number line:
–2 –1 0 1 2
enlargement with inversion
reduction with
inversion
reduction enlargement
no shape
A scale factor of 1 leaves the shape unchanged; a scale factor of –1 inverts the shape but doesn’t change its area.
Pupils need to be able to perform a specified transformation of a shape. It’s good to develop a culture where pupils
check their own drawings by measuring lengths and angles so that they rarely need to ask “is this right?” Accuracy
of ± 1 mm and ± 1° should be the aim.
Marking is much easier when drawings are done on co-ordinate axes. Pupils can then write down the co-ordinates of
the points of the image shape(s) and it is easy to see whether these are correct or not. Otherwise the only quick way
to mark drawings is to do the accurate drawing yourself, photocopy onto an acetate (this is much easier – although
more expensive - than trying to do an accurate drawing using acetate pens) and then place this over the pupil’s work.
You can set up some kind of rule for marks; e.g., within 1° or 1 mm, 2 marks; within 2° or 2 mm,
1 mark.
Coloured acetate is available from art shops, and although it’s expensive you can do a lot with just one sheet. You
can cut out various shapes and place onto an acetate of 1 cm × 1 cm squares (available in section 1.23). This is
particularly helpful with visualising translations. Dynamic Geometry software can make this even slicker.
Small mirrors can be useful, and tracing paper is more or less essential for many pupils.
2.13.1 Reflections.
Completing the other half of pictures of
animals/aliens, etc. can be useful practice.
The reflected image is always congruent to the
original object.
What stays the same and what changes in a
reflection?
Good for displays.
Diagonal mirror lines are sometimes easier to do by
rotating the paper so that the line goes away from
you. You need to count the squares (or diagonals of
squares) or measure in a direction perpendicular to
the mirror line.
“Diagonal” mirror lines that are not at 45° are very
difficult to do accurately unless the shape is well
chosen.
Same: size, shape, lengths of sides, area, angles;
Different: position, “orientation”, “handedness”.
2.13.2 NEED “Symmetrical Squares” sheets.
Several possible answers.
2.13.3 Introduce by drawing axes from –6 to 6 in both
directions on the board.
Plot the co-ordinates A(1,1), B(1,4), C(2,4), D(2,2),
E(3,2) and F(3,1) and join them up to get an L-shape.
Recaps plotting co-ordinates.
Or you can use a scalene right-angled triangle. You
don’t want to use anything with symmetry because

© Colin Foster, 2003 www.foster77.co.uk
I’m going to add 3 to all the coordinates to get six
new points. So A becomes (4,4). What do you think
the new shape will be like?
We’re adding 3 to the x -number (the first number)
and 3 to the y -number (the second number).
What if leave the x -numbers alone and make the y -
numbers into minus what they are?
i.e., ( , )x y → ( , )x y
Put up a list of possible co-ordinate transformations.
Pupils can invent their own.
They could work in groups so as to cover all these as
a class in a reasonable amount of time.
Make a table of results.
Try to generalise; e.g.,
( , )x a y b is a translation a
b
(even if a or b are negative).
( , )ax ay is an enlargement, scale factor a centred on
the origin.
Try out more complicated ones; e.g.,
( , )x y → (3 2,3 1)x y .
An enlargement, scale factor 3 about the origin
followed by a translation 2 units to the left and 1 unit
up.
that sometimes makes it hard to see if the shape has
been changed or not, although so long as the vertices
are labelled clearly this does not have to be a
problem.
Many will think shape will be stretched or enlarged.
Actually it’s just a translation 3
3
.
So transforming the co-ordinates ( , )x y into
( 3, 3)x y is the translation 3
3
.
This time it’s a reflection in the x -axis.
( , )x y → transformation
( 3, 3)x y translation 3 to the right, 3 up
( , )x y reflection in 0y
( , )x y reflection in 0x
( , )x y rotation 180° about (0,0)
( , )y x reflection in y x
( , )y x rotation –90° about (0,0)
( , )y x rotation +90° about (0,0)
( , )y x reflection in y x
( 1, 3)x y translation 1
3
(2 ,2 )x y
enlargement, scale factor 2,
centre (0,0)
[Need vertical axis up to 8 for
this one.]
2.13.4 An alternative approach is to use Dynamic Geometry
software to allow pupils to explore different
transformations on a shape of their choice and
investigate what happens to the co-ordinates of the
vertices under each different transformation.
The software may allow other transformations such
as stretch and shear.
Some pupils might like to investigate matrices to try
to work out the effects of putting different numbers in
the four different “slots”.
2.13.5 Is a human face symmetrical?
What’s the minimum change you’d have to make to
a human face to give it some rotational symmetry?!
(Pupils can sketch their ideas.)
There is more or less a vertical line of symmetry, but
not exactly. If it were, our faces would look the same
in the mirror, and they don’t. Some studies suggest
that highly symmetrical faces are the most beautiful.
You could aim for order 2 rotational symmetry, and
even that is not easy.
2.13.6 Why does a mirror swap round left and right but it
doesn’t swap round up and down?
I mean why is my left hand where my right hand is
(and vice versa), but my head isn’t where my feet are
(and vice versa)?
Does a mirror really know which way is up? (What
we mean by “up” is really something like “the
opposite way to gravity” – how could a mirror know
about gravity?)
Answer: This is quite a tricky one.
It’s really because we imagine our mirror image
standing (upright) next to us.
If you’re facing a mirror straight-on, every point is
reflected exactly in front of the original point.
© Colin Foster, 2003 www.foster77.co.uk
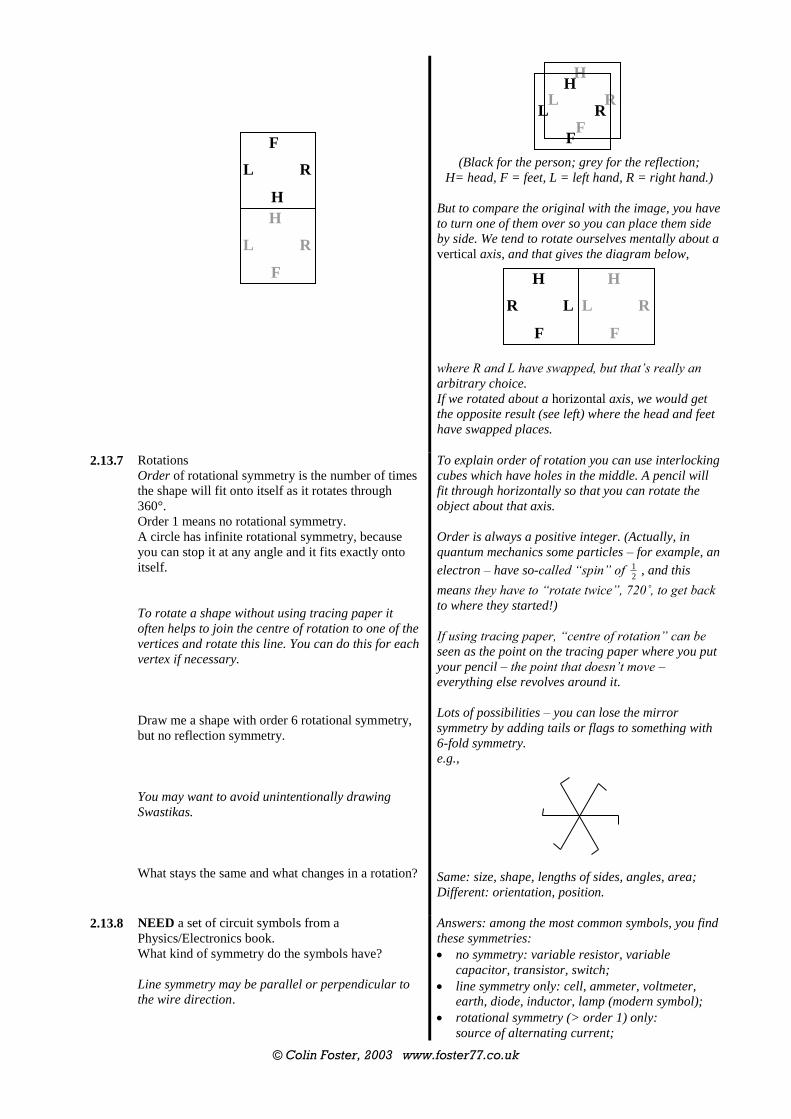
(Black for the person; grey for the reflection;
H= head, F = feet, L = left hand, R = right hand.)
But to compare the original with the image, you have
to turn one of them over so you can place them side
by side. We tend to rotate ourselves mentally about a
vertical axis, and that gives the diagram below,
where R and L have swapped, but that’s really an
arbitrary choice.
If we rotated about a horizontal axis, we would get
the opposite result (see left) where the head and feet
have swapped places.
2.13.7 Rotations
Order of rotational symmetry is the number of times
the shape will fit onto itself as it rotates through
360°.
Order 1 means no rotational symmetry.
A circle has infinite rotational symmetry, because
you can stop it at any angle and it fits exactly onto
itself.
To rotate a shape without using tracing paper it
often helps to join the centre of rotation to one of the
vertices and rotate this line. You can do this for each
vertex if necessary.
Draw me a shape with order 6 rotational symmetry,
but no reflection symmetry.
You may want to avoid unintentionally drawing
Swastikas.
What stays the same and what changes in a rotation?
To explain order of rotation you can use interlocking
cubes which have holes in the middle. A pencil will
fit through horizontally so that you can rotate the
object about that axis.
Order is always a positive integer. (Actually, in
quantum mechanics some particles – for example, an
electron – have so-called “spin” of 1
2, and this
means they have to “rotate twice”, 720˚, to get back
to where they started!)
If using tracing paper, “centre of rotation” can be
seen as the point on the tracing paper where you put
your pencil – the point that doesn’t move –
everything else revolves around it.
Lots of possibilities – you can lose the mirror
symmetry by adding tails or flags to something with
6-fold symmetry.
e.g.,
Same: size, shape, lengths of sides, angles, area;
Different: orientation, position.
2.13.8 NEED a set of circuit symbols from a
Physics/Electronics book.
What kind of symmetry do the symbols have?
Line symmetry may be parallel or perpendicular to
the wire direction.
Answers: among the most common symbols, you find
these symmetries:
no symmetry: variable resistor, variable
capacitor, transistor, switch;
line symmetry only: cell, ammeter, voltmeter,
earth, diode, inductor, lamp (modern symbol);
rotational symmetry (> order 1) only:
source of alternating current;
H
F
R L H
F
R L
H
F
R L
H
F
L R
H
F
R L
F
H
R L
© Colin Foster, 2003 www.foster77.co.uk
You can do the same with hazard warning symbols
(Science department) (ignore the writing underneath
the symbol).
Highway code road signs are another possibility, but
most have no symmetry. Generally you should
ignore the writing underneath and possibly ignore the
shape of the sign itself (triangle, circle, etc.) as well.
Signs from music notation.
line symmetry and rotational symmetry
(> order 1): connecting wire, lamp (old-
fashioned cross symbol), resistor, transformer,
fuse, capacitor.
“Toxic” has line symmetry, and “harmful” and
“radioactive” have both line and rotational.
“Oxidising” almost has line symmetry but not quite
because of the “flames”!
line symmetry only: crossroads, dual
carriageway ends, chevrons, road narrows on
both sides, uneven road, traffic signals, hump
bridge, level crossing with barrier, general
danger, tunnel, low-flying air-craft, road humps;
line symmetry and rotational symmetry: general
warning, roundabout (line symmetry only
approximate here).
line symmetry only: accents, ties, pause,
crescendo, diminuendo, up/down bow (string
players), alto/tenor clef;
rotational symmetry only: sharp sign, natural
sign, turn, mordent;
line symmetry and rotational symmetry: breve,
semibreve (and their rests), 5-line stave, bar line,
double bar line, repeat marks, staccato dots,
double-sharp sign.
2.13.9 NEED crosswords from newspapers (collect for
homework). Sort them according to their symmetry.
You could make a display out of this.
2.13.10 NEED pencil crayons (or just pencil), sheets.
Colour And Symmetry.
Colour in the shapes to give them rotational
symmetry of
1. order 1
2. order 2
3. order 3
What other orders of rotational symmetry are
possible?
What is the minimum number of different colours
you need to use?
Do any of the finished shapes have any line
symmetry?
Answers:
Colouring the hexagon in the centre never makes any
difference so long as it’s all the same colour.
See sheet for answers.
None.
One (and white).
No.
If using different colours, be careful not to
embarrass anyone who is colour-blind.
2.13.11 Translations.
Pupils need to be clear that the vector defines the
movement of each point to its image point; this isn’t
necessarily the same as the “gap” between the object
and image shapes.
What stays the same and what changes in a
translation?
Translation vectors are not that difficult and are a
less cumbersome way of describing translations than
using words.
They are best defined as
distance to the right
distance up
.
(Notice that this is “upside down” compared with
the way gradient is defined.)
Same: size, shape, lengths of sides, area, angles,
orientation;
Different: position.
© Colin Foster, 2003 www.foster77.co.uk
2.13.12 Combined Transformations.
1. I’m thinking of a point. If I translate it by 4
0
, I
get to the same point as if I reflect the point I’m
thinking of in the y-axis. Where is the point?
(There is more than one possibility.)
2. I’m thinking of a point. If I translate the point by
3
3
, I get to the same point as if I reflect the
point I’m thinking of in the lines y x . Where
could the point be?
3. I’m thinking of a point. If I translate the point by
2
6
, that’s equivalent to a rotation of it by 90°
clockwise about the origin. Where could the
point be this time?
4. This time if I translate my point by 4
2
, that’s
equivalent to rotating it by 90° clockwise about
the origin. Where is this point?
Answers:
1. (–2, anything); i.e., any point on the line
2x ;
2. either (1,4) or (–4,–1);
3. (4,2)
4. (–3,1)
Solve these by doing rough sketches.
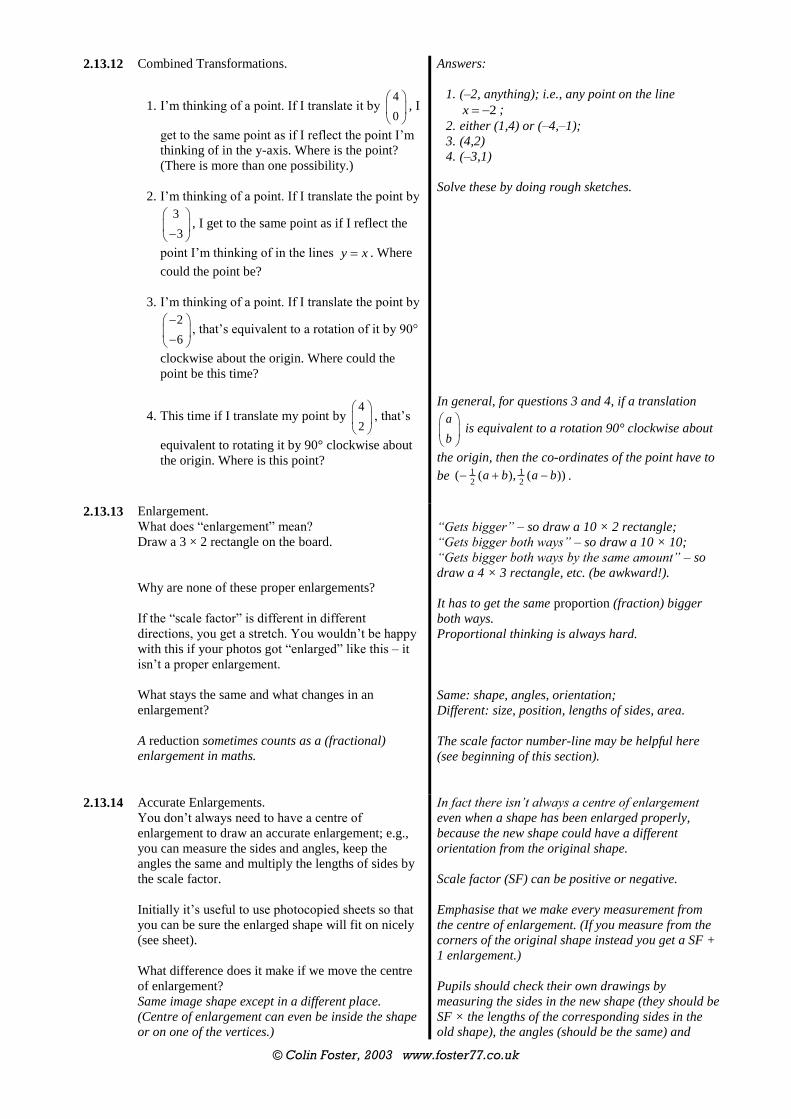
In general, for questions 3 and 4, if a translation
a
b
is equivalent to a rotation 90° clockwise about
the origin, then the co-ordinates of the point have to
be 1 1
2 2( ( ), ( ))a b a b .
2.13.13 Enlargement.
What does “enlargement” mean?
Draw a 3 × 2 rectangle on the board.
Why are none of these proper enlargements?
If the “scale factor” is different in different
directions, you get a stretch. You wouldn’t be happy
with this if your photos got “enlarged” like this – it
isn’t a proper enlargement.
What stays the same and what changes in an
enlargement?
A reduction sometimes counts as a (fractional)
enlargement in maths.
“Gets bigger” – so draw a 10 × 2 rectangle;
“Gets bigger both ways” – so draw a 10 × 10;
“Gets bigger both ways by the same amount” – so
draw a 4 × 3 rectangle, etc. (be awkward!).
It has to get the same proportion (fraction) bigger
both ways.
Proportional thinking is always hard.
Same: shape, angles, orientation;
Different: size, position, lengths of sides, area.
The scale factor number-line may be helpful here
(see beginning of this section).
2.13.14 Accurate Enlargements.
You don’t always need to have a centre of
enlargement to draw an accurate enlargement; e.g.,
you can measure the sides and angles, keep the
angles the same and multiply the lengths of sides by
the scale factor.
Initially it’s useful to use photocopied sheets so that
you can be sure the enlarged shape will fit on nicely
(see sheet).
What difference does it make if we move the centre
of enlargement?
Same image shape except in a different place.
(Centre of enlargement can even be inside the shape
or on one of the vertices.)
In fact there isn’t always a centre of enlargement
even when a shape has been enlarged properly,
because the new shape could have a different
orientation from the original shape.
Scale factor (SF) can be positive or negative.
Emphasise that we make every measurement from
the centre of enlargement. (If you measure from the
corners of the original shape instead you get a SF +
1 enlargement.)
Pupils should check their own drawings by
measuring the sides in the new shape (they should be
SF × the lengths of the corresponding sides in the
old shape), the angles (should be the same) and
© Colin Foster, 2003 www.foster77.co.uk
Four possible “kinds” of scale factor (SF):
1. SF >1; shape gets bigger;
2. 0 < SF < 1; shape gets smaller;
3. SF < –1; shape gets bigger and inverted;
4. –1 < SF < 0; shape gets smaller and inverted.
checking that the orientation is the same.
See the SF number-line at the beginning of this
section.
Probably best to do in this order.
2.13.15 Enlargement. “Aspect Ratios”, TV/cinema.
A normal TV screen has an “aspect ratio” of 4:3 (its
size is 4 along by 3 up).
If you display a widescreen movie (2.35:1) so that
the whole screen is filled with picture, what % of the
picture do you lose?
What about if you view the whole picture (so you
don’t miss anything) “letterbox” style. What % of the
screen is wasted with “black bars”?
Which do you think is better?
What if you have a high-definition TV (16:9)?
Answers:
% viewed = 4 1
2.35 357%
, so 43% is missing.
(You see all of the vertical direction but lose the two
ends in the horizontal direction.)
Same as before; 43% of the screen is black.
(Widescreen isn’t always as “wide”: 1.85:1 is
common, as is 16:9, which is normal theatre screen
dimensions.)
Film buffs tend to prefer to see everything the
director intended, even if that means having a
smaller picture.
This time you lose only 24% of the picture (or waste
24% of the screen).
2.13.16 NEED compasses, A4 plain paper.
Constructing a Golden Rectangle.
Take piece of A4 paper, landscape orientation, and
draw a square 18 cm by
18 cm in the bottom left corner.
Split the square into two congruent rectangles with a
vertical line.
Place the point of your compasses at the bottom of
this line and stretch the pencil up to the top right
corner of the square.
Draw an arc down from here until it reaches the
bottom of the paper.
This point along the bottom side is the position of the
bottom right end of the Golden Rectangle.
From here, draw a line 18 cm long vertically up the
page. Then draw a line to meet the left side of the
paper.
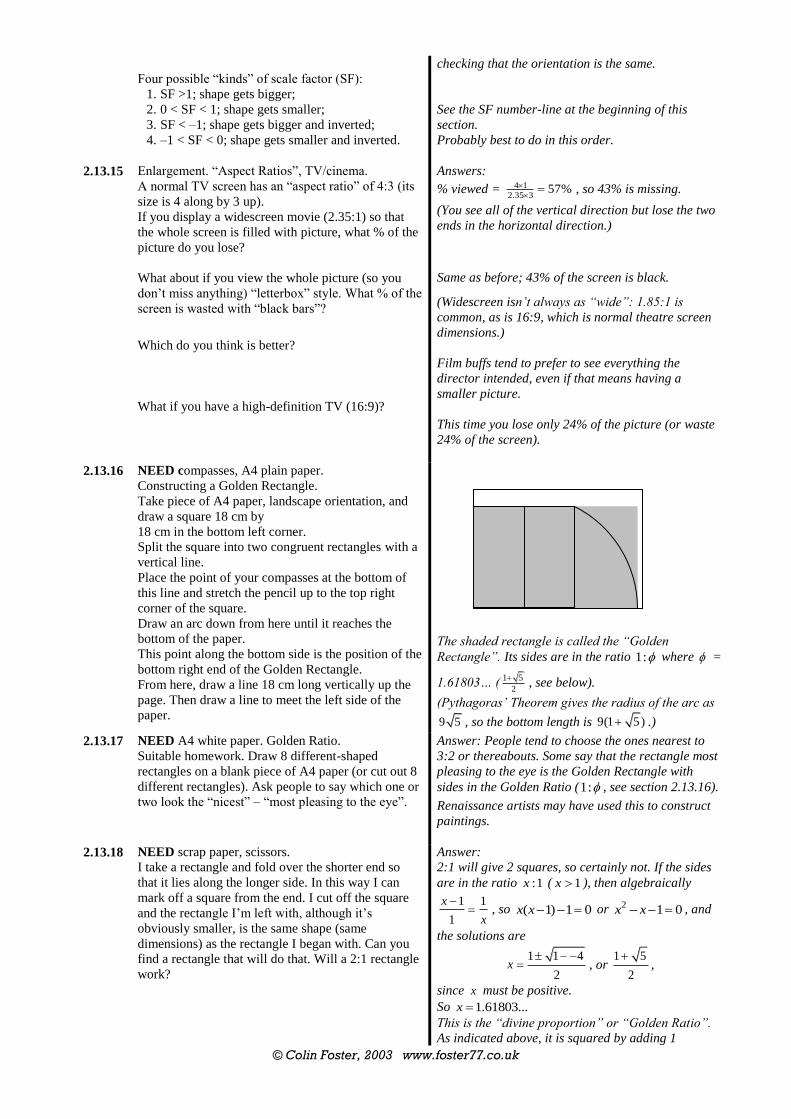
The shaded rectangle is called the “Golden
Rectangle”. Its sides are in the ratio 1: where =
1.61803… (1 5
2
, see below).
(Pythagoras’ Theorem gives the radius of the arc as
9 5 , so the bottom length is 9(1 5) .)
2.13.17 NEED A4 white paper. Golden Ratio.
Suitable homework. Draw 8 different-shaped
rectangles on a blank piece of A4 paper (or cut out 8
different rectangles). Ask people to say which one or
two look the “nicest” – “most pleasing to the eye”.
Answer: People tend to choose the ones nearest to
3:2 or thereabouts. Some say that the rectangle most
pleasing to the eye is the Golden Rectangle with
sides in the Golden Ratio (1: , see section 2.13.16).
Renaissance artists may have used this to construct
paintings.
2.13.18 NEED scrap paper, scissors. I take a rectangle and fold over the shorter end so
that it lies along the longer side. In this way I can
mark off a square from the end. I cut off the square
and the rectangle I’m left with, although it’s
obviously smaller, is the same shape (same
dimensions) as the rectangle I began with. Can you
find a rectangle that will do that. Will a 2:1 rectangle
work?
Answer:
2:1 will give 2 squares, so certainly not. If the sides
are in the ratio :1x ( 1x ), then algebraically
1 1
1
x
x
, so ( 1) 1 0x x or 2
1 0x x , and
the solutions are
1 1 4
2x
, or
1 5
2
,
since x must be positive.
So 1.61803...x
This is the “divine proportion” or “Golden Ratio”.
As indicated above, it is squared by adding 1
© Colin Foster, 2003 www.foster77.co.uk
(See task involving A-size paper in section 1.10.6.)
(See section 1.19.10 for a task involving the
Fibonacci series.)
( 21x x ).
The ratio of a term in the Fibonacci sequence (1170-
1250) to the previous term gets closer to the Golden
Ratio as you go to higher and higher terms.
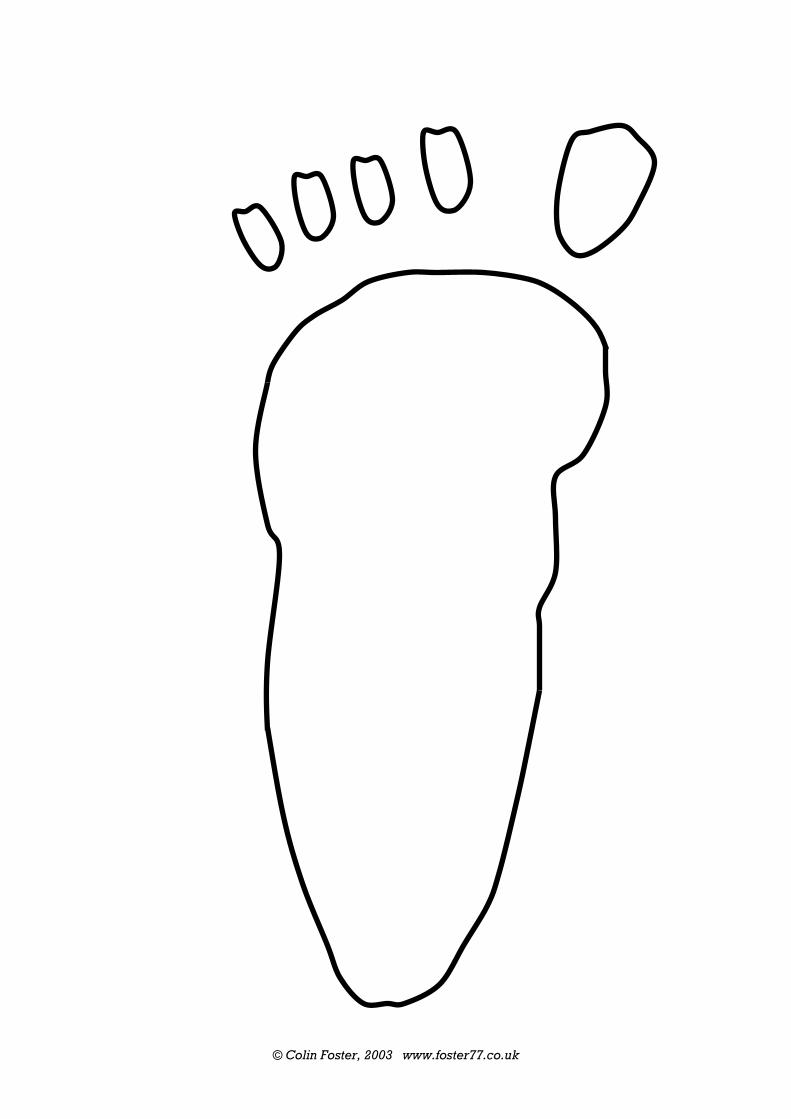
2.13.18 NEED A3 piece of paper showing a large footprint
or “pawprint”. What can you say about the size of
the animal that could have produced this?! (Imagine
we discovered it outside school in the morning.)
Pupils can take measurements from it and try to
predict things like height, mass, length of stride, the
tallest wall it could climb over, how much food it
might eat per day, etc.
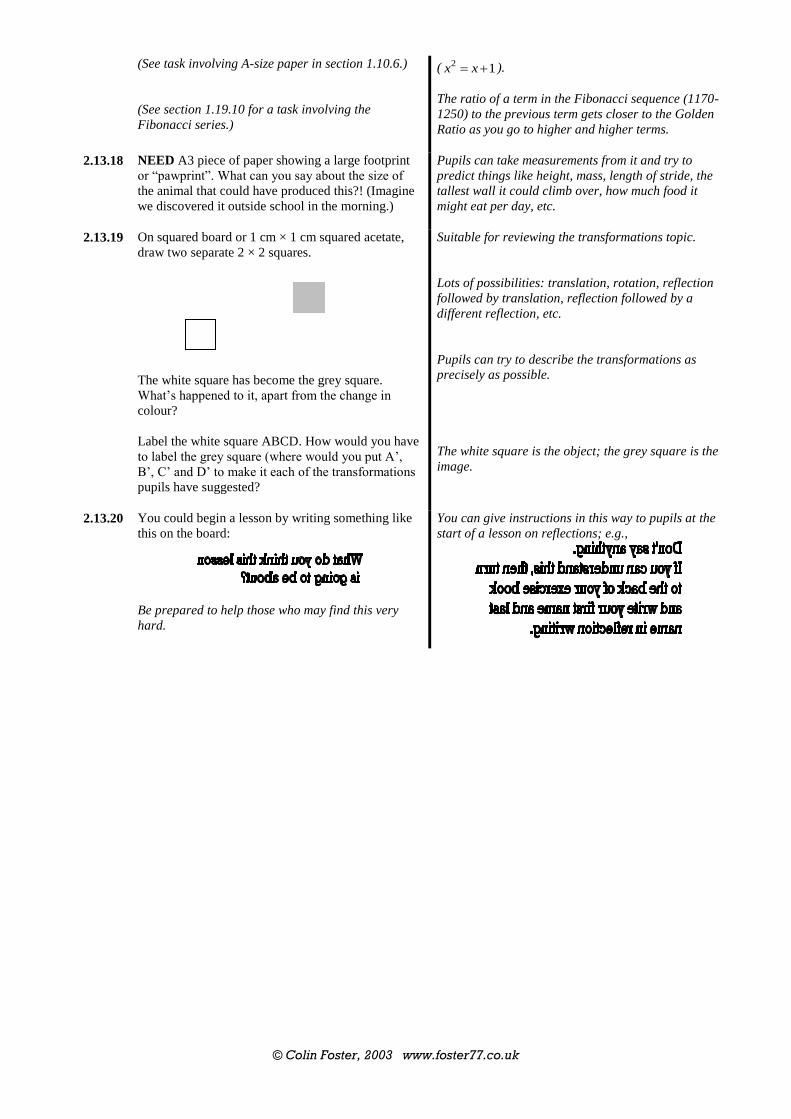
2.13.19 On squared board or 1 cm × 1 cm squared acetate,
draw two separate 2 × 2 squares.
The white square has become the grey square.
What’s happened to it, apart from the change in
colour?
Label the white square ABCD. How would you have
to label the grey square (where would you put A’,
B’, C’ and D’ to make it each of the transformations
pupils have suggested?
Suitable for reviewing the transformations topic.
Lots of possibilities: translation, rotation, reflection
followed by translation, reflection followed by a
different reflection, etc.
Pupils can try to describe the transformations as
precisely as possible.
The white square is the object; the grey square is the
image.
2.13.20 You could begin a lesson by writing something like
this on the board:
Be prepared to help those who may find this very
hard.
You can give instructions in this way to pupils at the
start of a lesson on reflections; e.g.,
© Colin Foster, 2003 www.foster77.co.uk
© Colin Foster, 2003 www.foster77.co.uk
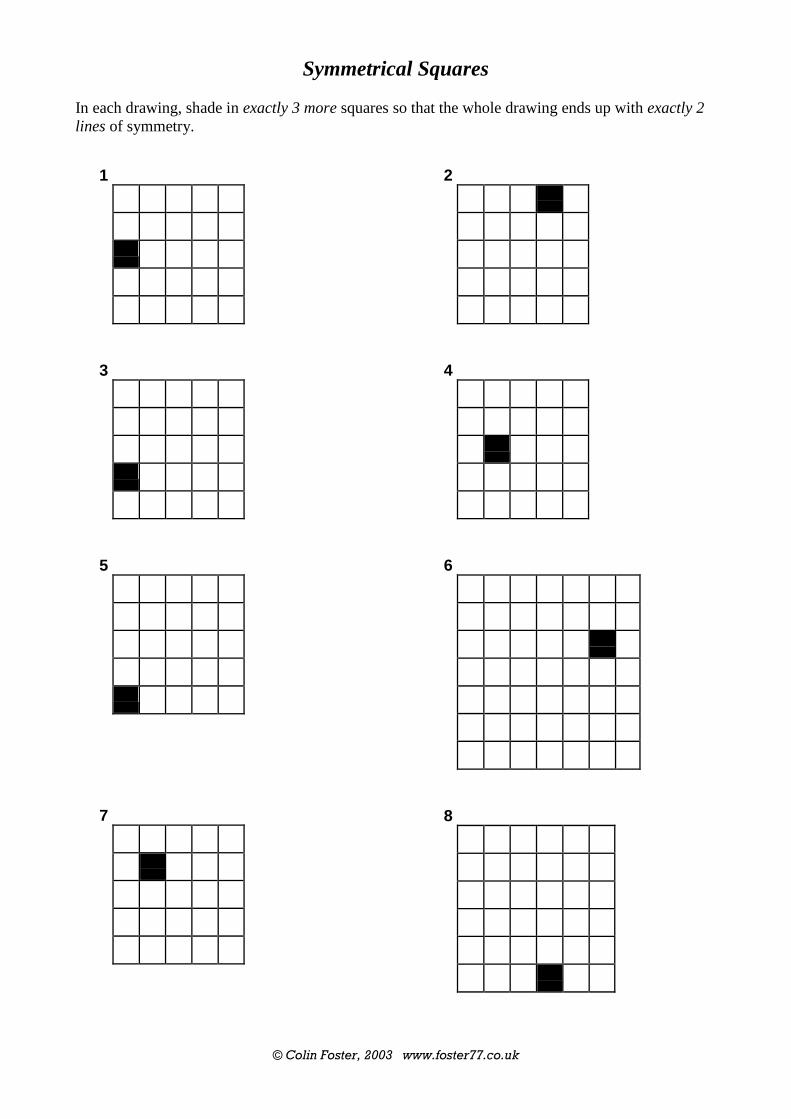
Symmetrical Squares
In each drawing, shade in exactly 3 more squares so that the whole drawing ends up with exactly 2
lines of symmetry.
1
3
5
7
2
4
6
8
© Colin Foster, 2003 www.foster77.co.uk
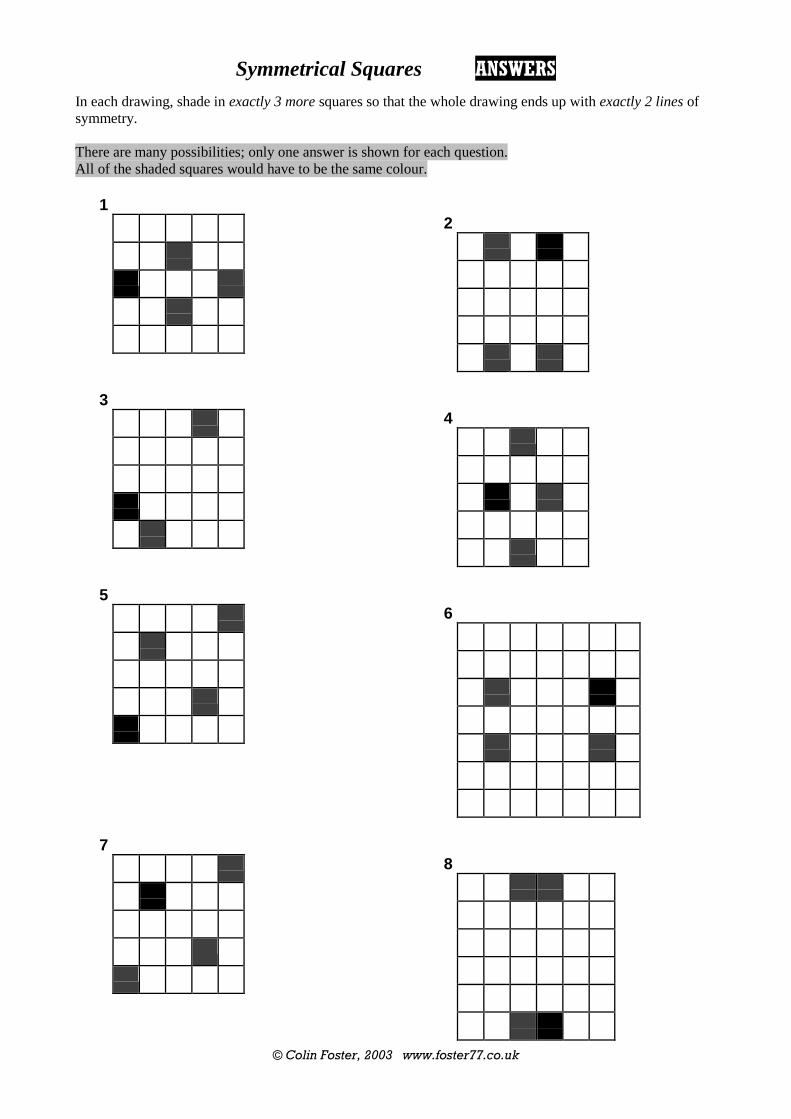
Symmetrical Squares ANSWERS
In each drawing, shade in exactly 3 more squares so that the whole drawing ends up with exactly 2 lines of
symmetry.
There are many possibilities; only one answer is shown for each question.
All of the shaded squares would have to be the same colour.
1
3
5
7
2
4
6
8
© Colin Foster, 2003 www.foster77.co.uk
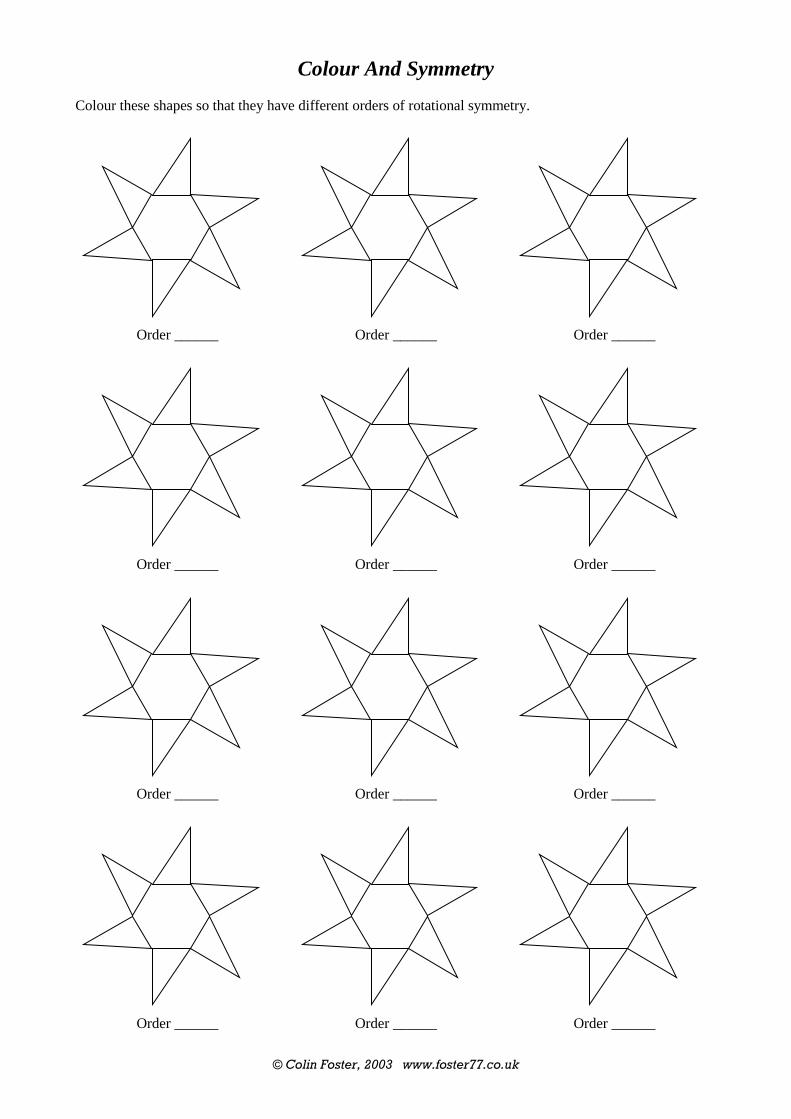
Colour And Symmetry
Colour these shapes so that they have different orders of rotational symmetry.
Order ______
Order ______
Order ______
Order ______
Order ______
Order ______
Order ______
Order ______
Order ______
Order ______ Order ______ Order ______
© Colin Foster, 2003 www.foster77.co.uk
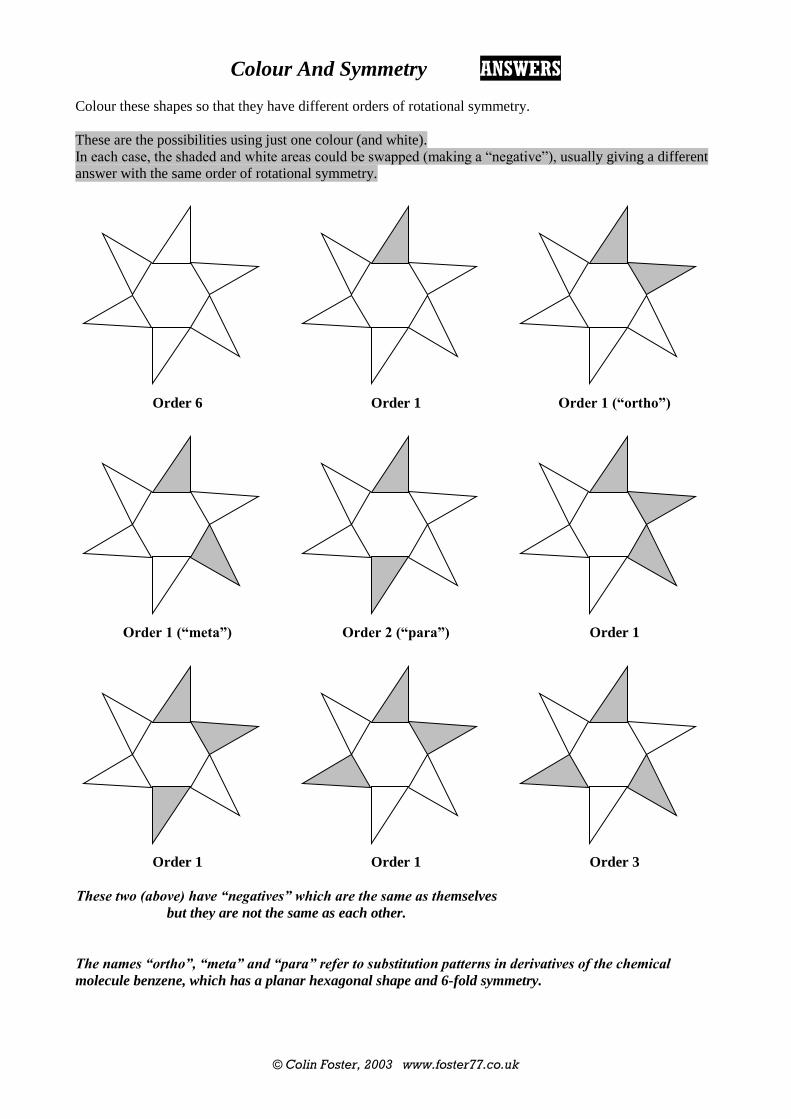
Colour And Symmetry ANSWERS
Colour these shapes so that they have different orders of rotational symmetry.
These are the possibilities using just one colour (and white).
In each case, the shaded and white areas could be swapped (making a “negative”), usually giving a different
answer with the same order of rotational symmetry.
Order 6
Order 1
Order 1 (“ortho”)
Order 1 (“meta”)
Order 2 (“para”)
Order 1
Order 1
Order 1
Order 3
These two (above) have “negatives” which are the same as themselves
but they are not the same as each other.
The names “ortho”, “meta” and “para” refer to substitution patterns in derivatives of the chemical
molecule benzene, which has a planar hexagonal shape and 6-fold symmetry.
© Colin Foster, 2003 www.foster77.co.uk
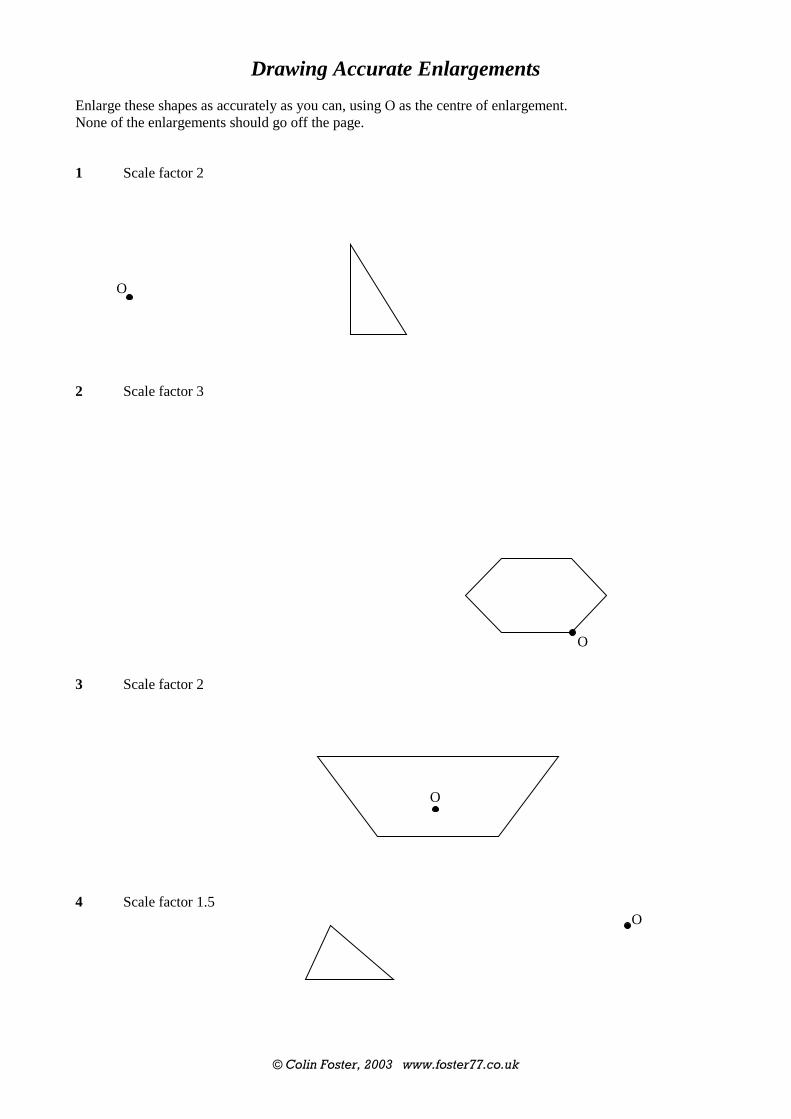
Drawing Accurate Enlargements
Enlarge these shapes as accurately as you can, using O as the centre of enlargement.
None of the enlargements should go off the page.
1 Scale factor 2
2 Scale factor 3
3 Scale factor 2
4 Scale factor 1.5
O
O
O
O
© Colin Foster, 2003 www.foster77.co.uk
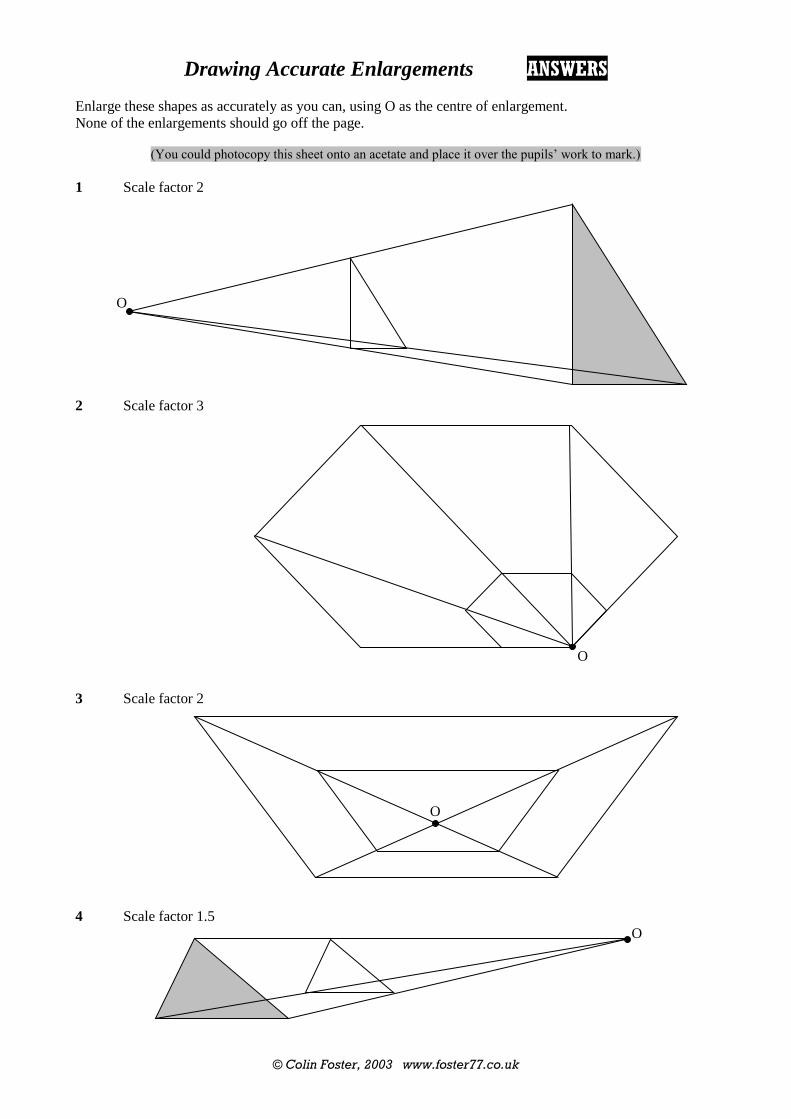
Drawing Accurate Enlargements ANSWERS
Enlarge these shapes as accurately as you can, using O as the centre of enlargement.
None of the enlargements should go off the page.
(You could photocopy this sheet onto an acetate and place it over the pupils’ work to mark.)
1 Scale factor 2
2 Scale factor 3
3 Scale factor 2
4 Scale factor 1.5
O
O
O
O