Embed Size (px)
Citation preview

1. The Rose Napkin Fold
The rose napkin fold is one of our favorite folds. Despite coming across as intricate and fancy, the rose fold is not that difficult to do. This fold is perfect if you are looking to impress your guests or if you are looking for a fancy, ornate table setting. This fold works well with most of our cotton and linen dinner napkins. For best folding results, it may help to first iron the napkins thoroughly with starch to ensure a more rigid napkin.
Step1: Iron the napkin flat. Step2: Fold all the tips of the napkins into the center
Step3: Turn the napkin over Step4: Fold the outer corners in so they meet at the center once again.
Step5: Once all of the tips are folded you are left with a square about 1/4 the size of the unfolded napkin.

Step6: Place something sturdy in the center (A drinking glass works great!)
Step7: While maintaining downward pressure in the center of the napkin, reach underneath each corner and pull out the flaps to create petals.
Step8: Pull out the flaps on all four corners of the napkin
Step9: Remove the center weight a nd your rose is finished.

2. The Fancy Silverware Pouch
This is similar to the basic silverware pouch, except for two more folds near the end. It is good for a more decorative touch than the basic pouch.
Step1: Iron the napkin flat. Step2 Fold the napkin in half and orient the open end toward you.
Step3: Fold the napkin into quarters. Step4: Orient the napkin so the open corner is facing away and to the right. Fold the top-most
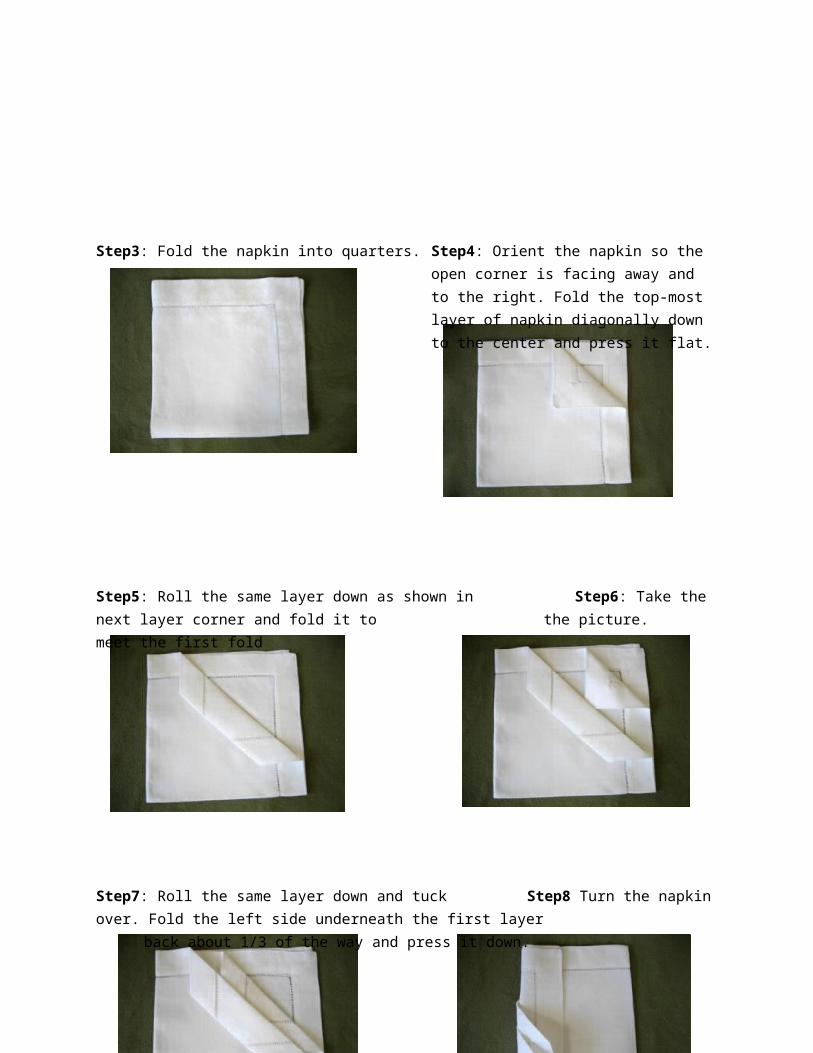
layer of napkin diagonally down to the center and press it flat.
Step5: Roll the same layer down as shown in Step6: Take the next layer corner and fold it to the picture. meet the first fold
Step7: Roll the same layer down and tuck Step8 Turn the napkin over. Fold the left side underneath the first layer back about 1/3 of the way and press it down.
Step9: Fold the right side back to meet the left Step10: Flip it over and insert the silverware hand fold and tuck underneath the flap. Press with an iron.

3. The Bishop's Hat Napkin Fold
The Bishops Hat napkin fold is a very classic fold used in many restaurants. This fold looks great lying down or standing up on the place setting and works well with most of our cotton and linen dinner napkins. For best folding results, it may help to first iron the napkins thoroughly with starch to ensure a more rigid napkin.
Step1: Iron the napkin flat. Step2: Fold the napkin in half diagonally
Step3: Fold the bottom right and left corners Step4: Fold the bottom corner 3/4 of the way up to the top corner. up to the top corner.

Step5: Fold the front top corner down flush Step6: Fold the two top flaps down and tuck the with the bottom as shown. edges under the front fold as shown.
Step7: Turn the napkin over and fold the Step8: Fold the right hand side over and tuck left hand side over one-third of the way. the napkin underneath the left hand fold
Step9: Flip the napkin over and you are done. Looks great standing up or lying on the table!
4. The Classic 3 Point Fold
The three point napkin fold is very classic yet extremely quick to fold. Because the

three point fold leaves the napkin mostly open, this fold is ideal for showing off any delicate embroidery that may be stitched on your napkin. This fold works well with all of our cotton and linen dinner napkins. For best folding results, it may help to first iron the napkins thoroughly with starch to ensure a more rigid napkin.
Step1: Iron the napkin flat. Step2: Fold the napkin in half diagonally.
Step3: Fold the right corner of the napkin Step4: Fold the right side of the napkin towards over to the left as shown in the picture. the left until the desired necktie shape is
formed on the napkin
5. The Crown Fold
The crown fold is very similar to the bishops hat fold in that it looks great lying down or standing up. For this fold in particular, it is especially

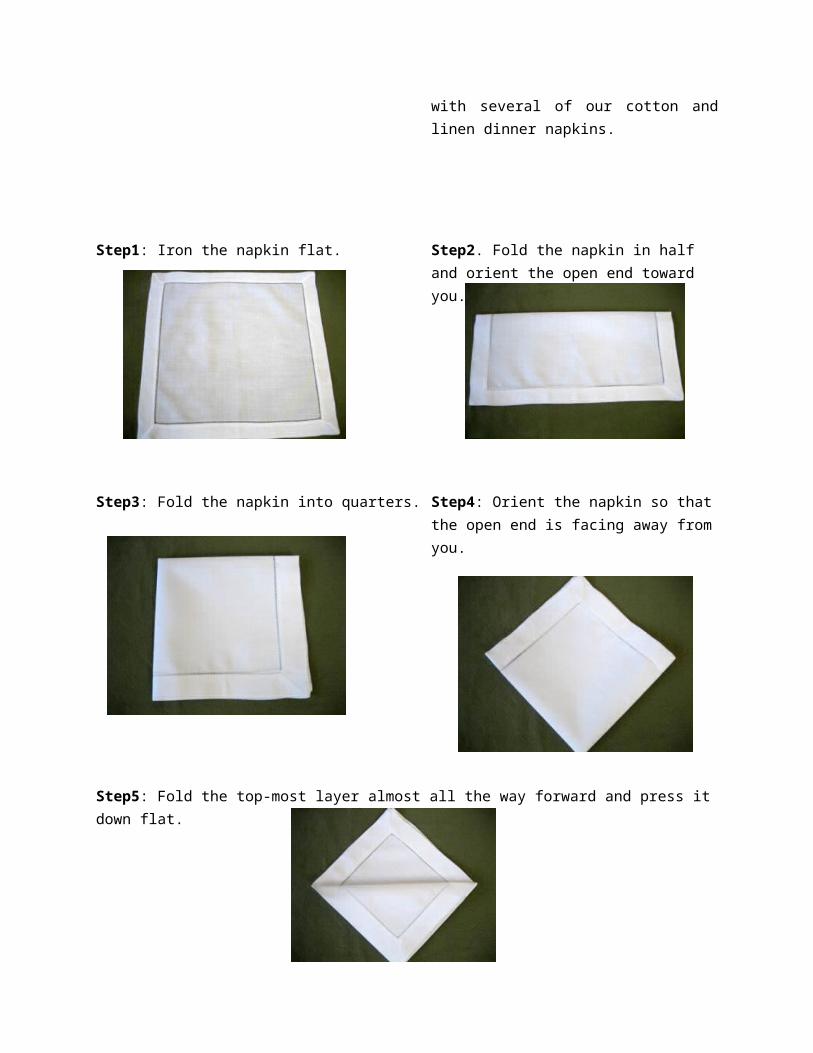
important to make sure the napkin is rigid prior to folding the napkin. We suggest ironing the napkin with starch before you begin. This fold works well with several of our cotton and linen dinner napkins.
Step1: Iron the napkin flat. Step2: Fold the napkin in half diagonally.
Step3: Orient the napkin so the open ends are Step4: Fold the bottom of the napkin onepointing away from you. Bring the left and right half of the way up and press this foldcorners of the napkin to the point of the triangle down as well.(center o f the napkin)

Step5: Flip the napkin over and fold the left Step6: Flip the napkin over again and pull the hand side over one third of the way. Fold the two tips of the napkins down to form petals. right side over and tuck the napkin underneath the left fold
6. The Diamond Arrow Fold
The diamond arrow is one of the faster folds to make and does not require a rigid napkin. If you are in a crunch for time or are using old soft napkins, the diamond arrow fold is the one you want. This fold works well with several of our cotton and linen dinner napkins.
Step1: Iron the napkin flat. Step2. Fold the napkin in half and orient the open end toward you.
Step3: Fold the napkin into quarters. Step4: Orient the napkin so that the open end is facing away from you.

Step5: Fold the top-most layer almost all the way forward and press it down flat.
Step6: Fold the next top-most layer of napkin Step7: Fold the next layer forward as you did forward almost as far as the previous one and the two before it.press it down as well. Make sure the edges are even with the previous fold.
Step8: Finally, fold the last layer forward similar Step9: Turn the napkin overto the three before it.
Step10: Now fold both sides of the napkin under Step11: You now have a beautiful diamond and in to create an even, staggered diamond arrow napkin foldeffect on the napkin.
7. Heart Napkin Fold
Planning a romantic dinner for a loved one? The heart napkin fold will show how much you care. This fold works extremely well with our hemstitched linen napkins.
Step1: Iron the napkin flat. Step2: Fold the napkin in half.
Step3: Fold the napkin in half again Step4: Fold the right hand side up vertically. Repeat with the left side.

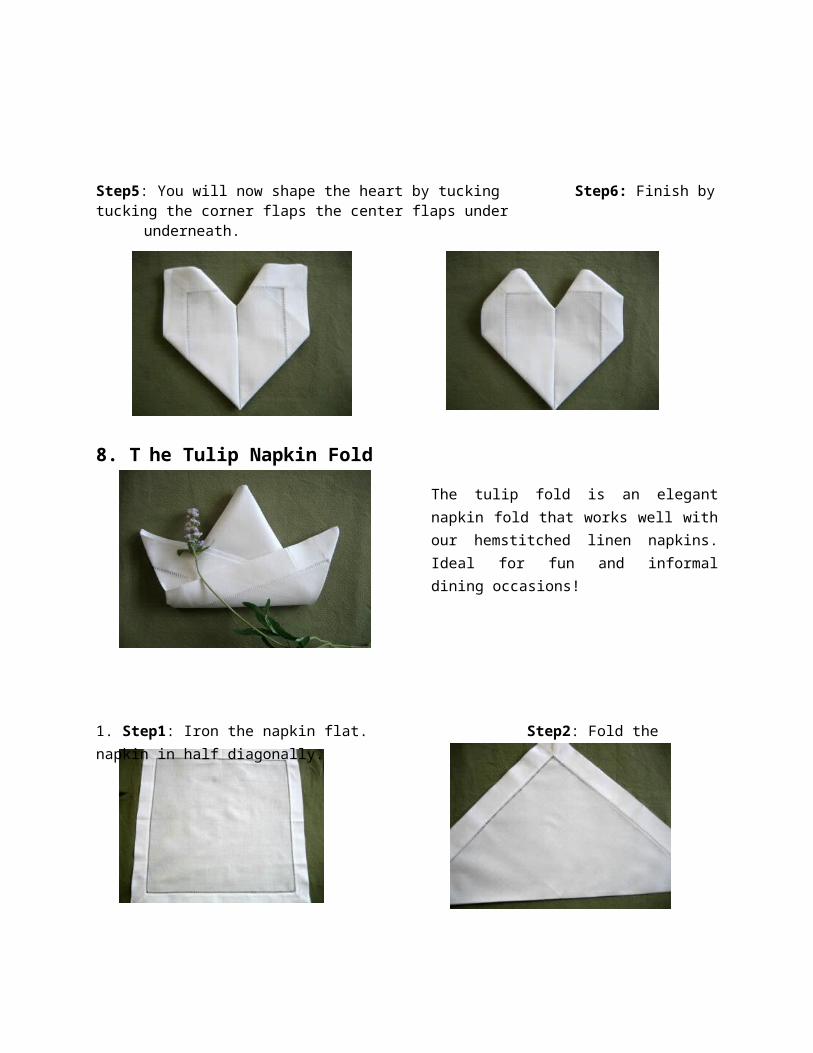
Step5: You will now shape the heart by tucking Step6: Finish by tucking the corner flaps the center flaps under underneath.
8. T he Tulip Napkin Fold
The tulip fold is an elegant napkin fold that works well with our hemstitched linen napkins. Ideal for fun and informal dining occasions!
1. Step1: Iron the napkin flat. Step2: Fold the napkin in half diagonally.
Step3: Fold both layers of the top of the triangle Step4: Take the right edge of the triangle and down to the bottom edge fold up at an angle. Repeat on the left side.

Step5: Turn the napkin over and finish by taking the lower flaps and folding them up and at an angle
9.The Lovers Knot Napkin Fold
Planning a memorable engagement dinner? The lovers knot symbolizes the unity between two people. The lovers knot napkin fold is easy to do but takes a bit of practice to get it right. This fold works extremely well with all lace edged and hemstitched napkins.
Step1: Iron the napkin flat. Step2: Fold the napkin in half
Step3: Fold it again in half again. Step4:Continue to the fold it in half twice more.
Step5: Approx one third from the right, fold Step6: Fold the left half of the strip down from down the edge of the napkin so that the folded the same point of the top edge, foldingedge i s vertical. it back
Step7: Fold the longer end of the strip back a second time, swing it in front of the right side
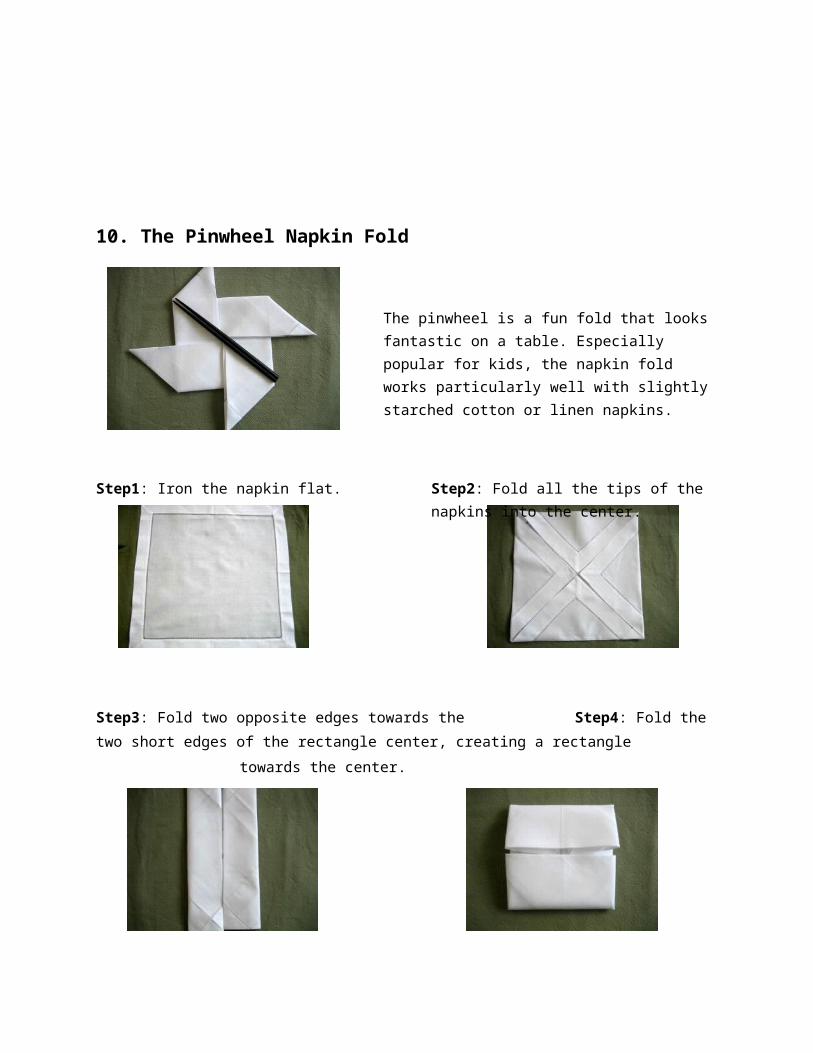
10. The Pinwheel Napkin Fold
The pinwheel is a fun fold that looks fantastic on a table. Especially popular for kids, the napkin fold works particularly well with slightly starched cotton or linen napkins.
Step1: Iron the napkin flat. Step2: Fold all the tips of the napkins into the center.

Step3: Fold two opposite edges towards the Step4: Fold the two short edges of the rectangle center, creating a rectangle towards the center.
Step5: Now take one flap and pull out one Step6: Repeat with the second flapof the edges to make a point.
Step7: With the right flap, pull it down Step8: Turn the napkin around and repeat steps towards you. 5-6 to finish up the pinwheel napkin fold.
11. The Envelope Napkin Fold
The envelope napkin fold is very classic yet extremely quick to fold. This fold works well with all of our cotton and linen dinner napkins. For best folding results, it may help to first iron the napkins thoroughly with starch to ensure a more rigid napkin.

Step1: Iron the napkin flat. Step2: Fold the napkin in half so that the open end is facing away from you.
Step3: On the right hand side of the napkin, Step4: Fold the left side of the napkin over infold both corner edges towards the center to half to meet the right.form two triangles
Step5: Take both triangle layers and fold both over to create the napkin envelop fold.
12. Double Roll Napkin Fold
If are looking for an asian feel to your dining experience, the double roll is the perfect fold. This fold works well with all of our cotton and linen dinner napkins. For best folding results, it may help to first iron the napkins thoroughly with starch to ensure a more rigid napkin.
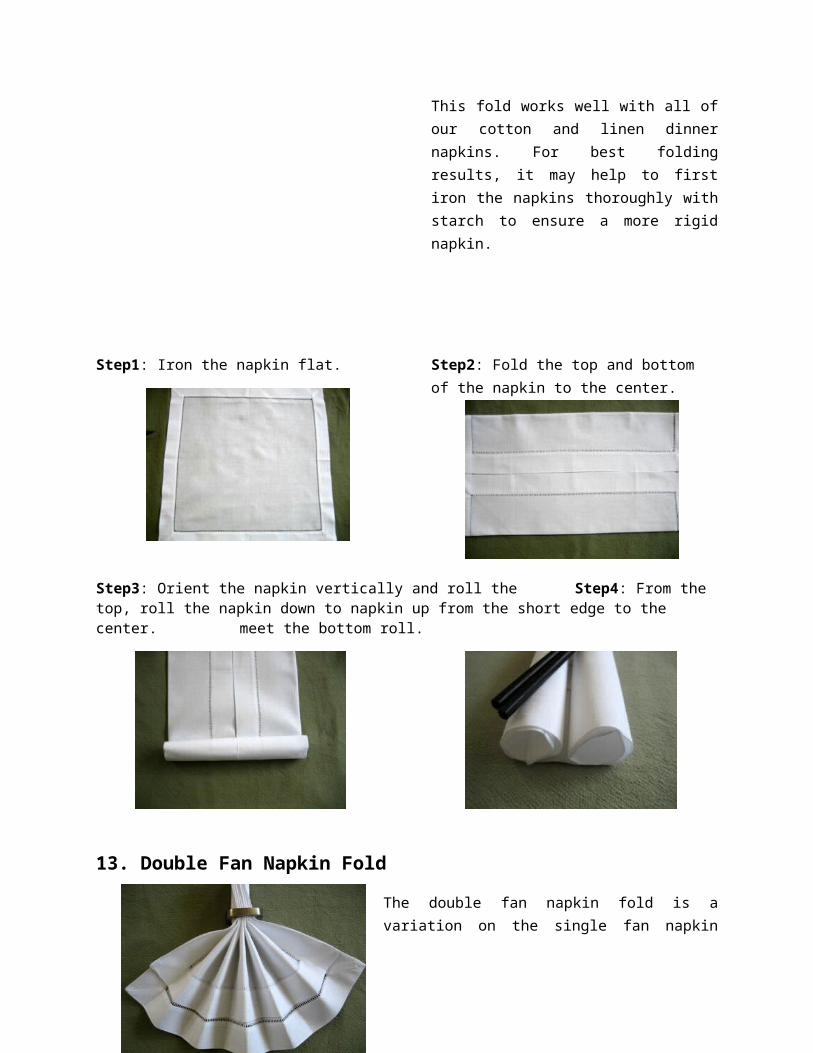
Step1: Iron the napkin flat. Step2: Fold the top and bottom of the napkin to the center.
Step3: Orient the napkin vertically and roll the Step4: From the top, roll the napkin down to napkin up from the short edge to the center. meet the bottom roll.
13. Double Fan Napkin Fold
The double fan napkin fold is a variation on the single fan napkin fold and works particularly well with starched cotton or linen napkins. The double fan napkin fold can be used for practically any occasion.
Step1: Iron the napkin flat. Step2: Fold the left hand side of the napkintowards the right hand side but leave an inch from the edge.
Step3: Now fold the bottom edge of the napkin Step4: Slide a napkin ring up the pleats up one inch. Then fold back the napkin one inch. and fan out the top of the napkin.You will repeat this motion until the entire napkin is complete.
14. Triangle Pouch Napkin Fold
If you have napkins with fancy lace or hemstitched edging and you would like to show it off, the triangle pouch fold is the way to go. This fold works extremely well with all lace edged napkins or napkins with a small decorative corner. The triangle pouch also provides a space in the middle if you would like to frame your silverware. Our lace edged dinner napkins all work well with this fold

Step1: Iron the napkin flat. Step2: Fold one corner of the napkin diagonally toward the opposite corner leaving approximately 1.5 inches from the edge.
Step3: Fold the right hand side of the napkin Step4: Fold the left hand side to match theover one third of the way. right hand side as shown in the picture.
Step5: Flip the napkin over. Step6: Fold the bottom of the napkin one third of the way up.
Step7: Complete by flipping the napkin over to the front.
15. The Knotted Napkin Fold
Whoever thought that tying a napkin into a knot could be so elegant? The knotted napkin fold is easy to do but takes a bit of practice to get it right. This fold works extremely well with all lace edged and hemstitched napkins.
Step1: Iron the napkin flat. Step2: Fold the napkin in half diagonally.
Step3: Starting from the long edge, fold the Step4: Continue folding the napkin over until itnapkin edge up one inch makes one long strip.
Step5: Finish by folding the right edge over the left and loop to create a knot.

16. Cap Fold
These little hats made out of napkins are really popular with children. Ideal for birthday parties or informal dining occasions.
Step1: Iron the napkin flat. Step2: Fold the napkin in half
Step3: Fold the left and right edges of the Step4: Take hold of the inner left edge ofrectangle to the center. the napkin and pull it out to form a tent like
shape
Step5: Repeat with the right hand side Step6: Turn the napkin over and fold both outer edges to the center.

Step7: With one layer, fold up the bottom Step8: Open out the napkin and have it standedge up twice. Repeat with the second layer up. Use your finger and dimple the top of the
napkin cap.
17. The Cone Napkin Fold
The cone napkin fold is very classic and quick to fold. This fold works well with all of our cotton and linen dinner napkins. For best folding results, it may help to first iron the napkins thoroughly with starch to ensure a more rigid napkin.
Step1: Iron the napkin flat. Step2: Fold the napkin in half and orient the open end away from you.
Step3: Fold the napkin into quarters. Step4: Orient the napkin so that the open end is facing away from you. Fold the top-most layer all the way forward and press it down flat.

Step5: Turn the napkin over and fold the Step6: Fold the right hand side of the napkin left hand side of the napkin over two thirds over to match the left hand side.of the way.
Step7: Tuck the corners of the napkin into the left hand side flap.