Embed Size (px)
Citation preview

HOW to INSTALL and CONFIGUREA TWO-NODE CLUSTER
Angel Camacho, Solaris Product ManagementLisa Shepherd, Senior Technical WriterRita McKissick, Senior Technical Writer
> Solaris™ 10 How To Guides
ContentsSun Two-Node Cluster: Overview Page 1
Prerequisites, Assumptions, and Defaults Page 1Configuration Assumptions Page 1
Prerequisites for Each System Page 2
Initial Preparation of Public IP Addresses and Logical Hostnames Page 2
Defaults Page 2
Installing Sun Cluster Software Packages Page 3
Configuring Sun Cluster Software Page 9
For More Information Page 11
About This Solaris How To GuideThis Sun Cluster Two-Node Installation and Configuration How-To guide is intended to help a new or experienced
Solaris user quickly and easily install and configure Sun Cluster software for two nodes, including the configuration of
a quorum device. Users are guided step-by-step through the process, with examples and screenshots to simplify the
process. This document will not cover the configuration of highly available services; that topic will be covered in a
separate guide.
For more details about how to install and configure other Sun Cluster software configurations, see the Sun Cluster
Software Installation Guide at docs.sun.com/app/docs/doc/819-0420.
Contributors: Videhi Malella, Shobhana Viswanathan
Sun Two-Node Cluster: OverviewThis Sun Cluster Two-Node Installation and Configuration How-To guide uses the interactive scinstall utility. This utility
enables you to configure all the nodes of your new cluster quickly and easily. The interactive scinstall utility is menu
driven. These menus help reduce the chance of mistakes and promote best practices by using default values and
prompting you for information specific to your cluster. The utility also helps prevent mistakes by identifying invalid entries.
Finally, the scinstall utility eliminates the need to manually set up a quorum device by automating the configuration of a
quorum device for your new cluster. This How-To Guide refers to the Sun Cluster 3.1 release. For more information about
the latest Sun Cluster release, visit: sun.com/cluster.
Prerequisites, Assumptions, and Defaults
Configuration AssumptionsThis How-To guide assumes the following configuration:
• You are installing on Solaris 10 6/06 and you have basic administration skills.
• You are installing Sun Cluster 3.1 8/05 software.
• You already have the Sun Cluster 3.1 8/05 software. If not, you can download it from sun.com/software/solaris/get.jsp;
select the Sun Java Availability Suite and click Get Downloads & Media.
• The cluster hardware is a supported configuration for Sun Cluster 3.1 8/05 software. If you are not sure about your
configuration, visit: sun.com/software/solaris/cluster/specs.xml.
• This is a two-node cluster, and you have a third system that will be your administrative console.
• Each node has two spare network interfaces to be used as private interconnects.
• SCSI shared storage is connected to the two nodes.
• All of the SCSI devices are supported by Sun Cluster software as potential quorum devices. For more information about
SCSI devices that are supported for use as quorum device, see your Sun Cluster customer service representative or visit
the online documentation at sun.com/app/docs/doc/819-0579?q=suncluster+3.1.
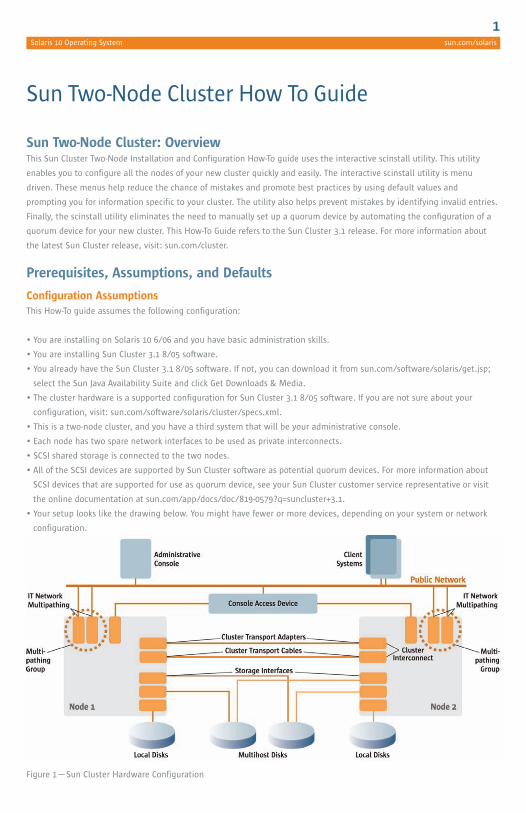
• Your setup looks like the drawing below. You might have fewer or more devices, depending on your system or network
configuration.
Figure 1—Sun Cluster Hardware Configuration
Sun Two-Node Cluster How To Guide
1Solaris 10 Operating System sun.com/solaris

Prerequisites for Each SystemThis How-To guide assumes that the following prerequisites have been met on both systems:
• Solaris 10 6/06 is installed.
• The Solaris software group is at least End User.
• A 512-Mbyte partition is named /globaldevices.
• (Optional) A 20-Mbyte partition is created on slice 7 for volume manager use.
• The latest patches have been installed on your systems using Sun Update Connection. For more information, visit
sun.com/service/sunupdate/ or sunsolve.sun.com/.
If Solaris software is preinstalled on the servers that you will configure as cluster nodes, ensure that the Solaris OS meets
the above criteria. If the Solaris OS does not meet these requirements, modify the configuration or reinstall Solaris
software on each server.
Initial Preparation of Public IP Addresses and Logical HostnamesYou have to add the logical names (hostnames) and IP addresses of the nodes to be configured as a cluster. Add those
entries on each other's /etc/inet/hosts file or /etc/inet/ipnodes file or both, as appropriate, and to a naming service if
used (like DNS or NIS+ maps).
In this example, the configuration is:
DefaultsThe scinstall interactive utility in Typical mode installs Sun Cluster software with the following defaults:
• Private-network address 172.16.0.0• Private-network netmask 255.255.248.0• Cluster-transport switches switch1 and switch2• Installation security (DES) level Limited
The example in this guide has no cluster-transport switches. Instead, the private-networking is resolved by using cross-overcables. More information can be found at: docs.sun.com/ (search for Sun Cluster 3.1 architecture).
In this example, the interfaces of the private interconnects are eri1 and hme0 on both cluster nodes. To find moreinformation about how to identify your hardware, visit the Solaris 10 hardware platform guide: docs.sun.com/source/817-6337/chapterHPG.html
Name Interface IP Address
Administrative Console myconsole ce0 192.168.1.1
Cluster Name mycluster
Node 1 mynode1 eri0 192.168.1.10
Node 2 mynode2 eri0 192.168.1.11
Solaris 10 Operating System sun.com/solaris
2
3Solaris 10 Operating System sun.com/solaris
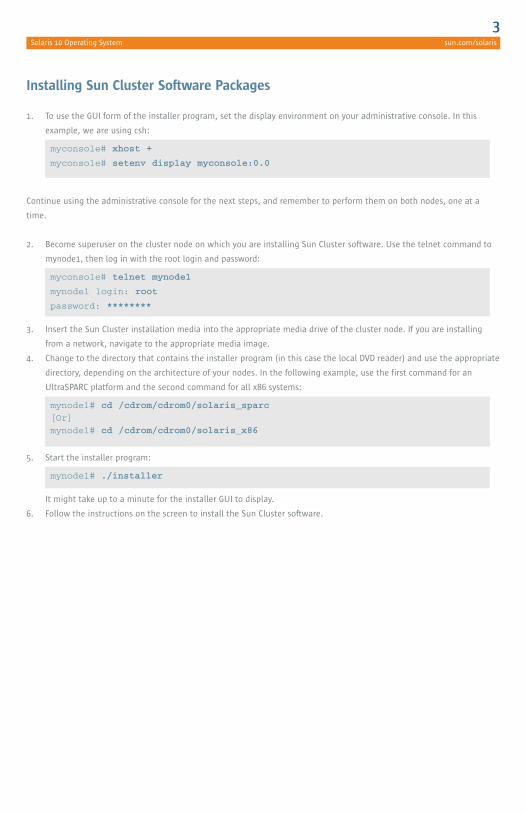
Installing Sun Cluster Software Packages
1. To use the GUI form of the installer program, set the display environment on your administrative console. In this
example, we are using csh:
Continue using the administrative console for the next steps, and remember to perform them on both nodes, one at a
time.
2. Become superuser on the cluster node on which you are installing Sun Cluster software. Use the telnet command to
mynode1, then log in with the root login and password:
3. Insert the Sun Cluster installation media into the appropriate media drive of the cluster node. If you are installing
from a network, navigate to the appropriate media image.
4. Change to the directory that contains the installer program (in this case the local DVD reader) and use the appropriate
directory, depending on the architecture of your nodes. In the following example, use the first command for an
UltraSPARC platform and the second command for all x86 systems:
5. Start the installer program:
It might take up to a minute for the installer GUI to display.
6. Follow the instructions on the screen to install the Sun Cluster software.
mynode1# ./installer
mynode1# cd /cdrom/cdrom0/solaris_sparc[Or]mynode1# cd /cdrom/cdrom0/solaris_x86
myconsole# telnet mynode1
mynode1 login: root
password: ********
myconsole# xhost +
myconsole# setenv display myconsole:0.0
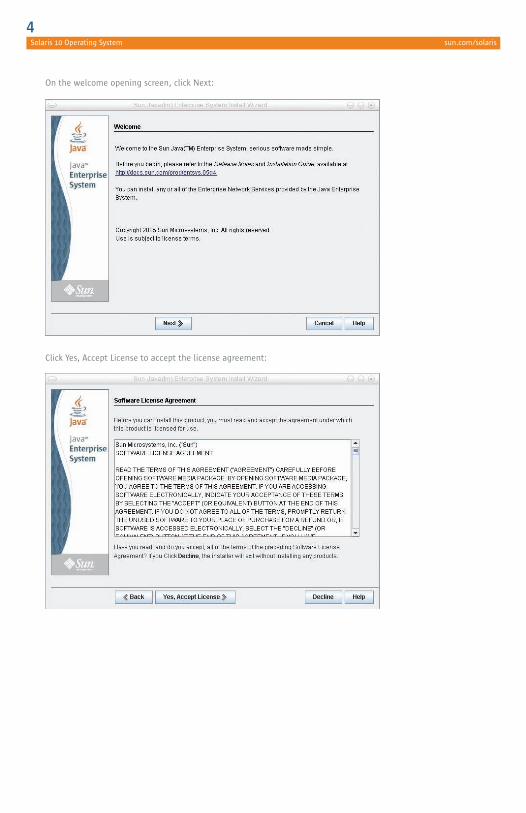
On the welcome opening screen, click Next:
Click Yes, Accept License to accept the license agreement:
Solaris 10 Operating System sun.com/solaris
4
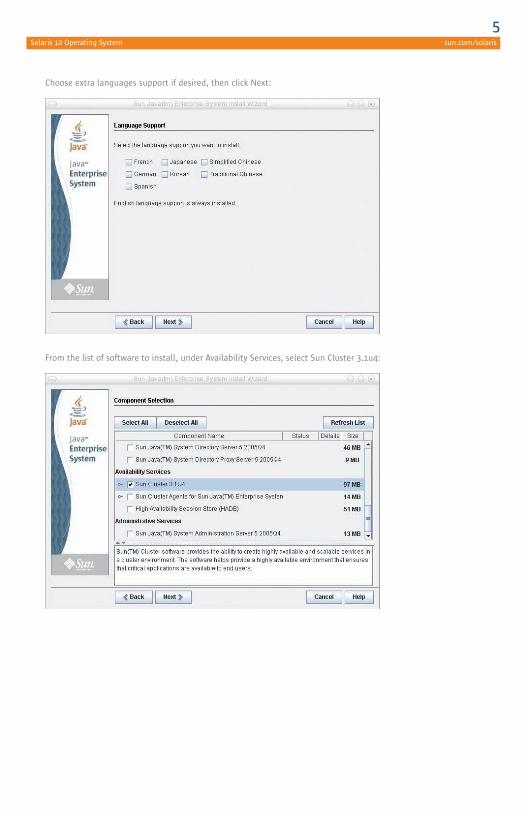
Choose extra languages support if desired, then click Next:
From the list of software to install, under Availability Services, select Sun Cluster 3.1u4:
5Solaris 10 Operating System sun.com/solaris
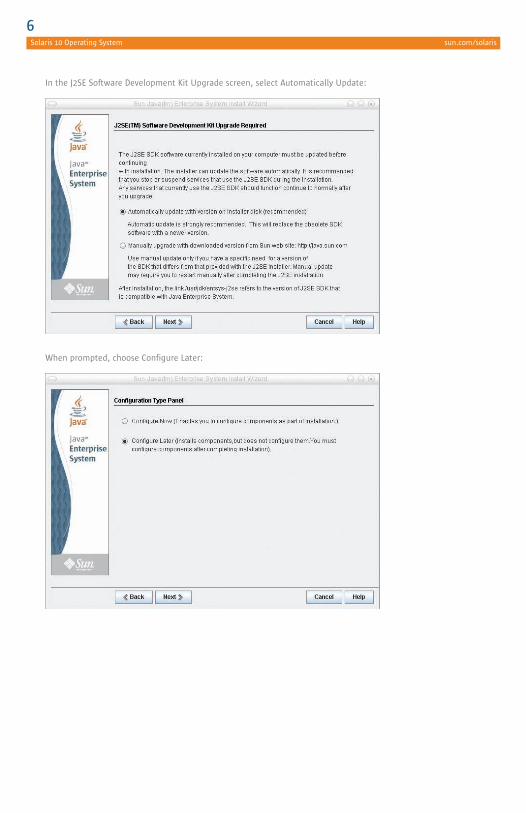
In the J2SE Software Development Kit Upgrade screen, select Automatically Update:
When prompted, choose Configure Later:
Solaris 10 Operating System sun.com/solaris
6
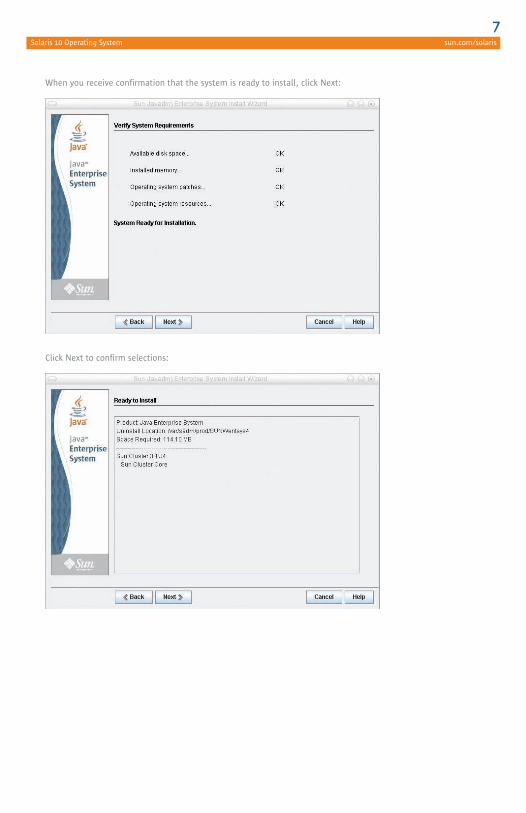
When you receive confirmation that the system is ready to install, click Next:
Click Next to confirm selections:
7Solaris 10 Operating System sun.com/solaris

For product registration and installation, click Install:
The installer program installs Sun Cluster software packages plus additional software that is required to run certain
Sun Cluster functionality. When finished, the installer program provides an installation summary.
7. Now that you have finished the installation on Node1, go back to step 2 and start the installation process, this time
for Node 2.
8. Install any necessary patches.
Go to sunsolve.sun.com/ and download the recommended patches for Java ES Component Patch Solaris 10 SPARC or
x86 accordingly and install on each node.
Solaris 10 Operating System sun.com/solaris
8
Configuring Sun Cluster Software
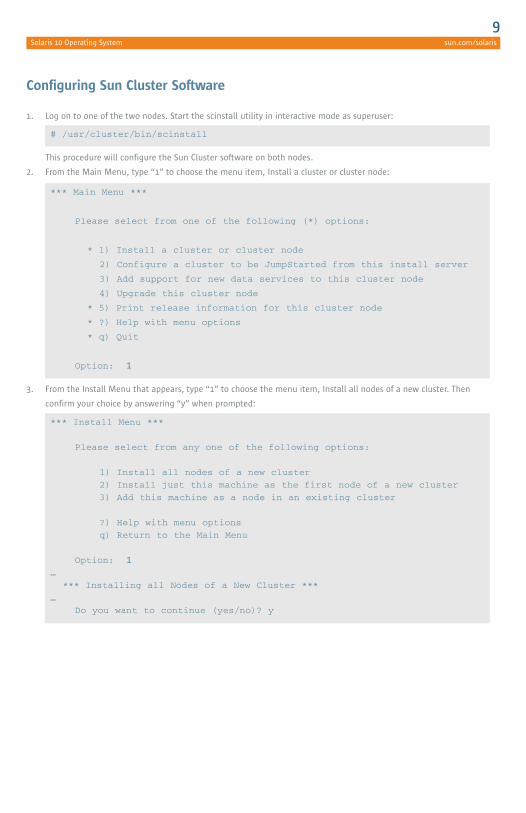
1. Log on to one of the two nodes. Start the scinstall utility in interactive mode as superuser:
This procedure will configure the Sun Cluster software on both nodes.
2. From the Main Menu, type “1” to choose the menu item, Install a cluster or cluster node:
3. From the Install Menu that appears, type “1” to choose the menu item, Install all nodes of a new cluster. Then
confirm your choice by answering “y” when prompted:
*** Install Menu ***
Please select from any one of the following options:
1) Install all nodes of a new cluster2) Install just this machine as the first node of a new cluster3) Add this machine as a node in an existing cluster
?) Help with menu optionsq) Return to the Main Menu
Option: 1…
*** Installing all Nodes of a New Cluster ***…
Do you want to continue (yes/no)? y
*** Main Menu ***
Please select from one of the following (*) options:
* 1) Install a cluster or cluster node
2) Configure a cluster to be JumpStarted from this install server
3) Add support for new data services to this cluster node
4) Upgrade this cluster node
* 5) Print release information for this cluster node
* ?) Help with menu options
* q) Quit
Option: 1
# /usr/cluster/bin/scinstall
9Solaris 10 Operating System sun.com/solaris
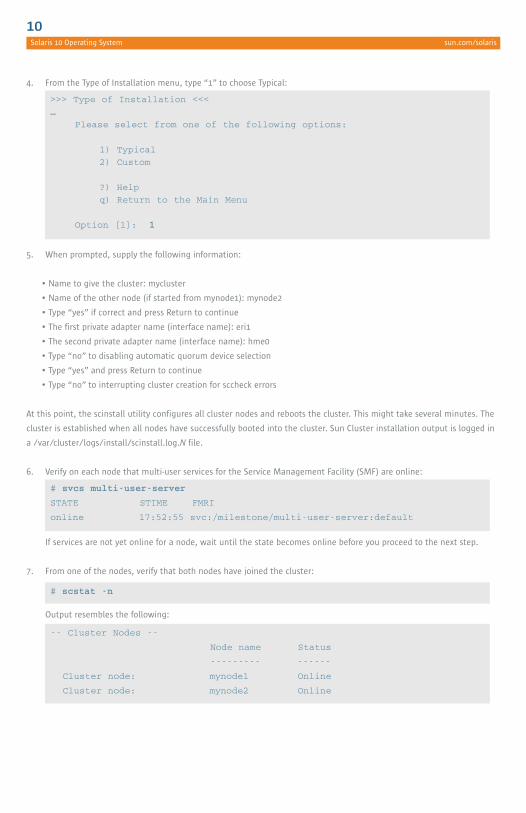
4. From the Type of Installation menu, type “1” to choose Typical:
5. When prompted, supply the following information:
• Name to give the cluster: mycluster
• Name of the other node (if started from mynode1): mynode2
• Type “yes” if correct and press Return to continue
• The first private adapter name (interface name): eri1
• The second private adapter name (interface name): hme0
• Type “no” to disabling automatic quorum device selection
• Type “yes” and press Return to continue
• Type “no” to interrupting cluster creation for sccheck errors
At this point, the scinstall utility configures all cluster nodes and reboots the cluster. This might take several minutes. The
cluster is established when all nodes have successfully booted into the cluster. Sun Cluster installation output is logged in
a /var/cluster/logs/install/scinstall.log.N file.
6. Verify on each node that multi-user services for the Service Management Facility (SMF) are online:
If services are not yet online for a node, wait until the state becomes online before you proceed to the next step.
7. From one of the nodes, verify that both nodes have joined the cluster:
Output resembles the following:
-- Cluster Nodes --
Node name Status
--------- ------
Cluster node: mynode1 Online
Cluster node: mynode2 Online
# scstat -n
# svcs multi-user-server
STATE STIME FMRI
online 17:52:55 svc:/milestone/multi-user-server:default
>>> Type of Installation <<<…
Please select from one of the following options:
1) Typical2) Custom
?) Helpq) Return to the Main Menu
Option [1]: 1
Solaris 10 Operating System sun.com/solaris
10

At this point, the scinstall utility runs the following tasks:
• Configures the cluster nodes• Chooses a SCSI device and configures it as a quorum device• Removes the cluster from installation mode
When the scinstall utility finishes, this completes the installation and configuration of the basic Sun Cluster software.
The cluster is now ready to configure the components you will use to support highly available applications. These clustercomponents can include device groups, cluster file systems, highly available local file systems, and individual data services.To configure these components, consult the installation documentation detailed below.
For More InformationFor more information about configuring the Sun Cluster components, see the following manuals:
11Solaris 10 Operating System sun.com/solaris
Manuals
Sun Cluster Software Installation Guide
Configuring the Cluster in the Sun Cluster SoftwareInstallation Guide
Data Services Planning and Administration Guide
Individual Data Service Manuals
Sun Cluster 3.1 Administration
Sun Cluster Advanced Edition for Oracle RAC
Sun Cluster Geographic Edition 3.1 Software Administration
Sun Cluster 3.1 Advanced Administration
For information on the latest Sun Cluster release,documentation and training, visit:
docs.sun.com/app/docs/doc/819-0420
docs.sun.com/app/docs/doc/819-0420/6n2rlnnaa?a=view
docs.sun.com/app/docs/doc/819-0703
docs.sun.com/app/docs/coll/1124.4
sun.com/training/catalog/courses/ES-338.xml
sun.com/training/catalog/courses/WET-3094.xml
sun.com/training/catalog/courses/ES-361.xml
sun.com/training/catalog/courses/ES-438.xml
docs.sun.com/app/docs/doc/820-0335/6nc35dge2?a=viewsun.com/training/savings/cluster.xml

sun.com/solaris
©2007 Sun Microsystems, Inc. All rights reserved. Sun, Sun Microsystems, the Sun logo and Solaris are trademarks or registered trademarks of Sun Microsystems, Inc. in the United States and other countries.
Sun Microsystems, Inc. 4150 Network Circle, Santa Clara, CA 95054 USA Phone 1-650-960-1300 or 1-800-555-9SUN Web sun.com