Embed Size (px)
Citation preview
1
PowerPoint Lesson 4Expanding on PowerPoint Basics
Microsoft Office 2010 Introductory
Pasewark & Pasewark
Po
we
rPo
int
Les
so
n
4
Pasewark & Pasewark Microsoft Office 2010 Introductory 222
Objectives
Integrate PowerPoint with other Office programs.
Create new slide masters. Create Action buttons. Insert comments and work collaboratively
with others. Create custom slide shows, organize slides
into sections, and hide slides for specific audiences.
Po
we
rPo
int
Les
so
n
4
Pasewark & Pasewark Microsoft Office 2010 Introductory 333
Objectives (continued)
Rehearse timings, set up a slide show, and use on-screen annotation tools.
Send a presentation using email, package a presentation for CD, and broadcast a presentation option.
Save a presentation as a video.
Po
we
rPo
int
Les
so
n
4
Pasewark & Pasewark Microsoft Office 2010 Introductory 444
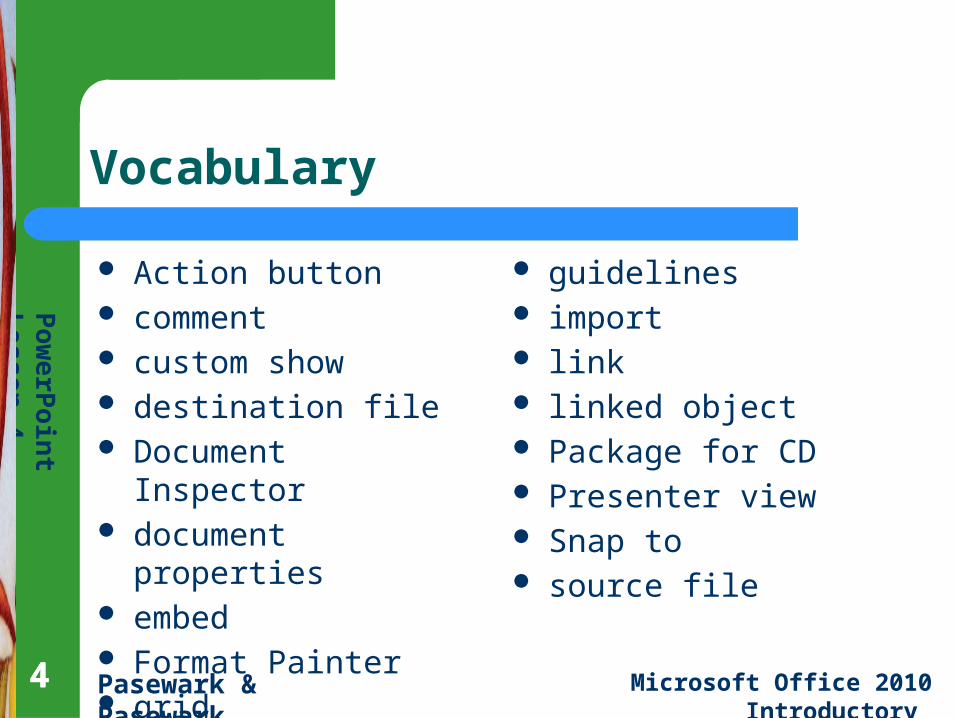
Vocabulary
Action button comment custom show destination file Document Inspector document properties embed Format Painter grid
guidelines import link linked object Package for CD Presenter view Snap to source file
Po
we
rPo
int
Les
so
n
4
Pasewark & Pasewark Microsoft Office 2010 Introductory 55
Integrating PowerPoint with Other Office Programs
You can insert objects and link or embed text or data from other programs into slides.
You can import text from Word to create a new presentation or add slides to an existing presentation. Import means to bring a file or part of a file into the presentation.
A Word outline is the easiest kind of document to import because it is formatted with styles.
5
Po
we
rPo
int
Les
so
n
4
Pasewark & Pasewark Microsoft Office 2010 Introductory 66
Integrating PowerPoint with Other Office Programs (continued)
The Office theme is applied to the slides in the presentation by default.
The presentation file is the destination file. The source file is where you have the text or
data to bring into the presentation. When you move data among applications,
Microsoft Office changes the format of the data so it can be used in the destination file.
6
Po
we
rPo
int
Les
so
n
4
Pasewark & Pasewark Microsoft Office 2010 Introductory 77
Integrating PowerPoint with Other Office Programs (continued)
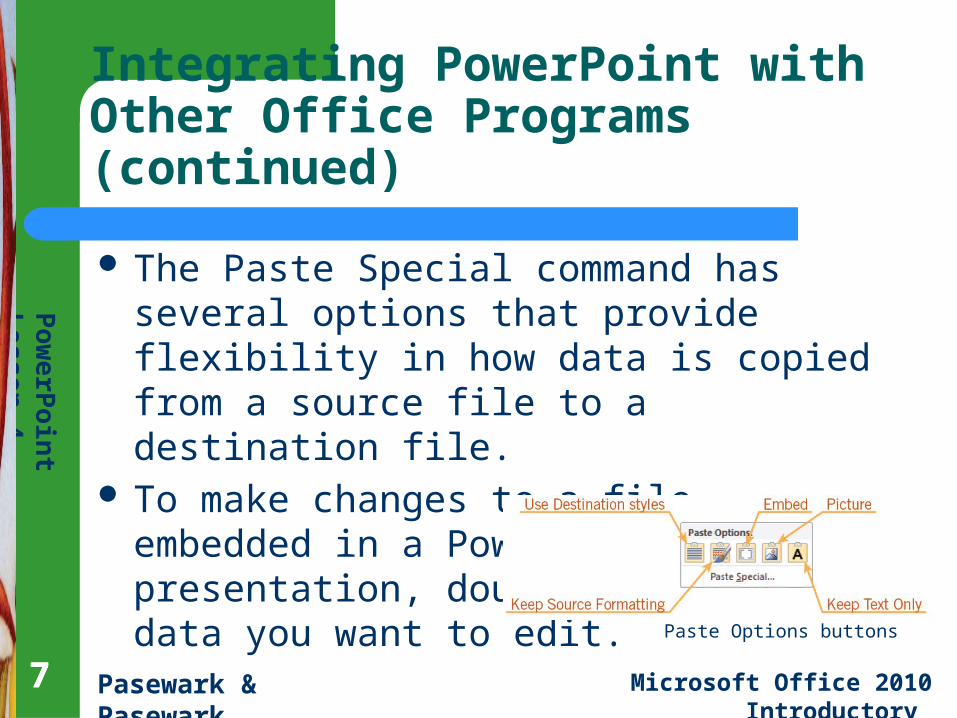
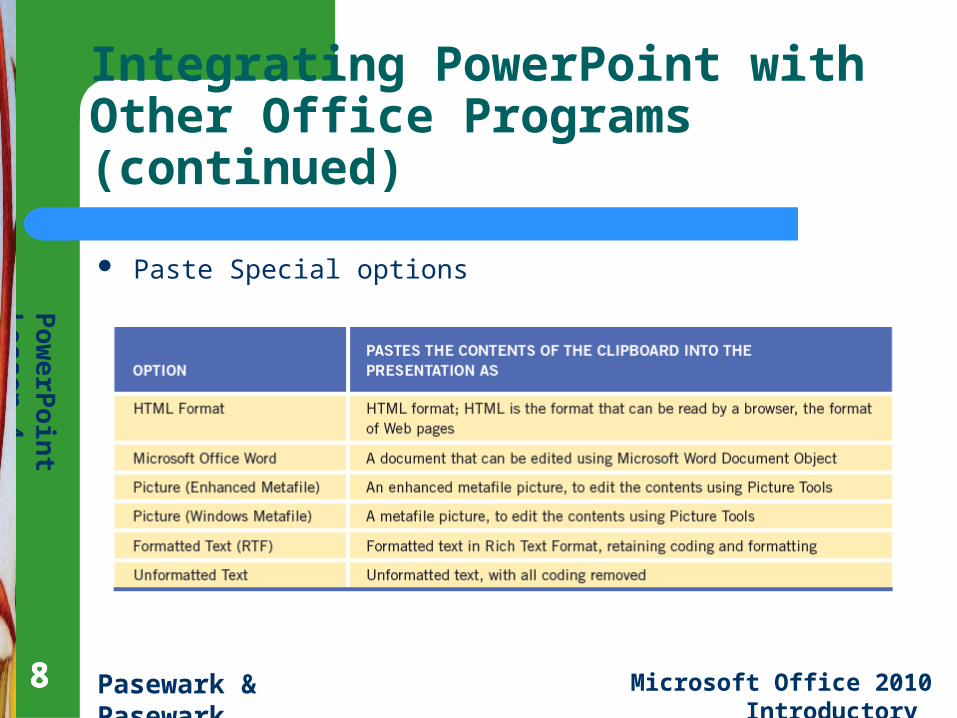
The Paste Special command has several options that provide flexibility in how data is copied from a source file to a destination file.
To make changes to a file embedded in a PowerPoint presentation, double-click the data you want to edit.
7
Paste Options buttons
Po
we
rPo
int
Les
so
n
4
Pasewark & Pasewark Microsoft Office 2010 Introductory 88
Integrating PowerPoint with Other Office Programs (continued)
8
Paste Special options
Po
we
rPo
int
Les
so
n
4
Pasewark & Pasewark Microsoft Office 2010 Introductory 99
Integrating PowerPoint with Other Office Programs (continued)
There are different methods for reusing slides. You can copy and paste slides between presentations or use a Slide Library to store favorite slides.
You can save a presentation as a Word document to use as a handout, or create other documents using the text and slides from the presentation.
9
Po
we
rPo
int
Les
so
n
4
Pasewark & Pasewark Microsoft Office 2010 Introductory
Creating New Masters
PowerPoint allows you to apply more than one slide master to a presentation.– This is useful if your presentation contains slides
with more than one theme. – This saves time as you are create presentations,
because you can choose which master to apply to each slide.
10
Po
we
rPo
int
Les
so
n
4
Pasewark & Pasewark Microsoft Office 2010 Introductory 1111
Creating New Layout Masters
11
PowerPoint allows you to create a new layout master for any slide master.
When you click the New Slide button, you are presented with a series of layouts for that slide master.
PowerPoint allows you to create a custom slide layout and then add the placeholders as needed.
Po
we
rPo
int
Les
so
n
4
Pasewark & Pasewark Microsoft Office 2010 Introductory 1212
Formatting Text and Objects
12
Formatting allows you to change colors, fonts, and effects in both text and objects.
You can replace a font throughout your presentation to another font.
If you format an object with certain attributes, and then want to format another object the same way, use the Format Painter.
Po
we
rPo
int
Les
so
n
4
Pasewark & Pasewark Microsoft Office 2010 Introductory 1313
Using the Grid, Guides, and Rulers to Align Objects
13
Use the grid, guidelines, and ruler in concert to place objects on a slide.
To align a text box or picture, you can display the grid and guidelines on the slide pane; the ruler identifies the exact placement on the slide.
The Snap to option "Snap objects to grid" moves an object to the closest intersection of the grid on a slide.
Po
we
rPo
int
Les
so
n
4
Pasewark & Pasewark Microsoft Office 2010 Introductory 1414
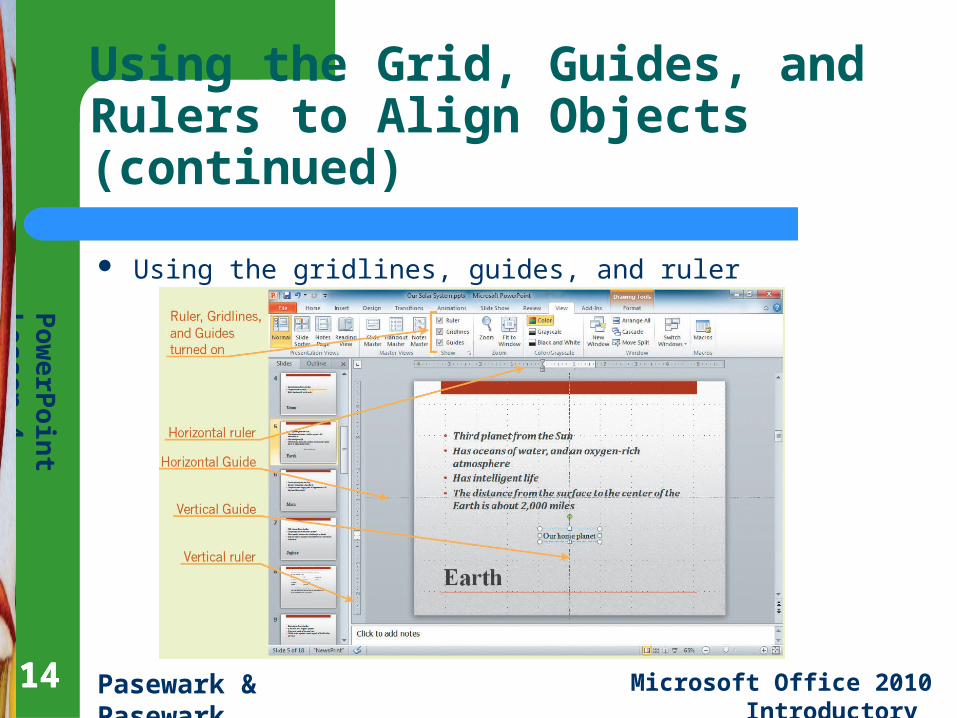
Using the Grid, Guides, and Rulers to Align Objects (continued)
14
Using the gridlines, guides, and ruler
Po
we
rPo
int
Les
so
n
4
Pasewark & Pasewark Microsoft Office 2010 Introductory 1515
Inserting Comments
15
You can insert, review, and edit comments on slides.
Each user's comment will have a different color or initial.
The Compare tool makes it possible to see which changes have been made by each contributor and create one presentation file that includes all the changes.

Po
we
rPo
int
Les
so
n
4
Pasewark & Pasewark Microsoft Office 2010 Introductory 1616
Delivering a Presentation
16
To start a slide show, click the Slide Show button on the status bar.
If your presentation has a lot of slides, you can break the presentation into sections. The Section menu includes options to rename, collapse, expand, and remove sections.
A custom show is a way to limit the slides in any slide show for a particular audience.
Po
we
rPo
int
Les
so
n
4
Pasewark & Pasewark Microsoft Office 2010 Introductory 1717
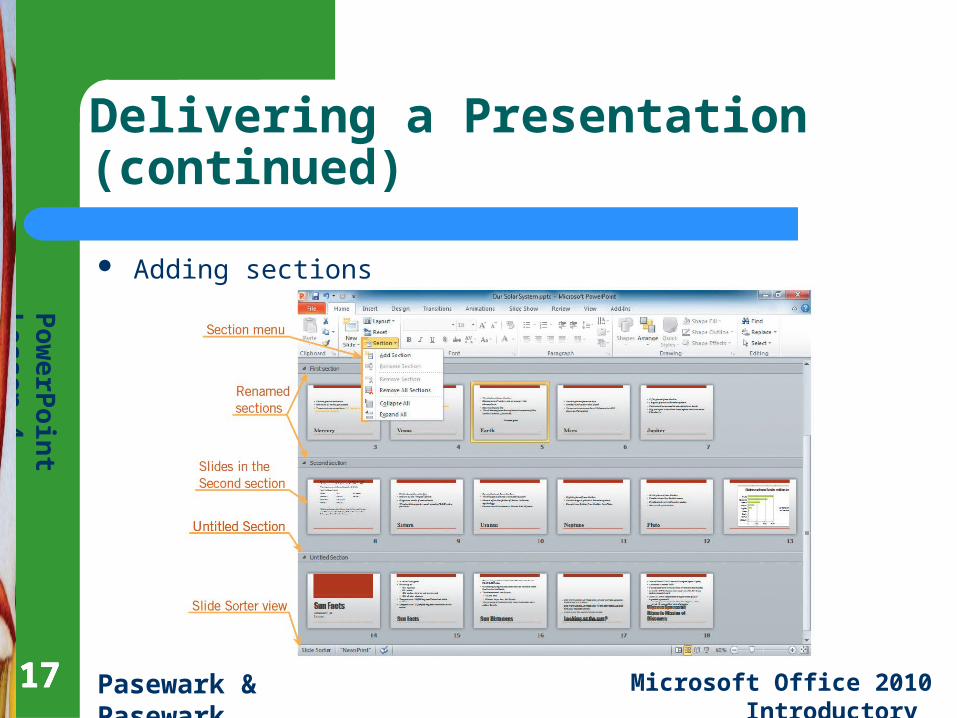
Delivering a Presentation (continued)
17
Adding sections
Po
we
rPo
int
Les
so
n
4
Pasewark & Pasewark Microsoft Office 2010 Introductory
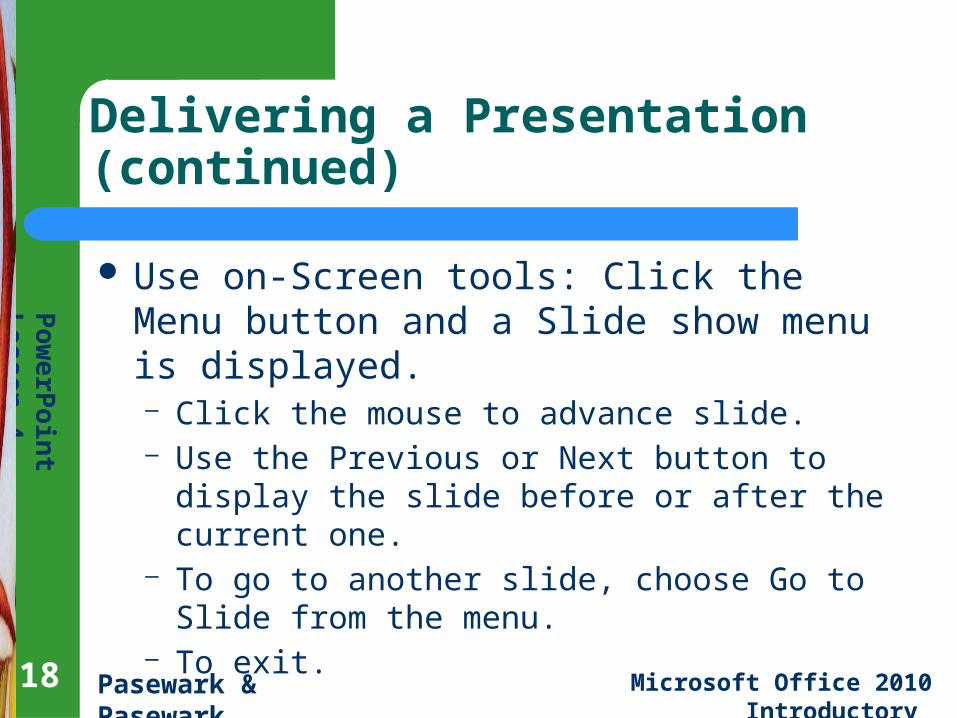
Delivering a Presentation (continued)
Use on-Screen tools: Click the Menu button and a Slide show menu is displayed.– Click the mouse to advance slide.– Use the Previous or Next button to display the
slide before or after the current one.– To go to another slide, choose Go to Slide from
the menu. – To exit.
18
Po
we
rPo
int
Les
so
n
4
Pasewark & Pasewark Microsoft Office 2010 Introductory 1919
Delivering a Presentation (continued)
19
When inserted on a slide, Action buttons enable you to jump from slide to slide.
If you need to limit the number of slides, you can quickly hide slides.
As you are presenting a slide show, you can use the on-screen annotation tools to emphasize text or graphics.

Po
we
rPo
int
Les
so
n
4
Pasewark & Pasewark Microsoft Office 2010 Introductory
Setting Up a Slide Show
There are several options for delivering a presentation:– A presentation can be set up to be self-running.– You can broadcast a presentation using a browser
over the Internet.– The most common method is to run a
presentation with a speaker who directs the show.
20
Po
we
rPo
int
Les
so
n
4
Pasewark & Pasewark Microsoft Office 2010 Introductory 2121
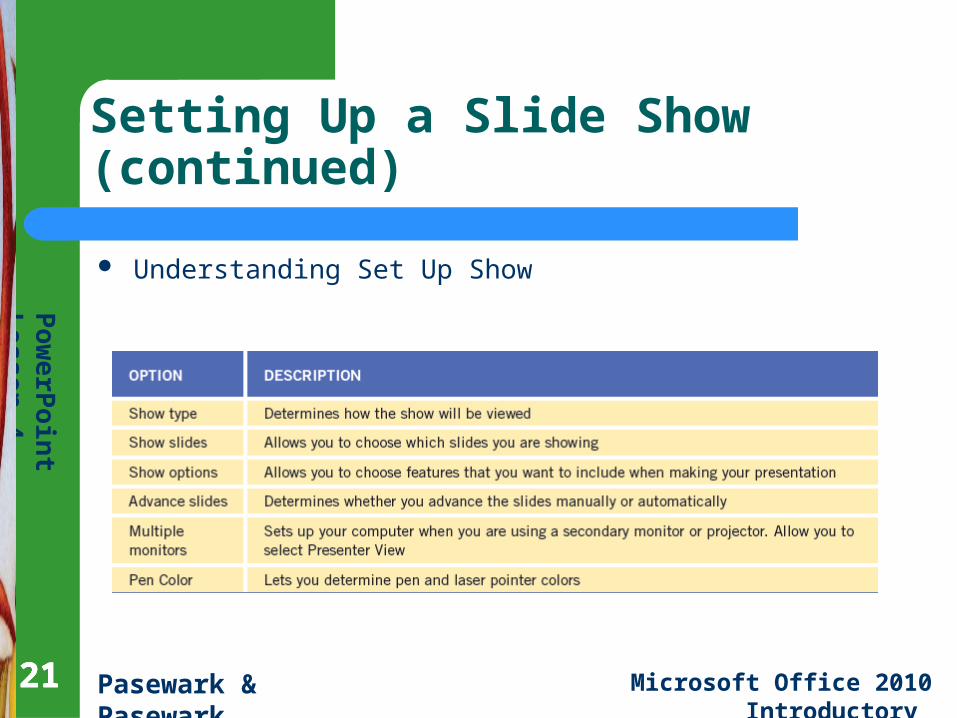
Setting Up a Slide Show (continued)
21
Understanding Set Up Show
Po
we
rPo
int
Les
so
n
4
Pasewark & Pasewark Microsoft Office 2010 Introductory 2222
Setting Up a Slide Show (continued)
22
Presenter view offers a way for you to view your presentation with speaker notes on one computer screen, while an audience views the presentation without viewing the speaker notes on another computer screen.
PowerPoint can automatically advance the slides in your presentation at preset time intervals.
Po
we
rPo
int
Les
so
n
4
Pasewark & Pasewark Microsoft Office 2010 Introductory 2323
Inspecting a Document and Viewing Document Properties
23
Before you send a presentation, inspect it for personal information using the Document Inspector.
The Document Properties Panel stores information about the document called the document properties.
If you are not using your own computer, you can embed fonts into your presentation.
Po
we
rPo
int
Les
so
n
4
Pasewark & Pasewark Microsoft Office 2010 Introductory 2424
Using Package Presentation for CD and Copying Presentations to Folders
If you are giving your presentation on another computer, you can use Package for CD to compact all your presentation files into a single, compressed file that fits on a CD.
If the computer on which you are giving your presentation does not have PowerPoint installed, you can download a PowerPoint Viewer.
24
Po
we
rPo
int
Les
so
n
4
Pasewark & Pasewark Microsoft Office 2010 Introductory 2525
Sending a Presentation via E-mail
You can send a presentation as an e-mail attachment or e-mail it to a recipient for review.
If you click Send as Attachment, if you have the Outlook e-mail program installed on your computer, a new blank message will open with the presentation attached.
25
Po
we
rPo
int
Les
so
n
4
Pasewark & Pasewark Microsoft Office 2010 Introductory 2626
Setting Up the Pages
You can alter the output format of your presentation by working in the Page Setup dialog box.
You can change the orientation of your slides or notes, handouts, and outline.
Before you print or share a presentation, you should check spelling, review the design of each slide, and run the show to check timings.
26
Po
we
rPo
int
Les
so
n
4
Pasewark & Pasewark Microsoft Office 2010 Introductory 2727
Summary
In this lesson, you learned: To embed or link data from other applications such as
Microsoft Excel and Microsoft Word into PowerPoint presentations. Embedded information can be edited using the original application. To make changes to an embedded object, double-click on it to open the application that created it. Changes made when editing are reflected in the destination file.
27
Po
we
rPo
int
Les
so
n
4
Pasewark & Pasewark Microsoft Office 2010 Introductory 2828
Summary (continued)
Text can be imported from Word to create a new presentation or add slides. It is easiest for PowerPoint to convert the text to slides when the Word document is in outline form.
Slides can be copied and pasted from one presentation to another. You can also use a Slide Library to store favorite slides that you want to reuse again and again. You can also save a presentation as a Word document to use as a handout, or create other documents using the text and slides from the presentation.
28
Po
we
rPo
int
Les
so
n
4
Pasewark & Pasewark Microsoft Office 2010 Introductory 2929
Summary (continued)
To apply multiple slide masters to a presentation. This can help you save time if you are creating a presentation containing slides with more than one theme or any other features that are controlled by the slide master.
PowerPoint allows you to create a new layout master for any theme or slide master. You can also create custom slide layouts and then add the placeholders as needed.
29
Po
we
rPo
int
Les
so
n
4
Pasewark & Pasewark Microsoft Office 2010 Introductory 3030
Summary (continued)
To replace fonts throughout an entire presentation, use the Replace Font dialog box.
To copy the formatting of an object or text by clicking the Format Painter button. Use the Format Painter to apply the same format to another object or text.
To align a text box or picture, you can add grid lines, the ruler, and guides to slides.
Comments can be inserted in a slide for others to see. You can use the Compare feature to work collaboratively with others.
30

Po
we
rPo
int
Les
so
n
4
Pasewark & Pasewark Microsoft Office 2010 Introductory 3131
Summary (continued)
A custom show can be created to limit the slides displayed in any slide show for particular audiences. You can hide slides for certain audiences.
Action buttons are the buttons inserted on a slide that enable you to jump from slide to slide, even to slides in another slide show, or to other documents.
31
Po
we
rPo
int
Les
so
n
4
Pasewark & Pasewark Microsoft Office 2010 Introductory 3232
Summary (continued)
When presenting a slide show, you can use on-screen annotation tools to emphasize specific text or graphics on a slide. The Pen, and Highlighter tools allow you to write or highlight features on the screen. The Eraser tool erases any ink it touches, and Erase All Ink on Slide deletes all ink marks.
A presentation can be set up to be self-running, so that it automatically advances the slides at preset time intervals.
32

Po
we
rPo
int
Les
so
n
4
Pasewark & Pasewark Microsoft Office 2010 Introductory 3333
Summary (continued)
To inspect a presentation for personal information or anything that you might not want to “travel” with the presentation file, using the Document Inspector.
If you are giving your presentation on another computer, you can use Package for CD to compact all your presentation files into a single, compressed file that fits on a CD. You can then unpack the files when you reach your destination computer.
33
Po
we
rPo
int
Les
so
n
4
Pasewark & Pasewark Microsoft Office 2010 Introductory 3434
Summary (continued)
PowerPoint helps you easily broadcast a presentation for remote users to view on the Internet.
To send a presentation as an e-mail attachment to a recipient for review.
To alter a presentation’s output format depending on the target audience.
34