Embed Size (px)
Citation preview

Elite , Elite and BMX Elite , Elite and BMX
L.H. Thomson Co. Inc. 7800 N.E. Industrial Blvd.Macon, Georgia USA 31216-7748phone: 478.788.5052email: [email protected]
Carbon Fiber and Aluminum Steerers
Congratulations!THANK YOU for purchasing the Thomson Stem. The following instructions should be read completely before installation. If you have any questions regarding installation or service of this product, please contact your local dealer. We recommend that a professional bicycle mechanic install and service this product.
Before starting assembly
Carbon, Aluminum
or SteelSteerer Tube
Grease all of the bolt threads and the threads inside the stem before assembly. All bolts are identical.
Important: For carbon fiber steerer tubes refer to the manu-facturer specifications on how to cut and finish the steerer tube.
Important: For carbon fiber steerer tubes refer to the manufacturer specifications on how to cut and finish the steerer tube.
Using a torque wrench, alternate tightening each bolt in small amounts until both are tightened to 5.5 Nm
Make sure there is an equal gap between the handlebar clamp and the stem body. Using a torque wrench, tighten the four bar clamp bolts to 4.0 Nm
Make sure there is an equal gap between the handlebar clamp and the stem body. Using a torque wrench, tighten the four bar clamp bolts to 5.1 Nm
Using a torque wrench,alternate tightening each bolt in small amounts until both bolts are tightened to 12.4 Nm
Tightening Process for and Steerer Clamp Bolts
Tightening Process for Bar Clamp Bolts
Tightening Process for Bar Clamp Bolts
Tightening Process for BMX Stem Bolts
Torque Pattern for Tightening BMX Stem Bolts
For steel and aluminum steerer tubes: Remove any burrs from the steerer tube; do not remove any base metal. File a smooth radius around the top edge as shown. If the Thomson Stem has a burr at the point of contact with the steerer tube, handlebar, or clamp, remove the burr with 400 grit sandpaper.
Steerer tube
Smooth finish
Make sure there are no burrs.
Degrease the steerer tube, the inside of the Thomson Stem and the steerer clamps before assembly. Rubbing alcohol is an effective degreaser.
Before riding, check that the stem is tight and properly installed. Pinch the front wheel of the bike between your knees and attempt to rotate the bars. The bars should not twist. This should be done before every bike ride.
After installing the stem, check that the cable housings do not bind. Check by turning the handlebar until the grip hits the frame. If the housings bind, replace with longer ones.
Tighten handlebar clamp using numbered torque pattern. Make sure bolts are tight-ened to 12.4 Nm
Grease
Grease
Grease
Grease
Degrease
Equal gap
Equal gap
Equal gap
Equal gap
does not bind
Steerer should extend 3mm above stem requiring a 5mm spacer.
1
2
3
4
5
7
6
U.S. Patents 6,309,135; 6,945,135; 7,407,176; 7,500,415; 5,123,485 S; 515,983 S; 515,4983 S; 516,965 S; 528,047 E.U. Patents 1,210,261 EP; 021,083,488 PCT; 1,595,778 EP
LH Thomson Co. Inc. 7800 N.E. Industrial Blvd.Macon, Georgia USA 31216-7748phone: 478.788.5052email: [email protected]
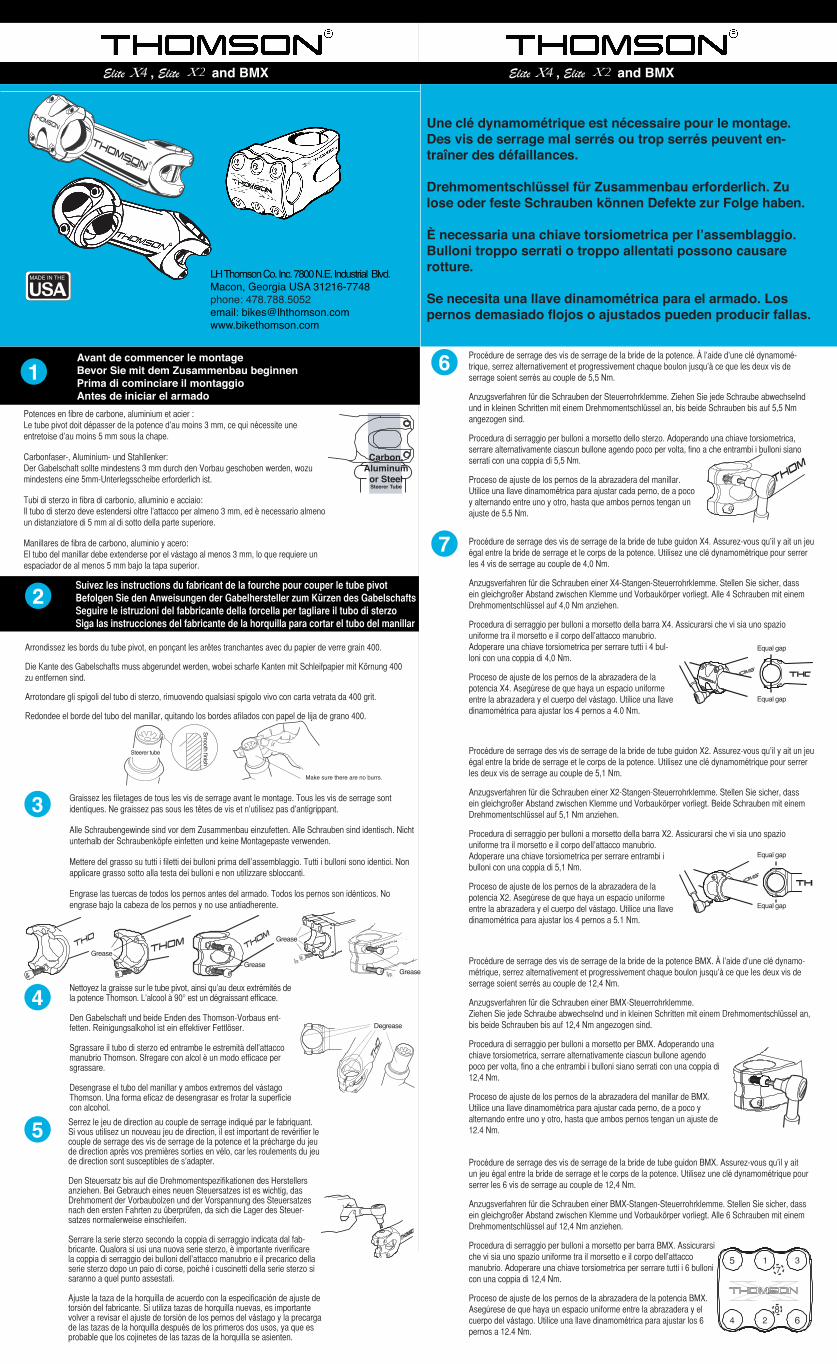
Potences en fibre de carbone, aluminium et acier :Le tube pivot doit dépasser de la potence d’au moins 3 mm, ce qui nécessite une entretoise d’au moins 5 mm sous la chape.
Carbonfaser-, Aluminium- und Stahllenker:Der Gabelschaft sollte mindestens 3 mm durch den Vorbau geschoben werden, wozu mindestens eine 5mm-Unterlegsscheibe erforderlich ist.
Tubi di sterzo in fibra di carbonio, alluminio e acciaio:Il tubo di sterzo deve estendersi oltre l’attacco per almeno 3 mm, ed è necessario almeno un distanziatore di 5 mm al di sotto della parte superiore.
Manillares de fibra de carbono, aluminio y acero:El tubo del manillar debe extenderse por el vástago al menos 3 mm, lo que requiere un espaciador de al menos 5 mm bajo la tapa superior.
Avant de commencer le montageBevor Sie mit dem Zusammenbau beginnenPrima di cominciare il montaggioAntes de iniciar el armado
Carbon, Aluminum
or SteelSteerer Tube
Graissez les filetages de tous les vis de serrage avant le montage. Tous les vis de serrage sont identiques. Ne graissez pas sous les têtes de vis et n’utilisez pas d’antigrippant.
Alle Schraubengewinde sind vor dem Zusammenbau einzufetten. Alle Schrauben sind identisch. Nicht unterhalb der Schraubenköpfe einfetten und keine Montagepaste verwenden.
Mettere del grasso su tutti i filetti dei bulloni prima dell’assemblaggio. Tutti i bulloni sono identici. Non applicare grasso sotto alla testa dei bulloni e non utilizzare sbloccanti.
Engrase las tuercas de todos los pernos antes del armado. Todos los pernos son idénticos. No engrase bajo la cabeza de los pernos y no use antiadherente.
Suivez les instructions du fabricant de la fourche pour couper le tube pivotBefolgen Sie den Anweisungen der Gabelhersteller zum Kürzen des GabelschaftsSeguire le istruzioni del fabbricante della forcella per tagliare il tubo di sterzoSiga las instrucciones del fabricante de la horquilla para cortar el tubo del manillar
Serrez le jeu de direction au couple de serrage indiqué par le fabriquant. Si vous utilisez un nouveau jeu de direction, il est important de revérifier le couple de serrage des vis de serrage de la potence et la précharge du jeu de direction après vos premières sorties en vélo, car les roulements du jeu de direction sont susceptibles de s’adapter.
Den Steuersatz bis auf die Drehmomentspezifikationen des Herstellers anziehen. Bei Gebrauch eines neuen Steuersatzes ist es wichtig, das Drehmoment der Vorbaubolzen und der Vorspannung des Steuersatzes nach den ersten Fahrten zu überprüfen, da sich die Lager des Steuer-satzes normalerweise einschleifen.
Serrare la serie sterzo secondo la coppia di serraggio indicata dal fab-bricante. Qualora si usi una nuova serie sterzo, è importante riverificare la coppia di serraggio dei bulloni dell’attacco manubrio e il precarico della serie sterzo dopo un paio di corse, poiché i cuscinetti della serie sterzo si saranno a quel punto assestati.
Ajuste la taza de la horquilla de acuerdo con la especificación de ajuste de torsión del fabricante. Si utiliza tazas de horquilla nuevas, es importante volver a revisar el ajuste de torsión de los pernos del vástago y la precarga de las tazas de la horquilla después de los primeros dos usos, ya que es probable que los cojinetes de las tazas de la horquilla se asienten.
Procédure de serrage des vis de serrage de la bride de tube guidon X4. Assurez-vous qu’il y ait un jeu égal entre la bride de serrage et le corps de la potence. Utilisez une clé dynamométrique pour serrer les 4 vis de serrage au couple de 4,0 Nm.
Anzugsverfahren für die Schrauben einer X4-Stangen-Steuerrohrklemme. Stellen Sie sicher, dass ein gleichgroßer Abstand zwischen Klemme und Vorbaukörper vorliegt. Alle 4 Schrauben mit einem Drehmomentschlüssel auf 4,0 Nm anziehen.
Procedura di serraggio per bulloni a morsetto della barra X4. Assicurarsi che vi sia uno spazio uniforme tra il morsetto e il corpo dell’attacco manubrio. Adoperare una chiave torsiometrica per serrare tutti i 4 bul-loni con una coppia di 4,0 Nm.
Proceso de ajuste de los pernos de la abrazadera de la potencia X4. Asegúrese de que haya un espacio uniforme entre la abrazadera y el cuerpo del vástago. Utilice una llave dinamométrica para ajustar los 4 pernos a 4.0 Nm.
Procédure de serrage des vis de serrage de la bride de tube guidon X2. Assurez-vous qu’il y ait un jeu égal entre la bride de serrage et le corps de la potence. Utilisez une clé dynamométrique pour serrer les deux vis de serrage au couple de 5,1 Nm.
Anzugsverfahren für die Schrauben einer X2-Stangen-Steuerrohrklemme. Stellen Sie sicher, dass ein gleichgroßer Abstand zwischen Klemme und Vorbaukörper vorliegt. Beide Schrauben mit einem Drehmomentschlüssel auf 5,1 Nm anziehen.
Procedura di serraggio per bulloni a morsetto della barra X2. Assicurarsi che vi sia uno spazio uniforme tra il morsetto e il corpo dell’attacco manubrio. Adoperare una chiave torsiometrica per serrare entrambi i bulloni con una coppia di 5,1 Nm.
Proceso de ajuste de los pernos de la abrazadera de la potencia X2. Asegúrese de que haya un espacio uniforme entre la abrazadera y el cuerpo del vástago. Utilice una llave dinamométrica para ajustar los 4 pernos a 5.1 Nm.
Procédure de serrage des vis de serrage de la bride de la potence BMX. À l’aide d’une clé dynamo-métrique, serrez alternativement et progressivement chaque boulon jusqu’à ce que les deux vis de serrage soient serrés au couple de 12,4 Nm.
Anzugsverfahren für die Schrauben einer BMX-Steuerrohrklemme. Ziehen Sie jede Schraube abwechselnd und in kleinen Schritten mit einem Drehmomentschlüssel an, bis beide Schrauben bis auf 12,4 Nm angezogen sind.
Procedura di serraggio per bulloni a morsetto per BMX. Adoperando una chiave torsiometrica, serrare alternativamente ciascun bullone agendo poco per volta, fino a che entrambi i bulloni siano serrati con una coppia di 12,4 Nm.
Proceso de ajuste de los pernos de la abrazadera del manillar de BMX. Utilice una llave dinamométrica para ajustar cada perno, de a poco y alternando entre uno y otro, hasta que ambos pernos tengan un ajuste de 12.4 Nm.
Procédure de serrage des vis de serrage de la bride de tube guidon BMX. Assurez-vous qu’il y ait un jeu égal entre la bride de serrage et le corps de la potence. Utilisez une clé dynamométrique pour serrer les 6 vis de serrage au couple de 12,4 Nm.
Anzugsverfahren für die Schrauben einer BMX-Stangen-Steuerrohrklemme. Stellen Sie sicher, dass ein gleichgroßer Abstand zwischen Klemme und Vorbaukörper vorliegt. Alle 6 Schrauben mit einem Drehmomentschlüssel auf 12,4 Nm anziehen.
Procedura di serraggio per bulloni a morsetto per barra BMX. Assicurarsi che vi sia uno spazio uniforme tra il morsetto e il corpo dell’attacco manubrio. Adoperare una chiave torsiometrica per serrare tutti i 6 bulloni con una coppia di 12,4 Nm.
Proceso de ajuste de los pernos de la abrazadera de la potencia BMX. Asegúrese de que haya un espacio uniforme entre la abrazadera y el cuerpo del vástago. Utilice una llave dinamométrica para ajustar los 6 pernos a 12.4 Nm.
Procédure de serrage des vis de serrage de la bride de la potence. À l’aide d’une clé dynamomé-trique, serrez alternativement et progressivement chaque boulon jusqu’à ce que les deux vis de serrage soient serrés au couple de 5,5 Nm.
Anzugsverfahren für die Schrauben der Steuerrohrklemme. Ziehen Sie jede Schraube abwechselnd und in kleinen Schritten mit einem Drehmomentschlüssel an, bis beide Schrauben bis auf 5,5 Nm angezogen sind.
Procedura di serraggio per bulloni a morsetto dello sterzo. Adoperando una chiave torsiometrica, serrare alternativamente ciascun bullone agendo poco per volta, fino a che entrambi i bulloni siano serrati con una coppia di 5,5 Nm.
Proceso de ajuste de los pernos de la abrazadera del manillar. Utilice una llave dinamométrica para ajustar cada perno, de a poco y alternando entre uno y otro, hasta que ambos pernos tengan un ajuste de 5.5 Nm.
Arrondissez les bords du tube pivot, en ponçant les arêtes tranchantes avec du papier de verre grain 400.
Die Kante des Gabelschafts muss abgerundet werden, wobei scharfe Kanten mit Schleifpapier mit Körnung 400 zu entfernen sind.
Arrotondare gli spigoli del tubo di sterzo, rimuovendo qualsiasi spigolo vivo con carta vetrata da 400 grit.
Redondee el borde del tubo del manillar, quitando los bordes afilados con papel de lija de grano 400.
Steerer tube
Smooth finish
Make sure there are no burrs.
Nettoyez la graisse sur le tube pivot, ainsi qu’au deux extrémités de la potence Thomson. L’alcool à 90° est un dégraissant efficace.
Den Gabelschaft und beide Enden des Thomson-Vorbaus ent-fetten. Reinigungsalkohol ist ein effektiver Fettlöser.
Sgrassare il tubo di sterzo ed entrambe le estremità dell’attacco manubrio Thomson. Sfregare con alcol è un modo efficace per sgrassare.
Desengrase el tubo del manillar y ambos extremos del vástago Thomson. Una forma eficaz de desengrasar es frotar la superficie con alcohol.
GreaseGrease
Grease
Grease
Degrease
Equal gap
Equal gap
Equal gap
Equal gap
Une clé dynamométrique est nécessaire pour le montage. Des vis de serrage mal serrés ou trop serrés peuvent en-traîner des défaillances.
Drehmomentschlüssel für Zusammenbau erforderlich. Zu lose oder feste Schrauben können Defekte zur Folge haben.
È necessaria una chiave torsiometrica per l’assemblaggio. Bulloni troppo serrati o troppo allentati possono causare rotture.
Se necesita una llave dinamométrica para el armado. Los pernos demasiado flojos o ajustados pueden producir fallas.
1
2
3
4
5
7
6
Elite , Elite and BMX Elite , Elite and BMX